Home
Bookmarks
Home
Samsung
Samsung QE65Q70BAT User Manual
Page 28
Samsung QE65Q70BAT 65" Q70B QLED 4K Quantum HDR Smart TV
E-MANUAL - Page 28
For QE65Q70BAT.
PDF File Manual
,
302 pages
,
Read Online
|
Download pdf file
Guide
Connections
Connection Guide
Connecting An Antenna (Aerial)
Connecting To The Network
Establishing A Wired Network Connection
Establishing A Wireless Network Connection
Checking The Network Connection Status
Resetting Your Network
Turning On The TV With A Mobile Device
Connecting An IP Control Device To The TV
Allowing To Connect A Wireless Network
Allowing To Connect The Wi–Fi Direct
Changing The Name Of The TV
Displaying Your Mobile Device Screen On The TV
Using Screen Sharing (Smart View)
Using Apple AirPlay
Using Screen Sharing (Tap View)
Enabling Tap View
Connection Cables For External Devices
Switching Between External Devices Connected To The TV
Editing The Name And Icon Of An External Device
Using Additional Functions
Connection Notes
Connection Notes For HDMI
Connection Notes For Audio Devices
Connection Notes For Computers
Connection Notes For Mobile Devices
Connection Notes For Portrait Mode
Remote Control And Peripherals
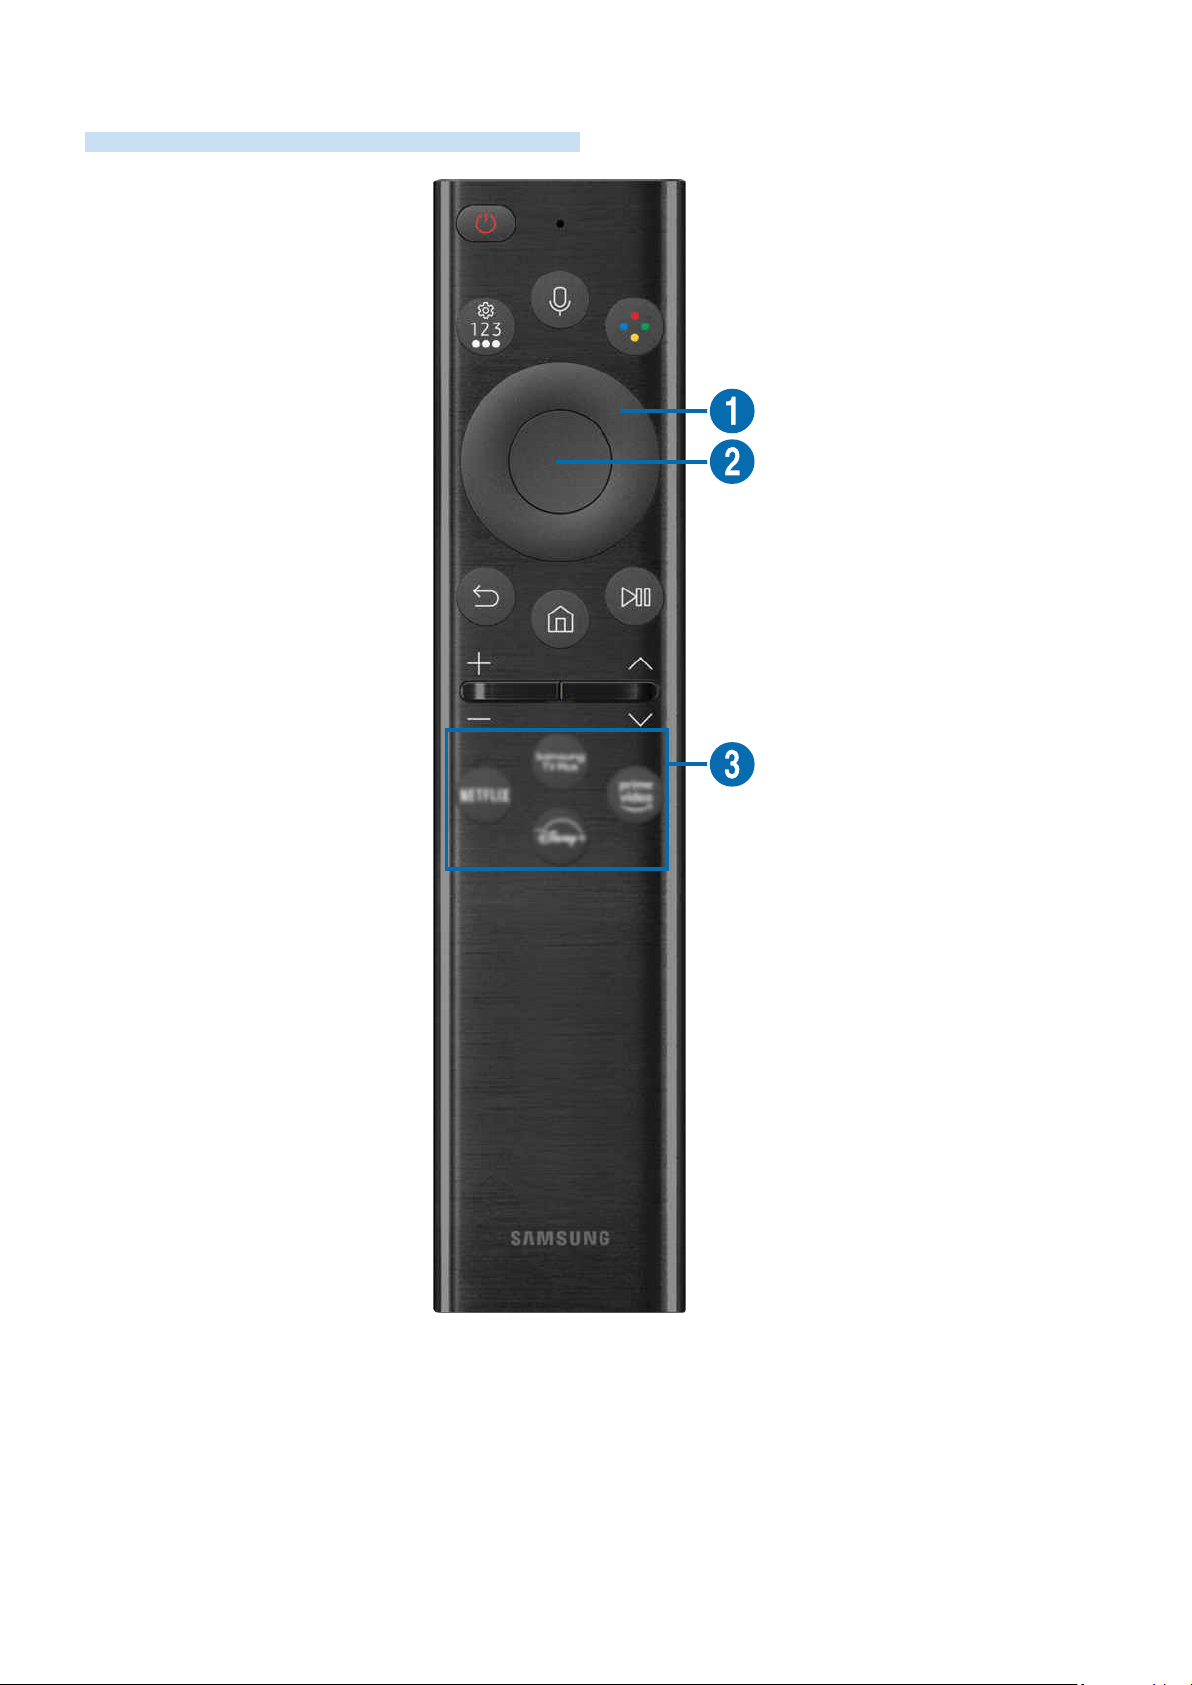
About The Samsung Smart Remote (QLED TV/The Frame (43–inch Or Larger Models)/The Serif/OLED TV)
About The Samsung Smart Remote (The Frame (32LS03B Model)/BU8 Series)
About The Samsung Smart Remote (The Sero)
About The Samsung Smart Remote (The Frame (LS03BS Model))
Connecting The Samsung Smart Remote To The TV
Controlling External Devices With A Samsung Remote Control–Using The Universal Remote
Learn How To Use Samsung Smart Remote
Using Anynet+ (HDMI–CEC)
Connecting An External Device Through Anynet+ And Using Their Menus
Read Before Connecting An Anynet+ (HDMI–CEC) Device
Controlling The TV With A Keyboard, Mouse Or Gamepad
Connecting A USB Keyboard, Mouse Or Gamepad
Connecting A Bluetooth Keyboard, Mouse Or Gamepad
Using The Keyboard And Mouse
Using The Gamepad
Using The Controller
Setting Up The Input Devices
Entering Text Using The On–Screen Virtual Keyboard
Entering Text Using The Remote Control's Microphone And The On–screen Virtual Keyboard
Smart Features
Using Smart Hub
Displaying The Home Screen
Launching Smart Hub Automatically
Launching The Last Used App Automatically
Automatic Mirroring From Multi View
Automatic Casting In Multi View
Launching Multi View Automatically When Rotating
Testing Smart Hub Connections
Resetting Smart Hub
Using Ambient Mode
Entering The TV Viewing Screen From Ambient Mode
Using Art Mode
About The Art Home Screen
Import Images From USB Memory
Using Art Mode With The SmartThings App
Precautions When Using Art Mode
Using Samsung Gaming Hub
About The Media Home Screen
About The Menu Home Screen
Using A Samsung Account
Signing In To A Samsung Account
Creating A New Account
Managing Your Samsung Account
Using The Shortcuts
Adding Channels
Moving Channels
Removing A Channels
Using Workspace
Using Screen Sharing (Windows PC) / AirPlay (Mac)
Using Easy Connection To Screen
Connecting A Remote PC
Playing Multimedia Content On A Remote PC
Using Samsung DeX
Using Microsoft 365
Adding The Web Service
Using Web Service
Using The Apps Service
Installing An App
Launching An App
Managing Installed Apps
Using The E–Manual
Launching The E–Manual
Using The Buttons In The E–Manual
Using The Internet
Using SmartThings
Registering Peripheral Devices Of The TV
Registering A TV / Smart Appliance / IoT Device From The Mobile App
Controlling The TV From The Mobile App
SmartThings Screen Layout
List Of Devices Compatible With The TV
Using The SmartThings Hub Function
Playing Pictures/video/music
Playing Multimedia Content On A PC Or Mobile Device
Playing Multimedia Content On A USB Device
Listening To Your Mobile Device Sound Through The TV Speaker Using Sound Mirroring
Buttons And Functions Available While Playing Multimedia Content
Using Multi View
Using Bixby
Starting Bixby With Voice
Starting Bixby Using Buttons On The Samsung Smart Remote
Learning About The Explore Bixby Screen
Read Before Using Bixby
Provisions For Using Bixby
Using The Game Bar
Starting The Game Bar
Learning About The Game Bar
Using FreeSync
Setting The Super Ultra Wide Game View
Changing The Super Ultra Wide Screen Position
Configuring 144 Hz Game Settings
Troubleshooting Of The Game Screen And Audio Problems
TV Viewing
Using The Guide
About The Guide Screen
Using Additional Features From The Guide
Recording Programmes
The Instant And Timer Recording Options From The Guide
Recording While Watching A Broadcast
Using The Recording Schedule Management Screen
Setting Up Schedule Viewing
Using The Schedule Viewing Options From The Guide Screen
Using The Schedule Viewing Options While Watching A Programme
Using The Viewing Schedule Management Screen
Using Timeshift
Buttons And Functions Available While Recording A Programme Or Timeshift
Using The Channel List
Accessing The Channel List
Using The Functions On The Channel List Screen
Using The Channel Edit Function
Accessing The Channel Edit Screen
Using The Channel Edit Functions
Using A Personal Favourites List
Creating A Favourites List
TV–Viewing Support Functions
Scanning For Available Channels
Selecting The Cable Network Search Option
Scanning For Available Channels On Standby Mode
Setting The Wake–up Time
Setting The Functions For The Service Provider
Viewing Broadcast Service Provider Info
Checking Digital Channel Signal Info And Strength
Selecting The Broadcasting Audio Option
Using Programme Rating Lock
Showing Common Interface Menu
Configuring Advanced Broadcasting Settings
Tuning Broadcast Signals Manually
Tuning Digital Channels
Tuning Analogue Channels
Fine–tuning Analogue Broadcasts
Transferring Channel List
Enabling/Disabling Edit Channel Numbers
Deleting CAM Operator Profile
Setting Satellite System
Changing Teletext Language
Selecting The Broadcast Audio Language
Showing TVkey Interface Menu
Reading Digital Text
Picture And Sound
Using Intelligent Mode
Adjusting The Picture Quality
Choosing A Picture Mode
Configuring Advanced Picture Settings
Picture Support Functions
Viewing A Picture–in–picture (PIP)
Changing The Picture Size Settings
Setting The Viewing Environment For External Devices
Playing Games On An Optimised Screen
Setting The Game Mode Details
Using Input Signal Plus
Using HDMI Black Level
Configuring A Sound Mode And Expert Settings
Choosing A Sound Mode
Configuring Advanced Sound Settings
Using The Sound Support Functions
Selecting Speakers
Listening To The TV Through Bluetooth Devices
Listening To The TV Through A Samsung Audio Device That Supports The Wi–Fi Function
System And Support
Using The Time Functions And The Timers
Setting The Clock Automatically
Adjusting The Clock For DST And Time Zone
Changing The Current Time
Setting The Clock Manually
Using The Sleep Timer
Turning Off The TV Using The Off Timer
Using The Power And Energy Saving Functions
Reducing The Energy Consumption Of The TV
Using The Panel Care Functions
Setting The Panel Care
Updating The TV's Software
Updating Through The Network
Updating Through A USB Device
Updating The TV Automatically
Updating Through The Mobile Network
Using The Parental Settings Function
Audio And Video Functions For The Visually Or Hearing Impaired
Running The Accessibility Functions
Running Accessibility Shortcuts
Enabling Voice Guides For The Visually Impaired
Changing The Volume, Speed, Pitch And The TV Background Volume Of The Voice Guide
Audio Description
The TV Screen Is Turned Off But Audio Continues
Enlarge The Screen
White Text On Black Background (high Contrast)
Setting The Screen To Black And White
Inverting The Screen Colour
Enlarging The Font (for The Visually Impaired)
Learning About The Remote Control (for The Visually Impaired)
Learning About The TV Menu
Watching TV Broadcasts With Subtitles
Selecting The Broadcasting Subtitle Language
Listening To The TV Through Bluetooth Devices (for The Hearing Impaired)
Enlarging The Sign Language Screen For The Hearing Impaired
Configure Sign Language Guide Options
Configuring The Repeat Settings For Remote Control Buttons
App For The Visually Impaired (SeeColors App)
Using Voice Assistants On The TV
Select The Voice Assistant
Using Other Functions
Changing The Menu Language
Setting Up A Password
Selecting Usage Or Retail Mode
Managing External Devices
Using AirPlay
Restoring The TV To The Factory Settings
HbbTV
Using A TV Viewing Card ( Cl Or Cl+ Card)
Connecting The Cl Or Cl+ Card Via COMMON INTERFACE Slot With The Cl CARD Adapter
Connecting The Cl Or Cl+ Card Via COMMON INTERFACE Slot
Using The Cl Or Cl+ Card
Teletext Feature
On The Samsung Smart Remote
On The Standard Remote Control
Typical Teletext Page
Precautions And Notes
Before Using The Recording And Timeshift Functions
Before Using The Recording And Schedule Recording Functions
Before Using The Timeshift Function
Supported Broadcasting Audio Options
Read Before Using Apps
Read Before Using The Internet Function
Read Before Setting Up A Wireless Network Connection
Precautions For Wireless Network
Wireless Security Protocols
Read Before Playing Photo, Video Or Music Files
Limitations To The Use Of Photo, Video And Music Files
Supported Subtitles
Subtitle Formats
Video Formats With Subtitles
Supported Image Formats And Resolutions
Supported Music Formats And Codecs
Supported Video Codecs (QLED TV Except For Q6*B Series/The Frame (43–inch Or Larger Models)/The Serif/The Sero/OLED TV)
Other Restrictions
Video Decoders
Audio Decoders
Supported Video Codecs (Q6*B Series)
Supported Video Codecs (BU8 Series)
Other Restrictions
Video Decoders
Audio Decoders
Supported Video Codecs (The Frame (32LS03B Model))
Other Restrictions
Video Decoders
Audio Decoders
Supported Video Codecs (QN7**B Series)
Other Restrictions
Video Decoders
Audio Decoders
Supported Video Codecs (QN8**B Series Or Higher)
Other Restrictions
Video Decoders
Audio Decoders
Read After Installing The TV
Picture Sizes And Input Signals
Installing An Anti–theft Lock
Supported Resolutions For UHD Input Signals
If Input Signal Plus Is Set To Off
If Input Signal Plus Is Set To On
Resolutions For Input Signals Supported By 8K Models (QN7**B Series Or Higher)
If Input Signal Plus Is Set To Off
If Input Signal Plus Is Set To On
Supported Resolutions For FreeSync (VRR)
Read Before Connecting A Computer (Supported Resolutions)
IBM
MAC
VESA DMT
VESA CVT
CTA–861
Supported Resolutions For Video Signals
CTA–861
VESA CVT
Read Before Using Bluetooth Devices
Restrictions On Using Bluetooth
Licences & Other Information
Troubleshooting
Picture Issues
The Screen Is Flashing Or Has Become Dark
The Picture Is Not Bright, Or The Picture Colours Do Not Look Clear
The Picture Colours Are Black And White Or Do Not Look The Way They Should Look
The TV Automatically Turns Off By Itself
TV (The Frame TV) Cannot Be Turned Off.
Unable To Power On
The TV Remains On Or Does Not Turn On Automatically.
Unable To Find A Channel
The TV Image Does Not Look As Good As It Did In The Store.
Displayed Video Looks Blurry
The Picture Is Distorted.
There Is A Dotted Line On The Edge Of The Screen.
The Picture Won't Display In Full Screen.
The Subtitle Function In The TV Menu Is Deactivated.
Subtitles Appear On The TV Screen.
The HDR Of The Connected External Device Turns Off.
Sound And Noise Issues
How Can I Connect An Audio Device To The TV?
There Is No Sound Or The Sound Is Too Low At Maximum Volume.
The Picture Is Good But There Is No Sound.
HDMI (eARC) Is Connected, And There Is No Sound.
The Speakers Are Making An Odd Sound.
The Sound Is Interrupted.
Whenever A Function Is Used On The TV Or The Channel Is Changed, The TV Voices The Activity.The TV Explains In Voice–over The Video Scenes Displayed On The Screen.
The TV Audio Is Not Being Played Through The Sound Bar Or A/V Receiver.
The Sound Is Not Heard Clearly.
The Volume Of The External Device Cannot Be Adjusted.
I Want To Turn The TV And Audio Device Off And On At The Same Time.
Channel And Broadcast Issues
Weak Or No Signal Displayed In TV Mode Or Cannot Find Channel.
The TV Is Not Receiving All Channels.
The Subtitles Are Not Provided On A Digital Channel.
Broadcasting Is Deactivated.
External Device Connectivity Issues
The "Mode Not Supported" Message Appears.
The Video Is OK But There Is No Audio.
I Want To Connect To A PC And Mobile Device Via Screen Mirroring.
No Screen Appears When Connecting The TV To An External Device.
I Want To Connect To A Bluetooth Speaker.
The PC Screen Does Not Appear Or It Flickers.
Network Issues
Wireless Network Connection Failed.Unable To Connect To A Wireless Access Point.Unable To Connect To The Network.
Wired Network Connection Failed.
Connected To A Local Network, But Not To The Internet.
Anynet+ (HDMI–CEC) Issues
What Is Anynet+?
Anynet+ Does Not Work.The Connected Device Is Not Displayed.
I Want To Start Anynet+.I Also Want The Connected Devices To Turn On When The TV Is Turned On.
I Want To Exit Anynet+.It Is Inconvenient To Turn On Other Devices Because The TV Also Turns On.It Is Inconvenient Because The Connected Devices (e.g.set–top Box) Turn Off Together.
The Message "Connecting To Anynet+ Device..." Or "Disconnecting From Anynet+ Device" Appears On The Screen.
The Anynet+ Device Won't Play.
Remote Control Issues
The Remote Control Does Not Work.
External Devices Cannot Be Operated With The TV Remote Control.
Recording Issues
The Timeshift Or Recording Function Cannot Be Used.
Cannot Record Videos Received From An External Device Or Samsung TV Plus.
The "Format Device" Message Appears When The Timeshift Or Recording Function Is Used.
The Recorded Files On The TV Are Not Played Back On A PC.
Apps
I Launched An App, But It's In A Different Language.How Can I Change The Language?
The App Does Not Work Properly.Its Image Quality Is Poor.
The Smart Hub Home Screen Keeps Appearing Whenever You Turn On The TV.
Media Files
Some Files Are Interrupted During Playback.
Some Files Can't Be Played.
Voice Assistant Issues
The Microphone Is Off.
The Voice Commands Do Not Work Well.
Bixby/Alexa Answers Although I Did Not Call It.
I Spoke "Hi, Bixby/Alexa" But Bixby/Alexa Does Not Answer.
Voice Recognition Does Not Work With The Samsung Smart Remote Unlike Other Features.There Is No Response Even If The Voice Assistant Button Is Pressed.
During Voice Recognition, The Heavy Load Message Appears And The Function Does Not Work.
I Want To See Weather Information Of The Desired Area.
Other Issues
The TV Is Hot.
The TV Smells Like Plastic.
The Settings Are Lost After 5 Minutes Or Every Time The TV Is Turned Off.
The TV Is Tilted To The Side.
The Stand Is Wobbly Or Crooked.
A POP (TV's Internal Banner Ad) Appears On The Screen.
The TV Is Making A Popping Noise.
The TV Is Making A Humming Noise.
The TV Narrates The Screen Events In Voice–over.
Diagnosing TV Operational Issues
Self Diagnosis
Cannot Select Signal Information In Self Diagnosis.
Reset Smart Hub
Reset Picture
Reset Sound
Getting Support
Getting Support Through Remote Management
Finding The Contact Information For Service
Requesting Service
FAQ
The TV Screen Does Not Display Properly
The TV Does Not Turn On
The Picture Is Distorted, Or No Sound Comes Out Of The Sound Bar
Network Access Is Not Available
There Is No Sound Or The Speakers Are Making An Odd Sound
The Remote Control Does Not Work
Updating The Software
Accessibility Guidance
Menu Learning Screen
Using The Remote Control
Orientation Of The Samsung Smart Remote
Description Of The Samsung Smart Remote
Using The Accessibility Menu
Running The Accessibility Shortcuts Menu
Running The Accessibility Menu Functions Using The General Menu
Running The Accessibility Menu Functions Using Bixby
Learning About The Accessibility Menu Functions
Using The TV With Voice Guide On
Changing Channel
Using On–screen Number Entry Via The Samsung Smart Remote
Changing Volume
Using Programme Information
Using The Guide
To View A Programme On Now
Other Options In The Guide
Using Schedule Viewing
Setting Up A Schedule Viewing
Cancelling A Scheduled Viewing
Using The Channel List
Recording
Using The Instant And Schedule Recording Options From The Guide Screen:
Recording The Programme You Are Watching
Scheduling Recording From The Programme Info Window
Changing The Recording Time
Viewing Recorded Programmes
Deleting A Recorded Programme
Using Smart Hub
Smart Hub
Using The Smart Hub Home Screen
Launching The E–Manual
Using Bixby
Running Bixby
Page 28/302
Page 1
Page 2
Page 3
Page 4
Page 5
Page 6
Page 7
Page 8
Page 9
Page 10
Page 11
Page 12
Page 13
Page 14
Page 15
Page 16
Page 17
Page 18
Page 19
Page 20
Page 21
Page 22
Page 23
Page 24
Page 25
Page 26
Page 27
Page 28
Page 29
Page 30
Page 31
Page 32
Page 33
Page 34
Page 35
Page 36
Page 37
Page 38
Page 39
Page 40
Page 41
Page 42
Page 43
Page 44
Page 45
Page 46
Page 47
Page 48
Page 49
Page 50
Page 51
Page 52
Page 53
Page 54
Page 55
Page 56
Page 57
Page 58
Page 59
Page 60
Page 61
Page 62
Page 63
Page 64
Page 65
Page 66
Page 67
Page 68
Page 69
Page 70
Page 71
Page 72
Page 73
Page 74
Page 75
Page 76
Page 77
Page 78
Page 79
Page 80
Page 81
Page 82
Page 83
Page 84
Page 85
Page 86
Page 87
Page 88
Page 89
Page 90
Page 91
Page 92
Page 93
Page 94
Page 95
Page 96
Page 97
Page 98
Page 99
Page 100
Page 101
Page 102
Page 103
Page 104
Page 105
Page 106
Page 107
Page 108
Page 109
Page 110
Page 111
Page 112
Page 113
Page 114
Page 115
Page 116
Page 117
Page 118
Page 119
Page 120
Page 121
Page 122
Page 123
Page 124
Page 125
Page 126
Page 127
Page 128
Page 129
Page 130
Page 131
Page 132
Page 133
Page 134
Page 135
Page 136
Page 137
Page 138
Page 139
Page 140
Page 141
Page 142
Page 143
Page 144
Page 145
Page 146
Page 147
Page 148
Page 149
Page 150
Page 151
Page 152
Page 153
Page 154
Page 155
Page 156
Page 157
Page 158
Page 159
Page 160
Page 161
Page 162
Page 163
Page 164
Page 165
Page 166
Page 167
Page 168
Page 169
Page 170
Page 171
Page 172
Page 173
Page 174
Page 175
Page 176
Page 177
Page 178
Page 179
Page 180
Page 181
Page 182
Page 183
Page 184
Page 185
Page 186
Page 187
Page 188
Page 189
Page 190
Page 191
Page 192
Page 193
Page 194
Page 195
Page 196
Page 197
Page 198
Page 199
Page 200
Page 201
Page 202
Page 203
Page 204
Page 205
Page 206
Page 207
Page 208
Page 209
Page 210
Page 211
Page 212
Page 213
Page 214
Page 215
Page 216
Page 217
Page 218
Page 219
Page 220
Page 221
Page 222
Page 223
Page 224
Page 225
Page 226
Page 227
Page 228
Page 229
Page 230
Page 231
Page 232
Page 233
Page 234
Page 235
Page 236
Page 237
Page 238
Page 239
Page 240
Page 241
Page 242
Page 243
Page 244
Page 245
Page 246
Page 247
Page 248
Page 249
Page 250
Page 251
Page 252
Page 253
Page 254
Page 255
Page 256
Page 257
Page 258
Page 259
Page 260
Page 261
Page 262
Page 263
Page 264
Page 265
Page 266
Page 267
Page 268
Page 269
Page 270
Page 271
Page 272
Page 273
Page 274
Page 275
Page 276
Page 277
Page 278
Page 279
Page 280
Page 281
Page 282
Page 283
Page 284
Page 285
Page 286
Page 287
Page 288
Page 289
Page 290
Page 291
Page 292
Page 293
Page 294
Page 295
Page 296
Page 297
Page 298
Page 299
Page 300
Page 301
Page 302
Contents
Table of Contents
Search
Previous
Next
Troubleshooting
Bookmarks
Loading ...
Loading ...
Loading ...
About the Samsung Smart Remote (The Frame (32LS03B model)/BU8 Series)
Learn about the buttons on the Samsung Smart Remote.
- 28 -
Loading ...
Loading ...
Loading ...
File type: PDF
File name: 95258048_qe65q70bat.pdf
File size: 227.31 KB
File Language: English
Pages: 302
Author: Samsung
File created: 2022-05-18
Published: 2022-08-19
Updated: 2024-02-20
Verified by
Kathryn Cummings
on 2024-02-20
Download File
Table of Contents
×
Guide
7
Connections
7
Connection Guide
7
Connecting An Antenna (Aerial)
9
Connecting To The Network
10
Establishing A Wired Network Connection
10
Establishing A Wireless Network Connection
11
Checking The Network Connection Status
12
Resetting Your Network
12
Turning On The TV With A Mobile Device
13
Connecting An IP Control Device To The TV
13
Allowing To Connect A Wireless Network
13
Allowing To Connect The Wi–Fi Direct
14
Changing The Name Of The TV
14
Displaying Your Mobile Device Screen On The TV
15
Using Screen Sharing (Smart View)
15
Using Apple AirPlay
15
Using Screen Sharing (Tap View)
16
Enabling Tap View
16
Connection Cables For External Devices
17
Switching Between External Devices Connected To The TV
19
Editing The Name And Icon Of An External Device
19
Using Additional Functions
21
Connection Notes
22
Connection Notes For HDMI
22
Connection Notes For Audio Devices
23
Connection Notes For Computers
23
Connection Notes For Mobile Devices
24
Connection Notes For Portrait Mode
24
Remote Control And Peripherals
25
About The Samsung Smart Remote (QLED TV/The Frame (43–inch Or Larger Models)/The Serif/OLED TV)
25
About The Samsung Smart Remote (The Frame (32LS03B Model)/BU8 Series)
28
About The Samsung Smart Remote (The Sero)
31
About The Samsung Smart Remote (The Frame (LS03BS Model))
34
Connecting The Samsung Smart Remote To The TV
37
Controlling External Devices With A Samsung Remote Control–Using The Universal Remote
38
Learn How To Use Samsung Smart Remote
38
Using Anynet+ (HDMI–CEC)
39
Connecting An External Device Through Anynet+ And Using Their Menus
39
Read Before Connecting An Anynet+ (HDMI–CEC) Device
39
Controlling The TV With A Keyboard, Mouse Or Gamepad
40
Connecting A USB Keyboard, Mouse Or Gamepad
40
Connecting A Bluetooth Keyboard, Mouse Or Gamepad
40
Using The Keyboard And Mouse
41
Using The Gamepad
42
Using The Controller
43
Setting Up The Input Devices
44
Entering Text Using The On–Screen Virtual Keyboard
44
Entering Text Using The Remote Control's Microphone And The On–screen Virtual Keyboard
45
Smart Features
46
Using Smart Hub
46
Displaying The Home Screen
47
Launching Smart Hub Automatically
49
Launching The Last Used App Automatically
49
Automatic Mirroring From Multi View
49
Automatic Casting In Multi View
49
Launching Multi View Automatically When Rotating
50
Testing Smart Hub Connections
50
Resetting Smart Hub
50
Using Ambient Mode
51
Entering The TV Viewing Screen From Ambient Mode
56
Using Art Mode
57
About The Art Home Screen
58
Import Images From USB Memory
62
Using Art Mode With The SmartThings App
63
Precautions When Using Art Mode
64
Using Samsung Gaming Hub
65
About The Media Home Screen
68
About The Menu Home Screen
71
Using A Samsung Account
75
Signing In To A Samsung Account
75
Creating A New Account
75
Managing Your Samsung Account
75
Using The Shortcuts
77
Adding Channels
79
Moving Channels
79
Removing A Channels
79
Using Workspace
80
Using Screen Sharing (Windows PC) / AirPlay (Mac)
80
Using Easy Connection To Screen
80
Connecting A Remote PC
81
Playing Multimedia Content On A Remote PC
84
Using Samsung DeX
84
Using Microsoft 365
85
Adding The Web Service
85
Using Web Service
86
Using The Apps Service
87
Installing An App
88
Launching An App
88
Managing Installed Apps
89
Using The E–Manual
91
Launching The E–Manual
91
Using The Buttons In The E–Manual
91
Using The Internet
93
Using SmartThings
94
Registering Peripheral Devices Of The TV
94
Registering A TV / Smart Appliance / IoT Device From The Mobile App
95
Controlling The TV From The Mobile App
95
SmartThings Screen Layout
96
List Of Devices Compatible With The TV
97
Using The SmartThings Hub Function
98
Playing Pictures/video/music
99
Playing Multimedia Content On A PC Or Mobile Device
100
Playing Multimedia Content On A USB Device
100
Listening To Your Mobile Device Sound Through The TV Speaker Using Sound Mirroring
101
Buttons And Functions Available While Playing Multimedia Content
101
Using Multi View
105
Using Bixby
107
Starting Bixby With Voice
107
Starting Bixby Using Buttons On The Samsung Smart Remote
108
Learning About The Explore Bixby Screen
109
Read Before Using Bixby
111
Provisions For Using Bixby
111
Using The Game Bar
112
Starting The Game Bar
112
Learning About The Game Bar
112
Using FreeSync
114
Setting The Super Ultra Wide Game View
115
Changing The Super Ultra Wide Screen Position
115
Configuring 144 Hz Game Settings
116
Troubleshooting Of The Game Screen And Audio Problems
116
TV Viewing
117
Using The Guide
117
About The Guide Screen
118
Using Additional Features From The Guide
120
Recording Programmes
121
The Instant And Timer Recording Options From The Guide
121
Recording While Watching A Broadcast
121
Using The Recording Schedule Management Screen
122
Setting Up Schedule Viewing
124
Using The Schedule Viewing Options From The Guide Screen
124
Using The Schedule Viewing Options While Watching A Programme
124
Using The Viewing Schedule Management Screen
124
Using Timeshift
125
Buttons And Functions Available While Recording A Programme Or Timeshift
126
Using The Channel List
128
Accessing The Channel List
128
Using The Functions On The Channel List Screen
128
Using The Channel Edit Function
130
Accessing The Channel Edit Screen
130
Using The Channel Edit Functions
130
Using A Personal Favourites List
132
Creating A Favourites List
132
TV–Viewing Support Functions
133
Scanning For Available Channels
133
Selecting The Cable Network Search Option
133
Scanning For Available Channels On Standby Mode
133
Setting The Wake–up Time
134
Setting The Functions For The Service Provider
134
Viewing Broadcast Service Provider Info
134
Checking Digital Channel Signal Info And Strength
135
Selecting The Broadcasting Audio Option
135
Using Programme Rating Lock
135
Showing Common Interface Menu
136
Configuring Advanced Broadcasting Settings
136
Tuning Broadcast Signals Manually
136
Tuning Digital Channels
137
Tuning Analogue Channels
137
Fine–tuning Analogue Broadcasts
137
Transferring Channel List
137
Enabling/Disabling Edit Channel Numbers
138
Deleting CAM Operator Profile
138
Setting Satellite System
138
Changing Teletext Language
138
Selecting The Broadcast Audio Language
139
Showing TVkey Interface Menu
139
Reading Digital Text
139
Picture And Sound
140
Using Intelligent Mode
140
Adjusting The Picture Quality
143
Choosing A Picture Mode
143
Configuring Advanced Picture Settings
144
Picture Support Functions
146
Viewing A Picture–in–picture (PIP)
146
Changing The Picture Size Settings
147
Setting The Viewing Environment For External Devices
148
Playing Games On An Optimised Screen
148
Setting The Game Mode Details
149
Using Input Signal Plus
151
Using HDMI Black Level
151
Configuring A Sound Mode And Expert Settings
152
Choosing A Sound Mode
152
Configuring Advanced Sound Settings
152
Using The Sound Support Functions
154
Selecting Speakers
154
Listening To The TV Through Bluetooth Devices
155
Listening To The TV Through A Samsung Audio Device That Supports The Wi–Fi Function
156
System And Support
157
Using The Time Functions And The Timers
157
Setting The Clock Automatically
157
Adjusting The Clock For DST And Time Zone
158
Changing The Current Time
158
Setting The Clock Manually
159
Using The Sleep Timer
159
Turning Off The TV Using The Off Timer
159
Using The Power And Energy Saving Functions
160
Reducing The Energy Consumption Of The TV
160
Using The Panel Care Functions
162
Setting The Panel Care
162
Updating The TV's Software
163
Updating Through The Network
163
Updating Through A USB Device
163
Updating The TV Automatically
163
Updating Through The Mobile Network
163
Using The Parental Settings Function
164
Audio And Video Functions For The Visually Or Hearing Impaired
165
Running The Accessibility Functions
165
Running Accessibility Shortcuts
165
Enabling Voice Guides For The Visually Impaired
166
Changing The Volume, Speed, Pitch And The TV Background Volume Of The Voice Guide
166
Audio Description
166
The TV Screen Is Turned Off But Audio Continues
167
Enlarge The Screen
167
White Text On Black Background (high Contrast)
167
Setting The Screen To Black And White
167
Inverting The Screen Colour
168
Enlarging The Font (for The Visually Impaired)
168
Learning About The Remote Control (for The Visually Impaired)
168
Learning About The TV Menu
168
Watching TV Broadcasts With Subtitles
169
Selecting The Broadcasting Subtitle Language
169
Listening To The TV Through Bluetooth Devices (for The Hearing Impaired)
170
Enlarging The Sign Language Screen For The Hearing Impaired
170
Configure Sign Language Guide Options
170
Configuring The Repeat Settings For Remote Control Buttons
170
App For The Visually Impaired (SeeColors App)
170
Using Voice Assistants On The TV
171
Select The Voice Assistant
171
Using Other Functions
172
Changing The Menu Language
172
Setting Up A Password
172
Selecting Usage Or Retail Mode
172
Managing External Devices
173
Using AirPlay
173
Restoring The TV To The Factory Settings
173
HbbTV
174
Using A TV Viewing Card ( Cl Or Cl+ Card)
175
Connecting The Cl Or Cl+ Card Via COMMON INTERFACE Slot With The Cl CARD Adapter
175
Connecting The Cl Or Cl+ Card Via COMMON INTERFACE Slot
176
Using The Cl Or Cl+ Card
177
Teletext Feature
178
On The Samsung Smart Remote
178
On The Standard Remote Control
179
Typical Teletext Page
181
Precautions And Notes
182
Before Using The Recording And Timeshift Functions
182
Before Using The Recording And Schedule Recording Functions
182
Before Using The Timeshift Function
184
Supported Broadcasting Audio Options
184
Read Before Using Apps
185
Read Before Using The Internet Function
186
Read Before Setting Up A Wireless Network Connection
187
Precautions For Wireless Network
187
Wireless Security Protocols
187
Read Before Playing Photo, Video Or Music Files
188
Limitations To The Use Of Photo, Video And Music Files
188
Supported Subtitles
189
Subtitle Formats
189
Video Formats With Subtitles
189
Supported Image Formats And Resolutions
190
Supported Music Formats And Codecs
190
Supported Video Codecs (QLED TV Except For Q6*B Series/The Frame (43–inch Or Larger Models)/The Serif/The Sero/OLED TV)
191
Other Restrictions
192
Video Decoders
193
Audio Decoders
193
Supported Video Codecs (Q6*B Series)
194
Supported Video Codecs (BU8 Series)
195
Other Restrictions
196
Video Decoders
196
Audio Decoders
196
Supported Video Codecs (The Frame (32LS03B Model))
197
Other Restrictions
198
Video Decoders
198
Audio Decoders
198
Supported Video Codecs (QN7**B Series)
199
Other Restrictions
200
Video Decoders
200
Audio Decoders
200
Supported Video Codecs (QN8**B Series Or Higher)
201
Other Restrictions
202
Video Decoders
202
Audio Decoders
202
Read After Installing The TV
203
Picture Sizes And Input Signals
203
Installing An Anti–theft Lock
203
Supported Resolutions For UHD Input Signals
204
If Input Signal Plus Is Set To Off
204
If Input Signal Plus Is Set To On
204
Resolutions For Input Signals Supported By 8K Models (QN7**B Series Or Higher)
205
If Input Signal Plus Is Set To Off
205
If Input Signal Plus Is Set To On
205
Supported Resolutions For FreeSync (VRR)
206
Read Before Connecting A Computer (Supported Resolutions)
207
IBM
207
MAC
207
VESA DMT
208
VESA CVT
209
CTA–861
209
Supported Resolutions For Video Signals
210
CTA–861
210
VESA CVT
211
Read Before Using Bluetooth Devices
212
Restrictions On Using Bluetooth
212
Licences & Other Information
213
Troubleshooting
215
Picture Issues
215
The Screen Is Flashing Or Has Become Dark
215
The Picture Is Not Bright, Or The Picture Colours Do Not Look Clear
216
The Picture Colours Are Black And White Or Do Not Look The Way They Should Look
217
The TV Automatically Turns Off By Itself
217
TV (The Frame TV) Cannot Be Turned Off.
218
Unable To Power On
218
The TV Remains On Or Does Not Turn On Automatically.
218
Unable To Find A Channel
219
The TV Image Does Not Look As Good As It Did In The Store.
219
Displayed Video Looks Blurry
219
The Picture Is Distorted.
220
There Is A Dotted Line On The Edge Of The Screen.
220
The Picture Won't Display In Full Screen.
220
The Subtitle Function In The TV Menu Is Deactivated.
220
Subtitles Appear On The TV Screen.
221
The HDR Of The Connected External Device Turns Off.
221
Sound And Noise Issues
222
How Can I Connect An Audio Device To The TV?
222
There Is No Sound Or The Sound Is Too Low At Maximum Volume.
222
The Picture Is Good But There Is No Sound.
222
HDMI (eARC) Is Connected, And There Is No Sound.
223
The Speakers Are Making An Odd Sound.
223
The Sound Is Interrupted.
223
Whenever A Function Is Used On The TV Or The Channel Is Changed, The TV Voices The Activity.The TV Explains In Voice–over The Video Scenes Displayed On The Screen.
224
The TV Audio Is Not Being Played Through The Sound Bar Or A/V Receiver.
224
The Sound Is Not Heard Clearly.
224
The Volume Of The External Device Cannot Be Adjusted.
225
I Want To Turn The TV And Audio Device Off And On At The Same Time.
225
Channel And Broadcast Issues
226
Weak Or No Signal Displayed In TV Mode Or Cannot Find Channel.
226
The TV Is Not Receiving All Channels.
226
The Subtitles Are Not Provided On A Digital Channel.
226
Broadcasting Is Deactivated.
226
External Device Connectivity Issues
227
The "Mode Not Supported" Message Appears.
227
The Video Is OK But There Is No Audio.
227
I Want To Connect To A PC And Mobile Device Via Screen Mirroring.
227
No Screen Appears When Connecting The TV To An External Device.
228
I Want To Connect To A Bluetooth Speaker.
228
The PC Screen Does Not Appear Or It Flickers.
228
Network Issues
229
Wireless Network Connection Failed.Unable To Connect To A Wireless Access Point.Unable To Connect To The Network.
229
Wired Network Connection Failed.
229
Connected To A Local Network, But Not To The Internet.
229
Anynet+ (HDMI–CEC) Issues
230
What Is Anynet+?
230
Anynet+ Does Not Work.The Connected Device Is Not Displayed.
230
I Want To Start Anynet+.I Also Want The Connected Devices To Turn On When The TV Is Turned On.
230
I Want To Exit Anynet+.It Is Inconvenient To Turn On Other Devices Because The TV Also Turns On.It Is Inconvenient Because The Connected Devices (e.g.set–top Box) Turn Off Together.
231
The Message "Connecting To Anynet+ Device..." Or "Disconnecting From Anynet+ Device" Appears On The Screen.
231
The Anynet+ Device Won't Play.
231
Remote Control Issues
232
The Remote Control Does Not Work.
232
External Devices Cannot Be Operated With The TV Remote Control.
232
Recording Issues
233
The Timeshift Or Recording Function Cannot Be Used.
233
Cannot Record Videos Received From An External Device Or Samsung TV Plus.
233
The "Format Device" Message Appears When The Timeshift Or Recording Function Is Used.
233
The Recorded Files On The TV Are Not Played Back On A PC.
233
Apps
234
I Launched An App, But It's In A Different Language.How Can I Change The Language?
234
The App Does Not Work Properly.Its Image Quality Is Poor.
234
The Smart Hub Home Screen Keeps Appearing Whenever You Turn On The TV.
234
Media Files
235
Some Files Are Interrupted During Playback.
235
Some Files Can't Be Played.
235
Voice Assistant Issues
236
The Microphone Is Off.
236
The Voice Commands Do Not Work Well.
236
Bixby/Alexa Answers Although I Did Not Call It.
236
I Spoke "Hi, Bixby/Alexa" But Bixby/Alexa Does Not Answer.
237
Voice Recognition Does Not Work With The Samsung Smart Remote Unlike Other Features.There Is No Response Even If The Voice Assistant Button Is Pressed.
237
During Voice Recognition, The Heavy Load Message Appears And The Function Does Not Work.
238
I Want To See Weather Information Of The Desired Area.
238
Other Issues
239
The TV Is Hot.
239
The TV Smells Like Plastic.
239
The Settings Are Lost After 5 Minutes Or Every Time The TV Is Turned Off.
239
The TV Is Tilted To The Side.
239
The Stand Is Wobbly Or Crooked.
239
A POP (TV's Internal Banner Ad) Appears On The Screen.
239
The TV Is Making A Popping Noise.
240
The TV Is Making A Humming Noise.
240
The TV Narrates The Screen Events In Voice–over.
240
Diagnosing TV Operational Issues
241
Self Diagnosis
241
Cannot Select Signal Information In Self Diagnosis.
241
Reset Smart Hub
242
Reset Picture
242
Reset Sound
242
Getting Support
243
Getting Support Through Remote Management
243
Finding The Contact Information For Service
243
Requesting Service
243
FAQ
244
The TV Screen Does Not Display Properly
244
The TV Does Not Turn On
249
The Picture Is Distorted, Or No Sound Comes Out Of The Sound Bar
255
Network Access Is Not Available
259
There Is No Sound Or The Speakers Are Making An Odd Sound
264
The Remote Control Does Not Work
270
Updating The Software
274
Accessibility Guidance
280
Menu Learning Screen
280
Using The Remote Control
280
Orientation Of The Samsung Smart Remote
280
Description Of The Samsung Smart Remote
280
Using The Accessibility Menu
282
Running The Accessibility Shortcuts Menu
282
Running The Accessibility Menu Functions Using The General Menu
282
Running The Accessibility Menu Functions Using Bixby
283
Learning About The Accessibility Menu Functions
284
Using The TV With Voice Guide On
286
Changing Channel
286
Using On–screen Number Entry Via The Samsung Smart Remote
286
Changing Volume
287
Using Programme Information
287
Using The Guide
288
To View A Programme On Now
289
Other Options In The Guide
290
Using Schedule Viewing
292
Setting Up A Schedule Viewing
292
Cancelling A Scheduled Viewing
292
Using The Channel List
293
Recording
295
Using The Instant And Schedule Recording Options From The Guide Screen:
295
Recording The Programme You Are Watching
296
Scheduling Recording From The Programme Info Window
296
Changing The Recording Time
296
Viewing Recorded Programmes
297
Deleting A Recorded Programme
297
Using Smart Hub
298
Smart Hub
298
Using The Smart Hub Home Screen
299
Launching The E–Manual
301
Using Bixby
302
Running Bixby
302
Search:
×
Search