1_8.t7S20
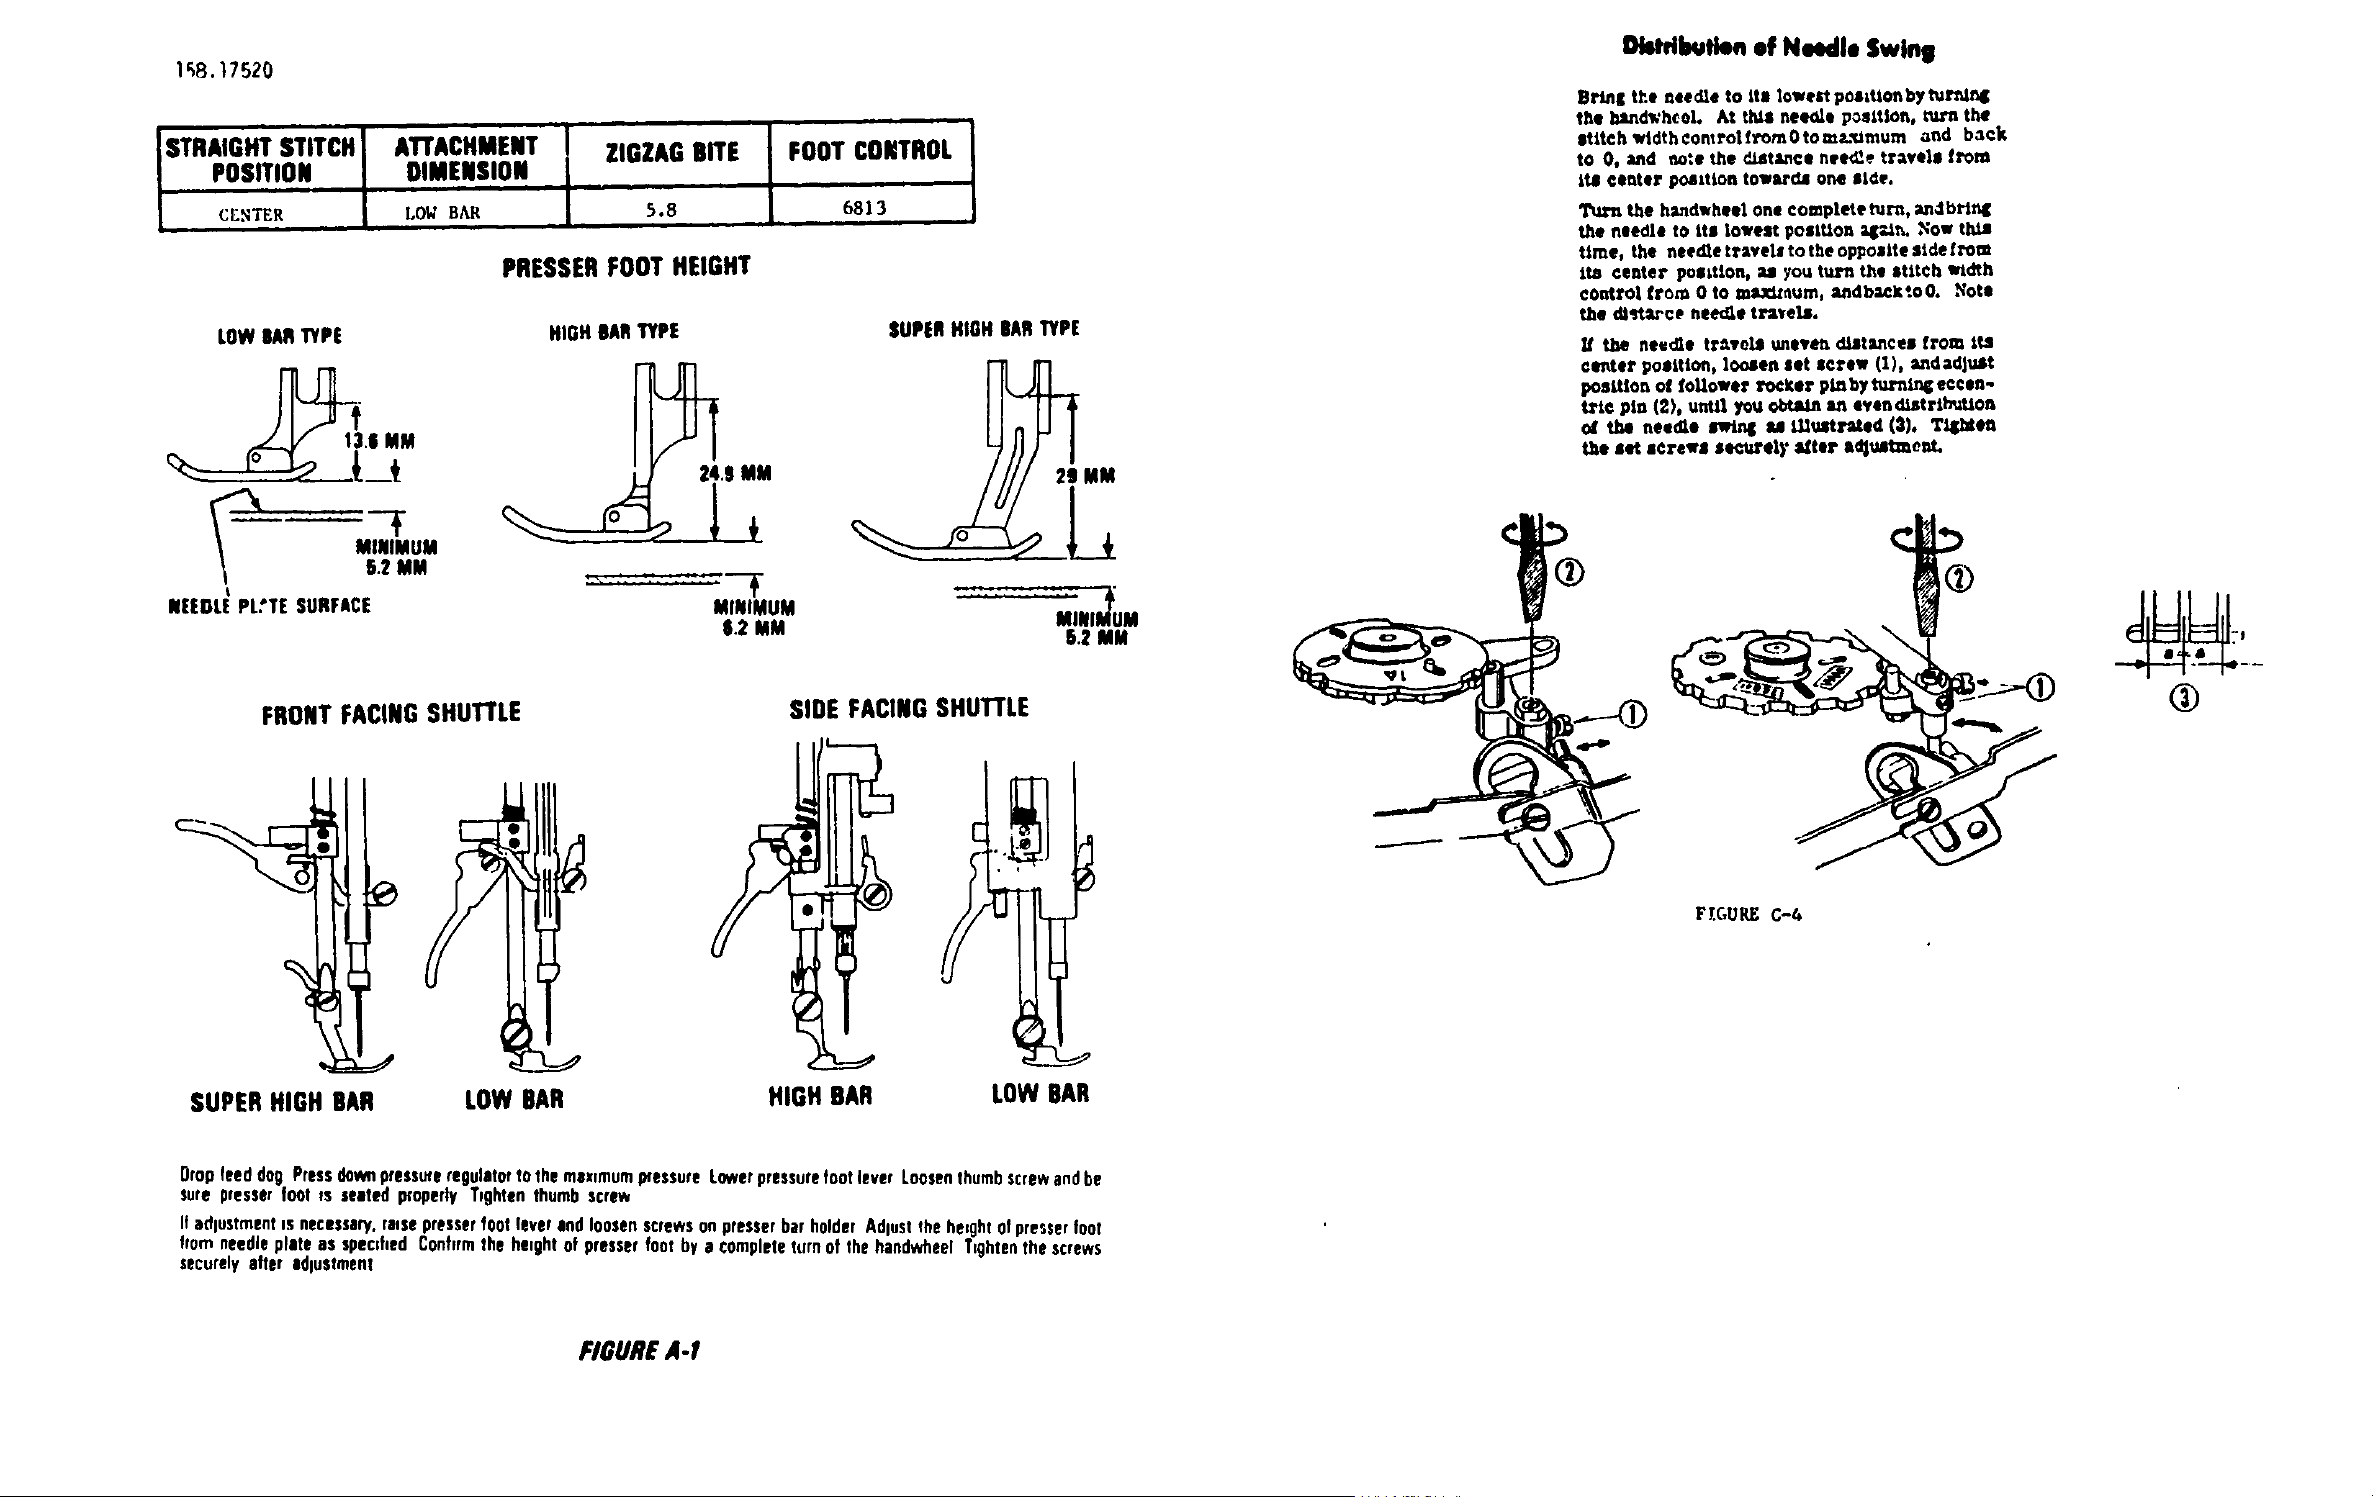
STRAIGHt STITCH ATTACHMENT ZIGZAGBITE FOOT CONTROL
POSITION DIMENSION
n n ham
CI_NTER LOW BAR 5.8 6813
L,
PRESSERFOOTHEIGHT
LOWBARTYPE
ti.li MM
_t
MINIMUM
5,2 MM
t
NEEDLE PL:TE SURFACE
HIGH OARTYPE SUPERHIGH OARTYPE
li.S MM
MINIMUM
S.2 MM
5.2 MM
FRONTFACINGSHUTTLE
SIDE FACINGSHUTTLE
t
SUPERHIGH BAR LOW BAR HIGH BAR LOW BAR
Dropfeed dog Pressdownpressureregulator to the mexvmumpressure Lowerpressurefoot lever Loosenthumbscrewandbe
sure presser foot vs seated properly T,ghten thumb screw
If adlustment _snecessary,raesepresserfoot feverand loosenscrewson presserbar holder Adlustthe he,ghtof presserfoot
from needle plate as specd,ed Confvrmthe hevghtof presserfoot by o completeturn of the handwheel Ttohtenthe screws
securelyafter adlustment
FIGURE A-F
Oimibuti,n ,f Noodle Swing
Dean| the noodle to its lowest pcaLtlon by turnln4;
the bsndwheol. At this neeole position, t-tu.nthe
ar[ItchwtdtheomrolfromOtoms.-.Imum and back
to O. and oote the _latamce needle travel= from
its center poaxtlon towa, r_ one slde.
•rum the haadwhae! Onecomplete turn, an4br/nl[
the naedJa to lie ]owens poaltlon q[;u_. ,_ow thla
ttme, the needle travele to the oppoeite side trom
Its center posLtton, _ you tux_ the stitch width
€0atrol from 0 to maxizoum, autdb:pek*.oO. Yots
ebe _a.*-ce needZe tz,..4yeIL
the Wee,no trAvolJ unev_'A dtJt_mcen from Its
€lmtsr position, loosen set screw (I), _mdadJust
pooP.fen of follower rocker pi.nby tu,'n_m4_eooen..
aria pin (2), until you obtain an oven dlstrtt'i'._tton
the needle _ M LU,atr-_ted (3), Tfpsen
the set screws se¢_rel), attar a_e_..
F T.GURE C-6
P km
FIGURE D-t
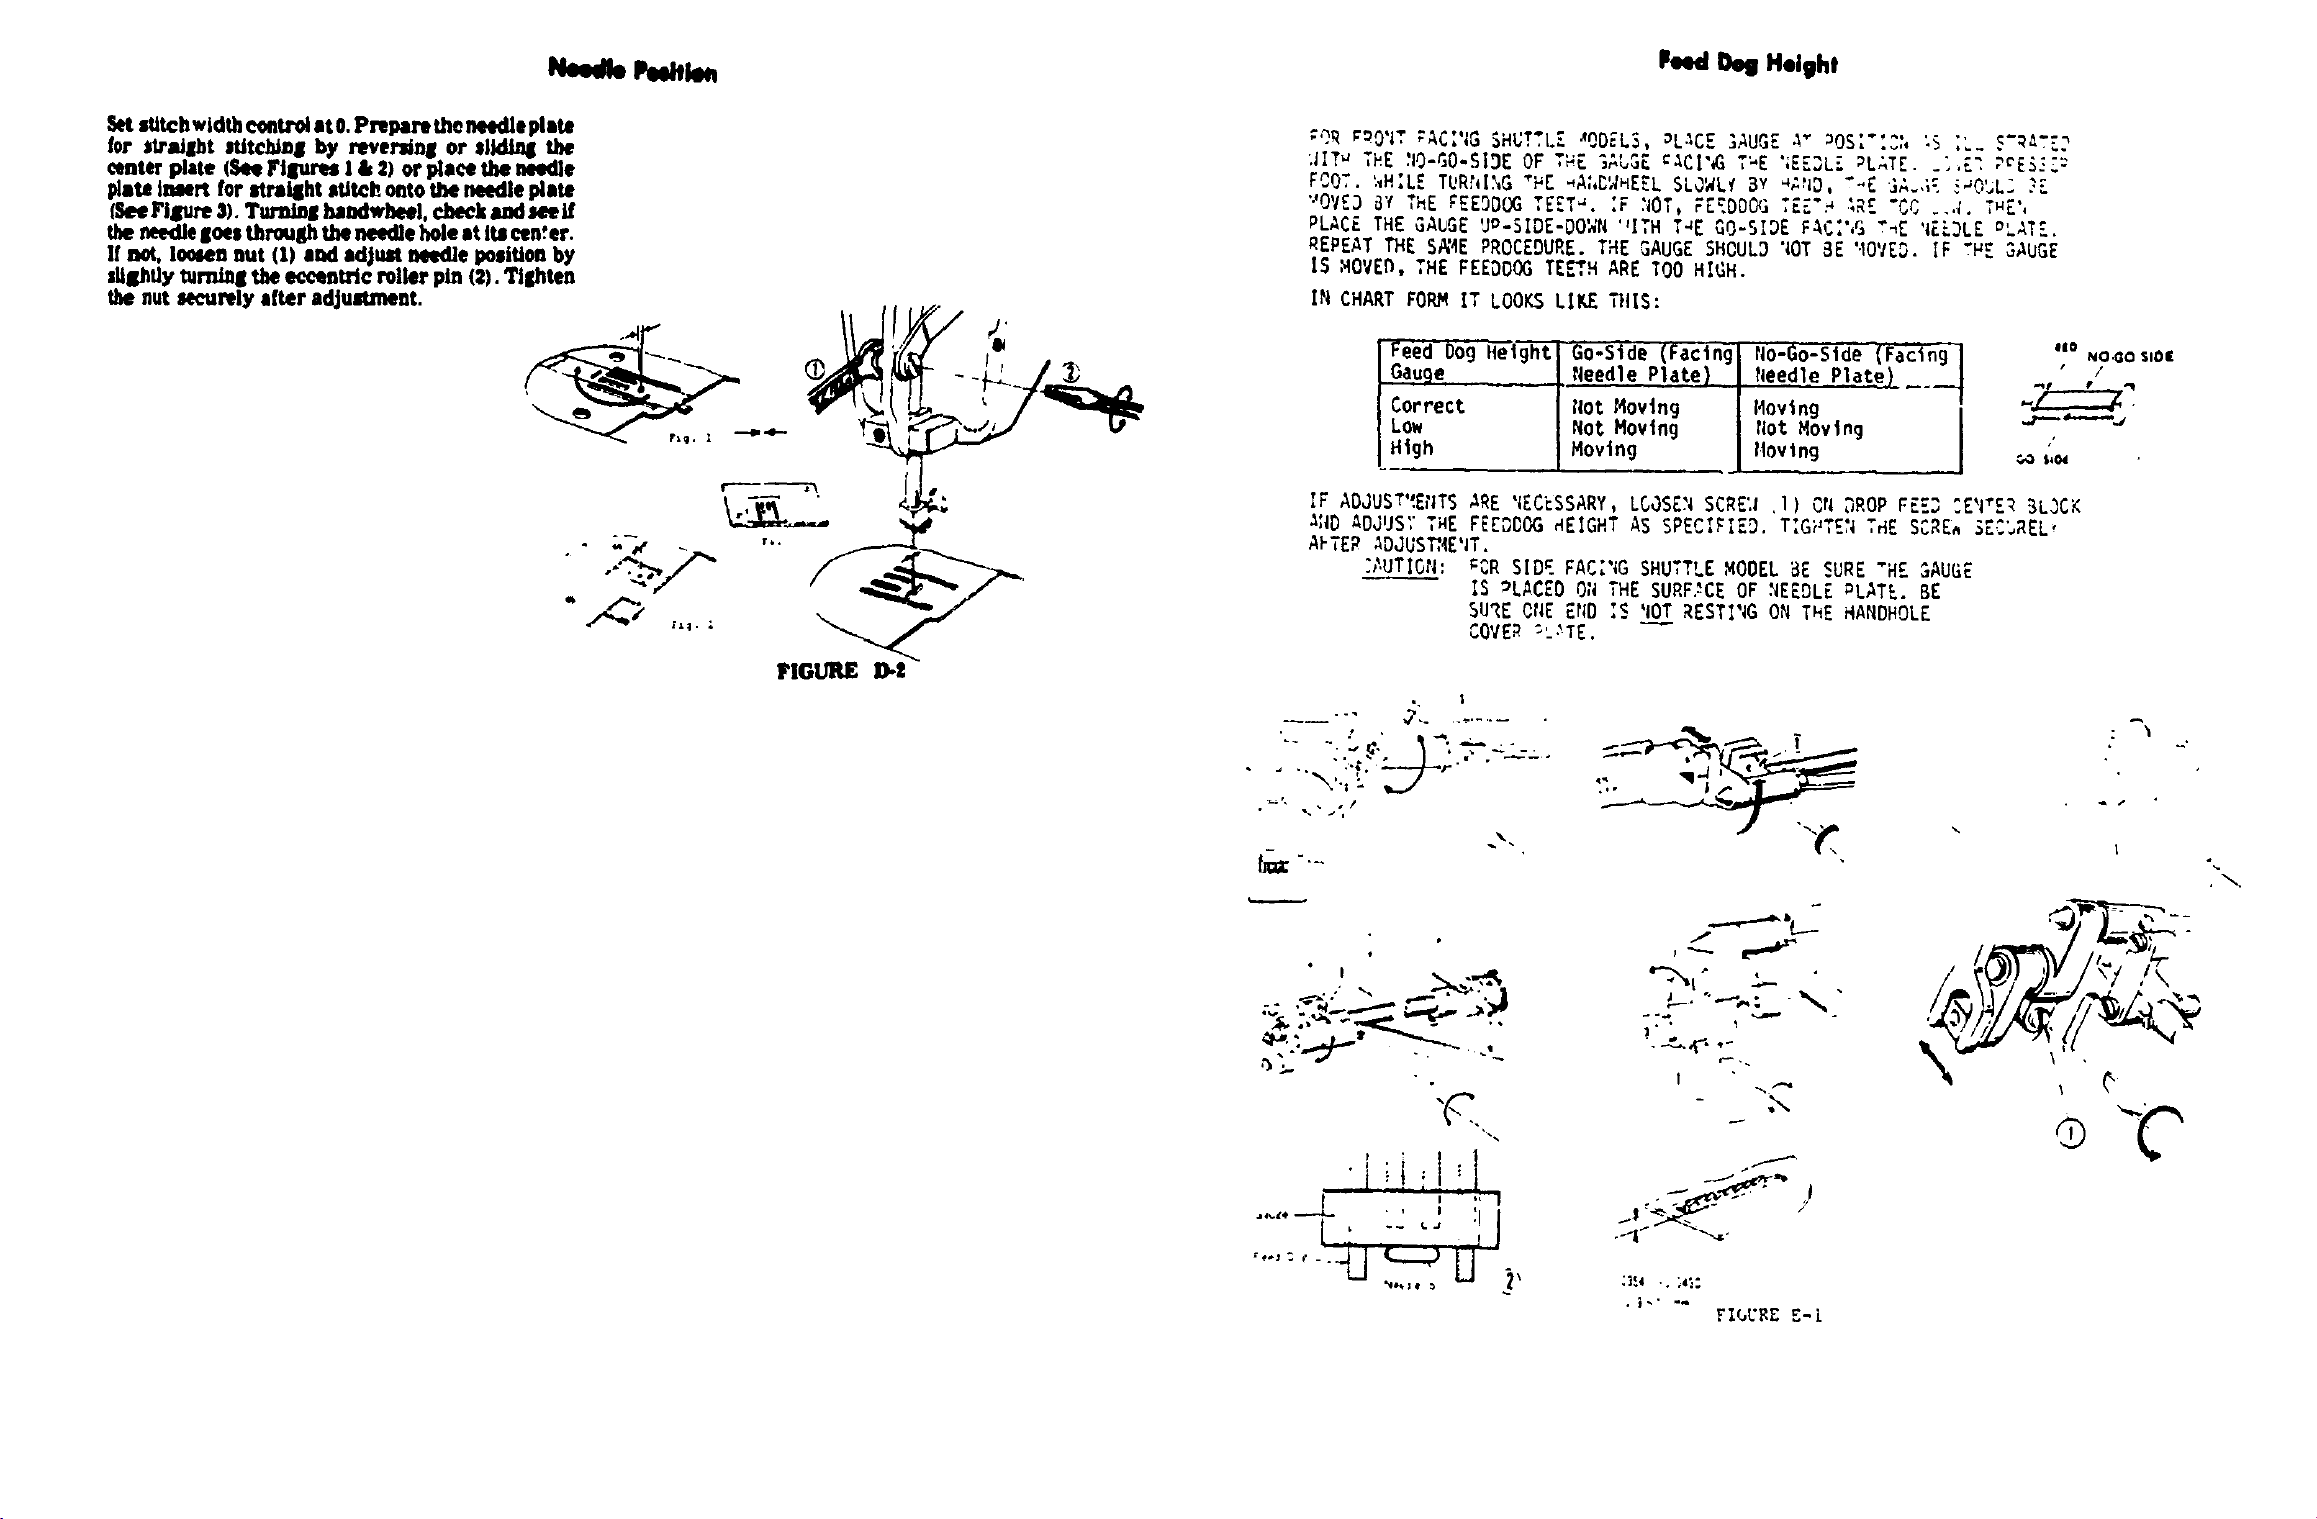
FeedOegHeight
:OR _O'IT ;AC;'4GSHUTTL-Z_ODELG, _LACE ;AUGE _ )OS..........., tS ,._ S-RATE2
.liT.THE :1g-GO-SIDEOF ,_ =_uo: _ACI'_ T'_E";[Z3L-_L;_TE..I,E_,._rE_.:_:
FOOT. '.,H;LETUR,r,I._G"HE .A;,CWHEELSLJWLf BY "_.ID,'-E _._,,:_aOSL] :_
'_OVE3_Y THE F_EDDOG " _
,E., . ;F 21OT,FEZDD{_ T_.---'._ _RE CO ..,;.TvE',
T
PLACE THE GAbGE Um-SIDE-DO'_N"ITH T_E _O-S,DE FAC",_ ?.E '4EL5LEmLAT_.
REPEAT THE S_4E PROCEDURE. THE GAUGE SHOULD NOT BE '.IOVE_.IF THE GAUGE
IS HOVED, THE FEEDDOG TE_H ARE IOO HIGH.
IN CHART FORM IT LOOKS LIKE THIS:
Feed Dog Height GO-el-de(Facing No-Go-side (Facing .o No._os,o{
Gauge Needle Plate). Needle Plate) /
Correct [iotMoving Moving _-_'_
Low Not Moving riotMoving "_'-'_"-"_
High Moving (1ovlng _ ,,o_
IF ADJUST':EtlTS_RE 'iECkSSARY,LCOSE_4SCRE',iI) or4DROP FE:.3_E'_ER "_LGCK
A:IDADJ,JS:"THE F{EDDOG HEIGHT AS SPECIFIED. T,G_ ,E,;T_E SORE^ SEC'_REL,
AFTER ADJUS_(ENT.
.'AUTIG_I:_CR SID#.FAC;'(GSHUTTLE MOOEL BE SURE "HE GAUGE
IS _LACED OilTHE SURF:CE OF NEEDLE PLATE. BE
SURE Or4EEr;D,.'__'iOTRESTI'4GON THE HAHDHOLE
COVER _L:TE.
i
--- ........
----- °
c_
I
FI(,URE _-].
\
T

SET STITCH LENGTHCONTROLAT O. TURNING HANOWHEEL.
CHECk,TO SEE IF THE FEED DOGMOVESHORIZO,"iTALLY. AT
0 POSITION THE FEED DOGSHOULDNOT MOVE.
IF FEED DOGMOVES, LOOSENTHE NUT (2) HOLDING SCREW(1).
TURN SCREWEITHER WAYTO ELIMINATE MOVEMENTOF THE FEED
DCG. A._TERADJUSTMENT.TIGHTEN NUT (2) SECURELY.
l m,.Fl llelfl
l;'IGtYR£ ¥-6
SET SPECIAL STITCH DIAL AT "S", STITCH WIDTH CONTROLAT
"S" AND STITCH LENGTHCONTROl AT "O". TURNING tlANDMHEEL,,
CHECKTO SEE IF THE FEED DOGMOVESHORIZONTALLY. AT THIS
POSITION THE FEED DOGSHOULDNOT HOVE.
IF FEED DOGMOVES, LOOSENSCREW(1) SLIGHTLY. TURN
ECCENTRICSCREW(2) EITHER CLOCKWISEOR COONTERCLOCIOJlISE
UNTIL MACHINE DOESNOT FEED ON THE "O" SETTING. TIG'TEN
SCREW(2) SECURELYAFTER ADJUSTNENT.
FIGURE F-J
NEEDLE TIMING TO SHUTTLE
NEEDLe" BAR HEIGHT
THE RADIAL TIMING GAUGESAND TEST PINS, AS
ILLUSTRATED BELOW',ARE AVAILABLE FROI,I DIVISION
92, SOURCE192. THE KIT IS IDENTIFIED AS
#69659. EACHGAUGEAND TEST PIN CANALSO BE
ORDEREDINDIVIDUALLY.
THIS KIT IS USED FOR SOURCE148 AND 158
VERTICAL BOBBIN SEWINGNACHINES.
i /
RADIAL /
TIHIl'lG GAUGE ..,_-,L
#69894 _ "-"_ -'-"-'--_"_Jl,, TEST PIN'l #69873
RADIAL "=_'.,_!
TIMING GAUGE
#69692 _t
RADIAL
TIMING GAUGE
#69893
RADIAL
TIMING GAUGE
FIGURE G-I #69695
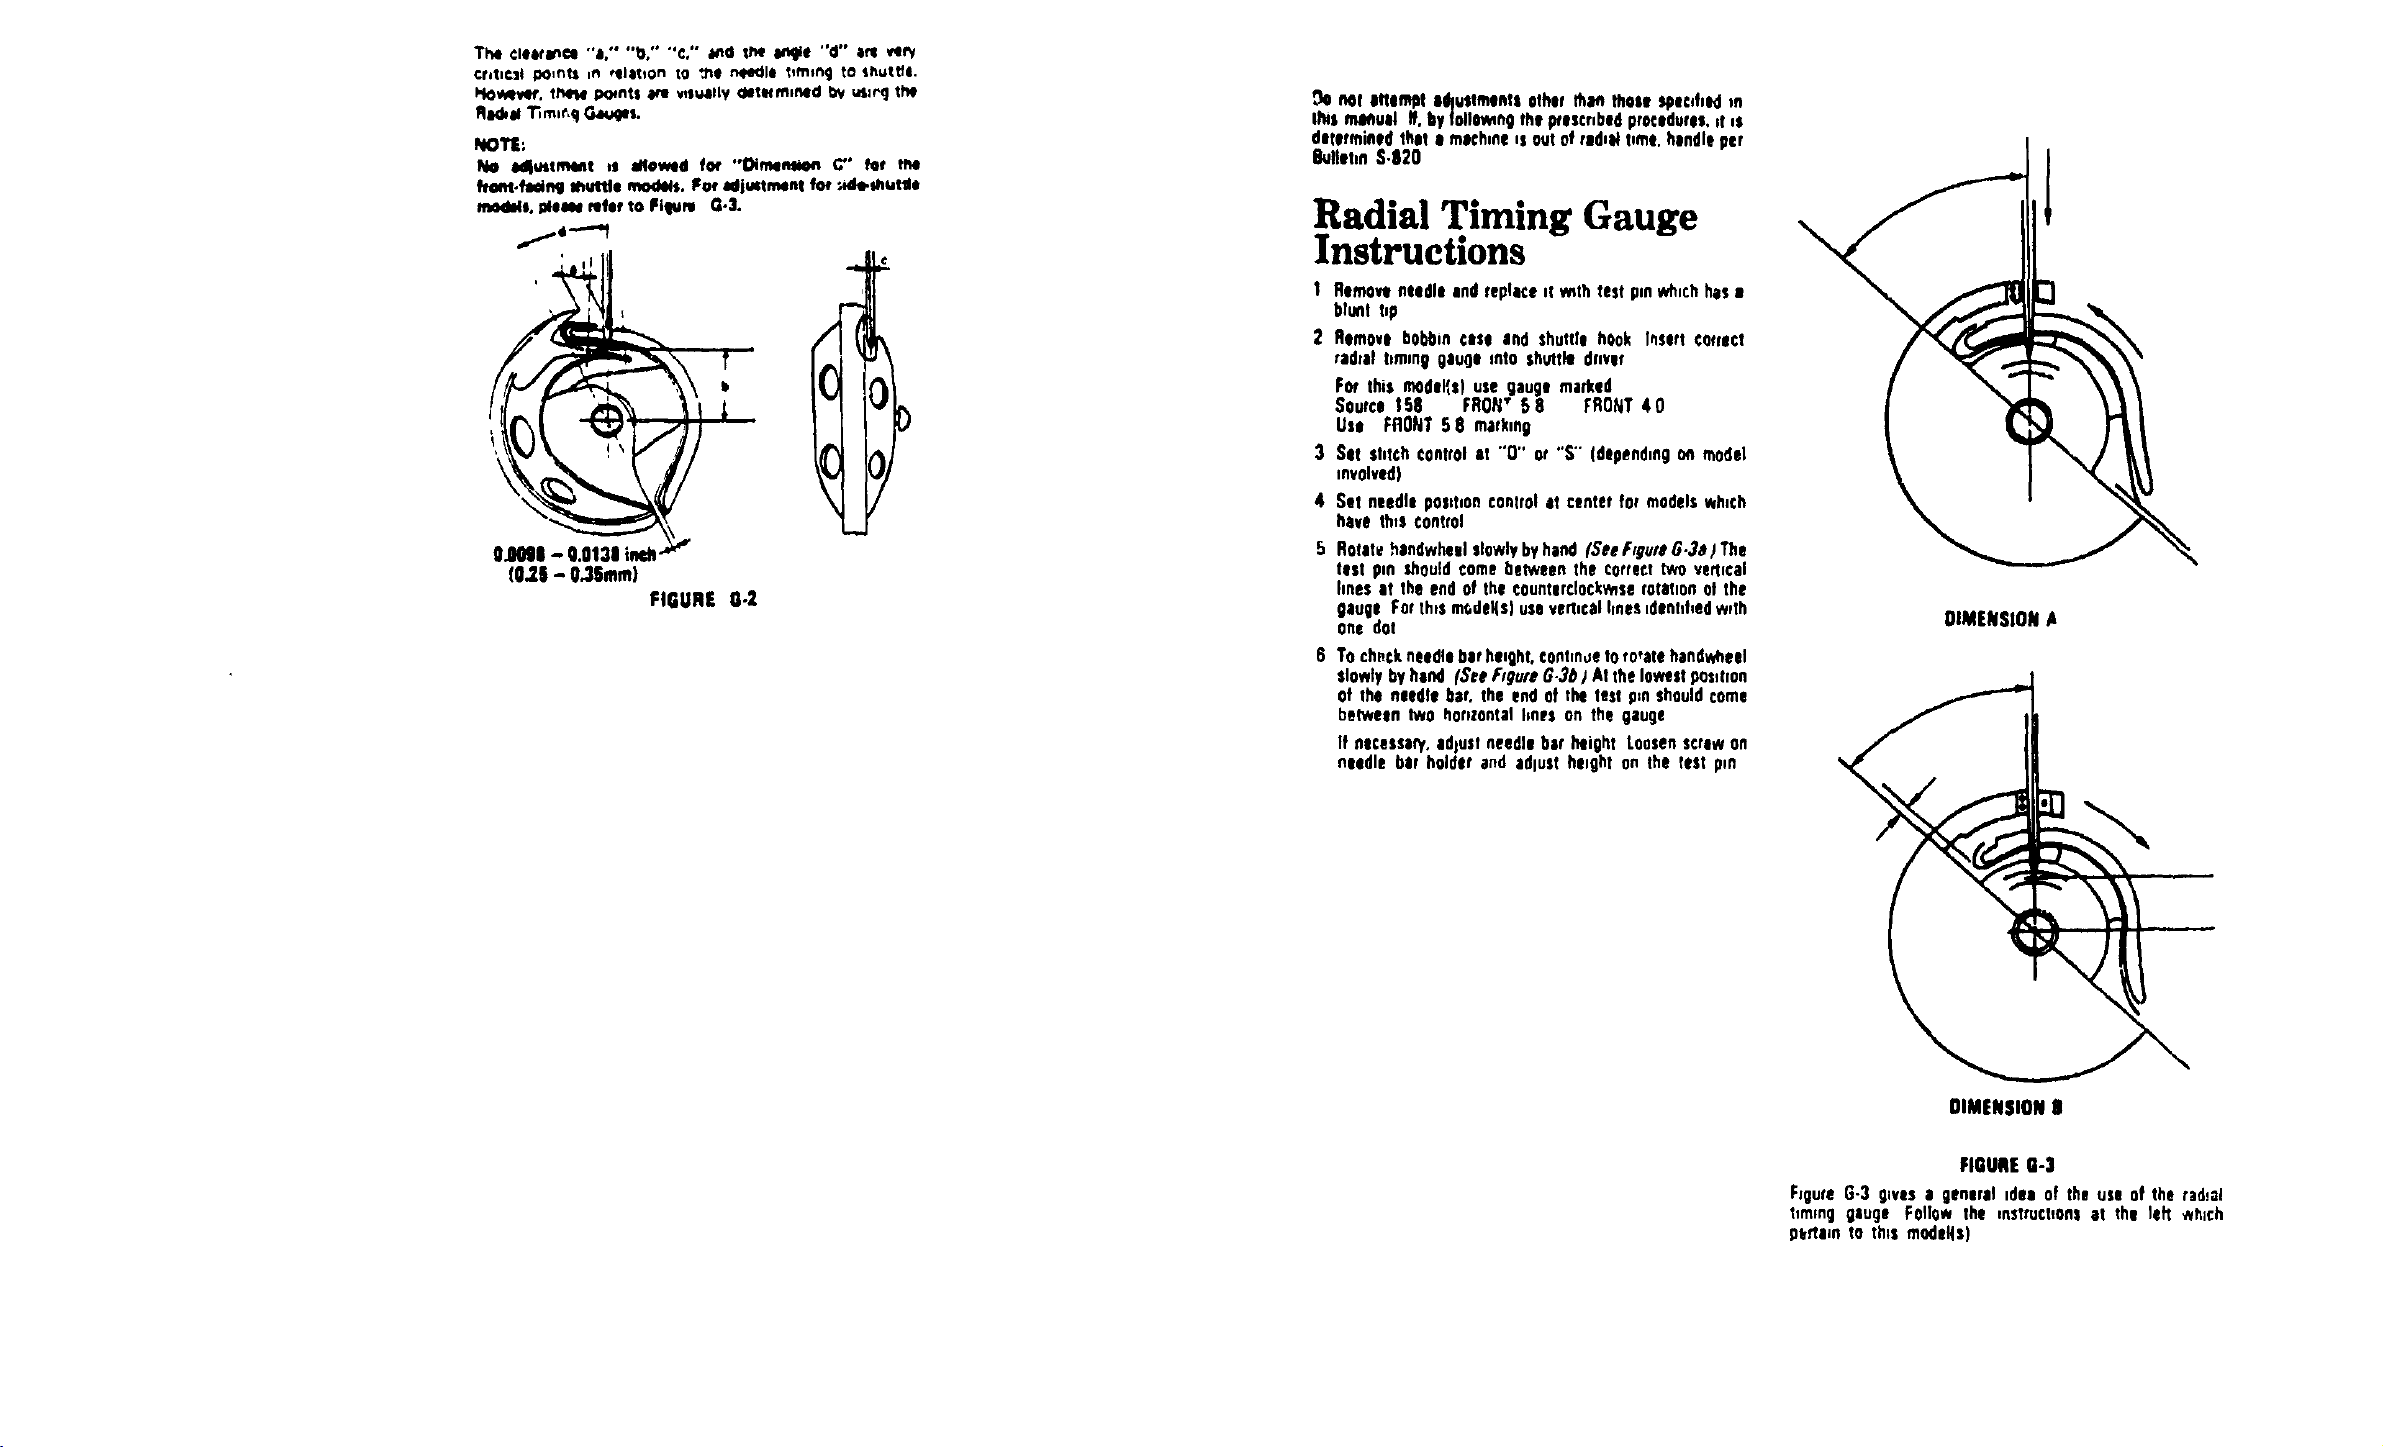
?h4_clearance -a.'" '"Oo""€," a_d _ en_e "d" a_ _
¢r,ti¢ll po_f_tt,a _llatlon to "Jlenq41dletiming to shuttle.
114_lv41r.tn4.N parersMe v_lvailyderefm_Md 0v "41_'gthe
Radial "1_mlr_q_s.
NOYI:
No adlmsm4Rt it _ov_d for "Oimem_4_ C" to, t_
f_t.fa_ng muttJe mod4Js.Fat adju4tmentfor :Mo.mutsi*
ragtime, lateelw mfef to FHIunl G.3.
f_---..?
(0.2§- 0.36ram)
FIGURE 6-2
_0 riotattemptalllvstmtnte otherthai thosespot,hidin
ti_emimuldIf,byfollOw_ thei:_rescr,bndprocedures,stJe
determinedthate machine*soutofrod,ll t,me,handleper
8ullet,nS,I120
Radial Timing Gauge
nstructmns
T Removeneedle end replace _tw_thtest pin whichhis •
blunt tup
2 Remove bobbin cese and shuttle hook l_sert correct
rndlel timing gauoe into shvttin driver
F_ this n14del_e)use gauge marked
Source 158 FRO/;" 58 FRONT40
Use FflO_lT 58 marking
3 Set stitch control at '0" or "S'" (dependingon model
involved)
4 Set needle positioncontrol et center for modelswhich
have this control
5 Rotet_ hondwheel slowlybyhand (SeefrgumGo3a) The
test pin shouldcome between the correcttwo vertical
lines It the end of the €ounterclockwise rotatnonoi the
gauge For th_smsdel_s)usevert0callinesudenhhedw,th
one dot DIMENSION A
To chpckneedlebar height°continuetofixate handwfleel
slowlyby hind (Set fugue#G.3b) At the lowestpos0tfon
of the needle bar. the end of the test panshouldcome
between two hor,zontalhoes on the gauge
If necess|_., edlusfneedle bar height Loosenscrewon
needle bar holder and OdluStheight on the lest pm
DIMENSIONO
FIGUREO-3
Figure G-3 eaves e general ndeo of the use of the radial
timing gouge Follow the instructionsat the left which
Ptflem to this model|s)
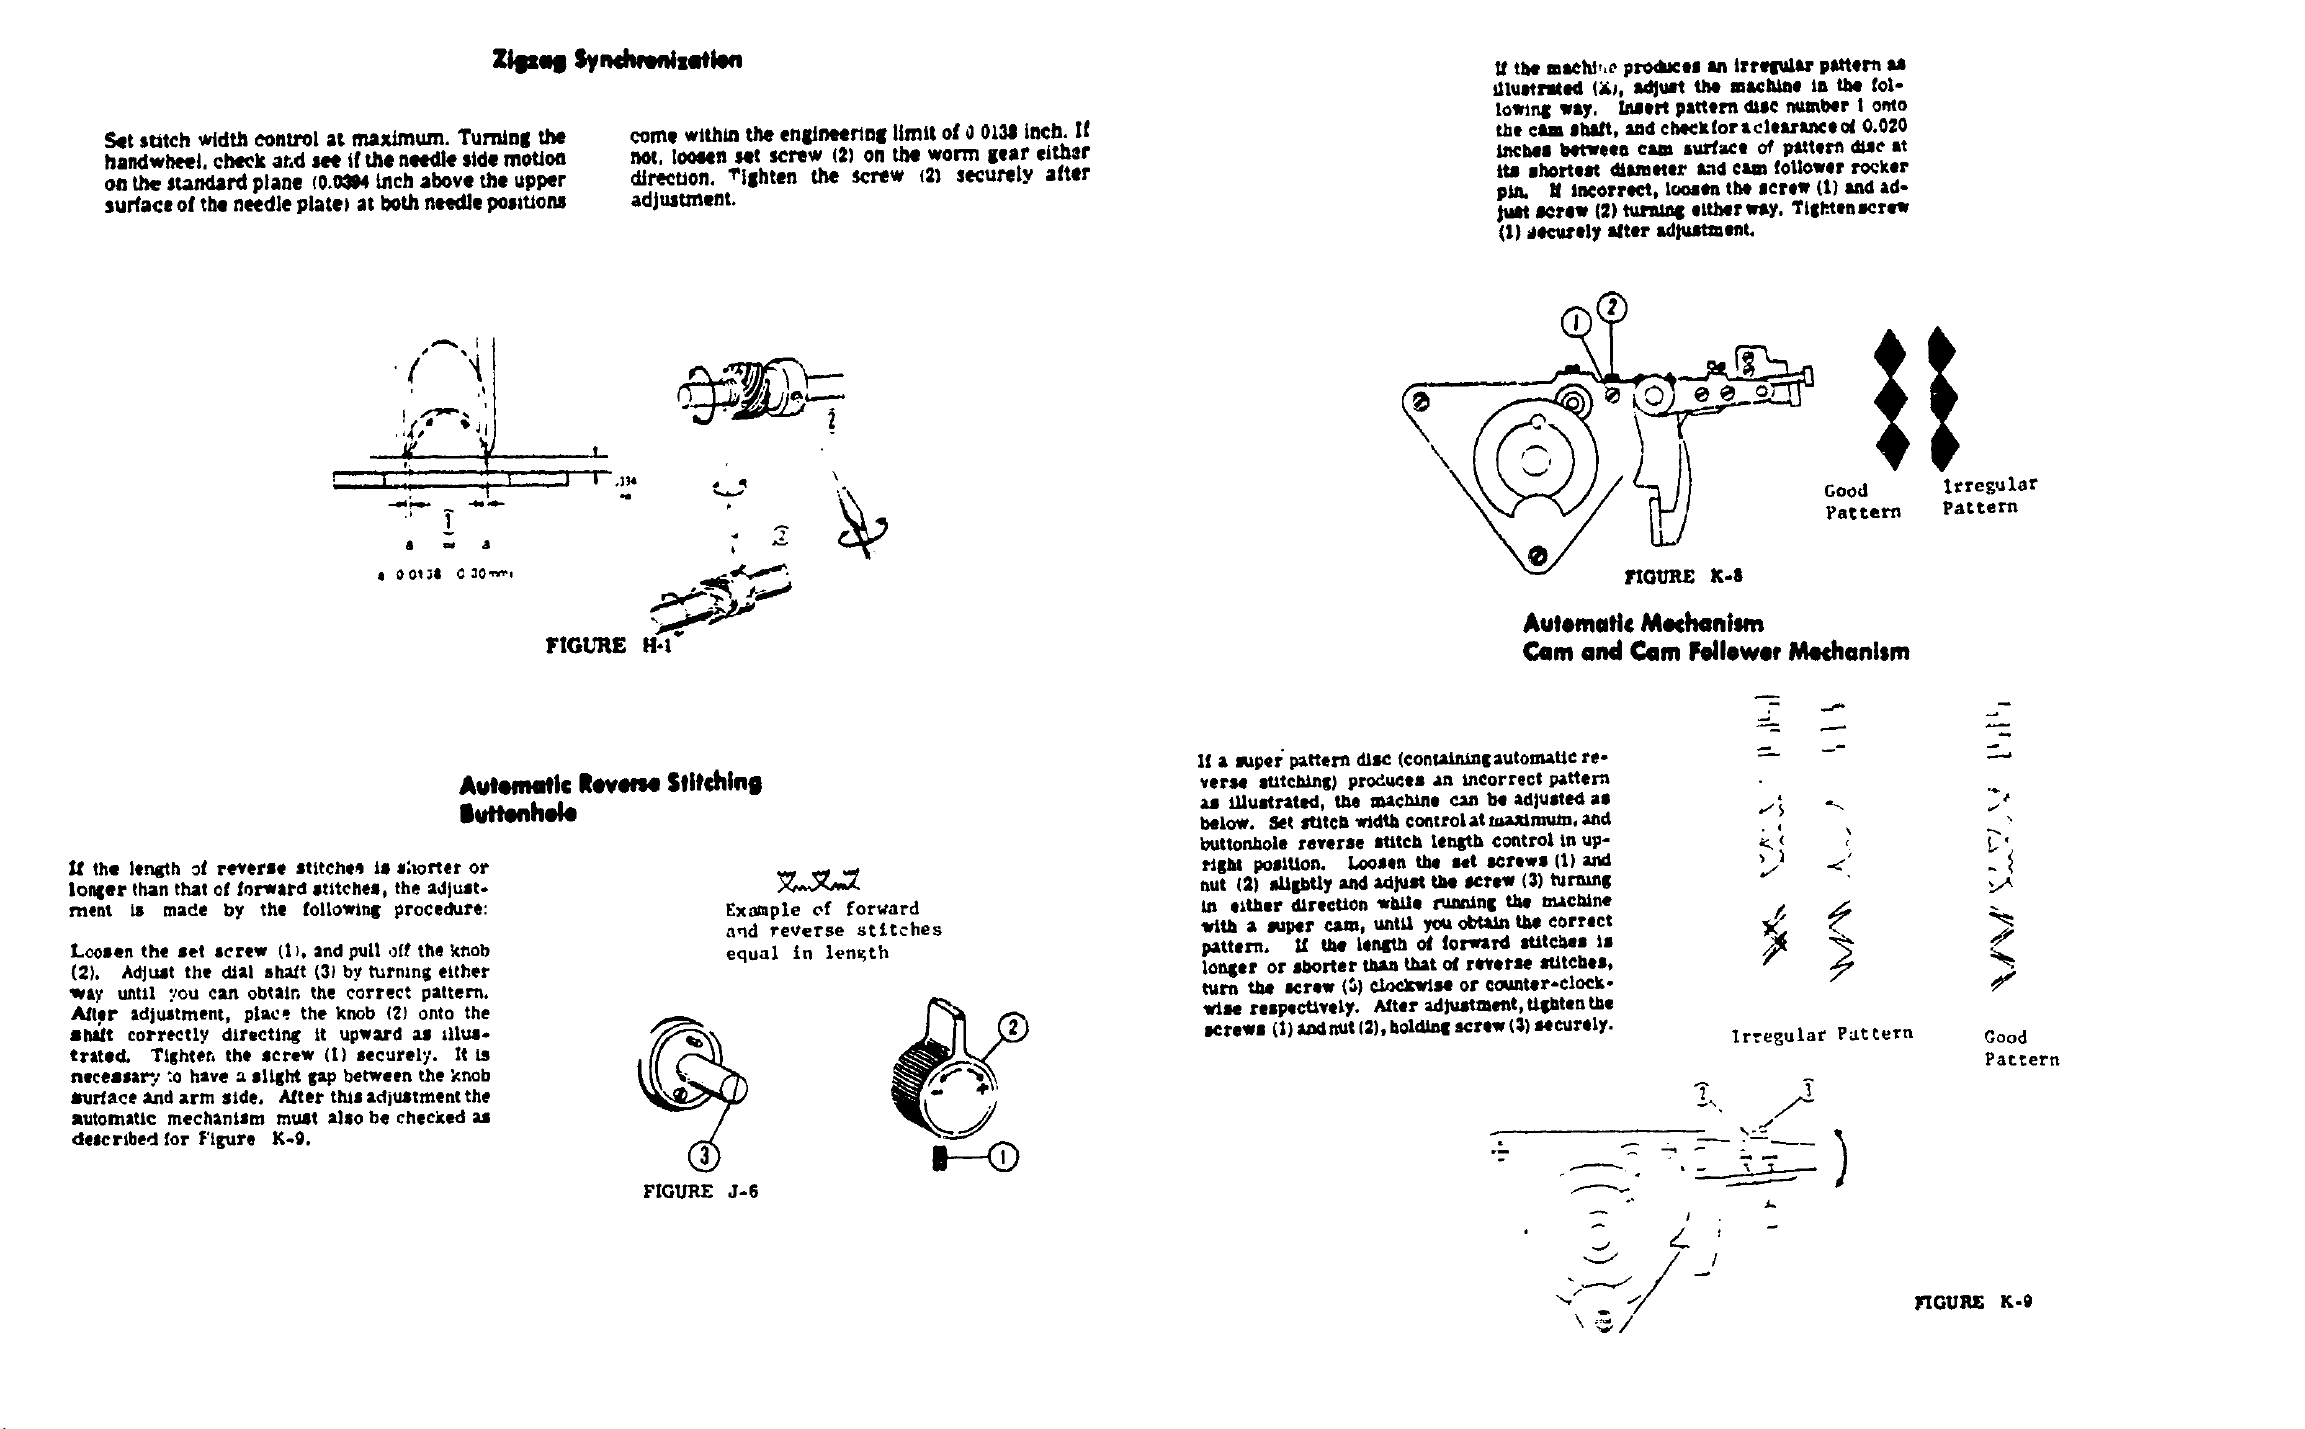
z eg Sy, h,,m eo
_t sutch width _nUrol at maximum. TumJn| the
ba.dwheel, check ar,d see if the needle side moUoa
on the standard plane (0,0_4 inch above the upper
surface of the needle plated at both needle poslUoM
come within the enirtneertng limit of 00t_l inch. If
n_, loQeen set screw (2) on the warm gear el_er
dJrecuon. "el|hten the screw _21 securely after
adjustment.
•('"!,
e. !
! i .... i
" _
• OOt3a _=O"r_l
.qB
#
\
Autemaflc Reverie Stitching
Iluttenhele
U the length of reverse atttche4 Ul aborter or
tonier than that of forward stitches, the :|dJuat-
merit is made by the tollowinK procedure:
LooJen the net screw (l), and pull off the _nob
(2), Adjust the dial shait (3) by t,.;rnmg either
wey u_tll you ¢_J1obtain the _orrect pattert_.
AJtpr ;dluJtment , pla_e the knob (2) onto the
s_ft correctly directln_ It upward as _ilus-
treted, Tlshter, the screw ([) securely. It ts
neceuar'/to have ; allllht Lap between the _nob
_rface xnd arm side. After tlua ad)ustnleot the
stutometic mecheniam tnuat also be checked U
de|cribed for Figure K-9.
FIGURE J-6
Ex;_ple of forward
and reverse stitches
equal in length
_f the mseht_,e produce| _n i_r_r pMtern U
dluotl'_ed (&_, adjust t_ m_l_e m the fol-
lowing way, IMert pattern d_ee member I onto
_be €',- Jl_fl, _d cMcXtor acle_ur_mte_ 0,020
_Ms betwees cam surface of I_ttern d_e at
_1 sMrtsst diameter _.'ld €_ foUower rocker
pJa. _ _oere<:t, loosen tl_ acte_ 1[) lind ;d-
emit IK_t(_ (21 tunU_ eithGr_y. Tl_hten_rew
(1) aecturely sdter adjusts;ant.
\
\
Good
Pat r.ern
Automatic Mechanism
Cam and Cam Foflewer Mechanism
• I \
./
Irre_ular Pattern
If a p,aper"l_ttern d_m (conf.tlnm|automttc re-
verse 8tttcl_dnlt)p_od_ea an tneorrect p_ttern
as _Uusfr'4¢ed, UIe m,tci_me¢Jmb4 adjusted as
below._t It_tcl_width€ontrol,ttma._mum,_r_d
buttor.hole reverse _11tcbte_b control in up-
ril_t poalUon. Loosen the Let screws (1) and
nut (21 _ktptly _1 _Nst t_e_rsw (3) turnml_
tn s_t_er cUrecUon _l_le _| the m,tcmne
with a super cam, u_t_t _ _ U_e _orrect
pattern. 1/ tl_e |en4llb o_ forward srbtc_ea JJ
IoniZer or _K)rter tJ_mthat of reverse _,titehes,
turn the _¢raw(_1€lqc.X_se ot (:mmter-clocJ;-
_e reapeoflvely. After _dN_tment, tlptent_a
_rewa (l) _mdnutf2),holdl,m_screw {$) _cure[y.
J.
I
J
\_/
Irregular
Pattet_
%
Good
Pattern
FtGUKE K-9