Loading ...
Loading ...
Loading ...
Electrical connection (non-Canada) 4-wire cord
- ELECTRICAL SHOCK HAZARD - Failure
to disconnect power source before servicing could result in
personal injuryor even death.
1. Turn off power supply to outlet.
2. Remove the screw securing the terminal block access cover in
the upper corner on the back of the dryer.
3. Install a UL-approved strain relief according to the power cord/
strain relief manufacturer's instructionsin the power cord entry
hole below the access panel. At this time, the strain relief should
be loosely in place.
4. Thread an UNPLUGGED,UL-approved, 30 amp. power cord,
NEMA 14-30 type STor SRDT,through the strain relief.
5. Disconnect the internal (WHITE)dryer harness ground wire from
the (GREEN)ground screw next to the terminal block.
6. Attach the ground (GREEN)power cord wire to the cabinet with
the ground (GREEN)screw. Tighten the screw securely.
7. Move the internal dryer harness ground (WHITE)wire to the
terminal block and attach it along with the neutral (WHITE)power
cord wire conductor to the center, SILVERcolored terminal on the
terminal block. Tighten the screw securely.
8. Attach the REDand BLACK power cord conductors to the outer,
BRASScolored terminals on the terminal block. Tighten both
screws securely.
- ELECTRICAL SHOCK HAZARD - Do not
make a sharp bend or crimp wiring/conductor at connections.
9. Follow manufacturer's guidelines for firmly securing the strain
relief and power cord.
10.Reinstall the terminal block cover.
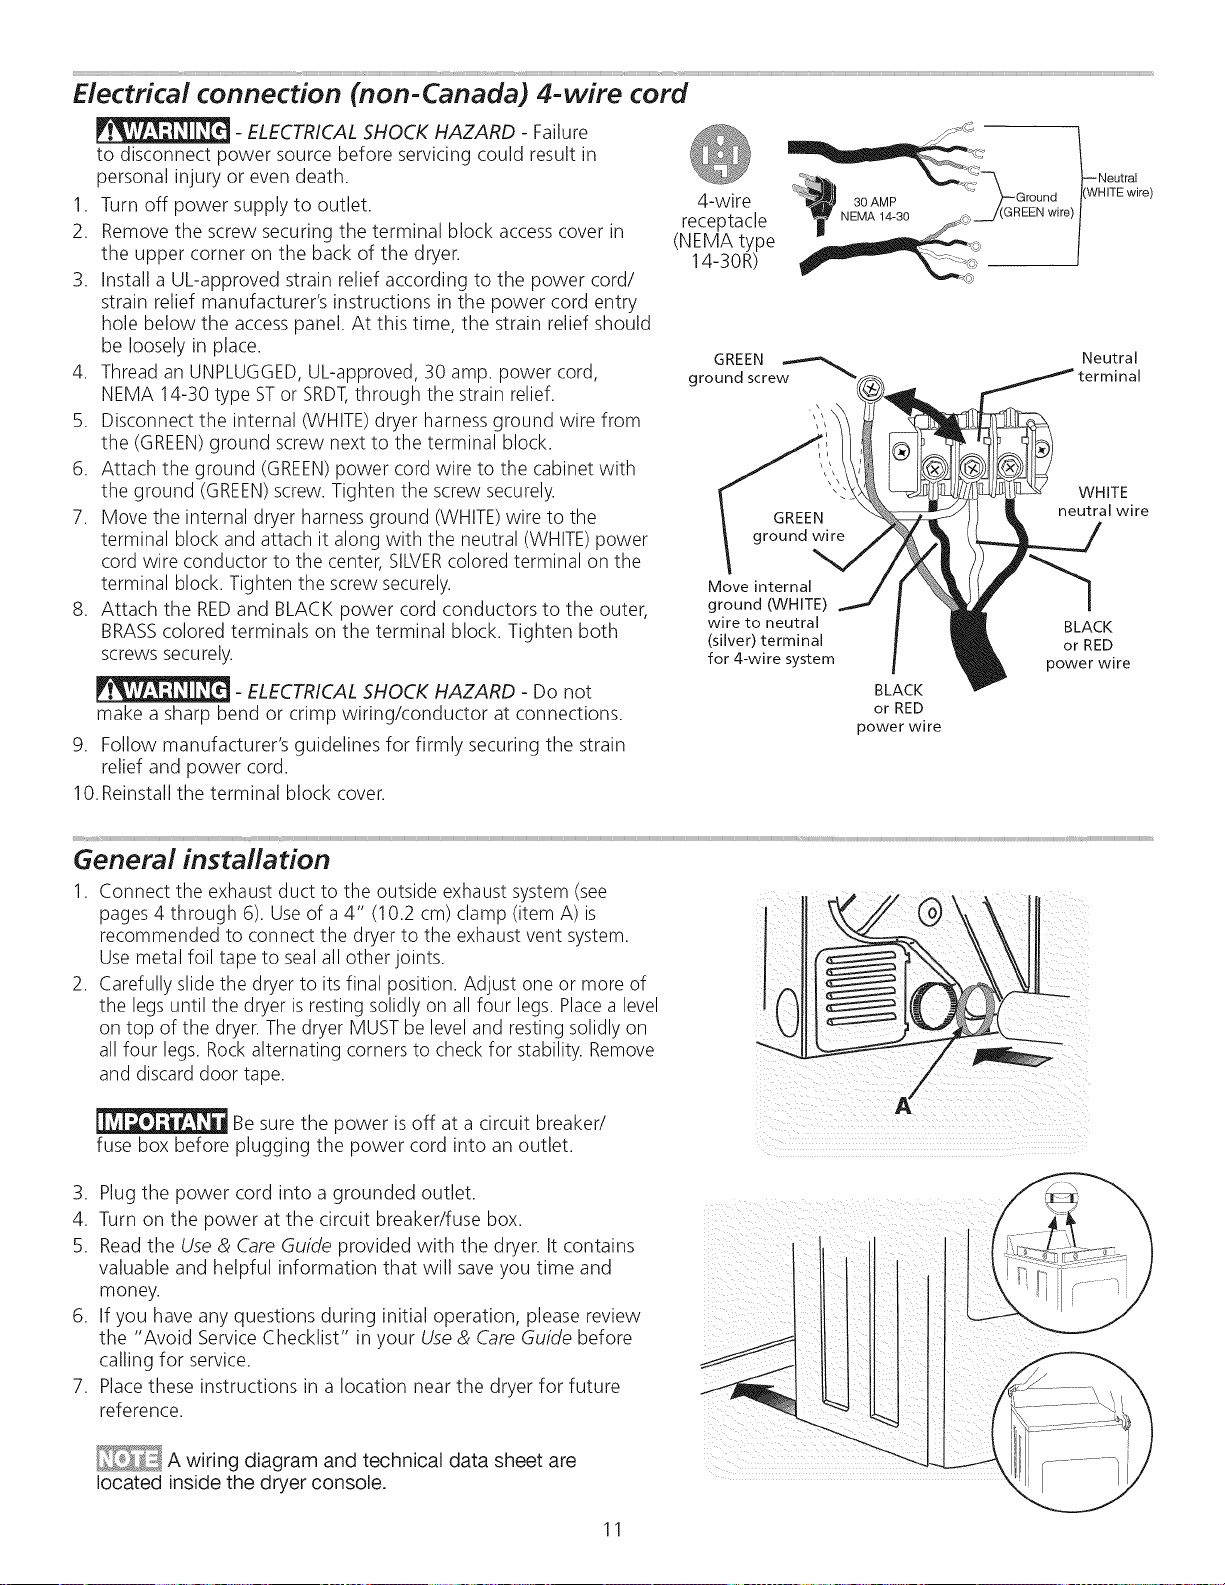
4-wire
receptacle
(NEMA type
14-30R)
--Neutral
{WHITE wire)
GREEN
ground screw
Neutral
GREEN
\
Move internal
ground (WHITE)
wire to neutral
(silver) terminal
for 4-wire system
BLACK
or RED
power wire
WHITE
neutral wire
BLACK
or RED
power wire
General installation
1. Connect the exhaust duct to the outside exhaust system (see
pages 4 through 6). Use of a 4" (10.2 cm) clamp (item A) is
recommended to connect the dryer to the exhaust vent system.
Use metal foil tape to seal all other joints.
2. Carefully slide the dryer to its final position. Adjust one or more of
the legs until the dryer isresting solidly on all four legs. Placea level
on top of the dryer. The dryer MUST be level and resting solidly on
all four legs. Rock alternating corners to check for stability. Remove
and discard door tape.
0
Be sure the power isoff at a circuit breaker/
fuse box before plugging the power cord into an outlet.
3. Plug the power cord into a grounded outlet.
4. Turn on the power at the circuit breaker/fuse box.
5. Readthe Use & Care Guide provided with the dryer. It contains ...........
valuable and helpful information that will save you time and
money.
6. If you have any questions during initial operation, please review
the "Avoid Service Checklist" in your Use & Care Guide before
calling for service.
7. Placethese instructions in a location near the dryer for future
reference.
_ _ A
wiring diagram and technical data sheet are
located inside the dryer console.
11
Loading ...
Loading ...
Loading ...