TECHNOLOGIE FÜR DEN HAUSHALT
TECHNOLOGY FOR DOMESTIC USE
Bedienungsanleitung
Instruction Manual
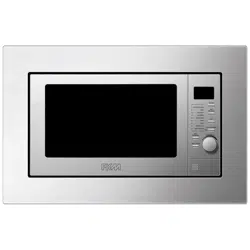
Einbau-Backofen
Built-In Oven
EBO9.4
Deutsch
Seite
2
English
Page
36
www.pkm-online.de

2
Sehr geehrter Kunde! Sehr geehrte Kundin! Wir möchten Ihnen herzlich danken, dass
Sie sich zum Erwerb eines Produkts aus unserem reichhaltigen Angebot entschieden
haben. Lesen Sie die gesamte Bedienungsanleitung, bevor Sie das Gerät zum ersten Mal
benutzen. Verwahren Sie diese Bedienungsanleitung zur zukünftigen Verwendung an
einem sicheren Ort. Falls Sie das Gerät weitergeben, müssen Sie diese
Bedienungsanleitung ebenfalls mit übergeben.
Inhalt
1. Sicherheitshinweise ........................................................................................................ 4
2. Installation ...................................................................................................................... 8
2.1 Entpacken und Wahl des Standorts ....................................................................... 8
2.2 Einbau des Backofens ............................................................................................. 8
2.3 Elektrischer Anschluss .......................................................................................... 11
3. Bedienung ..................................................................................................................... 11
3.1 Vor der ersten Benutzung ..................................................................................... 12
3.2 Gerät / Bedienfeld / Display ............................................................................... 13
3.2.1 Gerät / Vorderansicht ........................................................................................ 13
3.2.2 Gerät / Innenansicht .......................................................................................... 14
3.2.3 Bedienfeld ............................................................................................................ 14
3.2.4 Display.................................................................................................................. 15
3.3 Benutzung des Backofens ..................................................................................... 16
3.3.1 Allgemeine Bedienung des Backofens ............................................................. 17
3.3.2 Manueller Betriebsmodus .................................................................................. 18
3.3.3 Einstellung der Uhrzeit ...................................................................................... 18
3.4 Programmierung des Backofens .......................................................................... 19
3.4.1 Timer .................................................................................................................... 19
3.4.2 Halb-automatische Koch- / Backfunktion ...................................................... 20
3.4.3 Ende der Koch- / Backzeit einstellen .............................................................. 21
3.4.4 Automatische Koch- / Backfunktion............................................................... 22
3.4.5 Löschen der Programmierungen ...................................................................... 24
3.4.6 Auswahl des akustischen Signals ....................................................................... 25

3
3.4.7 Ändern der aktuellen Uhrzeit ............................................................................ 26
3.5 Backofenfunktionen .............................................................................................. 26
4. Hinweise für das Kochen ............................................................................................ 28
4.1 Tipps zum Backen und Braten ............................................................................. 28
4.2 Energie sparen ........................................................................................................ 29
5. Reinigung und Pflege .................................................................................................. 29
5.1 Austausch des Leuchtmittels ................................................................................ 30
4.2 Entnahme der Seitenführungen ........................................................................... 30
4.3 Entnahme der Ofentür ......................................................................................... 31
5.4 Problembehandlung .............................................................................................. 32
6. Technische Daten ........................................................................................................ 33
7. Entsorgung ................................................................................................................... 34
8. Garantiebedingungen .................................................................................................. 35
EG - Konformitätserklärung
Die in dieser Bedienungsanleitung beschriebenen Produkte entsprechen sämtlichen
harmonisierten Anforderungen.
Die relevanten Unterlagen können durch die zuständigen Behörden über den
Produktverkäufer angefordert werden.
Die in dieser Bedienungsanleitung enthaltenen Abbildungen können in einigen
Details von dem tatsächlichen Design Ihres Geräts abweichen. Folgen Sie in einem
solchen Fall dennoch den beschriebenen Sachverhalten. Lieferung ohne Inhalt.
Der Hersteller behält sich das Recht vor, solche Änderungen vorzunehmen, die
keinen Einfluss auf die Funktionsweise des Geräts haben.
Entsorgen Sie das Verpackungsmaterial entsprechend den örtlichen Vorschriften
Ihres Wohnorts.
Das von Ihnen gekaufte Gerät wurde möglicherweise inzwischen verbessert und
weist somit vielleicht Unterschiede zur Bedienungsanleitung auf. Dennoch sind die
Funktionen und Betriebsbedingungen identisch, sodass Sie die Bedienungsanleitung
im vollen Umfang nutzen können.
Technische Änderungen bzw. Druckfehler bleiben vorbehalten.
4
1. Sicherheitshinweise
Lesen Sie vor der ersten Benutzung des Geräts die gesamten Sicherheitshinweise
gründlich durch. Die darin enthaltenen Informationen dienen dem Schutz Ihrer
Gesundheit. Die Nichtbeachtung der Sicherheitshinweise kann zu schweren
Beeinträchtigungen Ihrer Gesundheit und im schlimmsten Fall zum Tod führen.
GEFAHR! verweist auf eine
Gefahrensituation, die, wenn sie nicht
abgewendet wird, eine unmittelbare
Gefährdung für Leben und Gesundheit
zur Folge hat.
WARNUNG! verweist auf eine
Gefahrensituation, die, wenn sie nicht
abgewendet wird, eine mögliche
bevorstehende Gefährdung für Leben
und Gesundheit zur Folge hat.
VORSICHT! verweist auf eine
Gefahrensituation, die, wenn sie nicht
abgewendet wird, zu mittelschweren
oder kleineren Verletzungen führen
kann.
HINWEIS! verweist auf eine
Gefahrensituation, die, wenn sie nicht
abgewendet wird, eine mögliche
Beschädigung des Geräts zur Folge hat.
Bewahren Sie diese Bedienungsanleitung so auf, dass sie bei Bedarf jederzeit
griffbereit ist. Befolgen Sie sorgfältig alle Hinweise, um Unfälle oder eine
Beschädigung des Geräts zu vermeiden.
Prüfen Sie auf jeden Fall auch das technische Umfeld des Geräts! Sind alle
Kabel oder Leitungen, die zu ihrem Gerät führen, in Ordnung? Oder sind sie
veraltet und halten der Geräteleistung nicht mehr Stand? Daher muss durch
eine qualifizierte Fachkraft (Elektrotechniker/-in) eine Überprüfung
bereits vorhandener wie auch neuer Anschlüsse erfolgen. Sämtliche Arbeiten,
die zum Anschluss des Geräts an die Stromversorgung notwendig sind, dürfen
nur von einer qualifizierten Fachkraft (Elektrotechniker/-in)
durchgeführt werden.
Das Gerät ist ausschließlich zur privaten Nutzung bestimmt.
Das Gerät ist ausschließlich zum Kochen in einem Privathaushalt bestimmt.
Das Gerät ist ausschließlich zum Betrieb innerhalb geschlossener Räume
bestimmt.
Dieses Gerät darf nicht für gewerbliche Zwecke, beim Camping und in
öffentlichen Verkehrsmitteln betrieben werden.
Betreiben Sie das Gerät ausschließlich im Sinne seiner bestimmungsgemäßen
Verwendung.
Erlauben Sie niemandem, der mit der Bedienungsanleitung nicht vertraut ist,
das Gerät zu benutzen.
5
Dieses Gerät kann von Kindern ab 8 Jahren und darüber sowie von Personen
mit verringerten physischen, sensorischen oder mentalen Fähigkeiten oder
Mangel an Erfahrung und Wissen benutzt werden, wenn sie beaufsichtigt oder
bezüglich des sicheren Gebrauchs des Gerätes unterwiesen wurden und die
daraus resultierenden Gefahren verstehen. Kinder dürfen nicht mit dem Gerät
spielen. Reinigung und Benutzer-Wartung dürfen nicht von Kindern ohne
Beaufsichtigung durchgeführt werden.
GEFAHR!
1. Das Gerät darf nur durch eine qualifizierte Fachkraft (Elektrotechniker/-in) an die
Stromversorgung angeschlossen werden, welche die landesüblichen gesetzlichen
Verordnungen und die Zusatzvorschriften der örtlichen
Stromversorgungsunternehmen genau kennt und sorgfältig beachtet.
2. Alle elektrischen Arbeiten müssen von einer qualifizierten Fachkraft
(Elektrotechniker/-in) durchgeführt werden. Es dürfen keine Änderungen oder
willkürlichen Veränderungen an der Stromversorgung durchgeführt werden. Der
Anschluss muss in Übereinstimmung mit den örtlich geltenden gesetzlichen
Bestimmungen erfolgen.
3. Schließen Sie das Gerät keinesfalls an die Stromversorgung an, wenn das Gerät, das
Netzkabel oder der Netzstecker sichtbare Beschädigungen aufweisen.
4. Versuchen Sie niemals selbst, das Gerät zu reparieren. Reparaturen, die von dazu
nicht qualifizierten Personen durchgeführt werden, können zu ernsthaften
Verletzungen und Schäden führen. Falls Ihr Gerät nicht ordnungsgemäß
funktioniert, kontaktieren Sie das Geschäft, in dem Sie das Gerät erworben haben.
Lassen Sie nur Original-Ersatzteile einbauen.
5. Wenn das Netzanschlusskabel beschädigt ist, darf es ausschließlich vom Hersteller
oder einem vom Hersteller autorisierten Kundendienst oder einer qualifizierten
Fachkraft (Elektrotechniker/-in) ausgetauscht werden.
WARNUNG!
1. Trennen Sie das Gerät von der Stromversorgung, bevor Sie irgendwelche
Reinigungs- oder Wartungsarbeiten an dem Gerät vornehmen.
2. Das Gerät muss immer entsprechen den Anforderungen der jeweiligen
Stromversorgung geerdet werden. Der Hauptstromkreislauf muss über eine
eingebaute Sicherheitsabschaltung verfügen.

6
3. Sämtliche Arbeiten, die zum Anschluss des Geräts an die Stromversorgung
notwendig sind, dürfen nur von einer qualifizierten Fachkraft
(Elektrotechniker/-in) durchgeführt werden.
4. Sollte es zu irgendeiner Fehlfunktion aufgrund eines technischen Defekts kommen,
trennen Sie das Gerät umgehend von der Stromversorgung (entsprechende
Haussicherung abschalten). Melden Sie die Fehlfunktion ihrem Kundendienst, damit
diese umgehend behoben werden kann.
5. Verwenden Sie zum Anschluss des Geräts keine Adapter, Steckdosenleisten oder
Verlängerungskabel- BRANDGEFAHR!
6. Nehmen Sie keine Veränderungen an dem Gerät vor.
7. Der Küchenraum muss trocken und gut zu belüften sein. Wenn das Gerät aufgebaut
wird, müssen alle Kontroll- und Bedienelemente gut zugänglich sein.
8. Die Furnierungen von Schränken müssen mit einem hitzeresistenen Leim befestigt
sein, der Temperaturen von 120
0
C widersteht.
9. Angrenzende Möbelstücke und alle zur Installation verwendeten Materialien müssen
mindestens einer Temperatur von 85
0
C über der Raumtemperatur des Raums, in
dem das Gerät installiert ist, während des Betriebs des Geräts widerstehen können.
10. Entfernen Sie die Rückwand des Umbaumöbels, um eine adäquate Belüftung um das
Gerät herum zu gewährleisten. Das Gerät muss an seiner Rückseite über einen
Freiraum von mindestens 45 mm verfügen.
11. Schließen Sie das Gerät nicht in Räumen oder an Orten an, in denen oder in deren
Umgebung sich brennbare Materialien wie Benzin, Gas oder Farben befinden.
Dieser Warnhinweis bezieht sich auch auf die Dämpfe, die durch diese Materialien
freigesetzt werden.
12. Dunstabzugshauben müssen entsprechend den Anweisungen ihrer Hersteller
angebracht werden.
13. Benutzen Sie das Gerät nicht zum Heizen oder zum Trocknen von Wäsche.
14. Schließen Sie das Gerät nicht in der Nähe von Vorhängen oder Polstermöbeln an.
BRANDGEFAHR.
15. Lagern Sie keine Gegenstände im Ofen. BRANDGEFAHR!
16. Haushaltsausstattungen sowie elektrische Leitungen aller Art dürfen niemals das
Gerät berühren, da deren Isolierungsmaterial durch hohe Temperaturen beschädigt
oder zerstört wird.
17. Benutzen Sie niemals einen Dampfreiniger zum Reinigen des Geräts. Der Dampf
kann die Elektrik des Geräts nachhaltig beschädigen. STROMSCHLAGGEFAHR.
18. Die zugänglichen Bereiche und Teile des Ofens werden bei der Benutzung sehr heiß.
Kinder müssen deshalb während der Benutzung des Geräts von diesem ferngehalten
werden. Das Gerät während seines Betriebs zu berühren, kann zu schweren
Verbrennungen führen.
19. Kinder dürfen nicht mit dem Gerät spielen.

7
20. Beaufsichtigen Sie Kinder stets, wenn diese sich in der Nähe des Geräts aufhalten.
VORSICHT!
1. Das Gerät wird während des Betriebs heiß. Berühren Sie nicht die heißen Teile
innerhalb des Ofens.
2. Benutzen Sie keine aggressiven oder ätzenden Reinigungsmittel und keine
scharfkantigen Gegenstände zum Reinigen der Tür, da diese die Oberfläche
verkratzen und somit Risse im Glas verursachen.
3. Stellen oder legen Sie kein Kochgeschirr und keine Backbleche direkt auf den Boden
des Ofeninnenraums. Decken Sie den Boden des Ofeninnenraums nicht mit
Aluminiumfolie ab.
4. Halten Sie die Backofentür beim Betrieb des Backofens immer geschlossen.
5. Stellen Sie kein Kochgeschirr direkt auf den Boden des Backofens. Nutzen Sie statt
dessen das Backblech oder den Rost.
6. Seien Sie vorsichtig, wenn Sie die Backofentür öffnen. Kommen Sie nicht in Kontakt
mit den heißen Bereichen oder mit dem Dampf, der aus dem geöffneten Backofen
entweicht.
7. Benutzen Sie stets Ofenhandschuhe.
8. Das Gerät entspricht der gegenwärtigen europäischen Sicherheitsgesetzgebung. Wir
möchten hierbei aber ausdrücklich betonen, dass diese Entsprechung nichts an der
Tatsache ändert, dass die Oberflächen des Geräts während der Benutzung heiß
werden und nach dem Ende der Benutzung noch Restwärme ausstrahlen.
HINWEIS!
1. Wenn Sie das Gerät bewegen, halten Sie es immer am unteren Ende fest und heben
Sie es vorsichtig an. Halten Sie das Gerät dabei aufrecht.
2. Benutzen Sie niemals die Tür selbst zum Transport des Geräts, da Sie dadurch die
Scharniere beschädigen.
3. Das Gerät muss von mindestens zwei Personen transportiert und angeschlossen
werden.
4. Merken Sie sich die Positionen aller Teile des Geräts, wenn Sie es auspacken, für den
Fall, es noch einmal einpacken und transportieren zu müssen.
5. Benutzen Sie das Gerät nicht, bevor alle dazugehörigen Teile sich ordnungsgemäß
an ihren dafür vorgesehenen Stellen befinden.
6. Benutzen Sie den Boden, die Schubladen, die Türen etc. des Geräts niemals als
Standfläche oder Stütze.
7. Die Belüftungsöffnungen des Geräts oder dessen Einbauvorrichtung (falls Ihr Gerät
für einen Einbau geeignet ist) müssen immer frei und unbedeckt sein.

8
8. Stellen oder legen Sie keine schweren Gegenstände auf die geöffnete Ofentür und
lehnen Sie sich nicht an die geöffnete Ofentür.. Dadurch beschädigen Sie die
Türscharniere.
2. Installation
2.1 Entpacken und Wahl des Standorts
1. Packen Sie das Gerät vorsichtig aus. Beachten Sie unbedingt die Hinweise zur
Entsorgung des Geräts in dieser Bedienungsanleitung.
2. Das Gerät ist möglicherweise für den Transport mit Transportsicherungen
geschützt. Entfernen Sie diese komplett. Benutzen Sie keine aggressiven
Reinigungsmittel, um Reste der Transportsicherungen zu entfernen.
3. Überprüfen Sie vor dem Anschluss des Geräts, ob das Netzanschlusskabel oder das
Gerät selbst keine Beschädigungen aufweisen.
4. Stellen Sie das Gerät nicht an einem Ort auf, an dem es mit Wasser oder Regen in
Kontakt kommen kann, damit die Isolierungen der Elektrik keinen Schaden nehmen.
5. Stellen Sie das Gerät auf einem geraden, trockenen und festen Untergrund auf.
Kontrollieren Sie mit einer Wasserwaage den ordnungsgemäßen Aufbau Ihres
Geräts.
6. Entfernen Sie vor Inbetriebnahme sämtliches Verpackungsmaterial innerhalb und
Außerhalb des Ofens.
7. Das Typenschild befindet sich im Inneren des Geräts oder außen an der Rückwand.
2.2 Einbau des Backofens
GEFAHR!
Das Gerät darf nur durch eine qualifizierte Fachkraft (Elektrotechniker/-
in) an die Stromversorgung angeschlossen werden, welche die
landesüblichen gesetzlichen Verordnungen und die Zusatzvorschriften
der örtlichen Stromversorgungsunternehmen genau kennt und sorgfältig
beachtet.
Alle elektrischen Arbeiten müssen von einer qualifizierten Fachkraft
(Elektrotechniker/-in) durchgeführt werden. Es dürfen keine Änderungen
oder willkürlichen Veränderungen an der Stromversorgung durchgeführt
werden. Der Anschluss muss in Übereinstimmung mit den örtlich
geltenden gesetzlichen Bestimmungen erfolgen.
1. Die Öffnung des Umbauschranks muss über die auf Abbildung 1 genannten
Abmessungen verfügen. Passen Sie das Gerät in die Öffnung ein.

9
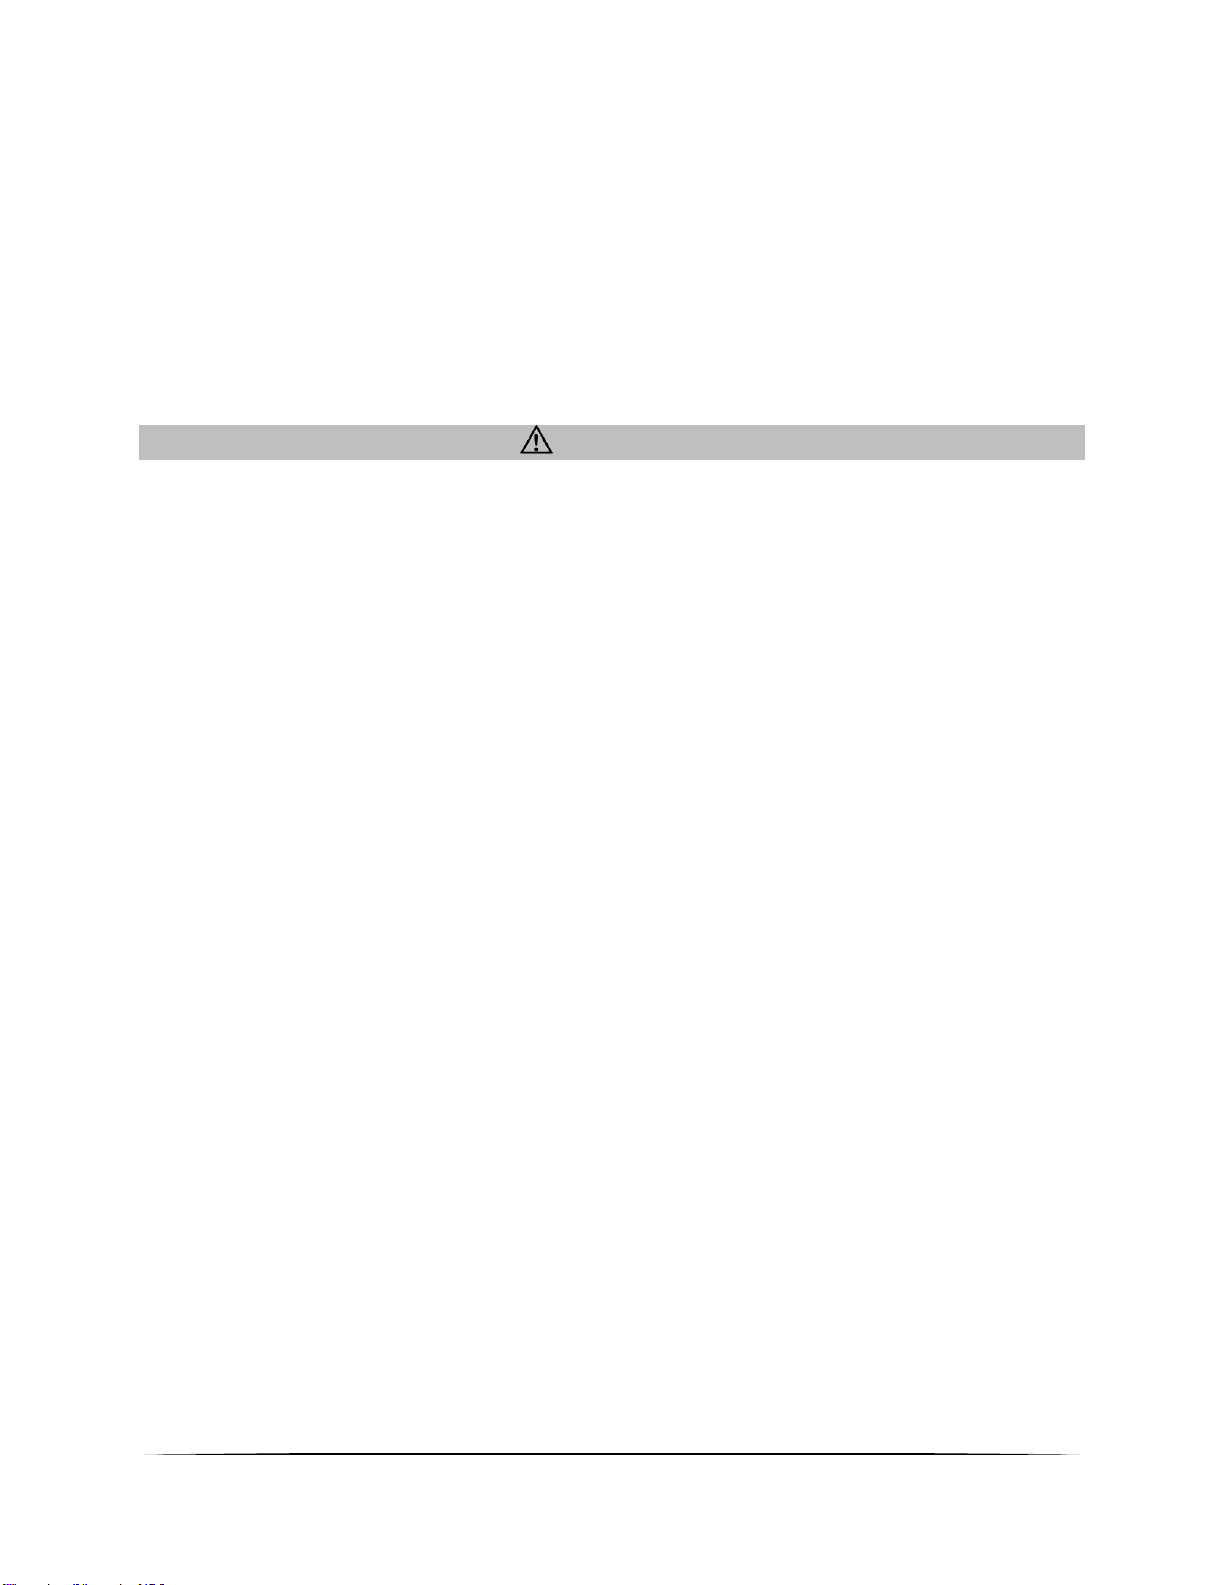
2. Öffnen Sie die Ofentür und entfernen sie die Gummikappen der zwei Schrauben an
der Seite des Ofenrahmens.
3. Befestigen Sie den Ofen mit den zwei Schrauben, die in die Löcher am Ofenrahmen
passen, am Umbauschrank.
4. Bringen Sie nach dem Einpassen des Ofens die Gummikappen wieder an.

10
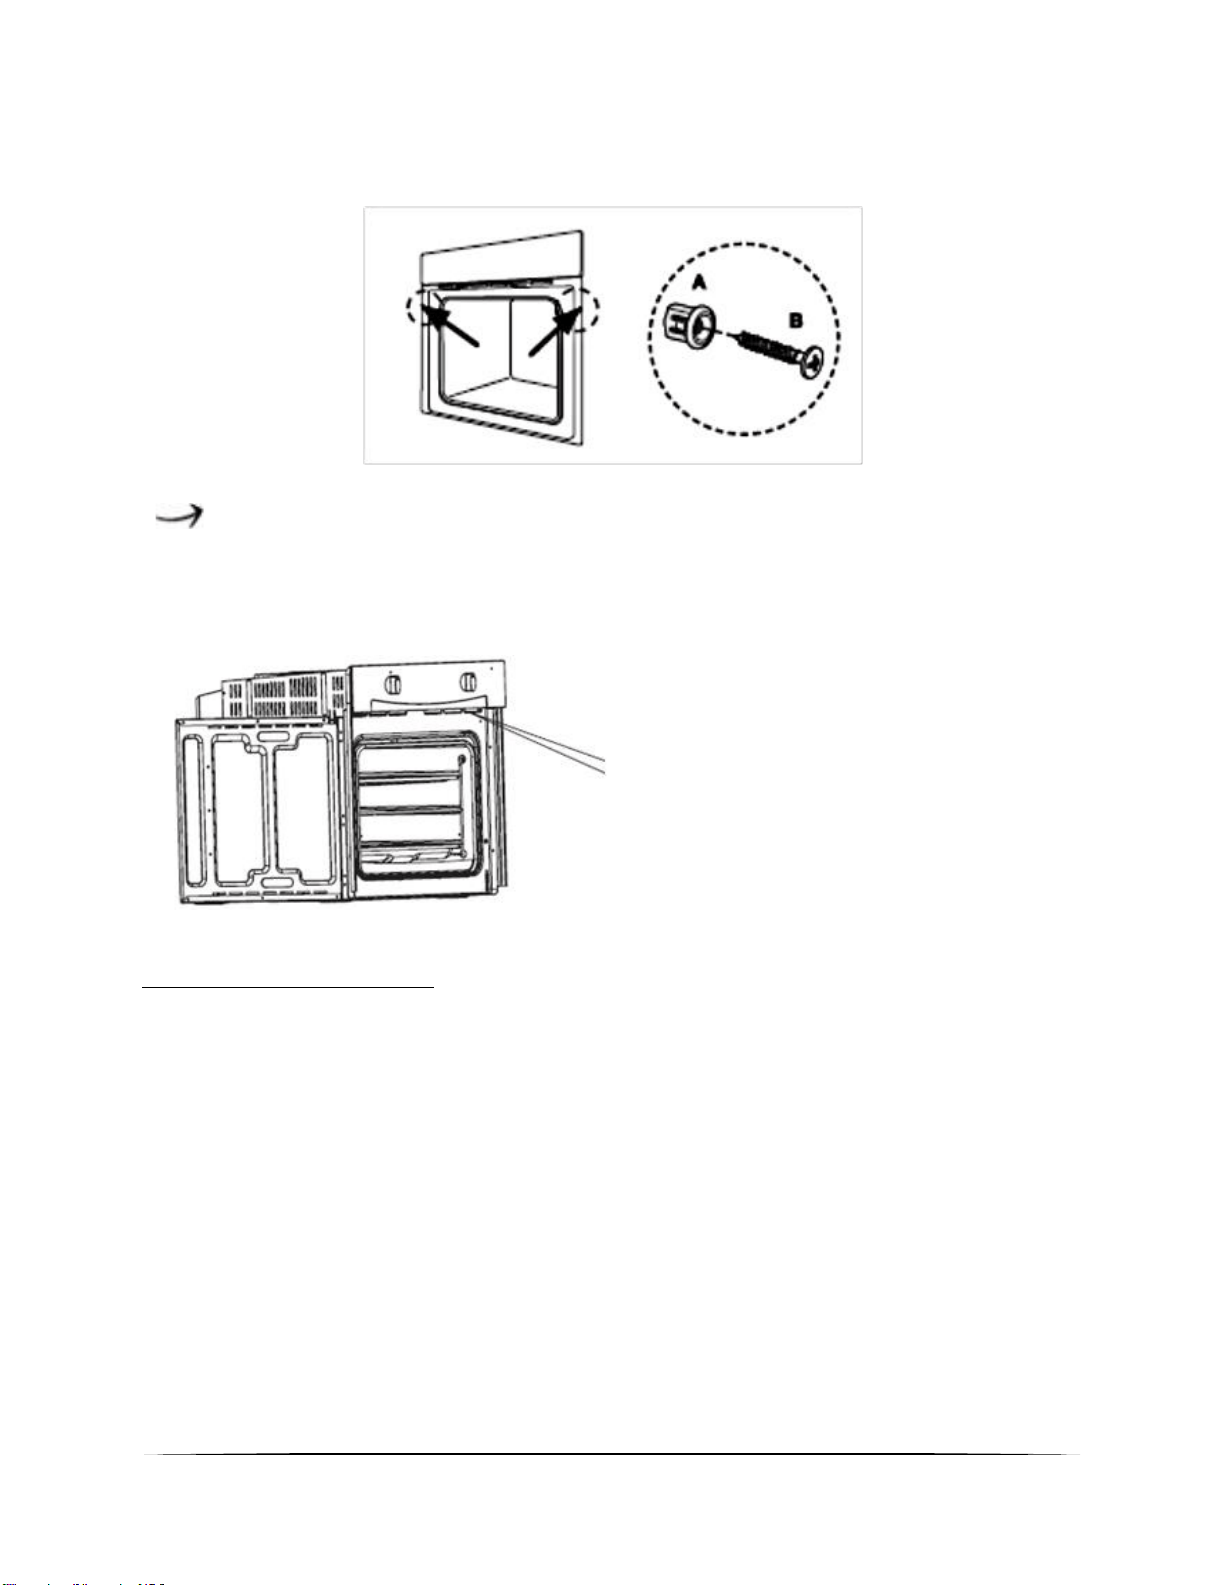
Abb. 1
Ventilationsöffnungen
Nach Beendigung des Kochens/Backens weist die Backröhre eine Temperatur von über
70
0
C auf. Die Ventilationsöffnungen arbeiten noch für 15 Minuten nach dem
Abschalten des Geräts.
11
Ventilationsöffnungen
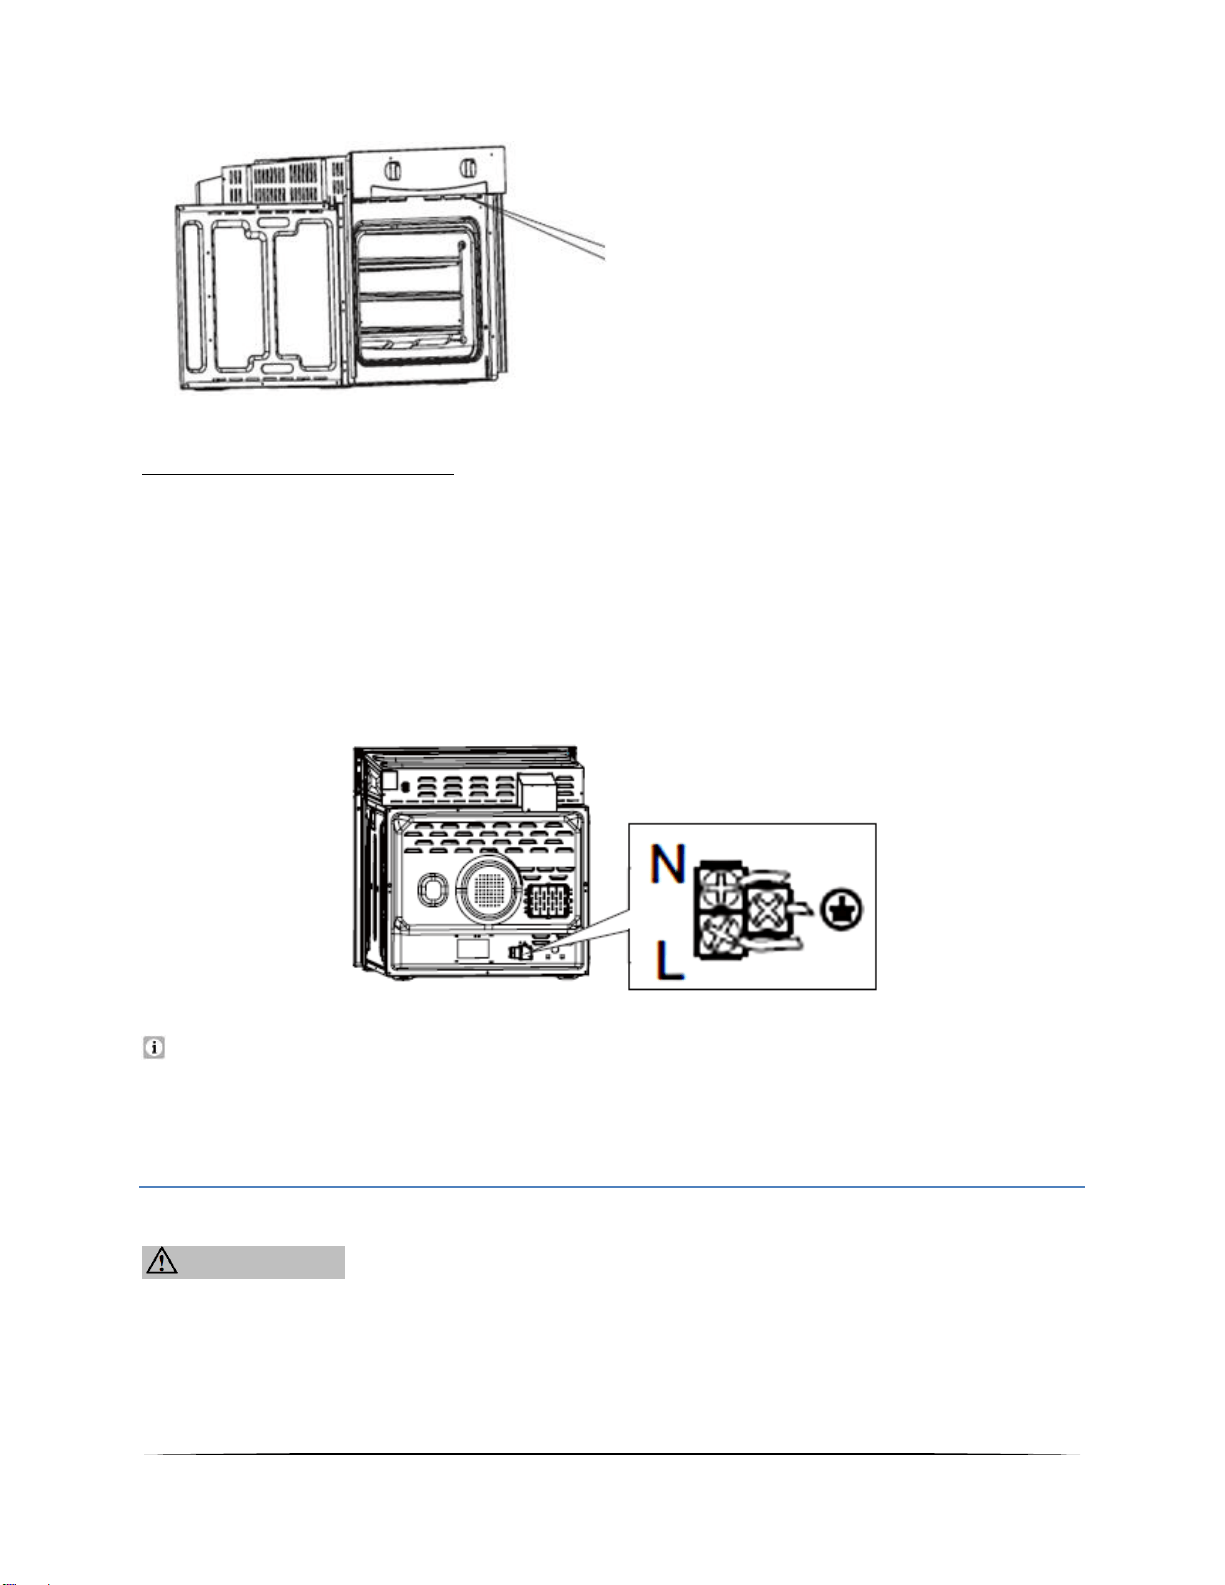
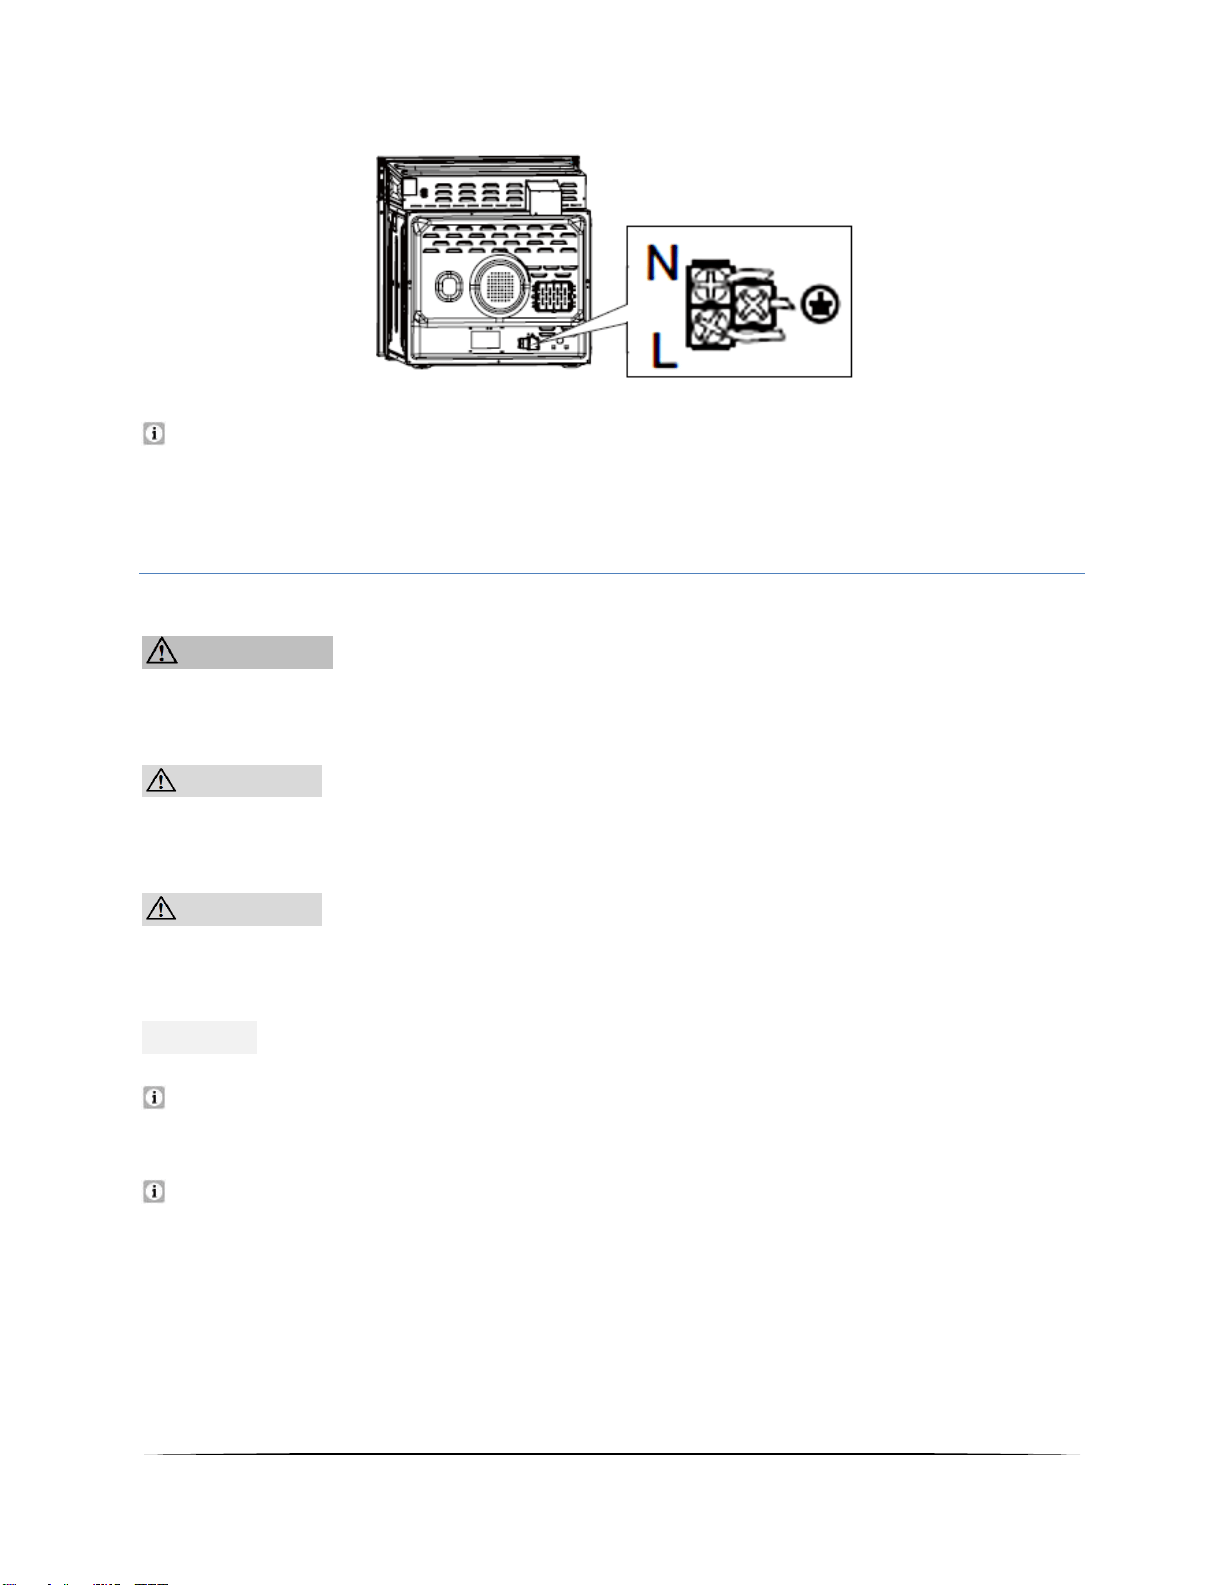
2.3 Elektrischer Anschluss
Hinweis für die qualifizierten Fachkraft (Elektrotechniker/-in)
Das Gerät wurde zum Anschluss an eine 230V-50Hz Stromversorgung entwickelt. Die
Gesamtleistungsaufnahme beträgt 2300W. Das Netzanschlusskabel muss über eine
Querschnitt von mindestens 1,5 mm
2
verfügen. Die direkte Verbindung zur
Energieversorgung muss über einen zweipoligen Schalter mit einer Belastbarkeit von
250V, 20A verfügen. Der Schalter darf an keiner Stelle das gelb-grüne Erdkabel trennen.
Nach der Installation und dem Anschluss muss das Netzanschlusskabel so verlegt
sein, dass es an keiner Stelle einen Hochtemperaturbereich berühren kann.
3. Bedienung
WARNUNG! Während des Betriebs können zugängliche Teile des
Gerätes heiß werden. Berühren Sie die heißen Bereiche nicht und halten Sie
Kinder vom Gerät fern. VERBRENNUNGSGEFAHR!

12
VORSICHT! Die inneren Bestandteile des Gerätes werden sehr heiß.
Berühren Sie keine dieser Bereiche, während Sie mit Ihrem Essgeschirr /
Kochgeschirr umgehen. VERBRENNUNGSGEFAHR!
VORSICHT! Kochutensilien können aufgrund der durch die Lebensmittel
weitergeleitete Hitze heiß werden. Verwenden Sie immer Topflappen oder
Backofenhandschuhe zum Umgang mit Ihrem Essgeschirr / Kochgeschirr.
HINWEIS! Verwenden Sie ausschließlich geeignetes und feuerfestes
Essgeschirr / Kochgeschirr.
Lesen Sie die komplette Bedienungsanleitung, bevor Sie das Gerät erstmalig
in Betreib nehmen. Beachten Sie hierbei besonders die Sicherheits- und
Warnhinweise!
Entfernen Sie alle Schutzfolien, die sich noch an dem Gerät befinden können.
3.1 Vor der ersten Benutzung
1. Entfernen Sie sämtliche Verpackungsmaterialien.
2. Reinigen Sie den Backofeninnenraum von dem aufgetragenen Schutzmittel.
3. Nehmen Sie die Ausstattungselemente heraus (Blech etc.) und reinigen Sie diese mit
warmem Wasser und etwas Spülmittel.
4. Schalten Sie die Raumbelüftung ein oder öffnen Sie das Fenster.
5. Lassen Sie den Backofen auf 250
0
C für 30 Minuten laufen. Entfernen Sie
anschließend Verunreinigungen und säubern Sie den Innenraum. Hierbei kann es für
etwa 15 Minuten zu einer leichten Rauchentwicklung und zur Freisetzung von
Geruch kommen. Dies ist ein normaler Betriebsvorgang, der durch eine
Schutzimprägnierung gegen Korrosionsschäden während des Transports verursacht
wird.
HINWEIS! Reinigen Sie den Innenraum des Backofens nur mit etwas
warmem Wasser und Spülmittel.

13
3.2 Gerät / Bedienfeld / Display
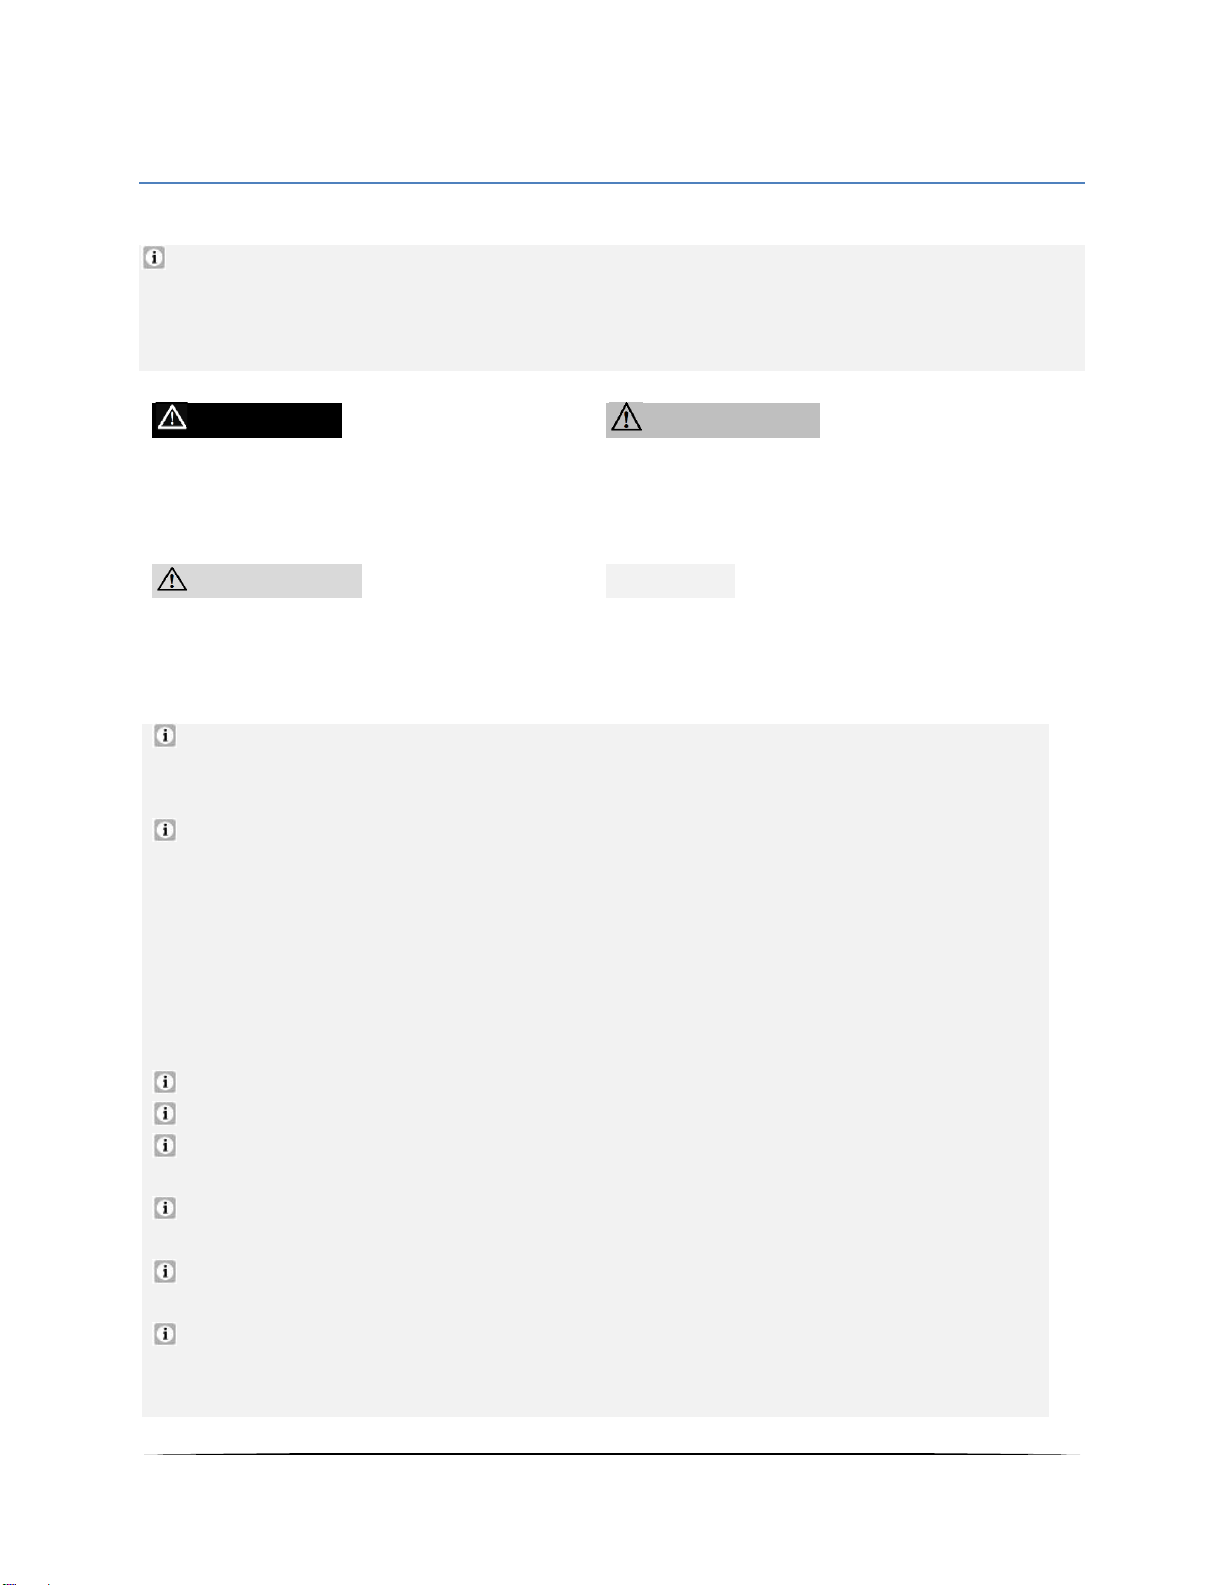
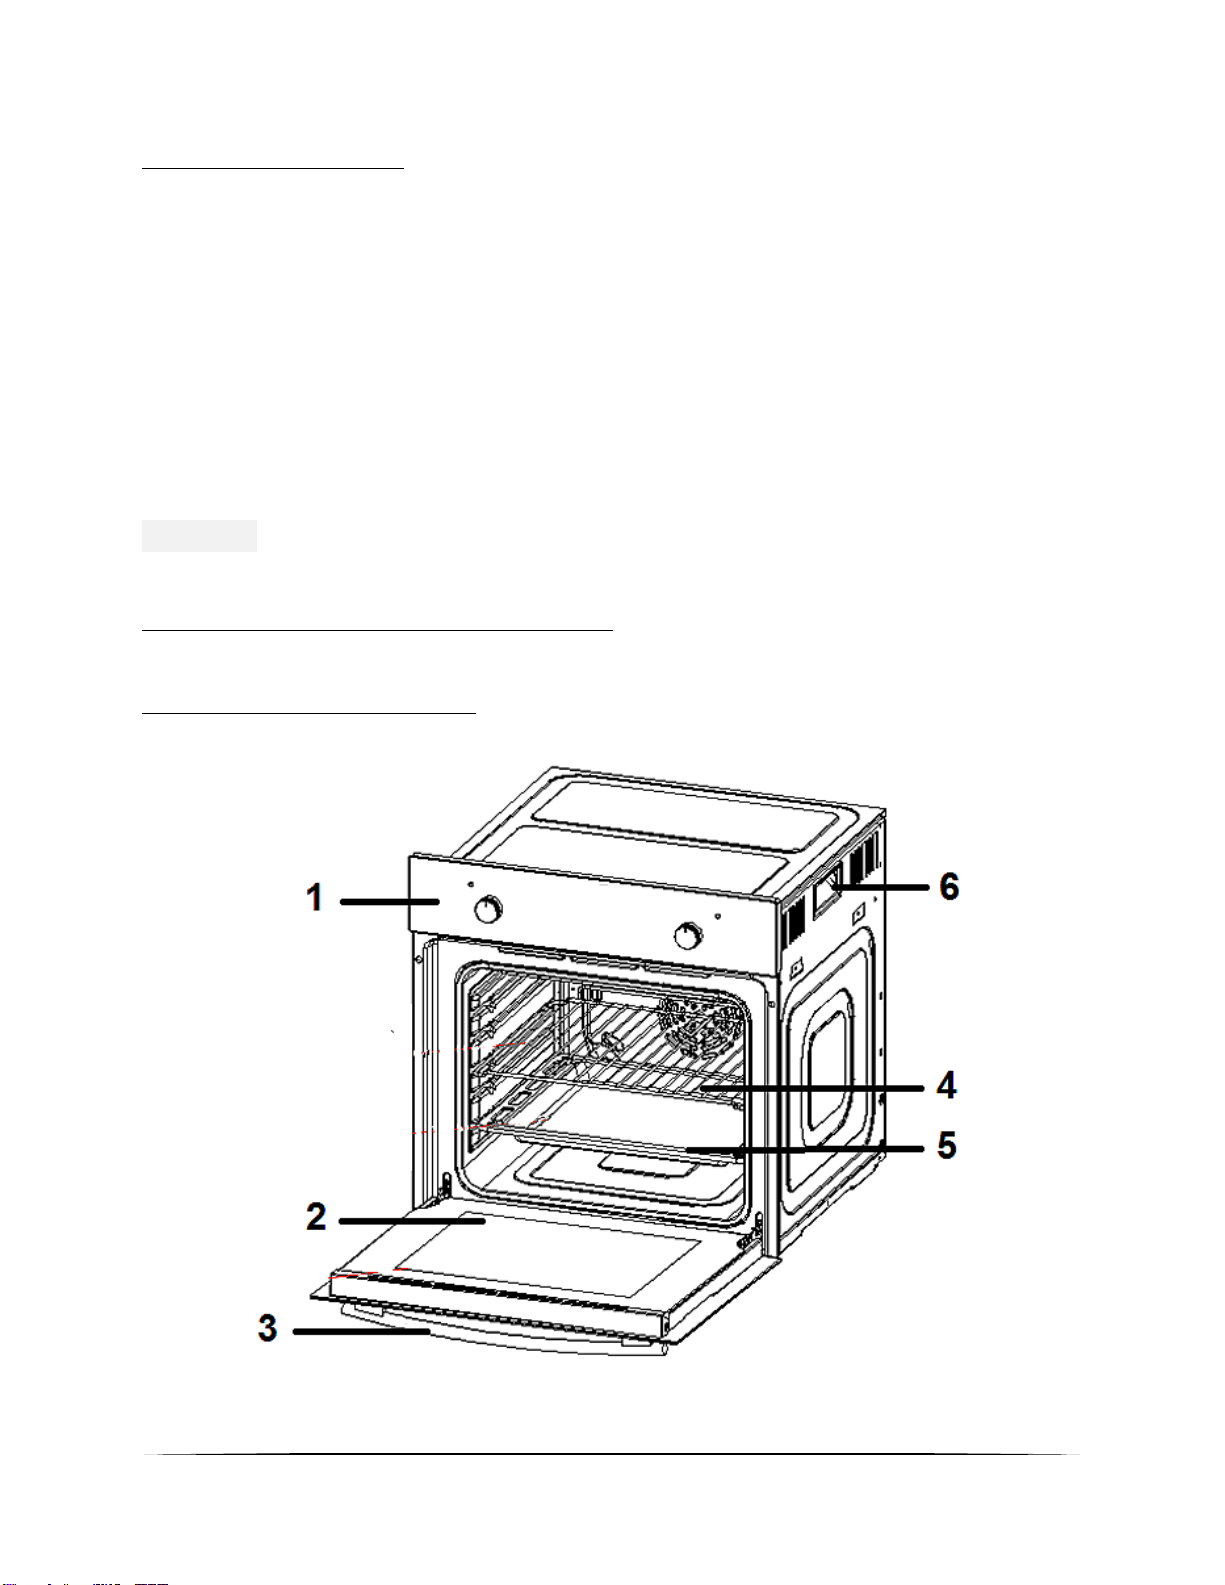
3.2.1 Gerät / Vorderansicht
1
BEDIENFELD (s. Kapitel 3.2.3 BEDIENFELD)
2
TÜR des Backofens
3
TÜRGRIFF
4
Grillrost
1
5
TROPFSCHALE / OFENPFANNE
2
6
SEITLICHER GRIFF zum Bewegen des Gerätes (an beiden Seiten)
1
Ausstattung abhängig vom Modell
2
Ausstattung abhängig vom Modell
14
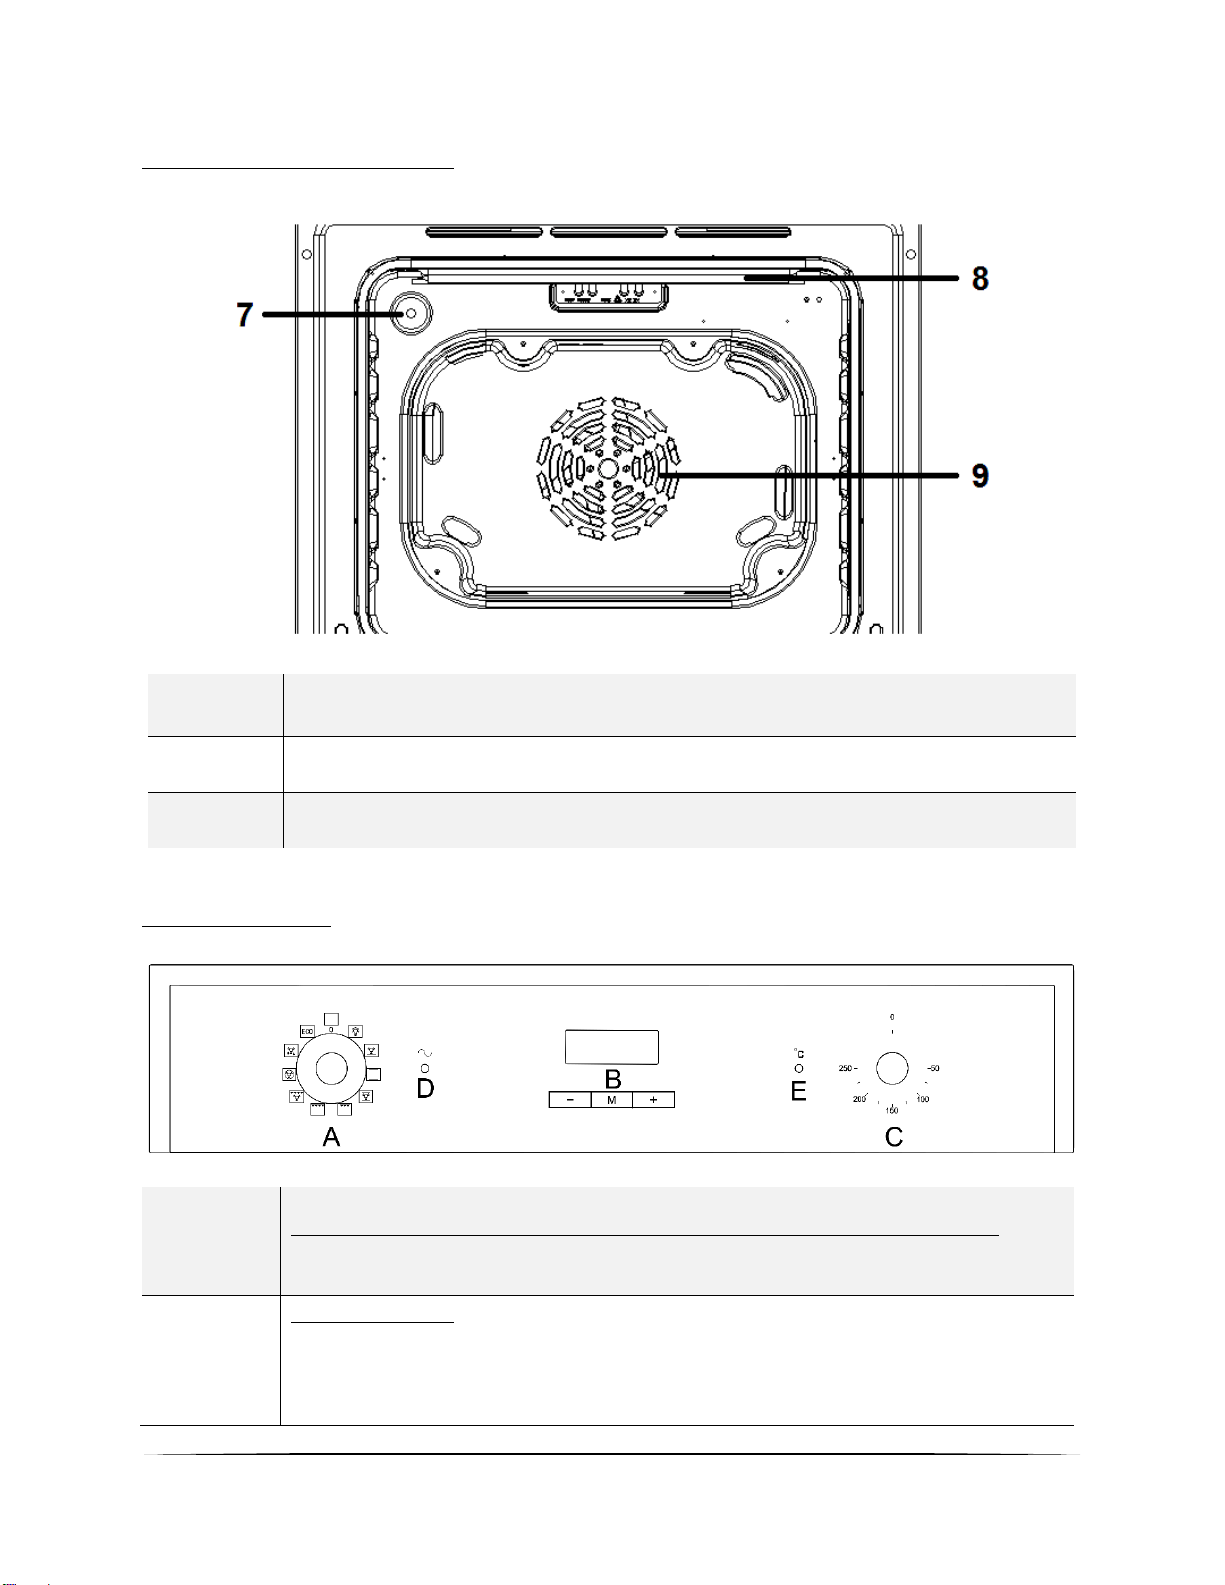
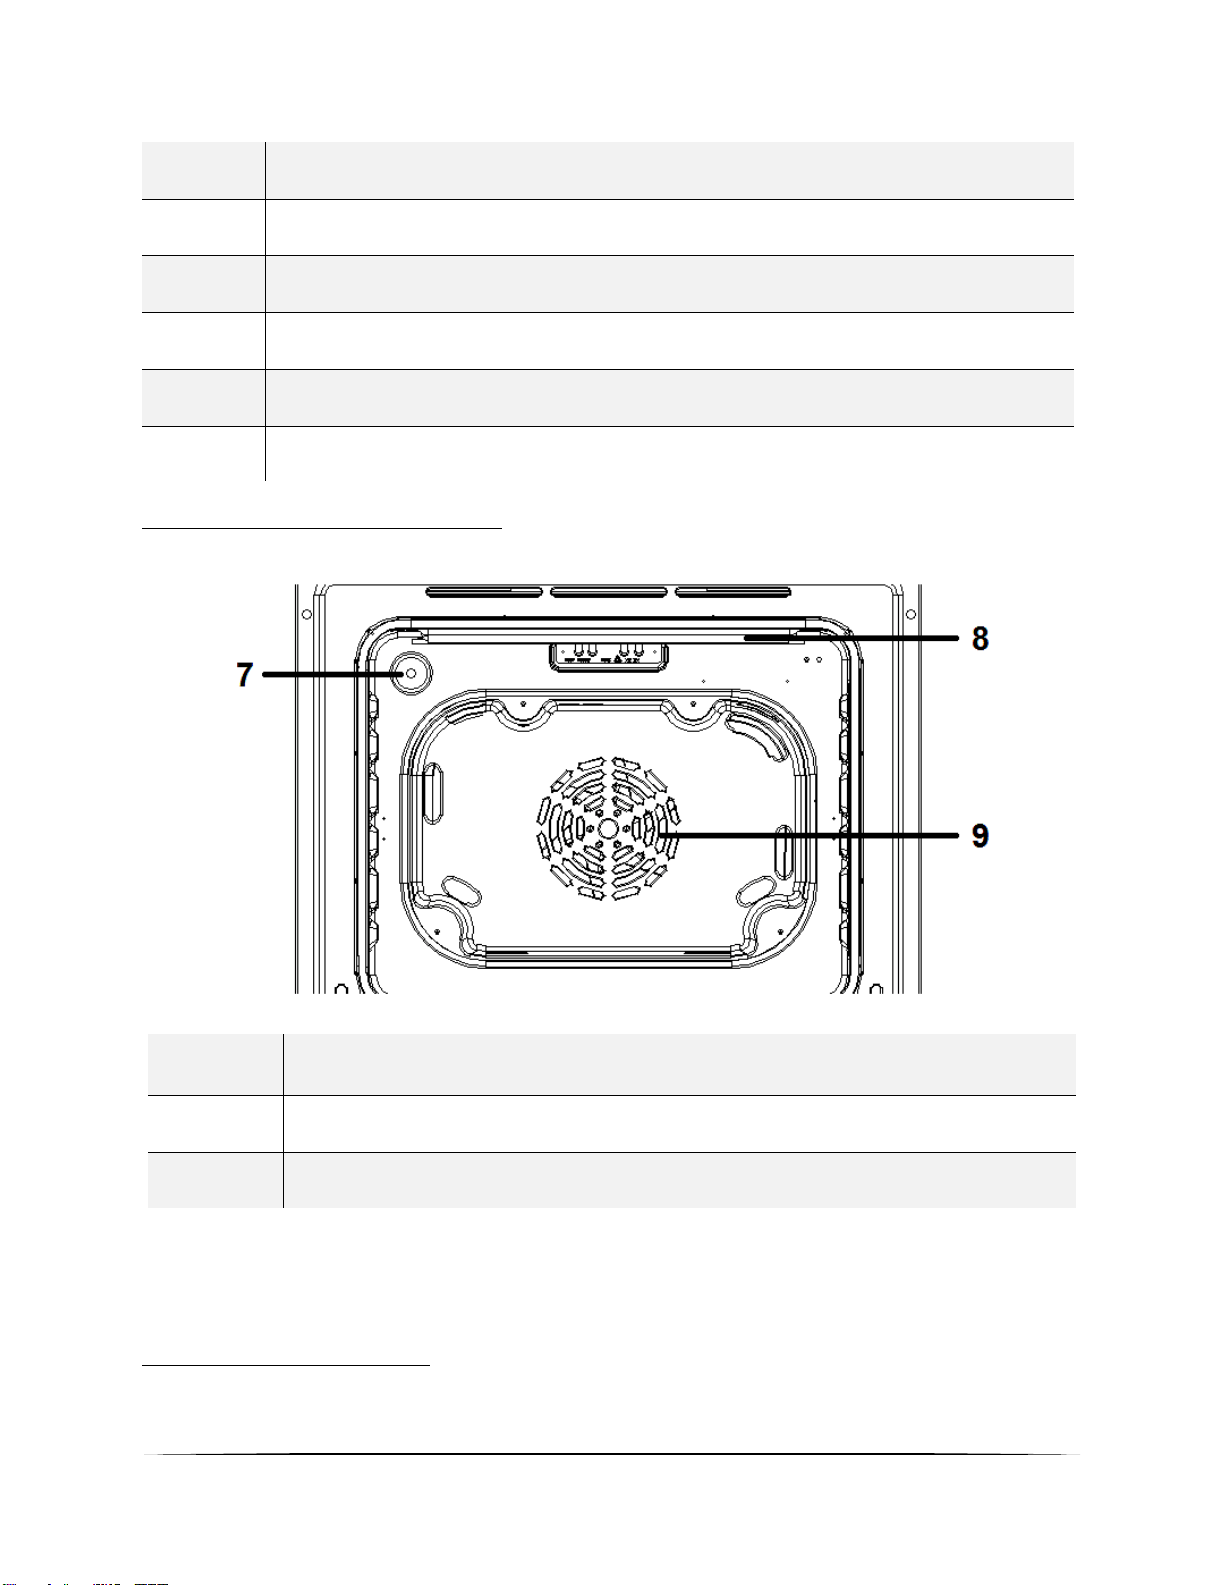
3.2.2 Gerät / Innenansicht
7
BELEUCHTUNG
8
GRILLELEMENT
9
LÜFTERMOTOR (hinter einer Stahlplatte)
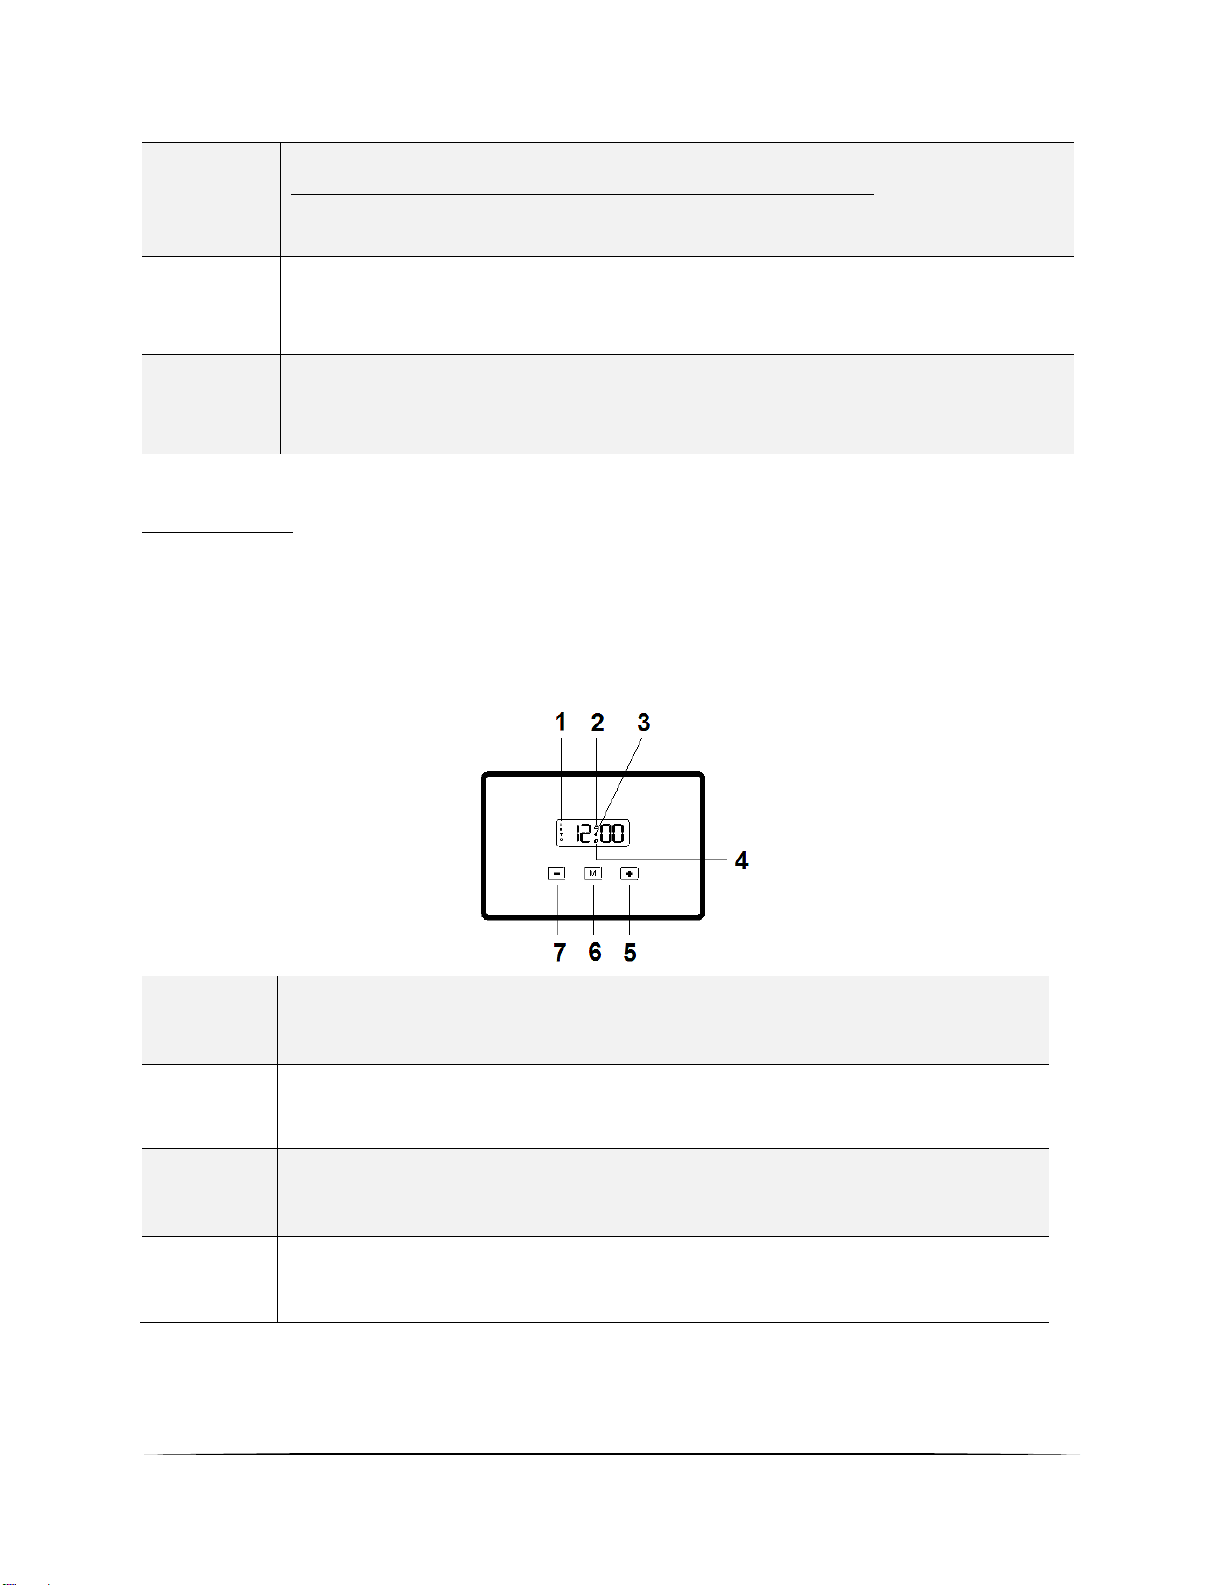
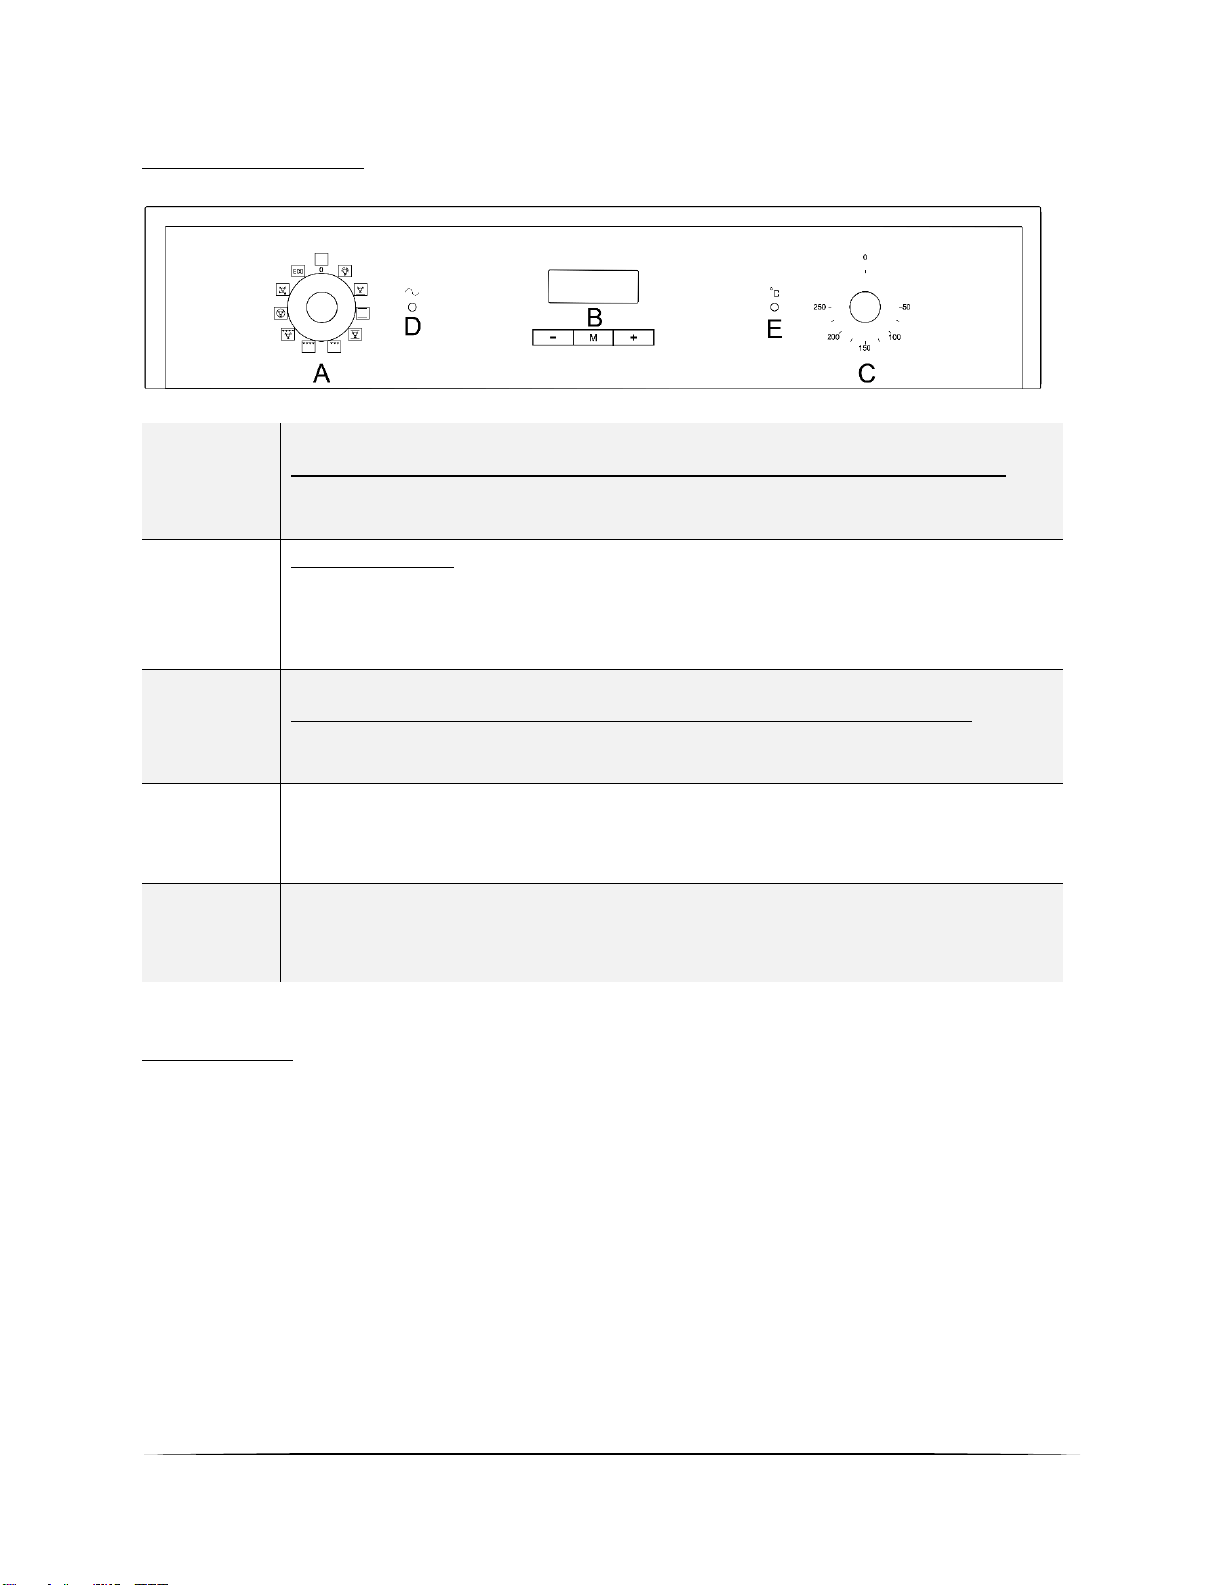
3.2.3 Bedienfeld
A
DREHSCHALTER ZUR AUSWAHL DER BACKOFENFUNKTIONEN
➢ Funktionswahl zur Zubereitung verschiedener Speisen
B
LED DISPLAY
➢ Zeitanzeige
➢ Tasten zur Einstellung der Uhr
➢ Tasten zur Programmierung des Backofens
15
C
DREHSCHALTER ZUR AUSWAHL DER TEMPERATUR
➢ Einstellbar von 50
0
C - 250
0
C
D
BETRIEBSANZEIGE des BACKOFENS
E
BETRIEBSANZEIGE: "Heizen"
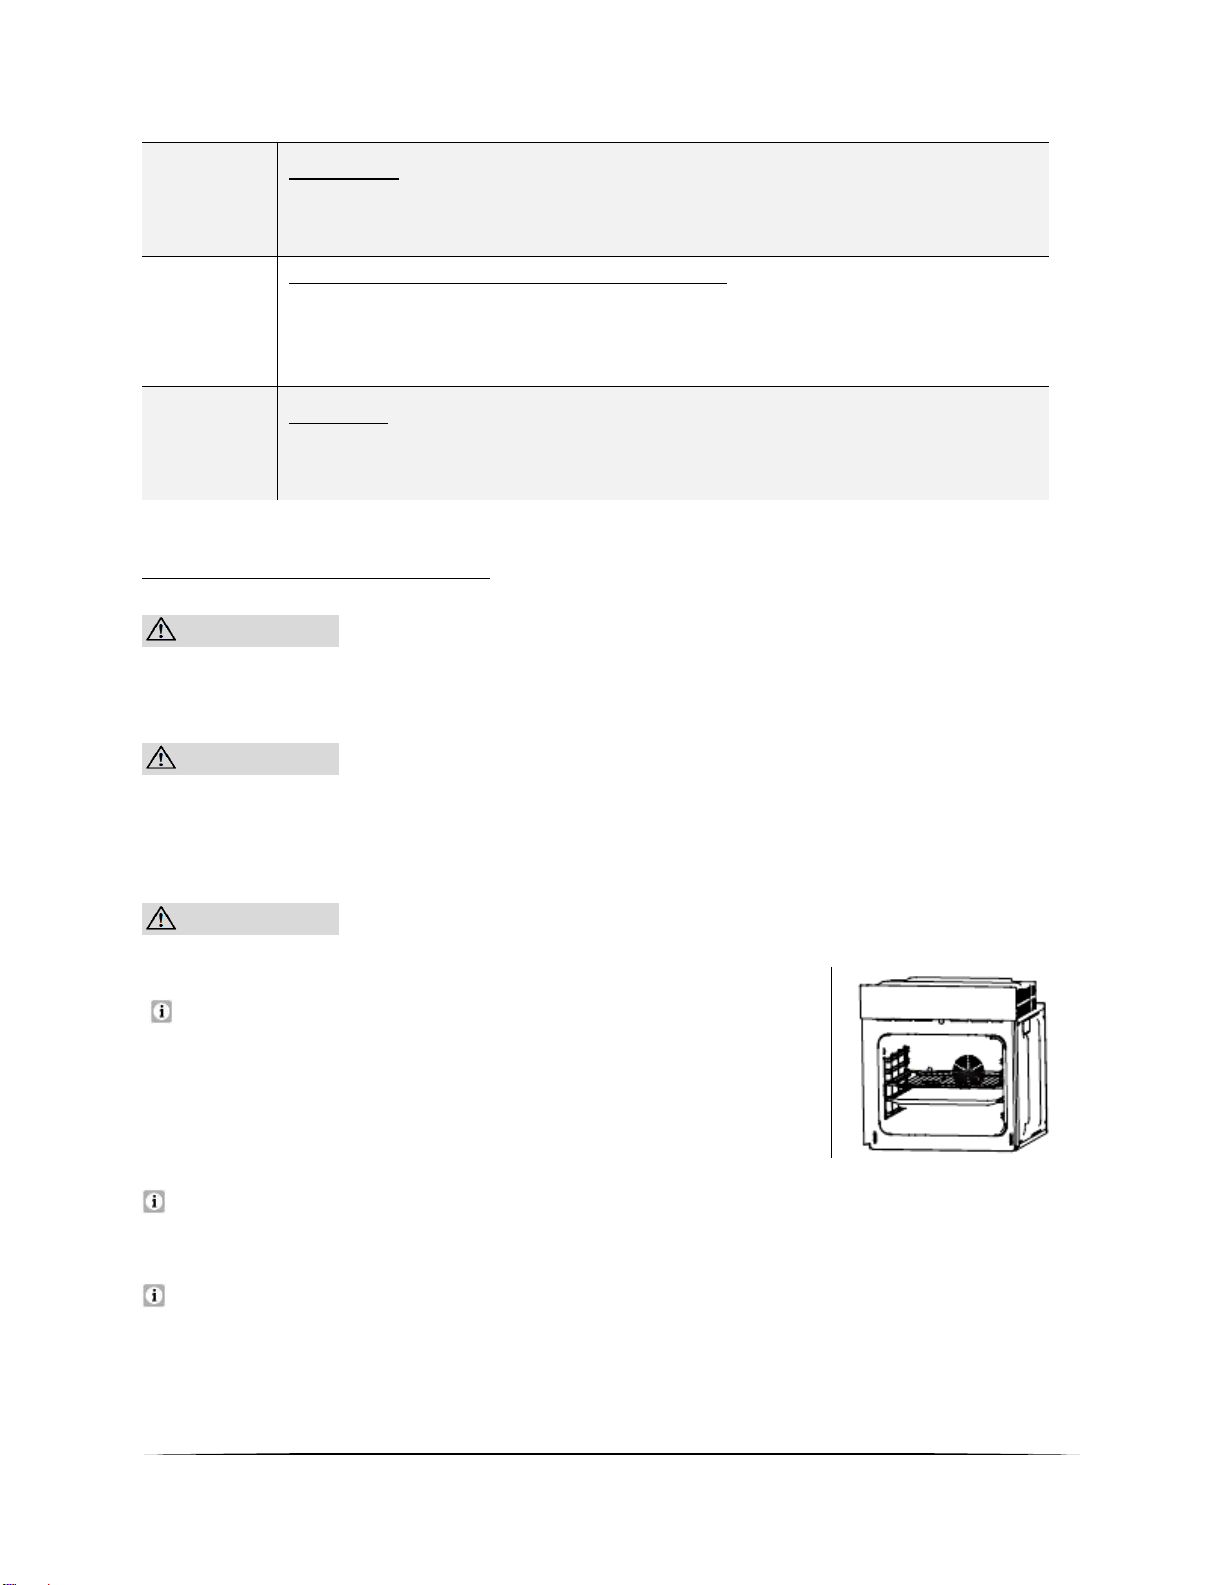
3.2.4 Display
❖ Das Display zeigt die aktuelle Uhrzeit.
❖ Das Display dient außerdem zur Programmierung des Backofens, des Timers und
zur Zeiteinstellung.
1
Anzeige: "AUTOMATISCHES KOCHEN"
2
Betriebsanzeige: "BACKOFEN IN VERWENDUNG"
3
Anzeige der DEZIMALPUNKTE DER UHR
4
Anzeige: TIMER (Zeitwächter)
16
5
TASTE: +
➢ Taste zur Einstellung der ZEIT.
➢ Taste zur Einstellung des TIMERS.
6
PROGRAMMTASTE / MANUELL-TASTE
➢ Taste zur Einstellung der ZEIT.
➢ Taste zur Einstellung des TIMERS.
➢ Taste zur PROGRAMMIERUNG des Backofens.
7
TASTE: -
➢ Taste zur Einstellung der ZEIT.
➢ Taste zur Einstellung des TIMERS.
3.3 Benutzung des Backofens
VORSICHT! Die inneren Bestandteile des Backofens werden sehr heiß.
Berühren Sie keine dieser Bereiche, während Sie mit Ihrem Kochgeschirr
umgehen. VERBRENNUNGSGEFAHR!
VORSICHT! Seien Sie vorsichtig, wenn Sie die Backofentür öffnen.
Kommen Sie nicht in Kontakt mit den heißen Bereichen oder mit dem Dampf,
der aus dem geöffneten Backofen entweicht. VERBRENNUNGSGEFAHR!
VERBRÜHUNGSGEFAHR!
VORSICHT! Benutzen Sie stets Backofenhandschuhe.
Für einen sicheren Betrieb des Gerätes ist die
ordnungsgemäße Positionierung der Einschubelemente
erforderlich, damit bei deren Entnahme kein heißes Koch-
/ Backgut oder Kochgeschirr herausfallen kann.
Wenn Sie das Gerät zum ersten Mal an die Stromversorgung anschließen, blinken
die Zahlen auf dem Display.
Der Lüfter des Backofen läuft nach Betriebsende noch einige Zeit weiter, auch wenn
das Gerät selbst ausgeschaltet ist.
17
Bevor Sie die Uhrzeit einstellen können bzw. eine Backofenfunktion oder
eine Backofentemperatur auswählen können, müssen Sie den manuellen
Betriebsmodus des Backofens aktivieren (s. Kapitel 3.3.2 MANUELLER
BETRIEBSMODUS).
3.3.1 Allgemeine Bedienung des Backofens
➢ Der Backofen kann durch die Benutzung der Oberhitze und der Unterhitze (mit
Umluft) aufgewärmt werden. Die Benutzung des Backofens wird durch den
DREHSCHALTER FÜR DIE BACKOFENFUNKTIONEN (A / s. Kapitel 3.2.3
BEDIENFELD) kontrolliert. Bewegen Sie den Drehschalter hierbei auf die gewünschte
Einstellung.
➢ Zur Einstellung der Temperatur bewegen Sie den DREHSCHALTER FÜR DIE
TEMPERATURKONTROLLE des Backofens (C / s. Kapitel 3.2.3 BEDIENFELD) auf die
gewünschte Einstellung. Sie können hierbei eine Temperatur von 50
0
C – 250
0
C
auswählen (mit dem Uhrzeigersinn drehen).
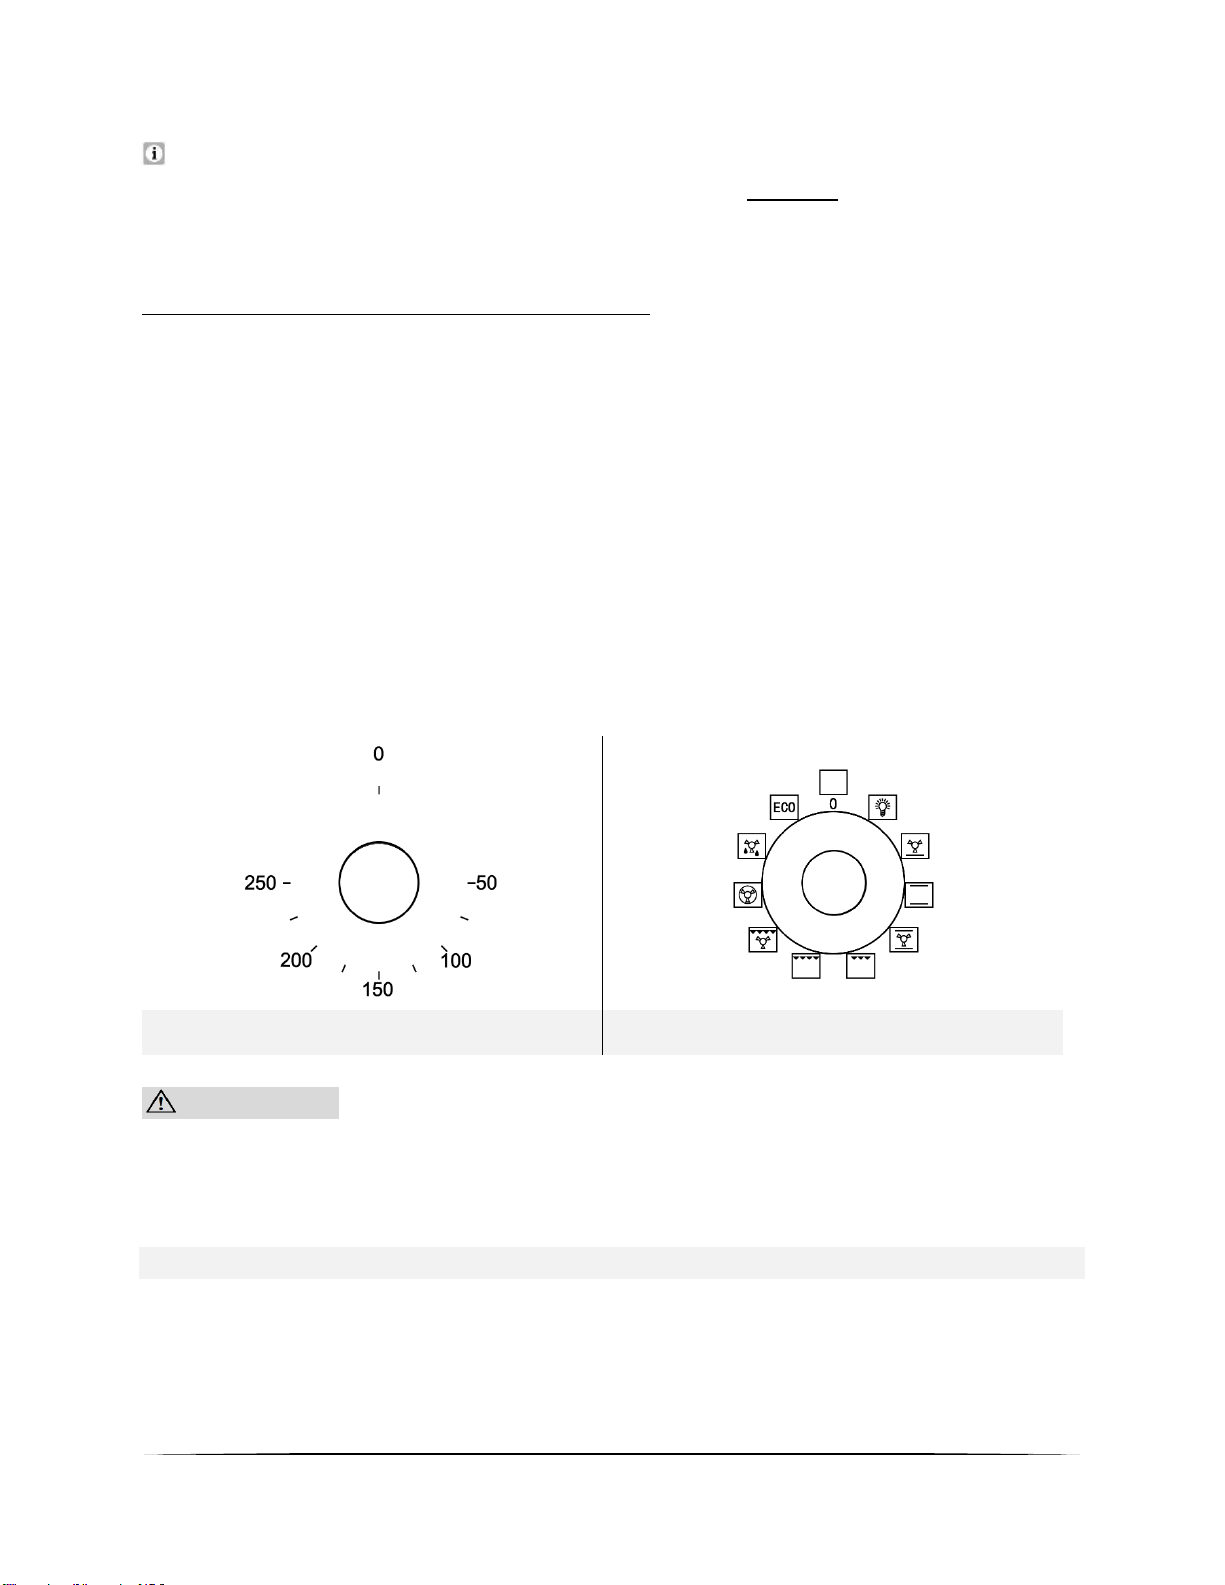
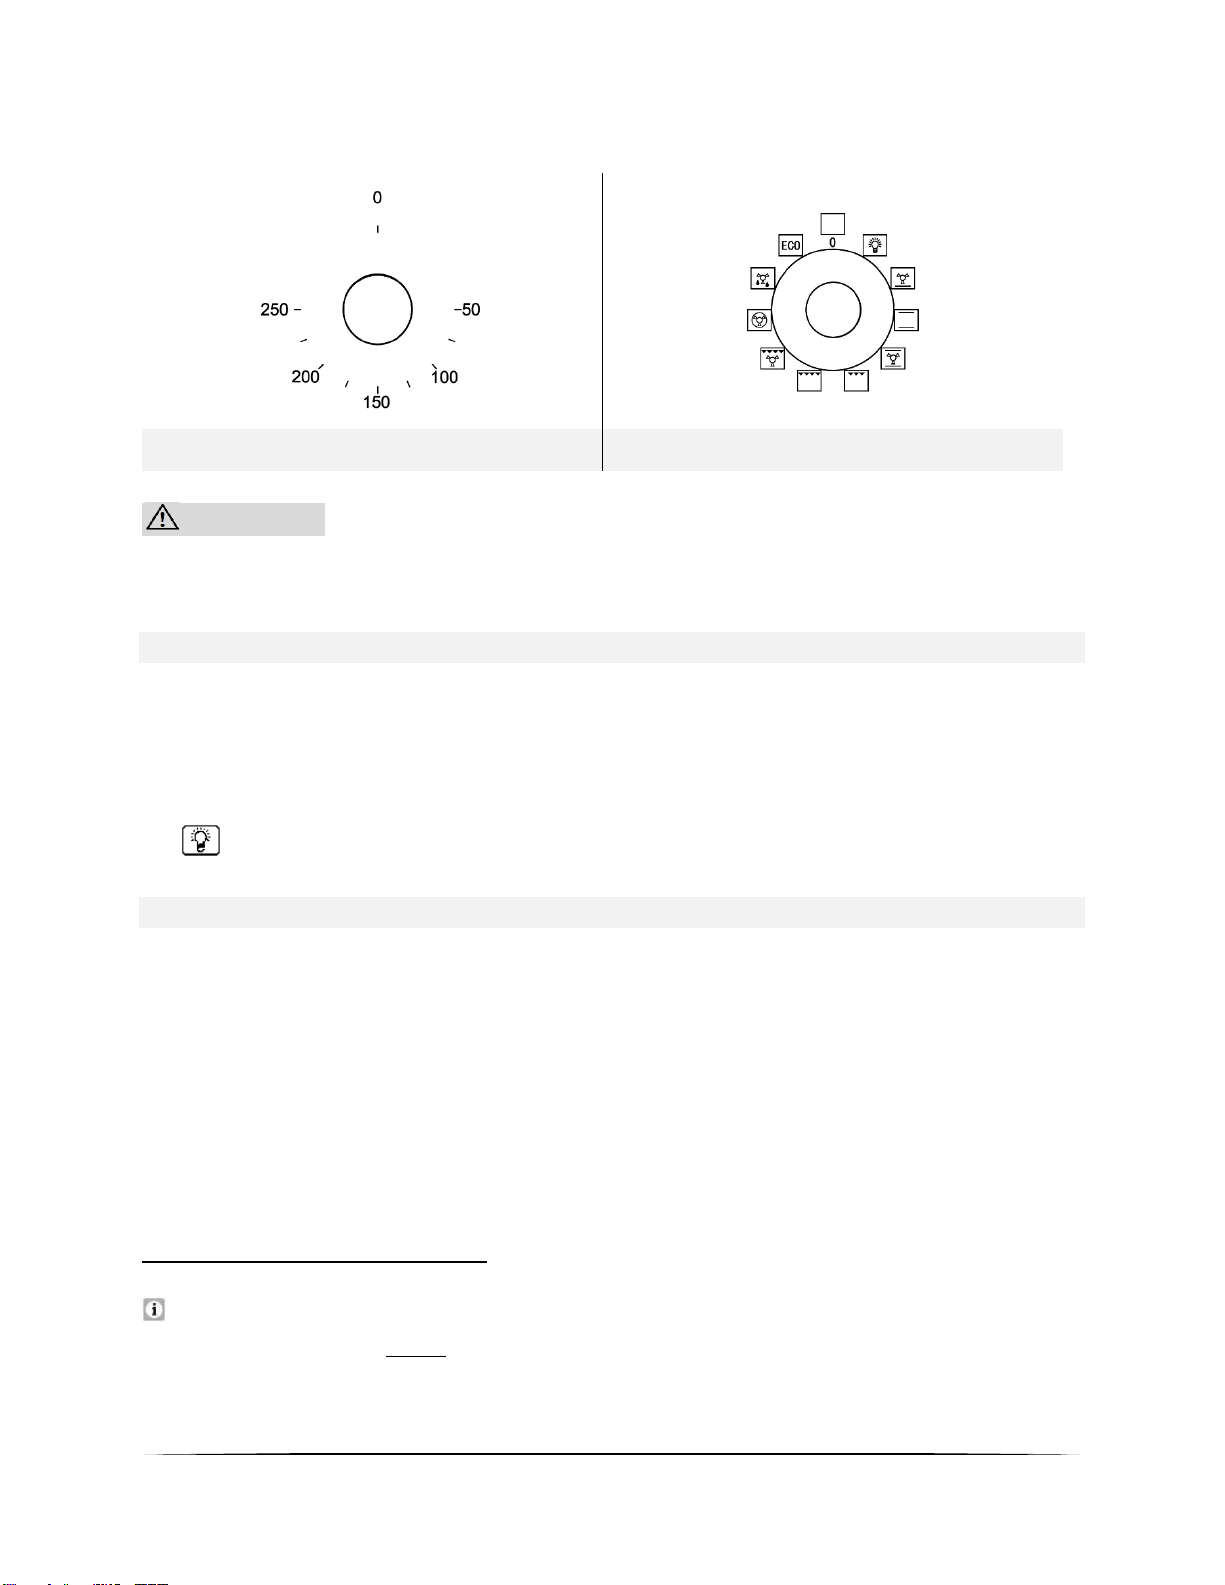
➢ Sie schalten den Backofen aus, indem Sie beide dieser Drehschalter auf die Position
0 einstellen (s. Abb. unten).
C / TEMPERATURKONTROLLE
A / BACKOFENFUNKTIONEN
VORSICHT! Drehen Sie den Temperaturkontrollschalter nur im
Uhrzeigersinn auf die gewünschte Temperatur. Danach können Sie den
Schalter zurück auf die Ausgangsposition drehen. Ansonsten können Sie die
Temperaturkontrollschalter beschädigen.
BETRIEBSANZEIGE DES BACKOFENS (D)
❖ Die Betriebsanzeige des Backofens (D // s. Kapitel 3.2.1 GERÄT /
VORDERANSICHT) zeigt an, dass das Gerät in Betrieb ist.
18
❖ Wenn der Drehschalter für die Backofenfunktionen (A) auf Beleuchtung
eingestellt ist, geht die Betriebsanzeige des Backofens ebenfalls an.
BETRIEBSANZEIGE "HEIZEN" (E)
❖ Die Betriebsanzeige "HEIZEN" (E // s. Kapitel 3.2.1 GERÄT / VORDERANSICHT)
zeigt an, dass der Backofen aufgeheizt wird. Wenn die Betriebsanzeige erlischt, hat
der Backofen seine voreingestellte Temperatur erreicht.
❖ Falls ein Kochrezept das Vorwärmen von Tellern empfiehlt, sollten diese erst in den
Backofen gestellt werden, wenn die Betriebsanzeige "HEIZEN" zum ersten Mal
erloschen ist.
❖ Während des Betriebs geht die Betriebsanzeige "HEIZEN" gelegentlich an oder aus,
um die voreingestellte Temperatur im Inneren des Backofens aufrechtzuerhalten.
3.3.2 Manueller Betriebsmodus
Bevor Sie die Uhrzeit einstellen können bzw. eine Backofenfunktion oder
eine Backofentemperatur auswählen können, müssen Sie den manuellen
Betriebsmodus aktivieren.
Beschreibung der jeweiligen Nummerierungen (s. unten, z.B. (6) / (2) / etc.): s.
Kapitel 3.2.4 DISPLAY
1. Um den manuellen Betriebsmodus zu aktivieren, drücken Sie die Programmtaste /
Manuell-Taste (6) für 3 Sekunden.
2. Die Betriebsanzeige "BACKOFEN IN VERWENDUNG" (2) auf dem Display leuchtet
auf.
3. Der manuelle Betriebsmodus des Backofens ist aktiviert.
3.3.3 Einstellung der Uhrzeit
Bevor Sie den Backofen generell benutzen können, müssen Sie die Uhrzeit
einstellen.
Beschreibung der jeweiligen Nummerierungen: s. Kapitel 3.2.4 DISPLAY
1. Der Backofen muss sich im manuellen Betriebsmodus befinden (s. Kapitel 3.3.2
MANUELLER BETRIEBSMODUS).
19
2. Drücken Sie die Programmtaste (6) einmal.
3. Die Dezimalpunkte der Uhr (3) blinken.
4. Stellen Sie mit den Tasten + (5) und / oder - (7) die korrekte Tageszeit ein.
5. Wenn die korrekte Uhrzeit auf dem Display angezeigt wird, geben Sie die + / -
Tasten frei und warten Sie einige Sekunden.
6. Die Dezimalpunkte der Uhr (3) hören auf zu blinken und der Backofen befindet sich
in Betriebsbereitschaft.
3.4 Programmierung des Backofens
3.4.1 Timer
❖ Der Timer dient als Zeitmesser und zählt die eingestellte Zeit (Countdown-Zeit) ab.
❖ Die maximal einstellbare Countdown-Zeit beträgt 23 Stunden und 59 Minuten.
Beschreibung der jeweiligen Nummerierungen: s. Kapitel 3.2.4 DISPLAY
TIMER (ZEITWÄCHTER) EINSTELLEN:
1. Drücken Sie die Programmtaste (6) zweimal.
2. Die Dezimalpunkte der Uhr (3) blinken.
3. Auf dem Display leuchtet die Anzeige für den Timer (4) auf.
4. Das Display zeigt 00:00.
5. Stellen Sie mit den Tasten + (5) und / oder - (7) die gewünschte Countdown-Zeit
ein.
6. Wenn die gewünschte Countdown-Zeit auf dem Display angezeigt wird, geben Sie
die + / - Tasten frei.
7. Der Countdown startet sofort.
8. Nach einigen Sekunden zeigt das Display wieder die aktuelle Uhrzeit.
9. Wenn die eingestellte Zeit abgelaufen ist ertönt ein akustisches Signal.
10. Das akustische Signal endet automatisch nach ca. 7 Minuten. Sie können das
akustische Signal aber auch durch Drücken einer beliebigen Taste auf dem Display
ausschalten.
❖ Die Timer Anzeige (4) wird auf dem Display angezeigt solange der Countdown aktiv
ist. Nach Ablauf der eingestellten Zeit erlischt die Anzeige.
❖ Zum Ausschalten des Backofens müssen die Drehschalter für die
Backofenfunktionen und der Temperaturkontrolle auf die Position -0- gestellt
werden.
20
WARNUNG! Bei o.g. Verwendung wird der Backofen nach Ablauf der
gewählten Zeitspanne nicht automatisch abgeschaltet.
3.4.2 Halb-automatische Koch- / Backfunktion
❖ Mit dieser Funktion können Sie eine Countdown-Zeit einstellen, bei der nach Ablauf
der Zeit der Backofen automatisch ausgeschaltet wird.
❖ Die maximal einstellbare Countdown-Zeit beträgt 10 Stunden.
Beschreibung der jeweiligen Nummerierungen: s. Kapitel 3.2.4 DISPLAY
HALB-AUTOMATISCHE KOCH- / BACKFUNKTION EINSTELLEN:
1. Stellen Sie das Koch- / Backgut in den Backofen und schließen Sie die Tür
ordnungsgemäß.
2. Wählen Sie die gewünschte Backofenfunktion (s. Kapitel 3.5
BACKOFENFUNKTIONEN) und Temperatur mit den entsprechenden Drehknöpfen (A
/ C) aus (s. Kapitel 3.2.3 BEDIENFELD).
3. Drücken Sie die Programmtaste (6) dreimal.
4. Die Dezimalpunkte der Uhr (3) blinken.
5. Die Betriebsanzeige "BACKOFEN IN VERWENDUNG" (2) auf dem Display leuchtet
auf.
6. Die Anzeige "AUTOMATISCHES KOCHEN" (1) leuchtet auf.
7. Das Display zeigt 00:00.
8. Stellen Sie mit den Tasten + (5) und / oder - (7) die gewünschte Countdown-Zeit
ein.
9. Wenn die gewünschte Countdown-Zeit auf dem Display angezeigt wird, geben Sie
die + / - Tasten frei.
10. Der Kochvorgang beginnt sofort und der Countdown der Zeit startet nach wenigen
Sekunden.
11. Wenn die eingestellte Zeit abgelaufen ist ertönt ein akustisches Signal und der
Backofen wird automatisch abgeschaltet.
12. Die Anzeige "AUTOMATISCHES KOCHEN" (1) und die TIMERANZEIGE (4) blinken.
13. Drücken Sie eine beliebige Taste auf dem Display um das akustische Signal
auszuschalten.
14. Stellen Sie die Drehschalter für die Backofenfunktionen und die
Temperaturkontrolle auf die Position 0.
21
RESET (ZURÜCKSETZEN DES BACKOFENS):
❖ Nach Benutzung der halb-automatischen Koch- und Backfunktion muss der
Backofen in den Ausgangsmodus zurückgesetzt werden.
1. Drücken Sie die Programmtaste (6) einmal für 3 Sekunden.
2. Das Display zeigt die Uhrzeit.
3. Drücken Sie die Programmtaste (6) ein weiteres Mal für 3 Sekunden.
4. Die Betriebsanzeige "BACKOFEN IN VERWENDUNG" (2) auf dem Display leuchtet
auf.
5. Die Anzeige "AUTOMATISCHES KOCHEN" (1) erlischt.
6. Der Backofen ist wieder betriebsbereit.
VORSICHT! Zum kompletten Ausschalten des Backofens müssen die
Drehschalter für die Backofenfunktionen und der Temperaturkontrolle auf die
Position 0 gestellt werden. Wenn die Drehschalter beim Reset
(Zurücksetzen) des Backofens nicht auf der Position 0 stehen, beginnt der
Backofen wieder zu heizen!
3.4.3 Ende der Koch- / Backzeit einstellen
❖ Mit dieser Funktion können Sie die Uhrzeit einstellen, an der der Backofen
automatisch ausgeschaltet werden soll.
❖ Die maximal einstellbare Uhrzeit für das Ende der Koch- / Backzeit beträgt 10
Stunden ab der aktuellen Uhrzeit.
Beschreibung der jeweiligen Nummerierungen: s. Kapitel 3.2.4 DISPLAY
ENDE DER KOCH- / BACKZEIT EINSTELLEN:
1. Stellen Sie das Koch- / Backgut in den Backofen und schließen Sie die Tür
ordnungsgemäß.
2. Wählen Sie die gewünschte Backofenfunktion (s. Kapitel 3.5
BACKOFENFUNKTIONEN) und Temperatur mit den entsprechenden Drehknöpfen (A
/ C) aus (s. Kapitel 3.2.3 BEDIENFELD).
3. Drücken Sie die Programmtaste (6) viermal.
4. Die Dezimalpunkte der Uhr (3) blinken.

22
5. Die Betriebsanzeige "BACKOFEN IN VERWENDUNG" (2) auf dem Display leuchtet
auf.
6. Die Anzeige "AUTOMATISCHES KOCHEN" (1) leuchtet auf.
7. Die aktuelle Uhrzeit blinkt.
8. Stellen Sie mit den Tasten + (5) und / oder - (7) die gewünschte Uhrzeit für das
Ende der Koch- / Backzeit ein.
9. Wenn die gewünschte Uhrzeit auf dem Display angezeigt wird, geben Sie die + / -
Tasten frei.
10. Der Kochvorgang beginnt sofort und der Countdown der Zeit startet nach wenigen
Sekunden.
11. Wenn die eingestellte Uhrzeit erreicht ist ertönt ein akustisches Signal und der
Backofen wird automatisch abgeschaltet.
12. Die Anzeige "AUTOMATISCHES KOCHEN" (1) und die TIMERANZEIGE (4) blinken.
13. Drücken Sie eine beliebige Taste auf dem Display um das akustische Signal
auszuschalten.
14. Stellen Sie die Drehschalter für die Backofenfunktionen und die
Temperaturkontrolle auf die Position 0.
RESET (ZURÜCKSETZEN DES BACKOFENS):
❖ Nachdem der Backofen bei Erreichen der eingestellten Uhrzeit automatisch
abgeschaltet wurde, muss er in den Ausgangsmodus zurückgesetzt werden.
1. Drücken Sie die Programmtaste (6) einmal für 3 Sekunden.
2. Das Display zeigt die Uhrzeit.
3. Drücken Sie die Programmtaste (6) ein weiteres Mal für 3 Sekunden.
4. Die Betriebsanzeige "BACKOFEN IN VERWENDUNG" (2) auf dem Display leuchtet
auf.
5. Die Anzeige "AUTOMATISCHES KOCHEN" (1) erlischt.
6. Der Backofen ist wieder betriebsbereit.
VORSICHT! Zum kompletten Ausschalten des Backofens müssen die
Drehschalter für die Backofenfunktionen und der Temperaturkontrolle auf die
Position 0 gestellt werden. Wenn die Drehschalter beim Reset
(Zurücksetzen) des Backofens nicht auf der Position 0 stehen, beginnt der
Backofen wieder zu heizen!
3.4.4 Automatische Koch- / Backfunktion
❖ Mit dieser Funktion können Sie die Dauer der Koch- / Backzeit einstellen und

23
gleichzeitig die Uhrzeit auswählen, an der der Backofen automatisch
ausgeschaltet werden soll.
❖ Die maximal einstellbare Koch- / Backdauer beträgt 10 Stunden.
❖ Die maximal einstellbare Uhrzeit für das Ende der Koch- / Backzeit beträgt 10
Stunden ab der aktuellen Uhrzeit.
Beschreibung der jeweiligen Nummerierungen: s. Kapitel 3.2.4 DISPLAY
AUTOMATISCHE KOCH- / BACKFUNKTION EINSTELLEN:
1. Stellen Sie das Koch- / Backgut in den Backofen und schließen Sie die Tür
ordnungsgemäß.
2. Wählen Sie die gewünschte Backofenfunktion (s. Kapitel 3.5
BACKOFENFUNKTIONEN) und Temperatur mit den entsprechenden Drehknöpfen (A
/ C) aus (s. Kapitel 3.2.3 BEDIENFELD).
3. Drücken Sie die Programmtaste (6) dreimal.
4. Die Dezimalpunkte der Uhr (3) blinken.
5. Die Betriebsanzeige "BACKOFEN IN VERWENDUNG" (2) auf dem Display leuchtet
auf.
6. Die Anzeige "AUTOMATISCHES KOCHEN" (1) leuchtet auf.
7. Stellen Sie mit den Tasten + (5) und / oder - (7) die gewünschte Dauer der Koch-
/ Backzeit ein.
8. Drücken Sie danach SOFORT die Programmtaste (6).
9. Die aktuelle Uhrzeit auf dem Display blinkt.
10. Stellen Sie mit den Tasten + (5) und / oder - (7) die gewünschte Uhrzeit für das
Ende der Koch- / Backzeit ein.
11. Wenn die gewünschte Uhrzeit auf dem Display angezeigt wird, geben Sie die + / -
Tasten frei.
12. Der Koch- / Backvorgang startet zu der berechneten Uhrzeit.
13. Nach Ende des Koch- / Backvorgangs ertönt ein akustisches Signal und der
Backofen wird automatisch abgeschaltet.
14. Die Anzeige "AUTOMATISCHES KOCHEN" (1) und die TIMERANZEIGE (4) blinken.
15. Drücken Sie eine beliebige Taste auf dem Display um das akustische Signal
auszuschalten.
16. Stellen Sie die Drehschalter für die Backofenfunktionen und die
Temperaturkontrolle auf die Position 0.

24
BEISPIEL:
❖ Es ist 8:00 Uhr. Sie möchten Koch- / Backgut für 2 Stunden garen. Um 13:00 Uhr
soll die Koch- / Backzeit enden.
❖ Zum Einstellen des Programms gehen Sie bitte wie oben unter "AUTOMATISCHE
KOCH- / BACKFUNKTION AUSWÄHLEN" beschrieben vor:
➢ Stellen Sie die Dauer der Koch- / Backzeit auf 2 Stunden.
➢ Stellen Sie das Ende der Koch- / Backzeit ein: 13:00 Uhr.
➢ Der berechnete Kochvorgang beginnt um 11:00 Uhr.
➢ Um 13:00 Uhr wird der Backofen automatisch abgeschaltet.
RESET (ZURÜCKSETZEN DES BACKOFENS):
❖ Nachdem der Backofen bei Erreichen der eingestellten Uhrzeit automatisch
abgeschaltet wurde, muss er in den Ausgangsmodus zurückgesetzt werden.
1. Drücken Sie die Programmtaste (6) einmal für 3 Sekunden.
2. Das Display zeigt die Uhrzeit.
3. Drücken Sie die Programmtaste (6) ein weiteres Mal für 3 Sekunden.
4. Die Betriebsanzeige "BACKOFEN IN VERWENDUNG" (2) auf dem Display leuchtet
auf.
5. Die Anzeige "AUTOMATISCHES KOCHEN" (1) erlischt.
6. Der Backofen ist wieder betriebsbereit.
VORSICHT! Zum kompletten Ausschalten des Backofens müssen die
Drehschalter für die Backofenfunktionen und der Temperaturkontrolle auf die
Position 0 gestellt werden. Wenn die Drehschalter beim Reset
(Zurücksetzen) des Backofens nicht auf der Position 0 stehen, beginnt der
Backofen wieder zu heizen!
3.4.5 Löschen der Programmierungen
LÖSCHEN DES TIMERS (ZEITWÄCHTER):
1. Drücken Sie die Programmtaste (6) zweimal um die TIMER FUNKTION
auszuwählen.
2. Stellen Sie die angezeigte Zeit auf dem Display auf 00:00 zurück.
25
LÖSCHEN DER HALB-AUTOMATISCHEN KOCH- / BACKFUNKTION:
1. Drücken Sie die Programmtaste (6) dreimal um die HALB-AUTOMATISCHE
KOCH- / BACKFUNKTION auszuwählen.
2. Stellen Sie die angezeigte Zeit auf dem Display auf 00:00 zurück.
DAS ENDE DER KOCH- / BACKZEIT LÖSCHEN:
1. Drücken Sie die Programmtaste (6) viermal um die Funktion "ENDE DER
KOCH- / BACKZEIT EINSTELLEN" aufzurufen.
2. Stellen Sie die angezeigte Zeit auf dem Display auf die aktuelle Uhrzeit zurück.
LÖSCHEN DER AUTOMATISCHEN KOCH- / BACKFUNKTION:
1. Zum Löschen der AUTOMATISCHEN KOCH- / BACKFUNKTION drücken Sie die
Programmtaste (6) dreimal.
2. Stellen Sie die angezeigte Kochdauer auf dem Display auf 00:00 zurück.
3. Drücken Sie die Programmtaste (6) erneut.
4. Stellen Sie die angezeigte Zeit auf dem Display auf die aktuelle Uhrzeit zurück.
VORSICHT! Zum kompletten Ausschalten des Backofens müssen die
Drehschalter für die Backofenfunktionen und der Temperaturkontrolle auf die
Position 0 gestellt werden. Wenn die Drehschalter nach Löschen der Timer-
/ Programmfunktionen nicht auf die Position 0 gestellt werden, heizt der
Backofen kontinuierlich weiter!
3.4.6 Auswahl des akustischen Signals
❖ Sie können drei verschiedene akustische Signale auswählen.
Die TIMER- / PROGRAMMFUNKTIONEN dürfen nicht aktiviert sein und die
Betriebsanzeige "BACKOFEN IN VERWENDUNG" (2) auf dem Display muss
leuchten (s. Kapitel 3.3.2 MANUELLER BETRIEBSMODUS).
Beschreibung der jeweiligen Nummerierungen: s. Kapitel 3.2.4 DISPLAY
1. Drücken Sie die + (5) und - (7) Tasten gleichzeitig für 2 Sekunden.
2. Das aktuell eingestellte akustische Signal ertönt.
3. Drücken Sie ein zweites Mal die + (5) und - (7) Tasten gleichzeitig für 2
Sekunden.

26
4. Das zweite wählbare akustische Signal ertönt.
5. Drücken Sie ein drittes Mal die + (5) und - (7) Tasten gleichzeitig für 2 Sekunden.
6. Das dritte wählbare akustische Signal ertönt.
7. Dieses Vorgehen kann beliebig wiederholt werden.
8. Wenn Sie das gewünschte akustische Signal ausgewählt haben, geben Sie die + (5)
und - (7) Tasten frei.
9. Das Display wechselt zu der aktuellen Uhrzeit und das gewünschte akustische Signal
ist aktiviert.
3.4.7 Ändern der aktuellen Uhrzeit
Die TIMER- / PROGRAMMFUNKTIONEN dürfen nicht aktiviert sein.
Der Backofen muss sich im manuellen Betriebsmodus befinden (s. Kapitel 3.3.2
MANUELLER BETRIEBSMODUS).
Die Betriebsanzeige "BACKOFEN IN VERWENDUNG" (2) auf dem Display muss
leuchten.
➢ Um die aktuelle Uhrzeit zu ändern folgen Sie bitte den Instruktionen in Kapitel 3.3.3
EINSTELLUNG DER UHRZEIT.
3.5 Backofenfunktionen
27
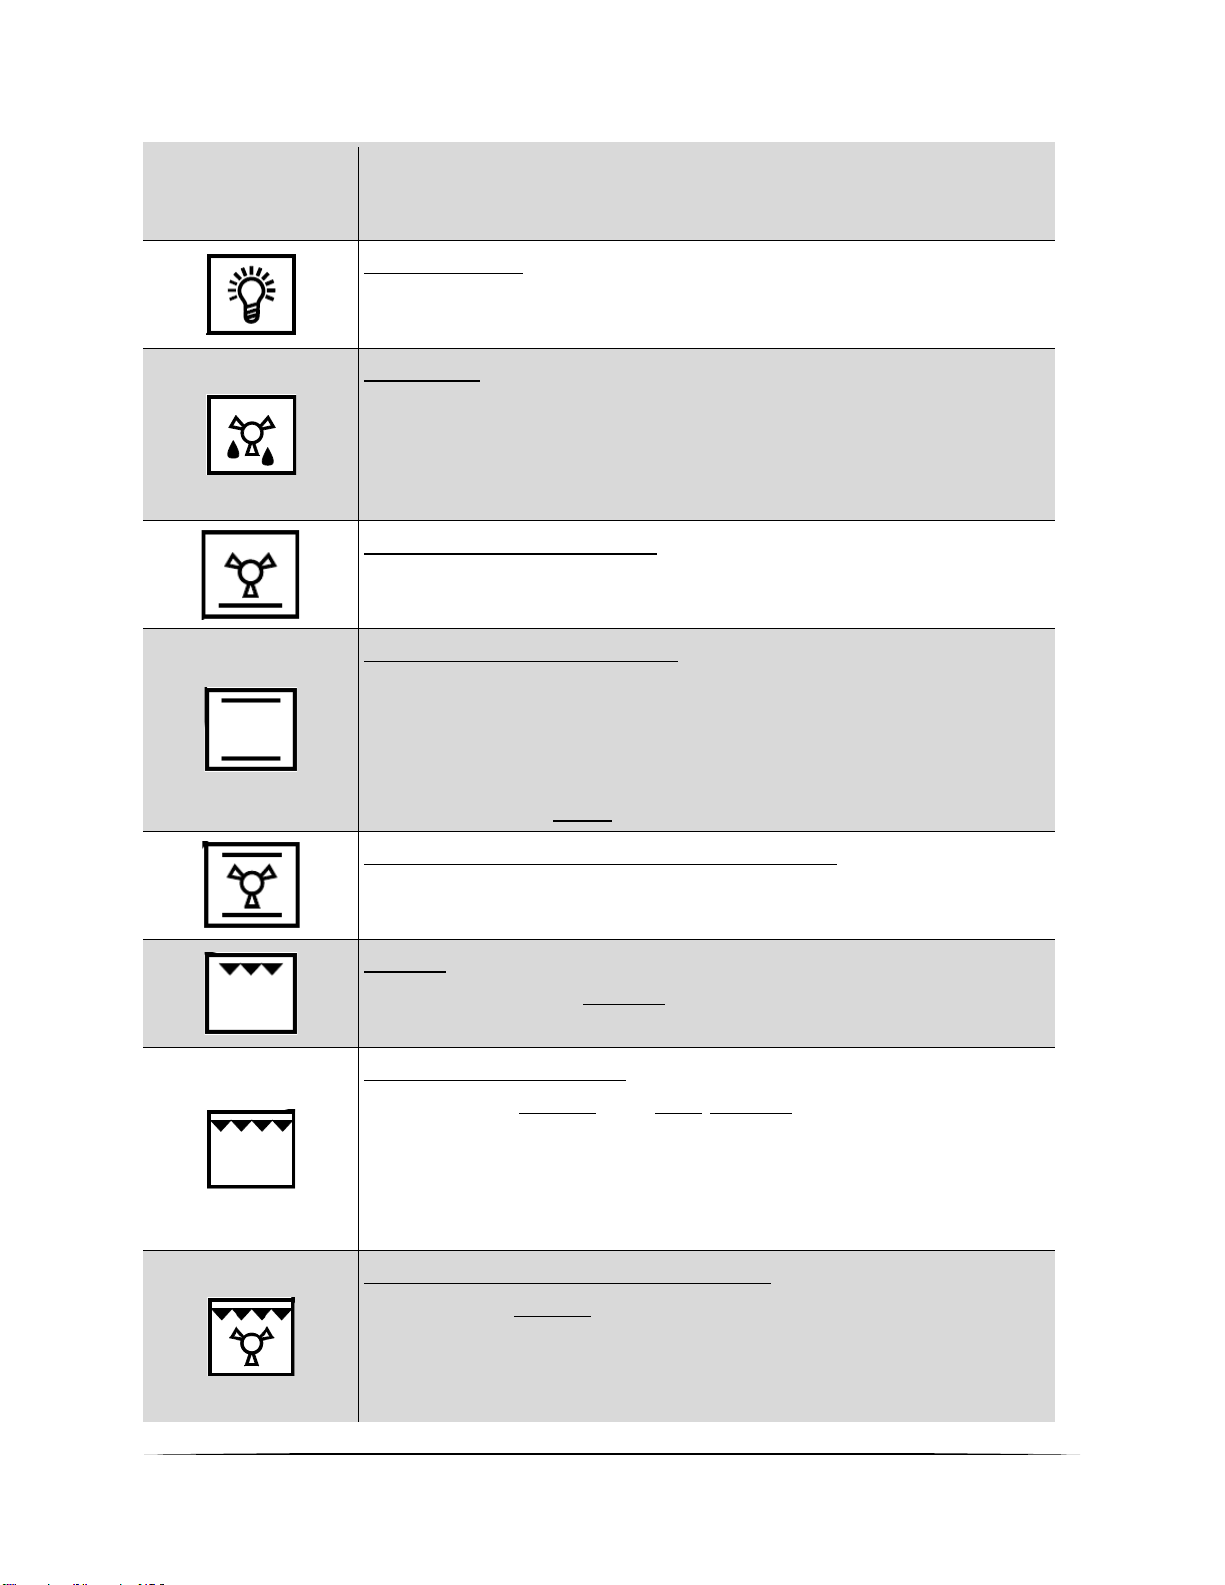
SYMBOLE
BESCHREIBUNG DER FUNKTIONEN
Beleuchtung:
➢ Drehen Sie den Drehschalter auf dieses Symbol um die
Beleuchtung des Backofens anzuschalten.
Auftauen:
➢ Die Umluft läuft ohne Wärmeeinstellung.
➢ Reduziert die Auftauzeit von gefrorenen Lebensmitteln.
➢ Auftauzeit: Abhängig von Zimmertemperatur sowie Menge
und Art der Lebensmittel
Unterhitze (mit Umluft):
➢ Beheizt den Backofen nur mit der Unterhitze, z.B. zum
abschließenden Backen von unten.
Oberhitze und Unterhitze:
➢ Bei dieser Einstellung wird der Backofen konventionell
beheizt.
➢ Vor einem Koch- / Backvorgang muss der Backofen
vorgeheizt werden.
Geeignet um auf einer Ebene zu Backen / Kochen.
Oberhitze und Unterhitze (mit Umluft):
➢ Bei dieser Einstellung wird der Backofen mit Umluft von
oben und unten beheizt.
Grillen
➢ Schaltet nur den inneren Teil des Grillelements ein.
➢ Geeignet zum Grillen von kleinen Portionen.
Grillen mit Oberhitze:
➢ Der Grill (innerer Teil und äußerer Teil des Grillelements)
und die Oberhitze arbeiten gleichzeitig.
➢ Kombiniertes Grillen erlaubt höhere Temperaturen im
oberen Garbereich, intensiviert das Bräunen und erlaubt
das Zubereiten größerer Portionen.
Grillen mit Oberhitze und Umluft:
➢ Der Grill (innerer Teil des Grillelements), die Oberhitze und
die Umluft arbeiten gleichzeitig.
➢ Beschleunigt das Grillen und verbessert den Geschmack
des Grillguts
28
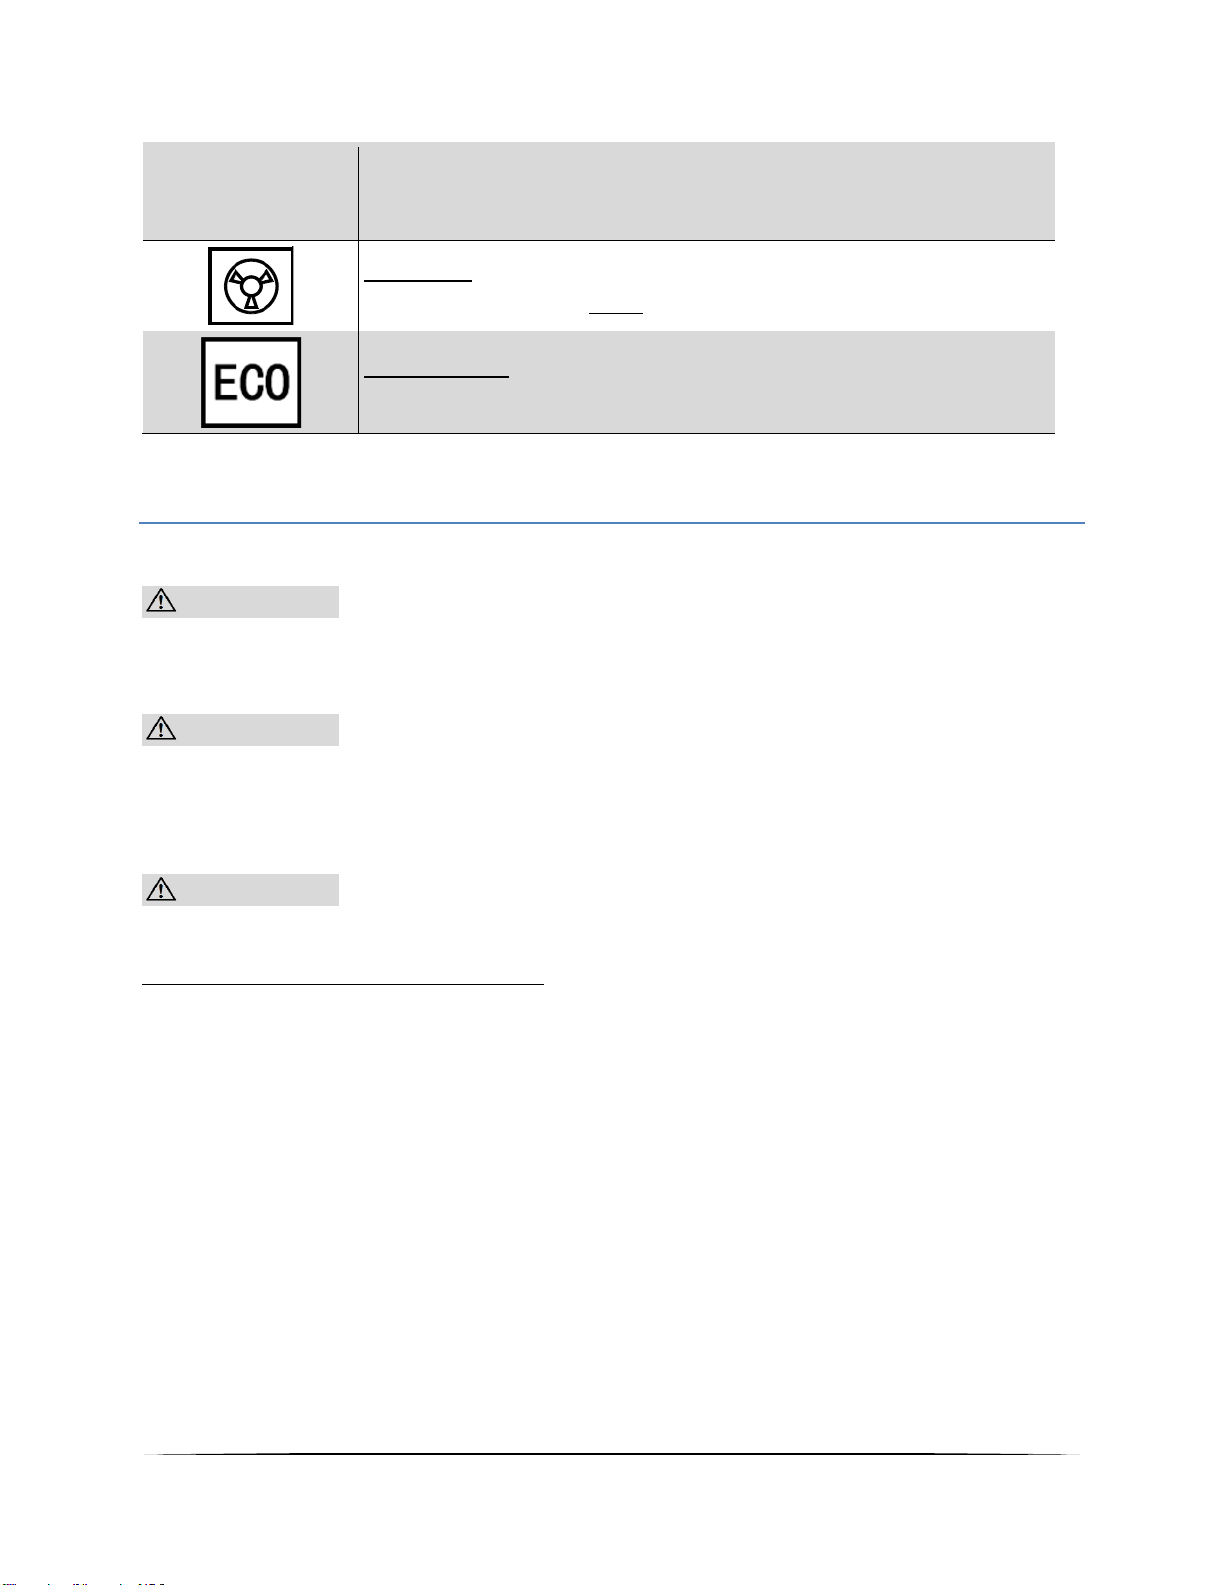
SYMBOLE
BESCHREIBUNG DER FUNKTIONEN
Heißluft:
➢ Geeignet um auf zwei Ebenen zu Backen / Kochen
Eco Modus:
➢ Ober-Unterhitze, Maximalleistung begrenzt
4. Hinweise für das Kochen
VORSICHT! Die inneren Bestandteile des Backofens werden sehr heiß.
Berühren Sie keine dieser Bereiche, während Sie mit Ihrem Kochgeschirr
umgehen. VERBRENNUNGSGEFAHR!
VORSICHT! Seien Sie vorsichtig, wenn Sie die Backofentür öffnen.
Kommen Sie nicht in Kontakt mit den heißen Bereichen oder mit dem Dampf,
der aus dem geöffneten Backofen entweicht. VERBRENNUNGSGEFAHR!
VERBRÜHUNGSGEFAHR!
VORSICHT! Benutzen Sie stets Backofenhandschuhe.
4.1 Tipps zum Backen und Braten
❖ Wir empfehlen die Nutzung des Backblechs, das mit dem Herd geliefert wurde.
❖ Es ist auch möglich, in Kuchenformen und auf Blechen zu backen, die an anderer
Stelle gekauft wurden. Zum Backen ist es besser, schwarze Bleche zu
verwenden, welche die Hitze besser leiten und die Backzeit verkürzen.
❖ Formen und Bleche mit hellen oder glänzenden Oberflächen werden nicht
empfohlen, wenn die konventionelle Aufheizmethode (obere und untere
Heizelemente) angewandt wird; die Nutzung solcher Formen kann zu einer zu
geringen Aufheizung des unteren Teils des Kuchens führen.
❖ Bevor der Kuchen aus dem Backofen herausgenommen wird, kontrollieren Sie, ob
das Backen abgeschlossen ist, indem Sie ein Holzstäbchen verwenden (der Kuchen
ist ausgebacken, wenn das Stäbchen trocken und sauber herauskommt, nachdem Sie
es in den Kuchen gesteckt haben).

29
❖ Nach dem Abschalten des Backofens ist es ratsam, den Kuchen für ungefähr 5
Minuten im Backofen zu lassen.
❖ Bereiten Sie Fleisch mit einem Gewicht von über 1 kg im Backofen zu; kleinere
Mengen sollten Sie auf einem Kochfeld zubereiten.
❖ Benutzen Sie backofengeeignetes Kochgeschirr. Achten Sie darauf, dass auch die
Griffe hitzeresistent sind.
❖ Wenn Sie Ihr Fleisch auf einem Gitterrost oder Grillrost zubereiten, schieben Sie ein
mit etwas Wasser gefülltes Backblech auf die niedrigste Einschubhöhe in den
Backofen.
❖ Wenden Sie während der Garzeit das Fleisch mindestens einmal. Übergießen Sie das
Fleisch mit seinem Bratensaft oder heißem Salzwasser.
❖ Gießen Sie niemals kaltes Wasser über das Fleisch.
4.2 Energie sparen
❖ Öffnen Sie die Backofentür nicht unnötig oft.
❖ Schalten Sie den Backofen rechtzeitig ab und nutzen Sie die Restwärme.
❖ Benutzen Sie den Backofen nur zur Zubereitung größerer Mengen.
❖ Fleisch mit einem Gewicht von unter 1 kg kann in einem Kochgeschirr auf dem
Kochfeld wirtschaftlicher zubereitet werden.
❖ Falls die Garzeit mehr als 40 Minuten beträgt, schalten Sie den Backofen 10 Minuten
vor Ende der Garzeit ab.
❖ Achten Sie darauf, dass die Backofentür richtig geschlossen ist.
❖ Aufgrund von Verunreinigungen an der Türdichtung kann dort Wärme entweichen.
Entfernen Sie deshalb umgehend alle Verunreinigungen.
❖ Schließen Sie das Gerät nicht in der unmittelbaren Umgebung von Kühl- und / oder
Gefriergeräten an. Andernfalls kann der Energieverbrauch unnötig ansteigen.
5. Reinigung und Pflege
WARNUNG!
Schalten Sie das Gerät vor dem Reinigen unbedingt aus und lassen Sie
es vollständig abkühlen. Trennen Sie das Gerät vor allen
Wartungsarbeiten von der Stromversorgung.
Ofen
➢ Reinigen Sie den Ofen nach jeder Benutzung.
➢ Schalten Sie beim Reinigen die Innenbeleuchtung des Ofens ein.
30
➢ Reinigen Sie das Innere des Ofens nur mit warmem Wasser und ein wenig
Spülmittel. Nehmen Sie dazu einen Schwamm oder ein weiches Tuch. Benutzen
Sie keine aggressiven und ätzenden Reinigungsmittel.
➢ Wischen Sie nach der Reinigung das Innere des Ofens trocken.
➢ Reinigen Sie die äußeren Bereiche des Ofens mit warmem Seifenwasser.
Nehmen Sie dazu einen Schwamm oder ein weiches Tuch. Benutzen Sie keine
aggressiven und ätzenden Reinigungsmittel.
➢ Wenn Sie einen speziellen Ofenreiniger anwenden, überprüfen Sie unbedingt
anhand der Angaben des Reinigungsherstellers, ob der Reiniger für Ihr Gerät
geeignet ist.
➢ Alle durch ein Reinigungsmittel an Ihrem Gerät verursachten Schäden werden
nicht kostenfrei behoben, auch nicht innerhalb des Garantierahmens.
Benutzen Sie niemals einen Dampfreiniger.
Ofentür
➢ Reinigen Sie die Glasscheibe der Ofentür äußerst vorsichtig. Verwenden Sie keine
Scheuermittel, da Sie ansonsten die Scheibe zerkratzen oder zerbrechen können..
Verwenden Sie etwas Spülmittel und warmes Wasser.
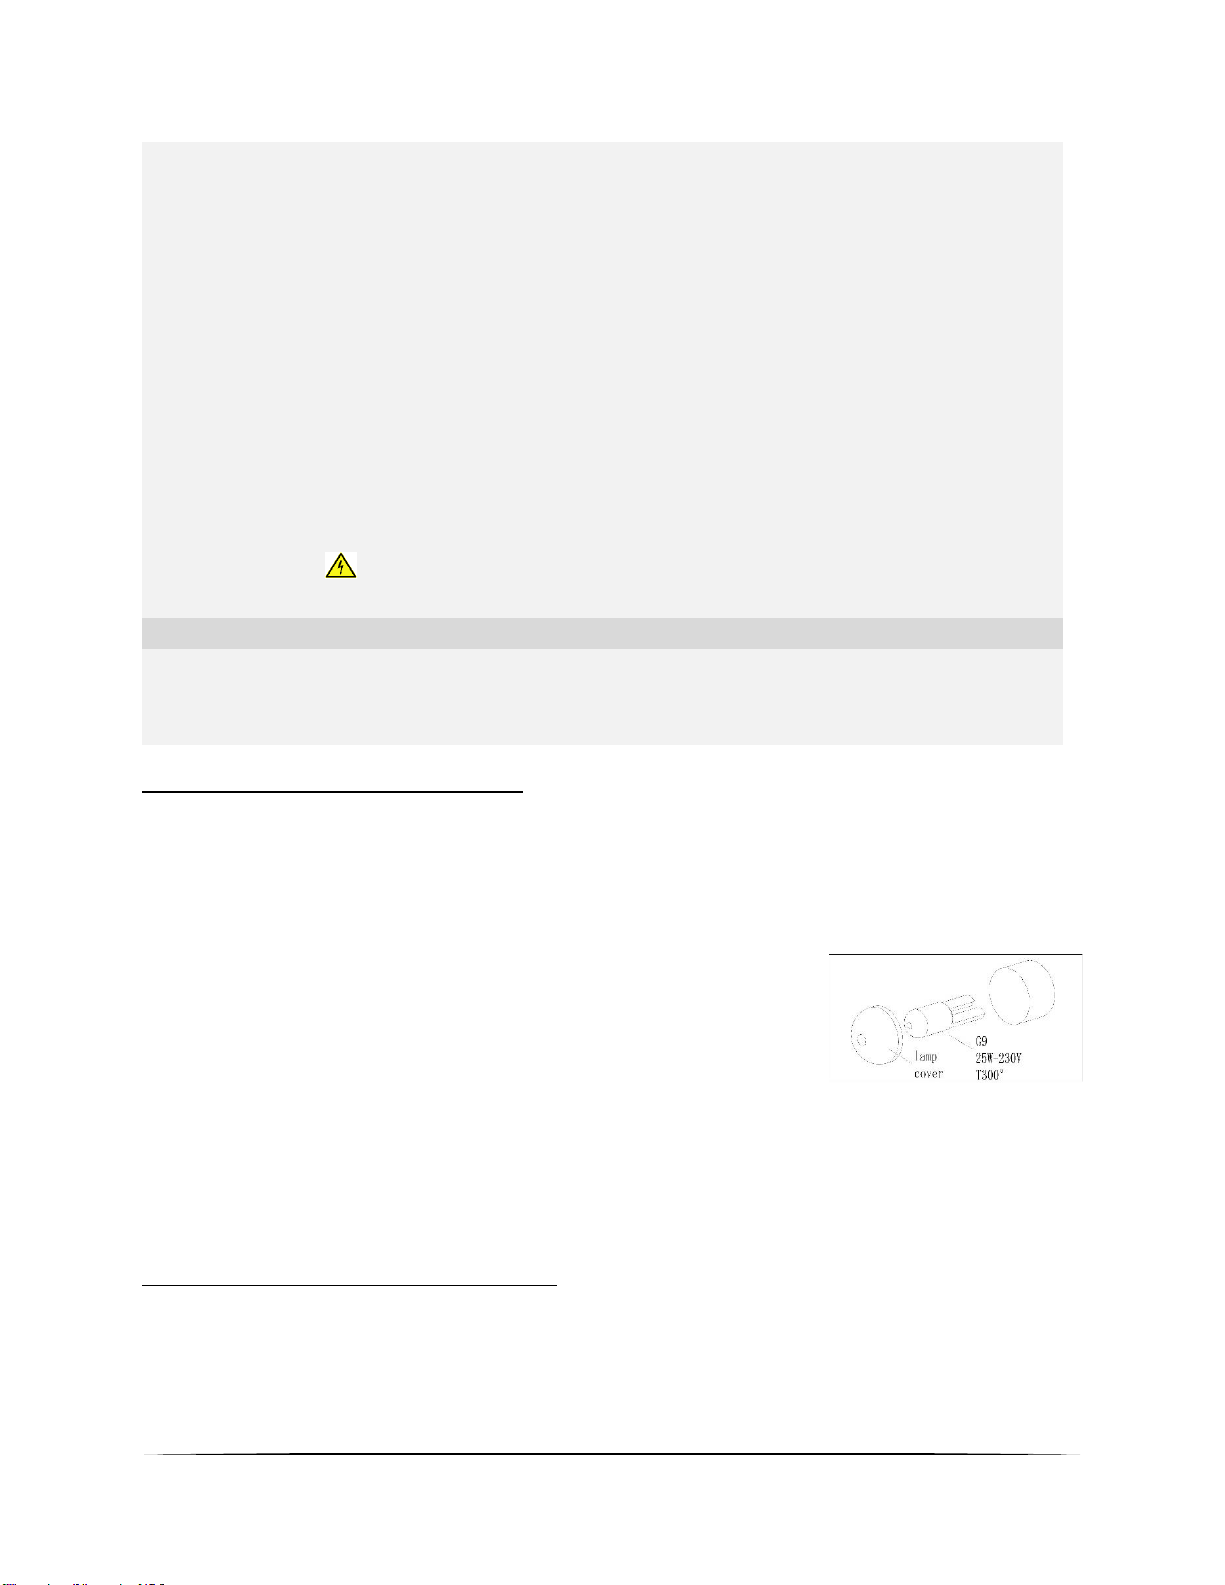
5.1 Austausch des Leuchtmittels
1. Schalten Sie das Gerät aus und trennen Sie es von
der Stromversorgung.
2. Drehen Sie die Leuchtmittelabdeckung ab und reinigen
Sie diese und trocknen Sie diese ab.
3. Drehen Sie das Leuchtmittel aus der Fassung und
ersetzen Sie es durch ein neues derselben Art und
Leistung:
➢ Hitzeresistentes Backofenleuchtmittel (300
0
C), 200-
240V/25W/ G9 Sockel /50Hz. Nutzen Sie keinesfalls
ein anderes Leuchtmittel.
4. Setzen Sie das Leuchtmittel ein und vergewissern Sie sich
das dieses richtig im Keramik Sockel eingesetzt ist.
5. Schrauben Sie die Leuchtmittelabdeckung wieder auf.
4.2 Entnahme der Seitenführungen
1. Lösen Sie die Schrauben der Seitenführungen.
2. Drehen Sie die Seitenführung vertikal, um sie von der Seitenwand des Ofens zu
lösen.

31
3. Nehmen Sie die Seitenführung aus dem Loch der Seitenwandbei einem Winkel von
ca. 45
0
zwischen der Seitenführung und der Seitenwand.
4.3 Entnahme der Ofentür
1. Öffnen Sie die Ofentür. Öffnen Sie die Scharnierabdeckung der Ofentür bis zur
maximalen Position (siehe Abbildung A).
2. Schließen Sie die Tür bis zum Anschlag, greifen Sie rechts und links an der Tür und
ziehen Sie die Tür nach oben ab.
Ofentür wieder installieren
Befolgen Sie die umgekehrte Reihenfolge der Türdemontage.
1. Achten Sie beim Einbau der Backofentür darauf, dass beide Scharniere direkt in die
Öffnung passen.
2. Beide Seiten des Scharnierfalzes müssen an der Scharnierbefestigungsöffnung der
Tür befestigt werden.
32
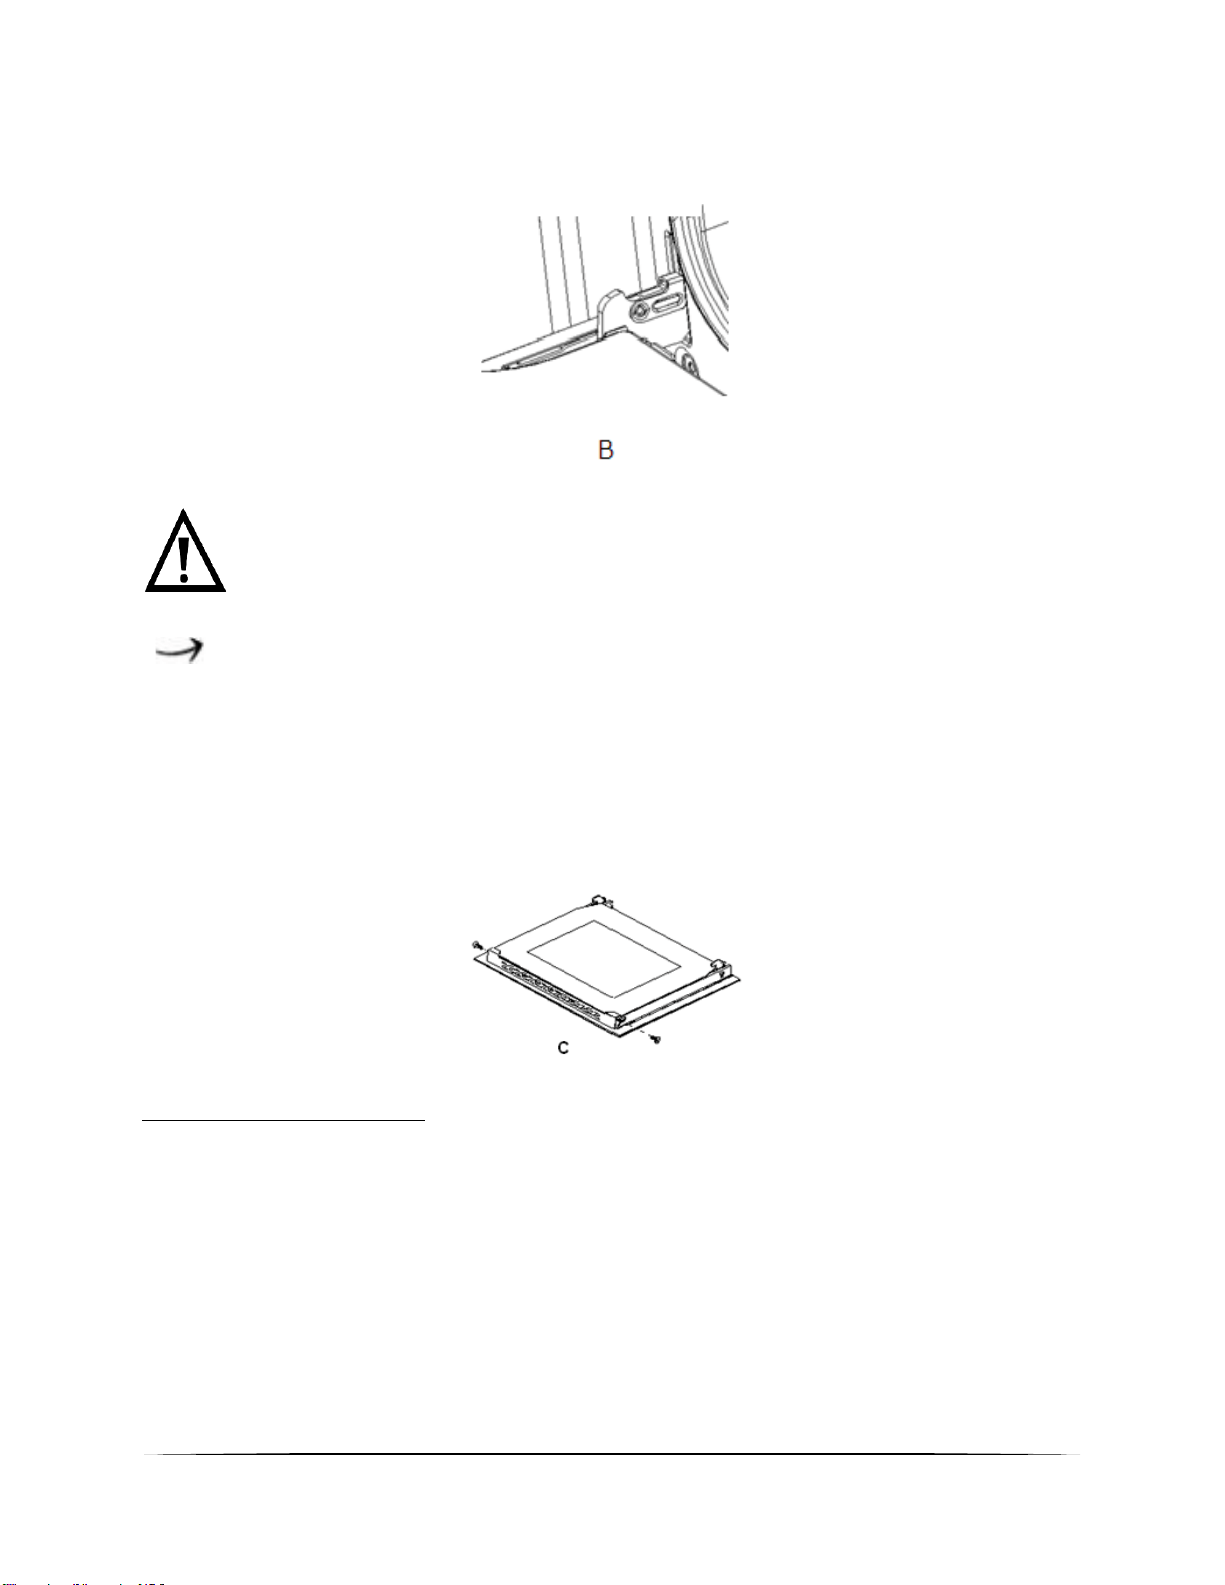
3. Wenn Sie die Tür öffnen, klappen Sie die Verriegelungsstange herunter (siehe
Abbildung B).
Wenn die Tür versehentlich herunterfällt oder sich die Scharniere
plötzlich schließen, drücken Sie Ihre Hand nicht in die Scharniere.
Rufen Sie Ihren Kundendienst an.
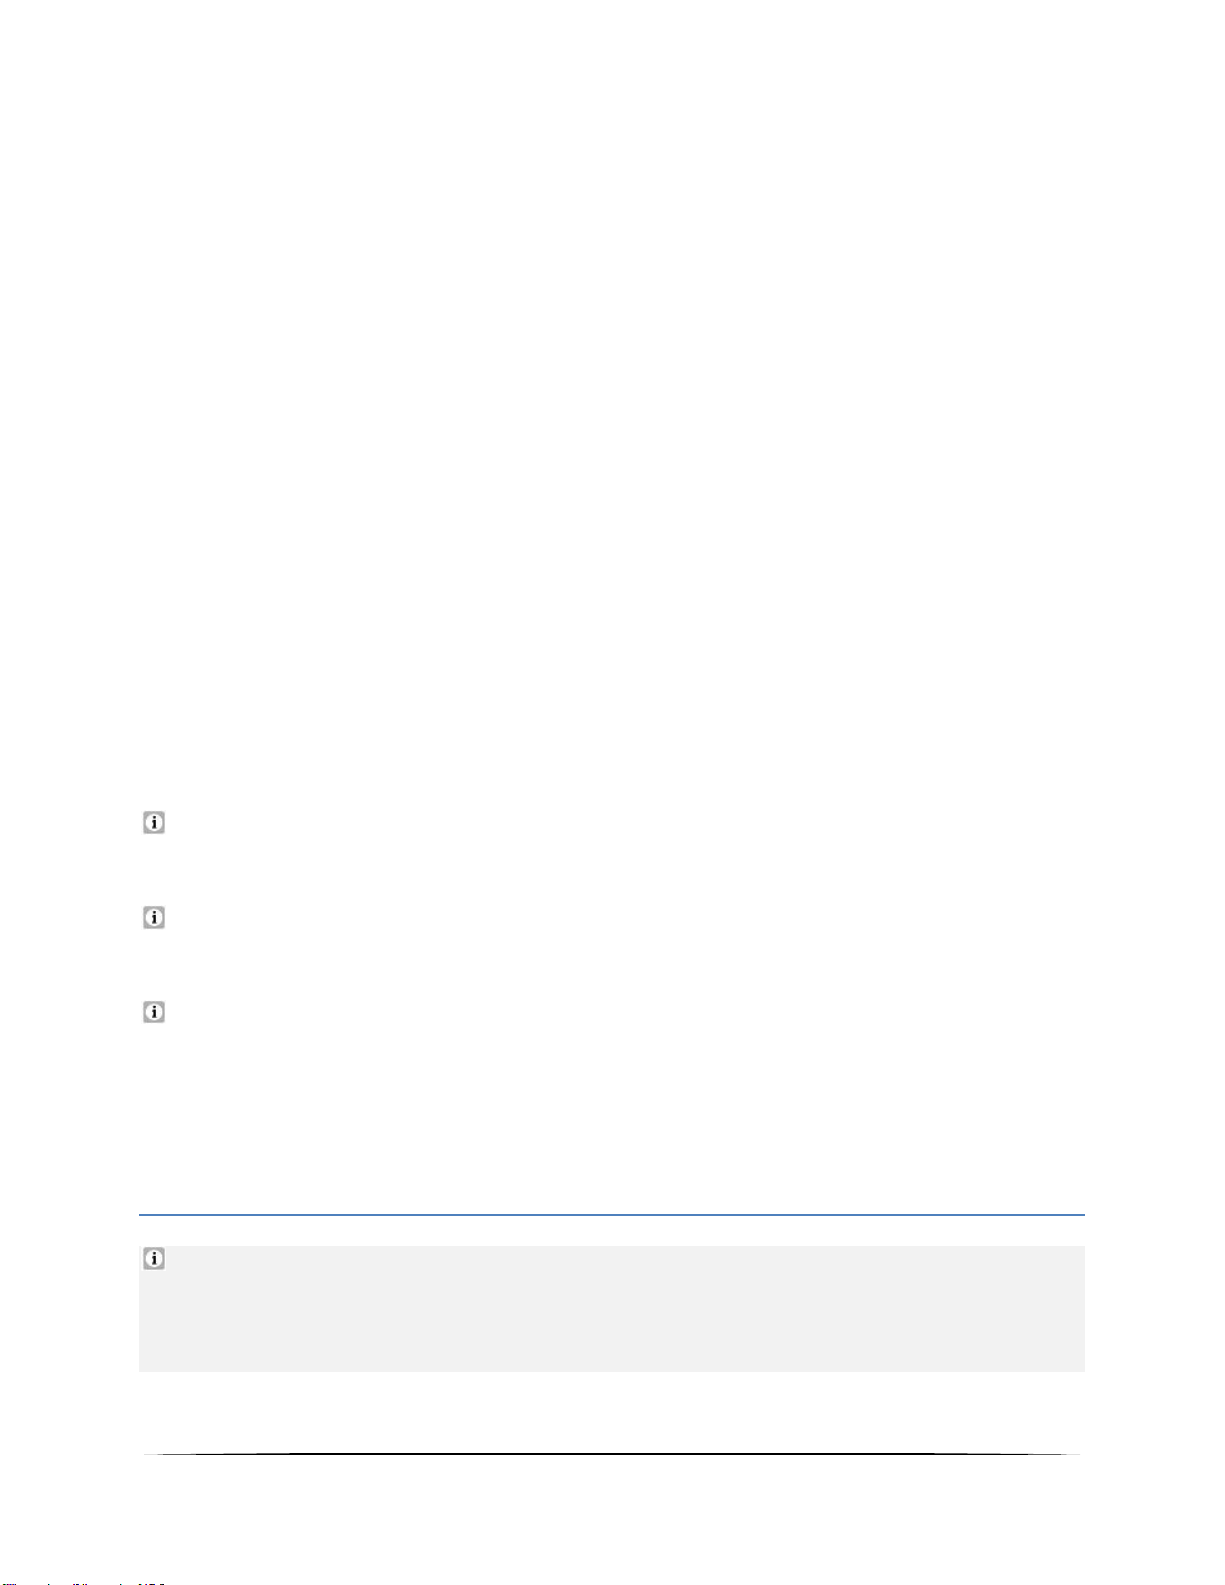
Entfernen der inneren Glasscheibe
1. Lösen Sie die Schrauben der Halterungsleiste die sich oben an der Tür befindet.
2. Entfernen Sie anschließend die innere Glasscheibe.
3. Nach dem reinigen der Glasscheibe, setzen Sie die Glasscheibe wieder ein, setzen
Sie die Halterungsleiste wieder ein und Schrauben Sie diese wieder fest. (siehe
Abbildung C).
5.4 Problembehandlung
Gehen Sie bei einem Notfall oder einer Fehlfunktion wie folgt vor:
1. Schalten Sie das Gerät komplett ab.
2. Trennen Sie das Gerät von der Stromversorgung (entsprechende Sicherung im
Sicherungskasten der Hausstromversorgung).
3. Kontaktieren Sie Ihren Kundendienst.
Überprüfen Sie die Angaben der Tabelle, bevor Sie den Kundendienst kontaktieren.

33
FEHLER
MÖGLICHE URSACHE
MASSNAHMEN
Gerät arbeitet überhaupt nicht.
➢ Das Gerät wird nicht mit Strom
versorgt.
➢ Überprüfen Sie die entsprechende
Sicherung im Sicherungskasten der
Hausstromversorgung.
Innenbeleuchtung funktioniert nicht.
➢ Das Leuchtmittel ist locker oder
beschädigt.
➢ Das Leuchtmittel festdrehen oder
ersetzen.
6. Technische Daten
Lieferant
PKM
Modell
EBO9.4
Energieeffizienzindex (IEE Backröhre)
92,4
Anzahl Backröhren
1
Wärmequelle je Backröhre
Elektrischer Strom
Geräteart
Einbaubackofen
Bedienpanel
Schwarze Glasblende
Energieeffizienzklasse
A
Energieverbrauch (konventionell)
0,76 KW/h
Energieverbrauch (Umluft)
0,74 KW/h
Nutzbares Volumen Backröhre
56,00 l
Größe des Geräts
mittel: 35 l ≤ Volumen < 65 l
Funktionen Backofen
Beleuchtung, Unterhitze mit Umluft,
Ober- und Unterhitze, Ober-und
Unterhitze mit Umluft, Grill, Oberhitze
mit Grill, Oberhitze mit Grill und
Umluft, Heißluft, Auftauen, ECO
Grill/Umluft/Heißluft
✓
✓
✓
Vollglasinnentüre
✓
Ofentür/Glasschichten
schwarzes Glas
3
Gehäusekühlung
✓
Griff und Knöpfe
Aluminium
Geräuschemmission
< 52 db/A
Maximale. Leistung
2,30 KW
Stromspannung/Frequenz
220-240V
50 Hz
Tropfschale/Grillrost
1
1

34
Kabellänge
150 cm
Gerätemaße in cm
59,50
59,50
55,00
Verpackungsmaße in cm
65,00
66,00
57,70
Gewicht netto/brutto
29,00
31,00
7. Entsorgung
1. Achten Sie beim Entpacken unbedingt darauf, dass die Bestandteile der Verpackung
( Polyäthylentüten, Polystyrenstücke ) nicht in die Reichweite von Kindern gelangen.
ERSTICKUNGSGEFAHR!
2. Nicht mehr benutzte und alte Geräte müssen der zuständigen
Wiederverwertungsstelle zugeführt werden. Keinesfalls offenen Flammen aussetzen.
3. Bevor Sie ein beliebiges Altgerät entsorgen, machen Sie dieses vorher unbedingt
funktionsuntüchtig! Das bedeutet, immer den Netzstecker ziehen und danach das
Stromanschlusskabel am Gerät abschneiden und direkt mit dem Netzstecker
entfernen und entsorgen! Demontieren Sie immer die komplette Tür, damit sich
keine Kinder einsperren und in Lebensgefahr geraten können!
4. Entsorgen Sie Papier und Kartonagen in den dafür vorgesehenen Behältern.
5. Entsorgen Sie Kunststoffe in den dafür vorgesehenen Behältern.
6. Falls es in Ihrem Wohnumfeld keine geeigneten Entsorgungsbehälter gibt, bringen
Sie diese Materialien zu einer geeigneten kommunalen Sammelstelle.
7. Nähere Informationen erhalten Sie von Ihrem Fachhändler oder bei Ihren
entsprechenden kommunalen Entsorgungseinrichtungen.
Alle mit diesem Symbol
gekennzeichneten Materialien sind
wiederverwertbar.
Alle verfügbaren Informationen zur
Mülltrennung erhalten Sie bei Ihren
örtlichen Behörden.

35
8. Garantiebedingungen
Der Hersteller leistet dem Verbraucher für die Dauer von 24 Monaten, gerechnet vom
Tag des Kaufes Garantie für einwandfreies Material und fehlerfreie Fertigung.
Dem Verbraucher stehen neben den Rechten aus der Garantie die gesetzlichen
Gewährleistungsrechte zu, die der Verbraucher gegen den Verkäufer hat, bei dem er das
Gerät erworben hat. Diese werden durch die Garantie nicht eingeschränkt.
Der Garantieanspruch ist vom Käufer durch Vorlage des Kaufbelegs mit Kauf-
und/oder Lieferdatum nachzuweisen und unverzüglich nach Feststellung und
innerhalb von 24 Monaten nach Lieferung an den Erstendabnehmer zu melden.
Die Garantie begründet keine Ansprüche auf Rücktritt vom Kaufvertrag oder
Minderung (Herabsetzung des Kaufpreises). Ersetzte Teile oder ausgetauschte Geräte
gehen in unser Eigentum über.
Der Garantieanspruch erstreckt sich nicht auf:
1. zerbrechliche Teile wie z.B. Kunststoff oder Glas bzw. Glühlampen;
2. geringfügige Abweichungen der PKM-Produkte von der Soll-Beschaffenheit, die auf
den Gebrauchswert des Produkts keinen Einfluss haben;
3. Schäden infolge Betriebs- und Bedienungsfehler,
4. Schäden durch aggressive Umgebungseinflüsse, Chemikalien, Reinigungsmittel;
5. Schäden am Produkt, die durch nicht fachgerechte Installation oder Transport
verursacht wurden;
6. Schäden infolge nicht haushaltsüblicher Nutzung;
7. Schäden, die außerhalb des Geräts durch ein PKM-Produkt entstanden sind - soweit
eine Haftung nicht zwingend gesetzlich angeordnet ist.
Die Gültigkeit der Garantie endet bei:
1. Nichtbeachten der Aufstell- und Bedienungsanleitung;
2. Reparatur durch nicht fachkundige Personen;
3. Schäden, verursacht durch den Verkäufer, Installateur oder dritte Personen;
4. unsachgemäße Installation oder Inbetriebnahme;
5. mangelnde oder fehlerhafte Wartung;
6. Geräten, die nicht ihrem vorgesehenen Zweck entsprechend verwendet werden;
7. Schäden durch höhere Gewalt oder Naturkatastrophen, insbesondere, aber nicht
abschließend bei Brand oder Explosion.
Garantieleistungen bewirken weder eine Verlängerung der Garantiefrist noch setzen sie
eine neue Garantiefrist in Lauf.
Der räumliche Geltungsbereich der Garantie erstreckt sich auf in Deutschland,
Österreich, Belgien, Luxemburg und in den Niederlanden gekaufte und verwendete
Geräte.
August 2014

36
Dear customer! We would like to thank you for purchasing a product from our wide
range of domestic appliances. Read the complete instruction manual before you operate
the appliance for the first time. Retain this instruction manual in a safe place for future
reference. If you transfer the appliance to a third party, also hand over this instruction
manual.
Index
Index .................................................................................................................................. 36
1. Safety instructions........................................................................................................ 37
2. Installation .................................................................................................................... 41
2.1 Unpacking and positioning ................................................................................... 41
2.2 Installation of the oven ......................................................................................... 41
2.3 Electrical connection ............................................................................................. 43
3. Operation ...................................................................................................................... 44
3.1 Before the first use ................................................................................................ 45
3.2 Appliance / Control panel / Display .................................................................. 45
3.2.1 Appliance / Front view ...................................................................................... 45
3.2.2 Appliance / Interior view .................................................................................. 46
3.2.3 Control panel ................................................................................................... 47
3.2.4 Display.................................................................................................................. 47
3.3 Use of the oven ..................................................................................................... 49
3.3.1 General operation of the oven ......................................................................... 49
3.3.2 Manual operating mode ..................................................................................... 50
3.3.3 Setting of the time of the day ........................................................................... 51
3.4 Programming of the oven .................................................................................... 51
3.4.1 Timer .................................................................................................................... 51
3.4.2 Semi-automatic cooking / baking function ..................................................... 52
3.4.3 Setting of the end of the cooking / baking time ........................................... 53
3.4.4 Automatic cooking / baking function ............................................................. 55
3.4.5 How to cancel the programming ...................................................................... 56
3.4.6 Selection of the acoustic signal ......................................................................... 57
37
3.4.7 Changing of the current time of the day ........................................................ 58
3.5 Functions of the oven ........................................................................................... 58
4. Cleaning and maintenance .......................................................................................... 60
4.1 Replacing of the illuminant .................................................................................. 61
4.2 Removing of the guides ........................................................................................ 61
4.3 Removing of the oven door ................................................................................. 61
4.4 Trouble shooting .................................................................................................... 63
5. Technical data ............................................................................................................... 63
6. Waste management ...................................................................................................... 65
7. Guarantee conditions .................................................................................................. 66
EU - Declaration of Conformity
The products, which are described in this instruction manual, comply with the
harmonized regulations.
The relevant documents can be requested from the final retailer by the competent
authorities.
The figures in this instruction manual may differ in some details from the current
design of your appliance. Nevertheless follow the instructions in such a case.
Delivery without content.
Any modifications, which do not influence the functions of the appliance. shall
remain reserved by the manufacturer. Please dispose of the packing with respect to
your current local and municipal regulations.
The appliance you have purchased may be an enhanced version of the unit this
manual was printed for. Nevertheless, the functions and operating conditions are
identical. This manual is therefore still valid. Technical modifications as well as
misprints shall remain reserved.
1. Safety instructions
Read the safety instructions carefully before you operate the appliance for the
first time. All information included in those pages serve for the protection of the
operator. If you ignore the safety instructions, you will endanger your health and
life.
38
DANGER! indicates a hazardous
situation which, if ignored, will result in
death or serious injury.
WARNING! indicates a hazardous
situation which, if ignored, could result
in death or serious injury.
CAUTION! indicates a hazardous
situation which, if not avoided, may
result in minor or moderate injury.
NOTICE! indicates possible damage to
the appliance.
Store this manual in a safe place so you can use it whenever it is needed. Strictly
observe the instructions to avoid damage to persons and property.
Check the technical periphery of the appliance! Do all wires and connections to
the appliance work properly? Or are they time-worn and do not match the
technical requirements of the appliance? A check-up of existing and newly-made
connections must be done by an authorized professional. All connections and
energy-leading components (incl. wires inside a wall) must be checked by a
qualified professional. All modifications to the electrical mains to enable the
installation of the appliance must be performed by a qualified professional.
The appliance is intended for private use only.
The appliance is intended for cooking in a private household only.
The appliance is intended for indoor-use only.
The appliance is not intended to be operated for commercial purposes, during
camping and in public transport.
Operate the appliance in accordance with its intended use only.
Do not allow anybody who is not familiar with this instruction manual to operate
the appliance.
➢ This appliance may be operated by children aged from 8 years and above as well
as by persons with reduced physical, sensory and mental capabilities or lack of
experience and knowledge if they are supervised or have been instructed
concerning the safe use of the appliance and do comprehend the hazards
involved. Children must not play with the appliance. Cleaning and user-
maintenance must not be carried out by children unless they are supervised.
DANGER!
1. The appliance must be connected to the mains by a qualified professional, who is
familiar with and adheres to the local requirements and supplementary regulations
of your energy supplier.
2. All electrical work must be carried out by a qualified professional. Do not modify
the energy supply. The connection must be carried out in accordance with the
current local and legal regulations
39
3. Do not connect the appliance to the mains if the appliance itself or the power cord
or the plug are visibly damaged.
4. Never try to repair the appliance yourself. Repairs carried out by unauthorized
persons can cause serious damage. If the appliance does not operate properly, please
contact the shop you purchased the appliance at. Original spare parts should be used
only.
5. When the power cord is damaged, it must be replaced by the manufacturer or an
authorized aftersales service or a qualified professional only.
WARNING!
1. Disconnect the appliance from the mains before you clean or maintain it.
2. The appliance must always be grounded and protected corresponding to the
requirements of your local energy supplier. The main current circuit must be
equipped with a safety shut-down device.
3. All modifications to the electrical mains to enable the installation of the appliance
must be performed by a qualified professional.
4. In case of an event caused by a technical malfunction, disconnect the appliance from
the mains. Report the malfunction to your service centre so it can be repaired.
5. Do not use adapters, multiple sockets and extension cords for connecting the
appliance to the mains.
6. Do not carry out any modifications to your appliance.
7. The room the appliance is installed in must be dry and well-ventilated. When the
appliance is installed, an easy access to all control elements is required.
8. The veneering of cabinets has to be fixed with a heat-resistant glue, that is able to
withstand a temperature of 120
0
C.
9. Adjacent furniture or housing and all materials used for installation must be able to
resist a temperature of min. 85
0
C above the ambient temperature of the room the
appliance is installed in during operation.
10. Remove the back of the kitchen unit to ensure adequate ventilation around the
appliance. The appliance must have at least 45 mm of free space at its back.
11. Do not install the appliance in rooms or at areas which contain flammable substances
as petrol, gas or paint. This warning also refers to the vapour these substances
release.
12. Cooker-hoods should be installed according to their manufacturers' instructions.
13. Do not heat your rooms or dry your washing by use of the appliance.
14. Do not install the appliance near to curtains or upholstered furniture. RISK OF
FIRE!
15. Do not store any objects in the oven. RISK OF FIRE!

40
16. Household equipment and connection leads must not touch the hot oven or the hob
as the insulation material is usually not heat-resistant.
17. Never use a steam cleaner to clean the appliance. The steam will cause serious
damage to the electric components of the appliance. Risk of electrical shock!
18. The accessible parts of the oven become hot during operation, so keep children
away from the operating appliance. Touching the appliance while it is operating can
cause serious burns.
19. Children must not play with the appliance.
20. Always supervise children if they are near the appliance.
CAUTION!
1. The appliance becomes hot while operating. Do not touch the hot components
inside the oven.
2. Do not use any aggressive, abrasive and acrid detergents or sharp-edged items to
clean the door of the oven. Otherwise you may scratch the surface and damage the
glass.
3. Do not put any cookware or baking trays directly on the base inside the oven. Do
not cover the base inside the oven with aluminium foil.
4. Keep the door of the oven always closed if you use one of the oven-functions.
5. Do not put any cookware directly on the base inside the oven. Use the trays.
6. Be careful if you open the door. Do not get in contact with the hot parts of the oven
or the steam, which will escape the oven.
7. Always use oven-gloves.
8. This appliance complies with the current European safety legislation. We do wish to
emphasize that this compliance does not negate the fact that the surfaces of the
appliance will become hot while operating and will retain and emit heat even if
it has stopped operating.
NOTICE
1. When you move the appliance, hold it at its base and lift it carefully. Keep the
appliance in an upright position.
2. Never use the door for moving the appliance as you will damage the hinges.
3. The appliance must be transported and installed by at least two persons.
4. When you unpack the appliance, you should take note of the position of every part
of the interior accessories in case you have to repack and transport it at a later point
of time.
5. Do not operate the appliance unless all components are installed properly.
6. Do not stand or lean on the base, the drawers, the doors etc of the appliance.

41
7. The air vents of the appliance or its built-in structure (if the appliance is suitable for
being built-in) must be completely open, unblocked and free of any kind of dirt.
8. Do not put any heavy items onto the open door of the oven. Do not lean against
the open door of the oven as you will damage the hinges.
2. Installation
2.1 Unpacking and positioning
1. Unpack the appliance carefully. Dispose of the packaging as described in chapter
waste management.
2. Completely remove the transport-protection. Be very careful and do not use any
aggressive or abrasive detergents to remove residuals of the transport-protection.
3. Check that the appliance and the power cord are not visible damaged.
4. Do not install the appliance in a place where it may come in contact with water or
rain; otherwise, the insulation of the electrical system will be damaged.
5. Install the appliance on a level, dry and solid floor. Check the correct installation
with a bubble level.
6. Remove the complete packaging material (inside and outside the appliance) before
initial operation.
7. The nameplate is situated inside the appliance or at the back.
2.2 Installation of the oven
DANGER!
The appliance must be connected to the mains by a qualified professional,
who is familiar with and adheres to the local requirements and
supplementary regulations of your electricity supplier.
All electrical work must be carried out by a qualified professional. Do not
modify the energy supply. The connection must be carried out in
accordance with the current local and legal regulations
1. Provide an opening meeting the dimensions on figure 1. Fit the appliance into the
opening.
2. Open the door and remove the rubber caps of the two screws on the sides of the
oven-frame.
3. Fix the oven on the kitchen cabinet with the two screws which fit the holes
provided in the oven-frame.
4. Fix the rubber caps after fitting the oven into the cabinet.

42
43
Fig. 1
Ventilation openings
The temperature of the oven is higher than 70
0
C after cooking. The ventilation opening
will keep working for 15 minutes when you have stopped cooking.
Ventilation openings
2.3 Electrical connection
Instructions for the installer (qualified professional)
The appliance is designed to be connected to a 230V-50Hz electricity supply. Total
power absorbed is 2300W. The cable used for connection must have a cross section of
1.5 mm
2
. The direct connection to the mains supply must have a double pole switch
with a minimum rating of 250V, 20A. The switch must not brake the yellow-green earth
cable at any point.
44
The cable must be placed in such a way that it cannot touch a high temperature area
at any point after installation and connection.
3. Operation
WARNING! The accessible parts of the appliance become hot during
operation, so keep children away from the operating appliance. Touching the
appliance while it is operating can cause serious burns.
CAUTION! The interior parts of the appliance become extremely hot. Do
not touch any parts inside the appliance if you handle your cookware. RISK
OF BURNS!
CAUTION! Cooking utensils may become hot because of the heat
transferred by the heated food. Potholders or oven gloves may be needed to
handle such utensils.
NOTICE! Use suitable ovenware only.
Read the complete instruction manual before you operate the appliance for
the first time. Strictly observe the safety instructions!
Remove the complete protective film!
45
3.1 Before the first use
1. Remove all packaging material.
2. Clean the oven inside from all protective agents.
3. Take out the supplied accessories and clean them with warm water and washing-up
liquid.
4. Switch on the room ventilation or open a window.
5. Let the oven operate (250
0
C) for 30 minutes. Now a little bit of smoke and odour
may be generated for approx. 15 minutes. This is normal. They are generated by the
substance, that protects your appliance against damage caused by the shipment from
the manufacturer's works.
NOTICE! Clean the oven with warm water and washing-up liquid only.
3.2 Appliance / Control panel / Display
3.2.1 Appliance / Front view
46
1
CONTROL PANEL (s. chapter 3.2.3 CONTROL PANEL)
2
DOOR of the oven
3
DOOR HANDLE
4
Grilling grate
3
5
DRIP PAN / OVEN PAN
4
6
LATERAL HANDLE for moving the appliance (on both sides)
3.2.2 Appliance / Interior view
7
INTERNAL LIGHT
8
GRILL ELEMENT
9
FAN MOTOR (behind a steel plate)
3
Depending on model
4
Depending on model
47
3.2.3 Control panel
A
ROTARY KNOB FOR THE SELECTION OF THE OVEN FUNCTIONS
➢ Select the desired cooking function.
B
LED DISPLAY
➢ Time indication.
➢ Buttons for the setting of the time of the day.
➢ Buttons for the programming of the oven.
C
ROTARY KNOB FOR THE SELECTION OF THE TEMPERATURE
➢ Can be adjusted from 50
0
C to 250
0
C
D
OPERATIONAL STATUS INDICATOR OF THE OVEN
E
OPERATIONAL STATUS INDICATOR: "HEATING"
3.2.4 Display
❖ The display indicates the current time of the day.
❖ The display can also be used for the programming of the oven, the timer, and for
time setting.

48
1
Indicator: "AUTOMATIC COOKING"
2
Operational status indicator: "OVEN IN USE"
3
Indicator: DECIMAL POINTS OF THE CLOCK
4
Indicator: TIMER
5
BUTTON: +
➢ Button for the setting of the TIME.
➢ Button for the setting of the TIMER.
6
PROGRAMME BUTTON / MANUAL-BUTTON
➢ Button for the setting of the TIME.
➢ Button for the setting of the TIMER.
➢ Button for the PROGRAMMING of the oven.
7
BUTTON: -
➢ Button for the setting of the TIME.
➢ Button for the setting of the TIMER.
49
3.3 Use of the oven
CAUTION! The interior parts of the appliance become extremely hot. Do
not touch any parts inside the appliance if you handle your cookware. RISK
OF BURNS!
CAUTION! Be careful if you open the door. Do not get in contact with the
hot parts of the oven or the steam, which will escape the oven. RISK OF
BURNS! RISK OF SCALDING!
CAUTION! Always use oven gloves.
Proper positioning of the trays is mandatory for safe
operation of the appliance. Otherwise hot food or
cookware can slide off the trays when removing them.
After the appliance has been connected to the mains for the first time, the numbers
on the display are flashing.
After the end of operation, the cooling fan still continues to run for a while.
Before you can set the time of the day, select an oven function or an oven
temperature, you must activate the manual operating mode of the oven (s.
chapter 3.3.2 MANUAL OPERATING MODE).
3.3.1 General operation of the oven
➢ The oven can be warmed up using the bottom and top heaters and the fan. The
operation of the oven is controlled by the ROTARY KNOB FOR THE SELECTION OF
THE OVEN FUNCTIONS (A / s. chapter 3.2.3 CONTROL PANEL).To set a function you
should turn the knob to the desired position (in clockwise or anticlockwise
direction).
➢ Use the ROTARY KNOB FOR THE SELECTION OF THE TEMPERATURE (C / s. chapter
3.2.3 CONTROL PANEL) to select a temperature. You can set the temperature within
a range of 50
0
C - 250
0
C (in clockwise direction).
➢ The oven can be switched off by setting both of these knobs to position 0 (s. fig
below).
50
C / TEMPERATURE CONTROL
A / OVEN FUNCTIONS
CAUTION! Turn the temperature control knob in clockwise direction
only. After you have set a temperature, you can turn the knob back to its
home position. Otherwise you may damage the temperature control knob.
OPERATIONAL STATUS INDICATOR OF THE OVEN (D)
❖ The operational status indicator of the oven (D // s. chapter 3.2.1 APPLIANCE /
FRONT VIEW) indicates that the oven is operating.
❖ If the rotary knob for the selection of the oven functions (A) is set to "internal light"
, the operational status indicator of the oven (D) goes on as well.
OPERATIONAL STATUS INDICATOR: "HEATING" (E)
❖ The operational status indicator "HEATING" (E // s. chapter 3.2.1 APPLIANCE /
FRONT VIEW) indicates that the oven is heating. When the operational status
indicator goes off the oven has reached the temperature you preset.
❖ lf a recipe recommends to place dishes in a warmed-up oven, place the dishes in the
oven after the operational status indicator "HEATING" has gone off for the first time.
❖ While the oven is used, the operational status indicator "HEATING" will go off and
on temporarily to maintain the preset temperature.
3.3.2 Manual operating mode
Before you can set the time of the day, select an oven function or an oven
temperature, you must activate the manual operating mode.
51
Description of the respective numerations (s. below, e.g. (6) / (2) / etc.): s. chapter
3.2.4 DISPLAY
1. Press the programme button / manual-button (6) for 3 seconds to activate the
manual operating mode.
2. The operational status indicator "OVEN IN USE" on the display (2) goes on.
3. The oven is now in manual operating mode.
3.3.3 Setting of the time of the day
Before you can use the oven generally, you must set the time of the day.
Description of the respective numerations: s. chapter 3.2.4 DISPLAY
1. The oven must be in manual operating mode (s. chapter 3.3.2 MANUAL OPERATING
MODE).
2. Press the programme button (6) once.
3. The decimal points of the clock (3) are flashing.
4. Set the correct time of the day using the buttons + (5) and / or - (7).
5. If the correct time of the day is displayed, release the + / - buttons and wait a few
seconds.
6. The decimal points of the clock stop flashing and the oven is ready for operation.
3.4 Programming of the oven
3.4.1 Timer
❖ The timer serves as a timepiece and counts down the set time (countdown time).
❖ The maximum settable countdown time is 23 hours and 59 minutes.
Description of the respective numerations: s. chapter 3.2.4 DISPLAY
HOW TO SET THE TIMER:
1. Press the programme button (6) twice.
2. The decimal points of the clock (3) are flashing.
3. The indicator of the timer (4) goes on.
52
4. The display indicates 00:00.
5. Set the desired countdown time using the buttons + (5) and / or - (7).
6. If the desired countdown time is displayed, release the + / - buttons.
7. The countdown starts immediately.
8. After a few seconds the display indicates the current time of the day.
9. If the countdown time has elapsed, an acoustic signal sounds.
10. After approx. 7 minutes the acoustic signal stops automatically. You can switch off
the acoustic signal as well by pressing any button on the display.
❖ The indicator of the timer (4) is displayed so long as the countdown is working. After
the countdown time has elapsed, the indicator goes off.
❖ To switch off the oven, the rotary knob for the selection of the oven functions (A)
and the rotary knob for the selection of the temperature (C) must be set to position
0.
WARNING When using the timer in countdown mode, the oven will
not be switched off automatically after the selected period of time has
elapsed.
3.4.2 Semi-automatic cooking / baking function
❖ This function allows you to set a countdown time by which the oven will be
switched off automatically after the time has elapsed.
❖ The maximum settable countdown time is 10 hours.
Description of the respective numerations: s. chapter 3.2.4 DISPLAY
HOW TO SET THE SEMI-AUTOMATIC COOKING / BAKING FUNCTION:
1. Place the food to be cooked or baked in the oven and close the door properly.
2. Select the desired oven function (s. chapter 3.5 FUNCTIONS OF THE OVEN) and oven
temperature using the corresponding rotary knobs (A / C // s. chapter 3.2.3
CONTROL PANEL).
3. Press the programme button (6) thrice.
4. The decimal points of the clock (3) are flashing.
5. The operational status indicator "OVEN IN USE" (2) on the display goes on.
6. The indicator "AUTOMATIC COOKING" (1) goes on.
7. The display indicates 00:00.
8. Set the desired countdown time using the buttons + (5) and / or - (7).
53
9. If the desired countdown time is displayed, release the + / - buttons.
10. The cooking process starts immediately and the countdown starts a few seconds
later.
11. If the countdown time has elapsed, an acoustic signal sounds and the oven will be
switched off automatically.
12. The indicator "AUTOMATIC COOKING" (1) and the indicator of the TIMER (4) are
flashing.
13. You can switch off the acoustic signal by pressing any button on the display.
14. To switch off the oven, the rotary knob for the selection of the oven functions
(A) and the rotary knob for the selection of the temperature (C) must be set
to position 0.
HOW TO RESET THE OVEN:
❖ After using the semi-automatic cooking / baking function the oven must be reset
to standard mode.
1. Press the programme button (6) once for 3 seconds.
2. The display indicates the time of the day.
3. Press the programme button (6) one more time for 3 seconds.
4. The operational status indicator "OVEN IN USE" (2) on the display goes on.
5. The indicator "AUTOMATIC COOKING" (1) goes off.
6. The oven is ready for operation again.
CAUTION! To switch off the oven completely the rotary knobs of the
oven function and of the temperature control must be set to position 0. If the
rotary knobs are not set to position 0 while resetting the oven, the oven starts
to heat again.
3.4.3 Setting of the end of the cooking / baking time
❖ This function allows you to select the time of the day by which the oven will be
switched off automatically.
❖ The maximum settable time of the day for the end of the cooking / baking time is
10 hours from the current time of the day.
Description of the respective numerations: s. chapter 3.2.4 DISPLAY

54
HOW TO SET THE END OF THE COOKING / BAKING TIME:
1. Place the food to be cooked or baked in the oven and close the door properly.
2. Select the desired oven function (s. chapter 3.5 FUNCTIONS OF THE OVEN) and oven
temperature using the corresponding rotary knobs (A / C // s. chapter 3.2.3
CONTROL PANEL).
3. Press the programme button (6) four times.
4. The decimal points of the clock (3) are flashing.
5. The operational status indicator "OVEN IN USE" (2) on the display goes on.
6. The indicator "AUTOMATIC COOKING" (1) goes on.
7. The display indicates 00:00.
8. Set the desired time of the day by which the cooking / baking process should be
finished using the buttons + (5) and / or - (7).
9. If the desired time of the day is displayed, release the + / - buttons.
10. The cooking process starts immediately and the countdown starts a few seconds
later.
11. If the set time of the day has been reached, an acoustic signal sounds and the oven
will be switched off automatically.
12. The indicator "AUTOMATIC COOKING" (1) and the indicator of the TIMER (4) are
flashing.
13. You can switch off the acoustic signal by pressing any button on the display.
14. To switch off the oven, the rotary knob for the selection of the oven functions
(A) and the rotary knob for the selection of the temperature (C) must be set
to position 0.
HOW TO RESET THE OVEN:
❖ After the oven has reached the set time of the day and is switched off automatically,
it must be reset to standard mode.
1. Press the programme button (6) once for 3 seconds.
2. The display indicates the time of the day.
3. Press the programme button (6) one more time for 3 seconds.
4. The operational status indicator "OVEN IN USE" (2) on the display goes on.
5. The indicator "AUTOMATIC COOKING" (1) goes off.
6. The oven is ready for operation again.
CAUTION! To switch off the oven completely the rotary knobs of the
oven function and of the temperature control must be set to position 0. If the
55
rotary knobs are not set to position 0 while resetting the oven, the oven starts
to heat again
3.4.4 Automatic cooking / baking function
❖ This function allows you to select the duration of the cooking / baking time and
to select the time of the day by which the oven will be switched off automatically
at the same time.
❖ The maximum settable duration of the cooking / baking time is 10 hours.
❖ The maximum settable time of the day for the end of the cooking / baking time is
10 hours from the current time of the day.
Description of the respective numerations: s. chapter 3.2.4 DISPLAY
HOW TO SET THE AUTOMATIC COOKING / BAKING FUNCTION:
1. Place the food to be cooked or baked in the oven and close the door properly.
2. Select the desired oven function (s. chapter 3.5 FUNCTIONS OF THE OVEN) and oven
temperature using the corresponding rotary knobs (A / C // s. chapter 3.2.3
CONTROL PANEL).
3. Press the programme button (6) thrice.
4. The decimal points of the clock (3) are flashing.
5. The operational status indicator "OVEN IN USE" (2) on the display goes on.
6. The indicator "AUTOMATIC COOKING" (1) goes on.
7. Set the desired duration of the cooking / baking time using the buttons + (5)
and / or - (7).
8. Press the programme button (6) immediately afterwards.
9. The current time of the day is flashing.
10. Set the desired time of the day by which the cooking / baking process should be
finished using the buttons + (5) and / or - (7).
11. If the desired time of the day is displayed, release the + / - buttons.
12. The cooking process starts at the calculated time of the day.
13. If the cooking / baking process has been finished, an acoustic signal sounds and the
oven will be switched off automatically.
14. The indicator "AUTOMATIC COOKING" (1) and the indicator of the TIMER (4) are
flashing.
15. You can switch off the acoustic signal by pressing any button on the display.
16. To switch off the oven, the rotary knob for the selection of the oven functions
(A) and the rotary knob for the selection of the temperature (C) must be set
to position 0.
56
EXAMPLE:
❖ It is 8:00 a.m. You want to cook or bake for 2 hours. The cooking / baking time
should be finished at 1:00 p.m.
❖ To set the programme please follow the instructions given above in: "HOW TO SET
THE AUTOMATIC COOKING / BAKING FUNCTION".
➢ Set the duration of the cooking / baking time to 2 hours.
➢ Set the time of the day by which the cooking / baking process should be finished
to 1:00 p.m.
➢ The calculated cooking process starts at 11:00 a.m.
➢ At 1:00 p.m. the oven will be switched off automatically.
HOW TO RESET THE OVEN:
❖ After the oven has reached the set time of the day and is switched off automatically,
it must be reset to standard mode.
1. Press the programme button (6) once for 3 seconds.
2. The display indicates the time of the day.
3. Press the programme button (6) one more time for 3 seconds.
4. The operational status indicator "OVEN IN USE" (2) on the display goes on.
5. The indicator "AUTOMATIC COOKING" (1) goes off.
6. The oven is ready for operation again.
CAUTION! To switch off the oven completely the rotary knobs of the
oven function and of the temperature control must be set to position 0. If the
rotary knobs are not set to position 0 while resetting the oven, the oven starts
to heat again.
3.4.5 How to cancel the programming
HOW TO CANCEL THE TIMER
1. Press the programme button (6) twice to select the TIMER FUNCTION.
2. Set the time which is indicated on the display back to 00:00.
57
HOW TO CANCEL THE SEMI-AUTOMATIC COOKING / BAKING FUNCTION:
1. Press the programme button (6) thrice to select the SEMI-AUTOMATIC COOKING
/ BAKING FUNCTION.
2. Set the time which is indicated on the display back to 00:00.
HOW TO CANCEL THE END OF THE COOKING / BAKING TIME:
1. Press the programme button (6) four times to select the function "SELECTION
OF THE END OF THE COOKING / BAKING TIME".
2. Set the time which is indicated on the display back to the current time of the day.
HOW TO CANCEL THE AUTOMATIC COOKING / BAKING FUNCTION:
1. To cancel the AUTOMATIC COOKING / BAKING FUNCTION press the programme
button (6) thrice.
2. Set the duration of the cooking / baking time which is indicated on the display back
to 00:00.
3. Press the programme button (6) once again.
4. Set the time which is indicated on the display back to the current time of the day.
CAUTION! To switch off the oven completely the rotary knobs of the
oven function and of the temperature control must be set to position 0. If the
rotary knobs are not set to position 0 after you have cancelled the timer /
programme functions, the oven will keep heating continuously.
3.4.6 Selection of the acoustic signal
❖ You can select three various acoustic signals.
The TIMER / PROGRAMME FUNCTIONS must not be activated and the operational
status indicator "OVEN IN USE" (2) on the display must be on (s. chapter 3.3.2
MANUAL OPERATING MODE).
Description of the respective numerations: s. chapter 3.2.4 DISPLAY
1. Press the buttons + (5) and - (7) for 2 seconds simultaneously.
2. The currently set acoustic signal sounds.
3. Press the buttons + (5) and - (7) a second time for 2 seconds simultaneously.
4. The second selectable acoustic signal sounds.
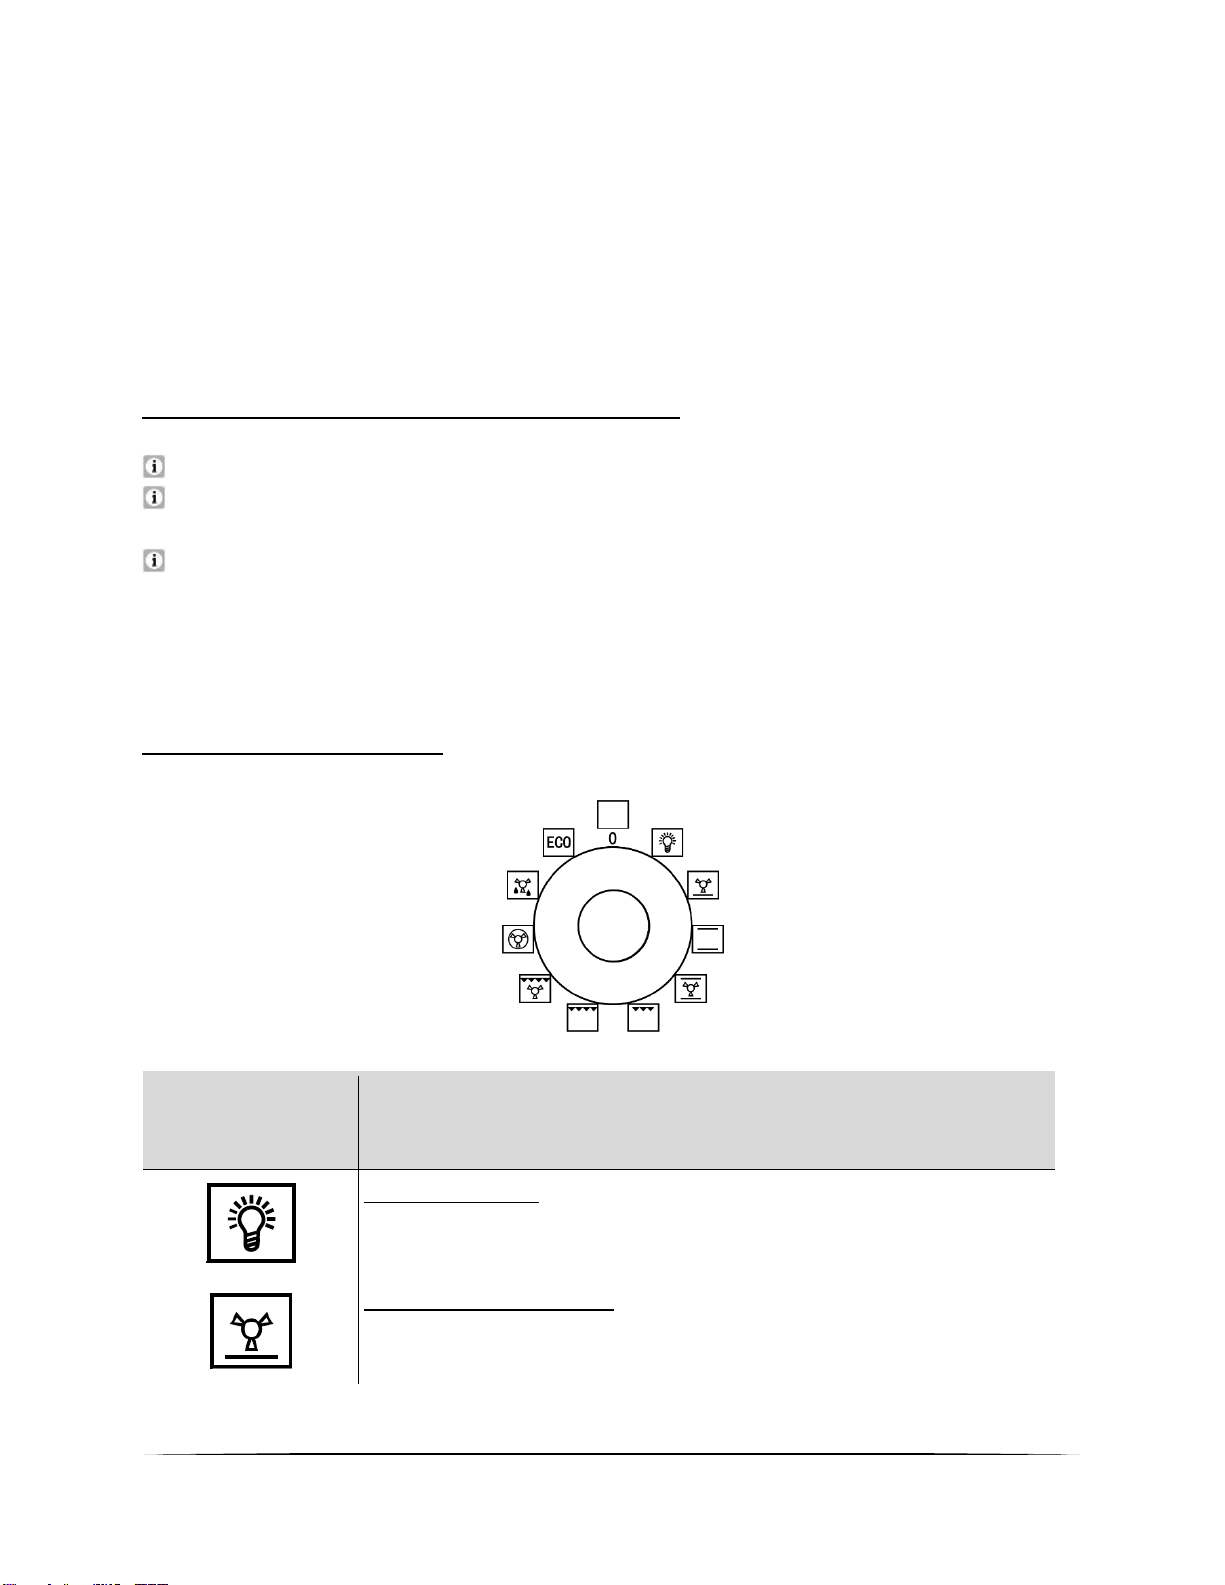
58
5. Press the buttons + (5) and - (7) a third time for 2 seconds simultaneously.
6. The third selectable acoustic signal sounds.
7. This procedure can be repeated as needed.
8. If you have selected the desired acoustic signal, release the + / - buttons.
9. The display changes to the current time of the day and the desired acoustic signal is
activated.
3.4.7 Changing of the current time of the day
The TIMER / PROGRAMME FUNCTIONS must not be activated.
The oven must be in the manual operating mode (s. chapter 3.3.2 MANUAL
OPERATING MODE).
The operational status indicator "OVEN IN USE" (2) on the display must be on.
➢ To change the current time of the day please follow the instructions given in chapter
3.3.3 SETTING OF THE TIME OF THE DAY.
3.5 Functions of the oven
SYMBOLS
DESCRIPTION OF THE FUNCTIONS
Internal Light:
➢ Turn the rotary knob to this symbol to switch on the internal
light
Bottom heat and fan:
✓ Switches on the bottom heater of the oven, e.g. for final
backing from the bottom.
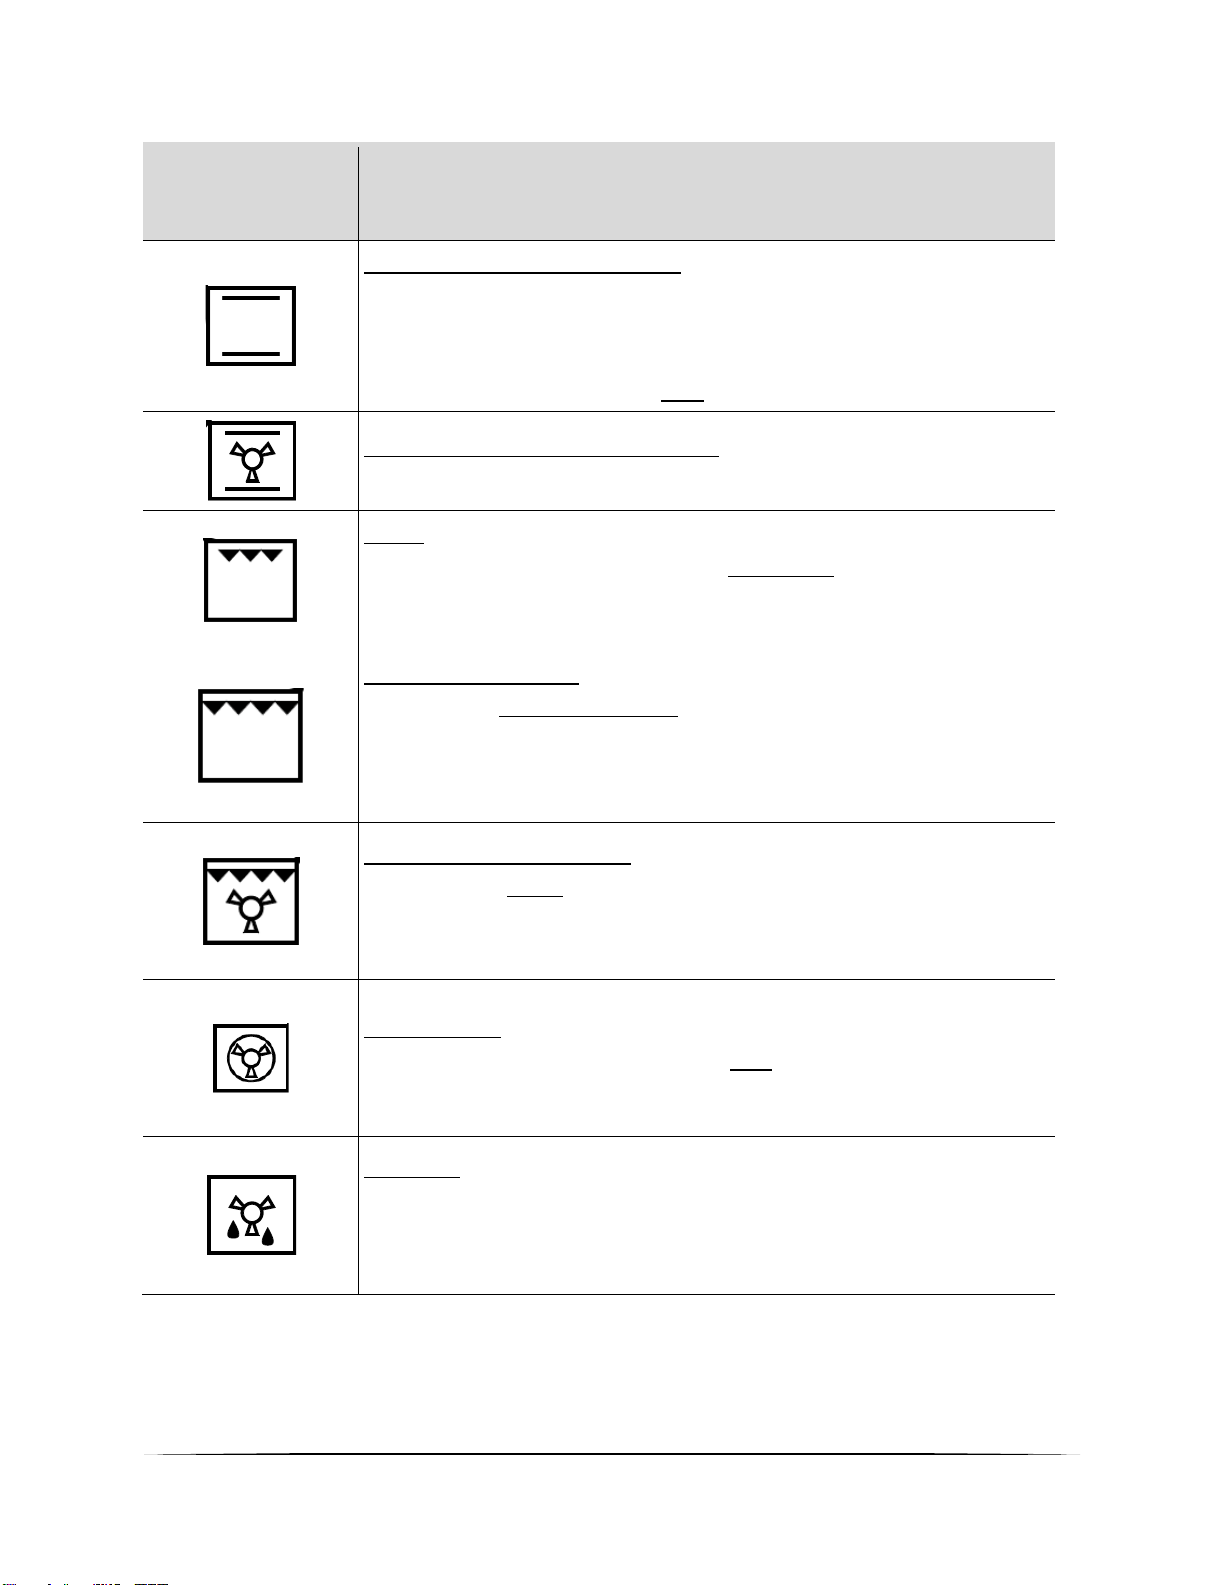
59
SYMBOLS
DESCRIPTION OF THE FUNCTIONS
Top heat and bottom heat:
➢ The oven is heated conventionally.
➢ The oven must be preheated before you start cooking /
baking.
Suitable to cook / bake on one cooking / baking level.
Top and bottom heat and fan:
➢ The oven is heated conventionally while using the fan.
Grill:
➢ This function switches on the inner part of the grill element
only.
➢ Suitable for grilling of small portions.
Grill and top heat:
➢ The grill (inner and outer part of the grill element) and the
top heat operate simultaneously.
➢ "Combined grilling" allows higher temperatures in the top
area and intensifies browning.
Grill, top heat and fan:
➢ The grill (inner part of the grill element), the top heat and
the fan operate simultaneously.
➢ Accelerates grilling and improves the taste of the food.
Hot air fan:
➢ Suitable to cookl / bake on two cooking / baking levels
simultaneously.
Defrost:
➢ The fan works without a heat setting.
➢ You can defrost frozen food.
➢ Defrosting time depends on size and weight of the food.
60
SYMBOLS
DESCRIPTION OF THE FUNCTIONS
ECO-Mode:
➢ Top and Bottom Heat, extra Energy save
4. Cleaning and maintenance
WARNING!
Switch off the appliance and let it cool down before cleaning.
Disconnect the appliance from the mains before maintenance.
Oven
➢ Clean the oven after use.
➢ Switch on the internal light while cleaning.
➢ Clean the interior with warm water and a little bit of washing-liquid. Use a
sponge or a soft cloth. Never use abrasive or aggressive detergents.
➢ Dry after cleaning.
➢ Clean the outside of the oven with warm soapy water. Use a sponge or a soft
cloth. Never use abrasive or aggressive detergents.
➢ If you use a special oven-detergent, check that the detergent is suitable for your
appliance ( instructions on the packaging of the detergent).
➢ Any damage that is caused to the appliance by a cleaning product will not be
fixed free of charge, even if the guarantee period of the appliance is still valid.
Never use a steam cleaner.
Oven-door
➢ Clean the door very carefully. Do not use any abrasive detergents; otherwise you
may damage or brake the glass. Use wash-up liquid and warm water.

61
4.1 Replacing of the illuminant
1. Switch off the appliance and disconnect it
from the mains.
2. Unscrew and wash the lamp cover and wipe it dry.
3. Remove the illuminant and replace it by a new one
of the same kind and power:
➢ Heat-proof illuminant for ovens (300
0
C), 200-
240V/25W/G9 thread /50 Hz.
4. Do not use any other type of bulb
5. Screw the bulb in, making sure it is properly
inserted into the ceramic socket.
6. Screw in the lamp cover.
4.2 Removing of the guides
1. Unscrew the screws of the guides.
2. Rotate the guide vertically to make it leave the side panel.
3. Take the guide out of the side panel hole, using an approx. 45
0
angle between the
guide and side panel.
4.3 Removing of the oven door
1. Fully open the door.
2. Fold up the right and left side of locking rod (Picture A).
3. Close the door until reach to stop step, hold on both left and right sides of the door,
then reclose the door, upward and downward and pull out the door.
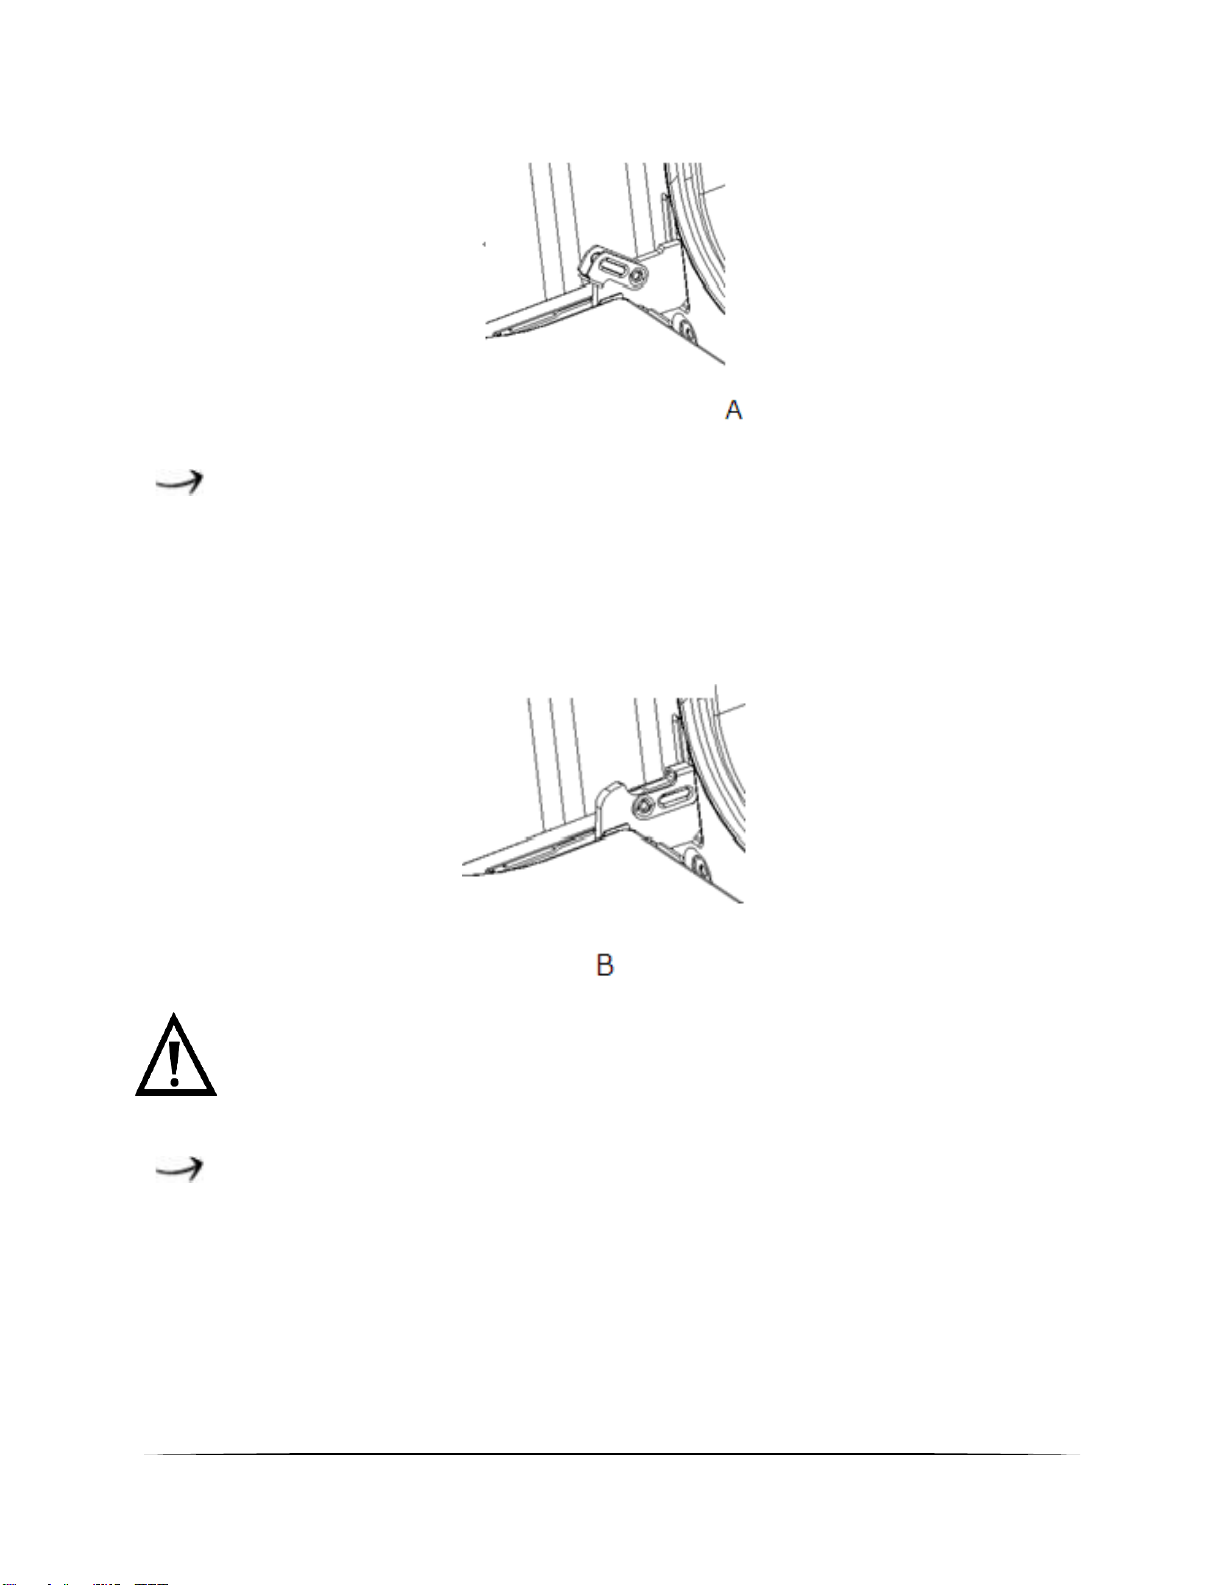
62
Reinstalling of the oven door
Follow to the opposite order of door disassembly
1. When install oven door, make sure both hinge plug into opening mouth directly.
2. Both sides of hinge rabbet must be fixed onto the hinge mounting hole on the door.
3. When open the door, spread down locking rod (Picture B).
If the door drops accidently or hinges shut up suddenly, do not push
your hand in hinges. Please call the after-sales.
Reinstalling of the oven door
1. Unscrew and unfasten the bracket latch that is in the corner at the top of the
door.
2. Next take out the glass from the second blocking mechanism and remove.
3. After cleaning, insert and block the glass panel, and screw in the blocking
mechanism (picture C).
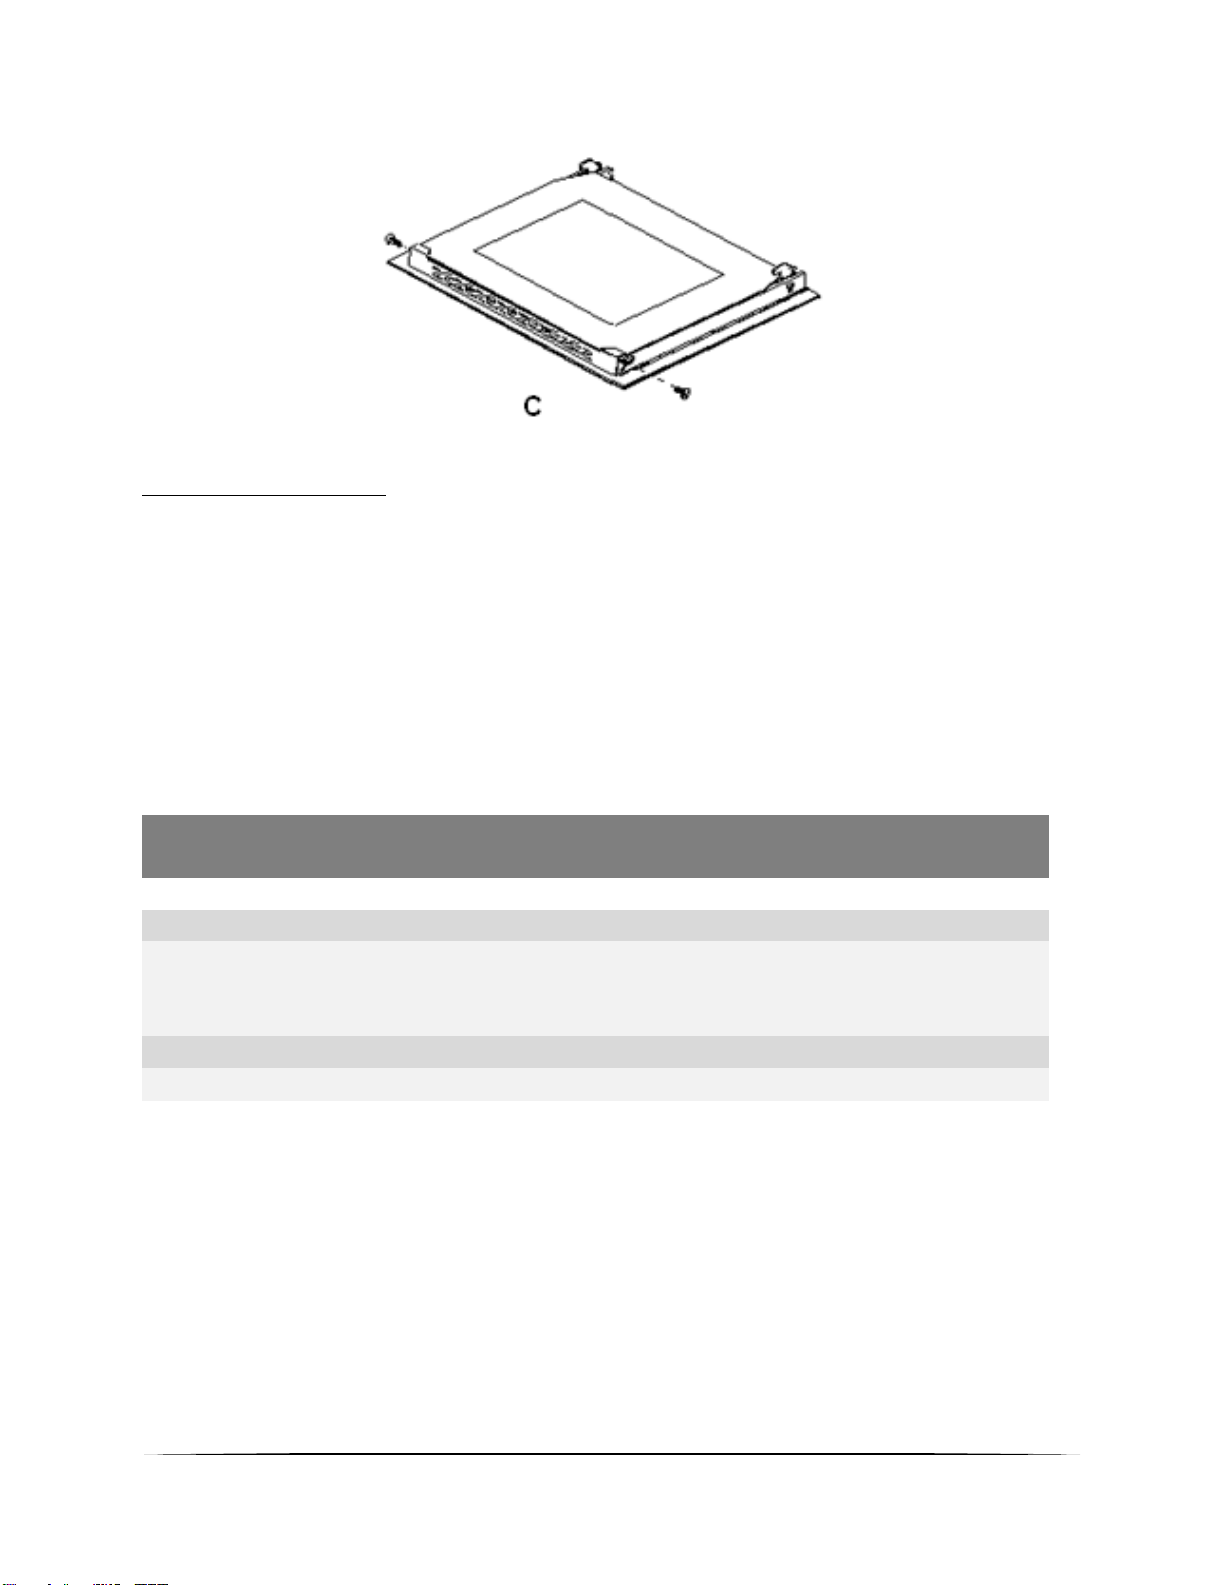
63
4.4 Trouble shooting
Emergency measures:
1. Switch off the entire appliance.
2. Disconnect the appliance from the mains (fuse box of your household power
supply).
3. Contact your aftersales service.
Check the schedule below before you contact your aftersales service.
MALFUNCTION
POSSIBLE CAUSES
MEASURES
Appliance does not work at all.
➢ The appliance is not supplied with
energy.
➢ Check the relevant fuse in the fuse
box of your household power
supply.
Internal light does not work.
➢ The illuminant is loose or damaged.
➢ Tighten or replace the illuminant.

64
5. Technical data
Supplier's name
PKM
Model
EBO9.4
Energy efficiency index(IEE cavity)
92.4
Number of cavities
1
Heat source per cavity
Electricity
Type
Built-In Oven
Control panel
Edelstahlblende
Energy efficiency class
A
Energy consumption (conventional)
0.76 KW/h
Energy consumption (with fan)
0.74 KW/h
Usable volume
56.00 l
Size of the appliance
medium: 35 l ≤ volume < 65 l
Functions
Internal light, Lower heat with Fan,
Upper- and Lower heat, Upper- and
lower heat with fan, Grill, Upper heat
with grill, Upper heat with Grill and
fan, Hot air fan, Defrost, ECO
Grill/fan/hot air fan
✓
✓
✓
All-glass inner door
✓
Door/glass layers
Black glass
3
Enclosure cooling
✓
Handle and knobs
Aluminium
Noise emission
< 52 db/A
Maximum power
2.30 KW
Voltage/frequency
220-240V
50 Hz
Drip tray/grillage
1
1
Cable length
150 cm
Installation dimensions in cm
59.50
59.50
50,00
Dimensions packaging in cm
65,00
66,00
57,70
Weight net/gross
29,00
31,00

65
6. Waste management
1. While unpacking, the packaging materials (polythene bags, polystyrene pieces, etc.)
should be kept away from children. CHOKING HAZARD!
2. Old and unused appliances must be send for disposal to the responsible recycling
centre. Never expose to open flames.
3. Before you dispose of an old appliance, render it inoperative. Unplug the appliance
and cut off the entire power cord. Dispose of the power cord and the plug
immediately. Remove the door completely so children are not able to get into the
appliance as this endangers their lives!
4. Dispose of any paper and cardboard into the corresponding containers.
5. Dispose of any plastics into the corresponding containers.
6. If suitable containers are not available at your residential area, dispose of these
materials at a suitable municipal collection point for waste-recycling.
7. Receive more detailed information from your retailer or your municipal facilities.
Materials marked with this symbol are
recyclable.
Please contact your local authorities to
receive further information.

66
7. Guarantee conditions
This appliance includes a 24-month guarantee for the consumer given by the
manufacturer, dated from the day of purchase, referring to its flawless material-
components and its faultless fabrication. The consumer is accredited with both the dues
of the guarantee given by the manufacturer and the vendor's guarantees. These are not
restricted to the manufacturer's guarantee. Any guarantee claim has to be made
immediately after the detection and within 24 months after the delivery to the first
ultimate vendee. The guarantee claim has to be verified by the vendee by submitting a
proof of purchase including the date of purchase and/or the date of delivery. The
guarantee does not establish any entitlement to withdraw from the purchase contract or
for a price reduction. Replaced components or exchanged appliances demise to us as
our property.
The guarantee claim does not cover:
1. fragile components as plastic, glass or bulbs;
2. minor modifications of the PKM-products concerning their authorized condition if
they do not influence the utility value of the product;
3. damage caused by handling errors or false operation;
4. damage caused by aggressive environmental conditions, chemicals, detergents;
5. damage caused by non-professional installation and haulage;
6. damage caused by non common household use;
7. damages which have been caused outside the appliance by a PKM-product unless a
liability is forced by legal regulations.
The validity of the guarantee will be terminated if:
1. the prescriptions of the installation and operation of the appliance are not observed.
2. the appliance is repaired by a non-professional.
3. the appliance is damaged by the vendor, the installer or a third party.
4. the installation or the start-up is performed inappropriately.
5. the maintenance is inadequately or incorrectly performed.
6. the appliance is not used for its intended purpose.
7. the appliance is damaged by force majeur or natural disasters, including, but with not
being limited to fires or explosions.
The guarantee claims neither extend the guarantee period nor initiate a new guarantee
period. The geographical scope of the guarantee is limited with respect to appliances,
which are purchased and used in Germany, Austria, Belgium, Luxembourg and the
Netherlands.
August 2014
67
TECHNOLOGIE FÜR DEN HAUSHALT
SERVICE INFORMATION
TECHNOLOGY FOR DOMESTIC USE
Sie finden alle Informationen zum Kundendienst
auf der Einlage in dieser Bedienungsanleitung.
Aftersales service information
on the leaflet inside this instruction manual.
Änderungen vorbehalten
Subject to alterations
Stand
Updated
19.04.2022
04/19/2022
© PKM GmbH & Co. KG, Neuer Wall 2, 47441 Moers