Instruction Manual Air Fryer Oven
Thank you for choosing this Silonn product! At Silonn we strive to provide you with the best quality products and services in the industry. Should you have any issues, please don't hesitate to contact us.
Please read and retain these instructions for future reference.
This appliance is intended for household use only.
Important Safeguards
When using an electrical air fryer oven, necessary safety precautions should always be followed, including, but not limited to the following:
- Read the instructions carefully before use.
- Remove and safely discard any packaging material and labels before using this product for the first time. Ensure that children do not play with plastic bags or any packaging materials.
- Before use, check that your local voltage corresponds with the specifications shown on the appliance nameplate located on the appliance.
- Always operate the appliance on a leveled horizontal surface that is stable and non-combustible. Do not operate the appliance on or near combustible materials such as tablecloths or curtains.
- Do not place the appliance on or near a hot gas or electric burner, or in a heated oven.
- Never connect this appliance to an external timer or separate remote-control system.
- Never use this appliance with an extension cord or power board. Ensure it is plugged into a dedicated power point and without any other appliances on the same outlet.
- Do not turn on the power until the appliance and parts are properly in place; make sure the door is closed before plugging in and switching on the power.
- To protect against electric shock, do not immerse the cord, plug, or appliance in water or any other liquid. Do not expose the appliance to dripping or splashing and ensure that no objects filled with liquids such as vases are placed on or near the appliance.
- Do not touch the appliance, power cord, or power plug with wet hands.
- Unplug from the outlet when not in use and before cleaning. Allow the appliance to cool down (if relevant) before putting on or taking off the parts, and before cleaning.
- The appliance does not contain any serviceable parts inside. Do not attempt to open and repair the appliance yourself. All components should only be serviced by a qualified technician.
- Do not use the appliance if the plug, power cable, or unit itself are damaged. If the power cord is damaged, you must have it replaced at a service center by a qualified technician in order to avoid a hazard.
- Close supervision is essential when any appliance is used near children. Keep the appliance and power cord out of reach of children when it is in operation and during the cooling process.
- This appliance is intended to be used in household and similar applications such as: staff kitchen areas in shops, offices, and other working environments, farmhouses, by clients in hotels, motels, and other residential type environments, bed and breakfast type environments.
- Do not use the appliance for anything other than the intended use. It is for household use only. It is not to be used outdoors or for commercial purposes.
- This appliance should be operated on a separate electrical power source from other operating appliances. If the power source is overloaded with other appliances, this oven may not work.
- Maintain a distance from other objects while in use. Do not block air intakes or exhausts.
- Do not place the appliance against a wall or against other appliances. Leave at least 10 centimeters of free space on the back and sides and above the appliance. Do not place anything on top of the appliance.
- When the appliance is in operation, air is released through the air outlet vent. Keep your hands and face at a safe distance from the air outlet vent.
- Do not touch the hot surfaces. The appliances outer surfaces may become hot during use. The rack and the oil tray will be hot. Wear oven mitts or use the tongs to remove them. Wear oven mitts or use the tongs when handling the rack and the oil tray.
- Extreme caution must be used when moving an oven containing hot oil or other hot liquids.
- Do not cover the appliance while in use.
- Do not let the cord hang over the edge of the table or counter.
- Do not unplug the appliance by pulling on the cord.
- This appliance is not designed to be used by people (including children) with a physical, sensory or mental impairment, or people without knowledge or experience, unless they are supervised or given prior instructions concerning the use of the appliance by someone responsible for their safety. Children must be supervised to ensure that they do not play with the appliance.
- Do not leave the appliance operating while unattended.
- The appliance may emit smoke during its first use. It is not defective, and the smoke will burn off within a few minutes.
- Should the appliance emit black smoke, unplug it immediately. Wait for the smoke to stop before removing the oven's contents.
Safety instructions
Short cord instructions:
Do not use an extension cord. A short power supply cord is provided to reduce the risks resulting from being entangled or tripping over a long cord.
Overheat protection:
Should the inner temperature control system fail, the overheating protection system will be activated, and the appliance will not function. Should this happen, unplug the power cord. Allow time for the appliance to cool completely before restarting.
Electric power:
If the electrical circuit is overloaded with other appliances, your unit may not operate properly. It should be operated on a dedicated electrical circuit (power socket).
Automatic shut-off:
This appliance has a built-in shut-off device that will automatically shut down the unit. When the timer LED reaches zero, You can manually switch off the appliance by locating and pressing the START/STOP button. The fan will then continue running for about 180 seconds to cool down the appliance.
Preparation for use:
- When using this appliance for the first time, the oven may emit a slight odor that is unharmful and will disappear after a few minutes. This is because a protective oil was applied to protect parts from possible friction during transport.
- Carefully unpack the oven and remove all the packing materials.
- Place the appliance on a flat, heat-resistant, and non-flammable surface.
- Use a soft sponge and soapy water to remove any dust on the surface that may have accumulated during packing and transport. Allow the appliance to dry before use.
Symbol Meanings:
CAUTION: HOT SURFACES
The surfaces will get hot during use do not touch.
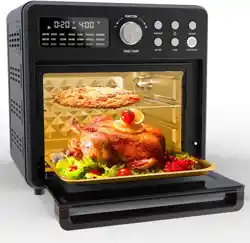
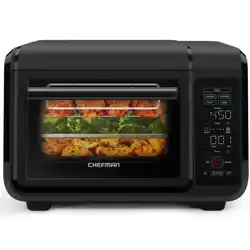
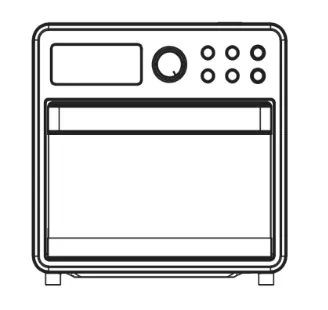
Product Introduction
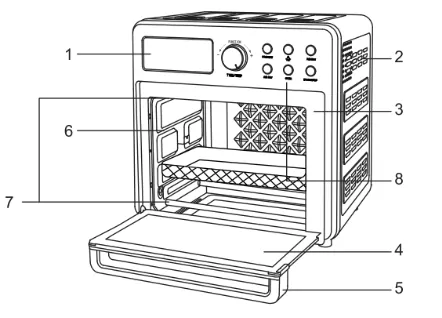
- Control Panel
- Ventilation Slots
- Oven Cavity
- Oven Door with Viewing Window
- Door Handle
- Top and Bottom Heating Elements (not shown)
- Control Panel
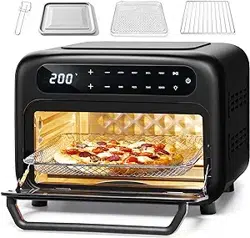
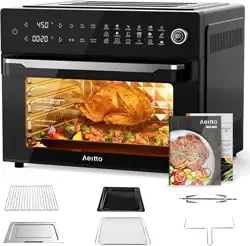
Accessories of the Air Fryer Oven
| Photo |
Name |
How to use |
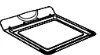 |
Crumb tray |
Slide the oil tray into one of the lower rack slots in the oven. Always keep the crumb tray comes in the bottom while using the appliance. |
 |
Oil tray / Baking tray |
Please always keep the oil tray in the lowest layer inside the oven for gathering oil from fried food. The oil tray can also be used as a baking tray. |
 |
Wire rack |
Each of the above can be used for a wide range. Each can slide into the Oven. Ideal for Multi-level cooking. |
 |
Air fry basket |
 |
Tray Handle |
Use to remove the oil tray, wire rack, and air fry basket. |
Product Parameters
Model: SLAFO2
Product name: Air fryer oven
SKU: SLAF02B
Inside capacity: 15L
Rated power: 1600W
Rated voltage / Frequency: 120V/ 60Hz
Display: LED display + 1 knob + 6 buttons
Product size: 345x315x340 mm
N.Weight.: 5.3kg
G.Weight.: 7.2kg
Note: Please use your oven mitts or tray handle to remove accessories after the cooking is complete.
Control Panel Introduction
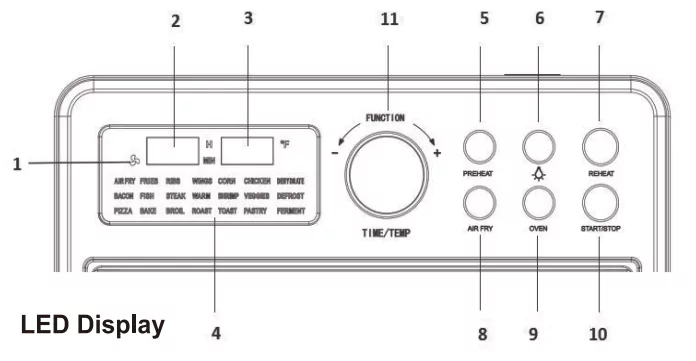
LED Display
- AIR FRY Fan
- Cooking Time
- Temperature
- Cooking Functions
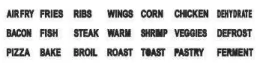
1) Selectable Cooking Function for AIR FRY:
• AIR FRY • FRIES • RIBS • WINGS • CORN • CHICKEN • DEHYDRATE • BACON • FISH • STEAK • WARM • SHRIMP • VEGGIES • DEFROST
2) Selectable Cooking Function for OVEN:
• PIZZA • BAKE • BROIL • ROAST • TOAST • PASTRY • FERMENT
- PREHEAT Button
In the standby mode, press the button to preheat the oven at the default temperature of 450°F and time of 3 minutes. The unit will start automatically without pressing START/STOP button. Cancel it by pressing the button again before selecting other functions.
- Light Button
Switch the light in the oven On/Off.
- REHEAT Button
In the standby mode, press the button to reheat the food at the default temperature of 230°F and time of 20 minutes. The unit will start automatically without pressing START/STOP button. Cancel it by pressing the button again before selecting other functions.
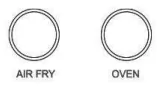
- AIR FRY Button
Press the button to select the desired AIR FRY cooking function. The corresponding cooking functions will light up on the LED screen.
- OVEN Button
Press the button to select the desired OVEN cooking function. The corresponding cooking functions will light up on the LED screen.
- START/STOP Button
Press the button to start or stop the cooking process. When cooking is stopped, the fan continues to rotate for 3 minutes to dissipate heat. During this time, press the button for 3 seconds to stop the fan.
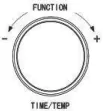
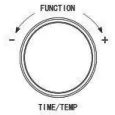
- Selector Dial
After pressing the AIR FRY or OVEN button, rotate it to adjust time or temperature or cooking function (The corresponding function will flash in the LED screen). Press the center of the dial to confirm the selection.
Using Your Air Fryer Oven
Step 1: Plug in the unit.

Step 2: Select the AIR FRY or OVEN mode.
Step 3: Rotate the dial to select cooking function.
Step 4: Select cooking function, press the dial to confirm the selection.
Step 5: Rotate the dial to set the time, press the dial to confirm. (You can skip this step and choose the default time.)
Step 6: Rotate the dial to set the temp, press the dial to confirm. (You can skip this step and choose the default temp.)
Step 7: Press the button to start or stop the unit.

Preset Cooking Temperature and Time
| Cooking Program |
Default Temperature (°F) |
Default Time (min) |
Adjustable Temperature Range (°F) |
Adjustable Time Range (min) |
| AIR FRY |
400 |
20 |
140-450 |
1-90 |
| FRIES |
450 |
13 |
140-450 |
1-90 |
| RIBS |
400 |
22 |
140-450 |
1-90 |
| CORN |
400 |
12 |
140-450 |
1-90 |
| FISH |
375 |
10 |
140-450 |
1-90 |
| SHRIMP |
375 |
10 |
140-450 |
1-90 |
| DEFROST |
125 |
– |
80-140 |
1-90 |
| BAKE |
350 |
25 |
140-450 |
1-90 |
| TOAST |
400 |
6 |
140-450 |
1-90 |
| PASTRY |
400 |
25 |
140-450 |
1-90 |
| FERMENT |
100 |
60 |
80-140 |
1-90 |
For cooking programs with an adjustable time range of 1-90mins, the adjustable interval is 1 minute.
For cooking programs with an adjustable time range of 1-24 hours, the adjustable interval is 1 hour.
The adjustable interval for setting the temperature will always be 5°F increments.
Troubleshooting Guide
| Problem |
Cause |
Solution |
| The Oven does not work. |
The appliance is not plugged into the mains power.
The oven door is not closed. |
Put the mains plug in an earthed wall socket.
Ensure the door is closed. |
| The ingredients are fried unevenly in the oven. |
There are too many ingredients inside.
The temperature is set too low.
The preparation time is too short. |
Use smaller batches for more even cooking.
Increase the cooking temperature.
Increase the cooking time. |
| Fried snacks are not crispy when they come out of the oven. |
You used a type of fried snack that is meant to be prepared in a traditional deep fryer. |
Use oven snacks or lightly brush some oil onto the snacks for a crispier result. |
| Chips / fries are not cooked evenly. |
You did not use the right potato type.
You did not soak the potato sticks properly before cooking. |
Use fresh potatoes and make sure they stay firm during frying.
Soak the potato sticks in a bowl of water for at least 30 minutes, then take them out and dry them with paper towels. |
| White smoke comes out of the appliance. |
You are preparing greasy ingredients.
There is excess oil inside the oven. |
Pay attention that the temperature is well-controlled to be under 374°F when you fry greasy ingredients in the Oven.
Wipe down the inside of the oven to remove excessive oil. |
Cleaning and Maintenance
- The wire rack, basket, oil tray, crumb tray and tray handle can all be washed in warm soapy water immediately after use.
- Never use solvents or scouring pads to scrub inside the appliance; use a nylon or polyester mesh pad if necessary.
- Wipe the outside of the appliance with a soft damp cloth only.
- Do not immerse the power cord, plug, or the housing body in water or any other liquids.
Storage
- Unplug the appliance and let it cool down thoroughly.
- Make sure all parts are clean and dry.
- Store the appliance in an upright position with all the parts intact and the door closed.
Proper disposal
Once the appliance reaches the end of its life cycle, do not throw it away. Hand it in at an official recycling collection point.