Loading ...
Loading ...
Loading ...
14
BEFORE STARTING THE ENGINE
CHECK ENGINE OIL LEVEL
The engine in your tractor has been shipped
from the factory already filled with sum mer
weight oil.
1. Check engine oil with tractor on level
ground.
2. Remove oil fill cap/dipstick and wipe
clean, reinsert the dipstick and screw cap
tight, wait for a few seconds, remove and
read oil level. If nec es sary, add oil until
“FULL” mark on dipstick is reached. Do
not overfill.
• For cold weather operation you should
change oil for easier starting (See the oil
viscosity chart in the Main te nance sec tion
of this man u al).
• To change engine oil, see the Main te nance
section in this manual.
ADD GASOLINE
• Fill fuel tank to bottom of filler neck. Do
not overfill. Use fresh, clean, regular
gasoline with a minimum of 87 octane.
Do not mix oil with gasoline. Purchase
fuel in quantities that can be used within
30 days to ensure fuel freshness.
CAUTION: Wipe off any spilled oil or fuel.
Do not store, spill or use gasoline near an
open flame.
IMPORTANT: When operating in tempera-
tures below 32°F (0°C), use fresh, clean
winter grade gasoline to help ensure good
cold weather starting.
CAUTION: Alcohol blended fuels (called
gasohol or using ethanol or methanol) can
attract moisture which leads to sep a ra tion
and for ma tion of acids during storage. Acidic
gas can damage the fuel system of an engine
while in storage. To avoid engine problems,
the fuel system should be emptied before
stor age of 30 days or longer. Drain the gas
tank, start the engine and let it run until the
fuel lines and carburetor are empty. Use
fresh fuel next season. See Storage In struc-
tions for additional information. Never use
engine or carburetor cleaner products in the
fuel tank or permanent damage may occur.
Fuel stabilizer is an acceptable alternative in
minimizing the formation of fuel gum deposits
during stor age. Add stabilizer to gasoline in
fuel tank or storage container. Always follow
the mix ratio found on stabilizer container.
Run engine at least 10 minutes after adding
stabilizer to allow the stabilizer to reach the
carburetor. Do not empty the gas tank and
carburetor if using fuel stabilizer.
TO START ENGINE
When starting the engine for the first time or
if the engine has run out of fuel, it will take
extra cranking time to move fuel from the
tank to the engine.
1. Ensure freewheel control is in the trans-
mis sion en gaged position.
2. Sit on seat in operating position, depress
clutch/brake pedal and set parking brake.
3. Place motion control lever in neutral
position.
4. Move attachment clutch to dis en gaged
position.
5. Move throttle control to choke po si tion.
NOTE: Before starting, read the warm and
cold starting procedures below.
6. Insert key into ignition and turn key
clock wise to start position and release
key as soon as engine starts. Do not run
starter continuously for more than fifteen
sec onds per minute. If the engine does
not start after several attempts, move
throt tle control to fast position, wait a
few minutes and try again. If engine still
does not start, move the throttle control
back to the choke position and retry.
WARM WEATHER STARTING
(50°F (10°C) and above)
7. When engine starts, move the throt tle
control to the fast position.
• The attachments and ground drive
can now be used. If the engine does
not accept the load, restart the en gine
and allow it to warm up for one minute
using the choke as de scribed above.
COLD WEATHER STARTING
(50°F (10°C) and below)
7. When engine starts, leave throttle control
in choke position until engine warms up
and begins to run roughly. Once rough
running begins, im me di ate ly move the
throttle control to the fast position. Engine
warm-up may take from several seconds
to several minutes (the colder the tem-
per a ture, the longer the warm-up).
AUTOMATIC TRANSMISSION WARM UP
Before driving the unit in cold weath er, the
trans mis sion should be warmed up as fol-
lows:
1. Ensure the tractor is on level ground.
2. Place the motion control lever in neutral.
Release the parking brake and let the
clutch/brake slowly re turn to operating
po si tion.
55
E
F
H
J
M
A
B
C
D
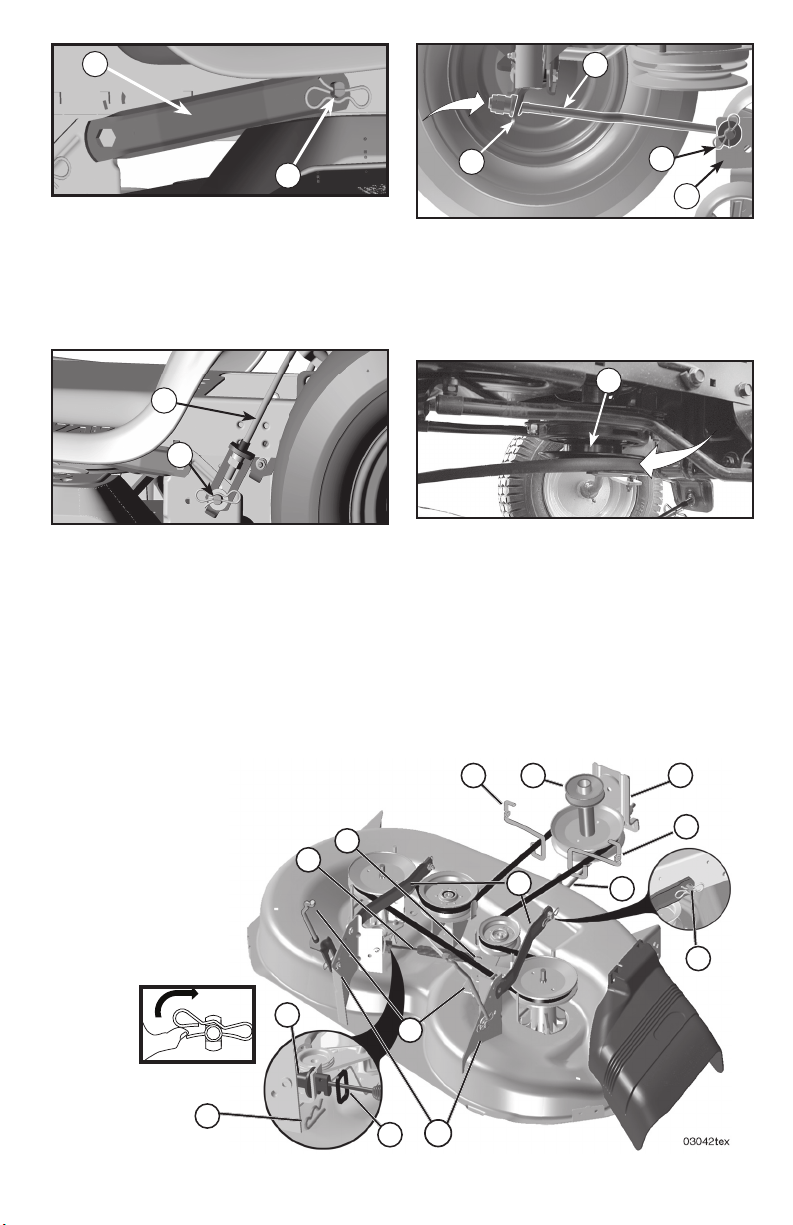
4. Realice el mismo procedimiento en el otro
lado del tractor.
5. FIJE LAS PIEZAS DE PROPULSIÓN POS-
TERIORES (C) – Levante la parte posterior
de la cortadora, ubique la ranura de la pieza
de unión (D) por encima de la clavija que hay
en la barra posterior de la cortadora y fíjela
con una arandela y un resorte de contención.
6. FIJE LA PIEZA DE UNIÓN ANTERIOR (E)
– Trabaje por el lado izquierdo del tractor.
Introduzca el extremo de la barra de la pieza
de unión por el orificio anterior de la barra de
suspensión anterior del tractor (F).
7. Introduzca el otro extremo de la pieza de
unión (E) en el orificio que se encuentra en
la barra anterior de la cortadora (H), y fíjelo
por medio de una arandela y un resorte de
contención (J).
8. Retire el resorte del cable del embrague (Q)
del brazo del engranaje (R).
9. Retire el resorte de sujeción (K), deslice la
abrazadera (L) hasta quitarla, y saque a
presión la guía de la caja (P) hasta que se
salga del soporte.
10. Instale la correa pasándola por encima de la
polea del motor (M) y fijadors de la correa (G).
IMPORTANTE: Verifique que la correa encaje
bien en todas las ranuras de las poleas de la
cortadora.
11. Suba la palanca elevadora a la posición de
más arriba.
12. Si es necesario, ajuste las rueditas del calibre
antes de poner en funcionamiento la corta-
dora, como se ilustra en el capítulo de Manejo
de este manual.
E
F
C
G
Q
R
D
K
G
P
B
L
M
A
Loading ...
Loading ...
Loading ...