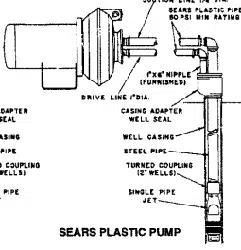

INSTRUCTIONS FOR INSTALLATION OF VERTICAL CASING ADAPTERS
FOR SINGLE PIPE JETS
In the past, Sears furnished horizontal casing adapters forhodzonta!pump installations.The vertical adapters now
being furnished offer more installation flexibilityas the following illustrations indicate.
TYPICAL INSTALLATIONS
SEARS PLASTIC PUMP
SEARS CAST-IRON SERIES
In some cases, your pump ownerSmanual may still show hori-
zontal casing adapter instaJlations.If so, disregard, and follow
these instructions.
INSTALL JET
1. Presoak the leathers on the leather packer-type jet. This
can be done by placing the jet in a pail of water until
leathers are soft. For best results, soak overnight.
2. Connect the jet to the first length of suction pipe, 1-1/4" pipe
for 2" and 3" casings.
CAUTION: 2" casing sizes require special turned couplings,
Do NOT use ordinary pipecouplings as you will restr;,ctthe
flow of water, and reduce the pump capacity.
3. Lower the jet and pipe assembly into the well casing, adding
additional lengths of pipe until proper depth is reached.
Tighten each joint as lengths are added. Use pipe
compound sparingly,and on male threads only.
4.After the correct depth is reached, move the jet up and
down slightly to help seat the leathers, Water pressure will
complete the sea_ng of the leatherS against the casing wall.
Be certain to leave sufficient pipe above the well casing to
allow for installation of the casing adapter and hook-up of
off-set piping. Support the suction pipe with a pipe clamp or
other suitable device just above the casing. To check the
foot valve for leakage, fill the pipes with water. The pipes
should remain full.
INSTALL CASING ADAPTER
1. Securely thread a 1" elbow onto the 1"x 6" nipple furnished.
2. Slide adapter over the 1-I/4" suction pipe and onto the well
casing as far as it willgo.
3. Securely thread 1-1/4" elbow onto the 1-1/4" suction pipe.
4. Slide the 1" nipple assembly into casing adapter drive hole
as far as it willgo, Be certain it extends through the rubber
packing.
5. Position the 1-1/4" suction line with respect to the t" drive
line as shown in illustrations.
6. Tighten three (3) belts to seal adapter to casing and piping
to adapter.
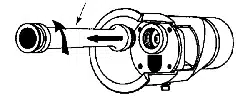
SEARS VERTICAL CASING ADAPTERS
8 _lC
REPAIR PARTS LIST
2" Vert|ca[ 3" Vertical
Key Casing Casing
No. Adapter Adapter
3216-13
U30-282ZP
J216-14
U30-282ZP
J16-19ZZP
J21-1S
J21-19
U30-277ZP
J51-tZZP
J21-17
J16-20ZZP
U36-38ZP
U37-116GP
2
3
4
5
6
7
8
9
10"
• FurK_shedwith3el Packaga.
JI6-2377p
J21-18
J21-19
U30-277Zp
JS1-3ZZP
J21-21
J16-24ZZP
U36-38ZP
U37-116GP
Part Description
2' Vedica] Casing Adapter
3' Vertical Casing Adapter
Machine Bo_t3/8-16 x 5" Ig.
(2 req'd,)
Upper F_ange
Seal Ping -Suction Pipe
Seal Ring - Drive Pipe
Machine Bolt 3/8-16 x 2-1/2"Ig,
Casing Adapter Body
Sea] Ring - Lower
Lower Range
Nut 3/8" Sq. Hd. (3 req'd,)
1"x 6" TOE Nipple
J80-56 (Rev. 4/3!01)
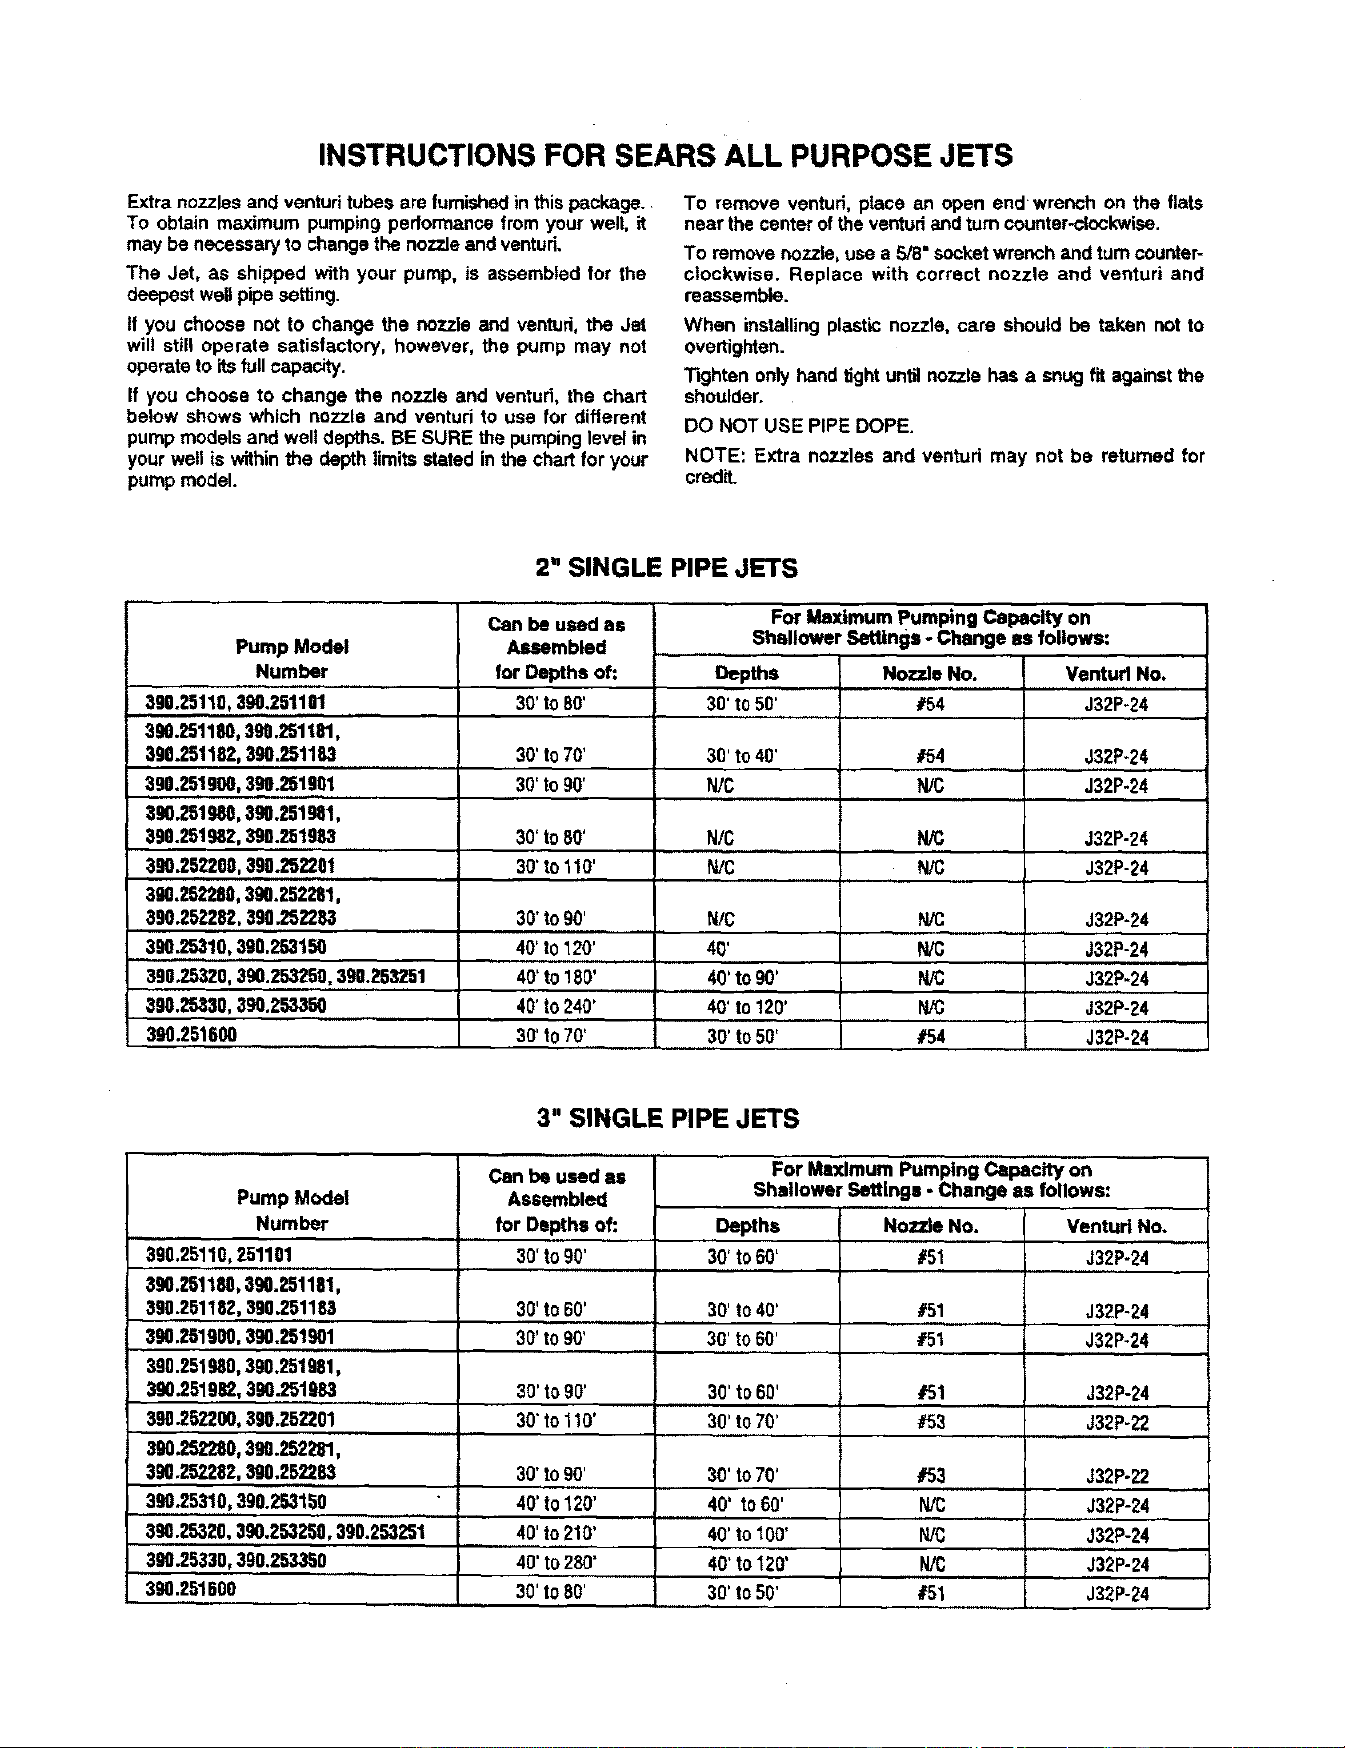
INSTRUCTIONS FOR SEARS ALL PURPOSE JETS
Extra nozzles end ventud tubes are furnishedin thispackage.
To oblain maximum pumping performance from your wall, it
may be necessary to change the nozzle and venturL
The Jet, as shipped with your pump, is assembled for the
deepest well pipe setting.
If you choose not to change the nozzle and vantud, the Jet
will still operate satisfactory, however, the pump may not
operate to its full capacity.
If you choose to change the nozzle and venturi, the chart
below shows which nozzle and vanturi to usa for different
pump modelsand well depths. BE SURE the pumpinglevel in
your well is within _e depth limits stated in the chart for your
pump model.
To remove vanturi, place an open end wrench on the flats
near the canter of the ventud and turncounter-clockwise.
To remove nozzle, use a 5/8" socketwrench and turn counter=
clockwise. Replace with correct nozzle and venturi and
rea.ssembte.
When installing plastic nozzle, care should be taken not to
overtighten.
Tighten only hand tight until nozzle has a snug fit againstthe
shoulder.
DO NOT USE PIPE DOPE.
NOTE: Extranozzles and venturimay nat be returnedfor
credit.
2" SINGLE PIPE JETS
Pump Modal
Number
390.25110,590.251101
590.251180,390.251181,
39o.2s11 ,5. 11.
590.zmg®,5. 1p1
390.251980,390.251981,
390.251982,390.251983
390.252200,590.25_01
390.252280,590.252281,
390.252282, 590.252283
390.2531o,Seo.2_lSO
590.25320, 390.253250, 390.253251
390.25330,390.253350
590.251600
Can be used as
Assembled
ForMaximumPumpingCapacityon
Shallower Settings - Change as follows:
for Depths of: Depths Nozzle No. Ventud No.
30'to 80' 30' to 50' #54 J32P-24
30'to 70' 30' to 40' #54 J32P-24
30'to 90' N/C N/C J32P-24
30'to 80' N/C N/C J32P-24
30'to 110' N/C NIC J32P-24
30'to 90' N/C N/C J32P-24
40' to 120' 40' NiC J32P-24
40'to 180' 40'to 90' N/C J32P-24
40'to 240' 40' to 120' i'_C J32P-24
30'to 70' 30' to 50' #54 J32P-24
3" SINGLE PIPE JETS
Pump Model
Number
.......39312mlo, 11of
590. 1190,3®.,,mm,
590.251182,390.251163
390.251900,390.251901
390.251980,390.251981,
390.251962,390.251983
390.252290,390.252201
390.252280,390.252281,
390.252282,390.252283
390.25310,590.253150
390.25320,390.253250,390.253_1
590.25350,390.253350
390.251600
Can be used as
Assembled
for Depths of: Depths NozTJeNo.
30'to 90' 30' to _L #51
30'to 60' 30' to 40' #51 J32P-24
30'to 90' 30' to 60' #51 J32P-24
30'to 90' 30'to 60' #51 J32P-24
30"to 110' 30'to 70' #53 J32P-22
30'to 90' 50' to70' #53 J32P-22
40' to 120' 40' to 60' N/C J32P-24
40'to 210' 40' to 100' WC J32P-24
40' to 280' 40' to 120' N/C J32P_24
30'to 80' 30'to 50' #51 J32P-24
ForM=xlmumPumpingCapacityon
ShallowerSettings. Changeas follows:
VentudNo.
J32P-24
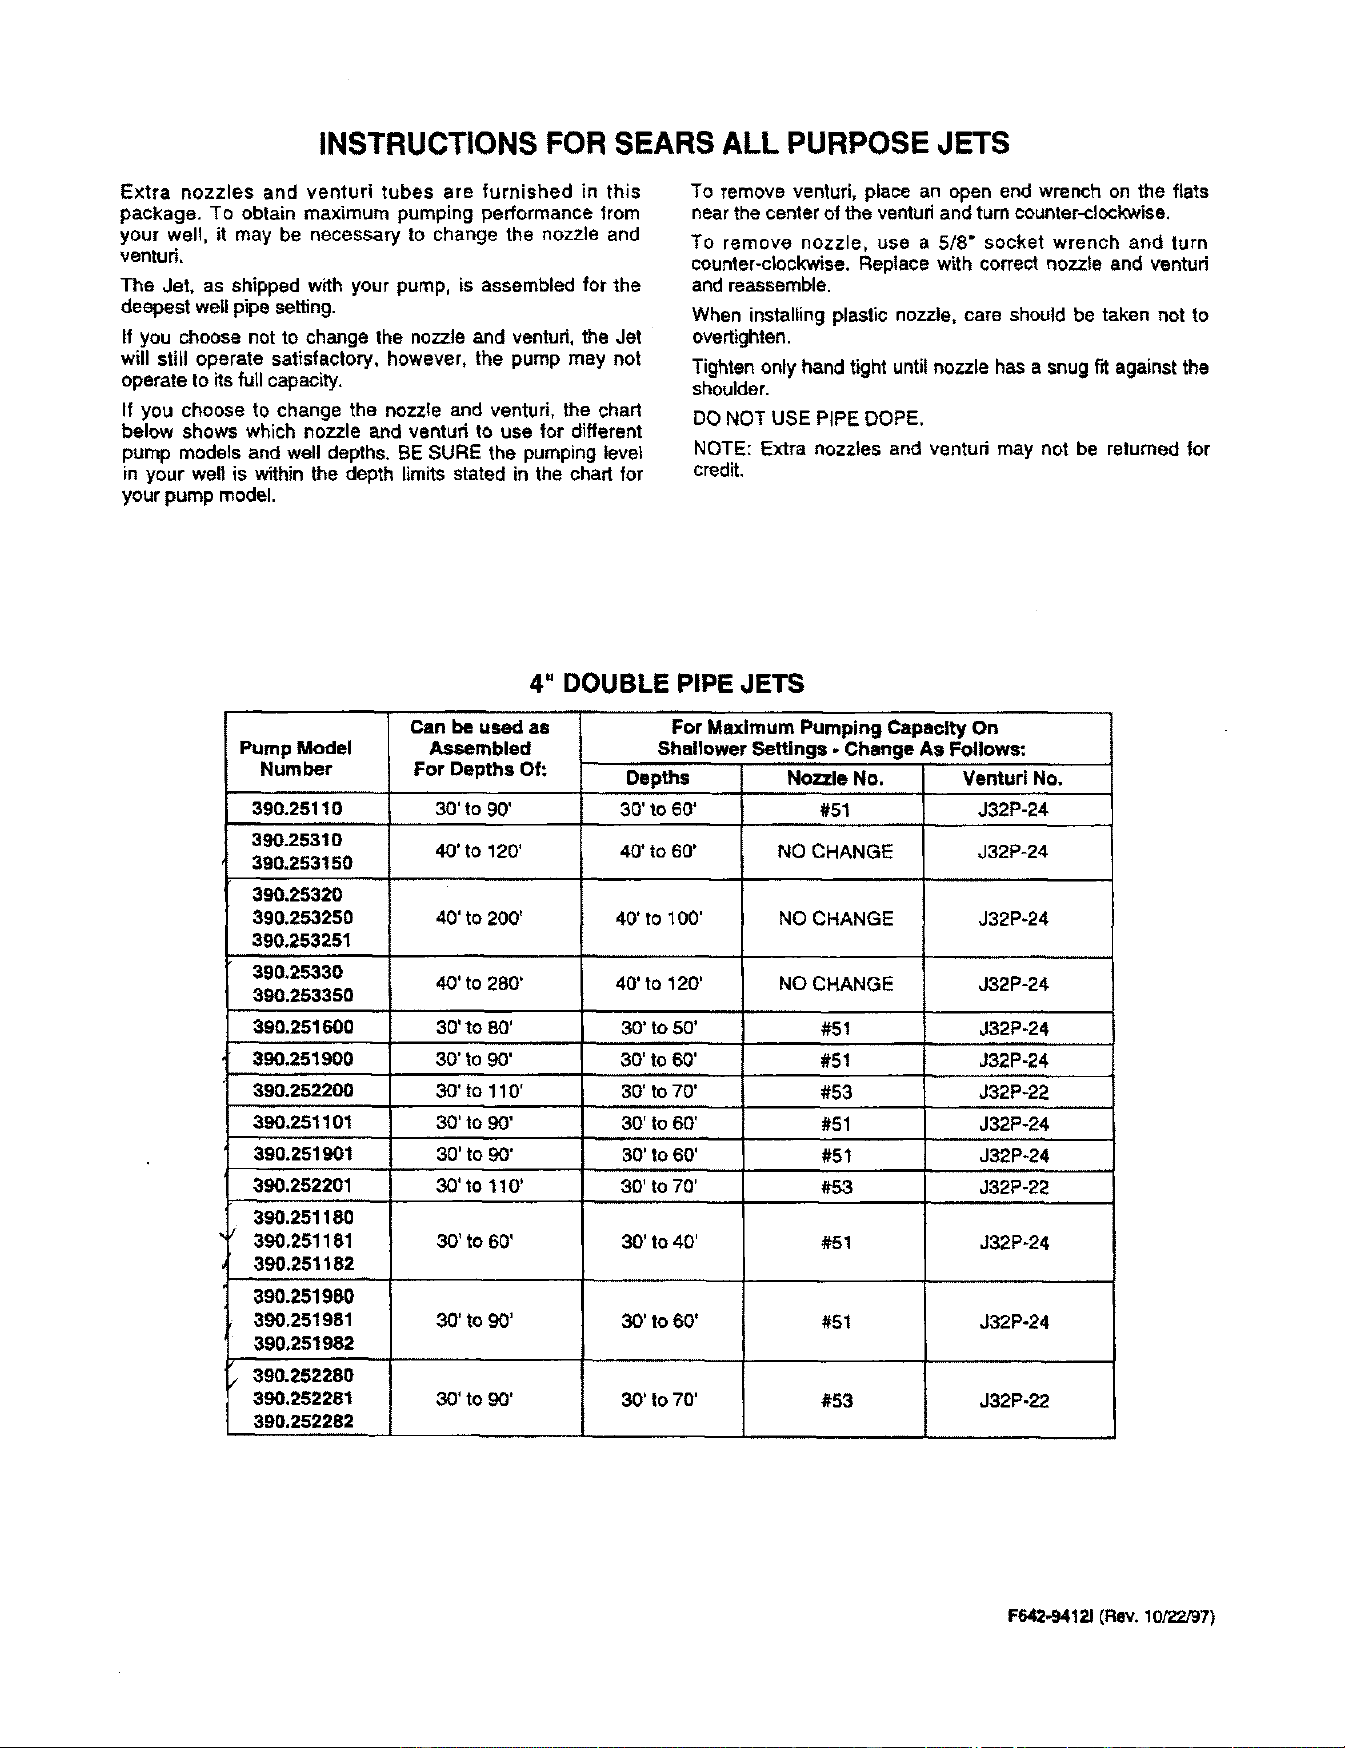
INSTRUCTIONS FOR SEARS ALL PURPOSE JETS
Extra nozzles and venturi tubes are furnished in this
package. To obtain maximum pumping performance from
your well, it may be necessary to change the nozzle and
ventud.
The Jet, as shipped with your pump, is assembled for the
deepest well pipe setting.
If you choose not to change the nozzle and ventud, the Jet
will still operate satisfactorY, however, the pump may not
operate to itsfull capacity.
If you choose to change the nozzle and venturi, the chart
below shows which nozzle and ventud to use for different
pump models and well depths. BE SURE the pumping level
in your we!t is within the depth limits stated in the chad for
your pump model.
To remove vanturi, place an open end wrench on the flats
near the center of the ventud and turn counter-clockwise.
To remove nozzle, use a 5/8" socket wrench and turn
counter-c_ockwise.Replace w_th correct nozzle and ventud
and reassemble.
When installing plastic nozzle, cars should be taken not to
overtightan.
Tighten only hand tight until nozzle has a snug fit against the
shoulder.
DO NOT USE PIPE DOPE.
NOTE: Extra nozzles end ventud may not be returned for
credit.
4" DOUBLE PIPE JETS
Pump Model
Number
Can be used as
Assembled
For Depths Of: Depths Nozzle No,
390.25110 30' to 90' 30' to 60' #51 J32P-24
390.25310
40' to 120' 40' to 60' NO CHANGE J32P-24
390.253150
390.25320
390.253250 40' to 200' 40' to 100' NO CHANGE J32P-24
390.253251
390,25330 40' to 280' 40' to 120' NO CHANGE J32P-24
390.253380
390.251600 30' to 80' 30' to 50' #51 J32P-24
390.251900 30' to 90' 30' to 60' I #51 J32P-24
390.252200 30' to 110' 30' to 70' 1 #53 J32P-22
390.251101 30' to 90' 30' to 60' #51 J32P-24
390.251901 30' to 90' 30' to 60' #51 J32P-24
390.252201 30' to 110' 30' to 70' #53 J32P-22
390,251180
390,251181 30' to 60' 30' to 40' #51 J32P-24
390.251182
390.251980
390.251981 30' to 90' 30' to 60' #51 J32P-24
390,251982
/ 390.252280
390.252281 30' to 90' 30' to 70' #53 J32P.22
390.252282
For Maximum Pumping Capacity On
Shallower Settings • Change As Follows:
Venturi No.
F_12J (Rev. 10/22/97

INSTALLATION PROCEDURE FOR USING 4 INCH JETS
1-1/4" Steel-
Pipe
-1" Steel
Pipe
1-1/4" _
Poly Pipe
Adapter
-- 1" Poly-
Pipe
Adapter
Pipe
1-1/4"Pot_.
Pipe --
Pipe Pipe
1-1/4"
1-1/4"
1-1/4"
Poly Pipe
x 1-1/4" Adapter
Face Bushing
Poly-
1-1/4"
1/4"
Face Bushing
Nipple
IMPORTANT: Use pipe thread compound on male threads and
tighten Venturi Adapter or Steel Pipe Into Jet Body.
IN WELL PIPING SIZES -ALL INSTALLATIONS
HP SUCTION DRIVE
3/4 Multi-Stage Jet Pump Piping 1-1/4" 1"
1 Multi-Stage Jet Pump Piping 1-1/4" 1-t/4"
1-1/2 Mufti-Stage Jet Pump Piping 1-1/4" 1-1/4"
All Horizontal Jet Pumps 1-1/4" 1"
For long horizontal runs of piping, consult your pump owner's manual
for recommended piping size increase.