Loading ...
Loading ...
Loading ...

Page 7
Installation instructions
ME10 / ME25 / ME40 / ME60
The installation must be completed by a licensed professional. All state and local codes must be adhered
to. The manufacturer will not be liable for any damages because of failure to comply with these installation
instructions or because of improper installation performed by an unqualied installer. Choose a location
that allows ease of access for maintenance or servicing, ideally installed at least 8” to 9” from the ceiling
(inside top of cabinet) or any adjacent walls.
Wall mounting
Fasten the supplied mounting bracket to the wall. Use screws that are suitable for the wall material and the
weight of the water heater lled to capacity (ME10 = 24 lbs ME25 = 41 lbs, ME40 = 57 lbs, ME60 = 76 lbs).
Hang the water heater on the bracket and pull downwards on the water heater to insure that both “ngers”
of the bracket are seated in the mounting slots. Conrm your water piping orientation (hot and cold) before
wall mounting. Only install in vertical position. The heater can sit on the oor in a tray with a drain.
Conrm water piping orientation before nalizing on oor. Again, only install in vertical position! Models
ME10, ME25, ME40 and ME60 can be installed under the sink.
Plumbing connections
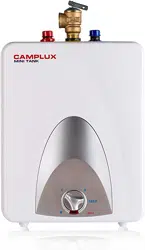
Connect the cold water inlet pipe to the inlet nipple (marked with a blue ring) and the hot water outlet pipe
to the outlet nipple (marked with a red ring).
Important: If Water pipes are copper or bronze, use dielectric connections to prevent corrosion. Failure
to provide dielectric insulation may result in premature tank or nipple failure and may void your warranty.
Insure that the water heater is installed in a level position. Install a shut off valve on the cold water side of
the water heater. The valve is for servicing and the valve should be in the open position when the water
heater is in operation. In order to protect the water heater from heat damage due to soldering, solder
a piece of tubing to a threaded union tting before screwing the union to the tank. Do not apply heat
directly to inlet or outlet connections.
Loading ...
Loading ...
Loading ...
