
Veranda 3 Outdoor 4K Television
SB-V3-[55/65/75]-4KHDR-BL
Owner’s Manual

2
Dear Valued Customer:
Thank you for choosing SunBrite. We’re honored that you’ve chosen us to be a part of your outdoor
experience.
At SunBrite, we’ve been developing and building the finest outdoor TVs since 2005 with the singular
goal of delivering the best possible outdoor experience—to bring people together to share in the
latest sports and entertainment while also enjoying all that the outdoors have to oer.
To ensure you receive the latest updates from SunBrite, please register your TV at this web address:
www.sunbritetv.com/support/product-support/product-registration
If, for any reason, you are not completely satisfied with your SunBrite TV, please let us know. Your
experience is of the utmost importance to us, and we don’t take it lightly. Reach our team of experts
Monday through Friday from 9:00 am – 6:00 pm Eastern at 866-357-8688.
Again, thank you for choosing a SunBrite premium outdoor television. We know you had options, and
we’re grateful you chose us to help you create new experiences with your friends and family.
—The SunBrite Team
Recycling
SunBriteTV operates a free mailback recycling program for consumers.
For more information on how to recycle your TV, please
visit https://www.sunbritetv.com/support/recycling-programs or
contact customer service at 866.357.8688.
Regulatory/Safety Information
To review complete regulatory information for your SunBrite products, see the information located on
the Snap One website at https://www.sunbritetv.com/snapone-legal .
General Operation
The front panel used in this product is made of glass. Therefore,
it can break when the product is dropped or impacted.
The Liquid Crystal Panel is a very high technology product with
2,073,600 pixels, giving you fine picture details. Occasionally, a
few non-active pixels may appear on the screen as a fixed point
of blue, green, or red. This does not aect the performance of
your product.
For added protection during a lightning storm, or when the
SunBrite is left unattended and unused for long periods of time,
unplug it from the wall outlet and disconnect the antenna. This
prevents damage due to lightning and power-line surges.
Do not place an outside antenna system in the vicinity of
overhead power lines or other electric light or power circuits, or
where it can fall into such power lines or circuits, as contact with
them might be fatal.
Never place a candle or flame on top or near your SunBrite.
Preserve Your Eyesight
To reduce the eye strain and protect your vision when you watch
your television, please take the following steps:
• Take regular and frequent breaks. Extended viewing may cause
eye fatigue. We do not recommend watching for more than
one hour without a break.
• Look away from the TV screen and focus on distant objects
during the breaks for at least 10 minutes.
• Relax yourself during a break by doing eye exercises or
outdoor activities.
The recommended viewing distance is to sit at least as far away
as three times the vertical height of the screen.
Proper breaks and exercises relieve eye strain and fatigue.
Repair
Do not service SunBrite yourself: Opening the cover voids the
warranty and exposes you to high voltage and other dangerous
risks. Refer all servicing to a qualified service professional.
If any of the following conditions occurs, unplug the power cord,
and call a qualified service professional to perform repairs:
• When power cord or plug is damaged.
• When objects have fallen into the product.
• If unit was submerged in water or pressure-washed.
• When product does not operate properly as described in the
operating instructions.
• When the product has been dropped or damaged.
• When the product displays an abnormal condition. Any
noticeable abnormality in the product indicates that the
product needs servicing.
Replacement parts: Ensure that the service person uses
replacement parts provided by SunBrite. Use of unauthorized
parts can result in fire, electric shock and/or other danger.
Safety checks: Upon completion of service or repair work, ask
the service technician to perform safety checks to ensure that the
product is in proper operating condition.

3
Contents
Media Bay .............................. 4
Remote Control ...........................5
Pairing the Bluetooth Remote ................5
Internet ..................................7
Establishing a Wi-Fi Connection ..............7
Other Options .............................8
Ethernet ..................................8
Bluetooth ................................8
Pairing a Bluetooth Device ..................8
Listening to the TV through Bluetooth Devices ..9
HDMI & CEC .............................9
Connecting an External Device ...............9
Digital Audio System with eARC/ARC ........9
AV Device, PC, or Console via HDMI ........10
Connecting USB Devices ..................10
Picture Menu: Adjusting the Image Quality ..11
The First Time You Turn It On. . . . . . . . . . . . . . . . .11
General Information ........................11
Game Mode Settings .....................13
Enabling Game Mode .....................13
Enabling Instant Game Response ............ 13
Enabling FreeSync ........................13
Sound Menu: Adjusting the Audio Quality ...14
Advanced Settings ........................14
Getting Familiar with the Home Screen .....15
Icons Across the Top of the Home Screen .....15
Managing Apps on the Apps Row ...........16
Using Voice Control ......................16
Google Assistant ..........................16
Media ..................................17
Browsing Content .........................17
Apps ...................................18
Installing an App ..........................18
Removing an App .........................18
Arranging App Icons ......................18
The Settings > Apps Menu .................18
Channel Scan ...........................19
Auto Scan ...............................19
Manual Scan .............................20
Channel List ............................ 20
Favorites .............................. 20
Editing Your Favorites ......................20
Screen Sharing ..........................21
Content Sharing .........................22
Mounting the Speaker Bar ................23
Ordering a Mount ....................... 25
On a Wall ................................25
On a Flat Surface .........................25
From a Ceiling ............................25
Cleaning the Panel .......................27
Caring for the Cabinet ....................27
Dust Cover ............................. 28
Accessibility ............................ 29
Parental Controls ....................... 29
Device Preferences ..................... 30
Google Assistant .........................30
Security & Restrictions .....................30
About ...................................30
Configuring Advanced System Settings .... 30
Serial/IP Control Port ......................31
Control4 Control Port ......................31
FAV/TV Button Customization ...............31
Mobile Device Connection Tips .............31
Clear Cache ..............................31
Help ....................................31
Self Diagnosis ...........................33
Quick Reference ........................ 46
4
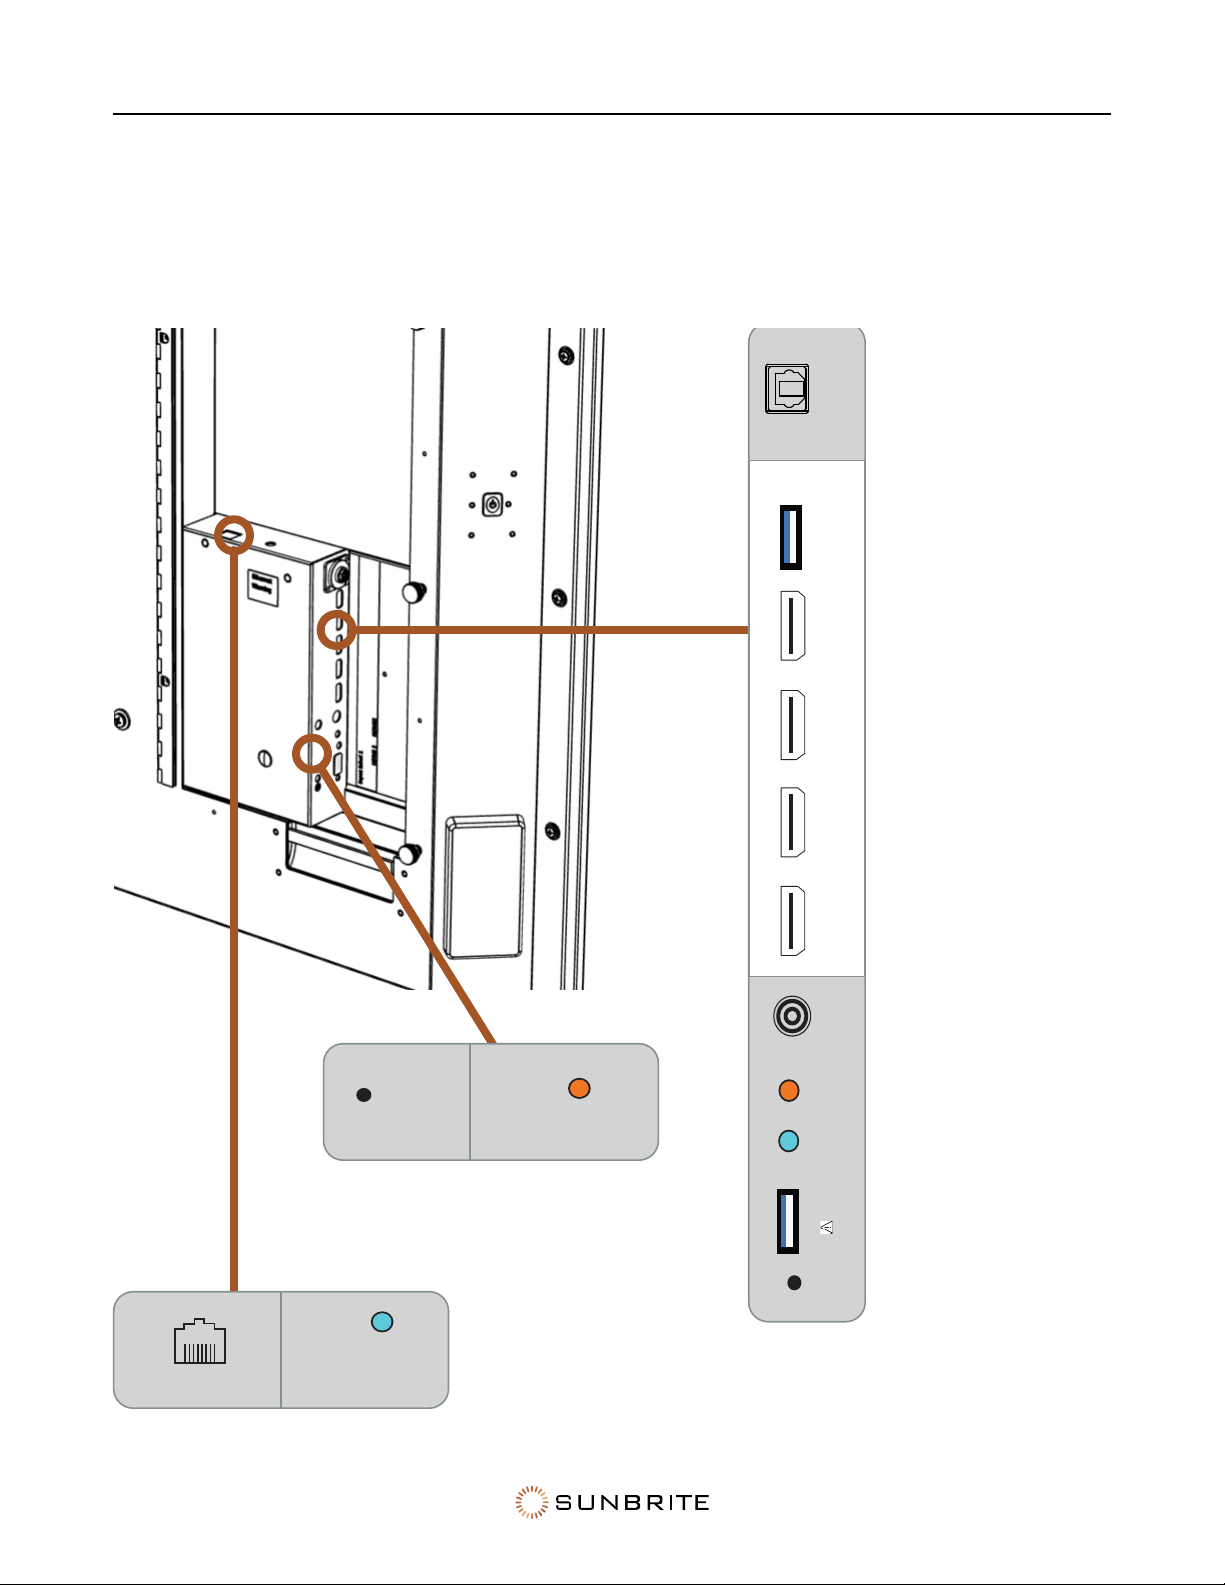
Media Bay
There are no controls on the front of the set. To control your TV, s”Remote Control” on page 5.
The rear of the television has a media bay, which is where all of your important connections are
made.
Digital Audio Out
SPDIF
SBTV PN:L23-001-00
USB 1
[DC 5V 1A]
ANT/CABLE
AUDIO
LINE OUT
A/V
INPUT
Rear IR
Receiver
Digital Audio Out
SPDIF
USB 2
SERVICE
ONLY
RESET
SERIAL PORT
SOUNDBAR
(INTERNAL SPEAKERS
WILL DISCONNECT)
[NOT FOR
SOUNDBAR]
HDMI 4
4K@120Hz
HDMI 2
4K@60Hz
eARC - 4K@120Hz
HDMI 1
4K@60Hz
HDMI 3
LAN
[ADAPTER
REQUIRED]
Rear IR
Receiver
Serial Port
(Service /
Future Use)
LAN
Port
Soundbar
Connector
USB 1
[DC 5V 1A]
HDMI 1
4K@60Hz
HDMI 2
4K@60Hz
HDMI 3
eARC - 4K@120Hz
HDMI 4
4K@120Hz
Antenna / Cable
A/V Input
USB 2
[SERVICE ONLY]
Reset Button
SBTV PN:L23-001-00
USB 1
[DC 5V 1A]
ANT/CABLE
AUDIO
LINE OUT
A/V
INPUT
Rear IR
Receiver
Digital Audio Out
SPDIF
USB 2
SERVICE
ONLY
RESET
SERIAL PORT
SOUNDBAR
(INTERNAL SPEAKERS
WILL DISCONNECT)
[NOT FOR
SOUNDBAR]
HDMI 4
4K@120Hz
HDMI 2
4K@60Hz
eARC - 4K@120Hz
HDMI 1
4K@60Hz
HDMI 3
LAN
[ADAPTER
REQUIRED]
Audio Line Out
[Not for Soundbar]
SBTV PN:L23-001-00
USB 1
[DC 5V 1A]
ANT/CABLE
AUDIO
LINE OUT
A/V
INPUT
Rear IR
Receiver
Digital Audio Out
SPDIF
USB 2
SERVICE
ONLY
RESET
SERIAL PORT
SOUNDBAR
(INTERNAL SPEAKERS
WILL DISCONNECT)
[NOT FOR
SOUNDBAR]
HDMI 4
4K@120Hz
HDMI 2
4K@60Hz
eARC - 4K@120Hz
HDMI 1
4K@60Hz
HDMI 3
LAN
[ADAPTER
REQUIRED]
5
Remote Control
1. Power
2. Input selection
3. Google voice: Bluetooth pairing required
4. FAV: sets a digital channel.
5. Numeric: allows manual entry of digits
6. D-Pad: navigate and select on-screen icons
7. Back arrow: return to previous menu.
8. Menu: visit the TV’s internal menu
9. Home: go to the main TV menu.
10. Volume control
11. Channel control
12. Mute
13. Rewind, Play/Pause, Fast Forward
14. Streaming Service Hotkeys
1
4
6
7
10
12
13
2
5
8
9
11
14
3
Pairing the Bluetooth Remote
• Ensure the remote has fresh batteries
in it, and the indicator light at the top of
the remote illuminates when a button is
pushed.
• Turn on the SunBrite TV using the power
button located on the side of the display.
• Press and hold the Menu
button for at
least 5 seconds.
• After 5 seconds, you should see a
message stating “Paired Successfully”.
• If the remote does not pair successfully,
press and hold the Menu
button for
another 5 seconds.

6
7
Section 1
Establishing Connections
Internet
Your SunBrite TV has a LAN port that allows you to connect it directly to your network. Use an ethernet
cable to connect your router or switch to the LAN jack on your TV.
Pro Tip: For best results, set your router to use Dynamic Host Configuration Protocol (DHCP). This
way the router automatically provides the TV with an IP address, subnet mask, gateway,
and DNS, so you don’t have to enter them manually.
Caution: When using the ethernet port for IP control, connect the cable to the network switch
before connecting it to the SunBriteTV ethernet port.
Establishing a Wi-Fi Connection
Pro Tip: Wired connections are more reliable and faster than wireless connections, so use an
Ethernet connection if at all possible.
Your SunBrite TV also has a dual-band wireless antenna built in, so it can establish a wireless
connection to your network. Ensure your wireless access points are working before starting.
• Press the Home
button on your remote.
• Select the Wireless icon to enter the Network & Internet page.
• Enable Wi-Fi.

8
• The page lists the top available wireless networks. Select your wireless network from the list. Enter
the password for your wireless network.
• If your wireless network does not appear in the list, select See All to display all visible networks.
Other Options
Add New Network: If your wireless network does not broadcast its SSID, this command allows you to
enter your network’s name, security mode, and password.
Scanning Always Available: This lets Google’s location service and other apps scan for networks,
even when Wi-Fi is o.
Wake on...: These options activate the TV when pinged by your network or a mobile device.
Ethernet
This shows whether or not you are connected to the internet.
Proxy Settings: Here you can enter an HTTP proxy for use. There are dozens of proxy types on the
internet: some change your IP address and protect your identity, while others authenticate users on
Wi-Fi networks.
Bluetooth
Your SunBrite TV can pair with Bluetooth devices such as speakers, headphones, keyboards, etc. If
maximum number of paired devices is reached, another device must be unpaired before pairing a
new device.
To pair the bluetooth remote with your SunBrite, “Remote Control” on page 5.
Certain Bluetooth devices may experience compatibility issues.
Pairing a Bluetooth Device
Before pairing your Bluetooth device, ensure it’s in pairing mode (see its manual for instructions) and
within range of the TV. After pairing is completed, the TV saves data for the connected device.
• Press the Home
button on your remote.
• Select the Gear (Settings) icon.
• Select Remotes & Accessories.
• Select Add Accessory to put the TV in pairing mode. It displays a list of available Bluetooth
devices.
• Select the desired device from the list, then follow the on-screen instructions. If you are prompted
to enter a passcode, refer to the device’s manual.

9
Listening to the TV through Bluetooth Devices
• Pair the Bluetooth audio devices as described above.
• Press the Home
button on your remote.
• Select the Gear (Settings) icon.
• Select Sound.
• Select Audio Output.
• Select the Bluetooth option to listen to the TV audio through your Bluetooth device.
HDMI & CEC
You can use your SunBrite remote to control external devices that are connected to the TV by an
HDMI cable (only). The external devices must support HDMI & CEC functionality, and you must enable
the HDMI & CEC feature of that connected device.
SunBrite HDMI & CEC supports One Touch Play, Routing Control, System Standby, Device OSD Name
Transfer, Remote Control Pass Through, Give Device Power Status, and System Audio Control.
Even if they claim to be, not all devices are compatible with SunBrite’s HDMI & CEC control feature.
Connecting an External Device
• Press the Home button on your remote.
• Select the Gear (Settings) icon.
• Select Inputs.
• Set HDMI Control (found under the CEC section) to On.
• Connect an HDMI & CEC compliant device to one of the TV’s HDMI ports.
• Turn on the connected external device. The device automatically connects to the TV.
Once the process completes, select that HDMI port as your input. Now you can access the menu of
the connected device through your TV screen using your SunBrite remote.
Digital Audio System with eARC/ARC
The Enhanced Audio Return Channel (eARC) / Audio Return Channel (ARC) feature sends audio from
the TV through an HDMI cable to a compatible digital sound system. With this feature, you can control
that sound system with your TV remote.
• Turn your TV and receiver o.
• Use an HDMI cable to connect your receiver to the eARC/ARC HDMI port of your TV.
• If the audio receiver has an Input Selector feature, change it to TV. When using the eARC/ARC
function, this port can be used as signal input when a media player is connected to the amplifier
and the amplifier is connected to the TV. (Some amplifiers may not support series connection.)
• Power on the TV and the sound system.
If you are using eARC,

10
• Press the Home button on your remote.
• Select the Gear (Settings) icon.
• Select Sound.
• Toggle eARC to On.
Next, for whichever mode you’re using,
• Select Sound.
• Select Audio Output.
• Choose ARC.
AV Device, PC, or Console via HDMI
You can connect a media player, PC, or Game Console using an HDMI cable.
• Power o the TV and the device.
• Connect the device using an HDMI port on the TV.
• Power on the device and the TV.
• Press the Input
button on your remote, then select the corresponding HDMI port as the input
source.
• If there is no sound from your TV, change the connected device’s audio settings.
Some devices such as DVD players require the HDMI signal to be set to output in the device’s settings.
Please consult your device user manual for instructions.
Connecting USB Devices
You can connect USB devices such as hard drives, flash drives, and digital cameras to your TV to
browse photos, listen to music, etc.
Connect the device to the blue USB 3.0 port of the TV.
Caution: Connected USB devices should not exceed 5V 1A. If a device requires more power than
the 5V 1A maximum allowed, use an alternate power source.
Your SunBrite TV supports USB drives of 4GB–128GB and other common market sizes, and hard drives
up to 8TB. It supports NTFS and FAT32 formats.
Certain digital cameras may not be compatible with the TV.
Warning: The blocked USB 2.0 port is for service only. Do not use this port with media players,
hard drives, flash drives, or digital cameras.
11
Section 2
Picture and Sound
Picture Menu: Adjusting the Image Quality
The First Time You Turn It On
Pro Tip: SunBrite TVs ship in Energy Saving Mode. For the best outdoor viewing experience,
switch the picture mode to Outdoor Day.
To switch your SunBrite to Outdoor Day mode,
• Press the Home
button on your remote.
• Select the Gear (Settings) icon.
• Select the Picture menu.
• Select Picture Mode.
• Select Outdoor Day.
General Information
To access these settings,
• Press the Home
button on your remote.
• Select the Gear (Settings) icon.
• Select the Picture menu.

12
Not all of the options below fit on the screen; you must scroll down to get to the options at the end of
the menu.
Backlight Functions: This opens a submenu where you can change the overall brightness of the
screen.
• Local Dimming: Have the TV automatically adjusts the backlight and contrast by sections to
compensate for changes in the image. Select O, Low, Medium, or High.
• Backlight Level: Adjust the screen’s brightness by moving the slider. A lower setting means a
darker image.
• Automatic Light Sensor: Enables your SunBrite to adjust the picture settings automatically
according to the ambient light.
• Light Sensor Shift: This adjusts the lower end of the dynamic backlight adjustments to reduce
power consumption and therefore save money.
Picture Mode: You can select the setting that provides the best viewing experience.
Picture Size: You can adjust the aspect ratio to fit your image on the screen.
Apply Picture Settings (to Other Input Sources):
• Press the Home
button on your remote.
• Select the Gear (Settings) icon.
• Select Picture.
• Select Apply Picture Settings.
When enabled, this forces the current picture mode to apply either to the current source, or to all
sources including external devices and OTT sources.
Smart Scene: When active, this enables your TV to recognize the content being watched and to
enhance the picture quality on all input sources. Some applications have explicit constraints that
prohibit content recognition.
Advanced Settings: Here you configure settings to provide the best viewing experience.
• Overscan: This slightly crops the edges of the displayed image to reduce artifacts.
• Color Temperature: Adjusts how warm (red) or cool (blue) the white areas of an image appear.
• Motion Enhancement: Reduces afterimages when viewing fast-moving objects. If you select
Custom, you can configure Blur Reduction and Judder Reduction manually.
• Motion Clearness: Removes blur to improve how clear that gaming imagery appears.
• Noise Reduction: Improve how clear the picture appears by reducing noise.
• Digital Noise Reduction: Improve picture clarity by reducing video noise.
• HDMI Dynamic Range: Adjusts the HDMI signal range to be more suitable to the content (HDMI
modes only).
• Active Contrast: Automatically darkens dark areas and lightens light areas to keep details visible.
• Color Space: Change the range of colors the TV displays.
Calibration Settings: Adjust the color space and gamma to best suit the content you’re viewing.
• Color Tuner: Adjust the hue, saturation and brightness for each of the colors (red, green, blue).
• White Balance: Adjust the intensity of red, green and blue lights to view the true colors of all
images in the picture.
• Gamma: Adjust the Gamma to alter how the TV responds to grayscale content. In a dark room,
choose a higher number like 2.2. In a brighter area, select a lower number like 2.0. In general, 2.4

13
is normally recommended.
• Gamma Calibration: Adjust the selected Gamma curve.
• RGB Only: View images based on default settings or choose to view it in red, blue or green.
Reset: Reset current picture settings back to the factory setting.
Game Mode Settings
This option only appears if you have a game console connected to your TV.
Enabling Game Mode
• Press the Home button on your remote.
• Select the Gear (Settings) icon.
• Select Picture then Picture Mode.
• Select Game mode.
This optimizes the TV’s settings for you to enjoy a comfortable gaming experience with a connected
PC or console by:
1. Reducing input lag to ensure every click matches what’s happening on the screen,
2. Improving responsiveness to reduce motion blur, and
3. Processing YUV 4:4:4 format signals precisely to present accurate image colors.
Enabling Instant Game Response
• Press the Home button on your remote.
• Select the Gear (Settings) icon.
• Select Picture.
• Select Advanced Settings.
• Select Instant Game Response.
You can enjoy a smooth viewing experience with external device connected to the TV when Instant
Game Response is turned on.
When Game Mode is selected, Instant Game Response is not switched o automatically.
Enabling FreeSync
Press the Home button on your remote, then select the Gear (Settings) icon. Select Picture then
Advanced Settings, and then FreeSync.
You can enjoy a smooth viewing experience with external device connected to the TV when FreeSync
is turned on.

14
Sound Menu: Adjusting the Audio Quality
• Press the Home button on your remote.
• Select the Gear (Settings) icon.
• Select the Sound menu.
The following settings might not be self-evident:
System Sounds: Set to On if you would like your TV to beep to confirm that you have made a menu
selection.
eARC: If you have a connected audio device that supports HDMI-eARC, set this to On for premium
sound quality.
TV Speaker: Turns your TV speaker on or o. If eARC/ARC or Bluetooth is selected in Audio Output,
you cannot configure them here; you must configure them on the device.
Wall Mount Setup: Automatically optimizes the sound for TVs mounted to the wall, using either the
built-in speaker or soundbar.
Advanced Settings
A few options here merit discussion.
• Auto Volume Control: Activate to prevent the perceived volume from changing when you switch
TV channels.
• Digital Audio Out: Select the digital audio output format that best suits the audio device type. This
is only applicable when Audio Output is set to ARC or when external audio players are connected
via the Digital Audio Out jack. With optical connections, we recommend PCM and Dolby Digital. If
your external audio device does not support Dolby or DTS, we recommend PCM.
• Digital Audio Delay: Adjust the digital audio output delay time to sync sound from an external
speaker with the images on the TV. This is only applicable when Audio Output is set to ARC or
when external audio players are connected via the Digital Audio Out jack.

15
Section 3
Smart Functions
Getting Familiar with the Home Screen
The simple design of the Home screen menu makes it easy to navigate. You can easily add or delete
applications according to your needs.
To access the Home screen,
• Press the Home
button on your remote.
• Use the D-pad to make your selection.
To exit the Home screen,
• Press the Input
button on your remote or use the D-pad to move the cursor to the Inputs icon
on the top of the screen.
• Press the OK button, and select your desired input source.
Icons Across the Top of the Home Screen
Google Assistant: You can search movies, TV, and more by voice command.
Google Search: You can search movies, TV, and more by typing.
Home: Sends you back to the home page.
Discover: Google gives you recommendations based on your usage.

16
Apps: Lets you review, sort, buy, delete, or run apps.
Notifications: Notifications can come from the system, an external device, an application, the media
player, etc.
Inputs: Select the input source depending on the device you have connected to your TV.
Network & Internet: You can set up your wireless or ethernet connections.
Settings: Here you configure the TV, set app options, add accounts, and change preferences.
Managing Apps on the Apps Row
On the apps row, select an app you want to open, remove, or move, and press and hold the OK
button.
If your favorite app is not on your Home screen,
• Select your favorite app.
• Press and hold the OK button.
• Select Add to Favorites.
Using Voice Control
Voice Control may not be applicable in some models/countries/regions.
To use voice control, ensure the remote control is paired via bluetooth. For remote pairing instructions,
“Remote Control” on page 5.
Google Assistant
You can ask for information, search for your favorite movies, control your TV and more, just by asking
Google Assistant.
Before setting up Google Assistant, connect your TV to the network.
Sign in Google Assistant on TV
• Press the Home button on your remote.
• Select the Gear (Settings) icon.
• Select Device Preferences.
• Select Google Assistant.
• Toggle Google Assistant on.
• Press the Home
button on your remote.
• Select the Gear (Settings) icon.
• Select Accounts & Sign In.
Sign in to get new apps, recommendations, movies, and more from Google. You can use your phone
or computer, or use your remote to sign in. Also you can select Google Assistant in the Guide when
you turn on the TV for the first time.

17
How to Start Google Assistant
There are several ways to start Google Assistant.
Option 1:
• Press the Home
button on your remote.
• Select the Gear (Settings) icon.
• Select Device Preferences.
• Select Google Assistant.
Option 2:
• Press the Home
button on your remote.
• Select one of the Google icons at the top of home screen.
Option 3:
• Press the Google button on your remote.
Media
Media is a central location for you to view or listen to dierent types of content, such as photos, music
and movies. You can view media content through:
• A USB flash drive or hard drive, or
• A compatible mobile phone, tablet, or personal device.
Browsing Content
You have two ways to enter Media.
Option 1:
• Insert a USB device.
• A prompt message appears; choose whether to go to the media.
Option 2 (if your USB device is connected to the TV that doesn’t show the Media page):
• Press the Home
button.
• Select Apps.
• Select Media.
To browse content based on the type that you wish to access, navigate to the appropriate menu tab
on the screen and select All Media, Videos, Photos, or Music.
Click the folder that contains your content. Make your selection to play or view the content.
To exit the Media center, press the Back Arrow
button on your remote.

18
Apps
To install an app, your TV must be connected to the Internet.
Installing an App
• Press the Home button on your remote
• Select Apps.
• Select Get More Apps.
• Use the D-pad on your remote to select the app that you want to install.
• Select Install. SunBrite installs the selected app.
Removing an App
You can only delete apps that you’ve added to the TV. You cannot remove factory-installed apps. To
delete an app:
• Press the Home
button on your remote.
• Select Apps.
• Use the D-pad on your remote to select the app that you want to remove.
• Press and hold the OK button.
• Select Uninstall.
• When the dialog appears, confirm that you want to uninstall the app.
Arranging App Icons
To move an app:
• Press the Home
button on your remote.
• Select Apps.
• Use the navigation buttons on your remote to select the app that you want to move.
• Press and hold the OK button.
• Select Move.
• Use the navigation buttons on your remote to adjust the location of the app.
• Press the OK button to confirm its new location.
The Settings > Apps Menu
This page displays your apps. By default it shows the apps you have used most recently, or you can
select to view all apps installed on your TV.
Permissions
App Permissions: This lets you select which apps have access to the various devices or records
attached or accessible to your TV. Each app that requests a specific type of access is noted.
Special App Access: This is where you allows apps the ability to modify the control of your TV. Each
setting applies globally to all apps.

19
Section 4
Live TV
Channel Scan
You can scan channels automatically or manually.
Auto Scan
There are two ways to begin an automatic scan for TV channels.
Option 1:
• Press the Input
button on your remote.
• Select Channels. If no channels have been saved to your SunBrite TV, you will be prompted to do
a channel search.
Option 2 (when in live TV):
• Press the Menu
button on your remote.
• Select Channels.
• Select Tuner Mode to decide whether to scan Antenna or Cable.
To start the scan, in Live TV, press the Menu
button on your remote, then select Channels. Select
Auto Channel Scan.

20
Manual Scan
In live TV:
• Press the Menu
button on your remote.
• Select Channels.
• Select Manual Scan.
• Type in a channel number to add it manually to your TV.
Channel List
In live TV, press the OK button on the remote to display the Channel List menu.
Favorites
Before creating your favorites list, you must complete a channel scan.
Editing Your Favorites
From live TV,
• Press the OK button. The channel list appears on the right side of the screen.
• Press the 123
button.
• Select the green icon.
• Press the OK button. A heart-shaped icon appears next to your favorite channel on Antenna/
Cable list, and the favorite channel appears in the favorite list.
If you want to remove a favorited channel:
• Press the 123
button.
• Select the green icon.
• Press the OK button, and the heart-shaped icon disappears.

21
Section 5
Multi-Screen
Screen Sharing
Mirror content from your compatible mobile device to the TV. View videos, photos and more from
your device on your TV screen.
• Press the Home
button on your remote.
• Select the Gear (Settings) icon.
• Select Advanced System.
• Select Mobile Device Connection Tips.
• Select Screen Sharing.
• Turn on the broadcasting function of your Android or Windows 10 device. Depending on the
device, this may be called “Wireless display”, “Smart view”, “Wireless projection”, or something else.
• Select the SunBrite TV in the search list of your device. The TV then mirrors your mobile device’s
screen. If you are using Wi-Fi, the connection may fail.
Close screen sharing with the Back arrow
button.

22
Content Sharing
Share videos, music or pictures from your Android/iOS/PC device to the TV screen.
• Press the Home
button on your remote.
• Select the Gear (Settings) icon.
• Select Advanced System.
• Select Mobile Device Connection Tips.
• Select Content Sharing.
• Ensure your device and the TV are connected to the same network.
• Turn on the content sharing function of your Android/iOS/PC device.
• Select the SunBrite in the search list of your device.
• Wait for the connection progress to complete, then select the content you want to share.
If your device doesn’t support content sharing, you can download an app that makes it possible.
Not all file formats for shared content can not be played. The shared content might not play smoothly
depending on the network connection; this is especially true for Wi-Fi.

23
Section 6
Optional Speaker Bar
Mounting the Speaker Bar
The optional speaker bar and required adapter cable are not included with your SunBrite TV. These
accessories are available through your local dealer or reseller, or at SunBriteTV.com.
Caution: Before detaching (or attaching) the speaker, turn o the TV and unplug the AC cord.
Mount the speaker bar to the bottom of the back of your Veranda Outdoor TV, using the hardware
provided with the speaker bar.
Attach the 4-conductor DIN adapter to the speaker bar connector and then plug the 3.5mm plug
inside the cable bay into the speaker bar output.

24

25
Section 7
Mounting
Ordering a Mount
To order a mount, contact your Authorized SunBrite dealer, call SunBrite Customer Care at
866.357.8688, or visit us at www.SunBriteTV.com.
The SunBrite Veranda 3 has a VESA standard pattern of 400 × 400 for all sizes.
On a Wall
Do not mount your SunBrite directly to a wall; use a SunBrite all-weather TV mount for safety and
security.
On a Flat Surface
The Veranda 3 does not come with a stand, nor do we recommend using one.
From a Ceiling
Use SunBrite All-Weather Ceiling Mounts for best results.

26
27
Section 8
Caring for Your TV
Cleaning the Panel
To clean the LCD panel, turn the TV o and unplug the AC cord from the wall outlet. Gently wipe the
surface of the display panel with a water-damp microfiber, cotton, or flannel cloth. If the front panel
is dusty, use an anti-static brush, which is commercially available.
Caution: Do not use tissues, rags, sponges, or paper towels, which can damage the screen and
leave behind lint. Do not use chemical cleaners.
If the LCD panel is very dirty, mix equal parts of isopropyl alcohol and distilled water in a clean spray
bottle, and spray the mixture onto a microfiber, cotton, or flannel cloth and gently wipe the panel
clean. Do not spray the solution directly on the panel.
Caring for the Cabinet
Clean only with dry cloth.
Turn o the main power and unplug the AC cord from the wall outlet.
To avoid scratching the frame, use a soft, lint-free cloth for cleaning.
Ensure nothing falls into the TV while you are cleaning it.

28
Dust Cover
Keep the TV covered with the optional SunBriteTV Outdoor Dust Cover when not in use.
The fitted dust cover is designed to protect the LCD panel from harmful UV rays from direct sunlight,
and keeps wind-blown objects from scratching the surface of the panel.
To order a Dust Cover, contact your Authorized SunBrite dealer, call SunBrite Customer Care at
866.357.8688, or visit us at www.SunBriteTV.com.
29
Section 9
Accessibility & System
Accessibility
The Accessibility menu provides options to aid the visually or hearing impaired.
• Press the Home
button on your remote.
• Select the Gear (Settings) icon.
• Select Device Preferences.
• Select Accessibility.
Here you can customize your caption style, configure your closed-caption options, and set up various
accessibility services.
Text to Speech reads whatever words are on the screen.
Accessibility Shortcut: Lets you set up quick access for your preferred service. When enabled, press
both the back and down buttons for 3 seconds to start the selected accessibility feature.
Parental Controls
• Press the Home button on your remote.
• Select the Gear (Settings) icon.
• Select Parental Control.

30
When Locks are first enabled, the Create Password window displays. Using the D-pad on your
remote, create and confirm the code. If you forget your password, call us at 866-357-8688.
Device Preferences
• Press the Home button on your remote.
• Select the Gear (Settings) icon.
• Select Device Preferences.
Here you set the date and time, either manually or as provided by the TV network as part of its
broadcast. You can manually set the current time when this is disabled. When set to O, the TV
Network may not be working properly.
This is also where you select your language, keyboard (for input), external storage, screen saver
settings, and customize your home screen.
Google Assistant
View permissions about accounts and limit the search results.
Chromecast Built-In: Enable your app to stream video and audio to the TV.
Usage & Diagnostics: Sends your personal usage and diagnostic information to Google.
Security & Restrictions
Supervise unknown sources for safety and check installed apps for harmful behavior.
About
View the version information, the status of network, and other information. You can also update the
software version or change the TV’s name.
Configuring Advanced System Settings
• Press the Home button on your remote.
• Select the Gear (Settings) icon.
• Select Advanced System.
Timers let you set specific times to power on or o, as well as a sleep timer.
Store Mode brightens the TV for retail settings, which uses more power.
Screenless Mode enables the Google Assistant even when the screen is o; for details, see “Google
Assistant” on page 16.
Enhanced Viewing enables Automatic Content Recognition, Picture Mode Auto Adaptation and Sound
Mode Auto Adaptation. Your TV must be connected to your network to use Enhanced Viewing.

31
Serial/IP Control Port
Our TV supports IP control through the local area network (LAN). The TV can accept compliant
instructions issued by another device in the same network through the pre-defined network interface
and command format, like shutdown, volume up/volume down, switch channels, etc.
Control4 Control Port
Control and linkage between devices can be achieved through drivers and protocols provided by
Control4. You can also use other control systems with a supporting driver.
This function may not be applicable in some models/countries/regions.
FAV/TV Button Customization
You can personalize FAV button on your remote for quick access to customized input source.
Mobile Device Connection Tips
Follow the on-screen instructions to learn more about the Screen Sharing and the Content Sharing.
Clear Cache
Clear cache of applications and system.
Help
System Message: View system message, including: Serial Number, Service Code, Software Version,
etc. The Serial Number may not be displayed in certain regions.
Support Information: View Support URL, Support Number.
Signal Information: Perform self diagnosis to test Video Format, Audio Format, Color Depth, etc.

32
33
Section 10
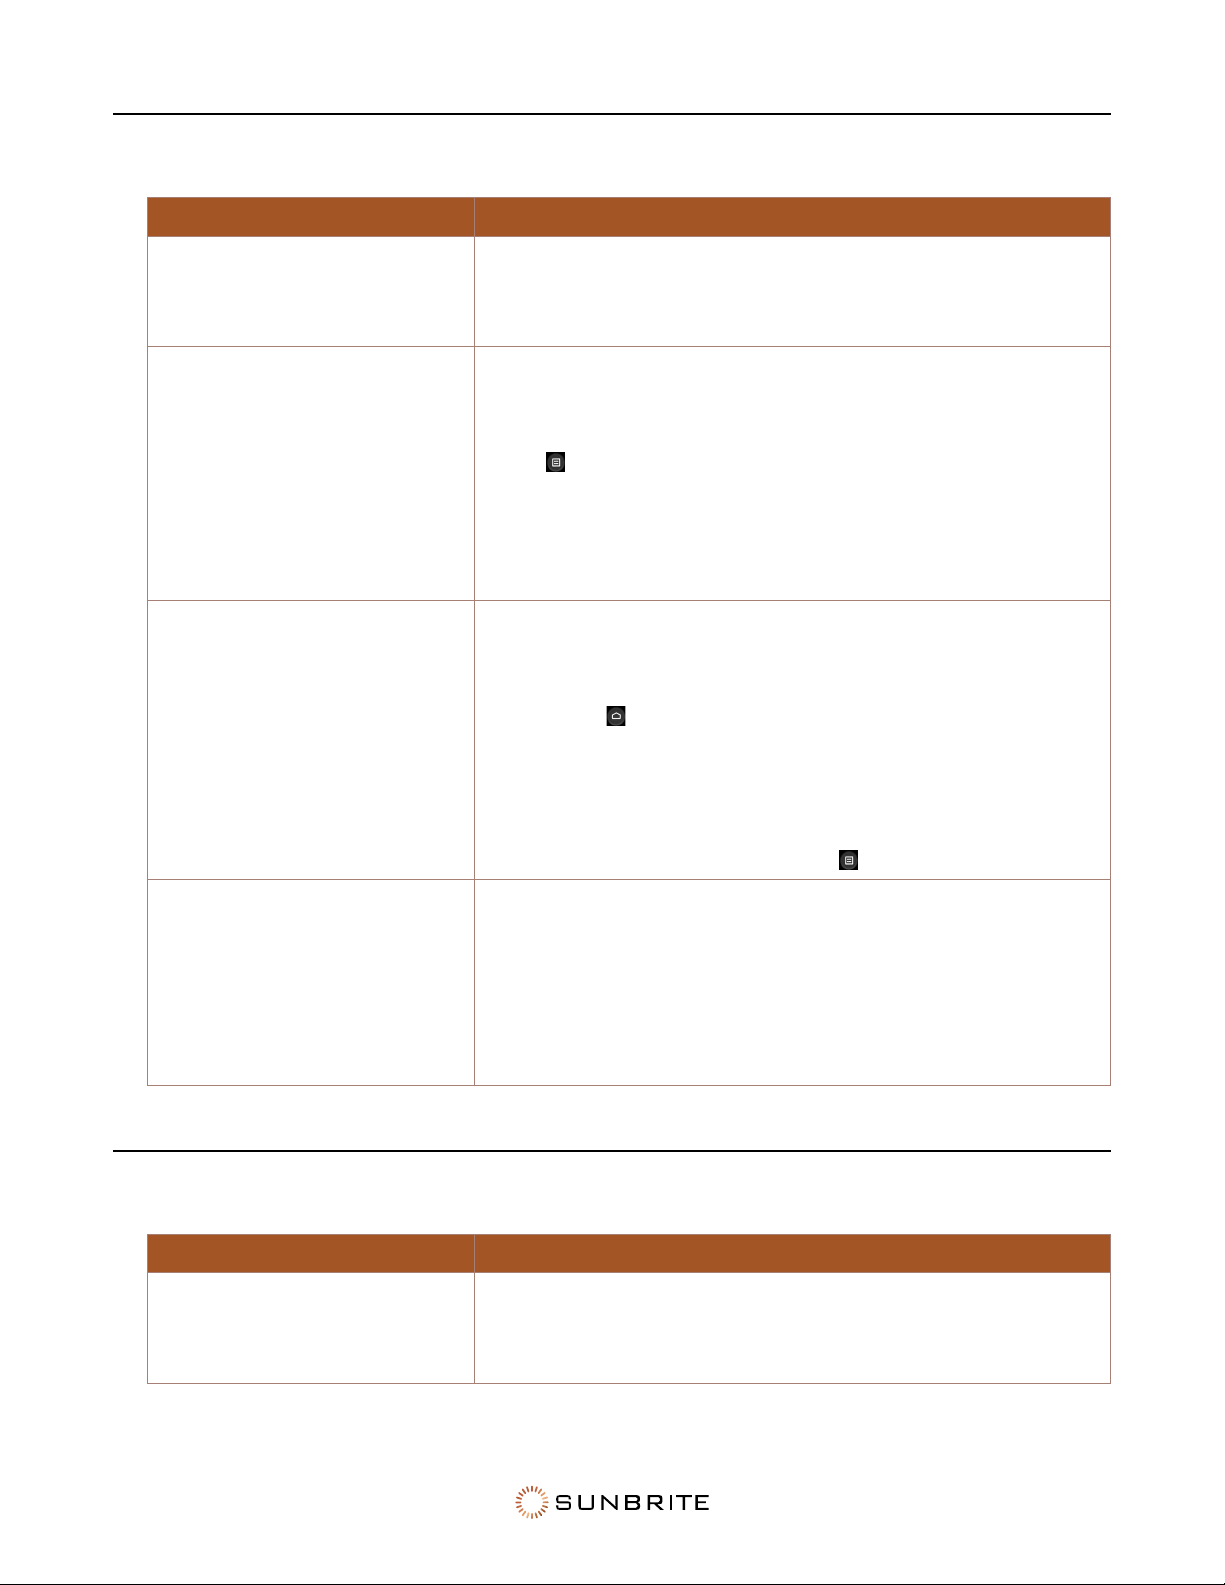
Troubleshooting
Self Diagnosis
• Press the Home button on your remote.
• Select the Gear (Settings) icon.
• Select Advanced System.
• Select Help.
• Select Self Diagnosis.
If this does help you resolve the issue, try the techniques listed below.
Voice Control Issues
Problem Possible Solutions
Google assistant won’t work.
Try to log in to Google. If you receive “I don’t understand” from
voice recognition, log out the account, then log back in.
After logging in to the Google account, the recognition language
may be dierent. You need to log in to the Google account on
the web page to set the voice language.
For more information, see “Google Assistant” on page 16.

34
Picture Issues
When the TV has picture problems, these steps may help resolve the problem.
Problem Possible Solutions
No picture, or black and white
picture.
Unplug the TV power cord from AC outlet and re-plug after 60
seconds.
Check that the Color Saturation is set to 50 or higher.
Try dierent TV channels.
The picture is distorted.
The compression of video content may cause picture distortions,
especially in fast-moving pictures from sports programs and
action movies.
If the signal reception is weak or poor, screen distortion may be
visible but it is not a malfunction.
Mobile phones used close to the TV (within 1m) may cause noise
on analogue and digital channels.
The picture is blurry or
flickering, or cuts out
momentarily.
Go to Home
> Settings > Picture > Sharpness. You can try to
increase or decrease the Sharpness.
If you use an external antenna, check the direction, position and
connection of the antenna.
Adjust the direction of your antenna, or reset or fine tune the
channel.
The picture appears red,
purple, pink and other colors.
Go to Home
> Settings > Picture > Calibration Settings >
White Balance. You can try to increase or decrease the White
Balance.
Picture distorted or appear
wavy.
Some electrical appliances may aect the TV. If you turn o the
appliance and the interference goes away, then move it further
away from TV.
Insert the power plug of the TV into another power outlet.
The picture is too dim to see.
Ensure that the TV is set to Outdioor Day or Outdoor Night mode.
For details on changing your TV’s picture settings, “Picture Menu:
Adjusting the Image Quality” on page 11.
If the problem persists, check the broadcast signal strength or refer to the external device’s manual.

35
Network Issues
Problem Possible Solutions
The TV cannot connect to your
network or apps.
Ensure the TV has an Ethernet or wireless connection to your
network.
Contact your Internet service provider and ensure your access is
working.
The wireless network
connection fails.
Make sure you are getting a signal from your wireless modem
or access point, and that it is connected to the Internet.
Shut o any appliances that interfere with wireless.
The wireless network signal is
too weak.
Position your wireless router or access point in a more central
location. Avoid putting it in a corner.
Sound Issues
Problem Possible Solutions
There is no sound or the sound
is too low at maximum volume.
Check the volume control of the device (cable or satellite box,
DVD, Blu- ray, etc.) connected to your TV.
Picture is normal, but no sound. Check the volume settings. Ensure that the audio is not muted.
The speakers are making an
odd sound.
Make sure that the audio cable is connected to the correct audio
output connector on the external device.
For antenna or cable connections, check the signal information.
A weak signal may cause distortion.
Audio is distorted or wavy.
Some electrical appliances may aect the TV. If you turn o
the appliance and the interference goes away, then move that
appliance further away from TV.
Move the TV’s power plug to another power outlet.
Sound is blurry or cuts out
momentarily.
If you use an external antenna, check the direction, position and
connection of the antenna.
Adjust the direction of your antenna or reset or fine tune the
channel.
Pro Tip: This TV does not support DTS CD bitstreams. Playing this format may cause undesirable
noise.
36
External Device Connection Issues
Problem Possible Solutions
I have connected an external
source to my TV but I get no
picture and/or sound.
Check that the connection between the external device and your
TV is not loose.
Ensure you have selected the correct input source.
There is no signal or weak
signal in the cable box.
If there is no signal occasionally, unplug the cable from the TV
and plug it back in after 60 seconds.
If there is no signal, or the signal cannot be restored, go to
Menu
> HDMI Format if you select HDMI as input, to confirm
whether the signal can be recognized.
Change to another HDMI port.
Replace the HDMI cable.
There is no sound.
Check if the Audio Out option in the menu is ARC/eARC, if not,
you need to check whether the external power amplifier device
is connected to the ARC port or optical port of the TV.
Go to Home
> Settings > Sound > Advanced Settings > Digital
Audio Out. You can try to select PCM, Dolby Digital, or Dolby
Digital Plus.
Whether the power amplifier device port is connected correctly.
If you select HDMI as input, try Menu
> HDMI Format.
The remote control does not
work.
Confirm that TV still has power and is operational.
Check that the batteries are correctly installed.
Place new batteries in the remote control.
If some buttons don't work, but the volume buttons work
normally, the problem is likely with the application.
Media Files
Problem Possible Solutions
Some files can’t be played.
Check the compatibility tables in the Appendix. Most files can be
played back, but you might experience problems with corrupted
files, or with files that have high bitrate, unsupported resolution,
unsupported container, or unsupported codec.

37
Apps
Problem Possible Solutions
Netflix won't play.
Go to Home
> Settings > Apps > Netflix > Force stop, then
reopen Netflix.
Reset the entire TV to factory settings.
Disney+ won't play.
Go to Home
> Settings > Apps > Disney plus > Force stop,
then reopen Disney+.
Go to Home
> Settings > Apps > Disney plus > Clear data,
then reopen Disney+.
Reset to factory settings.
Miscellany
Problem Possible Solutions
The TV is hot.
Watching media causes the TV to generate heat. The heat from
the panel dissipates through internal vents running along the top
of the TV. After extended use, it may feel hot to the touch. This is
not a defect and does not aect the TV's functionality.
The TV smells of plastic. This smell is normal for a new TV and will dissipate over time.
When I turn on my TV, there is a
delay of a few seconds before
the picture appears.
This is normal. The TV is initializing and searching for previous
setting information.

38
39
Section 12
Specifications
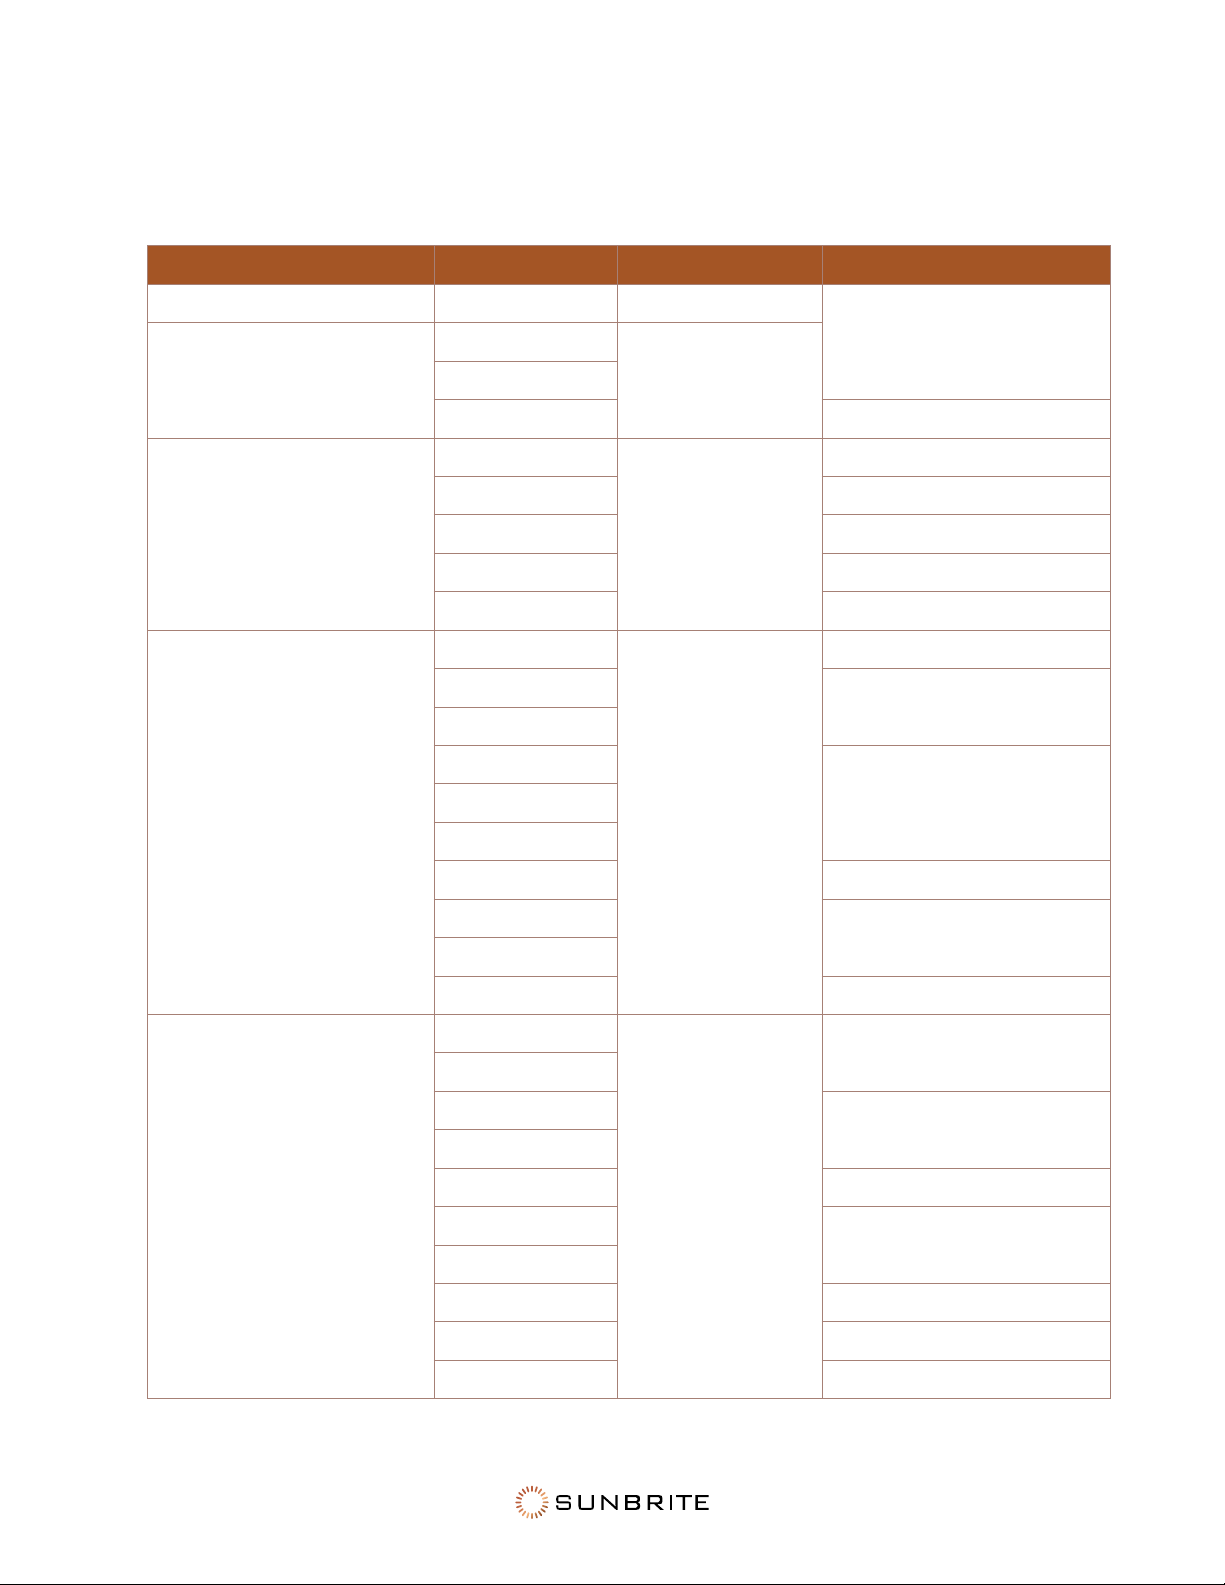
Supported Formats
Audio Format for USB Playback
Container Audio Codec File Extension
WAV
MPEG1/2 Layer1
.wav
MPEG1/2 Layer2
MPEG1/2/2.5 Layer3
AAC-LC, HEAAC
DTS, DTS HD
LPCM
MP3
MPEG1/2 Layer1
.mp3MPEG1/2 Layer2
MPEG1/2/2.5 Layer3
AAC AAC-LC, HEAAC .aac
WMA
WMA7, WMA8, WMA9
.wma, .wmv
WMA Pro, WMA9 Pro
FLAC FLAC .flac
40
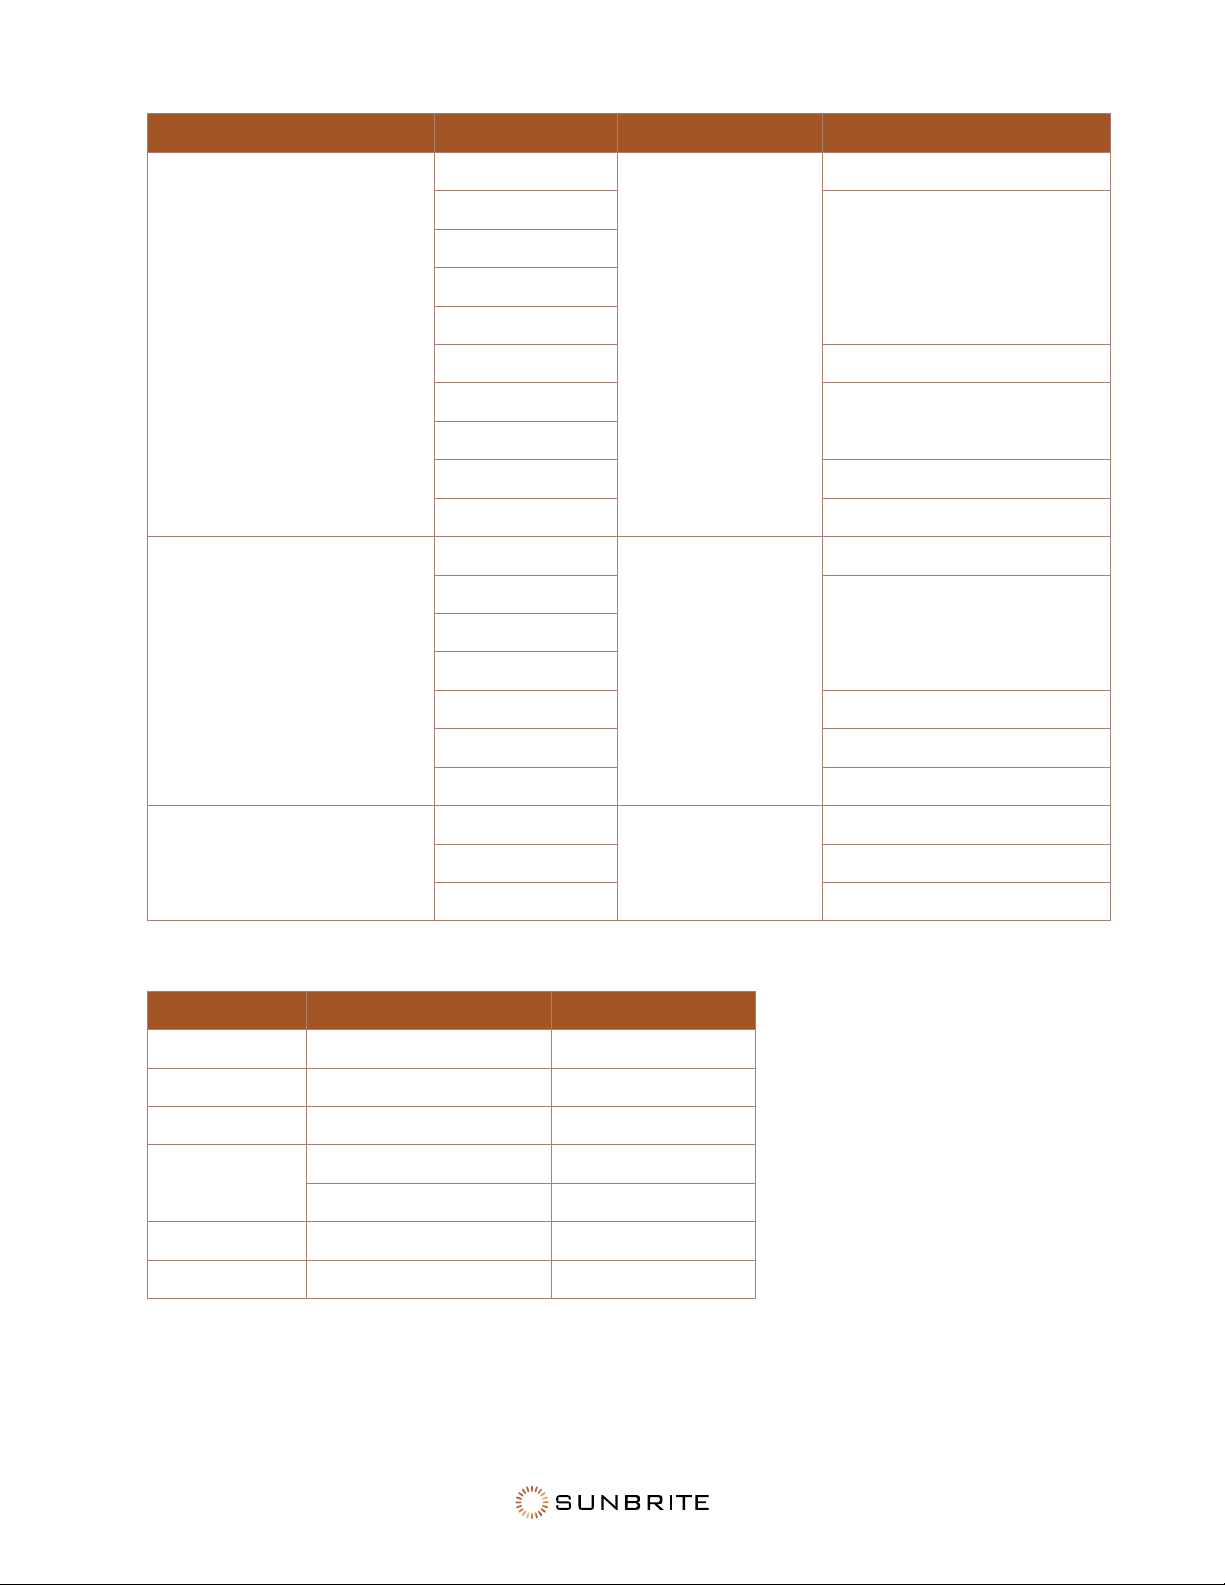
Video Format for USB Playback
Due to dierences in programming tools and other factors, some of the file formats that are listed
may not be supported.
Container Video Codec File Extension Resolution and Frame Rate
MPG MPEG1/2 .mpg .mpeg
1920 x 1080 @ 60fps
MPEG program stream
MPEG1/2
.DAT, .VOB, .MPG,
.MPEG
MPEG4
H.264 3840 x 2160 @ 120fps
MPEG transport stream
HEVC/H.265
.ts, .trp, .tp
3840 x 2160 @ 120fps
MPEG4 1920 x 1080 @ 60fps
H.264 3840 x 2160 @ 120fps
VC1 1920 x 1080 @ 60fps
MPEG1/2 1920 x 1080 @ 60fps
MP4
VP8
.mp4, .mov
1920 x 1080 @ 60fps
AV1
3840 x 2160 @ 120fps
HEVC/H.265
MPEG1/2
1920 x 1080 @ 60fpsMPEG4
H.263
H.264 3840 x 2160 @ 120fps
WMV3
1920 x 1080 @ 60fps
VC1
Motion JPEG 1920 x 1080 @ 30fps
MKV
VP9
.mkv
3840 x 2160 @ 120fps
HEVC/H.265
MPEG1/2
1920 x 1080 @ 60fps
MPEG4
H.264 3840 x 2160 @ 120fps
WMV3
1920 x 1080 @ 60fps
VC1
Motion JPEG 1920 x 1080 @ 30fps
VP8 1920 x 1080 @ 60fps
AV1 3840 x 2160 @ 120fps
41
Container Video Codec File Extension Resolution and Frame Rate
AVI
HEVC/H.265
.avi
3840 x 2160 @ 120fps
MPEG1/2
1920 x 1080 @ 60fps
MPEG4
Sorenson H.263
H.263
H.264 3840 x 2160 @ 120fps
WMV3
1920 x 1080 @ 60fps
VC1
Motion JPEG 1920 x 1080 @ 30fps
VP8 1920 x 1080 @ 60fps
FLV
HEVC/H.265
.flv
3840 x 2160 @ 120fps
MPEG4
1920 x 1080 @ 60fpsSorenson H.263
H.263
H.264 3840 x 2160 @ 120fps
Motion JPEG 1920 x 1080 @ 30fps
VP8 1920 x 1080 @ 60fps
WEBM
VP9
.webm
3840 x 2160 @ 120fps
VP8 1920 x 1080 @ 60fps
AV1 3840 x 2160 @ 120fps
Photo Format for USB Playback
File Type Audio Codec File Extension
BMP 9600 x 6400
GIF 6400 x 4800
HEIF 4000 x 3000
JPEG
.jpg .jpeg 15360 x 8640
Progressive 1024 x 768
PNG 9600 x 6400
WebP 3840 x 2160

42
Dimensions: 55" Model
LCD Screen 55-inch diagonal Color Active Matrix TFT LED LCD
Resolution 3840×2160 UHD 4k HDR
Aspect Ratio 16:9
Blacklight Brightness
- Surface Luminance, white
1000 nits (cd/m2)
Contrast Ratio 4000:1
Frame Rate 60Hz standard, 120Hz maximum
H/V Viewing Angle 178° by 178°
Response Time 8 milliseconds
TV formats 2160p (HDMI only), 1080p, 1080i, 720p, 720i, 480p, 480i
RF Input Connector Antenna/CATV (NTSC/ATSC/QAM) x1
HDMI Input Connector
HDMI Input ×4 (Supports HDMI 2.1, HDMI 2.0, HDMI 1.4,
HDCP 1.4 & HDCP 2.2) (eARC on HDMI 3)
Video Composite Input Connector
Composite Video ×1, L/R Audio Inputs ×1 (Requires Adapter,
not included)
Control Set Discrete IR Control, Concealed rear IR receiver, IP Control
Audio Out Toslink Optical audio (Fixed) / Analog 3.5mm (variable)
Speakers
20 Watt downfiring internal speakers (included) or optional
speaker bar (not included)
Exterior Powder-coated aluminum
Colors Black only
Input Power 120 VAC, 60Hz 1.6A Max
Operating Temperature -24° to 104° F. (-31° to 40° C)
Non-operating Temperature -24° to 140° F. (-31° to 60° C)
Accessories Included Weatherproof remote control with battery
TV Dimensions
49.75" W × 29.25" H × 4.25" D
1258mm W × 741mm H × 108mm D
TV Weight 47 lb. / 21.3 kg
Shipping Weight 62 lb. / 28.1 kg
Residential Warranty 1 year
Commercial Warranty 1 year
VESA Mount Pattern 400mm × 400mm

43
Dimensions: 65" Model
LCD Screen 65-inch diagonal Color Active Matrix TFT LED LCD
Resolution 3840×2160 UHD 4k HDR
Aspect Ratio 16:9
Blacklight Brightness
- Surface Luminance, white
1000 nits (cd/m2)
Contrast Ratio 4000:1
Frame Rate 60Hz standard, 120Hz maximum
H/V Viewing Angle 178° by 178°
Response Time 8 milliseconds
TV formats 2160p (HDMI only), 1080p, 1080i, 720p, 720i, 480p, 480i
RF Input Connector Antenna/CATV (NTSC/ATSC/QAM) x1
HDMI Input Connector
HDMI Input ×4 (Supports HDMI 2.1, HDMI 2.0, HDMI 1.4,
HDCP 1.4 & HDCP 2.2) (eARC on HDMI 3)
Video Composite Input Connector
Composite Video ×1, L/R Audio Inputs ×1 (Requires Adapter,
not included)
Control Set Discrete IR Control, Concealed rear IR receiver, IP Control
Audio Out Toslink Optical audio (Fixed) / Analog 3.5mm (variable)
Speakers
20 Watt downfiring internal speakers (included) or optional
speaker bar (not included)
Exterior Powder-coated aluminum
Colors Black only
Input Power 120 VAC, 60Hz 2.1A Max
Operating Temperature -24° to 104° F. (-31° to 40° C)
Non-operating Temperature -24° to 140° F. (-31° to 60° C)
Accessories Included Weatherproof remote control with battery
TV Dimensions
58" W × 34" H × 4.25" D
1473mm W × 864mm H × 108mm D
TV Weight 60 lb. / 27.3 kg
Shipping Weight 78 lb. / 35.4 kg
Residential Warranty 1 year
Commercial Warranty 1 year
VESA Mount Pattern 400mm × 400mm

44
Dimensions: 75" Model
LCD Screen 75-inch diagonal Color Active Matrix TFT LED LCD
Resolution 3840×2160 UHD 4k HDR
Aspect Ratio 16:9
Blacklight Brightness
- Surface Luminance, white
1000 nits (cd/m2)
Contrast Ratio 4000:1
Frame Rate 60Hz standard, 120Hz maximum
H/V Viewing Angle 178° by 178°
Response Time 8 milliseconds
TV formats 2160p (HDMI only), 1080p, 1080i, 720p, 720i, 480p, 480i
RF Input Connector Antenna/CATV (NTSC/ATSC/QAM) x1
HDMI Input Connector
HDMI Input ×4 (Supports HDMI 2.1, HDMI 2.0, HDMI 1.4,
HDCP 1.4 & HDCP 2.2) (eARC on HDMI 3)
Video Composite Input Connector
Composite Video ×1, L/R Audio Inputs ×1 (Requires Adapter,
not included)
Control Set Discrete IR Control, Concealed rear IR receiver, IP Control
Audio Out Toslink Optical audio (Fixed) / Analog 3.5mm (variable)
Speakers
20 Watt downfiring internal speakers (included) or optional
speaker bar (not included)
Exterior Powder-coated aluminum
Colors Black only
Input Power 120 VAC, 60Hz 3.1A Max
Operating Temperature -24° to 104° F. (-31° to 40° C)
Non-operating Temperature -24° to 140° F. (-31° to 60° C)
Accessories Included Weatherproof remote control with battery
TV Dimensions
67" W × 39" H × 4.25" D
1700mm W × 987mm H × 108mm D
TV Weight 89 lb. / 40.4 kg
Shipping Weight 107 lb. / 48.5 kg
Residential Warranty 1 year
Commercial Warranty 1 year
VESA Mount Pattern 400mm × 400mm

45
46
Technical Support
For technical support, please call 866-357-8688 or visit https://www.sunbritetv.com/support/services/contact-support, fill out
the support request form, and our support team will respond via email.
Visit tech.control4.com/technician for discussions, instructional videos, news, and more.
Warranty and Legal Notices
Find details of the product’s Limited Warranty and other resources such as regulatory notices and patent and safety
information, at snapone.com/legal or request a paper copy from Customer Service at 866.424.4489.
Copyright ©2021, Snap One, LLC. All rights reserved. Snap One and its respective logos are registered trademarks or
trademarks of Snap One, LLC (formerly known as Wirepath Home Systems, LLC), in the United States and/or other countries.
Control4 and SunBriteTV are also registered trademarks or trademarks of Snap One, LLC. Other names and brands may be
claimed as the property of their respective owners. Snap One makes no claim that the information contained herein covers all
installation scenarios and contingencies, or product use risks. Information within this specification subject to change without
notice.
For DTS patents, see http://patents.dts.com. Manufactured under license from DTS, Inc. (for companies headquartered in the
U.S./Japan/Taiwan) or under license from DTS Licensing Limited (for all other companies). DTS, DTS-HD, and the DTS-HD
logo are registered trademarks or trademarks of DTS, Inc. in the United States and other countries. © 2022 DTS, Inc. ALL
RIGHTS RESERVED.
Manufactured under license from IMAX Corporation. IMAX® is a registered trademark of IMAX Corporation in the United
States and/or other countries. For DTS patents, see http://patents.dts.com. Manufactured under license from DTS, Inc. (for
companies headquartered in the U.S./Japan/Taiwan) or under license from DTS Licensing Limited (for all other companies).
DTS and the DTS logo are registered trademarks or trademarks of DTS, Inc. in the United States and other countries. © 2022
DTS, Inc. ALL RIGHTS RESERVED.
220405-0842
Part # 200-SB-V3-XX-4KHDR-BL-A
Quick Reference
Bluetooth: Home > Settings > Remotes & Accessories > Add Accessory
Channel Scan: Menu
> Channels > Tuner Mode, then Menu > Channels > Auto Channel Scan
Clear Cache: Home
> Settings > Advanced System
Closed Captions: Home
> Settings > Device Preferences > Accessibility
Favorites: OK button > 123
button > select the green icon > press OK button
Game Mode: Home
> Settings > Picture > Picture Mode > Game Mode
Google Assistant: Home
> Settings > Device Preferences > Google Assistant
LED Behavior: Home
> Settings > Advanced System
Name the TV: Home
> Settings > Device Preferences > About
Parental Controls: Home
> Settings > Parental Control
Scan for Channels: Menu
> Channels > Tuner Mode, then Menu > Channels > Auto Channel Scan
Screen Saver: Home
> Settings > Device Preferences > Screen Saver
Timer: Home
> Settings > Advanced System > Timer
Voice Control: Home
> Settings > Device Preferences > Google Assistant
Update Firmware: Home
> Settings > Device Preferences > About
Wi-Fi: Home
> Settings > Network & Internet
