E-MANUAL
Thank you for purchasing this Samsung product.
To receive more complete service, please register
your product at
www.samsung.com/register
Model Serial No.
Connecting Antenna and External
devices
Using the Remote Control and
Peripherals
Antenna Connection
Video Device Connections
2 HDMI Connection
3 Component Connection
4 Composite (A/V) Connection
Audio input and Output Connections
5 Digital Audio (Optical) Connection
6 Audio Output Connection
Connecting to a Computer
7 Connecting Through the HDMI Port
8 Connecting With a DVI to HDMI Cable
9 Connecting Through Samsung Link
9 Connecting Through DLNA Using Your Home Network
Connecting To a Mobile Device
11 Screen Mirroring
13 Connecting Mobile Devices without a Wireless Router
(Wi-Fi Direct)
13 Connecting Through Samsung Link
14 Connecting Through DLNA Using Your Home Network
14 Specifying the Name of the TV on a Network
Switching Between Video Sources
15 Other Functions Available When You Display the Source
List
15 The Universal Remote Function
16 Displaying and Using the On-Screen Remote
Controlling External Devices with the TV Remote -
Using the Universal Remote
17 Connecting the IR Extender Cable
18 Setting Up the Universal Remote Control
19 Universal Remote Features
Controlling the TV with a Keyboard
20 Connecting a Keyboard
20 Using the Keyboard
Controlling the TV with a Mouse
21 Connecting a Mouse
22 Using the Mouse
Entering Text Using the On-Screen QWERTY Keypad
23 Using Additional Functions
internet Connection
Establishing a Wired internet Connection
24 Using Cat 7 LAN Cables
25 Connecting to a Wired Internet Network Automatically
26 Connecting to a Wired Internet Network Manually
Establishing a Wireless Internet Connection
28 Connecting to a Wireless Internet Network Automatically
29 Connecting to a Wireless Internet Network Manually
30 Connecting to a Wireless Internet Network with WPS
Troubleshooting Internet Connectivity Issues
31 Troubleshooting Wired Internet Connectivity Issues
32 Troubleshooting Wireless Internet Connectivity Issues
Checking the Internet Connection Status
Smart Features TV Viewing
Smart Hub
34 Testing Smart Hub connections
35 Opening the First Screen
36 Moving to the Panel Screen
36 Using the Smart Hub Tutorial
36 Resetting Smart Hub
Using Smart Hub with a Samsung Account
37 Creating a Samsung Account
39 Signing in to a Samsung Account
40 Linking Your Samsung Account to External Service
Accounts
41 Changing and Adding Information to a Samsung Account
41 Deleting a Samsung Account from the TV
Using the SAMSUNG APPS Panel
43 Using Supported Features via the Pop-Up Menu -
Downloaded Apps
44 Using Supported Features via the Pop-Up Menu -
Recommended Apps
44 Installing an App
46 Default Apps
46 Relocating an App on the Apps Screen.
46 Deleting an App from the TV
47 Rating/Reviewing an App
47 Updating Apps
48 Using Other App Features and Functions
Using the On TV Panel
50 Using Supported Features via the Pop-Up Menu
50 Viewing Detailed Program Information
51 Configuring On TV Settings
Using the Multimedia (Playing Photos, Videos, and
Music)
52 Playing Media Content Saved on a USB Device
53 Buttons and Functions Available While Viewing Photos
54 Buttons and Functions Available While Viewing Videos
56 Buttons and Functions Available While Playing Music
57 Functions on the Media Content List Screen
Digital Broadcast Information at a Glance
58 Using the Guide
59 Viewing Detailed Information
59 Checking Current Program Info
59 Changing the broadcast signal
59 Digital Channel Signal Info and Strength
Setting Up a Schedule Viewing
60 Digital Channel Schedule Viewing
61 Analog Channel Schedule Viewing
62 Canceling a Schedule Viewing
62 Editing a Schedule Viewing
Using the Channel List
Registering, Removing, and Editing Channels
64 Registering and Removing Channels
65 Editing Registered Channels
66 Program Rating Lock
Creating a Personal Favorites List
69 Registering Channels as a Favorites
70 Selecting from Favorite List Channels Only
Editing a Favorites List
71 Edit Favorites Screen Menu Items
Making Sports Programs More Realistic with Soccer
Mode
74 Enabling Soccer Mode
TV-Viewing Support Features
75 Showing Captions
77 Enabling the Audio Guide for the Video Description
77 PIP Broadcast Viewing
78 Scanning for Available Channels
78 Selecting the Broadcast Audio Language
79 Fine-Tuning the Screen
79 Remove Scrambled Channels
Picture and Sound Settings General
Changing the Picture Mode and Adjusting the Picture
Quality
80 Choosing the Right Picture Mode for the Viewing
Environment
81 Adjusting the Picture Quality for Each Picture Mode
82 Fine-Tuning Each Picture Mode (Advanced Settings)
84 Adjusting the Picture for Easier Viewing (Picture Options)
Viewing in 3D
86 Starting 3D
87 Changing the 3D Mode
88 Adjusting the 3D Effect
Picture Support Functions
89 PIP Broadcast Viewing
90 Changing the Picture Size and Position
91 Listening to Audio Only with the Screen Turned Off
(Picture Off)
91 Resetting the Picture Mode Settings
Changing the Sound Mode and Using Sound Effects
92 Choosing the Right Sound Mode for the Environment
92 Using Sound Effects
Sound Support Functions
93 Selecting Speakers
93 Designating the TV's Installation Type
94 Enabling Digital Audio Output
94 Listening to 3D Audio in 3D Mode
94 Resetting All Sound Settings
Setting the Time and Using the Timer
95 Setting the Current Time
96 Using the Timers
Using the Screen Burn Protection and Energy Saving
Features
99 Preventing Screen Burn
99 Using Energy Saving Features
Using the e-Manual
100 Launching the e-Manual
100 Additional e-Manual Features
101 Accessing the Menu from the e-Manual
101 Loading Reference Pages
101 Updating the e-Manual to the Latest Version
Updating the TV's Software
102 Update now
102 Online
103 Manually, Using a USB Flash Drive
104 Enabling Automatic Software Updates
Protecting the TV from Hacking and malicious code
104 Checking the TV and Connected Storage Media
105 Automatically Scanning when the TV is Powered On
105 Automatically Adding malicious code to the Blocked List
Using Other Functions
106 Setting Up a Password
106 Changing the Menu Language
106 Checking Notifications
106 Adjusting the Menu Transparency
107 White Text on Black Background (High Contrast)
107 Expanding the Smart Hub's Focus Area
107 Locking/Unlocking the Panel Keys
107 Showing/Hiding the Samsung Logo while Booting
107 Enabling Game Mode
108 Enjoying Rich Colors and Superior Picture Quality (BD
Wise)
108 Registering the TV as a DivX-Certified Device (To Watch
For Pay DivX Movies)
109 Restoring the TV to the Factory Settings
109 Using the TV as a Display Model (exclusively for retail
stores)
Troubleshooting
Getting Support
110 Support through Remote Management
111 Finding the Information You Need for Service
There is a problem with the picture
112 Testing the Picture
I can't hear the sound clearly
114 Testing the Sound
I can't see 3D images clearly.
115 Testing 3D Picture Quality
There is a problem with the broadcast.
My computer won't connect.
I can't connect to the Internet.
I am having trouble launching/using apps.
My file won't play.
I want to reset the TV.
Other Issues
Appendix
Read Before Using 3D Viewing Mode
120 3D Precautions
Supported Resolutions for 3D Modes
123 HDMI
123 Component
123 Digital Channel
123 Videos/Photos
123 Computer via HDMI Cable.
Read Before Using Apps
Read Before Using the Web Browser
Read Before Playing Photo, Video, or Music Files
127 Photo, Video, and Music File Use Limitations
127 Compatible Storage Devices for File Transfers
128 Supported External Subtitles
128 Supported Internal Subtitles
129 Supported Image Formats and Resolutions
129 Supported Music Formats and Codecs
130 Supported Video Codecs
Read After Installing the TV
132 Picture Sizes and Input Signals
132 Installing an Anti-Theft Lock
133 Read Before Setting Up a Wireless Internet Connection
Read Before Connecting a Computer (Supported
Resolutions)
134 LED 5203, 5303 and 6203 series
134 IBM
134 MAC
135 VESA DMT
136 LED 4303 series
136 IBM
136 MAC
136 VESA DMT
Supported Resolutions for Video Signals
137 CEA-861
License
Glossary
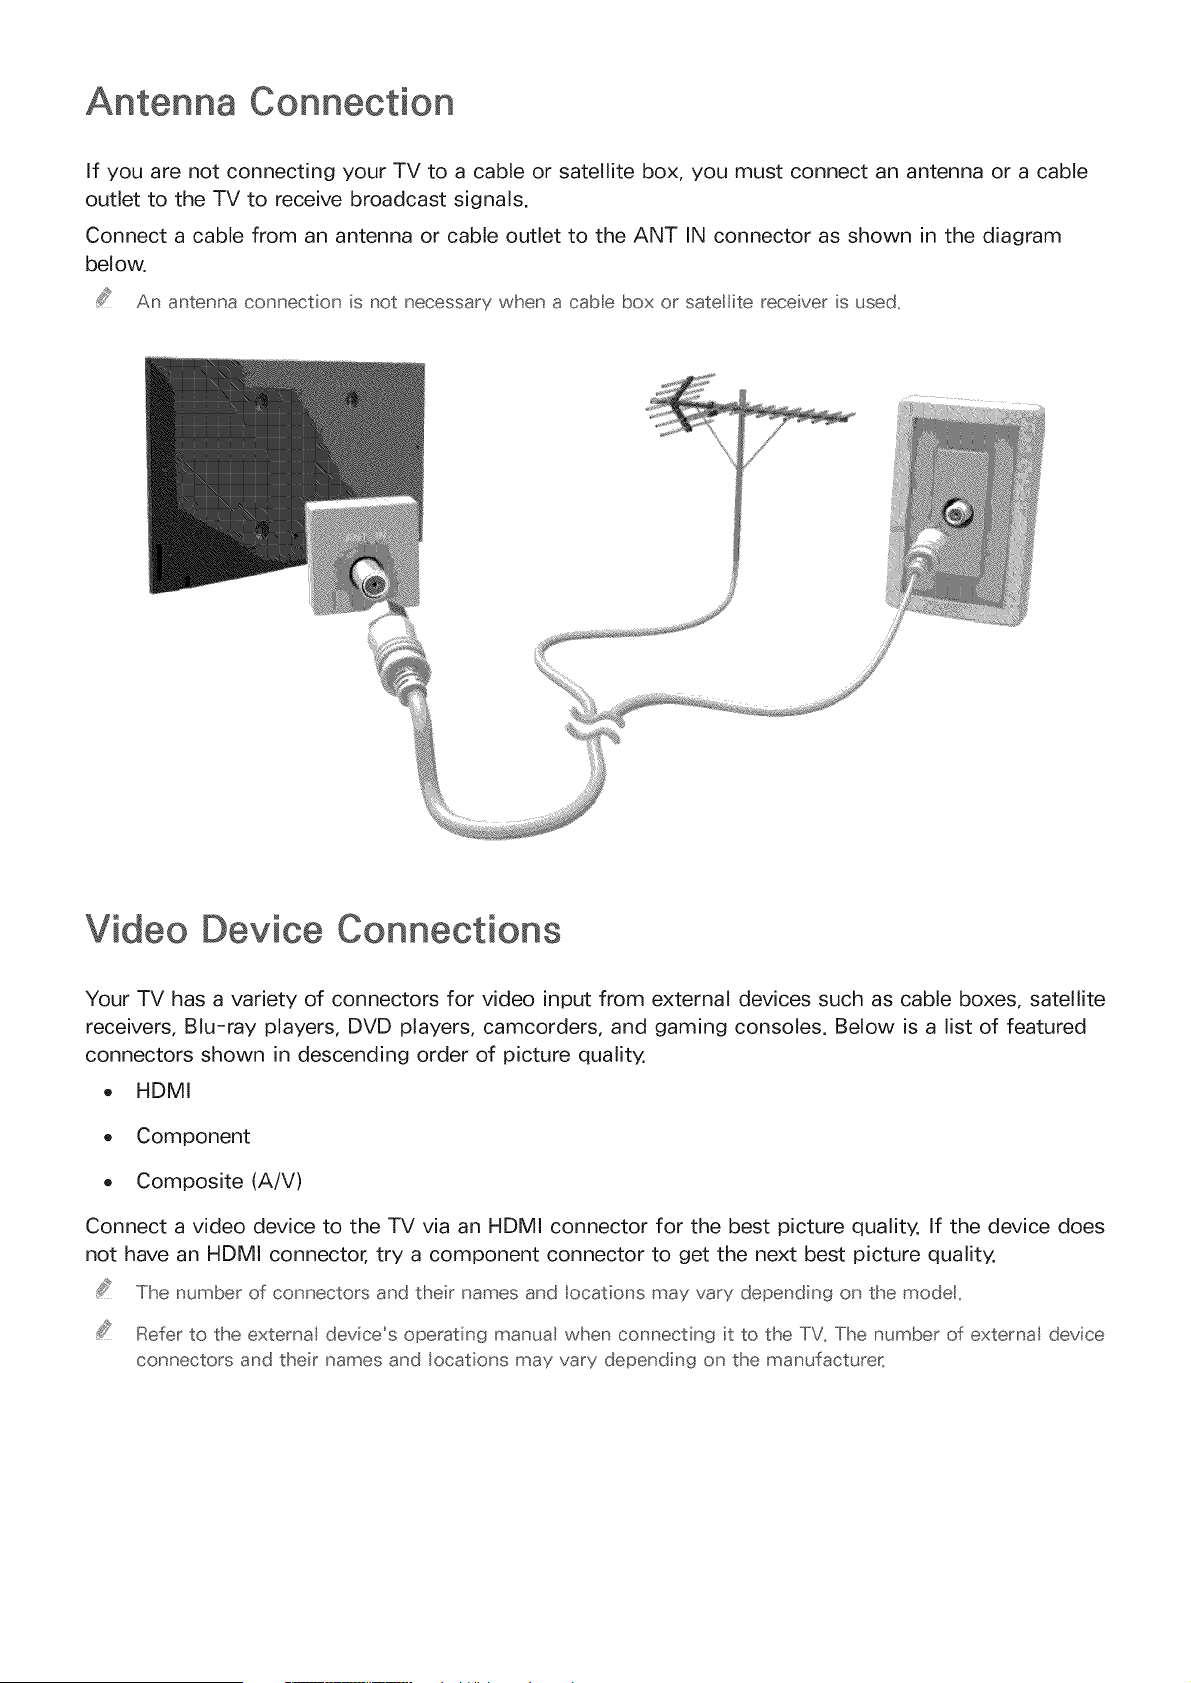
Antenna Connection
If you are not connecting your TV to a cable or satellite box, you must connect an antenna or a cable
outlet to the TV to receive broadcast signals.
Connect a cable from an antenna or cable outlet to the ANT IN connector as shown in the diagram
below.
An antenna connection is not necessary when a cabe box or satellite receiver is used,
Video Device Connections
Your TV has a variety of connectors for video input from external devices such as cable boxes, satellite
receivers, Blu-ray players, DVD players, camcorders, and gaming consoles. Below is a list of featured
connectors shown in descending order of picture quality.
o HDMI
o Component
Composite (A/V)
Connect a video device to the TV via an HDMI connector for the best picture quality. If the device does
not have an HDMI connector, try a component connector to get the next best picture quality.
The number of connectors and their names and locations may vary depending on the modet,
Refer to the external device's operating manual when connecting it to the TV. The number of external device
connectors and their names and locations may vary depending on the manufacturer_
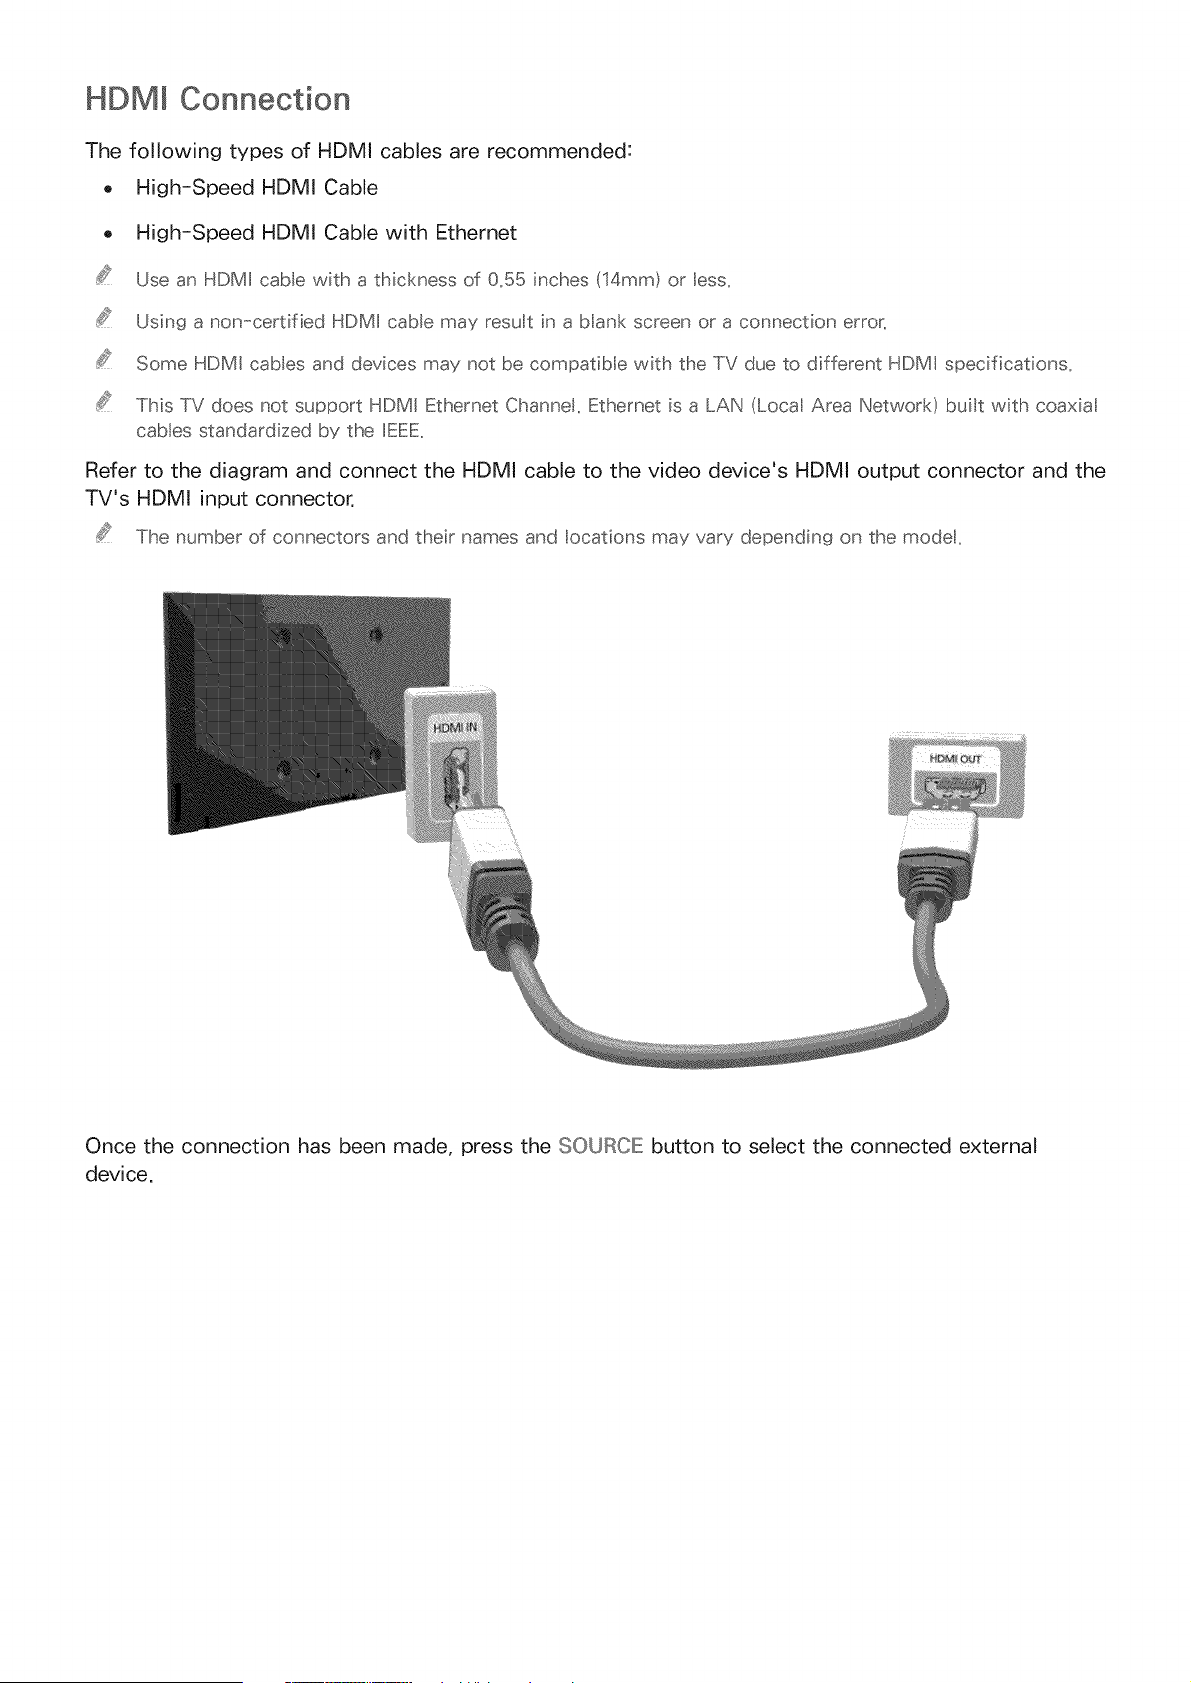
HDMI Connection
The following types of HDMI cables are recommended:
o High-Speed HDMI Cable
o High-Speed HDMI Cable with Ethernet
Use an HDMI cable with a thickness of 0,55 inches (14mm) or less,
Using a non-certified HDMI cable may result in a blank screen or a connection error_
Some HDMI cables and devices may not be compatible with the TV due to different HDMI specifications_
This TV does not support HDMI Ethernet Channe, Ethernet is a LAN (Loca Area Network) buit with coaxial
cables standardized by the IEEE_
Refer to the diagram and connect the HDMI cable to the video device's HDMI output connector and the
TV's HDMI input connector.
The number of connectors and their names and locations may vary depending on the modet_
Once the connection has been made, press the SOURCE: button to select the connected external
device.
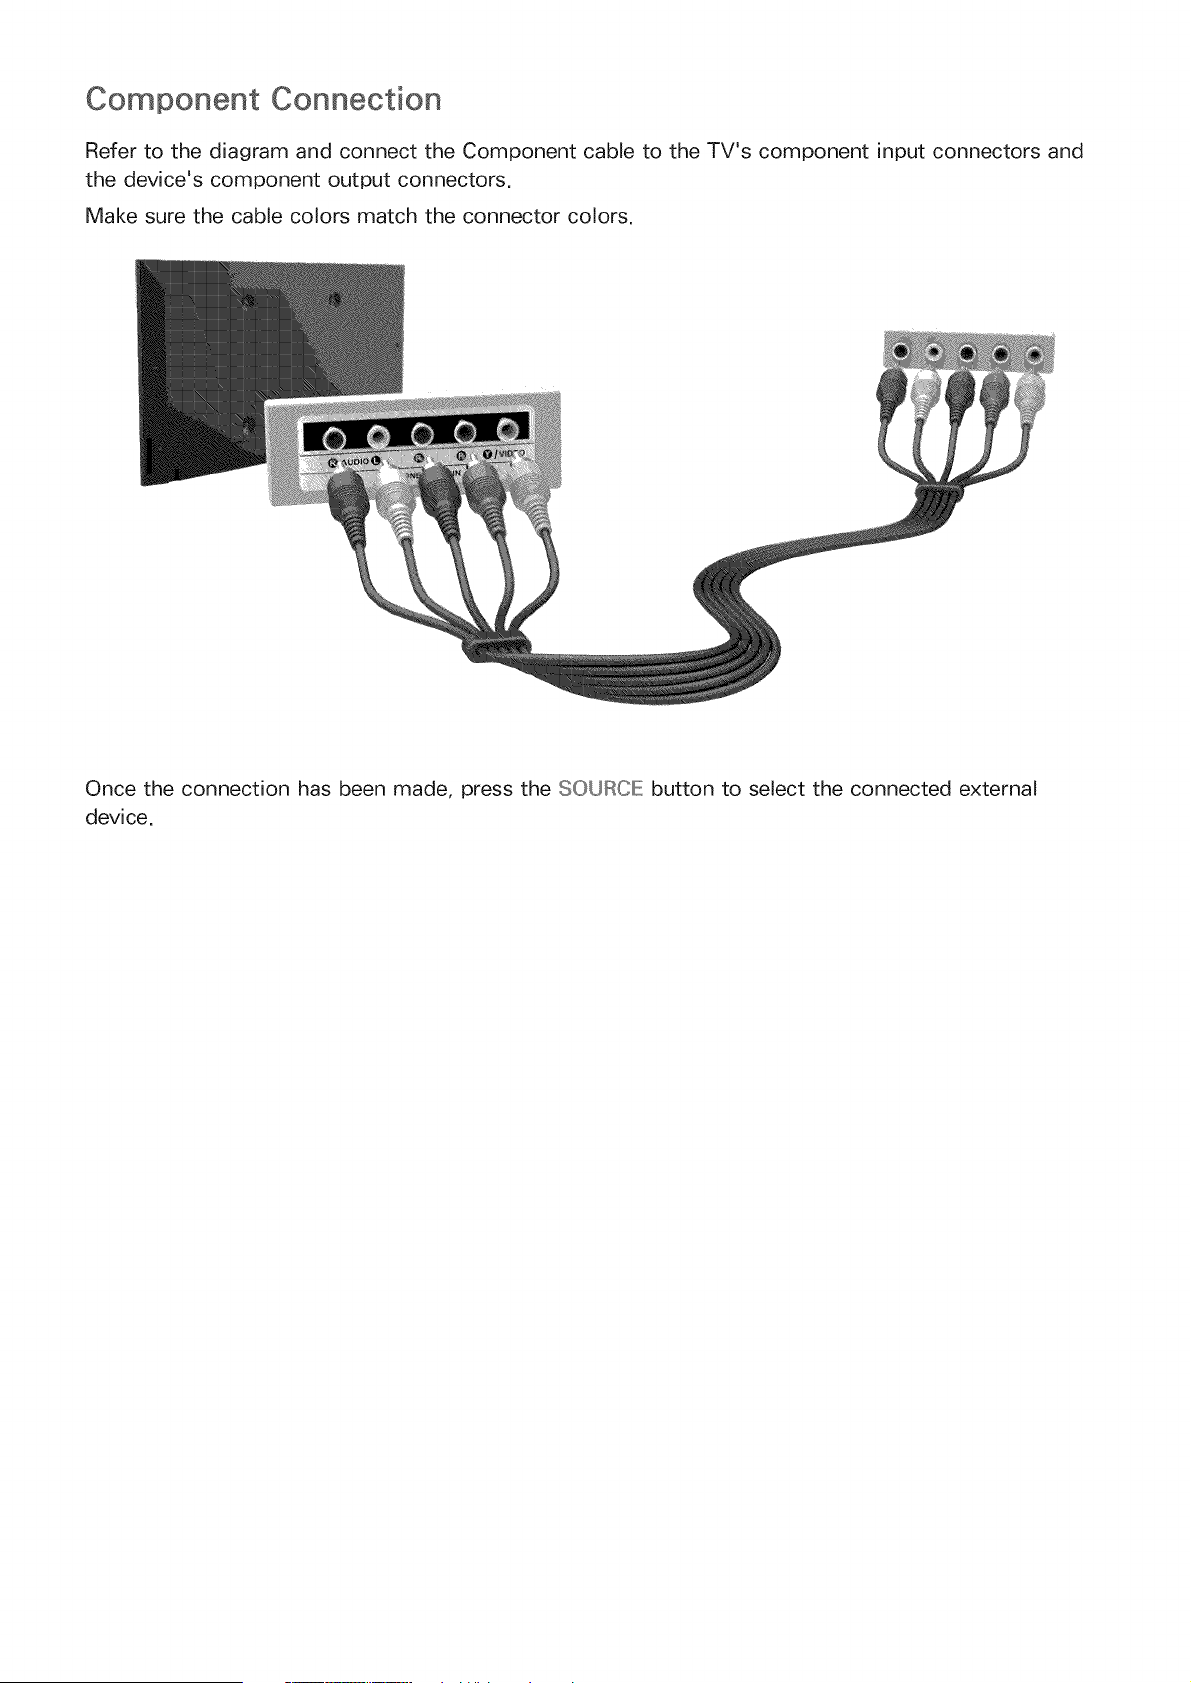
Component Connection
Refer to the diagram and connect the Component cable to the TV's component input connectors and
the device's component output connectors.
Make sure the cable colors match the connector colors.
Once the connection has been made, press the SOURCE: button to select the connected external
device.
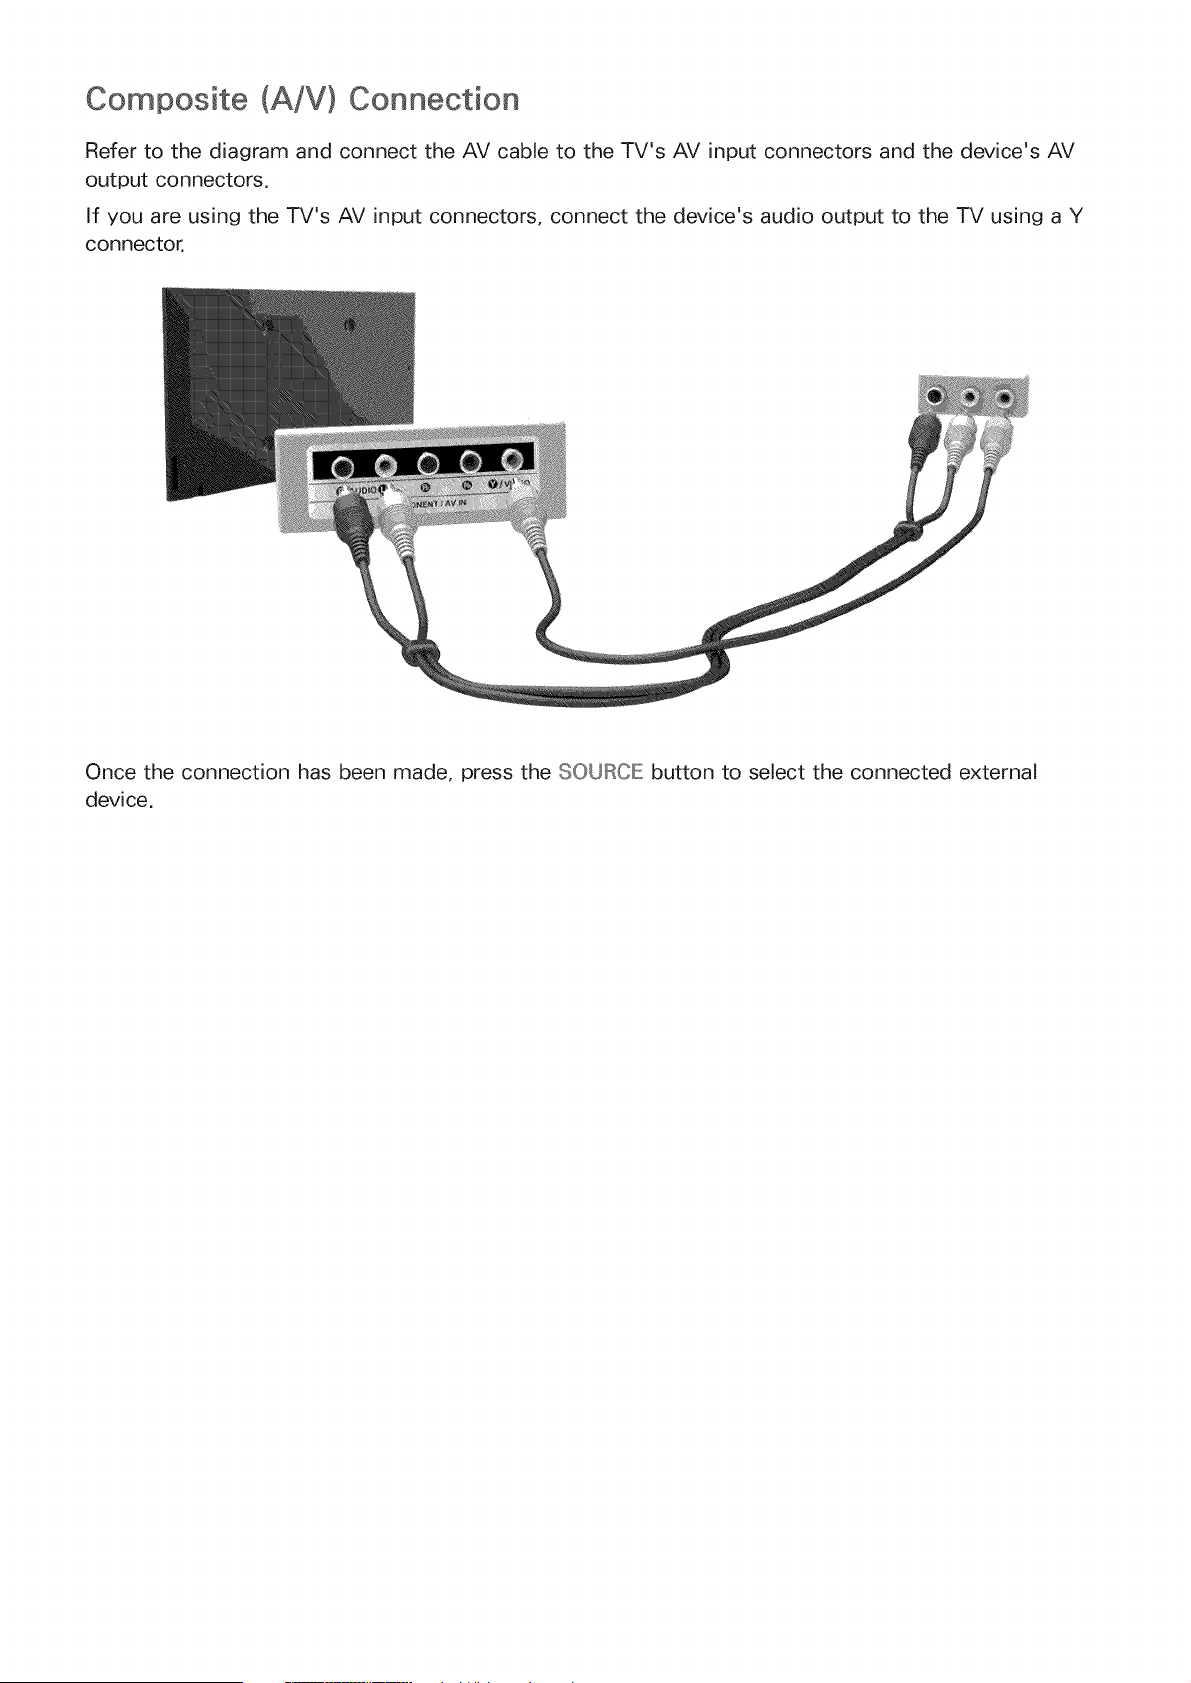
Composite (A/V) Connection
Refer to the diagram and connect the AV cable to the TV's AV input connectors and the device's AV
output connectors.
If you are using the TV's AV input connectors, connect the device's audio output to the TV using a Y
connector.
Once the connection has been made, press the SOURCE button to select the connected external
device.
Input and Output Connections
Your TV has a variety of connections for audio input from devices such as Blu-ray players and DVD
players and for audio output to such devices as amplifiers. The connections are listed below.
o Digital Audio (Optical)
Audio (Analog)
For better audio qualit'y; it is a good idea to use an _'J receiver_
The number of connectors and their names and locations may vary depending on the model,
Refer to the external device's operating manual when connecting it to the TV. The number of external device
connectors and their names and locations may vary depending on the manufacturer_
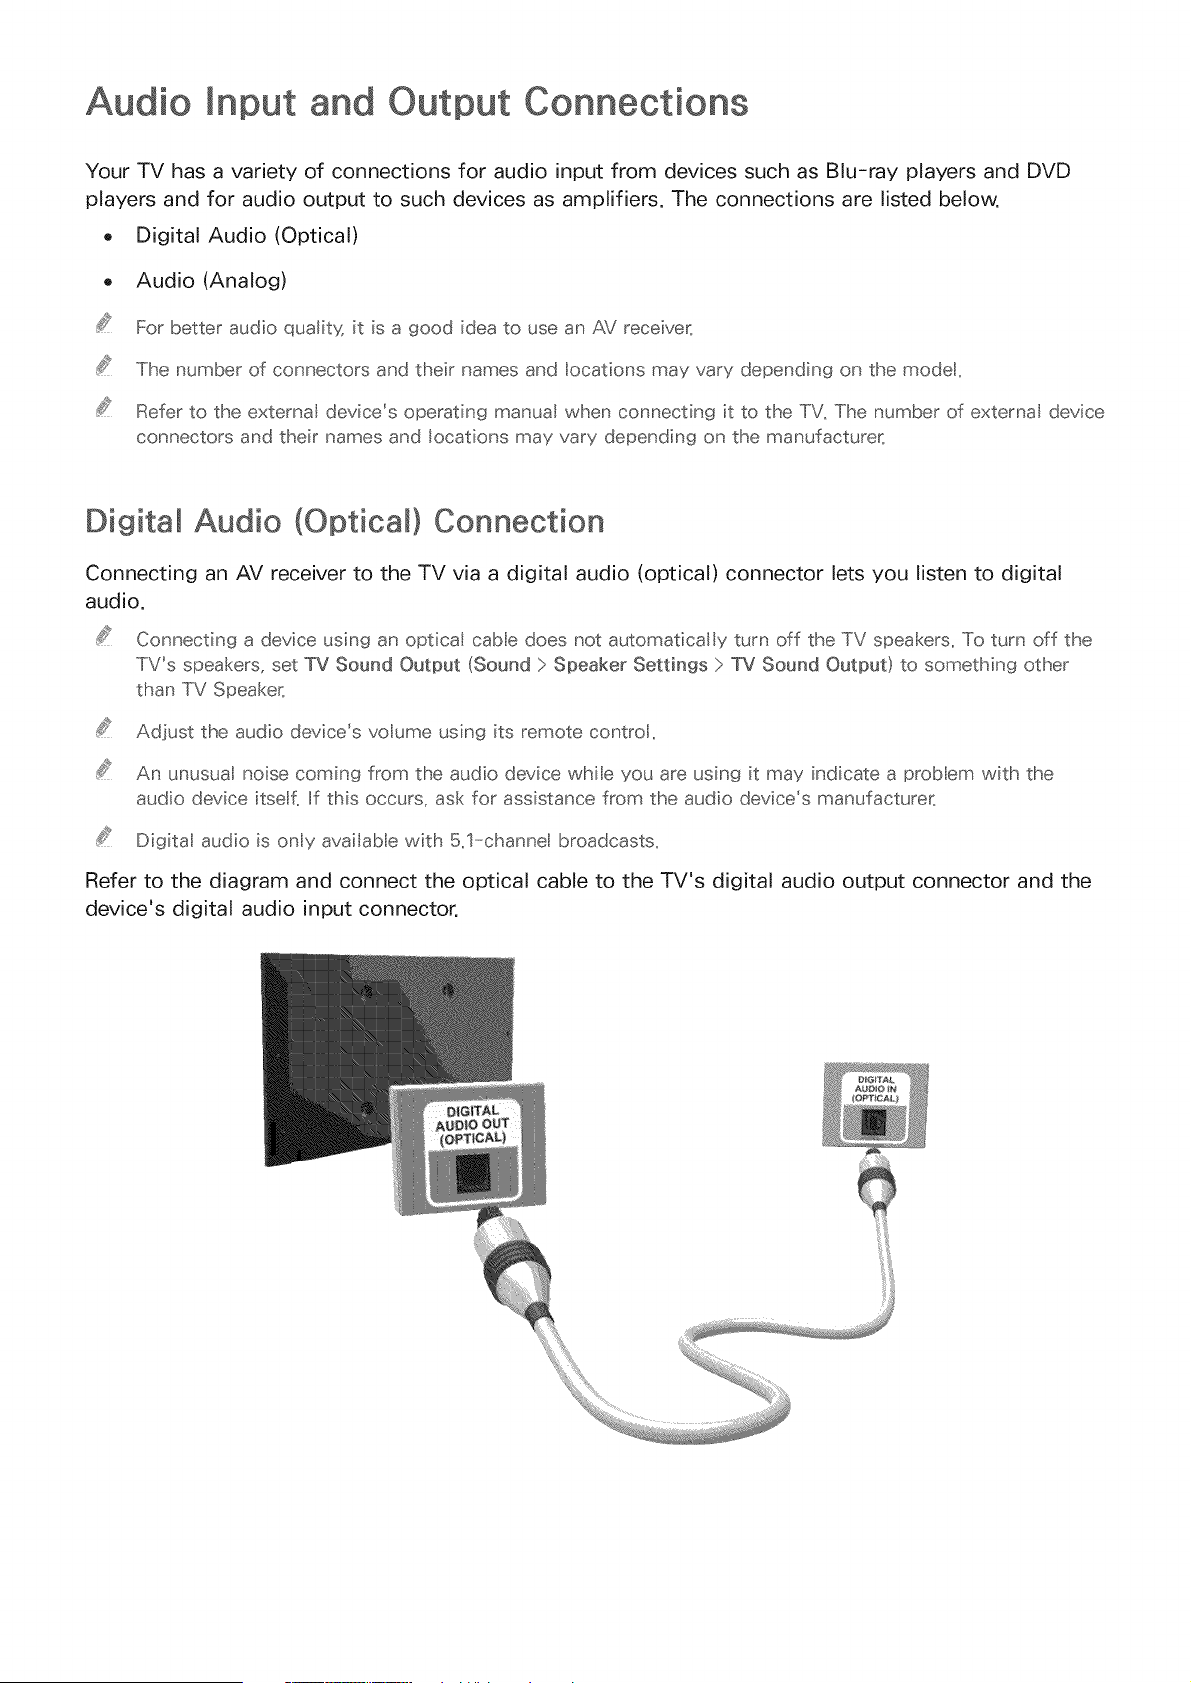
Digital Audio (Optical} Connection
Connecting an AV receiver to the TV via a digital audio (optical) connector lets you listen to digital
audio.
Connecting a device using an optical cable does not automatical y turn off the TV speakers. To turn off the
TV's speakers, set TV Sound Output (Sound :> Speaker Settings :> TV Sound Output) to something other
than TV Speaker_
Adjust the audio device's voume using its remote control,
An unusual noise coming from the audio device while you are using it may indicate a prob em with the
audio device itse{ If this occurs, ask for assistance from the audio device's manufacturer_
Digital audio is only available with 5,1-channe broadcasts,
Refer to the diagram and connect the optical cable to the TV's digital audio output connector and the
device's digital audio input connector.
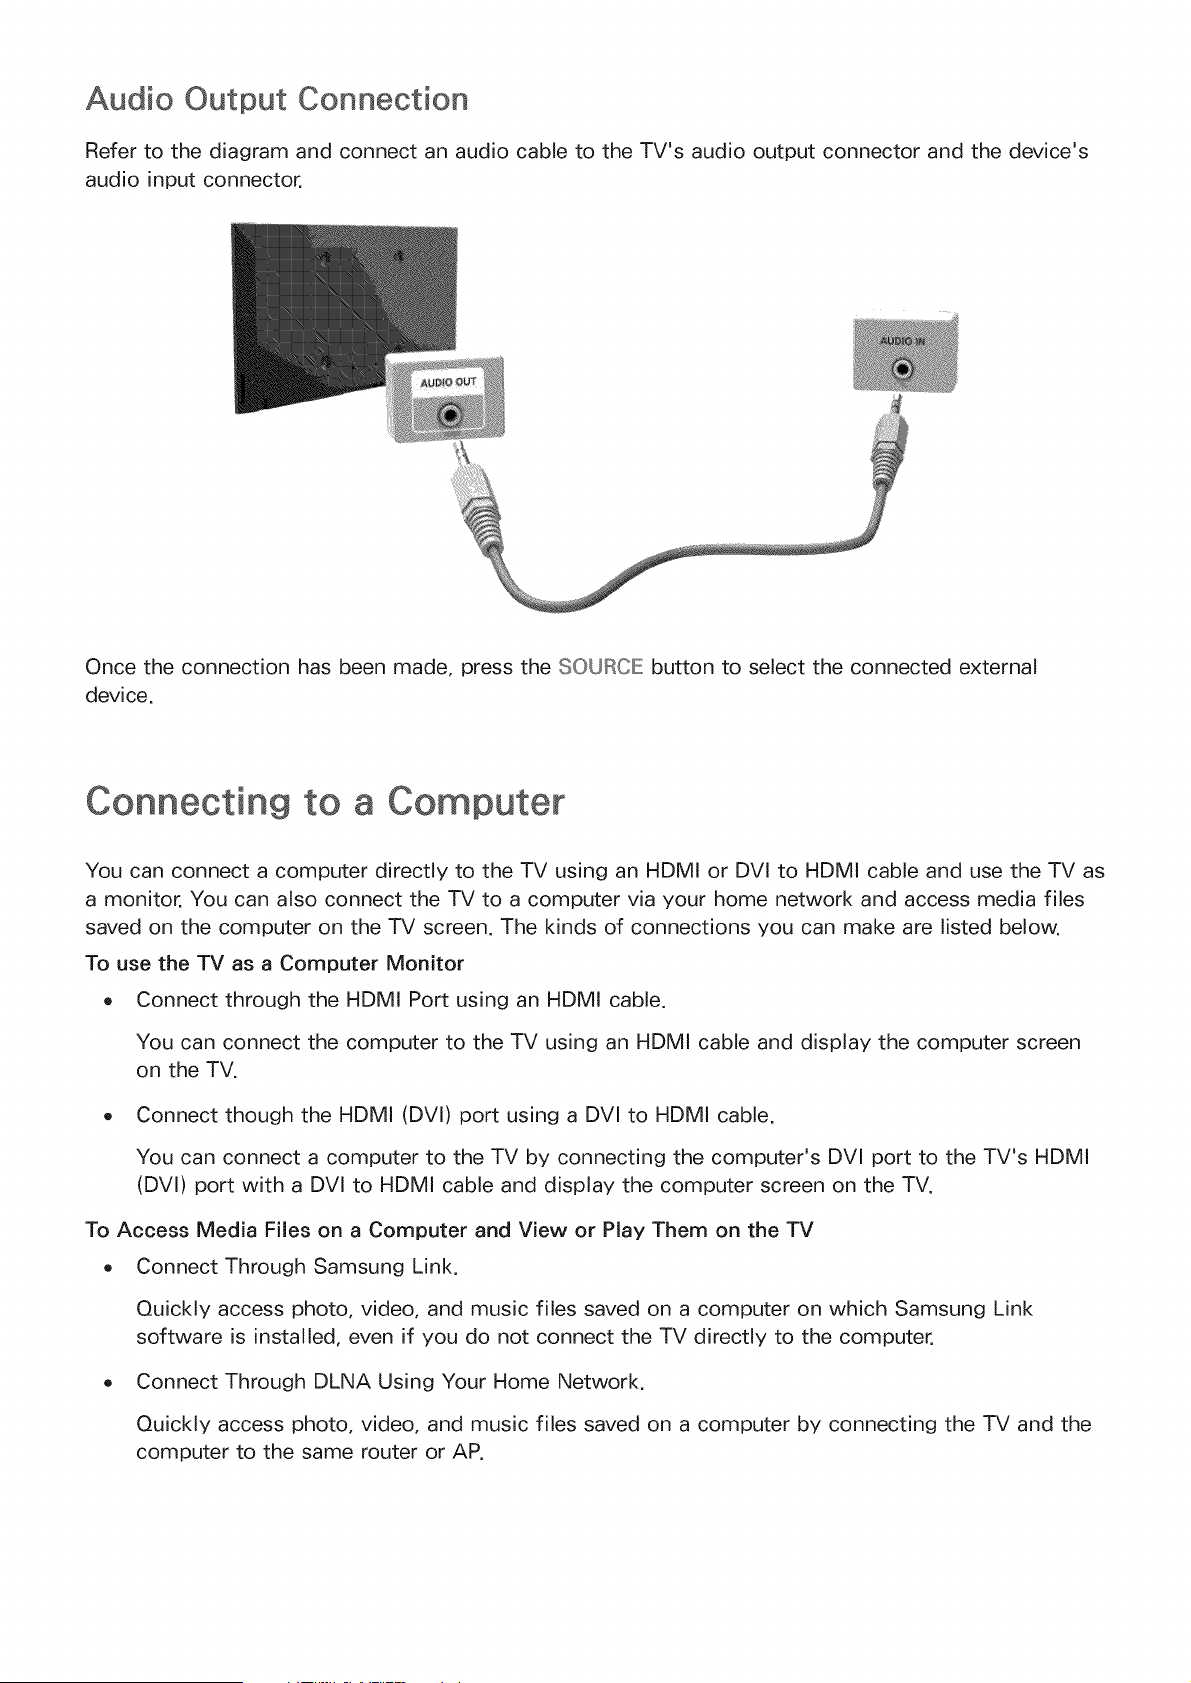
Audio Output Connection
Refer to the diagram and connect an audio cable to the TV's audio output connector and the device's
audio input connector.
Once the connection has been made, press the SOURCE button to select the connected external
device.
Connecting to a Computer
You can connect a computer directly to the TV using an HDMI or DVI to HDMI cable and use the TV as
a monitor. You can also connect the TV to a computer via your home network and access media files
saved on the computer on the TV screen. The kinds of connections you can make are listed below.
To use the TV as a Computer Monitor
o Connect through the HDMI Port using an HDMI cable.
You can connect the computer to the TV using an HDMI cable and display the computer screen
on the TV.
Connect though the HDMI (DVI) port using a DVI to HDMI cable.
You can connect a computer to the TV by connecting the computer's DVl port to the TV's HDMI
(DVl) port with a DVl to HDMI cable and display the computer screen on the TV.
To Access Media Files on a Computer and View or Play Them on the TV
o Connect Through Samsung Link.
Quickly access photo, video, and music files saved on a computer on which Samsung Link
software is installed, even if you do not connect the TV directly to the computer.
Connect Through DLNA Using Your Home Network.
Quickly access photo, video, and music files saved on a computer by connecting the TV and the
computer to the same router or AP.

Connecting Through the HDMI Port
For an HDMI connection, we recommend one of the following HDMI cable types:
o High-Speed HDMI Cable
o High-Speed HDMI Cable with Ethernet
Use an HDMI cable with a thickness of 0_55 inches (14ram) or less_ Using a non-certified HDMI cable may
result in a blank screen or a connection error,
Some HDMI cables and devices may not be compatible with the TV due to different HDMI specifications_
This TV does not support HDMI Ethernet ChanneI_ Ethernet is a LAN (Local Area Network) buit on coaxia
cables standardized by the IEEE,
Many computer graphics adaptors do not have HDMI ports, but have DVI ports instead_ if your computer
graphics adaptor has a DVI port, use a DVI to HDMI cable to connect the computer to the TV_ For more
information, refer to "Connecting With a DVI to HDMI Cable"_
Refer to the diagram and connect an HDMI cable to the computer's HDMI output connector and the
TV's HDMI input connector.
The number of ports, and their names and locations may vary depending on the modet,
Once the connection has been made, press the SOURCE button to select the connected external
device.
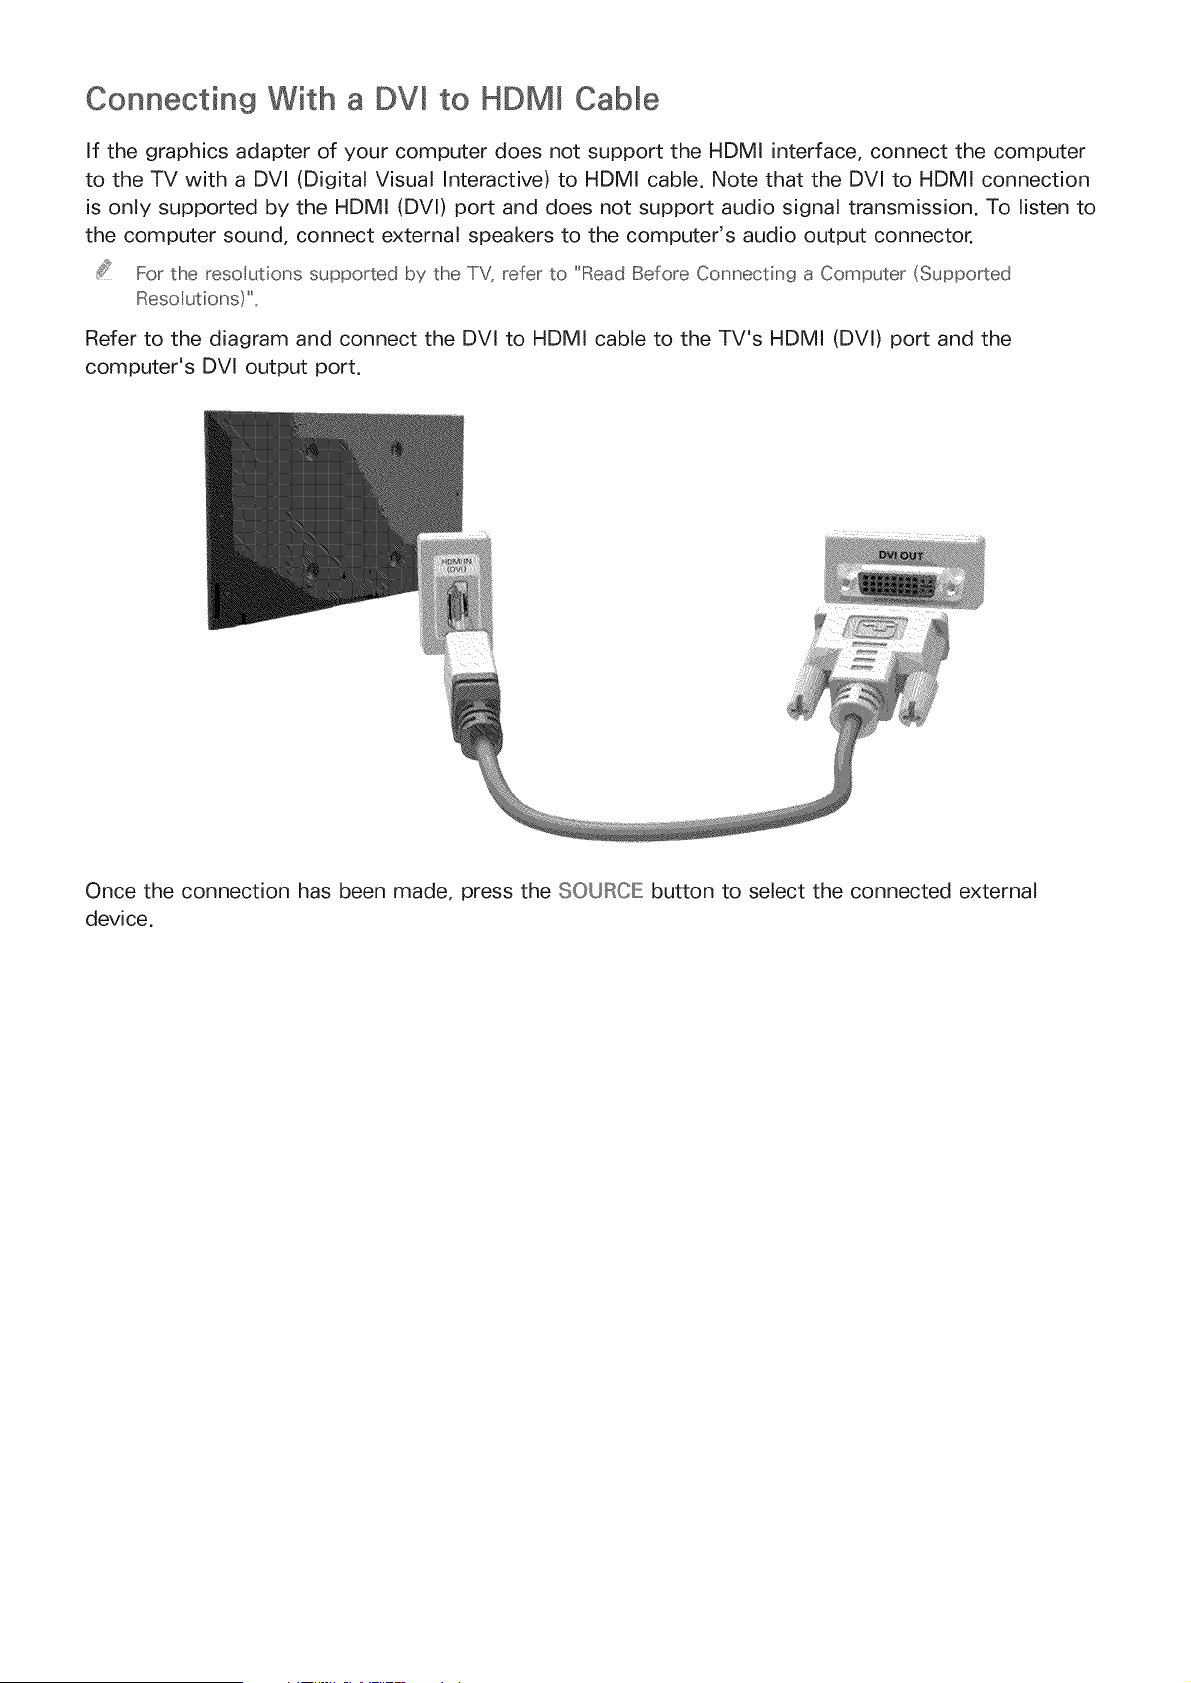
Connecting With a DV[ to HDM[ Cable
If the graphics adapter of your computer does not support the HDMI interface, connect the computer
to the TV with a DVl (Digital Visual Interactive) to HDMI cable. Note that the DVl to HDMI connection
is only supported by the HDMI (DVl) port and does not support audio signal transmission. To listen to
the computer sound, connect external speakers to the computer's audio output connector.
For the reso utions supported by the TV, refer to "Read Before Connecting a Computer (Supported
Reso utions)"_
Refer to the diagram and connect the DVI to HDMI cable to the TV's HDMI (DVI) port and the
computer's DVl output port.
Once the connection has been made, press the SOURCE button to select the connected external
device.
Connecting Through Samsung Link
Quickly access photo, video, and music files saved on a computer on which Samsung Link software
is installed. In addition, using Samsung Link, you can view or play the content of a computer which is
registered with Samsung Link through your Samsung account, even if the computer and the TV are not
connected to the same router or AP.
On a computer, navigate to the Samsung content and service portal (http://link.samsung.com),
and then sign into your Samsung account.
2,
3,
.....Iio nstal tlhe Sams_.ng Lnk desktop software yotJ _eed to sign nto yotJ Sar_ss_ng account,, Iif yo_;
dont have a Sams_ ng acco_ nt c_eate one f _st,,
Install the Samsung Link desktop software. When the installation _s complete, the computer will
be registered with Samsung Link.
Specify a folder on the computer to connect to the TV. You can view or play the photo, video,
and music files in the specified folder on the TV.
For more nfomsation abo_£ _;sing the Sams_ ng link desktop software, refe_ to the Hep sect[o_ of the
Sams_ ng Ink software,,
Connecting Through DLNA Using Your Home Network
Quickly access and play photo, video, and music files stored on a computer on the TV.
Connect the TV and the computer to the same router or AP. Once you connect them to the same
router or AP, a home network is configured.
2,
3,
4,
D NA s the technoogy that ets IiVs computers and moble devices co_nected to o_e w_ed or
w _e ess ro_£e_ share co _tent,,
On the computer, select [Control Panel] ) [Network and Internet] ) [Network and Sharing Center]
) [Change advanced sharing settings], and then select [Choose media streaming options...] to
activate media streaming.
From the list, set the TV to [Allowed].
Launch Windows Media Player on a computer. Select [Settings] ) [Library Management], and then
add the location where photo, video, and music files are saved to play them on the TV.
A te__ative y, you can move tlhe fles to the defa_ It foder specif ed lay W []dows Media Ii:::>ayec and then
pay or view tli'sern on the IIV
As ong as Fie Sha_ ng s activated, _na_ tl"_o_zed access may occtc When you do _ot _eed to access
data, disab e Fie Shar ng,,
Connecting To a Mobile Device
You can connect a mobile device such as a smartphone or tablet directly to the TV, or connect it to the
network and display the mobile device's screen or play its content on the TV. The kinds of connections
you can make are listed below.
o Connect by Mirroring the Mobile Device's Screen on the TV (Screen Mirroring)
Wirelessly connect the TV and the mobile device with the mirroring function. You can view the
mobile device's screen on the TV screen.
.....Iihis optio _ s ava abe O_y 0_ 8 moble device that s_ppo_ts the mi__o_ng fi_nctio _,,
Connect Mobile Devices without a Wireless Router (Wi-Fi Direct)
Wi-Fi Direct enables you to connect the TV and the mobile device without a router or AP. Quickly
access and play photo, video, and music files in the connected mobile device on the TV.
.....Iihis optio _ s ava labe Ony On 8 moble device that s_ppo_ts the W F Direct fi_nctio _,,
Connect Through Samsung Link
Samsung Link enables you to play photo, video, and music files saved on a Samsung Link-
enabled mobile device easily, without the need for a connection to the TV.
Connect Through DLNA Using Your Home Network
You can conveniently play photo, video, and music files saved on a mobile device by connecting
the mobile device and the TV to the same router or AP.
Screen Mirroring
MIE:INU) Network ) Screen Mirroring
Wirelessly connect a mirroring-enabled mobile device to the TV and play the video and audio files
stored on the device on the TV. Mirroring refers to the function that plays the video and audio files
located on a mobile device on a TV and on the mobile device simultaneously.
To use the Screen Mirroring funct on, the mobile devce must support a mirroring funct on such as A tShare
Cast or Screen Mirror ng. To check whether your mobte device supports the m rroring funct on, please vist
the moble device manufacturer's webs te.
The video oraudomay ntermttenttystopdependngonnetworkcondtons_
Connecting via a mobile device
On the mobile device, run Screen Mirroring. The mobile device searches for available devices to
connect to.
2, In the search result list, select the TV. The TV displays a pop-up at the top of the screen.
3, In the pop-up, select Allow to connect the mobile device.
A previo_sly al owed moble dev ces wl a_tomatica y connect w tlno_£ needing approval,,
Iif yo_. select Deny, the device cannot connect,, Iinaddit[o_, yo[ are setting the devices connection
stat_,s to Deny and it wl not be abe to connect n the f_ ture _;nless you change its connection status,,
.....Iio change tlhe connection status of a denied device, Navigate to Network > Screen Mirroring > Device
Manager, seect the device, and then seect Allow,,
Connecting by Automatically A_owing the Connection
Navigate to Network > Screen Mirroring, and then select Screen Mirroring. The Screen Mirroring
function starts. You can also start screen mirroring by pressing the SOURCE button on your
remote, and then selecting Screen Mirroring from the list at the top of the screen.
2_ Launch Screen Mirroring on your mobile device. The device searches for available devices.
3_ Select the TV from the list. The TV automatically allows the connection and the device connects.
Iif the moble device cannot co _nect, tr_yt_ ruing the IiV off and o_,,
Managing the Connection Status of P_"_eviously Connected Mobile Devices
2_
3_
This funct on is only ava labte f dev ces have previously connected to the TV or have pr°eviously attempted
to connect and been denied.
Navigate to Network > Screen Mirroring > Device Manager. The TV displays a list of devices that
have previously connected to the TV or have tried to connect to the TV and been denied. The
status of the connection (Allow/Deny) is also displayed.
Select a device. A pop-up appears.
In the pop-up, you can select Allow connection, Deny connection, or Delete the device from the
list.
Connecting Mobile Devices without a Wireless Router (Wi-Fi
Navigate to MIE:INU) Network ) Wi-Fi Direct
You can connect a mobile device with the Wi-Fi Direct feature directly to the TV without using a
wireless router or AP. By connecting a mobile device to the TV through Wi-Fi Direct, you can play
photo, video, and music files saved on the mobile device on the TV.
This option is ava Iab[e ony on a mob[e device that supports the W-F Direct funct on, Pease check f your
mobte device supports Wi-F DrecL
2,
The video or audo may nterm ttently stop depend ng on network cond t}ons.
Enable Wi-Fi Direct on the mobile device, and then navigate to Network and select Wi-Fi Direct
on the TV. The TV automatically scans for and displays a list of available devices. The TV's name
also appears on the mobile device.
Select the device from the list to initiate a connection. If a connection request is made by the TV,
a permission message appears on the mobile device and vice versa.
3, Allow the connection. The TV and mobile device connect.
Connecting Through Samsung Link
Samsung Link lets you play the photo, video, and music files saved on a Samsung Link-enabled
mobile device. In addition, using Samsung Link, you can play the content of a mobile device, which is
registered to Samsung Link through your Samsung account, even if the mobile device and the TV are
not connected to the same router or AP.
Run the Samsung Link app on the mobile device, and then sign in to your Samsung account.
.....Ilo _se SamsL ng [.nk, yoL have to sign n to yo_r Sams_ ng acco_nt,, Iif yo_ do_t have a Sams_ ng
acco_nt, create o_e f rst,,
2, Access and play photo, video, and music files saved on the mobile device.
For more nforrnatio_ abo_£ _sing the Sams_ng I nk moble software, refer to the Hep sectio_ of the
software.
Connecting Through DLNA Using Your Home Network
Quickly access and play photo, video, and music files stored on a mobile device on the TV.
Connect both the TV and the mobile device to the same router or AP. Once you connect them to
a single router or AP, a home network is configured.
D,NA s the techno ogy that ets IiVs, comp_£ers, and moble devices co snected to ose w_ed or
w reess _o_£ersha_e content
2, Enable File Sharing on the mobile device. You can play the content shared on the mobile device
on the TV.
As ong as Fie Sharing s active, _na_ tho_ zed access can occ_ When yo_ do sot seed to access data,
disab e Fie Sha_ ng
Specifying the Name of the TV on a Network
MEI_U > Network > Device Name
Choose or specify a name for the TV that will appear on mobile devices and laptop computers,
Select Device Name from the Network menu, and then choose a name from the list that appears,
Alternatively, select User input to enter a name manually,
2, Check the name from a mobile device or laptop computer,

Switching Between Video
Press the SOURCE button to switch between external devices connected to the TV. For example, to
switch to a game console connected to the second HDMI connector, press the SOURCE: button. The
Source List appears across the top of the screen. From the Source List, select HDMm2.
The connector names may vary depend ng on the product_
Other Functions Available When You Display the Source List
A number of functions are available in the pop-up Options menu when the TV displays the Source
List. The functions that appear in the Options menu vary, depending on the source you selected in the
Source List and the external device connected to the source.
To view the Options menu, press the TOOLS button or press and hold the {ii@button.
The functions that appear in the Options menu can include any of the following:
o Edit Narae: Lets you assign a device name to an input source, for example, Blu-ray to HDMI1. To
assign a device name to an input source, follow these steps:
2_
Open the Source List. The list appears in a horizontal line across the top of the TV. Using your
remote, highlight the source you want to assign a device name to.
Select Edit Name in the Options menu. The on-screen keyboard appears.
Using the keyboard, enter a new name. You can enter up to 15 characters.
When finished, select DOINIE on the keyboard, and then press the {7_ button.
_nformation: View information about the connected devices.
Remove USB: Use to safely remove a USB device connected to the TV. This option is only
available when a USB device has been selected.
Delete: Use to delete an external device from a source. When you delete an external device
from a source, you erase the information the TV has stored about the device and you delete the
association the device has with the source.
The Universal Remote Function
This function may not be available depending on the country or model.
When you display the Source List, the Universal Remote Setup button is displayed in the upper right
corner of the screen. Select this button to start the Universal Remote function. The Universal Remote
function lets you control cable boxes, Blu-ray players, home theaters, and other external devices using
your TV remote control. Refer to the "Controlling External Devices with the TV Remote - Using the
Universal Remote" section for more information on using the Universal Remote function.
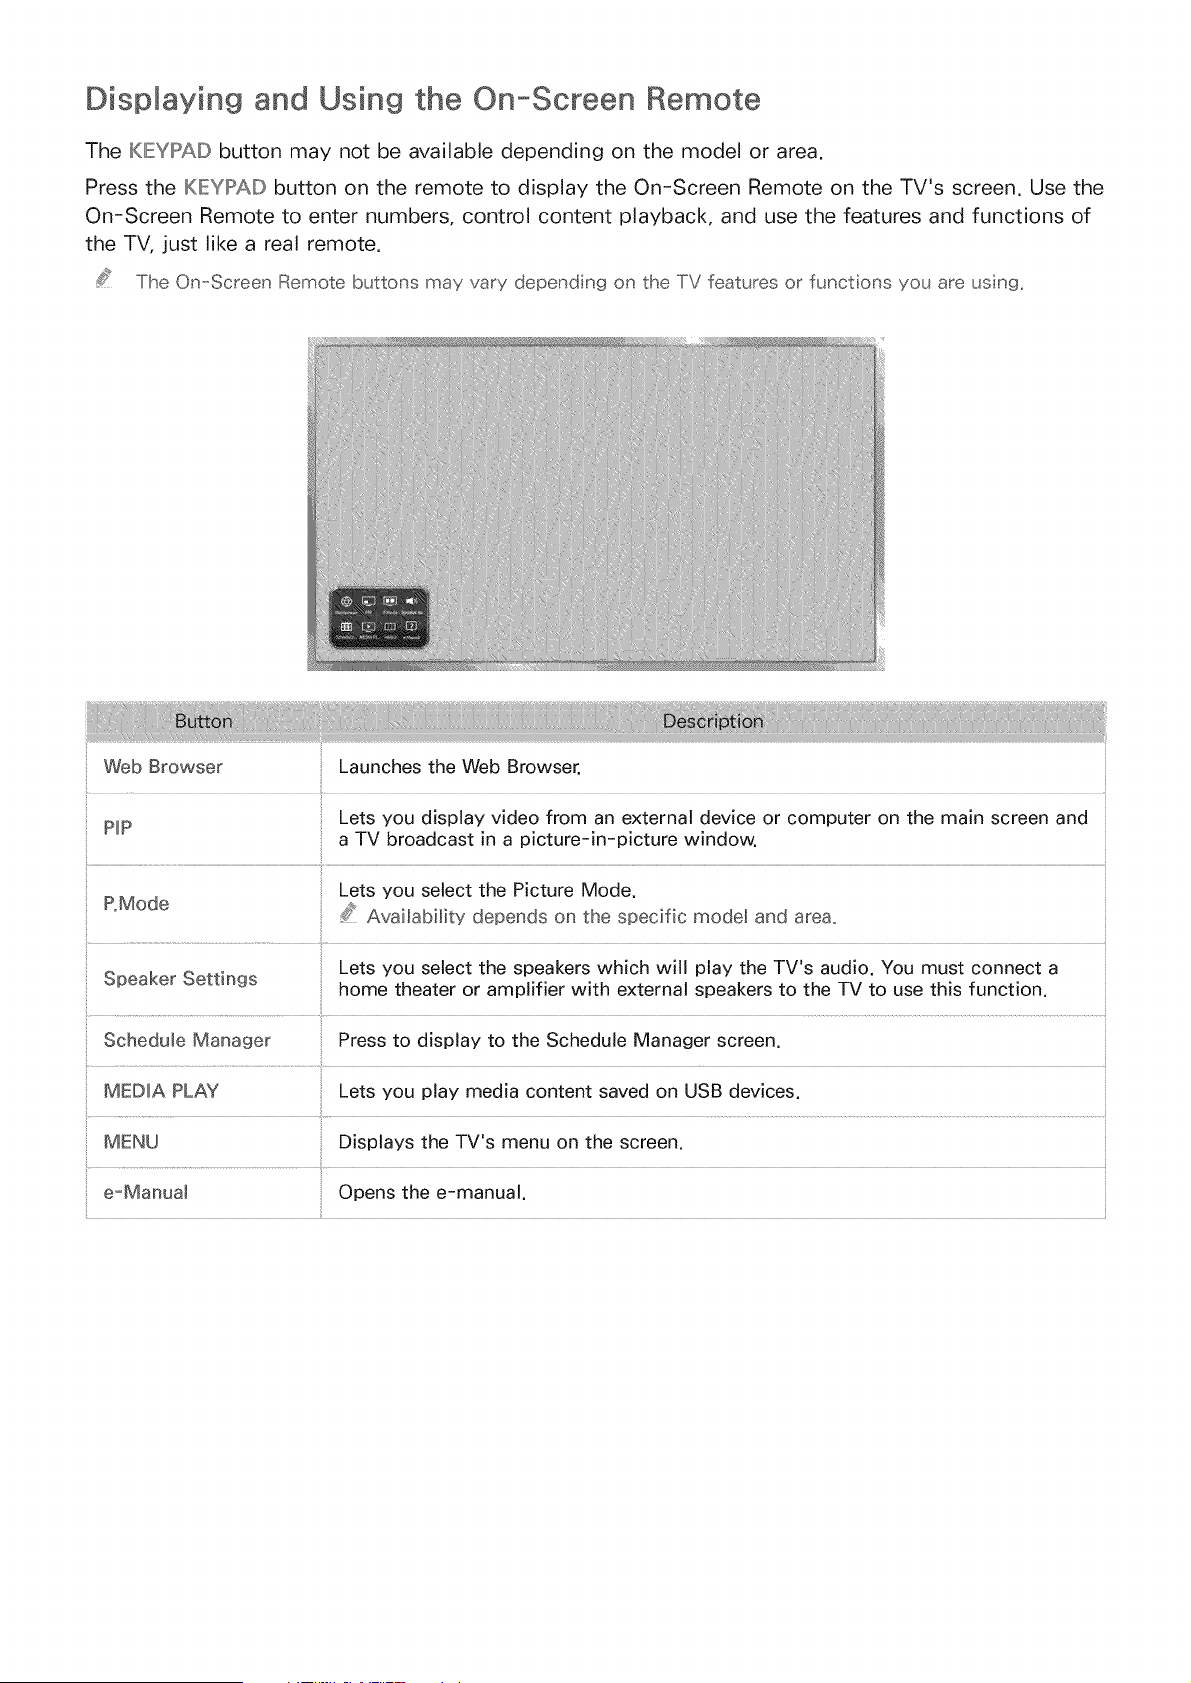
Displaying and Using the On-Screen Remote
The KIEMIPAIDbutton may not be available depending on the model or area.
Press the IKIEYPAIDbutton on the remote to display the On-Screen Remote on the TV's screen. Use the
On-Screen Remote to enter numbers, control content playback, and use the features and functions of
the TV, just like a real remote.
The On-Screen Remote buttons may vary depend ng on the TV features or functions you are usng_
Web Browser Launches the Web Browser.
Lets you display video from an external device or computer on the main screen and
PIP
a TV broadcast in a picture-in-picture window.
i
P.Mode Lets you select the Picture Mode.
/;_ Availability depends on the specific rood@ and area.
Lets you select the speakers which will play the TV's audio. You must connect a
Speaker Settings home theater or amplifier with external speakers to the TV to use this function.
Schedule Manager Press to display to the Schedule Manager screen.
MEDIA PLAY Lets you play media content saved on USB devices.
MENU Displays the TV's menu on the screen.
e-Manual Opens the e-manual.
ControMMingExternaM
Using the Universal
Devices with the TV Remote
IMIEINU> System > Universal Remote Setup
This function may not be available depending on the model or region.
The universal remote control feature lets you control cable boxes, Blu-ray players, home theaters,
and other third-party external devices connected to the TV using the TV's remote control. For each
external device you want to control, you must run the universal remote set up process. The first step
in the process is connecting the IR extender cable (included) to the TV and positioning the transmitter
end of the cable in front of the device you want to control.
Certain externa devices connected to the TV may not support the universa remote feature,
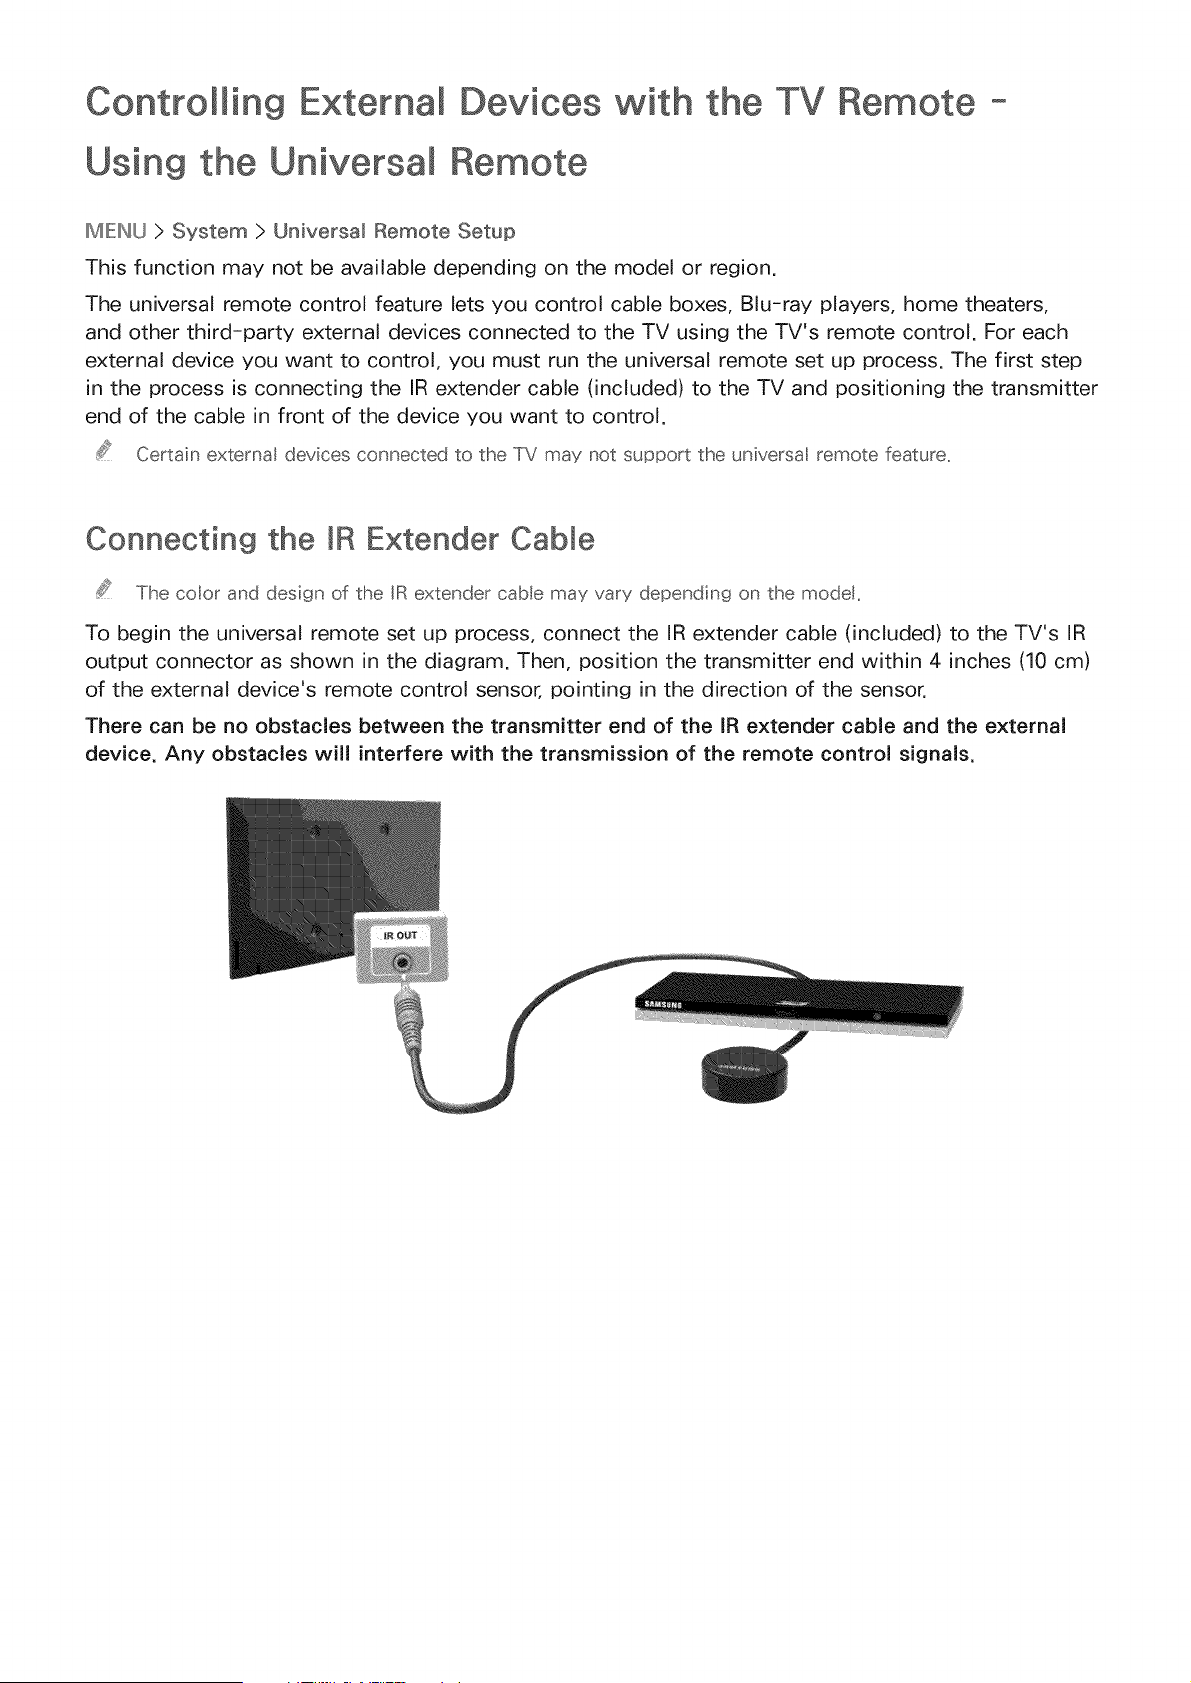
Connecting the mRExtender Cable
The coot and design of the IR extender cable may vary depending on the modet,
To begin the universal remote set up process, connect the IR extender cable (included) to the TV's IR
output connector as shown in the diagram. Then, position the transmitter end within 4 inches (10 cm)
of the external device's remote control sensor, pointing in the direction of the sensor.
There can be no obstacles between the transmitter end of the IR extender cable and the external
device. Any obstacles will interfere with the transmission of the remote control signals.
Setting Up the Universal Remote Control
If you want to control a set-top-box, you need to have your zip code and your cable providers name and
locat on on hand before you begin_ If you want to contro a BIu-r@ payer or home theater; you need the
manufacturers name and the devices mode number_
Turn on the external device you want to control with the universal remote function.
2_ Press the SOURCE button on your remote to bring up the Source screen.
3_ Select the _ Universal Remote Setup icon.
You can also start Universa IRemote Setup thro_gh the IiVs men_. Navigate to System > Universal
Remote Setup
4_ The TV checks if the IR Extender cable is connected. If it confirms the connection, press the {iii_
button.
Select the type of device you want to control - set-top-box, Blu-ray player, or home theater.
8_ Follow the directions on the screen to complete the set up and register the device. The directions
will be different, depending on the device you want to control.
Iif the externa device does _ot respond after being registered, register t agan _sing ts mode _ mbe_
Yo_ m_st eave the IIIRextender n pace so that t faces the exter _a device to be abe to co_tro the
device
Controlling an External Device with the TV Remote
During the universal remote set up process, the TV registers the connector (source) the external device
is connected to. To control a registered external device with your TV's remote, select the external
device on the Source List.
Press the SOURCE: button on your remote.
2_
Select the source (connector) the device is connected to (HDMI1, HDMI2, etc.). If the external
device is a Blu-ray player, home theater, or similar kind of device, the external device's home
screen or menu appears on the TV screen. If the external device is a set-top-box, a channel
appears on the screen.
3_ Aim the remote at the IR sensor on the TV to control the device.
Universal Remote Features
Press SOURCE to display the Source list.
2_ Select _ Universal Remote Setup from the top of the screen. This initiates the universal remote
setup process.
3_ Select an external registered device on the Universal Remote Setup screen. The following
options are available:
o Use with Set-Top Box
Listen to the audio from a set-top box through the home theater that is connected to the TV.
.....Iihis s availabe ony f yo_; have seected a set top box n Step 3 and yo_; have a home theater
connected to the IIV..
Use with Blu-ray player
Listen to the audio from a Blu-ray player through the home theater that is connected to the
TV.
.....IiMs s availab eony f you have seected a B _ _ay payer n Step 3 and you have a home theater
connected to the IIV.
Use with Home Theater
Listen to the audio from an external device through the connected home theater.
.....Ilhis ;s availab e ony ;f you have se ected a set top box o_ B _ _ay payer in Step 3 and yo_ have
a home theater co _nected to the IiV..
Source Setup
Change the TV's input source of your selected external device.
Synced TV power
When set to On, the connected set-top-box turns off when you turn the TV off.
.....IiMs ;s ava lab e O_y ;f yo_ have se ected a set top box in Step 3. Y(£_ can o_y SynC IiV power' to
aset top box..
e Rename
Rename the registered external device. The name can be up to 15 characters long.
Demete
Remove the external device from the list of registered devices. The device is de-registered
and you will no longer be able to control it with the Universal Remote function.
Controlling the TV with a Keyboard
ME:INU>System>DeviceManager>KeyboardSetti°gs
Connecting a keyboard makes it easy to control most of the functions on the TV.
Certain models do not support USB HiD cass keyboards.
Connecting a Keyboard
Connecting a USB Keyboard
Plug the keyboard cable into the TV's USB port. A connection message appears on the screen.
Using the Keyboard
Use the following remote features with the USB keyboard connected to the TV.
, Arrow Keys (moving the focus), Windows Key (MIEINU Button), Menu List Key (TOOLS Button),
Enter Key (Select/run item), ESC (RIETURIN Button), Number Keys (Number Buttons)
, F1 (1_), F2 (10S),F3 (D), F4 (D), F5 (_'t), F6 (SOURCE Button), F7 (CH List), F8 (C2 Button), F9/F10
(Volume Buttons), Fll / F12 (Channel Buttons)
, Page Up/Page Down: Scroll web browser pages up/down.
Changing Keyboards
Select System > Device Manager > Keyboard Settings > Select Keyboard. Designate which keyboard
to use.
Only one keyboard can be used at a time.
_nput Lang_,,,_ages, Keyboard "[ype_ and Switch Language Key
Select System > Device Manager > Keyboard Settings > Keyboard Options. The following options are
available:
, Keyboard Language
If the keyboard supports multiple languages, choose the language you want to use from the
displayed list.
, Keyboard Type
Match the Keyboard Type to the language selected in Keyboard Language.
.....Ilhe Keyboard Type list vares depending o_ which ang_ age was se ected _nder Keyboard Language..
,, Switch input Language
If the keyboard supports multiple languages, choose the key you want to use to switch between
languages.
Contromming the TV with a
MEINU > System > Device Manager > Mouse Settings
Connecting a mouse makes it easy to control most of the functions on the TV.
Certa n modes do not support USB HID cass mce_
Connecting a Mouse
Connecting a USB Mouse
Plug the mouse cable into the TV's USB port. A connection message appears on the screen.
Using the Mouse
Once a USB mouse is connected to the TV, a pointer appears on the TV's screen. You can use this
pointer to control the TV in the same way you use a pointer on a computer.
o Selecting and Running an Item
Left-click using the mouse.
Showing Tools Buttons
Right-clicking displays the Tools buttons on the screen so that you can easily use the TV's
functions.
.....Iihe Iioos b_£to_s may va[y depending o_ the fi;nct[o_ yo_J a_e _;sin((_,,
Scrolling the TV Menu or Screen
Move the mouse wheel up or down. This scrolls the TV menu or screen up/down.
Exiting the TV Menu or Feature
Click the X button. This closes the menu.
.....Iihe X b_tton appears on the IIV men_ when a mouse [s being _sed,, eft clicking o_ce while _sing a
feat_ re disp ays the X b_tton on tlhe c_trent screen..
Chan singMice
Select System > Device Manager > Mouse Settings > Select Mouse, Designate which mouse to use.
Only one mouse can be used at a tree,
Cha ngin g M o use Butto ns and Point er S pe ed
Select System > Device Manager > Mouse Settings > Mouse Options. The following options are
available:
Primary Button
Choose which button (left or right) to use to select and run items.
Pointer Speed
Adjust the movement speed of the pointer that appears on the screen.

Entering Text Using the On-Screen QWERTY Keypad
A QWERTY keypad appears when you need to enter text (entering the network password, logging into
your Samsung account, etc.), allowing you to enter text using your remote control.
Using Additional Functions
Select 0 on the QWERTY keyboard screen. The following options are available:
o Recommended text
Enable/disable the Recommended Text feature Enabling the Recommended text feature allows
you to quickly enter text starting with the characters you typed in by displaying recommended
words. To enter the word "lnternet," for example, all you have to do is enter "In" and select the
word "lnternet" from the list of recommended words. The word is memorized so that you can
enter the same text again more easily.
o Reset recommended text data
Delete both the recommended words and the memorized words to clear the list.
Predict Next Letter
Enable/disable the Text Prediction feature. Enabling the Text Prediction feature eliminates the
need to find and select individual character keys. To enter the word "lnternet," for example, select
"1". A predicted word will then appear next to the I key. Simply select the predicted word to enter
"Inter net".
.....Ibis feature is imited to words that have previous y beeu' added to the diction' ary,
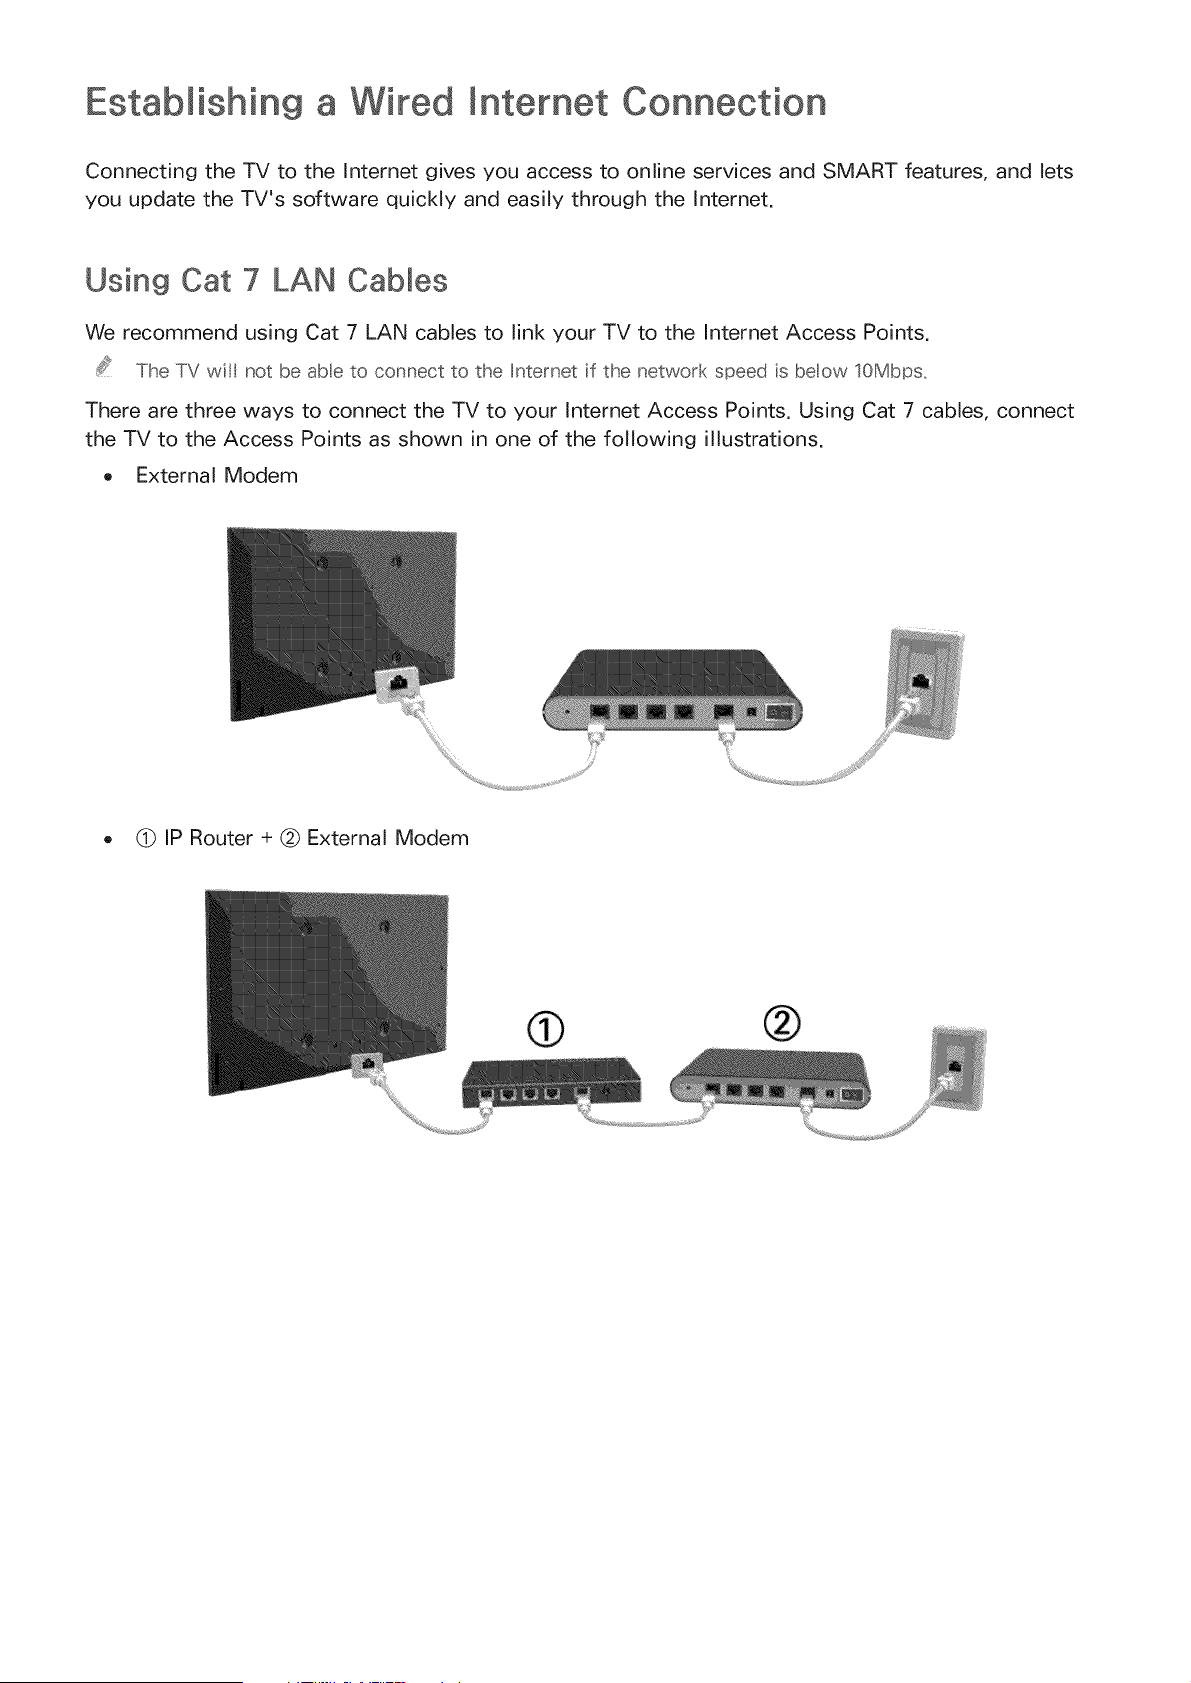
Estabmishin9 a Wired Internet Connection
Connecting the TV to the Internet gives you access to online services and SMART features, and lets
you update the TV's software quickly and easily through the Internet.
Using Cat 7 LAN Cables
We recommend using Cat 7 LAN cables to link your TV to the Internet Access Points.
The TV wi not be abe to connect to the Intemet if the network speed is below 10Mbps,
There are three ways to connect the TV to your Internet Access Points. Using Cat 7 cables, connect
the TV to the Access Points as shown in one of the following illustrations.
o External Modem
o (_ IP Router + @ External Modem
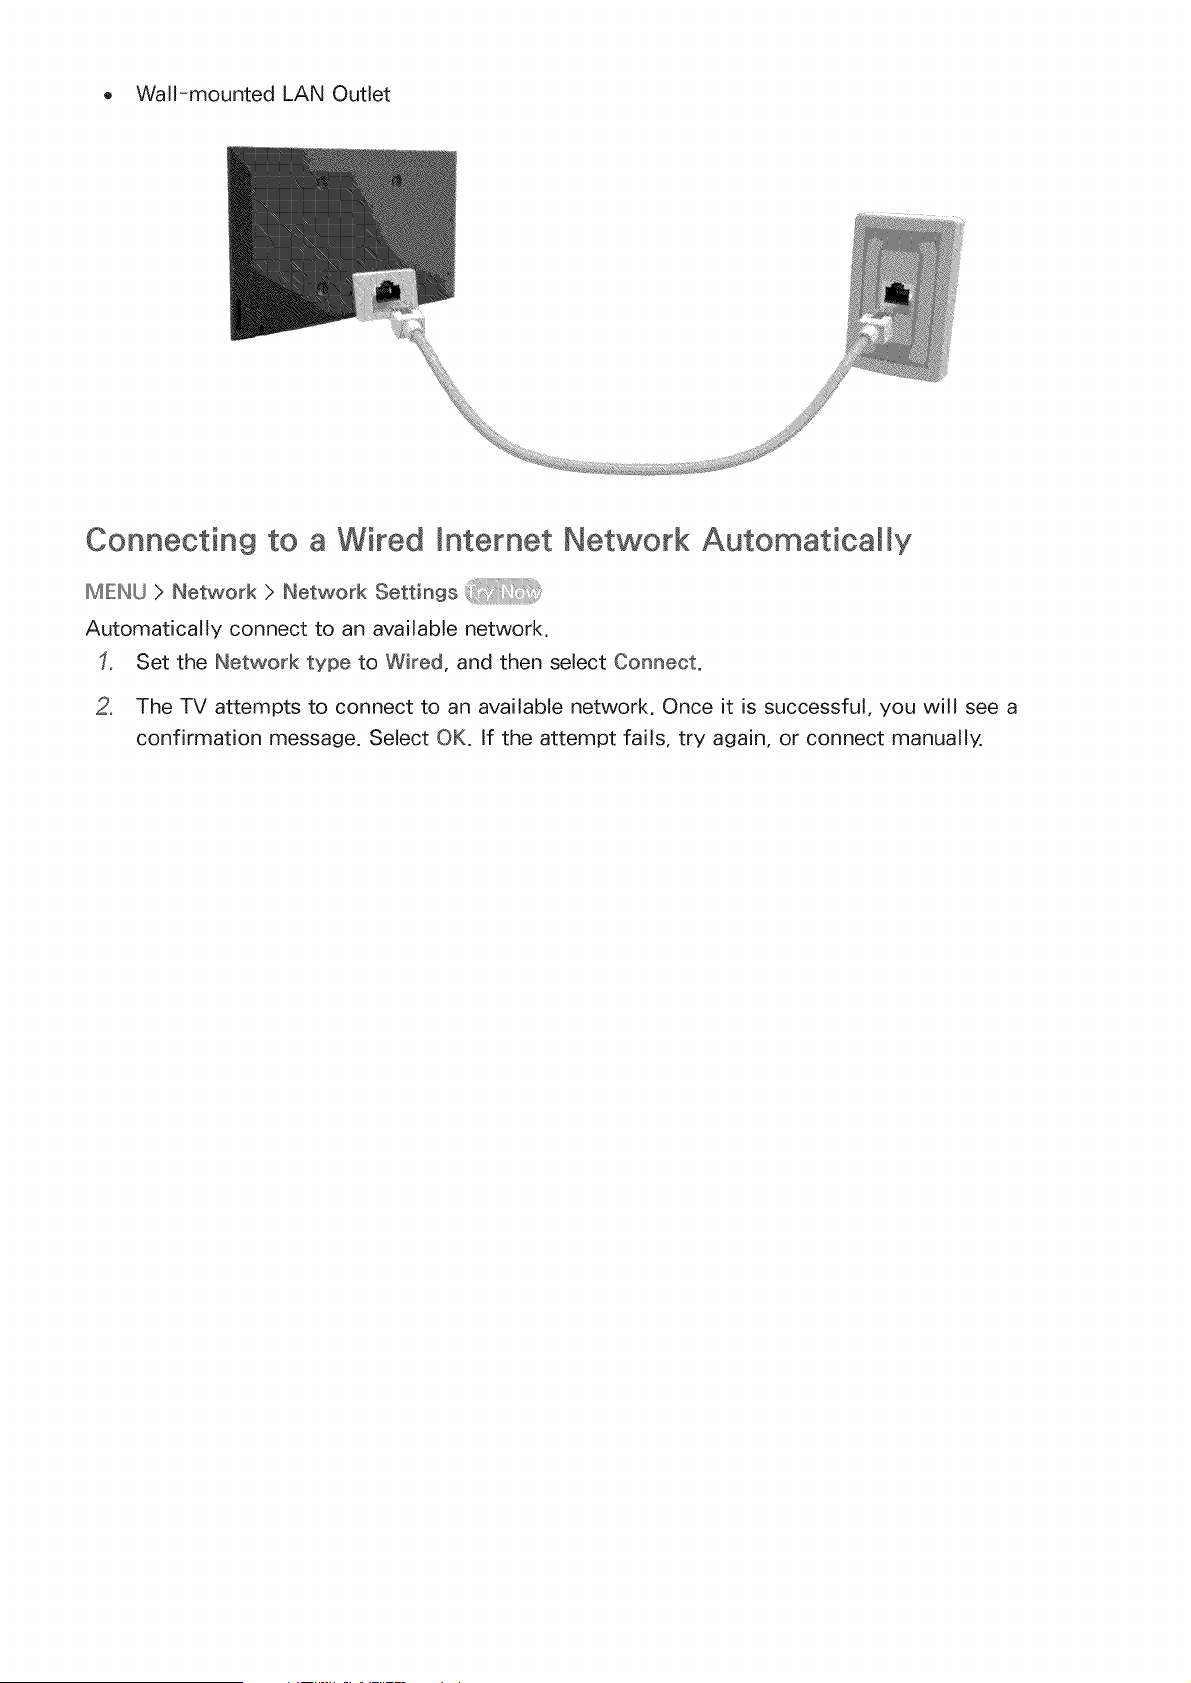
o Wall-mounted LAN Outlet
Connecting to a Wired Entemet Network Automatically
IMIEINU> Network > Network Settings
Automatically connect to an available network.
Set the Network type to Wired, and then select Connect.
2. The TV attempts to connect to an available network. Once it is successful, you will see a
confirmation message. Select OK. If the attempt fails, try again, or connect manually,
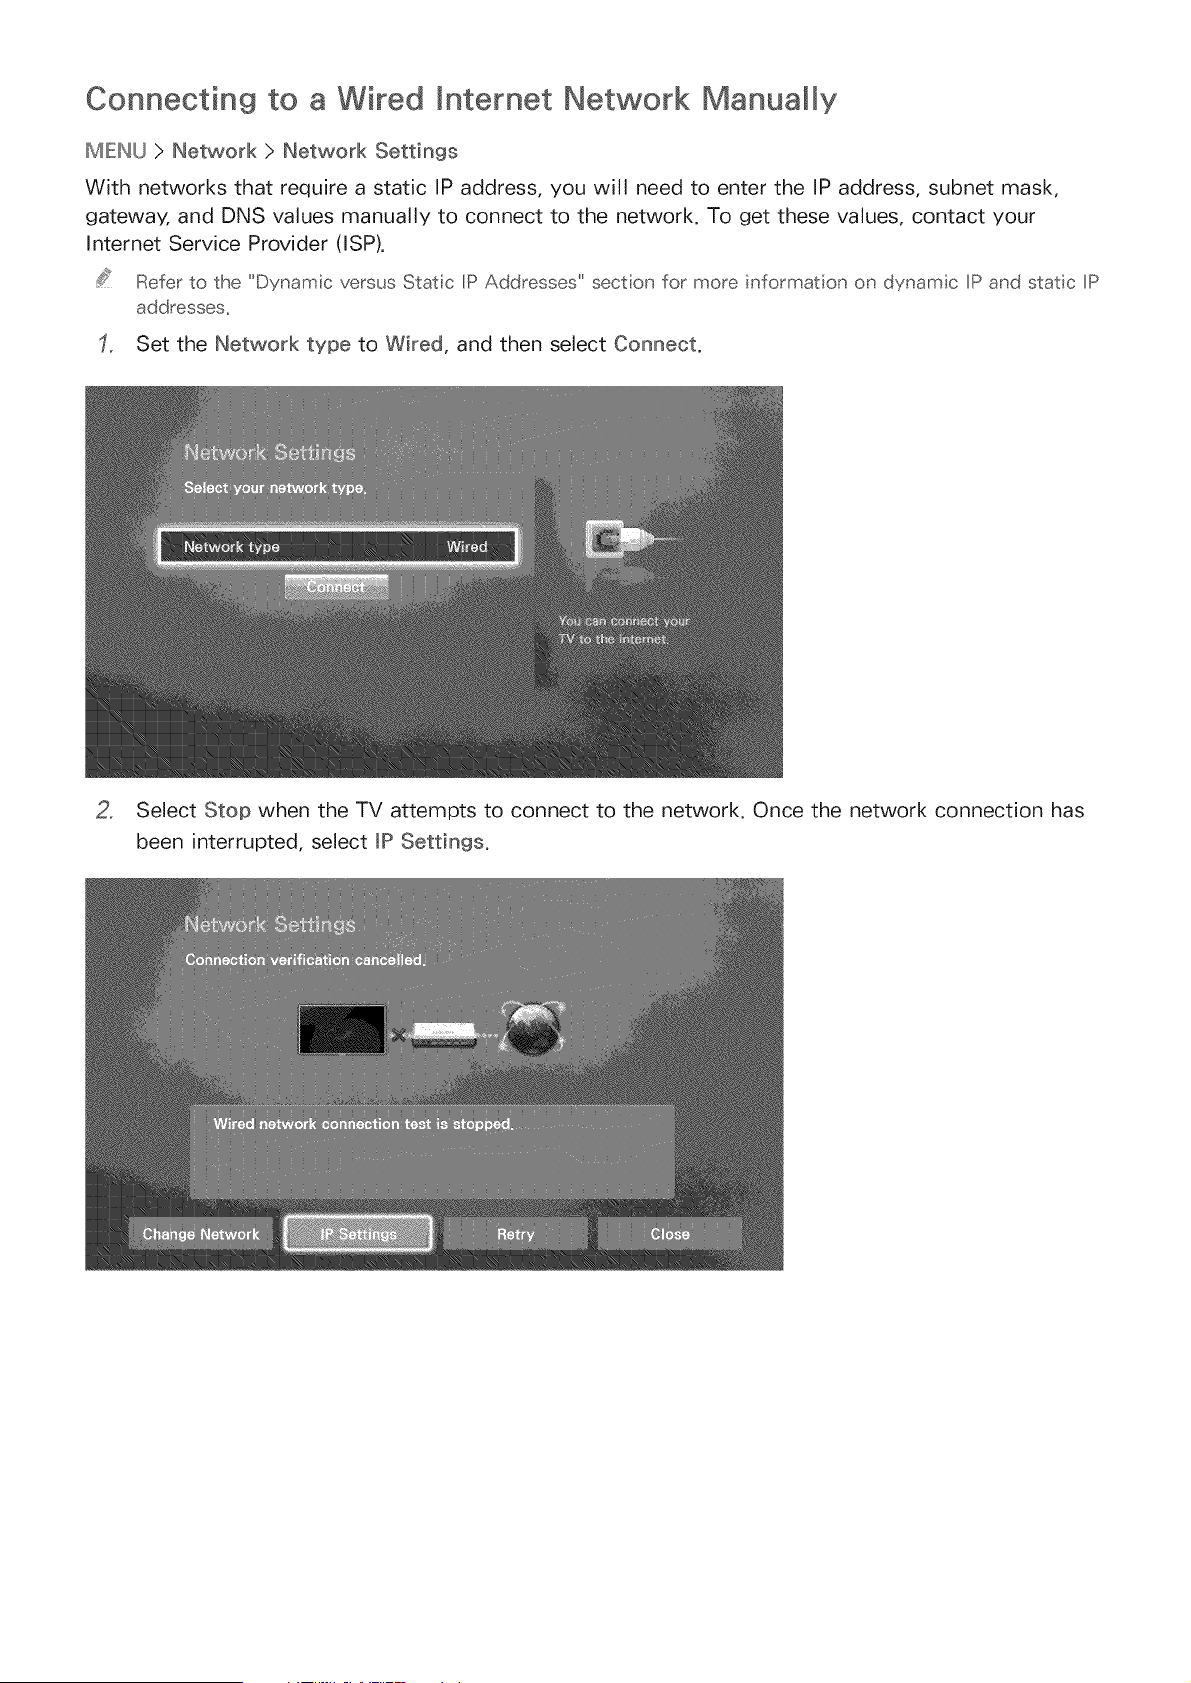
Connecting to a Wired Internet Network Manua_My
MIENU > Network > Network Settings
With networks that require a static IP address, you will need to enter the IP address, subnet mask,
gateway, and DNS values manually to connect to the network. To get these values, contact your
Internet Service Provider (ISP).
Refer to the "Dynamic versus Statc IP Addresses" sect on for more nformat on on dynam c IP and statc IP
addresses_
Set the Network type to Wired, and then select Connect.
2, Select Stop when the TV attempts to connect to the network. Once the network connection has
been interrupted, select _P Settings.

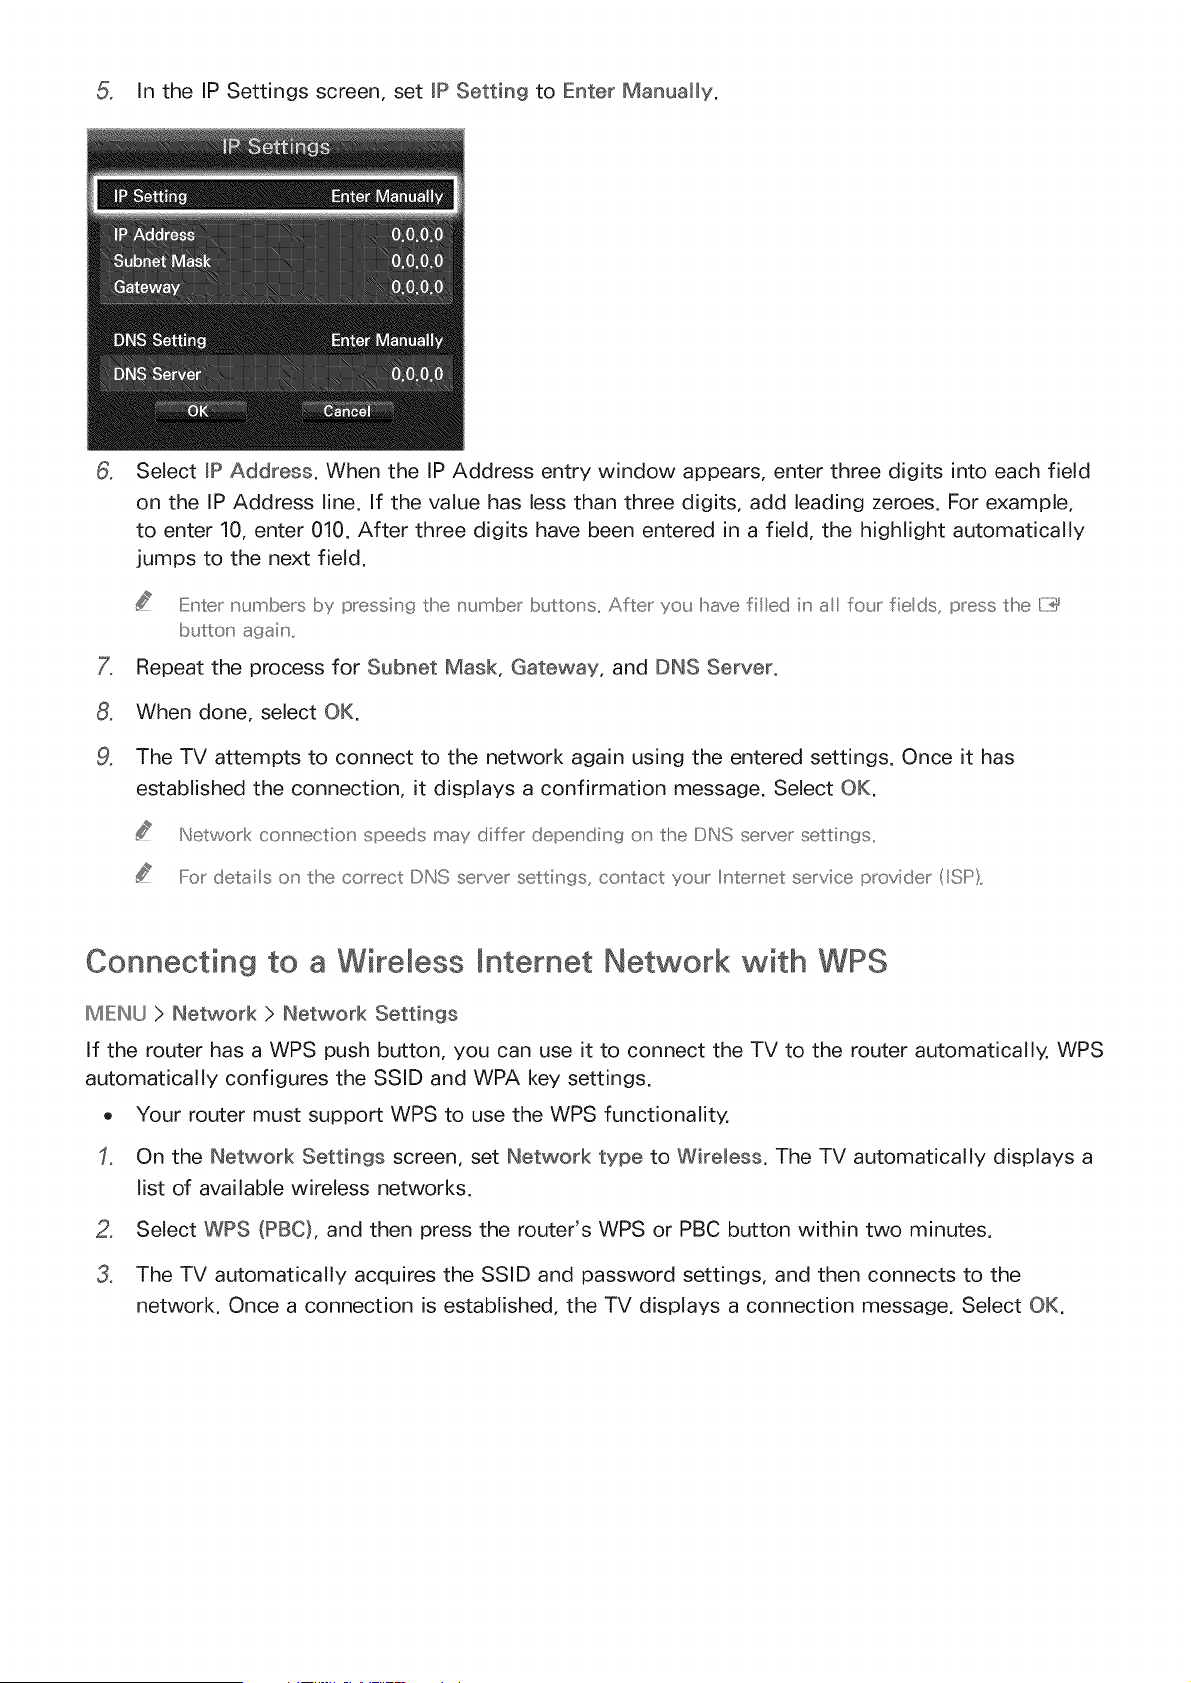
3. In the IP Settings screen, set IP Setting to Enter Manually.
o
Select IP Address. When the IP Address entry window appears, enter three digits into each field
on the IP Address line. If the value has less than three digits, add leading zeroes. For example,
to enter 10, enter 010. After three digits have been entered in a field, the highlight automatically
jumps to the next field.
IiiE_'ter numbers I)y pressing the number buttons. Mfter you have filed h' _ fo_.Jrfie ds, press the [TY
Repeat the process for Subnet Mask, Gateway, and DNS Server.
When done, select OK.
The TV attempts to connect to the network again using the settings you entered. Once it has
established the connection, it displays a confirmation message. Select OK.
..../he network co_','ectio_' speed may differ depe,' din9 o_' the DNS server settings..
For details o_' the DNS server settings, co_'tact yo_J Intemet service provider (ISP)..
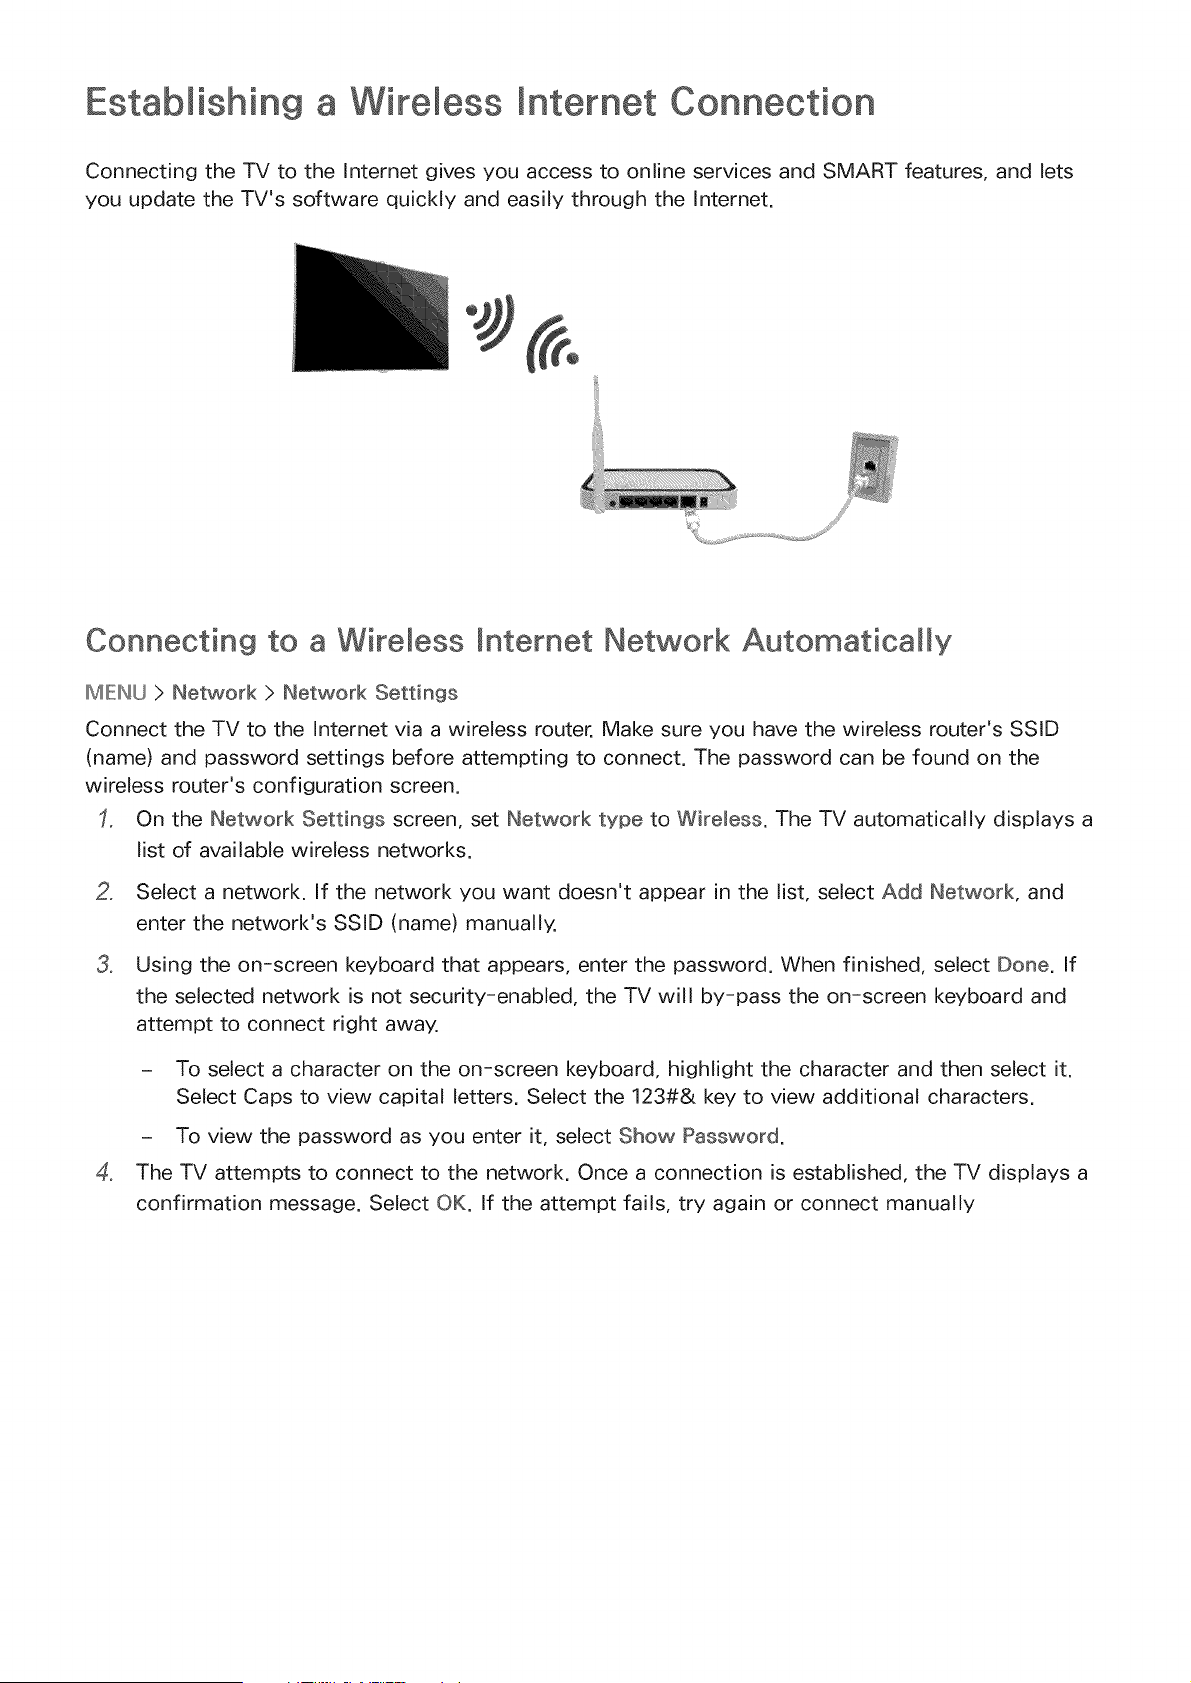
Estabmishin9 a Wireless Internet Connection
Connecting the TV to the Internet gives you access to online services and SMART features, and lets
you update the TV's software quickly and easily through the Internet.
Connecting to a Wireless mnternet Network Automatically
IMIEINU> Network > Network Settings
Connect the TV to the Internet via a wireless router. Make sure you have the wireless router's SSID
(name) and password settings before attempting to connect. The password can be found on the
wireless router's configuration screen.
On the Network Settings screen, set Network type to Wireless. The TV automatically displays a
list of available wireless networks.
o
o
Select a network. If the network you want doesn't appear in the list, select Add Network, and
enter the network's SSID (name) manually.
Using the on-screen keyboard that appears, enter the password. When finished, select Done. If
the selected network is not security-enabled, the TV will by-pass the on-screen keyboard and
attempt to connect right away.
o
- To select a character on the on-screen keyboard, highlight the character and then select it.
Select Caps to view capital letters. Select the 123#& key to view additional characters.
- To view the password as you enter it, select Show Password.
The TV attempts to connect to the network. Once a connection is established, the TV displays a
confirmation message. Select OK. If the attempt fails, try again or connect manually
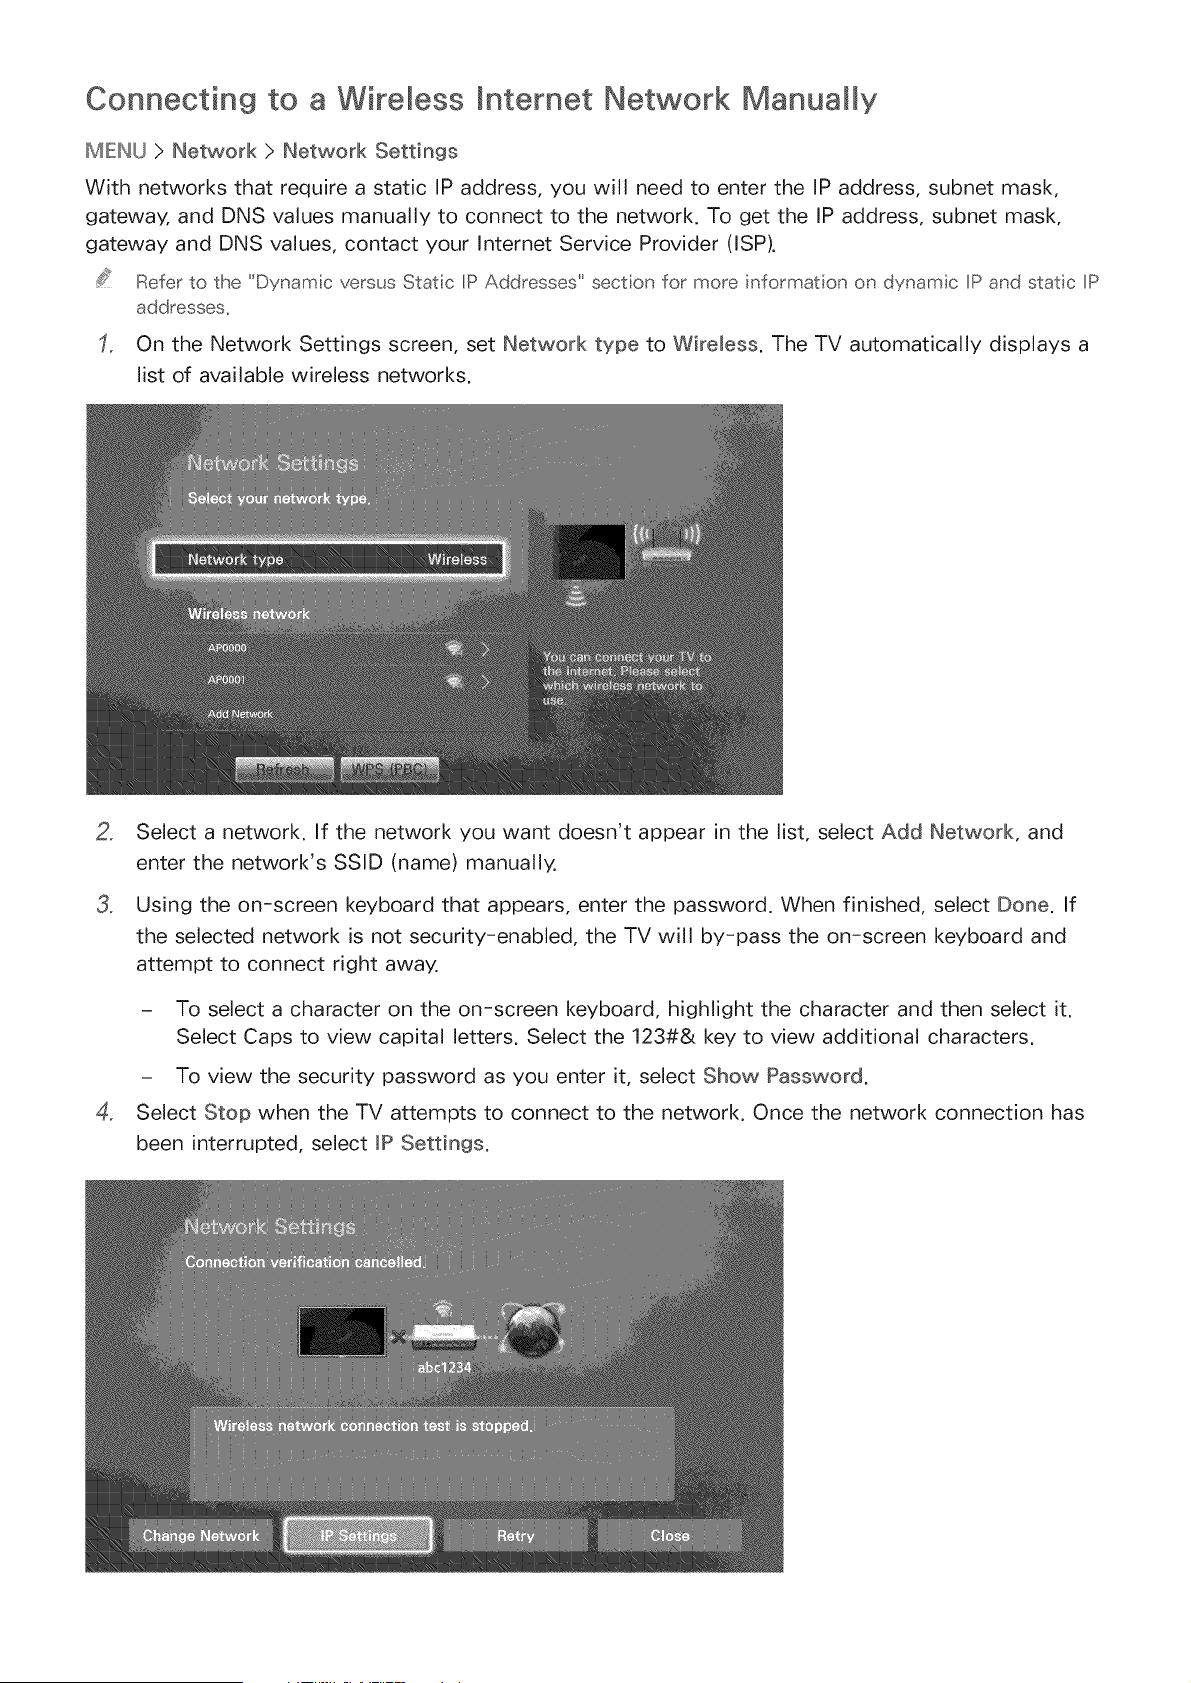
Connecting to a Wireless mnternet Network Manua My
MIENU > Network > Network Settings
With networks that require a static IP address, you will need to enter the IP address, subnet mask,
gateway, and DNS values manually to connect to the network. To get the IP address, subnet mask,
gateway and DNS values, contact your Internet Service Provider (ISP).
Refer to the 'Dynam c versus Statc IP Addresses" sect on for more informat on on dynam c IP and statc IP
addresses_
On the Network Settings screen, set Network type to Wireless. The TV automatically displays a
list of available wireless networks.
2_
3_
4_
Select a network. If the network you want doesn't appear in the list, select Add Network, and
enter the network's SSID (name) manually.
Using the on-screen keyboard that appears, enter the password. When finished, select Done. If
the selected network is not security-enabled, the TV will by-pass the on-screen keyboard and
attempt to connect right away.
- To select a character on the on-screen keyboard, highlight the character and then select it.
Select Caps to view capital letters. Select the 123#& key to view additional characters.
- To view the security password as you enter it, select Show Password.
Select Stop when the TV attempts to connect to the network. Once the network connection has
been interrupted, select JP Settings.
In the IPSettings screen,set JPSetting to EnterManually.
o
Select JP Address. When the IP Address entry window appears, enter three digits into each field
on the IP Address line. If the value has less than three digits, add leading zeroes. For example,
to enter 10, enter 010. After three digits have been entered in a field, the highlight automatically
jumps to the next field.
IiiE_'ter numbers H)y pressing the number buttons, After you have filed iu' a four fie ds, press the [:::Y
Repeat the process for Subnet Mask, Gateway, and DNS Server.
When done, select OK.
The TV attempts to connect to the network again using the entered settings. Once it has
established the connection, it displays a confirmation message. Select OK.
Network con'rnection'r speeds may differ depending on'r the DNS server settings,
For details o_' the correct DNS server settinc_s, co_' tact yo_Jr Internet service provider {ISP),
Connecting to a Wireless Jnternet Network with WPS
MENU > Network > Network Settings
If the router has a WPS push button, you can use it to connect the TV to the router automatically. WPS
automatically configures the SSID and WPA key settings.
o Your router must support WPS to use the WPS functionality.
On the Network Settings screen, set Network type to Wireless. The TV automatically displays a
list of available wireless networks.
Select WPS (PBC}, and then press the router's WPS or PBC button within two minutes.
o
The TV automatically acquires the SSID and password settings, and then connects to the
network. Once a connection is established, the TV displays a connection message. Select OK.
Troubleshooting Internet Connectivity Issues
If you are not able to connect the TV to the Internet, read the information below.
Troubleshooting Wired mnternet Connectivity mssues
HonetworkcaUefound ' [:}
Make sure the network cable is plugged in. If it is connected, make sure the router is turned on. If it is
on, try turning if off and on again.
_P auto settin 9 fai_ed
Do the following or configure the _P Settings manually,
Ensure that the DHCP server is enabled on the router and reset the router,
2, If this does not work, contact your Internet Service Provider for more information,
U n a b_e to co n n e ct t o t he netwo r k
Do the following:
Check all JP Settings.
Ensure that the DHCP server is enabled on the router. Then, unplug the router and plug it back in.
3, If this does not work, contact your Internet Service Provider for more information.
Connected to a Ioca_ network_ but not to the _nternet
Make sure that the Internet LAN cable is connected to the router's external LAN port.
2, Check the DNS values in JP Settings.
3, If the problem persists, contact your Internet Service Provider.
Network setup is comp_ete_ but unable to connect to the _nternet
if the problem persists, contact your Internet Service Provider.
Troubleshooting Wireless mnternet Connectivity mssues
wirebssnetworkconnectionfai ed ::!S
Selected wireless router not found. Go to Network Settings and select the correct router.
U na b_e to co nnect to a w irele ss router t:
Check the following:
Check if the router is turned on. If it is, turn it off and on again.
2, Enter the correct password if required.
_P auto setting fai_ed
Do the following or configure the _P Settings manually.
Make sure that the DHCP server is enabled on the router. Then, unplug the router and plug it back
in.
2, Enter the correct password if required.
3, If this does not work, contact your Internet Service Provider for more information.
Unable to connect to the network
Do the following:
Check all JP Settings.
2, Enter the correct password if required.
3, If this does not work, contact your Internet Service Provider for more information.
Connected to a Ioca_ network_ but not to the _ntemet
Make sure that the Internet LAN cable is connected to the router's external LAN port.
2. Check the DNS values in JRSettings.
3. If the problem persists, contact your Internet Service Provider.
Network setup is complete_ but unable to connect to the _ntemet
If the problem persists, contact your Internet Service Provider,
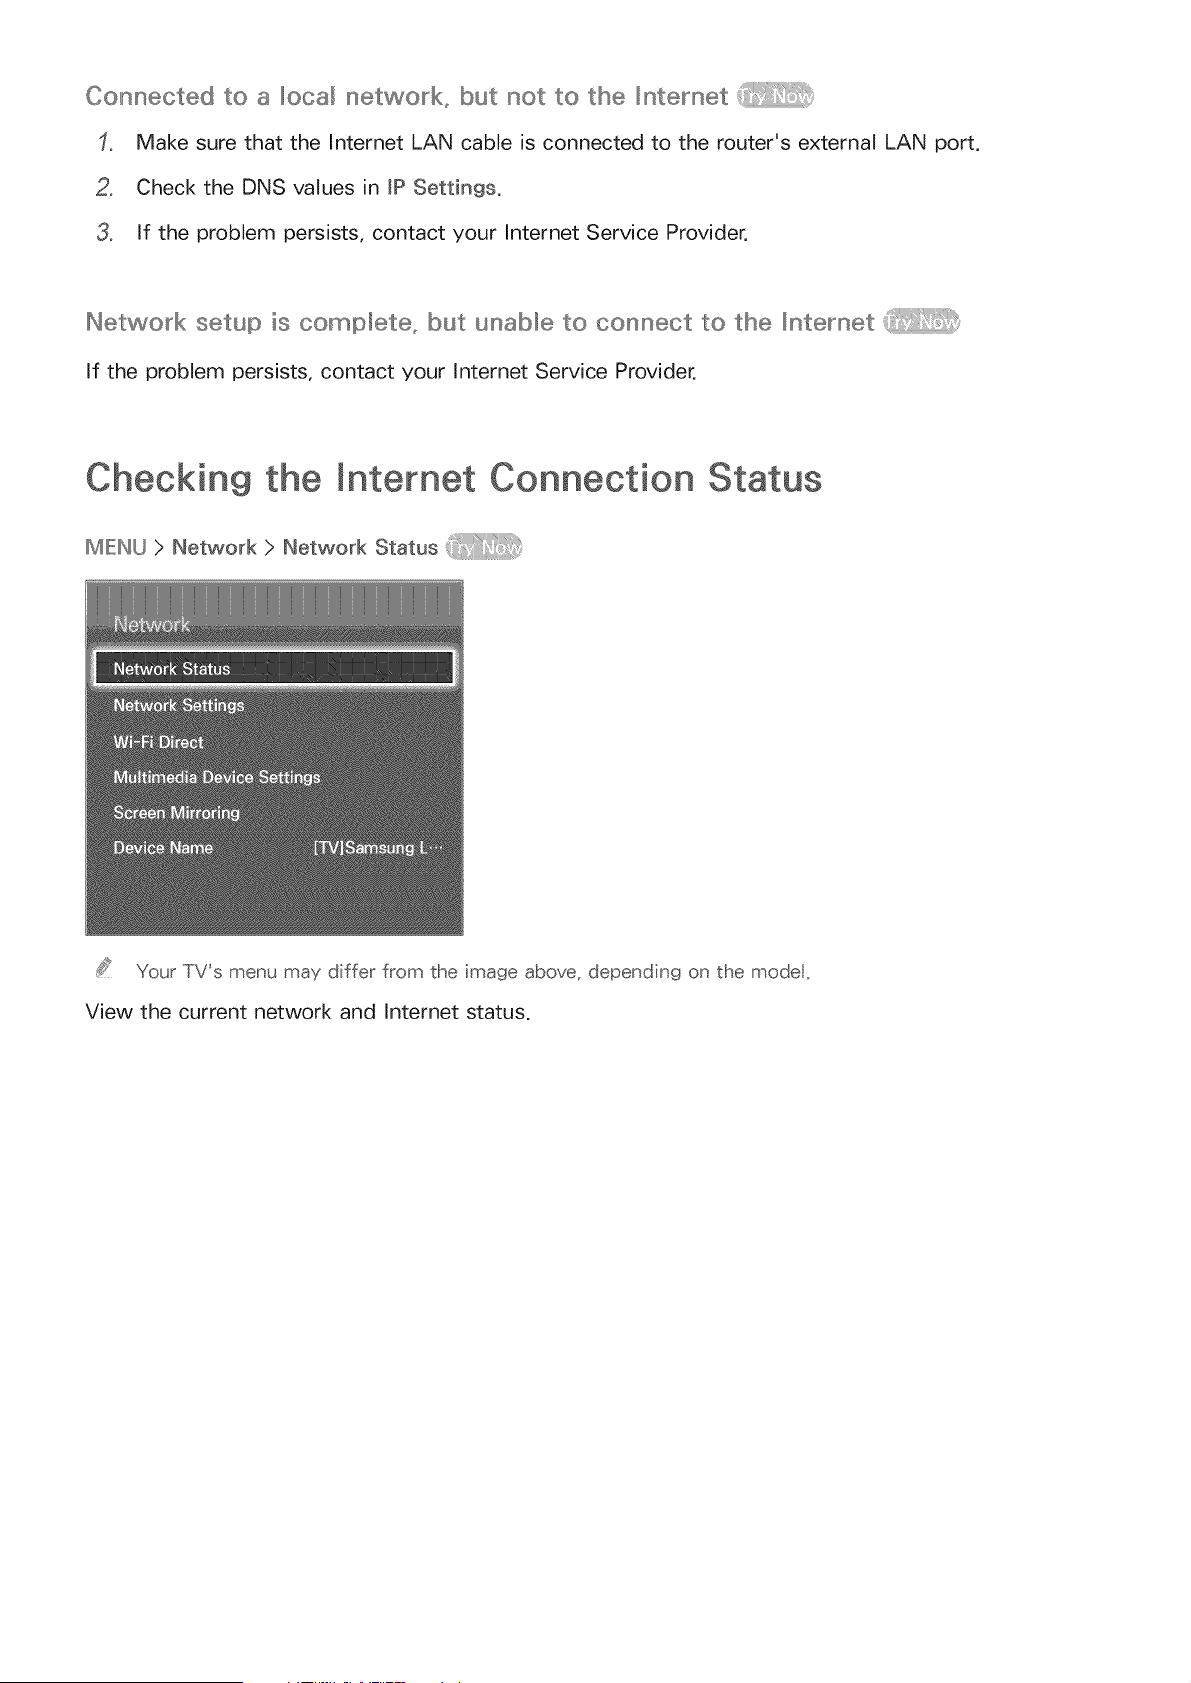
Checking the Internet Connection Status
MIEINU > ,etwork > ,etwork Status
Your TV's menu may differ from the image above, depending on the modet.
View the current network and Internet status.
Smart Hub
ME:INU>SmartHub>OpenSmartHub
With Smart Hub, you can surf the web and download apps.
Some of the Smart Hub services are for pay serv ces. To use a for pay service, you must have an account
with the serv;ce provider or a Samsung Apps TV account, Refer to the "Using Smart Hub with a Samsung
Account" sect on for more information_
The TV must be connected to the [nternet to access Smart Hub,
Some Smart Hub features may not be ava Iable depending on the service provider: language, or region.
To use Smart Hub, you must agree to the end user agreement and privacy policy, Otherw se, you w!l not be
able to access the features and serv ces associated wth them. You can v;ew the entre text of the Terms &
Policy by navigating to Smart Hub :> Terms & Po[icy_ If you want to stop usng Smart Hub, you can cance
the agreement_
Smart Hub service outages can be caused by d srupt ons n your [nternet service,
Testing Smart Hub connections
MENU > Support > Serf Diagnosis > Smart Hub Connection Test
If Smart Hub is not functioning, navigate to Support > Serf Diagnosis > Smart Hub Connection Test.
Diagnose the problem by checking the internet connection, your ISP, the Samsung server and the
Samsung Apps panels.
After completing the test, if Smart Hub cont hues to have prob eros, contact your [nternet Service Provider
or a Samsung Contact Center:
Opening the First Screen
Press the 0 button while watching TV to open the First Screen.
On the First Screen, search through favorite apps, channels, or sources and access previously run or
frequently used functions.
Settin9 you_ _ favorite item
Press the _g button to open the First Screen, and move to a desired item.
2, Press and hold the [i_ button. The Options menu appears.
3, In the Options menu, select Add to Favorites to add the selected item to the favorite list, which
will move top of the list.
..../o deete a favodte item, select it, and theu' press a_'d Ihod the [Y_}_button' to disp ay the co_'text meu'_s,,
..../ Iheu',seect Remove from Favorites,,
De_etin9 browsing history
Press the @ button to open the First Screen, and select Clear All. You will be asked to confirm
your selection.
2, Select OK on the screen. Your browsing history is deleted completely,
Howeve_tthe IFavodtes ist items wil not be deeted,,
Yo_Jca_' aso deete yo_J_browsiu' 9 history by seectin9 Clear Al_ ih"the Smart [dub > First Screen
Settings meu'_,,
Moving to the Panel Screen
Press the @ button to open the First Screen, and select the Panel icon. On the Panel screen for each
service panel, the following are available:
o ¢_?SAMSUNG APPS
You can enjoy a variety of free and for pay news, sports, weather, and gaming apps on the TV as
you would on a smart phone or tablet.
, i"}i_On TV
This function is only available in the U.S.A. and Canada.
You can view the current programs on TV at a glance and view Program Recommendations by
Channel or by Time for programs that will be broadcast later.
Using the Smart Hub Tutorial
IMIEINLJ> Support > Smart Hub Tutorial
Select Support > Smart Hub Tutorial. The tutorial introduces you to the basics of using Smart Hub and
the Smart Hub panels.
Resetting Smart Hub
IMIEINU> Smart Features > Smart Hub Reset
Smart Hub Reset lets you remove all Samsung accounts and everything linked to them, including apps,
from the TV. To access Smart Hub Reset, you must enter your Smart Hub password.
To use Smart Hub again fully after resetting it, you must agree to the terms and conditions again.
Open the System menu, choose Setup, and then follow the initial setup procedure.
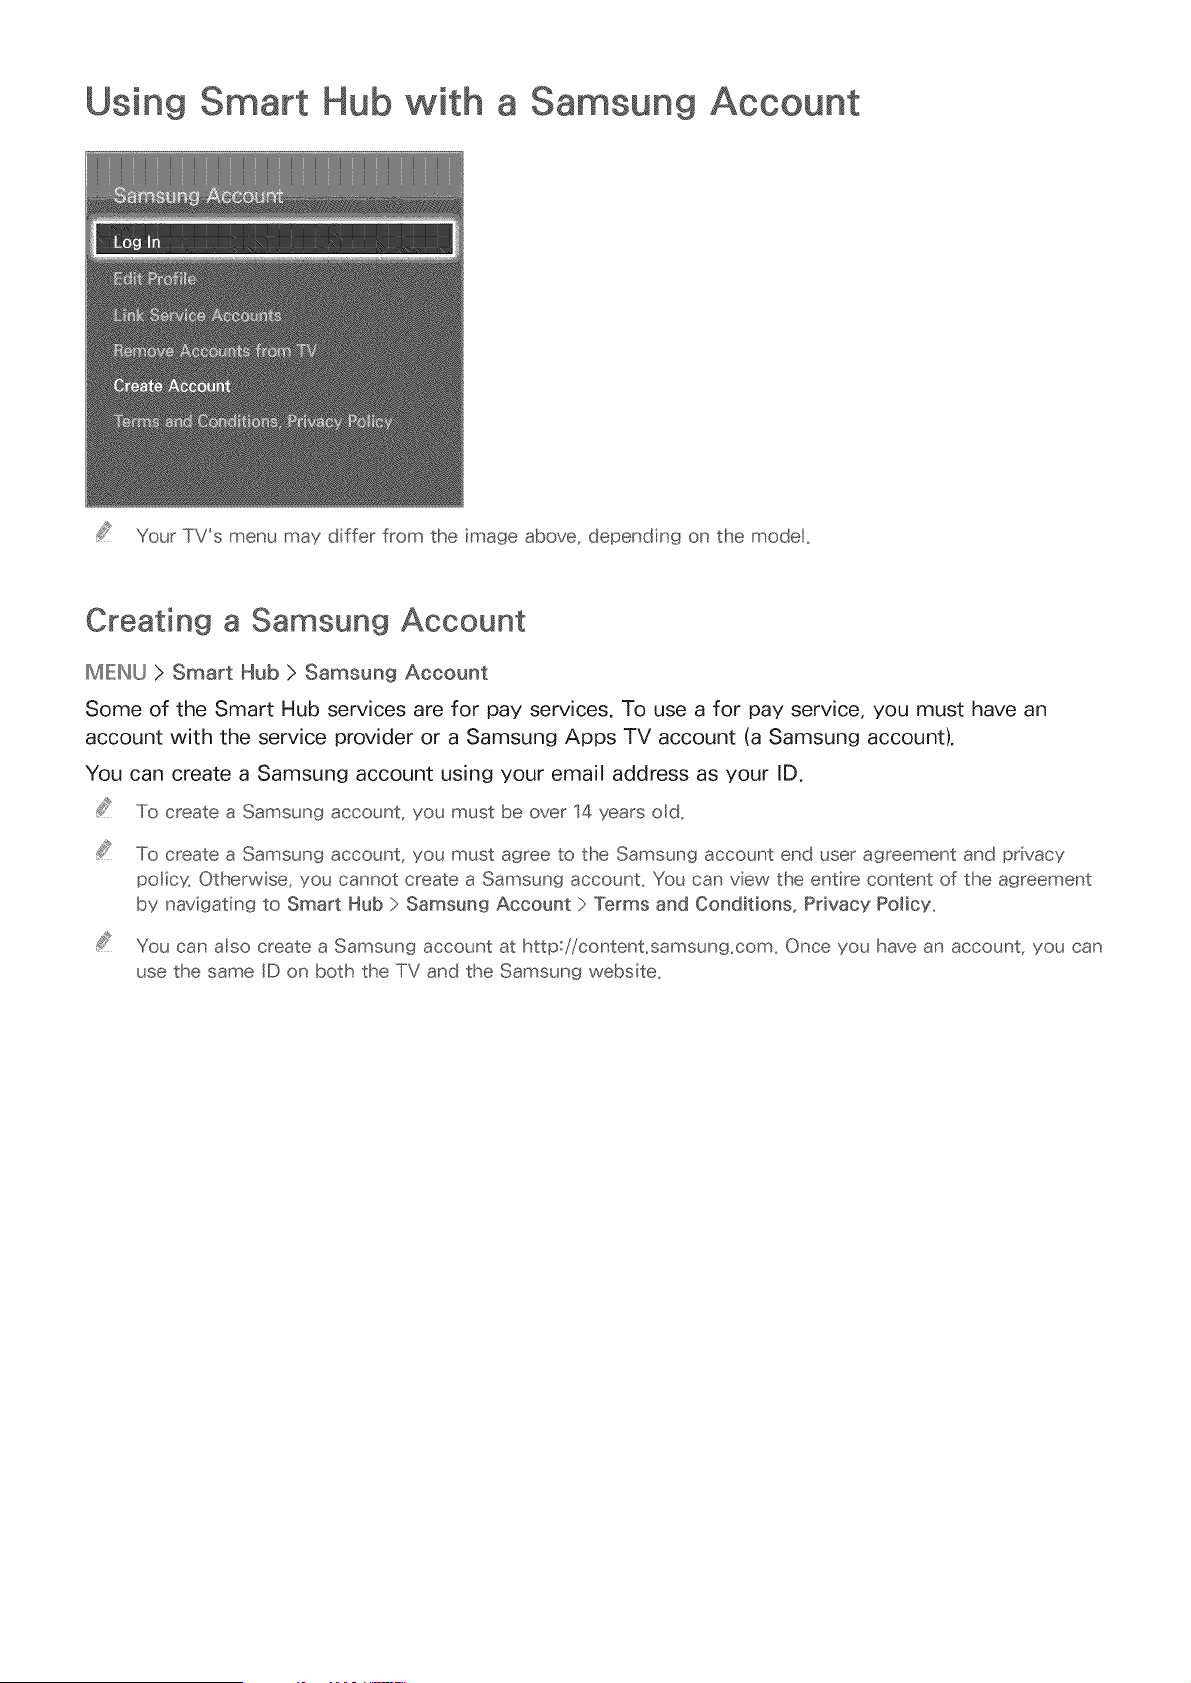
Using Smart Hub with a Samsung Account
Your TV's menu may differ from the image above, depending on the modek
Creating a Samsung Account
IMIEINU> Smart Hub > Samsung Account
Some of the Smart Hub services are for pay services, To use a for pay service, you must have an
account with the service provider or a Samsung Apps TV account (a Samsung account),
You can create a Samsung account using your email address as your ID,
To create a Samsung account, you must be over 14 years od,
To create a Samsung account, you must agree to the Samsung account end user agreement and privacy
polic% Otherwise, you cannot create a Samsung account. You can view the entire content of the agreement
by navigating to Smart Hub }>Samsung Account }>Terms and Conditions, Privacy Policy,
You can aso create a Samsung account at http://contenLsamsung.com. Once you have an account, you can
use the same ID on both the TV and the Samsung website.
Creating a Samsung Account Using the Create Samsung Account Menu
Press the MIEINU button on your remote, and then select Smart Hub > Samsung Account > Create
Account > Create Samsung Account. The Terms and Conditions screen appears.
2. Press the {7_ button to agree to the Terms and Conditions, and then press {7_ button again.
3.
Iif yot want to mveiw the and Conditio _s, seect the Vew Deta Is btttons,,
Select the Email field. The keyboard pop-up appears. Enter your e-mail address. Use the
directional keys to move from character to character, and then press the (_i_ button to select a
character. Select the Caps button on the left to enter capital letters. Select the 123#& button to
view and select additional symbols. Select .corn at the bottom of the keyboard to enter .com.
4. When finished, select Done on the keyboard. The Create Account screen reappears.
Enter a password, your first name, and last name in the same fashion.
.
Iif yo_, want your accoLJ_l: to be passwo_d p_otected, selecl: "Password (Sect, r ty: Hgh" n the fed
below the II:::>asswo_dfield Iif you don_t, seect "No password _eq_.ired_ You st;I need to c_eate a
passwo_d, howeve_ Other f_ nctions n yo_J acco_nt _eq_ ire that yo_ enter a passwo_d
eave "Sign me n a_.tomatica y" checked f you want the IlV to og you n to yotJ accot_nt
a_ tomatical y when yo_. t_._ _ the IIV o_,,
Select the Date of Birth field, and then select numbers pressing the up or down directional
buttons, or, on a standard remote, using the number pad. Move from month to day to year by
pressing the left or right directional buttons. Press the IRIETURINbutton on the remote when done.
After you have finished with all the fields, select Next. The Image Selection screen appears.
Select an image to use to identify your account. The Account Created screen appears. Press the
{7_ button. You are signed in to your Samsung account.
Iif yo_ have an existing acco_nt saved o_ the IiV_ yo_ m_st be ogged o_£ of the acco_nt to c_eate _ew
acco_nts o_ the liT,,
Creating a Samsung Account using a Facebook Account
if you have a Facebook account, you can use the account to create a Samsung account.
Press the MIEINU button on your remote, select Smart Hub > Samsung Account. And then select
Log in. The Sign In screen appears.
2_ Select _, and then select Create with Facebook on the Sign In screen.
3_ Enter your Facebook ID and password and select Sign in.
4_ The Terms and Conditions screen appears.
Press the {7_ button to agree to the Terms and Conditions, and then press the {7_ button again.
8_ Follow the directions on the Create Account screen to create a Samsung account.
Once a Samsung account is created, you are automatically signed in.
Ill yo_ c[eate a Sams_ ng acco_nt _sing yo_J Facebook acco_nt, they a_e a_tomat[ca y inked,,
Signing in to a Samsung Account
MIEINU > Smart Hub ) Samsung Account ) Log Jn
Press the MIEINU button on your remote, and then select Smart Hub > Samsung Account > Log in,
2_ On the Log In screen, select your account, And then select Sign Jn on the Sign In screen,
3_ If you don't need to enter a password, Iogin proceeds, If you need to enter a password, the on-
screen keyboard appears, Enter your password, When finished, select Done,
Linking Your Samsung Account to External Service Accounts
MIEINU > Smart Hub > Samsung Account > Link Service Accounts
Linking your Samsung account to an external service accounts lets you automatically log in to
the linked account when you log into your Samsung account. For example, you can download the
Facebook application - which lets you access Facebook from your TV - and then link your Facebook
account to your Samsung account. Logging into your Samsung account then automatically logs you
into your Facebook account as well and lets you access it directly from the TV.
To use Link Service Accounts, you must frst log nto your Samsung account.
Linking a Service Account
Log in to your Samsung Account.
2, Navigate to Smart Hub ) Samsung Account, and then select Link Service Accounts. The
accounts you can link to your Samsung account are displayed.
3, Select an account from the list. The Link to other accounts window appears on the screen.
4, Enter the current ID and password of the account to log in and select OK.
When the Iogin is complete, the account is linked to the Samsung account.
Disconnectin9 a Linked Account
Navigate to Smart Hub ) Samsung Account, select Link Service Accounts. Select an account to
unlink.
2, A confirmation dialog box appears. Select Yes to unlink the account.
Changing and Adding Information to a Samsung Account
MEINU > Smart Hub > Samsun9 Account
Using the Samsung Account menu, you can manage your Samsung account.
To change the account nformation, you must be logged n to your Samsung account_
Navigate to Smart Hub > Samsung Account, and then select Edit Profile. The keyboard appears.
2, Enter your password, and then selec Done. The Edit Profile screen appears.
The Edit Profile screen lets you do the following:
o Change Your Profile Image
Select Edit Profile Picture to change your profile image.
Choose a Samsung Account Sign-in Method
Select Sign-in Method and choose a sign-in method from the drop down that appears.
Turn Auto Login On or Off
Select Sign me in automatically. Auto Login automatically logs you in to your Samsung account
when you turn the TV on. A check mark indicates that Auto Login is on.
Enter Basic User Information
You can enter your first name, last name, and date of birth.
Add a Credit Card to Your Samsung Account
Select Add Card to add a credit card to your Samsung Account. Adding a credit card to your
account makes it easier to purchase online movies and TV shows. Follow the easy directions on
the screen.
Subscribe to the Samsung e-Newsletter
You can receive emails containing information about Samsung products, new service
announcements, special offers, and events.
Deleting a Samsung Account from the TV
MIEINU > Smart Hub > Samsung Account > Remove Accounts from TV
Navigate to Smart Hub > Samsung Account and select Remove Accounts from TV. The account
and password information for the currently signed in account is deleted from the TV. The account
information for any external accounts linked to the signed in account is also deleted from the TV.
Only the informat on for the current sgned n account s de[eted_ Account nformat on for all other accounts
saved on the TV rema n_
Using the SAMSUNG APPS Pane[
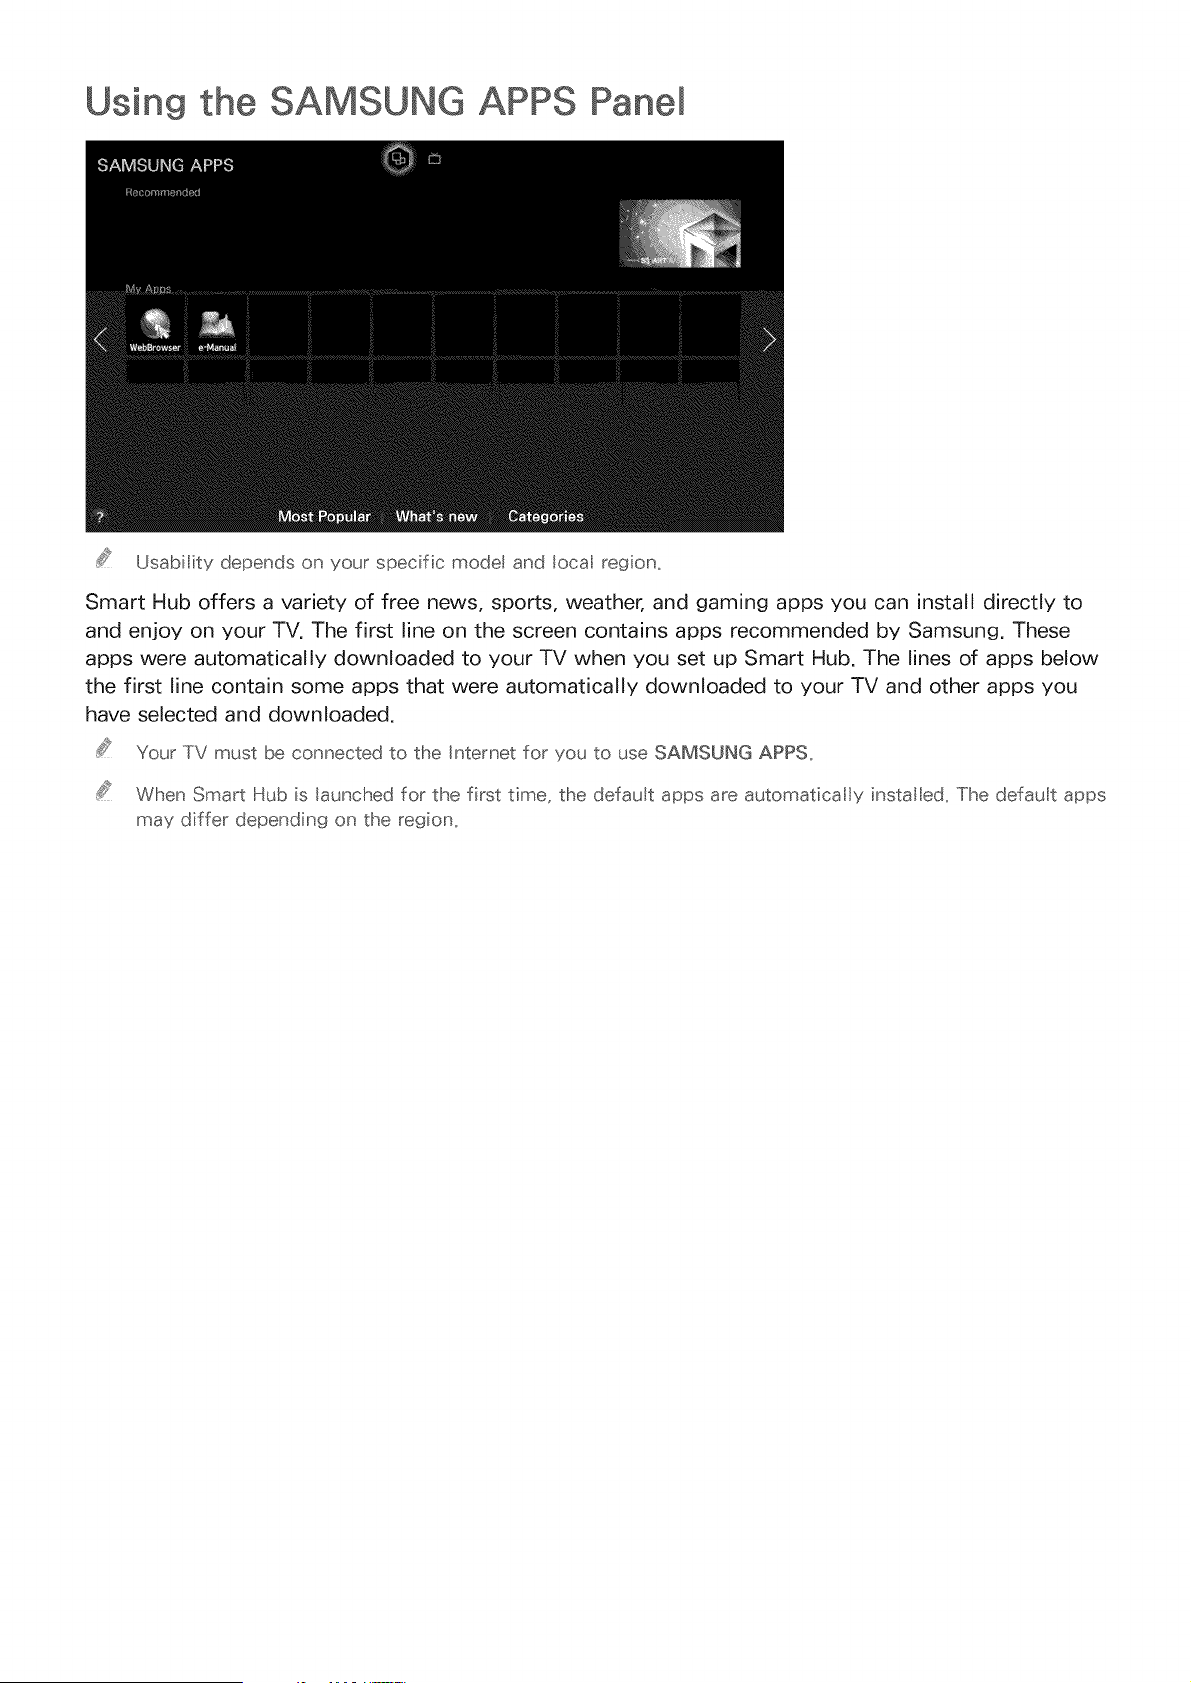
Usability depends on your specific modet and locaI region_
Smart Hub offers a variety of free news, sports, weather, and gaming apps you can install directly to
and enjoy on your TV. The first line on the screen contains apps recommended by Samsung. These
apps were automatically downloaded to your TV when you set up Smart Hub. The lines of apps below
the first line contain some apps that were automatically downloaded to your TV and other apps you
have selected and downloaded.
Your TV must be connected to the Internet for you to use SAMSUNG APPS,
When Smart Hub is launched for the first time, the default apps are automatical y insta ed, The default apps
may differ depending on the region,
Using Supported Features via the Pop-Up Menu - Downloaded
Move the focus to an app in the second row or below, and then press and hold the {:i:_ button. The
Tools menu appears displaying the following functions.
o Move
Lets you relocate an app on the screen.
Delete
Lets you remove a selected app from your TV.
Multi Delete
Lets you remove multiple apps from the TV.
View Details
Displays detailed information about a selected app.
Change View
Lets you change how the apps are sorted on the screen, by Custom or Most Played.
Lock/Unlock
Lets you lock or unlock an app.
Update Apps
Displays a list of apps that have updates available. You can select which apps to update.
Using Supported Features via the Pop-Up Menu - Recommended
Move the focus to a recommended app in the top row, and then press and hold the {:i:_ button. A drop
down list appears with the following functions.
. View Details
Displays detailed information for a selected app.
Update Apps
Lets you update the apps when updates are available.
,, Lock/Unlock
Lets you lock or unlock an app.
mnstalMin9 an App
Quick _nstalllation
On the SAMSUNG APPS screen, select Most Popular, What's new, or Categories.
Most Popular arid What's new show the most popL lar and new SamsL ng apps, respective _ Iio view
the entire app st by _enre, seect Categories When the Categories sc_een appea_s, seect a catego_y
;co_ to view the apps in that catego_y
Move the focus to an app, and then press and hold the I:i}_ button. A pop-up menu appears.
3_ On the pop-up menu, select Downmoad.
4_
Most apps are flee to nsta
While an app ;s being ;nstal ed, the p_og_ess ba_ appea_s at the bottom of the app ;co_ so that yo_ can
monitor the p_ogress of the ;nsta atio _L
The selected app is installed on the TV.
You can view nsta ed apps o_ the SAMSUNG APPS screen
_nsta_in9 an App from the Detailed App _nformation Screen
On the SAMSUNG APPS screen, select Most PopuNar, What's new, or Categories.
.....Iihe Most Popular and What's new show the most popL lar and new SamsL ng aDDs, respective y, Ii0
view the enl:ire app ist by genre seect Categories,, When the Categor es screen appears, seect a
category con to vew tlBe apps n that categorx
2_ Select an app from the list. Detailed information about your selection appears on the screen.
3_ Select Download to install the selected app on the TV.
Most apps are free to nsta ,,
While an app s being nsta ed the progress bar appears at the bottom of the spp cos so that yo_ can
mostortlbeprogressofthe nsta ation.
4, When the installation is complete, the Download button changes to Open.
Y(£_ can view nsta ed apps o] the 8AMSUNG APPS screen.
Additiona_ Notes
When the TV's nterna memory is insufficient, you can nstal an app on a USB device_
You can vew icons for the apps saved on the USB devce on the Apps screen only when the device _s
connected to the TV. You can use an app insta led on a USB device ony when the USB devce s connected
to the TV. If the USB device is disconnected whe the app s running, the app s term hated.
You can use the app nsta ed on the USB device on a PC or another TV.
Launching an App
Select an app on the SAMSUNG APPS screen, and then press the {7_ button. You can also start an
app from its Detail screen.
Default Apps
Default apps download to your TV automatically during set up.
The embedded e-manual contains information about your TV's key features.
Web Browser
Web Browser is an Internet browsing app. Using Web Browser, you can surf the Internet on the TV
in the same manner as you would using a PC - even while watching a TV program using PIP. Use a
keyboard and mouse for a more convenient web browsing experience.
The browsing page may dffer from that on a PC.
Relocating an App on the Apps Screen.
On the SAMSUNG APPS screen, select to the app you want to move.
2, Press and hold the {7_ button. A pop-up menu appears.
3, On the pop-up menu, select Move.
Y(£ may be asked to chan_t_ethe view to Qstom
4, Highlight an app you want to move. Move the app to a desired location use the arrows buttons.
When the app is in it's new location, press the {iii_ button.
Y(£_cannot move Recommended i_,pps
Deleting an App from the TV
If an app s deleted, the data re ated to the app s aso deleted.
Deleting an App
On the SAMSUNG APPS screen, move to the app you want to remove.
2_ Press and hold the button. A pop-up menu appears.
3_ On the pop-up menu, select Demete. A removal confirmation window appears.
4_ Select Yes. The selected app is deleted.
Removin9 Multiple Apps
On the SAMSUNG APPS screen, move to an app you want to remove.
2. Press and hold the [:i:_ button. A pop-up menu appears.
3. On the pop-up menu, select Multi Delete. A check box appears on the app icons.
4. Select all the apps you want to delete. A check mark appears on each app you select. When
done, select Delete at the bottom of the page. A removal confirmation window appears.
Select Yes. The selected apps are deleted.
Rating/Reviewing an App
On the detailed app information screen, you can rate an app or send a review to the app developer.
To rate or review an app, you must log nto your Samsung accounL You can only rate or review with a TV
purchasing apps and games_
Updating Apps
On the SAMSUNG APPS screen, select an app.
2. Press and hold the {iii_ button. A pop-up menu appears.
3. On the pop-up menu, select Update Apps. A pop-up window listing all the apps with available
updates.
4. Select the apps you want to update, and then select Update. All the selected apps are updated to
the latest version.
Y(£_can choose a the apps isted n the Update wndow at o_ce by seectin(t_ Seect A
Setting Auto App Update
To update apps automatically, navigate to Smart Hub > Apps Settings and set Auto Update to On. The
apps will then be updated automatically when an update becomes available.
Using Other App Features and Functions
MIEINU)SmartHub)AppsSettings(_ ::! !
You can configure additional app features and functions.
Setting Push Notification
The Push notification function lets publishers of some apps installed on the TV send alarm messages
containing news about their apps, modification information, etc. The messages are displayed on your
screen as you watch TV.
Navigate to Smart Hub ) Apps Settings ) Push Notification Settings, and then set Push
Notification to On.
2, On the Push Notification screen, select the apps you want push notifications for.
.....Iihe Push Notification app ists o_y the apps that s_ pport Push Notification Settings,,
Usin9 Channel Bound Apps,
A Channel-Bound App is an app that is linked to a particular channel. These apps provide services for
or information about programs on the linked channel while you are watching the programs.
Navigate to Smart Hub ) Apps Settings and set Channel-Bound Apps to On.
You can use ths feature only when an app supportng Channel-Bound Apps s nsta ed on the TV_
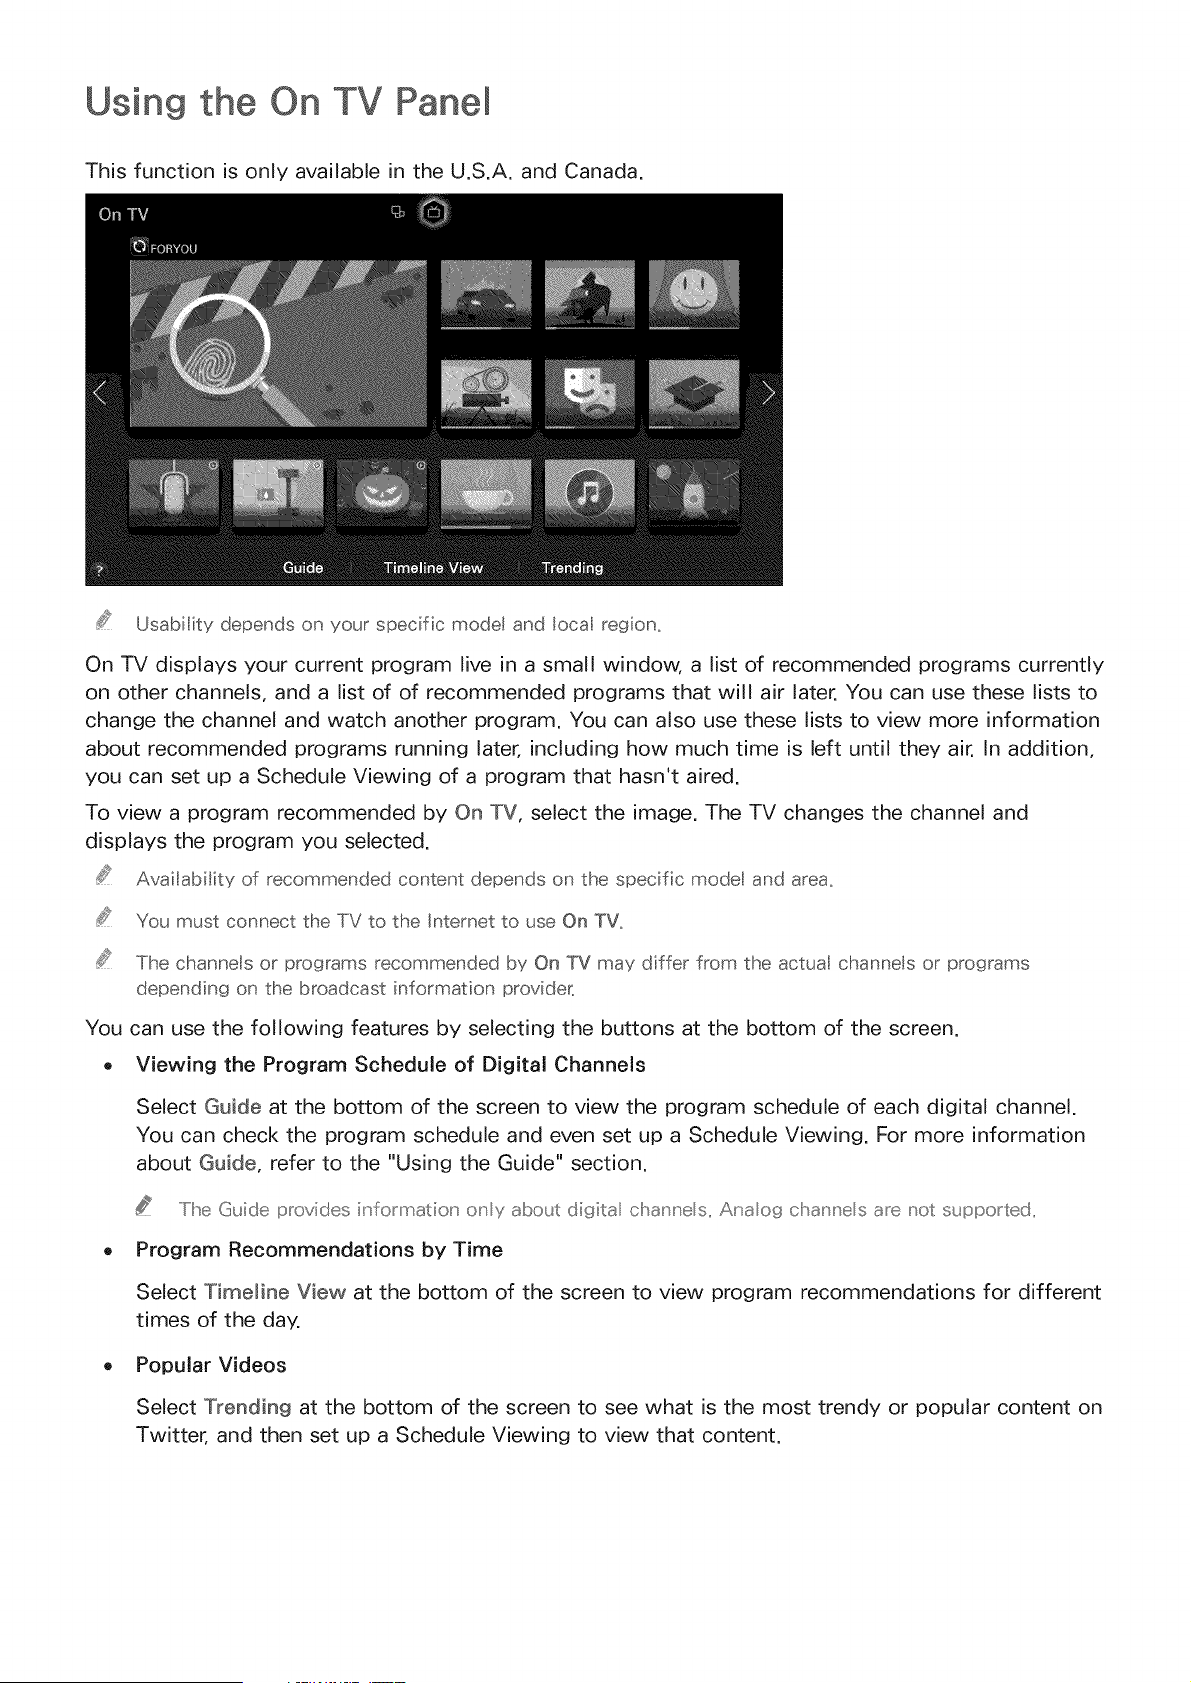
Using the On TV Pane[
This function is only available in the U.S.A. and Canada.
Usability depends on your specific model and locaI region_
On TV displays your current program live in a small window, a list of recommended programs currently
on other channels, and a list of of recommended programs that will air later. You can use these lists to
change the channel and watch another program. You can also use these lists to view more information
about recommended programs running later, including how much time is left until they air. In addition,
you can set up a Schedule Viewing of a program that hasn't aired.
To view a program recommended by On TV, select the image. The TV changes the channel and
displays the program you selected.
Availability of recommended content depends on the specific model and area,
You must connect the TV to the Internet to use On TV,
The channels or programs recommended by On TV may differ from the actua channe s or programs
depending on the broadcast information provider_
You can use the following features by selecting the buttons at the bottom of the screen.
o Viewing the Program Schedule of Digital Channels
Select Guide at the bottom of the screen to view the program schedule of each digital channel.
You can check the program schedule and even set up a Schedule Viewing. For more information
about Guide, refer to the "Using the Guide" section.
..../he Guide provides iu'formation' o_'y about digita cha_'u'e s,, Anaog cha_'u'e s are not supported,,
Program Recommendations by Time
Select Timeline View at the bottom of the screen to view program recommendations for different
times of the day.
Popular Videos
Select Trending at the bottom of the screen to see what is the most trendy or popular content on
Twitter, and then set up a Schedule Viewing to view that content.
Using Supported Features via the Pop-Up Menu
Move the focus to a desired program, and then press and hold the {:::_button. The following options
are available:
Ava abe optons may dffer dependn9 on the seected program_
- Viewing Detailed Information
Lets you view detailed information about the program you selected.
. Reserving
Lets you set up a Scheduled Viewing for the program you selected.
Viewing Detailed Program
Move the focus to a desired program, and then press and hold the {7_ button. A context-sensitive
menu appears.
2, On the context-sensitive menu, select View details. Detailed information about the selected
program screen appears.
Select a program from the list to see more information about the program and to access the following
options:
. Moving to a Channe[
Jumps to the selected program's channel.
. Reserving
Lets you set up a Schedule for the program.
. Viewing Related Content
View a list of content related to the program. If you select an item from the list, the detailed
information screen of the selected item appears.
. Rate
Lets you rate the program.
. Sharing
You can share information about the selected program via an SNS.
Configuring On TV Settings
MIEINU > Smart Hub > On TV Settings > Set Up Service Provider
Lets you select the source of your TV programs and the source of the program information that
appears on the On TV screen (the signal source, cable company provider, etc.). Follow the Instructions
that appear on your TV screen when you start this function. Set Up Service Provider is only available
if you have not set up Smart Hub.
Receiving Recommended Content Notification
You can configure the TV to display a notification when a frequently watched program is broadcast.
Navigate to Smart Hub > On TV Settings and set Automatic Notifications to On.
Changing Recommendation Type
Lets you choose the kind of program notifications you will see. Select Preference to see notifications
for shows you watch often or PopuEarity to see notifications for popular shows. You must enable
Automatic Notifications for this function to work. See Automatic Notifications above.
Navigate to Smart Hub > On TV Settings, select Recommendation Type and set it to a desired type.
Removing Adult Content from the Recommended List
Enabling Block Adult Content prevents the On TV screen from listing TV programs with adult content.
Navigate to Smart Hub > On TV Settings and set Block Adult Content to On.
Using the Multimedia (P ayin9 Photos, Videos, and
You cannot play meda conssent if the content is not supported by the TV_ For more nformat on, refer to
"Read Before Playing Photo, Vdeo, or Music F tes".
Backup mportant ftes before connect ng a USB device, Samsung s not respons be for damaged or lost
fes,
Playing Media Content Saved on a USB Device
To use the multimedia function, press the KIEYIPAID button, and then select Media Play or press
the SOURCE: button. The USB devices connected to the TV are listed.
2, Select the device you want to access. The folders and files in the selected USB are listed.
3, Select the media content you want to play from the list. The media content plays.
A ternat vex _avigate to the media content yo_ want to pax and then press the _ b_£to _ to pay the
co _tent,,
4, To exit, press the _ button or IRETURIN button,
If you connect a USB device to the TV while watching the TV, the New Devce Connected pop-up appears.
Select AII, Musc, V deos, or Photos, and then press the Ii:_ button. The fo ders and fes on the USB device
are I sted.
ABernat ve y; f you seect a USB device on the Source screen, a pop--up window appears on the screen
d splaying the fo ders and fbs of the USB device.
Safely Removing a USB Device
Press the SOURCE button. The Source screen appears.
2, Navigate to the USB device you want to remove, Press and hold the {7_ button, An options list
window appears,
3, Select Remove USB in the list,
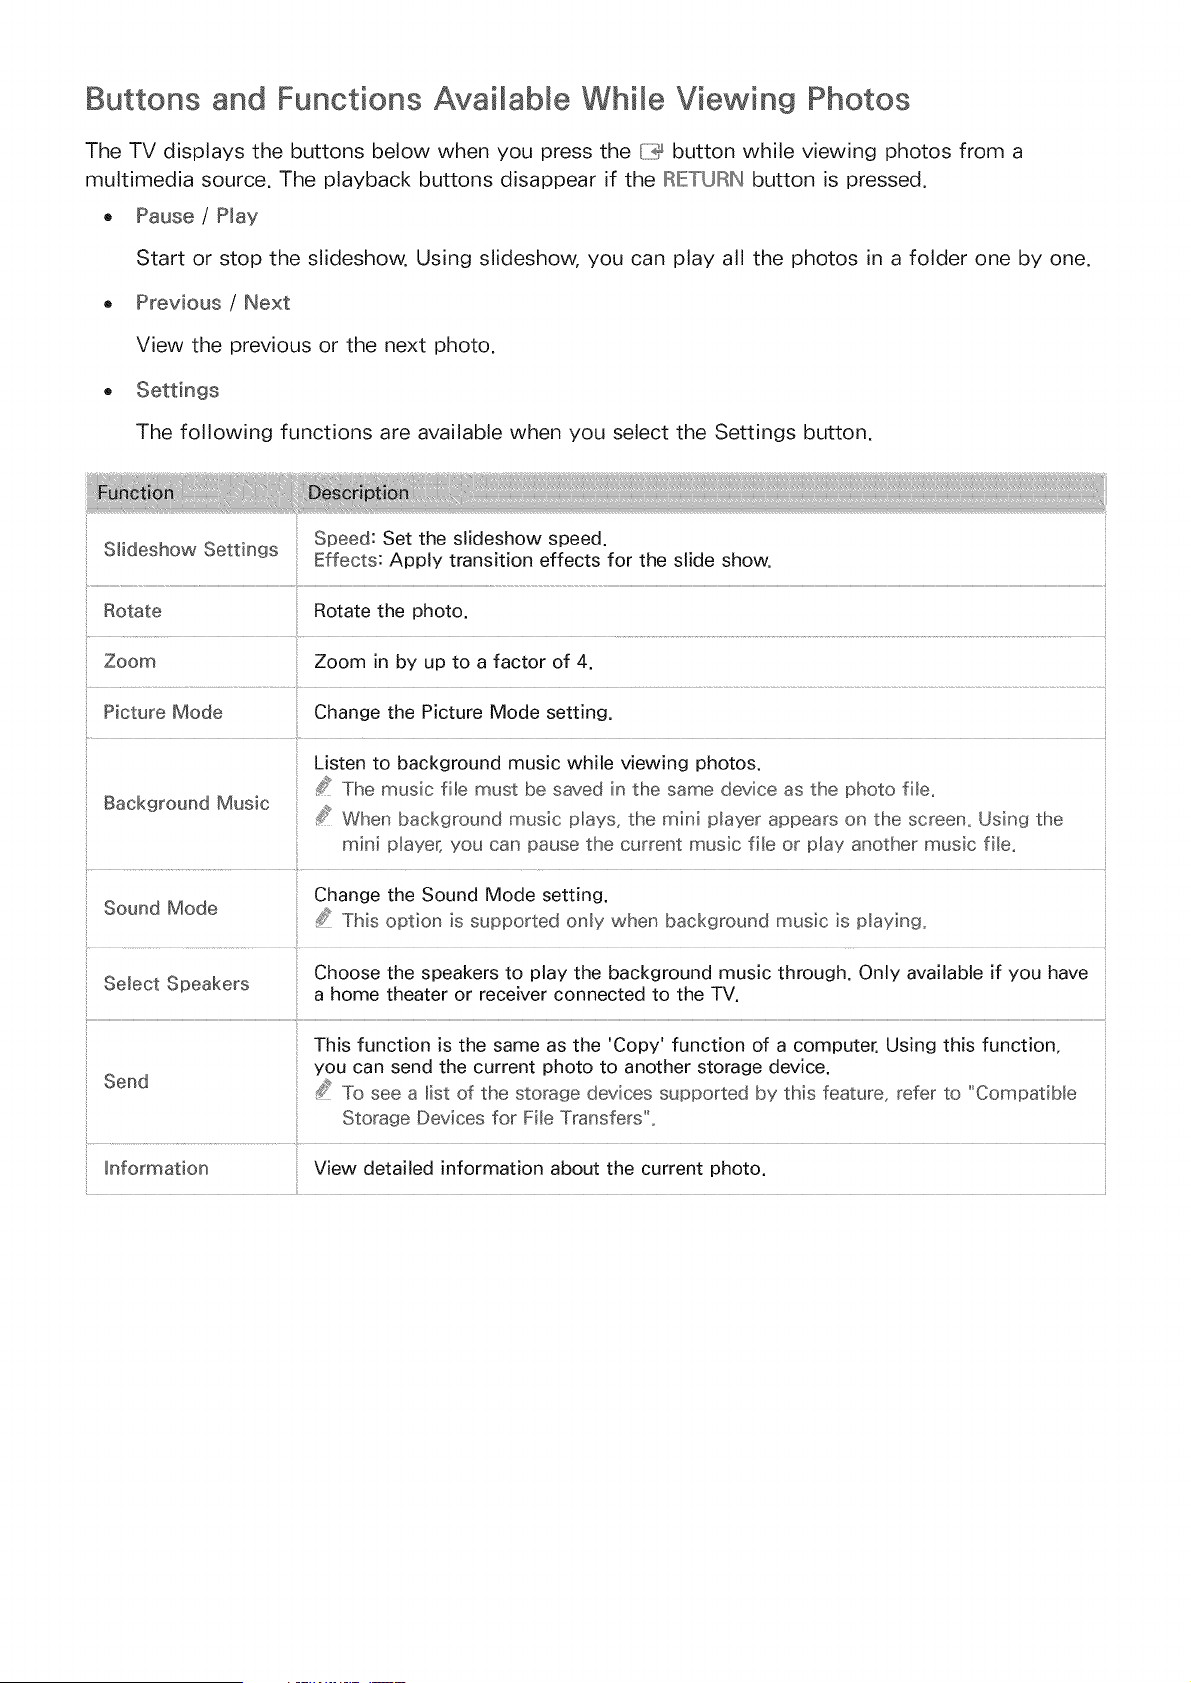
Buttons and Functions Available While Viewing Photos
The TV displays the buttons below when you press the {lily button while viewing photos from a
multimedia source. The playback buttons disappear if the IRIETURIN button is pressed.
e Pause / Hay
Start or stop the slideshow. Using slideshow, you can play all the photos in a folder one by one.
o Previous / Next
View the previous or the next photo.
The following functions are available when you select the Settings button.
Slideshow Settings Speed: Set the slideshow speed.
Effects: Apply transition effects for the slide show.
Rotate Rotate the photo.
Zoom Zoom in by up to a factor of 4.
Picture Mode Change the Picture Mode setting.
Listen to background music while viewing photos.
_'s The music fib must be saved in the same device as the photo fib,
Background Music _'s When background music plays, the mini player appears on the screen, Using the
Change the Sound Mode setting.
Sound Mode ,Cs_ This option is supported only ,when background music is p_aying,
Choose the speakers to play the background music through. Only available if you have
Select Speakers
a home theater or receiver connected to the TV.
i
This function is the same as the 'Copy' function of a computer. Using this function,
you can send the current photo to another storage device.
Send
To see a list of the storage devices supported by this feature, refer to "Compatible
Storage Devices for File Trar_sfers".
_nformation View detailed information about the current photo.
Buttons and Functions Available While Viewing Videos
The TV displays the buttons listed below when you press the {ii!@button while viewing videos from a
multimedia source. The playback buttons disappear if the IRIETUH_ button is pressed.
e Pause / Play
Pause or play the video.
When the video is paused, you can use the following functions. The TV does not play audio when
the video is paused or when you are using the Step or Slow Motion functions described below.
- Step: Whenever you press the H button, it scans the paused video one frame at a time.
- Slow Motion: Select the ÷ button to play the video in slow playback speed (1/8, 1/4, 1/2).
, Rewind / Fast Forward
Rewind or fast forward the video.
o Previous / Next
Select the n,<,_button twice to play the previous video. Selecting n,<,4once starts the current video
from the beginning.
To play the next video, select the _bl button.

o
The following functions are available when you select the Settings button.
Select Scene
Thumbnails: Select a scene and play the video from the scene.
/t Thumbnails is not avai[aMe if 1) the thumbnail of the video is not extracted yet, 2)
the video contains audio only or 3) the video p_ay time is shorter than 60 seconds.
Chapter Titles: Select and play another video in the same folder.
Time Bar: You can use the ( and _ buttons to scan through the file in 10-second
intervals or enter a specific time value to jump to that point in the video.
Control the subtitles of the video.
Language: Turn the subtitles on or off.
Sync: When the video and the subtitles are not synchronized, you can adjust the
Subtitle synchronization.
Reset Sync: Reset the subtitle synchronization adjustment to 0.
Size: Choose the font size for the subtitles.
Encoding: If the subtitles are not working, you can change the encoding language.
Set the repeat mode. Repeat One repeats the current video only. Repeat A[[ repeats all
Repeat videos contained in the folder.
Picture Size Change the picture size. The supported video sizes are determined by the video
content.
Picture Mode Change the Picture Mode setting.
Sound Mode Change the Sound Mode setting.
Choose the speakers to play the audio through. Only available if you have a home
Select Speakers theater or receiver connected to the TV.
Choose a desired audio language. This option works only when the video supports
Audio Language multi-track sound.
_nformation View detailed information about the video.
Buttons and Functions Available While Playing Music
The TV displays the buttons listed below when you press the {YI_button while playing music files from
a multimedia source. The playback buttons disappear if the RIETURIN button is pressed.
o Pause / Play
Pause or resume the music.
Rewind / Fast Forward
Rewind or fast forward the music file. Repeatedly select the button to make the rewind/fast
forward speed up to 3 times faster. To restore normal playback speed, select _.
Previous / Next
Select the n,<,<button twice to play the previous music file. Selecting n,<,<once starts the current
music file from the beginning.
To play the next music file, select the _1 button.
Set the repeat mode. Repeat One repeats the current music file only, Repeat All repeats all music
files contained in the folder.
Shuffle
Play the music files in random order.
e Select Speakers
Choose the speakers to play the audio through, Only available if you have a home theater or
receiver connected to the TV.
Sound Mode
Change the Sound Mode setting.
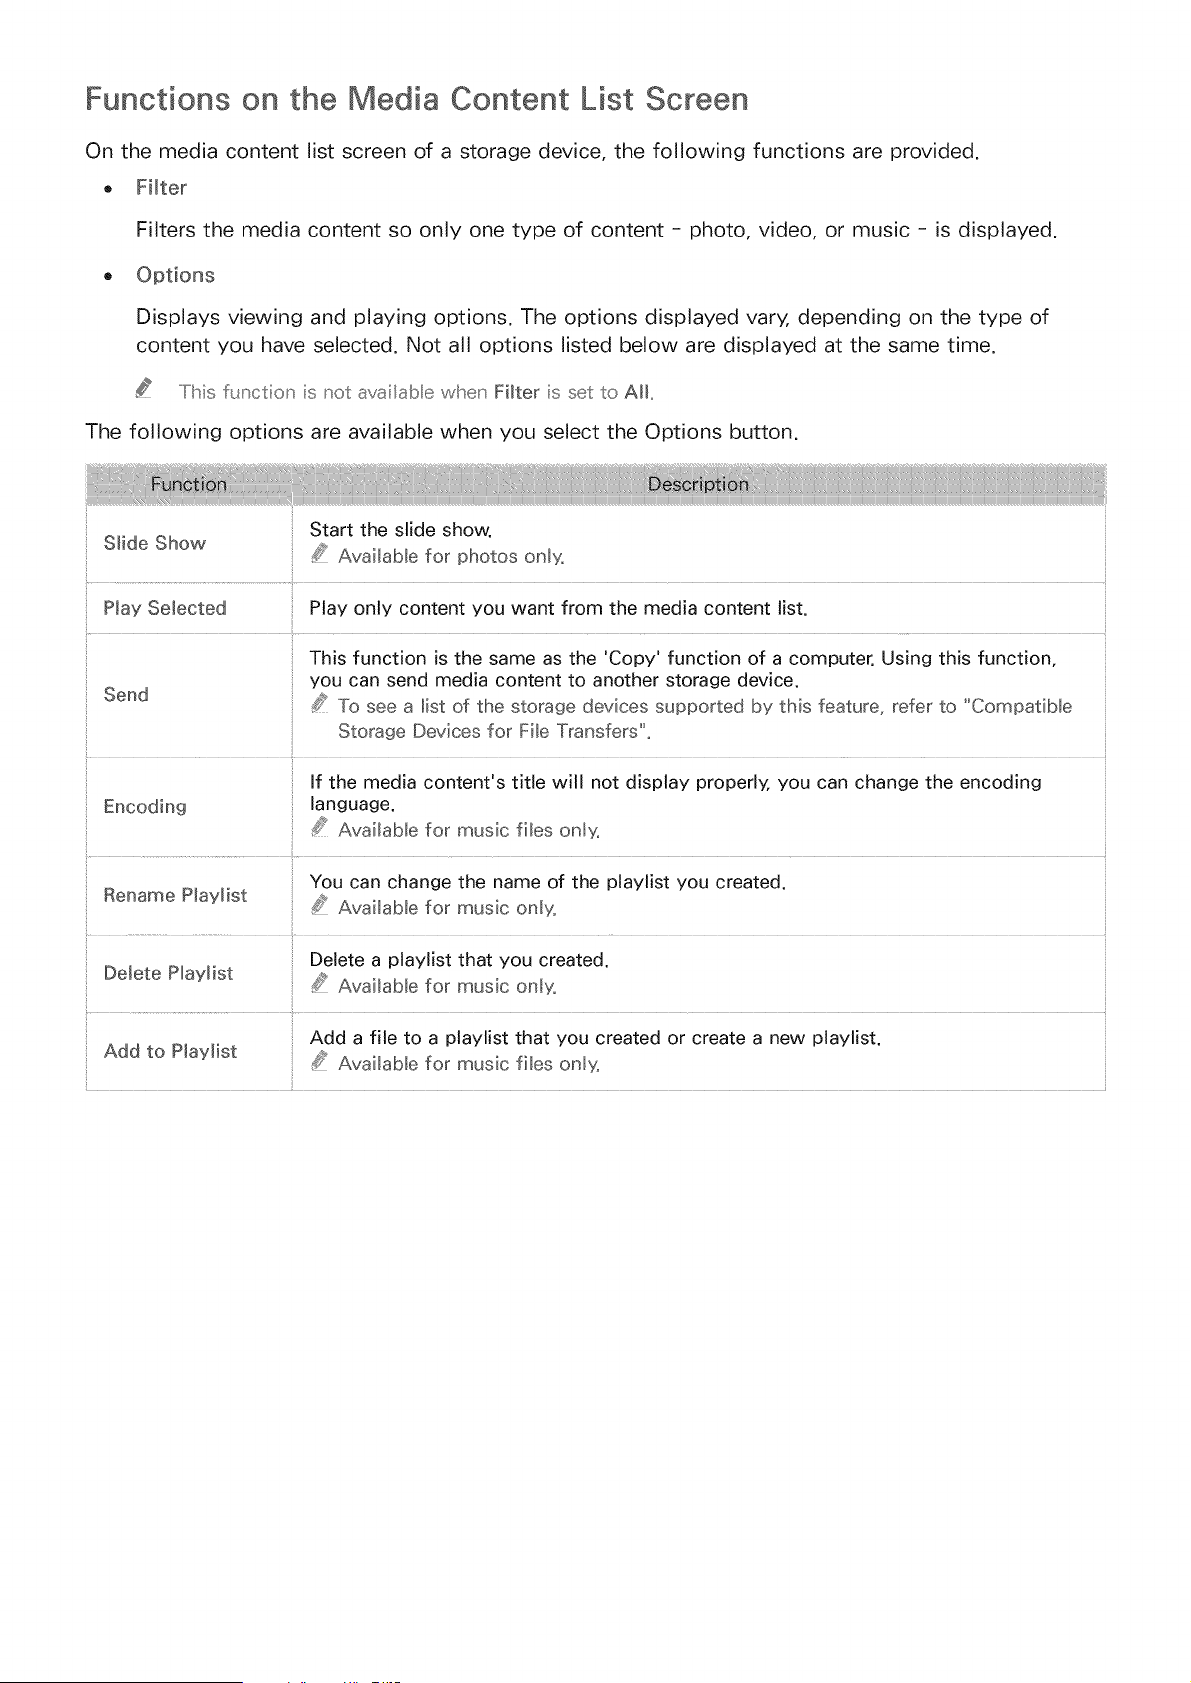
Functions on the Media Content List Screen
On the media content list screen of a storage device, the following functions are provided.
o Filter
Filters the media content so only one type of content - photo, video, or music - is displayed.
Displays viewing and playing options. The options displayed vary, depending on the type of
content you have selected. Not all options listed below are displayed at the same time.
.....Ilhis f_,mction s not availab e when Filter s set to AH,,
The following options are available when you select the Options button.
Start the slide show.
S_ide Show 44_Available for photos only,
P_ay Selected Play only content you want from the media content list.
This function is the same as the 'Copy' function of a computer. Using this function,
you can send media content to another storage device.
Send _S_' To see a list of the storage devices supported by this feature, refer to "Compatible
Storage Devices for Fib Transfers'L
If the media content's title will not display properly, you can change the encoding
Encoding language.
#_ Available for music flies on_y,
You can change the name of the playlist you created.
Rename P_aylist #_ Available for music only,
Add a file to a playlist that you created or create a new playlist.
Add to Playlist o_J_AvaiEabb for music fi_es onh£
Digita Information at a Gmance
ME: NU>Sroadoaat og>Go,de
The Guide provides an overview of each digital channel's program lineup. You can check the program
schedules and set up a Schedule Viewing.
Press the GUDE button on the remote to launch the Guide.
The nformaton ntheGuide sfordgta channesonly_Anaogchannesarenotsupported.
Using the Guide
To access the Guide functions, press and hold the {7_ button. A popup window listing the following
functions appears.
Channel Fi_ter
Channel filter lets you filter the channels in the Guide by the following categories: Added Oh. and
Favorites 1 - Favorites 5.
Navigating the Program Schedule
You can move the Guide by 2 hours in either direction each time you press the _ or ÷ button. You can
only view programs scheduled after the current time.
Schedule Manager
This displays the schedule manager. For information about the Schedule Manager, see "Setting Up a
Schedule Viewing".
Edit Favorite Channels
Edit favorites lets you designate a channel you have selected in the Guide as a favorite.
To use Edit Favorite Channels:
Highlight a channel you want to add to your favorites in the Guide.
2. Press the TOOLS button. The Guide functions pop-up window appears.
3. Select Edit Favorite Channels. The Edit Favorites window appears.
4. Select the Favorites list you want to put the channel into.
Viewing Detai ed mnformation
You can view detailed information about a selected program. The program information may differ
depending on the broadcast signal and may not be available at all for certain programs.
. Select a current program on another channel, and then View Details to Watch the program.
, Select an upcoming program, and then select View Details to set up a Schedule Viewing.
For more nformat on about watch ng or Schedule Viewing refer to "Sett ng Up a Schedu e V ewing".
Checking Current Program nfo
To get information about a show, press IINFO on your remote.
To view the program info, you must frst set the TV's cock. Go to Clock (System > Time > Clock).
The program informaton may vary depend ng on the type of ncomngsgna and may not beava abeat
aI for certa n programs_
Use the _ and ) buttons to view information about upcoming programs. Select a program to set up a
Schedule Viewing for that program.
For more information on Schedule Viewing, refer to "Setting Up a Schedule Viewing".
Changing the broadcast signal
MIE:INU> Broadcasting > Antenna
You can choose the appropriate DTV mode for your viewing environment. Choose Air or Cable. Air is
suitable for homes equipped with a separate, over-the-air antenna. Cable is suitable for homes that
have subscribed to a local cable-service or satellite-service provider.
Do not use ths funct on f your TV s connected to a cabe or sate I te box,
Digitai ChanneJ SignaM Info and Strength
MIE:INU) Support ) Self Diagnosis ) Signa_ information
Select Support > Self Diagnosis > Signal information. This displays the digital channel's signal
information and strength.
If your TV is attached to a separate, ovePthe-a r antenna, you can use the signal strength nformat on to
ad}ust the antenna for ncreased signal strength and improved HD channe recept on,
SgnaI nformaton sonlyava abefordgta channes,
Setting Up a Schedule Viewing
Configure the TV to show a specific channel or program at a specific time and date. The @ icon
appears next to programs that have been configured for a Schedule Viewing.
To set up a Schedule Viewing, you must first set the TVs cloc<, Go to C_ock (System :>Time :>Clock),
Digital Channel Schedule Viewing
You can set up Schedule Viewing for programs on digital channels on the following screens:
o The Guide Screen
o The Program Info Screen
The Guide Screen
To set up a scheduled viewing on the Guide screen, follow these steps:
Press the GUIIDIE button on your remote.
o
o
On the Guide screen, use your remote control to highlight, and then select a program you would
like to view.
On the Information Screen that appears, select Schedule Viewing. The program is scheduled for
viewing. The Guide screen re-appears.
The Program _nfo Screen
To set up a ScheduNe Viewing on the [NFO screen, follow these steps:
Change the channel to the channel that will be broadcasting the program you want to schedule.
2, Press the IINIFObutton.
3, Move right to see program information for later broadcasts. The program information for the
programs that will be broadcast later on that channel is displayed on the screen.
d, Highlight and then select the program you want to schedule. The Information screen appears.
Select ScheduNe Viewing. The program is scheduled for viewing. Press the IRIETURINbutton on
your remote.
Analog Channel Schedule Viewing
MEINU>Broadcaating>SchedoleManager
When you set up a scheduled viewing for an analog channel, you need to know the channel, day or
days of the week the program is airing, and the time the program is airing.
To set up a schedule viewing for an analog station, follow theses steps:
Press the MENU button, and then select Broadcasting > Schedule Manager.
2, On the Schedule Manager screen, select Schedub. The ScheduNe Viewing screen appears.
3, On the Schedule Viewing screen, select the Antenna connection (Air or Cable), and then move to
the Channel field.
I[f yo[_ only rece ve your FV b_oadcasts thro_gh Air o_ CaMe, the Antenna co_nect[o_ fed disp ays
ony Air o_ ony CaUe,,
4, Highlight the Channel field, and then select it. Scroll it up or down, find the desired channel, and
then select it. Move to the Repeat field.
Highlight the Repeat filed, and then select it. Select Once, Manual, Sat-Sun, Mon-Fri, or
Everyday. If you select manual, you must also highlight and select the days you want.
6, Move to the Time field, and then select it. Set the hours by using the Up/Down directional
buttons to move the numbers up or down. Do the same for the am/pm and minutes fields.
When done entering the time, press RETURN.
Select OK at the bottom of the Schedule Viewing screen.
Canceling a Schedume Viewing
To cancel a specific scheduled viewing, follow these steps:
Press the MIEINU button, and then select Broadcasting > Schedule Manager.
2, On the Schedumed screen, select the scheduled viewing. A pop-up menu appears.
3, Select Delete to cancel.
4, Select Yes on the "Remove this show" pop-up. The scheduled viewing is removed.
Editing a Schedume Viewing
To edit the time, days, or channel of a Schedule Viewing, follow these steps:
Press the MIEINU button, and then select Broadcasting > Schedule Manager.
2, On the ScheduNed screen, select the scheduled viewing. A pop-up menu appears.
3, Select Edit.
4, Change the time, days, or channel in the way described in Analog Channel ScheduNe Viewing.
Select OK when done.

Using the Channel
ME:INU>B oodoost og>Chaooo uat
Press and hold the GU_IDIEbutton while watching TV to bring up the Channel List and change the
channel or check programs on other digital channels.
Select a channel from the Channel List to jump to it right away. To quickly scroll through the list, use
the channel up/down buttons. This moves the focus one page at a time.
The Channel List screen contains the following icons:
- :A "An analog channel
- " A favorite channel
- " A locked channel
o Using Options
Press the _ button, and then select Options. The following options are available:
Antenna
Choose Air or Cable as the DTV mode. Air is suitable for homes equipped with
separate, over-the-air antennas, CaMe is suitable for homes that subscribe to a local
cable-service or satellite-service provider.
Sort the list so that it includes channels of a selected genre only, You can only use
Genre Genre if you have set the channel mode in the Channe_ List to Added Oh. and only if
the added channels contain genre information.
Edit Favorites Designate favorite channels. Refer to the "Creating a Personal Favorites List" section
for more information.
Viewing the Added Channels or Favorites Lists
In the Channel List, press the > button, and then select Added Cho or Favorites. Favorites will
only appear if you have registered at least one favorite channel. For more information, refer to
"Creating a Personal Favorites List".
Registering, Removing, and Editing Channels
IMIEINU) Broadcasting ) Edit Channel
Remove channels from the index of channels, restore removed channels, and rename analog channels.
The Edit Channel screen icons indicate the following:
o "An analog channel
o _ " A favorite channel
1
• A locked channel
Registering and Removing Channels
IMIEINU) Broadcastin9 ) Edit Channel
Removin9 Registered Channels
Removing a registered channel from the channel index removes it from the list of channels you can
access using the ClH_LIST buttons on your remote.
Move the highlight to a channel, and then select it to remove it. Repeat to select additional
channels.
2. To unselect a channel, move the highlight to the channel, and then select it.
3. To select all channels, select Options, and then select Select All from the list. You can also select
Deselect All.
4. After you have made your selections, select Delete.
Adding Back Removed Channels
You restore channels to the index of channels by adding them back. Removed channels are displayed
in gray in the A_I list only. In addition, the Add option is only available for removed channels.
Select Options to display a list of options. Select Category from the list, and then select ANI.
2. Move the highlight to a channel you want to add. Repeat to select additional channels.
3. To unselect a channel, move the highlight to the channel, and then select it.
4. To select all channels, select Options, and then select Sebct ANI from the list. You can also select
Dese_ect ANI.
After you have made your selections, select Add.
Editing Registered Channels
MIEINU > Broadcasting > Edit Channem
Select Options at the bottom left of the screen to access the following options. The available options
may vary depending on the broadcast signal.
o Select AH
Selects all channels displayed on the Edit Channe_ screen.
Antenna
Choose Air or Cable as the DTV mode.
Channels stored in the TV are grouped into the following categories: AH and Added Cho.
Edit Favorites
Designate favorite channels. For more information, refer to "Creating a Personal Favorites List".
Rename Channel
Rename analog channels. The new name can be up to 5 characters long.
information
View detailed information about the current program.
Program Rating Lock
MENU > Broadcasting > Program Rating Lock
The Program Rating Lock feature lets you block programs based on their ratings. This is useful for
controlling what children watch on TV. Program Rating Lock does not block programs originating from
external sources, such as Blu-ray players, DVD players, or USB files.
Every time you access the Program Rating Lock feature, you must enter the security PIN. You must
also enter this PIN to watch a blocked program. The default PIN is 0000. To change the PIN, go to
System > Change P_N.
The Program Rating Lock is available only in TV mode.
Blocking Programs Using the TV Rating
To block content, select a rating category to lock. All programs at that level and higher are blocked
and require the PIN to watch. To unblock a category, select the lock icon. To unblock all the categories
in a row, select the lock under ALL.
Categories on the left:
o TWY: Young children
TWY7: Children 7 and over
TWG: General audience
TWPG: Parental guidance
TW14: Viewers 14 and over
TWMA: Mature audience
Categories on the top:
ALL: Lock all TV ratings.
FV: Fantasy violence
V: Violence
S: Sexual situations
L: Adult Language
D: Sexually Suggestive Dialog
Blocking based on Movie Bating (MPAA)
Block movies based on their MPAA rating. This applies to all material with supplied ratings in the USA.
From the MPAA:
"The Motion Picture Association of America (MPAA) has implemented a rating system that provides
parents or guardians with advanced information on which films are appropriate for children."
Select a lock beside one of the rating categories to block that category and all higher categories. To
unblock a category, select the lock icon.
o G: General audience (no restrictions).
PG: Parental guidance suggested.
PGm13: Parents strongly cautioned.
R: Restricted. Children under 17 should be accompanied by an adult.
NC-17: No children under age 17.
X: Adults only.
NR: Not rated.
Blocking Based on Canadian English Bating
Block material based on its English Canadian rating. This applies to all rated material viewed on
English-Canadian TV channels.
Select a lock beside one of the rating categories to block that category and all higher categories. To
unblock a category, select the lock icon.
6: Programming intended for children under age 8
68+: Programming generally considered acceptable for children 8 years and over to watch on
their own
G: General programming, suitable for all audiences.
PG: Parental Guidance
14+: Programming containing themes or content which may not be suitable for viewers under the
age of 14
18+: Adult programming
Blocking Based on Canadian French Ratin9
Block material based on its French Canadian rating. This applies to all rated material viewed on
French-Canadian TV channels.
Select a lock beside one of the rating categories to block that category and all higher categories. To
unblock a category, select the lock icon.
G: General
8 ans+: Programming acceptable for children 8 years and over to watch on their own
13 ans+: Programming that may not be suitable for children under the age of 13
16 ans+: Programming not suitable for children under the age of 16
18 ans+: Programming restricted to adults
Blocking Based on Downloadablle US Rating
Block material based on its Downloadable U,S, Rating. This rating system only applies to material
originating from US DTV channels.
Parental restriction information is automatically downloaded while you watch DTV channels. This
download may take several seconds. If the information is unavailable from the broadcasting station,
the Downloadable U°S° Rating menu is deactivated.
Parental restriction levels differ depending on the broadcasting station. The default menu name and
the Downloadable U.S. Rating name changes depending on the downloaded information.
Even when the on-screen display is set to another language, the Downloadable U.S. Rating menu
appears only in English.
Select a lock beside one of the rating categories to block that category and all higher categories. To
unblock a category, select the lock icon.
Watching Blocked / Restricted Programs
To watch a blocked program, enter the PIN when requested.
When initially showing a restricted program or movie, the screen is blank because the Program Rating
Lock blocks it. Enter the PIN to unblock the program when a message appears requesting the code.
Creating a Persona Favorites List
II%EINU> Broadcasting > Edit Favorites
You can designate frequently watched channels as favorite channels. Favorite channels are highlighted
in the Edit Channel and Channel List screens with the _ symbol. You can create up to 5 favorite
channel lists.
Registering Channels as a
Favorites
IMIEINU> Broadcasting > Edit Favorites
Registering the Current Channel as a Favorite
To register the current channel as a favorite:
While watching a TV channel, press the TOOLS button,
2, Select Edit Favorites from the list.
3, In the popup window that appears, select the Favorites lists you want, and then select OK.
Yo_Jcan seect more that ore IFavodtes ist,
4, Select OK again. The TV has added the current channel to the Favorites list(s) you selected.
Registedn9 Multiple Channels as Favorites
To register multiple channels as favorites at the same time:
Press the MIEINU button, and then select Broadcasting ) Edit Favorites.
2. Select the channels that you want to add to your Favorites list(s) from the list in the screen.
3. Select Change Favo on the screen.
4. Press the IiT_button repeatedly on the standard remote to cycle through the Favorites list until the
list you want appears.
Select Add on the screen. The TV adds the channels you selected to the Favorites list you chose.
Selecting from Favorite List Channels Only
To flip through Favorite list channels only and select a channel using the channel up/down buttons:
You can select a Favorites Ist only f t contains at least one favor te channet.
Press the MIEINU button, and then select Broadcasting > Channe_ List. The Channem List appears.
2. Press the > button. A Favorites list appears.
3. Press the _ or > button to view other Favorites list.
4. Highlight a channel from the selected Favorites list using the channel up/down buttons, and then
select it. The channel changes.
iting a Favorites List
MIE:INU> Broadcasting > Edit Favorites
You can rename and edit Favorites lists.
Edit Favorites Screen Menu Items
Select Options on the Edit Favorites screen to access the following options:
e Copy to Favorites
Copy channels from one favorite channels list to another. Refer to the "Copying Channels from
One Favorites list to Another" section for more information.
YoL can _se Copy to Favorites O_y f yo_ have ref;_istered o_e or more channe s to at east o_e
Favorites ist
Rename Favorites
Rename an existing favorite channels list. Refer to the "Renaming a Favorites List" section for
more information.
You can _se Rename O_y ;f yo_ have registered o_e or more channe s to at east o_e Favorites ist,,
Antenna
Choose between Air and Cable.
Edit Channem
Lets you manage the channels saved on the TV. For more information, refer to "Registering,
Removing, and Editing Channels".
information
View detailed information about the current program.
Removing Registered Channels from a Favorites List
To remove channels from a favorite list:
Select Change Favo.
2.
3.
4.
Press the [iii_ button repeatedly to change the Favorites list on the screen to the Favorites list you
want to use.
Select the channels you want to remove from the selected Favorites list.
Select Delete. The channels are removed.
Rearranging a Favorites List
To rearrange the order of the channels in a favorite channels list:
Select Change Favo at the screen,
2.
Press the [iii_ button repeatedly to change the Favorites list displayed to the Favorites list you
want to use.
3, In the selected Favorites list, choose the channels you want to rearrange.
.....Iihe liT vvl move tlqe cbanne s yot seected as a g_'OL_©and rearrange them so they are disp ayed o_e
after another n their _ew ocat[o_,,
4. Select Change order. The Change Order highlight appears highlighting the channel you chose
that is closest to the top of the screen.
Press the _/V arrow buttons to relocate the channels you selected. Press the {7_ button to set
the channels into their new location in the list.

Renaming a Favorites List
To rename an existing favorite channels list:
Select Options on the screen. A list of Options appears.
2. Select Rename Favorites from the list. A popup window appears.
3. In the popup window, select the Favorites list whose name you want to change. The on-screen
keyboard appears.
4. On the keyboard, select the Clear button on the right. The current name displayed in the text
entry field disappears.
Using the keyboard, enter a new name. The new name can be up to 20 characters long.
6. When finished, select Done. The list of favorite lists appears displaying the renamed list. Select
OK.
Copying Channels from One Favorites list to Another
To copy channels from one favorite channels list to another:
Select Change Favo
2. Press the C_ button repeatedly to change the displayed Favorites list to the Favorites list that
contains the channels you want to copy.
3. Select Options on the screen. A list of Options appears.
4. Select Copy to Favorites from the list. A popup window appears.
Copy to Favorites sony _v_ d:_e f there _re ch_nne s n _t e_:_sto_e F_vor tes [st
In the popup list, select the Favorites lists you want to copy the selected channels to.
6. When done, select OK. The TV copies the channels. Select OK again.
Making Sports Programs More Realistic with
MIE:INU> System ) Soccer Mode
This function is not available in the U.S.A and Canada.
Enabling Soccer Mode
MIEINU > System ) Soccer Mode ) Soccer Mode
Go to System ) Soccer Mode and then set Soccer Mode to On. The picture and sound modes of the
TV are automatically optimized for sports events.
Enabling Soccer Mode changes the Picture Mode to Stadium and the Sound Mode to Stadium, and d sab es
some Picture and Sound menus.
Press the Q} button to turn Soccer Mode on or of{
[] (Zoom): Pause p aybac< and dvide the p cture nto 9 parts, Seect a part to zoom t n_
TV-Viewin9 Support Features
Showing Captions
MIE:INU> System > Accessibility > Caption
You can watch TV broadcasts with captions.
Even f enab ed, capt;ons wll not be displayed by programs that do not support captions.
E
na b_in9 Ca pti o ns
Select System > Accessibility > Caption > Caption
The TV cannot controt or modfy DVD or BIu-ray subtit es. To control DVD or BIu-ray subt t es, use the sub-
t;tte feature of the DVD or BIu-ray player and the payer's remote centre.
S elect in g t he Ca ptio n L a n 9 u a 9 e
Select System > Accessibility > Caption > Caption Mode to display a list of subtitle modes. The list of
modes may vary depending on the broadcast.
o DefauNt / 001 ~ 004 / Text1 ~ Text4
(Analog channels only) The analog caption function operates in either analog TV channel mode
or when a signal is supplied from an external device to the TV. (Depending on the broadcast
signal, the analog caption function may or may not work with digital channels.)
DefauNt / Service1 _ Service6 / CO1 _ 004 / Text1 _ Text4
(Digital channels only) The digital caption function works with digital channels. Service1 -
Service6 may not be available in digital caption mode depending on the broadcast.
Changing the Font Co_or_ Caption Size_ and Font Opacity
Change the font color, background color, and size settings.
Select System > Accessibility > Caption > Digital Caption Options and then choose the setting to
change.
- Size
Use to change the font size. Size is not supported by analog channels.
Font Styme
Choose the font style for the subtitles.
Font Color
Use to change the font color,
Background Color
Use to change the caption's background color.
Window Color
Use to select the color of the digital caption window,
Font Opacity
Use to change the caption's opacity,
e Background Opacity
Use to change the background's opacity.
Window Opacity
Use to select the transparency level of the digital caption window.
,, Edge Type
Use to select outline type of the digital captions,
,, Edge Color
Use to select the color outline of the digital captions,
,, Return to Default
This restores all caption display options to Default. Setting to Default applies the TV station's
transmitted settings.
The foreground and background color and opac ty sett ngs cannot be the same_
Enabling the Audio Guide for the Video Description
MIEINU > System > Accessibility > Video Description
Select System > Accessibility > Video Description. Activates the audio guide for the visually impaired.
This function is only available with broadcasts that provide this service.
Broadcast Viewing
MENU > Picture> ProP
Use the PIP ("Picture-ln-Picture")functionto watch TV in a small window within the main screen
while also watching content from a DVD player,Blu-ray player,computer, or a differentexternaldevice
on the main screen.
Select Picture> PIP to display the PIP settingsscreen. The PIP settingsscreen contains the following
options:
- P_P Settin9
Activates/deactivatesPIP.
Antenna
Choose Air or Cable as the digital channel mode.
- Channem
Select the PIP sub-picture channel.
- Size
Select the PIP sub-picture size.
. Position
Select the PIP sub-picture position.
- Select Sound
Select the audio source.
Choose a broadcast.
You cannot use PIP whe usng Smart Hub or the 3D funct on, (Apples n countries or for models
support ng 3D_)
Tumng off the TV automatica ly disables PIP,
Playing a game or usng the karaoke feature on the main screen can resut in lower PIP picture qual ty_
For PIP to work, the main screen's source must be Component or HDMI and the nput reso ut on must be
lessFuIHD(FHD-1080p),The PIP sub-screen supportsdgta channesonly_
Scanning for Avaimable Channels
MIEINU ) Broadcasting ) Auto Program _
Automatically scans and indexes all channels received through the TV's antenna input connector.
Do not use ths function if your TV s connected to a cabe or satellite bo×.
If the TV has saved channe s, Auto Program deletes the ex st ng Ist, and then saves the newly scanned
channe s.
Select Broadcasting ) Auto Program.
2, Select Start when prompted. This initiates the Auto Program function. The process can take up to
30 minutes to complete.
Selecting the Broadcast Audio Language
MEINU ) Broadcasting ) Audio Options
Configure the program's audio language. Audio Options functions differently for analog and digital
channels.
Press the INFO button to view the current broadcast's aud;o sgna nformat on.
Selecting the Broadcast Audio Language (Digital}
Selecting a Language
Select Audio Options ) Preferred Language, and then choose a language. Digital broadcasts
contain audio signals in multiple languages. Digital programs that include the language you
selected in Preferred Language are automatically played using that language. If the language
you selected is not supported by the broadcast signal, the TV will use the default audio language
broadcast by the TV station.

Selectin9 the Broadcast Audio Language (Analog/
Listening to MultFTrack Sound
Select Audio Options > MuEti-Track Sound. Configure the audio for the current broadcast. Multi-
Track Sound can be set to mono or stereo, depending on the broadcast signal or program.
However, this option is automatically set to mono if the broadcast signal or program does not
support stereo.
Press the IIINFObLtto _ to view the current broadcast s a_dio signal information,,
While watching IiV, press the TOOLS b_£to _, and then seect Multi-Track Sound
Fine-Tuning the Screen
MIEI_U > Broadcasting > Channel Settings > Fine Tune _
Ava abe for anaIog broadcasts ony,
Analog pictures can become shaky and full of noise. If this happens, you can fine-tune the signal
and/or reduce noise to clear up the picture.
Select Broadcasting > Channel Settings > Fine Tune. An adjustment bar appears on the screen.
2, Press the < or > button to make adjustments. Select Save or Close to apply the new setting.
Select Reset to reset the Fine-Tune operation.
Remove Scrambled Channels
MIEINU > Broadcasting > Channel Settings > Clear Scrambled Channe_
Remove scrambled channels from your auto-programed channel list.
Changing the Picture Mode and Adjusting the
Choosing the Right Picture Mode for the Viewing Environment
ME:INU>P_otor÷>P_otoremode
The following picture modes utilize different contrast and brightness settings to provide the best
viewing experience for the environment.
Nav gate to Edit Name, f you use the PC sett ng for PC or DVI PC, you can only ava abe Standard and
Entertain_
If the ambient lighting is too bright and makes the screen blurry, use this mode to make the
picture clearer.
. Standard
This is the default mode suitable for most environments.
,, Natural
This mode is useful for reducing eye strain.
,, Movie
Appropriate for darkened rooms, for watching movies, and when experiencing eye fatigue.
Darkens the screen and reduces glare.
,, Entertain
Sharpens images for a more dynamic viewing experience.
.....Iihis mode ;s O_y ava lab e when yo_ {_sea Ii:::>Csetting for PC or DVI PC o_ Edit Name,,
Adjusting the Picture Quality for Each Picture Mode
MIE:INU> Picture
Select one of the settings below from the Picture menu to display the slide bar for the selected
setting. Adjust the value by pressing the ( or > button on your remote. Choose a different setting by
pressing the A or V button. Adjusted values are applied to the current source and picture mode.
The Co,or and Tint (G/R} sett ngs cannot be adjusted when the TV s connected to a computer via an HDMI
to DVI cabte.
Choose a Picture Mode - Dynamic, Standard, Natural, Movie - and then adjust the settings.
- BacMight _:_
Adjusts the brightness of individual pixels. Decreasing the brightness reduces power
consumption.
- Contrast
Adjusts the screen contrast.
- Brightness_::_
Adjusts the overall brightness.
o Sharpness _
Sharpens or dulls the edges of objects.
o Comor
Adjusts the overall color saturation.
Tint (G/R)
Adjusts the ratio of green to red. Increase the green value to saturate the greens and the red
value to saturate the reds.
Adjusted vaIues are saved by the TV for the current source and picture mode, and reman n effect each
tree the source and p cture mode s seected, Consequent y, the TV can have d fferent p cture sett ngs for
each externa source,
App_yi,n9 the Curr®,nt Picture Settings to Other _nput Sources _/}{: ;/}
MIEINU > Picture > Apply Picture Mode
You can apply the picture quality setting that you configured for the TV to all external devices
connected to the TV or to the current source only.
To apply the setting to all external devices connected to the TV, select All Sources. To apply the
setting to the current input only, select Current Source.
Fine-Tuning Each Picture Mode (Advanced Settings}
MIE:INU> Picture > Advanced Settings
Select Picture > Advanced Settings to fine-tune how images are displayed on the TV screen for each
Picture Mode.
Advanced Settings is only available when the Picture Mode s set to Standard or Movie.
When the TV is connected to a computer via an HDMHDVI cabe, only White BaJance and Gamma can be
adiusted.
Choose a Picture Mode and then adjust the settings.
- Dynamic Contrast
Automatically adjusts the screen contrast. Use this option to achieve the optimal contrast setting.
- Black Tone
Adjusts the black color depth.
- Flesh Tone
Darkens or lightens skin tones.
o RGBonlyMode i!:
Adjusts the red, green, and blue levels individually.
Color Space
Forthe LED5203,5303 and 4303 seriesmodels,Customis notsupported.
Adjuststhe rangeof colors (the color space)that the TV can display.Auto automaticallyadjusts
the color spacedependingon the inputsignal. Nativeappliesa rangethat iswider than the input
signal.Customallows you to adjustthe color spacemanually.
o White Balance
For the LED 5203, 5303 and 4303 series models
You can adjust the color temperature of the picture to make white objects look white and the
overall picture appear natural. You can adjust each of the 3 color's luminosity with the offset
menu and the brightness with the gain menu. To restore the default values, select Reset.
For the LED 6203 series and higher
You can adjust the color temperature of the picture to make white objects look white and the
overall picture appear natural.
2 Point: Lets you adjust red, green, and blue luminosity with the offset menu and brightness with
the gain menu. To restore the default values, select Reset.
10 Point: Divides red, green, and blue into 10 sections each, and lets you modify the white
balance by adjusting the brightness of each section. Select the section to adjust in the Leve_
field.
Y(_Lcan use the !0 Point functio _O_y when the Picture Mode s set to Movie.. Some exter _a devices
m_£ynot support this f_nctio _..
Gommo
Adjusts the primary color intensity.
Motion Lighting
Adjusts the brightness in response to on-screen movements to reduce power consumption.
.....Iihis feature sony availabe when the Picture Mode s set to Standard and s _ot ava labe n 3D mode,,
(Appies n co_ntries or for models s_.pportin(t_ 3D,,)
Adj_ sting the Contrast, Brightness, and other p ctLre qta ity setdngs deactivates Motion Lighting,,
Adjusting the Picture for Easier Viewing (Picture Options)
MEINU>P_oture>P_otureOpt_oos
Select Picture > Picture Options to make additional adjustments for a better viewing experience.
When the TV s connected to a computer via an HDMFDVl cabe, only Color Tone can be adjusted.
Choose a Picture Mode and then adjust the settings.
. comorTooe
Adjusts the color tone. The setting is applied on an individual Picture Mode basis. When
you select a new Picture Mode, the TV applies the Color Tone you selected for that mode
automatical ly.
I!f the Picture Mode is set to Dynamic, yo_ wl O_y be abe to choose Cool or Standard,,
- Digita_ Clean View
Reduces static and ghosting caused by a weak signal. Selecting Auto Visualization displays the
signal strength on the screen. Green indicates the best possible signal.
.....Ilhis function is only availab e for anaog channe s,,
- MPEG Noise Filter
Reduces MPEG noise and improves video quality.
. .DM_BmaokLevem
Some external devices connected to the TV via an HDMI cable can have issues such as low black
level, low contrast, and dull colors. Use HDMI Black Level to adjust the black level to compensate.
H©MI! Back Leve sony availabe when you are view n(?_ content from an externa device connected to
the IiV via an HDMI! co x_ectio s.

. F,mmod
Optimizes the picture quality for movies. Select this mode for watching movies.
.....Iihis feature s orfly availabe when yo_. a_e watchir_t_ a IiV b_oadcast or whe__ the np_t si_;_na s/%
CompoNent (480i, 1080 or HDMI! (10S0/,,
Auto Motion Plus
This function is only available with the LED 6203 series and higher.
Removes blurring and judder from scenes with rapid movement. If you select Custom, you can
configure Blur Reduction and Judder Reduction manually and set LED Clear Motion on for a
sharper LED image.
Iif yo_ have Auto Motion Plus on, and ther_ bdng _._pthe INFO sc_een, the INFO sc_'een disp ays the
reso _.tion and frequency of tlhe ;ncoming video sgna (60Hz},, Ilhis f_eq_ er_cy ;s _ot the same as the
flequency of the pict_, re the IIV ;s disp ay;ng when Auto Motion Plus ;s o_,,
Iif LED Clear Motion ;s On and the IiV ;s receMng a 60Hz video signa, the sc_ee__ may f ickec
LED Clear Motion
This function is only available for the LED 5203, 5303 and 4303 series.
Removes drag from fast scenes with a lot of movement to provide a clear picture.
in 3D
MIEINU > Picture > 3D
3D is not available in the U.S.A. and Canada and is only available on LED 6203 series TVs or higher.
The 3D option lets you view 3D media content and broadcasts. You will need to wear Samsung 3D
Active Glasses to play 3D content. IR-type Samsung 3D Active Glasses and third-party 3D glasses are
not supported.
Carefully read the health and safety information concern ng 3D viewing before viewing 3D content_ Refer to
the "3D Precaut ons" sect on for more nformat on,
Whether 3D video s d splayed n true HD s usually determ ned by the quat ty and format of the video,
Starting 3D
Press the 31D button on your remote control or select the 3D On-Screen Remote.
2, Play 3D content.
3, Put on the Samsung 3D glasses, and then turn the glasses on. 3D viewing is enabled.
The ideal viewing distance is three times the height of the screen or more. 3D images may not appear
if you do not adhere to the recommended viewing angle or distance.
The 3D feature may not work properly if there is another 3D product or an electronic device running
nearby. If there is a problem, keep other electronic devices as far away as possible from the 3D Active
Glasses.
The left and right 3D images may initially overlap when the TV is turned on. It takes a moment for the
display to optimize and the overlapping to stop.
There are several restrictions when using 3D TV:
o Launching Smart Hub automatically disables 3D mode.
P_P cannot be used.
Certain Picture options are disabled.
Changin9 the 3D Mode
MIEINU ) Picture ) 3D ) 3D Mode
Press the 3D button on your remote to start the 3D function, and then select 3D Mode under
Picture ) 3D.
2. Choose from the 3D modes that appear on the screen. The supported 3D Modes may vary
depending on the 3D content.
3D Mode s a_tomatica y conf g_ red for most 3D co _tent.
The following 3D Modes are available. However, mode availability may vary depending on the 3D
content's format.
The supported reso ut ons vary for each mode_ Refer to the _Supported Reso ut ons for 3D Modes" sect on
for more nformaton_
_ (Off)
Deactivates 3D viewing.
_ (Normal)
Converts normal images to 3D images.
Some formats do _ot s_ pport this mode.
,, _ (L/R)
Splits a single image into left and right overlapping images to create the 3D effect.
. _ (T/B)
Splits a single image into top and bottom overlapping images to create the 3D effect.
Adjusting the 3D Effect
MEINU ) Picture ) 3D
Configure the viewpoint, depth, and other 3D settings for a custom viewing experience.
Al! 3D effects with the except on of 3D Auto View can only be used whe watch ng 3D content.
o Adjusting the 3D Viewpoint
Select Picture ) 3D ) 3D Perspective. Use the adjustment bar shown on the screen to adjust the
viewpoint.
Adjusting the 3D Depth
Select Picture ) 3D ) Depth. Use the adjustment bar shown on the screen to adjust the depth.
.....Iihis OpI:;O _ cannot be {_sed ;f 3D mode ;s set to _ (L/IR) or _ ( I!/%,
Reversing the Left/Right 3D Images
Select Picture ) 3D ) L/R Change. Use to reverse the left and right images.
Displaying 3D Content in 2D
Select Picture ) 3D ) 3D _ 2D. Use to enable 2D viewing of 3D content.
.....Iihis f_nctio _ ;s _ot ava labe ;f 3D mode ;s set to _ (Norma) or _ (Off),,
Adjusting 3D Brightness
Select Picture ) 3D ) 3D Light Control. Adjust the 3D brightness level. If the screen is too dark,
select High.
Picture Support Functions
Broadcast Viewing
ME:INU>Pioture>Prop
Watch video from an external device such as a Blu-ray player on the main screen while viewing a TV
broadcast in a picture-in-picture window.
Select Pioture > P_P to display the PIP settings window. The PIP settings window contains the
following options:
o P_P
Activates/deactivates PIP.
Antenna
Choose Air or Cable as the input source for the PiP sub-picture window.
Channem
Selects the PIP sub-picture channel.
Size
Selects the PIP sub-picture size.
Position
Selects the PIP sub-picture position.
Sound Select
Selects the audio source.
Choose a broadcast.
PIP cannot be used wh e Smart Hub or 3D is active_ (Applies in countries or for modes supportng 3D_)
Tumng off the TV automat ca ly d sabes PIP,
Playing a game or usng the karaoke feature on the man screen can resut in a lower PIP picture quafity_
For PIP to work, the main screen"s source must be Component or HDMI and the nput reso ut on must be
less than FHD (Ful HD), The PIP sub-screen supports dgta channe s only_
Changing the Picture Size and Position
Choosin9 the Right Screen Size
MIE:INU> Picture > Picture Size > Picture Size
Most TV programs and videos are displayed in full screen, but some programs and videos are
displayed in sizes that are larger or smaller. You can change the screen size for such programs and
videos so that the picture fits the screen better.
Supported screen sizes vary depending on the input signa _ Refer to the "Picture Szes and input S gna s"
section for more nformat on about supported screen szes,
o 16:9
Set the picture to the 16:9 wide-screen format.
Zoom1
Magnify 16:9 pictures vertically. A magnified picture can be moved up and down.
Zoom2
Magnify Zoom1 picture even more. A magnified picture can be moved up and down.
Wide Fit
Enlarge the aspect ratio of the picture so it fits the entire screen. Enjoy 4:3 images as undistorted
16:9 images.
4:3
Sets the picture to basic 4:3 mode.
Screen Fit
Displays the full image without any cutoff.
Smart View 1
Reduces a 16:9 picture by 50%.
Smart View 2
Reduces a 16:9 picture by 25%.
Adiustin9 the Screen Position
MIE:INU> Picture > Picture Size > Position
Adjusts the screen position.
This option is ony avaitab e with Size set to Zoom1, Zoom2, Wide Fit or Screen Fit, When the TV is tuned
to a dgta channel, the screen post on cannot be adjusted if the Picture Size s set to Screen Fit_
To adjust the screen's position, select Picture > Picture Size > Position. A popup window
appears.
2, Select Position again from the popup window.
3, Press the A, V, { or > button to move the screen. When done, select Position and then Close.
Select Reset to reset the screen position.
Listening to Audio Only with the Screen Turned Off (Picture Off}
MIE:INU> Picture > Picture Off
Turns off the screen and plays audio through the speakers only, To turn the screen back on, press any
button other than the power and volume buttons,
Resetting the Picture Mode Settings
MEINU > Picture > Reset Picture
Use this option to reset the current Picture Mode to its factory settings, This does not affect the
settings of other Picture Modes,
Changing the Sound Mode and Using Sound Effects
Choosing the Right Sound Mode for the Environment
ME_NU>Sound>SoundMode
Sound modes apply preset adjustments to the sound output, optimized for different viewing and
listening circumstances.
The sound modes cannot be used when you are I stening to aud;o through externa speakers.
o Standard
This is the normal sound mode.
Music
This mode emphasizes normal music instead of voices.
Movie
This mode is calibrated to provide the best sound for movies.
Clear Voice
This mode emphasizes voices.
This mode increases the overall intensity of high-frequency sounds for a better listening
experience. It is designed for hearing-impaired listeners.
Using Sound Effects
MENU > Sound > Sound Effect
Use sound effects to alter how the TV projects sound.
Sound effects can only be used if the Sound Mode is set to Standard_
The sound effects cannot be used when you are I stening to audo through externa speakers_
Choose a Sound Effect and then adjust the settings.
. DTSTruSurround.D
Produces sound that will make you feel like you are sitting in a movie theater or concert hall.
. DTSTruD_amog
Increases voice intensity to make dialog clearer.
o Equa,zer
Lets you adjust the speaker balance and make bandwidth adjustments. Select Reset to reset the
settings.
Sound Support Functions
Selecting Speakers
MIE:INU> Sound > Speaker Settings > TV Sound Output
TV Sound Output lets you choose which speakers the TV uses for audio output. Select Sound >
Speaker Settings > TV Sound Output, and then select the speakers from the list. To listen to audio
through the TV's speakers and the speakers of a connected AV receiver or home theater simultaneously,
select TV Speaker. If this causes an echo effect, choose any speaker option other than TV Speaker to
mute the TV speakers, or turn off the receiver or home theater.
Usng externa speakers aone d sabes the voume button and the mute funct on. In add t on, certa n Sound
opt ons are aso d sab ed_
o TV Speaker
Listen to the TV's audio through the TV's internal speakers.
Audio Out
Listen to the TV's audio though headphones or through the speakers of a device connected to the
TV via a digital optical cable.
Designating the TV°s mnsta lation Type
MIE:INU) Sound > Speaker Settings > TV installation Type
Specify the TV's installation type. Choose between Wall Mount and Stand to optimize the TV's sound
automatically.
Enabling Digital Audio Output
MIE:INU) Sound ) Additional Settings
This Smart TV is SPDIF-enabled. The Sony Philips Digital Interface (SPDIF) provides digital audio
output to speakers and various digital devices, including A/V Receivers and home theaters.
. AudioFormat
Selects the Digital Audio output (SPDIF) format. The available Digital Audio output (SPDIF)
formats may vary depending on the input source
- Audio Demay
This settinghelps correcttiming mismatches between the audio and video trackswhen you are
watching TV and listeningto audio through a digitalaudio device.Enabling the featuredisplays a
slidebar that you can use to adjustthe delay by up to 250ms.
e Do[by Digita_ Comp
Set Dolby Digital compression mode.
* Auto Volume _:_
When you change channels, video sources, or content, Auto Volume automatically adjusts the
TV's volume level so that the volume level remains the same for all sources. For example, if you
switch from a streaming video application to a Blu-ray player or a favorite TV channel, Auto
Volume can modify the volume up to 12db to equalize the sound.
The Auto Volume function has two settings: Normal and Night. Normal applies a normal level
of volume adjustment. Night applies a slightly lower volume level and is ideal for late-night TV
viewing. If you want to use the volume control of a connected source device to control the sound,
deactivate the Auto Volume function. When you use the Auto Volume function with a source
device, the device's volume control may not function properly.
Listening to 3D Audio in 3D Mode
MIEINU ) Sound ) 3D Audio
This function is not available in the U.S.A and Canada.
This function is only available for the LED 6203 series models.
3D audio technology provides immersive sound that matches the pop-up effect of 3D video by using
perspective in the audio depth control.
Ths funct on s only ava abe n 3D mode,
Resetting All Sound Settings
MENu>Sound>RoaotSound
Use to reset allsound settingsto the factory defaults.
Setting the Time and Using the Timer
Setting the Current Time
MIEINU > System > Time > Clock
Set the clock manually or automatically.
To view the time after the clock is set, press the JNFO button on your remote.
The coc< must be reset every tree the power s d sconnected.
Setting the Clliook using II©igita_ Broadcast _nfo
ME:INU>System>Time>Clook>ClookMode
Set Clock Mode to Auto. The TV automatically downloads the correct time from a digital channel. To
enable this option, the TV's Antenna jack must be connected to either an antenna or a cable output
and must be receiving digital broadcasts. The accuracy of the time information received may vary
depending on the channel and signal. If your TV is connected to a set-top-box or satellite box using
HDMI or Component connections, you must set the time manually.
_f the ClfFookis Wrong in Auto Mode
MIEINU > System > Time > Clook > Time Offset
If the time the TV sets automatically is incorrect, you can offset the clock in 1-hour increments by as
much as -/+ 12 hours. Select System > Time > Clook > Time Offset, and then offset the clock to the
correct time.
Time Offset adjusts the tree through a network connection and is only ava abe f the Clock Mode s set to
Auto and the TV is connected to the Internet though a locaI area networlq
Time Offset adiusts the t me ftheTVfa storecevetme nformatonthroughnormaIdgta broadcast
s gnaIs_
Setting the Clock Manually
MIEINU } System } Time } Clock } Clock Set
To enter the time and date manually, follow these steps.
Set Clock Mode to Manual, and then select Clock Set.
2, Select Date. The date entry pop-up appears.
3, Use the A and V buttons to change the month. When done, move to the date field and then
the year field and set them in the same fashion. When done, press the IRIETURINbutton on your
remote.
4, Select the Time field. Use the A and V buttons to set the hour.
When done, move to the minutes field and then the am/pm field and set them in the same
fashion. When done, press the IRIETURINbutton on your remote.
Using the Timers
Using the SIieep "[ime_ _
ME Nu>System>T me>
This function automatically shuts off the TV after a preconfigured period of time. Select System >
Time > SJeep Timer. You can set the timer up to 180 minutes in 30-minute increments.
Tunrsing On the "[V using On "[ime_
ME NU>Syatem>T me>OnT mer
Set the On Timer so that the TV turns on automatically at a chosen time. You can set up three
separate On Timer configurations concurrently: On Timer 1, On Timer 2, and On Timer 3. The On
Timer is only available if the Clock has been set.
Select Off, Everyday, Mon~Fri, Sat-_Sun, or Manual. If you select Manual, you can select the
days you want the On Timer to turn on the TV by highlighting each day, and then selecting it.
Time
Set the time that the TV turns on automatically, See "Setting the Clock Manually" for time setting
instructions,
o Volume
Specify the volume the TV will set itself to when it turns on.
Source
Select a signal source from the list. This is the source the TV will access when it turns on. If you
want to use a USB device, that USB device must be connected to the TV before you start the On
Timer set up. To play back media from an HDMI or Component source such as a DVD player, Blu-
ray player, or set-top-box, you must leave the device on. It must be on and playing when the TV
turns on.
Antenna
If you have set the Source to TV, select a broadcast signal source, Air or Cable.
Channem
If you have set the Source to TV, select a channel.
Music / Photo
If you have set the Source to USB, specify a USB device folder containing music files in the
music field and/or a folder containing photos in the photo field. If you select a folder that
contains music files and a folder that contains photo files, the TV plays the music files and
displays the photos at the same time.
To select (for example)a music folder,follow these steps:
Selectthe musicfield. Themusic screenappears.
2, If you have no folders in the USB drive and all your music files are in the root directory, highlight,
and then select the Sellect button. The USB drive is selected and the On Timer screen reappears
displaying the name of the USB drive in the music field.
3, If you have folders with music on the USB drive, press the C_ button. The TV displays all the
folders on the drive.
4, Scroll the list of folders until the folder you want appears. Move the highlight to the Sellect
button to the right of the folder. Press the C_ button. The On Timer screen reappears displaying
the folder name in the music field.
Iif the foder yo_ choose has s_b fo ders yo_J can seect a s_,b fo der n the same fashion
If you want, select a photo folder in the same way. Start by selecting the photo field.
This feature wit not funct on properly f the seected USB device does not conta n meda ftes or a foder
has not been spec fed.
The sideshow wil not start f there s only one mage fte on the USB device_
Fo ders with long names cannot be seected.
Always use d fferent foder names for mu t pie USB devices.
Use a USB memory stick or multi-card reader_ The On Timer may not work wth certain battery-powered
USB devices, MP3 players, or PMPs because the TV may take too long to recognize the device.
Tumin9 Off the TV Using the Off Timer
MEINU>Syate >T me>OffT mer
Set the Off Timer to turn the TV off automatically at a specific time. You can set up three separate
Off Timer configurations concurrently: Off Timer 1, Off Timer 2, and Off Timer 3. The Off Timer is
available only if the Clock has been set.
Select Off, Everyday, Mon~Fd, Sat~Sun, or Manual. if you select Manual, you can select the
days you want the Off Timer to turn off the TV by highlighting each day, and then selecting it.
Time
Set the time that the TV turns off automatically,
Using the Screen Burn Protection and Energy Saving
Preventing Screen Burn
HEINU > System > Auto Protection Time
Still images can leave burned-in after-images on the screen if left on the screen for a long period of
time. Use Screen Burn Protection to protect the screen. Select System > Auto Protection Time and
then choose a time setting from the list. If a still image is shown on the screen for longer than the
time you selected, the TV will automatically activate the Screen Burn Protection function to prevent
burnt-in after-images.
Using Energy Saving Features
MEINU > System > Eco Solution
Eco Solution adjusts the TV's brightness level and prevents overheating to reduce overall power
consumption.
e Energy Saving
Select a brightness setting from the list to reduce the TV's power consumption.
. EooSensor
Automatically adjusts the TV's brightness level based on the ambient light level to reduce the
TV's power consumption. If the Eco Sensor has adjusted the screen's brightness level, you can
manually adjust the screen's minimum brightness level by adjusting the Min. BacMight or Min
Cell Light (in applicable models). Changing the BacMight or Min Cell Light setting (in applicable
models) while Eco Sensor is running automatically disables Eco Sensor.
. No Signal Power Off _ii :::!:1!i:!:
Select a time from the list. If no signal is received for the specified duration, the TV will
automatically cut off the power to reduce power consumption.
- Auto Power Off
If the TV remains on for four hours without any user input, the TV will automatically turn off to
prevent overheating.
Using the e-Manua
Launching the e-Manual
IMIEINU> Support > e-Manual
The embedded e-manual contains information about your TV's key features,
A ternatively, you can download a copy of the e-manua from Samsung's website, and read it on your
computer or' print it out_
Words in yellow (e_g. Picture Mode} indicate a menu item and bold words in white (e_g. Smart Hub}
indicate remote control buttons_
Arrows are used to indicate the menu path, (ExampIe: MENU > Picture > Picture Mode}
Press the IEHMAINkJAL button on the remote, You can also select Support > e-Manual in the TV's
menu,
2, Select a category from the left side of the screen, Once a selection has been made, the contents
of the selected category appears on the right side of the screen,
3, Select an item from the list, This opens the e-manual on the corresponding page,
_f a description doesn°t fit on a single screen,.
o Position the focus on the page to display / on the screen, Press the _ or V buttons to
scroll the page up and down,
Additionam e Manual Features
Loading Pages using Keywords
Select Search to bring up the search screen. Enter a search term, and then select Done. Select an item
from the search results to load the corresponding page.
Loading Pages from the Index Page
Select Index to bring up the index screen. Select a topic from the list to navigate to the relevant page.
Using Nistory to Load P_eviously Read Pages
Select Opened page. A list of previously read pages is shown. Select a page. The e-Manual jumps to
the selected page.
Accessing the Menu from the e-Manual
Select _ (Try Now) from the right side of a feature-description page to access the corresponding
menu item and try out the feature right away. If you want to read the e-Manual entry on a specific
screen menu feature:
- Press the eHManua_ button on the remote to load the corresponding e-Manual page.
The e-Manua cannot be accessed from some menu scr'eens_
Loading Reference Pages
Select _ (Link) from the right side of a feature-description page to access the corresponding
reference page.
Updating the e-Manual to the Latest Version
You can update the e-Manual in the same way you update apps.
Press the [_ button to open the First Screen, and then select the Panel icon. The Panel screen
appears.
2o Go to the SAMSUNG APPS screen and the highlight the e-Manual.
3o Press and hold the 8_ button. The Tools menu appears.
4o Select Update Apps from the Tools menu. A popup window appears.
Select e-Manual in the popup window, and then select Update.
Configu_'ing Auto Update
IMIEINU> Smart Hub > Apps Settings
To update the e-Manual automatically, navigate to the Smart Hub > Apps Settings menu, and then
set the Auto Update option to On. The e-manual is updated automatically when an update becomes
available.
Updating the TV's Software
MIE:INU> Support > Software Update
View your TV's software version and update it if necessary.
The TV is set to update software automatically via the internet by default. If you don't want to update
it automatically, set Auto Update (Support > Software Update > Auto Update) to Off.
/k DO NOT turn off the TV's power until the update is complete. The TV will turn off and on
automatically after completing the software update. All video and audio settings return to the
default settings after a software update.
Update now
MIE:INU> Support > Software Update > Update now
Update now lets you update your TV's software in three ways:
o Online, by downloading the update from the Internet directly to your TV.
Manually, using a USB flash drive.
Automatically (Auto Update), while the TV is in Standby Mode.
Each method is explained below.
Online
To update your TV using the Online method, follow these steps:
Make sure that your TV is connected to your local network and the Internet. The connection can
be wired or wireless.
2, All video and audio settings return to their default settings after a software update. We
recommend you record your current settings now so you can easily re-establish your settings
when the update is complete.
3, Press the MIEINU button, and then select Support > Software Update > Update now. The Update
now pop-up appears.
4, The TV searches on line for the latest software version for your TV.
If it does not find an update, the "No new updates" pop-up appears. Press the EXIT button to
exit.
6, If the TV finds a new version, the Update Request pop-up appears.
Select OK. The TV updates the software, turns off, and then turns on automatically.
Do _ot t_rn off the liT dt_ ng the Softwa_e Update,, lit may catse the liT to r_saft_nctio _,,
Manua My, Using a USB Flash Drive
To update your TV using the Manual method, follow these steps:
All video and audio settings return to their default settings after a software update. We
recommend you record your current settings so you can easily re-establish these settings when
the update is complete.
2. On a computer, visit www.samsung.com.
3. Select GET SUPPORT > Get Downloads.
4. Enter the product's model number into the search field. As you enter the model number, a drop
down will display products that match the model number.
Click your product's model number in the drop down list.
6. On the page that appears, scroll down to and then click Downloads.
Click Firmware in the center of the page.
Click the ZIP button in the File column.
Click Send in the first pop-up that appears.
10. Click Save in the second pop-up to download, and then save the firmware file to your computer.
Unzip the zip archive to your computer. You should have a single folder with the same name as
the zip file.
Copy the folder to a USB flash drive.
13. Insert the USB flash drive into a USB port of the TV.
In the TV's menu, go to Support > Software Update > Update now. The TV searches for the
software on the USB drive. When it finds the software, the Update Request pop-up appears.
Select OK. The TV updates the software, turns off, and then turns back on automatically.
Do _ot t_m off the IiV d__ n_(_the Softwa_e Upd_te,, lit may cause the IiV to ma f_;nctio_,,
Enabling Automatic Software Updates
MIE:INU) Support ) Software Update ) Auto Update
If the TV is connected to the Internet, it can be updated via Auto Update while watching the TV. When
the Background upgrade completed, the update will be applied the next time the TV is used.
Ths opt;on requires an Internet connect;on,
If you agree to the Smart Hub terms and conditions, Auto Update will be set to On automatically. If
you don't want the TV's software updated automatically, set Auto Update (Support) Software Update
) Auto Update) to Off.
Protecting the TV from Hacking and mamicious
MIEINU > System ) Smart Security
When the TV is connected to the Internet, it is vulnerable to hacks and malicious code. Smart Security
protects the TV and storage media connected to the TV from such threats.
Navigate to System ) Smart Security and set Smart Security to On.
Checking the TV and Connected Storage Media
MEINU ) System ) Smart Security ) Scan
Navigate to System ) Smart Security and select Scan. This scans the TV and connected media for the
presence of malicious code. If no malicious code is detected, a notification window appears on the
screen.
_f malicious code is detected...
If malicious code is found, the results of the scan will appear on the screen, This result window
displays all malicious code found, and provides options to either quarantine the code or allow it to
function,
Select all the malicious code you want to quarantine or allow,
2, Select Block or Allow, This moves the selected malicious code to the isolated List or AHowed
List,
.....Iihe _soJated List disp ays a quarantined and b ocked r_s8 icious code,, You can aso _e ocate codes
from this ist to the A owed I st.
.....Iihe AlJowed List disp ays a aowed ma icicles code,, Yo_ can aso _eocate codes hom this ist to the
Iiso ated Ist,,
Automatically Scanning when the TV is Powered On
MIEINU > System > Smart Security > Settings > Auto Scan
Navigate to System > Smart Security > Settings and then set Auto Scan to On, This automatically
scans the TV and connected storage media when the TV is powered on,
Automatically Adding malicious code to the Blocked List
MIEINU > System > Smart Security > Settings > Move to isolated List automatically
Navigate to System > Smart Security > Settings and set Move to isolated List automatically to On.
Malicious code found during the scanning process is automatically added to the Blocked List.
Using Other Functions
Setting Up a Password
MENU ) System ) Change PIN _S:_
Set a PIN (Personal Identification Number) to lock channels, reset the TV, and change the TV settings.
Select System ) Change PIN. The PIN input window appears.
2, Enter a PIN. The default PIN is 0000.
3, Enter a new PIN and then enter it again to confirm it. The PIN change is complete.
If you forget your PPN,you can reset it using your remote control. With the TV turned on, press the
following buttons on the remote to reset the PPNto 0000: MUTE _ o_ _RETURN _ o'-'-'o_RETURN _o_-
RETURN, "+" s the Volume Up button, "-" s the Volume Down button,
Changing the Menu Language
MENU > System > Menu Language
Use this option to change the menu language. Select System > Menu Language, and then choose a
language from the list.
Checking Notifications
MENU > System ) Notifications
Select Notifications from the System menu to view the list of event messages generated by the TV.
Notifications appear on the screen when events such as an update release for an app or Samsung
Account Iogin/Iogout occurs.
Seect Delete All to delete atl notif cations,
Seect Service Notice to chec< the SMART TV service not ficat ons n a web browser_
Adjusting the Menu Transparency
MENU ) System ) Accessibility ) Menu Transparency
Navigate to System ) Accessibility and adjust the opacity level and the menu's transparency.
When the High Contrast (System > Accessibility > High Contrast) setting is set to On, the menu d splay s
automat caI y set to opaque and you cannot change the Menu Transparency sett ngs_
White Text on Black Background (High Contrast)
MENU > System > Accessibility > High Contrast
Navigate to System > Accessibility and set High Contrast to On. This option changes major service
screens to white text on a black background or changes the transparent TV menus to opaque so that
text can be read more easily.
Expanding the Smart Hub°s Focus Area
MIE:NU ) System ) Accessibility ) Enlarge
Navigate to System ) Accessibility and set Enlarge to On. This zooms in the focused item when you
use Smart Hub and makes the item larger.
LocMng/Un[ocMng the Pane[ Keys
MENU > System > General > Pane[ Lock
Use to lock and unlock the TV's front panel buttons (menu, channel, and volume) and the control stick
on the back of the TV. Select System ) General ) Panem Lock and lock/unlock the keys.
Showing/Hiding the Samsung Logo while Booting
MENU > System > General > Boot Logo
Use to enable or disable the Samsung logo display that appears when the TV starts up.
Enabling Game Mode
MENU>System>eeneram>GameMode_D
Game Mode optimizes the TV's settings for playing video games on a gaming console such as
PlayStation TM or Xbox TM.
Game Mode cannot be used for normal TV viewing,
Connect the gamng console before enab ing Game Mode. Otherwise, the picture qual;ty may suffer,
The screen may shake a little.
Enab ing Game Mode automatical y sets the Picture Mode to Standard and the Sound Mode to Movie.
To use a d fferent external device, frst d sconnect the game conso e and dsabe Game Mode.

Enjoying Rich Colors and Superior Picture QuaJity (BD Wise)
MIEINU > System > Genera[ > BD Wise
This function is only available for the LED 6203 series models.
Connecting a Samsung DVD player, Blu-ray player, or home theater system that supports BD Wise
enables the richest colors and best possible picture quality. Enabling BD Wise automatically optimizes
the TV's resolution.
Ths feature s only ava abe when the externa device s connected via an HDM[ cabe_
Registering the TV as a DivX-Certified Device (To Watch For Pay
DivX Movies)
MIEINU > System > DivX@ Video On Demand
To watch DivX DRM protected movies on the TV, you must register the TV as a DivX certified device.
DRM stands for D gital Rghts Management and s a technical security mechanism to protect the copyright
of the content provider:
You can watch movies that you have free DivX movies without reg stration.
Visit the DivX website (http:/iwww.divx.com) and log nto your user account before reg stering the TV as a
DivX-certif ed device. If you do not have an account, please create one.
Select System > DivX@ Video On Demand. A window with a registration code appears on the
screen.
2, Visit the DivX website on a computer, and then click [Register Your Device] under [Support] in the
top menu.
3, Enter the registration code shown on the TV's screen in the [Enter your registration code] field.
4, Enter the TV's name in the [Name your device] field, and then click [NEXT].
Click [DOWNLOAD], and then save the [device_name.divx] file.
6, Transfer the [device_name.divx] file from the computer onto a USB device, and then plug the USB
device into the TV.
Run the [device_name.divx] file on the TV to register the TV as a DivX-certified device.
Restoring the TV to the Factory Settings
ME:INU>Support>SemfDiagoosis>Reset
This option restores all TV settings (excluding the Internet and network settings) to the factory
defaults.
Select Support > Se_f Diagnosis > Reset. The Security PIN entry window appears on the screen.
2. Enter the Security PIN, and then select Yes. All settings are then reset. The TV turns off and on
again automatically, and then displays the Setup screen.
For more ;nformatio _ o_ Set_ p, refer to the {_ser man_a that came w;th the liT,,
Using the TV as a Display Model (exclusively for retaiM stores}
MIE:INU> Support > Use Mode
Select Support > Use Mode > Store Demo. This turns the TV into a display model for use in a retail
environment,
For at! other uses, seect Home Use,
Store Demo should be used n retait environments ony. With Store Demo, certa n funct ons are d sabed and
the TV automat caI y resets tsef after a certa n amount of tree,
Getting Support
The TV has several built-in systems designed for user and TV system support.
Support through Remote Management
MIE:INU> Support > Remote Management
If you need assistance with your TV, you can use this feature to let Samsung Electronics diagnose your
TV remotely. You will need to read and agree to the service agreement before using this feature. A
Samsung Electronics technician will then diagnose, repair, and update your TV remotely. These features
are only available when your TV is connected to the Internet.
Gettin_s Remote S_pport
Samsung Remote Support service offers you one-on-one support with a Samsung Technician who can
remotely.
e Diagnose your TV
o Adjust the TV settings for you
Reset your TV to its factory settings.
Install recommended firmware updates
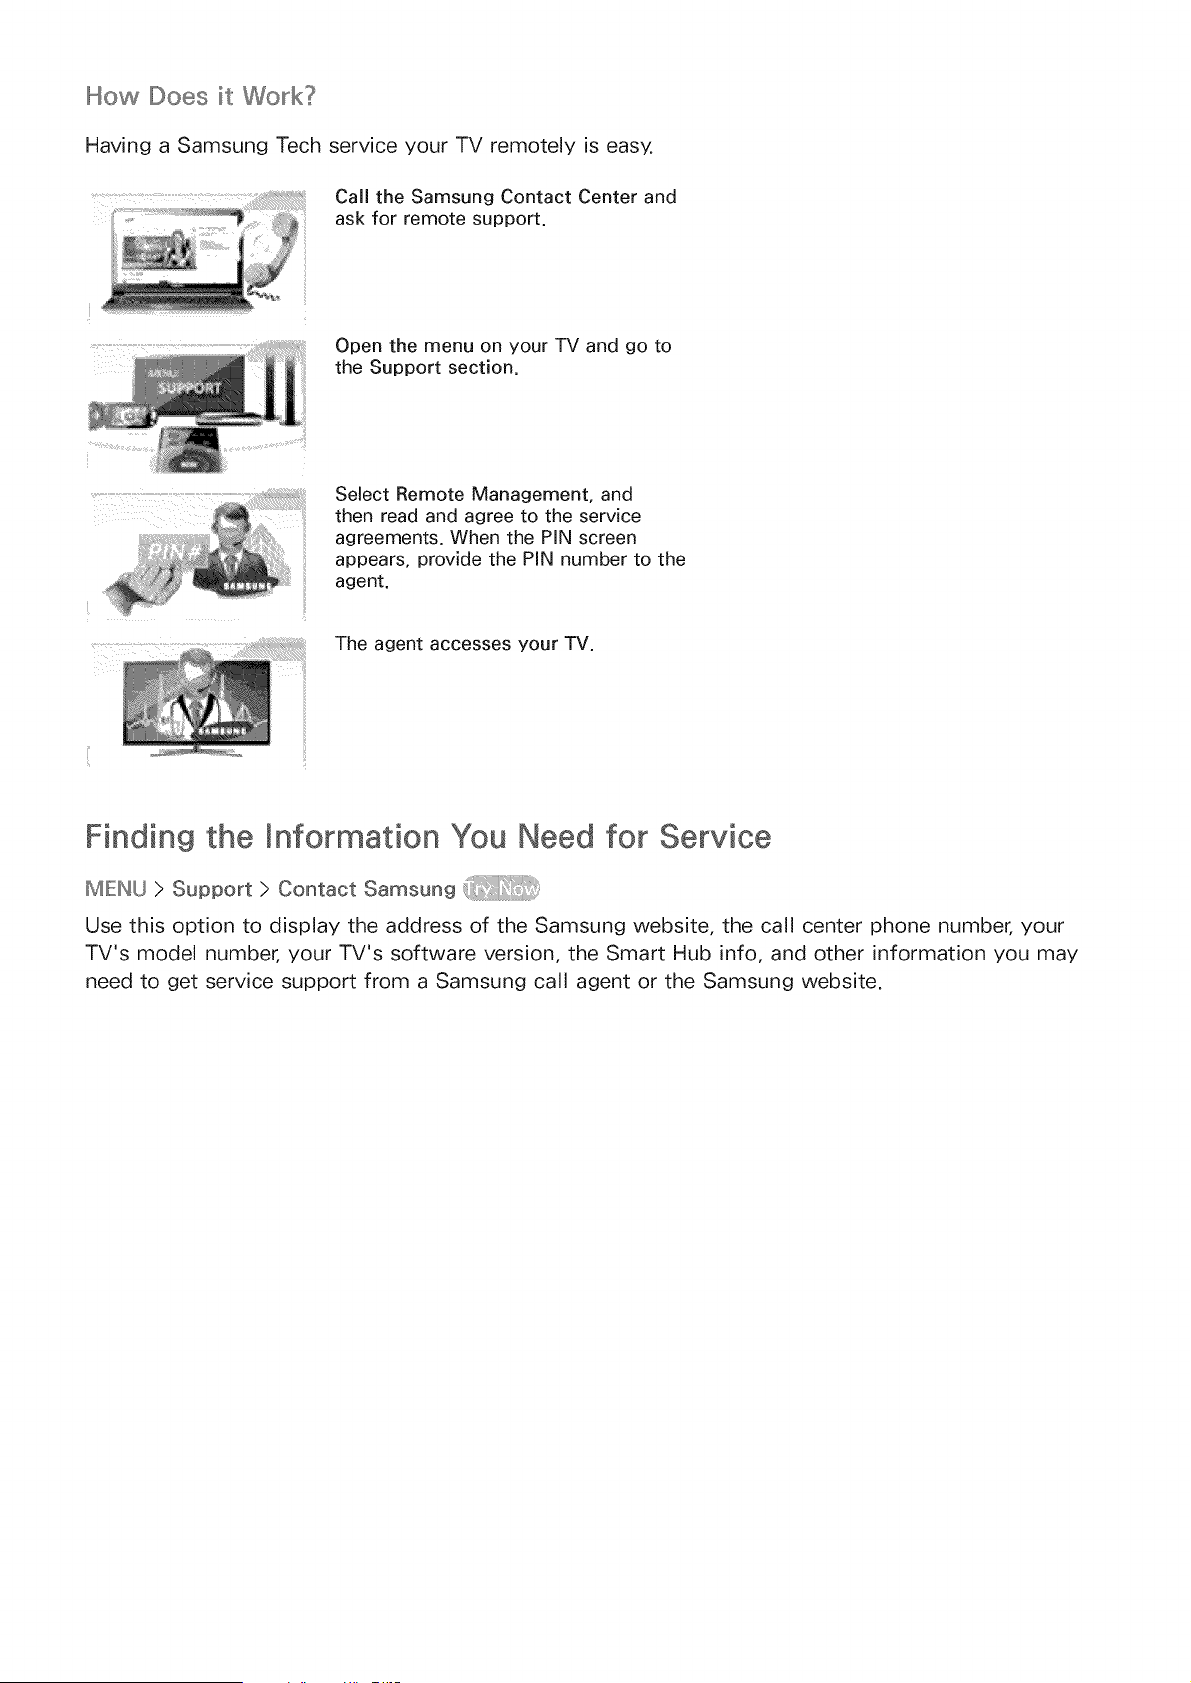
How Does it Work?
Having a Samsung Tech service your TV remotely is easy.
Call the Samsung Contact Center and
ask for remote support.
Open the menu on your TV and go to
the Support section.
Select Remote Management, and
then read and agree to the service
agreements. When the PiN screen
appears, provide the PiN number to the
agent.
The agent accesses your TV.
Finding the Information You Need for Service
MEINU } Support } Contact Samsung
Use this option to display the address of the Samsung website, the call center phone number, your
TV's model number, your TV's software version, the Smart Hub info, and other information you may
need to get service support from a Samsung call agent or the Samsung website.
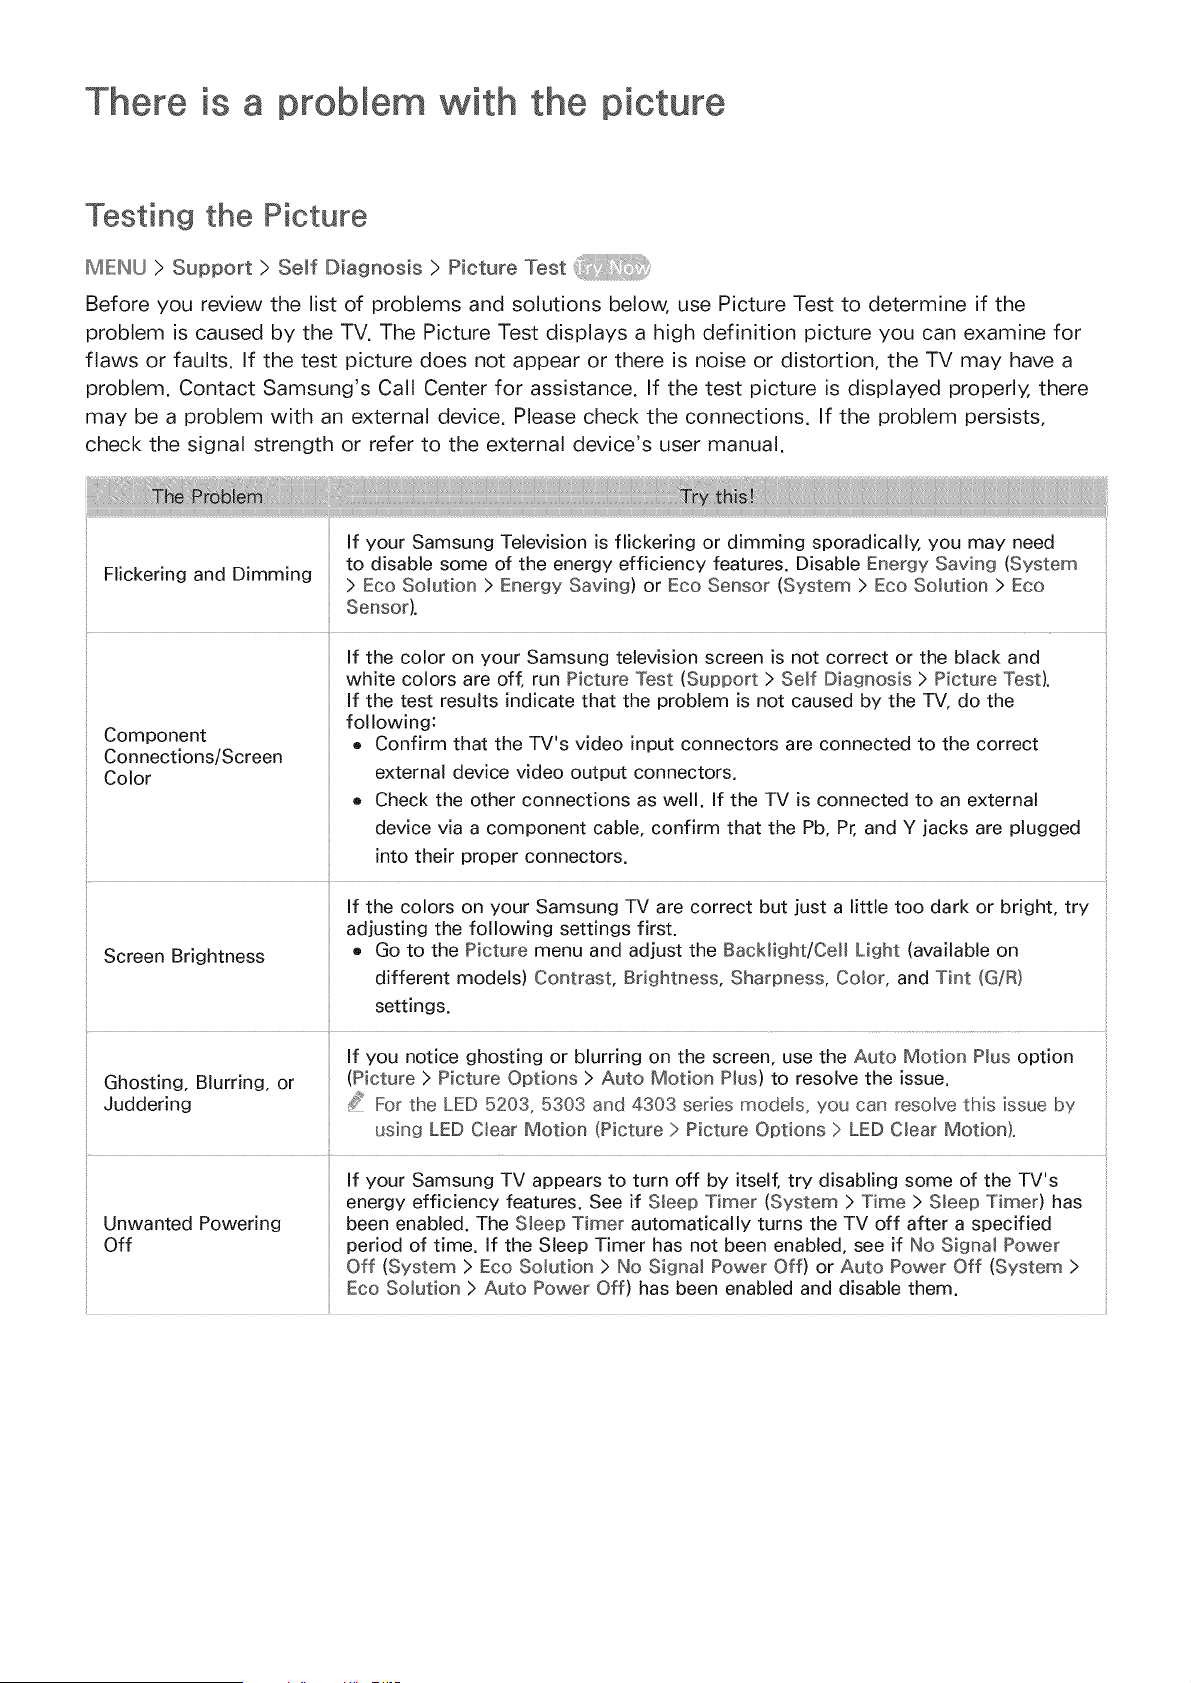
There is a problem with the p
Testing the Picture
MEINU>Sopport>somfDiagoosis>Piotor÷z÷at
Before you review the list of problems and solutions below, use Picture Test to determine if the
problem is caused by the TV. The Picture Test displays a high definition picture you can examine for
flaws or faults. If the test picture does not appear or there is noise or distortion, the TV may have a
problem. Contact Samsung's Call Center for assistance. If the test picture is displayed properly, there
may be a problem with an external device. Please check the connections. If the problem persists,
check the signal strength or refer to the external device's user manual.
Sensor).
If the color on your Samsung television screen is not correct or the black and
white colors are off, run Picture Test (Support > Self Diagnosis > Picture Test).
If the test results indicate that the problem is not caused by the TV, do the
following:
Component e Confirm that the TV's video input connectors are connected to the correct
Connections/Screen
Color external device video output connectors.
e Check the other connections as well. If the TV is connected to an external
device via a component cable, confirm that the Pb, Pr, and Y jacks are plugged
into their proper connectors.
If the colors on your Samsung TV are correct but just a little too dark or bright, try
adjusting the following settings first.
Screen Brightness • Go to the Picture menu and adjust the BacMight/Ce[[ Light (available on
different models) Contrast, Brightness, Sharpness, Color, and Tint (G/R)
settings.
If you notice ghosting or blurring on the screen, use the Auto Motion Plus option
Ghosting, Blurring, or (Picture > Picture Options > Auto Motion Plus) to resolve the issue.
Juddering _ For the LED 5203, 5303 and 4303 series models, you can resolve this issue by
using LED Clear Motion (Picture > Picture Options > LED Clear Motion}.
If your Samsung TV appears to turn off by itself, try disabling some of the TV's
energy efficiency features. See if Sleep Timer (System > Time > Sleep Timer) has
Unwanted Powering been enabled. The Sleep Timer automatically turns the TV off after a specified
Off period of time. If the Sleep Timer has not been enabled, see if No Signa_ Power
Off (System > Eco Solution > No Signal Power Off) or Auto Power Off (System >
Eco Solution > Auto Power Off) has been enabled and disable them.
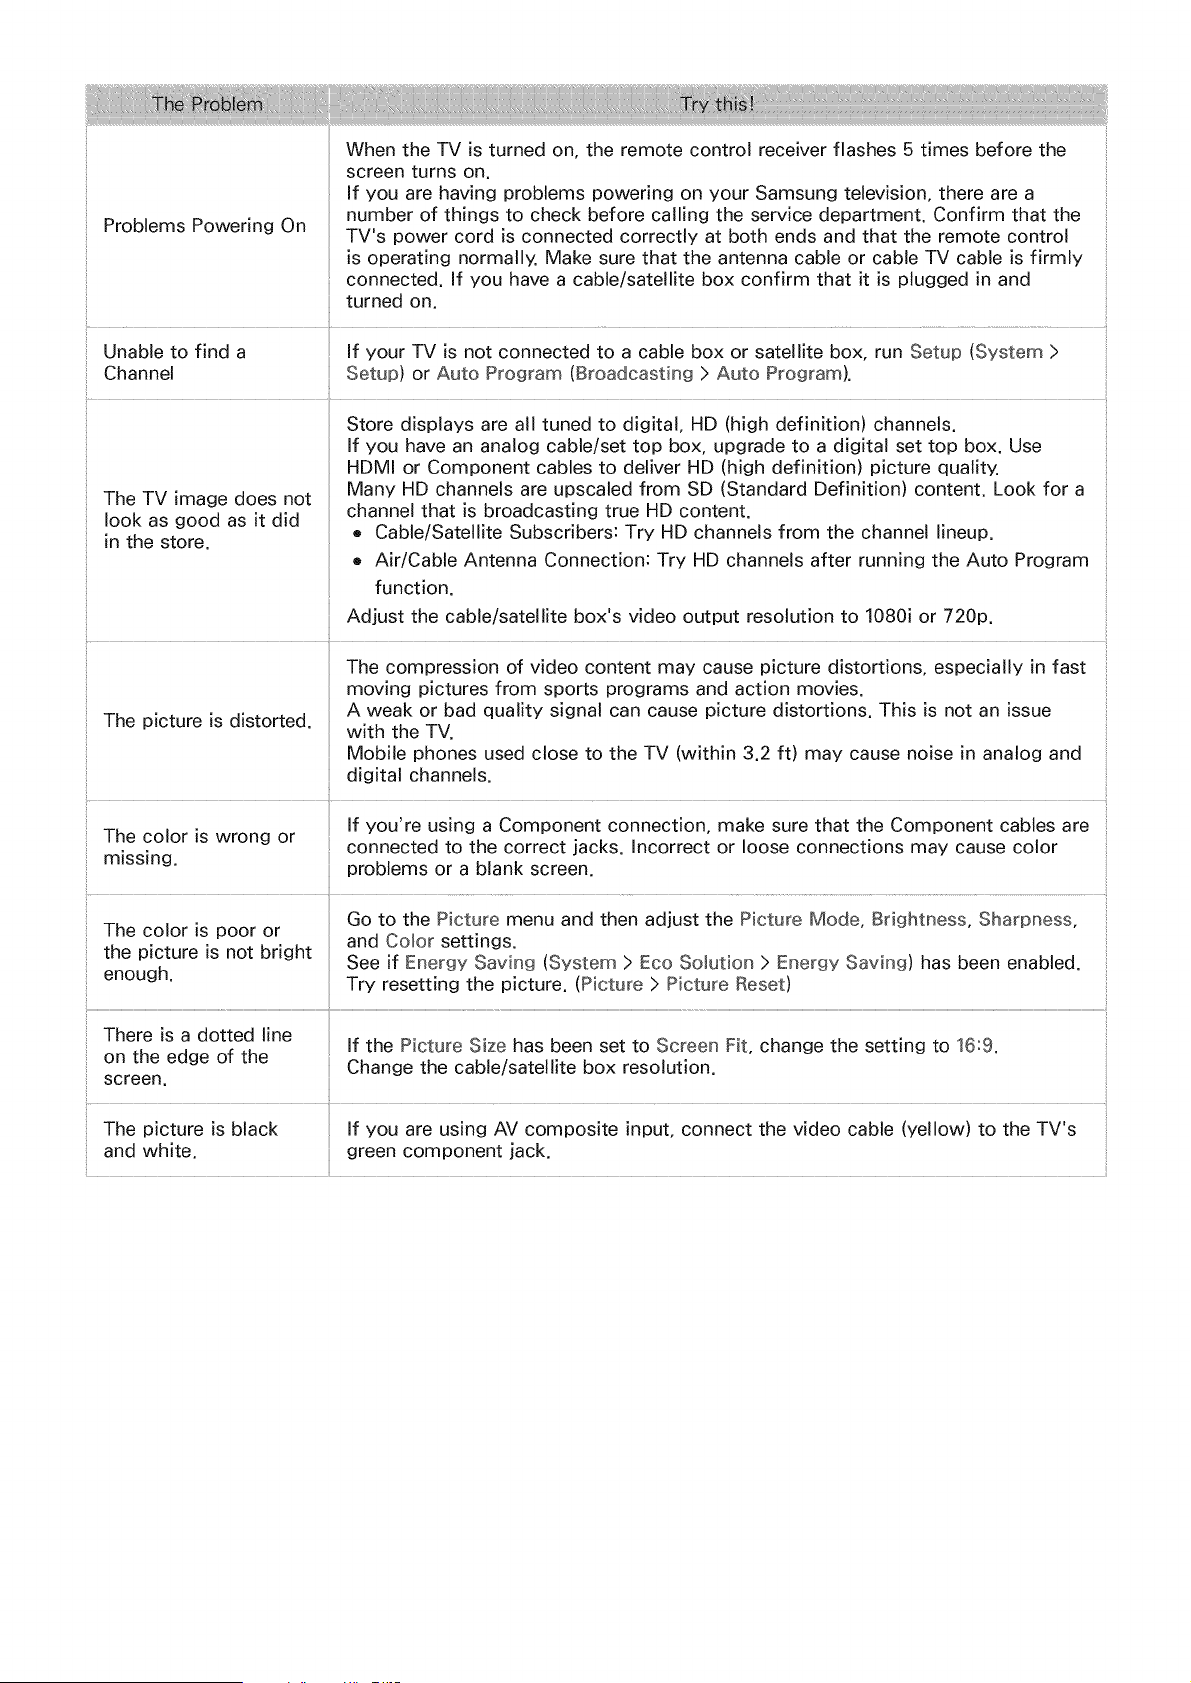
WhentheTVis turnedon,theremotecontrolreceiverflashes5 timesbeforethe
screenturnson.
If youarehavingproblemspoweringonyourSamsungtelevision,therearea
numberof thingsto checkbeforecallingthe servicedepartment.Confirmthatthe
ProblemsPoweringOn
TV'spowercordisconnectedcorrectlyat bothendsandthattheremotecontrol
isoperatingnormally.Makesurethattheantennacableor cableTVcableis firmly
connected.If youhavea cable/satellite box confirm that it is plugged in and
turned on.
i
Unable to find a If your TV is not connected to a cable box or satellite box, run Setup (System >
Channel Setup) or Auto Program (Broadcasting > Auto Program).
Store displays are all tuned to digital, HD (high definition) channels.
If you have an analog cable/set top box, upgrade to a digital set top box. Use
HDMI or Component cables to deliver HD (high definition) picture quality.
The TV image does not Many HD channels are upscaled from SD (Standard Definition) content. Look for a
look as good as it did channel that is broadcasting true HD content.
e Cable/Satellite Subscribers: Try HD channels from the channel lineup.
in the store.
e Air/Cable Antenna Connection: Try HD channels after running the Auto Program
function.
Adjust the cable/satellite box's video output resolution to 1080i or 720p.
The compression of video content may cause picture distortions, especially in fast
moving pictures from sports programs and action movies.
A weak or bad quality signal can cause picture distortions. This is not an issue
The picture is distorted, with the TV.
Mobile phones used close to the TV (within 3.2 ft) may cause noise in analog and
digital channels.
_, . If you're using a Component connection make sure that the Component cables are
/ne color ts wrong or . " .
connected to the correct jacks. Incorrect or loose connections may cause color
missing, problems or a blank screen.
Go to the Picture menu and then adjust the Picture Mode, Brightness, Sharpness,
The color is poor or and Color settings.
the picture is not bright See if Energy Saving (System > Eco Solution > Energy Saving) has been enabled.
enough. Try resetting the picture. (Picture > Picture Reset)
There is a dotted line
If the Picture Size has been set to Screen Fit, change the setting to 16:9.
on the edge of the
Change the cable/satellite box resolution.
screen.
.... il .....
The picture is black If you are using AV composite input, connect the video cable (yellow) to the TV's
and white, green component jack.
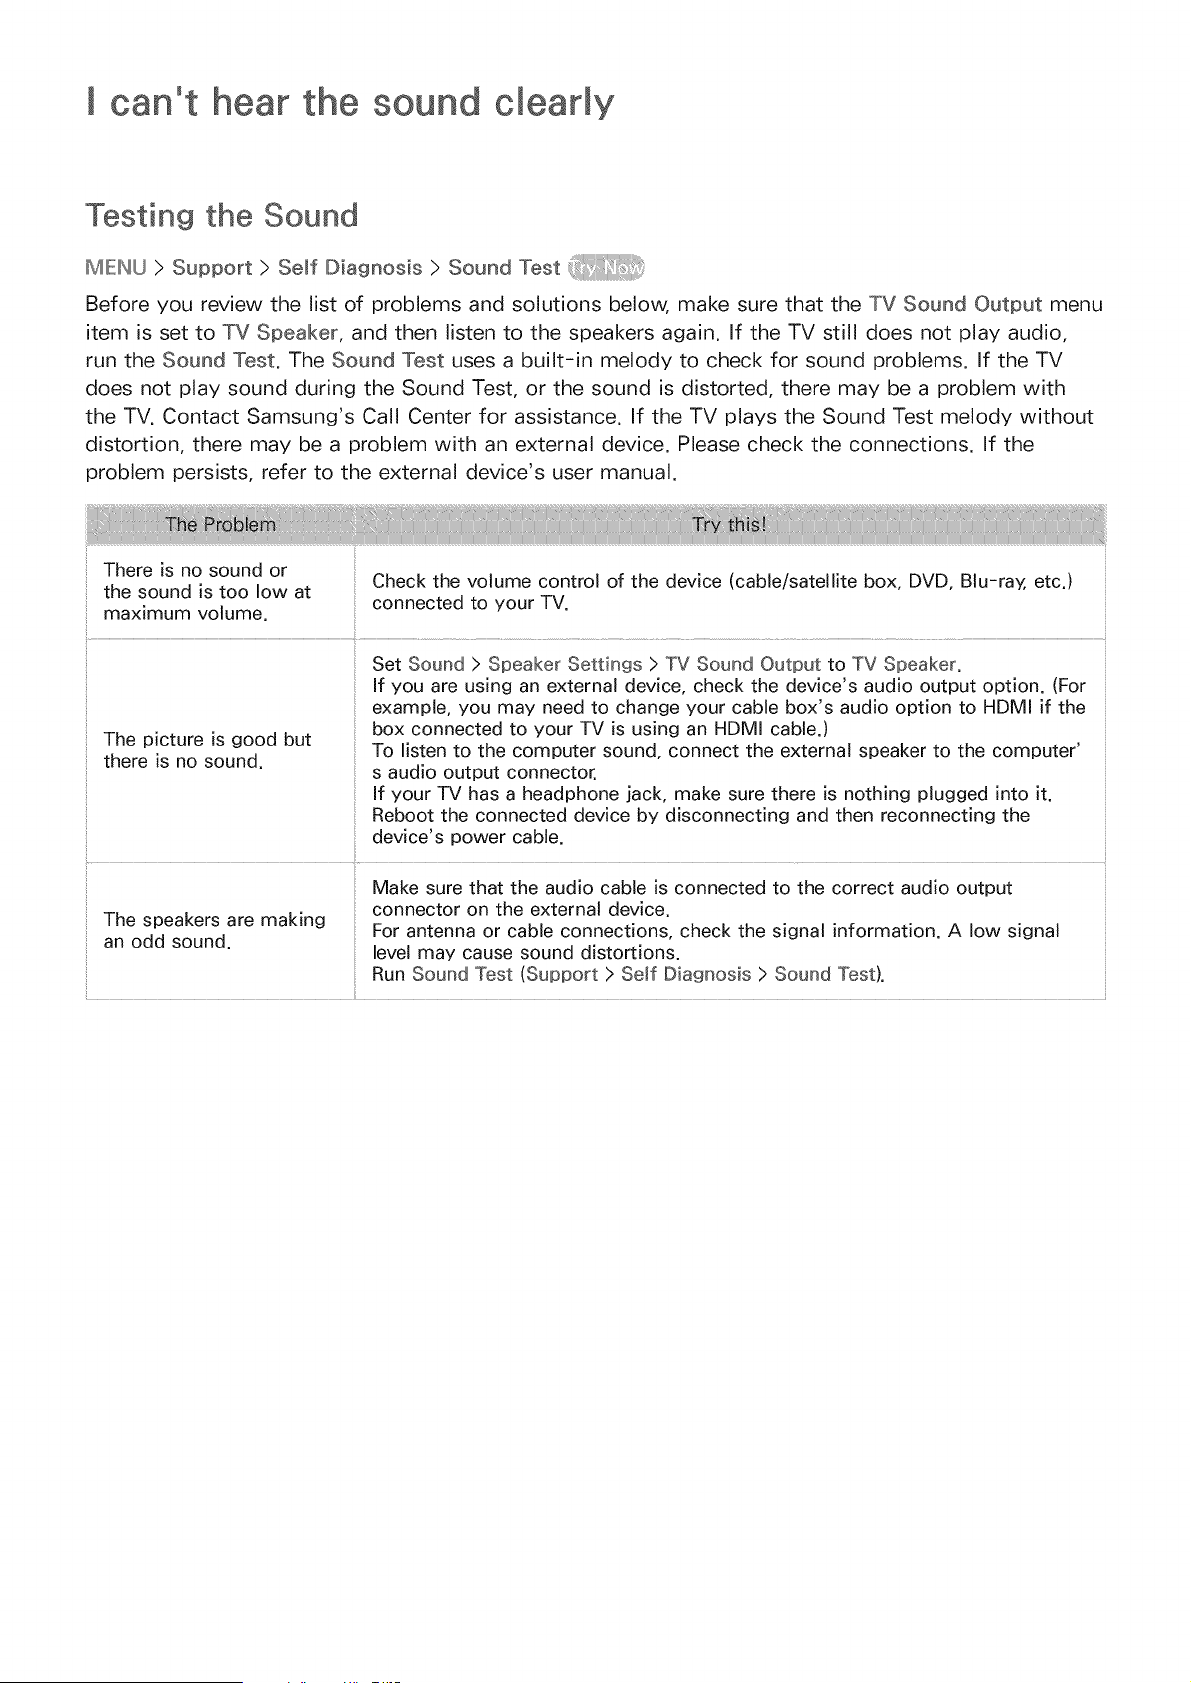
I can't hear the sound clearmy
Testing the Sound
ME:INU>Support>SemfD agnoa a>SoundTeat
Before you review the list of problems and solutions below, make sure that the TV Sound Output menu
item is set to TV Speaker, and then listen to the speakers again. If the TV still does not play audio,
run the Sound Test. The Sound Test uses a built-in melody to check for sound problems. If the TV
does not play sound during the Sound Test, or the sound is distorted, there may be a problem with
the TV. Contact Samsung's Call Center for assistance. If the TV plays the Sound Test melody without
distortion, there may be a problem with an external device. Please check the connections. If the
problem persists, refer to the external device's user manual.
There is no sound or
the sound is too low at
maximum volume.
Check the volume control of the device (cable/satellite box, DVD, Blu-ray, etc.)
connected to your TV.
Set Sound > Speaker Settings > TV Sound Output to TV Speaker.
If you are using an external device, check the device's audio output option. (For
example, you may need to change your cable box's audio option to HDMI if the
box connected to your TV is using an HDMI cable.)
The picture is good but
To listen to the computer sound, connect the external speaker to the computer'
there is no sound.
s audio output connector.
If your TV has a headphone jack, make sure there is nothing plugged into it.
Reboot the connected device by disconnecting and then reconnecting the
device's power cable.
Make sure that the audio cable is connected to the correct audio output ::
: ..... connector on the external device
/ne_l_eacKersdare maK.ng For antenna or cable connections check the signal information A low signal
level may cause sound distortions.
Run Sound Test (Support > Se_f Diagnosis > Sound Test).
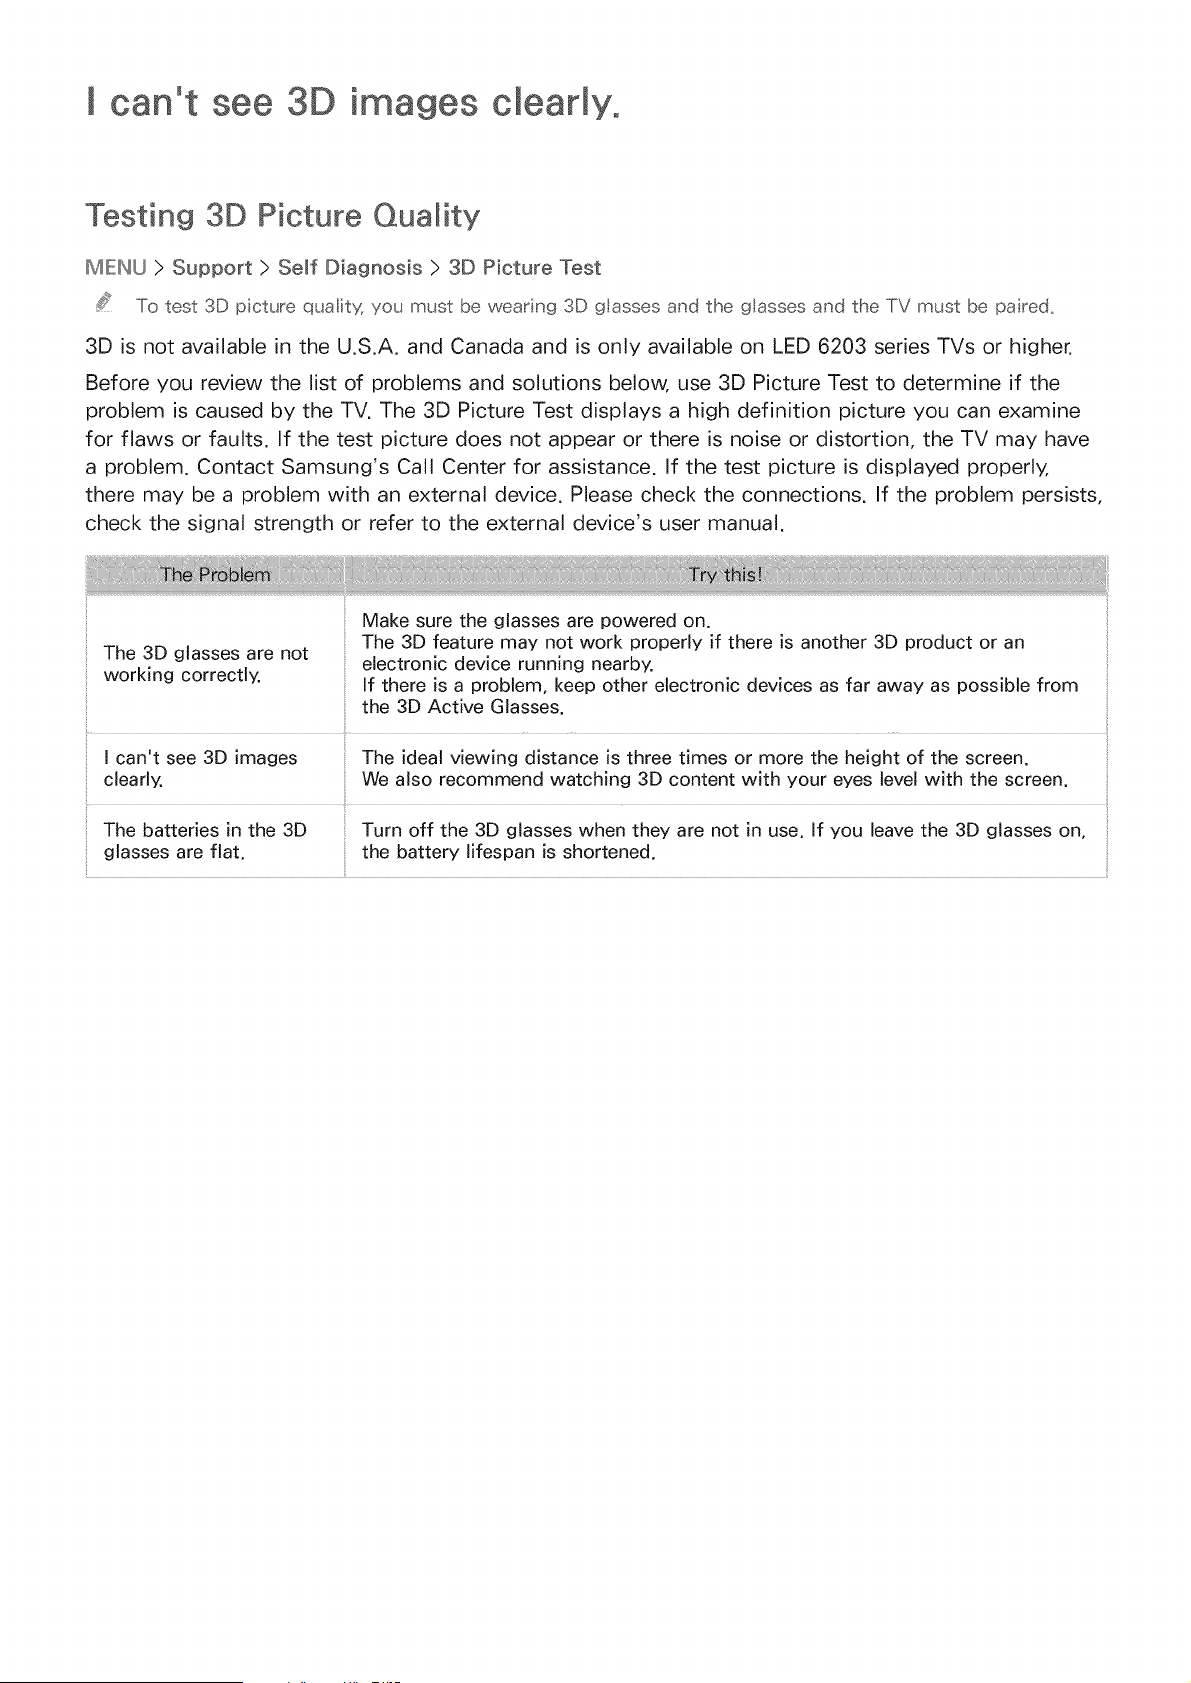
I can't see 3D images clearmyo
Testing 3D Picture Quality
MIE:W_U> Support > Self Diagnosis > 3D Picture Test
To test 3D picture qual;ty, you must be wearing 3D glasses and the glasses and the TV must be pa red,
3D is not available in the U.S.A. and Canada and is only available on LED 6203 series TVs or higher.
Before you review the list of problems and solutions below, use 3D Picture Test to determine if the
problem is caused by the TV. The 3D Picture Test displays a high definition picture you can examine
for flaws or faults. If the test picture does not appear or there is noise or distortion, the TV may have
a problem. Contact Samsung's Call Center for assistance. If the test picture is displayed properly,
there may be a problem with an external device. Please check the connections. If the problem persists,
check the signal strength or refer to the external device's user manual.
The 3D glasses are not
working correctly.
Make sure the glasses are powered on.
The 3D feature may not work properly if there is another 3D product or an
electronic device running nearby.
If there is a problem, keep other electronic devices as far away as possible from
the 3D Active Glasses.
I can't see 3D images The ideal viewing distance is three times or more the height of the screen.
clearly. We also recommend watching 3D content with your eyes level with the screen.
The batteries in the 3D Turn off the 3D glasses when they are not in use. If you leave the 3D glasses on,
glasses are flat. the battery lifespan is shortened.
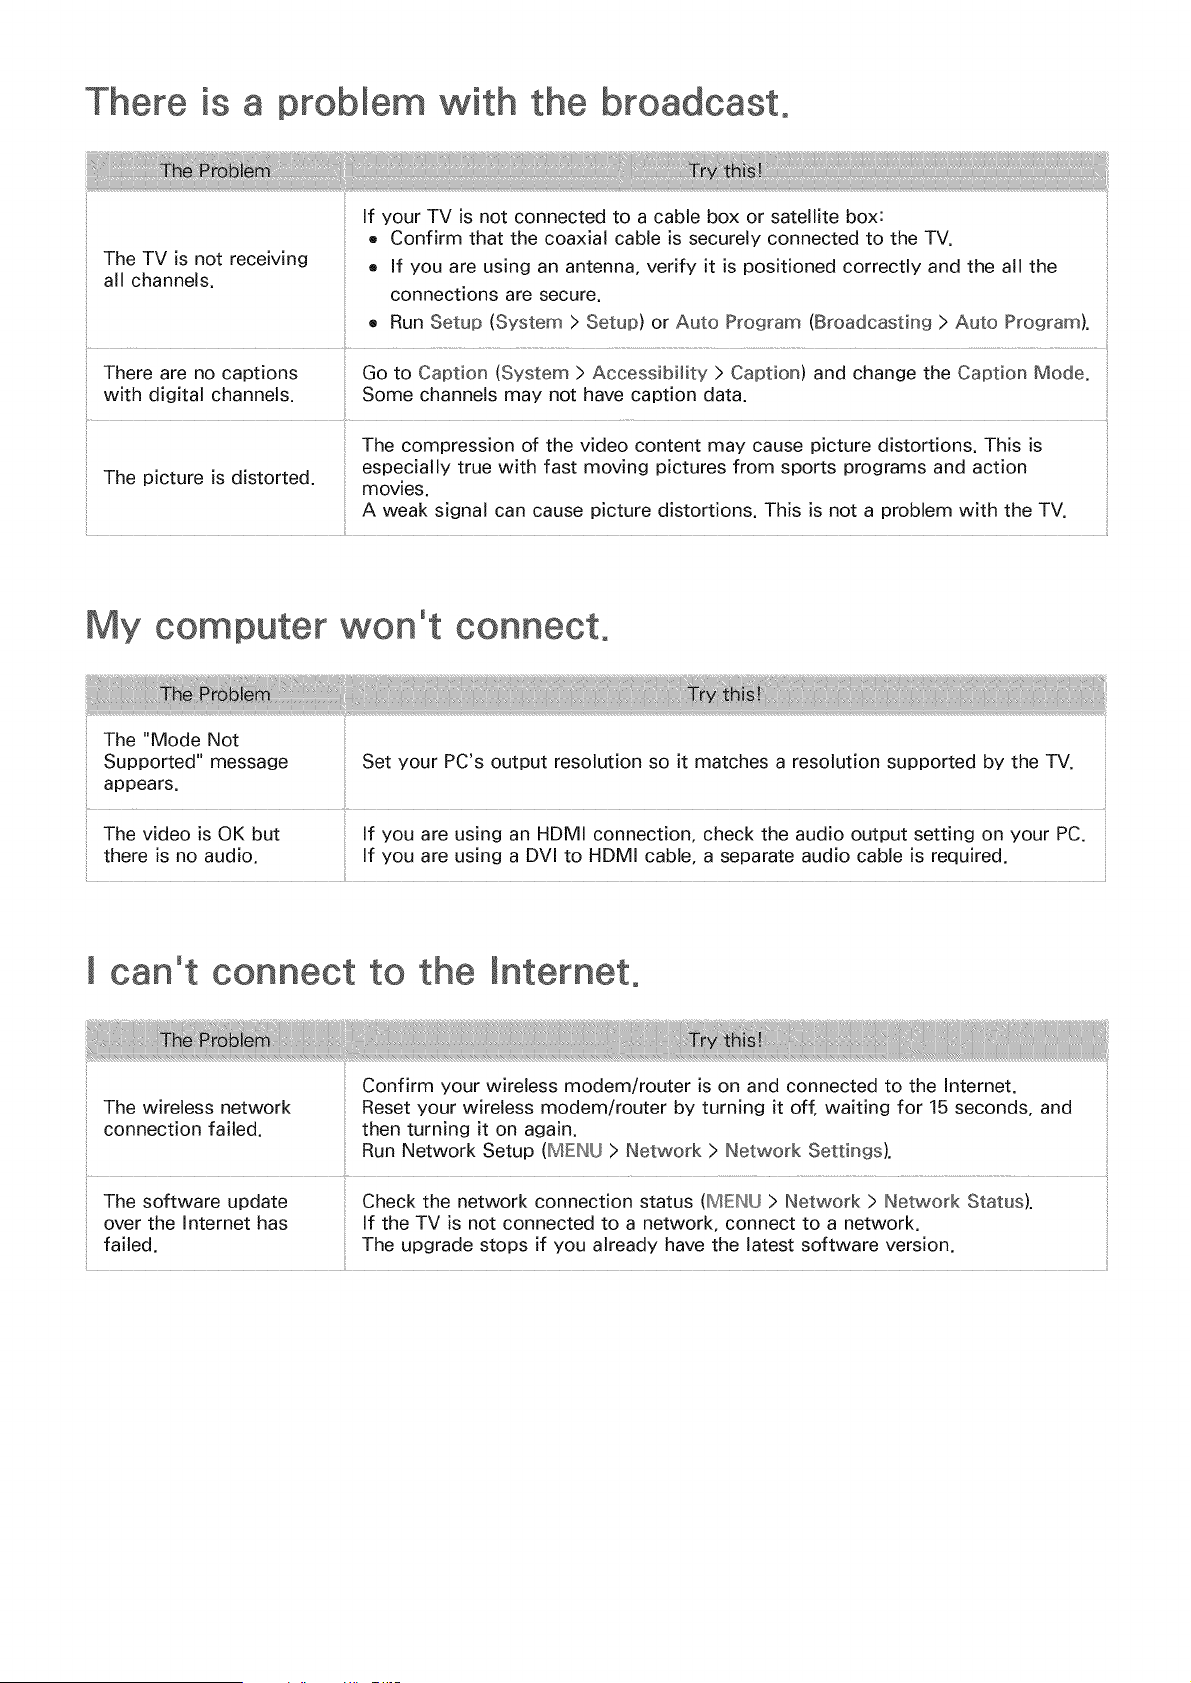
is a problem with the broadcast.
The TV is not receiving
all channels.
If your TV is not connected to a cable box or satellite box:
e Confirm that the coaxial cable is securely connected to the TV.
e If you are using an antenna, verify it is positioned correctly and the all the
connections are secure.
e Run Setup (System > Setup) or Auto Program (Broadcasting > Auto Program).
There are no captions Go to Caption (System > Accessibility > Caption) and change the Caption Mode.
with digital channels. Some channels may not have caption data.
:: The compression of the video content may cause picture distortions. This is
The picture is distorted, especially true with fast moving pictures from sports programs and action
movies.
A weak signal can cause picture distortions. This is not a problem with the TV.
My computer won't connect,
The "Mode Not
Supported" message Set your PC's output resolution so it matches a resolution supported by the TV.
appears.
The video is OK but If you are using an HDMI connection, check the audio output setting on your PC.
there is no audio. If you are using a DVl to HDMI cable, a separate audio cable is required.
[ can't connect to the
The wireless network
connection failed.
Confirm your wireless modem/router is on and connected to the Internet.
Reset your wireless modem/router by turning it off, waiting for 15 seconds, and
then turning it on again.
Run Network Setup (MENU > Network > Network Settings).
The software update Check the network connection status (MENU > Network > Network Status).
over the Internet has if the TV is not connected to a network, connect to a network.
failed. The upgrade stops if you already have the latest software version.
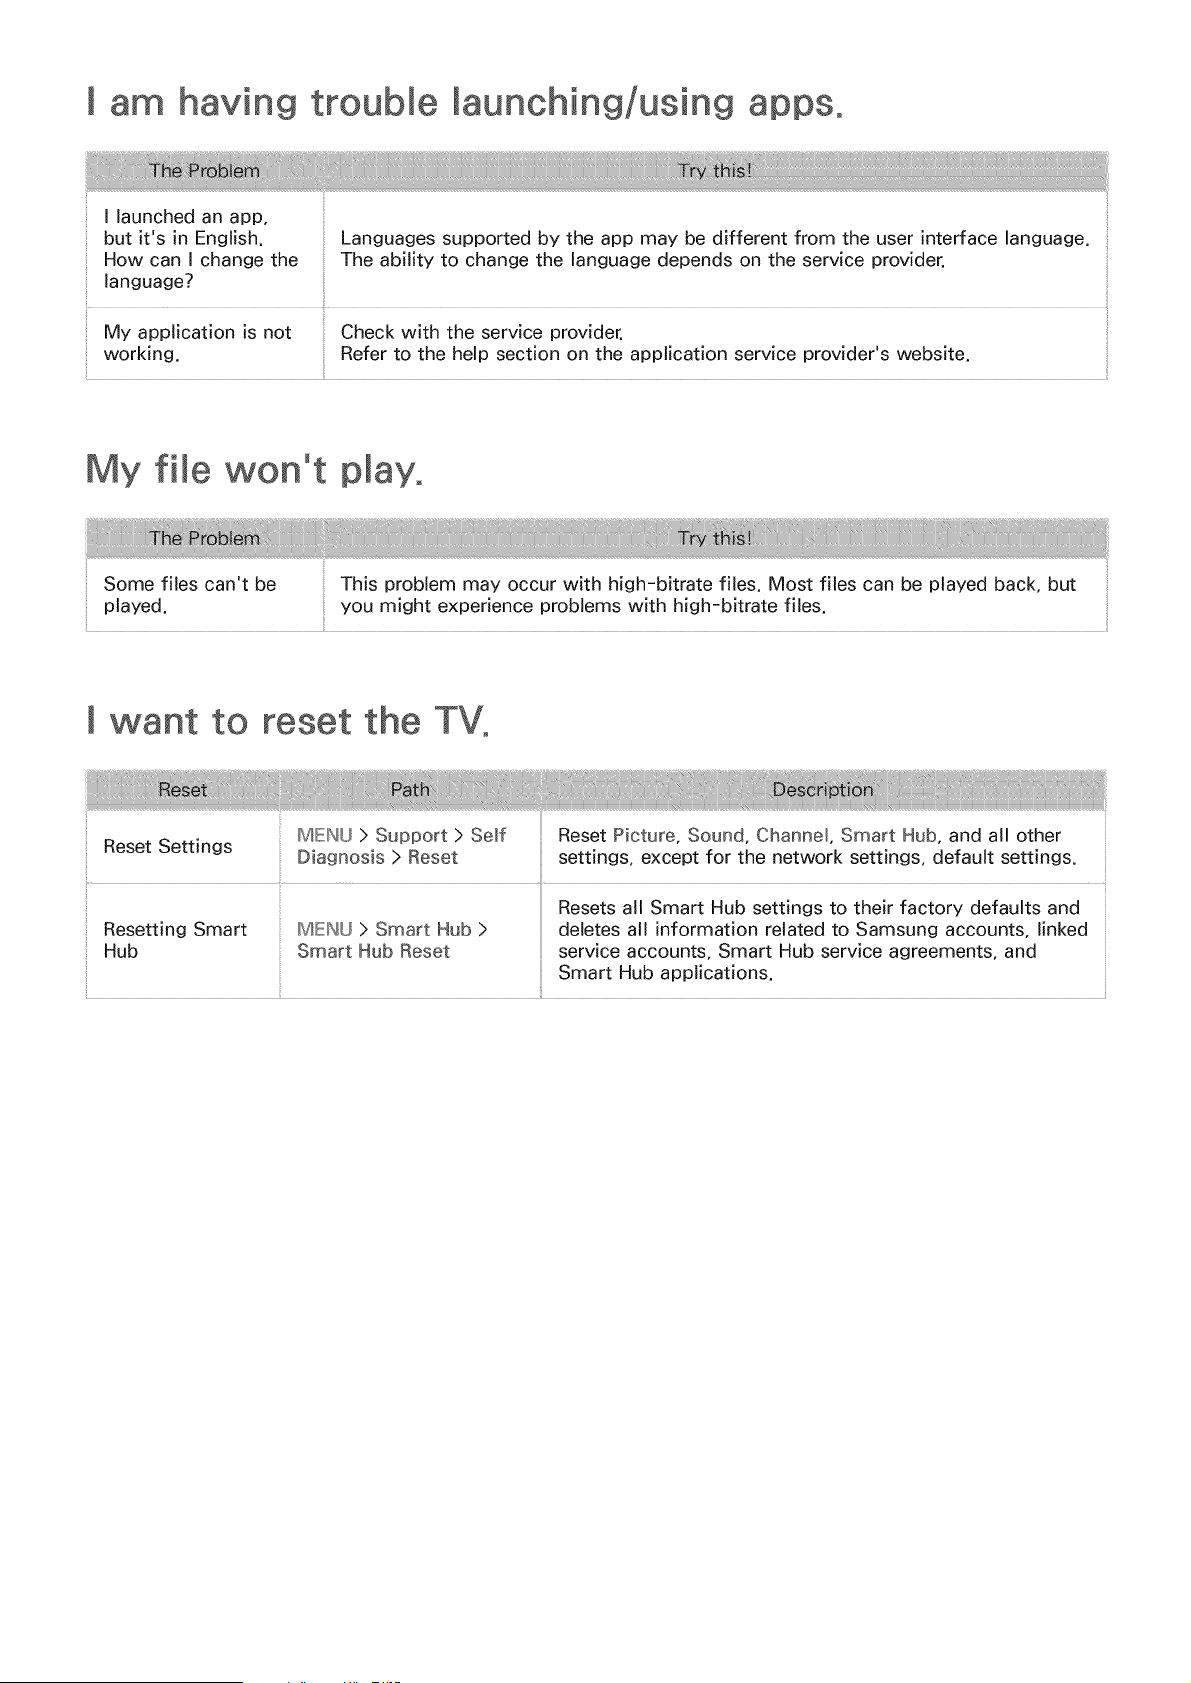
I am having Maunching/using
I launched an app,
but it's in English. Languages supported by the app may be different from the user interface language.
How can I change the The ability to change the language depends on the service provider.
language?
My application is not Check with the service provider.
working. Refer to the help section on the application service provider's website.
My flee won't play,
Some files can't be
played.
This problem may occur with high-bitrate flies. Most files can be played back, but
you might experience problems with high-bitrate files.
I want to reset the TV,
MENU > Support > Self
Reset Settings
Diagnosis > Reset
Resetting Smart
Hub
MENU > Smart Hub >
Smart Hub Reset
Reset Picture, Sound, Channel, Smart Hub, and all other
settings, except for the network settings, default settings.
Resets all Smart Hub settings to their factory defaults and
deletes all information related to Samsung accounts, linked
service accounts, Smart Hub service agreements, and
Smart Hub applications.
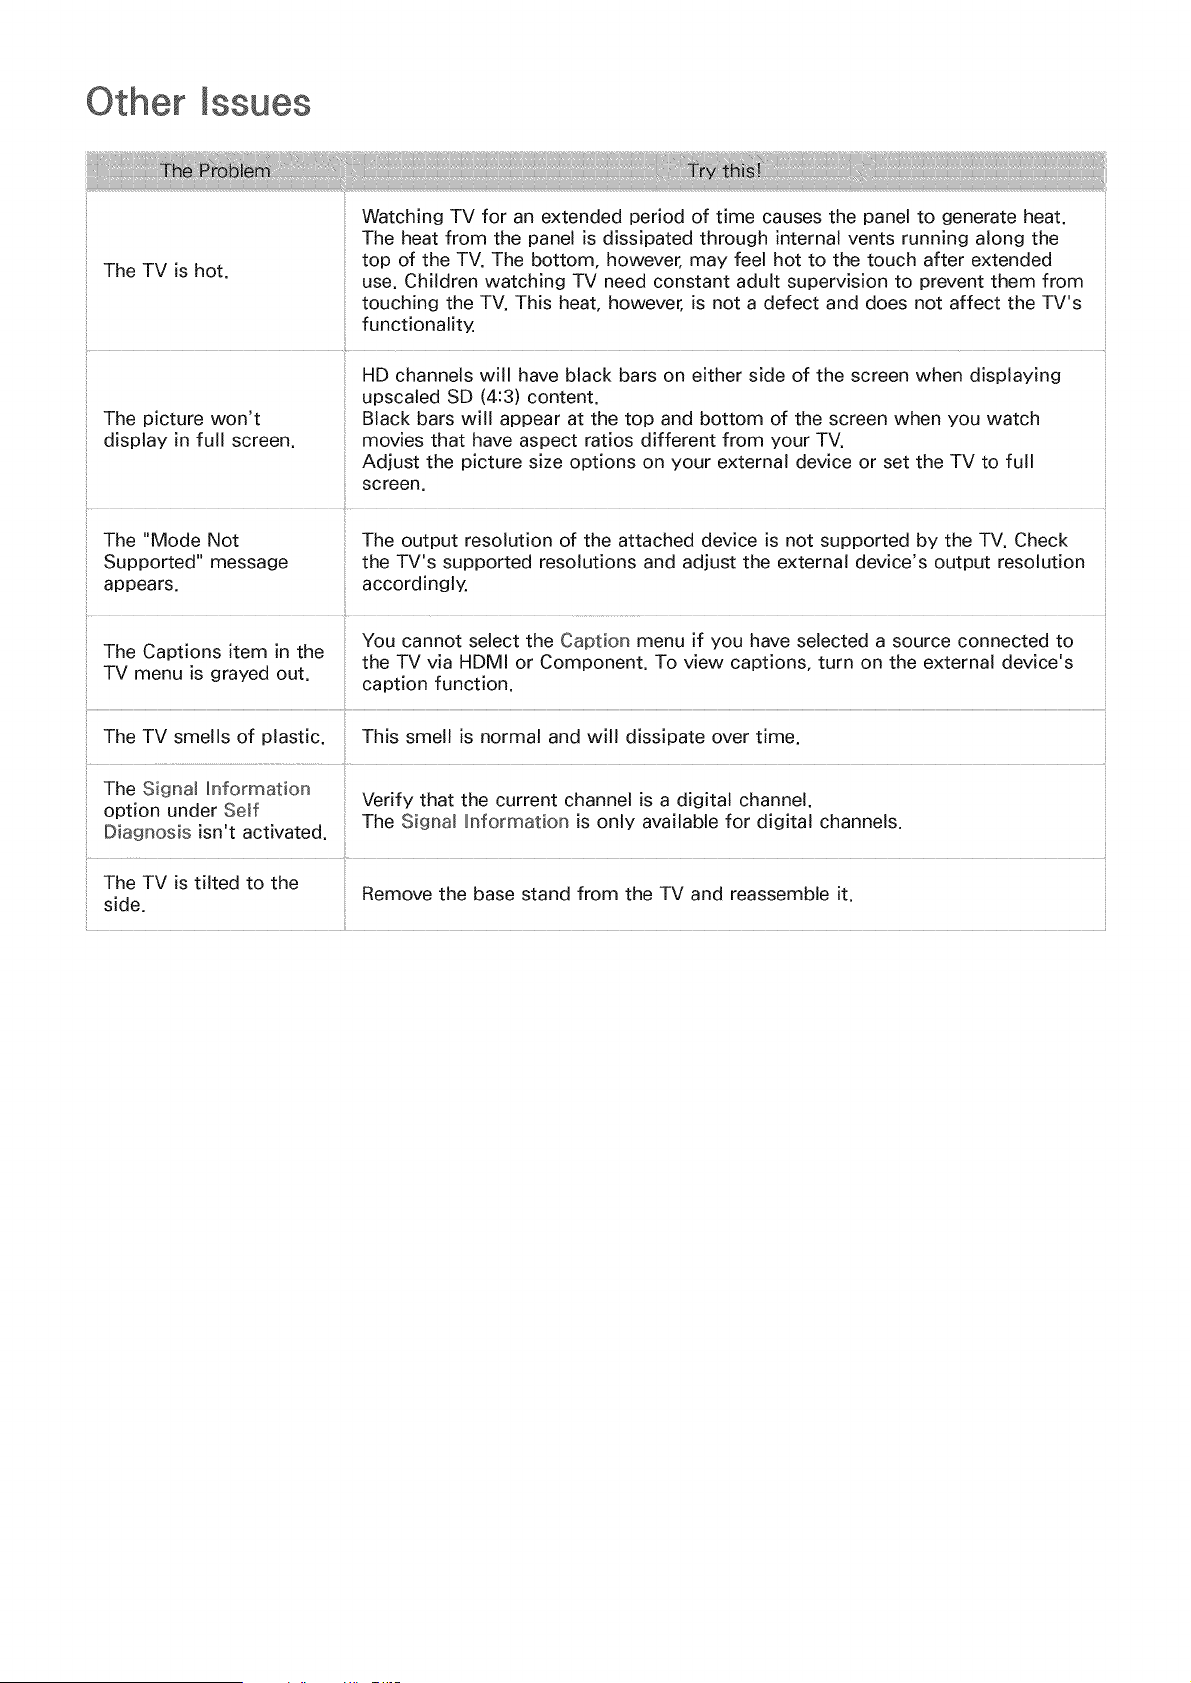
Other mssues
The TV is hot.
use. Children watching TV need constant adult supervision to prevent them from
touching the TV. This heat, however, is not a defect and does not affect the TV's
functionality.
The picture won't
display in full screen.
..... ii¸
The "Mode Not
Supported" message
appears.
HD channels will have black bars on either side of the screen when displaying
upscaled SD (4:3) content.
Black bars will appear at the top and bottom of the screen when you watch
movies that have aspect ratios different from your TV.
Adjust the picture size options on your external device or set the TV to full
screen.
The output resolution of the attached device is not supported by the TV. Check
the TV's supported resolutions and adjust the external device's output resolution
accordingly.
You cannot select the Caption menu if you have selected a source connected to
The Captions item in the
the TV via HDMI or Component. To view captions, turn on the external device's
TV menu is grayed out. caption function.
The TV smells of plastic. This smell is normal and will dissipate over time.
The Signal hformation
option under Self Verify that the current channel is a digital channel.
Diagnosis isn't activated. The Signal Information is only available for digital channels.
The TV is tilted to the
Remove the base stand from the TV and reassemble it.
side.
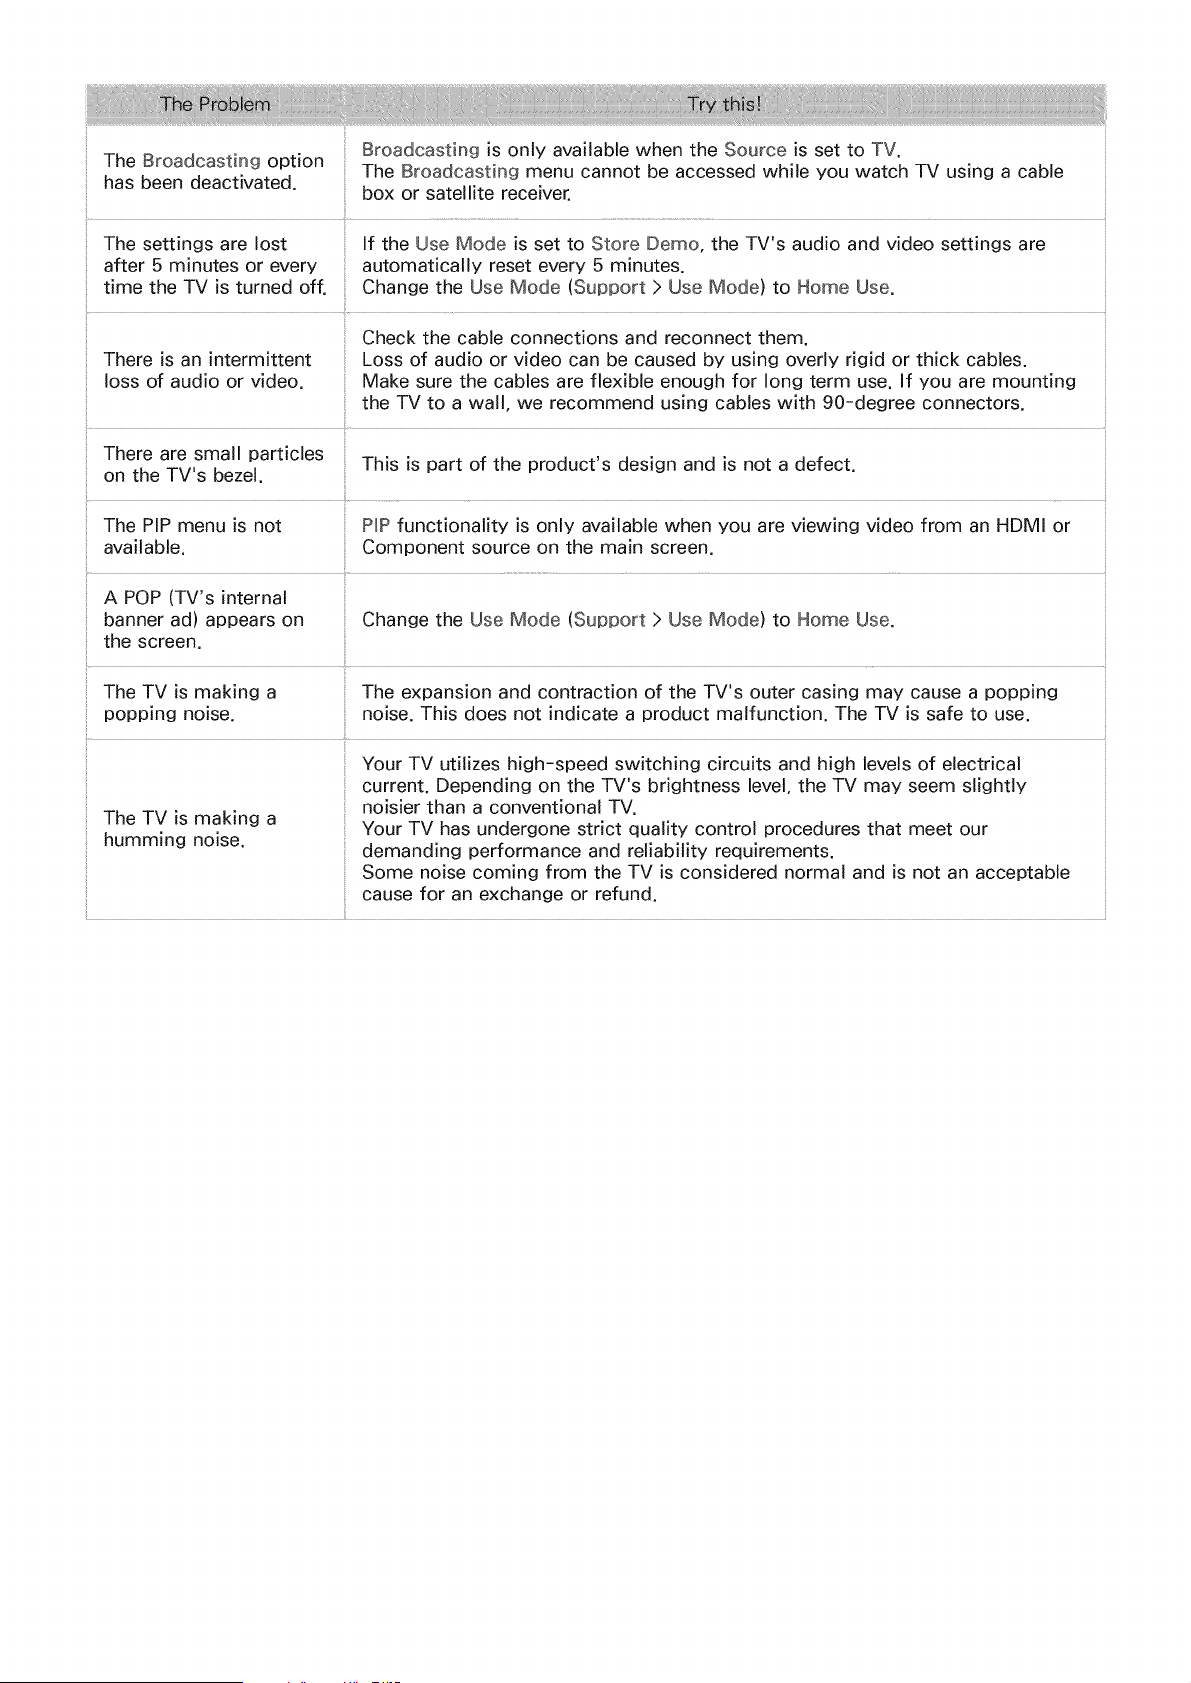
BroadcastingisonlyavailablewhentheSourceis setto TV.
TheBroadcastingoption TheBroadcastingmenucannotbeaccessedwhileyouwatchTVusingacable
hasbeendeactivated, boxor satellitereceiver.
Thesettingsarelost If theUseModeis setto StoreDemo,theTV'saudioandvideosettingsare
after5minutesor every automaticallyresetevery5 minutes.
timetheTVisturnedoff. ChangetheUseMode(Support>UseMode)to HomeUse.
Checkthecableconnectionsandreconnectthem.
Thereisanintermittent Lossof audioorvideocanbecausedbyusingoverlyrigidorthickcables.
lossof audioorvideo, Makesurethecablesareflexibleenoughfor longtermuse.If youaremounting
theTVto a wal!,werecommendusingcableswith 90-degreeconnectors.
Therearesmallparticles Thisis partof theproduct'sdesignandisnot adefect.
ontheTV'sbezel,
ThePIPmenuisnot ProPfunctionalityisonlyavailablewhenyouareviewingvideofromanHDM[or
available. Componentsourceonthemainscreen,
A POP(TV'sinternal
bannerad)appearson Changethe UseMode(Support>UseMode)to HomeUse.
thescreen.
TheTVis makinga Theexpansionandcontractionof theTV'soutercasingmaycauseapopping
poppingnoise, noise,Thisdoesnotindicatea productmalfunction,TheTVis safeto use.
The TV is making a
humming noise.
Your TV utilizes high-speed switching circuits and high levels of electrical
current. Depending on the TV's brightness level, the TV may seem slightly
noisier than a conventional TV.
Your TV has undergone strict quality control procedures that meet our
demanding performance and reliability requirements.
Some noise coming from the TV is considered normal and is not an acceptable
cause for an exchange or refund.
Read Before Using 3D Viewing Mode
3D is not available in the U.S.A. and Canada and is only available on LED 6203 series TVs or higher.
3D Precautions
/k
o
Warning
When viewing a 3D video under a fluorescent lamp (50 Hz - 60 Hz) or 3-wavelength lamp, you
may notice a small amount of screen flickering.
Iif this OCCLrS dim or"t_m off the ight
Switching the input mode while watching a 3D mowe may disable the 3D function on the TV.
As a _est t, the 3D glasses may _ot ft_nctio _and the movie may _ot be disp ayed proper x
Ensure you are within the working distance of the glasses when you view a 3D video.
.....Iihe mages may _ot be vewabe n 3D f yo_ move o_ts de of rise wo_king distance for 3 seconds,,
Iif the 3D glasses a_e moved otts de of tl"te r wo_king distance_ the signa from the IiV wl disco_;nect
and tlhe glasses 3D ft nctio_ wl t_rn off after seve_a seco _ds,, When this happens, the _ed lED wl
t_rn on for 3 seconds.
If you lie on your side while watching TV with 3D active glasses, the picture may appear dark or
may not be visible. The actual 3D effect may be experienced differently depending on the viewer.
The 3D effect may not be visible if the visual ability of your left eye differs greatly from the visual
ability of your right eye.
If a part of the 3D glasses or lenses is defective or damaged, it cannot be repaired and the
glasses should be replaced. If the glasses stop working within the warranty period, the glasses
can be repaired or replaced for free. If the glasses have been damaged due to the fault of the
customer or the warranty period has expired, a new pair of glasses will have to be purchased.
The 3D glasses may not work properly due to interference from other 3D products or electronic
devices that operate on the 2.4GHz frequency such as a microwave oven or Internet AP. If
the 3D function malfunctions due to interference, please move all other electronic or wireless
communication devices as far away from the glasses and the TV as possible.
The vividness of the image may appear degraded if you view 3D video in a place that is exposed
to direct sunlight or illumination.
The 3D glasses may malfunction if there is an electric field or metallic object such as a steel
plate nearby. Keep the glasses as far away as possible from electric fields and metallic objects.
With SSG-3570 model glasses, the glasses may power off if you remain stationary while viewing
3D video for an extended period of time.
With SSG-3570 model glasses, if the 3D glasses do not function immediately after you put them
on when the TV is in 3D mode, take them off and then put them back on.
AX Caution
IMPORTANT HEALTH AND SAFETY INFORMATION FOR 3D IMAGES. READ THE FOLLOWING
CAUTIONS BEFORE YOU OR YOUR CHILD USE THE 3D FUNCTION.
. Adults should frequently check on children who are using the 3D function. If there are any
complaints of tired eyes, headaches, dizziness, or nausea, stop the child from viewing the 3D TV
and ensure that they rest.
o Do not use the 3D glasses for other purposes such as general wear, sunglasses, protective
goggles, etc.
Some viewers may experience discomfort such as dizziness, nausea, and headaches while viewing
3D TV. If you experience any of these symptoms, stop viewing the 3D TV, remove the 3D glasses,
and rest for awhile.
Watching 3D pictures for an extended period of time may cause eye strain. If you experience any
eye strain, stop viewing the 3D TV, remove the 3D glasses, and rest for awhile.
Do not use the 3D function or 3D glasses while walking or moving around. Using the 3D function
or 3D Active Glasses while moving around may result in injury from running into objects, tripping,
and/or falling.
Do not sleep with the 3D glasses on. You can damage or break the temples.
The temples on your 3D glasses are not foldable. Forcing the temples to fold will damage the 3D
glasses.
If you have SSG-3570 model 3D glasses, do not shake them repeatedly. Shaking the glasses will
power them on and can cause the battery to discharge faster than it would normally.
If you have SSG-5100GB or SSG-5150GB model glasses, there is a danger of explosion if the
battery is replaced with the wrong type of battery.
If you have SSG-5100GB or SSG-5150GB model glasses, make sure to replace the battery with
the same type of battery.
/_ Safety Precautions
Please read the following safety instructions to ensure your personal safety, prevent property
damage, and ensure the proper use of the product.
o Do not place the product in a location exposed to direct sunlight, heat, fire, or water. Exposure
may result in a product malfunction or fire.
Do not apply force to the lenses of the 3D glasses. Do not drop or bend the product. Applying
force, dropping, or bending may result in a 3D glasses malfunction.
Keep the components of the 3D glasses out of reach of children. Especially, ensure children do
not swallow any of the components. If your child swallows a component, consult your doctor
immediately.
When cleaning the product, do not spray water or cleaner directly onto the surface of the product.
Spraying water or cleaner directly onto the glasses may result in fire or electric shock, damage to
the product's surface, or cause the indicator labels on the product's surface to come loose.
Do not apply chemicals containing alcohol, solvent, or surfactant such as wax, benzene, thinner,
pesticide, air freshener, lubricant, or cleaner to the product. These chemicals may cause the
product's exterior to be discolored or cracked, or labels or instructions to be removed. Use only
a soft cloth such as superfine fibers or cotton flannels for cleaning the product as the surface
or the lenses easily crack. Because the product can be easily scratched with foreign substances,
make sure to dust off the cloth before using.
Do not disassemble, or attempt to repair or modify your 3D active glasses by yourself.
Be careful not to let the temple ends of the 3D active glasses harm your eye.
Do not sleep with the 3D glasses on. You can break the arms.
Use your hands to put on or remove the 3D glasses.
For SSG-5100 and SSG-5150GB model glasses, use only the specified standard batteries. When
replacing the battery, insert the battery so that its polarity (+, -) is correct. Failing to do so may
damage the battery or result in fire, personal injury, or environmental damage caused by liquid
leaking from the battery.
For SSG-5100 and SSG-5150GB model glasses, keep used batteries out of the reach of children
so that they do not accidently swallow them. If your child swallows a battery, consult your
doctor immediately.
Swallowing the cylindrical (button type) battery can cause serious damage to your internal
organs. If a button type battery is swallowed, contact a doctor immediately.
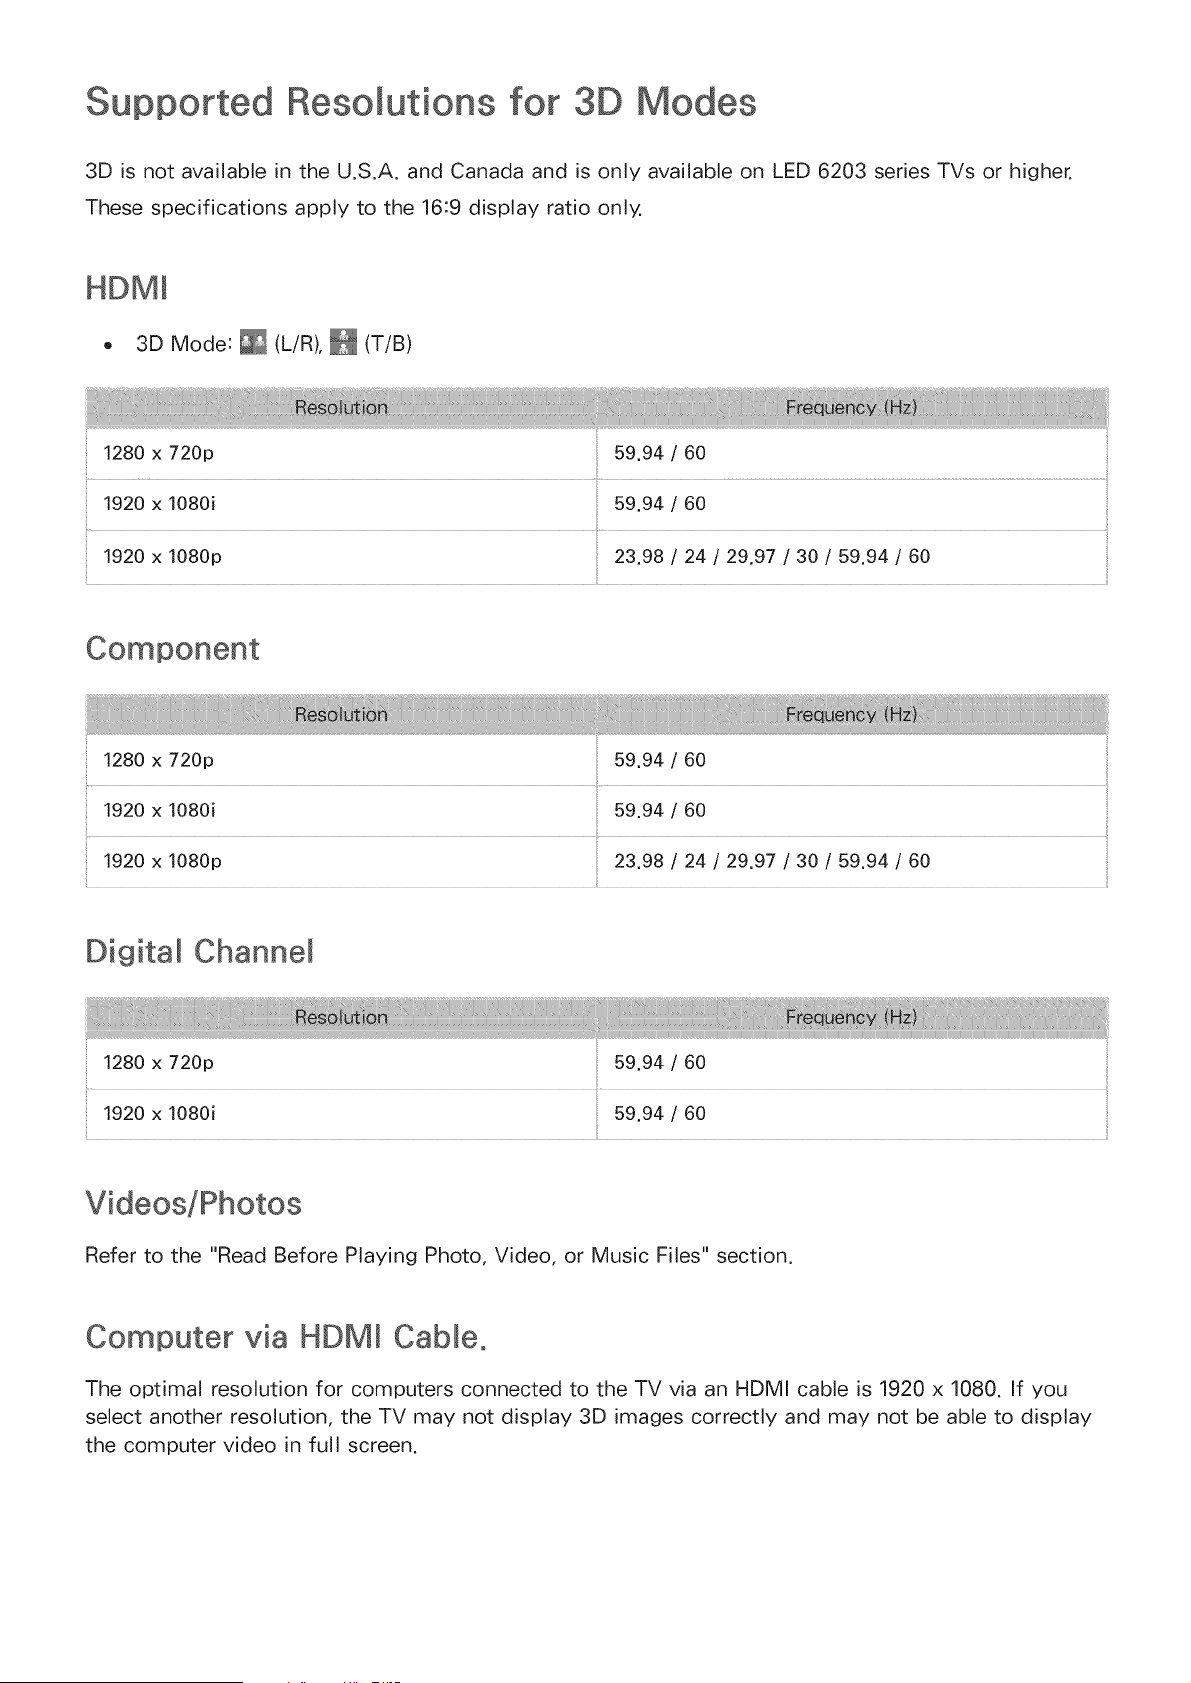
Resomutions for 3D
3D is not available in the U.S.A. and Canada and is only available on LED 6203 series TVs or higher.
These specifications apply to the 16:9 display ratio only.
HDMm
• 3D Mode: _ (L/R), _ (T/B)
i_ii_iiiiii_iiiiiiiil_iiii_iiil_iiii_iiil_iiii_iiil_iiii_iiiii_iiiiiiWiiiiii_i_iiii_i@iiiiiiiiIiI_iiiiiiIiiiiiiiiiiiiiiiiiiiiiiiiiiiiiiiiiiiiiiiiiiiiii_!!_i_iii
59.94 / 60
!920 x 1080p 23.98 / 24 / 29.97 / 30 / 59.94 / 60
!920 x 1080p
59.94/60
59.94/60
23.98/24/29.97/30/59.94/60
Digital Channem
!280 x 720p 59.94 / 60
1920 x 1080i 59.94 / 60
Refer to the "Read Before Playing Photo, Video, or Music Files" section.
Computer via HDMm Cable.
The optimal resolution for computers connected to the TV via an HDMI cable is 1920 x 1080. If you
select another resolution, the TV may not display 3D images correctly and may not be able to display
the computer video in full screen.
Read Before Using Apps
o
o
o
o
o
o
Due to the product characteristics featured on the Samsung Smart Hub, as well as limitations in
available content, certain features, applications, and services may not be available on all devices
or in all territories. Some Smart Hub features may also require additional peripheral devices
or membership fees. Visit http://www.samsung.com for more information on specific device
information and content availability. Services and content availability are subject to change
without prior notice.
Samsung Electronics takes no legal responsibility whatsoever for any interruption of app services
caused by the service provider for any reason.
Application services may be provided in English only and available content may vary depending
on the area.
For more information about applications, visit the applicable service provider's website.
An unstable Internet connection may cause delays or interruptions. In addition, applications may
terminate automatically depending on the network environment. If this occurs, check your Internet
connection and try again.
Application services and updates may become unavailable.
Application content is subject to change by the service provider without prior notice
Specific services may vary depending on the version of the application installed on the TV.
An application's functionality may change in future versions of the application. If this occurs, run
the application's tutorial or visit the service provider's website.
o Depending on the service provider's policies, certain applications may not support multitasking.
Read Before Using the Browser
o
o
o
o
o
o
o
o
o
o
o
o
Select Web Browser. The browsing screen may differ from the one on your computer.
The web browser is not compatible with Java applications.
You cannot download files. If you attempt to download a file, you will receive an error message
instead.
The web browser may not be able to access certain websites.
Playing Flash videos may be restricted.
E-commerce for online purchases is not supported.
With websites that have scrollable windows, scrolling a window can result in corrupted
characters.
ActiveX is not supported.
Certain options are not accessible in Link Browsing mode. Switch to Pointer Browsing to activate
those options.)
Only a limited number of fonts are supported. Certain symbols and characters may not be
displayed properly,
The response to remote commands and the resulting on-screen display may be delayed while a
webpage is loading.
Loading a webpage may be delayed or suspended completely with certain operating systems.
The copy and paste operations are not supported.
When composing an email or a simple message, certain functions such as the font size and color
selection may not be available.
o Thereis a limit to the numberof bookmarksand the size of the log file that can be saved.
Thenumberof windowsthat can be openedconcurrentlyvariesdependingon the search
conditionsand the TV model.
Theweb browsingspeedwill vary dependingon the networkenvironment.
Embeddedvideoscan play with a picture-in-picture (PIP)at the sametime.
Theweb browsersupports .mp3audio files only.
Theweb browsersupportsa specific file format for importingand exporting bookmarks.
(CompatibleFormat:Netscape-bookmarkfile-1)
Thefolder tree information is not includedwhenimporting and exporting bookmarks.
Exportingbookmarksto a USBdeviceconnectedto the TV savesthe bookmarksundera folder
named"SamsungSmartTVBookmark".
If the Clock (System>Time > Clock)has not beenset, the browsinghistorywill not be saved.
Thebrowsinghistory is savedfrom latestto oldest,with the oldest entriesbeing overwrittenfirst.
Dependingon the types of video/audiocodecssupported,it might not be possibleto play certain
videoand audiofiles while playing Flashcontent.
Videosourcesfrom PC-optimizedstreamingserviceprovidersmay not play properlyon our
proprietaryweb browser.
Usingthe on-screenQWERTYkeyboardautomaticallydisablesPIP.(Exceptwhenenteringa URL.)
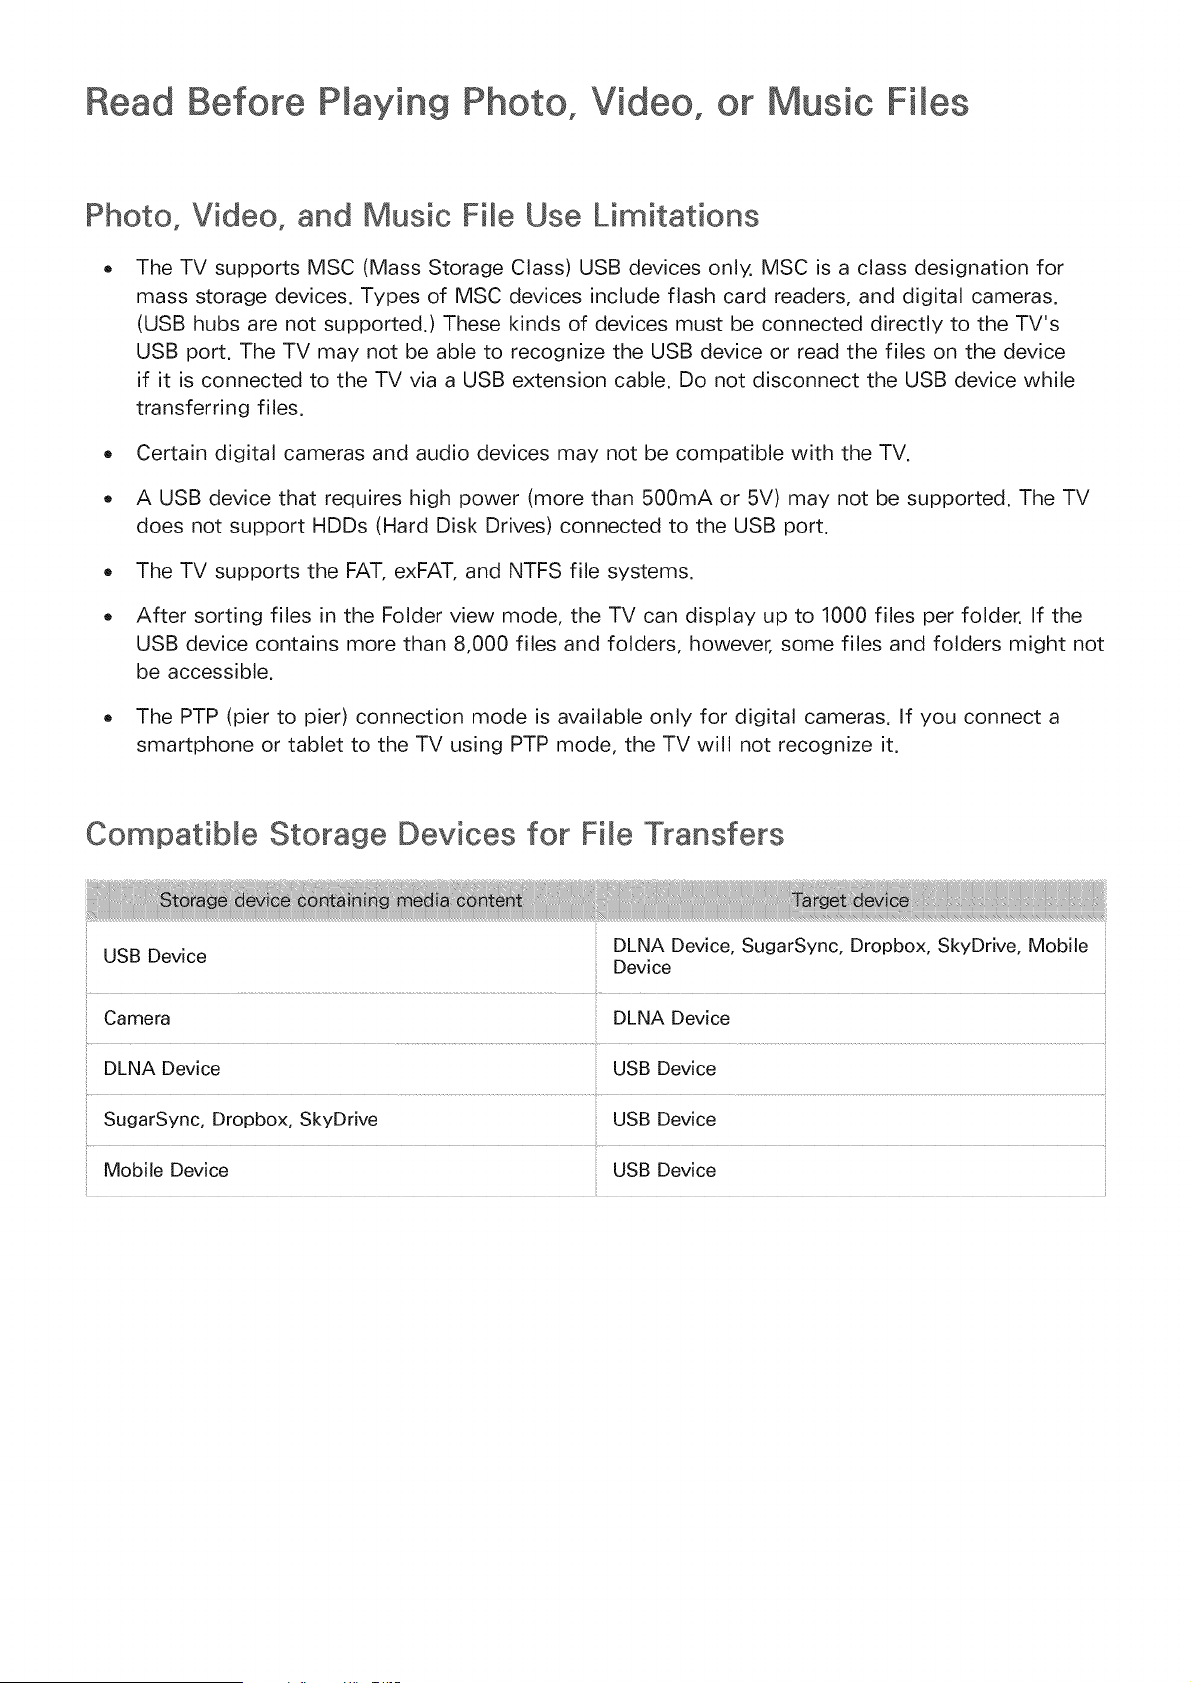
Read Before Pmaying Photo, Video, or Music Fi es
Photo, Video, and Music File Use Limitations
The TV supports MSC (Mass Storage Class) USB devices only. MSC is a class designation for
mass storage devices. Types of MSC devices include flash card readers, and digital cameras.
(USB hubs are not supported.) These kinds of devices must be connected directly to the TV's
USB port. The TV may not be able to recognize the USB device or read the files on the device
if it is connected to the TV via a USB extension cable. Do not disconnect the USB device while
transferring files.
o Certain digital cameras and audio devices may not be compatible with the TV.
A USB device that requires high power (more than 500mA or 5V) may not be supported. The TV
does not support HDDs (Hard Disk Drives) connected to the USB port.
The TV supports the FAT, exFAT, and NTFS file systems.
After sorting files in the Folder view mode, the TV can display up to 1000 files per folder. If the
USB device contains more than 8,000 files and folders, however, some files and folders might not
be accessible.
The PTP (pier to pier) connection mode is available only for digital cameras. If you connect a
smartphone or tablet to the TV using PTP mode, the TV will not recognize it.
CompatibWe Storage Devices for Fi_e Transfers
DLNA Device, SugarSync, Dropbox, SkyDrive, Mobile
USB Device Device
Camera DLNA Device
........................................................................................................................... I
DLNA Device USB Device
SugarSync, Dropbox, SkyDrive USB Device
Mobile Device USB Device
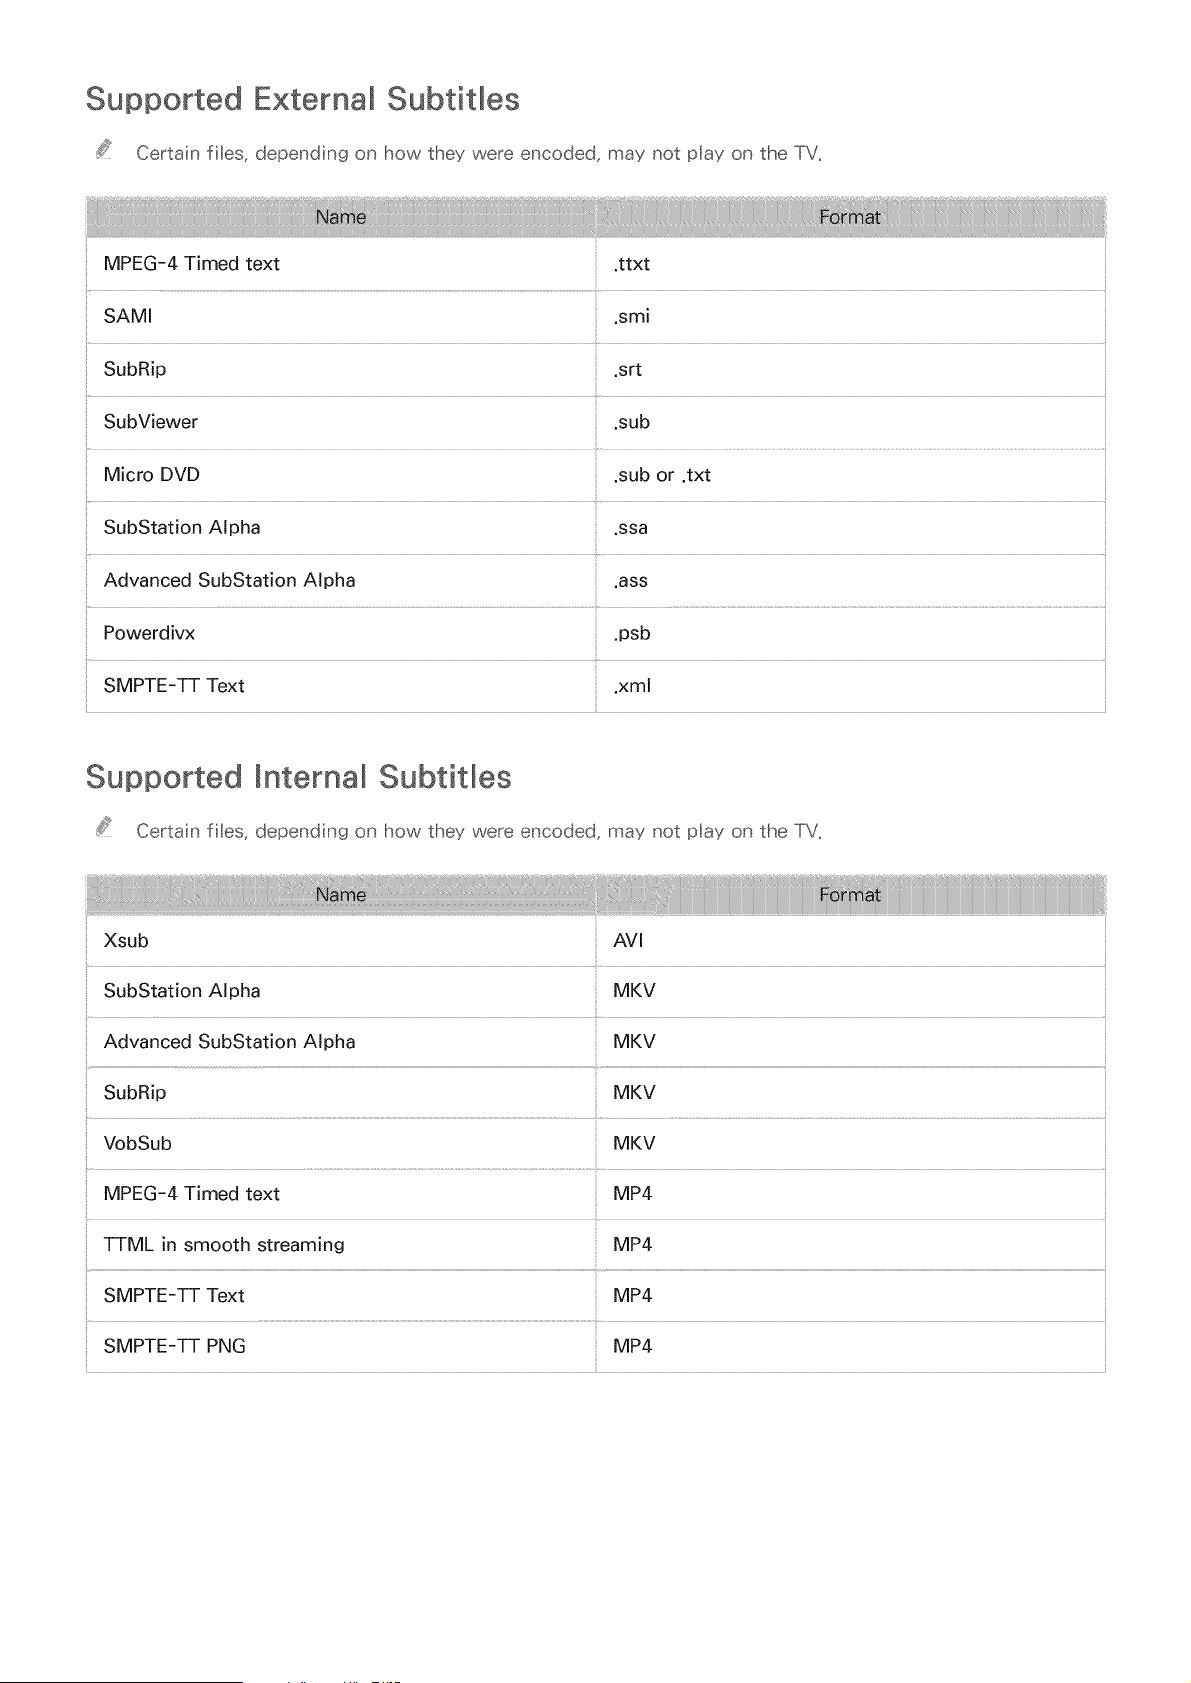
Supported External Subtitles
Certain fibs_ depending on how they were encoded_ may not play on the TV_
MPEG-4 Timed text .ttxt
SAMI .smi
SubRip srt
SubViewer sub
Micro DVD ,sub or ,txt
SubStation Alpha ,ssa
Advanced SubStation Alpha
.ass
Powerdivx .psb
SMPTE-TT Text .xml
Supported mnternal SubtitMes
Certa n ftes, depend ng on how they were encoded, may not play on the TV_
Xsub AVl
Advanced SubStation Alpha MKV
SubRip MKV
VobSub MKV
MPEG-4 Timed text MP4
TTML in smooth streaming MP4
SMPTE-TT Text MP4
SMPTE-TT PNG MP4
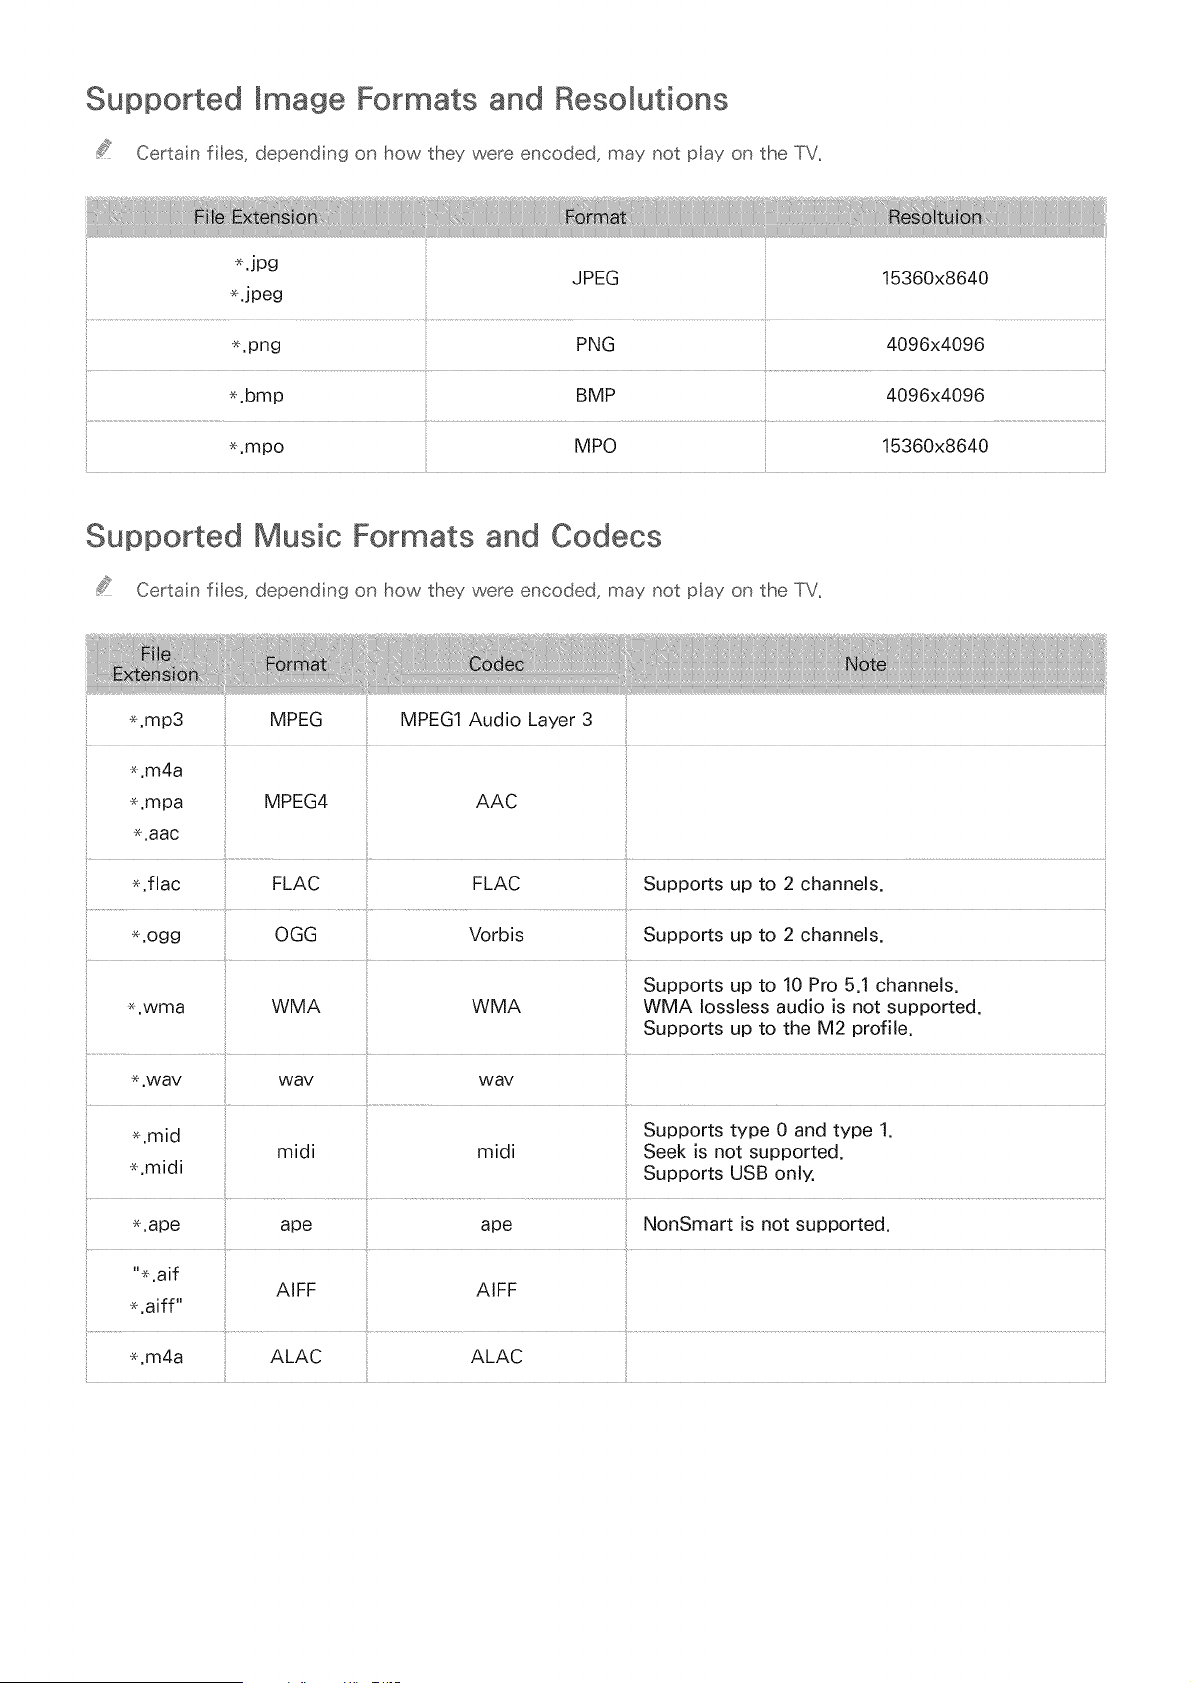
Supported Image Formats and Resolutions
Certain files, depending on how they were encoded, may not play on the TV,
_JPg JPEG 15360x8640
_.jpeg
e.png PNG 4096x4096
_.bmp BMP 4096x4096
_.mpo MPO 15360x8640
Supported Music Formats and Codecs
Certain files, depending on how they were encoded, may not play on the TV.
_.mp3
.m4a
.mpa
.aac
MPEG
MPEG4
MPEG1 Audio Layer 3
AAC
41 i!
_.flac FLAC FLAC Supports up to 2 channels.
e.ogg OGG Vorbis Supports up to 2 channels.
Supports up to 10 Pro 5.1 channels.
_.wma WMA WMA WMA Iossless audio is not supported.
Supports up to the M2 profile.
_+.way way way
_.mid Supports type 0 and type 1.
midi midi Seek is not supported.
_.midi Supports USB only.
_.ape ape ape NonSmart is not supported.
%.aif
AIFF AIFF
_.aiff"
_.m4a ALAC ALAC
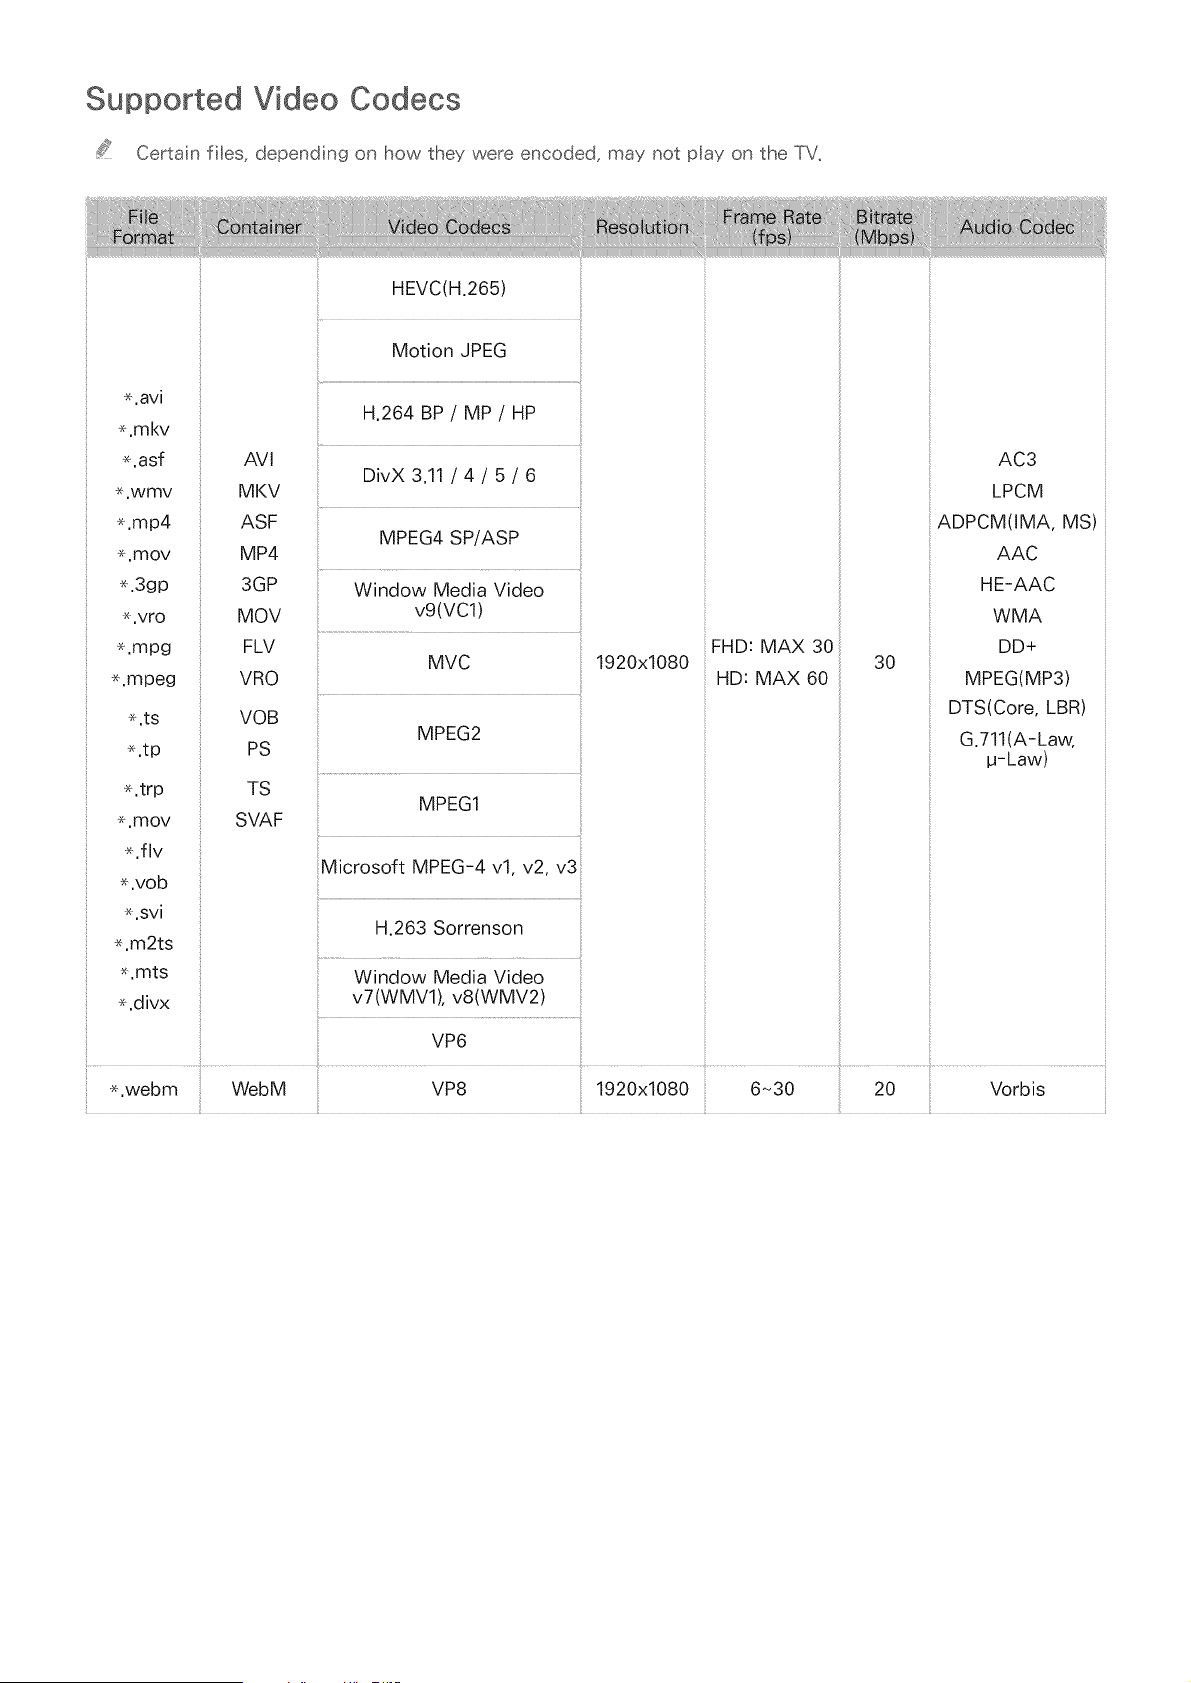
Supported Video Codecs
Certain files, depending on how they were encoded, may not play on the TV.
*.avi
.mkv
*,asf
.wmv
.mp4
*,mov
%3gp
.vro
.mpg
.mpeg
.ts
.tp
.trp
*.mov
.flv
*.vob
*.svi
.m2ts
*.mts
*.divx
AVI
MKV
ASF
MP4
3GP
MOV
FLV
VRO
VOB
PS
TS
SVAF
HEVC(H.265)
Motion JPEG
H,264 BP / MP / HP
DivX 3,11 / 4 / 5 / 6
MPEG4 SP/ASP
Window Media Video
vg(vc1)
MVC
MPEG2
MPEG1
Microsoft MPEG-4 vlo v2o v3
i
H.263 Sorrenson
Window Media Video
v7(WMVl), v8(WMV2)
VP6
*,webm WebM VP8
1920x1080
1920x1080
FHD: MAX 30
HD: MAX 60
30
AC3
LPCM
ADPCM(IMA, MS)
AAC
HE-AAC
WMA
DD+
MPEG(MP3)
DTS(Core, LBR)
G.711(A-Law,
u-Law)
Other Restrictions
- Codecs may not function properly if there is a problem with the content.
. Video content does not play or does not play correctly if there is an error in the content or
container.
. Sound or video may not work if they have standard bit rates/frame rates above the TV's
compatibility ratings.
. If the Index Table is has an error, the Seek (Jump) function will not work.
. When playing video over a network connection, the video may not play smoothly because of data
transmission speeds.
. Some USB/digital camera devices may not be compatible with the TV.
. HEVC codec is only available in MKV / MP4 / TS containers.
Video Decoders
- Supports up to H.264, Level 4.1 (does not support FMO/ASO/RS)
. VC1 AP L4 is not supported.
. All video codecs excluding WMV v7, v8, MSMPEG4 v3, MVC, and VP6:
Below 1280x720:60 frame max
Above 1280x720:30 frame max
- GMC 2 or above is not supported.
. Supports SVAF Top/Botton, Side by Side, and Left/Right view sequence type (2ES) only.
. Supports BD MVC specs only.
Audio Decoders
. WMA 10 Pro supports up to 5.1 channels. Supports up to the M2 profile. WMA Iossless audio is
not supported.
. WMA 10 pro M3 is not supported.
. QCELP and AMR NB/WB are not supported.
. Vorbis is supported for up to 2 channels.
. DD+ is supported for up to 5.1 channels.
. The DTS LBR codec is only available for MKV / MP4 / TS containers.
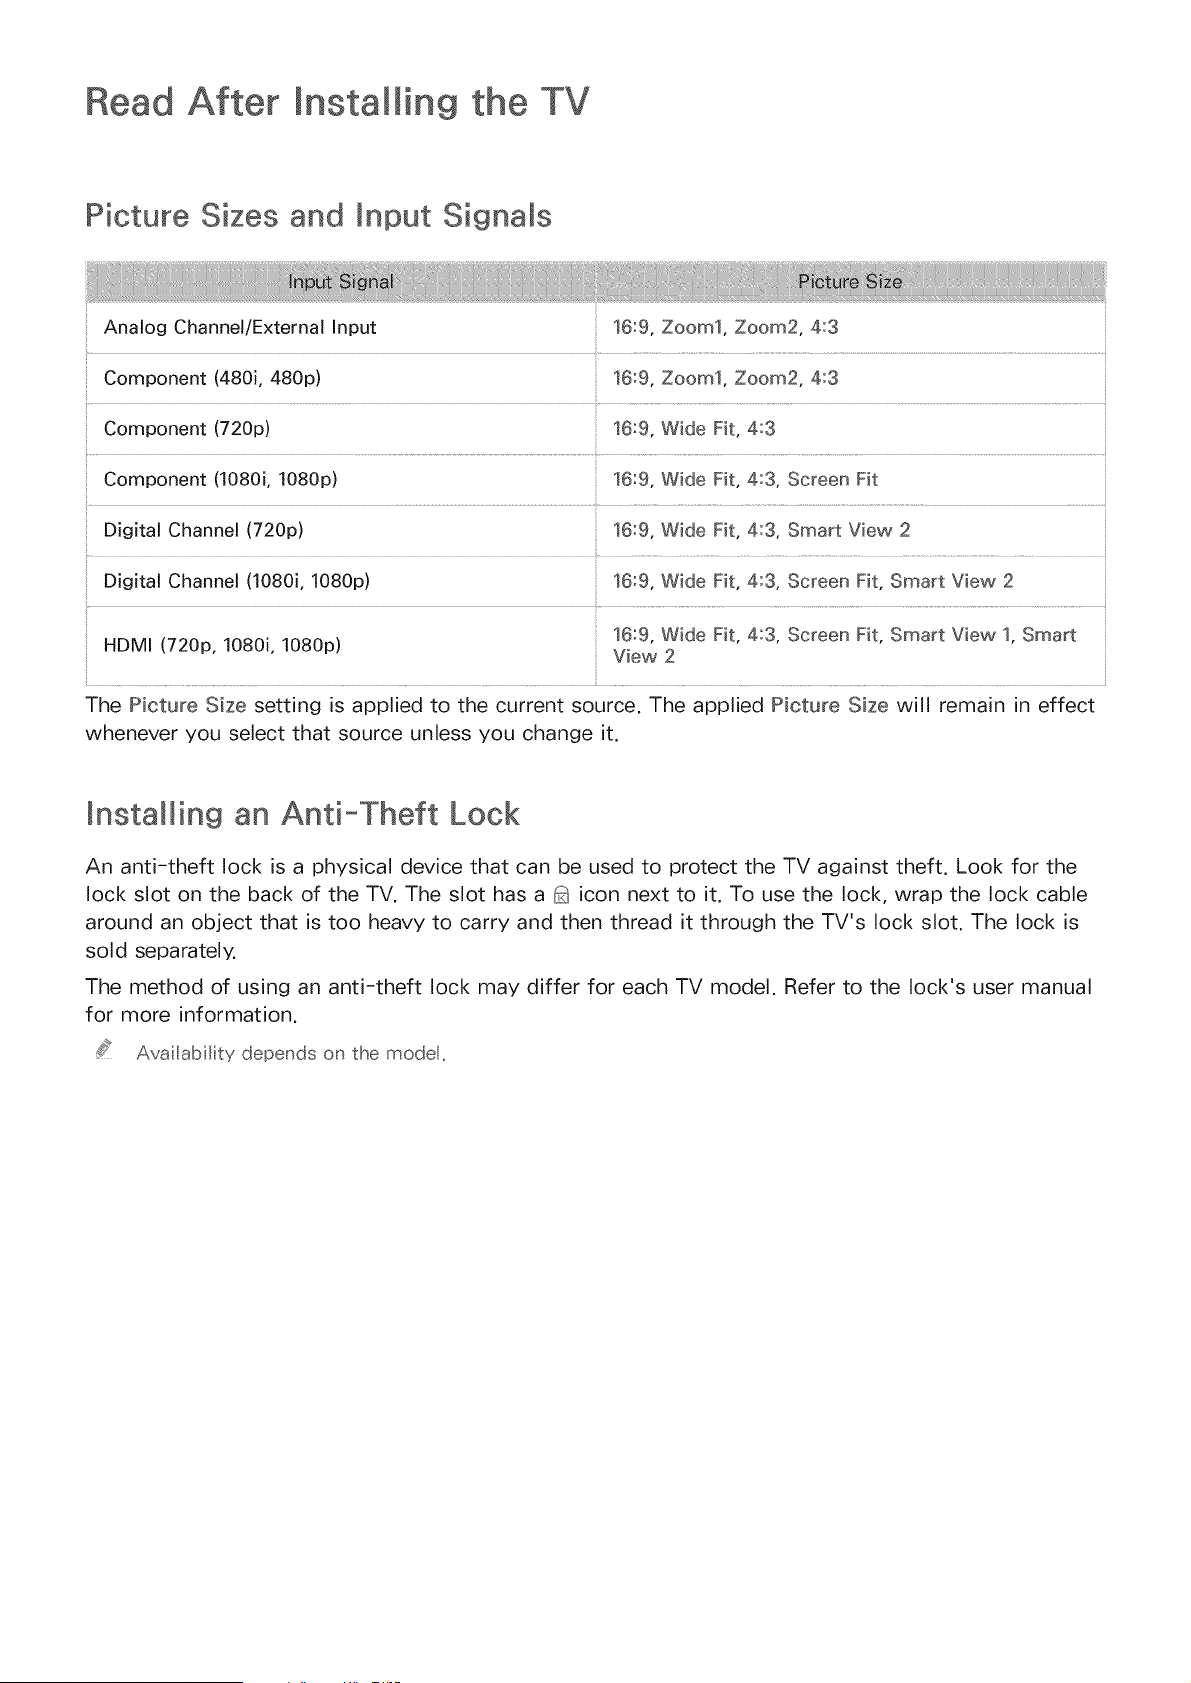
Read After Installing the TV
Picture Sizes and Input Signals
Analog Channel/External Input 16:9, Zoom1, Zoom2, 4:3
Component (480i, 480p) 16:9, Zoom1, Zoom2, 4:3
Component (720p) 16:9, Wide Fit, 4:3
Component (1080i, 1080p) 16:9, Wide Fit, 4:3, Screen Fit
Digital Channel (720p) 16:9, Wide Fit, 4:3, Smart View 2
Digital Channel (1080i, 1080p) 16:9, Wide Fit, 4:3, Screen Fit, Smart View 2
16:9, Wide Fit, 4:3, Screen Fit, Smart View 1, Smart
HDMI (720p, 1080i, 1080p) View 2
The Picture Size setting is applied to the current source. The applied Picture Size will remain in effect
whenever you select that source unless you change it.
Installing an Anti-Theft Lock
An anti-theft lock is a physical device that can be used to protect the TV against theft. Look for the
lock slot on the back of the TV. The slot has a _ icon next to it. To use the lock, wrap the lock cable
around an object that is too heavy to carry and then thread it through the TV's lock slot. The lock is
sold separately.
The method of using an anti-theft lock may differ for each TV model. Refer to the lock's user manual
for more information.
Ava lability depends on the model,
Read Before Setting Up a Wireless mnternet Connection
Wireless _nternet Precautions
This TV supports the IEEE 802.11a/b/g/n communication protocols. Samsung recommends using
IEEE 802.11n. Video flies stored on a device connected to the TV via DLNA may not play back
smoothly.
To use wireless Internet, the TV must be connected to a wireless router or modem. If the wireless
router supports DHCP, the TV can use a DHCP or static IP address to connect to the wireless
network.
o Select a channel that is not currently in use for the wireless router. If the channel set for the
wireless router is currently being used by another device, the result is usually interference and/or
a communications failure.
Most wireless networks have an optional security system. To enable a wireless network's security
system, you need to create a password using characters and numbers. This password is then
needed to connect to a security-enabled AP.
Wireless Security Protocols
The TV only supports the following wireless network security protocols.
Authentication Modes: WEP, WPAPSK, WPA2PSK
Encryption Types: WEP, TKIP, AES
In compliance with the newest Wi-Fi certification specifications, Samsung TVs do not support WEP or
TKIP security encryption in networks running in the 802.11n mode.
If the wireless router supports WPS (Wi-Fi Protected Setup), you can connect the TV to your network
using PBC (Push Button Configuration) or a PIN (Personal Identification Number). WPS automatically
configures the SSID and WPA key settings.
The TV cannot connect to non-certified wireless routers.
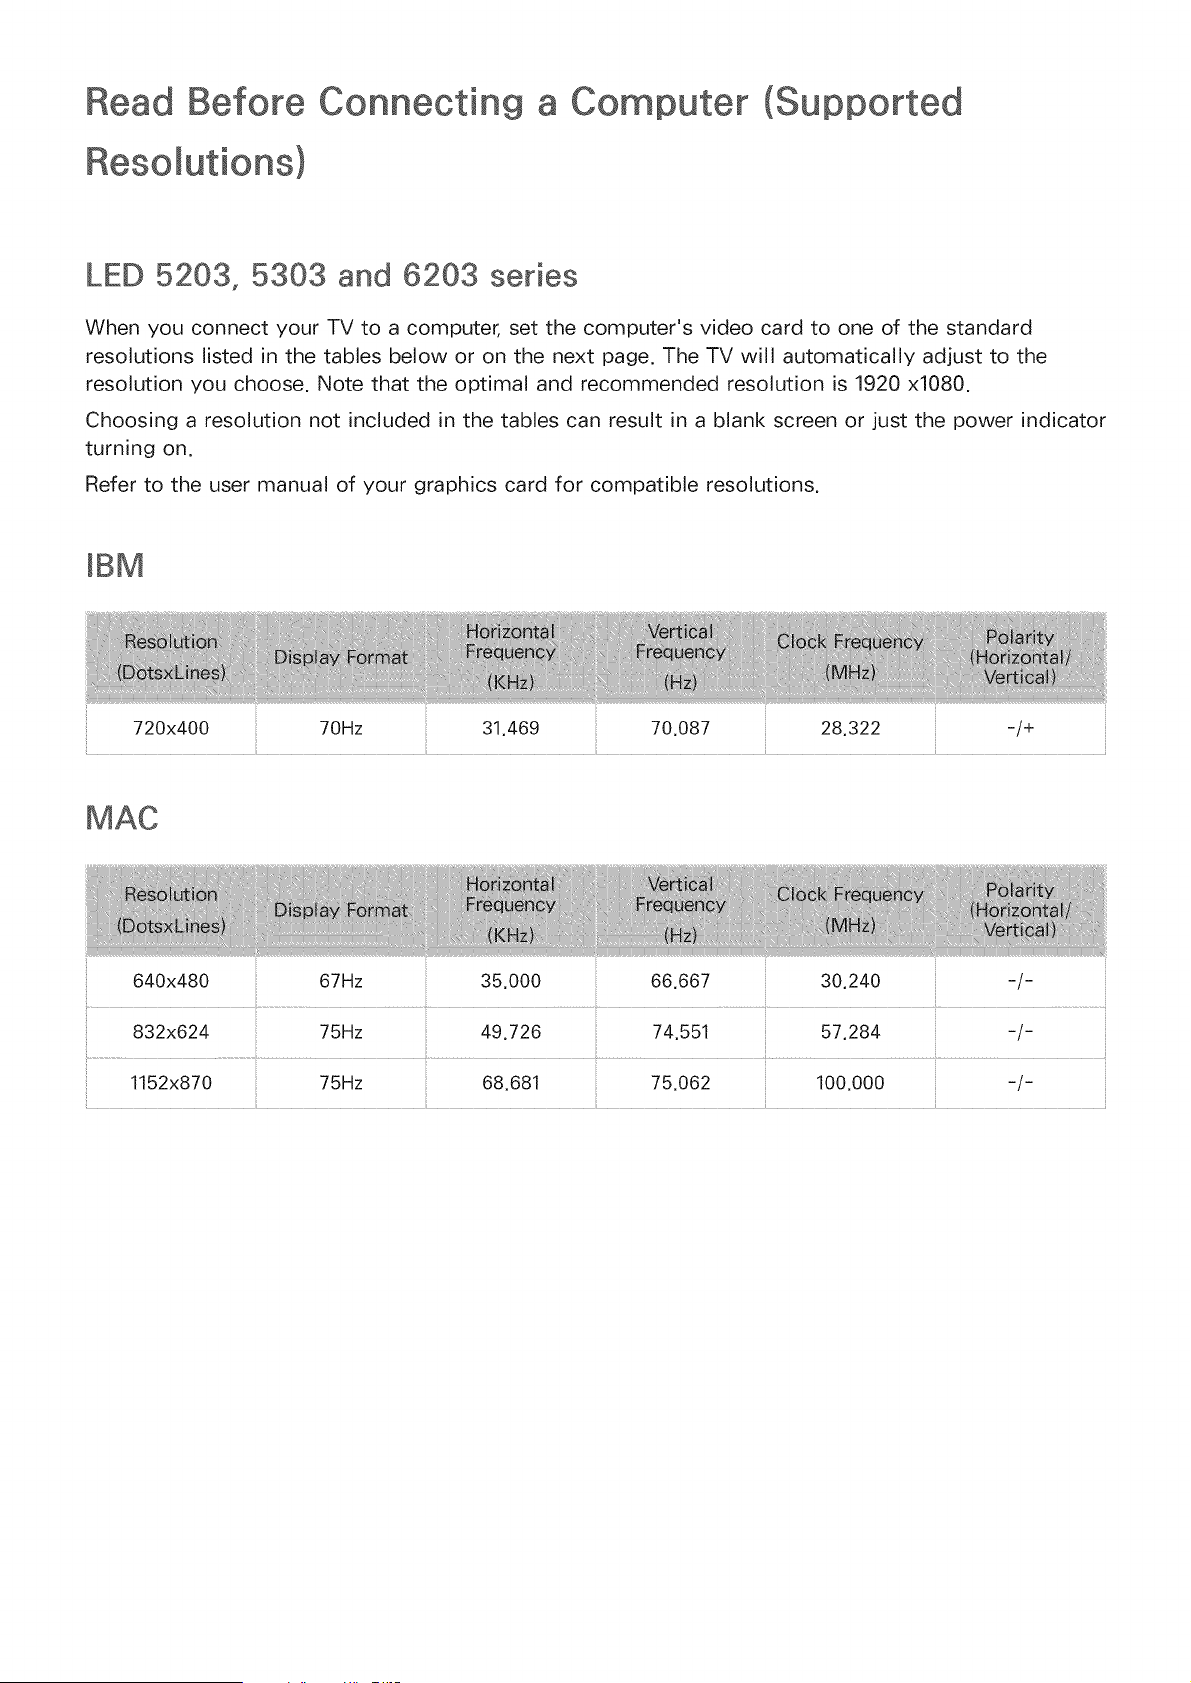
Before Connecting
Resomutions)
a Computer (Supported
LED 5203, 5303 and 6203 series
When you connect your TV to a computer, set the computer's video card to one of the standard
resolutions listed in the tables below or on the next page. The TV will automatically adjust to the
resolution you choose. Note that the optimal and recommended resolution is 1920 x1080.
Choosing a resolution not included in the tables can result in a blank screen or just the power indicator
turning on.
Refer to the user manual of your graphics card for compatible resolutions.
mBM
720x400 70Hz 31.469 70.087 28.322
-/+
640x480 67Hz 35.000 66.667 30.240 -/-
832x624 75Hz 49.726 74.551 57.284 -/-
1152x870 75Hz 68.681 75.062 100.000 -/-
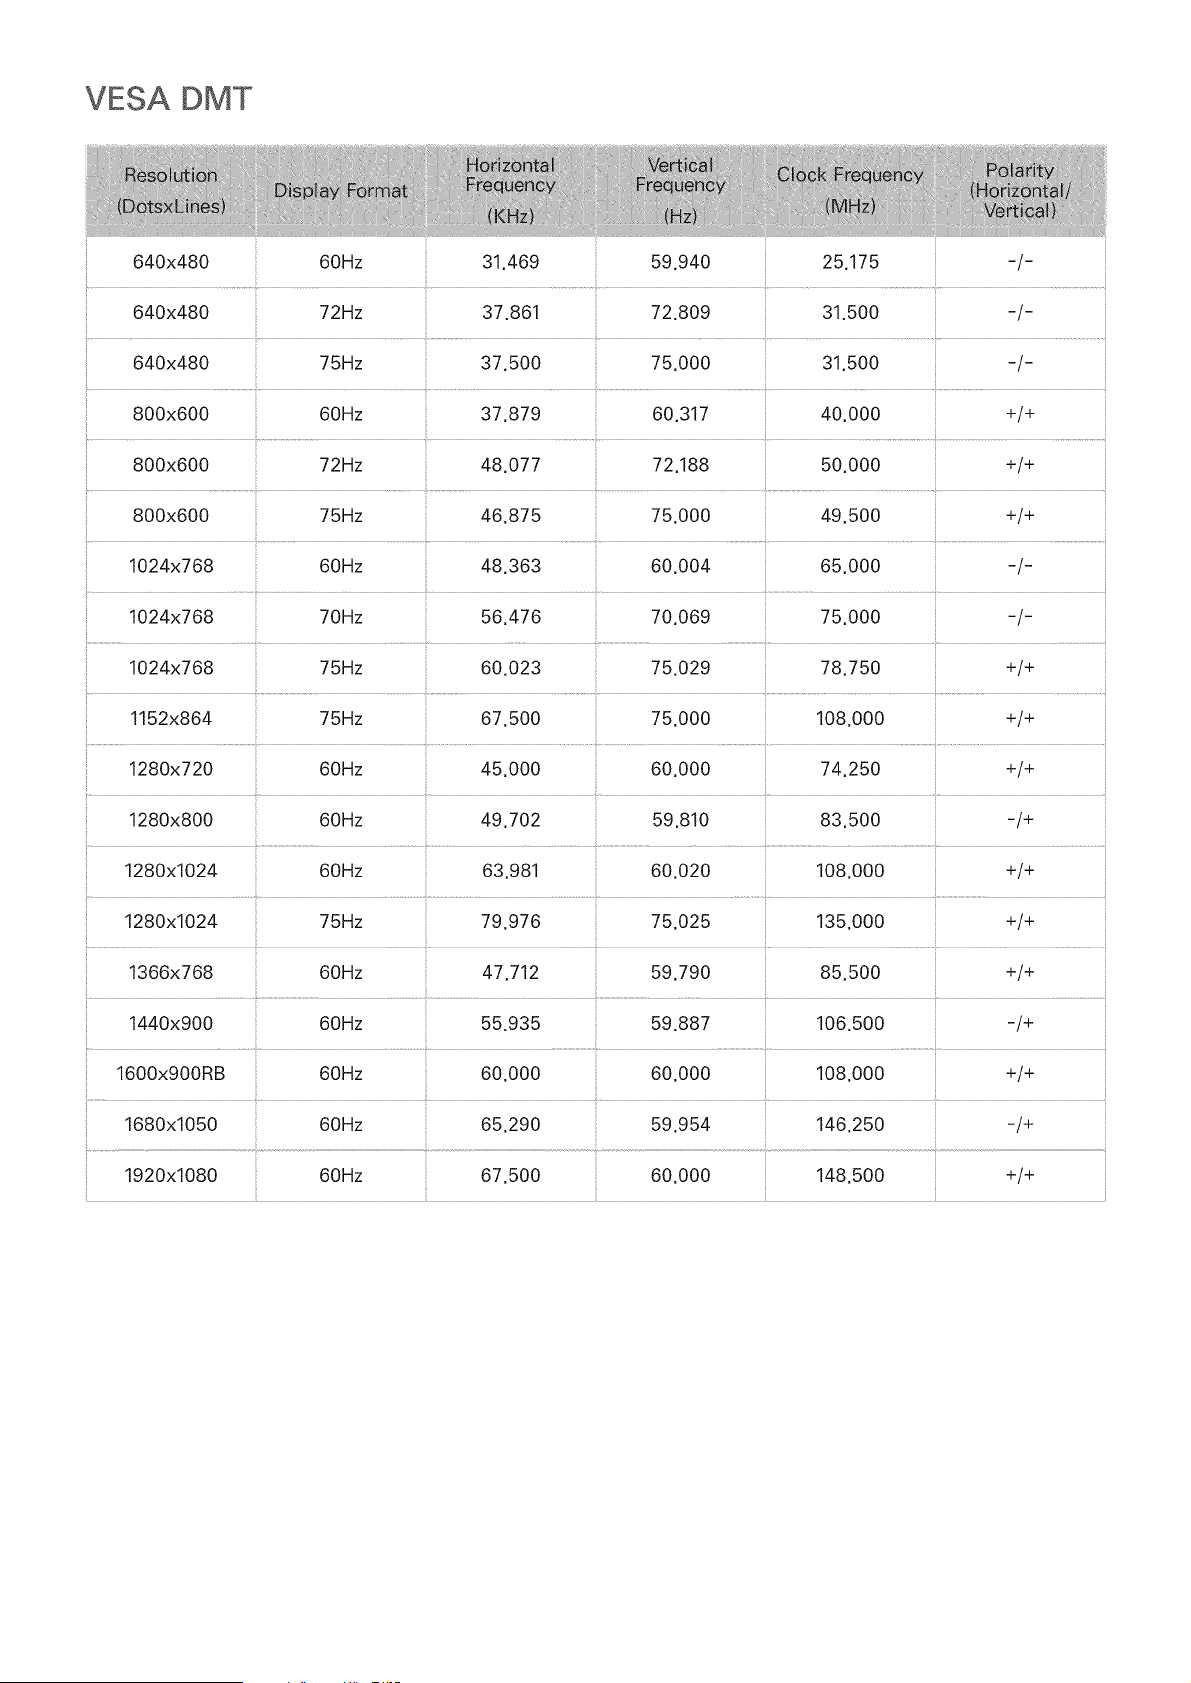
VESA DMT
640x480 60Hz 31.469 59.940 25.175 -/-
640x480 72Hz 37.861 72.809 31.500 -/-
...... t .................................................. .................. ................
640x480 75Hz 37.500 75.000 31.500 -/-
800x600 60Hz 37.879 60.317 40.000 +/+
800x600 72Hz 48.077 72.188 50.000 +/+
800x600 75Hz 46.875 75.000 49.500 +/+
1024x768 60Hz 48.363 60.004 65.000 -/-
1024x768 70Hz 56.476 70.069 75.000 -/-
1024x768 75Hz 60.023 75.029 78.750 +/+
1152x864 75Hz 67.500 75.000 108.000 +/+
1280x720 60Hz 45.000 60.000 74.250 +/+
1280x800 60Hz 49.702 59.810 83.500 -/+
1280x1024 60Hz 63.981 60.020 108.000 +/+
1280x1024 75Hz 79.976 75.025 135.000 +/+
1366x768 60Hz 47.712 59.790 85.500 +/+
1440x900 60Hz 55.935 59.887 106.500 -/+
1600x900RB 60Hz 60.000 60.000 108.000 +/+
1680x1050 60Hz 65.290 59.954 146.250 -/+
1920x1080 60Hz 67.500 60.000 148.500 +/+
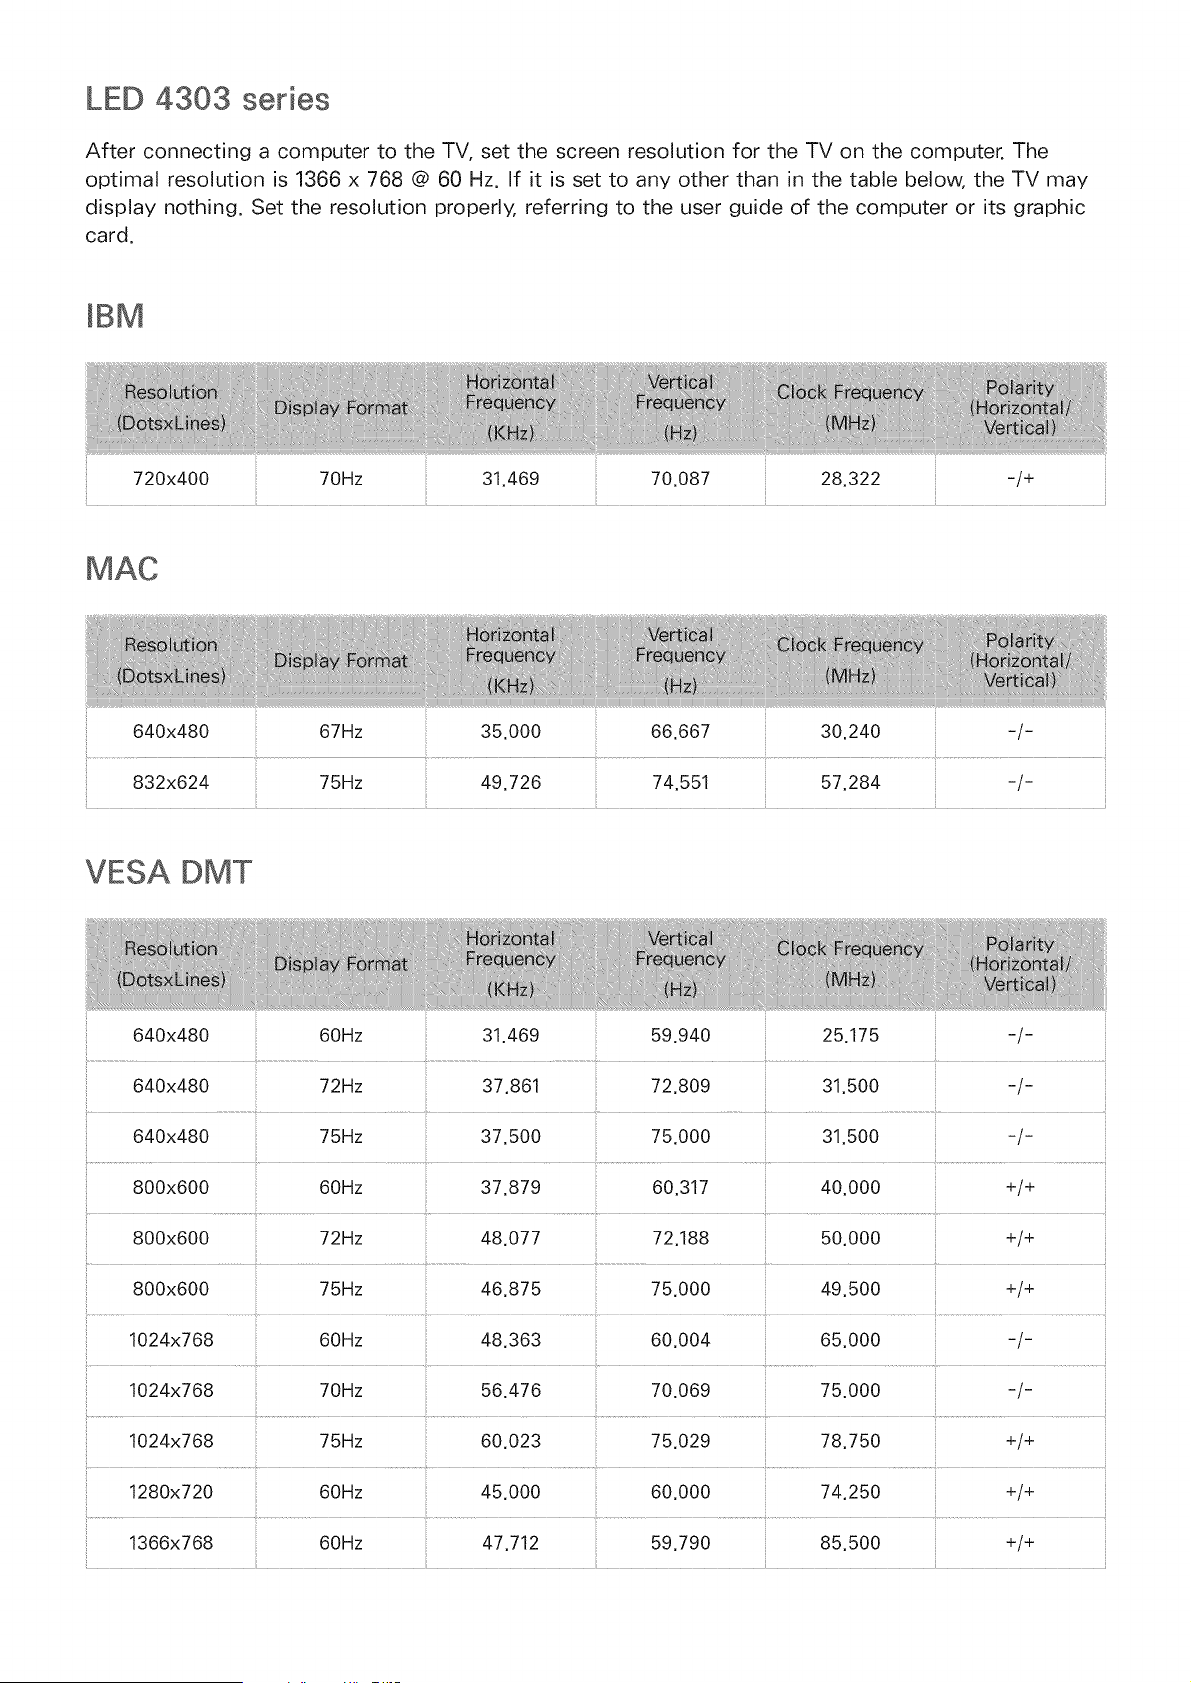
LED 4303 series
After connecting a computer to the TV, set the screen resolution for the TV on the computer. The
optimal resolution is 1366 x 768 @ 60 Hz. If it is set to any other than in the table below, the TV may
display nothing. Set the resolution properly, referring to the user guide of the computer or its graphic
card.
mBM
720x400 70Hz 31.469 70.087 28.322
-/+
640x480 67Hz
832x624 75Hz
35.000
49.726
66.667 30.240 -/-
-/-
VESA DMT
800x600 75Hz
1024x768 60Hz 48.363 60.004
1024x768 70Hz 56.476 70.069
1024x768 75Hz 60.023 75.029
640x480 60Hz 31.469 59.940 25.175 -/-
640x480 72Hz 37.861 72.809 31,500 -/-
640x480 75Hz 37.500 75.000 31.500 -/-
............................................... t ..................................................................... ......................................................................................................
800x600 60Hz 37.879 60.317 40.000 +/+
800x600 72Hz 48.077 72.188 50.000 +/+
46.875 75.000 49.500 +/+
65.000 -/-
75.000 -/-
78.750 +/+
1280x720 60Hz 45.000 60.000 74.250 +/+
1366x768 60Hz 47.712 59.790 85.500 +/+
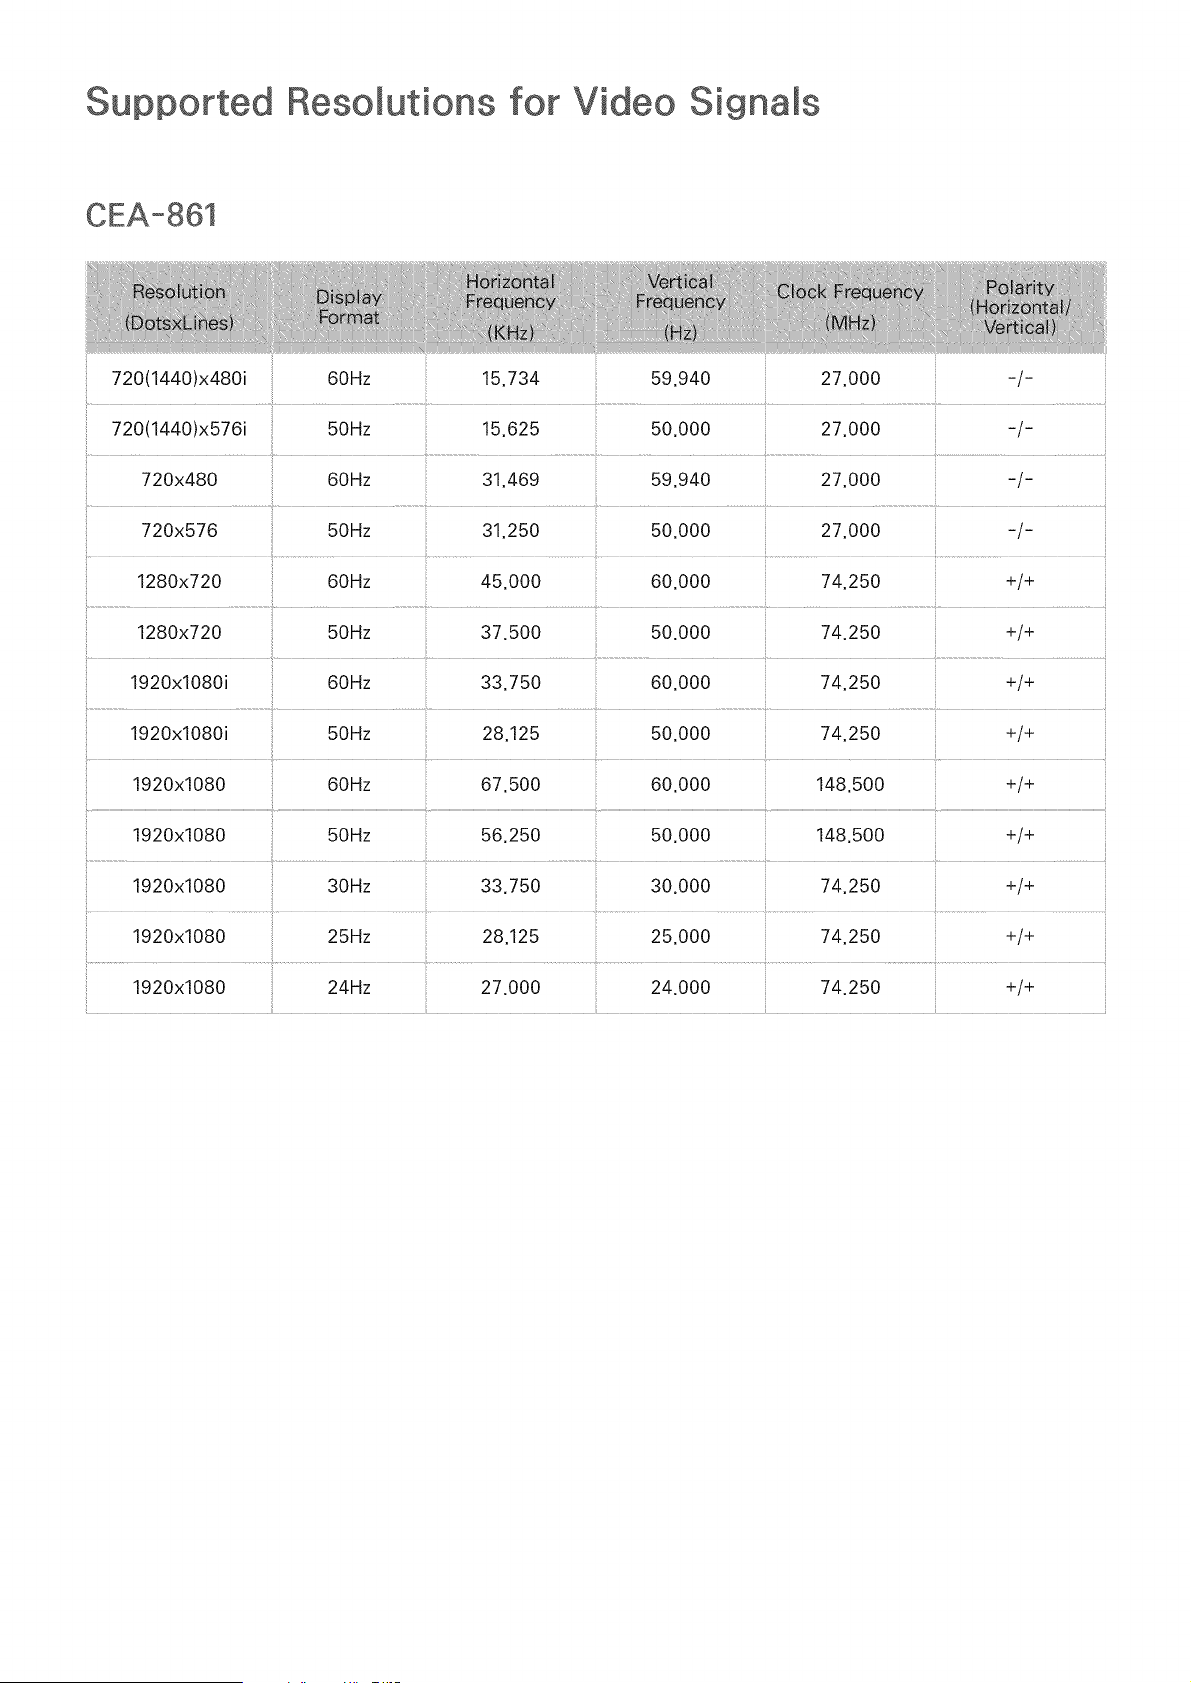
Resomutions for Video Signams
720(1440)x480i 60Hz 15.734 59.940 27.000 -/-
720x480 60Hz 31.469
720x576 50Hz 31.250 50.000 27.000 -/-
1280x720 60Hz 45.000 60.000 74.250 +/+
1280x720 50Hz 37.500 50.000 74.250 +/+
1920x1080i 60Hz 33.750 60.000 74.250 +/+
1920x1080i 50Hz 28.125 50.000 74.250 +/+
1920x1080 60Hz 67.500 60.000 148.500 +/+
:: 1920x1080 :: 50Hz 56.250 50.000 148.500 +/+
1920x1080 30Hz 33.750 30.000 74.250 +/+
1920x1080 25Hz 28.125 25.000 74.250 +/+
1920x1080 24Hz 27.000 24.000 74.250 +/+
License
HD
DivX Certified@ to play DivX@ video up to HD 1080p, including premium content.
ABOUT DIVX VIDEO: DivX@ is a digital video format created by DivX, LLC, a subsidiary of Rovi Corporation. This
is an official DivX Certified@ device that has passed rigorous testing to verify that it plays DivX video. Visit divx.
com for more information and software tools to convert your files into DivX videos.
ABOUT DIVX VIDEO-ON-DEMAND: This DivX Certified@ device must be registered in order to play purchased
DivX Video-on-Demand (VOD) movies. To obtain your registration code, locate the DivX VOD section in your
device setup menu. Go to vod.divx.com for more information on how to complete your registration.
DivX@, DivX Certified@ and associated Iogos are trademarks of Rovi Corporation or its subsidiaries and are used
under license.
Covered by one or more of the following U.S. patents: 7,295,673; 7,460,668; 7,515,710; 7,519,274
PremiumSound 15.1
Manufactured under a license from U.S. Patent No's: 5,956,674, 5,974,380, 5,978,762, 6,487,535, 6,226,616,
7,212,872, 7,003,467, 7,272,567, 7,668,723, 7,392,195, 7,930,184, 7,333,929 and 7,548,853. DTS, the Symbol,
and DTS and the Symbol together are registered trademarks & DTS Premium Sound I 5.1 is a trademark of DTS,
Inc. @2012 DTS, Inc. All Rights Reserved.
StudioSound
Manufactured under a license from U.S. Patent No's: 6,285,767, 8,027,477, 5,319,713, 5,333,201, 5,638,452,
5,771,295, 5,970,152, 5,912,976, 7,200,236, 7,492,907, 8,050,434, 7,720,240, 7,031,474, 7,907,736 and
7,764,802. DTS, the Symbol, and DTS and the Symbol together are registered trademarks & DTS Studio Sound is
a trademark of DTS, inc. @2012 DTS, inc. All Rights Reserved.

DOLBY
DIGITAL PLUS
Manufactured under license from Dolby Laboratories.
Dolby and the doubte-D symbol are trademarks of Dolby Laboratories.
I-I--'11"111
The terms HDMI and HDMI High-Definition Multimedia Interface, and the HDMI Logo are trademarks or registered
trademarks of HDMI Licensing LLC in the United States and other countries.
Open Source License Notice
Open Source used in this product can be found on the following webpage.
(http://opensource.samsung.com) Open Source License Notice is written only English.
This license is may not be supported depending on the country or model.
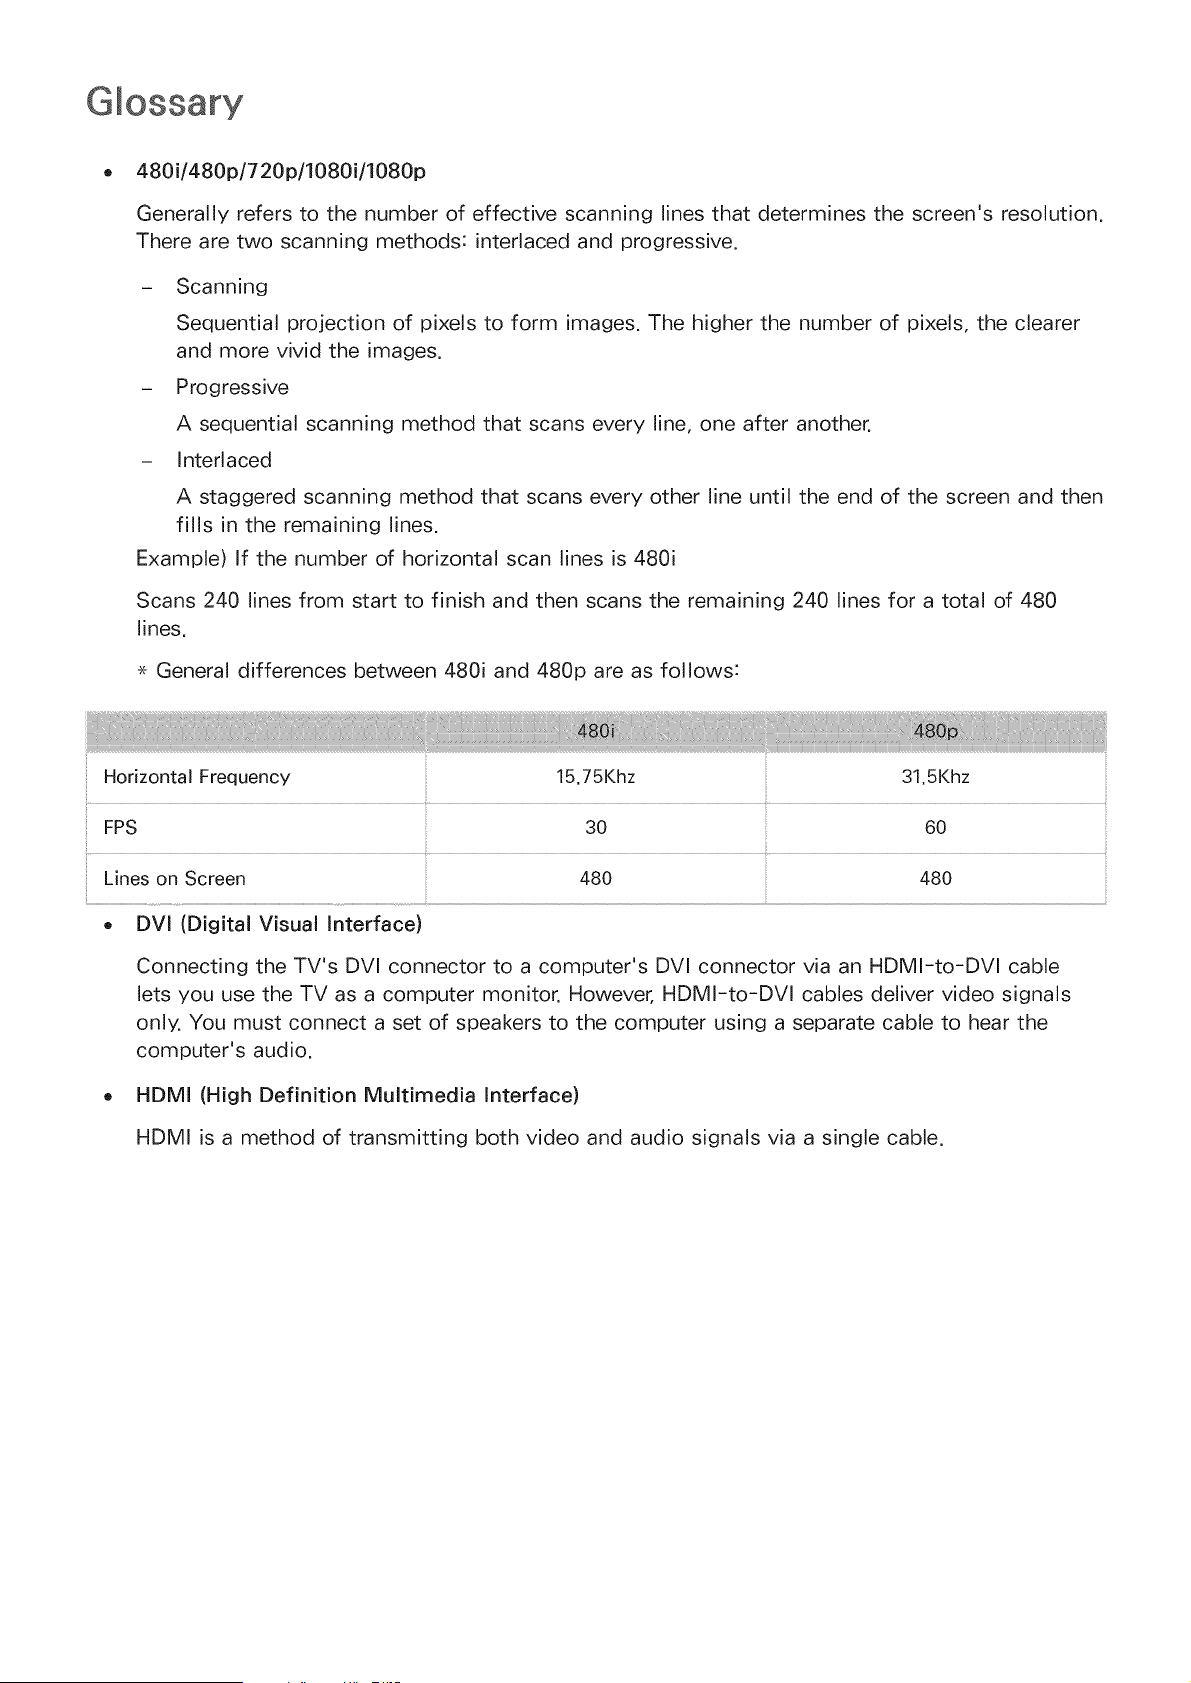
480i/480p/720p/1080i/1080p
Generally refers to the number of effective scanning lines that determines the screen's resolution.
There are two scanning methods: interlaced and progressive.
- Scanning
Sequential projection of pixels to form images. The higher the number of pixels, the clearer
and more vivid the images.
- Progressive
A sequential scanning method that scans every line, one after another.
- Interlaced
A staggered scanning method that scans every other line until the end of the screen and then
fills in the remaining lines.
Example) If the number of horizontal scan lines is 480i
Scans 240 lines from start to finish and then scans the remaining 240 lines for a total of 480
lines.
General differences between 480i and 480p are as follows:
30 60
:: Lines on Screen 480 480 ::
o DVl (Digital Visual interface)
Connecting the TV's DVI connector to a computer's DVI connector via an HDMI-to-DVI cable
lets you use the TV as a computer monitor. However, HDMI-to-DVl cables deliver video signals
only. You must connect a set of speakers to the computer using a separate cable to hear the
computer's audio.
HDMI (High Definition Multimedia interface)
HDMI is a method of transmitting both video and audio signals via a single cable.
Dynamicversus Static IPAddresses
If the networkrequiresa dynamic IPaddress,usean ADSL modemor routerthat supports
the DynamicHostConfigurationProtocol(DHCP).Modemsand toutersthat supportDHCP
automaticallyprovidethe IP address,subnetmask,gatewayand DNSvaluesthe TV needsto
accessthe Internet,so they do not haveto be enteredmanually.Most homenetworksuse a
dynamicIPaddress.
If the networkrequiresa static IP address,enterthe IPaddress,subnetmask,gateway,and DNS
valuesmanuallywhensetting up the networkconnection.To get the IPaddress,subnetmask,
gatewayand DNSvalues,contactyour InternetServiceProvider(ISP).
If the networkrequiresa static IP address,usean ADSL modemthat supportsDHCP.ADSL
modemsthat support DHCPalso allow static IPaddresses.
Ethernet
Ethernetis a LAN (LocalArea Network)that usescoaxial cablesstandardizedby the IEEE.
ComponentConnection
Componentconnectionsare mostly usedfor gameconsolesandtransmit the videosignal by
splitting it into a luminancesignal (Y)and two color signals (Pband Pr).Theconnectoris marked
as [ComponentIN]_(Pr,Pb,Y) onthe back of the TV.On somedevices,it is sometimesmarked
as Cr,Cb, Y. Cb and Cr arethe digital conversionsof the Pband Prsignals.
Theconnectorsare normally color-codedred (R),blue (B),and green(G) andoffer the best
picturequality possiblefor an analogconnection.