English
1 Your electric kettle
Congratulations on your purchase and welcome to Philips!
To fully benet from the support that Philips oers, register
your product at www.philips.com/welcome.
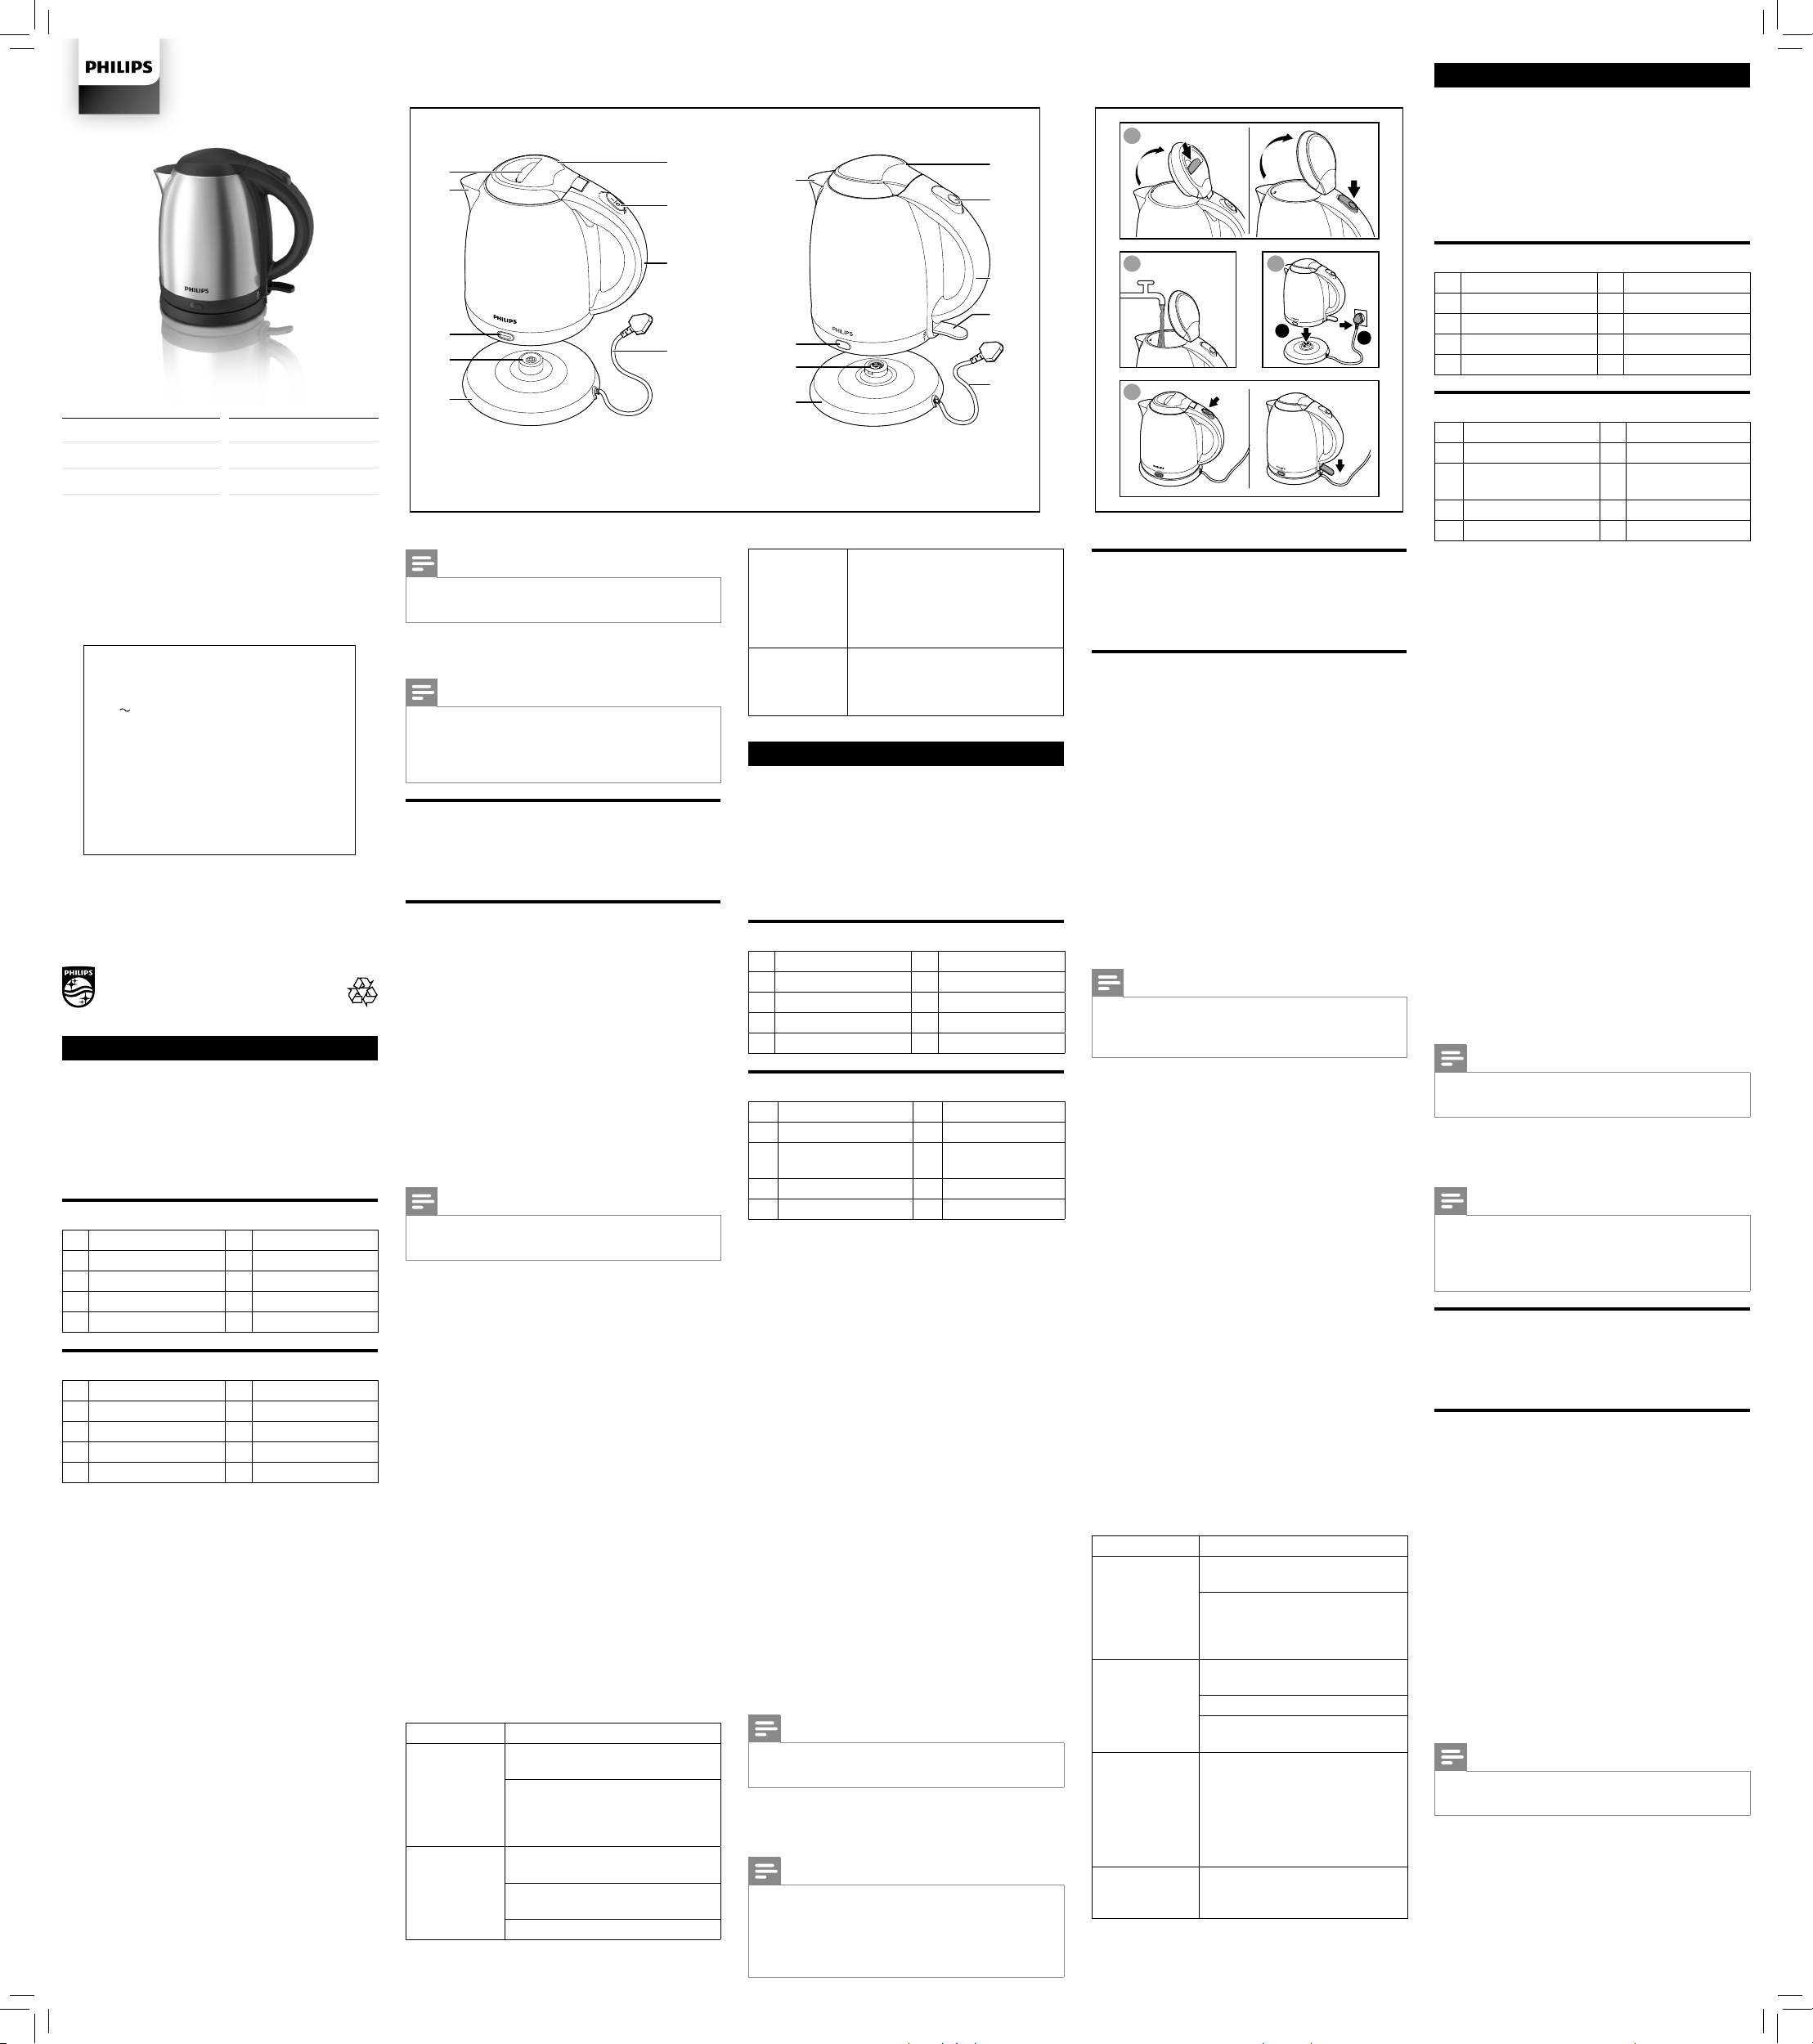
2 Overview
HD9303
a
Lid release button
f
Power cord
b
Spout
g
Handle
c
Power indicator
h
ON/OFF switch
d
Base connector
i
Lid
e
Base
HD9306
a
Spout
f
ON/OFF switch
b
Power indicator
g
Handle
c
Base connector
h
Lid release button
d
Base
i
Lid
e
Power cord
3 Before first use
1 Remove stickers, if any, from the base or the kettle.
2 Place the base on a dry, stable and at surface.
3 To adjust the length of the cord, wind part of it around
the cord storage facility in the bottom of the base.
4 Pass the cord through one of the slots in the base.
5 Rinse the kettle with water.
6 Fill the kettle with water up to the MAX indication and
let the water boil once.
7 Pour out the hot water and rinse the kettle once more.
4 Use the kettle
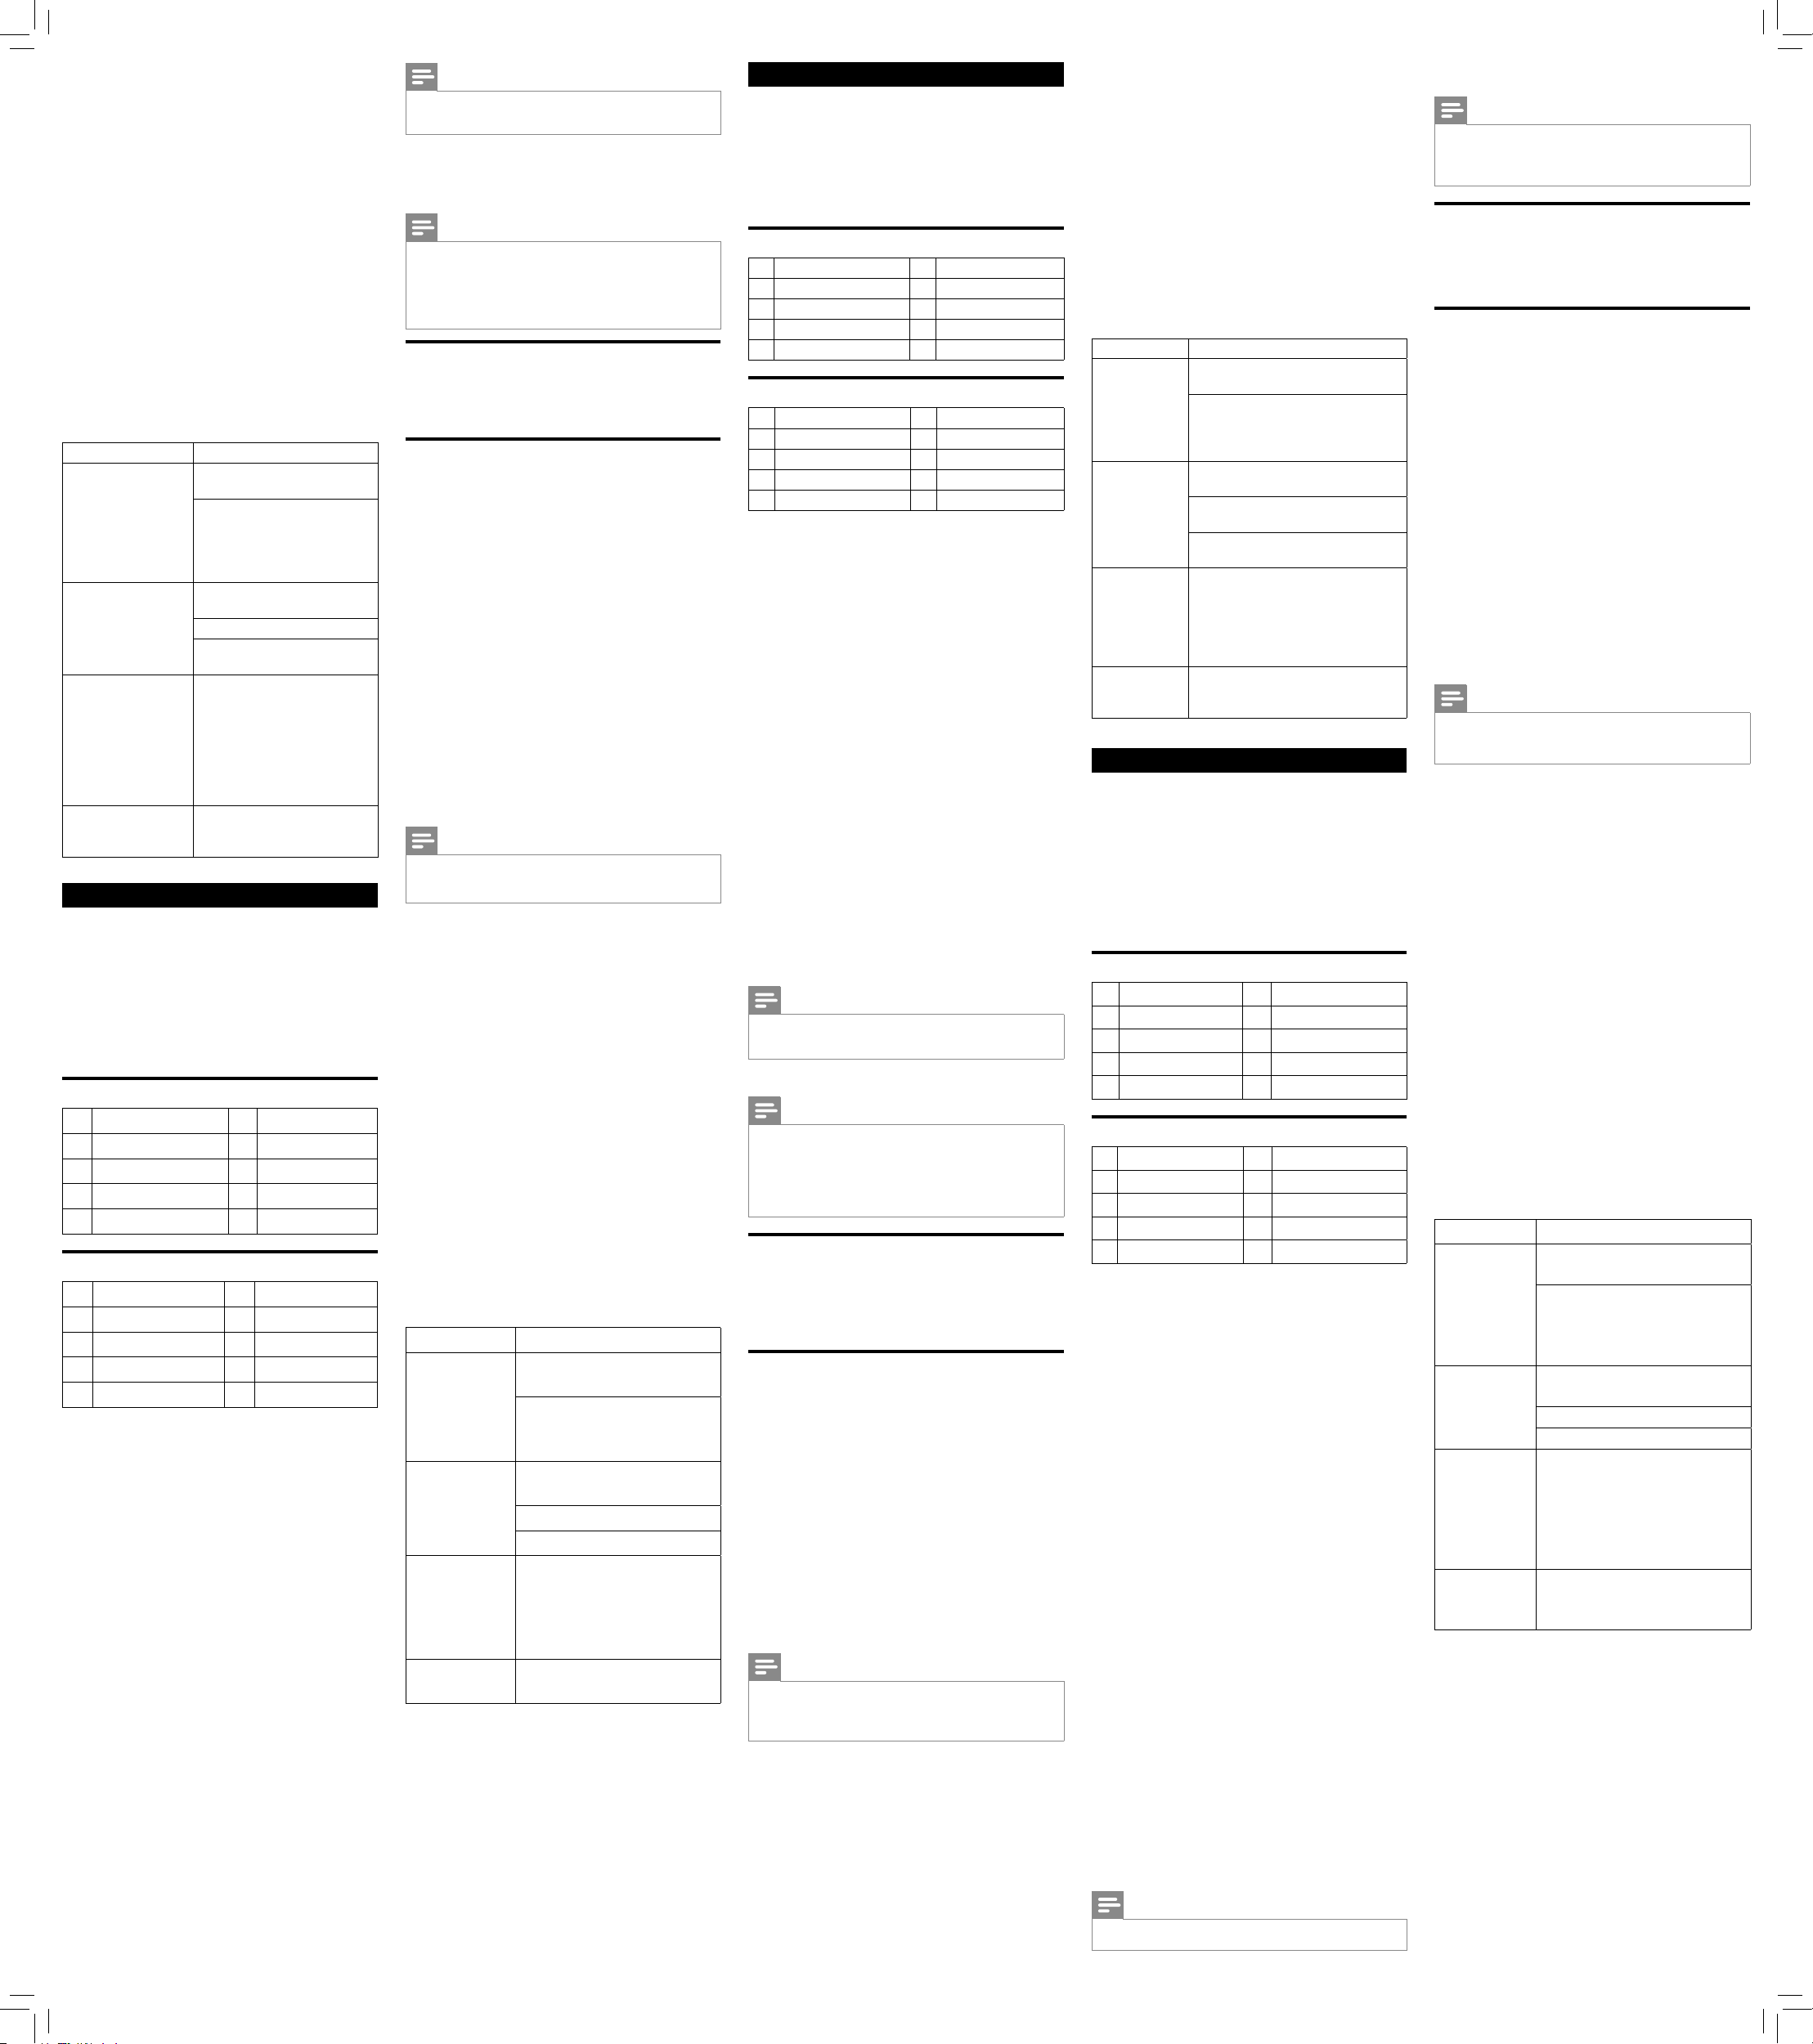
1 Press the lid release button.
» The lid opens automatically.
2 Fill the kettle with the desired amount of water.
3 Close the lid properly.
4 Place the kettle on its base and put the plug in the wall
socket.
5 For HD9303, set the ON/OFF switch to “I” to switch
on the kettle; for HD9306, push the ON/OFF switch
downwards to do so.
» The power-on light goes on.
» The kettle starts heating up.
6 The kettle switches o automatically when the water
boils.
» The power-on light goes out automatically.
Note
• Make sure the lid is properly closed to prevent the
kettle from boiling dry.
5 Cleaning and Descaling
Note
• Never use scouring pads, abrasive cleaning agents or
aggressive liquids such as petrol or acetone to clean
the kettle.
• Never immerse the kettle or its base in water.
Clean the kettle
1 Unplug the kettle and wait until it cools down.
2 Clean the outside of the kettle with a soft cloth
moistened with warm water and some mild cleaning
agent.
Descale the kettle
Regular descaling prolongs the life of the kettle.
In case of normal use (up to 5 times a day), the following
descaling frequency is recommended:
• Once every 3 months for soft water areas (up to 18dH).
• Once every month for hard water areas (more than
18dH).
1 Fill the kettle with water up to three-quarters of the
maximum level and bring the water to the boil.
2 After the kettle has switched o, add white vinegar (8%
acetic acid) to the maximum level.
3 Leave the solution in the kettle overnight.
4 Empty the kettle and rinse the inside thoroughly.
5 Fill the kettle with fresh water and boil the water.
6 Empty the kettle and rinse it with fresh water again.
7 Repeat the procedure if there is still some scale in the
kettle.
Note
• You can also use an appropriate descaler. In that case,
follow the instructions of the descaler.
6 Storage
Store the mains cord by winding it round the reel in the base
of the kettle.
7 Replacement
If the kettle, the base or the mains cord of the appliance is
damaged, take the kettle, the base or the mains cord to a
service centre authorised by Philips for repair or replacement
to avoid a hazard.
8 Recycling
Do not throw away the product with the normal household
waste at the end of its life, but hand it in at an ocial
collection point for recycling. By doing this, you help to
preserve the environment.
Follow your country's rules for the separate collection of
electrical and electronic products. Correct disposal helps
prevent negative consequences for the environment and
human health.
9 Troubleshooting
If your kettle does not function properly or if the kettle
quality is insucient, consult the table below. If you are
unable to solve the problem, contact a Philips service center
or the Consumer Care Center in your country.
Problem Solution
The kettle
switches o
automatically
before the water
boils.
There is some scale in the kettle.
Descale the kettle.
There is no water or not enough
water in the kettle, and the boil-dry
protection is activated. Add more water
to the kettle.
The kettle does
not work.
Make sure the plug is properly
connected to the power socket.
Make sure the power cord is not
damaged.
Make sure the kettle is not boiling dry.
There is
unpleasant smell
in the water.
Follow steps 5 and 6 in "Before rst
use" section. If the problem still exists,
add water to the maximum level and
pour two spoons of baking soda into
the kettle, then boil the water and rinse
the kettle.
There is some
scale in the
water, and the
water is turbid.
The water hardness is high in the area
you live. Descale the kettle.
Indonesia
1 Ketel listrik Anda
Selamat atas pembelian Anda dan selamat datang di
Philips! Untuk memanfaatkan sepenuhnya dukungan yang
ditawarkan Philips, daftarkan produk Anda di
www.philips.com/welcome.
2 Ikhtisar
HD9303
a
Tombol pembuka tutup
f
Kabel listrik
b
Cerat
g
Gagang
c
Indikator daya
h
Sakelar ON/OFF
d
Konektor alas
i
Tutup
e
Alas
HD9306
a
Cerat
f
Sakelar ON/OFF
b
Indikator daya
g
Gagang
c
Konektor alas
h
Tombol pembuka
tutup
d
Alas
i
Tutup
e
Kabel listrik
3 Sebelum menggunakan alat
pertama kali
1 Lepaskan stiker, jika ada, dari alas atau ketel.
2 Letakkan alas di permukaan yang kering, stabil dan
rata.
3 Untuk menyesuaikan panjang kabel, gulung sebagian
pada tempat penyimpanan kabel di bagian bawah alas.
4 Masukkan kabel melalui salah satu slot pada alasnya.
5 Bilas ketel dengan air.
6 Isi ketel dengan air hingga tanda MAX dan biarkan
mendidih satu kali.
7 Buang air panas dan bilaslah ketel sekali lagi.
4 Menggunakan ketel
1 Tekan tombol pelepas tutup.
» Tutup akan terbuka secara otomatis.
2 Isi ketel dengan air sebanyak yang diinginkan.
3 Tutup penutup dengan benar.
4 Letakkan ketel pada alasnya dan hubungkan steker ke
stopkontak di dinding.
5 Untuk HD9303, setel sakelar ON/OFF ke “I” untuk
menyalakan ketel; untuk HD9306, tekan sakelar ON/
OFF ke bawah untuk melakukannya.
» Lampu daya menyala terus.
» Ketel mulai memanas.
6 Ketel mati secara otomatis bila air sudah mendidih.
» Lampu tanda hidup padam secara otomatis.
Catatan
• Pastikan tutup ketel dirapatkan dengan benar untuk
mencegah ketel merebus dalam keadaan kering.
5 Membersihkan dan Membersihkan
Kerak
Catatan
• Jangan sekali-kali menggunakan sabut gosok, bahan
pembersih abrasif atau cairan agresif seperti minyak
tanah atau aseton untuk membersihkan ketel.
• Jangan sekali-kali merendam ketel atau alasnya dalam
air.
Membersihkan ketel
1 Cabut steker ketel dan tunggu hingga dingin.
2 Bersihkan bagian luar ketel dengan kain lembut
yang dibasahi dengan air hangat dan sedikit bahan
pembersih ringan.
Membersihkan kerak ketel
Membersihkan kerak secara teratur akan memperpanjang
masa pakai ketel.
Untuk pemakaian normal (sampai 5 kali sehari), disarankan
membersihkan kerak dengan frekuensi berikut ini:
• Setiap 3 bulan sekali untuk wilayah dengan air yang
tidak sadah (hingga 18 dH).
• Sebulan sekali untuk wilayah dengan air yang sadah
(lebih dari 18 dH).
1 Isi ketel dengan air hingga tiga perempat batas
maksimum dan rebus hingga mendidih.
2 Setelah ketel dimatikan, tambahkan cuka putih (8%
asam asetat) hingga batas maksimum.
3 Biarkan larutan dalam ketel semalaman.
4 Kosongkan ketel dan bilas bagian dalamnya secara
saksama.
5 Isi ketel dengan air bersih dan rebuslah air.
6 Kosongkan ketel dan bilas lagi dengan air bersih.
7 Ulangi prosedur ini jika masih ada kerak dalam ketel.
Catatan
• Anda juga dapat menggunakan pembersih kerak yang
sesuai. Jika demikian, ikutilah petunjuk pada pembersih
kerak.
6 Penyimpanan
Simpanlah kabel listriknya dengan menggulung pada
kumparan di alas ketel.
7 Penggantian
Jika ketel, alas, atau kabel listrik alat rusak, bawalah alas
atau ketel, alas atau kabel listriknya ke pusat layanan resmi
Philips untuk diperbaiki atau diganti guna menghindari
bahaya.
8 Mendaur ulang
Jangan membuang alat bersama limbah rumah tangga biasa
jika alat sudah tidak bisa dipakai lagi, tetapi serahkan ke titik
pengumpulan atau daur ulang resmi. Dengan melakukan hal
ini, Anda ikut membantu melestarikan lingkungan.
Patuhi peraturan mengenai pengumpulan terpisah produk-
produk elektrik dan elektronik di negara Anda . Pembuangan
produk secara benar akan membantu mencegah dampak
negatif terhadap lingkungan dan kesehatan manusia.
9 Mengatasi masalah
Jika ketel Anda tidak berfungsi dengan benar atau jika
kualitas ketel tidak memadai, perhatikan tabel di bawah ini.
Jika Anda tidak dapat mengatasi masalah tersebut, hubungi
pusat layanan Philips atau Pusat Layanan Konsumen di
negara Anda.
Masalah Solusi
Ketel mati secara
otomatis sebelum
air mendidih.
Ada kerak dalam ketel. Bersihkan
kerak ketel.
Tidak ada air atau air tidak cukup
dalam ketel, dan perlindungan
merebus dalam keadaan kering telah
diaktifkan. Tambahkan air ke ketel.
Ketel tidak
bekerja.
Pastikan steker telah dihubungkan
dengan benar ke soket daya.
Pastikan kabel listriknya tidak rusak.
Pastikan ketel tidak sedang merebus
dalam keadaan kering.
Airnya berbau
tidak enak.
Ikuti langkah 5 dan 6 di bagian
"Sebelum menggunakan pertama kali".
Jika masalah masih ada, tambahkan
air hingga batas maksimum dan
masukkan dua sendok soda kue ke
dalam ketel, kemudian didihkan air
dan bilas ketel.
Ada kerak dalam
air, dan airnya
keruh.
Kesadahan air di tempat tinggal Anda
tinggi. Bersihkan kerak ketel.
HD9303 HD9306
HD9306HD9303
HD9306HD9303
b
a
c
d
e
a
b
d
c
i
e
h
g
f
h
i
g
f
1
2 3
4
2
1
EN User manual
ID Buku Petunjuk Pengguna
MS Manual pengguna
TH
VI Hướng dẫn sử dụng
ZH-S 用户手册
Overview Gambaran keseluruhan
Tổng quan
Ikhtisar
概述
Use the kettle Gunakan cerek
Sử dụng bình đun
Menggunakan ketel
使用电水壶
Bahasa Melayu
1 Cerek elektrik anda
Tahniah atas pembelian anda dan selamat menggunakan
Philips! Untuk mendapatkan manfaat sepenuhnya daripada
sokongan yang ditawarkan oleh Philips, daftar produk anda
di www.philips.com/welcome.
2 Gambaran keseluruhan
HD9303
a
Butang pelepas tudung
f
Kord kuasa
b
Muncung
g
Pemegang
c
Penunjuk kuasa
h
Suis ON/OFF
d
Penyambung tapak
i
Tudung
e
Tapak
HD9306
a
Muncung
f
Suis ON/OFF
b
Penunjuk kuasa
g
Pemegang
c
Penyambung tapak.
h
Butang pelepas
tudung
d
Tapak
i
Tudung
e
Kord kuasa
3 Sebelum penggunaan pertama
1 Tanggalkan pelekat, jika ada, dari cerek atau tapaknya.
2 Letakkan tapak di atas permukaan yang kering, stabil
dan rata.
3 Untuk melaraskan kepanjangan kord, lilitkan
sebahagian daripadanya pada kemudahan
penyimpanan kord di bahagian bawah tapak.
4 Masukkan kord ke dalam salah satu dari slot pada
tapak.
5 Bilas cerek dengan air.
6 Isikan cerek dengan air sehingga penunjuk MAX dan
biarkan air mendidih sekali.
7 Tuangkan keluar air panas dan bilas cerek sekali lagi.
4 Gunakan cerek
1 Tekan butang pelepas tudung.
» Tudungnya terbuka secara automatik.
2 Isikan cerek dengan jumlah air yang dikehendaki.
3 Tutup tudungnya dengan betul.
4 Letakkan cerek di atas tapaknya dan masukkan plag ke
dalam soket dinding.
5 Bagi HD9303, tetapkan suis ON/OFF kepada “I” untuk
menghidupkan cerek; bagi HD9306, tolak suis ON/OFF
ke bawah untuk berbuat demikian.
» Lampu kuasa hidup menyala.
» Cerek akan mula memanas.
6 Cerek mati secara automatik apabila air menggelegak.
» Lampu kuasa hidup padam secara automatik.
Catatan
• Pastikan tudung ditutup dengan sempurna untuk
mengelakkan cerek dari mendidih hingga kering.
5 Membersihkan dan Menanggalkan
Kerak
Catatan
• Jangan sekali-kali menggunakan pad penyental,
agen pembersih yang melelas atau cecair yang agresif
seperti petrol atau aseton untuk membersihkan cerek.
• Jangan tenggelamkan cerek atau tapaknya di dalam air.
Bersihkan cerek
1 Tanggalkan plag cerek dan tunggu hingga ia menyejuk.
2 Bersihkan bahagian luar cerek dengan kain lembut
yang dilembabkan dengan air suam dan sedikit bahan
pencuci lembut.
Menanggalkan kerak cerek
Anda boleh memanjangkan usia cerek dengan
menanggalkan kerak secara tetap.
Dalam keadaan penggunaan biasa (sehingga 5 kali sehari),
kekerapan penanggalan kerak disyorkan seperti berikut:
• Sekali setiap 3 bulan bagi kawasan berair lembut
(sehingga 18 dH).
• Sekali sebulan bagi kawasan berair liat (lebih daripada
18dH).
1 Isikan cerek dengan air sehingga tiga suku paras
maksimum dan didihkan air.
2 Selepas cerek dimatikan kuasa, tambahkan cuka putih
(asid asetik 8%) sehingga paras maksimum.
3 Biarkan larutan di dalam cerek semalaman.
4 Kosongkan cerek dan basuh bahagian dalam dengan
sebersih-bersihnya.
5 Isikan cerek dengan air bersih dan didihkan air itu.
6 Kosongkan cerek dan basuh ia sekali lagi dengan air
bersih.
7 Ulangi prosedur jika masih ada kerak di dalam cerek.
Catatan
• Anda juga boleh menggunakan pembersih kerak yang
sesuai. Jika demikian, ikuti arahan penanggal kerak.
6 Penyimpanan
Simpan kord sesalur utama dengan menggulungnya di
keliling gelendong pada bahagian tapak cerek.
PHILIPS
Pemanas Air
HD9306
220V 50-60Hz 1800W
Diimpor oleh:
PT Philips Domestic Appliances Indonesia Commercial
Gedung Cibis Nine Lantai 10
Jl. T.B. Simatupang No. 2 RT. 001 RW. 005
Kel. Cilandak Timur, Kec. Pasar Minggu
Jakarta Selatan 12560
–
Indonesia
Negara Pembuat: Cina
No. Reg.: IMKG.268.02.2021
© 2021 Philips Domestic Appliances Holding B.V.
All rights reserved.
660 8000 05456
HD9303
HD9306
7 Penggantian
Jika cerek, tapak atau kord sesalur perkakas rosak, bawa
cerek, tapak atau kord sesalur ke pusat servis yang disahkan
oleh Philips untuk dibaiki atau diganti untuk mengelakkan
bahaya.
8 Kitar semula
Jangan buang produk dengan sisa rumah biasa di akhir
hayatnya, sebaliknya bawanya ke pusat pungutan rasmi
untuk dikitar semula. Dengan melakukan ini, anda
membantu memelihara alam sekitar.
Ikut peraturan negara anda berkenaan pengumpulan
berasingan produk elektrik dan elektronik. Cara membuang
yang betul akan membantu mencegah akibat negatif
terhadap alam sekitar dan kesihatan manusia.
9 Menyelesaikan masalah
Jika cerek anda tidak berfungsi dengan betul atau jika kualiti
cerek tidak mencukupi, rujuk kepada jadual di bawah. Jika
anda tidak dapat menyelesaikan masalah tersebut, hubungi
pusat perkhidmatan Philips atau Pusat Layanan Pelanggan
di negara anda.
Masalah Penyelesaian
Cerek mati secara
automatik sebelum air
menggelegak.
Terdapat kerak di dalam cerek.
Menanggalkan kerak cerek.
Air tidak mencukupi atau tiada air
dalam cerek, dan perlindungan
masak didih diaktifkan.
Tambahkan lebih banyak air ke
dalam cerek.
Cerek tidak berfungsi.
Pastikan plag disambungkan
dengan betul pada soket kuasa.
Pastikan kord kuasa tidak rosak.
Pastikan cerek tidak
menggelegak kering.
Terdapat bau yang
kurang menyenangkan
pada air.
Ikuti langkah 5 dan 6 dalam
bahagian "Sebelum penggunaan
pertama". Jika masalah
berterusan, tambahkan air ke
paras maksimum dan tuangkan
dua sudu soda penaik ke dalam
cerek, kemudian didihkan air dan
bilas cerek.
Terdapat kerak di
dalam air, dan airnya
keruh.
Keliatan air tinggi di kawasan
anda tinggal. Bersihkan kerak di
dalam cerek.
1
Philips Philips
www.philips.com/welcome
2
HD9303
a
f
b
g
c
h
/
d
i
e
HD9306
a
f
/
b
g
c
h
d
i
e
3
1 ()
2
3
4
5
6 MAX
7
4
1
»
2
3
4
5 HD9303 / “I”
HD9306 /
»
»
6
»
•
5
•
•
1
2
( 5 )
• 3
( 18 dH)
•
( 18 dH)
1 3 4
2 (
8%)
3
4
5
6
7
•
6
7
Philips
8
9
Philips
5 6
""
Tiếng Việt
1 Bình đun điện
Chúc mừng đơn đặt hàng của bạn và chào mừng bạn đến
với Philips! Để có được lợi ích đầy đủ từ sự hỗ trợ do Philips
cung cấp, hãy đăng ký sản phẩm tại
www.philips.com/welcome.
2 Tổng quan
HD9303
a
Nút mở nắp
f
Dây điện
b
Vòi
g
Tay cầm
c
Chỉ báo nguồn
h
Nút ON/OFF (bật/tắt)
d
Đầu nối chân đế
i
Nắp
e
Đế
HD9306
a
Vòi
f
Nút ON/OFF (bật/tắt)
b
Chỉ báo nguồn
g
Tay cầm
c
Đầu nối chân đế
h
Nút mở nắp
d
Đế
i
Nắp
e
Dây điện
3 Trước khi sử dụng ln đu
1 Bóc hết nhãn dán, nếu có, ra khi chân đế hay bình
đun nước.
2 Đặt chân đế trên mt b mặt khô ráo, vng chắc và
bng phng.
3 Để điu chỉnh chiu dài dây điện, quấn mt phần dây
quanh nơi bảo quản dây điện ở đáy chân đế.
4 Luồn dây điện qua mt trong các khe trong đế.
5 Súc ra bình đun bng nước.
6 Đ nước vào bình đun lên đến chỉ báo mực nước tối
đa (MAX) và đun sôi nước mt lần.
7 Rót hết nước nóng ra và súc ra bình đun nước thêm
lần na.
4 Sử dụng bình đun
1 Nhấn nút mở nắp.
» Nắp mở ra tự đng.
2 Đ lượng nước mong muốn vào bình đun.
3 Đóng thật kín nắp.
4 Đặt bình đun lên chân đế và cắm phích cắm vào
điện.
5 Với HD9303, chuyển công tắc ON/OFF (bật/tắt) sang vị
trí “I” để bật bình đun; với HD9306, nhấn nút ON/OFF
xuống để bật bình đun.
» Đèn nguồn sẽ sáng.
» Bình đun nước sẽ bắt đầu nóng lên.
6 Bình đun sẽ tắt tự đng khi nước sôi.
» Đèn nguồn sẽ tắt tự đng.
Ghi chú
• Đảm bảo rng nắp được đóng chặt để tránh không để
bình sôi khô.
5 Lm sch v tẩy cn
Ghi chú
• Không s dụng miếng tẩy ra, chất tẩy ra có nh ăn
mòn hoặc nhng chất lng mạnh như là xăng hoặc
axêtôn để lau chùi bình đun.
• Không nhúng bình đun hay chân đế của bình đun vào
trong nước.
Lm sch bình đun
1 Rút phích cắm điện của bình đun và để bình đun ngui
xuống.
2 Dùng mt miếng vải mm có thấm nước ấm và mt
chút chất làm sạch nhẹ để lau chùi bên ngoài bình
đun.
Tẩy cn bình đun
Thưng xuyên tẩy cặn sẽ ko dài tui th của bình đun.
Trong trưng hợp s dụng thông thưng (tối đa 5 lần mỗi
ngày) nên tẩy cặn theo tần xuất sau đây:
• 3 tháng mt lần mỗi đối với nhng vùng có nước mm
(tối đa 18dH).
• Mỗi tháng mt lần đối với nhng vùng có nước cng
(cao hơn 18dH).
1 Đ nước vào trong bình lên đến ba phần tư mực nước
tối đa và đun sôi nước.
2 Sau khi bình đun nước tự đng tắt, cho thêm dấm
trắng (8% axit axec) vào bình đến mực nước tối đa.
3 Để dung dịch trong bình đun nước qua đêm.
4 Đ nước trong bình ra và súc ra bên trong thật sạch.
5 Đ nước sạch vào trong bình và đun sôi nước.
6 Đ nước trong bình ra và súc ra bng nước sạch mt
lần na.
7 Lặp lại quá trình này nếu vn còn cặn bám trong bình.
Ghi chú
• Bạn cũng có thể s dụng chất kh cặn thích hợp. Trong
trưng hợp này, hãy thực hiện theo hướng dn ghi
trên chất kh cặn.
6 Bảo quản
Bảo quản dây điện bng cách cuốn dây quanh cun tại chân
đế của bình đun.
7 Thay thế phụ kiện
Nếu bình, chân đế hay dây điện của thiết bị bị hư hng, hãy
mang bình đun, chân đế hay dây điện đến trung tâm dịch
vụ do Philips ủy quyn để sa cha hoặc thay thế để tránh
gặp nguy hiểm.
8 Tái chế
Không vt sản phẩm cùng chung với rác thải gia đình thông
thưng khi ngừng s dụng nó, mà hãy đem sản phẩm đến
điểm thu gom chính thc để tái chế. Làm như vậy sẽ giúp
bảo vệ môi trưng.
Làm theo các quy định tại quốc gia của bạn đối với việc thu
gom riêng các sản phẩm điện và điện t. Việc vt b đúng
cách sẽ giúp phòng tránh các hậu quả xấu cho môi trưng
và sc khe con ngưi.
9 Xử lý sự cố
Nếu bình đun hoạt đng không bình thưng hoặc chất
lượng bình đun không tốt, hãy tham khảo bảng sau đây.
Nếu bạn không thể giải quyết được vấn đ, hãy liên hệ với
trung tâm dịch vụ hoặc Trung tâm Chăm sóc Khách hàng
của Philips tại nước bạn.
Sự cố Giải pháp
Bình tự đng tắt
trước khi nước
sôi.
Có cặn bám trong bình đun. Tẩy cặn
bình đun.
Không có nước hoặc không đủ nước
trong bình đun và chc năng bảo vệ
chống sôi khô được kích hoạt. Thêm
nước vào bình đun.
Bình đun không
hoạt đng.
Đảm bảo rng phích cắm đã được cắm
chặt vào điện.
Đảm bảo rng dây điện không bị hư
hng.
Đảm bảo rng bình đun không bị sôi
khô.
Nước có mùi
khó chịu.
Thực hiện theo các bước 5 và 6 trong
mục "Trước khi s dụng lần đầu". Nếu
vấn đ vn còn, thêm nước đến mc
tối đa và cho hai thìa muối nấu ăn vào
bình đun, sau đó đun sôi nước và xúc
ra bình đun.
Có mt chút cặn
trong nước và
nước bị đục.
Đ cng của nước cao tại khu vực bạn
sống. Tẩy cặn bình đun.
简体中文
1
您的电水壶
欢迎购买并使用飞利浦产品!为了您能充分
享受飞利浦提供的支持,请在
www.philips.com/welcome 上注册您的
产品。
2
概述
HD9303
a
壶盖打开键
f
电源线
b
壶嘴
g
手柄
c
电源指示灯
h
开
/
关按钮
d
底座连接器
i
壶盖
e
底座
HD9306
a
壶嘴
f
开
/
关按钮
b
电源指示灯
g
手柄
c
底座连接器
h
壶盖打开键
d
底座
i
壶盖
e
电源线
3 首次使用之前
1
撕去底座或水壶上的所有标签(如果
有)。
2 将底座放在一个干燥、平稳的表面上。
3 要调整电源线的长度,请将部分电源线
缠绕在底座底部的电源线存储装置上。
4 将电源线穿过底座的其中一个槽中。
5 用水清洁电水壶。
6 将水满到
MAX
(最高)水位线的位置,
然后将水烧开一次。
7 将热水倒出,然后再清洁一次电水壶。
4 使用电水壶
1 按下壶盖打开钮。
» 壶盖将自动打开。
2 给电水壶注入所需水量。
3 请盖好盖子。
4 将电水壶放到底座上,然后将插头插入
电源插座。
5 对于
HD9303
,将开关设置为“
I
”可打
开水壶电源;对于
HD9306
,向下按开
/
关按钮可打开电水壶电源。
» 电源指示灯亮起。
» 水壶开始加热。
6 电水壶会在水煮沸时自动关闭。
» 电源指示灯会自动熄灭。
注
• 确保壶盖已盖好,以防止壶烧干。
5 清洁与除垢
注
• 切勿使用钢丝绒、研磨性清洁剂或腐蚀性
液体(例如汽油或丙酮)来清洁电水壶。
• 切勿将水壶或底座浸入水中。
清洁电水壶
1 拔下电水壶的电源插头,等待其冷却。
2 用蘸有温水和无害清洁剂的软布擦拭壶
的外表面。
为电水壶除垢
定期除垢可延长电水壶的使用寿命。
在正常使用的情况下(一天使用
5
次),建
议按以下频率去除水垢:
• 在软水(最高
18dH
)地区,每三个月一
次。
• 在硬水(大于
18dH
)地区,每月一次。
1 往壶中注水,满到最高水位的
3/4
,将
水烧开。
2 切断电水壶电源后,加入白醋(醋酸度
为
8%
),加至最高水位线。
3 让溶剂留在水壶中一整夜。
4 倒出溶剂,用清水彻底冲洗水壶内部。
5 往水壶内注入清水,然后烧开。
6 倒空壶中的脏水,用清水再次冲洗水壶
内部。
7 如果水壶中还有水垢,可重复此步骤。
注
• 您也可以使用适当的除水垢剂。在这种
情况下,应按照除垢剂的说明进行操作。
6 存储
将电源线缠绕在电水壶底座中的卷轴上进行
存放。
7 更换
如果电水壶、底座或产品电源线损坏,应将
电水壶、底座或电源线送至飞利浦授权的服
务中心进行修理或更换,以免发生危险。
8 回收
弃置产品时,请不要将它与一般生活垃圾一
同丢弃,应将其交给官方指定的回收中心。
这样做有利于环保。
请遵循您所在国家
/
地区的电器及电子产品
分类回收规定。正确弃置产品有助于避免对
环境和人类健康造成负面影响。
9 故障种类和处理方法
如果电水壶工作不正常或质量有缺陷,请查
询下表。如果无法解决问题,则请联系您所
在国家
/
地区的飞利浦服务中心或客户服务
中心。
问题 解决方法
电水壶会在
水煮沸前自
动关闭。
电水壶中有水垢。为电水壶
除垢。
电水壶中没有水或水量不
足,防干烧保护功能已启
动。向电水壶中加入更多
的水。
电水壶无法
工作。
确保插头已正确连接到电源
插座。
确保电源线未损坏。
确保电水壶未烧干。
水中有难闻
的气味。
按照“首次使用之前”部分
中的步骤
5
和
6
进行操作。
如果问题仍然存在,请加水
至最高水位,并向电水壶中
倒入
2
匙小苏打,然后将水
烧开并冲洗电水壶。
水中有一些
水垢,将水
变浑浊了。
您居住区域的水硬度较高。
为电水壶除垢。