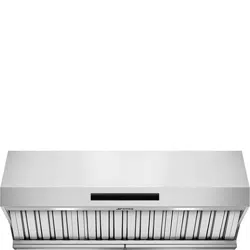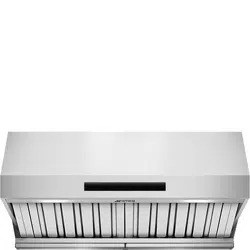
EN Instruction on mounting and use
ZH 安装使用说明

Ø3,5x9,5mm
3x
Ø4,2x35mm
4x
Ø4,5x16mm
4x
Ø4x8mm
6x
1x
2x
2x
1x
1x
1x
2x
1x
1x
1x
L
R
1
1 x
Ø 3,5x9,5
20
*
1-3-4-5-6/7-8-1
0-16-17-18-19-
20-21
26 cm
*
2
1-6/7-9-10-11-1
2-13-14-15-16-
17-18-19-20-21
*
> 28,5 cm
4 x Ø 5mm
3
4
5
6
7
8
4x Ø 4,2x35
10
4x Ø 4,5x16
* *
9
*

11
4 x Ø 4x8
*
12
*
13
*
14
*
15
16
2 x Ø 4x8
2 x
Ø 3,5x9,5
*

17
18a
*
18b
*
2x
20
21
*
*

2
EN - Instruction on mounting and use
Closely follow the instructions set out in this manual. All
responsibility, for any eventual inconveniences, damages or fires
caused by not complying with the instructions in this manual, is
declined. This appliance is intended to be used in household and
similar application such as: - staff kitchen areas in shop, offices
and other working environments; - farm houses; - by clients in
hotels, motels and other residential type environments; - bed and
breakfast type environments.
The hood can look different to that illustrated in the drawings
in this booklet. The instructions for use, maintenance and
installation, however, remain the same.
• It is important to conserve this booklet for consultation at any
moment. In the case of sale, cession or move, make sure it is
together with the product.
• Read the instructions carefully: there is important information
about installation, use and safety.
• Do not carry out electrical or mechanical variations on the
product or on the discharge conduits.
• Before proceeding with the installation of the appliance verify
that there are no damaged all components. Otherwise
contact your dealer and do not proceed with the installation.
Note: The parts marked with the symbol "(*)" are optional
accessories supplied only with some models or otherwise not
supplied, but available for purchase.
Caution
• Before any cleaning or maintenance
operation, disconnect hood from the mains
by removing the plug or disconnecting the
mains electrical supply.
• Always wear work gloves for all
installation and maintenance operations.
• This appliance can be used by children
aged from 8 years and above and persons
with reduced physical, sensory or mental
capabilities or lack of experience and
knowledge if they have been given
supervision or instruction concerning use of
the appliance in a safe way and
understand the hazards involved.
• Children shall not be allowed to tamper
with the controls or play with the appliance.
• Cleaning and user maintenance shall not
be made by children without supervision.
• The premises where the appliance is
installed must be sufficiently ventilated,
when the kitchen hood is used together
with other gas combustion devices or other
fuels.
• The hood must be regularly cleaned on
both the inside and outside (AT LEAST
ONCE A MONTH).
• This must be completed in accordance
with the maintenance instructions provided.
Failure to follow the instructions provided
regarding the cleaning of the hood and
filters will lead to the risk of fires.
• Do not flambé under the range hood.
• Do not remove filters during cooking.
• For lamp replacement use only lamp type
indicated in the Maintenance/Replacing
lamps section of this manual.
The use of exposed flames is detrimental
to the filters and may cause a fire risk, and
must therefore be avoided in all
circumstances.
Any frying must be done with care in order
to make sure that the oil does not overheat
and ignite.
CAUTION: Accessible parts of the hood
may become hot when used with cooking
appliances.
• Do not connect the appliance to the mains
until the installation is fully complete.
• With regards to the technical and safety measures to be adopted
for fume discharging it is important to closely follow the regulations
provided by the local authorities.
• The air must not be discharged into a flue that is used for
exhausting fumes from appliance burning gas or other fuels.
• Do not use or leave the hood without the lamp correctly mounted
due to the possible risk of electric shocks.
• Never use the hood without effectively mounted grids.
• The hood must NEVER be used as a support surface unless
specifically indicated.
• Use only the fixing screws supplied with the product for
installation or, if not supplied, purchase the correct screws type.
• Use the correct length for the screws which are identified in the
Installation Guide.
• In case of doubt, consult an authorized service assistance center
or similar qualified person.

3
WARNING!
• Failure to install the screws or fixing device in accordance
with these instructions may result in electrical hazards.
• Do not use with a programmer, timer, separate remote
control system or any other device that switches on
automatically.
• This appliance is marked according to the European directive
2012/19/EC on Waste Electrical and Electronic Equipment
(WEEE).
• By ensuring this product is disposed of correctly, you will help
prevent potential negative consequences for the environment and
human health, which could otherwise be caused by inappropriate
waste handling of this product.
• The symbol
on the product, or on the documents
accompanying the product, indicates that this appliance may not
be treated as household waste. Instead it should be taken to the
appropriate collection point for the recycling of electrical and
electronic equipment. Disposal must be carried out in accordance
with local environmental regulations for waste disposal.
• For further detailed information regarding the process, collection
and recycling of this product, please contact the appropriate
department of your local authorities or the local department for
household waste or the shop where you purchased this product.
Appliance designed, tested and manufactured according to:
• Safety: EN/IEC 60335-1; EN/IEC 60335-2-31, EN/IEC 62233.
• Performance: EN/IEC 61591; ISO 5167-1; ISO 5167-3; ISO
5168; EN/IEC 60704-1; EN/IEC 60704-2-13; EN/IEC 60704-3; ISO
3741; EN 50564; IEC 62301.
• EMC: EN 55014-1; CISPR 14-1; EN 55014-2; CISPR 14-2;
EN/IEC 61000-3-2; EN/IEC 61000-3-3. Suggestions for a correct
use in order to reduce the environmental impact: Switch ON the
hood at minimum speed when you start cooking and kept it
running for few minutes after cooking is finished. Increase the
speed only in case of large amount of smoke and vapor and use
boost speed(s) only in extreme situations. Replace the charcoal
filter(s) when necessary to maintain a good odor reduction
efficiency. Clean the grease filter(s) when necessary to maintain a
good grease filter efficiency. Use the maximum diameter of the
ducting system indicated in this manual to optimize efficiency and
minimize noise.
Use
The hood is designed to be used either for exhausting or filter
version.
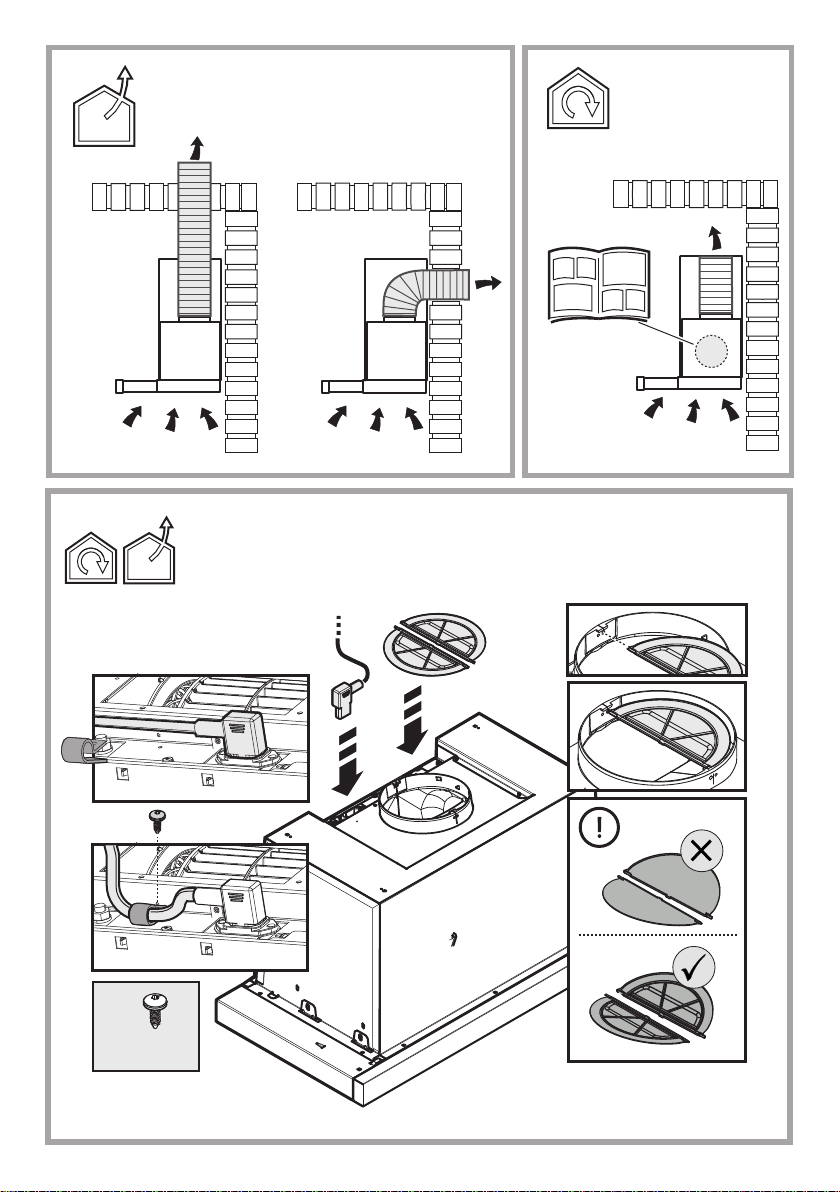
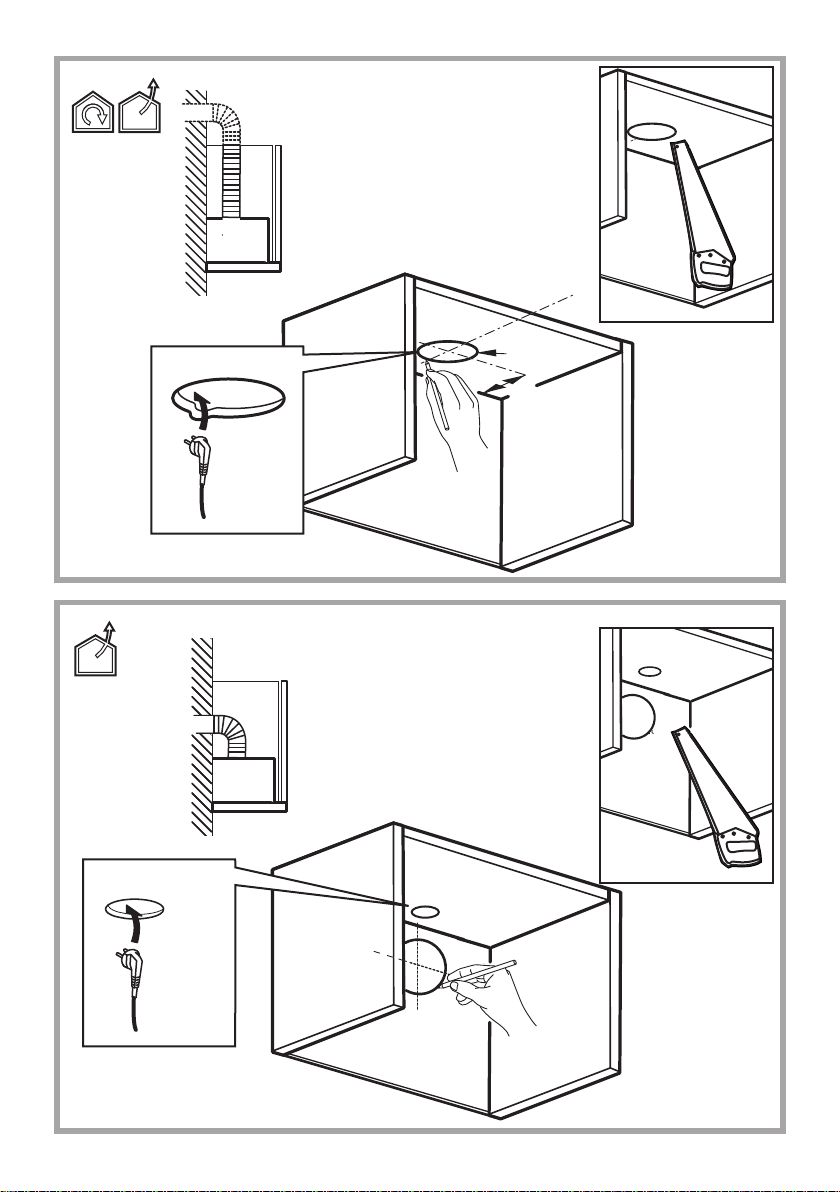
Extraction version
In this case the fumes are conveyed outside of the building by
means of a special pipe connected with the connection ring
located on top of the hood.
CAUTION!
The exhausting pipe is not supplied and must be purchased apart.
Diameter of the exhausting pipe must be equal to that of the
connection ring.
CAUTION!
If the hood is supplied with active charcoal filter, then it must be
removed.
Connect the hood and discharge holes on the walls with a
diameter equivalent to the air outlet (connection flange).
! Use a duct of the minimum indispensable length.
! Use a duct with as few elbows as possible (maximum elbow
angle: 90°).
! Avoid drastic changes in the duct cross-section.
Filtration version
The aspirated air will be degreased and deodorised before being
fed back into the room.
In order to use the hood in this version, you have to install a
system of additional filtering based on activated charcoal.
Attention! If the hood is not supplied with carbon filter, then it
must be ordered and mounted.
4
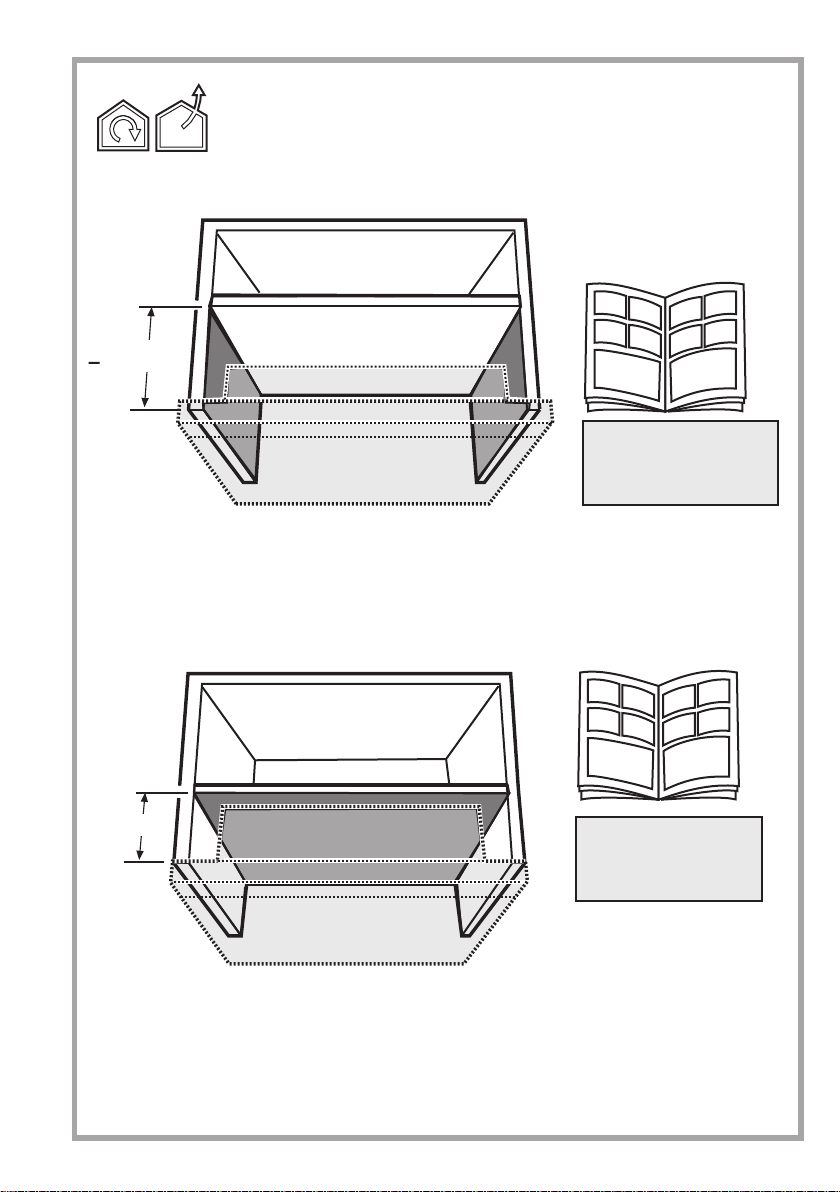
Installation
The minimum distance between the supporting surface for the
cooking equipment on the hob and the lowest part of the range
hood must be not less than 50cm from electric cookers and 65cm
from gas or mixed cookers.
If the instructions for installation for the gas hob specify a
greater distance, this must be adhered to.
Electrical connection
The mains power supply must correspond to the rating indicated
on the plate situated inside the hood. If provided with a plug
connect the hood to a socket in compliance with current
regulations and positioned in an accessible area, after installation.
If it not fitted with a plug (direct mains connection) or if the plug is
not located in an accessible area, after installation, apply a double
pole switch in accordance with standards which assures the
complete disconnection of the mains under conditions relating to
over-current category III, in accordance with installation
instructions.
WARNING!
Before re-connecting the hood circuit to the mains supply and
checking the efficient function, always check that the mains cable
is correctly assembled.
The hood is provided with a special power cable ; if the cable is
damaged, request a new one from Technical Service.
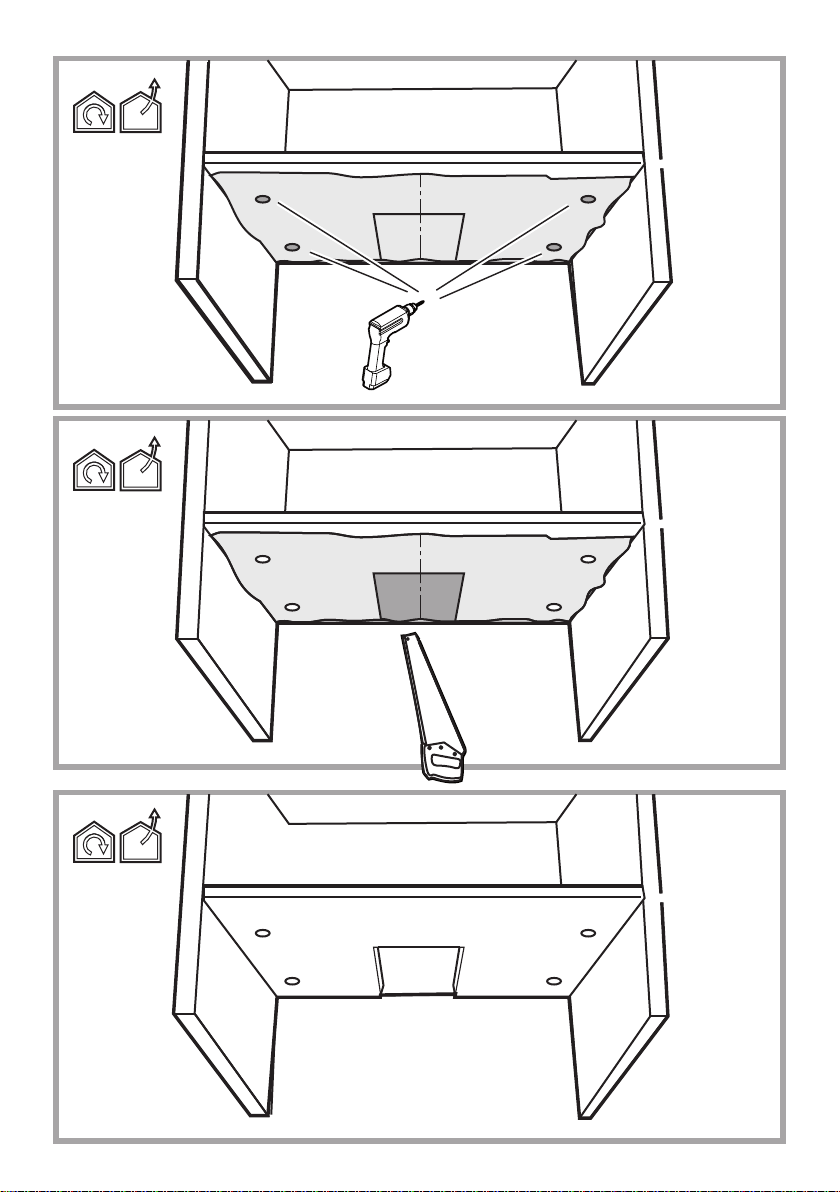
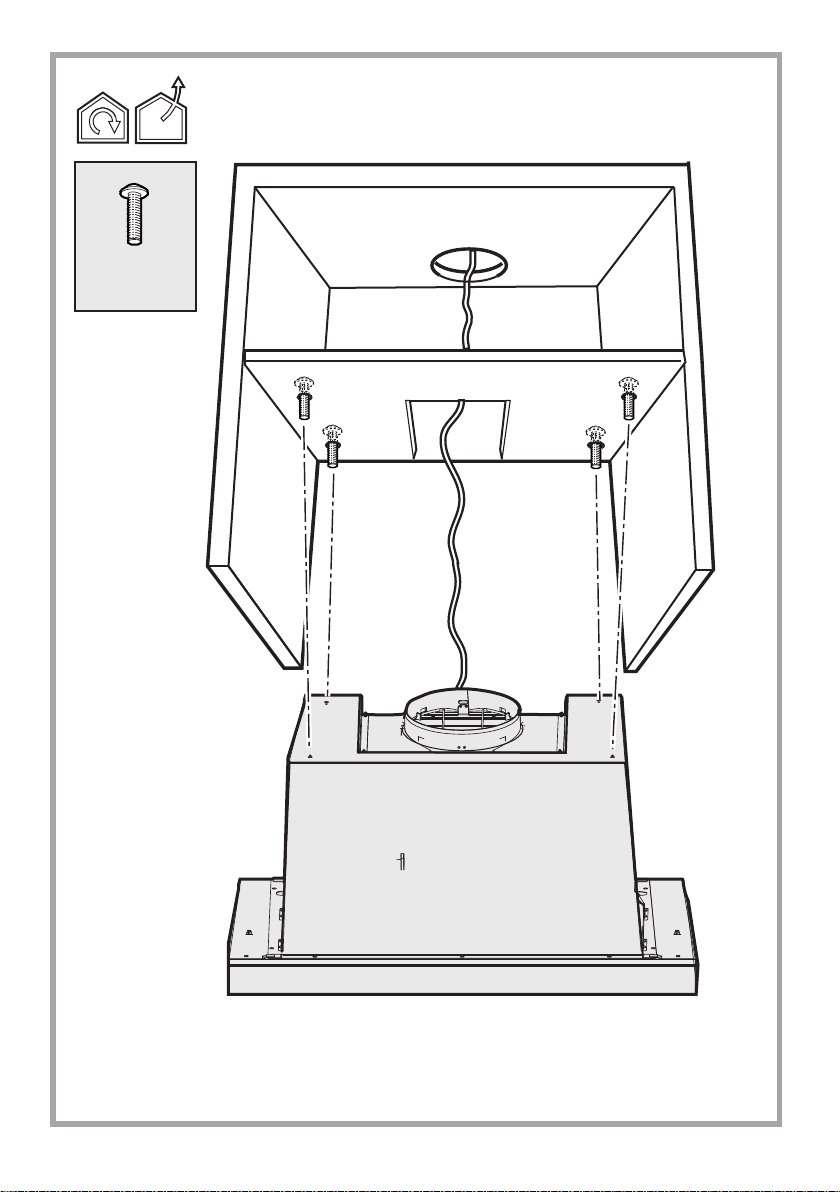
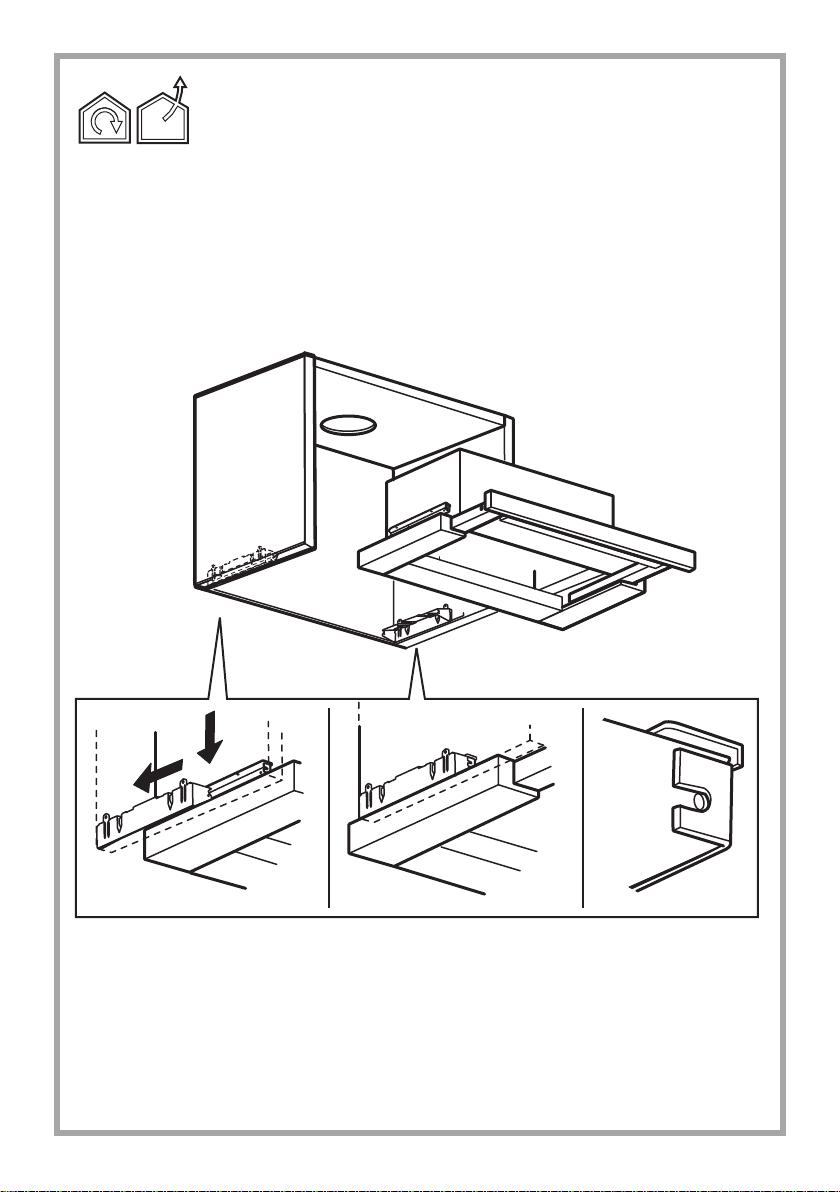
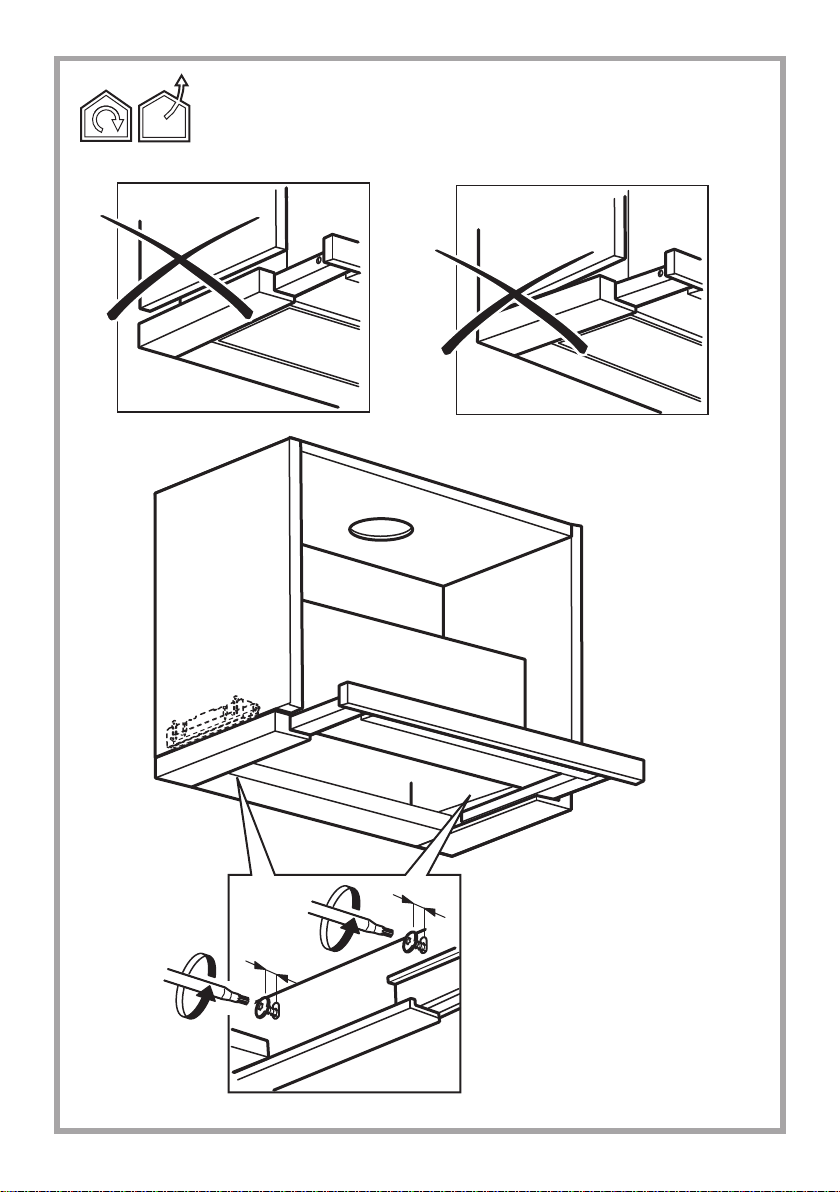
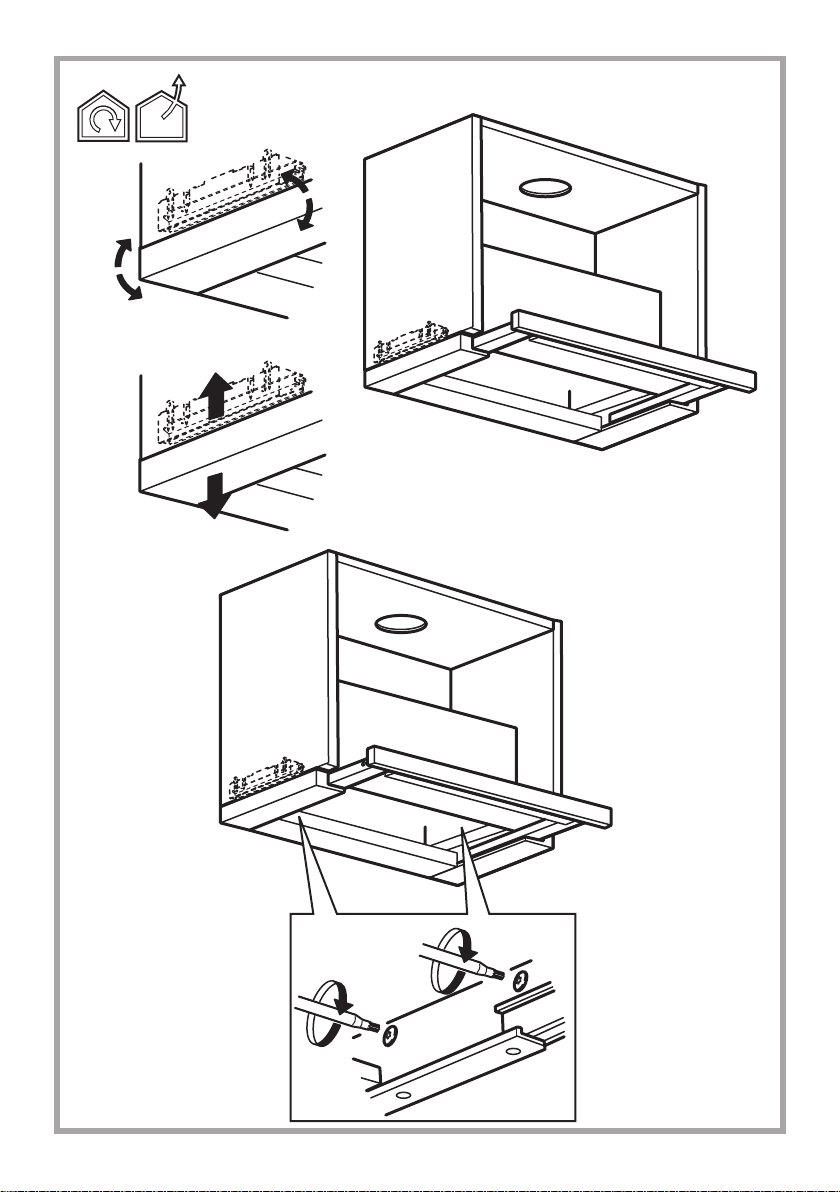
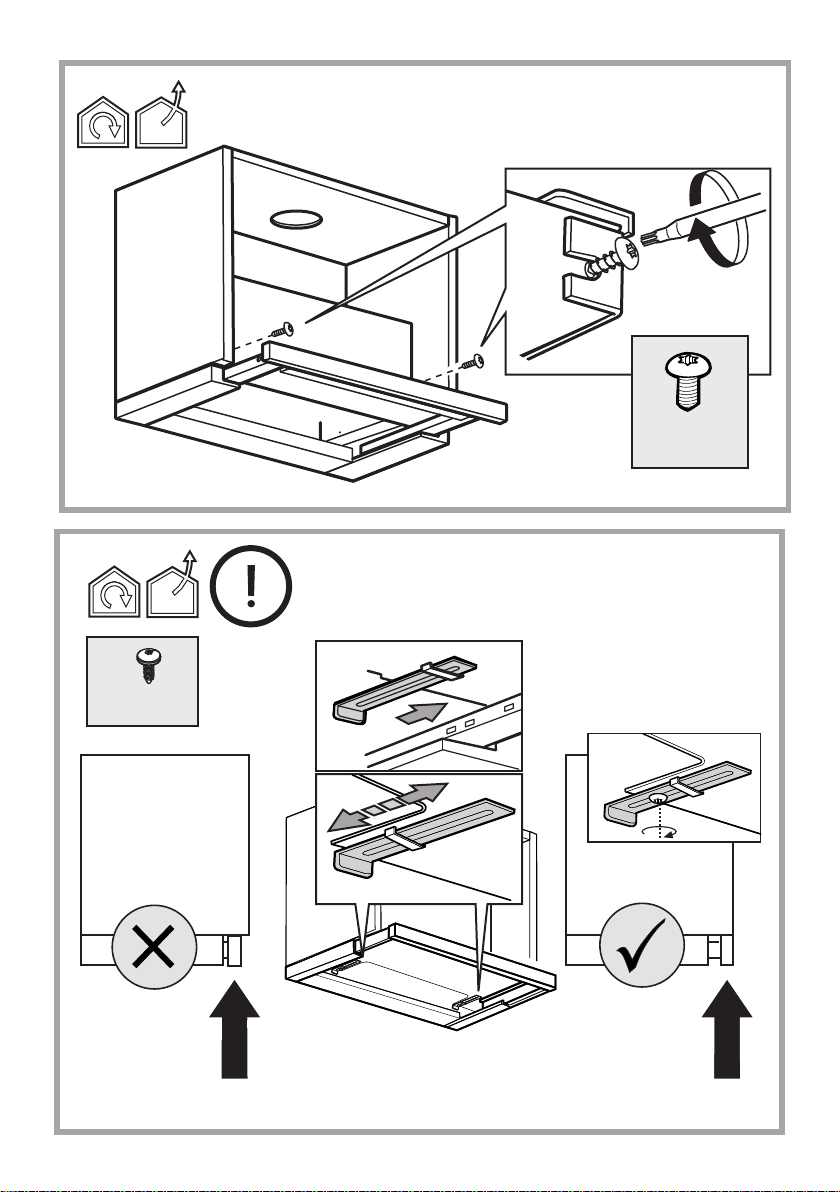
Mounting
Before beginning installation:
• Check that the product purchased is of a suitable size for the
chosen installation area.
• Remove the charcoal (*) filter/s if supplied (see also relative
paragraph). This/these is/are to be mounted only if you want
lo use the hood in the filtering version.
• Check (for transport reasons) that there is no other supplied
material inside the hood (e.g. packets with screws (*),
guarantees (*), etc.), eventually removing them and keeping
them.
Expansion wall plugs are provided to secure the hood to most
types of walls/ceilings. However, a qualified technician must verify
suitability of the materials in accordance with the type of
wall/ceiling. The wall/ceiling must be strong enough to take the
weight of the hood.
Do not tile, grout or silicone this appliance to the wall. Surface
mounting only.
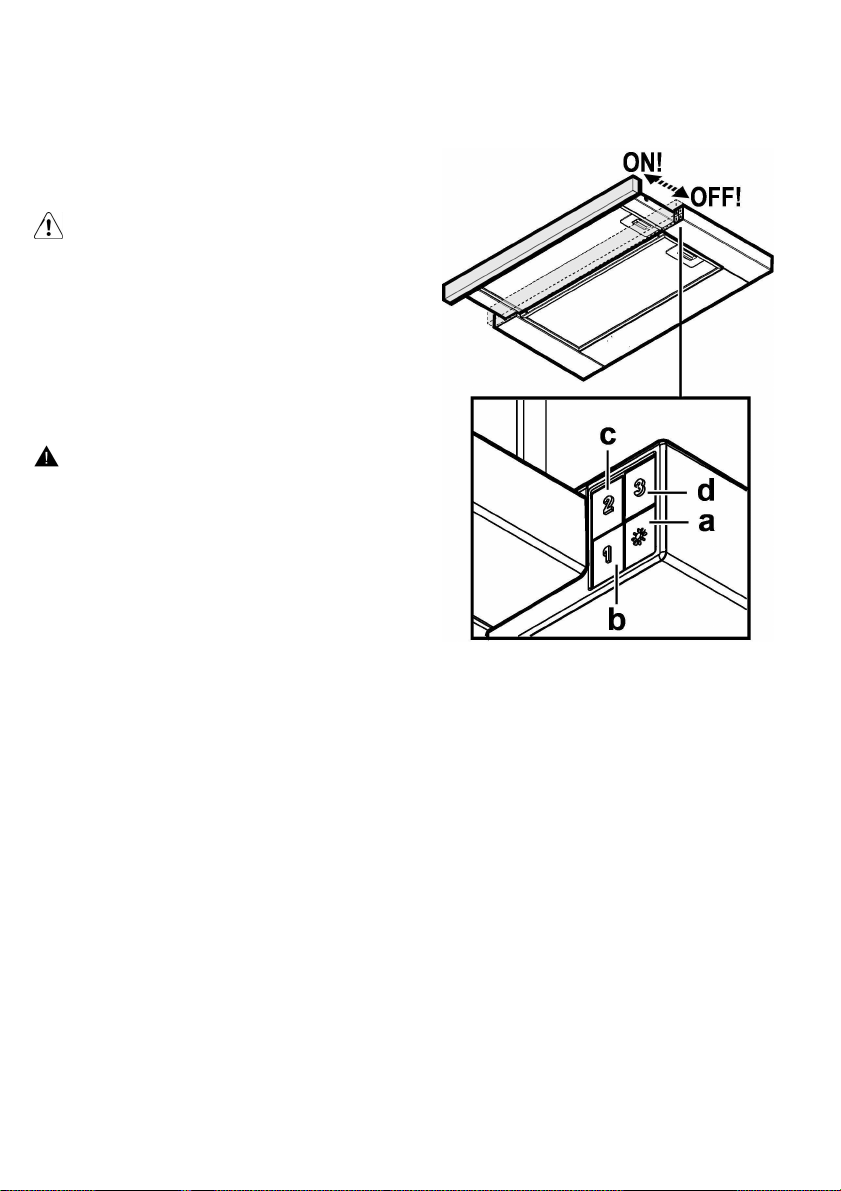
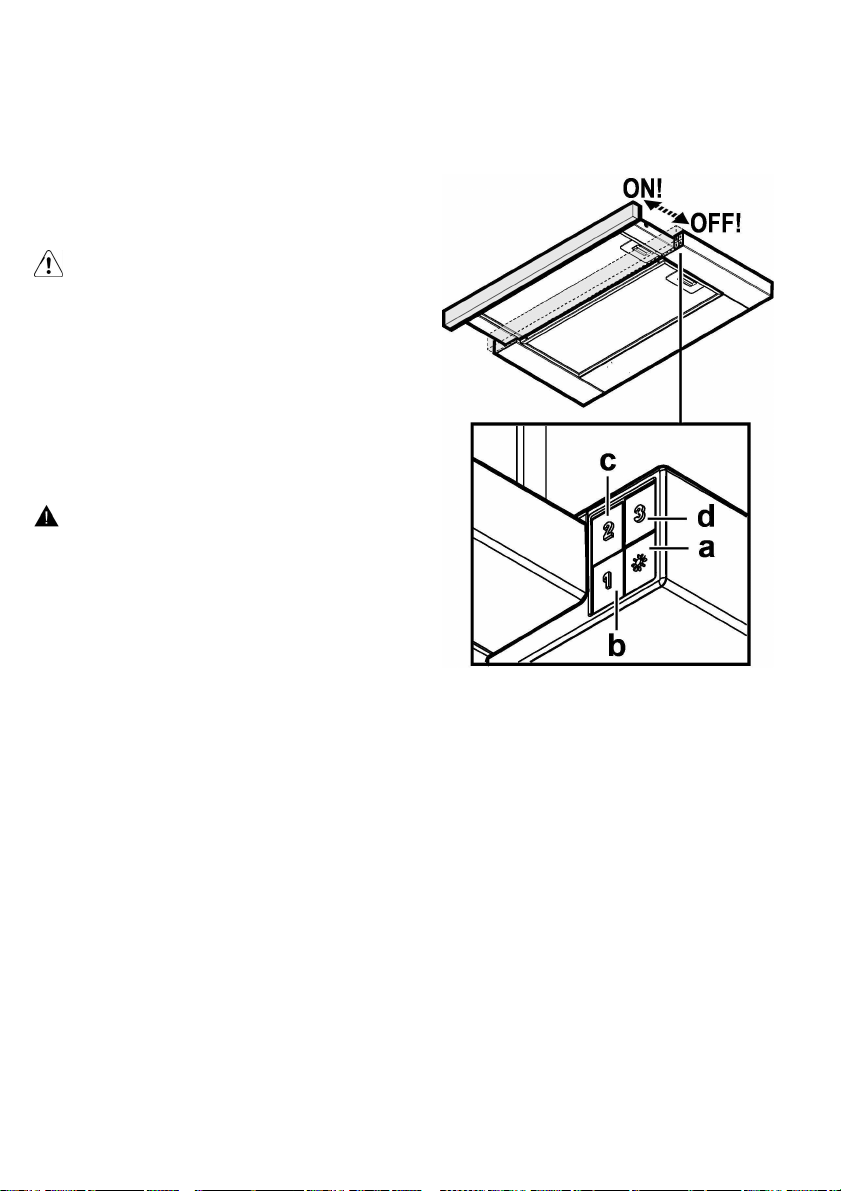
Operation
The hood is fitted with a control panel with aspiration speed
selection control and a light switch to control cooking area
lights.
a. ON/OFF light switch
b. Speed 1/OFF switch
c. 2-speed selection
d. 3-speed selection

5
Maintenance
Cleaning
Clean using ONLY a cloth dampened with neutral liquid
detergent. DO NOT CLEAN WITH TOOLS OR
INSTRUMENTS. Do not use abrasive products. DO NOT USE
ALCOHOL!
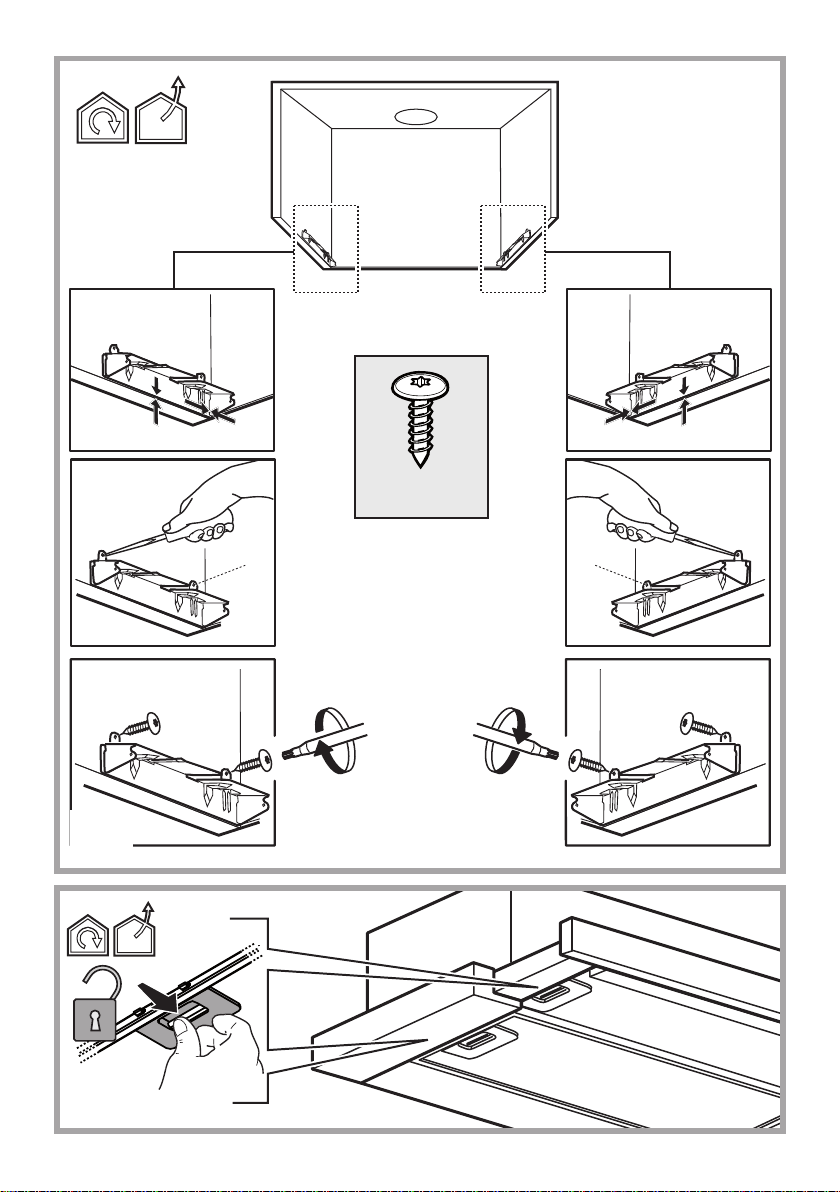
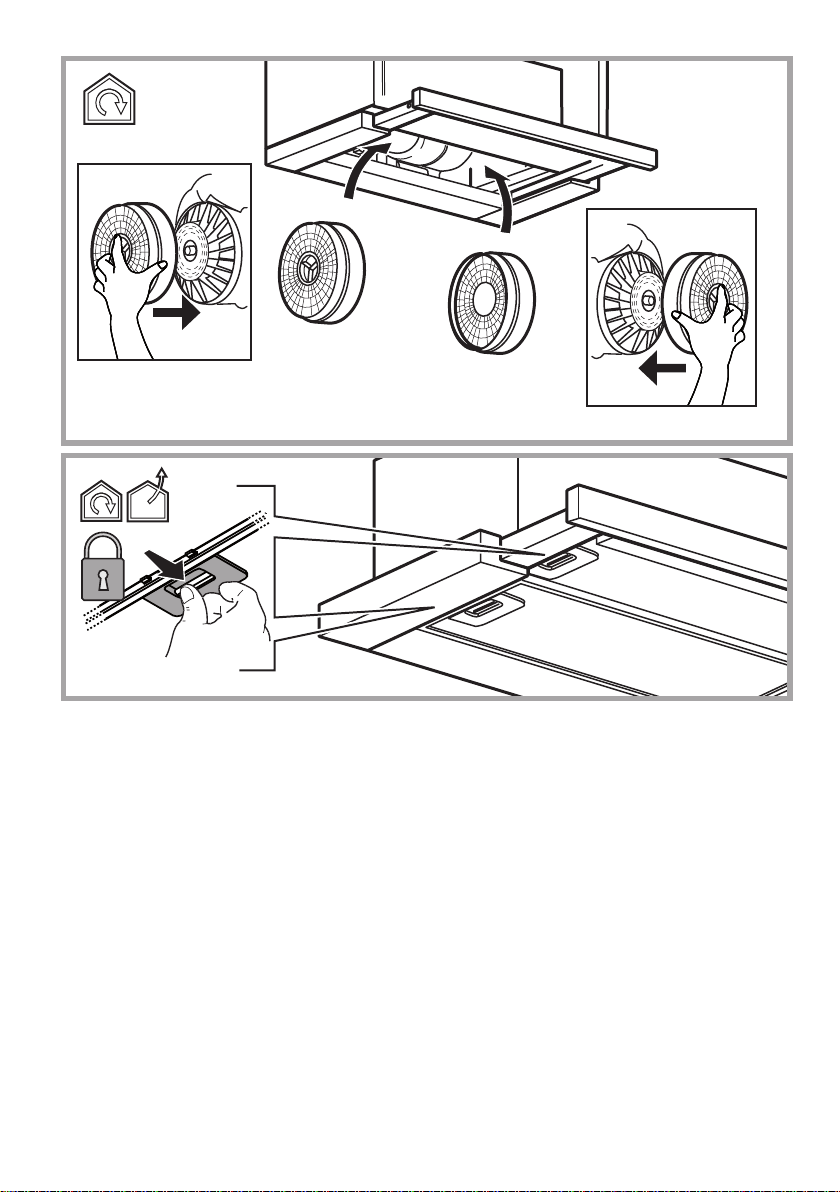
Grease filter
Fig. 10-21
Traps cooking grease particles.
The grease filter must be cleaned once a month using non
aggressive detergents, either by hand or in the dishwasher,
which must be set to a low temperature and a short cycle.
When washed in a dishwasher, the grease filter may discolor
slightly, but this does not affect its filtering capacity.
To remove the grease filter, pull the spring release handle.
Charcoal filter (filter version only)
Fig. 20
It absorbs unpleasant odors caused by cooking.
The saturation of the charcoal filter occurs after more or less
prolonged use, depending on the type of cooking and the
regularity of cleaning of the grease filter.
In any case it is necessary to replace the cartridge at least
every four months.
The charcoal filter may NOT be washed or regenerated.
Remove the grease filters.
Apply one charcoal filter each side and hook in onto the hood.
Refit the grease filter.
Replacing lamps
Disconnect the appliance from the electricity.
Warning! Prior to touching the light bulbs ensure they are
cooled down.
Extract the drawer completely.
Put the grill back.
Replace the damaged lamp.
Use E14 2,5W max LED lamps only. For more details, check
enclosed leaflet “ILCOS D” (alfanumeric position “1e”).
If the lights do not work, make sure that the lamps are fitted
properly into their housings before you call for technical
assistance.
6
中文-安装和使用说明
请务必严格遵守本手册中的说明指示。对于因不遵
守本手册中的说明指示而导致的设备问题、损伤与
火灾,本公司概不负责。本抽油烟机的设计用途为
抽吸烹饪产生的油烟与蒸汽,仅供家庭使用。
产品若与图示不同,请以实物为准。任何与安
装、使用、保养说明不符的特点描述,也请以
实物为准。
•必须妥善保管所有产品附带的手册,以便随时查阅。
如果出售、转让或搬迁本机,请确保说明手册与产
品同在。
•请仔细阅读说明:内有关于安装、使用和安全的重
要信息。
•切勿对产品或排气管进行电气或机械更改。
•请先检查确保抽油烟机完整无损,然后才可
进行安装。否则请联系经销商,不可进行安装。
备注:标有(*)
号的零件是只为某些型号供应的可选性配件,或是
不随机供应而需另行购买的零件。
警告
·在进行任何清洁或维护操作之前
,请切断抽油烟机的电源,拔下插
头或切断居所内的总开关。
·所有安装和维护操作都必须使用
工作手套。
·8岁或以上儿童,身体、感官或
智力残障人士,或缺乏经验和必要
知识的人士,必须在监控下或获得
必要的安全使用指示并理解相关危
险之后,方可使用本设备。
·儿童必须得到监控,不可玩弄本
设备。
·儿童不得在缺乏监控的情况下,
对本设备进行清洁和维护。
·如果抽油烟机与其他燃气或燃烧
设备同时使用,安装地点必须具有
良好的通风条件。
·抽油烟机必须经常进行内外清洁
(至少每月一次),请遵守维护说
明指示。不遵守抽油烟机的清洁及
滤网的更换清洁规范,可导致火灾
风险。
·严禁在抽油烟机下明火烧烤食物
·更换灯泡只可使用本手册的灯泡
维护/更换章节中指示的灯泡类型。
使用明火会损害滤网,可能会导致
火灾,在任何情况下必须避免。
油炸必须注意控制,避免过热的烹
油着火。
注意:使用炉灶时,抽油烟机可触
及的部分可能会发热。
• 安装未全部完成时,切勿使设备通电。
•关于排烟需采取的技术与安全措施,必须严格遵守
当地有关部门的规定。
•抽吸的空气不得排入燃气设备或其他燃烧设备产生
油烟的排烟管道。
•如抽油烟机的灯泡安装不当,切勿使用,亦不可置
之不理,会有触电风险。
• 切勿使用格栅安装不当的抽油烟机!
•抽油烟机切不可用于放置物品,除非有本说明手册
有明确指示。
•安装只可使用产品配送的固定螺丝,如果没有配送,
请购买类型正确的螺丝。
• 请使用安装指南中指定的螺丝正确长度。
•如有疑问,请联系授权的售后服务中心或类似的合
资格人员。
注意!
·安装不符合本手册规定的螺丝和固定设备,可能
会导致电气风险。
·切勿使用独立的编程器、计时器、遥控器或任何
自动开启的设备。
本设备标明符合关于废旧电气电子设备的2012/19/EC
欧盟指令(WEEE)。请确保本产品以正确方式处理,
用户必须预防它对环境与健康可能产生的负面影响。
产品或附属文件上的标志
表示本产品不得作为家庭垃圾处理,必须交付
7
至符合要求的电子电气设备回收点。本产品必须根
据本地垃圾处理规范拆毁。欲了解更多关于本产品
的处理、修复和回收信息,请联当地有关部门、家
庭垃圾回收服务或购买产品的商店。
本产品的设计、测试与制造均符合以下规范:
·安全:EN/IEC 60335-1; EN/IEC 60335-2-31,
EN/IEC 62233.
·性能:EN/IEC 61591; ISO 5167-1; ISO 5167-3;
ISO 5168; EN/IEC 60704-1; EN/IEC 60704-2-13;
EN/IEC 60704-3; ISO 3741; EN 50564; IEC
62301.
·EMC:EN 55014-1; CISPR 14-1; EN 55014-2;
CISPR 14-2; EN/IEC 61000-3-2; EN/IEC 61000-3-
3.为降低对环境的负面影响,请遵守以下正确使用
建议:开始烹饪时,以最小速度打开油烟机,烹饪
结束后,让它继续运转数分钟。只有在产生大量油
烟和蒸汽的情况下才提高速度,只有在极端情况下
才使用助推器功能。为了保持除味系统的效率,在
必要时更换过滤器/碳。为了保持油脂滤网的效率,
在必要时进行清洁。为了优化效率,减少噪音,请
使用本手册指示的管道系统的最大直径。
使用说明
本吸油烟机是专为排气或过滤使用设计。
外排式
在这种情况下,可以将这种特殊的管道与烟机
顶部的连接环连接起来,以便将烟气排放到室
外。
注意!
排气管为选配件,需另行购买。
排气管的直径必须与连接环一致。
注意!
注意!如果烟机配有活性碳网,则应在安装前
先移除。
将烟机与墙上当量孔径为排气口(转接口)大
小的排放口相连。
!所用管道长度不得小于规定长度。
!所用管道最好无弯头(最大折弯角度:90度) 。
!避免在管道横截面上做重大改变。
内循环式
烟气中的油脂和气味经碳网吸附后通过外网罩
排放到室内。
在这种情况下,需根据活性碳的情况额外安装
一个过滤系统。
注意!如果碳滤网未有随抽油烟机配备,必须在使
用前订购并安装。
8
安装说明
炉灶上的容器的支撑面与抽油烟机最低的部分之间
,如果是电磁炉,必须保持不低于 50厘米
的距离,如果燃气炉或混合炉,应保持不低于
65厘米
的距离。
如果燃气炉灶的安装说明指定了更大的距离,必须
遵守。
电气连接
主电源应与烟机线路板上额定值相符。如果烟机配
有插头,则在安装完成后,按照现有的电流调节图
将其与插座连接起来并将其固定在可触及的位置上
。如果未配插头(直接连接到电源上)或者安装完
成后未将其固定在可触及的位置上,则可按照安装
要求使用符合标准要求的双极开关,以确保电流在
超过III级时可与主电源完全断开。
警告!
请在重新连接主电源和烟机电路前以及检查能否高
效运作前,仔细检查电源线连接是否正确。
本产品配有专门的电源线:若电源线损坏,为避免
危险,必须联系维修机构的专业人员进行更换。
安装前须知
安装前须知
•检查产品尺寸是否符合安装位置的要求。
•如配有活性碳网(*),请先将其移去(详见相关段落)。
活性碳网仅限使用过滤功能时使用。
•检查烟机内部是否存有其他物件(出于对运输原因
的考虑,如螺钉包(*)、保修卡(*)等等)。如有,请
先将其拿出妥为保管。
抽油烟机配备了适合大部分墙壁/天花板的固定楔子
。不过,还是必须咨询合资格的技术人员,确保材
料适合墙壁/天花板的类型。墙壁/天花板必须足够
结实,能够承受抽油烟机的重量。
操作说明
油烟机设置带一个控制抽吸速度和控制用于烹饪灶
台的照明灯点亮的控制面板.
a.开启/关闭照明灯
b.开启1速/关闭开关
c.开启2速
d.开启3速

9
保养说明
清洁说明
清洁只可使用蘸有中性清洁剂的抹布。切勿使用工
具进行清洁!
避免使用磨蚀性产品。切勿使用酒精!
滤油网
图 10-21
拦截烹饪产生的油脂粒子
滤油网需每月用非侵蚀性的清洁剂清洗一次。清洗
时可以直接用手清洗,也可以使用洗碗机,但前提
是必须将洗碗机设定在低温低循环的工作状态下。
使用洗碗机进行清洗会造成滤油网的轻微褪色,但
不会对滤油网的过滤效果造成任何影响。
拆卸滤油网时,请先拨动网板上的弹簧释放把手,
随后再进行滤油网的拆卸工作。
活性碳网
图 20
拦截烹饪异味
根据烹调习惯和滤油网的清洗频率,活性碳网在使
用一段时间后会达到饱和状态,此时需要更换碳网
再继续使用。
建议在任何情况下每隔4个月更换一次碳网。
禁止水洗或反复使用同一个碳网。
取出防油脂过滤器。
在每侧应用炭过滤器且将其挂在油烟机上。
替换防油脂过滤器。
更换照明灯
在更换之前,请确认您的吸油烟机已经关机并与电
源断开连接。
警告!在更换灯泡前,
请先确认其是否已经完全冷却。
打开可移动抽屉。
取出防油脂过滤器。
更换损坏的灯泡
仅可使用E14 2,5W max
LED灯泡。更多详情请查看随附的说明书"ILCOS
D"(字母数字位置“1e”).
如果灯泡不亮,在寻求技术协助之前,先检查灯泡
是否有正确插入灯泡座。

LIB0169709 Ed. 06/20