Loading ...
Loading ...
Loading ...
5. Operation
Step 1
1. After plugging, the screen is lit for 2 seconds & device
is ready to use post 3 buzzer sounds. The function
button(Blue) & start/stop button (Red button) will
blink.
1.a. By default, the “Bake” function is displayed (the
pointer points the bake function) & default time
and temperature is displayed
Step 2
2. Press the function button to select between separate
menus
2.a. If you select “Toast” or “Bagel” menu, the default
browning level “4” and only time is displayed.
You can adjust the browning level. But not the
temperature.
2.b. If you select “Roast” or “Broil” menu, the default time
& temperature and rotation icon(rotisserie) is
displayed
2.c. If you select other menu, the default time &
temperature is displayed.
Step 3
3. The time & temperature can be adjusted according to
recipes by rotating the respective knobs (refer to
recipe booklet)
Step 4
4. After the setting is completed, press the “Start/Stop”
button to initiate the cooking.
Step 5
5a. Press convection button to turn on/o the inbuilt fan
in particular modes (Broil, Cookie, Roast, Grill and
Tikka). Fan icon appears in the LCD screen when the
convection function is ON.
5b. Press the temperature knob to turn on/o the light
*Once the cooking time is over, buzzer beeps 3 times
and the pointer goes to Bake mode which is default
function
* In case power goes o in between, the appliance will
turn to default menu. Then set the time & temperature
based on the level of cooked food and press the
"Start/Stop" button
8. Tips
• It is recommended to defrost food to normal
temperature before cooking for optimum results
• It is recommended to use a food thermometer to
check the roasting progress.
• The appliance can roast up to 2kg of chicken in
rotiserrie rod
• In the event of food are-ups, keep the door closed,
press the START/STOP button and unplug the
appliance.
• Do not keep smaller food pieces than the gap of wire
rack
10. Cleaning & Maintenance
• Proper maintenance will ensure many years of service
from your appliance. Clean the appliance after every
use. The appliance contains no user serviceable parts
and requires little maintenance. Leave any servicing or
repairs to qualied personnel.
• CAUTION: -- Always press the START/STOP button (30)
and ensure the appliance is switched o. Disconnect the
plug (5) from the wall outlet. Allow all parts of the
appliance to cool down completely.
• NOTE:Do not immerse the power cord and plug (5) or
appliance into water or any other liquid. Do not use
abrasive cleaners, steel wool or scouring pads
• Dry all parts thoroughly after cleaning, before using or
storing the appliance. Ensure that no water enters the
appliance housing (2).
• Remove any accessory placed in the appliance.
• Wipe the walls with a damp sponge, cloth or nylon
scouring pad and some mild detergent if needed.
• Take extra care when cleaning near the lower (13) and
upper heating elements (19) in order not to damage them.
11. Trouble shooting
The appliance is not working
Appliance not plugged in
Wall outlet not energized
Insert the plug into the wall outlet
Check fuses and circuit breaker
The appliance does not reach set
temperature
The door is not closed properly
Ensure the door is closed properly
Food not fully cooked
Cooking time too short
Cooking temperature too low
Extend cooking time
Increase set temperature
Food overcooked or burnt
Cooking time too long
Cooking temperature too high
Reduce cooking time
Reduce set temperature
Smoke escaping from OTG
Overcooked food
Food residue in heating element
Reduce the temperature of time
Clean the heating element with cloth
when its cool
9. How to use rotisserie & tongs?
1. Insert the spit rod into skewer and
select proper position of skewer
2. Rotate the skewer screw to x the
spit rod at the proper position
3. Use the Spit rod to penetrate
through the middle of food & x
the food with the skewer on 1 side
4. Insert the spit into another skewer
& compress the food tightly
5. Rotate the skewer screw to x the
skewer
6. Use the rotisserie tongs to place
the rotisserie in the appliance
6. Know your appliance
Buttons
1. Function
Function button is used to select dierent menus in
preset Menu (After powering on, Button keeps blinking
till we select any preset menu and Start cooking)
2. Convection
Convection button can be pressed to turn on/o the
fan inside the chamber for particular modes. (Broil,
Cookie,Roast,Grill,Tikka). Button will glow in blue when
the fan is on and fan icon is displayed.
3. Start/Stop
This button can be used to start or stop process
(After powering on, Button glows red & keeps blinking
till we select any preset menu and Start cooking)
Knobs switches
1) Time Control Knob
a) The time ranges from 0-90 mins
b) Rotate the knob to adjust the time
c) Stepless rotary knob jump at 1 min every interval
d) The screen displays the selected time then press
‘Start/Stop’ to start cooking in the appliance
2) Temperature and light control Knob
a) Temperature control range is 65°C-230°C
b) Rotate the knob to adjust the temperature
c) Press the knob to illuminate the chamber
light for easy viewing. Light will turn On for
60 sec and automatically turns o
d) The screen displays the selected
temperature then press ‘Start/Stop’ to start
cooking in the appliance
• All accessories can be washed in hot soapy water or in
a dishwasher.
• Clean all accessories after each use, including the
crumb tray (12) and baking/drip tray (15).
• Clean the appliance housing (2) with a damp sponge
or cloth.
• Dry all parts and surfaces thoroughly before use. Make
sure that all parts and surfaces are completely dry
before connecting the appliance to a wall outlet.
Storage
• Before storage, always make sure the appliance is
completely cool, clean and dry.
• It is recommended to store the appliance in a dry place.
• Store the power cord (5) on the cord storage (4) of the
appliance.
• Store the appliance on a stable shelf or in a cupboard.
To avoid accidents, ensure that both the appliance and
its power cord (5) are beyond reach of children or pets.
4. Quick start guide
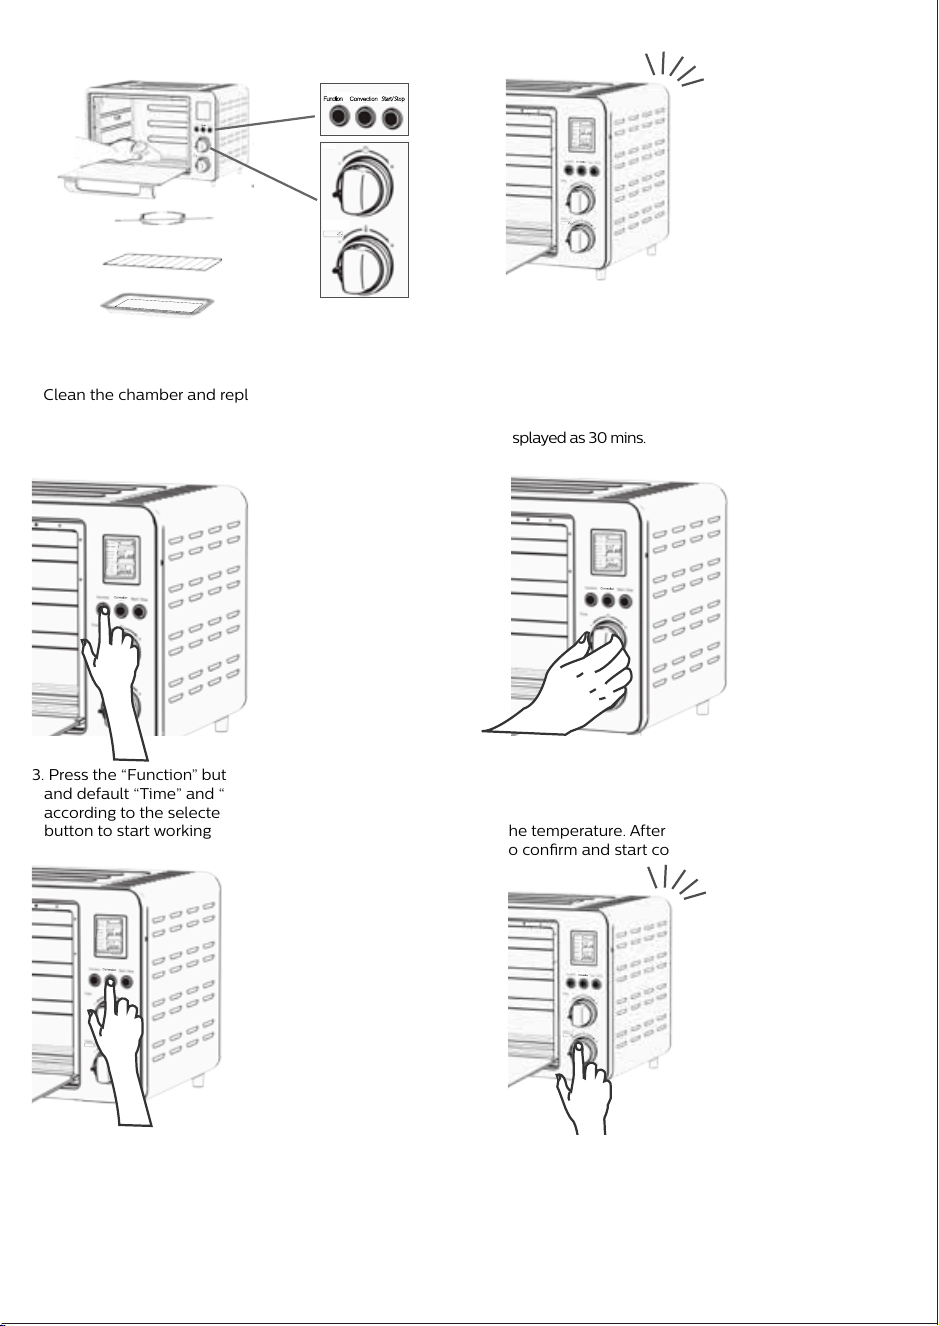
1. Unbox the product and remove all the accessories from
the packaging box
Clean the chamber and replace the required accessories
2. Before plugging in the power, please check if the power
is 220-240V/50/60Hz. After plugging, the screen is lit for
2 seconds and device is ready to use post 3 buzzer
sounds. The default selection is “bake”, the default
temperature is displayed as 180°C, and the default time is
displayed as 30 mins.
3. Press the “Function” button to select the required menu,
and default “Time” and “Temperature” are displayed
according to the selected menu. Press the “Start/Stop”
button to start working
4. If you need to adjust “Time” and “Temp”, after “Preset
Menu” is selected using function button, turn the “Time”
knob to set the time, and turn the “Temp” knob to set
the temperature. After this press the “Start/Stop” button
to conrm and start cooking
5. Whenever convection is needed , press the "Convection"
button to turn on the inbuilt fan and press again to o
6. You can press Temp knob to turn on the light whenever
needed to monitor the cooking process. Same knob to
be pressed again to switch o the light.
* Size of chicken is depicted small to make illustration clear
Time
(Mins)
Temp
(℃)
1 2
2 3
3 4
4 5
5 6
6 7
7 8
1
2 7:00
3 9:00
4 12:00
5 14:00
6 16:00
7 18:00
3 Pizza / Upper+Lower 15 200 1-30 minutes
4 Bake / Upper+Lower 30 180
65-230 °C
1-90 minutes
5 Broil / Upper+Motor 45 190 1-90 minutes
6 Cookies / Upper+Lower 15 160 1-30 minutes
7 Roast / Upper+Lower+ Motor
45
200 1-90 minutes
8 Grill / Lower 50 200 1-90 minutes
9 Tikka / Upper+Lower 30 180 1-60 minutes
10 Preheat / Upper+Lower 10 180 1-15 minutes
Not
adjustable
2
Bagel
Browning level can
be varied by rotating
Time knob from 1 to 7
(Displayed as bars in
menu)
Upper+Lower
No
display
Not
adjustable
Preset
sequence
(LCD)
Preset Menu
(LCD Display)
Brown-
ing level
Heating coil and
synchronous
motor work
situation
Program
default
1
Toast
Browning level can
be varied by rotating
Time knob from 1 to 7
(Displayed as bars in
menu)
Upper+Lower
No
display
7. Standby
• After the appliance is plugged in and if it is not
operated for more than 1minute then the appliance
goes in standby mode. The LCD screen & button
lights are turned O.
• In the standby state, press the button or turn the knob
to return to the power-on state, which is equivalent to
waking up. In the above operation, there will be 1 beep
every time.
Time
Temp. °C
PROBLEM CAUSE
SOLUTION
150-220 °C
100-200 °C
65-230 °C
150-220 °C
150-200 °C
160-200 °C
150-220 °C
Temp
adjustment
range
Time
adjustment
range
Optional
browning
level 1-7
(Default
setting is 4)
Optional
browning
level 1-7
(Default
setting is 4)
Convection
No
No
No
Yes (optional)
Yes (optional)
Yes (optional)
Yes (optional)
Yes (optional)
No
Temp
(℃)
Time
* Default time and temperature are optimum to the given preset menus. However it may vary slightly based on the quantity, Ingredients
quality and room temperature. Time and temperature can be adjusted to get the desired level of output after selection of any preset menu.
Press
Press
Press
Press
Press
7. After the work is completed, the buzzer sounds three
times, and the display goes to default "bake mode".
5:00
No
Loading ...
Loading ...
Loading ...