Installation and Operating Instructions
Issue: 1
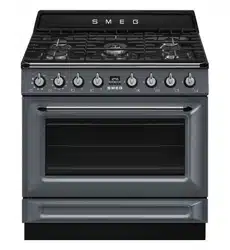
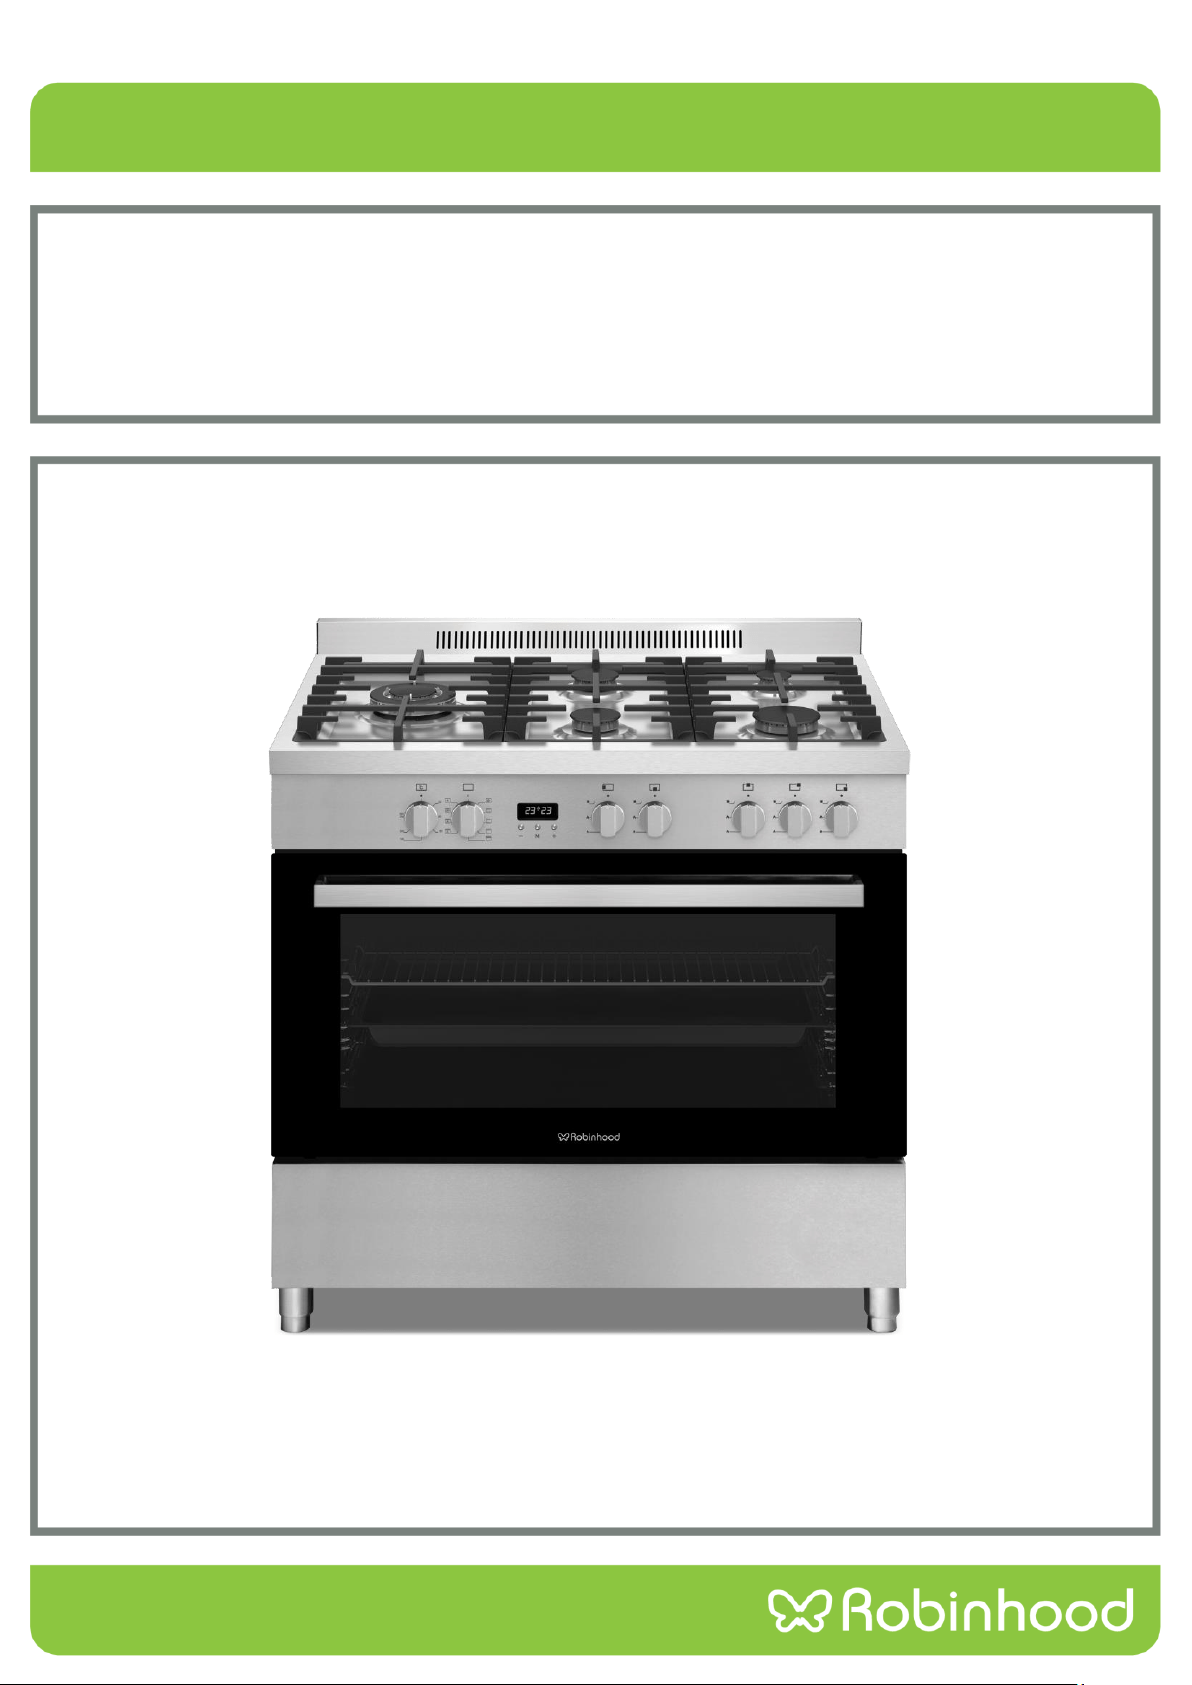
Description: ROBINHOOD FREESTANDING OVEN 90CM
Model Numbers: RHFS909GX
Actual product may vary from above picture
Contents
Congratulations!
Thank you for choosing one of our appliances. Before you use the appliance, we strongly recommend that you read
through the whole user manual which provides important safety instructions and description of the product and the
proper use of its functions.
To avoid the ever-present risks involved with using an electrical appliance it is vital that the oven is installed
correctly and that you read the safety instructions carefully to avoid misuse and hazards. It is important that you
retain these instructions and your proof of purchase along with any other important documents about this product
for future reference.
Due to continual product development, Robinhood reserves the right to alter specifications or appearances without
notice.
Important Safety Instructions .......................................................................................................................... 1-3
Product Information .............................................................................................................................................4
Technical Data ......................................................................................................................................................5
Accessories ...........................................................................................................................................................6
Installation Instructions .................................................................................................................................. 7-11
Operating Instructions ................................................................................................................................ 121-15
Maintenance and Cleaning ......................................................................................................................... 165-18
Changing the Lamp .......................................................................................................................................... 199
Troubleshooting ................................................................................................................................................ 20
Warranty Certificate (New Zealand)................................................................................................................ 211
Warranty Certificate (Australia) ...................................................................................................................... 222
Disposal Information
• Most of the packing materials are recyclable. Please dispose of these materials through your local recycling
depot or by placing them in appropriate collection containers.
• If you wish to discard this product, please contact your local authorities and ask for the correct method of
disposal.
1
Important Safety Instructions
Please read these operating instructions carefully.
1. Installation and repair should always be performed by an authorised service. The manufacturer and supplier
shall not be held responsible for operations performed by unauthorized persons.
2. The oven should be used according to the operating instructions.
3. Keep children below the age of 8 and pets away whilst operating.
4. WARNING: The accessible parts may be hot while using the grill. Keep away from children.
5. WARNING: Fire hazard; do not store the materials on the cooking surface.
6. WARNING: The appliance and its accessible parts are hot during operation.
7. Setting conditions of this device are specified on the label. (Or on the data plate)
8. The accessible parts may be hot when the grill is used. Small children should be kept away.
9. WARNING: This appliance is intended for cooking. It should not be used for other purposes like heating a
room.
10. To clean the appliance, do not use steam cleaners.
11. Ensure that the oven door is completely closed after putting food inside the oven.
12. NEVER try to put out a fire on the oven with water. Shut off the power and use an appropriate non-water
based fire extinguisher or cover the flame with a fire blanket.
13. Children under 8 years of age should be kept away, if they cannot be monitored continuously.
14. Touching the heating elements should be avoided.
15. CAUTION: Cooking process shall be supervised. Cooking process shall always be supervised.
16. This device can be used by children over 8 years of age, people with physical, hearing or mental challenges or
people with lack of experience or knowledge; as long as control is ensured or information is provided regarding
the dangers.
17. This device has been designed for household use only.
18. Children must not play with the appliance. Cleaning or user maintenance of the appliance shall not be
performed by children unless they are older than 8 years and supervised by adults.
19. Keep the appliance and its power cord away from children less than 8 years old.
20. Put curtains, tulles, paper or any flammable (ignitable) material away from the appliance before starting to use
the appliance. Do not put ignitable or flammable materials on or in the appliance.
21. Keep the ventilation channels open.
22. The appliance is not suitable for use with an external timer or a separate remote control system.
23. Do not heat closed cans and glass jars. The pressure may lead jars to explode.
24. Oven handle is not a towel drier. Do not hang towels, etc. on the oven handle.
25. Do not place the oven trays, plates or aluminium foils directly on the oven base. The accumulated heat may
damage the base of the oven.
26. While placing or removing food from the oven, etc., always use heat resistant oven gloves.
27. Do not use the oven whilst under the effects of heavy medication or under the influence of alcohol or other
substances which may affect your ability or judgement.
28. Be careful when using alcohol in your foods. Alcohol will evaporate at high temperatures and may catch fire if it
comes in contact with hot surfaces.
29. After each use, check if the unit is turned off.
30. If the appliance is faulty or has a visible damage, do not operate the appliance.
31. Do not touch the plug with wet hands. Do not pull the cord to plug off, always hold the plug.
32. Do not use the appliance with its front door glass removed or broken.
33. Place the baking paper together with the food into a pre-heated oven by putting it inside a cooker or on an
oven accessory (tray, wire grill etc.).
34. Do not put objects that children may reach on the appliance.
35. It is important to place the wire grill and tray properly on the wire racks and/or correctly place the tray on the
rack. Place the grill or tray between two rails and make sure it is balanced before putting food on it.
36. Against the risk of touching the oven heater elements, remove excess parts of the baking paper that hang over
from the accessory or container.
37. Never use it at higher oven temperatures than the maximum usage temperature indicated on your baking
paper. Do not place the baking paper on the base of the oven.
38. When the door is open, do not place any heavy object on the door or allow children to sit on it. You may cause
the oven to overturn or the door hinges to be damaged.
39. The packaging materials are dangerous for children. Keep packaging materials away from the reach of children.
40. Do not use abrasive cleaners or sharp metal scrapers to clean the glass as the scratches that may occur on the
surface of the door glass may cause the glass to break.
41. Do not place the appliance on a surface covered with carpets. Electric parts gets overheated since there will be
no ventilation from below. This will cause failure of the appliance.
42. Do not hit glass surfaces of vitro-ceramic cookers with a hard metal, resistance can get damaged. It may cause
an electric shock.
43. User shall be careful when cleaning gas burners. It may cause personal injuries.
2
Important Safety Instructions
1. Food can spill when foot of oven is dismantled or gets broken, be careful. It may cause personal injuries.
2. During usage, the internal and external surfaces of the oven get hot. As you open the oven door, step back to
avoid the hot vapour coming out from the interior. There is risk of burning.
3. Upper cover of the oven can be closed for a reason, than cookware can trip over. Step back to avoid the hot
food coming on you. There is risk of burning.
4. Do not place heavy objects when oven door is open, risk of toppling.
5. User should not dislocate the resistance during cleaning. It may cause an electric shock.
6. Do not remove ignition switches from the appliance. Otherwise, live electric cables can be accessed. It may
cause an electric shock.
7. Oven supply can be disconnected during any construction work at home. After completing the work, re-
connecting the oven shall be done by authorized service.
8. Do not place metal utensils such as knife, fork, spoon on the surface of the appliance, since they will get hot.
9. To prevent overheating, the appliance should not be installed behind of a decorative cover.
10. Turn off the appliance before removing the safeguards. After cleaning, install the safeguards according to
instructions.
11. Cable fixing point shall be protected.
12. WARNING: Don’t use oven and grill burners at same time.
13. Please don’t cook the food directly on the tray / grid. Please put the food into or on appropriate tools before
putting them in the oven.
14. Hot surface, leave for cooling before closing the cover.
Electrical Safety
1. Plug the appliance in a grounded socket protected by a fuse conforming to the values specified in the technical
specifications chart.
2. Have an authorized electrician set grounding equipment. Our company shall not be responsible for the damages
that shall be incurred due to using the product without grounding according to local regulations.
3. The circuit breaker switches of the oven shall be placed so that end user can reach them when the oven is
installed.
4. The power supply cord (the cord with plug) shall not contact the hot parts of the appliance.
5. If the power supply cord (the cord with plug) is damaged, this cord shall be replaced by the manufacturer or its
service agent or an equally qualified personnel to prevent a hazardous situation.
6. Never wash the product by spraying or pouring water on it! There is a risk of electrocution.
7. WARNING: To avoid electric shock, ensure that the device circuit is open before changing the lamp.
8. WARNING: Cut off all supply circuit connections before accessing the terminals.
9. WARNING: If the surface is cracked, turn off the appliance to avoid risk of electric shock.
10. Do not use cut or damaged cords or extension cords other than the original cord.
11. Make sure that there is no liquid or humidity in the outlet where the product plug is installed.
12. The rear surface of the oven also heats up when the oven is operated. Electrical connections shall not touch the
rear surface, otherwise the connections may be damaged.
13. Do not tighten the connecting cables to the oven door and do not run them over hot surfaces. If the cord melts,
this may cause the oven to short circuit and even a fire.
14. Unplug the unit during installation, maintenance, cleaning and repair.
15. If the power supply cable is damaged, it must be replaced by its manufacturer or authorized technical service or
any other personnel qualified at the same level, in order to avoid any dangerous situation.
16. Make sure the plug is inserted firmly into wall socket to avoid sparks.
17. Do not use steam cleaners for cleaning the appliance, otherwise electric shock may occur.
18. An omnipolar switch capable to disconnect power supply is required for installation. Disconnection from power
supply shall be provided with a switch or an integrated fuse installed on fixed power supply according to
building code.
19. Appliance is equipped with a type ‘’Y’’ cord cable.
20. Fixed connections shall be connected to a power supply enabling omnipolar disconnection. For appliances with
over voltage category below III, disconnection device shall be connected to fixed power supply according to
wiring code.

3
Important Safety Instructions
Gas Safety
1. This appliance is not connected to burning products evacuation apparatus. This appliance must be connected
and installed according to the installation regulations in force. Conditions regarding ventilation must be
considered.
2. When a gas cooking appliance is used; humidity, heat and burning products are generated in the room. First of
all, make sure the kitchen is well ventilated when operating the appliance and maintain natural ventilation
openings or install mechanical ventilation equipment.
3. After using the appliance heavily for an extended period of time, additional ventilation may be required. For
example open a window or adjust a higher speed for mechanical ventilation, if any.
4. This appliance must be used only in well ventilated locations in accordance with the regulations in force. Please
read the manual before installing or using this product.
5. Before positioning the appliance, make sure local network conditions (gas type and gas pressure) meets
appliance requirements.
6. The mechanism cannot be run for longer than 15 seconds. If the burner is not on after 15 seconds, stop the
mechanism and wait for at least one minute before trying to ignite the burner again.
7. All kinds of operations to be performed on gas installation must be performed by authorized and competent
people.
8. This appliance is adjusted for natural gas (NG). If you have to use your product with a different gas type, you
have to apply to authorized service for the conversion.
9. For proper operation, hood, gas pipe and clamp should be replaced periodically according to manufacturer
recommendations and when required.
10. Gas should burn well in gas products. Well burning gas can be understood from blue flame and continuous
burning. If gas does not burn sufficiently, carbon monoxide (CO) can be generated. Carbon monoxide is a
colourless, odourless and very toxic gas; even small amounts have lethal effect.
11. Ask your local gas supplies about the phone numbers for emergencies related to gas and the measures to be
taken upon gas odour is detected.
What to do when Gas Odour is Detected
1. Do not use naked flame, and do not smoke.
2. Do not operate any electrical switch. (For example: lamp switch or doorbell)
3. Do not use telephone or mobile phone.
4. Open the doors and windows.
5. Close all valves on the appliances that utilize gas and the gas counters.
6. Call fire brigade from a telephone outside the home.
7. Check all hoses and their connections against leaks. If you still smell gas, leave the house and warn your
neighbours.
8. Do not enter into the house until authorities clarify it is safe.
Intended Use
1. This product is designed for home use. Commercial use of the appliance is not permitted.
2. This appliance may only be used for cooking purposes. It shall not be used for other purposes like heating a
room.
3. This appliance shall not be used to heat plates under the grill, dry clothes or towels by hanging them on the
handle or for heating purposes.
4. The manufacturer and supplier assume no responsibility for any damages due to misuse or mishandling.
5. The oven cavity may be used for thawing, roasting, frying and grilling food.

4
Product Information
12
13
14
15
16
1. Oven control knobs
9. Lamp
2. Hob control knobs
10. Grill
3. Wire grill
11. Deep tray
4. Deep tray
12. Large burner
5. Door
13. Middle burner
6. Handle
14. Auxiliary burner
7. Lower cabinet door
15. WOK burner
8. Plastic leg
16. Hot plate
5
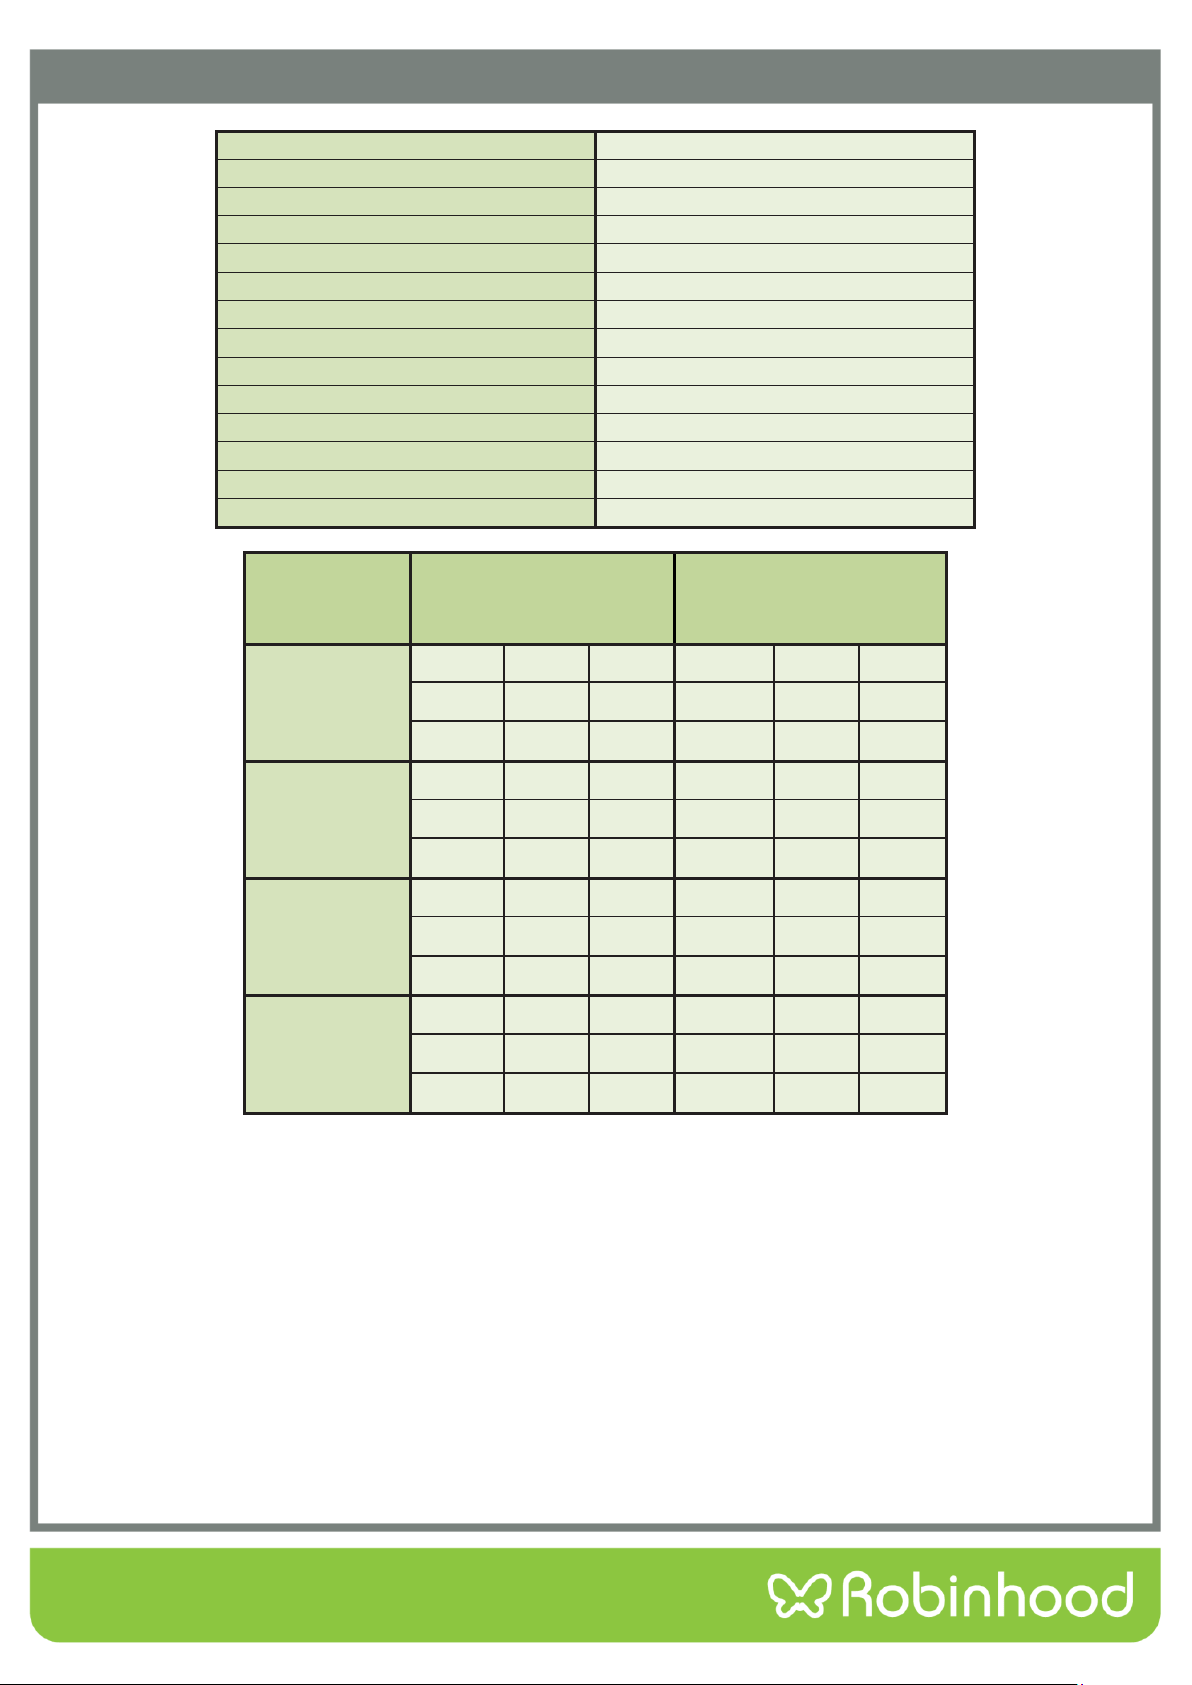
Technical Data
Specifications
90x60
Outer width
900 mm
Outer depth
610 mm
Outer height
925 mm
Lamp power
15-25 W
Bottom heating element
2000 W
Top heating element
1500 W
Grill heating element
2500 W / 3250 W
Turbo heating element
1250 W x 2
Supply voltage
220-240V AC/380-415V AC 50/60 Hz
Hot plate 145 mm *
1000 W
Hot plate 180 mm *
1500 W
Hot plate rapid 145 mm *
1500 W
Hot plate rapid 180 mm *
2000 W
Burner
Specifications
Gas Natural 1.00kPa
ULPG 2.75kPa
Wok Burner
Injector
1.60
mm
Injector
0.92
mm
Gas flow
0.318
m³/h
Gas flow
242
g/h
Power
12.00
MJ/h
Power
12.00
MJ/h
Rapid Burner
Injector
1.55
mm
Injector
0.90
mm
Gas flow
0.318
m³/h
Gas flow
211.7
g/h
Power
11.00
MJ/h
Power
11.00
MJ/h
Semi-Rapid
Burner
Injector
1.20
mm
Injector
0.70
mm
Gas flow
0.185
m³/h
Gas flow
141
g/h
Power
7.00
MJ/h
Power
7.00
MJ/h
Auxiliary Burner
Injector
0.90
mm
Injector
0.50
mm
Gas flow
1.00
m³/h
Gas flow
76.3
g/h
Power
3.80
MJ/h
Power
3.30
MJ/h
Note: Diameter values written on the injector are specified without a decimal point. For example; a diameter of
“1.70 mm” is specified as “170” on the injector.
6
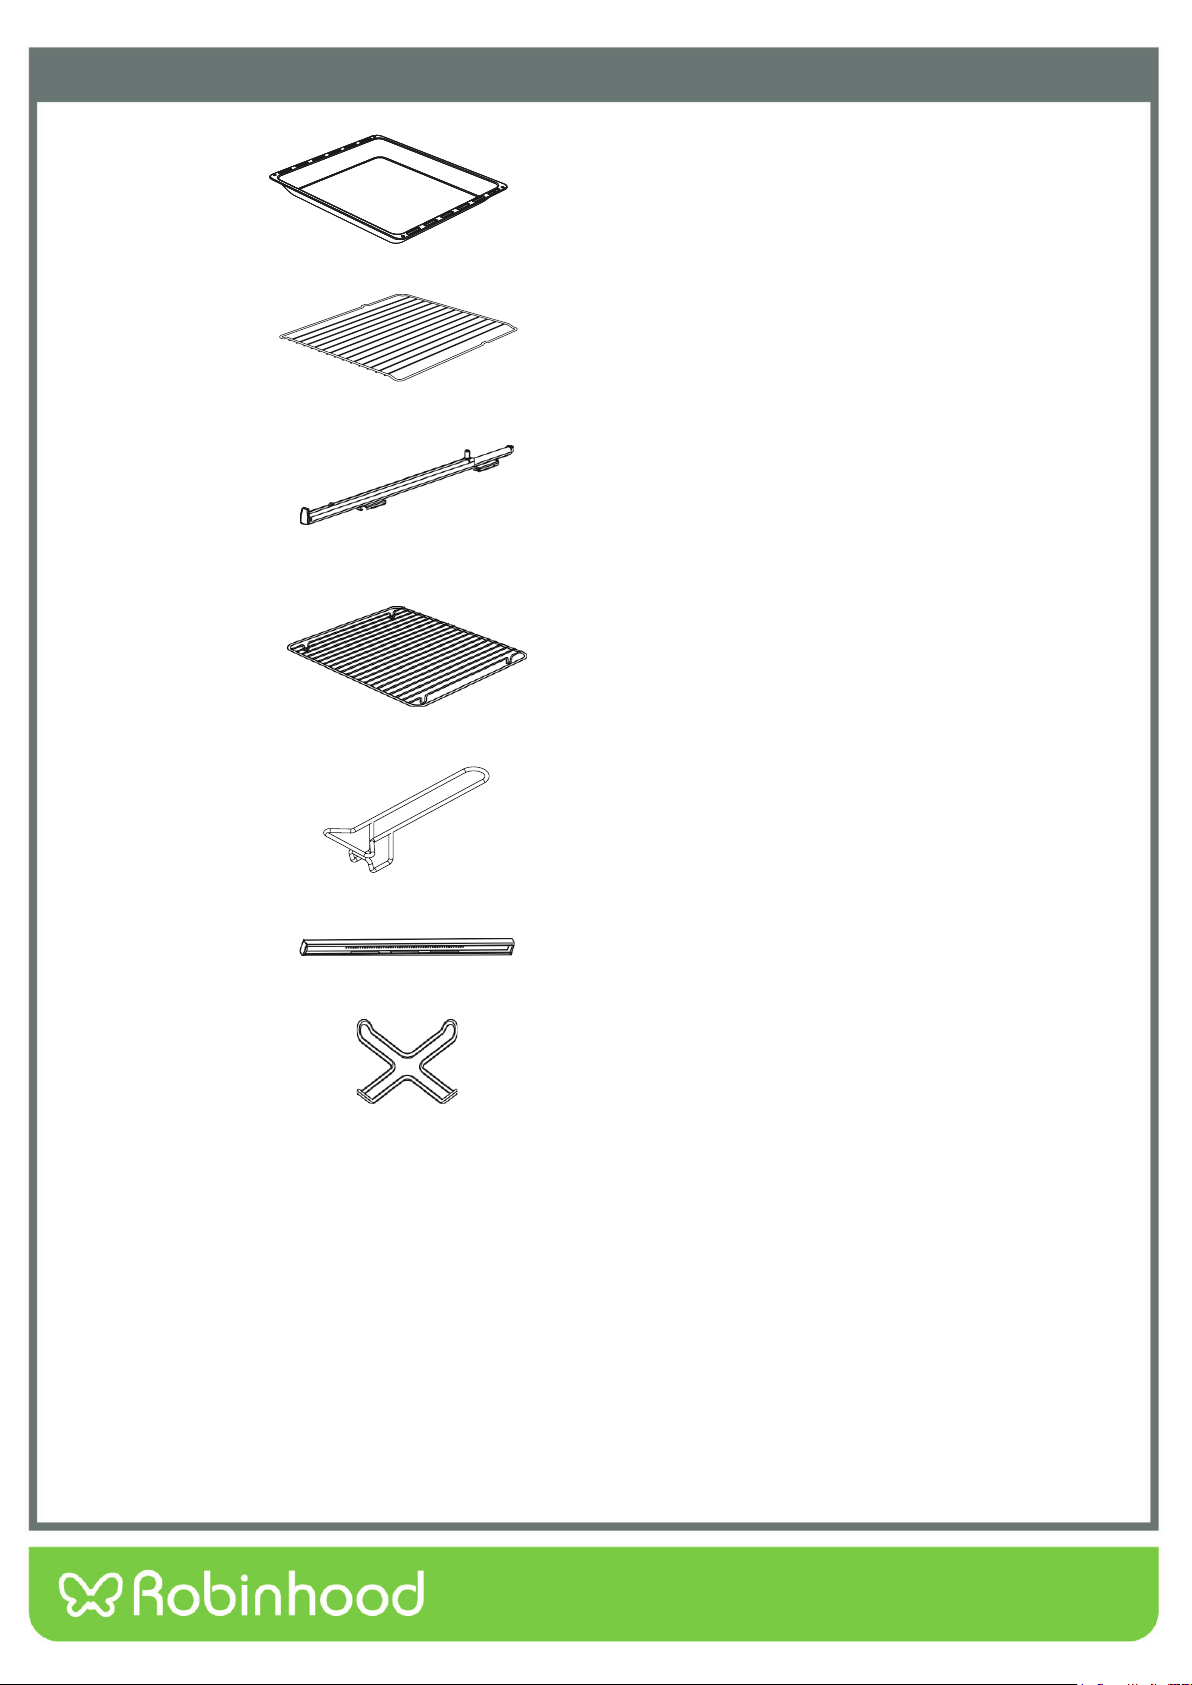
Accessories
Deep tray
Used for pastries, deep fried foods and stew recipes.
In case of frying directly on the grill for cakes,
frozen foods and meat dishes, it can be used as
an oil catchment tray.
Wire grill
Used for frying and/or placing the foods to be
baked, fried and frozen on the desired rack.
Telescopic rail
With the help of telescopic rails, the trays and/or
wire racks can be easily placed and removed.
In tray wire grill
Foods that can stick while cooking, such as beef,
can be placed on the in-tray grill. Thus, the
contact and sticking of the food is prevented.
Tray handle
Used to hold hot trays.
Splash back
The resulting temperature of the oven
chimney avoids contact with the wall.
Coffee pot support unit
Can be used for a coffee pot.
7
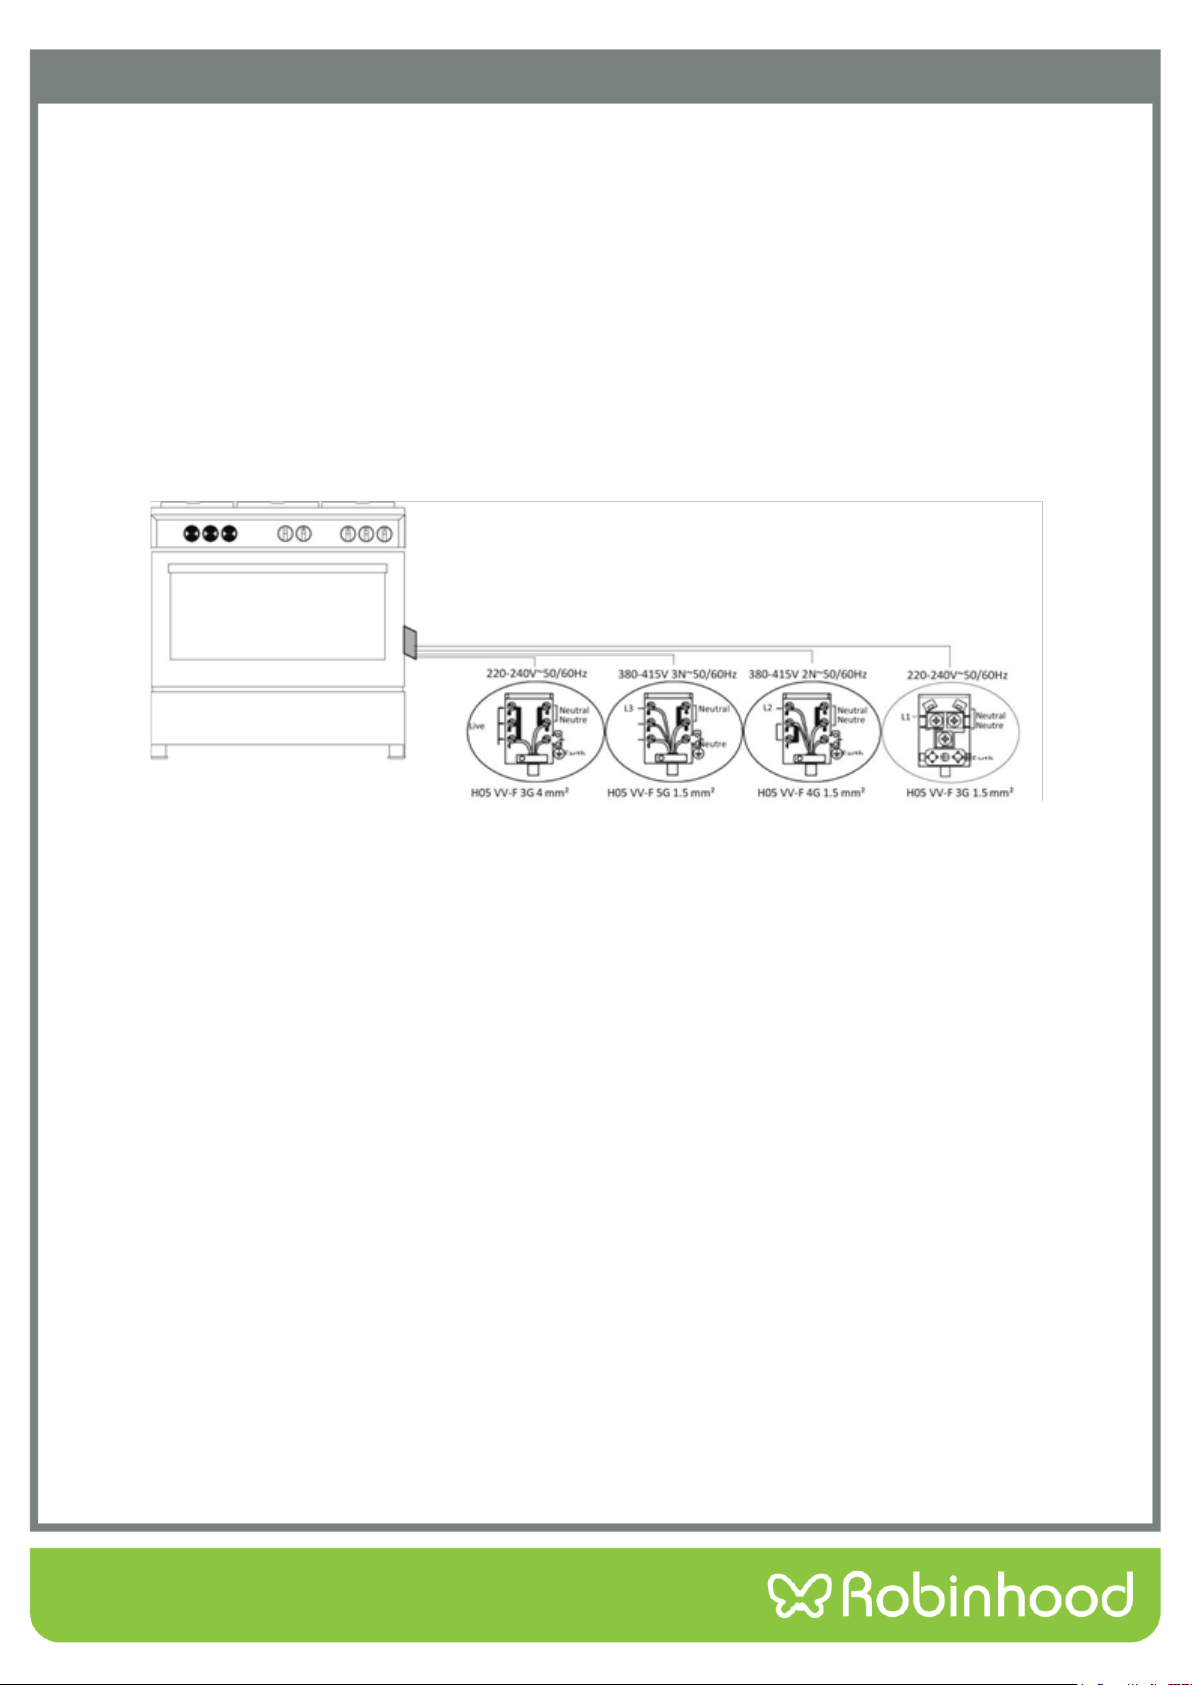
Installation Instructions
Electrical Connection
1. Your oven requires 16 or 32 Ampere fuse according to the appliance’s power. If necessary, installation by a
qualified electrician is recommended.
2. Your oven is adjusted in compliance with 220-240V AC/380-415V AC 50/60Hz. electric supply. If the mains are
different from this specified value, contact your authorized service.
3. Electrical connection of the oven should only be made by the sockets with earth system installed in compliance
with the regulations. If there is no proper socket with earth system in the place where the oven will be placed,
immediately contact a qualified electrician. Manufacturer shall never be responsible from the damages that will
arise because of the sockets connected to the appliance with no earth system. If the ends of the electrical
connection cable are open, according to the appliance type, make a proper switch installed in the mains by
which all ends can be disconnected in case of connecting / disconnecting from / to the mains.
4. If your electrical supply cable gets damaged, it should be replaced by an authorized service or qualified
electricians immediately in order to avoid the danger.
5. Electrical cable should not touch the hot parts of the appliance.
6. Please operate your oven in a dry atmosphere.
Gas Connection
WARNING: Before starting any work related with gas installation, turn off the gas supply. Risk of explosion.
1. Fit the clamp to the hose. Push on the hose until it goes to the end of the pipe.
2. For the sealing control; ensure that the buttons in the control panel are closed, but the gas cylinder is open.
Apply some soap bubbles to the connection. If there is gas leakage, there will be foaming in the soaped area.
3. The oven should be used a well ventilation room and should be installed on flat ground.
4. Re-inspect the gas connection.
5. When placing your oven in its location, ensure that it is at the counter level. Bring it to the counter level by
adjusting the feet if necessary.
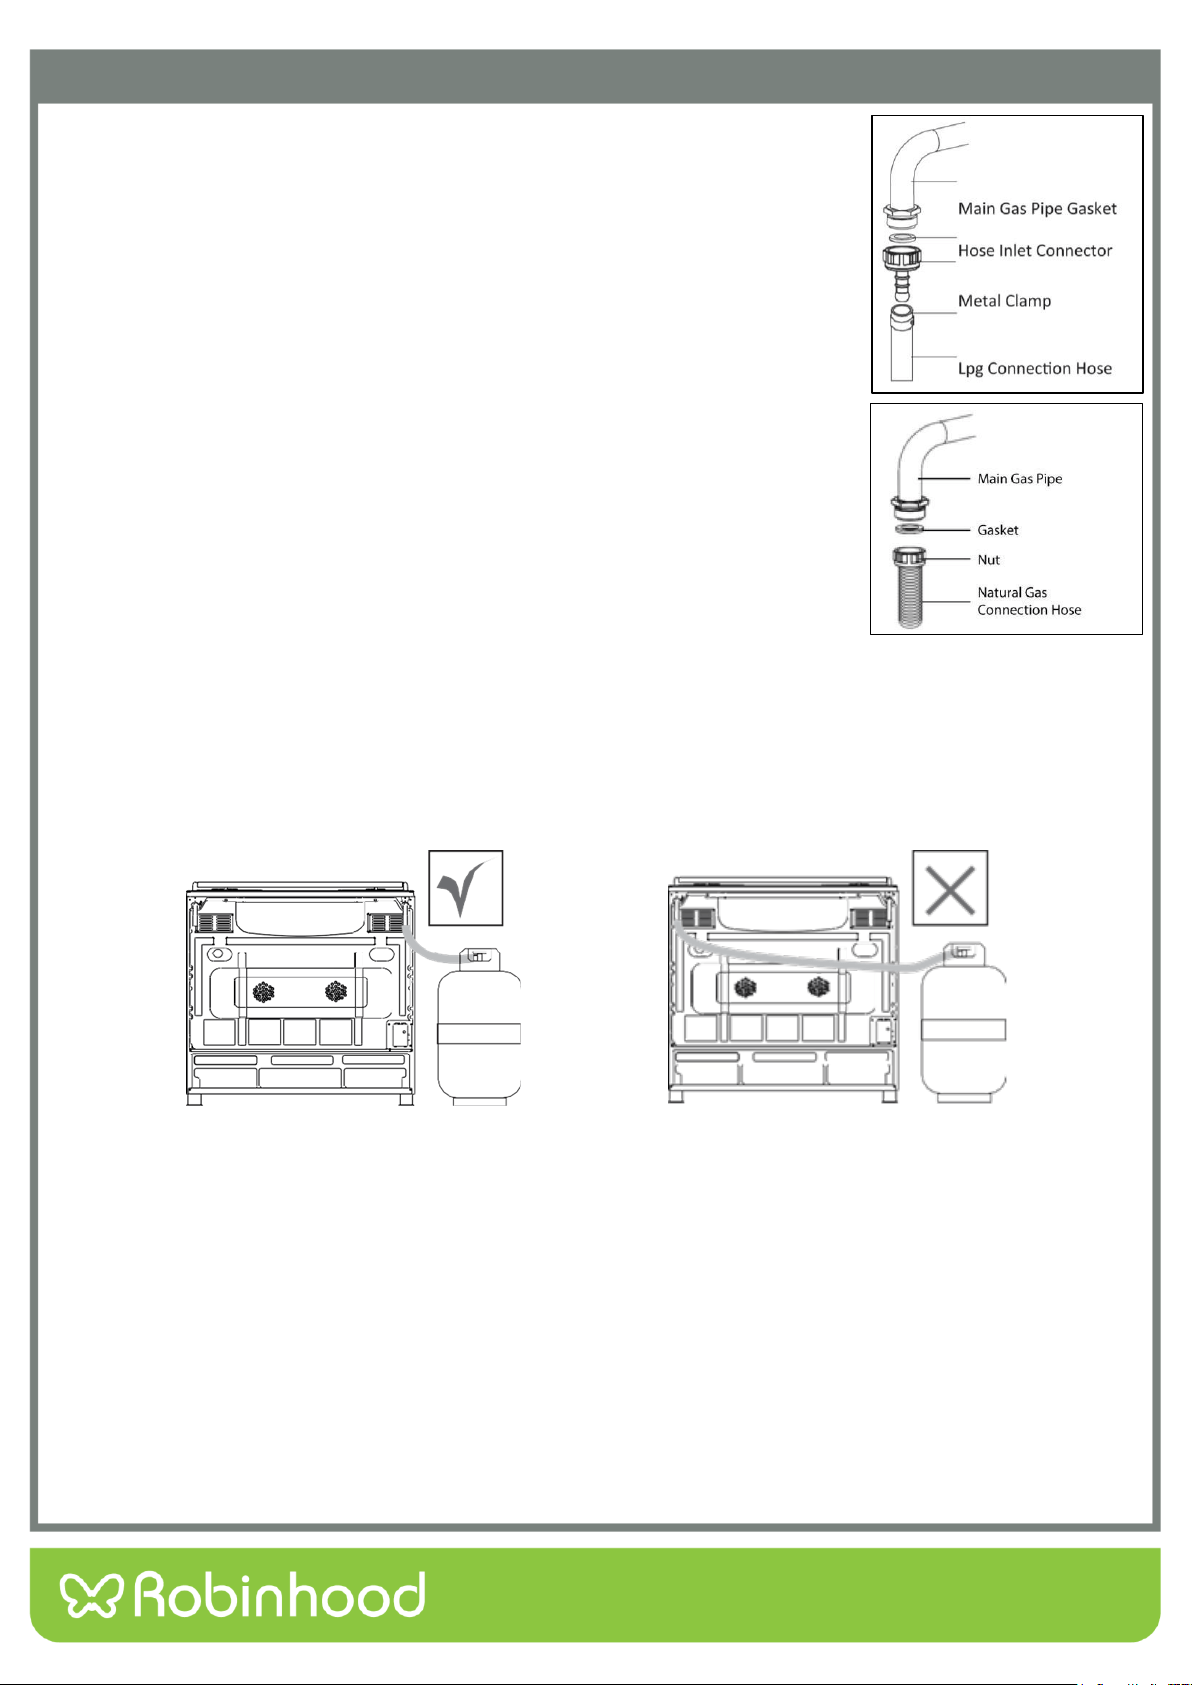
6. Do not route the gas hose and electrical supply cable of your oven through heated areas, especially through the
rear side of the oven. Do not move the oven with the gas connected as this can cause a gas leak.
7. Please use a flexible hose for gas connection.
8
Installation Instructions
For LPG Connection
For LPG (cylinder) connection, affix a metal clamp on the hose coming from LPG
cylinder. Affix an edge of the hose on hose inlet connector behind the appliance by
pushing to end through heating the hose in boiled water. Afterward, bring the clamp
towards end section of the hose and tighten it with screwdriver. The gasket and hose
inlet connector required for connection is as the picture shown below.
NOTE: The regulator to be affixed on LPG cylinder should have 300 mmSS feature.
For Natural Gas Connection
WARNING: Natural gas connection should be done by an authorized service. For
natural gas connection, place a gasket in the nut at the edge of the natural gas
connection hose. To install the hose on the main gas pipe, turn the nut.
Complete the connection by doing a gas leakage control.
Gas hose passage way
Connect the appliance to the gas piping tap in the shortest possible route and in a
way that ensures no gas leakage will occur.
In order to carry on a tightness and sealing safety check ensure that the knobs on the
control panel are closed and the gas cylinder is open.
WARNING: While performing a gas leakage check, never use any kind of lighter,
match, cigarette or similar burning substance.
Apply soap bubbles on the connection points. If there is any kind of leakage then it will cause bubbling.
While inserting the appliance into place ensure that it is on the same level with the benchtop. If required, adjust the
legs in order the make level with the benchtop.
Use the appliance on a level surface and in a well ventilated environment.
WARNING: Before placing the appliance, check that the local distribution conditions (gas type and pressure)
conform to the product settings.
9
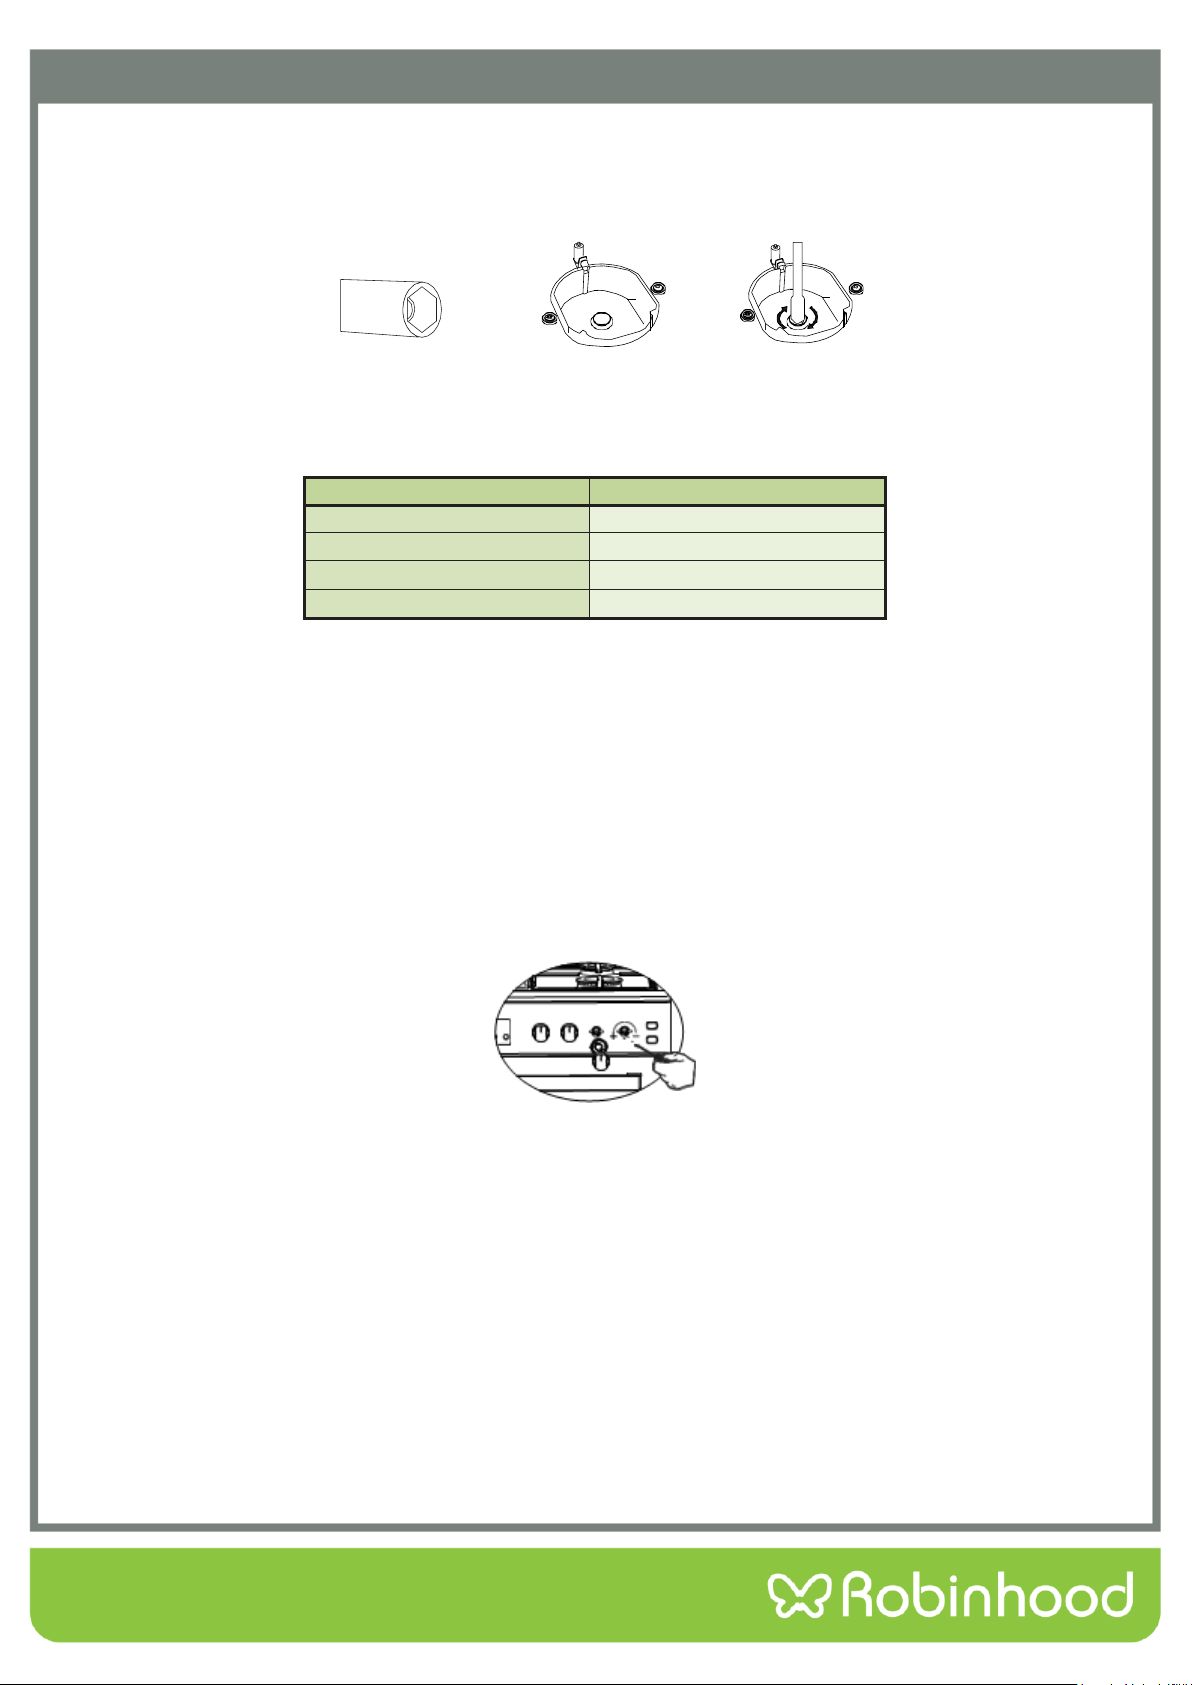
Installation Instructions
Changing the Nozzle
1. Use a screwdriver to remove and install the nozzle as in Figure 3.
2. Remove the nozzle (figure 4) from the burner with nozzle driver and install a new nozzle (Figure 5).
Figure 3
Figure 4
Figure 5
Ventilation of Room
This product requires adequate ventilation. Ensure that there is proper ventilation when installing the appliance.
Room size
Ventilation opening
Smaller than 5 m³
min. 100 cm²
Between 5 m³ - 10 m³
min. 50 cm²
Bigger than 10 m³
no need
In basement or cellar
min. 65 cm²
Reduced Gas Flow Rate Setting for Hob Taps
1. Ignite the burner that is to be adjusted and turn the knob to the reduced position.
2. Remove the knob from the gas tap.
3. Use an appropriately sized screwdriver to adjust the flow rate adjustment screw. For LPG (butane-pro pane)
turn the screw clockwise. For natural gas, turn the screw counter- clockwise once.
4. The normal length of a straight flame in the reduced position should be 6-7 mm.
5. If the flame is higher than the desired position, turn the screw clockwise. If it is smaller turn anticlockwise.
6. For the last control, bring the burner both to high-flame and reduced positions and check whether the flame is
on or off.
Depending on the type of gas tap used in your appliance the adjustment screw position may vary.
To adjust your oven acc. to the gas type, make the adjustment for reduced flame carefully by turning with a small
screwdriver as shown below on the screw in the middle of the gas cocks as well as nozzle changes (figure 6).
Figure 6
10
Installation Instructions
Check that the appliance has been properly connected to the power supply. If the electrical installation is not
suitable, call an electrician and plumber to arrange the utilities as necessary. The manufacturer and supplier shall
not be held responsible for damages caused by operations performed by unauthorized persons.
WARNING: It is customer's responsibility to prepare the location the product shall be placed on and also to have
the electrical installation prepared.
WARNING: The rules in local standards about electrical installations shall be followed during product installation.
WARNING: Check for any damage on the appliance before installing it. Do not have the product installed if it is
damaged. Damaged products are a hazard.
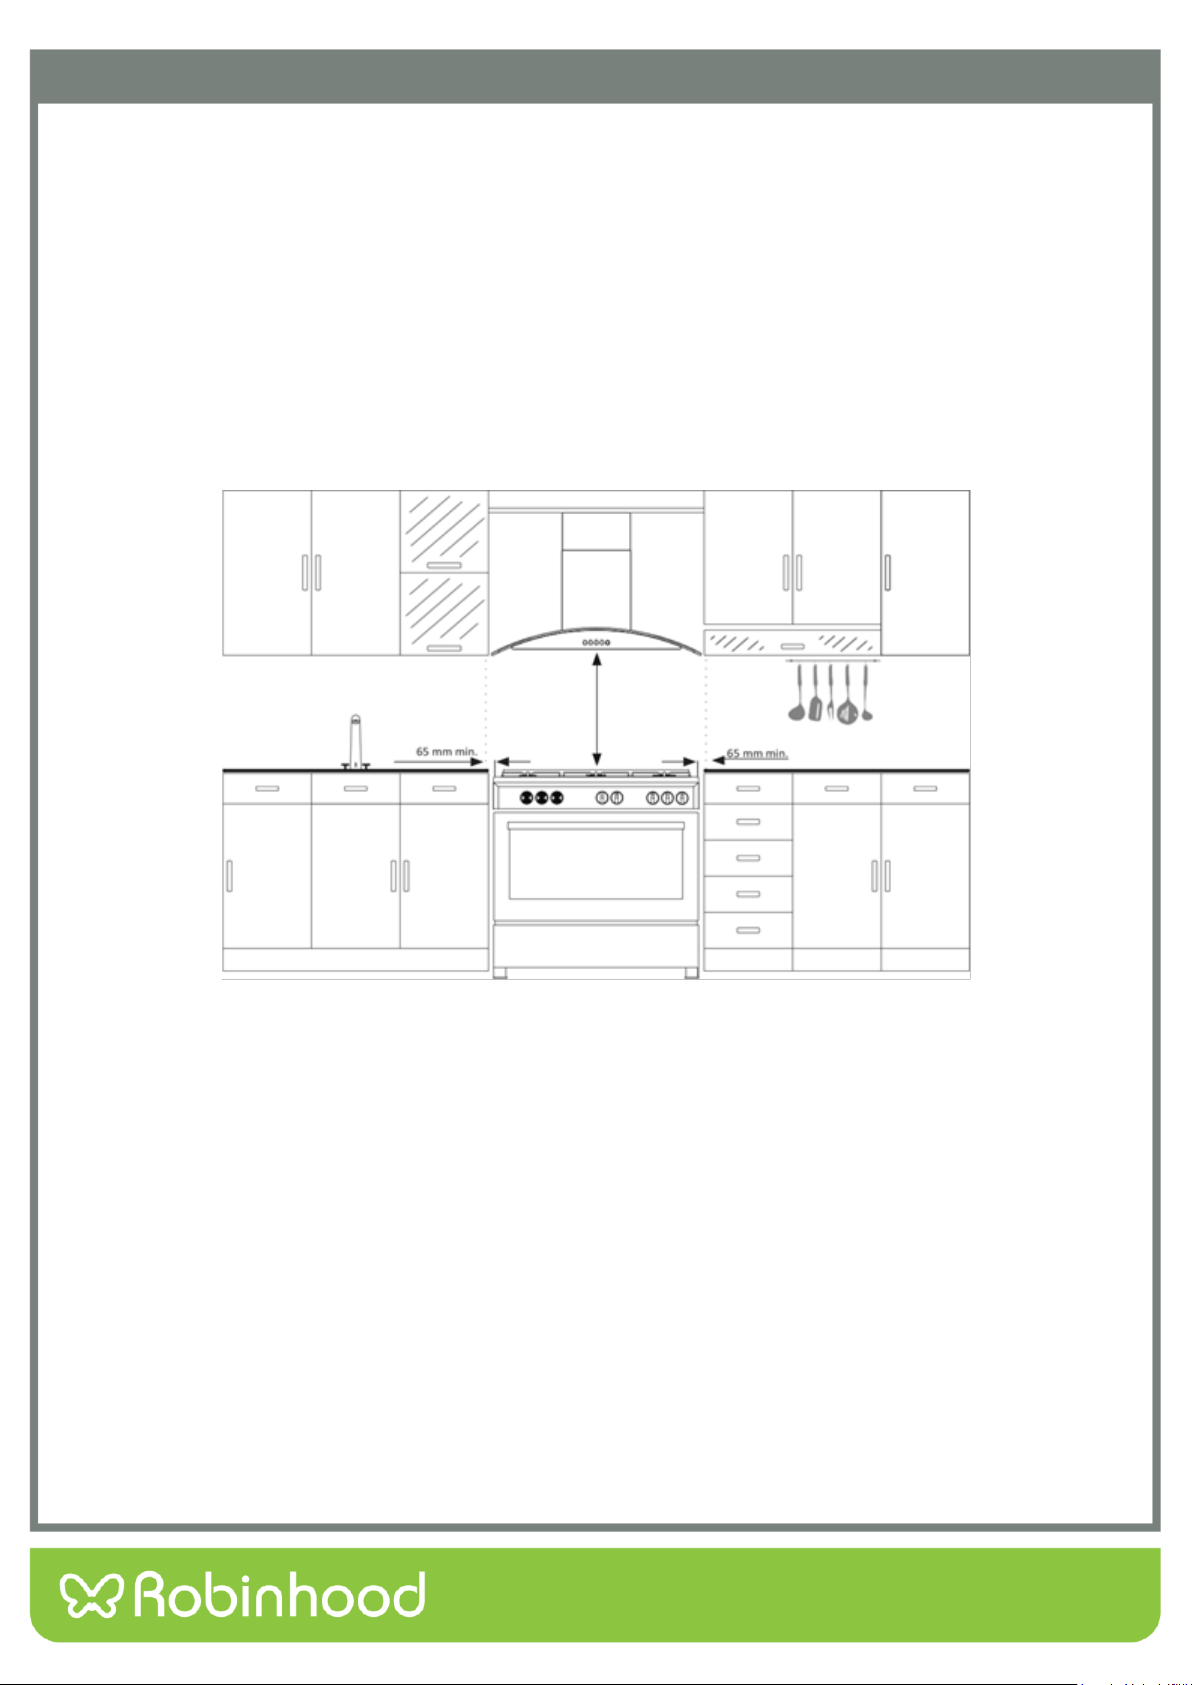
Right Place for Installation and Important Warnings
The appliance should not be placed on soft surfaces such as carpets. The kitchen floor must be durable enough to
hold the weight of the unit and any other kitchenware that may be used on the oven.
When installing a range hood, it must be installed a minimum of 650 mm above the cooktop. If the instructions of
the range hood specify a different height, the greater of the two must be used.
WARNING: Kitchen furniture near the appliance must be heat resistant.
WARNING: Do not use the door and/or handle to carry or move the appliance.
WARNING: Do not install the appliance beside refrigerators or coolers. Heat radiated by the appliance increases the
energy consumption of cooling devices.
11
Installation Instructions
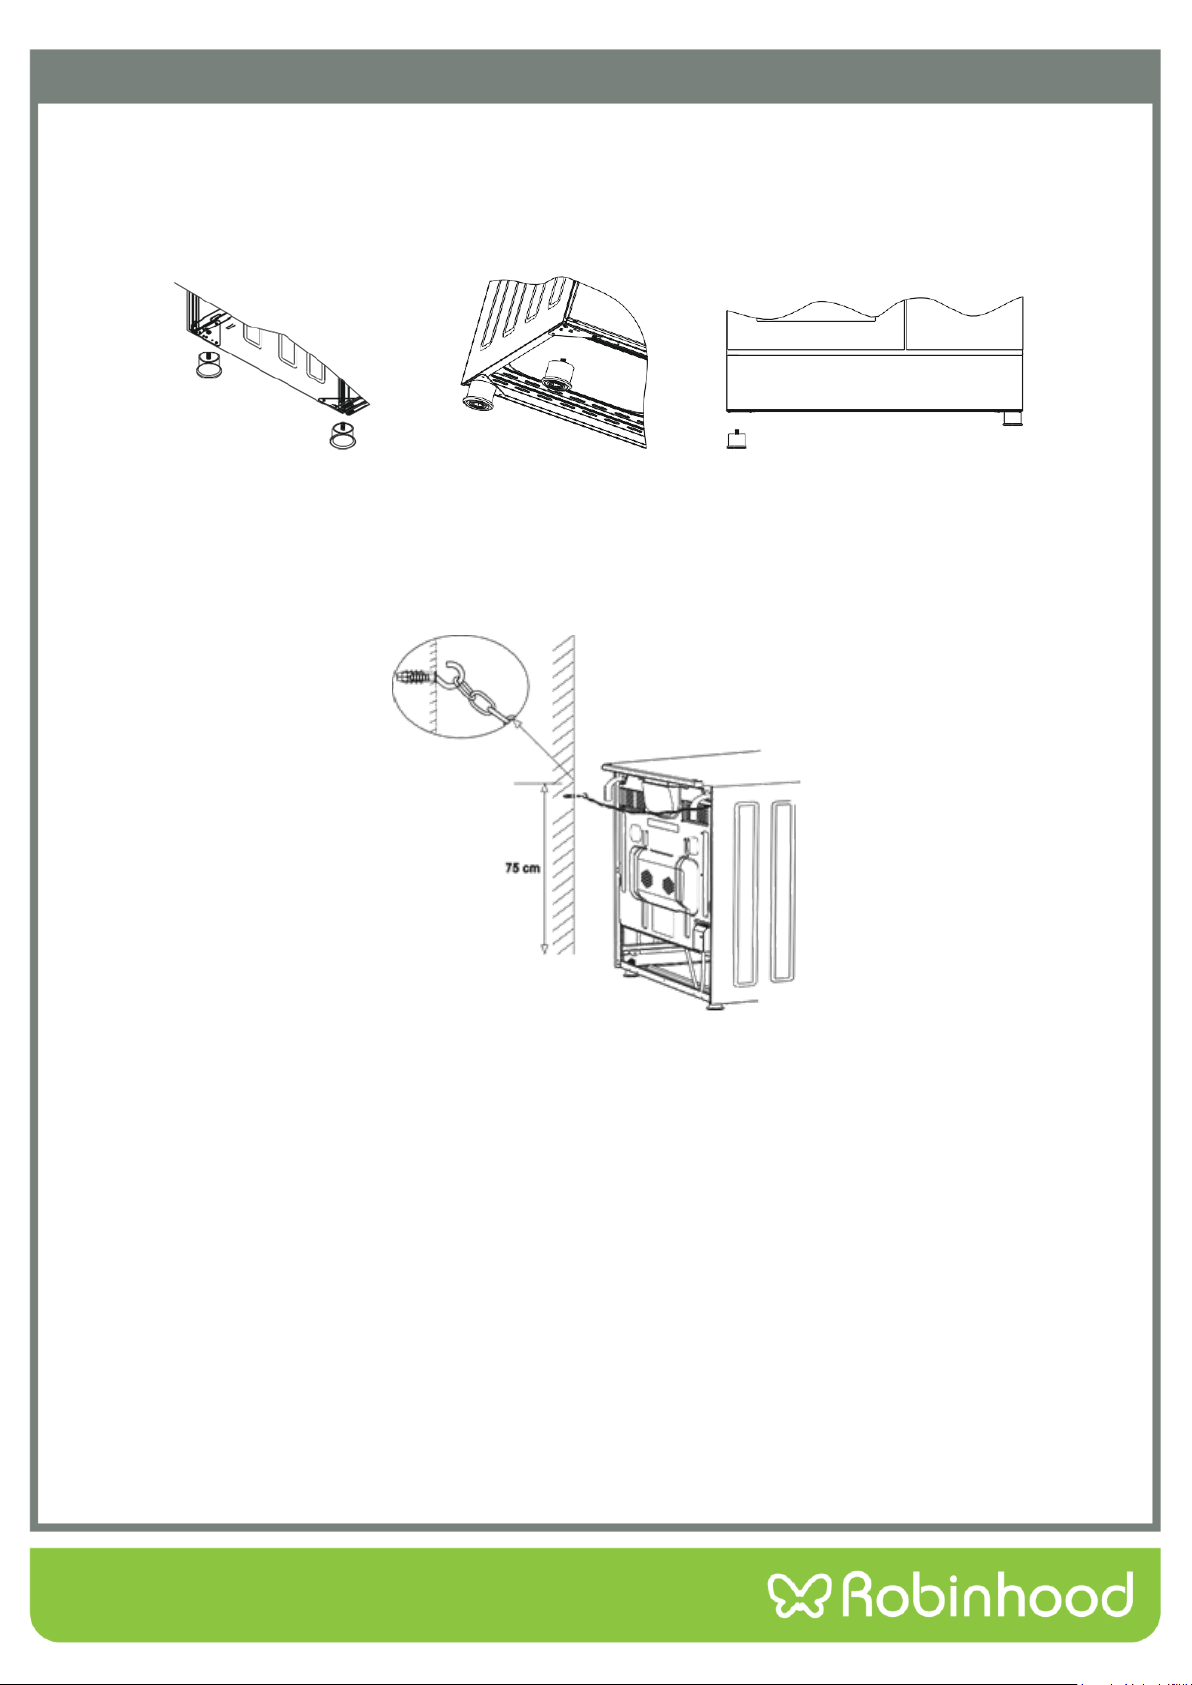
Attaching the Feet
1. Screw the feet into the bottom four corners of the oven.
2. You can balance your oven by turning the screwed feet according to the surface type you are using.
Figure 7
Figure 8
Figure 9
Chain Lashing Illustration
In order to ensure safe use before using the appliance, be sure to fix the appliance to the wall using the chain and
hooked screw supplied. Ensure that the hook is screwed into the wall securely.
12
Installation Instructionserating Instructions
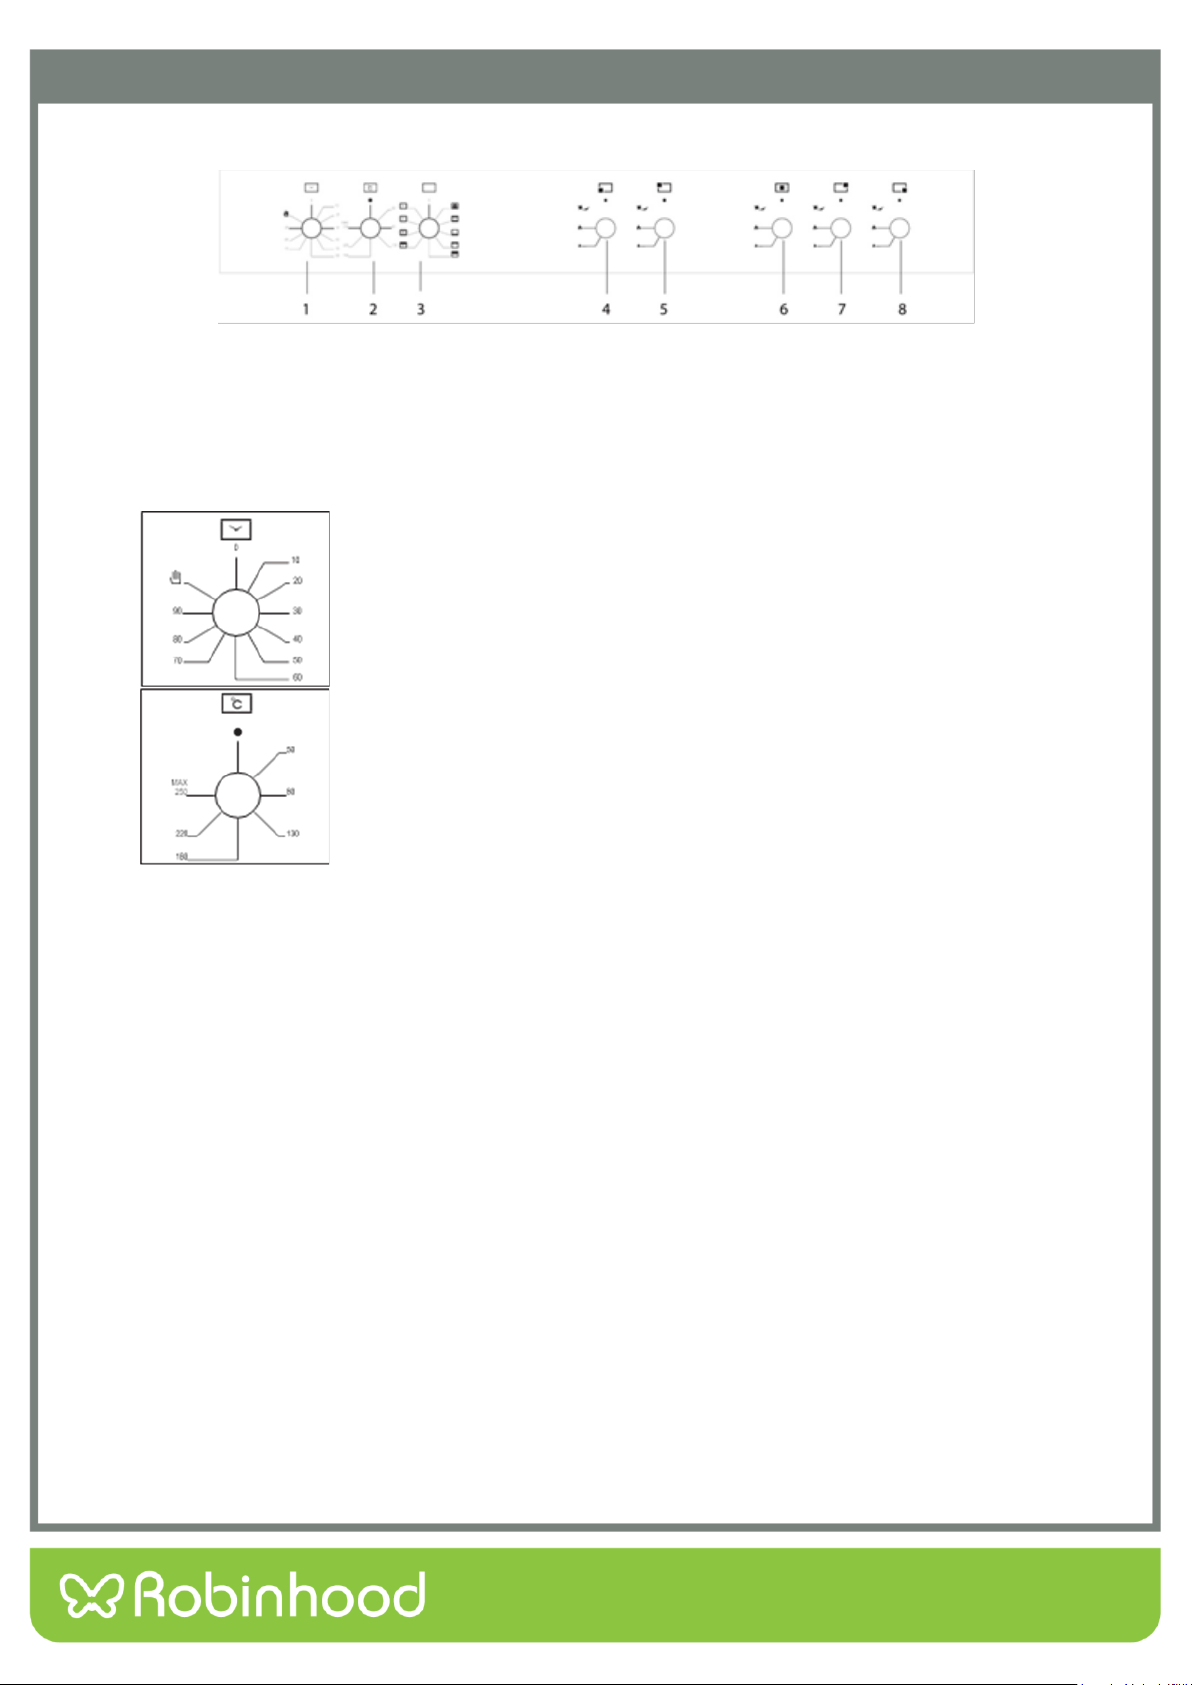
Controls
1.
Mechanical timer
2.
Thermostat
3.
Function selection button
4.
Front left heater
5.
Rear left heater
6.
Center heater (Wok burner or
hotplate)
7.
Rear right heater
8.
Front right heater
WARNING: The control panel above is only for illustration purposes. Consider the control panel on your device.
Mechanical timer: Used for determining the period for cooking in the
oven. When the set time expires, the elements are turned off and an
audible warning signal is emitted. The mechanical timer can be adjusted to
the desired period between 0 - 90 minutes.
Thermostat: Used for determining the cooking temperature. After placing
the food inside the oven, turn the dial to set the desired temperature
between 50-280°C.
Using Oven Heating Elements
1. When operating the oven for the first time, you may notice an odour coming from the oven. This is normal and
it is recommended to operate the oven at 250°C for 45-60 minutes while it is empty before cooking any food.
2. Set the temperature dial to the required temperature in order to operate the oven.
3. Whilst the oven is operation, try to open the oven door as little as possible as this lets the heat out and reduces
the cooking efficiency.
13
Operating Instructions
Using the Grill
When grilling on the top rack, ensure that the food does not touch the grill. Place food in the center of the grill for
best grilling results.
To Start the Grill
• Set the function dial to ‘Grill’.
• Set the desired temperature.
To Stop the Grill
• Set the function dial to the off position and set the temperature dial to zero.
WARNING: Keep the oven door closed while grilling.
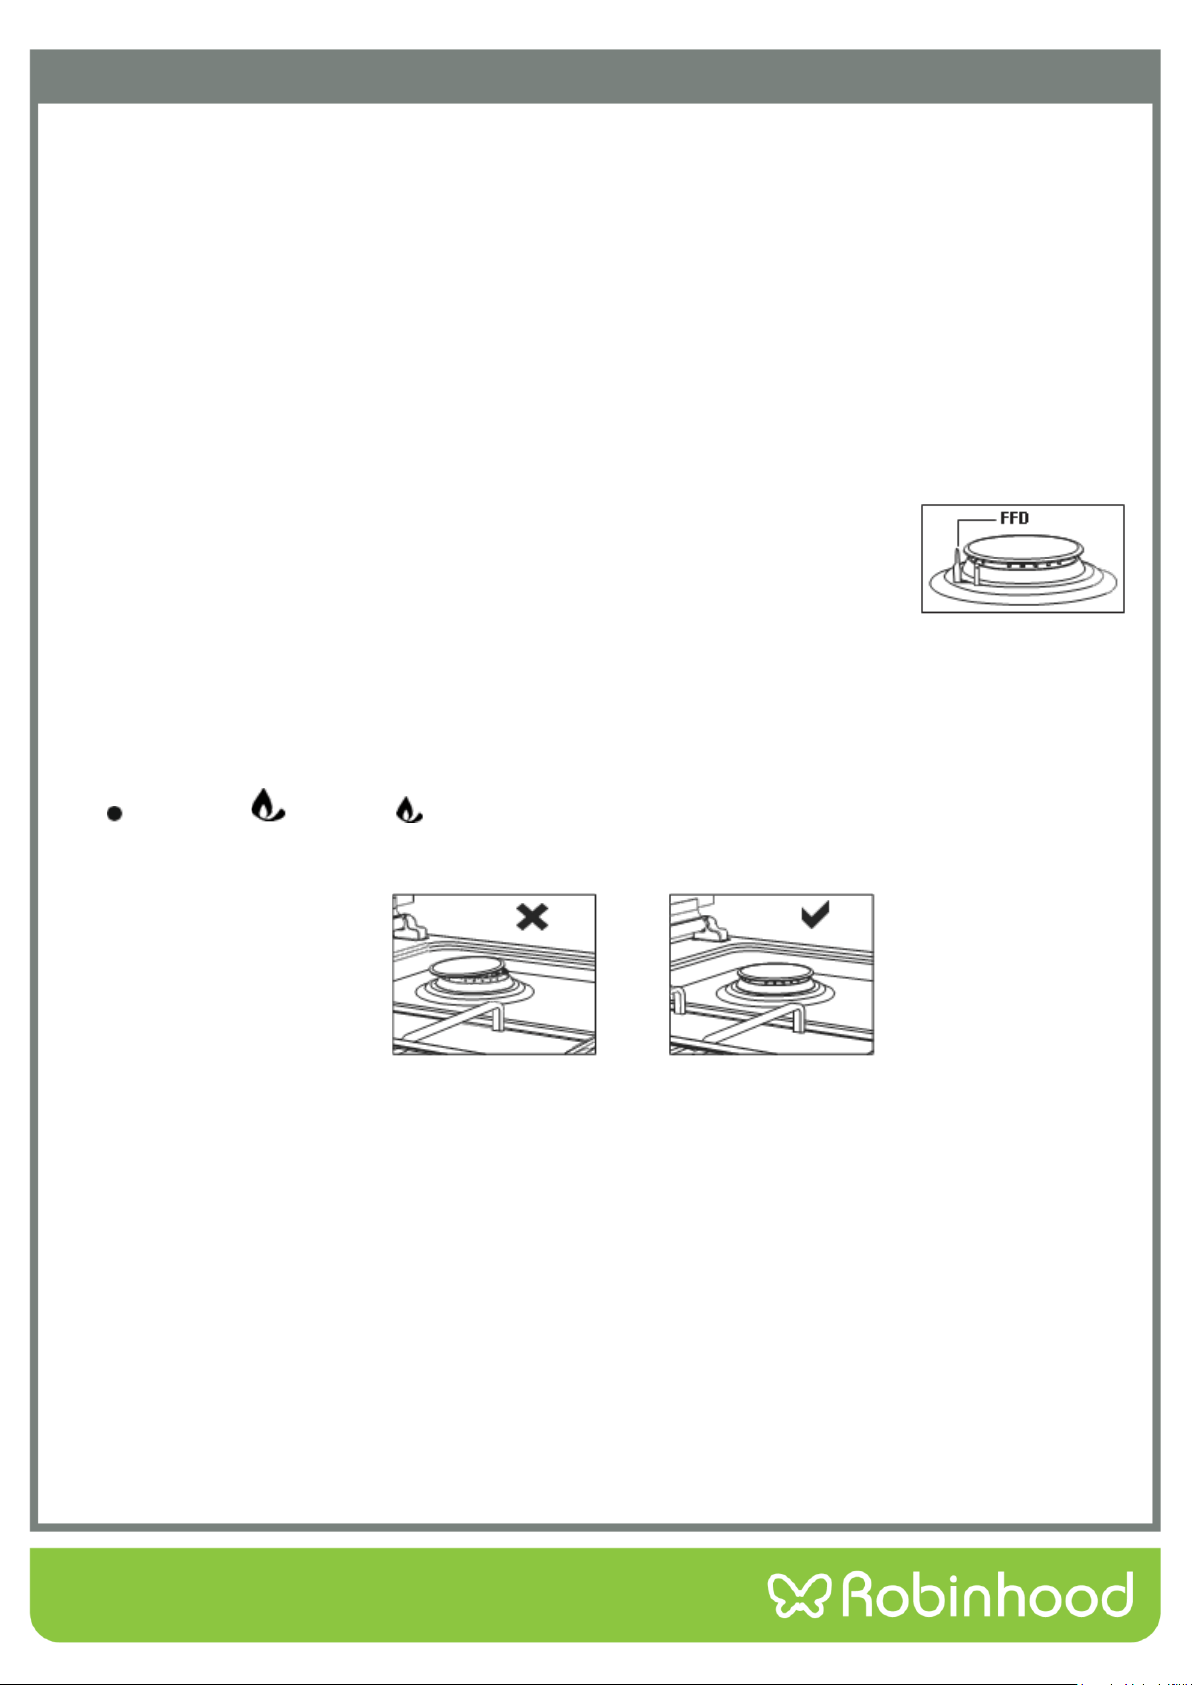
Using Gas Burners
The flame cut-off safety device (FFD); operates instantly when the safety mechanism
activates due to overflown liquid over the upper hobs.
1. The valves controlling the gas cookers have a special security mechanism. To light the
cooker, hold down the switch and turn it counter-clockwise. All of the lighters will
operate and the cooker you are controlling will light. Keep the switch pressed until the
cooker ignites.
2. Do not continuously operate the igniter for more than 15 seconds. If the burner does not ignite, wait a
minimum of one minute before trying again.
3. In models with the gas security system, when the flame of the cooker is extinguished, a control valve cuts off
the gas automatically. To operate the burners with the gas security system you must press the knob and turn
counter-clock-wise. After the ignition you must wait approximately 5-10 seconds for the gas security system to
activate. If the burner is extinguished for any reason, close the gas control valve and wait a minimum of one
minute before trying again.
4. Closed Fully open Half open
5. Before operating your hob please make sure that the burner caps are well positioned. The right placement of
the burner caps are shown below.
Figure 13
Figure 14

14
Operating Instructions
Level 1
Level 2
Level 3
Level 4
Level 5
Level 6
Ø80 mm
200 W
250 W
450 W
---
---
---
Ø145 mm
250 W
750 W
1000 W
---
---
---
Ø180 mm
500 W
750 W
1500 W
---
---
---
Ø145 mm rapid
500 W
1000 W
1500 W
---
---
---
Ø180 mm rapid
850 W
1150 W
2000 W
---
---
---
Ø145 mm
95 W
155 W
250 W
400 W
750 W
1000 W
Ø180 mm
115 W
175 W
250 W
600 W
850 W
1500 W
Ø145 mm rapid
135 W
165 W
250 W
500 W
750 W
1500 W
Ø180 mm rapid
175 W
220 W
300 W
850 W
1150 W
2000 W
Ø220 mm
220 W
350 W
560 W
910 W
1460 W
2000 W
1. Electric hotplates have a standard 6 temperature levels.
2. When using for the first time, operate your electric hotplate in position 6 for 5 minutes. This will harden the
coating on the hotplate.
3. Use flat bottomed saucepans which fully contact with the hotplate as much as you can.
Pot Sizes
90*60
Small burner
12-18 cm
Normal burner
18-22 cm
Big burner
22-26 cm
WOK burner
26-32 cm
Incorrect
Incorrect
Incorrect
Correct
15
Operating Instructions
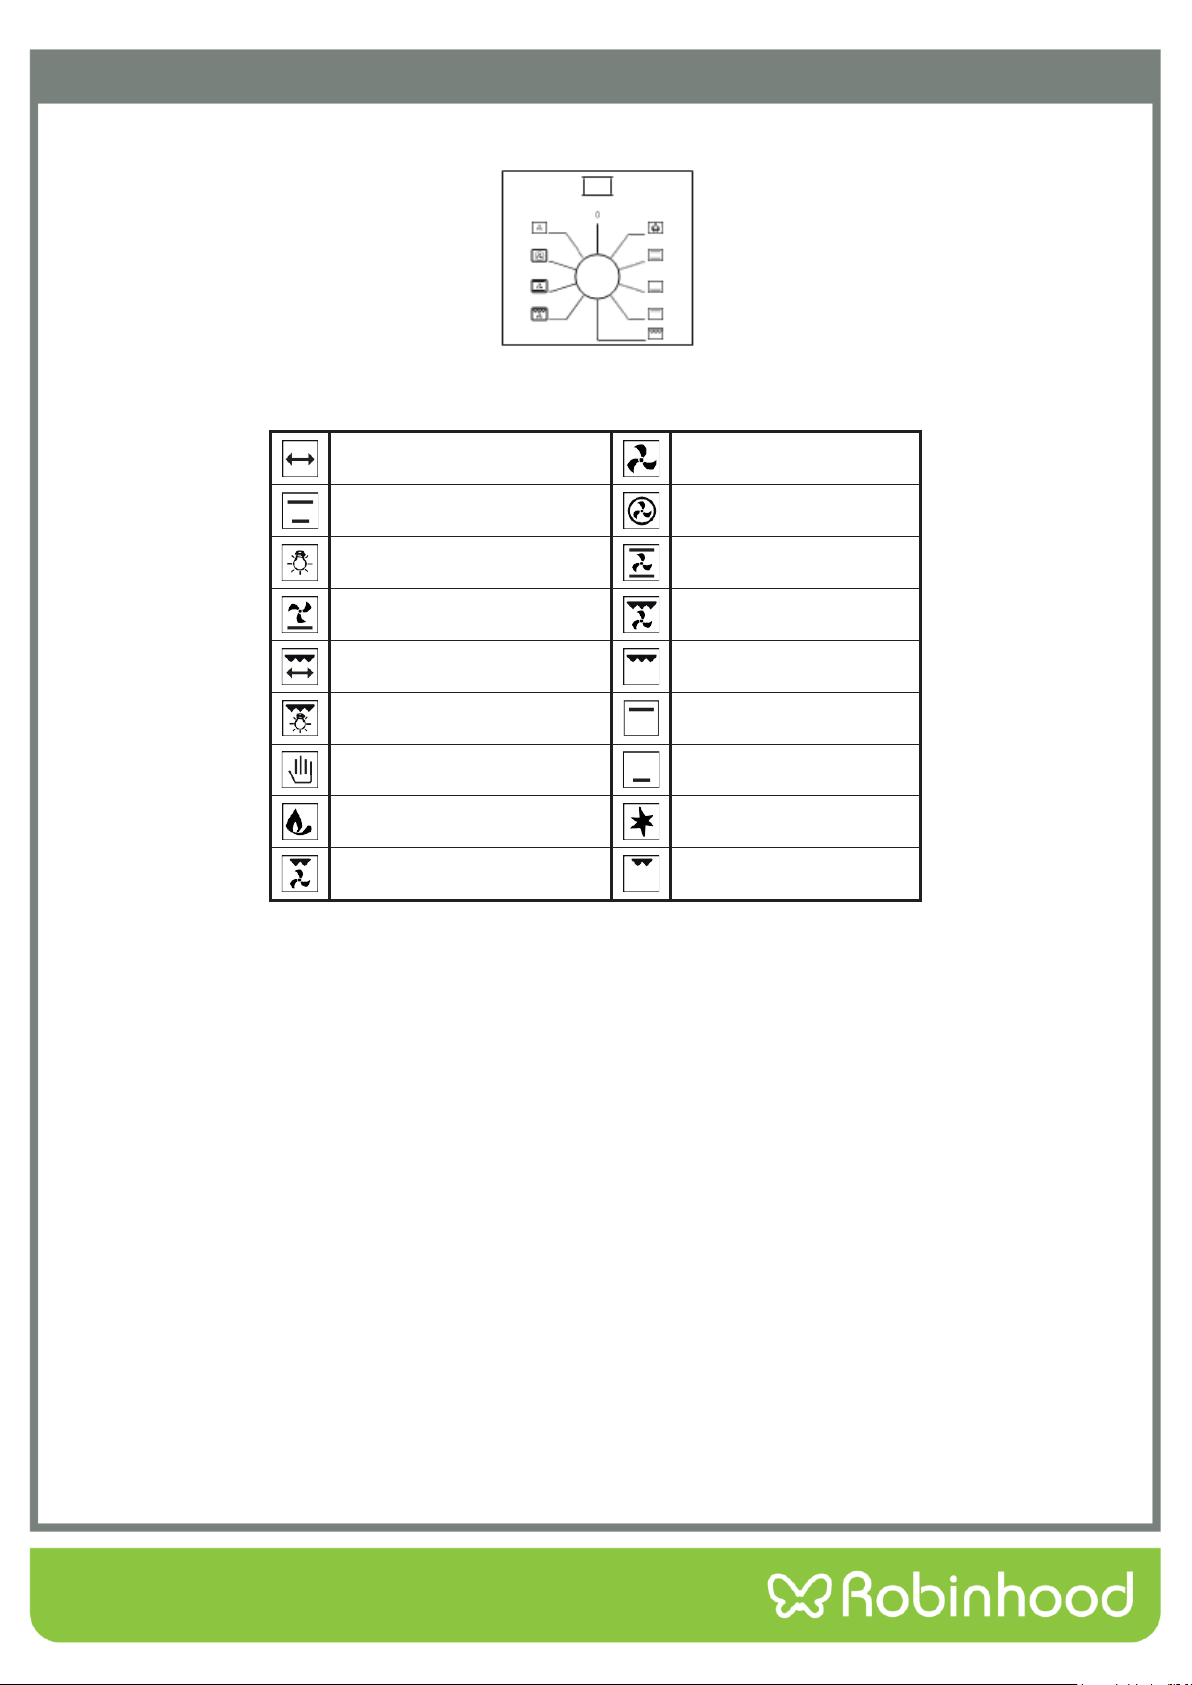
Function Dial
This is used for determining the cooking function to be used. The cooking functions are described below. All cooking
functions may not be available in all models.
Rotisserie
Fan
Lower and upper heating
elements
Turbo heating and fan
Lamp
Lower-upper heating element
and fan
Lower heating element and fan
Grill and fan
Grill and roast chicken
Grill
Grill and lamp
Upper heating element
Electrical timer
Lower heating element
Flame
Ignition lighter
Small grill and fan
Small grill
16
Maintenance and Cleaning
WARNING: Disconnect the appliance from the electrical supply before performing any maintenance or cleaning.
1. While the oven is operating or shortly after it starts operating, it is extremely hot. Avoid touching the heating
elements.
2. Do not use harsh cleaners such as hard wire brushes, abrasive cleaners or detergents.
3. Use a soft, damp, soapy cloth to clean the interior of the oven. Dry with a soft towel.
4. Clean the glass surfaces with special glass cleaning agents.
5. Do not use steam cleaners to clean your oven.
6. Clean spilled liquid from the top cover of the oven before removing.
7. Never use inflammable agents like acid, thinner or gasoline when cleaning your oven.
8. Do not wash any part of your oven in the dishwasher.
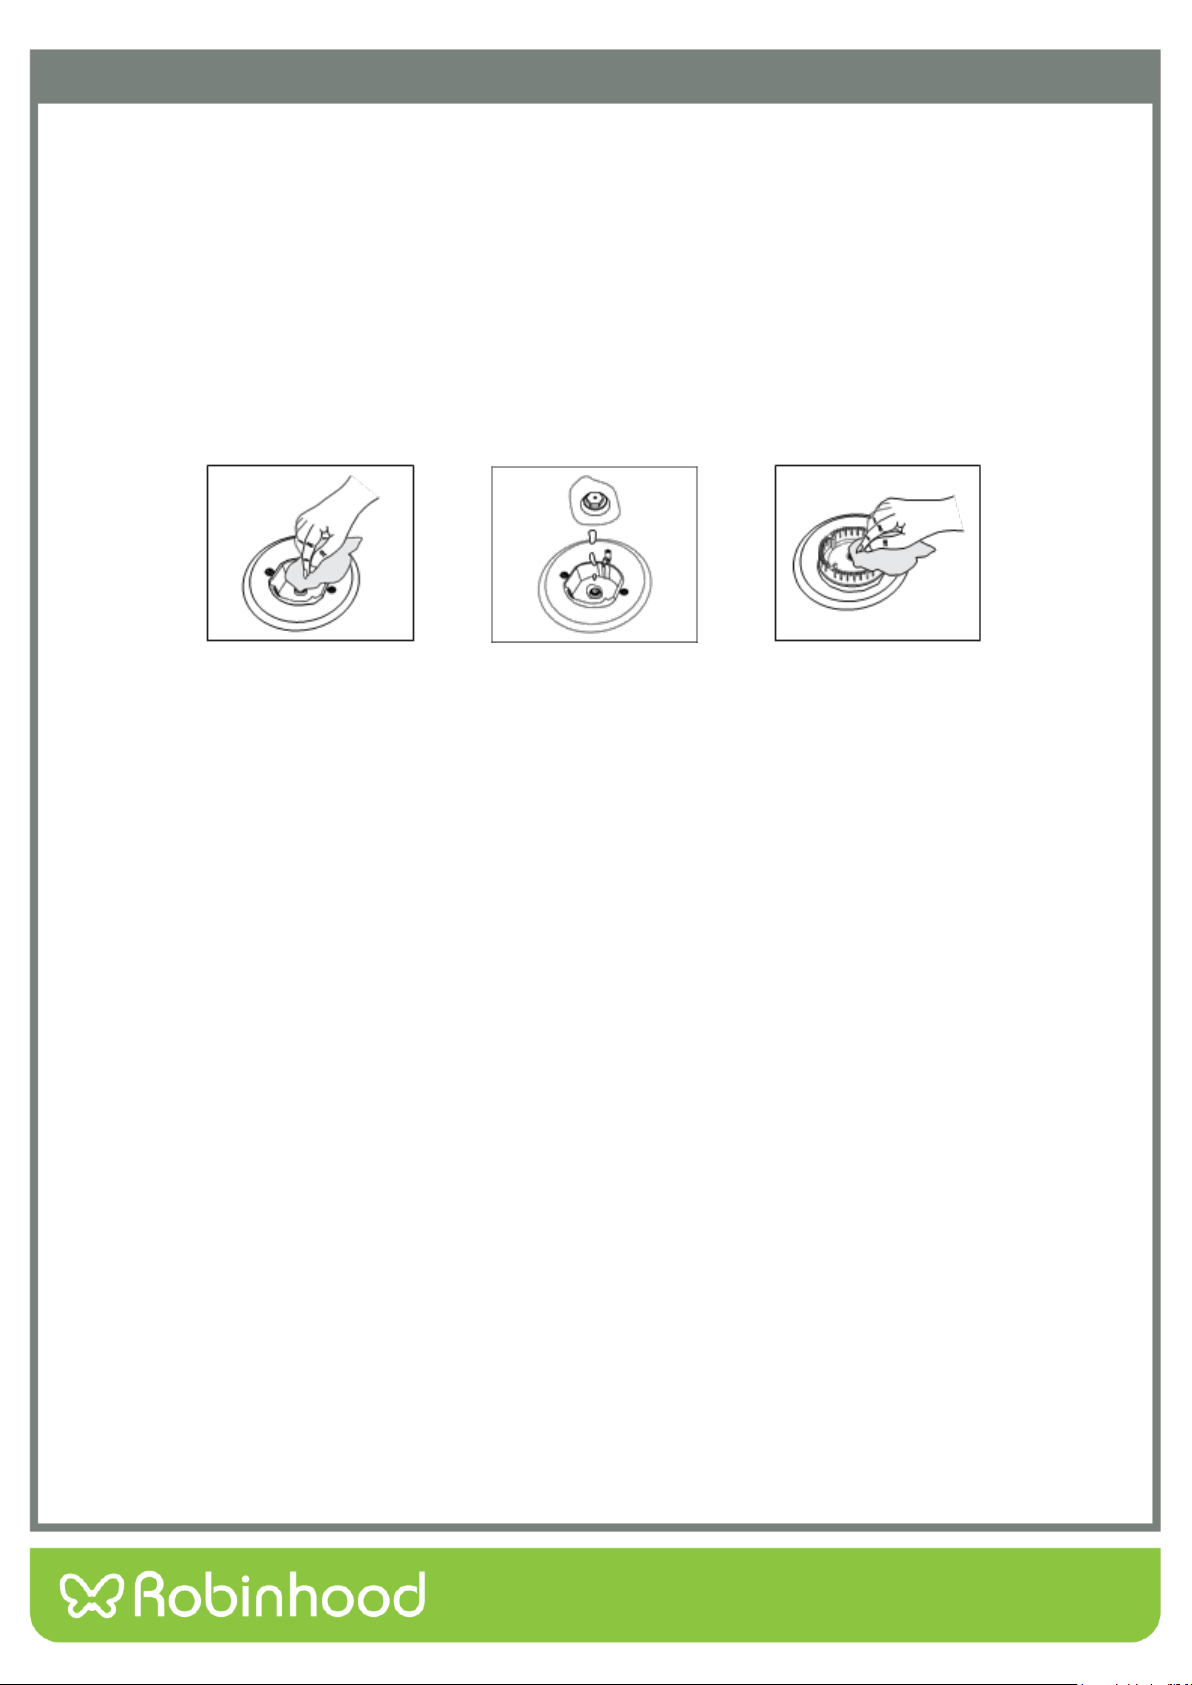
9. In order to clean the front glass of the oven; remove the fixing screws fixing the handle with a screwdriver and
remove the oven door. Clean and rinse it thoroughly. After drying, place the oven glass properly and re- install
the handle. Take care to not scratch the glass as scratches can cause it to shatter during operation.
Figure 15
Figure 16
Figure 17
17
Maintenance and Cleaning
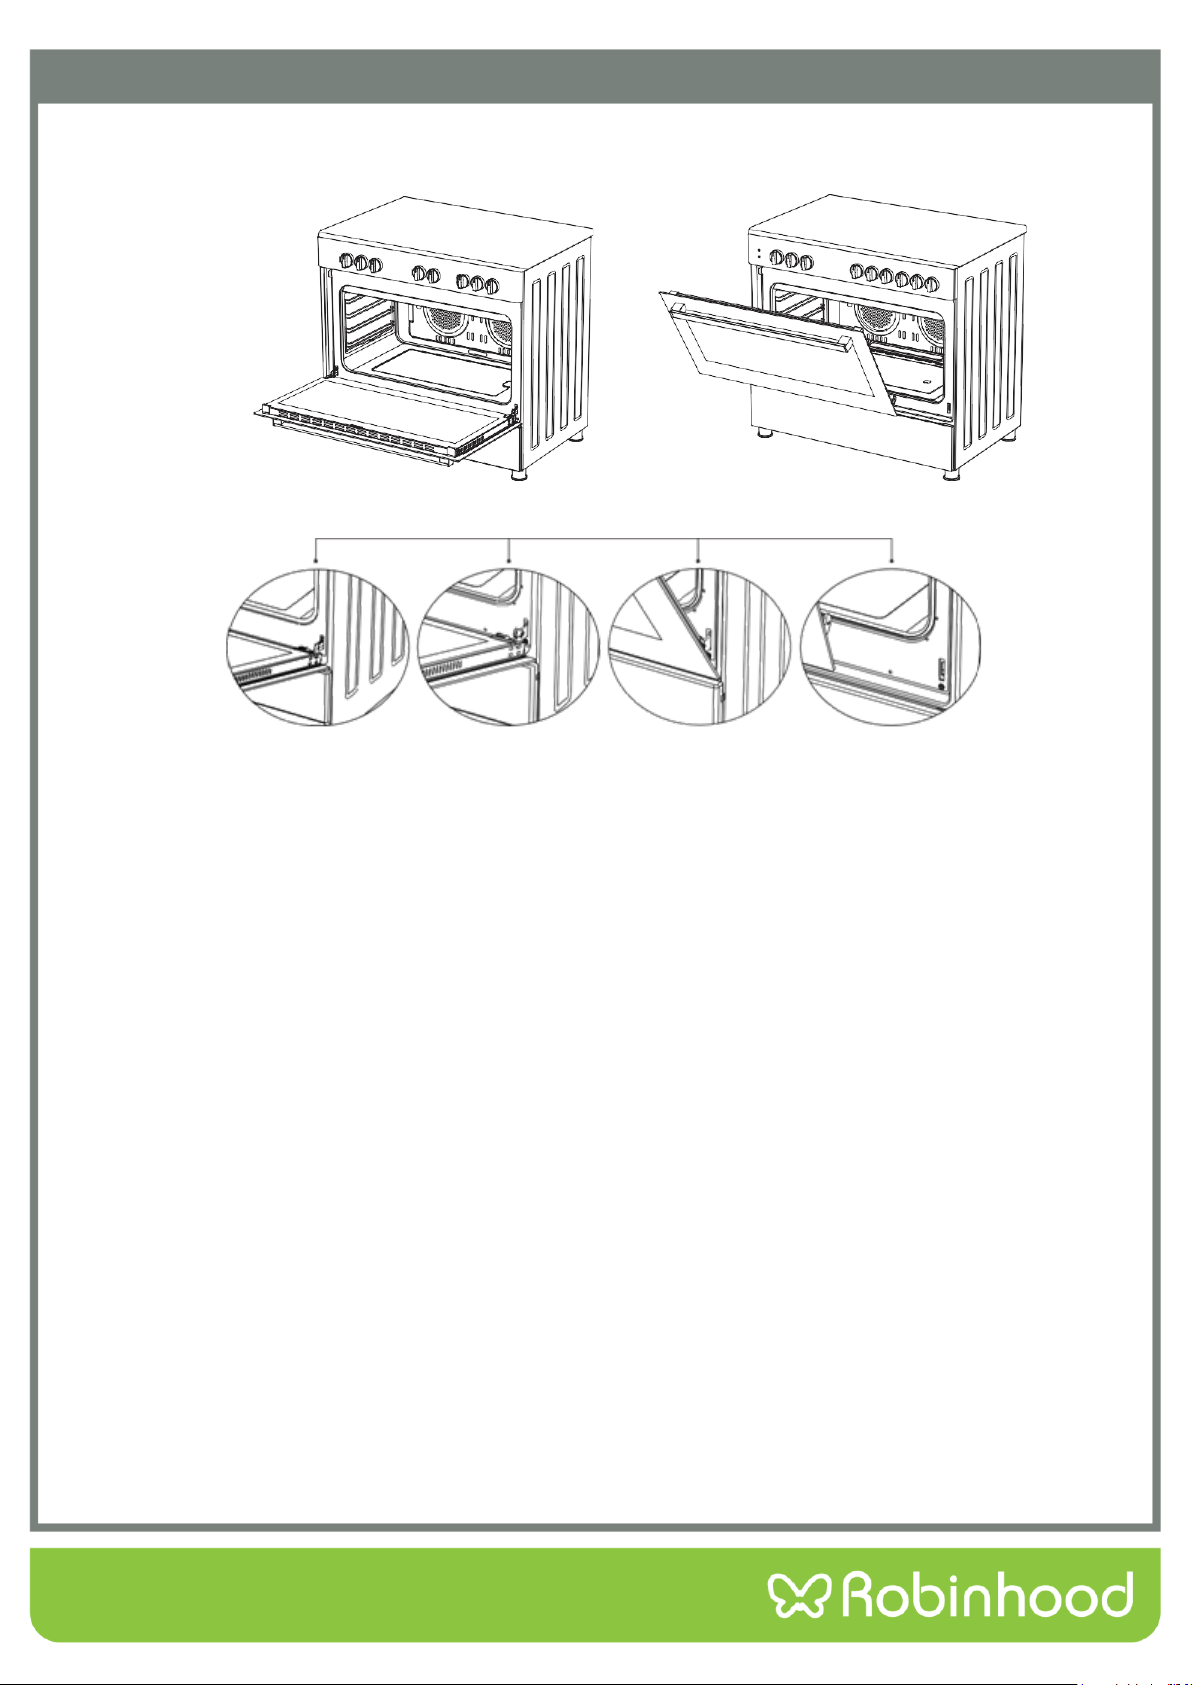
Installation of Oven Door
Figure 18
Figure 19
Figure 18.1
Completely open the
oven door by pulling it
towards yourself.
Unlock the hinge by
pulling the lock
upwards with the help
of a screw driver as
shown in figure 18.1.
Figure 18.2
Bring the hinge lock
to the widest angle
as shown in figure
18.2. Bring both
hinges connecting
the oven door to the
oven to the same
position.
Figure 19.1
Afterwards, close
the oven door as to
lean on the hinge
lock as shown in
figure 19.1.
Figure 19.2
To remove the oven
door, pull it upwards
by holding it with
both hands when
close to the closed
position as shown in
figure 19.2.
In order to re-place the oven door, perform the abovementioned steps in reverse.
18
Maintenance and Cleaning
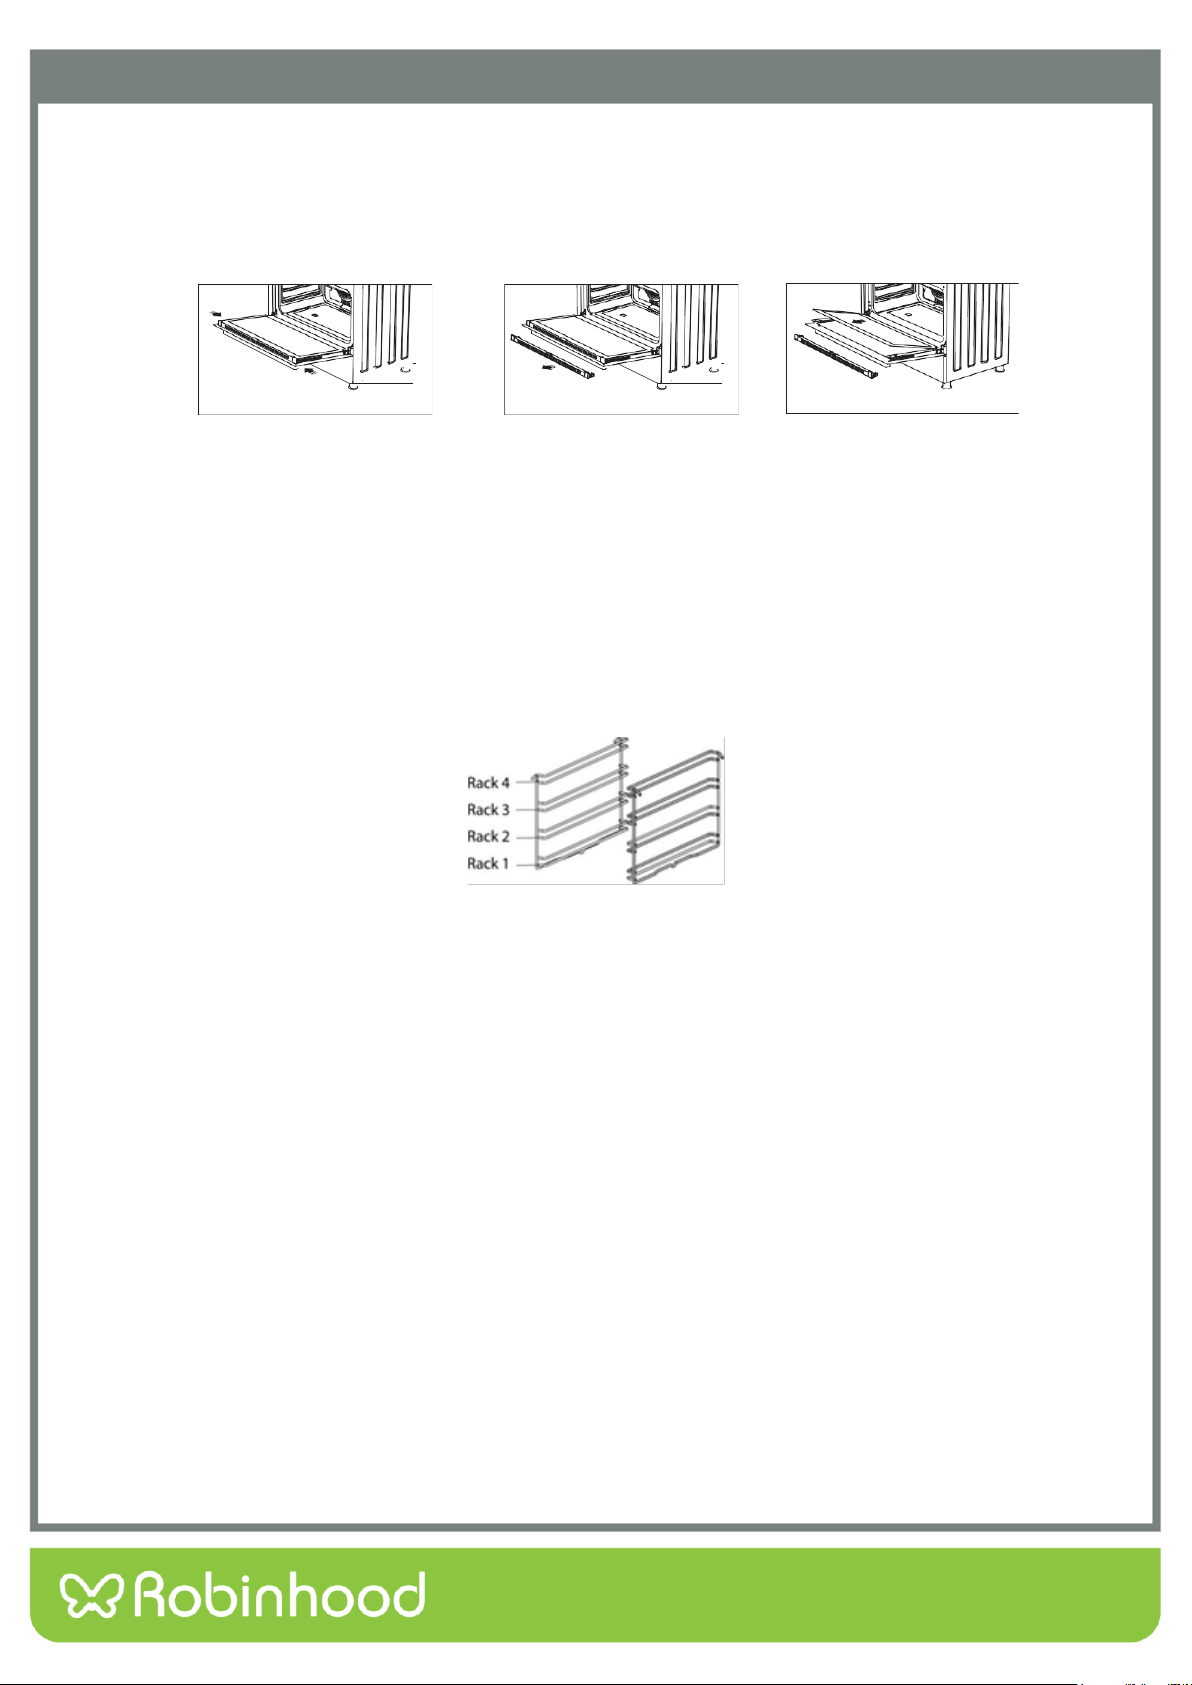
Cleaning And Maintenance of the Oven’s Front Door Glass
Remove the profile by pressing the plastic latches on both left and right sides as shown in figure 20 and pulling the
profile towards yourself as shown in figure 21. Then remove the inner-glass as shown in figure 22. If required, the
middle glass can be removed in the same way. After cleaning and maintenance is done, remount the glass and the
profile in reverse order. Make sure the profile is properly seated in its place.
Figure 20
Figure 21
Figure 22
Catalytic Walls
Catalytic walls are located on the left and the right side of cavity under the guides. Catalytic walls trap bad smells
and help to obtain the best performance from the oven. Catalytic walls also absorb oil residue and clean your oven
while it is operating.
Removing the catalytic walls
The guides must be pulled out in order to remove the catalytic walls. As soon as the guides are pulled out, the
catalytic walls will be released automatically. The catalytic walls must be changed after 2-3 years.
Rack Positions
It is important to place the wire rack into the oven properly. Do not allow wire rack to touch the rear wall of the
oven. Rack positions are shown in the above image. You may place a deep tray or a standard tray in the lower and
upper wire racks.
Installing and removing wire racks
To remove the wire racks, press the clips and first remove the lower and then the upper side from the mount.
Reverse the procedure to replace the wire racks.

19
Changing the Lamp
WARNING: Disconnect the appliance from the power supply and ensure that it is cold before changing the lamp.
• Unscrew the glass protective cover.
• Remove the lamp by turning it; install a new lamp with the same specifications.
• Reinstall glass protective cover, plug the power cable of appliance into electrical socket and complete
replacement.
Type G9 Lamp
Type E14 Lamp
220-240 V, AC
15-25 W
Figure 23
220-240 V, AC
15 W
Figure 24
20
Troubleshooting
You may solve the problems you may encounter with your product by checking the following points before calling
the technical service.
Problem
Possible Cause
What to Do
Oven does not operate.
Power supply not available.
Check for power supply.
Gas supply not available.
Check if main gas valve is open.
Check if gas pipe is bent or kinked.
Make sure gas hose is connected to
the oven.
Check if suitable gas valve is being
used.
Turns off during cooking.
Operating continuously for
too long.
Let the oven cool down after long
cooking cycles.
Oven door is not opening
properly.
Food residues jammed
between the door and
internal cavity.
Clean the oven cavity and try to re-
open the door.
Lighter not operating.
Tips or body of ignition plugs
are clogged.
Clean tips or body of ignition plugs of
gas burners.
Gas burner pipes are
clogged.
Clean gas burner pipes.
Electric shock when touching
the oven.
Not grounded properly.
Make sure power supply is grounded
properly.
Ungrounded wall socket is
used.
Water dripping.
Water or steam may
generate under certain
conditions depending on the
food being cooked. This is
not a fault of the appliance.
Let the oven cool down and then wipe
dry with a dishcloth.
Steam coming out from a
crack on oven door.
Water remaining inside the
oven.
Oven does not heat.
Oven door is open.
Close the door and restart.
Oven controls not correctly
adjusted.
Read the section regarding operation
of the oven and reset the oven.
Fuse tripped or circuit
breaker turned off.
Replace the fuse or reset the circuit
breaker. If this is repeating frequently,
call an electrician.
Smoking during operation.
When operating the oven for
the first time.
Smoke comes out from the heaters.
This is not a fault. After 2-3 cycles,
there will be no more smoke.
Food on element.
Let the oven cool down and clean food
residues from the element.
Burning or plastic odour
emitted during operation.
Plastic or other non-heat
resistant accessories are
being used inside the oven.
Always use oven safe cookware.
Oven does not cook well.
Oven door is opened
frequently during cooking.
Refrain from opening the oven door
frequently. If you open the door
frequently the internal temperature
drops and therefore the cooking result
will be influenced.
Internal light is dim or does
not operate.
Foreign object covering the
lamp during cooking.
Clean internal surface of the oven and
check again.
Lamp has failed.
Replace with a lamp with the same
specifications.

21
Warranty Certificate (New Zealand)
Terms and Conditions
The following conditions apply in respect of the warranty given in this certificate:
1. Monaco Corporation Limited (“Monaco”) warrants the following Robinhood products against manufacturing defects and
faulty materials, under normal use and subject to the exclusions in this certificate, for a period of:
• Rangehood, Ovens, Cooktops, Dishwashers, Refrigeration - 24 months from date of original purchase for domestic
use.
• Uniduct – 12 months from date of original purchase for domestic use.
• Ironing centre – 12 months from date of original purchase for domestic use.
• Sinks sets– 5 years on stainless steel sink including draining bench from date of original purchase for domestic use, 6
months on all stainless steel accessories, including wire rack, colander and tray from date of original purchase for
domestic use.
• Laundry Tub - 5 years on stainless bowl, 24 months on Tap, Cabinet and other components from the date of original
purchase for domestic use.
“Original purchase”, when used in this certificate, means purchase by the customer directly from Monaco or one of its approved
suppliers.
2. This warranty is limited to the repair or replacement, at our option, within the warranty period of any component part
which we at our discretion determine to contain faulty materials or a manufacturing defect in breach of this warranty. This
warranty is subject to terms and conditions set out in this certificate.
3. The warranty only applies within New Zealand.
4. The customer must produce the original invoice or other purchase documentation as proof of the original purchase date.
Warranty exclusions
1. The warranty does not apply where, in Monaco’s opinion:
• The defect is caused by misuse, wear and tear, dirt, fire or accidental damage. The product has been repaired or
serviced by an unauthorised person.
• The product was not installed in accordance with our instructions.
• The product was purchased overseas or was not designed for use in New Zealand. The product was not used, cleaned
or cared for in accordance with our instructions.
• The product was used outdoors.
2. In addition, this warranty does not extend to damage or defects which in our opinion, directly or indirectly arise from or
are due to:
• Exposing the product to acidic or corrosive materials or chemicals such as dyes, solvents, denture cleaner or acetone;
Using inappropriate household cleaning products such as abrasive cream or powder cleansers, furniture polish,
bleach, mentholated spirits, drain cleaners, sugar soap, metal pads and strongly alkaline or acidic cleaners;
• Heat damage, including from washing the product at high temperatures;
• Impact or mishandling the product, including the impact caused by objects scraped along, thrown or dropped on the
product surface or excessive weight being placed on the product;
• Structural or support changes in or affecting the building or the application where the product has been installed;
• Failure to clean or maintain the product as recommended; or any other causes specified in the product information as
being excluded from this warranty.
3. Variations with the colour or gloss within the product or any ageing or fading of colour, shine or gloss level over time are
not covered by this warranty. The warranty does not cover visual imperfections or blemishes in the surface and edges of
the product that were not brought to your supplier’s attention at the time you inspected the product.
4. Costs incurred on installation or removal of a product, or any reinstallation of a product, or any associated costs, are not
covered by this warranty.
5. Monaco will not be liable for consequential or indirect loss or damage whatsoever and however arising out of or in
connection with the supply, performance or removal of the product, including (but not limited to) loss of profit, loss of
revenue, loss of contract, loss of goodwill or increased cost of workings, even if due to the negligence of Monaco or any of
its approved suppliers, employees or agents.
6. Charcoal filters and light bulbs are not covered by this warranty
7. This warranty and the statements contained in this certificate or other documents given to you do not exclude, restrict or
modify the application of any term implied into this warranty by statute, provided that (to the extent any statutory
provision permits Monaco to limit its liability for a breach of an implied condition or warranty) Monaco’s liability for such
breach is limited to the payment of the cost of replacing the product, repairing the product or acquiring an equivalent
product.
8. Subject to clause 5, our obligations under this warranty are limited to those set out in this certificate, and this warranty is
expressly instead of all other warranties, express or implied, including any implied warranty of merchantability or fitness
for a particular purpose and notwithstanding any course of dealing between the parties or custom and usage in trade to
the contrary.
Terms and conditions are subject to change.

22
Warranty Certificate (Australia)
Terms and Conditions
If you are a consumer under the Australian Consumer Law, our goods come with guarantees that cannot be excluded under the Australian
Consumer Law. You are entitled to a replacement or refund for a major failure and for compensation for any other reasonably foreseeable
loss or damage. You are also entitled to have the goods repaired or replaced if the goods fail to be of acceptable quality and the failure does
not amount to a major failure.
1. Shriro Australia Pty Limited (“Shriro”) also warrants the following Robinhood products against manufacturing defects and faulty
materials, under normal use and subject to the exclusions in this certificate, for a period of:
• Rangehood, Ovens, Cooktops, Dishwashers, Refrigeration - 24 months from date of original purchase for domestic use.
• Uniduct – 12 months from date of original purchase for domestic use.
• Ironing centre – 12 months from date of original purchase for domestic use.
• Sinks sets– 5 years on stainless steel sink including draining bench from date of original purchase for domestic use, 6 months
on all stainless steel accessories, including wire rack, colander and tray from date of original purchase for domestic use.
• Laundry Tub - 5 years on stainless bowl, 24 months on Tap, Cabinet and other components from the date of original
purchase for domestic use. “Original purchase”, when used in this certificate, means purchase by the customer directly from
Shriro or one of its approved suppliers.
2. This warranty is limited to the repair or replacement, at our option, within the warranty period of any component part which we at
our discretion determine to contain faulty materials or a manufacturing defect in breach of this warranty. This warranty is subject
to terms and conditions set out in this certificate.
3. The warranty only applies within Australia.
4. For warranty service outside of capital city metropolitan area or 30 km from nearest authorised service agent you will be liable for
reasonable travelling expenses and the cost of transport of the product or parts to and from the service agent
5. To make a claim under this warranty, you must produce the original invoice or other purchase documentation as proof of the
original purchase date. You must send your claim to Shriro Australia Pty Limited, 104 Vanessa Street, Kingsgrove, NSW, 2208,
within 7 days of any alleged defect or failure of the product first becoming apparent. You are responsible for the expense of
making a claim under this warranty.
This warranty is given by:
Shriro Australia Pty Ltd, ABN: 28 002 386 129
Telephone: 1800 648 556
Facsimile: 1800 628 577
Email: [email protected]
www.robinhood.com.au
Attention: Customer Services Manager
Warranty exclusions
1. The warranty does not apply where, in Shriro’s opinion:
• The defect is caused by misuse, wear and tear, dirt, fire or accidental damage. The product has been repaired or serviced by
an unauthorised person.
• The product was not installed in accordance with our instructions.
• The product was purchased overseas or was not designed for use in Australia.
• The product was not used, cleaned or cared for in accordance with our instructions.
• The product was used outdoors.
2. All Robinhood Rangehoods are suitable for indoor use only and not suitable over BBQs or charcoal cookers designed for outdoor
use.
3. In addition, this warranty does not extend to damage or defects which in our opinion, directly or indirectly arise from or are due
to: exposing the product to acidic or corrosive materials or chemicals such as dyes, solvents, denture cleaner or acetone; using
inappropriate household cleaning products such as abrasive cream or powder cleansers, furniture polish, bleach, mentholated
spirits, drain cleaners, sugar soap, metal pads and strongly alkaline or acidic cleaners; heat damage, including from washing the
product at high temperatures; impact or mishandling the product, including the impact caused by objects scraped along, thrown
or dropped on the product surface or excessive weight being placed on the product; structural or support changes in or affecting
the building or the application where the product has been installed; failure to clean or maintain the product as recommended; or
any other causes specified in the product information as being excluded from this warranty.
4. Variations with the colour or gloss within the product or any ageing or fading of colour, shine or gloss level over time are not
covered by this warranty. The warranty does not cover visual imperfections or blemishes in the surface and edges of the product
that were not brought to your supplier’s attention at the time you inspected the product.
5. We will not be responsible under this warranty for, nor pay the costs of, removing the existing product, or reinstalling the new
product, or any associated costs or damages.
6. Charcoal filters and light bulbs are not covered by this warranty.
The benefits given by this warranty are in addition to other rights and remedies of consumers under any law in relation to the goods which
cannot be excluded.
This warranty certificate is not intended to create a contract between Shriro Australia Pty Limited and the purchaser.
New Zealand
Monaco Corporation Ltd
Telephone: (09) 415 6000
Facsimile: (09) 415 7400
Email: customercare@robinhood.co.nz
www.robinhood.co.nz
Australia
Shriro Australia Pty Ltd
ABN 28 002 386 129
Telephone: 1800 648 556
Facsimile: 1800 628 577
Email: [email protected]om.au
www.robinhood.com.au
IM Ref: RHFS909GX IM v1 14/02/2020