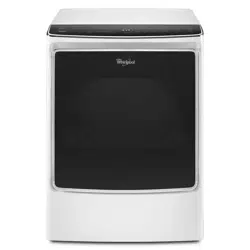
Using Your Dryer
WARNING Explosion Hazard Keep flammable materials and vapors, such as gasoline, away from dryer. Do not dry anything that has ever had anything flammable on it (even after washing). Failure to follow these instructions can result in death, explosion, or fire.
WARNING Explosion Hazard Keep flammable materials and vapors, such as gasoline, away from dryer. Do not dry anything that has ever had anything flammable on it (even after washing). Failure to follow these instructions can result in death, explosion, or fire.
WARNING: To reduce the risk of fire, electric shock, or injury to persons, read the IMPORTANT SAFETY INSTRUCTIONS before operating this appliance.
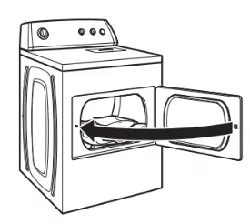
1, Clean the lint screen
Clean the lint screen before each load. Pull the lint screen straight up and push tab down on front to open lint screen. Roll lint off the screen with your fingers. Do not rinse or wash screen to remove lint. Wet lint is hard to remove. Close lint screen and push the lint screen firmly back into place. For additional cleaning information, see "Dryer Care."
2, Load the dryer
Open the door by pulling on the handle. Place laundry in the dryer. Add a dryer sheet to wet load, if desired. Close the door.
IMPORTANT: Do not tightly pack the dryer. Items need to tumble freely. Tightly packing can lead to poor drying performance and may increase wrinkling and tangling.
3. Touch POWER
Touch POWER to turn on the dryer.
4. Select type of load to dry
First select a cycle from the "What to Dry" (Automatic cycles) and then select the "How to Dry" to get the best combination cycle available for the type of items you are going to dry. See "Cycle Guide" for cycle details. Not all cycles are available on all models.
Automatic Cycles: You can select a different dryness level, depending on your load. Touch DRYNESS to scroll to Less to More. Selecting Less to More automatically adjusts the dryness level at which the dryer will shut off. Dryness level can be changed in the first 5-8 minutes of the cycle. Automatic Cycles give the best drying in the shortest time. Drying time varies based on fabric type, load size, and dryness setting.
NOTE: Automatic Cycles will give you up to 3 temperatures to adjust and it varies, depending on the "What to Dry" or "How to Dry" selections that have been made.
TIMED DRY Cycle: When you select Timed Dry, the default time appears in the display. Touch "+" and "-" to increase or decrease the time in 1 minute increments. Touch and hold to change the time in 5 minute increments. The default temperature may be changed by pressing Temperature until the desired dry temperature is lit.
Steam Refresh Cycles (on some models): Select Steam Refresh to reduce odors and light wrinkles in dry loads consisting of wrinkle-free cotton, cotton-polyester blends, common knits, and synthetics. If you will be unable to remove a load immediately, touch Wrinkle Shield TM to add up to 150 minutes of periodic tumbling. You may select the + Steam setting to add a short steam cycle after 60 minutes to help smooth out wrinkles.
5. Adjust cycle modifiers, if desired
You may adjust different settings, depending on what you are drying and how you are going to dry the item. See the "Cycle Guide" for detailed information.
NOTE: Not all options and modifiers are available with all cycles. Not all cycles are on all models.
6. Select any additional options
Add additional options such as Static Reduce, Wrinkle Shield, and/or EcoBoost™ (on some models) by touching that option. If you will be unable to remove the load promptly, select Wrinkle Shield™ before pressing START/PAUSE. You may select the “+ Steam” setting (on some models) to add a short steam cycle after 60 minutes to help smooth out wrinkles.
NOTE: Not all options and settings are available with all cycles.
7. Touch and hold START/PAUSE to begin cycle
Touch and hold START/PAUSE to begin the cycle.
8. Remove garments promptly after cycle is finished
Promptly remove garments after cycle has completed to reduce wrinkling.
Changing the Automatic Cycle settings to increase or decrease drying time
If all your loads on all Automatic Cycles are consistently less dry or more dry than you would like, you may change the default settings to increase or decrease the default dryness level. Your automatic drying settings can be adjusted to adapt to different installations, environmental conditions, or personal preference. This change is retained and will affect all of your Automatic Cycles, not just the current cycle/load. There are 5 drying settings, which are displayed using the time display:
- 0 Much wetter clothes, 30% less drying time.
- 1 Slightly wetter clothes, 15% less drying time.
- 2 Factory preset dryness level.
- 3 Slightly drier clothes, 15% more drying time.
- 4 Much drier clothes, 30% more drying time.
To change the drying settings:
NOTE: The settings cannot be changed while the dryer is running or paused. The dryer must be in standby mode (power is off) to adjust the default settings.
- 1. Before starting a cycle, touch and hold DRYNESS for 6 seconds.
- 2. Touch DRYNESS to select the dryness level shown in the time display: 0, 1, 2, 3, or 4.
- 3. Touch START/PAUSE to save the new dryness level setting.
Additional Features
USING THE DRYING RACK
To obtain a drying rack for your dryer, order by calling 1-877-944-7566. You will need your model and serial number and the purchase date. Remove and discard any packing material before use. Use the Drying Rack for items that you do not want to tumble dry, such as sweaters and tennis shoes. When you use the drying rack, the drum continues to turn, but the rack remains stationary. The drying rack is intended for use with the Manual Dry/ Timed Dry cycles only. The drying rack cannot be used with Automatic cycles.
To use the drying rack:
IMPORTANT: Do not remove the lint screen.
1. Open dryer door.
2. Align the two hooks on the front of the drying rack with the holes in the dryer door opening and press down fully into holes. Rest the rear support on the dryer back ledge.
3. Place wet items on top of the drying rack. Allow space around items for air to circulate. The drying rack does not move, but the drum will rotate; be sure to leave adequate clearance between items and the inside of the dryer drum. Make sure items do not hang over the edges or between drying rack grille.
4. Close the door.
5. Select a Timed Dry/Air Only, or Low Temperature cycle. Items containing foam, rubber, or plastic must be dried on a clothesline or by using the Air Only setting.
6. When the cycle is selected, the Estimated Time Remaining display shows the default time. You can change the actual time in the cycle by increasing or decreasing the cycle time.
7. Start the dryer.
NOTE: Check the lint screen and remove any lint accumulated from items dried on the drying rack after the cycle is finished.