the possibilities
Thank you for purchasing this Samsung product.
INSTALLING YOUR WASHER
OPERATING INSTRUCTIONS
WASHING A LOAD OF LAUNDRY
MAINTAINING YOUR WASHER
TROUBLESHOOTING
APPENDIX
11 Unpacking your washer
11 Overview of your washer
12 Electrical
12 Grounding
12 Water
13 Drain facility
13 Flooring
13 Location considerations
13 Alcove or closet installation
13 Undercounter installation (washer only)
14 With optional pedestal base or stacking kit
15 Important note to installer
15 Installation flow chart
18 Loading your washer
18 Washing clothes: Basic Instructions
19
21
22
22
22
22
23
23
24
25
25
26
26
28
28
28
28
29
30
30
31
Overview of the control panel
Child Lock
Spin Only
Garment+ _++
Delay End
Sound
My Cycle
Smart Care
Washing clothes using the cycle selector
Using steam wash
ATC (Auto Temperature Control)
Detergent use
Features
Cleaning the exterior
Cleaning the interior
Cleaning the dispensers
Storing your washer
Cleaning the debris filter
Cleaning the door Diaphragm
Preserving the top cover and the front frame
Self Clean+
32 Check these solutions if your washer...
34 Information codes
36 Fabric care chart
37 Cycle chart
39 Helping the environment
39 Declaration of conformity
39 Specification

_f tv nforrn _ton
J
Congratulations on your new Samsung washer. This manual contains important
information on the installation, use, and care of your appliance. Please take time
to read this manual to take full advantage of your washer's many benefits and
features.
WHAT YOU NEED TO KNOW ABOUT SAFETY INSTRUCTIONS
Warnings and Important Safety Instructions in this manual do not cover all possible conditions and
situations that may occur. It is your responsibility to use common sense, caution, and care when installing,
maintaining, and operating your washer.
IMPORTANT SAFETY SYMBOLS AND PRECAUTIONS
What the icons and signs in this user manual mean:
Hazards or unsafe practices that may result in severe personal injury
or death.
WARNING To reduce the risk of fire, explosion, electric shock, or personal injury
when using your washer, follow these basic safety precautions:
Z_ Hazards or unsafe practices that may result in minor personal injury or
CAUTION property damage.
Do NOT attempt.
Do NOT disassemble.
[_ Do NOT touch.
(_) Follow directions explicitly.
Unplug the power plug from the wall socket.
Make sure the machine is grounded to prevent electric shock.
Call the service center for help.
Note
These warning signs are here to prevent injury to you and others.
Please follow them explicitly.
After reading this section, keep it in a safe place for future reference.
_Read all instructions before the
using appliance.
SAVE THESE INSTRUCTIONS
English 3
/_ WARNING: To reduce the risk of fire, electric shock, or injury to when using
persons your
WARNINGappliance, follow basic precautions, including the following:
1. Read all instructions before using the appliance.
2. Do not wash or dry articles that have been previously cleaned in, washed in, soaked in,
or spotted with gasoline, dry-cleaning solvents, other flammable or explosive substances
as they give off vapors that could ignite or explode.
3. Do not allow children to play on or in the appliance. Close supervision of children is
necessary when the appliance is used near children.
4. Before the appliance is removed from service or discarded, remove the door to the
washing or drying compartment.
5. Do not reach into the appliance if the drum is moving.
6. Do not install or store this appliance where it will be exposed to the weather.
7. Do not tamper with controls.
8. Do not repair or replace any part of the appliance or attempt any servicing unless
specifically recommended in the user-maintenance instructions or in published user-
repair instructions that you understand and have the skills to carry out.
9. Do not add gasoline, dry-cleaning solvents, or other flammable or explosive substances
to the wash water. These substances give off vapors that could ignite or explode.
10. Under certain conditions, hydrogen gas may be produced in a hot water system that
has not been used for 2 weeks or more. HYDROGEN GAS IS EXPLOSIVE. If the hot
water system has not been used for such a period, before using a washer or combination
washer-dryer, turn on all hot water faucets and let the water flow from each for several
minutes. This will release any accumulated hydrogen gas. As the gas is flammable, do
not smoke or use an open flame during this time.
_ State of California Proposition 65 Warnings:
WARNING
WARNING: This product contains chemicals known to the State of California to cause
cancer and reproductive toxicity.
SAVE THESE INSTRUCTIONS

SEVERE WARNING SIGNS FOR iNSTALLATiON
WARNING
Plug the power cord into an AC 120 V / 60 Hz / 15 A wall socket or higher and use the
socket for this appliance only. In addition, do not use an extension cord.
Sharing a wall socket with other appliances using a power strip or extending the power
cord may result in electric shock or fire.
Do not use an electric transformer. It may result in electric shock or fire.
Ensure that the power voltage, frequency and current are the same as those of the
product specifications. Failing to do so may result in electric shock or fire.
The installation of this appliance must be performed by a qualified technician or service
company.
Failing to do so may result in electric shock, fire, an explosion, problems with the
product, or injury.
Remove all foreign substances such as dust or water from the power plug terminals and
contact points using a dry cloth on a regular basis.
Unplug the power plug and clean it with a dry cloth.
Failing to do so may result in electric shock or fire.
Plug the power plug into the wall socket in the right direction so that the cord runs towards
the floor.
If you plug the power plug into the socket in the opposite direction, the electric wires
within the cable may be damaged and this may result in electric shock or fire.
This appliance must be properly grounded.
Do not ground the appliance to a gas pipe, plastic water pipe, or telephone line.
This may result in electric shock, fire, an explosion, or problems with the product.
Never plug the power cord into a socket that is not grounded correctly and make sure
that it is in accordance with local and national codes.
Do not install this appliance near a heater or flammable material.
Do not install this appliance in a humid, oily or dusty location, in a location exposed to direct
sunlight and water (rain drops).
Do not install this appliance in a location where gas may leak.
This may result in electric shock or fire.
Plug the power plug into the wall socket firmly. Do not use a damaged power plug,
damaged power cord or loose wall socket.
This may result in electric shock or fire.
Do not pull or excessively bend the power cord.
Do not twist or tie the power cord.
Do not hook the power cord over a metal object, place a heavy object on the power cord,
insert the power cord between objects, or push the power cord into the space behind the
appliance.
This may result in electric shock or fire.
Do not pull the power cord when unplugging the power plug.
Unplug the power plug by holding the plug.
Failing to do so may result in electric shock or fire.
SAVE THESE INSTRUCTIONS
English 5
When the power plug or power cord is damaged, contact your nearest service center.
CAUTION SIGNS FOR INSTALLATION
CAUTION
_This appliance should be positioned in such a way that it is accessible to the power plug.
Failing to do so may result in electric shock or fire due to electric leakage.
Install your appliance on a level and hard floor that can support its weight.
Failing to do so may result in abnormal vibrations, noise, or problems with the product.
_ nplug the power plug when the appliance is not being used for long periods of time or
during a thunder/lightning storm.
Failing to do so may result in electric shock or fire.
A
SEVERE WARNING SIGNS FOR USING
WARNING
lf the appliance is flooded, cut the power immediately and contact your nearest service
center.
If the appliance generates a strange noise, a burning smell or smoke, unplug the power
plug immediately and contact your nearest service center.
Failing to do so may result in electric shock or fire.
In the event of a gas leak (such as propane gas, LP gas, etc.), ventilate immediately without
touching the power plug. Do not touch the appliance or power cord.
Do not use a ventilating fan.
A spark may result in an explosion or fire.
Do not wash items contaminated with gasoline, kerosene, benzene, paint thinner, alcohol or
other flammable or explosive substances.
This may result in electric shock, fire or an explosion.
Do not open the washer door by force while it is operating (high-temperature washing/
drying/spinning).
Water flowing out of the washer may result in burns or cause the floor to be slippery.
This may result in injury.
Opening the door by force may result in damage to the product or injury.
Make sure to remove the packaging (sponge, styrofoam) attached to the bottom of the
washer before using it.
Do not insert your hand under the washer.
This may result in injury.
SAVE THESE INSTRUCTIONS
Do not touch the power plug with wet hands.
This may result in electric shock.
Do not turn the appliance off by unplugging the power plug while an operation is in
progress.
Plugging the power plug into the wall socket again may cause a spark and result in
electric shock or fire.
Keep all packaging materials well out of the reach of children, as packaging materials can
be dangerous to children.
If a child places a bag over their head, they may result in suffocation.
Do not let children or infirm persons use this washer unsupervised.
Failing to do so may result in electric shock, burns or injury.
Do not insert your hand or a metal object under the washer while it is operating.
This may result in injury.
Make sure the detergent drawer is closed before you put laundry into the washer or remove
laundry from the washer.
If the detergent drawer is open, you could strike the drawer with your head and injure
yourself.
,} Do not attempt to repair, disassemble, or modify the appliance yourself.
Do not use any fuse (such as copper, steel wire, etc.) other than the standard fuse.
When repairing or reinstalling the appliance is required, contact your nearest service
center.
Failing to do so may result in electric shock, fire, problems with the product, or injury.
lf any foreign substance such as water has entered the appliance, unplug the power plug
and contact your nearest service center.
Failing to do so may result in electric shock or fire.
When the water supply hose comes loose from the faucet and floods the appliance, unplug
the power plug.
Failing to do so may result in electric shock or fire.
If any foreign substance enters the appliance, unplug the power plug and contact you
nearest service center.
Failing to do so my result in electric shock or fire.
SAVE THESE INSTRUCTIONS
English 7

CAUTION SIGNS FOR USING
CAUTION
When the washer is contaminated by a foreign substance such as detergent, dirt, food
waste, etc., unplug the power plug and clean the washer using a damp and soft cloth.
Failing to do so may result in discoloration, deformation, damage or rust.
The front glass may be broken by a strong impact. Take care when using the washer.
When the glass is broken, it may result in injury.
After a water supply failure or when reconnecting the water supply hose, open the faucet
slowly.
Open the faucet slowly after a long period of non-use.
The air pressure in the water supply hose or the water pipe may result in damage to a
part or in water leakage.
If a drain error occurs during an operation, check if there is a draining problem.
If the washer is used when it is flooded because of a draining problem, it may result in
electric shock or fire due to electric leakage.
Insert the laundry into the washer completely so that laundry does not get caught in the
door.
If laundry gets caught in the door, it may result in damage to the laundry or the washer,
or result in water leakage.
Ensure that the faucet is turned off when the washer is not being used.
Ensure that the screw on the water supply hose connector is properly tightened.
Failing to do so may result in property damage or injury.
Take care that the Rubber Seal and the Front Door Glass are not contaminated by a foreign
substance (e.g. waste, thread, hair, etc.)
If a foreign substance is caught in the door or the door is not completely closed, it may
cause a water leakage.
Open the faucet and check if the water supply hose connector is firmly tightened and that
there is no water leaking before using the product.
If the screws or the water supply hose connector are loose, it may result in water
leakage.
The product you have purchased is designed for domestic use only.
The use for business purposes qualifies as product misuse. In this case, the product will not
be covered by the standard warranty provided by Samsung and no responsibility can be
attributed to Samsung for malfunctions or damages resulting from such misuse.
If the wash is not started and the laundry is left for a period of time after you have added
detergent or applied stain remover or pre-treatment onto the laundry, the laundry may be
discolored.
Select the recommended cycle and temperature on the basis of the laundry items, sort the
laundry by color on the basis of its colorfastness and select the appropriate cycle.
Make sure that foreign objects such as pins, buttons and coins are removed from clothing
items when adding laundry to the washer. Wash dirty laundry separately from relatively
clean items and wash fragile items separately from tougher textiles.
If an item is stained, wash it as soon as possible. Use stain remover or detergent only after
testing the colorfastness of the item by applying a small quantity to an inside seam.
SAVE THESE INSTRUCTIONS
Do not stand on top of the appliance or place objects (such as laundry, lighted candles,
lighted cigarettes, dishes, chemicals, metal objects, etc.) on the appliance.
This may result in electric shock, fire, problems with the product, or injury.
Do not operate the appliance with wet hands.
This may result in electric shock.
Do not spray volatile material such as insecticide onto the surface of the appliance.
As well as being harmful to humans, it may also result in electric shock, fire or problems
with the product.
Do not place an object that generates a electromagnetic field near the washer.
This may result in injury due to a malfunction.
Since the water drained during a high-temperature wash or drying cycle is hot, do not touch
the water.
This may result in burns or injury.
Do not wash, spin or dry water-proof seats, mats or clothing (*).
Do not wash thick, hard mats even if the washer mark is on the care label.
This may result in injury or damage to the washer, walls, floor or clothing due to
abnormal vibrations.
* Woolen Bedding, rain covers, fishing vests, ski pants, sleeping bags, diaper covers,
sweat suits, and bicycle, motorcycle, car covers, etc.
Do not operate the washer when the detergent drawer is removed.
This may result in electric shock or injury due to water leakage.
Do not touch the inside of the tub during or just after drying as it is hot.
This may result in burns.
Do not insert your hand into the detergent dispenser after opening it.
This may result in injury as your hand may be caught.
Do not place any objects (such as shoes, food waste, animals) other than laundry into the
washer.
This may result in damage to the washer, or injury and death in the case of pets due to
the abnormal vibrations.
Do not press the buttons using sharp objects such as pins, knifes, fingernails, etc.
This may result in electric shock or injury.
Do not wash laundry contaminated by oils, creams or lotions usually found in skincare
shops or massage clinics.
This may result in the rubber seal becoming deformed and water leakage.
Do not leave metal objects such as a safety pin or hair pin, or bleach in the tub for long
periods of time.
This may cause the tub to rust.
If rust starts appearing on the surface of the tub, apply a cleansing agent (neutral) to the
surface and use a sponge to clean it. Never use a metal brush.
SAVE THESE INSTRUCTIONS
English 9
Do not use dry cleaning detergent directly and do not wash, rinse, or spin laundry
contaminated by dry cleaning detergent.
This may result in spontaneous combustion or ignition due to the heat of the oxidation of
the oil.
Do not use hot water from water cooling/heating devices.
This may result in problems with the washer.
Do not use natural hand-washing soap for the washer.
If it hardens and accumulates inside the washer, it may result in problems with the
product, discoloration, rust or bad odors.
Do not wash large laundry items such as Bedding in the washing net.
Failing to do so may result in injury due to abnormal vibrations.
Place smaller items, such as lace socks and lingerie in the washing net.
Do not use hardened detergent.
If it accumulates inside the washer, it may result in water leakage.
Do not wash throw rugs or doormats.
If you wash throw rugs or doormats, the sand will accumulate inside the washer. It may
result in error such as no draining.
Take care that children's fingers are not caught in the door when closing it. This may result
in injury.
A
! SEVERE WARNING SIGNS FOR CLEANING
WARNING
G
Do not clean the appliance by spraying water directly onto it.
Do not use the strong acid cleaning agent.
Do not use benzene, thinner or alcohol to clean the appliance.
This may result in discoloration, deformation, damage, electric shock or fire.
Before cleaning or performing maintenance, unplug the appliance from the wall socket.
Failing to do so may result in electric shock or fire.
SAVE THESE INSTRUCTIONS
UNPACKING YOUR WASHER
Unpack your washer and inspect it for shipping damage. Make sure you have received all the items
shown below. If your washer was damaged during shipping, or you do not have all of the items, contact
1-800-SAMSUNG (726-7864).
To prevent personal injury or strain, wear protective gloves whenever lifting or carrying the unit.
Z_ Packing materials can be dangerous to children. Keep all packing material (plastic bags, polystyrene,
....... etc.) well out of the reach of children.
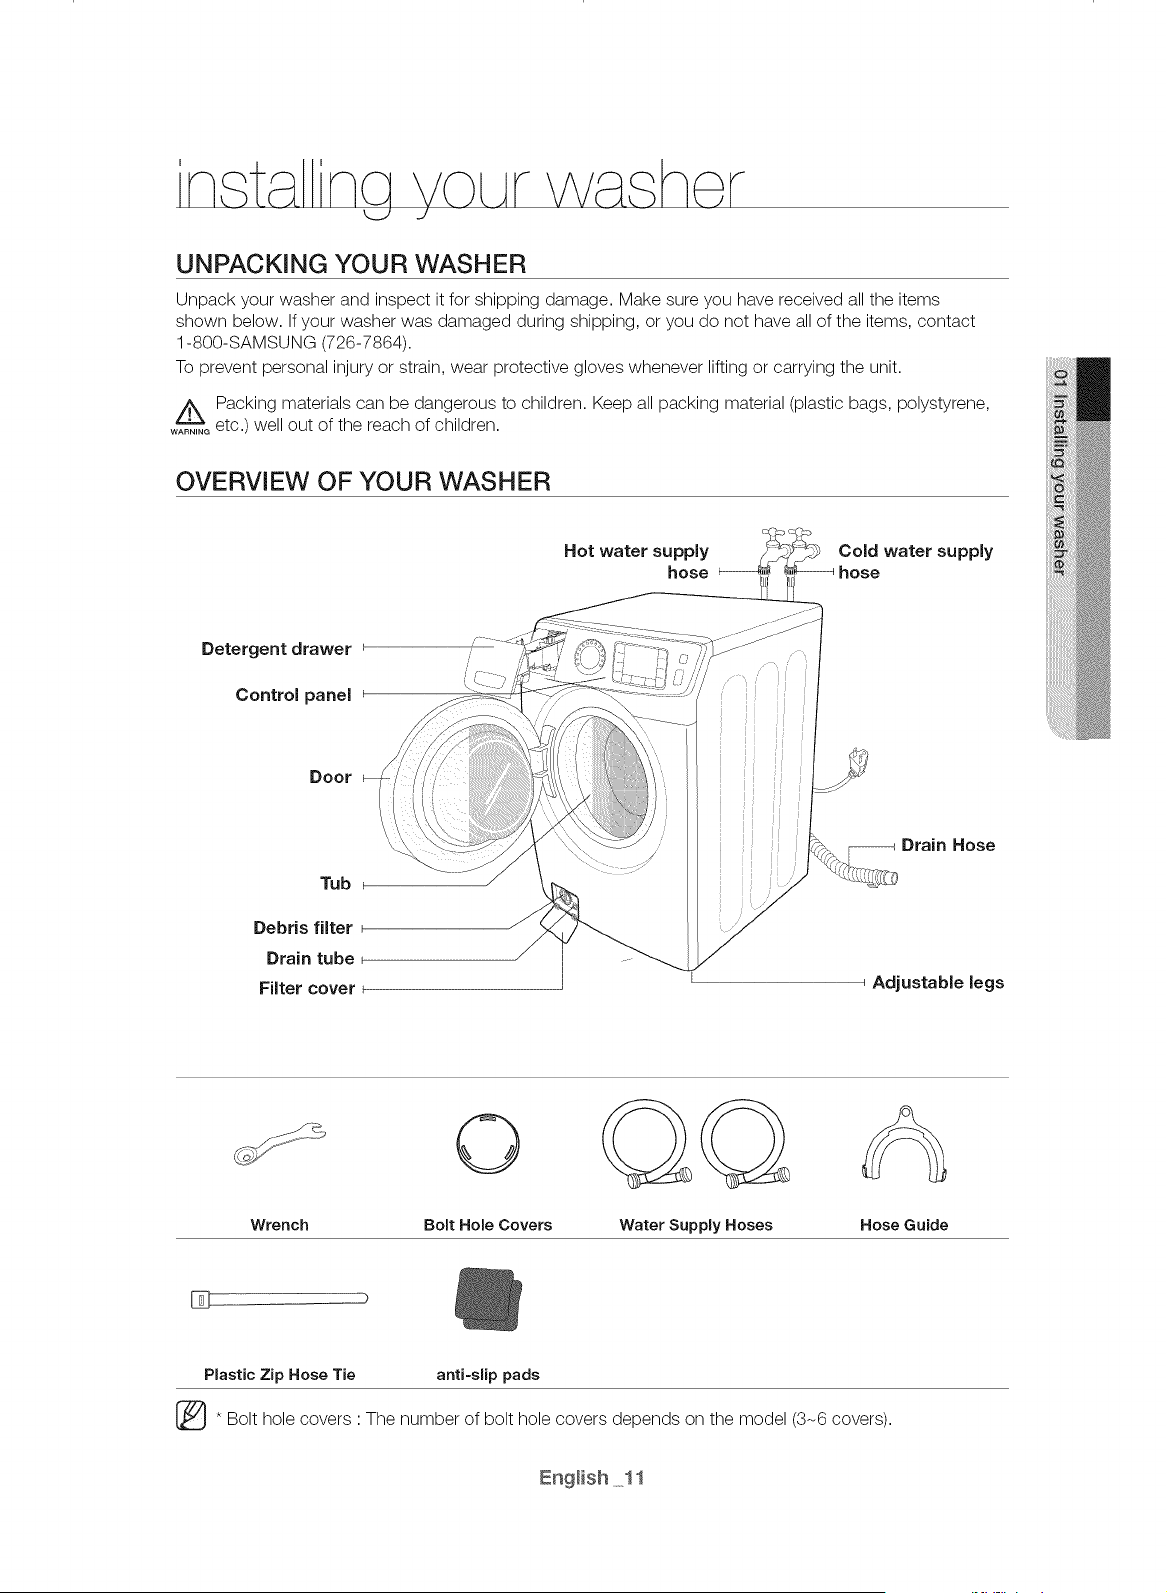
OVERVIEW OF YOUR WASHER
Hot water supply
hose
Cold water supply
Detergent drawer
Control panel
Door
Tub
Debris filter
Drain tube
Filter cover
Drain Hose
Adjustable legs
Wrench Bolt Hole Covers
Water Supply Hoses
Hose Guide
Plastic Zip Hose Tie antFslip pads
(_* Bolt hole covers ' The number of bolt hole covers depends on the model (3-6 covers).
BASIC LOCATION REQUIREMENTS
Electrical
120 Volt 60 Hz 15 AMP fuse or circuit breaker.
Individual branch circuit serving only your washer is recommended.
Your washer is equipped with a power cord.
Z_ NEVER USE AN EXTENSION CORD.
CAUTION
Grounding
ELECTRICAL GROUNDING IS REQUIRED FOR THIS APPLIANCE,
This appliance must be grounded. In the event of malfunction or breakdown, grounding will
reduce the risk of electric shock by providing a path of least resistance for electric current.
This appliance is equipped with a power cord having a three-prong grounding plug for use in a
properly installed and grounded three-prong outlet.
The plug must be plugged into an appropriate outlet that is properly installed and grounded in
accordance with all local codes and ordinances.
_An improperly connected equipment-grounding conductor can increase the risk of electrical
....... shock. Check with a qualified electrician or serviceman if you are not sure whether the
appliance is properly grounded. Do not modify the plug provided with the appliance - if it
does not fit the outlet, have a proper outlet installed by a qualified electrician.
IMPORTANT SAFETY PRECAUTIONS
To prevent unnecessary risk of fire, electrical shock or personal injury, all wiring and
grounding must be done in accordance with the National Electrical Code ANSI/FNPA, No.
70 Latest Revision and local codes and ordinances. It is the personal responsibility of the
appliance owner to provide adequate electrical service for this appliance.
/_ NEVER CONNECT THE GROUND WIRE TO PLASTIC PLUMBING LINES, GAS LINES, OR
....... HOT WATER PIPES.
Water
Using bad quality water may cause the water supply valve to operate abnormally.
To correctly fill your washer in the proper amount of time, water pressure of 20-116 psi (137-
800 kPa)is required.
Water pressure less than 20 psi may cause water valve failure, may not allow the water valve to
shut off completely, or may extend the fill time beyond what your washer controls allow, causing
your washer to turn off. A time limit is built into the controls to prevent extensive flooding in your
home if an internal hose becomes loose.
The water faucets must be within 4 feet / 122 cm of the back of your washer to match the inlet
hoses provided with your washer.
[_ ccessory inlet hoses are available in various lengths up to 10 feet/305 cm for faucets that
are further away from the back of your washer.
To avoid the possibility of water damage:
,, Have water faucets easily accessible.
,, Turn off faucets when the washer is not in use.
,, Periodically check that there is no leakage from the water inlet hose fittings.
CHECK ALL CONNECTIONS AT THE WATER VALVE AND FAUCET FOR LEAKS.
WARNING
Drain facility
The recommended height of the standpipe is 18 in/46 cm. The drain hose must be routed
through the drain hose clip to the standpipe. The standpipe must be large enough to accept the
outside diameter of the drain hose. The drain hose is attached at the factory.
Flooring
For best performance, you must install your washer on a solidly constructed floor. Wood floors
may need to be reinforced to minimize vibration and/or unbalanced load situations. Carpeting
and soft tile surfaces are contributing factors to vibration which can cause your washer to move
slightly during the spin cycle.
Never install your washer on a platform or weakly supported structure.
Location considerations
Do not install your washer in areas where water may freeze, since your washer will always retain
some water in its water valve, pump, and hose areas. Freezing water can damage the belts,the
pump, hoses and other components.
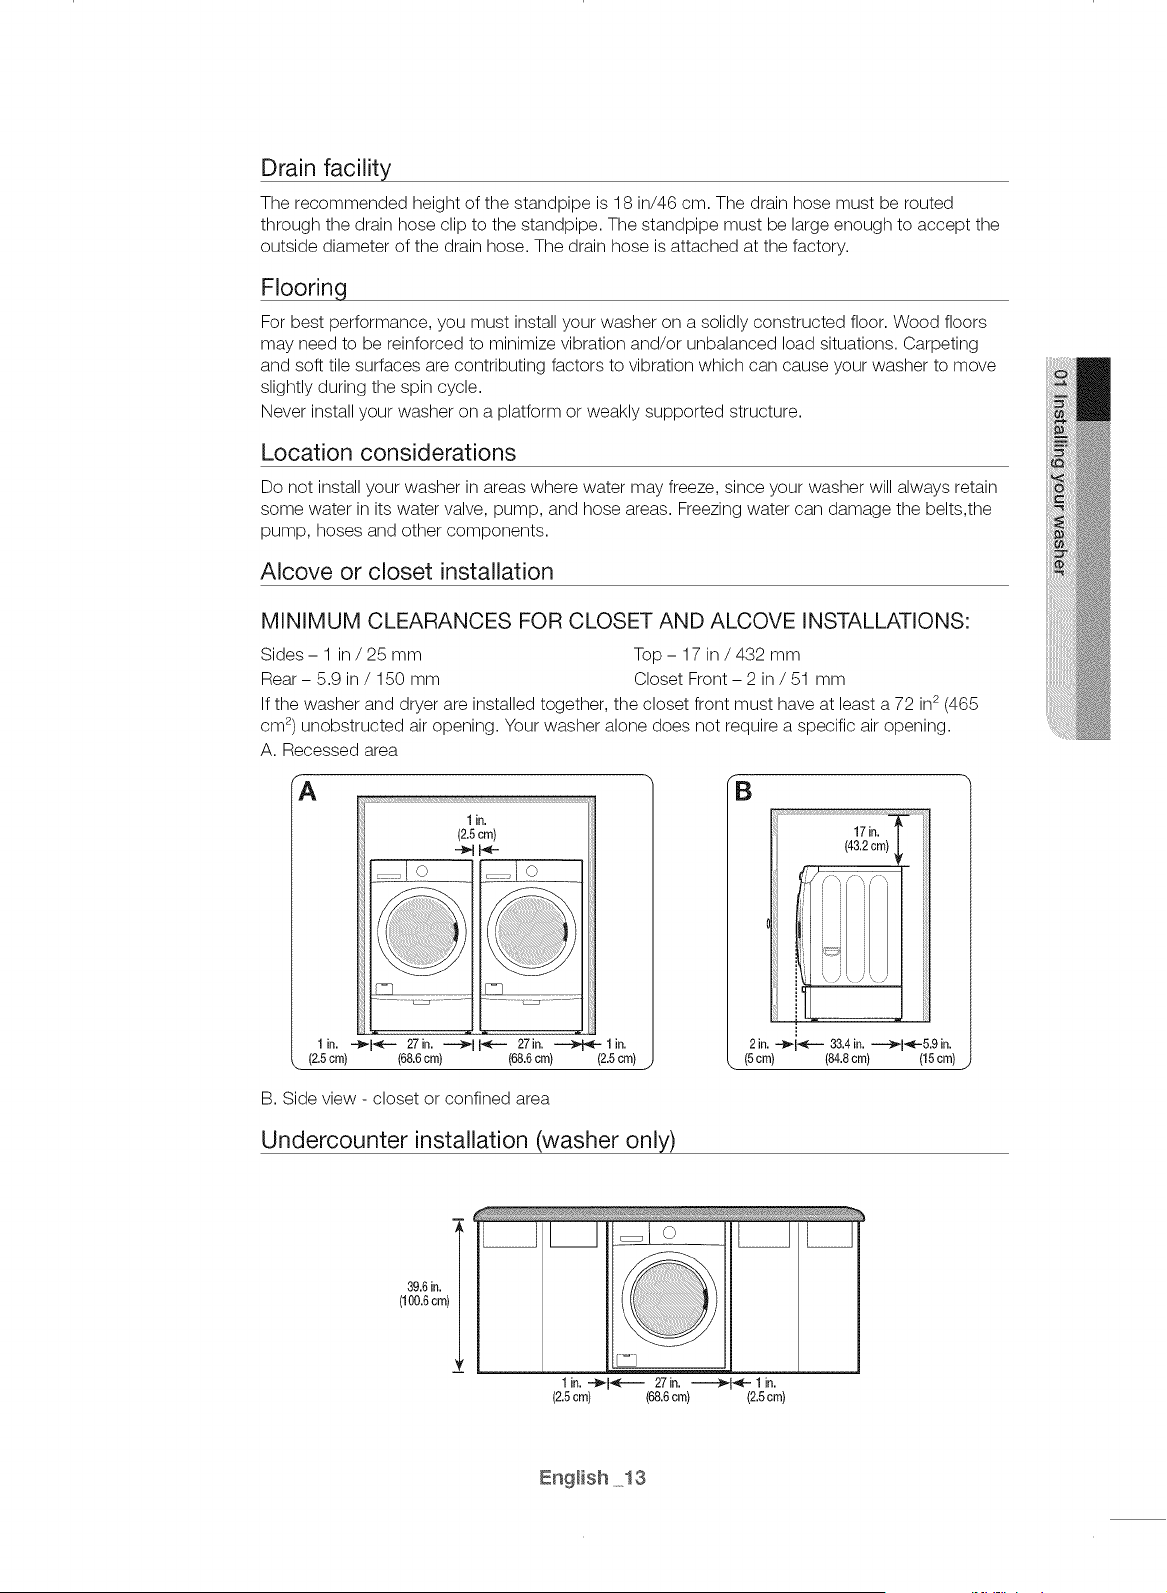
Alcove or closet installation
MINIMUM CLEARANCES FOR CLOSET AND ALCOVE INSTALLATIONS:
Sides - 1 in / 25 mm Top - 17 in / 432 mm
Rear - 5.9 in / 150 mm Closet Front - 2 in / 51 mm
If the washer and dryer are installed together, the closet front must have at least a 72 in2(465
cm 2)unobstructed air opening. Your washer alone does not require a specific air opening.
A. Recessed area
A
1 in,
(2.5cm)
_q rq
1in. ---_-14_- 27 in. ---"-_'1I_" 27in. _ 1 in.
(2.5cm) (68.8cm) (68.6cm) (2.5cm)
B. Side view - closet or confined area
Undercounter installation (washer only)
m
39.6in. _
(100.6 cm)
I in. -..._I_.------ 27 in. ----_I_ ..-I in.
(2.5ore) (68.6cm) (2.5ore)

With optional pedestal base or stacking kit
Required Dimensions for Installation With Pedestal (Model No : WE357"
51.2in.(130cm)to clearopendoor
[_e-5.9in.
(84.8cm) (15cm)
387n:/
(98.4)
......._ .... 53.4in. |
(135.6cm)_
27in.
(68.6cm)
Closetor Door
3 in,
(7.6cm)
3 in,
(7.80m)
-_11_- 5in.
(12.7cm)
1in. -'_1 _'- 83.4in. ---_1 _- 5.9 in.**
(2.5cm) (84.8cm) (15cm) _,
Required Dimensions for Installation With Stacking Kit (Model No : SK-5A)
77.5in.
(197cm)
©
©
* Required spacing
** External exhaust elbow requires
additional space.
IMPORTANT NOTE TO INSTALLER
Please read the following instructions carefully before installing the washer.
These instructions should be retained for future reference.
We recommend you hire a professional to install this washer.
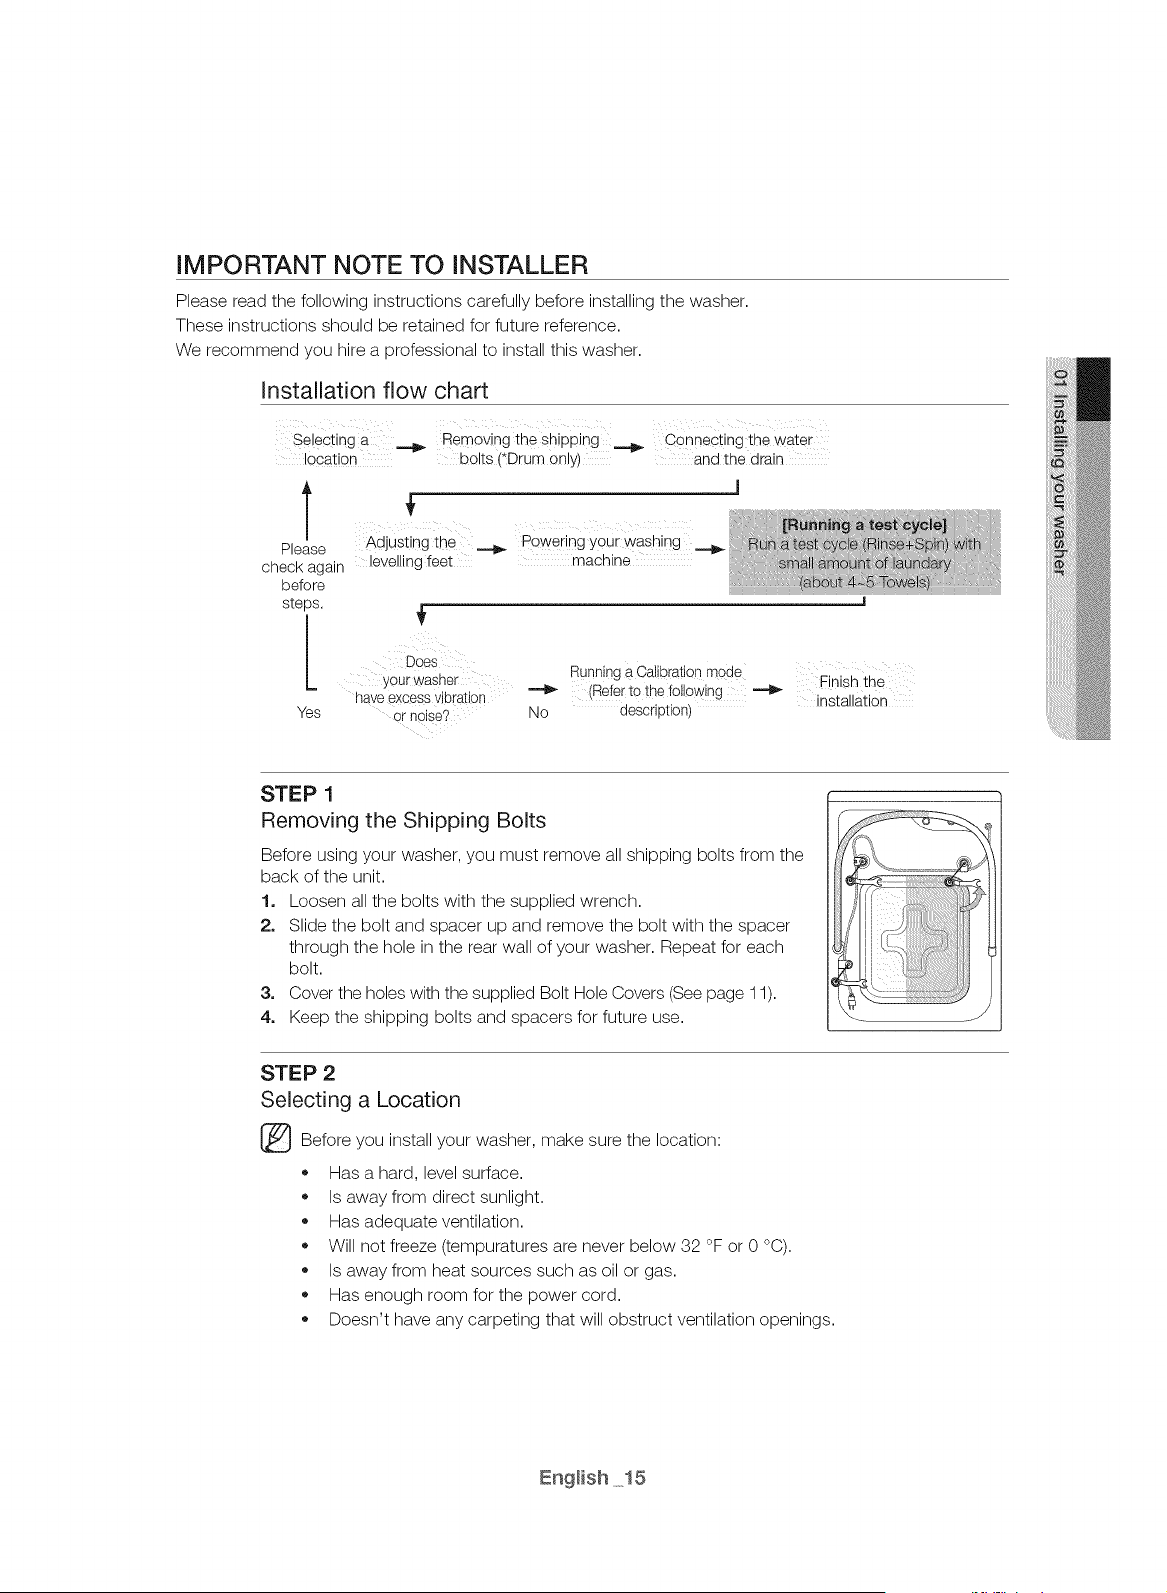
Installation flow chart
Selectinga _ Removingthe shipping _ Connecting thewater
location bolts (*Drumonly) andthe drain
T
i i i ii i ii i
Please Adjusting the _ poweringyour washing
check again levellingfeet machine
before
steps.
[
Yes
DOes
yourwasher
haveexcessvibration
ornoise?
Running a Calibration mode
(RefertOthe following _ Finish the
installation
No description)
STEP 1
Removing the Shipping Bolts
Before using your washer, you must remove all shipping bolts from the
back of the unit.
1, Loosen all the bolts with the supplied wrench.
2, Slide the bolt and spacer up and remove the bolt with the spacer
through the hole in the rear wall of your washer. Repeat for each
bolt.
3, Cover the holes with the supplied Bolt Hole Covers (See page 11).
4, Keep the shipping bolts and spacers for future use.
STEP 2
Selecting a Location
_ Before you install your washer, make sure the location:
Has a hard, level surface.
Is away from direct sunlight.
Has adequate ventilation.
Will not freeze (tempuratures are never below 32 °F or 0 °C).
Is away from heat sources such as oil or gas.
Has enough room for the power cord.
Doesn't have any carpeting that will obstruct ventilation openings.

STEP 3
Installing your Washer
1. If you use a standpipe, make sure the connection
between the drain hose and the standpipe is NOT
airtight. The standpipe must be at least 18 in or 46
cm high.
You must always exercise caution to avoid
collapsing or damaging the drain hose. For best
results, the drain hose should not be restricted
in any way - by elbows, couplings, or excessive
length. For situations where the drain hose cannot
be conveniently elevated to at least 18 in or 46 cm,
the drain hose must be supported.
If drain hose is installed below 18"(46cm), water
can be drained in cycle working cause of siphon
phenomenon. It causes the washer to "4E" error.
_ Drain Hose can be installed until 96"(245cm) maximum.
But drain capability can be reduced at this height.
It causes the washer to have an odor because of
remaining water in the drain system.
_ onnect the hose guide within 6"(15cm) from the end of
the drain hose. If the drain hose is extended more than
6"(15cm) beyond the end of the hose guide, mold or
microorganisms could spread to the inside of the washer.
Laundry tub
Nomorethan!_i I_
6"(15cm)_...._
Hose Guide
Cold
2. Check the inlet hose to ensure a washer is inside each fill hose.
Thread the inlet hoses to the HOT and COLD faucet connections.
On the other end of the hose, check for one rubber washer per hose
and attach each fill hose to the water valve. Make sure the hose with
Hot printed on it is attached to the HOT faucet. Tighten by hand until
snug, then two-thirds of a turn with pliers.
For correct water use, connect both HOT and COLD water valves. If
either or both are not connected, an "4E" (no fill) error can occur.
Standpipe
Hot
Rubber
Washer
3. Turn on the "HOT" and "COLD "water supply and check the water
valve and the water supply connections for leaks.
Cold printed Hot printed
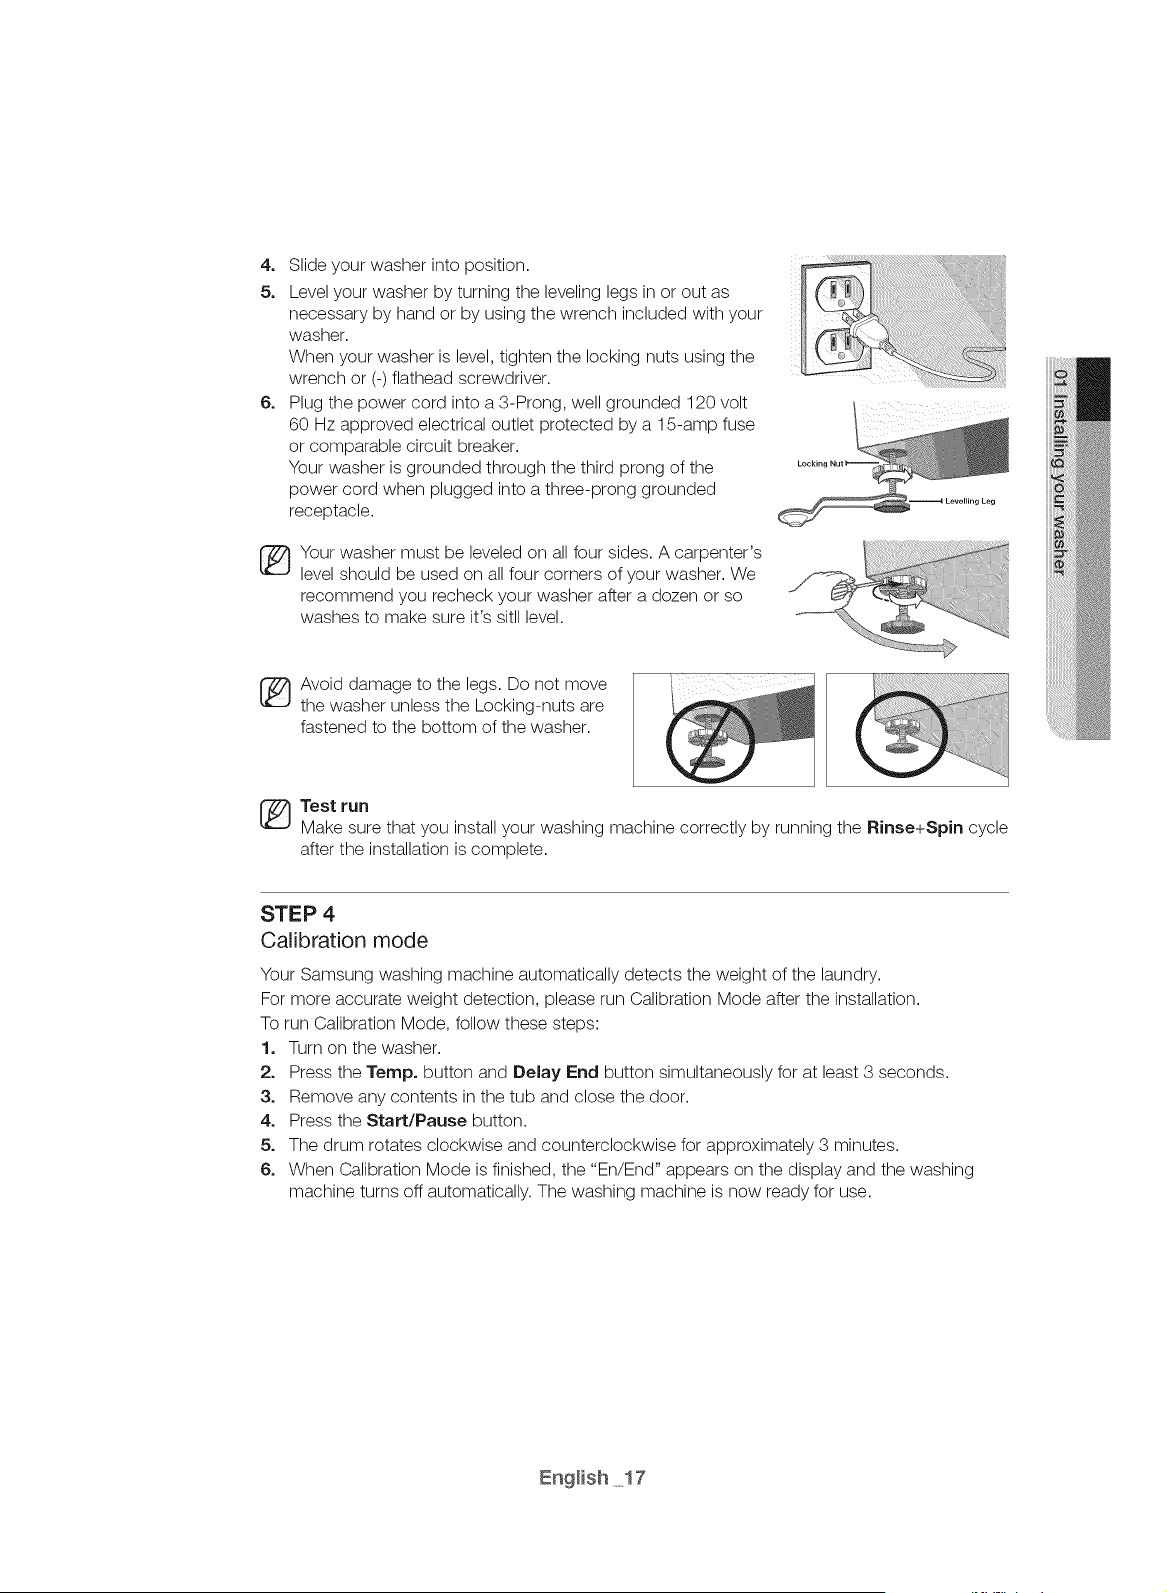
4, Slideyourwasherintoposition.
5, Levelyourwasherbyturningthelevelinglegsinoroutas
necessarybyhandorbyusingthewrenchincludedwithyour
washer.
Whenyourwasherislevel,tightenthelockingnutsusingthe
wrenchor(-)flatheadscrewdriver.
6, Plugthepowercordintoa3-Prong,wellgrounded120volt
60Hzapprovedelectricaloutletprotectedbya15-ampfuse
orcomparablecircuitbreaker.
Yourwasherisgroundedthroughthethirdprongofthe
powercordwhenpluggedintoathree-pronggrounded
receptacle.
Yourwashermustbeleveledonallfoursides.Acarpenter's
levelshouldbeusedonallfourcornersofyourwasher.We
recommendyourecheckyourwasherafteradozenorso
washestomakesureit'ssitlllevel.
_ voiddamagetothelegs.Donotmove
thewasherunlesstheLocking-nutsare
fastenedtothebottomofthewasher.
Test run
Make sure that you install your washing machine correctly by running the Rinse+Spin cycle
after the installation is complete.
STEP 4
Calibration mode
Your Samsung washing machine automatically detects the weight of the laundry.
For more accurate weight detection, please run Calibration Mode after the installation.
To run Calibration Mode, follow these steps:
1. Turn on the washer.
2o Press the Tempo button and Belay End button simultaneously for at least 3 seconds.
3, Remove any contents in the tub and close the door.
4, Press the Start/Pause button.
5, The drum rotates clockwise and counterclockwise for approximately 3 minutes.
6, When Calibration Mode is finished, the "En/End" appears on the display and the washing
machine turns off automatically. The washing machine is now ready for use.
na n tnActon
I
/_To reduce the risk of fire, electric shock, or injury to persons, read the IMPORTANT SAFETY
....... INSTRUCTIONS before operating this appliance.
LOADING YOUR WASHER
,, You can fill the tub with dry, unfolded clothes, but DO NOT OVERLOAD the tub. No more than 3/4 full.
,, Overloading may reduce washing efficiency, cause excess wear, and possibly cause creasing or
wrinkling of the load.
,, Wash delicate items such as bras, hosiery, and other lingerie in the Delicates cycle with similar
lightweight items.
,, When washing big bulky items or a few smaller items that don't fill the tub completely - a rug, a pillow,
stuffed toys, or one or two sweaters, for example - add a few towels to improve tumbling and spin
performance.
_ uring the spin cycle, the washer may add additional water to redistribute the clothes and correct an
inbalance inside the drum.
,, To ensure good cleaning result when washing heavily soiled loads, do not overload your washer.
,, When the "_+" light is ON (see page 22), you can add or remove laundry items during a wash.
1. Press the Start/Pause Button.
2, Wait for the Door Lock light to go out (5 seconds).
3, Add the item, close the door, and press the Start/Pause Button.
After a 10-second pause, the cycle will resume.
_To add items within five minutes of the wash
ensure
thorough cleaning, starting cycle.
WASHING CLOTHES: BASIC INSTRUCTIONS
1. Press the Power button, open the door, and then load the washer.
2, Close the door.
_Push the laundry into the drum completely to prevent the laundry from being caught in the door or
....... from falling out of the drum.
3, Add detergent and additives to the dispenser (see pages 27-28).
4, Select the appropriate cycle and options for the load (see pages 19 -21 and 24).
5, Press the Start/Pause Button.
The drum automatically rotates and measures the weight of the laundry without supplying water in
order to adjust the wash time. (The rotating display on the display panel indicates that the weight of the
laundry is being measured.)
6, The Wash Indicator light will illuminate.
7° The estimated cycle time will appear in the display.
The time may fluctuate to indicate the time remaining in the cycle.
The actual time required for a cycle may differ from the estimated time in the display depending on the
water pressure, water temperature, detergent, and laundry.
8. Before your washer starts to fill, it will make a series of clicking noises to check the door lock and do a
quick drain.
_ hen the cycle is complete, the Door Lock light will go out and "End" will appear in the display.
,, DO NOT attempt to open the door until the Door Lock light is off. To add a forgotten item, see the
"Loading your Washer" section above.
When your washer is restarted after a pause, expect a delay of up to 15 seconds before the cycle
continues.
,, Pressing the Power button cancels the cycle and stops your washer.
,, The Pre Wash, Wash, Rinse, and Spin indicator lights will illuminate during those portions of the
cycle.
ADo not place anything on top of your washer while it is running.
WARNING

HEAVYDUTY 'XNORMAL ECOCOLD
....
SANITIZE PERM PRESS
ALLERG£ OELICATES
[] Steam Cycles_
HEAVY DUTY \ NORMAL / 0UICK WASH
\
SANITIZE PERM PRESS
ALLERGE ELICATES
[] Steam Cycles _.Z_ _
@
]i _ iI ......
i_ow ER
@ @ @ @ @ © ®
Select the appropriate cycle for the type of load.
This will determine the tumble pattern and spin speed for the cycle.
To minimize wrinkling of laundry, select the Perm Press cycle.
HEAVY DUTY - For sturdy, colorfast fabrics and heavily soiled garments.
BEDDING - For bulky items such as blankets, comforters and sheets. When
you are washing bulky items, use liquid detergent.
SANITIZE - For heavily soiled, colorfast garments. This cycle heats the water
to 150 °F to eliminate bacteria.
If you select pause during the heating portion of the Sanitize Cycle, your
Washer door will remain locked for your safety.
When selecting this cycle, the water heats to an extra high temperature
to remove 99.9% of certain bacteria typically found on clothing, bedding,
or towels. This certification is conducted by NSF International, an
independent third-party testing and certification organization.
Please check the garment care label to avoid garment damage. Only
sanitizing cycles have been designed to meet the requirements of this
protocol for sanitization efficacy.
_S_ [ NSF Protocol P172
Sanitization Performance of Residential and
Commercial, Family-Sized Clothes Washers
ALLERGEN - This course is applied to remove dust mites, pet dander or
other allergic substances of the fabric.
Only ALLERGEN cycle has been designed to meet the requirement of
P351 for allergen reduction efficacy.
_ [ NSF Protocol P351
Allergen Reduction Performance of Residential and
Commercial,Family-Sized Clothes Washers

iiiiiiiiiiiiiiiiiiiiiiiiiiiiiiiiiiiiiiiiiiiiiiiiiiiiiiiiiiiiiiiiiiiiiiiiiiiiiiiiiiiiiiiiiiiiiiiiiiiiiiiiiiiiiiiiiiiiiiiiiiiiiiiiiiiiiiiiiiiiiii
iiiiiiiiiiiiiiiiiiiiiiiiiiiiiiiiiiiiiiiiiiiiiiiiiiiiiiiiiiiiiiiiiiiiiiiiiiiiiiiiiiiiiiiiiiiiiiiiiiiiiiiiiiiiiiiiiiiiiiiiiiiiiiiiiiiiiiiiiiiiiii
iiiiiiiiiiiiiiiiiiiiiiiiiiiiiiiiiiiiiiiiiiiiiiiiiiiiiiiiiiiiiiiiiiiiiiiiiiiiiiiiiiiiiiiiiiiiiiiiiiiiiiiiiiiiiiiiiiiiiiiiiiiiiiiiiiiiiiiiiiiiiii
R_NSE + SPIN - Use for loads that need rinsing only or to add rinse-added
fabric softener to a load.
NORMAL - For most fabrics including cottons, linens, and normally soiled
garments.
ECO COLD - It provides useful daily care for normally and lightly soiled
laundry by using only cold water, saving energy and caring fabric.(Only for
WF42 H5500A*)
QUICK WASH - For lightly soiled garments needed quickly.
TOWELS - For bath towels, washcloths, and mats.(Only for WF42H5400A*)
PERM PRESS - For wash-and-wear, synthetic fabrics, and lightly to normally
soiled garments.
DEMCATES - For sheer fabrics, bras, lingerie silk, and other handwash-only
fabrics. For best results, use liquid detergent.
ACTIVE WEAR - Use this cycle to wash exercise wear such as sports
jerseys, training pants, shirts/tops and other performance clothing. This cycle
provides effective soil removal with gentle action for special fabric care.
The large Digital Display is easy to use. It provides instructions and
diagnostics while keeping you updated on the cycle status and time
remaining.
Press the button repeatedly to cycle through the different water temperature
options.
Extra Hot - Heavily soiled, colorfast items. Only available with the Sanitize
cycle.
Hot - Whites and heavily soiled, colorfast items.
Warm - Colorfast items. When warm rinse is selected, only the final rinse will
be warm.
The other rinses will be cold to conserve energy.
Eco Warm - Moderately soiled, colorfast items; most wrinkle-free items.
Cold - Brightly colored, very lightly soiled items.
Press the button repeatedly to cycle through the different spin speed options.
(Rins hold (AllLamp Turn Off)---) No Spin ---) Low ---)Medium ---)High ---) Extra
High)
Extra High - Removes more water from loads during spin.
To minimize wrinkling of wrinkle-free and no-iron fabrics, DO NOT use
the Extra High spin option for these loads, nor overload your Washer.
High - Use for underwear, t-shirts, jeans and sturdy cottons.
Medium - Use for jeans, wrinkle-free or wash-and-wear items and synthetics.
Low - Use for delicate items needing a slow spin speed.
No Spin - Drains your Washer without spinning. Use for extremely delicate
items that cannot tolerate any spin.
Rinse Hold (AllLamp Turn Off) - The laundry remains soaking in the final rinse
water. Either a drain or spin cycle must be performed to unload the laundry.
Press the button to select the soil level/washing time.
(Light --_V ---)Normal ---)/_ --_ Heavy)
Heavy - For heavily soiled loads.
A
Normal - For moderately soiled loads. This setting is best for most loads.
V
Light - For lightly soiled loads.
Press these buttons to select different cycle options.
Pre Wash - To use this feature, add detergent to the pre wash section of the
detergent compartment. When turned on, the washer fills with cold water and
detergent, tumbles, then drains and advances to the selected wash cycle.
Some cycles cannot be selected with this option (See page 27-28).
Extra Rinse - Add an additional rinse at the end of the cycle to remove
laundry additives and perfumes more thoroughly.

ExtraSpin-Addadditionaltimetoremovemorewaterfromloads.
Steam- PressthisbuttontousetheSteamWashfunction.SteamWashis
availablewiththeNormal,HeavyDuty,Bedding,Sanitize,DeepSteamand
Allergencycles.Forheavilysoiled,colorfastgarments,SteamWashimproves
staintreatmentanduseslesswater(Seepage25).
Sound-WhenyouactivateSoundofffunction,the"_" lampilluminates.
(OnlyforWF42H5500A*)
MyCycle-Chooseyourfavoritecycleincludingtemperature,spin,soillevel,
options,etc.(seepage23)
DelayEnd-Anycyclecanbedelayedforupto24hoursinone-hour
increments.Displayedhourindicatesthetimeatwhichthewashwillbe
started.(Seepage22).
SelfClean+- Usetocleandirtandmoldfromthedrum.Regularuse(after
every40washes)isrecommended.Nodetergentorbleachisneeded(see
page31).
SuperSpeed- Pressthisbuttonifyouneedtoshortenthewashingtime,
applicableforNormal,Deepsteam,HeavyDuty,BeddingorAllergencourse.
TheshortenedtimemaydifferdependingontheCourse/Load/Option.(Only
forWF42H5400A*)
Presstopauseandrestartprograms.
Pressoncetoturnyourwasheron,pressagaintoturnyourwasheroff.If
thewasherisleftonformorethan10minuteswithoutanybuttonsbeing
touched,thepowerautomaticallyturnsoff.
Child Lock
Child Lock prevents children from playing with your washer.
Once you have activated the Child Lock function, the control panel cannot be activated,
preventing children from playing with the washer.
Activating the Child Lock function
Press and hold both the Soil Level and Spin buttons simultaneously for 3 seconds.
• When you activate the Child Lock function, the door locks and the "Child Lock _" lamp
illuminates.
If you press the START/PAUSE button after you have activated the Child Lock function, none of
the buttons will work except for the POWER button.
If you press a button when the buttons are locked, the "Child Lock _" lamp blinks.
Pausing the Child Lock function
When the door is locked or the buttons are locked by the Child Lock function, you can pause the
Child Lock operation for 1 minute by pressing and holding both the Soil Level and Spin buttons
simultaneously for 3 seconds.
If you pause the Child Lock mode temporarily, the door lock is released for 1 minute for user
convenience. During this period, the "Child Lock _" lamp blinks.
If you open the door after the minute is over, an alarm sounds for up to 2 minutes.
If you close the door within the 2 minutes, the door is locked and the Child Lock function is
reactivated. If you close the door after the 2 minutes, the door is not locked automatically and
no alarm sounds.
Deactivating the Child Lock function
Pressand hold both the Soil Level and Spin buttons simultaneouslyfor approximately 6 seconds,
• When you deactivate the Child Lock function, the door is unlocked and the "Child Lock 6" is turned off.
//_o The Child Lock function prevents children or the infirmfrom accidently operatingthe washer and
....... injuring themselves,
If a child entersthe washing machine, the child may become trapped and suffocate,
Once you haveactivated the Child Lock function, it continues working even if the power is turned
off,
Openingthe door by force can result in injury due to damage to the product.
z_To add laundryafter you have activatedthe Child Lockfunction, you must first pause or deactivate the
....... Child Lock function.
lf you want to open the door of the washing machine when the Child Lock function is activated:
Pause or deactivatethe Child Lock function.
Turnthe washing machineoff and then on again.
Spin Only
If you press the POWER button and then press and hold the Spin button for 3 seconds, the
spin time will be displayed on the display panel.
Then, press the Spin button repeatedly until the required spin level is selected, and then press
the START/PAUSE button.
_ Before pressing the Spin Only button to use the Spin Only function, you can select a cycle
with the Cycle Selector. If you have selected a cycle, you can only select the spin level
corresponding to the selected cycle.
Garment+ _+
You can add or take out laundry items even after the wash has started, as long as the "_++" light
is on. Pushing the START/PAUSE button unlocks the door, unless the water is too hot or if there
is too much water in your washer. If you are able to unlock the door and wish to continue the
wash cycle, close the door, and then press the START/PAUSE button.
Delay End
You can set the washing machineto start your wash automaticallyat a latertime, choosing a delay time.
The hour displayed indicatesthe time at which the wash will be started.
1. Set your wash cycle.
2. Pressthe Belay End button repeatedlyuntil the delaytime is set.
3. Pressthe START/PAUSE button, The "Delay EndQ" indicator will be lit, and the clock will begin
counting down until it reachesthe set time,
4. Tocancel a Delay Endfunction, press the POWER button and then turn the washing machine on
again.
Sound
The Sound Off function can be selected during all cycle.

My Cycle
Lets you save a custom wash cycle (temperature, spin, soil level, etc.) and then recall and use it
with one button convenience.
To save a cycle and selected options as your My Cycle, follow these steps:
1. Select the cycle using the Cycle Selector dial.
2. After cycle selection, set each option.
_See 39 for available with each
page
option settings cycle.
3. You can then store the selected cycle and options by pressing and holding the My Cycle
button for longer than 3 seconds. The cycle and options you select will be displayed the next
time you choose the My Cycle function.
4. Press the My Cycle button to load and use the saved My Cycle options. The "My Cycle" light
will indicate activation. Also, the chosen cycle and option lights will flicker.
You can change the "My Cycle" settings by repeating the process above.
The washer displays the last settings used the next time you choose "My Cycle".
lf you press My Cycle and release it within 3 seconds, the previously saved cycle and
options appear. If you press and hold My Cycle for 3 second or longer, the currently set
cycle and options are saved and the LED blinks for 3 seconds.
Smart Care
This function enables you to check the status of the washing machine using a smartphone.
1. To enable the Smart Care function, press and hold the WF42H5500A* model press and hold
the Sound button; WF42H5400A* model Press the Super
Speed button for 3 seconds within 10seconds after turning
the power on by pressing the Power button.
2. If the Smart Care function is activated, the LED on the
window display rotates for 2 or 3 seconds and then the
Smart Care indicator is lit on the display. ................................... ........
3. Run the Smart Care app on your smart phone. _.... ....,_ ......, ........... ,
4. The Smart Care function is optimized with Galaxy and iPhone , ,:- *"'_"_"
Series.
5. Focus your smart phone's camera on the display panel of
the washing machine.
6. If the smart phone's camera is focused on the display ............................
panel of the washing machine, the panel and error .........[....................
message is automatically recognized and the error type ................................... ...........
and countermeasures are displayed on the smart phone. ........ ...... ....... ..........;...............
7. If the smartphone fails to recognize the error code more
than twice, please enter the error code displayed on the
display panel of the washer manually into the Smart Care app.
_ Downloading the Smart Care
app
• Download the Samsung Laundry App into your mobile phone from the Android market
or Apple App store. (Search word : Samsung Smart Washer/Dryer}
_ Precautions when Smart Care
using
• If a lighting device (e.g. fluorescent or lamp) is reflected on the display panel of the
washing machine, the result on the display panel may not be recognized easily.
• If an error occurs more than twice, please manually enter the error code displayed on the
display panel of the washing machine into the Smart Care app.
• If the angle of the smartphone camera and the display panel of the washing machine is
incorrect, the error may not be recognized properly.
Please try to hold the smart phone at an angle to the display panel as shown by the
figure.

Washing clothes using the cycle selector
Your new washing machine makes washing clothes easy, using Samsung's "Fuzzy Control"
automatic control system. When you select a wash program, the machine will set the correct
temperature, washing time, and washing speed.
1. Turn on your sink's water tap.
2. Press the Power button.
3. Open the door.
4. Load the articles of clothing one at a time loosely into the drum, without overfilling it.
5. Close the door.
6. Add detergent, softener, and pre-wash detergent (if necessary) into the appropriate
compartments.
Pre-wash is only available when selecting the Normal Deep Steam, Heavy Duty, Bedding,
Sanitize, Allergen, Active Wear, Perm Press, Towels [unly for WF42H5400A* model), Eco
Cold (Only for WF42H5500A* model) cycles. It is only necessary if your clothing is heavily
soiled.
7. Use the Cycle Selector to select the appropriate cycle according to the type of material:
NORMAL, HEAVY DUTY, BEDDING, SANITIZE, ALLERGEN, RINSE+SPIN, ECO COLD (Only
for WF42H5500A* model),QUICK WASH, TOWELS (Only for WF42H5400A* model),PERM
PRESS, DELICATES, ACTIVE WEAR. The relevant indicators will illuminate on the control
panel.
8. At this time, you can control the wash temperature, the number of rinse cycles, the spinning
speed, and the delay time by pressing the appropriate option button.
9. Press the Start/Pause button on the Cycle Selector and the wash will begin. The process
indicator will light up and the remaining time for the cycle will appear in the display.
Pause Option
1. Within 5 minutes of starting a wash, it is possible to add/remove laundry items to/from the
wash.
2. Press the Start/Pause button to unlock the door.
3. The door cannot be opened when the water is too HOT or the water level is too HIGH.
4. After closing the door, press the Start/Pause button to restart the wash.
When the cycle is finished:
After the total cycle has finished, the power will turn off automatically.
1. Open the door.
2. Remove laundry.

USING STEAM WASH
If you select steam, the steam acts at the most effective times for the detected amount of laundry,
maximizing the effect of the steam, increasing the wash temperature, enhancing the Soak effect, and
improving wash performance.
1. Load the washer.
2. Press the Power button.
3. Turn the Cycle Selector and select a Steam Cycle. (The Deep Steam cycle automatically selects
Steam.)
4. Press the Steam button.
5. Add detergent to the dispenser tray and add fabric softener up to the marked line.
6. Press the Start/Pause button.
: The washer automatically selects the optimal wash conditions by sensing the weight of the laundry.
_ team may not necessarily be visible during the steam cycles. Steam may not be present during the
entire steam wash cycle.
ATC (AUTO TEMPERATURE CONTROL)
ATC is the control function that the washer controls water temperaturewith temperaturesensor (thermistor).
_ ecause there are numerous water temperatures depending on the customer's environments (cold
areas, warm areas, various water temperature, settings of heater temperature, ete), ATC function in
our washer maintains the certain level of wash temperature to output the best washing performance at
each cycle.
lf you select normal & heavy duty cycle, those courses are the regulation and UL cycle. Since new
washer must reduce the amount of energy usage at first priority, customer will notice more cold water
entering the washer. But This is Normal, not a problem.
In those regulation cycle, Hot temperature is similar to acceptable adult bath-water temperature and
_warm temperature is similar to comfortable swimming-pool water temperature.
If customer want to wash clothes in specific water temperature, customer should choose a different
cycle at each temperature (Hot/Warm/Eco Warm).

DETERGENT USE
Your Washer is designed to use high efficiency (HE) detergents.
,, For best cleaning results, use a high efficiency detergent such as
Tide HE, Wisk HE, Cheer HE, or Gain HE*. High efficiency detergents
contain suds suppressors that reduce or eliminate suds. When fewer
suds are produced, the load tumbles more efficiently and cleaning is
maximized.
/_ Regular detergent is NOT recommended. Please use HE detergents
wAR'--"_,,,only.
_ educing the amount of detergent may reduce the quality of cleaning. It is important to pre-treat
stains, sort carefully by color and soil level, and avoid overloading.
* Brand names are trademarks of their respective manufacturers.
FEATURES
Automatic dispenser
Your washer has separate compartments for dispensing
detergent and color-safe bleach, chlorine bleach, and
fabric softener. Add all laundry additives to their respective
compartments before starting your washer.
The automatic dispenser MUST ALWAYS be in place before
you start your washer.
DO NOT open the automatic dispenser when your washer is
running.
Usage Pointers:
,, Never exceed the manufacturer's recommendations when
adding detergent.
,, This compartment holds liquid detergent for the main wash
cycle, which the washer adds to the load at the beginning
of the cycle.
_ efore using powdered detergent, remove the Liquid
Detergent holder from the compartment. Powdered
detergent will not dispense from the Liquid Detergent
holder.
----q Liquid Detergent
---q Pre wash
compartment
Detergent compartment
,, Pour the recommended amount of laundry detergent directly into the detergent compartment
before starting your washer.
Pre wash compartment
When using the Pre Wash option, add detergent to both the Pre Wash compartment and the
detergent compartment. The washer will automatically dispense the detergent during Pre Wash.
If you use a high efficiency (HE) detergent, add 1/3 of the recommended amount to the Pre
Wash compartment and 2/3 of the recommended amount to the detergent compartment.
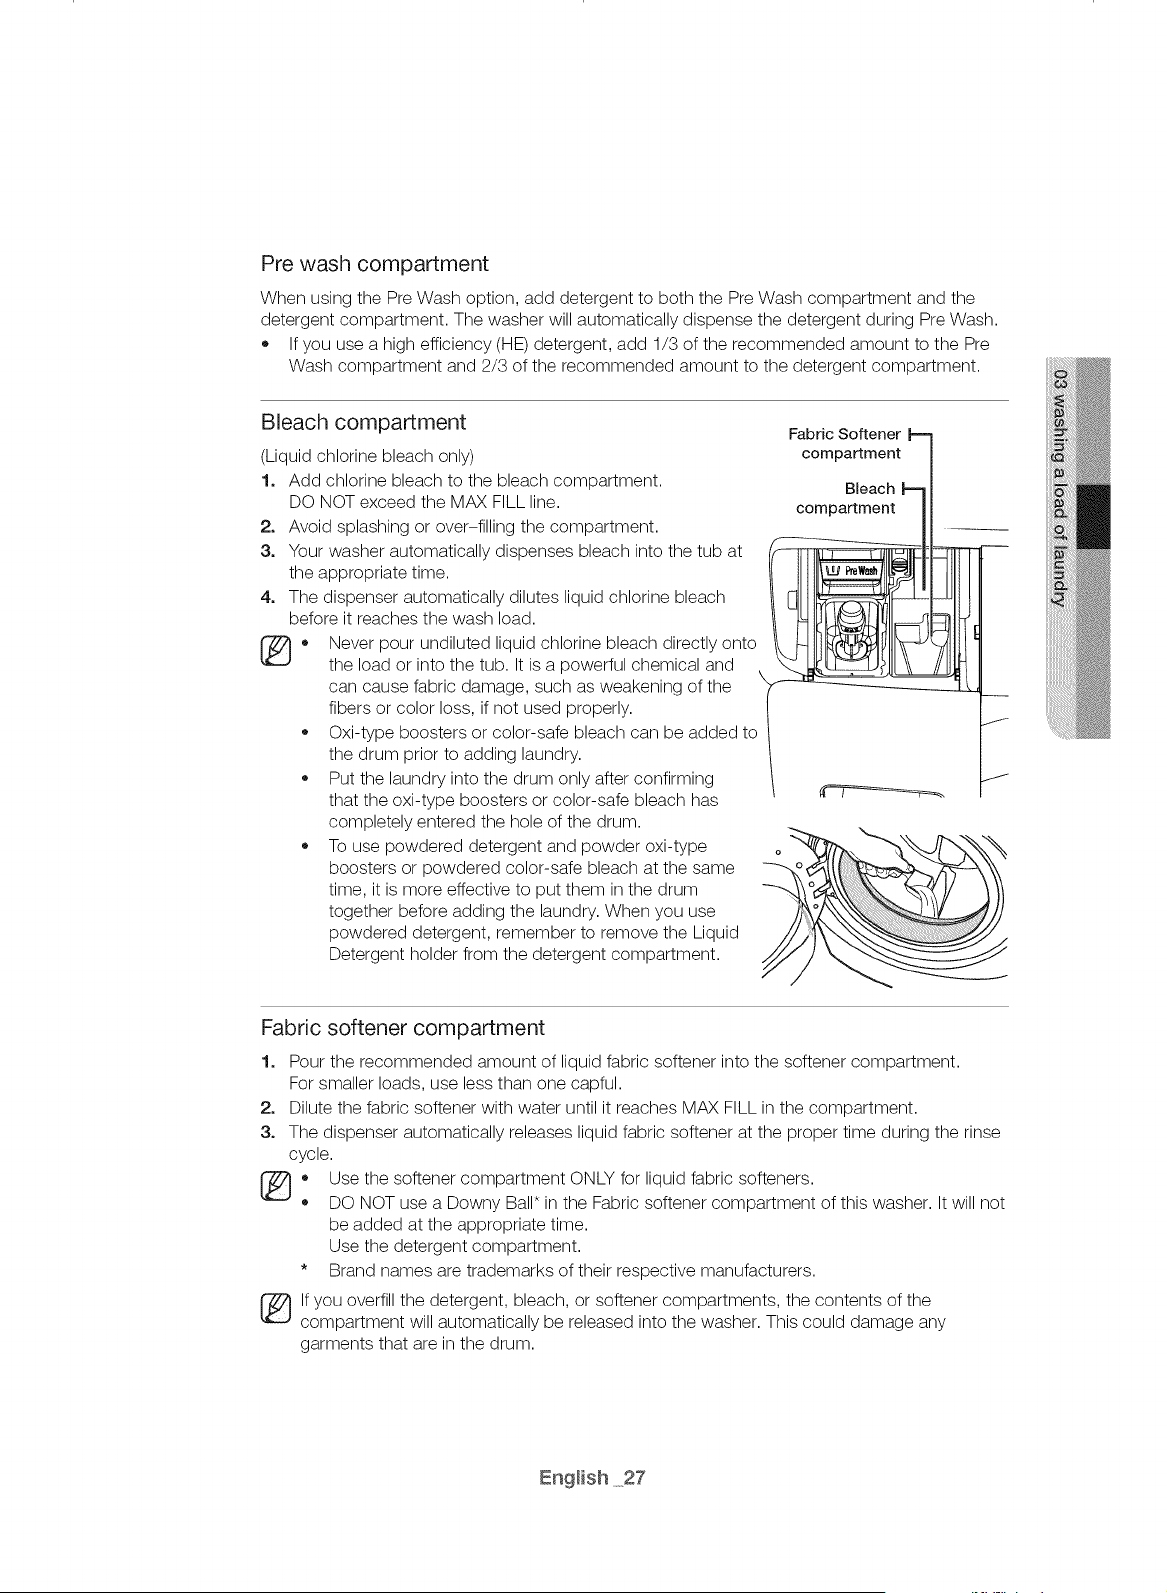
Bleach compartment
(Liquid chlorine bleach only)
1. Add chlorine bleach to the bleach compartment.
DO NOT exceed the MAX FILL line.
2. Avoid splashing or over-filling the compartment.
3. Your washer automatically dispenses bleach into the tub at
the appropriate time.
4. The dispenser automatically dilutes liquid chlorine bleach
before it reaches the wash load.
_* Never pour undiluted liquid chlorine bleach directly onto
the load or into the tub. It is a powerful chemical and
\
can cause fabric damage, such as weakening of the
fibers or color loss, if not used properly.
Oxi-type boosters or color-safe bleach can be added to
the drum prior to adding laundry.
Put the laundry into the drum only after confirming
that the oxi-type boosters or color-safe bleach has
completely entered the hole of the drum.
To use powdered detergent and powder oxi-type
boosters or powdered color-safe bleach at the same
time, it is more effective to put them in the drum
together before adding the laundry. When you use
powdered detergent, remember to remove the Liquid
Detergent holder from the detergent compartment.
Fabric Softener
compartment
Bleach
compartment
I
J
Fabric softener compartment
1. Pour the recommended amount of liquid fabric softener into the softener compartment.
For smaller loads, use less than one capful.
2. Dilute the fabric softener with water until it reaches MAX FILL in the compartment.
3. The dispenser automatically releases liquid fabric softener at the proper time during the rinse
cycle.
_ se the softener compartment ONLY for liquid fabric softeners.
DO NOT use a Downy Ball* in the Fabric softener compartment of this washer. It will not
be added at the appropriate time.
Use the detergent compartment.
* Brand names are trademarks of their respective manufacturers.
lf you overfill the detergent, bleach, or softener compartments, the contents of the
compartment will automatically be released into the washer. This could damage any
garments that are in the drum.
CLEANING THE EXTERIOR
Turn off the water faucets after finishing the day's washing.
This will shut off the water supply to your washer and prevent the unlikely possibility of damage from
escaping water. Leave the door open to allow the inside of your washer to dry out.
Use a soft cloth to wipe up all detergent, bleach or other spills as they occur.
Clean the following as recommended below:
Control Panel - Clean with a soft, damp cloth. Do not use abrasive powders or cleaning pads. Do not spray
cleaners directly on the panel.
Cabinet - Clean with soap and water.
CLEANING THE INTERIOR
Clean the interior of your washer periodically to remove any dirt, soil, odor, mold, mildew, or bacterial
residue that may remain in your washer as a result of washing clothes.
Failure to follow these instructions may result in unpleasant conditions, including odors and/or permanent
stains on your washer or laundry.
Hard water deposits may be removed, if needed. Use a cleaner labeled "Washer safe".
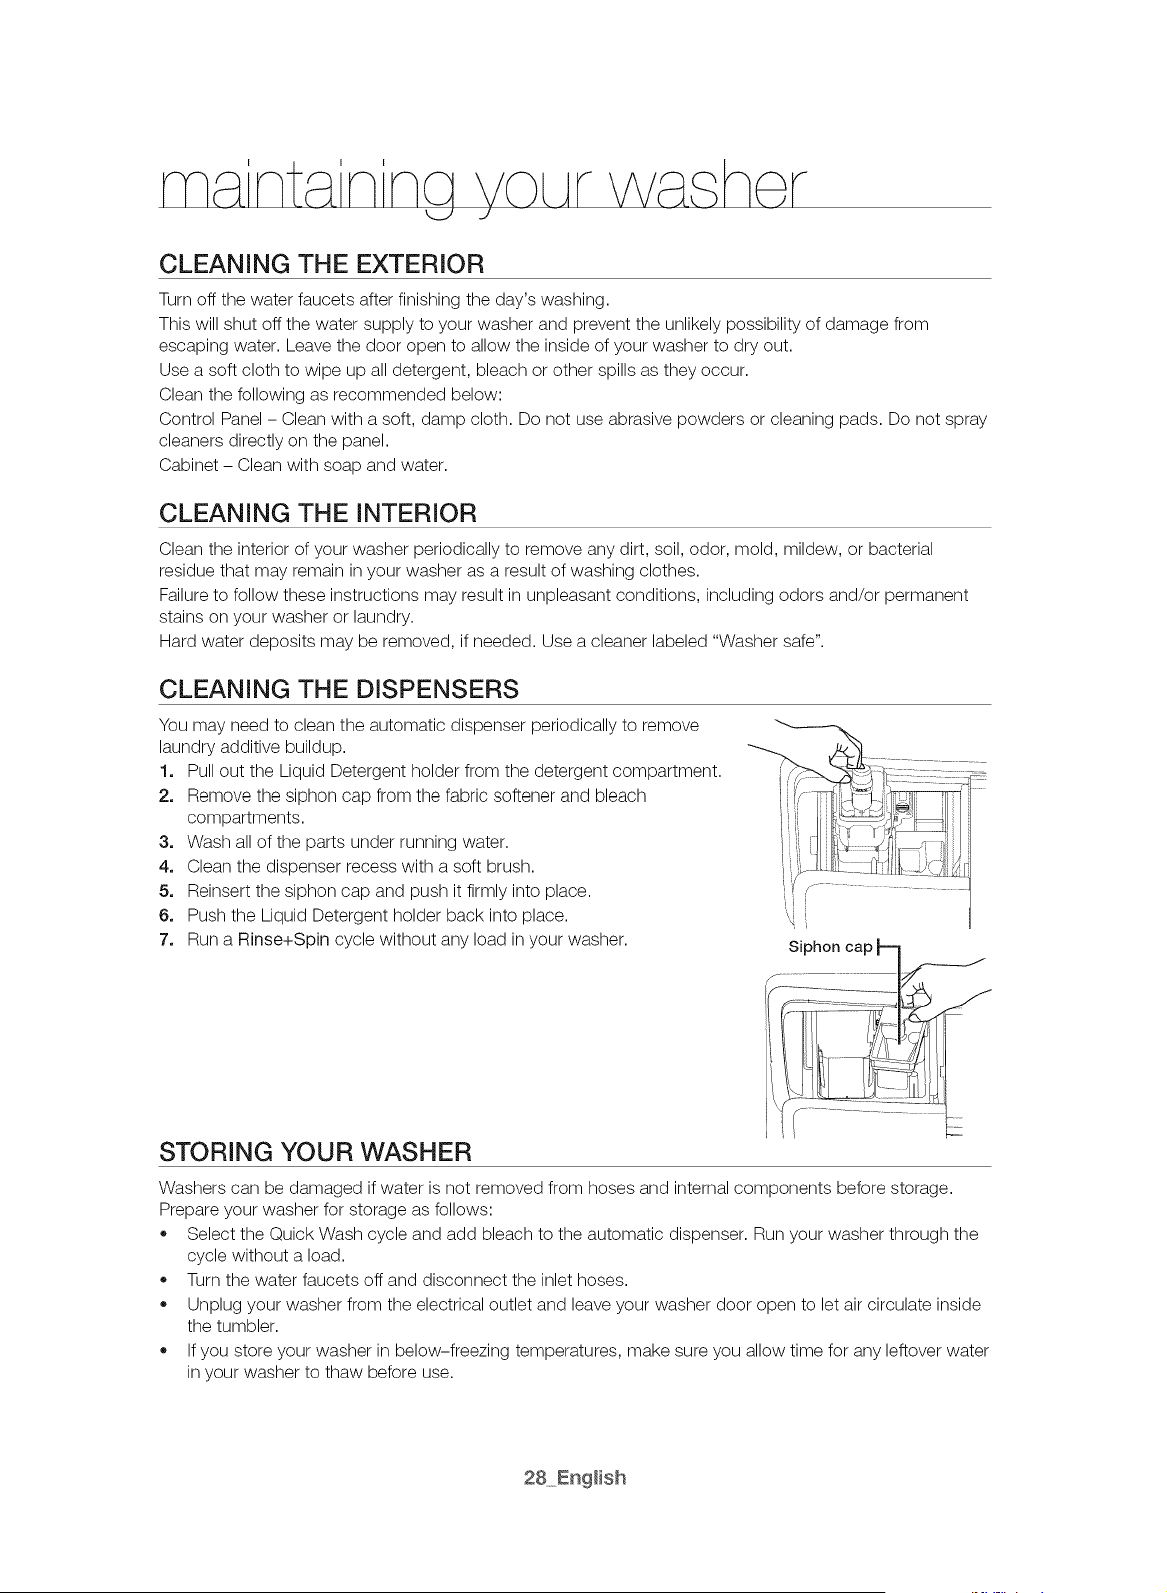
CLEANING THE DISPENSERS
You may need to clean the automatic dispenser periodically to remove
laundry additive buildup.
1. Pull out the Liquid Detergent holder from the detergent compartment.
2. Remove the siphon cap from the fabric softener and bleach
compartments.
3. Wash all of the parts under running water.
4. Clean the dispenser recess with a soft brush.
5. Reinsert the siphon cap and push it firmly into place.
6. Push the Liquid Detergent holder back into place.
7. Run a Rinse+Spin cycle without any load in your washer.
i
STORING YOUR WASHER
Washers can be damaged if water is not removed from hoses and internal components before storage.
Prepare your washer for storage as follows:
,, Select the Quick Wash cycle and add bleach to the automatic dispenser. Run your washer through the
cycle without a load.
,, Turn the water faucets off and disconnect the inlet hoses.
* Unplug your washer from the electrical outlet and leave your washer door open to let air circulate inside
the tumbler.
* If you store your washer in below-freezing temperatures, make sure you allow time for any leftover water
in your washer to thaw before use.
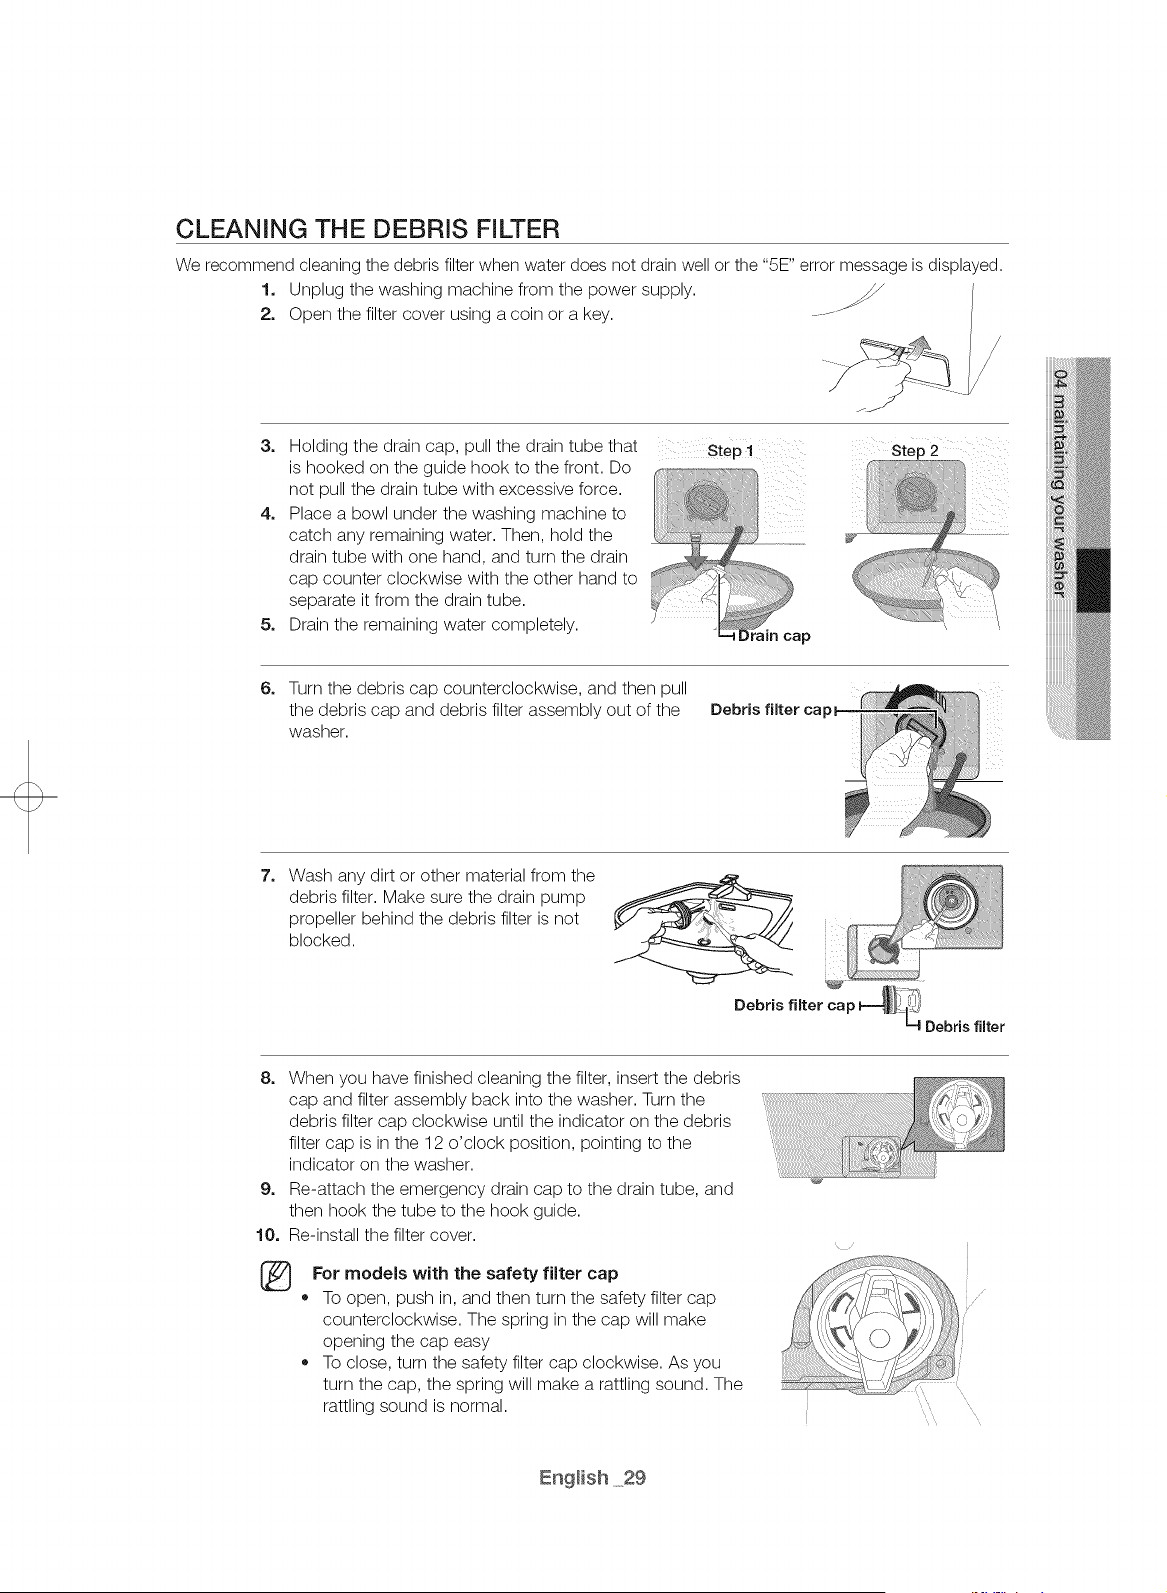
CLEANING THE DEBRIS FILTER
We recommend cleaning the debris filter when water does not drain well or the "5E" error message is displayed.
1. Unplug the washing machine from the power supply.
2. Open the filter cover using a coin or a key. J
3. Holding the drain cap, pull the drain tube that step!
is hooked on the guide hook to the front. Do
not pull the drain tube with excessive force.
4. Place a bowl under the washing machine to
catch any remaining water. Then, hold the
drain tube with one hand, and turn the drain
cap counter clockwise with the other hand to
separate it from the drain tube.
5. Drain the remaining water completely.
6_
Turn the debris cap counterclockwise, and then pull
the debris cap and debris filter assembly out of the Debris filter capl
washer.
7_
Wash any dirt or other material from the
debris filter. Make sure the drain pump
propeller behind the debris filter is not
blocked.
Debris filter c_p _ Debrisfilter
8. When you have finished cleaning the filter, insert the debris
cap and filter assembly back into the washer. Turn the
debris filter cap clockwise until the indicator on the debris
filter cap is in the 12 o'clock position, pointing to the
indicator on the washer.
9. Re-attach the emergency drain cap to the drain tube, and
then hook the tube to the hook guide.
10. Re-install the filter cover.
®
For models with the safety filter cap
,, To open, push in, and then turn the safety filter cad
counterclockwise. The spring in the cap w maKe
opening the cap easy
,, To close, turn the safety filter cap ClOCKWISe.AS jou
turn the cap, the spring will make a rattling sound The
rattling sound is normal.
CLEANING THE DOOR DIAPHRAGM
1. Open the washer door and remove any clothing or items from the washer.
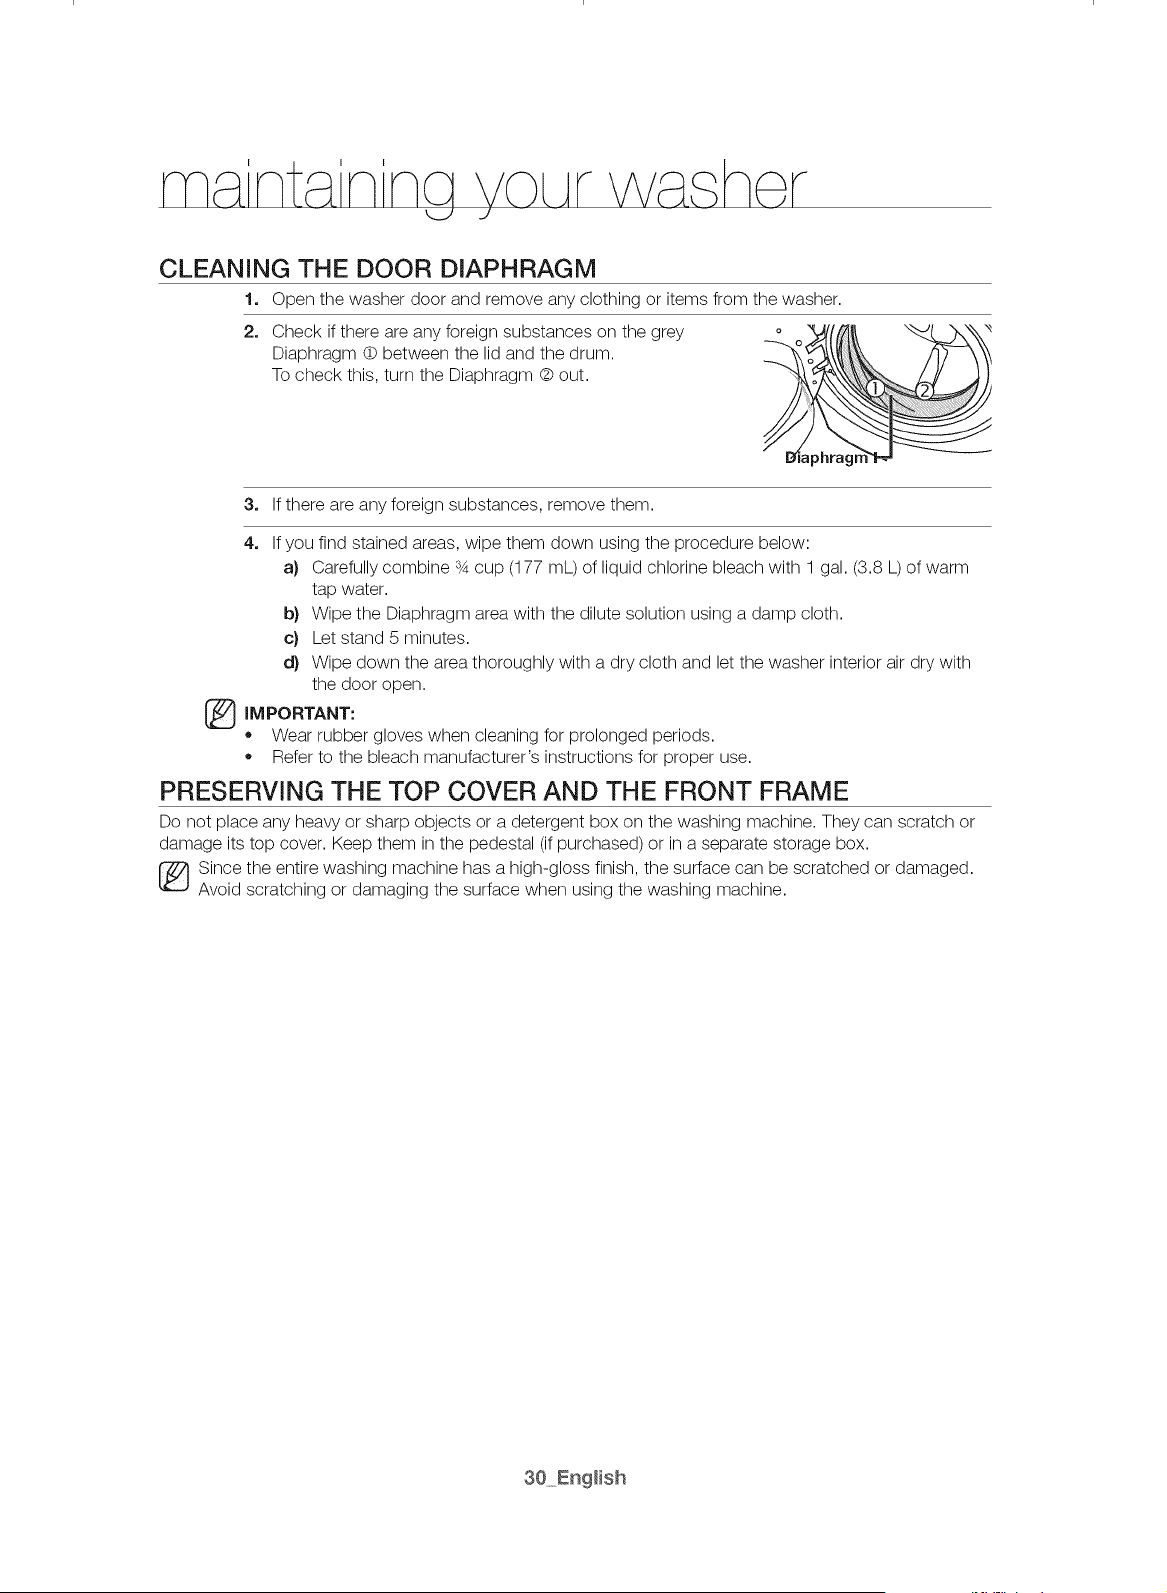
2. Check if there are any foreign substances on the grey
Diaphragm @ between the lid and the drum.
To check this, turn the Diaphragm @out.
3. If there are any foreign substances, remove them.
4, If you find stained areas, wipe them down using the procedure below:
a} Carefully combine s4cup (177 mL) of liquid chlorine bleach with 1 gal. (3.8 L) of warm
tap water.
b} Wipe the Diaphragm area with the dilute solution using a damp cloth.
c) Let stand 5 minutes.
d} Wipe down the area thoroughly with a dry cloth and let the washer interior air dry with
the door open.
IMPORTANT:
Wear rubber gloves when cleaning for prolonged periods.
Refer to the bleach manufacturer's instructions for proper use.
PRESERVING THE TOP COVER AND THE FRONT FRAME
Do not place any heavy or sharp objects or a detergent box on the washing machine. They can scratch or
damage its top cover. Keep them in the pedestal (if purchased) or in a separate storage box.
_ ince the entire washing machine has a high-gloss finish, the surface can be scratched or damaged.
Avoid scratching or damaging the surface when using the washing machine.
SELF CLEAN+
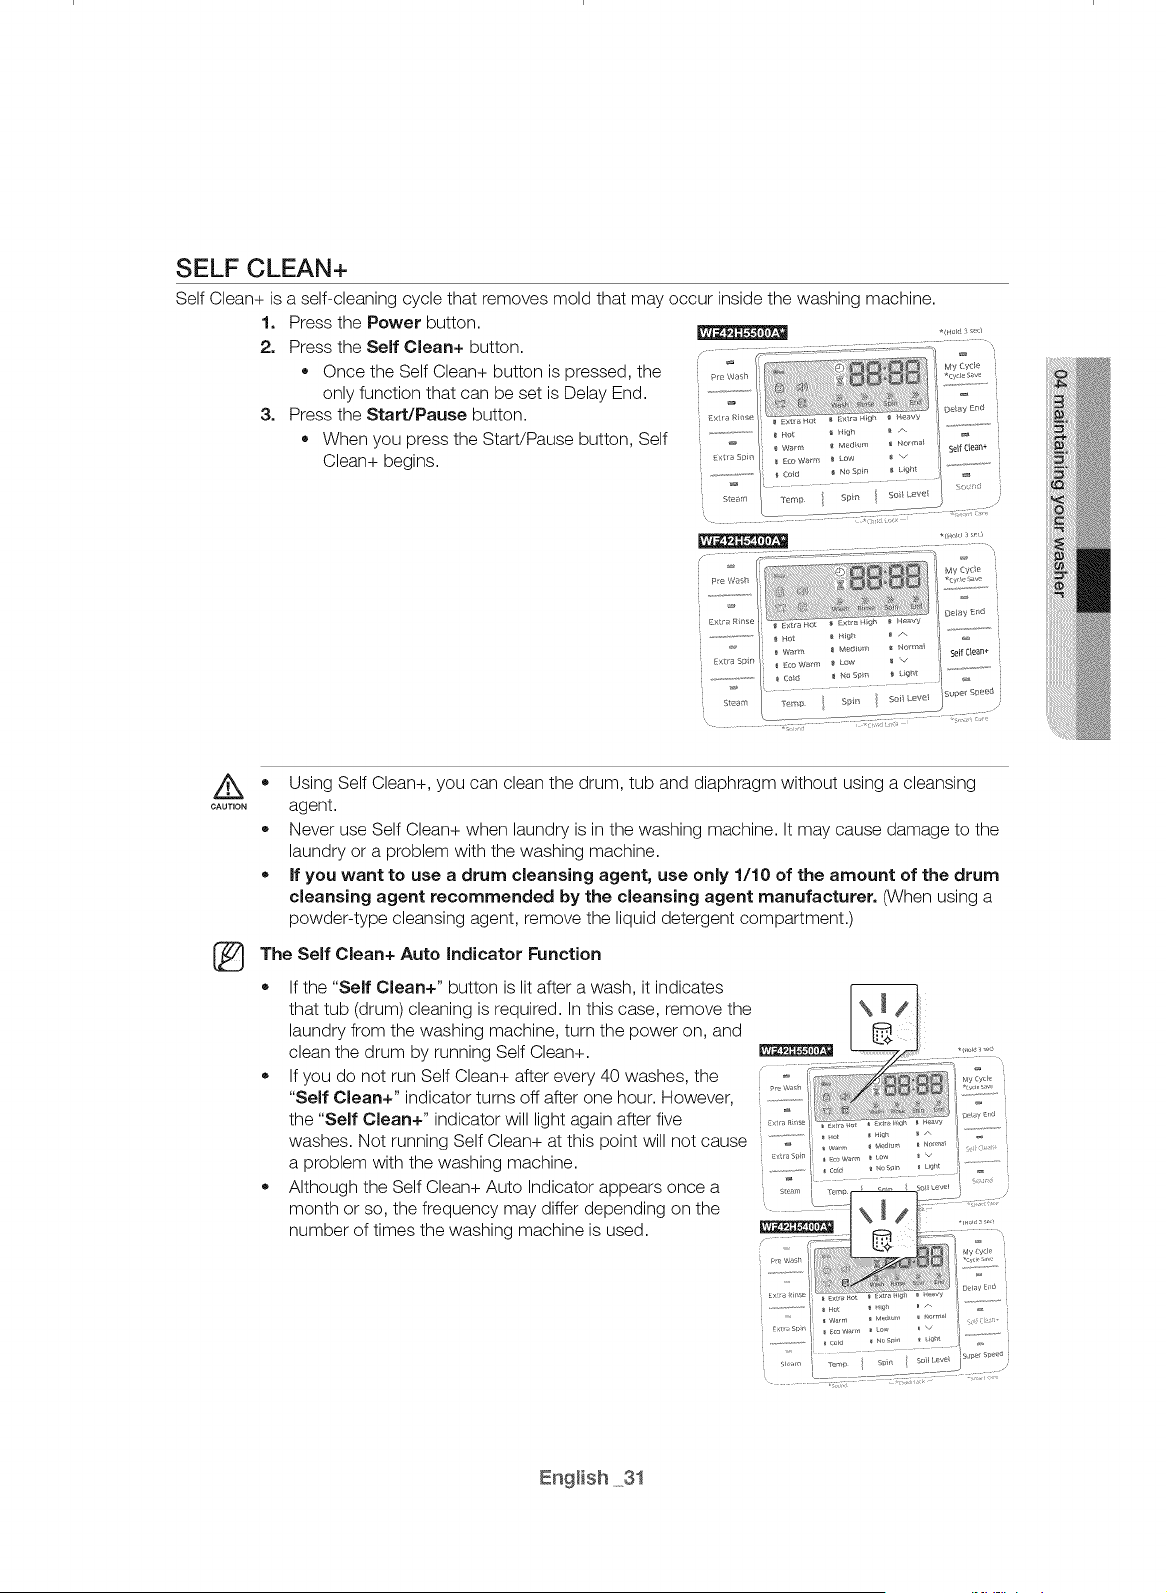
Self Clean+ is a self-cleaning cycle that removes mold that may occur inside the washing machine.
1. Press the Power button.
2. Press the Self Clean+ button.
• Once the Self Clean+ button is pressed, the
only function that can be set is Delay End.
3. Press the Start/Pause button.
When you press the Start/Pause button, Self
Clean+ begins.
My Cvc_e
Oe_y E_
_×tr'a _/s_ ...................
Self Clean+
xtra Sp_ .....................
sleam
............ , ,<
D
Hot _ HOb _ /-
e warm _ Medium _ No_ma_
_o Warm _ LoW _ v
Co_d _ NO Sp_n _ Ught
Tem_ Spt_ Soi Lye
_ _ warn _ Medium _ Normal Self Clean÷
Extra sp_n _ E_oWarm _ _ow _ _'/ ................ i
No S_m _ U_ht
....... Sup<_rSpeed
Str_arr" lemD Spir Soil LeVel ..... .
" .... ;; [ ...... : :;:i*
CAUTION
%
Using Self Clean+, you can clean the drum, tub and diaphragm without using a cleansing
agent.
Never use Self Clean+ when laundry is in the washing machine. It may cause damage to the
laundry or a problem with the washing machine.
• If you want to use a drum cleansing agent, use only 1/10 of the amount of the drum
cleansing agent recommended by the cleansing agent manufacturer. (When using a
powder-type cleansing agent, remove the liquid detergent compartment.)
The Self Clean+ Auto Indicator Function
If the "Self Clean+" button is lit after a wash, it indicates
that tub (drum) cleaning is required. In this case, remove the
laundry from the washing machine, turn the power on, and
clean the drum by running Self Clean+.
If you do not run Self Clean+ after every 40 washes, the
"Self Clean+" indicator turns off after one hour. However,
the "Self Clean+" indicator will light again after five
washes. Not running Self Clean+ at this point will not cause
a problem with the washing machine.
Although the Self Clean+ Auto Indicator appears once a
month or so, the frequency may differ depending on the
number of times the washing machine is used.
CHECK THESE SOLUTIONS IF YOUR WASHER...
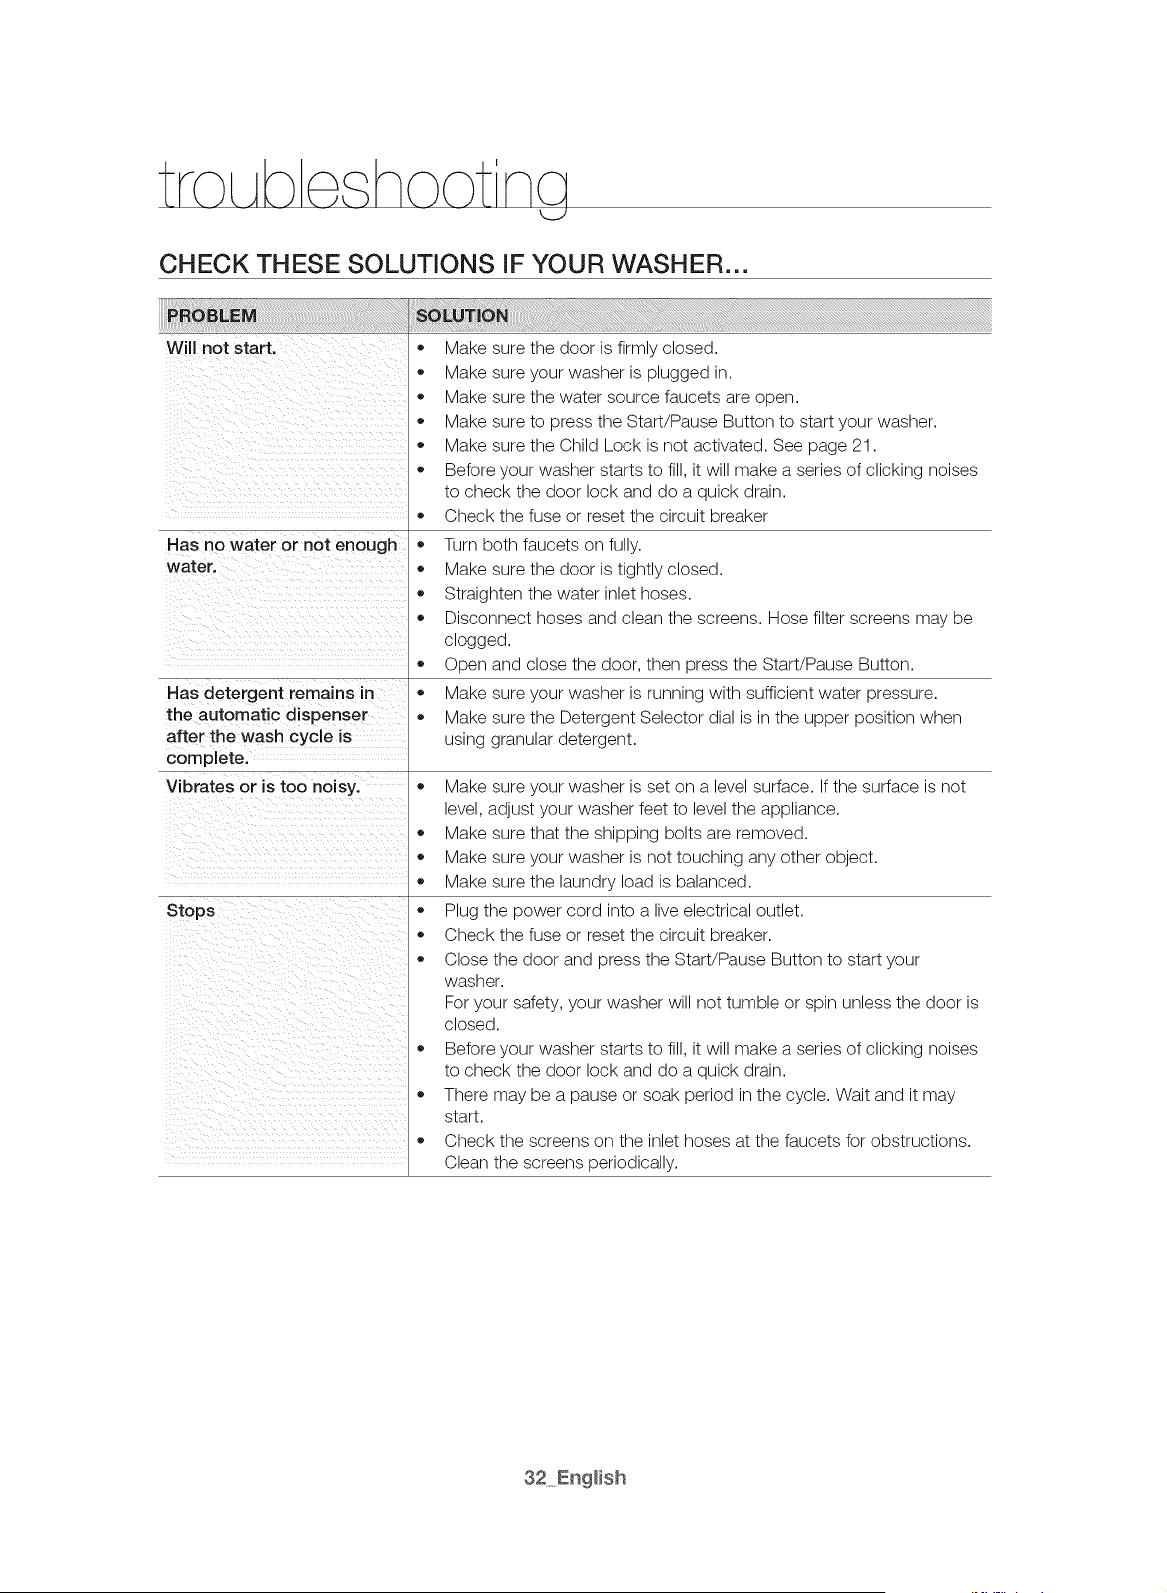
Will not start.
,, Make sure the door is firmly closed.
Make sure your washer is plugged in.
Make sure the water source faucets are open.
Make sure to press the Start/Pause Button to start your washer.
,, Make sure the Child Lock is not activated. See page 21.
Before your washer starts to fill, it will make a series of clicking noises
to check the door lock and do a quick drain.
,, Check the fuse or reset the circuit breaker
Turn both faucets on fully.
Make sure the door is tightly closed.
,, Straighten the water inlet hoses.
,, Disconnect hoses and clean the screens. Hose filter screens may be
clogged.
Open and close the door, then press the Start/Pause Button.
Make sure your washer is running with sufficient water pressure.
Make sure the Detergent Selector dial is in the upper position when
using granular detergent.
Has no water or not enough
water.
Has detergent remains in
the automatic dispenser
after the wash cycle is
complete.
Vibrates or is too noisy. ,,
Stops
Make sure your washer is set on a level surface. If the surface is not
level, adjust your washer feet to level the appliance.
Make sure that the shipping bolts are removed.
Make sure your washer is not touching any other object.
Make sure the laundry load is balanced.
,, Plug the power cord into a live electrical outlet.
,, Check the fuse or reset the circuit breaker.
Close the door and press the Start/Pause Button to start your
washer.
For your safety, your washer will not tumble or spin unless the door is
closed.
Before your washer starts to fill, it will make a series of clicking noises
to check the door lock and do a quick drain.
,, There may be a pause or soak period in the cycle. Wait and it may
start.
,, Check the screens on the inlet hoses at the faucets for obstructions.
Clean the screens periodically.

Fillswiththewrong
temperaturewater.
Doorlocked or will not
open.
Does not drain and/or spin.
®
Load is too wet at the end •
of the cycle.
®
Leaks water.
Has excessive suds.
Has an odor.
,, Turn both faucets on fully.
,, Make sure the temperature selection is correct.
,, Make sure the hoses are connected to the correct faucets.
Flush water lines.
,, Check the water heater. It should be set to deliver a minimum 120 °F
(49 °C) hot water at the tap. Also check the water heater capacity
and recovery rate.
,, Disconnect the hoses and clean the screens. The hose filter screens
may be plugged.
As your washer is filling, the water temperature may change as
the automatic temperature control feature checks incoming water
temperature. This is normal.
While your washer is filling, you may notice just hot and/or just
cold water going through the dispenser when you have selected
cold or warm wash temperatures. This is a normal function of the
automatic temperature control feature as your washer determines the
temperature of the water.
Press the Start/Pause Button to stop your washer.
Your washer door will remain locked during the heating portion of the
Sanitize Cycle
It may take a few moments for the door lock mechanism to
disengage.
,, Check the fuse or reset the circuit breaker.
,, Straighten the drain hoses. Eliminate kinked hoses. If there is a drain
restriction, call for service.
Close the door and press the Start/Pause Button. For your safety,
your washer will not tumble or spin unless the door is closed.
Make sure the debris filter is not clogged.
Use the High or Extra High spin speed.
Use high efficiency detergent to reduce over-sudsing.
The load is too small. Very small loads (one or two items) may
become unbalanced and not spin out completely.
Make sure the door is firmly closed.
,, Make sure all hose connections are tight.
Make sure the end of the drain hose is correctly inserted and secured
to the drainage system.
Avoid overloading.
,, Use high efficiency detergent to prevent over-sudsing.
,, Use high efficiency detergent to prevent over-sudsing.
,, Reduce the detergent amount for soft water, small or lightly soiled
loads.
,, Non-HE detergent is NOT recommended.
,, Excessive suds collect in nooks and crannies and can cause foul
odors.
,, Run cleansing cycles to sanitize the machine periodically. (Sanitize
Cycle or Self Clean+)
Clean the door seal (Diaphragm).
,, Dry the interior of your washer after the total cycle has finished.

INFORMATION CODES
The washer may display information codes to help you better understand what is occurring with your
washer.
Unbalanced load prevented your washer from spinning.
UE
Redistribute the load, press the StaWPause button.
The door is open when the washer is running.
dE Close the door tightly and restart the cycle. If the code reappears, call customer
service.
dE1 Your washer failed to lock or unlock the door.
A water temperature control problem. (Heater control problem)
lie
Call customer service.
Your washer has tried to fill, but has not reached the proper water level.
Call customer service.
LE
_} hen washer displays "LE", washer do draining for 3 minutes,At this time,
Power button is invalid.
Your washer is not draining. This can also mean that the unit senses a small clog
while draining.
1, Turn off the unit for 10 seconds and then turn it on again.
5E 2. Select the Spin Only cycle.
3, Press the StaWPause to drain the water.
If it still does not drain, call for service.
Your washer has tried to fill but was unsuccessful.
Make sure the water faucets are open all the way. Check for bent hoses. Check the
inlet screens on the hoses. If you are using a Flood Safety Device, please remove
the device and connect the water hoses directly to the unit.
Check if the hot water supply hose is connected.
4E
You must connect the hot water supply hose because hot water is supplied by the
Auto Temperature Control (A.T.C.) function if the temperature of the cold water is
lower than 59°F.
_} hen washer displays "4E", washer do draining for 3 minutes. At this time,
Power button is invalid.
The hot/cold water hose connection is not correct.
4E2. Please connect the hot/cold water hose connection correctly.
A fault is detected in the water level sensor.
OE
Call customer service.
The Water Level sensor is not working properly.
Call customer service.
1E
_} hen washer displays "1E", washer do draining for 3 minutes,At this time,
Power button is invalid
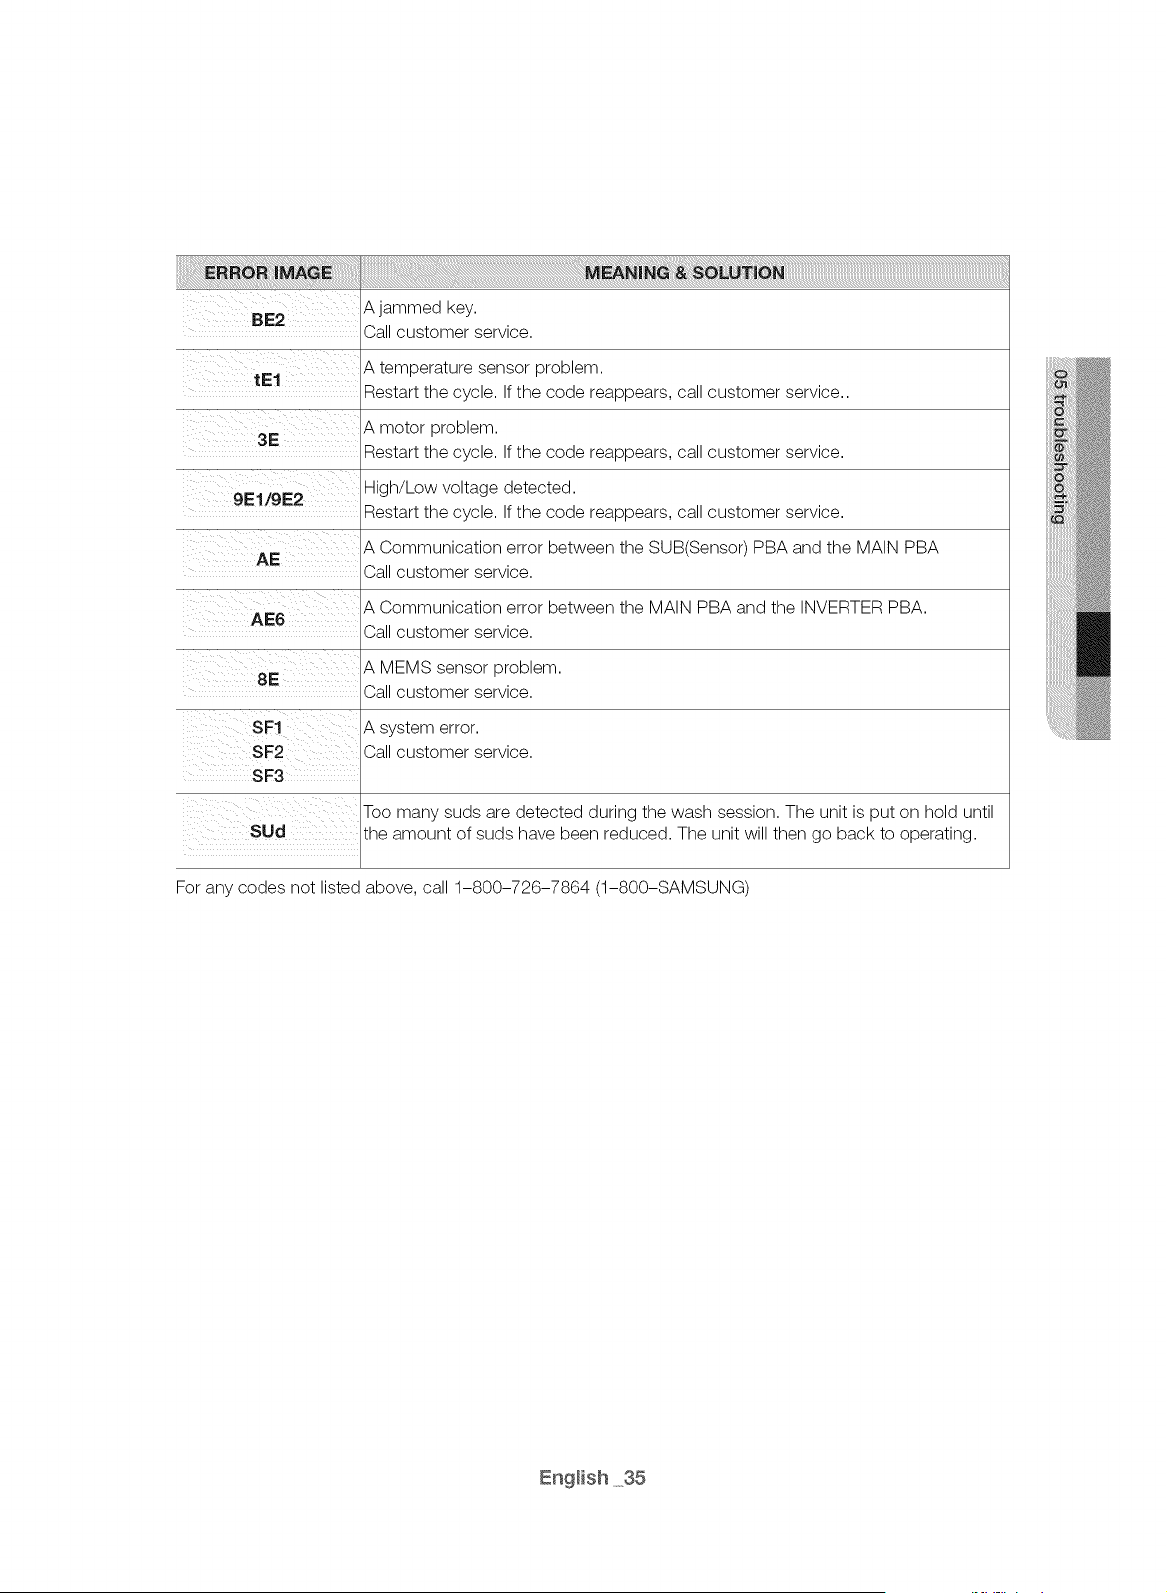
BE2
tel
Ajammedkey.
Callcustomerservice.
Atemperaturesensorproblem.
Restartthecycle.Ifthecodereappears,callcustomerservice..
Amotorproblem.
3E
Restart the cycle. If the code reappears, call customer service.
9E1/gE2 High/Low voltage detected.
Restart the cycle. If the code reappears, call customer service.
A Communication error between the SUB(Senso0 PBA and the MAIN PBA
AE
Call customer service.
AE6
8E
SF1
SF2
SF3
SUd
A Communication error between the MAIN PBA and the INVERTER PBA.
Call customer service.
A MEMS sensor problem.
Call customer service.
A system error.
Call customer service.
Too many suds are detected during the wash session. The unit is put on hold until
the amount of suds have been reduced. The unit will then go back to operating.
For any codes not listed above, call 1-800-726-7864 (1-800-SAMSUNG)
appendx
FABRIC CARE CHART
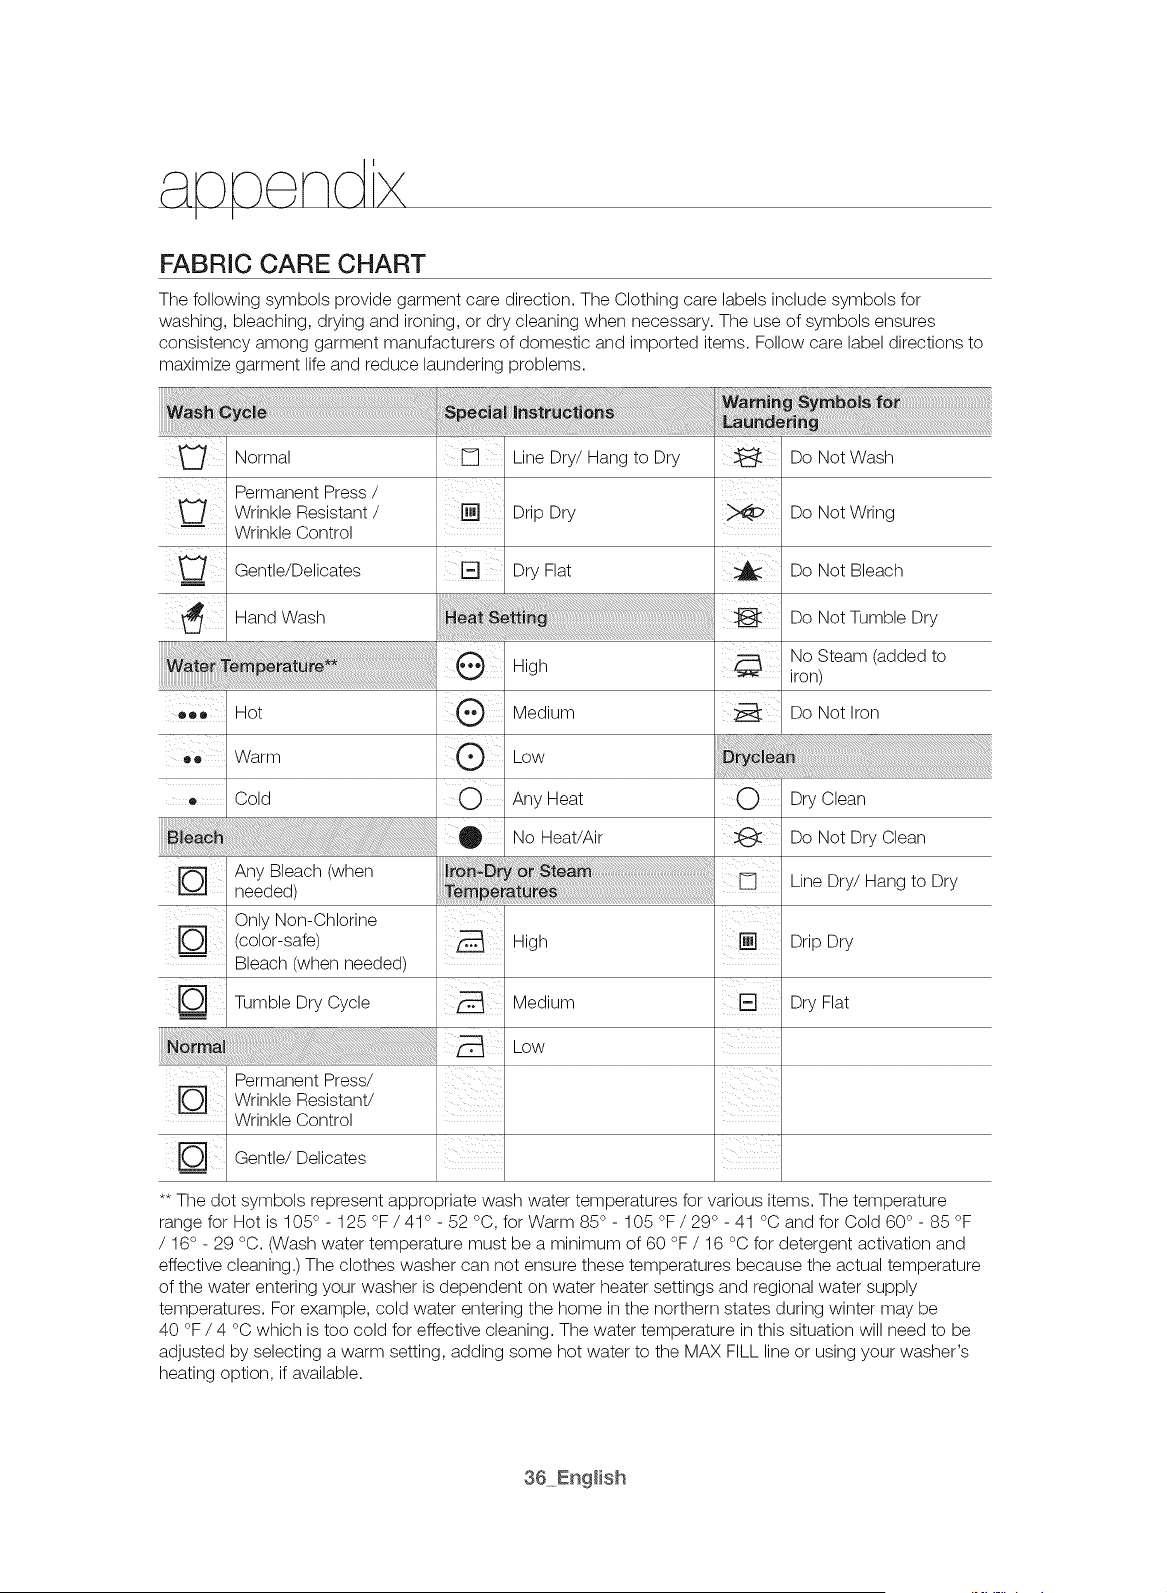
The bllowing symbols provide garment care direction. The Clothing care labels include symbols for
washing, bleaching, drying and ironing, or dry cleaning when necessary. The use of symbols ensures
consistency among garment manufacturers of domestic and imported items. Follow care label directions to
maximize garment life and reduce laundering problems.
iiii!!!!iA:iii@i{{{{{i{{{{{{{{{{{{{{{{ii{{{{{i@#ss S(SSii¸
Permanent Press /
Wrinkle Resistant /
Wrinkle Control
Gentle/Uelicates
BandWash
Hot
co Warm
. Cold O
Line Dry/Hang to Dry Do Not Wash
[] Drip Dry
Dry Flat
High
Medium
Low
Any Heat
Do Not Wring
Do Not Bleach
Do Not Tumble Dry
No Steam (added to
iron)
Do Not Iron
O Dry Clean
No Heat/Air
Any Bleach (when
needed)
Only Non-Chlorine
(color-safe) High [] Drip Dry
Bleach (when needed)
Tumble Dry Cycle _ Medium Dry Flat
Low
PermanentPress/
Wrinkle Resistant/
Wrinkle Control
Gentle/Delioates
Do Not Dry Clean
Line Dry/Hang to Dry
** The dot symbols represent appropriate wash water temperatures for various items. The temperature
range for Hot is 105° - 125 °F / 41° _ 52 °C, for Warm 85 ° - 105 °F / 29 ° - 41 °C and for Cold 60 ° - 85 °F
/ 16 ° - 29 °C. (Wash water temperature must be a minimum of 60 °F / 16 °C for detergent activation and
effective cleaning.) The clothes washer can not ensure these temperatures because the actual temperature
of the water entering your washer is dependent on water heater settings and regional water supply
temperatures. For example, cold water entering the home in the northern states during winter may be
40 °F / 4 °C which is too cold for effective cleaning. The water temperature in this situation will need to be
adjusted by selecting a warm setting, adding some hot water to the MAX FILL line or using your washer's
heating option, if available.

CYCLE CHART
Use this chart to set the best cycle and option for you laundry.
Model: WF42H5500A*
( • ' factory setting, _ ' selectable )
NORMAL _ • _ _ _ • _ _ _ _
HEAVY DUTY ® _ _ _ ® _ _ _ _ ®
BEDDING ® _ _ _ ® _ _
SANiTiZE ..............
ALLERGEN ® ® _ _ _ _ _
RINSE + SPIN ® _ _ _ _
ACTIVE WEAR ® _ _ _ ® _ _
DELICATES _ _ ® ® _ _
PERM PRESS ® _ _ _ _ ® _ _
QUICK WASH _ ® _ _ _ ® _ _ _ _
EGO COLD ® _ ® _ _ _
SELF CLEAN+ ® ®
®
®
®
®
®
®
®
®
®
®
®
®
®
®
®
®
®
®
®
®
®
®
®
®
®
®
®
®
®
®
®
®
®
®
®
®
®
®
®
NORMAL
HEAVY DUTY
BEDDING
SANiTiZE
ALLERGEN
R_NSE+SP=N
ACTIVE WEAR
DELICATES
PERM PRESS
QUICK WASH
ECO COLD
SELF CLEAN+
EH: Extra Hot
H: Hot
W: Warm
EW: Eco Warm
C: Cold
® ® ® ® ®
® ® ® ® ®
® ® ® ® ®
® ® ® ® ®
® ® ® ® ®
® ® ®
® ® ® ®
® ®
® ® ® ®
® ®
® ® ® ®
EH: Extra High
H: High
M: Medium
L: Low
NS: No Spin
H: Heavy
A
N: Normal
V
L: Light
®
®
®
®
®
®
®
®
®
®
®
®
®
®
®
®
®
®
®
®
®
®
®
®

a_ppondx
Model: WF42HB400A*
( • ' factory setting, <_' selectable )
NORMAL _ ®
HEAVY DUTY .....
BEDDING ®
SANITIZE ®
ALLERGEN ®
RINSE + SPIN
ACTIVE WEAR ®
DEUCATES _
PERM PRESS ®
TOWELS .....
QUICK WASH _, •
SELF CLEAN+ •
®
®
®
®
®
®
®
®
®
®
®
®
®
®
®
®
®
®
®
®
®
®
®
®
®
NORMAL
HEAVY DUTY
BEDDING
SANITIZE
ALLERGEN
RINSE + SPIN
ACTIVE WEAR
DELICATES
PERM PRESS
TOWELS
QUICK WASH
SELF CLEAN+
®
®
®
®
®
®
®
®
®
®
® ® ® ® ® ® ®
® ® ® ® ® ® ®
® ® ® ® ® ® ®
® ® ® ® ® ® ®
® ® ® ® ® ® ®
® ®
® ® ® ® ® ® ®
® ® ® ® ® ® ®
® ® ® ® ® ® ®
® ® ® ® ® ® ®
® ® ® ® ® ® ®
®
!i!iiiii!i!!iii_!!i_i!ili!i_ii!i!i!i_i!i_iii!iiiiiiiii!iiii_!i!iiii_ii_iii_i_iiii!i!!!i!ii_i!i_iii!i;i_i!i_!_i!i_iii!!i!ii!i!_i!!!!ili_i_ii_i_!ii_il!i!iiiii!i!ii_i_iiiii!iii_iiiii_i_!i!iliiiil;i_!i!_i_i_i!i_i_iiiii_iii_i_ili_ii!ii!iiii!_ii!i!iiii_!i!_i_i_i!i_i;iiiii_i_i!i!i_ili_iii_iliiiiii!i_i_i_!ii_i_iiiiii!i!i!ii!ii!ii_iiiiiii'i'ii!i!ii!ii!i_i_!i_!ii!i!i!_i_ii!ii!i!ili!i!_ii_i!i!ili_iiiiiii!i!i!iii!iiiiiii!i!!!i!i!i!i!iiii_!i_ii_!i_ii_!i_ii_!i_!i_i_!i!!i!!_!!i!ii!!i!iiiiiiiiiiiiiiiiiiiiiiiiiiiiii_iii!!!!i!i!iiiiiiii!i_ii_ii_ii_i!i!_i_ii_i_!i_!__!ii!iiiiiiiiiiiiiiiiililiii!i_!_iiiii_ii_iii_i_£i_l!_iiliilii!iiiiilillilliii_iiiiiiiiiiiiiiiiiiii!_;iiiii!i!_iiiii!!!iiiiiii!i_ii!iiiiiiiiiiilliiiijiiiiiii_iil_i_!i!iii_i_iii_il;iiiili!i!iiii!iiii!i!!ii!!!!_!_!__iiiiiil!_iiiii!!!i!ili!ilili!ilililiiii!iiiiiiii!!i!iii!ilili!ililililili!!!iiii!iiiilii_ili!ii!iii!i!i!i!_iii!ii!iiiiiiiiiiiiilililiiii!i!!!!iiiiiiiiii!;!i_!i_!i!i!i!i!iiiiiliii_ii_ii_ii_i_ii_iiiiiiiiiiiiiiiiiiiiii_ii_ii_iliiiiiiii_i!iii!iiiii!iiililiiii!iiil
@
®
®
®
®
®
®
@
®
®
®
®
®
®
®
®
®
®
@
®
®
®
®
®
®
®
®
@
®
®
®
®
EH: Extra Hot EH: Extra High H: Heavy
H: Hot H: High /X
W: Warm M: Medium N: Normal
EW" Eco Warm L: Low V
O: Cold NS: No Spin L" Light
@
®
®
@
®
®
®
®
®
®
®
®
®
®
®
@
®
®
®
®
®
®
®
®
®
®
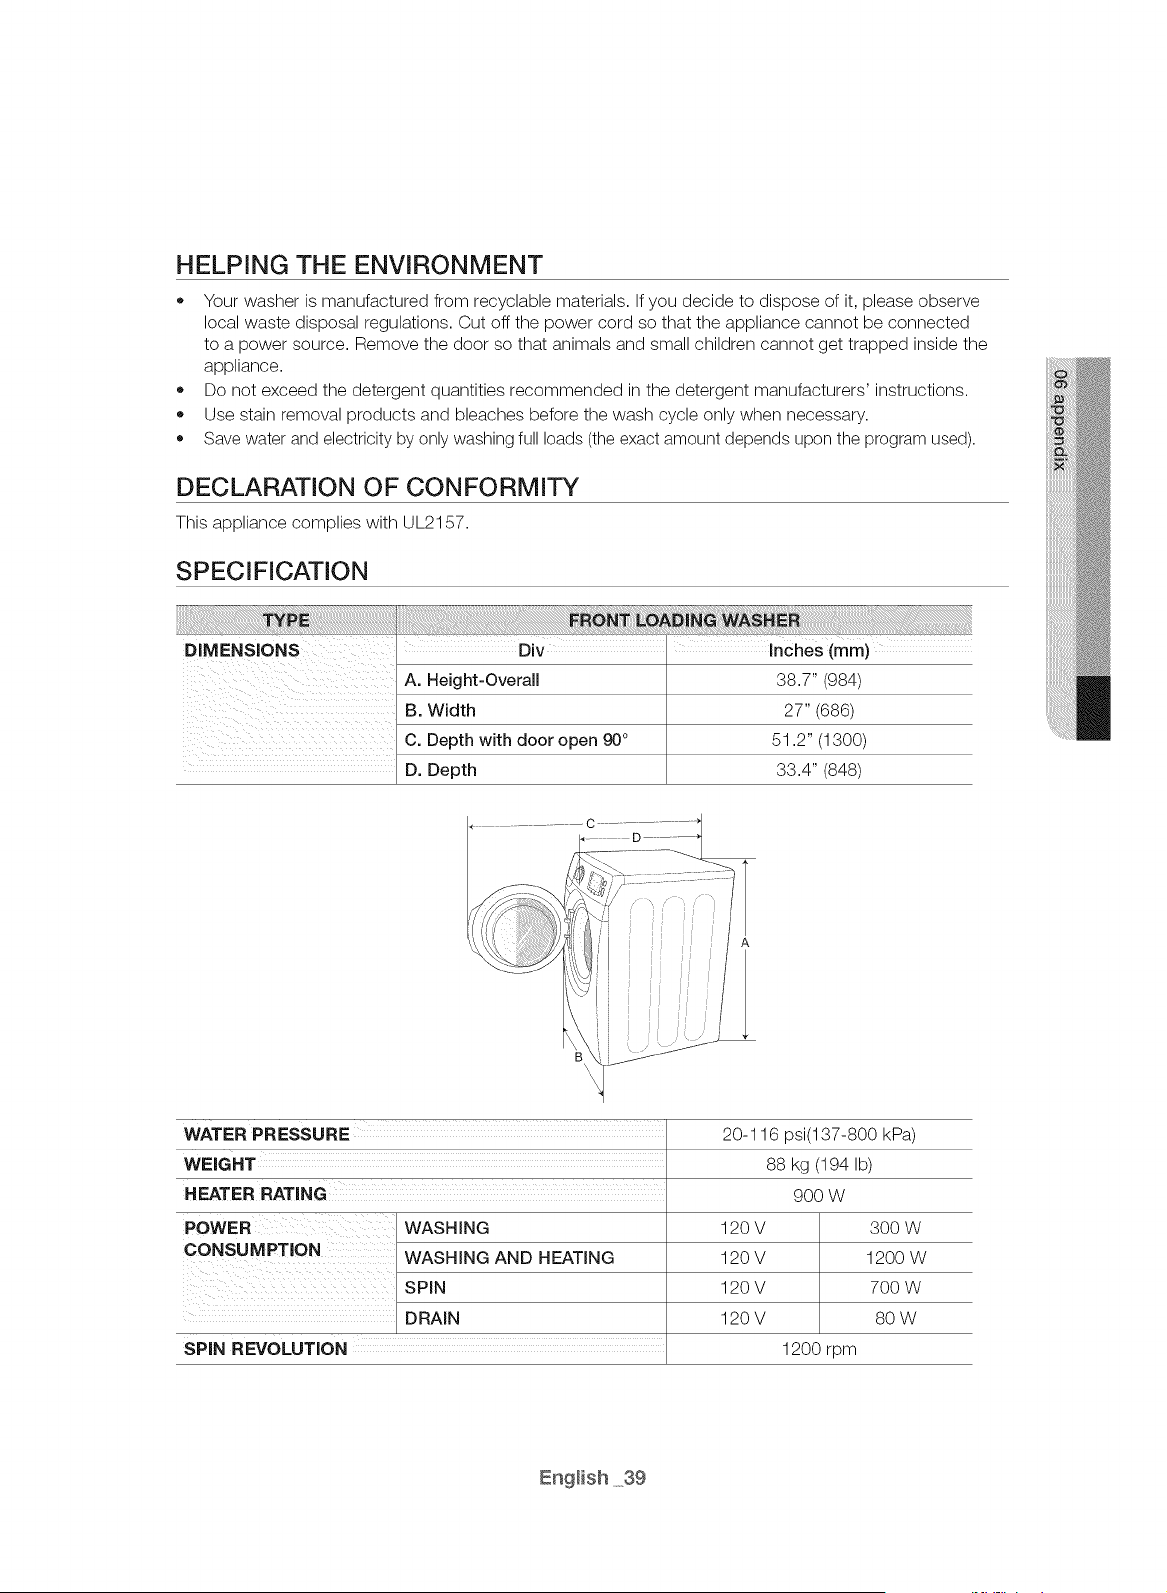
HELPING THE ENVIRONMENT
Your washer is manufactured from recyclable materials. If you decide to dispose of it, please observe
local waste disposal regulations. Cut off the power cord so that the appliance cannot be connected
to a power source. Remove the door so that animals and small children cannot get trapped inside the
appliance.
Do not exceed the detergent quantities recommended in the detergent manufacturers' instructions.
Use stain removal products and bleaches before the wash cycle only when necessary.
Save water and electricity by only washing full loads (the exact amount depends upon the program used).
DECLARATION OF CONFORMITY
This appliance complies with UL2157.
SPECIFICATION
DIMENSIONS I DiV ' inches (ram)
A. Height-Overall 38.7" (984)
B. Width 27" (686)
C. Depth with door open 90 ° 51.2" (1300)
D. Depth 33.4" (848)
WATER PRESSURE
WEIGHT
HEATER RATING
POWER WASHING
CONSUMPTION / WASHING AND HEATING
[ SPIN
DRAIN
SPIN REVOLUTION
20-116 psi(137-800 kPa)
88 kg (194 Ib)
900 W
120V
120V
120V
120V
3OOW
1200 W
700 W
8O W
1200 rpm

SAMSUNGWASHER
LiMiTED WARRANTY TO ORiGiNAL PURCHASER
This SAMSUNG brand product, as supplied and distributed by SAMSUNG ELECTRONICS AMERICA, INC.
(SAMSUNG) and delivered new, in the original carton to the original consumer purchaser, is warranted by
SAMSUNG against manufacturing defects in materials and workmanship for a limited warranty period of:
One (1) year part and labor, Two (2) years Control Board Parts (Part Only), Three (3) years stainless tub part
(Part Only), Five (5) years washing motor part (Part Only), Ten (10) years washing DD motor part (Part Only).
This limited warranty begins on the original date of purchase, and is valid only on products purchased and
used in the United States. To receive warranty service, the purchaser must contact SAMSUNG for problem
determination and service procedures. Warranty service can only be performed by a SAMSUNG authorized
service center. The original dated bill of sale must be presented upon request as proof of purchase to
SAMSUNG or SAMSUNG's authorized service center. SAMSUNG will provide in-home service during the
warranty period at no charge, subject to availability within the contiguous United States. In-home service is
not available in all areas.
To receive in-home service, product must be unobstructed and accessible to the service agent. If service
is not available, SAMSUNG may elect to provide transportation of the product to and from an authorized
service center.
SAMSUNG will repair, replace, or refund this product at our option and at no charge as stipulated herein,
with new or reconditioned parts or products if found to be defective during the limited warranty period
specified above. All replaced parts and products become the property of SAMSUNG and must be returned
to SAMSUNG. Replacement parts and products assume the remaining original warranty, or ninety (90)
days, whichever is longer.This limited warranty covers manufacturing defects in materials and workmanship
encountered in normal, noncommercial use of this product and shall not apply to the following: damage
that occurs in shipment; delivery and installation; applications and uses for which this product was not
intended; altered product or serial numbers; cosmetic damage or exterior finish; accidents, abuse, neglect,
fire, water, lightning, or other acts of nature or God; use of products, equipment, systems, utilities, services,
parts, supplies, accessories, applications, installations, repairs, external wiring or connectors not supplied
or authorized by SAMSUNG that damage this product or result in service problems; incorrect electrical
line voltage, fluctuations and surges; customer adjustments and failure to follow operating instructions,
maintenance and environmental instructions that are covered and prescribed in the instruction book;
product removal and reinstallation; problems caused by pest infestations. This limited warranty does not
cover problems resulting from incorrect electric current, voltage or supply, light bulbs, house fuses, house
wiring, cost of a service call for instructions, or fixing installation errors. SAMSUNG does not warrant
uninterrupted or error-free operation of the product.

EXCEPTASSETFORTHHEREIN,THEREARENOWARRANTIESONTHISPRODUCTEITHEREXPRESS
ORIMPLIED,ANDSAMSUNGDISCLAIMSALLWARRANTIESINCLUDING,BUTNOTLIMITEDTO,ANY
IMPLIEDWARRANTIESOFMERCHANTABILITY,INFRINGEMENTORFITNESSFORAPARTICULAR
PURPOSE.
NOWARRANTYORGUARANTEEGIVENBYANYPERSON,FIRM,ORCORPORATIONWITHRESPECT
TOTHISPRODUCTSHALLBEBINDINGONSAMSUNG.SAMSUNGSHALLNOTBELIABLEFORLOSS
OFREVENUEORPROFITS,FAILURETOREALIZESAVINGSOROTHERBENEFITS,ORANYOTHER
SPECIAL,INCIDENTALORCONSEQUENTIALDAMAGESCAUSEDBYTHEUSE,MISUSE,ORINABILITY
TOUSETHISPRODUCT,REGARDLESSOFTHELEGALTHEORYONWHICHTHECLAIMISBASED,
ANDEVENIFSAMSUNGHASBEENADVISEDOFTHEPOSSIBILITYOFSUCHDAMAGES.
NORSHALLRECOVERYOFANYKINDAGAINSTSAMSUNGBEGREATERINAMOUNTTHANTHE
PURCHASEPRICEOFTHEPRODUCTSOLDBYSAMSUNGANDCAUSINGTHEALLEGEDDAMAGE.
WITHOUTLIMITINGTHEFOREGOING,PURCHASERASSUMESALLRISKANDLIABILITYFORLOSS,
DAMAGE,ORINJURYTOPURCHASERANDPURCHASER'SPROPERTYANDTOOTHERSANDTHEIR
PROPERTYARISINGOUTOFTHEUSE,MISUSE,ORINABILITYTOUSETHISPRODUCT.THISLIMITED
WARRANTYSHALLNOTEXTENDTOANYONEOTHERTHANTHEORIGINALPURCHASEROFTHIS
PRODUCT,ISNONTRANSFERABLEANDSTATESYOUREXCLUSIVEREMEDY.
Somestatesdonotallowlimitationsonhowlonganimpliedwarrantylasts,ortheexclusionorlimitation
ofincidentalorconsequentialdamages,sotheabovelimitationsorexclusionsmaynotapplytoyou.This
warrantygivesyouspecificrights,andyoumayalsohaveotherrights,whichvaryfromstatetostate.
Toobtainwarranty service, please contact SAMSUNG at:
Samsung Electronics America, inc.
85 Challenger Road Ridgefield Park, NJ 07660
1-800-SAMSUNG (726-7864)
www.samsung.com/us/support
Visits by a Service Engineer to explain functions, maintenance or installation is not covered by warranty.
Please contact your Samsung call agent for help with any of these issues.
SAMSUNGWASHER
LiMiTED WARRANTY TO ORiGiNAL PURCHASER
This SAMSUNG brand product, as supplied and distributed by SAMSUNG ELECTRONICS CANADA, INC.
(SAMSUNG) and delivered new, in the original carton to the original consumer purchaser, is warranted by
SAMSUNG against manufacturing defects in materials and workmanship for a limited warranty period of:
One (1) year part and labor, Ten (10) years washing DD motor (Part only)
This limited warranty begins on the original date of purchase, and is valid only on products purchased
and used in the Canada. To receive warranty service, the purchaser must contact SAMSUNG for problem
determination and service procedures. Warranty service can only be performed by a SAMSUNG authorized
service center. The original dated bill of sale must be presented upon request as proof of purchase to
SAMSUNG or SAMSUNG's authorized service center. SAMSUNG will provide in-home service during the
warranty period at no charge, subject to availability within the Canada. In-home service is not available in all
areas.
To receive in-home service, product must be unobstructed and accessible to the service agent. If service
is not available, SAMSUNG may elect to provide transportation of the product to and from an authorized
service center.
SAMSUNG will repair, replace, or refund this product at our option and at no charge as stipulated herein,
with new or reconditioned parts or products if found to be defective during the limited warranty period
specified above. All replaced parts and products become the property of SAMSUNG and must be returned
to SAMSUNG. Replacement parts and products assume the remaining original warranty, or ninety (90)
days, whichever is longer.This limited warranty covers manufacturing defects in materials and workmanship
encountered in normal, noncommercial use of this product and shall not apply to the following: damage
that occurs in shipment; delivery and installation; applications and uses for which this product was not
intended; altered product or serial numbers; cosmetic damage or exterior finish; accidents, abuse, neglect,
fire, water, lightning, or other acts of nature or God; use of products, equipment, systems, utilities, services,
parts, supplies, accessories, applications, installations, repairs, external wiring or connectors not supplied
or authorized by SAMSUNG that damage this product or result in service problems; incorrect electrical
line voltage, fluctuations and surges; customer adjustments and failure to follow operating instructions,
maintenance and environmental instructions that are covered and prescribed in the instruction book;
product removal and reinstallation; problems caused by pest infestations. This limited warranty does not
cover problems resulting from incorrect electric current, voltage or supply, light bulbs, house fuses, house
wiring, cost of a service call for instructions, or fixing installation errors. SAMSUNG does not warrant
uninterrupted or error-free operation of the product.
EXCEPTASSETFORTHHEREIN,THEREARENOWARRANTIESONTHISPRODUCTEITHEREXPRESS
ORIMPLIED,ANDSAMSUNGDISCLAIMSALLWARRANTIESINCLUDING,BUTNOTLIMITEDTO,ANY
IMPLIEDWARRANTIESOFMERCHANTABILITY,INFRINGEMENTORFITNESSFORAPARTICULAR
PURPOSE.
NOWARRANTYORGUARANTEEGIVENBYANYPERSON,FIRM,ORCORPORATIONWITHRESPECT
TOTHISPRODUCTSHALLBEBINDINGONSAMSUNG.SAMSUNGSHALLNOTBELIABLEFORLOSS
OFREVENUEORPROFITS,FAILURETOREALIZESAVINGSOROTHERBENEFITS,ORANYOTHER
SPECIAL,INCIDENTALORCONSEQUENTIALDAMAGESCAUSEDBYTHEUSE,MISUSE,ORINABILITY
TOUSETHISPRODUCT,REGARDLESSOFTHELEGALTHEORYONWHICHTHECLAIMISBASED,
ANDEVENIFSAMSUNGHASBEENADVISEDOFTHEPOSSIBILITYOFSUCHDAMAGES.
NORSHALLRECOVERYOFANYKINDAGAINSTSAMSUNGBEGREATERINAMOUNTTHANTHE
PURCHASEPRICEOFTHEPRODUCTSOLDBYSAMSUNGANDCAUSINGTHEALLEGEDDAMAGE.
WITHOUTLIMITINGTHEFOREGOING,PURCHASERASSUMESALLRISKANDLIABILITYFORLOSS,
DAMAGE,ORINJURYTOPURCHASERANDPURCHASER'SPROPERTYANDTOOTHERSANDTHEIR
PROPERTYARISINGOUTOFTHEUSE,MISUSE,ORINABILITYTOUSETHISPRODUCT.THISLIMITED
WARRANTYSHALLNOTEXTENDTOANYONEOTHERTHANTHEORIGINALPURCHASEROFTHIS
PRODUCT,ISNONTRANSFERABLEANDSTATESYOUREXCLUSIVEREMEDY.
Someprovincesdonotallowlimitationsonhowlonganimpliedwarrantylasts,ortheexclusionorlimitation
ofincidentalorconsequentialdamages,sotheabovelimitationsorexclusionsmaynotapplytoyou.
Thiswarrantygivesyouspecificrights,andyoumayalsohaveotherrights,whichvaryfromprovinceto
province.
To obtain warranty service, please contact SAMSUNG at:
Samsung Electronics Canada inc.
2050 Derry Road West, Mississauga, Ontario L5N 0B9 Canada
1-800-SAMSUNG (726=7884)
www.samsung.com/ca/support (English)
www.samsung.com/ca_fr/support (French}
FAX:1-866-436-4617
Visits by a Service Engineer to explain functions, maintenance or installation is not covered by warranty.
Please contact your Samsung call agent for help with any of these issues.
QUESTIONS OR COMMENTS?
bit.ly/samsungwashers
Scan the QR code* or visit
www.samsung.com/spsn
to view our he[pfut
How-to Videos and Live Shows
_Requires reader to be installed on your smartphone
U.S.A 1-800-SAMSUNG (726-7864) www.samsung.com/us/support
MEXICO 01-800-SAMSUNG (726-7864) www.samsung.com/mx/support
www.samsung.com/ca/support (English)
CANADA 1-800-SAMSUNG (726-7864) www.samsung.com/ca_fr/support (French)
Visits by a Service Engineer to explain functions, maintenance or installation is not covered by warranty.
Please contact your Samsung call agent for help with any of these issues.
Code No. DC68-03401A-01_EN
manual
or8
del usuario
Gracias pot adquirir este producto Samsung.
conten do
INSTALACION DE LA LAVADORA
MANUAL DE INSTRUCClONES
LAVADO DE UNA CARGA DE ROPA
MANTENIMIENTO DE LA LAVADORA
GU|A DE SOLUCI6N DE PROBLEMAS
11 Desembalaje de la lavadora
11 Descripci6n general de la lavadora
12 Instalacion el_ctrica
12 Conexion a tierra
12 Agua
13 Drenaje
13 Suelo
13 Consideraciones acerca de la ubicaci0n
13 Instalaci0n del electrodom_stico en un
gabinete o en un hueco
13 Instalacion bajo contador (s01olavadora)
14 Con pedestal o kit de apilamiento
opcionales
15 Nota importante para el instalador
15 Cuadro de flujo de instalacion
18 C6mo cargar la lavadora
18 Lavado de la ropa: Instrucciones b_.sicas
19 Descripci6n general del panel de control
21 Child Lock (Seguro para Ninos)
22 Spin Only (Solo centrifugado)
22 Mb.s prendas _++
22 Delay End (Final Retardado)
22 Sound (Sonido)
23 My Cycle (Mi ciclo)
23 Smart Care (Cuidado Inteligente)
24 Lavado de prendas con el selector de
ciclos
25 Uso del lavado a vapor
25 Funci6n ATC (control autom_.tico de
temperatura)
26 Uso del detergente
26 Funciones
28 Limpieza del exterior
28 Limpieza del interior
28 Limpieza de los dosificadores
28 C6mo guardar la lavadora
29 Limpieza del filtro de residuos
30 Limpieza del diafragma de la puerta
30 Mantenimiento de la cubierta superior y del
marco frontal
31 Self Clean+ (Autolimpieza+)
32 Controle estas soluciones si su lavadora...
34 C6digos de informaci6n
APENDICE
36 Tabla de indicaciones sobre la tela
37 Tabla de ciclos
39 Ayuda al medioambiente
39 Declaraci6n de conformidad
39 Especificaciones

Felicitaciones por la compra de la nueva lavadora Samsung. Este manual
contbne informaci6n importante acerca de la instalaci6n, el uso y el cuidado del
electrodomestico. Lea detenidamente estas instrucdones a fin de aprovechar al
m_ximo los mOltiples beneficios y funciones de la lavadora.
LO QUE NECESITA SABER SOBRE LAS INSTRUCCIONES DE
SEGURIDAD
Las advertencias y las instrucciones de seguridad importantes de este manual no cubren todas las posibles
condiciones y situaciones que pueden ocurrir. Es su responsabilidad actuar con sentido comLin, precaucion
y cuidado cuando instale, realice el mantenimiento y ponga en funcionamiento la lavadora.
SiMBOLOS Y PRECAUCIONES DE SEGURIDAD IMPORTANTES
Los fconos y las se_ales incluidas en este manual del usuario
significan Io siguiente:
Peligros o pr&.cticas inseguras que pueden causar lesiones fisicas
ADVERTENCIA
PRECAUCION
graves o la muerte.
Para reducir el riesgo de incendio, explosion, descargas el_ctricas o
lesiones fisieas cuando usa esta lavadora, siga estas instruceiones de
seguridad bb.sieas:
Peligros o prb.cticas inseguras que pueden causar lesiones fisicas leves
o da_os materiales.
@
@
®
®
@
@
@
®
NO intente hacer nada.
NO desarme.
NO toque.
Siga las instrucciones completamente.
Desenchufe el cable de alimentacion el_ctrica del tomacorriente de pared.
AsegOrese de que la m&.quina tenga buena conexion a tierra para evitar
descarqas el_ctricas.
Llame al centro de servicio t_cnico para obtener asistencia.
Nota
Estas seSales de advertencia estan aquf para evitar que usted u otras personas sufran
daSos.
Siga las instrucciones completamente.
Despu_s de leer esta secci6n, guardela en un lugar seguro para consultas futuras.
_Lea todas las instrucciones antes de el electrodom_stico.
usar
CONSERVE ESTAS INSTRUCCIONES
Espa_o_3

_ ADVERTENCIA: Para reducir el de incendio, el_ctricas lesiones fisicas
riesgo descargas
o
ADVE_T"="=--_EN0cuando usa este electrodom_stico, siga las instrucciones de seguridad bb.sicas que figuran
a continuacion:
1. Lea todas las instrucciones antes de usar el electrodom_stico.
2. No lave o seque prendas que han sido previamente limpiadas, lavadas, remojadas o
salpicadas con gasolina, solventes de limpieza en seco u otras sustancias inflamables o
explosivas, ya que emiten vapores que pueden prenderse fuego o explotar.
3. No permita que los ninos jueguen sobre el electrodom_stico ni en su interior. Se requiere
de supervision cuando el electrodom_stico es utilizado cerca de los ninos.
4. Antes de descartar el aparato o de trasladarlo para que se le efect0e el servicio t_cnico,
retire la puerta del compartimiento de la lavadora o la secadora.
5. No introduzca la mano en el electrodom_stico si el tambor est&.en movimiento.
6. No instale o guarde este electrodom_stico donde quede expuesto a factores clim&.ticos.
7. No modifique los controles.
8. No repare, reemplace ni intente realizar el mantenimiento de cualquier pieza del
electrodom_stico salvo que est_ recomendado espec(ficamente en las instrucciones
de mantenimiento del usuario o en las instrucciones de reparaci0n para el usuario
publicadas y que, a su juicio, usted tenga la habilidad para Ilevarlas a cabo.
9. No agregue gasolina, solventes de limpieza en seco u otras sustancias inflamables o
explosivas al agua del lavado. Estas sustancias emiten vapores que se pueden prender
fuego o explotar.
10.En ciertas circunstancias, se puede producir gas hidrogeno en un sistema de agua
caliente que no se ha usado durante 2 semanas o ma.s. EL GAS HIDR©GENO ES
EXPLOSIVO. Si el sistema de agua caliente no fue utilizado durante dicho per(odo, antes
de usar la lavadora o la lavadora y la secadora combinadas, abra las Ilaves de agua
caliente y deje correr el agua por varios minutos. De esta manera, se eliminar&,el gas
hidrogeno acumulado. Dado que el gas es inflamable, no fume ni use una llama abierta
en ese momento.
_ Advertencias de la disposici6n 65 del Estado de California:
ADVERTENC_,
ADVERTENCIA: Este producto contiene qdmicos que se sabe en el estado de California
que causan cb.ncer y toxicidad reproductiva.
CONSERVE ESTAS INSTRUCClONES
SENALES DE ADVERTENCIA IMPORTANTES PARA LA
INSTALACi0N
ADVERTENCIA
_ nchufe el cable de alimentacion en un tomacorriente de pared de 120 V/60 Hz/15 A
CA o superior y utilice el tomacorriente sOlo con este electrodom_stico. No use un cable
prolongador.
Compartir el tomacorriente de pared con otros electrodom_sticos, utilizando un
multicontacto o prolongando el cable de alimentacion, puede provocar un incendio o
una descarga el_ctrica.
No utilice un transformador el_ctrico. Puede provocar un incendio o una descarga
el_ctrica.
AsegOrese de que el voltaje, la frecuencia y la corriente son los mismos que los
especificados en el producto. Si no Io hace puede provocar un incendio o una descarga
el_ctrica.
La instalacion de este electrodom_stico la debe efectuar un t_cnico cualificado o una
empresa de servicios.
Si no Io hace, puede provocar una descarga el_ctrica, un incendio, una explosion,
problemas con el producto o lesiones.
Retire regularmente todas las sustancias extranas, como polvo o agua, de los terminales y
los puntos de contacto de la alimentacion con un pano seco.
Desenchufe el cable de alimentacion y I(mpielo con un pano seco.
Si no Io hace puede provocar un incendio o una descarga el_ctrica.
Enchufe el cable de alimentacion en un tomacorriente de pared en la direccion adecuada
de manera que el cable baje hacia el suelo.
Si enchufa el cable de alimentacion en el tomacorriente en la direccion opuesta, los
cables el_ctricos del interior del cable se pueden danar y se puede provocar un incendio
o una descarga el_ctrica.
Este electrodomestico debe conectarse a tierra correctamente.
La toma de tierra no se ha de conectar a una conduccion de gas o de agua ni a la I(nea
telefonica.
Puede provocar un incendio, una descarga el_ctrica, un incendio o problemas con el
producto.
Nunca enchufe el cable de alimentacion a un tomacorriente que no est_ conectado a
tierra correctamente y asegOrese de que guarde conformidad con los codigos locales y
nacionales.
G
No instale este electrodom_stico cerca de un calefactor o materiales inflamables.
No instale este aparato en un lugar con humedad, aceites o polvo, que est_ expuesto a la
luz directa del sol o al agua (gotas de Iluvia).
No instale este electrodom_stico en un lugar donde pueda haber fugas de gas.
Puede provocar un incendio o una descarga el_ctrica.
Enchufe el cable de alimentacion firmemente en el tomacorriente de pared. No utilice un
cable de alimentacion danado ni un tomacorriente que est_ flojo.
Puede provocar un incendio o una descarga el_ctrica.
No tire del cable de alimentacion ni Io doble excesivamente.
No tuerza ni ate el cable de alimentacion.
No cuelgue el cable de alimentacion de un objeto metalico, no coloque objetos pesados
sobre _1, no inserte el cable de alimentacion entre objetos ni Io empuje en un espacio
detra.s del electrodom_stico.
Puede provocar un incendio o una descarga el_ctrica.
No tire del cable de alimentacion para desenchufarlo.
Desenchufe el cable de alimentacion sujet_tndolo pot el enchufe.
Si no Io hace puede provocar un incendio o una descarga el_ctrica.
CONSERVE ESTAS INSTRUCClONES
EspaSo_5

/
Si el enchufe o el cable de alimentacion est&.ndanados, comun(quese con el centro de
, , r
servlclO mas cercano.
SENALES DE PRECAUCION PARA LA INSTALACION
PREOAUOION
Este electrodom_stico debe estar ubicado de manera tal que se pueda acceder al enchufe.
Si no Io hace puede provocar un incendio o una descarga causados por fugas
el_ctricas.
Instale el electrodom_stico sobre una superficie nivelada que pueda soportar su peso.
Si no Io hace pueden producirse vibraciones anormales, ruidos o problemas con el
producto.
_ esenchufe el electrodomestico si no Io va a utilizar durante un perfodo prolongado o
durante una tormenta con aparato el_etrico.
Si no Io hace puede provocar un incendio o una descarga el_ctrica.
SENALES DE ADVERTENCIA IMPORTANTES DURANTE EL USO
Si el electrodom_stico se inunda, descon_ctelo inmediatamente y Ilame al centro de
servlclO mas cercano.
Si el electrodom_stico genera ruidos extranos, olores a quemado o humo, descon_ctelo
inmediatamente y Ilame al centro de servieio m&.seercano.
Si no Io hace puede provocar un incendio o una descarga el_ctrica.
En caso de fugas de gas (como propano, LP, etc.), ventile inmediatamente sin tocar el
enchufe. No toque el electrodom_stico ni el cable de alimentacion.
No utiliee un ventilador.
Una chispa puede provocar un incendio o una explosion.
No lave prendas contaminadas con gasolina, queroseno, benceno, disolventes de pinturas,
alcohol u otras sustancias inflamables o explosivas.
Puede provocar una descarga el_ctrica, un incendio o una explosion.
No abra la puerta de la lavadora pot la fuerza mientras est_ en funcionamiento (lavado a
alta temperatura/secado/centrifugado).
El agua que salga de la lavadora puede causar quemaduras o convertir el suelo en
resbaladizo.
Esto puede provocar lesiones personales.
Abrir la puerta pot la fuerza puede danar el producto o causar lesiones personales.
AsegOrese de quitar el embalaje (goma espuma, poliestireno) del fondo de la lavadora antes
de utilizar _sta.
No introduzca las manos bajo la lavadora.
Se puede causar lesiones personales.
CONSERVE ESTAS INSTRUCClONES

No toque el enchufe con las manos mojadas.
Puede causar lesiones personales.
No apague el electrodom_stico desenchuf&.ndolo mientras est_ en funcionamiento.
Si vuelve a enchufar el electrodom_stico en el tomacorriente puede originar una chispa y
causar una descarga el_ctrica o un incendio.
Mantenga los materiales del embalaje fuera del alcance de los ninos, ya que son peligrosos
para _stos.
Si un nino introduce la cabeza en una bolsa se puede asfixiar.
No permita que los ninos o las personas inestables utilicen la lavadora sin supervision.
Si Io hace puede provocar una descarga el_ctrica, quemaduras o lesiones.
No introduzca la mano ni objetos de metal bajo la lavadora mientras _sta est_ en
funcionamiento.
Se puede causar lesiones personales.
Antes de poner la ropa a lavar o de sacar la ropa limpia, compruebe que el cajon para
detergente est_ cerrado.
Si el cajon para detergente esta. abierto, se podrfa golpear la cabeza con _1y lesionarse.
No trate de reparar, desensamblar ni modificar la lavadora usted mismo.
- No utilice un fusible (de cobre, cable de acero, etc) que no est_ normalizado.
Para reparar o volver a instalar el electrodom_stico comun(quese con el centro de
servicio ma.s cercano.
Si no Io hace puede provocar una descarga electrica, un incendio, problemas con el
producto o lesiones.
Si alguna sustancia extrana, como agua, se introduce en el electrodom_stico, desenchufe
el cable de alimentacion y comun(quese con el centro de servicio ma.s cercano.
Si no Io hace puede provocar un incendio o una descarga el_ctrica.
Si se afloja la manguera de suministro de agua de la Ilave de agua y se inunda el
electrodom_stico, desenchufe el cable de alimentacion.
Si no Io hace puede provocar un incendio o una descarga el_ctrica.
Si entra la m&.quina cualquier sustancia extrana, desenchufe el enchufe y comun(quese con
su centro de reparaciones ma.s cercano.
Si no Io hace puede provocar un incendio o una descarga el_ctrica.
CONSERVE ESTAS INSTRUCClONES
Espa_o_7

SENALES DE PRECAUCiON DURANTE EL USO
PRECAUCION
Si la lavadora est&.contaminada pot sustancias extranas, tales como detergente, tierra,
restos de alimentos, etc., desenchufe el cable de alimentaci0n y limpie la lavadora con un
pano suave humedecido.
Si no Io hace se puede producir decoloraci0n, deformaci0n, danos u 0xido.
El cristal frontal se puede romper con un impacto fuerte. Sea cuidadoso cuando utilice la
lavadora.
La rotura del cristal puede causar lesiones.
Ante una falla de suministro de agua o cuando se vuelve a conectar la manguera de
suministro, abra lentamente la Ilave del agua.
Abra lentamente la Ilave del agua tras un periodo prolongado de falta de uso.
La presi0n del aire de la manguera de suministro o de la conducci0n de agua puede
danar una pieza o provocar fugas de agua.
Si durante el funcionamiento hay una falla en el drenaje, compruebe _ste.
Si se utiliza la lavadora inundada pot una falla en el drenaje, se puede provocar una
descarga el_ctrica o un incendio.
Introduzca completamente la ropa en la lavadora para que no pueda quedar atrapada pot
la puerta.
Si la ropa queda atrapada pot la puerta, se puede danar la ropa o la lavadora, o puede
haber fugas de agua.
AsegOrese de que la Ilave del agua est_ cerrada cuando la lavadora no se utiliza.
AsegOrese de que el tornillo del conector de la manguera de suministro del agua est_
correctamente apretado.
Si no Io hace puede provocar danos materiales o lesiones.
Procure que la junta de goma y el vidrio de la puerta frontal no est_n contaminados pot
sustancias extranas (como restos, hilos, cabellos, etc.)
Si una sustancia extrana queda atrapada en la puerta o si la puerta no ester bien
cerrada,se puede producir una fuga de agua.
Antes de utilizar el producto, abra la Ilave del agua y compruebe si el conector de la
manguera de suministro del agua ester firmemente asegurado y que no haya fugas de agua.
Si los tornillos o el conector de la manguera de suministro del agua est_tn flojos, puede
haber fugas de agua.
El producto adquirido ester disenado exclusivamente para uso dom_stico.
Su utilizaci0n con fines comerciales se considera un uso incorrecto del producto. En tal
caso el producto no quedarb, cubierto pot la garantfa esta.ndar que ofrece Samsung y no se
podra, atribuir a Samsung ninguna responsabilidad pot el malfuncionamiento o los danos
resultantes de este uso incorrecto.
Si no se inicia el lavado y la ropa se deja pot un tiempo despu_s de agregar detergente o
aplicar productos quitamanchas o de tratamiento previo, la ropa se puede decolorar.
Seleccione el ciclo y la temperatura recomendados dependiendo de la ropa que va a lavar,
clasifique las prendas segOn la solidez del color y seleccione el ciclo apropiado.
AsegOrese de que no haya objetos extranos como clips, botones o monedas en la ropa
que va a lavar. Antes del lavado separe lave la ropa sucia de la que ester relativamente
limpia, y la delicada de las telas m_ts resistentes.
Si una prenda est&.manchada, I&.valaIo m&.s pronto posible. Antes de utilizar productos
quitamanchas o detergente, pruebe la solidez del color aplicando una pequena cantidad en
una costura interior.
CONSERVE ESTAS INSTRUCClONES

No se suba encima del electrodom_stico ni coloque encima de _ste objetos (como ropa,
velas o cigarrillos encendidos, platos, productos qdmicos, objetos meta.licos, etc.).
Puede provocar una descarga el_ctrica, un incendio, problemas con el producto o
lesiones.
No haga funcionar el electrodom_stico con las manos mojadas.
Puede causar lesiones personales.
No rode materiales vol&.tiles,como insecticidas, en la superficie del electrodom_stico.
Adema.s de ser perjudiciales para las personas, tambi_n pueden provocar una descarga
el_ctrica, un incendio o problemas con el producto.
No coloque objetos que generen campos electromagn_ticos cerca de la lavadora.
Puede causar lesiones por un malfuncionamiento.
No toque el agua que se drena durante el lavado a alta temperatura o durante el ciclo de
secado ya que est&.caliente.
Puede causar lesiones personales o quemaduras.
No lave, centrifugue ni seque alfombrillas o prendas impermeables(*).
No lave alfombrillas gruesas y espesas aunque Ileven la marca de lavado en la etiqueta.
Se pueden causar lesiones o danar la lavadora, las paredes, el suelo o la ropa debido a
vibraciones anormales.
* Ropa de cama de lana, fundas de Iluvia, ropa para pescar, pantalones de esqd,
bolsas de dormir, cubiertas de panales, cha.ndales, cubiertas de bicicletas, mobs y
automoviles, etc.
No haga funcionar la lavadora sin el cajon del detergente.
Se puede provocar una descarga electrica o lesiones debido a fugas de agua.
No toque el interior de la tina durante o inmediatamente despu_s del secado, ya que est&.
caliente.
Puede causar quemaduras.
No introduzca las manos en el dosificador de detergente despu_s de abrirlo.
Se puede causar lesiones en la mano si _sta queda atrapada.
No introduzca ningOn objeto (como zapatos, restos de comida, animales) que no sea ropa
en la lavadora.
Se puede danar la lavadora, causar lesiones o la muerte en caso de mascotas por
vibraciones anormales.
No presione los botones con objetos afilados, como alfileres, cuchillos, las unas, etc.
Puede provocar una descarga el_ctrica o lesiones personales.
No lave ropa contaminada por aceites, cremas o Iociones que se utilizan normalmente en
los establecimientos para el cuidado de la piel o en las clfnicas de masajes.
Se puede deformar la junta de goma y provocar fugas de agua.
No deje objetos de metal, como horquillas o clips, ni lejfa en la tina durante periodos
prolongados de tiempo.
Se puede oxidar el tambor.
Si comienza a aparecer Oxido en la superficie de la tina, aplique un agente limpiador
(neutro) sobre la superficie y utilice una esponja para limpiarla. Nunca utilice un cepillo de
metal.
CONSERVE ESTAS INSTRUCClONES
Espa_o_9
No utilice detergentes de limpieza en seco directamente ni lave, enjuague ni centrifugue
ropa contaminada por detergentes de limpieza en seco.
Se puede producir una combusti6n esponta.nea o un incendio por el calor de la
oxidaci6n del aceite.
No utilice agua caliente de los dispositivos de calentamiento o enfriamiento del agua.
Podrfa tener problemas con la lavadora.
No utilice jab6n natural para lavado a mano en la lavadora.
Si se endurece y se acumula en el interior de la lavadora, puede causar problemas en el
producto, tales como decoloraci6n, 6xido y malos olores.
No lave prendas grandes como ropa de cama dentro de una red.
De no hacerlo se pueden producir lesiones personales por las vibraciones anormales.
Coloque los art(culos m&.spequenos, como las medias y la lencer(a, dentro de una red.
No utilice detergente endurecido.
Si se acumula en el interior de la lavadora, puede provocar fugas de agua.
No lave alfombras ni felpudos.
Si lava alfombras o felpudos, se acumulara arena en el interior de la lavadora. Puede
provocar errores como la falta de drenaje.
AI cerrar la puerta tenga cuidado de no atrapar los dedos de los ninos. Esto puede
provocar lesiones personales.
A SEI ALES DE ADVERTENCIA IMPORTANTES DURANTE LA
ADVERTENCIA_ LIMPIEZA
Q
No limpie el electrodom_stico rociando directamente agua dentro de _1.
No utilice un agente limpiador muy a.cido.
No utilice benceno, disolventes ni alcohol para limpiar el electrodom_stico.
Puede provocar decoloraci6n, deformaci6n, danos, incendio o descarga el_ctrica.
Antes de la limpieza o las tareas de mantenimiento, desenchufe el electrodom_stico del
tomacorriente de la pared.
Si no Io hace puede provocar un incendio o una descarga el_ctrica.
CONSERVE ESTAS INSTRUCClONES
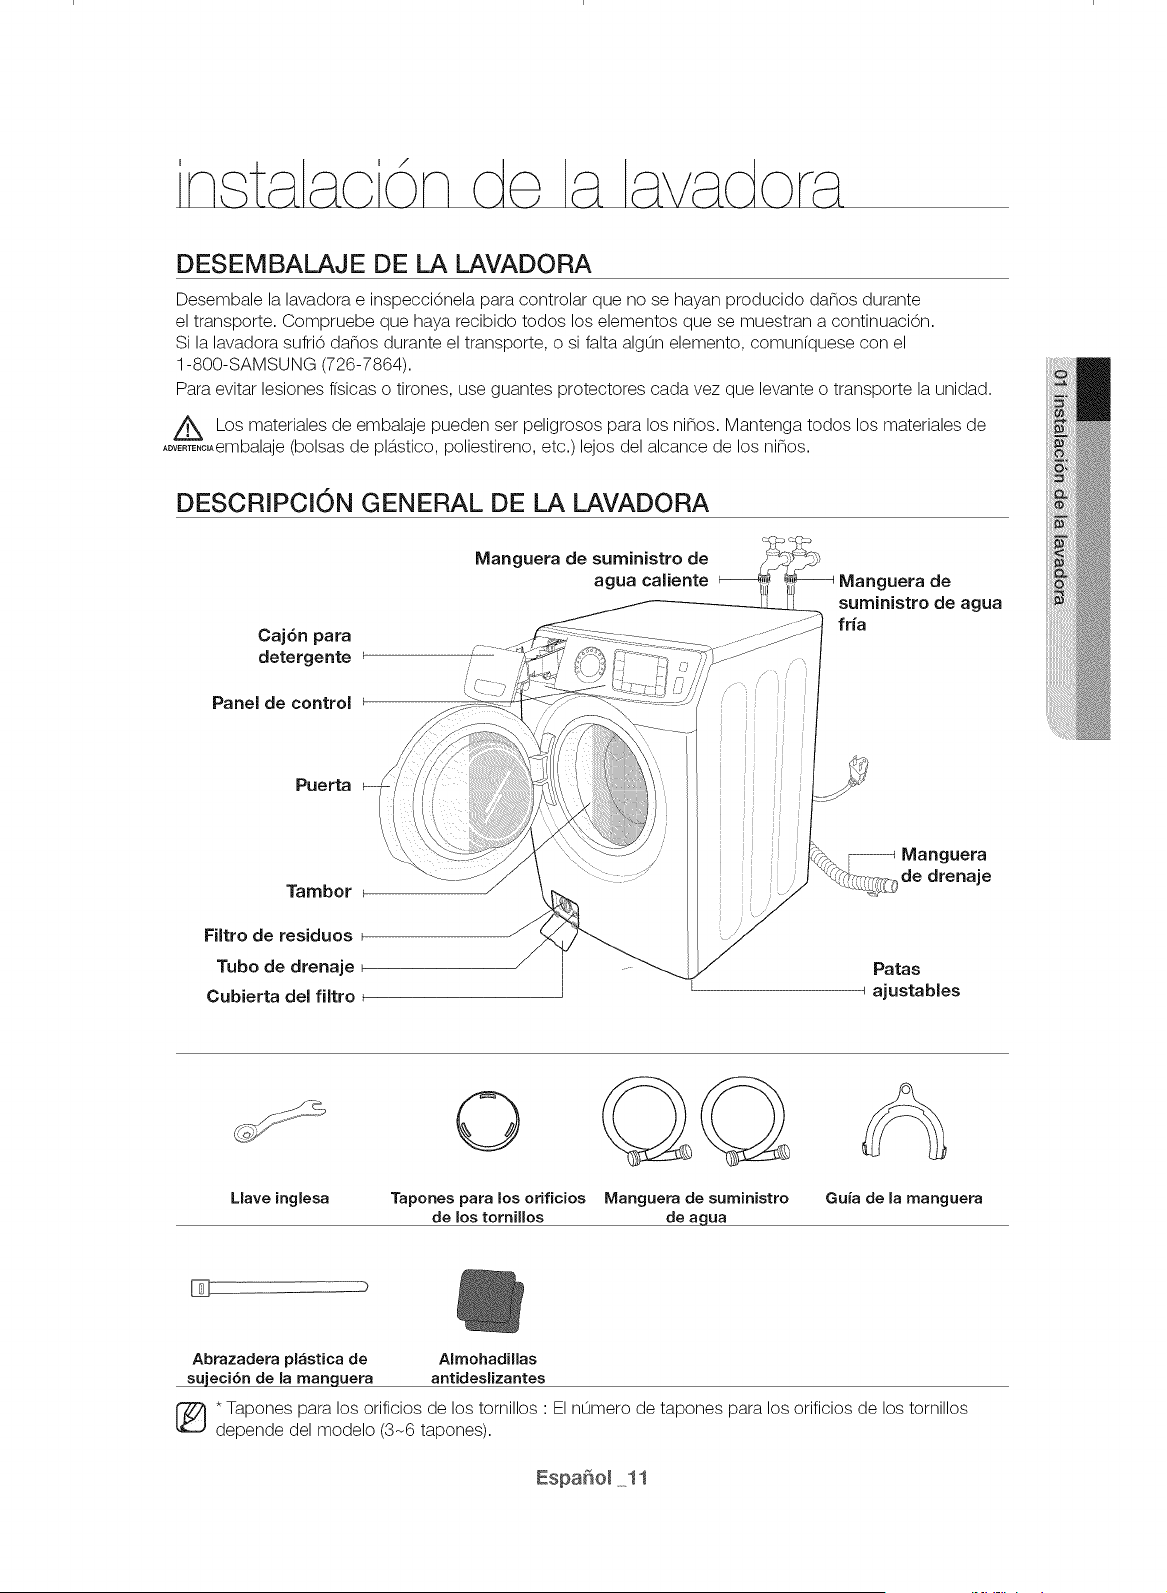
DESEMBALAJE DE LA LAVADORA
Desembale la lavadora e inspecci0nela para controlar que no se hayan _roducido daflos durante
el transporte. Compruebe que haya recibido todos los elementos que se muestran a continuaci0n.
Si la lavadora sufri0 danos durante el transporte, o si falta algLin elemento, comun(quese con el
1-800-SAMSUNG (726-7864).
Para evitar lesiones %icas o tirones, use guantes protectores cada vez que levante o transporte la unidad.
Z_ Los materiales de embalaje pueden set peligrosos para los ninos. Mantenga todos los materiales de
........... embalaje (bolsas de pl_tstico, poliestireno, etc.)lejos del alcance de los ninos.
DESCRIPCION GENERAL DE LA LAVADORA
Caj6n para
detergente
de s uministro de __
Manguera
agua caliente i_' 71 Manguera de
LL_Zj suministro de agua
fria
Panel de control
Puerta
Tambor
Filtro de residuos
Tubo de drenaje
Cubierta del filtro
Manguera
de drenaje
Patas
_ajustables
O
Llave inglesa Tapones para los orificios
de los torniUos
Manguera de suministro
de agua
Guia de la manguera
Abrazadera pl_stica de Almohadillas
sujecibn de la manqluera antideslizantes
* Tapones para los orificios de los tornillos ' El nLimero de tapones para los orificios de los tornillos
depende del modelo (3-6 tapones).
/
REQUISITOS BASICOS ACERCA DE LA UBICACi0N
Instalaci6n el ctrica
Fusible o disyuntor de 120 voltios, 60 Hz, 15 A
Se recomienda contar con un circuito derivado individual destinado 0nicamente a la
lavadora.
,,. La lavadora est&.equipada con un cable de alimentacion.
NUNCA UTILICE UN CABLE PROLONGADOR.
PRECAUCION
Conexi6n a tierra
ES PRECISO QUE ESTE ELECTRODOMESTICO ESTE CONECTADO A
TIERRA,
Este electrodom_stico debe conectarse a tierra. En caso de que el electrodom_stico funcione
mal o se descomponga, la conexion a tierra reducir&, el riesgo de descarga el_ctrica al ofrecer
una via de menos resistencia a la corriente electrica.
Este electrodom_stico est&.equipado con un cable de alimentacion que cuenta con un enchufe
de tres pines con conexion a tierra para utilizar en un tomacorriente con conexion a tierra.
El enchufe debe conectarse a un tomacorriente adecuado que este correctamente instalado y
conectado a tierra en conformidad con todos los codigos y ordenanzas locales.
La conexion inadecuada del conductor de conexion a tierra del equipo puede aumentar
'/_el riesgo de descarga el_ctrica. Consulte a un electricista o t_cnico calificado si le surgen
ADVERTENOIA
dudas acerca de si la conexion a tierra del electrodom_stico es adecuada. No modifique
el enchufe provisto con el electrodom_stico; si no entra en el tomacorriente, solicite a un
electricista calificado que instale el tomacorriente adecuado.
PRECAUCIONES DE SEGURIDAD IMPORTANTES
,, Para evitar el riesgo de incendio, descarga el_ctrica o lesiones fisicas innecesarias, todo
el cableado y la conexion a tierra deben realizarse en conformidad con el Codigo El_ctrico
Nacional, ANSI/FNPA, Nro. 70, la revision ma.s reciente, y los codigos y ordenanzas locales.
Es exclusiva responsabilidad del propietario del electrodom_stico proveer los servicios
el_ctricos adecuados para este electrodom_stico.
Z_ NUNCA CONECTE EL CABLE A TIERRA ALAS TUBER[AS DE PLA,STICO, LAS TUBER[AS
........ o,DE GAS O LAS CAINER[AS DE AGUA CALIENTE.
Agua
Usar agua de mala calidad puede provocar que la v&.lvula de suministro de agua no funcione
correctamente.
Para Ilenar correctamente la lavadora en el tiempo adecuado, se requiere una presion de agua
de 20- 116 psi (de 137 -800 kPa).
Una presion de agua inferior a 20 psi puede ocasionar fallas en la v&.lvula de agua, impedir que
la v&.lvula de agua se cierre completamente o prolongar el tiempo de Ilenado ma.sall&.de Io
permitido por los controles de la lavadora y que, como resultado, la lavadora se apague. En los
controles, se establece un I(mite de tiempo para evitar que se inunde la casa si una manguera
intema se afloja.
Las Ilaves de agua deben estar colocadas dentro de los 4 pies (122 cm) de distancia de la parte
posterior de la lavadora para las mangueras de entrada provistas con ella.
Las mangueras de entrada accesorias est&.n disponibles en varias longitudes hasta 10 pies
(305 cm) para Ilaves que se encuentren alejadas de la parte posterior de la lavadora.
Para evitar la posibilidad de que se produzcan danos a causa del agua:
,, Las Ilaves de agua deben ser de f&.cilacceso.
,, Cierre las Ilaves cuando no use la lavadora.
,, Verifique periOdicamente que no haya p_rdidas de agua que provengan de los
accesorios de la manguera de entrada de agua.
/_ CONTROLE QUE TODAS LAS CONEXIONES DE LA VALVULA Y DE LA LLAVE DE AGUA
.........._ ANOPRESENTEN PCRDIDAS.

Drenaje
La altura recomendada de la toma de agua es de 18 pulg. (46 cm). La manguera de drenaje
debe colocarse a trav_s del gancho para dicha manguera y dirigirse hacia la toma de agua. La
toma de agua debe tenet la suficiente Iongitud como para aceptar el di&.metro exterior de la
manguera de drenaje. La manguera de drenaje viene conectada de f_tbrica.
Suelo
Para un mejor desempeno, debe instalar la lavadora sobre un piso de construccion solida.
Posiblemente los pisos de madera neeesiten reforzarse para minimizar la vibracion y/o los
desequilibrios de la earga. Las superficies alfombradas o con revestimiento sint_tieo son factores
que contribuyen a la vibracion y pueden provocar que la lavadora se mueva levemente durante
el cielo de eentrifugado.
Nunca instale la lavadora sobre una plataforma o sobre una estructura con soportes poco
resistentes.
Consideraciones acerca de la ubicaci6n
No instale la lavadora en &.teas donde el agua se congele, dado que la lavadora siempre retendr_t
algo de agua en el &.teade la v_tlvula de agua, la bombay la manguera. El agua congelada
puede ocasionar danos a la bomba, las mangueras y dem&.s componentes.
Instalaci6n del electrodom6stico en un gabinete o en un hueco
DEJE UN ESPACIO LIBRE MiNIMO CUANDO INSTALE EL
ELECTRODOMESTICO EN UN GABINETE O EN UN HUECO:
Laterales: 1 pulg. / 25 mm
Parte posterior: 5,9 pulg. / 150 mm
Parte superior: 17 pulg. / 432 mm
Frente del gabinete: 2 pulg. / 51 mm
Si la lavadora y la secadora se instalan una junto a la otra, el frente del gabinete debe contar pot
Io menos con una abertura de aire sin obstrucciones de 72 pulg 2(465 cm2). La lavadora sola no
requiere una abertura de aire especffica.
A. Area empotrada
X ,,,
1 pulg.
(2,5cm)
1 pulg. --_27,0 pulg.----_l _-_27,0 pulg.-_,_-I pulg.
(2,5cm) (68,6cm) (68,6cm) (2,5 cm)
B. Vista lateral - gabinete o _treaempotrada
_B
.............................................
(43,2cm)_
INI
2 pulg.-€_l-_-_33,4 pulg._l_r - 5,9 puk
,. (Scm) (84,8cm) (15 cm!
Instalaci6n bajo contador (s61o lavadora)
39,6pulg.
(100,5cm)
1 pulg.---_q-,_m---27,0pulg.-----------_l_.-1pulg.
(2,5ore) (68,6cm) (2,5cm)
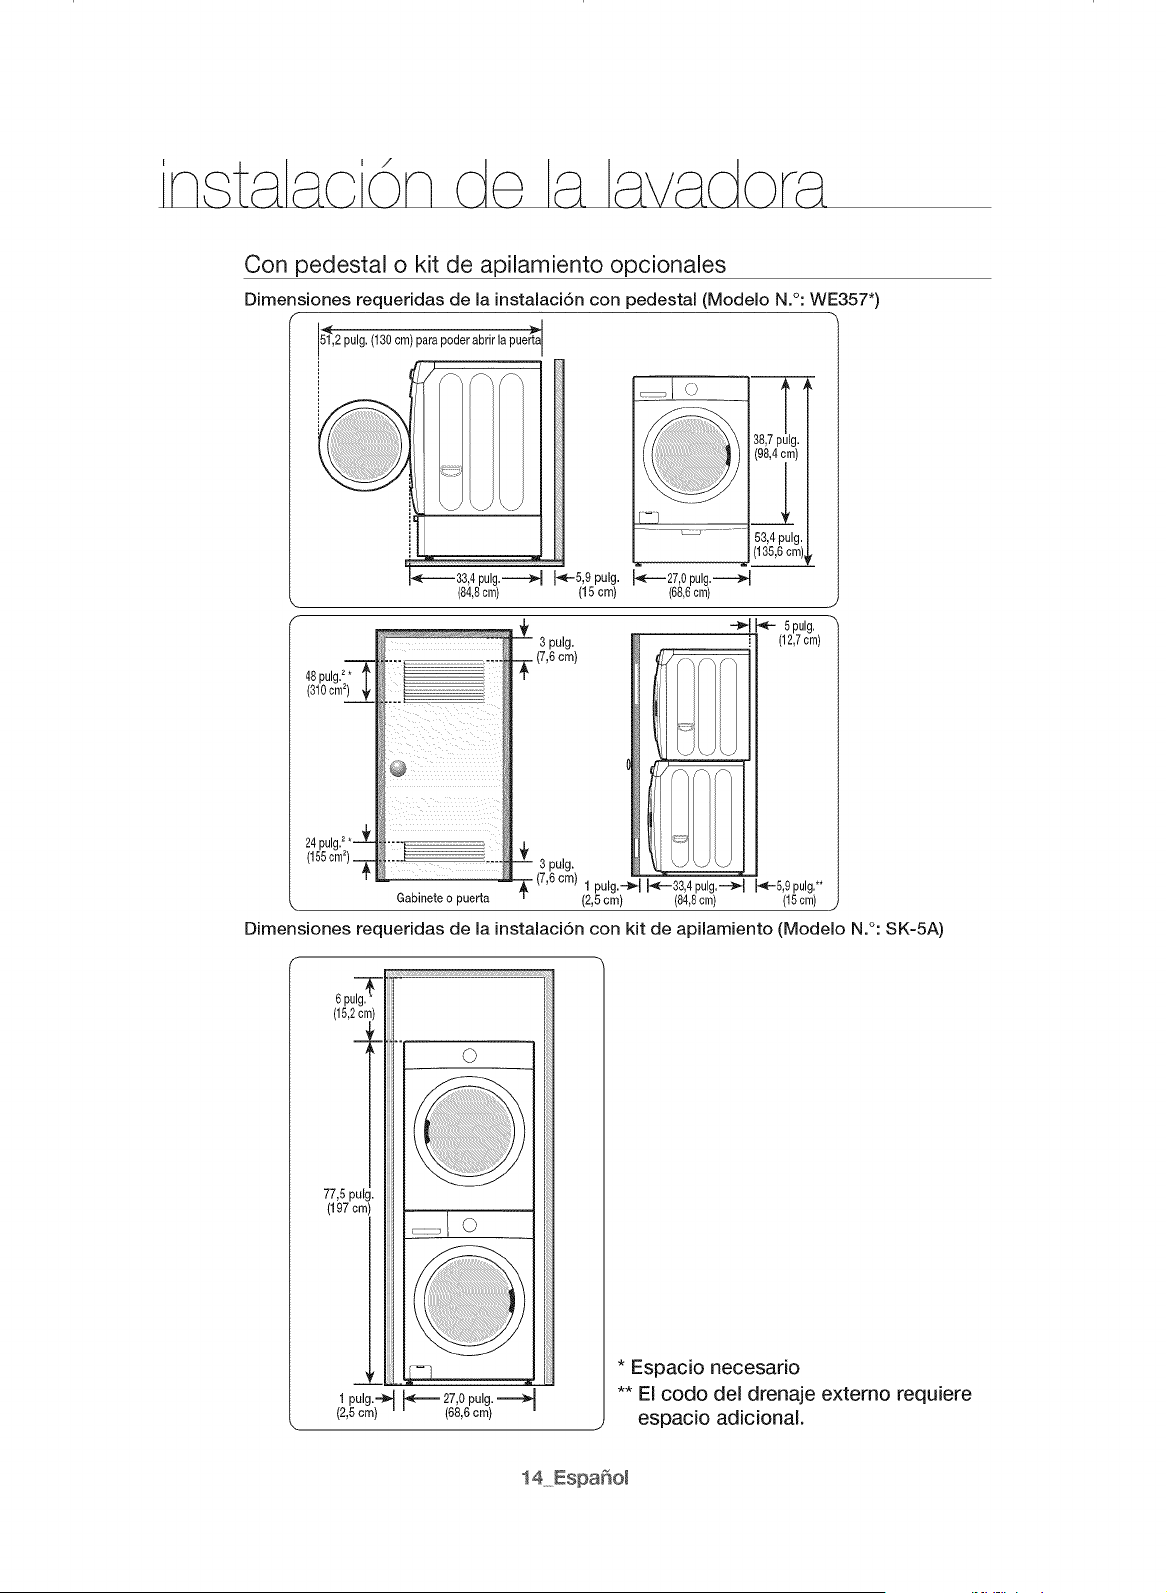
/
Con pedestal o kit de apilamiento opcionales
Dimensiones requeridas de la instalaci6n con pedestal (Model© N.°: WE357")
i4(
i51,2pulg.(130cm) parapoderabrir lapuerta
38,7pulg.
(98,4cm)
53,4pulg.
(135,6cm)_
1_5,0pulo._,_--27,Opul_.----N--
(84,8cm) (15 cm) (68,6cm)
Gabinete o puerta
5pulg.
""_l _ (12,7ore)
3pulg.
(7,6cm) 1 pulg.'-_l }'_---33,4 pulg.'--_l _-5,9 pulg.**
(2,5cm) (84,8cm) (15cm) .,
Dimensiones requeddas de la instalaci6n con kit de apilamiento (Model© N.°: SK-5A)
77,5pulg.
(197 cm)
©
©
* Espacio necesado
** El cod© del drenaje extemo requiere
espacio adicional.

NOTA IMPORTANTE PARA EL INSTALADOR
Lea las siguientes instrucciones con detenimiento antes de instalar la lavadora.
Estas instrucciones se deben conservar para consultas futuras.
Le recomendamos que contrate a un profesional para que instale esta lavadora.
Cuadro de flujo de instalaci6n
Seleccionar una
Ubicaci6n
Retirarlostomillosde _ Conectar el suministro
transporte(*solodeltambor) de agua y eld_enaje
l
Vuelvaa
controlar
antesde
cada paso.
&Produce
L sulavadora _-I_--
demasiadosruidos0
S[ vbraciones? No
Ajustar las patas Suminist!arelectricidad
niveladoras _ a su lavadora
Ejecucion de un Modo de
Finalizar la
ca!ib_aci6!_(Rem[tasea la _ instalacion
siguiente descripcbn)
PASO 1
Retirar los tornillos de transporte
Antes de usar su lavadora, debe retirar todos los tomillos de transporte
de la parte trasera de la unidad.
1. Afloje todos los tomillos con la Ilave provista.
2. Deslice el tomillo y el separador hacia arriba y retire el tomillo con
la arandela a trav_s del orificio de la parte posterior de la lavadora.
Repita el proceso para cada tomillo.
3. Cubra los orificios con los tapones para los orificios de los tomillos
(consulte la pa.gina 11).
4. Conserve los tornillos de transporte y las arandelas en caso de que
los necesite en el futuro.
PASO 2
Seleccionar una ubicaci6n
_ Antes de instalar la lavadora, de la ubieacion:
asegQrese que
Tenga una superficie resistente y nivelada.
Est_ alejada de la luz solar directa.
Tenga una ventilaciOn adecuada.
No se congele (temperaturas nunca inferiores a los 32 °F o 0 °C)
Est_ alejada de las fuentes de calor, tales como el aceite o el gas.
Tenga suficiente espacio para el cable de alimentacion.
No tenga alfombras que obstruyan los orificios de ventilacion.
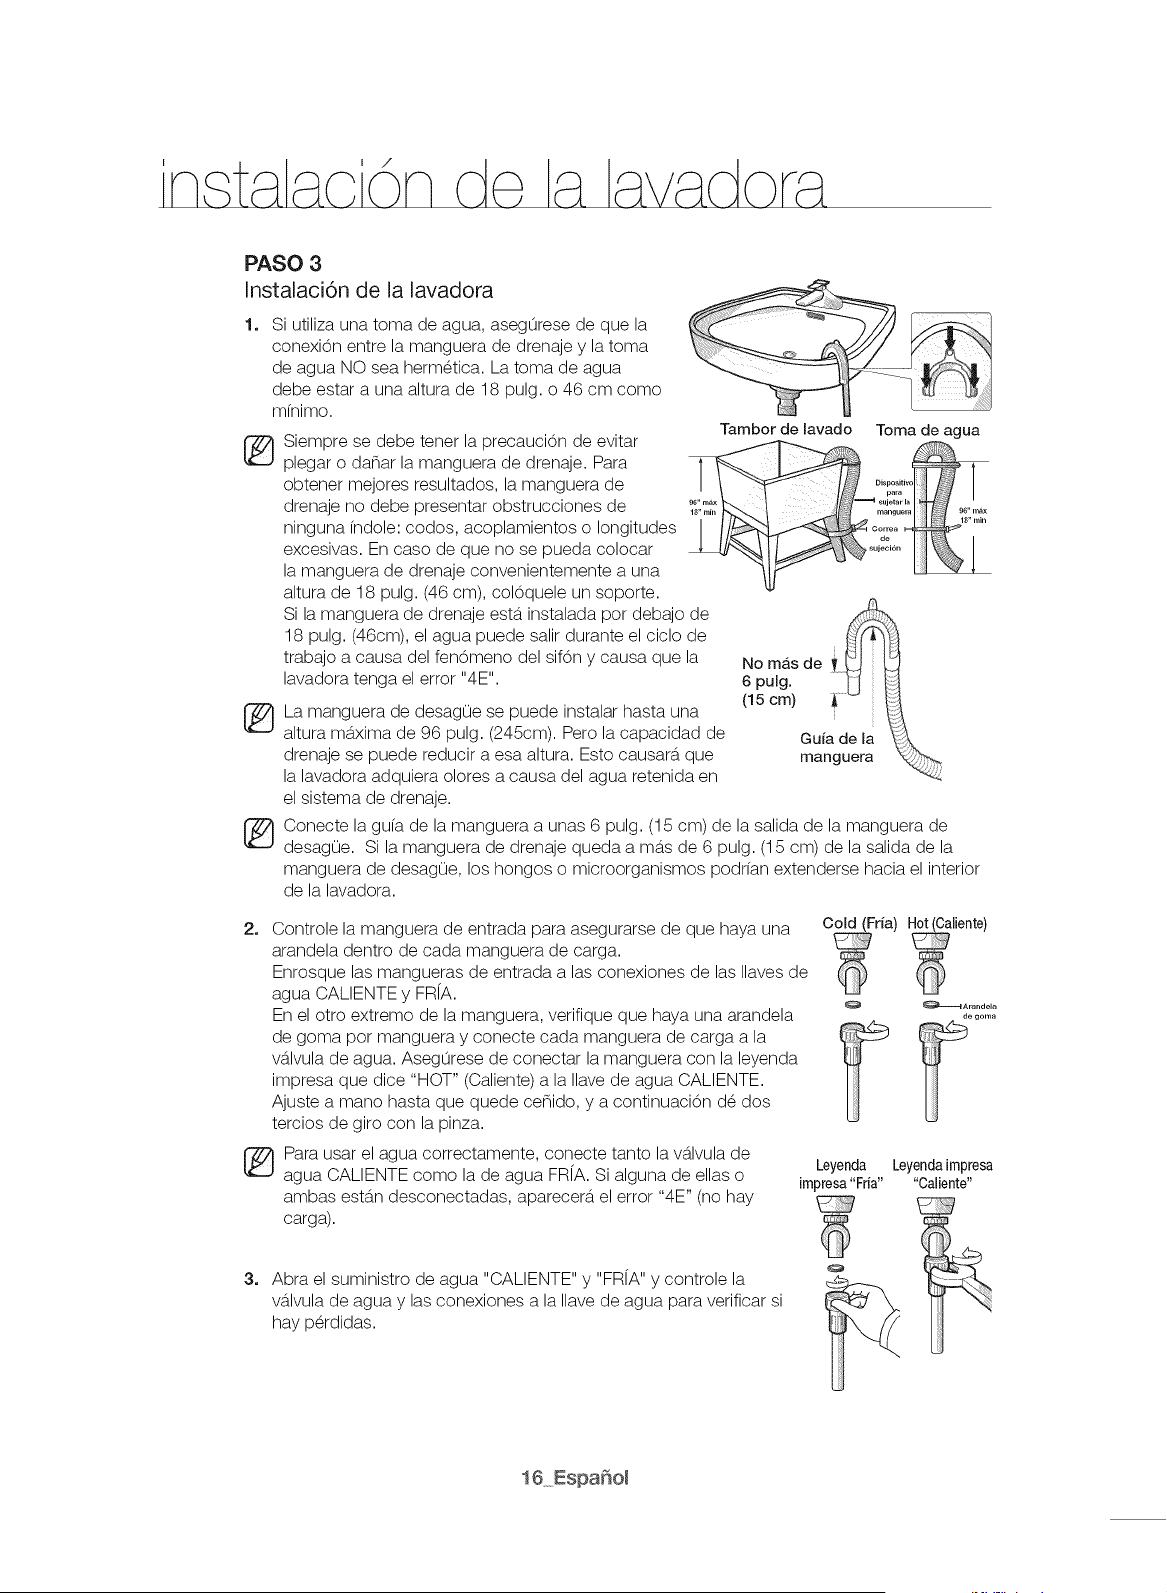
/
PASO 3
Instalaci6n de la lavadora
1.
Si utiliza una toma de agua, asegOrese de que la
conexi6n entre la manguera de drenaje y la toma
de agua NO sea herm_tica. La toma de agua
debe estar a una altura de 18 pulg. o 46 cm como
mfnimo.
Siempre se debe tenet la precauci0n de evitar
plegar o danar la manguera de drenaje. Para
obtener mejores resultados, la manguera de
drenaje no debe presentar obstrucciones de
ninguna (ndole: codos, acoplamientos o longitudes
excesivas. En caso de que no se pueda colocar
la manguera de drenaje convenientemente a una
altura de 18 pulg. (46 cm), col0quele un soporte.
Si la manguera de drenaje esta. instalada pot debajo de
18 pulg. (46cm), el agua puede salir durante el ciclo de
trabajo a causa del fen6meno del sifon y causa que la
lavadora tenga el error "4E".
La manguera de desagOe se puede instalar hasta una
altura ma.xima de 96 pulg. (245cm). Pero la capacidad de
drenaje se puede reducir a esa altura. Esto causara, que
la lavadora adquiera olores a causa del agua retenida en
el sistema de drenaje.
Tambor de lavado
No mAs de [_
6 pulg. +
U
(15 cm)
Gufa de la
manguera
Toma de agua
Conecte la gu(a de la manguera a unas 6 pulg. (15 cm) de la salida de la manguera de
desagOe. Si la manguera de drenaje queda a mas de 6 pulg. (15 cm) de la salida de la
manguera de desagOe, los hongos o microorganismos podr(an extenderse hacia el interior
de la lavadora.
2. Controle la manguera de entrada para asegurarse de que haya una
arandela dentro de cada manguera de carga.
Enrosque las mangueras de entrada alas conexiones de las Ilaves de
agua CALIENTE y FR[A.
En el otto extremo de la manguera, verifique que haya una arandela
de goma pot manguera y conecte cada manguera de carga a la
v_tlvulade agua. AsegOrese de conectar la manguera con la leyenda
impresa que dice "HOT" (Caliente) a la Ilave de agua CALIENTE.
Ajuste a mano hasta que quede cenido, y a continuacion d_ dos
tercios de giro con la pinza.
Para usar el agua correctamente, conecte tanto la valvula de
agua CALIENTE como la de agua FR[A. Si alguna de elias o
ambas est_tn desconectadas, aparecer_t el error "4E" (no hay
carga).
3. Abra el suministro de agua "CALIENTE" y "FR[A" y controle la
v&.lvulade agua y las conexiones a la Ilave de agua para verificar si
hay p_rdidas.
Cold (Fria) Hot (Caliente)
_dL.....--4 A rand ela
de goma
TT
Leyenda
impresa"Fria"
Leyendaimpresa
"Calbnte"
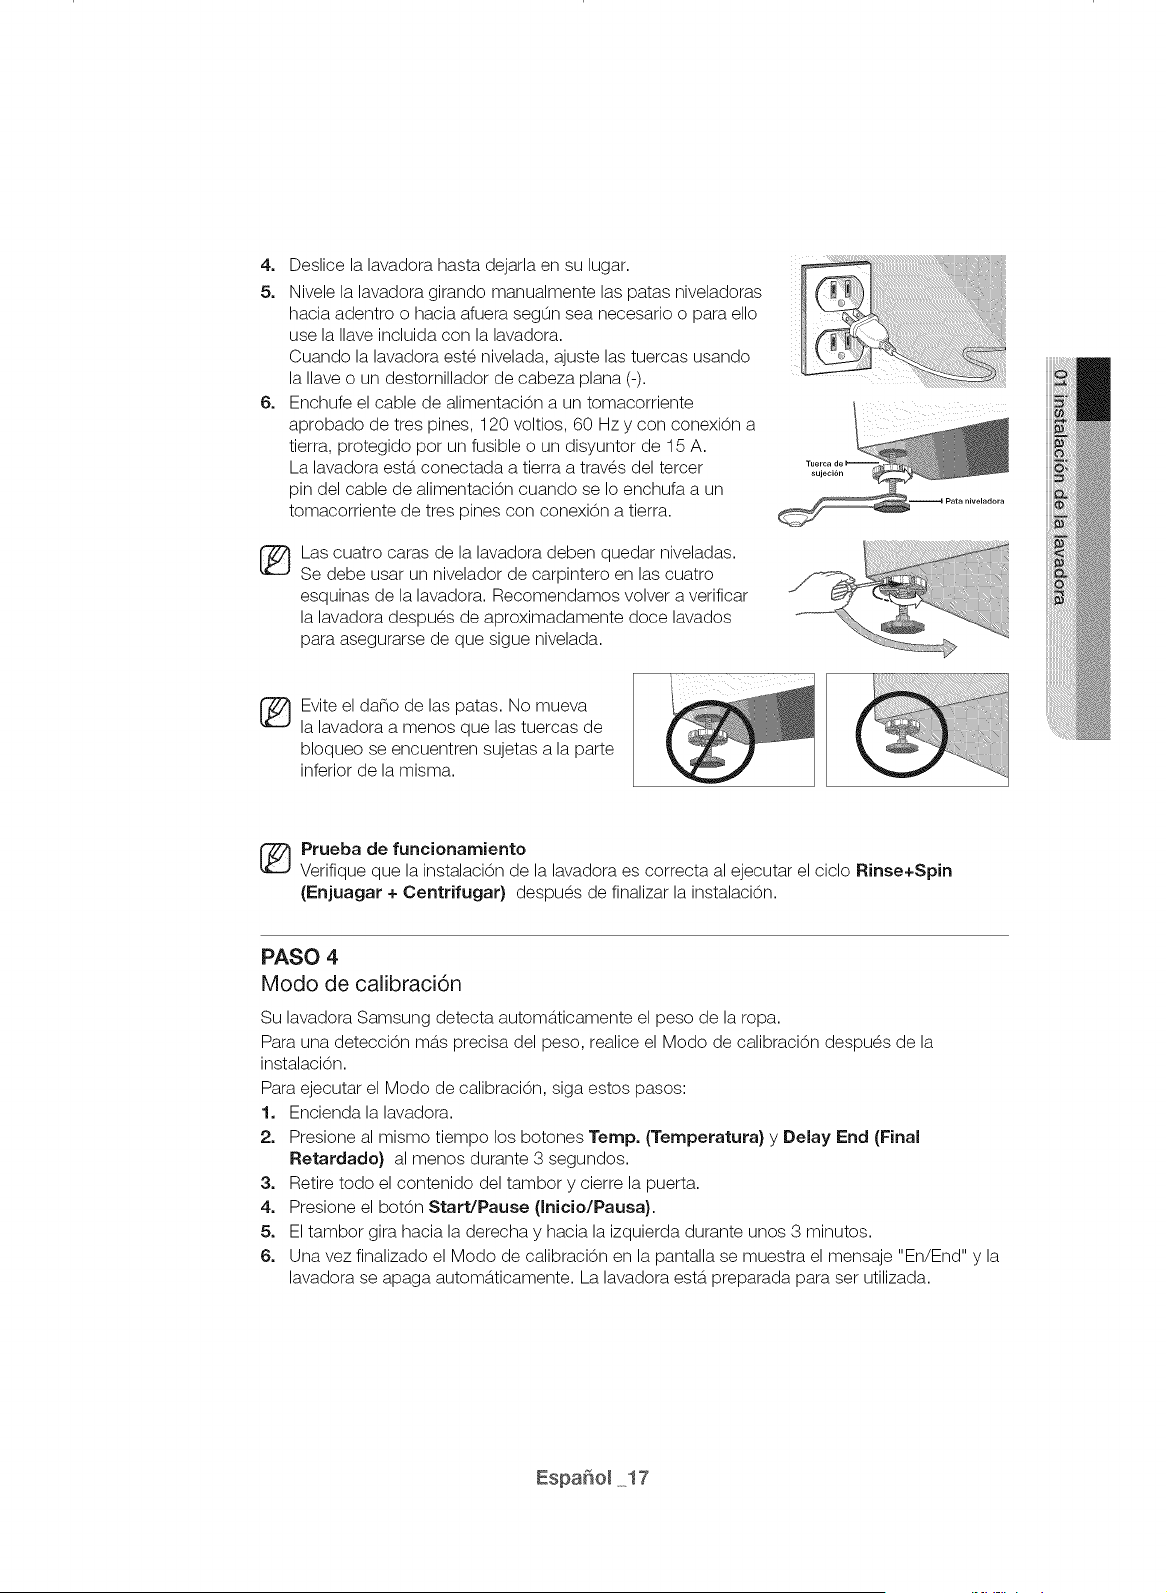
4. Deslicelalavadorahastadejarlaensulugar.
5. Nivelelalavadoragirandomanualmentelaspatasniveladoras
haciaadentroohaciaafuerasegOnseanecesariooparaello
uselaIlaveincluidaconlalavadora.
Cuandolalavadoraest_nivelada,ajustelastuercasusando
laIlaveoundestornilladordecabezaplana(-).
6. Enchufeelcabledealimentacionauntomacorriente
aprobadodetrespines,120voltios,60Hzyconconexiona
tierra,protegidopotunfusibleoundisyuntorde15A.
Lalavadoraestaconectadaatierraatrav_sdeltercer
pindelcabledealimentaci0ncuandoseIoenchufaaun
tomacorrientedetrespinesconconexionatierra.
Lascuatrocarasdelalavadoradebenquedarniveladas.
Sedebeusarunniveladordecarpinteroenlascuatro
esquinasdelalavadora.Recomendamosvolveraverificar
lalavadoradespu_sdeaproximadamentedocelavados
paraasegurarsedequesiguenivelada.
_ Eviteeldanodelaspatas.Nomueva
lalavadoraamenosquelastuercasde
bloqueoseencuentrensujetasalaparte
inferiordelamisma.
_ ruebadefuncionarniento
Verifiquequelainstalaci0ndelalavadoraescorrectaalejecutarelcicloRinse+Spin
(Enjuagar + Oentrifugar} despu_s de finalizar la instalacion.
PASO 4
Modo de calibraci6n
Su lavadora Samsung detecta automaticamente el peso de la ropa.
Para una deteccion m_ts precisa del peso, realice el Modo de calibracion despu_s de la
instalacion.
Para ejecutar el Modo de calibracion, siga estos pasos:
1. Encienda la lavadora.
2. Presione al mismo tiempo los botones Temp. (Ternperatura} y Delay End (Final
Retardado} al menos durante 3 segundos.
3. Retire todo el contenido del tambor y cierre la puerta.
4. Presione el bot0n Start/Pause (Inicio/Pausa}.
5. El tambor gira hacia la derecha y hacia la izquierda durante unos 3 minutos.
6. Una vez finalizado el Modo de calibracion en la pantalla se muestra el mensaje "En/End" y la
lavadora se apaga autom_tticamente. La lavadora ester preparada para set utilizada.
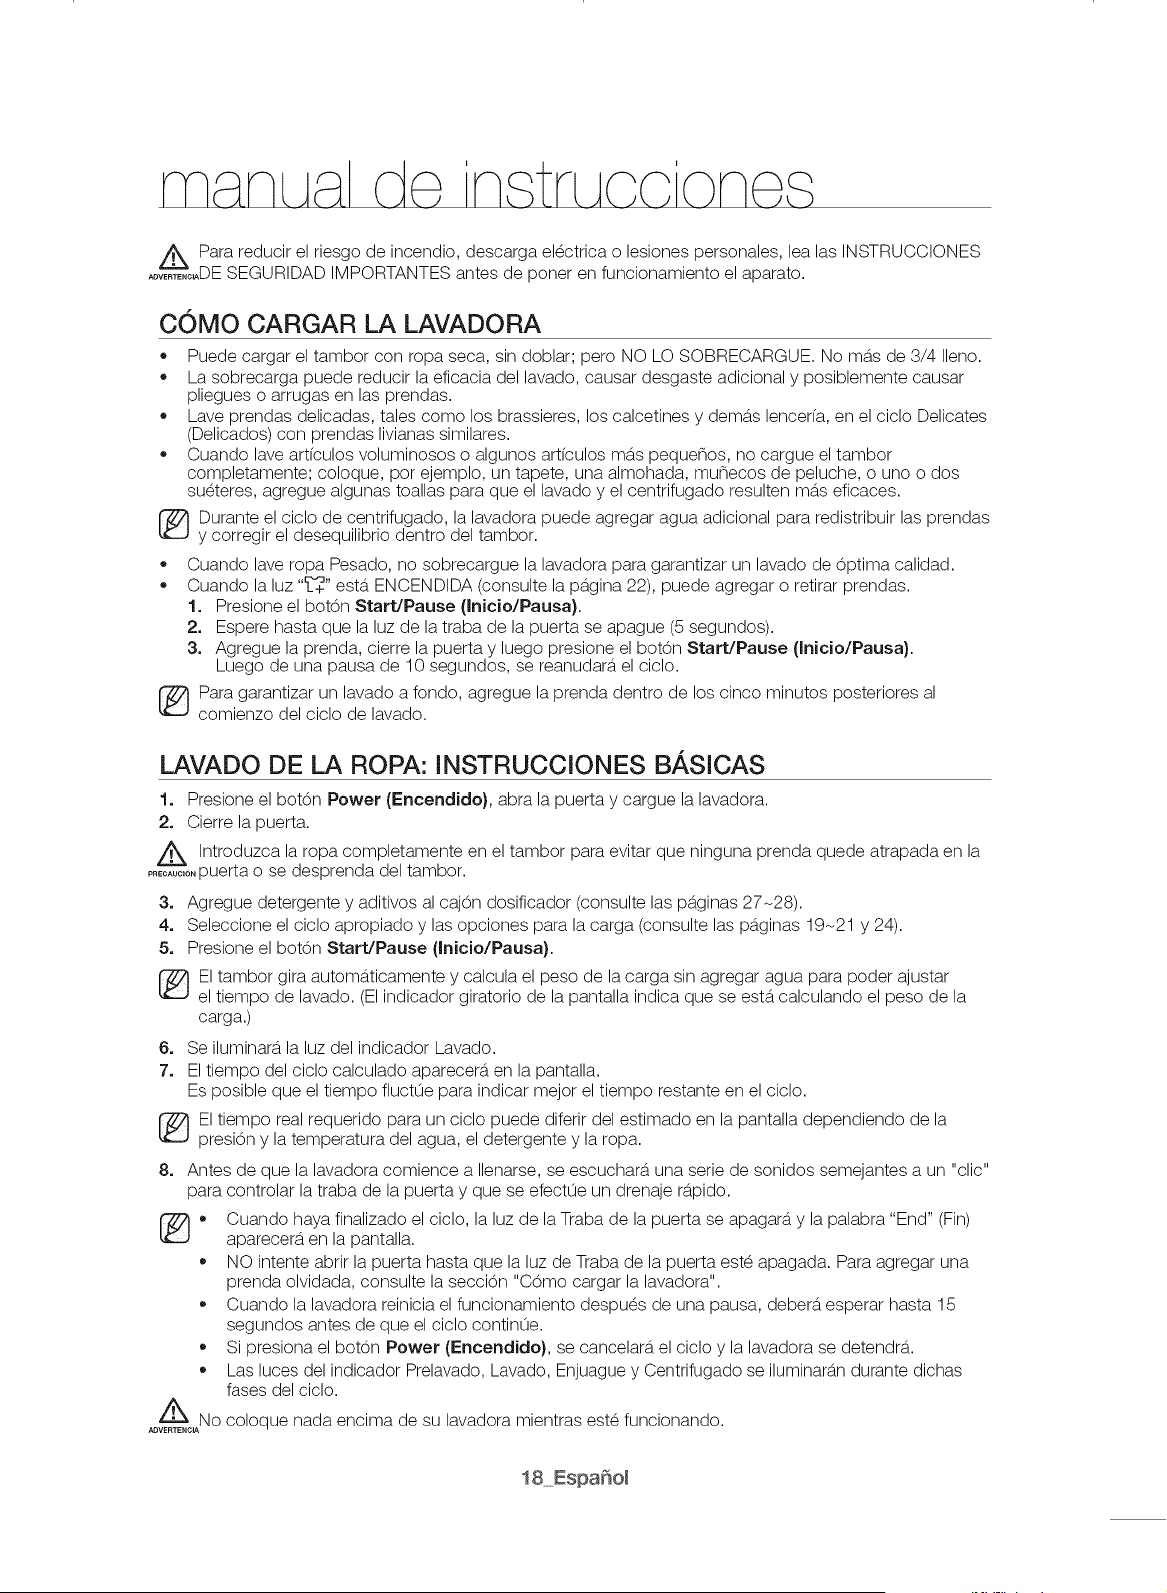
/._ Para reducir el riesgo de incendio, descarga el_ctrica o lesiones personales, lea las INSTRUCCIONES
.......... DE SEGURIDAD IMPORTANTES antes de poner en funcionamiento el aparato.
COMe CARGAR LA LAVADORA
• Puede cargar el tambor con ropa seca, sin doblar; pero NO LO SOBRECARGUE. No m&.s de 3/4 Ileno.
• La sobrecarga puede reducir la eficacia del lavado, causar desgaste adicional y posiblemente causar
pliegues o arrugas en las prendas.
• Lave prendas delicadas, tales come los brassieres, los calcetines y demurs lencer(a, en el oielo Delicates
(Delicados) con prendas livianas similares.
• Cuando lave art(culos voluminosos o algunos art(culos m&.spequenos, no cargue el tambor
completamente; coloque, per ejemplo, un tapete, una almohada, munecos de peluche, o uno o dos
su_teres, agregue algunas toallas para que el lavado y el centrifugado resulten m_tseficaces.
Durante el ciclo de centrifugado, la lavadora puede agregar agua adicional para redistribuir las prendas
y corregir el desequilibrio dentro del tambor.
• Cuando lave ropa Pesado, no sobrecargue la lavadora para garantizar un lavado de Optima calidad.
• Cuando la luz "_-_+"esta. ENCENDIDA (consulte la pb.gina 22), puede agregar o retirar prendas.
1. Presione el boton Start/Pause (Inicio/Pausa).
2. Espere hasta que la luz de la traba de la puerta se apague (5 segundos).
3. Agregue la prenda, cierre la puerta y luego presione el boton Start/Pause (Inicio/Pausa}.
Luego de una pausa de 10 segundos, se reanudara, el ciclo.
Para garantizar un lavado a fondo, agregue la prenda dentro de los cinco minutes posteriores al
comienzo del ciclo de lavado.
LAVADO DE LA ROPA: INSTRUCCIONES B,&SICAS
1. Presione el boton Power (Encendido}, abra la puerta y cargue la lavadora.
2. Cierre la puerta.
Z_ Introduzca la completamente en el tambor evitar ninguna prenda quede atrapada en la
ropa para que
........o,puerta o se desprenda del tambor.
3. Agregue detergente y aditivos al cajon dosificador (consulte las pb.ginas 27-28).
4. Seleccione el ciclo apropiado y las opciones para la carga (consulte las pb.ginas 19-21 y 24).
5. Presione el boton Start/Pause (Inicio/Pausa}.
El tambor gira autom_tticamente y calcula el peso de la carga sin agregar agua para poder ajustar
el tiempo de lavado. (El indicador giratorio de la pantalla indica que se estercalculando el peso de la
carga.)
6. Se iluminar_t la luz del indicador Lavado.
7. El tiempo del ciclo calculado aparecer&, en la pantalla.
Es posible que el tiempo fluct0e para indicar mejor el tiempo restante en el ciclo.
El tiempo real requerido para un ciclo puede diferir del estimado en la pantalla dependiendo de la
presion y la temperatura del agua, el detergente y la ropa.
8. Antes de que la lavadora comience a Ilenarse, se escuchar&, una serie de sonidos semejantes a un "clic"
para controlar la traba de la puerta y que se efect0e un drenaje r_tpido.
@o Cuando haya finalizado el ciclo, la luz de la Traba de la puerta se apagar_t y la palabra "End" (Fin)
aparecer&, en la pantalla.
NO intente abrir la puerta hasta que la luz de Traba de la puerta est_ apagada. Para agregar una
prenda olvidada, consulte la seccion "Come cargar la lavadora".
Cuando la lavadora reinicia el funcionamiento despu_s de una pausa, deber_t esperar hasta 15
segundos antes de que el oicIo contin0e.
Si presiona el boton Power (Encendido}, se cancelar_t el cicIo y la lavadora se detendr_t.
Las luces del indicador Prelavado, Lavado, Enjuague y Centrifugado se iluminarb.n durante dichas
fases del ciclo.
Z_No coloque nada encima de su lavadora mientras est_ funcionando.
ADVERTENCiA
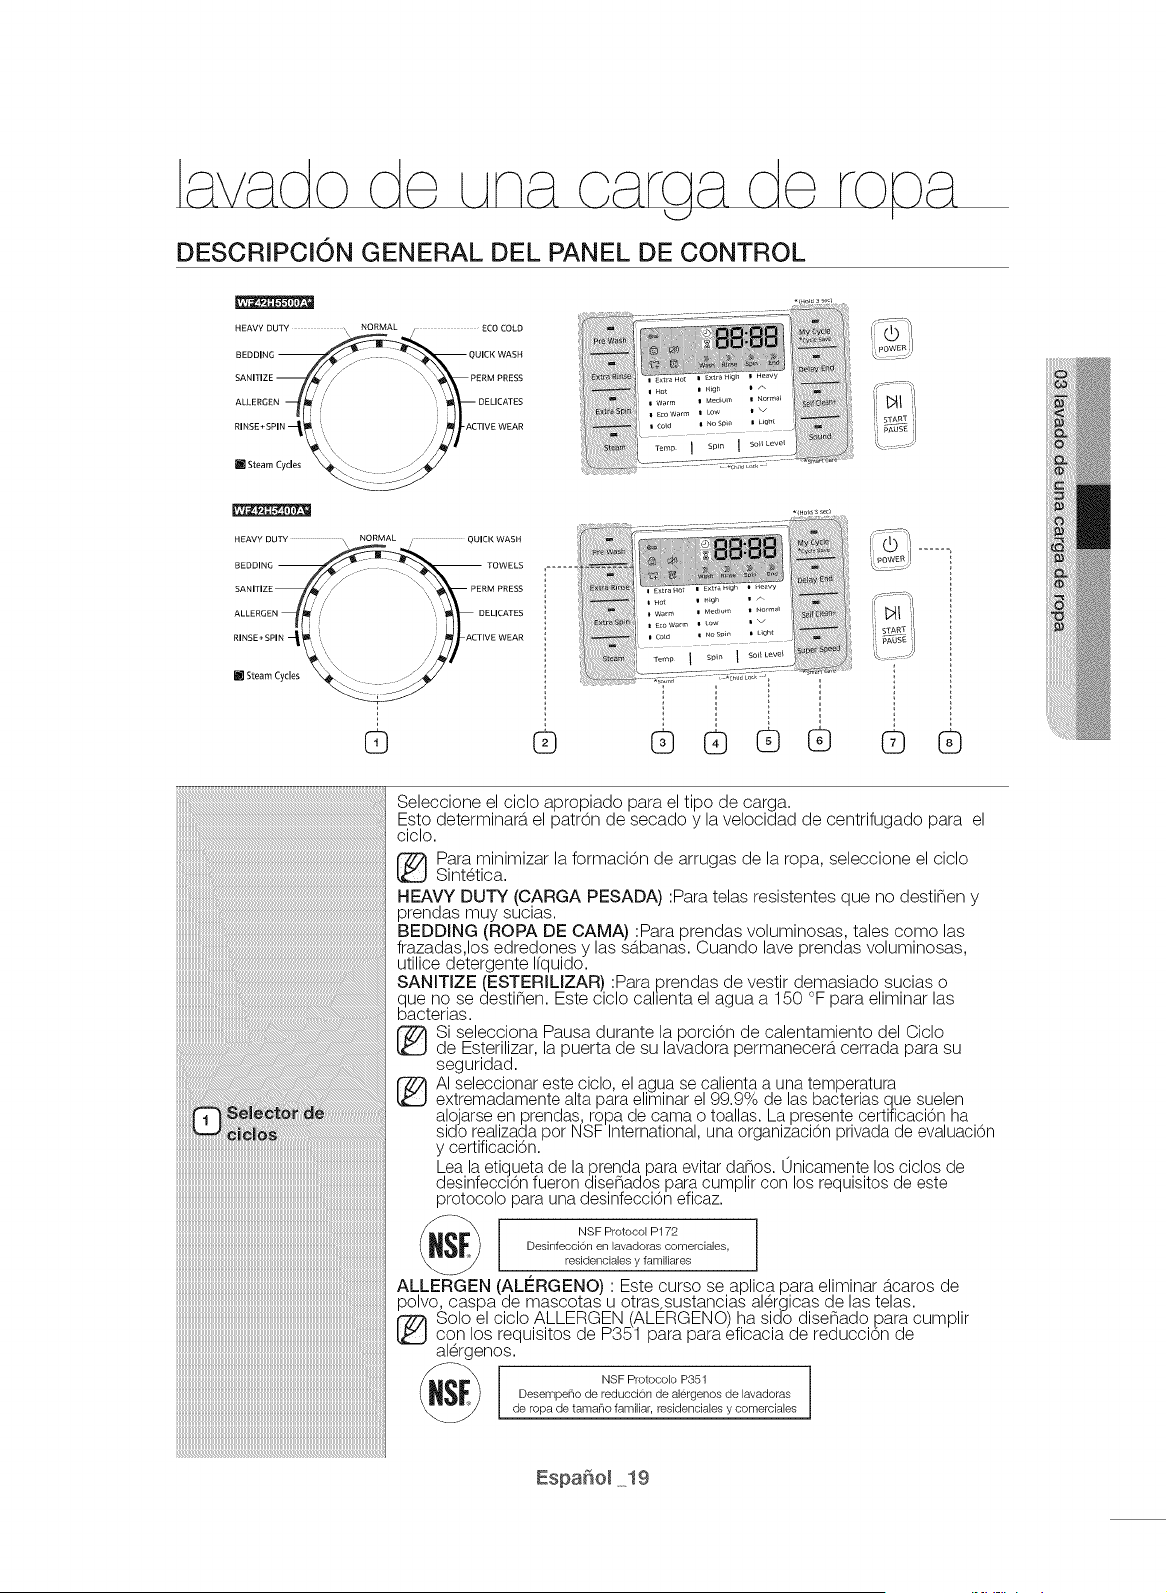
lavado de LAnacaraa de
DESCRIPCiON GENERAL DEL PANEL DE CONTROL
HEAVY DUTY 'S NORMAL ECO COLD
....
SANITIZE PERM PRESS
ALLERG£ OELICATES
[] Steam Cycles_
HEAVY DUTY \ NORMAL / QUICK WASH
\
.... ......
SANITIZE PERM PRESS
ALLERGE ELICATES
[] Steam Cycles _._
@
]i _ iI ......
i_ow ER
@ @ @ @ @ © ®
Seleccione el ciclo apropiado para el tipo de carga.
Esto determinar&, el patr6n de secado y la velocidad de centrifugado para el
oicIo.
Para minimizar la formaci6n de arrugas de la ropa, seleccione el ciclo
Sint@tiea.
HEAVY DUTY (CARGA PESADA) :Para telas resistentes que no destinen y
prendas muy sucias.
BEDDING (ROPA DE CAMA) :Para prendas voluminosas, tales eomo las
frazadas,los edredones y las sb.banas. Cuando lave prendas voluminosas,
utilice detergente Ifquido.
SANITIZE (ESTERILIZAR) :Para prendas de vestir demasiado sucias o
clue no se destinen. Este cielo cahenta el agua a 150 °F para eliminar las
!oacterias.
Si seleeeiona Pausa durante la porei6n de calentamiento del Cielo
de Esterilizar, la puerta de su lavadora permanecer&, cerrada para su
seguridad.
AI seleccionar este ciclo, el agua se calienta a una temperatura
extremadamente alta para eliminar el 99.9% de las bacterias que suelen
alojarse en prendas, ropa de cama o toallas. La presente certificaci6n ha
sido realizada por NSF International, una organizaci6n privada de evaluaci6n
y certificaci6n.
Lea la etiqueta de la prenda para evitar daBos. 0nicamente los ciclos de
desinfecci6n fueron diseBados para cumplir con los requisitos de este
protocolo para una desinfecci6n eficaz.
_S_ NSF Protocol P172
Desinfecci6n en lavadoras comerciales,
residenciales y familiares
ALLERGEN (ALleRGENO) : Este curso se aplica para eliminar &.caros de
polvo, caspa de mascotas u otras sustancias al@gicas de las telas.
¢77_ Solo el ciclo ALLERGEN (ALERGENO) ha sido disenado para cumplir
con los requisitos de P351 para para eficacia de reducci6n de
al@genos.
Desempei'lo de reducci6rl de alergenos de lavadoras
de ropa de tamai_lo familiar, residenciales y comerciales
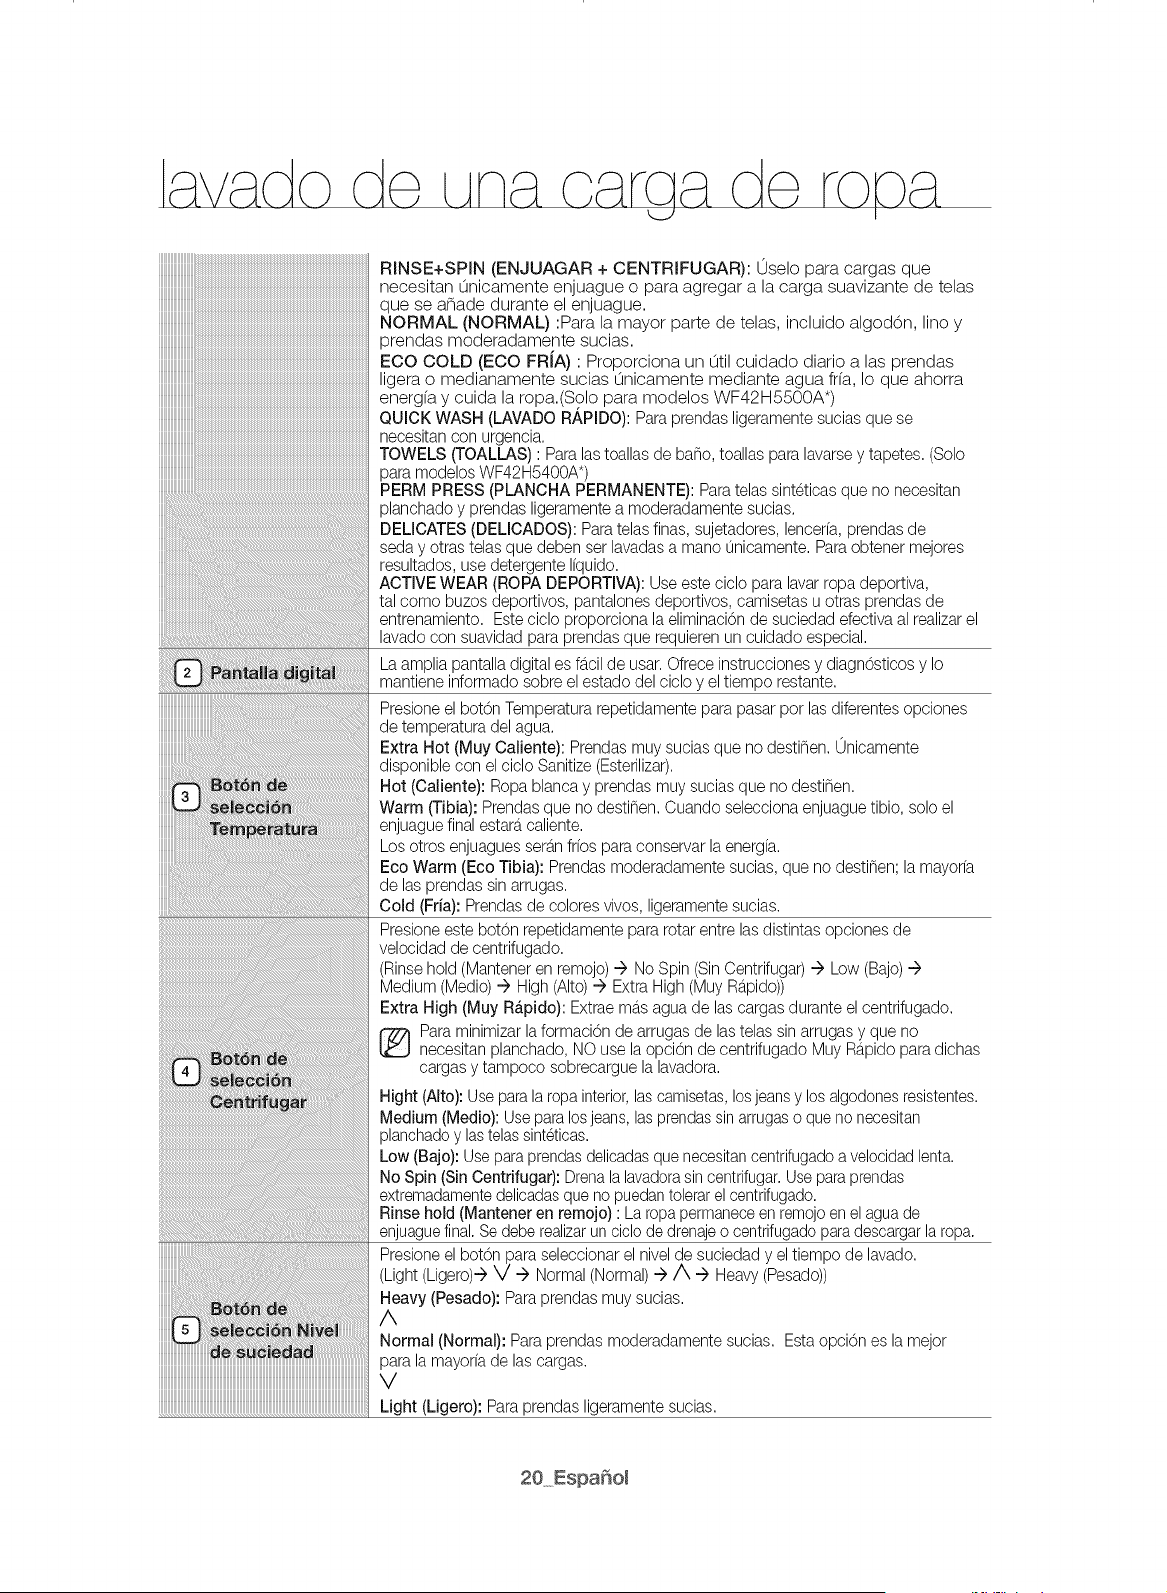
RINSE+SP_N (ENJUAGAR + CENTRIFUGAR): Uselo para cargas que
necesitan Linicamente enjuague o para agregar a la carga suavizante de telas
que se a_ade durante el enjuague.
NORMAL (NORMAL) :Para la mayor parte de telas, incluido algod0n, lino y
prendas moderadamente sucias.
ECO COLD (ECO FRiA) : Proporciona un Qtil cuidado diario alas prendas
ligera o medianamente sucias Qnicamente mediante agua fr(a, Io que ahorra
energia y cuida la ropa.(Solo para modelos WF42H5500A*)
QUICK WASH (LAVADO R,&PIDO):Para prendas ligeramentesucias que se
necesitancon urgencia.
TOWELS (TOALLAS): Para lastoallas de ba_o, toallas para lavarsey tapetes. (Solo
para modelosWF42H5400A*)
PERM PRESS (PLANCHA PERMANENTE): Paratelas sinteticasque no necesitan
planchado y prendas ligeramentea moderadamentesucias.
DELICATES(DELICADOS): Paratelas finas, sujetadores, lenceria, prendas de
seda y otras telas que deben set lavadasa mano unicamente. Para obtener mejores
resultados,use detergente liquido.
ACTIVE WEAR (ROPA DEPORTIVA): Use este ciclo para lavarropa deportiva,
tal como buzos deportivos, pantalonesdeportivos, camisetas u otras prendas de
entrenamiento. Este ciclo proporciona la eliminaci0nde suciedad efectiva al realizarel
lavado con suavidad para prendas que requierenun cuidado especial.
La amplia pantalla digital es fb.cilde usar. Ofrece instrucciones y diagnOsticosy Io
mantiene informado sobre el estado del ciclo y el tiempo restante.
Presioneel bot0n Temperaturarepetidamente parapasar pot las diferentes opciones
de temperaturadel agua.
Extra Hot (Muy Caliente): Prendas muy sucias que no desti_en. 0nicamente
disponiblecon el ciclo Sanitize(Esterilizar).
Hot (Caliente): Ropa blanca y prendas muy sucias que no desti_en.
Warm (Tibia): Prendas que no desti_en. Cuando selecciona enjuaguetibio, solo el
enjuaguefinal estarb,caliente.
Los otros enjuaguesserb.nfrios para conservar la energia.
Eco Warm (Eco Tibia): Prendasmoderadamente sucias, que no desti_en; la mayoria
de las prendas sin arrugas.
Cold (Fria): Prendasde colores vivos, ligeramentesucias.
Presioneeste botOn repetidamentepara rotar entre lasdistintas opcionesde
velocidad de centrifugado.
(Rinsehold (Manteneren remojo)--) No Spin (SinOentrifugar)--) Low (Bajo)--)
Medium (Medic) --) High (Alto)--) Extra High (Muy Rb.pido))
Extra High (Muy RApido): Extraemb.sagua de las cargas durante el centrifugado.
Para minimizarlaformaci0n de arrugas de las telas sin arrugas y que no
necesitanplanchado, NO use la opci0n de centrifugado Muy Rb.pidopara dichas
cargas y tampoco sobrecargue la lavadora.
Hight (Alto): Usepara la ropa interior,lascamisetas,losjeansy los algodonesresistentes.
Medium (Medic): Usepara losjeans,las prendassinarrugaso que no necesitan
planchadoy lastelassinteticas.
Low (Bajo): Usepara prendasdelicadasque necesitancentrifugadoa velocidadlenta.
No Spin (Sin Centrifugar): Drena lalavadorasin centrifugar.Useparaprendas
extremadamentedelicadasque no puedantolerarel centrifugado.
Rinse hold (Mantener en remojo) : La ropapermaneceen remojoen el aguade
enjuaguefinal. Se debe realizarun ciclo de drenajeo centrifugadopara descargarlaropa.
Presioneel bot0n paraseleccionar el nivelde suciedad y el tiempo de lavado.
(Light (Ligero)--)d -->Normal (Normal)-->/X -->Heavy (Pesado))
Heavy (Pesado): Paraprendas muy sucias.
A
Normal (Normal): Para prendas moderadamentesucias. EstaopciOnes la mejor
para la mayoriade las cargas.
V
Light (Ligero): Paraprendas ligeramentesucias.

Presioneestosbotonesparaseleccionardiferentesopcionesdelciclo.
PreWash(PreLavado):Parausarestafunci0n,coloquedetergenteenel
compartimientoparaeldetergentedelasecci0ndeprelavado.Unavezque
seenciende,lalavadoraseIlenadeaguafr(aydetergente,rota,luegodrena
yavanzaalciclodelavadoseleccionado.Algunosciclosnopuedenser
seleccionadosconestaopci0n(Consultelaspb.ginas27y28).
ExtraRinse(ExtraEnjuague):Agregueunenjuagueadicionalalfinaldel
ciclopararemoverlosaditivosyperfumesdellavadoconmayoreficacia.
ExtraSpin(MayorCentrifugado):Agreguetiempoadicionalparaextraer
m&.saguadelascargas.
Steam(Vapor):Presioneestebot0nparausarlafunci0ndelimpiezaal
vapor.EllavadoconvaporseencuentradisponibleparalosciclosNormal
(Normal),HeavyDuty(CargaPesada),Bedding(RopadeCama),Sanitize
(Esteriliza0,DeepSteam(Vaporizaci0nProfunda)yAllergen(Al_rgeno).
Paraprendasmuysuciasyquenodestinen,ellavadoalvapormejoralos
tratamientosparaeliminarmanchasyempleamenosaguaencadaoiclo
(consultelapb.gina25).
Sound(Sonido):Cuandoactivelafunci0nSoundOff(Sonidoapagado),la"
" la.mparaseilumina.(SoloparamodelosWF42H5500A*)
MyCycle(Miciclo): Elijasuciclofavorito,incluyendotemperatura,
centrifugado,niveldesuciedad,opciones,etc.(consultelapb.gina23)
DelayEnd(FinalRetardado):Cualquierciclopuederetardarsehasta24
horasenincrementosdeunahora.Lahoraenpantallaindicaeltiempoenel
cualcomenzar&,ellavado.(Consultelapb.gina22).
SelfClean+(Autolimpieza+):Useloparalimpiarsuciedady mohodel
tambor.Serecomiendaelusoregular(despuesde40lavados).Noes
necesariodetergentenilejfa(consultelapb.gina31).
SuperSpeed(Supervelocidad): Presioneestebot0nsinecesitaacortar
eltiempodelavado,aplicableparacursoNormal(Normal),DeepSteam
(VaporizacionProfunda),HeavyDuty(CargaPesada),Bedding(RopadeCama)
oAllergen(Al_rgeno).Eltiempoacortadopuedediferirdependiendodel
Curso/Carga/Opcion.(SoloparamodelosWF42H5400A*)
Presioneloparadeteneryreiniciarlosprogramas.
Presioneunavezparaencenderlalavadoraypresi0nelonuevamentepara
apagarla.Silalavadorapermaneceencendidadurantema.sde10minutos
sinquesetoqueningunodelosbotones,seapagar&,autom&.ticamente.
Child Lock (Seguro para Ni_os) @
La funcion Seguro para ninos evita que los ninos jueguen con la lavadora.
Una vez activada la funci0n del Seguro para ninos, el panel de control no se puede activar, as(
se evita que los ninos jueguen con la lavadora.
Activaci6n de la funci6n Seguro para ni_os
Mantenga presionados simulta.neamente los botones Soil Level (Nivel de Sueiedad} y Spin
(Centrifugar} durante aproximadamente 3 segundos.
• Si la funciOn Seguro para Ninos estb.activada, la puerta se bloquea y la Ib.mparade "Seguro para
Ninos @" se ilumina.
Si se presiona el botOn START/PAUSE (INICIO/PAUSA) despues de activar la funciOn de
Seguro para Ninos, no funciona ningun botOn, excepto POWER (ENCENDIDO}.
Si se presiona un botOn cuando los botones estb.n bloqueados, la Ib.mparade "Seguro para
ninos @" parpadea.
Pausa en la funci6n Seguro para ni_os
Cuando la puerta est&.bloqueada o los botones est&.n bloqueados por la funci0n Seguro
para Ninos, puede hacer una pausa en la funcion de bloqueo para ninos durante 1 minuto al
mantener presionados simult&.neamente los botones Soil Level (Nivel de Sueiedad} y Spin
(Centrifugar} durante aproximadamente 3 segundos.
Si el modo de Seguro para Ninos esta. en pausa temporalmente, el bloqueo de la puerta
se libera durante 1 minuto para comodidad del usuario. Durante este tiempo, la la.mpara de
"Seguro para ninos @" parpadea.

Siseabrelapuertatranscurridoelminute,suenaunaalarmadurante2minutes.
Sisecierralapuertaantesdetranscurrirlos2minutes,_stasebloqueaylafunci0nSeguro
paraNinessereactiva.Sisecierralapuertadespu_sdelos2minutes,_stanosebloquea
autom&.ticamenteniseeyeningunaalarma.
Desactivaci6n de la funci6n Seguro para ni_os
Mantenga presionados simultb.neamentelos botones Soil Level (Nivel de Suciedad) y Spin
(Centrifugar} duranteaproximadamente 6 segundos.
• Si lafunciOnSeguro para Ninesestb.desactivada, la puerta se desbloqueay la Ib.mparade "Seguro
para nines@" se apaga.
La funciOnSeguro para ninesimpide que los nineso las personas discapacitadas pongan en
Z_ funcionamiento la lavadora accidentalmentey se lesionen.
........... • Si un nine entraa la lavadora, puede quedar atrapado y asfixiarse.
Una vez activada lafunciOnSeguro para nines, esta contin0a funcionando aunque la lavadoraeste
apagada.
Abrir la puerta per la fuerza puede danar el producto y causar lesionespersonales.
//_ Para cuando la funciOnSeguro ninesestb.activada, primero se debe en
agregar ropa para poner
........ o,pausao desactivar dicha funciOn.
Sidesea abrir la puerta de la lavadora cuando lafunciOnBloqueo para nines estb.activada:
Pongaen pausa o desactive la funciOnSeguro para Nines.
Apague la lavadora y enciendalade nuevo.
Spin Only (Solo centrifugado)
Si presiona el bot0n POWER (ENCENDIDO} y luego presiona y sostiene el bot0n Spin
(Centrifugar} durante 3 segundos, se mostrar&, el tiempo de centrifugado en el panel de la
pantalla.
Luego presione el botOn Spin (Centrifugar} repetidamente hasta que se seleccione el nivel de
centrifugado requerido, y luego presione el bot0n START/PAUSE (INIOIO/PAUSA}.
Antes de presionar el bot0n de Spin Only (Solo centrifugado) para usar la funci0n de solo
centrifugado, puede seleccionar un ciclo con el Selector de ciclo. Si ha seleccionado
un cicIo, puede seleccionar solamente el nivel de centrifugado que corresponde al ciclo
seleccionado.
MAs prendas _++
Puede agregar o retirar prendas para lavar incluso despu_s de que haya comenzado el lavado,
siempre y cuando est_ encendida la luz de "_-_+". AI presionar el bot0n START/PAUSE (INIClO/
PAUSA} se destraba la puerta, salvo que el agua est_ demasiado caliente o que no haya mucha
agua en la lavadora. Si puede destrabar la puerta y desea continuar el cielo de lavado, cierre la
puerta y presione el bot0n START/PAUSE (INICIO/PAUSA}.
Delay End (Final Retardado)
Puedehacer que la lavadorainicie automb.ticamenteel lavado en otto memento, eligiendo un tiempo de
retardo mb.ximo.La heraen pantalla indicacuando comenzarb,el lavado.
1. Establezcasu programa de lavado.
2. Presionerepetidamenteel bot6n Delay End {Final Retardado} hasta establecer el tiempo de retardo.
3. Presioneel bot6n START/PAUSE (INICIO/PAUSA). El indicador de "Delay End (Final Retardado)O"
se encenderb,y el reloj comenzarb,lacuenta regresiva hasta Ilegar al memento establecido.
4. Para cancelar lafunciOn DelayEnd (FinalRetardado),presione el botOnPOWER (ENCENDIDO) y
luego encienda la lavadora nuevamente.
Sound (Sonido)
La funcion Sound Off (Sonido apagado) se puede seleccionar durante todos los curses.

My Cycle (Mi ciclo)
Le permite guardar un cicIo de lavado personalizado (temperatura, centrifugado, nivel de
suciedad, etc.) para recuperarlo y utilizarlo con la practicidad de presionar un solo bot0n.
Para guardar un ciclo y las opciones seleccionadas como My Cycle (Mi ciclo), siga estos pasos:
1. Seleccione el oicIo utilizando el disco Selector de cidos.
2. Despu_s de seleccionar el ciclo, elija una opci0n.
_ onsulte la pb.gina 39 para conocer las configuraciones de las opciones disponibles para
cada ciclo.
3. Puede guardar las opciones y el cicIo seleccionados manteniendo presionado el boton My
Cycle (Mi ciclo} durante ma.s de 3 segundos en el modo My Cycle (Mi ciclo). El ciclo y las
opciones que seleccione aparecer_tn la pr0xima vez que elija la funci0n My Cycle (Mi ciclo).
4. Pulse el bot0n My Cycle (Mi ciclo) para cargar y utilizar las opciones guardadas del programa
My Cycle (Mi ciclo). La luz del programa My Cycle (Mi ciclo) indicara la activacion. Ademas, el
curso elegido y luces de opcion parpadearan.
_ uede modificar las configuraciones de "My Cycle (Mi ciclo)" repitiendo el proceso
anterior.
Aparecer_t la Liltima configuracion utilizada la proxima vez que seleccione "My Cycle (Mi
ciclo)".
Si presiona el boton My Cycle (Mi ciclo) y Io suelta dentro de 3 segundos, las opciones y el
programa guardados anteriormente aparecera.n. Si mantiene presionado el boton My Cycle
(Mi ciclo) durante 3 segundos o m_ts, las opciones y el programa configurados actualmente
se guardar_tn y el LED parpadear&, durante 3 segundos.
Smart Care (Cuidado Inteligente)
Esta funci0n permite comprobar el estado de la lavadora con un tel_fono inteligente.
1. Para habilitar la funci0n Smart Care (Cuidado Inteligente),
mantenga presionado el boton Sound (Sonido) (Solo para
modelos WF42H5500A*),Super Speed (Supervelocidad}
(Solo para modelos WF42H5400A*) durante 3 segundos
dentro de los 10 segundos despues de encender mediante
la presi0n del boton Power (Encendido).
2. Si activa la funci0n Cuidado Inteligente, la LED de la
pantalla gira durante 2 o 3 segundos y el indicador
Cuidado Inteligente se enciende en la pantalla.
q' e , F ,d
.................. _ llot _ id , A "
E×tlaSI tcuw m _ ow
i i
3. Ejecute la aplicacion Cuidado Inteligente en su tel_fono _ ::1,,:.inteligente. .......................o
4. La funci0n Smart Care (Cuidado Inteligente) estb.optimizada ,,_,,,,.,_,_ *,:..:::::
con las series Galaxy e iPhone. ...............o ,_-, _
i 9eay n
5. Enfoque la cb.mara del tel_fono inteligente al panel de la .......... ..............
pantalla de la lavadora, o_ .......................... .....
×tra 9pr_ [ _ F(_ werr _ Low _ _ , ................
6. Si enfoca la cb.mara del tel_fono inteligente al panel de la ..................................
pantalla de la lavadora, el panel y el mensaje de error se
reconocen automa.ticamente y el tipo de error y la solucion .............
se muestran en el tel_fono inteligente.
7. Si el tel_fono inteligente no reconoce el c0digo de error m&.sde dos veces, ingrese en forma
manual el c0digo de error indicado en el panel de la pantalla de la lavadora en la aplicacion
Cuidado Inteligente.
_ Descarga de la aplicacion Cuidado Inteligente
* Descargue la Samsung Laundry App en su telefono celular desde Android Market o
Apple App store. (Buscar paiabra: Samsung Smart Washer/Dryer}
_ Precauciones de uso de Cuidado Inteligente
* Si un dispositivo de iluminaci0n (por ejemplo, un fluorescente o una la.mpara) se refleja
en el panel de la pantalla de la lavadora, es posible que el resultado no se reconozca
f&.cilmente.
Si ocurre un error m&.sde dos veces, ingrese en forma manual el c0digo de error
indicado en el panel de la pantalla de la lavadora en la aplicaci0n Cuidado Inteligente.
Si el 6.ngulo de la cb.mara del tel_fono inteligente y el panel de la pantalla de la lavadora
es incorrecto, el error puede no reconocerse en forma apropiada.
Trate de sostener el tel_fono inteligente en un _tngulo con el panel de la pantalla como se
muestra en la figura.
Lavado de prendas con el selector de ciclos
Su nueva lavadora facilita el lavado de las prendas gracias al sistema de control automatico
"Fuzzy Control" de Samsung. Cuando seleccione un programa de lavado, la lavadora elegir_t la
temperatura correcta, el tiempo de lavado y la velocidad de lavado.
1. Abra la Ilave de agua del fregadero.
2. Presione el boton Power (Encendido).
3. Abra la puerta.
4. Coloque las prendas una a una bien extendidas en el tambor, sin Ilenarlo demasiado.
5. Cierre la puerta.
6. Agregue el detergente, el suavizante y el detergente para prelavado (si es necesario) en el
compartimiento adecuado.
El prelavado solo ester disponible cuando se seleccionan los ciclos Normal (Normal),
Deep Steam (Vaporizacion Profunda), Heavy Duty (Carga Pesada), Bedding (Ropa de
Cama), Sanitize (Esterilizar), Allergen (Al_rgeno), Active Wear (Ropa Deportiva), Perm Press
(Plancha Permanente), Towels (Toallas)(Solo para modelos WF42H5400A*) y Eco Cold (Eco
Frfa)(Solo para modelos WF42H5500A*). S01o es necesario si la ropa ester muy sucia.
7. Utilice el selector de ciclos para seleccionar el ciclo adecuado para cada tipo de material:
NORMAL (NORMAL), HEAVY DUTY (CARGA PESADA), BEDDING (ROPA DE CAMA),
SANITIZE (ESTERILIZAR), ALLERGEN (ALERGENO), RINSE+SPIN (ENJUAGAR +
CENTRIFUGAR), ECO COLD (ECO FR[A)(Solo para modelos WF42H5500A* ),QUICK WASH
(LAVADO RAPIDO), TOWELS (TOALLAS)(Solo para modelos WF42H5400A* ),PERM PRESS
(PLANCHA PERMANENTE), DELICATES (DELICADOS), ACTIVE WEAR (ROPA DEPORTIVA).
Se encender_tn los indicadores correspondientes en el panel de control.
8. En ese momento, puede controlar la temperatura del lavado, la cantidad de cicIos de
enjuague, la velocidad de centrifugado y el tiempo de retardo presionando el boton de la
opcion adecuada.
9. Presione el boton Start/Pause ([nicio/Pausa) en el selector de cicIos y se iniciar_t el lavado.
El indicador de funcionamiento se iluminar_t y aparecer_t en la pantalla el tiempo restante del
ciclo de lavado.
Opci6n de pausa
1. Dentro de los 5 minutos de comenzar un lavado, es posible agregar ropa al lavado o sacar
ropa de este.
2. Presione el boton Start/Pause (Inicio/Pausa) para destrabar la puerta.
3. No es posible abrir la puerta cuando la temperatura del agua es muy CALIENTE o el nivel del
agua ester muy ALTO.
4. Despu_s de cerrar la puerta, presione el boton Start/Pause (Inicio/Pausa) para reiniciar el
lavado.
Cuando el ciclo ha finalizado:
AI finalizar el ciclo, la lavadora se apagar_t autom_tticamente.
1. Abra la puerta.
2. Saque la ropa limpia.
USO DEL LAVADO A VAPOR
Si selecciona Vapor el vapor actOa en tiempos m&.seficaces para la cantidad detectada de ropa para lavar,
aumenta la temperatura del agua, mejora el efecto de remojo y mejora el rendimiento de lavado.
1. Cargue la lavadora.
2. Presione el boton Power (Encendido}.
3. Active el Selector de ciclos y seleccione Steam Cycle (Vapor Oiclo}. (El programa Deep Steam
(VaporizaciOn Profunda) selecciona automa.ticamente la funcion Vapor.)
4. Presione el botOn Steam (Vapor).
5. Vierta detergente en la bandeja del dosificador y suavizante de telas hasta la I(nea marcada.
6. Presione el boton Start/Pause (Inicio/Pausa).
: La lavadora selecciona autom&.ticamente las condiciones de lavado optimas al detectar el peso de las
prendas.
EI vapor puede no set necesariamente visible durante los ciclos de vapor. Es posible que el vapor no
est_ presente en todo el ciclo de lavado al vapor.
FUNCi0N ATC (CONTROL AUTOM, ,TiCO DE TEMPERATURA)
ElATC es la funciOnque controla latemperatura del agua en la lavadoramediante unsensor (el termostato).
_ ependiendo de donde est_ Iocalizado el cliente, hay variantes de temperaturas de agua (zonas if(as,
zonas calientes, varias temperaturas de agua, configuraciones de temperatura del calentador, etc.),
pot Io tanto, la funcion ATC de nuestra lavadora es mantener un cierto nivel de temperatura de lavado
para poder Iograr el mejor rendimiento de lavado en cada ciclo.
Si usted selecciona las configuraciones de servicio normal o pesado, esas configuraciones ser&.n
las reglamentarias y tambi_n las de UL. Ya que esta lavadora nueva tiene como su primera prioridad
reducir el consumo de energ(a, el cliente se dar&.cuenta de que estar&,entrando m&.sagua fr(a a la
lavadora. Pero esto es normal y no es un problema.
_ Durante el proceso normal de la regulaciOn de la temperatura, la caliente set&.de una temperatura
similar a la que es aceptable para un adulto durante un bano y la temperatura tibia set&.similar a la
temperatura del agua de una alberca.
Si el cliente quiere lavar la ropa a una temperatura de agua espec(fica, deber&, seleccionar una
configuraciOn distinta para cada temperatura (Hot (Caliente)/Warm (Tibia) / Eco Warm (Eco Tibia))
Es_aSo_ 25
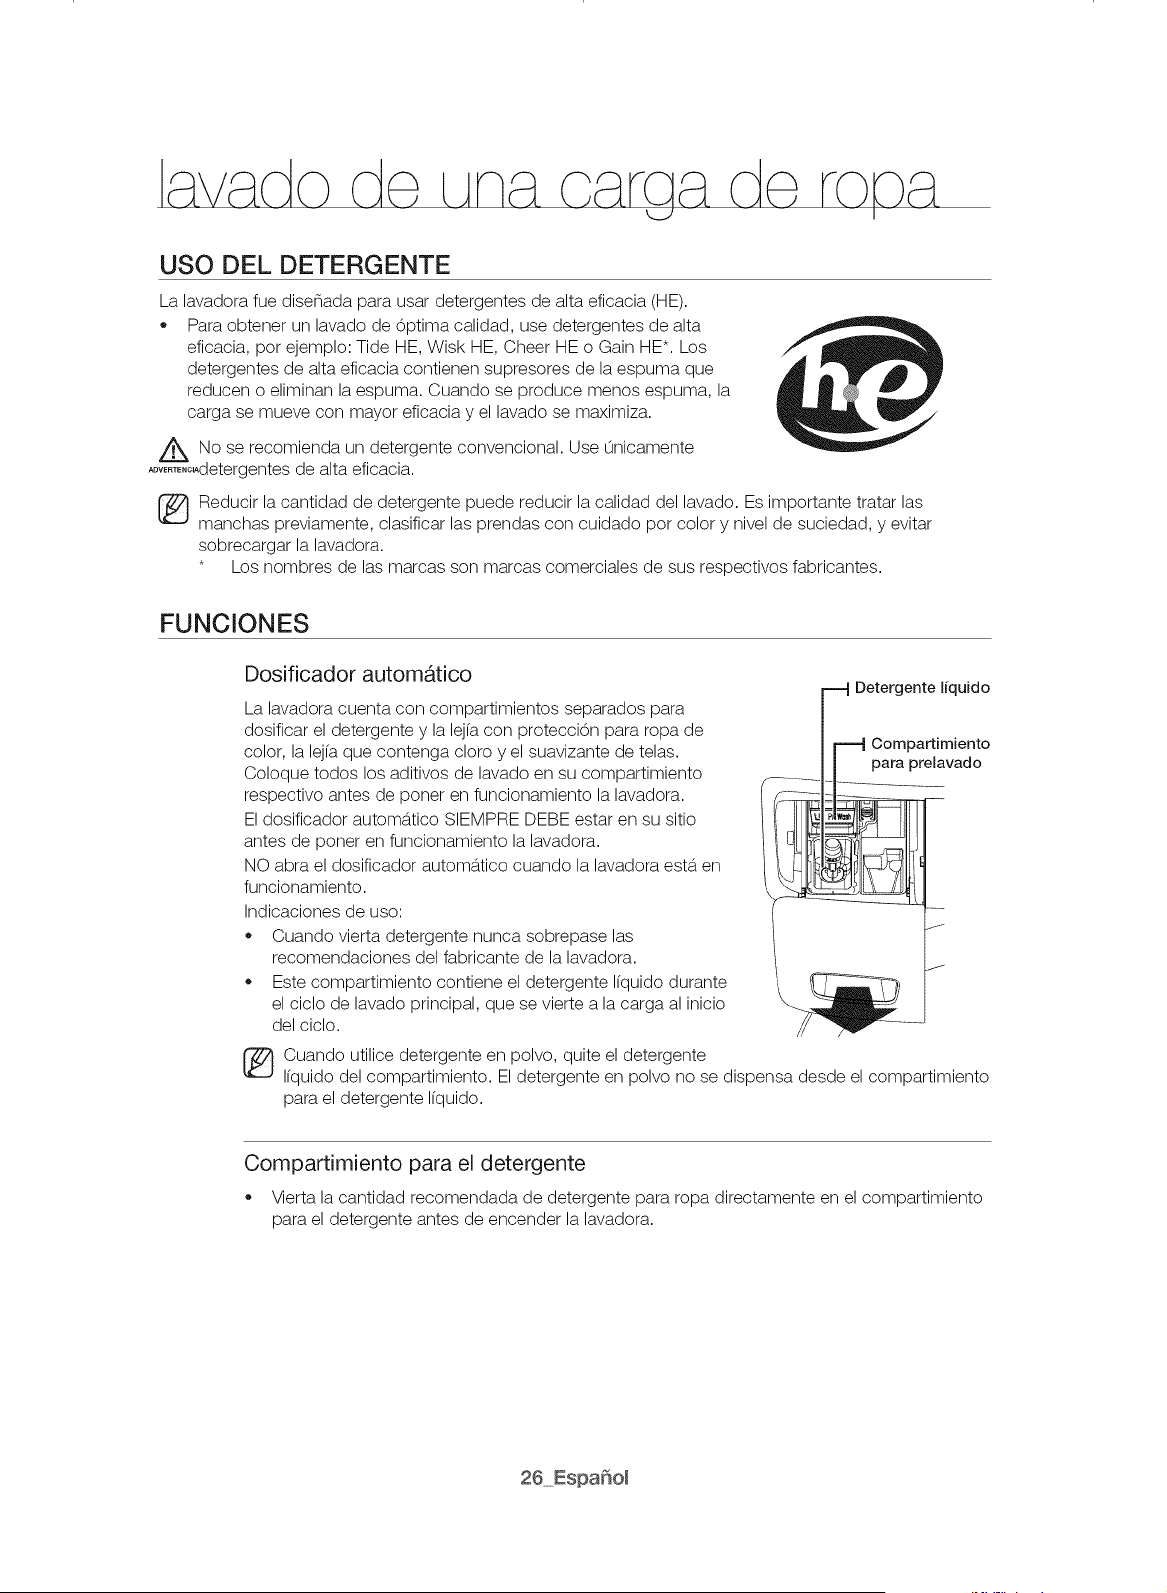
USO DEL DETERGENTE
La lavadora fue diseflada para usar detergentes de alta eficacia (HE).
Para obtener un lavado de Optima calidad, use detergentes de alta
eficacia, por ejemplo: Tide HE, Wisk HE, Cheer HE o Gain HE*. Los
detergentes de alta eficacia contienen supresores de la espuma que
reducen o eliminan la espuma. Cuando se produce menos espuma, la
carga se mueve con mayor eficacia y el lavado se maximiza.
_No se recomienda un detergente convencional. Use 0nicamente
.......... detergentes de alta eficacia.
_ Reducir la cantidad de detergente puede reducir la calidad del lavado. Es importante tratar las
manchas previamente, clasificar las prendas con cuidado por color y nivel de suciedad, y evitar
sobrecargar la lavadora.
* Los nombres de las marcas son marcas comerciales de sus respectivos fabricantes.
FUNCIONES
Dosificador automatico
La lavadora cuenta con compartimientos separados para
dosificar el detergente y la lejfa con proteccion para ropa de
color, la lejfa que contenga cloro y el suavizante de telas.
Coloque todos los aditivos de lavado en su compartimiento
respectivo antes de poner en funcionamiento la lavadora.
El dosificador autom&,tico SIEMPRE DEBE estar en su sitio
antes de poner en funcionamiento la lavadora.
NO abra el dosificador autom_ttico cuando la lavadora ester en
funcionamiento.
Indicaciones de uso:
Cuando vierta detergente nunca sobrepase las
recomendaciones del fabricante de la lavadora.
Este compartimiento contiene el detergente Ifquido durante
el ciclo de lavado principal, que se vierte a la carga al inicio
del ciclo.
Detergente liquido
Compartimiento
para prelavado
_ Cuando utilice detergente en polvo, quite el detergente
Ifquido del compartimiento. El detergente en polvo no se dispensa desde el compartimiento
para el detergente Ifquido.
Compartimiento para el detergente
Vierta la cantidad recomendada de detergente para ropa directamente en el compartimiento
para el detergente antes de encender la lavadora.
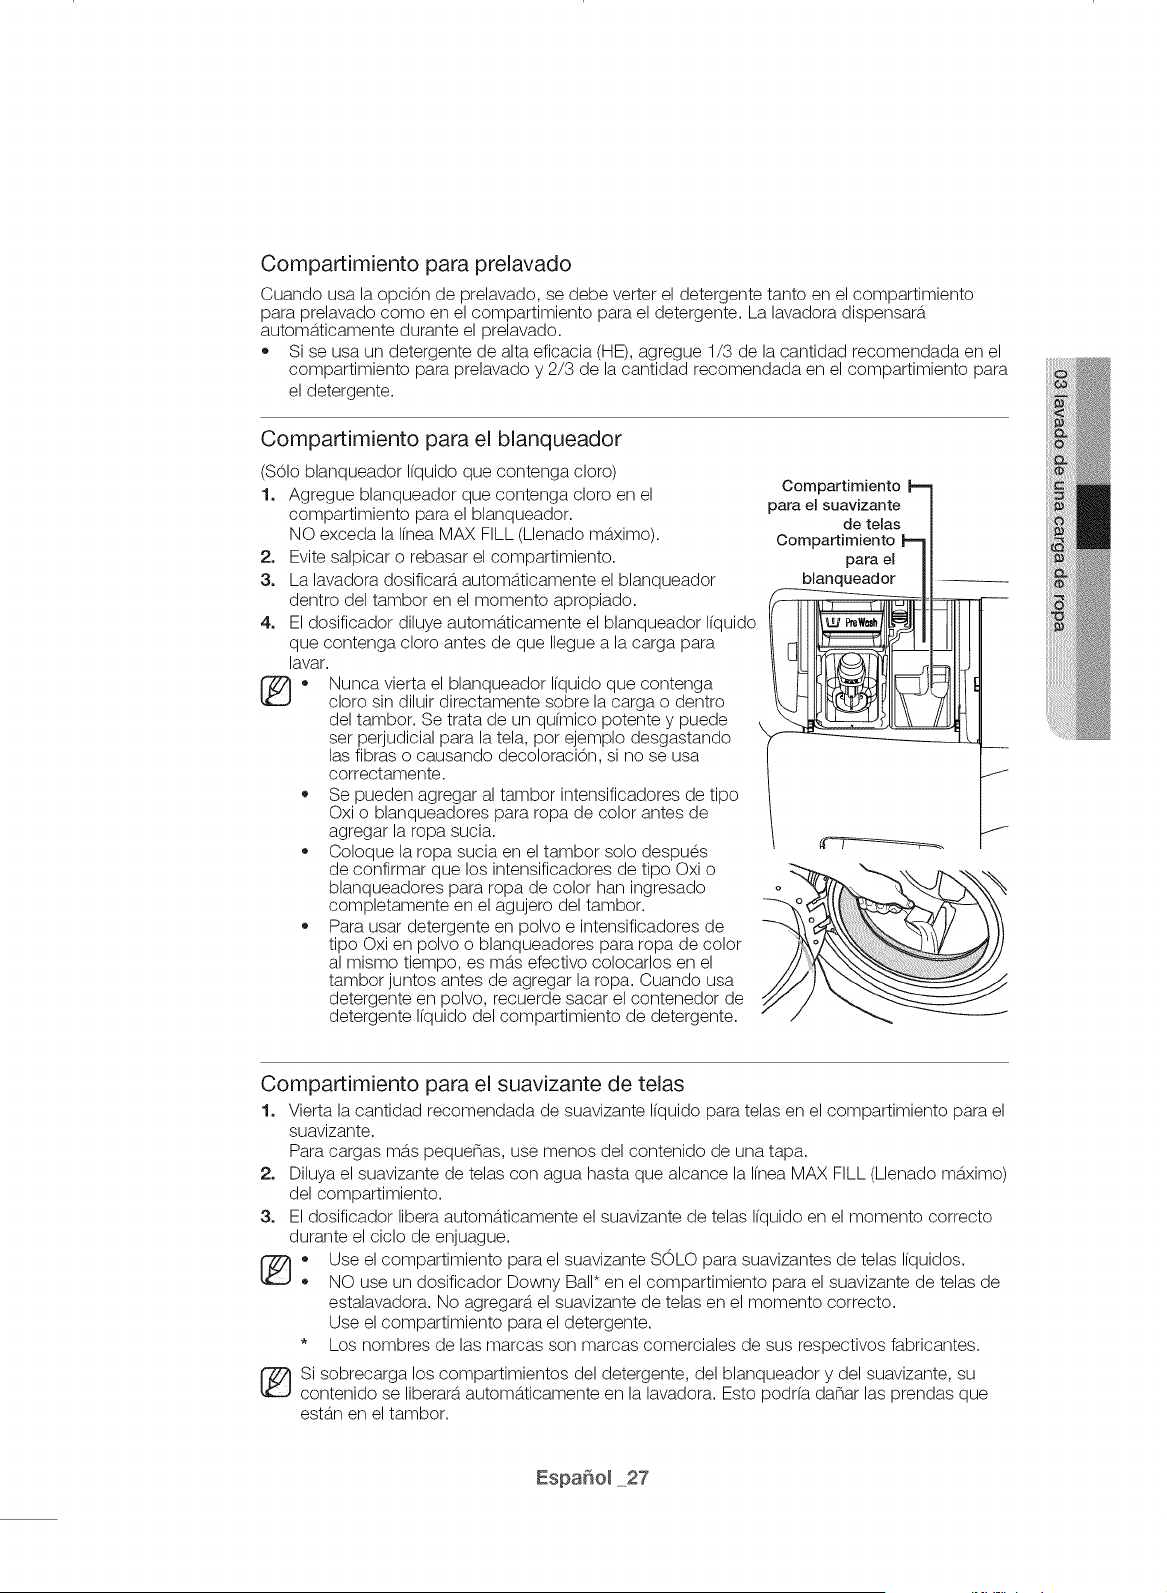
Compartimiento para prelavado
Cuando usa la opcion de prelavado, se debe verter el detergente tanto en el compartimiento
para prelavado como en el compartimiento para el detergente. La lavadora dispensator
automaticamente durante el prelavado.
Si se usa un detergente de alta eficacia (HE), agregue 1/3 de la cantidad recomendada en el
compartimiento para prelavado y 2/3 de la cantidad recomendada en el compartimiento para
el detergente.
Compartimiento para el blanqueador
(S01oblanqueador Ifquido que contenga cloro)
1, Agregue blanqueador que contenga cloro en el
compartimiento para el blanqueador.
NO exceda la Ifnea MAX FILL (Llenado m_tximo).
2, Evite salpicar o rebasar el compartimiento.
3, La lavadora dosificar&, automaticamente el blanqueador
Compartimiento I_
para el suavizante
de telas
Compartimiento I"-
para el
blanqueador
4_
que contenga oloro antes de que Ilegue a la carga para
lavar.
Nunca vierta el blanqueador Ifquido que contenga
cloro sin diluir directamente sobre la carga o dentro
del tambor. Se trata de un qufmico potente y puede
set perjudicial para la tela, pot ejemplo desgastando
las fibras o causando decoloracion, si no se usa
correctamente.
Se pueden agregar al tambor intensificadores de tipo
Oxi o blanqueadores para ropa de color antes de
agregar la ropa sucia.
Coloque la ropa sucia en el tambor solo despues
de confirmar que los intensificadores de tipo Oxi o
blanqueadores para ropa de color han ingresado
completamente en el agujero del tambor.
Para usar detergente en polvo e intensificadores de
tipo Oxi en polvo o blanqueadores para ropa de color
al mismo tiempo, es mas efectivo colocarlos en el
tambor juntos antes de agregar la ropa. Cuando usa
detergente en polvo, recuerde sacar el contenedor de
detergente Ifquido del compartimiento de detergente.
dentro del tambor en el momento apropiado. _ _i_
El dosificador diluye automa, ticamente el blanqueador Ifquido
t
J
J
Compartimiento para el suavizante de telas
1. Vierta la cantidad recomendada de suavizante Ifquido para telas en el compartimiento para el
suavizante.
Para cargas ma.s pequenas, use menos del contenido de una tapa.
2. Diluya el suavizante de telas con agua hasta que alcance la Ifnea MAX FILL (Llenado m_tximo)
del compartimiento.
3. El dosificador libera automa.ticamente el suavizante de telas Ifquido en el momento correcto
durante el cicIo de enjuague.
* se el compartimiento para el suavizante SOLO para suavizantes de telas Ifquidos.
NO use un dosificador Downy Ball* en el compartimiento para el suavizante de telas de
estalavadora. No agregara, el suavizante de telas en el momento correcto.
Use el compartimiento para el detergente.
* Los nombres de las marcas son marcas comerciales de sus respectivos fabricantes.
Si sobrecarga los compartimientos del detergente, del blanqueador y del suavizante, su
contenido se liberara, autom_tticamente en la lavadora. Esto podrfa danar las prendas que
est_tn en el tambor.
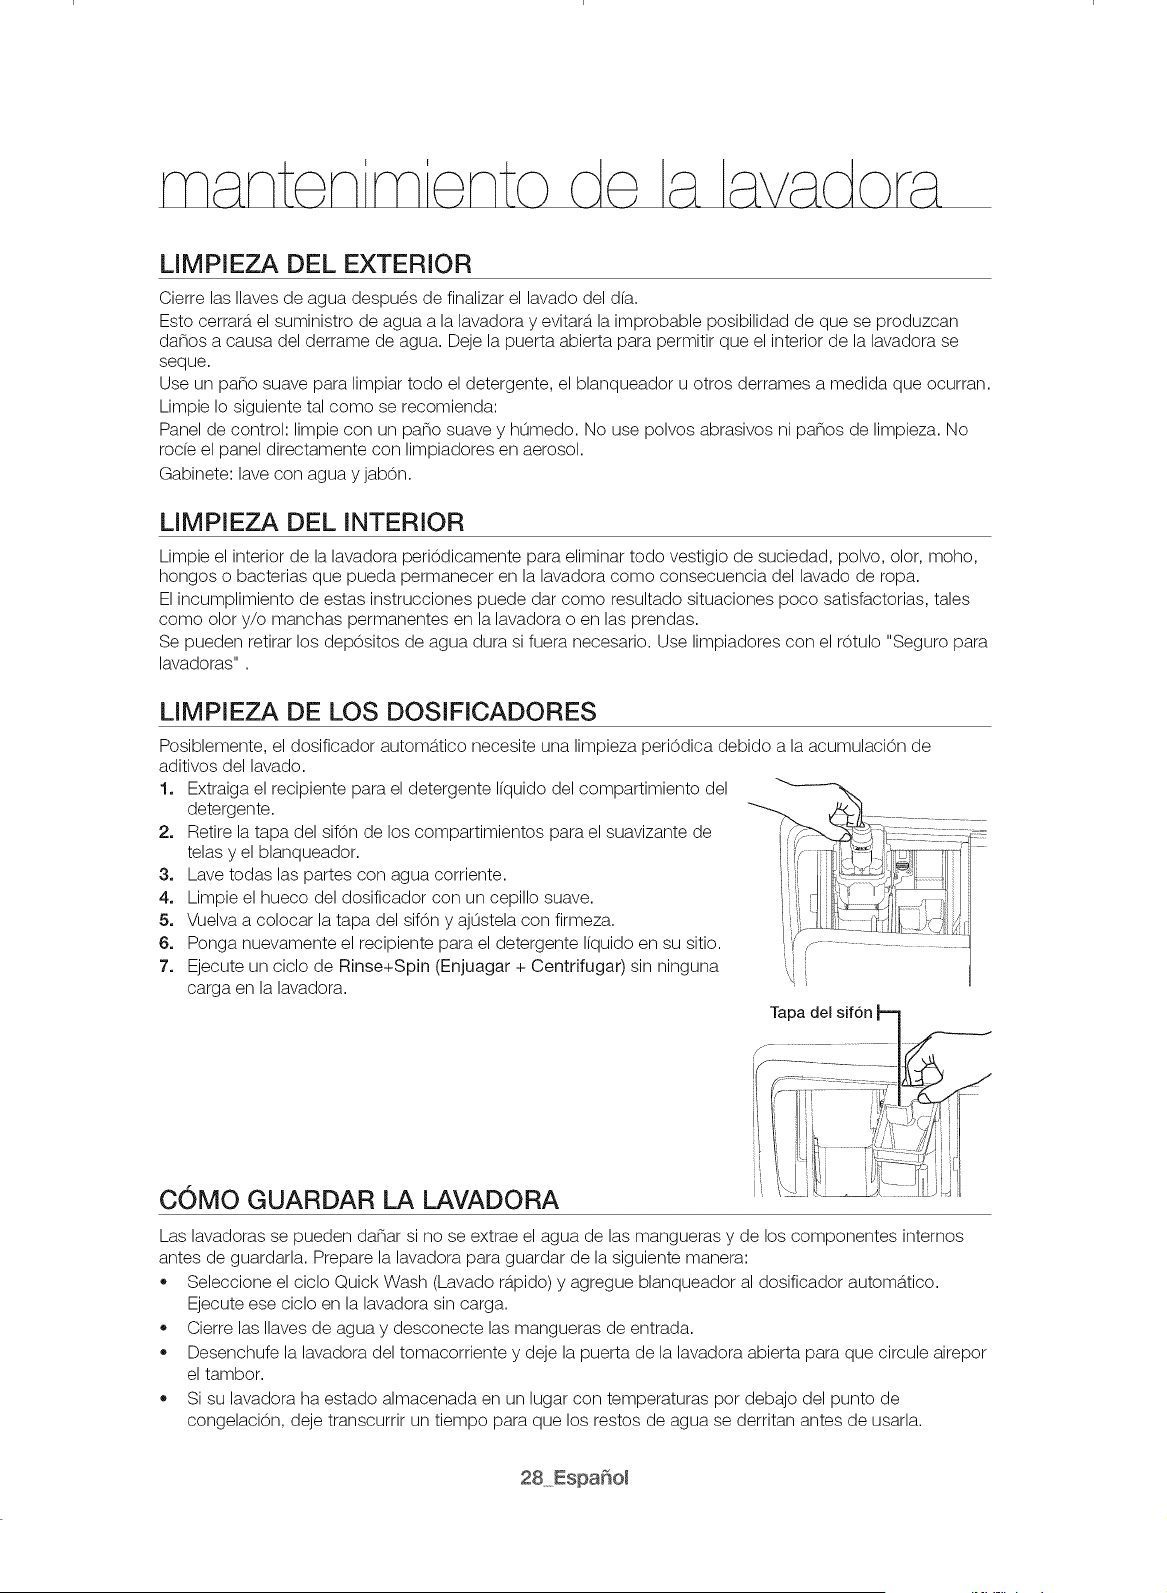
LIMPIEZA DEL EXTERIOR
Cierre las Ilaves de agua despu_s de finalizar el lavado del d(a.
Esto cerrar_t el suministro de agua a la lavadora y evitar_t la improbable posibilidad de que se produzcan
danos a causa del derrame de agua. Deje la puerta abierta para permitir que el interior de la lavadora se
seque.
Use un pano suave para limpiar todo el detergente, el blanqueador u otros derrames a medida que ocurran.
Limpie Io siguiente tal como se recomienda:
Panel de control: limpie con un pano suave y hLimedo. No use polvos abrasivos ni panos de limpieza. No
rode el panel directamente con limpiadores en aerosol.
Gabinete: lave con agua y jabon.
LIMPIEZA DEL INTERIOR
Limpie el interior de la lavadora peri0dicamente para eliminar todo vestigio de suciedad, polvo, olor, moho,
hongos o bacterias que pueda permanecer en la lavadora como consecuencia del lavado de ropa.
El incumplimiento de estas instrucciones puede dar como resultado situaciones poco satisfactorias, tales
como olor y/o manchas permanentes en la lavadora o en las prendas.
Se pueden retirar los depositos de agua dura si fuera necesario. Use limpiadores con el rotulo "Seguro para
lavadoras".
LIMPIEZA DE LOS DOSIFiCADORES
Posiblemente, el dosificador autom_ttico necesite una limpieza peri0dica debido a la acumulaci0n de
aditivos del lavado.
1. Extraiga el recipiente para el detergente I(quido del compartimiento del
detergente.
2. Retire la tapa del sif0n de los compartimientos para el suavizante de
telas y el blanqueador.
3. Lave todas las partes con agua corriente.
4. Limpie el hueco del dosificador con un cepillo suave.
5. Vuelva a colocar la tapa del sif0n y ajListela con firmeza.
6. Ponga nuevamente el recipiente para el detergente I(quido en su sitio.
7. Ejecute un cicIo de Rinse+Spin (Enjuagar + Centrifugar) sin ninguna i
carga en la lavadora.
Tapa del sifOn
COMO GUARDAR LA LAVADORA
Las lavadoras se pueden danar si no se extrae el agua de las mangueras y de los componentes internos
antes de guardarla. Prepare la lavadora para guardar de la siguiente manera:
• Seleccione el ciclo Quick Wash (Lavado ra,pido) y agregue blanqueador al dosificador autom_ttico.
Ejecute ese ciclo en la lavadora sin carga.
,, Cierre las Ilaves de agua y desconecte las mangueras de entrada.
• Desenchufe la lavadora del tomacorriente y deje la puerta de la lavadora abierta para que circule airepor
el tambor.
• Si su lavadora ha estado almacenada en un lugar con temperaturas pot debajo del punto de
congelaci0n, deje transcurrir un tiempo para que los restos de agua se derritan antes de usarla.

LIMPIEZA DEL FILTRO DE RESIDUOS
Recomendamos limpiar el filtro de residuos cuando el agua no drena correctamente o cuando aparece en la
pantalla el mensaje de error "5E". //
1. Desenchufe la lavadora. .......
2, Abra la tapa del filtro utilizando una moneda o una Ilave.
3. Pas02
4.
5.
6.
Sostenga la tapa de drenaje, tire del tubo de
drenaje que ester enganchado en el gancho
gufa en el frente. No tire del tubo de drenaje
con fuerza excesiva.
Coloque un recipiente debajo de la lavadora
para recoger el agua que quede. Luego
sostenga el tubo de drenaje con una mano
y gire la tapa de drenaje en sentido contrario
alas agujas del reloj con la otra mano para
separarla del tubo de drenaje.
Drene el agua que queda completamente.
a de drenaje
Gire la tapa de suciedad en sentido contrario alas
agujas del reloj y luego saque la tapa de suciedad y
el ensamble de filtro de suciedad de la lavadora.
Tapa del filtro del
residuos
7.
Limpie la suciedad u otros materiales ___--
que hubieran quedado en el filtro de
residuos. AsegOrese de que no est_
bloqueada la bomba de dl'enaje ubicada
detr_ts del filtro de residuos.
Tapa del filtro de _1_,_
residuos 4 Filtro de
residuos
8. Cuando haya terminado de limpiar el filtro, inserte la tapa
de suciedad y el ensamble de filtro en la lavadora. Gire la
tapa de suciedad en el sentido de las agujas del reloj hasta
que el indicador en la tapa del filtro de suciedad est_ en la
posici0n de las 12 en punto, apuntando al indicador en la
lavadora.
9. Vuelva a colocar la tapa de drenaje de emergencia en el
tubo de drenaje, y enganche el tubo en la gufa del gancho.
10. Vuelva a instalar la cubierta del filtro.
Para modelos la taza de filtro de
con
seguridad
• Para abrir, empuje hacia adentro, y luego gire la taza
del filtro de seguridad en sentido contrario a las agujas
del reloj. El resorte en la taza hara.que sea fa.cil abrirla.
• Para cerrar, gire la taza del filtro de seguridad en el
sentido de las agujas del reloj. A medida que gira
la taza, el resorte har_tun sonido de tamborileo. El
sonido de tamborileo es normal.
EspaSo_ 29

LIMPIEZA DEL DIAFRAGMA DE LA PUERTA
1, Abra la puerta de la lavadora y saque la ropa o cualquier otro objeto.
2, Verifique si hay alguna sustancia extrana en los diaffagmas
grises @ entre la tapa y el tambor.
Para verificar esto, d_ la vuelta al diafragma @.
3= Si hay sustancias extranas, ret(relas.
4, Si encuentra zonas sucias, I(mpielas utilizando el siguiente procedimiento:
a} Mezcle una soluci0n diluida de ¾ de taza (177 mL) de blanqueador Ifquido con cloro y 1
gal. (3,8 L) de agua corriente caliente.
b} Limpie el a,rea del diafragma con la solucion de dilucion con un pano h0medo.
c} Deje reposar durante 5 minutos.
d} Limpie meticulosamente el a,rea con un pano seco y deje la puerta abierta para que se
seque el interior de la lavadora.
IMPORTANTE:
,, P0ngase guantes de goma cuando vaya a realizar una limpieza prolongada.
• Consulte las instrucciones del fabricante del blanqueador para un uso adecuado.
MANTENIMIENTO DE LA CUBIERTA SUPERIOR Y DEL MARCO
FRONTAL
No coloque objetos pesados ni afilados ni tampoco el paquete de detergente sobre la lavadora. Pueden
rayar o danar la cubierta superior. Mant_ngalos apartados en el pedestal (si Io adquiri6) o en una caja de
almacenaje por separado.
Ya que toda la lavadora tiene un acabado brillante, la superficie se puede rayar o danar f&,cilmente.
Evite rayar o danar la superficie cuando use la lavadora.
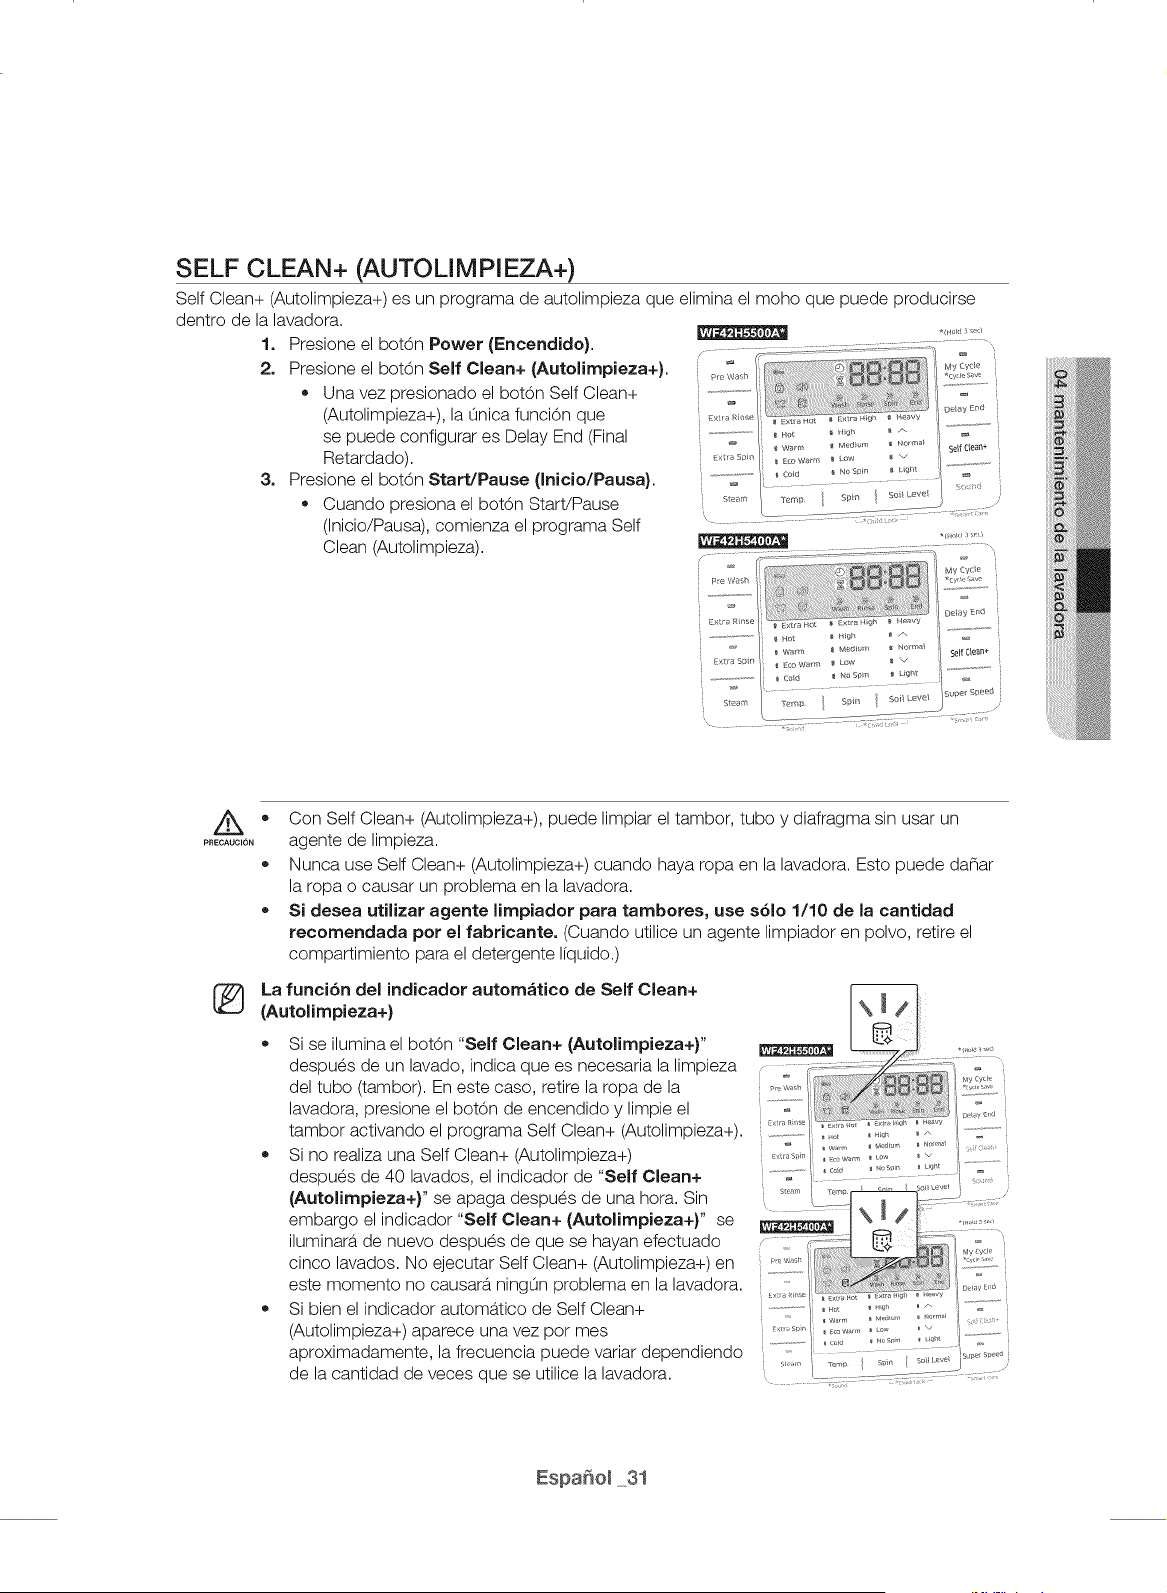
SELF CLEAN+ (AUTOLIM PI EZA+)
Self Clean+ (Autolimpieza+) es un programa de autolimpieza que elimina el moho que puede producirse
dentro de la lavadora.
1. Presione el botOn Power (Encendido).
2. Presione el botOn Self Clean+ (Autolimpieza+).
* Una vez presionado el botOn Self Clean+
(Autolimpieza+), la Qnica funciOn que
se puede configurar es Delay End (Final
Retardado).
3. Presione el botOn Start/Pause (Inicio/Pausa).
Cuando presiona el bot0n Start/Pause
(Inicio/Pausa), comienza el programa Self
Clean (Autolimpieza).
Pre Wash
*(_,,,_<s e,)
Pre Wsh
Extra Rinse
iiii_i;iiiil;;;;;;;;;;i;¸¸¸¸¸¸¸11¸¸¸¸;i_i¸I¸I¸il;!;!;!;!;;;;;@iiiiiiii_i;!i¸ii{i_il;iiiliiii¸ii¸ii¸ii{¸iiiiiil¸ii_¸!iiiiiii¸i¸iii!!iiiiiii_¸ii!iiiii
Hot _ High @ /'_
W_m _ Medbr_ _ _orrr,,*_
_}//._'.'%
Delay! End
Self Clean+
PRECAUOION
Con Self Clean+ (Autolimpieza+), puede limpiar el tambor, tubo y diafragma sin usar un
agente de limpieza.
Nunca use Self Clean+ (Autolimpieza+) cuando haya ropa en la lavadora. Esto puede dafiar
la ropa o causar un problema en la lavadora.
* Si desea utilizar agente limpiador para tambores, use s6io 1110 de la cantidad
recomendada por el fabricante. (Cuando utilice un agente limpiador en polvo, retire el
compartimiento para el detergente liquido.)
La funci6n del indicador autom_itico de Self Clean+
(Autolimpieza+)
Si se ilumina el botOn "Self Clean+ (Autolimpieza+)"
despues de un lavado, indica que es necesaria la limpieza
del tubo (tambor). En este caso, retire la ropa de la
lavadora, presione el bot0n de encendido y limpie el
tambor activando el programa Self Clean+ (Autolimpieza+).
Si no realiza una Self Clean+ (Autolimpieza+)
despues de 40 lavados, el indicador de "Self Clean+
seam I Tr_ _,-, Sot Leve_ ]
(Autolimpieza+)" se apaga despues de una hora. Sin ..... _.:- :-:£
embargo el indicador "Self Clean+ (Autolimpieza+)" se
iluminara de nuevo despues de que se hayan efectuado I ,: ...........'
cinco lavados. No ejecutar Self Clean+ (Autolimpieza+) en i/iii_'i I ........,2:_::::::::
este momento no causara ningOn problema en la lavadora. ......,,, '
Si bien el indicador automatico de Self Clean+ ..... J _;.................... ......
: _ ' v,, ,-w v I
(Autolimpieza+) aparece una vez por mes ........ I °'_',i_°'' ,.............. i .................
aproximadamente,
la frecuencia
puede
variar
dependiendo
de la cantidad de veces que se utilice la lavadora. , _.........' _

CONTROLE ESTAS SOLUCIONES Si SU LAVADORA...
No enciende.
No tiene agua o no tiene
suflciente agua.
Tiene restos de detergente
en el dosiflcador automAtico
despu6s de finalizar el ciclo
de lavado.
Vibra o hace demasiado
ruido.
Se detiene
®
®
AsegOrese de que la puerta est_ bien cerrada.
Verifique que la lavadora est_ enchufada.
Verifique que las Ilaves de agua est_n abiertas.
Presione el boton Start/Pause (Inicio/Pausa) para encender la lavadora.
AsegOrese de que la funcion Seguro para ninos no est_ activada.
Consulte la pb.gina 21.
Antes de que la lavadora comience a Ilenarse, se escuchar&, una serie
de sonidos semejantes a un "clic" para controlar la traba de la puerta y
que se efect0e un drenaje ra.pido.
Controle el fusible o reinicie el disvuntor.
Abra las dos Ilaves completamente.
AsegOrese de que la puerta est&.herm_ticamente cerrada.
Enderece las mangueras de entrada de agua.
Desconecte las mangueras y limpie los filtros. Posiblemente los filtros
de las mangueras est_n tapados.
Abra y cierre la puerta y, a continuacion, presione el boton Start/Pause
(Inicio/Pausa).
AsegOrese de que la lavadora funcione con suficiente presion de agua.
AsegOrese de que el disco selector de detergente se encuentre en la
posicion superior cuando usa detergente granulado.
Compruebe que la lavadora est_ ubicada sobre una superficie
nivelada. Si la superficie no ester nivelada, ajuste las patas de la
lavadora para nivelar el electrodom_stico.
AsegOrese de que se hayan retirado los tornillos de transporte.
AsegOrese de que la lavadora no toque ningOn otro objeto.
Verifique que la car.cjade ropa sea equilibrada.
Enchufe el cable de alimentaci0n a un tomacorriente que funcione.
Controle el fusible o reinicie el disyuntor.
Cierre la puerta y presione el boton Start/Pause (Inicio/Pausa) para
iniciar la lavadora.
Pot su seguridad, la lavadora no lavar_tni centrifugar_t salvo que la
puerta est_ cerrada.
Antes de que la lavadora comience a Ilenarse, se escuchar&, una serie
de sonidos semejantes a un "clic" para controlar la traba de la puerta y
que se efectQe un drenaje ra.pido.
Se puede producir una pausa o un perfodo de remojo en el ciclo.
Espere hasta que comience a funcionar.
Controle que los filtros de las mangueras de entrada a la altura de las
Ilaves no presenten obstrucciones.
Limpie los filtros periodicamente.
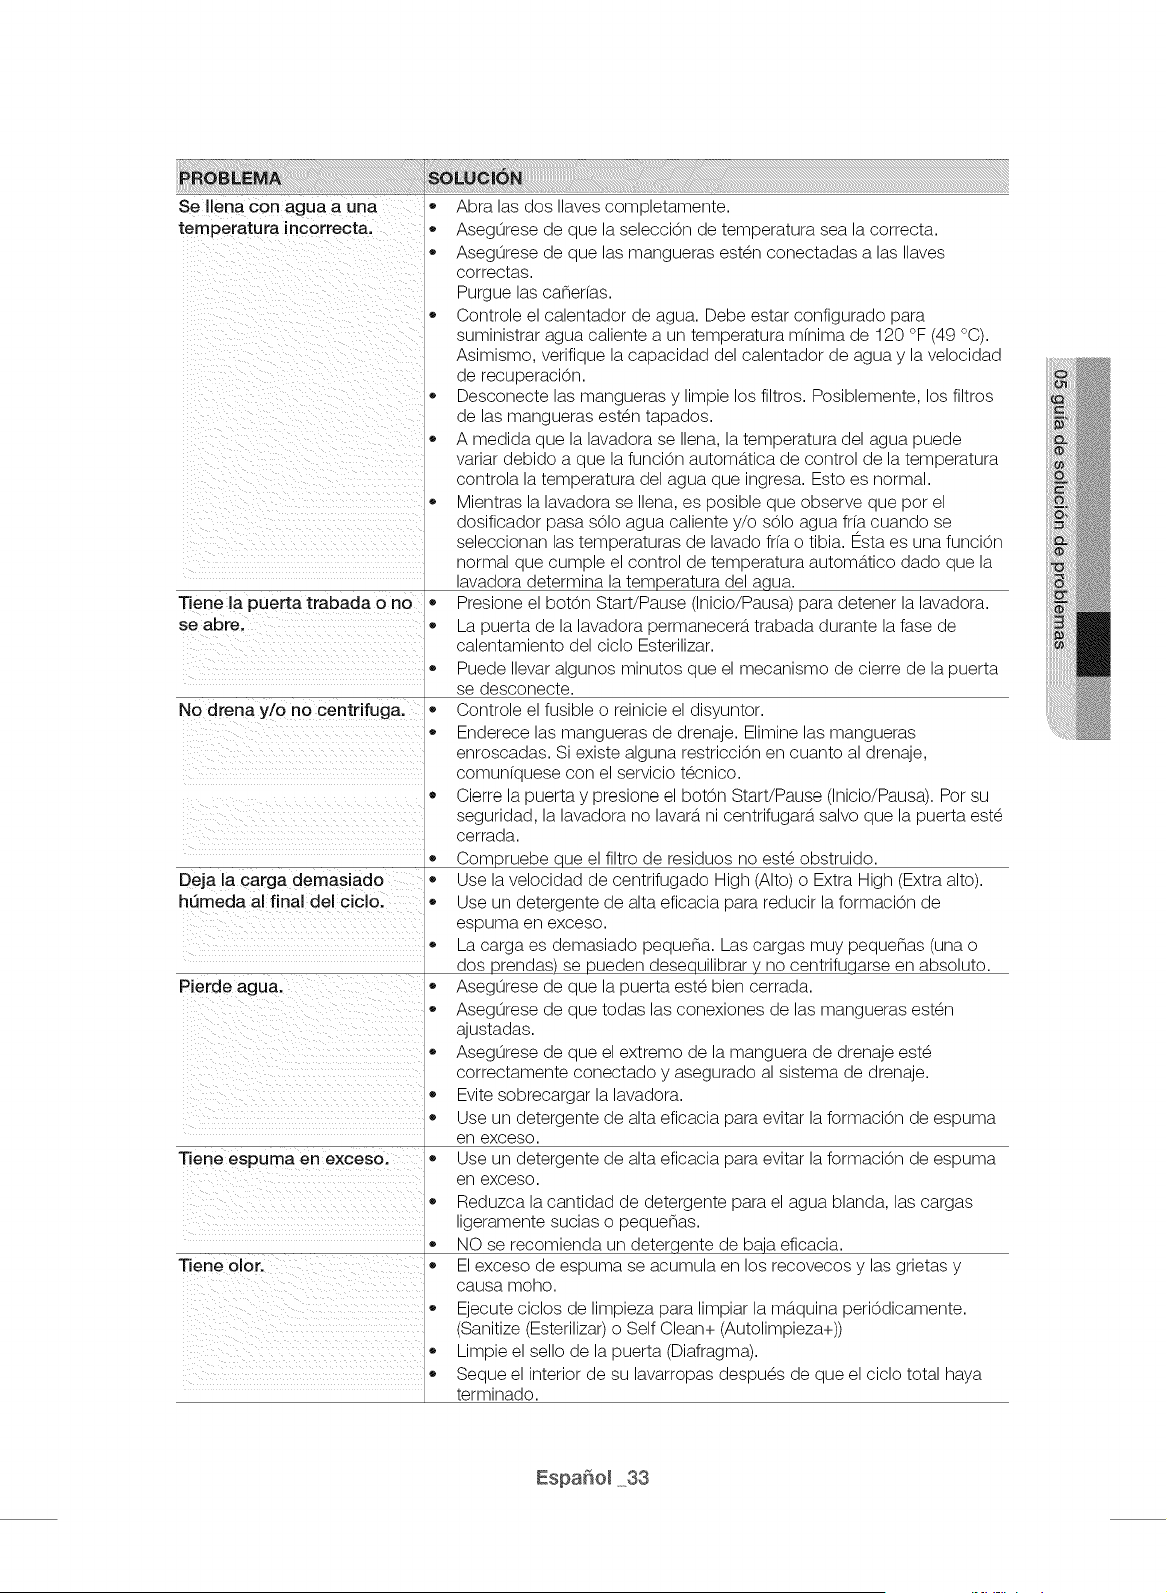
Sellenaconaguaauna
ternperaturaincorrecta.
Nodrenay/onocentrifuga.
Dejalacargademasiado
h[_medaalfinaldelciclo.
®
®
®
®
®
®
®
Tiene la puerta trabada o no •
se abre.
®
®
®
e
®
®
®
®
®
®
®
®
®
®
®
®
®
®
®
®
Pierde agua.
Tiene espuma en exceso.
Tiene olor.
Abra las dos Ilaves completamente.
AsegOrese de que la selecciOn de temperatura sea la correcta.
AsegOrese de que las mangueras est_n conectadas alas Ilaves
correctas.
Purgue las canerfas.
Controle el ealentador de agua. Debe estar configurado para
suministrar agua caliente a un temperatura mfnima de 120 °F (49 °C).
Asimismo, verifique la capacidad del calentador de agua y la velocidad
de recuperacion.
Deseonecte las mangueras y limpie los filtros. Posiblemente, los filtros
de las mangueras est_n tapados.
A medida que la lavadora se Ilena, la temperatura del agua puede
variar debido a que la funcion autom&.tica de control de la temperatura
controla la temperatura del agua que ingresa. Esto es normal.
Mientras la lavadora se Ilena, es posible que observe que pot el
dosifieador pasa s01o agua caliente y/o s01o agua frfa cuando se
seleeeionan las temperaturas de lavado frfa o tibia. Esta es una funcion
normal que eumple el control de temperatura autom&.tico dado que la
lavadora determina la temperatura del agua.
Presione el boron Start/Pause (Inicio/Pausa) para detener la lavadora.
La puerta de la lavadora permaneeer&, trabada durante la fase de
calentamiento del ciclo Esterilizar.
Puede Ilevar algunos minutos que el mecanismo de cierre de la puerta
se desconecte.
Controle el fusible o reinieie el disyuntor.
Endereee las mangueras de drenaje. Elimine las mangueras
enroseadas. Si existe alguna restriecion en cuanto al drenaje,
comunfquese con el servicio t_cnieo.
Cierre la puerta y presione el boron Start/Pause (Inicio/Pausa). Por su
seguridad, la lavadora no lavar&,ni centrifugar&, salvo que la puerta est_
cerrada.
Compruebe que el filtro de residuos no est_ obstruido.
Use la velocidad de centrifugado High (Alto) o Extra High (Extra alto).
Use un detergente de alta eficacia para reducir la formacion de
espuma en exceso.
La carga es demasiado pequena. Las eargas muy pequenas (una o
dos prendas) se pueden desequilibrar y no centrifuqarse en absoluto.
AsegOrese de que la puerta est_ bien cerrada.
AsegOrese de que todas las conexiones de las mangueras est_n
ajustadas.
AsegOrese de que el extremo de la manguera de drenaje est_
correctamente eoneetado y asegurado al sistema de drenaje.
Evite sobrecargar la lavadora.
Use un detergente de alta eficacia para evitar la formacion de espuma
en exceso.
Use un detergente de alta eficacia para evitar la formacion de espuma
en exceso.
Reduzca la cantidad de detergente para el agua blanda, las cargas
ligeramente sucias o pequenas.
NO se recomienda un deterqente de baia eficacia.
El exeeso de espuma se acumula en los recovecos y las grietas y
causa moho.
Ejecute ciclos de limpieza para limpiar la m&.quina periodicamente.
(Sanitize (Esterilizar) o Self Clean+ (Autolimpieza+))
Limpie el sello de la puerta (Diafragma).
Seque el interior de su lavarropas despu_s de que el ciclo total haya
terminado.
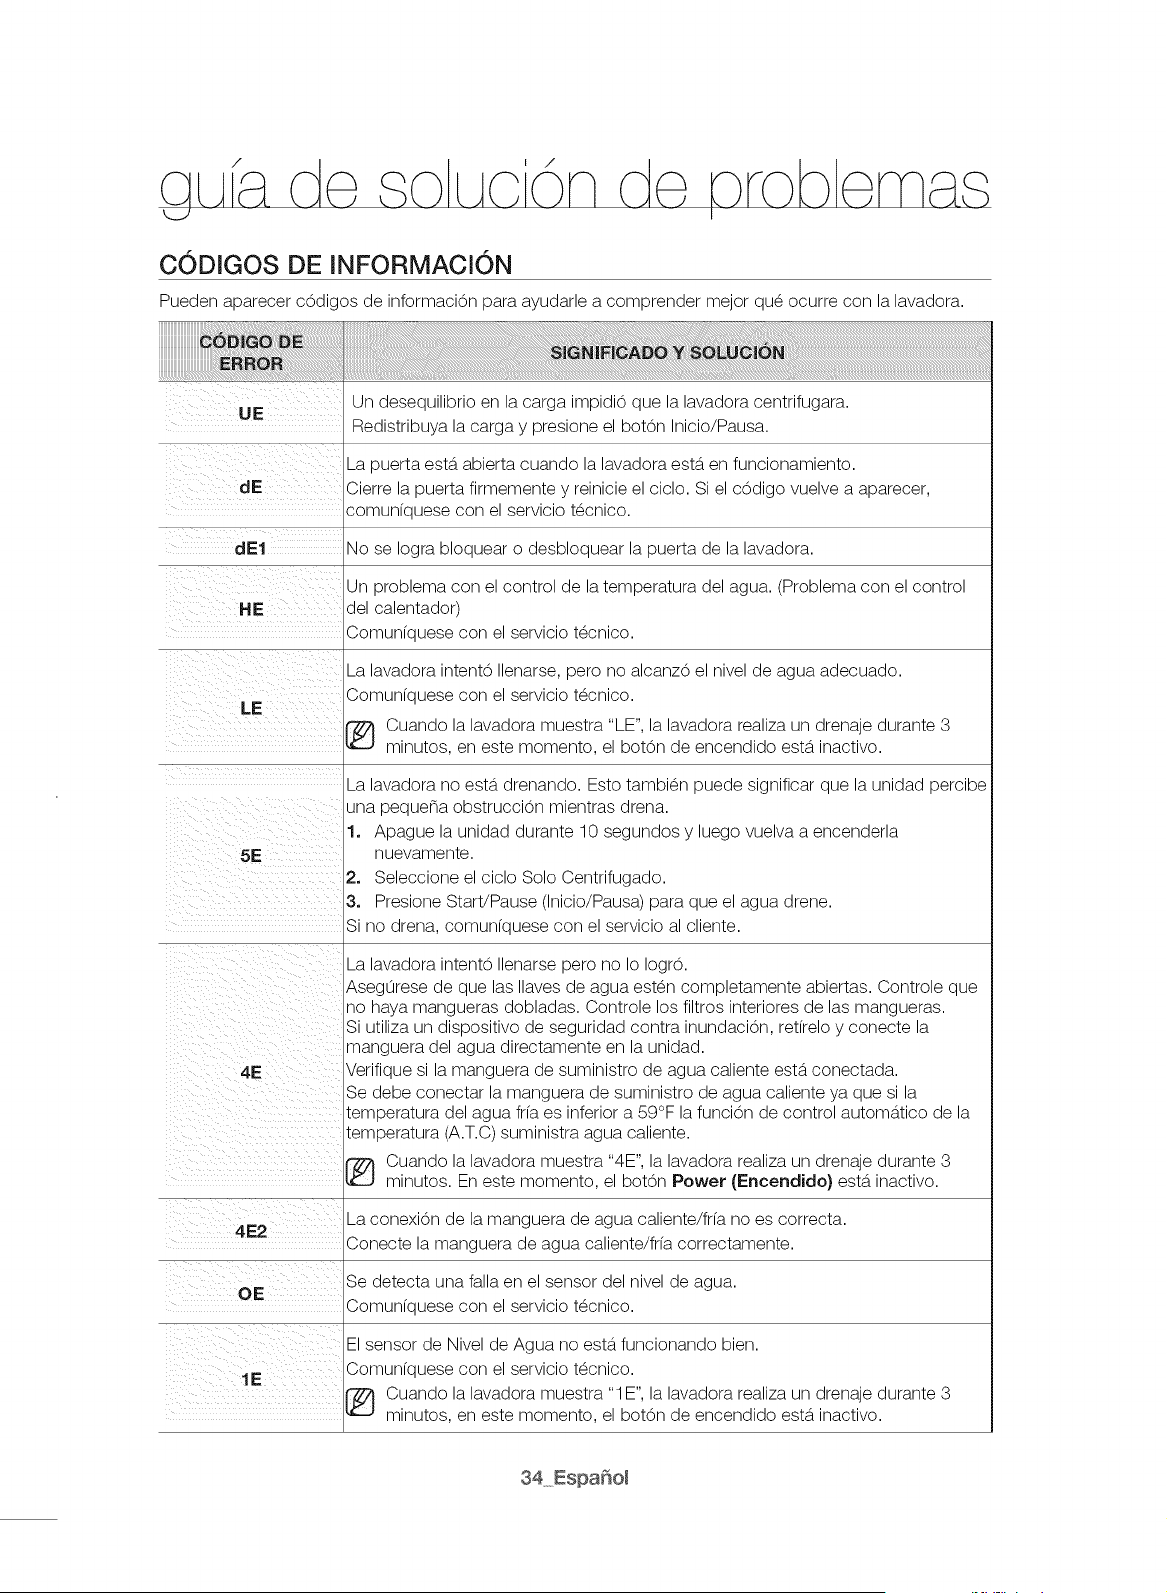
C0DIGOS DE INFORMACi0N
Pueden aparecer c0digos de informaci0n para ayudarle a comprender mejor qu_ ocurre con la lavadora.
UE
dE
dE1
HE
LE
5E
4E
Un desequilibrio en la carga impidi0 que la lavadora centrifugara.
Redistribuya la carga y presione el bot0n Inicio/Pausa.
La puerta estS.abierta cuando la lavadora ests. en funcionamiento.
Cierre la puerta firmemente y reinicie el ciclo. Si el c0digo vuelve a aparecer,
comun(quese con el servicio t_cnico.
No se Iogra bloquear o desbloquear la puerta de la lavadora.
Un problema con el control de la temperatura del agua. (Problema con el control
del calentado0
Comun(quese con el servicio t_cnico.
La lavadora intent0 Ilenarse, pero no alcanz0 el nivel de agua adecuado.
Comun(quese con el servicio t_cnico.
_ uando la lavadora muestra "LE", la lavadora realiza un drenaje durante 3
minutos, en este momento, el bot0n de encendido ests. inactivo.
La lavadora no ests. drenando. Esto tambi_n puede significar que la unidad percibe
una pequena obstrucci0n mientras drena.
1. Apague la unidad durante 10 segundos y luego vuelva a encenderla
nuevamente.
2. Seleccione el ciclo Solo Centrifugado.
3. Presione StaWPause (Inicio/Pausa) para que el agua drene.
Si no drena, comun(quese con el servicio al cliente.
La lavadora intent0 Ilenarse pero no Io Iogr0.
Aseg0rese de que las Ilaves de agua est_n completamente abiertas. Controle que
no haya mangueras dobladas. Controle los filtros interiores de las mangueras.
Si utiliza un dispositivo de seguridad contra inundaci0n, ret(relo y conecte la
manguera del agua directamente en la unidad.
Verifique si la manguera de suministro de agua caliente estS.conectada.
Se debe conectar la manguera de suministro de agua caliente ya que si la
temperatura del agua fffa es inferior a 59°F la funci0n de control automs.tico de la
temperatura (A.T.C) suministra agua caliente.
_ uando la lavadora muestra "4E", la lavadora realiza un drenaje durante 3
minutos. En este momento, el bot0n Power (Encendido} ests. inactivo.
La conexi0n de la manguera de agua caliente/fffa no es correcta.
4E2
Conecte la manguera de agua caliente/fffa correctamente.
Se detecta una falla en el sensor del nivel de agua.
OE
Comun(quese con el servicio t_cnico.
1E
El sensor de Nivel de Agua no estS.funcionando bien.
Comun(quese con el servicio t_cnico.
_ uando la lavadora muestra "1E", la lavadora realiza un drenaje durante 3
minutos, en este momento, el bot0n de encendido ests. inactivo.
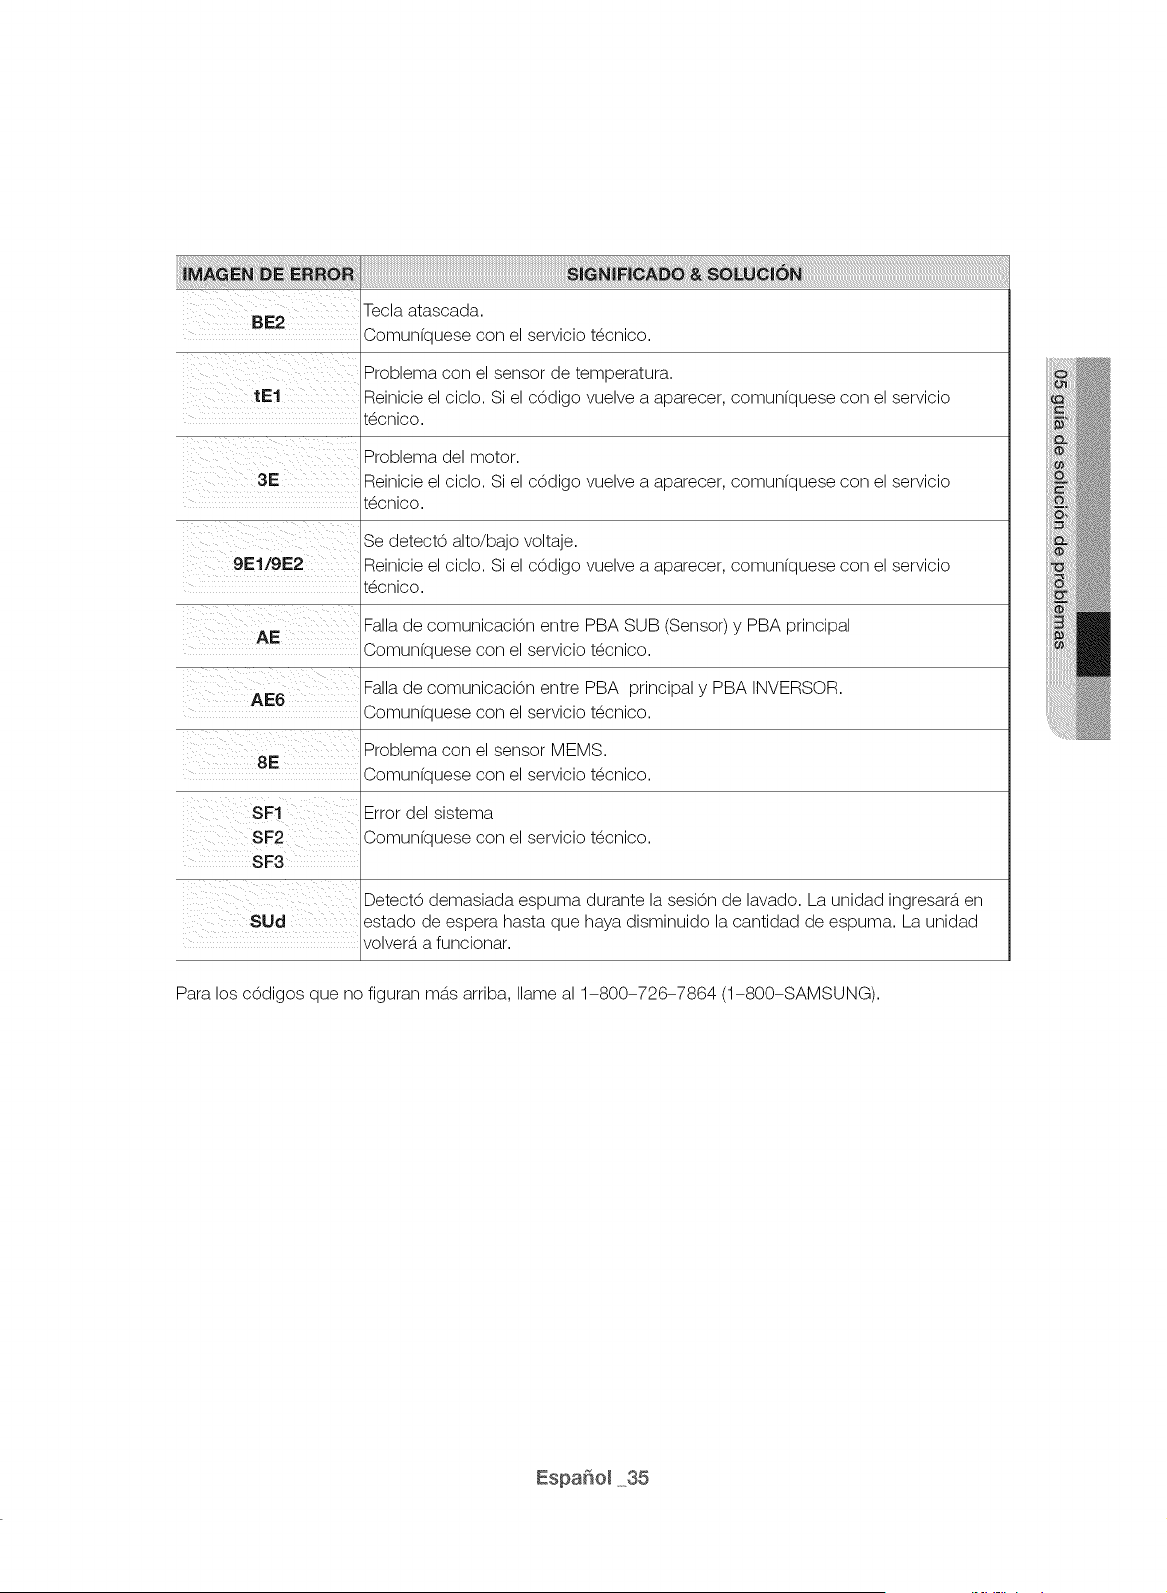
M GE.DEERROR s G. ncADoSowC 6.
Tecla ataseada.
BE2
Comunfquese con el servicio t_cnico.
Problema con el sensor de temperatura.
tel Reinicie el cielo. Si el cOdigo vuelve a aparecer, comunfquese con el servieio
t_cnieo.
3E
Problema del motor.
Reinicie el cielo. Si el cOdigo vuelve a aparecer, comunfquese con el servieio
t_cnieo.
SF1
SF2
SF3
Se detect6 alto/bajo voltaje.
9E1/gE2 Reinicie el cielo. Si el c6digo vuelve a aparecer, comunfquese con el servieio
t_cnieo.
Falla de comunieaci6n entre PBA SUB (Sensor) y PBA principal
AE
Comunfquese con el servieio t_cnieo.
Falla de comunieaci6n entre PBA principal y PBA INVERSOR.
AE6
Comunfquese con el servieio t_cnieo.
Problema con el sensor MEMS.
8E
Comunfquese con el servieio t_cnieo.
Error del sistema
Comunfquese con el servieio t_cnieo.
SUd
Detect6 demasiada espuma durante la sesi6n de lavado. La unidad ingresar&, en
estado de espera hasta que haya disminuido la cantidad de espuma. La unidad
volver&, a funcionar.
Para los c6digos que no figuran m&,sarriba, Ilame al 1-800-726-7864 (1-800-SAMSUNG).

apend ae
TABLA DE INDICACIONES SOBRE LA TELA
Los siguientes s(mbolos ofrecen indicaciones acerca de las prendas. La etiqueta de indicaciones de la
prenda incluye dmbolos para lavado, blanqueado, secado y planchado, o limpieza a seco cuando sea
necesaria. El uso de dmbolos garantiza la consistencia entre los fabricantes textiles de art(culos nacionales
e importados. Siga las indicaciones de la etiqueta para prolongar la vida Litil de la prenda y reducir los
problemas del lavado.
Plancha permanente /
Antiarrugas / Control de
arrugas
Prendas suaves /
delicadas
,avadoamano
[] Colgar para que escurra
Secar en posici0n
horizontal
No retorcer
No usar blanqueador
No secar en secadora
coo Hot (Caliente)
o® Warm (Tibia)
Fr[a
Hight (Alto)
Medium (Medic)
Low (Bajo)
O Cualquier calor
Sin vapor (agregado a la
olancha)
No planchar
Limpiar en seco
Sin calor / aire
Cualquier blanqueador
cuando sea necesario)
$61o blanqueador sin
cloro (con proteooi0n para
ropa de color) Hight (Alto)
Blanqueador (cuando sea
necesaria)
Ciolo de seoado en
secadora _ Medium (Medic)
Low (Bajo)
:_C No limpiar en seco
Secar colgado/tender
[] Colgar para que escurra
Secar en posicion
horizontal
Plancha permanente /
Antiarrugas / Control de
arrugas
delicadas
Prendas suaves /
** Los s(mbolos con punto representan las temperaturas del agua del lavado apropiadas para diversas
prendas. El rango de temperatura para Caliente es de 105° a 125 °F / 41 oa 52 °C, para Tibia es de 85 °
a 105 °F / 29 ° a 41 °C y para Frfa es de 60 ° a 85 °F / 16° a 29 °C. (La temperatura del agua del lavado
debe alcanzar un mfnimo de 60 °F / 16 °C para que se active el detergente y se Iogre un lavado eficaz.)
Posiblemente, la lavadora no garantice estas temperaturas porque las temperaturas reales del agua que
ingresa en la lavadora dependen de la configuracion del calentador de agua y de las temperaturas del
suministro de agua regional. Pot ejemplo, el agua fr(a que ingresa en las casas de los Estados del Norte
durante el invierno puede ser de 40 °F/4 °C, la cual es demasiado frfa para que se Iogre un lavado eficaz.
En este caso, set&.preciso ajustar la temperatura del agua seleccionando la opci0n de temperatura
tibia, agregando algo de agua caliente a la I(nea MAX FILL (Llenado m&.ximo) o usando la opcion de
calentamiento de la lavadora, si se dispone de ella.
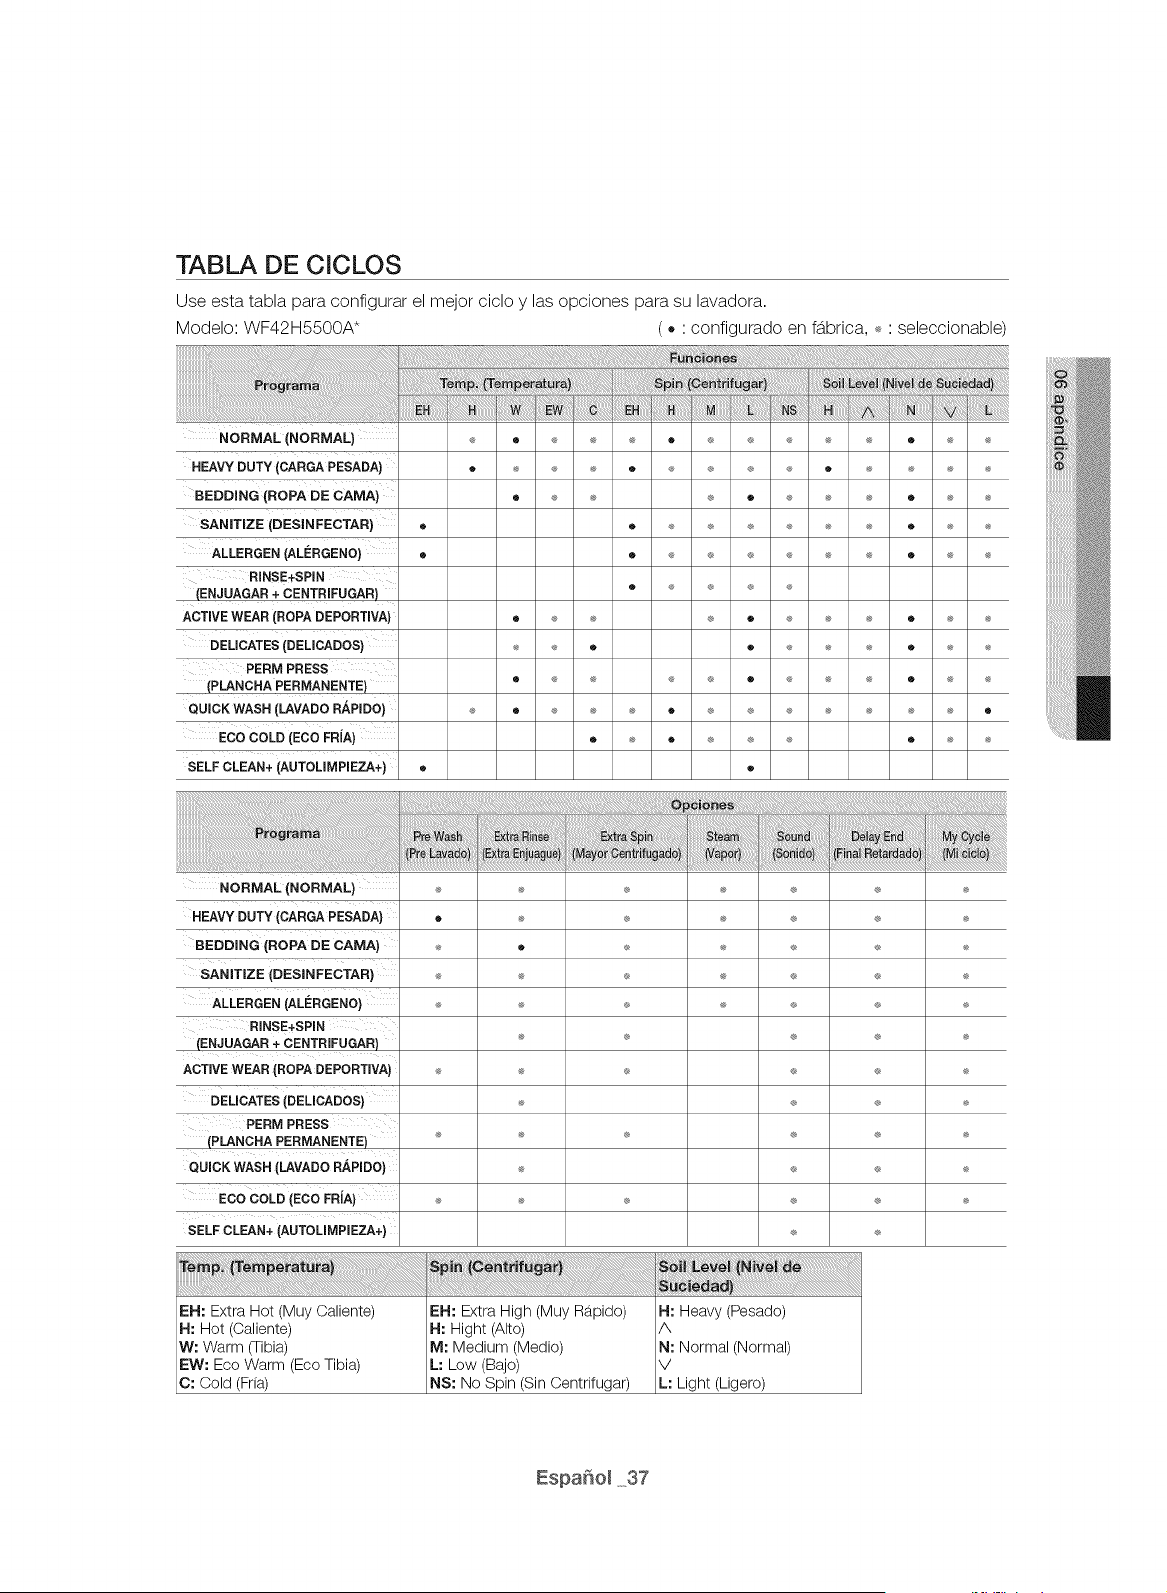
TABLA DE CICLOS
Use esta tabla para configurar el mejor ciclo y las opciones para su lavadora.
Modelo: WF42H5500A* ( • ' configurado en fabrica, _ ' seleccionable)
EH LH W EW E. H
NORMAL (NORMAL) _, ® _, _, _, ® _, _, _, _, _, ® _, _,
HEAVY DUTY (CARGA PESADA) ® _, _, _, ® _, _, _, _, ® _, _, _, _,
BEDDING (ROPA DE CAMA) ® _, _, _, ® _, _, _, ® _, _,
SANiTiZE (DESIN FECTAR) ® ® _, _, _, _, _, _, ® _, _,
ALLERGEN (ALERGENO} ® ® _, _, _, _, _, _, ® _, _,
RiNSE+SPIN
_ENJUAGAR + CENTRIFU_ ® _' _' _' _'
ACTIVE WEAR ® _, _, _, ® _, _, _, ® _, _,
DELICATES (DELICADOS) _, _, ® ® _, _, _, ® _, _,
PERM PRESS
® ® ® ® ® ® ® ® ® ® ® ®
QUICK WASH (LAVADO RAPIDO} _, ® _, _, _, ® _, _, _, _, _, _, _, ®
EGO COLD (EGO FRiA) ® _, ® _, _, _, ® _, _,
SELF CLEAN+ (AUTOLIMPIEZA+) ® ®
i !i ii ii ii !i !i! ! !i !i !i !i !i !i !! ! !i !i i iii ii ii iiiii ii ii!ii!ii!ii!ii!ii!ii!i i i!ii!i!i!ii ii!ii ii!ii ii!ii ii!ii ii!ii ii!ii ii!ii ii!ii ii!ii ii!ii iiiiii!i! iiiii!iiiiiiiiiiii
NORMAL (NORMAL) _ _
HEAVY DUTY (CARGA PESADA) ® _
BEDDING (ROPA DE CAMA) _ ®
SANmZEiDES_N_ECTAR) _ _
ALLERGEN (ALERGENO} _ _
RINSE+SPIN
_ENJUAGAR ± CENTRIFU_ _
ACTIVE WEAR (I _ _
DELICATES (DELICADOS) _
PERM PRESS
QUICK WASH (LAVADO R_,PIDO) _
ECO COLD (ECO FRIA) _ _
®
®
®
®
®
®
®
®
®
®
®
®
®
®
®
®
®
®
®
®
®
®
®
SELFCLEAN+iAUTOU_P_EZ_+),,
EH: Extra Hot (Muy Caliente) EH: Extra High (Muy Rapido) H: Heavy (Pesado)
H: Hot (Caliente) H: Hight (Alto) /k
W: Warm (Tibia) M: Medium (Medio) N: Normal (Normal)
EW: Eco Warm (Eco Tibia) L: Low (Bajo) V
C: Cold (Fria) NS: No Spin (Sin Oentrifugar) L: Light (Ligero)
®
®
®
®
®
®
®
®
®
®
®
®
®
®
®
®
®
®
®
®
®
®
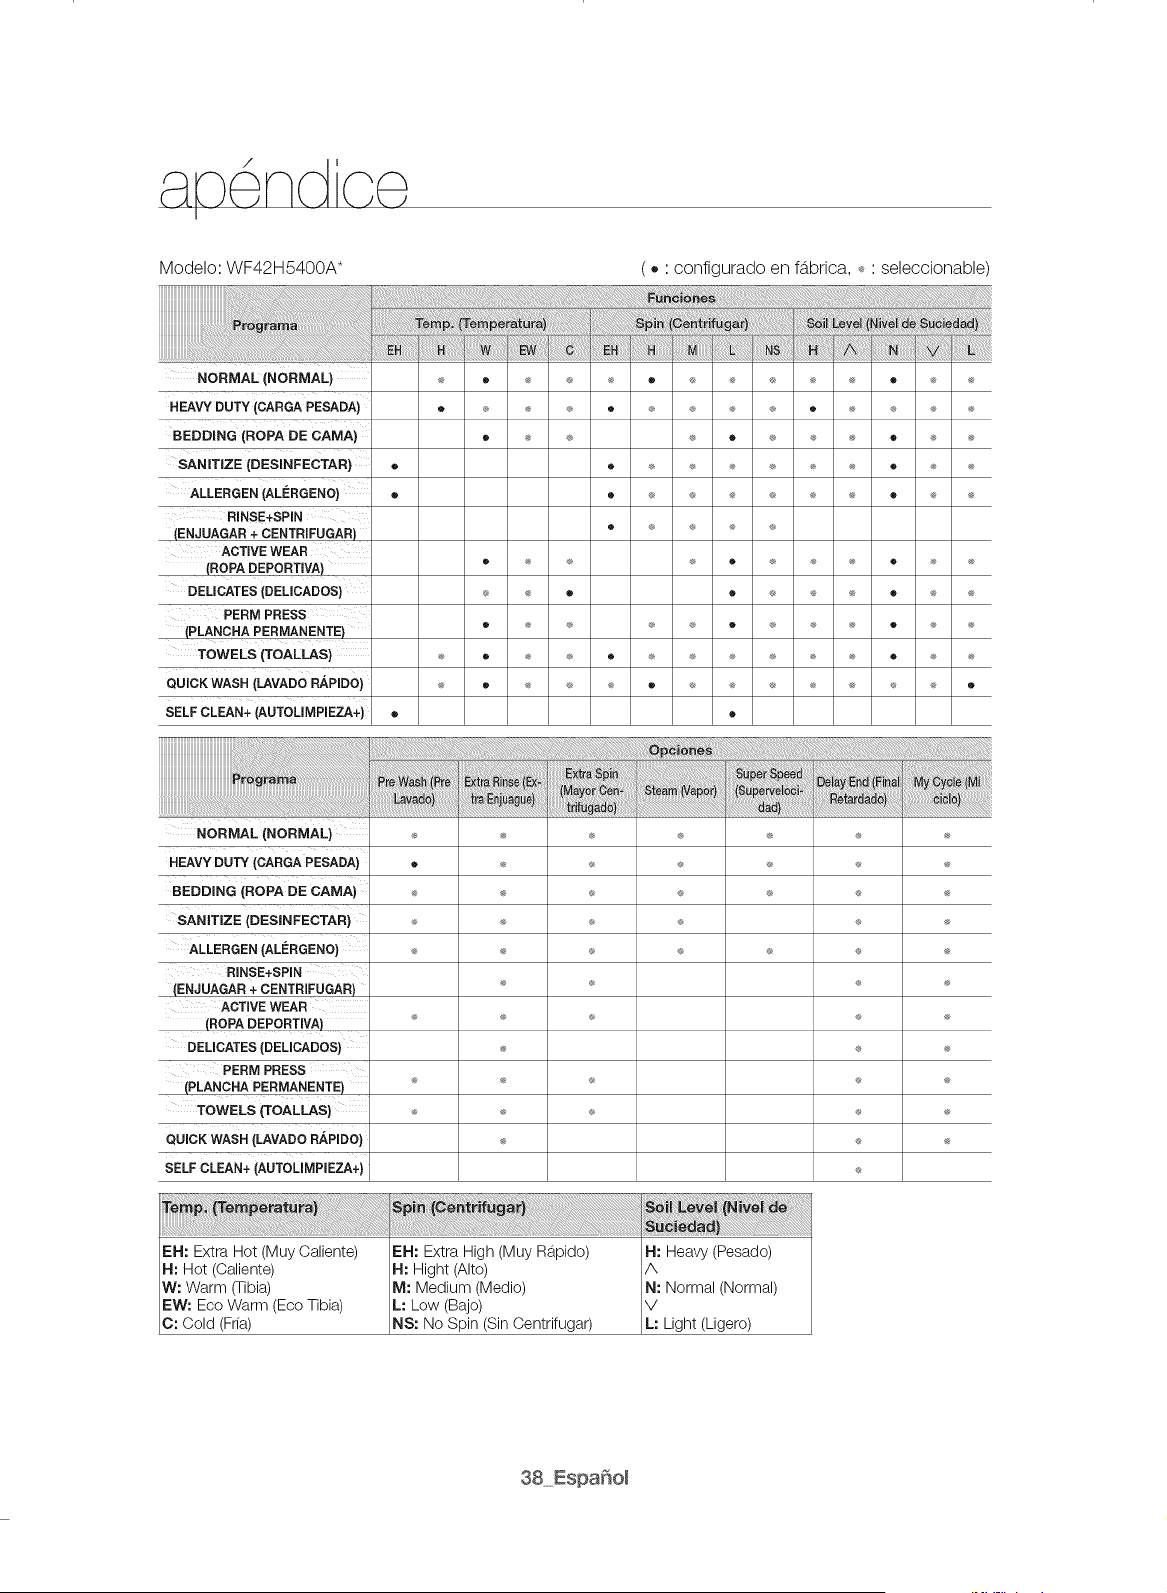
ae
Modelo: WF42H5400A*
( • ' configurado en fabrica, _ ' seleccionable)
NORMAL (NORMAL}
HEAVY DUTY
BEDDING (ROPA DE CAMA}
SANITIZE (DESINFECTAR)
ALLERGEN (ALI_RGENO}
RINSE+SPIN
_ENJUAGAR + CENTRIFU,
ACTIVE WEAR
DELICATES (DELICADOS)
PERM PRESS
TOWELS (TOALLAS}
QUICK WASH (LAVADO RAPIDO}
SELF CLEAN+
®
®
®
®
®
®
®
®
®
®
®
®
®
®
®
® ® ® ® ® ® ® ®
® ® ® ® ® ® ® ®
® ® ® ® ® ®
® ® ® ® ® ®
® ® ® ® ® ®
® ® ® ® ®
® ® ® ® ® ®
® ® ® ® ®
® ® ® ® ® ® ®
® ® ® ® ® ® ® ®
® ® ® ® ® ® ® ®
®
®
®
®
®
®
®
®
®
®
®
® ®
® ®
® ®
® ®
® ®
® ®
® ®
® ®
® ®
® ®
®
®
®
®
®
®
®
®
®
®
P_'_grama
NORMAL (NORMAL)
HEAVY DUTY (CARGA PESADA)
BEDDING IROPA DE CAMA)
SANiTiZE (DESINFECTAR)
ALLERGEN (ALC:RGENO)
RINSE+SPIN
_ENJUAGAR + CENTRIFUGAR_
ACTIVE WEAR
_OPA DEPORTIVL
DELICATES (DELICADOS)
PERM PRESS
_PLANCHA PERMANENTE_
TOWELS _rOALLAS)
QUICK WASH [LAVADO RAPIDO)
SELF CLEAN+ (AUTOLIMPIEZA+)
®
®
®
®
®
®
®
®
®
®
®
®
®
®
®
®
®
®
®
®
®
®
®
®
®
®
®
®
®
®
®
®
®
®
®
®
®
®
®
®
®
®
®
® ®
® ®
EH: Extra Hot (Muy Caliente) EH: Extra High (Muy Rapido) H: Heavy (Pesado)
H: Hot (Caliente) H: Hight (Alto) /k
W: Warm (Tibia) M; Medium (Medio) It; Normal (Normal)
EW; Eco Warm (Eco Tibia) L: Low (Bajo) V
C: Oold (Fria) 11S: No Spin (Sin Oentrifuga0 L; Light (Ligero)
®
®
®
®
®
®
®
®
®
®
®

AYUDA AL MEDIOAMBIENTE
Esta lavadora se fabrica con materiales reciclables. Si decide deshacerse de ella, siga la normativa
local relacionada con la eliminaci0n de desechos. Corte el cable de alimentacion para que el
electrodom_stico no pueda conectarse a una fuente de alimentaci0n. Quite la puerta para que los
animales y los ninos pequenos no puedan quedar atrapados dentro del electrodom_stico.
No utilice cantidades de detergente mayores alas recomendadas por el fabricante del detergente.
Utilice productos quitamanchas y blanqueadores antes del ciclo de lavado y sOlo cuando sea necesario.
Ahorre agua y electricidad utilizando la capacidad total de la lavadora (la cantidad exacta depende del
programa que se utilice).
DECLARACi0N DE CONFORMIDAD
Este aparato cumple con la norma UL2157.
ESPECIFiCACIONES
DIMENSIONES
A. Altura-General
B. Ancho
C. Profundidad con la puerta
.......................... abierta 90 °
D. Profundidad
38,7" (984)
27" (686)
51,2" (1300)
33,4" (848)
PRESION DEL AGUA
POTENClA DEL CALENTADOR
DRENAJE
20-116 psi (137-800 kPa)
88 kg (194 Ib)
900 W
120V
120V
120V
120V
3OOW
1200 W
700 W
8O W
1200 rpm
LAVADORA SAMSU NG
GARANTIA LIIVIITADA PARA EL COMPRADOR ORIGINAL
El presente producto de la marca 3AMGUN®, tal como Io provee y distribuye 3AMGUN® ELECTRONICS
AMERIOA, INO. (3AMSUNG) y Io entrega nuevo, en su embalaje de cart6n original al comprador o
consumidor original, esta. garantizado por 3AMGUN® contra defectos de fabricaci6n de los materiales y la
mano de obra durante el periodo limitado de la garantia de:
Un (1) aflo para las piezas y la mano de obra, Dos (2) aflos para las piezas del panel de control (Solo
piezas), Tres (3) aros para las piezas del tambor inoxidable (Solo piezas), Cinco (5) aros para las piezas del
motor de la lavadora (Solo piezas), Diez (10) aros aros para las piezas del motor DD de la lavadora (Solo
piezas).
La presente garant(a limitada comienza en la fecha original de compra yes v&.lida 0nicamente para
productos comprados y usados en los Estados Unidos. Para recibir el servicio t_cnico de la garantia,
el comprador debe comunicarse con SAMSUNG con el fin de que se determine el problema y los
procedimientos del servicio. El servicio t_cnico de la garantia sOIo puede ser prestado por un centro de
servicio t_cnico autorizado de SAMSUNG. Se debe presentar la factura de compra original como prueba de
compra a SAMSUNG o al servicio t_cnico autorizado de SAMSUNG. SAMSUNG prestar&,servicio t_cnico a
domicilio durante el perbdo de la garant(a sin costo, sujeto a la disponibilidad dentro de los Estados Unidos
contiguos. El servicio t_cnico a domicilio no est&.disponible en todas las &.reas.
Para recibir el servicio t_cnico a domicilio, el producto no debe presentar obstrucciones y debe ser
accesible para el agente del servicio t_cnico. Si el servicio t_cnico no est&.disponible, SAMSUNG puede
optar por transportar el producto hasta y desde el servicio t_cnico autorizado.
SAMSUNG reparar&.,reemplazar&, el producto u ofrecer&, un reembolso a su criterio y sin cargo adicional,
tal como se establece en la presente garant(a, con piezas o productos nuevos o reacondicionados si se
comprueba que es defectuoso durante el perbdo limitado de la garant[a especificado anteriormente. Todas
las piezas y los productos reemplazados pasan a ser propiedad de SAMSUNG y deben ser devueltos a
SAMSUNG. Las piezas y los productos reemplazados asumen la garant(a original que resta, o noventa (90)
d(as, el perbdo que sea el m&.sprolongado.La presente garant(a limitada cubre defectos de fabricaciOn
de los materiales y la mano de obra encontrados durante el uso normal y dom_stico de este producto y
no ser&.v&.lida para Io siguiente: daros que ocurran durante el env(o; entrega e instalacion; aplicaciones
y usos para los cuales el presente producto no fue destinado; nLimeros de serie o producto alterados;
daro cosm_tico o acabado exterior; accidentes, abuso, descuido, incendio, inundacion, ca(da de rayos, u
otros casos fortuitos o de fuerza mayor; uso de productos, equipo, sistemas, utilidades, servicios, piezas,
suministros, accesorios, aplicaciones, instalaciones, reparaciones, cableado extemo o conectores no
provistos ni autorizados por SAMSUNG que darien este producto o que acarreen problemas en el servicio;
voltaje de la I(nea el_ctrica incorrecto, fluctuaciones y sobretensiOn; ajustes del cliente e incumplimiento
de Io establecido en el manual de instrucciones, instrucciones de mantenimiento y ambientales que est&.n
cubiertas y recomendadas en el manual de instrucciones; traslado y reinstalaciOn del producto; problemas
causados por plagas. La presente garant[a limitada no cubre problemas derivados de la corriente, el voltaje
o el suministro el_ctrico incorrectos, las bombillas de luz, los fusibles de la casa, el cableado de la casa,
el costo del servicio t_cnico para recibir instrucciones o corregir errores en la instalacion. SAMSUNG no
garantiza el funcionamiento ininterrumpido o sin errores del producto.

SALVOLOESTABLECIDOENLAPRESENTEGARANT[A,NOEXISTENGARANT[ASSOBREEL
PRESENTEPRODUCTO,YASEANEXPRESASOTACITAS,YSAMSUNGDESCONOCETODASLAS
GARANT[ASQUEINCLUYEN,AUNQUENOENCARACTERTAXATIVO,CUALQUIERGARANT[A
T_,CITADEQUEELPRODUCTOSEENCUENTRAENCONDICIONESAPTASPARALAVENTA,DE
DEFRAUDACIONDEDERECHOSODEQUEELPRODUCTOSEADECUAALOSFINESESPEC[FICOS
PARALOSCUALESSEADQUIERE.
NINGUNAVALOGARANT[AOTORGADOSPORPERSONA,COMPAN[AOCORPORACION
ALGUNACONRESPECTOALPRESENTEPRODUCTOREVESTIRACARACTERVlNCULANTEPARA
SAMSUNG.SAMSUNGNOSERARESPONSABLEPORPCRDIDADEINGRESOSOLUCROCESANTE,
IMPOSIBILIDADDEGENERARAHORROSUOBTENEROTROSBENEFICIOS,OCUALQUIERDAiqO
DERIVADODECIRCUNSTANCIASESPECIALES,DANOIMPREVlSTOODERIVADOCAUSADO
PORELUSO,USOINCORRECTO,OINCAPACIDADPARAUSARELPRESENTEPRODUCTO,
INDEPENDIENTEMENTEDELATEOR[ALEGALENQUESEFUNDEELRECLAMOYAUNCUANDOSE
LEHAYANOTIFICADOASAMSUNGDELAPOSIBILIDADDETALESDAIqOS.
NINGUNRESARCIMIENTODENINGUNA[NDOLECONTRASAMSUNGSUPERARAELMONTODE
COMPRADELPRODUCTOVENDIDOPORSAMSUNGYCAUSANTEDELPRESUNTODANO.SIN
LIMITARLOPRECEDENTE,ELCOMPRADORASUMETODOELRIESGOYLARESPONSABILIDADPOR
PCRDIDA,DANOOLESIONALCOMPRADORYALOSBIENESDELCOMPRADORYATERCEROSYA
SUSBIENESDERIVADOSDELUSO,USOINCORRECTOOINCAPACIDADPARAUSARELPRESENTE
PRODUCTO.LAPRESENTEGARANT[ALIMITADANOSEEXTENDERAANINGUNAPERSONADISTINTA
DELCOMPRADORORIGINALDELPRESENTEPRODUCTO,ESINTRANSFERIBLEYESTABLECESU
EXCLUSIVAREPARACION.
AlgunosEstadosnopermitenlimitacionesencuantoalplazodeunagarant(aimpl(cita,olaexclusiono
limitaciondedanosimprevistoso derivados,porIotantolaslimitacioneso exclusionesantedichaspueden
noaplicarseensucaso.Estagarant(aleotorgaderechosespec(ficos,yadem&.spuedetenerotros
derechosquevar(ansegOnelEstadoenelqueseencuentre.
Para recibir un servicio t_cnico de garantia, comuniquese con SAMSUNG a:
Samsung Electronics America, Inc.
85 Challenger Road Ridgefield Park, NJ 07660
I=800=SAMSUNG (726=7864)
wwwosamsungocom/us/support
Las visitas de un Ingeniero de reparaciones para explicar funciones, el mantenimiento o la instalacion no
esta.n cubiertas por la garantfa.
Contacte con su agente de Samsung para que Io ayude con cualquiera de estos problemas.
/
LAVADORA SAMSU NG
GARANTIA LIMITADA PARA EL COMPRADOR ORiGiNAL
El presente producto de la marca SAMSUNG, tal como Io provee y distribuye SAMSUNG ELECTRONICS
CANADA, INC. (SAMSUNG) y Io entrega nuevo, en su embalaje de carton original al comprador o
consumidor original, est&.garantizado pot SAMSUNG contra defectos de fabricacion de los materiales y la
mano de obra durante el perfodo limitado de la garantfa de:
Un (1) ano para las piezas y la mano de obra. Diez (10) anos anos para las piezas del motor DD de la
lavadora (Solo piezas).
La presente garant(a limitada comienza en la fecha original de compra yes v&.lida Linicamente para
productos comprados y usados en Canadb.. Para recibir el servicio t_cnico de la garantfa, el comprador
debe comunicarse con SAMSUNG con el fin de que se determine el problema y los procedimientos
del servicio. El servicio t_cnico de la garantfa s01o puede ser prestado por un centro de servicio t_cnico
autorizado de SAMSUNG. Se debe presentar la factura de compra original como prueba de compra a
SAMSUNG o al servicio t_cnico autorizado de SAMSUNG. SAMSUNG prestar&, servicio t_cnico a domicilio
durante el per(odo de la garant(a sin costo, sujeto a la disponibilidad dentro de Canadb.. El servicio t_cnico a
domicilio no est&.disponible en todas las &.teas.
Para recibir el servicio t_cnico a domicilio, el producto no debe presentar obstrucciones y debe ser
accesible para el agente del servicio t_cnico. Si el servicio t_cnico no est&.disponible, SAMSUNG puede
optar por transportar el producto hasta y desde el servicio t_cnico autorizado.
SAMSUNG reparar&.,reemplazar&, el producto u ofrecer&, un reembolso a su criterio y sin cargo adicional,
tal como se establece en la presente garant(a, con piezas o productos nuevos o reacondicionados si se
comprueba que es defectuoso durante el per[odo limitado de la garant[a especificado anteriormente. Todas
las piezas y los productos reemplazados pasan a ser propiedad de SAMSUNG y deben ser devueltos a
SAMSUNG. Las piezas y los productos reemplazados asumen la garant(a original que testa, o noventa (90)
d(as, el per(odo que sea el m&.s prolongado.La presente garant(a limitada cubre defectos de fabricacion
de los materiales y la mano de obra encontrados durante el uso normal y dom_stico de este producto y
no set&.v&.lidapara Io siguiente: danos que ocurran durante el env(o; entrega e instalacion; aplicaciones
y usos para los cuales el presente producto no fue destinado; nOmeros de serie o producto alterados;
dano cosm_tico o acabado exterior; accidentes, abuso, descuido, incendio, inundacion, ca(da de rayos, u
otros casos fortuitos o de fuerza mayor; uso de productos, equipo, sistemas, utilidades, servicios, piezas,
suministros, accesorios, aplicaciones, instalaciones, reparaciones, cableado externo o conectores no
provistos ni autorizados por SAMSUNG que danen este producto o que acarreen problemas en el servicio;
voltaje de la I(nea el_ctrica incorrecto, fluctuaciones y sobretension; ajustes del cliente e incumplimiento
de Io establecido en el manual de instrucciones, instrucciones de mantenimiento y ambientales que est&.n
cubiertas y recomendadas en el manual de instrucciones; traslado y reinstalacion del producto; problemas
causados por plagas. La presente garant[a limitada no cubre problemas derivados de la corriente, el voltaje
o el suministro el_ctrico incorrectos, las bombillas de luz, los fusibles de la casa, el cableado de la casa,
el costo del servicio t_cnico para recibir instrucciones o corregir errores en la instalacion. SAMSUNG no
garantiza el funcionamiento ininterrumpido o sin errores del producto.
SALVOLOESTABLECIDOENLAPRESENTEGARANT[A,NOEXISTENGARANT[ASSOBREEL
PRESENTEPRODUCTO,YASEANEXPRESASOTACITAS,YSAMSUNGDESCONOCETODASLAS
GARANT[ASQUEINCLUYEN,AUNQUENOENCARACTERTAXATIVO,CUALQUIERGARANT[A
T_,CITADEQUEELPRODUCTOSEENCUENTRAENCONDICIONESAPTASPARALAVENTA,DE
DEFRAUDACIONDEDERECHOSODEQUEELPRODUCTOSEADECUAALOSFINESESPEC[FICOS
PARALOSCUALESSEADQUIERE.
NINGUNAVALOGARANT[AOTORGADOSPORPERSONA,COMPAN[AOCORPORACION
ALGUNACONRESPECTOALPRESENTEPRODUCTOREVESTIRACARACTERVlNCULANTEPARA
SAMSUNG.SAMSUNGNOSERARESPONSABLEPORPCRDIDADEINGRESOSOLUCROCESANTE,
IMPOSIBILIDADDEGENERARAHORROSUOBTENEROTROSBENEFICIOS,OCUALQUIERDAiqO
DERIVADODECIRCUNSTANCIASESPECIALES,DANOIMPREVlSTOODERIVADOCAUSADO
PORELUSO,USOINCORRECTO,OINCAPACIDADPARAUSARELPRESENTEPRODUCTO,
INDEPENDIENTEMENTEDELATEOR[ALEGALENQUESEFUNDEELRECLAMOYAUNCUANDOSE
LEHAYANOTIFICADOASAMSUNGDELAPOSIBILIDADDETALESDAIqOS.
NINGUNRESARCIMIENTODENINGUNA[NDOLECONTRASAMSUNGSUPERARAELMONTODE
COMPRADELPRODUCTOVENDIDOPORSAMSUNGYCAUSANTEDELPRESUNTODANO.SIN
LIMITARLOPRECEDENTE,ELCOMPRADORASUMETODOELRIESGOYLARESPONSABILIDADPOR
PCRDIDA,DANOOLESIONALCOMPRADORYALOSBIENESDELCOMPRADORYATERCEROSYA
SUSBIENESDERIVADOSDELUSO,USOINCORRECTOOINCAPACIDADPARAUSARELPRESENTE
PRODUCTO.LAPRESENTEGARANT[ALIMITADANOSEEXTENDERAANINGUNAPERSONADISTINTA
DELCOMPRADORORIGINALDELPRESENTEPRODUCTO,ESINTRANSFERIBLEYESTABLECESU
EXCLUSIVAREPARACION.
Algunasprovinciasnopermitenlimitacionesencuantoalplazodeunagarant(aimpl(cita,olaexclusiono
limitaciondedanosimprevistoso derivados,porIoquelaslimitacionesoexclusionesantedichaspueden
noaplicarseensucaso.Estagarant(aleotorgaderechosespec(ficos,yadem&.spuedetenerotros
derechosquevar(ansegOnlaprovinciaenlaqueseencuentre.
Para recibir un servicio t_cnico de garantia, comuniquese con SAMSUNG a:
Samsung Electronics Canada Inc.
2050 Derry Road West, Mississauga, Ontario L5N 0B9 Canada
1-800-SAMSUNG (726=7884}
www.samsung.com/ca/support (English}
www.samsung.com/ca_fr/support (French}
FAX:1-866-436-4617
Las visitas de un Ingeniero de reparaciones para explicar funciones, el mantenimiento o la instalacion no
esta.n cubiertas por la garantfa.
Contacte con su agente de Samsung para que Io ayude con cualquiera de estos problemas.
i.,TiENE PREGUNTAS O COMENTARiOS?
U.S.A 1-800-SAMSUNG (726-7864) www.samsung.com/us/support
MEXICO 01-800-SAMSUNG (726-7864) www.samsung.com/mx/support
www.samsung.com/ca/support (English)
CANADA 1-800-SAMSUNG (726-7864) www.samsung.com/ca fr/support (French)
Las visitas de un Ingeniero de reparaciones para explicar funciones, el mantenimiento o la instalacion no
est&.ncubiertas por la garant(a.
Contacte con su agente de Samsung para que Io ayude con cualquiera de estos problemas.
N.° de codigo. DC68-03401A-01_MES