Gas - Easy Touch Controm500
Care & Cleaning ............................................ 15-18
Form No. B/09/04 Part No 8113P449-60 @2004 Maytag Appliances Sales Co. Litho USA
Consumer: £[ease lead and keep this manual for future
Model Number
Serial Number
clan. Do not attempt to adjust, repair, service, or replace
any part of your appliance unless it is specifically recom-
mended in this guide. All other servicing should be
referred to a qualified servicer. Have the installer show
}ou the location of the gas shut offvalve and howto
shut it off in an emergency,
Always disconnect power to appliance before servicing,
[n our continuing effort to [mprovethe quality and performance
of our cooking products, it may be necessaryto make changes
ror se_viceJnrormatJen,seepa#e 2a,
Warning and Impo[tant Safety Instructions appearing in
this guide are not meant to cover all possible conditions
and situations that may occur. Common sense, caution,
and care must be exercised when installing, maintaining,
or operating the appliance.
Always contact your dealer, distributor, service agent, or
manufacturer about problems or conditions you do not
understand.
Recognize Safety Symbols, Words, LabeHs
if the information in this marion[ is not followed
e×actly, a fire or e×plosion may resoit causing
property damage, persona[ |njury or death.
Do not store or use gasoline or other flam-
mable vapors and liquids in the vicinity of this
or any appliance.
[F YOU SMELL GAS:
° Do not try to Jight any appliance.
o Do not touch any electrical switch.
o Do not use any phone in your building.
o immediately caU your gas supplier from a
neighboCs phone° Follow the gas supplieCs
instructions.
- [f you cannot reach your gas supplier, call
the fire department°
installation and service must be per{ormed by
a qualified installer, service agency or the gas
sa ppiier.
by smell aione_ Gas suppliers recommend you pur_
and use in accordance with the manufacturer's
instructions,
WARNING - Hazards or unsafe practices which
COULD resuJt in severe personal injury or death,
CAUTnON - Hazards or unsafe practices which
COULD result in minor personal injury.
Read and follow all instructions before using this
appmiance to prevent the potential risk of fire, electric
shock, personal injury or damage to the appliance as a
result of improper usage of the appliance. Use appliance
only for its intended purpose as described in this guide.
To ensure proper and safe operation: Appliance must
be properly installed and grounded by a qualified techni-
GeneraJ instructions
TUPAND
CAUSE UNJUR[ES TO PERSONS
o [NSTALLANT[-T[P DEVmCE
o FOLLOW ALL UNSTALLATiON
abnorma[ usage or by excessive Joading of the
oven door, the appliance must be secured by a
properly
i
To check if device is properly installed, look underneath
range with a flashlight to make sure one of the rear
leveling legs is properly engaged in the bracket slot. The
antPdp device secures the rear leveling leg to the floor
when properly engaged. You should check this anytime
the range has been moved.
Do not use water on grease fires. Use baking soda, a
dry chemical or foam-type extinguisher to smother fire
or flame.
Child Safety
Te Prevent Fire er Smoke
Be sure all packing materials are removed from the
appliance before operating it.
Keep area around appliance clear and free from com-
busdbb materials, gasoline, and other flammable vapors
and matedab.
If appliance is installed near a window, proper precau-
tions should be taken to prevent curtains from blowing
over burners.
NEVER leave any items on the cooktop. The hot air from
the vent may ignite flammabb items and may increase
pressure in dosed containers which may cause them to
burst.
Many aerosoPtype spray cans are EXPLOSIVE when
exposed to heat and may be highly flammabb. Avoid
their use or storage near an appliance.
Many plastics are vulnerabb to heal Keep plastics away
from parts of the appliance that may become warm or
hoL Do not leave plastic items on the cooktop as they
may melt or soften if left too close to the vent or a
lighted surface burner.
To eliminate the hazard of reaching over hot surface
burners, cabinet storage should not be provided directly
above a unit. If storage is provided, it should be limited
to items which are used infrequently and which are
safely stored in an area subjected to heat from an
appliance. Temperatures may be unsafe for some items,
such as volatile liquids, cleaners or aerosol sprays.
In Case of Fire
Turn off appliance and ventilating hood to avoid spread-
ing the flame. Extinguish flame then turn on hood to
remove smoke and odor.
, Gooktop: Smother fire or flame in a pan with a lid or
cookie sheeL
NEVER pick up or move a flaming pan.
, Ovens Smother fire or flame by closing the oven door.
above an appliance 0r on backguard of a range,
items could be seriously injured.
NEVER leave children alone or unsupervised near the
appliance when it is in use or is still hot.
NEVER allow children to sit or stand on any part of the
appliance as they could be injured or burned.
Children must be taught that the appliance and utensils
in it can be hot. Let hot utensils cool in a safe place, out
of reach of small children. Children should be taught
that an appliance is not a toy. Children should not be
allowed to play with controls or other parts of the unit.
About Your Appliance
2
NEVER use appliance door as a step stool or seat as this
may result in possible tipping of the appliance and serious
injuries,
NEVER use this appliance as a space heater to heat o_
warm a room. Doing SOmay result in carbon monox-
ide poisoning and overheating of the oven.
NEVER cover any slots, holes or passages in the oven
bottom or cover the entire rack with materials such as
aluminum foil. Doing so blocks air flow through the
oven and may cause carbon monoxide poisoning.
Aluminum foil may also trap heat causing a fire
hazard.
NEVER obstruct the flow of combustion and ventilation
air by blocking the oven vent o_ air intakes. Doing so
restricts air to the burners and may result in carbon
monoxide poisoning.
The oven vent is located at the base of the backguard.
Avoid touching oven vent area while oven is on and for
several minutes after oven is turned off. Some parts of
the vent and surrounding area become hot enough to
causeburns.Afterovenisturnedoff,do nottouchthe
ovenventorsurroundingareasuntiltheyhavehad
sufficienttimeto cool.
Otherpotentiallyhotsurfacesincludecooktop,areas
facingthecooktop,ovenvent,surfacenearthevent
opening,ovendoor,areaaroundtheovendoorand
ovenwindow.
Do not touch a hot oven light bulb with a damp cloth as
the bulb could break. Should the bulb break, disconnect
power to the appliance before removing bulb to avoid
ebctdcal shock.
Do not use the cooktop or oven as a storage area for
food or cooking utensib.
Cooking Safety
Always place a pan on a surface burner before turning it
on. Be sure you know which knob controls which
surface burner. Make sure the correct burner is turned
on and that the burner has ignited. When cooking is
completed, turn burner off before removing pan to
prevent exposure to burner flame.
Always adjust surface burner flame so that it does not
extend beyond the bottom edge of the pan. An exces-
sive flame is hazardous, wastes energy and may damage
the appliance, pan or cabinets above the appliance.
NEVER leave a surface cooking operation unattended
especially when using a high heat setting or when deep
fat frying. Boilovers cause smoking and greasy spillovers
may ignite. Clean up greasy spills as soon as possible.
Do not use high heat for extended cooking operations.
NEVER heat an unopened container on the surface
burner or in the oven. Pressure build-up may cause
container to burst resulting in serious personal injury or
damage to the appliance.
Use dry, sturdy potholders. Damp potholders may cause
burns from steam. Dish towels or other substitutes
should never be used as potholders because they can
trail across hot surface burners and ignite or get caught
on appliance parts.
Always let quantities of hot fat used for deep fat frying
cool before attempting to move or handle.
Do not let cooking grease or other flammabb materials
accumulate in or near the appliance, hood or vent fan.
Clean hood frequently to prevent grease from accumu-
lating on hood or filter. When flaming foods under the
hood turn the fan on.
NEVER wear garments made of fiammabb material or
loose fitting or Iong-sbeved apparel while cooking.
Clothing may ignite or catch utensil handles.
Always place oven racks in the desired positions while
oven is cook Slide oven rack out to add or remove food,
using dry, sturdy potholders. Always avoid reaching into
the oven to add or remove food. If a rack must be
moved while hot, use a dry potholder. Always turn the
oven off at the end of cooking.
Use care when opening the oven door. Let hot air or
steam escape before moving or replacing food.
PREPARED FOOD WARNUNG: Follow food
manufacturer's instructions, if a plastic frozen food
container and/or its cover distorts, warps, or is otherwise
damaged during cooking, immediately discard the food
and its container. The food could be contaminated.
NEVER use aluminum foil to cover oven racks or oven
bottom. This could result in risk of electric shock, fire, or
damage to the appliance. Use foil only as directed in this
guide.
Utensim Safety
Use pans with flat bottoms and handles that are easily
grasped and stay cool. Avoid using unstable, warped,
easily tipped or Ioose-handbd pans. Also avoid using
pans, especially small pans, with heavy handles as they
could be unstable and easily tip. Pans that are heavy to
move when filled with food may also be hazardous.
Be sure utensil is large enough to properly contain food
and avoid boilovers. Pan size is particuhrly important in
deep fat frying. Be sure pan will accommodate the
volume of food that is to be added as well as the bubble
action of fat.
To minimize burns, ignition of flammabb materials and
spillage due to unintentional contact with the utensil, do
not extend handles over adjacent surface burners.
Always turn pan handles toward the side or back of the
appliance, not out into the room where they are easily
hit or reached by small children.
Never let a pan boil dry as this could damage the utensil
and the appliance.
Follow the manufacturer's directions when using oven
cooking bags.
3
Only certain types of glass, glass/ceramic, ceramic or
glazed utensils are suitable for cooktop or oven usage
without breaking due to the sudden change in tempera-
ture. Follow manufacturer's instructions when using
glass.
This appliance has been tested for safe performance
using conventional cookware. Do not use any devices or
accessories that are not specifically recommended in
this guide. Do not use eyelid covers for the surface
units, stovetop grills, or add-on oven convection sys-
tems. The use of devices or accessories that are not
expressly recommended in this manual can create
serious safety hazards, result in performance problems,
and reduce the life of the components of the appliance.
Cmeaning Safety
Turn off all controls and wait for appliance parts to cool
before touching or cleaning them. Do not touch the
burner grates or surrounding areas until they have had
sufficient time to cool.
Clean appliance with caution. Use care to avoid steam
burns if a wet sponge or cloth is used to wipe spills on a
hot surface. Some cleaners can produce noxious fumes
if applied to a hot surface.
Before self-cleaning the oven, remove broiler pan, oven
racks and other utensils and wipe up excessive
spfllovers to prevent excessive smoke, flare-ups or
flaming.
It is normal for the cooktop of the range to become hot
during a self-clean cycle. Therefore, touching the
cooktop during a clean cycle should be avoided.
Important Safety Notice and
The California Safe Drinking Water and Toxic Enforce-
ment Act of 1986 (Proposition 65} requires the Governor
of California to publish a list of substances known to the
State of California to cause cancer or reproductive harm,
and requires businesses to warn customers of potential
exposures to such substances.
Users of this appliance are hereby warned that the
burning of gas can result in low-level exposure to some
of the listed substances, including benzene, formalde-
hyde and soot, due primarily to the incomplete combus-
tion of natural gas or liquid petroleum (LP} fuels. Prop-
erly adjusted burners will minimize incomplete combus-
tion. Exposure to these substances can also be mini-
mized by properly venting the burners to the outdoors.
Self-Clean Oven
Users of this appliance are hereby warned that when
the oven is engaged in the self-clean cycle, there may
be some low-level exposure to some of the listed
substances, including carbon monoxide. Exposure to
these substances can be minimized by properly venting
the oven to the outdoors by opening the windows and/
or door in the room where the appliance is located
during the self-clean cycle.
Clean only parts listed in this guide. Do not clean door
UMPORTANT NOTUCE REGARDUNG PET BURDS:
gasket. The door gasket is essential for a good seal.
Care should be taken not to rub, damage, or move the
gasket. Do not use oven cleaners of any kind in or
around any part of the self-clean oven.
Never keep pet birds in the kitchen or in rooms where
the fumes from the kitchen could reach. Birds have a
very sensitive respiratory system. Fumes released during
an oven self-cleaning cycle may be harmful or fatal to
birds. Fumes released due to overheated cooking off, fat,
margarine and overheated non-stick cookware may be
equally harmful.
Save These Instructions for Future Reference
4
@
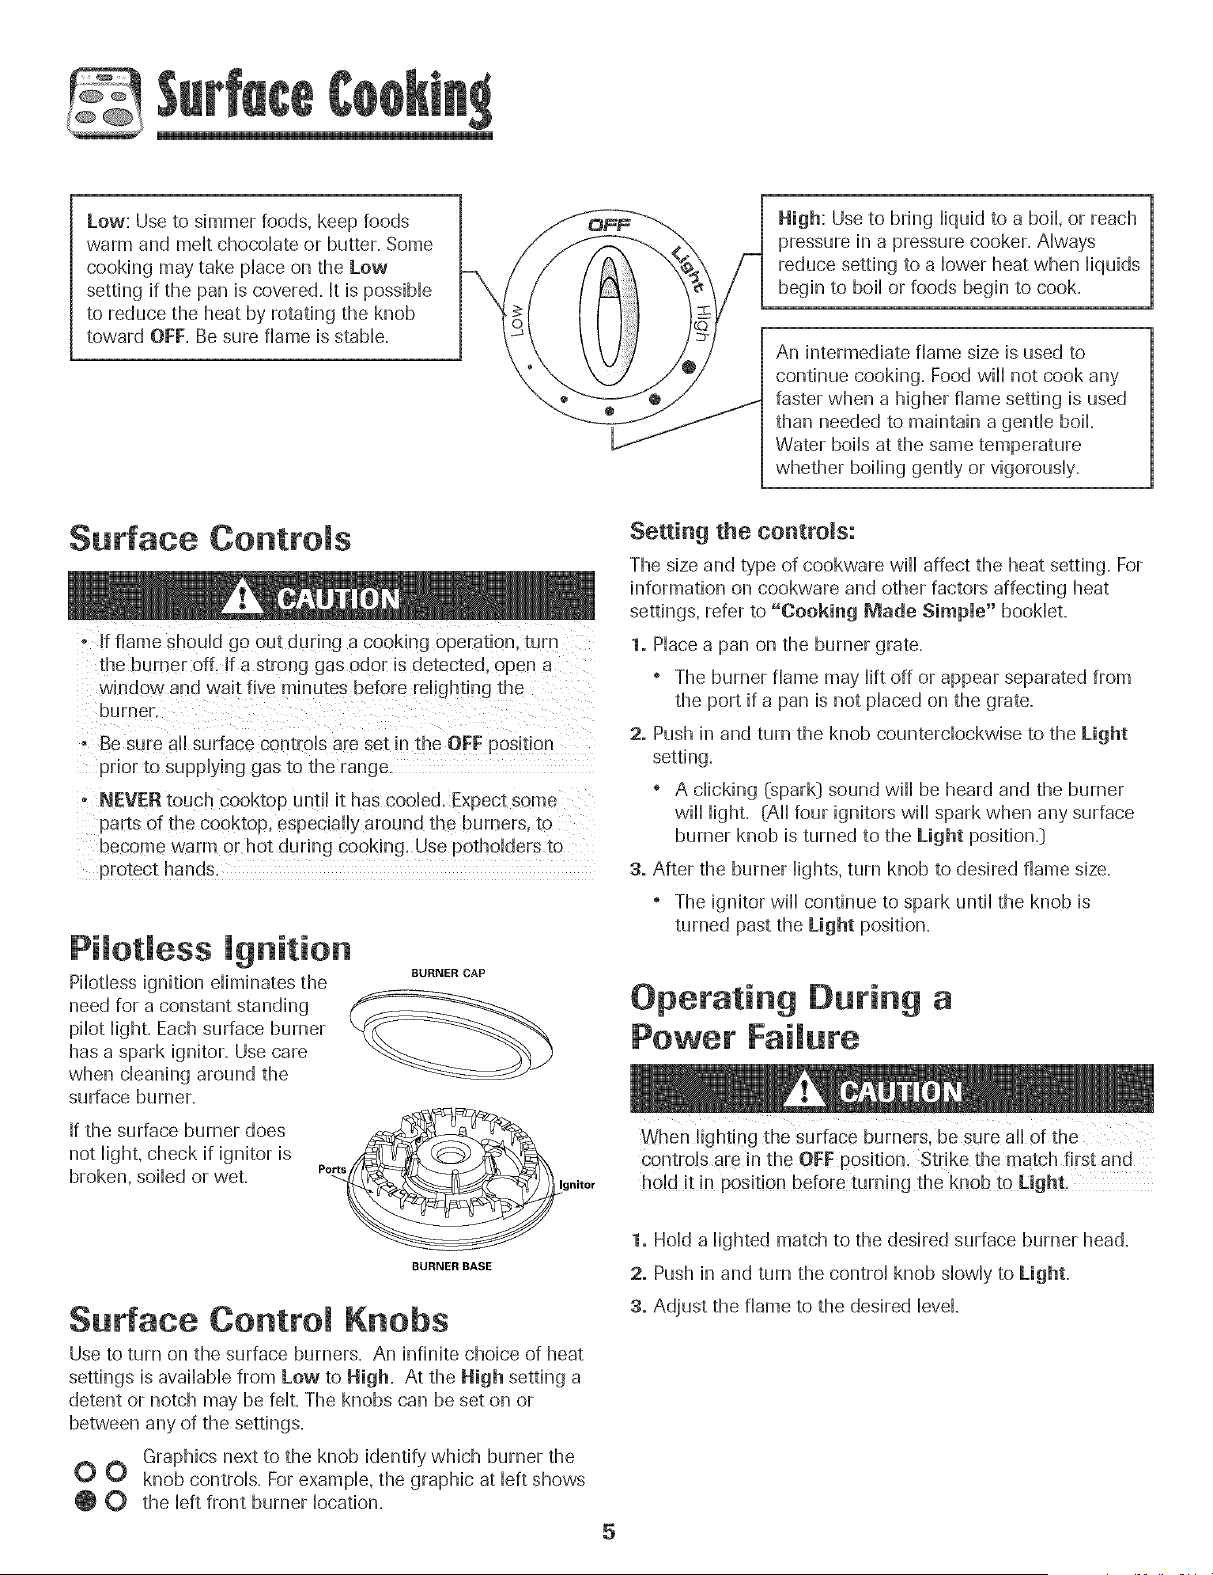
Low: Use to simmer foods, keep foods
warm and meritchocoHateor butter. Some
cooking may take pHaceon the Low
setting if the pan is covered. It is possibHe
to reduce the heat by rotating the knob
toward OFF. Be sure flame is stabile.
High: Use to bring hquid to a boiH,or reach
pressure in a pressure cooker. AHways
reduce setting to a Howerheat when Hiquids
begin to boiHor foods begin to cook.
An intermediate flame size is used to
continue cooking. Food wiHHnot cook any
faster when a higher flame setting is used
than needed to maintain a gentile boil
Water boiHsat the same temperature
whether boiHinggentHyor vigorousHy.
Surface Controls
• If flame shouHdgo out durung a cooking operation, turn
the burner off. If a strong gas odor is detected, open a
window and wait five minutes aetore relighting the
burner
o Be s_re aiHsurface controls are set in the OFF position
prior to supplying gas to the range.
- @EVERtouch cooktop until it has cooled, Expec_some
parts of the cooktop, especiaii} around the burners, to
become warm or hot during cooking, Use potholders to
Pilotless Ignition
PiHotHessignition eHiminatesthe
need for a constant standing
piHotHight.Each surface burner
has a spark ignitor. Use care
when cleaning around the
surface burner.
[f the surface burner does
not Hight,check if ignitor is
broken, soiled or wet.
BURNER CAP
Ports
gnitor
BURNER BASE
Surface Control Knobs
Use to turn on the surface burners= An infinite choice of heat
settings is available from Low to High. At the High setting a
detent or notch may be felt. The knobs can be set on or
between any of the settings.
Graphics next to the knob identify which burner the
0 0 knob controls. For example, the graphic at Heftshows
0 0 the Heftfront burner location.
Setting the controls:
The size and type of cookware will affect the heat setting. For
information on cookware and other factors affecting heat
settings, refer to "Cooking Made Simple" bookieL
1. Place a pan on the burner grate.
" The burner flame may lift off or appear separated from
the port if a pan is not placed on the grate.
2. Push in and turn the knob counterclockwise to the Light
setting.
o A clicking (spark} sound wiil be heard and tile burner
wiil Hight. (AHIfour ignitors wiil spark when any surface
burner knob is turned to the Light position.}
3oAfter the burner lights, turn knob to desired flame size.
The ignitor wiil continue to spark until the knob is
turned past the Light position.
Operating During a
Power Failure
When lighting the surface burners, be sure alHof the
ControHsare in the OFF position, Strike the reatchfirst and
hoHdit in position before turning the knob to Light,
1. HoHda Hightedmatch to the desired surface burner head.
2. Push in and turn the controHknob showilyto Light.
3. Adjust the flame to the desired Hovel
5
@
Cooktop
To prevent the cooktop from discoloring or
staining:
"Cban cooktop after each use.
Wipe acidic or sugary' spins as soon as the cooktop has
coobd as these spins may discobr the
:_ _ porcelain.
_ Unlike a range with standard gas burners,
__ this cooktop does not lift-up nor is it
removable. Do i?ot attempt to lift the
cooktop for any reason.
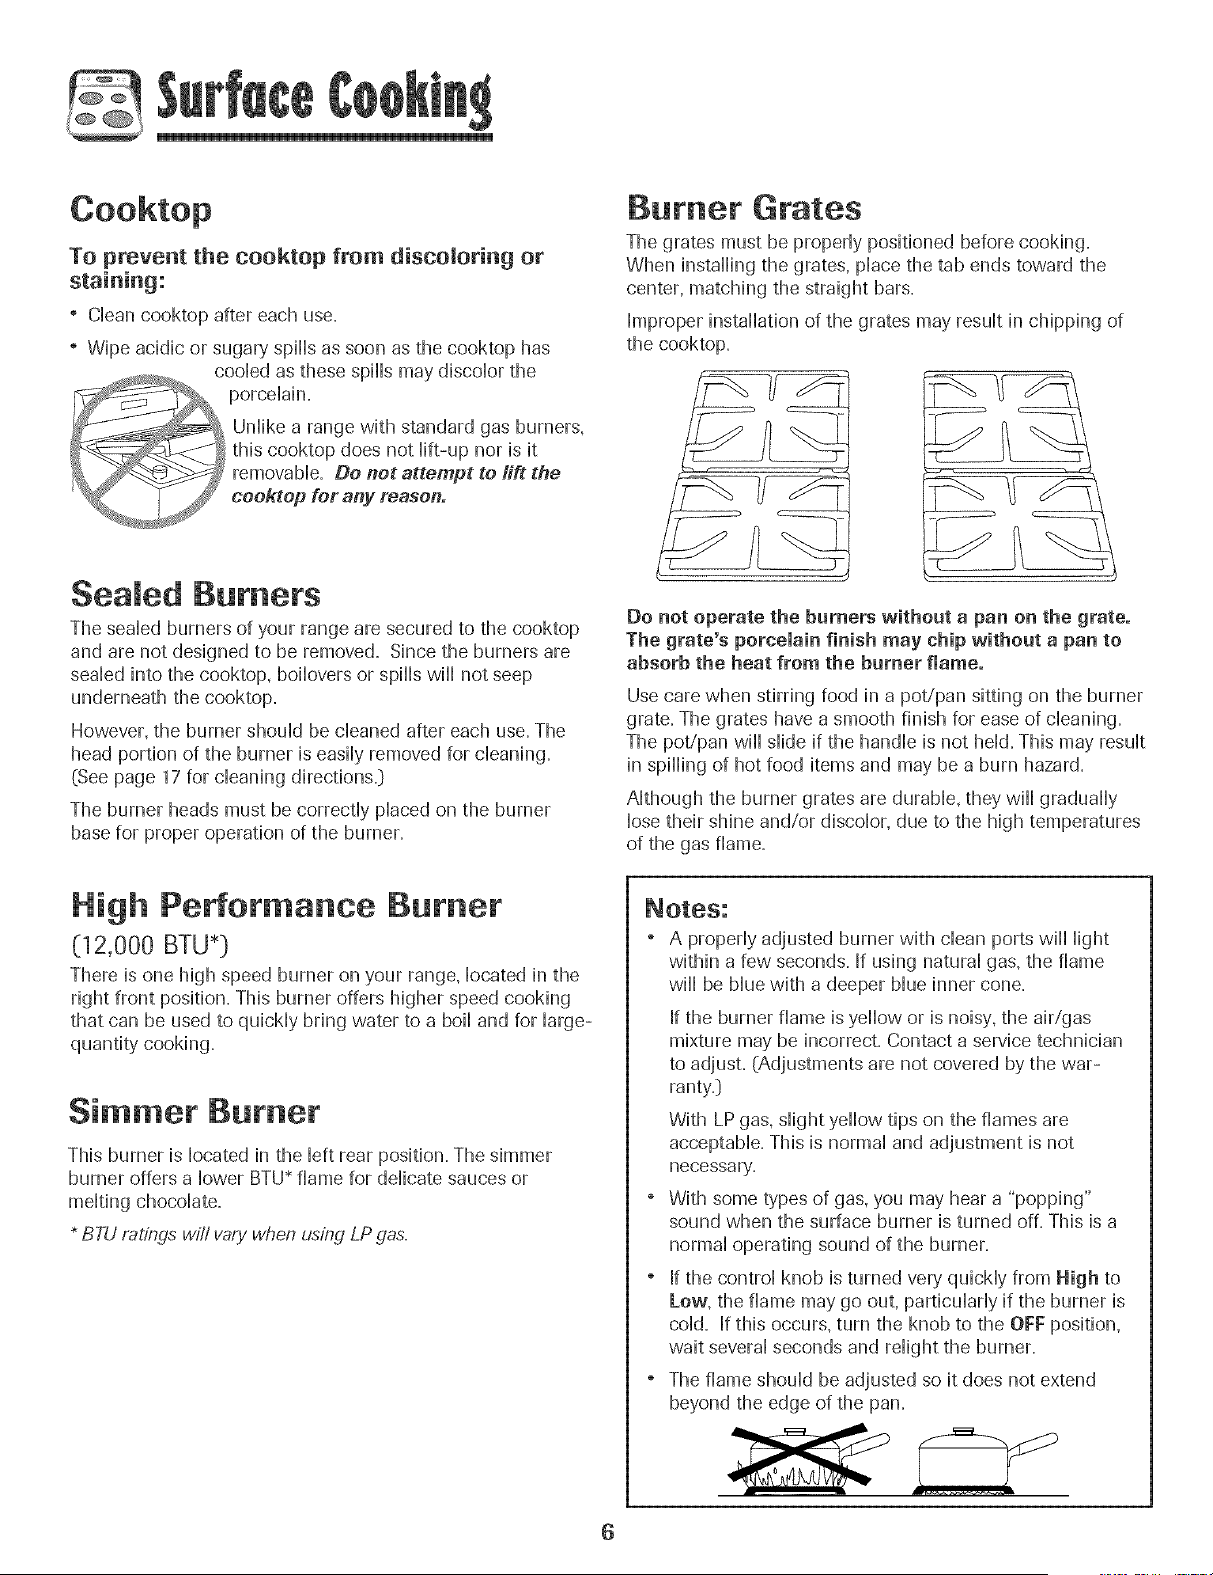
Burner Grates
The grates must be properiy positioned before cookhlg.
When h)stdling the grates, place the tab ends toward the
center, matching the straight bars.
hnproper installation of the grates may result in chipping of
the cooktop.
Sea ed Burners
The sealed burners of your range are secured to the cooktop
and are not designed to be removed. Since the burners are
sealed into the cooktop, boilovers or spills will not seep
underneath the cooktop.
However, the burner should be cleaned after each use. The
head portion of the burner is easily removed for cbaning.
(See page 17 for cbaning directions{)
The burner heads must be correctly placed on the burner
base for proper operation of the burner.
Do not operate the burners without a pan on the grate.
The grate's porcelain finish may chip without a pan to
absorb the heat from the burner flame.
Use care when stirring food in a pot/pan sitting on the burner
grate. The grates have a smooth finish for ease of cleaning.
The pot/pan will slide if the handle is not held. This may result
in spilling of hot food items and may be a burn hazard.
Although the burner grates are durable, they will gradually
lose their shine and/or discolor, due to the high temperatures
of the gas flame.
Nigh Performance Burner
(12,000 BTU*}
There is one high speed burner on your range, located in the
right front position. This burner offers higher speed cooking
that can be used to quickly bring water to a boil and for large-
quantity cooking.
Simmer Burr|or
This burner is located in the left rear position. The simmer
burner offers a lower BTU* flame for delicate sauces or
melting chocolate.
BTU ratings wiii vary when using LP gas.
" A properly adjusted burner with clean ports wiii light
within a few seconds. If using natural gas, the flame
wiii be blue with a deeper blue inner cone.
If the burner flame is yellow or is noisy, the air/gas
mixture may be incorrect. Contact a service technician
to adjust. (Adjustments are not covered by the war-
ranty.}
With LPgas, slight yellow tips on the flames are
acceptable. This is normal and adjustment is not
necessary'.
" With some types of gas, you may hear a "popping"
sound when the surface burner is turned off. This is a
normal operating sound of the burner.
" If the control knob is turned very' quickly from Nigh to
Low, the flame may go out, particularly if the burner is
cold. If this occurs, turn the knob to the OFF position,
wait several seconds and relight the burner.
" The flame should be adjusted so it does not extend
beyond the edge of the pan.
6

Contro Pane
A B
\
\ Bake
\
\
\
\
\
\
\ Broil
\
\
\
\
\
\
Cook&
Hold Clean Delay Clock
t
E
F G H
Keep
Warm
1 J
The control panel is designed for ease in programming. The dispiaywindow on the control shows time of day, timer and oven functions.
Control panel shown includes model specific features. (Styling may vary depending on modeL}
A
B
C
D
E
G
N ¸
Broil
Bake
More (a,} or
Less (V}
Timer
Cook & Hold
Clean
Delay
Clock
Keep Warm
Cancel
Use for broiling and top browning.
Use for baking and roasting.
Enters or changes time, oven
temperature. Sets HI or LO broil.
Sets Timer.
Bakes for a preset time, then holds food
warm for 1 hour.
Use to set self-clean cycle.
Programs the oven to start baking at
a later time.
Use to set time of day clock.
Use to keep cooked food warm in oven.
Cancels all operations except Timer
and Clock.
Using the Touchpads
Pressthe desired pad.
Pressthe A or _' to enter time or temperature.
° A beep wiii sound when any pad is touched.
° A double beep wiii sound if a programming error occurs.
Note: Four seconds after pressing the A or V pads, the
time or temperature will automatically be entered. If more
than 30 seconds elapse between touching a function pad
and the A or _' pads, the function will be canceled and
the display will return to the previous display.
The clock can be set to display time in a 12-hour or 2a-hour
format. The clock is set at the factory for the 12-hour format.
To change the clock to
24-honr format:
1. Press and hold the Cancel and Delay
pads for three seconds.
2. Press A or V" to select 12 or 24 hour.
3. Set the time of day following the
directions below.
To set the Clock:
1. Press the Clock pad.
° Colon flashes in the display.
2. Press A or V to set the time of day.
° Colon continues flashing.
3. Pressthe CHockpad again or wait four
seconds. The colon stops flashing.
When electrical power is supplied or after a power interrup-
tion, the last clock time before power was interrupted will
flash.
To recall the time of day when another time function is
showing, press the Clock pad.
Clock time cannot be changed when the oven has been
programmed for cook or clean Delay or Cook & Hold.
conto
@
To canoe+ the Clock dispmay:
[f you do not want the time of day to dispiay:
Press and hoid the Cancei and CHock
pads for three seconds. The time of day
wiii disappear from the dispiay
When the chock dispiay is cancelled, press __ cmeck
the CHockpad to brbfiy dispiay the time
of day.
To restore the Clock display:
Press and hoid the Cancei and CHockpads for three seconds.
The time of day wiii reappear in the dispiay.
The timer can be set from one minute (0:01} up to 99 hours
and 59 minutes (99:59}.
The timer can be used independentiy of any other oven
activity. It can aiso be set whiie another oven function is
operating.
The Timer does not contro] the oven. It onJycontrois a
beeper.
Timer
To set the Timer:
1. Press the Timer pad.
+ 0:00 ]ights in the dispiay.
+The co]on will]flash.
2.
A
Press the A or V pad until the
correct time appears in the display.
+The colon will continue to flash.
3,
PressTimer pad again or wait four seconds.
+The colon continues flashing and the time begins
counting down.
+The last minute of the timer countdown wiii be displayed
as seconds.
4. At the end of the set time, one long beep wiii sound.
To cancel the Timer:
1. Press and hoid the Timer pad for three seconds.
OR
2. Press the Timer pad and set the time to 0:00.
Locking the Control
and Oven Oooc
The touch pad controis and oven door can be Hockedfor
safety, cieaning, or to prevent unwanted use. They will] not
function when Hocked.
If the oven is currently in use, the controls and door cannot be
locked.
The current time of day wiii remain in the display when the
controls are locked.
To lock:
Press and hold the Cancel and Cook &
Hold pads for three seconds. (Press
Cancel pad first.}
LOCK flashes in the display.
To untock:
HoHd
Press and hold the Cancel and Cook & Hold pads for three
seconds. (Press Cancel pad first.}
LOCK disappears from the display.
Fault Codes
BAKE or LOCK may flash rapidly in the display to alert you if
there is an error or a problem. If BAKE or LOCK flash in the
display, press the Cancel pad. If BAKE or LOCK continue to
flash, disconnect power to the appliance. Wait a few minutes,
and then reconnect power. If the flashing still continues,
disconnect power to the appliance and call an authorized
servicer.
8
@
To set Bake:
1. Press the Bake pad.
° BAKEwill flash. Bake
° 000 will Hightin the dispiay.
2. Sebct the oven temperature. The oven tempera-
ture carl be set from 170° to 550°. Pressor press
and hold the A or V pads.
, 350° will Hightwhen either pad is first pressed.
, Press the A pad to increase the temperature.
, Press the _' pad to decrease the temperature.
3. Press Bake pad again or wait four seconds.
° BAKEwiii stop flashing and light in the display.
° 100° or the actual oven temperature wiii display. The
temperature will rise in 5° increments until the preset
temperature is reached.
4. Allow the oven to preheat for 8-15 minutes.
° When the set oven temperature is reached, one long
beep will sound.
° To recall the set temperature during preheat, press the
Bake pad.
5. Place food in the oven.
6. Check cooking progress at the minimum cooking time.
Cook longer if needed.
7. When cooking is finished, press Cancel. _,_u_
8. Remove food from the oven.
Baking Notes:
° To change the oven temperature during cooking,
press the Bake pad, then the A or V pad until the
desired temperature is displayed.
To change the oven temperature during preheat,
press the Bake pad twice, then press the A or V pads
until the desired temperature is displayed.
° If you forget to turn off the oven, it will automatically turn
off at the end of 12 hours. If you wish to deactivate this
feature, see page 12.
° For additional baking and roasting tips, see "Cooking
Made Simple" booklet.
Baking Differences Between Your OM
and New Oven
It is normal to notice some baking time differences between a
new oven and an old one. See"Adjusting the OvenTemperature"
on page 12.
Cook & Hold
Cook & Hold allows you to bake for a preset amount of time,
followed by a one-hour Keep Warm cycle.
To set Cook & Hold:
1. Press the Cook & Hold pad. Cook&
° BAKE and HOLD flash. Hold
° 000 lights in the display.
A
2. Select the oven temperature. The oven tempera-
ture can be set from 170° to 550°. Pressor press
and hold the A or _' pads.
, Pressthe A pad to increase the temperature.
, Pressthe V pad to decrease the temperature.
3. Press Cook & Hold again ORwait four seconds.
, HOLD flashes.
, 00:00 flashes in the display.
4. Enter the amount of time you want to bake by pressing the
A or _' pads. Bake time can be set from 10 minutes
(00:10} to 11 hours, 59 minutes (11:59}.
, BAKE and HOLD light in the display.
, The baking time wiii light in the display.
, The baking time wiii start counting down.
When the cooking time has elapsed:
° Four beeps wiii sound.
° BAKE will turn off.
° HOLD and WARM will light.
° 170°will display.
After one honr in HOLD WARM:
, "End" wiii display.
° The time of day reappears in the display.
TO caneem Cook & Hold at any time:
Press the Cancel pad. Remove food from oven.
9
5
De ay Bake
Do not use delayed baking for highly perishable foods such
as daky products, pork, poultry, or seafood.
When using Delay, the oven begins to cook Hater in the day.
Set the amount of time that you want to deiay before the oven
turns on and how iong you want to cook The oven be@ns to
heat at the seiected time and cooks for the specified iength of
time.
Deiay time can be set from 10 minutes C00:10[to 11 hours 59
minutes (11:59}.
To set a Demayed Baking cycle:
1. Press the Deiay pad.
Delay
° DELAY flashes.
2.
WMHeDELAY is stiHHflashing:
3. Press the Cook &Hoid pad.
° 000 ]ights in the dispiay.
° BAKE and HOLD flash.
4. Press A to set the baking temperature.
° 00:00 and HOLD flash.
° 00:00 flashes in the dispiay.
Press the A or V pad to set the delay time.
Cook&
Hold
° BAKE stays Hit.
Press A to set the baking time.
° The Deiay time, DELAY, BAKE and HOLD Hightin
the dispiay.
When the Delay time has expired:
° DELAY wiii turn off=
, Baking time is displayed.
, BAKE and HOLD are dispiayed.
To set a Delay when Cook & Hold has already
been programmed:
1. Press the Deiay pad. OeHey
° DELAY flashes.
° 00:00 appears in the dispiay.
2. Pressthe A or V pad to set the deiay time.
° After four seconds, DELAY wiii
stay Hitto remind you that a deiayed
cooking cycie has been set.
When the Delay time has expired and the oven
starts:
, The baking time will] be dispiayed.
, DELAY will] turn off.
° BAKE and HOLD will remain lit.
To cance!:
Press the Cancei pad.
, AHHtimed and untimed cooking functions wiii be
canceied.
° The time of day wiii reappear in the display.
Notes:
Do not use delayed baking for items that require a
preheated oven, such as cakes, cookies, and breads.
Do not use delayed baking if oven is already hot.
10
@
Keep War
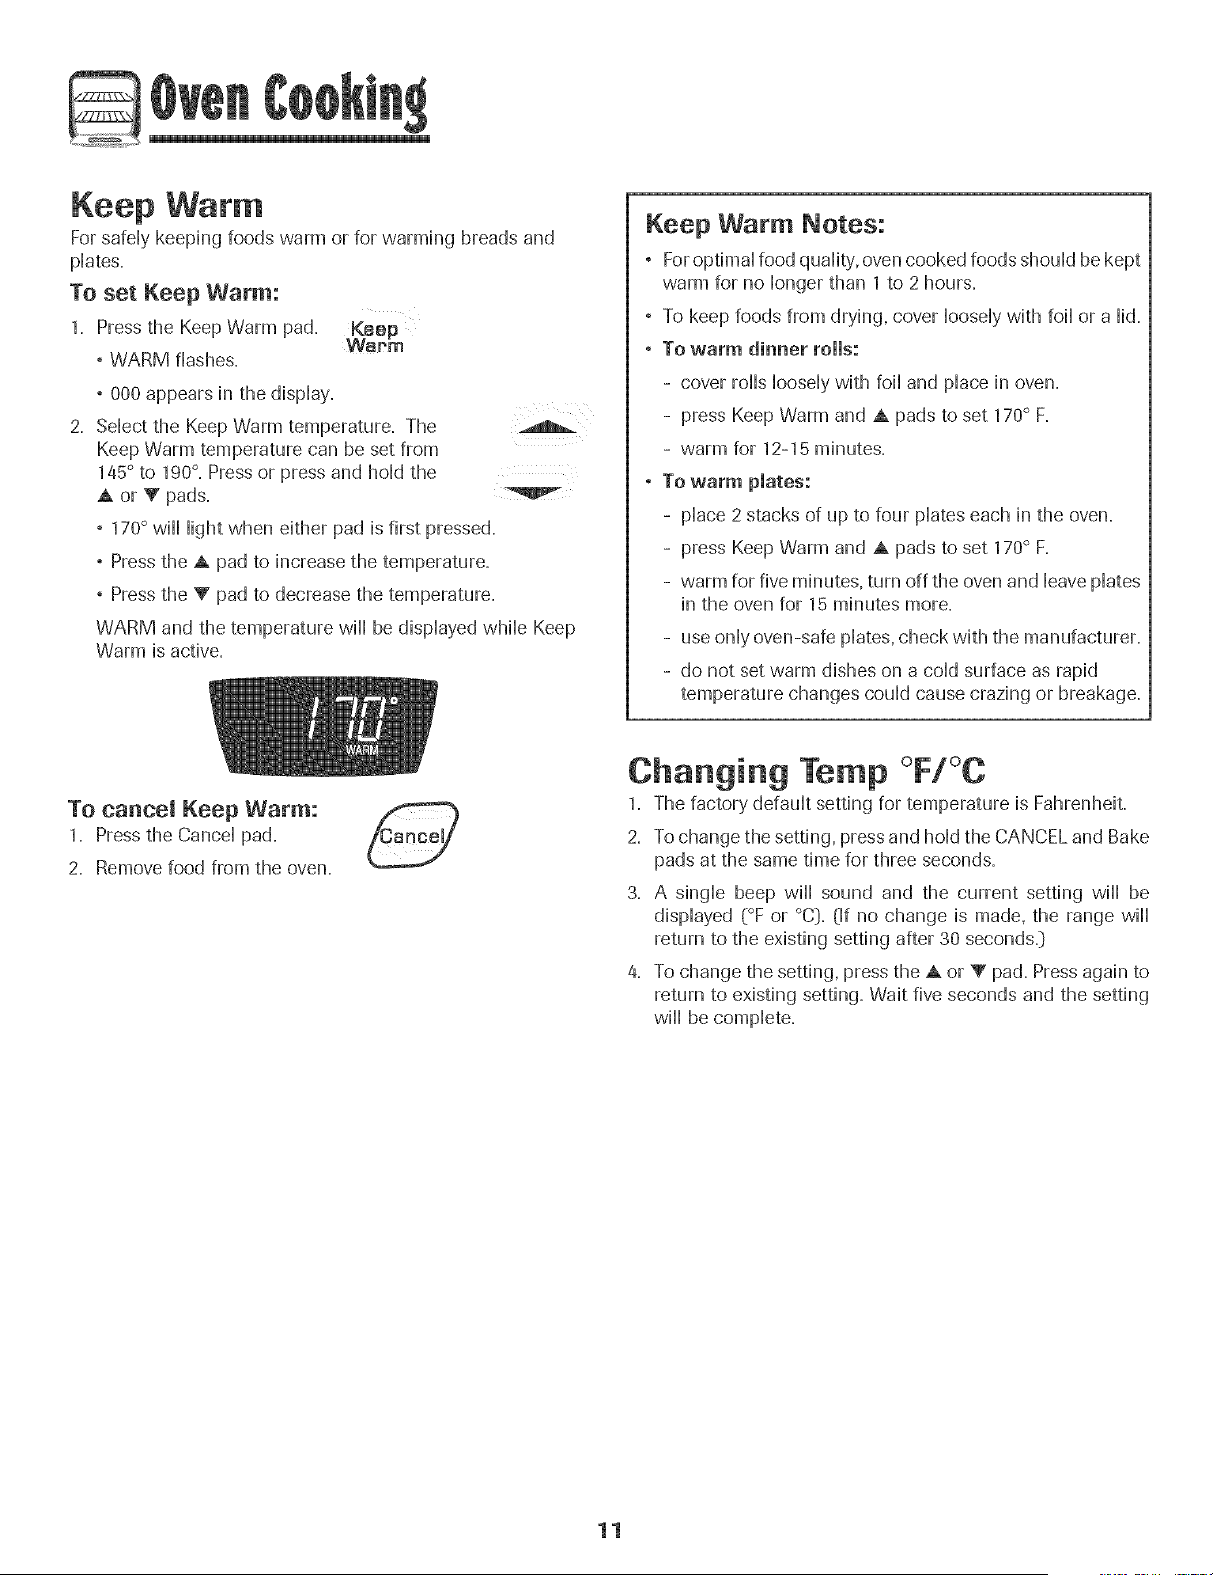
For safeHykeeping foods warm or for warming breads and
pHates.
To set Keep Warm:
1. Press the Keep Warm pad.
WBr'm
° WARM flashes.
,000 appears in the dispHay.
SeHectthe Keep Warm temperature. The
Keep Warm temperature can be set from
145° to 190°. Press or press and hoHdthe
A or V pads.
° 170° wiHHHightwhen either pad is first pressed.
° Press the A pad to increase the temperature.
° Press the V pad to decrease the temperature.
WARM and the temperature wiil be displayed while Keep
Warm is active.
Keep Warm Notes:
° ForoptimaHfood quaHity,oven cooked foods shouHdbe kept
warm for no Hongerthan 1 to 2 hours.
° To keep foods from drying, cover HooseHywith foiHor a Hid.
, To warm dinner rolls:
- cover roHHsHooseHywith foiHand pHacein oven.
- press Keep Warm and A pads to set 170° F.
- warm for 12-15 minutes.
, To warm plates:
- pHace2 stacks of up to four pHateseach in the oven.
- press Keep Warm and A pads to set 170° F.
- warm for five minutes, turn off the oven and HeavepHates
in the oven for 15 minutes more.
- use onHyoven-safe pHates,check with the manufacturer.
- do not set warm dishes on a coHdsurface as rapid
temperature changes couHdcause crazing or breakage.
To cancel Keep Warm:
1. Press the CanceHpad.
2. Remove food from the oven.
Changing Temp °F/°C
1. The factory defauHtsetting for temperature is Fahrenheit.
2. To change the setting, press and hoHdthe CANCEL and Bake
pads at the same time for three seconds.
3. A singHe beep wiHHsound and the current setting wiHHbe
dispHayed(°F or °C:).(If no change is made, the range wiHH
return to the existing setting after 30 seconds.:)
4. To change the setting, press the A or V pad. Press again to
return to existing setting. Wait five seconds and the setting
wiHHbe compHete.
11
Q
Automatic Shut-Off/Sabbath
Mode
The oven will automatically turn off after 12 hours if you
accidentally Heaveit on= This safety feature can be turned off=
TO cancel the 12-hour shut-off and run the
oven continuously for 72 hours:
1. Set the oven to bake (see page 9]. Clock
2= Press and hoHdthe CHockpad for five seconds.
° SAb wifl be dispHayedand flash for five seconds.
, SAb wifl then be dispHayedcontinuousHy untiHturned off
or untiHthe 72-hour time limit is reached.
, BAKEwill also be displayed if a bake cycle is in use
while the oven is in Sabbath Mode.
All other functions EXCEPTBAKE {Timer, Keep Warm,
Clean, etc.:} are locked out during the Sabbath Mode.
To cancel Bake when in Sabbath Mode:
Press Cancel.
, BAKEwill turn off in the display.
° No beeps will sound.
To cancel the Sabbath Mode:
1. Press the Clock pad for five seconds. Olock
OR
2. After 72 hours, the Sabbath Mode will end.
, SAb will flash for 5 seconds.
, The time of day will return to the display.
Adjusting the Oven Tempe|'ature
Oven temperatures are carefully tested for accuracy at the
factory. It is normal to notice some baking or browning
differences between a new oven and an old one= As ranges
get older, the oven temperature can shift.
You may adjust the oven temperature if you think the oven is
not baking or browning correctly. To decide how much to
change the temperature, set the temperature 25° higher or
lower than your recipe recommends, then bake. The results
of the "test" should give you an idea of how much to adjust
the temperature=
To adjust the oven temperature: .............................
1. Press Bake.
2= Enter 550° by pressing the A pad=
3, Pressand hold the Bake pad for several
seconds or until 0° appears in the display.
If the oven temperature was previously adjusted, the
change will be displayed. For example, if the oven tem-
perature was reduced by 15° the display will show "-15 °'',
4. Pressthe A or V pad to adjust the temperature.
Each time a pad is pressed, the temperature changes by
5°, The oven temperature can be increased or decreased
by 5° to 35°,
5= The time of day will automaticafly reappear in the display.
You do not need to readjust the oven temperature if there
is a power failure or interruption. Broiling and cleaning
temperatures cannot be adjusted.
Sabbath Mode Notes:
° Sabbath Mode can be turned on at any time with or
without the oven on.
° Sabbath Mode cannot be turned on if the touchpads are
locked out or when the door is locked.
, If the oven is baking when Sabbath Mode is set, BAKE
will go out at the end of the baking cycle. There will be
no audible beeps.
° If the oven light is desired while in Sabbath Mode, it
must be turned on before the Sabbath Mode is started.
, When the Sabbath Mode is started, no preheat beep will
sound.
, All prompts, messages and beeps are deactivated when
Sabbath Mode is active.
, The automatic door lock does not operate during the
Sabbath Mode.
, Pressing Cancel will cancel a bake cycle, however the
control will stay in the Sabbath Mode.
° If power fails, the oven will power up in Sabbath Mode with
72 hours remaining and no cycle active.
12
@
Broiling
To set Broit:
1. Press the Broil pad.
BroiM
, BROIL flashes.
, SEt is displayed.
2. Press the A pad to set HI broil or press the V pad to set
LO broil
. HI or LO wiii be displayed.
, Select HI broil (550° F} for normal broiling. Select
LO broil (a50° F} for low-temperature broiling of longer
cooking foods such as poultry.
3. After four seconds, the oven will start.
, BROIL wiii remain iit.
4. For optimum browning, preheat for 2-3 minutes before
adding food.
5. Place food in the oven. Close the oven door.
6. Turn meat once about halfway through cooking.
7. When food is cooked, press the Cancel pad.
Remove food and broiler pan from the oven.
° The time of day wiii reappear in the display.
Broi Notes:
, For best results when broiling, use a pan designed for
broiling.
, HI is used for most broiling. Use LO broil when broiling
longer cooking foods. The lower temperature allows
food to cook to the well done stage without excessive
browning.
. To change the oven temperature during broiling,
press the Broil pad, then the A or V pad to switch
between LO and Hi broil.
, Broil times may be longer when the lower broiling temp-
erature is selected.
, Most foods should be turned halfway through broiling
time.
, For additional broiling tips and temperatures, refer to
the "Cooking Made Simple" booklet.
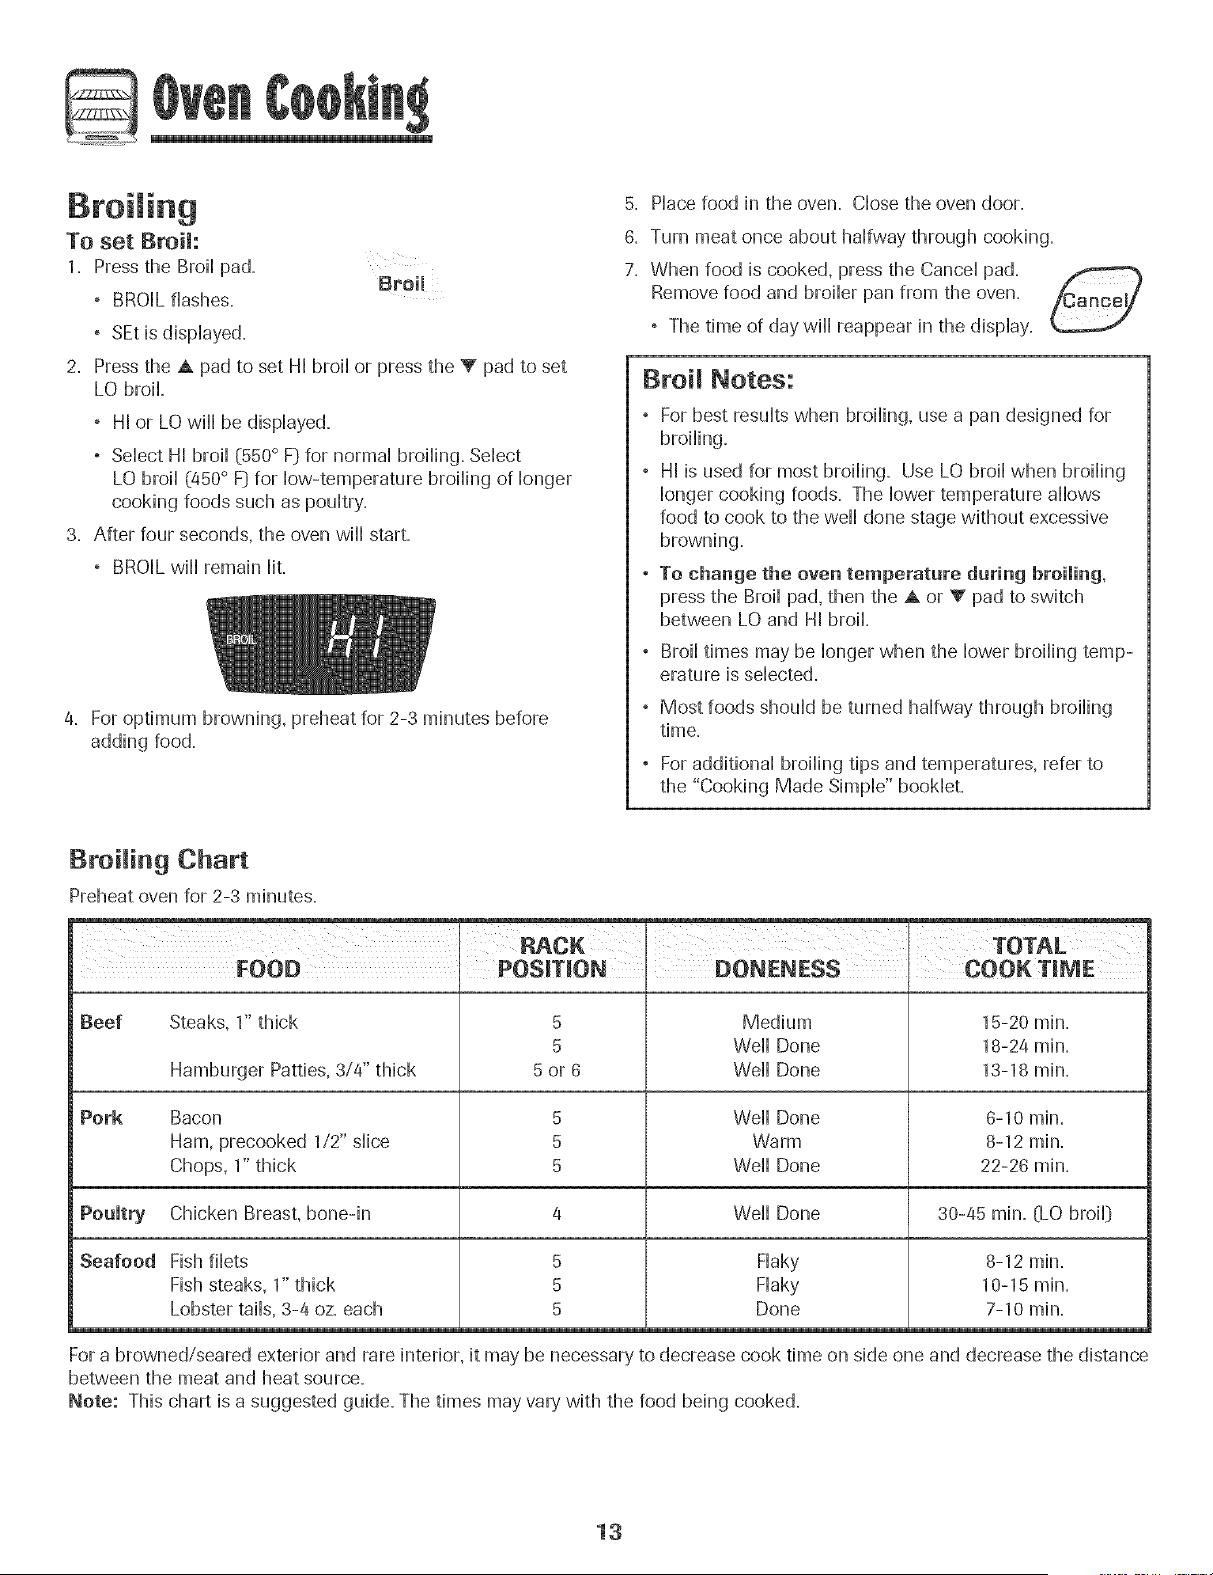
Broiling Chart
Preheat oven for 2-3 minutes.
Beef 5 Medium 15-20 min.
5 Weii Done 18-24 rain.
5 or 6 Weil Done 13-18 min.
Pork 5 Well Done 6-10 min.
5 Warm 8-12 rain.
5 Well Done 22-26 rain.
Poultry 4 Well Done 30-45 min. (LO broil}
Seafood
Steaks, 1" thick
Hamburger Patties, 3/4" thick
Bacon
Ham, precooked 1/2" slice
Chops, 1" thick
Chicken Breast, bone-in
Fish filets
Fish steaks, 1" thick
Lobster tails, 3-4 oz. each
5
5
5
Flaky
Flaky
Done
8-12 rain.
10-15 min.
7-10 min.
For a browned/seared exterior and rare interior, it may be necessary to decrease cook time on side one and decrease the distance
between the meat and heat source.
Note: This chart is a suggested guide. The times may vary with the food being cooked.
13
Pilotless ignition
Your range is equipped with pibtbss ignition. With this type of
ignition system, the gas automatically shuts off and the even will
not operate during a power failure.
A lighted match will not mightthe oven burner. No attempt
should be made to operate the oven daring a power failure.
Oven Vent
When the oven is hl use the area near the vent may become
hot enough to cause burns. Never block the vent opening.
The oven vent is located below the backgaard vent shield
on your range.
OVEN VENT
Do not place
plastics near the
vent opening as
heat from the vent
could distort or
melt the plastic.
Oven Light
Pressthe oven light pad to turn the oven light on
and off. The oven light is only activated by this
switch.
Oven Bottom
©
Oven
Mght
Protect oven bottom against spillovers, especially acidic or
sugary spills, as they may discolor the porcelain enamel, Use
the correct pan size to avoid spillovers and boilovers, Do not
place utensils or aluminum foil directly on the oven
bottom.
Oven Racks
2. Lift up on the front of the rack and pull out.
To replace:
1. Place rack on the rack support in the oven.
2. Tilt the front end up slightly. Slide rack back until it clears
the lock-stop position.
3. Lower front and slide back into the oven.
Never cover an entire rack with aluminum foil or place
foil on the oven bottom. Raking results will be affected
and damage may occur to the oven bottom.
Rack Positions
RACK 7 [highest
position): For single rack
baking on cookie sheets
and broiling=
RACK 6: Used for single
rack baking on cookie
sheets and broiling= Used
for multiple rack baking.
Bottom
Two Rack Baking
RACK 5: For single rack baking on cookie sheets and
broiling.
RACK 4: Used for single rack baking on cookie sheets, sheet
cakes, casseroles and broiling. Used for multiple rack baking.
RACK 3: For single rack baking on cookie sheets, casseroles,
layer cakes, loaves of bread and sheet cakes. Used for
RACK 2: Used for single rack baking on cookie sheets and
roasting small cuts of meat. Also use for multiple rack baking.
RACK 1: Use for roasting large cuts of meat and poultry.
Oven Bottom: Place oven rack
on raised sides of oven bottom.
Use for additional space when
cooking large oven meals.
MULTIPLE RACK COOKING:
Two rack: Use rack positions 3
and 6, or 2 and 4.
-Do not use the Ovenfor Storing food OrCookware.
The oven has two racks. All racks
are designed with a lock-stop
edge.
To remove:
1. Pull rack straight out until it
stops at the lock-stop position.
Baking Layer Cakes on Two Racks
For best results when bak-
mg cakes on two racks, use
racks 2 and 4.
Place the cakes on the
rack as shown.
14
Seff-C ean Oven
o It is normal for parts of the range to become hot during a
- To prevent damage to oven door. do not attemptto open
the door when LOCK is displayed.
, Avoid touching cooktop, door. window or oven vent area
during a clean cycle.
- Do not use commercial oven cleaners on the oven finish
or around any part of the oven. They wiii damage the
finish o_ parts.
The self-clean cycle uses above-normal cooking temperatures
to automatically clean the oven interior.
It is normal for flare-ups, smoking, or flaming to occur during
cleaning if the oven is heavily soiled. It is better to clean the
oven regularly rather than to wait until there is a heavy build-
up of soil in the oven.
During the cleaning process, the kitchen should be well
ventilated to get rid of normal odors associated with cleaning.
Before Seff-C eaning
1. Turn off the oven light before cleaning. The light may burn
out during the clean cycle.
2. Remove broiler pan, all pans, and oven racks from the
oven. The oven racks will discolor and may not slide easily
after a self-clean cycle if they are not removed.
3. Clean oven frame, door frame, area outside of gasket, and
around the opening in the door gasket with a nonabrasive
cleaner such as Bon AmP or detergent and water. The
self-cleaning process does not clean these areas. They
should be cleaned to prevent soil from baking on during
the clean cycle. (The gasket is the
seal around the oven door and
window.}
4. To prevent damage, do not clean or
rub the gasket around the oven
door. The gasket is designed to
seal in heat during the clean cycle.
5. Wipe up excess grease or spillovers from the oven bottom.
This prevents excessive smoking, flare-ups or flaming
during the clean cycle.
6. Wipe up sugary and acidic spillovers such as sweet
potatoes, tomato, or milk-based sauces. Porcelain enamel
is acid-resistant, not acid-proof. The porcelain finish may
discolor if acidic spills are not wiped up before a self-clean
cycle.
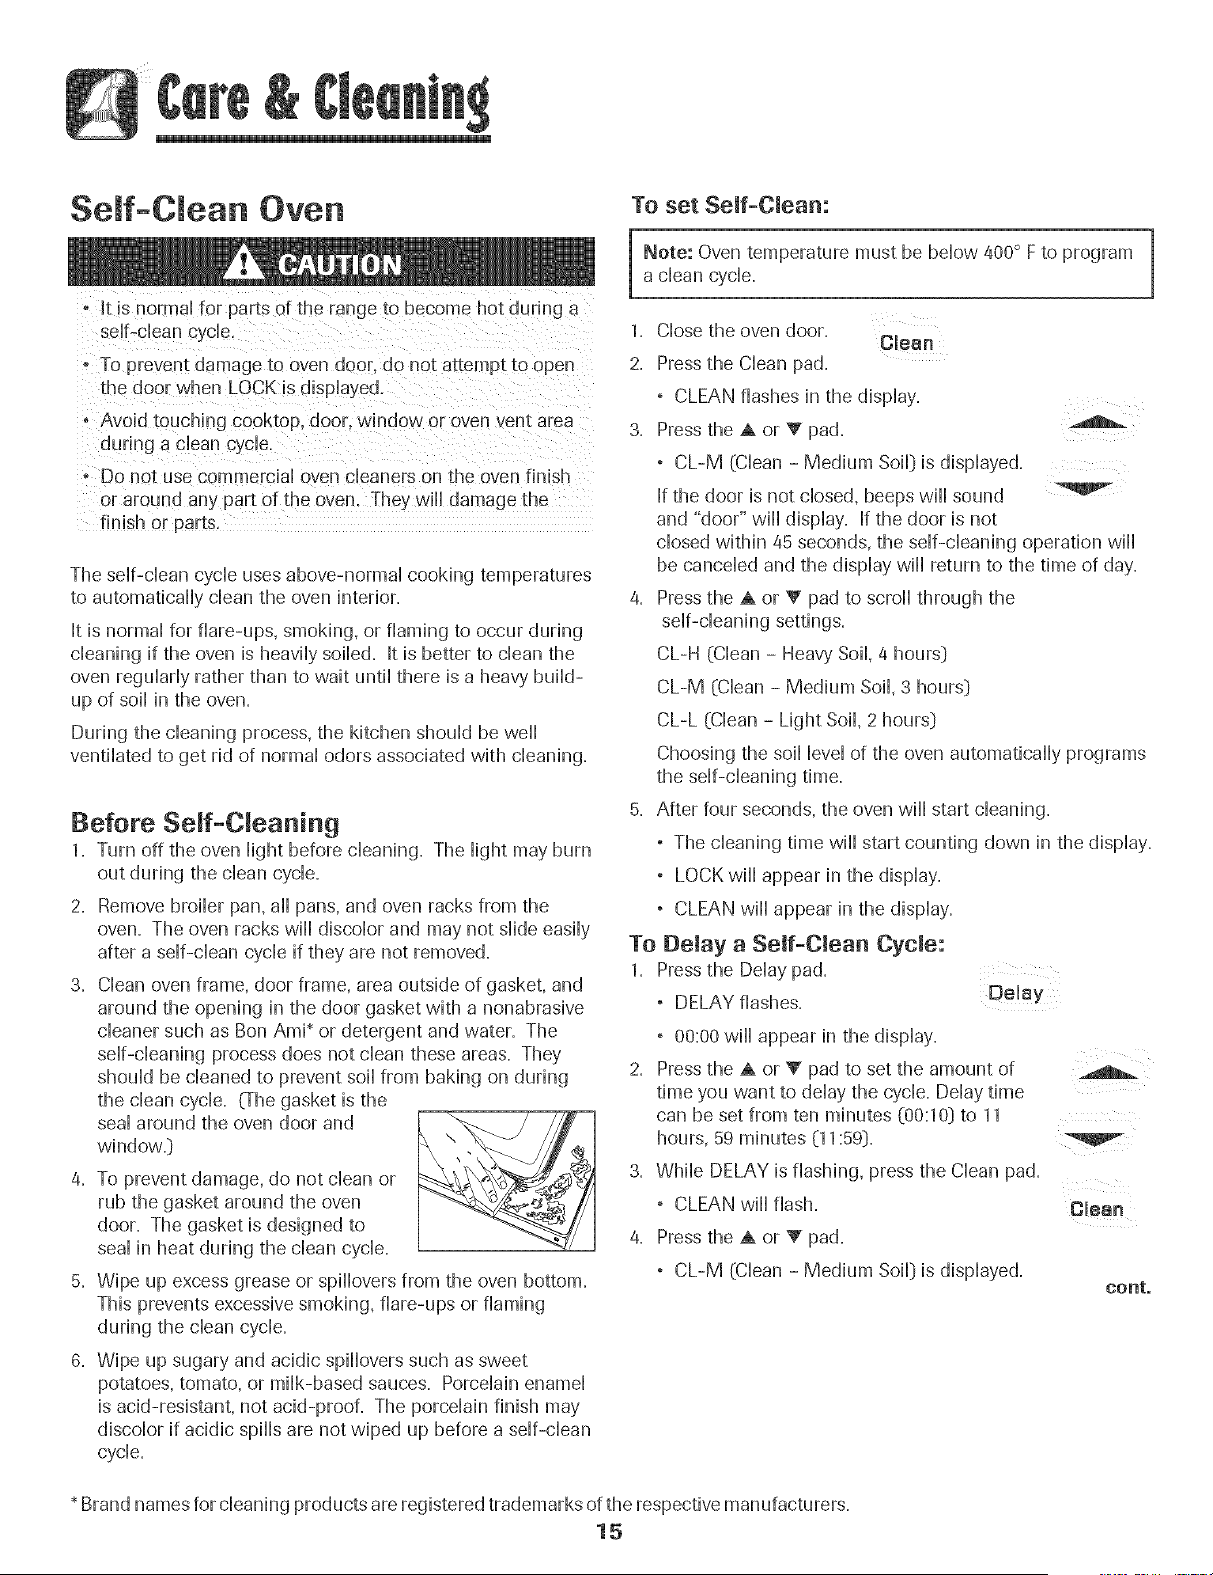
To set Self-Clean:
Note: Oven temperature must be below 400° F to program
a clean cycle.
1.
2.
Close the oven door.
CI88n
Press the Clean pad.
, CLEAN flashes in the display.
3. Press the A or V pad.
° CL-M (Clean - Medium Soil} is displayed.
If the door is not closed, beeps wiii sound
and "door" wiii display. If the door is not
closed within 45 seconds, the self-cleaning operation wiii
be canceled and the display wiii return to the time of day.
4. Press the A or V pad to scroll through the
self-cleaning settings.
CL-H (Clean - Heavy Soil, 4 hours}
CL-M (Clean - Medium Soil, 3 hours}
CL-L (Clean - Light Soil, 2 hours}
Choosing the soil level of the oven automatically programs
the self-cleaning time.
5. After four seconds, the oven wiii start cleaning.
° The cleaning time wiii start counting down in the display.
° LOCK wiii appear in the display.
° CLEAN wiii appear in the display.
To Delay a Seif-Omean Cycle:
1. Press the Delay pad.
° DELAY flashes.
2.
3.
4.
Delay
° 00:00 wiii appear in the display.
Press the A or V pad to set the amount of
time you want to delay the cycle. Delay time
can be set from ten minutes (00:10} to 11
hours, 59 minutes (11:59}.
While DELAY is flashing, press the Clean pad.
° CLEAN wiii flash. Clean
Press the A or _' pad.
° CL-M (Clean - Medium Soil} is displayed.
conto
* Brand names for cleaning products are registered trademarks of the respective manufacturers,
15
5. Press the A or V pad to scroll through the stir-charting
settings.
CL-H (Cban - Heavy SoE 4 hours:}
CL-M (Cban - Medium SoE 3 hours:}
CL-L (Cban - Light SoE 2 hours:}
Choosing the soii bvd of the oven automatically programs
the sdf-cbaning time.
6. After four seconds, CLEAN, DELAY and LOCK will appear
in the dispiay to show that the oven is set for a ddayed
dean operation. The deiay time is dispiayed.
During the Self-Clean Cycle
When LOCK shows in the dispiay, the door cannot be opened.
To prevent damage to the door, do not force the door open
when LOCK is dispiayed.
Smoke and Sin!!ms
You may see some smoke and smell an odor the first few
times the oven is cleaned. This is normal and will lessen in
time.
Smoke may also occur if the oven is heavily soiled or if a
broiler pan was left in the oven.
Sounds
As the oven heats, you may hear sounds of metal parts
expanding and contracting. This is normal and will not
damage the oven.
Jf the oven has already been set for a clean
cycle and you wish to set a delay:
1. Press the Delay pad.
° DELAY flashes. Delay
° 00:00 will appear in the display.
2. Press the A or _' pad to set the amount of time you want
to delay the cycle.
After four seconds, CLEAN, DELAY and LOCK will appear
in the display to show that the oven is set for a ddayed
dean operation. The dday time is displayed.
When the Self-Clean cycle starLs:
° DELAY will turn off.
° The clean time will appear in the display.
To cancel the Self-Clean cycle:
Press the Cancel pad. /Cancel/
° All words disappear from the display.
° All functions are canceled.
° The time of day appears in the display.
After Serf-Cleaning
About one hour after the end of the self-dean cycle, LOCK
will turn off. The door can then be opened.
Some soil may leave a light gray, powdery ash. Remove
it with a damp cloth. If soil remains after wiping, that means
the clean cycle was not long enough. The soil will be re-
moved during the next clean cycb.
if oven racks were left in the oven and do not slide
smoothly after a clean cycle, wipe racks and rack supports
with a small amount of vegetable oil to make them easier to
move.
Fine lines may appear in the porcelain because it went
throagh heating and cooling. This is normal and wiii not
affect performance.
A white discoloration may appear after cleaning if acidic
or sugary foods were not wiped up before the self=clean
cycle. This discoloration is normal and will not affect perfor-
mance.
If the oven door is left open, "door" wiii flash in the
display and a signal will beep until the door is closed
and the Clean pad is pressed again.
If more than five seconds elapse between pressing the
Clean pad and the A or V pad, the program will
automatically return to the previous display.
The oven door will be damaged if the oven door is
forced to open when LOCK is still displayed.
16
Cleaning Procedures
t !f a Part !Sremoved, be sure it is correctly replaced .
* Brand names are registered trademarks of the
respective manufacturers.
** To order call 1-877-232-6771 USA and
1-800-688-8408 Canada.
PART PROCEDURE
Broimer Pan Never cover insert with aluminum foil as this prevents the fat from draining to the pan below.
and Insert ° Place soapy cloth over insert and pan; let soak to loosen soil
° Wash in warm soapy water. Use scouring pad to remove stubborn soil
, Broiler pan and insert can be cleaned in dishwasher.
Seamed Gas
Burners
Burner Grates =
Porcemainon
Cast iron
cmock and
Control Pad
Area
Control Knobs
Cooktop and
Control Panem-
Porcemain Enamel
Removabme Burner Heads
, Allow burner to cool Remove burner cap and wash in soapy water with a plastic scouring pad. For
stubborn soils, clean with a soap-filled, nonabrasive pad or Cooktop Cleaning Creme*
(Part #20000001}** and a sponge.
° Do not clean in the dishwasher or self-cleaning oven.
Seamed Gas Burners
° Clean frequently. Allow burner to cool Clean with soap and plastic scouring pad. For stubborn soils,
clean with a soap-filled, nonabrasive pad. Do not enlarge or distort hobs.
° Be careful not to get water into burner ports.
° Use care when cleaning the ignitor. If the ignitor is wet or damaged the surface burner will not lighL
° Wash with warm, soapy water and a nonabrasive, plastic, scrubbing pad For stubborn soils,
clean with a soap-filled, nonabrasive, plastic pad or Cooktop Cleaning Creme* (Part #20000001}**
and a sponge. If soil remains, reapply Cooktop Cleaning Creme, cover with a damp paper towel
and soak for 30 minutes. Scrub again, rinse and dry.
° Do not clean in the dishwasher or self-cleaning oven.
° To activate "Control Lock" for cleaning, see page 8.
° Wipe with a damp cloth and dry. Do not use abrasive cleaning agents as they may scratch the finish.
° Glass cleaners may be used if sprayed on a cloth first. DO NOTapray directly on centrelpad and
display area.
° Remove knobs in the OFFposition by pulling forward.
, Wash, rinse and dry. Do not use abrasive cleaning agents as they may scratch the finish.
° Turn on each burner to be sure the knobs have been correctly replaced.
Porcelain enamel is glassfused on metal and may crack or chip with misuse, kis acid resistant, not acid proof.
All spillovers, especially acidic or sugary spillovers, should be wiped up immediately with a dry cloth.
° When cool, wash with soapy water, rinse and dry.
, Never wipe off a warm or hot surface with a damp cloth. This may cause cracking or chipping.
, Never use oven cleaners, abrasive or caustic cleaning agents on exterior finish of range.
° When cool, wash with warm soapy water, rinse and dry. Never wipe a warm or hot surface with a damp
cloth as this may damage the surface and may cause a steam burn.
° Forstubborn soil, use mildly abrasive cleaning agents such as baking soda paste or Bon Ami*. Do not use
abrasive cleaners such as steel wool pads or oven cleaners. These products will scratch or permanently
damage the surface.
Note: Use a dry towel or cloth to wipe up spills, especially acidic or sugary spills. Surface may
discolor or dutl if soil is not immediately removed. This is especially important for white surfaces.
Side Panems,
Storage Drawer
and Door
Handmes -
Painted Enamel
17

Oven Window
and Door - Glass
+ Avoid using excessive amounts of water which may seep under or behind gHasscausing staining.
+ Wash with soap and water. Rinsewith dear water and dry. GHasscHeanercan be used if sprayed on acHoth
first.
+ Do not use abrasive materiaHssuch as scouring pads, steeHwooHor powdered cHeanersas theywiHHscratch
gHass.
Oven interior + FoHHowinstructions on page 15-16 to set a seHf-cHeancycHe.
Oven Racks
Stainmess Steel
(seHect modems:)
®
®
®
CHeanwith soapy water.
Remove stubborn soiHwith cHeansingpowder or soap-fiHHedscouring pad. Rinse and dry.
Racks wiHHpermanently discoHorand may not sHideout smoothHyif Heftin the oven during a seHf-cHean
operation. If this occurs, wipe the rack and embossed rack supports with a smaHHamount of vegetabHeoiH
to restore ease of movement, then wipe off excess oil
* DO NOT USE ANY CLEANING PRODUCT CONTAINING CHLORINE BLEACH.
* DO NOT USEABRASIVE OR ORANGE CLEANERS.
* ALWAYS WIPE WITH THE GRAIN WHEN CLEANING.
* Daily Cleaning/Light Soil -- Wipe with one of the following - soapywater, white vinegar/water solution,
Formula 409 GHassand Surface CHeaner+ or a similar gHasscHeaner- using a sponge or soft cHoth.
Rinse and dry. To poHishand heHpprevent fingerprints, foHHowwith StainHessSteeHMagic Spray+
(Part No. 20000008:)+*-
, Moderate/Heavy Soil -- Wipe with one of the foHHowing- Bon Ami, Smart CHeanser,or Soft Scrub* -
using a damp sponge or soft cHoth.Rinse and dry. Stubborn soiHsmay be removed with a damp muHti-
purpose Scotch-Brite +pad; rub evenHywith the grain. Rinse and dry. To restore Husterand remove streaks,
foHHowwith StainHessSteeHMagic Spray*.
, Discoloration -- Using a damp sponge or soft cHoth,wipe with Cameo StainHessSteeHCHeaner+-Rinse
immediateHyand dry. To remove streaks and restore Huster,foHHowwith StainHessSteeHMagic Spray*.
+ Brand names for cHeaning products are registered trademarks of the respective manufacturers.
+* To order direct, caHH1-877-232-8771 USA and 1-800-888-8408 Canada,
18
Oven Door
oven door, This could cause the range to tip over, break
the d0ar, 0r k_Jurethe user.
Note: The oven door on a new range may feel "spongy"
when it is closed. This is normal and wiil decrease with use.
Oven Window
To protect the oven door window:
1. Do not use abrasive cleaning agents such as steel wool
scouring pads or powdered cleansers as they may scratch
the glass=
2. Do not hit the glass with pots, pans, furniture, toys, or other
objects.
3. Do not close the oven door until the oven racks are in
place.
Scratching, hitting, jarring or stressing the glass may weaken
its structure causing an increased risk of breakage at a later
date.
Leveling Legs
[eye!!ng legs to the f!oor. This bracket prevents the range
from accidentally tipping.
Emectrical Connection
Appliances which require electrical power
are equipped with a three=prong
grounding plug which must be plugged
directly into a properly grounded three-
hole 120volt electrical outieL
A/ways disconnect power to appliance before servicing.
The three-prong grounding plug offers protection against
shock hazards. DO NOT CUT OR REMOVE THE THIRD
GROUNDING PRONG FROM THE POWER CORD PLUG.
If an ungrounded, two-hole or other type electrical outlet is
encountered, it is the personal responsibility of the
appliance owner to have the outlet replaced with a
properly grounded three-hole electrical outlet.
Oven Light
- AHow oven to cool before repiadng light bulb.
- Make sure bulb cover and bulb are cool before touching.
To replace oven light bulb:
1=When oven is coo[, hold bulb cover BuLscovER
in place, then slide wire retainer
off cover. NOTE: Bulb cover
will fall if not held in place
while removing wire retainer=
2. Remove bulb cover and light
RETAINER
bulb=
3= Replace with a 40-watt appliance bulb=
4= Replace bulb cover and secure with wire retainer=
5= Reconnect power to range. Reset clock=
19
Remova of Gas Appmiance
Gas appiiance connectors used to connect this appiiance to
the gas suppiy are not designed for continuous movement.
Once installed, DO NOT repeatediy move this gas appiiance
for cbaning or to rebcate. If this appiiance has to be moved
and/or removed for servicing, follow the procedure described
in the installation instructions. For information, contact
Amana Customer Assistance at 1-800-843-0304 USA or
1-866-587-2002 Canada.
To prevent range from accidentally tipping, range must be
secured to the floor by sliding rear leveling leg into the anti-
tip bracket.
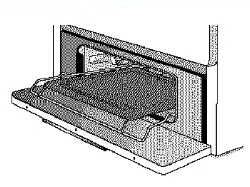
Storage [}rawer
Do not store plastic, paper products, food or flammable
for these items when the oven is in use.
The storage drawer can be removed to allow you to clean
To remove:
1. Empty drawer and pull out to the first stop position.
2. Lift up the front of the drawer.
3. Pull out to the second stop position.
4. Grasp sides and lift drawer up and out.
To replace:
1. Fit the ends of the drawer glides into the rails in the range.
2. Lift up the front of the drawer and gently push in to the
first stop position.
3. Lift drawer up again and push until drawer is closed.
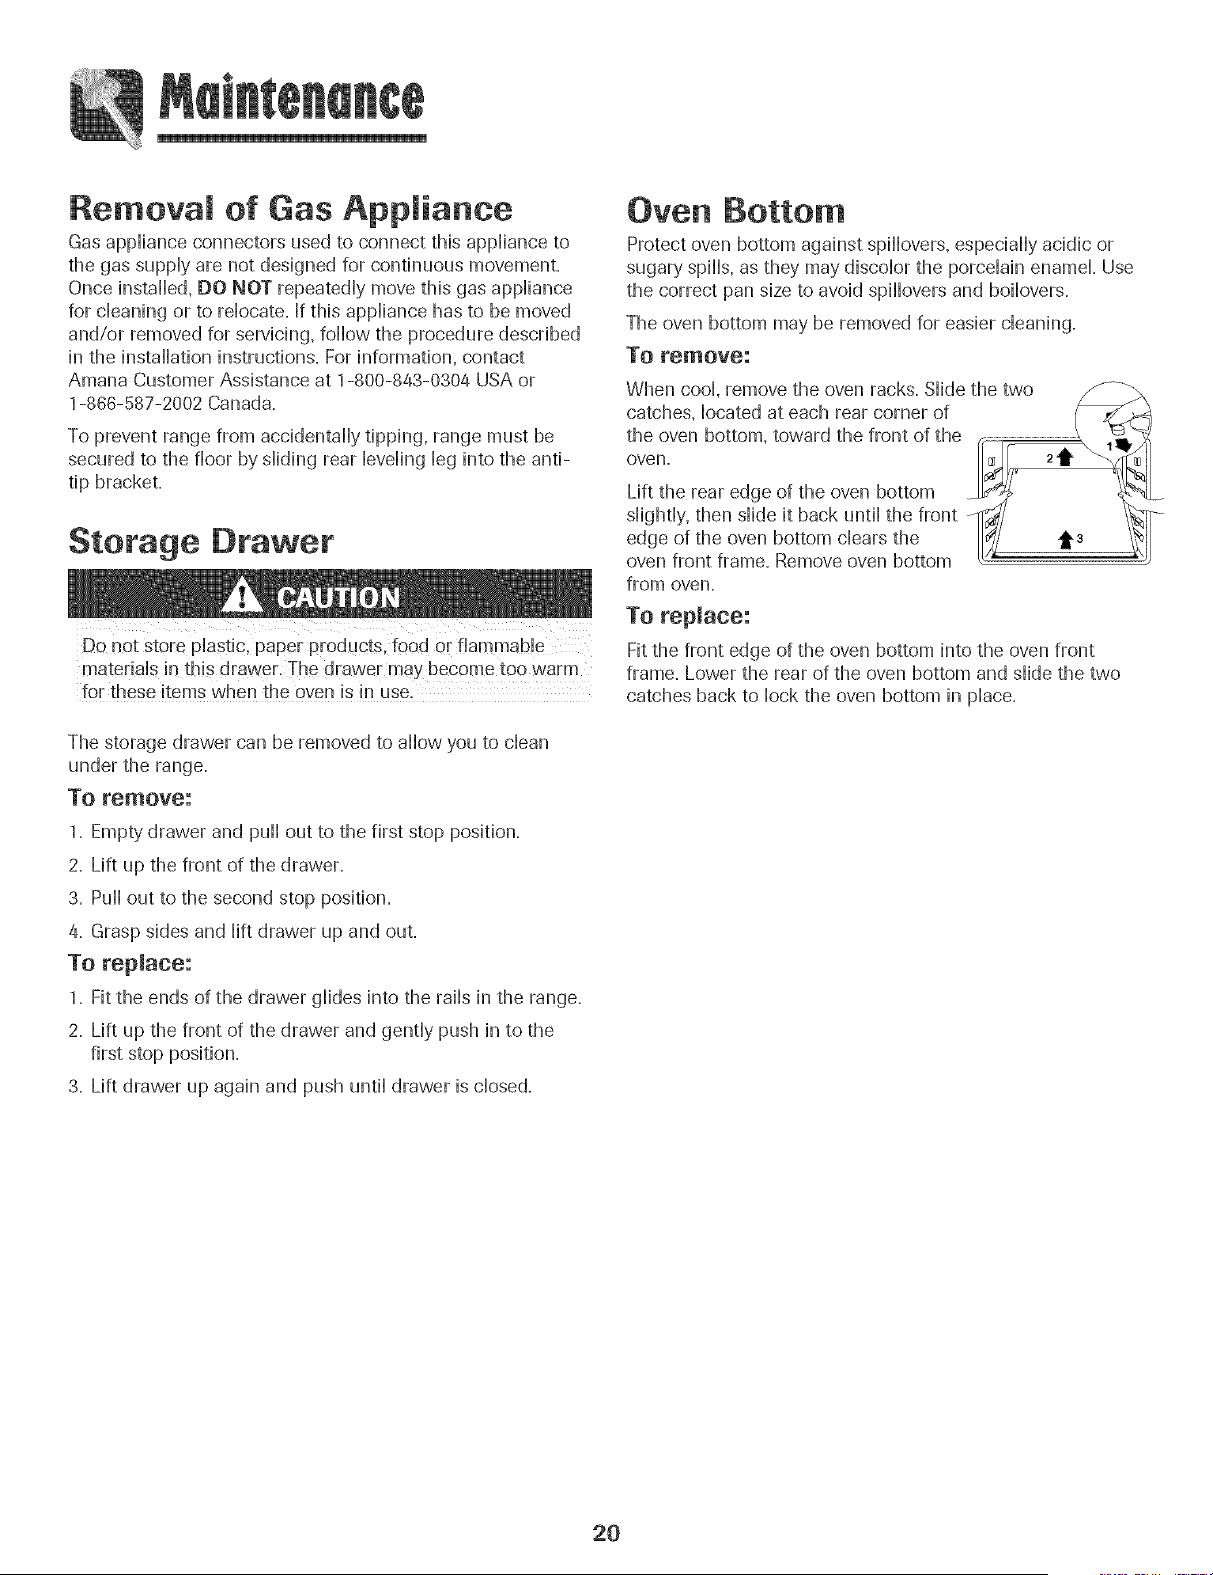
Oven Bottom
Protect oven bottom against spillovers, especially acidic or
sugary spills, as they may discolor the porcelain enamel. Use
the correct pan size to avoid spillovers and boilovers.
The oven bottom may be removed for easier cleaning.
To remove:
from oven.
To replace:
Fit the front edge of the oven bottom into the oven front
frame. Lower the rear of the oven bottom and slide the two
catches back to lock the oven bottom in place.
20
PROBLEM SOLUTION
For most concerns, try these first. ° Check if oven controHshave been propedy set.
° Check to be sure pHugis secureHyinserted into receptacle.
° Check or re-set circuit breaker. Check or repHacefuse.
° Check power suppHy.
Surface burner fails to light. , Check to be sure unit is propedy connected to power suppHy.
° Check for a Mown circuit fuse or a tripped main circuit breaker.
° Check to be sure ignitor is dry and cHicHng.Burner will not Hightif ignitor is damaged.
soiHedor wet. If ignitor doesn't chick,turn controHknob OFF.
The flame is uneven. ° Burner ports may be clogged.
Sarface burner flame lifts ° Check to be sure a pan is sitting on the grate above.
off ports.
Baking resumts are not as ° Check the oven temperature selected. Make sure oven is preheated when recipe
expected or differ from or directions recommend preheat.
previous oven. , Make sure the oven vent has not been blocked. See page 14 for location.
° Check to make sure range is level.
, Temperatures often vary between a new oven and an old one. As ovens age, the oven
temperature often "drifts" and may become hotter or cooler. See page 12 for
instructions on adjusting the oven temperature. NOTE: It is not recommended to
adjust the temperature if only one or two recipes are in question.
° Use correct pan. Dark pans produce dark browning. Shiny pans produce light
browning. See "Cooking Made Simple" booklet for more information on bakeware.
° Check rack positions and pan placement. Stagger pans when using two racks. Allow
1-2 inches between pans and oven wall.
° Check the use of foil in the oven. Never use foil to cover an entire oven rack. Place
a small piece of foil on the rack below the pan to catch spillovers.
Food is not broiling properly or , Check oven rack positions. Food may be too close to flame.
smokes excessively. , Aluminum foil was incorrectly used. Never line the broiler insert with foil.
, Trim excess fat from meat before broiling.
, A soiled broiler pan was used.
, Preheat oven for 2-3 minutes before placing food in the oven.
, Broil with the oven door closed.
Oven will not self-clean. ° Check to make sure the cycle is not set for a delayed start. See pages 15-16.
, Check if door is closed.
, Check if control is in Sabbath Mode. See page 12.
, Oven may be over 400° F.Oven temperature must be below 400° F to program a
clean cycle.
21
PP,DBLEM SOLUTmDN
Oven did not clean properly. , Longer cleaning time may be needed.
° Excessive spillovers, especially sugary' and/or acidic foods, were not removed prior
to the self-clean cycle.
Oven door wimmnot unmock after
self=clean cycle.
Moisture collects on oven
window or steam comes from
oven vent.
There is a strong odor or light
smoke when oven is turned on.
Faumt Codes
Noises may be heard.
There are no beeps and
"SAb" flashing and then
Oven interior is still hot. Allow about one hour for the oven to cool after the
completion of a self-clean cycle. The door can be opened when "LOCK" is not
displayed.
The control and door may be locked. See page 8.
° This is normal when cooking foods high in moisture.
° Excessive moisture was used when cleaning the window.
, This is normal for a new range and will disappear after a few uses. Initiating a clean
cycle will "burn off" the odors more quickly.
, Turning on a ventilation fan will help remove the smoke and/or odor.
, Excessive food soils on the oven bottom. Use a self-clean cycle.
° BAKE or LOCK may flash rapidly in the display to alert you if there is an error
or a problem. If BAKEor LOCK appear in the display, press the Cancel pad.
If BAKE or LOCK continue to flash, disconnect power to the appliance.
Wait a few minutes, and then reconnect power. If the flashing still continues,
disconnect power to the appliance and call an authorized servicer.
° If the oven is heavily soiled, excessive flareups may result in a fault code during
cleaning. Press the CANCEL pad and allow the oven to cool completely, wipe out
excess soil, then reset the clean cycle. If the fault code reappears, contact an
authorized servicer.
° The oven makes several low level noises. You may hear the oven relays as they go on
and off. This is normal.
° As the oven heats and cools, you may hear sounds of metal parts expanding and
contracting. This is normal and will not damage your appliance.
° Control may be in Sabbath Mode. See page 12.
° Oven is in Sabbath Mode. To cancel, press and hold the Clock pad for five
seconds.
22
Fuji One Year Warranty -
Parts and Labor
For erie {1} year from the original retail
purchase date. any part which fails in
normal home use will be repaired or
replaced free of charge.
Canadian Residents
The above warranties only cover an
appliance installed in Canada that, has
been certified or listed by appropriate
test agencies for compliance to a
National Standard of Canada unless the
appliance was brought into Canada due
to Eransfer of residence from the United
States to Ca nada
Limited Warranty Outside the
United States and Canada -
Parts Only
For one {1} yeaH from the date of
original retail purchase, any part which
fails in normal home use will be re-
paired or replaced free of charge for the
part itself, with the owner paying al
other costs, including labor, mileage,
tra nsportation, trip charge and diagnos-
tic charge, if required
The specific wafTantles expressed above
are the ONLY warranties provided by the
manufacturer. These warranties give you
specific legal ffghts, and you may also
have other r_ghts whic,_ va(v from state
to state.
What is Not Covered By These
1. Conditions and damages resulting from any of the following:
a. Improper installation, delivery, or maintenance.
b. Any repair, modification, alteration, or adjustment not authorized by
the manufacturer or an authorized servicer.
c. Misuse, abuse, accidents, or unreasonable use.
d. Incorrect electric current, voltage, or supply.
e. Improper setting of any control
2. Warranties are void if the original serial numbers have been removed,
altered, or cannot be readily determined.
3. Light bulbs.
4. Products purchased for commercial or industrial use.
5. The cost of service or service caii to:
a. Correct installation errors.
b. Instruct the user on the proper use of the product.
c. Transport the appliance to the servicer.
6. Consequential or incidental damages sustained by any person as a result of
any breach of these warranties. Some states do not allow the exclusion or
limitation of consequential or incidental damages, so the above exclusion may
not apply.
If You Need Service
o Call the dealer from whom your appliance was purchased or call Maytag
Services sM,Amana Customer Assistance at 1-800-843-0304 U.S.A. or
1-866-587-2002 Canada to locate an authorized servicer.
® Be sure to retain proof of purchase to verify warranty' status. Refer to
WARRANTY for further information on owner's responsibilities for warranty
service.
o If the dealer or service company cannot resolve the problem, write to Maytag
Services sM,Attn: CAIR _:Center, P.O. Box 2370, Cleveland, TN 37320-2370, or
call 1-800-843-0304 UoSoAoor 1-866-587-2002 Canada.
U.S.customers using TTY for deaf, hearing impaired or speech impaired, caii
1-800-688-2080.
User's guides, service manuals and parts information are available from
Maytag Servicess_, Amana Customer Assistance.
When writing or calling about a service problem, please include:
a. Your name, address and telephone number;
b. Model number and serial number;
c. Name and address of your dealer or servicer;
d. A clear description of the problem you are having;
e. Proof of purchase (sales receip0.
23
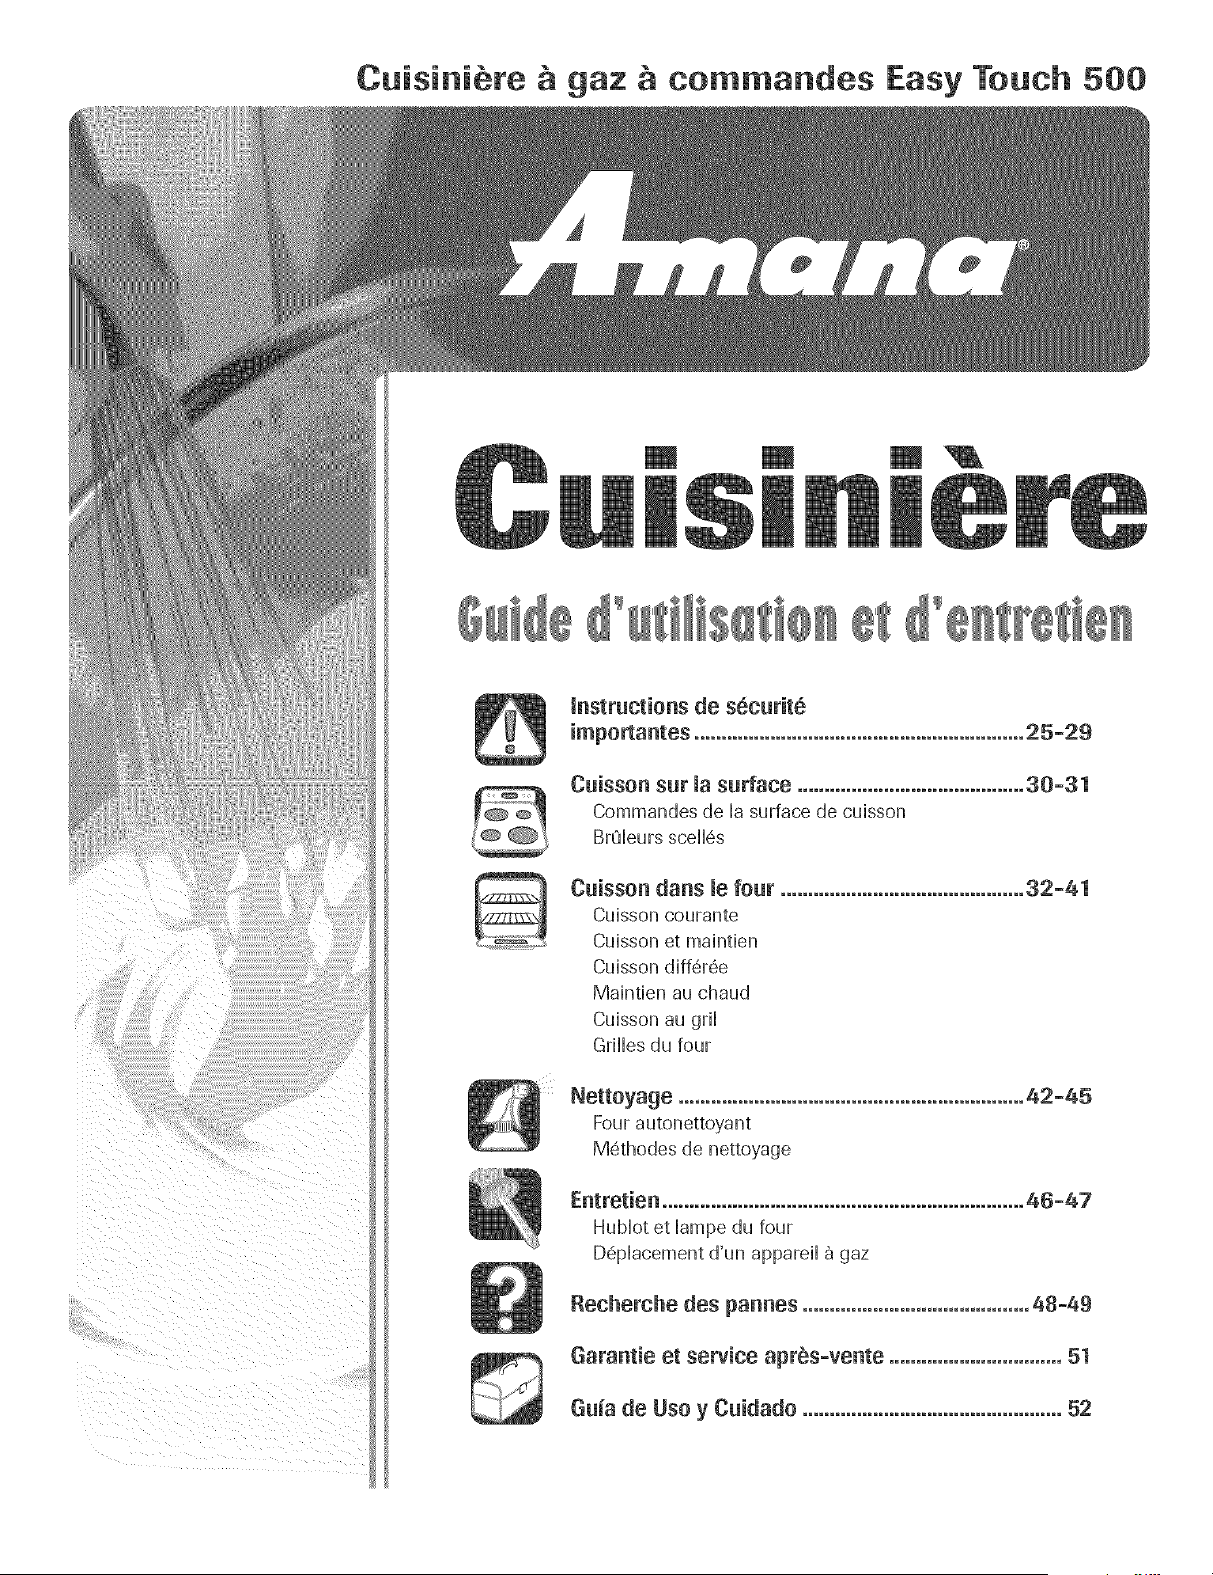
Cuisini_re h gaz h cow.andes Easy Touch 500
instructions de s6curit6
importantes ............................................................. 25-29
Cuisson sur la surface .......................................... 30-31
Commandes de Hasurface de cuisson
Br_JHeurssceH6s
Cuissen darts [e four ............................................. 32-81
Cuisson courante
Cuisson et maintien
Cuisson diff6r6e
Maintien au chaud
Cuisson au gril
Grilles du four
Nettoyage ................................................................ 42-45
Four autonettoyant
M6thodes de nettoyage
Entretien ................................................................... 46-47
Hub[ot et [ampe du four
D6p[acement d'un apparei[ 8 gaz
Recherche des pannes ..........................................48-49
Garantie et service aprbs-vente ................................ 51
Guia de Use y Cuidade ................................................52
InstaUateur: Laissezce guideavecI'apparell.
Oensommatear : Veui!lezlire le guide etie conserverpour
consultationuiterieure Conservezla fae[ure d'achat ou [e cheque
encalssecomme preuvede I'achat.
Numerode mo@[e
Numerode serie
Date d'achat
Sivousavezoes questions,veul[Ieznous appeler:
Service a a clientele de Amana
1-800-843-0304 USA
1-866-587-2002 Canada
Internet: http:iA_Nw.amana.com
Duns[ecadre de nos pratlquesd'ame[[orationconstantede a
qua[it6et de laperformance(]e nos produitsdecaissoN,des
modificationsde [appareil qu_ne sentpas mentionn@sduns ce
guide pourront @-entrodultes.
Repettez-vous _ la page 51 pour plus d'_rlfermadons
cencerltant le service apr6s-vente.
Lire toutes los instructions avant d'utiliser cot appareii;
observer toutes bs instructions pour eliminer bs risques
d'incendie, choc ebctrique, dommages materiels et corporeb
que pourrait susciter une utilisation incorrecte de Fappareik
Utiflser I'apparefl uniquement pour bs fonctions pr@ues,
d@rites dans ce guide,
Pour une utilisatien adequate et en s6curit6, il faut que
I'appareil soit convenabbment instafle par un technicien
qualifie, et relic 8 la terre, Ne pas regbr, r@arer ni remplacer
un composant, a moins que cela ne soit specifiquement
recommande dans ce guide, Toute autre reparation doit 6tre
effectuee par un technicien qualifie, Demander a I'instaflateur
de montrer o8 se trouve b robinet d'arret de gaz et comment
b fermer en cas d'urgence,
Toujours d@rancher I'appareil avant d'y faire de I'entretien,
Ne pus ranger ni utiliser d'essence eu autre vapeur
Les instructions de securit6 importantes et bs paragraphes
<<avertissement - de ce guide ne sent pas destines a couvnr
toutes bs conditions et situations qui pourraient se presenter.
II faut faire preuve de ben sens. de prudence et de soin Iors de
I'instdlation. de I'entretien ou du fonctionnement de I'apparei[
Toujours prendre contact avec b detafllant, b distributeur.
I'agent de seMce apres-vente ou b lubricant duns b cas de
probl(_mesou de conditions qui ne seraent pas comprises.
Reconna_tre los etiquettes, paragraphes et
symboUes sat la s_curit_
QUE FAmRESmL'ON SENT UNE ODEUR DE GAZ :
• Ne pas teucher _ un intertupteur 6iectriqueo
, N utiliser aucun tel6phene de I immeubme.
, Se readre chez un veisiu et telephener
imra6diatement _ la compagnie de gaz. Suivre los
dkectives donnees par le propose de la
compagnie de gaz.
S,il est impossible de jein_re la ce_pagnie
gaz, t616phouer au service _es iaceu_ies ,
confiees _ un instaimateur cerapetent,_uae
AVE_T_SSE_ENT _ Dangers ou pratiques dangereuses qui
POURRAIENTresulter en de graves blessures ou m_me la
mort.
_TTENT_ON _ Dangers OUpratiques dangereuses qu i
POURR#JENTresulter en des blessures mineures,
Une fuite de gaz pourrait Survenir dans le sYstBme et
gaz recommandent I'instaflation d'un detecteur de gaz
{hom01ogation UL}_ ]nsta!!eret utiiise[ b detecteur
conformement aux instructions du lubricant.
25
,u
instructions gen raJes
o TOUTE CUm$1NIEREPEUT BASCULER
ET PROVOQUER DES BLESSURES°
o mNSTALLERLA BRIDE
ANTIBASCULEMENT FOURNIE AVEC
CETTE CUISINIERE.
o RESPECTERTOUTES LES iNSTRUC-
TiONS D'INSTALLATION°
AVERTJSSEMENT: Pour r_duire Je
risque de basculement de I'appareil _ m'occasien
d'une utiHsation anormaie ou d'un chargement
e×eessif de Ja porte du four, il faut que Ja bride
antibaseuiement soit cenvenabiement instaii_e,
Utiliser une Bmpe torche pour determiner si la bride
antibascubment est convenabbment instaflee sous la
cuisiniere, L'un des pieds arriere de reghge de I'aplomb doit
etre convenabbment engage darts la fente de la bride,
Lorsque la cuisiniere est convenabbment calee, la bride
antibascubment immoNise b pied arriere contre b sol,
Verifier la parfaite immobflisation de la cuisiniere par la bride
apres chaque @placement de la cuisiniere,
Pour viter ur| incendie ou des
dommages par la fum e
S'assurer que tous bs materiaux de conditionnement sont
retires de Fappareil avant de b mettre en marche,
Garder bs materiaux combustibles, [essence et autres
matieres et vapeurs inflammables bien 61oignesde Fappare&
Si I'appareil est installe pres d'une fenetre, des precautions
appropriees doivent etre prises pour @iter que b vent entrdne
bs rideaux au-dessus des bn]burs,
NE JAMAIS Bisser des articles sur la table de cuisson, L'air
chaud de Fevent peut bs enfiammer et mettre egabment sous
pression des contenants fermes qui pourraient alors exploser,
De nombreux flacons d'aerosol peuvent EXPLOSERIorsqu'on
bs expose a la chabur, et ib peuvent contenir un produit tres
inflammable, Eviter d'utifiser ou remiser un flacon d'aerosol
proximite de [@pare&
De nombreux articles en plastique peuvent etre deteriores par
la chabur, Conserver bs articles en plastique a distance des
composants de ['apparei[ susceptibies de devenir tiedes ou
chauds, Ne pas laisser des articles en plastique sur la table
de cuisson; un article en plastique trop proche de I'event du
four ou d'un brQbur allume pourrait s'amollir ou fondre,
Pour eliminer le besoin d'atteindre quelque chose par-dessus
les brQburs de surface, il est preferable qu'il n'y ait aucune
armoire de cuisine directement au-dessus de I'appareil, S'il y
a une armoire, on ne @wait y remiser que des articles peu
frequemment utilises et capables de resister a la chaleur
emise par I'appareil, La temperature pourrait etre excessive
pour certains articles, comme liquides volatils, produits de
nettoyage ou flacons d'aerosol,
En cas d'incendie
Interrompre b fonctionnement de Fappareil et de la hotte de
ventilation pour minimiser b risque d'extension des fiammes,
Eteindre bs fiammes, pub mettre la hotte en marche pour
evacuer la fumee et Fair vicie,
° Table de euisson : Utfliser un couverde ou une plaque
biscuits pour etouffer bs fiammes d'un feu qui se declare
darts un ustensib de cuisine,
NE JAMAJS saisir ou d@Bcer un ustensib de cuisine
enfiamme,
. Four : Fermer la porte du four pour etouffer bs fiammes,
Ne pas projeter de [eau sur un feu de graisse, Utiliser du
bicarbonate de sodium ou un extincteur a mousse ou produit
chimique sec pour eteindre bs fiammes,
Securit pour Jes enfants
NE JAMAIS iaisser des enfants seuis ou sans supervision
Iorsque I'appareil est en service ou encore chaud,
NE JAMAIS laisser un enfant s'asseoir ou se tenir sur une
partie quelconque de I'appareil, II pourrait se blesser ou se
brOler,
II est important d'enseigner aux enfants que la cuisiniere et les
ustensiles places dessus ou dedans peuvent etre chauds,
Laisser refroidir les ustensiles en un lieu sOr, hors d'atteinte
26
des enfants, fl est important d'enseigner aux enfants qu'un
apparefl menager n'est pas un jouet, et qu'fls ne doivent
toucher aucune commande ou autre composant de rapparefl.
Familiarisation avee l'appareil
NE JANIA|S utiliser la porte de four comme tabouret/
siege/escabeau: ceci pourrait faire bascubr rappareii et
entrainer dommages corporals serieux,
NE JANIA_S utiiiser la cuisinuerecomme source de chaieur
pour le chauffage de la piece. Sinon un empousonnement au
monox} de de carbone pourrait s'ensuiwe ainsi qu une
surchauffe du four.
NE JAMAIS recouvrer bs fentes, ouvertures ou passages
de la sob de four ni la grHb toute entiere avec un materiau
comme du papier d'aiuminium. SJnon.la circulation de rair
dans le four sera entravee et donc entrai'ner un
empoisonnement au monox}de de carbone. Le papier
d'aiuminium peut aussl emprisonner de la chaleur et
entrainer un rusqued'incendie.
NE JAMAIS obstruer la circulation de rair de combustion el
de ventilation au niveau de r@'eHt de four ou des entrees
d'air. Sinon. fair ne parvient pas correctement aux brQleurs
et donc cela peut poser un risque d'empoisonnement au
monox} de de carbone.
L'event de four est situe a la base du dosseret,
Evitez de toucher ie voisinage de r@ent de four iorsque ie four
est utiiise et pendant piusieurs minutes apres rarret du four,
Certains composants de I'event et la zone voisine peuvent
devenir suffisamment chauds pour provoquer des brOiures,
Apres rarret du four, ne touchez pas revent de four ou ia zone
voisine avant que ces composants aient pu se refroidir
suffisamment,
Autres surfaces potentiellement chaudes : table de cuisson,
zones faisant face a ia table de cuisson, event de four, zone
voisine de i'event, porte de four et zone voisine de porte et
de hubiot,
Ne touchez pas rampoule chaude du four avec un linge
humide; le choc thermique pourrait la briser. Si tel est le cas,
debranchez rappareil avant de retirer rampoule pour eviter
une decharge electrique.
Ne remisez pas des aliments ou ustensiles de cuisine sur la
table de cuisson ou dans le four.
Cuisson et s cutit6
Placer toujours un ustensiie sur un brSieur de surface avant de
rallumer. Veiller a bien connaitre la correspondance entre les
boutons de commande et les brOleurs.Veiller a allumer le
brOleur correct et verifier que le brQleur s'allume
effectivement. A la fin de la periode de cuisson, eteindre le
brQleur avant de retirer I'ustensile, pour eviter une exposition
aux flammes du brQleur.
Veiller a toujours ajuster correctement la taille des flammes
pour qu'elles ne depassent pas sur la peripherie de rustensile.
Des flammes de trop grande taille sur un brOleur sont
dangereuses, elles entrainent un gaspillage d'energie et elles
peuvent faire subir des dommages a I'ustensile, a rappareil ou
rarmoire situee au-dessus.
NE JAMAIS iaisser un brQieur de surface aiiume sans
surveillance, particulierement avec une puissance de
chauffage elevee ou Iors d'une operation de friture. Un
debordement pourrait provoquer la formation de fumee et des
produits gras pourraient s'enflammer. Eiiminer des que
possible les produits gras renverses. Ne pas utiliser une
puissance de chauffage elevee pendant une periode
proiongee.
NF JAMAIS faire chauffer un recipient non ouvert dans le
four ou sur un brQleur de surface; raccumulation de pression
dans le recipient pourrait provoquer son eclatement et de
graves dommages materiels ou corporels.
Utiliser des maniques robustes et seches. Des maniques
humides peuvent provoquer la formation de vapeur brQlante.
Ne jamais utiliser un torchon a vaisselle ou autre article textile
la place de maniques; un tel article pourrait trainer sur un
brQleur et s'enflammer, ou accrocher un ustensile ou un
composant de rappareil.
Laisser toujours refroidir un recipient d'huile de friture chaude
avant de tenter de le deplacer et le manipuler.
Ne pas laisser la graisse de cuisson ou autre materiau inflam-
mable s'accumuler dans ou pres de rappareil, de la hotte ou
du ventilateur de revent. Nettoyer frequemment la hotte pour
empecher route accumulation sur la hotte elle-meme ou sur le
filtre. Lots du flambage d'aliments sous la hotte, mettre le
ventilateur en marche.
NE JAMAIS porter, Iors de rutilisation de rappareil, des
vetements fairs d'un materiau inflammable, ou amples, ou
Iongues manches. De tels vetements peuvent s'enflammer ou
accrocher la poignee d'un ustensile.
27
Placertoujours[esgrillesa[apositionapproprieedarts[efour
Iorsquelefourestfroid.FairecoulisserlagrilleversI'exterieur
avantd'ajouterouenleverunplat;utiliserpourcelaune
maniquerobusteetseche.Eviterd'introduirelamaindartsle
fourpouryplacerouretirerunplat.S'ilestnecessairede
d@lacerunegrilleIorsqu'elleestchaude,utiliserunemanique
seche.Veilleratoujoursarreterlefouralafind'uneperiode
decuisson.
Ouvrirtoujourslaportedufourtresprudemment.LaisserFair
chaudoulavapeurs'echapperavantderetirer/introduireun
plat.
AVFRTmSSI:MFNT: Metspr@ar_s: Respecterlesinstruc-
tionsdufabricant.Silecontenantoulecouvercleenplastique
d'unmetssurgeleseddormeouestendommagedurantla
cuisson,jeterimmediatementlerecipientetsoncontenu.Les
alimentspourraient6trecontamines.
NEJAIV[AmSgarnirlasoleouunegrilledufouravecdela
feuilled'aluminium.Cecipourraitsusciterunrisquedechoc
electriqueoud'incendie,ouuneautredeteriorationde
I'appareil.Utiliserdelafeuilled'aluminiumuniquementselon
lesinstructionsdeceguide.
Ustensi es et s6curit
Utiliser des ustensiles a fond plat comportant une poignee
qu'on peut facilement saisir et qui reste froide. Eviterd'utiliser
un ustensile instable ou ddorme, qui pourrait facilement
basculer, ou dont la poignee est mal fixee. Eviter egalement
d'utiliser des ustensiles de petite taille comportant une
poignee Iourde; ces ustensiles sont generalement instables et
peuvent facilement basculer. Un ustensile Iourd Iorsqu'il est
rempli peut egalement 6tre dangereux Iors des manipulations.
Veiller a utiliser un ustensile de taille suffisante pour que le
contenu ne risque pas de deborder. Ceci est particulierement
important pour un ustensile rempli d'huile de friture. Verifier
que la taille de I'ustensile est suffisante pour qu'il puisse
recevoir les produits alimentaires a cuire, et absorber
I'augmentation de volume suscitee par I'ebullition de la
graisse.
Pour minimiser les risques de brQlure, d'infiammation de
mati@reset de renversement par contact non intentionnel avec
un ustensile, ne pas orienter la poignee d'un ustensile vers un
brQleur adjacent; orienter toujours la poignee d'un ustensile
vers le cote ou I'arriere de I'appareil; ne pas laisser non plus la
poignee d'un ustensile deborder a I'avant de I'appareil, oQ un
jeune enfant pourrait facilement la saisir.
Veiller a ne jamais laisser le contenu liquide d'un ustensile
s'evaporer completement; I'ustensile et I'appareil pourraient
subir des dommages.
Appliquer les instructions du fabricant Iors de I'emploi d'un
sachet pour cuisson au four.
Seuls certains materiaux en verre, vitroceramique, ceramique,
ou certains ustensiles vitrifies/emailles peuvent 6tre utilises sur
la table de cuisson ou darts le four sans risque de bris sous
I'effet du choc thermique. Observer les instructions du
fabricant Iors de I'utilisation d'un ustensile en verre.
La secur[te de fonct[onnement de cet @pare[[ a ete testee
I'aide d'ustensiles de cuisine conventionnels, Ne pas utiliser un
ustensile ou accessoire qui n'est pas specifiquement
recommande darts ce guide, Ne pas utiliser de couvre-brQleur,
gril place sur la table de cuisson ou systeme de convection
additionnel, L'utilisation d'un dispositif ou accessoire qui n'est
pas expressement recommande darts ce guide peut degrader
la securite de I'appareil ou sa performance, ou reduire la
Iongevite des composants,
Nettoyage et sOcurit
ArrOter routes les commandes et attendre le refroidissement
de tousles composants avant de les toucher ou d'entre-
prendre le nettoyage. Ne pas toucher la grille d'un brQleur ou
la zone voisine avant que ces composants aient pu suffisam-
merit refroidir.
Exercer une grande prudence [ors du nettoyage de I'appareil.
Travailler prudemment pour eviter des brQlures par la vapeur
en cas d'utilisation d'un chiffon ou d'une @onge humide Iors
de I'elimination d'un produit renverse sur une surface chaude.
Certains produits de nettoyage peuvent generer des vapeurs
nocives Iorsqu'on les applique sur une surface chaude.
Four autor|ettoyar|t
Nettoyer uniquement les pieces mentionnees dans ce guide.
Ne pas nettoyer le joint de porte; le joint joue un role essentiel
quanta I'etancheite. Ne pas frotter, endommager ou deplacer
le joint. Ne pas utiliser de produit de nettoyage du four darts
le four autonettoyant ou sur les zones voisines.
28
Avant d'executer une operation d'autonettoyage, retirer la
lechefdte, les grilles du four et les autres ustensiles, et eliminer
par essuyage tout exces de residus renverses pour eviter la
formation de fumee ou Finfiammation de ces residus.
II est normal que la surface de cuisson devienne chaude
durant une operation d'autonettoyage; par consequent, eviter
de toucher la surface de cuisson durant Fautonettoyage.
Avertisse ent et avis
important pour s curit
La Ioi cdifornienne _Safe Drinking Water and Toxic Enforce-
ment Act >>de 1986 (proposition 65:)stipule la publication par
le gouverneur de la Cdifornie d'une liste de substances que
I'etat de Cdifornie considere comme cancerigenes ou
dangereuses pour le systeme reproducteur, et impose aux
entreprises commercides [obligation de signaler a leurs
clients les risques d'exposition a de telles substances.
Les utilisateurs de cet appareil peuvent etre exposes a une
faible concentration de certaines substances figurant darts la
liste mentionnee ci-dessus, dont benzene, formaldehyde et
suie, du fait de la combustion incomplete du gaz naturel ou du
gaz de petrole liqudie. Pour minimiser la combustion
incomplete, veiller ace que les bru21eurssoient parfaitement
regles. Pour minimiser Fexposition aces substances, veiller
bien evacuer les gaz de combustion a Fexterieur.
Nous informons les utilisateurs de cet appareil que Iors d'une
operation d'autonettoyage, ils peuvent etre exposes a une
faible concentration de certaines substances figurant darts la
liste mentionnee ci-dessus, dont le monoxyde de carbone.
Pour minimiser [exposition, veiller ace que la piece ou se
trouve le four soit convenablement aeree durant une operation
d'autonettoyage par Fouverture d'une fenetre ou d'une porte.
AVIS IMPORTANT _ OISEAUX FAMILIERS : Les oiseaux ont
un systeme respiratoire tres sensible. Ne pas garder un oiseau
familier darts la cuisine ou darts une piece oubil pourrait etre
expose aux fumees. Les fumees emises durant une operation
d'autonettoyage peuvent etre dangereuses ou mortelles pour
un oiseau, de meme que les fumees emises Iors du chauffage
excessif de graisse, huile, margarine, et du chauffage excessif
darts un ustensile a revetement antiadhesif.
Conserver ces instructions pour consultation u t rieure
29
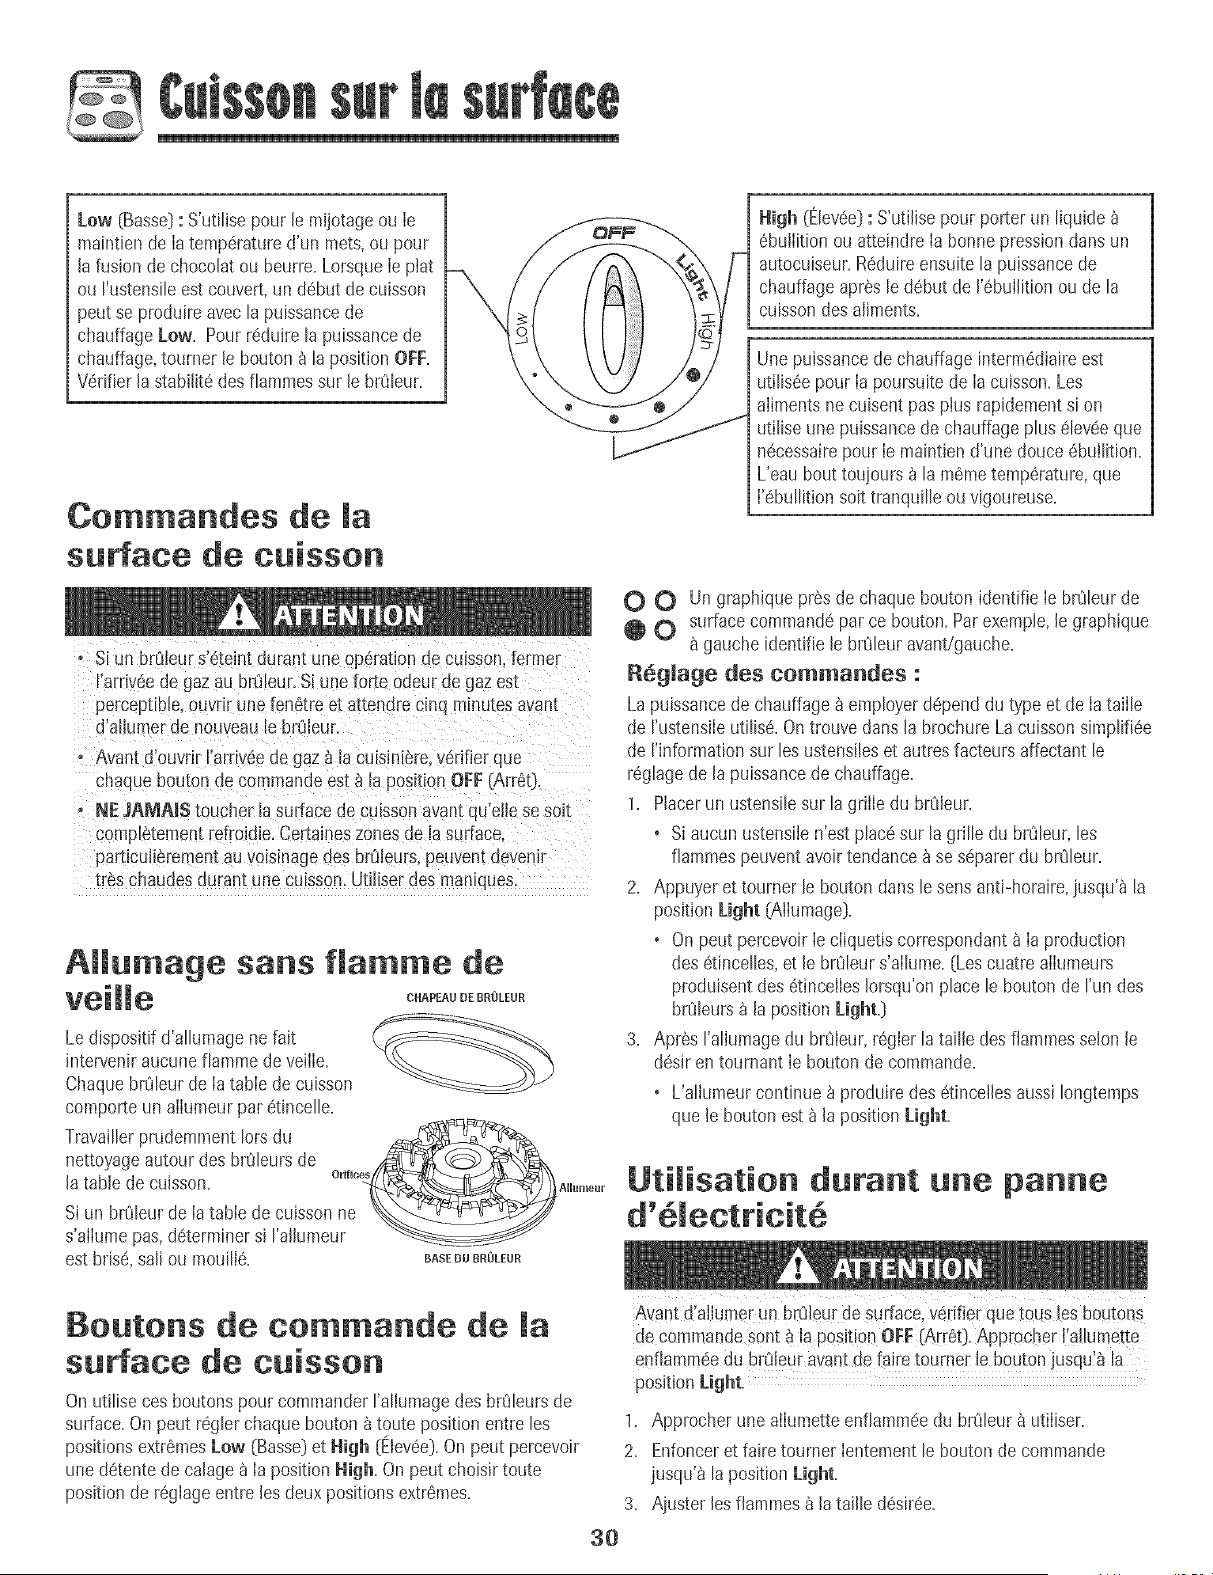
Low (Basse:}: S'utiHsepour le mijotage ou Ie
maintiende Iatemp6ratured'un mets,ou pour
lafusion de chocoht ou beurre.LorsqueIe plat
ou I'ustensileest couvert,un d6but de cuisson
peut se produireavech puissancede
chauffage Low. Pourr6duireh puissancede
chauffage,tourner le bouton _ N position OFF.
V6rifier la stabilit6 desfiammessur le blQleur.
Commandes de la
surface de cuisson
+
S[un brQleurs'6telntdurant une op6ratlonde culsson,ferme+
I'arr+v6edegaz au br_Jleur.Si uneforte odeur de gaz est
perceptible,ouvrg une fenetre et attendrecmq minutesavan[
d'aIlumerae nouveau[e brtileur.
A_ant d'ouvrir I'arriv_ede gaz a la cuisini_re+verifierque
cnaquebouton de commandeest _ la position OFF(Art60.
NEJAMAI$ toucher la surfacede cuissonavamqu'elleseso+t
completementrefroid+e.Certaineszonesde Jasuri:ace
Dart+cutierementau voEsmagedes brQleurs,peuventdeveni+
ires chaudesdurant unecu[sson.Ut+liserdes maniqaes.
AHumage sans flamme de
veiHe +++o,,°o+o
Ledispositifd'allumagene fait
interveniraucune fiammede veilIe.
Chaquebr_Jleurde Iatable de cuisson
comporte un alIumeurpar etincelle.
Travaillerprudemmentlots du
nettoyageautour des bt_Jleursde ,4_ (-_ ,:_"'_i{_-,
latable decuisson. °'+r+__m+
Siun brOleurde Iatable de cuJssonne _,..__
s'alIumepas,determinersJI'alhmeur
est brisk, sal[ou moui[le. BASEB°BOOLEUR
Be°tons de commande de la
surface de cuisson
Onutllise cesboutonspour commanderI'allumagedes brOleursde
surface.Onpeut reglerchaquebouton _ toute positionentre les
pos+tionsextr6mesLow (Basse}et High (Elev6e}.On peut percevoir
unedetentede ca[age_ [a positionNigh. On peut choisir toute
positionde r6glageentre [esdeux positionsextremes.
3O
High (E[evee}: S'utiHsepour porter un [[quide
6bullition ou atteindre [a bonnepress+ondansun
autocuiseur.Reduireensuite [a puissancede
chauffageapres le debut de %bul[ition ou de la
cuissondes aliments.
Une puissancede chauffage interm6diaireest
utilis6epour Ia poursuitede Ia cuisson.Les
alimentsne cuisent pas plus rapidementsi on
utiIise unepuissancede chauffageplus eIeveeque
necessairepour Ie maintiend'une douce 6bullition.
L'eau bout toujours _ la memetemp6rature,que
['ebullition soit tranqui% ouvigoureuse.
O O Un graphique prSsde chaque bouton identifieIe brOleurde
O surfacecommandepar ce bouton. Parexemple,[e graphique
gauche identifie le btCJleuravant/gauche.
R6giage des commandes :
La puissancede chauffage_ employerdependdu type et de [ataii[e
de rustensiie utilis6.Ontrouve dans[a brochureLacuisson simplifiee
de rinformation sur [es ustensi[eset autresfacteurs affectant [e
rSghge de [a puissancede chauffage.
1. Placerun ustensilesur lagrille du brOleur.
, Si aucun ustensiien'est placesur la grille du braleur, les
fiammespeuventavoir tendance _se separerdu brOleur.
2. Appuyer et tourner le boutonclansle sens anti-horaire,jusqu'_ la
positionLight [Alhpaage[}.
, Onpeut percevoir [e ciiquetiscorrespondant_ [a production
des etincelles,et le brOleurs'ailume.(Lescuatreaiiumeurs
produisentdes 6tincelles[orsqu'onphce le bouton de I'un des
brO[eurs_ [a positionLight.]
3. Apr6s rallumage du br0Ieur, r6glerla taille des flapapaesselon le
desir en tournant Ie bouton de commande.
, Ualiumeurcontinue _ produiredes 6tincellesaussiIongtemps
que le boutonest _ la position Light.
Uti[isation durant une panne
Avantd'aliumer un brOleurdesurface,v_rifier que tousies boutons
de commandeSont_ [a pos+tienOFF(Arr#t]. Approcher ['a[iumette
enf[ammeedu br_i[euravantde faire tourne[ [e bouton jusqu:_ la
positionLight.
1. Appmcher une allumetteenfiamm6edu br8leur a utiliser.
2. Enfonceret faire tourner Ientementle boutonde commande
jusqu'_ la positionLight.
3. Ajuster [esfJapapaesa [ataille d6sir6e.
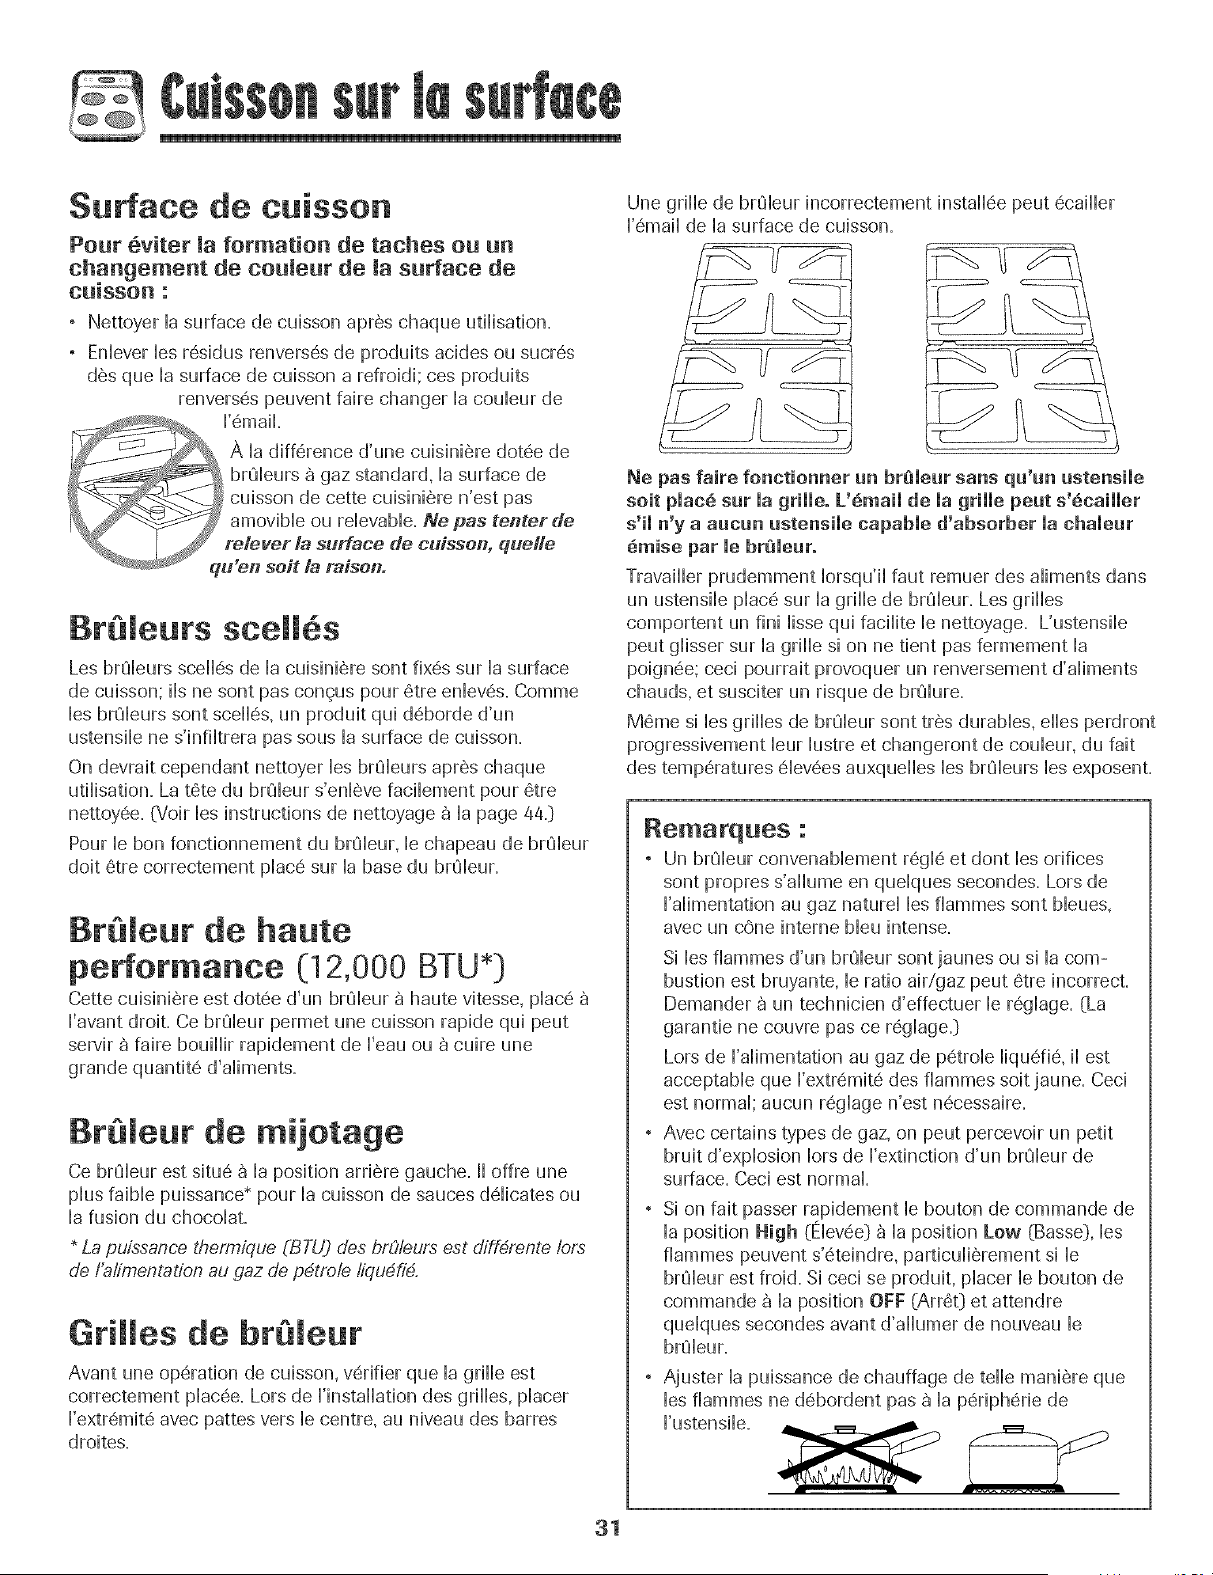
@=/ _:I !},
Surface de cuisson
Pour 6vitet ia formation de taches ou un
changement de couieur de la surface de
cuisson :
, Nettoyer Hasurface de cubson apres chaque utiibation.
° Enbver bs residus renverses de produits acides ou sucres
des que Hasurface de cubson a refroidi; ces produits
renverses peuvent faire changer Hacoubur de
I'emaiL
qu'en soit la raison.
Br leurs scell s
Les br_Jburs scelles de la cuisiniere sont fixes sur la surface
de cuisson; ib ne sont pas congus pour 6tre enbves. Comme
bs br_Jburs sont scelles, un produit qui deborde d'un
ustensib ne s'infigrera pas sous la surface de cuisson.
On devrait cependant nettoyer bs br_Jburs apres chaque
utilisation. La tote du br_Jleurs'enleve facibment pour 6tre
nettoyee. @_oirbs instructions de nettoyage 8 la page 44.}
Pour le bon fonctionnement du brQbur, le chapeau de brCJbur
doit etre correctement place sur la base du brCJbur.
Br eur de haute
performance (12,000 BTU*}
Cette cuisiniere est dotee d'un br_Jbur 8 haute vitesse, place
I'avant droit. Ce br_Jbur permet une cuisson rapide qui peut
servir 8 faire bouillir rapidement de I'eau ou b cuire une
grande quantit6 d'aliments.
Bt eut de mijotage
Ce br{ibur est situ6 8 la position arriere gauche. II offre une
plus faibb puissance* pour la cuisson de sauces ddicates ou
la fusion du chocolat.
La puissance thermique (BTU} des brE/leursest diff4rente Io_
de I'alimentation au gaz de p_trole liqu_h_.
Grilles de br eur
Avant une operation de cuisson, verifier que la grille est
correctement placee. Lors de Finstallation des grilles, placer
Fextremite avec pattes vers le centre, au niveau des barres
droites.
Une grille de brqleur incorrectement installee peut ecailler
I'email de la surface de cuisson.
Ne pas faire fonctionner un br_mear sans qa'un ustensile
soit place sar la grille. L'Omail de la grille peat s'Ocailler
s'il n'y a aucan astensile capable d'absorber la chalear
6raise par le br_leur.
Travailbr prudemment Iorsqu'il faut remuer des aliments dans
un ustensib place sur la grille de brCJbur.Les grilles
comportent un fini lisse qui facilite le nettoyage. L'ustensib
peut glisser sur la grille si on ne tient pas fermement la
poignee; ceci pourrait provoquer un renversement d'aliments
chauds, et susciter un risque de brCJlure.
Meme si bs grilles de brQbur sont tres durables, efles perdront
progressivement bur lustre et changeront de coubur, du fait
des temperatures ebvees auxqudbs bs brCJburs bs exposent.
Renlarques :
° Un brCJbur convenabbment regle et dont bs orifices
sont propres s'allume en quelques secondes. Lors de
I'alimentation au gaz naturel les flammes sont bleues,
avec un cone interne bleu intense.
Si ies fiammes d'un brqieur sont jaunes ou si ia com-
bustion est bruyante, le ratio air/gaz peut etre incorrect.
Demander _ un technicien d'effectuer le reglage. (La
garantie ne couvre pas ce regiage.}
Lots de I'alimentation au gaz de petrole liquefie, ii est
acceptable que I'extremite des flammes soit jaune. Ceci
est normal; aucun reglage n'est necessaire.
, Avec certains types de gaz, on peut percevoir un petit
bruit d'explosion Iors de I'extinction d'un brqleur de
surface. Ceci est normal
, Si on fait passer rapidement le bouton de commande de
ia position High (Eievee} _ ia position Low (Basse}, ies
flammes peuvent s'eteindre, particulierement si le
brqleur est froid. Si ceci se produit, placer le bouton de
commande _ la position OFF (Arret} et attendre
quelques secondes avant d'allumer de nouveau le
brqleur.
, Ajuster la puissance de chauffage de telle maniere que
les flammes ne debordent pas a la peripherie de
I'ustensile. _ ,_
31
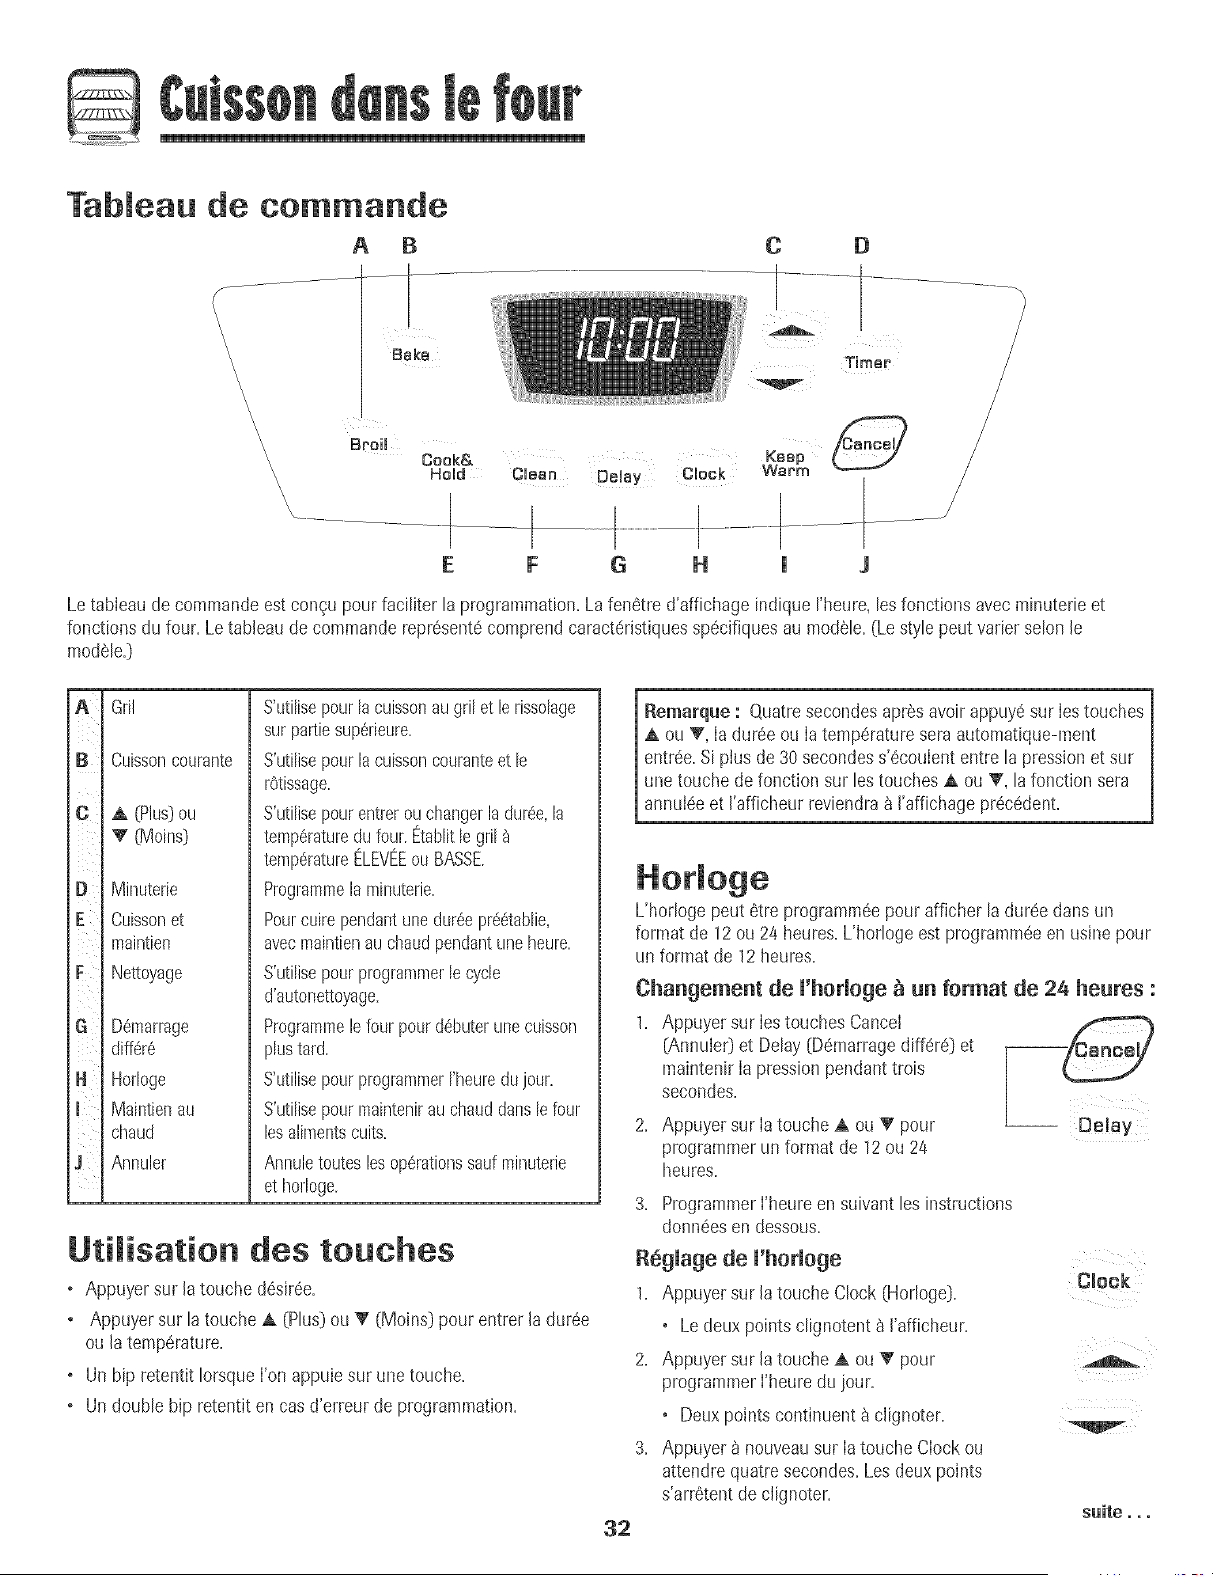
@
Tableau de commande
\
\
\
\
\
\
A B
Bake
\ Broim
\ Cook&
\ Hold
\
\
Clean Delay Clock
....
F G H
Keep
Warm
........
l J
Le tabieaude commandeest congu pourfaciliter la programmation.Lafen#tre d'affichageindique I'heure,lesfonctionsavec minuterieet
fonctionsdu four. Le tableaude commanderepr6sent6comprendcaract#ristiquessp6cifiquesau modele.(Le style peut varier selonle
module.)
A
B
Di
G
H
/i
Gill
Cuisson courarlte
A (Plus)ou
_' (Moins)
Minuterie
Cuisson et
maintlen
Nettoyage
D6marrage
diff6r6
Horloge
Maintienau
chaud
Annulet
S'utilisepourlacuissonaugril et le rissolage
surpattiesup6rieure.
S'utilisepourlacuissoncouranteet le
rOtissage.
S'utilisepourentrerouchangerla dur6e,la
temp6raturedu four.Etablitle gril
temperatureELEVEEou BASSE.
Programmela minuterie.
Pourcuirependantunedur6epr6_taNie,
avecmaintienauchaudpendantuneheure.
S'utilisepourprogramraerlecycle
d'autonettoyage.
Programmelefour pourd6buterunecuisson
plustar&
S'utilisepourprogrammerI'heuredu jour.
S'utilisepourmaintenirau chauddanalefour
lesatimentscults.
Annuletouteslesoperationssaufminuterie
et horloge.
Utilisation des touches
o Appuyersur la touche d6sir6e.
. Appuyer sur la touche A [Plus) ou _' (Moins)pour entrer la dur6e
ou latemp6rature.
o Un bip retentit IorsqueI'on appuiesur une touche.
o Un doublebip retentiten casd'erreur de programmation.
Remarque : Quatresecondesapr_savoirappuy6sur Iestouches
A ou _', Ia dur6eou Iatemp6raturesera automatique-ment
entr6e.Si plus de 30 secondess'6coulententre la pressionet sur
unetouche defonction sur los touchesA ou V, la fonction sera
[annu 6eet affic]eur reviendraa affic]age pr6c6dent.
L'horloge peut 6tre programm6epour afficher la dur6edans un
format de 12ou24 heures.L'horloge estprogramm_een usinepour
un format de 12heures.
Changement de l'horloge _ un format de 24 heures :
1. Appuyer sur Iestouches Cancel
(Annu+e0et Delay(D6marragediffere) et
maintenirIa pressionpendanttrois
secondes.
2. Appuyer sur Ia touche A ou _' pour
programmerun format de 12 ou 24
heures.
--Delay
3. ProgrammerI'heureen suivantles instructions
donn6esen dessous.
R691age de l'horioge
1. Appuyer sur la touche Clock (Horloge).
• Le deux points clignotent8 I'afficheur.
2. Appuyer sur la touche A ou _' pour
programmerI'heuredu jour.
• Deux pointscontinuent _ clignoter.
3. Appuyer _ nouveausur Iatouche CIockou
attendrequatresecondes.Lesdeux points
s'arr6tentde clignoter.
32
Clock
saite o..
Lorsque[e courant #[ectriquearriveou apres une interruption de
courant,ta derniSreheure avantrinterruption de courant va
clignoter.
Pourrappebr rheure du jour brsqu'une autre fonction de dur6e
s'affiche,appuyersur la touche CIock.
L'heure de I'hodogene pout 6tre chang6eIorsqueb four a 6t6
programm6pour une cuissonou un nettoyagediff6r6 ou pour la
fonction de cuissonet maintien.
Annumation de m'affichage de m'heure:
Si I'onne d6sire pasI'affichagede l'heure du jour :
Appuyersur Iestouches Cancel(Annule0 et
Clock (Horloge}et bs maintenir ainsi pendant
trois secondes.L'heuredu jour disparakde
I'afficheur.
LorsqueI'affichagede I'heureest annu+6,
appuyersur Ia touche Clockpour afficher
bri6vementrheure du jour.
R6affichage de m'heure:
Clock
Appuyersur Iestouches Cancelet Clocket los maintenir ainsi
pendanttrois secondes.L'heuredu jour r6apparait_ I'afficheur.
La minuterie peut 6tre programm6e de une minute (0:01} jusqu'_
99 heures et 59 minutes (99:59}+
La minuterie pout 6tre utilis6e ind6pendamment de toute autre
activit6 du four. Elle peut 6tre aussi programm@e alors qu'une autre
fonction du four est en cours d'utilisation+
La minuterie necommandepas le four.Eliene sert qu'_ 6mettre
des hips.
Programmation de maminuterie : ................................
1. Appuyer sur Ia toucheTimer {Minuterie}. TimeP
+ 0:00s'alhme _ I'afficheur.
+ Lesdeux points clignotent.
2. Appuyer sur la touche A ou Ir jusqu'_ ce que
rheurejuste paraisse_ I'afficheur.
+ Lesdeux points continuent _ clignoter.
3. Appuyer _ nouveausur latouche Timer ou attendrequatre
secondes.
+ Lesdeux points continuent _ clignoteret le d6comptede la
dureecommence.
+ Ladern+6reminutedu d6comptesera affich_esousforme de
secondes.
4. A la fin de la dur6e programm6e,un hip long retentit.
Annumation de maminuterie :
1. Appuyer sur Jatouche Timeret la maintenirainsipendant trois
secondes.
OU
2. Appuyer sur la touche Timeret r6glerI'heure_ 0:00.
Verroui age des commandos
et de maporte du four
La porte du four et Ies touchespeuvent 6tre verrouilIeespour des
raisonsde s6curite, nettoyageou pour empachertoute utilisation
non souhait6e.Eiiesne pourront 6tre utilis_essi ellessont
verrouJll_es.
Sile four esten cours d'utilbation, les commandeset la porte ne
peuventatre verrouillees.
L'heure actue!ledujour restera_ I'afficheur Iorsqueloscommandes
serontverrouiilees.
Verreuillage :
Appuyersur lostouches Cance!et Cook&
HoId [Cuissonet maintien}et los maintenir
ainsi pendanttrois secondes.{Appuyer
d'abord sur latouche CANCEL.} Cook&
-- Hold
+ Le mot LOCK[VERROUILLAGE}
clignote _ I'afficheur.
Oeverroui_age :
Appuyersur bs touches Cance+et Cook&HoId et los maintenirainsi
pendanttrois secondes.{Appuyerd'abord sur la touche CANCEL.}
• Lemot LOCKdisparattde I'affbheur.
Codes d'a oma ie
Los mots BAKE(CUISSONCOURANTE}ou LOCK6/ERROUILLAGE}
peuventc+ignoterrapidementb i'afficheurpour pr6veniren cas
d'erreur ou de probbme.Si tel est le cas,appuyersur iatouche
Cancel Si bs mots BAKEou LOCKcont+nuent_ ciignoter,
d6brancheri'appareiLAttendre que+quesminutes,puis rebrancher
I'appareii.Si run des mots continueb ciignoter,d6brancherrappareil
et prendrecontactavecun reparateurautoris_.
33
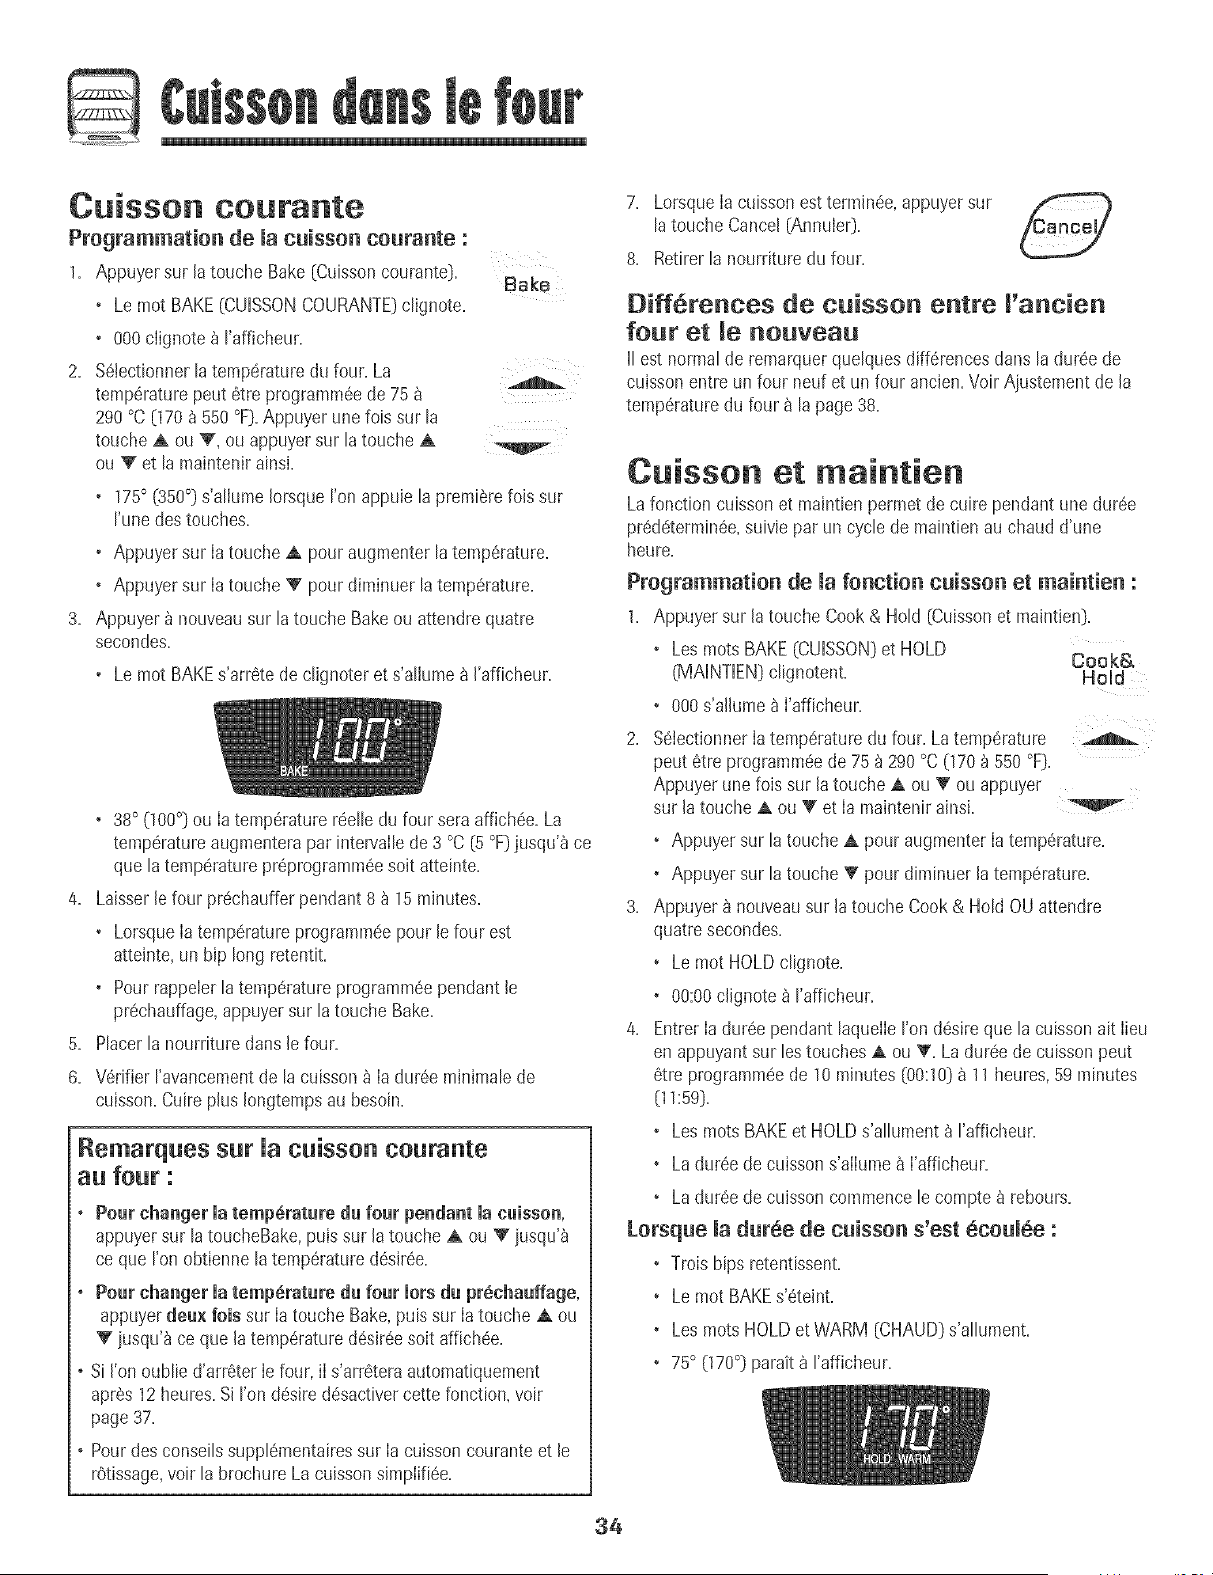
@
Cuisson courante
Programmatien de macuissen ceurante :
1. Appuyer sur la touche Bake(CuissoncouranteD. Bake
• Le mot BAKE(CUISSONCOURANTE)c@note.
• 000cIignote _ I'afficheur.
2. %tectionner la temperaturedu four. La
temperaturepeut 6tre programmeede 75
290°C(170_ 550 °F].Appuyer une lois sur la
touche A ou V', ou appuyersur latouche A
ou Y" et la maintenirainsi.
• 175° (350°) s'aliumeIorsqueton appuie la premierefois sur
I'unedes touches.
• Appuyer sur la touche A pouraugmenterla temperature.
• Appuyer sur Ia touche V pourdiminuer latemperature.
3. Appuyer _ nouveausur latouche Bakeou attendre quatre
secondes.
• Le mot BAKEs'arretede clignoter et s'allume_ I'afficheur.
• 38° (100°] ou Ia temperaturereelle du four sera affichee.La
temperatureaugmenterapar intervallede 3 °C (5°F)jusqu'_ ce
que la temperaturepreprogrammeesoit atteinte.
4. Laisserlefour prechaufferpendant 8 _ 15 minutes.
• LorsqueIatemperatureprogrammeepour lefour est
atteinte,un bip long retentit.
• Pour rappeIerla temperatureprogrammeependant le
prechauffage,appuyersur la touche Bake.
5. Placerla nourriture dans le four.
6. Verifier I'avancementde la cuisson_ Ia duree minimalede
cuisson.Cuirephs Iongtempsau besoin.
Remarques sur Ua euisson eourante
au four :
o Pourchanger matemperature du four pendant macuissen,
appuyersur la toucheBake,puis sur latouche A ou V jusqu'_
ce que ton obtienne la temperaturedesiree.
o Pourchanger matemp6rature du four morsdu precha_ffage,
appuyerde_× lois sur Ia touche Bake.puissur Ia touche _ ou
V jusqu'_ ceque la temperaturedesireesoit affich_e.
oSi I'onoublie d'arreter Iefour, iI s'arreteraautomatiquement
apres 12heures.Si I'ondesiredesactivercette fonction,voir
page37,
o Pourdes conseilssupplementairessur Ia cuissoncouranteet le
r0tissage,voir la brochure Lacuissonsimplifiee.
7. LorsqueIacuisson estterminee,appuyersur
latouche Cancel(Annuier}.
8. Retirerla nourriture du four.
Diff6rences de c_isson entre I'ancien
fo_t et _e no_vea_
II est normalde remarquerquelques differencesclansla dureede
cuissonentre un four neuf et un four ancien.VoirAjustementde la
temperaturedu four a la page38.
C isso et mai tie
Lafonction cuissonet maintienpermet decuire pendantune duree
predeterminee,suivie par un cyclede maintienau chaud d'une
heure,
Programmatio_ _e _afo_ctio_ c_isso_ et mai_tie_ :
1= Appuyer sur la touche Cook& Hold [Cuissonet maintien_.
• Losroots BAKE(CUISSON]et HOLD
Cook&
(MAINTIEN)clignotent. Hold
• 000 s'alhme b I'afficheur.
2. %iectionner Iatemperaturedu four. La temperature
peut etre programmeede 75 b 290 °C(170_ 550°F).
Appuyer unefois sur latouche _ ou _ ou appuyer
sur latouche _ ou Tet la maintenirainsL
• Appuyer sur la touche_ pour augmenterIa temperature.
• Appuyer sur la touche_' pour diminuer latemperature.
3. Appuyer 8 nouveausur latouche Cook& Hold OU attendre
quatre secondes.
• Lemot HOLDclignote.
• 00:00ciignote_ I'afficheur.
4. EntrerIaduree pendant laquelIeI'ondesireque la cuissonait lieu
en appuyant sur lestouches A ou _'. La duree de cuissonpeut
etre programmeede 10 minutes(00:10)_ 11heures,59minutes
fl_:59)=
• Losroots BAKEet HOLDs'allument _ I'afficheur.
• Ladureede cuissons'alIume_ I'afficheur.
• Ladureede cuissoncommencele compte_ rebours.
Lorsq_e la d_r6e de c_isso_ s'est 6co_16e :
• Troiships retentissenL
• Lemot BAKEs'eteint.
•Les rootsHOLDet WARM (CHAUD)s'allument.
• 75° (170°] parait _ I'afficheur.
34
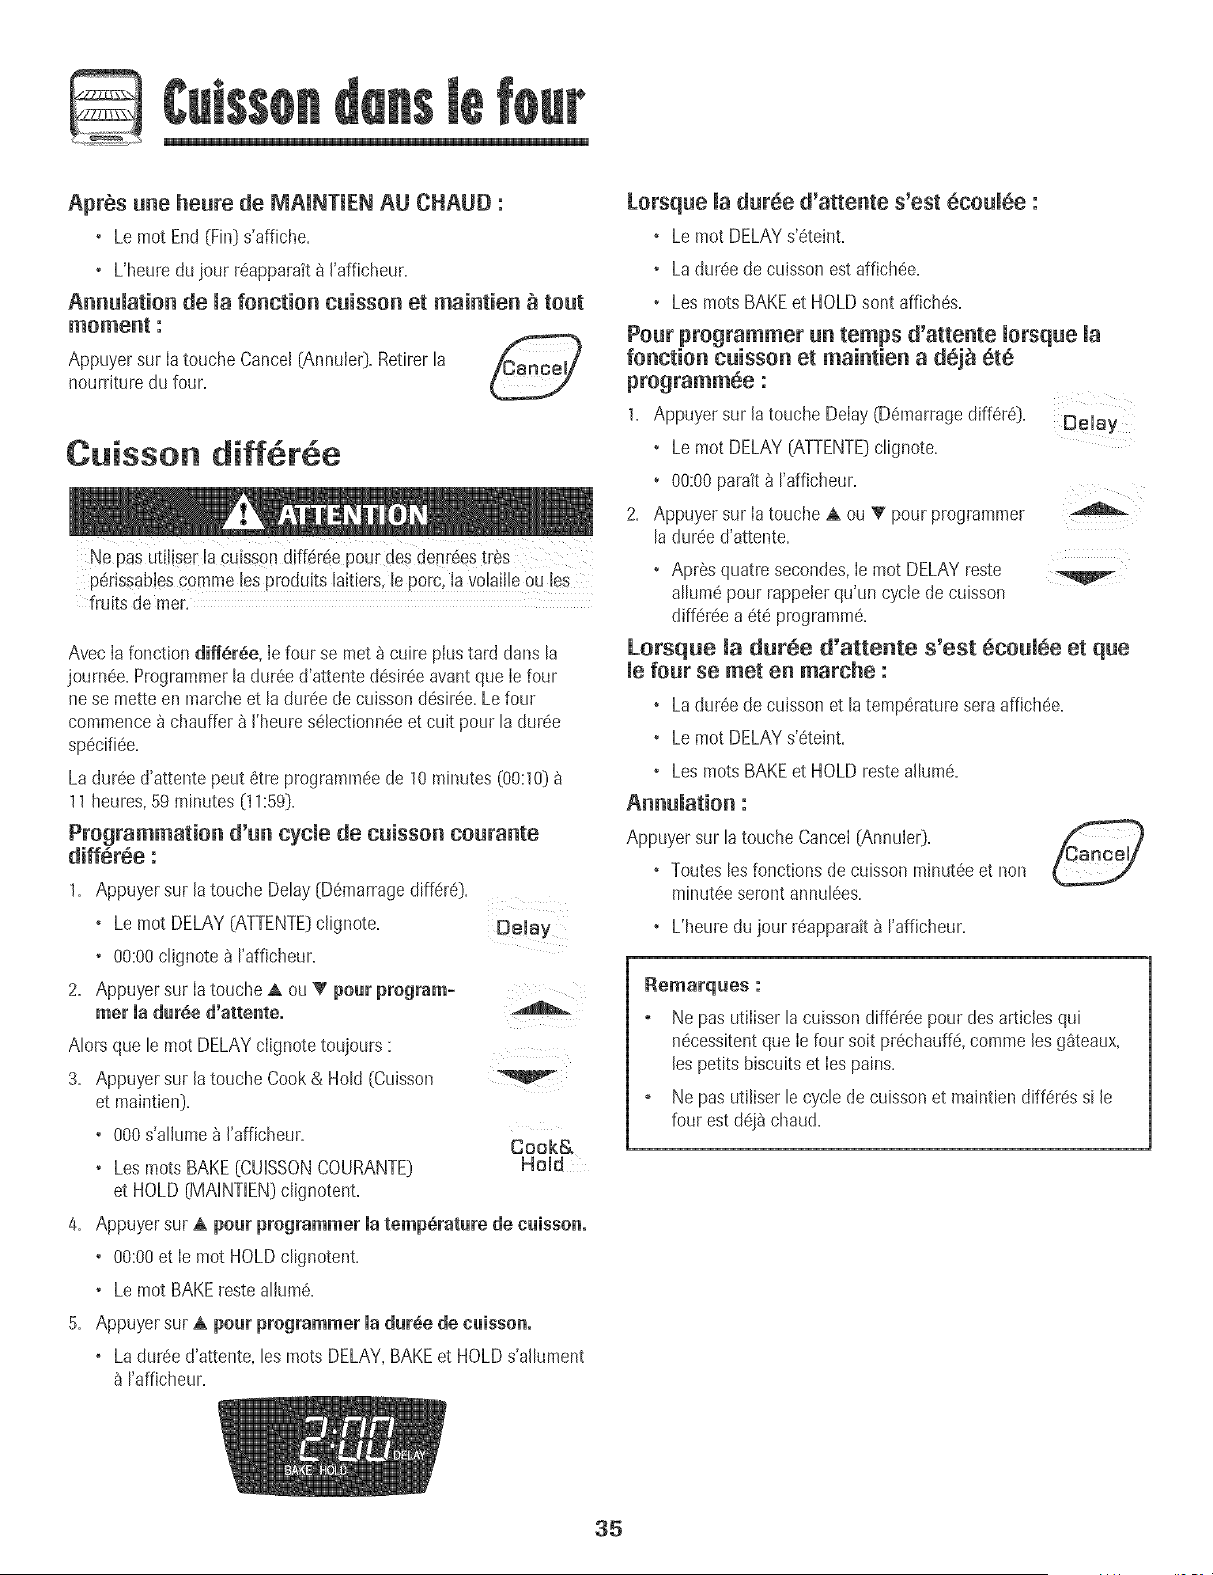
@
Aprbs une heure de MAiNTIEN AU CHAUD :
• Le mot End (Fin]s'affiche.
• L'heuredu jour r6apparait_ I'afficheur.
Annumation de mafonction cuisson et maintien _ tout
moment :
Appuyersur la touche Cancel (Annub0. Retirerla £_nr.PI/
nourriture du four.
Cuisson diff6r6e
Ne pas Uti!iserb Cuiss0ndiff6r@ pour des denr@str_s
pSrissabiescomme lesproduits laitiers,le porc, la volailleou les
fruits de rner.
AvecIa fonction di#6r6e, Ie four se met b cuire plustard dans la
journ@. Programmerla dur@ d'attente@sir@ avantque Ie four
ne se metteen marcheet ladur@ de cuisson d@ir@. Le four
commence_ chauffer_ I'heures61ectionn@et cuit pour la dur@
sp@ifi@.
La dur@ d'attentepeut 6tre programpa@de 10 minutes(00:10)
11heures,59 minutes (11:59}.
Programmation d'un cycle de cuisson courante
differee :
1. Appuyer sur la touche Delay (D6marragediff6re).
• Le mot DELAY(ATTENTE}c@note. Delay
• 00:00clignote _ I'afficheur.
2. Appuyer sur Ia touche A ou _' pour program ...............
mer madur6e d'attenteo
AIorsque le mot DELAYciignotetoujours :
3. Appuyer sur la touche Cook& Hold (Cuisson
et maintien).
• 000s'allume _ I'afficheur.
Cook&
• LesrootsBAKE{CUiSSONCOURANTE} Hold
et HOLD(MAINTIEN}clignotent.
4. Appuyer sur A pear programmer matemp6rature de cuisson°
• 00:00 et Ie mot HOLD c@notent.
• Le mot BAKEreste allure6.
5. Appuyer sur A pour programmer la dur6e de cuisson.
o Ladur@ d'attente, les rootsDELAY,BAKEet HOLDs'allument
rafficheur.
Lorsque madur6e d'attente s'est 6coum6e :
• Lemot DELAYs'6teint.
• Ladur@ de cuissonest affich@.
• Lesroots BAKEet HOLDsont affich@.
Pour programmer un temps d'attente morsque la
fonction cuisson et maintien a dej_ 6t6
programmee :
1. Appuyer sur la toucheDelay(D@_arragediffSr@.
• Lemot DELAY(ATTENTE}clignote.
Delay
o 00:00parait _ I'afficheur.
2. Appuyer sur Ia touche _ ou _' pour programmer
ladur@ d'attente.
• Apr6s quatre secondes,Ie mot DELAYreste
allure6pour rappebr qu'un cycle de cuisson
differ@ a _t_ prograpam_.
Lorsq_e la d_r6e d'atte_te s'est 6cou_6e et que
_e four se met e_ marche :
• Ladur6ede cuissonet latemp6ratureseraaffich@.
• Lemot DELAYs'6teint.
• Lesroots BAKEet HOLDresteaJlum6.
Appuyersur la touche Cancel (AnnuIe0.
• Toutesles fonctionsde cuissonminut@ et non
minut@seront annul6es.
• L'heuredu jour r6apparait_ rafficheur.
_e_arques :
Ne pas utiliser la cuisson diff6r@ pour des articles qui
n@essitent que Ie four soit pr@hauff6, comme les gSteaux,
les petits biscuits et Ies pains.
Ne pas utiliser le cycle de cuisson et maintien differ@ si le
four est d6}_ chaud.
35
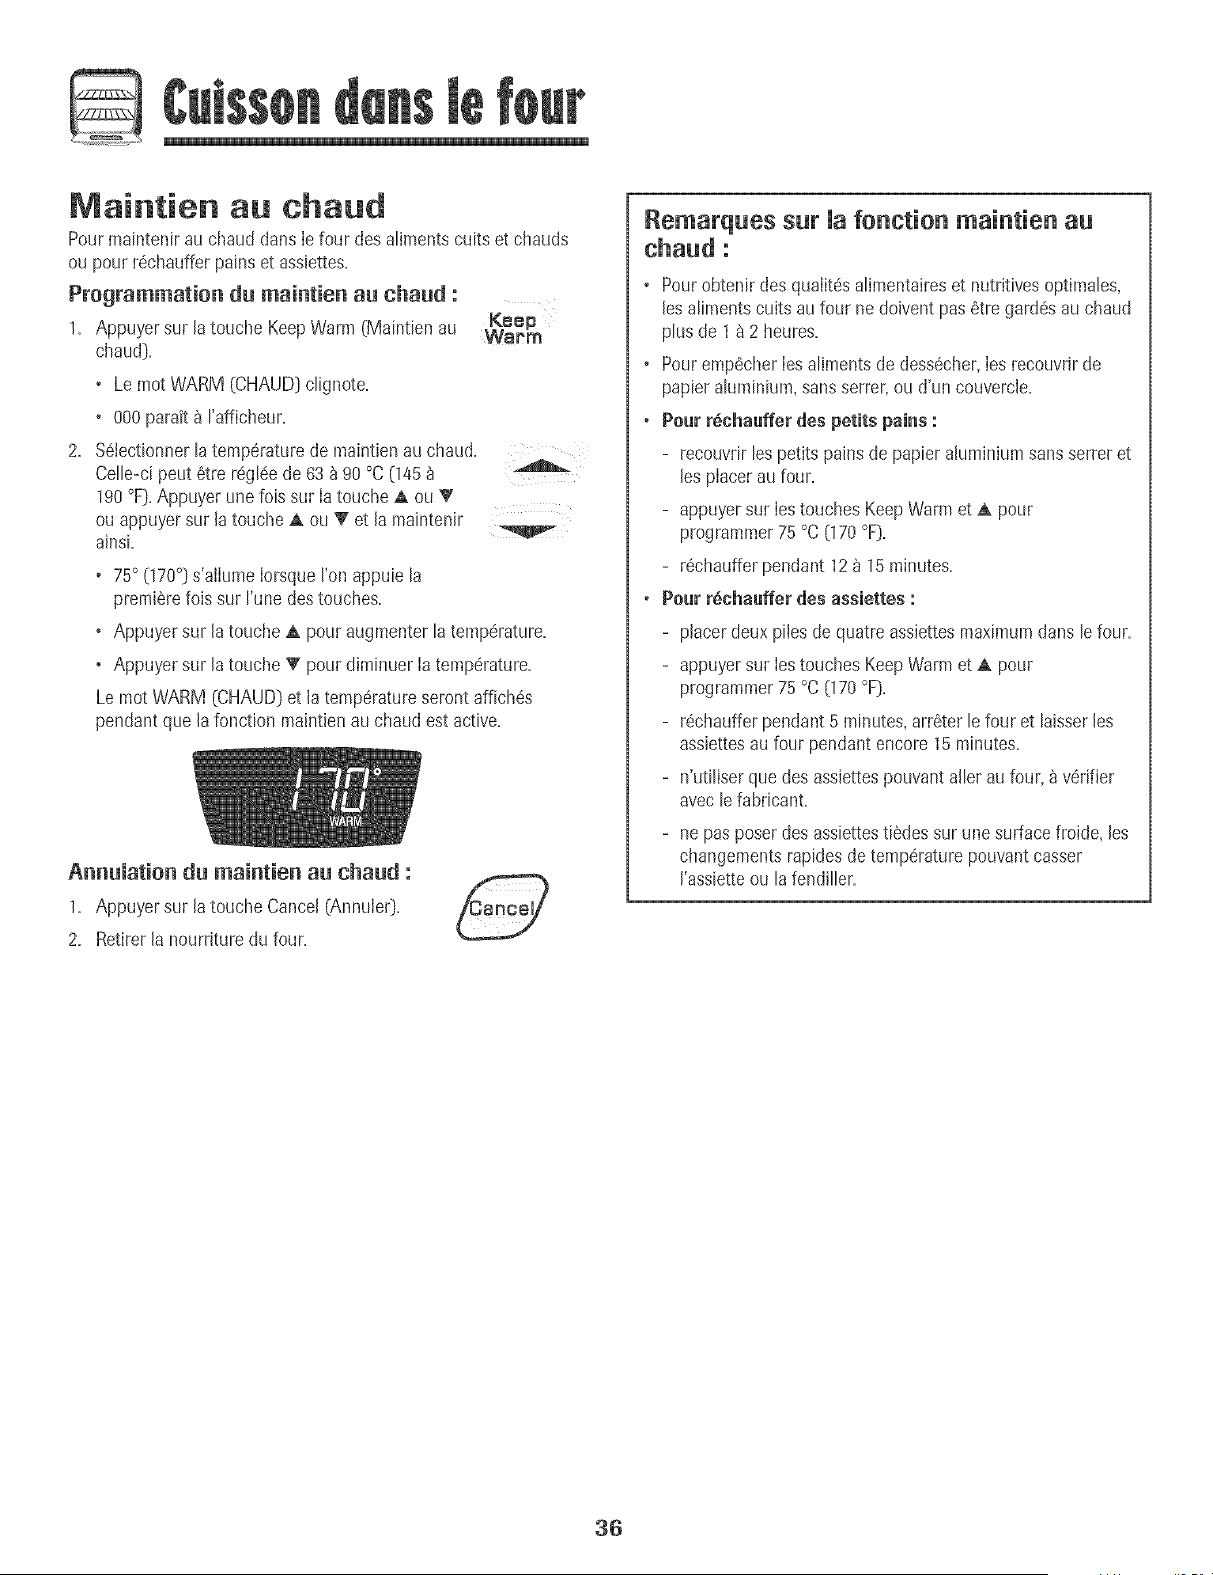
Maintien au chaud
Pourmaintenirau chaud dans[e four desailments cuits et chauds
ou pour r6chaufferpains et assiettes.
Programmation du maintien au chaud :
KBep
1. Appuyer sur la touche KeepWarm (Maintien au Warm
chaud).
, Lemot WARM (CHAUD}clignote.
• 000 parait_ rafficheur.
2. %[ectionner [a temperature de maintien au chaud.
CeIIe-ci peut etre regIee de 63 _ 90 °C (145 _
190 °F_.Appuyer une lois sur la touche A ou _'
ou appuyer sur [a touche A ou T et [a maintenir
ainsL
• 75° (170°_s'ailume lomque['on appuie[a
premierefois sur ['unedestouches.
• Appuyer sur [a touche A pour augmenterla temperature.
• Appuyer sur [a touche T pour diminuer [atemperature.
Lemot WARM (CHAUD)et [a temperatureseront affiches
pendantque la fonction maintienau chaud est active.
Annu[ation du maintien au chaud :
1. Appuyer sur la touche Cancel(Annulet[}.
2. Retirerla nourriture du four.
Remarques sur [a fonction maintien au
chaud :
• Pourobtenir des qualitesallmentaireset nutritivesoptima[es,
[esalimentscuits au four ne doivent pas etre gardesau chaud
plus de 1 _ 2 heures.
• Pourempecher[esaliments dedessecher,[es recouvrirde
papieraIuminium,sans serrer,ou d'un couverc[e.
• Pour r_chauffer des petits pains :
- recouvrirlespetits pains de papier ahminium sansserrer et
[esplacerau four.
- appuyersur [estouches KeepWarm et A pour
programmer75°C [170°F].
- rechaufferpendant 12 _ 15 minutes.
• Pour r6chauffer des assiettes :
- pJacerdeux piles dequatre assiettesmaximumdans [efour.
- appuyersur [estouches KeepWarm et A pour
programmer75°C {170°F}.
- rechaufferpendant5 minutes,arreter [e four et hisser [es
assiettesau four pendant encore 15 minutes.
- n'utiIiserquedes assiettespouvanta[Ierau four, _ verifier
avec [efabricant.
- nepas poserdes assiettesti6des sur une surfacefroide, [es
changementsrapidesde temperaturepouvantcasser
['assietteou [afendiIIer.
36
Arr t auto atique/Mode
Lefour s'arr6teautomatiquementapr_s12heuress'il a 6t6
accidentetlementlaisseen marche.Cettecaract6ristiquede s6curit6
peut 6tre arr6t6e.
Pour annuler l'arr_t 12 heures et faire fonctionner le
four en continu pendant 72 heures :
1. Programmerle four pour une cuissoncourante [voir page 34_.
2. Appuyer sur Ia touche CIock [Horloge[}et la
maintenirainsipendant 5 secondes. 131eok
• SAbsera affich6 et ciignotera pendant 5 secondes.
• SAbsera ensuite affich6 en continujusqu'_ ce qu'on rarr6te ou
iusqu'_ ce que Ia dur6elimite de 72heuressoit atteinte.
• Le mot BAKE(CUISSONCOURANTE_sera aussi affichesi un
cyclede cuissoncouranteest en coursalors que le four est en
modesabbat.
Toutes Iesautresfonctions (Minuterie,Maintien au chaud, Nettoyage,
etc.[}sont verrouill6es,sauf BAKE,pendantle mode sabbat.
Annumation de macuisson courante amorsque mefour
est en mode sabbat :
Appuyersur la touche Cancel [Annuie0.
• Le mot BAKEs'6teintb rafficheur.
• Aucun hip sonorene retentit.
Annuiation du mode sabbat :
1. Appuyer sur la touche Clock pendant5 secondes. Clock
OU
2. Apres 72 heures,le modesabbatsetermine.
• SAbclignote pendant 5 secondes.
• L'heuredu jour revient_ I'afficheur.
Remarques sur Uemode sabbat :
• Le modesabbatpeut 6tre mis en marche_ tout moment,que
le four soit en marcheou non.
, Le modesabbatne peut pas 6tre mis en marchesi les
commandessontverrouili6esou Japorte verrouill6e.
• Si Ie four esten mode cuissonIorsque le modesabbat est
programme,le mot BAKE(CUISSONCOURANTE]s'6teint _ la
fin du cycle de cuisson.IIn'y aura aucun signal sonoreaudible.
• Si I'6clairagedu four est souhait6pendant le modesabbat,la
lampedevra 6treallum6e avantque le mode sabbatne d6bute.
• Lorsquele modesabbata d6marr@,aucun hip de pr6chauffage
ne retentiL
, Tousles messageset [esbips sont desactiv6s[orsquele mode
sabbatest actifl
• Le verrouillageautomatiquede la porte ne fonctionne pas
pendant le modesabbat.
• Si I'on appuiesur latouche CanceI,un cycle de cuisson
couranteaufour seraannul& Cependant,le programmateur
resteraen modesabbat.
, Apr_s unepannede courant,le four revient en modesabbat
avec72 heuresrestanteset aucuncycle actiE
37
Ajustement de temp6rature
du four
La pr6cisiondes temp6raturesdu four a 6t6 soigneusementv6rifi_e
rusine+Hiest normatde remarquerquelquesdiff6rencesdans Ia
cuissonentre un four neuf et un four ancien+Au fur et _ mesureque
lescuisinieressont moins neuves,la temp6raturedu four peut vader+
II estposs+bled'ajusterla temp6raturedu four si I'on pensequa Ie
four necuit pasou ne rissolepas correctement+Pour d6ciderde
I'ajustement_ apporter,r6glerIefour _ une temp6raturede 15°C
(25°F[}phs 6iev6eou pius bassequa Ia temp6ratureindiqu6edarts
la recette,puisfaire cuire Ia pr6paration+Les r6suItatsdu _test >>de
cuissondoivent donnerune id6edu hombrede degr6sduquel la
temp6raturedoit 6tre ajust6e+
Ajustement de matemperature du feur :
1+ Appuyer sur Ia touche Bake[Cuissoncourantd}+ Bake
2+ Entrer285 °C[550 °F[}en appuyantsur Ia toucheA+
3. Appuyer sur Ia touche Bakeet lamaintenir ainsi
pendantplusieurs secondesou jusqu'_ ce que 0°
paraisse_ I'afficheur.
Si Iatemp6raturedu four a 6t6 pr6c6demmentajust6e,Ie
changementsaraaffich6. Parexample,si latemp6raturedu four
a 6t6 r6duitede 8 °C [15 °F},I'afficheurindiquera-8° [-15°}.
4. Appuyer sur Ia touche A ou _' pour ajusterla temp6rature.
A chaquefois qua I'on appuie sur unetouche, la temperature
changede 3 °C[5 °F}.Latemp6raturedu four peut 6tre
augment6eou diminu6ede 3 _ 20 °C[5 _ 35 °F}.
5. Uheuredu jour r6apparakautomatiquement_ I'afficheur.
II n'est pas n6cessairede r6ajusterla temp6raturedufour en cas
depanneou d'interruption de courant.Lestemperaturesde
cuissonau gri+et de nettoyagene peuvent6tre ajust6es.
Changement de ma
temp6tat te °F/°C
1+ Le r_gIagepar ddaut de I'usinepour latemperatureesten
Fahrenheit.
2. Pour modifier ce r6glage, appuyer sur Ies touches CANCEL et
Bake simultan_ment et maintener-les enfoncees pendant trois
secondes.
3. Un hip retentit et ie r6glagecourant (°Fou °C} parait _ rafficheur.
[Sivous ne faites pas de changement,la cuisini6re retoumeau
reglageexistantapr6s30secondes.}
4. Pourmodifierle r6glage,appuyersur latouch8 _ ou _'.
Appuyer _ nouveausur Iatouche pour retoumer au reglage
existant+Attendercinq secondeset le r6gIageseradfectu_+
38
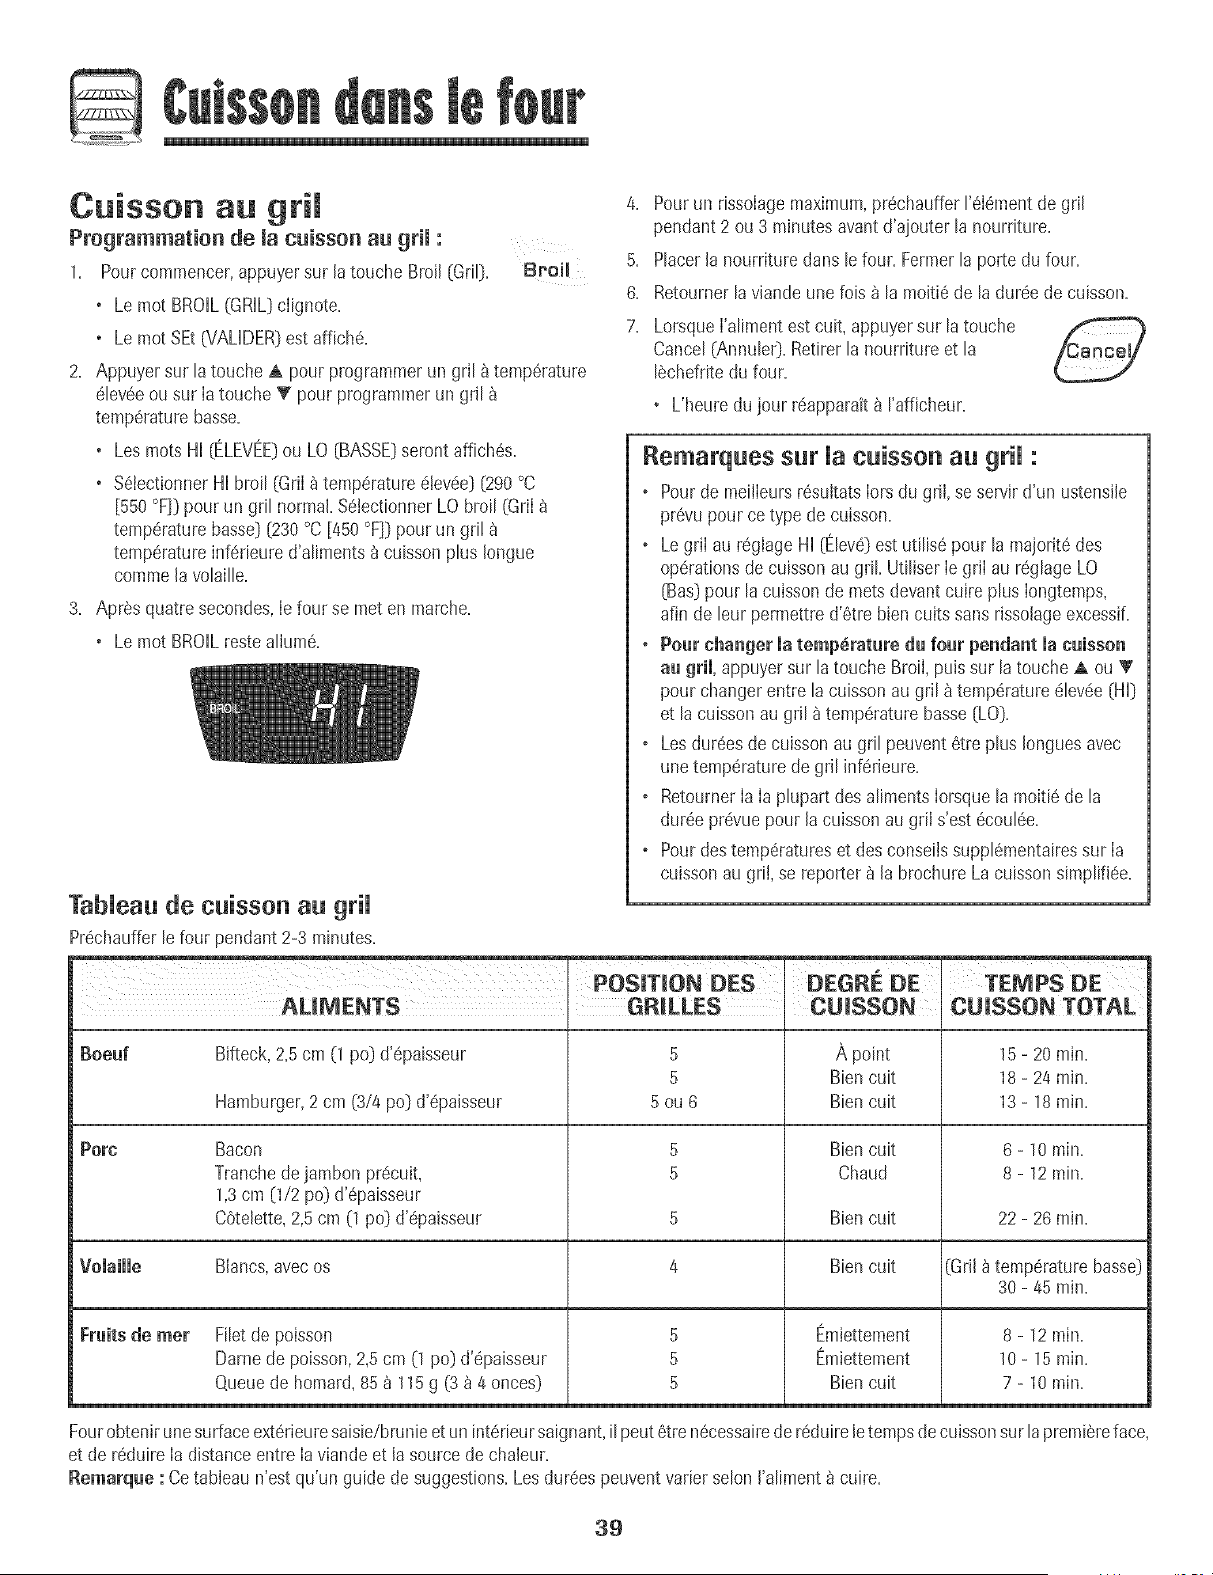
Cuisson au gril
Programmation de la cuisson au gril :
1. Pourcommencer,appuyersur Jatouche Broil (GriO. Broil
o Le mot BROHL(GRHL)clignote.
o Le mot SEt(VAUDER)estaffich&
2. Appuyersur la touche A pour programmerun gril _tempSrature
61ev6eou sur Iatouche T pour programmerun gril
tempSraturebasse.
o Les rootsHI [ELEVt'EDou LO (BASSEDseront affich6s.
o %tectionner HI broil (GriI_ temperature_+ev6e][290°C
[550 °F]) pour un gril normal+SetectionnerLO broil (GriI
temp6raturebasseD(230°C[450 °F]Dpour un gri!
temp6ratureinfedeure d'aliments_ cuissonplus Iongue
commela volaille.
3. AprSsquatre secondes,Ie four se met en marche.
o Le mot BROILresteallum&
TabUeau de cuisson au grH
Pr6chaufferle four pendant 2-3 minutes+
4. Pourun rissolagemaximum,prechauffer['616mentde gri[
pendant 2 ou 3 minutesavantd'ajouter la nourriture.
5. Placer[a nourriture dans le four. Fermerla porte du four.
6. Retournerlaviande une lois _ la moiti6de ladur6ede cuisson.
7. LorsqueI'alimentest cuit, appuyersur latouche
Cancel(AnnulerD.Retirer la nourriture et la
18chefritedu four.
• L'heuredu jour r6apparait_ I'afficheur.
Remarques sur Uacuisson au grH :
o Pourde meilIeursr6sultatsIorsdu gri+,se servir d'un ustensile
pr6vupour ce type de cuisson.
o Legri[ au reglageHI [t'lev6Dest utilis6pour la majorit6 des
op6rationsde cuissonat] gall UtiHser[e gri[ au r6g[ageLO
(BasDpour la cuissonde metsdevantcuire plus [ongtemps,
afin de leur permettred'6tre bJencuits sans rJssoJageexcessif.
+ Pour changer [a temperature du four pendant [a cuisson
au gril, appuyersur la touche Broil, puissur la touche A ou _'
pour changerentre la cuissonau gril _ temp6rature61ev6e[HID
et lacuissonau gdl _temperaturebasse(LOD.
o Lesdur_esde cuissonau gril peuvent8tre plus Ionguesavec
unetemperaturede gdl infedeure.
o RetoumerIa Ia plupart des alimentsIorsquela moiti6 de la
dur6epr6vuepour la cuissonau griI s'est 6coul6e.
o Pourdestemp6ratureset des conseilssupplSmentairessur Ia
cuissonau grii, se reportera la brochureLa cuissonsimplifi6e.
POSITION DES DEGRE DE TEMPS DE
AM_ENTS GRILLES CUISSON CUISSON TOTAL
Boe_f
Po_c
Bifteck,2,5 cm (1 podd'@aisseur
Hamburger,2 cm (3/4 podd'@aisseur
Bacon
Tranchedejambon pr_cuit,
1,3cm [1/2 podd'@aisseur
C6telette,2,5cm (1podd'@aisseur
Blancs,avecos
5
5
5ou6
5
5
A point
Bien cuit
Bien cuit
Biencuit
Chaud
15 - 20 min.
18 - 24 min.
13 - 18 min.
5 Biencuit 22- 26 min.
Volaille 4 Biencuit (GrJl_ temperaturebasse)
30- 45 rain.
Fruits de met t_miettement
t_miettement
Bien cuit
Filetde poisson
Dame de poisson,2,5cm (1 podd'@aisseur
Queuede homard,85a 115g (3_ 4 onces}
5
5
5
8 - 12 rain.
10 - 15 rain.
7 - 10 rain.
Fourobtenirunesurfaceext_rieuresaisie/brunieet un int_rieursaignant,il peut8tre nScessairede reduireletempsde cuissonsur la premiSreface,
et de reduire Ia distanceentre Iaviande et lasourcede chaleur.
Remarqae : Cetableau n'est qu'un guide de suggestions.Les dureespeuventvarier selon I'aliment_ cuire.
3g
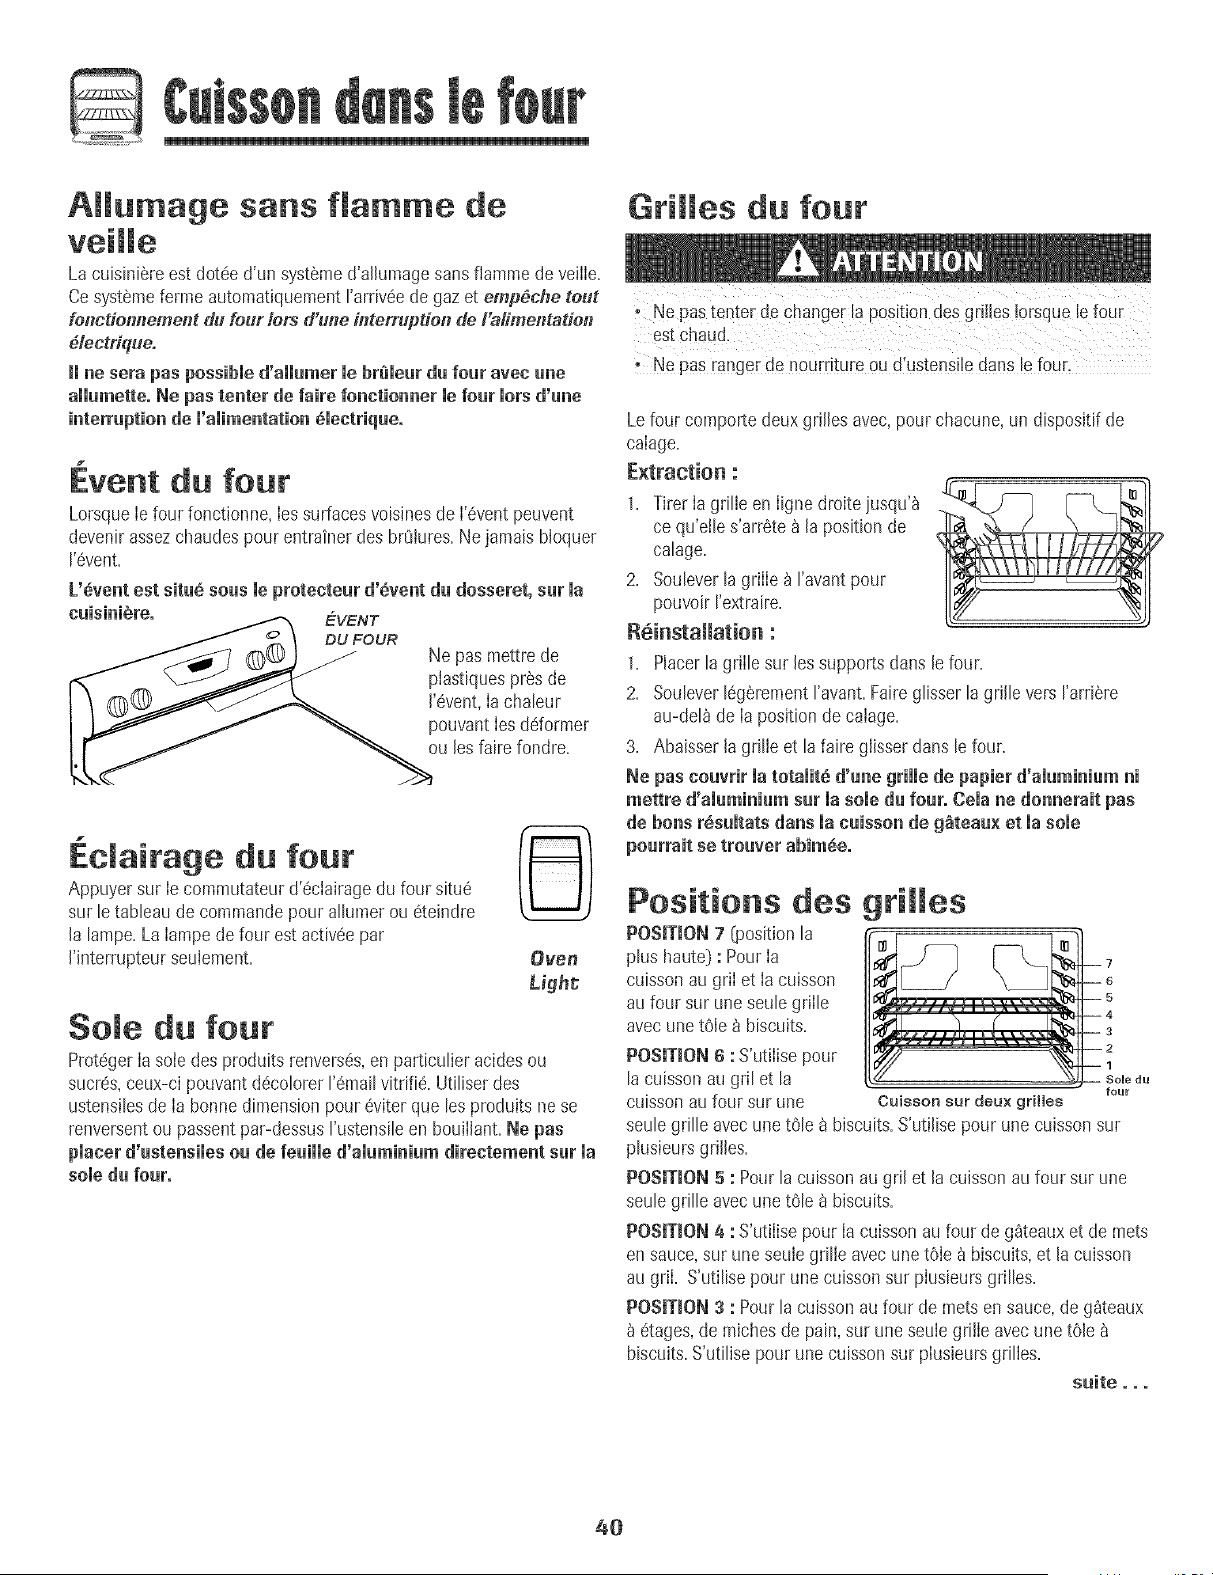
AHumage sans flamme de
Grilles du four
La cuisiniSre est dot6e d'un systSme d'alhmage sans flamme de veilIe.
Ce syst@meferme automatiquement t'arriv6e de gaz et emp#cfle teut
fo#cdo##ement du four/ors d'une #_terruptien de I'alimentatie#
#/ectriqueo
+mae sera pas possibme d'ammumermebreieur du four avee uae
ammumette.Ne pas tenter de faire feactioaaer mefour morsd'uae
iaterruptioa de m'amimeatatioaemeetdque,
1
Event du four
LorsqueIe four fonctionne,Iessurfacesvoisinesde I'6ventpeuvent
devenirassezchaudespour entrainer des brQlures.Ne jamaisNoquer
1'6vent.
L'6veat est situ_ seas meprotecteur d'_veat du dosseret, sat ma
cuisiai_re. _ EVENT
/ _ I DU FOUR
/._-j (D_L93 _ Ne pas mettre de
i__ _ __ plastiquespresde
I _ __ 1'6vent,Iachaleur
I _ / _ pouvantIesddormer
LL<j ,o+++++o+
EcJamrage du four
Appuyersur Iecommutateurd'6ciairagedu four situ6
sur le tableau decommandepour allumerou 6teindre
la lampe+LaIampede four estactiv6e par
I'interrupteurseulement. Oven
Ligh_
Sole du four
Prot6gerIasoie des produitsrenvers6s,en particulier acidesou
sucres,ceux-ci pouvantd6colorer1'6mailvitrifi& Utiliserdes
ustensilesde Ia bonne dimensionpour 6viterque les produits ne se
renversentou passentpar-dessusI'ustensileen bouiIlant+Ne pus
placer d'usteasimesou de feaimmed'amumiaiumdirectemeat sat ma
somedu four°
, Ne pas tenter dechanger !a position des griJJes!orsquele four
estchaUd.
Ne Pasranger de nourritu[e ou d'ustens!!edans !ef0ur,
Lefour comportedeux griflesavec,pourchacune,un dispositifde
calage+
E×traction :
1+ Tirer Ia grille en Iignedroite jusqu'_
ce qu'etles'arr6te _ la position de
calage+
2+ SouleverlagriIIe_ I'avantpour
pouw)ir I'extraire.
R6installation :
1= Placerla griIle sur lessupportsclansle four.
2+ Soulever16g_rementI'avant+Faireglisserla grille vers I'arriSre
au-del_de Ia positionde caiage+
3+ Abaisser lagrilIe et la faire gIisserclanslefour+
Ne pas couvrir la totamit8d'uae grille de papier d'amumiaiumai
mettre d'aiumiaium sur la sole du four° Cemaae doaaerait pus
de boas rSsumtatsdaas macuissoa de g_teau× et masome
Positions des grilles
POSiTiON7 _osition la
plus haute) : Pour Ia
cuissonau griI et Ia cuisson
aufour sur uneseulegriIle
avecunet6Ie _ biscuits.
POSITION6 : S'ut+Iisepour
la cuissonau gril et la
cuissonau four sur une
four
Cuisson sur deux grilles
seulegrille avec unetOle_ biscuits.S'utilise pour une cuissonsur
plusieursgrilles.
POSMON 5 : Pourla cuissonau gril et la cuissonau four sur une
seulegrille avec unetOle_ biscuits.
POSMON 4 : S'utiIisepour Iacuisson au four de g_teauxet de lets
ensauce,sur uneseuiegrille avec unet6Ie _ biscuits,et lacuisson
au griL S'utilise pour une cuissonsur pIusieursgrilles.
POSMON 3 : Pourla cuissonau four de lets en sauce,de gSteaux
dtages,de michesde pain,sur uneseuie grflIe avecune t61e
biscuits.S'utilisepour une cuissonsur phsieurs grilles.
suite ooo
40
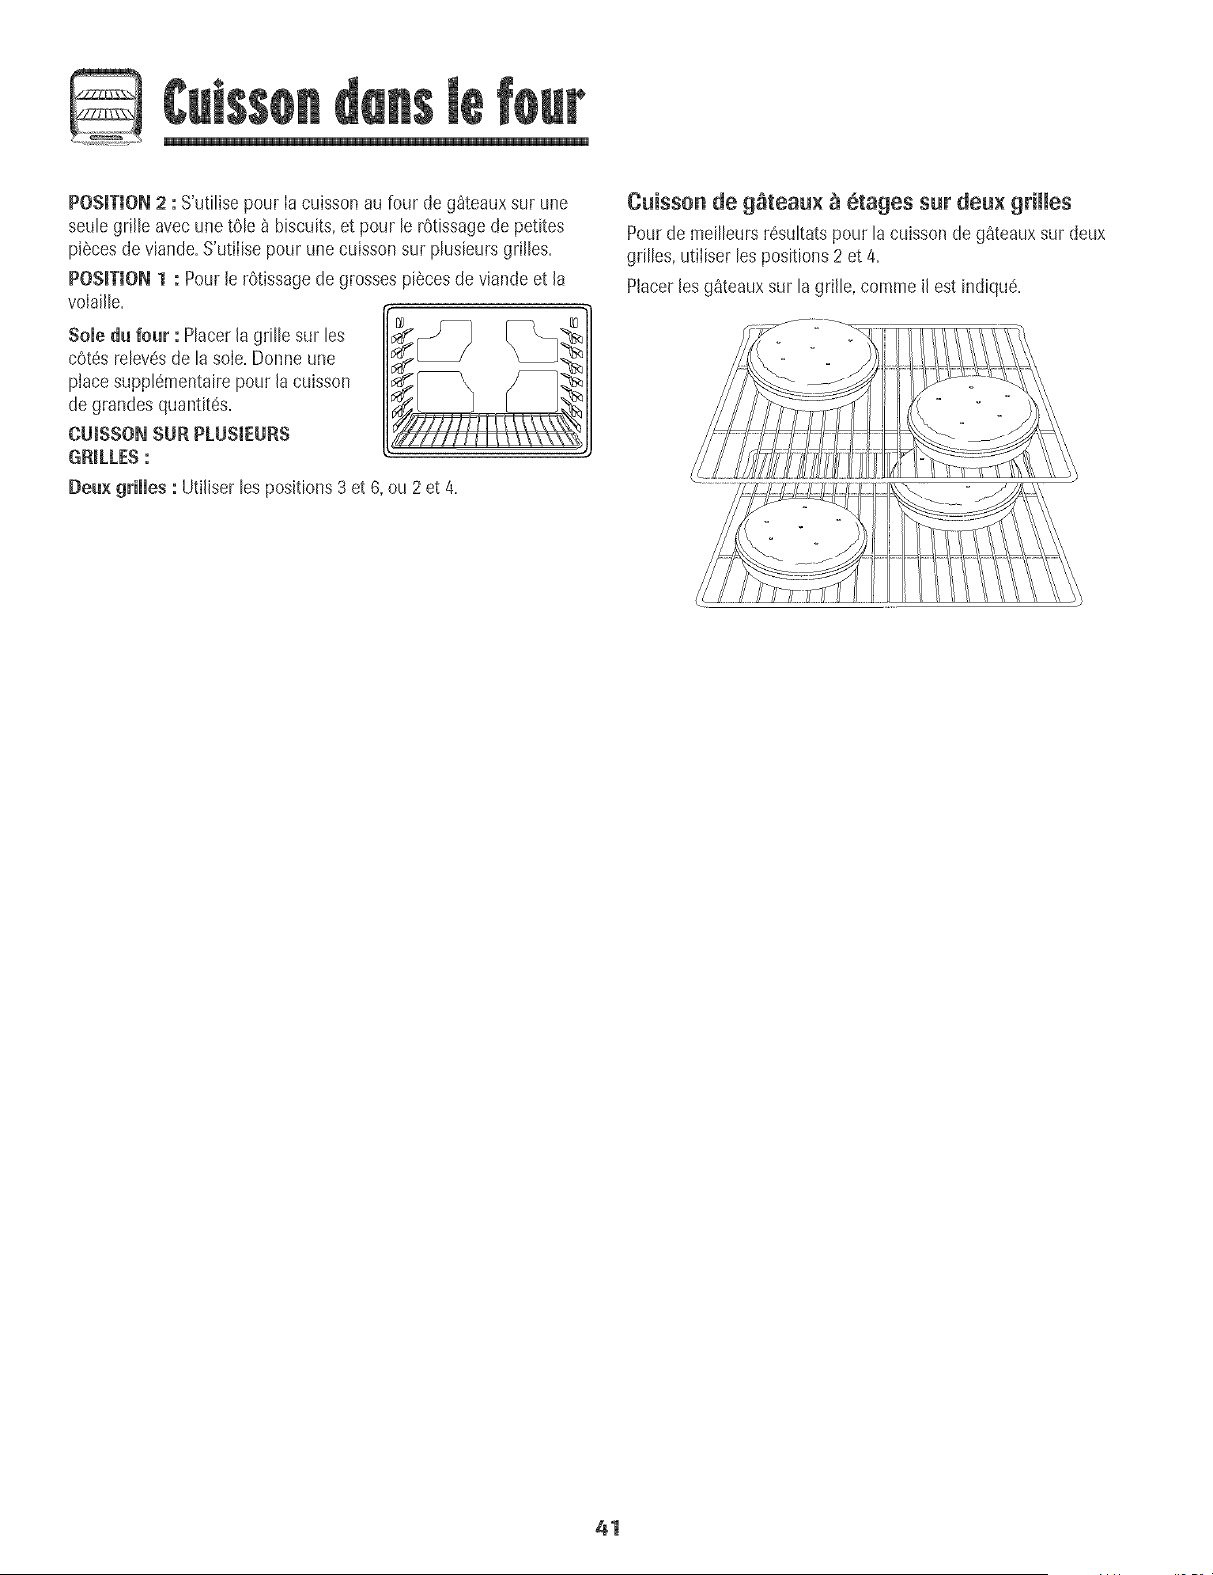
POSITION2 :S'utiNsepour Iacuisson aufour de g_teauxsur une
seulegrille avec unetOle8 biscuits,et pour le r6tissagede petites
piecesdeviande.S'utiIisepour une cuissonsur plusieursgrilles.
POSITION1 : Pourle rOtissagede grossespiecesde viandeet la
volaille.
Sole du four : Placerla grille sur les
cotes relevesde la sole.Donneune
place supp!ementairepourla cuisson
de grandesquantites.
CU_SSONSUR PLUSIEURS
GRILLES:
Deux grilles : Utiliser les positions 3 et 8, ou 2 et 4.
Cuisson de g_teau× _ 6rages sur deu× grimmes
Pourde meilleursresultats pour lacuisson de g_teauxsur deux
grilles,utiliser lospositions2 et 4.
Placerlosg_teauxsur la grille, commeil estindique.
41

Four autonettoyant
I!est normal que certamespiecesde iaculslnieredevLennent
tres chaudesIorsd'un cycle de nettoyage,
Pourevlter que a porte du four nesubissedesdommages_ne
gastenter de J'ouvrirIorsaueie mot LOCK_VERROUILLAGE}est
visiblesur [afflcheur.
Eviterdetoucher la porte,ie hublot et ia zonede 1'6ventdu four
_orsd'un cycled'autonettoyage.
°Ne pas utiiiser de ne[_oyan[pourfour du commercesur le fini
dufour ousurtout autre composantdu foun Celaabfmerait ie
tint ou lesconi_osantsdufour.
Lecycle d'autonettoyageutilisedes ten"3era_uressupeneuresa a
normae sour assurerle neuoyageautomatioue(_eIa totalite du four.
SIe four est tres sale,iI es_norma qu'on observeIa formation de
fum@ ou de flammesdurant le nettoyage.NettoyerIe four
intewalles r%uliers plutOtqued'attendre une accumulation
importantede residus.
Durantle processusd'autonettoyage,iI convientde bbn aerer la
cuisinepour @minerles odeurs normalement@_Jsesdurant le
nettoyage.
Avant rautonettoyage
1. Eteindrela lampedu four avant le nettoyage.Ellerisqueraitsinon,
de griller.
2. Enbver Ia Iechefrite,tous bs platset bs grilles du four. Lesgrilles
risquentde se dScoloreret de neplus glisseraussibien apr@un
cycle d'autonettoyagesi on neles enlevepas.
3. NettoyerIe cadre du four, le cadre de Ia porte,lazone _ I'ext6rieur
du joint et autour de I'ouverturedartsJejoint de la porte,_ I'aide
d'un produit de nettoyagenon abrasif commeBon Ami* ou d'eau
additionn@ de detergent=Leprocessusd'autonettoyagene
nettoie pasceszones.Ellesdoivent @e nettoy@spour emp@her
Jasalet6 des'incruster pendant Iecycle de nettoyage.(Lejoint
assureI'6tancheiteautour de Ia porte et du hublot du four.}
4. Pour emp@hertout dommage,ne pasnettoyerni frotter Jejoint
qui se trouveautour de laporte du four.
Cejoint estcon_u pour @itel bs pertes
de chabur pendantle cycle
d'autonettoyage.
5. Eliminerles r@idus de graisseou de
produits renvers@sur Iasole avant le
nettoyage.Ceciemp6chelaformation
de flammesou de fumee durant le nettoyage.
Essuyerles r6sidussucr@et acides,comme lespatatesdouces,
latomate ou bs sauces_ basede Iait.La porcelainevitrifi@
posse@une certaine r@istanceaux composesacides,mais qui
n'est pas limit@. EIb peut se decolorersi Ies residusacidesou
sucres nesont pas enIevesavantde commencerI'autonettoyage.
Programmation de l'autonetteyage :
[ Rematque : Latemperaturedu four doit 6tre situ@ endessous
de205 °C(400°F}pour programmerun cycb d'autonettoyage.
1
1. Fermerla porte du four.
Clean
2. Appuyersur latouche Clean (Nettoyage}.
. Le mot CLEAN(NETTOYAGE}clignote_ I'affbheur.
Appuyersur la touche A ou V.
. CL-M (Nettoyage- salete moyenne}estaffich&
Si la porte n'est pasferm@, des hips retentissent
et le mot 'door' (porte}paratt_ I'afficheur.Si la
porte n'est pasferm6edarts les45 secondes,
I'op6rationd'autonettoyageest annul@et I'afficheur
revient8 I'heuredu jour.
4. Appuyersur latouche A ou V pourvoir defiler bs differents
r6glagesde I'autonettoyage.
CL-H (Nettoyage- salet6importante,4 heures}
CL-M (Nettoyage- sabt6 moyenne,3 heures}
CL-L (Nettoyage- salet6Iegere,2 heures}
Le choix du niveaude salet6 du four programme
automatiquementla duree du cycle d'autonettoyage.
5. Apres quatresecondes,Iefour commencele nettoyage.
. La dur@ de nettoyage commence le d@ompte _ I'affbheur.
. Le mot LOCKCv_ERROUiLLAGE}paraita J'afficheur.
• Le mot CLEANparait _ I'afficheur.
D6marrage diff6r6 d'un cycle d'autonettoyage :
1. Appuyersur latouche Delay (D6marragediff6r@.
. Le mot DELAY(ATTENTE}c%note. De!ay
, 00:00paratt _ I'afficheur.
Appuyersur la touche A ou V pour programmer
la dul@ d'attente avant que necommenceIe
cycle.Ladur@ d'attente peut ¢tre regl6e,de dix
minutes (00:10}_ onzeheures,cinquante-neuf
minutes 01:59}.
Alors que b mot DELAYdignote, appuyersur
[a toucheClean (Nettoyage}. Clean
. Le mot CLEANva c%noter.
suite...
*Lesnomsde marquedes produitsde nettoyagesont des marquesd@os@sdes differents fabricants.
_2

4+ Appuyer sur Ia touche a, ou _'+
+ CL-M (Nettoyage- salet6 moyenne}est affiche+
5+ Appuyer sur Ia touche a, ou _' pour voir dditer les differents
reglagesde t'autonettoyage+
CL-H{Nettoyage- saleteimportante,4 heures}
CL-M {Nettoyage- satetemoyenne,3 heures}
CL-L CNettoyage- satete tegere,2 heures}
Lechoixdu niveaude salet6du four programme
automatiquementtaduree du cycled'autonettoyage+
6+ Apres quatre secondes,tes rootsCLEAN(NETTOYAGE},DELAY
{ATTENTE}et LOCK(VERROUILLAGE}paraissent_ I'afficheur
pour indiquer que le four est programmepour une operationde
nettoyagediff6r6+Letemps d'attenteparait _ I'afficheur+
Pendant le cycle d'autonettoyage
Lorsquele mot LOCKparak _ rafficheur, Ia porte ne peut 6tre
ouverte+Poureviter d'endommagerla porte, ne pasla forcer pour
I'ouvrir Iorsque le mot LOCKest affiche+
Fumee et odeurs
La premierefois o_ lefour est nettoye,il peut y avoir production
d'odeur et de ftJm6e+Ceciest normal et disparaitra_ [usage+
Si lefour esttres saleou si la Iechefritea 6te laiss6eclansle four, il
peut y avoir productionde fumee+
Bruits
Pendantque le four chauffe,il peut se pmduire des bruits de metal
en diIatationou en contraction+Ceci estnormal et n'indique pasque
le four s'abtme.
AprSs cycme
Si mefour a dej_ ere programme pour un cycle de
nettoyage et que re'ondesire 6tabmir un demai:
1+ Appuyer sur la touche Delay {Demarragediff6r6]+
• Le mot DELAYciignote+ Delay
+ 00:00paratt_ I'afficheur+
2+ Appuyer sur Ia touche A ou T pour programmer
la dur6edesireede I'attente avantque ne debute
le cycle.
Apres quatre secondes,les rootsCLEAN,DELAY
et LOCKparaissent_ I'afficheurpour indiquer
que Ie four est programmepour une operationde nettoyage
differe+Letemps d'attente parait _ I'afficheur+
Lorsque mecycle d'autonettoyage d6bute :
+ Lemot DELAYs'eteint+
• La dureede nettoyageparak _ I'afficheur+
Annumation du cycmed'autonettoyage :
Appuyersur Iatouche Cancel {Annulet}+
+ Tousles roots disparaissentde I'afficheur+
+ ToutesIesfonctionssent annuI6es+
• L'heuredu jour parait8 rafficheur+
Environune heureapr@sla fin du cycle, le motLOCKs'6teint+Ace
moment,laporte peut 6tre ouverte+
La samet_peut aveir maiss6un r6sidu gris po_dre_×. L'enlever
avecun linge humide+S'il restede lasaIet_,cela indique que le cycle
de nettoyagen'a pas ete assezlong+Cettesalete restantesera
enlev_eau prochain cycled'autonettoyage+
Si ies grilles ont _t8 maiss_es_ m'intSrieurdu fo_r pendant me
cyemed'auto_ettoyage et qu'emmesglisse_t real sur leurs sup-
ports, lesenduire,ainsi que lessupports,d'une fine couched'huile
veg_tale+
De fi_es lig_es pervert apparaitre da_s la porcelai_e parce
q_'elle a s_5i ehale_r et refroidisseme_t. Ceciest normal et
n'affecterapas Ia performance+
U_e d_comoratio_blanche pe_t apparaitre apr_s me_ettoyage
si des alimems acides o_ s_cr_s _'o_t pas _t_ e_leves avast
q_e _e cemme_ce l'a_to_ettoyage. Ladecelerationest normale
et n'affecterapas la performancedu four.
Remarques:
, si la porte du four n'est pas fermee,le mot <<door>>{porte}
clignotea I'afficheur et le four _metdes hips jusqu'_ ce que la
porte soitfermeeet que I'onappuie _ nouveausur Clean.
, S'iI s'_couleplus de cinq secondesentre Ie momento8 I'on
appuiesur Cleanet celui o_JI'on appuie sur la touche A ou T,
rafficheur retourneautomatiquement_ I'affichageprecedent.
, Lapoisedu four se trouveraendommageesiron force son
ouverturealors que le mot LOCKestencore affiche.
43
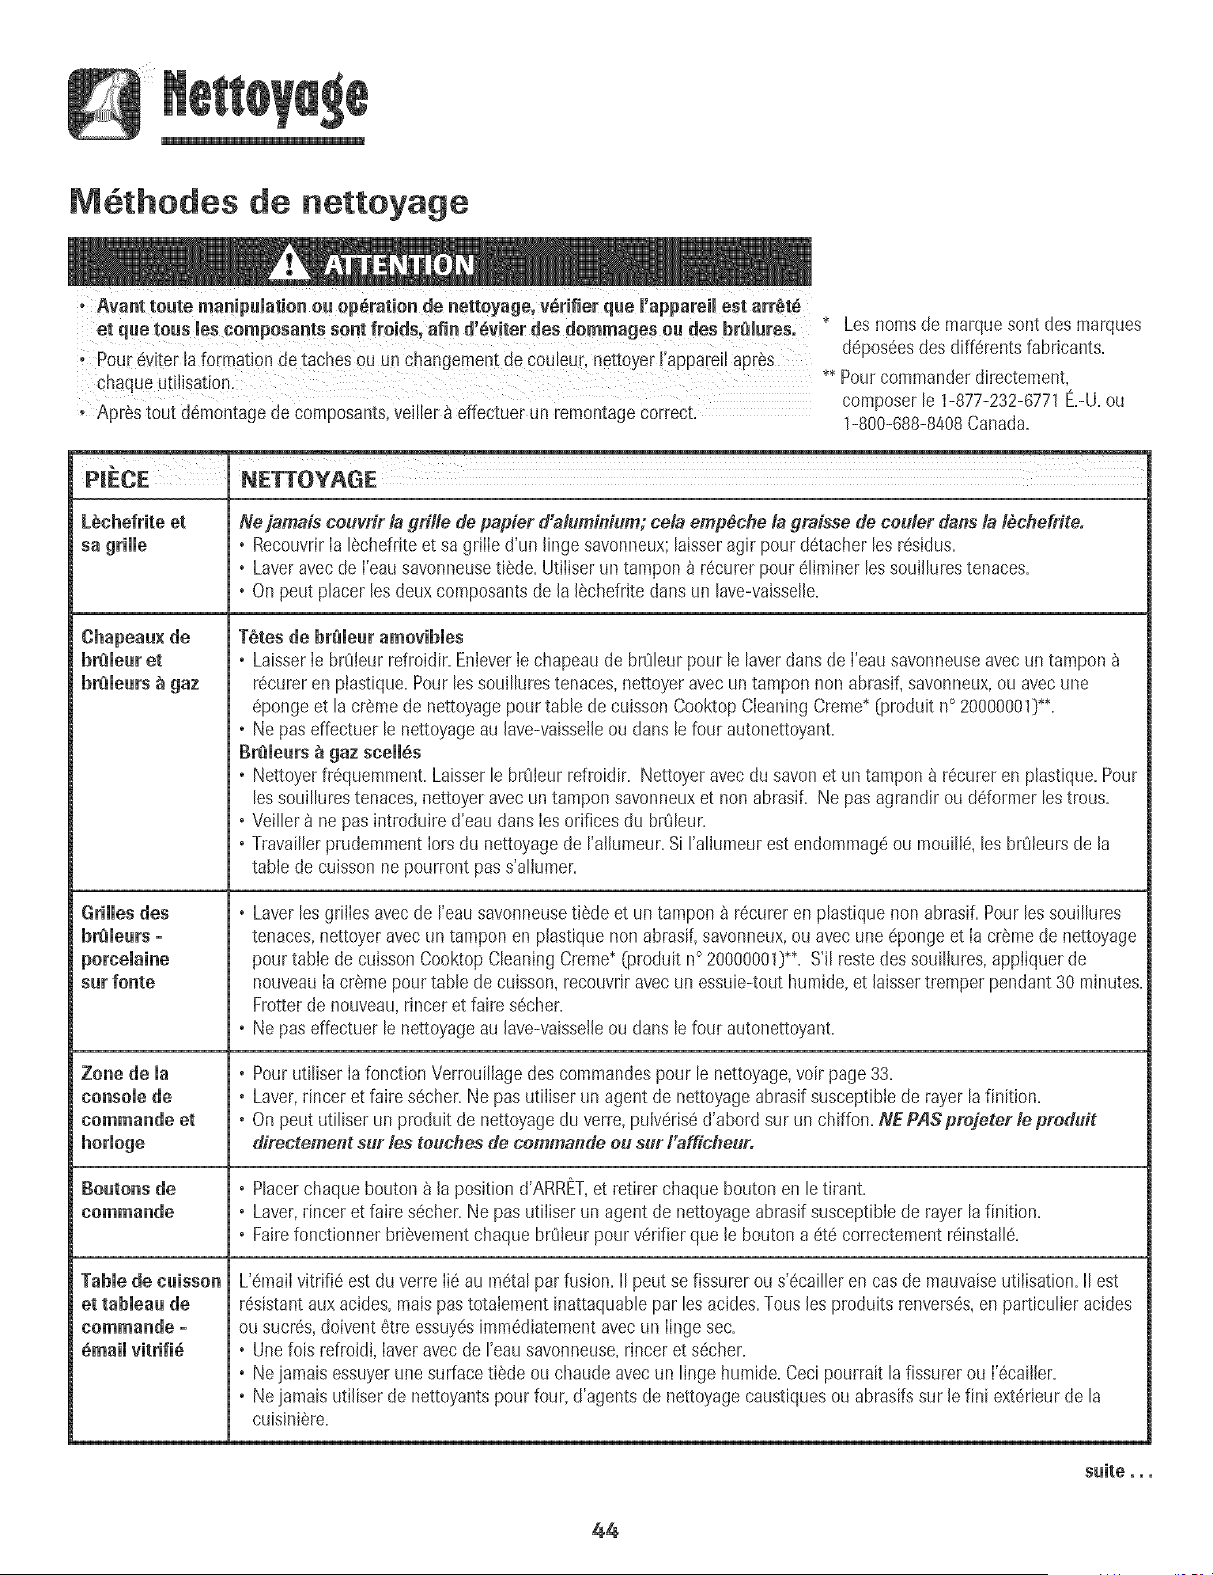
M6thodes de nettoyage
et que tousles eomposantssont freids, afin d!6vitet des dommages eu des 5r_lures. " Lesnomsde marquesont des marques
' POUr8viter la formation de{aches0UUnChangementde €0uieur netto er i,appareila r_s d6pos6esdes differents fabricants.
, Y P
chaque utflisation. _*Pour commanderdirectement,
composerle 1-877-232-6771E.-U.ou
Apres tout demontagede composants,vei!ler_ effectuerun remontagecorrect. 1-800-688-8408Canada.
P_ECE NETTOYAGE
L_chefrite et Ne jamais ceuvrir Jagrille de papier d'alumfldum;ce/a emp_che la gmisse de ceuler da1_s/a /_cheffite.
sa grille o RecouvrirIa lechefrite et sa griIIe d'un linge savonneux;laisseragir pour detacherlesresidus.
o Laveravec de I'eausavonneusetilde. UtiIiserun tampon _ recurerpour eliminer lessouillurestenaces.
o Onpeut placer lesdeux composantsde la lechefritedans un lave-vaisselle.
surfonte
Zone de ia
console de
commandeet
TaMe de cuisson
et tabmeaude
commande -
dmaii vitrifid
TStes de br_leur amovibles
o LaisserIe brOleurrefroidir.EnleverIechapeau de brOleurpour le laverdartsde I'eausavonneuseavecun tampon
recureren ptastique.Pour les souillurestenaces,nettoyeravecuntampon non abrasif,savonneux,ou avec une
epongeet la cr_mede nettoyagepourtable de cuissonCooktopCleaningCreme*(produit n° 20000001D**.
o Ne pas effectuerle nettoyageau lave-vaisselleou clansle four autonettoyant.
gr_leurs _ gaz seell6s
o Nettoyer%quemment. Laisserle brOleurrefroidir. Nettoyeravecdu savonet un tampon _ recureren plastique.Pour
les souillurestenaces,nettoyeravecuntampon savonneuxet nonabrasif. Ne pasagrandir ou ddormer les trous.
o Veiller_ ne pasintroduire d'eau dartsIesorificesdu brCJleur.
o TravaillerprudemmentIors du nettoyagede ralhmeur. Si rallumeur estendommageou mouille,les brOleursde la
table de cuissonne pourront pass'aliumer.
o Laverles grilles avecde Feausavonneusetiede et un tampon _ recureren plastique nonabrasif. Pourlessoui%res
tenaces,nettoyeravec un tampon en plastiquenon abrasif,savonneux,ou avec une epongeet ia cremede nettoyage
pour table de cuissonCooktopCleaningCreme*(produit n° 20000001_*_, S'il restedes souiliures,appliquerde
nouveauIacreme pour table de cuisson,recouvriravecun essuie-touthumide,et laissertremperpendant30 minutes.
Frotterde nouveau,rincer et faire secher.
o Ne pas effectuerle nettoyageau lave-vaisselleou clansle four autonettoyant.
o PourutiliserIa fonction Verrouiliagedes commandespour le nettoyage,voir page33.
o Laver,rincer et faire secher.Ne pasutiliser un agent de nettoyageabrasifsusceptibiede rayer la finition.
o Onpeut utiliserun produit de nettoyagedu verre, pulverised'abord sur un chiffon. NEPASprejeterlepreduit
directement sur les touches de cemmande eu sur Fafficheuro
o Placerchaquebouton _ la position d'ARRET,et retirer chaque boutonen le tirant.
o Laver,rincer et faire secher.Ne pasutiliser un agent de nettoyageabrasifsusceptiblede rayer la finition.
o Fairefonctionner brievementchaquebrOieurpourverifier que le bouton a ete correctementreinsta%
L'emaiIvitrifie estdu verre Iie au metal parfusion. II peut se fissurerou s'ecailler en cas de mauvaiseutiiisation.II est
resistantauxacides,mais pastotaiement inattaquablepar lesacides.Tousles produits renverses,en particulier acides
ou sucres,doivent etre essuyesimmediatementavecun Iinge sec.
o Une lois refroidi,Iaveravecde reausavonneuse,rincer et secher.
o Ne iamaisessuyerunesurfacetiede ou chaudeavecun linge humide.Cecipourrait la fissurer ou I'ecaiiler.
o Ne iamaisutiliserde nettoyantspourfour, d'agents de nettoyagecaustiquesou abrasifssur le fini exterieur de la
cuisiniere.
s_ite.,,
44
Panneaux
lat_rau×,tiroir
de remisage
et poign_es
de porte -
_U _OUr en verre
, Une lois Iespi@esrefroidbs, bs raver_ FeausavonneusetiSde,rincer et s@her.Ne iamaisessuyerune surface
tilde ou chaudeavecun Iinge humide,cecipouvant endommagerlasurface et entrainer une brOIurepar Ia vapeur.
, Pourlestaches rebelbs, utiliser des agentsde nettoyageI6g_rementabrasifscommeIa p_te au bicarbonatede
soudeou Bon Ami*. Ne pasutiliser de nettoyantsabrasifs,caustiquesou @ergiquescomme Iesnettoyantspour
four ou Iestamponsen Iaine d'acbr. Cesproduitsrabrabnt ou endommageraientde fagon permanentela surface.
Remarque : Udliserun #l_geeu u1_terchensec pour essuyer les preduits rei_vers6s,surtout s'its sent addes
eu sucres° La su_ace pourrait se d6ceferer eu se temir si la saiet6 n'6tait pas Jmm6diatementenlev_e. Ceei
est pardcuH_rement important darts/e cas de surfaces blanches.
, Eviterd'utiliser trop d'eau,qui risqueraitde s'infiltrer sousou derrierele verreet detacher.
, Laver_ I'eauet au savon.Rinceravec de I'eaupropre et s@her.Un produit de nettoyageduverre peut 6tre utilis# en
le vapodsantd'abord sur un linge.
, Ne pas utiliserde produits abrasifscommetampons_ r@urer, lained'acierou produit de nettoyageen poudre qui
risqueraientde rayer le verre.
IntSHeur du four • Ex@uter les instructions pr6sent@s aux pages 42-43 pour I'autonettoyage du four,
Grilles du four
[certainsmo@les}
* Nettoyeravecde I'eausavonneuse.
* Eliminerlessouillures tenacesavec unepoudrede nettoyageou un tampon a r6curer savonneux.Rinceret faire
s@her.
, SiIesgrilles sont iaiss@sdartsIe four pendantie cycIe d'autonettoyage,etlesse d@olorent et peuventne plus tr6s
bien glisser.Si cecise produit, appIiquerparessuyageun peu d'huile v6g6tab sur la grille et sessupportsen relbf
pour faciliter le mouvement,et enbver I'exc6sd'huile.
, NE PAS UTIUSERDE PRODUffS DE NETTOYAGECONTENANTDU JAVELLISANT.
, NE PAS UTIUSERDE NETTOYANTS_ ORANGE_ OU ABRAS_FSo
, TOUJOURSESSUYERDANS £ESENSDE LA TEXTUREDE L'ACtERLORSDU NETTOYAGE.
° Nettoyage jo_malier/salet8 l_g_re - Essuyeravec I'un desproduits suivants:eau savonneuse,vinaigre bIanc/eau,
produit de nettoyagepourverre et surface Formula409*ou un produit semblablepour verre - avecun lingesoupb
et une @onge. Rinceret s@her.Pourpoiir et enbver bs marquesde doigts,faire suivre par unevaporisationde
Magic Spray*pour acbr inoxydabb {produit n° 20000008}**.
, Salet_,mod_rSe/_.paisse - EssuyeravecI'un des produits suivants:Bon Ami*,Smart Cleanser*ou Soft Scrub*-
raide d'un linge soupleou d'une @onge humide.Rinceret s@her.Lestaches rebeibs peuvent6tre enlev@savec
un tampon multi-usagesScotch-Brite*humidi% Frotteruniform6mentdans lesensdu metal Rinceret s6cher.
Pourredonnerdu lustreet retirer lesrayures,faire suivre par une vaporisationde Magic Spray*pour acier
inoxydabb.
, D_celoratio_ - A raide d'une @ongehumidifi6e ou d'un lingesouple,essuyer_ I'aidedu nettoyantCameo*pour
acier inoxydable.RincerimmSdiatementet s@her.Pour enleverles marqueset redonner du hstre, faire suivre par
unevaporisationde Magic Spray*pouracier inoxydable.
* Lesnoms de marquesontdes marquesd@o@esdes diff_rentsfabricants.
** Pourcommanderdirectement,composerle 1-877-232-6771E.-U.ou 1-800-688-8408Canada.
45
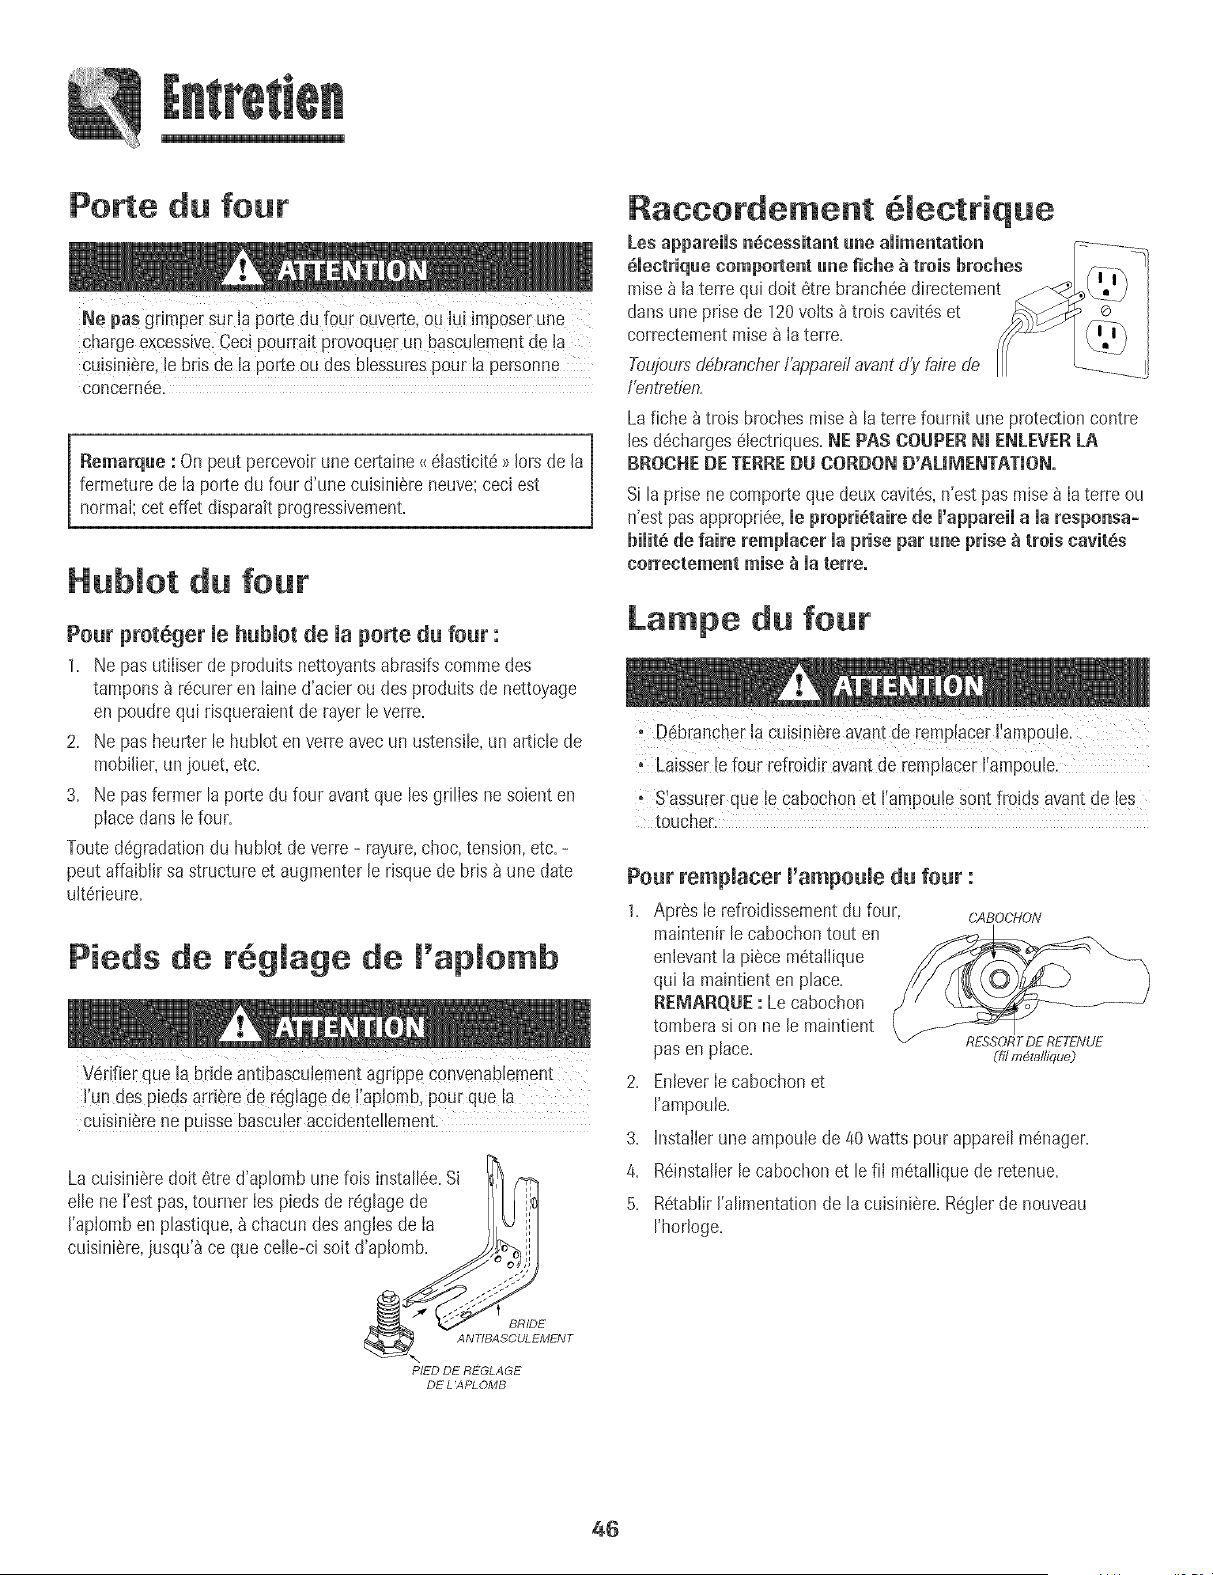
Porte du four
Nepas grimper sur la porte du four ouverte,ou lui imposer une
charge excessive.Ceeipour[air provoquerun bascubmentde la
cuisini6re,le bris de ia porte ou des Nessurespour la personne
concernee.
Remarqee : On peut percevoir une certaine _<61asticitd >7Iors de la
fermeture de Ia porte du four d'une cuisiniere neuve; ceci est
normal cet effet disparait progressivement,
Hublot du four
Pour proteger le hublot de la porte du four :
1. Ne pas utiliser de produits nettoyantsabrasifscommedes
tampons _ recureren lained'acier ou des produks de nettoyage
en poudrequi risqueraientde rayer le verre.
2. Ne pas heurter le hublot enverre avec un ustensile,un articlede
mobilier,un iouet, etc.
3. Ne pas fermerla porte du four avant que lesgrilles ne soienten
placedans le four.
Touted6gradationdu hublot de verre - rayure,choc, tension,etc. -
peut affaiblir sa structure et augmenterle risque de bris _ une date
ult6rieure.
Pieds de r6glage de l'aplo b
VSrif!erque [a bride antibascuiementagdppe convenablement
i'un des piedsarriere de r6glagede I'aplomb,pour que la
CUisiniemne PUiSSebasculeraccidentellement.
LacuisiniSredoit 6tre d'aplombune fois install6e.Si
elle ne I'estpas,tourner Ies pieds de reglagede I _
I'aplomben plastique,a chacun desangles de Ia
cuisiniere,iusqu'_ce que celle-ci soit d'aplomb. ,jj
PIED DE REGLAGE
DE L 'A PL OMB
Raeeorde ent lectrique
Les appareils n_cessitant une amimentation
_mectriquecomportent une fiche _ trois hroches
mise_ la terre qui dolt etre branch6edirectement
dans une prisede 120voits _trois cavites et
correctementmise a Iaterre.
Toujoursd4bmncherf'appardl avantd'y fafi'ede
l'entretien,
La fiche _ trois brochesmise _ la terre fournit une pmtec.tioncontre
[esd6chargeselectriques.NEPAS COUPERNi ENLEVERLA
BROONEDETERREDU CORDON D'AUMENTATION.
Si la prise necomporteque deux cavites,n'est pas mise _ Ia terre ou
n'est pasappropri6e,mepropri_taire de m'appareima la respoasao
bimit6de faire rempmacermaprise par une prise _ trois cavit6s
correctement raise _ la terre.
La pe du four
i Ddbrancher [a cuisini_reavant de rempiaceri'ampoule.
, Laisserlefour refroidir avant de rempiacer!'ampoule.
Sassurerque !e Cabod]0n et ! amp0u!esont fro!ds avant de!es
toucher:
Pour rempiacer l'ampouie du four :
1. Apres Ie refroidissementdu four, r;ABOCHOiV
maintenirlecabochontout en
enlevantla piece mStalIique
qui la maintienten place.
RENARQUE:Le cabochon
tomberasi on ne le maintient
pas en place.
2. EnteverIecabochon et
I'ampouie.
3. h]stailerune ampouiede 40 watts pour appareilmenager.
4. RSinstalierlecabochon et lefii metalliquede retenue.
5. RdtabIirI'alimentationde la cuisiniere.R6gierde nouveau
I'horloge.
RESSORTDE RE7ENU_
(fit m#tallique)
46
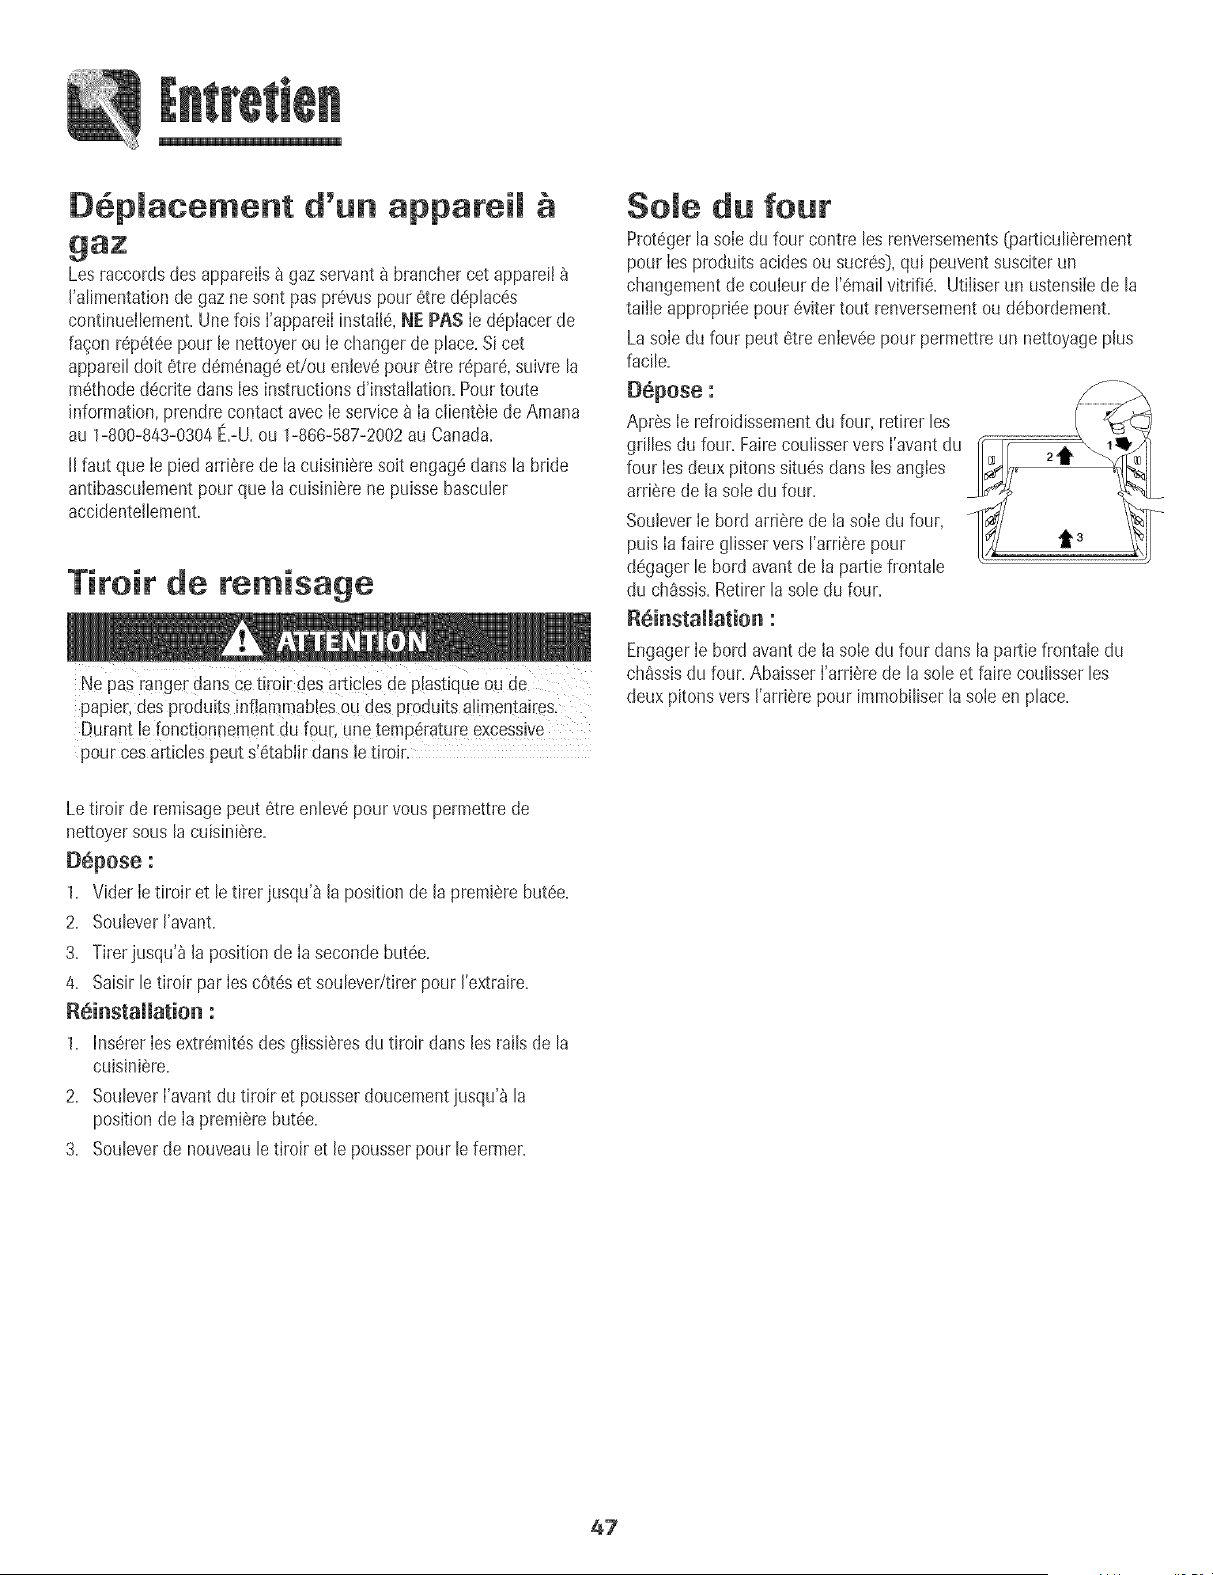
06placement d'un appareil
Les raccordsdes appareils_ gazservant_ brancher cet appareil
J'alimentationde gazne sont paspr@us pour 6tre d@lac6s
continueilement=Unefois I'appareiIinstaiJ_,NE PA$ Ie d@Iacerde
fa_on r@6t6epour Jenettoyerou Iechanger de place=Sicet
appareildoit 6tre d6m6nag6et/ou enlev6pour 6tre r@ar6,suivre la
m6thoded6crite dans Ies instructionsd'installation=Pourtoute
information,prendrecontact avecIeservice_ Ia ciientele deAmana
au 1-800-843-0304t_=-U=ou 1-866-587-2002au Canada.
IJfaut que Ie piedarri_rede Ia cuisJnieresoit engagedans la bride
antJbasculementpourque JacuisJnierene puissebasculer
accidenteJlement=
Tireir de remisage
Ne pas rangerdans ce tiroir des artic!esde p[astiqueou de
papJer,des produits inflammablesou des p[oduits a!imentaires.
Durant !efoncti0nn_mentdu four, une ternp6ratureexcessJye
pour ces articles peut s!6tablirdans le tiroir.
Sole da fear
Prot6gerla sole du four contre les renversements(ooarticulierement
pour Ies produitsacidesou sucres),qu[ peuventsusc[terun
changementde couleur de 1'6mailvitri% UtilJserun ustensJlede la
taille appropri6epour @Jtertout renversementou d6bordement.
Lasole du four peut 6tre enlev6epour permettreun nettoyageplus
facile.
D6pose :
Apr_s Ie refroidissementdu four, retirer les
grilles du four. FairecoulisserversI'avantdu
four Iesdeux pitonssitu6s dans les angles
arriSrede la soledu four.
SouleverIe bord arri@ede lasole du four,
puis Ia faire glisserversJ'arrierepour
d6gagerle bordavantde Japattie frontale
du chassis.Retirerlasole du four.
t3
F{6instaJJation :
EngagerIe bord avantde la sole du four dans la pattie frontale du
chassisdu four. AbaisserFar@rede lasole et faire cou!isserles
deux pitonsversFar@repour immobiliserJasole en place.
Letiroir de remisagepeut 6tre enlev6pour vous permettrede
nettoyersous la cuisiniSre+
D6pose :
1= Vider Ietiroir et le tirer jusqu'_ Japositionde Japremierebut6e+
2+ SouleverJ'avanL
3+ Tirerjusqu'_ Japosition de Ia secondebut6e+
4+ Saisirle tiroir par IescOt6set soulever/tirerpour J'extraire+
R6instaJJation :
1+ InsQrerIes extr@nJt6sdes giJssiSresdu tiroir dans Jesrails de la
cuisiniere.
2. SouleverI'avantdu t[roir et pousserdoucementjusqu'_ la
positionde Iapremiere but6e.
3. Souleverde nouveauletiroir et le pousserpour le fermer.
47
P_OBL_WE iiiiiiiiiiiiiiiiiiiiiiiiiiiiiiiiiiiiiiiiiiiiiiiiiiiiiiiiiiiiii_SOLUT_ONI_
Pour mapmuparldes probm_mes
observ6s, essayer d'abord mes
solutions possibles,_ droite.
Un br_ieur de surface ne s'aiiume
pus.
, V6rifier que Iescommandesdu four sont correctementr6gl6es.
, V6rifier si lafiche est biersins6r6edunsIa prise.
, Inspecteffr6armerle disjoncteur.Inspecteffremplacerlesfusibles.
, ContrOlerla source d'alimentation61ectrique.
V6rifier que I'appareiIest correctementraccorde_ la sourced'electricite.
Determinersi I'alimentationelectriqueest interrompueCfusiblegrillddisjoncteur ouvert].
Verifier que I'allumeurest sec et qu'iI emetdes etincelles.Le br0Ieur ne peut s'allumersi
I'allumeurestendommage,souilleoumouilIe.SiI'alIumeurnegen_repusd'etincelles,ramener
Ie bouton de commande_ la position OFF(ARRCT).
Fmummesnon uniformes, + Orificesdu brOieurobstrues.
S6paration entre mesfmammeset + VeilIer _ placercorrectementI'ustensilesur Ia grille du brOieur.
mebremeur.
R_sumtatsde cuisson au four
cliff, rents des attentes ou de eeu×
produits par mefour ant_rieur,
R_sumtutsineorrects morsdemu
cuissonuu grim,ou _mission
excessive de fum_e.
Verifier que Ia temperatureselectionneeest correcte. Veiller ;_prechaufferlefour si
ceciest demandeduns la recette.
, Determinersi I'eventdu four estobstrue.Voirson emplacementpage 40.
, S'assurerque la cuis+n+ereest d'aplomb.
, Les regiagesde temperaturevarientsouvententre un four neuf et Ie four qu'iI remplace.
Onobsewesouventune derivedu reglagede temperatured'un four a mesurequ'iI vieillit;
il peut devenirplus chaud ou moins chaud.Voir page38 les instructionsd'ajustementde
latemperaturedu four.REMARQUE: il n'est pusutile de modifierlereglage detemperature
si lavariationn'affecte qu'une ou deux recettes.
, UtiliserIesbonsustensiles.Lesustensilesfoncesdonnentun brunissementdecouleurfoncee,
les ustensilesbrillants,un brunissementplus clair. Pourd'autresinformationsau sujet de la
cuissonau four, voir Ia brochureLa cuissonsimplifiee.
, Verifier la positiondesgrilles et des ustensiles. Lorsde la repartitionsur deux grilles,ne pus
superposerIesplats. Veillera hisser un espacede 2,5a 5 cm (1 _2 po} entre lesplatset les
paroisdu four.
+ ContrOlerrutilisation de feuille d'aluminiumduns le four+Nejamais recouvrircompletement
unegrilledufour avecdelafeuilled'alumin+um+Placerun petitmorceaudefeuille d'aluminium
sur la grille sousle plat pourrecuperer les matieresrenversees+
Determinerla position des grilles.Lesalimentspeuventetre trop presdes flammes.
UtJlisatJonincorrectede feuille d'aJuminium.Nejamais garnir lagriJlede lechefrite avec
de Iafeuille d'aluminium.
EnleverI'exc_sde graissesur Ia pi6cede viandeavantla cuissonau gril.
Utilisationd'uneI6chefritesouillee.
PrechaufferIe four pendant2 _ 3 minutesavantde placer le plat duns le four.
Portedu four fermeedurant la cuissonau gril.
suite,,,
48
PROBLEME SOLUTION
mpossibimit d autonettoyage
du four.
Lefour ne se nettoie pas
correctemento
La porte du four ne se d_verreuiHe
o D6terminerque I'appareiln'a pas6te pmgramm6pour un autonettoyagediff6r6.Voir
pages42-43.
° Wrifier que Ia porte est fermee.
° Wrifier si lacommandeesten Mode Sabbat.Voirpage 37.
o Le four estpeut 6tre _ unetemp6raturesuperieure_ 205 °C (400°F).La temperaturedu
four doit 6treinferieure_205 °C(400°F)pour pouvoirprogrammeruncycled'autonettoyage.
° Un tempsde nettoyageplus long peut 6tre n6cessaire.
° Onn'a pas6IimineavantI'op6rationd'autonettoyagelesaccumulationsexcessivesderesidus,
particuliSrementIesr6sidusd'alimentsacidesou sucres.
Accumulation d'humidit6 sur me , Ceciest normal durant Ia cuissond'alimentscontenantbeaucoupd'eau.
hubmotou vupeursortant de m'_vent, , Utilisationexcessived'humidit6 lots du nettoyagedu hublot.
emission d'une fore edeur ou de
fum6e mersde ia raise en marche
du four.
Codes d'unomumieo
Des bruits se font entendreo
L'interieurdu four estencore chaud.Attendre environ une heureapr6sI'achSvementde la
perioded'autonettoyage.IIestpossibled'ouvrir la porteaprSsladisparitiondu messageLOCK
G!ERROUILLAGE)sur I'afficheur.
Lescommandeset la porte sent peut-etre verrouillees.Voir page 33.
o Ceciest normal pour une cuisiniSreneuveet disparait apres quelquesutilisations.
Un cycled'autonettoyage_blOlera_plus rapidementles odeurs.
o La raiseen marche d'un ventilateur aide _ retirer fum6eet odeurs.
o Pr6sencede salet6ssur la sole.Preceder_ un autonettoyage.
o LesrootsBAKEouLOCKpeuventclignoterrapidement_J'afficheurpour prevenird'une erreur
ou d'un probleme.Sile mot BAKEou LOCKparait_ rafficheur, appuyersur la toucheCancel
Si le mot BAKEou LOCKcontinue_ c@noter,d6brancherI'appareil.Attendre quelques
minutes,puis rebrancherI'appareil.Si le mot continue_ ciignoter,d6brancherI'appareilet
prendrecontactavecun reparateurautorise.
o SiIefour esttressale,IesfiammSchespeuventproduireun coded'anomalieaucoursducycle
d'autonettoyage.Appuyersur Ia touche Cancelet IaisserIefour refroidir compl6tement,
essuyerlasalet6en excespuisreprograminerI'autonettoyage.Sile coded'anomaliereapparait,
prendrecontactavecun reparateurautoris_.
®
Lefour fait plusieurs bruitsfaibies.IIestpossibled'entendreles relaisdu four qui se mettent
en marche et s'arr6tent.Ceciest normal.
AIorsqueIefourse r6chauffeetse refroidit,iI estpossibled'entendredesbruits correspondant
Iadilatation et _lacontractiondespi_cesm6talliques.Ceciestnormalet n'endommagepas
I'appareil.
_mn'yu ni hip ni affichage, o Le four estpeut-6tre en Mode Sabbat.Voir page 37.
_ SAb _ nmignotepuis
reste amm_m_.
• Le four esten modesabbat. Pourannuler,appuyersur Jatouche Clocket maintener-la
enfonceependantcinq secondes.
49

50
Gatantie complbte d'une ann6e - Pibces
et maiN-d'ceuvte
Dumnt une pCrioded'un (1} an _ comp[erde ladate
de J'achatinitial au detail toute piecequi se rev6ierait
ddec[ueuse dab desconditions normalesd'usage
menagersera repareeou rempJacCegra[ultement.
Residents ca nadiens
Lesgarantiesci-oessus couvrentun appareilJnstal[6
au Canada.seulements'il a 6t6 agr@ par bs agences
de tes_habiJitees(verification de la conformit6_ une
normenat_onaledu Canada},sauf si I'appareila 6t6
introduit au Canada_ I'occasiond'un changemen_ae
residencedesEtats-Unisvers b Canada.
Garantie JimitSe hers des Etats=Unis et
du Canada = PiSces seuiement
Pendantune pCrioded'un [1} an a cumpter de B
oa_ede l'achat m_t_alau ae[al, toute piecequl se
rCvCJeraitddectueuse dans desconditions normales
d'usage menagersera repareeou remplac@
gratuitement (pieceseulemen0;le propriCtare(_evra
assumer:ous lesautresfrais,y compnsfrais de main-
d'ceuvre,ae d@Iacement_de transport,ae
kilometrageet de diagnostic.Jecas r_ch@nt.
Lesgarantiessp4eifiquesformut@scJ-dessussont les
SEULESque le fabrieantaecorde.Cesgarantiesvous
conf_rentdes drnitsjuridiques@4eifiquese_vous
pouvez4galemenLiouird'autre5droits,vaflablesd'un
dtatb /'autre.droneprovince8 une autre.
Ne sont pas couverts par ces
gatanties ."
1= Les dommagesouderangementsdus _:
a=Mise en sewice,IJvraisonou entretieneffectu@incorrectemenL
b=Touter@aration,modification,alterationet tout rCgJagenon autorbCspar
le fabricant uu par un prestatairede serviceapres-venteagr66=
c=Accidents,mauvaiseutJIisationou usageabusif ou deraisonnable=
d=Alimentatiun6bctrique {tension,intensJt@incorrecte=
e=RCgIageincorrect d'une commande=
2= Les garantiesne peuvent6tre honor@ss[les numCrosdesCried'origine ont
6t6 enbv@, modi%s ou ne sont pasfacibment lisJbles=
3. Ampoules.
4. Appareilsachet@auxfins d'usagecommercialou industrie!.
5. Lesfrais de visited'un prestatairede serviceou de serviceapr@-vente
encouruspour bs raisonssuivantes:
a=Correctiond'erreursde raiseenservice=
b=initiation de rutilisateur _ I'emploide I'appareiL
c=Transportde I'appareiIaux Iocauxdu prestatairede service.
6= Dommagessecondairesou indirectssubis par toute personnesuite au non-
respectde ces garanties.Certains6tatsou provincesne permettentpas
rexclusion ou la limitation des dommagessecundairesou indirects;par
consequentIes Iimitationsouexclusionsci-dessuspeuvent nepas
s'applJqueravotre cas=
Si J'intervention d' n r parate r est
• Cuntacterle dCtaillantchezqui I'appareJla6t6 achetC,ou contacter
Maytag ServicesS_/service_ Jaclientelede Amana au 1-800-883-0304E.-U.
ou 1-866-587-2002au Canada,pour obtenir les coordonn@sd'une agencede
serviceagreCe.
• Veiller _ conserverlafacture d'achat pour justifier de Ia validit6 de la garantb.
Pourd'autres informationsen ce qui concerne lesresponsabiJit@du
propri6taire a I'egarddu servicesousgarantie,vuir Ietexte de la GARANTIE.
• Si Ie @taiJIantou I'agencede serviceaprCs-ventenepeut r@oudreie
probiCme,8crire _ Maytag ServicessM,attention : CAIR:_Center,RO.Box
2370,Cleveland,TN37328-2370ou tSJ@honerau 1_800_8_3_03e4 Eo_Uoo_
1_866_587_2ee2au Canada.
• Lesguides d'utJIisation,Ies manueJsde serviceet ies renseignementssur les
piecessont disponibbs auprCsde MaytagServicess_,servicea la clbntCle de
Amana=
emarq es :
Lorsde tout contact concernantun probl@_e,fournir I'Jnformationsuivante:
a. Nora,adresseet numdro det6I@honedu clbnt;
b. Num6rode mo@le et num_ro des6rie de I'appareil;
c. Noraet adressedu dCtaillantou de I'agencedeservice;
d. Descriptionclaire du problCmeobserve;
e. Preuved'achat [facturede vente}.
51

Estufa a Gas con Conttom 'Easy Touch' 5GO
Insttucciones Jmportantes
sobre Seguridad ..................................................... 53-57
Cocinando en maEstufa ......................................... 58-59
ControHes
Quemadores de Gas SeHados
Cocinando en el Homo .........................................60-69
Homeado
'Cook & HoHd'
'Cook & Hold' Diferido
Mantener Cdiente
Asar a HaParriHa
ParriHasdd Homo
Cuidado y Limpieza ............................................... 70-73
Procedimientos de Limpieza
IViantenimiento ....................................................... 74-75
Ventana y Luz dd Homo
Retiro de la Estufa a Gas
Locaiizaci6n y Soluci6n
de Avetias ................................................................ 76-77
Garantia y Servicio ....................................................... 79
Consumidor:%r favor Jeay conserveesta gu[apara re[erencia
futura.Conse_e e[ recibode compra y/o e! cheque 6ancelado
N0mem de Modelo
Ni:imerode Ser[e
Fecha de Cornp(a
Amana CustomerAss stance
i}800_843_0304E.E.U.U.
1_866%87-2002Canad_
(Lunes a Viemes,8_00a,m,a 8:00p.m. Hornde[ Este}
!ntemet:http://www.amana.com
Ennuestrocontinuo alan de mejorar!a ca!jdad y rendimientode
nuestroselectrodorn@tiCOS,puedeque sea necesariomodificar
Para J#fermacJ## sebre servicie, ver pbg#la 19.
Lea y siga todas las instrucciones antes de usar este
eiectrodom_stico para evitar el riesgo potencial de incendio.
choque electrico, lesion personal o da_io al ebctrodom6stico
como resultado de su uso inapropiado, Utilice este
ebctrodomestico soBmente para el prop6sito que ha sido
destinado segOn se describe en esta guia,
Para asegurar funcionamiento correcto y segaro: El
ebctrodom6stico debe sell instdado debidamente y puesto a
tierra poll un tecnico calificado, No intente ajustar, reparal
presta servicio o reemplazar nmguna pieza de este ebctro-
dom6stico a menos que sea espec#icamente recomendado en
esta guia, Todas las reparaciones deben ser reaiizadas por un
tecnico calificado. Pida al instahdor que b indique la
ubicaciOn de la valvula de cierre del gas y como cerrafla en
caso de una emergencia,
Siempre desenchufe el ebctrodom6stico antes de efectua
alguna reparacion,
Las advertencias e instrucciones importantes sobre seguridad
que aparecen en esta guia no est_n destinadas a cubrir todas
Ins posibbs circunstancias y situaciones que puedan ocurrir,
Se debe ejercer sentido comOn, precauci6n y cuidado cuando
instab, redice mantenimiento o haga funcionar el artefacto,
Siempre p6ngase en contacto con su distribuidor, agente de
servicio o fabricante si surgen probbmas o situaciones que
usted no comprenda,
Reconozca los simboJos, advertencias,
etiquetas de seguridad
Si no se sigue estrictamente Jainfermaci6n
prepercienada en esta gala, se puede preducir an
incendie e una e×plesi6n, eausande da_os materiales,
lesienes persenales e mertales.
No almacene ni use gaselina ni etres vaperes y
liquides inflamables en la vecindad de este
eJectrodom_stico o de cualquier otto.
QUE HACER SJ PERCIBE OLOR A GAS:
o No trate de encender ning_n artefacte°
, No toque ningun interrupter ei_ctrice.
• Ne use ningen tei_feno en su edificie.
• Llarae inmediatamente a su preveedor de gas
desde emtei_fene de un vecine. Sign las
instruccienes proporcienadas per el preveeder
de gas.
o Si no puede lecaiizar a su preveeder de gas,
liame amcuerpe de bemberes.
- La instalaci6n y reparaciones deben set efectuadas
pot un t_cnico caiificade, una agencia de
reparacienes e el preveeder de gas.
PODRIAN Causar bsi6n personal grave o mortak
una s!tuaci6n peligrosa. Los escapes de gas no pueden ser
PODRIAN causar lesi6n personal menos grave.
acuerdo con las inst[ucciones del fabdcante,
53
lnstrucciones Generates
o TOE}AS LAS ESTUFAS SE PUEDEN
VOLCAR Y CAUSAR LESmONES
PERSONALES
o INSTALE EL DISPOSITmVO
ANTIVUELCO mNCLUmDOCON LA
ESTUFA
o SIGA TODAS LAS INSTRUCCiONES
DE mNSTALACmON
ADVERTENCIA: Para reducir el riesgo de vueico den
ebctrodom6stico a causa de use anormal o debido a
peso e×eesivo en [a puer_ dei homo, es neoesario
asegurarlo mediante un dispositivo antivuelco
debidamente instalado=
Paraverificar si eI disposidvo est,1debidamente instaBdo, mire
debajo de la estufa con una linterna para asegurarse de que
uno de los tornflios niveiadores traseros este debidamente
enganchado en la ranura del soporte, El dispositivo antivuebo
asegura el tornfllo niveBdor trasero al piso cuando estd
debidamente enganchado, Esto debe verificarse carla vez
que la estufa sea movida,
Pa|'a Evita|" tin lncendie e
Da e Causado per el Hume
Asegurese de que se hayan retirado todos los materiabs de
empaque del ebctrodomestico antes de su use,
Mantenga el drea alrededor del ebctrodomestico libre y
exenta de materiabs combustibles, gasolina u otros vapores y
materiabs inflamabbs,
Si el ebctrodomestico es instalado cerca de una ventana, se
debe tener cuidado para evitar que las cortinas pasen sobre
los quemadores,
NUNCA deje articulos sobre la cubierta de la estufa, Elaire
caliente del respiradero puede encender los articulos
inflamabbs y aumentar la presi6n en los envases cerrados
hasta hacerlos reventar,
Muchos envases de tipo aerosol son EXPLOSIVOScuando son
expuestos al crier y pueden ser altamente inflamabbs, Evite
su use o su almacenamiento cerca del ebctrodom6stico,
Muchos pl_sticos son vulnerables al calor, Mantenga los
pl_sticos alejados de las piezas de la estufa que puedan estar
tibias o calientes, No deje articulos de pl_istico sobre la
cubierta de la estufa pues se pueden derretir o ablandar si
est_indemasiado cerca del respiradero o de un quemador
superior encendido,
Paraeiiminar ei riesgo de pasar sobre los quemadores
superiores calientes, no se deben guardar articulos en los
armarios que est_n directamente sobre la estufa, Si tabs
armarios son usados para almacenamiento, debe limitarse a
colocar articulos de use poco frecuente y que pueden
guardarse en forma segura en una _rea que est,1sujeta ai
calor proveniente de la estufa, Las temperaturas pueden no
set apropiadas para algunos art[culos, tal come liquidos
vol_itiles,limpiadores o sprays en aerosol,
En Case de lncendie
Apague ei eiectrodomestico y ia campana de ventiiaci6n para
evitar que las llamas se dispersen, Extinga las llamas luego
encienda ia campana para expuisar ei humo y ei oior,
• En la cubierta: Apague ei fuego o ia llama en una sart6n
con una tapa o una bandeja de hornear,
NUNCA levante o mueva una sartdn en llamas,
• En el homo: Apague ei fuego o ia llama cerrando ia puerta
dei homo,
No use agua en los incendios de grasa, Use bicarbonate, un
producto quimico seco o un extinguidor del tipo con espuma
para apagar un incendio o ia llama,
Segutidad para Ni es
armar!os que estjn sabre !a estufa o en el protector trasero
estda para alcanzar tales articu!os pueden lesionarse
seriamente,
NUNCA deje a los nixies solos o sin supervisi6n cuando el
electrodomestico est6 en use o este caliente,
NUNCA permita que los nixies se sienten o se paren en
ninguna parte del electrodomdstico pues se pueden lesionar o
quemar,
54
Se[esdebeensdiara losnifiosquee[e[ectrodom6sticoy
losutensHiosqueest_inen6[osobre6[puedenestar
caHentes,DejeenfdarlosutensHioscaHentesenun[ugar
seguro,fuerade[a[cancedelosnifiospequdios,Se[es
debeense_ara losnifiosqueune[ectrodom6sticonoesun
juguete,Nosedebepermitirquelosnifiosjueguenconlos
contro[esu otraspiezasde[aestufa,
NUNCAuselapuertadeesteelectrodom6st[cocomopelda_o
oas[entoyaquee[ electrodom6st[co se puede volcar, y causal
[es[onesgraves.
NUNCA use este e[ectrodom6stico como ca[dactor de area
o para elevar [a temperatura de [a habitac[6n. Esto puede
causar envenenamiento por mon6x[do de carbono y el
sobreca[entam[ento dell qorno.
NUNCA cubra nnguna rend[ja, agujero o canal en [a parte
inferior de[ homo o cubra la rej[[[a completa con materia[es
tamescomo el papel de a[um[n[o. Estoevita que e[ a[re fluya
a traves de[ homo y puede causar envenenam[ento por
mon6x[do de carbono. E[ pape[ de a[um[n[o tambi6n puede
contener el ca[or y producir un ries£ a de [ncendio.
NUNOA obstruya el flujo del a[re de combusti6n y de
vent[[ac[Oncubriendo las entradas o sa[[dasde a[re de[ homo.
Esto puede restring[r el acceso del a[re a los quemadores y
causar envenenamiento por monOx[dode carbono.
E[ respiradero de[ homo se encuentra debajo de[ protector
trasero,
Evite tocar e[ _rea de[ respiradero mientras e[ homo est6
encendido y durante varios minutos despu6s de haberlo
apagado, Algunas partes del respiradero y del _ireaque Io
rodea se calientan Io suficiente como para causar
quemaduras, Despu6s de apagar el homo, no toque el
respiradero o el area que Io rodea hasta que haya tenido
suficiente tiempo para enfriarse,
Otras superficies que pueden estar calientes incluyen la
cubierta, las superficies que est_indirigidas hacia la cubierta,
el respiradero del homo, la superficie cercana a la abertura
del respiradero, la puerta del homo y la _rea que la rodea,
y la ventanilla del homo,
No toque un foco de homo caliente con un pafio huJmedoya
que se puede romper, Si el foco se rompe, desconecte el
suministro el6ctrico al electrodom6stico antes de retirar el foco
para evitar un choque el6ctrico,
No uti[ice [a cubierta o e[ homo como dreas de
a[macenamiento para a[imentos o utensi[ios de cocina.
Seguridad Para Ceeinar
Siempre co[oque un utensi[io en un quemador superior antes
de encender[o, Aseg0rese de usar [a peri[[a correcta que
contro[a cada quemador superior, AseguJresede encender e[
quemador correcto y comprobar de queen efecto e[
quemador haya sido encendido, Cuando haya terminado de
cocinar, apague e[ quemador antes de retirar e[ utensi[io para
evitar exposici6n a [a llama de[ quemador,
Siempre ajuste [a llama de[ quemador superior de modo que
no se extienda m_s a[[_ de[ borde inferior de[ utensi[io, Una
llama excesiva es pe[igrosa, desperdicia energia y puede
dafiar [a estufa, e[ utensi[io o los armarios que est_in sobre [a
estufa,
NUNCR deje sin supervisi6n [a cubierta de [a estufa cuando
est6 cocinando, especia[mente cuando usa un ajuste de ca[or
alto o cuando est6 usando una freidora, Los reboses pueden
producir humo y los derrames de grasa pueden infiamarse,
Limpie los derrames grasosos tan pronto como sea posib[e,
No use ca[or alto durante periodos de cocci6n pro[ongados,
NUNCA ca[iente un envase cerrado en e[ quemador superior
o en e[ homo, La acumu[aci6n de presi6n puede hacer
exp[otar e[ envase causando una [esi6n persona[ grave o da_o
a [a estufa,
Use tomao[[as secos y gruesos. Los tomao[[as h0medos
pueden causar quemaduras a causa de[ vapor. Las toa[[as u
otros sustitutos no deben set usados como tomao[[as porque
olios pueden quedar co[gando a trav6s de los quemadores
superiores y encenderse o enredarse en [as piezas de [a
estufa.
Siempre deje enfriar [a grasa ca[iente que se ha usado en [a
freidora antes de intentar mover o manipularla.
No permita que se acumule grasa u otros materiales
infiamables en la estufa o cerca de ella, en la campana o en el
ventilador aspirador. Limpie la campana extractora con
frecuencia para evitar que la grasa u otros materiales
infiamables se acumulen en la campana o en el filtro.
Encienda el ventilador cuando cocine alimentos fiameados
debajo la campana.
NUNCA use vestimentas de materiales infiamables, ropa
suelta o de mangas largas cuando est6 cocinando. La
vestimenta se puede encender o enganchar en los mangos de
los utensilios.
55
SbmprecoIoqueBsparriiiasdeIhomoenlaposid6ndeseada
cuandoeIhomoest6frio. DesibelaparriihdeIhomohacia
afueraparaagregaroretiraraiimento,usandotomaoiBssecos
yresbtentes.SiempreeviteabanzardentrodeIhomopara
agregaro retiraraiimentos.Siunaparriiiadebesersacada
cuandoest,1todaviacaibnte,useuntomaoiiasseco.Siempre
@agueeIhomodespu_sdehaberterminadodecocinar.
TengacuidadocuandoabralapuertadeIhomo.Dejeque
escapeeIaireo eIvaporcaiienteantesdesacarovoiver
coIocareIaiimento.
ADVERTENCmASOBRELOSALIMENTOSPREPARADOS:
SigaBsinstruccionesdelfabricantedelosalimentos.Siun
envasedepldsticodealimentocongeBdoy/osutapase
deforma,secombao seda_iadealgunaotramaneradurante
lacocci6n,descarteinmediatamenteelalimentoy suenvase.
Elalimentopuedeestarcontaminado.
NUNCAusepapeldeduminioparacubrirunaparrilhdel
homoolaparteinferiordelhomo.Elusoincorrectopuede
resultarenunriesgodechoqueel6ctrico,incendiooda_oal
ebctrodomestico.UsepapeldeduminiosoBmentecomose
indicaenestaguia.
Utensilios Apropiados
Use sartenes con rondos pBnos y mangos que sean fdcibs de
tomar y que permanezcan frios. Evite usar sartenes u ollas
inestabbs, combadas que se pueden vobar fdcilmente u olBs
cuyos mangos esten sueltos. Ademas evite usar utensilios
especidmente pequeSos o sartenes con mangos pesados
pues ellos pueden ser inestabbs y vobarse fdcilmente. Los
utensilios que son pesados de mover cuando est_inIbnos con
alimento pueden tambien ser un peligro.
Asegurese de que el utensilio sea Io suficientemente grande
como para contener en forma debida los alimentos y evitar
derrames. El tamaSo es particuhrmente importante cuando
se utilizan freidoras. AseguJresede que el utensilio tiene
capacidad para ei voiumen de aiimentos que se va a agregar
ai iguai que para ia formaci6n de burbujas de ia grasa.
Para reducir a un minimo las quemaduras y que los materiales
inflamables y los derrames se enciendan debidos a contacto
no intencional con el utensilio, los mangos no deben
extenderse sobre el quemador superior adyacente. Siempre
gire los mangos de los utensilios hacia el lado o hacia la parte
trasera de la estufa, no hacia la habitaci6n donde puede ser
f_cilmente golpeados o alcanzados por los ni_os peque_os.
Nunca deje que un utensilio hierva hasta quedar seco pues
esto puede da_iar el utensilio y la estufa.
Siga las instrucciones del fabricante cuando use bolsas para
cocinar en el homo.
Solamente ciertos tipos de utensilios de vidrio cer_mico, de
ceramica o glaseados son convenientes para uso en la
cubierta de la estufa o en el homo sin quebrarse debido al
cambio repentino de temperatura. Siga las instrucciones del
fabricante cuando use utensilios de vidrio.
Esteelectrodomestico ha sido probado respecto a su
rendimiento seguro usando utensilios de cocina
convencionales. No use ningun dispositivo o accesorio que no
haya sido espedficamente recomendado en esta guia. No use
tapas para cubrir los quemadores superiores, rejiiias para ia
cubierta de la estufa ni agregue sistemas de convecci6n para
hornos. El uso de dispositivos o accesorios que no son
expresamente recomendados en esta guia, puede crear serios
peligros de seguridad, resultar en problemas de rendimiento y
reducir la vida utii de los componentes de la estufa.
Seguridad de la Limpieza
Apague todos los controles y espere que se enfrien las piezas
de la estufa antes de tocarlas o limpiarlas. No toque las
rejillas de los quemadores o las _reas circundantes hasta que
elias no hayan tenido tiempo suficiente de enfriarse.
Limpie la estufa con cuidado. Tenga cuidado para evitar
quemaduras de vapor si se usa una esponja o un patio mojado
para limpiar los derrames en una superficie caliente. AIgunos
iimpiadores pueden producir vapores nocivos cuando se
aplican a una superficie caliente.
Homo Auto impiarmte
No deje a!imento ni utensilios de cocina, etc. en e! homo
durante el cicio de autolimpieza_
Limpie solamente las piezas que se indican en esta guia. No
iimpie ia junta de ia puerta. La junta es esenciai para un
sellado herm6tico. No restriegue, ddie, ni mueva la junta de
la puerta. No use limpiadores de homo de ninguna clase en el
homo ni alrededor de cualquier parte del homo autolimpiante.
56
Antes de la autolimpieza del homo, saque la asadera, las
parrillas del homo y otros utensilios y limpie los derrames
excesivos para evitar que se produzca demasiado humo,
Ilamaradas o llamas.
Es normal que la cubierta de la estufa se cdiente durante el
ciclo de autolimpieza, Pot Io tanto, se debe evitar tocar la
cubierta durante un ciclo de autolimpieza,
Aviso y Advertencia
lmportante Sobre Seguridad
La Propuesta 65 de la Ley de 1986 del Estado de California
Sobre Seguridad y Contaminad6n del Agua Potable (California
Safe Drinking Water and Toxic Enforcement Act of 1986_}exige
que el Gobemador de California publique una lista de las
sustancias que segun el estado de California causan c_incer o
ddio al sistema reproductivo y exige que las empresas
adviertan a sus dientes sobre la exposici6n potencid a tales
sustancias.
Se advierte a los usuarios de esta estufa que la combusti6n
del gas puede resultar en exposici6n de bajo nivel a dgunas
de las sustancias publicadas en la lista, induyendo benceno,
formddeh{do y hollin, debido principalmente a la combusti6n
incompleta del gas natural o de los combustibles de petr61eo
licuado. Los quemadores ajustados en forma debida
reducir_n la combusti6n incompleta. La exposici6n a estas
sustancias puede tambi6n set reducida a un minimo
ventilando los quemadores al exterior en forma adecuada.
Se advierte a los usuarios de este electrodom_stico que
cuando el homo est,1funcionando en el cido de autolimpieza,
puede haber exposici6n de bajo nivel a dgunas de las
sustancias indicadas en la lista, induyendo mon6xido de
carbono. La exposici6n a estas sustancias puede set reducida
a un minimo ventilando el homo al exterior en forma
adecuada, abriendo las ventanas y/o la puerta en la habitaci6n
en donde est,1ubicado el electrodom_stico durante el cido de
AVISO IMPORTANTE RESPECTO A LOS PAJAROS
DOMESTmCOS:
Nunca mantenga los p_ijarosen [a cocina o en [as
habitaciones donde puedan [[egar los humos de [a cocina. Los
p_jaros tienen un sistema respiratorio muy sensitivo. Los
humos producidos durante el cido de autolimpieza del homo
pueden set perjudiciales o mortales para los p_ijaros. Los
humos que despide el aceite de cocina recalentado, la grasa,
margarina y los utensilios antiadherentes recalentados pueden
tambi6n set perjudicides.
Conserve estas lnstrucciones para Referencia Futura
57
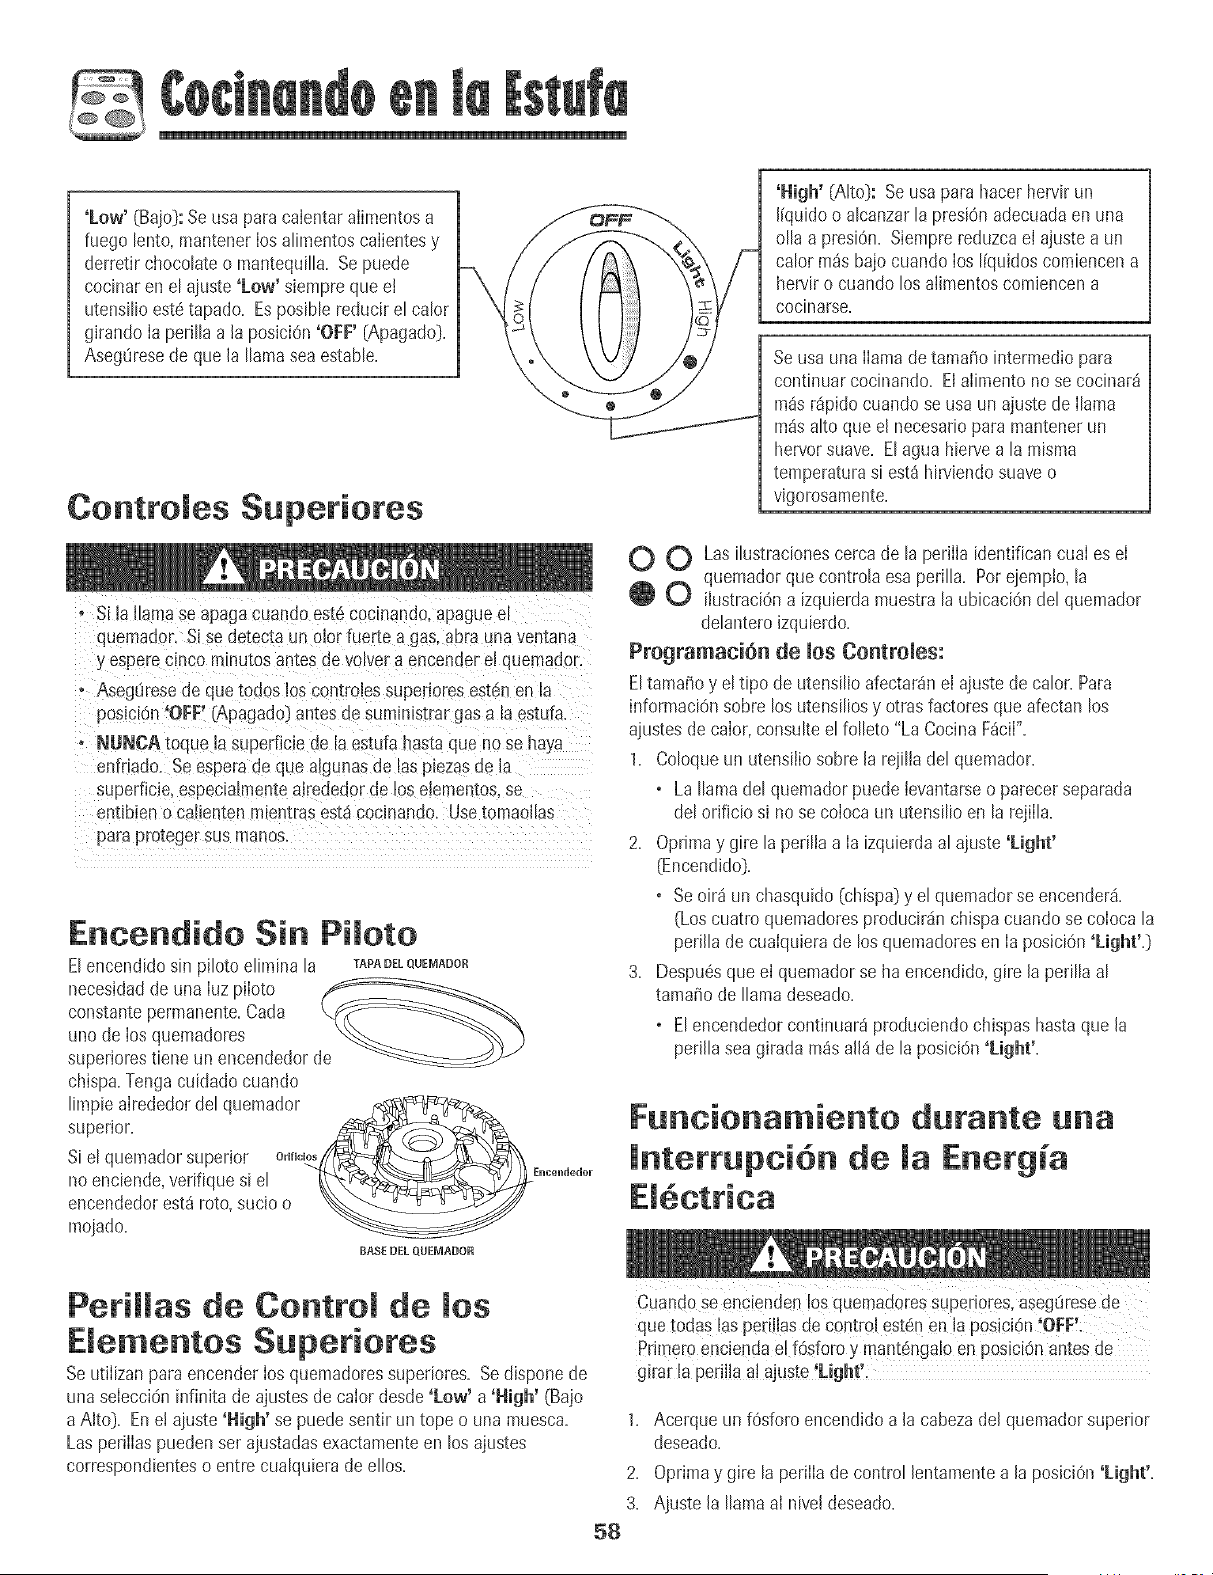
'LeW [Bajo):Seusa para calentaraiimentosa
fuego lento,mantenerIosalimentoscaiientesy
derretir chocolateo mantequilla+Sepuede
cocinaren el ajuste'Lew' s+emprequeet
utensilioest6tapado+Esposible reducirel calor
g+randoIaperilh a la pos+ciOn'OFF' (Apagado)+
Aseg0resede que la llamasea estable+
Controles Superiores
o Si la llamase apaga cuandoest6cocinando,apaguee!
quemador. Si se detectaun o+orfuerte a gas.aura una venmna
y esperec+ncommutosantesde volver a encendere+quemador.
+ Aseg0resedeque [odos los contro+essuperioresest6n en la
pos+ciOn'OFF' (Apagado)antesde summmtrargasa taestufa.
• NUNCA toque la superficie de la estufa hasmque no se haya
enfnado. Seesperadeque aigunasde las pmzasde la
superficie,especmlmenteairededorde tos elememos,se
entibien o cat+entenmmmrasestdcocinando. Usetomaollas
paraproteger sus manos.
Encendide Sin Pilete
Elencendidosin piloto elimina la TAPADELQUEMADOR
neces+daddeuna iuz piioto
constantepermanente+Cada
unode los quemadores
superiorestiene un encendedorde
chispa+Tengacuidado cuando
limpie alrededordel quemador
auperior.
Si el quemadorsuperior mm_V'#__/\\
no enciende,verifique si el -__E _ ,i_d_
encendedolestd roto,sucio o _.___
mojado,
B,_SEDEL QUEM,_DOR
PeriHas de Controm de rues
Emementos Superiotes
Seutilizanpara encenderlos quemadoressuperiores+Sed+sponede
una selecci6ninfinita deajustesde calor desde'Low+a 'High' (Bajo
a Alto). Ene! ajuste 'High' se puedesentir un tope o una muesca.
Las perilIaspuedenset ajustadasexactamenteen los ajustes
correspondienteso entre cualquierade ellos.
58
'High' (Alto): Seusa para hater hewir un
liquidoo alcanzarla presiOnadecuadaen una
olla a presiOn.Siemprereduzcael ajustea un
calor m_sbajocuando los I[r/uidoscomiencena
herviro cuandolos alimentoscomiencena
oooinarse.
Seusa una llamade tamafio intermedio para
continuarcocinando. Elalimentono secocinar_
m_sr_pidocuandose usa un ajuste de Ilama
m_salto que el necesariopara mantenerun
hervorsuave. El aguahiervea la misma
temperaturasi est_ hirviendosuaveo
vigorosamente.
O O Lasilustracionescercade la perilla identificancuaI es el
quemadorque controla esa pe+illa. Potejempto,la
O iiustraci6na izquierdamuestrala ubicaciOndel quemador
delanteroizquierdo.
Programaci6n de ruesContromes:
Eltamafio y el tipo de utensilio afectar_ne] ajuste de calor. Para
informaciOnsobre los utensiliosy otrasfactoresque afectan los
ajustesde calor, consulteel folleto "La Cocina F_ciI".
1. Coloqueun utensiiio sobrela rejilia del quemador.
• La %ma del quemadorpuedeievantarseo parecerseparada
del orificio s+no se coIocaun utensilio en la rejilla.
2. Oprimay gire la periliaa Ia izquierdaal ajuste 'Light'
(Encendido).
o Seoir_ un chasquido (chispa}y el quemadorse encender&
(Loscuatm quemadoresproducir_inchispacuando se coloca la
perillade cuaiquierade los quemadoresen la poslciOn'Light'.)
3. Despu6sque el quemadorse ha encend+do,gire [a perilla al
tamafio de llama deseado.
o Elencendedorcontinuar8produciendochispashastaque [a
peri[laseagirada m_s a[l_de la posici6n 'Light'.
Funcionamiento durante una
lnterrupci6n de Energia
cuandoseencienden!oSquemado_esSuper!Oreslasegoresede
quetodas las perillasde control est6n en la pos+ciSn,OFF:
PrJmeroenciendael fOsforoy mant_ngaloen posicJ6nantesde
girar la perilJaa] ajuste Light :
1. Acerque un f6sforo encendidoa la cabezadelquemadorsuperior
deseado.
2. Oprimay gire la perilIa decontrol lentamentea la posiciOn'Light'.
3. Ajuste la llamaai niveldeseado.
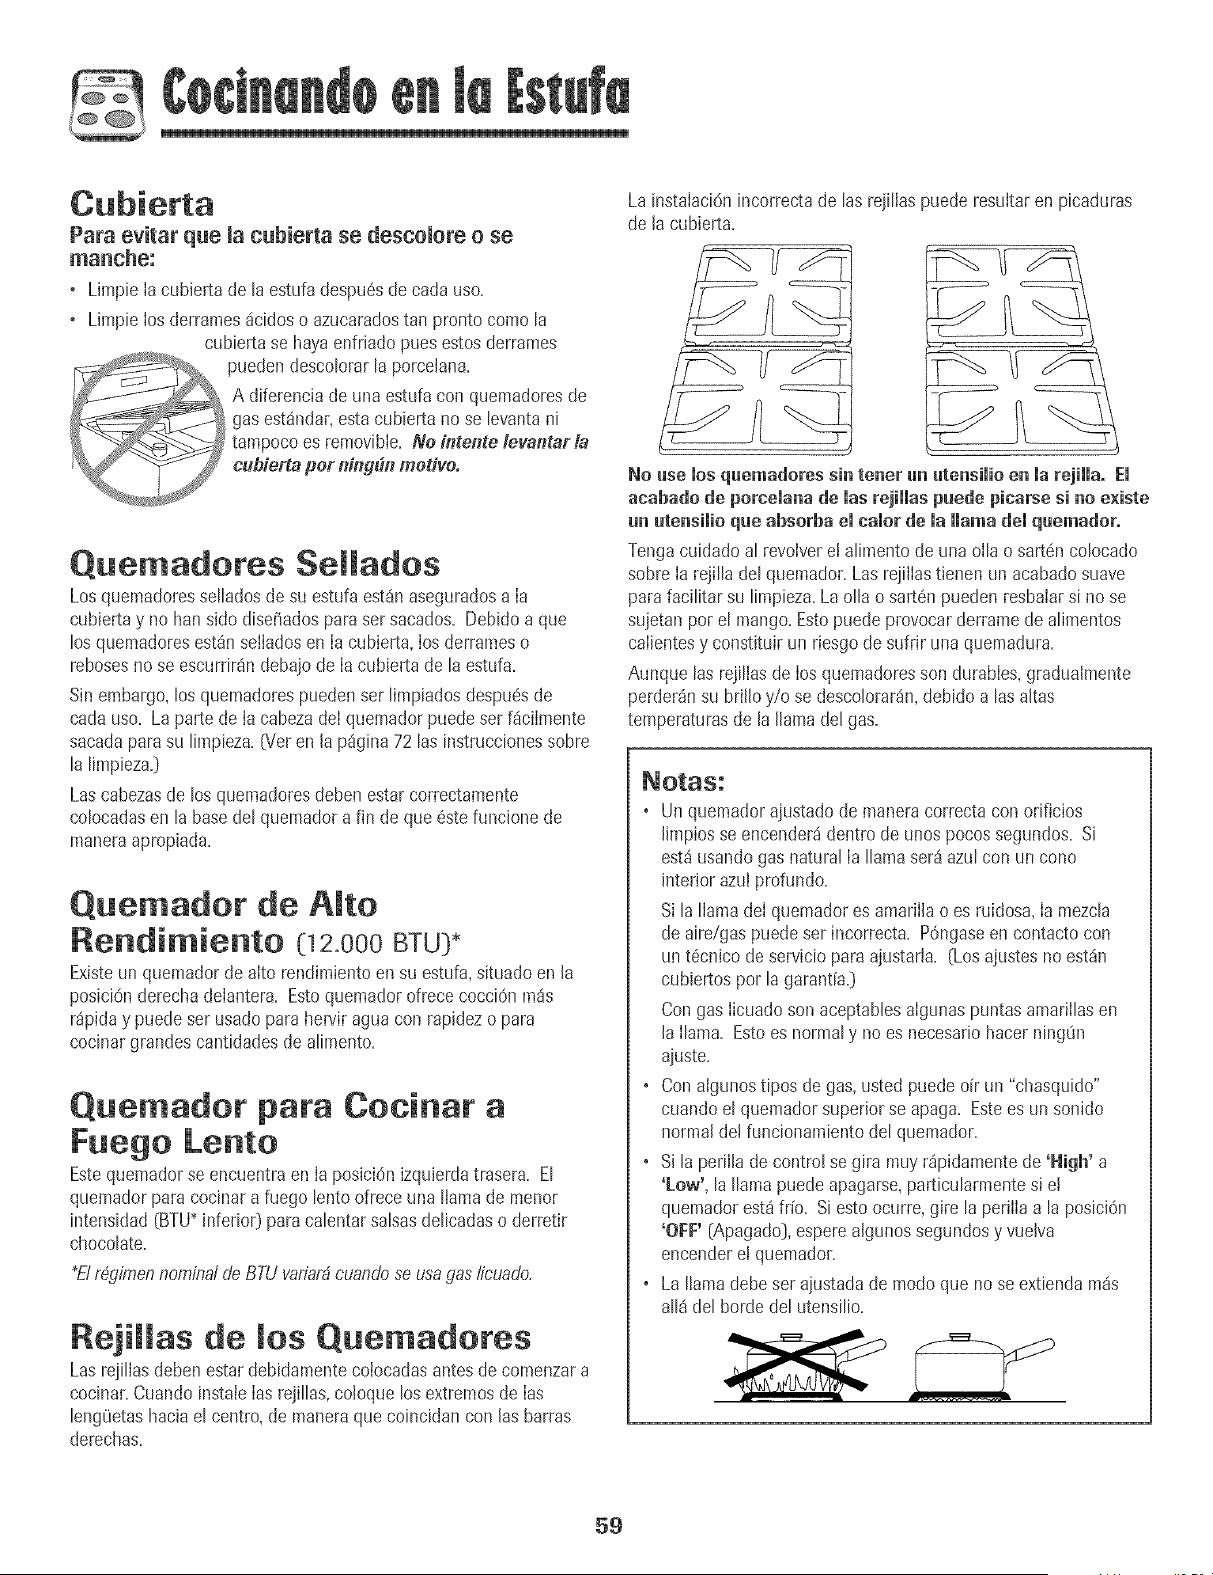
Para evitar que macubierta se descomore o se
• Limpie [acubierta de [aestufa despu6sdecada uso+
• Limpie [osderrames_cidoso azucaradostan pronto como ta
cubiertase hayaenfriado puesestos derrames
puedendescotorarta porcelana+
A diferenciade unaestufa con quemadoresde
gas estandar,esta cubiertano se tevantani
tampocoes removible. Ne iiite#te levalltar la
cubietta per ning_n metive.
Quemadores Selmados
Losquemadoressellados desu estufaest_naseguradosa [a
cubiertay no hart sido disefiadosparasersacados. Debido a que
los quemadoresest_nselladosen [a cubierta,los derrameso
rebosesnose escurdrSndebajo de [acubierta de laestufa.
Sin embargo,los quemadorespuedenset limpiadosdespuesde
carlauso. La parte de [a cabezadel quemadorpuedeset f_cilmente
sacadaparasu limpieza.(Vet en [a pSgina72 las instruccionessobre
la limpieza.)
Lascabezasde los quemadoresdeben estarcorrectamente
colocadasen la basedel quemadorafin deque 6ste funcionede
maneraapropJada+
Quemador de Amto
Rendimiento (12.oooBTU)*
Existeun quemadorde alto rendimiento ensu estufa,situadoen la
posiciOnderechadeiantera. EstoquemadorofrececocciOnross
r_piday puede ser usado paraherviragua con rapidezo para
cocinargrandescantidadesde alimento.
Quemador para Cocinar a
Fuego Lento
Estequemadorse encuentra en [a posici6n izquierdatrasera+El
quemadorpara cocinara fuego lento ofreceuna llama de menor
intensidad(BTU*inferio0para calentarsalsasdelicadaso derretir
chocolate+
+Rr6,gimennominalde BTUvaria,rbeuandoseusagas/icuado,
Rejimmasde ruesQuemadores
Lasreji[las debenestardebidamentecoiocadasantes decomenzara
cocinar+Cuandoinstaie[as rejillas,co[oquelosextremosde [as
lengOetashaciael centro, de maneraque coincidan con [asbarras
derechas+
La instalaci6nincorrectade las rejillaspuederesultaren picaduras
de [acubierta.
No use mosquemadores sin tenet un utensimioen marejimma.Em
acabado de porcemanade masrejimmaspuede picarse si no e×iste
un utensimioque absorba el taler de la Hamadei quemador.
Tengacuidado al revoiverel alimento de una oIla o sart6ncolocado
sobre Ia rejilla del quemador.Lasrejiilastienen un acabadosuave
parafacilitar su limpieza.Laolla o sart6n puedenresbaIarsi no se
sujetan por el mango.Estopuedeprovocarderramedealimentos
calientesy const+tuirun riesgode sufrir una quemadura.
Aunque las rejiliasde losquemadoresson durables,gradualmente
perder_nsu brilloy/o se descolorar_n,debidoalas altas
temperaturasde la llama del gas.
, Un quemadorajustado de maneracorrectacon orificios
limpiosse encender_dentro de unospocossegundos. Si
est_usando gasnatural Ia llama set8azul con un cono
interior azuiprofundo.
Si la llamadeI quemadores amarillao es ruidosa,Ia mezcla
de aire/gas puedeset incorrecta. POngaseen contactocon
un t6cnico de servicioparaajustarla. (Losajustesno estdn
cubiertos por la garant[ay
Con gas Iicuadoson aceptablesalgunaspuntas amarillasen
la Ilama. Estoes normaly noes necesariohacerning_n
ajuste.
+ Con algunostipos de gas,usted puede off un "chasquido"
cuando el quemadorsuperior se apaga. Estees un sonido
normal de! funcionamientodel quemador.
+ Si la perillade control segira muyr_pidamentede 'Nigh' a
'Low', la llamapuede apagarse,particularmentesi e!
quemadorest_ if[o. Si esto ocurre,gire la perilIaa la posicidn
'OFF' (Apagado),esperealgunossegundosy vuelva
encenderei quemador.
+ La llamadebe ser ajustadade modo que nose extienda m_s
all_ del bordedel utensilio.
59
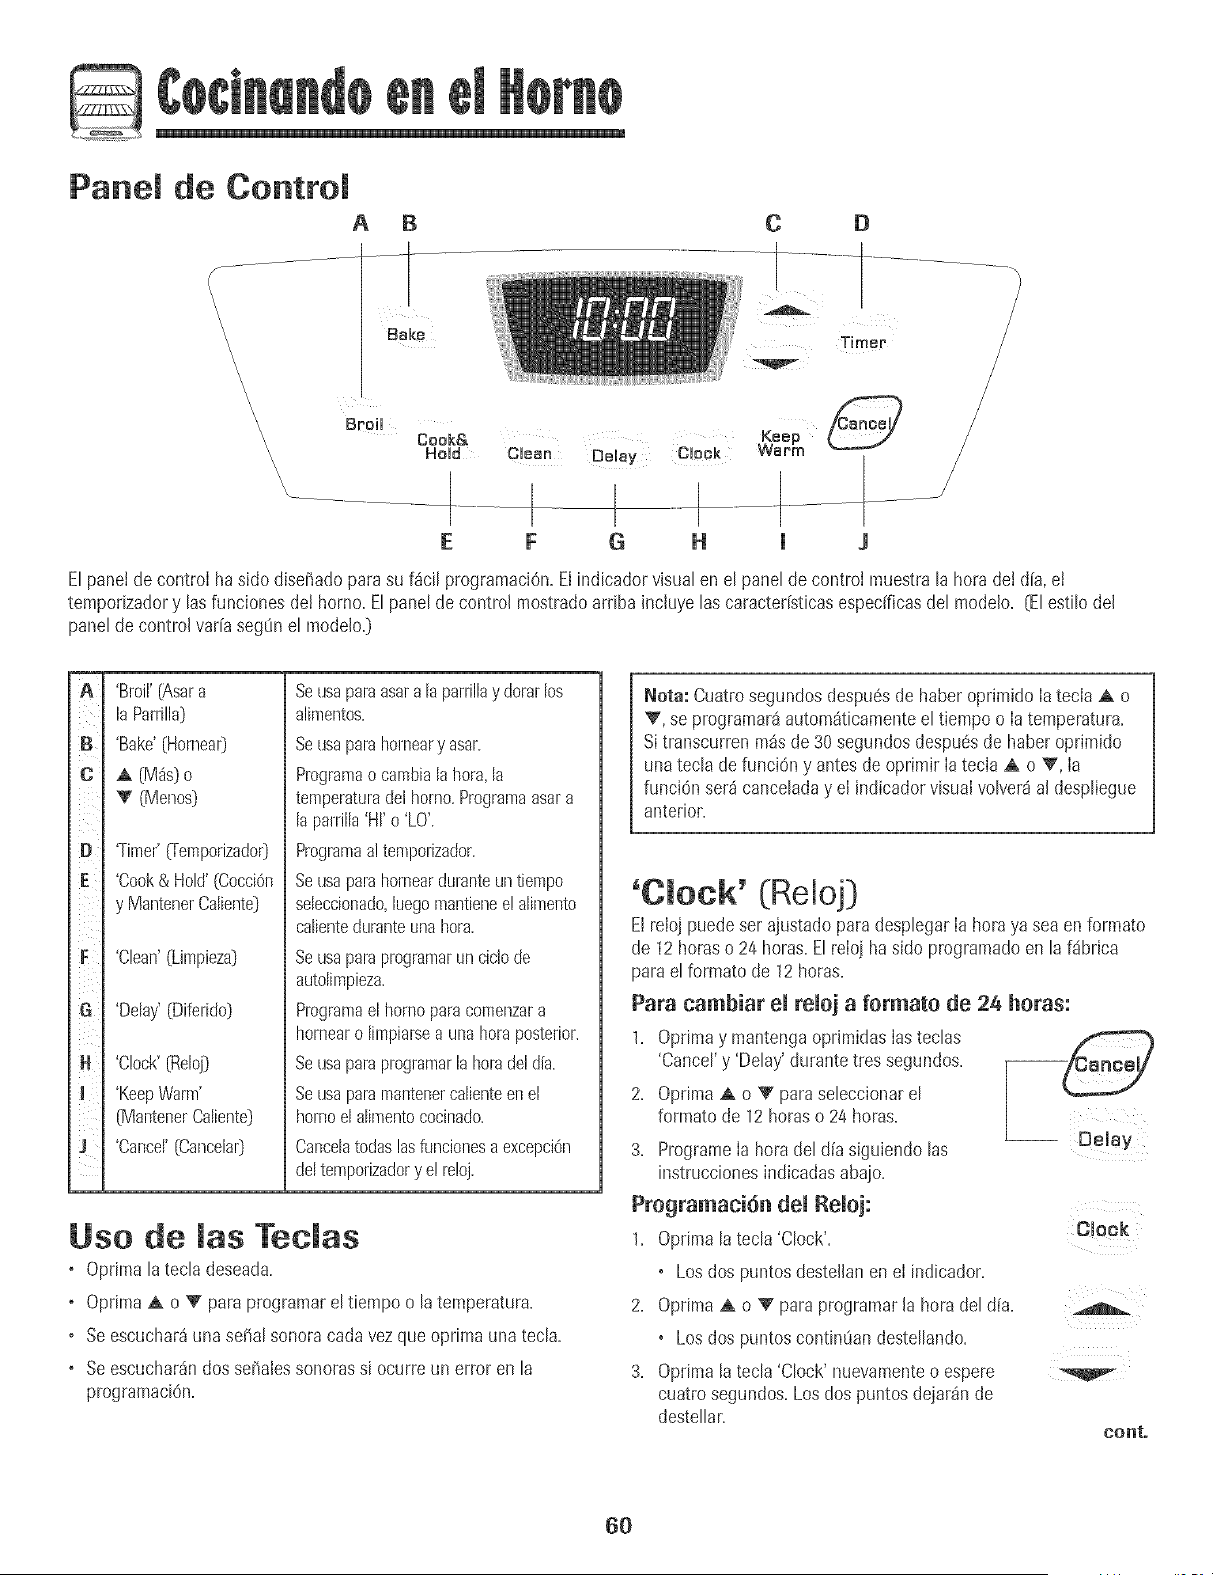
Panel de Control
A
\
\
\
\
\
\
\
\
\ Broil
\
\
\
\
B
Bake
Cook& Keep
Hold CUean Delay CHOCk Wmrm
+ t t lJ
E F G H 1 J
Elpanelde control ha sido diseiiadoparesu f_ci[ programaciOn.Elindbador visualen el panel de controi muest+ala hora det d[a,et
tempodzadory tasfunciones de! horno.Etpanetde control mostradoarribainc[uyelas caracteffsticasespecfficasdel modelo. [Elestilo del
panelde controlvaffa seg0n el modelo.)
A
B
C ¸
iL
D
E
!i_iiI
G ¸
H
I
m
'Broil'(Asara
laParrilla)
'Bake'[Hornea0
,a,[IVies}o
_' (Menos}
'Timer'_emporizado0
'Cook& Hold'(CocciOn
y MantenerCaliente)
'Clean'(Limpieza)
'Delay'(Diferido)
'Clock'[Reloj)
+KeepWarm'
[MantenerCal[ente)
'Cancel'[Cancela0
Seusaparaasara lapanillay dorarlos
alimentos.
Seusaparehorneary asar.
Programao cambialahora,la
temperaturadel horno.Programaasara
laparrilla'HI'o 'LO'.
Programaa!temporizador.
Seusaparehomearduranteun tiempo
seleccionado,luegoi-nantienee!alimento
calienteduranteunahora.
Seusapareprogramarunciclode
autolimpieza.
Programael homoparecomenzara
homearo limpiarsea unahoraposterior.
Seusapareprogramarlahoradel die.
Seusaparemantenercalienteenel
homoel alimentococinado.
Cancehtodaslasfuncionesaexcepci0n
deltemporizadory e!reloj.
Use de las Teclas
o Oprima latecla deseada.
o OptimaA o _' pareprogramareltiempo o la temperature.
o Seescuchar_unase_al sonoracada vezque oprima una tecla.
o Seescuchardndos se_alessonorassi ocurre un error en la
programaciOn.
Nora: Cuatrosegundosdespu6sde haberoprimido Iatecla A o
Y', se programar4autom4ticamenteel tiempo o latemperature.
Si transcurrenm4s de30 segundosdespu6sde haberoprimido
unatecla defunci6n y antes deoprimir Iatecla A o V', Ia
funciOnser_ canceladay el indicadorvisualvolver4aJdespliegue
anterior.
'Clock' (Reloj}
El relojpuedeser ajustado paredesplegarIa horaya seaen formato
de 12boreso 24 bores.Elreloj ha sido programaticen la f_brica
pareel formato de 12 horas.
Pare cambiar ei reioj a formate de 24 bores:
1. Optima y mantengaoprimidasIasteclas
'Cancel'y 'Delay'durante tressegundos.
2. OptimaA o '_' paresebccionar el
formato de 12boreso 24 horas.
3. ProgrameIa hora del dia siguiendolas
instruccionesindicadasabajo.
Programaci6n dei Reioj:
1. Optima la tecD 'Clock'.
• Losdos puntosdestellanen el indicador.
2. OptimaA o V pare programarla hora del d[a.
+ Losdos puntos contin0andestellando.
3. Oprimala tecla 'Clock' nuevamenteo espere
cuatrosegundos.Los dos puntosdejar_nde
destellar.
-- Delay
Clock
A
V
eonto
6O
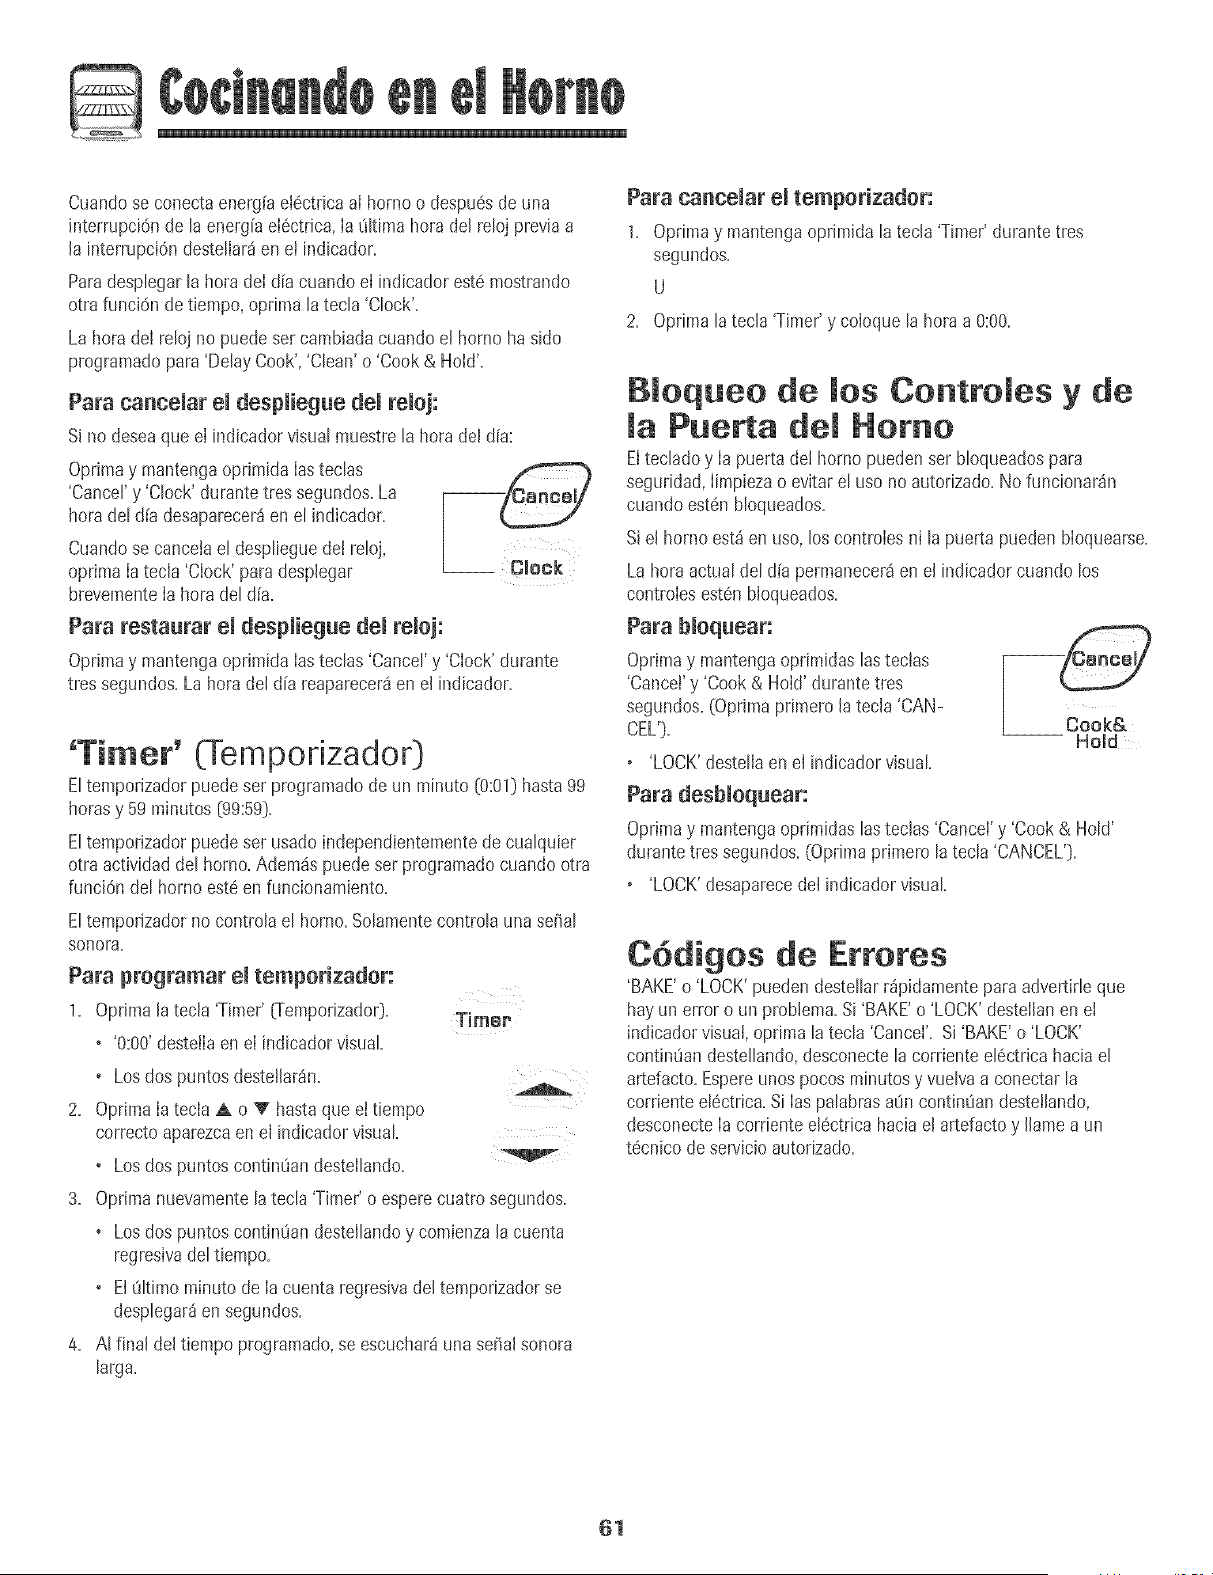
©
Cuandose conectaenergiael6ctdcaai horno o despu6sdeuna
interrupci6nde la energfaeI6ctrica,Ia (dtimahoradel reloj previaa
la interrupcidndestellar_en ei indicador.
Paradesplegarla hora deI aliacuando el indicadorest6 mostrando
otra funcidn de tiempo, optima latech 'Clock'.
La hora deI reloj no puedeser cambiadacuandoel hornoha sido
programatic para'DelayCook','Clean' o 'Cook& Hold'.
Para canceiar el despiiegue dei reioj:
Si nodeseaque eI indicadorvisualmuestre la hora del dia:
Oprimay mantengaoprimida Iasteclas
'Cancel'y 'Clock' durantetres segundos.La
horadel d[a desaparecer_enel indicador.
Cuandose cancetael desplieguede! reloj,
oprima Iatecla 'Clock' para desplegar
brevementeIa hora del dia.
Para restaurar emdespmiegue demremoj:
Optimay mantengaoprimida Iasteclas 'Cancel'y 'Clock'durante
tres segundos.La horadel d[a reaparecer8en el indicador.
__ Clock
'Timer' trTemporizador}
Eltemporizadorpuedeset programatic de un minuto {0:01}hasta99
horasy 59 minutos{99:59}.
Eltemporizadorpuedeset usado independientementedecualquier
otra actividaddel horno.Adem_spuede ser programadocuando otra
funciOndel homo est6 en funcionamiento.
Eltemporizadorno controlael horno.Solamentecontrolauna seSal
SOROFS.
Para programar emtemporizador:
1. OprJma[atecJa'Timer' [Temporizador). Timer
• '0:00'destella en eI indicadorvisual
• Losdos puntosdestelJar4n.
2. OprimaIatecla ,A o V hastaque el tiempo
correctoaparezcaen el indicadorvisual
• Losdos puntoscontinOandestellando.
3. Optimanuevamentelatecla 'Timer'o esperecuatro segundos.
• Losdos puntoscontinOandestellandoy comienzala cuenta
regresivadel tiempo.
• El _Sltimominuto de Ia cuentaregresivadel temporizadorse
desplegar_en segundos.
4. A! final del tiempo programatic,se escuchar_una sepalsonora
larga.
A
Para cancemar emtemporizador:
1. Optimay mantengaoprJmJda[a tecJa'Timer' durantetres
segundos.
U
2. Optima la tecla 'Timer'y coloque la hora a 0:00.
Bmoqueo de los Controles y de
la Puerta dem Homo
Eltecladoy Ia puertade! horno puedenser bloqueadospara
seguridad,Iimpiezao evitar el uso noautorizado.No funcionar_n
cuandoest6n bloqueados.
Siel homo est_ en uso,los controlesni la puerta puedenbloquearse.
La hora actualdel d[a permanecer_en el indicador cuando los
controlesest6n bloqueados.
Para bmoquear:
Oprimay mantengaoprimidas lasteclas
'Cancel'y 'Cook & Hold'durante tres
segundos.(Oprimaprimero latecla 'CAN-
CEL'). Cook&
Herod
'LOCK'destelIaen el indicadorvisual
Para desbmoquear:
Oprimay mantengaoprimidas lasteclas 'Cancel'y 'Cook & HoW
durantetres segundos.(Oprimaprimero la tecla'CANCEL').
'LOCK'desaparecedel indicador visual
C6digos de Errores
'BAKE'o 'LOCK'puedendestellarr_pidamenteparaadvertirle que
hay un error o un problema.Si 'BAKE'o 'LOCK'destellanen ei
indicadorvisual,optima la tecla 'Cancel'. Si 'BAKE'o 'LOCK'
contin_andestellando,desconectelacorrienteel6ctrica haciael
artefacto.Espereunos pocos minutosy vuelvaa conectarla
corrienteel6ctrica.Si Iaspalabrasa0n contin0andesteJJando,
desconectela cordente electdcahacia el artefactoy Jlamea un
t6cnico deservicioautorizado.
61
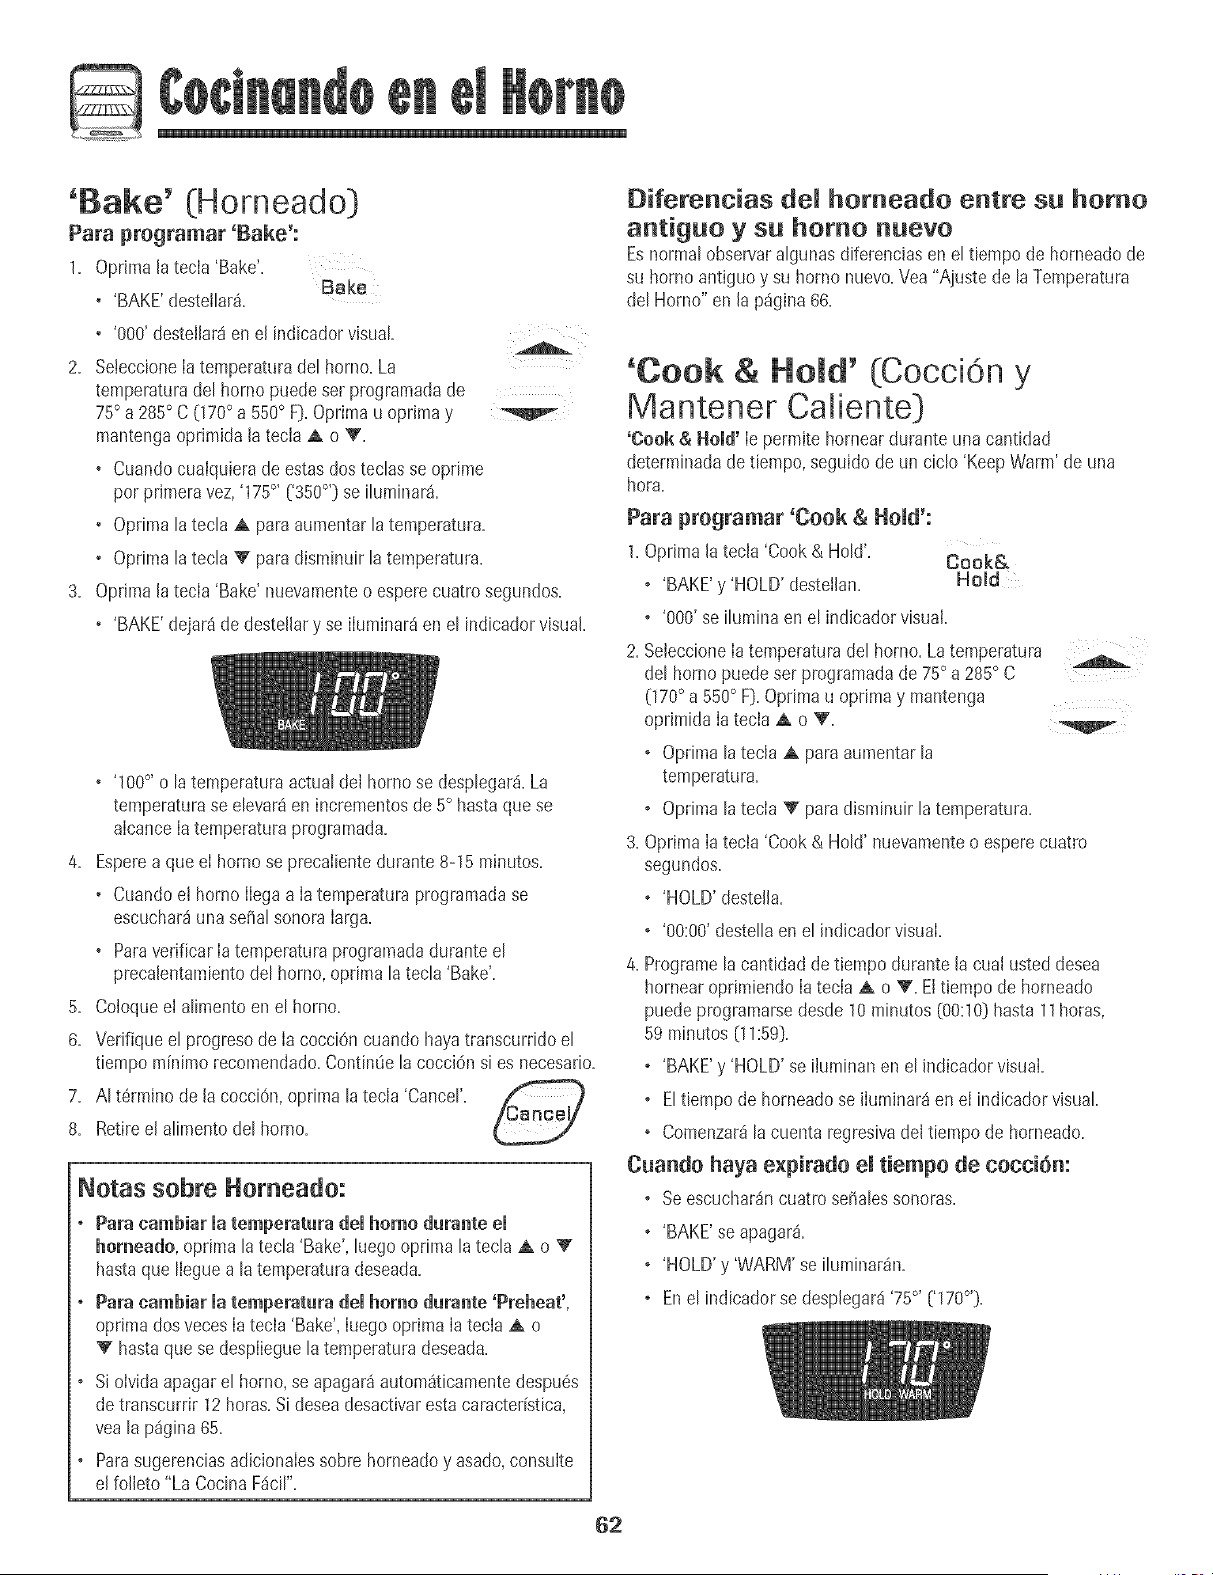
©
'Bake' (Horneado}
Para pregramar 'Bake':
1. Oprimalatecla 'Bake'.
Bake
+ 'BAKE'desteitar&
+ '000'desteilar8en el indicadorvisual
2. SeteccioneIatemperaturadot homo. La
temperaturadot horno puedeser programadade
75° a 285° C (170° a 550° F}.Oprimau oprima y
mantengaoprimida latecia A o V.
+ Cuandocualquierade estasdos techs se oprime
per primeravez,'175°, ('350°') se ituminar&
+ Optima ta tecta ,& para aumentar ta temperatura.
+ Optimalatecla V para d+sminuirla temperatura.
3. Oprh_a[atecla 'Bake' nuevamenteo esperecuatrosegundos.
+ 'BAKE'dejar_de destellary se iluminar_en el indicadorvisual.
+ '100°' o latemperaturaactualdel homose desplegar&La
temperaturase elevar8en incrementosde 5° hastaquese
alcanceIa temperaturaprogramada.
4. Esperea que eI homo se precalientedurante 8-15minutes.
+ Cuandoel borneIlegaa Iatemperaturaprogramadase
escuchar_una sei]al sonoraIarga.
+ ParaverificarIa temperaturaprogramadadurante el
precalentamientodel horno,optima la tecla 'Bake'.
5. Coloqueel alimento en el homo.
6. Verifique el progresode Ia cocciOncuando hayatranscurridoel
tiempo minima recomendado.ContinOela cocci6n si es necesario.
7. AI t6rmino de la cocciOn,optima la tecla 'Cancer
8. Retireel alimentodel horno.
Notas sabre Norneado:
, Para cambiar ia temperatara dei homo durante ei
homeado,oprima la tecla 'Bake',luegooprima la tecla ,& o 'V'
hastaque Ileguea latemperaturadeseada.
, Para cambiar matemperatura damhomo durante 'Preheat',
oprimados vecesIatecla 'Bake',Iuego oprimaIa tecla ,& o
V hastaquese desplieguelatemperaturadeseada.
, Si olvidaapagarel horno, seapagar_autom_ticamentedespu6s
detranscurrir 12horas.Si deseadesactivarestacaracterBtica,
yea la p_gina65.
, Parasugerenciasadicionalessabre horneadoy asado,consulte
elfolleto "La Cocina F_cil".
Diferenc+as tier homeado entre st+ homo
antigua y su homo nuevo
Esnormal obsewaralgunas diferenciasen el tiempo de horneadode
su horno antiguay su homo nuevo.Vea"Ajustede laTemperatura
del Horno" en la p%ina 6&
'Cook & Hemal'(Cocci6n y
Mantener Caliente}
'Oaok & Hold' Ie permitehorneardurante una cantidad
determinadadetiempo, seguidode un ciclo 'KeepWarm' de una
hera.
Para programar 'Cook & Hemal':
1+Oprimala tecla 'Cook& HoW+
Cook&
, 'BAKE'y 'HOLD'destetlan. Hold
, '000' se iluminaen el indicador visual.
2. SeleccioneIa temperaturadel horno.Latemperatura
del borne puedeser programadade 75° a 285° C
(170° a 550° F).Opdmau optima y mantenga
oprimida Iatecla ,& o V.
, Optima latecla ,& para aumentarla
temperatura.
, Optima [atecla 'V' paradisminuir [atemperatura.
3. OprimaIa tecla 'Cook& HoW nuevamenteo esperecuatro
segundos.
, 'HOLD'destella.
, '00:00'destellaenel indicadorvisual.
4. Programela cantidad de tiempodurante la cual usted desea
hornearoprimiendoIa tecla A o _'. Elt+empode horneado
puedeprogramarsedesde 10 minutes (00:10)hasta 11horas,
59 minutes (11:59).
, 'BAKE'y 'HOLD'se iiuminan en el indicadorvisual.
, Eltiempode horneadose iluminar_en eI indicadorvisual
+ Comenzardla cuenta regresivadeltiempo de horneado.
Cuande haya expirado el tiempe de cocci6n:
, Seescuchar_ncuatroseSalessonoras+
, 'BAKE'se apagar&
, 'HOLD'y 'WARM'se iluminar_n+
, Enel indicadorse desplegar_i'75°' ('170°')+
62
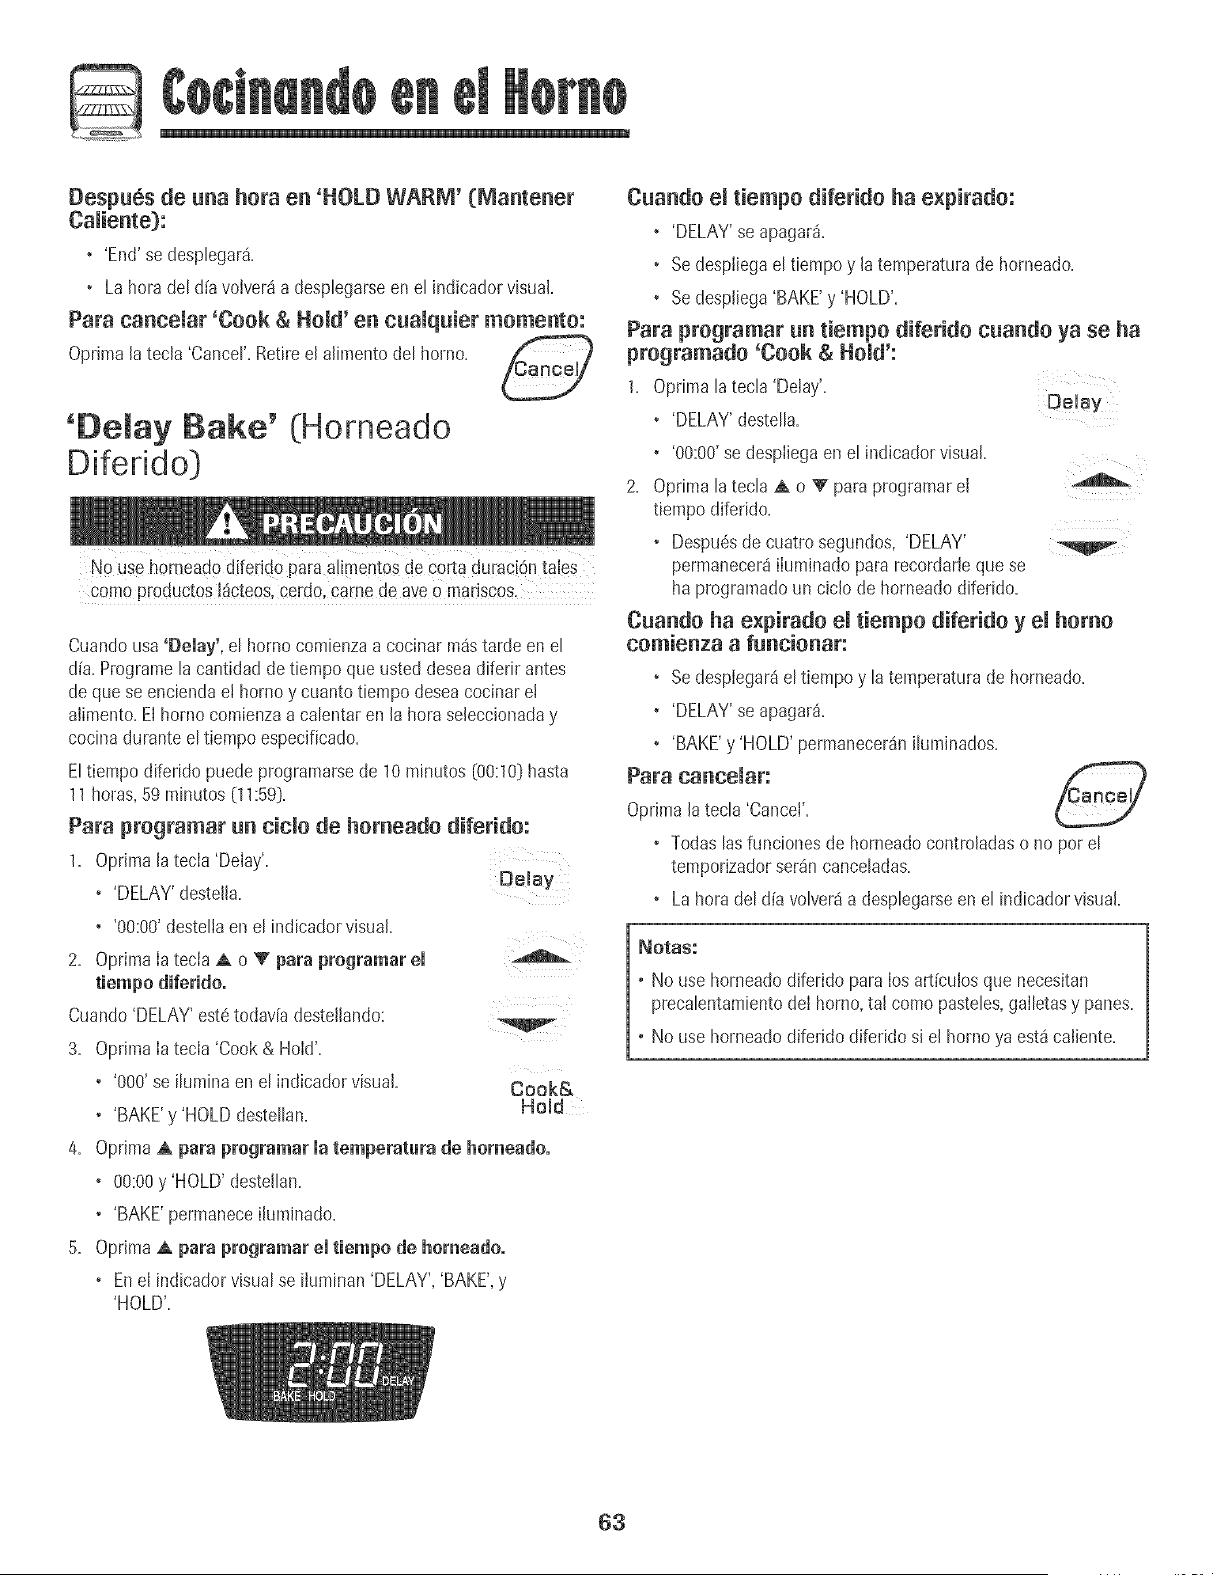
Despubsde una hera en 'HOLD WARM' (Mantener
• 'End'se desplegar4.
• La hera del d{avoIver4a desplegarseen el indicadorvisual.
Para cancemar 'Cook & Herod'en cuamquier memento:
Optimala tecJa'Cancer Retireel alimento del homo. C_ancey_
'Demay BaNe' (Horneado
Diferido)
No usehomeado d[ferido paraalimentosde cortaauraciOntales
comeproductos [4cteos,cerdo,came ae aveo mariscos.
Cuandousa 'Delay', el homo comienzaa cocinar m4starde en el
d[a.Programela cantidaddetiempo que usted deseadiferir antes
de que se enciendaet borne y cuantotiempo deseacocinaret
aiimento.El homo comienzaa calentaren [a hera seleccionaday
cocinadurante el tiempo especificado.
Eltiempo diferido puedeprogramarsede 10minutes (00:10]hasta
11horas,59minutes (11:59).
Para programar un ciclo de homeado diferido:
1. OprJmala tecla 'Delay'.
• 'DELAY'destella. Deley
• '00:00'destellaen el indicadorvisual.
2. Oprimala tecla ,A o 'V para #rogramar el
Cuando'DELAY'est6todav[adesteHando:
3. OptimaIatecla 'Cook & Hold'.
• '000'se ilumina en el indicadorvisual.
• 'BAKE'y 'HOLDdestellan.
V
Cook&
Hold
4. OprJmaA para programar la temperatara de heraeadeo
• 00:00y 'HOLD' destellan.
• 'BAKE'permaneceiluminado.
5. Oprima,A para programar el tiempe de heraeadeo
• Enel indicadorvisualse iluminan 'DELAY','BAKE',y
'HOLD'.
Cuando el tiempo diferido ha e×pirado:
• 'DELAY'se apagar_.
• Se despliegael tiempoy Jatemperaturade horneado.
• Se despJiega'BAKE'y 'HOLD'.
Para programar un tiempo diferido cuando ya se ha
programado 'Cook & Hold':
1, Oprima lateela 'Delay',
Delay
• 'DELAY'destella.
• '00:00'sedespiiegaen el indicadorvisual.
2. Oprima la tecla ,A o V" paraprogramarel
tiempo difelido.
• Despu6sde cuatrosegundos, 'DELAY'
permanecer4iluminadopara recordadeque se
haprogramadoun ciclo de horneadodiferido.
Cuando ha e×pirado el tiempo diferido y el homo
comienza a funcionar:
• Se desplegar4el tiempo y la temperaturade horneado.
• 'DELAY'se apagar4.
• 'BAKE'y 'HOLD' permanecer4niluminados.
Para cancelar:
OprJmala tecla 'Cancer
• Todas lasfuncionesde homeadocontroladaso no par el
temporizadorser4n canceladas.
• Laheradel aliavolver4a desplegarseen el indicadorvisual.
Notaa."
• No use homeadodiferido para Ios art(culosque necesRan
precalentamientodeI homo,tal come pasteles,gailetasy panes.
• No use homeadodiferJdodiferido si el homo ya est4 caliente.
63

'Keep Warm' (Mantener
Caliente])
Paramantenercatientesen forma seguraalimentoscalienteso para
calentarpanesy ptatos.
Para programar 'Keep Warm':
1. OprJmaIatecla 'Keep Warm'. Keep
_'8Pm
+ 'WARM'destella.
+ '000'se despliegaenel indicadorvisual.
2. SeteccioneIatemperaturade 'KeepWarm'.La
temperaturapara 'KeepWarm' puede ser
programadade 63° a 90° C (145° a 190° F).
Oprimau oprimay mantengaoprimida la tecla
Ao_'.
+ Cuandocualquierade estasdos tectasse oprime pot primera
vez,'75°, ('170°') se i[uminar&
+ Optimatatecta _¶aumentar latemperatura.
+ Optimalatecla '_' parad+sminuirla temperatura.
'WARM'y Iatemperaturase desplegar_nen el ind+cadorcuando
el ciclo'Keep Warm' est8activo.
Para gaBcemar 'Keep Warm':
1. Oprimalatecla 'Cancer P_,mnP.p.I]
2. Retireel alimentodel horno.
Notas sobre 'Keep Warm':
o ParacalidadOptimade los alimentos,losalimentoscoc+nados
en e! horno deben ser mantenidoscalientespor no m_sde 1a
2 horas.
o Paraevitarque losalimentosse sequen,cObraloslevemente
con papelde aluminioo unatap&
o Para camentarpanec+Hos:
- cubra Ievementelos paneeilloscon papel de ahminio y
colOqueloseneI homo.
- oprima 'KeepWarm' y Jatecla A para programar
75° C [] 70° F].
- calientedurante 12a 15minutos.
o Para caJentar plates:
- coloque 2 pilas de cuatro platoscada unaen el horno.
- oprima 'KeepWarm' y latecla A para programar
75° C [] 70° F].
- caliente los platosdurante cinco minutos,apague e! homo y
deje los platos en eI hornodurante 15minutosm_s.
- use solamenteplatos resistentesal horno,verifique con el
fabricante.
- no coloque Iosplatoscalientessobreuna superficiefr[a
pues el cambio r_pidode temperaturapuedecausarfisuras
superficiales.
64
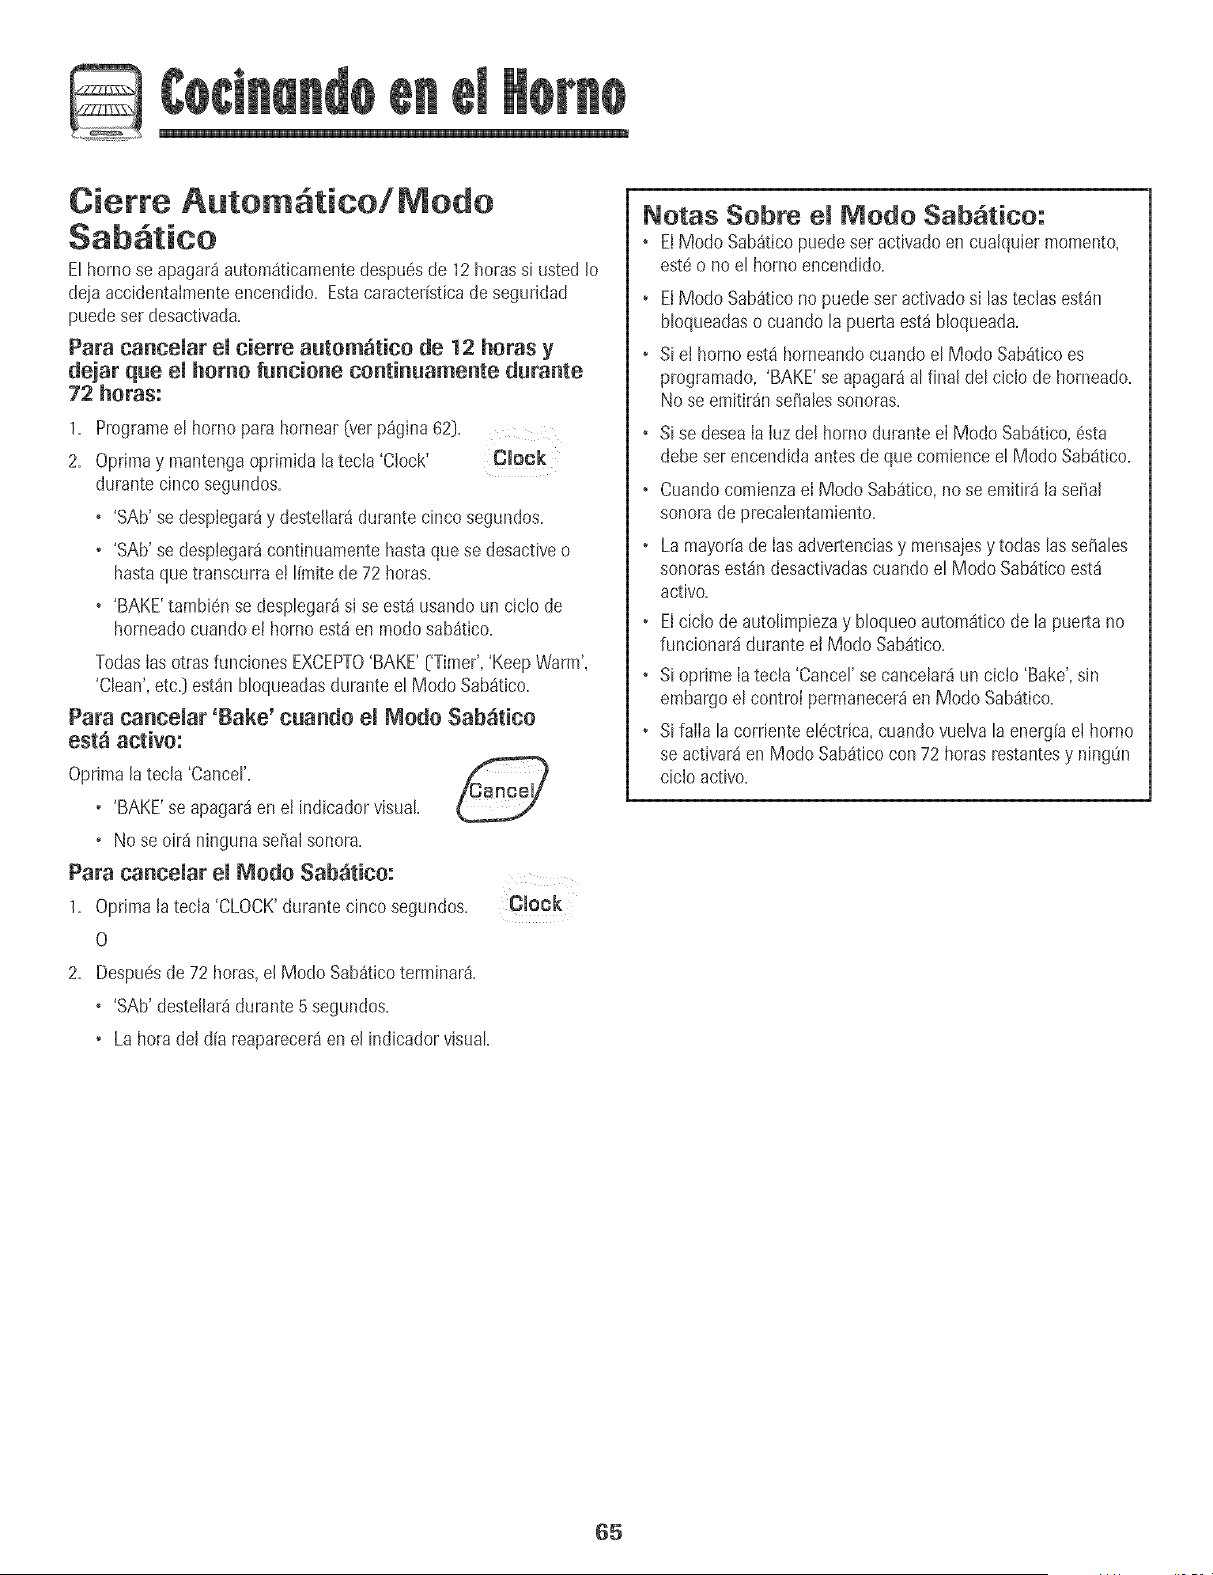
Cierte Autom tico/Mode
E[horno se apagar_autom_t[camentedespu6sde 12betassi usted [o
dejaaccidentaimenteencendido. EstacaracterFsticade seguridad
puedeset desactivada.
Para caaceiar el cierre autem_tice de 12 betas y
dejar que el herae fuacieae ceatiauameate duraate
72 horas:
1. Programeel homo para hornear(verp%ina 62}.
2. Optimay mantengaoprimida JatecJa'Clock' CJock
durantecinco segundos.
+ 'SAb'se despiegar_y destellar_durantecinco segundos.
• 'SAb'se desplegar_continuamentehastaquese desactiveo
hastaque transcurrae! I[mitede 72betas.
+ 'BAKE'tambi6nse desplegar_si se est_usando un ciclo de
horneadocuandoel borne est_en mode sab_tico.
TodasIasotrasfunciones EXCEPTO'BAKE'['Timer','KeepWarm',
'Clean',etc.) est_n bloqueadasduranteel Mode Sab_tico.
Para cancemar 'Bake' cuande emMode Sab_tice
est_ active:
Oprimala tecla 'Cancer.
• 'BAKE'se apagar_en et indicadorvisual
+ No se oir_ ningunaserialsonora.
Para cancemar el Mode Sab_tice:
1. Optima JatecJa'CLOCK'durante cinco segundos. CJock
O
2. Despu6sde 72 horas,el Mode Sab_ticoterminar&
+ 'SAb'destellar_durante 5 segundos.
• La hera del dia reaparecer_en el indicadorvisual
Notas Sobre Mode Sab tico:
+ ElModo Sab_ticopuedeset activadoen cualquier momento,
est6o no el hornoencendido.
+ ElMode Sab_ticonopuede ser activadosi las teclasest_n
bloqueadaso cuando la puertaest_ bloqueada.
+ Siel borneest8horneandocuando el Mode Sab_ticoes
programado, 'BAKE'se apagar_al final del ciclo de horneado.
No se emitir_nse_alessonoras.
+ Sise deseala luz del homo duranteel Mode Sab_tico,6sta
debeset encendidaantesde que comienceel Mode Sab_tico.
+ Cuandocomienzael Mode Sab_tico,nose emitir_ [aseffa[
sonorade precaientamiento.
+ La mayor[ade [asadvertenciasy mensajesy todas lassei_ales
sonorasest_ndesactivadascuandoel Mode Sab_ticoest_
active.
+ Elciclo de autolimpiezay b[oqueoautom_ticode la puertano
funcionar_durante el Mode Sab_tico.
+ Sioprime [atecia 'Cancel'se cancelar_un cicio 'Bake',sin
embargoel control permanecer_en Mode Sab_tico.
• Si falIa la corrienteel6ctrica,cuandovuelvalaenergiaet homo
se activar_en Mode Sab_ticocon 72 betas restantesy ningOn
ciclo active.
65
Ajuste de temperatura
La exactitudde las temperaturasde[ homo es cuidadosamente
probadaen laf_brica. Es normalnotar algunadiferenciaentre Ia
temperaturade horneado, entre un horno nuevoy un homo antiguo.
Con et correrdel tiempo+latemperaturadel horno puedecambiar.
Usted puedeajustar la temperaturadeI horno,si consideraquesu
homo noest_ horneandoo dorandoenforma correcta. Paradecidir
cuantodebecambiarIa temperatura,programeIatemperaturadel
homo a 15° C {25° F] m_salta o m_sbajaque Iatemperatura
indicadaen sus recetas,luego hornee. Los resultadosde Ia
"prueba" puedendarleuna idea de cuantoajustar la temperatura.
Ajuste de la temperatura del homo: .............
1. Oprimalatecla 'Bake'. Bake
2. Programe280° (550°) oprimiendola tecla A.
3. Optimay mantengaoprimida Ia tecla 'Bake'
durantevariossegundoso hasta que0°
aparezcaen el indicadorvisuai.
Si Iatemperaturadel hornoha sido previamenteajustada,el
cambioaparecer_enel indicadorvisual. Porejemplo,si la
temperaturadel horno fue reducidaen 8° C 05° F) el indicador
mostrar_'- 8°' ('-15°':).
4. OprimaIatecla A o V paraajustarla temperatura.
Cadavez que se oprimeuna tecta, Iatemperaturacambiaen
3° C [5° FD.LatemperaturadeI homo puedeser aumentadao
disminuidaen 3° a 20° C (5° a 35° F}.
5. Lahora del d[a reaparecer_autom_ticamenteen el indicador
visual
No necesitareajustar latemperaturadel horno si hayuna falla o
interrupcidndeenerg[ae!6ctrica. Lastemperaturasde asara la
parrillay limpiezano puedenser ajustadas.
Cambio de la temperatura
de °F/°C
1. El ajustede f_brica de la medidadetemperaturaes Fahrenheit.
2. Paracambiaretajuste,oprima y mantengaoprimidasIas teclas
'CANCEL'(Anula0 y 'Bake' (Hornear:)al mismotiempodurante
tres segundos.
3. Escuchar_unasepal sonoray el ajuste actual [°F o °C) se
desplegar_en la pantalla.(Sino se realizaningOncambio, la
estufa regresar_al ajuste actualdespuesde 30segundosD.
4. Paracambiare!ajuste,oprima la tech A o V. Oprimala
nuevarnentepara regresaral ajusteanterior.Esperecinco
segundosy el ajuste se guardar_.
66
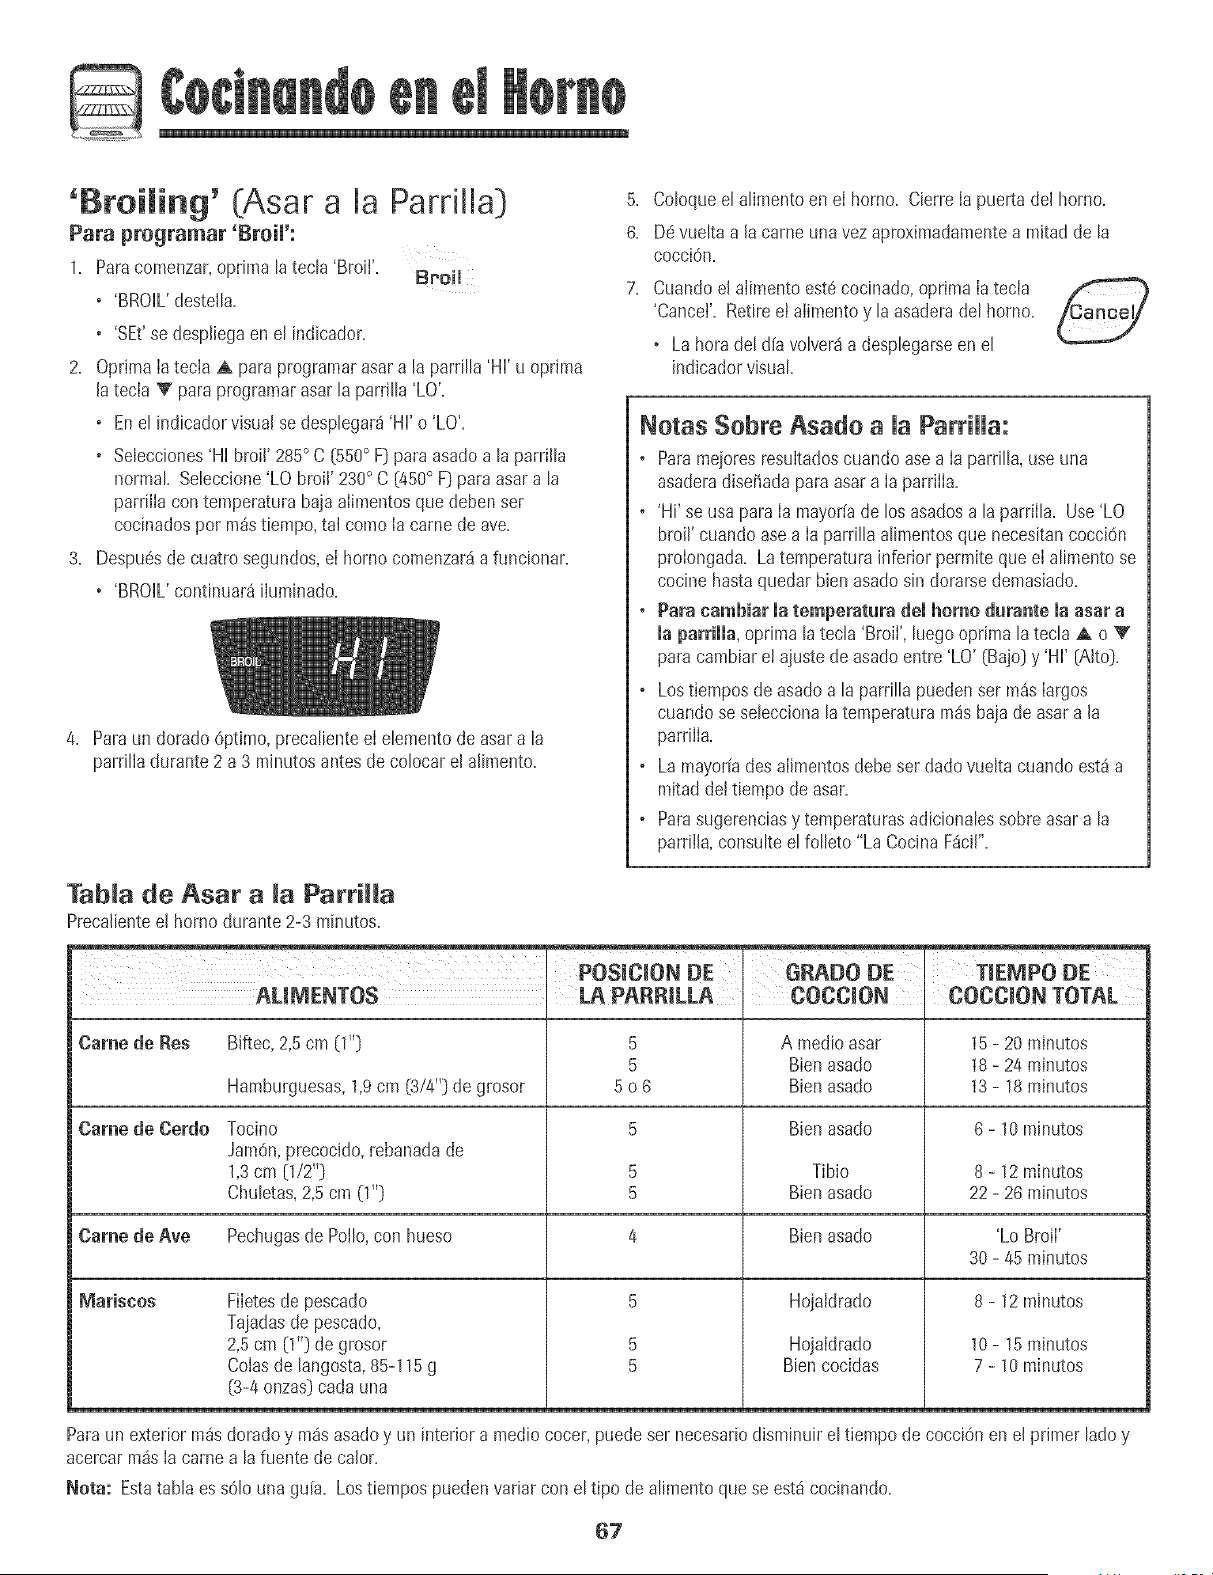
D
'Broiling' (Asar a ia Pardi[a)
Para programar 'Broi[':
1+ Paracomenzar,oprima [a tecta'Broil'+
BPOH
+ 'BROHL'destella+
o 'SEt'se desp[iegaen e[ indicador+
2+ Oprima[atecia A paraprogramarasar a [a parritta'HH'u oprima
[a tecia V paraprogramarasar [aparritta 'LO'+
o Ene[ indicadorvisualse desptegar_'HH'o 'LO'+
o Selecciones'HHbroil' 285° C [550° F)para asadoa [a parri[[a
normal SeIeccione'LO broil' 230° C (450° F}para asar a la
parriiiacon temperaturabaja alimentosque deben set
cocinadosper m_stiempo,ta[ come [a camede ave+
3+ Despuesde cuatrosegundos,e[ homo comenzar_a funcionar+
o 'BROHL'continuar_iiuminado.
4. Para un dorado 6pt[mo, preca[iente el eIemento de asar a [a
parriIla durante 2 a 3 minutes antes de co[ocar el a[imento.
5. Co[oquee[ aIimentoen el borne. Cierre[a puerta del borne.
6. D6vueItaa [acame una vezaproximadamentea mitad de [a
cocciOn.
7. Cuandoel alimento estecocinado,oprima latecia
'Cancel'. Retireel alimentoy [aasaderade[ homo.
+ La herade[ d[a voIver_a despIegarseen e[
indicadorvisual
Netas Sebre Asade a [a ParriUUa:
o Paramejoresresu[tadoscuando asea [a parrilla, useuna
asaderadisefiada para asara [a parriiia+
o 'Hi' se usa para [a mayoffade los asadosa [aparriila+ Use'LO
broil' cuando asea [a parrilla alimentosque necesitancoccidn
proiongada+Latemperaturainferior permite que el a[imentose
cocine hastaquedar bien asadosin dorarsedemasiado+
+ Para cambiar matemperatura demhomo durante maasar a
la parrilla, oprima [atec[a 'Broi[', [uegooptima [atecIa A o V
para cambiaret ajuste de asadoentre 'LO' (Bajo)y 'H[' [Alto[}+
o Lostiemposde asadoa [a parriIIapuedenser m_slargos
cuando se seIecciona[a temperaturam_s bajade asara [a
parriiia+
o Lamayoffades aiimentosdebeset dadovueltacuando est_ a
re[tadde! tiempode asar+
o Parasugerenciasy temperaturasadicionaIessobre asara [a
parrii[a,consuItee[ foIIeto "La CocinaF_ci["+
Tab[a de Asar a [a Parri[Ra
Preca[ienteel homo durante 2-3 minutes+
[ POS+C+ONOE GRADODE TmmPODE
AUNI£NTOS . L& PARRILLA COCCiON COCCiON TOTAL
Came de Res
Came de Cerdo
Biftec,2,5cm (1'+)
Hamburguesas,1,9cm (3/4") de grosor
Tocino
Jam0n,precocido,rebanadade
1,3cm [1/2"]
ChuIetas,2,5cm (1'+]
Pechugasde Polio,con hueso
5
5
506
5
5
5
4
A medio asar
Bienasado
Bienasado
Bienasado
Tibio
Bienasado
Came de Ave Bien asado
Mar[sees 5
5
5
Filetesde pescado
Tajadasde pescado,
2,5 cm (1") de grosor
Colasde [angosta,85-115g
(3-4onzas)cada una
Hojaidrado
Hojaidrado
Biencocidas
15 - 20 minutes
18 - 24 minutes
13 - 18 minutes
6 - 10 mhlutos
8 - 12 minutes
22 - 26 minutes
'Lo Broil'
30 - 45 minutes
8 - 12 minutes
10 - 15 minutes
7 - 10 minutes
Paraun exterior m_sdoradoy m_s asadoy un interior a mediococer,puedeser necesariodisminuir el tiempo decocciOnen el primer ladey
acercarm_s[a carnea [a fuente de ca[or.
Nora: Estatabia es sO[ouna guia. Lostiempos puedenvariar con e[ %o de alimento quese estd cocinando.
67
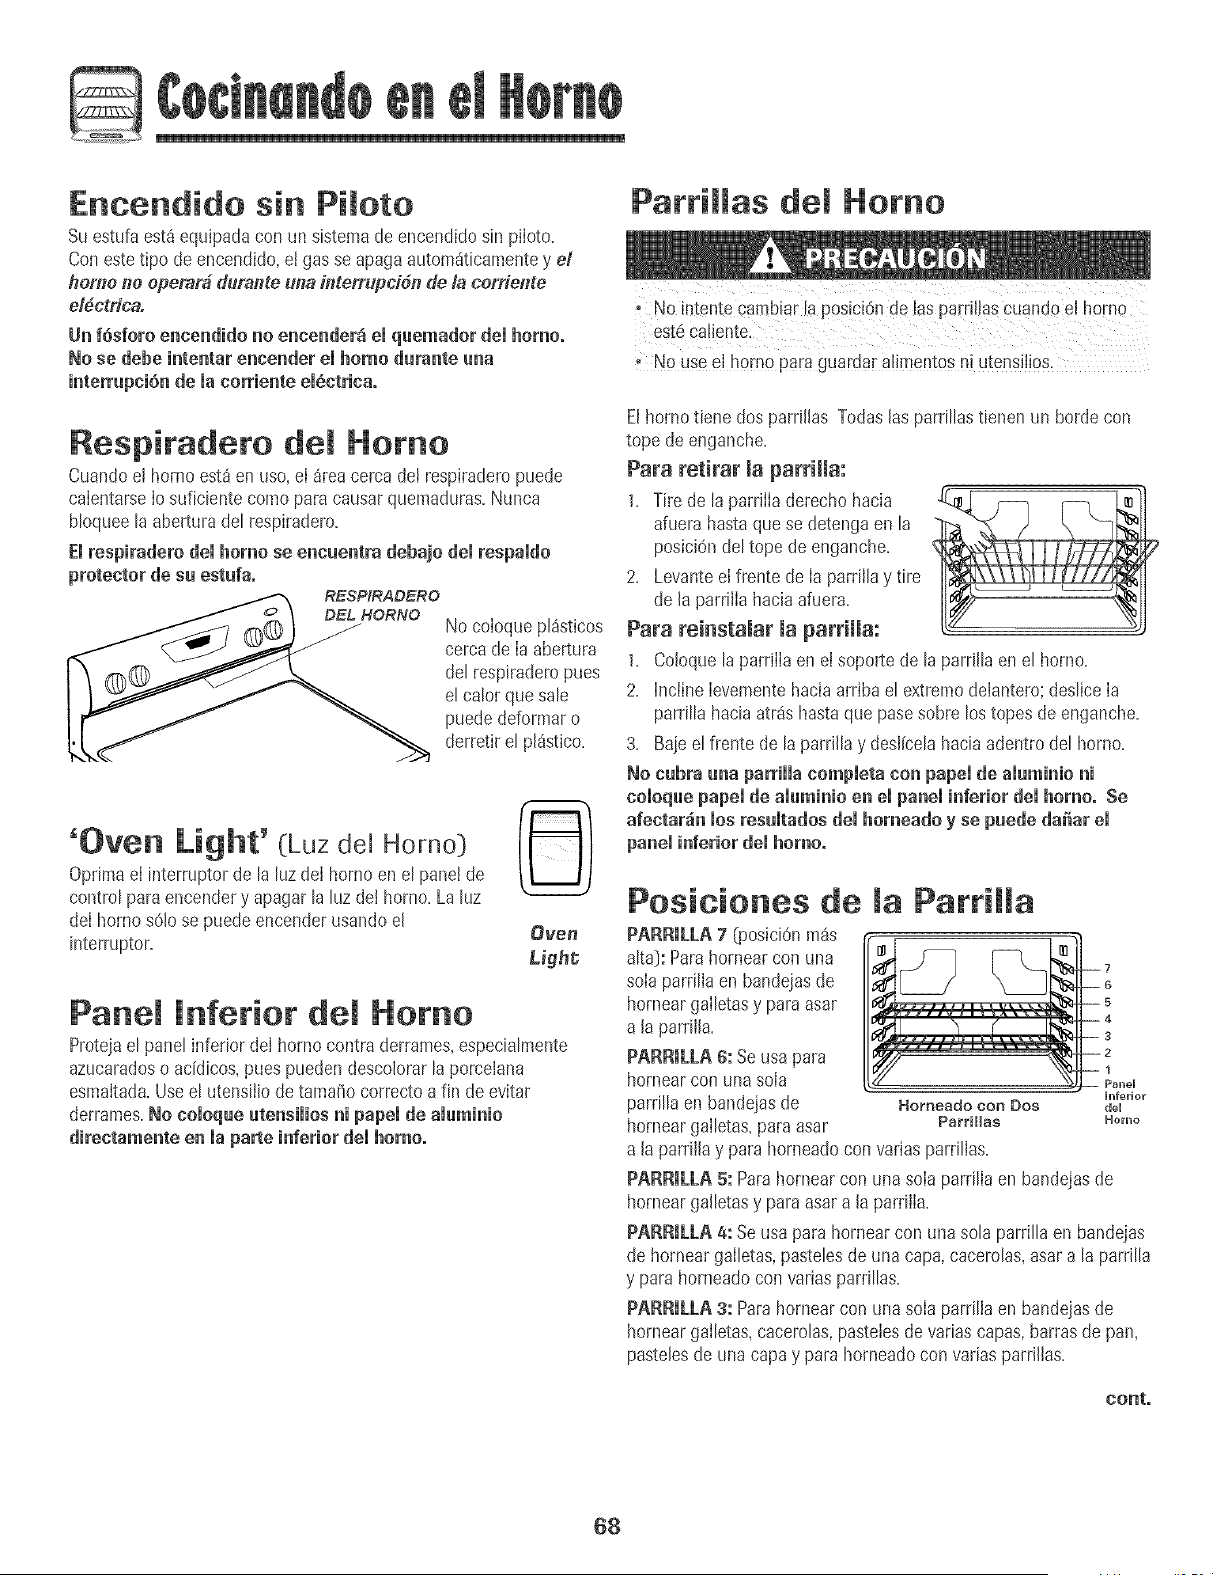
Encendido sin Pimoto
Suestufa est_ equipadacon un sistemade encendidosin piioto.
Con estetipo de encendido,e! gas seapagaautomSticamentey el
homo no opemr_ duranteuna interrupddn de la corriente
electric&
Un f6sforo encendido no encender_ el quemador del homo°
No se debe intentar encender el homo durante una
interrupci6nde la corriente elSctrica,
Respiradero deJ Homo
Cuandoe! horno est_ en uso,el _rea cercadet respiraderopuede
calentarseIosuficientecomo para causarquemaduras.Nunca
bloqueela aberturadel respiradero.
El respiradere demhomo se encuentra debajo demrespamdo
protector de su estufao
RESPIRADERO
No coioquepl_stieos
cercade Ia abertura
del respiraderopues
el calor que sale
puededeformaro
derretir el pl_stico.
'Oven Light' (Luz del Homo)
Oprima ei interruptorde la luz del homo en el pane!de
control para encendery apagar la luzde! homo=La luz
dei homo sOlose puede encenderusando el
Oven
interruptor. Light,
Panem inferior dem Homo
Protejael panel infedor deI homo eontraderrames,especialmente
azucaradoso addicos, pues puedendescobrar [aporceiana
esmaitada.Useel utensiiio de tama_ocorrectoa fin de evitar
derrames.No coioque utensimiosni papel de aiuminio
directamente en maparte inferiordemhomo,
Parrillas Homo
est6calbnte.
,No useeJhomo paraguardara!imentosni utensiJ!0S.
• No intenteca_!biar [apos[ci6nde [asparriliascuando el home
Elhornotiene dos parri[[as Todas[asparri[[astbnen un bordecon
tope de enganche.
Para retirar maparrimma:
1. Tire de [a parriiiaderecho hacia
afuera hastaquese detengaen la
posici6ndel tope de enganche.
2. Levanteelfrente de [a parrii[ay tire
de [a parrilia haciaafuera.
Para reinstamar maparriHa:
1. Co[oque[aparriiia en el soportede [a parri[[a ene[ homo.
2. incline [evementehacia arribael extremodeiantero;deslice[a
parrillahacia atr_s hastaque pasosobre los topes de enganche.
3. Baieel frente de la parri[lay desl[celahacia adentrodel homo.
No cubra una parrimmacompmetacon papei de amuminioni
coioque papei de aiuminio en el panel inferior dei homo° Se
afectar_in los resuitados del homeado y se puede da_ar el
panel inferior del homo°
Posiciones de ParriJJa
PARRJLLA7 (posiciOnm_s
alta}: Parahornear con una
sob parrillaen bandejasde
horneargailetasy paraasar
a la parriila.
PARRJLLA6: Seusa para
hornearcon una soia
parrillaen bandejasde
horneargailetas,para asar
ian£l
hlferior
Homeado con Dos del
ParriHas Herno
a la parriilay parahorneadocon variasparrilIas.
PARRmLLA5: Parahornearcon unasoIa parrillaen bandejasde
horneargalletasy paraasara la parrilIa.
PARRmLLA4: Seusa parahornear con una sola parrillaen bandejas
de hornear gaIletas,pastebs de una cap& cacerolas,asar a la parrilla
y para homeadocon varias parrillas.
PARRJLLA3: Para hornearcon unasola parrilIaen bandejasde
horneargalletas,cacerolas,pastebs devanascapas,barrasde pan,
pastelesde una capay parahorneadocon variasparrillas.
conto
68
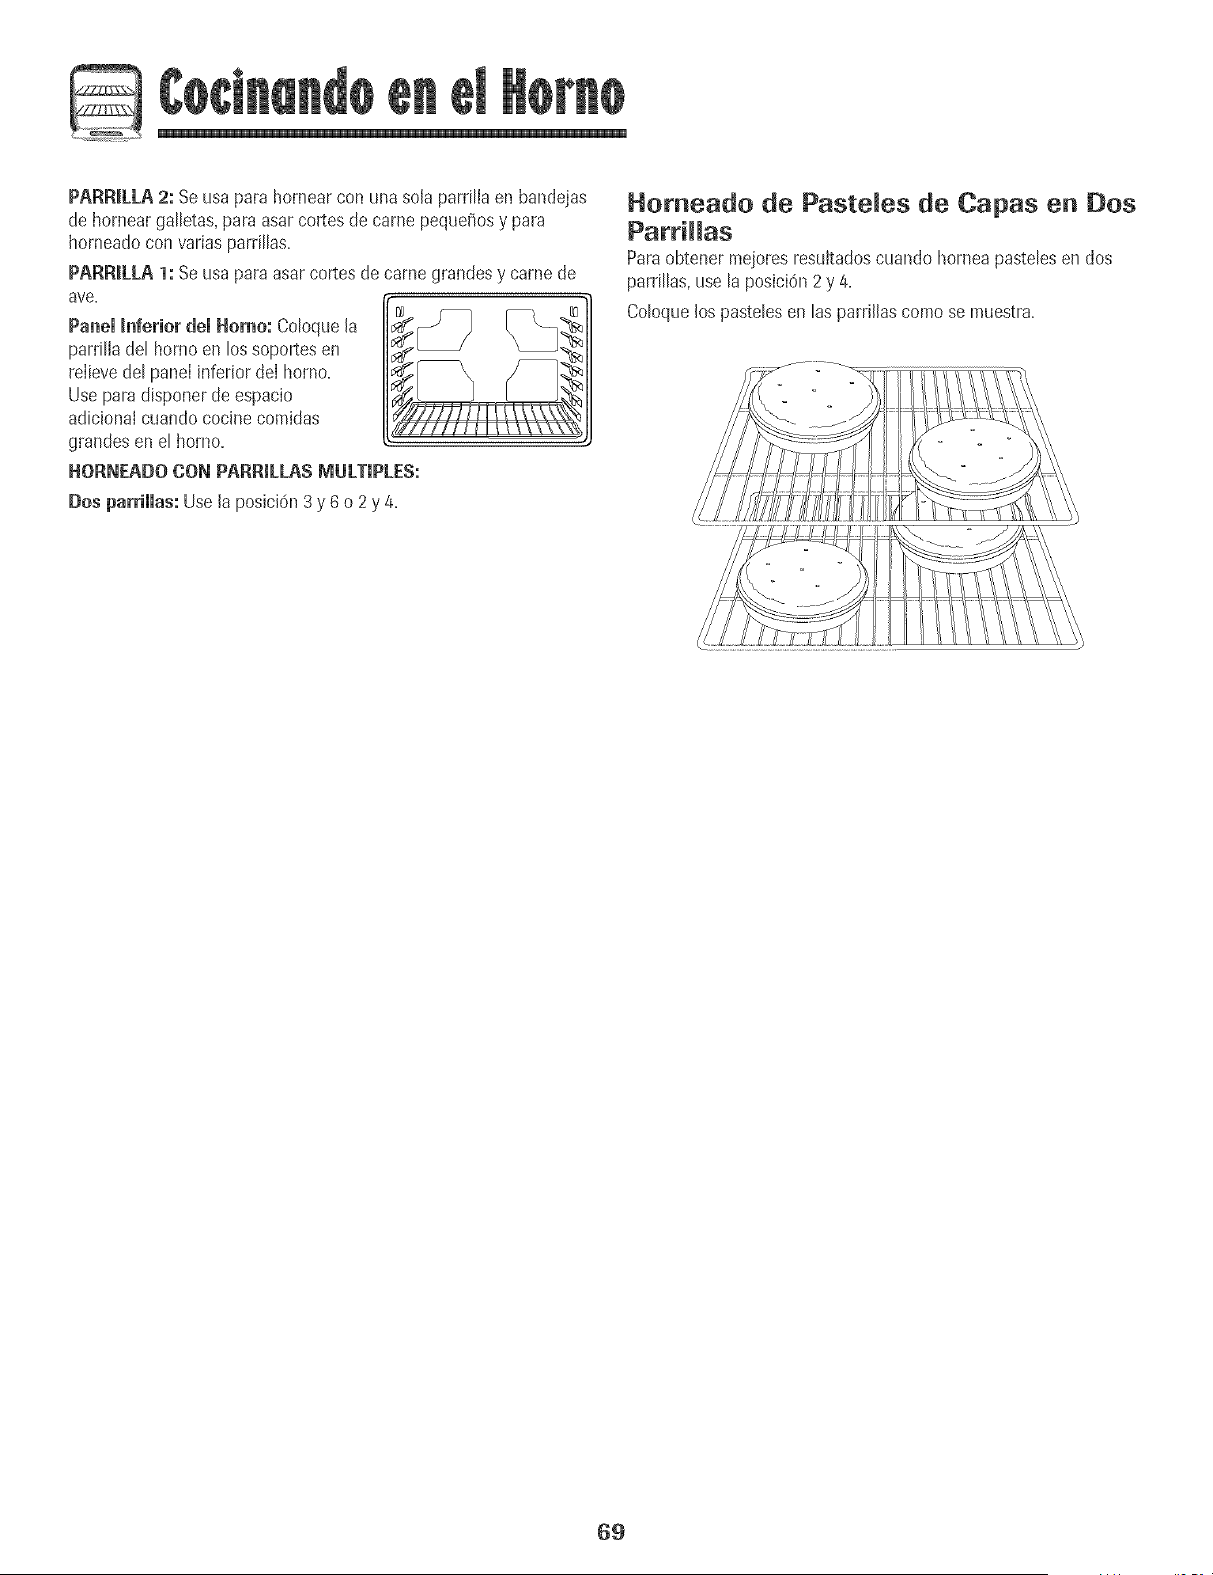
Q
PAflfl[U.A 2: Seusa para homear con una so[apard[laen bandejas
de homear gattetas,paraasar cortesde came peque_osy para
homeadocon varias parrittas.
PARfl[[_[.A1: Se usa paraasarcortes de camegrandesy carnede
8ve.
Panel Inferior demHomo: Cotoque[a
parri[iadet homo en tos soportesen
reiievedet parle[inferior de[ homo.
Useparadisponerde espacio
adiciona[cuando cocinecomidas
grandesen et homo.
HORNEADO CON PARRILLAS MULTIPLES:
Dos parrimmas:Use [a posici6n3 y 6o 2y 4.
Homeado de PasteJes de Capas en Dos
Parri[Jas
Paraobtener mejoresresuitadoscuando homea pastelesen dos
parrillas,use la posici6n 2y 4.
Coloquelos pastelesen las parri[[ascomo se muestra.
69
Homo Autolimpiante
+ Esnormal que Jasplezasdel homo se caiientenduranteel c_c!o
de autoJJmp+eza.
o ParaevJtarda[Io a Lapue[ta, no intente abnrtacuando JapaJaDra
'LOCK'est_desplegadaen eJindicadorvisual.
. Evite[ocar ia pue[ta, Javentanao ei area del +espJraderodel
homo duran[eun ciclo de Jimpieza
. No use limpiadoresde hornos comerclalesen _, acabadodel
homo r' airededorde Emguna plezadel homo pues pueae
da[mrel acabadoo las p_ezas.
Elcicio de autoiimpiezausatemperaturasde coccidn supedoresalas
normalespara iimpiar autom4ticamentetodo ei interior del homo+
Esnormal que ocurran Ilamaradas,humoo llamasdurante ia limpieza
si ei hornoest4demasiadosucio. Esmejor limpiar el horno
reguiarmenteenvezde esperarhastaque se hayaacumuiado
demasiadasuciedad.
Durantee! proceso de limpieza,ia cocina debeestarbien ventilada
paraeliminar los olores normalesasociadoscon la limpieza.
Antes de Ja AutoJimpieza
1. Apague ia iuz dei homo antes de la iimpieza.La luz del horno
puedefundirse duranteel cicio de iimpieza.
2. Retirelaasadera,todos ios utensi+iosy las parriilasdel homo+Las
pardllasdeI horno se descolorar_ny no se desiizar_nf_ciJmente
despuesde unciclo de autoiimpiezasi no son retiradasdel homo+
3. Limpieei marcodel homo,el marco de ia puerta,el 4rea fuera de
Jajunta de la puertay alrededorde laaberturaen lajunta de la
puerta,con un agentede iimpieza noabrasivotai como'Bon
AmP o con detergentey agua.El procesode autolimpiezano
Jimpiaestas_reas. Eliasdebenser iimpiadaspara evitarque la
suciedadse hornee duranteel ciclo de autolimpieza. [La junta es
el sello ahededorde la puertay ventana del homo+]
4. Paraevitarda_o noiimpie ni froteia _ _
junta situadaalrededorde la puerta del
homo+Lajunta est4dise_adapara
sellar herm6ticamenteel calor durante
el ciclo de Iimpieza.
5. Limpieel excesodegrasa o derrames
de Iaparte inferiordel homo+ Esto
evita humo excesivoo Ilamaradasdurante el ciclo de Iimpieza.
6. Limpie losderramesazucaradoso _cidostales como papadulce
(camote],tomates o salsasa basede Ieche.La porcelana
esmaltadaes resistenteal 4cido pero no a prueba de 4cidos. El
acabadode porcelanapuededescolorarsesl los derrames_cidos
o azucaradosno son Iimpiadosantesde un ciclo de autolimpieza.
Para programar 'Self-Clean' (Autolimpieza):
Nora: LatemperaturadeJbarrio debeser inferior a 205° C
(400° F) paraprogramarun ciclo de limpieza.
1. CierreJapuerta del homo+
2= Optimalatecla 'CIean'. Clean
o 'CLEAN'destetlaeneJh_dicadorvisual
3. Oprimala tecla A o V.
+ Se despJiega'CL-M [Limpieza- Suoiedad
Mediana].
Sila puerta no secierra, se oir4n seiiales
sonatasy Ia palabra 'door' se desplegar_en
el indicadorvisual Si la puerta no se cierra dentro de 45
segundos,la operacJdnde autolimpiezaser4 canceladay el
indicadorvolver4a desplegarJahoradeJalia.
4. Optimalatecla A o V para desplazarlos
ajustesde autoiJmpieza.
'CL-H' [Limpieza- SuciedadIntensa,4 horas}
'CL-M' (Limpieza- SuciedadMediana,3 horas}
'CL- L' (Limpieza- SuciedadLeve,2 horas}
AI seieccionareI nivel de suciedaddel homo se programa
autom_ticamentee! tiempo de Iimpieza.
5. Despu6sde cuatro segundos,el homo comenzar4a limpiar.
o Eltiempo de limpiezacomenzar4la cuentaregresivaen el
indicador.
+ 'LOCK'se desplegar4enel indicadorvisual.
o 'CLEAN'se desplegar_en el indicadorvisual.
Para diferir un cicJo de autoiimpieza:
1. Oprimalatecla 'Delay'. Delay
o 'DELAY'destella.
o '00:00'se desplegar4en el indicadol visual.
2. Oprimala tecla A o V paraprogramarla
cantidaddetiempo que usteddeseadiferir el
ciclo. Eltiempo diferido puede ser programatic
de 10 minutos (00:10}a 11horas,59 minutos
[11:59}.
3. CuandoDELAYest6destellando,oprh_alatecia Clean
'Clean'.
o 'CLEAN'destellar4.
Oprimala tecla A o V.
. 'CL-M' (Limpieza- SuciedadMediana)se
despJiegaen el indicador.
eoeto
+Losnombresde los productosson marcasregistradasde sus respectivosfabrJcantes.
70
5. OprimaIatecla A o V paradesplazarlosajustesde
autolimpieza.
'CL-H' (Limpieza- SuciedadIntensa,4 horas)
'CL-M' (Limpieza- SuciedadModerada,3 horas)
'CL-L' (Limpieza- SuciedadIeve,2 horas)
AI seleccionarel nivel de suciedadde+homo se programa
autom_ticamenteel tiempo de limpieza.
6. Despu6sde cuatro segundos,'CLEAN','DELAY'y 'LOCK'se
desplegar_nen e+indicadorvisual paraindicar que el borne esta
programadopara un ciclo de limpiezadiferido. El tiempodiferido
tambi_nse despliegaen el indicadorvisual.
Durante el tide de autolimpieza
Cuandoaparece'LOCK'enel indicador,Ia puerta no se puede abrir.
Paraevitardaho a la puerta,nofuerce Ia puertapara abrirtacuando
la palabra'LOCK'est_desplegadaen el indicadorvisual.
Humo y Oiores
Ustedpuede vet humoy sentir olor Iasprimerasvecesque el homo
es limpiado. Estoes normal y disminuir_con el tiempo.
Tambi6npuedeocurdr humosi e! homo est_demasiadosucio o si
se ha dejado unaasaderaen el homo.
Sonidos
A medidaque el horno se calienta,usted puede oir sonidosde
piezasmet_licasquese expandeny contraen. Estoes normaly no
dahar_el homo.
Si el homo ya ha sido programado para un cido de
limpieza y usted desea programar un tiempo
diferido:
1. Oprima[atecla 'Delay'.
• 'DELAY'desteila.
* '00:00'se desplegar_en el indicadorvisual.
2. OptimaIatecla A o V para programarla cantidad
detiempo queusted deseadiferir el ciclo.
Despu6sde cuatro segundos,'CLEAN','DELAY'
y 'LOCK'se desplegar_nen el indicadorvisual
paraindicar que el homo est_ programadopara una ciclo de
limpiezadiferido.Eltiempo diferido tambi6nse despliegaen el
indicadorvisual.
Cuando comienza el ciclo de autolimpieza:
• 'DELAY'se apagar&
• Eltiempo de limpiezase desplegarden el indicadorvisual.
Para cancelar el title de autolimpieza:
Oprimala tecla 'Cancer.
• El indicadorvisual quedaen blanco.
• TodasIasfuncionesson canceladas.
* La hora deldfa se despliegaen el indicadol visual.
Despu(!s del title de
autolimpieza
Aproximadamenteunahora despu6sde+fin deI ciclo de limpieza,
'LOCK'desaparecer& Lapuerta ahora puedeser abierta.
Amgunasuciedad puede quedar como una mereceniza 9ris tipo
polvo. Ret[relacon un paho h_medo. Si Ia suciedadpermanece
despu6sde limpiada,significa que el ciclo de limpiezano rueIo
suficientementelargo. La suciedadser_eliminada duranteel
proximociclo de limpieza.
Si masparriHas demhomo fueron dejadas en el homo y no se
desmizansuavemente despu6s de un cicmode mimpieza,Iimpie
las parrillasy los soportesde lasparrilias con una pequehacantidad
de aceite vegetalpara hacerdeslizarlascon mhsfacilidad.
Pueden aparecer mineasdemgadasen maporcemanaampasar per
cicmosde camentamientoy enfHamiento. Estoes normaly no
afectarhel rendimiento.
Ona descomoracihnbmancapuede aparecer despu6s demcicmo
de mimpiezasi mosamimentos_icidos o azucarados no fueron
limpiados antes dem¢icmode automimpieza.Estadescoloraci6nes
normaly no afectar_el rendimiento.
NOta$:
* Si se dejaabierta la pue_a del homo,Ia paIabra'door'
destellar8enel indicadorvisuaIy se escuchar_una sehal
sonora hastaque la puertasea cerraday la tecla 'Clean' sea
oprimidanuevamente.
* Si transcurrenm_s de cinco segundosdespu_sde oprimir Ia
tecia 'Clean'y antesde oprimir Ias teclas _ o V, el programa
volver_automhticamentea+despliegueprevio.
* Lapuerta de[ homo se daiiar_ si se fuerza paraabrirla cuando
la palabra'LOCK'contin0adespJegadaen e[ indicador.
71
Procedi ientos de Li pieza
Ase rose,eq.eel,ore0est6.pa .,oyq°ot0,as p e.aSeSt n
frgasantes de t0cario e [impiar[o. De este mode se evitar_ da_e y
posiblesquemaduras. * Losnombresde los productosson marcasregistradas
Paraevitarrnanchaso dec0!oraci6nlimpie e! homo desPU6Sdecarla uso. de sus respectivosfabricantes=
•* Para hacerpedidos, IIamea[ 1-877-232-6771EEUU=o
, Sise retira algunapieza,aseg0resede que seareinsta[adaen forma correcta, a[ 1-800-688-8408Canada=
P[EZA PROCED[M[ENTO DE L[[MP[EZA
Asadera e Nuaca cubra el inserto con papel de aiumildo pues este evita que la gmsa se escurra a la baadeja iaferior.
[nserto , Co[oqueun patio enjabonadosabreel insertoy [a bandeja;dejeremoiar paraso[tar[a suciedad=
, Laveen aguajabonosatibia=Use una esponjadefregar para quitar [a suciedadpersistente=
, La bandeiade asary e[ insertopuedenset [avadasene[ [avavajiIIas=
Tapas de Cabezas de Qnemadores Removibies
Quemadores y , Dejeenfriarel quemador=RetirelatapayI_velaenaguajabonasaconuna espanjade restregardepl_stico=Parasuciedad
Quemadoresde dificiL[impieconunaesponianoabrasivare[lenaconjabOno concremapara [impiezadecubiertas'CooktopCleaning
Gas Seiiados Creme'*(Pieza#20000001)**y una espon]a=
, No [as[aveenel [avavaji[lasni en un homo autoIimpiante=
Quemadores de Gas Seiiados
, L[mpieIoscon frecuencia=Dejeenfriar el quemador=Limpie conjab6n y una esponjade restregarde pI_stico=Para
suciedaddificil, limpie con una esponjano abrasivareiIenacon jabOn=No agrandeni modifiquelos agujeros=
, Tengacuidado de que no entreagua en [os orificios de [osquemadores=
, Tengacuidado cuando limpie el encendedor=Si elencendedorest_h0medo o daSado,el quemadorsuperior no
encender&
Rejiiias de los , L_velascon aguatibiajabonosay unaesponjadepl_stico noabrasiva=Paramanchasrebe[des,[impieconunaesponja
Quemadores _ depi_sticorel[enaconjabOn,noabrasivao con 'CooktopCleaningCreme'*(Cremapara LimpiezadeCubiertas)(Pieza
poreeiana sobre 20000001)**y una esponja.Si[asuciedadpersiste,vueivaa aplicar'CooktopCleaningCreme',cubracon unatoa[[ade
pape!hlimeda y deie remojardurante 30 minutos.Restrieguenuevamente,enjuaguey seque.
, No [as[aveenel [avavajiHasni en un hornoautolimpiante.
Area dei Reioj y , Paraactivar 'Control Lock' [Bioqueode [ascontroles_}para[a [impieza,ver p_gina 61.
de las Teeias , Lave,enjuaguey seque. No useagentes de limpiezaabrasivospuespueden rayarel acabado.
de Control , Sepuedeusar [impiav[ddossi se rocianen el paso primero=NO retie direetamente en dpaneL
Periiias de , Retirelas perillascuandoest6nen la posiciOn'OFF'tir_ndo[ashaciaade[ante=
Control , Lave,enj_Jaguey seque. No useagentesde limpiezaabrasivospuespueden rayarel acabado.
, Enciendacada quemadorparaasegurarsede que JasperJJJashartsido correctamentereinstaJadas.
Cubierta y Panel Laporcelanaesmaltadaesvidrio fundido en metaJy puedeagrietarseo picarsesi no se usacorrectamente.Esresistente
de Control- a los _cidos,no a prueba de4cidos.Todos[osderrames,especiaJmente[asderramesazucaradosoacidicos debenset
Esmaite de [[mpiadosinmediatamentecon un paffo seco.
Poreelana , Cuandose enfffe, lavecon agua jabonosa,enjuaguey seque=
, Nunca[impie unasuperficietibia o caiientecon un paso hOmedo=Estopuede causaragrietamientoo picaduras=
, Nuncause limpiadoresde homo, agentesde limpiezaablasivoso c_usticosenel acabadoexterior de la estufa=
72
PRocEmmmmmPIEZA
Paneies Lateraies
Gaveta de
Almacenamiento
y Manijas de las
Puertas - Esmaite
Pintado
Ventana y Puerta
dei Homo - Vidrio
° Cuandoest6fda, Iave con aguatibia jabonosa,enjuaguey seque.Nunca Iimpie unasuper[icietibia o caliente
con un patio h0medopues estopuededafiar la superficiey causaruna quemaduraa causadet vapor.
• Paramanchasrebeldes,use agentesde IimpiezaIevementeabrasivosta! como pastade bicarbonatoo 'BonArni'*.
No useIimpiadoresabrasivos,c_usticoso _sperostal comoesponjasde lanadeacera o Iimpiadoresde hornos.Estos
productospueden rayaro dafiar permanentementeIa superficie.
Nota: Use u#a toalla e un pale sece para Iimpiar los derrames, especialmente los derPamesaddicos o
azucaradosoLa supedicie se puede desce!erar o perder el brJlle si el dermme no se #mpia #lmediatamente.
Esto es especiaimerlte #npertante en las superficies bfancas.
° Eviteusar cantidadesexcesivasde agua pues puedeescurrirsedebajoo detr_isdeI vidrio causandomanchas.
• Lavecon aguay jab6n. Enjuaguecon aguaIimpiay seque. El limpiador devidrio puede usarsesi se roda en un
pai_oprimero.
• No use materialesabrasivostales comoesponjasde restregar,limpiadores enpolvo o esponjasde lana de acero
pues puedenrayarelvidrio.
+nterior del Homo • Siga las instruccionesen las p_ginas70-71paraprogramarun ciclo de autolimpieza.
Acero lno×idable
(modelosseiectos)
* Limpiarcon aguacon jab6n.
* Sacarlas manchasdificiles con polvo de Iimpiezao una espon]aIlenacon jabOn. En]uaguey seque.
, Lasparrillassedescolorar4npernmnentementey puedennodeslizarseconsuavidadsisondejadasen eIhornodurante
unciclo deautolimpieza.Siestosucede,IimpieIaparri!Iay Iossoportesen relievecon una peque_acantidaddeaceite
vegetaJpara restaurarJafaciJJdadde movimiento,Juegolimpie elexcesode aceite.
• NO USENINGUN PRODUCTODE UMPIEZA QUECONTENGABLANQUEADORA BASE DE CLORO.
• NO USELIMPIADORES "ORANGE" NI LIMPIADORESABRASIVO&
° SIEMPRELIMPIE LAS SUPERFICIESDE ACEROA FAVORDEL GRANO,
• Limpieza [}iaria/Suciedad Leve- Limpie con uno de [os siguientes- agua conjabOn,una soJuci6nde vinagre
bJancocon agua,[impiador parasuperficiesy vJddo'Formula409'*o un [impiavidriossimiJar- usandouna esponja
o un patio suave. Enjuaguey seque. ParapulJry evitar marcasde [os dedos,use el praducto 'StaJnJessSteel
Magic Spray'*[PJezaNo.20000008)**.
• Saciedad Moderada/Jntensa + Limpiecon unode lossiguientes- 'Bon Ami'*, 'SmartCJeanser'*o 'Soft Scrub'* -
usandouna esponja h0medao un paiio suave. Enjuaguey seque. LasmanchasdificiJespuedenser quitadascon
una esponjamuJti-uso'Scotch-Bdte'*h0meda;frote a favorde[ grano. Enjuaguey seque. Pararestaurare[
[ustrey sacar [asvetas,aplique 'StainJessStee[Magic Spray'*.
• Descoioraci6n - Useuna esponjamojadao un paso suave,[impiecon [impiador de acero'CameoStainJessSteel
Cleaner'*.Enjuagueinmediatamentey seque.Paraeliminar lasestr[asy restaurarel lustre,use despu6srociador
paraacera inoxidable'StainlessSteelMagic Spray'*.
*Losnombresde Iosproductosson marcasregistradasde sus respectivosfabricantes.
** Parahacer pedidos,Ilameal 1-877-232-6771EE.UU.o al 1-800-688-8408Canad&
?3
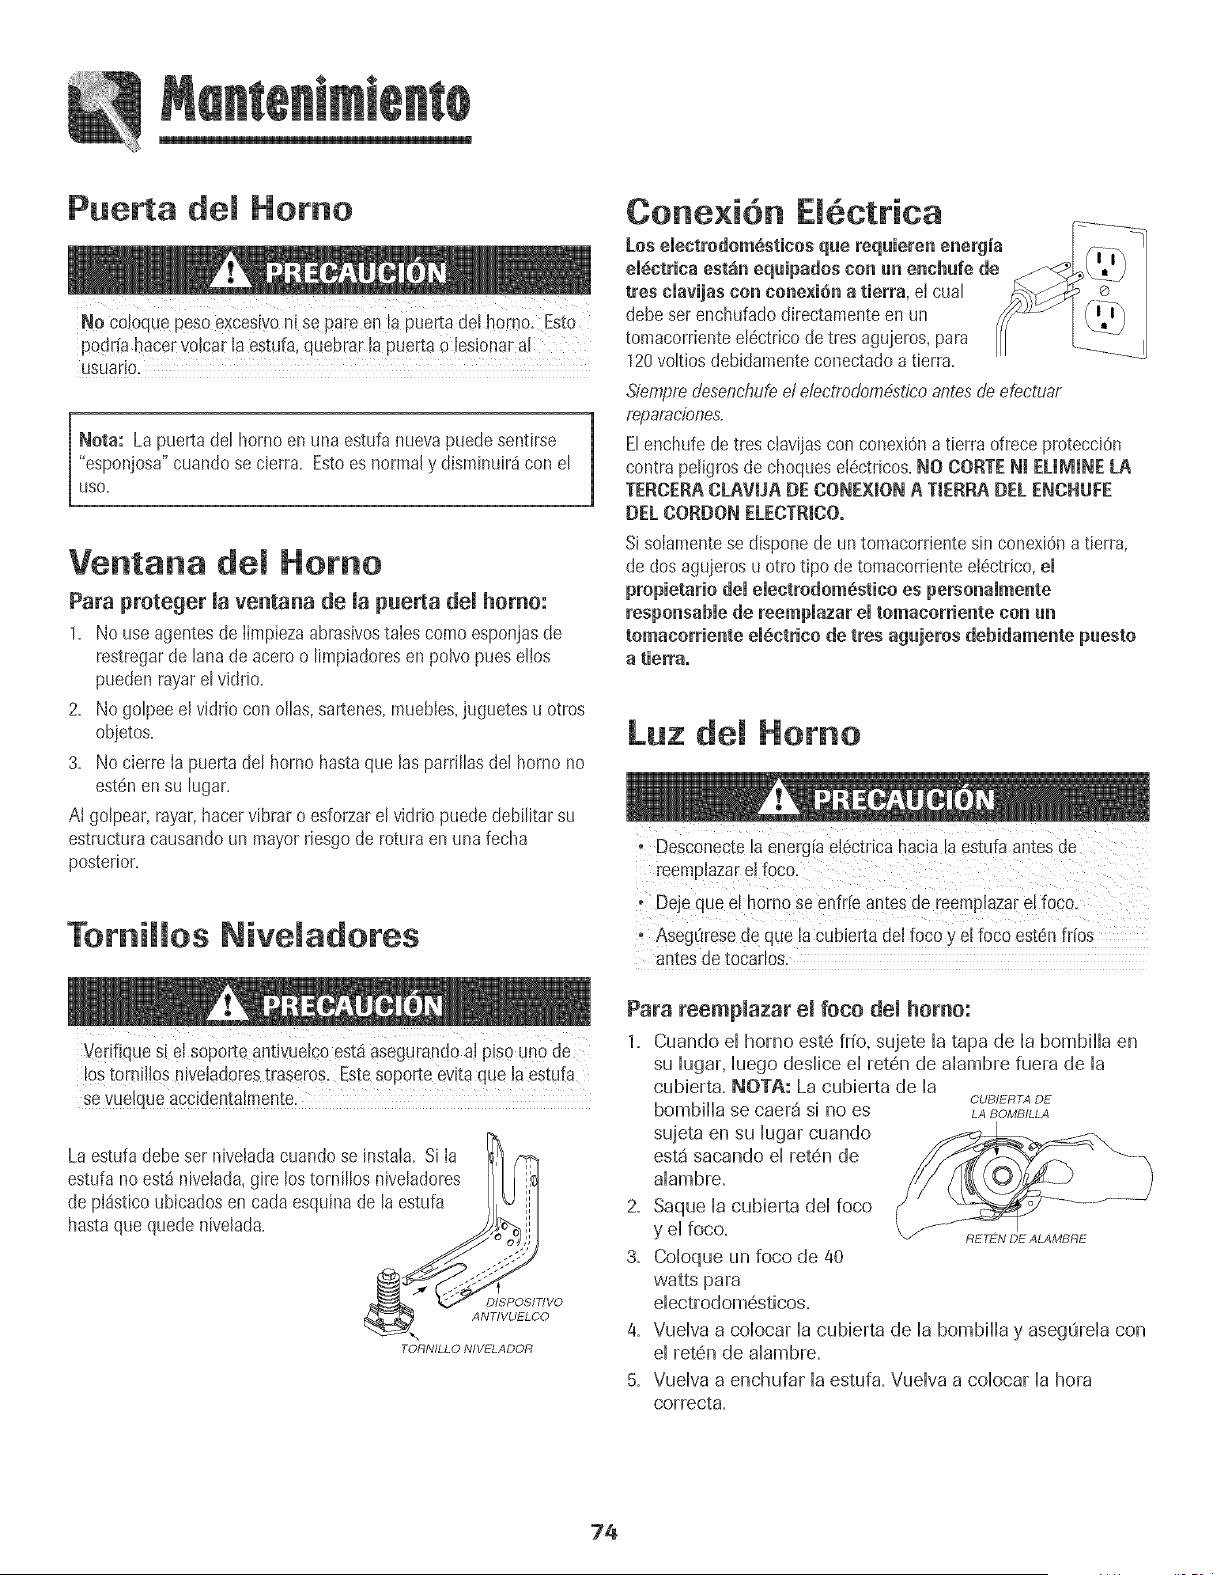
Puerta del Homo
NO coloquepesoexcesivonise pareen la puerta deLhomo. Esto
podr[a hacervo!ca[ la estufa,quebrar!a pue[ta Olesionaral
HSUaFiO.
Nora: Lapuerta del horriDen una estufanuevapuedesentirse
"esponjosa"cuando se cierra=Estoes normaly disminuir_ con el
USO=
Ventana del Norno
Para proteger maventana de mapuerta demhomo:
1. No use agentesde limpiezaabrasivostalescoredesponjasde
restregarde hna de aceroo limpiadoresen polvo pues ellos
puedenrayarelvidrio=
2= No golpeeel vidrio con ollas, sartenes,muebles,juguetes u otros
objetos=
3= No cierre Ia puertadel horridhastaque las parrillasdel homo no
est6nen su lugar=
Ai golpear, rayar,hacervibrar o esforzarel vidrio puededebilitar su
estructuracausandoun mayorriesgode rotura en unafecha
posterior.
Cone×i6n El ctrica
Loseieetrodomasticos que requieren energi'a
el6etriea est_n eqaipados con an enchufe de
ires clavijas con cone×i6n a tierra, eI cual
debesetenchufadodirectamenteen un
tomacorrienteel6ctrico detres aguieros,para
120voltios debidamenteconectadoa tierra.
Siempredesenchufeel e/ectrodom4stieoantes deefectuar
#epa#acione&
Elenchufe de tres ciaviiascon conexiOna tierra ofrece pmtecciOn
contrape@rosde choques et6ctricos=NO CORTENl [EMMIN[E[.A
TERCERACLAVUA DECONE×ION A TtERRA DE[ ENCNUFE
DELCORDONELECTRICO.
Si solamentese disponede un tomacorrientesin conexi6n a tierra,
dedos agujerosu otto %o detomacorrientee!_ctrico,el
propietado dei eiectrodom@stico es personaimente
respensablede reemplazar el tomacorriente con an
tomaeerriente el6etrieo de tres agujeros debidamente puesto
a tierra.
Luz del Homo
Tornillos Niveladores
Verifique si eI soporteantivuelcoest_asegurand0a! PiS0uno de
los tomillos niveladorestraseros. Estesoporteevitaque la estufa
Sevue!queaccidentalmente_
Laestufa debe ser nivetadacuando se instal& Si Ia
estufa no est_ nivelada,gire lostornillos niveladores
de pI_sticoubicadosencada esquinade la estufa
hastaquequedenivelad& ,jj
TORNILLO NIVELADOR
oAseg8rese de que la cubie[ta delfoco y elfoco est6n fr[os
antesde tocados.
Para reempmazaremfoco demhomo:
1= Cuando el horno est6 frio, sujete la tapa de la bombilla en
su lugar, luego deslice el ret6n de alambre fuera de la
cubierta= NOTA: La cubierta de la
CUB/ERTA DE
bombi[[a se caer_ si no es LABOMR_LL4
sujeta en su lugar cuando
est_ sacando el ret6n de
alambre=
2. Saque la cubierta del foco
y el [OCO= RETEN DEALAMRRE
3. Coloque un foco de 40
watts para
electrodom6sticos=
4. Vuelva a colocar la cubierta de la bombilla y aseg_rela con
el ret6n de alambre=
5. Vuelva a enchufar la estufa=Vuelva a colocar la hora
correct&
74
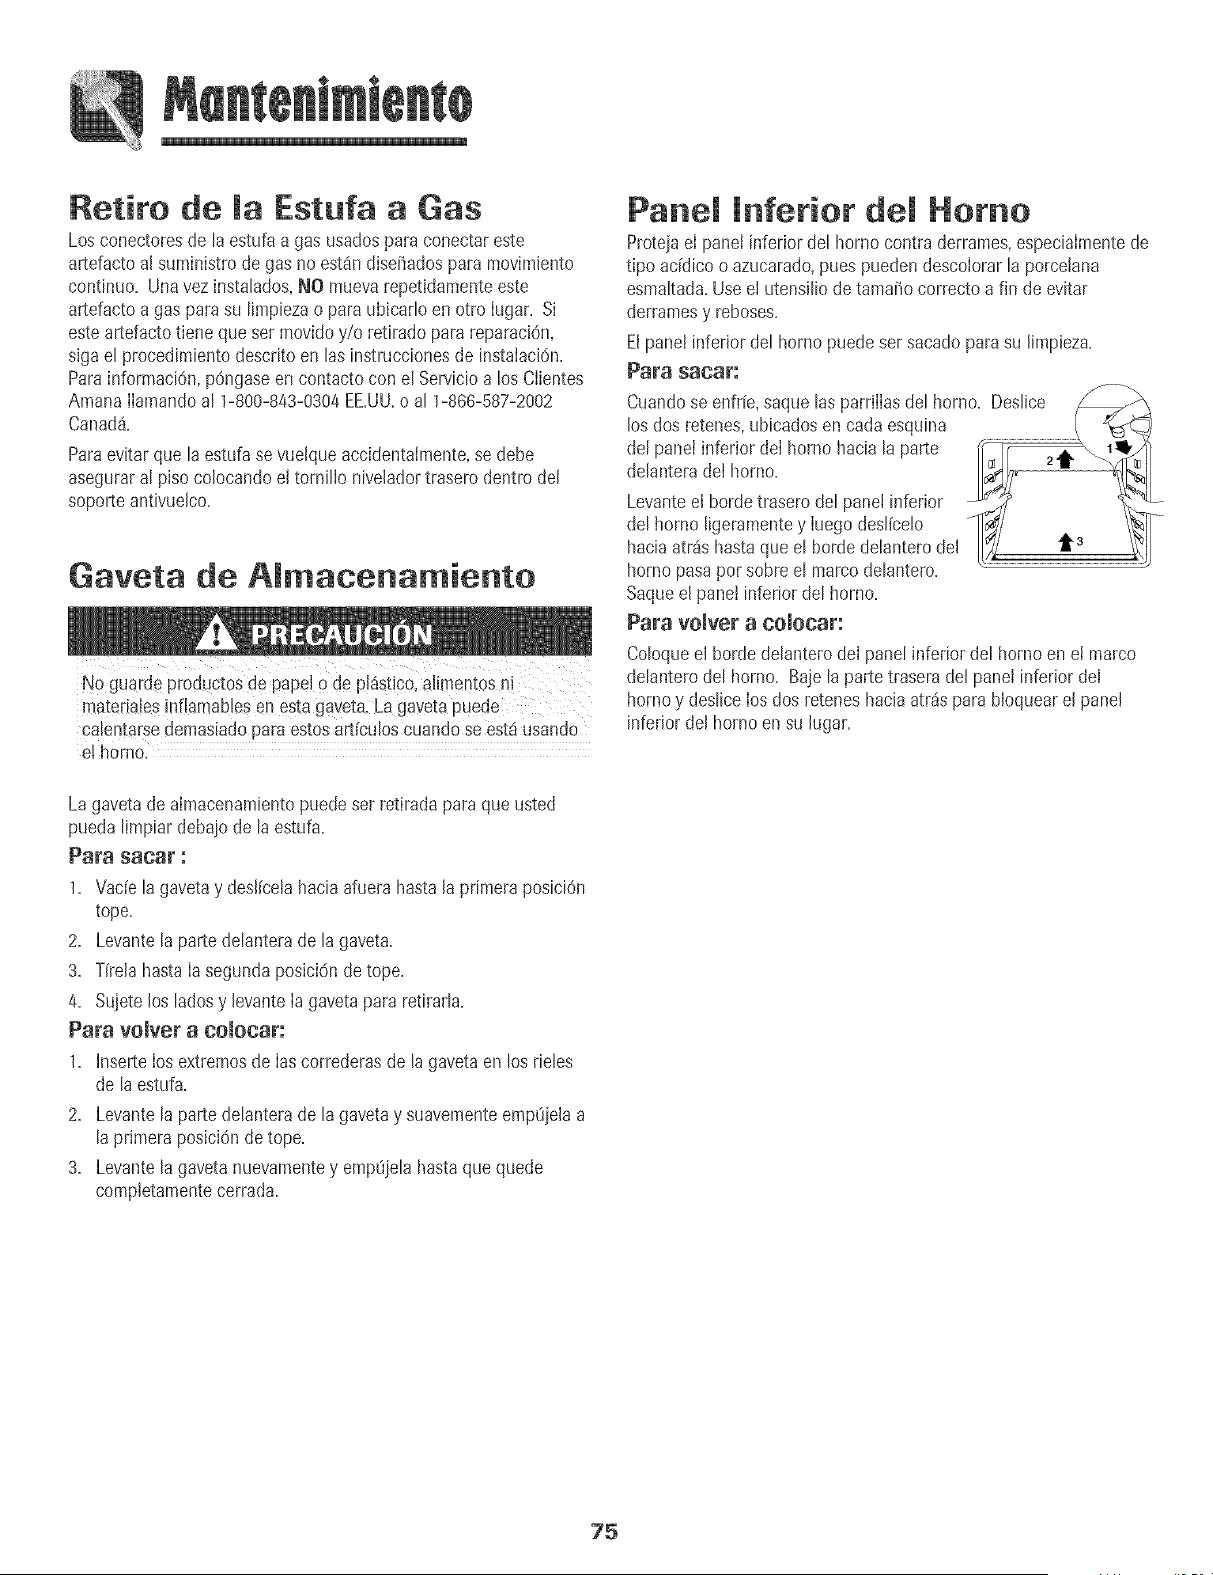
Retiro de Ja Estufa a Gas
Los conectoresde [aestufa a gas usadospapaconectareste
artefactoal suministrode gas no estSndiseriadospapamovirniento
continuo. Unavezinstatados,NO muevarepet+damenteeste
artefactoa gas papasu rimpiezao papaubicadoen otro Iugar. Si
esteartefactotiene queset movidoy/o retiradopapareparaci6n,
siga et procedimientodescdto en hs instruccionesde instaiacidn.
PapainformaciOn,pOngaseen contacto con et Servicioa los CIientes
Amana[[amandoa[ 1-800-843-0304EE.UU.o a[ 1-866-587-2002
Canad&
Papaevitarque la estufase vuelqueaccidentaimente,se debe
aseguraral piso colocandoel tornilio niveladortraserodentro del
soporteantivuelco.
Gaveta de Almacenamiento
NO guardeproductos de paPe+Ode pl_istic0,a+imentosni
materia!esinfiamablesen estagavetalLagavetapuede
Calentarsedemasiadopapaestosarticuloscuandose esta usando
e! homo.
Panel inferior del Home
ProtejaeI panel infepiopdel hopnocontraderpames,especialmentede
tipo addico o azucapado,pues puedendescolopapla porcetana
esmaltada.Useel utensiliodetamario coprectoa fin de evitap
depramesy reboses.
Elpane! inferiordel hopnopuedeset sacadopapasu limpieza.
PaPa sacar:
Cuandose enfr[e,saque las parpilIasdel homo+ Deslice _
los dos retenes,ubicados en cadaesquina / _ _:_
del panei inferior deI homo hacia la parte ___
delanteradei homo+ _i
Levanteel borde traserodel panel inferior . m_
do,,+mo,++o+++ ,oo+o++,,oo,o
ha++aate++ a+ta+ee+ ordede+onte+de,+-'
homo pasapopsobre el marcodelantero.
Saqueel panel inferiordel homo+
Papa velvet a colocar:
Coloqueel horde delanterodeI panelinferior del homo en et marco
dehntero del homo+ Bajela partetrasera del panei infepiopdei
homo y desliceIosdos reteneshacia atrdspapabloqueapel panel
infedopdel homo en su hgar.
La gavetade aimacenamientopuedeset retiradapapaque usted
puedalimpiapdebajode la estufa.
Papa sacar :
1. Vade la gavetay deslicelahaciaafuera hastala ppimeraposiciOn
tope.
2. Levantela partedelanterade la gaveta.
3. Tirela hasta IasegundaposiciGnde tope.
4. Sujete los ladosy levanteIa gavetapapapetirarla.
Para vomvera comocar:
1. InserteIosextremosde Ias correderasde la gavetaen los rieles
de la estufa.
2. Levantela partedelanterade la gavetay suavementeepaptSjelaa
la primeraposiciOnde tope.
3. Levantelagavetanuevamentey empt_jelahastaquequede
completamentecerrada.
75
m
PROBLEMA SOLUC_ON
Para mamayer_ade moaprobmemas, ° Revisesi Ios controbs deI hornoest_ndebidamenteaiustados.
verifique primero mosigaiente, ° Verifique si et enchufe est_firmementeinsertadoen el tomacorriente.
• Verifique ovuelvaa reponer et disyuntor. Verifique o reempBceel fusibb.
• Verifique elsuministrode energ[ael6ctrica.
Emquemador superior no se , Verifique si la estufaest_ debidamenteconectadaa Ia fuente de alimentaci@l.
eneiende, , Verifique si est_ fundido un fusibledel circuito o si se dispar6el disyuntor principal
° Verifique paraasegurarsede que el encendedorest6 secoy que emita chasquidos. El
quemadorno seencender_si e! encendedorest_dai_ado,sucioo moiado. Si el encendedor
no produceun chasquido,gire la perilla de control a la posici6n'Off'.
La llama es dispareja. ° Losorificios del quemadorpuedenestarobstruidos.
La llama del quemader saperior se , Verifique paraasegurarsede queel utensilio est_asentadoen [aparrilla sobre elquemador.
levantadel orifieio.
Los resumtadosdemhomeado no sen , Verifique IatemperaturadeJhomo seleccionada.Aseg[iresede que el horno est#
come se esperaban o soil precalentadocuando la receta o instruccionesrecombndan precalentamientodeI homo.
diferentes a los del homo anterior. ° Aseg0resedeque elrespiraderodelhomo noest6 bloqueado,Vet p_gina68para laubicaci6n,
• Venfique paraasegularsede que la estufaest_nivelada,
• Lastemperaturasa menudovar{anentre un homo nuevoy uno antiguo. A medidaque pasa
eltiempo, la temperaturadet horno cambiay puede hacersem_scalienteo m_sfr{a. Ver
p_g.70 para las instruccionescomo aiustar latemperaturadeI horno. NO?AtNo se
recombnda ajustar latemperaturasi hatenido problemascon solo una o dos recetas.
• Useel utensilio correcto.Los utensiliososcurosproducendoradooscuro.Los utensilios
brilIantesproducendoradoclaro.Consulteelfolleto "LaCocinaF_cil"parapaayolinformaciOn
sobre los utensiliosde hornear.
• Verifique lasposicionesdeIasparrilIasy Iacolocaci@ de Iosutensilios.AIterne Iosutensilios
cuandouse dosparrillas.Deie2.5-5cm (1-2 pulgadas]entre los utensiliosy las paredesdel
homo.
° Verifique eJuso depapet de aluminioen el homo. Nunca use papelde aluminio para cubrir
unaparrilIacompJetadel homo.Coloqueun pedazopequeriode papeIde aluminioen laparrilJa
queest_debajodel utensilio para recibir los derrames,
Los alimentos no se asan a la , Verifique [as posbionesde [asparriliasde[ homo. Elalimentopuede estarmuycerca de
parrillaen forma debida o sale la llama.
demasiado humo. , Elpapetde ahminio se us6demaneraincorrecta. Nuncaforreel insertodei asadorcon papel
deaiuminio.
• Recorteel excesode grasade Ia came antesde ponerlaaasar a la parrilla.
• Seus6 una asaderasucia.
• Precaiienteel horno durante dos atres minutosantesde colocar el alimento enel holno.
• Ase a la parrilla con la puerta del holno cerrada.
76
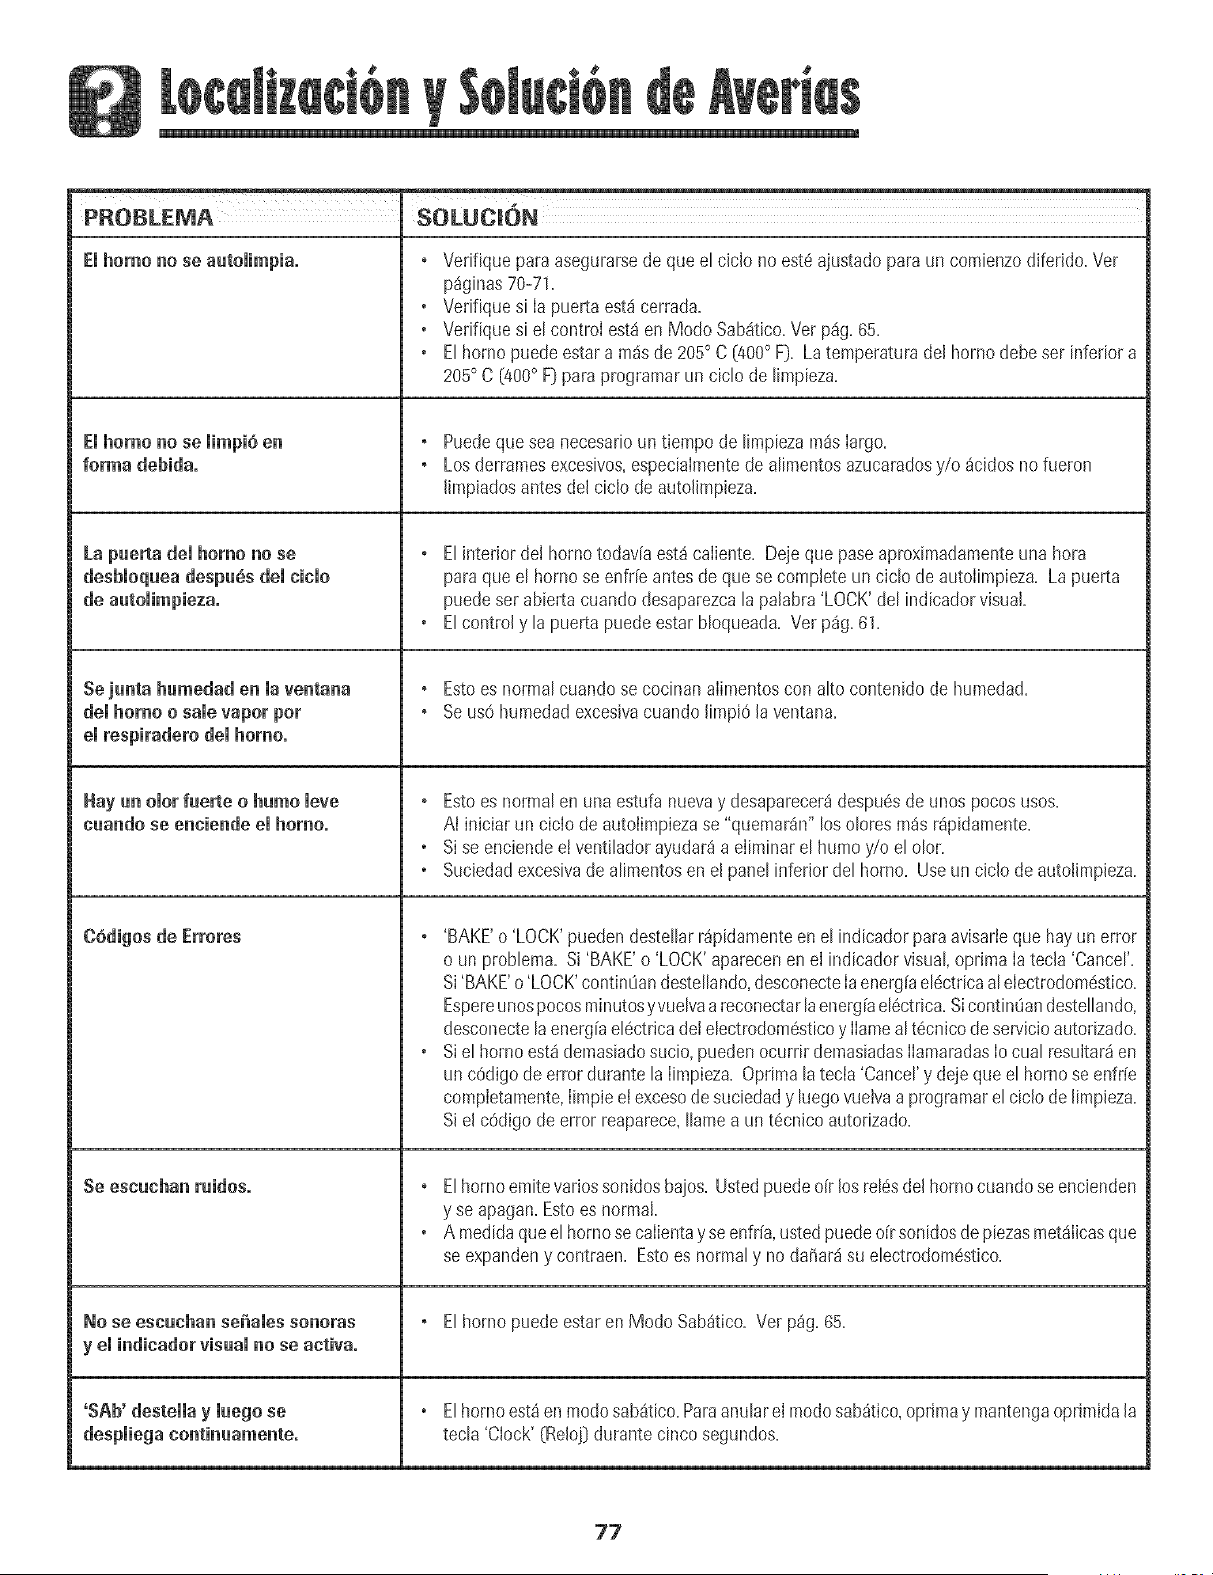
PROBLEMA SOLUCION
Emhomo no se autemimpiao ° Verifique para asegurarsede (lueel ciclo no est6ajustadopara un comienzodiferido.Ver
p_ginas70-71.
o Verifiquesi Ia puerta est_ cerrada.
o Verifiquesi el controi est_ en Mode Sab_tico.Vet p%. 65.
o El hornopuedeestar a m_sde 205° C (400° F). Latemperaturadel borne debeser inferiora
205° C [400° FDparaprogramarun cido de limpieza.
Elhomo no se mimpi6en ° Puedeque sea necesar[oun tiempo de limpiezaross largo.
ferma debidao ° Losderramesexcesivos,especiaImentede alimentosazucaradosy/o _cidos no fueron
limpiadosantesdel ciclo deautolimpieza.
La puerta del homo no se ° Elinterior de! homo todavia est_caliente. Deje que paseaproximadamenteuna hera
desbloquea despu_s deJ niolo paraque el bornese enfr[eantes deque se completeun ciclo de autolimpieza. La puerta
puedeset abierta cuandodesaparezcala palabra 'LOCK'del indicadorvisual.
o Elcontrol y la puerta puede estarbloqueada. Vet p%. 61.
Se junta humedad en la ventana , Estoes normalcuando se cocinan alimentoscon alto contenido de humedad.
demhome o sale vapor per , Se us6 humedadexcesivacuando limpi6 la ventana.
emrespiradere demhomo.
Flayun emorfuerte o humo mere , Estoes normalen una estufa nuevay desaparecer_despu6sde unos pocosuses.
cuando se enciende el homo° At iniciar un ciclo de autolimpiezase "quemar_n" losolores m_sr_pidamente.
o Sise enciendee!ventihdor ayudar_a eliminarel humo y/o el olor.
o Suciedadexcesivade alimentosen el panel inferior del homo. Useun ciclo de autolimpieza.
O6digos de Errores , 'BAKE'o 'LOCK'puedendestellarr_pidamenteen el indicadorpara avisarteque hayun error
o un problema. Si 'BAKE'o 'LOCK'aparecenenel indicadorvisual,oprima IatecJa'Cancer
Si'BAKE'o'LOCK'continOandestellando,desconecteIaenerg[ael6ctricaalelectrodom6stico.
Espereunospocosminutesyvuelvaareconectarlaenerg[ael6ctrica.Sicontimian destellando,
desconectelaenerg[ael6ctricadeJelectrodom@sticoy Ilameal t6cnicode servicioautodzado.
o Siel homo est_demasiadosucio, puedenocurrir demasiadasIlamaradasIocual resuJtar_en
unc6digo de error durante la Iimpieza.Oprimalatecla 'Cancel'y de]equeel homose enfr[e
compJetamente,Iimpieel excesodesuciedady luegovueJvaa programarel ciclo de JimpJeza.
SJel cOdigodeerror reaparece,Ilamea un t6cnJcoautorizado.
Se esnuchan ruidoso , Elhomo emitevariessonidosbajos.Ustedpuedeoir losrel6sde[hornocuandose encienden
y se apagan.Esto esnormal.
o A medidaque elhomo secalientay seenfr[a,ustedpuedeo[r sonidosde piezasmetSlicasque
se expandeny contraen. Estoes normaly noda_ar_ su electrodomestico.
No se eseuchan seiiales soneras ° Elhomo puede estaren Mode Sab_tico. Vet p%. 65.
y emindicadorvisual no se activao
'Sgb' destella y luego se o Elborne est4en modesab4tlco.Paraanularel modesab_tico,optimay mantengaoprJmida[a
tecla 'Clock' (Rel@durante cinco segundos.
77

=
78
Garantia Completa de Un A_o - Piezas
y Mano de Obra
Dumnte un (t) a_o desde[a fechaoriginal de
compraa_pot menor,se repararao reemptazar_i
gratu[tamentecualqu_erp_ezaque taile durante uso
normalen e_hogar.
Residentes Canadienses
LasgarandasantedorescubrensoIamenteaquelios
electmdom6sticosinstaladosen Canadaque ban
sldo certificadoso aprobacas pot las agenciasde
pruebascorrespondientespara cumpIimientocon [a
NormaNacionalde Canadaa menosque el
electmdom6sticohayasidotraido a Canadadesde
los EstadaosUnidos debidoa un cambio de
residencm.
Garantia Limitada Fuera de ruesEstados
L[nidos y Canad_ - Piezas Solamente
Durame an (1) a_o desdela techa de compra
originalal por menor,cuakluler plezaque taIle
durante uso normalen el hogar sera reemp_azadao
reparadagratuitamenteen 1oque respec[aa la pleza
y el propietariodeber_ pagartodos los otroscos[os
mcluyendomanode obra.K_lometrajeimiilaje.
[ranspor[e.cos[ode[ viajey costo de[ diagnOstico,sl
fuesenecesario.
Lasgarantiasespecfficasexpresadasantefiormente
sonlas UHICAS garantiaspmvistaspot el fabricante.
Estasgamntiasle otorganderechoslegates
espedficosy ustedpuede tenet ademb_otro_
derechnsque vaffandeun estadoa otro.
Lo que No Cubren Estas Garantias:
1= Situacionesy dafiosresultantesde cuaIquierade lassiguientes
eventualidades:
a. Instalaci6n,entregao mantenimientoinapropiados.
b. Cualquierreparaci6n,modificaci6n,alteraci6no ajuste noautorizadopor
el fabricanteo por un centro de servicioautorizado.
c. Mal uso,abuso,accidenteso uso irrazonable.
d. Corrienteel6ctrlca,voltajeo suministroincorrecto.
e. Programaci6nincorrectade cualquierade los controles.
2. Lasgarant[asquedan hulassl los nOmerosde serieoriginales bansido
retirados,alteradoso no son f_cilmentelegibles.
3. Focos.
4= Productoscompradosparausocomercia[o industrial
5= Elcostode] servicioo IIamadade serviciopara:
a=Corregirerroresde instaIaci6n=
b=Instruir a[ usuariosobre el usocorrecto del artefacto=
c= Transportedel artefactoa[estabIecimientode servicio=
6= Losdafios consecuenteso incidentaiessufridospot cuaiquier personacomo
resultadode cuaIquier incumpIimientode estasgarant[as=Enaigunos
estadosno se permite la exciusi6no [imitaciOnde los dafios consecuenteso
incidentales,por Io tanto [a excIusiOnanterior puedeque no se apIiqueen su
08SO=
Si @ecesita Servicio
• LIameal distdbuidor dondecomprOsu electrodom6sticoo IIamea Maytag
Services sM, Servicioa los C[ientesAmana [[amandoa[ 1-800-843-0304EE.UU.
o a[ 1-866-587-2002Canada=para ubicar aun t6cnico autorizado=
o AsegOresede conservare[ comprobantede compra paraverificare[ estadode
[a garant[a=ConsuIte[asecciOnsobre [a GARANTIAparamayorinformaci6n
sobre [asresponsabiIidadesde[ propietarioparaservicio bajo [a garant[a=
o Si e[distribuidor o [a compafi[ade serviciono pueden reso[vere[ probiema,
escribaa MaytagServicessM,Attn: CAIW Center,RO=Box2370,Cleveland,TN
37320-2370o [lamea[ 1-800-843-e304 EE.UU.o ai 1-866-587-2002
Canada=
o Las gu[asde[ usuario,manuaiesde servicioe informaciOnsobre [aspiezas
puedensoIicitarsea Maytag ServicessM,Servicioa los C[ientesAmana=
Cuando[lame o escribaacema de un prob[emade sewicio,porfavor
inciuya[a siguiente informaciOn.
a. Suhombre,direcciOny m_merode teIdono;
b. N_imerode mode[oy nOmerode serie;
c. Nombrey direcci6n de su distribuidor o t6cnico de servicio;
d. Una descripci6nclarade[ probIemaqueest_ experimentando;
e. Comprobantede compra (recibode compra).
Form No. B/09/04 Part No. 8113P449-60 _::2004 Maytag Appliances Sales Co. Litho U.SA