NUCLIAS CONNECT
User Manual
V 1.10
2021 | Business Class Networking

Nuclias Connect Software User Manual
Page 2
Table of Contents
Product Overview ............................................................................................................ 3
Recommended System Requirements ............................................................................................. 3
Software Installation ....................................................................................................... 4
Downloading Nuclias Connect Package .......................................................................................... 4
Nuclias Connect for Windows ........................................................................................................5
Nuclias Connect for Linux ................................................................................................................5
Windows Installation .........................................................................................................................7
Nuclias Connect Server Installation ...................................................................................................7
Linux OS Installation ........................................................................................................................18
Launching Nuclias Connect ................................................................................................................26
Nuclias Connect App .............................................................................................................................28
Nuclias Connect Conguration ..................................................................................... 40
Dashboard .................................................................................................................................................41
Monitor .......................................................................................................................................................42
Access Point ........................................................................................................................................42
Switch....................................................................................................................................................46
Topology ....................................................................................................................................................62
Topology ....................................................................................................................................................63
Floor Plan ...................................................................................................................................................65
Conguration ...........................................................................................................................................66
Create Prole ......................................................................................................................................66
Prole Settings ...................................................................................................................................69
Firmware Upgrade ............................................................................................................................ 97
SSL Certicate ....................................................................................................................................98
Payment Gateway .............................................................................................................................99
Repor t ...................................................................................................................................................... 100
Access Point ..................................................................................................................................... 100
Switch................................................................................................................................................. 104
Log ............................................................................................................................................................ 107
Device Syslog ..................................................................................................................................107
System Event Log........................................................................................................................... 108
Device Log ........................................................................................................................................109
Audit Log .......................................................................................................................................... 110
Alerts .................................................................................................................................................. 111
System ..................................................................................................................................................... 112
Device Management .................................................................................................................... 112
User Management ......................................................................................................................... 113
Settings ............................................................................................................................................. 115
Resources ..........................................................................................................................................124
About ................................................................................................................................................. 125

Nuclias Connect Software User Manual Product Overview
Page 3
Product Overview
D-Link Nuclias Connect is a versatile, convenient software solution for administrators to manage wireless devices throughout
the network from a central point.
Recommended System Requirements
Scale Size
Larger Scale
Smaller Scale
Maximum Managed Devices
1500 devices
100 devices
Recommended CPU
8th Generation Intel® Core™, i7 Processors
Intel® Core™ i5 Processors, 3.2 GHz
Recommended RAM
24G DDR3
8G DDR3
Recommended Storage
4TB
2TB
Ethernet NIC
1
Gigabit Ethernet Card
Gigabit Ethernet Card
Monitor Resolution
1080P
1080P
Platform (Windows)
Windows 10 Server 2019 (64-bit)
Windows 10 Professional (64-bit)
Platform (Linux
2
)
Ubuntu
CentOS 7
Ubuntu
CentOS 7
Browser for Nuclias Connect
Management
Edge, Chrome, Safari
Edge, Chrome, Safari
Recommended Uplink Bandwidth
20 Mbps for larger scale
10 Mbps for smaller scale
1
Recommended uplink bandwidth: 20 Mbps for larger scale, 10 Mbps for smaller scale.
2
Docker and Docker Compose toolsets are required for the installation in a Linux platform.
Nuclias Connect Software User Manual Software Installation
Page 4
In the following section, we’ll discuss the software that needs to be installed to successfully run the Nuclias Connect
application.
The following software applications must be installed in the following order:
• The Nuclias Connect Server application. This is the main application that will be responsible for the day-to-day wireless
network management and maintenance tasks. For more information, refer to “Nuclias Connect Server Installation” on
page 7 and “Nuclias Connect Conguration” on page 40.
• The Nuclias Connect App. This App is a wireless access point management tool that allows for easy conguration and
deployment of standalone AP devices and the management of multiple sites and networks. For more information, refer
to “Nuclias Connect App” on page 28.
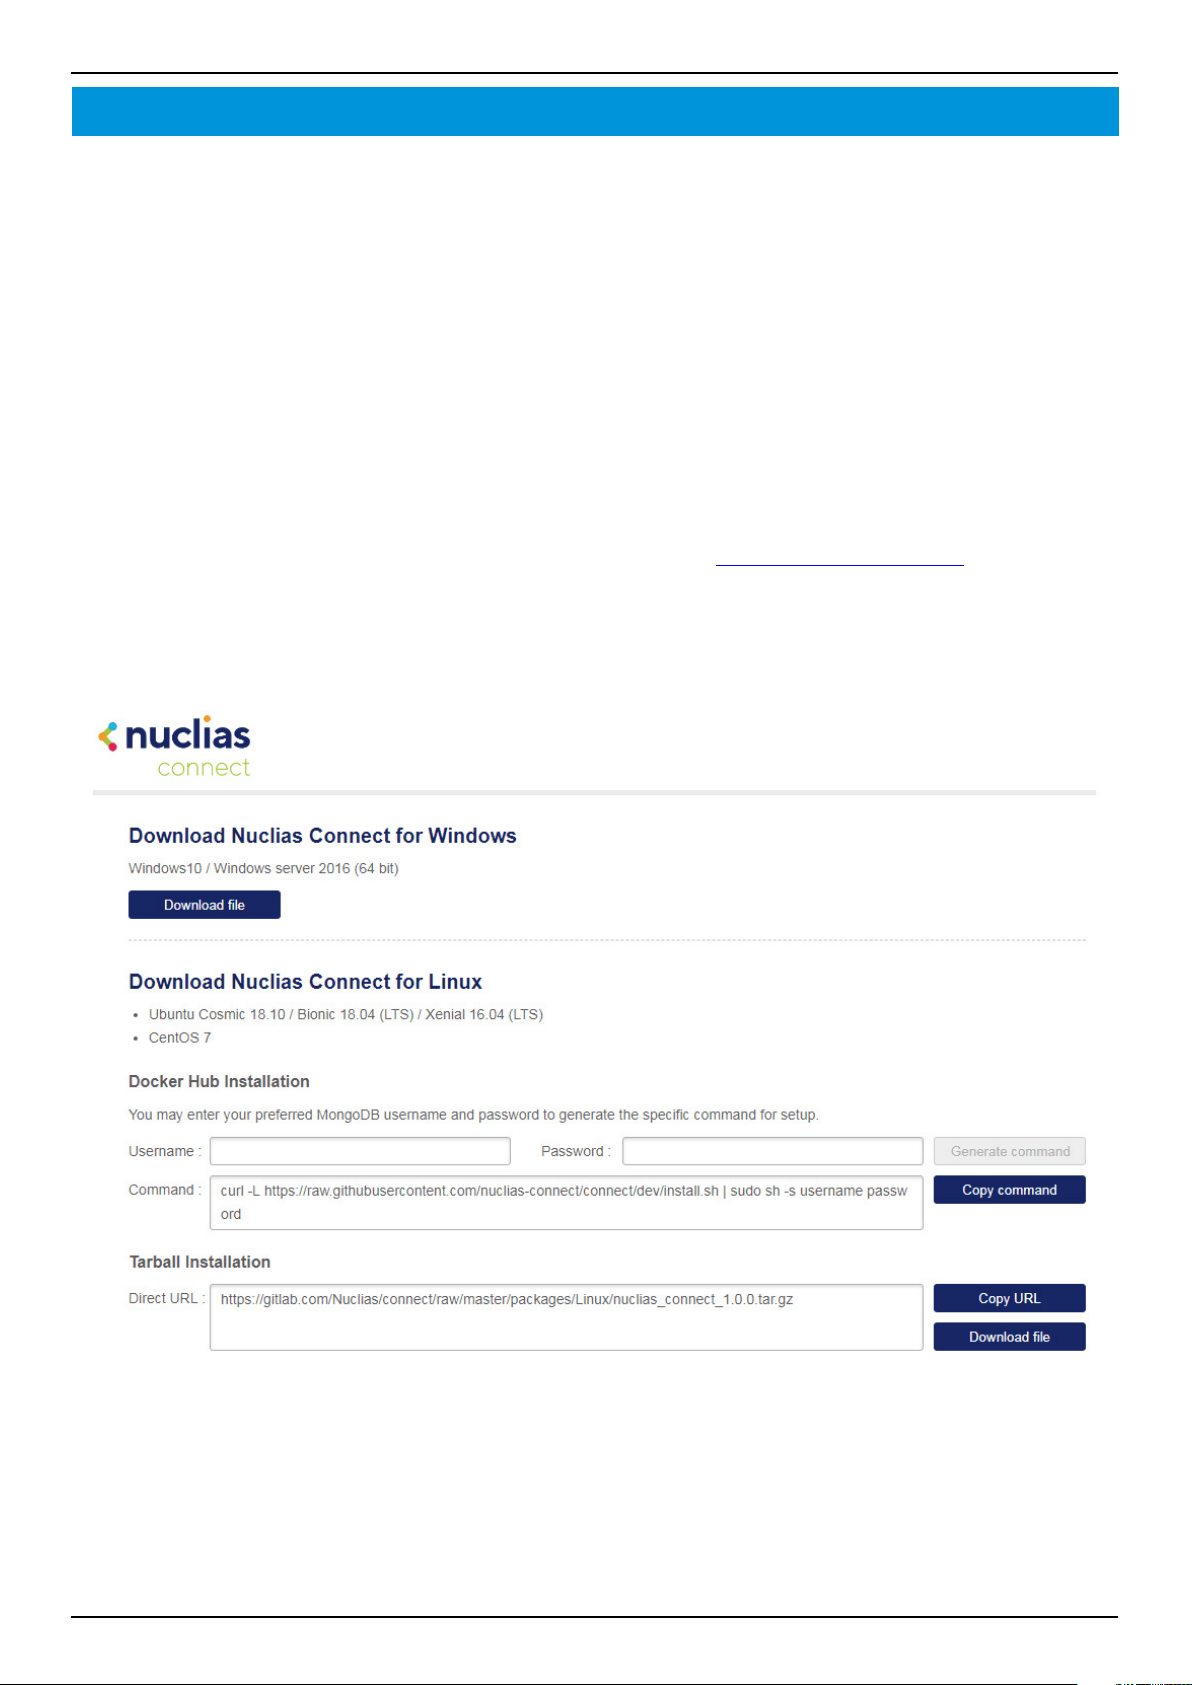
Downloading Nuclias Connect Package
Access to the Nuclias Connect packages for Windows and Linux is available at
https://download.nuclias.com.
Through this page, you can generate the command for installing through Docker Hub for Linux OS or download the
compressed installation le for both Linux and Windows OS. See “Recommended System Requirements” on page 3 for
system requirements and details. The Download Nuclias website will appear as per the following gure.
Software Installation
Nuclias Connect Software User Manual Software Installation
Page 5
Nuclias Connect for Windows
Go to
https://download.nuclias.com to download the installation package for Windows OS.
From the menu, locate the section labeled Download Nuclias Connect for Windows.
Click Download le to begin downloading the installation package.
Save the le to a local directory. Take note of the location for installation.
Once the download is complete, you can begin the installation. See “Windows Installation” on page 7 for more details.
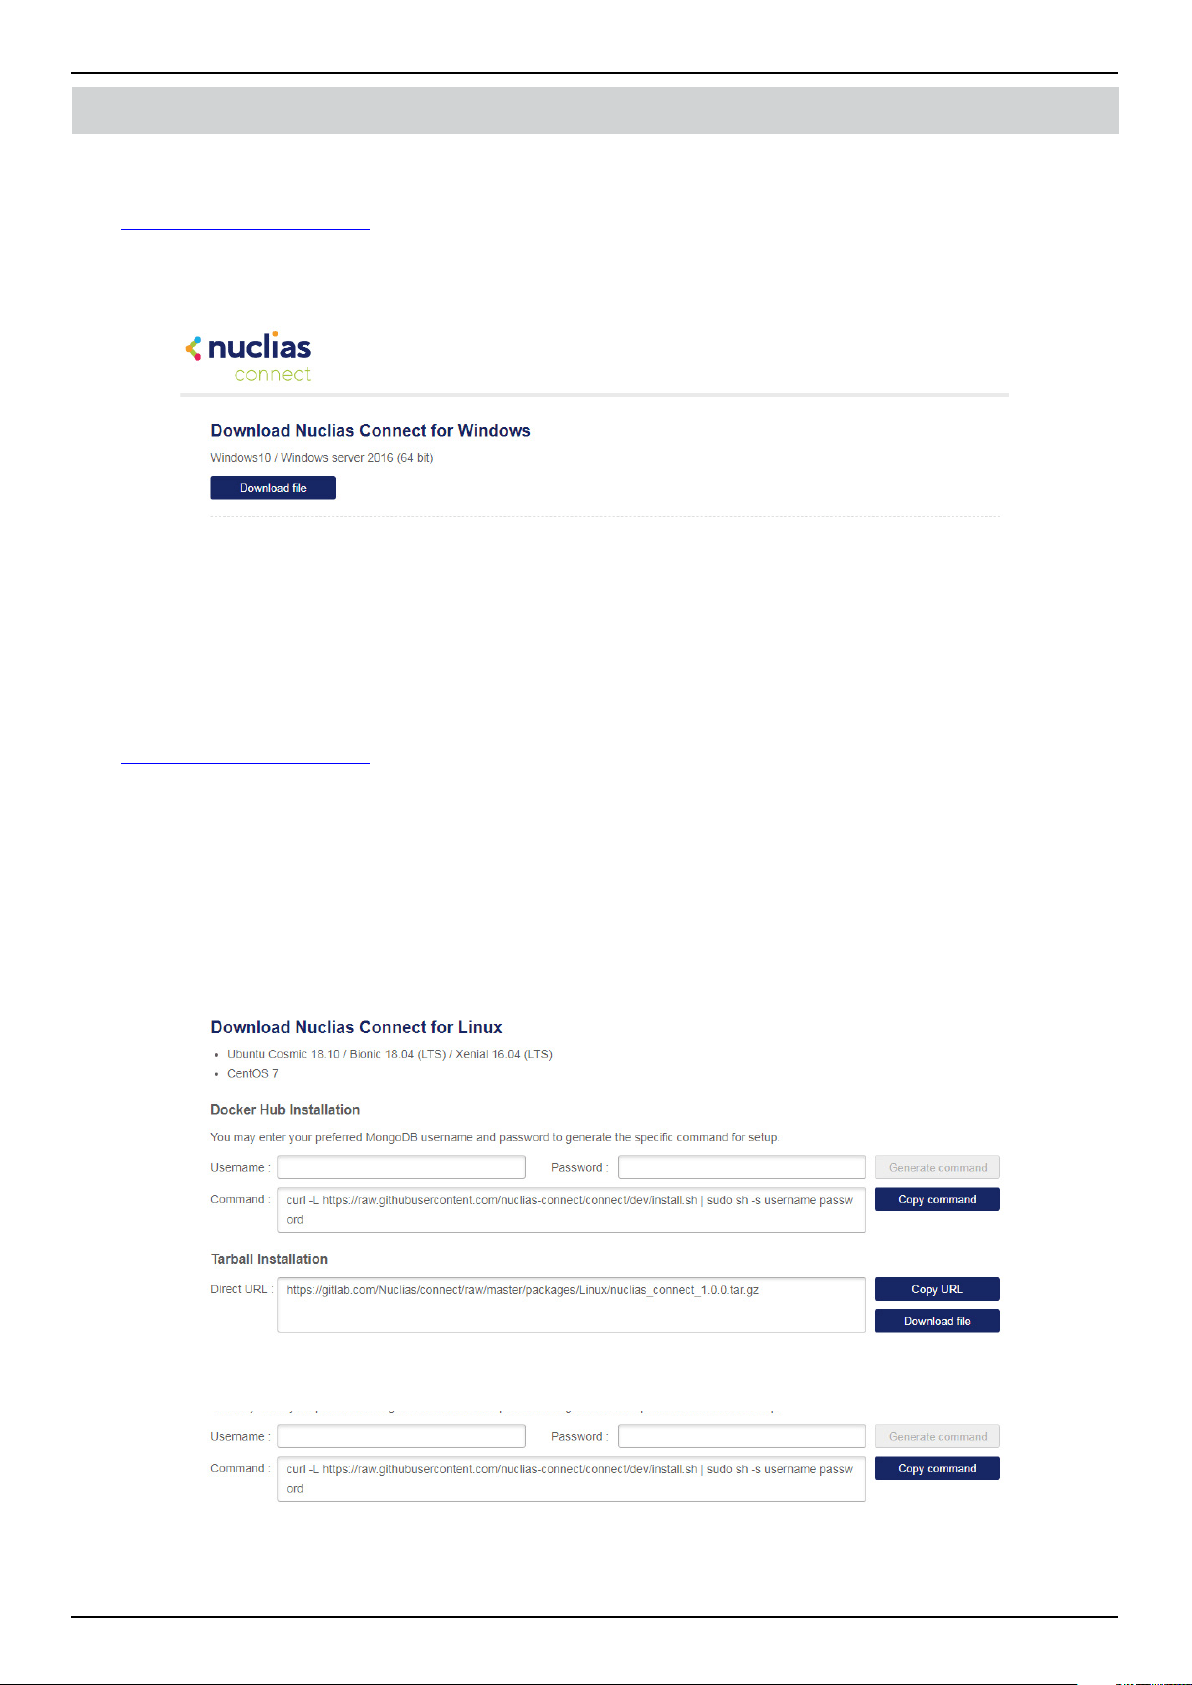
Nuclias Connect for Linux
Nuclias Connect is available for Linux and can be installed using Docker Hub or Tarball. See below on how to obtain the
correct command that can be used in Linux for either Docker Hub or Tarball.
Go to
https://download.nuclias.com to obtain the Linux command.
From the menu, locate the section labeled Download Nuclias Connect for Linux.
Docker Hub Installation
A specic command line can be downloaded from the Nuclias Connect download website.
From the menu, locate the section labeled Docker Hub Installation.
In the Username and Password elds, specify the preferred variables to associate with MongoDB.
Click Generate Command to get the command line.
Click on the Copy command.
The command is now copied to the clipboard and can be used during the Linux Docker Hub installation.
Software Installation
Nuclias Connect Software User Manual Software Installation
Page 6
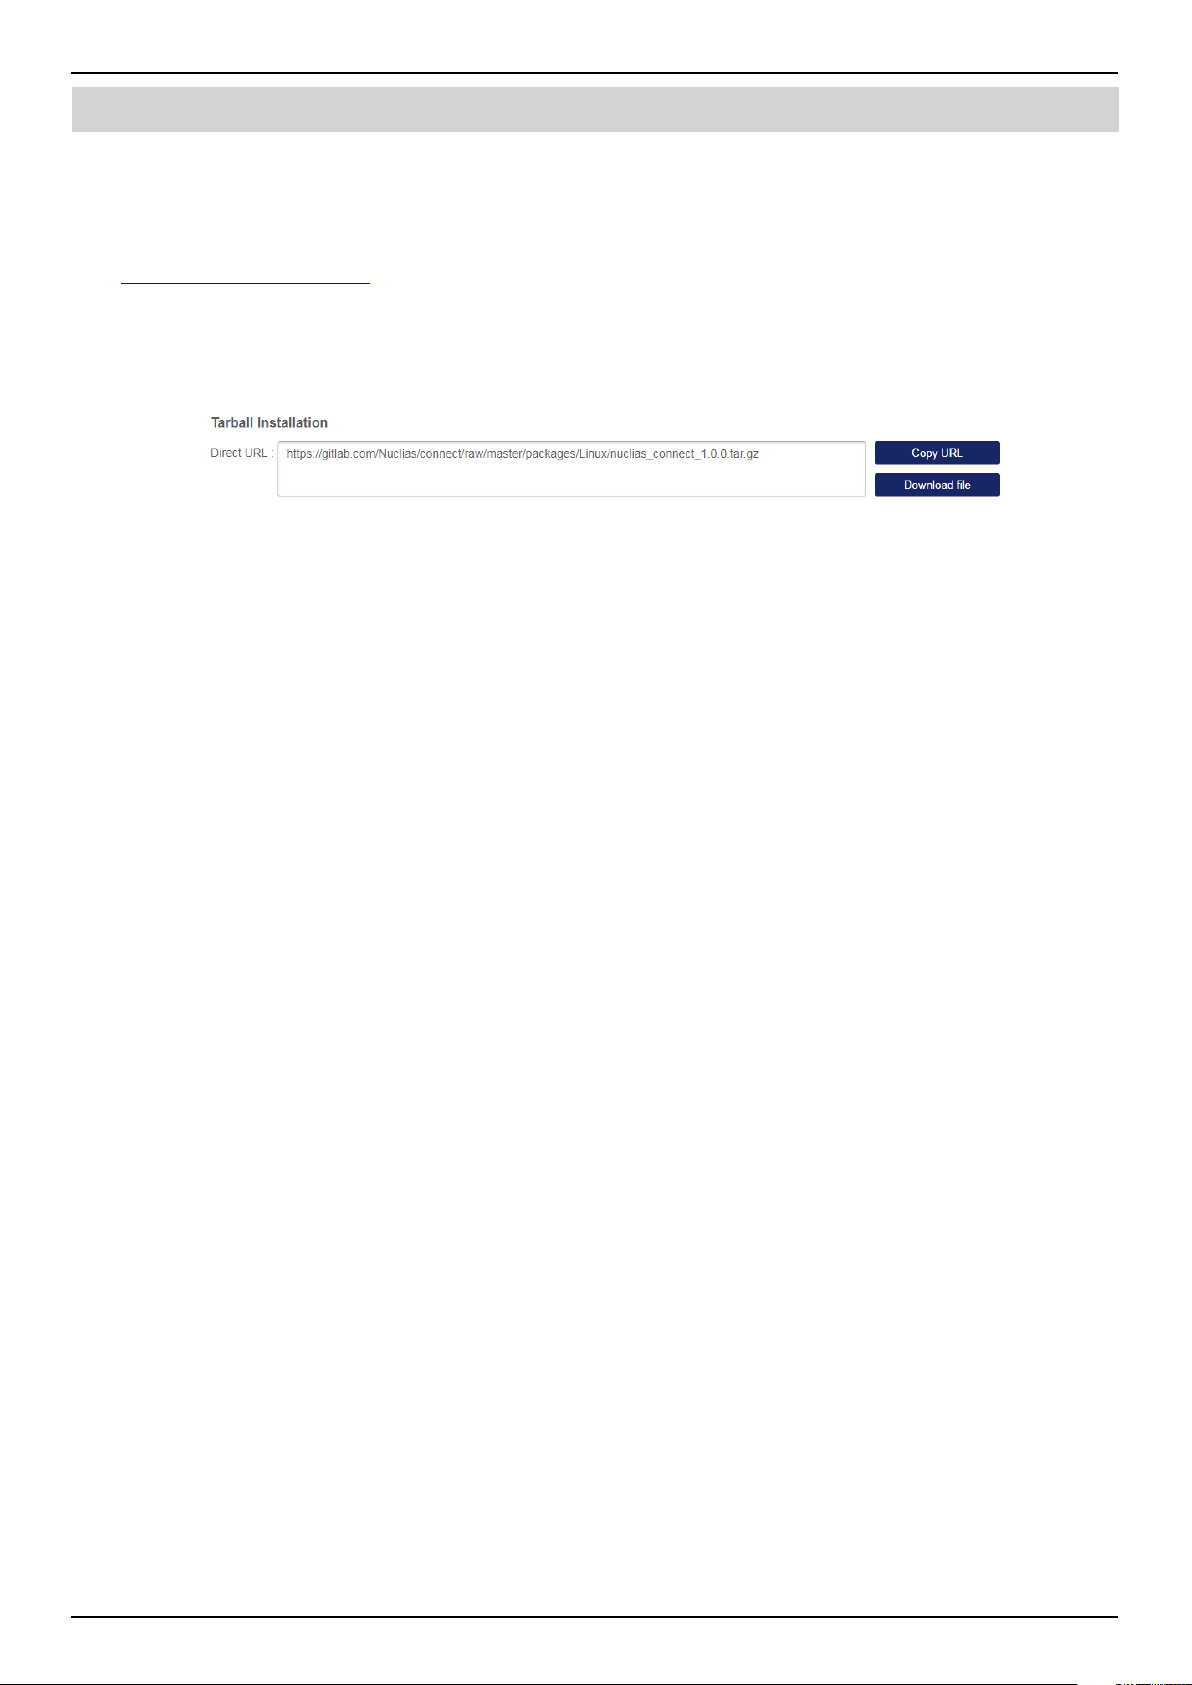
Tarball File Installation
Nuclias Connect is also available for Linux through a compressed tarball le. Use the following information to obtain the correct
Nuclias Connect package.
Go to
https://download.nuclias.com.
From the menu, locate the section labeled Tarball Installation.
In the Direct URL eld, the latest tarball package will be listed.
Click Copy URL to copy the link to the clipboard or Download le to begin downloading the compressed tarball le.
Save le to a local directory. Take note of the location for installation.
Once the download is complete, you can begin the installation.
Software Installation

Nuclias Connect Software User Manual Software Installation
Page 7
Software Installation
Windows Installation
Nuclias Connect Server Installation
Before you begin this procedure, download the latest Nuclias Connect package. See the following for further information.
Locate the Nuclias Connect package and run the le to start the installation process.
A Welcome window will appear.
Click the Next > button to continue. Click the Cancel button to stop and exit the installation.
The License Agreement window will appear. Before installing, review the license terms. Once accepted, click the I Agree
button to continue.
Nuclias Connect Software User Manual Software Installation
Page 8
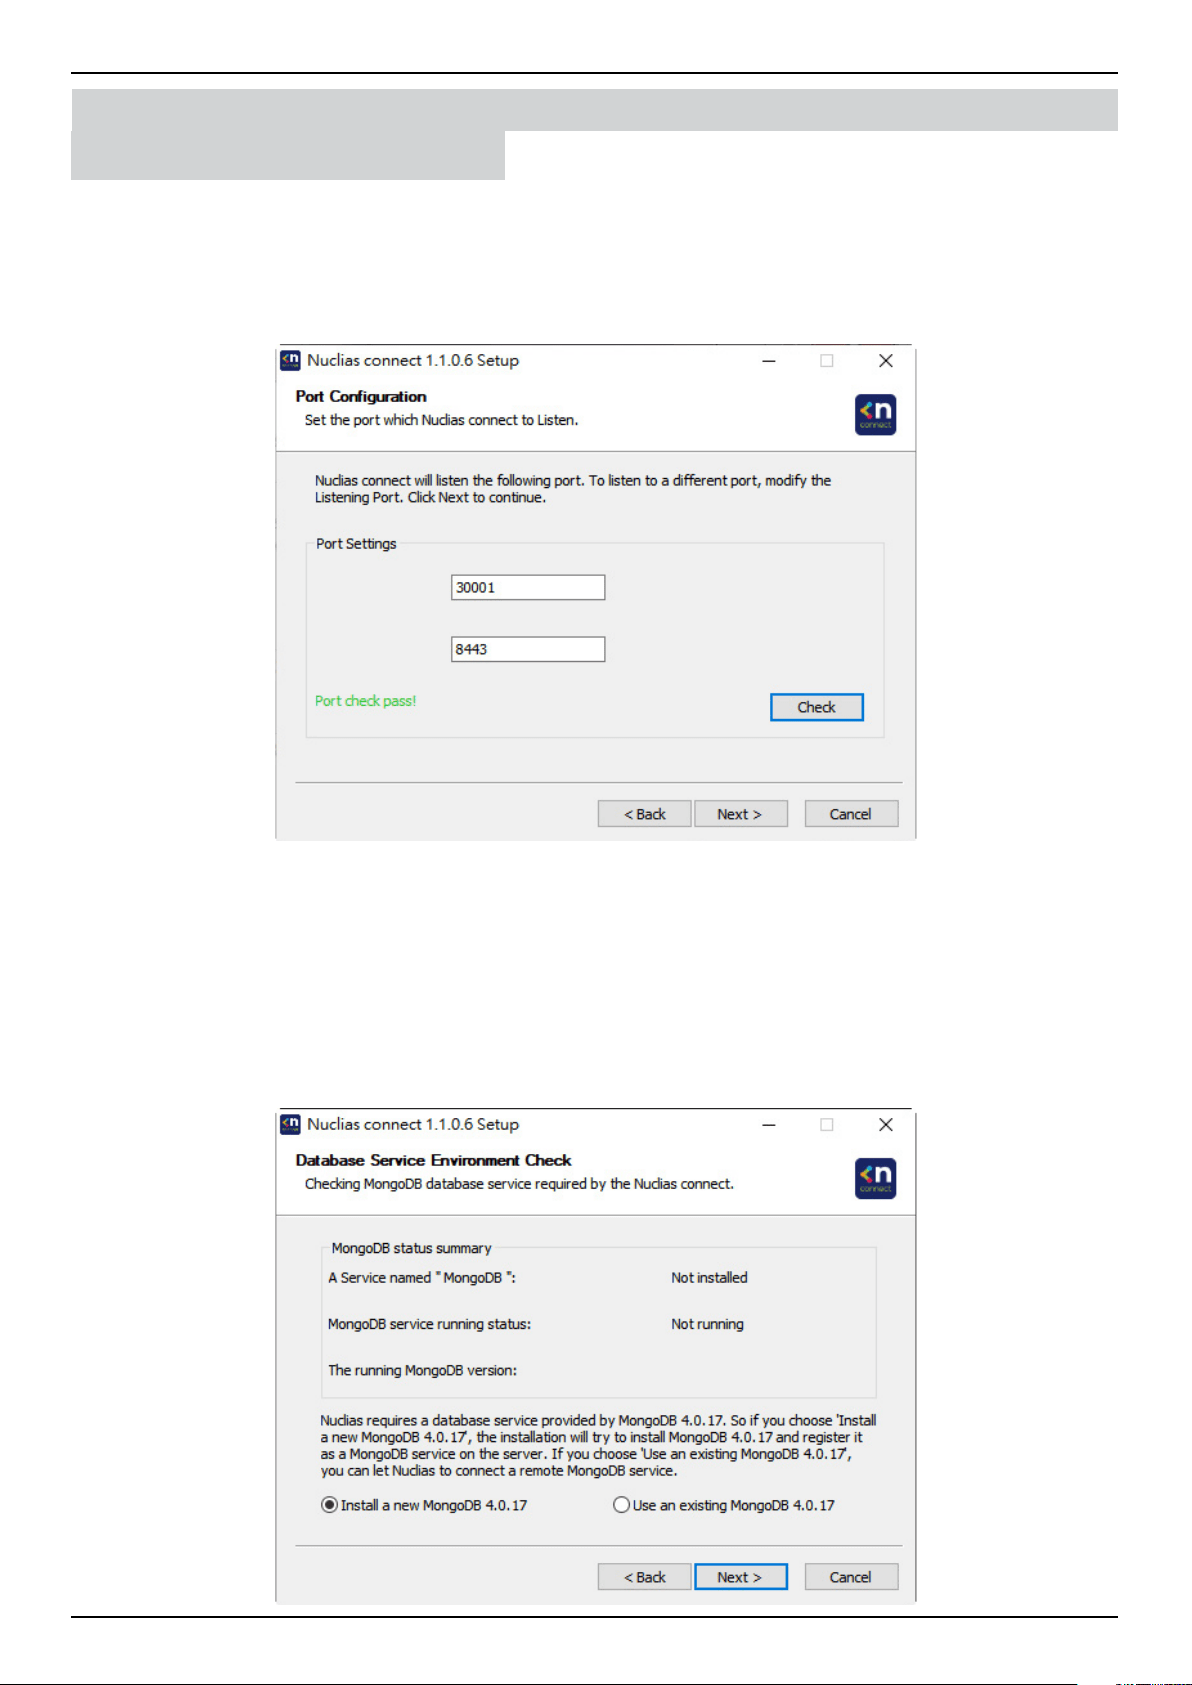
In this window, enter the Web Port (default: 30001) and CoreServer Port (default: 8443) settings as required. These ports
are used for multiple access point connections and must be specied in this window. Use the default settings if the ports are
accessible.
Click the < Back button to return to the previous step. Click the Next > button to continue to the next step. Click the Cancel
button to stop and exit the installation.
The Database Service Environment Check window is displayed. Click Check to perform a systems check for the required
MongoDB database services. A report is visible in the MongoDB status summary eld displaying the MongoDB version and
status.
Nuclias Connect requires a database service to function properly. Support for existing MongoDB on the server or remotely
is available by selecting the related radio button, see the following image. By selecting a new install instance, mongoDB is
registered as a service on the server.
Click the < Back button to return to the previous step. Click the Next > button to continue to the next step. Click the Cancel
button to stop and exit the installation.
Software Installation Nuclias Connect Server Installation
Linux OS Installation
Nuclias Connect Software User Manual Software Installation
Page 9
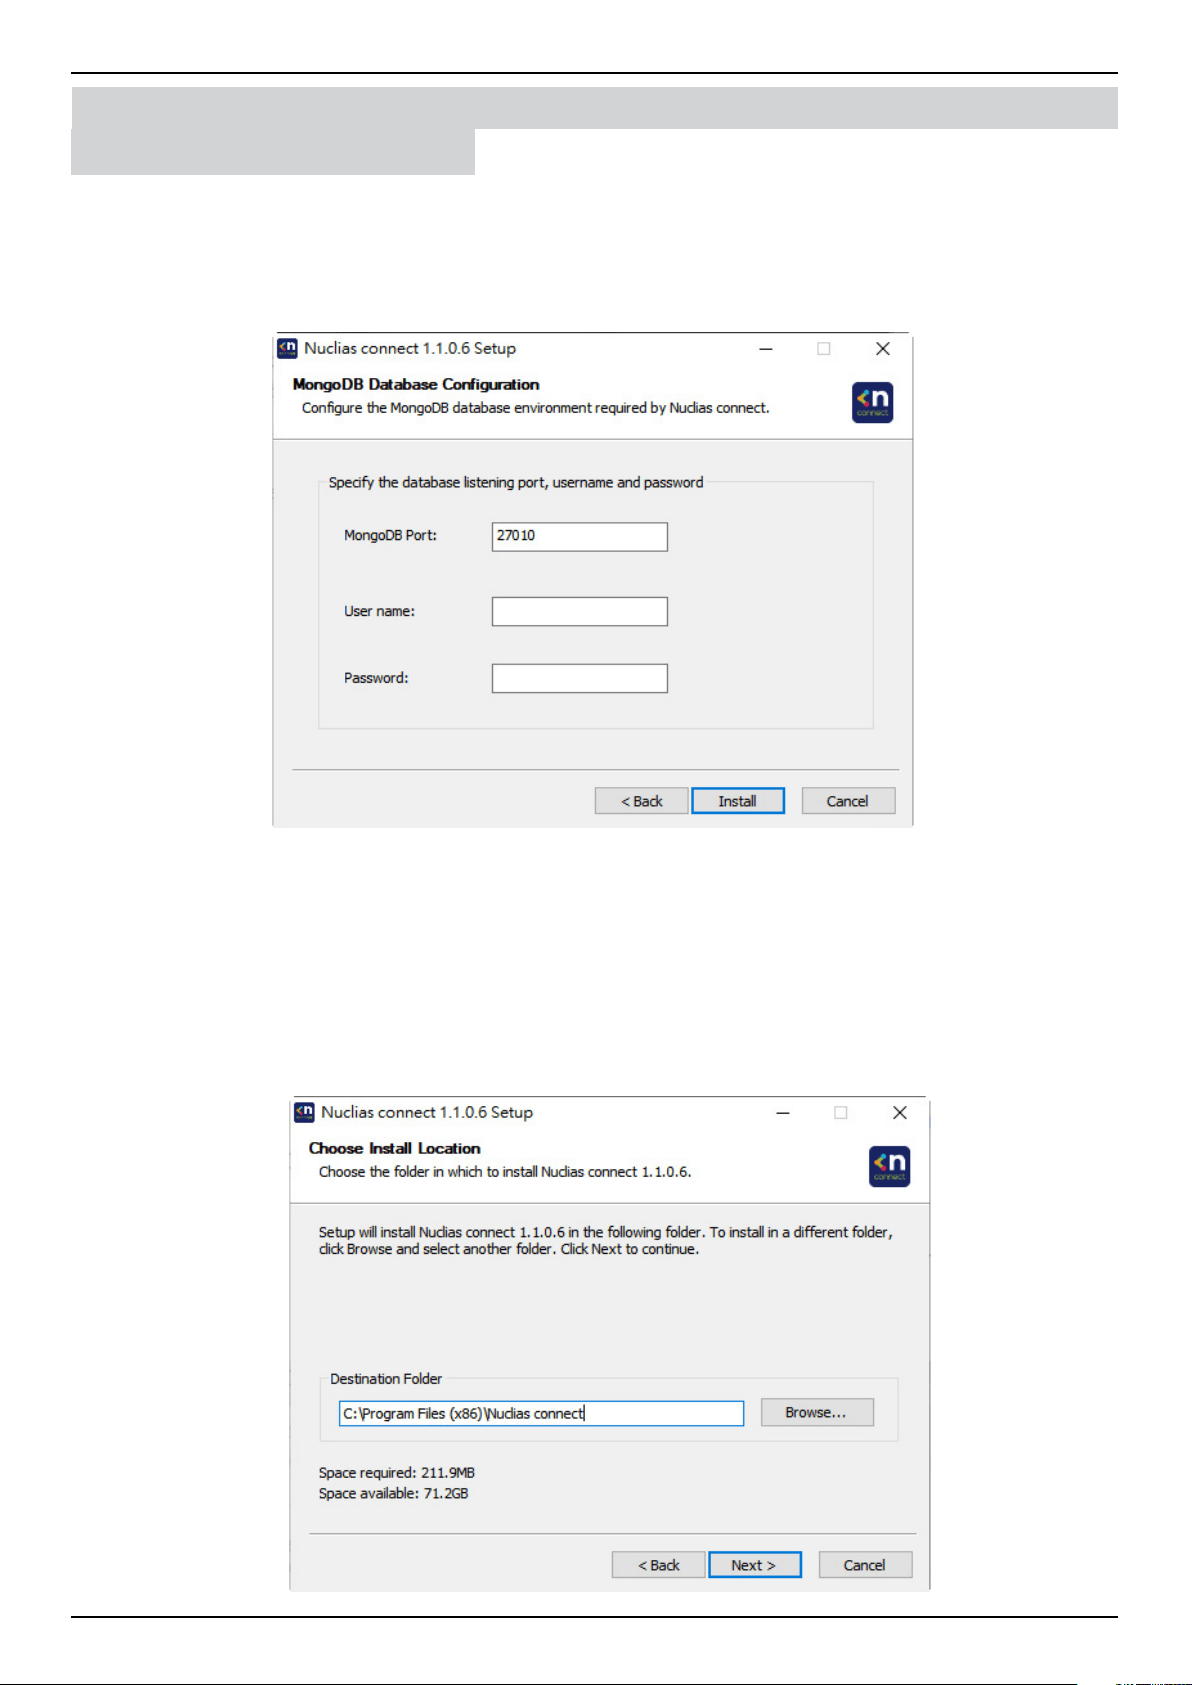
The MongoDB Database Conguration window will appear. In this window, specify the MongoDB listening port (default:
27010), the user name and password for the Postgres database associated with this application.
Click the < Back button to return to the previous step. Click the Next > button to continue to the next step. Click the Cancel
button to stop and exit the installation.
The rewall on the computer might block the Apache HTTP Server application. If the server uses Windows Firewall, a security
alert message will appear. Click the Allow Access button to allow this application to communicate with the network.
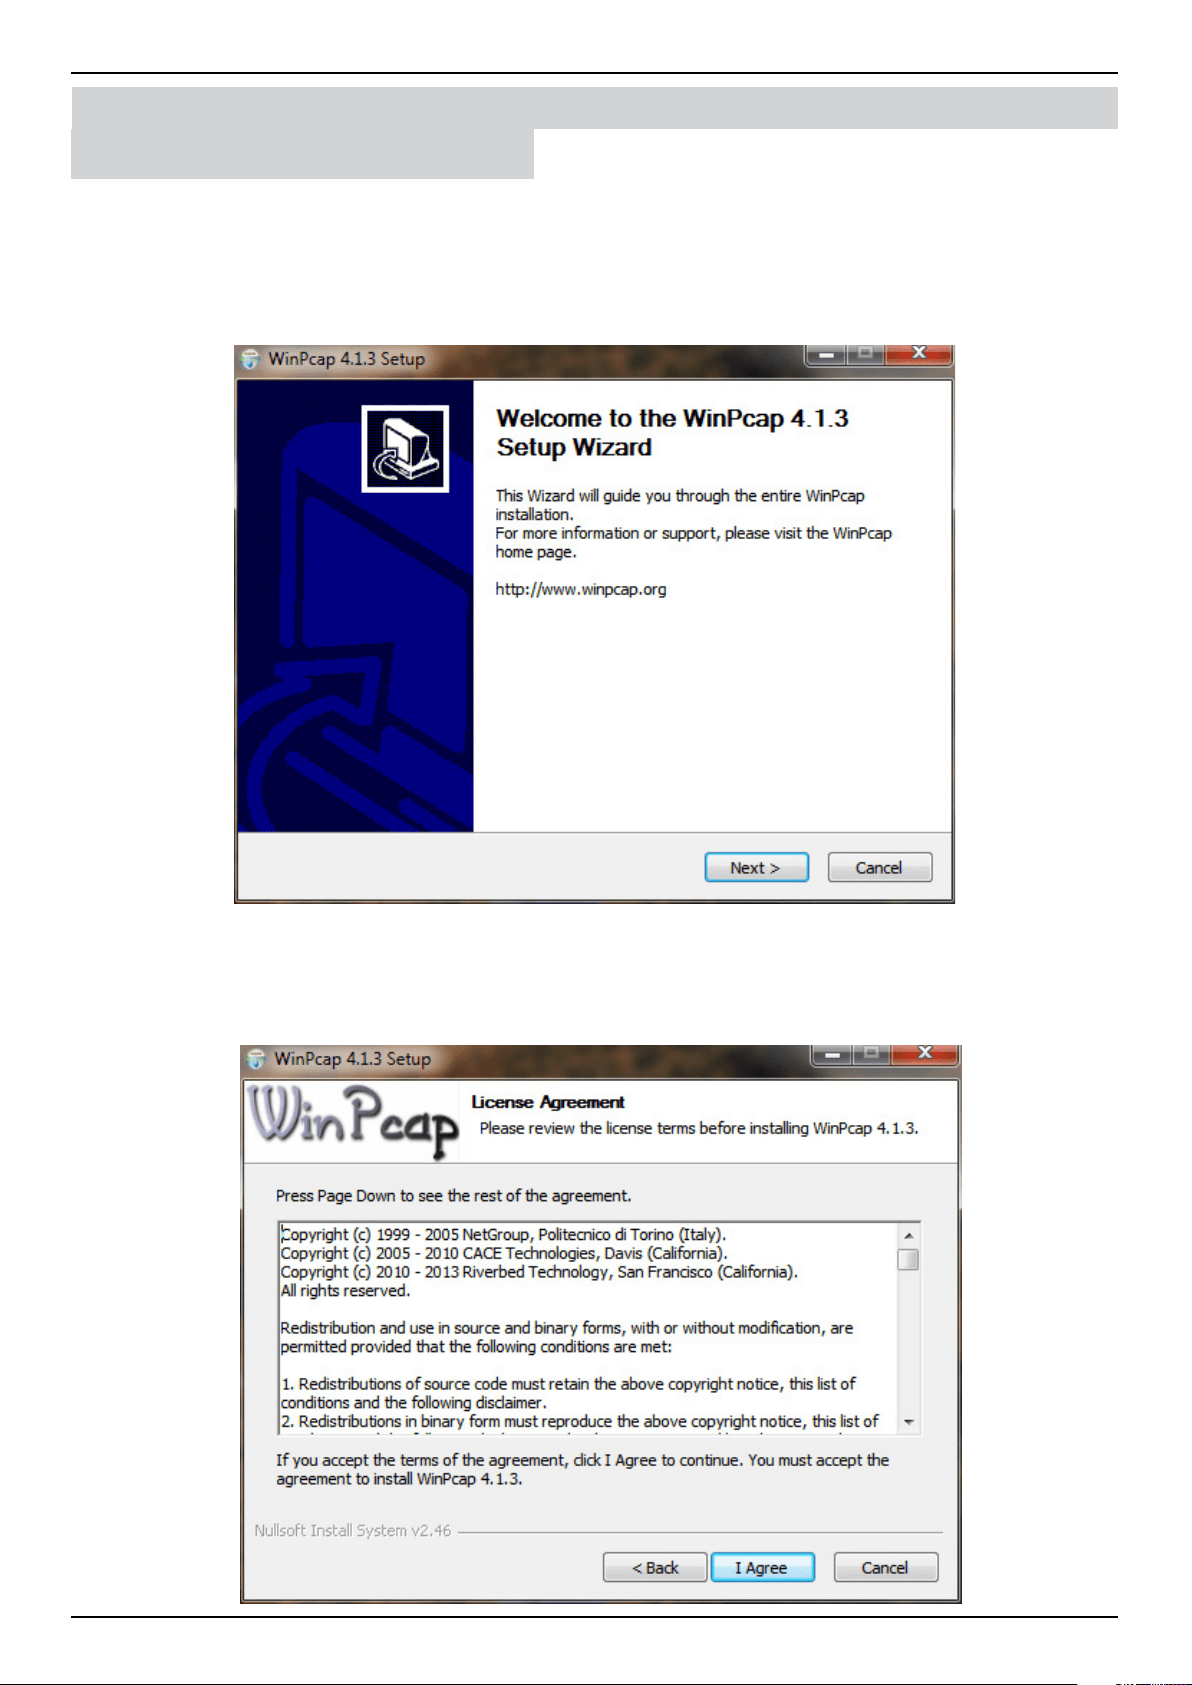
The Choose Destination Location window will appear. To install Nuclias Connect in a dierent folder or on a dierent drive,
click the Browse… button and specify a target folder.
Click the < Back button to return to the previous step. Click the Next > button to continue to the next step. Click the Cancel
button to stop and exit the installation.
Software Installation Nuclias Connect Server Installation
Windows Installation
Nuclias Connect Software User Manual Software Installation
Page 10
Software Installation
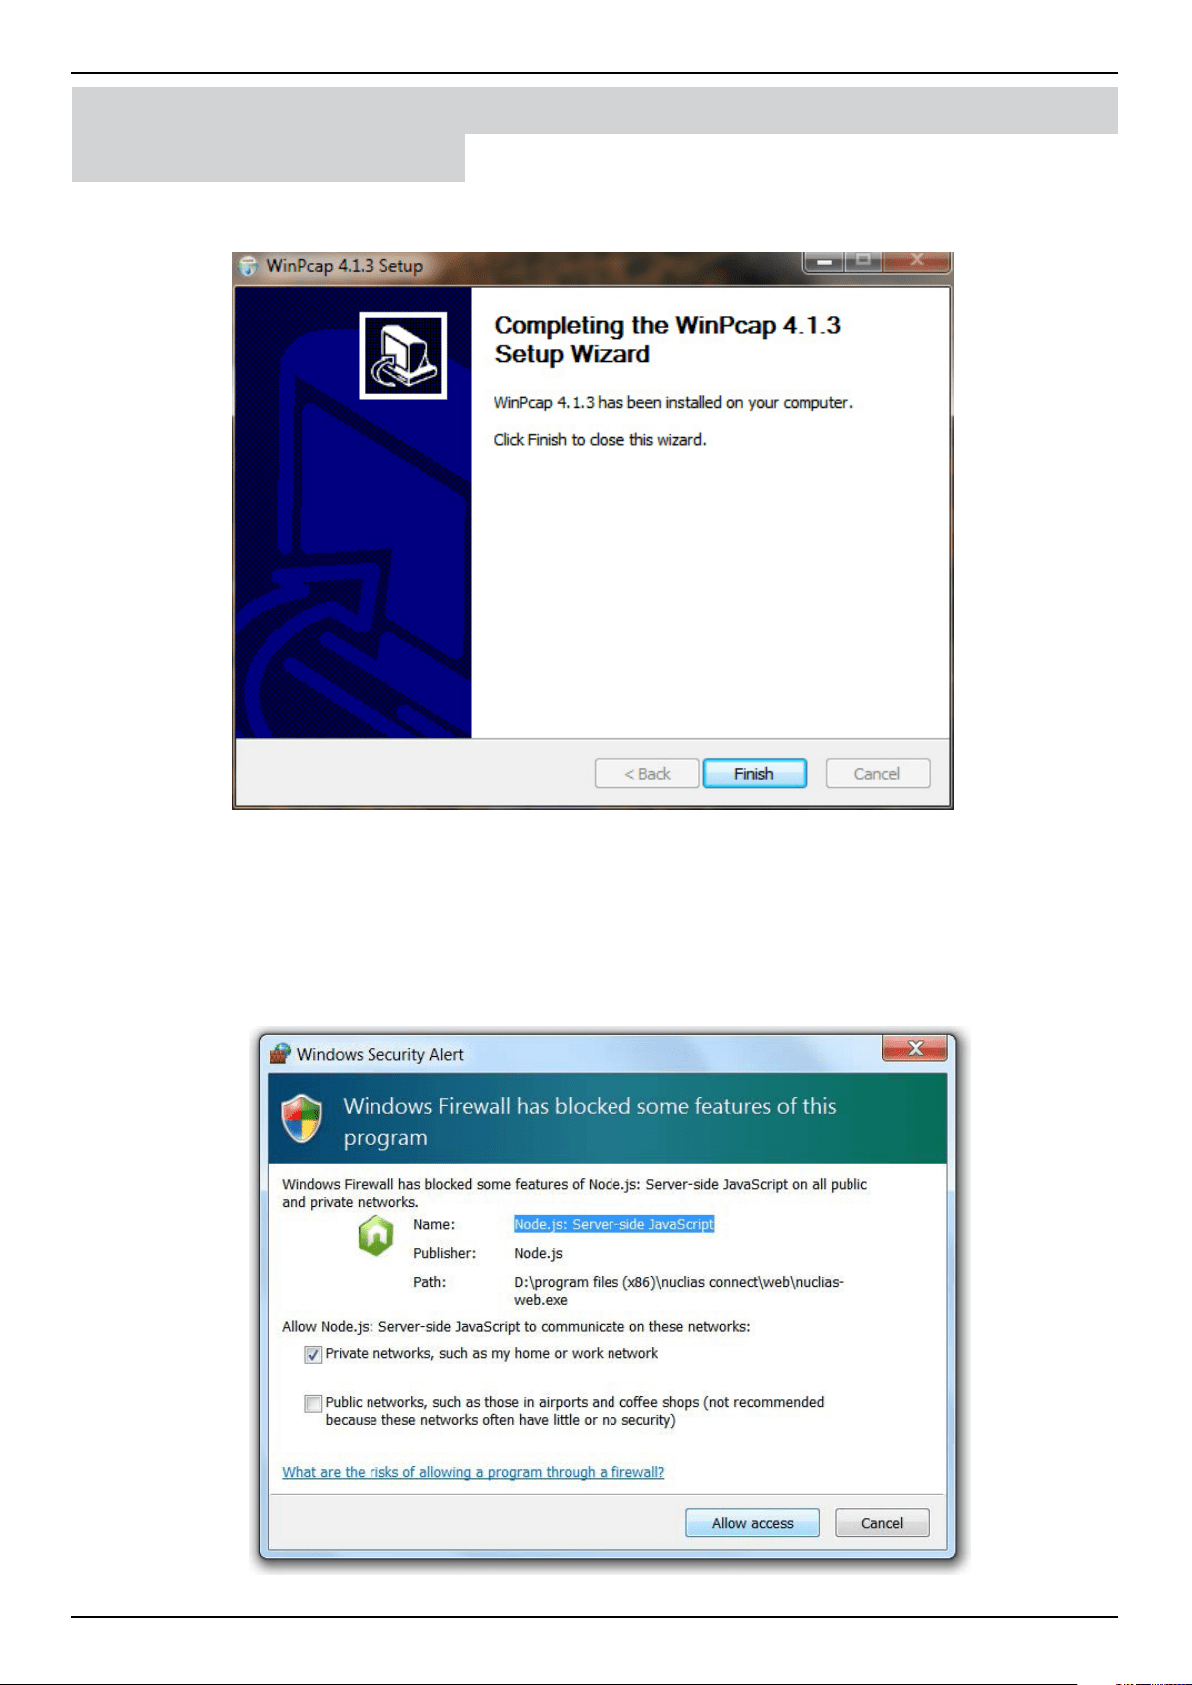
The WinPcap Setup Wizard window will appear. The WinPcap installation allows link-layer network access in Windows
environments, allowing applications to capture and transmit network packets bypassing the protocol stack, this includes
kernel-level packet ltering, a network statistics engine and support for remote packet capture.
Click the Next > button to initiate the Setup Wizard. Click the Cancel button to stop and exit the installation.
The License Agreement window will appear. Review the license terms before installing WinPcap. Once the agreement is
accepted, click I Agree to continue.
Click the < Back button to return to the previous step. Click the Cancel button to stop and exit the installation.
Nuclias Connect Server Installation
Windows Installation
Nuclias Connect Software User Manual Software Installation
Page 11
Software Installation
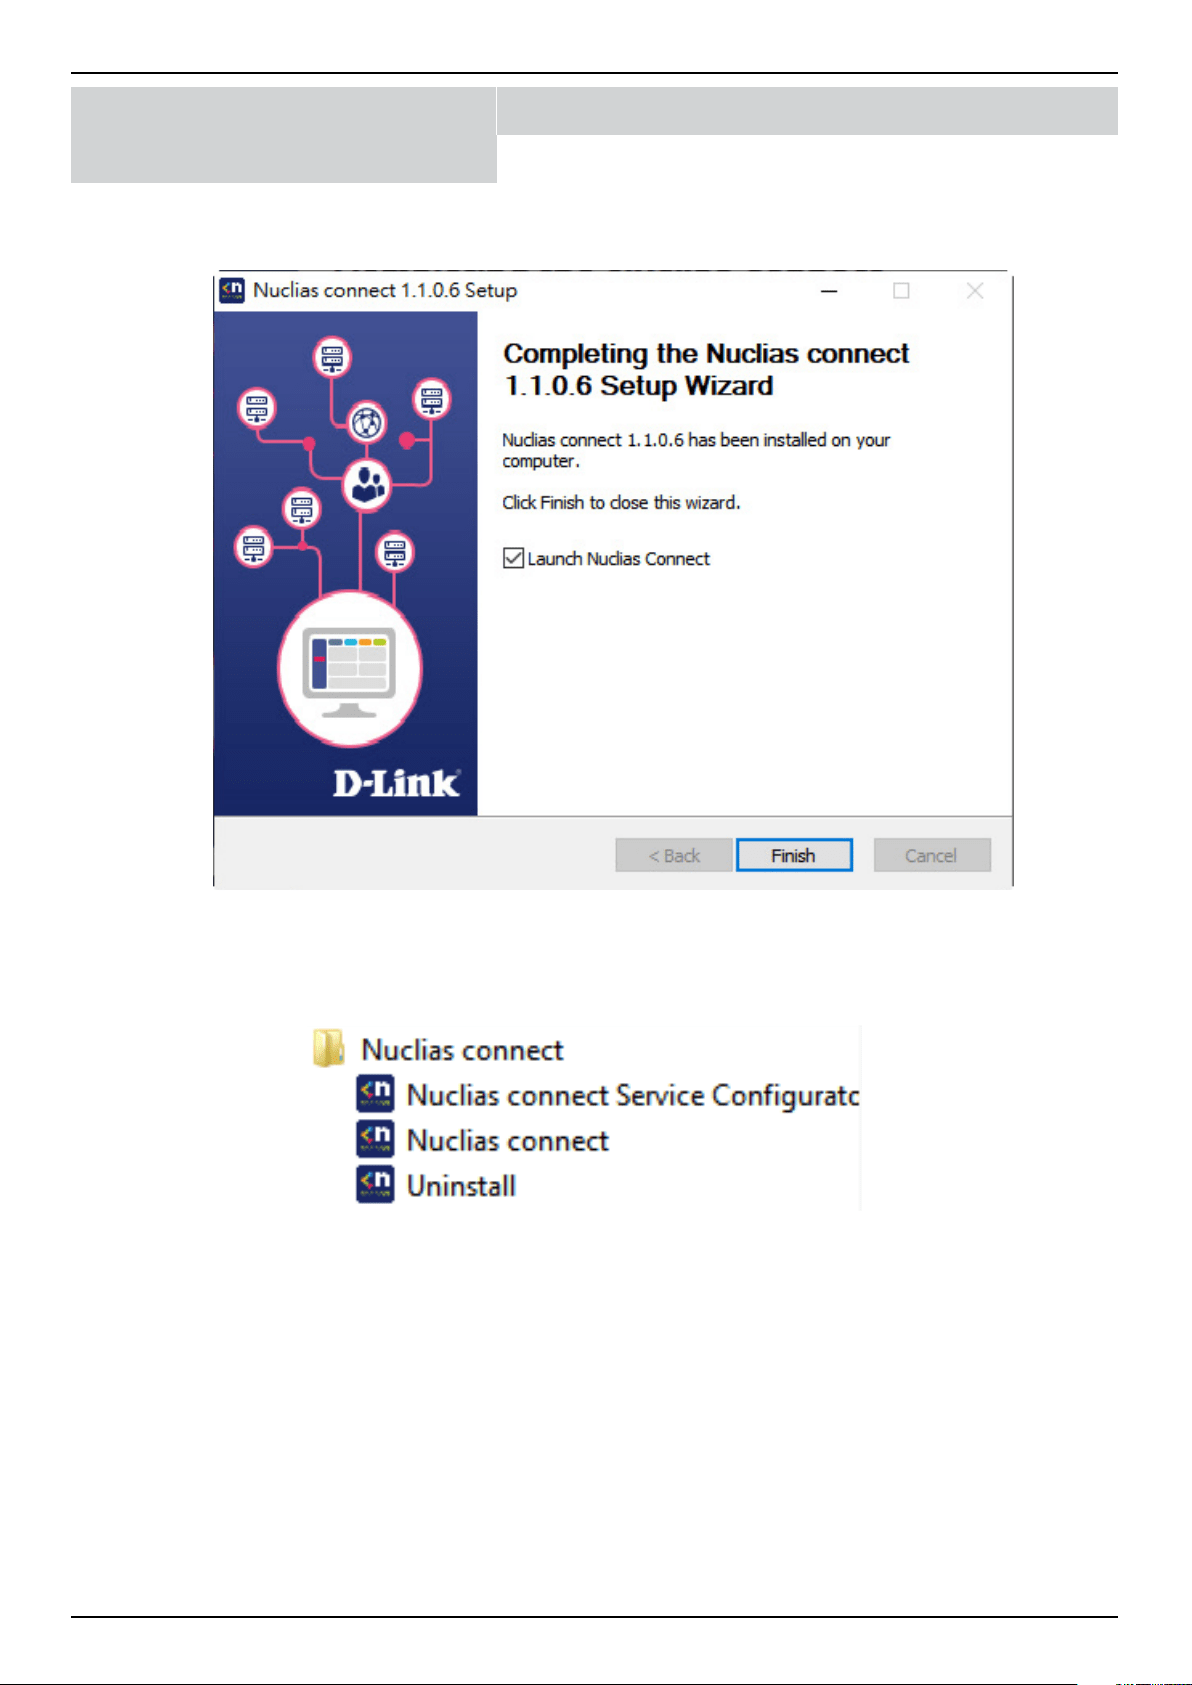
The Completing … Setup Wizard window will appear. Click the Finish button to complete and exit the installation wizard.
Once the WinPcap tool has been installed, the Nuclias Connect setup wizard will continue with the installation.
A Windows Security Alert may display a warning that certain features are blocked from installation, such as Server-side JavaScript.
If the pop-up window appears, select network settings—in the following gure, select Private networks (best suited to access
the rewall) and click Allow access. Otherwise, click Cancel to stop the installation process. See the following gure for further
information.
Nuclias Connect Server Installation
Windows Installation
Nuclias Connect Software User Manual Software Installation
Page 12
Software Installation
The Completing the D-Link Nuclias Connect Setup window will appear. Click the Finish button to complete and exit the
installation wizard.
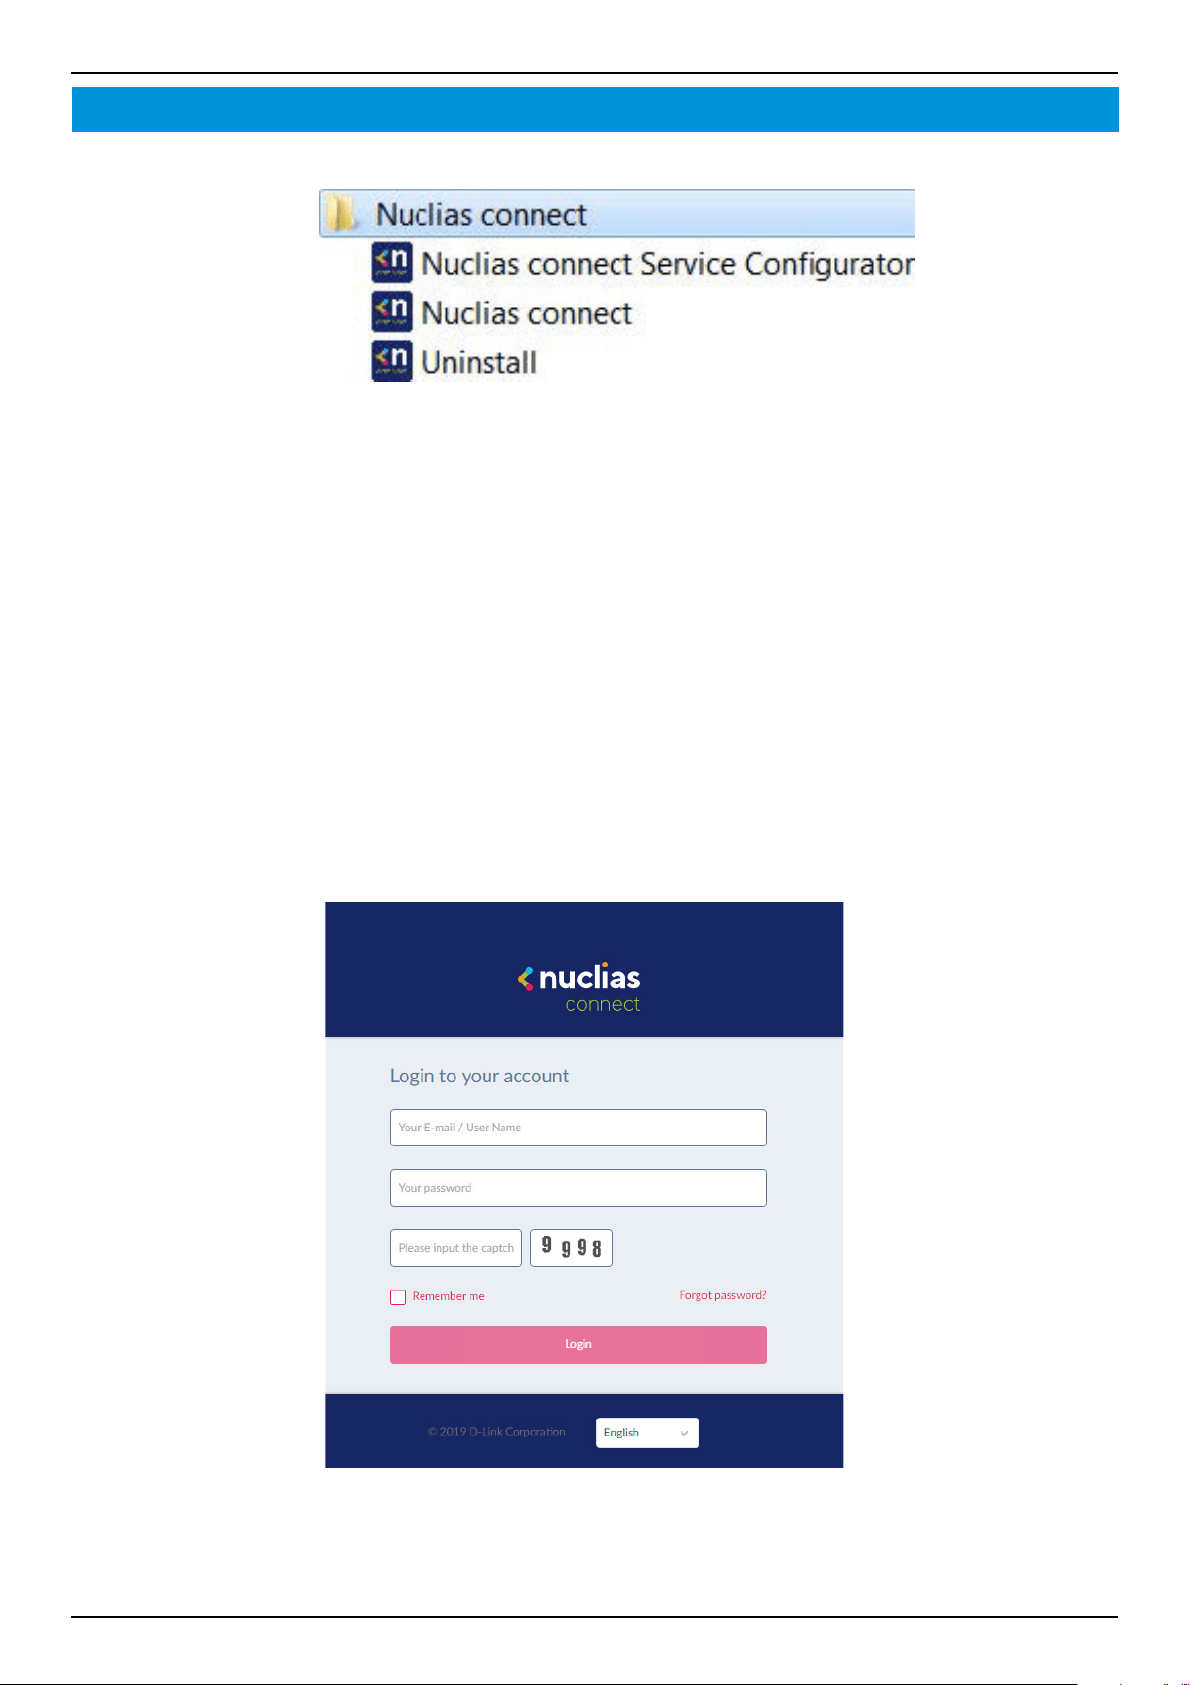
After the installation, the Nuclias Connect Service Congurator, Nuclias Connect, and Uninstall shortcuts will appear in the
programs list as follows:
Nuclias Connect Server Installation
Windows Installation
Nuclias Connect Software User Manual Software Installation
Page 13
Software Installation
Running the Nuclias Connect Server
This section describes how to run the Nuclias Connect Server application. After the installation is completed, the following
applications will appear on the Programs listing.
NOTE: The following instructions were written under the Windows 7 operating system, screenshots and wording may vary
depending on your operating system.
From the desktop, navigate to Start > All Programs > Nuclias Connect and click
to open the Nuclias Connect
setup. The Conguration window will appear as follows.
The Menu contains the Start/Stop Services and Launch access buttons. Before you can manage Nuclias Connect, its Services
must rst be enabled. Use the Restart Services button to enable Nuclias server or Stop to disable the server services.
The Nuclias Connect conguration interface is accessible through a browser window. Click Launch a Browser to Manage the
Network to open a default browser window.
Logging in for the First Time
Nuclias Connect Online Registration
Nuclias Connect provides a 30-days Free Trial. You may continue the use by registering a Nuclias account at register.nuclias.
com or redirected from the Settings on Nuclias Connect. The Nuclias account can also login to D-Link’s Nuclias Cloud Platform if
you have Cloud-managed devices. If there is no registered account, click No Account? Register now to create valid credentials.
Nuclias Connect Server Installation
Windows Installation
Nuclias Connect Software User Manual Software Installation
Page 14
Once the registration process is initialized, a new browser window will be opened. The server registration page will appear.
There are three steps in the registration process. The rst step is as follows.
Step 1: Selecting server region and country.
The account is created on the servers within the selected region and the selected country. Your account data will be stored in
the regional server based on your selected region and country.
NOTE: If you already have an account, you may login directly.
Once the region and country are entered, you will see the user, organization, and site page. Enter the required information and
agree to the Terms of Use and Privacy agreement to enable the account creation button.
Click Create Account to continue.
Software Installation Nuclias Connect Server Installation
Windows Installation
Nuclias Connect Software User Manual Software Installation
Page 15
If the registration is successful, the Finish page will appear. Click Close to complete the process. The registered account is now
available for use. The verication information will be delivered to the registered email of the account.
Your Nuclias account must be validated before use. You will receive an email from v[email protected] with a verication link
included. Please click on the verication link to activate your Nuclias account.
You will be redirected to the Login page. You may skip this step if you do not have Nuclias Cloud-enabled devices.
Software Installation Nuclias Connect Server Installation
Windows Installation
Nuclias Connect Software User Manual Software Installation
Page 16
Launch Nuclias Connect
Nuclias Connect features multiple login options from using the Nuclias Connect installed software on a local computer to a
browser on a remote computer (Edge or Chrome is recommended). Open the browser and enter the IP address or Domain
Name of the host computer running the Nuclias server (for example, https://192.168.10.1:30001 or https://domain-name.com).
On the locally installed software, use the Nuclias Service Congurator or the Nuclias Connect shortcuts to open the interface in
a browser.
From the desktop, navigate to Start > All Programs > Nuclias Connect and click on
to open the
Nuclias Connect Conguration window.
From the Nuclias Connect window, click Launch a Browser to Manage the Network. The default browser will be launched
to show the Nuclias Connect interface.
Alternatively, the interface is also accessible through the following:
From the desktop, navigate to Start > All Programs > Nuclias Connect and click on
to open the default Web
browser.
Enter the modied username and password in the respective elds.
Enter the Captcha code as shown on screen.
NOTE:
• The Remember me function saves the password entry for future use.
• The Forgot password function allows you to reset your password in the event that the current password is lost.
• The interface supports Multi-language options. Click the language drop-down menu to select a dierent language.
Software Installation Nuclias Connect Server Installation
Windows Installation
Nuclias Connect Software User Manual Software Installation
Page 17
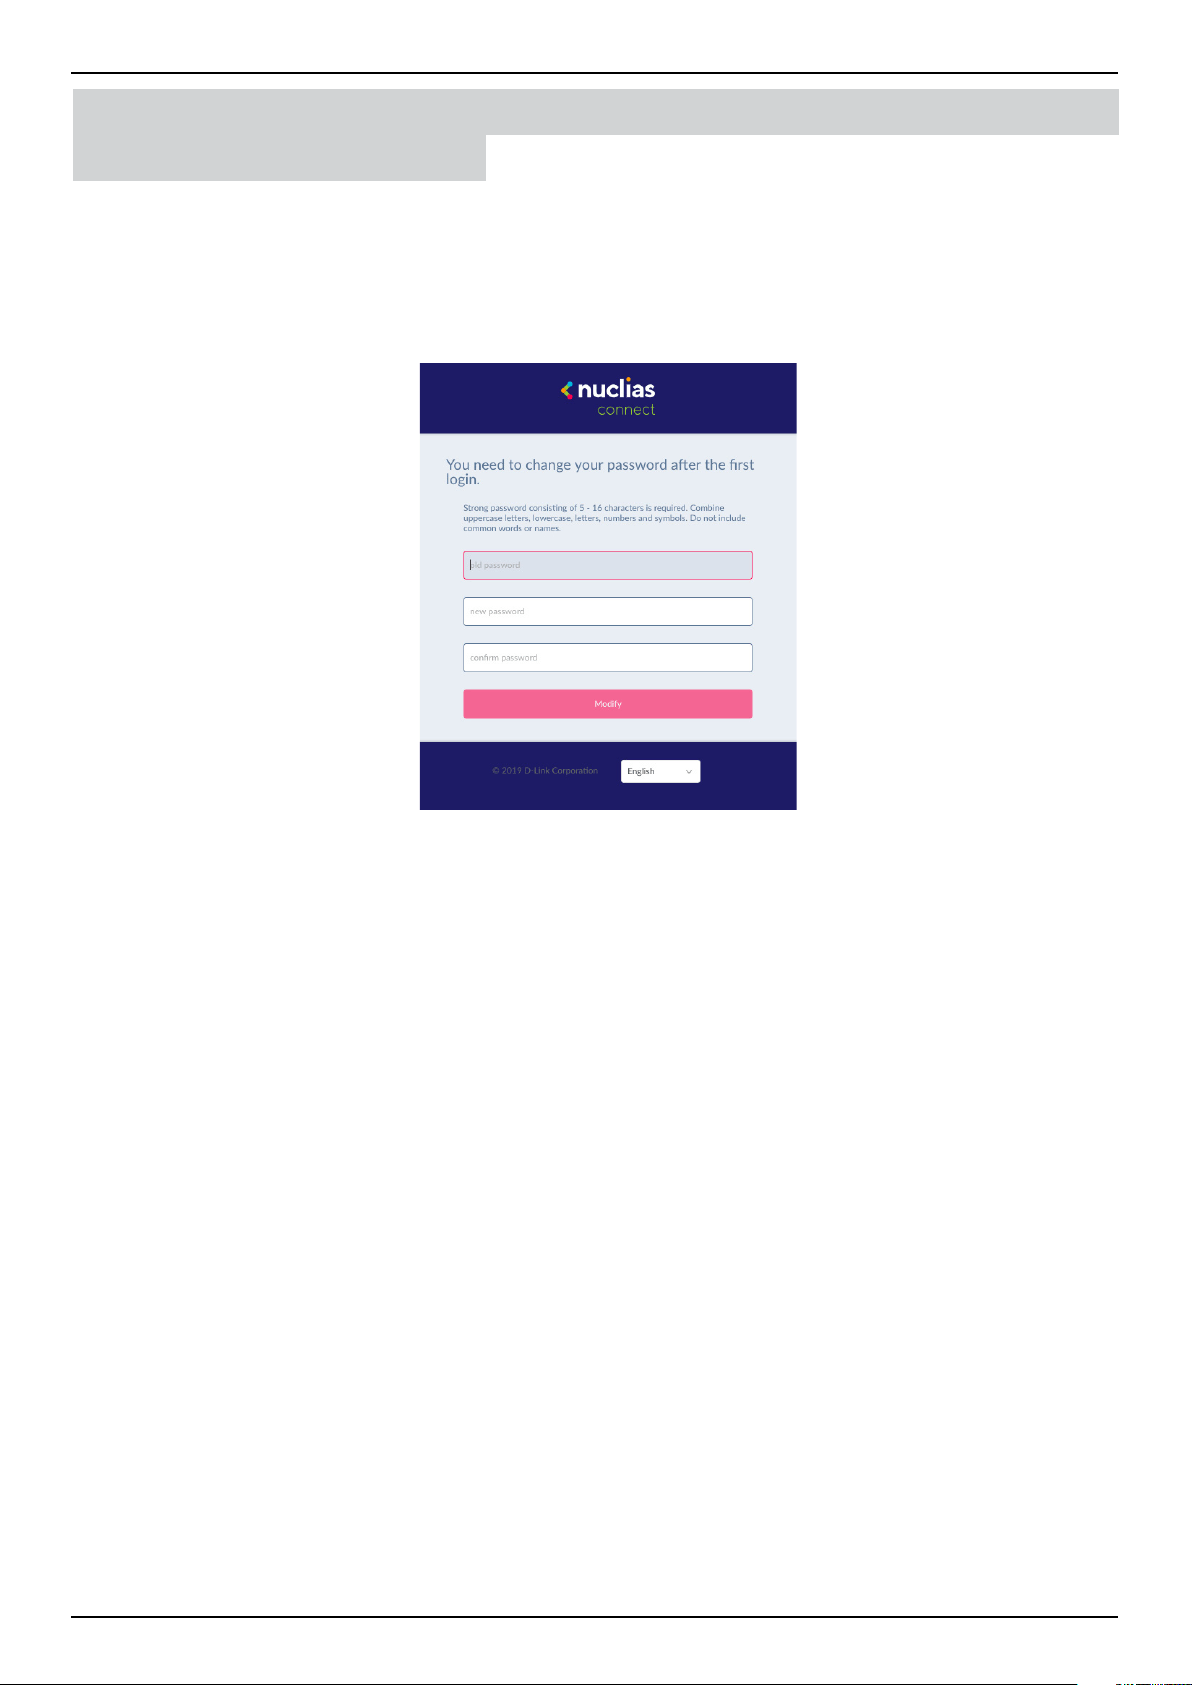
After the web browser opens and connects successfully to the server, a change-password dialog will appear. A change in the
default password is required after the rst login.
When assigning a password, it is recommended to use a strong password. The new password is required to be 5 - 16 characters
in length. Mixing uppercase and lowercase characters along with numbers and symbols can help ensure stronger security.
NOTE: Do not include common words or names.
Enter the previous password in the Old Password eld.
In the New Password eld enter the new password.
Enter the same password in the Conrm Password eld to verify the entry.
Click Modify to complete the process.
Upon logging in, the System Settings page will appear. In the event that the device access address or port have been changed,
the Nuclias Connect Core server must be restarted. Complete the following settings page before continuing.
Software Installation Nuclias Connect Server Installation
Windows Installation

Nuclias Connect Software User Manual Software Installation
Page 18
Software Installation Nuclias Connect Server Installation
Linux OS Installation
There are two ways to install Nuclias Connect on Linux:
1. Docker Hub
2. Tarball – See “Tarball Installation (Option 2)” on page 22.
Docker Hub Installation
Preparing the Software Environment
Before installing the Nuclias Connect, we must rst set up the environment. The steps outlined in the following information are
provided as a guide to complete the installation task. Please follow the guide for installing Nuclias Connect with Docker Hub in
the following order before continuing on to the next item on the list.
• Install Docker
• Install Docker Compose
• Install Nuclias Connect via the terminal
Install Docker
Docker is available in two editions: Community Edition (CE) and Enterprise Edition (EE). In this section, Docker CE is used. For
more information about Docker CE, see Docker Enterprise Edition.
To install Docker, you will need a 64-bit OS and a kernel at 3.10 or newer. Kernels older than 3.10 do not have the necessary
features required to run containers; data loss and kernel panics occur frequently under certain conditions.
Check your current Linux version by using the uname –r command.
Prerequisites
To install Docker CE, you need the 64-bit version of one of these Ubuntu versions, or CentOS 7:
• Cosmic 18.10
• Bionic 18.04 (LTS)
• Xenial 16.04 (LTS)
• User name with sudo privileges
Docker CE is supported on x86_64 (or amd64), armhf, arm64, s390x (IBM Z), and ppc64le (IBM Power) architectures.
Uninstalling Previous Versions of Docker
It is recommended to uninstall any previous versions of the Docker software before proceeding. Use the following command
to uninstall.
$ sudo apt-get remove docker docker-engine docker.io docker-ce
Once the previous version is removed, the latest version of the Docker software can be installed.

Nuclias Connect Software User Manual Software Installation
Page 19
Installing Docker
Installing Docker is performed through the terminal window by using the following command:
$ sudo apt-get install docker.io
Once the command is initiated, the following results are displayed.
[sudo] password for dlink:
Reading package lists... Done
Building dependency tree
Reading state information... Done
The following additional packages will be installed:
bridge-utils cgroupfs-mount containerd docker.io pigz runc Ubuntu-fan
0 upgraded, 7 newly installed, 0 to remove and 63 not upgraded.
Need to get 0 B/52.2 MB of archives.
After this operation, 257 MB of additional disk space will be used.
Do you want to continue? [Y/n]
To nalize the installation, enter Y.
Do you want to continue? [Y/n] Y
The following results are displayed.
Preconguring packages ...
Selecting previously unselected package pigz.
(Reading database ... 175976 les and directories currently installed.)
Preparing to unpack .../0-pigz_2.4-1_amd64.deb ...
Unpacking pigz (2.4-1) ...
Selecting previously unselected package bridge-utils.
Preparing to unpack .../1-bridge-utils_1.6-2ubuntu1_amd64.deb ...
Unpacking bridge-utils (1.6-2ubuntu1) ...
Selecting previously unselected package cgroupfs-mount.
Preparing to unpack .../2-cgroupfs-mount_1.4_all.deb ...
Unpacking cgroupfs-mount (1.4) ...
Selecting previously unselected package runc.
Preparing to unpack .../3-runc_1.0.0~rc7+git20190403.029124da-0ubuntu1_adm64.deb ...
Unpacking runc (1.0.0~rc7+git20190403.029124da-0ubuntu1) ...
Selecting previously unselected package containerd.
Preparing to unpack .../4-containerd_1.2.6-0ubuntu1_amd64.deb ...
Unpacking containerd (1.2.6-0ubuntu1) ...
Software Installation Nuclias Connect Server Installation
Linux OS Installation

Nuclias Connect Software User Manual Software Installation
Page 20
Selecting
Preparing to unpack .../5-docker.io_18.09.5-0ubuntu1_amd64.deb ...
Unpacking docker.io (18.09.5-0ubuntu1) ...
Selecting previously unselected package Ubuntu-fan.
Preparing to unpack .../6-ubuntu-fan_0.12.12_all.deb ...
Unpacking Ubuntu-fan (0.12.12) ...
Setting up runc (1.0.0~rc7+git20190403.029124da-0ubuntu1) ...
Setting up pigz (2.4-1) ...
Setting up cgroupfs-mount (1.4) ...
Setting up containerd (1.2.6-0ubuntu1) ...
Created symlink /etc/system/system/multi-user.target.wants/containerd.service/lib/system/system /
conatinerd.service.
Setting up Ubuntu-fan (0.12.12) ...
Created symlink /etc/system/system/multi-user.target.wants/Ubuntu-fan.service/lib/system/system /
Ubuntu-fan.service.
Setting up docker.io (18.09.4-0ubuntu1) ...
Adding group ‘docker’ (GID 130)
Done.
Created Symlink /etc/system/system/sockets.target.wants/docker.socket → /lib/system/system/docker.
socket.
Processing triggers for systemd (240-6ubuntu5) ...
Processing triggers for man-db (2.8.5-2) ...
After installing Docker, you need to congure Docker to start at boot so when the server is rebooted, Docker service will start
automatically.
$ sudo systemctl enable docker
$ sudo systemctl start docker
Software Installation Nuclias Connect Server Installation
Linux OS Installation

Nuclias Connect Software User Manual Software Installation
Page 21
Install Docker Compose
Compose is available for the Windows or 64-bit Linux operating systems.
Prerequisites
Docker Engine must be installed prior to the installation of Compose.
• On Windows OS, Docker Compose is included in the desktop installation.
• On Linux OS, the Docker software for your specic OS must rst be installed. Once installed, continue with the Compose
installation process.
Installing Compose on Linux
On Linux, the Docker Compose binary can be downloaded from the Compose repository release page found on GitHub. See the
following instructions.
Check the latest Docker Compose from Github at
https://github.com/docker/compose.
$ sudo curl -L https://github.com/docker/compose/releases/download/1.23.1/docker-compose-
`uname -s`-`uname -m` -o /usr/local/bin/docker-compose
NOTE: To install a dierent version of Compose, substitute the variable 1.23.1 with the preferred version of Compose.
Apply executable permissions to the aforementioned binary. See the following command:
$ sudo chmod +x /usr/local/bin/docker-compose
Once the installation is complete, verify it by checking its version number. See the following command to verify the version of
the Compose binary.
$ sudo docker-compose –version
docker-compose version 1.23.1, build b02f1306
Docker Hub Installation (Option 1)
To generate the command for setting up Nuclias Connect through Docker Hub, go to http://download.nuclias.com. See
“Nuclias Connect for Linux” on page 5. Below you can see an example of the command:
$ sudo curl -L https://raw.githubusercontent.com/nuclias-connect/connect/dev/install.sh |
sudo sh -s [mongo-username] [mongo-password]
This completes the Docker Hub installation of Nuclias Connect.
Software Installation Nuclias Connect Server Installation
Linux OS Installation

Nuclias Connect Software User Manual Software Installation
Page 22
Tarball Installation (Option 2)
Download Nuclias Connect for Linux to your system. You’ll nd the necessary information through the following link:
https://download.nuclias.com
Once the package is downloaded, make a note of its location for later use. In this example, the tar package (nuclias-connect.tar.
gz) is downloaded in an archived form (GZ) to the desktop.
To extract the Nuclias Connect package:
From the desktop, press Ctrl + Alt + T to launch a terminal window.
From the terminal window, navigate to the location where the tar package is downloaded. In this example, the package is
located on the desktop.
Enter the command to change directories.
$ cd Desktop
Once in the correct directory, use the ls command to view a list of available les in the directory.
To extract the package, type in the following command and the respective password for the user.
:~/Desktop$sudo tar xvzf nuclias-connect.tar.gz
The command will extract the contents of the package. The following results will appear.
Nuclias_connect/
Nuclias_connect/docker-compose.yml
Nuclias_connect/cong/
Nuclias_connect/cong/key/
Nuclias_connect/cong/key/ca-cert.pem
Nuclias_connect/cong/key/openssl.cnf
Nuclias_connect/appcong.json
Nuclias_connect/images
Nuclias_connect/images/mongo.tar
Nuclias_connect/images/core.tar
Nuclias_connect/images/web.tar
Nuclias_connect/entrypoint-initdb.sh
The Nuclias Connect package is now extracted and ready for installation.
Navigate to the directory containing the init.sh shell le and type in the following command to initialize the Nuclias Connect
package.
$ cd Desktop
~/Desktop$ cd nuclias_connect
~/Desktop/nuclias_connect$ sudo ./init.sh
Software Installation Nuclias Connect Server Installation
Linux OS Installation

Nuclias Connect Software User Manual Software Installation
Page 23
The binary is executed and the following results will appear.
########### Welcome to Nuclias Connect ###########
--
--
--
-e (1/11)---- check your system type ----
SYSTEM: Linux Ubuntu
-e check system nished
-e (2/11)---- check docker ----
Docker version 18.09.6, build 481bc77
-e docker installed
-e (3/11)---- check docker-compose ----
docker-compose version 1.23.1, build b02f1306
-e docker-compose installed
-e (4/11)---- check docker status ----
message: 2
-e docker sevice is running
-e (5/11)---- check core image ----
message: 2
-e core image is existed
-e (6/11)---- check web image ----
message: 2
-e web image is existed
-e (7/11)---- check mongo image ----
message: 2
-e mongo image is existed
-e (8/11)---- check web_port ----
message: 0
-e web_port is free
-e (9/11)---- check core_port ----
message: 0
Software Installation Nuclias Connect Server Installation
Linux OS Installation

Nuclias Connect Software User Manual Software Installation
Page 24
-e core_port is free
-e (11/11)---- check le and directory ----
-e check le nished
-e all check_job nished
-e Now initial set the database administrator account for Nuclias Connect, please conrm is
the rst time set administrator account? [y/n]
As the initialization of the Nuclias Connect software takes place, a prompt will appear requesting to setup the database
administrator account. If this is the rst time using the database, you need to set a database administrator for the account.
Otherwise, skip this step and go to Verifying the Installed Software.
Setup Database Prole
For rst time users, you must rst set the database administrator.. The following command describes the process.
In the Nuclias Connect initialization stage, the following prompt will appear.
-e Now initial set the database administrator account for Nuclias Connect, please conrm is
the rst time set administrator account? [y/n]
Enter Y (Yes) to set the administrator account and password.
At the prompt, enter the administrator user name and the related password. In the following example, the variable admin is
used for both instances.
User Name: admin
Password: admin
Conrm Password: admin
Creating volume “nuclias_connect_MONGO-DATA” with default driver
Creating mongo ... done
Creating nuclias_connect_core ... done
Creating nuclias_connect_web ... done
-e Nuclias services are running...
-- commands list -----------------------
| |
-e | start: docker-compose up –d |
-e | stop:: docker-compose down |
| |
---------------------------------------
:~/Desktop/nuclias_connect$
With the Mongo DB, core, and web containers setup complete, the Nuclias Connect can now be launched using a web browser.
Software Installation Nuclias Connect Server Installation
Linux OS Installation

Nuclias Connect Software User Manual Software Installation
Page 25
Find Your Server IP Address
To connect to Nuclias Connect, follow the below informaton:
From the desktop, press Ctrl + Alt + T to launch a terminal window.
In the console, navigate to the directory containing the Nuclias Connect package. In the following example, the folder nuclias_
connect is used to describe the location of the software.
$ cd Desktop
~/Desktop$ cd nuclias_connect
Enter the following command to obtain the dened IP address of the Nuclias Connect instance.
~/Desktop/nuclias_connect$ ip addr
The results will appear as follows. The IP address to use in a web browser is found below. In this instance, the address is
172.17.5.47, but yours may dier.
1: lo: <LOOPBACK, UP, LOWER_UP> mtu 65536 qdisc noqueue state UNKNOWN group t glen 1000
Link/loopback 00:00:00:00:00:00 brd 00:00:00:00:00:00
Inet 127.0.0.1/8 scope host lo
Valid_lft forever preferred_lft forever
Inet6 ::1/128 scope host
Valid_lft forever preferred_lft forever
2: enp3s0f2: <BROADCAST, MULTICAT, UP,LOWER_UP> mtu 1500 qdisc fq_code1 state up group
default qlen 1000
link/ether 30:65:ec:25:be:3b brd :::::
inet 172.17.5.47/24 brd 172.17.5.255 scope global dynamic noprexroute ip3 sof2
valid_lft 22085sec preferred_lft 22085sec
inet6 fe80::c3a8:bcbd:6cda:4dc3/64 scope link noprexroute
valid_lft forever preferred_lft forever
3: wlp2s0: <NO-CARRIER,BROADCAST, MULITCAST,UP> mtu 1500 qdisc noqueu state DOWN group
default qlen 1000
link/ether a4:db:30:cb:36:0e brd :::::
4: docker0: <NO-CARRIER,BROADCAST, MULITCAST,UP> mtu 1500 qdisc noqueu state DOWN group
default qlen 1000
link/ether 02:42:11::39:9f brd :::::s
inet 172.18.0.1/16 brd 172.18.255.255 scope global docker0
valid_lft forever preferred_lft forever
In the above interface session, the IP address (172.17.5.47) of the Nuclias Connect is identied. This is the IP address to use
through a web browser to access the Nuclias Connect interface.
The Docker Hub installation process is now complete. The core containers necessary to access Nuclias Connect through a web
browser are now in place. To access the Nuclias Connect interface, see “Launching Nuclias Connect” on page 26 for further
details.
Software Installation Nuclias Connect Server Installation
Linux OS Installation
Nuclias Connect Software User Manual Software Installation
Page 26
Software Installation Launching Nuclias Connect
With the core containers setup and the MongoDB proles congured, the Nuclias Connect can be accessed through a web
browser.
To obtain the dened IP address to access the Nuclias Connect through a web browser, see “” on page 245.
The default settings for the Nuclias Connect are as follows:
• Web port: 30001
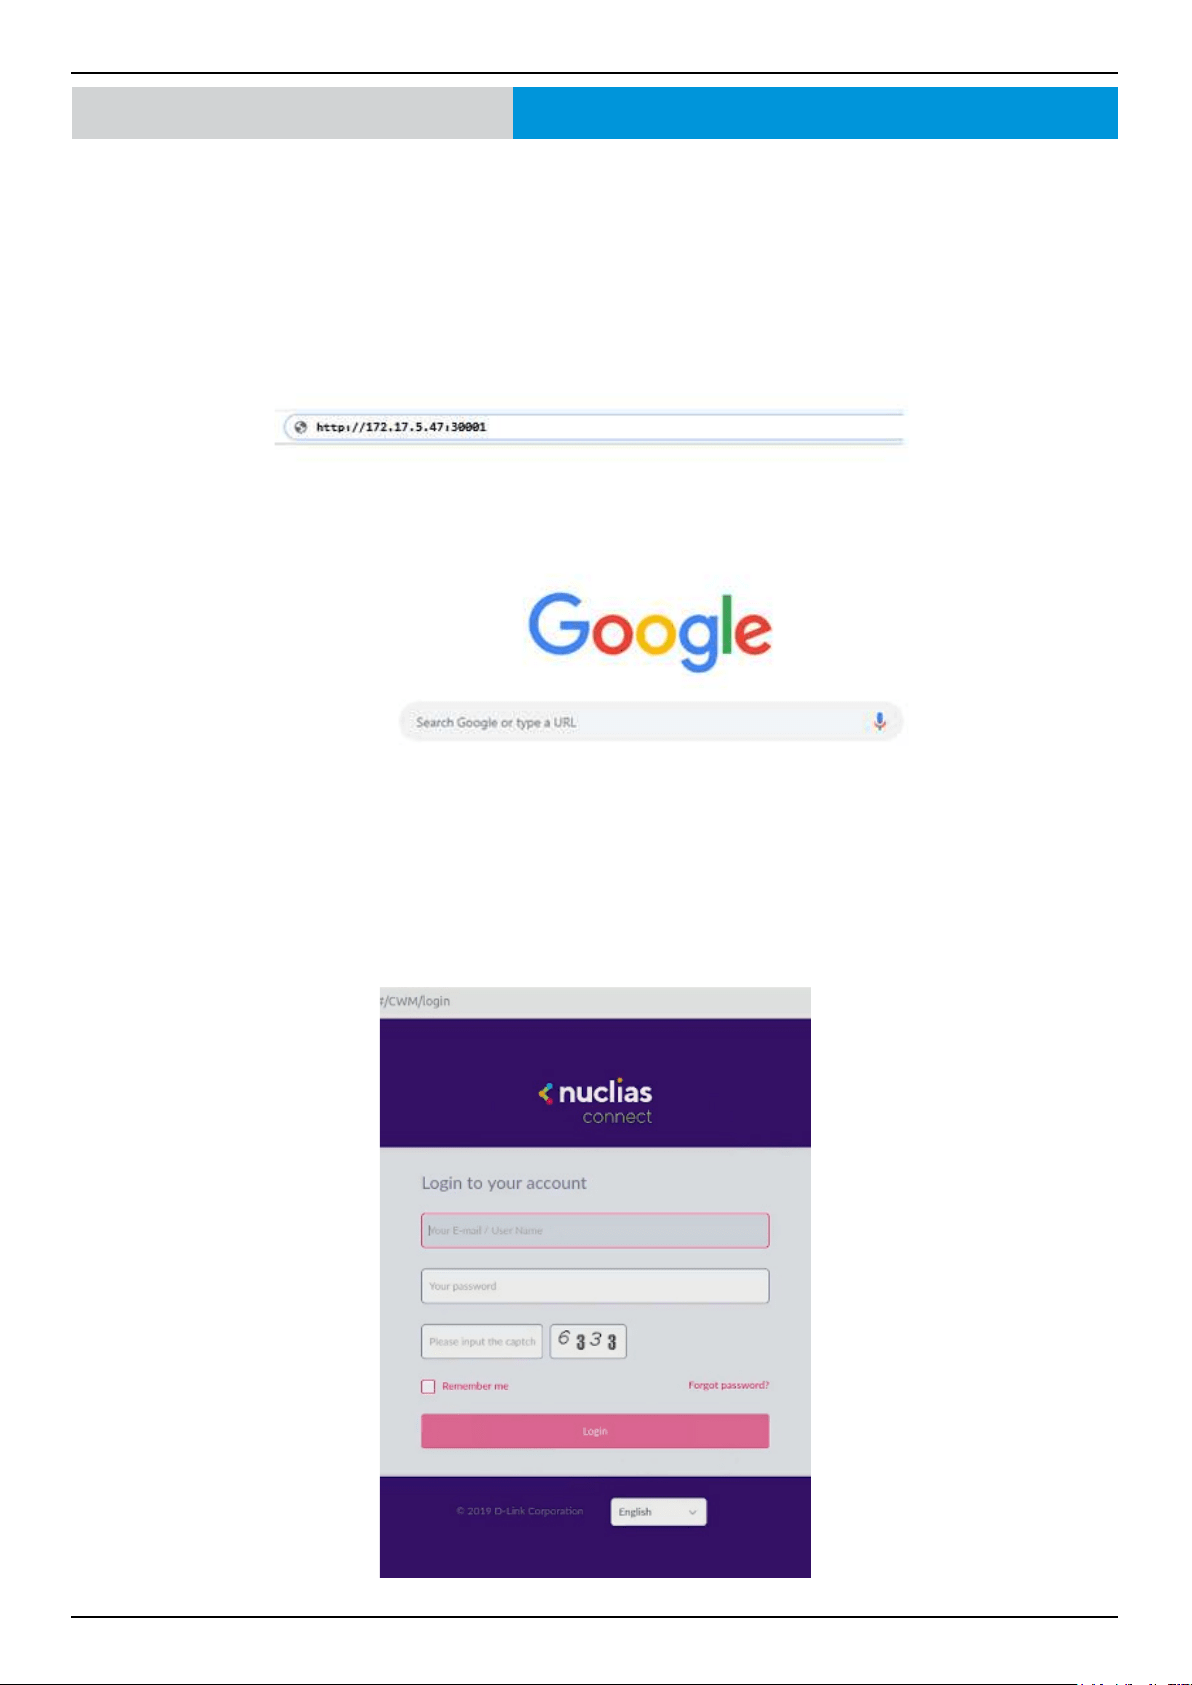
From the desktop, open a web browser.
In the address eld, enter the aforementioned address to Nuclias Connect. In this instance, the IP address is 172.17.5.47:30001.
A privacy error message may appear when establishing a connection to the Nuclias Connect server. In this instance, click
Proceed to 172.17.5.47 (unsafe) to open the Nuclias Connect portal.
The Nuclias Connect main login screen will appear as seen in the following gure.
Nuclias Connect Software User Manual Software Installation
Page 27
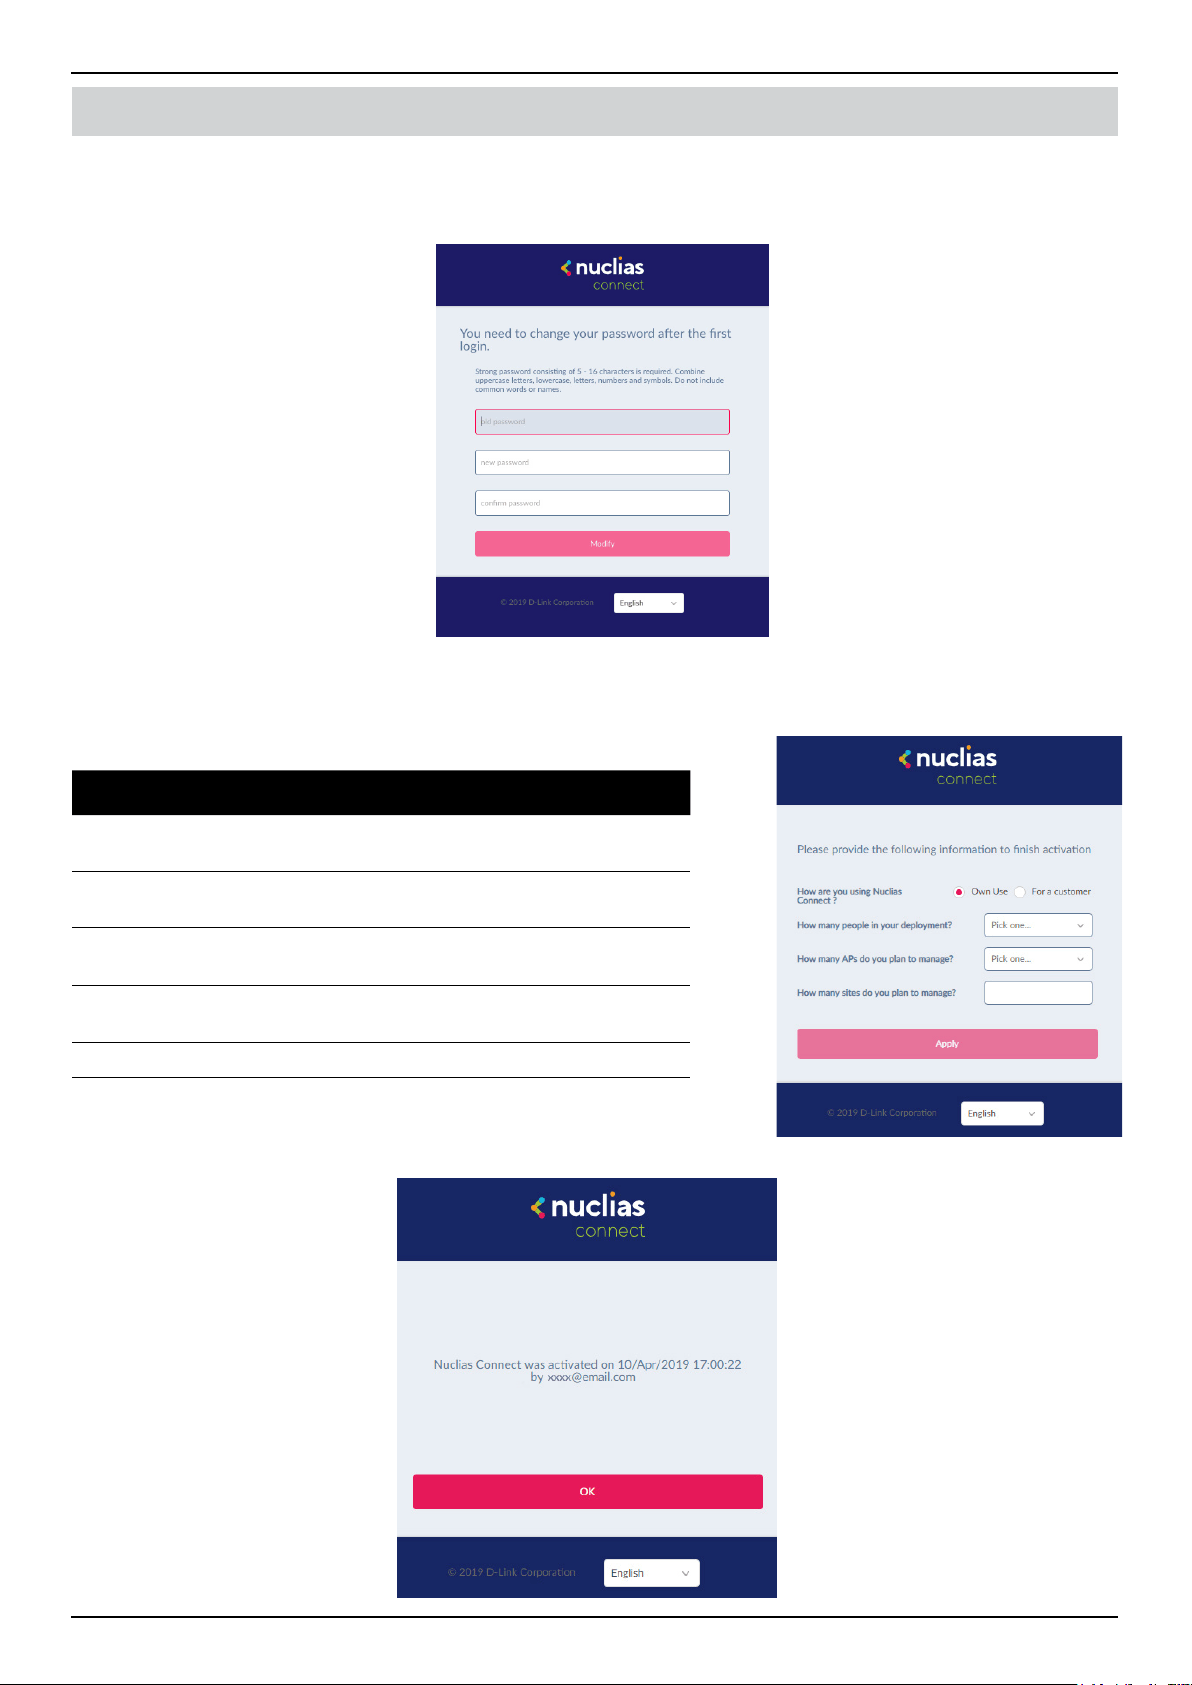
After a successful password change, you will be required to provide installation information to continue the activation.
Complete the requested information and click Apply to continue.
Parameter Description
How are you using
Nuclias Connect?
Personal Use or Customer
How many people in your
department?
Options: <10, 10-50, 50-100, >100
How many APs do you
plan to manage?
Options: <20, 20-50, 50-100, 100-500, >500
How many sites do you
plan to manage?
Enter the number of sites to manage
Apply Click to continue the activation process.
The activation process is now complete. Click OK to nalize the process.
Software Installation Launching Nuclias Connect
The default username and password is admin. You will be required to change your password after the initial login. Enter the
current password, then enter your new password and its conrmation in the appropriate elds.
Click Modify to continue.

Nuclias Connect Software User Manual Software Installation
Page 28
Software Installation Nuclias Connect App
Through the use of the Nuclias Connect App, users can manage sites and network remotely and easily by accessing the tool
through a smart device.
This section provides information on exporting the required network proles from the Nuclias server for managing connected
APs. Additional information explaining the functionality of the Nuclias Connect App is also included.
Export Network Proles
To add new access points to Nuclias Connect, you must rst export the required network prole from Nuclias. The network
prole contains the authentication key and the IP address of the controller. Navigate to Conguration > Create Prole and
click
to export the network prole to your computer.
When switches or access points are located on a public network and you are accessing Nuclias Connect remotely, you must
ensure that Nuclias Connect uses a public IP address or domain name. To verify Nuclias Connect’s IP address, go to System >
Settings > Connection and check the Device Access Address eld.
Nuclias Connect Software User Manual Software Installation
Page 29
Software Installation Nuclias Connect App
Discover and Congure APs Using the Nuclias Connect App
The Nuclias Connect App is a wireless access management tool that provides the means to easily manage single or multiple
sites and networks from your smartphone or tablet. With the Nuclias Connect App, you can quickly deploy standalone APs to
Nuclias Connect, scan a network for D-Link access points or congure individual APs.
NOTE:
• The Nuclias Connect App cannot discover switches or access points located on Layer 3 networks.
• Before attempting to import a network prole, ensure that you have access to the Nuclias Connect controller.
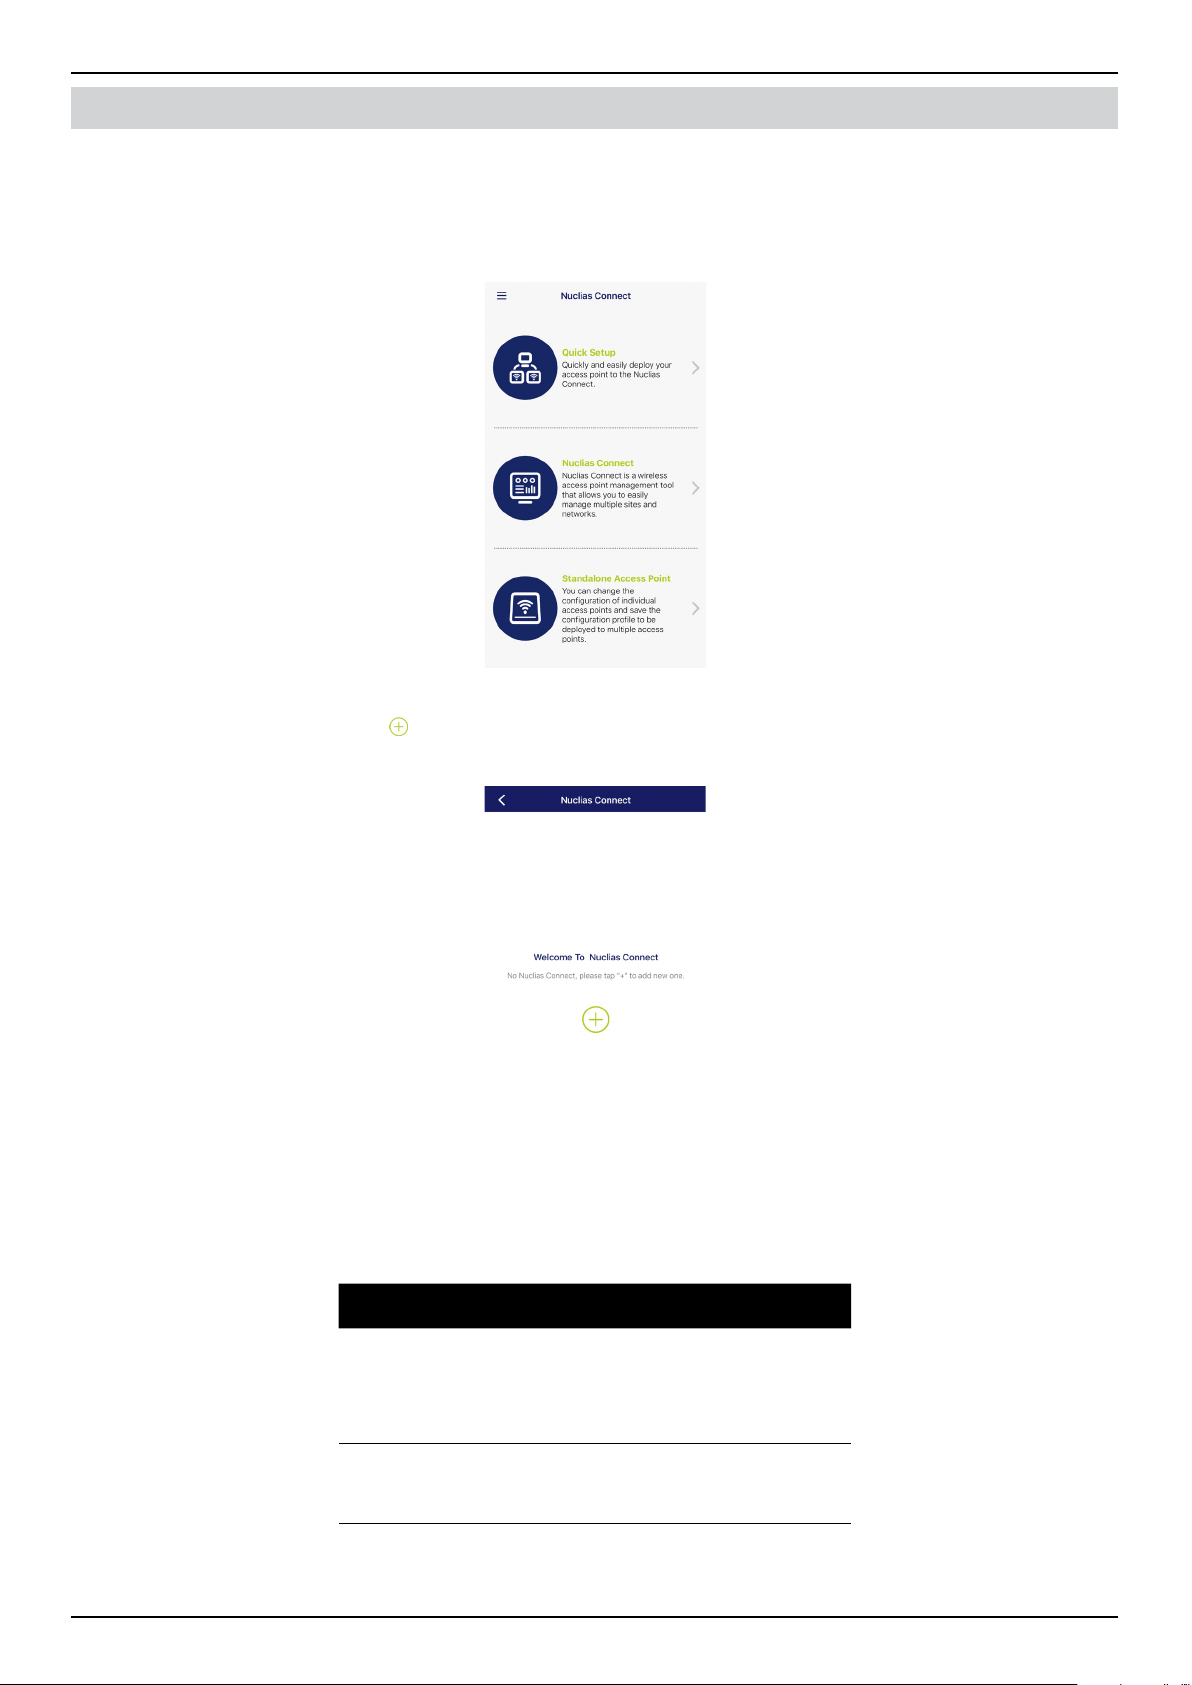
The Nuclias Connect App is available for both iOS and Android smart devices. The following functions are available:
• Quick Setup: Quickly and easily deploy your standalone AP to the Nuclias Connect controller.
• Nuclias Connect: Manage your current sites and networks through Nuclias Connect.
• Standalone Access Point: You can change the conguration of individual APs and save the conguration prole to be
deployed to multiple APs.
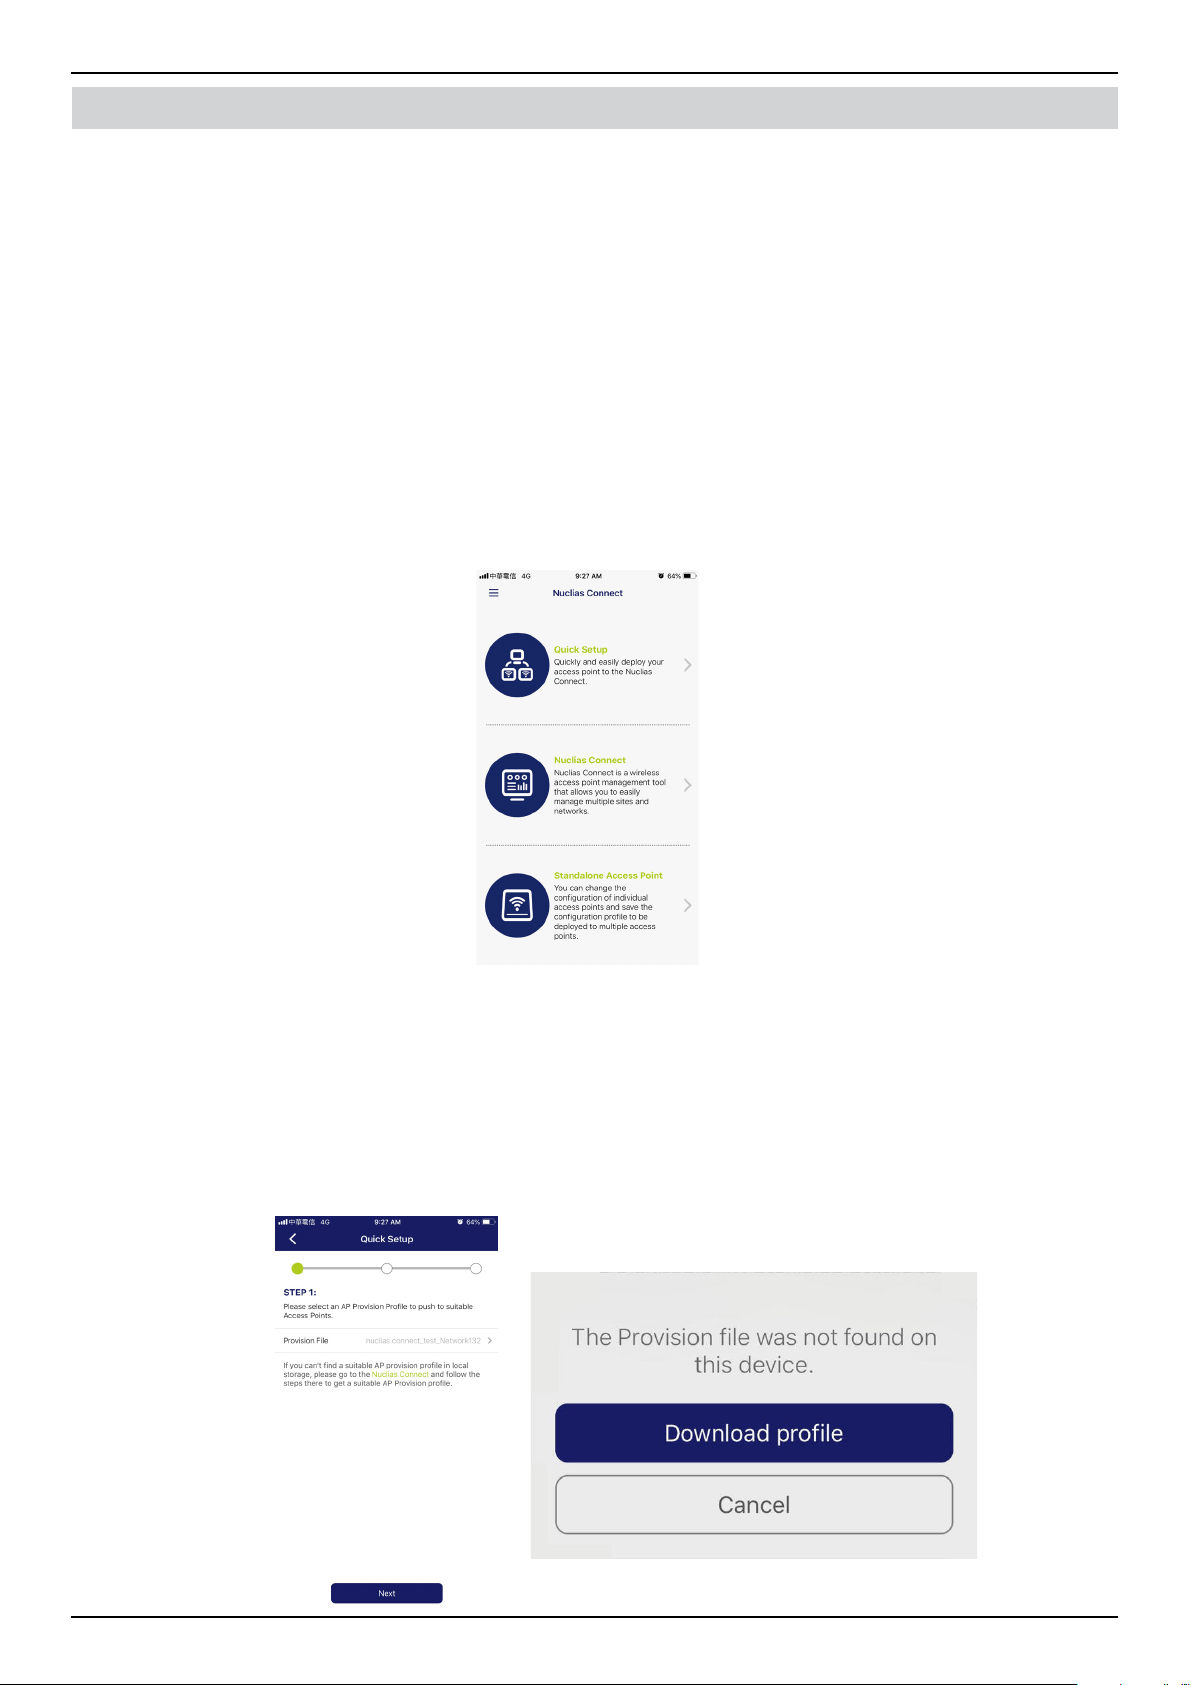
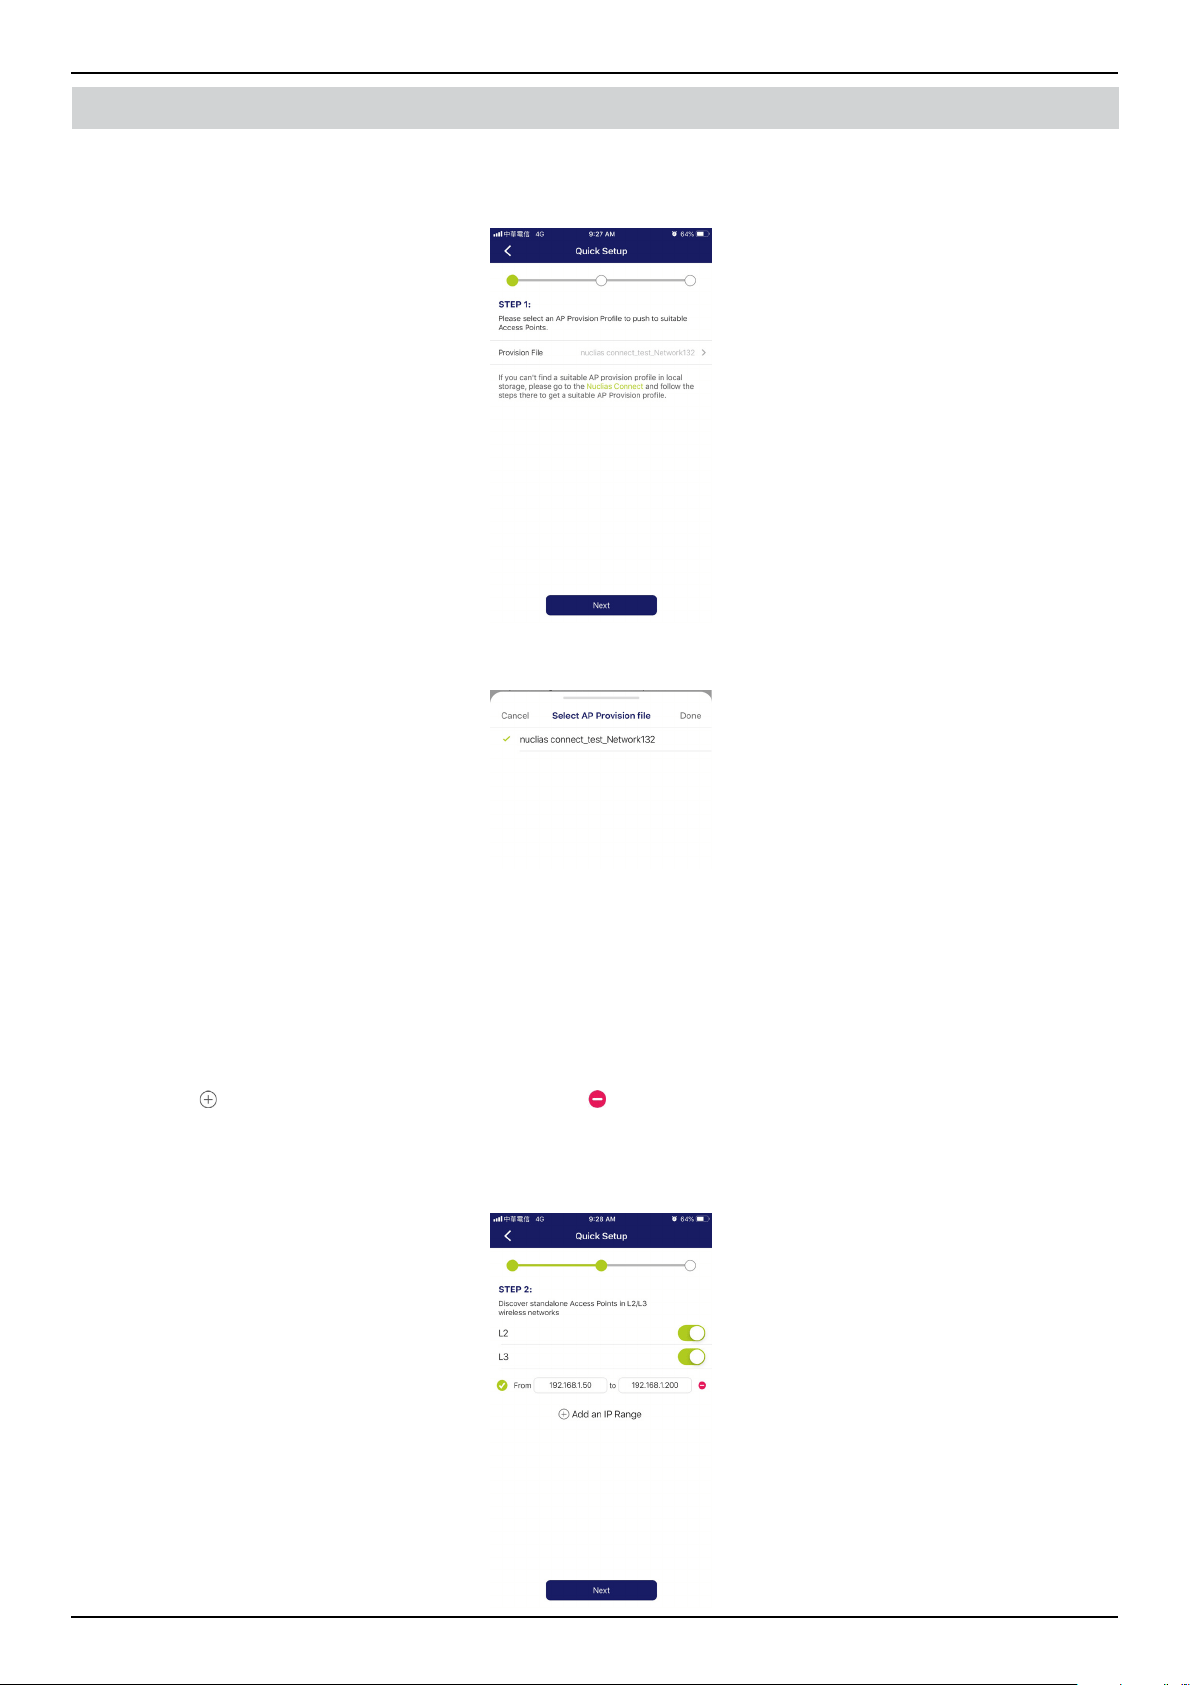
Quick Setup
After opening the Nuclias Connect App, the following window will appear (iOS). Tap on Quick Setup to start the setup
process.
The next step is to select an AP provision prole. The prole is used to push the selected APs. Tap Quick Setup to begin the
deployment of a standalone AP to the Nuclias Connect server.
The Step 1 screen will appear. In the below gure, the Provision File entry is None.
Tap Provision File to display a list of available local proles. If no locally stored prole exists, a pop-up page will appear with
further instructions to download a prole.
Tap Download prole to specify a connection to the Nuclias Connect controller.
Nuclias Connect Software User Manual Software Installation
Page 30
Software Installation Nuclias Connect App
Once a Nuclias Connect controller connection is established, it’ll be listed next to the eld Provision File
Tap Provision File to select a local AP provision prole. In the following gure, the entry Nuclias_test_Network1 is available.
A pop-up screen will appear. Select an available provision le from local storage and tap Done to continue.
The process will continue and the app will return to the previous screen. From the Step 1 page, tap Next to continue.
Step 2 will appear. From this page, you can discover standalone APs connected to the L2/L3 wireless network.
Tap the button on the L2 eld to enable discovery on the L2 network.
Tap the button on the L3 eld to enable discovery on the L3 network. Then enter an IP range in the provided From and To
elds. Tap add (
) to create a new IP range entry. Tap remove ( ) to delete any dened range entries.
In the IP range elds, specify the starting and ending IP addresses.. Once the range is dened, tap Next to initiate the
discovery process.
Nuclias Connect Software User Manual Software Installation
Page 31
Software Installation Nuclias Connect App
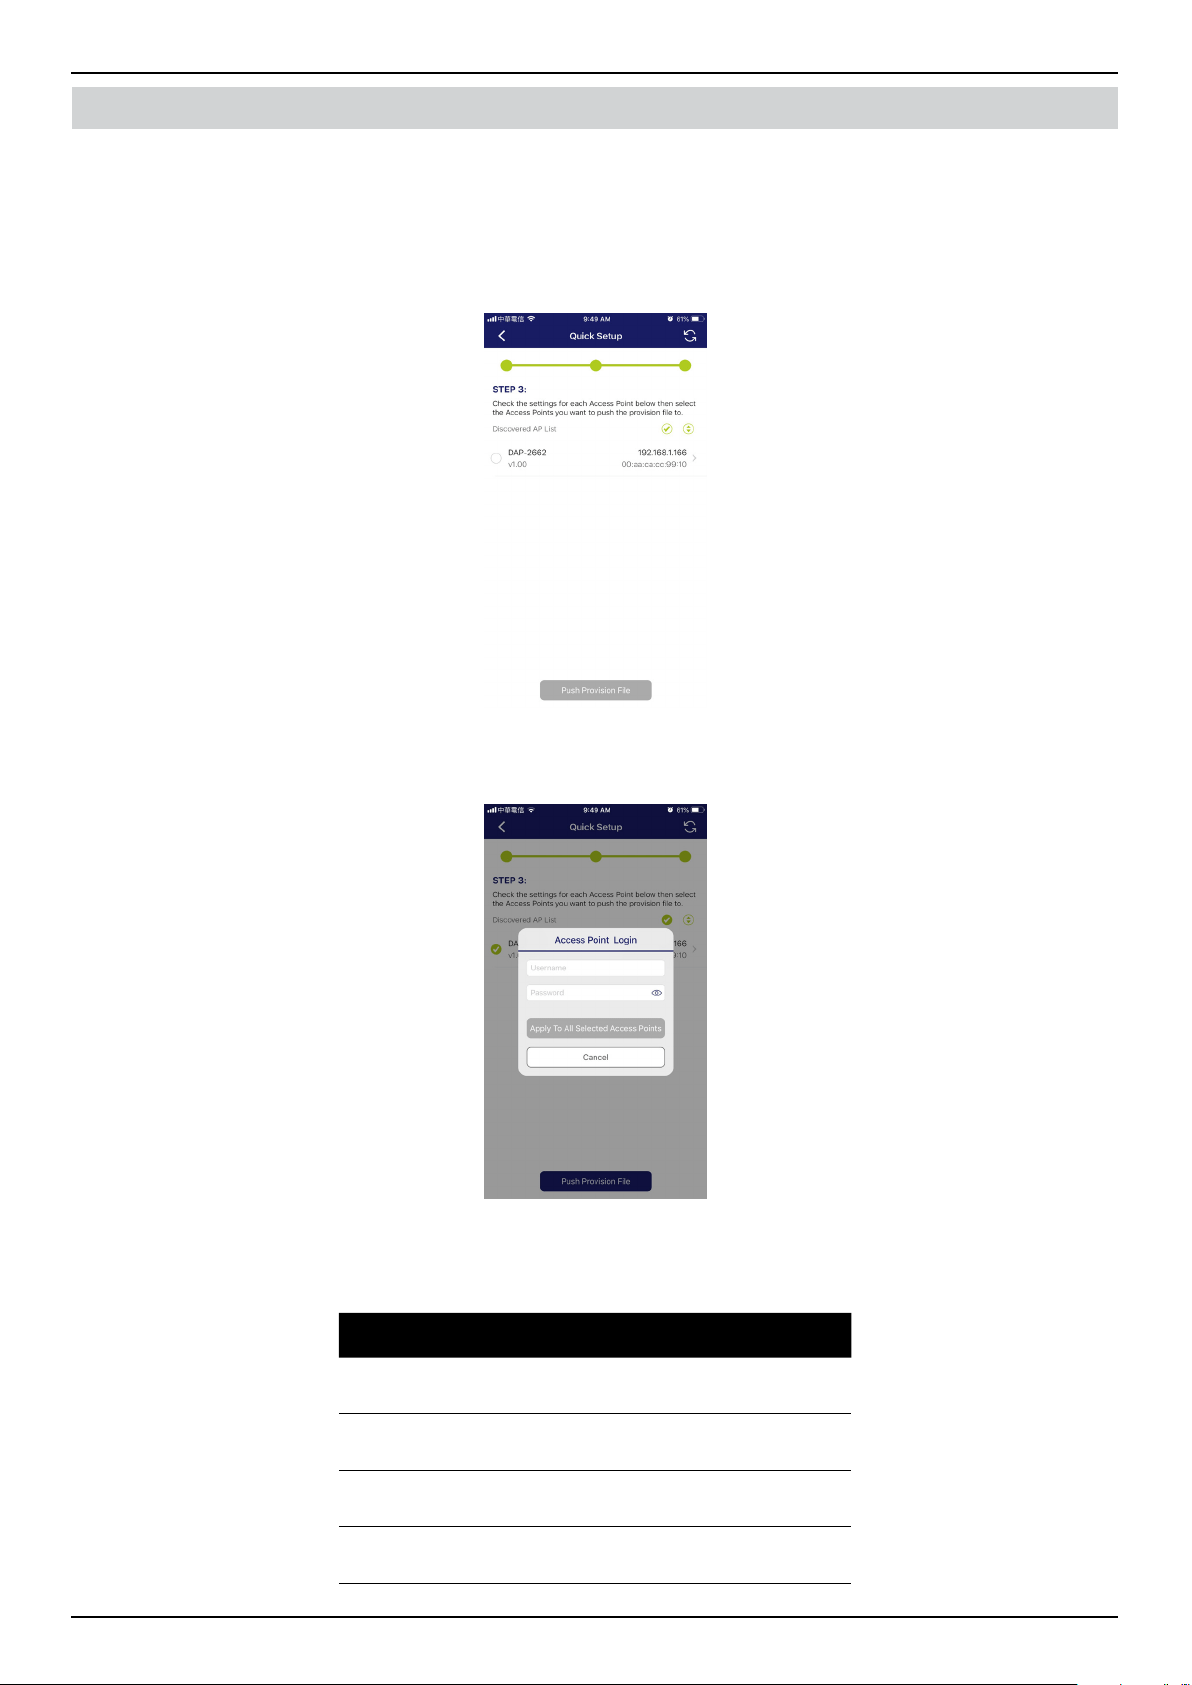
After scanning the network range, any detected access points will be listed here.
Tap the radio button next to the AP to select it. The local provision le that you previously selected will be pushed to the
selected AP.
Tap Push Provision File to continue.
The AP login pop-up window is displayed. The listed IP and MAC address are shown at the top of the window. Conrm the
selection and enter the user name and password with authorization to access the selected AP.
Tap Apply to continue the login process. The Modify IP Information page will appear. Any listed information can be modied;
see the following gure for further information.
Parameter Description
Cancel Tap to discard any changes and continue
the process.
Done Tap to accept any changes and continue
the process.
Model Name Displays the model name for the listed
AP device.
MAC Displays the MAC address of the listed AP
device.
Nuclias Connect Software User Manual Software Installation
Page 32
Software Installation Nuclias Connect App
Parameter Description
DHCP Mode Tap to enable or disable the DHCP
mode function. When enabled, the AP
establishes dynamic IP address settings
with any authorized client connections.
IP Address Tap to designate an IP gateway setting.
Subnet Mask Tap to designate a subnet mask.
Default
Gateway
Tap to designate a default gateway
setting.
DNS Tap to designate a DNS setting.
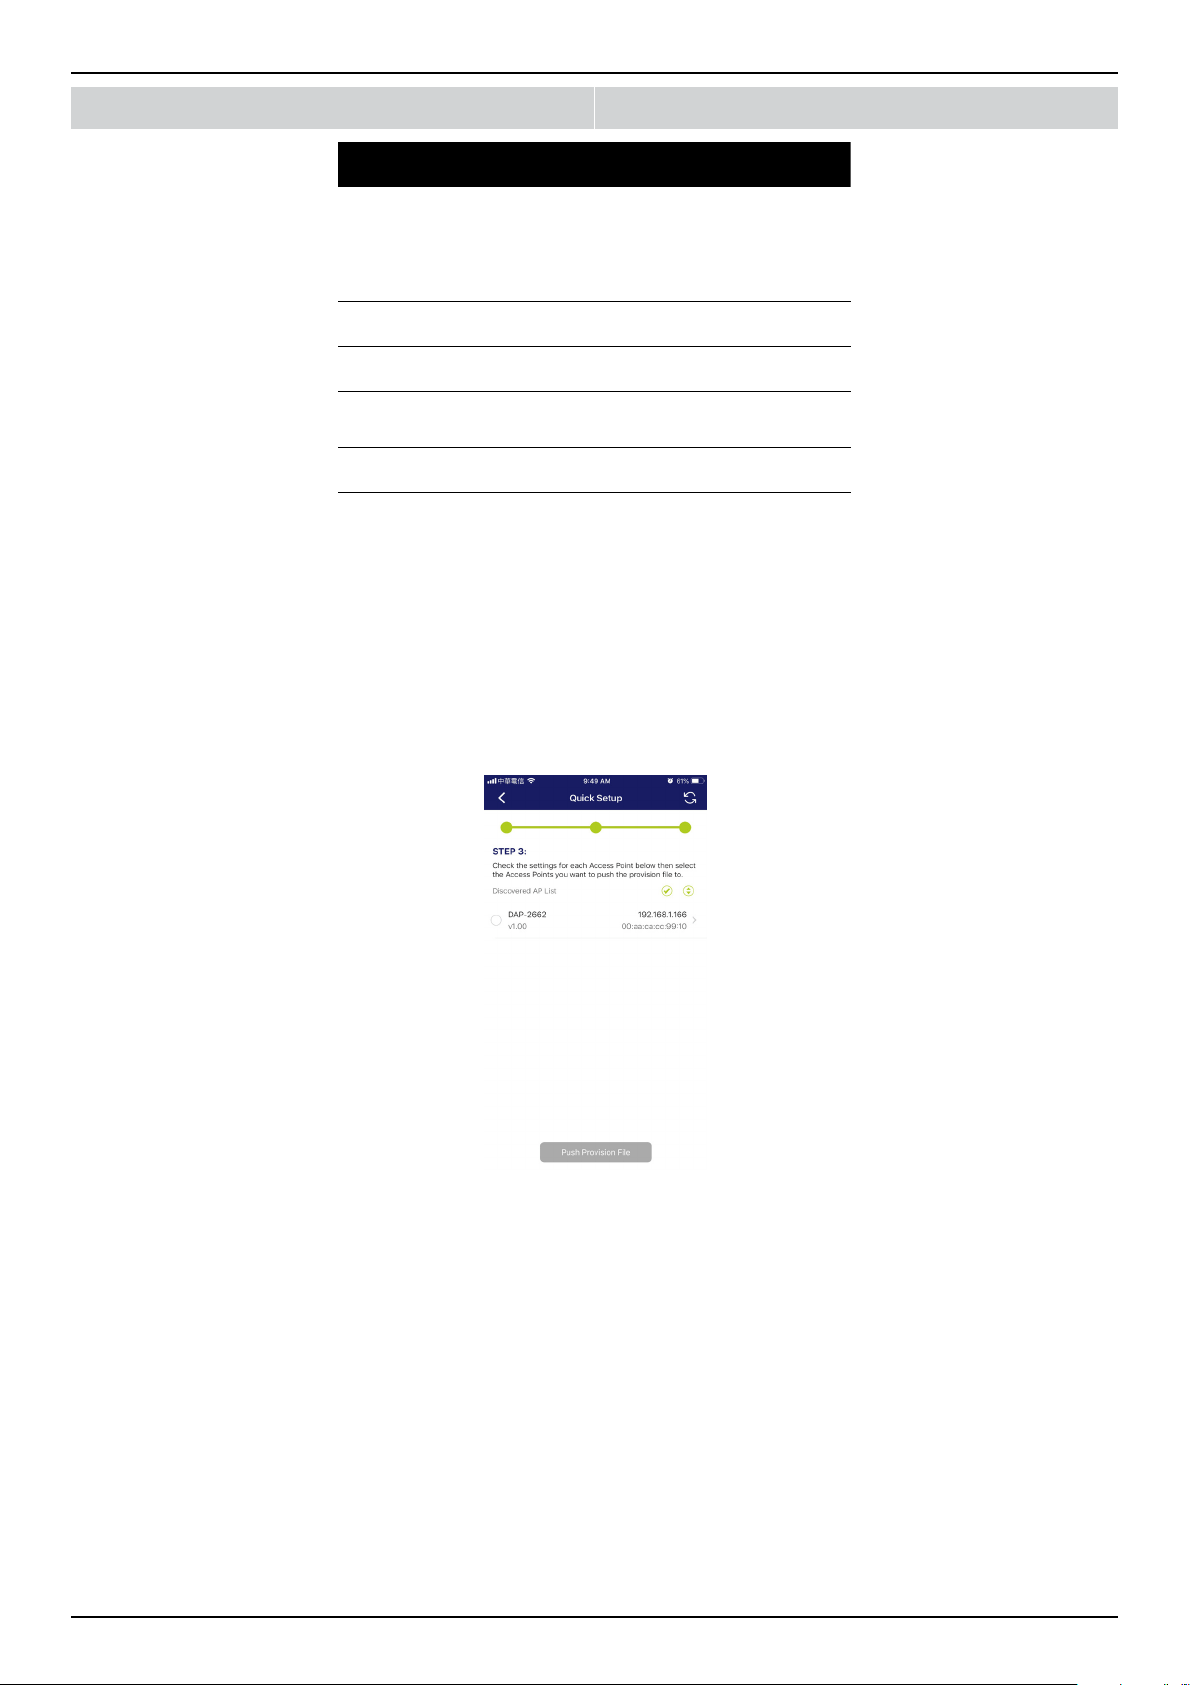
Tap Done or Cancel to continue the process. The provision le will be pushed to the selected AP device (s). The App will return
to the Step 3 page and will display the status of the Push function. The discovered APs lists the state of the push function with
either a successful or failed state. See the following gure for further details.
Tap Finish to complete the process. In the event of a failed process, tap Push Provision File to attempt the function a second
time.
Nuclias Connect Software User Manual Software Installation
Page 33
Software Installation Nuclias Connect App
Nuclias Connect
Nuclias Connect is a wireless access point management tool capable of managing your sites and networks.
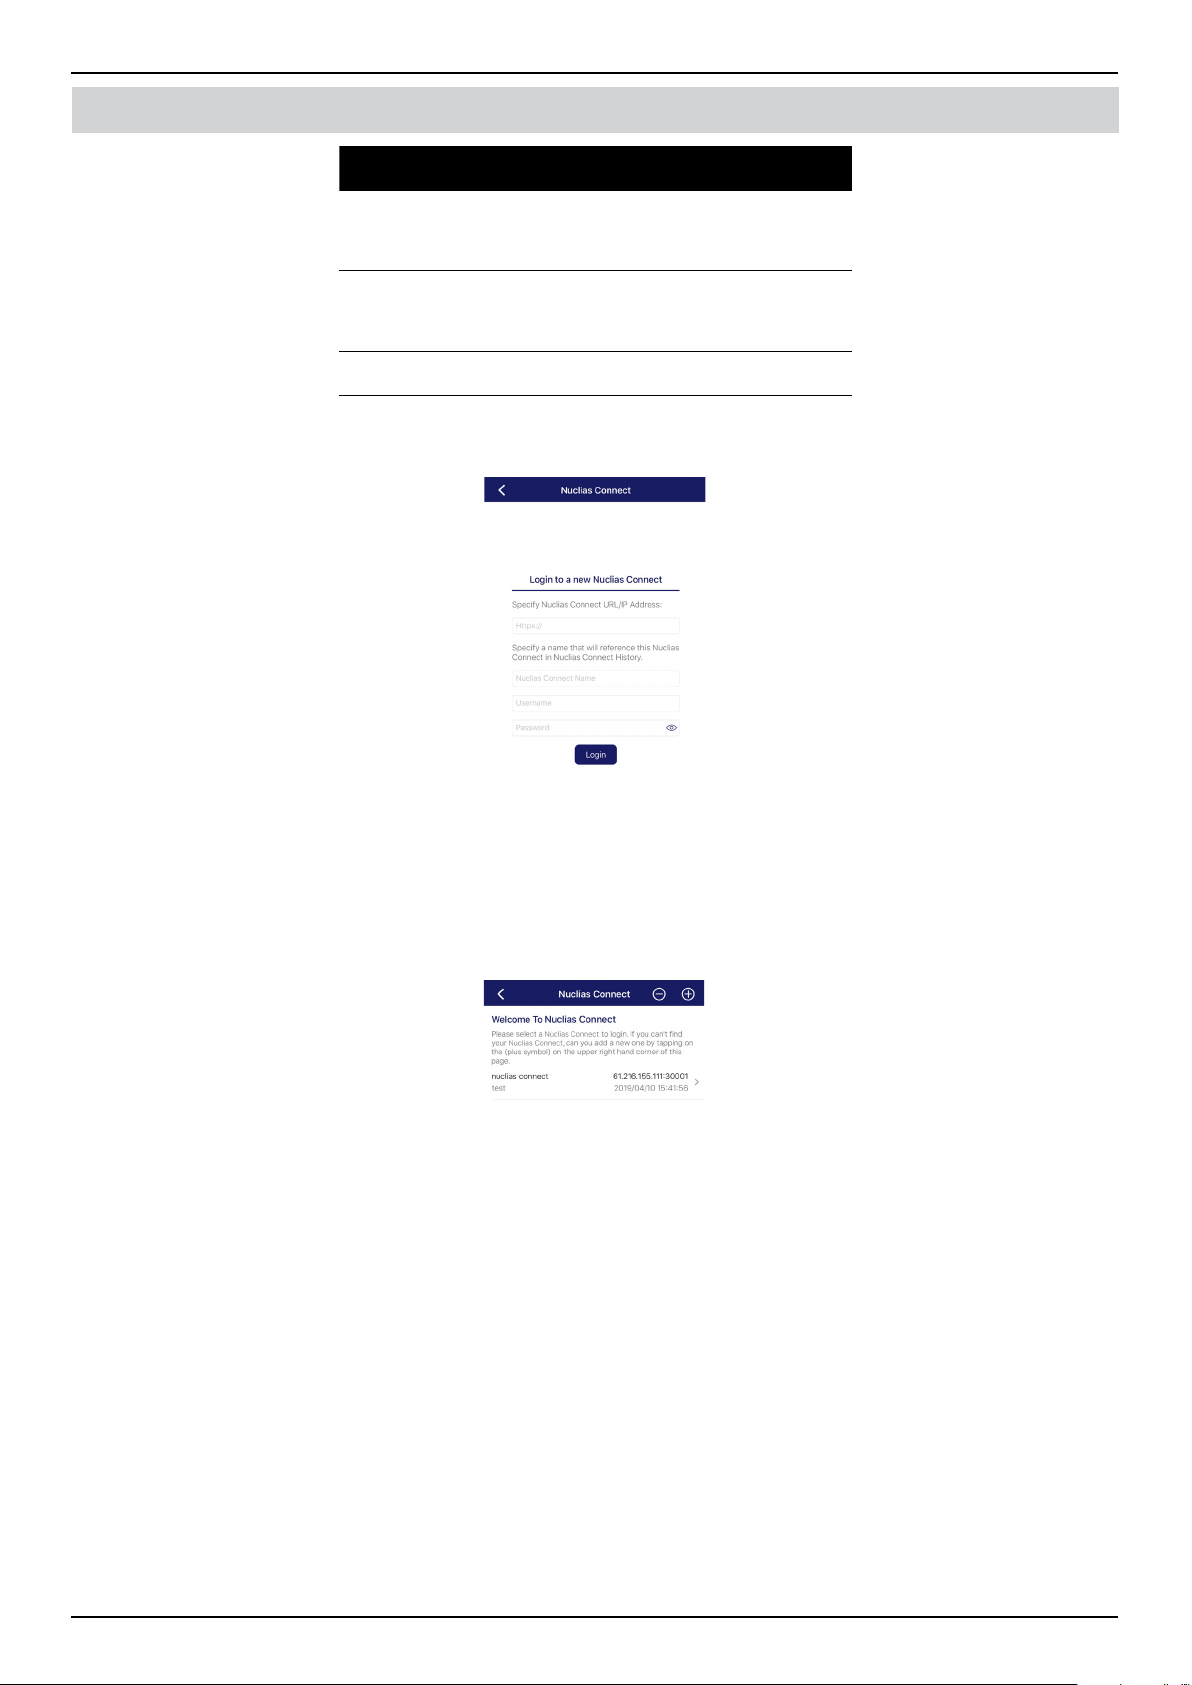
Tap Nuclias Connect to connect to a Nuclias Connect server.
The Welcome page will appear. If this is the rst time pairing Nuclias Connect controller, you’ll be asked to create a new
Nuclias Connect pairing. Tap the add (
) button to start the process.
The following page lists the information required to log in to a designated Nuclias Connect controller. Enter the required
information in each eld.
Parameter Description
Specify
Nuclias Connect
URL/IP Address
Enter the secure URL/IP address of the
Nuclias Connect server to pair with the
App.
Specify a
reference name
Enter a specic name to identify the
paired Nuclias Connect server.
Nuclias Connect Software User Manual Software Installation
Page 34
Software Installation Nuclias Connect App
Parameter Description
User name Enter a user name with the authority to
access the Nuclias Connect controller.
Password Enter the password for the referenced
user name with the authority to access
the Nuclias Connect server.
Login Tap Login to initiate the login process.
Tap on Login to initiate the login process.
After a successful login, the pairing will be added to the listing and will be available for future login selection.
Tap on a Nuclias Connect server from the list.
Nuclias Connect Software User Manual Software Installation
Page 35
Software Installation Nuclias Connect App
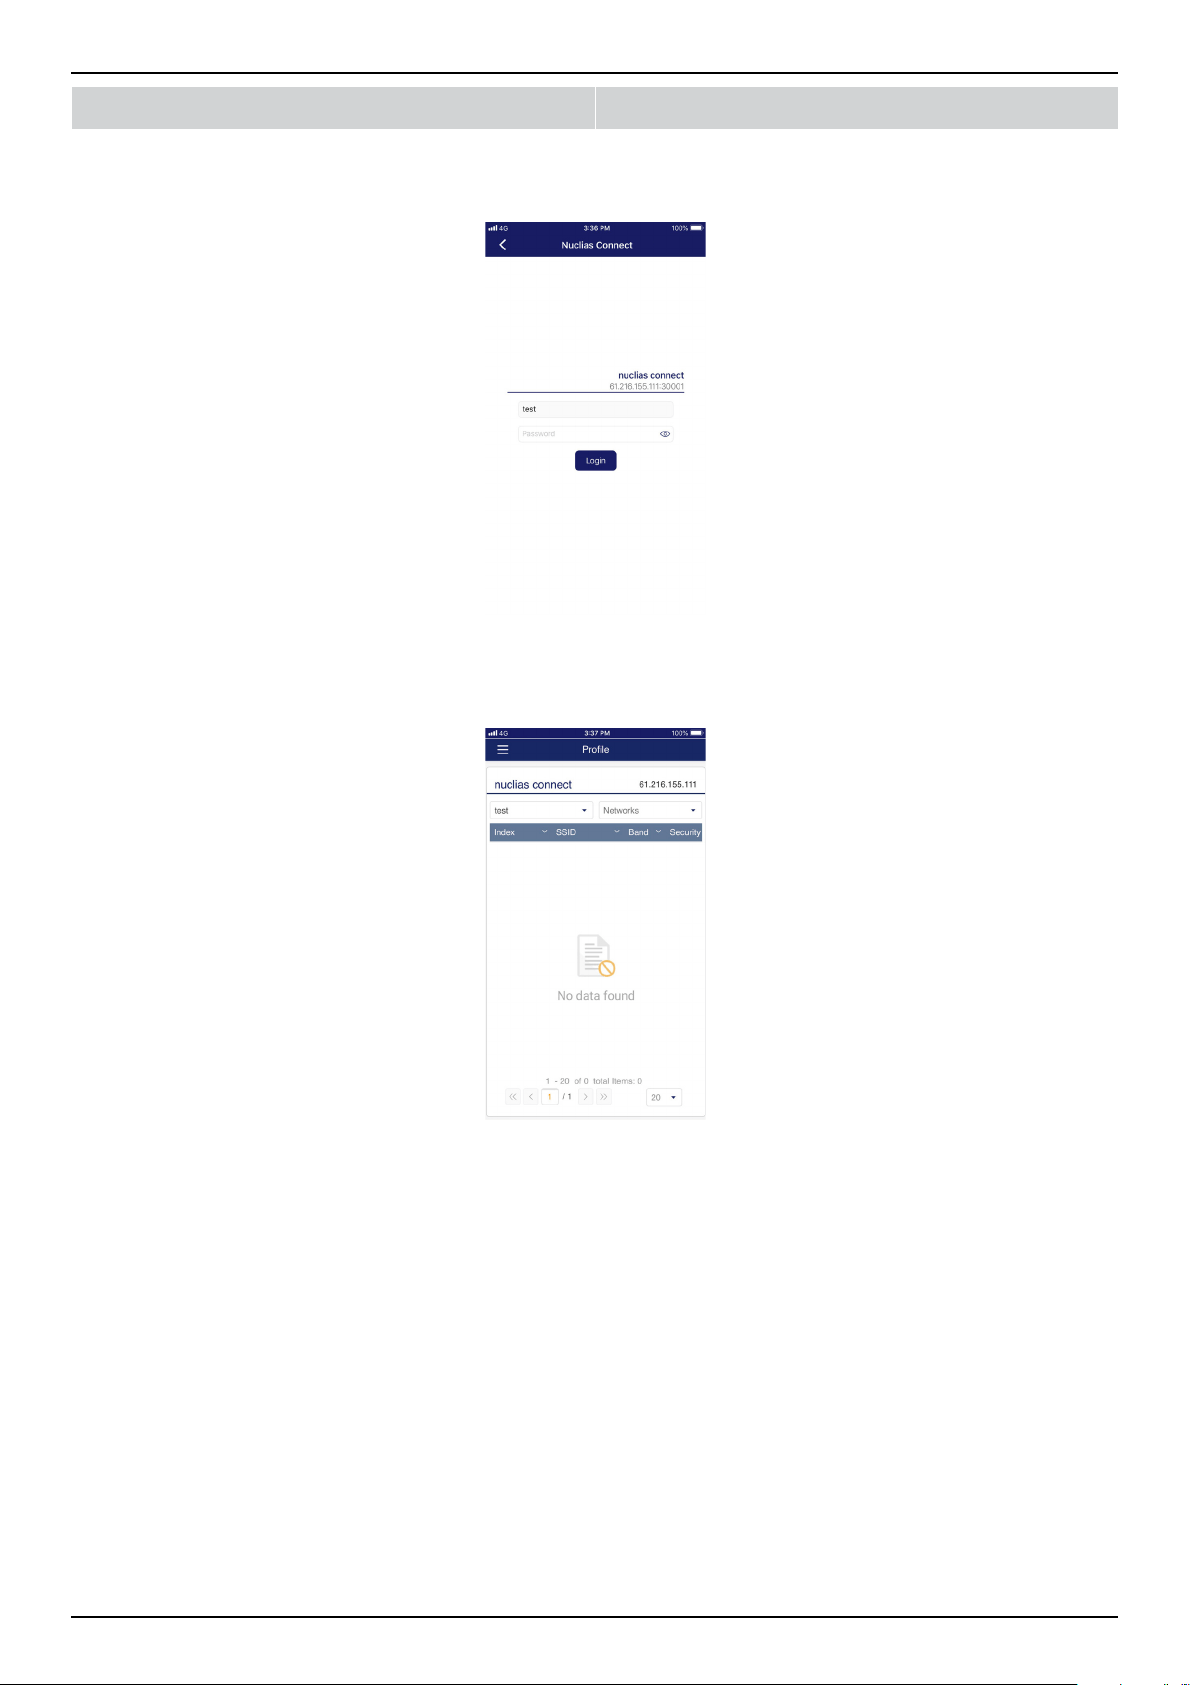
The user name page will appear. Enter the user name and password with authority to access the selected Nuclias Connect server.
Tap Login to initiate the login process.
After the login process is authenticated, the dashboard will appear. The Nuclias Connect dashboard will list any currently
dened sites, networks, access points, and clients.
The Nuclias Connect App is now paired with the Nuclias Connect server. Through the App interface, proles can be
downloaded to a local device, which can then be pushed to supported APs.

Nuclias Connect Software User Manual Software Installation
Page 36
Software Installation Nuclias Connect App
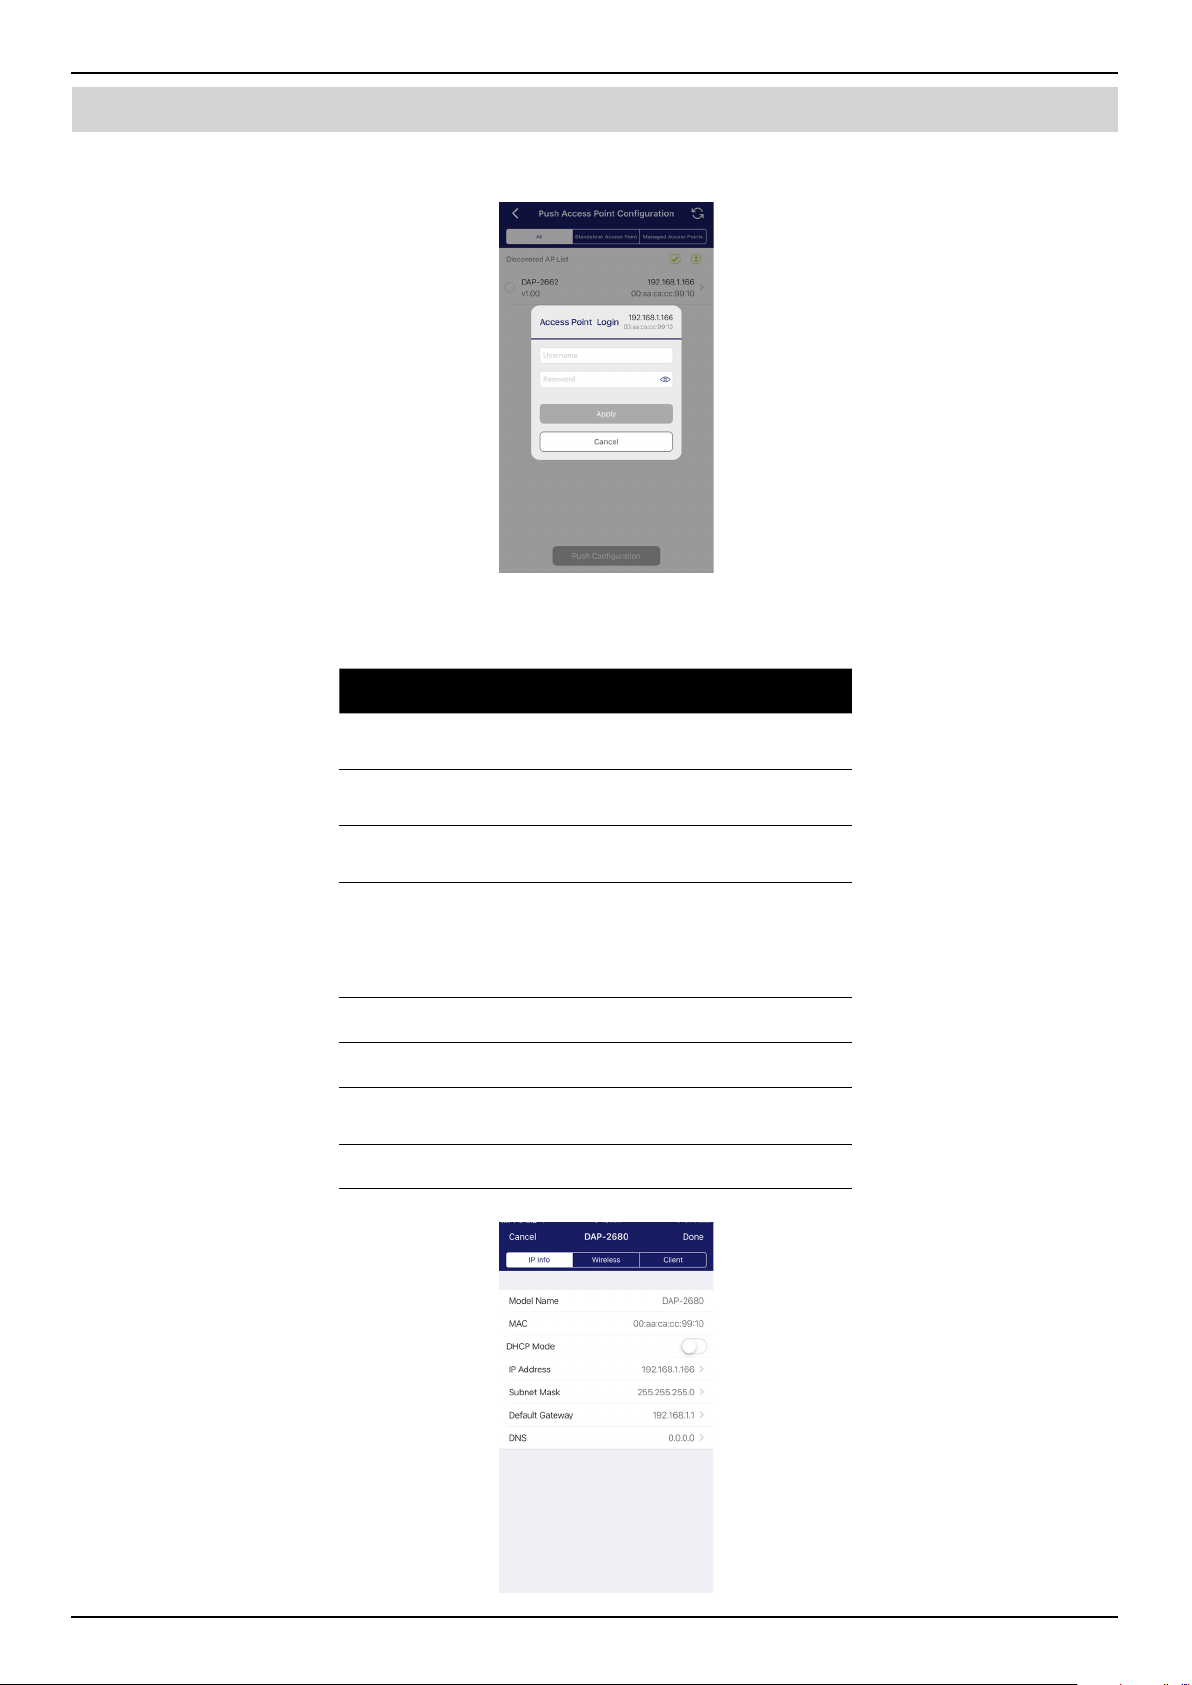
Standalone Access Point
Discover APs
The Discover AP function allows you to discover any AP devices in a L2/L3 wireless network.
From this page, you can discover standalone APs connected to the L2/L3 wireless network.
Tap the button on the L2 eld to enable discovery on the L2 network.
Tap the button on the L3 eld to enable discovery on the L2 network. Then enter an IP range in the provided From and To elds.
Tap add (
) to create a new IP range entry. Tap remove ( ) to delete any dened range entries.
Once the range is dened, tap Next to initiate the discovery process.
Alternatively, tap Congure Access Point Proles from the bottom of the page to add or delete any local proles. See Congure
Access Point Proles.
After the scanning the network range, the Step 3 page will list any detected access points.
Tap the radio button next to the AP to select it. The selected local provision le will be pushed to the selected AP.
Tap Push Provision File to continue.
Nuclias Connect Software User Manual Software Installation
Page 37
Software Installation Nuclias Connect App
The AP login pop-up window will appear. The IP and MAC address are shown at the top of the window. Conrm the selection
and enter the user name and password with authorization to access the selected AP. Tap Apply to continue.
Once a successful login is established, the AP interface menu will appear. The IP information, Wireless, and Client menu are
listed as follows.
Parameter Description
Cancel Tap to discard any changes and continue
the process.
Model Name Displays the model name for the listed
AP device.
MAC Displays the MAC address of the listed AP
device.
DHCP Mode Tap to enable or disable the DHCP
mode function. When enabled, the AP
establishes dynamic IP address settings
with any authorized client connections.
IP Address Tap to designate an IP gateway setting.
Subnet Mask Tap to designate a subnet mask.
Default
Gateway
Tap to designate a default gateway
setting.
DNS Tap to designate a DNS setting.
Nuclias Connect Software User Manual Software Installation
Page 38
Software Installation Nuclias Connect App
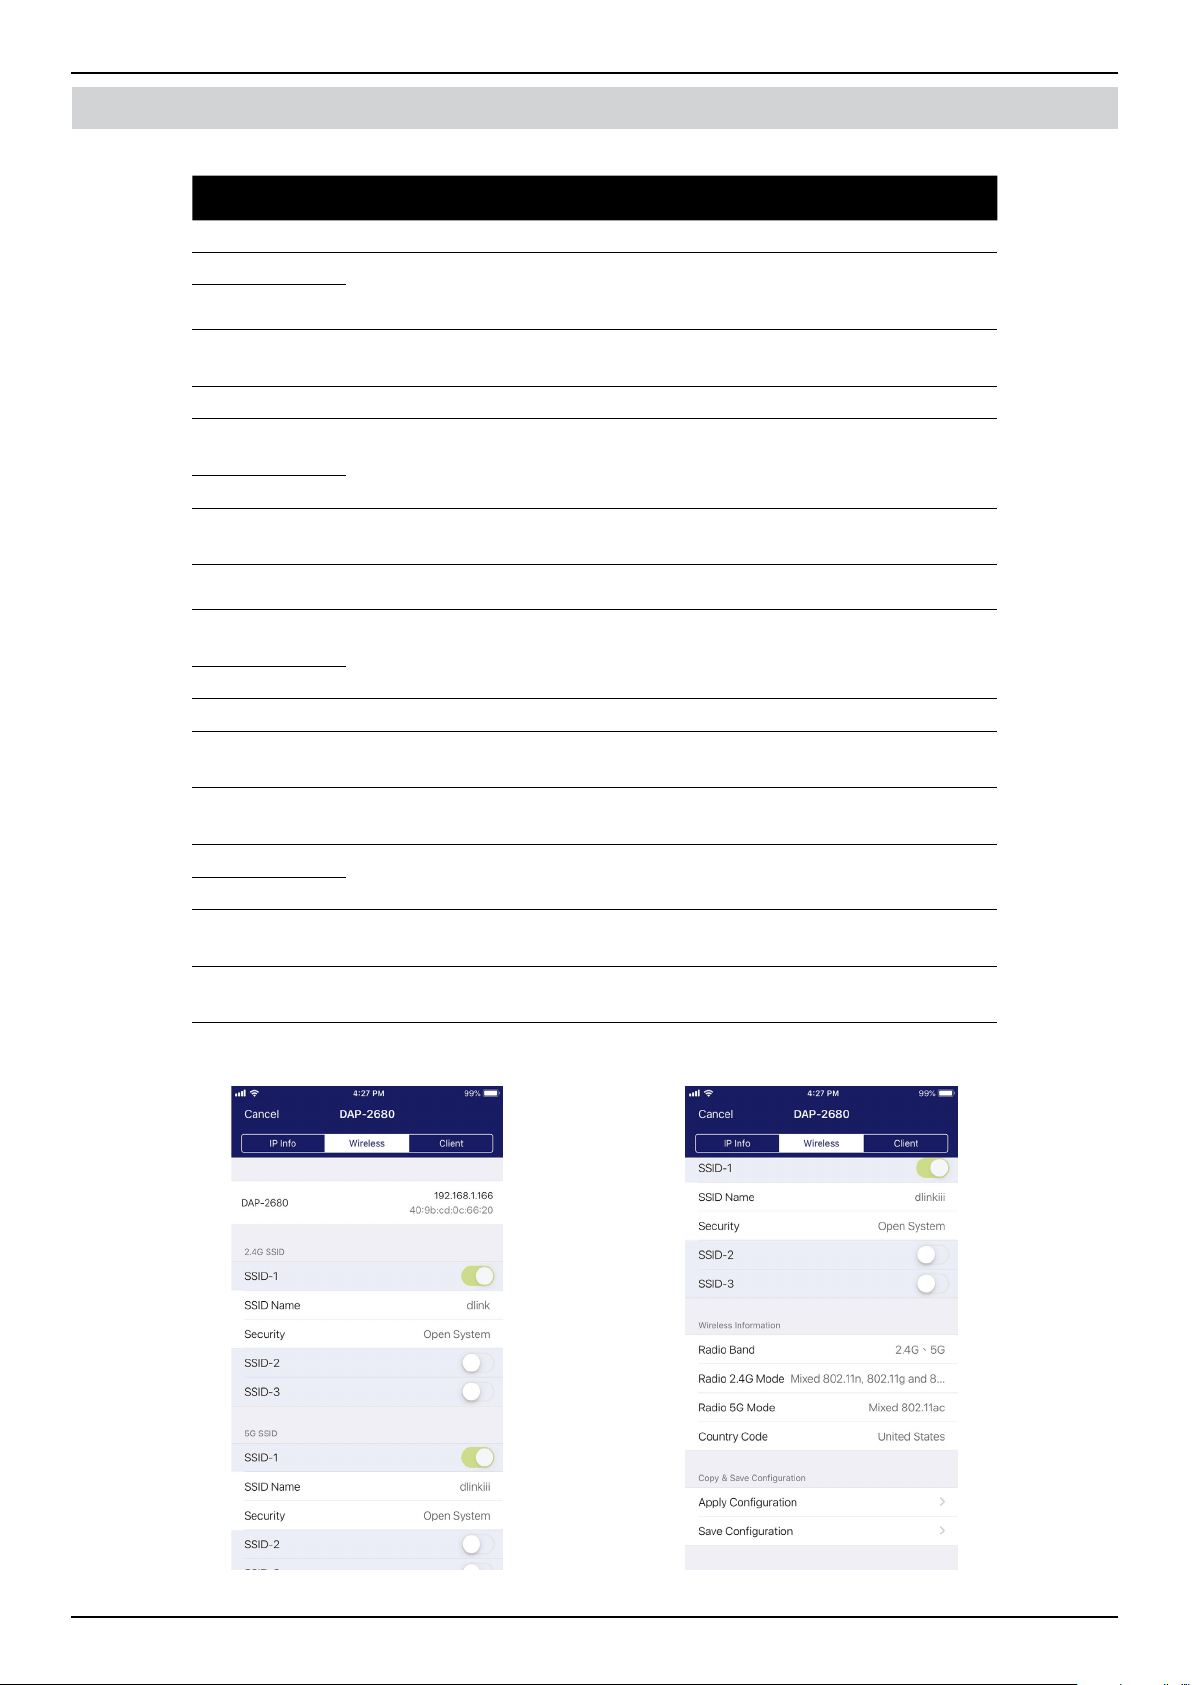
The Wireless settings menu is listed in the following gure.
Parameter Description
Cancel Tap to discard any changes and continue the process.
DAP-xxxx Displays the model name and IP address of the AP device.
2.4G SSID
SSID-# Tap the slide button to enable or disable the SSID. The # character indicates
the identifying number of the SSID.
SSID Name Tap to change the current name of the SSID.
Security Tap to select a specic security protocol: Open System (default), WPA-
Personal, or WPA-Enterprise.
5G SSID
SSID-# Tap the slide button to enable or disable the SSID. The # character indicates
the identifying number of the SSID.
SSID Name Tap to change the current name of the SSID.
Security Tap to select a specic security protocol: Open System (default), WPA-
Personal, or WPA-Enterprise.
Wireless Information
Radio Band Tap to select a specic radio band: O, 2.4G, 5G, or 2.4G / 5G.
Radio 2.4G
Mode
Tap to select a specic 2.4G radio mode: Mixed 802.11n, 80211g and 802.11b;
Mixed 802.11g, 802.11b; 802.11n Only.
Radio 5G Mode Tap to select a specic 5G radio mode: Mixed 802.11n, 80211a; 802.11a Only;
802.11n; Mixed 802.11ac.
Country Code Displays the assigned country designation for the AP.
Copy & Save Conguration
Apply
Conguration
Tap to select an alternate discovered AP device to push the current
conguration.
Save
Conguration
Tap to name and archive the current conguration prole.
Nuclias Connect Software User Manual Software Installation
Page 39
Software Installation Nuclias Connect App
Verify Managed Devices
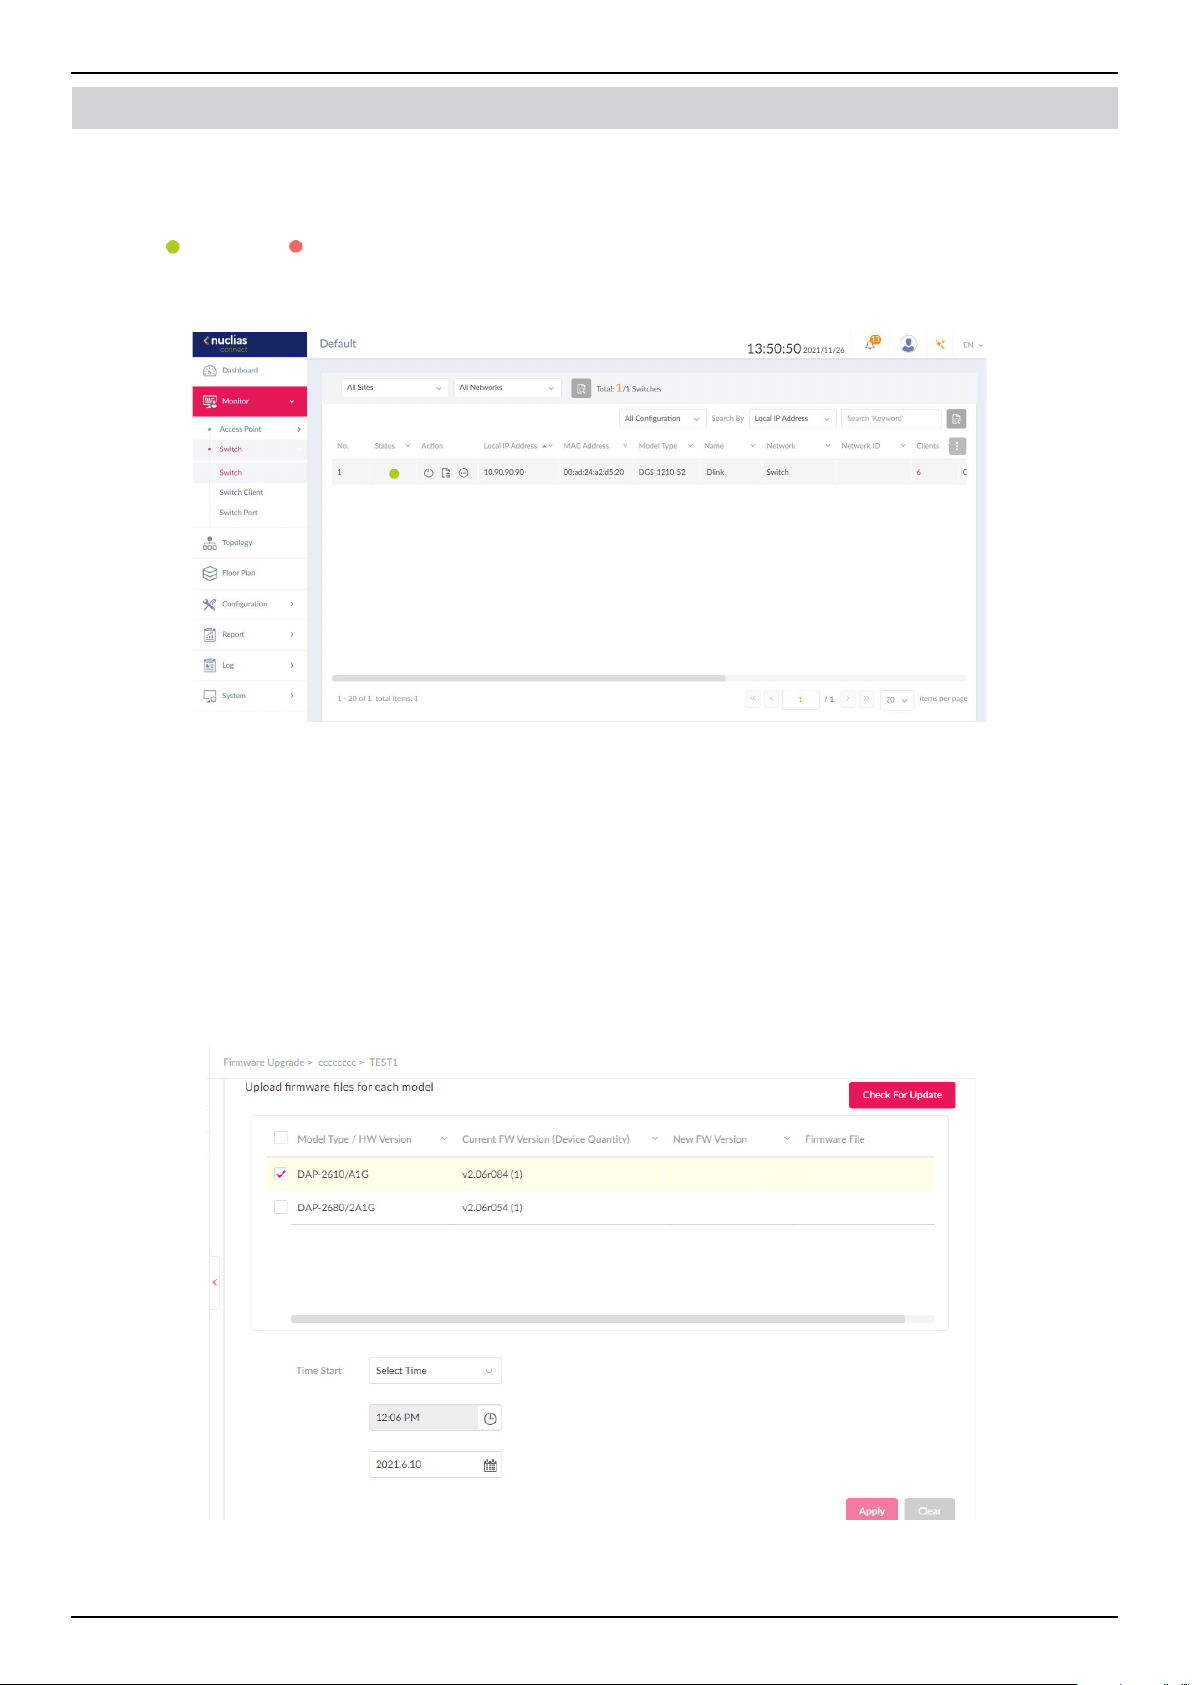
To verify the connections status of the switch and access point , go to Monitor > Access Point/ Switch. Click on the drop-down
menu to select the Site and the available network. The available APs/switches are listed. The Status column will show the either
the online ( ) and oine ( ) status.
The following information is also available: Number, Action, Local IP Address, MAC Address, Model Type and Network.
Upload New or Updated Conguration
Through the Nuclias Connect interface, you can manage individual or multiple AP models as well as upgrading the rmware.
Simply select the rmware le and apply it immediately or schedule the update time.
Navigate to Conguration > Firmware Upgrade, select the site and network to view the available AP models.
From the ensuing screen, select the rmware to upload by clicking the Change button. From the Time Start eld, select
Immediate and click Apply to immediately upgrade the rmware to the selected access points on the network. Alternatively,
click the drop-down menu and use the Select Time option to dene a set time for uploading the rmware.
Nuclias Connect Software User Manual Nuclias Connect Conguration
Page 40
After the software installation is complete, the following applications will be available.
Click on Nuclias Connect to open the client application.
Nuclias Connect uses a secure HTTPS connection to connect to the Nuclias Connect Controller. By default, the application will
open the default Web browser and connect to the localhost, which is the local means of connecting to the computer’s own IP
address.
Alternatively, from a remote computer, you can also connect to the Nuclias Connect Server by entering the IP address of the
computer that has the controller application installed on the web browser. Open the web browser on the remote computer
(Internet Explorer or Google Chrome are recommended) and enter the IP address or domain name of the host computer in the
address bar of the Web browser and press ENTER to open the Nuclias Connect management interface.
The Nuclias login screen will appear once a connection to the server is established. Enter the login user name, password and
captcha requirement, if applicable. Click Login to enter Nuclias Connect .
NOTE: By default, the user name and password are “admin”. Supported languages include: English (default), Traditional
Chinese, Simplied Chinese, Korean, Japanese, French, Spanish, German, Russian, Italian, and Turkish.
Nuclias Connect Conguration
Nuclias Connect Software User Manual Nuclias Connect Conguration
Page 41
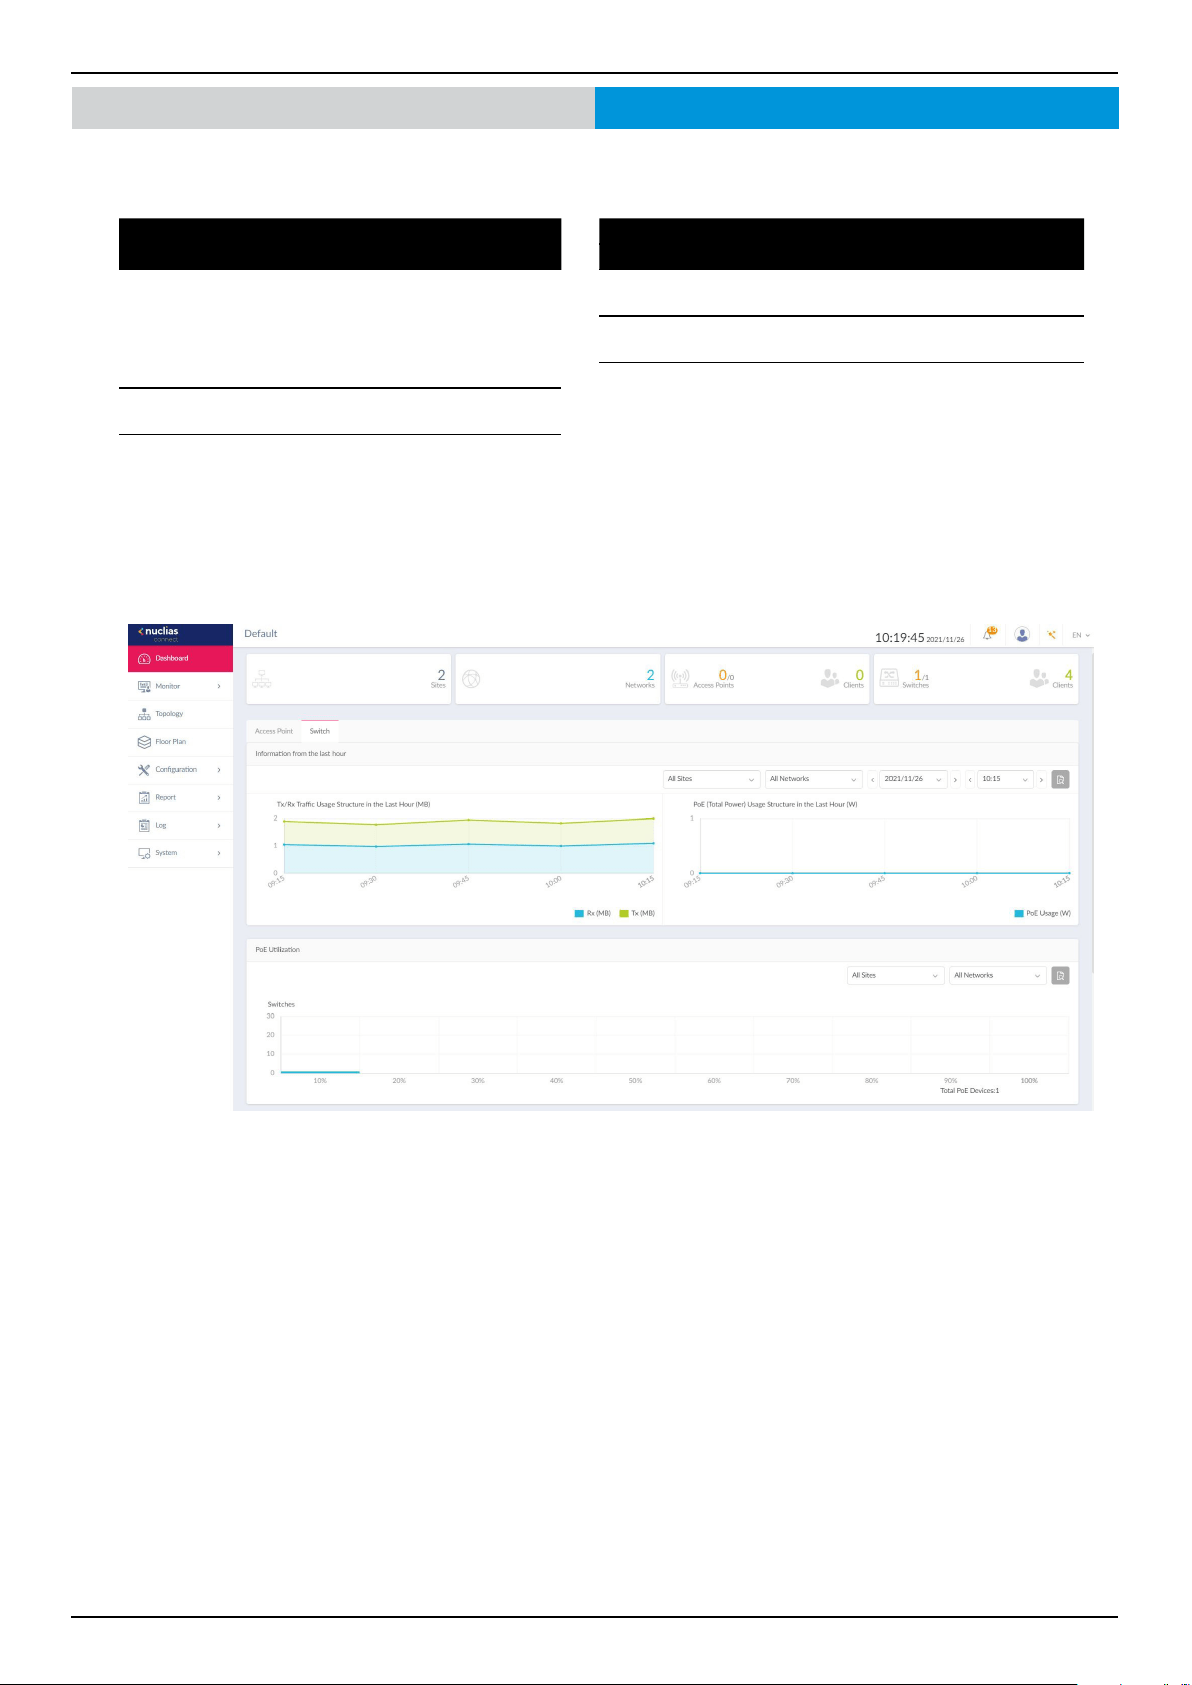
Nuclias Connect Dashboard
After successfully logging into the server, the Dashboard page for Access Point and Switch is displayed. The dashboard provides
an overview of total sites, created networks, available access points and its clients, and available switches and its clients
Access Point
Field Description
Information from
the Last Hour
Displays the number of clients(Last
hour vs Past 7 days), trac(Last hour
vs Past 7 days), last hour downlink/
uplink trac, and last hour trac by
SSID.
Channel
Utilization
Displays the utilization rate for
both 2.4 and 5 GHz bandwidth.
Latest Events Displays a simplied log of
the latest events across all or
selected sites.
Switch
Field Description
Information from
the Last Hour
Displays last hour Tx/Rx trac usage
and last hour PoE total power usage.
PoE Utilization Displays the utilization rate of switches
across dierent sites and networks.
Latest Events Displays a simplied log of the latest
events across all or selected sites.
Nuclias Connect Software User Manual Nuclias Connect Conguration
Page 42
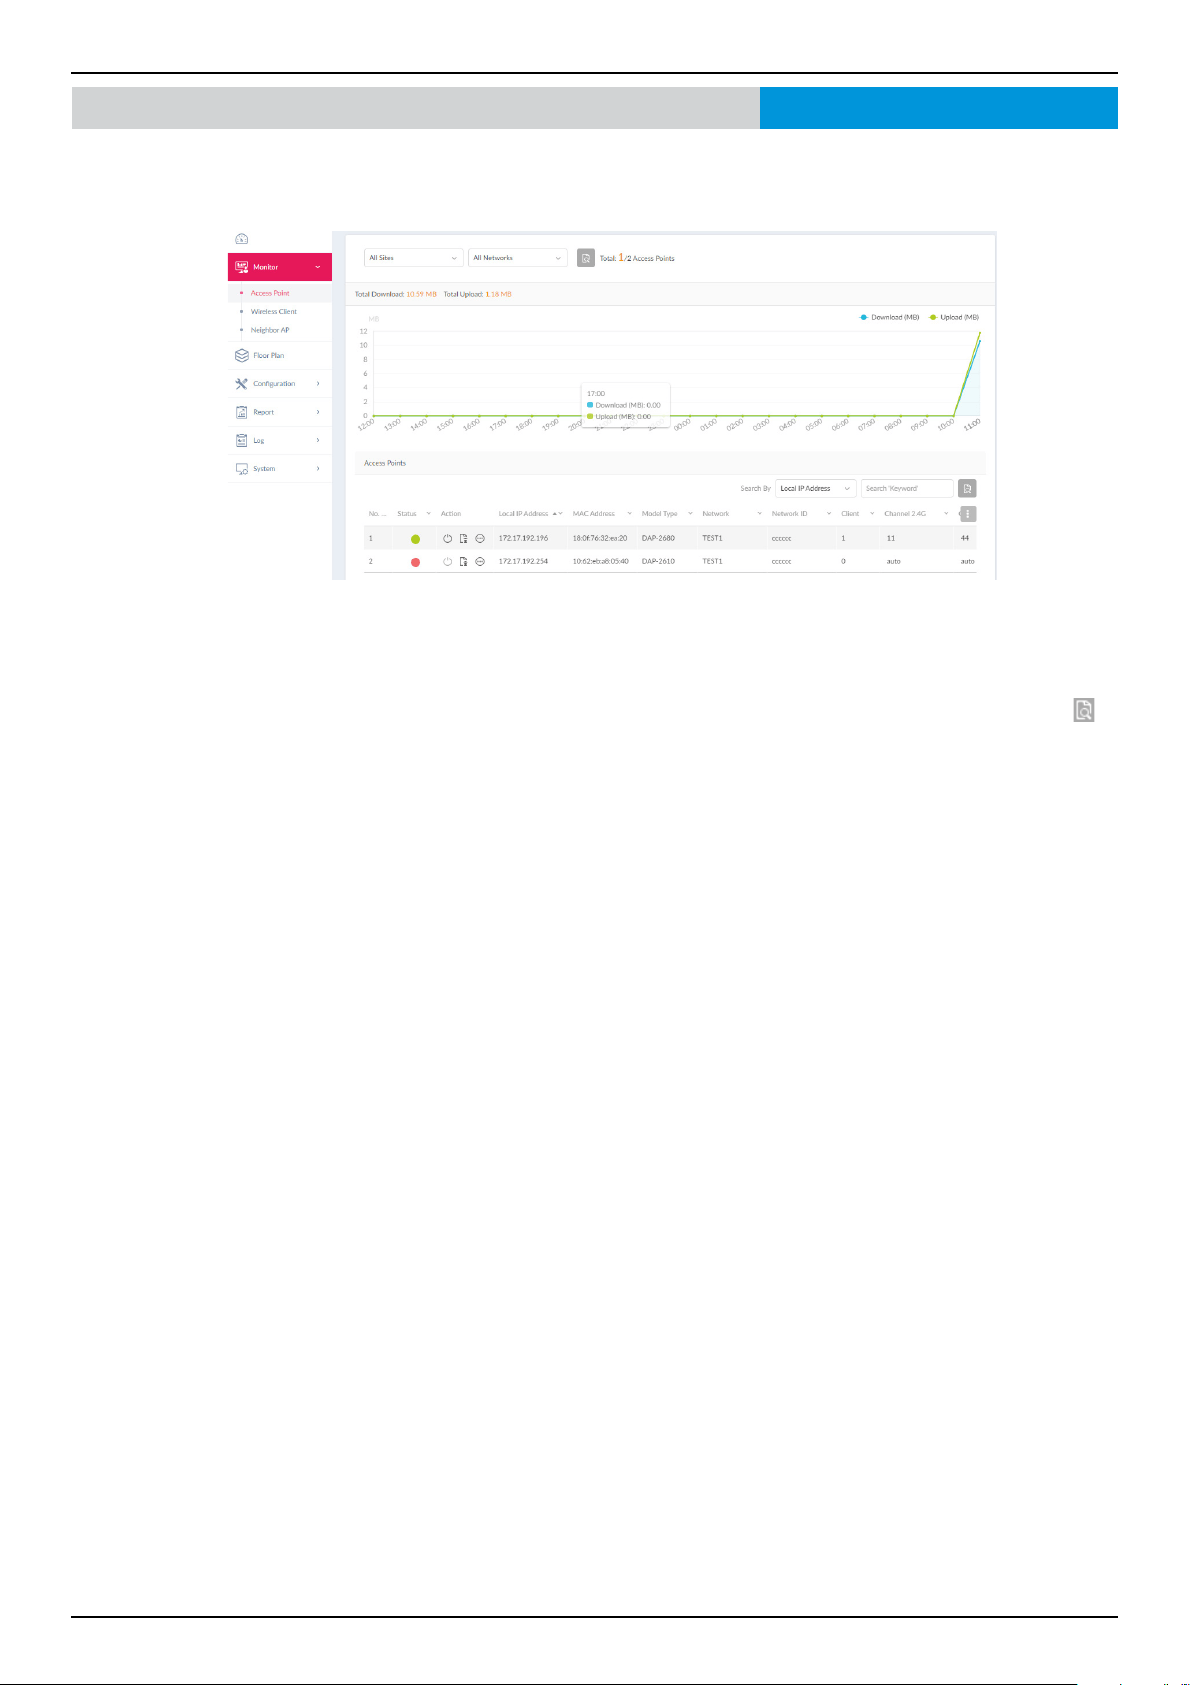
Go to Monitor on the left panel to view data usage and total number of access points. On this page, you can view a summary
of the data usage of all or selected number of wireless clients and networks managed by the application.
In the Search By drop-down eld, select an attribute (Local IP Address, Local IPv6 Address, NAT IP Address, MAC Address,
Model Type, FW Version, Name, Location, Channel 2.4G, Channel 5G 1, Channel 5G 2 (Tri-Band), Power 2.4G, Power 5g 1,
Power 5g 2 (Tri-Band)) to specify the search eld or enter a keyword related to the target device in the Search eld. Click
to
start the process. Any relevant devices meeting the search criteria will be listed.-
Monitor Access PointNuclias Connect
Nuclias Connect Software User Manual Nuclias Connect Conguration
Page 43
Navigate to Monitor > Access Point > Wireless Client on the left panel, the Connected Clients tab is displayed. You can view
a summary of all connected clients managed by the application.
Three lters are displayed: Site, Network, and Clients.
The following gure shows a typical summary. Use the lters to select a specic Site, network and client. Additionally, you can
enter a keyword related to the target device in the Search eld and click
to start the process. Any relevant devices meeting
the search criteria will be listed in the frame.
All wireless clients connected to the access points that are managed by this application are displayed. Information such as
Network, IP Address, IPv6 Address, MAC Address, Auth. Type, OS (only available on captive portal clients), Upload,
Download, Channel, RSSI (dBm), SNR (dB), Band, SSID, AP MAC Address, Trac Usage, Trac Usage(%), Last Seen, and
Uptime is displayed for each wireless client.
Wireless Client
Connected Clients
MonitorNuclias Connect Access Point
Nuclias Connect Software User Manual Nuclias Connect Conguration
Page 44
Wireless Client
Blocked Clients
Navigate to Monitor > Access Point > Wireless Client on the left panel, then click the Blocked Clients tab. Use the Sites and
Networks drop-down menu to select a Site and Network. Click
to start the search. Any relevant devices meeting the search
criteria will be listed.
The page lists the following information: Blocked client count, Action, Network, MAC Address, Band, SSID, and Auth. Type.
Monitor
Nuclias Connect Access Point
Nuclias Connect Software User Manual Nuclias Connect Conguration
Page 45
Monitor Neighbor AP
Navigate to Monitor > Access Point > Neighbor AP on the left panel, the neighbor AP list is displayed. To enable this function,
go to Conguration > Prole Settings > Site>Network > Wireless Resource > Neighbor AP Detection and click Enabled.
Nuclias Connect
Field Description
BSSID Displays the MAC address of the AP’s wireless
interface.
Detected by Displays the mac address of AP that the AP was
scanning.
Status Displays the status of AP (Unknown, Known, and
Managed).
SSID Displays the name of the wireless network.
Security Displays the security status indicating whether
encryption is used.
RSSI Displays the RSSI that the AP was detecting.
BW(MHz) Displays the channel width that the AP was using.
Channel Displays the channel setting that the AP was detected
on.
Supported Modes Displays the list of modes that the AP was supported.
Access Point
Nuclias Connect Software User Manual Nuclias Connect Conguration
Page 46
Monitor Switch
Nuclias Connect
Go to Monitor > Switch and use the Site and Network lter to locate the device you’d like to monitor. On this page, you can view
a summary of the devices managed by the application. The summary includes the following: Status, Local IP Address, NAT IP
Address, MAC Address, Model Type, FW Version, HW Version, Serial Number, Name, Location, Site, Network, Network ID,
Clients, Power Budget, CPU Usage, Memory Usage, Ports, Use Conguration, Last Seen, Uptime and Power Delivered.
Select a conguration type (Prole, Standalone, All) and attribute (Local IP Address, MAC Address, Model Type, FW Version,
Name, Ports) to narrow down the search eld or enter a keyword related to the target device in the Search eld. Click
to start
the process. Any relevant devices meeting the search criteria will be listed.
Under the Action panel, click
to restart your device. Click to move the device to Unmanaged. Click to enter the Device
Detail Page.
Key Fields Description
Name Displays user-dened name of the switch. Empty if no name is given.
Click the column to revise or create a name. The max length of the name
is 63 characters.
Location Displays the location of the switch. Click the column to revise or create
a name for the location. The max length for the location name is 32
characters.
Clients Displays the total number of clients connecting to the switch. Click on
the Clients number to be directed to the Switch Client page.
Ports Displays the total number of ports on the switch. Click on the ports to
be directed to the Switch Port page.
Use Conguration Displays the conguration mode (Prole/ Standalone).
• Prole: Devices under prole mode share the same congurations
in the prole.
• Standalone: Devices have their own congurations, and does not
get aected by prole.
Last Seen Displays the last connected time of the switch.
Uptime The activating time of the switch after reboot.
Nuclias Connect Software User Manual Nuclias Connect Conguration
Page 47
Monitor
Basic
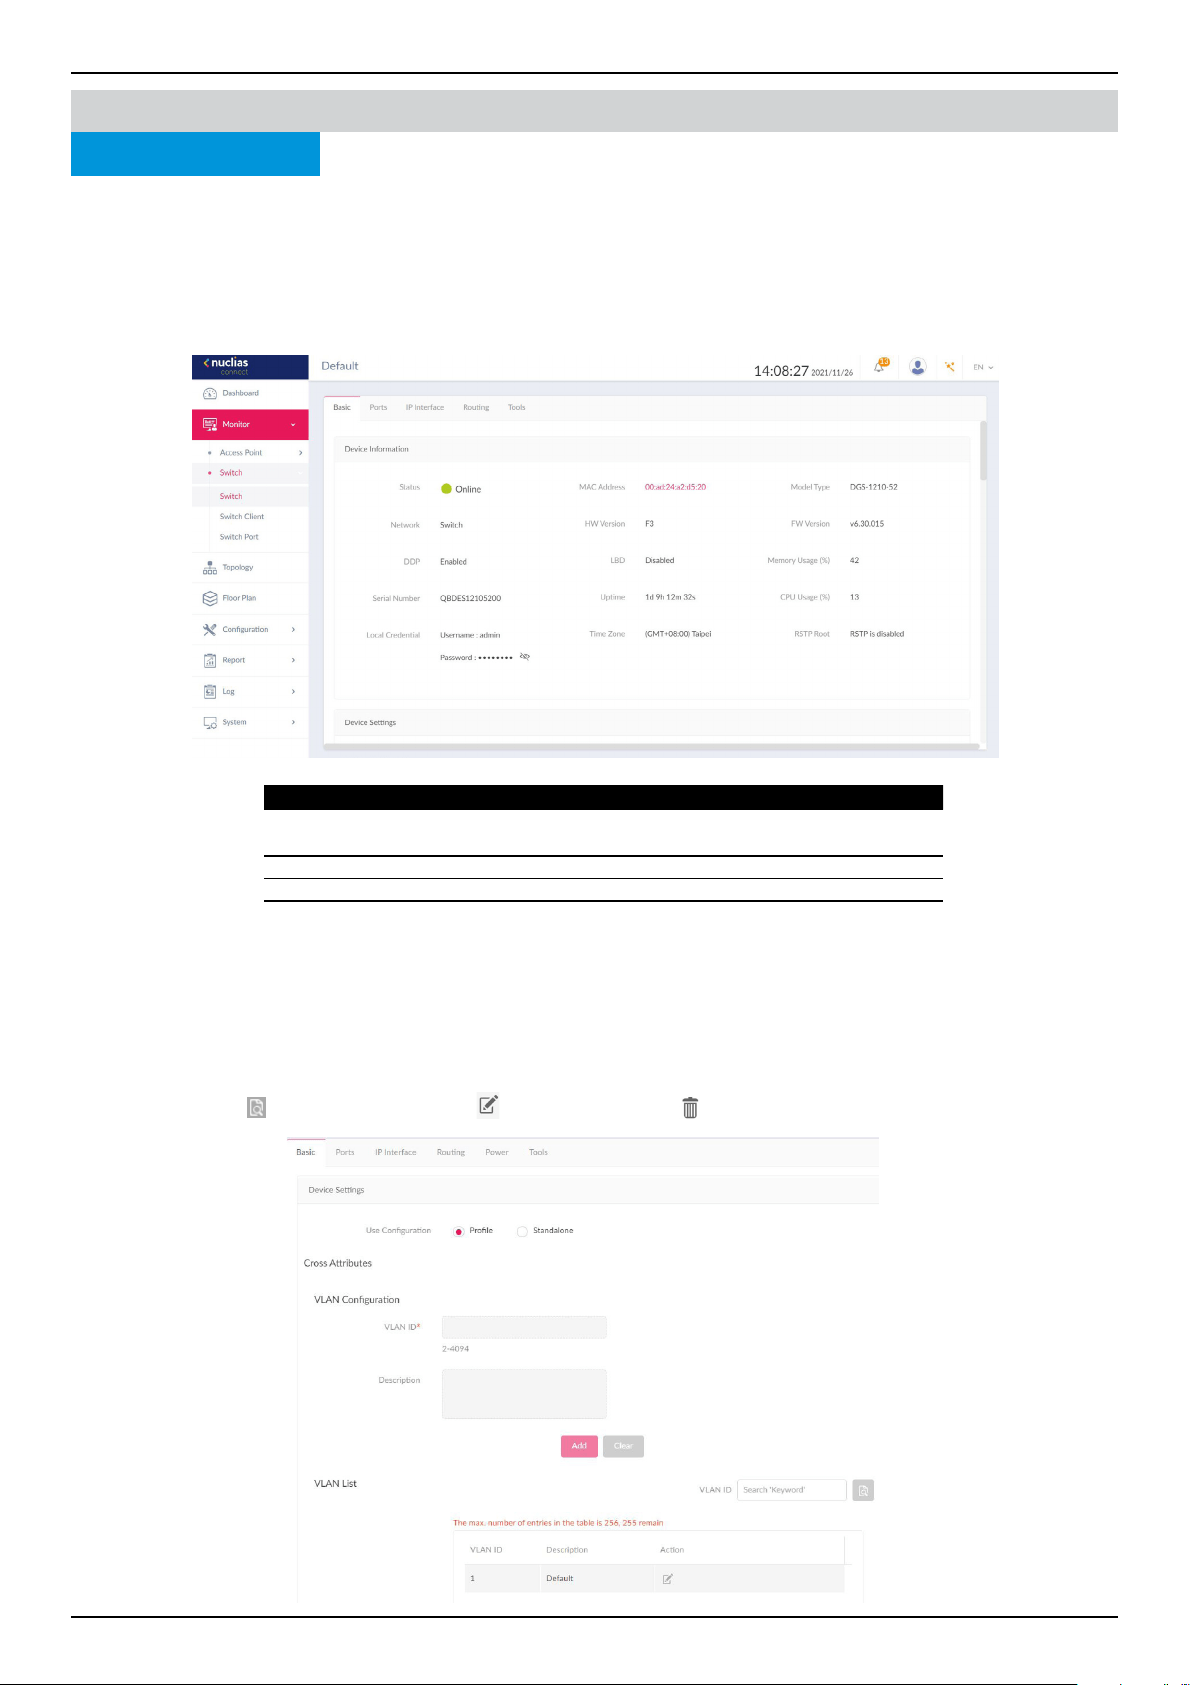
Nuclias Connect
Switch Device Detail Page
The device detail page displays comprehensive information of your switches and allows users to congure the ports, IP
interface, route settings, and many more. Navigate to Monitor > Switch, and click Link to Device Detail Page under Action.
On the Basic tab, you can congure your device and view a summary of Device Information. The following information is
displayed under the Device Information section: Online Status, Network, DDP, Serial Number, Local Credential, MAC
Address, HW Version, LBD, Uptime, Time Zone, Model Type, FW Version, Memory Usage, CPU Usage, and RSTP Root.
In the Device Settings section, select a use conguration (Prole or Standalone). If Prole is selected, the subsequent settings,
such as VLAN and IGMP Snooping will be xed. If Standalone is selected, the above-mentioned settings will be available for
editing.
Under VLAN Conguration, you can set up a VLAN by entering a VLAN ID (2-4094) and a description for ease of identication.
Click Add to create, or Clear to cancel. The created VLAN IDs will be displayed under the VLAN list. Enter a keyword in the
search eld and click
to locate a VLAN ID. Click to edit the ID or click to delete it.
Key Fields Description
DDP Displays the DDP (D-Link Discovery Protocol) settings of the
switch.
Local Credential Displays the username and password for local GUI/console.
LBD Displays the LBD (Loopback Detection) settings of the switch.
RSTP Root Displays the root bridge and its priority of the spanning tree.
Nuclias Connect Software User Manual Nuclias Connect Conguration
Page 48
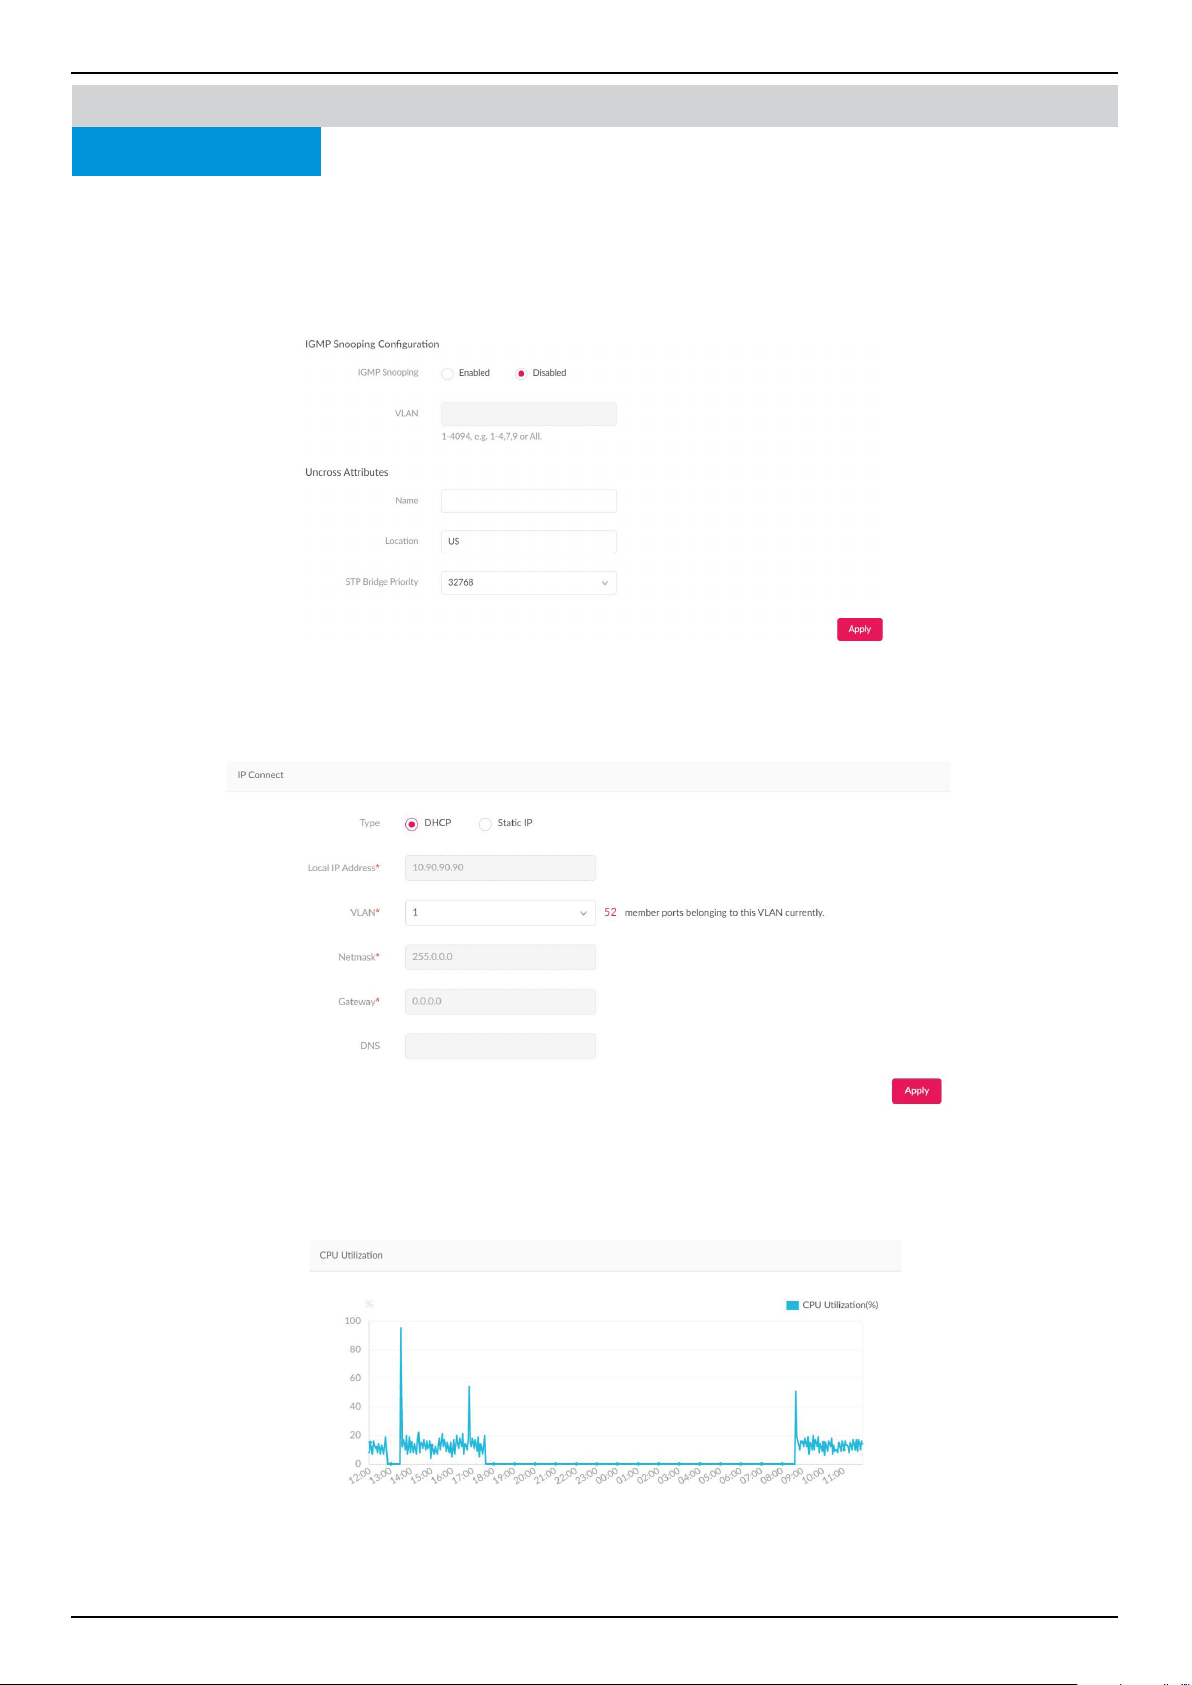
IGMP Snooping is disabled by default. When use conguration is set to Standalone, you can enable IGMP Snooping. Enter
the VLAN to complete the process.
In the Uncross Attributes section, features that cannot be congured via prole will be listed here. Enter a name, location,
and use the drop down menu to select a STP Bridge Priority. Click Apply to complete the settings.
In the IP Connect section, you can deploy primary connections. Choose a type of IP (DHCP or Static IP), and enter a Local IP
Address, VLAN (VLAN ID), Netmask, Gateway. If DHCP is selected, enter the DNS. If static IP is selected, enter a Primary DNS,
Secondary DNS, Third DNS. Click Apply to complete the set up.
In the CPU utilization section, a CPU Utilization graph is displayed. On the Y axis shows the percentage of CPU utilization. On
the X axis shows the time by hour.
Monitor
Basic
Nuclias Connect
Switch Device Detail Page
Nuclias Connect Software User Manual Nuclias Connect Conguration
Page 49
Monitor
Ports
Nuclias Connect
Switch Device Detail Page
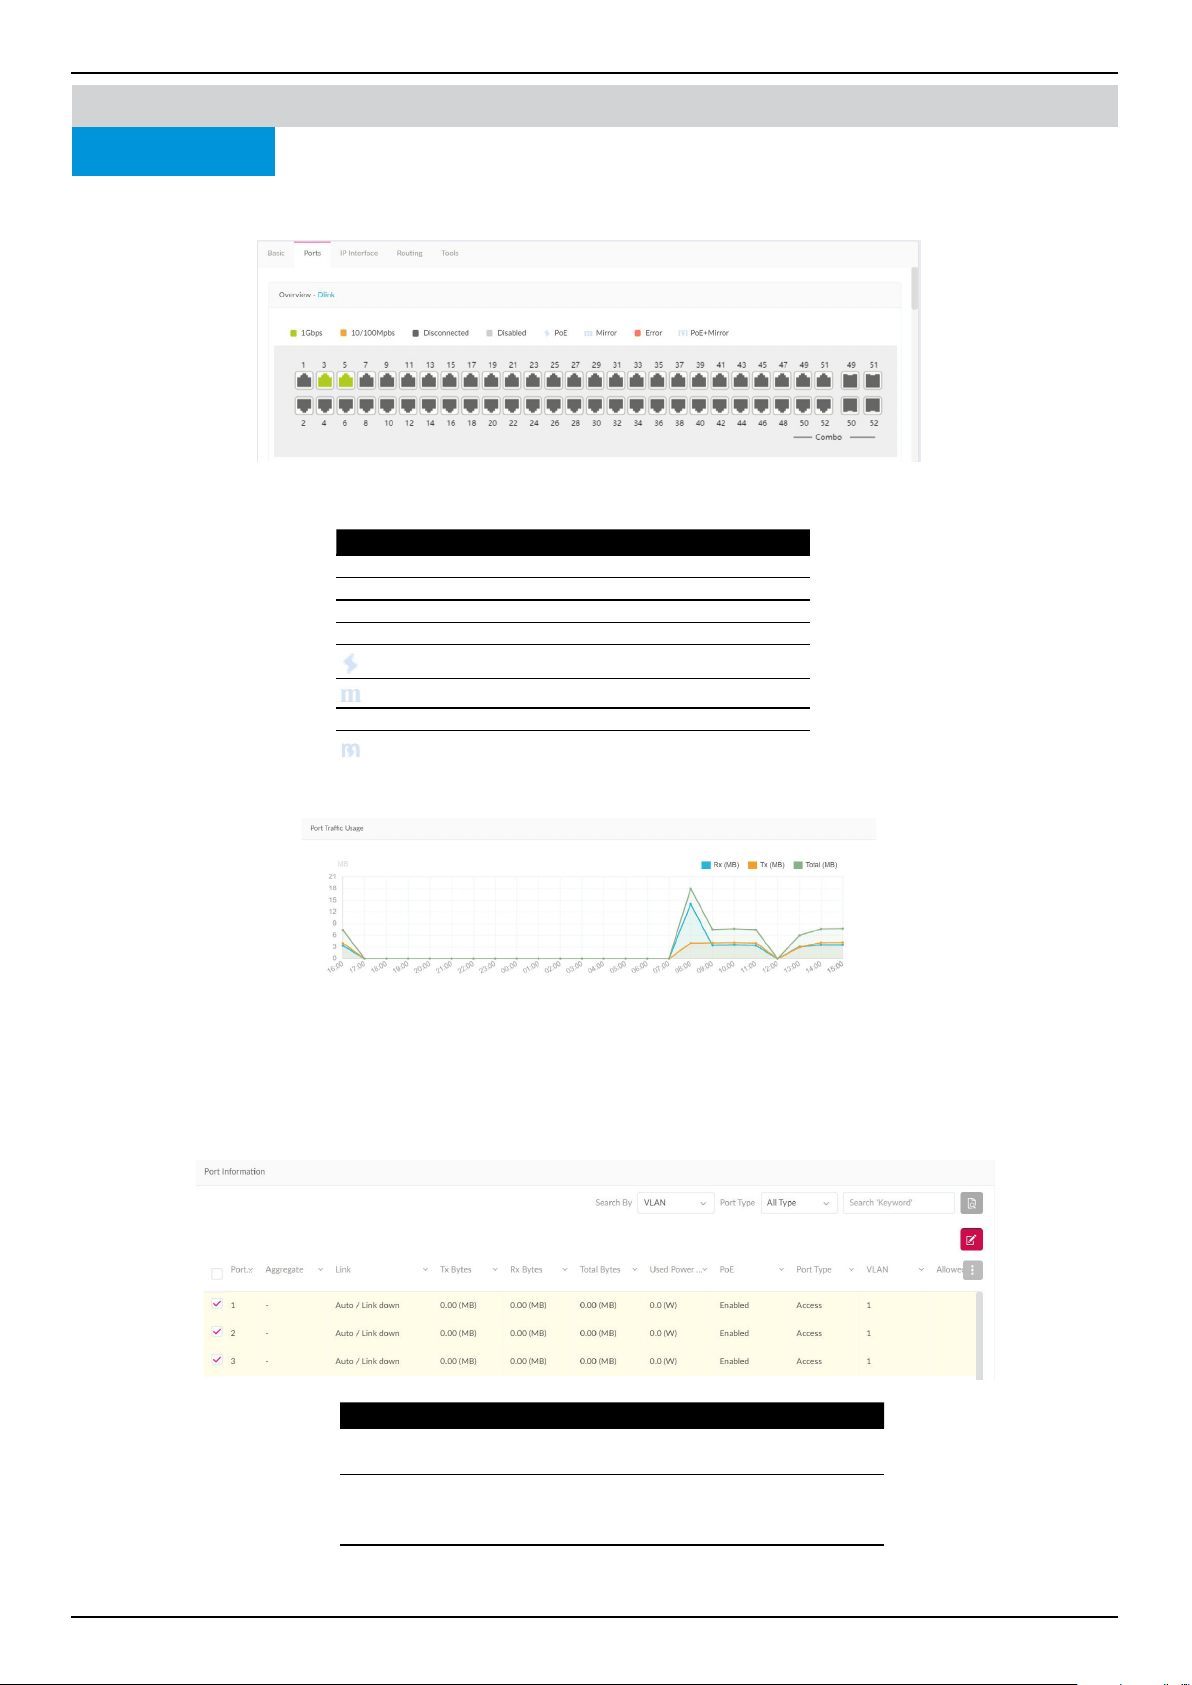
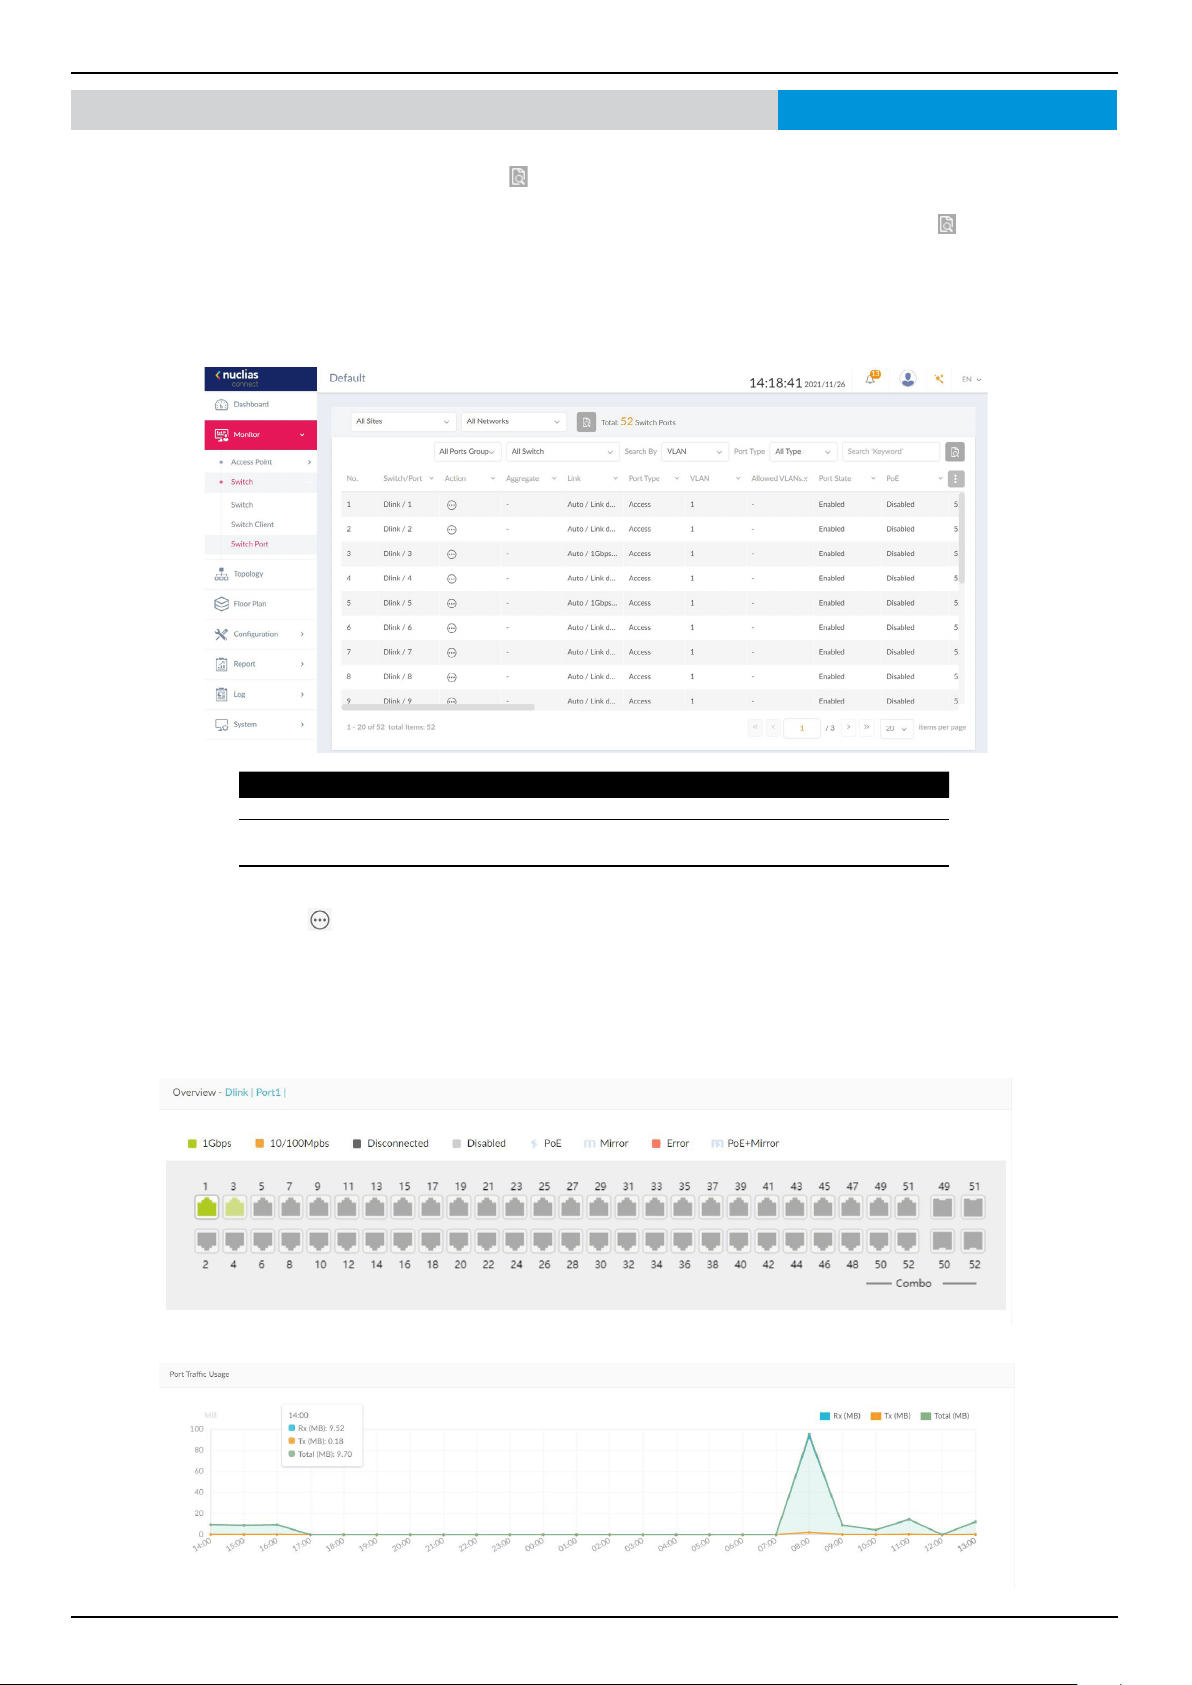
Under the Ports tab, a port status overview is presented. The graph displays a range of colors and icons to inform users of the
status of each individual port. Clicking on the port icons will direct users to the Port Detail page of the specied port.
Here’s a summary of all the statuses and what they represent:
In the Port Trac Usage section, a graph indicating Rx and Tx usage based on time is presented.
In the Port Information section, you can view a summary of all active and inactive ports. The summary includes information
such as port number, Aggregate link status, Tx/Rx/Total bytes, used power, PoE, Port type, VLAN, Allowed VLANs, Port
State, PoE Supply Schedule, RSTP, LBD, DDP, Port Shutdown Schedule, Mirror, Access Policies, LLDP, and Port Name.
Use the Search By drop down menu to select between VLAN and Port, and select a Port Type (Access, Trunk, or all) to narrow
down the search, or enter a keyword to locate a port.
Status Description
Green Connected to Gigabit Ethernet
Orange Connected to 10/100Mbps Ethernet
Dark Gray Port disconnected
Light Gray Port disabled
Powered by PoE
Port mirrored
Red Error detected
PoE+Mirror
Key Fields Description
Aggregate Displays the port-channel ID and aggregate type
(static/LACP).
VLAN Displays the native VLAN ID of Trunk mode or the
VLAN ID of Access mode. In addition, it also indi-
cates the Voice VLAN ID when display.
Allowed
VLANs
Displays the allowed VLAN ID when the Port Type
belongs to Trunk.
Nuclias Connect Software User Manual Nuclias Connect Conguration
Page 50
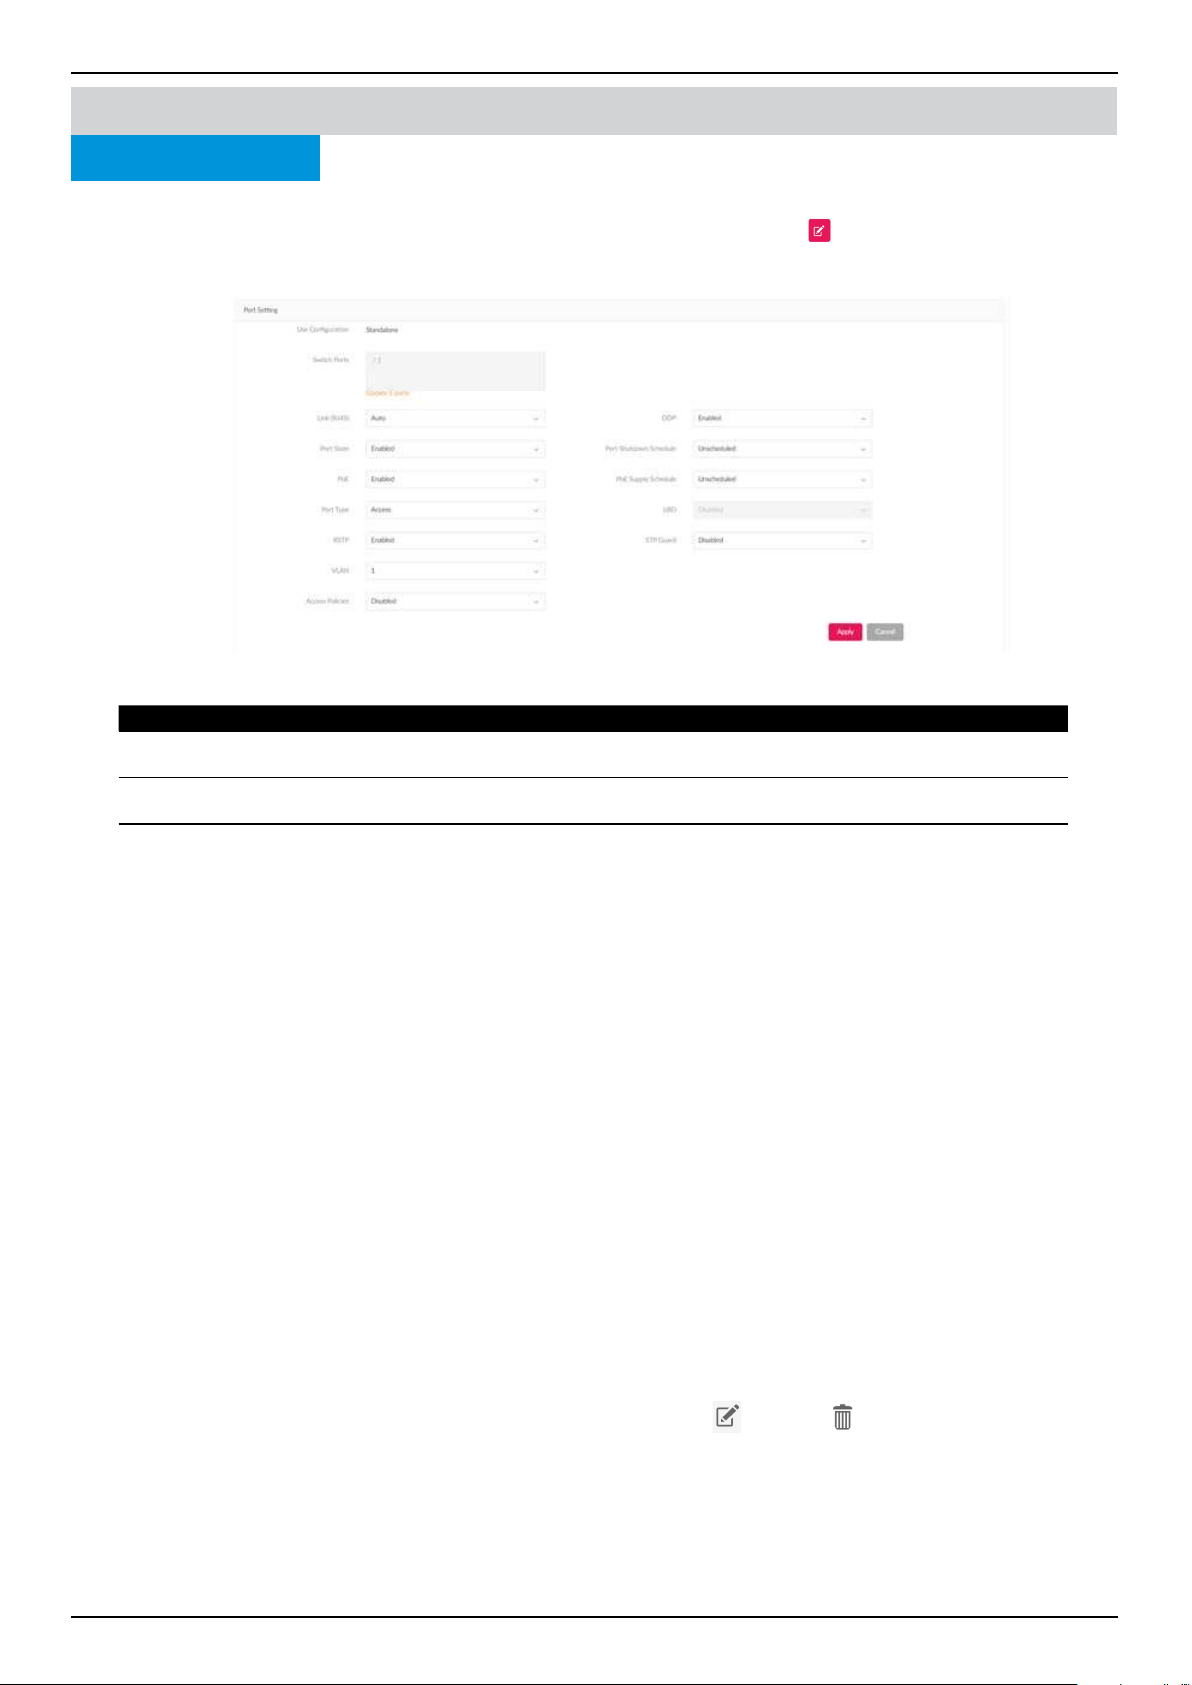
To make changes to a port or port group on the switch, rst make sure the User Conguration is set to Standalone in the De-
vice Settings section. Next, check the boxes next to the port(s) you’d like to change. Click
to edit. Scroll down to access the
Port Settings. Once the changes are made, click Apply to update the changes.
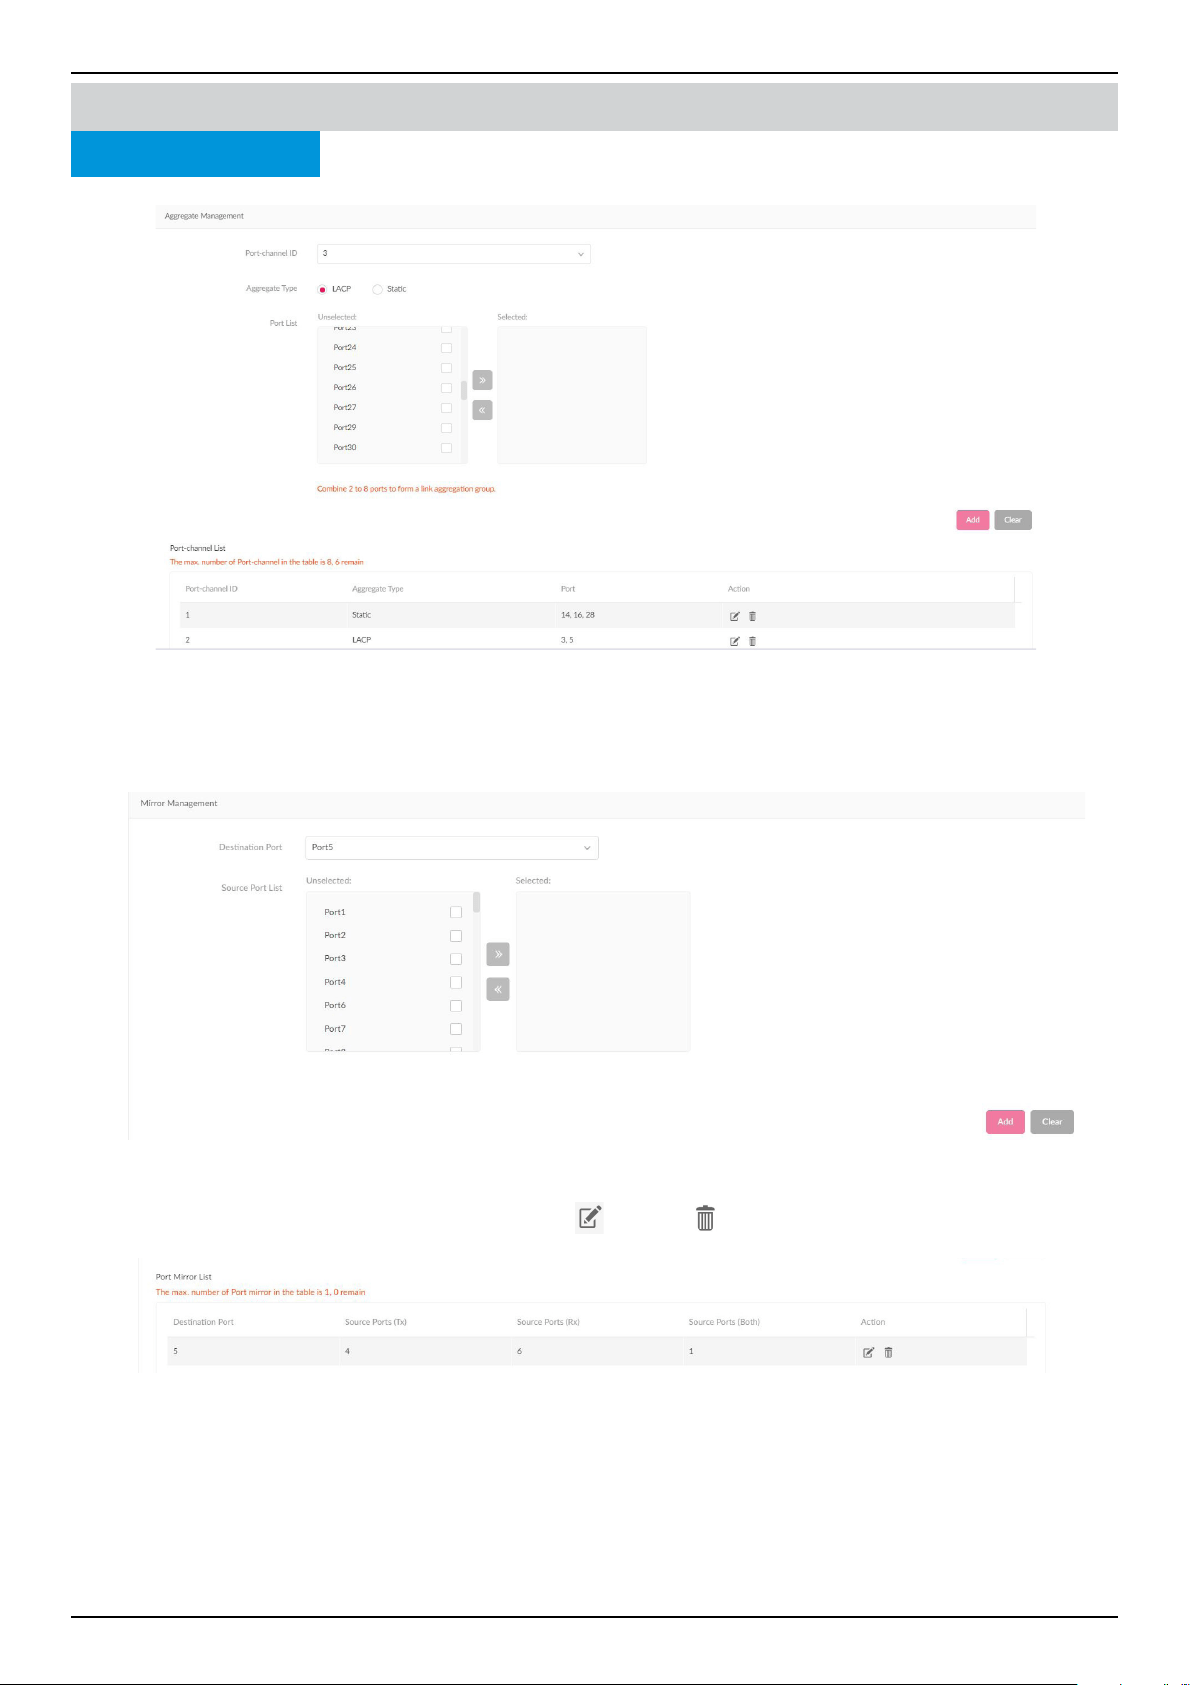
In the Aggregate Management section, you can combine a minimum of 2 to 8 network connections into a link aggregation
group. From the Port-channel ID drop-down menu, select between 1 to 8. Next, select an aggregate type, LACP or Static.
From the Port list, select 2 to 8 ports to form a link aggregation group. Click Add to form, or Clear to cancel.
Under the Port-channel List, you'll see a summary list of link aggregation you have created. The summary shows the Port-
channel ID, Aggregate Type and Port numbers. Beneath the Action eld, click
to edit, or to delete. Click Apply to save
the changes.
Monitor
Ports
Nuclias Connect
Switch Device Detail Page
Field Description
Port Shutdown
Schedule
Apply a time prole to the port shutdown function. The time prole is created in the time
prole page.
PoE Supply
Schedule
Apply a time prole to the PoE supply function.
Port Type Type: Switch ports can be congured as one of the following two types.
(1) Trunk: Trunk port allows the selected port to accept/pass 802.1Q tagged trac.
• Native VLAN: All untagged trac will be placed on this VLAN. The range is 1-4094.
• Allowed VLANs: Only selected VLANs are able to traverse this link. The range is All/1-4094.
(2) Access: Access port places all trac on its dened VLAN.
• Access VLAN: All trac is placed on this VLAN. The range is 1-4094.
• Access policy: Apply a restriction policy to this port.
* Disabled: All devices can access this port.
* Static MAC Whitelist: Only the devices with MAC addresses specied in this list can
access this port.
* Port Security Delete-on-time Mode: All learned MAC addresses will be purged when an
entry is aged out or when the user manually deletes these entries. Users can congure
the number of dynamic learned entries via “Dynamic whitelist size limit”. When the total
number of “Dynamic Whitelisted MACs” exceeds the value of “Dynamic Whitelist Size
Limit”, all subsequent MAC address will be denied access to this port. A table displaying
dynamically learned MAC address is available.
* User dened access policy: Apply a policy name dened via Access Policy Page.
Nuclias Connect Software User Manual Nuclias Connect Conguration
Page 51
In the Mirror Management section, you can mirror the network packet on one switch port to another. First select a
Destination Port using the drop-down menu. Next, from the Souce Port list, select the ports you'd like to mirror. Once selected,
from the drop-down menu, pick the type of trac to mirror over(Rx, Tx, or Both). Click Add to create, or Clear to cancel.
Under the Port Mirror list, you'll see a a summary of the ports you have mirrored. The summary displays the Destination Port,
and Source Ports(Tx/Rx/Both). Beneath the Action eld, click
to edit, or to delete. Click Apply to save the changes.
Monitor
Ports
Nuclias Connect
Switch Device Detail Page
Nuclias Connect Software User Manual Nuclias Connect Conguration
Page 52
Monitor
Ports
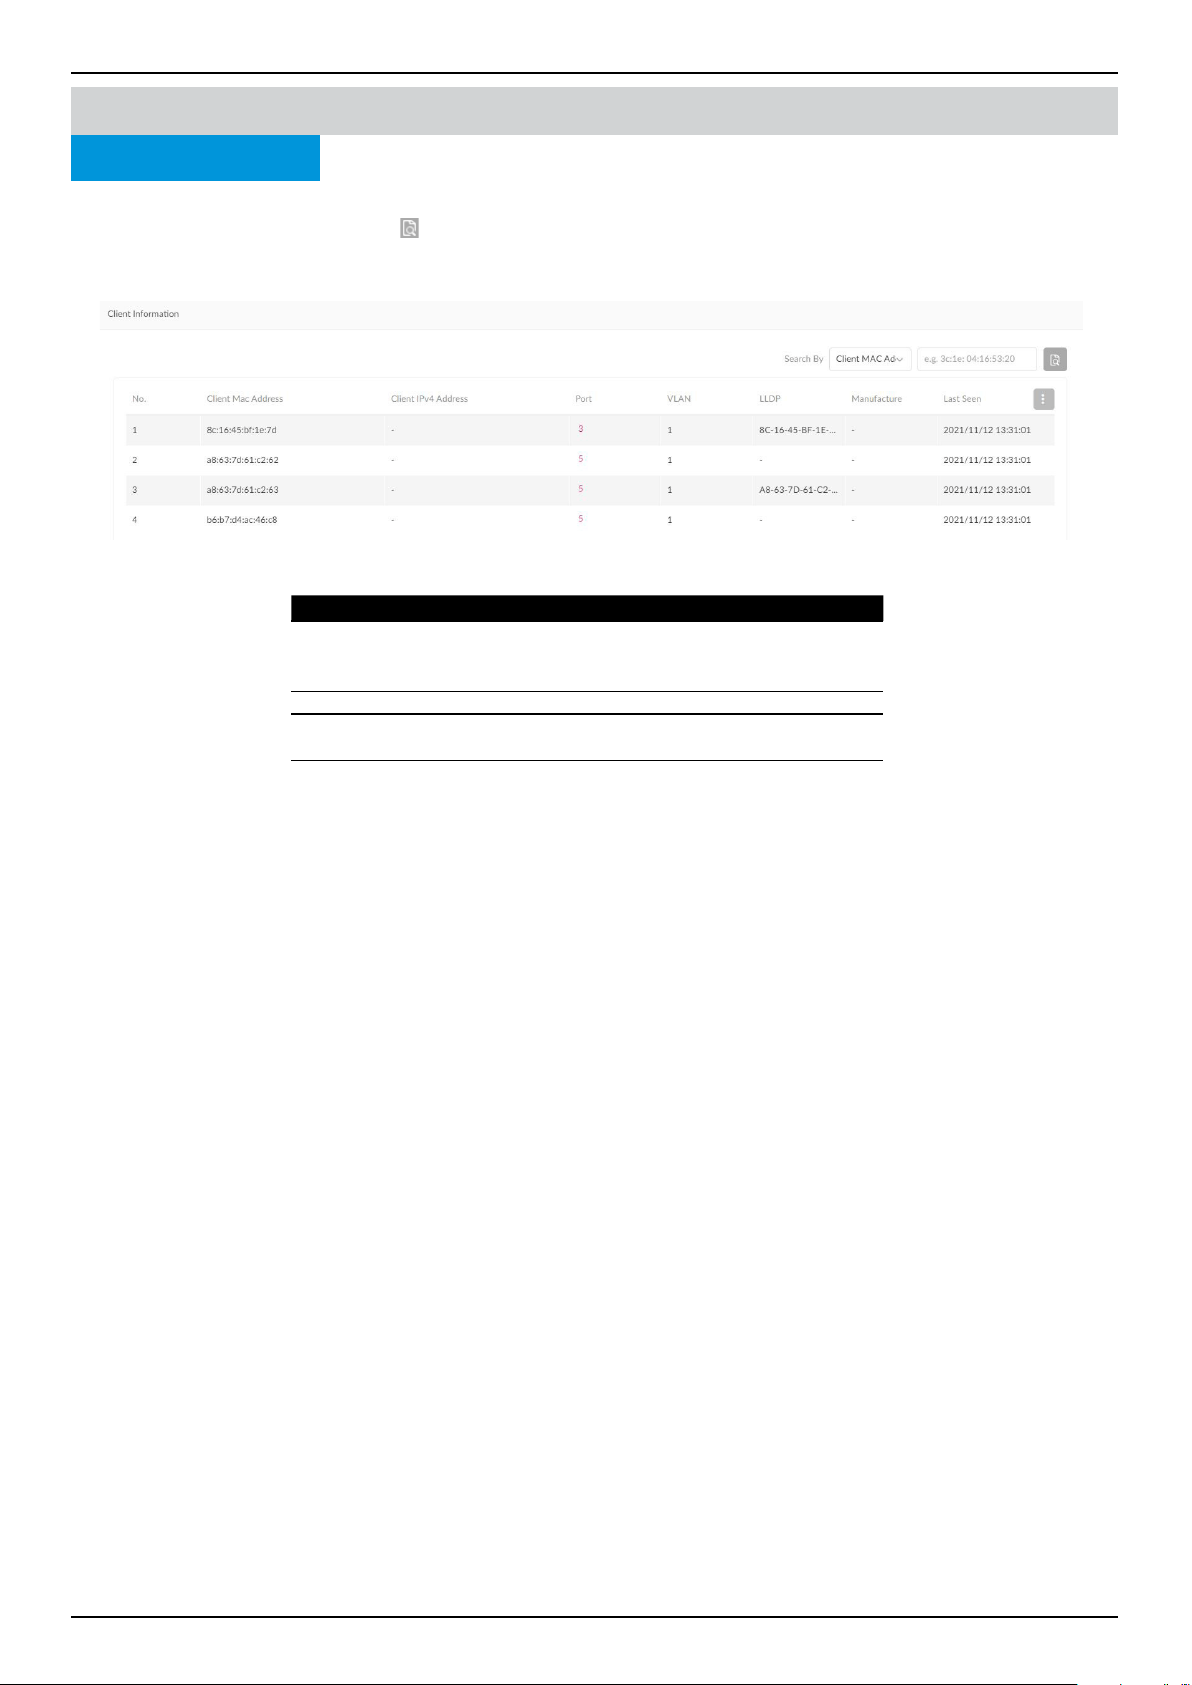
Key Fields Description
Port Displays the port number of the switch to which the
client is connected to. Click the Port number to be
directed to port detail page
LLDP Displays the LLDP information of neighbors.
Manufacture Displays the Manufacture name of the remote device
via LLDP.
Last Seen Displays the last time that the client was seen on the
network.
Nuclias Connect
Switch
In the Client Information section, a summary of client information is displayed. Use the Search By drop-down menu to select
a criteria to lter the search result. Click to start the search. The following information is displayed in the summary: Num-
ber, Site, Network, Client MAC Address, Client IPv4 Address, Port, VLAN, LLDP, Manufacture, and Last Seen.
Device Detail Page
Nuclias Connect Software User Manual Nuclias Connect Conguration
Page 53
Monitor
IP Interface
Nuclias Connect
Switch Device Detail Page
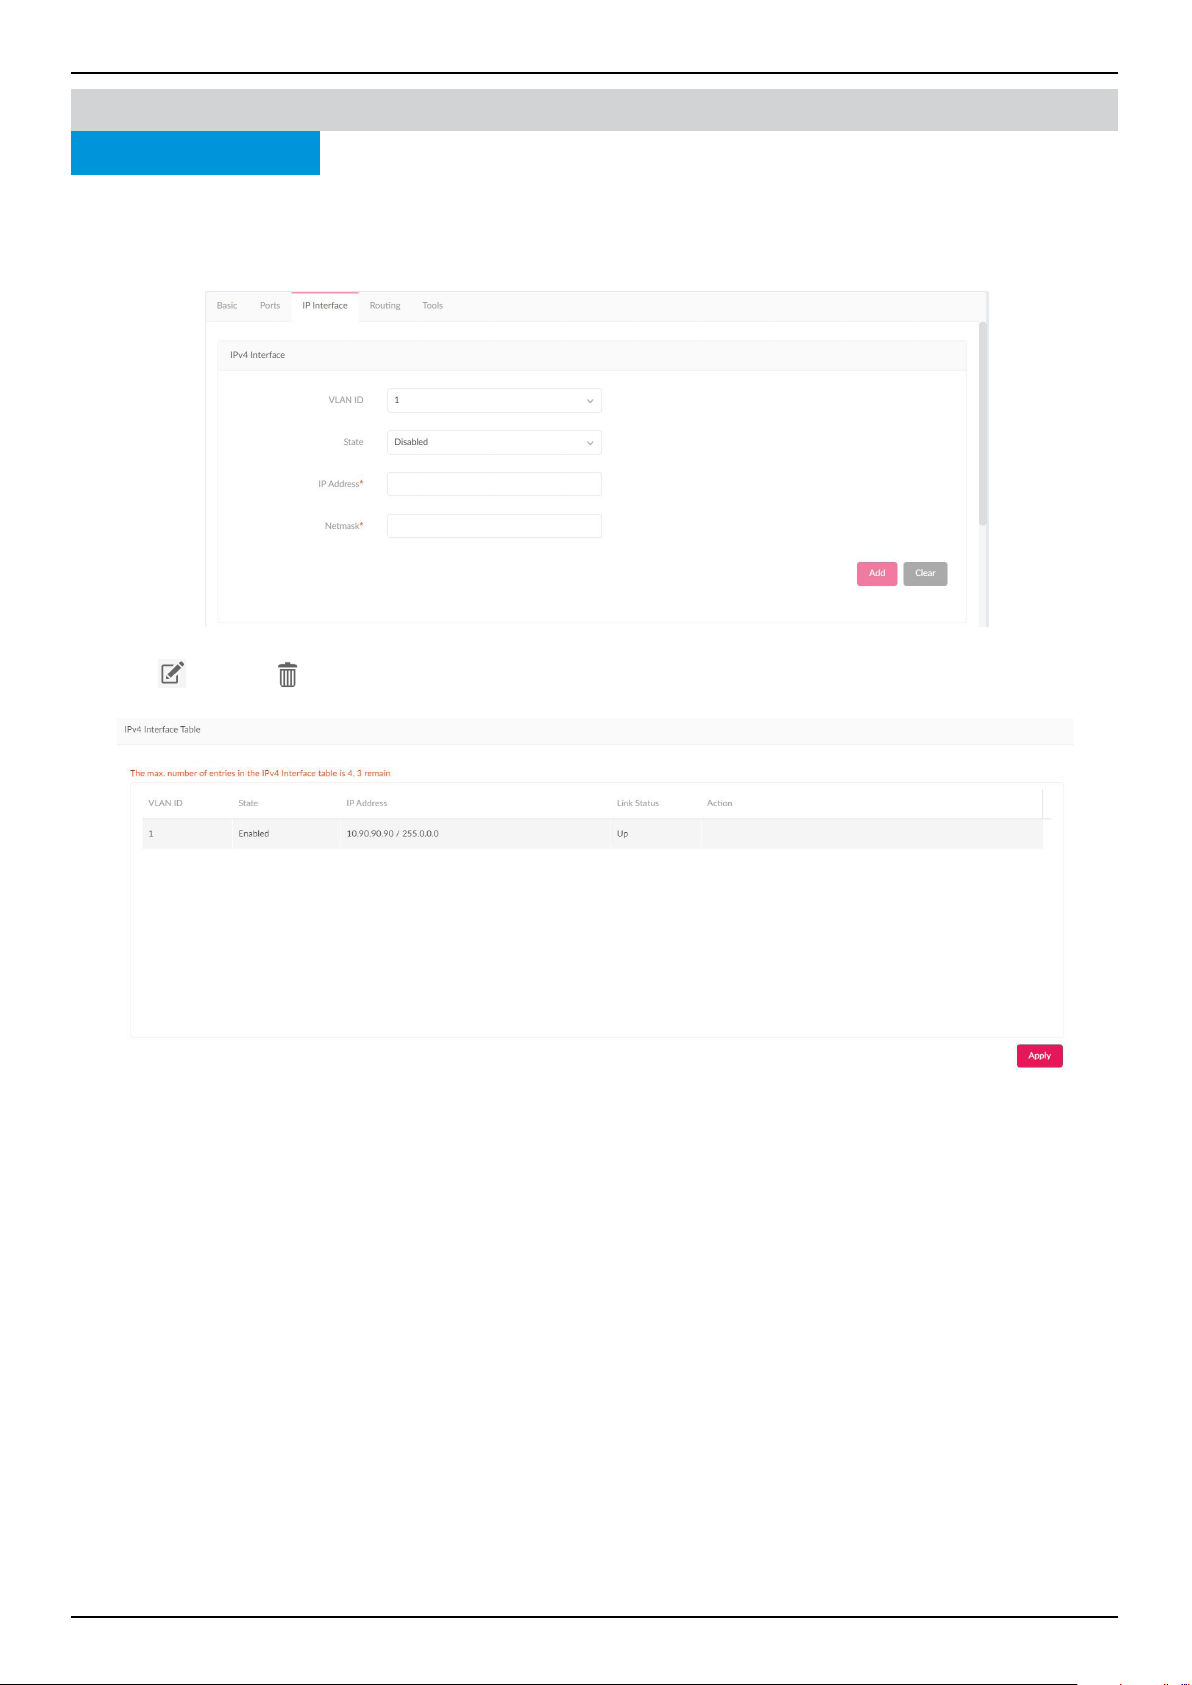
Under the IP Interface tab, you can congure the IPv4 interface and view a summary of their statuses. To create an IPv4 in-
terface, go to IPv4 Interface, select a VLAN ID, and choose to Enable or Disable the interface admin state. Enter an IPv4 IP
address and Netmask. Click Add to apply the IP interface to a VLAN, or Clear to remove the entered values.
In the IPv4 Interface Table, a summary containing VLAN ID, State, IP Address, and Link Status is displayed. Beneath the Action
eld, click
to edit, or to delete. Click Apply to save the changes.
Nuclias Connect Software User Manual Nuclias Connect Conguration
Page 54
Monitor
Routing
Nuclias Connect Switch Device Detail Page
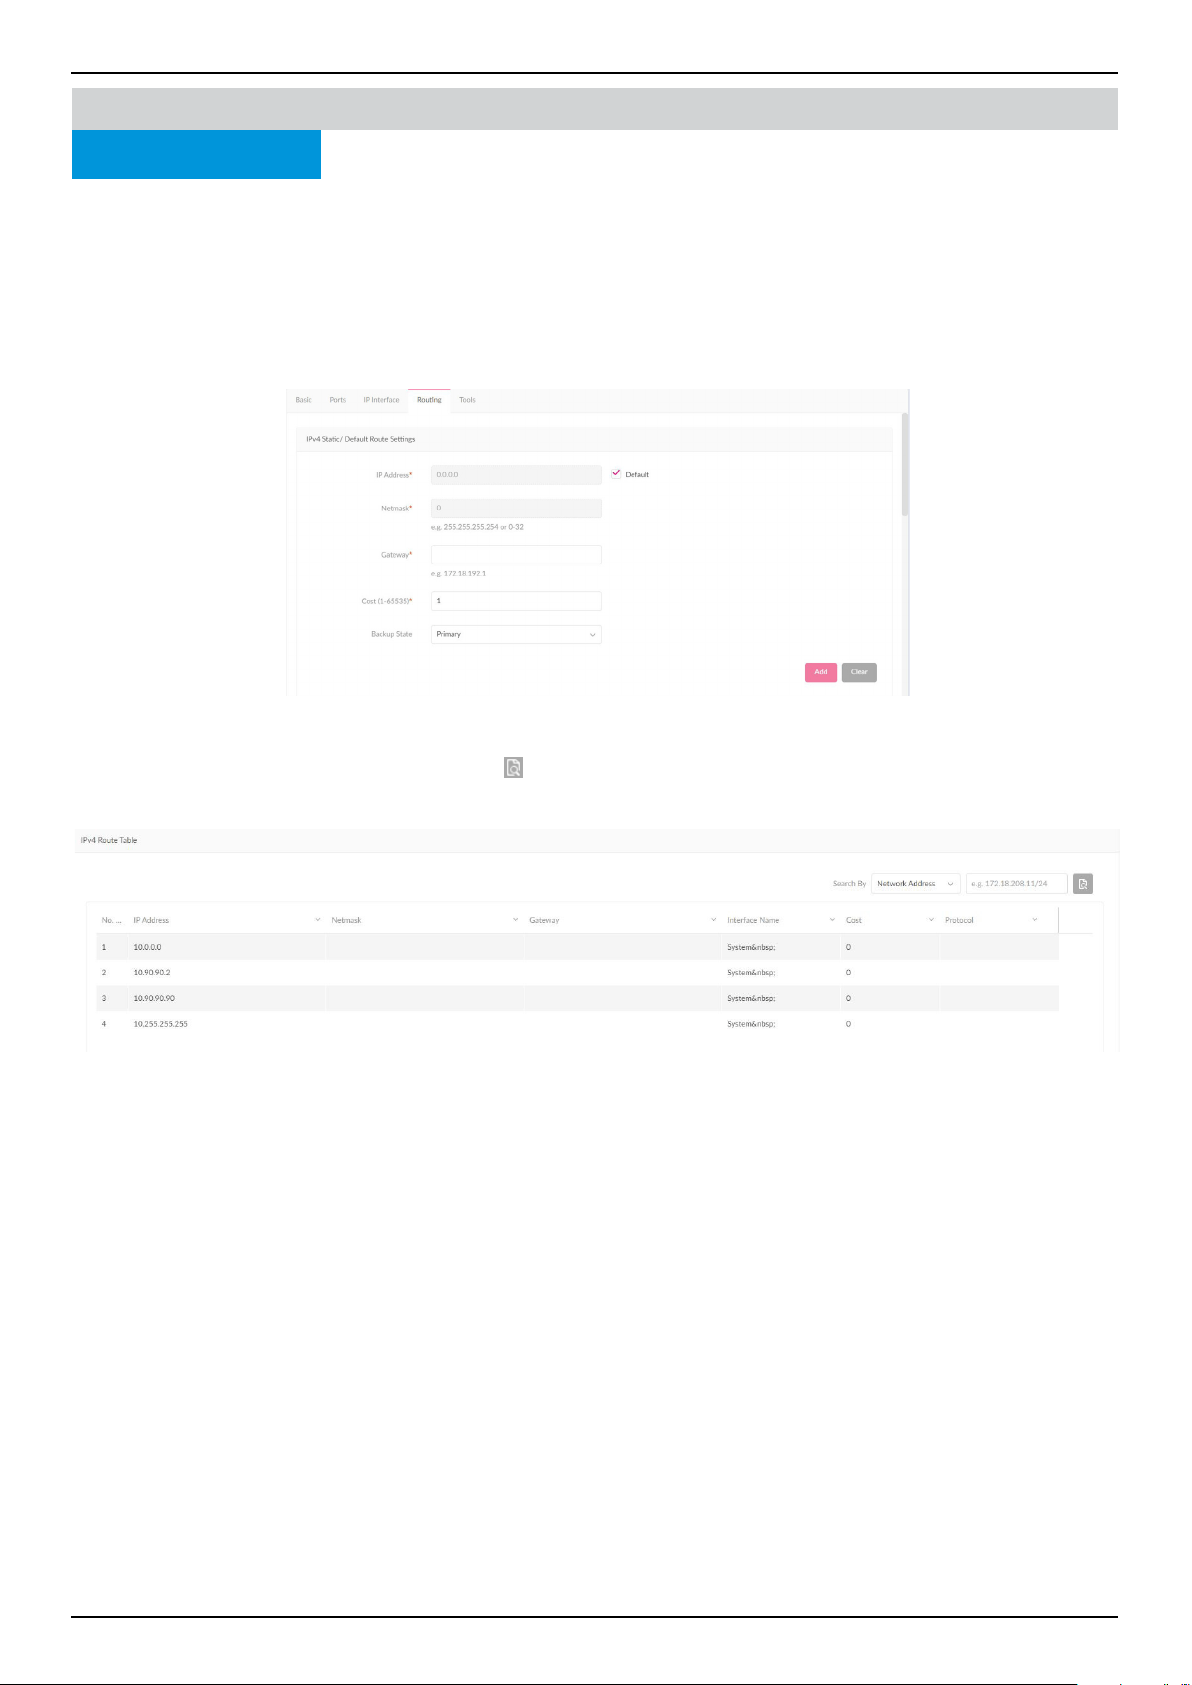
In the Routing tab, you can set up static routing for IPv4 formatted addressing. Under the IPv4 Static/Default Route Settings
section, enter an IP address or use the Default route, Netmask, Gateway, Cost, and Backup State(Primary/Backup). Click
Add to add the route settings, or Clear to clear the values entered.
In the Static Route Table, a summary of Static Route containing Number, IP Address/Netmask, Gateway, Cost, Protocol,
Backup, and Status is displayed. Beneath the Action eld, click Delete to delete the static route. Click Apply to apply the
settings to the switch.
The IPv4 Route Table stores the routes information of the switch. Use the Search By drop-down menu to select a search crite-
ria (Network/IP Address) to lter your search. Click to start the search. The following information is presented in the table:
Number, IP Address, Netmask, Gateway, Interface Name, Cost, and Protocol.
Nuclias Connect Software User Manual Nuclias Connect Conguration
Page 55
Monitor
Power
Nuclias Connect Switch Device Detail Page
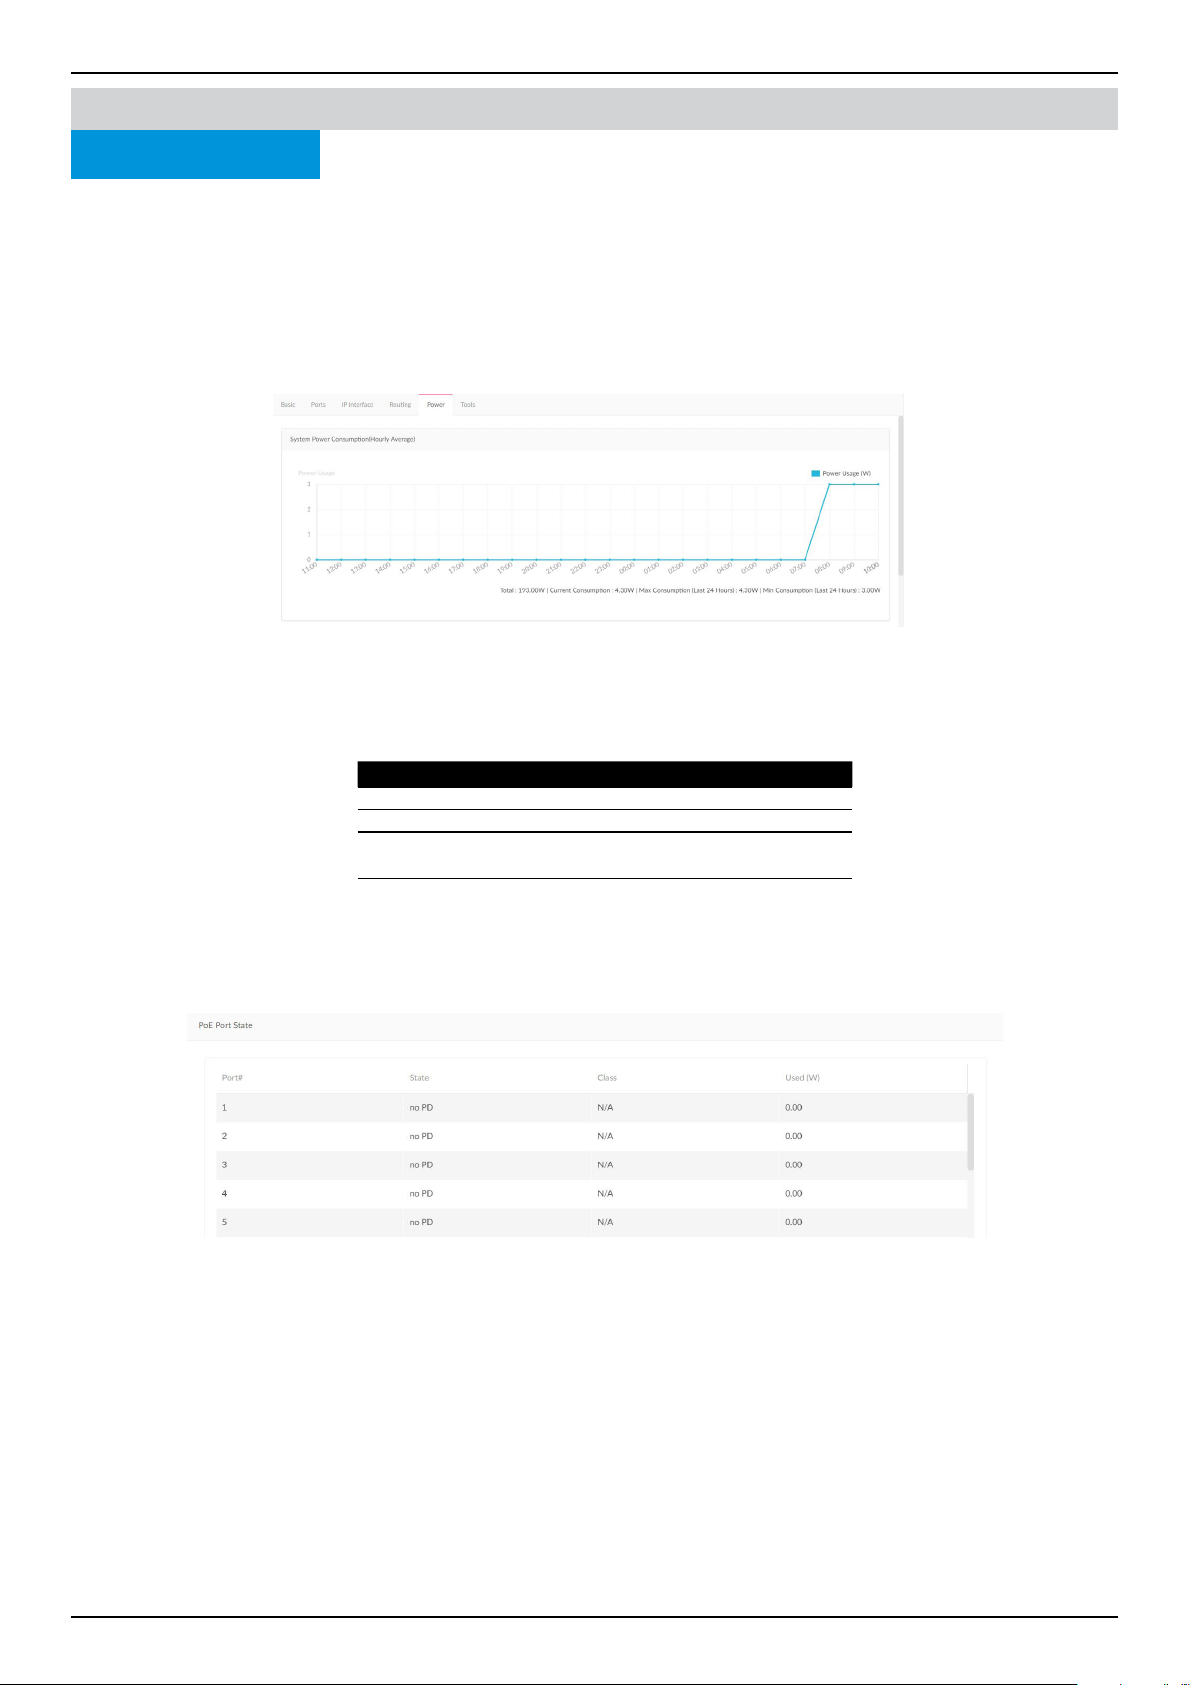
Under the Power tab, the System Power Consumption chart and PoE Port State summary is displayed.
Note that the Power tab will only be available if your switch supports PoE.
The System Power Consumption chart shows your switch’s power usage in watt by the hour, as well as
the total, current, minimum, and maximum power consumption.
The PoE Port State summary shows the IEEE classication and the power consumption of each port on
the switch. The following table describes each of the eld in the summary:
Field Description
No. Port number
State PoE port status.
Class The IEEE classication: N/A or a value from IEEE
class 0 to 4.
Used(W) The amount of power that is currently allocated
to PoE ports in watts.
Nuclias Connect Software User Manual Nuclias Connect Conguration
Page 56
Monitor
Tools
Nuclias Connect
Switch Device Detail Page
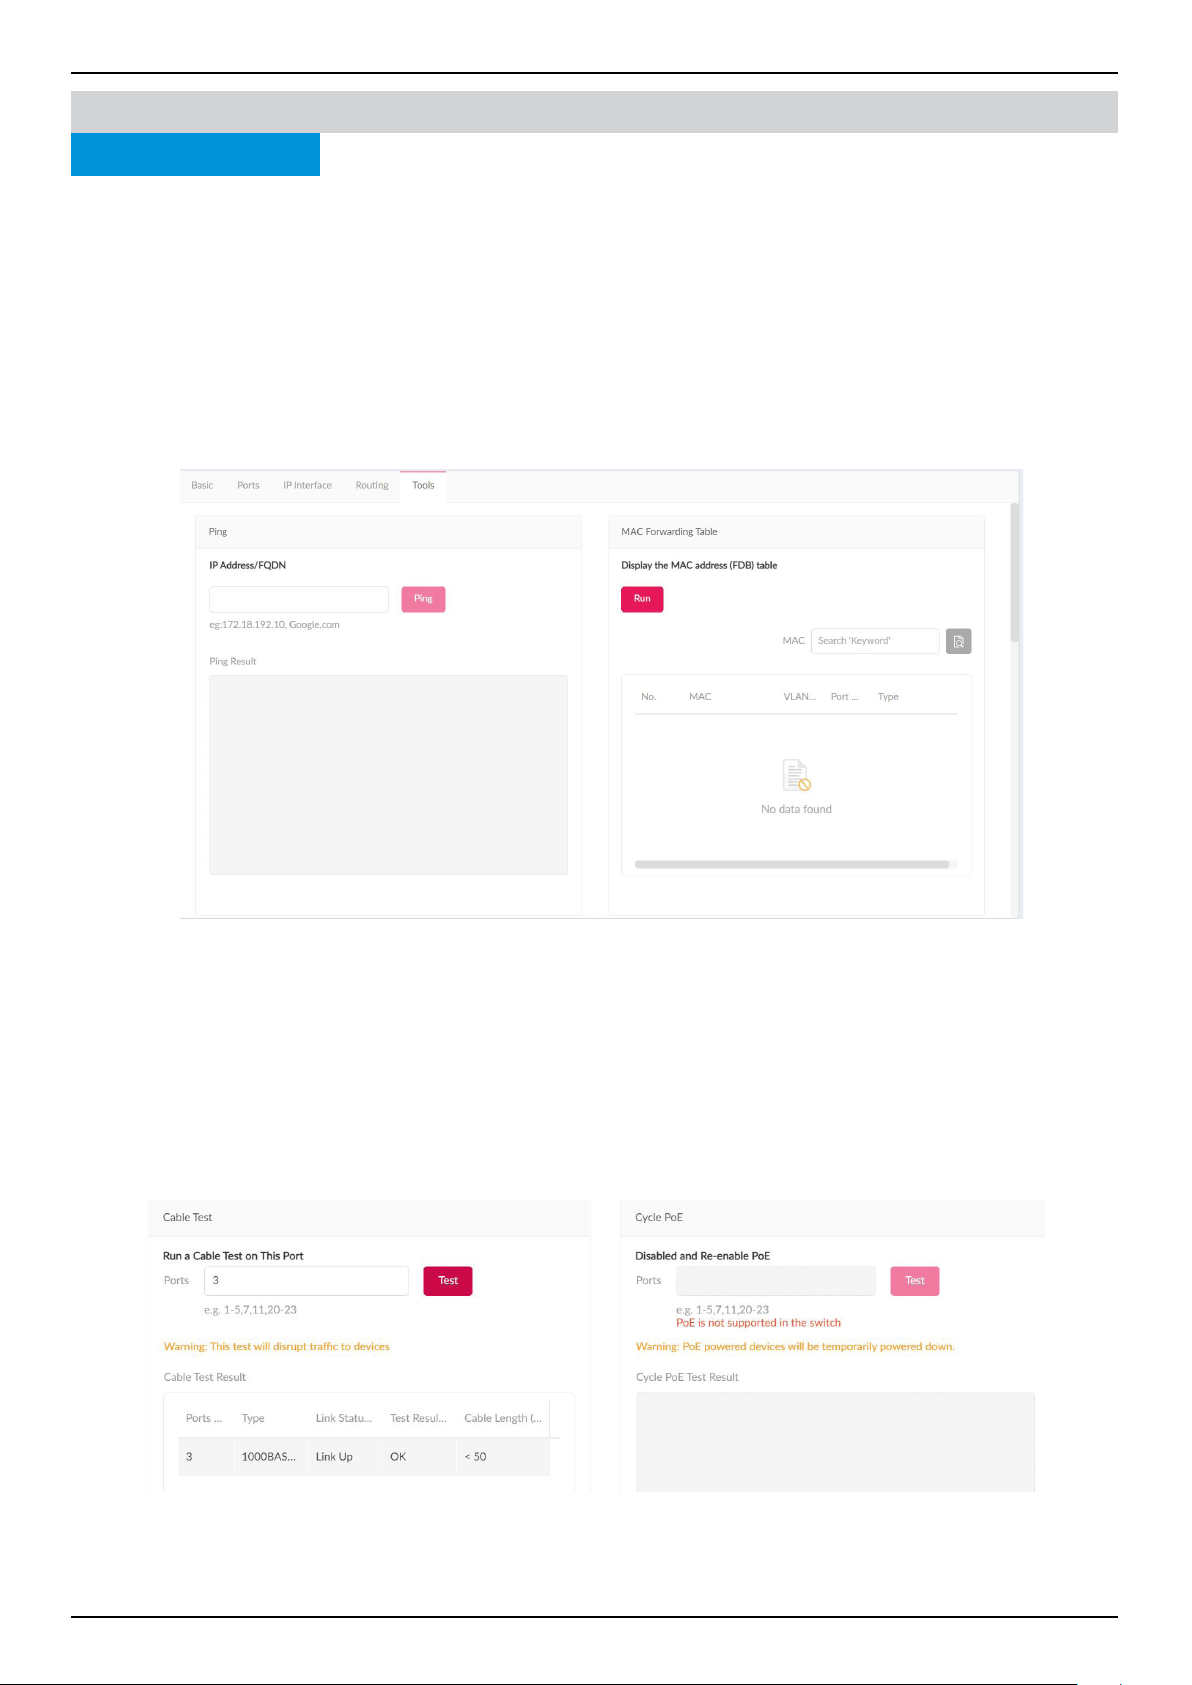
Under the Tools tab, you’re presented with the following tests to help troubleshooting: Ping, Locate Device, Cable Test,
Cycle PoE, MAC Forwarding Table, and Copy Conguration to Other Device. Note that the tools are disabled when your
devices are oine.
The Ping Tool can identify if a connection is working. Enter a host name or IP address and click Ping to perform the ping test.
When the server received the ping signal, a summary of Ping Statistics including Packet sent, received, and lost is displayed.
If no signal is received, the message “ The device is unreachable” is displayed.
The MAC Forwarding Table shows a summary of MAC addresses, VLAN, Port, and IP Address Type. Press Run to begin the
process. On the MAC search led, enter a relevant keyword to help locate the MAC address.
The Cable Test allows you to test the connectivity of one or multiple ports. Enter a number of port(s) and click Test to begin
the process. The following information will be displayed: Port number, Type, Link Status, Test Result, and Cable Length.
Under the Test Result eld, 5 statuses can be displayed: OK, Open, Short, Test failed and -.
Note: The cable test will disrupt trac to devices.
The Cycle PoE tool allows you to disable or enable PoE on specic ports. This tool can only be executed when PoE is enabled.
Note that if the switch does not support PoE, this section will be disabled.
Nuclias Connect Software User Manual Nuclias Connect Conguration
Page 57
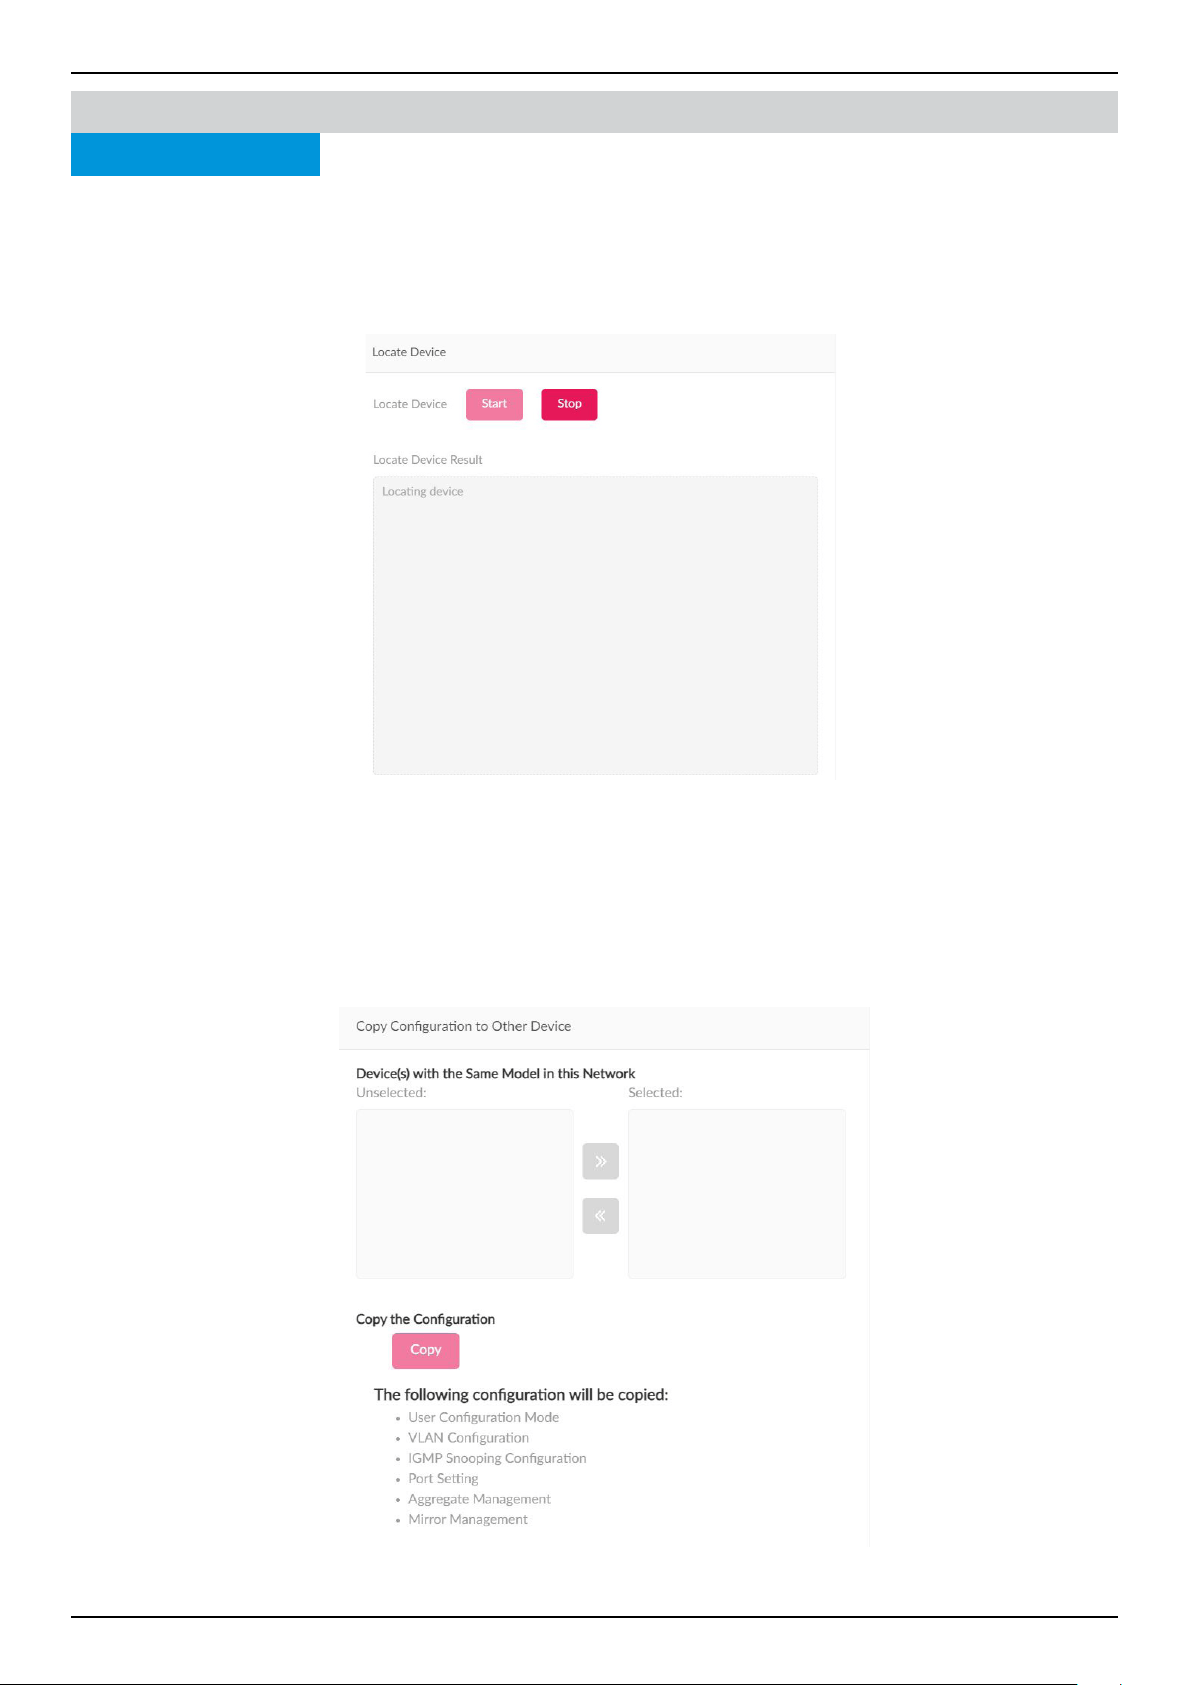
The Locate Device function can help identify unlabled switches by lighting up the LEDs on the switch. Click the Start button
to light up the switch. All LEDs will light up in green for 5 minutes. Click the Stop button to stop the light immediately. If a
device is located, a message "Locating device..." will be displayed under the Locate Device Result eld. If no devices can be
located, a message "The device is unreachable" will be displayed. If the server receives failure message sent by the switch, a
message "Locate device failed" will be displayed.
The Copy Conguration function allows you to copy Conguration Mode, VLAN Conguration, IGMP Snooping, Port
Settings, Aggregate Management, and Mirror Management settings from your device to other device(s) in the network.
(Note that the two device needs to be the same model.)
To copy the conguration, select the switch(es) in the network that will be copied. Click the Copy button to copy the
conguration from your device to the selected device(s). A pop-up window will conrm once again. Click Copy to continue or
Cancel to stop.
Monitor
Tools
Nuclias Connect
Switch Device Detail Page

Nuclias Connect Software User Manual Nuclias Connect Conguration
Page 58
Monitor Switch Switch ClientNuclias Connect
The Switch Client page displays a cumulative list of all the active client devices that are connected to the switch network. The
following information is displayed: Number, Client MAC Address, Client IPv4 Address, Switch MAC Address, Switch Name,
Port, VLAN, LLDP, Manufacturer, and Last Seen.
Use the Site and Network drop-down menu to lter the information, and click
to start the search. Likewise, you can use
the Switch and Search By drop-down menu to select a criteria (Client MAC address, Client IPv4 Address, VLAN and Port)
and enter relevant keywords to narrow the search result.
Key Fields Description
Switch MAC
Address
Displays the MAC Address of the switch that the client is connected
to. Click the MAC Address to be redirected to the switch detail page.
Port Displays the port number of the D-Link switch that the client is con-
nected to. Click the port number, it will be directed to per port page.
Nuclias Connect Software User Manual Nuclias Connect Conguration
Page 59
Monitor Switch Switch PortNuclias Connect
Under the Switch Port section, you can view the statuses of all the switch ports from all sites and networks. Use the Sites and
Networks drop-down menu to lter the search. Click to start the search. Subsequently, use the Ports Group and Switch
drop-down menu to lter the search, and select VLAN/Port and Access/Trunk/All from the Search By and Port Type drop
down menu respectively. Under the Search column, enter a relevant keyword to narrow the search. Click to start the search.
The following information is displayed: Number, Switch/Port, Aggrregate, Link, Port Type, VLAN, Allowed VLANs, Port
State, PoE, Ports, RSTP, LBD, DDP, Port Shutdown Schedule, PoE Supply Schedule, Access Policies, Mirror, LLDP, Port
Name, Rx Broadcast Packets, Tx Boardcast Packets, Rx Multicast Packets, Tx Multicast Packets, Rx Bytes, Tx Bytes, Rx
Packets, Tx Packets, and Total Bytes.
Under the Action eld, click
to go to the Port Detail page. You'll be directed to detail page for the specic port of the
switch you have selected.
In the Port Detail page, you get an overview on the Switch Port Connection Status, Port Trac Usage, Current
Conguration, Port Status, Testing Tools including Cable Test and Cycle PoE, Packet Overview and Client Information.
Key Fields Description
Switch/ Port Displays the switch name and the port number.
Aggregate Displays the link aggregation type (Static/LACP/-) of the port-channel
group.
Link Displays link conguration and link status of the port.
Nuclias Connect Software User Manual Nuclias Connect Conguration
Page 60
Nuclias Connect Software User Manual Nuclias Connect Conguration
Page 61
Nuclias Connect Software User Manual Nuclias Connect Conguration
Page 62
Nuclias Connect Topology
Under the Topology page, users can view the topological relations between switch devices and access points in a network.
Press
to zoom in, to zoom out, and to reset the topology. A basic network and device summary is displayed. The
following information is included: Network name, Belonging Site, Range, Total Device/Switch, Online Device/Switch.
Select an access point or switch from the site and network. The Device and Link information will be displayed on the right side.
Clicking on the green device icon will reveal detailed device information. Clicking on the link will reveal the Link information.
AP Device Detail
Field Description
Name Displays the name to identify the switch on
server. Click the name to be redirected to the
device detail page. Note that the AP name must
be unique to the Site.
Status Displays the connection status of the AP: Online,
Oine or Unmanaged. Green indicates online,
red indicates oine.
Local IP Address Displays the IP address.
MAC Address Displays the system MAC address of the device.
Model Type Displays the model type of the device.
Hardware Version Displays the hardware version of the device.
FW version Displays the Firmware version
CPU Usage (%) Displays the CPU Usage of the device.
Memory Usage (%) Displays the memory usage of the device.
Upload Displays the upload trac of the device.
Download Displays the download trac of the device.
Uptime Display the activating time of the AP since after
last start or reboot.
Location Displays the location of the device.
Nuclias Connect Software User Manual Nuclias Connect Conguration
Page 63
Switch Device Detail
Field Description
Name Displays the switch name on the server. Click the
name to be directed to the device detail page. Note
that the switch name must be unique to the Site.
Status Displays the connection status of the switch: Online
or oine. Green indicates online, red indicates oine
and is unreachable by the server.
IP Address Displays the IPv4 address.
Note: User congured IPv4 address is displayed when
the device is unknown.
MAC Address Displays the system MAC address of the switch.
Model Type Displays the model type of the switch.
Serial Number Displays the serial number of the switch.
IGMP Snoop-
ing
Displays the state of IGMP snooping.
RSTP Root Displays the root bridge and its spanning tree prior-
ity.
Display format.
• “Root is X/ root bridge priority: Y”
X represents device name (System name) of the root
switch.
Y represents bridge priority of root switch.
• “RSTP is disabled”
- When RSTP is not enabled on the switch
- RSTP is enabled only on the switch, not the ports.
• “-”
When the switch is oine or doesn’t relay the infor-
mation.
DDP Display the DDP setting of the switch.
LBD Display the LBD setting of the switch.
IGMP Snoop-
ing
Displays the state of IGMP snooping.
Hardware
Version
Displays the hardware version of the switch.
CPU Usage (%) Displays the CPU Usage of the switch.
FW Version Displays the Firmware version of the switch.
Time zone Displays the time zone which the device belongs to.
Uptime Display the activating time of the switch after the last
start or reboot.
Location Displays the location of the switch.
Nuclias Connect Topology
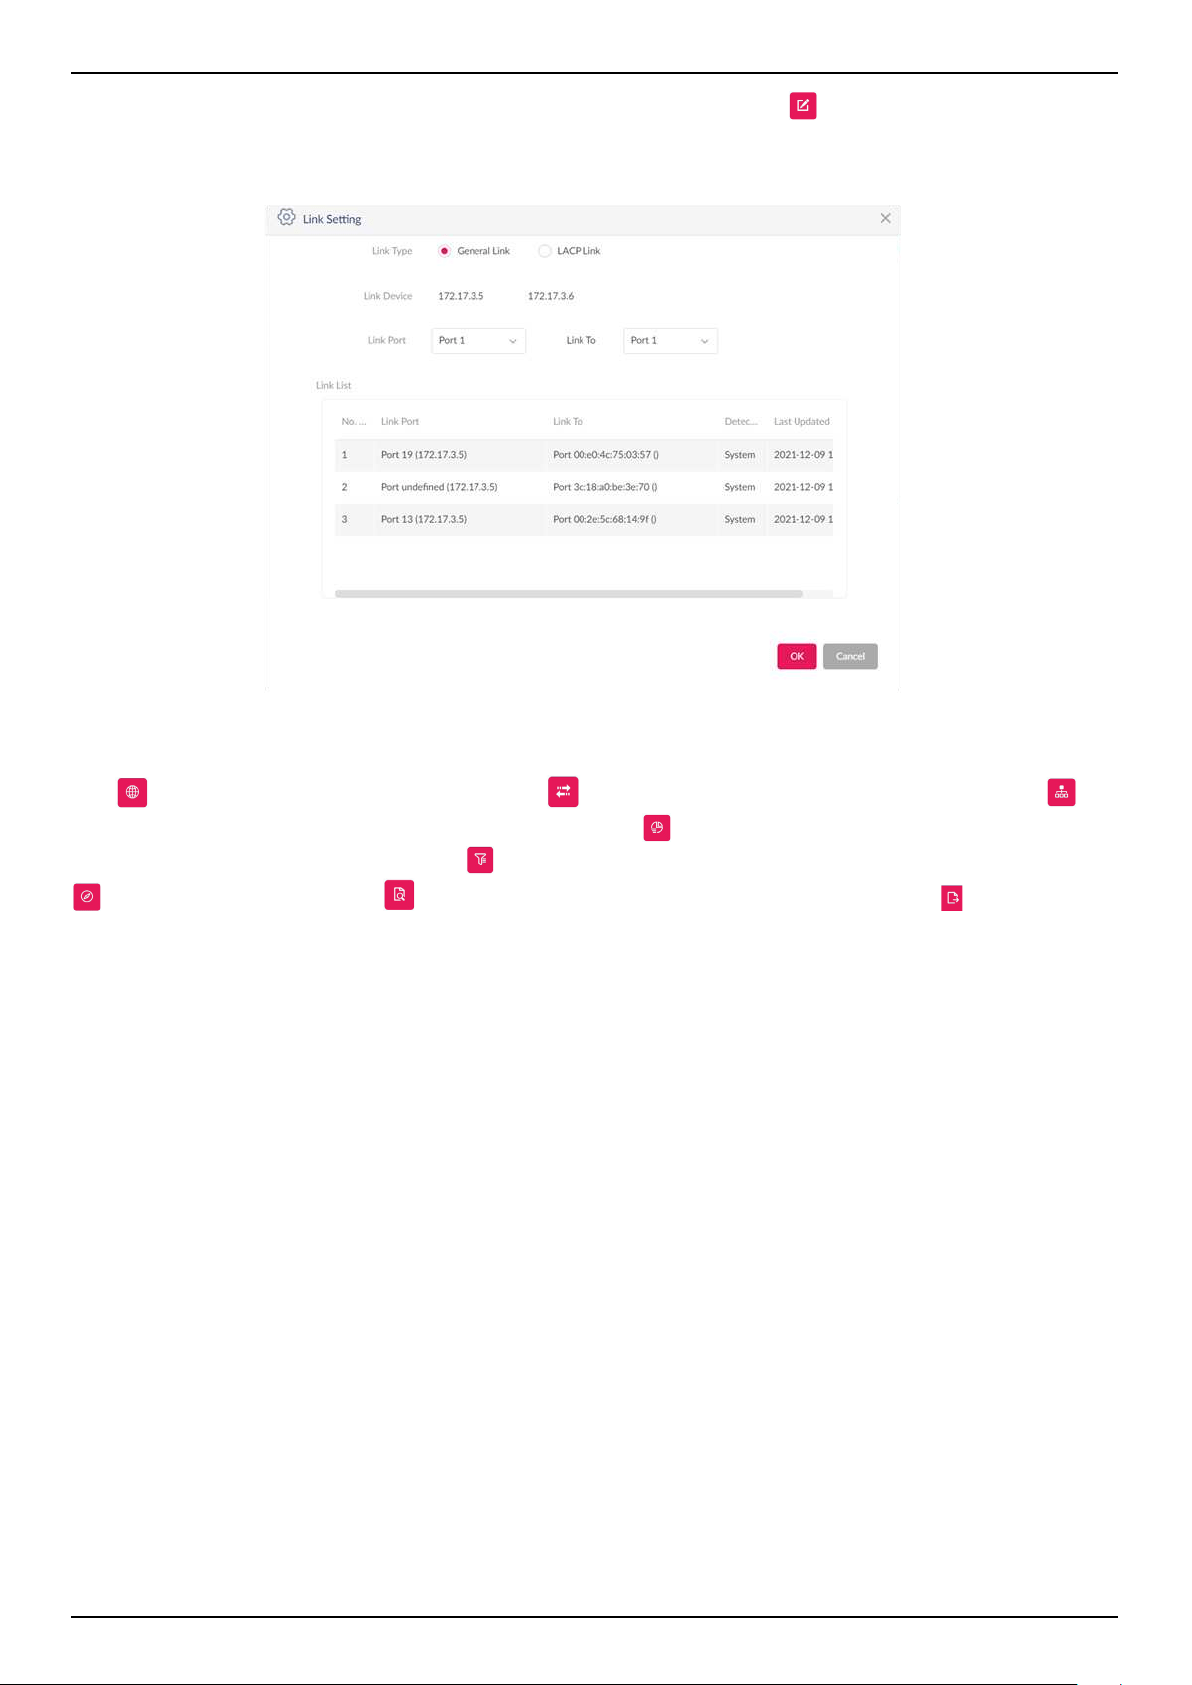
Nuclias Connect Software User Manual Nuclias Connect Conguration
Page 64
Users can also view relations between two devices by manually dening the link. Click
to begin edit. Click on one of the a
targeted device icon, then click another device icon to create a linkage. Once created, the Link Setting page is displayed.
Below charts explain what each eld entails.
On the upper right corner, there are options available to modify and check basic information of the switches and access
points.
Click to show Network and Device information. Click to change the background image of the topology. Click to
congure the arrangement type (Star/Tree) and Central Device. Click
to view the Topological Legend, or the meaning of
symbols and colors used on the topology. Click
to set the display content for node information (IP Address or Name). Click
to rediscovery the topology. Click to search for matching devices in the network, and nally, click to export the
topology as a PDF le.
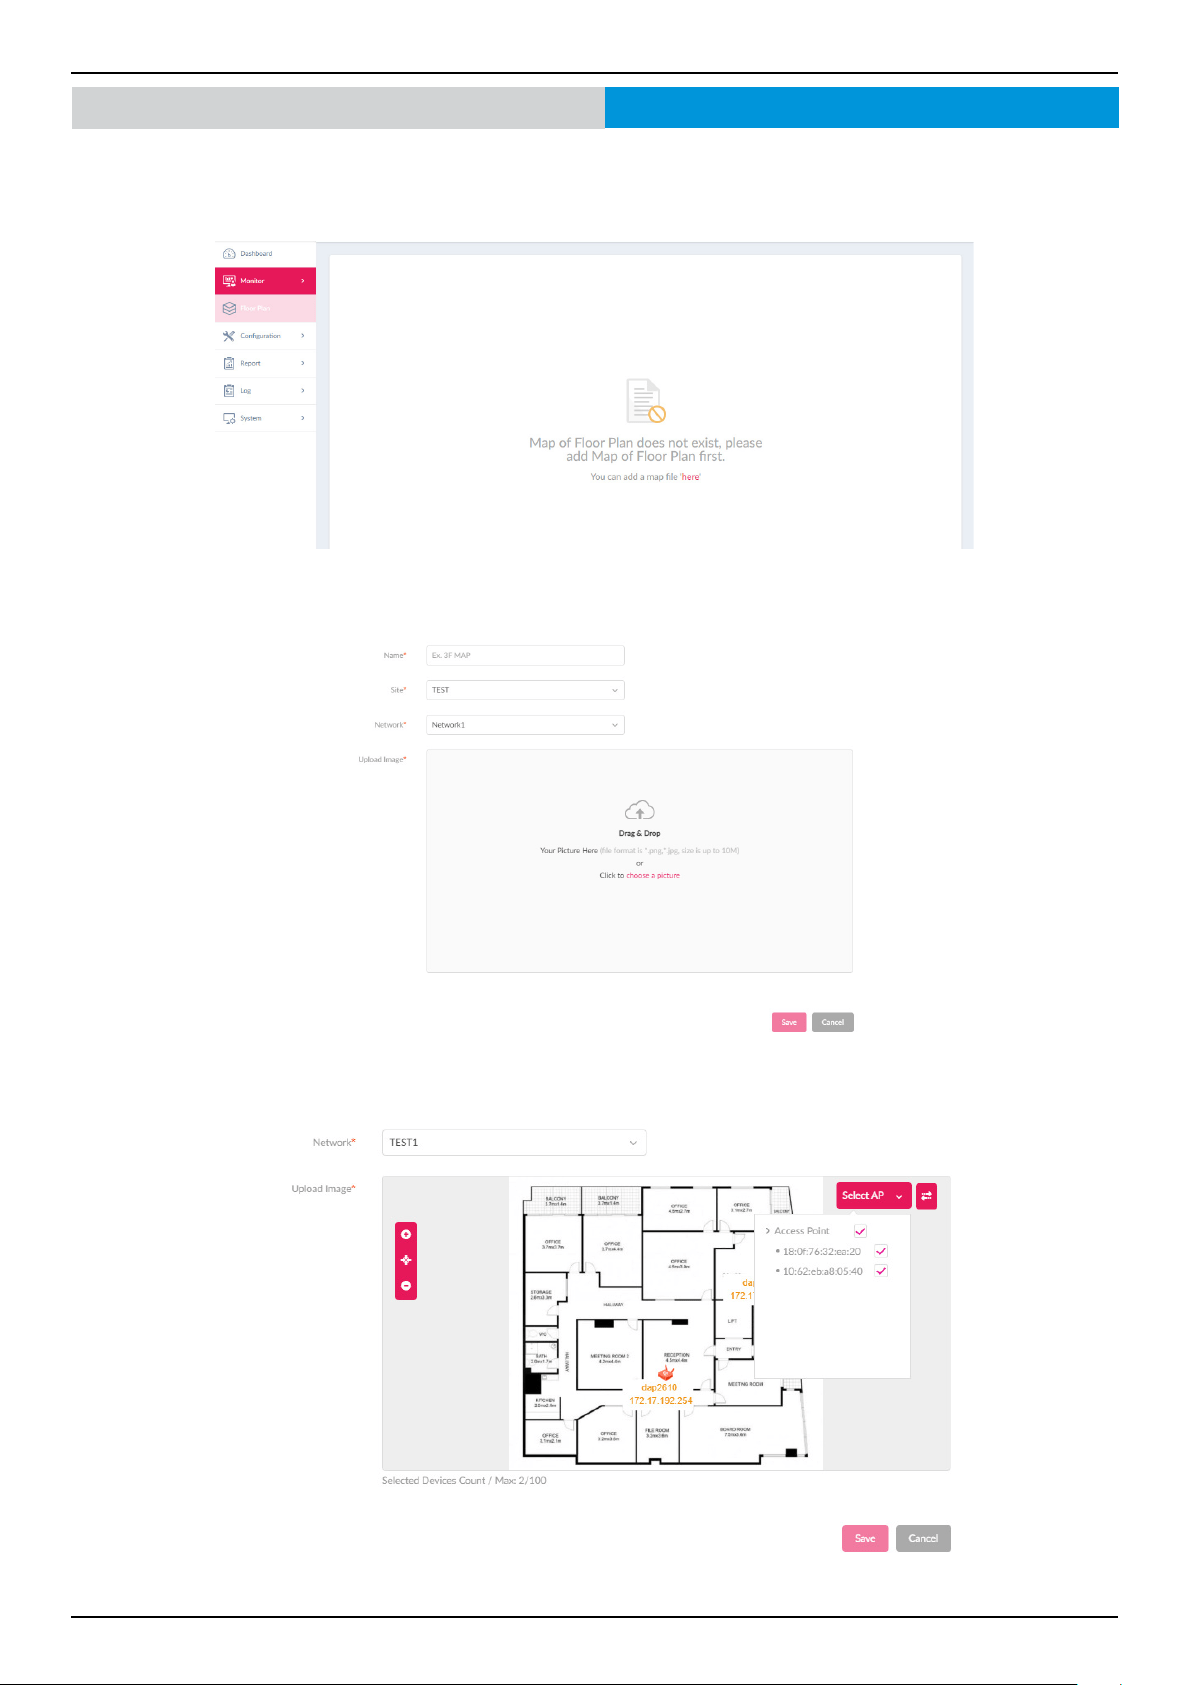
Nuclias Connect Software User Manual Nuclias Connect Conguration
Page 65
Floor Plan
Floor plan is a drawing to scale, a bird’s-eye view of the relationships between rooms, spaces, trac patterns, and other physical
features at one level of a structure.
Click “here” to add a new oor image, enter a name and select Site and Network.
Click “choose a picture” to upload the image, then click “Save”.
Click Select AP to choose devices, move devices to the correct position and save it.
Nuclias Connect
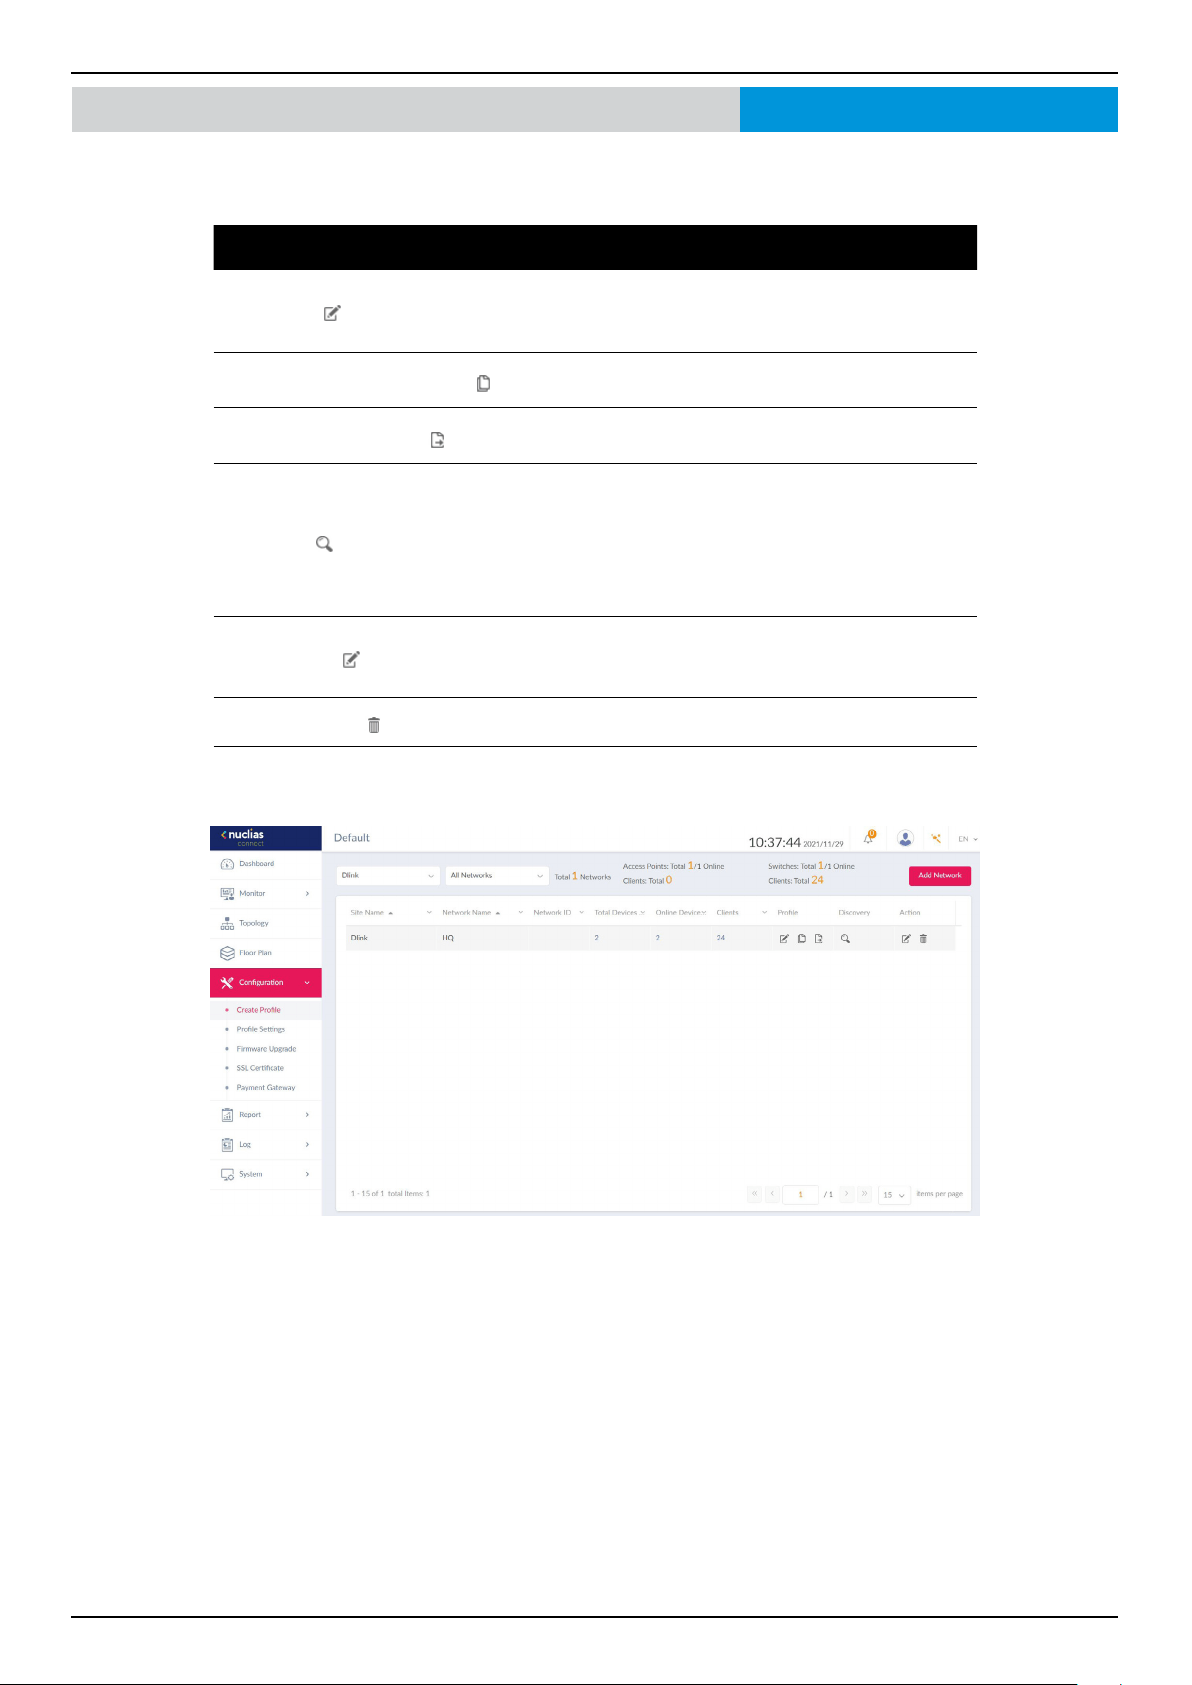
Nuclias Connect Software User Manual Nuclias Connect Conguration
Page 66
Conguration Create Prole
Navigate to Conguration > Create Prole, click Add Network to create a new site and network. All available sites and
networks are listed in the Default page. See the following for further information.
Field Description
Edit Prole
Opens Prole Settings page of the selected site. The
security, access control, user authentication settings ,
many more are available.
Copy Prole to this Network
Copy existing prole to a designated site and network.
Export Network Prole
Export selected prole to a le (*.dat) on a local
directory.
Discovery
Opens the Discovery Network Settings page. From
this page, you can search for devices located on L2
protocol layer or specic IP addresses / Prex subnet
IPs. Once the criteria is dened, click Next. Click Start
Discovery to nd begin the search(Congurable and
Managed devices).
Edit Network
Opens the Edit Network page. From this page, you can
edit network settings or migrate to a new or existing
site.
Delete Network
Delete the selected network conguration.
Nuclias Connect
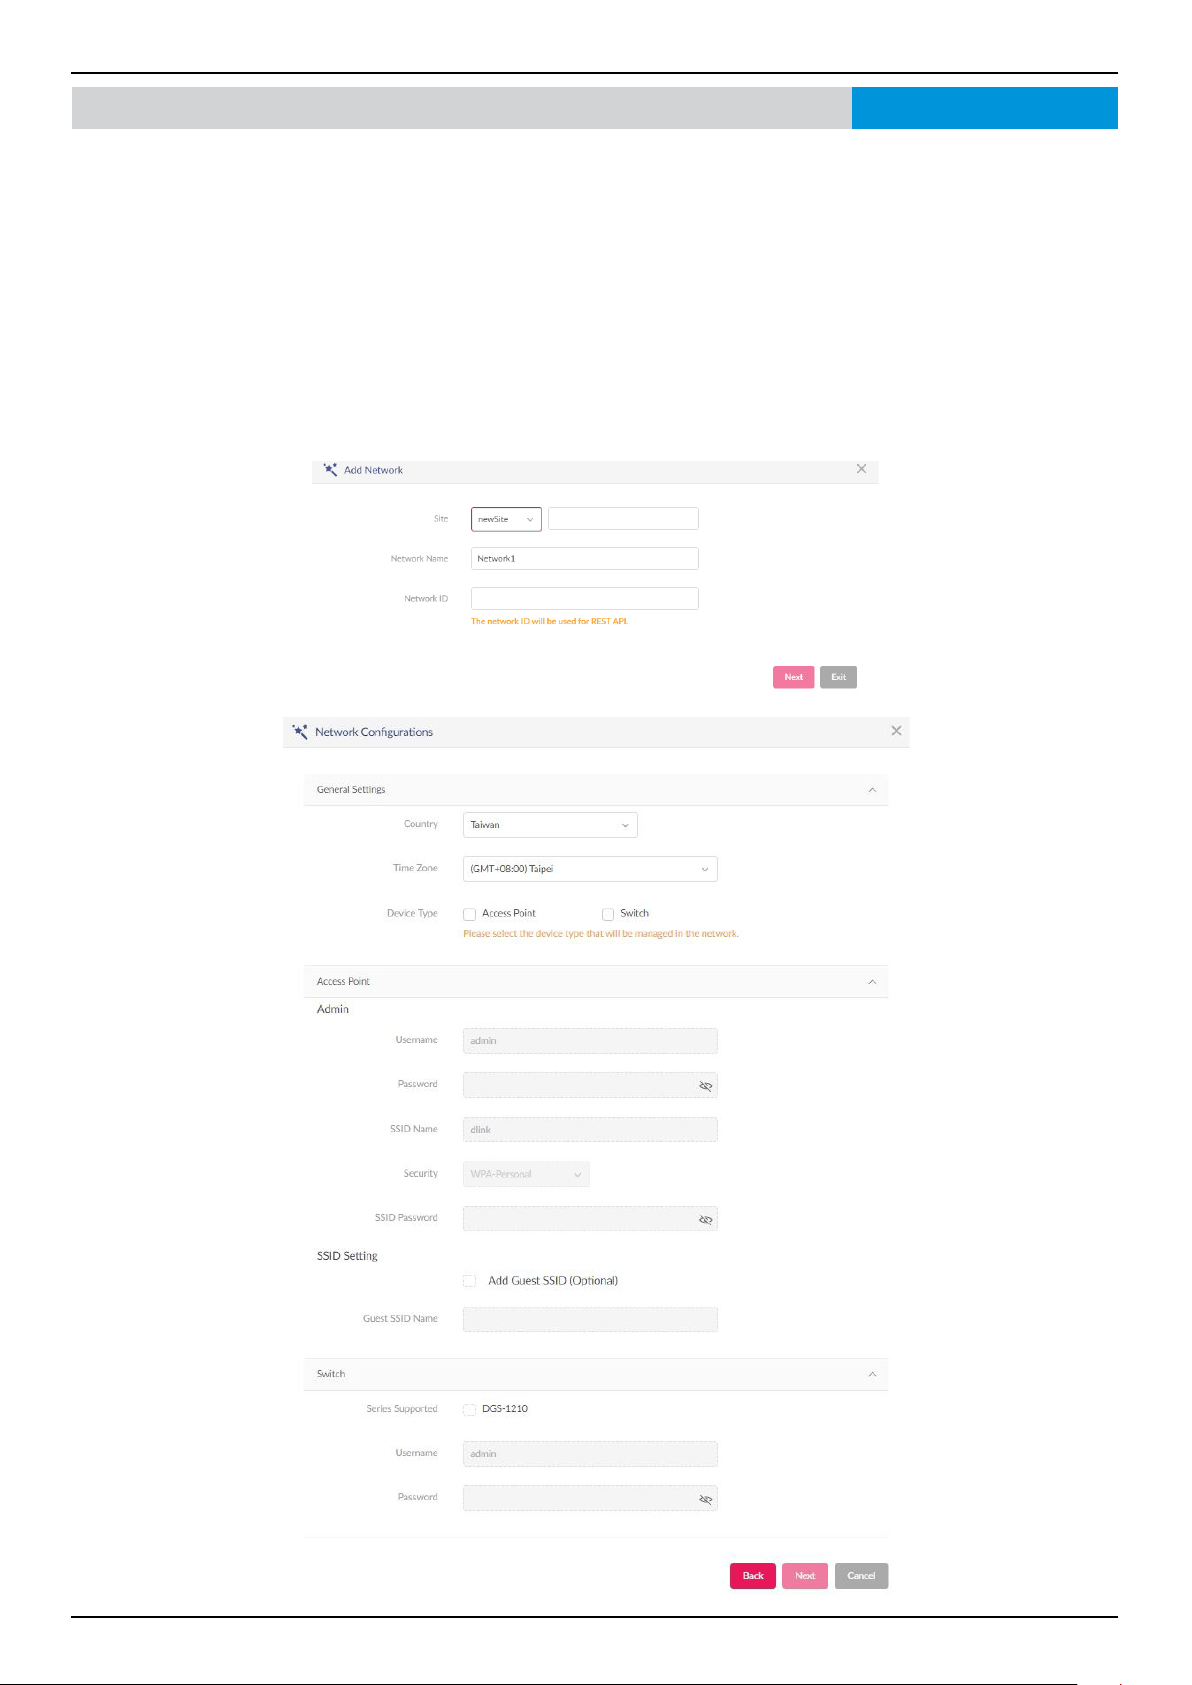
Nuclias Connect Software User Manual Nuclias Connect Conguration
Page 67
Conguration Create Prole Add Network
From the Create Prole link, click on Add Network to create a new network.
The Add Network page is displayed. From the Site drop-down menu, select an existing site or a new Site and enter the name of
the site in the empty eld.
In the Network Name eld, enter the name to identify the new network. Click Next to continue or Exit to return to the previous
screen.
The Network Congurations page will appear. Enter the wireless and device settings to dene the network conguration. Click
Next to continue. To return to the previous page, click Back or click Exit to discontinue the conguration process. The Network
ID eld is optional and is used for REST API function. Leave it as empty if you’re not intended to use REST API.
Nuclias Connect
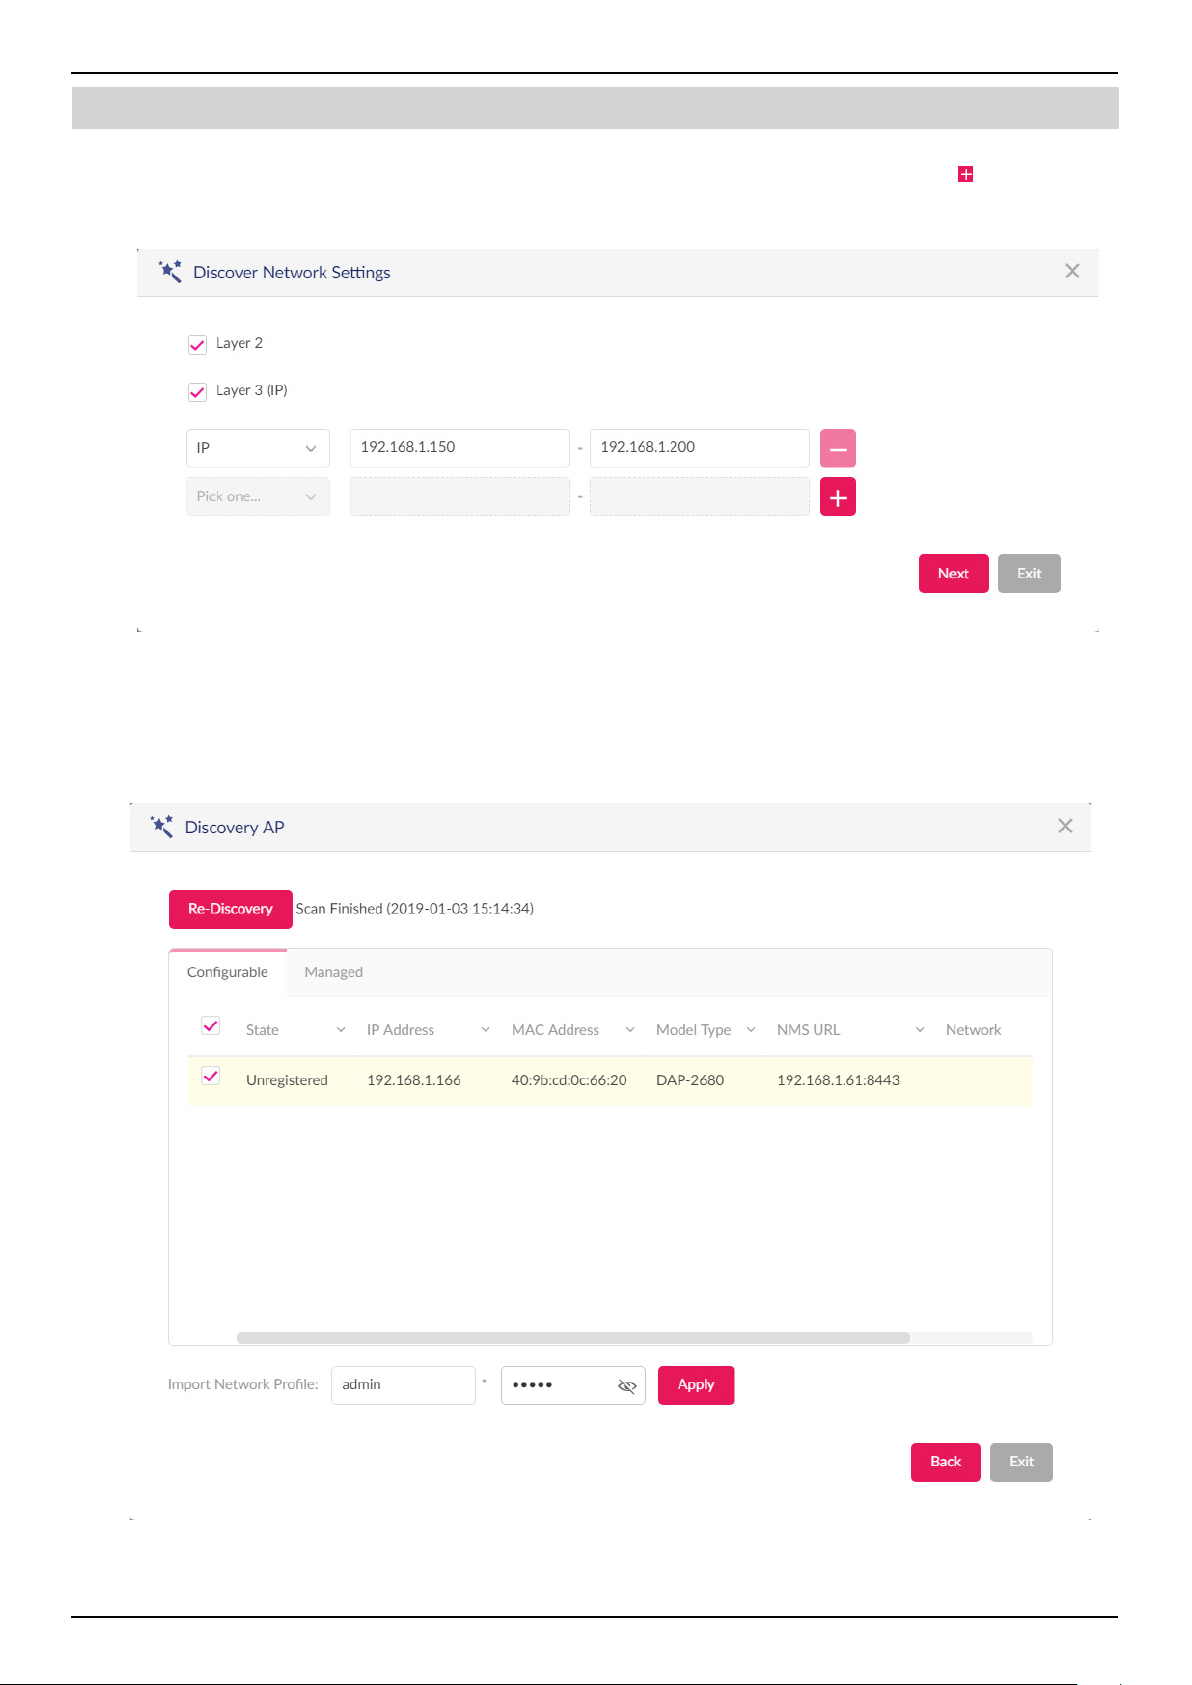
Nuclias Connect Software User Manual Nuclias Connect Conguration
Page 68
Conguration Create Prole Add Network
The Discover Network Settings page is displayed. Select the data link layer (layer 2 or layer 3) to dene the type of network to
run on. If Layer 3 is selected, click the drop-down menu to dene either an IP or a prex segmentation. Click to add additional
IP/prex segments or Next to continue. Click Exit to discontinue the conguration process.
The Start Discovery Page is displayed. Click Start Discovery to search for all available unmanaged devices. If a device is found,
select it and click Apply to import the network prole. Click on the Managed tab to select dened devices and add them to the
network.
Nuclias Connect
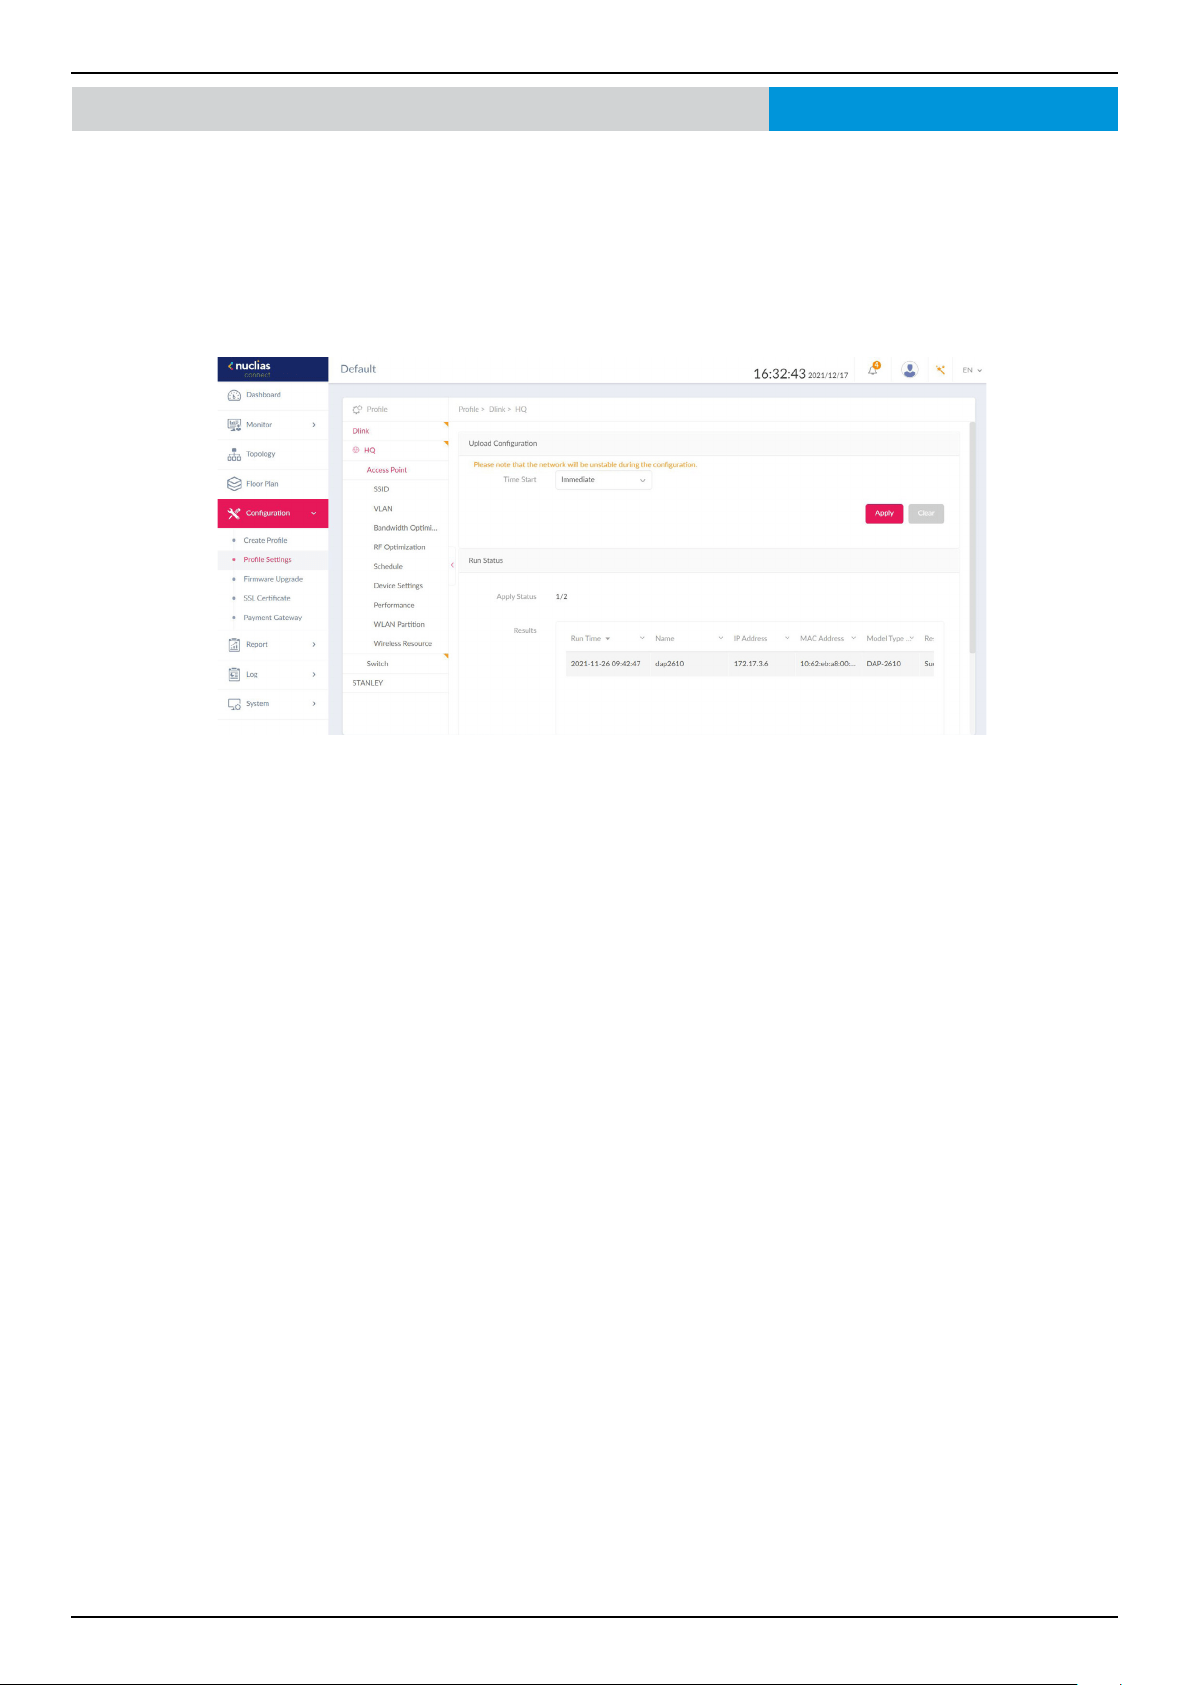
Nuclias Connect Software User Manual Nuclias Connect Conguration
Page 69
Conguration Prole Settings
The Prole Settings function allows for the management of existing networks. Navigate to Conguration > Prole Settings to
view existing sites. Select a site followed by a network to view all settings that are available for edit. For Access Points, the below
options are displayed: SSID, VLAN, Bandwidth Optimization, RF Optimization, Schedule, Device Setting, Performance,
WLAN Partition, and Wireless Resources. For Switches, the following options are displayed: Common settings (RADIUS
Server and Time Prole) and Switch series (Basic, IPv4 ACL, Access Policy, Port Setting, and SNTP.)
Once a network is selected, the Upload Conguration and Run Status will become available for both switches and access points.
For the conguration to take eect, it must be uploaded to the access point/switch. Under the Upload Conguration tab, click
the Time Start drop-down menu and select Immediate or Select Time to set the time for uploading the conguration.
If Select Time is selected, set the day and time to upload the conguration. Once the Time Start is dened, click Apply to initiate
the process.
Under the Run Status window, the status of the upload conguration is reported. Once an update is complete, the results will
be displayed in the Results window.
Nuclias Connect
Nuclias Connect Software User Manual Nuclias Connect Conguration
Page 70
If the device type of the prole chosen is an Access Point, the following options are displayed: SSID, VLAN, Bandwidth
Optimization, RF Optimization, Schedule, Device Settings, Performance, WLAN Partition, and Wireless Resource.
The SSID page displays the congurable parameters of a network’s wireless settings. Navigate to Conguration > Prole
Settings > [Site] > [Network] > Access Point > SSID to view existing settings.
In the Security section, the following parameters can be congured:
Field Description
Band Click the drop-down menu to select wireless frequency band.
Index Click the drop-down menu to select SSID index (Parameters: Primary, SSID 1 to
SSID 7). To create a new SSID, select the index parameter rst.
SSID Enter the wireless network name. The SSID must be the same across all frequencies.
In addition, make sure the network name (SSID) on the selected access point is
the same as the dened network name (SSID) on Nuclias Connect. For further
information, go to Access Point Basic > Wireless Settings and Advanced Settings
> DHCP Server > Dynamic Pool Settings, to ensure the Domain Name eld
reects the dened network name (SSID) on Nuclias Connect.
Character Set Click the drop-down menu to select the character set to be used in the SSID
encoding: UTF-8 or GB2312.
SSID Broadcast Click the drop-down menu to enable or disable the wireless SSID visibility.
WMM (Wi-Fi
Multimedia)
Click the drop-down menu to enable or disable the Wi-Fi multimedia.
Security Click the drop-down menu to select the wireless security protocol: Open System
(no pre-shared key required), WPA-Personal, WPA Enterprise (Radius server
required), WPA2-Personal, WPA2-Enterprise (Radius server required), WPA-Auto-
Personal, WPA-Auto-Enterprise (Radius server required).
Fast Roaming Select Enabled to enable Fast Roaming function on AP.(Applicable only to APs
that support this function.)
Encryption Click the drop-down menu to enable or disable WEP Open System encryption.
The function is only available when Security is set to Open System.
Key Size Click the drop-down menu to select the WEP key size.
Key Type Click the drop-down menu to select the WEP key type.
Key Index Click the drop-down menu to select the WEP key index.
Key Value Enter the open system WEP encryption key.
Nuclias Connect Conguration Prole Settings
SSID
Access Point
Nuclias Connect Software User Manual Nuclias Connect Conguration
Page 71
In the Access Control section, the following parameters can be congured:
Block Description
Action Click the drop-down menu to select the action that will applied to the
clients.
MAC Address Enter the MAC address of the clients that will be allowed or denied
access and click Add.
Upload MAC Address
List
Click Browser... to select a MAC address le located on the local
computer. Click Upload to update the MAC address list. Click Download
to download the current MAC address list.
Action Click on the drop-down menu to enable or disable the IP lter function.
IP Address Enter the IP address.
Subnet Mask Enter the subnet mask.
In the User Authentication section, the following parameters can be congured:
Block Description
Authentication Type Click the drop-down menu to select the authentication type applied to
the wireless client. (Web redirection only, User name/Password, Remote
Radius, LDAP, POP3, Passcode, External Captive Portal, MAC address, Click
through and Social Login)
Idle Timeout (2~1440) Enter the session timeout value.
Session timeout Dene how long wireless client can use network without re-login.
Allow Dene how many times wireless client can re-login per day(The start time
is 0:00)
Interval Dene how long wireless client can login after session timeout.
Enable White List Check the box to enable the white list function. This function is only
available when Authentication Type is Username/Password.
MAC Address Enter the MAC address of the network device that will be whitelisted and
click Add to add the address to the white list table. This function is only
available when Authentication Type is set to Username/Password.
Upload Whitelist File Click Browser... to select a white list le, located on the local
computer. Click Upload to update the white list. Click Download to
download the current white list. The function is only available when
Authentication Type is set to Username/Password.
IPIF Status Click the drop-down menu to enable or disable the use of the IP
interface.
VLAN Group Enter the VLAN group name.
Get IP Address From Click the drop-down menu to select the IP address conguration
setting.
IP Address Enter the IP address of the IP interface.
Subnet Mask Enter the subnet mask of the IP interface.
Gateway Enter the gateway of the IP interface.
DNS Enter the preferred DNS address of the IP interface.
Username Enter the username. The function is only available when
Authentication Type is set as Username/Password.
Nuclias Connect Conguration Prole Settings Access Point
SSID

Nuclias Connect Software User Manual Nuclias Connect Conguration
Page 72
Block Description
Password Enter the password and click Add. Click Clear to clear the entered
elds. This function is only available when Authentication Type is
set to Username/Password.
RADIUS Server Enter the RADIUS server’s IP address. This function is only available
when Authentication Type is set to Remote RADIUS or MAC
Address.
RADIUS Port Enter the RADIUS server’s port number. This function is only available
when Authentication Type is set to Remote RADIUS or MAC
Address.
RADIUS Secret Enter the RADIUS server’s secret. This function is only available when
Authentication Type is set to Remote RADIUS or MAC Address.
Remote RADIUS Type Enter the RADIUS server’s type. This function is only available when
Authentication Type is set to Remote RADIUS or MAC Address.
Server Enter the LDAP server’s IP address. This function is only available
when Authentication Type is set to LDAP.
Port Enter the LDAP server’s port number. This function is only available
when Authentication Type is set to LDAP.
Authentication Mode Click on the drop-down menu to select the authentication mode. This
function is only available when Authentication Type is set to LDAP.
Username Enter the administrator’s username to access and search the LDAP
database. This function is only available when Authentication Type
is set to LDAP.
Password Enter the administrator’s password to access and search the LDAP
database. This function is only available when Authentication Type
is set to LDAP.
Base DN Enter the base domain name of the LDAP database. This function is
only available when Authentication Type is set to LDAP.
Account Attribute Enter attribute for the account. This function is only available when
Authentication Type is set to LDAP.
Identity Enter the name of the administrator. This function is only available
when Authentication Type is set to LDAP.
Server Enter the POP3 server’s IP address. This function is only available
when Authentication Type is set to POP3.
Port Enter the POP3 server’s port number. This function is only available
when Authentication Type is POP3.
Connection Type Click the drop-down menu to select the connection type. This
function is only available when Authentication Type is set to POP3.
Passcode List Display the congured front desk user accounts that have been
assigned to this network and have generated a passcode from the
Web login page.
Account Server Status Click the drop-down menu to select HTTP or HTTPS. After selecting,
enter the URL of the website. This function is only available when
Authentication Type is set to External Captive Portal.
Web Redirection Check the box to enable the website redirection function.
Website Click the drop-down menu to select HTTP or HTTPS. After selecting,
enter the URL of the website.

Nuclias Connect Software User Manual Nuclias Connect Conguration
Page 73
Block Description
Choose Template Click the drop-down menu to select the used login style. This
function is only not available when Authentication Type is set to
Web Redirection Only.
• Click Preview to preview the selected style.
• Click Upload Login File to upload a new style.
• Click
to delete the selected style.
• Click to download the style template.
Click Save to save the values and update the screen.
Click Reset to reset all settings.
Click Cancel to restore default value.
Once the settings are updated, the conguration must be uploaded to the access points. See “Prole Settings” on page 69 for
further information.
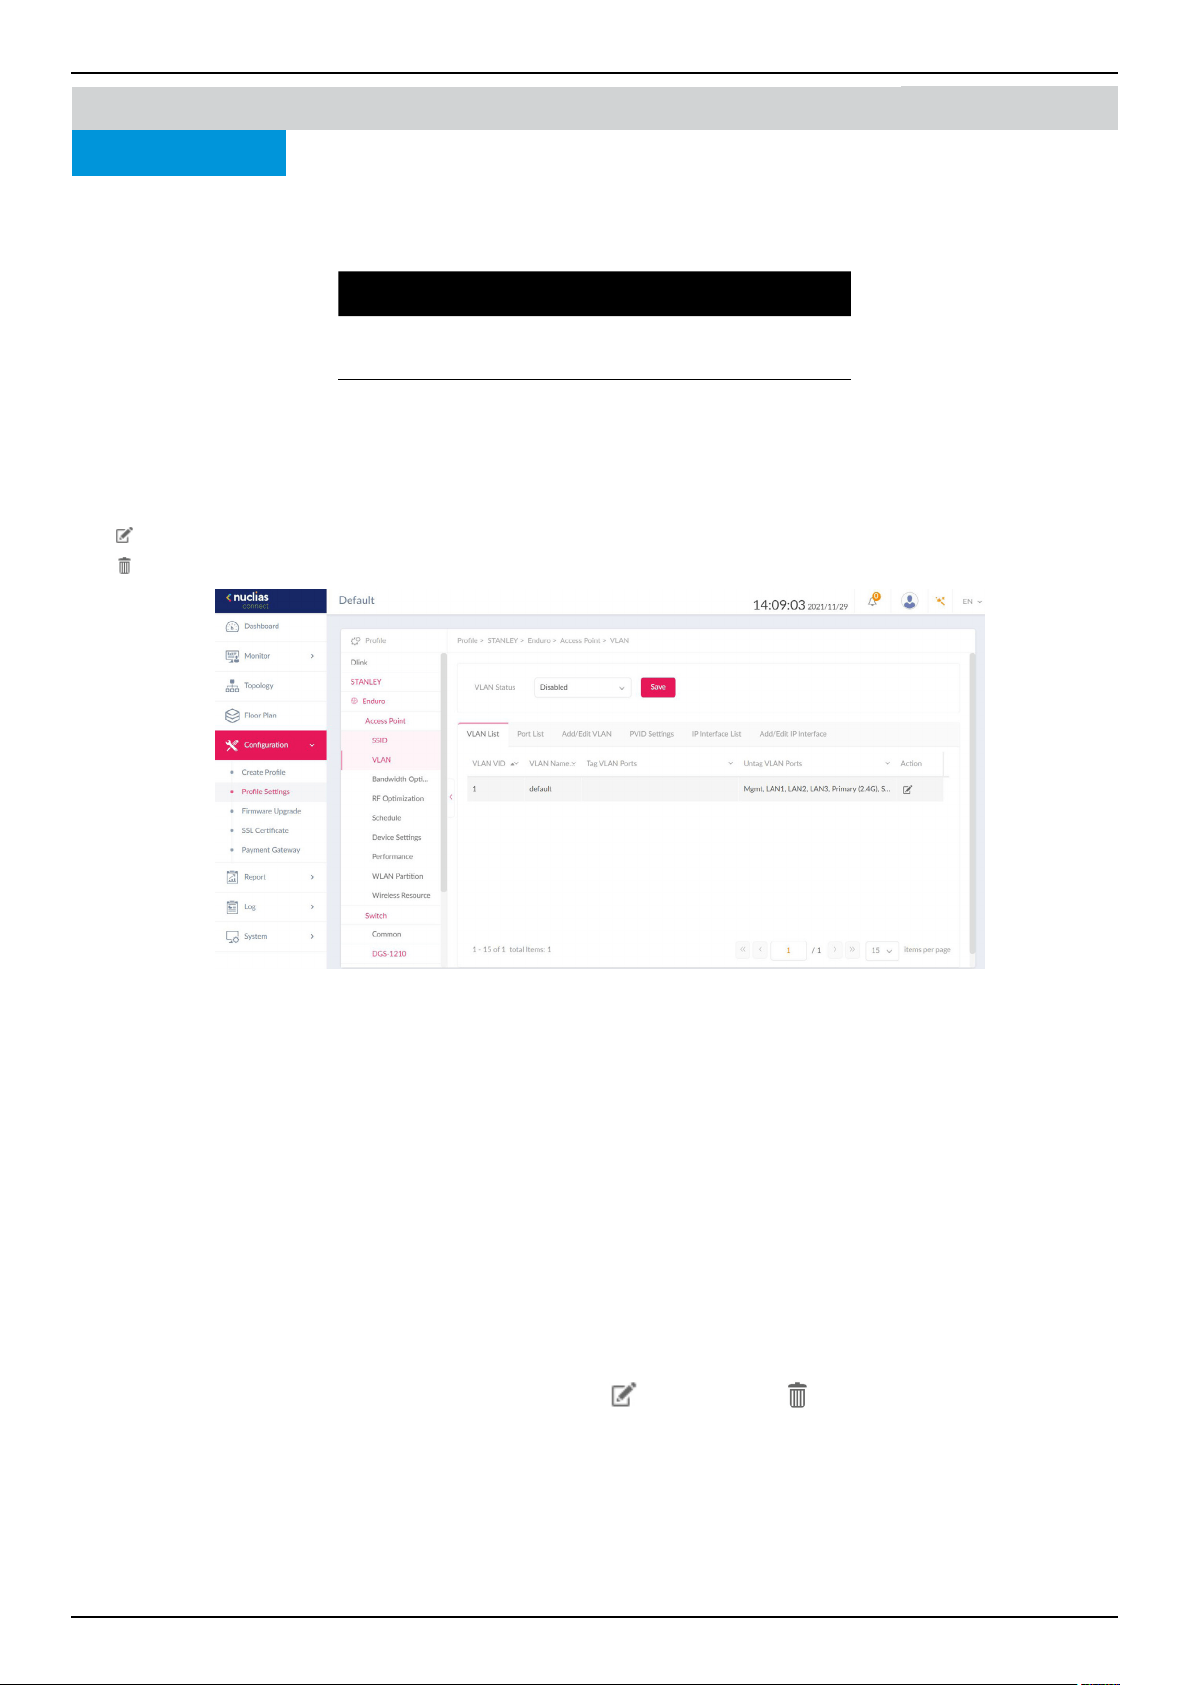
Nuclias Connect Software User Manual Nuclias Connect Conguration
Page 74
VLAN
The VLAN page will show the congurable settings of a network’s virtual LAN subnetwork settings. Navigate to Conguration
> Prole Settings > [Site] > [Network] > VLAN to view existing settings.
Block Description
VLAN Status Click the drop-down menu to enable or
disable VLANs.
Click Save to save the values and update the screen.
The VLAN List tab will show a list of all created VLANs.
Click
to modify an existing VLAN.
Click
to remove an existing VLAN.
In the Port List tab, a list of port assignments is displayed. The list shows the tagged and untagged ports available on the access
points in the network.
In the columns next to the Port Name entries, the Tag/Untag ID columns indicate if the port is a tagged member (Tag VID) or
an untagged member (Untag VID) of the VLAN. In the last column, the port VLAN ID shows the connected virtual LAN segment.
In the Add/Edit VLAN tab, you can create a new VLAN and assign untagged ports in that VLAN. Click the Modify icon in the
VLAN List tab to modify an existing VLAN.
In the PVID Setting tab, you can view and congure the Port VLAN Identier (PVID) settings for access points and wireless client
in this network.
In the IP Interface List tab, you can view a summary of IP Interface. The following information is listed: VLAN VID, VLAN Name,
Get IP Address From, and IP Address. Under the action eld, click
to revise, or click to delete.
In the Add/Edit IP Interface tab, you can add or edit IP interface. The following elds are presented: VLAN VID, Get IP Address
From, IP Address, Subnet Mask, Gateway, and DNS. Click Save to save your changes.
Nuclias Connect
Once the settings are updated, the conguration must be uploaded to the access points. See “Prole Settings” on page 69 for
further information.
Conguration Prole Settings
Access Point
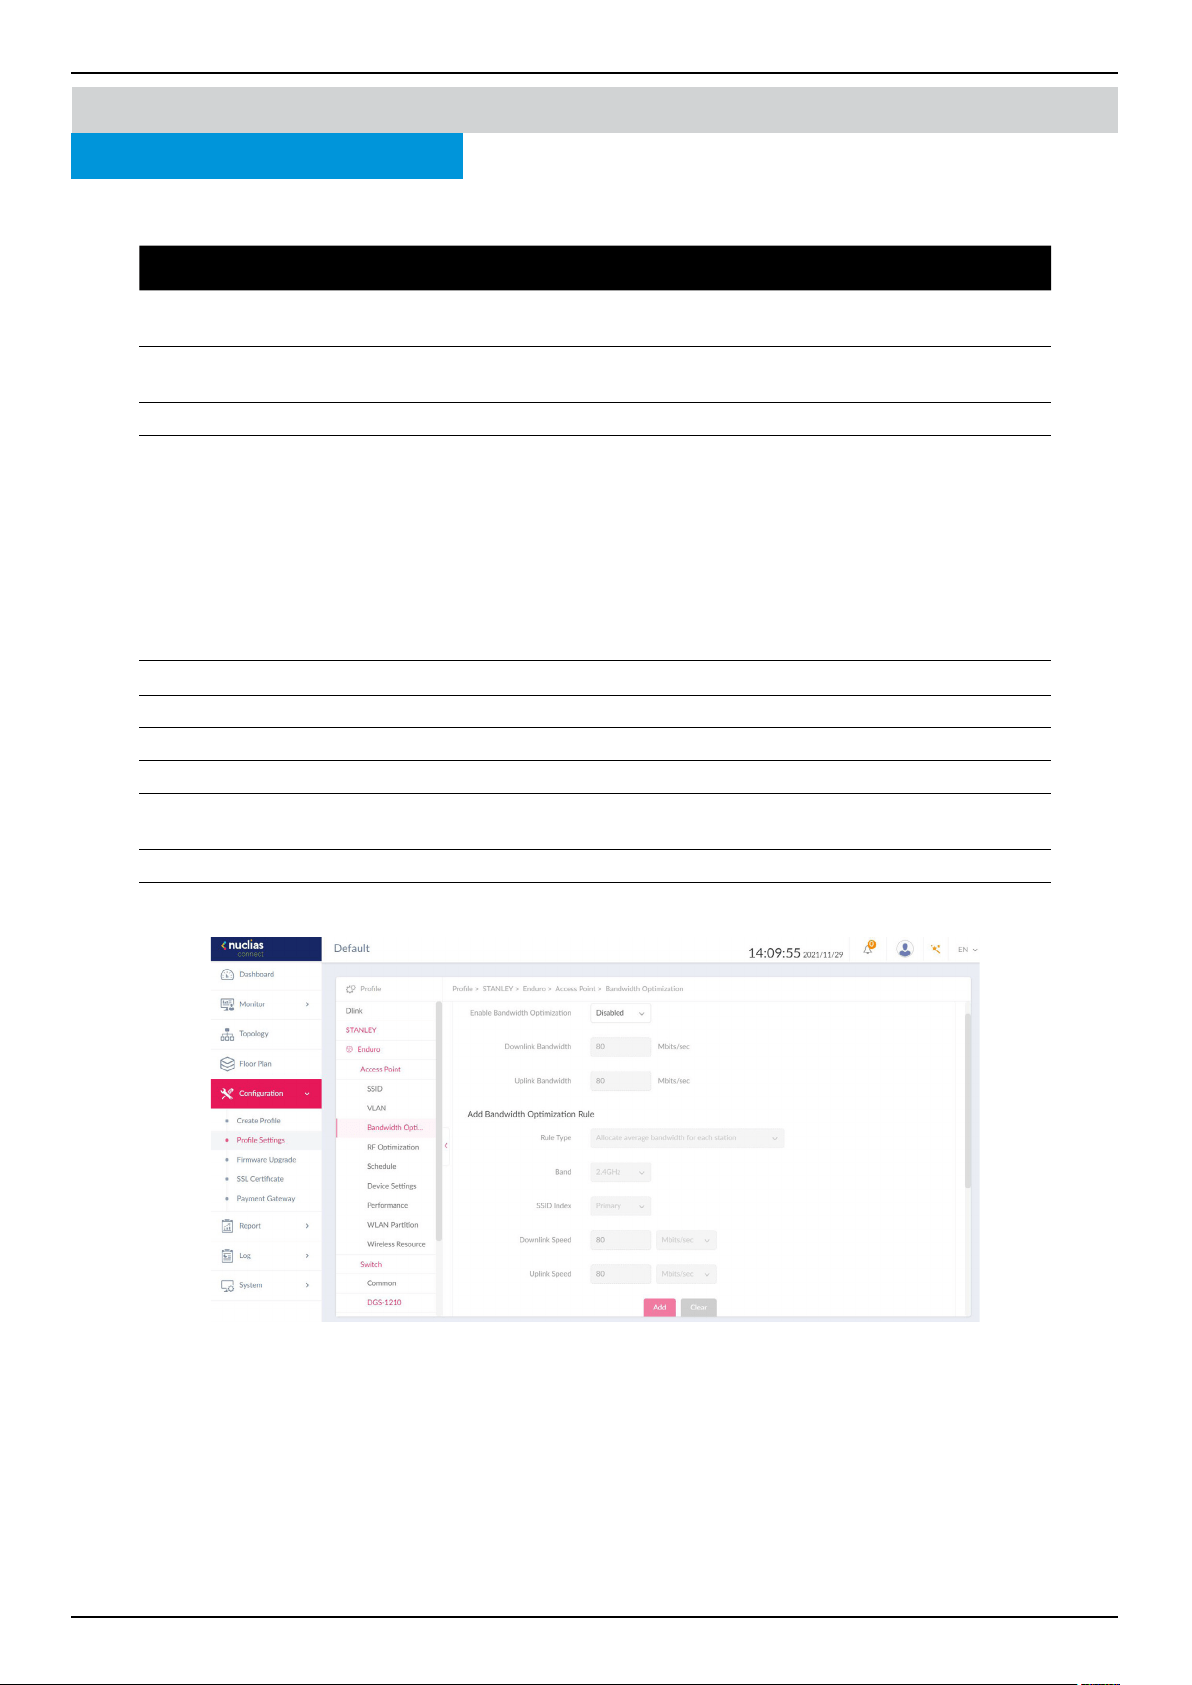
Nuclias Connect Software User Manual Nuclias Connect Conguration
Page 75
Prole Settings
Bandwidth Optimization
The Bandwidth Optimization page displays the congurable settings to optimize available bandwidth. Navigate to Conguration
> Prole Settings > [Site] > [Network] > Bandwidth Optimization to view existing settings.
Block Description
Enable Bandwidth
Optimization
Click the drop-down menu to enable or disable the bandwidth optimization function.
Downlink
Bandwidth
Enter the total downlink bandwidth speed for the access points in the network.
Uplink Bandwidth Enter the total uplink bandwidth speed for the access points in the network.
Rule Type Click the drop-down menu to select the rule type.
• Allocate an average BW for each station: Optimize bandwidth by averaging the
allocated bandwidth for each client.
• Allocate a maximum BW for each station: Specify the maximum bandwidth for each
connected client, while reserving available bandwidth for additional clients.
• Allocate a dierent BW for 11a/b/g/n station: The weight of 802.11b/g/n and
802.11a/n clients are 10%/20%/70% and 20%/80%. The AP will distribute dierent
bandwidth for 802.11a/b/g/n clients.
• Allocate a specic BW for SSID: All clients share the assigned bandwidth.
Band Click the drop-down menu to select the wireless frequency band used in the rule.
SSID Index Click the drop-down menu to select the SSID used in the rule.
Downlink Speed Enter the downlink speed assigned to either each station or the specied SSID.
Uplink Speed Enter the uplink speed assigned to either each station or the specied SSID.
Add Click Add to add the rule into the Bandwidth Optimization
Rules.
Clear Click Clear to clear the entered rule.
Click Save to save the values and update the screen.
Once the settings are updated, the conguration must be uploaded to the access points. See “Prole Settings” on page 69 for
further information.
Nuclias Connect
Conguration
Access Point
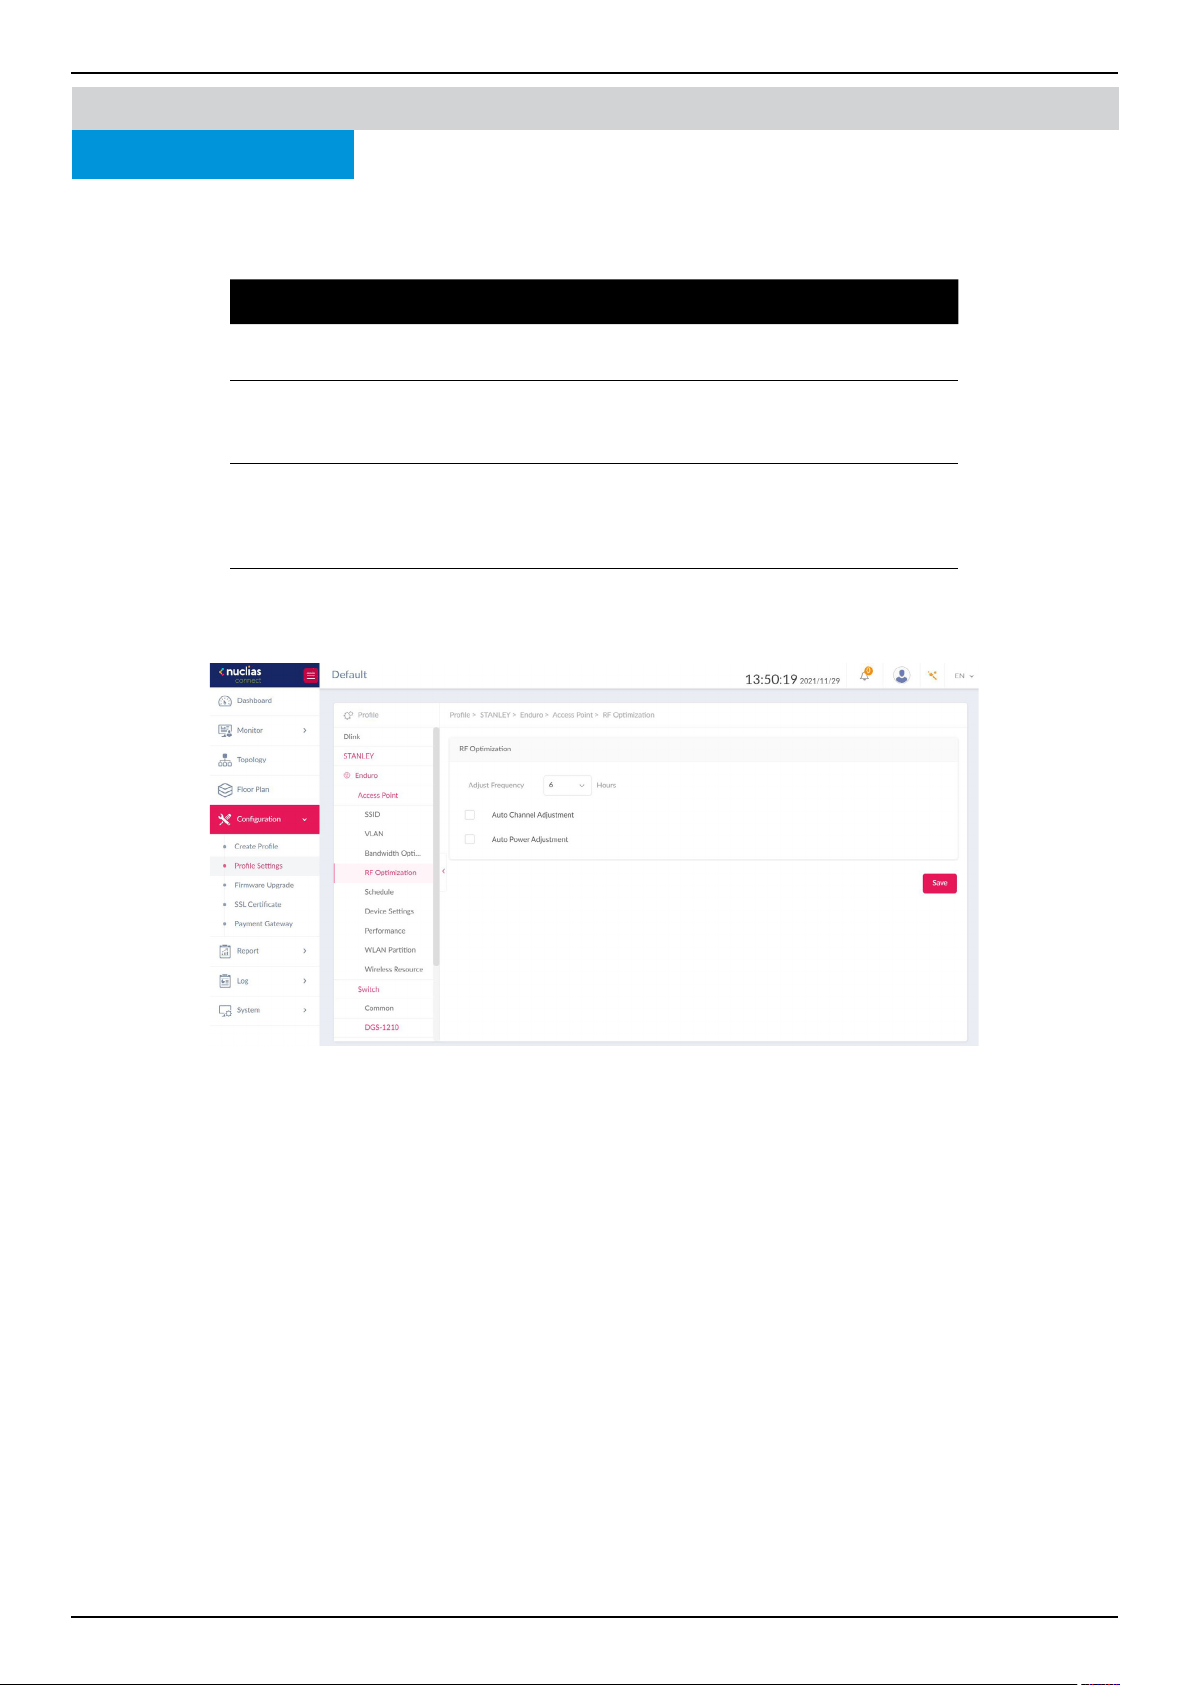
Nuclias Connect Software User Manual Nuclias Connect Conguration
Page 76
Conguration Prole Settings
RF Optimization
The RF Optimization page displays the congurable Radio Frequency (RF) settings used on the access points of the wireless
network. Navigate to Conguration > Prole Settings > [Site] > [Network] > RF Optimization to view existing settings.
Block Description
Adjust Frequency Click the drop-down menu to set the rate in hours at
which the RF frequency is adjusted.
Auto Channel
Adjustment
Click the Auto RF Optimize radio button to enable the
function to automatically adjust the channel of the client
to avoid RF interference.
Auto Power Adjustment Available if Auto Channel Adjustment is enabled. Click the
radio button to enable the feature to automatically adjust
AP radio power to optimize coverage when interference
is present.
Click Save to save the values and update the screen.
Nuclias Connect
Once the settings are updated, the conguration must be uploaded to the access points. See “Prole Settings” on page 69 for
further information.
Access Point
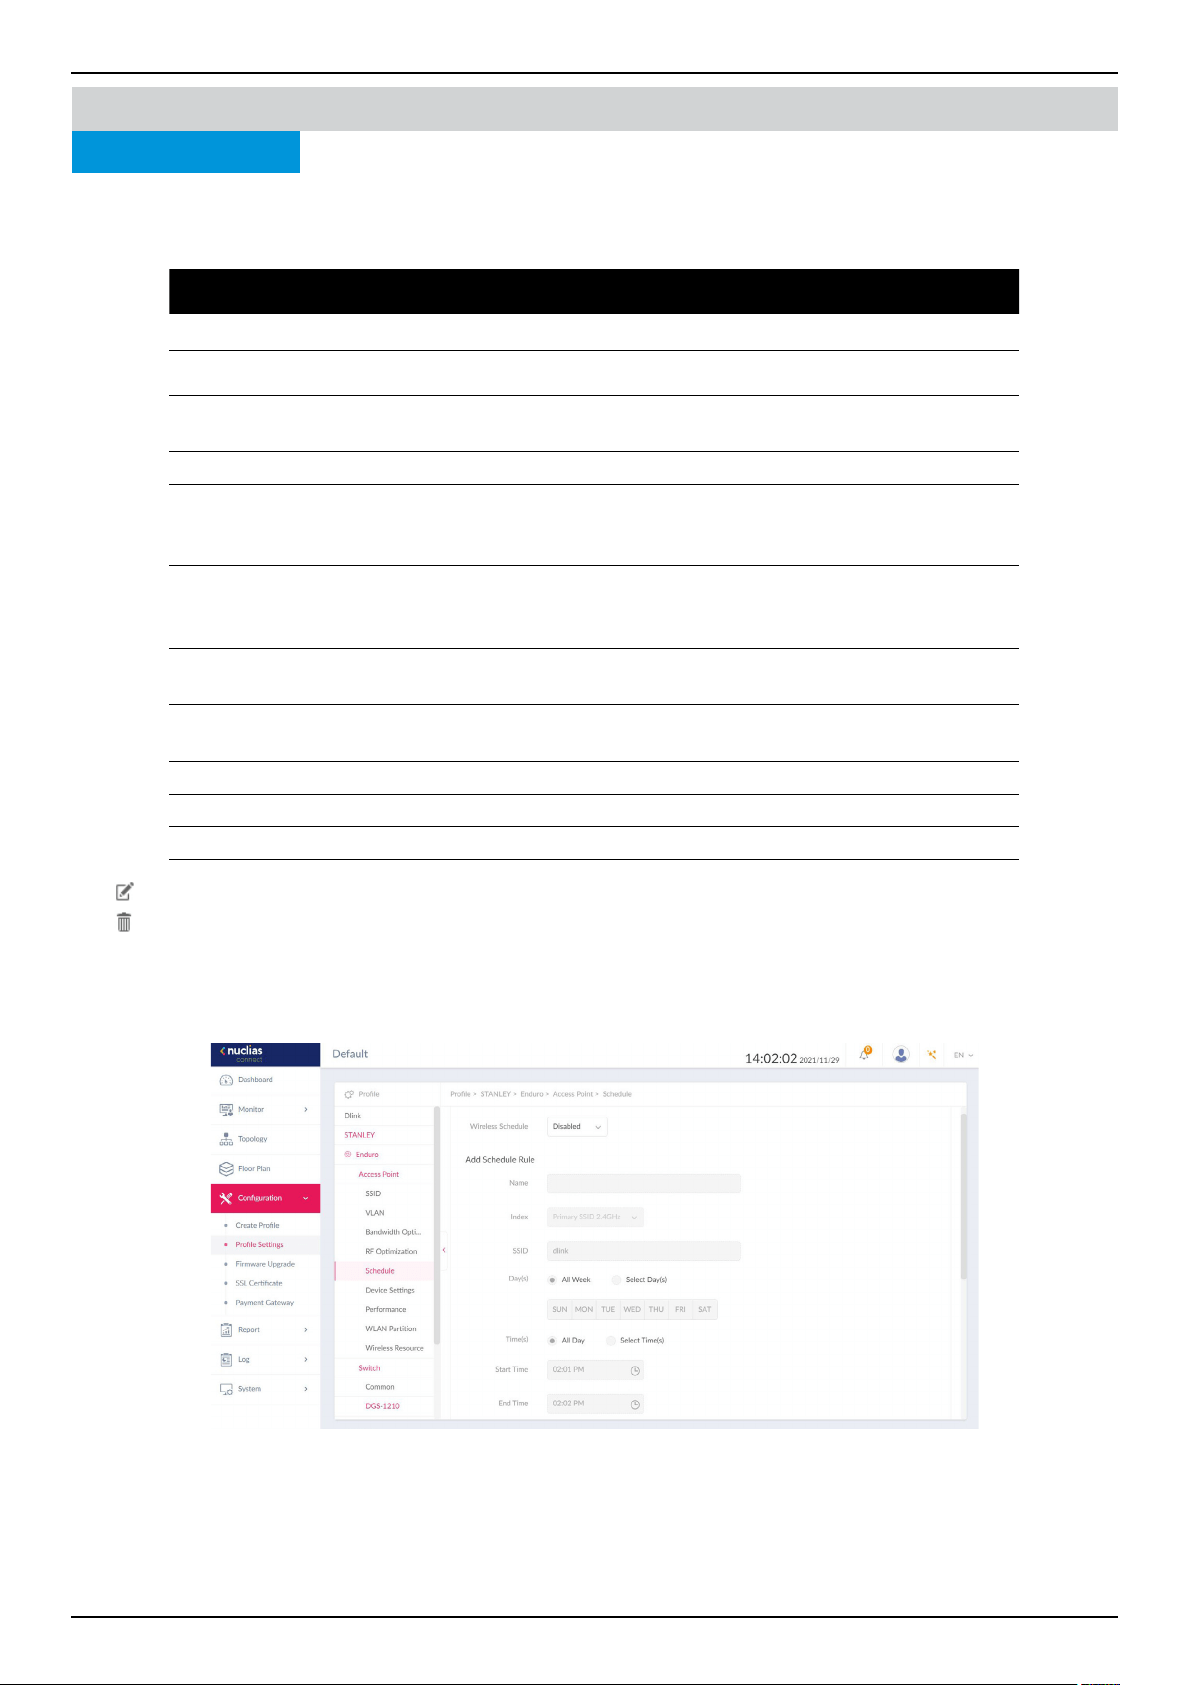
Nuclias Connect Software User Manual Nuclias Connect Conguration
Page 77
Conguration Prole Settings
Schedule
Under the Schedule page, you can congure a schedule to keep the SSID active within a specied time. Navigate to Conguration
> Prole Settings > [Site] > [Network] > Schedule to view settings.
Parameter Description
Wireless Schedule Click the drop-down menu to enable or disable the wireless schedule function.
Name Enter the name of the schedule rule.
Index Click the drop-down menu to select SSID to which the schedule setting is
applied.
SSID Display the SSID name.
Day(s) Click the radio button to select the active days for the schedule.
• All Week: Enable the rule for the whole week.
• Select Day(s): Specify particular day(s) to activate the rule.
Time(s) Click the radio button to select the active times for the schedule.
• All Day: Enable the rule for the whole day.
• Select Time(s): Specify a start and end time for the rule.
Start Time Enter the hours and minutes of the day. This function is only available when
Time(s) is set as Select Time(s).
End Time Enter the hours and minutes of the day. This function is only available when
Time(s) is set as Select Time(s).
Over Night Check the box to enable activity overnight.
Add Click Add to add the rule into the schedule.
Clear Click Clear to clear the entered rule.
Click
to modify the desired rule.
Click
to delete the desired rule.
Click Save to save the values and update the screen.
Nuclias Connect
Once the settings are updated, the conguration must be uploaded to the access points. See “Prole Settings” on page 69 for
further information.
Access Point
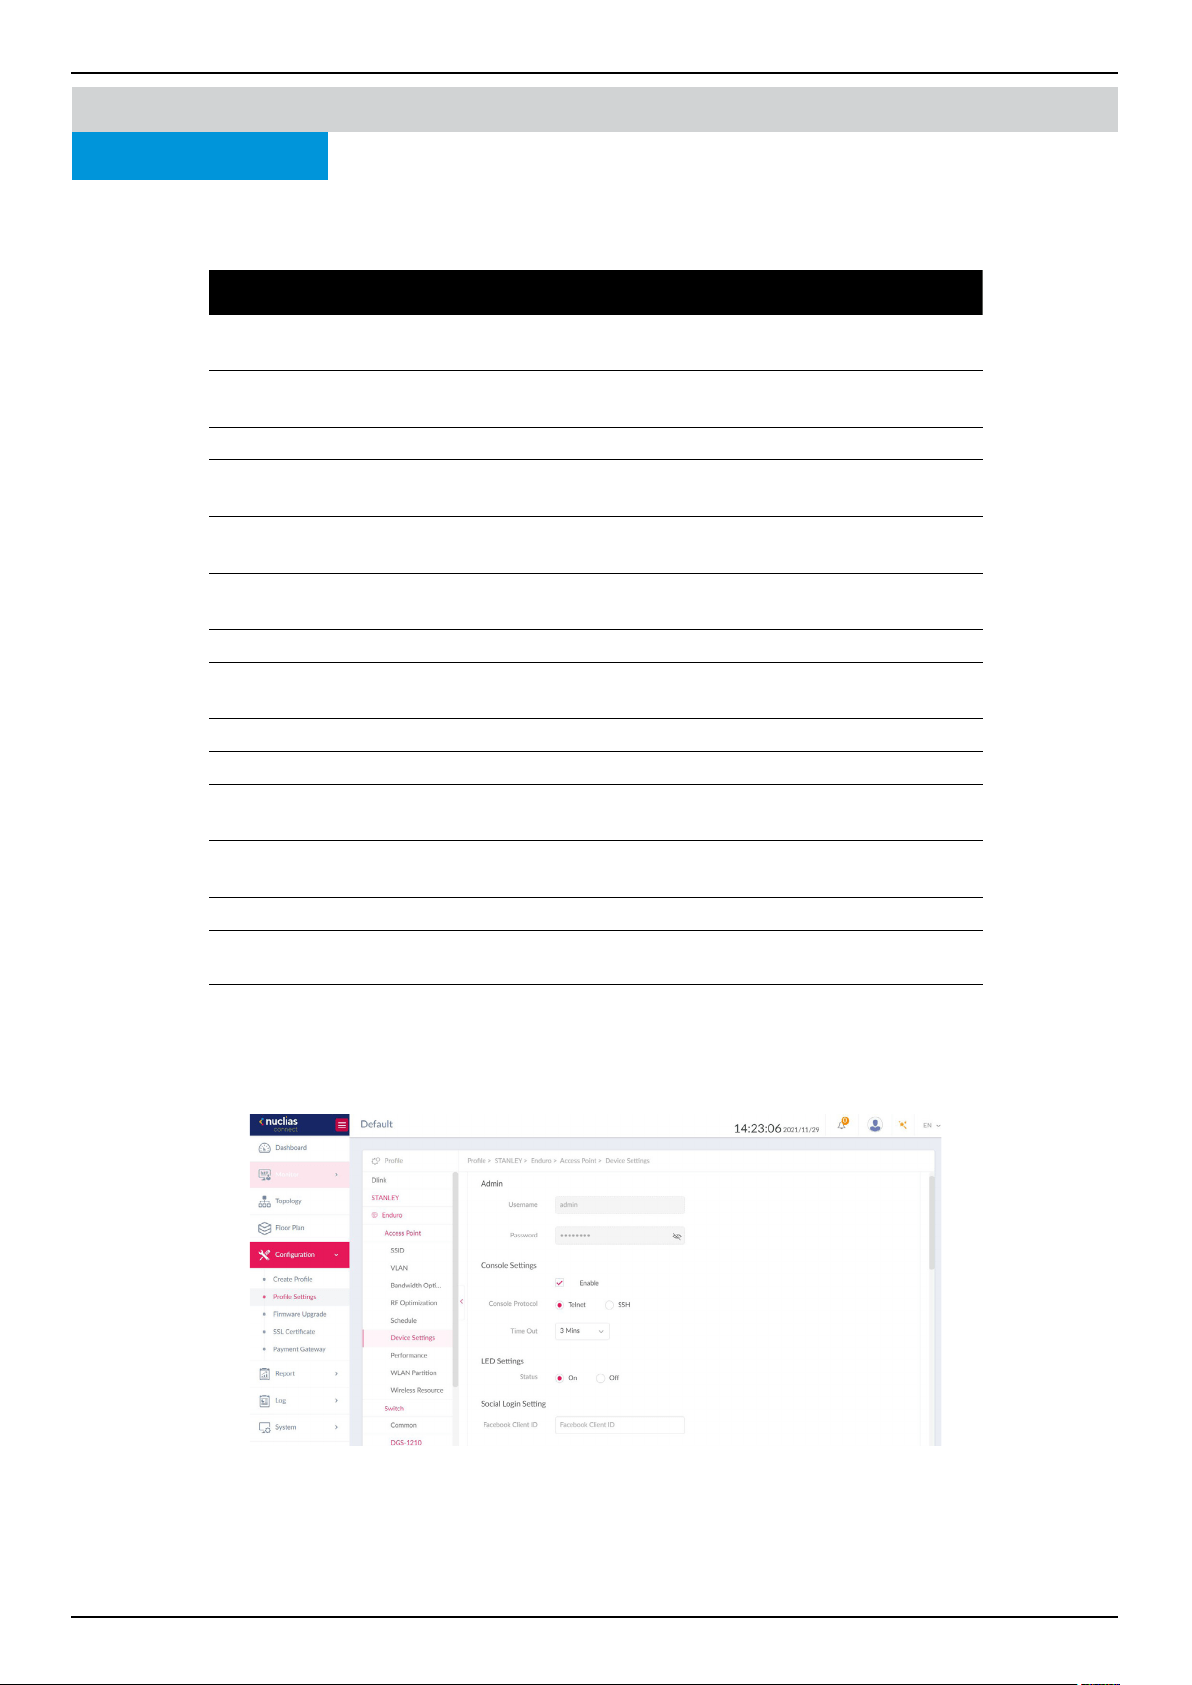
Nuclias Connect Software User Manual Nuclias Connect Conguration
Page 78
Conguration Prole Settings
Device Setting
The Device Settings page allows you to view and congure the login and accessibility settings for access points in this network.
Advanced wireless settings can be congured for both the 2.4GHz and 5GHz frequency bands. Navigate to Conguration >
Prole Settings > [Site] > [Network] > Device Setting to view existing settings.
Parameter Description
Username Enter the administrative username that is used to access the
conguration settings for all access points in the network.
Password Enter the administrative password that is used to access the
conguration settings for to all access points in the network.
Enable Check the box to enable the console function.
Console Protocol Click the radio button to select the console protocol that is
applied to all access points in the network.
Time Out Click the drop-down menu to select the active console session
time out value.
Enable NTP Server Check the box to enable the Network Time Protocol (NTP) server
function.
NTP Server Enter the IP address or domain name of the NTP server.
Select Country Click the drop-down menu to select the country region of APs in
the network.
Time Zone Click the drop-down menu to select the time zone.
Enable Daylight Saving Check the box to enable the daylight saving function.
DST Start (24HR) Click the drop-down menu to designate the start date and time
for Daylight Saving Time (DST).
DST End (24HR) Click the drop-down menu to designate the end date and time
for Daylight Saving Time (DST).
DST Oset (minutes) Click the drop-down menu to select DST Oset time.
External Syslog Server Enter the IP address or domain name of the external syslog server.
Click Save to save the values and update the screen.
Nuclias Connect
Once the settings are updated, the conguration must be uploaded to the related access points. See “Prole Settings” on page
69 for further information.
Access Point
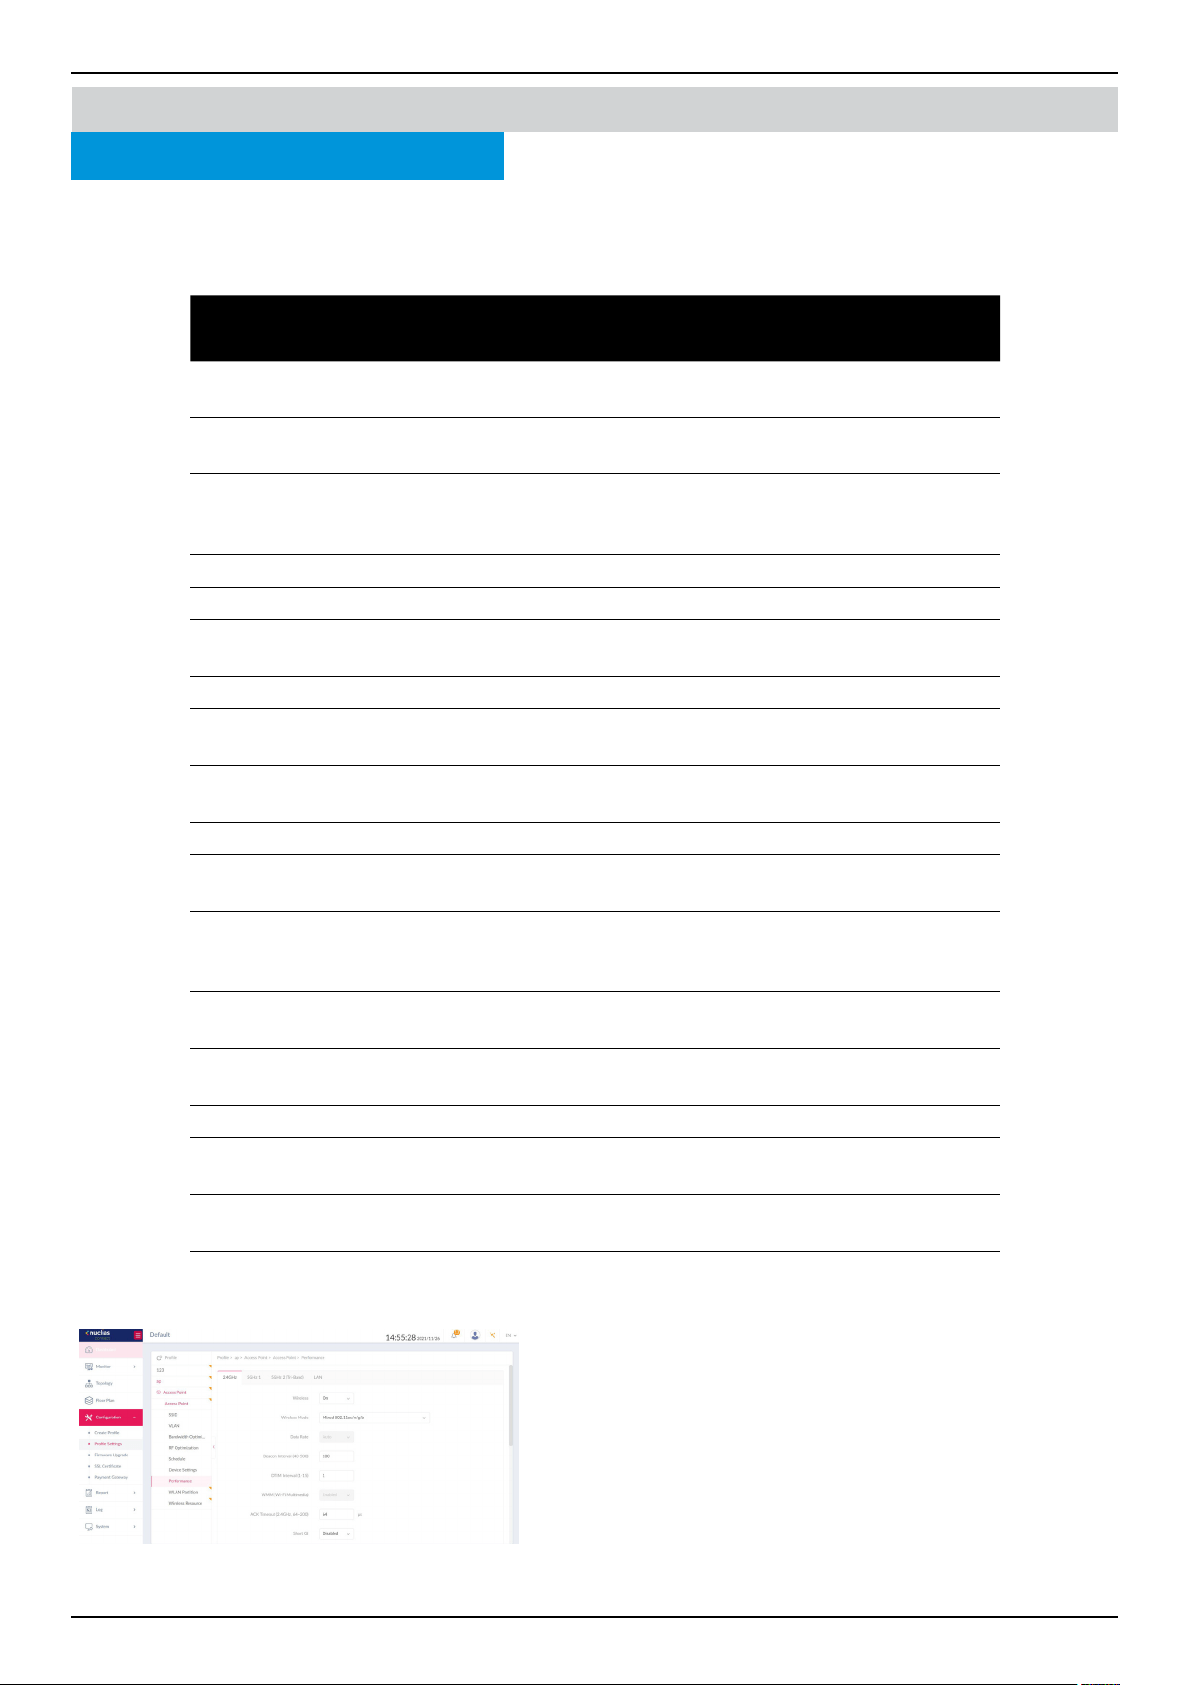
Nuclias Connect Software User Manual Nuclias Connect Conguration
Page 79
The Schedule page allows you to congure the wireless performance for access points on your network. Additionally, advanced
wireless settings can be congured on the page for both the 2.4GHz and 5GHz frequency bands. Navigate to Conguration >
Prole Settings > [Site] > [Network] > Access Point > Device Settings to view existing settings. Click the 2.4GHz or 5GHz tab
to view existing settings.
Parameter Description
Wireless Click the drop-down menu to turn on or o the wireless band for
the network.
Wireless Mode Click the drop-down menu to select the wireless mode used in the
network.
Data Rate Click the drop-down menu to select the wireless data rate. The
function is only available when Wireless Mode is set as Mixed
802.11g and 802.11b (2.4GHz) or 802.11a Only (5GHz).
Beacon Interval Enter the beacon interval value. The default value is 100.
DTIM Interval (1-15) Enter the DTIM interval value. The default value is 1.
WMM (Wi-Fi Multimedia) Click the drop-down menu to enable or disable the Wi-Fi Multimedia
(WMM) function.
ACK Timeout Enter the ACK timeout value. The default value is 48.
Short GI Click the drop-down menu to enable or disable the short GI
function.
IGMP Snooping Click the drop-down menu to enable or disable the IGMP snooping
function.
Multicast Rate Click the drop-down menu to select the multicast rate value.
Multicast Bandwidth
Control
Click the drop-down menu to enable or disable the multicast
bandwidth control function.
Maximum Multicast
Bandwidth
Enter the maximum multicast bandwidth value. The default value
is 100. The function is only available when Multicast Bandwidth
Control is Enabled.
HT20/40 Coexistence Click the drop-down menu to enable or disable the HT20/40
coexistence function.
Change DHCP Oers
from Multicast to Unicast
Click the drop-down menu to allow or deny the transfer of DHCP
oers to unicast function.
RTS Length (256-2346) Enter the RTS length value. The default value is 2346.
Fragment Length (256-
2346)
Enter the fragment length value. The default value is 2346.
Channel Width Click the drop-down menu to select the channel width used by the
network.
Click Save to save the values and update the screen.
Conguration Prole Settings Access Point
2.4GHz/5GHz/5GHz 2 (Tri-Band)
Nuclias Connect
Once the settings are updated, the conguration must be
uploaded to the access points. See “Prole Settings” on page
69 for further information.
Performance
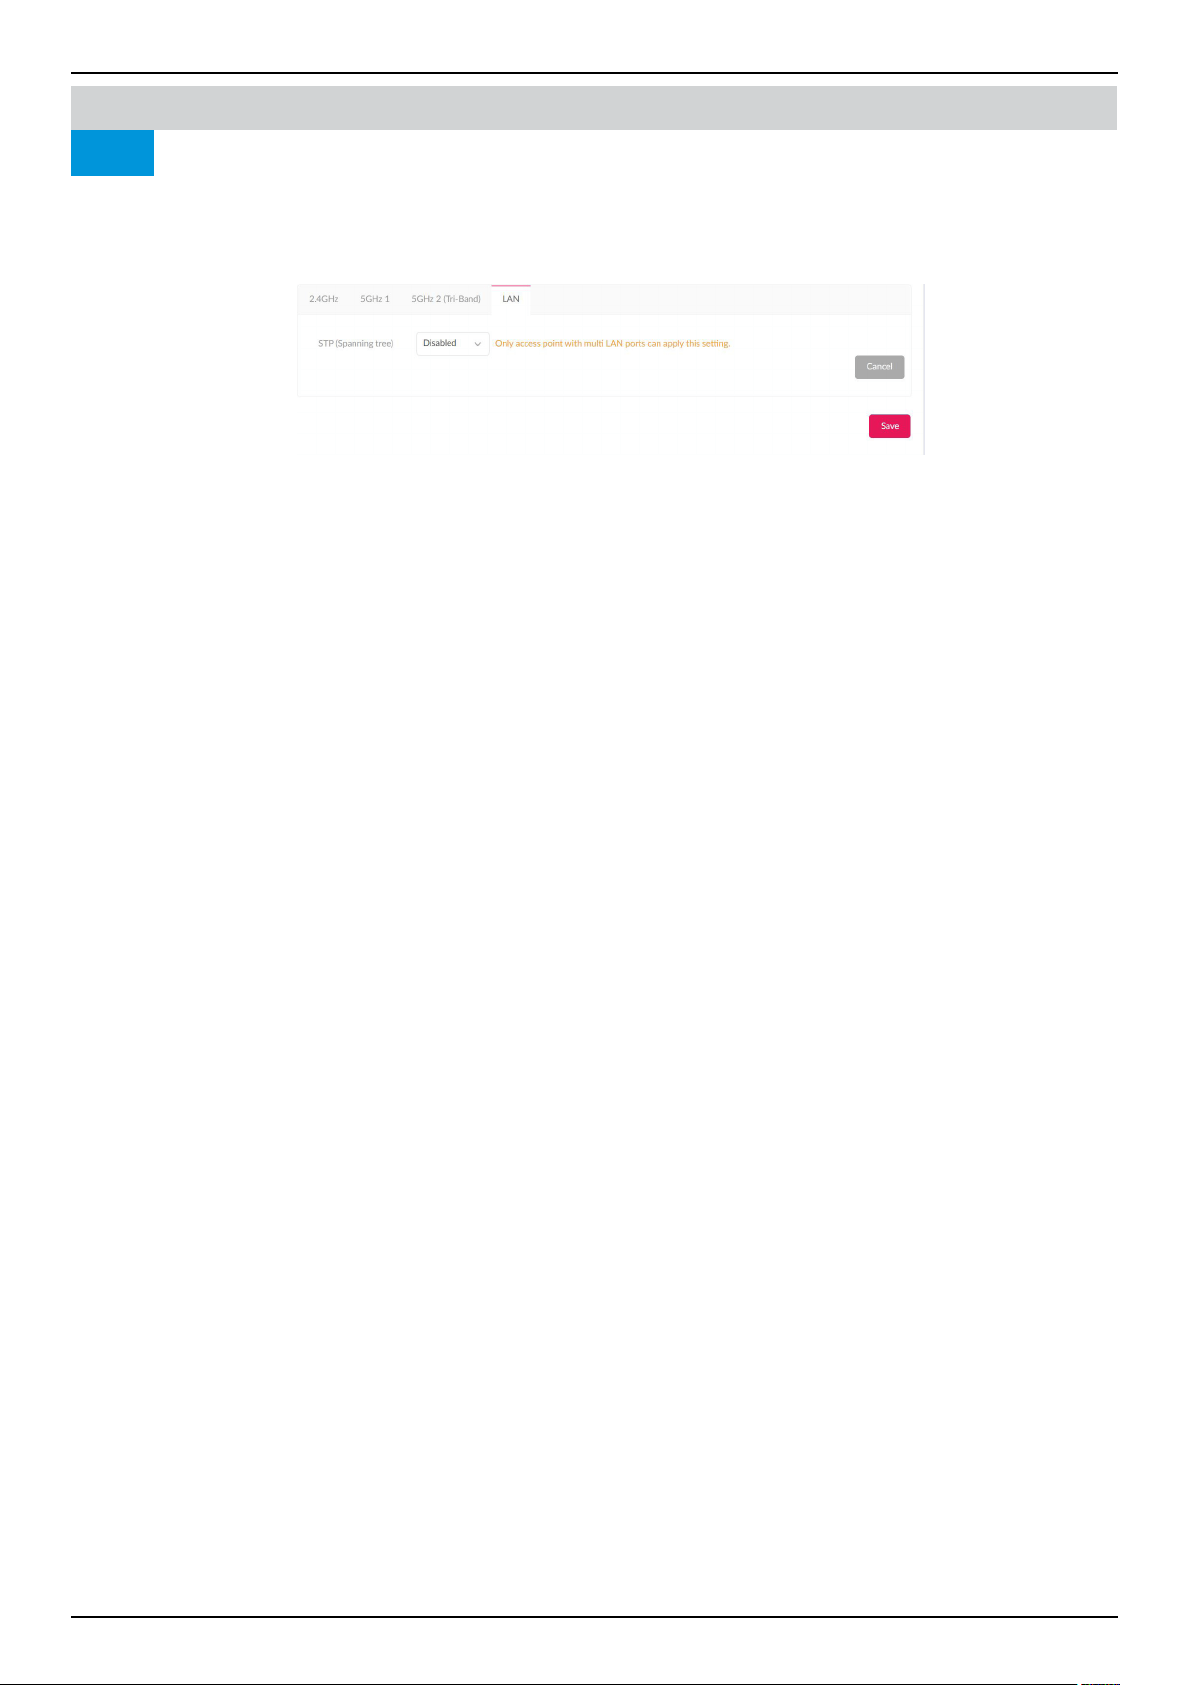
Nuclias Connect Software User Manual Nuclias Connect Conguration
Page 80
Conguration Prole Settings Access Point
LAN
Nuclias Connect Performance
Under the LAN tab, users can enable or disable STP (Spanning tree). STP can help ensure that no loops are created when you
have redundant paths in your network.
Navigate to Conguration > Prole Settings > [Site] > [Network] > Access Point >
Performance > LAN.
Note that only access point with multi LAN ports can apply this setting.
Once the settings are updated, the conguration must be uploaded to the access points. See “Prole Settings” on page 69 for
further information.
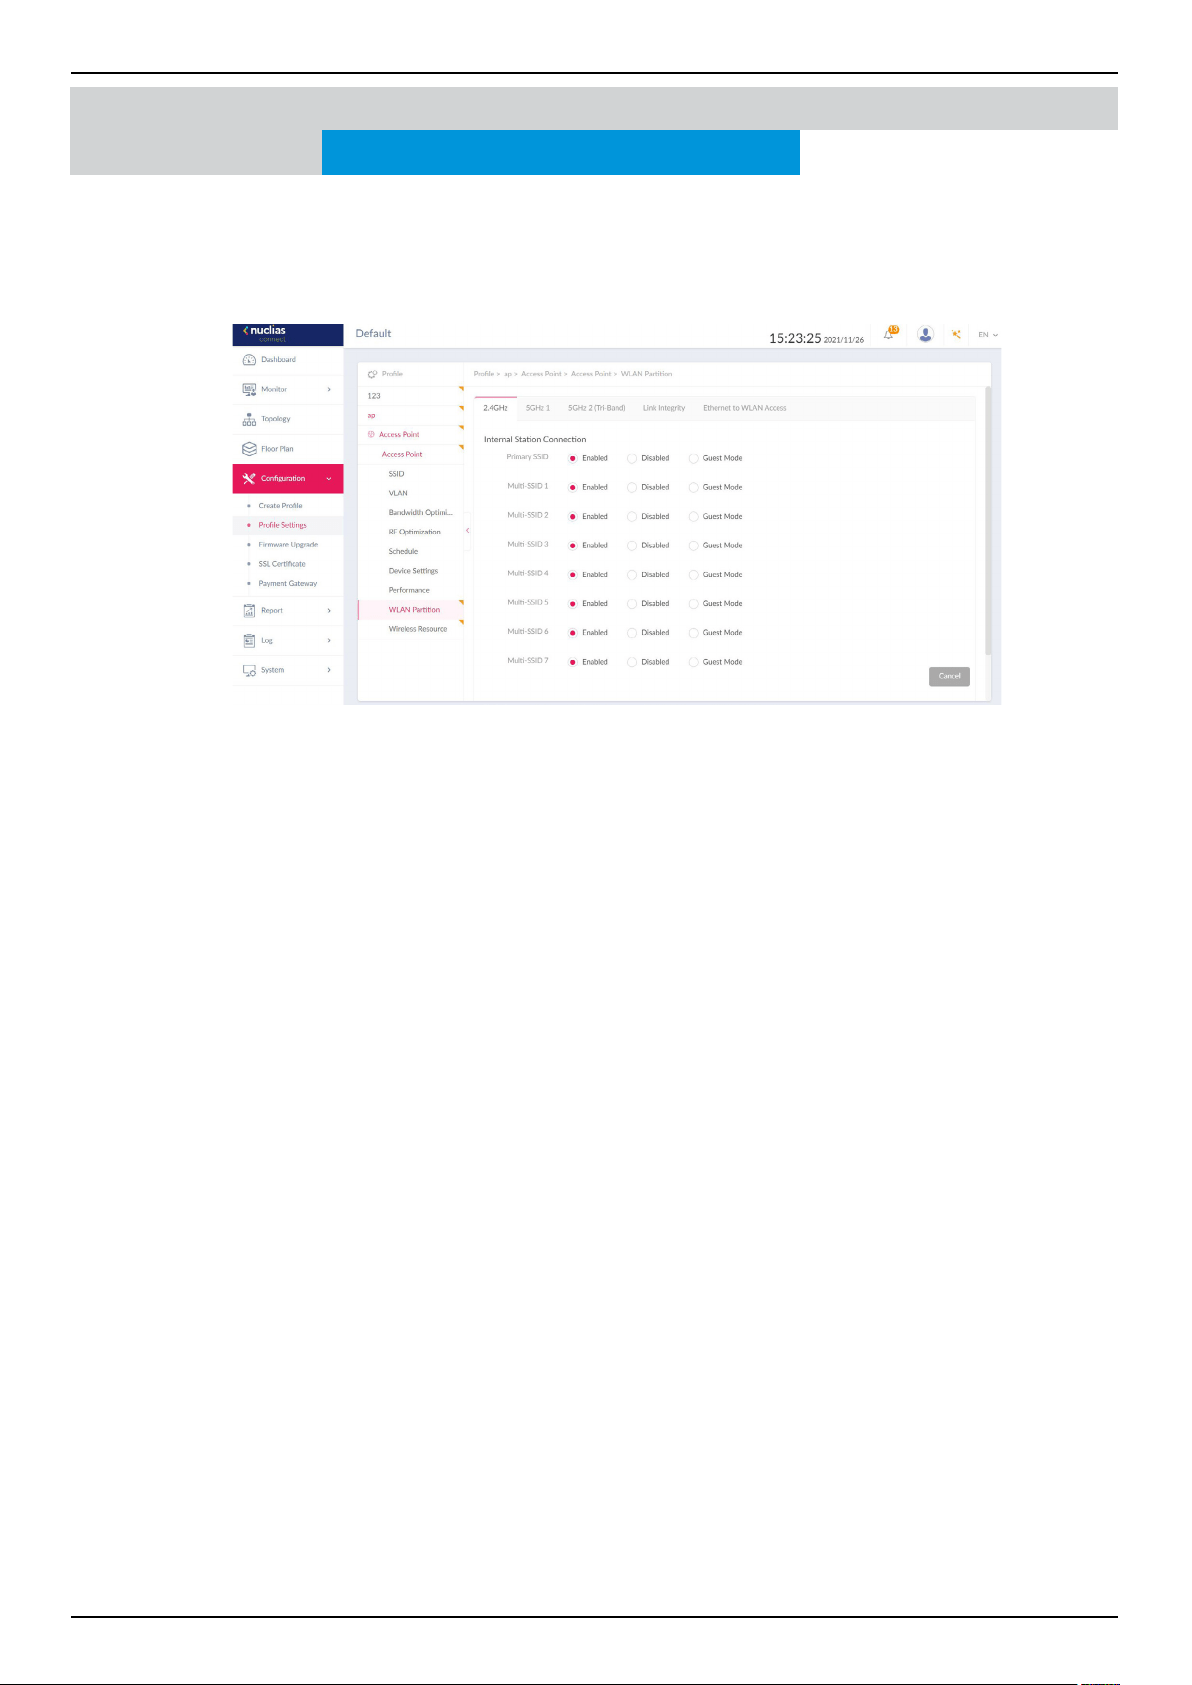
Nuclias Connect Software User Manual Nuclias Connect Conguration
Page 81
The WLAN Partition page displays the wireless partitioning settings that allow you to enable/disable associated wireless clients
from communicating with each other. Additionally, advanced wireless settings can be congured on the page for both the
2.4GHz and 5GHz frequency bands. Navigate to Conguration > Prole Settings > [Site] > [Network] > WLAN Partition. Click
the 2.4GHz or 5GHz tab to view existing settings. Click Save to save the values and update the screen.
Conguration Prole Settings
WLAN Partition 2.4GHz/5GHz/ 5GHz 2(Tri-Band)
Nuclias Connect
Once the settings are updated, the conguration must be uploaded to the related access points. See “Prole Settings” on page
69 for further information.
Access Point
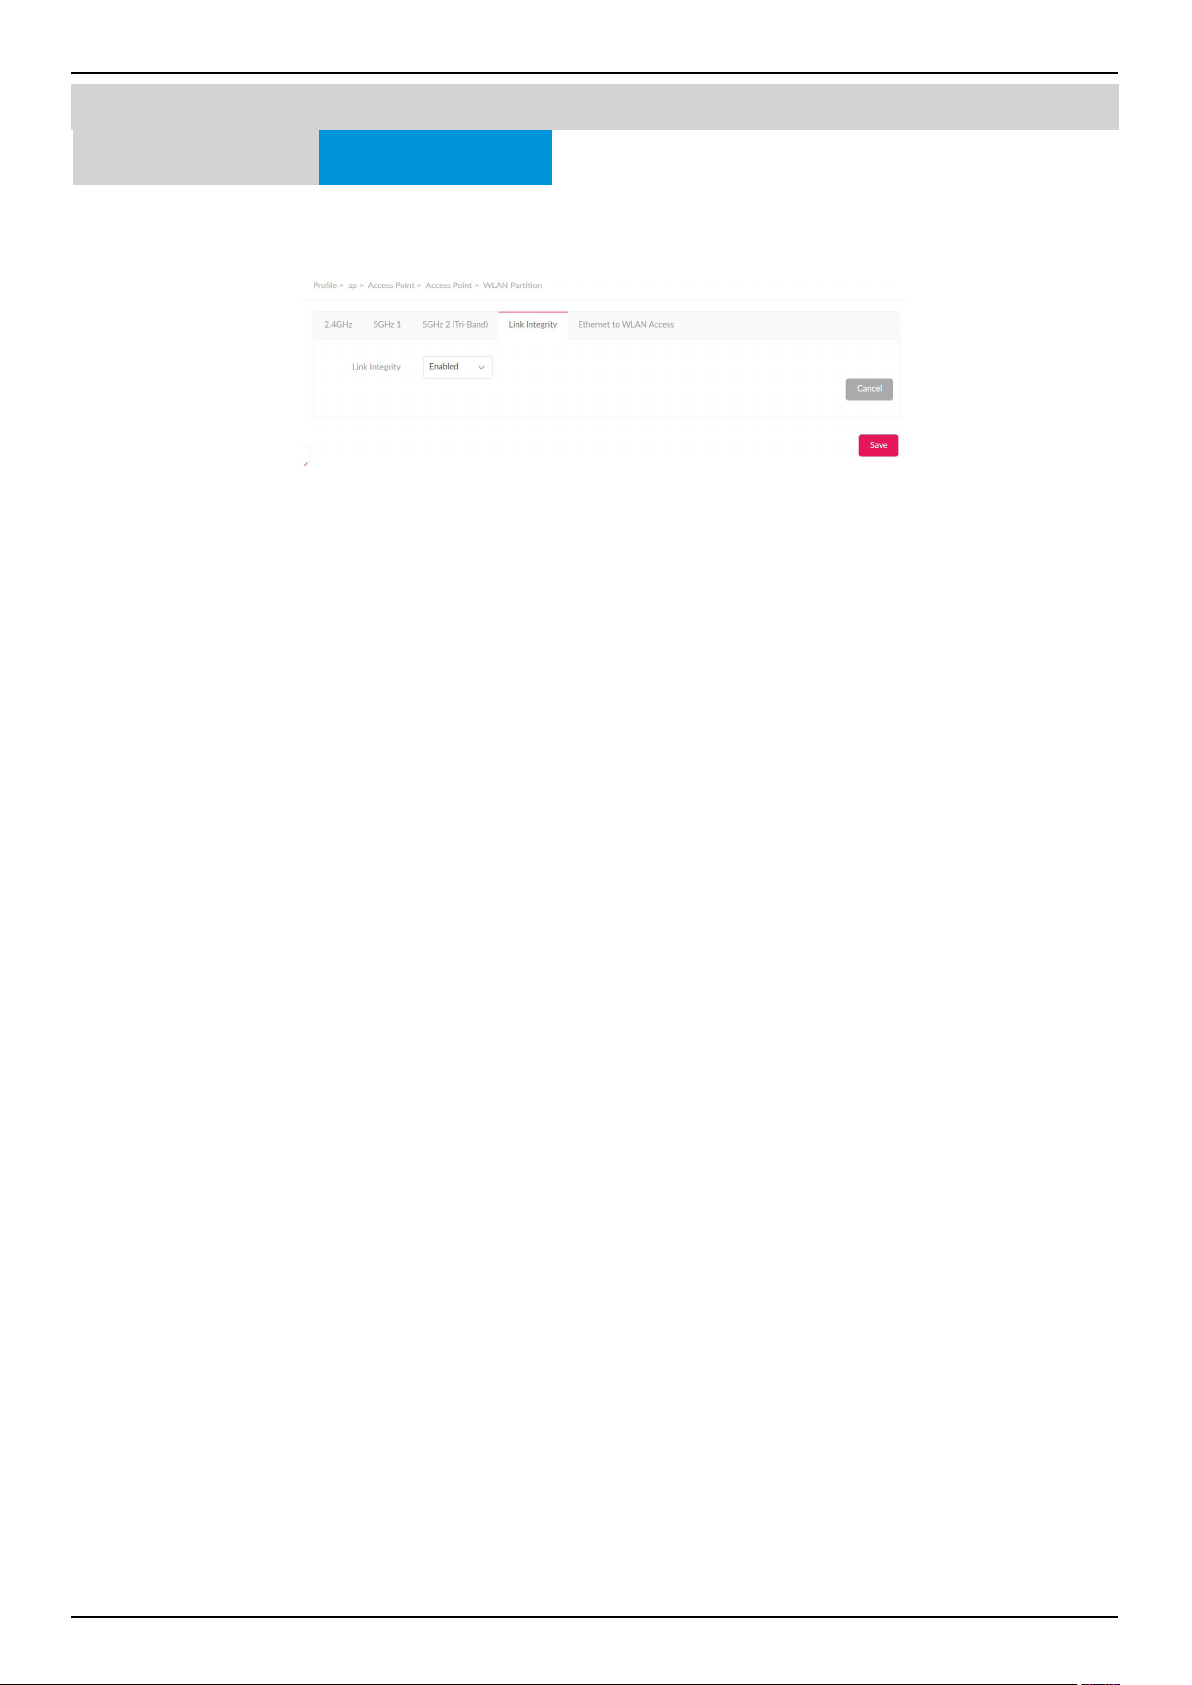
Nuclias Connect Software User Manual Nuclias Connect Conguration
Page 82
Conguration Prole Settings
WLAN Partition Link Integrity
Nuclias Connect Access Point
The Link Integrity feature disassociates wireless segments from the AP when the LAN and AP is disconnected. Click the drop-
down menu to enable or disable the wireless link integrity function.
Click Save to save the changes. Once the settings are updated, the conguration must be uploaded to the access points. See
“Prole Settings” on page 69 for further information.
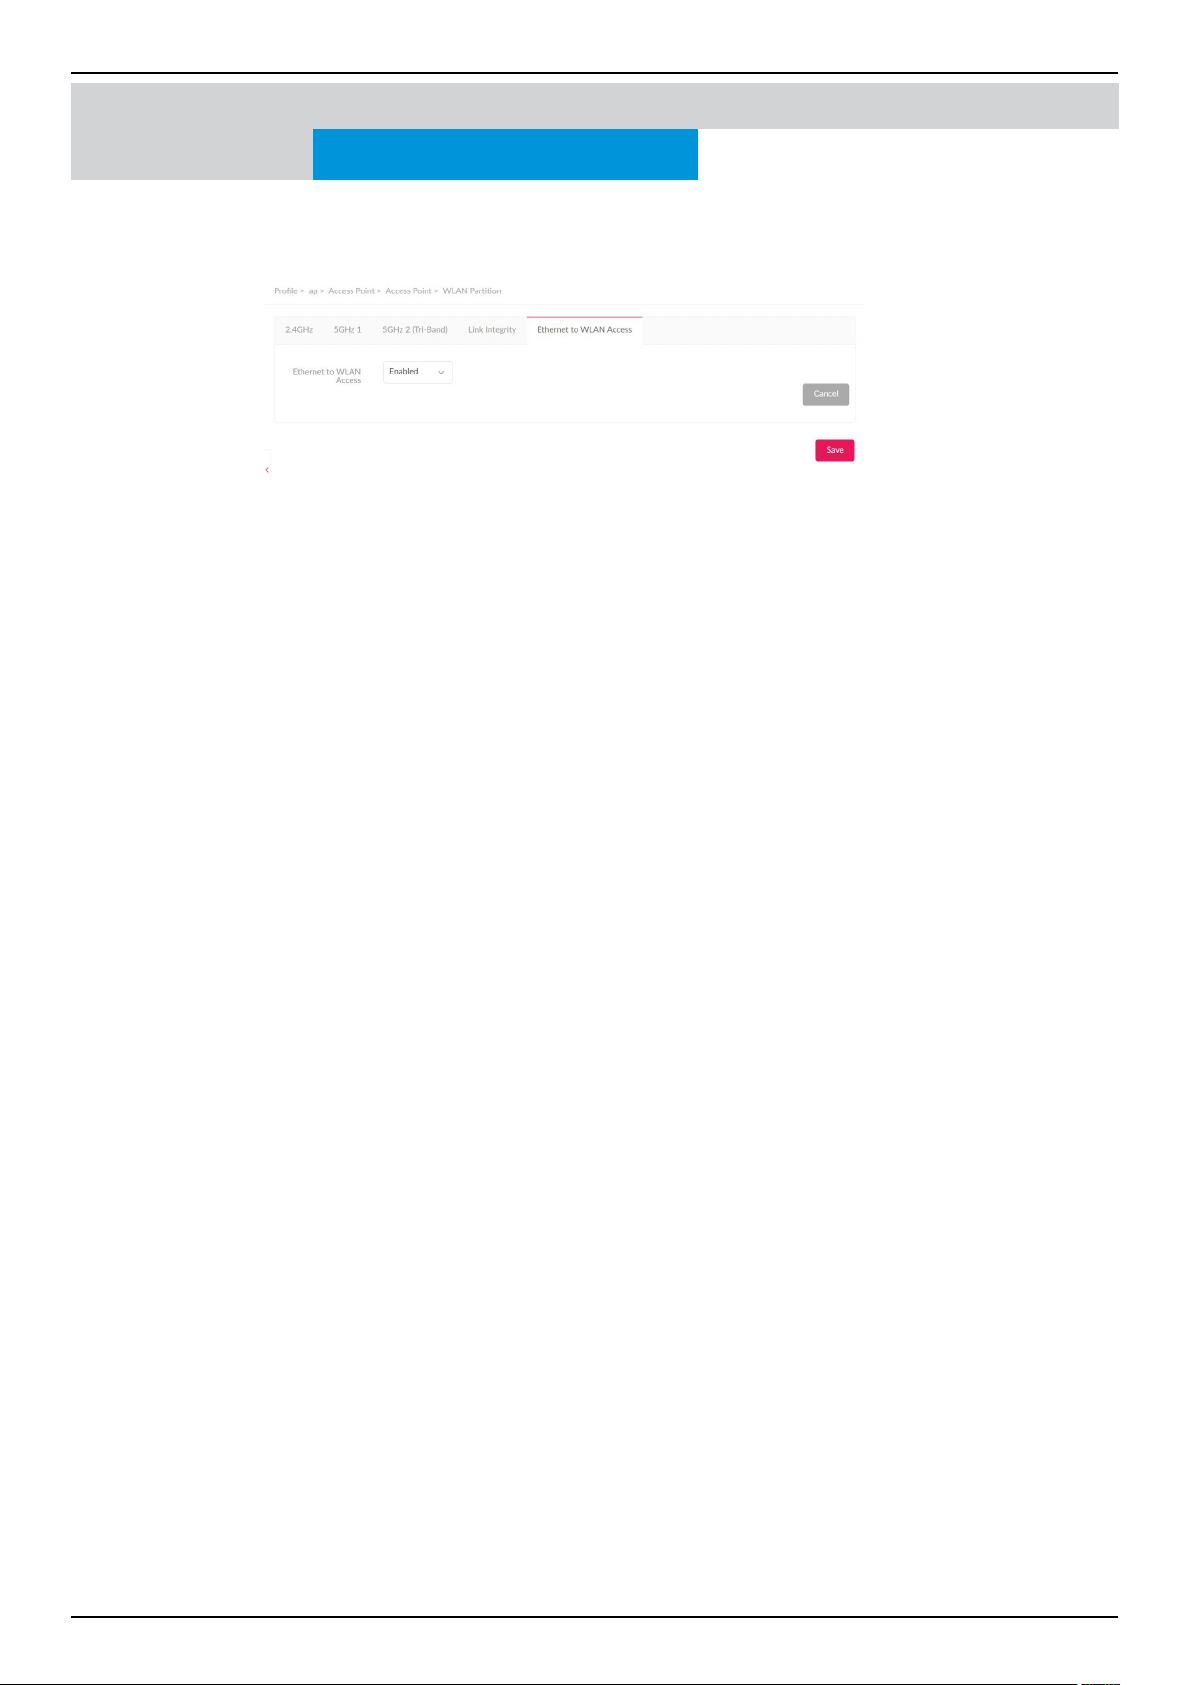
Nuclias Connect Software User Manual Nuclias Connect Conguration
Page 83
Conguration Prole Settings
WLAN Partition
Ethernet to WLAN Access
Nuclias Connect Access Point
The Ethernet to WLAN Access feature allows Ethernet to send and receive data from associated wireless devices. Click the
drop-down menu to enable or disable Ethernet to WLAN Access.
Click Save to save the changes. Once the settings are updated, the conguration must be uploaded to the access points. See
“Prole Settings” on page 69 for further information.
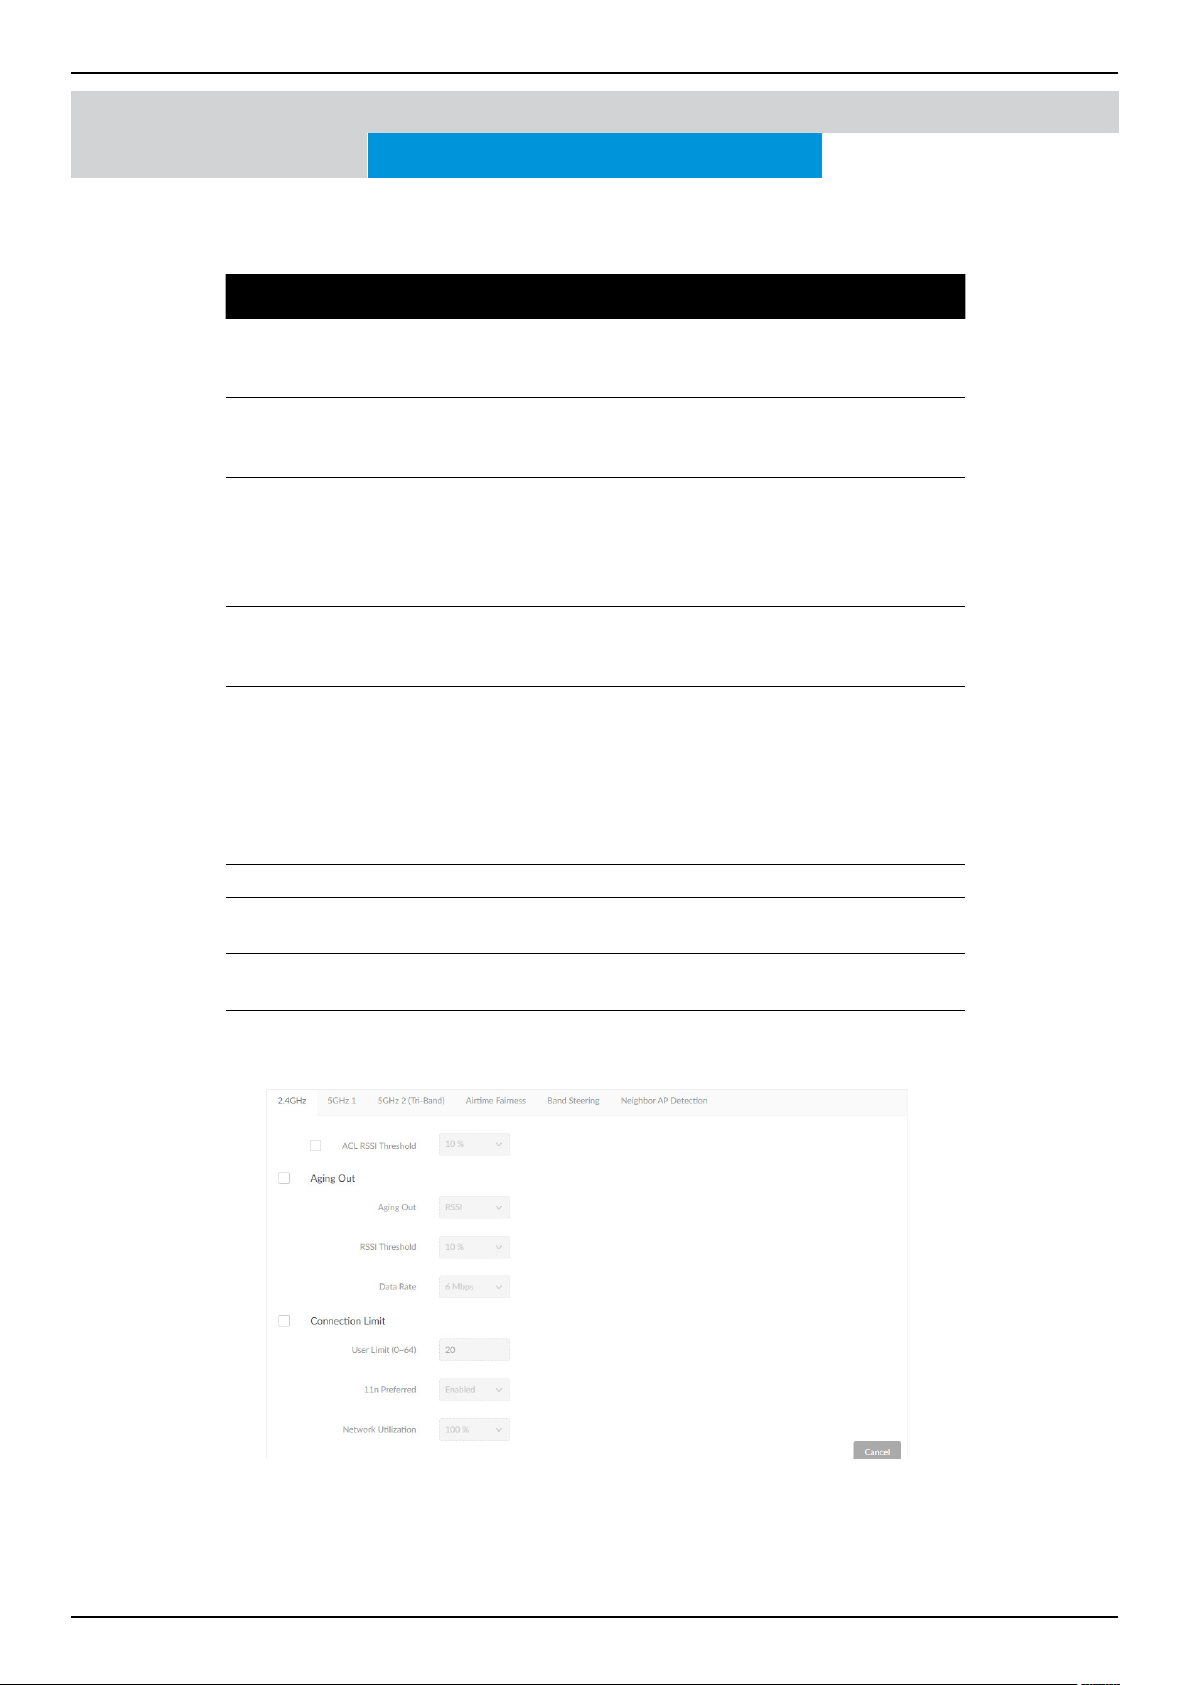
Nuclias Connect Software User Manual Nuclias Connect Conguration
Page 84
The Wireless Resource function in Nuclias Connect helps provide real-time RF management of the wireless network. Navigate
to Conguration > Prole Settings > [Site] > [Network] > Wireless Resource. Click the 2.4GHz or 5GHz tab to view existing
settings.
Parameter Description
ACL RSSI
Threshold
Check the box to enable ACL RSSI threshold function and click the
drop-down menu to select the ACL RSSI threshold percentage.
Aging Out Click to enable the Aging Out function. From the menu, select a
criteria to disconnect a wireless clients. Available options are RSSI
and Data Rate.
RSSI Threshold When RSSI is selected in the Aging out drop-down menu, select
a value between 10% to 100%. This parameter sets the minimum
RRSI for a wireless clients to respond to a probe. If the determined
value is lower than the specied percentage, the wireless client is
disconnected.
Data Rate Click the drop-down menu to select the data rate connection
limit. The function is only available when the Aging Out policy is
set to Data Rate.
Connection Limit
Click the radio button to enable or disable the function. Connection
limit is designed to provide load balancing. This policy allows user
access management on the wireless network. The exact number is
entered in the User Limit eld below. If this function is enabled and
the number of users exceed this value, or the network utilization
exceeds the specied percentage, the policy will not allow further
client association.
User Limit (0~64) Enter the user connection limit. The default value is 20.
11n Preferred Click the drop-down menu to enable or disable the preferred use
of 802.11n.
Network
Utilization
Click the drop-down menu to select the network utilization
percentage.
Click Save to save the values and update the screen.
Once the settings are updated, the conguration must be uploaded to the access points. See “Prole Settings” on page 69 for
further information.
Conguration Prole Settings
Wireless Resource 2.4GHz/5GHz/ 5GHz 2(Tri-Band)
Nuclias Connect Access Point

Nuclias Connect Software User Manual Nuclias Connect Conguration
Page 85
Airtime Fairness
Airtime Fairness allows you to boost overall network performance. This function sacrices network time from the slowest devices
to boost overall performance of the network.
Note: Devices identied as having slow WiFi speed may be attributed to long connection distance, weak signal strength or older
legacy hardware. Navigate to Conguration > Prole Settings > [Site] > [Network] > Wireless Resource. Click the Airtime
Fairness tab to view the existing settings.
Check the box to enable or disable the airtime fairness function.
Click Save to save the values and update the screen.
Once the settings are updated, the conguration must be uploaded to the related access points. See “Prole Settings” on page
69 for further information.
Conguration Prole Settings
Wireless Resource
Nuclias Connect Access Point

Nuclias Connect Software User Manual Nuclias Connect Conguration
Page 86
Band Steering allows dual-band-capable clients to connect to the less crowded 5GHz network, and leave the 2.4GHz network
available for clients that support 2.4GHz only.
Navigate to Conguration > Prole Settings > [Site] > [Network] > Wireless Resource. Click on the Band Steering tab to
view the existing setting.
Check the box to enable or disable the wireless band steering function.
Click Save to save the values and update the screen.
Band Steering
Conguration Prole Settings
Wireless Resource
Nuclias Connect Access Point
Once the settings are updated, the conguration must be uploaded to the related access points. See “Prole Settings” on page
69 for further information.
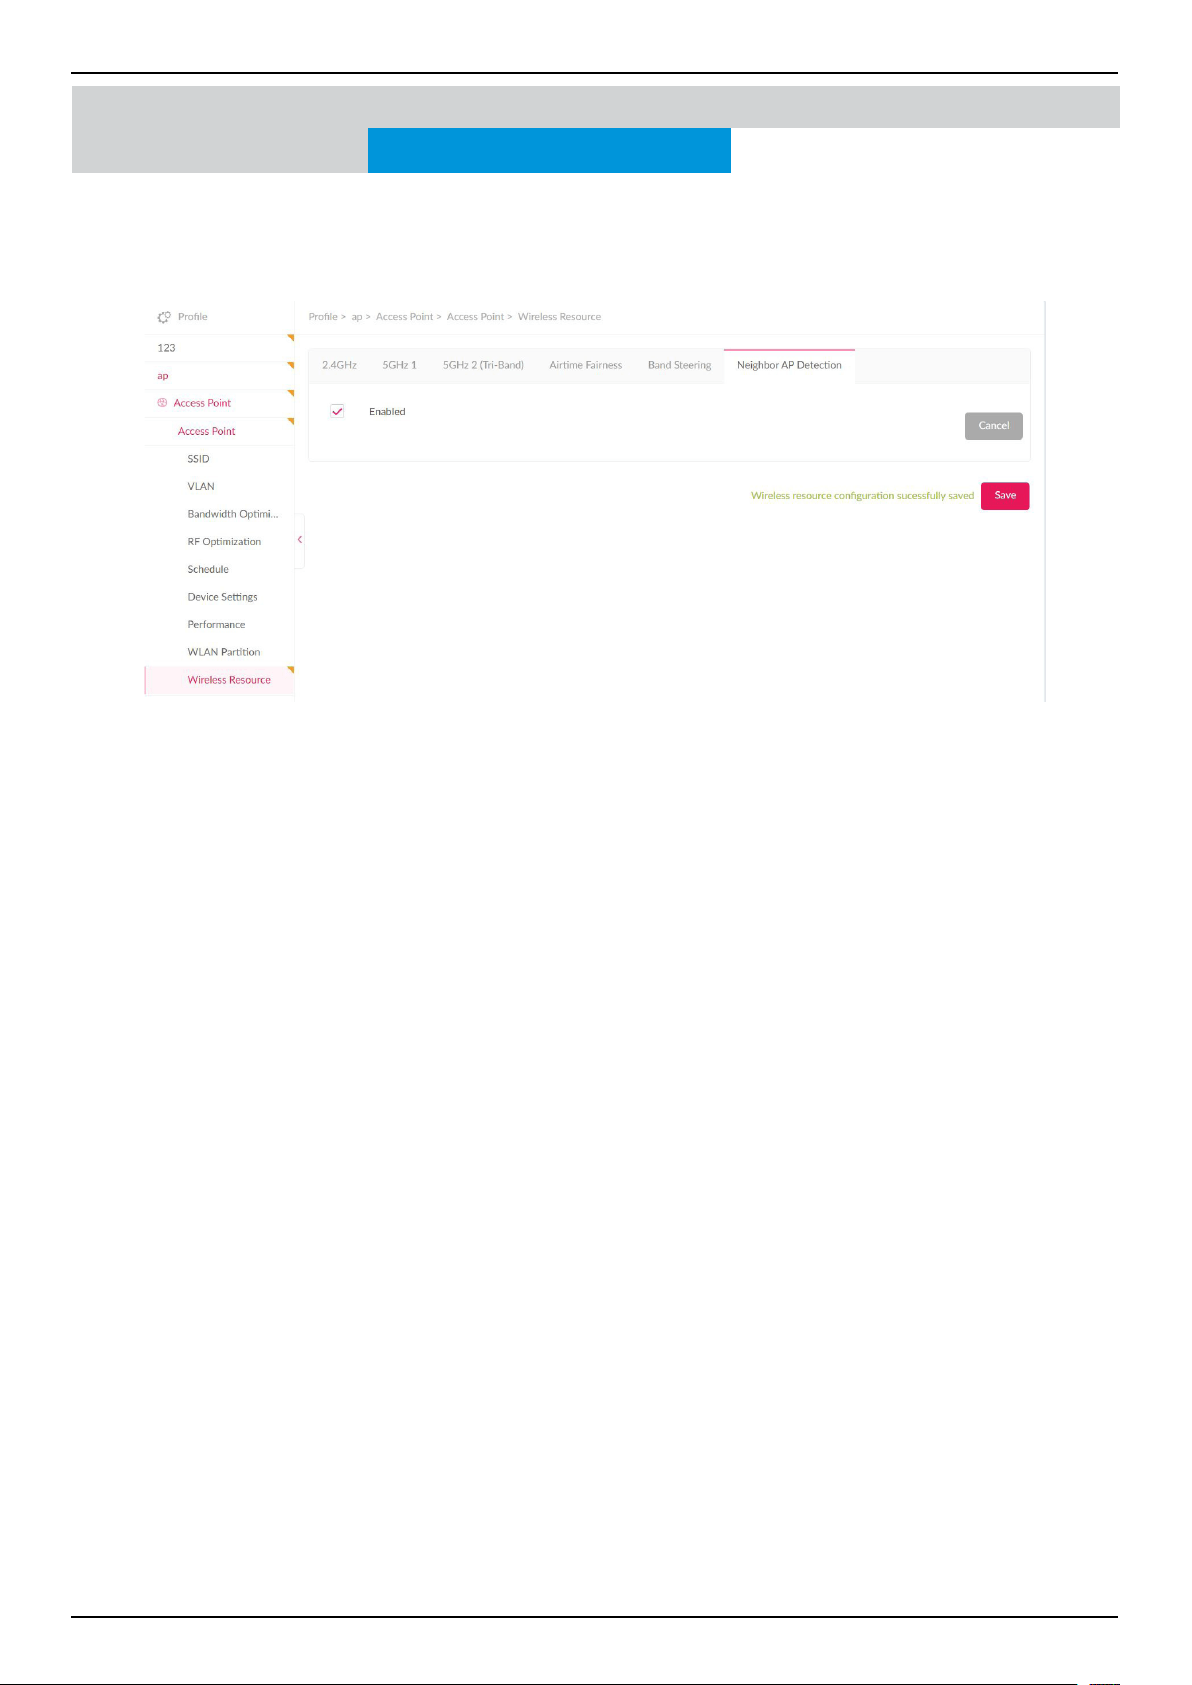
Nuclias Connect Software User Manual Nuclias Connect Conguration
Page 87
Users can view neighbor information on a specied AP radio to determine the AP location and neighbor relationship, helping
locate rogue APs and plan the WLAN.
Check “Enabled” to enable detection, and go to Monitor>Neighbor AP to review AP list.
Neighbor AP Detection
Conguration Prole Settings
Wireless Resource
Nuclias Connect Access Point
Once the settings are updated, the conguration must be uploaded to the related access points. See “Prole Settings” on page
69 for further information.
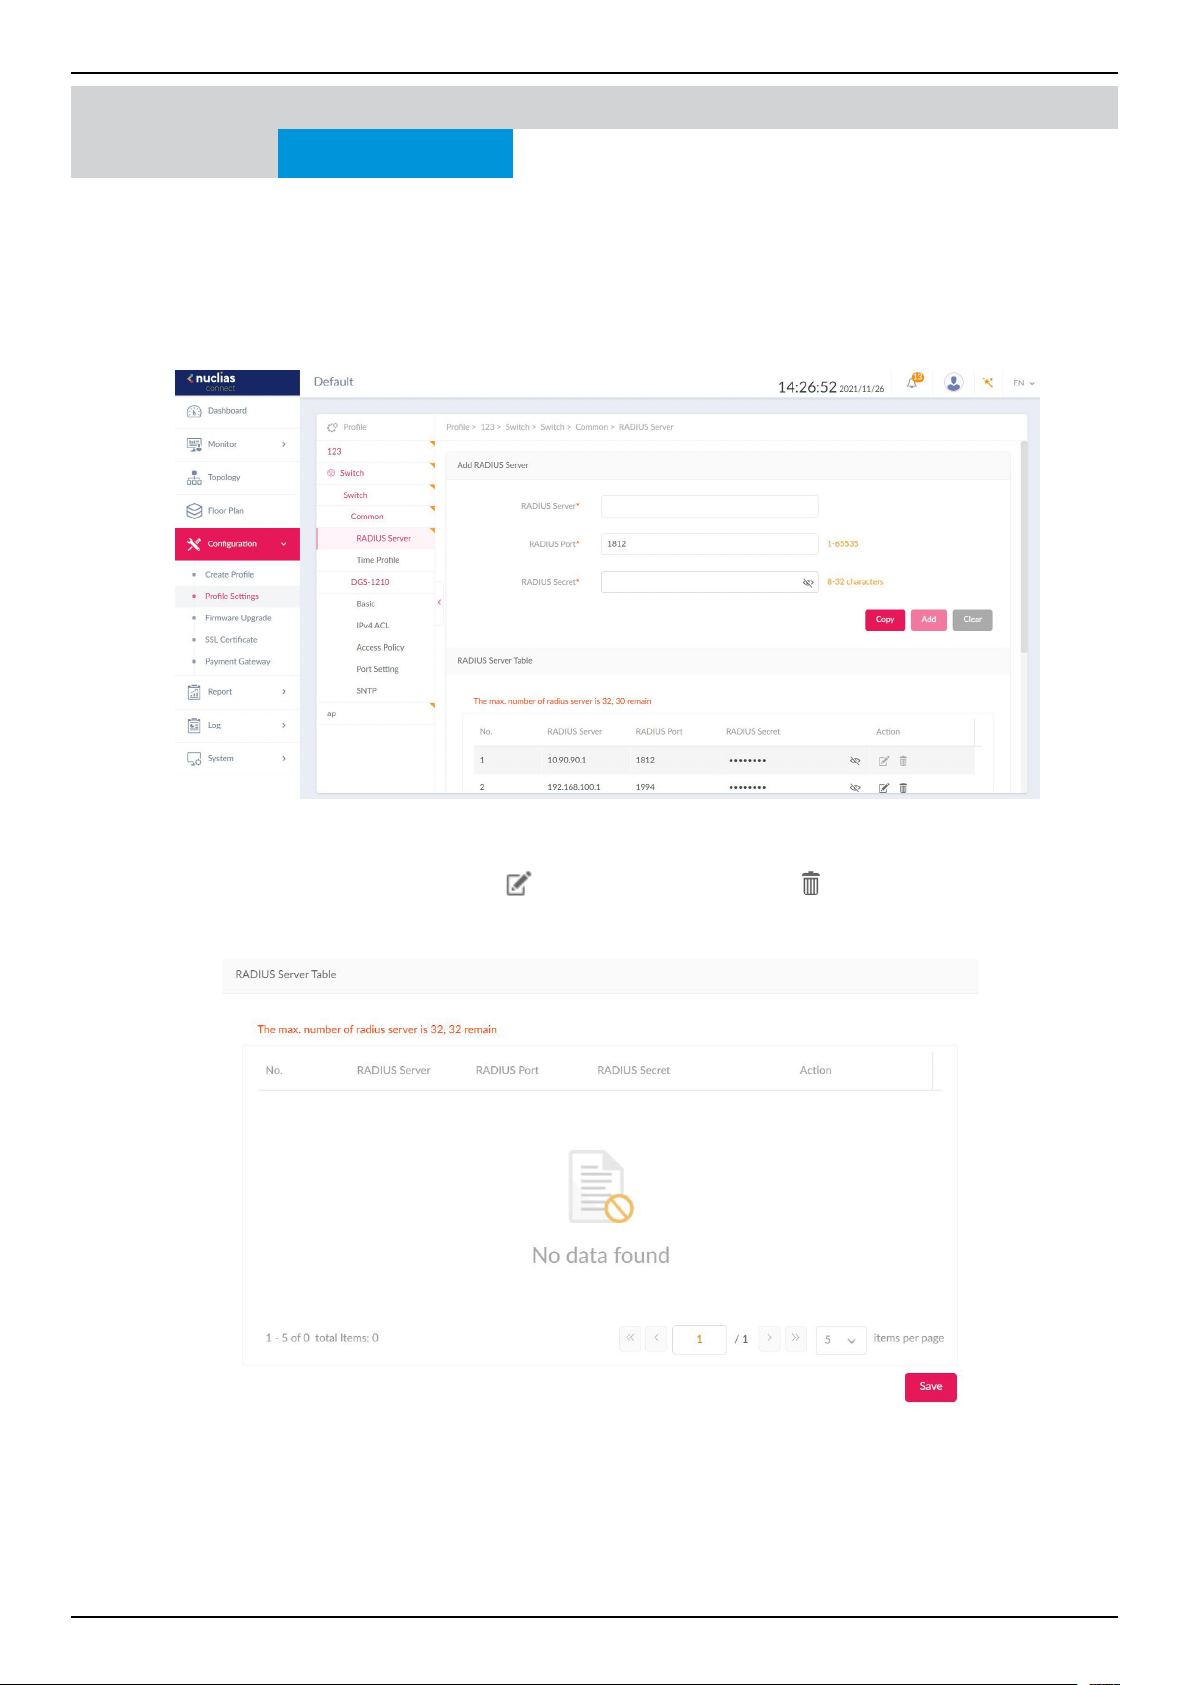
Nuclias Connect Software User Manual Nuclias Connect Conguration
Page 88
Nuclias Connect Conguration Prole Settings
RADIUS Server
In the RADIUS Server page, you can forward access requests from your switches to one or more specied remote RADIUS
servers. Navigate to Conguration > Prole Settings >Switch > Common > RADIUS Server to set up remote RADIUS server
for all switches in the network.
To add a RADIUS server, enter the RADIUS authentication server, the UDP port and the secret used to communicate with the
server. Alternatively, click Copy to copy RADIUS server from other network. Once completed, click Add to add a new RADIUS
server, or Clear to remove the entries.
In the RADIUS Server Table below, a summary of all the RADIUS Servers details including the number, RADIUS server, port
and secret is displayed. Under the Action eld, click
to edit the RADIUS server. Click to delete the selected RADIUS
server. Click Save when completed.
Switch
Common
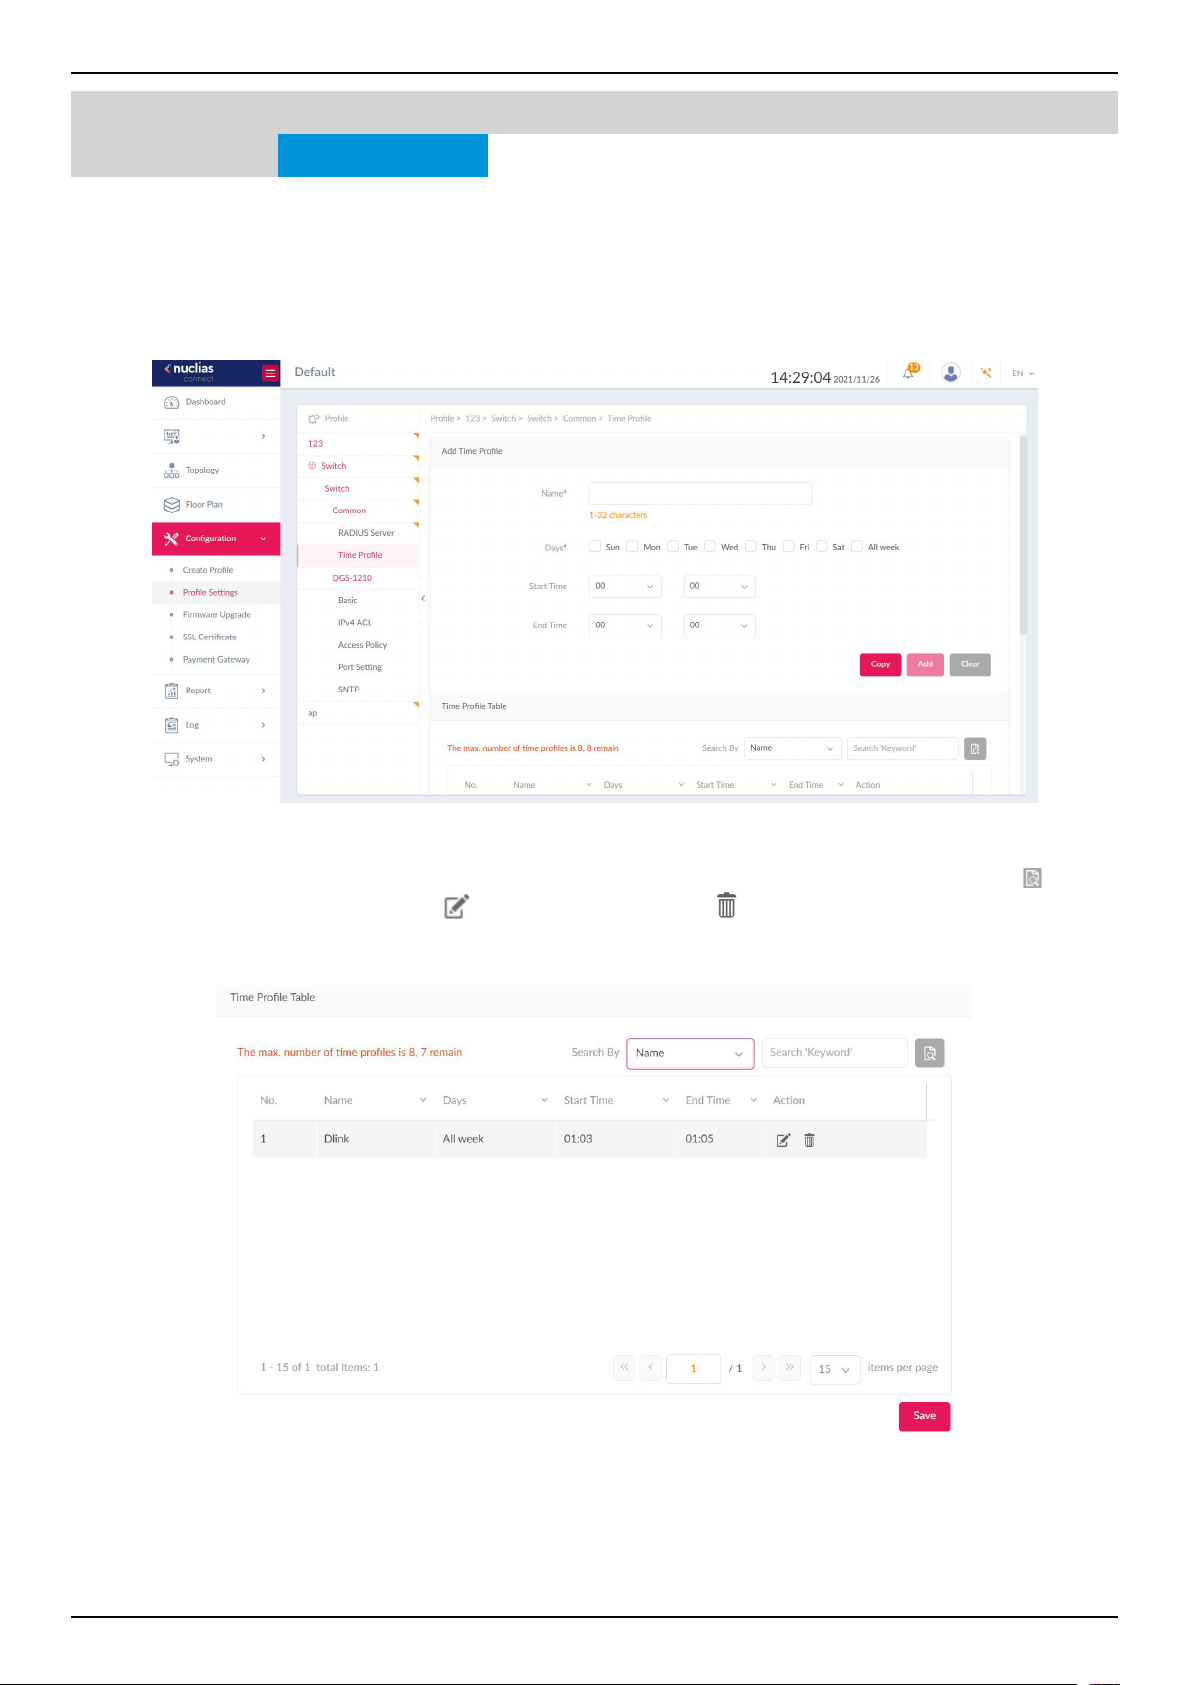
Nuclias Connect Software User Manual Nuclias Connect Conguration
Page 89
Nuclias Connect Conguration Prole Settings
Time Prole
Under the Time Prole page, users can set up time prole for all the switches in the network. Navigate to Conguration >
Prole Settings > Switch > Common > Time Prole to set up the time prole.
In the Add Time Prole page, enter a name for the prole. Select the work days for the switch. Next, enter the Start and End
time using the drop-down menu. Alternatively, click Copy to copy the time prole from other network. Once the time is set,
click Add to add a schedule, or Clear to remove all values.
In the Time Prole Table, a summary of the time prole, including the name, days, start/end time is displayed. Use the drop-
down menu to lter the time proles by either Name or Days. Enter a relevant keyword to narrow the search. Click to
start the search. Under the Action eld, click
to edit the time prole. Click to delete the time prole. Click Save when
completed.
Switch
Common
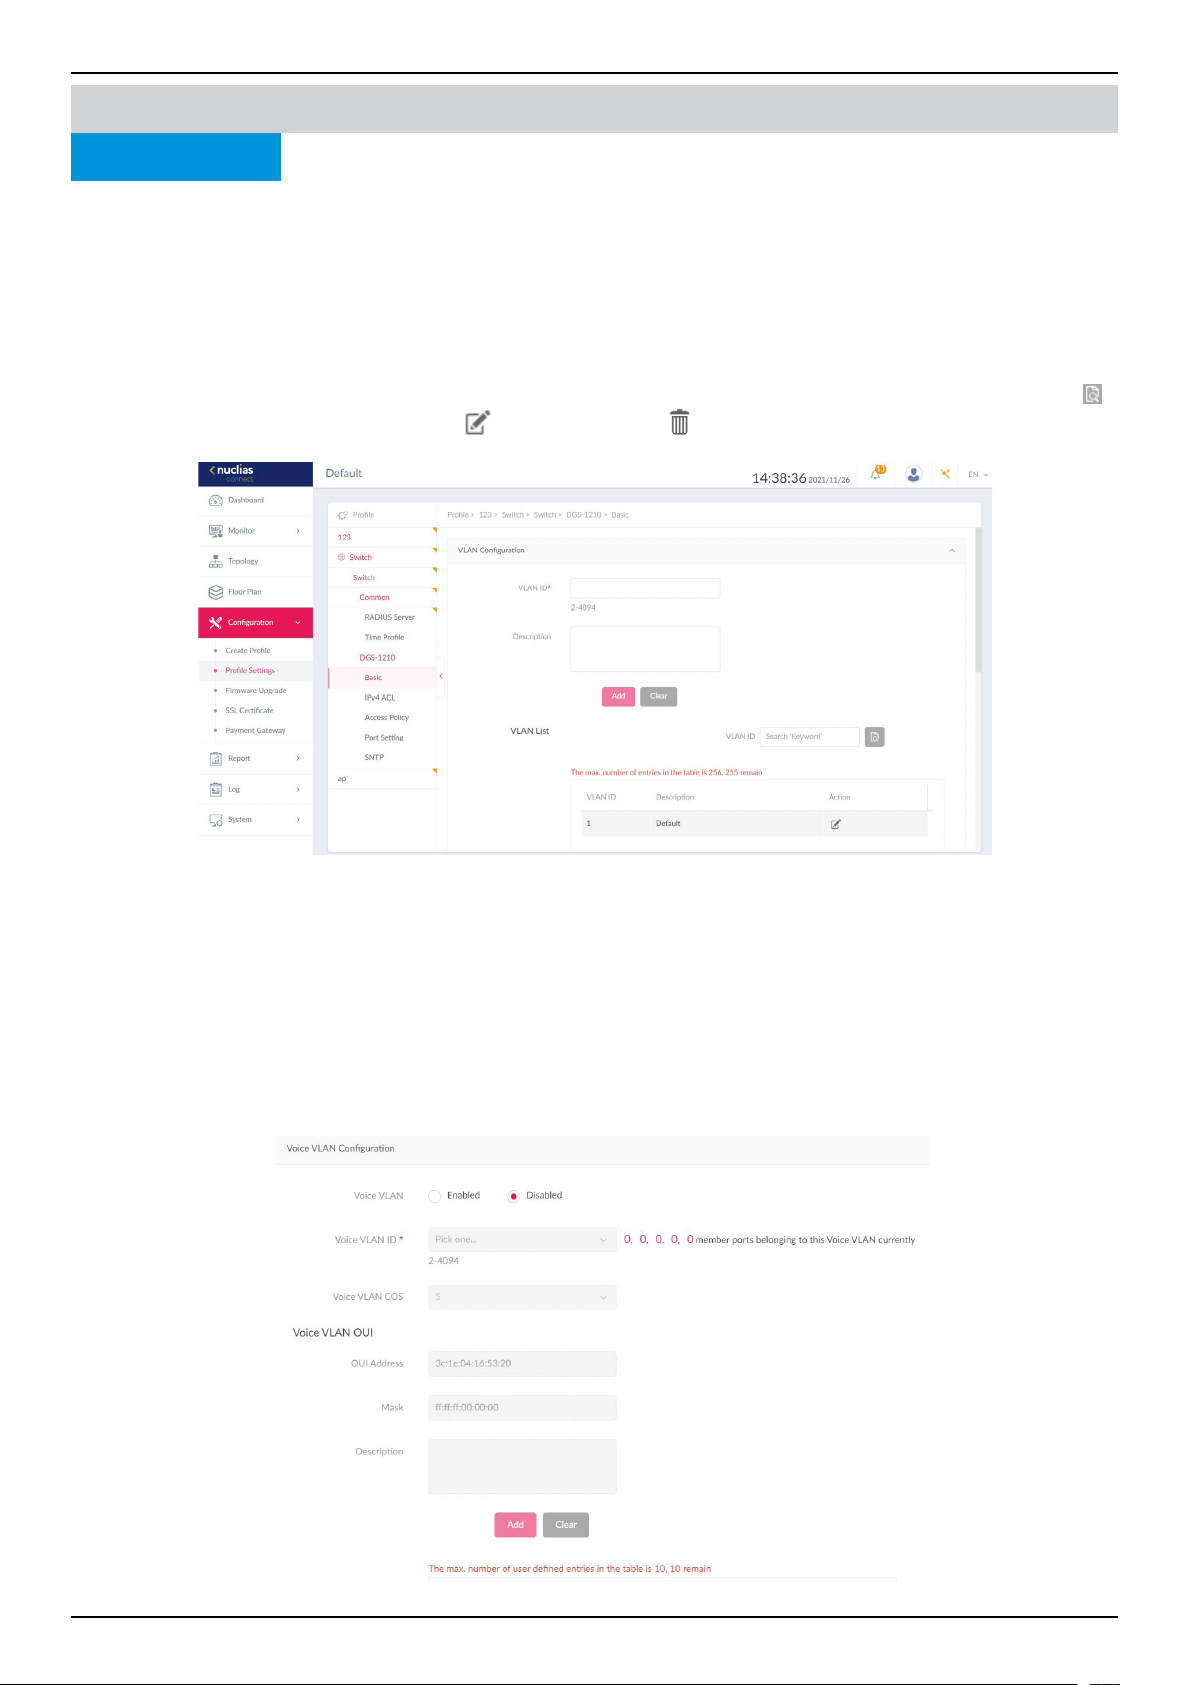
Nuclias Connect Software User Manual Nuclias Connect Conguration
Page 90
Under the Basic tab, users can congure global switch settings such as VLAN, IGMP Snooping, Quality of service and more.
Navigate to Conguration > Prole Settings > Switch > Your Device > Basic to congure the switch. Below describes the
functionality of each conguration options.
VLAN Conguration
In this section, users can add, edit, or delete a VLAN. Enter a VLAN ID in the VLAN ID eld, the range of 2 to 4094. Next, enter a
description for the VLAN. Once complete, click Add to add a VLAN, or Clear to clear the entry.
In the VLAN List section, a summary of VLAN is dispalyed. Enter keyword in the VLAN ID search eld to locate a VLAN. Click
to start the search. Under the Action eld, click to edit a VLAN. Click to delete a VLAN. Click Save when complete.
Voice VLAN Conguration
In this section, users can view and congure global Voice VLAN settings and Voice VLAN OUI( Organizationally Unique Iden-
tier). In the Voice VLAN eld, select Enabled or Disabled. If Enabled, select Voice VLAN ID and Voice VLAN COS from the
drop-down menu. On the right side of Voice VLAN ID eld, users can view the number of member ports belonging to the voice
VLAN. Click the numbers to be directed to the Port Setting page.
In the Voice VLAN OUI section, Voice VLAN is disabled. When enabled, users can add self-dened OUI for the voice VLAN. To do
so, enter a description for ease of identication. Click Add to add a new Voice VLAN, or Clear to remove entered values. Up to
10 entires can be entered.
Nuclias Connect Conguration Prole Settings
Basic
Switch

Nuclias Connect Software User Manual Nuclias Connect Conguration
Page 91
When Voice VLAN is enabled, a default Voice VLAN OUI list is displayed in the summary list below. These entries cannot be
edited nor deleted.
IGMP Snooping Conguration
IGMP snooping allows switches to be aware of multicasting groups and forward network trac accordingly. In this section,
users can enable or disable the IGMP Snooping function. When enabled, enter the VLAN ID of the VLAN. The max number of
VLANs is 256.
STP Conguration
RSTP (Rapid Spanning Tree Protocol) can ensure a loop-free topology and speedy convergence time. In this section, users can
enable or disable RSTP on all switches in the network.
DHCP Server Screen Conguration
DHCP (Dynamic Host Conguration Protocol) server screening provides a higher security by ltering illegal DHCP server pack-
ets. Select Enabled to turn on DHCP Server Screening. When Enabled is selected, enter the Allowed DHCP Server IP in the
eld.
Jumbo Frame Conguration
Jumbo frames are Ethernet frames with massive payload. They are used to reduce frame overload, increase system throughput
and reduce CPU utilization. In the Jumbo Frame eld, select Enabled or Disabled.
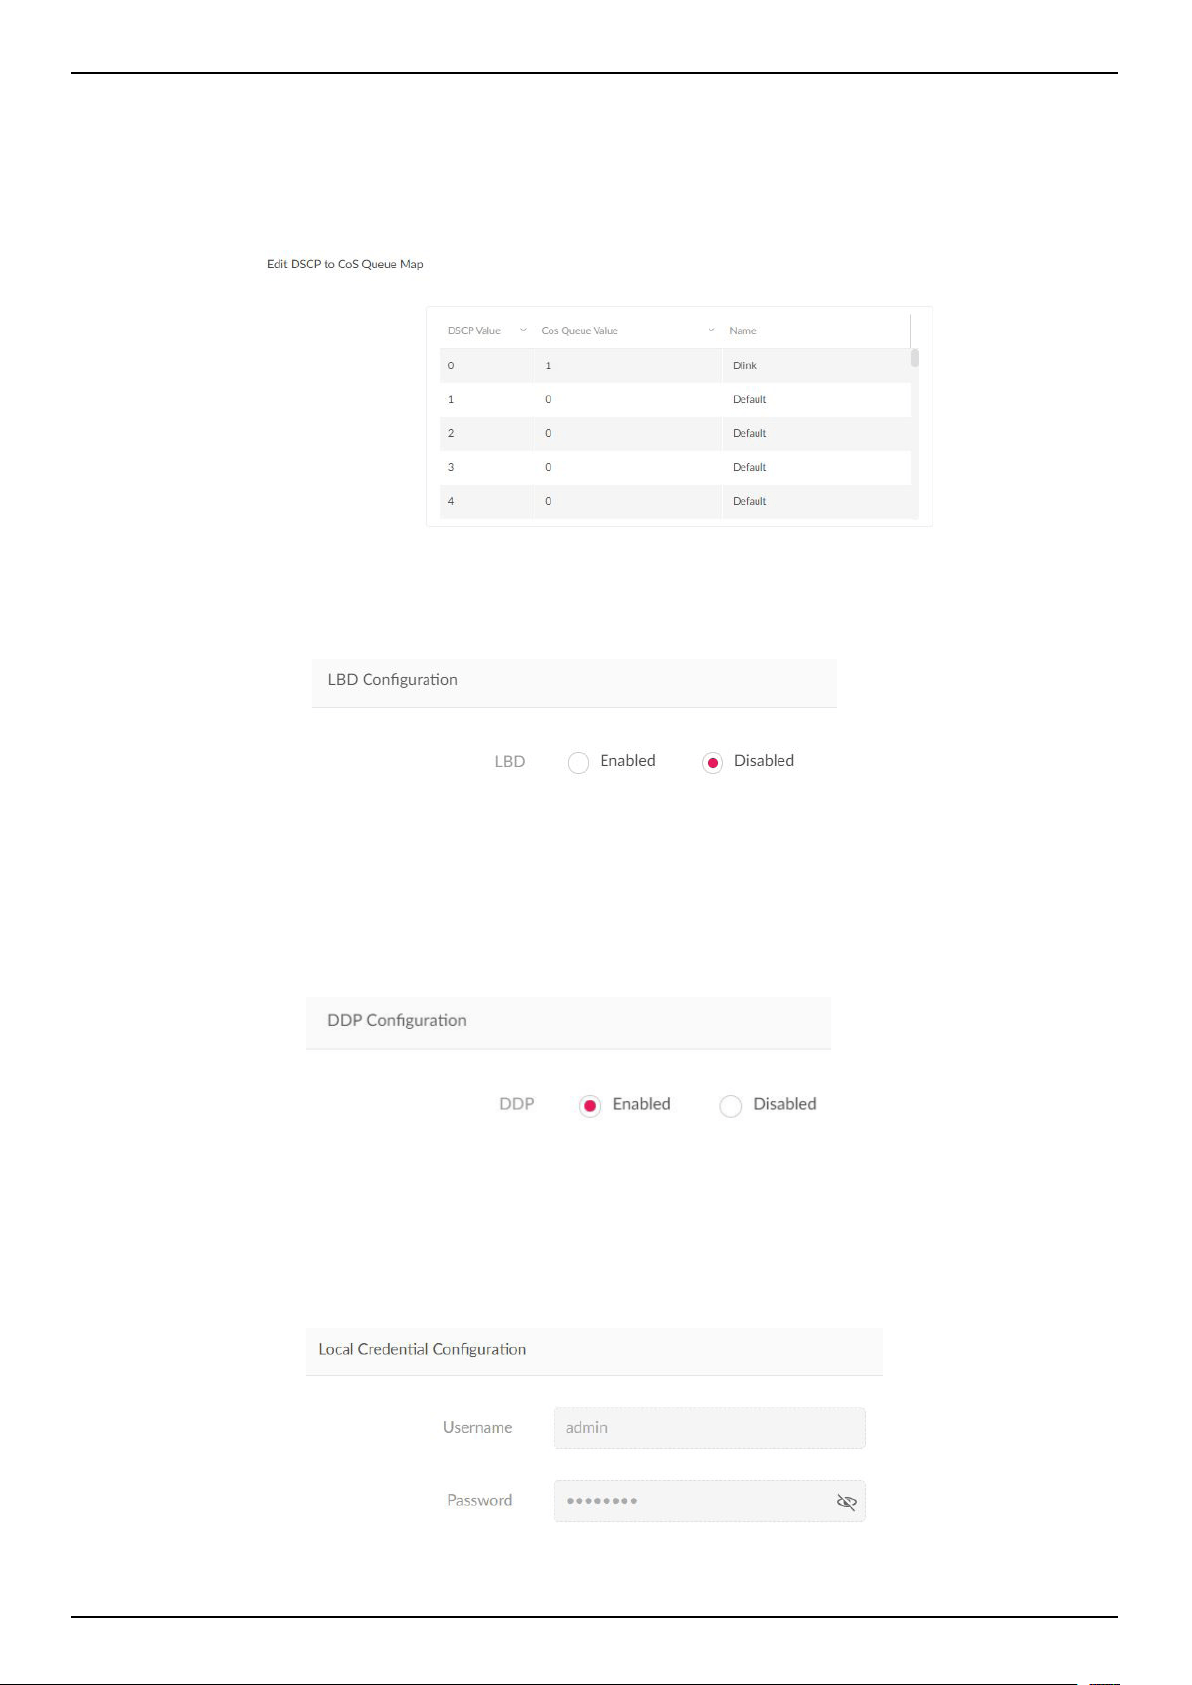
Nuclias Connect Software User Manual Nuclias Connect Conguration
Page 92
Quality of Service
The QoS feature can prioritize certain types of data with the use of dierentiated services model. The priorities are marked in
each packet using Dierentiated Services Code Point (DSCP) for trac classication. To set the DSCP to CoS (Class of Service)
queue, choose a value from the drop-down menu and set a name for it.
Note: One DSCP value can only be mapped to one CoS queue value.
LBD Conguration
The Loopback Detection (LBD) feature can detect loops occurring on one or across dierent ports. In the LBD eld, click En-
abled to turn on the feature. It is disabled by default.
DDP Conguration
The D-Link Discovery Protocol (DDP) is a communication protocol dened by D-Link. When enabled, your device will become
discoverable and can be managed by the DNC server. Features from DNA (D-Link Network Assistant) like IP settings, rmware
upgrade, reboot and reset function will also be supported.
In the DDP eld, click Enabled to turn on, or Disabled to turn o this feature. It is enabled by default.
Local Credential Conguration
The username and password of your device is listed here.

Nuclias Connect Software User Manual Nuclias Connect Conguration
Page 93
Nuclias Connect Conguration Prole Settings
IPv4 ACL
The IPv4 ACL (Access Control List) feature for the switch can help improve network performance and security by blocking se-
lected trac. Navigate to Conguration > Prole Settings > Site > Network > Switch > Your Device > IPv4 ACL to cong-
ure the settings.
In the User dened IPv4 ACL Rules section, the following elds are presented:
Once complete, click Add to add the rule, or Clear to clear all values.
In the IPv4 ACL Rule Table section, a summary of all IPv4 ACL Rule is displayed. Under the Action eld, click Edit to edit the
ACL rule; Click Delete to delete the ACL rule. Click Save to save the changes.
Field Description
Sequence No.
Set the sequence number. The range is 1-65535.
Select Auto to auto-assign the sequence number
Policy
Select to permit or deny what trac goes through the
switch.
Source
Enter the source IP address. When the Protocol is set to
Any, all trac destination will be evaluated.
Destination
Enter the destination IP address. When the destination
is set to Any, all trac destination will be evaluated.
Comment Enter a description for the rule.
Protocol Select between TCP, UDP, or Any.
Src Port
Specify the number of the source port. The valid value
is 0-65535. When the Src Port is set to Any, all trac
source will be evaluated.
Dst Port
Specify the number of the destination port. The valid
value is 0-65535. When the Dst Port is set to Any, all
trac source will be evaluated.
Switch
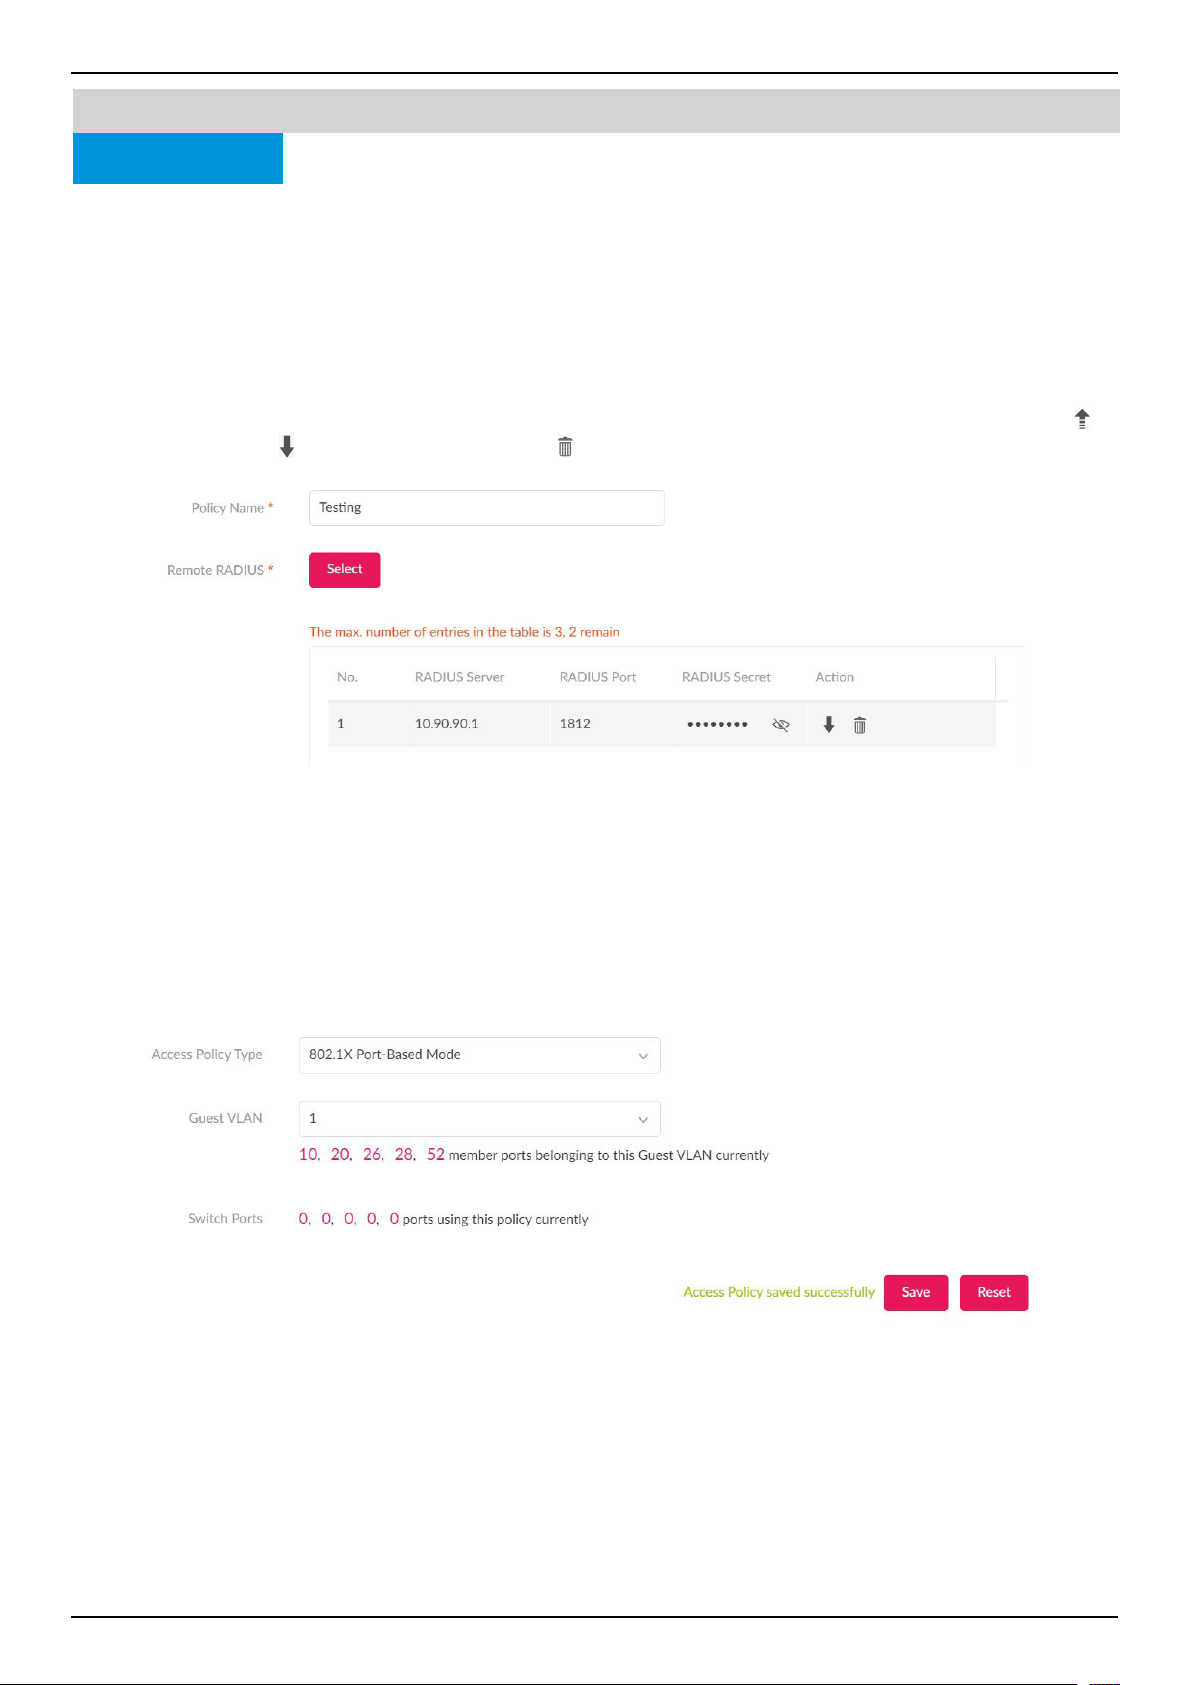
Nuclias Connect Software User Manual Nuclias Connect Conguration
Page 94
Nuclias Connect Conguration Prole Settings
Access Policy
D-Link switches support 802.1X authentication, MAC authentication and port security to prevent unauthorized client from ac-
cessing the network. Navigate to Conguration > Prole Setting > Site > Network > Switch > Your Device > Access Policy
to congure the settings.
In the Policy Name eld, enter a name for the policy. In the Remote RADIUS Server section, specify up to 3 RADIUS Servers
for the switches to forward access requests. Authentication requests will be processed by each of the RADIUS servers in the or-
der that they are submitted. Click Select to select existing RADIUS servers created via the RADIUS Server page. A pop window
will be presented to conrm your selection. Click OK to conrm, or Cancel to close the window.
Once the RADIUS Servers is selected, a summary of the RADIUS servers will be listed in the table. In the Action eld, click
to
move the entry up, click to move the entry down. Click to delete the entry.
In the Access Policy Type eld, select 802.1x Port Based. This will allow only one user to be authenticated per port by a re-
mote RADIUS server.
In the Guest VLAN eld, specify a guest VLAN ID or disable it from the drop-down menu. The VLAN ID range is 1 to 4094. One
switch only supports one Guest VLAN. When a VLAN ID is selected, the member port information will be presented. Click the
number to be directed to the Port Settings page
In the Switch Ports eld, the number of switch ports that’s applying to the policy is listed. Click the numbers to be directed to
the Port Settings page.
Switch
Nuclias Connect Software User Manual Nuclias Connect Conguration
Page 95
Nuclias Connect Conguration Prole Settings
Port Setting
Navigate to Conguration > Prole Settings > Network > Switch > Your Switch > Port Setting, a summary of each of the
switch port groups is displayed. Note that the number of port groups depends on the switch series.
To lter the search, from the Search By drop down menu, select VLAN/Port/Access Policy, and select Port Type Access/
Trunk/All. Under the Search column, enter a relevant keyword to narrow the search. Click
to start the search. The summary
includes information such as Port number, Link, Port type, VLAN, Allowed VLAN, Port State, PoE, RSTP, LBD, DDP, Port
Shutdown Schedule, PoE Supply Schedule, and Access Policies.
Note that under the Link eld, the value is Default (System default value) and cannot be modied in Prole Conguration.
Links can only be modied in Standalone mode via Monitor > Switch > Switch Port, or Monitor > Device Detail page > Ports.
To make changes to a port or port group, select the port(s) and click
to make the desired changes. Scroll down to view the
Port Setting table. Once complete, click Save to save the changes.
Switch
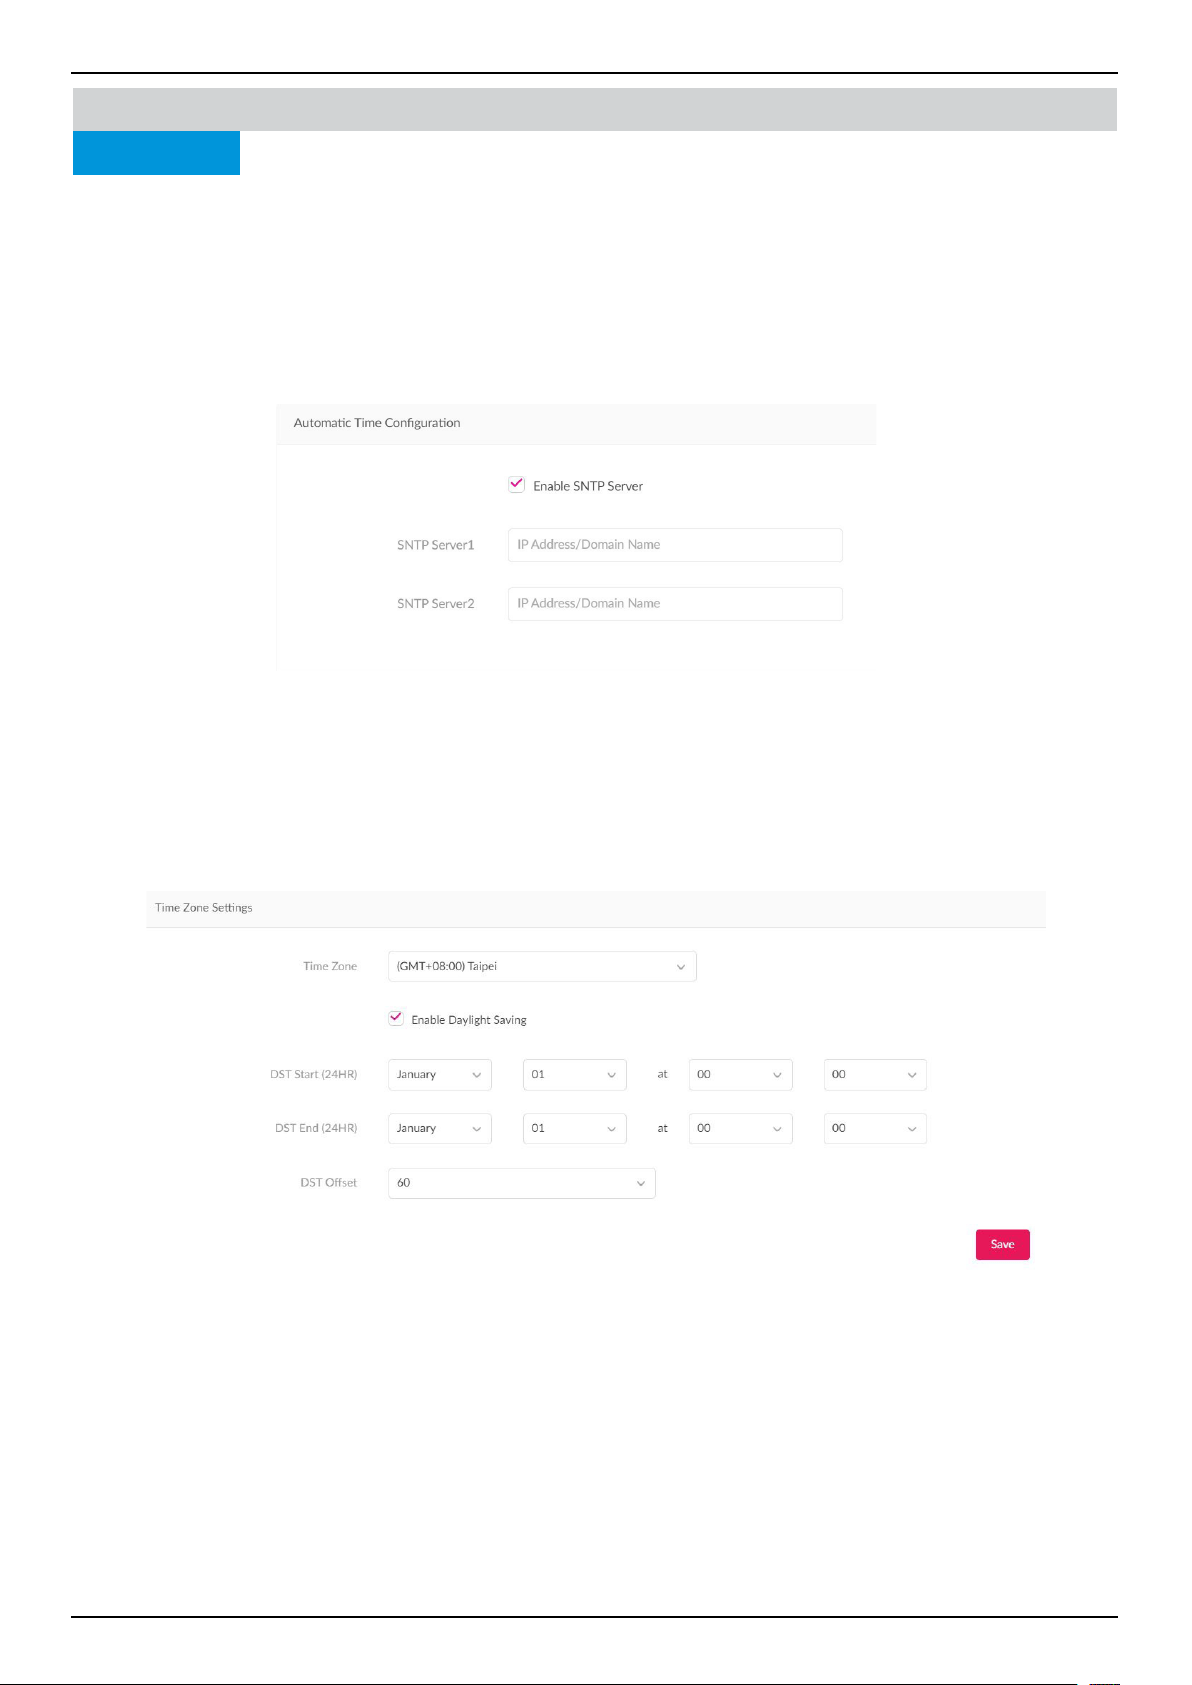
Nuclias Connect Software User Manual Nuclias Connect Conguration
Page 96
Nuclias Connect Conguration Prole Settings
SNTP
The SNTP (Simple Network Time Protocol) function allows the switch to synchronize clocks on a network. Navigate to Cong-
uration > Prole Settings > Site > Network > Switch > Your Switch > SNTP to conguration the settings.
Under the SNTP tab, you can congure Automatic Time Conguration and Time Zone Settings.
In the Automatic Time Conguration section, click Enable SNTP Server to enable or disable it.
Once enabled, specify the IPv4 address or domain name of the primary SNTP server from which the system time is retrieved in
the SNTP Server 1 eld, and the secondary SNTP server in the SNTP Server 2 eld.
In the Time Zone Settings section, users can congure time zones and daylight saving for SNTP. From the Time Zone eld,
select your local time zone. Click Enable Daylight Saving to enable or disable daylight saving.
In the DST Start (24HR) eld, enter the month, date, and time in which DST will start at. In the DST End (24HR) eld, enter
the month, date, and time in which DST will end at. In the DST Oset eld, specify the amount of time that will constitute the
local DST oset - 30, 60, 90, or 120 minutes. The default is 60 min. Click Save when complete.
Switch

Nuclias Connect Software User Manual Nuclias Connect Conguration
Page 97
Conguration Firmware Upgrade
The Firmware Upgrade function allows users to perform a rmware upgrade. For online update, please conrm your device is
online. For manual upgrade, please visit D-Link website of your region to see if newer rmware available.
Navigate to Conguration > Firmware Upgrade > [Site] > [Network].
Block Description
Online Check
Upgrade
Firmware
Click to congure online upgrade.
Check For Update Click to check if newer rmware is available on
online server.
Manual Upgrade
Firmware
Click to congure manual upgrade.
Change Click to select a rmware le to upload. Files
are model specic.
Time Start Click the drop-down menu to select a specic
time or update immediately.
Click Apply to save the above conguration settings.
Click Clear to delete the dened settings.
The rmware upgrade status and result can be seen at the Run Status section. The results can be sorted by Run Time, Name,
IP Address, MAC Address, Model Type and Result.
Nuclias Connect
Nuclias Connect Software User Manual Nuclias Connect Conguration
Page 98
Conguration SSL Certicate
The SSL Certicate function provides the means to install an SSL certicate for use on the network. To accomplish this task, an
intermediate certicate is required. The intermediate certicate is used to establish the trust of the SSL certicate by binding it
to the Certicate Authority’s root certicate. To complete the certicate trust conguration, the SSL Certicate function requires
the certicate le to be uploaded.
In the Update SSL certicate section, the following parameters can be congured.
Note that this setting is only applicable to Access Points.
Options Description
Upload Certicate From
File
Click Browser... to select the SSL certicate le located on the drive to
upload.
Upload Key From File Click Browser... to select the SSL key le located on the local drive to
upload.
Click Upload to initiate the le upload. The upload status and result will appear in the below area.
Nuclias Connect
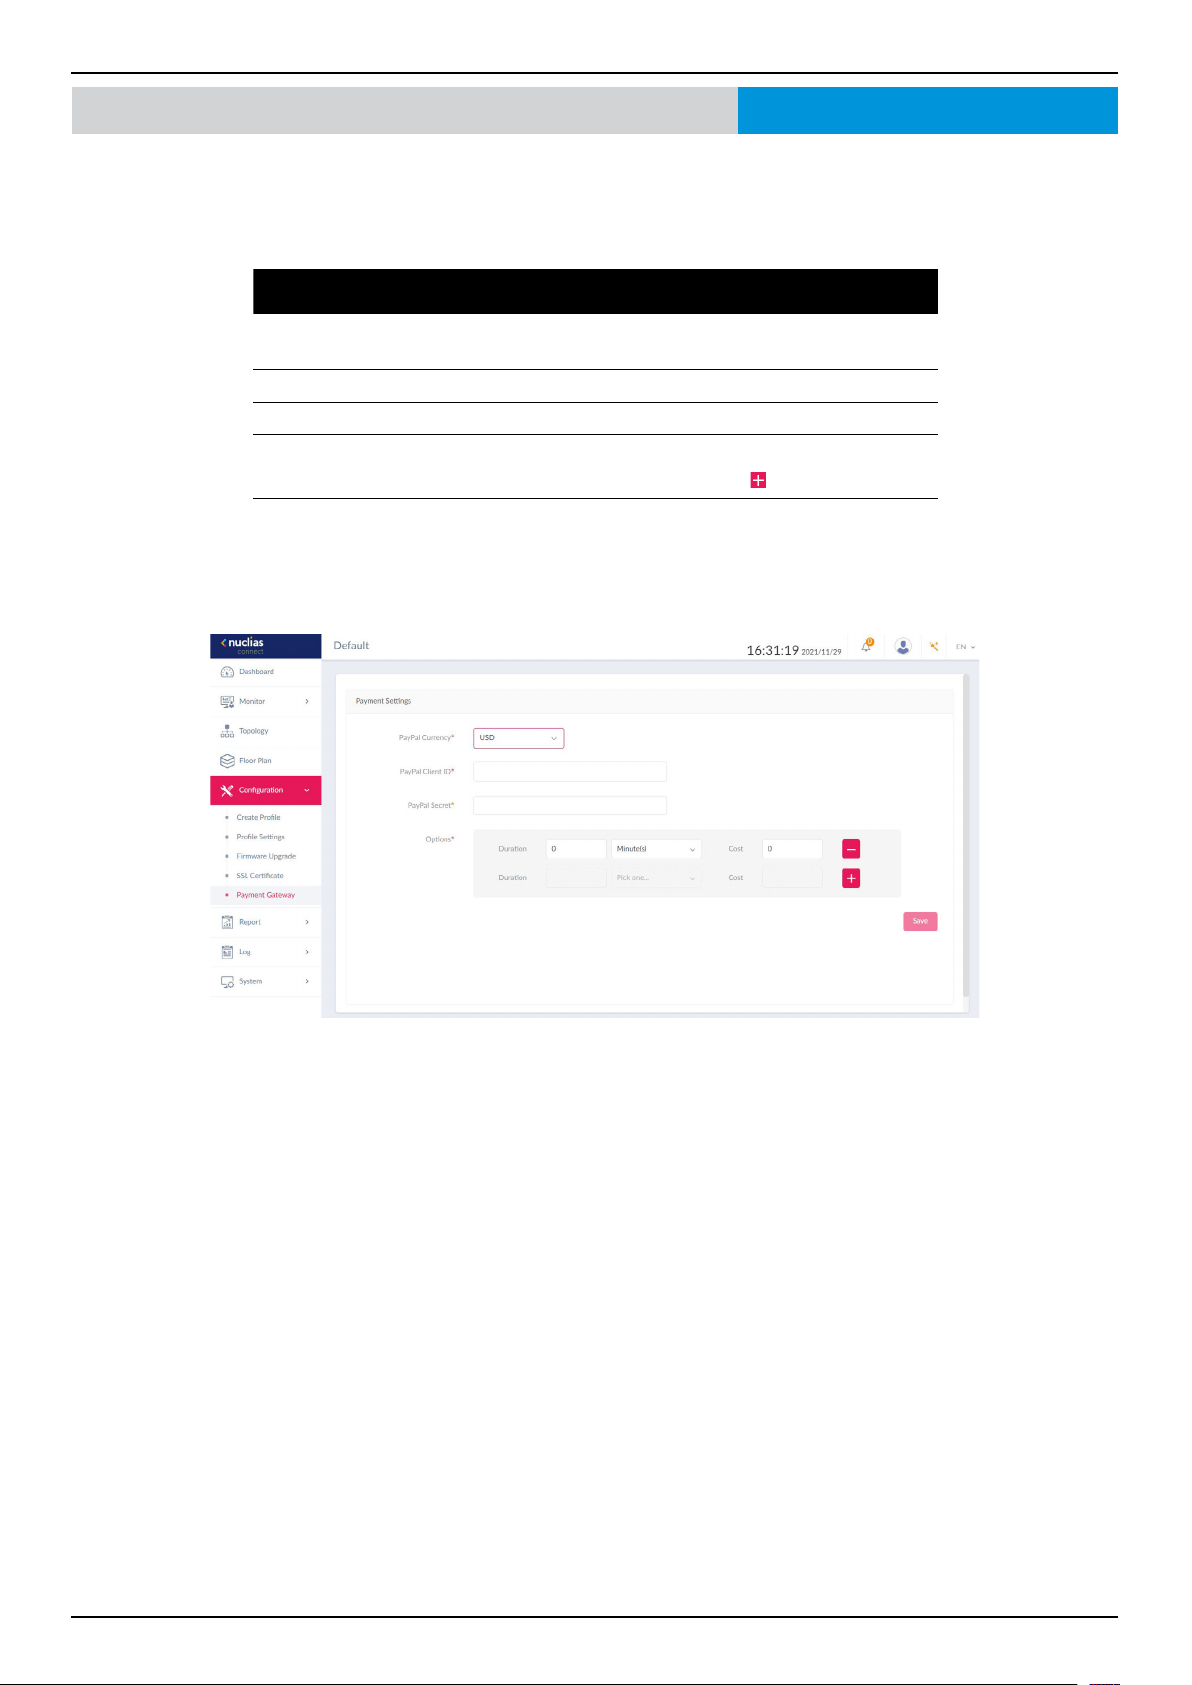
Nuclias Connect Software User Manual Nuclias Connect Conguration
Page 99
Conguration Payment Gateway
The payment gateway is a function that allows e-commerce services within the network. The Payment Gateway page will show
payment settings and options necessary to enable payment services.
Navigate to Conguration > Payment Gateway.
Parameter Description
PayPal Currency Click the drop-down menu to select the currency code for
the Paypal account.
PayPal Client ID Enter the username for the Paypal account.
PayPal Secret Enter the password for the Paypal account.
Options Enter the duration time in minutes, hours, or days as well as
the associated cost for the entry. Click
to enter the option.
Click Save to save the values and update the screen.
Nuclias Connect
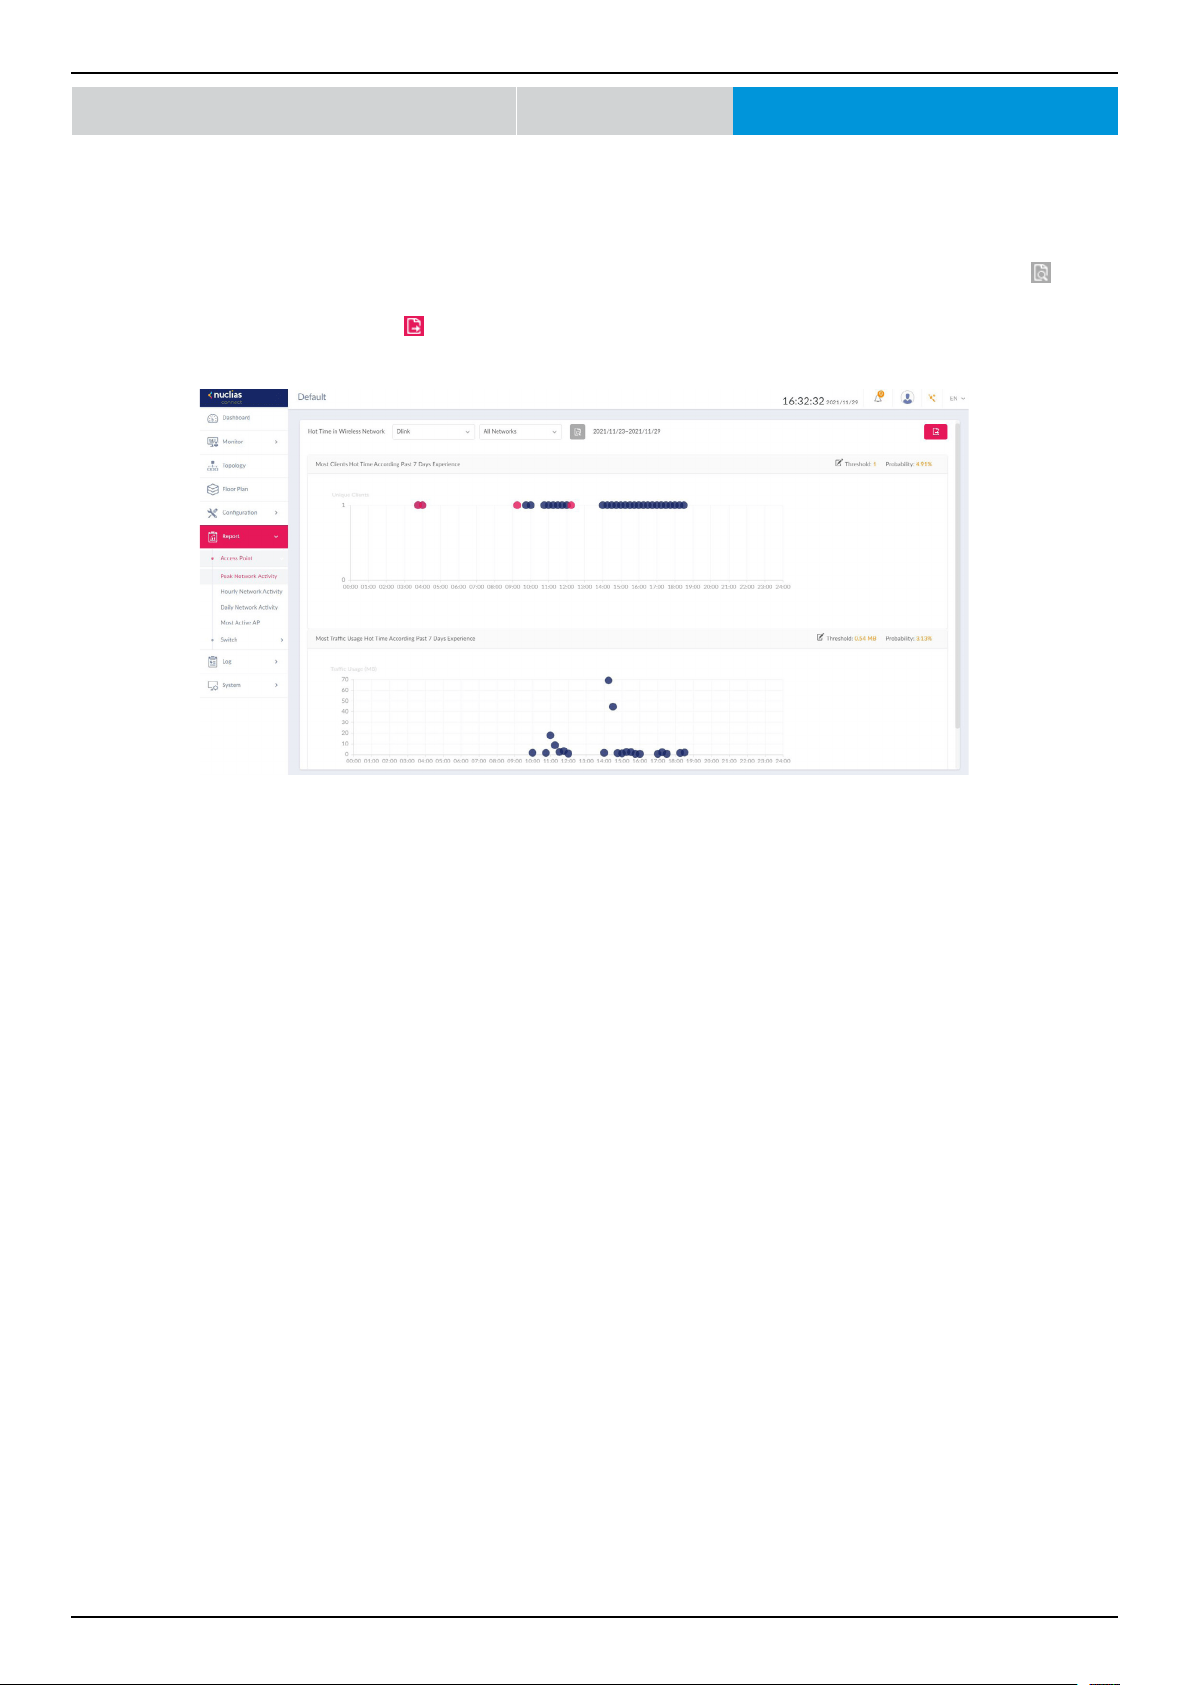
Nuclias Connect Software User Manual Nuclias Connect Conguration
Page 100
Report Peak Network Activity
The Peak Network Activity function allows administrators to monitor wireless trac on the network. Wireless activity for all or
specic sites and networks can be displayed according to unique clients and trac usage.
Navigate to Report > Peak Network Activity to view the information.
To view a network activity report, select the site and network from the corresponding drop-down menu and click
to view
the report.
Once a report has been generated, click
to save the report to a local PDF le.
Nuclias Connect Access Point
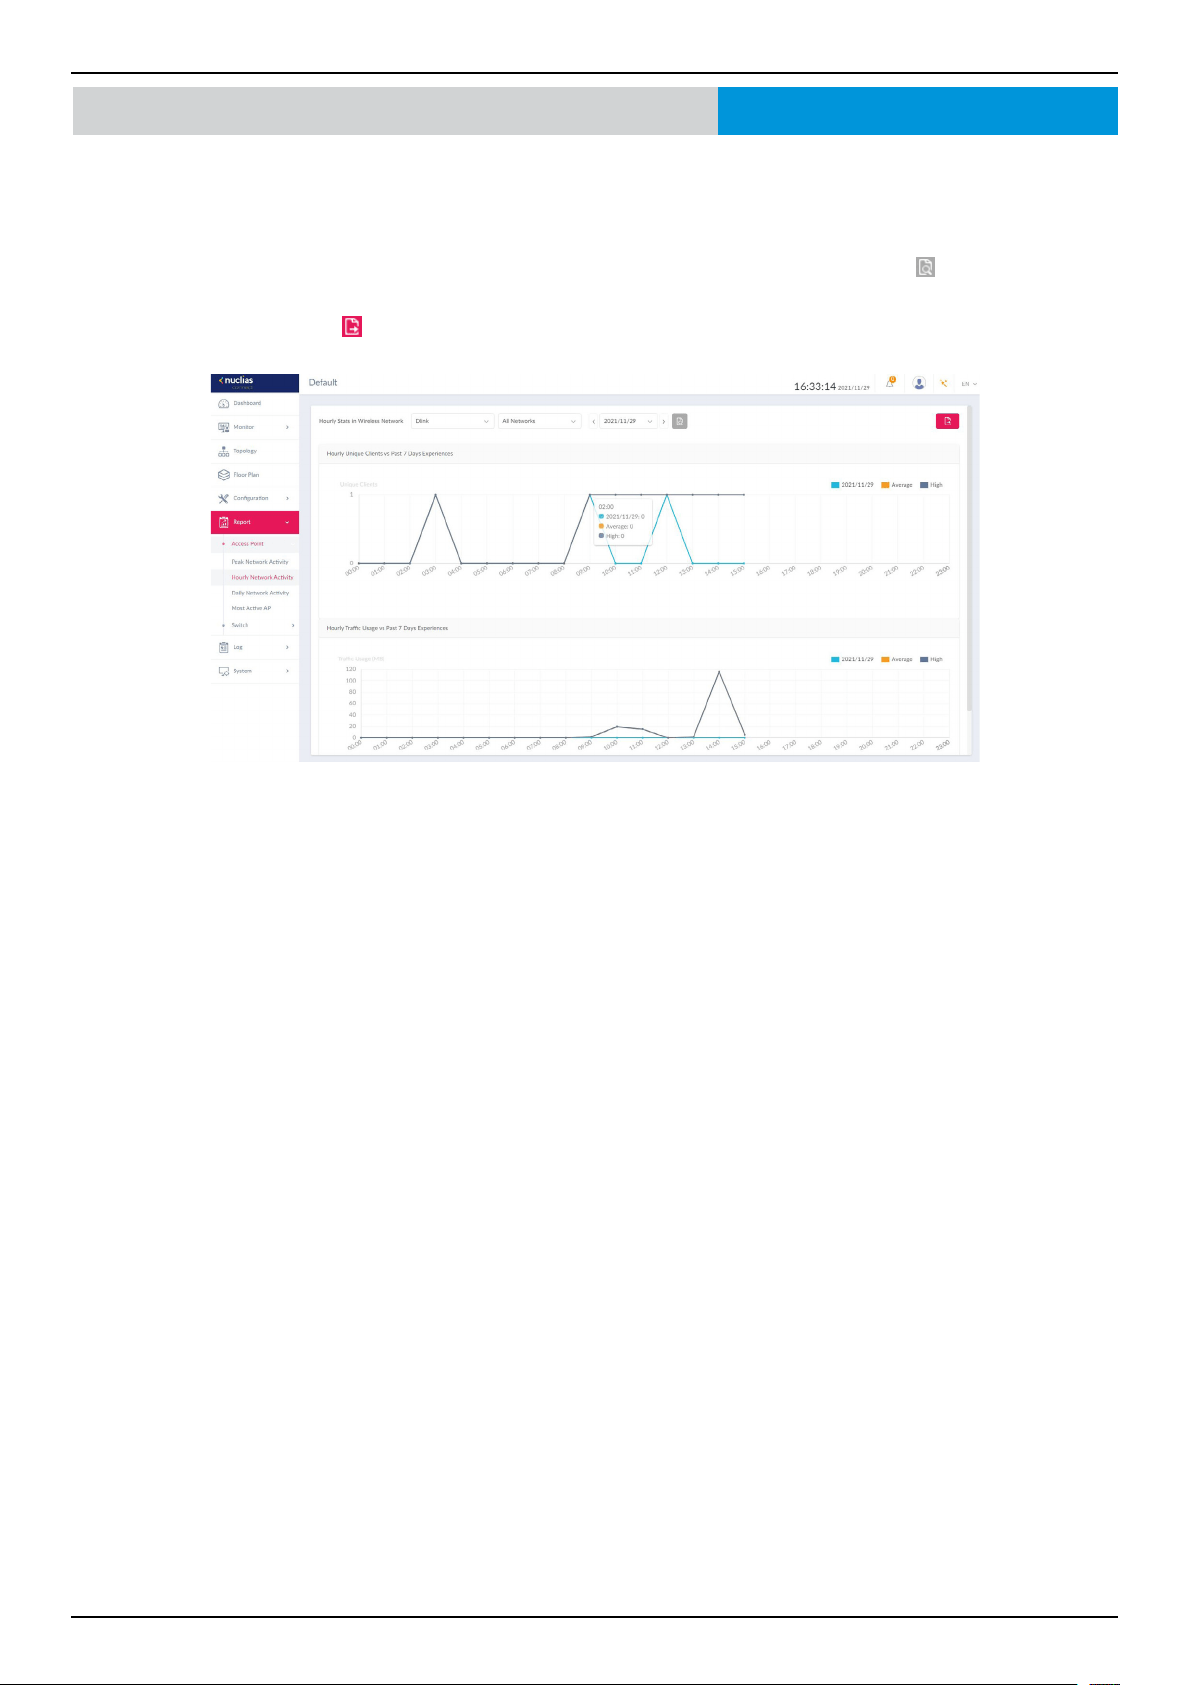
Nuclias Connect Software User Manual Nuclias Connect Conguration
Page 101
The Hourly Network Activity function allows administrators to monitor wireless trac on the network. Wireless activity for all or
specic sites and networks is displayed according to unique clients and trac usage as reported by the hour.
Navigate to Report > Hourly Network Activity to view the report.
To start a daily report, select the site and network from the corresponding drop-down menu and click
to view the report.
Once a report is generated, click
to save the report to a local PDF le.
Report Hourly Network ActivityNuclias Connect Access Point
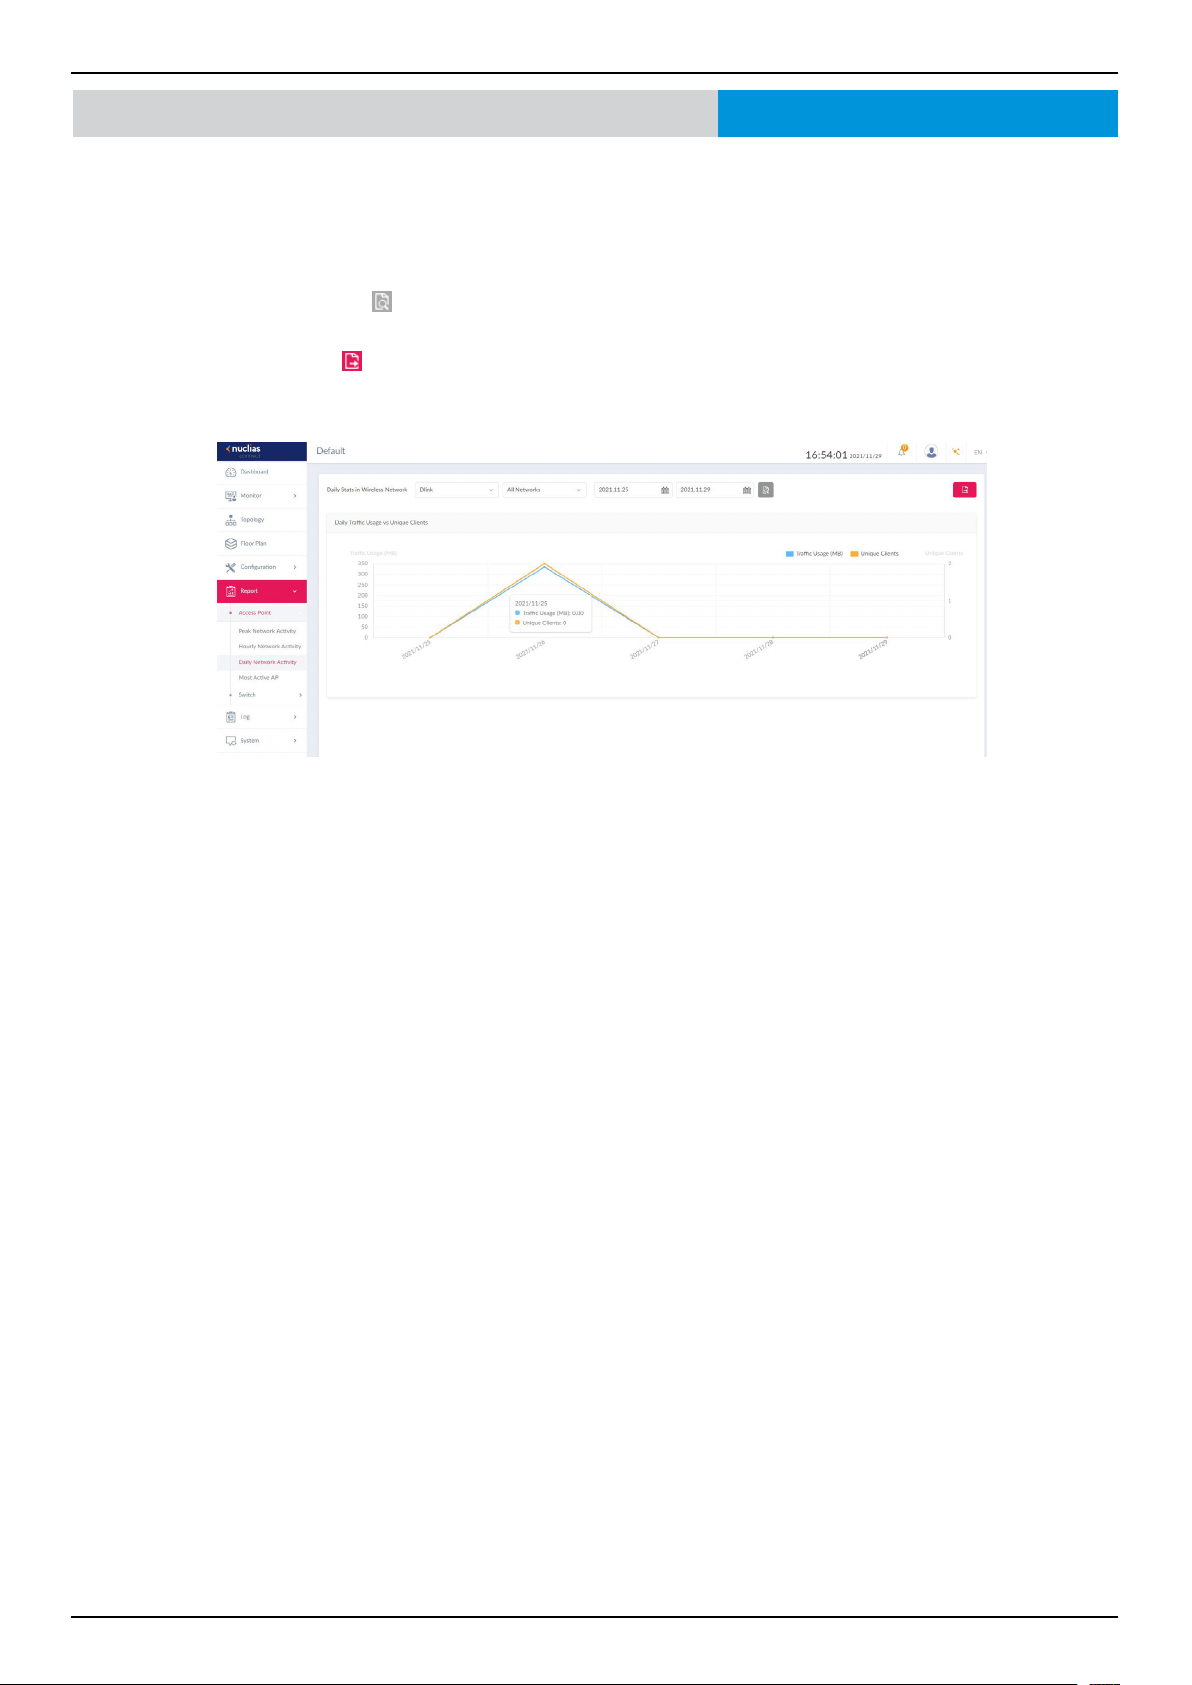
Nuclias Connect Software User Manual Nuclias Connect Conguration
Page 102
The Daily Network Activity function allows administrators to monitor daily wireless trac on the network. Wireless activity for
unique clients and trac usage is displayed according to unique clients and trac usage as reported by the day.
Navigate to Report > Daily Network Activity to generate and view the report.
To display a specic client’s trac usage, select a site, network, and dene the starting and ending dates of the search. Once the
search parameters are dened, click
to view the report.
Once a report is generated, click
to save the report to a local PDF le.
Report Daily Network ActivityNuclias Connect Access Point

Nuclias Connect Software User Manual Nuclias Connect Conguration
Page 103
To view a specic client’s trac usage, select a client from the most active APs column. Available maps can be edited or deleted
by clicking
or . In the Edit Map of Most Active APs page, enter the name of the map and click the Select AP drop-down
menu to select an AP from a list of available APs. Once dened, click Save to complete the process.
To add a new map, click
to open the Create Map of Most Active APs. Enter the map name in the name eld. Customize the
map by dragging and dropping an image (supported le formats: *.png,*.jpg; max. size: 10M) or browsing a local folder to select
an image.
To view a network AP active map report, select the date and time, and click
to view the report.
Once a report has been generated, click
to save the report to a local PDF le.
Report Most Active APNuclias Connect Access Point
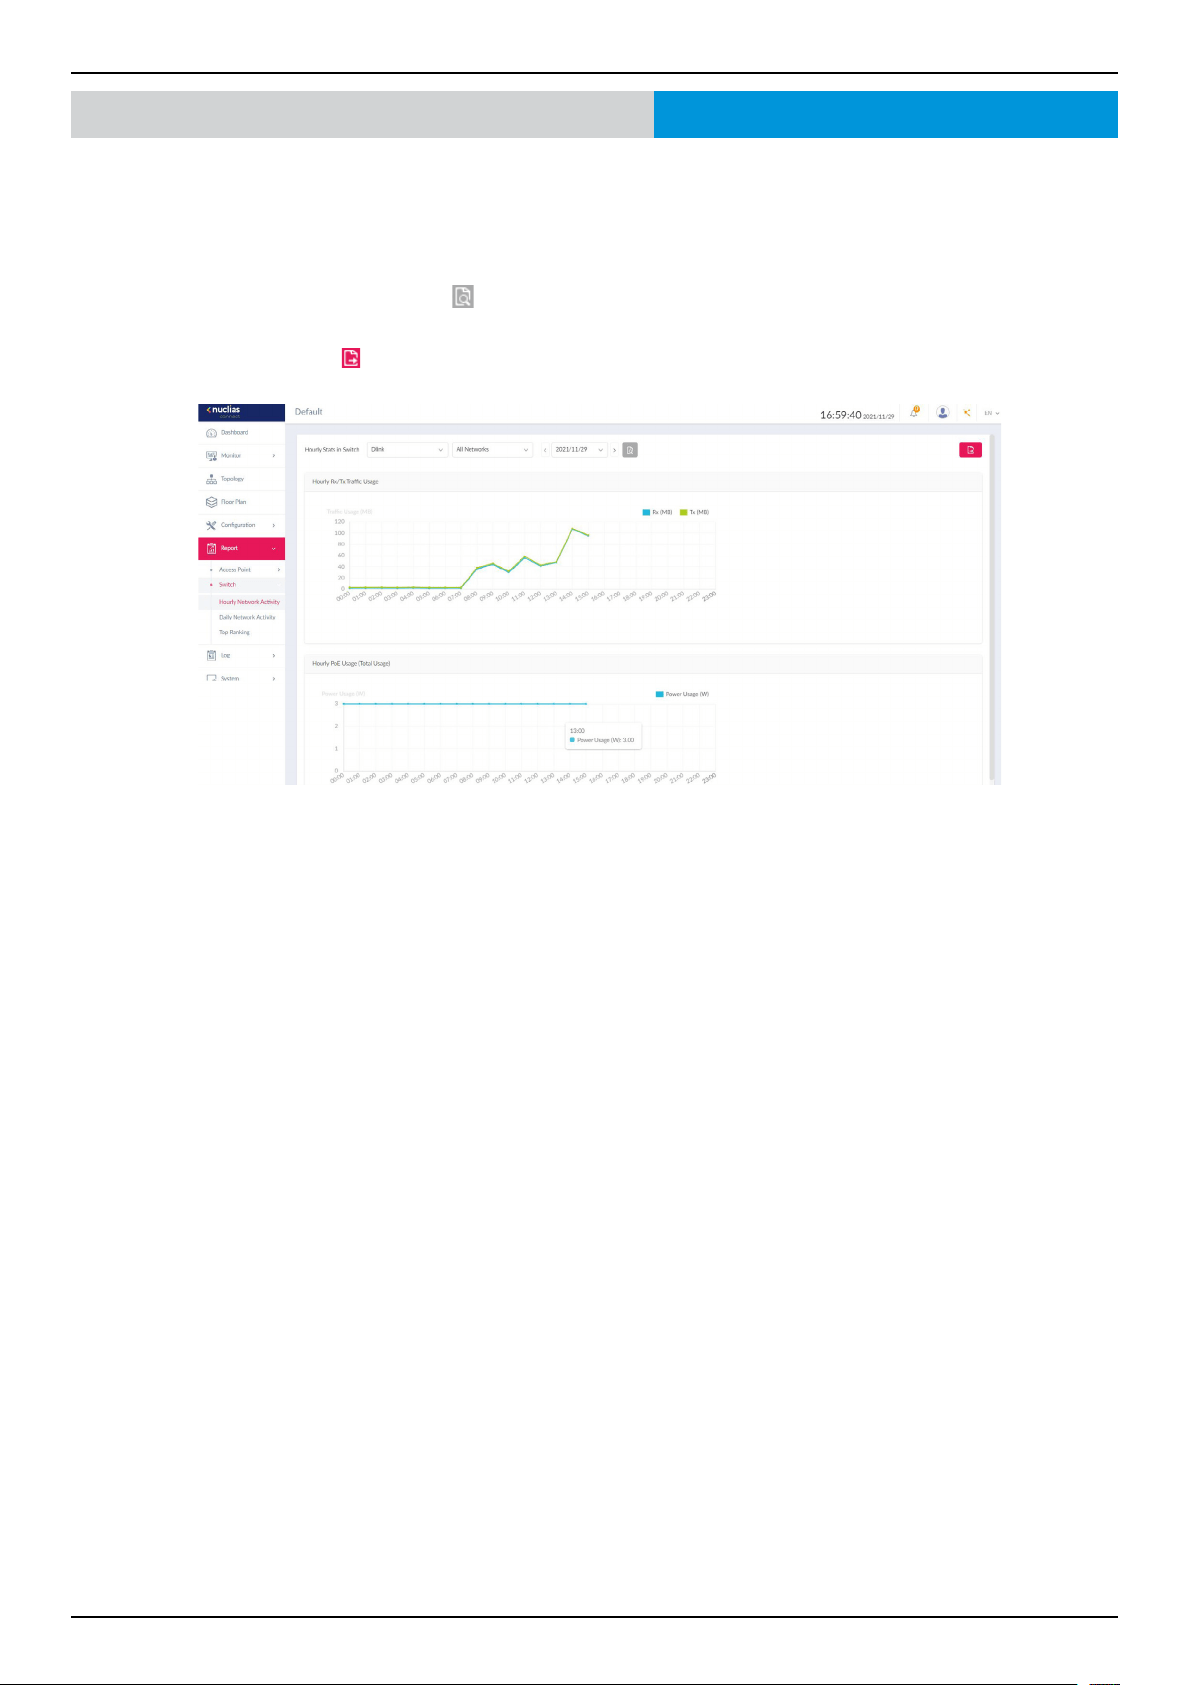
Nuclias Connect Software User Manual Nuclias Connect Conguration
Page 104
Report
Hourly Network Activity
Nuclias Connect Switch
The Hourly Network Activity function allows administrators to monitor daily trac and power usage on the network. Trac
usage and PoE Usage is reported by the hour. Navigate to Report > Switch > Hourly Network Activity to generate and view
the report.
To display clients’ trac usage and PoE usage, select a site, network, and dene the starting and ending dates of the search.
Once the search parameters are dened, click
to view the report.
Once a report is generated, click
to save the report to a local PDF le.
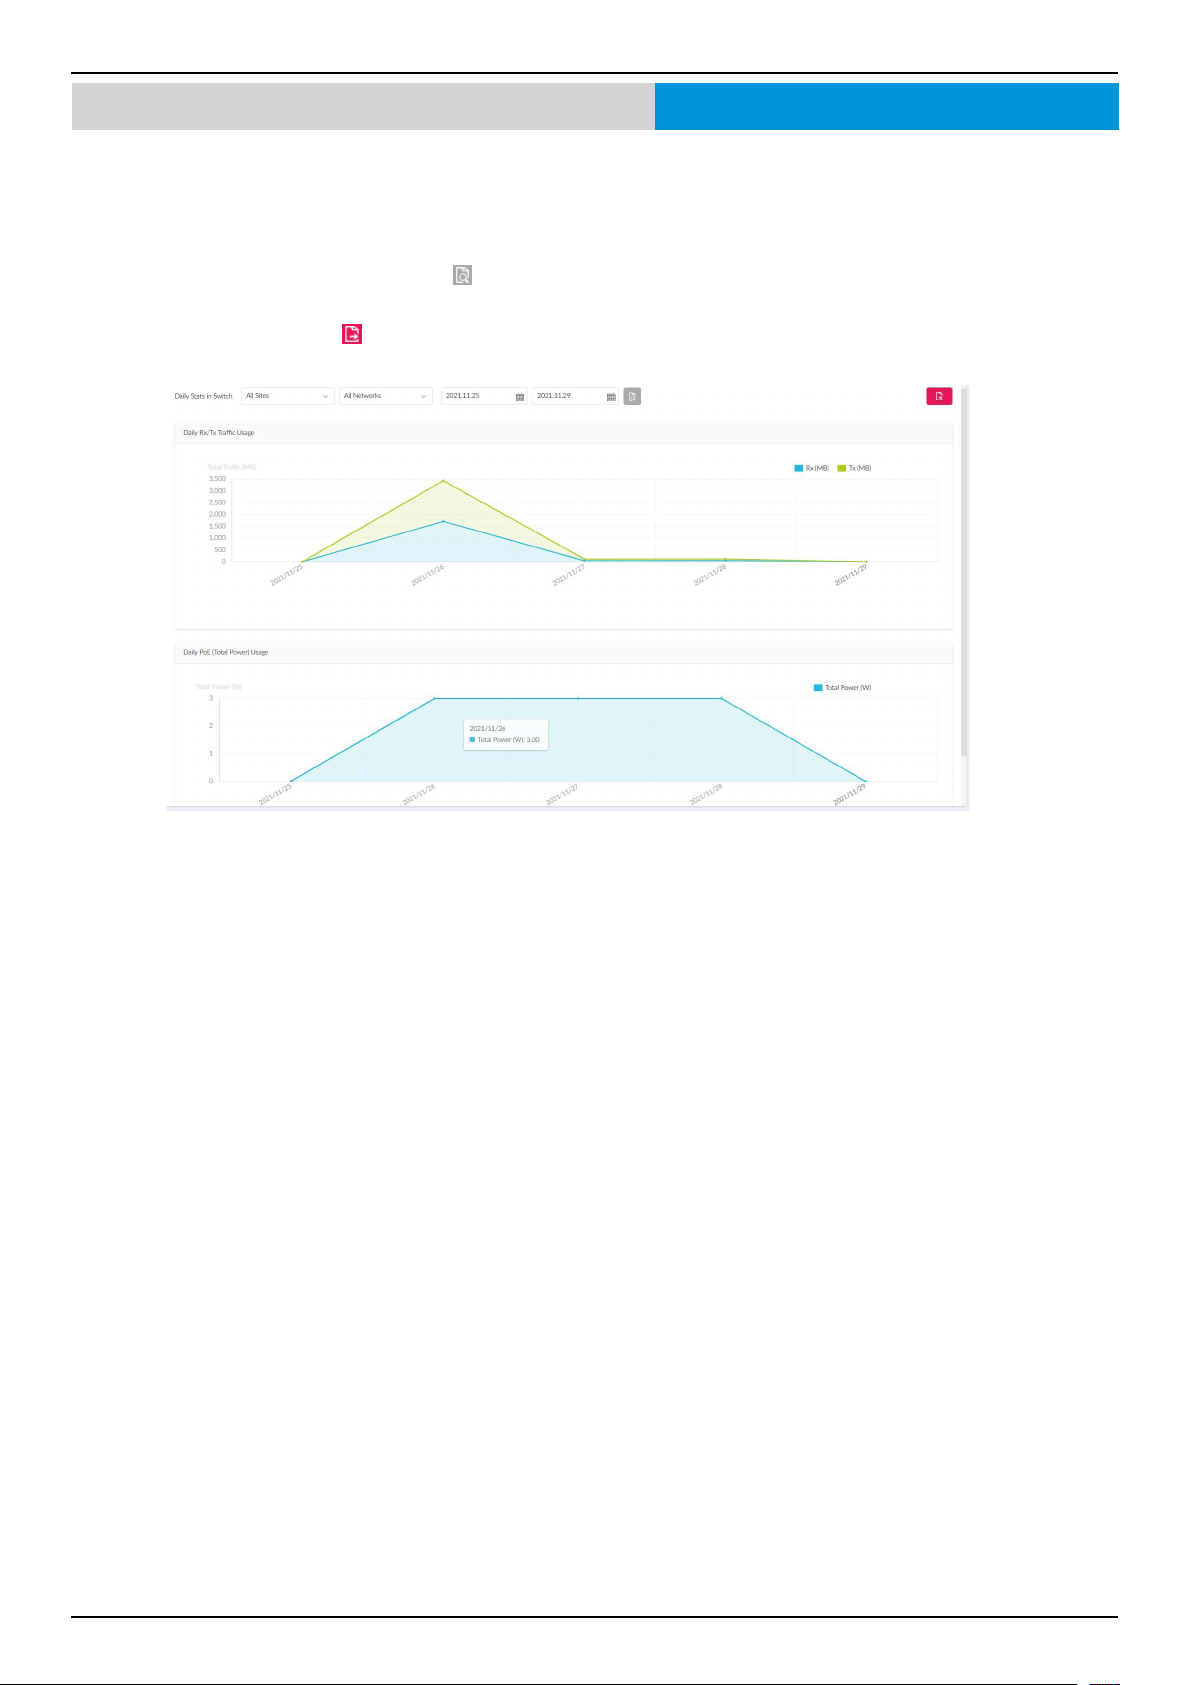
Nuclias Connect Software User Manual Nuclias Connect Conguration
Page 105
Report Daily Network ActivityNuclias Connect Switch
The Daily Network Activity function allows administrators to monitor daily trac and power usage on the network.
Navigate to Report > Switch > Daily Network Activity to generate and view the report.
To display clients’ trac usage and PoE usage, select a site, network, and dene the starting and ending dates of the search.
Once the search parameters are dened, click
to view the report.
Once a report is generated, click
to save the report to a local PDF le.
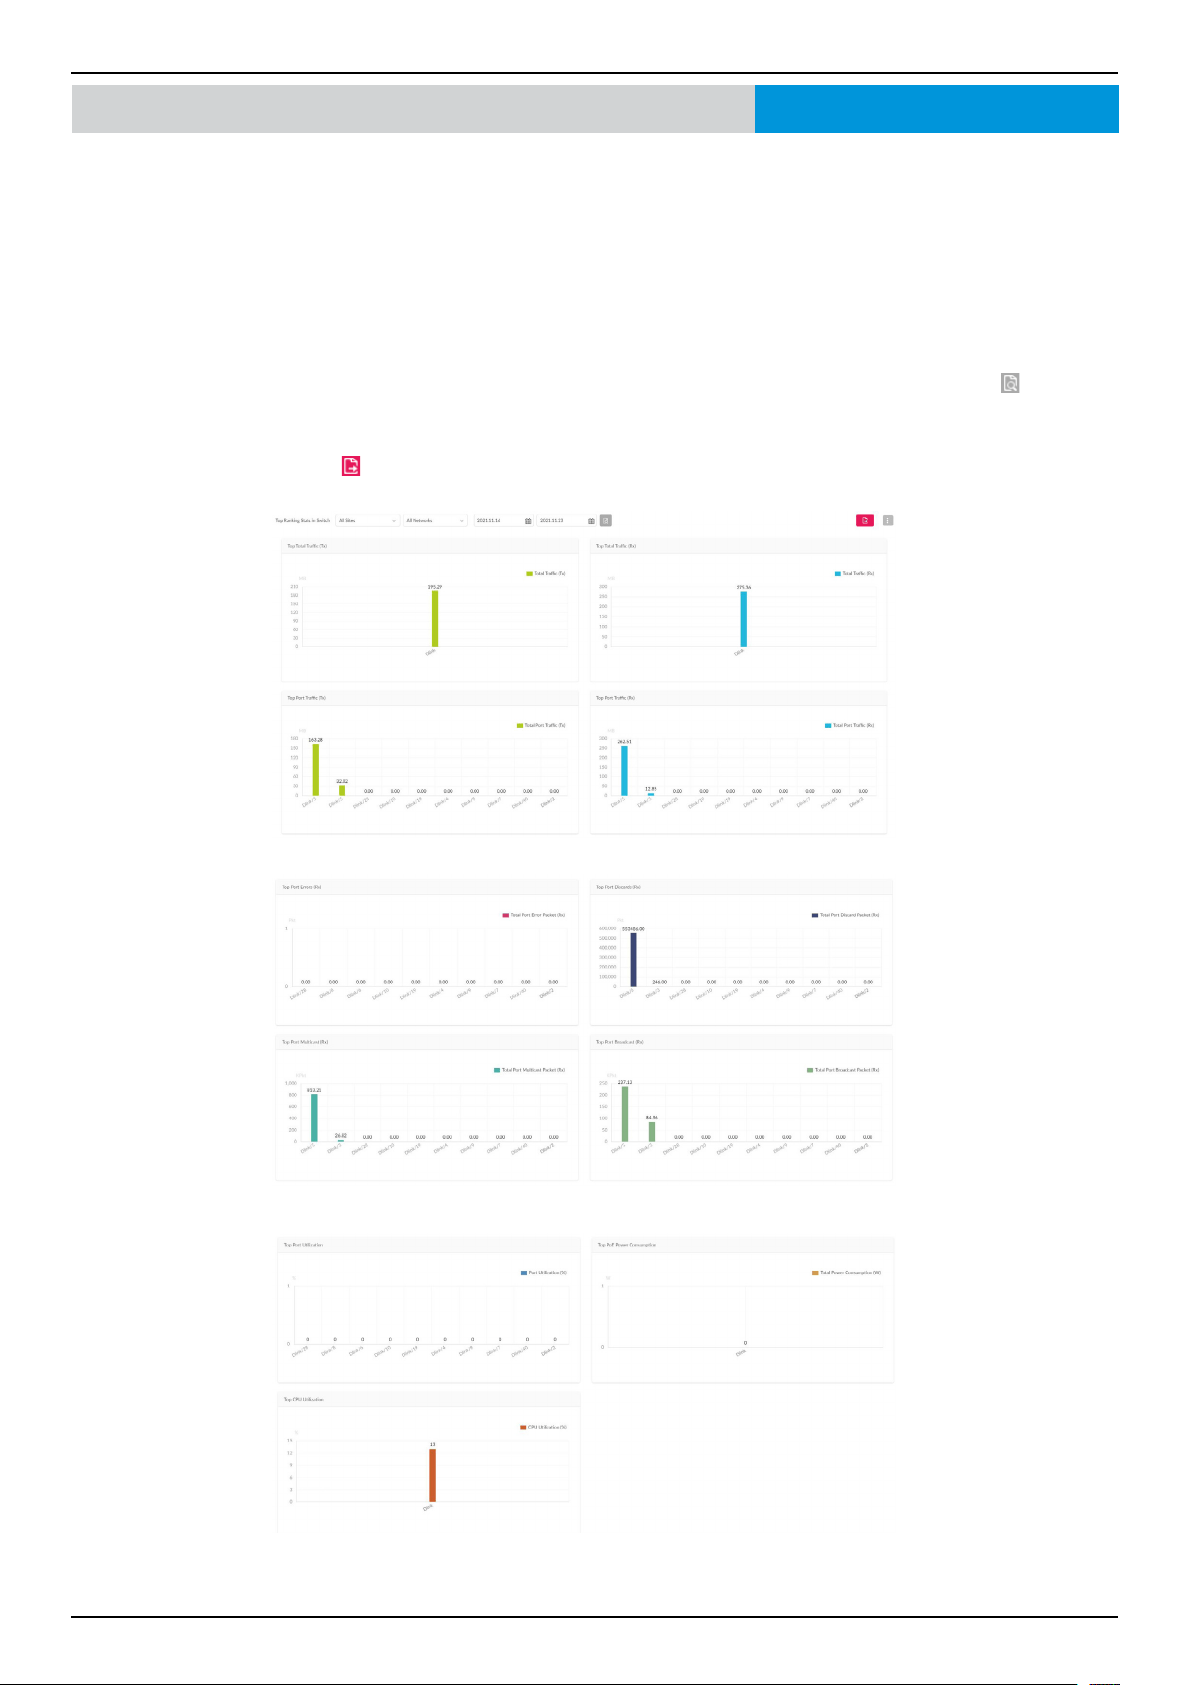
Nuclias Connect Software User Manual Nuclias Connect Conguration
Page 106
Report Top RankingNuclias Connect Switch
The Top Ranking report allows administrators to view a range of switch trac reports sorted by top 10 rankings on the site
and network.
The following ranking reports are available: Top Total Trac (Tx), Top Total Trac (Rx), Top Port Trac (Tx), Top Port Trac
(Rx), Top Port Errors (Tx), Top Port Discards (Rx), Top Port Multicast (Rx), Top Port Broadcast (Rx), Top Port Utilization,
Top PoE Power Consumption, and Top CPU Utilization.
Navigate to Report > Top Ranking to view the report.
To lter the top ranking report, select the site and network from the corresponding drop-down menu and click
to view the
report.
Once a report is generated, click
to save the report to a local PDF le.
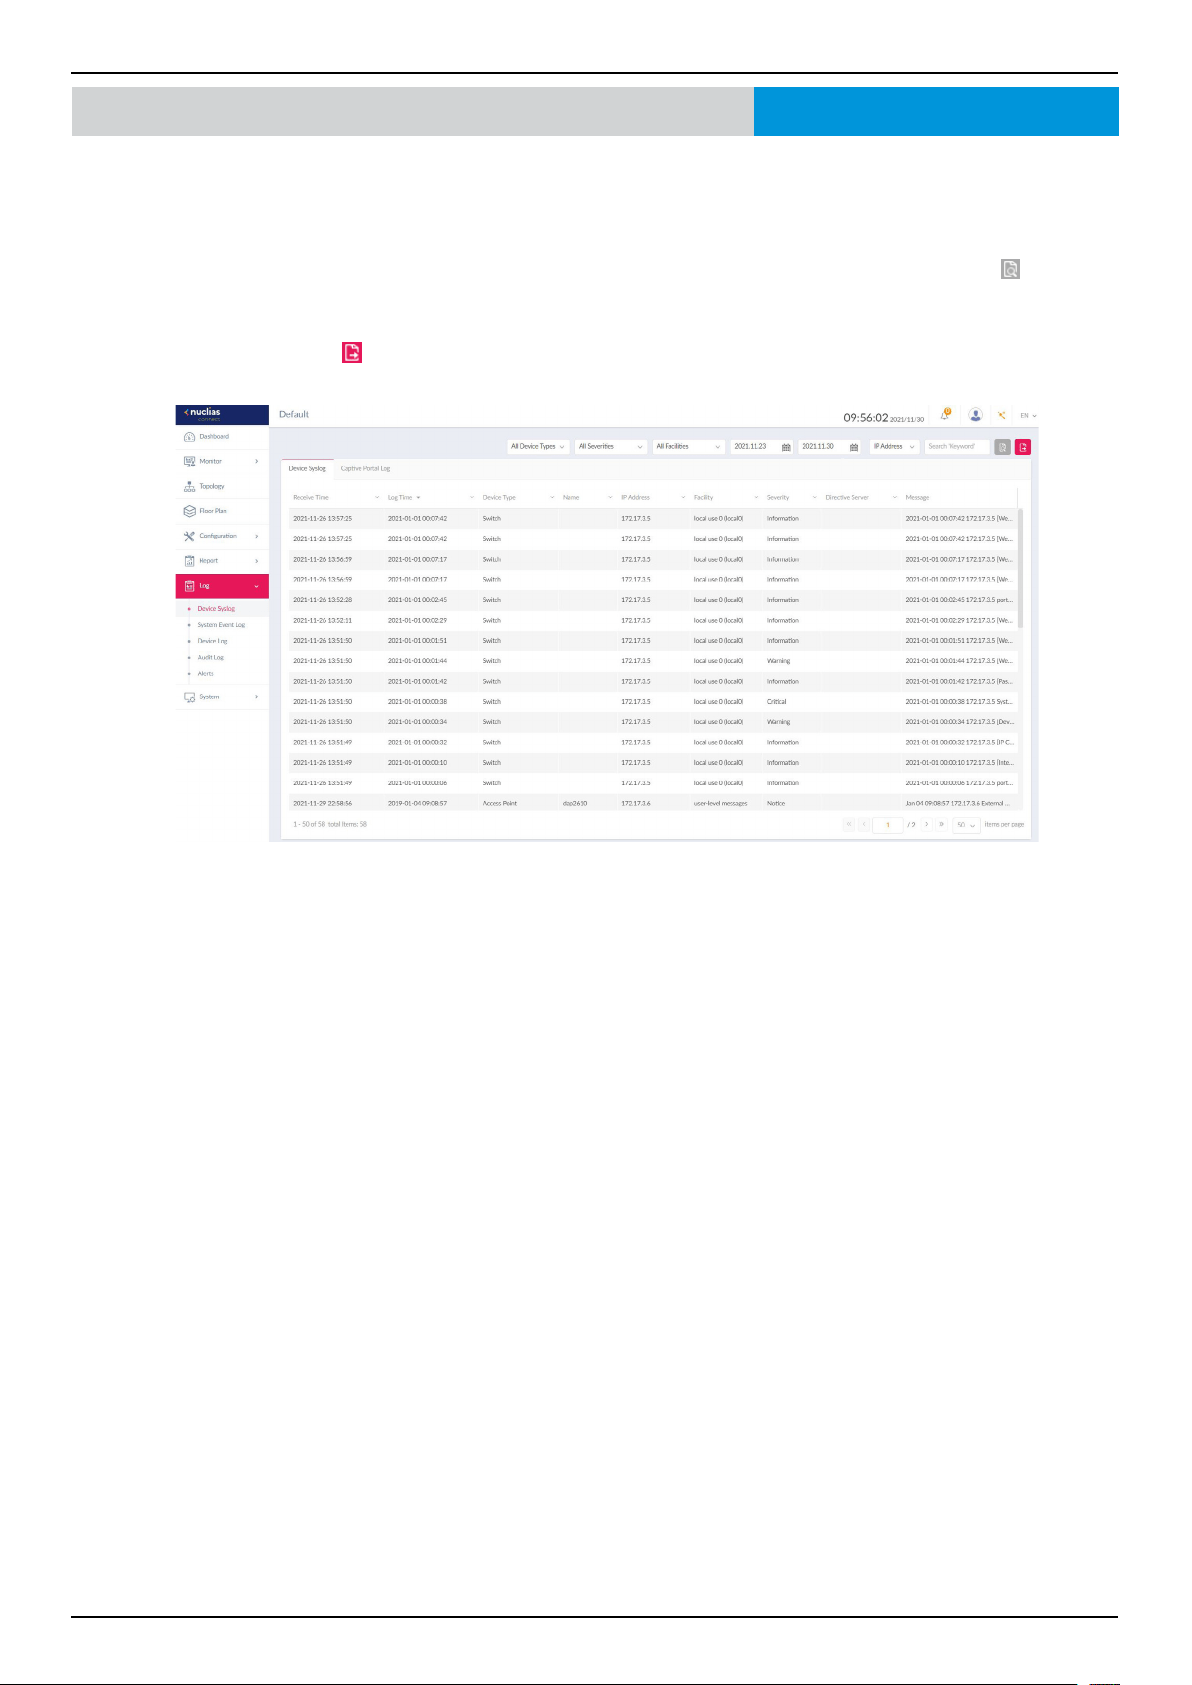
Nuclias Connect Software User Manual Nuclias Connect Conguration
Page 107
Log Device Syslog
The Syslog function allows administrators to view alert messages for events concerning system logs. Log messages for the
system and captive portals can be viewed here. Navigate to Log > Syslog to view the relevant information.
To start a syslog report, select the event severity, facility system, and dene the period of time to report. Click the drop-down
menu to dene the type of search criteria to view, IP Address or Trap Details. Fill in the keyword eld and click
to view the
generated report.
Once a report is generated, click
to save the report to a local PDF le.
Nuclias Connect
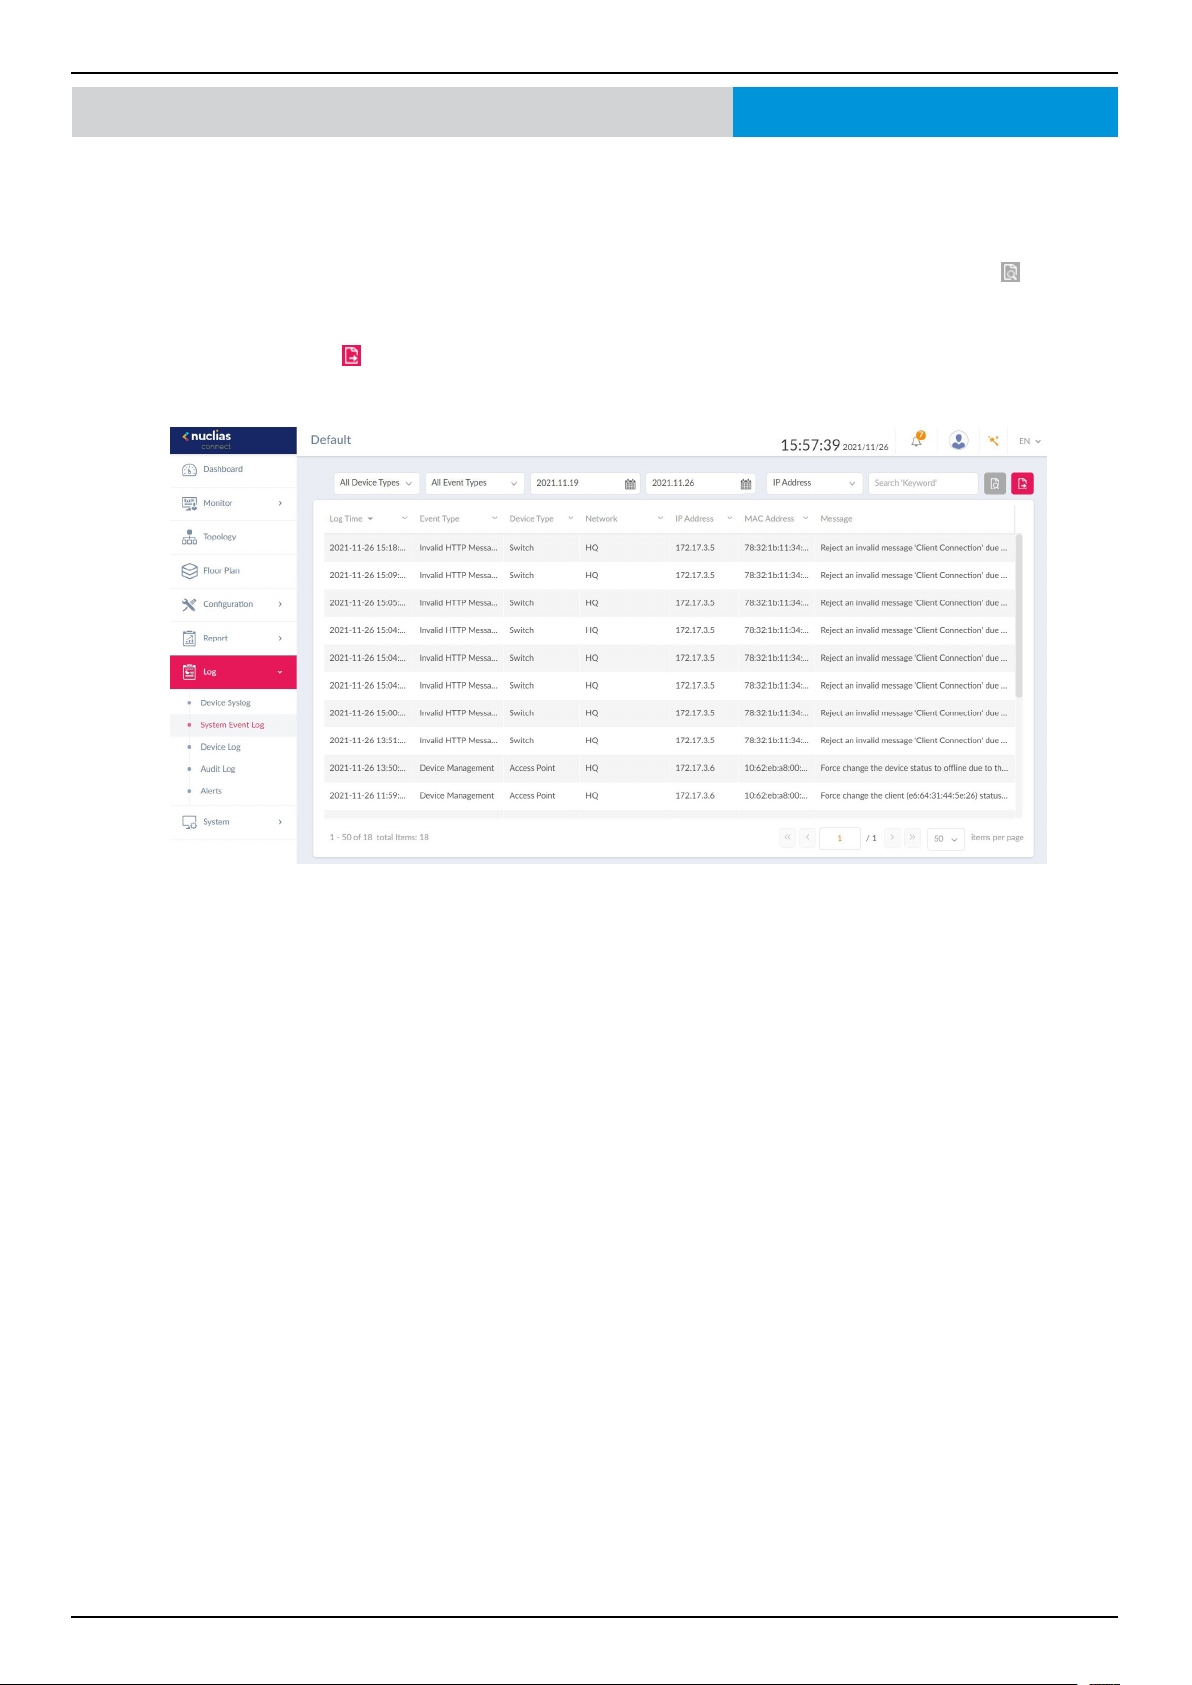
Nuclias Connect Software User Manual Nuclias Connect Conguration
Page 108
Nuclias Connect Log System Event Log
The System Event Log function allows administrators to view alerts that may require attention and necessary action to continue
operation and prevent failures. Navigate to Log > System Event Log to view the relevant information.
To generate a System Event Log report, select the event severity and dene the period of time to report. Click the drop-down
menu to dene the type of search criteria to view, IP Address or Trap Details. Fill in the keyword eld and click
to view the
generated report.
Once a report is generated, click
to save the report to a local PDF le.
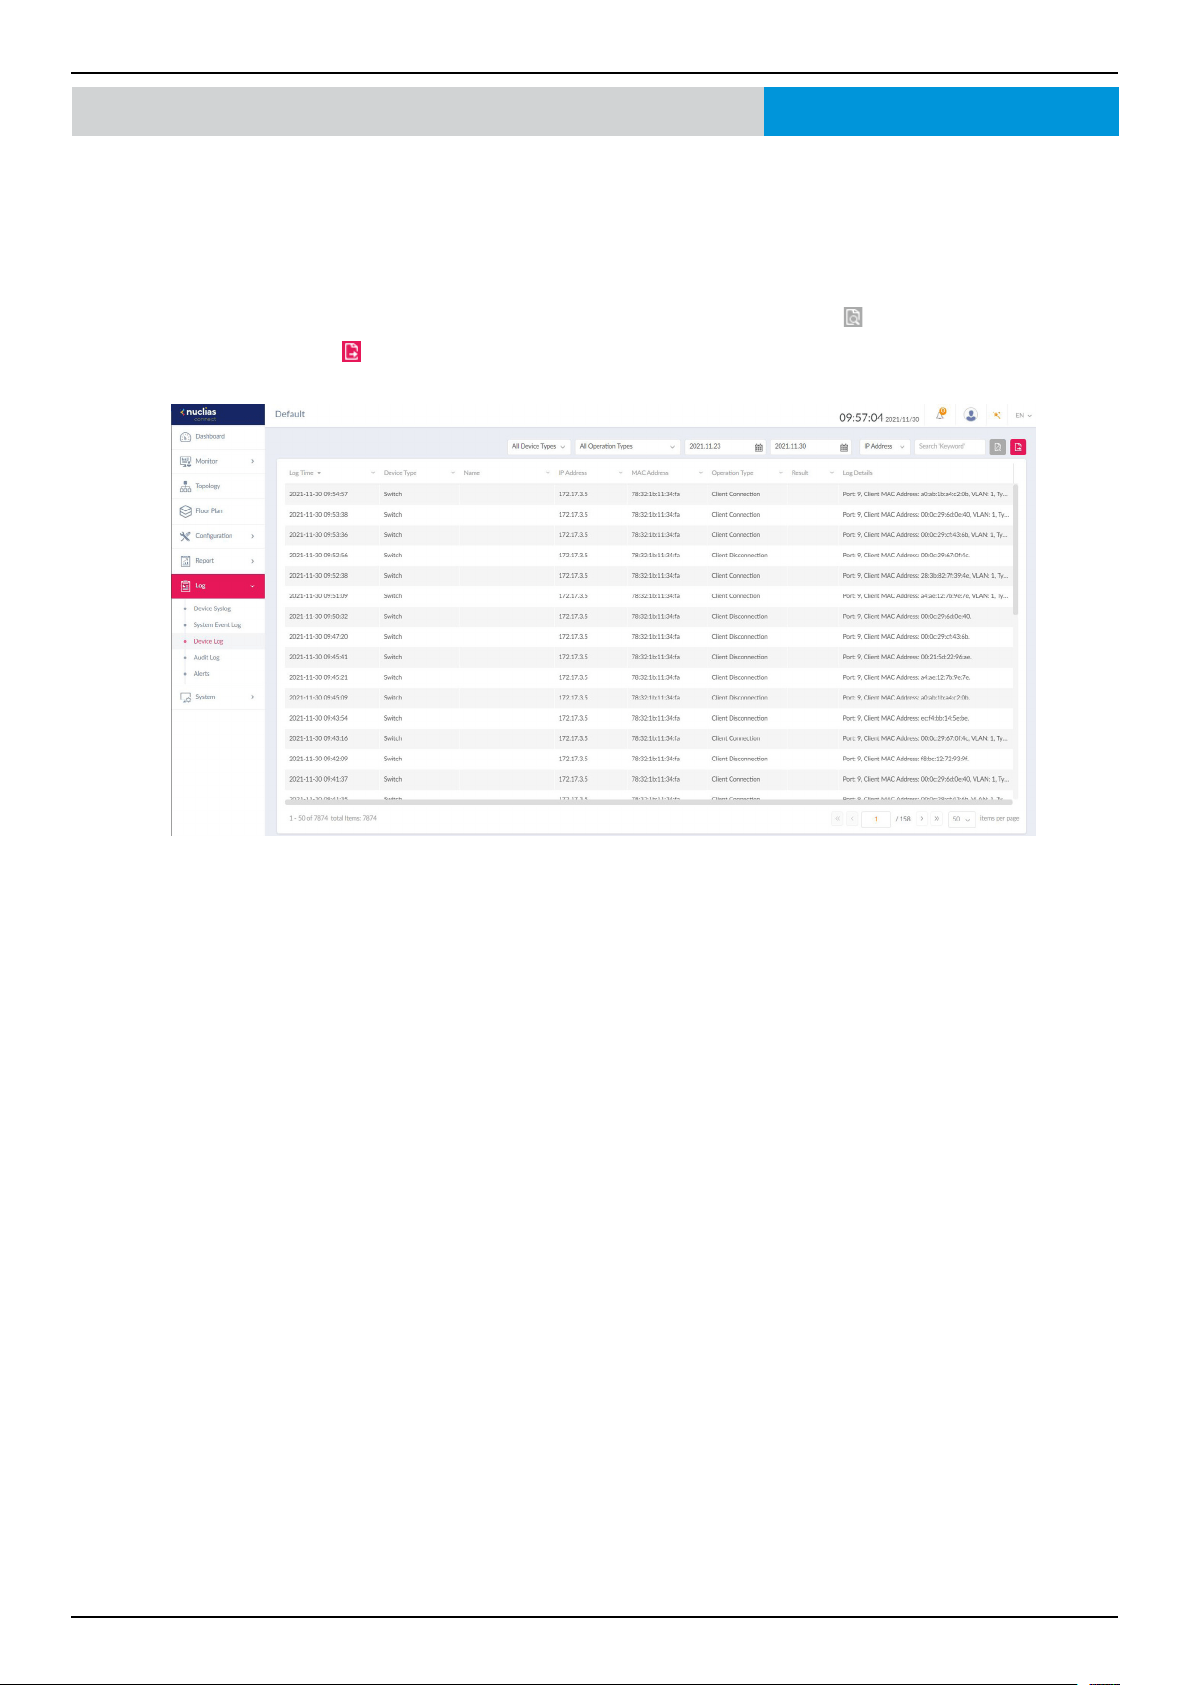
Nuclias Connect Software User Manual Nuclias Connect Conguration
Page 109
Log Device Log
The Device Log function allows administrators to view alert messages from a device’s embedded memory. The system and
network messages includes a time stamp and message type. The log information includes but not limited to the following items:
Synchronize device settings, upgrading rmware, upload conguration, and blocking clients.
Navigate to Log > Device Log to display the function information.
To start a Device Log, select the operation type and dene the period of time to report. Click the drop-down menu to dene
the type of search criteria to view, IP address or Trap Details. Fill in the keyword eld and click
to view the generated report.
Once a report is generated, click
to save the report to a local PDF le.
Nuclias Connect
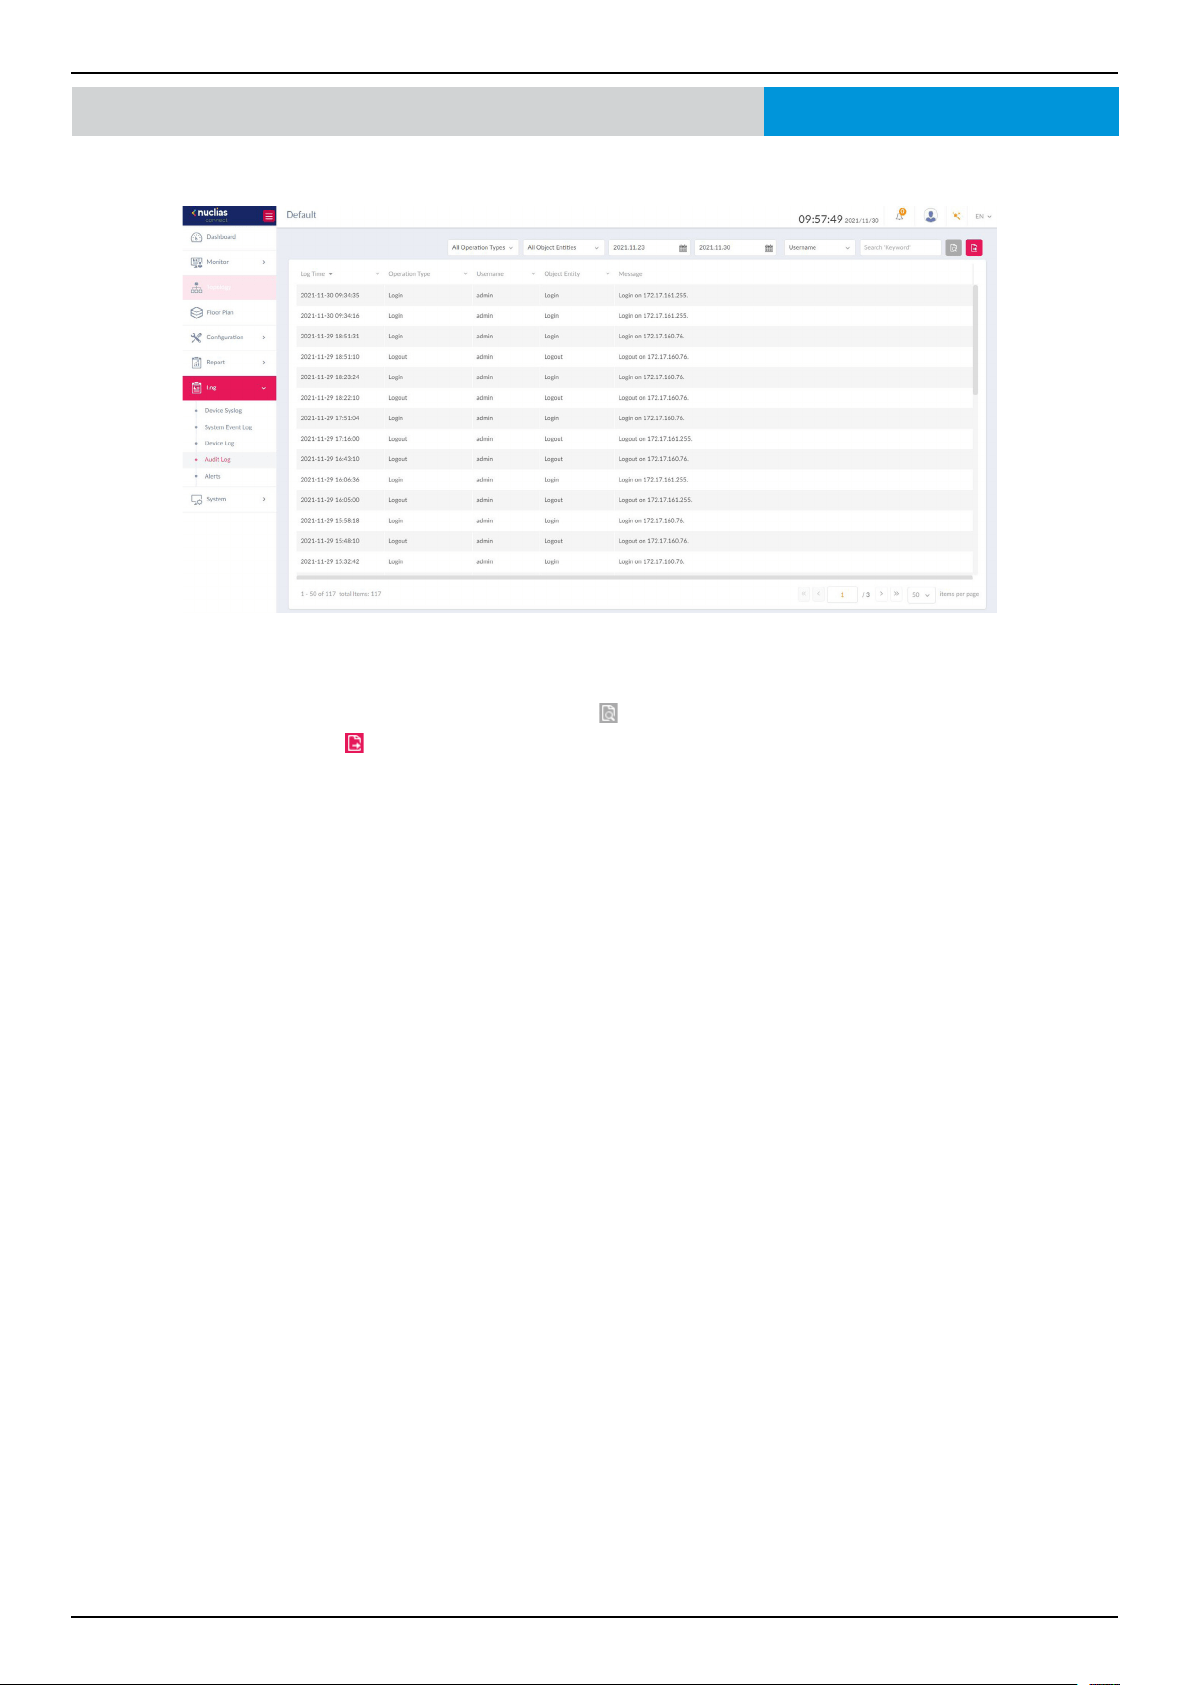
Nuclias Connect Software User Manual Nuclias Connect Conguration
Page 110
Log Audit Log
This type of log records user activities that can be performed on an object entity such as prole and network creation or deletion.
To generate an Audit Log report, select the entries by Operation Type (operations that performed on the object entities) and
Object Entity (i.e. objects associated with the functional tabs in the left pane), dene the time period, and select Username or
Message as the ltering criteria. Then enter a keyword and click
to display the search results.
Once a report is generated, click
to export it as a local Excel le. The le will be saved to your browser’s download directory
and will be named as follows: Nuclias_Connect_log type_YYYY_MMDD_HHMMSS.
Nuclias Connect
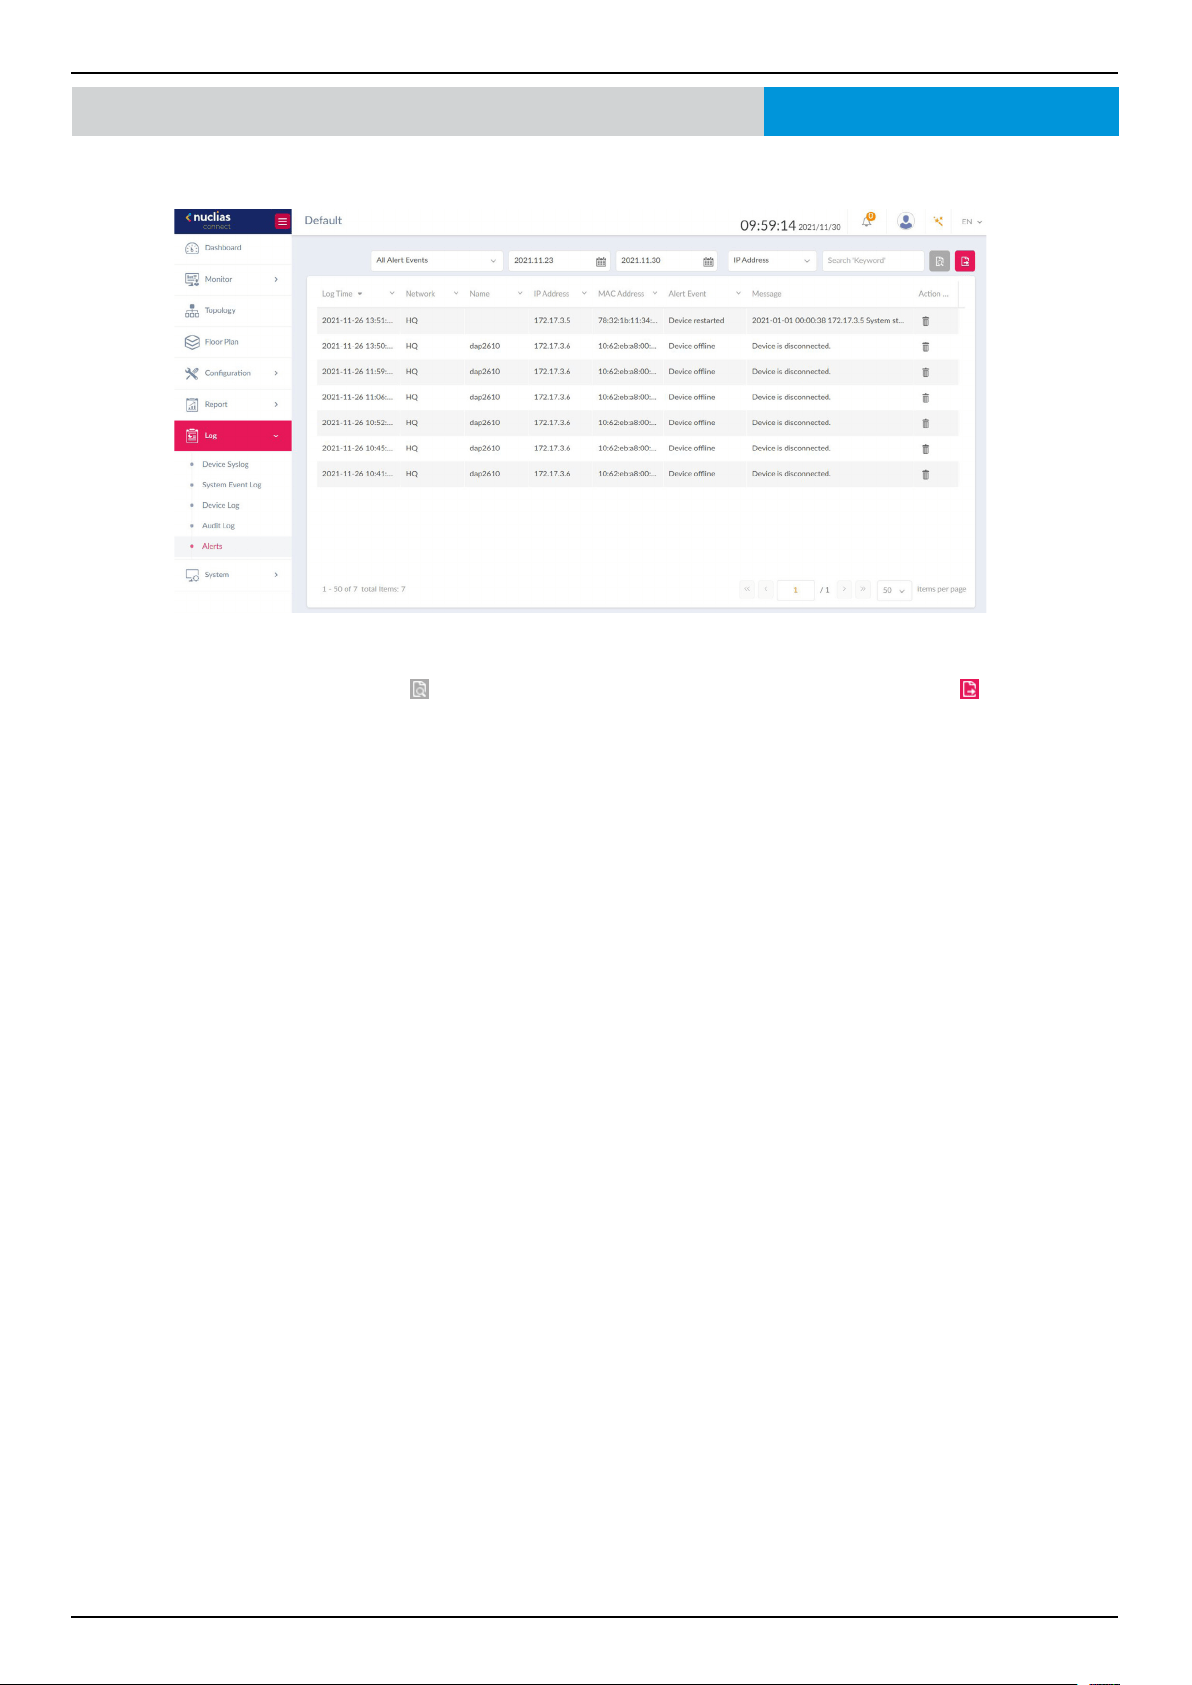
Nuclias Connect Software User Manual Nuclias Connect Conguration
Page 111
Log Alerts
This type of log records alert events such as new rmware release, port linked or blocked, device online status.
To generate an Alert report, select the alert events, dene the time period, and select IP Address or Message as the ltering
criteria. Then enter a keyword and click
to display the search results. Once a report is generated, click to export it as a
local Excel le. The le will be saved to your browser’s download directory and will be named as follows: Nuclias_Connect_log
type_YYYY_MMDD_HHMMSS.
Nuclias Connect
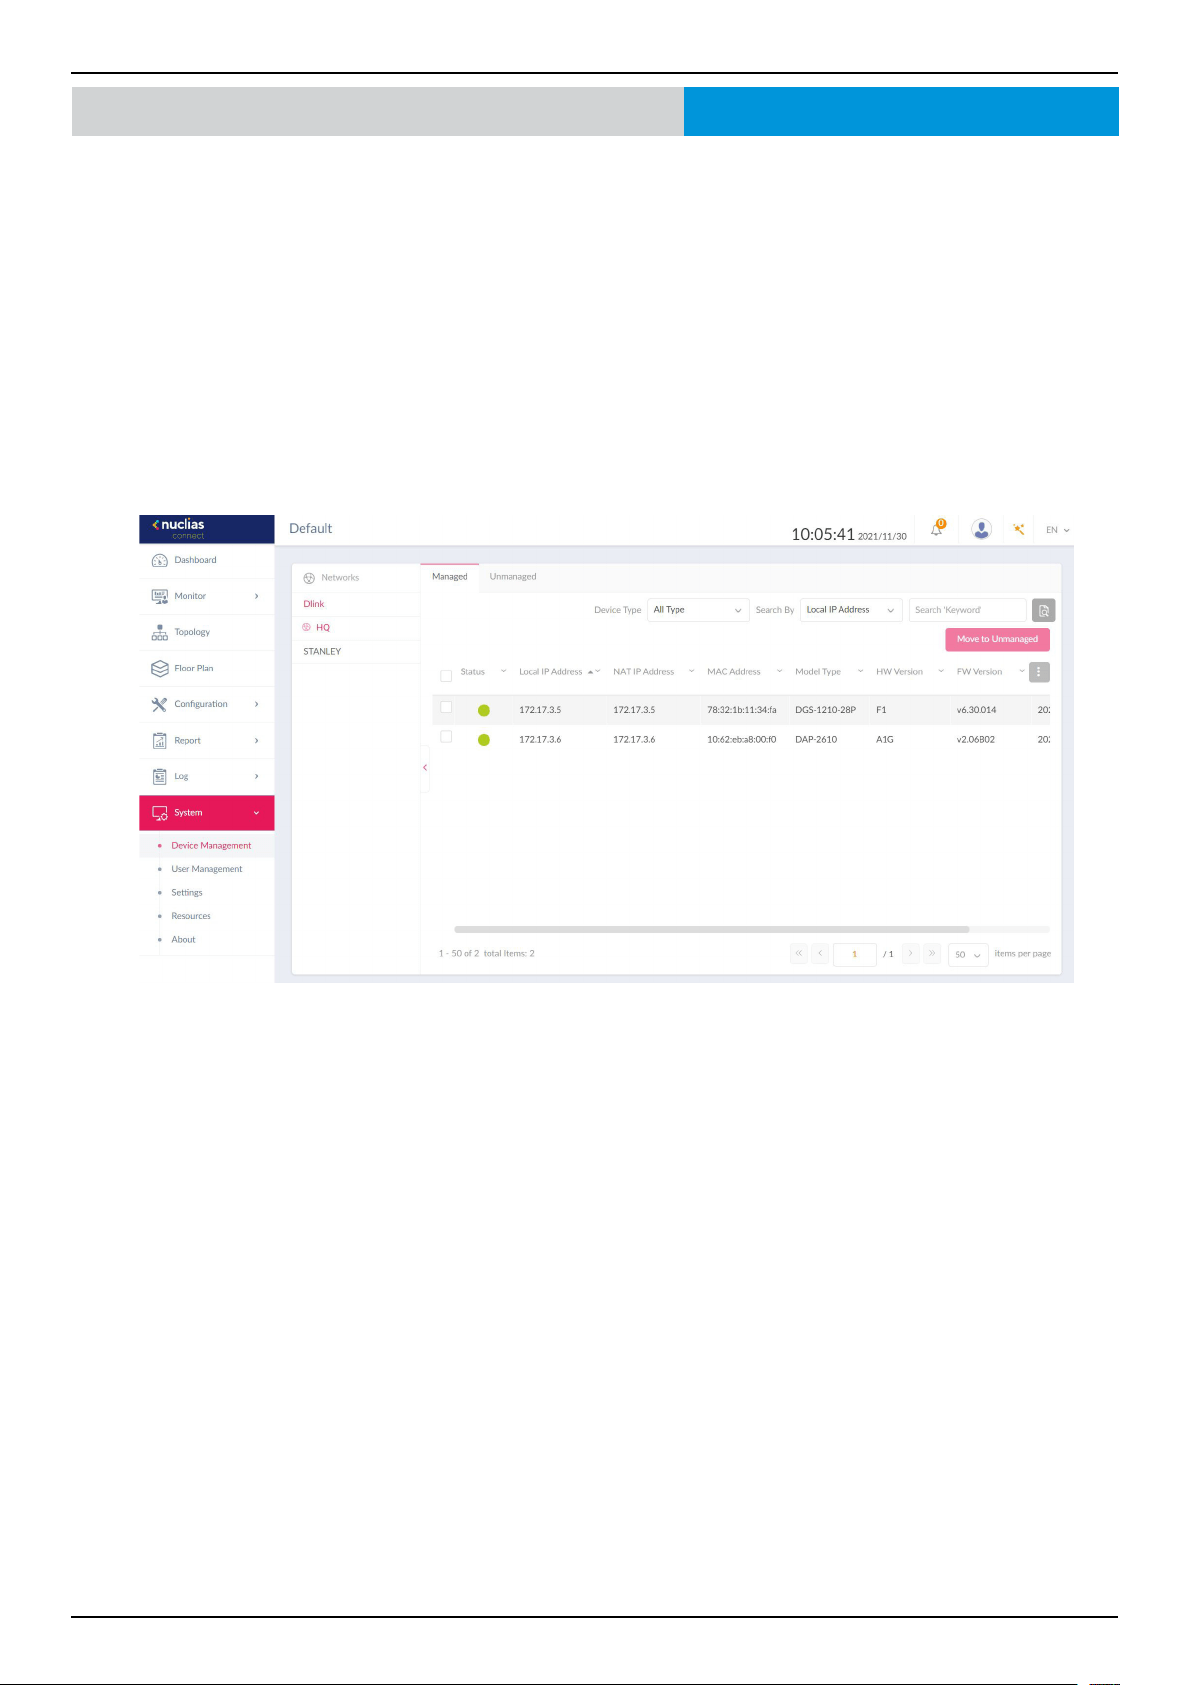
Nuclias Connect Software User Manual Nuclias Connect Conguration
Page 112
System Device Management
Navigate to System > Device Management to view both managed and unmanaged devices on the network. To view more
detailed information about the device, navigate to Log > Device Log.
First select the site and network, then click on the respective tab to view either managed or unmanaged devices.
The Move to... button on the upper right corner of each tab allows you to move devices between Managed and Unmanaged.
When a device is moved to Unmanaged, you’ll have to option to remove the device from the network by clicking the Delete
button.
The list of devices can be sorted by the following criteria: Status, Local IP Address, NAT IP address, MAC Address, Model Type,
HW Version, FW Version, Managed Time, Backup FW Version. The Menu button contains more elds to which you can add to
the list to view.
Nuclias Connect
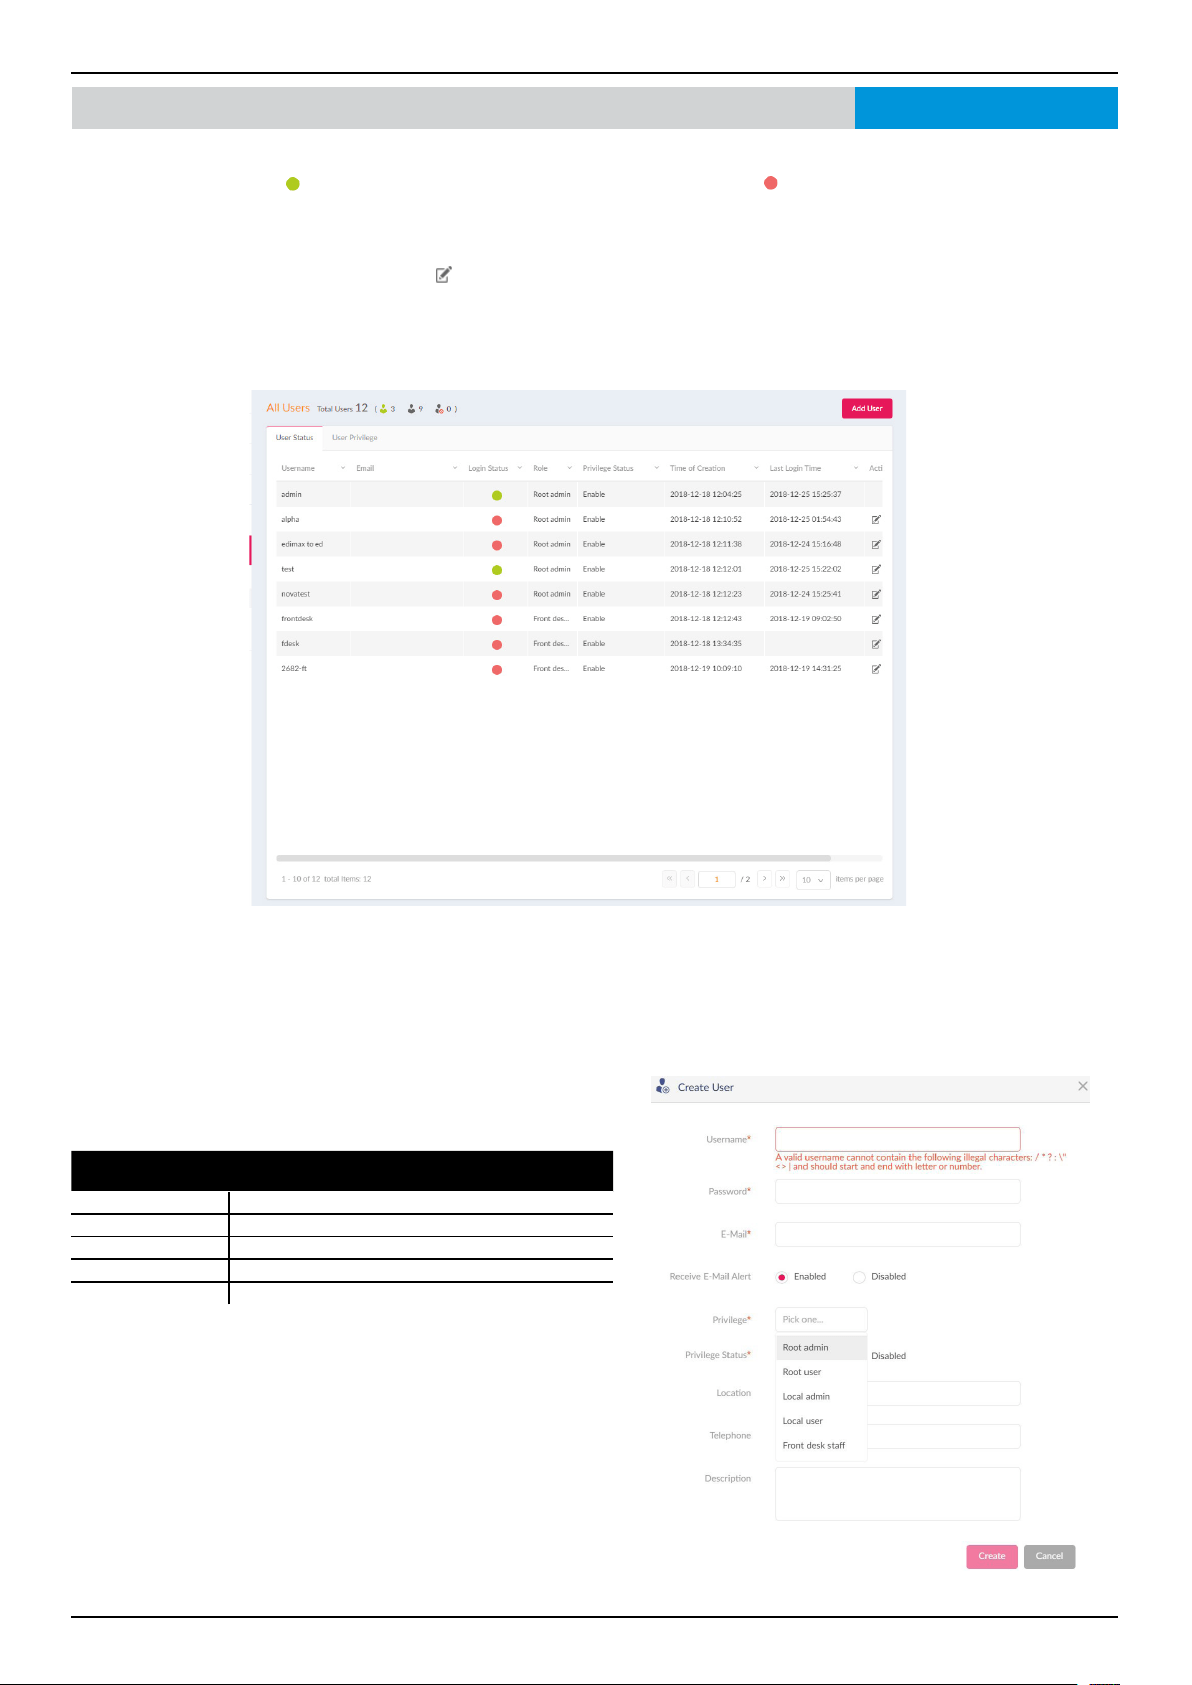
Nuclias Connect Software User Manual Nuclias Connect Conguration
Page 113
System User Management User Status
The User Status page allows administrators to view, edit, or delete the current status of all registered user proles. When the
Login Status shows green , the user is logged in. When the Login Status shows red , the user is logged out.
Navigate to System > User Management to view the relevant information.
To edit a user prole, click the edit button
corresponding to the user. The username, password, email, privilege, privilege
status, location, contact number as well as the user description are available for edit. Note that the administrator account cannot
be deleted or have its username and privilege settings modied.
Once the user settings are completed, click Save to conrm or Cancel to return to the previous menu.
To add a user to the selected network, click Add User to open the Create User page. In this page, enter the new user information.
Fields marked with an asterisk (*) are required in order to complete the new entry. Once the information is lled in, click Create
to save the new user prole. Alternatively, click Cancel to return to the previous screen without saving.
Nuclias Connect
The following explains the prole privileges available in the
Privilege drop-down menu.
Options Description
Root admin Manage all sites/networks on this server.
Local admin Manage your own network.
Root user View all sites/networks on this server.
Local user View your own network.
Front desk user
Able to generate and manage passcodes.
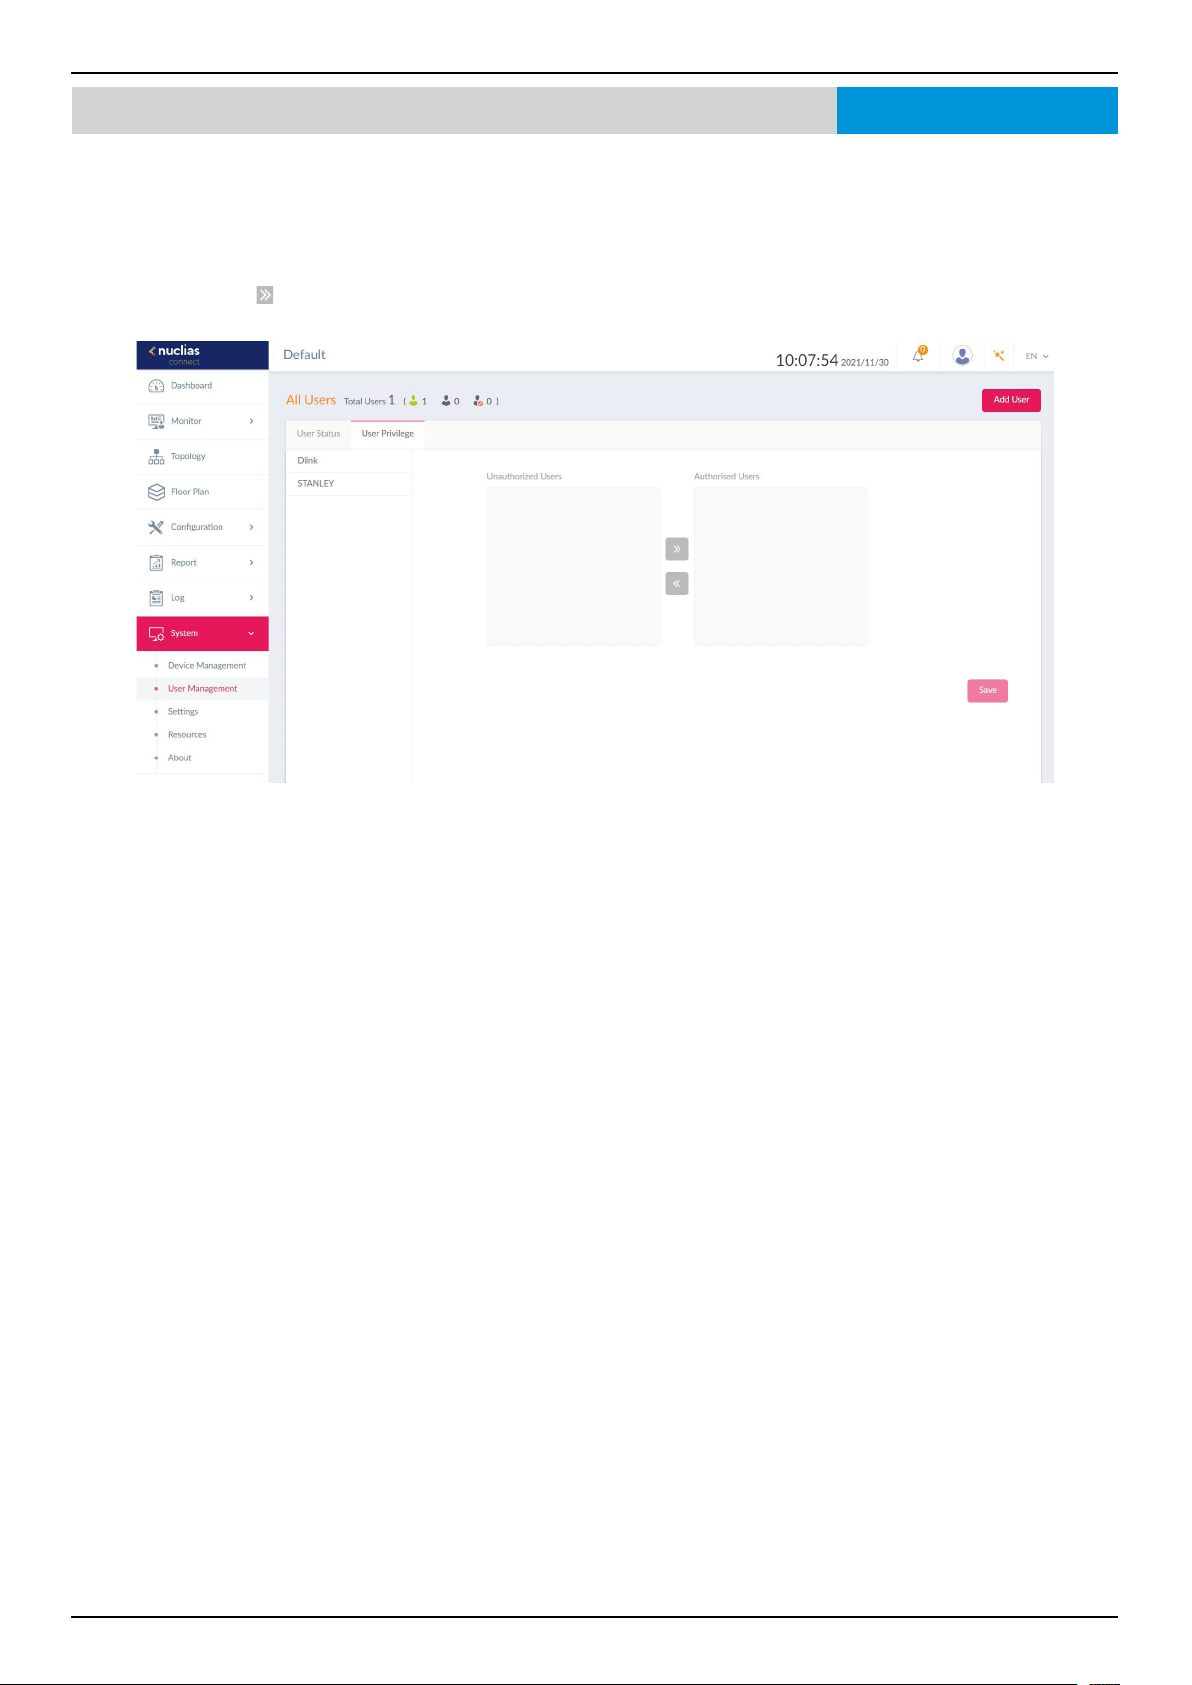
Nuclias Connect Software User Manual Nuclias Connect Conguration
Page 114
System User Management User Privilege
The User Privilege function allows administrators to add, view, and authorize/unauthorize users on a selected network.
Navigate to System > User Management and click on the User Privilege tab to display the relevant information.
To authorize or unauthorize an existing user, click an available site and then the target network. The available users for the
network are displayed on the ensuing screen. From the Unauthorized Users column, click the radio box of the target user. Once
a user is selected, click
to move to the respective column to authorize the user. The same process is used to unauthorize a user.
Nuclias Connect
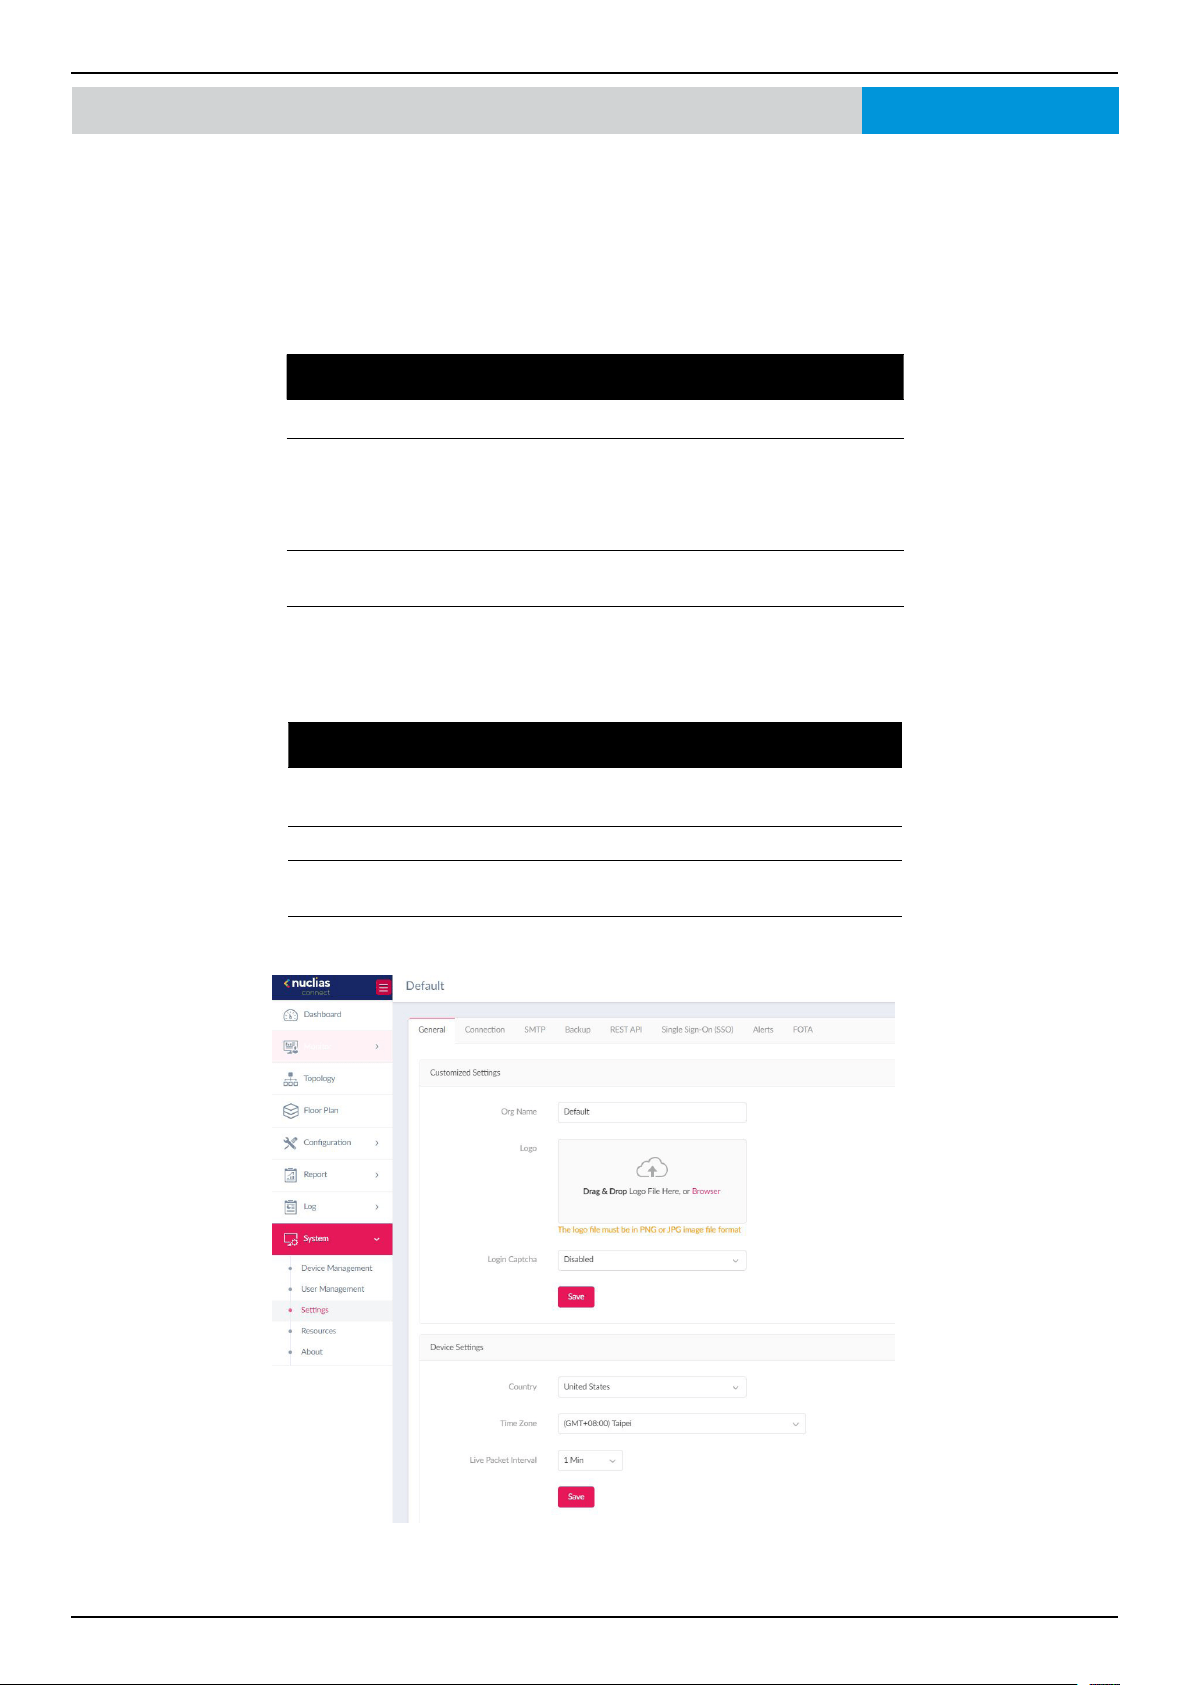
Nuclias Connect Software User Manual Nuclias Connect Conguration
Page 115
System Settings General
The Settings page displays General, Connection, SMTP, Backup, REST API, Single Sign-On (SSO), Alerts, and FOTA information.
Under the General tab, there are options to customize system settings, which includes adding a logo and enabling the captcha
feature. Device time and date and live packet interval settings are also available.
Navigate to System > Settings to congure your device settings.
In the Customized Settings section, the following parameters can be congured:
Parameter Description
Org Name Enter a description to set the organization name.
Logo Click Browser to select a le to be used as the interface
logo. A local le can be selected by using the browse
function or by dragging and dropping a le into the
frame. Supported le types include PNG or JPG images.
Login Captcha Click the drop-down menu to enable or disable the
login Captcha function.
Click Save to save the settings.
In the Device Settings section, the following parameters can be congured:
Parameter Description
Country Click the drop-down menu to select the country
region of the switches/APs in the network.
Time Zone Click the drop-down menu to select the time zone.
Live Packet
Interval
Click the drop-down menu to select the live packet
interval time.
Click Save to save the values and update the screen.
Nuclias Connect
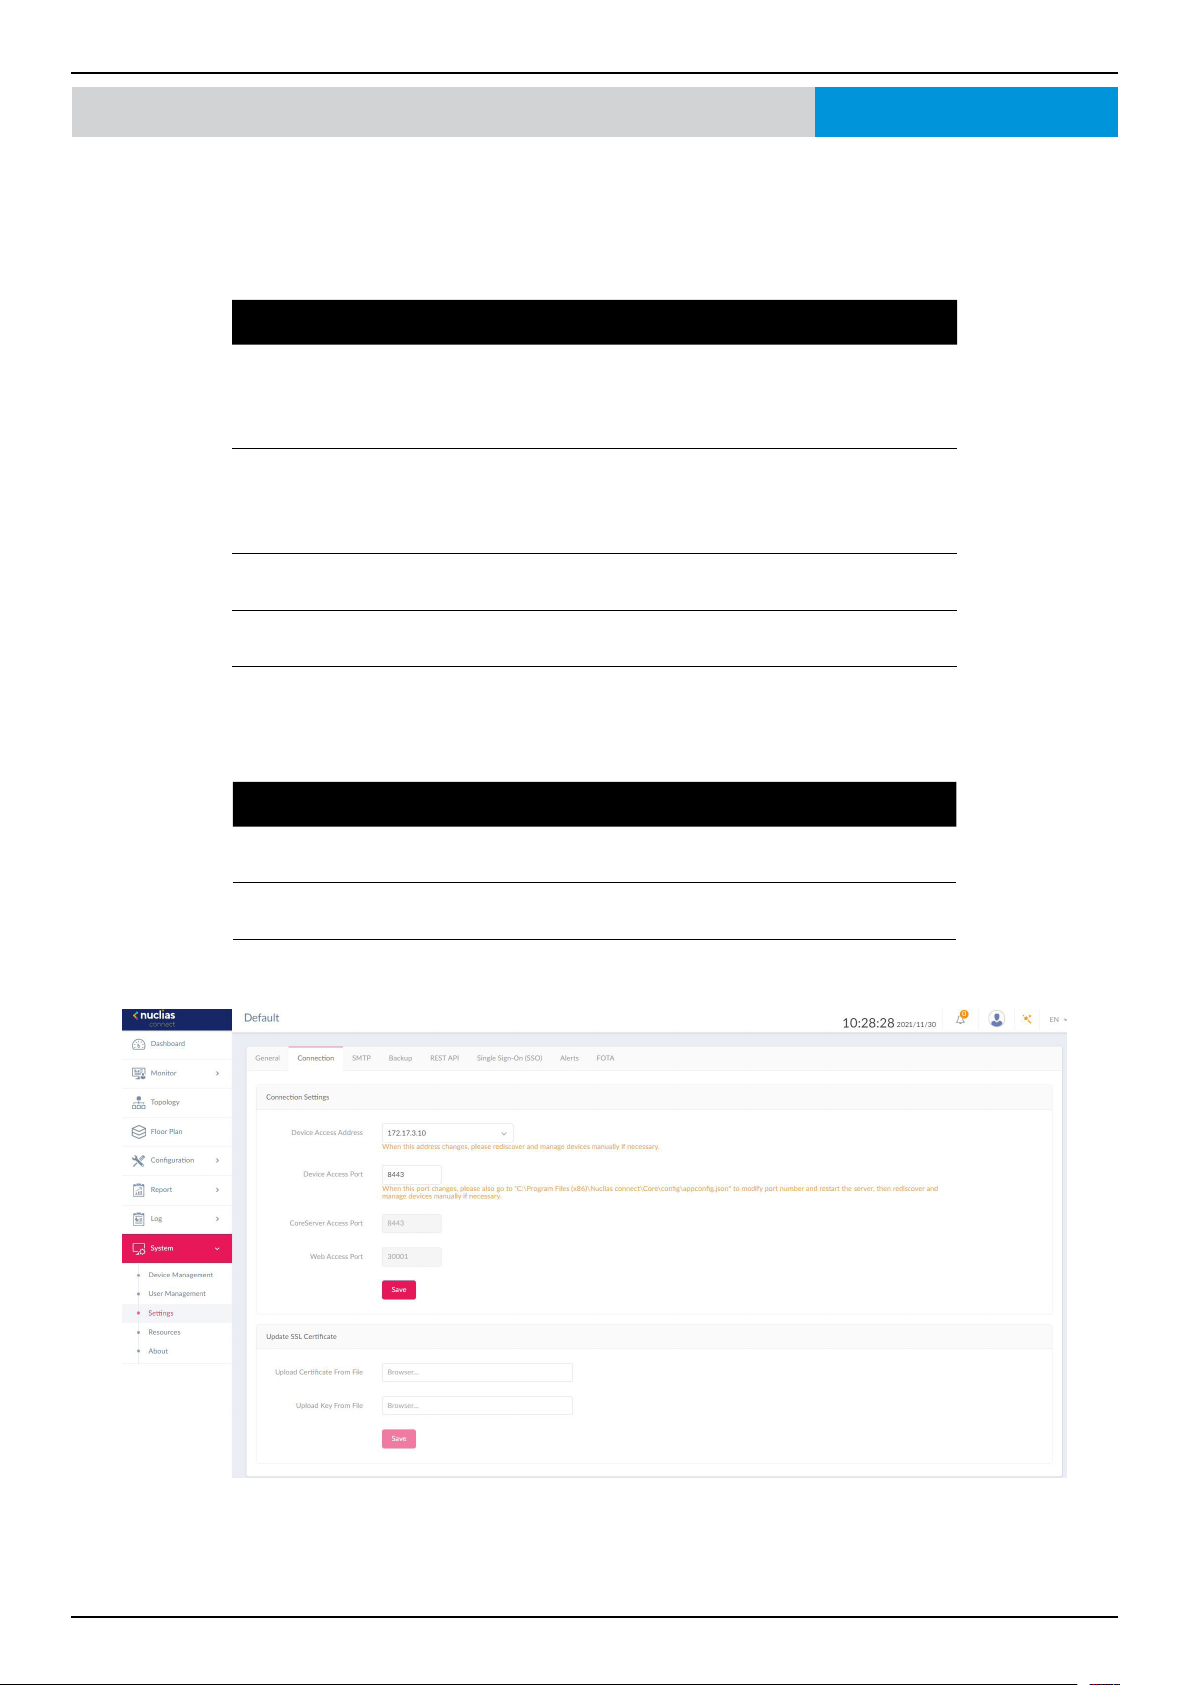
Nuclias Connect Software User Manual Nuclias Connect Conguration
Page 116
System Settings Connection
The Connection tab displays device access address, port, and SSL certicate settings.
Navigate to System > Settings and click the Connection tab to display the relevant information.
In the Connection Setting section, the following parameters can be congured:
Parameter Description
Device Access Address Enter the Nuclias Connect Server application’s IP address.
To manage remote APs, the IP address must be a public
IP address; IP mapping is required for instances behind a
rewall or router.
Device Access Port Enter the Nuclias Connect server application’s listen
port number. The default value is 8443. For remote AP
management behind a rewall or router, the inbound port
must be opened.
CoreServer Access Port Enter the server application’s service port number. The
default value is 8443.
Web Access Port The web access ports as dened during the installation.
The values are predened.
Click Save to save the values and update the screen.
In the Update SSL Certicate section, the following parameters can be congured:
Parameter Description
Upload Certicate From
File
Click Browse... to select the SSL certicate le located on
the local drive.
Upload Key From File Click Browse... to select the SSL key le located on the
local drive.
Click Save to save the values and update the screen.
Nuclias Connect
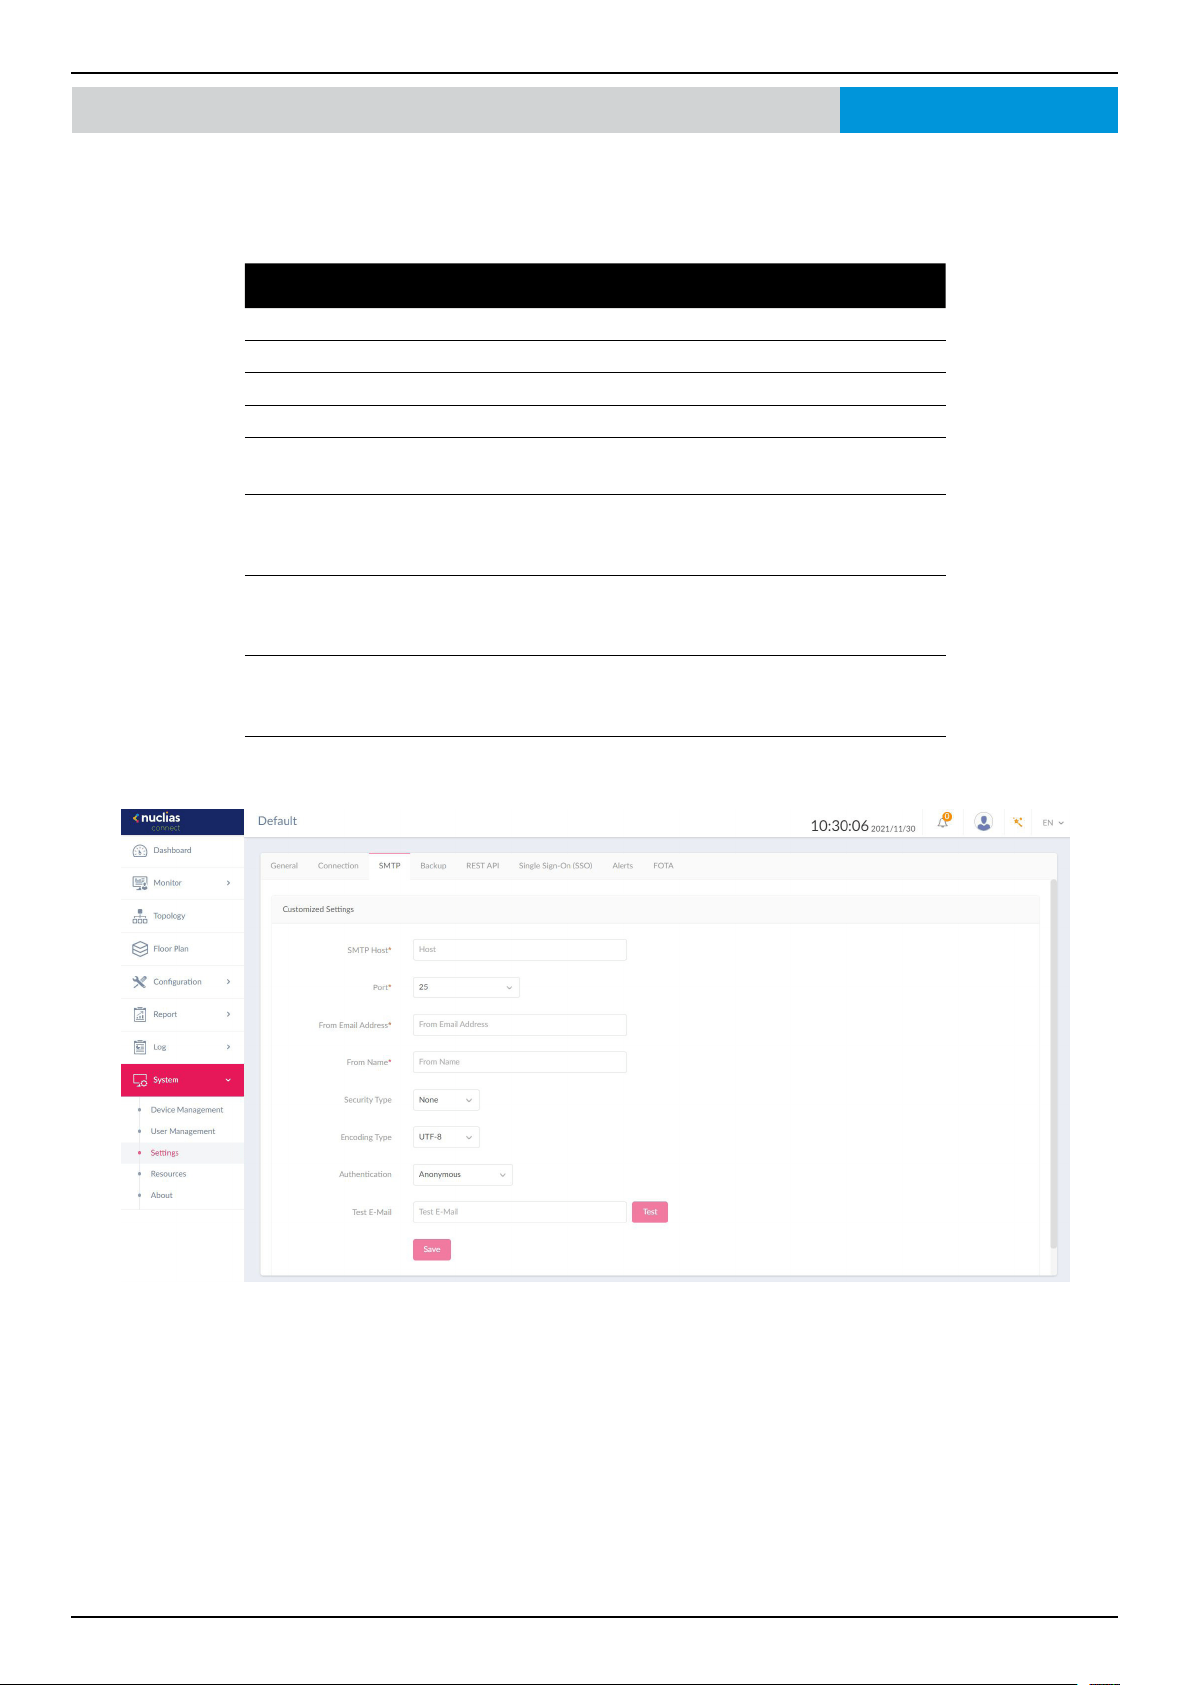
Nuclias Connect Software User Manual Nuclias Connect Conguration
Page 117
System Settings SMTP
The SMTP tab displays customizable settings for the simple mail transfer protocol (SMTP). This is necessary in order to send
emails on behalf of the system such as reset password validation emails.
Navigate to System > Settings and click on the SMTP tab to display the function information.
Parameter Description
SMTP Host Enter the SMTP server’s IP address or domain name.
Port Enter the SMTP server’s port number.
From Email Address Enter the sender’s email address.
From Name Enter the sender’s name.
Security Type Click the drop-down menu to select the security type to be
used in the e-mail system. The options include None or SSL.
Encoding Type Click the drop-down menu to select the encoding type to
match the supported e-mail client. The options include
UTF-8 or ASC-II.
Authentication
Click the drop-down menu to select the authentication
mechanism during login. The options include Anonymous
or SMTP Authentication.
Test Email Enter the recipient e-mail address to initiate a test e-mail
through the SMTP conguration. Click Test to start the test
function.
Click Save to save the values and update the screen.
Nuclias Connect
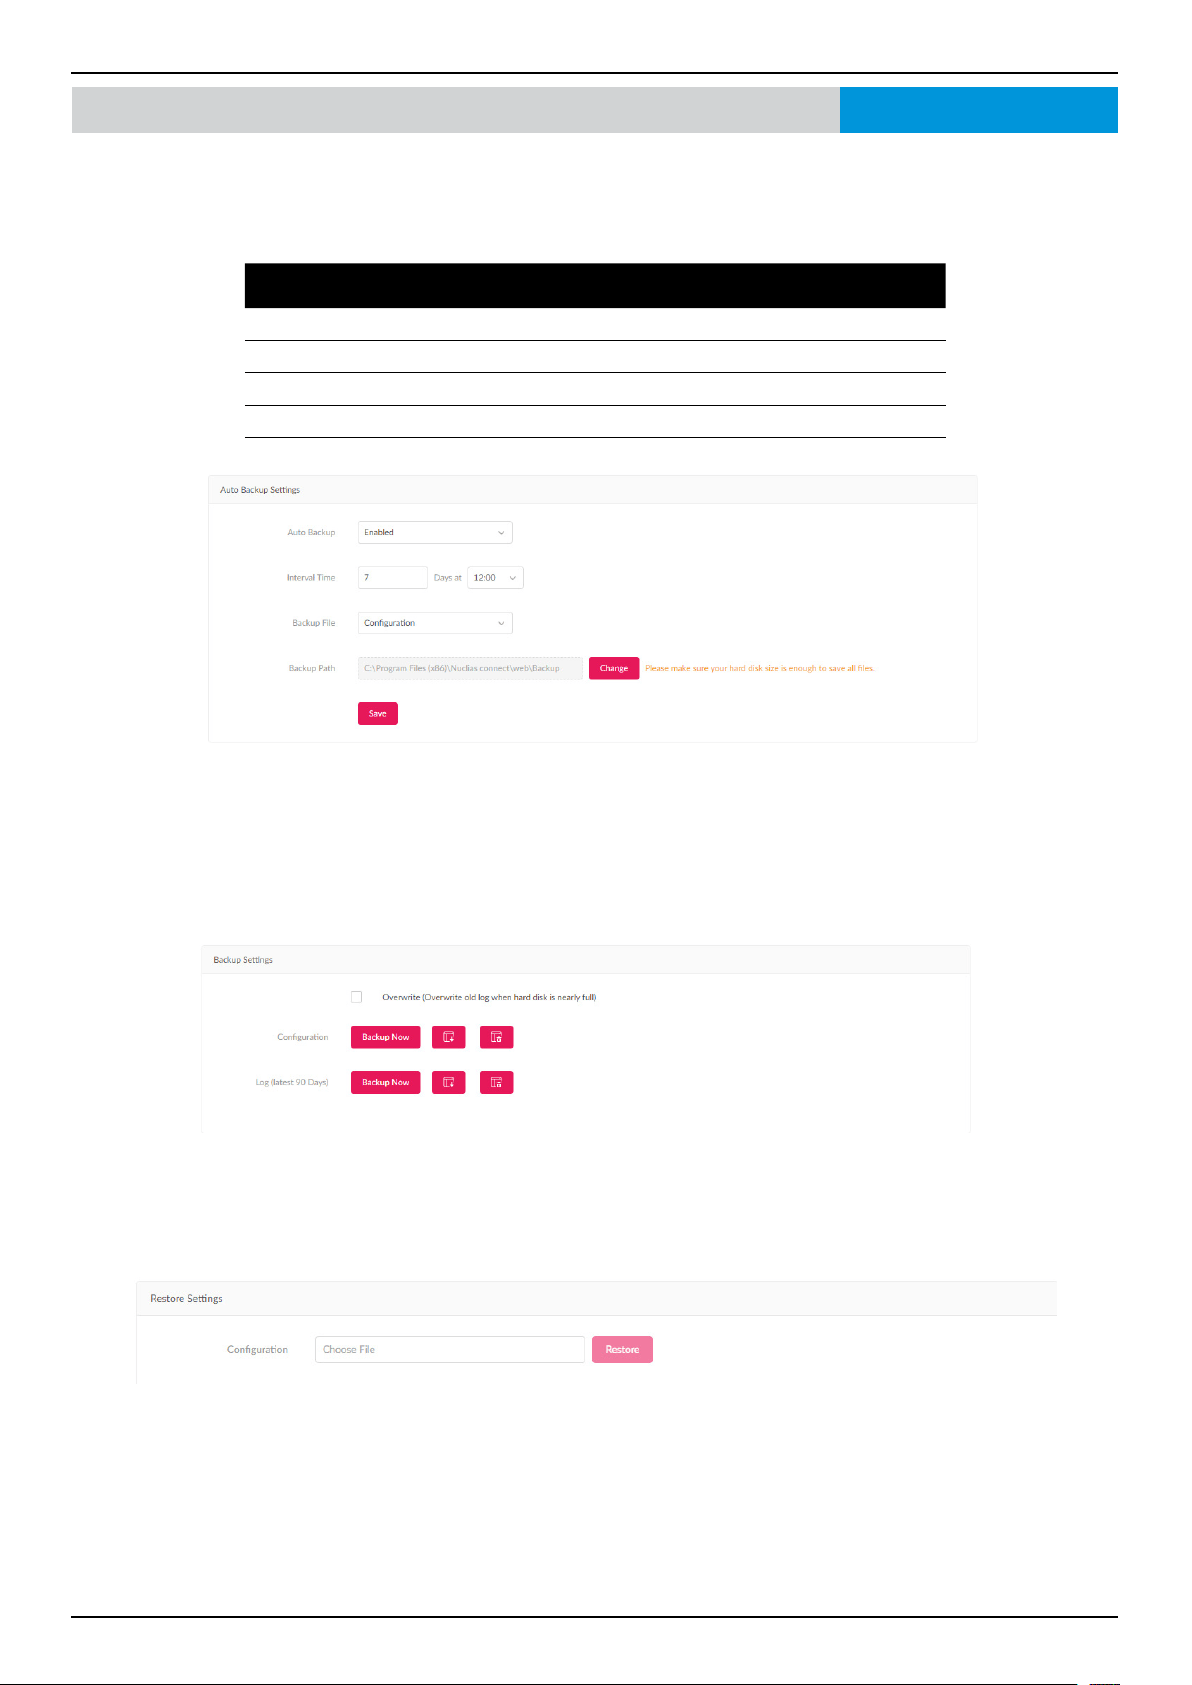
Nuclias Connect Software User Manual Nuclias Connect Conguration
Page 118
System Settings Backup
The Backup tab displays customizable settings for backing up conguration settings or logs. Navigate to System > Settings
and click on the Backup tab to display the function information.
In the Auto Backup Settings section, parameters regarding auto backup can be congured:
Parameter Description
Auto Backup Click on drop-down list to enable or disable auto backup.
Interval Time The interval time for backup
Backup File Conguration backup
Backup Path Click “Change” button to change default path
In the Backup Settings section, device conguration and logs can be backed up, downloaded to a local hard drive, or deleted.
Click “Backup Now” to backup the conguration le or log les.
Click the Download button to download the backup le to the management computer’s hard drive.
Click the Delete button to delete the backup conguration les or log les that are stored on the device.
Check the Overwrite box to overwrite old log when the hard disk reaches full capacity.
In the Restore Settings section, device conguration can be restored from local hard drive.
Select a conguration le to restore a conguration.
Nuclias Connect
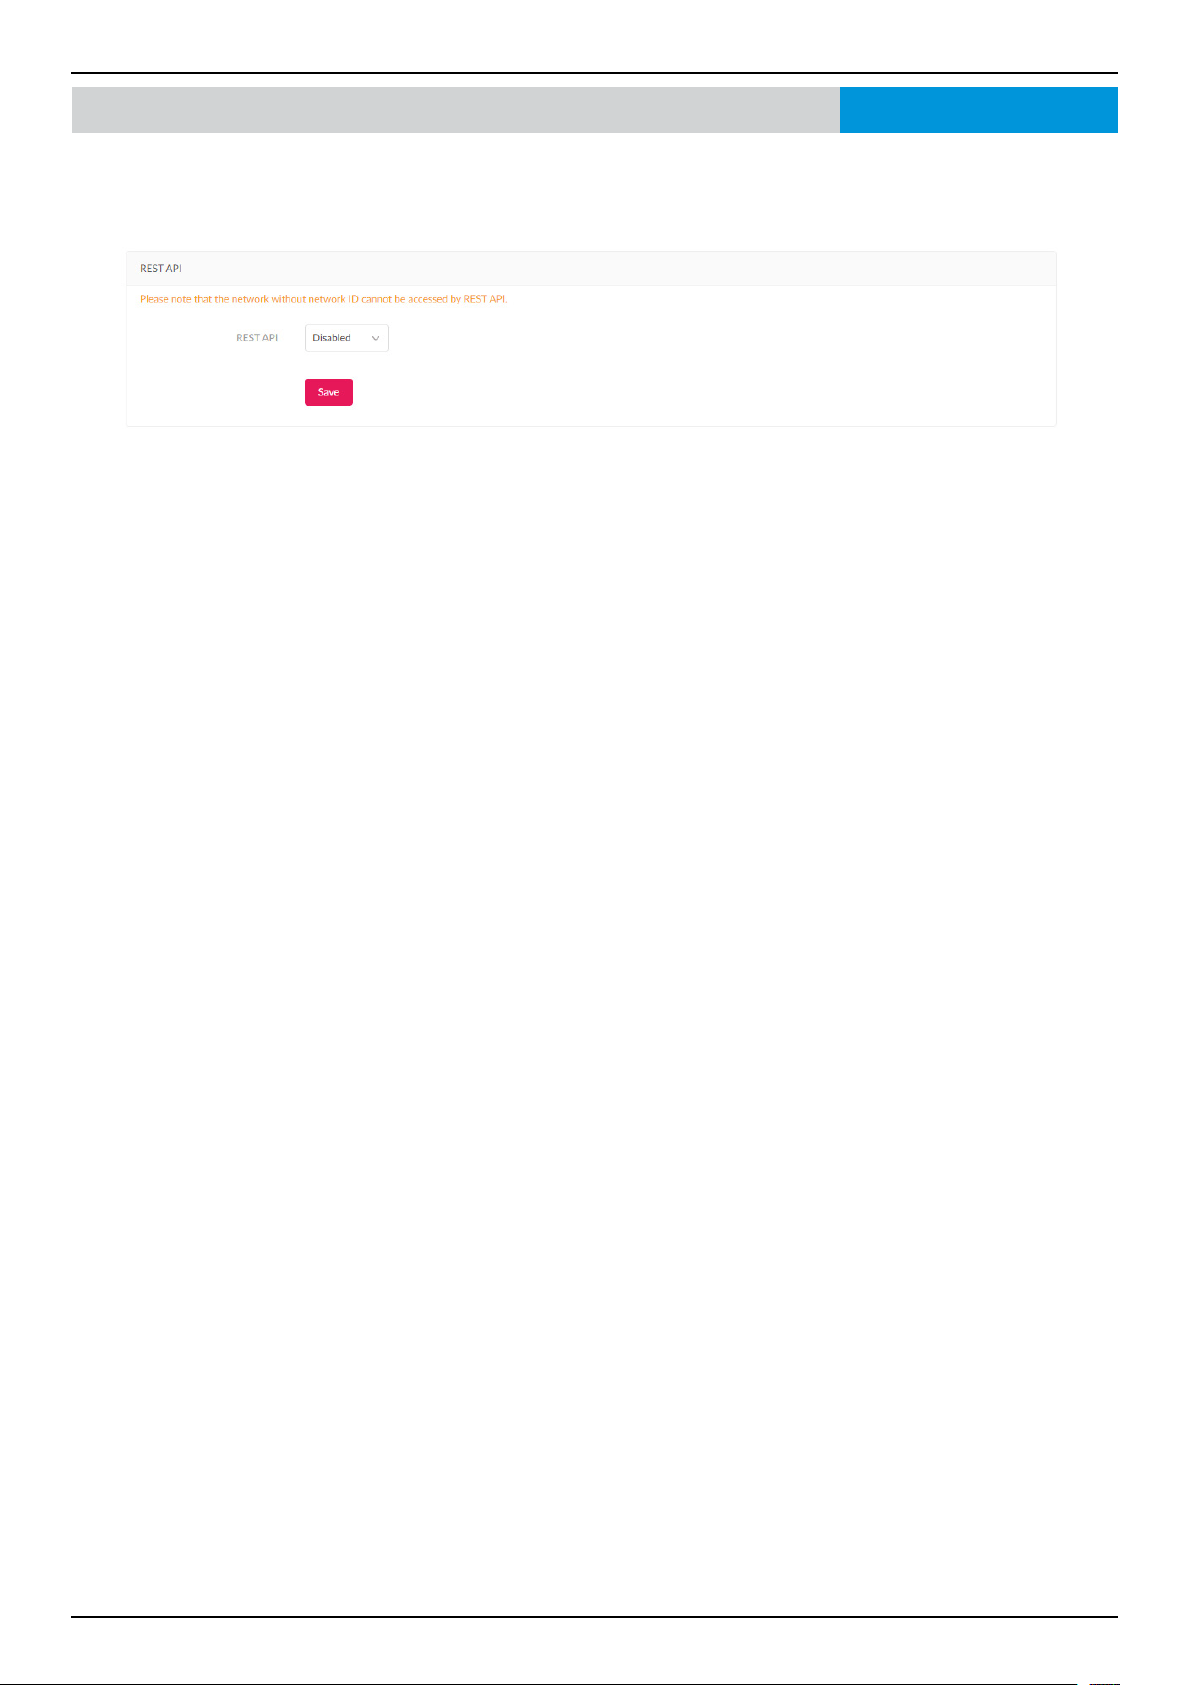
Nuclias Connect Software User Manual Nuclias Connect Conguration
Page 119
System Settings REST API
REST API is a software interface that allows two applications to communicate with each other over the internet and through
devices. Enable it to allow Nuclias Connect communicate with third-party application through REST API.
Nuclias Connect
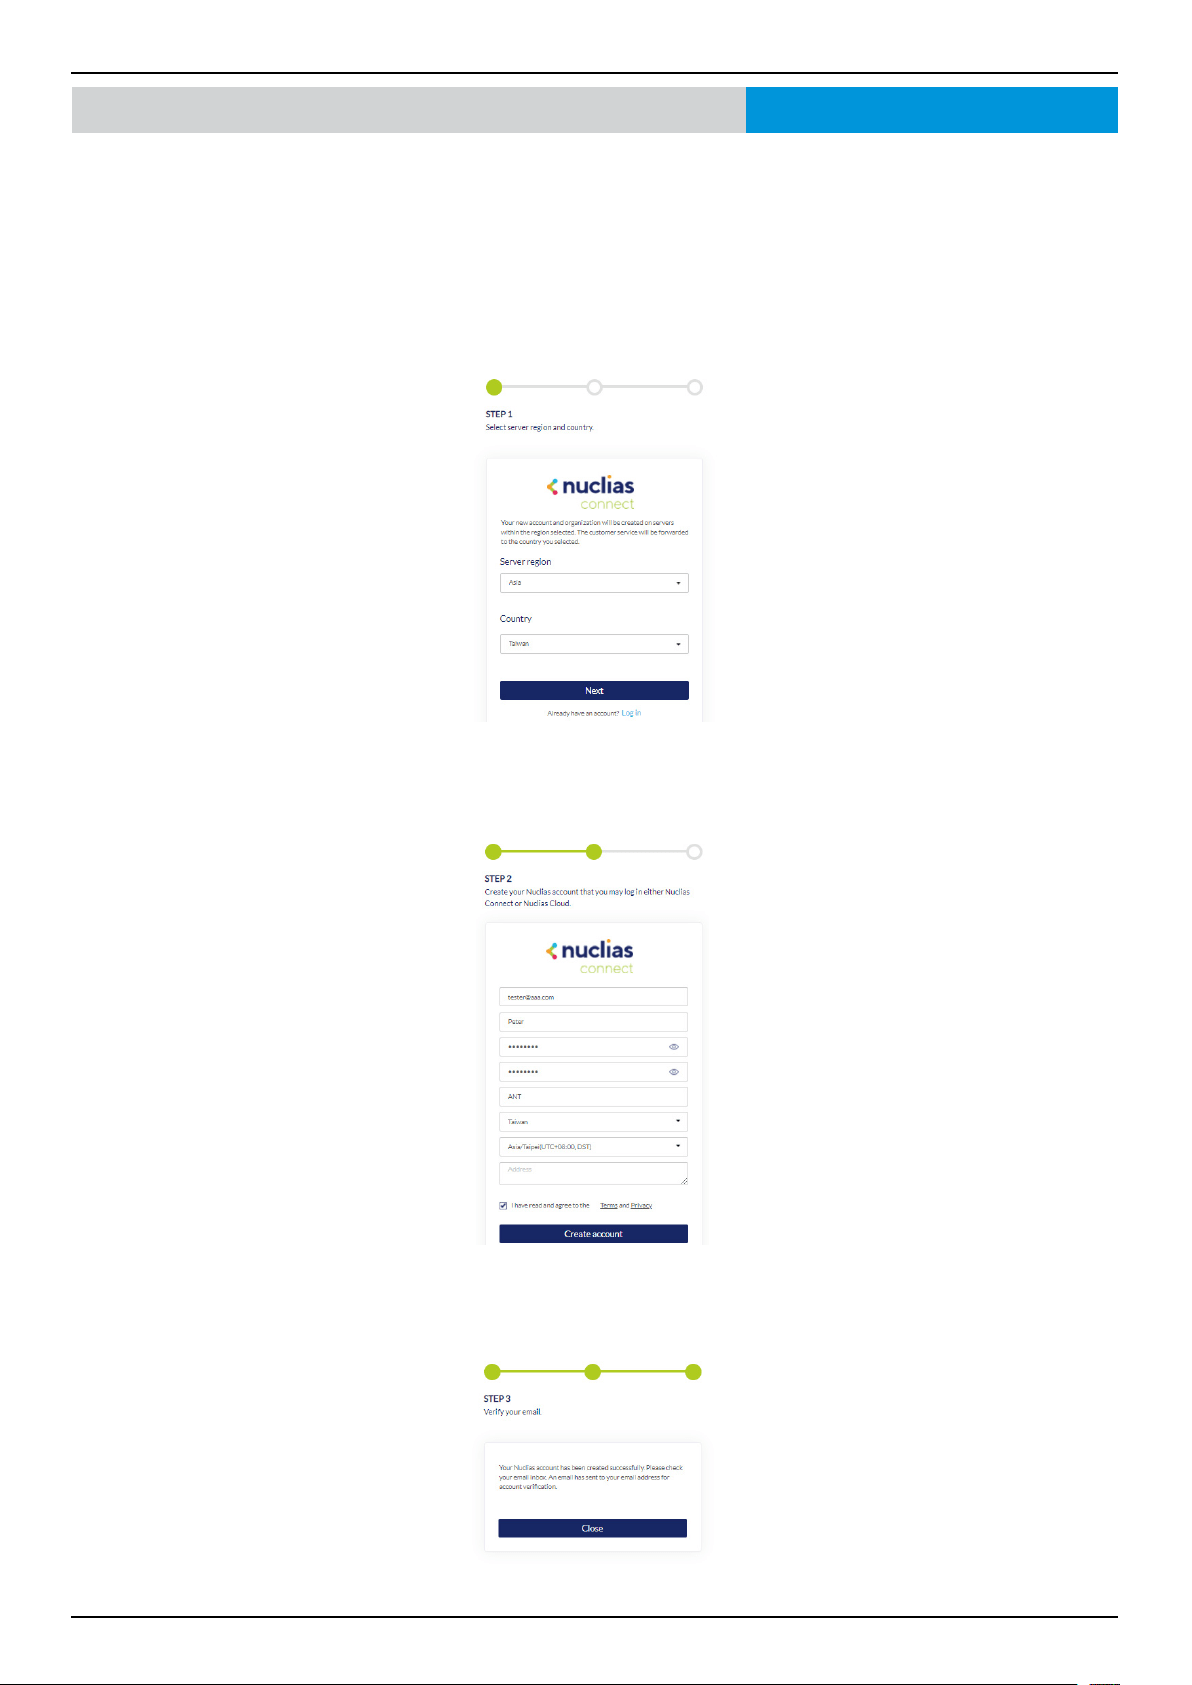
Nuclias Connect Software User Manual Nuclias Connect Conguration
Page 120
System Settings Single Sign-On (SSO)
The Single-Sign-On tab allows you to use a Nuclias Account to access Nuclias Cloud and the Nuclias Connect portal. If you do
not already have a Nuclias account, click Create account where a browser window will open to a link where you can create
one.
There are three steps in the registration process.
Step 1: Selecting server region and country.
The account is created on the servers within the selected region and the selected country. Your account data will be stored in
the regional server based on your selected region and country.
Step 2: Create organization and site.
Once the region and country have been entered, you will see the user, organization, and site page. Enter the required
information and agree to the Terms of Use and Privacy agreement to enable the account creation button.
Click Create Account to continue.
Step 3: Finish the registration.
Click Close to complete the process. The registered account is now available for use. The verication information will be
delivered to the registered email of the account
Nuclias Connect
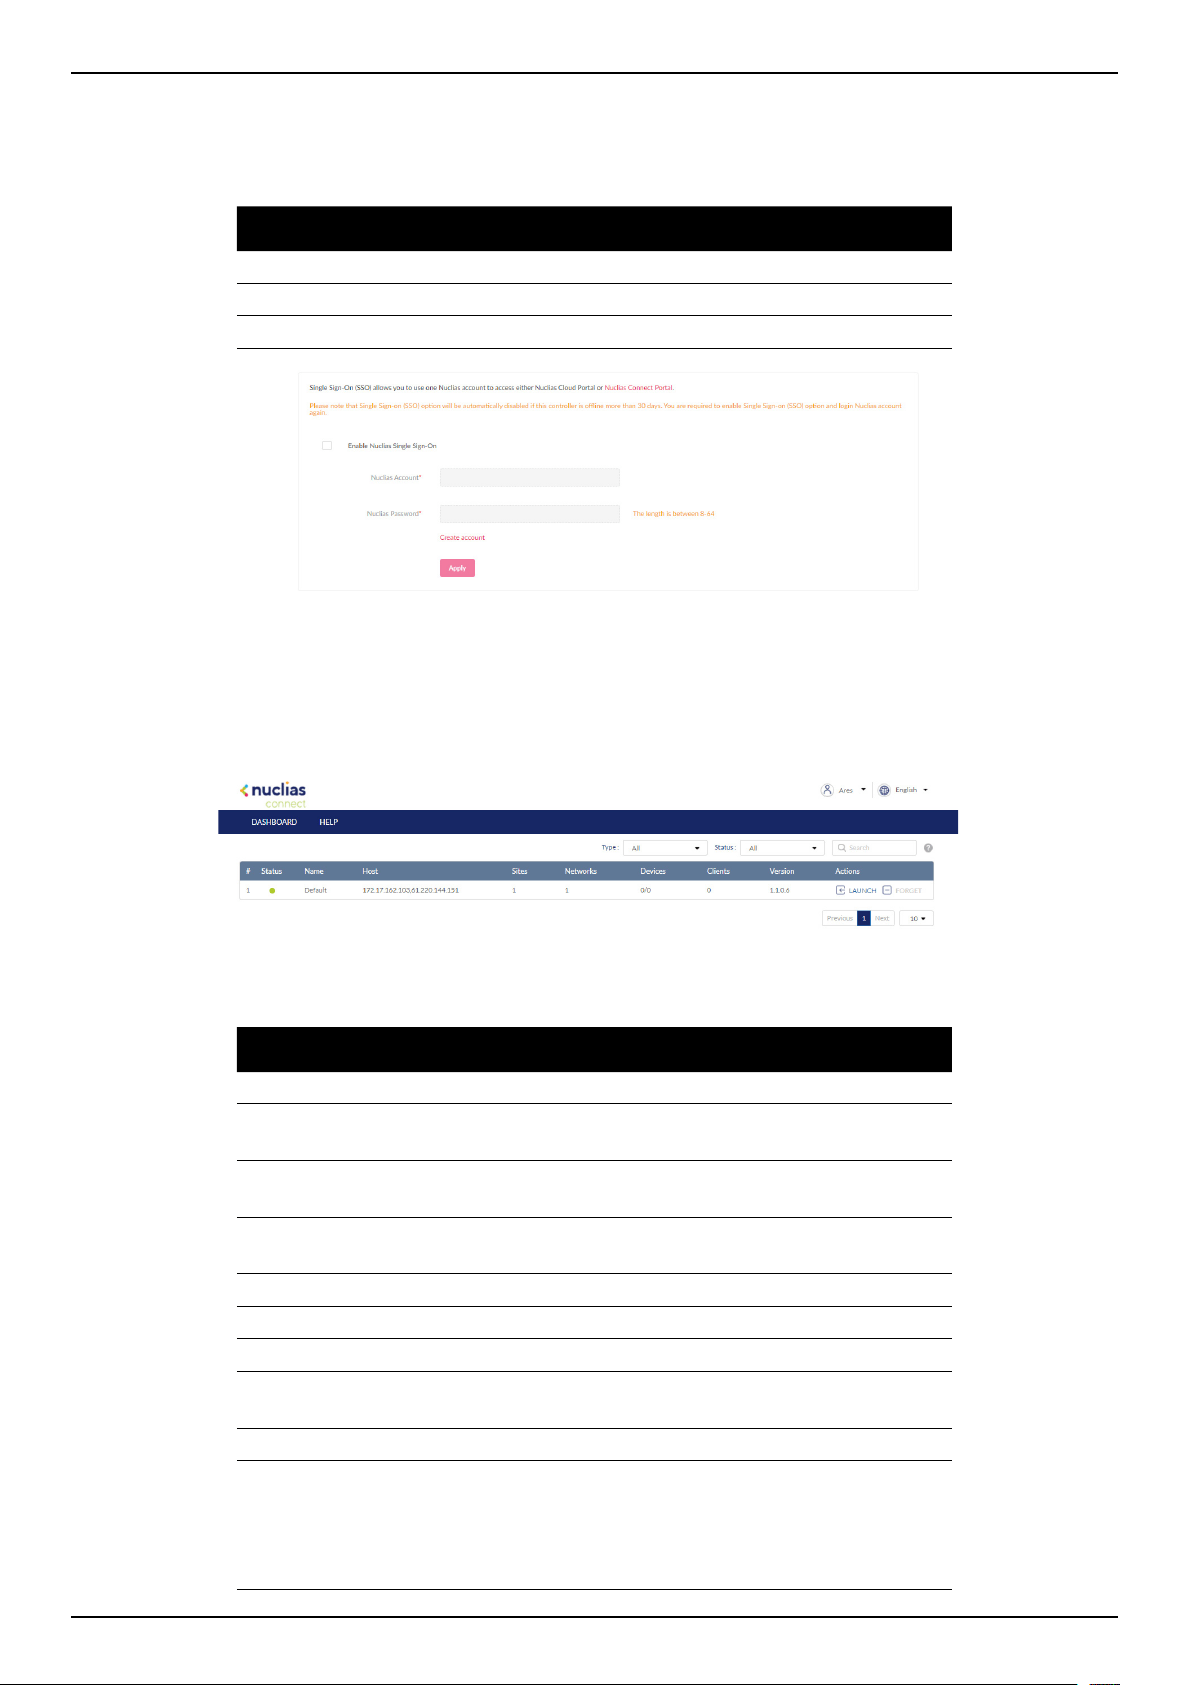
Nuclias Connect Software User Manual Nuclias Connect Conguration
Page 121
Your Nuclias account must be validated before use. You will receive an email from v[email protected] with a verication link
included. Please click on the verication link to activate your Nuclias account.
Once nished, specify the following parameters on the Single-Sign-On page and then click Apply.
Parameter Description
Enable single sign on Check to enable single-sign-on.
Nuclias Account Enter your Nuclias Account username.
Nuclias Password Enter your Nuclias Account password.
The Nuclias Connect Portal provides you with an easy way to view and connect to Nuclias Connect.
Requirements for use include:
• A Nuclias account
• DNC-100 with single-sign-on enabled
The portal can be found at: https://connect.nuclias.com/
The Portal provides the following information:
Parameter Description
Number Number of the DNC-100 on the list.
Status The connection status between the Nuclias Connect
portal and DNC-100.
Name Name of the Nuclias Connect. You can change this name
by clicking on it then typing on the available text box.
Host Displays both the device IP address and its public IP
address.
Sites Number of sites managed by DNC-100.
Networks Number of networks managed by DNC-100.
Devices Number of devices managed by DNC-100.
Clients Number of clients connected to devices managed by DNC-
100.
Version Software version of DNC-100.
Actions Click Launch to open the DNC-100 Nuclias Connect
interface. Please note that IP mapping is required for
instances behind a rewall or router. Click Forget to unlink
DNC-100 from the Nuclias Connect portal. (Forget is only
available when the device is oine.)
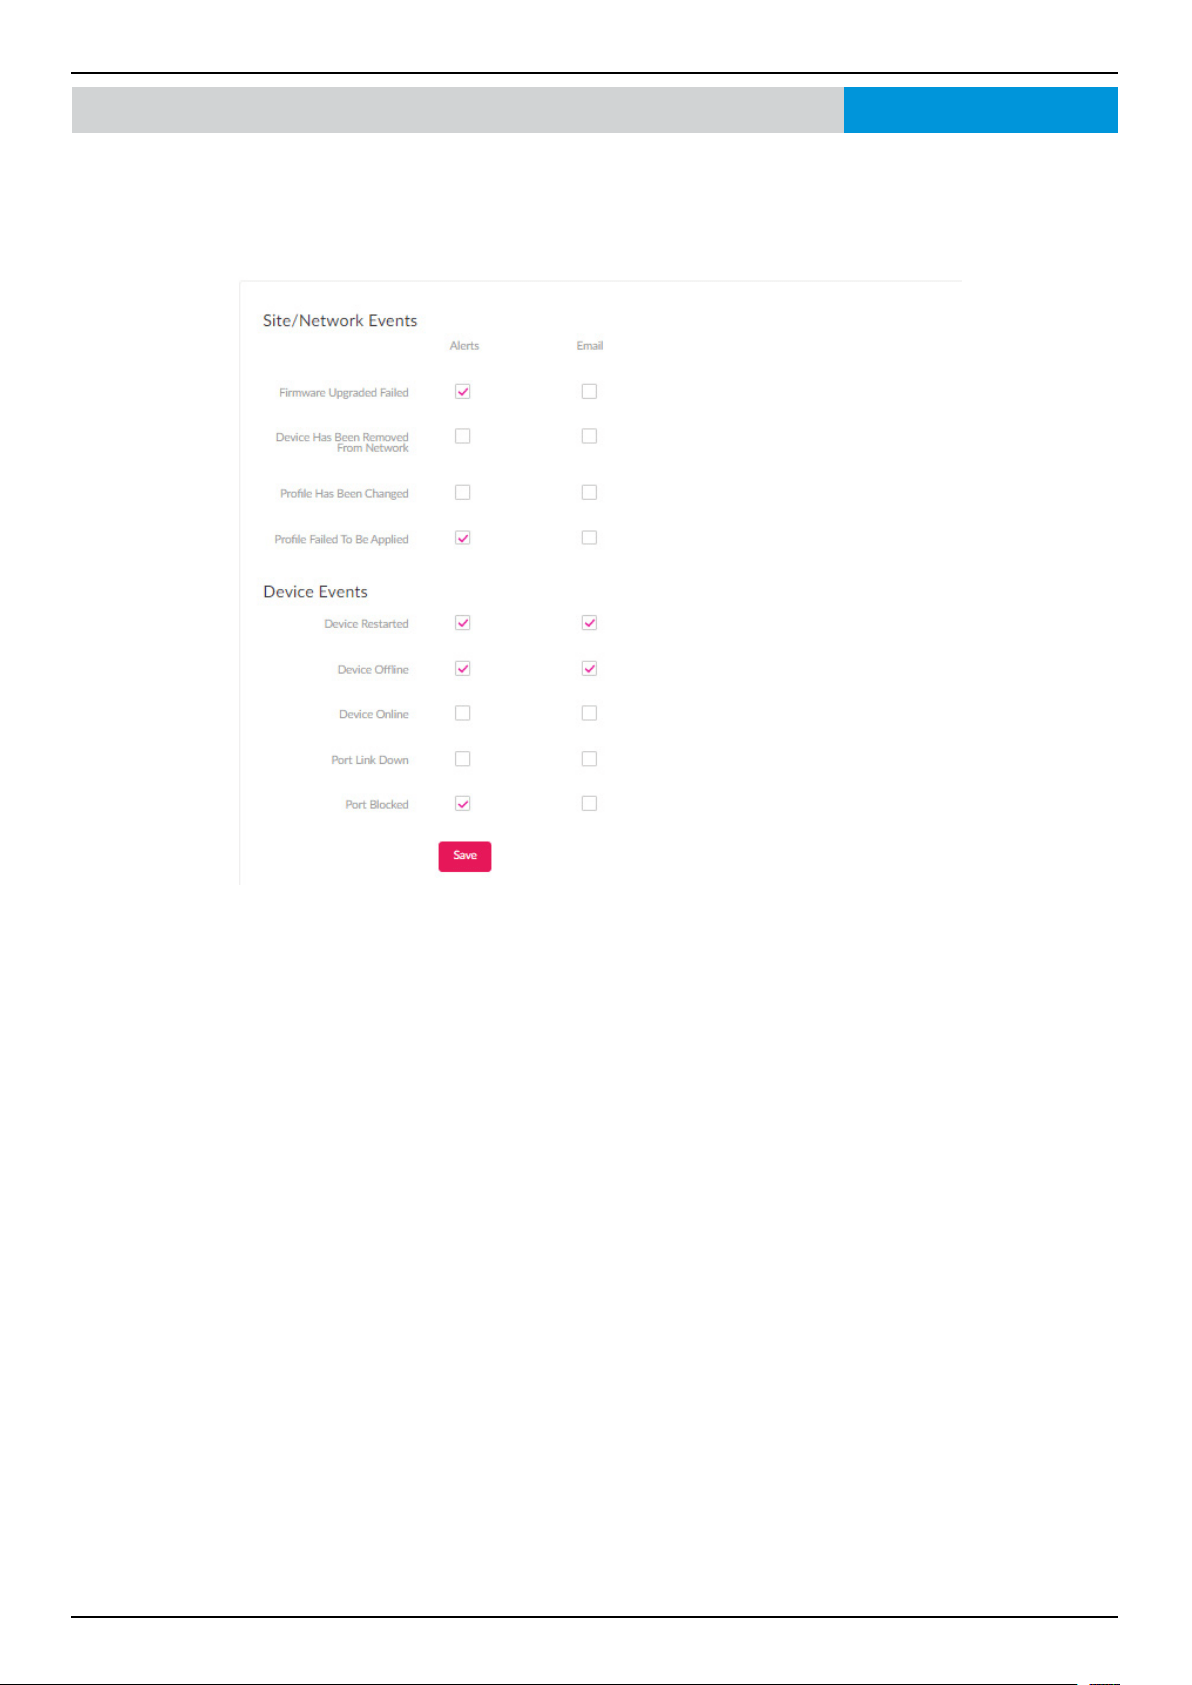
Nuclias Connect Software User Manual Nuclias Connect Conguration
Page 122
System Settings Alerts
The Alerts tab allows you to congure the alert event types. Check the types of events that should generate an alert. To view
generated alerts, go to Log > Alerts to view alerts.
To receive Email alerts, check the Email box next to the Events, and go to System>Settings>User Management, edit the user
and select “Receive Email Alert” to allow users to receive email alerts from Nuclias Connect.
Click Save to save the values and update the screen.
Nuclias Connect
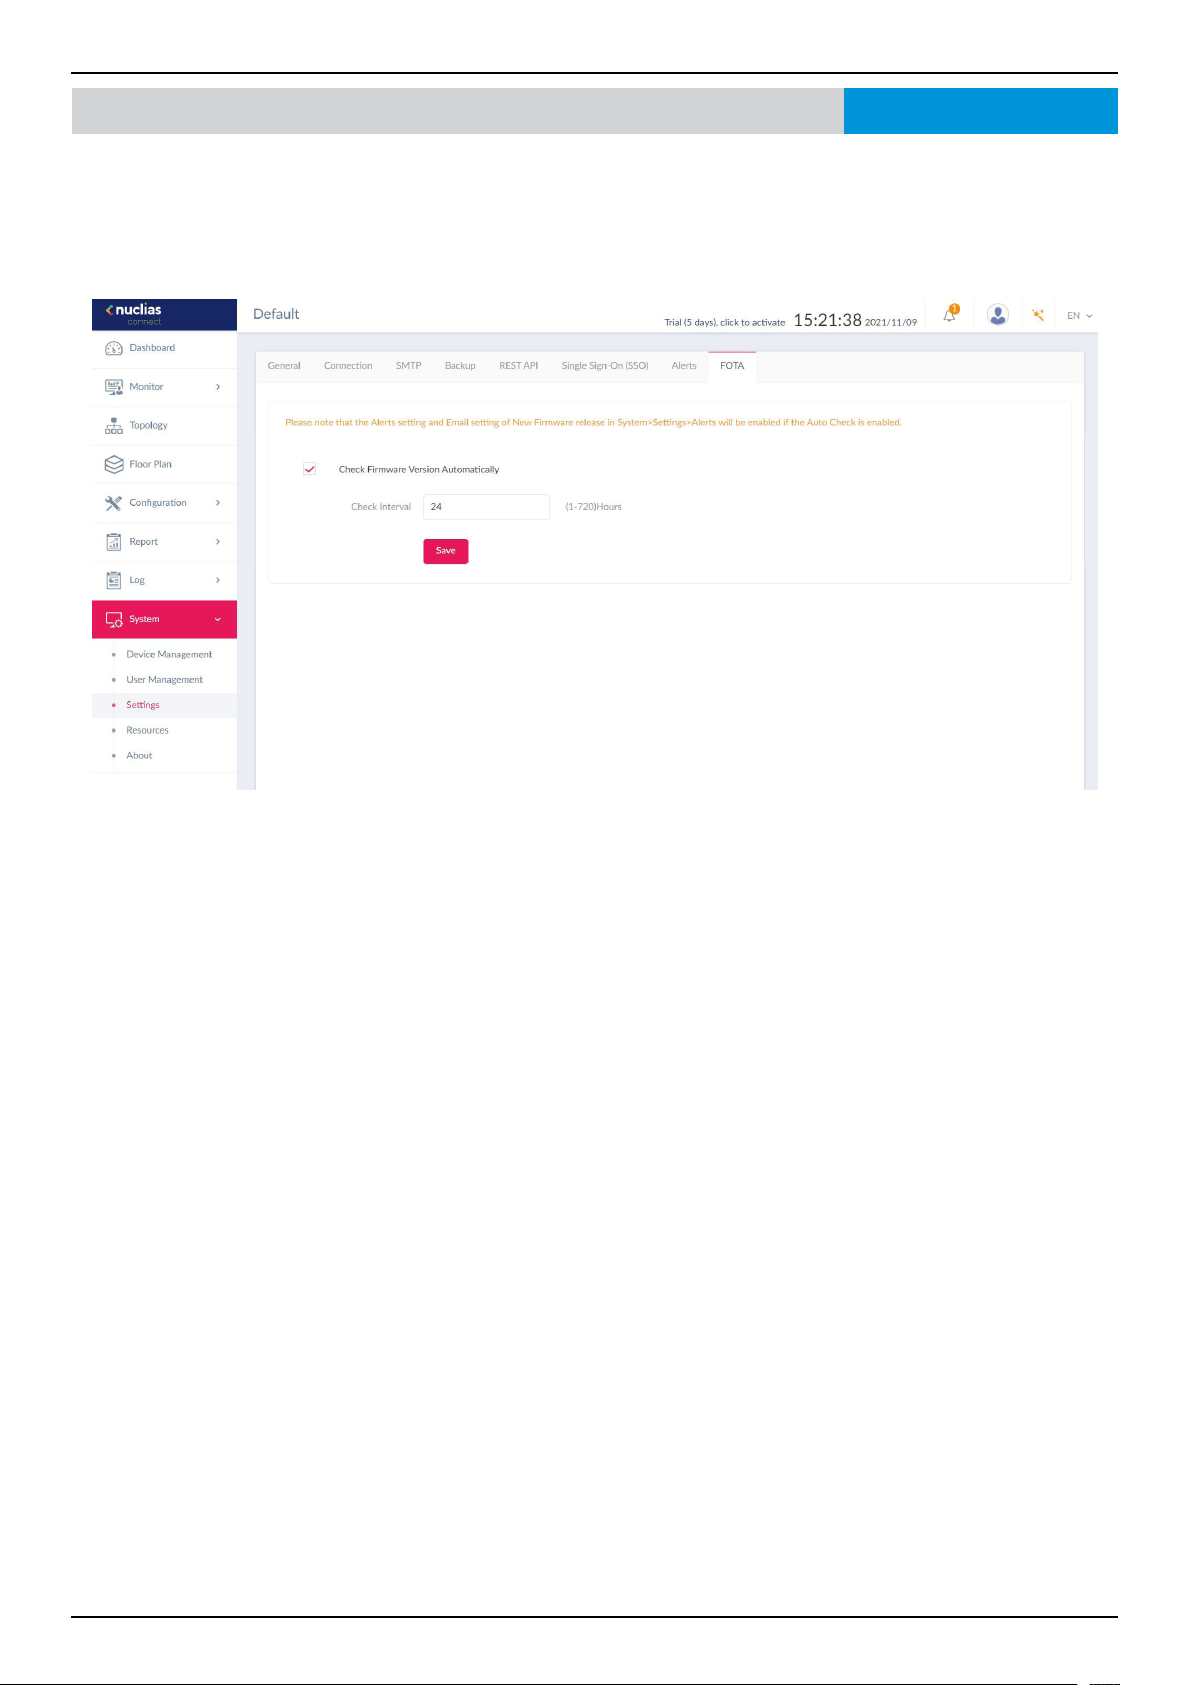
Nuclias Connect Software User Manual Nuclias Connect Conguration
Page 123
System Settings FOTANuclias Connect
The FOTA (Firmware Over-The-Air) feature enables users to wireless upgrade to the latest rmware. Click the box to enable
automatic rmware check. Once Auto Check is enabled, you can then set a check interval between 1-720 hours.
Note that when Auto Check is enabled, the Alert and Email settings will also be enabled.
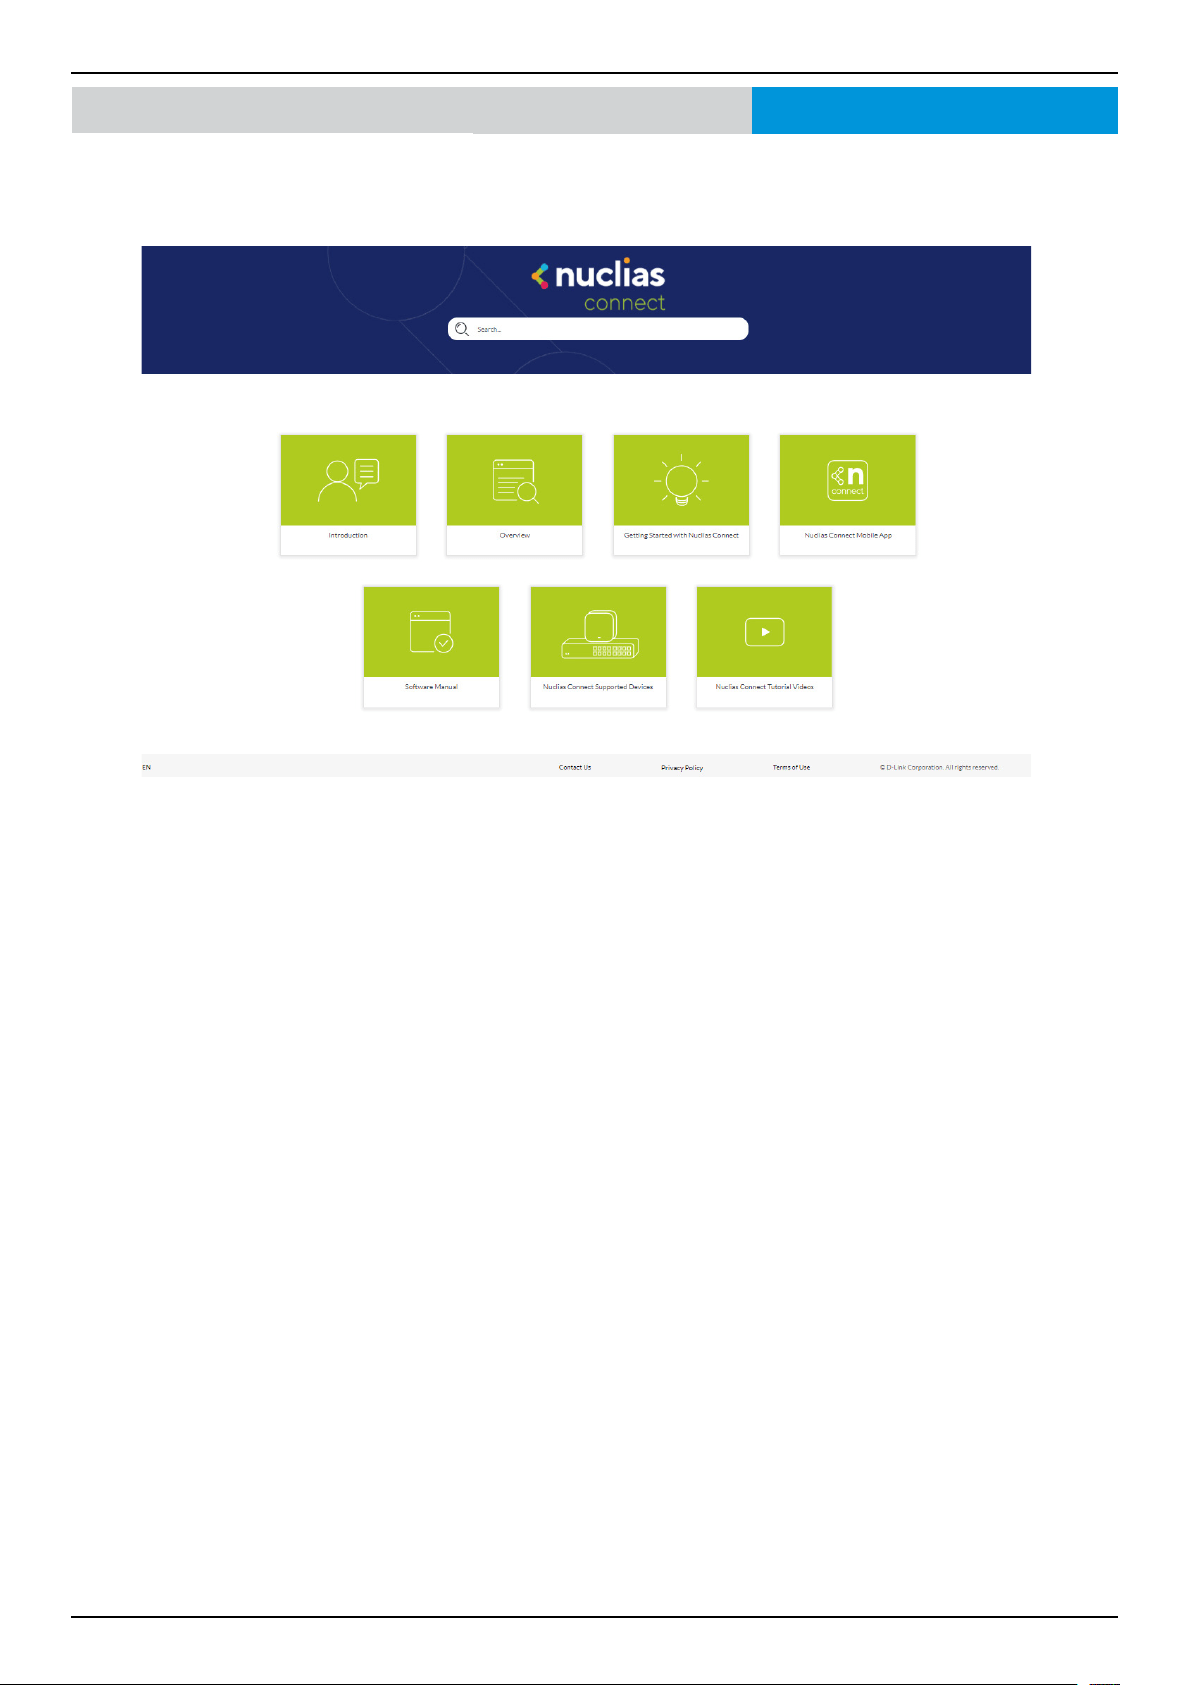
Nuclias Connect Software User Manual Nuclias Connect Conguration
Page 124
System Resources
The Resource page allows you to browse the online documents for quick setup, implementation, guidelines, and
troubleshooting tips.
Nuclias Connect
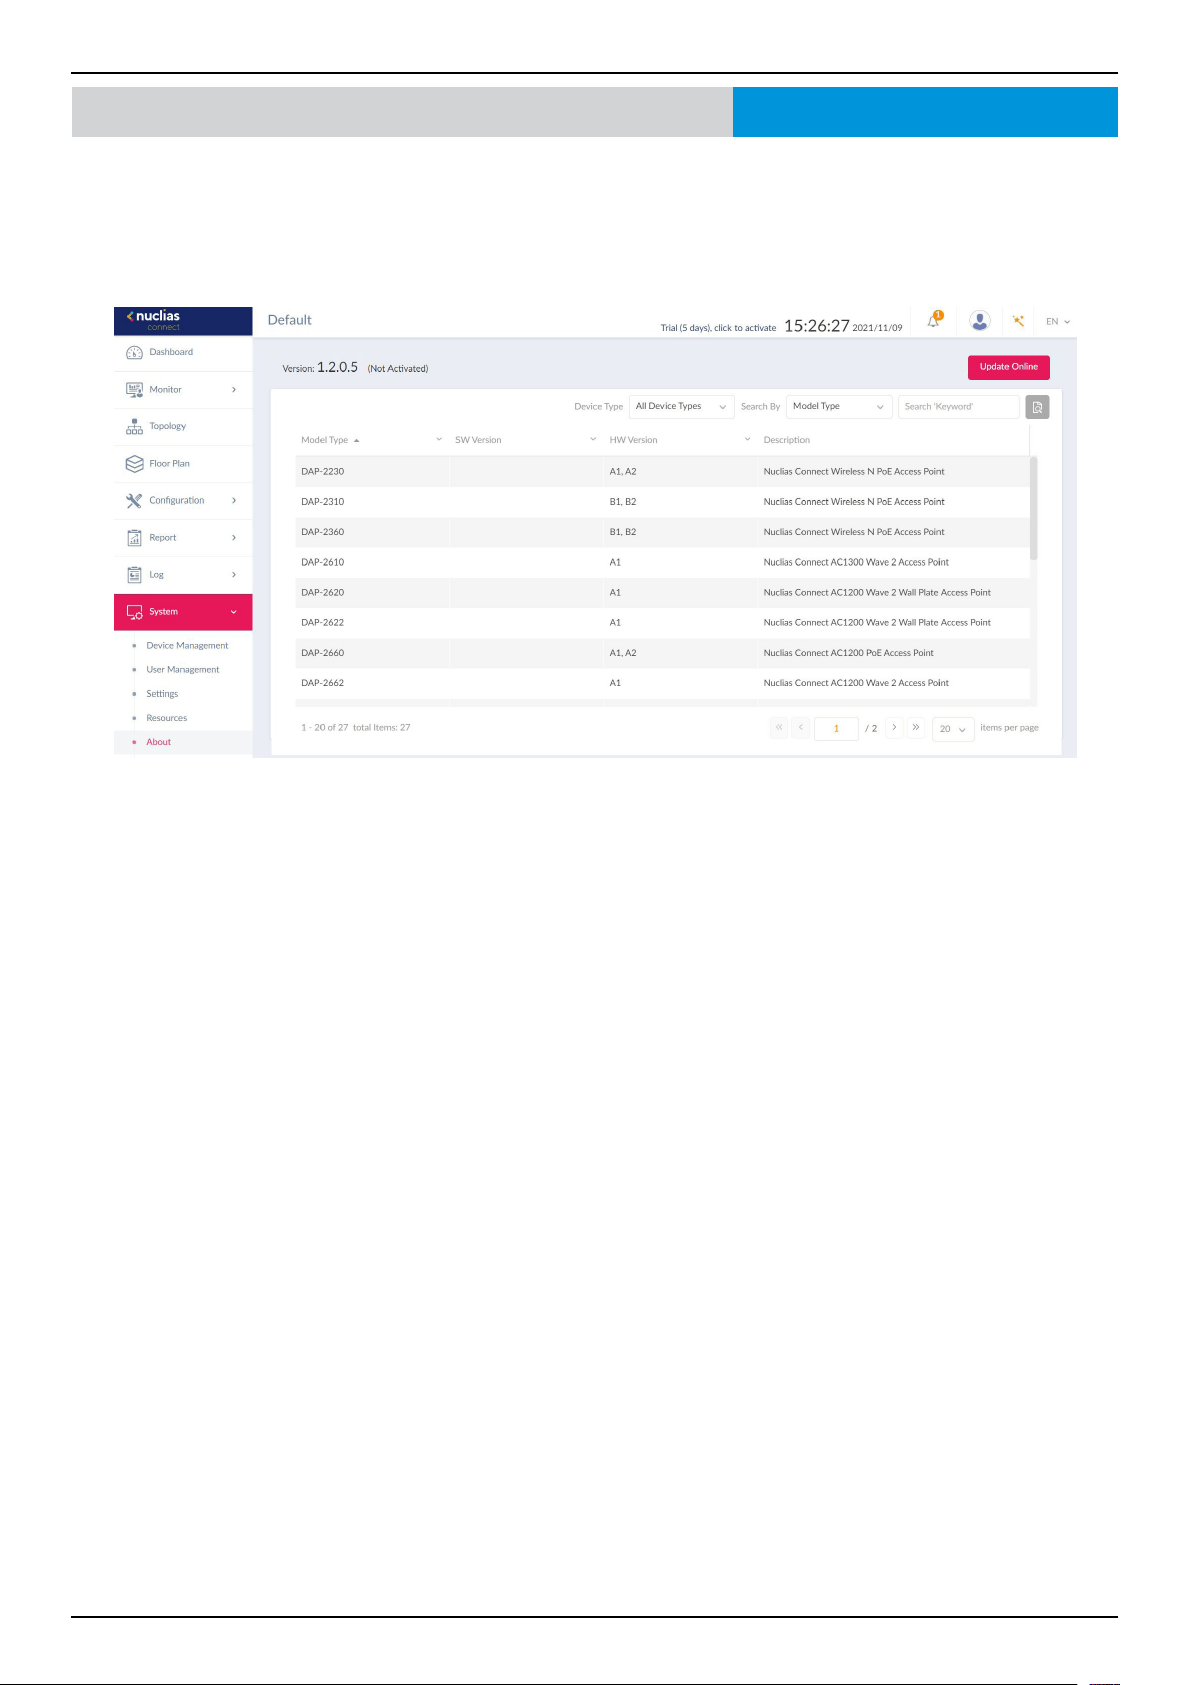
Nuclias Connect Software User Manual Nuclias Connect Conguration
Page 125
System About
The About page displays a list of supported switches and access points.
Navigate to System > About to view the information.
The list can be updated by clicking Update Online. If an update is available, new supported device will also be displayed.
Nuclias Connect