Loading ...
Loading ...
4
ENGLISH
5
ENGLISH
NO
NO
YES
Installation Procedures (continued)
Ill. 6
Ill. 4
Ill. 5
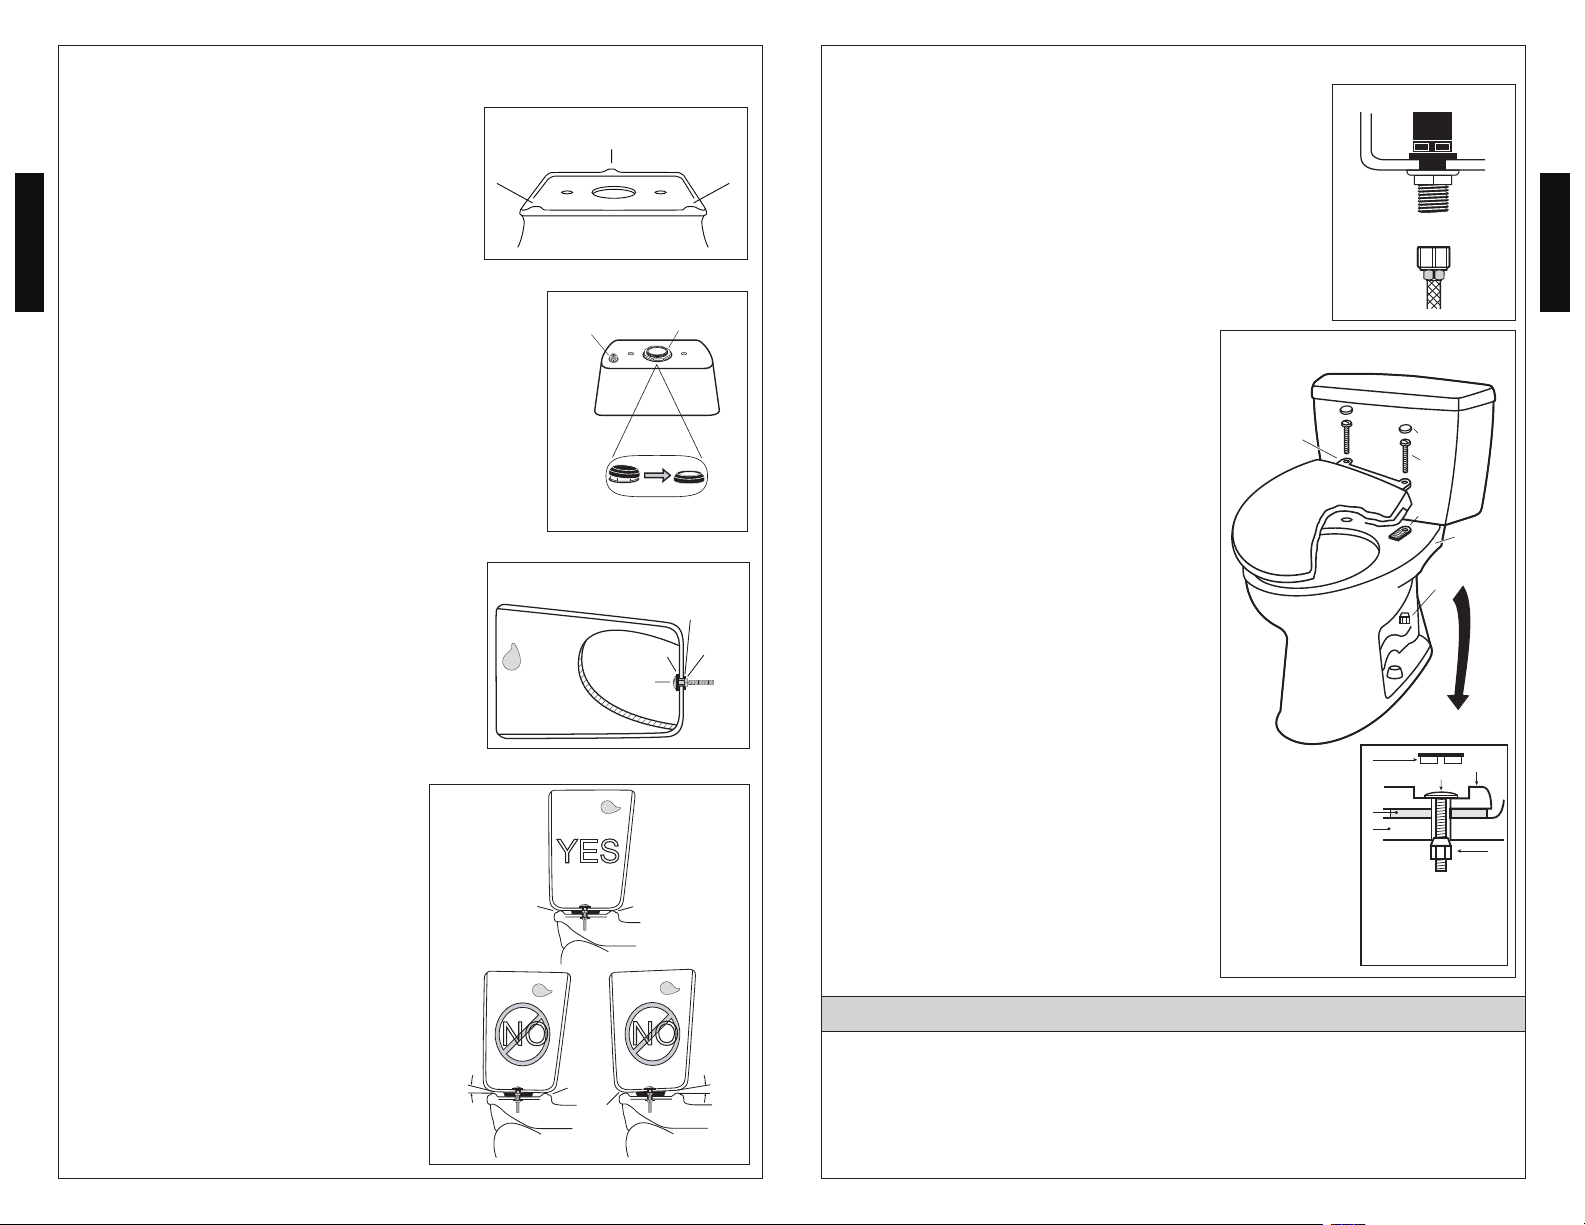
Tank to Bowl
Gasket
1
3
2
NO TE: Three Points of Contact:
The toilet bowl has three points of
contact, which will actually contact the
bottom of the toilet tank when properly
installed. The location of these points
can be seen on the bowl at the tank
receiving area. The three points are front
left (1), front right (2), and back center
(3). Recall these three points during the
Toilet Tank installation
3) Place the tank upside down onto some
padding. Inspect the smaller fill valve nut
and larger flush valve nut for a secure con-
nection (see Illustration 4). Try to tighten
the nuts with your hands. If loose, tighten
the nut hand tight and an additional 1/4
turn for the smaller fill valve nut and an
additional 1/2 turn for the larger flush
valve nut.
Place the tank-to-bowl gasket onto the
flush valve nut. While pressing down,
spread the gasket over the nut until the
gasket touches the bottom of the tank. A
slight gap between the tank bottom and
the gasket is allowable.
4) Lay the tank down on its back. Place a
rubber washer onto a brass bolt (see
Illustration 5). Reach inside the tank and
position the bolt through one of the holes
in the bottom of the tank. On the outside
of the tank, place a metal washer and nut
onto the bolt. Hold the bolt centered in
the hole and tighten the nut finger tight.
Turn the nut an additional 1/2 turn with
a wrench. Repeat this process for the
remaining hole in the tank.
Pick up the tank and carefully guide the
brass bolts to align the tank with the
bowl. Attach a metal washer and nut to
each bolt. Tighten the nuts finger tight
and inspect that the tank is level (see
Illustration 6). Once level, tighten the
bolts equally until the tank makes THREE
POINTS OF CONTACT with the bowl.
Fill Valve Nut
Flush Valve Nut
Metal Washer
Nut
Rubber Washer
Bolt
Cut Away View
3
1 & 2
3 Gap
1 & 2
3
1 & 2
Gap
Points of Contact
4
5
6
2
3
1
7/8” Ballcock Thread
HAND TIGHTEN ONLY
Installation Procedures (continued)
5) Flush the water supply line for a few seconds
to remove any debris that may enter the
new fill valve. (For new home constructions
and/or additions, flush the water supply line
for more than a minute to help remove any
residual PVC adhesives, solder flux, and/
or pipe sealants that were used for the new
plumbing.) Connect the water supply line to
the fill valve threads as seen at the bottom
of toilet tank (see Illustration 7). Tighten this
connection finger tight.
CA UTION: Avoid using a wrench to tighten
the connection as you may damage the
plastic threads and/or cause the fill valve
to rotate inside the tank.
NO TE: The water supply pressure should be
20 to 80 psi static.
6) No ballcock / fill valve adjustments are
needed. The water will automatically stop at
proper level.
Flush the toilet several times. Check flapper
valve for proper operation. Make sure that
chain is not tangled and that the flapper arm
is in its proper position.
7) Install the toilet tank lid onto the toilet tank
top.
8) Install the toilet seat onto the toilet bowl
using the mounting hardware in the toilet
seat box. Place seat onto bowl and rotate the
hinge down. Position seat stoppers under
the seat hinge. Insert bolt into seat hinge
and through the toilet bowl. Install plastic nut
onto bolt from underneath. Tighten the bolt
securely. Install the seat bolt caps.
NO TE: Tighten the seat bolt until the hinge
is secure. The seat and lid will have slight
side to side movement, which is normal.
This freedom of movement allows the
seat to SoftClose® without binding.
Ill. 7
TOILET TANK FILL VALVE INSTRUCTIONS
Installation Procedure
Ill. 8
Seat
Hinge
Cap
Plastic
Bolt
Seat
Stopper
Bowl
Plastic Nut
1 - Cap
2 - Plastic Bolt
3 - Seat Hinge
4 - Seat Stopper
5 - Toilet Bowl
6 - Plastic Nut
MOUNTING HARDWARE
1) Shut off the water supply to the toilet.
2) Flush toilet and remove remaining water from tank with a sponge.
3) Remove the water supply connection at the fill valve.
4) Remove old fill valve and use damp sponge to clean hole in tank.
Loading ...
Loading ...
Loading ...