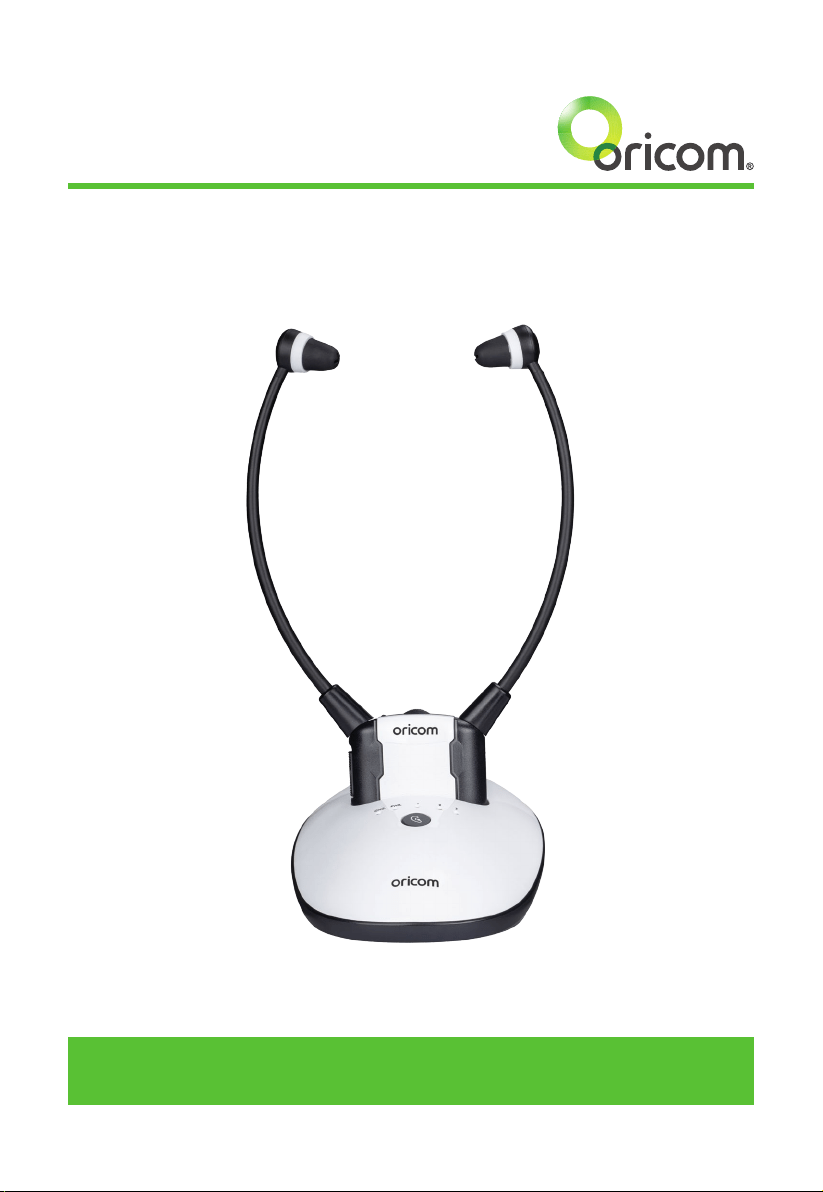
TV7400
2.4GHz Amplied Wireless TV Headset
User Guide
Keep this user guide for future reference. Always retain your proof of purchase
in case of warranty service.

2
Features .............................................................................................................................3
Getting to know your product
Components ........................................................................................................................ 5
Function identication: headset receiver ......................................................................... 6
Function identication: transmitter .................................................................................. 7
Charging the Battery ......................................................................................................... 8
Installation
Transmitter .......................................................................................................................... 9
Headset receiver ................................................................................................................ 10
Operation
Initial Operation ................................................................................................................. 11
Routine Operation .............................................................................................................. 11
Improving Sound by Switching Channels ....................................................................... 12
Adjusting the Sound Balance (left-right) ........................................................................ 13
Using the Mic Button and Microphone for Conversation ............................................... 13
Controlling the Tone (Bass & Treble)...............................................................................14
Technical specications .................................................................................................. 15
Troubleshooting ............................................................................................................... 15
Cleaning & Maintenance ................................................................................................. 16
Table of contents
Need Help?
If you need assistance setting up or using your Oricom product now or in the
future, call Oricom Support.
Australia 02 4574 8888
www.oricom.com.au
Mon-Fri 8am – 6pm AEST
New Zealand 0800 67 42 66
Mon-Fri 10am – 8pm NZST

3
*Need some help? Call 02 4574 8888 or go to www.oricom.com.au
Features
Welcome…
to your TV7400 2.4GHz Amplied Wireless TV Headset
The Oricom Wireless TV Headset is an audio amplication system
specically designed for people with hearing difculties.
The Oricom Wireless TV Headset can be used with all kinds of audio
systems for free listening enjoyment. This product can be used on all
audio devices with a 3.5mm/optical audio output, including all TV's,
Smartphones, and Hi-Fi systems. Audio output from a TV or audio device
is transmitted by the Charging Cradle, and the wireless receiver receives
the signal and amplies the audio sound for the listener.
Features
• Comfortable,lightweightandeasytouse
• WorkswithallTV’sandaudiodeviceswitha3.5mm/opticalaudio
output
• Integratedmicrophoneonheadsettoswitchtoconversationmode
and increase the ambient sound at the touch of a button
• Volumecontrol
• Fastchargingcradle
• RFTransmissionautooff(whennoaudiosignal)
• Audiobalancing(Left/Right)
• Adjustabletrebleandtoneclarity
• Continuousinusetime:Upto6hours
• Stereoaudioinputonthebase(3.5mmoropticalaudiocables)
• Operatingdistanceofupto25metres(inopenarea)
• 12monthwarranty
Note: Follow the local regulations regarding the disposal of your packing
materials. Wherever possible, recycle those materials.
ThisUserGuideprovidesyouwithalltheinformationyouneedtogetthe
most from your product.

4
*Need some help? Call 02 4574 8888 or go to www.oricom.com.au
Features
Need help?
If you have any problems setting up or using your TV7400 TV headset,
please nd answers to Frequently Asked Questions, available at
oricom.com.au
WARNINGS:
• Neverattempttorechargeconventionaldrycells.
• Batteries(batterypackorbatteriesinstalled)shallnotbeexposedto
excessiveheatfromsourcesincluding:sunshine,reorsimilar.
• Neveruseanothertypeofbatteryornon-rechargeablebatteriesto
replace the rechargeable batteries supplied.
• Whentheheadsetsarenotinuse,movetheswitchtotheOFF
position to avoid damaging the batteries.
• Thebatteriesmustalwaysbefullychargedbeforerstuse.An initial
3 hours charge is required to guarantee an acceptable service
life for the rechargeable batteries. Always ensure that the headset
ReceiverisswitchedtoOFFpositionwhilethebatteriesarecharging.
• Excessivesoundpressurefromearphonesandheadsetscancause
hearing loss.
5
*Need some help? Call 02 4574 8888 or go to www.oricom.com.au
Getting to know your product
Getting to know your product
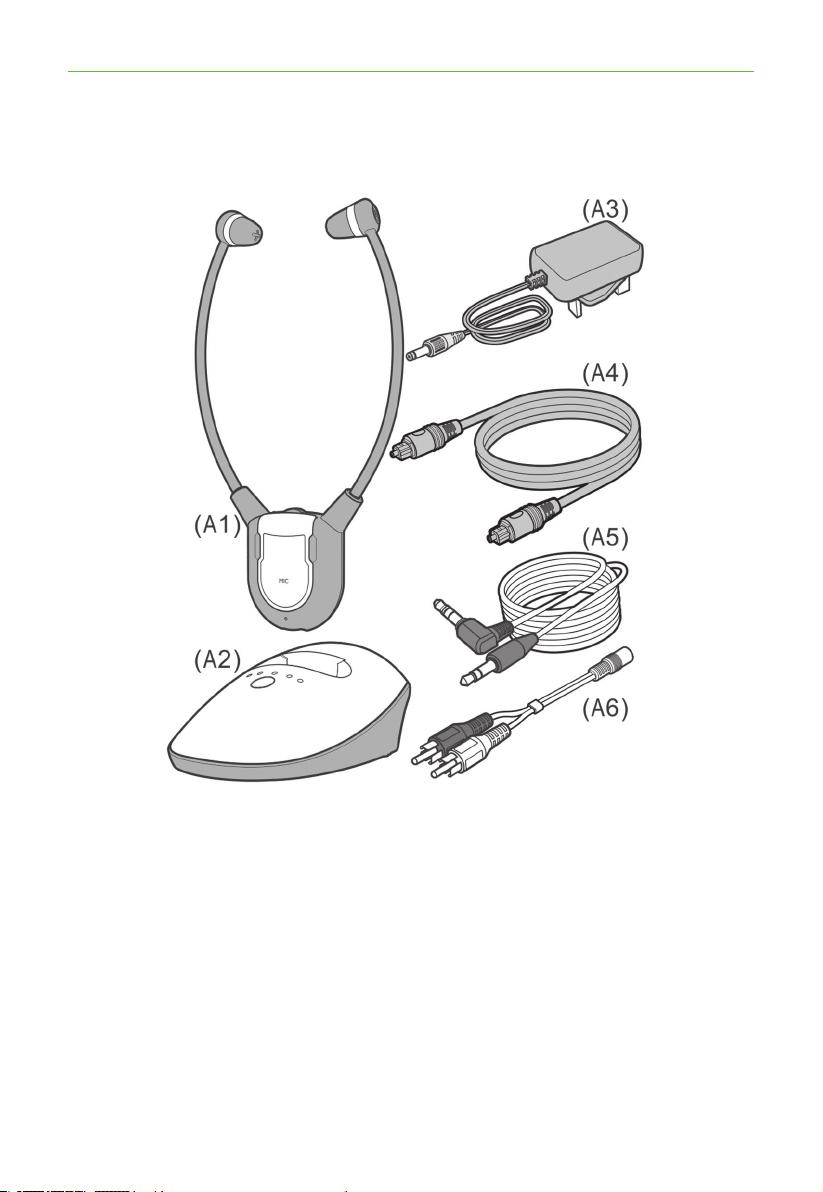
Components
(A1) TVHeadsetReceiver
(A2) ChargingCradleandTransmitter
(A3) PowerSupply
(A4) OpticalCable
(A5) AudioCable(bothendswith3.5mmstereoplug)
(A6) RCAAdapterCable

6
*Need some help? Call 02 4574 8888 or go to www.oricom.com.au
Function identication: headset receiver
Function identication: Headset receiver
FRONT REAR
(B1) Earbuds
(B2) VolumeControl
(B3) Power/SignalLEDIndicator
(B4) MuteButtonforVerbalCommunications
(B5) Microphone
(B6) PairButtonforFrequencyChannel
(B7) SoundBalanceControl
(B8) PowerOn/OffSwitch
(B9) BatteryContact
7
*Need some help? Call 02 4574 8888 or go to www.oricom.com.au
Function identication: transmitter
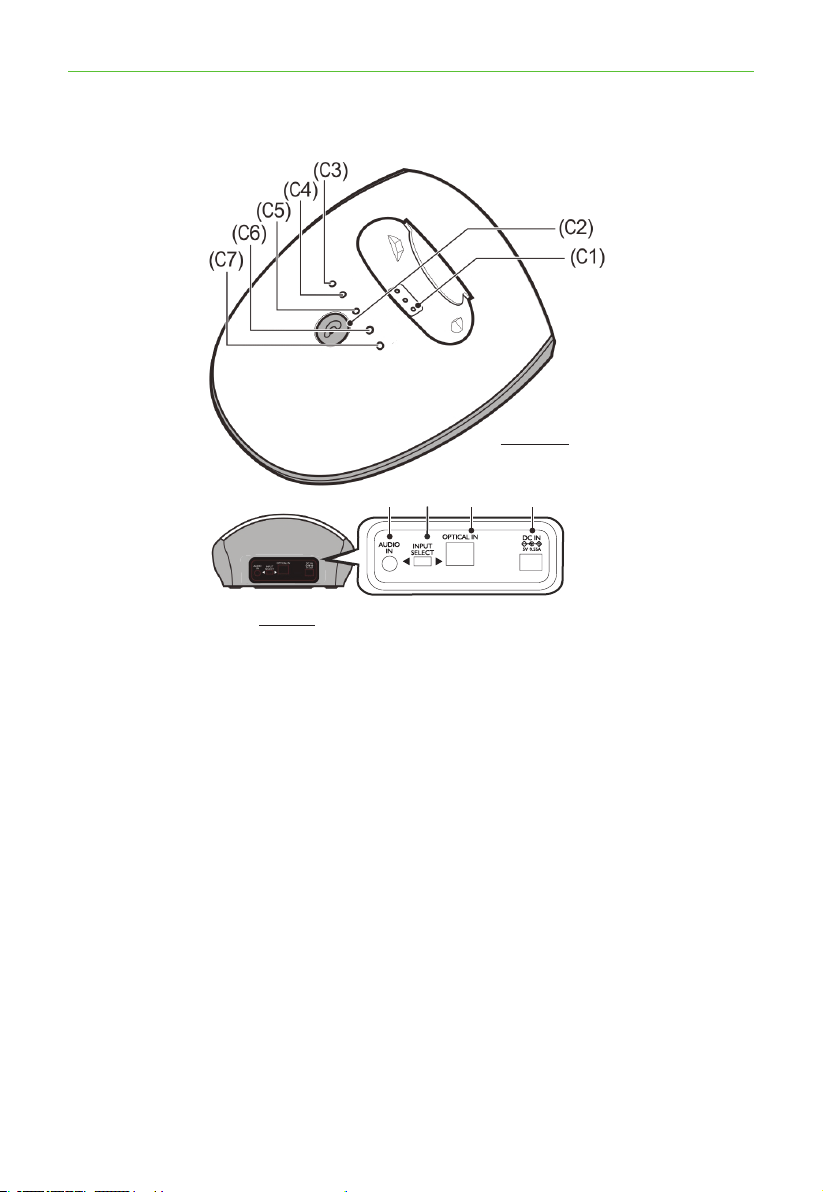
Function identication: transmitter
(C8) (C9) (C10)
(C11)
FRONT
REAR
(C1) ChargingPins
(C2) ToneAdjustment
(C3) LEDIndicator:BatteryCharge(Red=charging,Green=fullycharged)
(C4) LEDIndicator(Green):Power
(C5) LEDIndicator(Yellow):Bassenhanced+Trebleenhanced
(C6) LEDIndicator(Yellow):Trebleenhanced
(C7) LEDIndicator(Yellow):Bassenhanced
(C8) AudioIn
(C9) InputSelection(AudioINorOpticalIN)
(C10) OpticalInSocket
(C11) DCInSocket
Please note that only one input (either audio input or optical input)
must be connected.
8
*Need some help? Call 02 4574 8888 or go to www.oricom.com.au
Charging the Battery
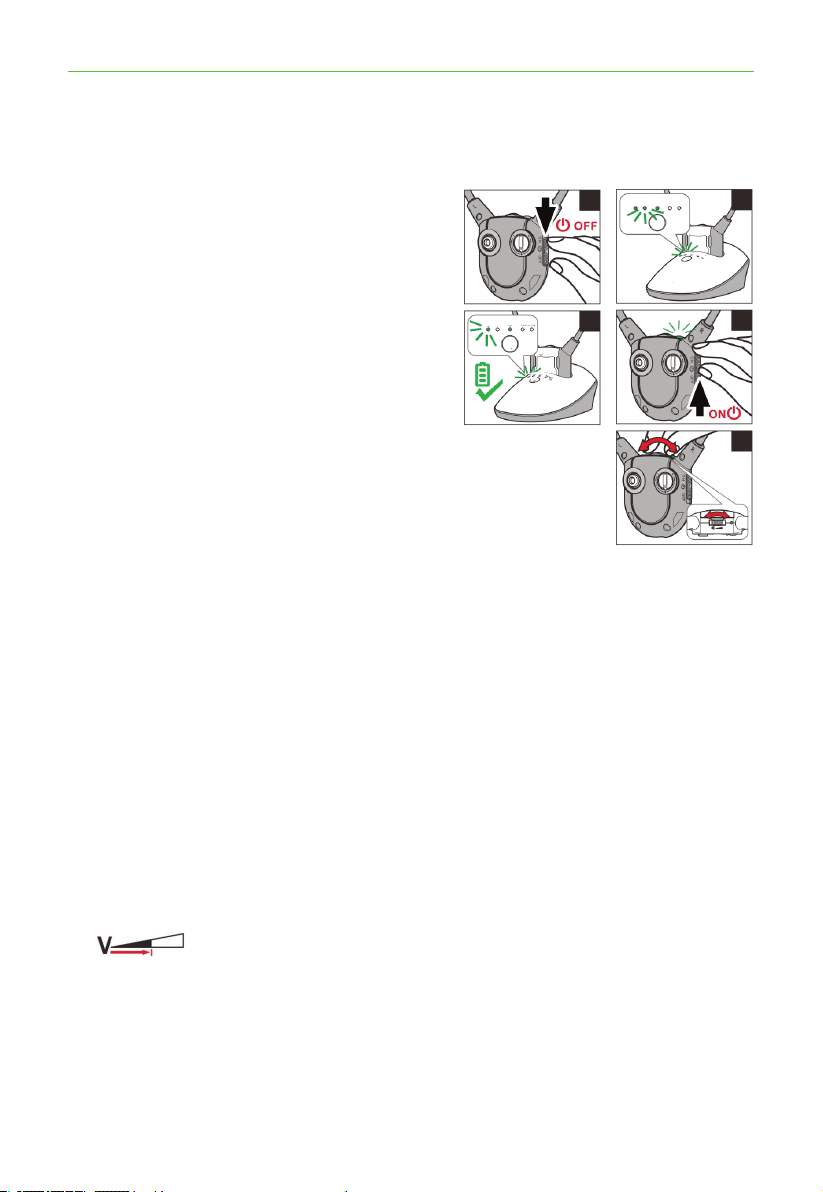
1. ThesignalLEDIndicatoronthe
HeadsetReceiverwillblinkslowly
when the battery level is low. At this
stage there are about 20 minutes of
operating time before the Headset will
switchoff.Rechargethebattery.
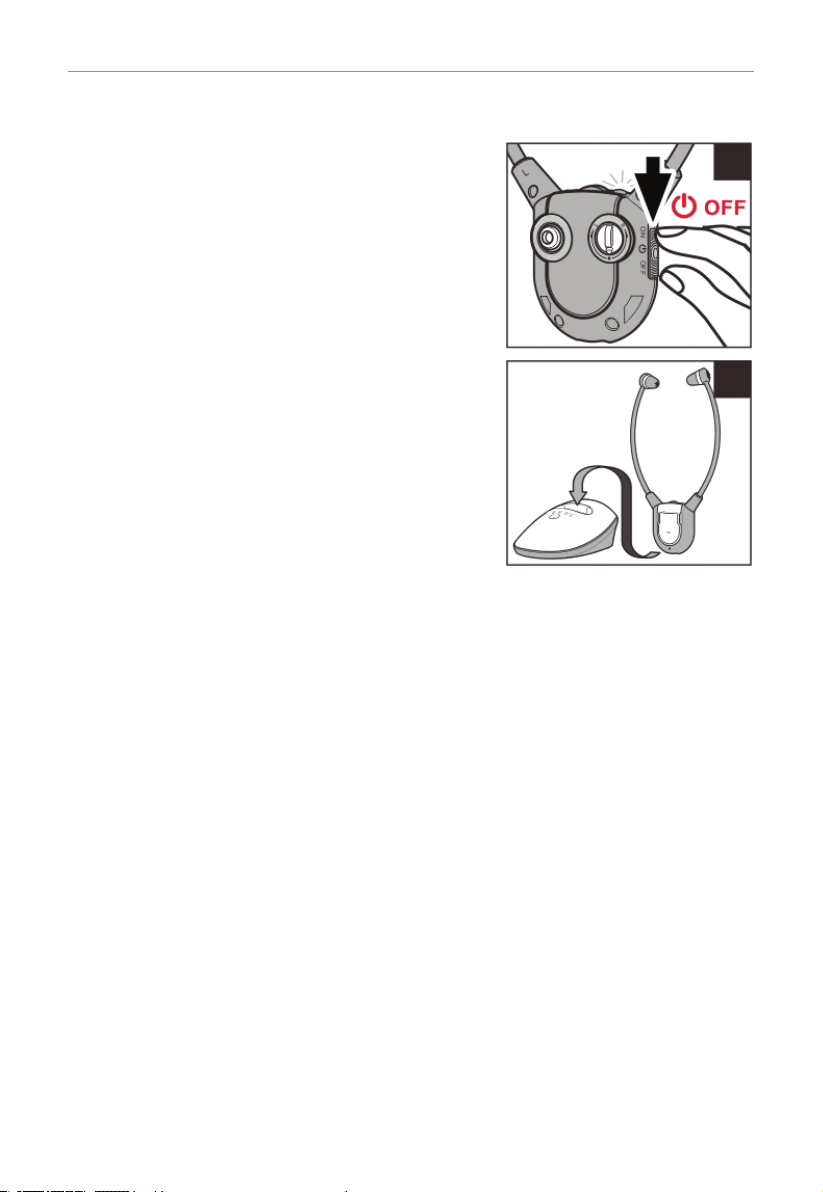
2. Switch OFF the On/Off Switch on the
Headset(seegure(1)).Thegreen
LEDontheHeadsetshouldturnoff.
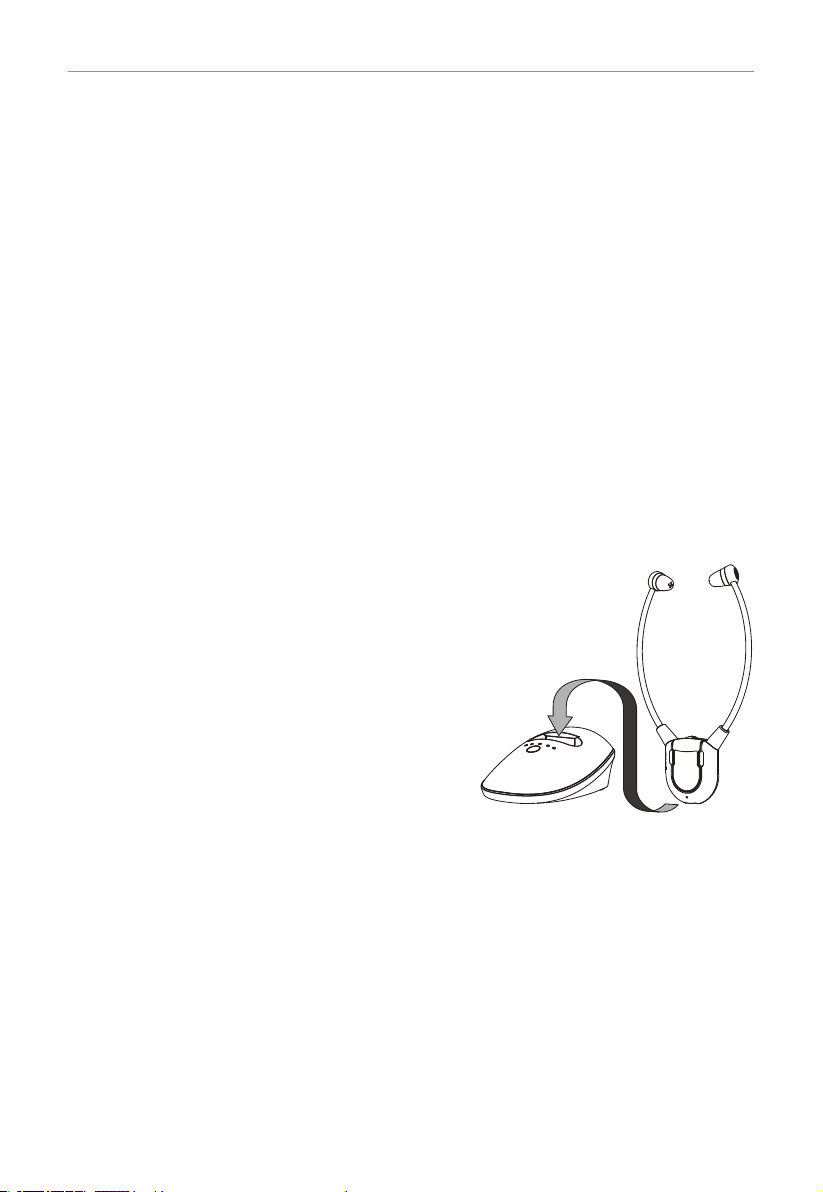
3. PlacetheheadsetontheCharging
Cradle(seegure(2)).Makesurethe
charge contact touches the charge
pins on the Charging Cradle.
4. The Charging process starts
automatically.
•TheLEDIndicatorglowsredduring
charging.
•Itwillglowgreenafterthebatteryis
fully charged.
WARNING:
•Thebatterymustnotbeexposedtoexcessiveheatsuchassunshine,re
etc.
•Donotattempttoreplacetheoriginalrechargeablebattery.
•Whentheheadsetsarenotinuse,movetheswitchtotheOFFposition
to avoid damaging the batteries.
•Thebatterymustalwaysbefullychargedbeforerstuse.Aninitial3
hours charge is required to guarantee an acceptable service life for the
rechargeablebattery.AlwaysensurethattheReceiverisswitchedto
OFF position while the battery is charging.
•Excessivesoundpressurefromearphonesandheadsetscancause
hearing loss.
IMPORTANT:
This unit should be operated with built-in rechargeable battery only. When
disposing of the unit, always comply with applicable laws relating to the
disposalofbattery.Pleaseplacetheminaproperdisposalcontainerto
ensure that they are eliminated safely and in an environmentally friendly
way.
(5)
(6)
(1)
(2)
Charging the Battery
9
*Need some help? Call 02 4574 8888 or go to www.oricom.com.au
Installation
Installation
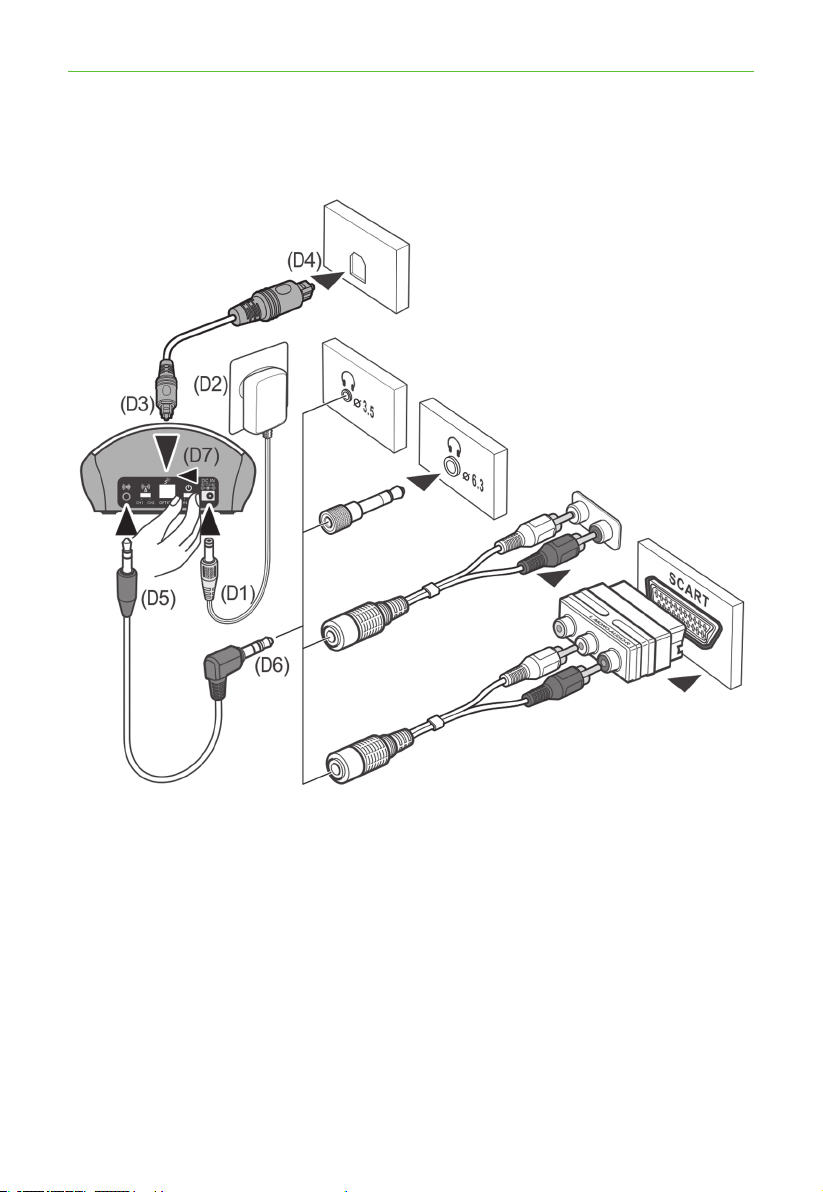
Transmitter
(D1) ConnectthePowerSupplytotheDCINSocketlocatedonthe
Charge Cradle rear panel.
(D2) ConnectthePowerSupplytomainspoweroutlet
(100-240V~50/60Hz).
(D3) ConnectoneendoftheOpticalCabletotherearpanelofthe
Charge Cradle.
(D4) ConnecttheotherendoftheOpticalCabletoyourAudioSource
(e.g.TVoraudiodevice)withOpticalOutput.
Optical Jack on
TV or HIFI system
3.5mm headset
socket
6.3mm headphone
socket
RCAsocket
SCART
socket
NOTE: 6.3mm and SCART
Adapters not included.
10
*Need some help? Call 02 4574 8888 or go to www.oricom.com.au
(D5) Accessories(6.3mm and SCART Adaptor) in above drawing are
NOT PROVIDED in the pack components.
(D6) IfyourAudioSourcedoesnothaveanopticalsocket,thenuse
one of the following Adapters that connects to the Audio In of the
Transmitter.
•3.5mmto6.3mmAdapterPlug(Notincluded)
•SCARTAdapter(Notincluded)
(D7) Whenconnectedtothemainspower,thegreenPowerIndicator
LEDwillglowimmediately.
WhentheaudiosignalisdetectedfromtheAudioSource,theGreenLED
PowerIndicatorwillglowconstantly.
Note: When using Optical Cable connection, please set your audio
devices/systems to PCM Two-Channel (support 32KHZ—196KHZ).
For details, please refer to the operation manual of your audio
devices/systems for the proper setting.
Headset receiver
Makesurethebuilt-inBatteryinsidethe
HeadsetReceiverisfullychargedforthe
rst use.
Installation
11
*Need some help? Call 02 4574 8888 or go to www.oricom.com.au
Operation
Operation
Initial Operation
1. Make sure the TV7400 is plugged
into the mains supply.
2. PlacetheTVHeadsetinthe
Charging Cradle for at least three
hours to allow it to fully charge.
•MakesuretheTVHeadsetis
switchedOFF(seegure(1)).
•TheLEDIndicatorglowsred
during charging.
•Itwillglowgreenafterthe
battery is fully charged
(seegure(2)).
3. After three hours have passed
andthechargingLEDhasturned
green, you can proceed to use the device.
Routine Operation
1. SwitchontheAudioSource(TVsetorotheraudiodevice)thatthe
Transmitterisconnectedto.ThePowerLEDIndicatorwillglow
continuously(seegure(3)).
2. PuttheEarPhoneplugintothe3.5mmphonejackofTVReceiver.
OntheTVReceiver,switchONtheOn/OffSwitch(seegure(4)).The
greenPowerLEDIndicatorwillglowcontinuously.
3. AdjusttheVolumetothedesiredsoundlevel(seegure(5)),thent
the earbuds in your ears.
NOTE:MakesurethevolumeonyourAudioSource(TVsetorotheraudio
device)isturneduptoatleasthalfofitsfullvolumetogetgoodsound
quality in your Earbuds.
(1)
(2)
(3)
(4)
(5)

12
*Need some help? Call 02 4574 8888 or go to www.oricom.com.au
Improving Sound by Switching Channels
Note: Make sure the battery is fully charged before rst use. Charge
the battery for about 3 hours before rst use.
RFTransmissionoftheTransmitterwillautomaticallyswitchOFFin
approximately5minutesifthereisnoAudioSignal,ortheSignalthat
it receives from the Audio Source is too weak for proper reception.
However, if the Signal returns to an acceptable level, the Transmitter will
automatically switch ON again.
13
*Need some help? Call 02 4574 8888 or go to www.oricom.com.au
Adjusting the Sound Balance (left-right)
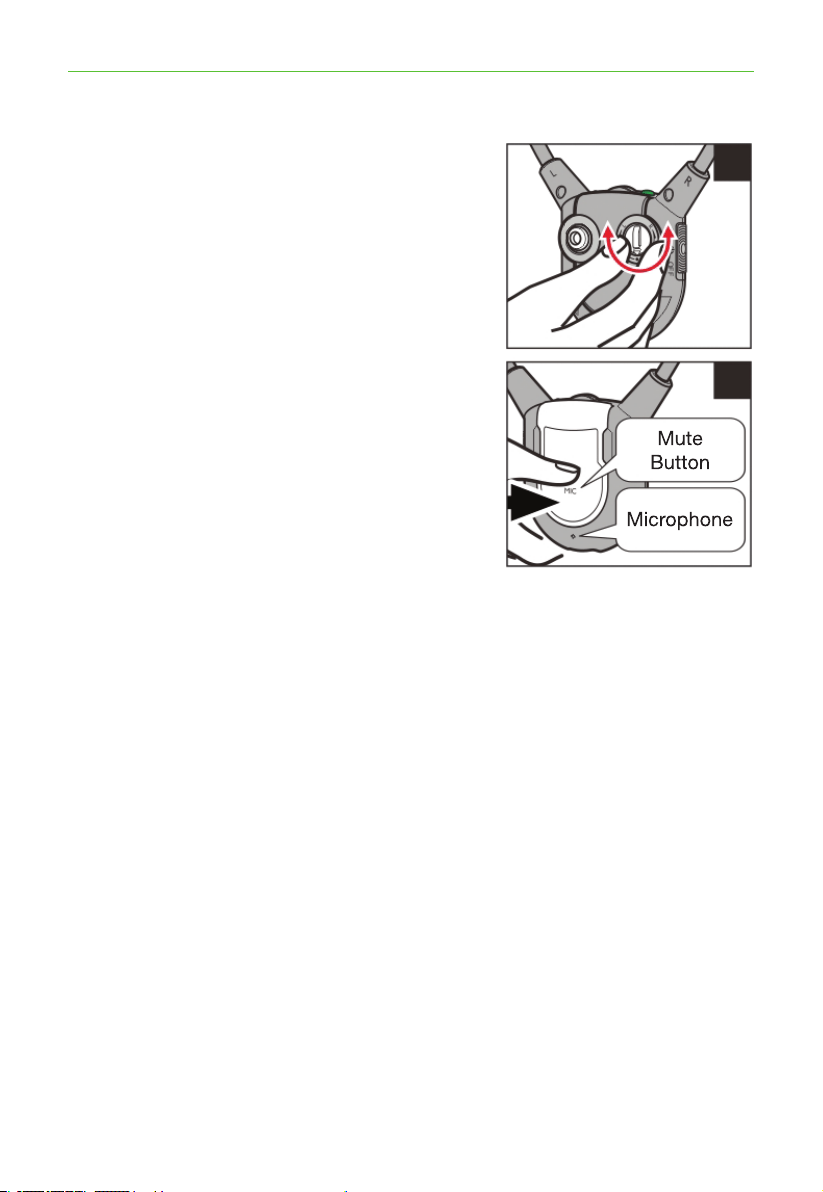
Youcanadjustthesoundtosuityour
hearing in each ear.
WiththeReceiveron,rotatetheSound
Balancebutton(seegure(5))toadjust
the sound – you will notice that the sound
seems to “drift” from one side to the other.
Adjust this button until you nd your most
pleasant sound balance.
Using the Mic Button and
Microphone for Conversation
YoucanswitchfromListeningmodeto
Conversation mode without having to take
offtheReceiver.
Totalkorlistentosomeone:
1. PresstheMicbutton(seegure(6)).
This will shut off the Audio Source and
theReceiverwillbecomeanamplierbyactivatingtheMicrophone.
2. To resume listening to your audio device, press the Mic button again.
The microphone will be shut off and the audio will resume.
Adjusting the Sound Balance (left-right)
(5)
(6)
14
*Need some help? Call 02 4574 8888 or go to www.oricom.com.au
Controlling the Tone (Bass & Treble)
Whennecessary,TrebleorBassintheHeadsetReceivercanbeadjusted
ontheTransmitterbytheToneClarityButton.SimplypresstheTone
ClarityButtontoselectTrebleorBass,andmatchtoyourlevelofhearing
aid capability.
Controlling the Tone (Bass & Treble)

15
*Need some help? Call 02 4574 8888 or go to www.oricom.com.au
Technical specications / Troubleshooting
Technical specications
Battery operating Time Upto6Hours
Range Upto25meters(openarea)
Frequency response 30Hz–10KHz
Signal-to-noise ratio >65dB
Distortion <2%
Headset weight 50 grams
Operating voltage
ChargingCradle:5V
0.55A
Headset:3.7V,380mAhLithiumPolymer
Battery
Transmission mode FHSS in 2 groups of channels
Carrier frequency 31channels2406to2472MHz
Troubleshooting
No Sound
• Ensurethepowersupplyisproperlypluggedintotheelectricitysocket
andthatitscableisproperlyconnectedtotheDCINconnectoronthe
Charge Cradle.
• EnsurethattheHeadsetPowerON/OFFswitchisswitchedON.
• CheckthestateoftheBatterychargingintheHeadset–placeitinthe
ChargeCradleandrechargethebatteryuntiltheBatteryChargeLED
turns green.
• EnsurethattheTVset,Hi-Fisystemoraudiocomponentisswitched
ON and set to a channel that broadcasts an audio signal.
• Ensurethatthevolumeontheconnectedaudiocomponentisturned
up to at least half its full volume.
• Theconnectedaudio/videoequipmentmaynotbeinplaybackmode.
Start playback on by the equipment.
• UsetheVolumeControlontheHeadsettoturnupthevolume.

16
*Need some help? Call 02 4574 8888 or go to www.oricom.com.au
Cleaning & Maintenance
• CheckwhethertheHeadsetvolumelevelissettoolow.Adjustthe
volume to a suitable level.
• Ifthesoundisnotclearanddistorted,changethefrequencyChannel
selection on the back of the Charge Cradle, and then press the Auto
TuneButtonontheHeadsetReceiverforbetterreception.
Distortion
• ThebatteryinsideHeadsetmayneedcharging.Rechargethebattery.
• TheHeadsetmaybetoofarawayfromthetransmitterinsidethe
ChargeCradle.Bringthemclosertogether.
• Theaudiosignalinputlevelfromtheaudiosourceistoolow.Increase
the volume at the audio source.
• Ifthesoundisnotclearanddistorted,changethefrequencyChannel
on the back of the Charge Cradle, and then press the Auto Tune
ButtonontheHeadsetforbetterreception.
Cleaning & Maintenance
Note: DO NOT use alcohol, chemical or spirit based cleaning agents.
WipeBaseandHeadsetcleanwithadampcloth.
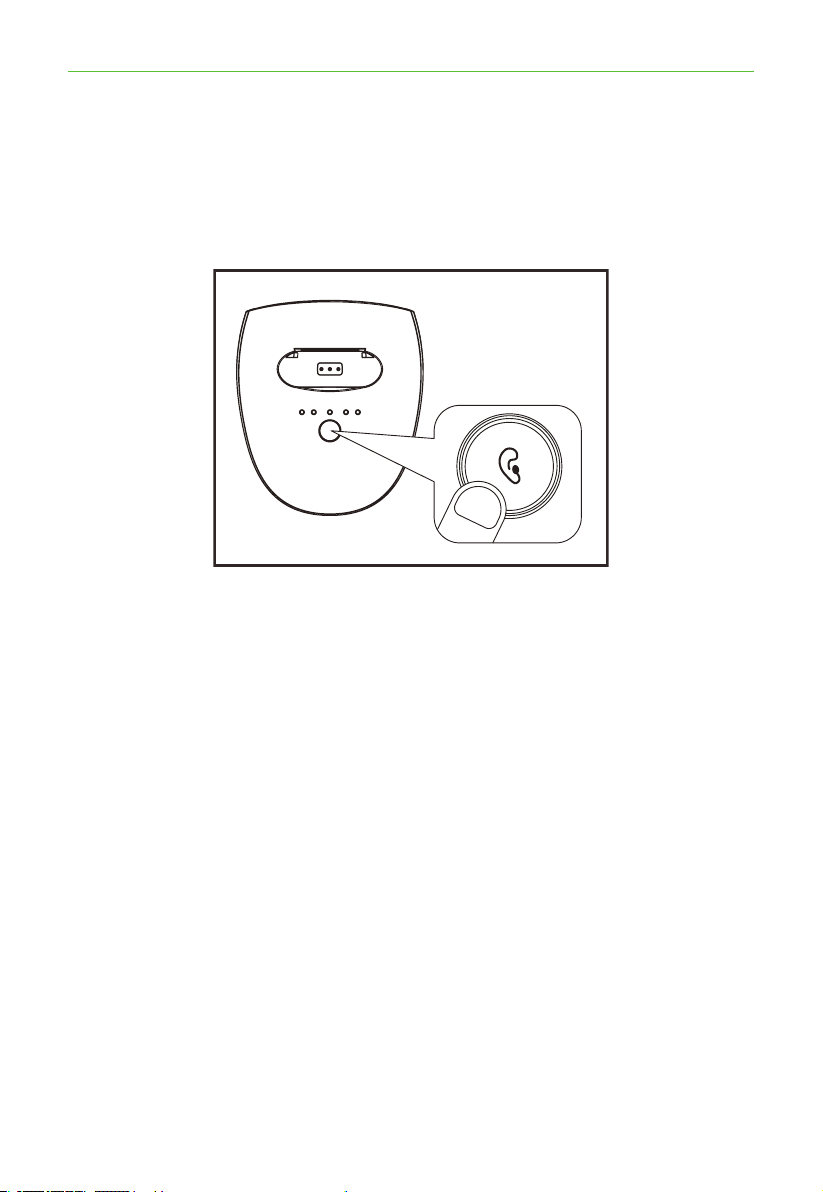
In case the receiver cannot be linked with the transmitter. Please
follow the following procedure for Pairing:
1. Disconnectthepoweradaptorofthetransmittertotheelectrical
outlet.
2. Turn ON the receiver.
3. PressandholdtheMICbuttonforabout5seconds,thegreen
LEDashfastinthereceiver,thenpluginthepoweradaptorofthe
transmitter to socket.
4. The receiver and the transmitter is then paired automatically, and the
greenLEDonthereceiverlightssteadily.

17
Express Warranty (Australia)
ThisExpressWarrantyisprovidedbyOricomInternationalPtyLtdABN46
086116369,Unit1,4SovereignPlace,SouthWindsorNSW2756,herein
after referred to as “Oricom”.
Oricom warrants that the product is free from defects in materials or
workmanshipduringtheExpressWarrantyPeriod.ThisExpressWarranty
doesnotextendtoanyproductfromwhichtheserialnumberhasbeen
removed or was purchased outside of Australia.
ThebenefitsofthisExpressWarrantyareinadditiontootherrightsand
remediesyoumayhaveundertheAustralianConsumerLaw.Ourgoods
comewithguaranteesthatcannotbeexcludedundertheAustralian
ConsumerLaw.Youareentitledtoareplacementorrefundforamajorfailure
andcompensationforanyotherreasonablyforeseeablelossordamage.You
are also entitled to have the goods repaired or replaced if the goods fail to
be of acceptable quality and the failure does not amount to a major failure. In
the event of a minor failure, Oricom reserves the right to choose to repair or
replace the product.
TheExpressWarrantyPeriodwillbeaperiodof12monthsbeginningonthe
dateofpurchaseoftheproductevidencedbyyourdatedsalesreceipt.You
arerequiredtoprovideproofofpurchaseasaconditionofreceivingExpress
Warranty services.
Youareentitledtoareplacementproductorrepairoftheproductat
our discretion according to the terms and conditions of this document
ifyourproductisfoundtobefaultywithintheExpressWarrantyPeriod.
ThisExpressWarrantyextendstotheoriginalpurchaseronlyandisnot
transferable.
Productsdistributed byOricomaremanufacturedusingnewmaterials or
new and used materials equivalent to new in performance and reliability.
Spare parts may be new or equivalent to new. Spare parts are warranted to
befreefromdefectsinmaterialorworkmanshipforthirty(30)daysorforthe
remainderoftheExpressWarrantyPeriodoftheOricombrandedproductin
whichtheyareinstalled,whicheverislonger.DuringtheExpressWarranty
Period,Oricomwillwherepossiblerepairandifnotreplacethefaulty
productorpartthereof.AllcomponentpartsremovedunderthisExpress
Warranty become the property of Oricom. In the unlikely event that your
Oricom product has a recurring failure, Oricom may always, subject to the
Competition and Consumer Act 2010, at its discretion, elect to provide you
with a replacement product of its choosing that is at least equivalent to your
product in performance.
Express Warranty (Australia)

18
NochangetotheconditionsofthisExpressWarrantyisvalidunlessitis
made in writing and signed by an authorised representative of Oricom.
OricomwillnotbeliableunderthisExpressWarranty,andtotheextent
permitted by law will not be liable for any defect, loss, damage or injury
arisingoutoforinconnectionwitha:
1. Failure by you to adhere to the warnings and follow the instructions set
out in this user guide for the proper installation and use of the product;
2. Willful misconduct or deliberate misuse by you of the product;
3. Anyexternalcausebeyondourcontrol,includingbutnotlimitedtopower
failure, lightning or over voltage; or
4. Modication to the product or services carried out on the product by
anyoneotherthanOricomorOricom’sauthorisedserviceprovider.
How to make a claim under your Express Warranty in Australia
Oricomhasasimplewarrantyprocessforyoutofollow:
• PleasecalloremailourCustomerSupportTeam,0245748888or
• ACustomerSupportTeammemberwillverifyaftertroubleshootingwith
you if your product qualies under warranty. If so, they will give you a
ProductReturnAuthorisationnumber.
• WewillthenemailaReturnAuthorisationformandaRepairNotice(if
necessary),togetherwithinstructionsonhowtoreturntheproductfor
warranty service.
PleasenotethatifaCustomerSupportTeammemberadvisesthatyour
product does not qualify for return, this warranty does not apply to your
product.ProductsthatareauthorisedtobereturnedtoOricominAustralia
mustincludeallofthefollowing:
• AcompletedReturnAuthorisationform
• AcopyofyourProofofPurchase(pleasekeepyouroriginalcopy)
• Thefaultyproduct,includingallaccessories.
Sendtheapprovedreturnsto:
OricomInternationalPtyLtd
LockedBag658
South Windsor NSW 2756 Australia
Express Warranty (Australia)

19
PleasenotethatthisExpressWarrantyexcludesexpensesincurredbyyouin
returninganyfaultyproducttous.Youmustarrangeandpayanyexpenses
incurred(includingpostage,delivery,freight,transportationorinsuranceofthe
product)toreturnthefaultyproducttous,however,wewillarrangedeliveryof
the repaired or replaced faulty product to you.
Important Information
Repair Notice
Pleasebeawarethattherepairofyourproductsmayresultinthelossofany
user-generateddata(suchasstoredtelephonenumbers,textmessagesand
contactinformation).Pleaseensurethatyouhavemadeacopyofanydata
savedonyourproductbeforesendingforrepair.Pleasealsobeawarethat
products presented for repair may be replaced by refurbished products or
parts of the same type rather than being repaired.
Express Warranty (Australia)

ORICOM CUSTOMER SUPPORT
Oricom have a trained and dedicated team of Customer Support
Representatives,eachwiththeknowledgeandresourcestoassistin
answering your questions quickly and efciently.
Oricom Support - Australia
For all product enquiries, troubleshooting or to discuss the range of Oricom
products, feel free to contact Oricom or visit our website for answers to
frequently asked questions.
(02) 4574 8888
Monday - Friday 8am – 6pm AEST
Email:[email protected]
www.oricom.com.au
Ref:24112020