Operating and installation
instructions
Built-in vacuum drawer
To avoid the risk of accidents or damage to the appliance it is essen-
tial to read these instructions before it is installed and used for the
first time.
en-GB M.-Nr. 11 168 360

Contents
2
Warning and Safety instructions...................................................................... 4
Caring for the environment .............................................................................. 13
Guide to the appliance...................................................................................... 14
Overview of the drawer ....................................................................................... 14
Controls and indicators ....................................................................................... 15
Accessories supplied .......................................................................................... 16
Cleaning for the first time................................................................................. 17
Operation............................................................................................................ 18
Important information for use.............................................................................. 18
Tips...................................................................................................................... 19
Using the vacuum settings.................................................................................. 20
Using the sealing levels....................................................................................... 21
Vacuuming and sealing bags .............................................................................. 23
Sealing the bag early...................................................................................... 24
Vacuum sealing preserving jars and jars with twist-off lids................................. 25
Vacuuming sealing external containers............................................................... 27
After use .............................................................................................................. 30
Cancelling a vacuum sealing process ................................................................. 30
Cleaning and care ............................................................................................. 31
Cleaning the drawer front and glass lid............................................................... 32
Cleaning the vacuum chamber and sealing bar.................................................. 32
Cleaning the vacuum adapter ............................................................................. 32
Cleaning the vacuum sealing bag support.......................................................... 32
Carrying out a drying cycle ................................................................................. 33
Problem solving guide ...................................................................................... 34
Optional accessories ........................................................................................ 40
After sales service............................................................................................. 41
Contact in the event of a fault ............................................................................. 41
Data plate ............................................................................................................ 41
Warranty .............................................................................................................. 41
Installation.......................................................................................................... 42
Safety instructions for installation ....................................................................... 42
Installation notes ................................................................................................. 43

Contents
3
Installation dimensions........................................................................................ 44
Installation in a tall or base unit...................................................................... 44
Combination appliance for niches with a height of 450mm.......................... 45
Combination appliance for niches with a height of 590mm.......................... 46
Side view ........................................................................................................ 47
Connections and ventilation........................................................................... 48
Installation ........................................................................................................... 49
Electrical connection ........................................................................................... 54
Warning and Safety instructions
4
Please note that the vacuum sealing drawer is referred to in these operating in-
structions as the drawer.
This drawer complies with all current local and national safety re-
quirements. Inappropriate use can, however, lead to personal in-
jury and material damage.
Read the operating and installation instructions carefully before
using the drawer. They contain important information on safety, in-
stallation, use and maintenance. This prevents both personal injury
and damage to the drawer.
In accordance with standard IEC60335-1, Miele expressly and
strongly advises that you read and follow the instructions in the
chapter on installing the drawer as well as the safety notes and
warnings.
Miele cannot be held liable for injury or damage caused by non-
compliance with these instructions.
Keep these operating and installation instructions in a safe place
and pass them on to any future owner.

Warning and Safety instructions
5
Correct application
The drawer is intended for domestic use and use in other similar
environments.
The drawer is not intended for outdoor use.
The drawer is only for domestic use to vacuum and seal food in
vacuum bags intended for this purpose, to vacuum seal preserving
jars, jars with twist-off lids and vacuum-proof containers made of
plastic or stainless steel.
Any other use is not permitted.
Never vacuum seal live food (e.g. mussels, seafood).
People with reduced physical, sensory or mental capabilities, or
lack of experience and knowledge who are not able to use the
drawer safely on their own must be supervised whilst using it. They
may only use it unsupervised if they have been shown how to use it
safely and recognise and understand the consequences of incorrect
operation.

Warning and Safety instructions
6
Safety with children
Children under the age of 8years must be kept away from the
drawer unless they are constantly supervised.
Children aged 8and older may only use the drawer without super-
vision if they have been shown how to use it and are able to do so in
a safe manner. Children must be able to understand and recognise
the possible dangers caused by incorrect operation.
Children must not be allowed to clean the drawer unsupervised.
Please supervise children in the vicinity of the drawer, and do not
let them play with it.
The sealing bar becomes hot during operation. The weld seam of
the vacuum bag is also heated to a very high temperature during the
sealing process. Keep children away from the drawer until the seal-
ing bar and the seam have cooled sufficiently that there is no longer
any danger of burning.
Danger of suffocation! Whilst playing, children may become en-
tangled in packaging material (such as plastic wrapping) or pull it
over their head with the risk of suffocation. Keep packaging material
away from children.

Warning and Safety instructions
7
Technical safety
Unauthorised installation, maintenance and repairs can cause
considerable danger for the user. Installation, maintenance and re-
pairs must only be carried out by a Miele authorised technician.
A damaged drawer can be dangerous. Always check for visible
signs of damage. Never use a damaged appliance.
Pay attention to any damage or cracks to the glass lid or chamber
seal. Damage to the glass lid can cause implosion. Never operate
the drawer if the glass lid and/or the chamber seal is damaged.
The drawer has an integrated vacuum pump which contains oil. To
prevent oil from leaking out, the drawer must be transported and
stored in a horizontal position only. Do not tilt the drawer and do not
stand it up on its side.
The manufacturer's warranty will be invalidated if oil has leaked out
of the appliance because it has not been transported or stored cor-
rectly.
Reliable and safe operation of the drawer can only be assured if it
has been connected to the mains electrical supply.
The electrical safety of this drawer can only be guaranteed when
correctly earthed. It is essential that this standard safety requirement
is met. If in any doubt please have the electrical installation tested by
a qualified electrician.
The connection data (voltage and frequency) on the data plate of
the drawer must match the mains electricity supply in order to avoid
the risk of damage to the drawer. Compare this data before connect-
ing the appliance. If in doubt, consult a suitably qualified electrician.
Do not connect the drawer to the mains electrical supply by a
multi-socket adapter or extension lead. These are a fire hazard and
do not guarantee the required safety of the appliance.
For safety reasons, this drawer may only be used when it has
been built in.

Warning and Safety instructions
8
This drawer must not be used in a non-stationary location (e.g. on
a ship).
Never open the casing of the drawer.
Touching or tampering with electrical connections or components
and mechanical parts is highly dangerous to the user and can cause
operational faults.
Do not operate the drawer with wet hands or if you are in contact
with water.
While the appliance is under warranty, repairs should only be un-
dertaken by a Miele authorised service technician. Otherwise the
warranty is invalidated.
Miele can only guarantee the safety of the appliance when genu-
ine original Miele replacement parts are used. Faulty components
must only be replaced by Miele spare parts.
If the plug is removed from the connection cable or if the cable is
supplied without a plug, the drawer must be connected to the elec-
trical supply by a suitably qualified electrician.
If the mains connection cable is damaged, it must be replaced
with a special mains connection cable (see “Electrical connection” in
the “Installation” chapter).
If power is interrupted during vacuum sealing the vacuum in the
chamber is retained and the glass lid cannot be opened. Do not un-
der any circumstances try to force the glass lid open or use tools to
open it. You will be able to open the lid when power has been re-
stored.
During installation, maintenance and repair work, the drawer must
be disconnected from the mains electricity supply.

Warning and Safety instructions
9
If the drawer is installed behind a furniture panel (e.g. a door), en-
sure that the door is never closed whilst the drawer is in use. Heat
and moisture can build up behind a closed furniture panel and cause
subsequent damage to the drawer, the housing unit and the floor. Do
not close the door until the sealing bar and the drawer have cooled
down completely.

Warning and Safety instructions
10
Correct use
Danger of burning. The sealing bar gets hot during operation. The
weld seam of the vacuum sealing bag is also heated to a very high
temperature during the sealing process. Do not touch the sealing bar
or the weld seam immediately after the vacuuming process.
Fire hazard. Do not store any easily flammable substances and
materials in the vicinity of the drawer.
The telescopic runners can support a maximum load of 15kg.
Overloading or leaning or sitting on the drawer will damage the tele-
scopic runners.
Damage to the glass lid can cause implosion. Do not place any
objects on the glass lid. Ensure that the glass lid cannot sustain
damage from falling objects.
Do not use the drawer or the glass lid as a working surface, a
chopping surface or as a shelf.
The drawer must be built in so that it can be pulled out completely
and there is sufficient room to open the glass lid. This ensures that
you can see into the vacuum chamber and avoid touching the seal-
ing bar and weld seam and burning yourself.
When vacuuming liquids, bubbles can form at lower temperatures
which will cause a boiling impression. Steam can escape which can
cause the drawer to malfunction.
For this reason only vacuum seal food (liquid or solid) when it has
cooled. Follow the vacuuming process carefully and if necessary seal
the bag early.
Liquid getting inside the drawer and into the vacuum pump air in-
take valve can result in damage to the vacuum pump.
Moisture in food or drinks can cause corrosion damage in the
drawer. Do not use the drawer to store food or drinks.

Warning and Safety instructions
11
Never insert the tubes attached to the drawer into any body ori-
fices.
Vacuum sealing preserving jars and jars with twist-off lids in the closed va-
cuum sealing chamber:
Danger of injury. Damage and cracks in jars or glass/twist-off lids
can cause implosion.
Only vacuum jars and lids which are in perfect condition.
Danger of injury. The high pressure during the vacuuming process
causes the vacuum chamber and the glass lid on the drawer to de-
form slightly. Do not let preserving jars or jars with twist-off lids
touch the drawer's glass lid during the vacuuming process as this
can cause damage to the protective coating on the glass lid and
cause it to implode.
Only vacuum seal preserving jars and jars with twist-off lids up to a
maximum height of 8cm in order to maintain a safety gap of at least
1cm between the lid on the jar and the glass lid on the drawer.

Warning and Safety instructions
12
Cleaning and care
Danger of electric shock. The steam from a steam cleaning appli-
ance could reach live electrical components and cause a short cir-
cuit. Do not use a steam cleaner to clean the warming drawer.

Caring for the environment
13
Disposal of the packing mater-
ial
The packaging is designed to protect
the appliance from damage during
transportation. The packaging materials
used are selected from materials which
are environmentally friendly for disposal
and should be recycled.
Recycling the packaging reduces the
use of raw materials in the manufactur-
ing process and also reduces the
amount of waste in landfill sites.
Disposing of your old appli-
ance
Electrical and electronic appliances of-
ten contain valuable materials. They
also contain specific materials, com-
pounds and components, which were
essential for their correct function and
safety. These could be hazardous to hu-
man health and to the environment if
disposed of with your domestic waste
or if handled incorrectly. Please do not,
therefore, dispose of your old appliance
with your household waste.
Please dispose of it at your local com-
munity waste collection / recycling
centre for electrical and electronic ap-
pliances, or contact your dealer or
Miele for advice. You are also respons-
ible for deleting any personal data that
may be stored on the appliance being
disposed of. Please ensure that your
old appliance poses no risk to children
while being stored prior to disposal.
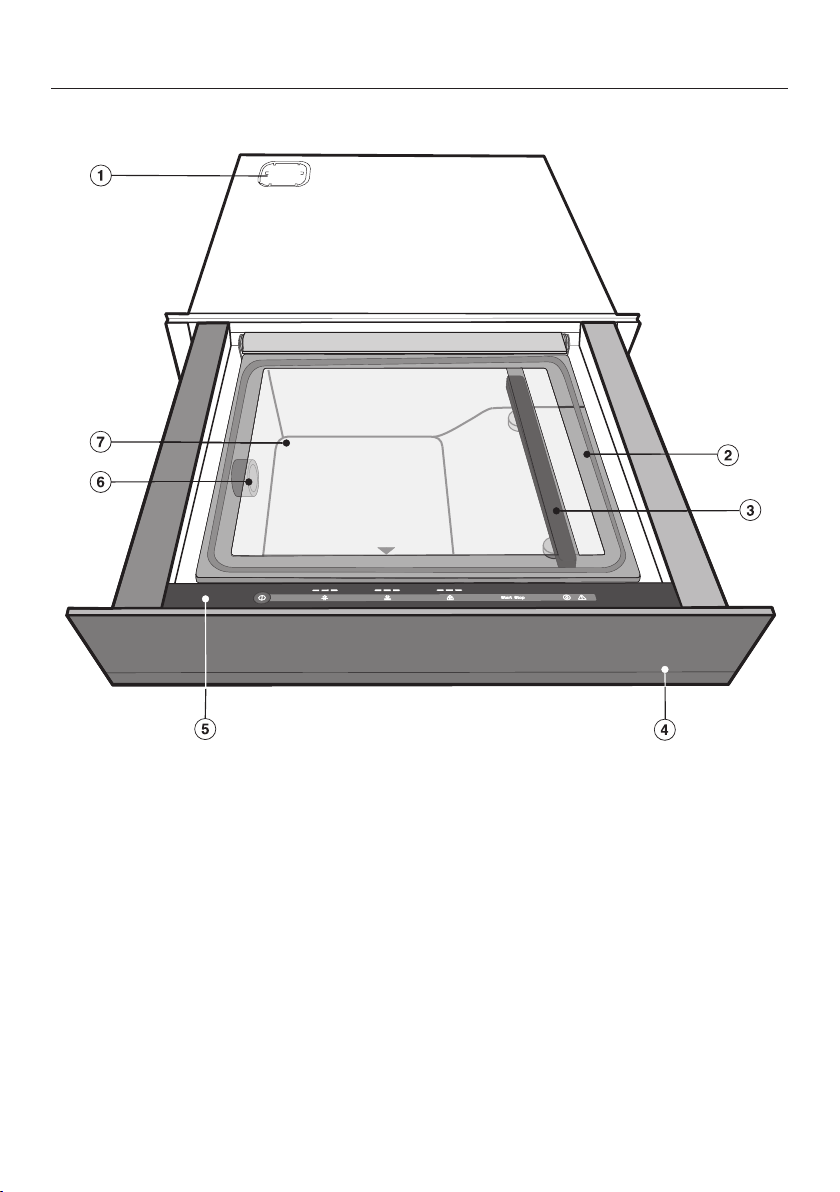
Guide to the appliance
14
Overview of the drawer
a
Air filter cover (see “Installation”)
b
Glass lid with chamber seal
Push down on the little black triangle to close the glass lid.
c
Sealing bar in the vacuum chamber and counterpressure bar on the underside
of the glass lid
d
Drawer front with Push2open mechanism
The drawer can be opened and closed by lightly pressing the drawer front.
e
Controls and indicators
f
Vacuum pump air intake valve/Vacuum adapter connection
g
Vacuum chamber

Guide to the appliance
15
Controls and indicators
a
b
c
d
e
f
gh
i
Sensor controls
a
On/Off sensor control
For switching the drawer on/off
b
Sensor control
For setting the vacuum settings
c
Sensor control
For setting the sealing level/sealing
the bag early
d
Sensor control
For setting the vacuum settings for
external containers
e
Sensor control
For starting the vacuum-sealing pro-
cess for external containers
f
Sensor control
For cancelling the:
– Vacuum-sealing process
– Vacuum-sealing process
for external containers
– Sealing process
– Drying cycle
g
Sensor control
For displaying/for starting a
drying cycle
(see “Cleaning and care – Carrying
out a drying cycle”).
Indicator lights
h
Indicator light
Indicates a warning
(see “Problem solving guide”)
i
Segment bar indicator lights
For displaying the:
– Vacuum settings
– Sealing level
– Vacuum settings
for external containers

Guide to the appliance
16
Accessories supplied
The accessories supplied with your ap-
pliance as well as a range of optional
ones are available to order from Miele
(see “Optional accessories”).
Vacuum adapter
1adapter for vacuum sealing external
containers
Vacuum sealing bag support
1 support for small bags
The vacuum sealing bags supplied
are not suitable for use in steam
ovens with pressure.
VB1828 vacuum sealing bags
50 bags for storage and sous vide
cooking of liquid and solid food
180x280mm (WxH), D = 90µm
VB2435 vacuum sealing bags
50 bags for storage and sous vide
cooking of liquid and solid food
240x350mm (WxH), D = 90µm

Cleaning for the first time
17
Remove any protective wrapping and
stickers.
Do not remove stickers carrying
safety or installation information or
the data plate.
This makes it easier to perform servi-
cing and repair work.
Cleaning the drawer for the
first time
Take all accessories out of the
drawer.
Damage due to unsuitable clean-
ing agents.
The glass lid and the chamber seal
become damaged or scratched.
Do not clean with any abrasive or
acidic cleaning agents or sharp poin-
ted objects.
Clean the drawer inside and out with
a clean sponge and a solution of hot
water and washing-up liquid or a
clean, damp microfibre cloth.
After cleaning, wipe the surfaces dry
using a soft cloth.

Operation
18
Important information for use
- Only vacuum seal food.
- Only use food that is fresh and in
good condition.
- Ensure hygienic conditions and that
food has not been out of the refriger-
ator too long, e.g. during transporta-
tion.
- Only vacuum seal food in suitable va-
cuum sealing bags, preserving jars
and jars with twist-off lids (screw-top
jars) or in vacuum-proof external con-
tainers.
We recommend that you use the va-
cuum sealing bags supplied (see “Op-
tional accessories”). These are cold
stable and boil-proof and therefore are
suitable for storage in the refrigerator
or freezer and for sous vide cooking of
solid and liquid food.
- Only vacuum seal food that has
cooled.
- Allow pre-cooked and grilled food to
cool down at least to room temperat-
ure (approx. 20°C) before vacuum
sealing it.
Food that is not normally stored in
the refrigerator, e.g. dried pasta or
muesli can also be vacuum sealed at
room temperature.
- If rinsing food with cold water, dry it
before vacuum sealing to prevent wa-
ter from collecting in the vacuum
sealing bag or container.
- Only vacuum seal food in bags of a
maximum size of 250x350mm
(sealed edge bags) or 240x350mm
(tubular bags).
- Use boil-proof bags if you want to
cook food sous vide after vacuum
sealing it.
- Select a suitable bag size for the size
of the food. If the vacuum sealing
bag is too big, too much air can re-
main inside. The bag can be cut to fit
the size of the food.
- If you want to vacuum seal several
types of food in one bag, place the
food evenly side by side in the bag.
- Fill the vacuum sealing bag to a max-
imum of ²/₃ with solid food or ¹/₃ with
liquid.
- For a perfect weld seam, make sure
that the edge of the bag is dry and
grease-free in the area of the seam.
- Position the open edge of the bag
parallel to the sealing bar so that the
edge protrudes over the sealing bar
by approx. 2cm.
- Take care not to cover the vacuum
pump air intake valve with the bag.
- Vacuum sealing bags are for single
use only.
- Place food that is suitable for cooling
in the refrigerator or freezer after va-
cuum sealing it.
- When vacuum sealing food in pre-
serving jars and jars with twist-off
lids, make sure that the jars and the
lids are clean and in good condition.

Operation
19
Danger of injury caused by im-
plosion.
Damage to the glass lid can cause
implosion.
Preserving jars and jars with twist-off
lids must only be vacuum sealed in
the closed vacuum chamber.
- To guarantee the minimum gap of
1cm to the glass lid of the drawer,
the jars must not be taller than 8cm.
Before vacuum sealing, make sure
that jars do not exceed the maximum
permitted height.
Tips
- Freeze liquids before vacuum sealing
them. You can then fill the bag ²/₃ full.
- Fold the edges of the vacuum sealing
bag outwards for filling. This will give
you clean, perfect seams.
- If you are unsure whether food such
as berries or crisps will lose its shape
during vacuum sealing, start with the
lowest vacuum setting.

Operation
20
Using the vacuum settings
There are 3vacuum sealing settings.
The higher the vacuum setting selected, the greater the vacuum.
Vacuum
settings
Intended use
Packaging, portioning and storing
Suitable for
- Food that is prone to squashing, e.g. lettuce, berries or crisps
- Preserving jars and jars with twist-off lids (screw cap lids) with
liquid contents, e.g. stock or pickled vegetables
Marinating, tenderising, sous vide cooking and freezing
Suitable for
- Food that is prone to squashing, e.g. tender fish fillets
- Sauces and food with a high liquid content(>50g), e.g. ragout,
curry
- Preserving jars and jars with twist-off lids (screw cap lids) with
more solid or dry contents e.g. jam, pesto or cake
Sous vide cooking, freezing and storage
Suitable for
- Meat and more solid food, e.g. potatoes, carrots
- Hard cheese (storage)
- Food with a low liquid content (≤50g), such as meat seasoned
with a herb oil

Operation
21
Using the sealing levels
There are 3levels for sealing vacuum
bags.
The sealing level to select depends on
the material thickness of the bag: the
stronger the bag, the higher the sealing
level.
Level3 is recommended for the vacuum
sealing bags supplied.
Tip: The sealing bar will get progress-
ively hotter when carrying out a number
of consecutive vacuuming processes.
You can use a lower sealing level after
sealing a few bags.

Operation
22
Danger of injury caused by im-
plosion.
Damage to the glass lid can cause
implosion.
Do not under any circumstances use
the drawer if the glass lid is dam-
aged.
Malfunction due to dirty and/or
covered sensor controls.
The sensor controls do not react or
unintentional switching procedures
result, perhaps even the automatic
deactivation of the drawer.
Keep the sensor controls and indic-
ators clean.
Do not place anything over the
sensor controls or indicators.
Damage caused by liquids.
Liquid getting into the vacuum pump
air intake valve during a vacuuming
process can result in damage to the
vacuum pump.
Fill the vacuum sealing bag with li-
quid to a maximum of ¹/₃.

Operation
23
Vacuuming and sealing bags
Fill the vacuum sealing bag.
Open the drawer and the glass lid.
Place the vacuum sealing bag in the
vacuum chamber so that the open
end of the bag lies across the sealing
bar. Ensure that the edge of the bag
is positioned centrally and crease-
free on the sealing bar.
If a bag is too small and slips into the
vacuum chamber, place the vacuum
sealing bag support under it.
Switch the drawer on with the On/
Off sensor control.
The segment bar indicator lights above
the and sensor controls light up.
Touch the sensor control re-
peatedly until the segment bar indic-
ator light for the required vacuum set-
ting lights up.
Touch the sensor control re-
peatedly until the segment bar indic-
ator light for the required sealing level
lights up.
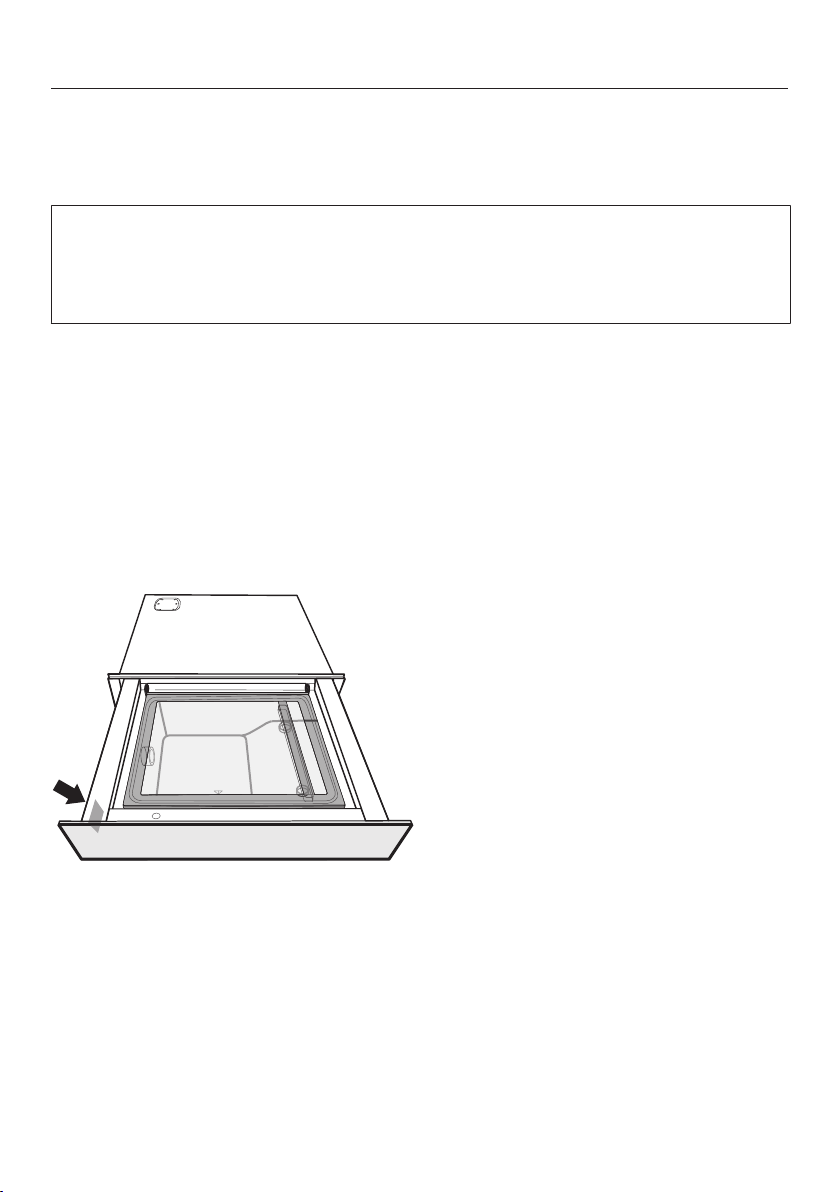
Close the glass lid and press it down
lightly.
Tip: Press the small black triangle to
close the glass lid.
The vacuum sealing process will start.
The sensor control goes out and
the sensor control lights up.
The following occurrences during the
process are normal and do not indic-
ate a functional or appliance fault:
- The bag inflates, before enveloping
the food being vacuum sealed.
- Bubbles form in the liquid, creating
the impression that it is boiling.
If you notice during the vacuuming
process that liquids are threatening
to spill out, you can end the process
and seal the bag early (see “Opera-
tion – Sealing the bag early”).

Operation
24
After the vacuuming process
A signal sounds.
Open the glass lid.
Danger of burning due to hot
surfaces.
The sealing bar and weld seam are
hot.
Do not touch the sealing bar or the
weld seam immediately after the va-
cuuming process.
Remove the vacuum sealing bag from
the vacuum chamber.
Before starting a new vacuuming
process, check that the vacuum
chamber and the sealing bar are
clean and dry.
Remove any soiling or liquid residues
if necessary.
Sealing the bag early
You can end the vacuuming process
before reaching the selected vacuum
settings and seal the bag early.
Touch the sensor control.
The vacuuming process stops. After a
few seconds the bag will be sealed.
Successful sealing of the bag is only
possible when there is a minimum va-
cuum (vacuum setting 1) in the cham-
ber.
Touch the sensor control again if
the required vacuum setting has not
yet been reached. For technical reas-
ons, a few seconds will elapse before
the bag is sealed.

Operation
25
Danger of injury caused by im-
plosion.
Damage and cracks in jars or glass/
twist-off lids can cause implosion.
Only vacuum jars and lids which are
in perfect condition.
Only vacuum jars on vacuum set-
ting1 or2.
Damage caused by deformation
of glass lids.
The glass lid may become deformed
due to the negative pressure that oc-
curs.
Only vacuum seal jars up to a max-
imum height of 8cm in order to
maintain a safety gap of at least
1cm between the lid on the jar and
the glass lid on the drawer.
Vacuum sealing preserving jars
and jars with twist-off lids
Close the jar with its appropriate lid
and rubber seal or with the twist-off
lid.
Open the drawer and the glass lid.
Place the jar in the vacuum chamber.
Switch the drawer on with the On/
Off sensor control.
The segment bar indicator lights above
the and sensor controls light up.
Touch the sensor control re-
peatedly until the segment bar indic-
ator light for vacuum setting1 or2
lights up.
Touch the sensor control re-
peatedly until the segment bar indic-
ator light for sealing level1lights up.
Close the glass lid and press it down
lightly.
Tip: Press the small black triangle to
close the glass lid.
The vacuum sealing process will start.
The sensor control goes out and
the sensor control lights up.

Operation
26
After the vacuuming process
A signal sounds.
Open the glass lid.
Danger of burning due to hot
surfaces.
The sealing bar is hot.
Do not touch the sealing bar immedi-
ately after the vacuuming process.
Remove the jar from the vacuum
chamber.
Before starting a new vacuuming
process, check that the vacuum
chamber and the sealing bar are
clean and dry.
Remove any soiling or liquid residues
if necessary.
Operation
27
Danger of injury caused by im-
plosion.
External glass containers can im-
plode during vacuuming.
Only use vacuum-proof containers
made of plastic or stainless steel.
We recommend caso
®
container sets
if you wish to use external contain-
ers. These containers can be con-
nected to the drawer using the va-
cuum adapter supplied.
Vacuum sealing containers with a ca-
pacity of 700ml can be damaged
during the vacuum sealing process.
Use only vacuum settings 1 and 2
when vacuum sealing these contain-
ers.
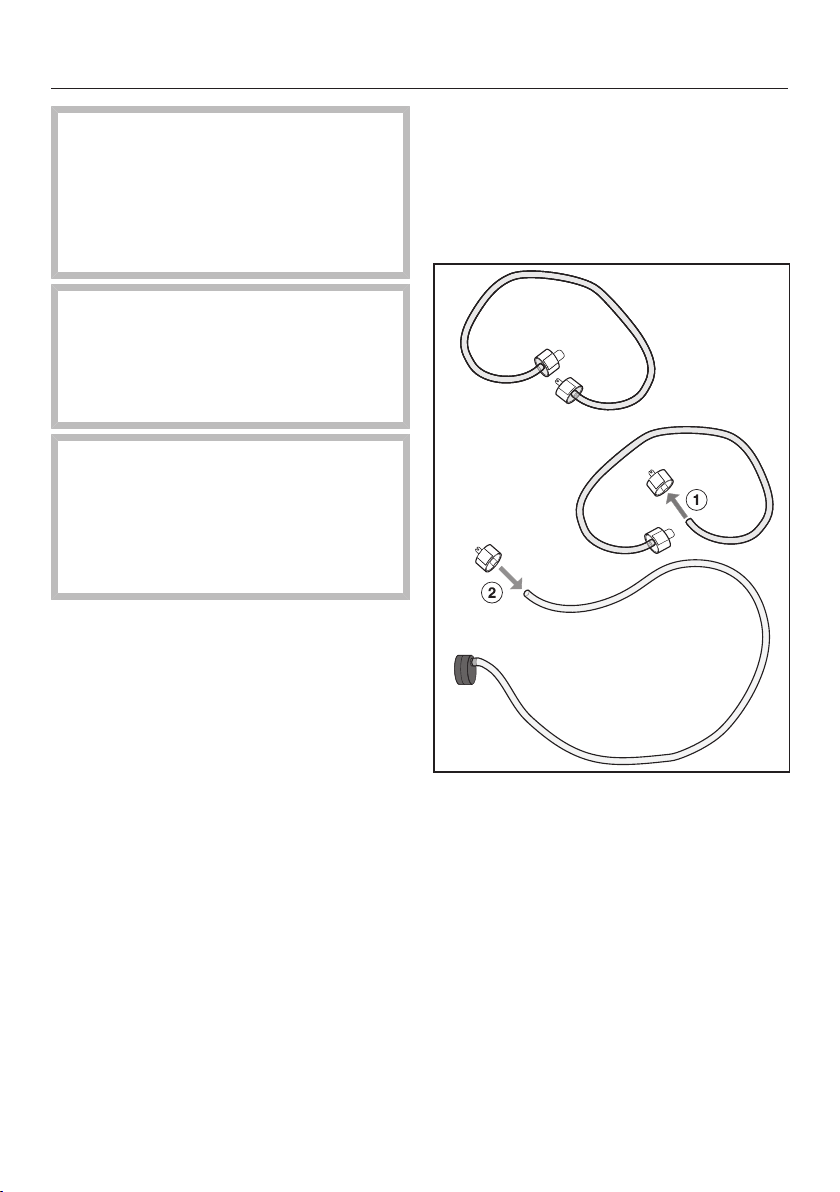
Vacuuming sealing external
containers
The process for vacuum sealing a con-
tainer from the caso
®
vacuum sealing
container set is described below.
Prepare the vacuum adapter:
Detach the container lid connector
(smaller diameter) from the con-
tainer set connecting tube.
Attach the connector to the end of
the vacuum adapter tube. For a
secure grip, make sure that the end
of the tube is pushed at least 0.5cm
over the opening on the connector.
Fill the container to a maximum of
3cm below the rim.
Place the lid on the container and
press it down.
Operation
28
Open the drawer and the glass lid.
a
b
c
O
P
E
N
Place the vacuum adapter over the
vacuum pump air intake valve.
Attach the connector to the con-
tainer lid. Make sure that the closure
of the lid is turned to “SEAL” (closed).
Switch the drawer on with the On/
Off sensor control.
The segment bar indicator lights above
the and sensor controls light up.
Touch the sensor control.
The segment bar indicator lights above
the and sensor controls go out.
The segment bar indicator lights above
the and sensor controls light up.
Touch the sensor control re-
peatedly until the segment bar indic-
ator light for the required vacuum set-
ting lights up.
Touch the sensor control.
The vacuum sealing process will start.
The sensor control goes out and
the sensor control lights up.
Leave the glass lid of the drawer open
for the entire duration of the vacuum
sealing process.
If an excessive amount of bubbles
form, you can cancel the vacuuming
process by pressing the sensor
control (see “Operation – Cancelling
the vacuum sealing process”).

Operation
29
After the vacuum sealing process
A signal sounds.
Detach the connector from the con-
tainer lid. Make sure that the closure
of the lid is still turned to
“SEAL” (closed).
Remove the vacuum adapter from the
vacuum pump air intake valve.
Before starting a new vacuuming
process, check that the vacuum ad-
apter, the tube and the vacuum
chamber are clean and dry.
Remove any soiling or liquid residues
if necessary.

Operation
30
After use
Switch off the drawer with the On/
Off sensor control.
Clean and dry the drawer and any ac-
cessories as described in “Cleaning
and care”.
Do not close the glass lid until the va-
cuum chamber is completely dry.
Close the drawer.
The last vacuum setting and sealing
level selected is automatically activ-
ated the next time the drawer is
switched on, and this is shown in the
control field.
Cancelling a vacuum sealing
process
You can cancel a vacuum sealing pro-
cess at any time, e.g. if you notice dur-
ing the process that the edge of the bag
is not positioned correctly or that the
closure on the container lid is not point-
ing to “SEAL” (closed).
Please note that when vacuum seal-
ing bags, if the vacuum sealing pro-
cess is cancelled, the bag will not be
sealed.
Touch the sensor control.
The vacuum sealing process stops.
Cleaning and care
31
Danger of injury due to electric
shock.
The steam from a steam cleaning ap-
pliance could reach live electrical
components and cause a short cir-
cuit.
Do not use a steam cleaner to clean
the drawer.
Danger of burning due to hot
surfaces.
The sealing bar is hot straight after a
vacuuming process.
Allow the sealing bar to cool before
cleaning it.
All surfaces could be discoloured or
damaged if unsuitable cleaning
agents are used. Use only domestic
washing-up liquid to clean the
drawer.
All surfaces are susceptible to
scratching. Scratches on glass can in
some circumstances lead to break-
age.
Remove all cleaning agent residues
immediately.
If soiling is left on for any length of
time, it may become impossible to
remove.
Surfaces may suffer discolouration or
damage.
It is therefore best to remove any
soiling immediately.
Switch the drawer off to clean it.
The drawer and accessories should
be cleaned and dried thoroughly after
each use.
Do not close the glass lid until the va-
cuum chamber is completely dry.
Unsuitable cleaning agents
To avoid damaging the surfaces of the
appliance, do not use:
- Cleaning agents containing soda,
ammonia, acids or chlorides
- Cleaning agents containing descaling
agents
- Abrasive cleaning agents, e.g.
powder cleaners and cream cleaners
- Cleaning agents containing solvents
- Stainless steel cleaners
- Cleaning agents for ceramic glass
hobs
- Dishwasher cleaner
- Oven cleaners or sprays
- Hard, abrasive sponges and brushes,
e.g. pot scourers
- Sharp metal scrapers

Cleaning and care
32
Cleaning the drawer front and
glass lid
Remove soiling and fingerprints with
a standard domestic glass cleaner or
with a clean, damp microfibre cloth.
After cleaning, wipe the surfaces dry
using a soft cloth.
Cleaning the vacuum chamber
and sealing bar
Damage caused by liquids.
Liquid getting into the vacuum pump
air intake valve can result in damage
to the vacuum pump.
Take care that liquids do not get into
the air intake valve.
Tip: To make cleaning easier, the seal-
ing bar can be lifted off.
Remove light soiling immediately us-
ing a solution of hot water and wash-
ing-up liquid applied with a clean
sponge or use a clean, damp mi-
crofibre cloth.
Remove any residual cleaning agent
with a little clean water.
After cleaning, wipe the surfaces dry
using a soft cloth.
Cleaning the vacuum adapter
Clean the vacuum adapter with a
clean sponge and a solution of hot
water and washing-up liquid or a
clean, damp microfibre cloth.
Then dry the vacuum adapter with a
cloth.
Do not use the vacuum adapter again
until it is completely dry.
Cleaning the vacuum sealing
bag support
Clean the vacuum sealing bag sup-
port with a clean sponge cloth, wash-
ing-up liquid and warm water or with
a clean, damp microfibre cloth.
Then dry the vacuum sealing bag
support using a cloth.
Do not use the vacuum sealing bag
support again until it is completely
dry.
Cleaning and care
33
Carrying out a drying cycle
When food is vacuum sealed, moisture
gets into the oil circulation system in the
vacuum pump. To remove the moisture,
it is necessary to run a drying cycle
after a particular operating time.
The sensor control on the control
field of the drawer lights up yellow when
a drying cycle needs to be carried out.
The sensor control lights up yellow and
you can still run another 10vacuum
sealing processes. When the sensor
control lights up red, the drying cycle
must be carried out. The drawer will
lock after the last remaining use and
cannot be used again until drying has
been carried out.
We recommend carrying out a drying
cycle before the drawer locks out.
The whole drying cycle lasts for a max-
imum of 20minutes.
When carrying out the drying cycle,
the vacuum chamber must be empty
and free of liquid residues.
Clean and dry the vacuum chamber
as necessary.
Touch the sensor control.
Close the glass lid.
The drying cycle starts. The sensor
control will flash yellow throughout the
entire duration.
You can cancel the drying cycle with
the sensor control. If a drying
cycle is cancelled, it must be repeated
after the remaining vacuum sealing
processes have elapsed or when the
drawer is switched on again.
When the drying cycle has finished, a
signal sounds and the sensor control
goes out. You can now use the drawer
again as usual.
The last selected vacuum setting and
sealing level are displayed on the con-
trol field.
Problem solving guide
34
Many malfunctions and faults that can occur in daily operation can be easily
remedied. Time and money will be saved because a service call will not be
needed.
The following guide may help you to find the reason for a malfunction or a fault,
and to correct it.
Problem Cause and remedy
The drawer will not
open.
The safety screws on the back of the drawer have
not been removed.
Call the Miele Service Department.
The drawer cannot be
switched on.
The appliance is not correctly plugged in and
switched on at the power socket.
Insert the plug and switch on at the socket.
The fuse has tripped.
Reset the trip switch in the fuse box or replace the
fuse in the plug (see data plate for minimum fuse
rating). If, after resetting/replacing the trip switch in
the fuse box or the residual current protection
device, the drawer will still not turn on, contact a
qualified electrician or the Miele Customer Service
Department.
There was a loud bang
during operation.
The transit device has not been not removed and the
air filter has not been fitted.
Call the Miele Service Department.
The drawer has
switched itself off.
The drawer will switch itself off automatically to save
energy if no other action is taken within a certain time
frame after switching it on or after the end of a vacu-
uming process.
Switch the drawer back on.
The sensor controls are
not reacting to touch.
Foreign objects, soiling or liquid residues have got
onto the control panel.
Remove the objects and/or clean and dry the con-
trol panel.
Problem solving guide
35
Problem Cause and remedy
The vacuuming process
takes longer than ex-
pected.
The oil in the vacuum pump has become extremely
hot.
Leave the drawer to cool for an hour before start-
ing another vacuuming process.
When carrying out a number of consecutive vacu-
uming processes, wait a minimum of 2minutes
between each process to prevent the oil from
overheating again.
The vacuum sealing bag
was not sealed in time.
The required vacuum (vacuum setting1) for sealing a
bag was not achieved.
Touch the sensor control again or repeatedly
until the vacuuming process ends and the bag is
sealed.
All the sensor controls
have gone out. The
glass lid will not open.
There was an interruption to the power supply during
the vacuuming process. The vacuum chamber is still
under pressure so the glass lid cannot be opened.
Damage to the drawer.
Do not in any circumstances try to force the glass
lid open or use tools to open it.
When the power supply is restored, the glass lid
can be opened again after initialisation (all sensor
controls and indicators light up).
Start the vacuuming process again if necessary.
There is still too much
air in the bag at the end
of the vacuuming pro-
cess.
The vacuum level was too low.
Start the vacuuming process again with a new bag
and a higher vacuum level.
The vacuum sealing bag is too big for the food to be
vacuumed.
Use a new smaller bag or cut a larger bag to fit the
size of the food.
Start the vacuuming process again, with a higher
vacuum level if necessary.
After several consecut-
ive vacuuming pro-
cesses the weld seam
is faulty/not properly
sealed.
The sealing bar has overheated.
Wait a minimum of 2minutes between individual
vacuuming processes to avoid the sealing bar
overheating again.
Problem solving guide
36
Problem Cause and remedy
The edge of the bag is
not completely sealed.
The edge of the bag was not positioned centrally
along the sealing bar or has slipped.
Place the edge of the bag centrally along the seal-
ing bar. Make sure that the edge of the bag is par-
allel to the sealing bar and protrudes over it by ap-
prox. 2cm.
If the vacuum sealing bag is too small, place it on
the vacuum sealing bag support.
The vacuum sealing bag is wider than 25cm.
Use vacuum sealing bags with a maximum width
of 25cm.
The seal was not strong
enough and has
opened.
The edge of the bag is dirty (inside and out). For a
perfect weld seam the edge of the bag must be dry
and grease-free in the area of the seam.
Fold the edges of the vacuum sealing bag out-
wards for filling. This will give you a clean, perfect
weld seam.
The edge of the bag was not positioned smoothly
and without creases on the sealing bar.
Position the bag smoothly and without creases
along the sealing bar.
The sealing level was too low.
Start the vacuuming process again with a new va-
cuum sealing bag and select a higher sealing level.
The rubber on the counterpressure bar is not evenly
fitted.
Flatten the rubber.
The sealing bar and/or the counterpressure bar is
damaged.
Call Miele to have it replaced.
The bag is not maintain-
ing the vacuum al-
though the weld seam
is intact.
The vacuum sealing bag has been damaged by
sharp pointed objects, e.g. pointed pasta shapes or a
bone.
Start the vacuuming process again with a new va-
cuum sealing bag, on a lower vacuum level if ne-
cessary.
Use an external container if possible.

Problem solving guide
37
Problem Cause and remedy
The weld seam is de-
fective or not properly
sealed in one or more
places.
The sealing bar and/or counterpressure bar are dirty
or there are liquid residues on the sealing bar.
Clean and dry the sealing bar and/or counterpres-
sure bar.
The rubber on the counterpressure bar is not evenly
fitted.
Flatten the rubber.
The edge of the bag is dirty (inside and out). For a
perfect weld seam the edge of the bag must be dry
and grease-free in the area of the seam.
Fold the edges of the vacuum sealing bag out-
wards for filling. This will give you a clean, perfect
weld seam.
The edge of the bag was not positioned smoothly
and without creases on the sealing bar.
Position the bag smoothly and without creases
along the sealing bar.
The sensor is lit up
even though a drying
cycle has been carried
out. The drawer cannot
be used.
The drying cycle failed to remove all of the moisture
from the oil circulation system in the vacuum pump.
The drawer is locked and cannot be used for 1hour.
Wait for 1hour and then carry out another drying
cycle (see “Cleaning and care – Carrying out a dry-
ing cycle”). Ensure that the vacuum chamber is
free of liquid residues.
The sensor lights up
yellow. The vacuum is
less than usual.
During the food evacuation process, moisture ingress
into the oil circulation system in the vacuum pump
has occurred. This can impair the performance of the
vacuum levels.
Carry out a drying cycle (see “Cleaning and care –
Carrying out a drying cycle”).
The sensor button
lights up red. A vacu-
uming process cannot
be started.
During the food evacuation process, moisture ingress
into the oil circulation system in the vacuum pump
has occurred. If the sensor lights up red, the
drawer is locked for further use.
Carry out a drying cycle (see “Cleaning and care –
Carrying out a drying cycle”).
Problem solving guide
38
Problem Cause and remedy
There is a film of oil on
the glass lid and in the
drawer.
The oil in the vacuum pump has become extremely
hot.
Clean the drawer and leave it to cool down for
1hour before starting another vacuuming process.
When carrying out a number of consecutive vacu-
uming processes, wait a minimum of 2minutes
between each process to prevent the oil from
overheating again.
If the problem occurs again, contact the Miele Ser-
vice Department.
The vacuuming process
is cancelled after
2minutes. A signal
sounds and the sym-
bol lights up red.
The required final vacuum could not be achieved.
Switch the drawer off and back on again.
Start the vacuuming process again with lower va-
cuum settings if necessary.
After intensive use of the drawer, the oil in the va-
cuum pump has become extremely hot.
Leave the drawer to cool for an hour before start-
ing another vacuuming process.
When carrying out a number of consecutive vacu-
uming processes, wait for at least 2minutes
between each process. This prevents the oil from
overheating again.
The vacuum sealing
process is cancelled
after 5seconds. A sig-
nal sounds and the
indicator light lights
up red.
The glass lid is not sitting evenly. There is an object,
such as the edge of a bag or some soiling, on the
surface of the chamber seal.
Remove the obstruction and/or the soiling.
Close the glass lid.
Press lightly on the black triangle on the glass lid
for approx. 5seconds.
The chamber seal is not fitted correctly.
Press the chamber seal in all the way round to
make sure it is fitted evenly.
The chamber seal is damaged, e.g. cracks can be
seen.
Call the Miele Customer Service Department to
have it replaced.

Problem solving guide
39
Problem Cause and remedy
Abrasion marks on the
top edge of the front
panel.
Installing or removing an appliance above the drawer
has caused abrasion marks.
Carefully remove the abrasion marks by rubbing
the top edge with the abrasive side of a standard
scouring pad.
Optional accessories
40
Miele offer a comprehensive range of
useful accessories as well as cleaning
and conditioning products for your
Miele appliances.
These products can be ordered through
the Miele Webshop.
They can also be ordered from Miele
(see end of this booklet for contact de-
tails) or from your Miele dealer.
Vacuum sealing bags
VB1828 (pack of 50)
For storing and sous vide cooking of li-
quid and solid food
180x280mm (WxH), D = 90µm
VB2435 (pack of 50)
For storing and sous vide cooking of li-
quid and solid food
240x350mm (WxH), D = 90µm
Cleaning and care products
Microfibre cloth
Removes finger marks and light soiling
After sales service
41
Contact in the event of a fault
In the event of any faults which you cannot remedy yourself, please contact your
Miele dealer or the Miele Customer Service Department.
You can book a Miele Customer Service Department call-out online at
www.miele.com/service.
Contact information for the Miele Customer Service Department can be found at
the end of this document.
Please quote the model identifier and serial number of your appliance (Fabr./SN/
Nr.) when contacting the Miele Customer Service Department. This information
can be found on the data plate.
Please note that telephone calls may be monitored and recorded for training pur-
poses and that a call-out charge will be applied to service visits where the problem
could have been resolved as described in this booklet.
Data plate
The data plate is located here:
Warranty
For information on the appliance warranty specific to your country please contact
Miele. See back cover for address.
In the UK, your appliance warranty is valid for 2 years from the date of purchase.
However, you must activate your cover by calling 0330 160 6640 or registering on-
line at www.miele.co.uk.

Installation
*INSTALLATION*
42
Safety instructions for installation
Risk of damage from incorrect installation.
Incorrect installation can cause damage to the drawer and/or the combination
appliance.
The appliance must only be installed by a qualified person.
Before connecting the drawer to the mains supply, ensure that the
connection data on the data plate (voltage and frequency) match the
mains electricity supply.
This data must correspond in order to avoid the risk of damage to
the drawer. Consult a qualified electrician if in any doubt.
The socket and on-off switch should be easily accessible after the
drawer has been installed.
The drawer may only be built in in combination with those appli-
ances quoted by Miele as being suitable. Miele cannot guarantee
trouble-free operation if the appliance is operated in combination
with appliances other than those quoted by Miele as being suitable.
The base on which the drawer and the combination appliance are
fitted must be fixed in place and must support the weight of both ap-
pliances.
When building in the combination appliance, it is essential to fol-
low the instructions given in the operating and installation instruc-
tions supplied with the combination appliance.
The drawer must be installed in such a way that
- you can see into the vacuum chamber. This helps to avoid scald-
ing and burns from touching the hot sealing bar or weld seam.
- there is enough space for the drawer to be pulled out fully and for
opening the glass lid.

Installation
*INSTALLATION*
43
Installation notes
The drawer can be used in combination with the following Miele built-in appli-
ances:
- all ovens with an appliance front width of 595mm
- all steam ovens with an appliance front width of 595mm
- all coffee machines with an appliance front width of 595mm
- all microwaves with an appliance front width of 595mm
- the Dialog oven with an appliance front width of 595mm
When building in the drawer with a combination appliance, the combination appli-
ance is placed on top of the drawer without the need for an interim shelf.
Installation
*INSTALLATION*
44
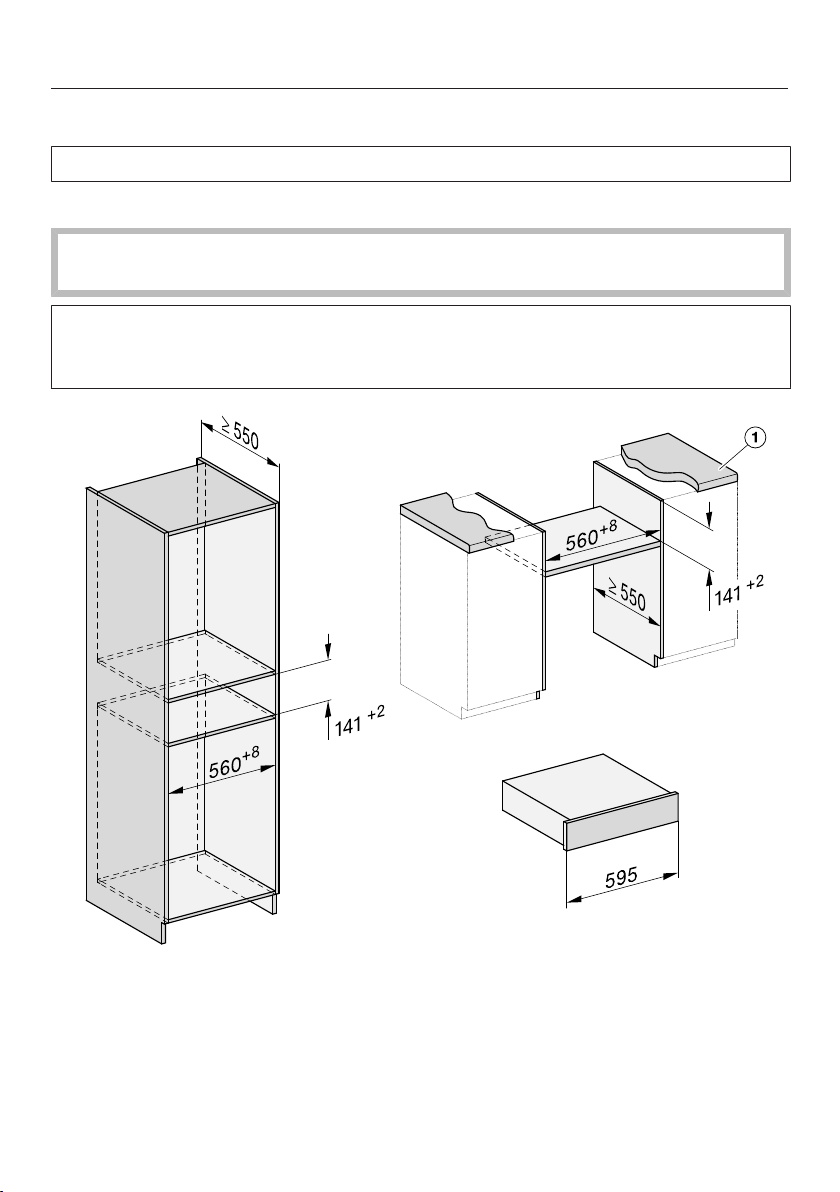
Installation dimensions
All dimensions are given in mm.
Installation in a tall or base unit
The furniture housing unit must not have a back panel fitted behind the build-
ing-in niche.
If the drawer is to be installed in a base unit underneath a hob, please also ob-
serve the installation instructions for the hob as well as the building-in depth re-
quired for the hob.
a
Worktop protrusion ≤ 29mm
Installation
*INSTALLATION*
45
Combination appliance for niches with a height of 450mm
The furniture housing unit must not have a back panel fitted behind the build-
ing-in niche.
Installation
*INSTALLATION*
46
Combination appliance for niches with a height of 590mm
The furniture housing unit must not have a back panel fitted behind the build-
ing-in niche.
Installation
*INSTALLATION*
47
Side view
A EVS 7010: 22mm
EVS 7110: 23.3mm
Installation
*INSTALLATION*
48
Connections and ventilation
a
View from the front
b
Mains connection cable, L=2200mm
c
No connections permitted in this area
d
Ventilation cut-out, min. 1800mm
2
Installation
*INSTALLATION*
49
Installation
The drawer has an integrated va-
cuum pump which contains oil.
To prevent oil from leaking out, the
drawer must be transported and
stored in a horizontal position only.
Do not tilt the drawer and do not
stand it up on its side.
Preparing the drawer
For safe transportation, the vacuum
pump is provided with a transit device
which must be removed before installa-
tion. The air filter supplied must be fit-
ted in place of the transit device.
There are also 2safety screws on the
back of the drawer to prevent the
drawer from being opened unintention-
ally during transportation and when it is
being removed from the packaging.
Fit the air filter before building in the
drawer and remove the safety
screws at the back.
Otherwise the drawer cannot be op-
erated and has to be taken out of the
housing unit.
Keep the transit device and safety
screws for any future transportation.
The transit device can be secured to
the back of the drawer.
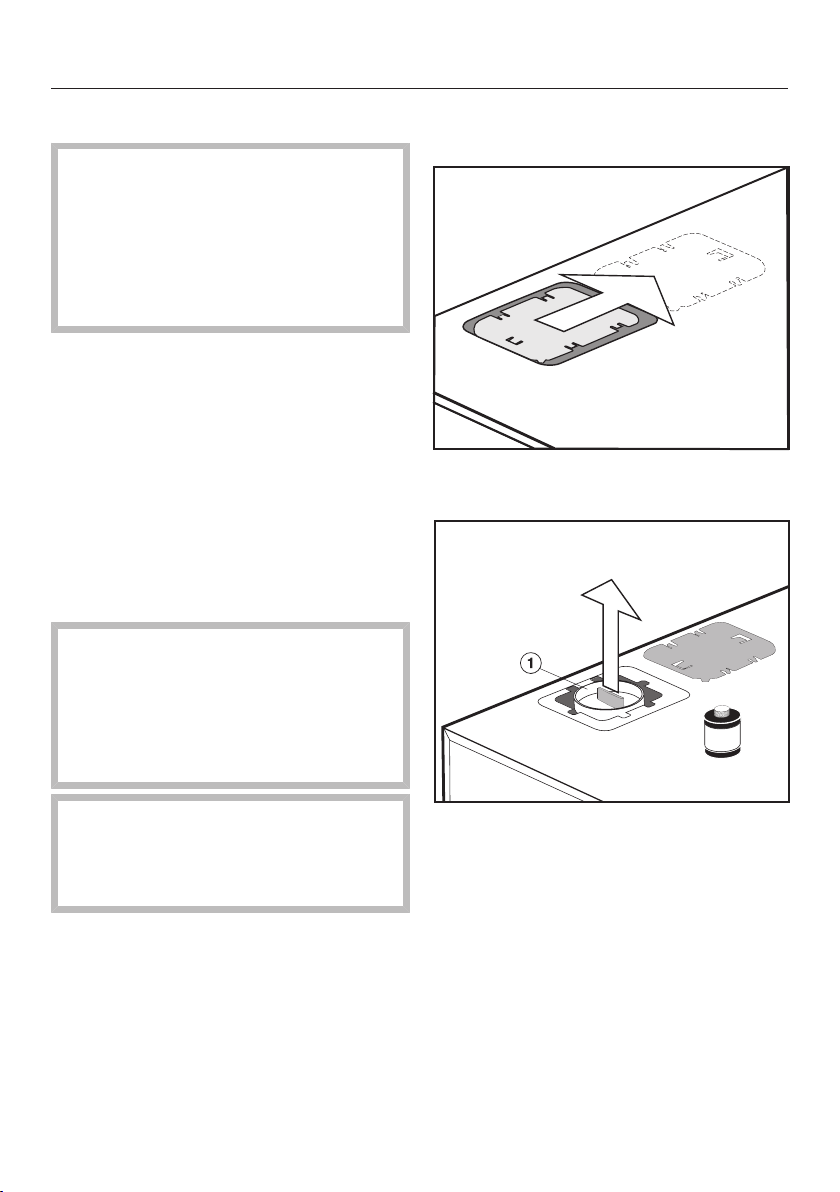
Fitting the air filter and removing the
safety screws
Slide the cover to the right and re-
move it.
Pull the red transit device up and
out, e.g. with universal pliers.
Installation
*INSTALLATION*
50
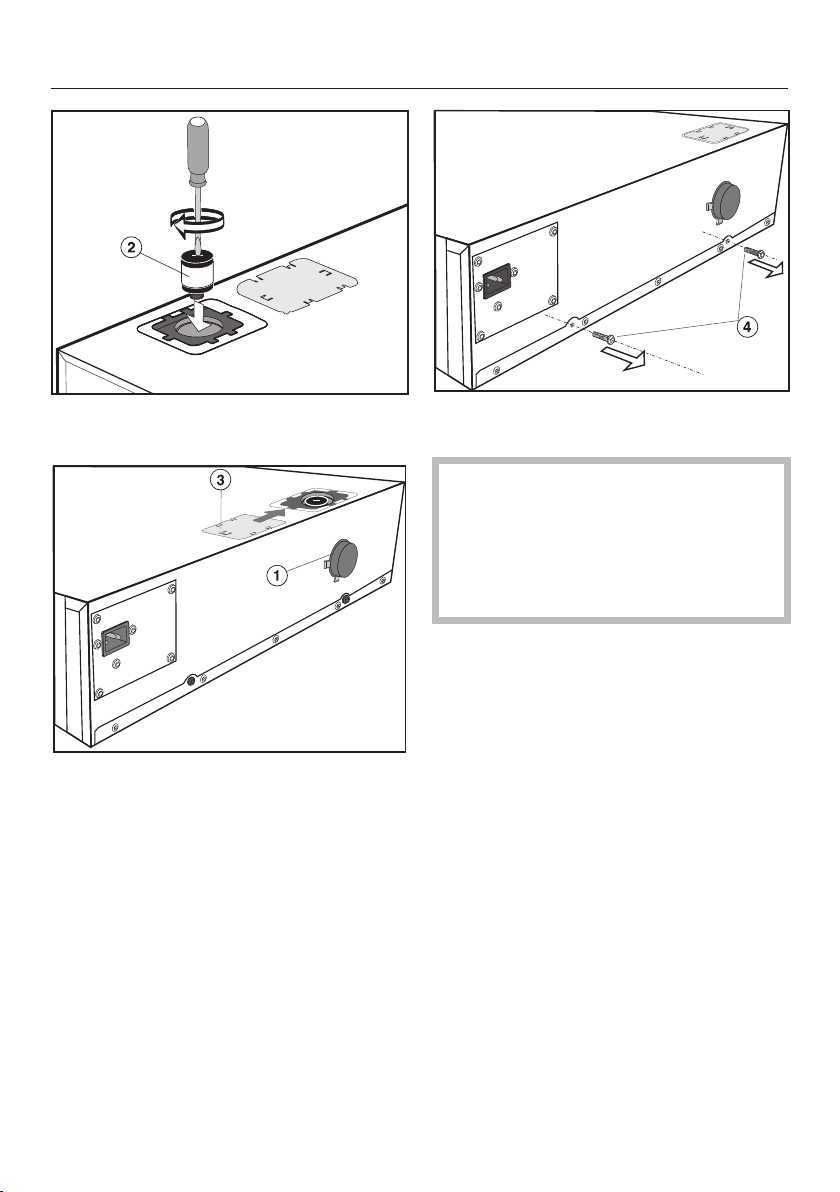
Screw the air filter onto the va-
cuum pump using a screwdriver.
Secure the transit device to the
back of the drawer.
Slide the cover over the opening to
close it.
Remove the safety screws from
the back of the drawer.
Oil may leak while transporting the
drawer.
Remove the air filter before trans-
porting the drawer and plug the va-
cuum pump with the transit
device.
To remove the air filter and fit the transit
device, carry out these steps in reverse
order.
Installation
*INSTALLATION*
51
Installing the drawer
Danger of injury due to incorrect
installation.
The drawer is heavy and will tip for-
wards when open.
Installation must be carried out by
two people.
Keep the drawer closed until it has
been fitted to the side walls of the
housing unit using the supplied anti-
tipping mechanism.
Check that the base on which the
drawer will sit is clean and level (use
a spirit level). This is important for
the appliance to function correctly.
Fitting the anti-tipping mechanism
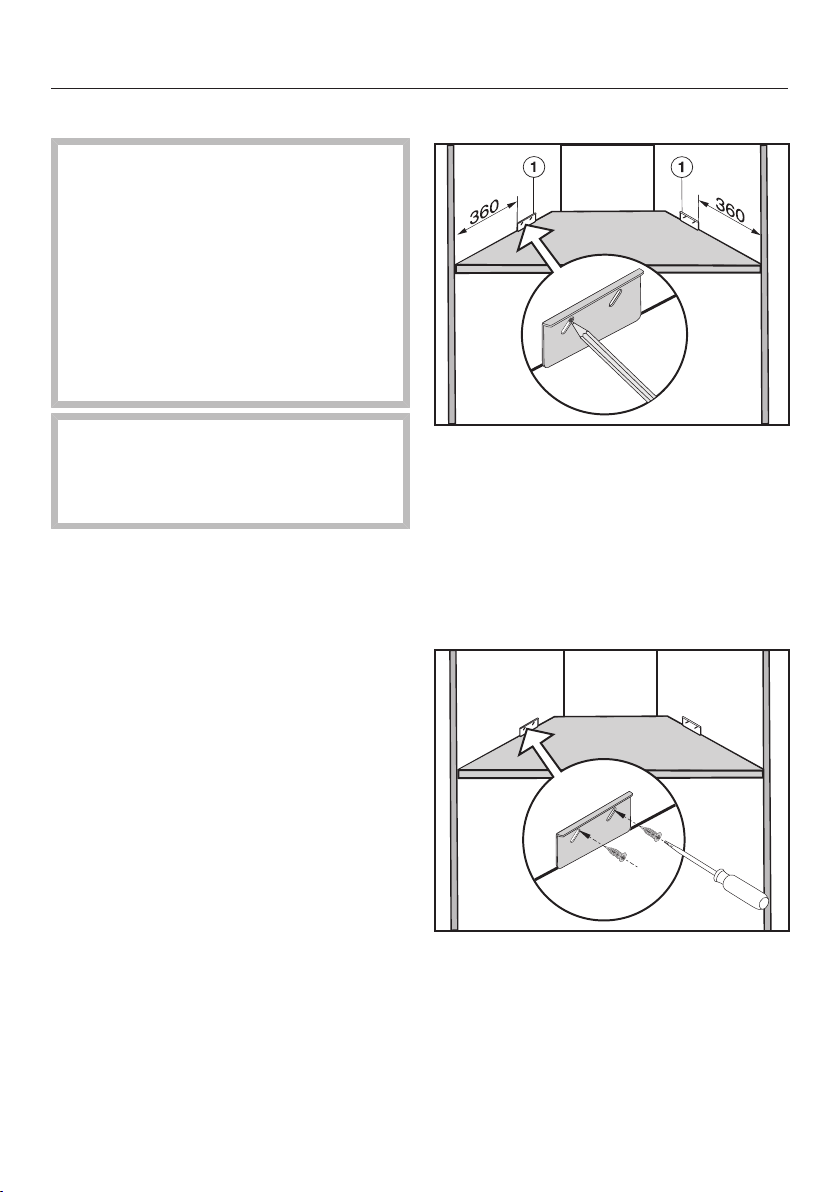
Measure the distance to the right and
left-hand side walls of the housing
(see illustration).
Mark the uppermost position in the
long slot of the anti-tipping mechan-
ism. Make sure that the anti-tip-
ping mechanism is flush with the
base of the housing unit.
Secure the anti-tipping mechanism to
the right and left-hand side walls of
the housing unit with the 4screws
supplied (4x16mm).
Installation
*INSTALLATION*
52
Installing and connecting the drawer
Check that the air filter is fitted and
the safety screws have been removed
from the back of the drawer (see “In-
stallation – Building in”).
Connect the mains cable to the
drawer.
Slide the closed drawer into the
housing unit. When doing so make
sure that the mains connection cable
does not get trapped or damaged.
Align the drawer at right angles.
Open the drawer and secure it to the
right and left-hand side walls of the
housing unit with the 2wood screws
supplied (3.5x25mm).
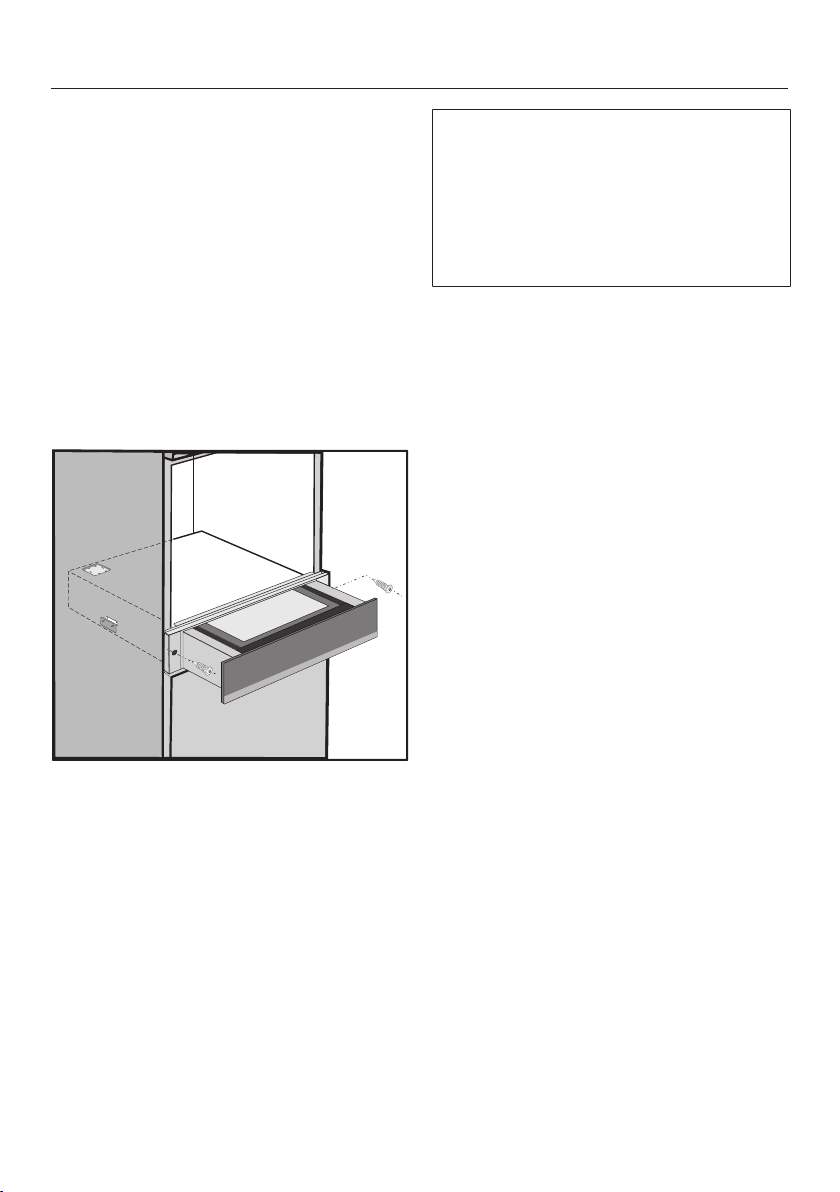
Remove the foam adhesive label from
the glass lid.
Remove the 4foam adhesive labels
from the back of the front panel on
the right and left-hand sides.
Connect the drawer to the mains.
When the drawer is first connected, or
after an interruption to the mains, all of
the sensor controls and indicators in
the display will light up for approx.
10seconds for testing (initialisation).
As soon as they go out, the drawer is
ready for use.
When installing the combination ap-
pliance, protect the top edge of the
front panel from abrasive marks.
Install the combination appliance in
accordance with the operating and
installation instructions supplied with
it.

Installation
*INSTALLATION*
53
Aligning the front of the drawer
After installing the combination appli-
ance, it may be necessary under certain
circumstances to align the front of the
drawer and adjust the gap between the
drawer and the combination appliance.
To help you do this, there are 2screws
behind the drawer front with which the
front is fixed to the drawer housing.
Open the drawer.
Loosen the fixing screws on the
right and left of the drawer housing.
Do not remove the screws com-
pletely, as the front may fall off.
Push the drawer up or down a little to
correct the alignment and the gap.
Tighten up the fixing screws.

Installation
*INSTALLATION*
54
Electrical connection
We recommend that you connect the
drawer to the mains via a suitable
switched electrical socket. This makes
it easier to perform servicing work. The
socket and on-off switch should be
easily accessible after the drawer has
been installed.
Danger of injury due to unauthor-
ised installation, maintenance and re-
pairs.
Installation, repairs and other work
by unqualified persons could be dan-
gerous. Miele cannot be held liable
for unauthorised work.
Miele cannot be held liable for dam-
age or injury caused by the lack of or
inadequacy of an on-site earthing
system (e.g. electric shock).
If the plug is removed from the con-
nection cable or if the cable is sup-
plied without a plug, the drawer must
be connected to the electrical supply
by a suitably qualified electrician.
If the socket is no longer accessible,
or if a hard-wired connection is
planned, an additional means of dis-
connection must be provided for all
poles. Suitable means of disconnec-
tion include switches with an all-pole
contact gap of at least 3mm. These
include miniature circuit breakers,
fuses and contactors. The required
connection data is given on the data
plate. Please ensure this information
matches the mains supply.
After installation, ensure that all elec-
trical components are shielded and
cannot be accessed by users.
Total power rating
See data plate
Connection data
The connection data is quoted on the
data plate. Please ensure these match
the household mains supply.
Residual current device
For extra safety, it is advisable to pro-
tect the drawer with a suitable residual
current device (RCD) with a trip range of
30mA.

Installation
*INSTALLATION*
55
Disconnecting from the mains
Risk of electric shock.
There is a risk of electric shock if the
appliance is connected to the mains
supply during repair or service work.
After disconnection, ensure the ap-
pliance cannot be switched back on
by mistake.
To disconnect the appliance from the
mains power supply, do one of the fol-
lowing depending on installation:
Safety fuses
Completely remove fuses.
Automatic circuit breakers
Press the (red) test button until the
middle (black) button springs out.
Built-in circuit breakers
Circuit breakers at least type B or C:
Switch the lever from 1 (on) to 0 (off).
Residual current device (RCD)
Switch the main switch from 1 (on) to
0 (off) or press the test button.
Replacing the mains connection
cable
When replacing the mains connection
cable, please use cable type H05VV-F
with a suitable cross-section. These
cables are available from the manufac-
turer or from Miele Service.


United Kingdom
Miele Co. Ltd., Fairacres, Marcham Road, Abingdon, Oxon, OX14 1TW
Tel: 0330 160 6600, Internet: www.miele.co.uk/service, E-mail: [email protected]
Australia
Miele Australia Pty. Ltd.
ACN 005 635 398
ABN 96 005 635 398
1 Gilbert Park Drive
Knoxfield, VIC 3180
Tel: 1300 464 353
Internet: www.miele.com.au
Miele Electrical Appliances Co., Ltd.
1-3 Floor, No. 82 Shi Men Yi Road
Jing' an District
200040 Shanghai, PRC
Tel: +86 21 6157 3500
Fax: +86 21 6157 3511
E-mail: [email protected],
Internet: www.miele.cn
China Mainland
Miele (Hong Kong) Ltd.
41/F - 4101, Manhattan Place
23 Wang Tai Road
Kowloon Bay, Hong Kong
Tel: (852) 2610 1025
Fax: (852) 3579 1404
Email:
Website: www.miele.hk
Hong Kong, China
Miele India Pvt. Ltd.
Ground Floor, Copia Corporate Suites
Plot No. 9, Jasola
New Delhi - 110025
Tel: 011-46 900 000
Fax: 011-46 900 001
E-mail: customercare@miele.in
Internet: www.miele.in
India
Miele Ireland Ltd.
2024 Bianconi Avenue
Citywest Business Campus
Dublin 24
Tel: (01) 461 07 10
Fax: (01) 461 07 97
E-Mail: [email protected]
Internet: www.miele.ie
Ireland
Malaysia
Miele Sdn Bhd
Suite 12-2, Level 12
Menara Sapura Kencana
Petroleum
Solaris Dutamas No. 1
Jalan Dutamas 1
50480 Kuala Lumpur, Malaysia
Phone: +603-6209-0288
Fax: +603-6205-3768
Miele New Zealand Limited
IRD 98 463 631
8 College Hill
Freemans Bay, Auckland 1011
New Zealand
Tel: 0800 464 353
Internet: www.miele.co.nz
New Zealand
Miele Pte. Ltd.
29 Media Circle
#11-04 ALICE@Mediapolis
Singapore 138565
sTel: +65 6735 1191
Fax: +65 6735 1161
E-Mail: [email protected]
Internet: www.miele.sg
Singapore
Miele (Pty) Ltd.
63 Peter Place
Bryanston 2194
P.O. Box 69434
Bryanston 2021
Tel: (011) 875 9000
Fax: (011) 875 9035
E-mail: [email protected]
Internet: www.miele.co.za
South Africa
Miele Appliances Ltd.
Showroom 1
Eiffel 1 Building
P.O. Box 114782 - Dubai
Tel. +971 4 3044 999
Fax. +971 4 3418 852
800-MIELE (64353)
E-Mail: [email protected]
Website: www.miele.ae
United Arab Emirates
Manufacturer:
Miele & Cie. KG, Carl-Miele-Straße 29, 33332 Gütersloh, Germany
Thailand
Miele Appliances Ltd.
BHIRAJ TOWER at EmQuartier
43rd Floor Unit 4301-4303
689 Sukhumvit Road
North Klongton Sub-District
Vadhana District
Bangkok 10110, Thailand
Sheikh Zayed Road, Umm Al Sheif

M.-Nr. 11 168 360 / 04en-GB
EVS 7010, EVS 7110