FAC SRL
macchine affettatrici industriali e familiari
Via Morazzone, 137 - 21044 CAVARIA (VA)
Tel. +39 0331 212252 - Fax. +39 0331 216443
www.slicers.it
100% Made in Italy
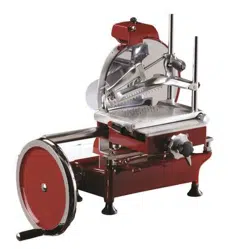
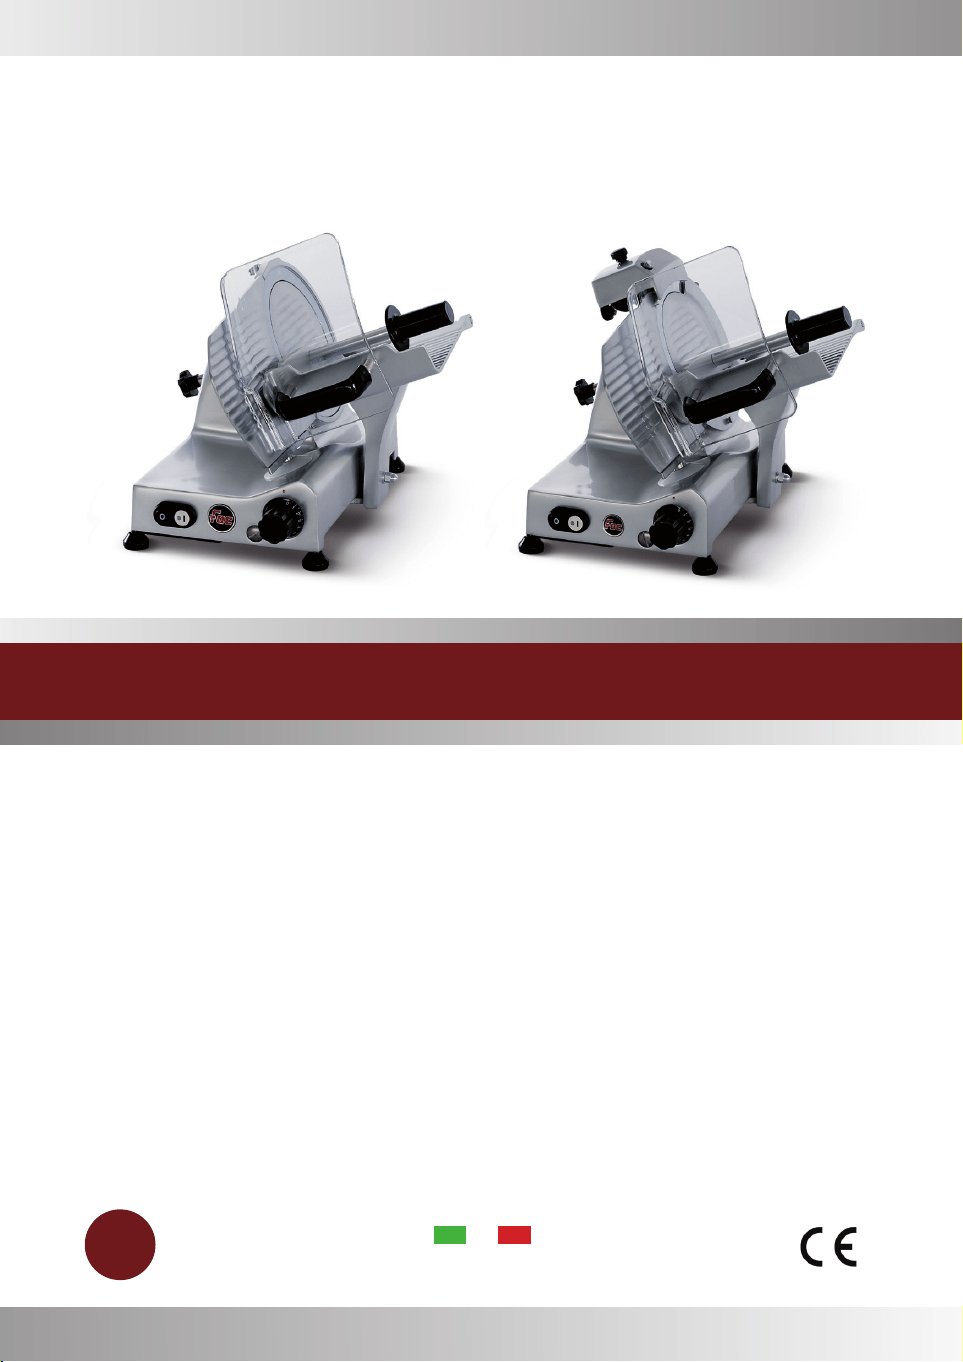
F 195 - S 220 - F 250 ES
S 220 AF - F 250 E - F 250 I - F 275 E - F 275 I - F 275 IL
F 300 R - F 300 E - F 300 EL - F 300 CL - F 300 I - F 330 I - F 350 I - F 370 I
CE PROFESSIONAL GRAVITY SLICING MACHINE
EN
USE AND MAINTENANCE MANUAL


3
EN
INDEX
• GENERAL WARNINGS ................................................................................................ Pag. 4
• USE WARNINGS ........................................................................................................ Pag. 10
• MANUFACTURER’S WARRANTY AND RESPONSIBILITIES ................................... Pag. 11
• PACKING ..................................................................................................................... Pag. 12
• NAMEPLATES - CONFORMITY MARKINGS ............................................................. Pag. 13
• SUPPLIED ACCESSORIES ........................................................................................ Pag. 14
• TECHNICAL DESCRIPTION AND INTENDED USE .................................................. Pag. 14
• ELECTRICAL AND MECHANICAL SAFETY DEVICES .............................................. Pag. 16
• SPACE REQUIREMENT ............................................................................................. Pag. 17
• MAIN TECHNICAL DATA ............................................................................................ Pag. 17
• MAIN COMPONENTS ................................................................................................. Pag. 20
• INSTALLATION ADN PRELIMINARY CHECKS .......................................................... Pag. 22
• COMMANDS DESCRIPTION ..................................................................................... Pag. 23
• USING THE MACHINE ............................................................................................... Pag. 23
• SLICER CLEANING .................................................................................................... Pag. 26
• MAINTENANCE .......................................................................................................... Pag. 33
• EXECUTION OF THE SHARPENING ......................................................................... Pag. 34
• LUBRICATION ............................................................................................................. Pag. 38
• MOTOR BELT TENSION ADJUSTMENT .................................................................... Pag. 39
• TAKING THE SLICER OUT OF SERVICE .................................................................. Pag. 40
• TROUBLESHOOTING ................................................................................................ Pag. 41
• USER NOTE ............................................................................................................... Pag. 42
• ELECTRICAL SCHEMES ............................................................................................ Pag. 43
• SPARE PARTS ............................................................................................................ Pag. 47
• DECLARATION OF CONFORMITY ............................................................................ Pag. 59
4
EN
GENERAL WARNINGS
Meaning of warning signs found in booklet
DANGER: Indicates an imminently hazardous situation
which, if not avoided, could result in serious injury
or even death. The use of this term is limited to the
most extreme situations.
ATTENTION: Indicates a potentially hazardous situation
which, if not avoided, could result in serious injury
(and in extreme cases death).
WARNING: Indicates a potentially hazardous situation
which, if not avoided, may result in minor injuries
to personnel or damage to equipment. It also alerts
the user on incorrect operating modes.
- - - - - - - - - - - - - - - - - - - - - - - - - - - - - - - - - - - - - - - - - - - - - - - - - -
Safety warnings
indispensable before use
Carefully read the warnings contained herein as they provide
important information regarding safe installation, use and
maintenance
of the Gravity slicing machines for food use.
The purpose of this pubblication, simply dened ‘manual’ below, is to
allow the user, especially to the direct operator to take every measure
and to prepare all the necessary human and material resources for
a safe and durable use of the. This booklet MUST be kept for all the
slicer lifetime and in case of need (example: damage tamperising
even partially its consultation, etc.) the user must ask for a new copy
to the manufacturer.
☞
☞
correctly connected to an efcient grounding installation
qualied personnel.
The purpose of this pubblication, simply dened ‘manual’ below, is to
☞
5
EN
GENERAL WARNINGS
In case of sale of the slicer, deliver to the new owner this manual too.
☞
The installation must be performed following the instructions
of the manufacturer. A wrong installation can cause damages
to people, animals or things, in respect of which the
manufacturer cannot be considered responsable.
Children should not use the device as a
toy and should neither clean nor use the
equipment.
Keep away the children form the device and the power
cord.
The appliance must be used by adults adequately trained
for the purpose who have carefully red the content of this
manual.
• The elements of the packing (plasti bags, expanded polystyrene, etc.)
must be kept out of reach of children as they are potential sources of
danger.
The electrical safety of this device is ensured only when it’s
correctly connected to an efcient grounding installation
in accordance with the electrical safety standards in force.
• It’s necessary to verify this fundamental safety requirement and, in case
of doubt, ask for an accurate installation safety control by professionally
qualied personnel.
The manufacturer cannot be considered responsible for any
damage caused by lack of installation’s grounding.

6
EN
GENERAL WARNINGS
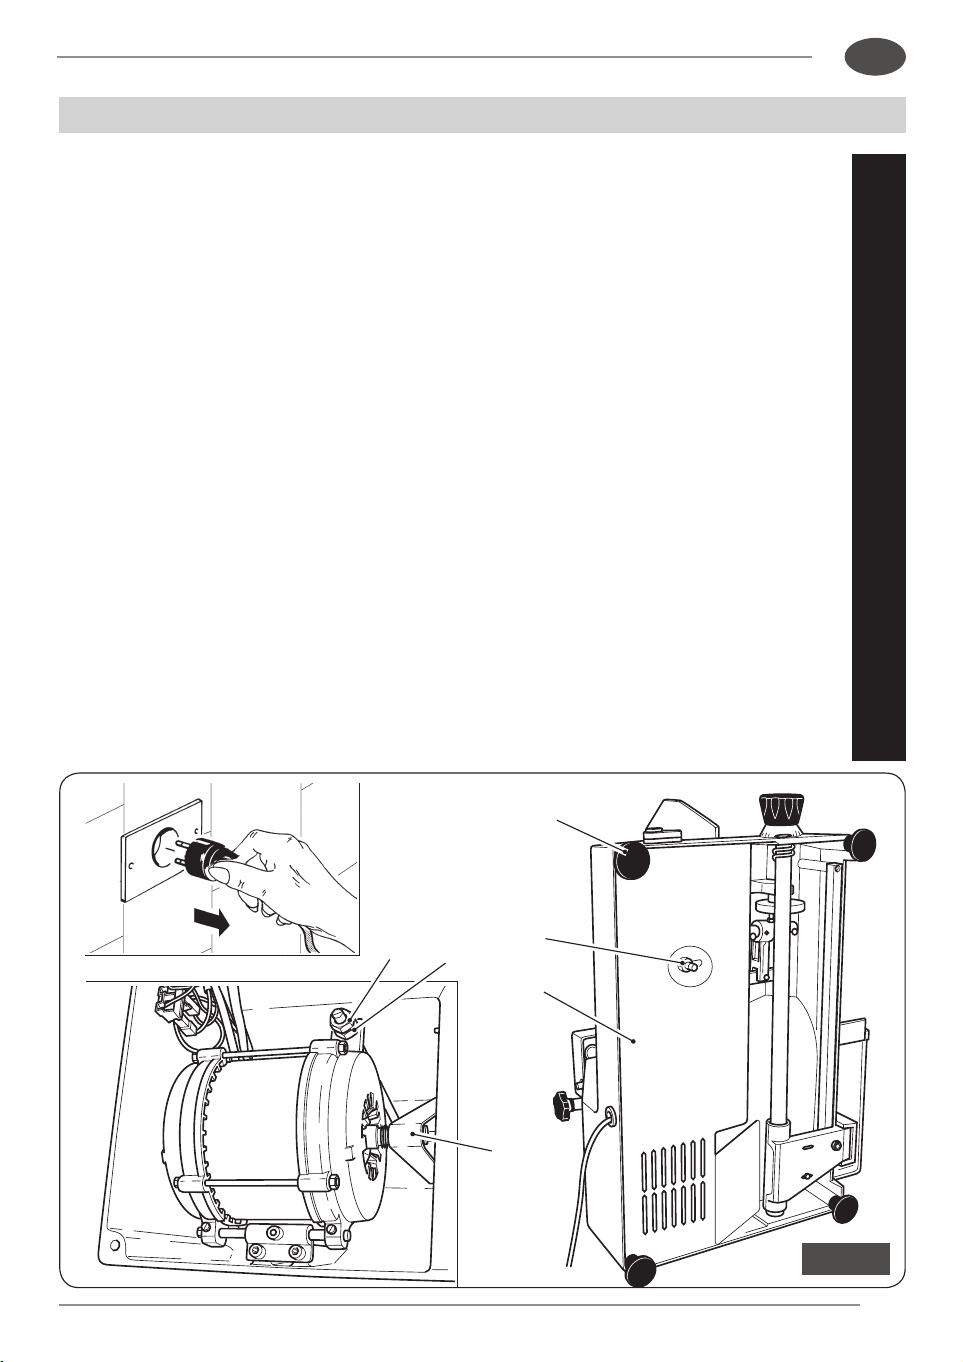
• Before plugging the appliance make sure that the data on the label
correspond to those of the electrical distribution network.
• The plate is on the bottom of the appliance.
•
For your safety, it is recommended to power the device through a circuit
breaker (DRC) with trip current not exceeding 30 mA.
• In case of incompatibility between the socket and the plug of the
appliance have the die-cast wire and plug with another one suitable
by an authorized retailer. In case of tampering the manufacturer
doesn’t answer neither for safety, nor for warranty. Alternatively have
the socket replaced with a suitable type by a qualied professional.
The latter, in particular, will also have to ensure that the section of the
socket cables is suitable for the power absorbed by the appliance.
In general it is not advisable to use adapters, multiple sockets and/or
extensions.
• Do not connect the appliance to the electrical power through external
timers or remote operating systems.
• The use of any electrical appliance requires the observance of some
basic rules. in particular:
- do not touch the appliance with wet hands
- do not use the appliance barefoot
- do not pull the power cord or the appliance itself to remove the plug
from the socket
-
do not leave the aplliance exposed to atmospheric agents (rain, sun,
etc.)
- do not move the appliance when is running.
- the appliance was not designed to be used under rain and must not
be deposited outdoor or in damp places.
• In case of failure and/or malfunction of the appliance, turn it off and
don’t tamper it.
For repairs apply only to the manufacturer or to a service center
authorized by the same and require the use of genuine spare parts.
Failure to comply with the above may compromise the security of the
device.
☞
☞
Make sure the power cord does not protrude from the oor

the socket replaced with a suitable type by a qualied professional.
7
EN
GENERAL WARNINGS
• If you decide not to use a device of this type any more, it must be
made inoperative by cutting the power cord after removing the plug
from the socket.
It is also recommended to make harmless those parts of the equipment
which may constitute a danger, especially for children who might use
an abandoned appliance for their games.
• To avoid dangerous overheating, it is recommended to extend the
power cord to its full length and use the appliance as recommended
in “USING THE MACHINE”.
☞
During the functioning, the socket must be easily accesible
in the event that becomes necessary to unplug the appliance.
Do not place the appliance under a socket so that the wire
doesn’t interfere with the correct use of the machine.
• Do not leave the appliance plugged in unnecessarily. Unplug it from
the power supply when the device is not used.
• After use, always switch off the unit and remove the plug from the
socket.
•
After each use, always perform a thorough cleaning of all parts in contact
with food, as mentioned under “Cleaning the slicer”.
• Do not block the openings, ventilation or heat dissipation slots.
• If the power cord of this appliance is damaged, it must be replaced
by a service center authorized by the manufacturer, as special tools
are required.
Before performing aby operation turn off the appliance
and disconnect the power plug from the socket.
☞
Make sure the power cord does not protrude from the oor
to avoid that someone can pull it also inadvertently knocking
the appliance.
8
EN
GENERAL WARNINGS
☞
Place the appliance on a horizontal and rm supporting plane,
whose surface is not sensitive (eg. Lacquered furniture,
tablecloths etc.). Make sure that the appliance is safely
supported.
☞
Do not place the appliance on or near heat sources.
Place the appliance far from sinks and faucets.
☞
The blades are sharp; handle with care.
Do not use the appliance if the blades are damaged.
☞
Never immerse the appliance in water.
☞
Do not use the appliance in environments containing explosive,
combustible gases or ammable liquids (paints, glues, spray cans,
etc.).
DANGER OF EXPLOSION AND FIRE
.
• This device is intended for domestic and professional use.
☞
This appliance must be used only for the purpose for which
it was designed, that is for slicing food products (see page
15) in respect to the directives and regulations reported in
the declaration of conformity (see next to last page).
Any other use is considered improper and dangerous.
The manufacturer can not be held responsible for any
damage caused by improper, erroneous and unreasonable
use.
☞
☞
☞
☞
☞
☞
• Do not wear loose-tting clothes particularly with open sleeves; where
☞
Place the appliance on a horizontal and rm supporting plane,
☞
☞
☞
☞
combustible gases or ammable liquids (paints, glues, spray cans,
☞
9
EN
GENERAL WARNINGS
Do not remove safety devices and do not alter or remove
mechanical and electrical guards.
☞
Always use protective scratchproof gloves for cleaning and
maintenance.
☞
Do not operate the empty appliance.
☞
In case of problems with the appliance, contact an authorized
service center.
Do not attempt to repair the device yourself.
Any repair work carried out on the device by
unauthorized personnel will void the warranty
even if its life had not come to an end.
☞
IIf you have any doubts regarding the contents of the user
guide or require additional information, please contact the
manufacturer or technical support immediately quoting the
clause number of the topic in question.
☞
No part of this publication shall be reproduced or transmitted
without written permission from the manufacturer.
☞
Use of the machine requires great concentration, PAY
ATTENTION AT ALL TIMES!
• Do not wear loose-tting clothes particularly with open sleeves; where
necessary use suitable headgear to cover hair.
• When slicing, do not allow anyone to approach the slicer, especially
the blade.

10
EN
• Do not remove, cover or alter the rating plates tted to the machine
body and ensure their prompt replacement in case of damage.
• Ensure that the product tray, receiving tray, surrounding areas and
oor are kept clean and dry at all times.
• Do not use the slicer as a supporting surface or lay any object on it
that is extraneous to normal slicing operations.
• Place and remove the goods to be sliced on the sliding plate only with
the platter completely retracted (away from the blade) and the cart
totally towards the operator.
☞
DO NOT use slicing accessories that have not been supplied
by the slicer manufacturer.
• Do not damage the blade by cutting hard objects (bones, etc.).
• If the size of the food to be sliced are higher than those indicated
under “Working cut” in the table “Technical data”, reduce its size to
work safely.
USE WARNINGS
- use of untrained personnel;
of installation;
repair;
spare parts;
- failure to comply with the specic
- insufcient or incomplete periodic

• Do not remove, cover or alter the rating plates tted to the machine
oor are kept clean and dry at all times.
☞
11
EN
• This device is guaranteed for 24
months.
The purchase date must be proven with
the relevant document.
In the absence of valid fiscal document,
the warranty claim can not be exercised.
• In case of non-compliance the claim
must be made in writing within two
months from the observation of the
defect attaching the tax document,
compiled in the act of buying, with stamp
and signature of the store.
Manufacturer’s warranty and responsibilities
• The guarantee of proper operation and
full compliance of the machines to their
intended service depends on the correct
application of the instructions contained
in this manual.
• The manufacturer is not responsible
directly and indirectly for any damage
caused by improper use of the device
resulting from:
- failure to follow instructions contained
in this manual
- use of untrained personnel;
- use not in accordance with specific
regulations, in force in the country
of installation;
- changes and / or unauthorized
repair;
- use of accessories and unoriginal
spare parts;
- misuse of the machine with different
functionality from the one it has been
built for.
- incorrect installation.
- failure to comply with the specic
power techniques
- insufcient or incomplete periodic
maintenance.
- use by people under the age of 18.
- use by people whose physical,
sensory or mental skills are reduced.
- exceeding the loading limits allowed
by the machine
- use in environments different from
the food one
- exeptional events.
MANUFACTURER’S WARRANTY AND RESPONSIBILITIES

12
EN
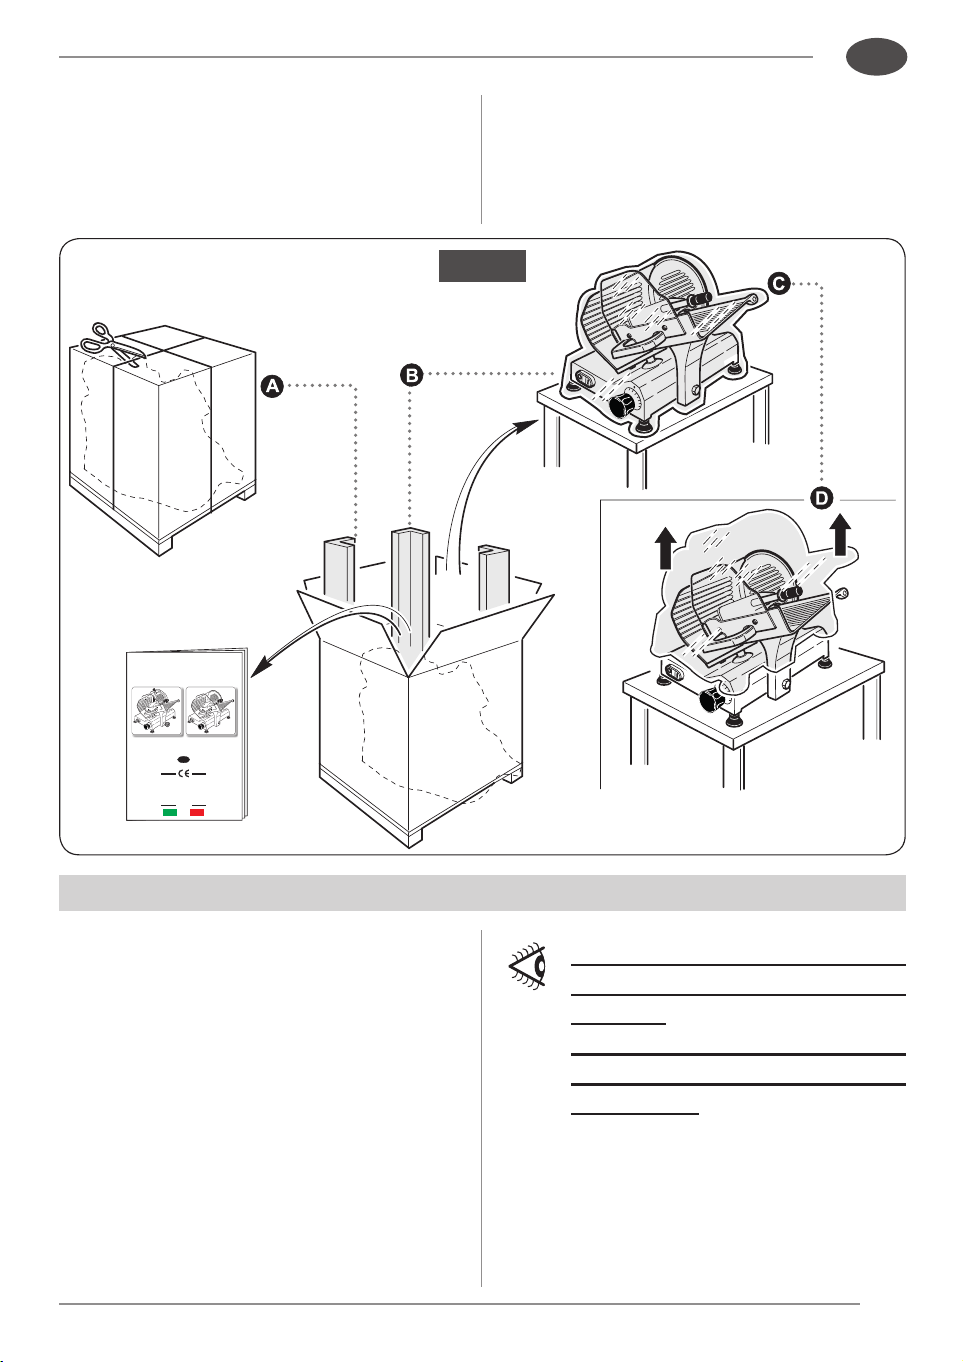
1
.1 - UNPACKING
When taking delivery of the slicer, ensure
that the packaging is fully intact; if this is
not the case, please advise the courier or
local dealer immediately.
In order to remove the slicer from the
packaging, please proceed as follows:
• Cut and remove the plastic bands.
• Open the box and take out the
instruction booklet.
• Proceed as described hereafter.
- Remove the protective cardboard
covers from inside the box.
- Lift the machine with great care and
place on a solid surface.
- Remove the plastic bag in which
the slicer is wrapped.
Check that all components spec-
ified in the deliv
ery note and this
instruction booklet are present
and fully intact.
•
Should any faults be noted, such as:
- dents to the frame or guards;
- controls that are either not working
or broken;
- missing items or other problems;
please advise the courier, manufacturer
and service centre immediately.
-
Carefully dispose of packaging com-
ponents (bands, cardboard, polysty-
rene, polythene bags, etc.) as report-
ed below and in accordance with the
standards of the
di seguito ed in ot-
temperanza alle norme del Country
of use.
PACKING
This product complied with Directive 2012/19/UE.
The crossed out wheeled bin symbol on equipment indicates that it must be treated separately
from household waste at the end of its working life and therefore taken to a recycling facility for
electrical and electronic equipment or handed over to the reseller when purchasing new equipment
of the same type.
The user is responsible for consigning the equipment to appropriate collection facilities at the end
of its working life or face the penalties provided for by current waste management legislation.
Separate collection for subsequent delivery of waste equipment to environmentally-compatible
recycling, treatment and disposal facilities to prevent possible negative impacts on the environment
and human health whilst encouraging recycling of the product’s components.
For further information regarding the available collection facilities, please contact your local refuse
collection service or the shop in which the purchase was made.
Manufacturers and/or importers fulfil their obligations concerning environmentally-compatible
recycling, treatment and disposal either directly or by joining a collective scheme.
GUIDE TO THE TREATMENT OF WASTE EQUIPMENT
(gura 2).
☞
that the packaging is fully intact; if this is
- dents to the frame or guards;
or broken;
- missing items or other problems;
13
MADE IN ITALY
F 195 - S 220 - F250 ES
S 220 AF - F 250 E - F 250 I - F 275 E - F 275 I - F 275 IL
F 300 R - F 300 E - F 300 EL - F 300 CL - F 300 I - F 330 I - F 350 I - F 370 I
Istruzioni per l’uso e la manutenzione
Affettatrici a Gravità CE Professionali
IT
Fig. 1
EN
The packing components (
bands
,
card-
board
,
polystyrene
, etc.) are products
assimilable to the urban solid refusals.
NAMEPLATES - CONFORMITY MARKINGS
The device described in this manual is
produced in accordance with the directives
in force, as amended. All component parts
are adapted to the requirements of the
Directive and the CE mark testifiying the
compliance.
The plate with the identification of the
manufacturer, the technical machine and
the CE marking is located on the base of
the slicer
(gura 2).
DO NOT DUMP PACKAGING!
DISPOSE OF WASTE
RESPONSIBLY!
☞
The plate must never be re-
moved and must always be
legible.
In case of wear or dama-
ge the user is required to
replace it.
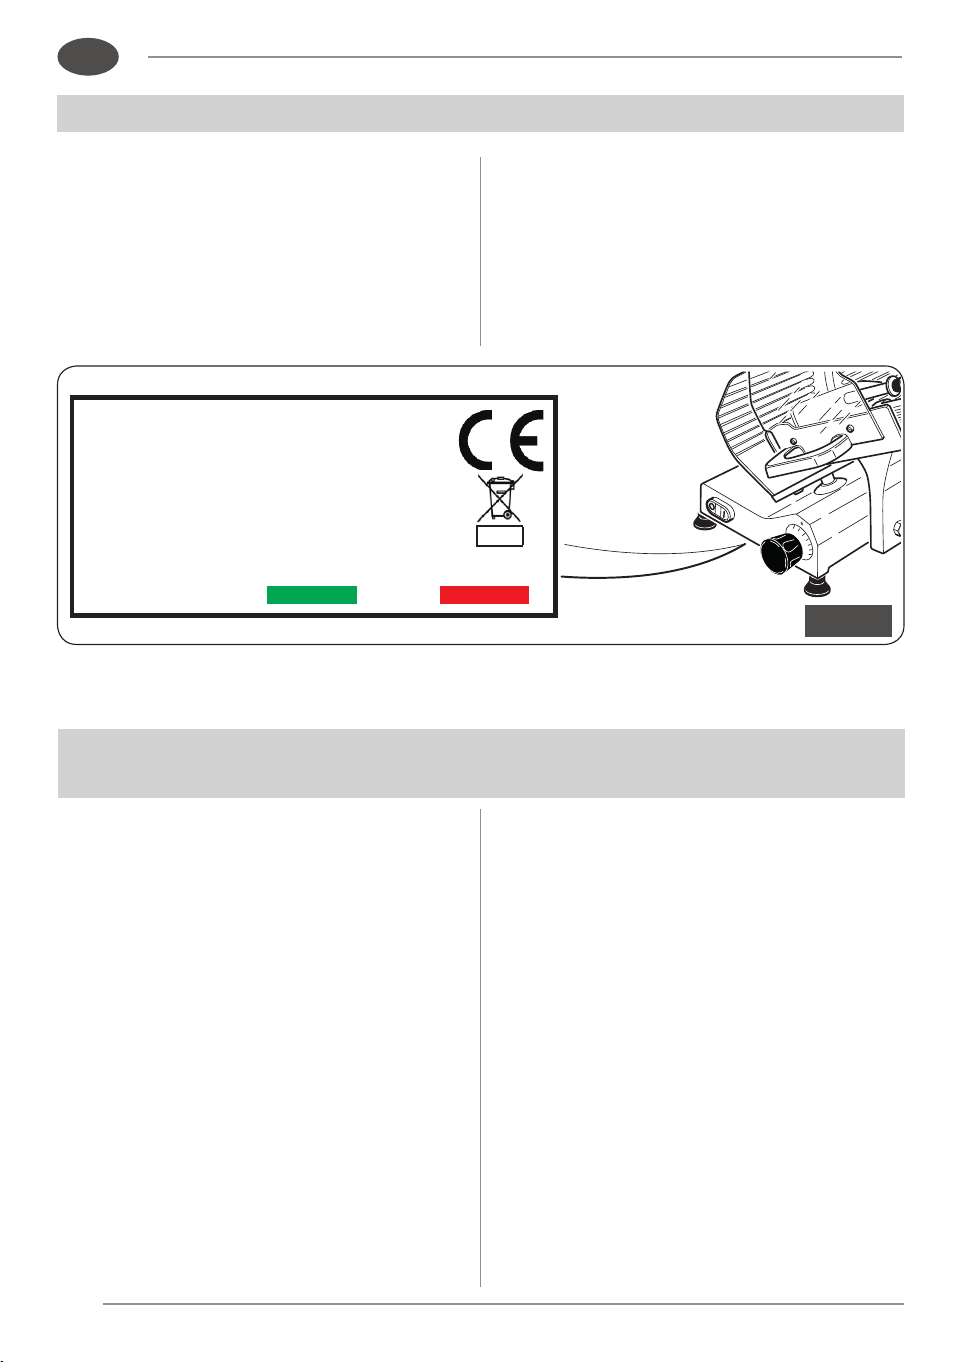
14
TYPE
N. /ANNO
KW. V- Hz.
CE USO PROFESSIONALE
M A D E IN I T A L Y
IPX1
Fig. 2
EN
TECHNICAL DESCRIPTION
AND INTENDED USE
Unless otherwise dened at the
moment of order, the machines are
supplied together with the following:
SUPPLIED ACCESSORIES
• EU conformity declaration;
• instructions manual for installation,
use and maintenance;
• oiler.
2.1 - General description
The slicer is mainly constituted by a
footing which supports a circular blade,
driven by an electric motor, which has the
function of slicing food products and by a
carriage sliding on rails which on its turn
supports a carriage plate, parallel to the
blade
.
The slice thickness is adjustable thanks
to a gauge plate placed before the
blade; This plate, against which rests
the product to be cut, can be moved
transversely with respect to the blade by
a value corresponding to the desired slice
thickness.
The product is fed to the machine
(towards the gauge plate) by weight
(gravity).
All components of the machine are made
of aluminum alloy polished and anodically
oxidized, stainless steel and plastic
material for food use.

Unless otherwise dened at the • EU conformity declaration;
use and maintenance;
blade; This plate, against which rests
15
EN
The cutting blade is driven by an electric
motor and the motion transmission is
obtained with a longitudinally grooved belt.
Start and stop are performed with a button
provided with auxiliary circuit preventing
accidental restarts after an outage
.
The machine incorporates (in some
versions) a sharpener built for ease of use
and safety.
2
.2 -
Environmental conditions of
the machine use
• Temperature ..from -5 °C to + 40 °C
• Relative humidity max 95%
2
.3 -
Slicer correct use
The slicer is only designed to slice food of
the type and within the dimensional limits
indicated in this instruction manuals
.
2.3.a - Intended use
(sliceable products)
The following products may be sliced:
• All types of cold cuts (raw and cooked
ham, bacon).
• Boneless meat (cooked or raw at a
temperature of not less than +3°C).
• Bread and cheese (obviously the
sliceable type such as Gruyère,
Fontina, etc.).
2.3.b - Unexpected or improper use
(NOT sliceable products)
The following products CANNOT be sliced
as they are liable to cause serious harm to
the user and/or slicer itself:
• Frozen food.
• Deep-frozen food.
• Food with bones (meat and fish).
• Any other type of product specifically
excluded product is sliceable but not
intended to be eaten.
16
EN
ELECTRICAL AND MECHANICAL SAFETY DEVICES
The mechanical safety devices taken
are the following:
• A series of aluminium and
transparent plastic guards on the
product carriage.
The electrical safety devices taken
are the following:
• Start/stop button that requires the
machine voluntary restart in case
of an outage or interruption of the
power supply.
• Start up and stop are performed with
the button connected to a control
auxiliary network that prevents
accidental start ups of the appliance
after a possible electrical power cut.
Do not tamper, remove
nor bypass, under no
circumstances, the
safety devices installed
on the equipment.
3
.1 -
Residual risks
During slicer use, cleaning and maintenance operations,
notwithstanding all the possible cautions taken during the design
and the construction of the machine, residual risks (cutting) still
exist during use or during cleaning or maintenance. Therefore be
careful and PAY THE UTMOST ATTENTION to what you are doing.
DO NOT use the machine if you are not in perfect psychological
and physical conditions.
DO NOT ALLOW anyone near the machine when it is in use.
ALWAYS wear gloves that can resist cuts or tears when cleaning,
lubricating or sharpening the blade.
.
Intermittent service
• ONLY for “F 195” version)
5 min. pause every 15/20 min. of work.
• All the other machines have a ventilated motor.
Supply voltage: Please see data plate on the machine base.
17
S 220 AF
F 250 E
F 250 I
F 195
S 220
F 250 ES
A
C
B
D
E
EN
MAIN TECHNICAL DATA
Version F 195 S 220 F 250 ES S 220 AF F 250 E F 250 I
Motor HP 0,20 0,25 0,30 0,25 0,30 0,35
Blade ø mm
195 220 250 220 250 250
Rpm 300 300 300 300 300 300
Slice thickness
mm
0/15 0/15 0/16 0/15 0/16 0/16
Cut
L x H mm
140 x 140 190 x 160 220 x 190 190 x 160 220 x 190 220 x 190
A mm 255 280 290 280 290 340
B mm 345 415 440 415 440 465
C mm 360 405 425 405 425 480
D mm 520 580 620 580 620 630
E mm 315 340 370 340 370 440
Weight Kg 10 13,5 15,5 13,5 15,5 21
Sharpener
not built-in not built-in not built-in not built-in not built-in not built-in
Immovable cap
nut
standard standard standard standard standard standard
Tray blocker not
included
on
request
on
request
on
request
on
request
on
request
SPACE REQUIREMENT
18
A
C
B
D
E
F 275 E
F 275 I
F 275 IL
F 300 R
F 300 E
F 300 EL
EN
MAIN TECHNICAL DATA
SPACE REQUIREMENT
Version F 275 E F 275I F 275 IL F 300 R F 300 E F 300 EL
Motor HP 0,30 0,35 0,35 0,33 0,35 0,35
Blade ø mm
275 275 275 300 300
100 CR6
300
100 CR6
Rpm 300 300 300 300 300 300
Slice thickness
mm
0/16 0/16 0/16 0/16 0/16 0/16
Cut
L x H mm
220 x 220 210 x 210 230 x 215 220 x 210 220 x 220 260 x 230
A mm 290 340 340 290 340 340
B mm 440 465 490 440 465 490
C mm 440 495 500 485 495 500
D mm 620 640 760 650 650 760
E mm 390 440 510 440 440 510
Weight Kg 16,5 22 22 19 23 25
Sharpener built-in built-in built-in built-in built-in built-in
Immovable cap
nut
standard standard standard standard standard standard
Tray blocker
on request on request on request on request on request on request
19
A
C
B
D
E
F 300 CL
F 300 I
F 330 I
F 350 I
F 370 I
EN
MAIN TECHNICAL DATA
SPACE REQUIREMENT
Version F 300 CL F 300 I F 330 I F 350 I F 370 I
Motor HP 0,35 0,50 0,50 0,50 0,50
Blade ø mm
300
100 CR6
300
100 CR6
330
100 CR6
350
100 CR6
370
100 CR6
Rpm 300 280 280 260 260
Slice thickness
mm
0/16 0/16 0/16 0/16 0/16
Cut
L x H mm
300 x 220 260 x 220 260 x 235 310 x 260 300 x 275
A mm 350 410 410 415 415
B mm 570 530 530 580 580
C mm 560 540 550 585 585
D mm 870 770 770 890 890
E mm 500 465 465 480 480
Weight Kg 27,5 30 32 36 37
Sharpener built-in built-in built-in built-in built-in
Immovable cap
nut
standard not
included
not
included
not
included
not
included
Tray blocker
on request
standard standard standard standard
20
F 195
S 220
F 250 ES
Fig. 3
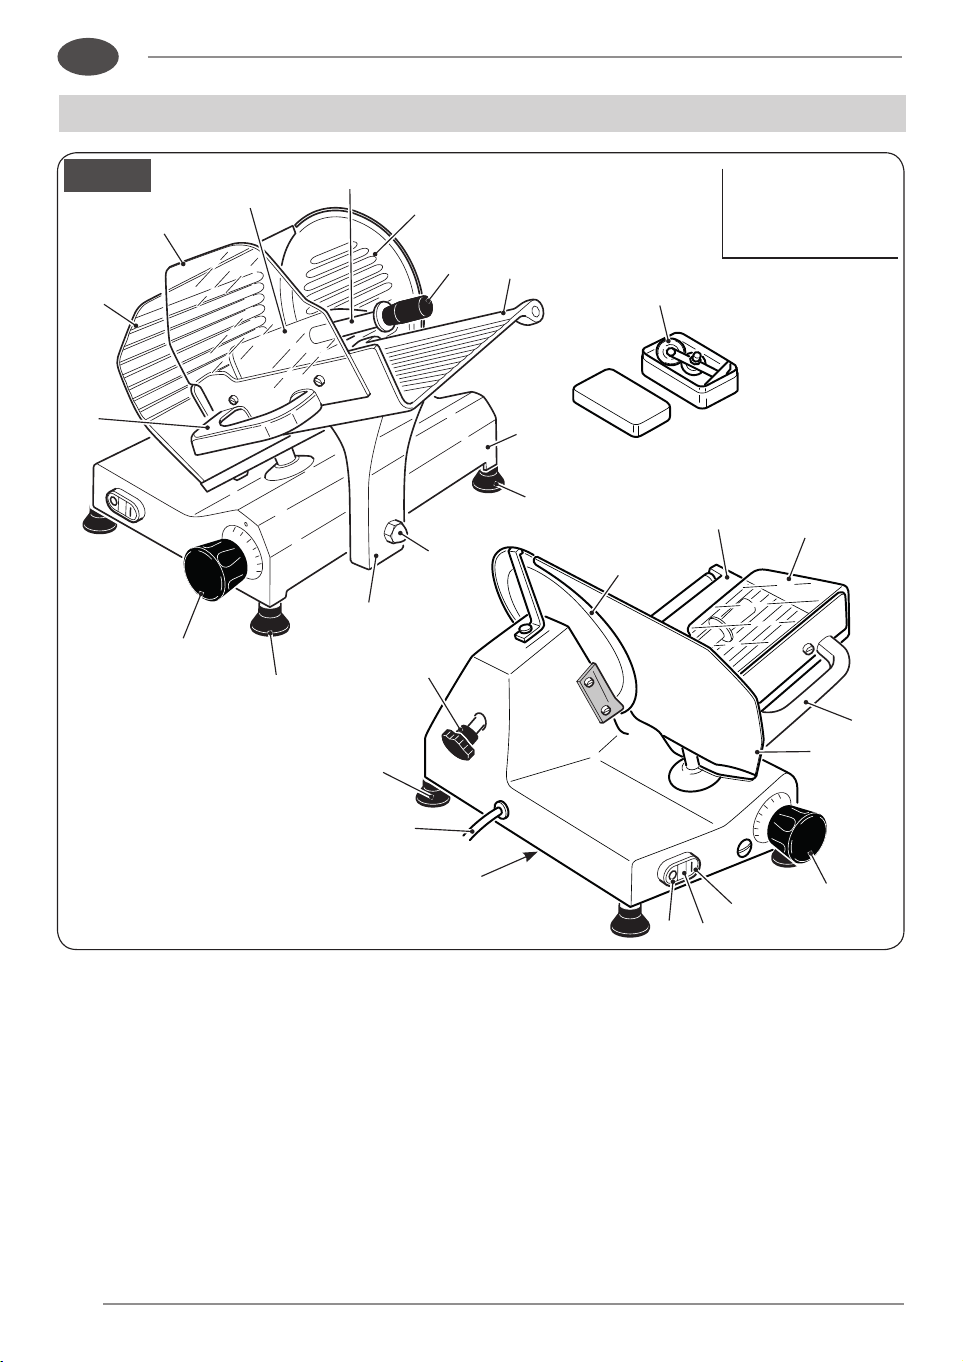
EN
MAIN COMPONENTS
1.
Startup button
(white or green)
2. Stop button (black or red)
3. Machine running warning light
4. Slice thickness control knob
5. Adjustable foot
6. Carriage tray support
6a. Immovable cap nut
(x)
7. Base
8. Product tray
9. Blade plate
10. Product grip
11. Blade
12. Product grip handle
13. Manufacturer identification plate,
machine data and UE marks
14. Pusher plate extension
15. Product tray hand protection
16. Product tray handle
17. Blade plate tie-rod
18. Supply cord
19. Gauge plate
20. Sharpener
11
6
16
16
12
6a
17
7
18
4
4
14
8
8
19
19
5
5
5
15
15
9
10
20
13
1
2
3
21
S 220 AF
(x) (z)
F 250 E
(x) (z)
F 250 I
(x) (z)
F 275 E
(x) (z)
F 275 I
(x) (z)
F 275 IL
(x) (z)
F 300 R
(x) (z)
F 300 E
(x) (z)
F 300 EL
(x) (z)
F 300 CL
(x) (z)
F 300 I
(y)
F 330 I
(y)
F 350 I
(y)
F 370 I
(y)
Fig. 4
(x)
(y) (z)
EN
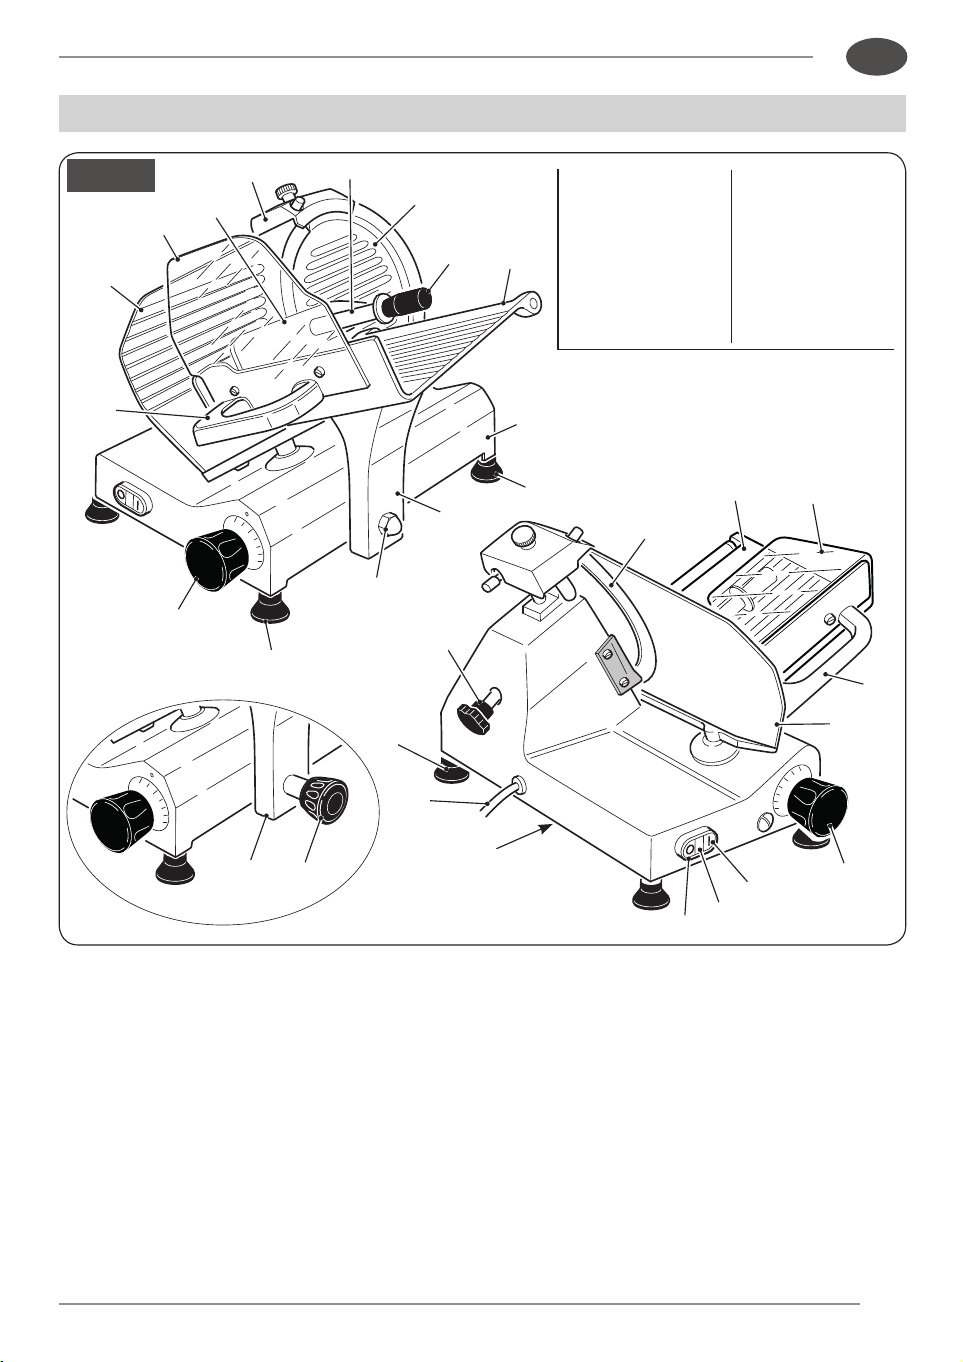
MAIN COMPONENTS
1.
Startup button
(white or green)
2. Stop button (black or red)
3. Machine running warning light
4. Slice thickness control knob
5. Adjustable foot
6. Carriage tray support
6a. Immovable cap nut
(x)
6b. Knob
(y) (z)
7. Base
8. Product tray
9. Blade plate
10. Product grip
11. Blade
12. Product grip handle
13. Manufacturer identification plate,
machine data and UE marks
14. Pusher plate extension
15. Product tray hand protection
16. Product tray handle
17. Blade plate tie-rod
18. Supply cord
19. Gauge plate
20. Sharpener
(x) (y)
standard /
(z)
on request
11
6
16
16
12
6a
17
7
4
4
14
8
8
19
19
5
5
15
9
10
20
18
5
13
1
2
3
6
6b
15

22
EN
4
.1 - Installation
Place the slicer on a well leveled, smooth,
dry and stable plane ,suitable to support
its weight.
4
.2 -
Electric connection
Install the slicer in the immediate vicinity
of an outlet to CE standards derived from
a system that complies with applicable
regulations.
It is the user’s responsibility to verify
the suitability and proper functioning of
the electrical system (supply line, outlet,
distribution panel, differential thermal
magnetic circuit breaker protection, system
grounding).
Before executing the connection
check that the characterisitcs of the
power supply network correspond to
those indicated on the nameplate of the
slicer.
4
.3 -
Control of operation and blade
rotation direction
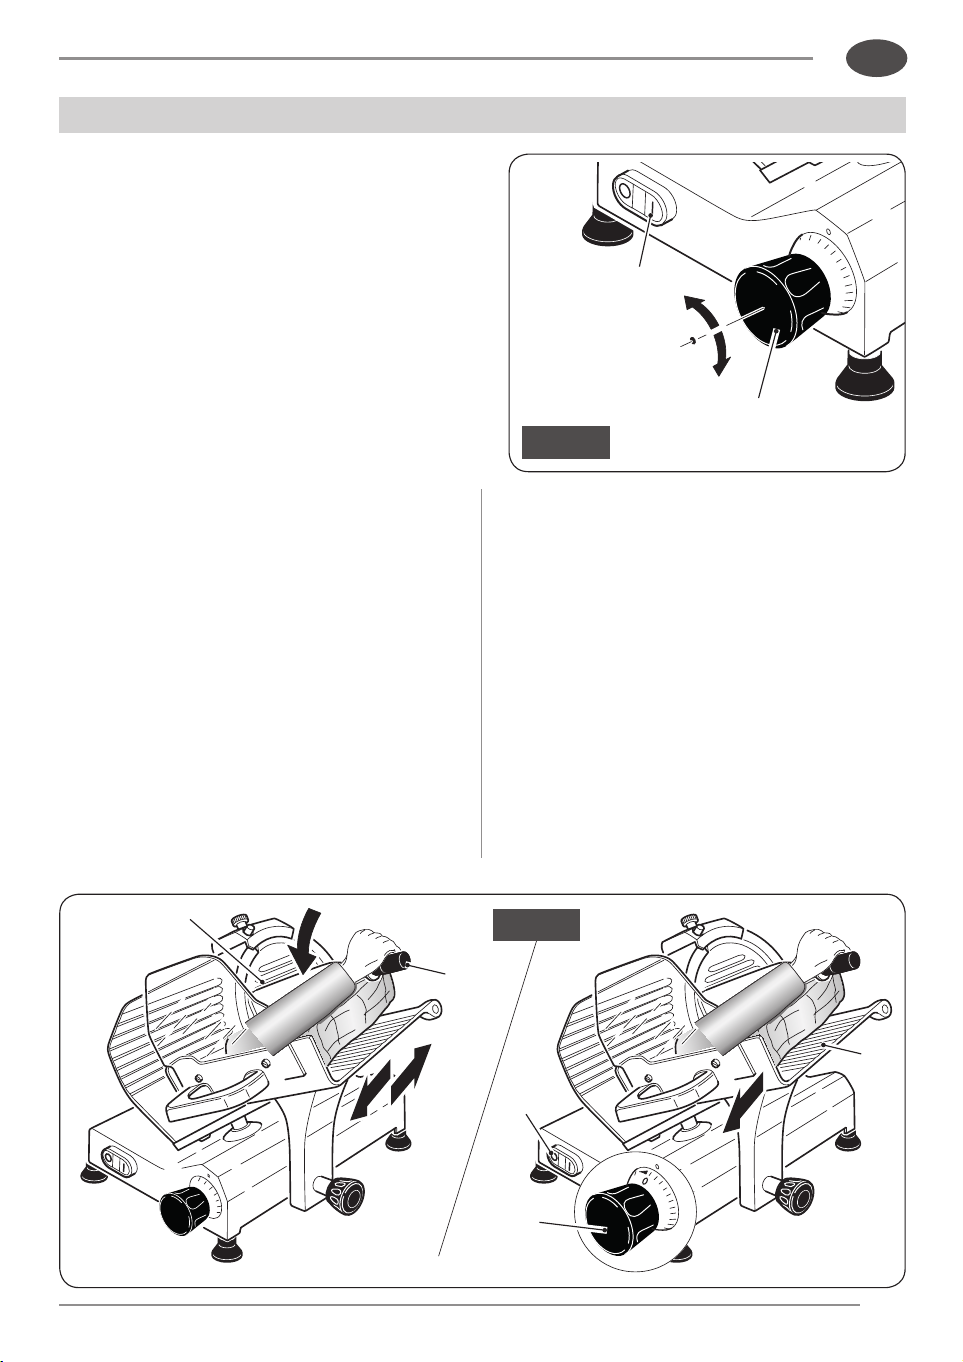
• Press the button “I” (1) to start the
machine and verify whether the
warning light is on (3).
INSTALLATION AND PRELIMINARY CHECKS
• Check that the blade (11) rotates in
the direction indicated by the arrow
(counterclockwise looking at the
machine from the blade plate side).
• For slicers with three-phase supply:
if the blade (11) rotates in the
opposite direction, immediatly stop
the machine pressing the button
“0” (2) and require the intervention
of qualied personnel to reverse
the power cords inside the plug.
•
Check the smoothness of the product
tray (8) and of the product pusher
(10)
.
•
Check the operation and adjustment
of the graduated knob (6) and the
gauge plate
(19).
• Press the white and green button (1) to start the blade;
• If the warning light turns on (3) indicates that the machine works correctly;
Regulation eld:
☞
of qualied personnel to reverse
23
1
2
3
4
5
1
2
3
4
5
Fig. 5
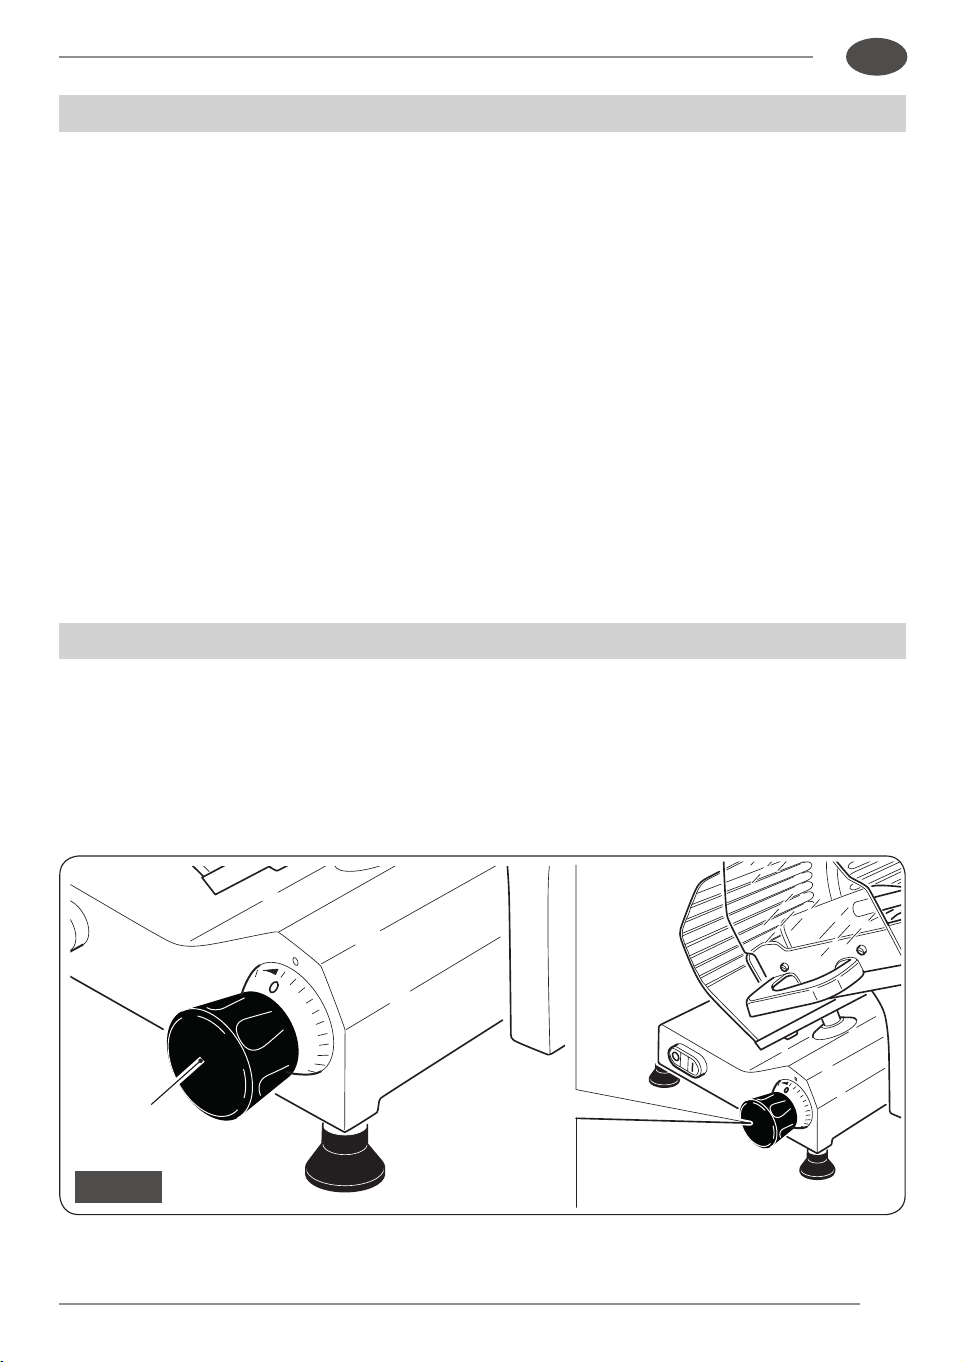
EN
COMMANDS DESCRIPTION
USING THE MACHINE
5
.1 -
Start and stop button
• Press the white and green button (1) to start the blade;
• If the warning light turns on (3) indicates that the machine works correctly;
• Press the black or red button (2) to stop the blade movement.
The thickness of the slices is adjustable rotating the knob (4), with graduated scale,
anticlockwise.
Regulation eld: see the “Technical description and intended use conditions”.
6
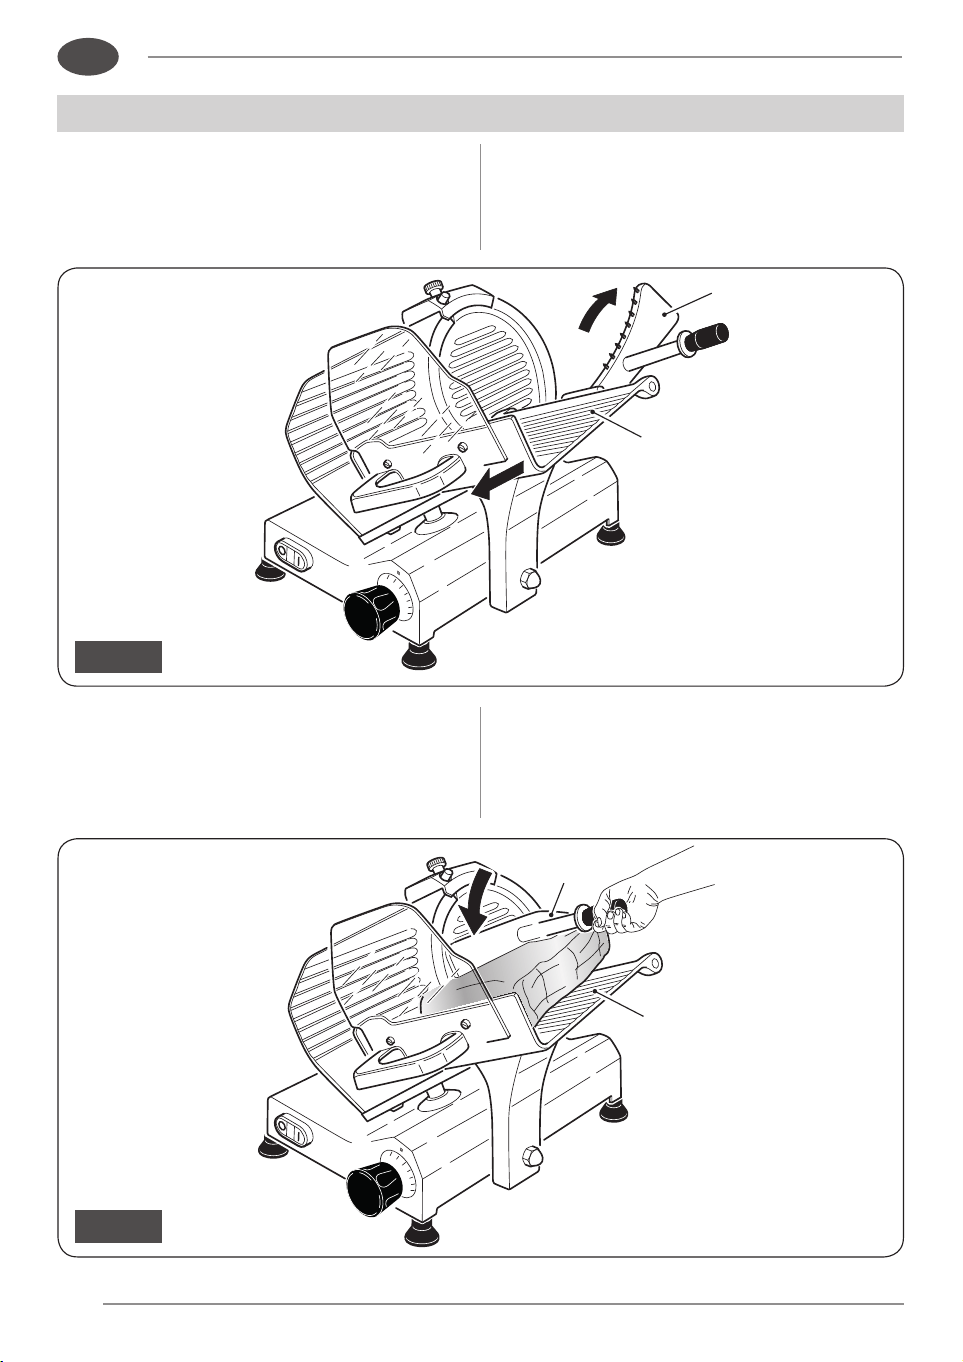
.1 -
Loading the product on the tray and slicing
☞
Check that the slice thickness regulation knob (4) is correctly placed
on ‘0’;
4
24
Fig. 6
Fig. 7
EN
•
Draw back the carriage completely
(8) (towards the operator) to loading
position.
USING THE MACHINE
• Lift the product grip (10) by pulling it
away by 10 cm from the blade and
put it in rest position;
• Lay the product to be sliced on the
carriage (8) against the wall on the
operator side;
• Secure by means of the product grip
(10) by exerting a slight pressure;
8
10
8
10
white or green button (1);
• Grip the handle (12) afxed on the
plate by weight (gravity);
(10);
☞
When nished, return the
put it in rest position;
operator side;
(10) by exerting a slight pressure;
25
4
5
6
7
8
3
2
Fig. 8
1
2
3
4
5
Fig. 9
EN
USING THE MACHINE
• Adjust the slice thickness with the
knob (4).
Start the blade by pressng on the
white or green button (1);
• Grip the handle (12) afxed on the
plate and start the forwward and
backward cutting movement. The
product travels towards the gauge
plate by weight (gravity);
•
When the product weight or its
dimensions do not provide a
satisfactory cut by effect of the
gravity use the product grip handle
(10);
☞
When nished, return the
thickness control knob (4)
to ‘0’ and draw the carriage
back (8);
• Stop the blade by pressing the black
or red button (2).
12
10
2
4
8
1
4
(17);
(17) to move it;
special lateral knobs (23);
with knurled head (24);
• Remove the deector (25).
26
4
5
6
7
8
3
2
EN
SLICER CLEANING
The machines have to be carefully cleaned at least once a day; if it is
necessary more frequently. After a shorter or longer period of inactivity
clean the slicer before use.
WARNING: Cutting hazard!
Use protective cut- and tear-resistant gloves and perform
all operations with extreme care.
PAY ATTENTION AT ALL TIMES!
7
.1 -
Disassembling the machine for cleaning
•
Disconnect the plug from the mains power supply.
;
Take to ‘0’ the adjustment knob of the gauge plate (4);
☞
•
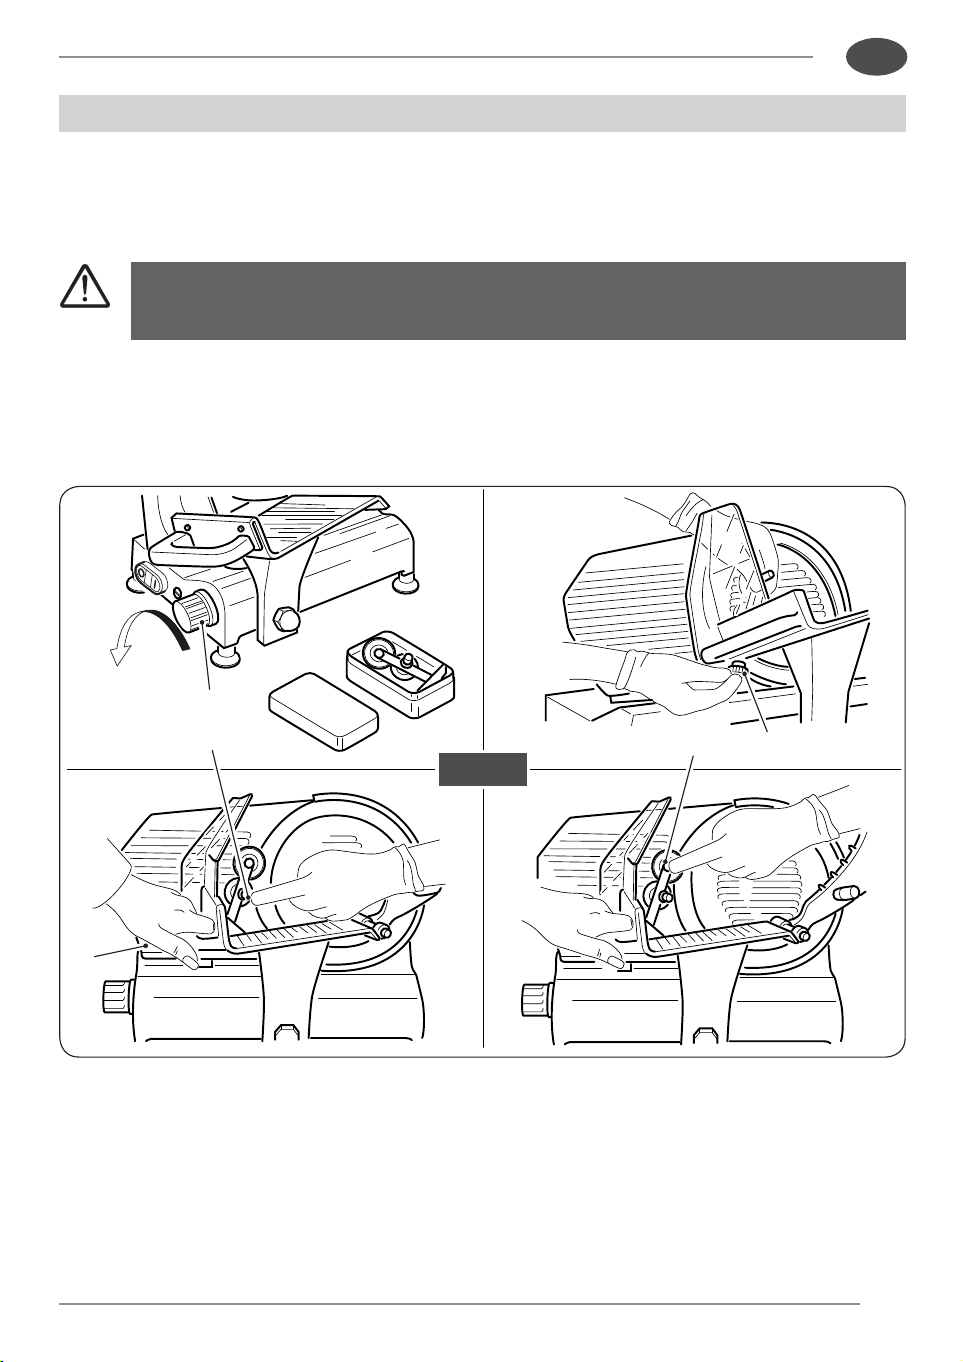
Remove the various components as described in the following paragraphs
;
4
27
EN
SLICER CLEANING
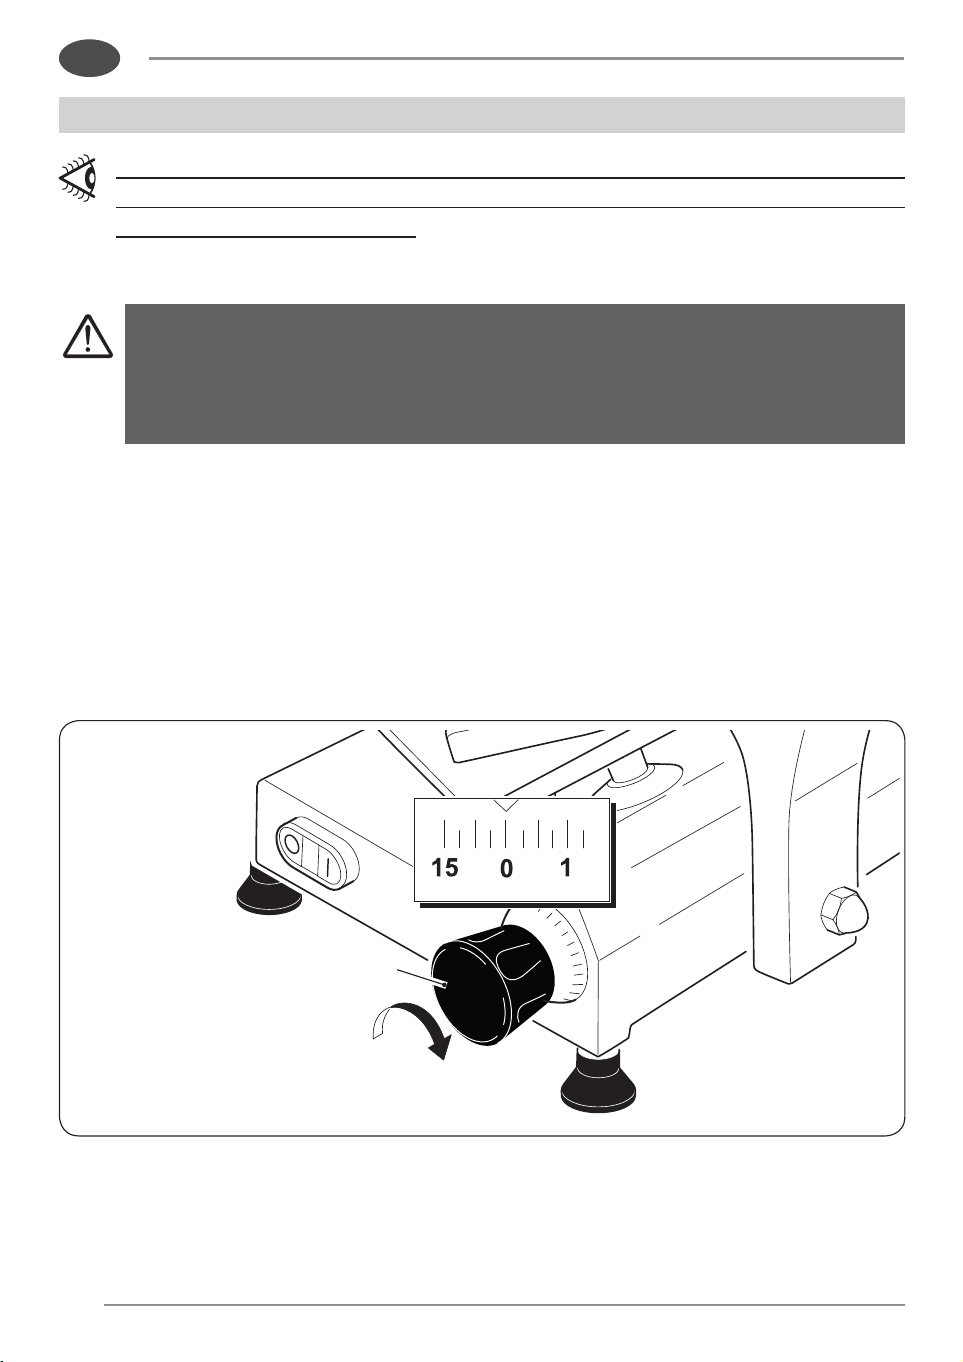
• Fully unscrew
(counterclockwise
rotation) the blade guard locking tie
rod
(17);
•
If the blade guard (9) is blocked, press
on the rod knob
(17) to move it;
• Remove the tie rod (17) and remove
the blade guard (9) using only the
special lateral knobs (23);
• Loosen and remove the two screws
with knurled head (24);
• Remove the deector (25).
24
24
25
23
23
11
9
17
;
☞
;
28
Fig. 13
EN
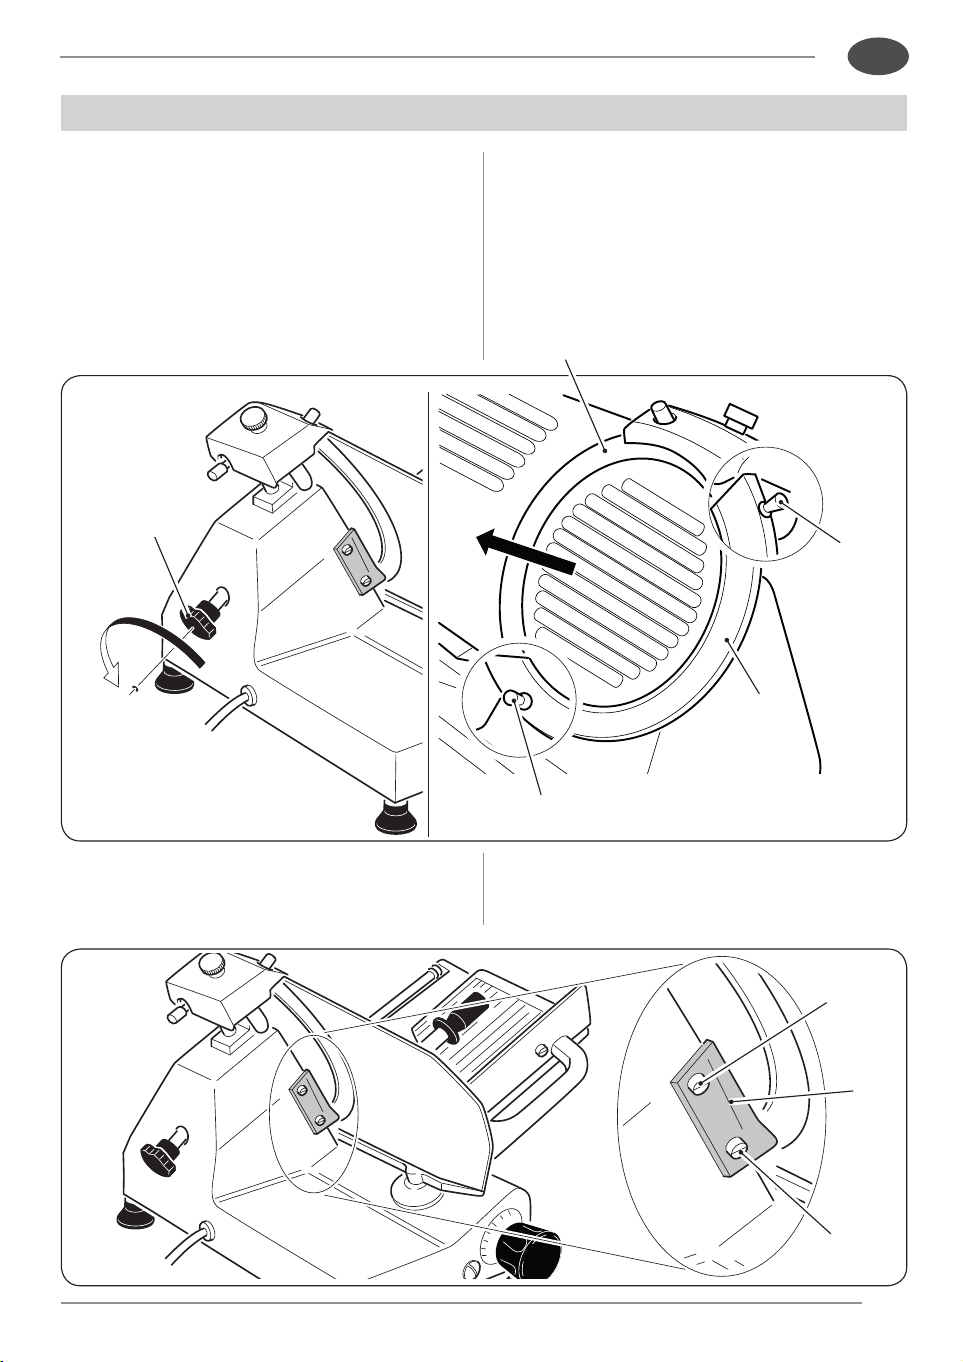
• Loosen the knob (20a) and remove
the sharpener (20).
SLICER CLEANING
• Take the sharpener (20) from the
knob (20b) and remove it by lifting it.
For the machine’s body and blade cleaning use only a cloth
dampened in water or alcohol and a biodegradable frothy
dishwasher cleanser at pH 7-8, at a temperature at least of
+30°C.
Do not clean the machine ...
... with water or vapor jets or similar methods.
... with corrosive cleansers.
... in the dishwasher.
20
20a
20b
29
Fig. 14
EN
SLICER CLEANING
7
.2 -
Base cleaning
After removing all the components as
described in the previous pages:
• Clean all the disassembled parts
and the machine’s body usimg only
hot water (at a temperature at least
of 30°C) and biodegradable frothy
dishwasher (at pH 7-8).
• Use a soft cloth, spongy and
possibly a nylon brush for the sharp
zones of the product tray (8) and of
the product grip(10).
• Rinse only with hot water and dry
with soft and spongy cloths.
DO NOT clean the machine with water jets, with vapor, similar
methods, with corrosive cleaners in the dishwasher.
7
.3 -
Cleaning the blade
• Press a damp cloth on the blade (11)
and rub slowly moving from inside
to out (towards the safety ring “S” and
towards the gauge plate “19”).
ALWAYS clean the
knife (11) with safety
ring (S) fitted and the
gauge plate (19) close
to the blade in the safety
position.
11
19
S
30
1
2
3
4
5
1
2
3
4
5
Fig. 16
Fig. 15
EN
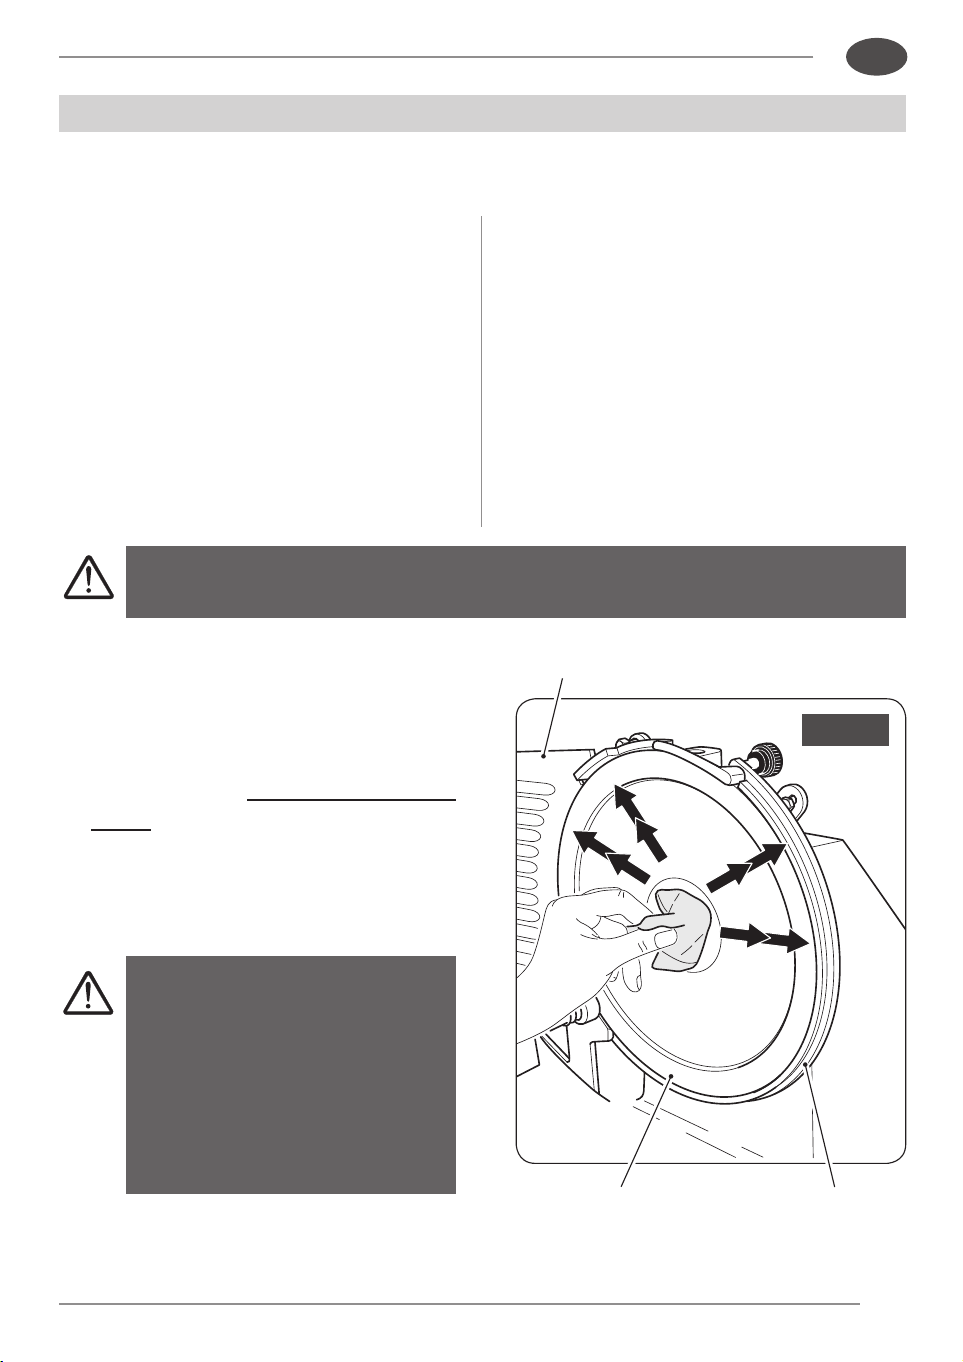
7.4 - Safety ring cleaning
•
Damp a cloth in a solution of water and
alcohol.
• Place the damp cloth between the
safety ring (S) and blade (11)
• Take the two ends of the cloth between
your hands and slide it along the safety
ring (S).
☞
Do not use detergents to
clean the blade (11).
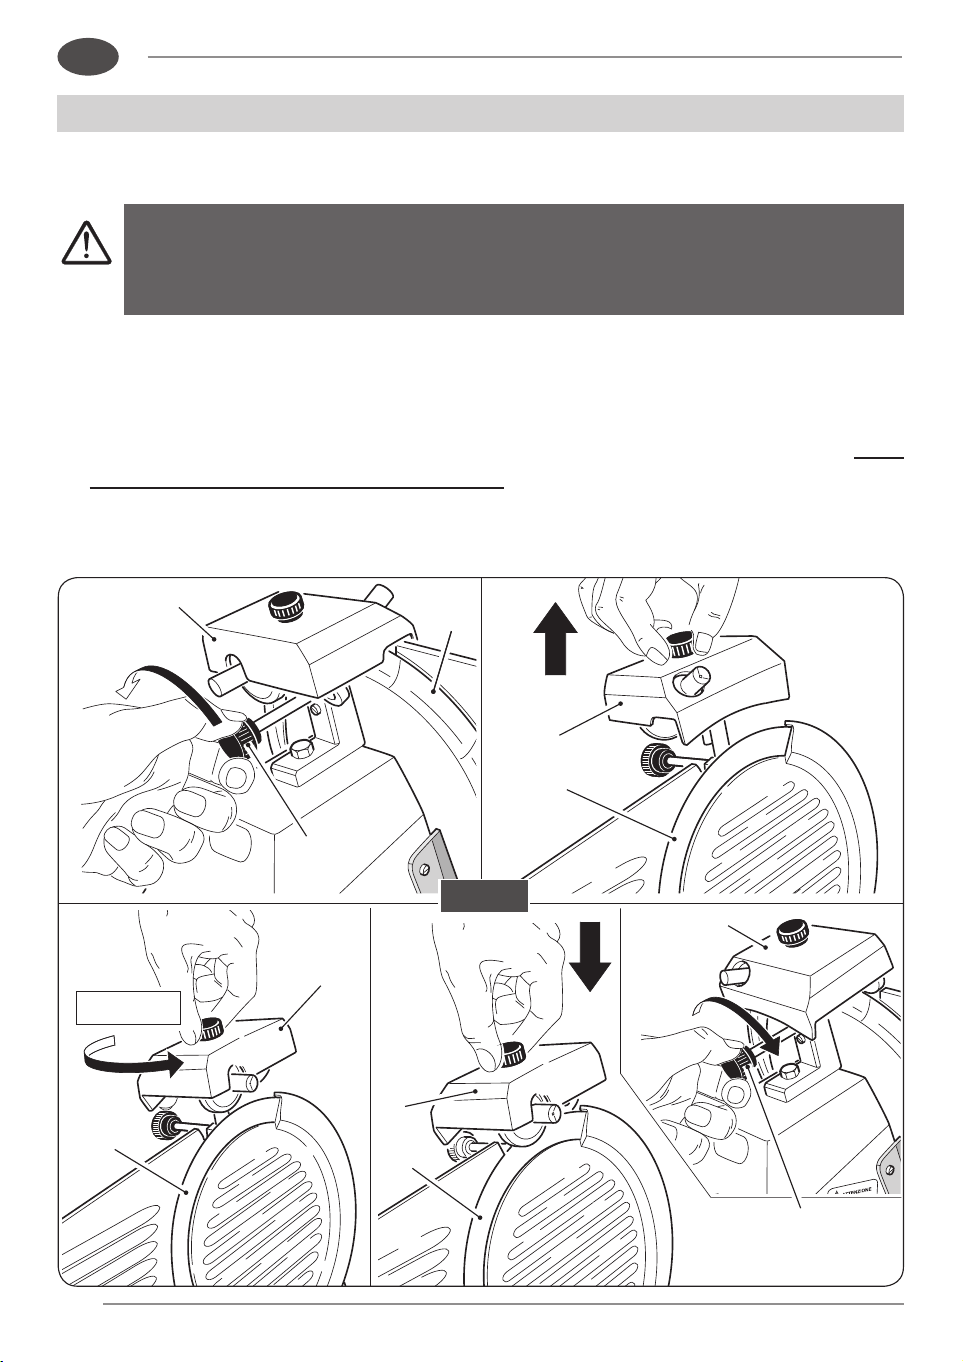
7.5 - Removing the product tray with tray blocker system
(in the versions where it’s provided)
To remove the product tray (8), work as follows:
• Rotate on “0” the graduated knob (4).
SLICER CLEANING
11 S
4
☞
31
Fig. 17
EN
SLICER CLEANING
• Bring the tray next to the graduated
knob.
• Completely unscrew the knob (6b).
• Strongly pull the tray towards the
operator until you hear the coupling
“click” safety pivot. In this position the
gauge plate (19) and the product tray
(8) cannot be moved.
8
19
6b
32
Fig. 18
EN
SLICER CLEANING
• Lift the tray (8) and remove it
(Figure 18).
☞
The product tray (8) is
particularly heavy, work
carefully, possibly with
two operators.
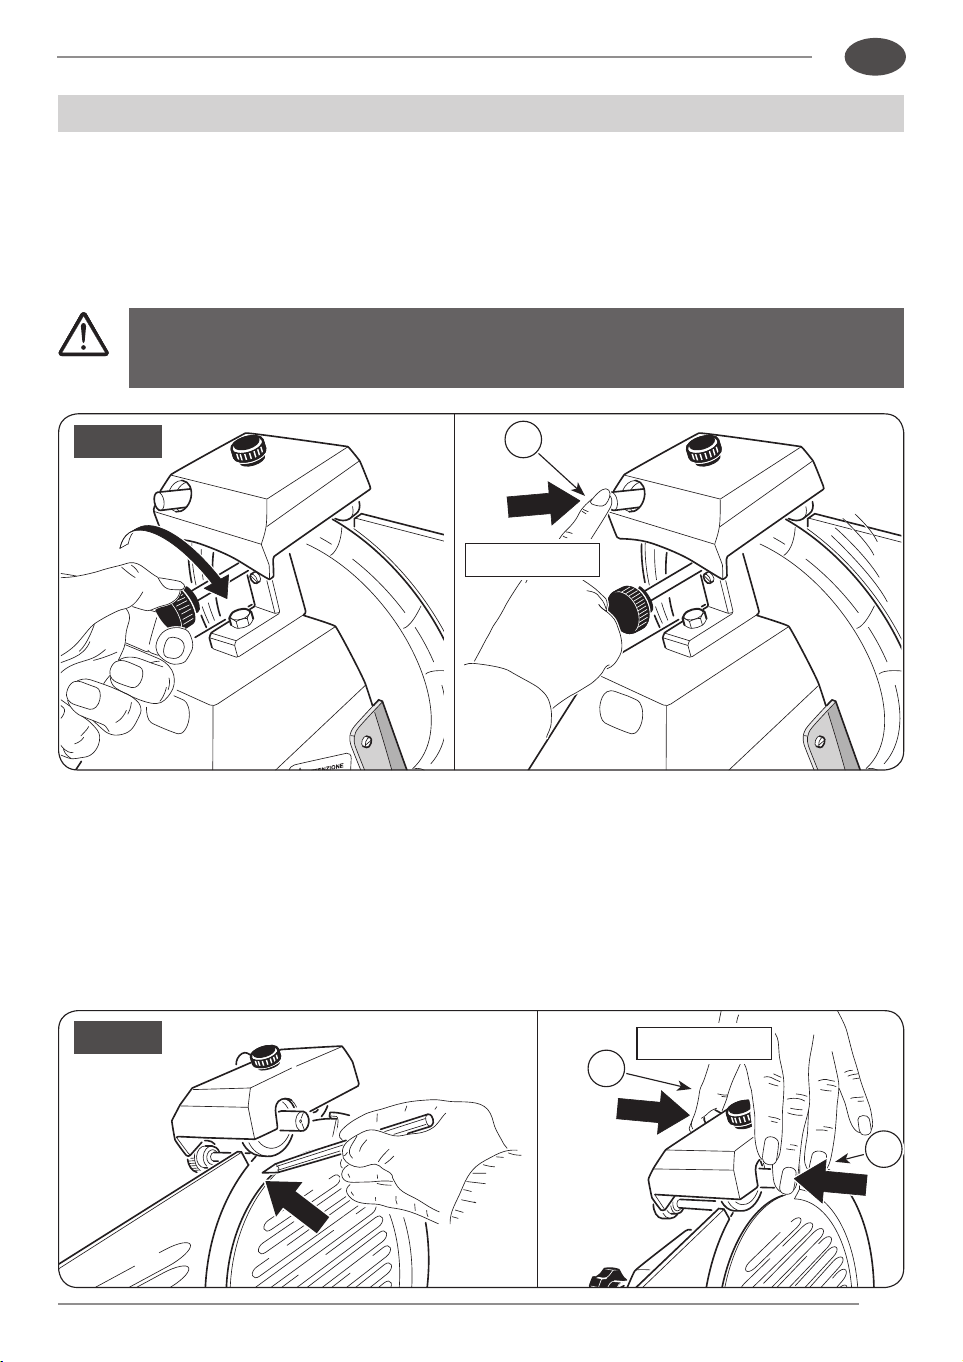
7.6 - Machine reassembling
Proceed in the opposite direction to what indicated in the previous operations.
To reassemble it:
• Correctly reposition the tray (8) on
the tray support (6).
• Tighten the knob (6b) until you free
the tray (8).
7.7 - Store the slicer
• When you nish using it, after carefully
have cleaned all the components (as
described in the previous sections)
be sure to bring the graduated knob
back to “0”.
• Is advised to cover the slicer with a
towel to protect it from dust.
If it is not intended to use the slicer
for some days, store it in a sepaired
and dry place.
6b
8
6
equipment use; working times and processed material type).
and, if it’s not specically necessary another position,

☞
• When you nish using it, after carefully
33
EN
MAINTENANCE
8
.1 -
Generalities
In addition to the above-mentioned cleaning operations, you should also perform routine
maintenance in order to guarantee the slicer’s operating efficiency over time.
The operator may perform the following maintenance operations:
• Blade sharpening: periodically (periodicity and duration depend obviously on the
equipment use; working times and processed material type).
• Lubrication of carriage sliding guides: weekly.
• Lubrication of product grip sliding bar: weekly.
• Visual check of the power cord and of the gland on the machine’s base
conditions: periodically.
The maintenance operations must be performed always
after disconnecting the machine from the power network
and, if it’s not specically necessary another position,
with the slice thickness regulation knob on ‘0’.
The maintenance operations to be entrusted to personnel authorized
by the manufacturer are the following:
• Blade replacement;
• Sharpener’s emery-wheelss replacement;
• Motor belt tension regulation;
• Motor transmission belt replacement;
• Underbase wiring’s components replacement;
• Structural parts repair, underbase components repair.

34
EN
MAINTENANCE
EXECUTION OF THE SHARPENING
8
.2 -
Blade sharpening
Accurately clean the machine as indicated in the previous paragraphs before
proceeding in the operations.
Sharpening can be performed up to a reduction of 12
mm of the blade’s diameter nominal. Over that value
IS MANDATORY TO CHANGE THE BLADE entrusting
the operation ONLY to personnel authorized by the
manufacturer.
1.
Carefully clean the blade with denatured
alcohol to degrease it
;
2.
Operate the graduated knob (4) by
turning it to the left to bring it to the
maximum opening
;
3.
Remove the sharpener from the bag
container provided
, unscrew
the
knurled knob of the sharpener and
insert the threaded metallic pin into
the hole
(4a) specially crafted on
the product carriage so that the two
emery-wheels v
are toward the blade
to be sharpened
helping the operation
by pressing the finger on the lower
9.1 - Versions equipped with sharpener to be applied
WARNING: Cutting hazard! Use protective cut- and tear-
resistant gloves and perform all operations with extreme care.
PAY ATTENTION AT ALL TIMES!
wheel button
(16a).
The lower wheel must remain inserted
for about half of its diameter between
the blade on which it rests, and the
regulatory plan
;
4.
Insert the plug in the socketand start
the blade
while holding the product tray
and the sharpener in the aforesaid
position, using the handle (16);
;
;
;
position, using the handle (16);
35
Fig. 19
EN
EXECUTION OF THE SHARPENING
5.
Allow the blade to rotate for about 30 to 40 seconds and then use the switch to stop
it checking with a slight shift (using a pencil) to the outside of the blade if the burr is
formed
.
We reccomend to perform this check very carefully as
the blade is very sharp.
Ascertained the formation of the burr, restart the blade and hold for 10 seconds the
wheel button (16b).
4a
16b
4
16a
16
36
180°
Fig. 20
EN
EXECUTION OF THE SHARPENING
9
.2 -
Versions with built-in sharpener
WARNING: Cutting hazard! Use protective cut- and tear-
resistant gloves and perform all operations with extreme care.
PAY ATTENTION AT ALL TIMES!
The blade sharpening should be performed periodically, as soon as you feel a decrease
in the ability of cutting blade
, it should follow the instructions below:
1. Carefully clean the blade (11) c
with denatured alcohol to degrease it after
disconnecting the plug from the socket;
2. Loosen the knob (20a), lift and rotate 180° the sharpener (20) and insert the wheels
on the slicer’s blade. Tighten the knob (20a);
20a
20a
20
20
11
20
20
20
11
11
11
3. Trigger the switch (1) and press the little button (x2);
pressing the little buttons at the same time (x2 and x3);
☞
on the slicer’s blade. Tighten the knob (20a);
37
Fig. 21
Fig. 22
30÷40 sec.
3÷4 sec.
EN
EXECUTION OF THE SHARPENING
3. Trigger the switch (1) and press the little button (x2);
4.
Allow the blade to rotate for about 30 to 40 seconds and then use the switch to stop
it checking with a slight shift (using a pencil) to the outside of the blade if the burr is
formed
.
We reccomend to perform this check very carefully as
the blade is very sharp.
5. Ascertained the formation of the burr, trigger the switch again (1) for 3/4 seconds
pressing the little buttons at the same time (x2 and x3);
☞
DO NOT PROLONG THIS OPERATION BEYOND THE FEW
ABOVEMENTIONED SECONDS TO PREVENT THAT THE
BLADE EDGE WILL TWIST.
x2
x3
x2
38
Fig. 23
EN
EXECUTION OF THE SHARPENING
LUBRICATION
6. After completing sharpening, we
advise cleaning the wheels using a
small brush soaked in alcohol;
7. After the sharpening operation return
the sharpener to its original position.
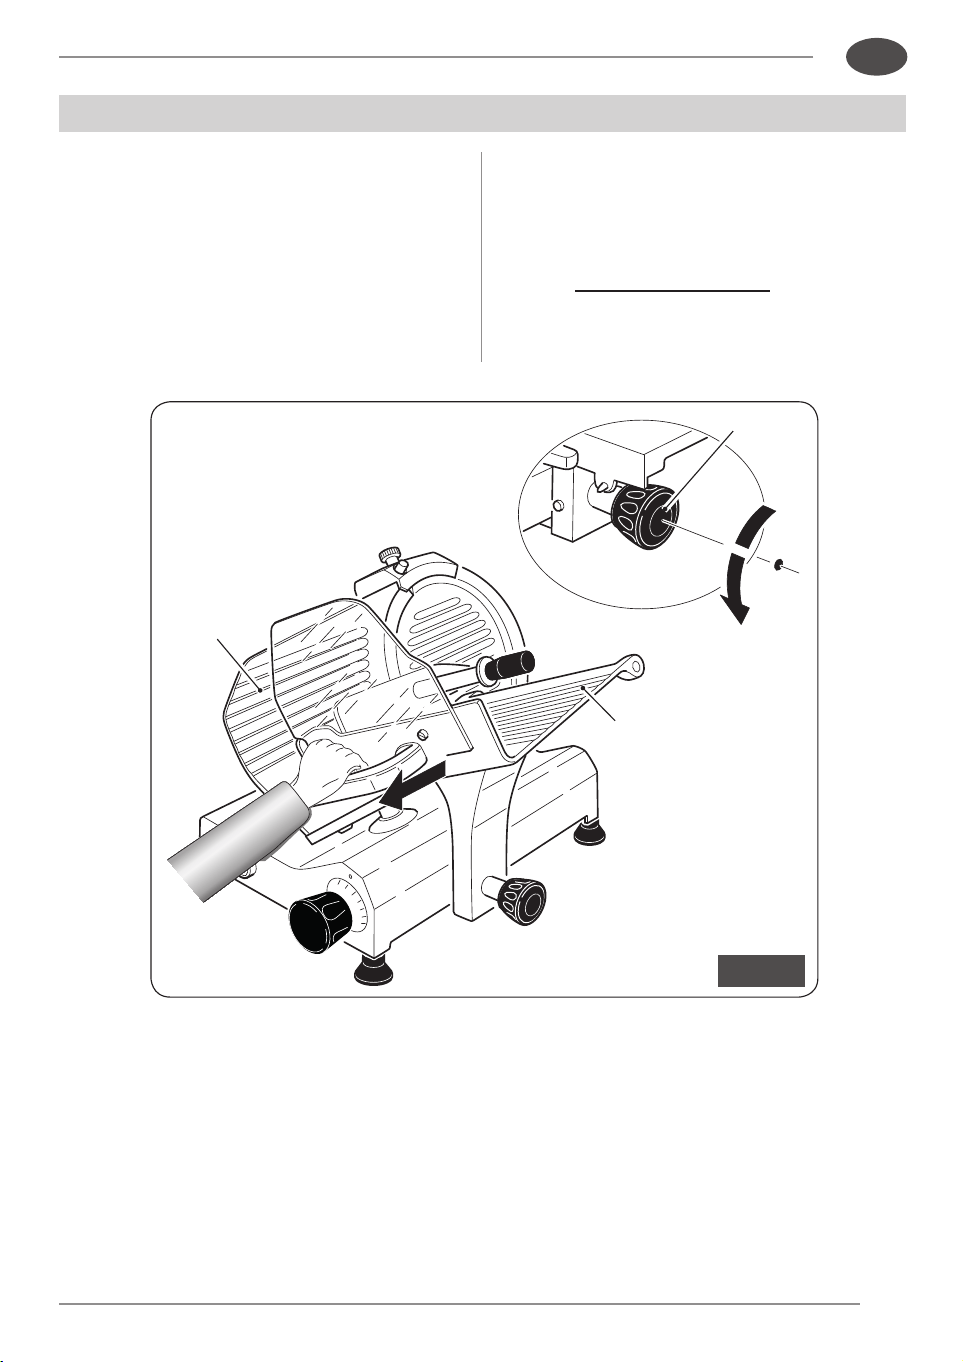
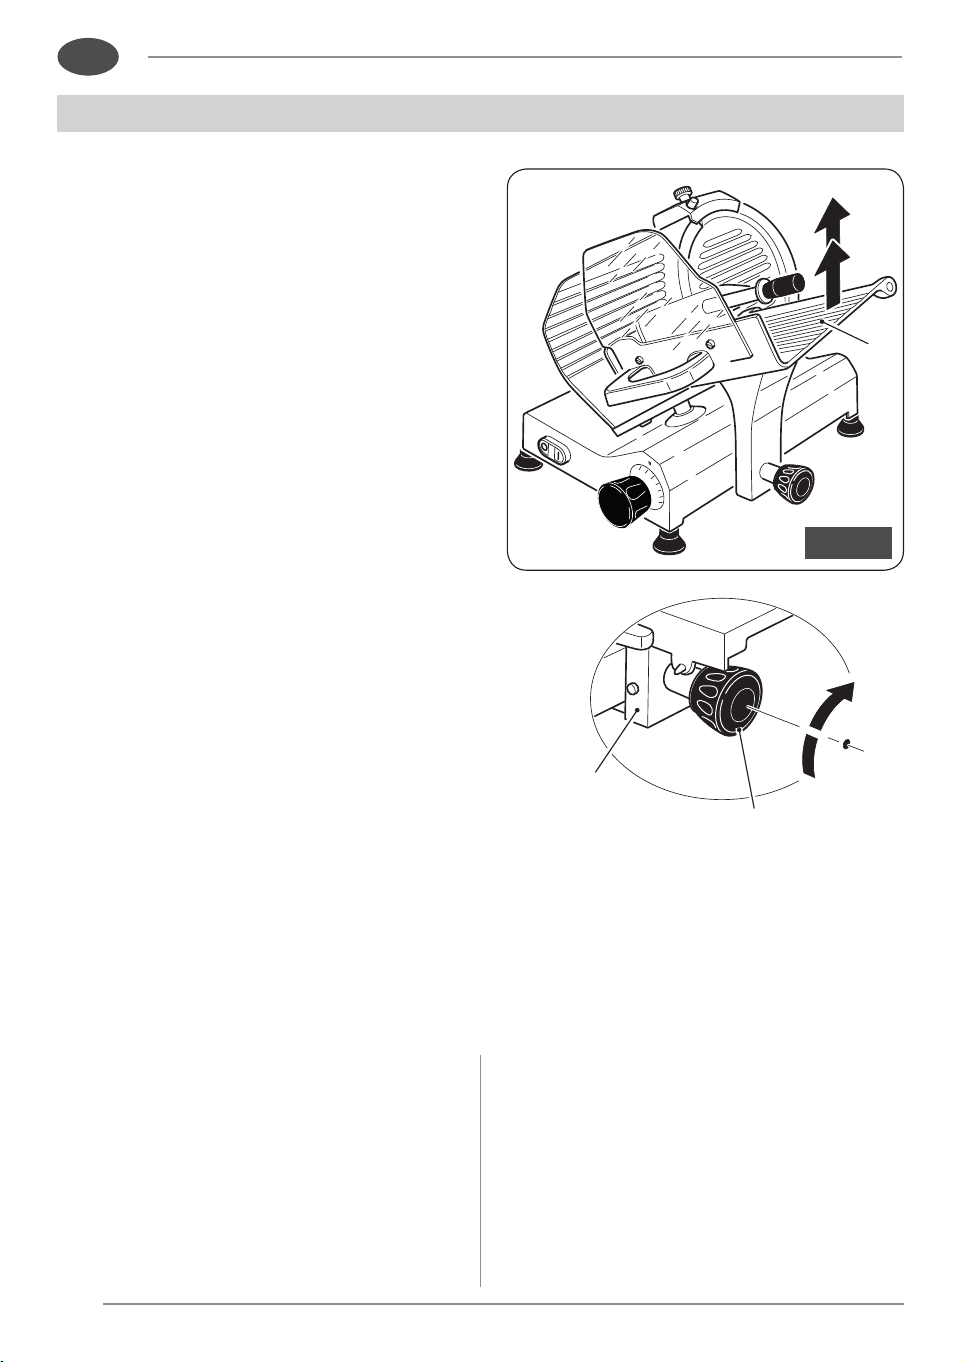
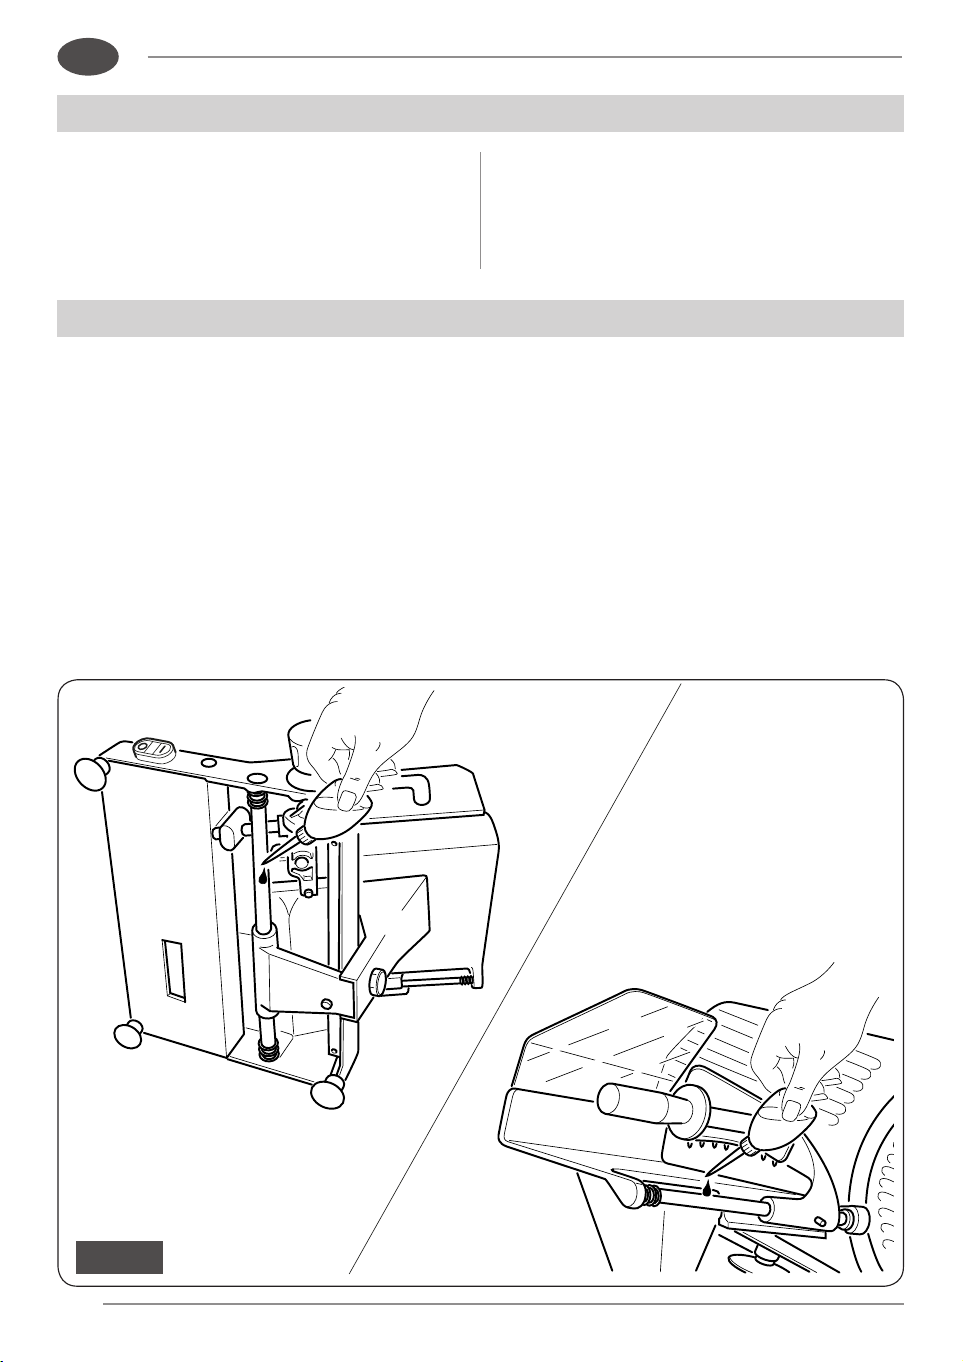
10.1 - Lubrication of carriage sliding guides and product holder plate
(weekly)
☞
Only use the tted oil; if you don’t have one use vaseline white
oil. DO NOT USE VEGETABLE OIL.
• Apply a few drops of lubricant o the guide rails and slide the assemblies back and
forth 3/4 times;
• Clean where necessary wiping the excess lubricant.
• Lift the slicer and place it on its side (gure “24”).
☞
☞
• Lift the slicer and place it on its side (gure “24”).
☞
☞
small brush soaked in alcohol;
☞
Only use the tted oil; if you don’t have one use vaseline white
forth 3/4 times;
EN
• Lift the slicer and place it on its side (gure “24”).
☞
☞
39
Fig. 24
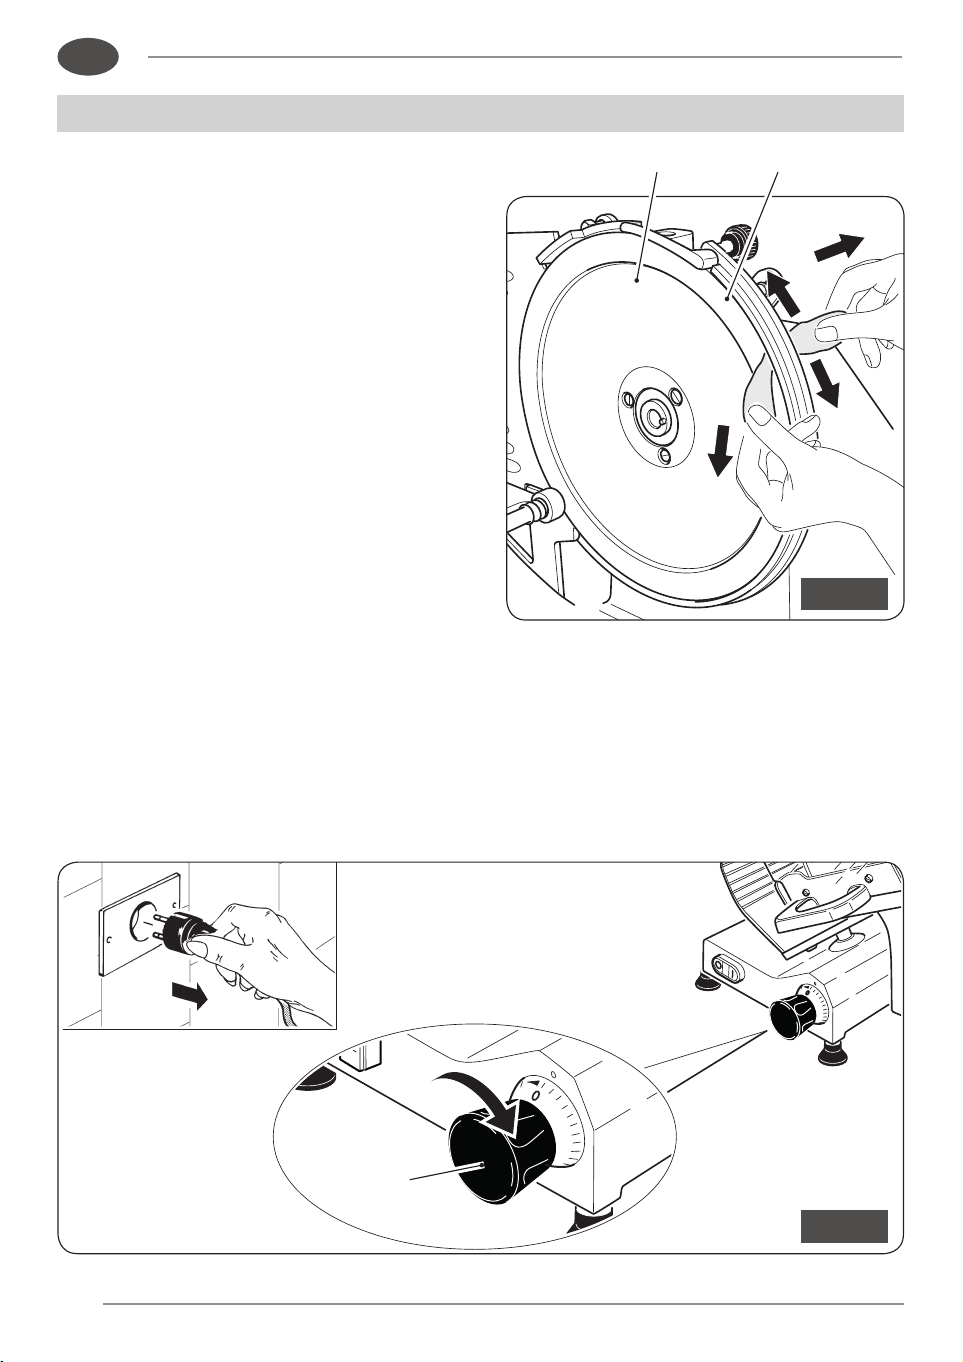
MOTOR BELT TENSION ADJUSTMENT
When after a given time the slicer has an unusual noise because of the belt
(30), proceed as follows:
• Disconnect the plug from the socket.
• Lift the slicer and place it on its side (gure “24”).
☞
Make sure that the slicer is stable and can not
inadvertently fall.
• Unscrew the pins (5).
• Loosen the screw (31) and remove the cover (32).
• Loosen the locknut (33). Turn the tensioner (34) until obtaining the optimal
tension of the belt (30).
• Tighten the locknut (33).
• Replace the cover (32) with the screw (31) and then replace the pins (5).
☞
Do not over-tighten the belt.
In the rotation, the engine could force and the belt
may be damaged.
Only for personnel authorized by the manufacturer
30
32
31
5
33
34

40
EN
TAKING THE SLICER OUT OF SERVICE
11
.1 - Correct procedure
A machine compromises:
• Aluminium-alloy frame.
• Stainless-steel inserts and components.
• Electrical parts and electrical cables.
• Electrical motor
• Plastics, etc.
- When commissioning third parties to perform dismantling and demolition, only
businesses authorised to dispose of these materials should be employed.
- When demolishing without outside assistance, sort the various types of material and
hand over to authorised businesses for disposal..
ALWAYS comply with the current legislation of the country in which the
slicer is utilised.
☞
WARNING: ALWAYS consult the manufacturer or authorised
service staff as regards removal and disposal of the blade (11)
so that this can take place in complete safety.
DO NOT ABANDON SCRAPS AS THEY ARE A SERIOUS
DANGER FOR PEOPLE, ESPECIALLY CHILDREN, AND
ANIMALS.
--------------------------
Refer to the “Instructions for treatment at the end of life” on page 12.
☞
☞
41
EN
PROBLEM CAUSES SOLUTION
Pressing the green or white
button the machine will not
start.
No power supply. Check that the plug is
properly inserted.
Defective electrical control
circuit.
Call technical assistance.
The machine will not start,
and you hear a continuous
noise like a buzz (only
machines with three-phase
motor).
The motor is functioning
single- phase.
Immediately press the
stop button (red) and have
checked the power supply
cable and the circuits
upstream by qualified
personnel.
TROUBLESHOOTING
• The following information is intended to aid in identifying and correcting defects and
faults that may occur during use of the machine.
☞
Some failures can be resolved by the user; others require
precise technical skills or special skills, and must be carried
out by qualified personnel with recognized expertise and
experience in the specific area of intervention.
Do not disassemble the internal parts of the slicer. The
manufacturer declines all responsibility for any damage
caused by tampering.
– - - - - - - - – - - - - - - - – - - - - - - - – - - - - - - - – - - - - - - - – - - - - - - - – - - - - - - -
• The table below shows the most common problems that occur during the use of the
slicer and the operations required to eliminate the possible causes.
> > > >

42
EN
USER NOTE
This pubblication shall consist of n°59 pages as specied below:
• Title page with Notes for the User (no print back);
• Index of contents, pag. 3;
• From pag. 3 to pag. 59: progressive numeration.
The maufacturer reserves its right to bring changes to the information indicated in the manual without
the obligation to communicate it in advance, as long as they don’t alter safety.
PROBLEM CAUSES SOLUTION
Pressing the green or
white button the machine
starts, but will not turn the
operation light on.
Defective indicator. Do not use the machine with
light indicator off; consult
promptly the customer
service.
The machine starts but
vibrates, the motor is very
hot and there is bad smell.
Defective motor or
transmission.
Do not use the machine,
consult promptly the
customer service.
The machine under load
slows or stops.
Defective transmission. Consult the customer
service.
Excessive resistance at
cutting of the product.
The blade is blunt. Sharpen the blade.
The slices are ragged
and/or irregularly shaped.
The blade is blunt. Sharpen the blade.
Blade excessively worn. Consult the customer
service.
The blade sharpening is
unsatisfactory.
Worn wheels. Replace the wheels; Call
the customer service.
The product tray does not
slide.
Insufficient guides
lubrication.
Lubricate.
Pressing the black or red
button the machine does
not stop.
Defective electrical control
circuit.
Stop the machine pulling
the plug from the network
and call customer service.
This pubblication shall consist of n°59 pages as specied below:
• Title page with Notes for the User (no print back);
• Index of contents, pag. 3;
light indicator off; consult
Replace the wheels; Call
43
*
230V - Hz 50
0
N
L
1
EN
Only for personnel authorized by the manufacturer
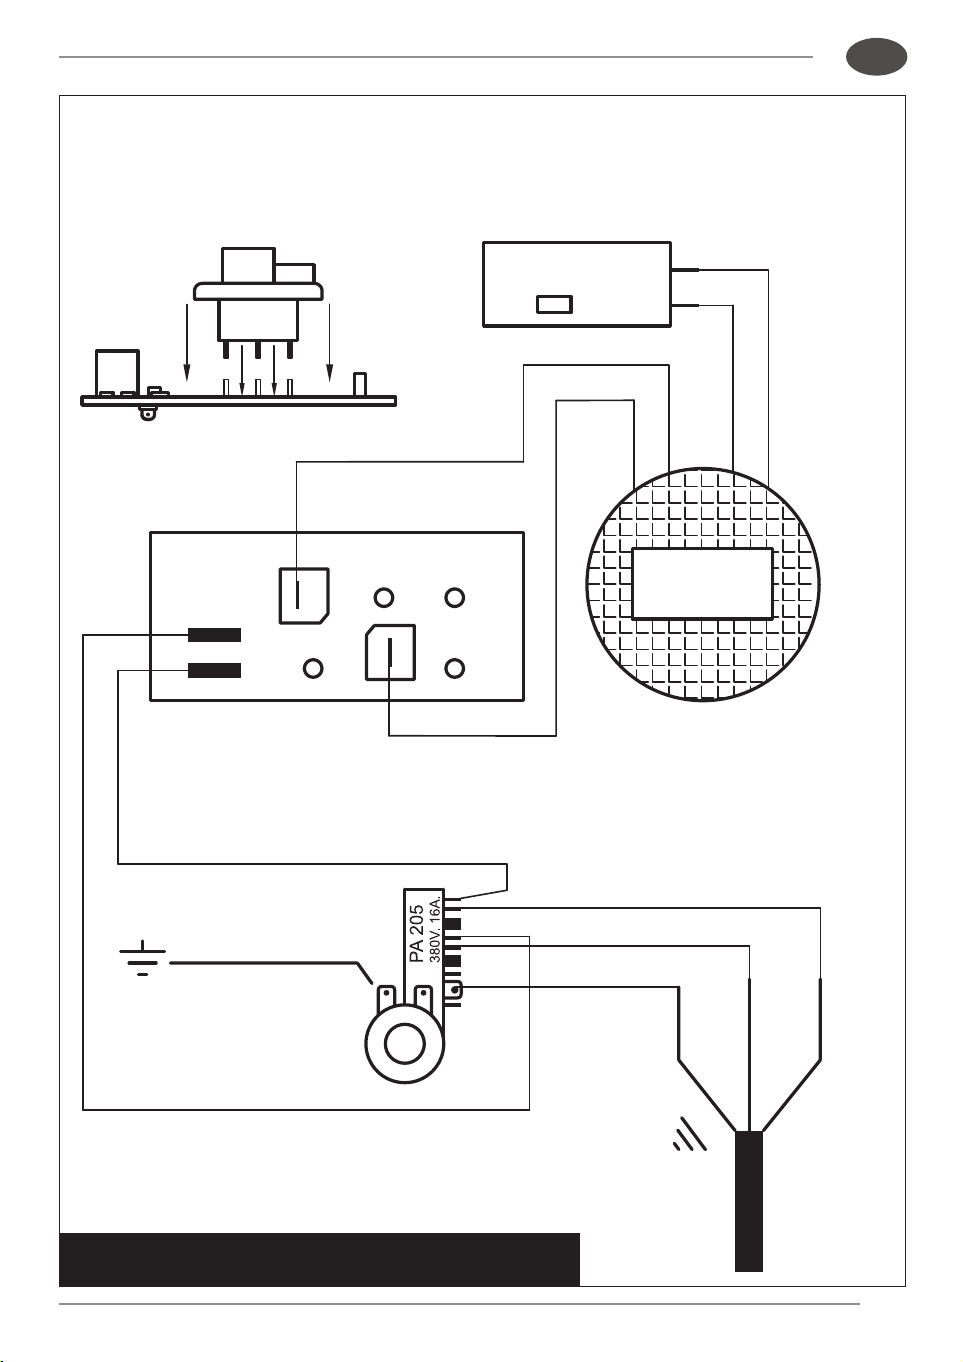
ELECTRICAL SCHEME TG 03SE
for versions
F 195 - S 220 - F 250 ES - S 220 AF - F 250 E - F 275 E - F 300 R
CONDENSER
tighten on slicer’s chassis
yellow-green
brown
blue
POWER
220V-50Hz
MOTOR
* MOD. 195 MF.6,3
* MOD. 220
* MOD. 250E MF.8
275E
300R
MF.
44
0 1
230V - Hz 50
8
PA 205
380V. 16A.
EN
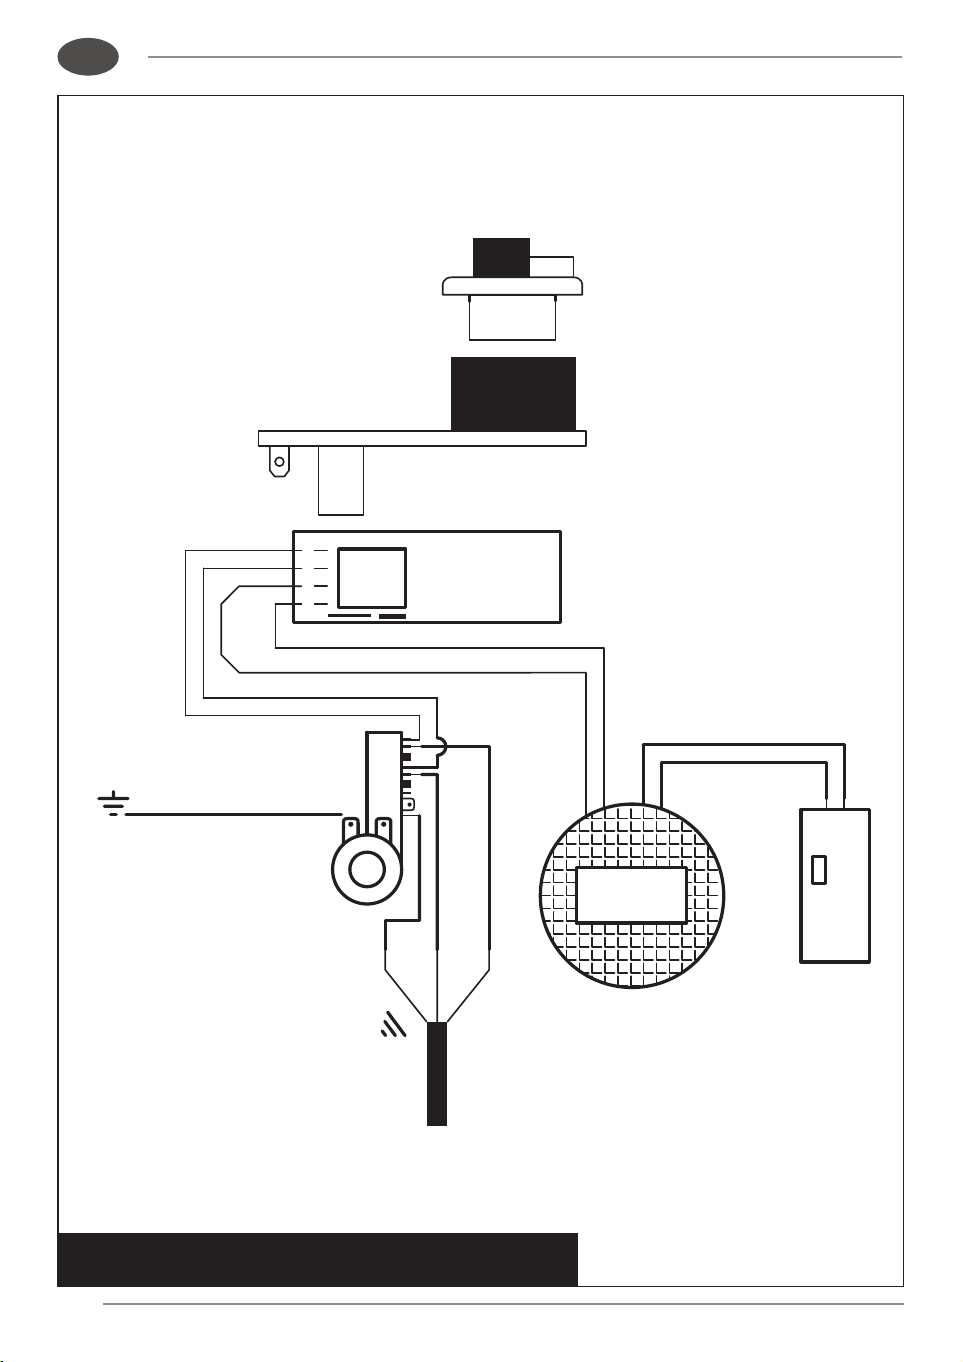
Only for personnel authorized by the manufacturer
ELECTRICAL SCHEME TG 00MINI
for versions
F 250 I - F 275 I - F 275 IL - F 300 E - F 300 EL - F 300 CL - F 300 I F 330 I - F 350 I - F 370 I
N.B.: In versions
F300I - F330I - F350I - F370I,
n°2 condensers of 6,3 µF
CONDENSER
tighten on slicer’s chassis
yellow-green
brown
blue
POWER
220V-50Hz
MOTOR
MF.
blue
Motor (black)
Line
Motor (black)
Line
RELAY
10A-250V
RELAY
blue
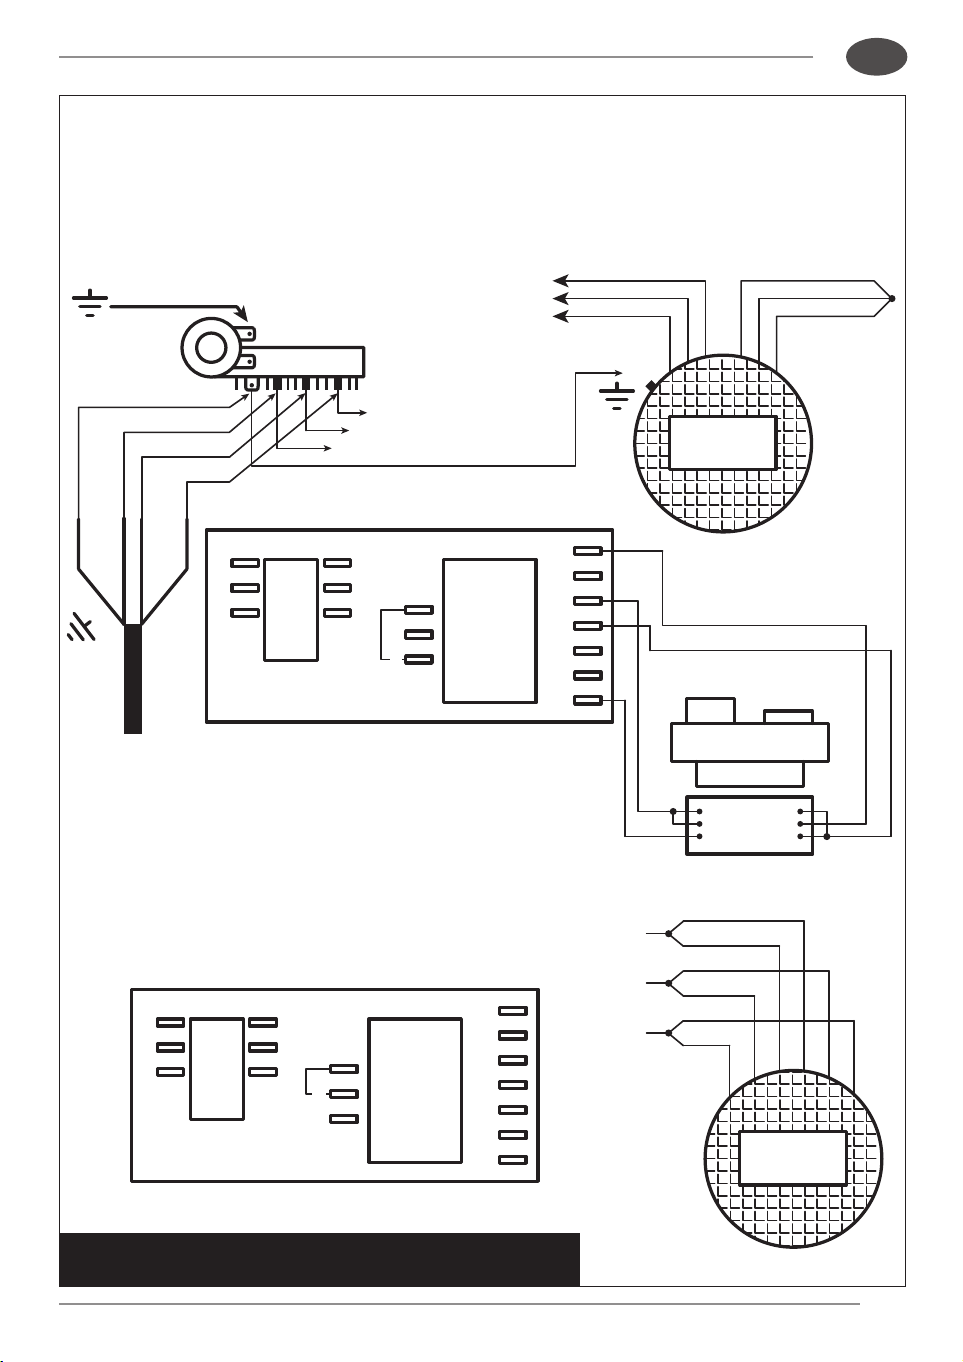
45
EN
230V/400V - Hz 50-60
230V/400V - Hz 50-60
PA 205
380V. 16A.
U
0 1
L1
L2
L3
V
W
U
L
L
M
C
A
S
M
V
W
U
V
W
L1
L2
L3
400 230
COM
U
V
W
L1
L2
L3
L
L
M
C
A
S
M
400
COM
230
Only for personnel authorized by the manufacturer
ELECTRICAL SCHEME THREE-PHASE TG00SR
all versions
Black
Black
Green
Motor Line
Yellow
Red
Brown
Blue
Black
Brown
Blue
Black
Brown Brown
Blue Blue
tighten on slicer’s chassis
CONNECTION AT 380V - 50/60Hz THREE-PHASE
CONNECTION AT 230V - 50/60Hz THREE-PHASE
MOTOR
MOTOR
Motor Line
yellow-green
brown
black
blue
POWER
220V-380V THREE-PHASE
Relay 250V 12A
24V ac
Relay 250V 12A
24V ac

46
EN
PAGE INTENTIONALLY LEFT BLANK
47
29
28
29
30
31
31
32
33
43
45
48
49
50
51
60
61
62
67
95
95
96
96
98
108
109
112
113
114
115
117
118
119
120
121
122
123
124
125
126
127
129
130
133
116
135
136
133
138
139
140
141
140
141
142
143
144
146
147
148
149
151
155
156
157
158
159
160
3
5
EN
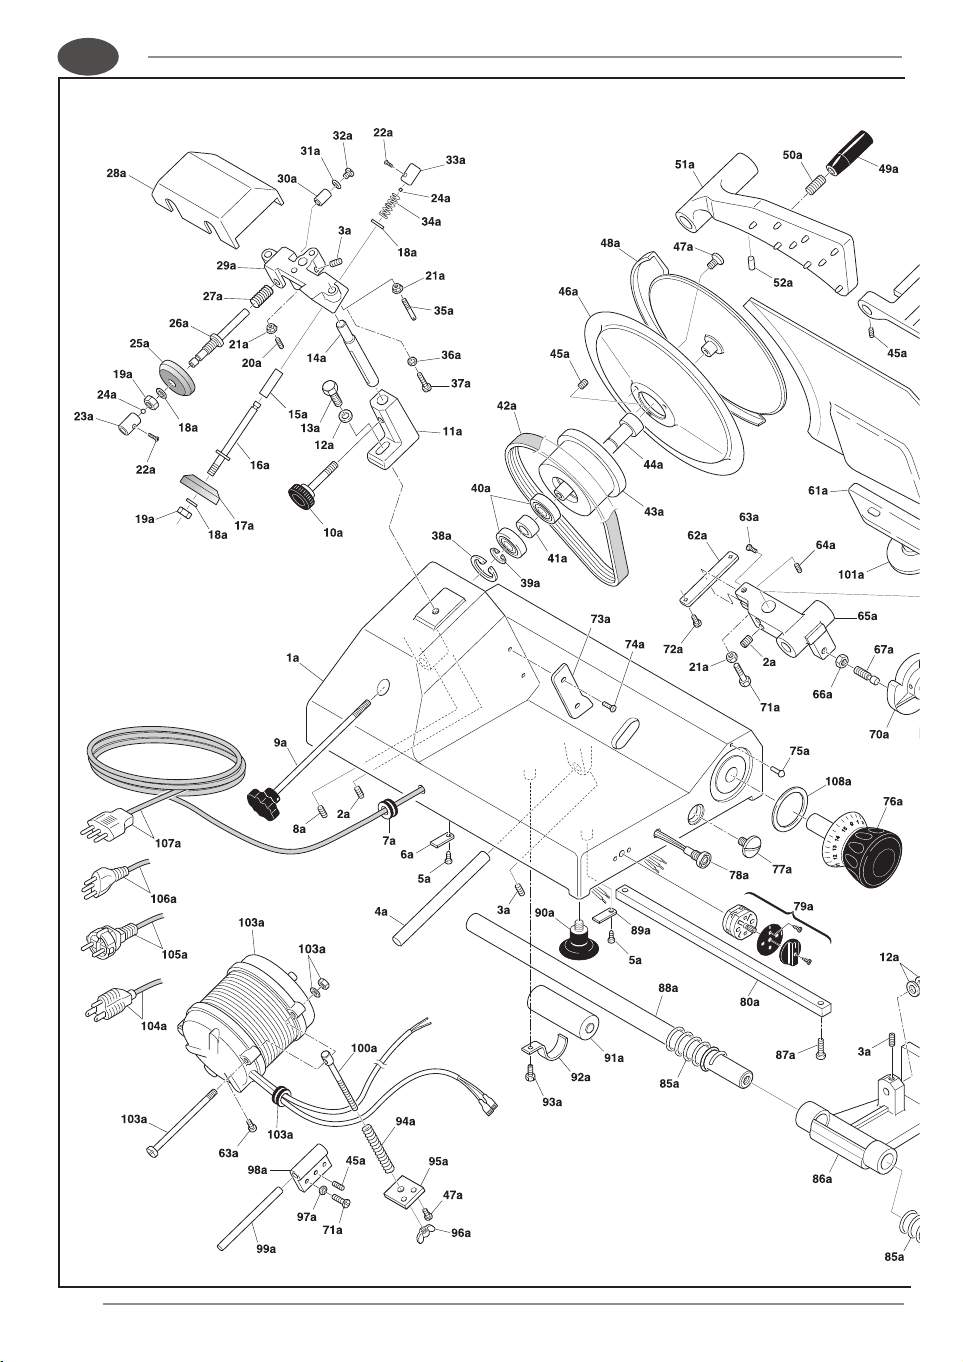
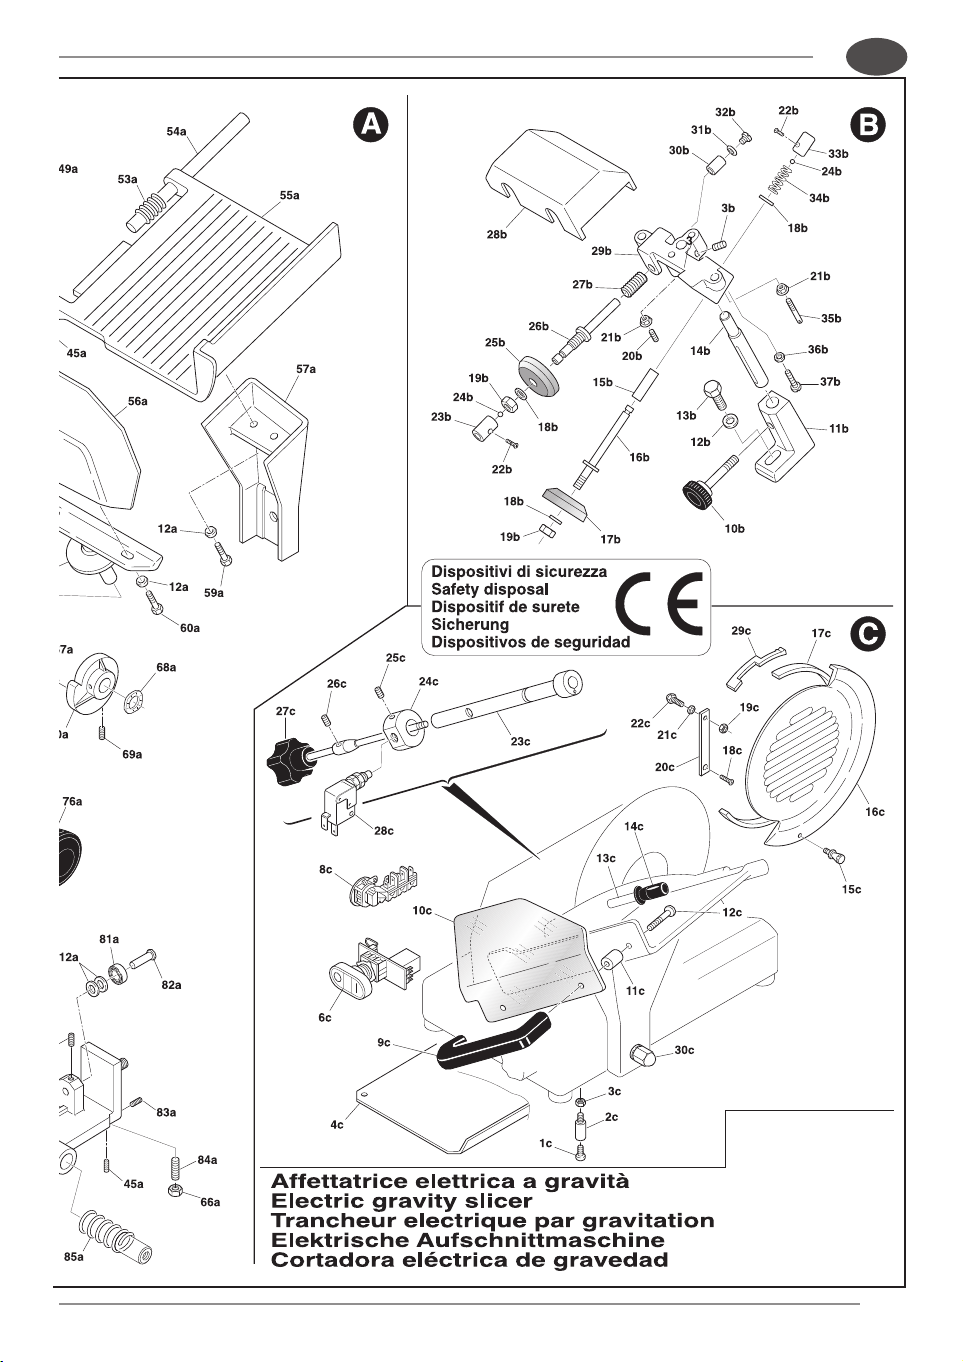
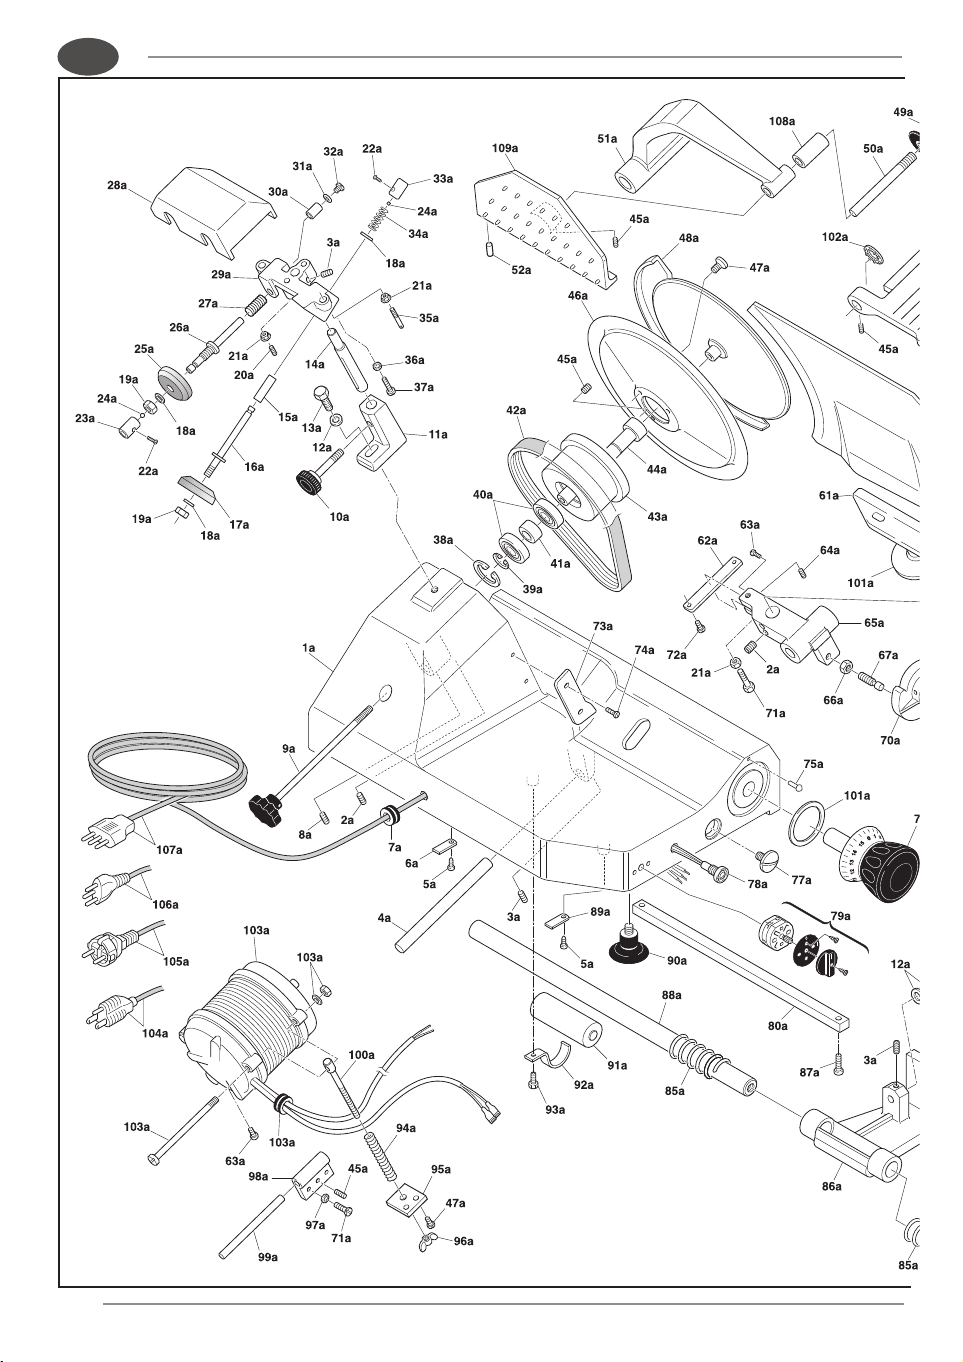
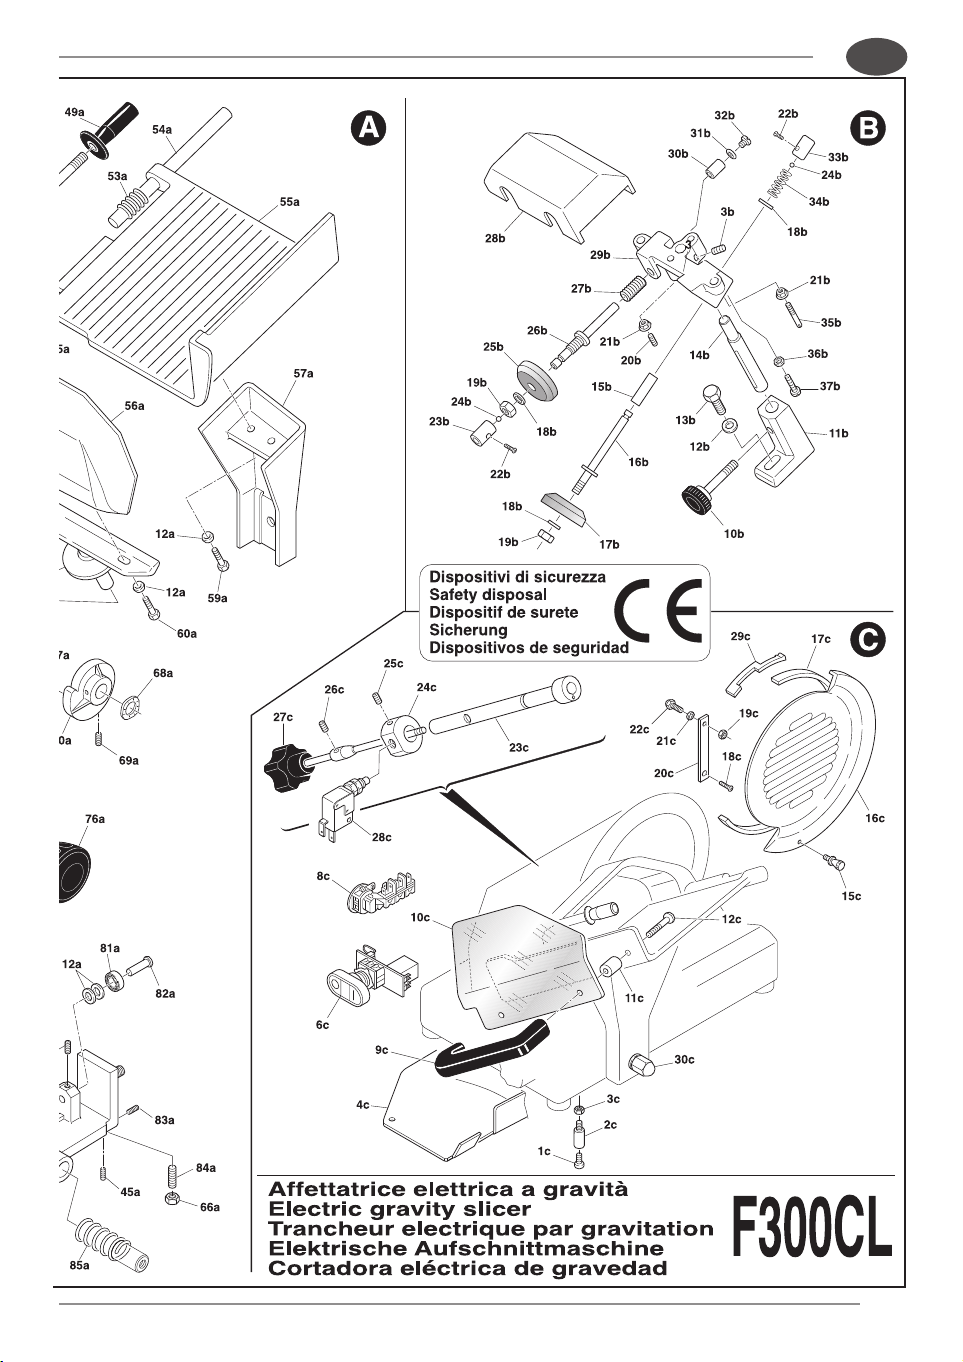
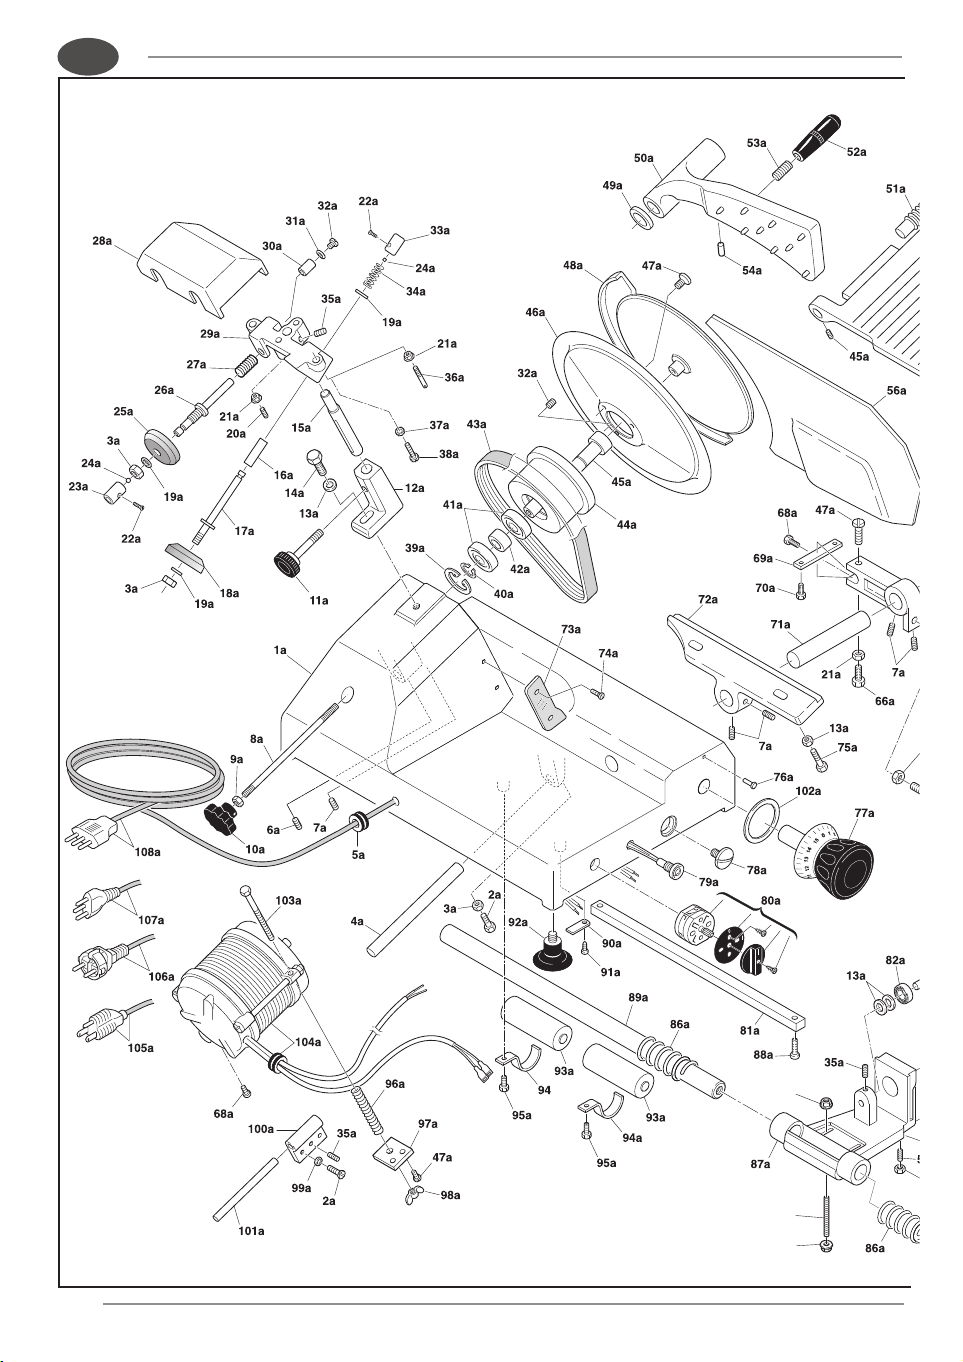
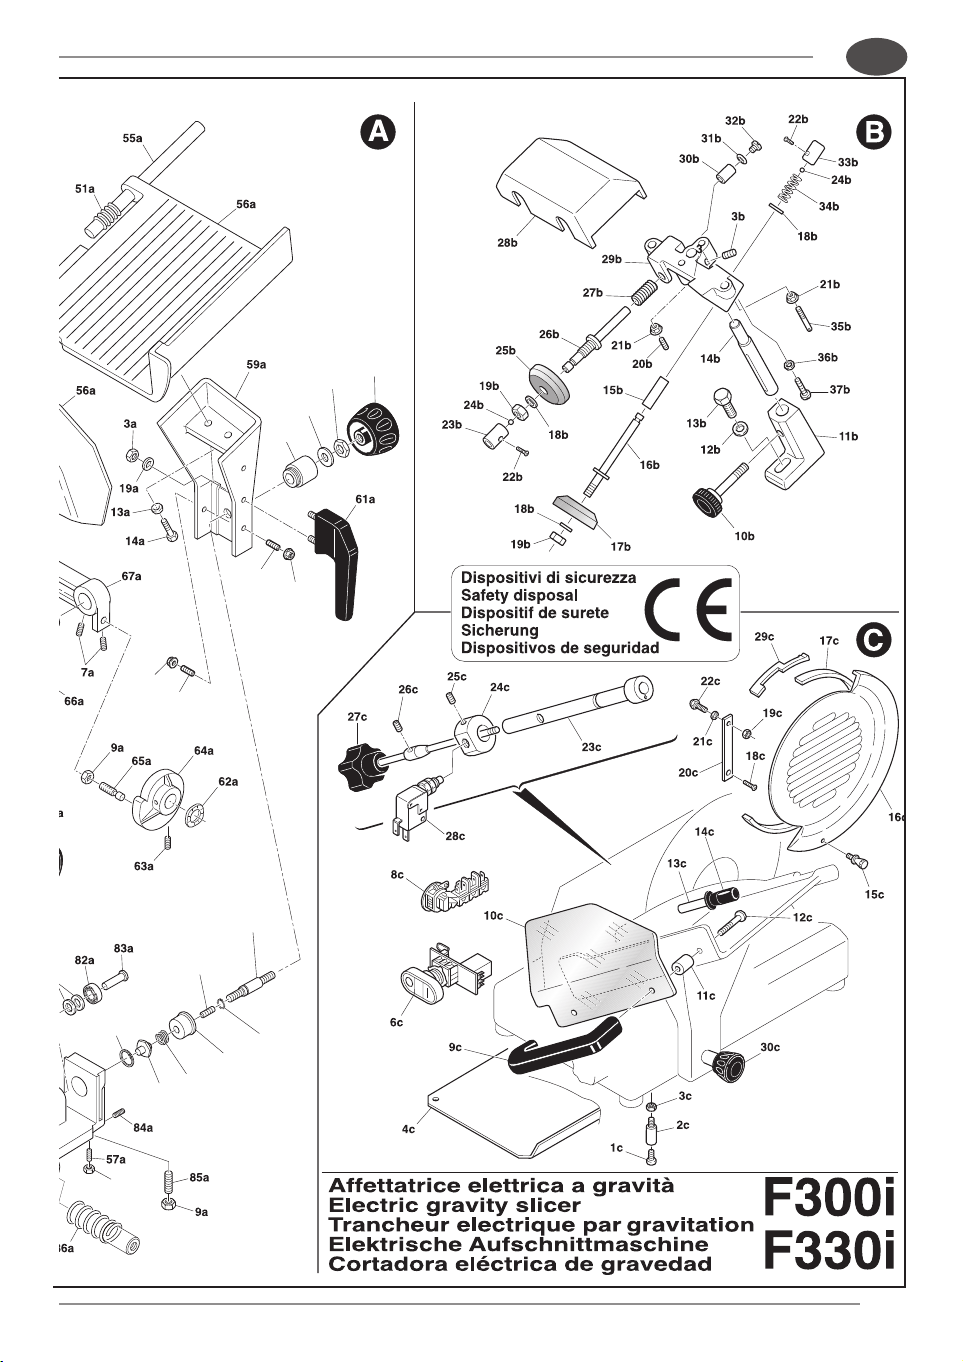
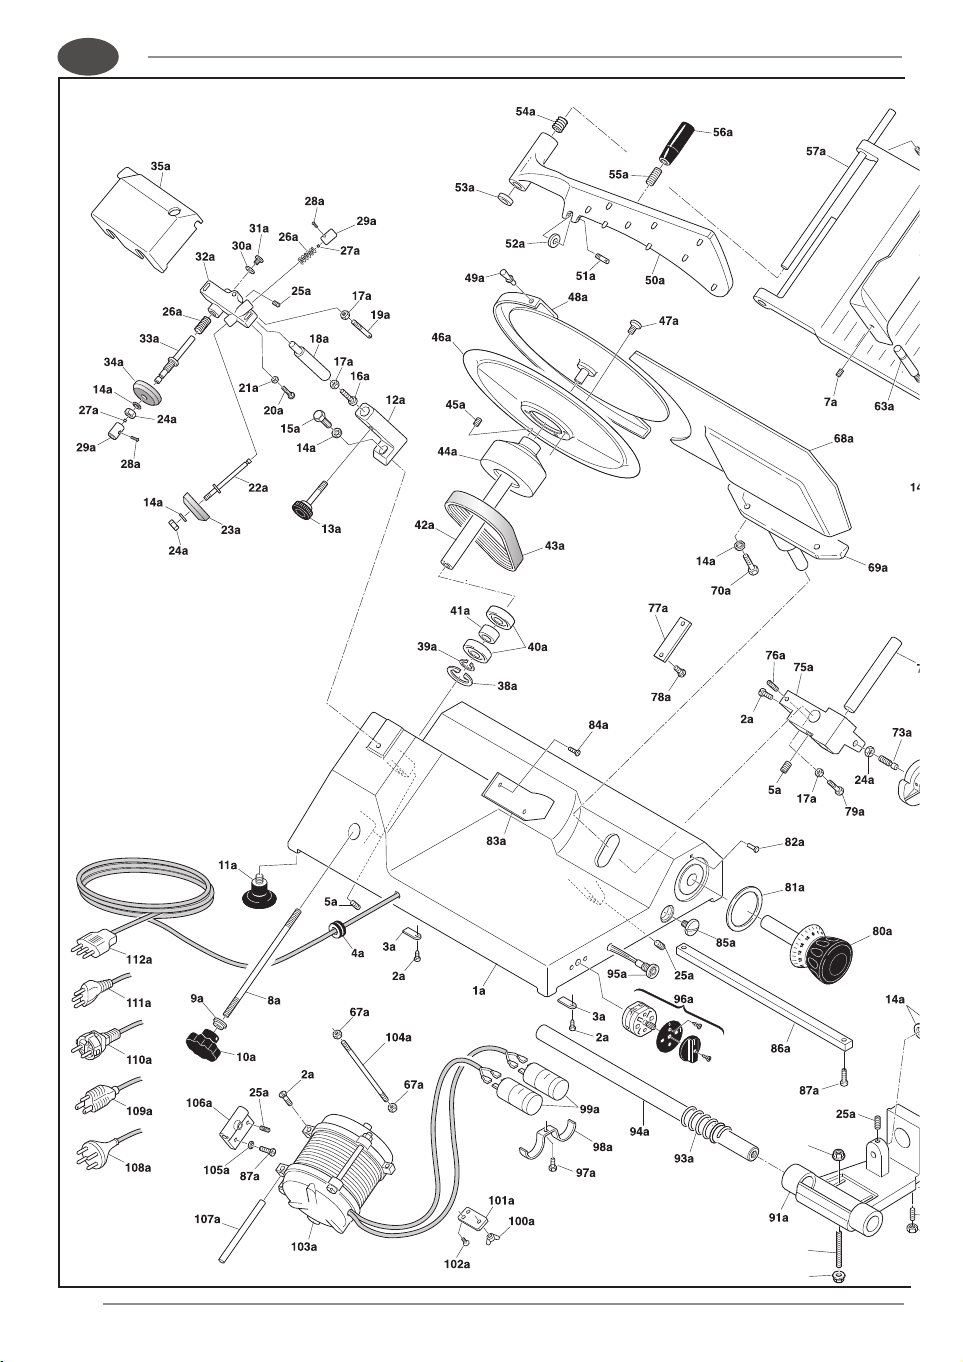
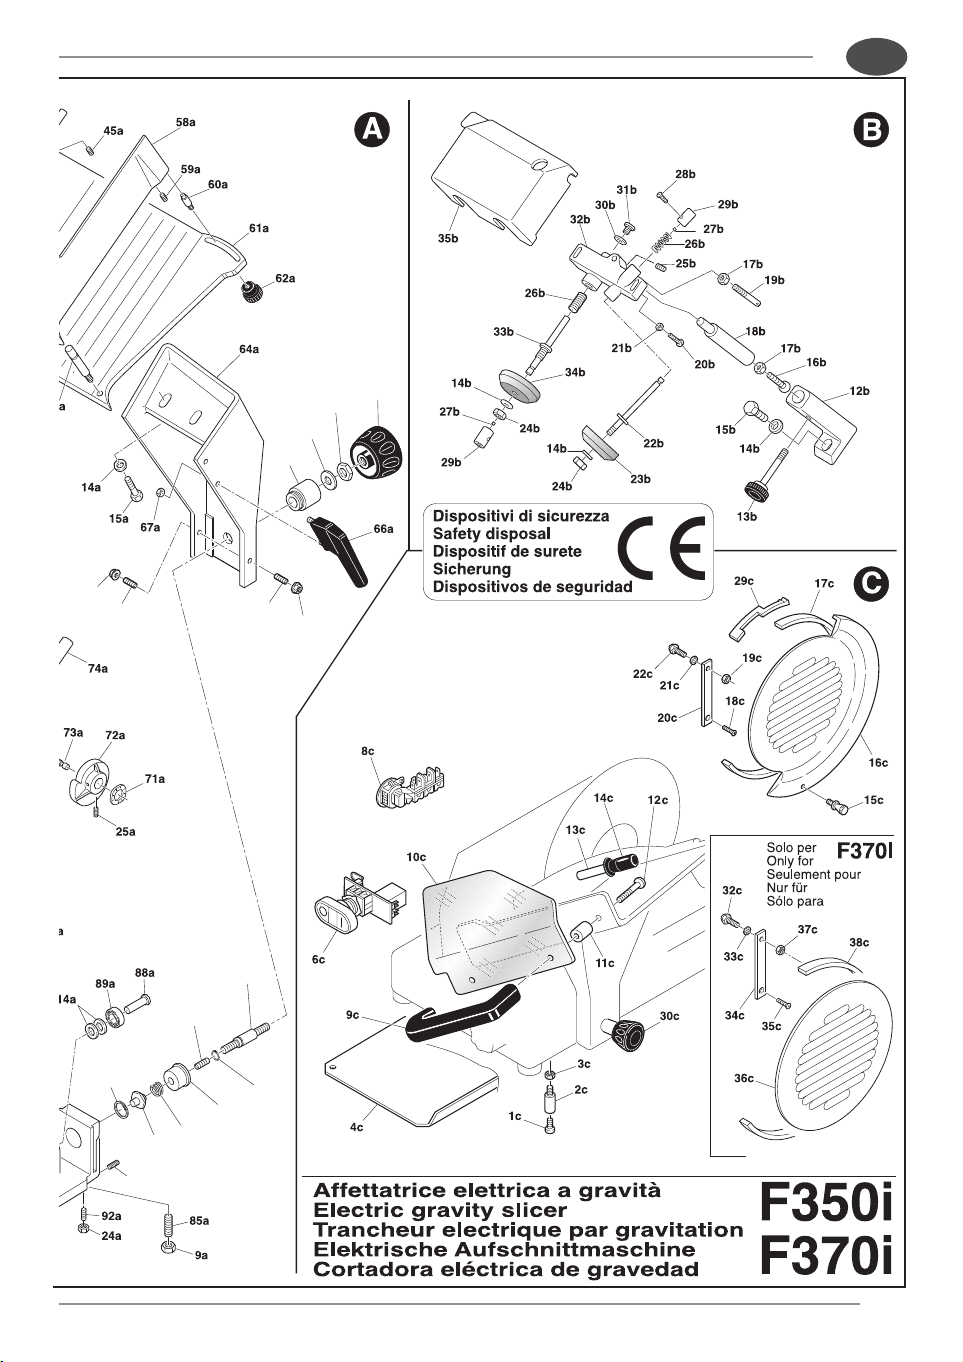
Spare parts
EN
48
EN
49
F195
S220
F250ES
F300R
F195AF
S220AF
F250E
F275E
Ed. 06/2016
EN
50
EN
51
F250I
F275I
F300E
F275IL
F300EL
Ed. 06/2016
EN
52
EN
53
Ed. 06/2016
EN
54
122
125
123
124
126
EN
55
128
127
Ed. 06/2016
116
118
117
119
120
121
122
126
128
127
60
113
114
115
EN
56
126
122
125
123
124
EN
57
Ed. 06/2016
116
127
127
115
114
113
65
126
126
118
122
121
90
120
119
117
EN
58
Ed. 06/2016
S220
F250ES
S220AF
F250E
F250I
F275E
F275I
F275IL
F300R
F300E
F300EL
F300CL
125
127
25
126
131
132
133
135
136
137
138
114
65
113
115
139
138
137
116
117
118
120
121
122
92
24
123
126
128
124
119
134
130
129
Solo per
Only for
Seulement pour
Nur für
Sólo para
F300CL
F300I
F350I
EN
TRAY BLOCKER SYSTEM
(on request optional)