

What you can do with this unit
3
Accessories
4
Part names and functions
5
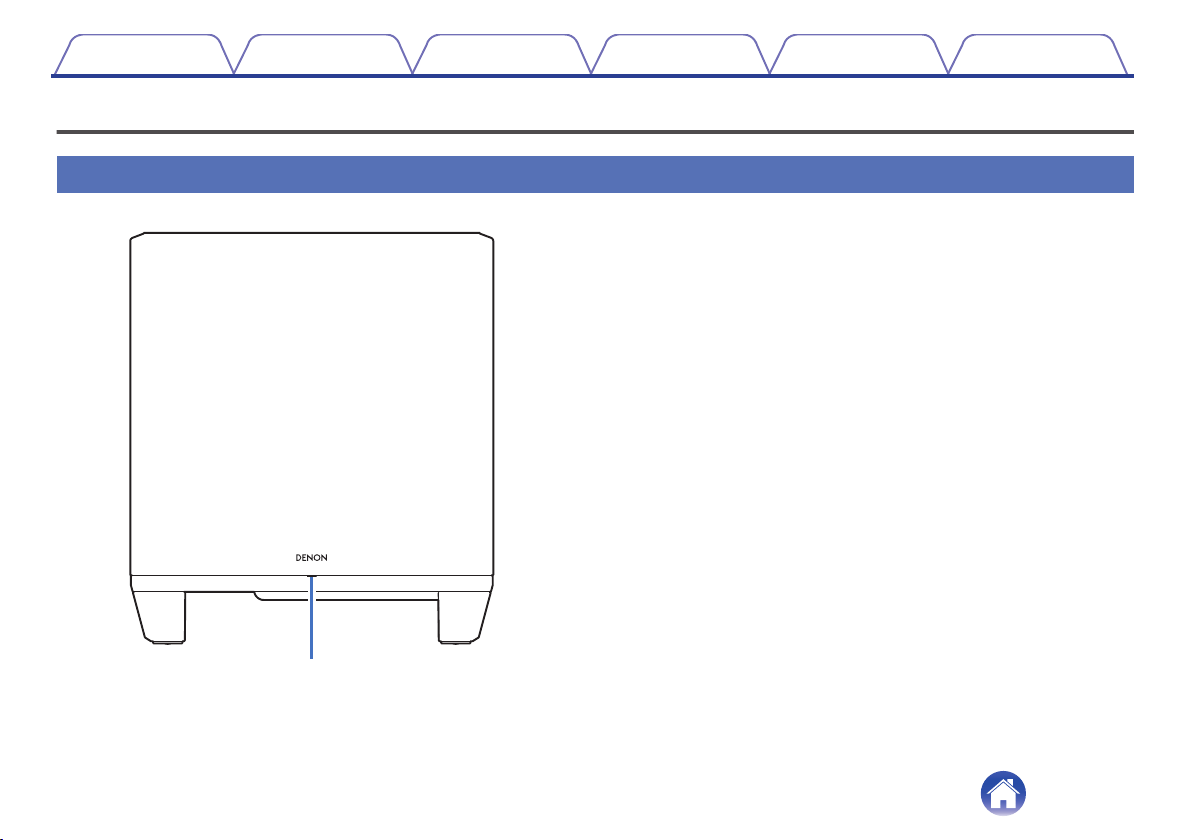
Front panel
5
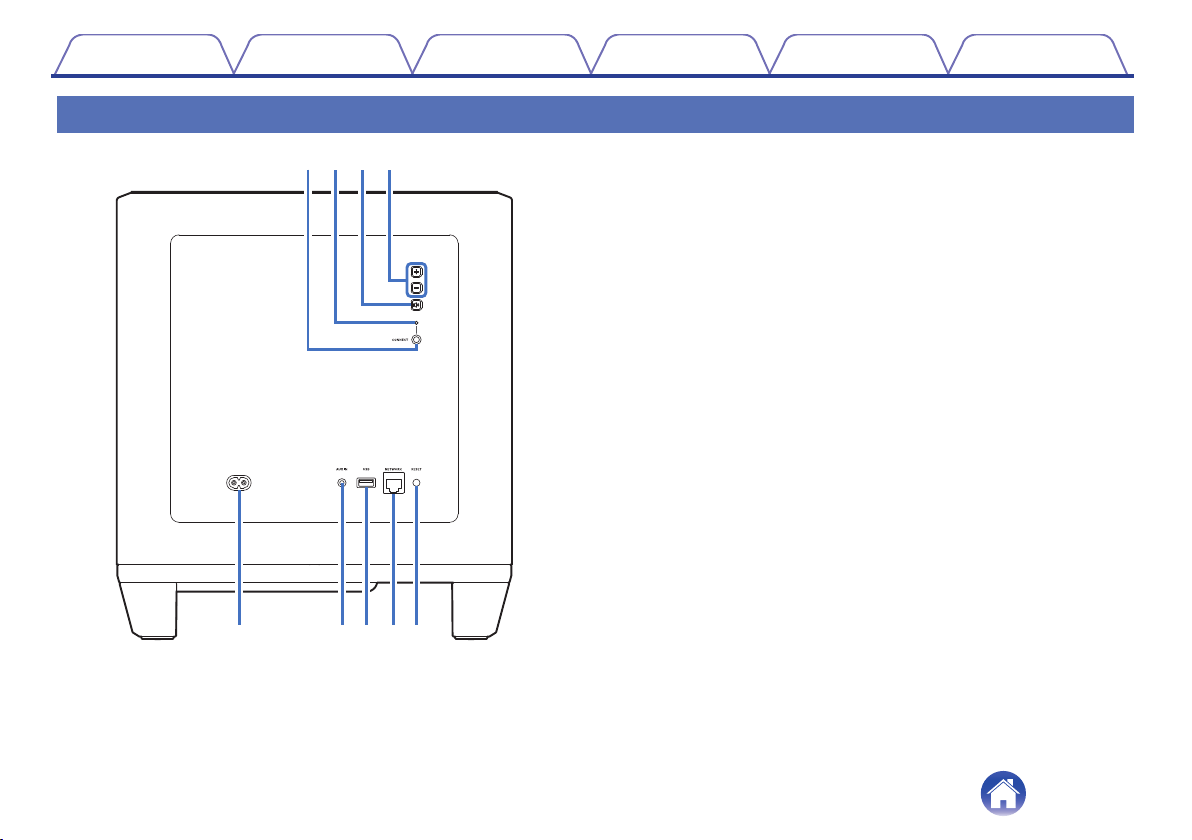
Rear panel
6
Connections
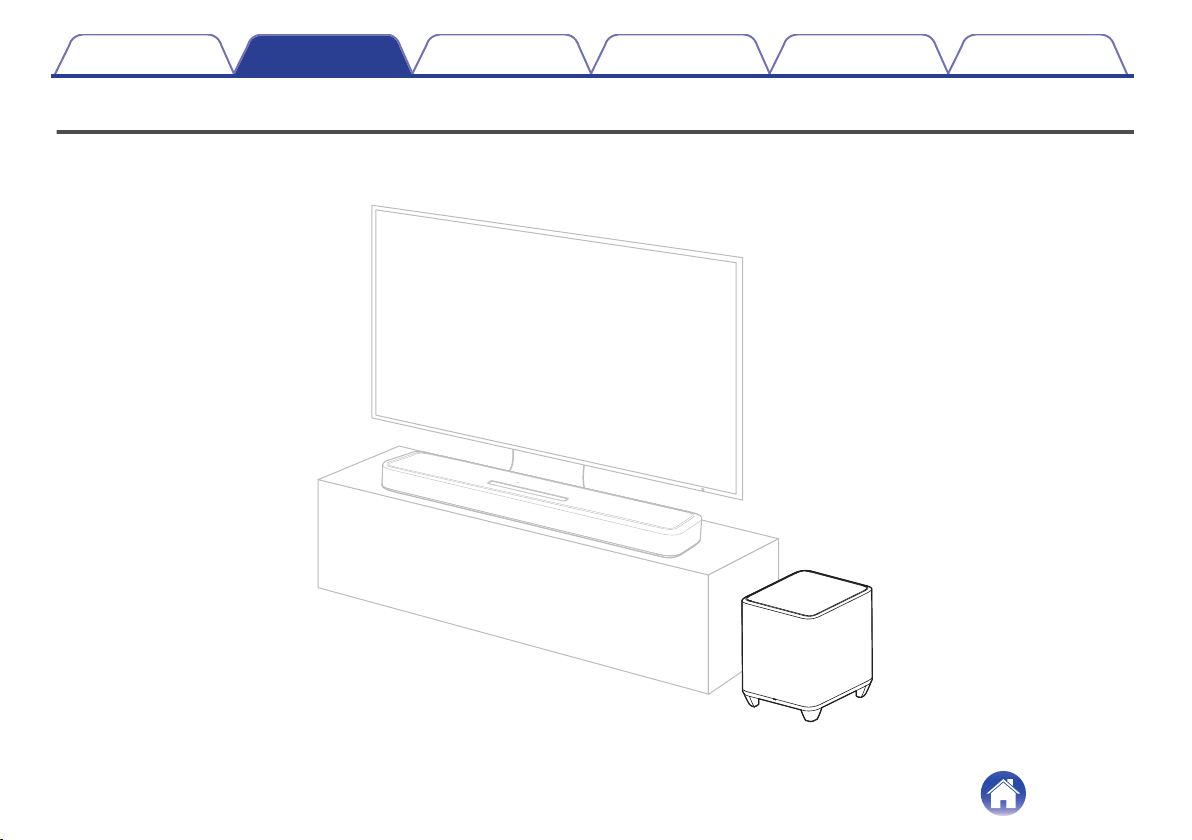
Positioning
7
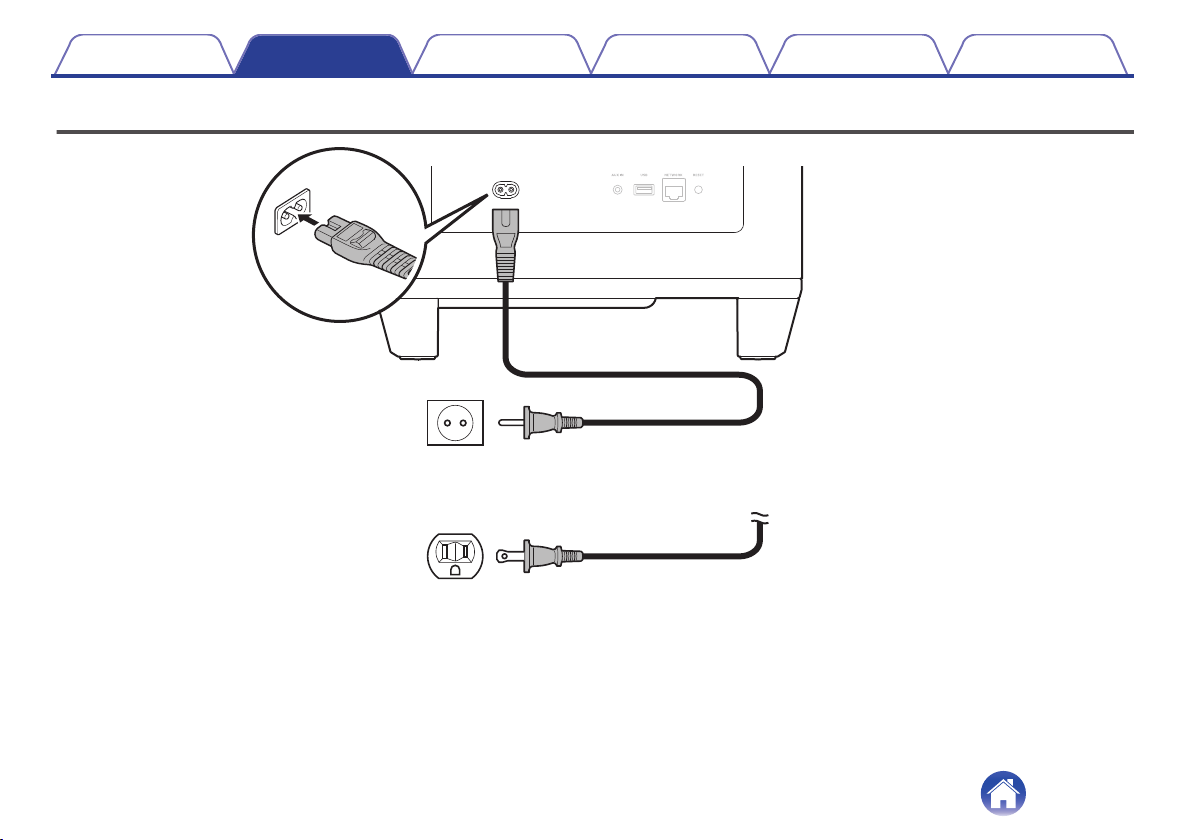
Connecting the power cords
8
Getting the HEOS App
9
Setting up first HEOS built-in device
10
Adding more HEOS built-in devices
11
Connecting devices
12
Pairing this unit to a HEOS built-in device
12
Unpairing this unit
14
Settings
Settings
15
Adjusting the subwoofer output level
15
Adjusting the low pass filter
15
Adjusting the phase
16
Adjusting the status light brightness
16
Tips
Troubleshooting
17
The power turns off and the status LED flashes in red
18
Connecting to a WPS network
18
Resetting factory settings
19
Resetting the firmware to the default state
20
Status LED
Status LED table
21
Appendix
Power management
27
Power modes
27
Supported file types and codecs
28
Trademark information
29
Specifications
30
Licence
32
Contents Connections Settings Tips Status LED Appendix
2
Thank you for purchasing this Denon product.
To ensure proper operation, please read this owner’s manual carefully before using the product.
After reading this manual, be sure to keep it for future reference.
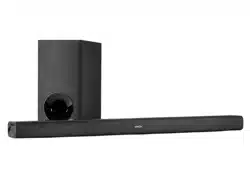
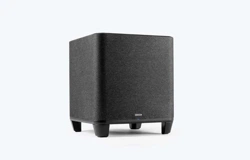
What you can do with this unit
This subwoofer can be wirelessly connected to a DENON HOME series sound bar, speakers, or any other device equipped with the HEOS wireless audio
system. By connecting to these devices, you can enjoy powerful bass sound.
Contents Connections Settings Tips Status LED Appendix
3
Rear panel
t y u i o
rewq
A
CONNECT button
Used for Wi-Fi setup.
B
Connect in status LED
Indicates the status of this unit. (v p. 21)
C
Mute button (h)
Mutes or unmutes the HEOS built-in device’s volume.
D
Volume up/down buttons (+, –)
Adjusts the HEOS built-in device’s volume level up or down.
E
AC inlet
Used to connect the power cord. (v p. 8)
F
AUX jack (AUX IN)
Use a commercially available 3.5 mm stereo audio cable to connect a
TV with an AUX audio output connector.
G
USB port
Used to connect USB storage devices.
H
NETWORK connector
Used to connect this unit to a wired Ethernet network. (v p. 11)
I
RESET button
Various settings are reset to the factory default values. (v p. 19)
Contents
Connections Settings Tips Status LED Appendix
6

Getting the HEOS App
You can use many online music streaming services from the HEOS App. Depending upon your geographical location, there are several options to choose
from.
Download the HEOS App for iOS or Android by searching App Store, Google Play store or Amazon Appstore for “HEOS”.
Contents Connections Settings Tips Status LED Appendix
9
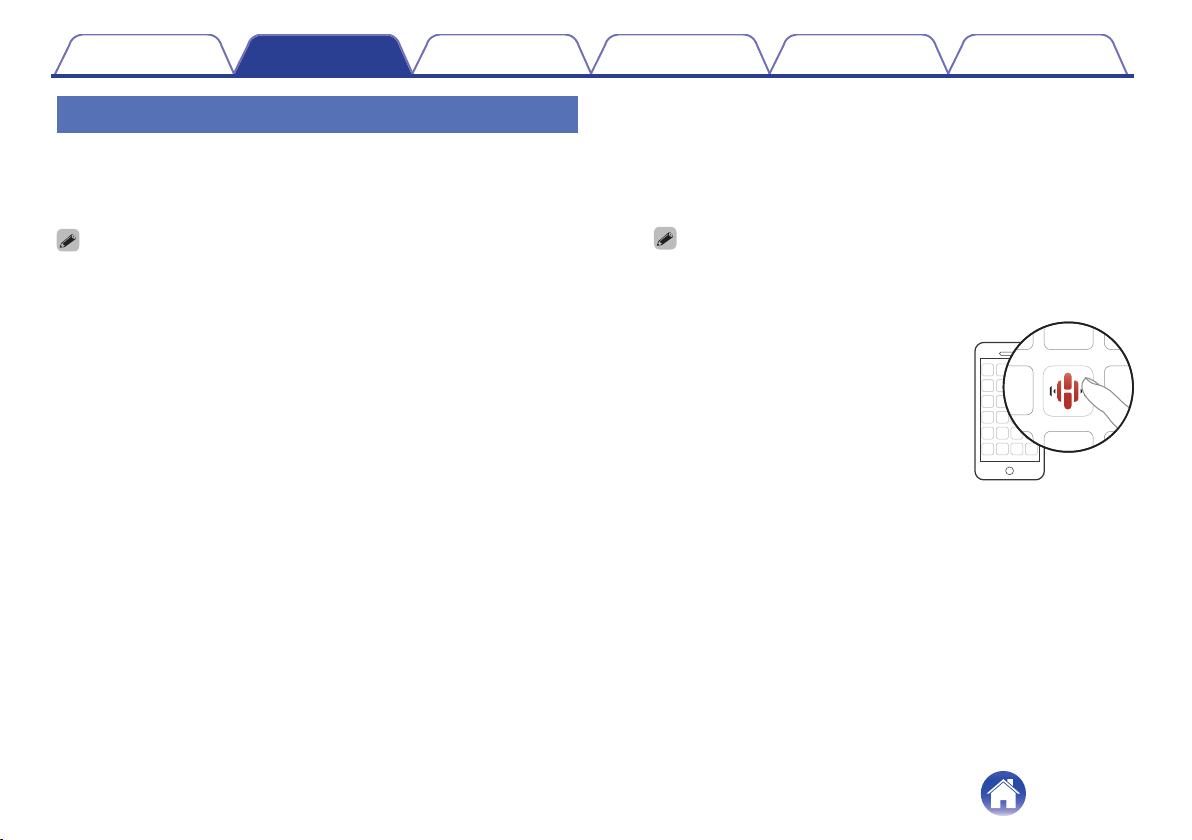
Setting up first HEOS built-in device
Once you have placed this unit in your listening room and have
downloaded the HEOS App, you are ready to configure this unit for music
playback. This involves following a few simple steps to get this unit
connected to your existing home network:
0
DO NOT connect the Ethernet cable if you are connecting this unit to a wireless
network. If you are connecting this unit to a wired network, use an Ethernet cable
sold separately to connect this unit to your network or router.
1
Make sure your mobile device is connected to your
wireless network (the same network this unit
connected to).
You can check this in the “Settings” - “Wi-Fi” menu of your iOS or
Android device.
0
Activate the Bluetooth setting on your mobile device.
0
If your wireless network is secure, make sure you know the password to join
your network.
2
Launch the HEOS App on your
mobile device.
3
Tap the “Setup Now” button at the top of the screen.
4
Follow the instructions to add this unit to your wireless
network and to select an input on this unit.
Contents Connections Settings Tips Status LED Appendix
10
Adding more HEOS built-in devices
The HEOS system is a true multiroom audio system that automatically
synchronizes audio playback between multiple HEOS built-in devices so
that the audio coming from different rooms is perfectly in sync and always
sounds amazing! You can easily add up to 32 HEOS built-in devices to
your HEOS system.
o
Adding wired HEOS built-in devices
Just connect the HEOS built-in devices to your home network using an
Ethernet cable and the HEOS built-in device will appear on your HEOS
App as a new room in the Rooms screen.
At your convenience, you can assign a name to the HEOS built-in
device to indicate which room you have it placed in.
0
Use only a shielded STP or ScTP LAN cable which is easily available at
electronics stores (CAT-5 or greater recommended).
0
Do not connect a NETWORK connector directly to the LAN port/Ethernet
connector on your computer.
o
Adding wireless HEOS built-in devices
You can add additional wireless HEOS built-in devices to your HEOS
system by selecting “Add Device” from the HEOS App’s settings menu
and follow the instructions:
Settings
Add Device
1
2
Music
Contents Connections Settings Tips Status LED Appendix
11
Connecting devices
Pairing this unit to a HEOS built-in
device
This unit needs to be paired with another HEOS built-in device.
Pairing can be done from the “My Devices” menu or from the “Rooms” menu.
o
Pairing this unit to HEOS built-in device from “My
Devices” menu.
This section describes how to pair with the Denon Home Sound Bar 550 as an
example.
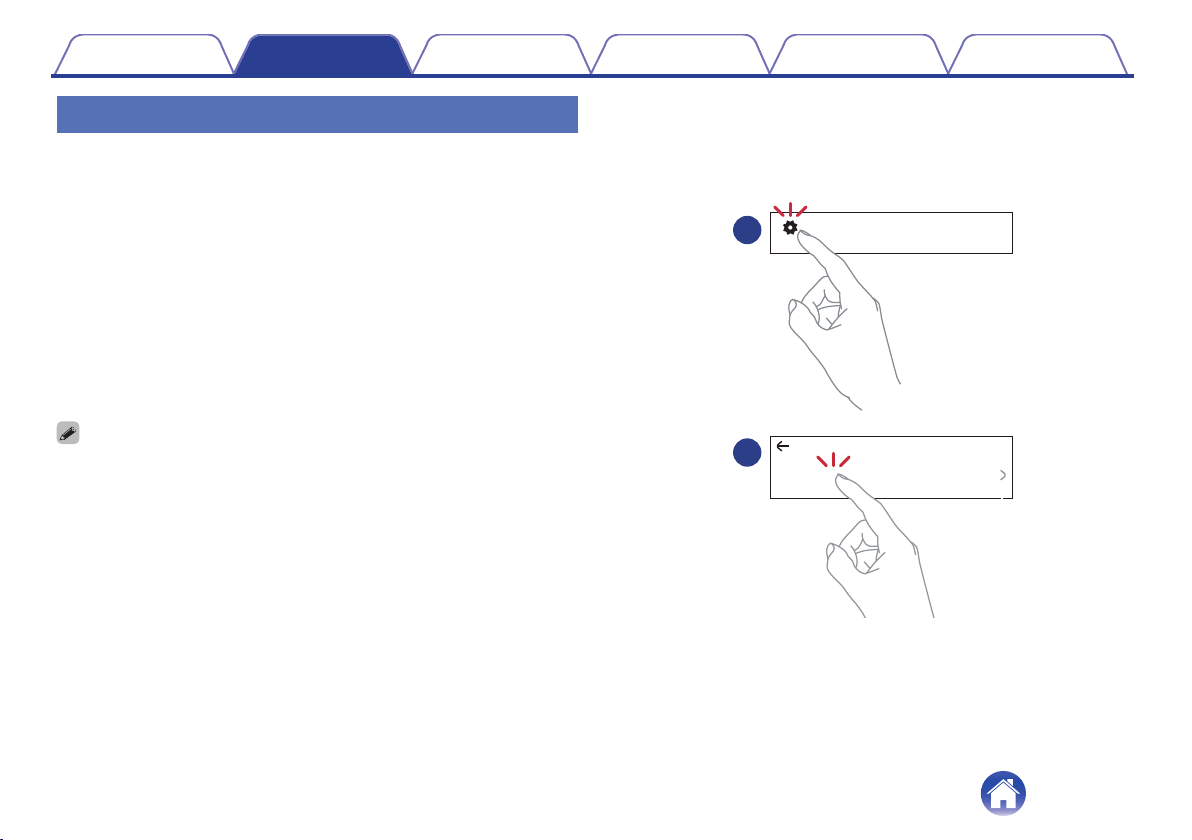
1
Select the Settings
0
icon located in the upper left corner of
the main “Music” menu to display the Settings menu.
2
Select the Denon Home Sound Bar 550 from “My Devices”.
3
Select “Setup Assistant”.
4
Select “Subwoofer”.
Follow the instructions in the menu to complete the setup.
NOTE
0
This unit can not playback any audio unless it is paired with some other HEOS built-in
device.
0
This unit needs to connect your wireless network before pairing.
Name
Network
EQ
Quality
Status Light
Touch Controls
Setup Assistant
Placement
TV lnput
Remote Control
Denon Home Sound Bar 550
xxxxxxxx
Normal
On Table
Denon Home Sound Bar...
Denon Home 150
Denon Home 250
Speakers
Soundbars
Subwoofers
Denon Home Sound Bar 550
Denon Home Subwoofer
My Devices
Denon Home 350
TV Connection
Subwoofer
Surrounds
Setup Assistant
Contents
Connections Settings Tips Status LED Appendix
12

o
Pairing this unit to HEOS built-in device from
“Rooms” menu.
1
Select the currently unpaired this unit.
2
Select the HEOS built-in device to be paired.
This unit will be grouped together with it and will play the deep bass
of the added HEOS built-in device.
NOTE
0
This unit can not playback any audio unless it is paired with some other HEOS
built-in device.
0
This unit needs to connect your wireless network before pairing.
Drag one room into another to group them
Song Name 1
Denon Home 150
Rooms
Song Name 2
Denon Home 250
Rooms Now PlayingMusic
Song Name 2
Denon Home 350
not paired-tap to conigure
Denon Home Subwoofer
Pair Subwoofer
Select a device to pair your Denon Home
Subwoofer with:
Denon Home 150
Denon Home 250
Denon Home 350
Next
Denon Home Subwoofer
Contents
Connections Settings Tips Status LED Appendix
13
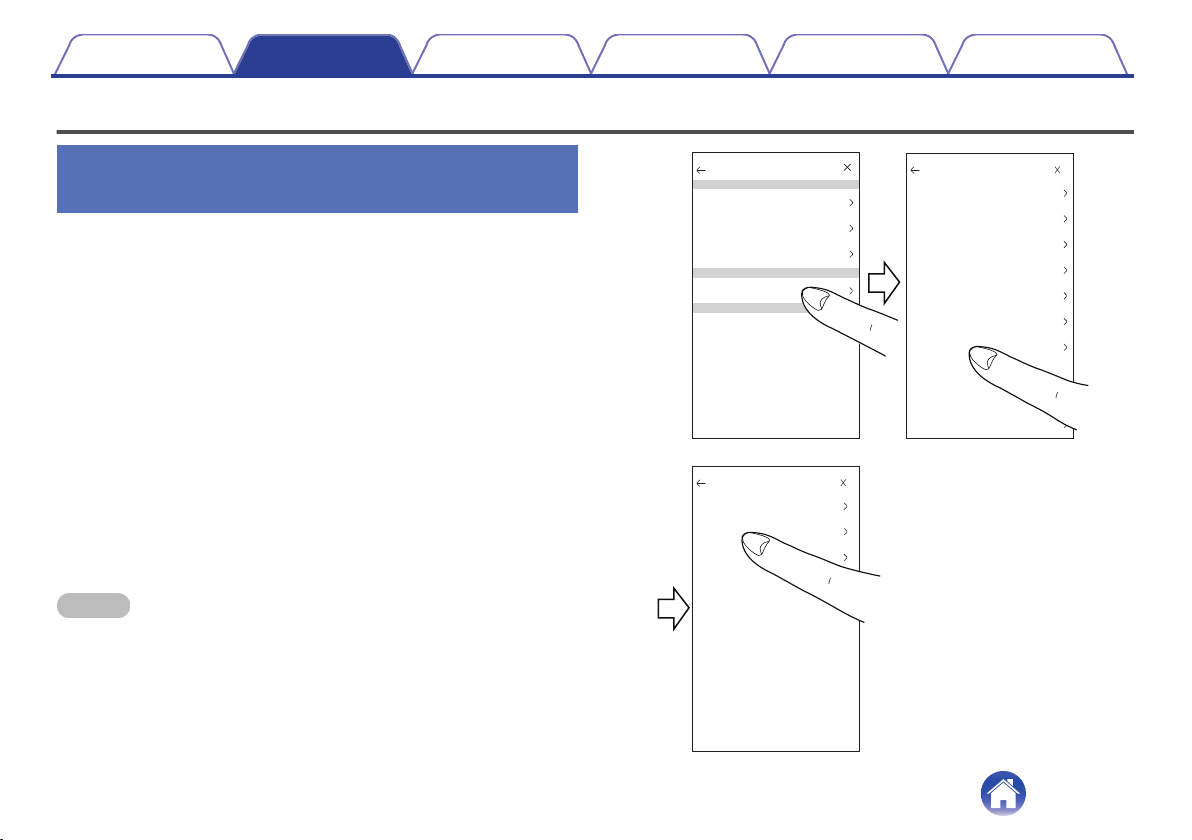
Unpairing this unit
1
Tap the pencil 1 icon in the upper right corner of the
“Rooms” menu.
2
Tap the HEOS built-in device from which to unpair this
unit.
3
Select "Disconnect Wireless Subwoofers".
Drag one room into another to group them
Denon Home 150
Rooms
Denon Home Sound Bar 550
Rooms Now PlayingMusic
Edit Group
Rooms Now PlayingMusic
Name
Disconnect Wireless Surrounds
Disconnect Wireless Subwoofers
On Table
Denon Home Sound Bar 550
Contents Connections Settings Tips Status LED Appendix
14
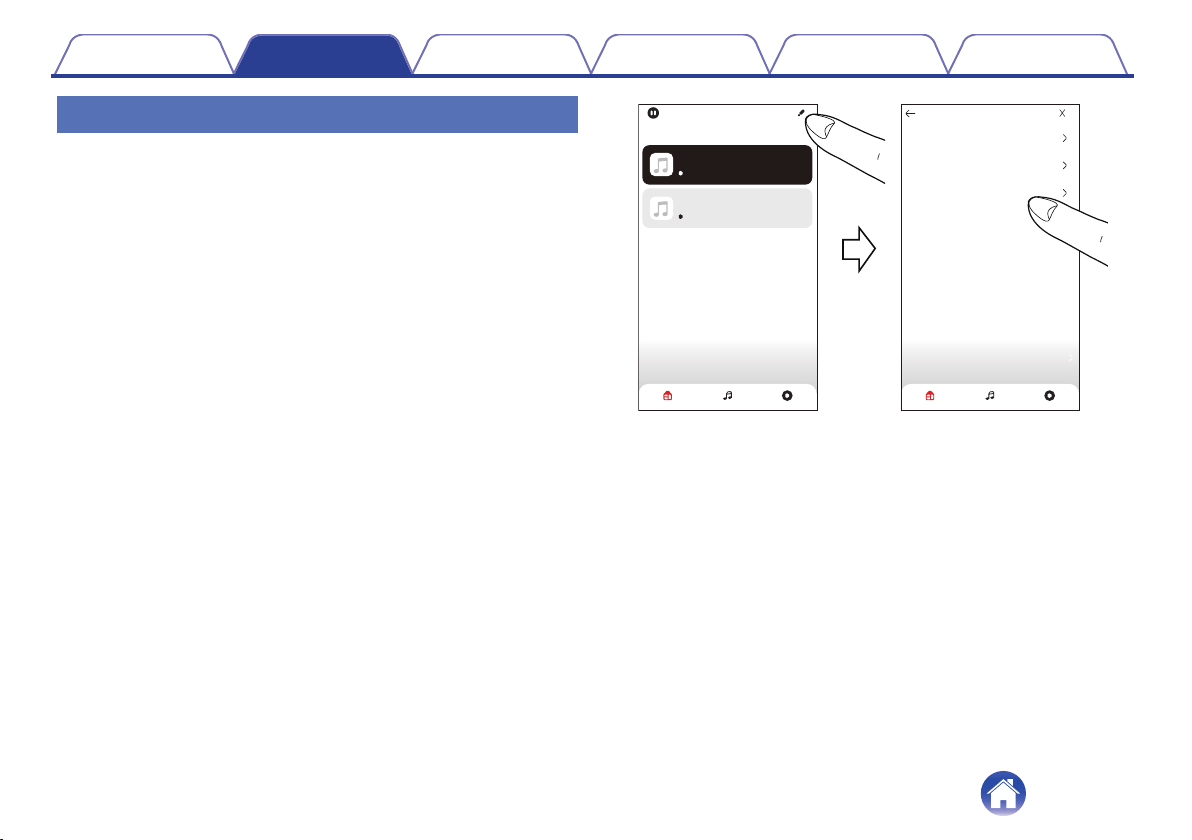
Settings
You can adjust specific settings for Denon Home Subwoofer in your
system:
1
Select the Settings 0 icon located in the upper left
corner of the main “Music” menu to display the
Settings menu.
2
Select “My Devices” to display a list of your HEOS
built-in devices.
3
Select the HEOS built-in device you want to adjust.
Adjusting the subwoofer output level
1
Select “Level”.
2
Adjust the level up or down to compensate for the
subwoofer output level.
0
You can also configure settings by tapping S in the Now Playing screen.
Adjusting the low pass filter
1
Select “Low Pass Filter”.
2
Set the frequency cutoff point.
Optimized
(recommended)
Select when using with HEOS built-in
speakers. Optimized values are set to each
of the speakers.
80Hz - 250Hz
(for experts)
When using with other speakers, configure
settings that match the characteristics of
the combined speakers.
Contents Connections Settings Tips Status LED Appendix
15
Adjusting the phase
1
Select “Phase”.
2
Select “Normal” (default) or “180°”.
0
For normal configuration, use “Normal”.
0
The bass volume may increase when switched to “180°” due to the installation
location of the Subwoofer.
Adjusting the status light brightness
1
Select “Status Light”.
2
Adjust the brightness.
Contents Connections Settings Tips Status LED Appendix
16
Troubleshooting
If a problem should arise, first check the following:
1. Are the connections correct?
2. Is the set being operated as described in the owner’s manual?
3. Are the other devices operating properly?
If this unit does not operate properly, check the corresponding symptoms in this section.
If the symptoms do not match any of those described here, consult your dealer as it could be due to a fault in this unit. In this case, disconnect the power
immediately and contact the store where you purchased this unit.
Contents Connections Settings Tips Status LED Appendix
17
The power turns off and the status LED flashes in red
The power turns off and the status LED flashes in red.
0
The protection circuit has been activated due to a rise in temperature within this unit. Unplug the power cord, wait about an hour until this unit cools
down sufficiently, and then turn the power on again.
Connecting to a WPS network
Connecting to a WPS network.
0
If your wireless router support WPS (Wi-Fi Protected Setup™) this unit can optionally connect to your network using the push button method by
following these steps:
(Wi-Fi Protected Setup™ is trademarks of Wi-Fi Alliance.)
1. Press the WPS button on your router.
2. Within 2 minutes, press and hold the CONNECT button on the rear panel of this unit for 5 seconds.
3. The LED on the front of this unit will flash green for several seconds as it connects to your WPS router.
4. When the connection is complete, the LED on the front of this unit will turn solid blue.
Contents Connections Settings Tips Status LED Appendix
18
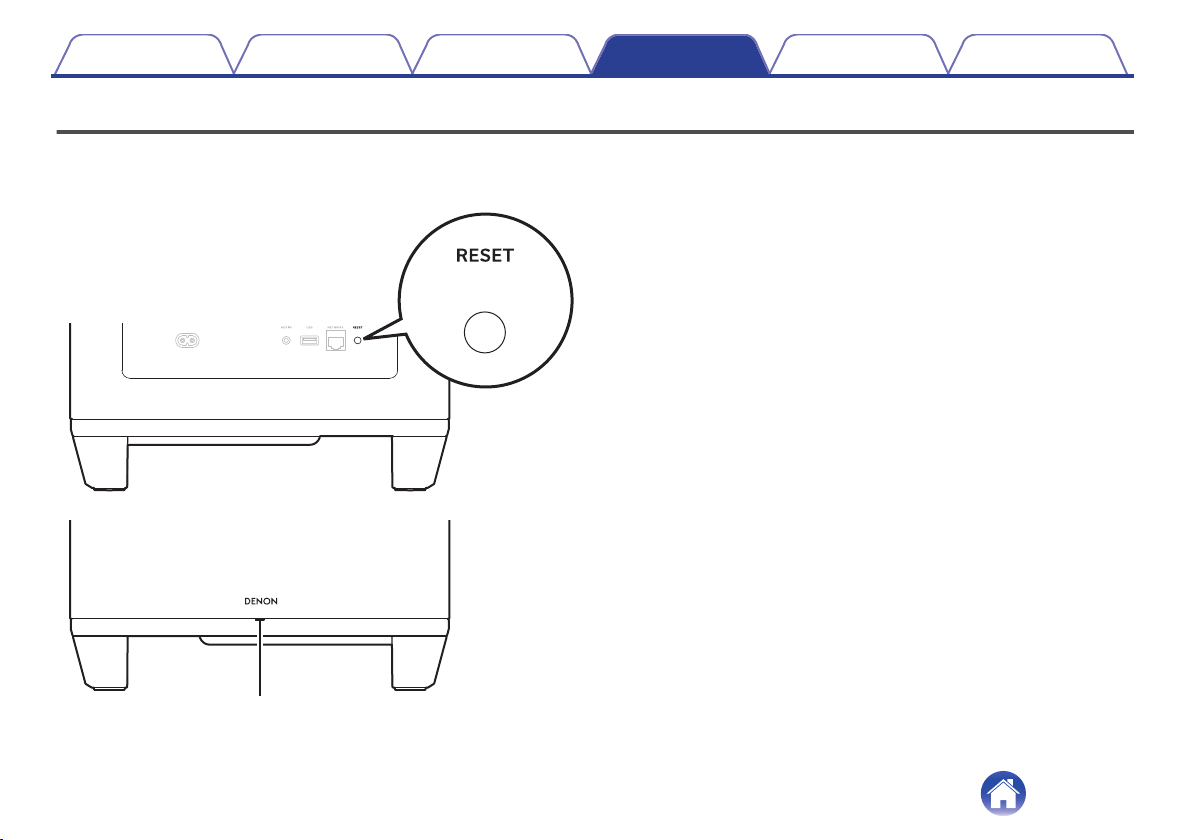
Resetting factory settings
When the network function or this unit do not operate correctly, the problem may be solved by resetting factory settings.
Resetting this unit will clear out the wireless network info, EQ, and name but retain it’s current software. You will have to use “Settings” - “Add Device” from
the HEOS App to reconnect this unit to your home network before it can be used.
Status LED
1
Press and hold the RESET button on this unit for 5
seconds.
The status LED blinks in amber and initiates a reset.
Contents Connections Settings Tips Status LED Appendix
19
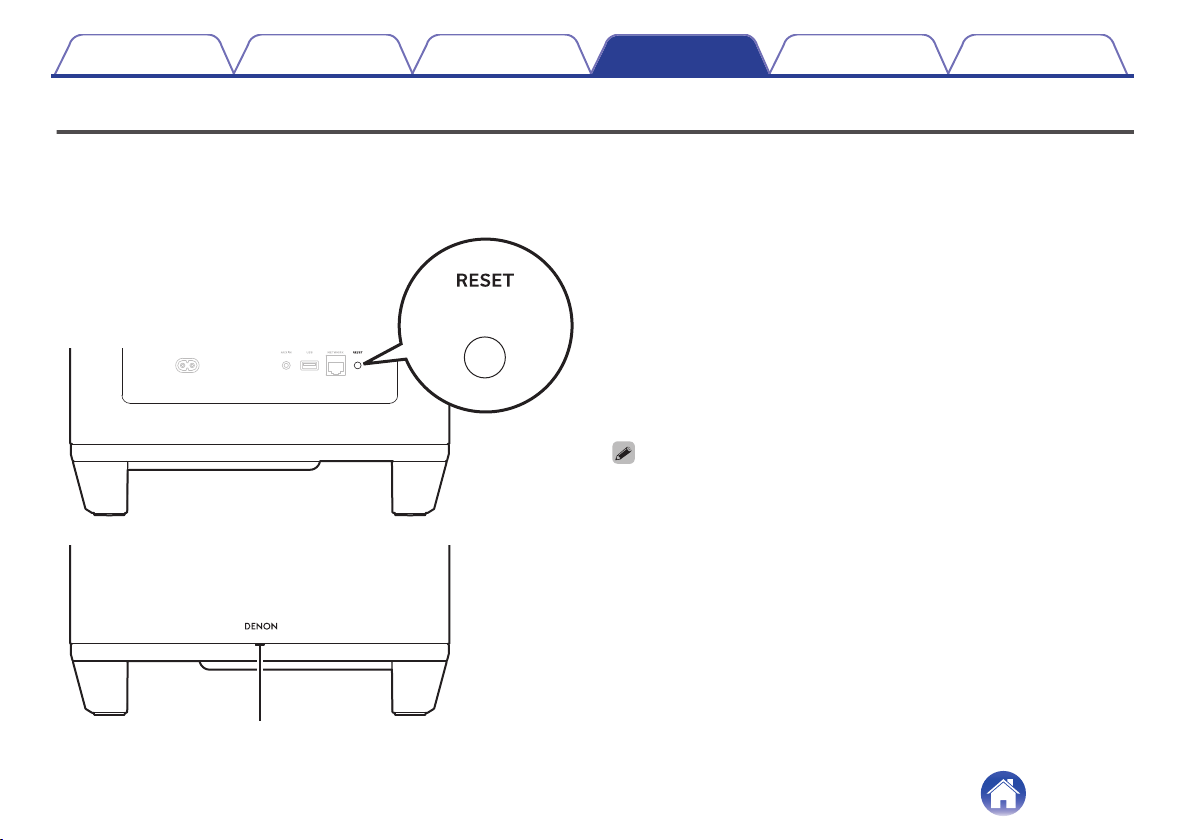
Resetting the firmware to the default state
When the network function or this unit do not operate correctly, the problem may be solved by resetting the firmware to the default state.
0
It is confirmed that the network connection has no problem, but the unit cannot connect to the Internet.
0
The solution described in “Resetting factory settings” does not work. (v p. 19)
For such cases, perform the following operation:
Status LED
1
Unplug the power cord from the power outlet.
2
Plug in the power cord while holding down the RESET
button.
3
Release the button after the status LED starts to blink
in amber.
When the status LED switches from blinking amber to solid, the
recovery process is complete.
0
Since this process includes a firmware recovery, it takes some time to complete.
0
This process will clear out all the information that you set.
0
Do not unplug the power cord until the entire process completes.
0
If the problem is not solved after performing this operation, contact our customer
service center.
Contents Connections Settings Tips Status LED Appendix
20
Status LED table
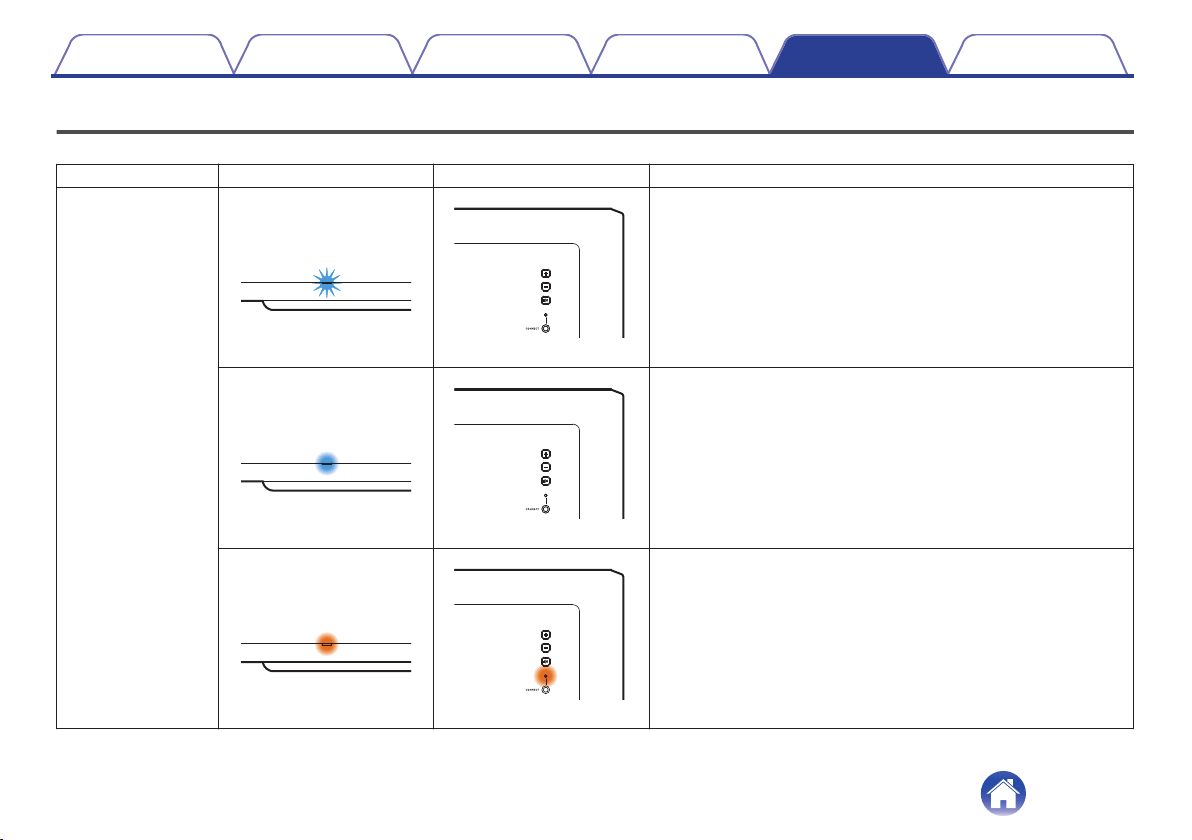
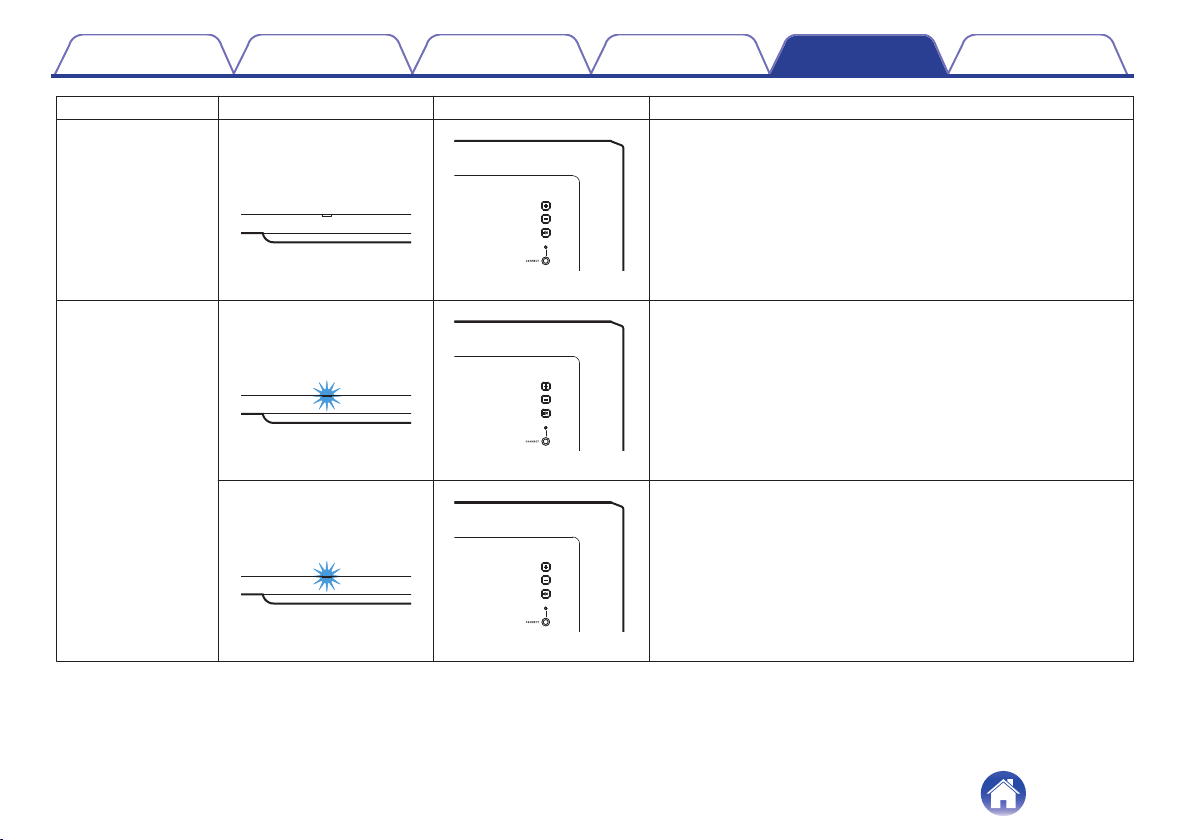
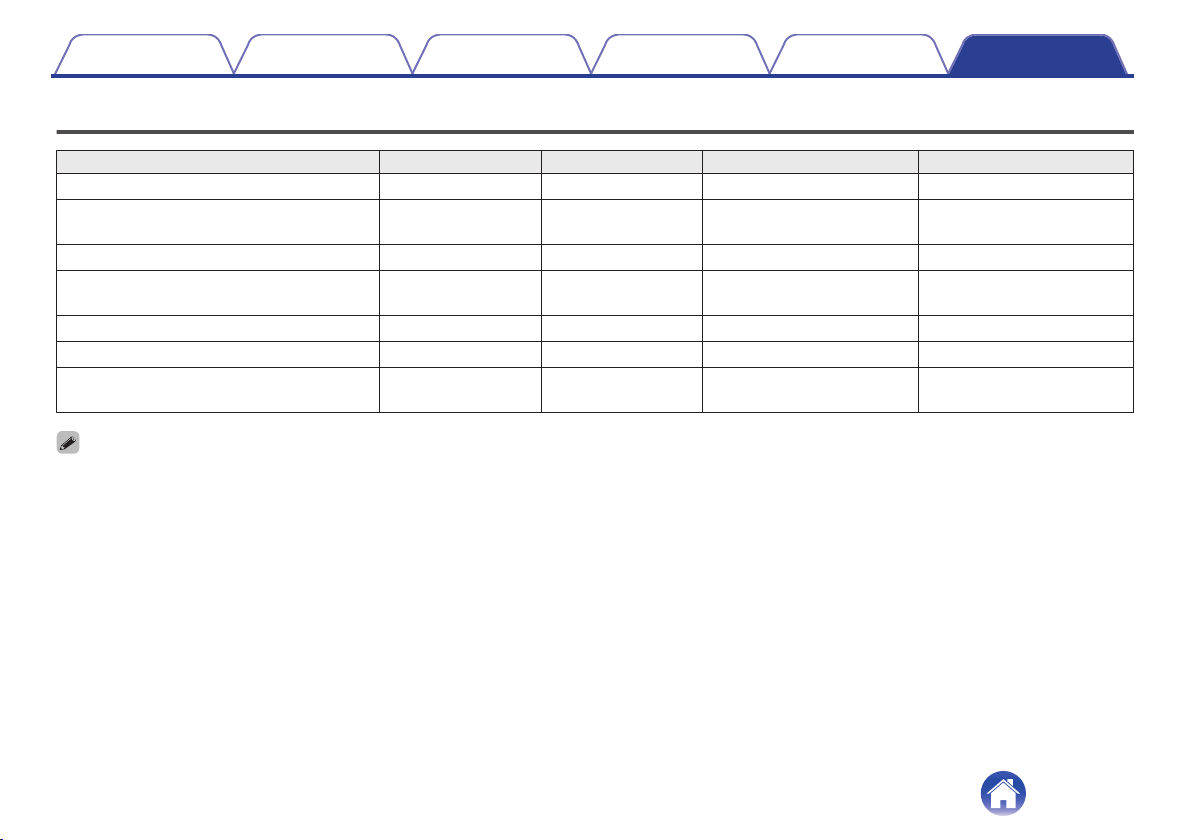
The LEDs on the front panel and rear panel change to indicate the current status.
Status Front LED action Rear LED action Description
Power on
(blink)
(off)
This unit is starting up or connecting to the network.
(solid)
(off)
This unit is connected to the network.
(solid)
(solid)
This unit is unable to connect to the network. Try to connect this unit
again.
Contents Connections Settings Tips Status LED Appendix
21
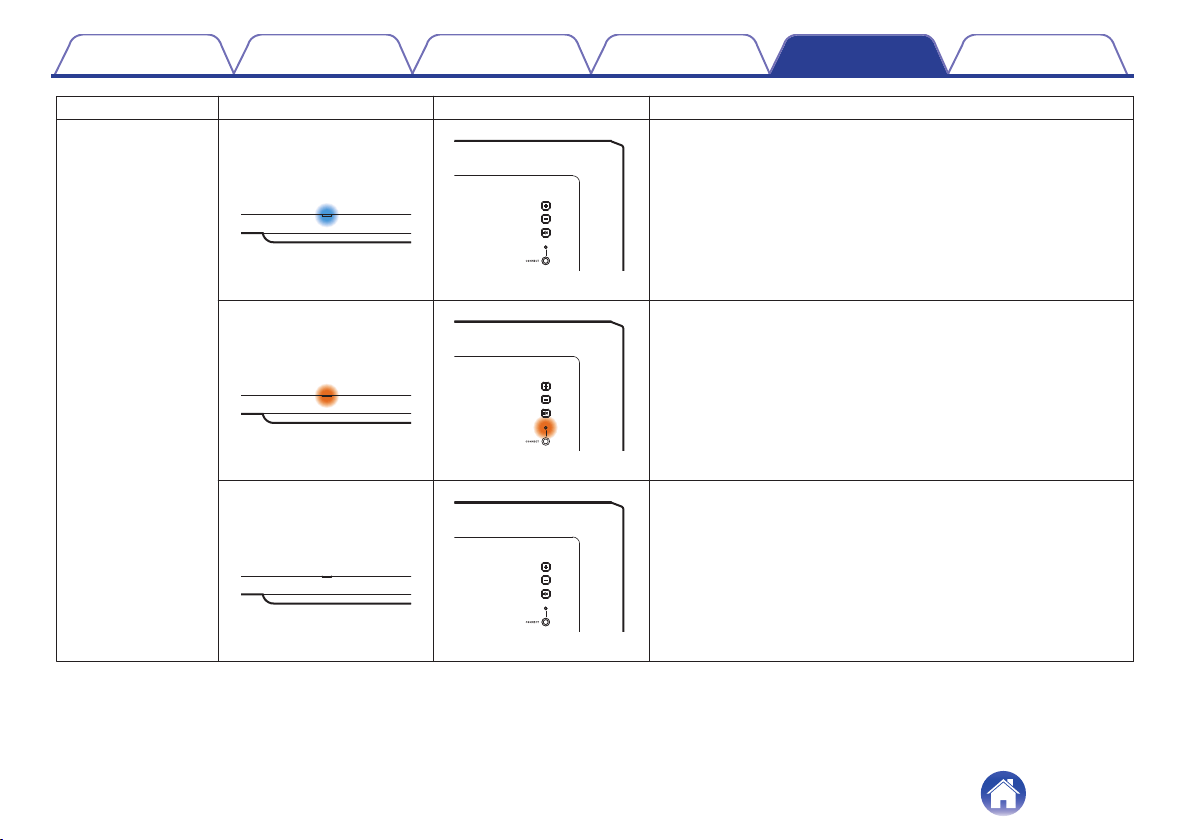
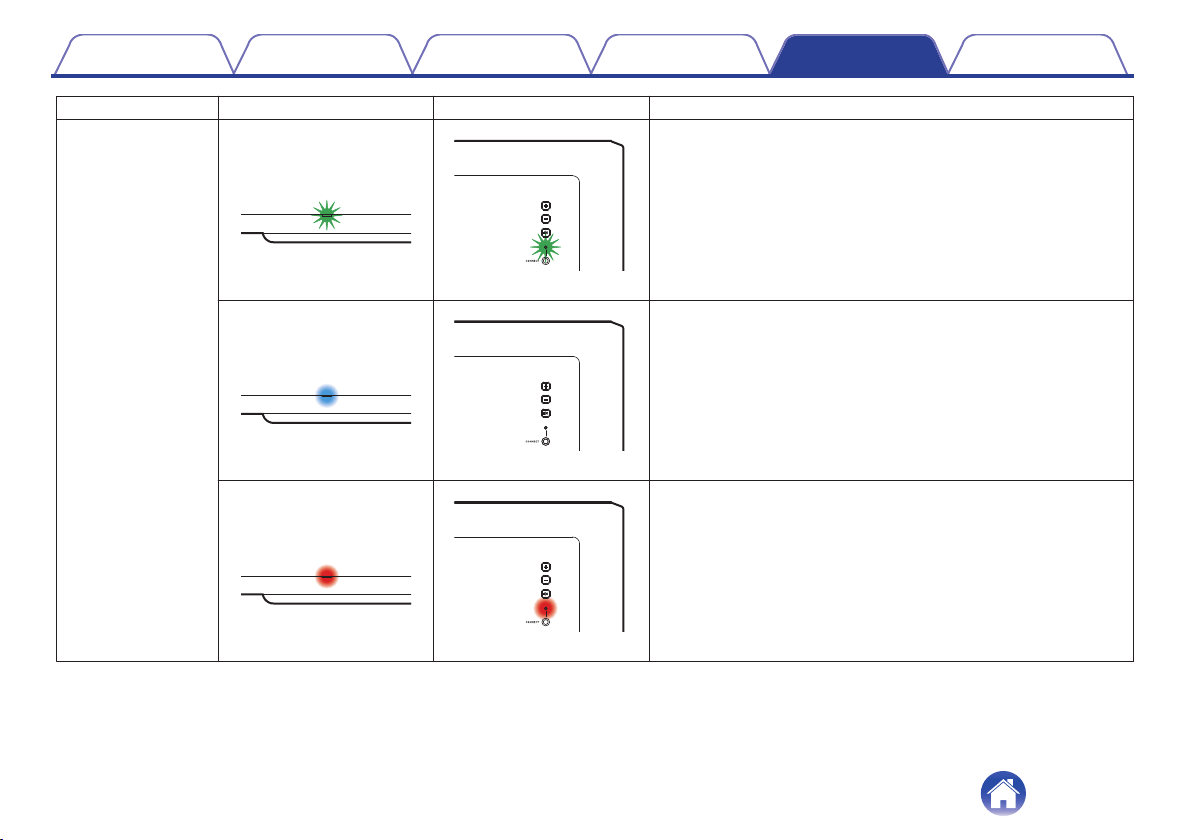
Status Front LED action Rear LED action Description
Quick start mode
(dimmed solid)
(off)
This unit is in quick start mode (Connected to your network).
(v p. 27)
(dimmed solid)
(dimmed solid)
This unit is in quick start mode (Not connected to your network).
(v p. 27)
(off)
(off)
This unit is in quick start mode (Paired with another HEOS built-in
device, but status of not being connected to your network continues
for 20 minutes or more) (v p. 27)
Contents Connections Settings Tips Status LED Appendix
22
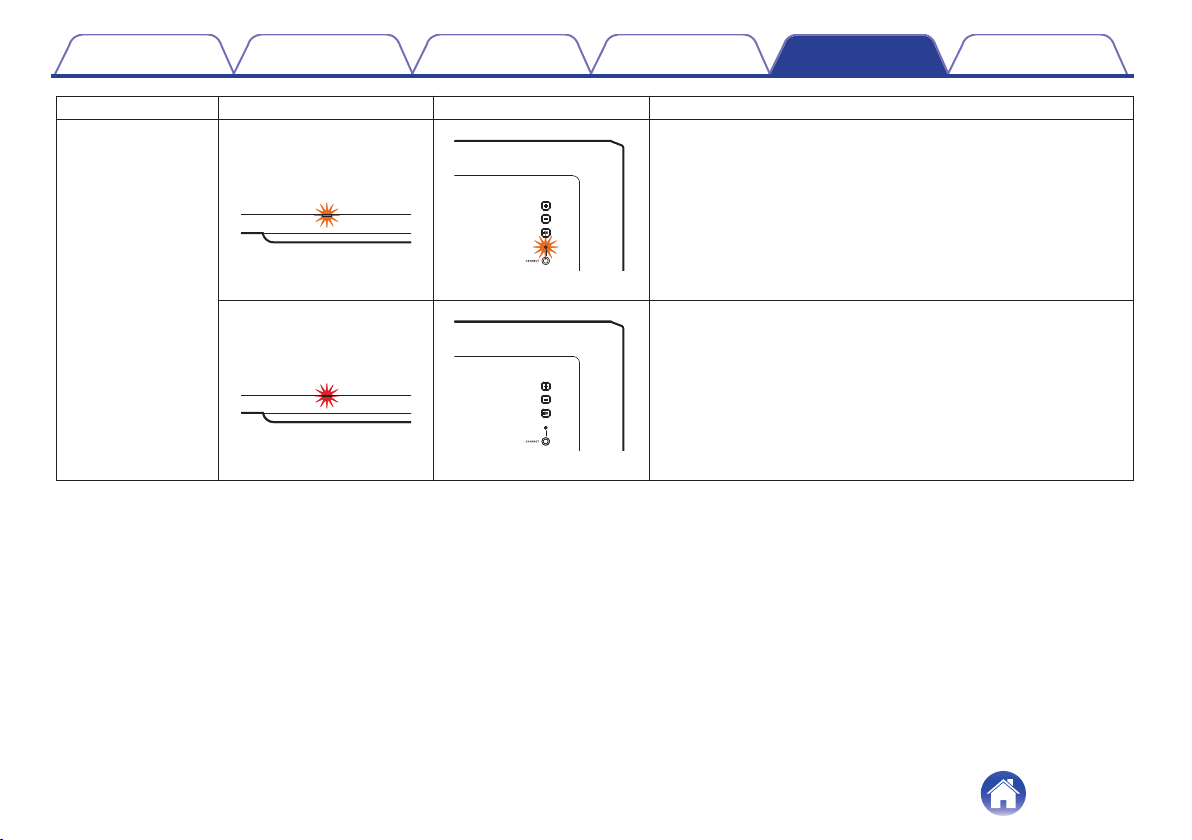
Status Front LED action Rear LED action Description
Firmware update
(blink)
(blink)
Firmware is being updated.
(slow blink (Not fade))
(off)
There is a firmware error. Check your usage environment, relaunch
the app, then try to update the firmware again.
Contents Connections Settings Tips Status LED Appendix
25
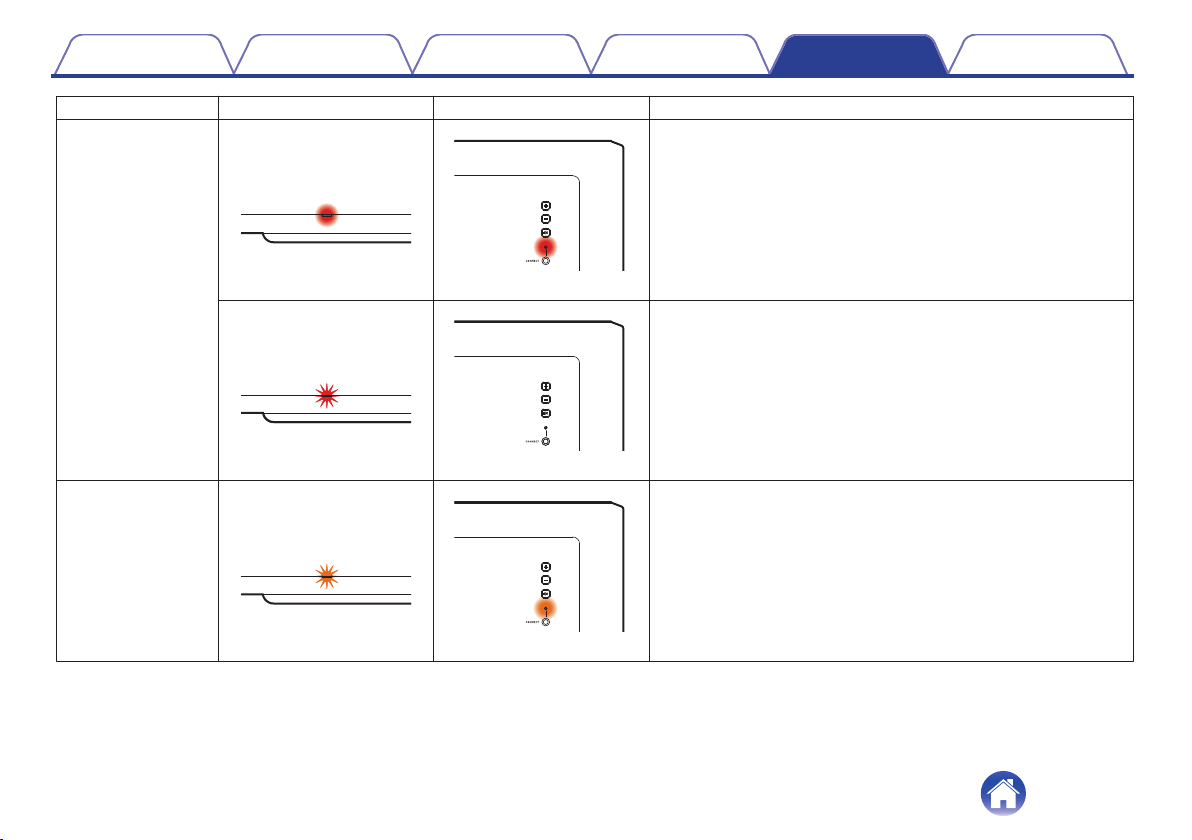
Status Front LED action Rear LED action Description
Error
(solid)
(solid)
There was a setup error. Check your usage environment, then
follow the correct procedure to try setup again. If the error occurs
again, restore factory settings and try setup again. (v p. 19)
(fast blink)
(off)
There is a hardware error. Unplug the power cord, wait a little while,
then plug the power cord back in.
Reset
(fast blink)
(solid)
Factory settings have been restored.
Contents Connections Settings Tips Status LED Appendix
26
Power management
Power modes
o
Quick start mode
This unit automatically enters quick start mode to save power in the
following cases. During quick start mode, this unit operations cause the
power to turn on.
For more information about the status LED during quick start mode,
refer to “Status LED table”. (v p. 22)
n
Ethernet
After around 20 minutes of no operation and no network access after
playing music via Ethernet.
n
Wi-Fi
After around 20 minutes of no operation and no network access after
playing music via Wi-Fi.
n
USB
After around 20 minutes of no operation and no network access after
playing music from a USB flash drive.
n
AUX input
After around 20 minutes of no audio.
o
Deep Standby
The device also has the ability to automatically enter “Deep Standby”
whenever the wired or wireless network connection is removed for
more than 60 minutes in quick start mode.
Status LED will turn off during Deep Standby.
To wake this unit from Deep Standby, you must press the volume or
mute buttons which will immediately turn on the front panel LED.
0
You also press the h button for 5 seconds, this unit enters the deep standby.
o
Off
To completely turn off the power to the device you must remove the
mains plug from the power outlet.
Contents
Connections Settings Tips Status LED Appendix
27
Supported file types and codecs
Frequency Sample rate File extension Codec Bit rates
32/44.1/48/88.2/96/176.4/192 kHz 16/24 bit .wav PCM –
32/44.1/48 kHz 16 bit .mp3
MPEG-1 Audio Layer 3
CBR/VBR
32 - 320 kbps
32/44.1/48 kHz 16 bit .aac/.m4a AAC-LC 48 - 320 kbps
32/44.1/48 kHz 16 bit .wma
wma9
CBR
CBR:48 - 192 kbps
44.1/48/88.2/96/176.4/192 kHz 16/24 bit .flac flac –
44.1/48/88.2/96/176.4/192 kHz 16/24 bit .m4a ALAC –
2.8/5.6 MHz 1 bit .dff/.dsf
DSDIFF
DSF
–
0
Files protected by DRM such as Apple’s Fairplay DRM, are not supported.
0
The Apple Lossless Audio Codec (ALAC) decoder is distributed under the Apache License, Version 2.0 (http://www.apache.org/licenses/LICENSE-2.0).
Contents Connections Settings Tips Status LED Appendix
28
Trademark information
The Wi-Fi CERTIFIED logo is a registered trademark of the Wi-Fi
Alliance.
Wi-Fi Certification provides assurance that the device has passed the
interoperability test conducted by the Wi-Fi Alliance, a group that certifies
interoperability among wireless LAN devices.
Contents Connections Settings Tips Status LED Appendix
29
Specifications
o
General
Operating temperature: 41 °F - 95 °F (5 °C - 35 °C)
Power supply: AC 100 – 240 V, 50/60 Hz (for Europe model)
AC 100 – 120 V, 50/60 Hz (for North America model)
Power consumption: 50 W
Power consumption in quick start mode: 1.8 W (Wi-Fi)
1.3 W (Ethernet)
Power consumption in deep standby mode: 0.1 W
o
Wireless LAN section
Network type (wireless LAN standard): Conforming to IEEE 802.11a/b/g/n/ac
(Wi-Fi
®
compliant)
z
Used frequency range: 2.4 GHz, 5 GHz
z
The Wi-Fi
®
CERTIFIED Logo and the Wi-Fi CERTIFIED On-Product Logo are registered trademarks of the Wi-Fi Alliance.
Contents
Connections Settings Tips Status LED Appendix
30


www.denon.com
3520 10819 00AD
©2021 Sound United. All Rights Reserved.
33