
Û²¶±§ ·¬ò
ëðŒ Ë´¬®¿ ØÜ ÔÛÜ ÌÊ
ÞÐëðìðËØÜ
ײ-¬®«½¬·±² Ó¿²«¿´
éèééóðï ÞÐëðìðËØÜ ÌÊ ×Þ Ý±ª»® ¿®¬ò·²¼¼ ï ïëñðçñîðïì ïïæðé ¿³
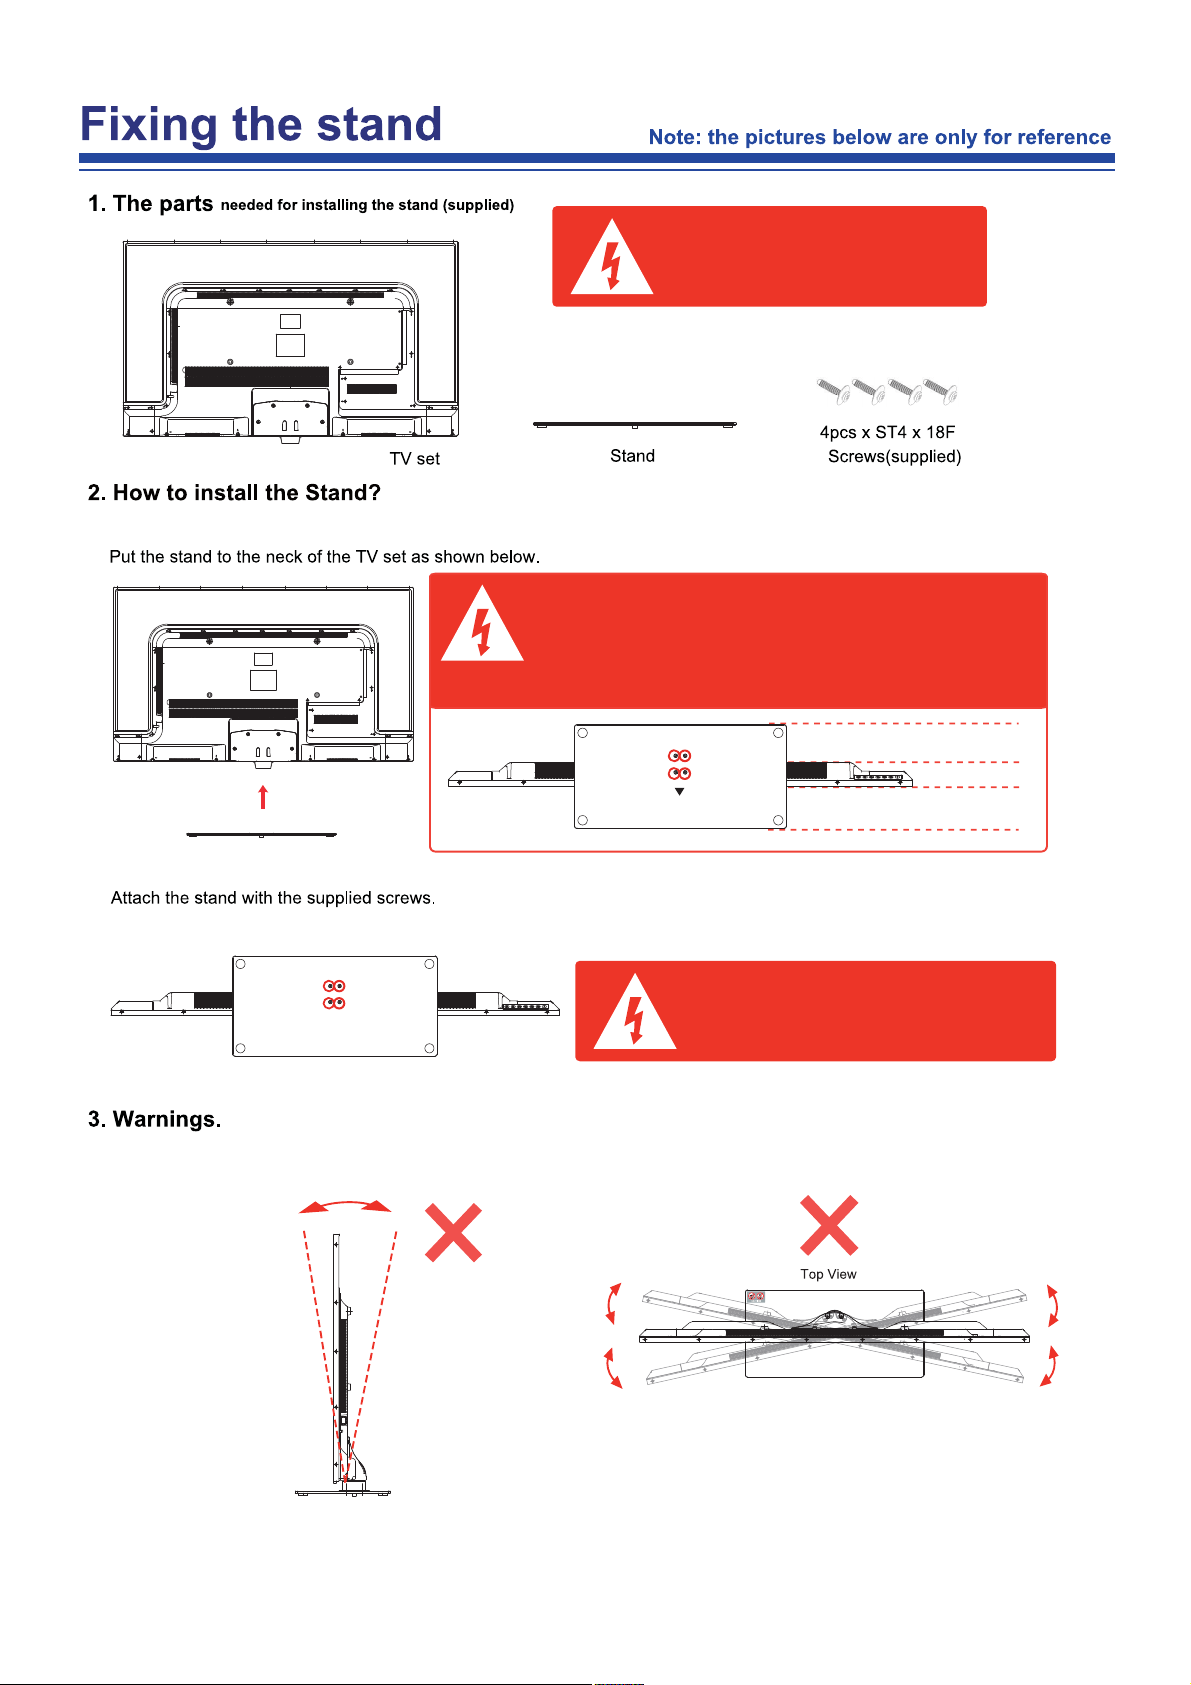
Before installing the stand, please check that
you have all of the parts and that there is no
visible damage. If a part is missing or appears
damaged, please contact customer service.
Back
Front
Place the TV face down on a soft and flat surface (blanket, foam, cloth, etc.) to prevent any damage to the TV.
1. Before you put on the stand, please make sure the direction is correct
as shown below.
2. When you are putting on the stand, please make sure the neck of the
TV set is in the correct position and attached tightly.
If you do not attach the stand correctly, it will make the TV unstable
and may tip over.
When attaching the stand, make sure the screws
are attached tightly.
If the screws do not attach tightly, it will lead the TV
to be unstable or may even tip over.
a. It can not be tilted to the front or back as
shown below. Doing so may damage the
stand.
b. It can not be tilted to the right or left as
shown below. Doing so may damage the
stand.
Front

Contents
Safety Information
OSD Menu
1.Channel
menu
2.
3.
4.
2
6
17-24
17-18
19
20
21
22
23
Names of earch Part
7-11Connections
Remote Control
Basic Operation
12-14
15-16
Multimedia Operation 25-27
Recording Operation 28-29
5.
5.
Picturemenu
Soundmenu
Time menu
Look menu
Setupmenu
32
Specifications
31
30
Maintenance and Service
USB Multimedia Playback Format
1noituaC
б©»® Í«°°´§
1
ײ-¬¿´´¿¬·±²
2
Ë-» ¿²¼ Ó¿·²¬»²¿²½»
3

Important Safety Instructions
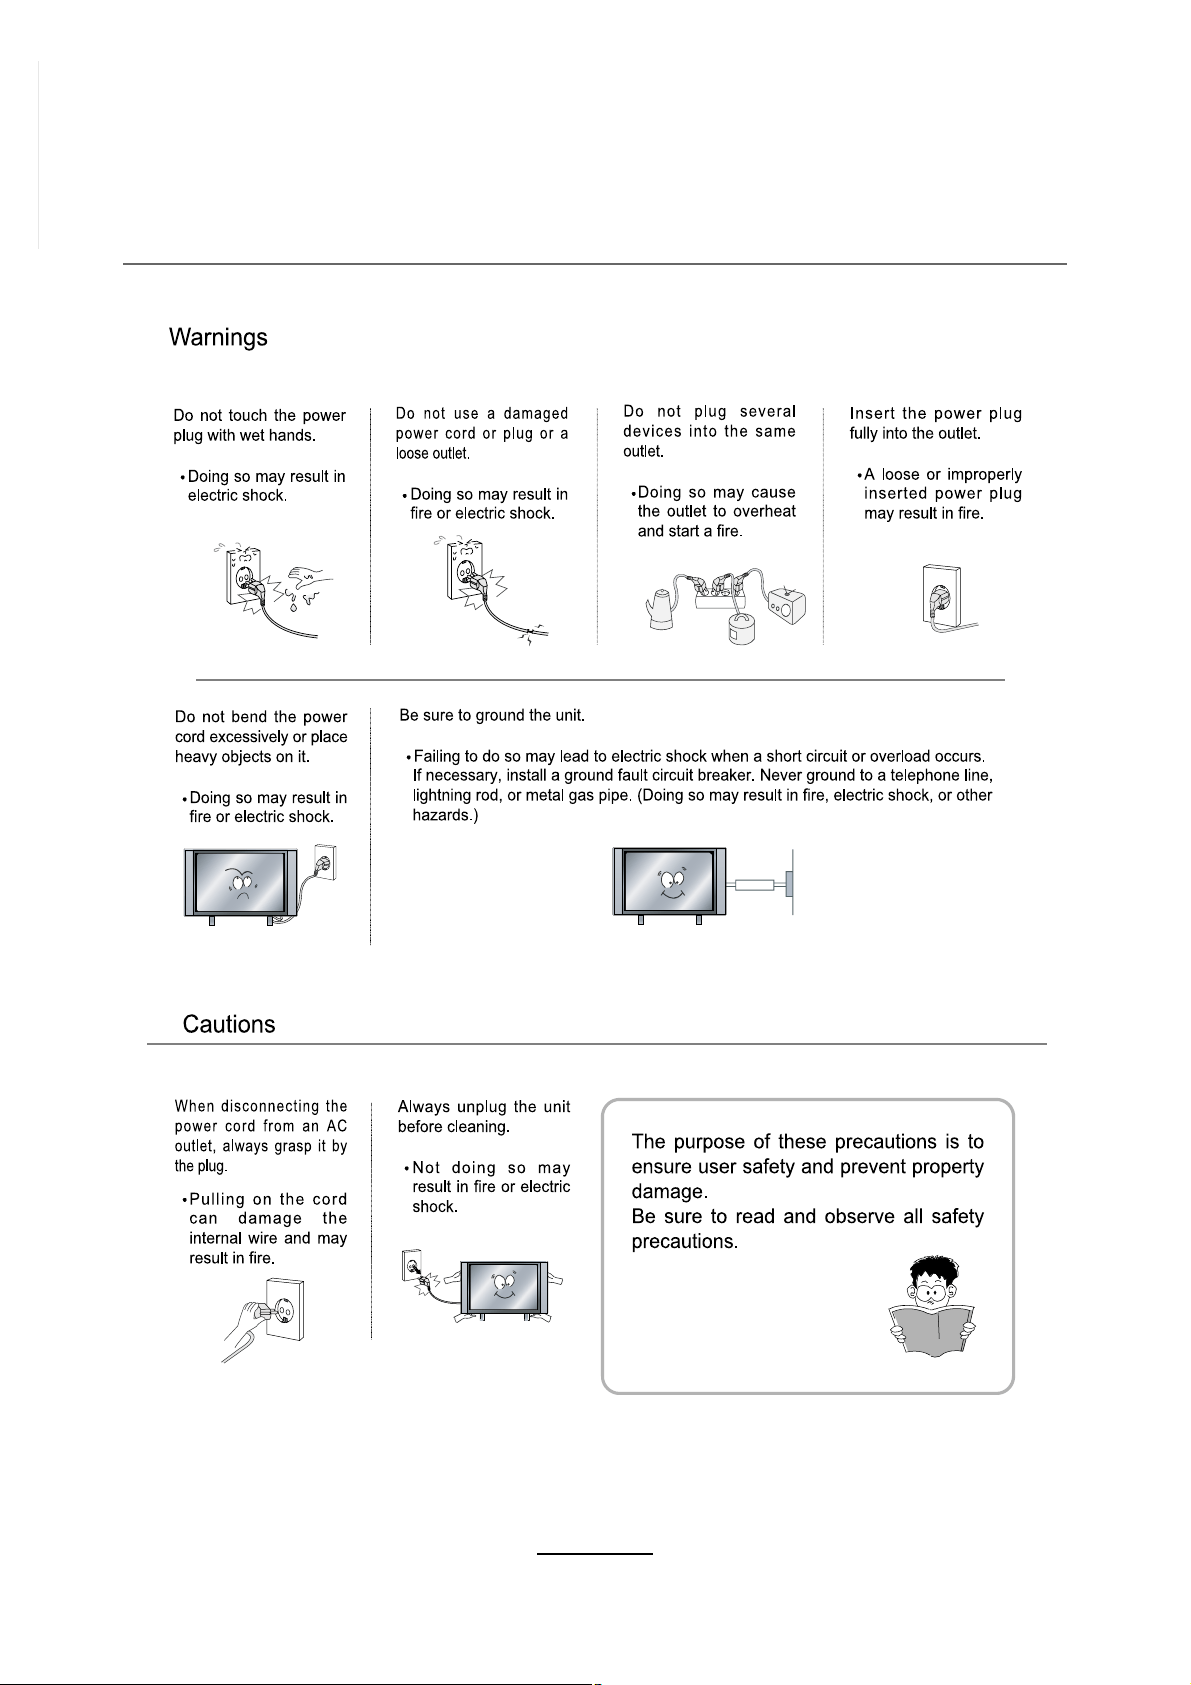
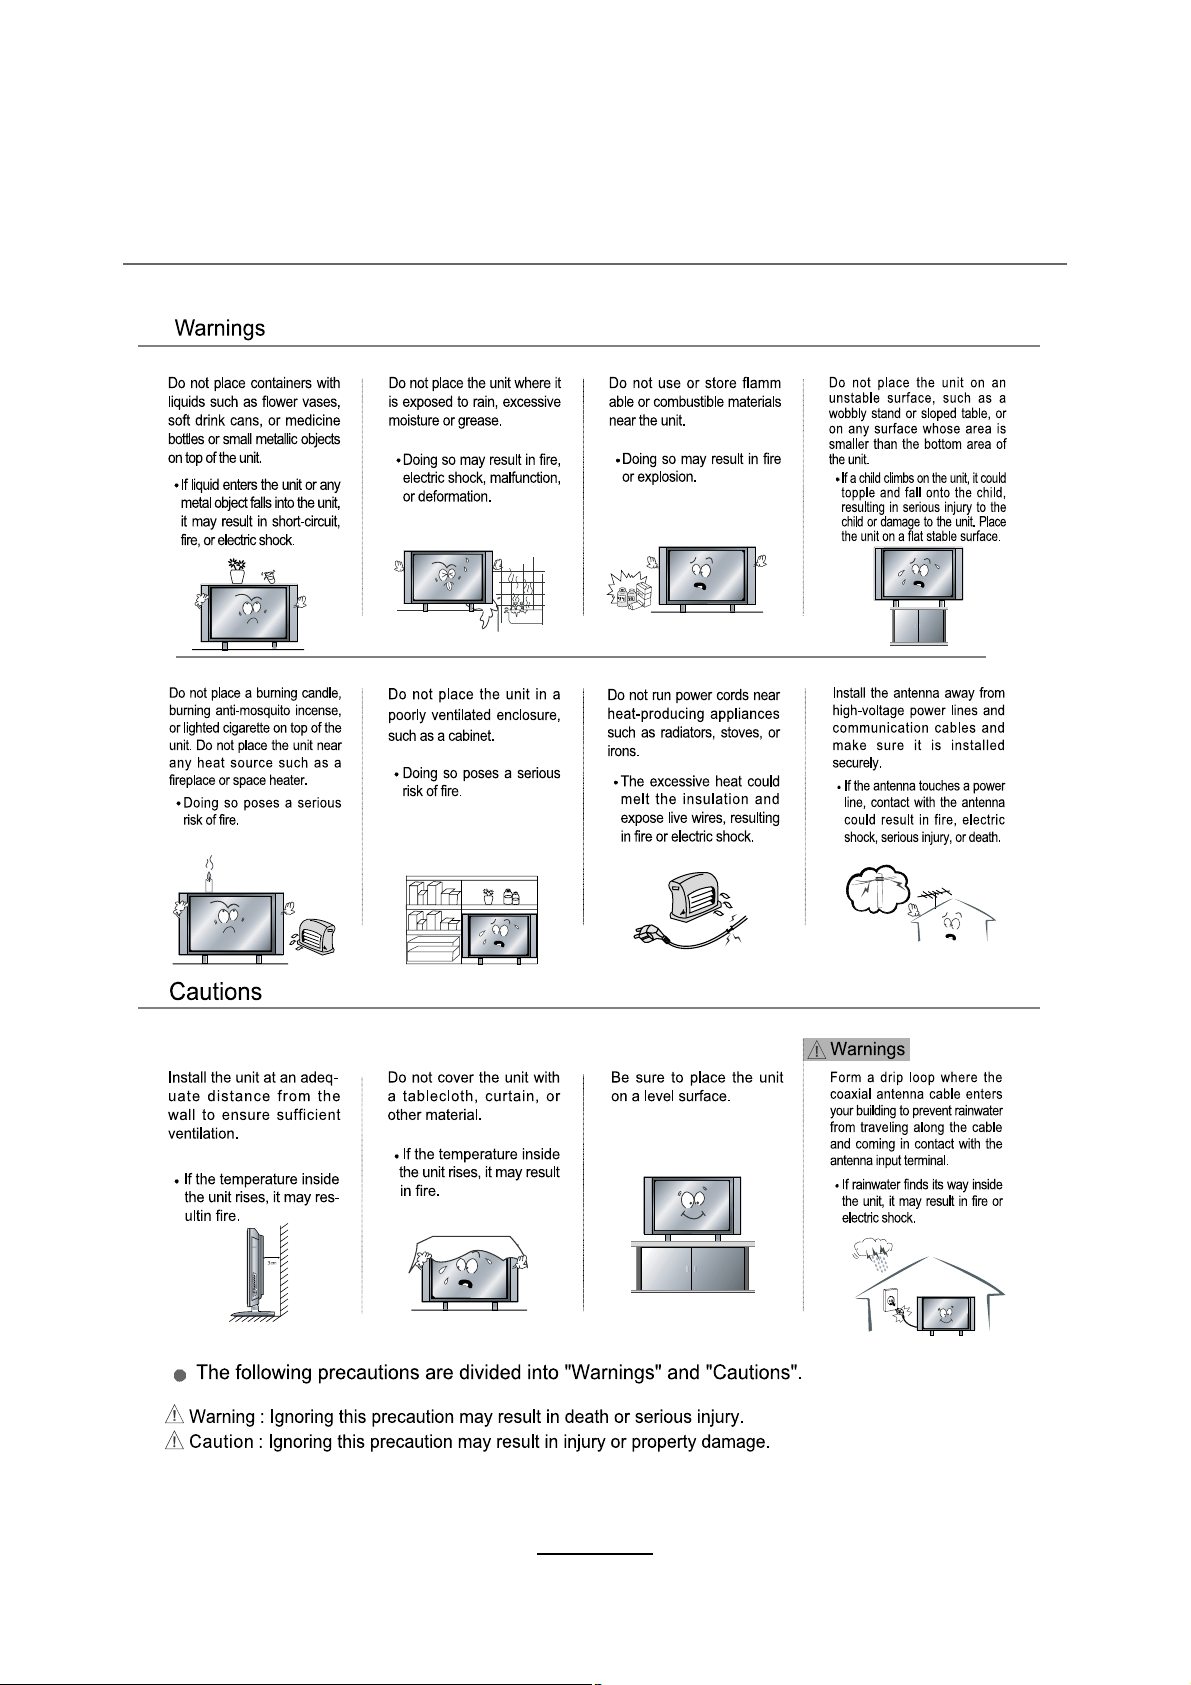
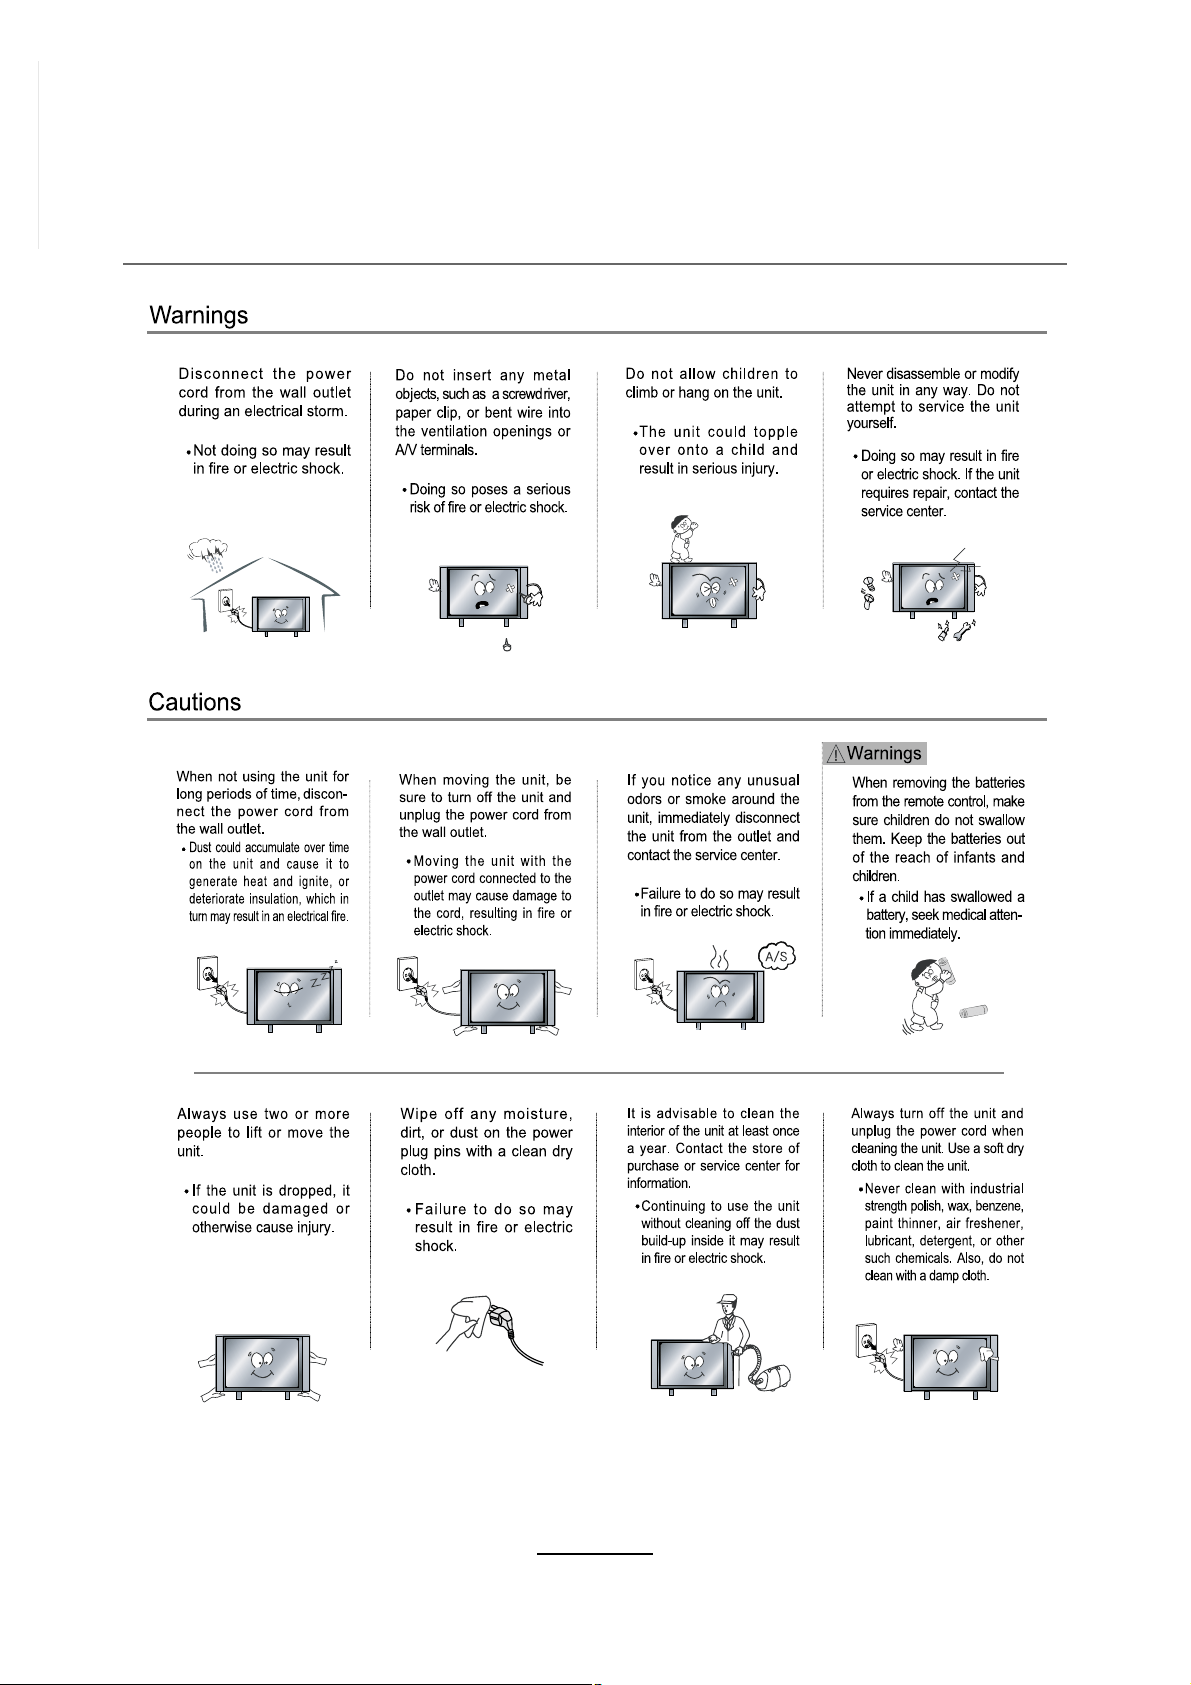
Warnings and Precautions
To prevent any injuries, the following safety precautions should be observed in the
installation, use servicing and maintenance of this equipment.
Before operating this equipment, please read this manual completely and keep it for future
reference.
1) Read these instructions.
2) Keep these instructions.
3) Heed all warnings.
4) Follow all instructions.
5) Do not use this apparatus near water.
6) Do not clean with strong chemical agents
7)The appliance is intended for household use only, and not for commercial or
industrial use.
8) Do not block any of the ventilation openings. Install in accordance with the
manufacturer's instructions.
9) Do not install near any heat sources such as radiators, heat registers, stoves, or
other apparatus (including amplifiers) that produce heat.
10) Care required with the use of this apparatus in tropical climates. Do not use the
appliance where temperatures is over 40°C.
11) Protect the power cord from being walked on or pinched particularly at plugs,
convenience receptacles, and the point where they exit from the apparatus.
12) Only use the attachments/accessories specified by the manufacturer.
13) Use only with a stand, or bracket, specified by the manufacturer, or sold with the
apparatus.
14) Unplug this apparatus during lightning storms or when unused for long periods of
time.
15) Do not operate the unit if it is not working normally or has been damaged in
anyway.Turn the unit off, unplug it from the power source and consult service
personnel. Do not attempt to service this unit yourself.
16) Refer all servicing to qualified service personnel. Servicing is required when the
apparatus has been damaged in any way, such as power supply cord or plug is
damaged, liquid has been spilled or objects have fallen into the apparatus, the
apparatus has been exposed to rain or moisture, does not operate normally, or has
been dropped.
Important Safety Instructions
17) Do not listen to headphones at high volumes; the excessive sound pressure from
earphones can cause hearing loss.
18) Do not subject the product to harsh impacts. Do not drop the appliance. This may
result in damage to the product.
Do not touch, push or rub the surface of the LCD screen with any sharp or hard
objects. When the surface of the LCD screen becomes dusty, wipe it ently with an
absorbent cotton cloth or other soft material like chamois. Do not use acetone, toluene
or alcohol to clean the surface of the screen. These chemicals will cause damage to
the surface.
19) Please observe the local regulations regarding the disposal of packaging
materials,
exhausted batteries and old equipment.
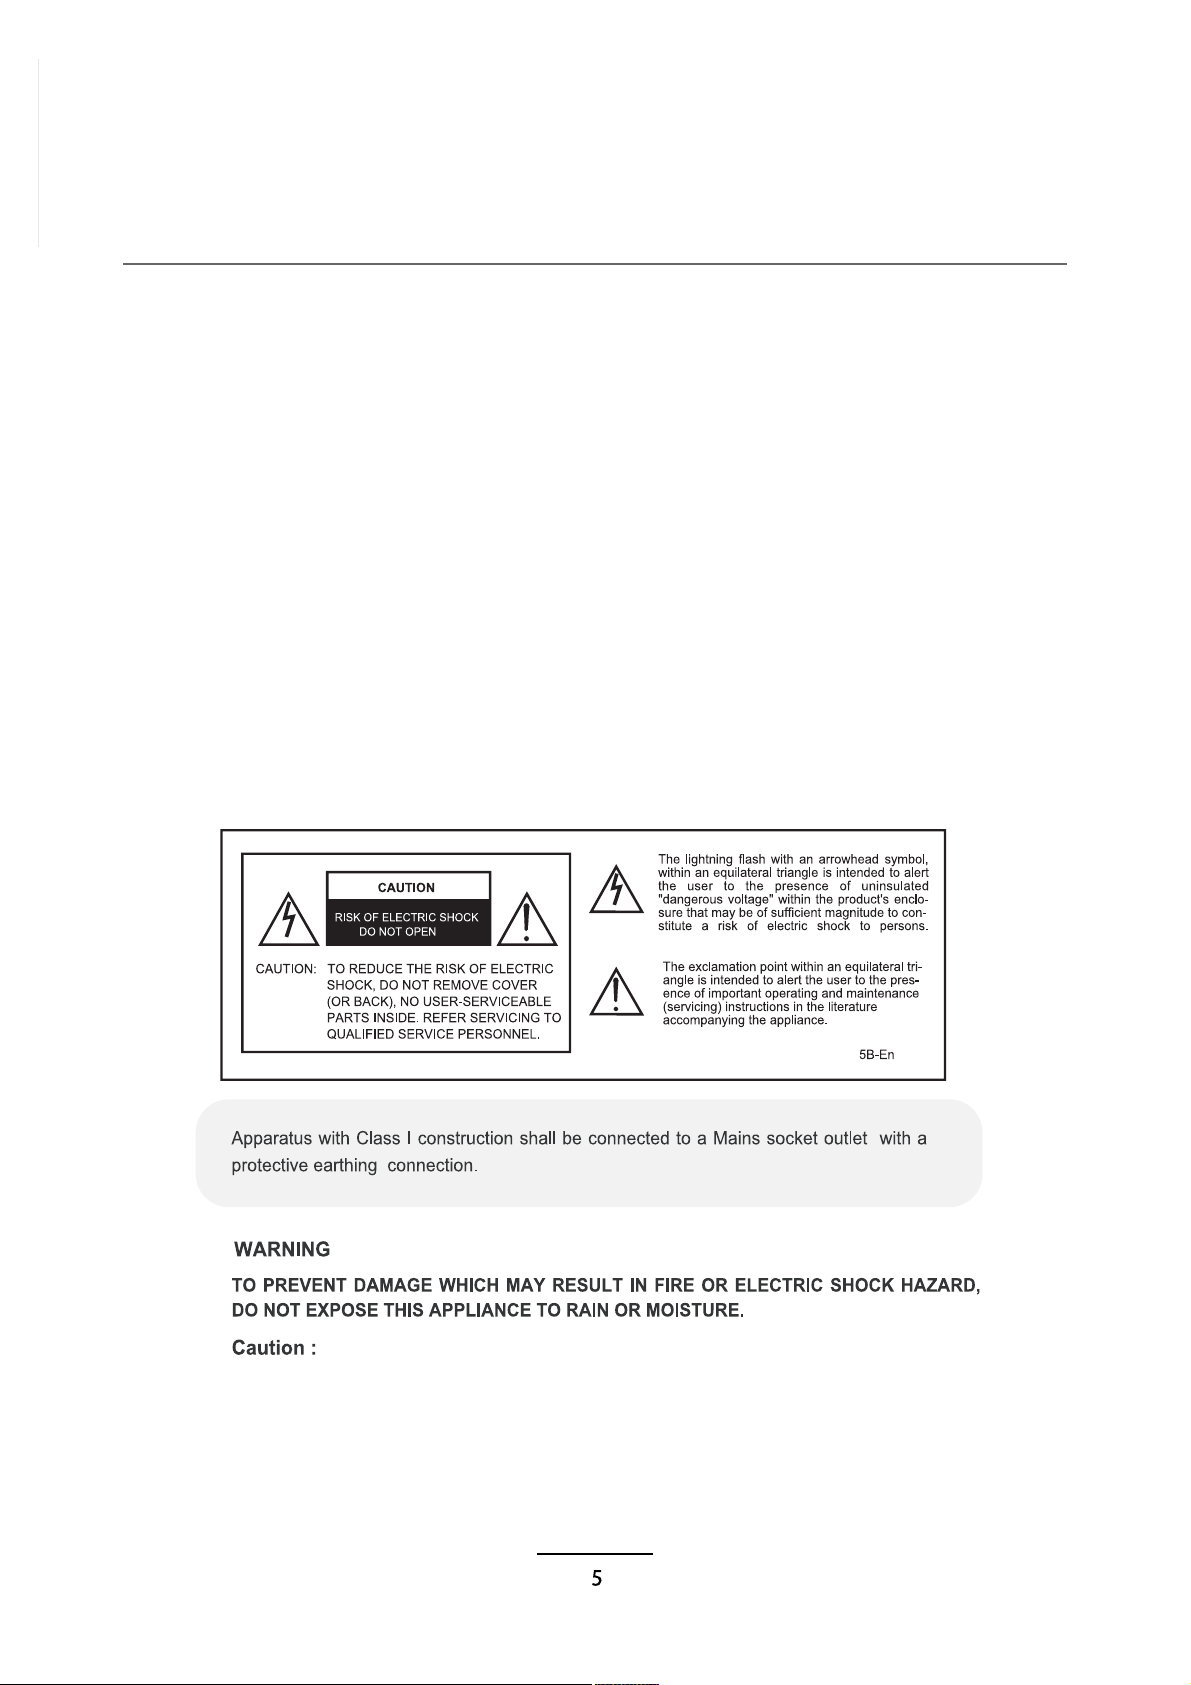
WARNING: To reduce the risk of fire or electric shock, this apparatus shall not be
exoposed to dripping or splashing and no objects filled with liquids, such as vases,
shall be placed on the apparatus.
- These servicing instructions are for use by qualified service personnel only.
To reduce the risk of electric shock, do not perform any servicing other than that contained in the
operating instructions unless you are qualified to do so.
- Any changes or modifications not expressly approved by the party responsible for compliance
could void the user's authority to operate the equipment.
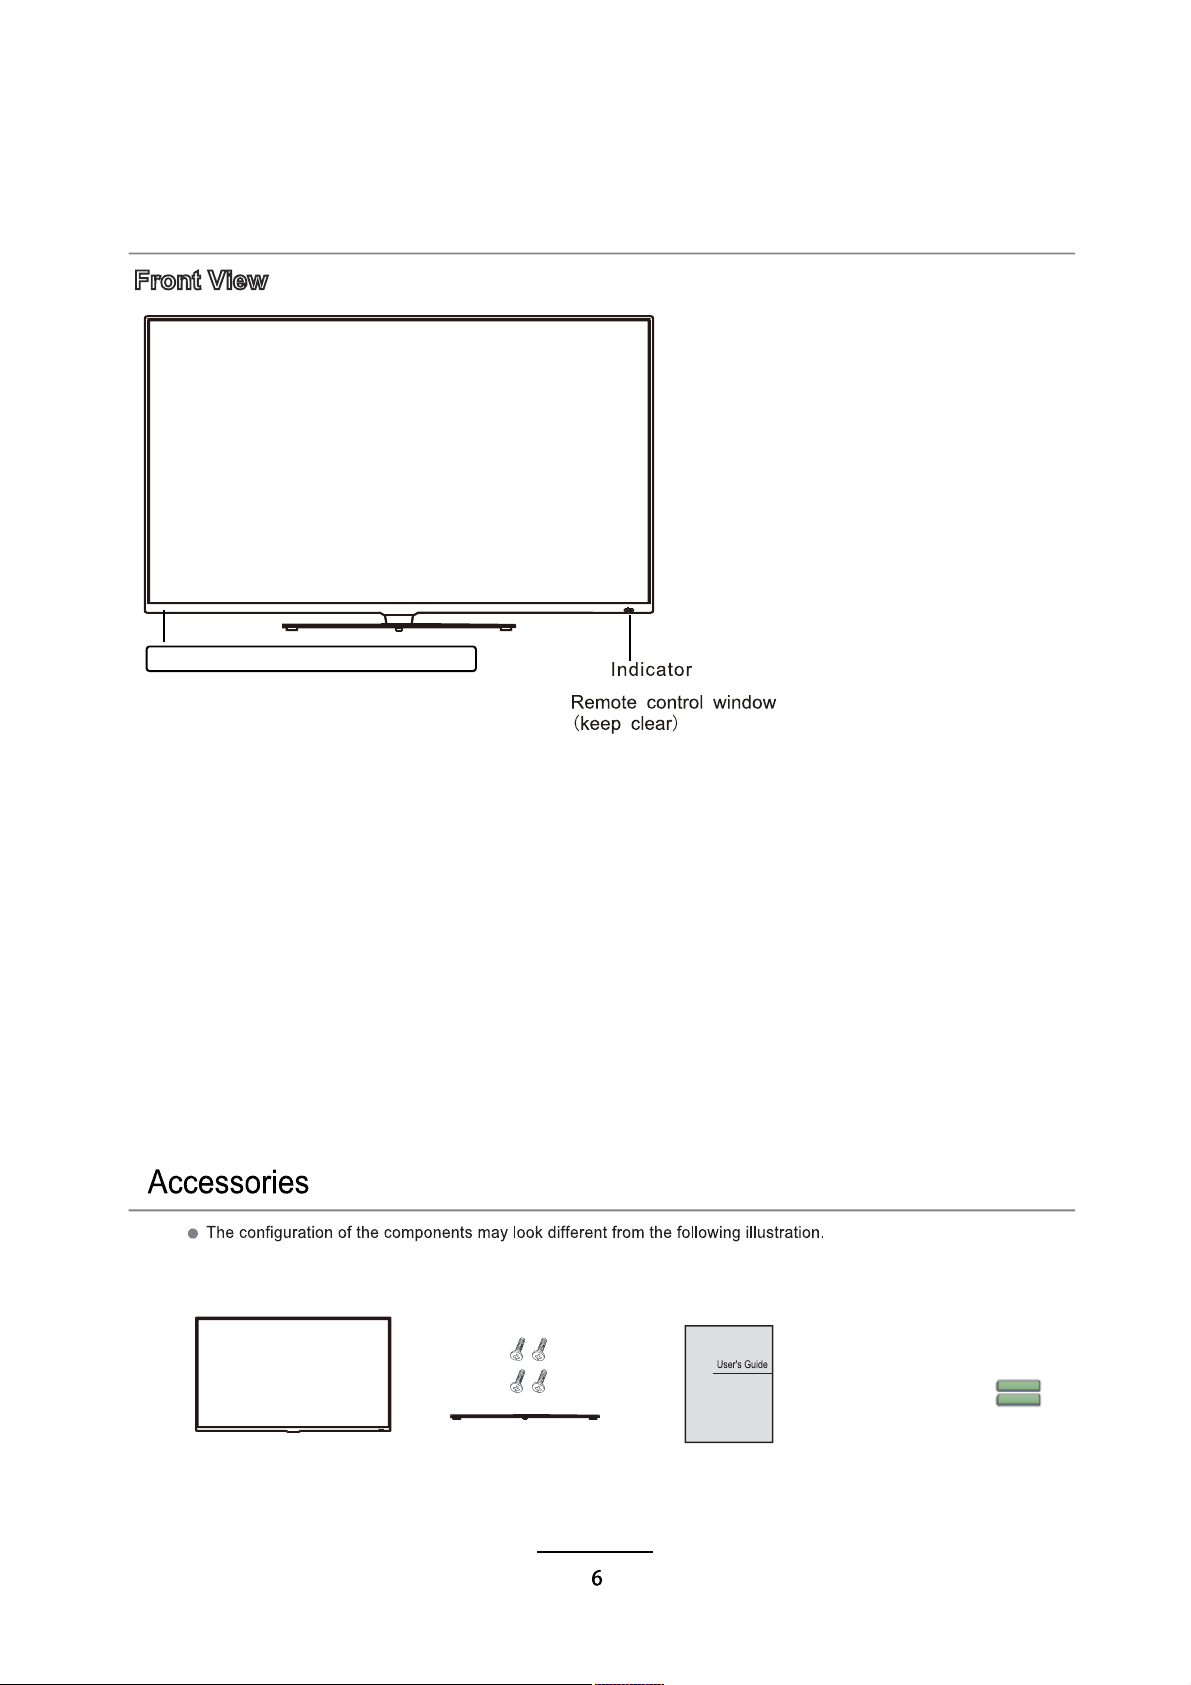
User’s GuideTV Set Stand Base,4 Screws
Remote Control
Names of each part
Batteries
Front View
1). (IR) Infrared Receiver: Receives IR signals from the remote control.
(Power on/Standby)LED Indicator: Press STANDBY to turn on and off.
Indicator on(Red) Standby mode
Indicator on(Green) Power on mode
LED
SOURCE: Press to display the input source menu.
MENU: Press to display the OSD menu, press again to exit the menu.
CH+/-: Press to scan through channels.
VOL+/-: Press to adjust the volume.
STANDBY: Turn on/standby theTV set.
SOURCE
MENUCH+
CH-
VOL+VOL-
STANDBY
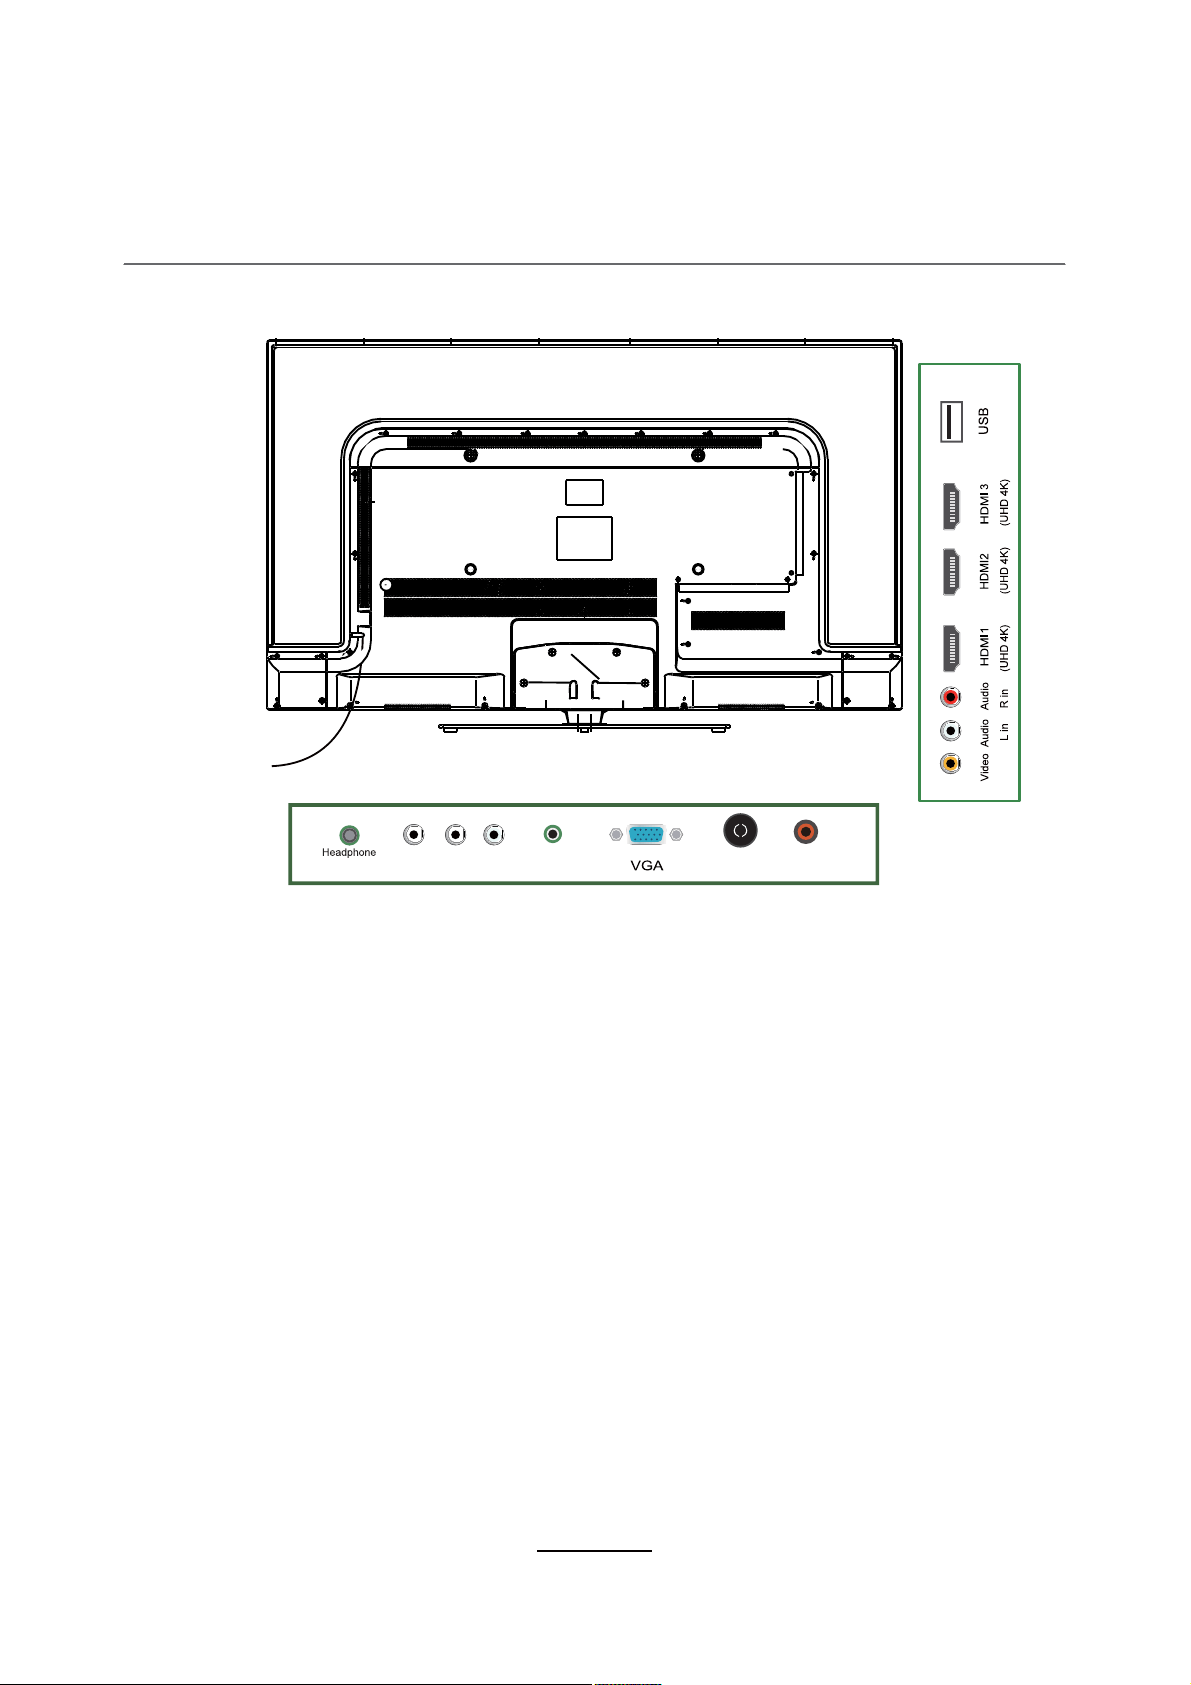
Connections
TV Aerial: Connect antenna or cable 75 Ohm coaxial to receive TV signal.
AC POWER IN: Connect to power.
HDMI1/2/3(UHD 4K): Connect it to the HDMI of DVD or other equipment.
VGA: For PC display.Connect it to the D-Sub 15 pins analog output connector of the PC.
PCAudio in: Connect it to the audio output terminal of PC.
Digital audio out:
Digital output to AV receiver.
YPbPr: Connect it to the YPbPr video output terminal of DVD with the Converter cable.
USB: Connect to USB device for multimedia
Headphone out: Connect it to your headphone or other audio equipment.
AC POWER IN
PC
TV AerialY Pb Pr Audio in
out
Digital
audio out
VIDEO: Connect to video output terminal of external devices.
L/R in: Connect to the audio output terminal of external devices.(shared with YPbPr)
7
Connections
3
VideoAudioAudio
(UHD 4K) (UHD 4K) (UHD 4K)
USB
L in R in
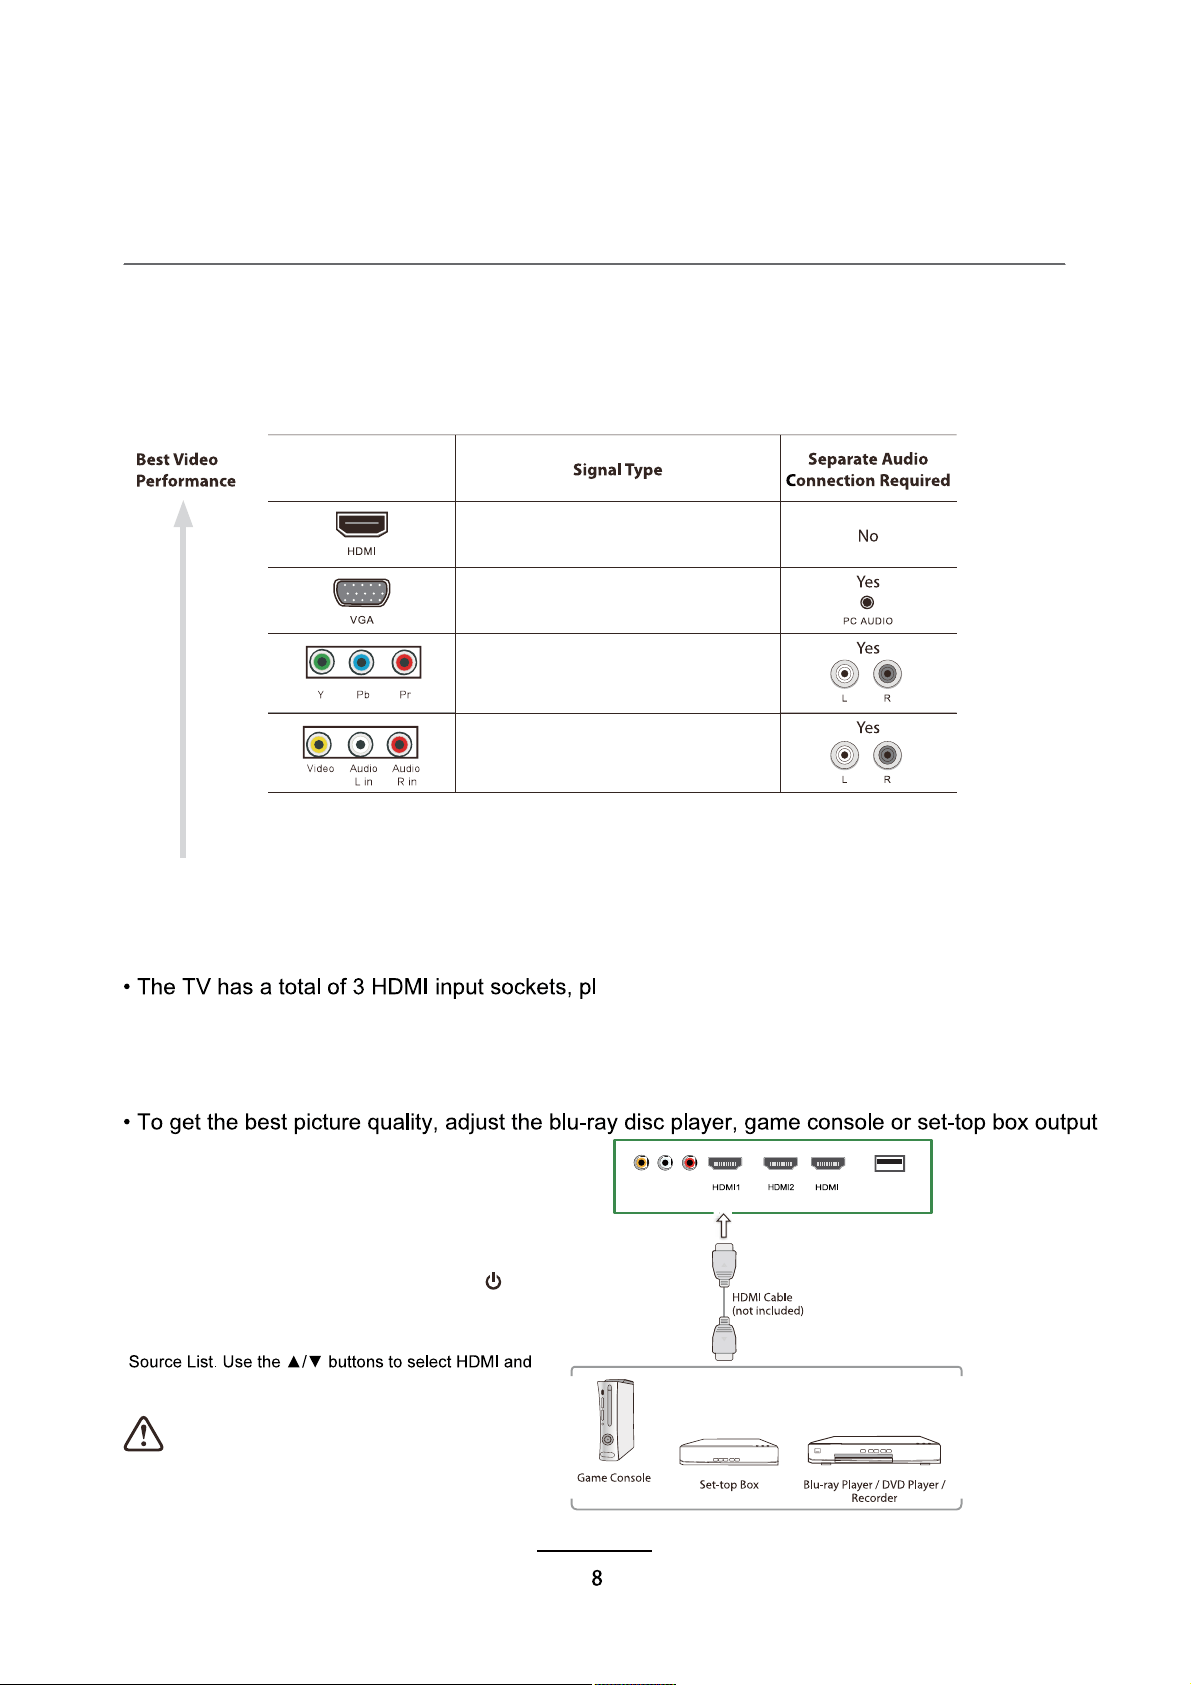
Making Video and Audio Connections
Connecting an AV Device with an HDMI Cable
Not all AV devices have the ability to connect to a TV, please refer to the owner's manual of your
AV device for compatibility and connection procedures. When connecting any external AV device,
do not connect the mains cable to the mains socket until all other connections are complete.
This TV can accept High-Definition Multimedia Interface (HDMI) and supports HDCP
(High-Bandwidth Digital Content Protection) Protocol.
ease make sure the correct input source is
selected corresponding to your connected HDMI input socket.
When you connect to the output of an HD ready player (blu-ray disc player, game console, set-top
box or computer) switch to the HDMI function and the TV will automatically detect the resolution
used by the HDMI source.
resolution up to 3840x2160, 24p/25p/30p.
1. Use an HDMI cable to connect the TV's HDMI input
socket to the external AV device's HDMI output
socket.
2. Plug the connected devices into the mains socket
3. Press the STANDBY button on the TV or the
button on the remote control to turn on your TV.
4. Press the SOURCE button on the TV or the
SOURCE button on the remote control to display the
then press the OK button to confirm.
Although this TV is able to connect to an HDMI
NOTE: This TV only supports UHD TV through
HDMI1/2/3 with resolution 3840x2160, 24p/25p/30p.
device, it is possible that some devices may
not operate correctly.
HDMI
(480i/480p/576i/576p/720p/1080i/1080p
3840x2160, 24p/25p/30p )
Component Video
(480i/480p/576i/576p/720p/1080i/1080p)
PC
Composite Video
Connections
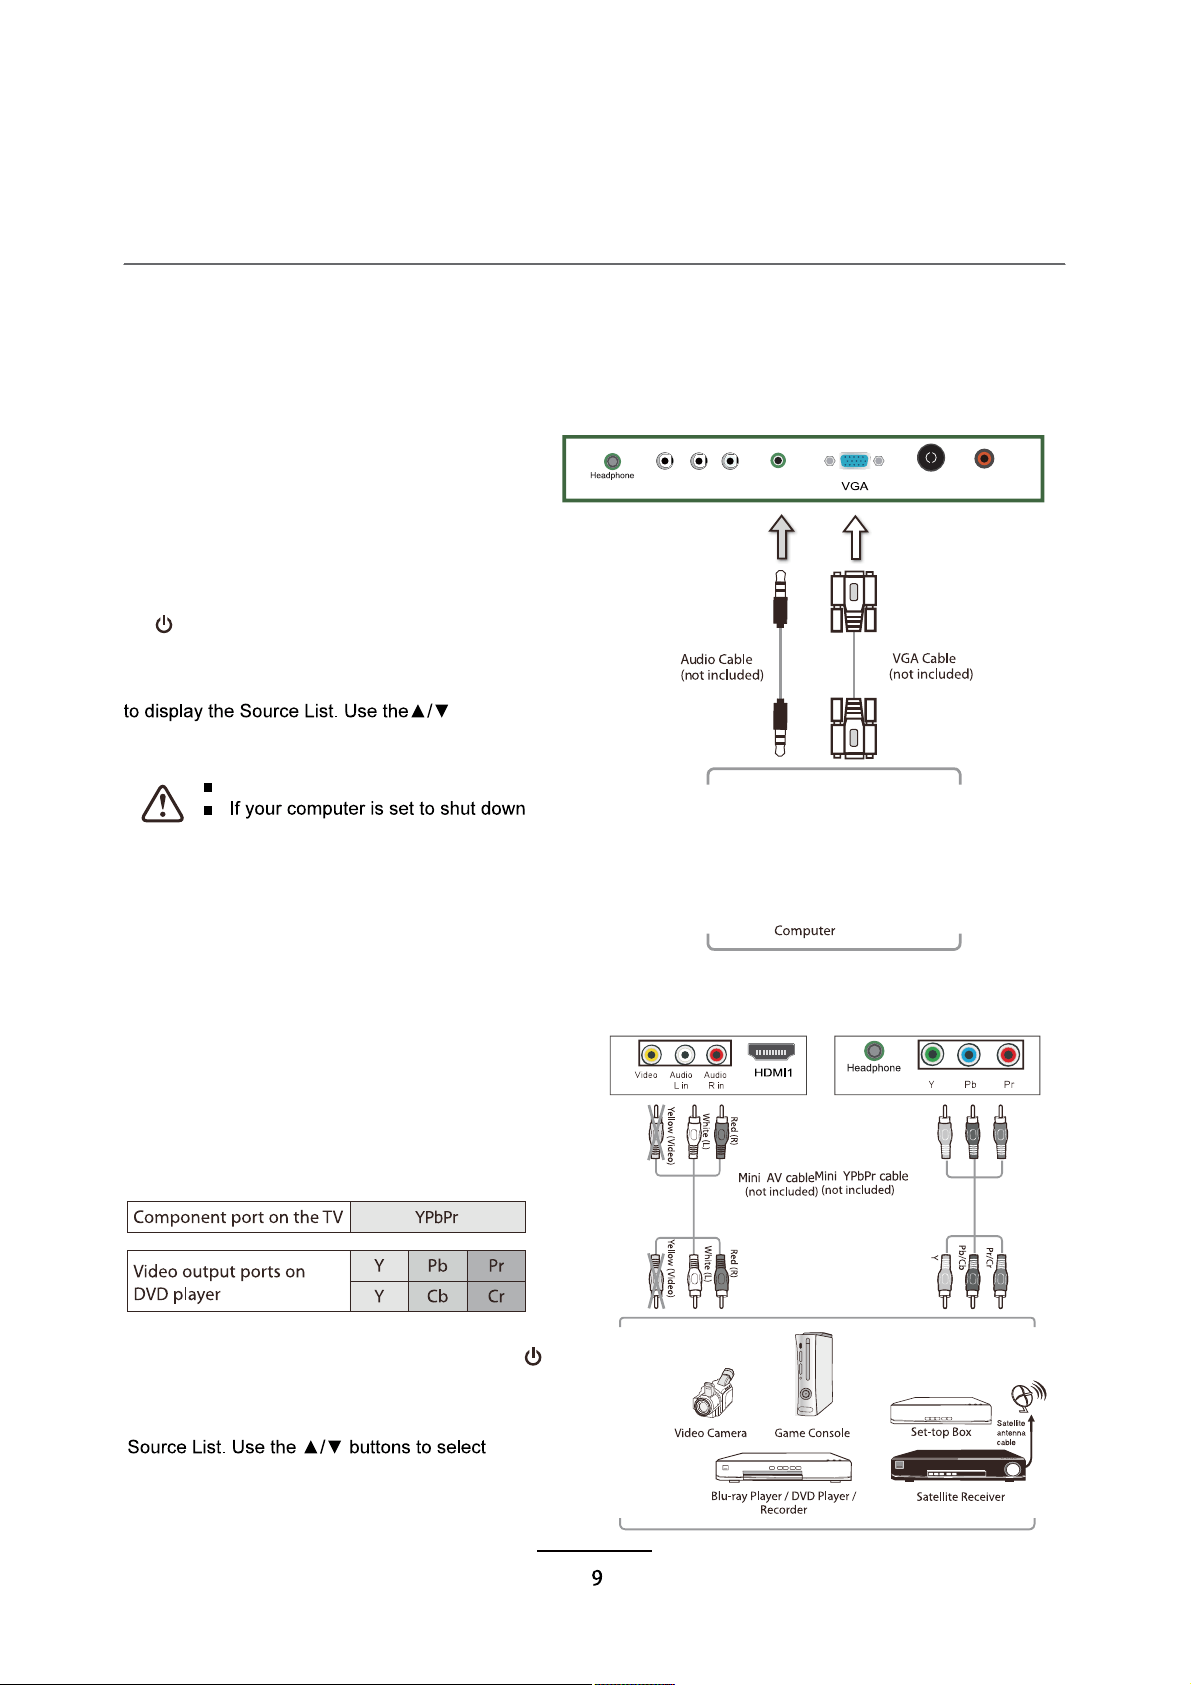
Connecting a Computer with a VGA Cable
Connecting an AV Device with a Component (YPbPr) Cable
Not all AV devices have the ability to connect to a TV, please refer to the owner's manual of your
AV device for compatibility and connection procedures. When connecting any external AV device,
do not connect the mains cable to the mains socket until all other connections are complete.
1. Use a VGA cable to connect theTV's PC
input socket to a computer's VGA output
socket. Use an audio cable to connect the
TV's PCAUDIO input socket to the
computer's audio output socket.
2. Plug the connected devices into the
mains socket
3. Press the STANDBY button on theTV or
the button on the remote control to turn
on yourTV.
4. Press the SOURCE button on theTV or
the SOURCE button on the remote control
buttons to select PC and then press the OK
button to confirm.
The best resolution is 3840x2160
after a few minutes of idle mode, theTV
will also switch to standby due to no
signal being received, this is to save
energy. Press the STANDBY button on
theTV when viewed from the front or the
(!) button on the remote control to restart
theTV.
PC
TV AerialY Pb Pr Audio in
out
Digital
audio out
1. Use a component cable to connect theTV'sYPbPr
input sockets to an externalAV device's component
output sockets.
2. Use anAV cable to connect theTV'sAV input sockets
to the externalAV device's component audio output
sockets. Video( Yello,Blue,Red)(Audio Left = white, and
Audio Right = red)
3. Plug the connected devices into the mains socket
4. Press the STANDBY button on theTV or the
button on the remote control to turn on yourTV.
5. Press the SOURCE button on theTV or the
SOURCE button on the remote control to display the
YPbPr and
then press the OK button to confirm.
NOTE: This type of connection cannot support UHD TV.
out
(UHD 4K)
Connections
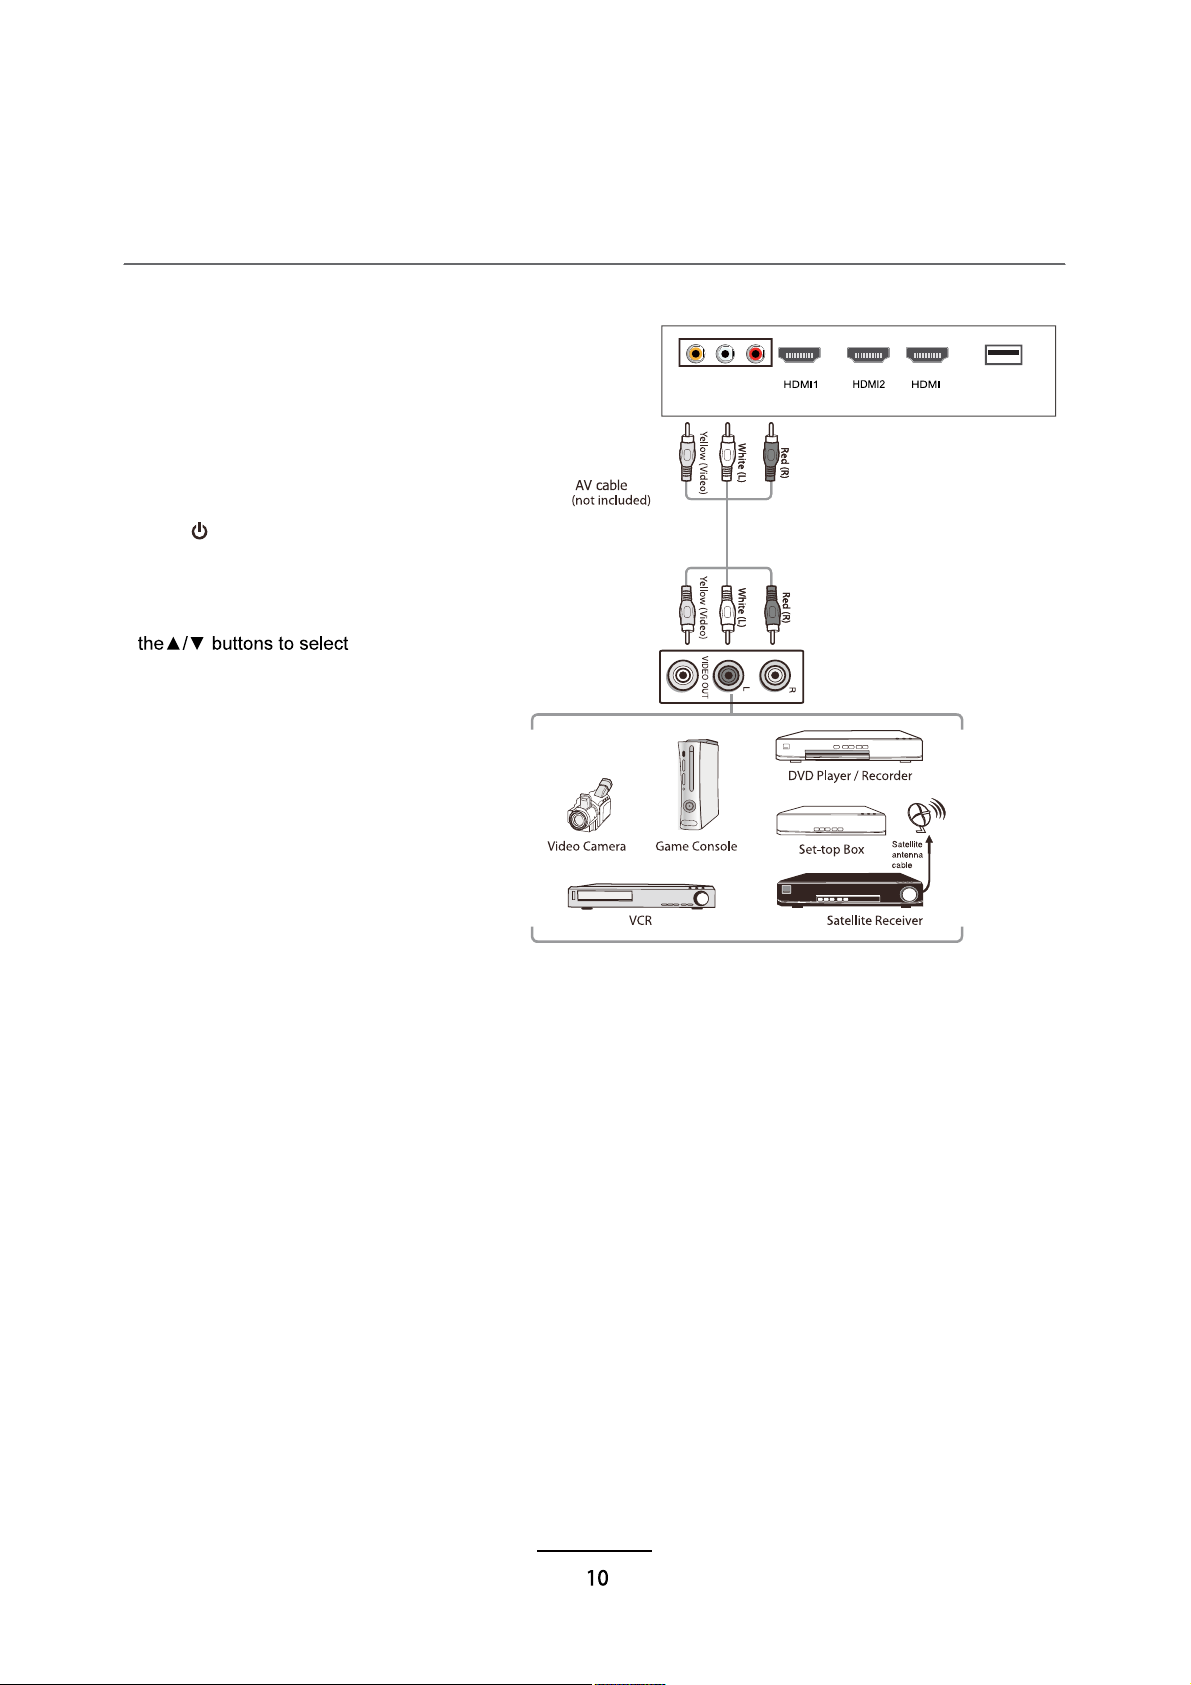
Connecting an AV Device with Composite Cable
1. Use anAV cable to connect theTV's
AV input sockets to an externalAV
device's composite audio/video sockets.
(Video = yellow,Audio Left = white, and
Audio Right = red)
2. Plug the connected devices into the
mains socket
3. Press the STANDBY button on theTV
or the button on the remote control to
turn on yourTV.
4. Press the SOURCE button on theTV
or the SOURCE button on the remote
control to display the Source List. Use
AV and then
press the OK button to confirm.
NOTE: This type of connection cannot
support UHD TV.
3
VideoAudio Audio
(UHD 4K) (UHD 4K) (UHD 4K)
USB
L in R in

Connections
Connecting a Digital Audio Receiver
Connecting Headphones
For better sound quality, you may want to play the audio through your multi-channel audio receiver.
1. Use an audio cable to connect the
TV's Digital Audio out socket to an
external audio receiver's audio coaxial
input socket.
2. Plug the connected devices into the
mains socket
3. Press the STANDBY button on the
TV or the button on the remote
control to turn on your TV.
4. Press the SOURCE button on the TV
or the SOURCE button on the remote
control to display the Source List. Use
input source and then press the OK
button to confirm.
The TV's volume control will
have no effect. You may
control the audio level via the
Audio Receiver.
PC
TV AerialY Pb Pr Audio in
out
Digital
audio out
PC
TV AerialY Pb Pr Audio in
out
Digital
audio out
Connect your headphones to the TV's
Headphone out socket.
Before putting on headphones, turn the
volume down then put the headphones on
and slowly increase the volume until you
reach a comfortable listening level.
Long-term exposure to loud
music may cause hearing
damage. It is best to avoid
extreme volume when using
earphones, especially for
extended periods.
11
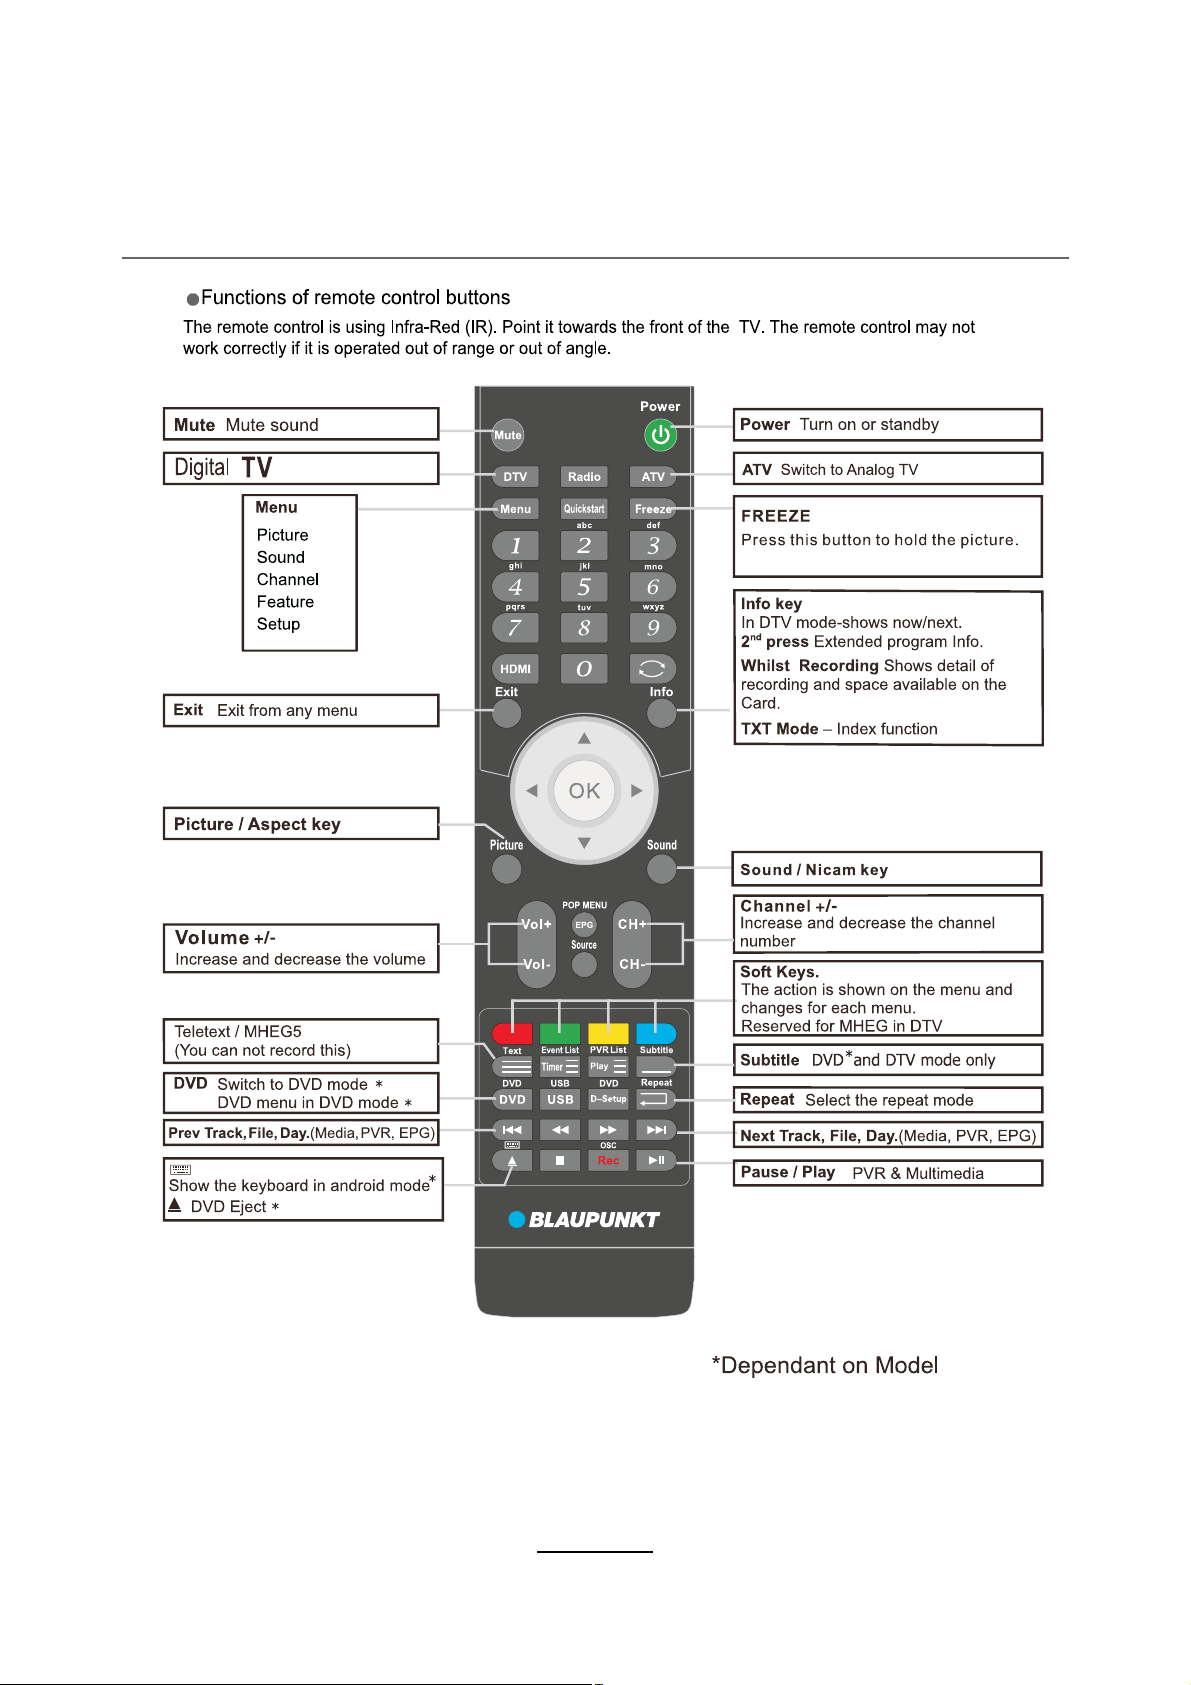
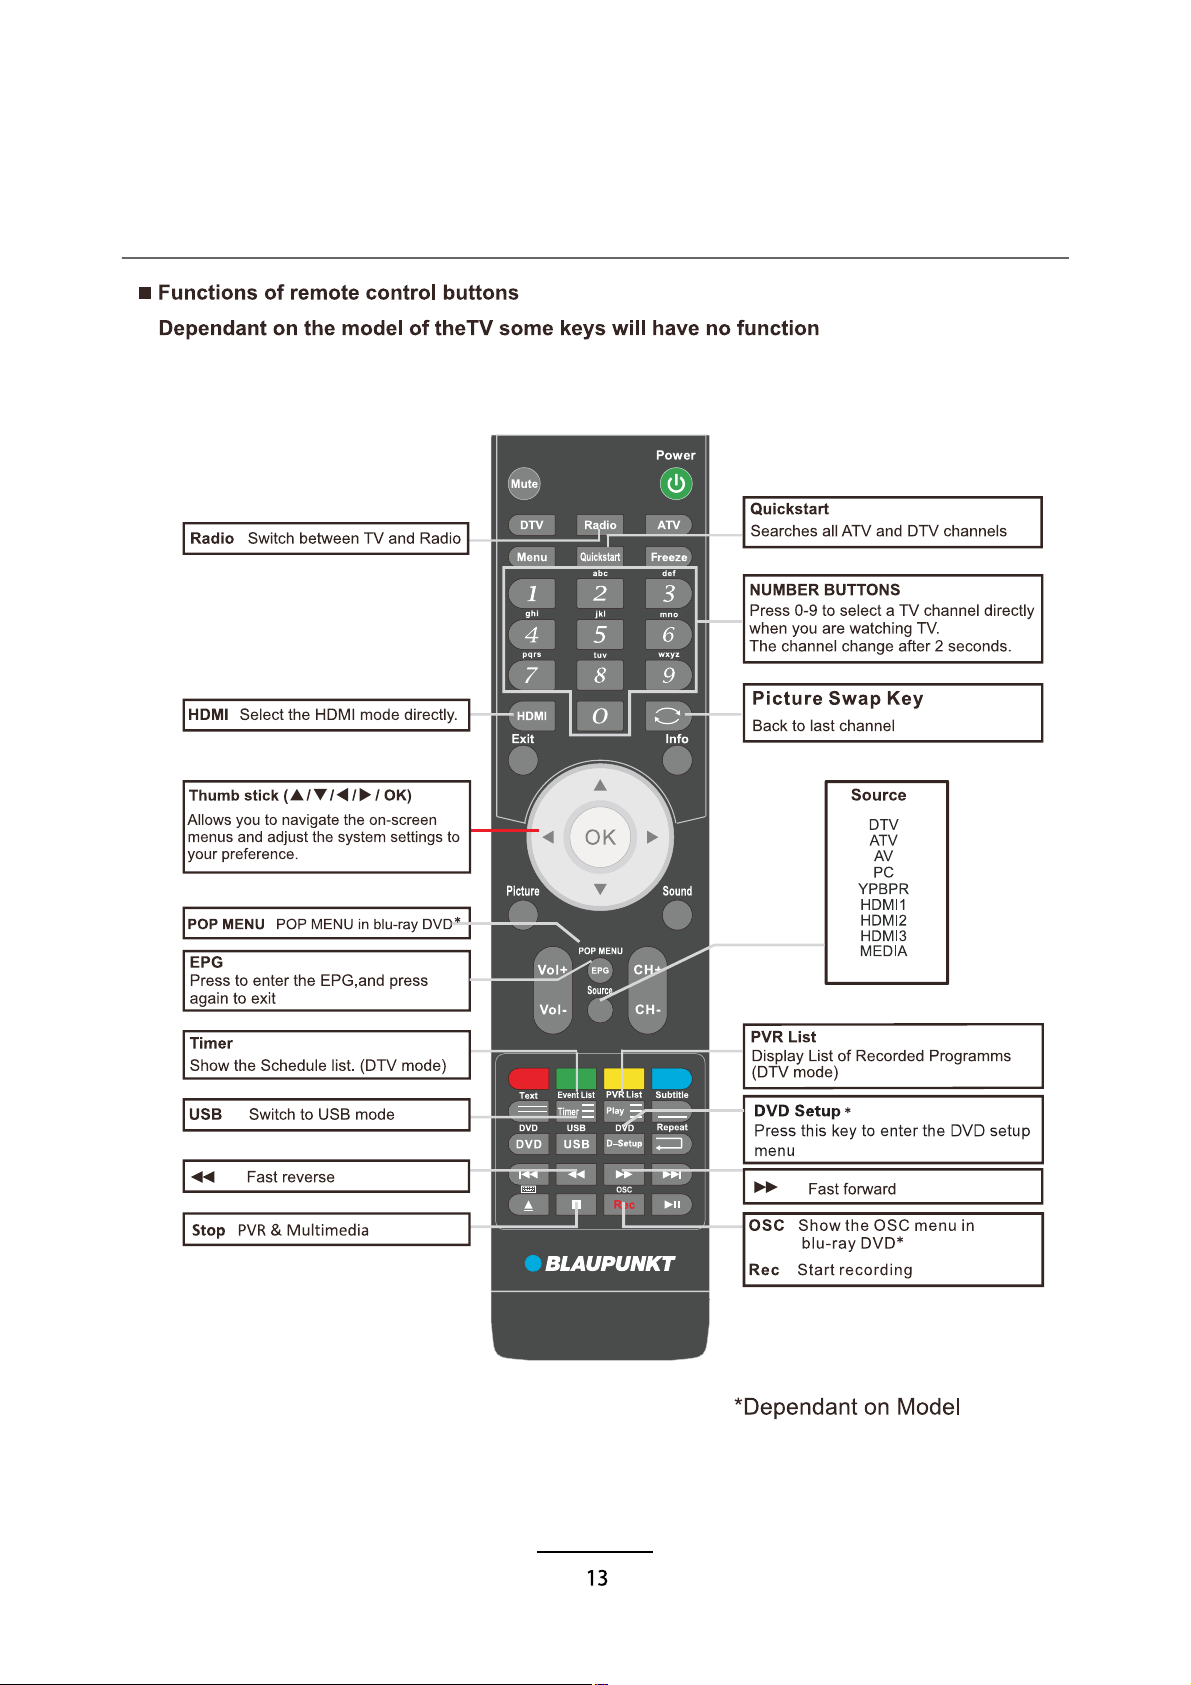
Remote Control
12
Remote Control
Remote Control
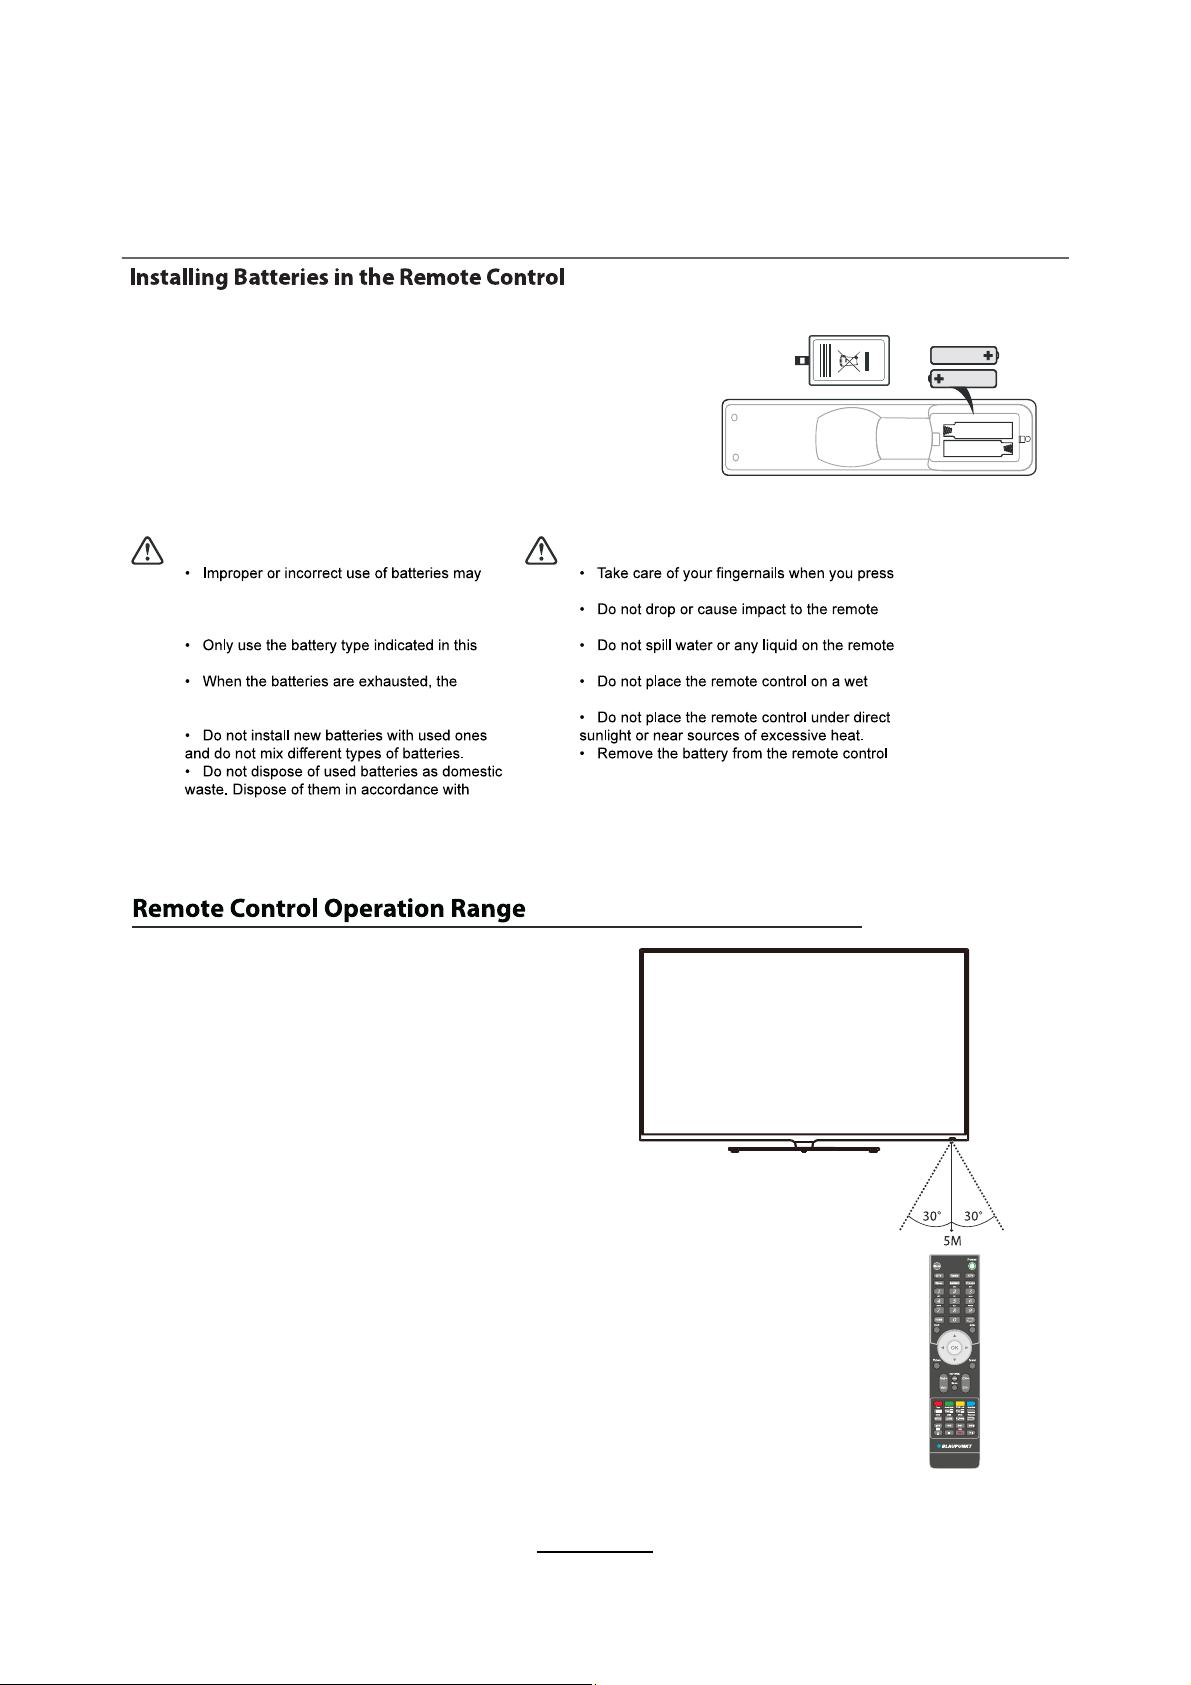
1. Press and lift the back cover to open the battery
compartment of the remote control.
2. Insert two 1.5V AAA size batteries. Make sure to
match the (+) and (-) ends of the batteries with the (+)
and (-) ends indicated in the battery compartment.
3. Close the battery compartment cover.
Point the remote control at the TV no more than
5 metres from the remote control sensor on the
TV and within 60° in front of the TV. The
operating distance may vary depending on the
brightness of the room.
Handling the Batteries
cause corrosion or battery leakage, which could
cause fire, personal injury or damage to
property.
manual.
remote will not function. Replace both batteries
at the same time with new ones.
local regulations.
Handling the Remote Control
and hold the battery release tab.
control.
control.
object.
when not in use for a long period of time, as it
could cause corrosion or battery leakage and
may result in physical injury and/or property
damage including fire.
14
Basic Operation
Power on/off
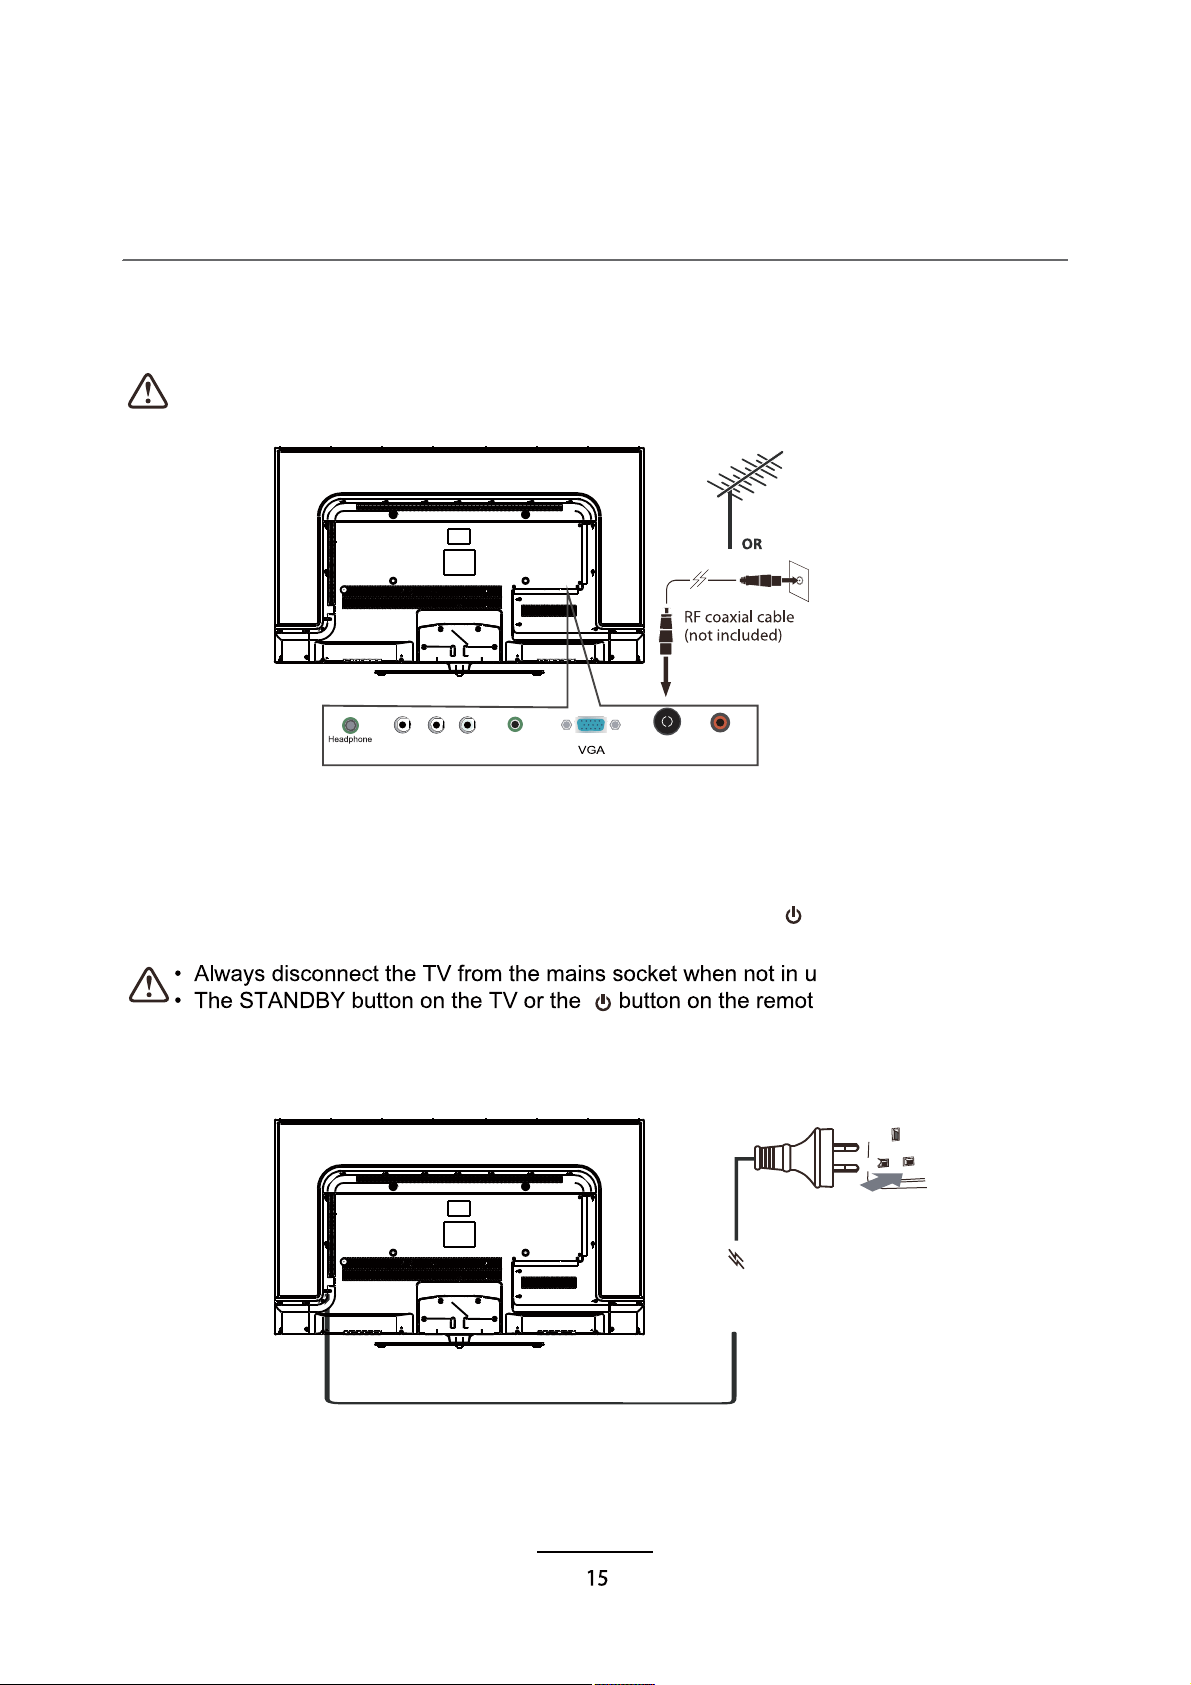
1. Connect one end of the RF coaxial cable to the aerial socket on the wall and the other end of
the cable to the Aerial socket at the rear bottom of yourTV.
2. Connect the mains cable to the mains socket after you have completed all the connections.
3. At this stage, the TV switches to standby mode. The red LED indicator will illuminate on the
front panel of the TV.
4. In standby mode, press the STANDBY button on the TV or the button on the remote control
to turn the TV on. The LED indicator will change from red to green.
Do not connect the TV to the mains supply until you have completed all the connections.
se for a long period of time.
e control is only used for
switching the TV into standby, it does not disconnect the TV from the mains power. To
completely disconnect the mains power, please remove the mains cable from the mains
socket.
PC
TV AerialY Pb Pr Audio in
out
Digital
audio out
button to select the function item, press button to adjust/setup,
Basic Operation
Input Source select
Press SOURCE button on the TV set or remote control to display input
source menu, and use CH+/- button on theTV set or button
on remote control to select the input source, press OK button on the
remote control to enter.
Note: Before you select the input source, make sure the
connections are prepared.
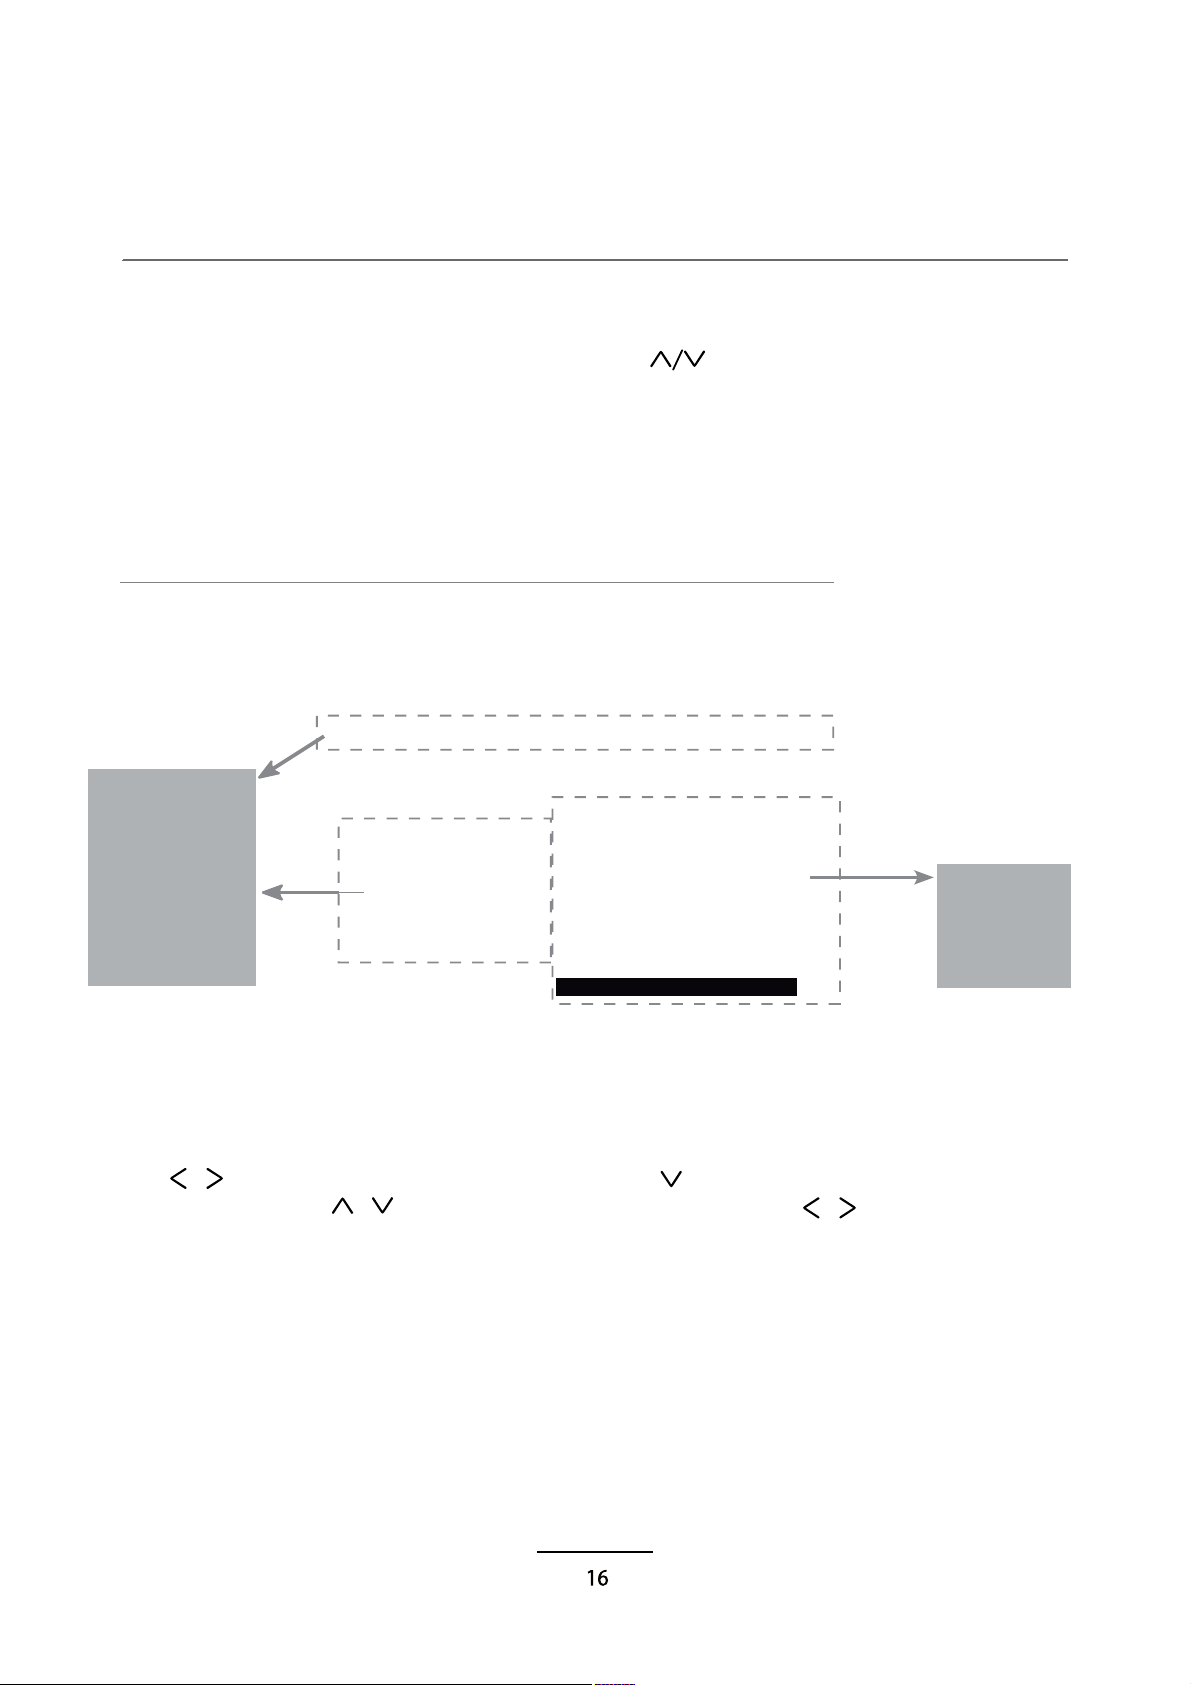
Basic OSD Menu operation
Press MENU button to display the OSD menu as below:
Use /
/
button to select the main menu, and press button to enter the submenu.
In the submenu, use /
or press OK button to enter the submenu.
* (Press MENU button to return to the upper menu.)
* (Press EXIT button to exit the menu display.)
Note1: Only when you input the suitable signal, the relevant items can be activated
# Main menu
C1
2
3
4
5
6
HANNEL
PICTURE
SOUND
TIME
LOCK
SETUP
Submenu
(PICTURE
menu for
example)
# 1 2 3 4 5 6
DTV Manual Tuning
Press OK button to enter the DTV Manual Tuning
menu, select a DTV channel, and press OK button
to start searching.
OSD Menu
1. CHANNEL menu
Description
Auto Tuning
Press
Press the MENU button on the
remote to enter the CHANNEL
menu, use the button on
the remote to select the submenu.
OK button to enter the Auto turning, and Press /
button to select the Tune Type, then press button, and use
/ / / button to select the Country for the TV, then
press OK button to start auto tuning.
Press / button to manual search.
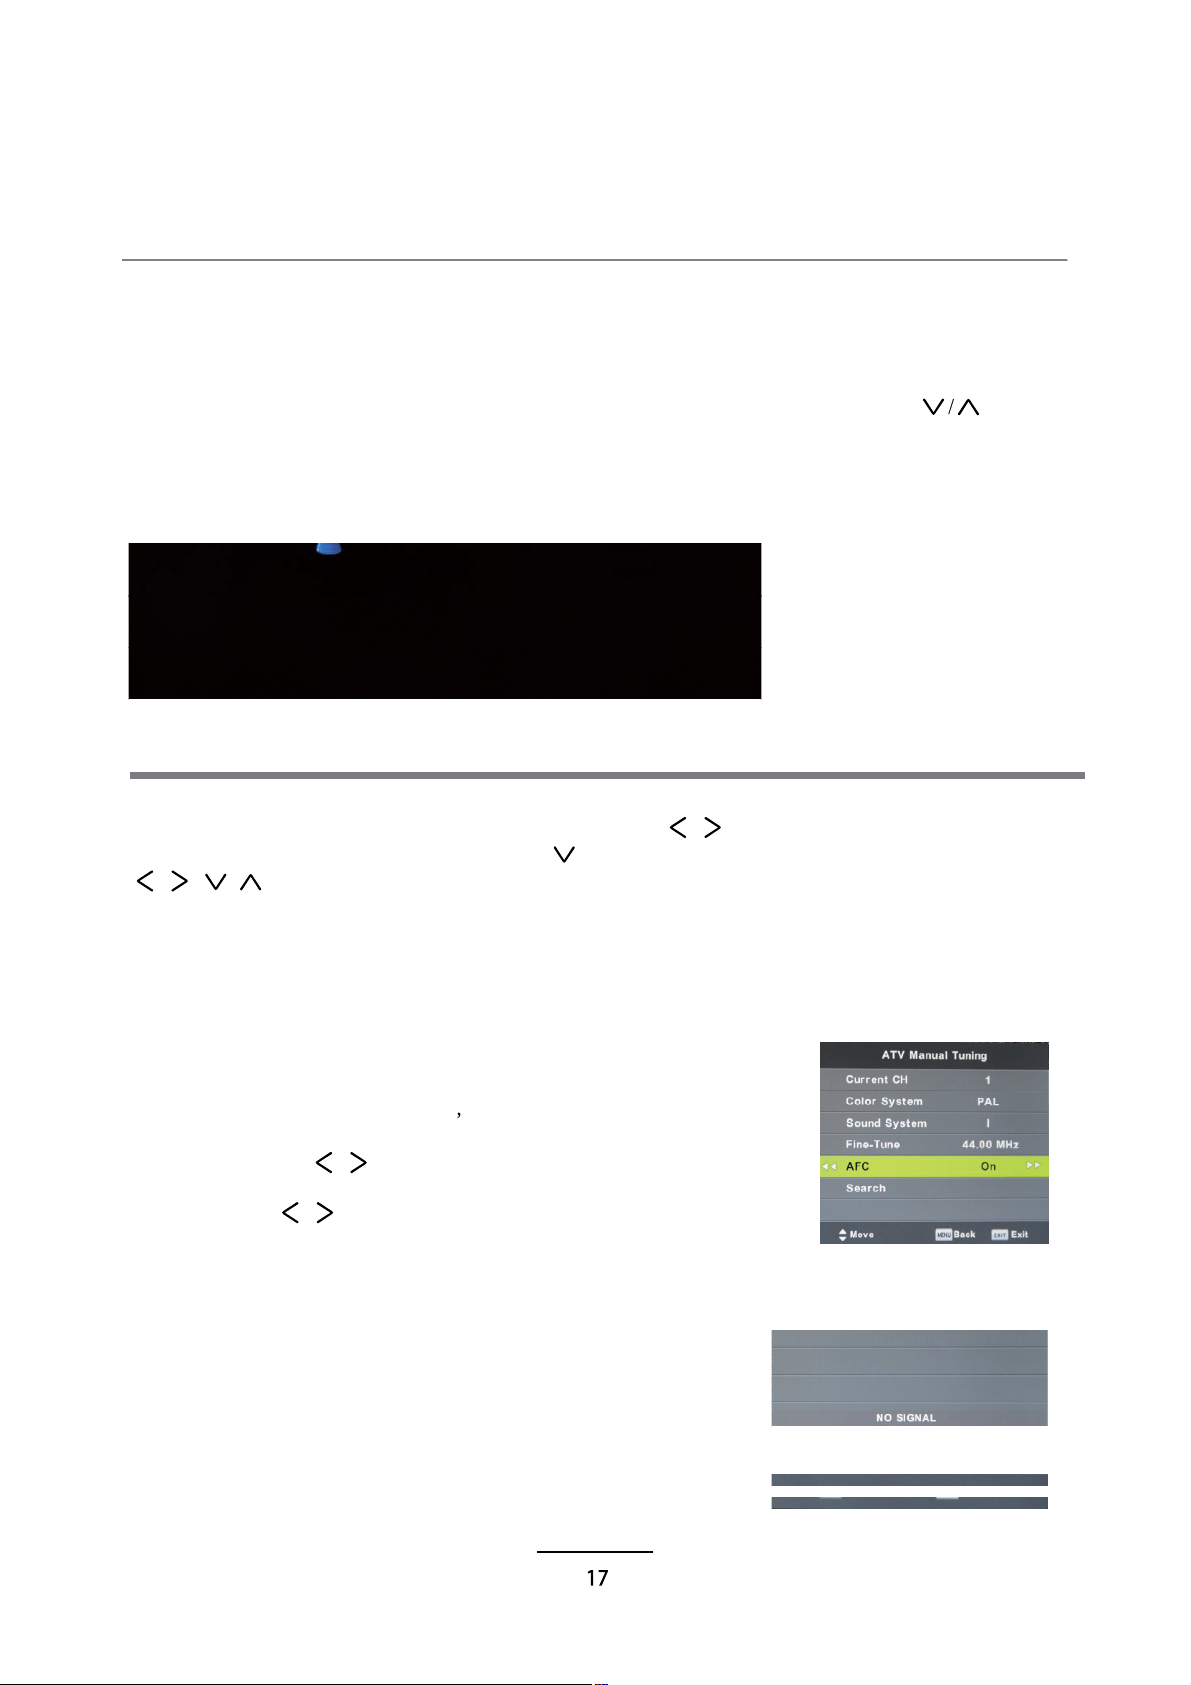
ATV Manual Tuning
Press OK button to enter the ATV Manual Tuning menu.
Current CH: Select a Channel for storing the programme.
Color System: Select from PAL AUTO and SECAM.
Sound System: Select from I, BG, DK
Search:
Fine Tune: Press / button to fine-tune.
AFC: Automatic Frequency control ON/OFF.
OSD Menu
Programme Edit
Press OK button to enter the Programme Edit menu as the following picture.
Skip: Select a channel and press the BLUE button to label the channel, as long as the channel
has a skip label it will be skipped when searching through the channels with the CH+/- buttons.
This allows you to set the
recordings.
Note: USB needed.
Signal Information
Display the digitalTV-signal information (DTV mode only).
Delete: Select a channel and press RED button, the program will be deleted.
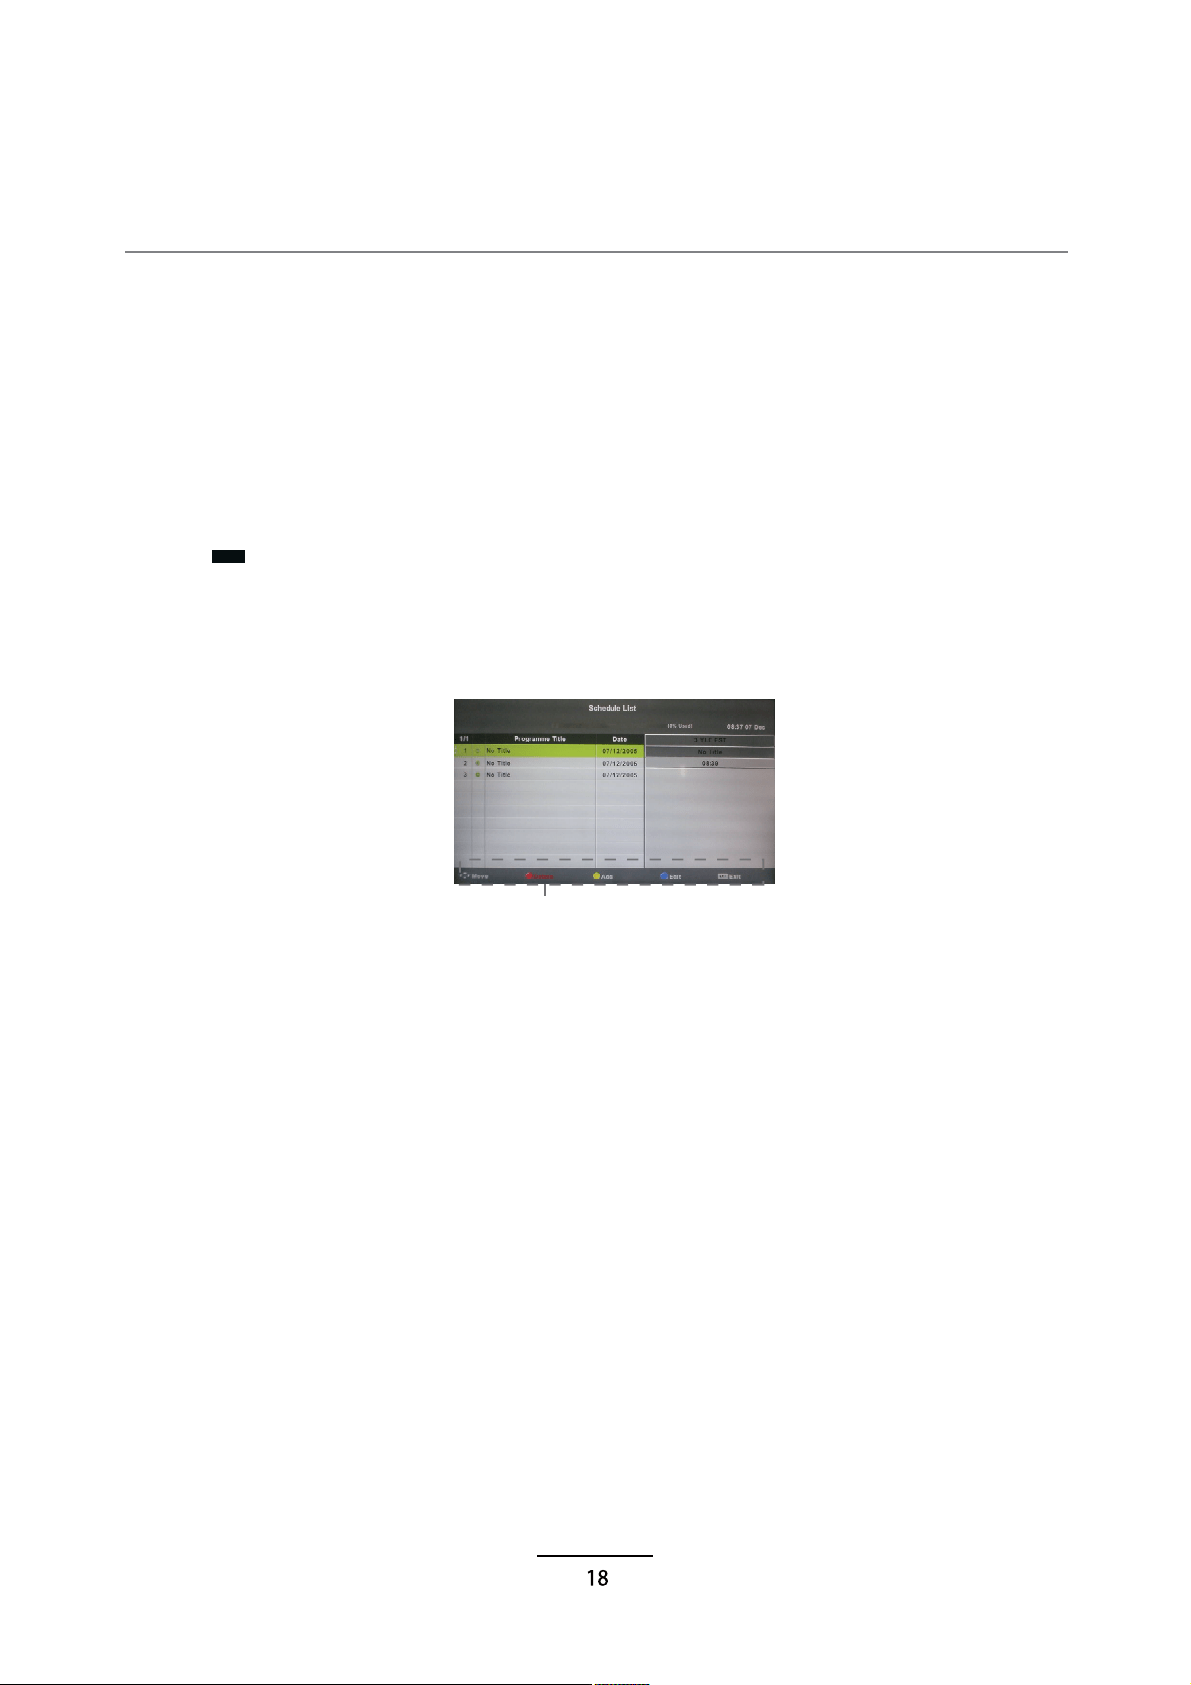
Schedule list (DTV mode only)
Hint---you should operate according to the hint.

OSD Menu
2.PICTUREmenu
Description
Picture Mode: Choose from Standard, Dynamic, Personal and Mild.
Note: Contrast, Brightness, Colour and sharpness are only available and can be adjusted
in the Personal mode option in the Picture Mode Settings.
Contrast: Controls the difference between the brightest and darkest regions of the picture.
Brightness: Controls the overall brightness of the picture.
Colour:Control the colour.
Sharpness: Increase this setting to see crisp edges in the picture; decrease it for soft edges.
Tint: Controls the tint ( NTSC mode only).
Colour Temperature: Choose from Cool, Normaland Warm.
Noise Reduction: If the broadcast signal received is weak, you can select the Noise Reduction
option to reduce the video noise level. (Off, Low, Middle, High and Default.)

OSD Menu
3. SOUND menu
Description
Sound Mode: Allows you to select among: Standard, Music, Movie, Sports and Personal.
Treble(Can be adjusted when the sound mode is Personal): Controls the relative intensity of
higher pitched sounds.
Bass (Can be adjusted when the sound mode is set to Personal): Controls the relative intensity
of lower pitched sounds.
Balance: To adjust the balance of the left and right sound track, or turn off the volume of the
left and right sound track.
Auto Volume: Turn this function on to auto-adjust volume levels from different input sources.
SPDIF MODE: Select the SPDIF mode for the TV.
AD Switch: Where a broadcaster supports Audio Description on TV content the user may switch
20
this to ON/OFF. Audio Description is delivered as an addition to the video content in the form
an additional narration track.

Auto Standby :
This unit will switch off itself automatically if no change in status within the last
sereral 3 hours of operation. You can choose3H, 4H, 5H, or Off.
OSD Menu
4. TIME menu
Description
Clock: Display the time.
Time Zone: Allows you to select the time zone.
Sleep Timer: Allows you to setup the sleep timer among: 10min, 20min, 30min, 60min, 90min,
120min,180min, 240min and off.
OSD Timer: Allows you to select the time for OSD menu displays on the screen. (You can choose
5s,10s,15s,20s,30s)

Block Program: You must enter the password to view channels that have been locked. Use
and buttons to select the channel and press the GREEN button on the remote control to
lock the channel.
Parental Guidance: Allows you to select the Parental Guidance mode.
Key Lock: Lock the buttons on the TV set when you turn on the function.
OSD Menu
5. LOCK menu
Description
Lock System: Turn on/off the Lock System function.
Note1: You should enter the code to operate the menu (original code is 0000).
Note2: Master password reset: 4711.
Set Password: Set pin code. If the Pin code has been changed you must enter the
present code.
New : Enter the new password.
Confirm: Enter the new password.
Source Lock:
L
L
V
A
V
MAX
Default Volume: Set the default volume when the program is on.
Import Database: Import all Hotel Settings from the USB device.
Export Database : Export all Hotel Settings to the USB device.
Clear Lock: Clear all the locks above, it means set all the locks to
OFF and max volume to 100.
V Y
r
OSD Menu
23

OSD Menu
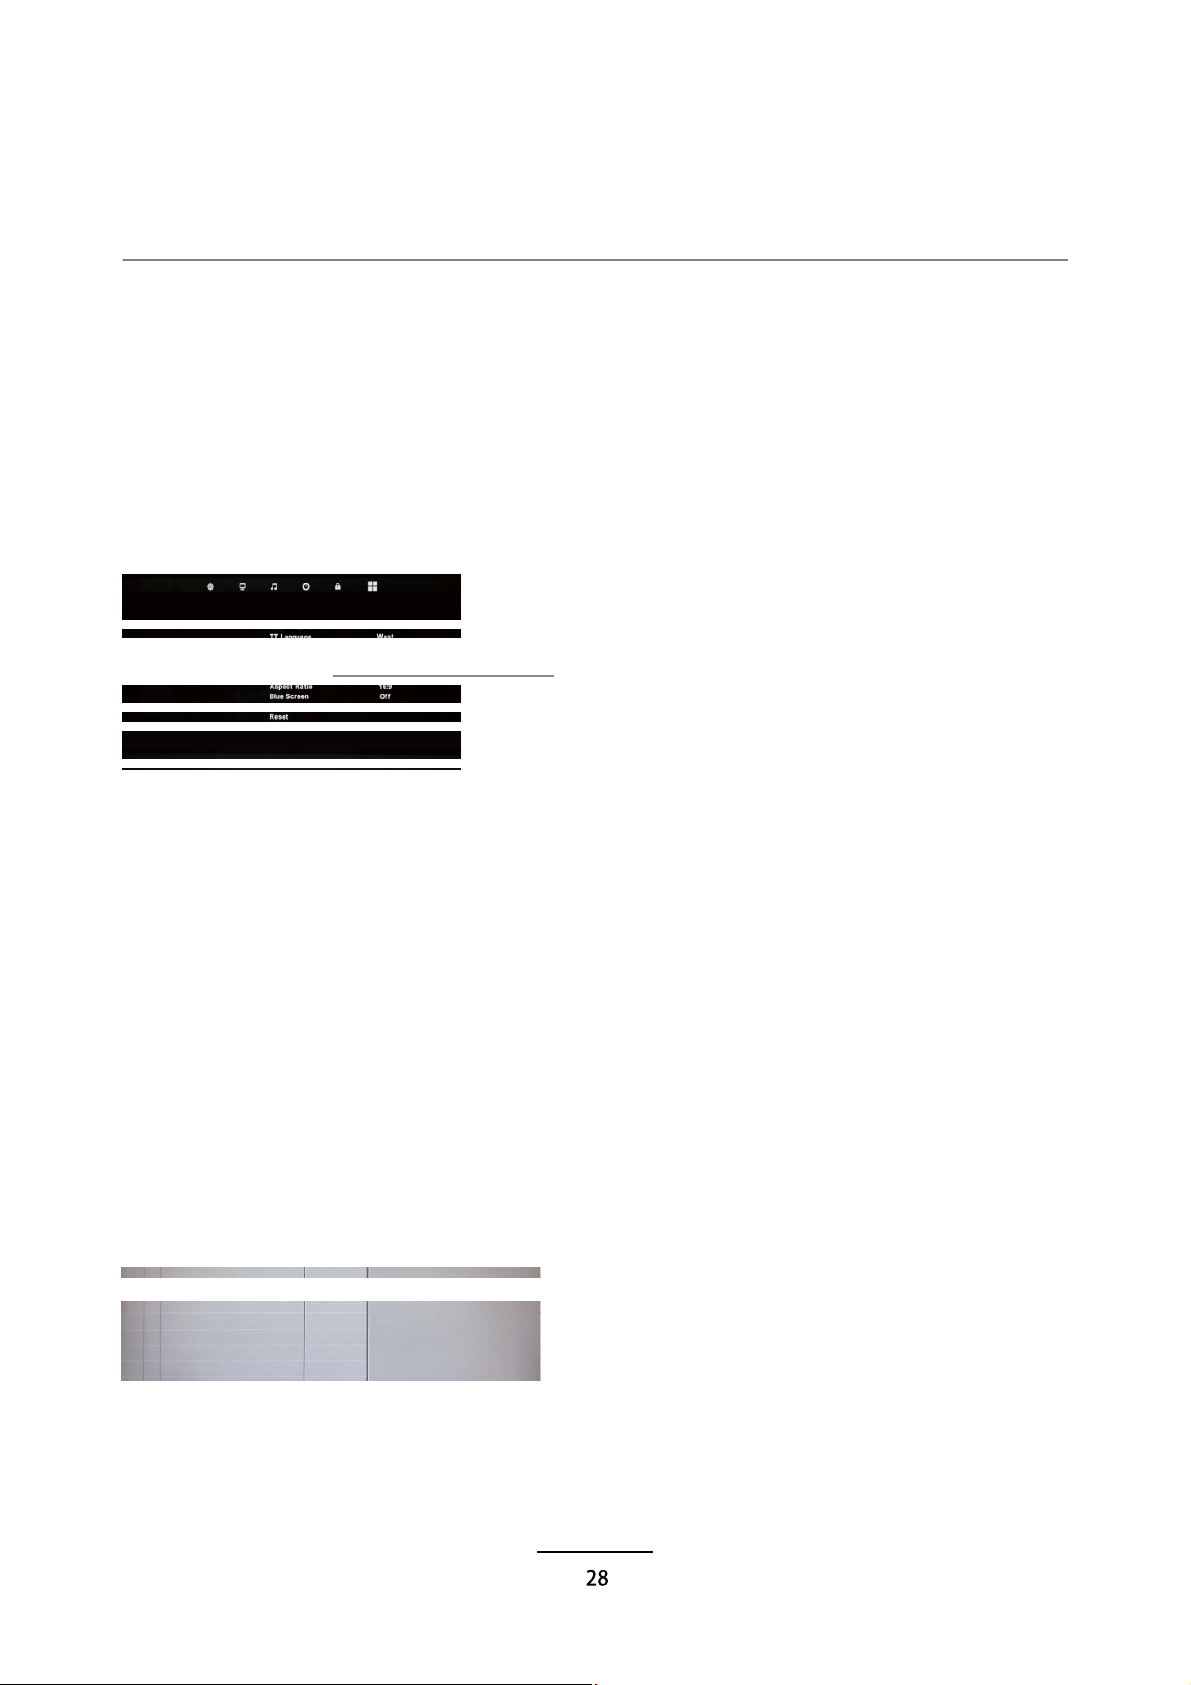
6. SETUP menu
Description
OSD Language: Allows you to select menu language.
TT Language: Allows you to select teletext language.
Audio Language: Allows you to select audio language.
Subtitle Language: Allows you to select subtitle language.
Hearing Impaired: Turn on/off the Hearing Impaired function.
PVR File System: Setup the PVR file system.
Note: The options PVR File System are described on pages 22 -23.
Aspect Ratio: Choose from 4:3, 16:9, Zoom1, Zoom2, Full Screen(potit to invot).
Blue Screen: Turn on/off the blue screen function when there’s no signal.
First Time Installation: Display the First Time Installation menu.
Reset: Press OK button to restore factory default.
Software update(USB):
Mode Seting: Choose home mode or shoping mode.
Press OK button to enter the software update menu.
Multimedia Operation
Press / / / buttons to select and the OK button to activate the file or open folder. Press
OK button to play the files in full screen mode. When in full screen mode press the OK button to
show the option menu on the bottom of the screen or press stop button to return to files.
Note: You can press RED button on the file to delete the file.
Basic Operation
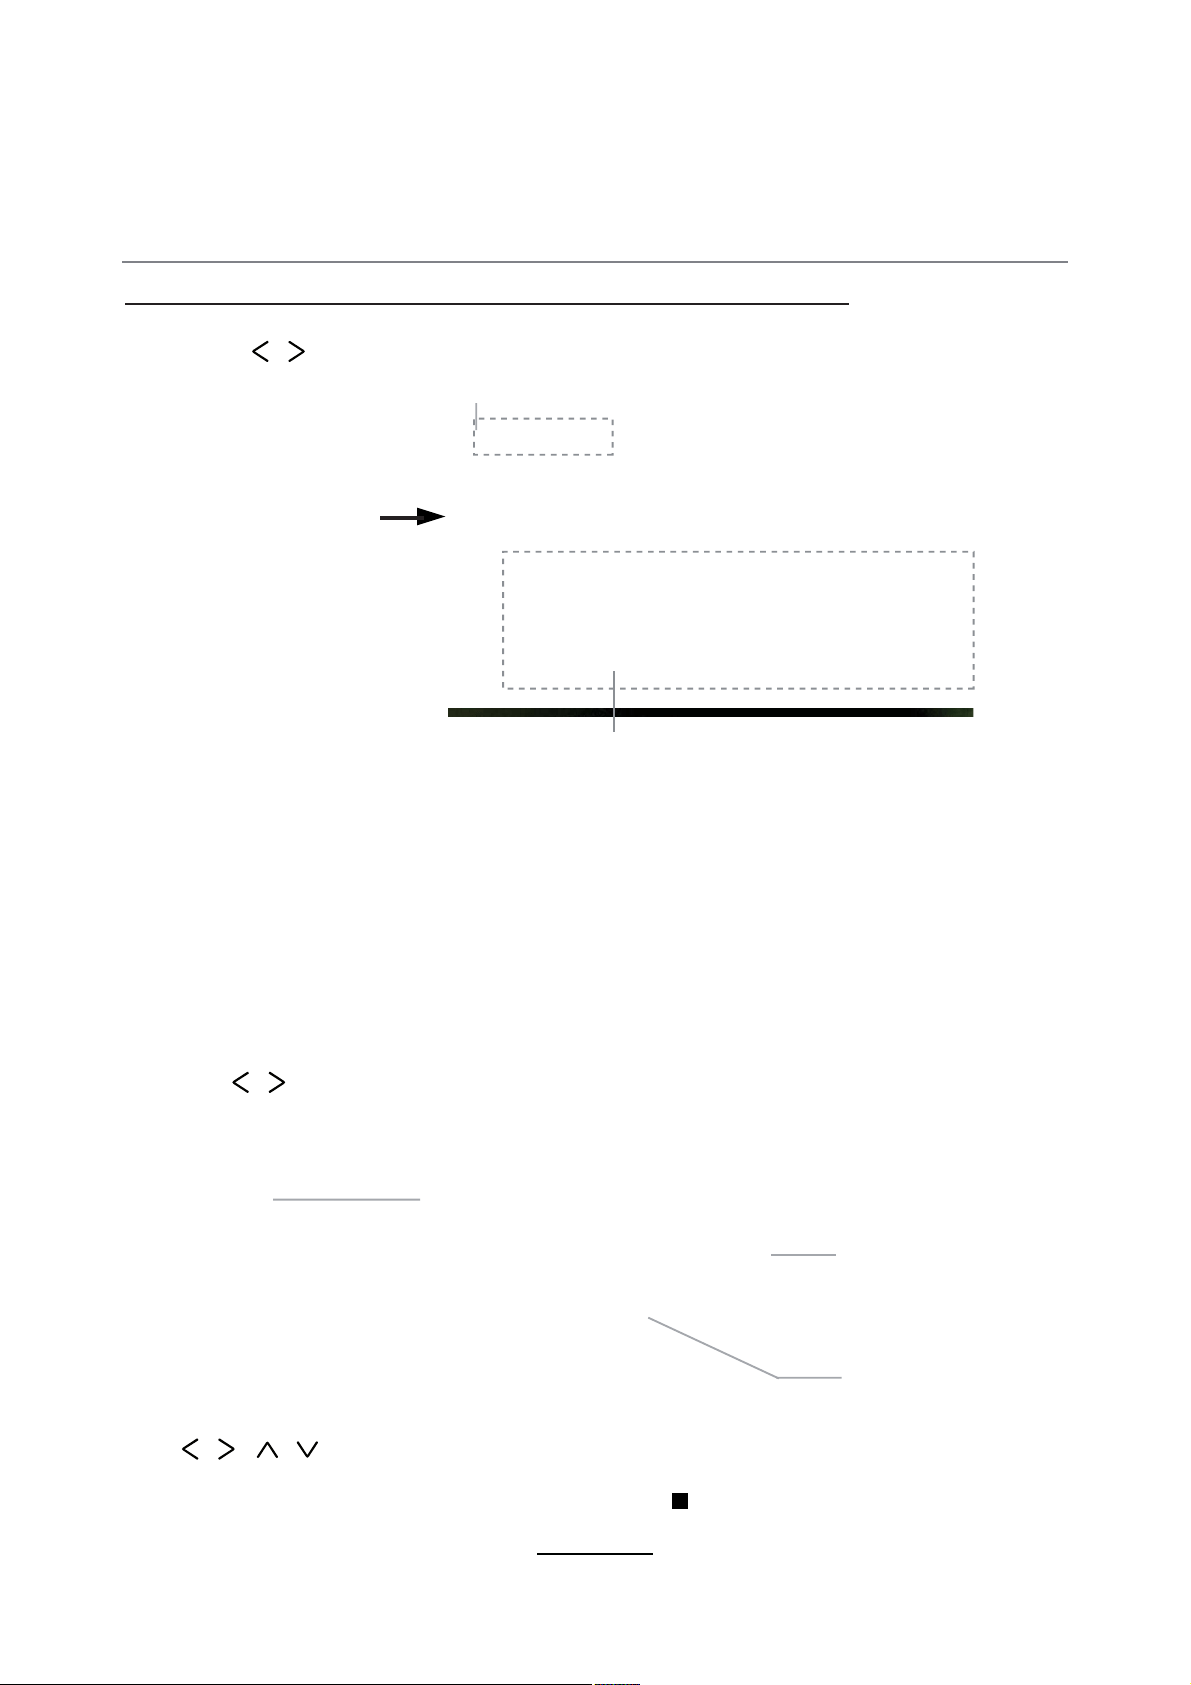
2). Select the file type (mains menu) you want to view, and insert USB device, you will find the
name of the device display on the screen.
3). Press / button to select the the USB device, and press OK button to enter.
1). Press the SOURCE button on the remote control to display the input source menu, select Media
source by the / buttons, and press OK button to enter the Multimedia menu seen below.
MAINS MENU: PHOTO MUSIC MOVIE TEXT
Preview
Return to
previous menu
Hints and informations of USB device
Information
EXIT
25
Multimedia Operation
Display the playlist on the screen and play the file by / button and OK button, you can
Press / button to select the option on the menu, and press
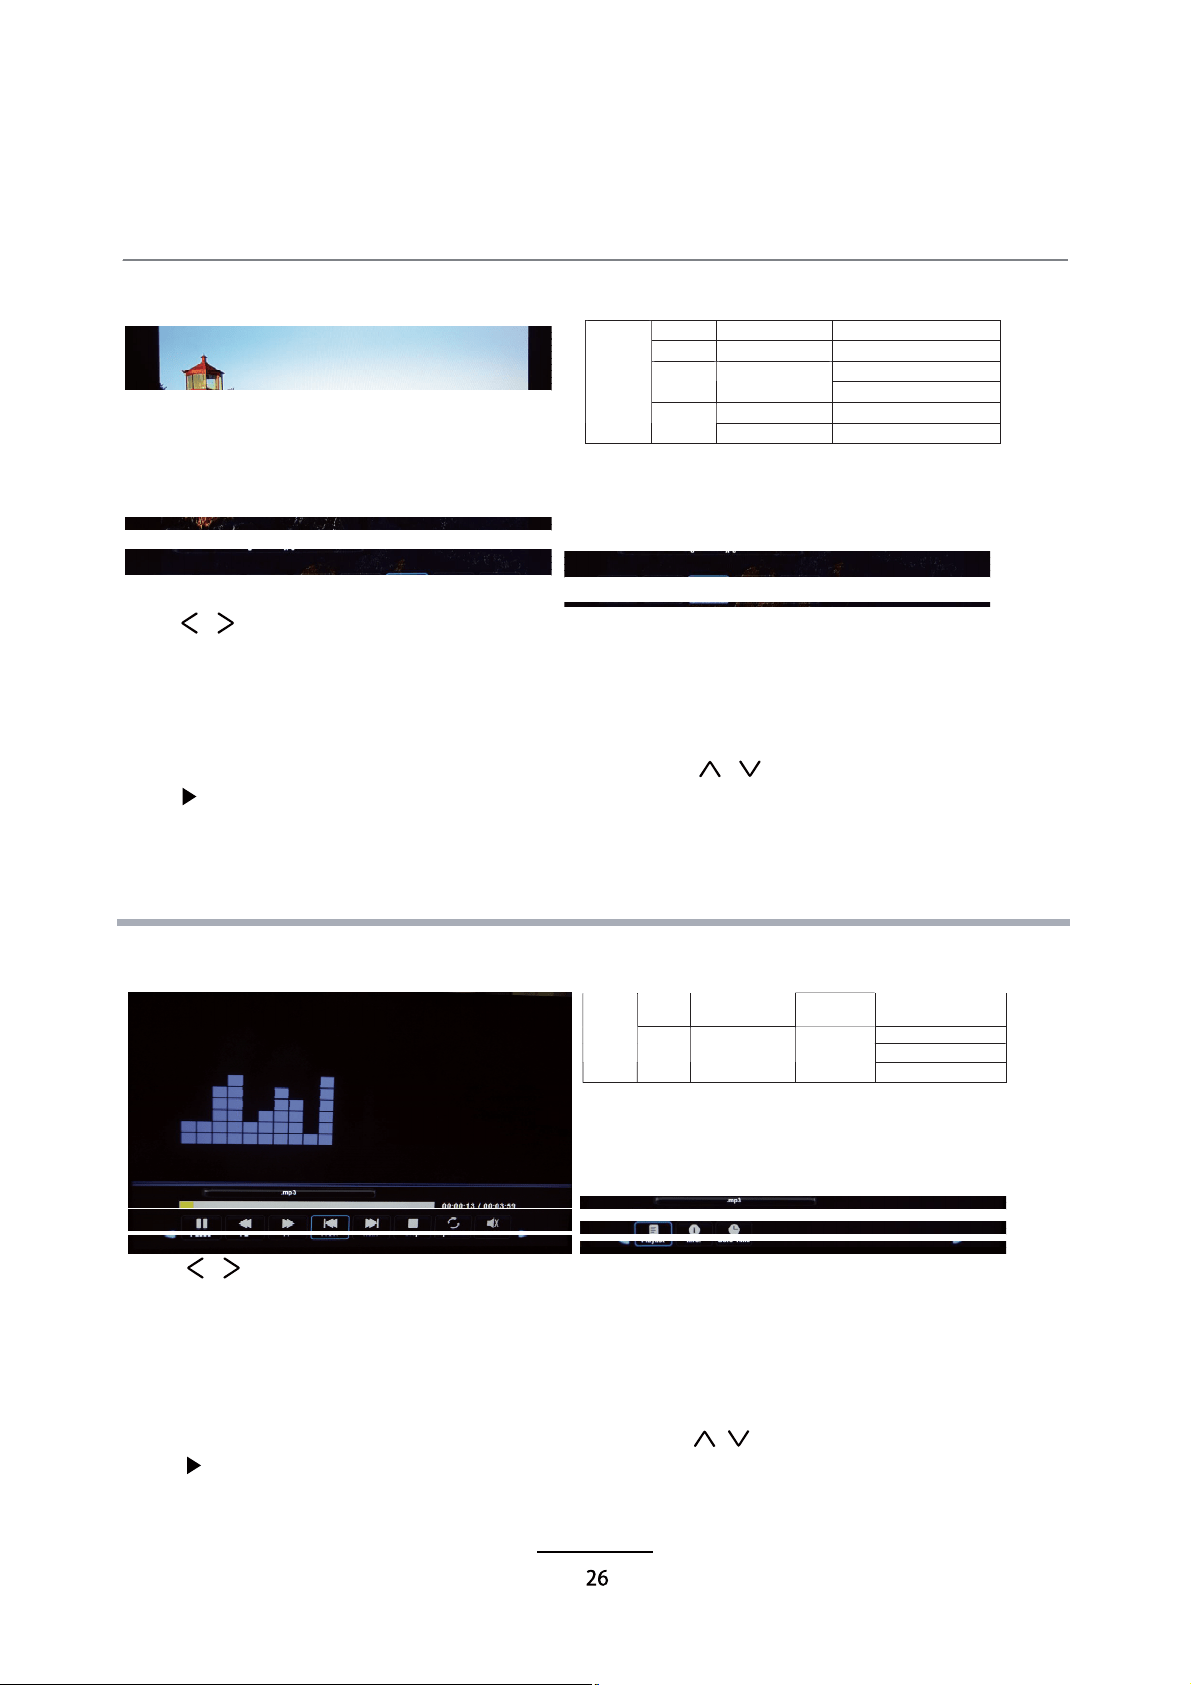
1. Photo
2. Music
OK button to change.
Pause: Play/pause the photo view.
Prev./Next: View the previous/next photo.
Stop: Stop the photo view.
Repeat: Select the repeat mode from Repeat All, Repeat 1, Repeat None.
Music: Play/Pause the music.
Playlist: Display the playlist on the screen and play the file by / button and OK button, you can
press button to select “CANCEL”, and press OK button to cancel the list displaying.
Info: Display the information of the file.
Rotate: Rotate the photo clockwise/counterclockwise.
Zoom Out/In: Zoom out/in the photo.
Move View: Move the photo in Zoom in mode.
Press / button to select the option on the menu, and press OK button to change.
Pause: Play/pause the music.
FB/FF: Fast backward/fast forward.
Prev./Next: Play the previous/next file.
Stop: Stop the music.
Repeat: Select the repeat mode from Repeat All, Repeat 1, Repeat None.
Mute: Mute the sound.
Playlist:
press button to select “CANCEL”, and press OK button to cancel the list displaying or press the “list”
button.
Info: Press “INFO” button to display the information of the file.
Goto Time: Play the music from the time you set.
Photo viewing
Play the music
.jpg/ Progressive JPEG MaxResolution: 1024×768
.jpeg BaselineJPEG MaxResolution: 8192×8192
MaxResolution: 6500×6500.bmp BMP
Pixel Depth:1/4/8/16/24/32 bpp
Non-Interlaced MaxResolution: 3000×3000
Photo
.png
Interlaced MaxResolution:1500×1500
.mp3
--
MP3
SampleRate: 8K~48KHz Bit
Rate:32K~320Kbps
SampleRate:16K~48KHz
BitRate: 32K~442Kbps
Music
.m4a/.aac
--
AAC
Channel: Mono/Stereo
Multimedia Operation
Multimedia Operation
Press / button to select the option on the menu, and press
3. Movie
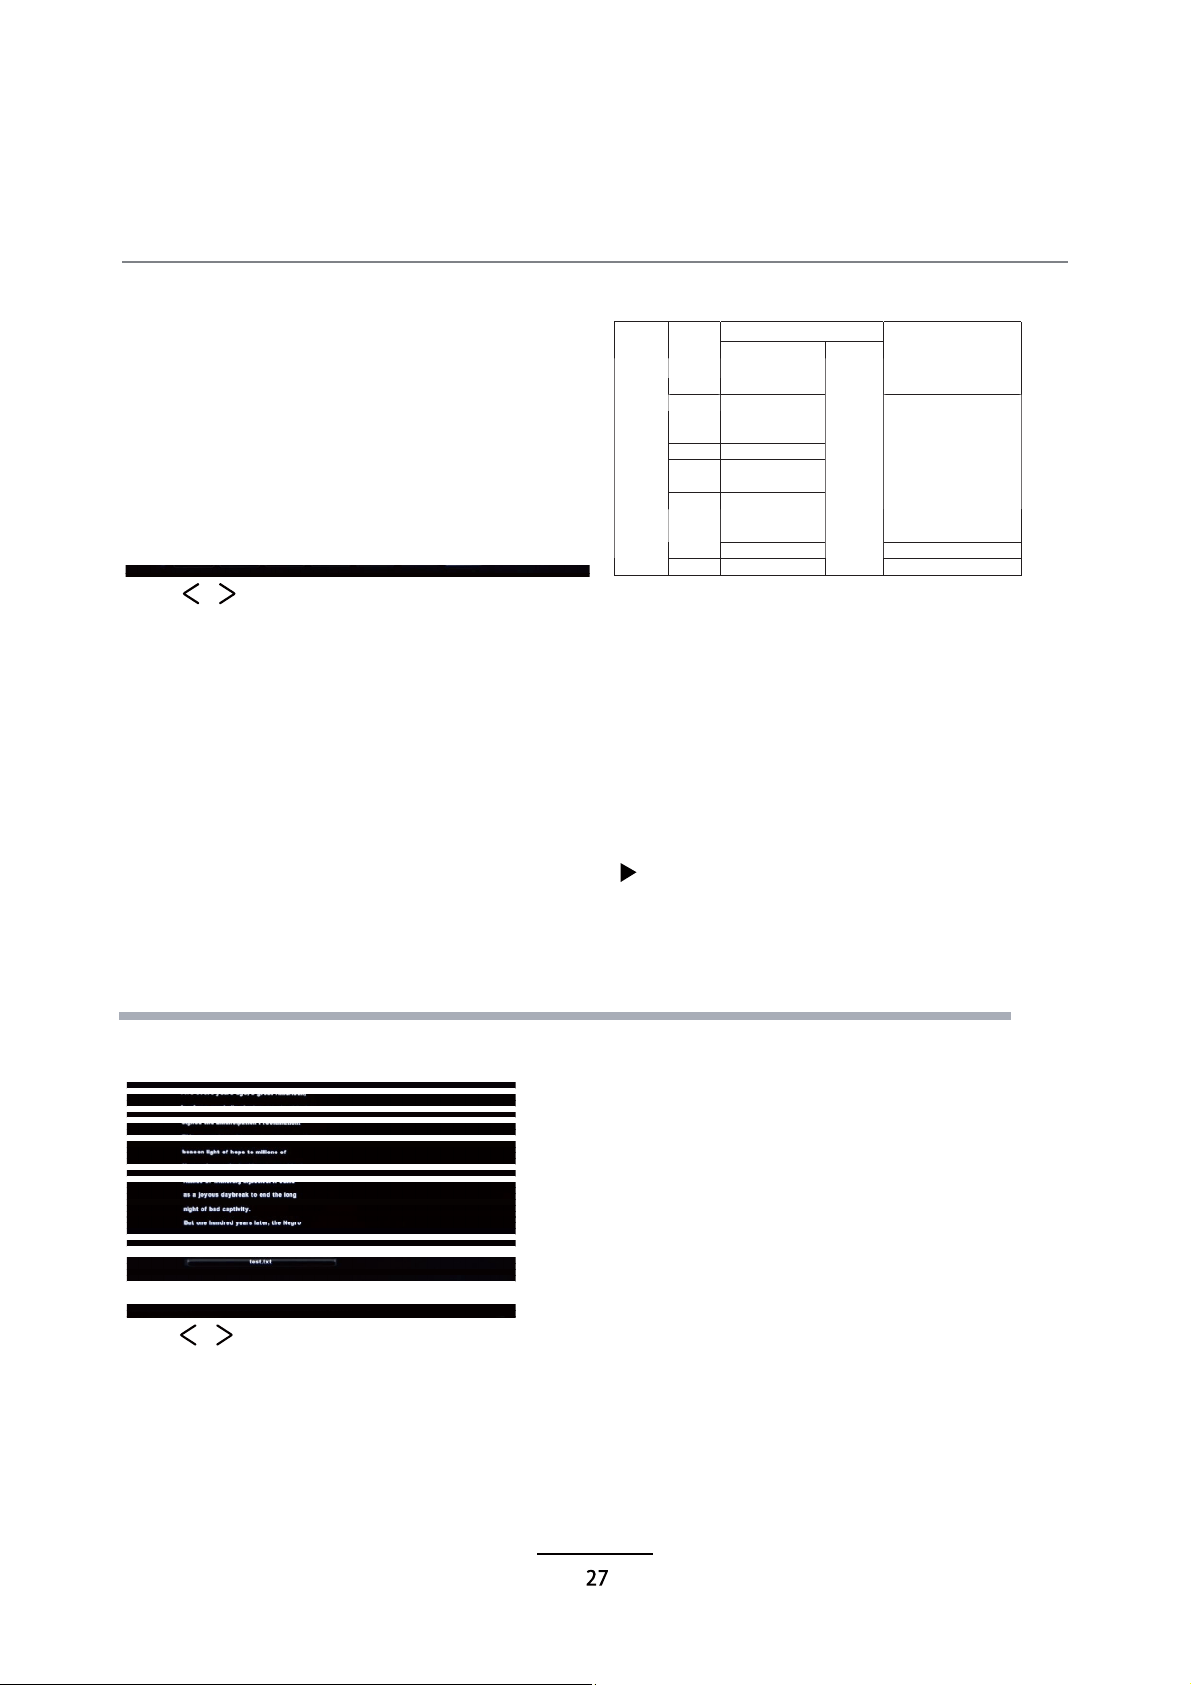
4. Text
OK button to change.
Pause: Play/pause the music.
FB/FF: Fast backward/fast forward.
Prev./Next: Play the previous/next file.
Stop: Stop the movie.
Repeat: Select the repeat mode from Repeat All, Repeat 1, Repeat None.
Set A-B: Select and play the preferable part of the file by setting A and B at the beginning and end.
Press OK button to cancel.
Playlist: Display the playlist on the screen.
Info: Display the information of the movie.
Slow Forward: Play the movies at slow speed, press button to cancel.
Step Forward: Step quickly through the movie by using this option
Goto Time: Program the movie form the time you set.
Zoom out/in: Zoom out/in the movie screen.
Aspect Ratio: Select the aspect ratio of the screen display.
Move View: Move the photo in Zoom in mode.
Press / button to select the option on the menu, and press OK button to change.
Previous/Next page: Turn to previous/next page of the text.
Prev./Next: Turn to previous/next file.
Stop: Stop auto turning pages.
Music: Play/pause the music programme.
Playlist: Display the playlist on the screen.
Info: Display the information of the text.
Play the movie
View the text
Char Set:
such as Western Europe(Windows).
Select a switable character libraly of the subtitle of the movie that you view
Char Set: Select a switable character libraly of corrent Text file that you view,such as Western Europe
(Windows).
CodecMedia File Ext.
Video Audio
Remark
Max Solution:1920×1080.mpg MPEG-1, MPEG-2
Max Data Rate: 40 Mbps
DivX,Xvid, MJPEG,.avi
MPEG-4SP/ASP,
H.264
.ts MPEG-2,H.264
.mov .
mkv
MPEG-4SP/ASP,
H.264
.dat
MPEG-1
MPEG-4SP/ASP,
H.264
Max Solution:1920×1080 Max
Data Rate:20 Mbps
.mp4
MPEG-1, MPEG-2 Max Solution: 720×576
Movie
.vob MPEG-2
MP3, AAC,
AC3,PCM
Max Data Rate: 40 Mbps
Recording Operation
PVR settings
Press the MENU button, select SETUP menu, and select “PVR File System”, then press OK
button to enter the setting menu.
1. PVR File System
Note:You select a recorded programme, and pressOK button to program.
Note:You can delete a recorded programme bypressing the RED button
on the list.
Note:You can press </> to choose REC LIST and Schedule List.
Select Disc: Select the device for the Record files.
Check PVR File System: Check the system.
USB Disc: Display the USB state.
Format: Format the USB device for PVR operating.
Note:The USB storage device will need to be formatted before being used for recording functions, to
ensure that it is formatted in the FAT32 file system, and that there is sufficient storage space available for
recording programs.
Time Shift Size: Display the size of the USB device (The device has been formated).
Speed: Display the speed of the USB device (The device has been formated).
Free Record Limit: Display the Free Record Limit state.
2. Recorder
Please check whether your USB device works or not before recording.
Press REC LIST button on the remote control to displaythe recorder menu in DTV mode as below.
The DVR function allows this unit to record live digital TV (DTV) programs, allowing for viewing on
demand at any time. This function supports DTV program recording, Time shift and playback as
described below.
DVR will only record when there is an external USB drive connected to the unit with sufficient memory
space available. Recording can be done both manually on demand and also using Scheduled
Recording.

Recording Operation
When you press REC button in DTV mode, the screen will display the recording menu as
below:
Record and Time shift function buttons
1) Recording menu
2) Timeshift menu
REC: Press to start recording.
Note: a. display and exit the navigation menu by pressing the REC .
b. Press STOP button to exit the recording mode.
c. Press PLAY button to play the programme you are recording from the beginning.
Recording
PAUSE: Press to enter the timeshift mode, press play to play the recording.
Press PAUSE button to enter the Timeshift mode in DTV mode, and the picture will be
c. Max Timeshift is 4hrs.
paused, the recording will begin.
Stop:
Press to stop recording or timeshift.
REC LIST:
To display the recorder menu.
Note:
a. Press STOP button to exit the Timeshift mode.
b. Press PLAY button to play the programme you are recording from the beginning.
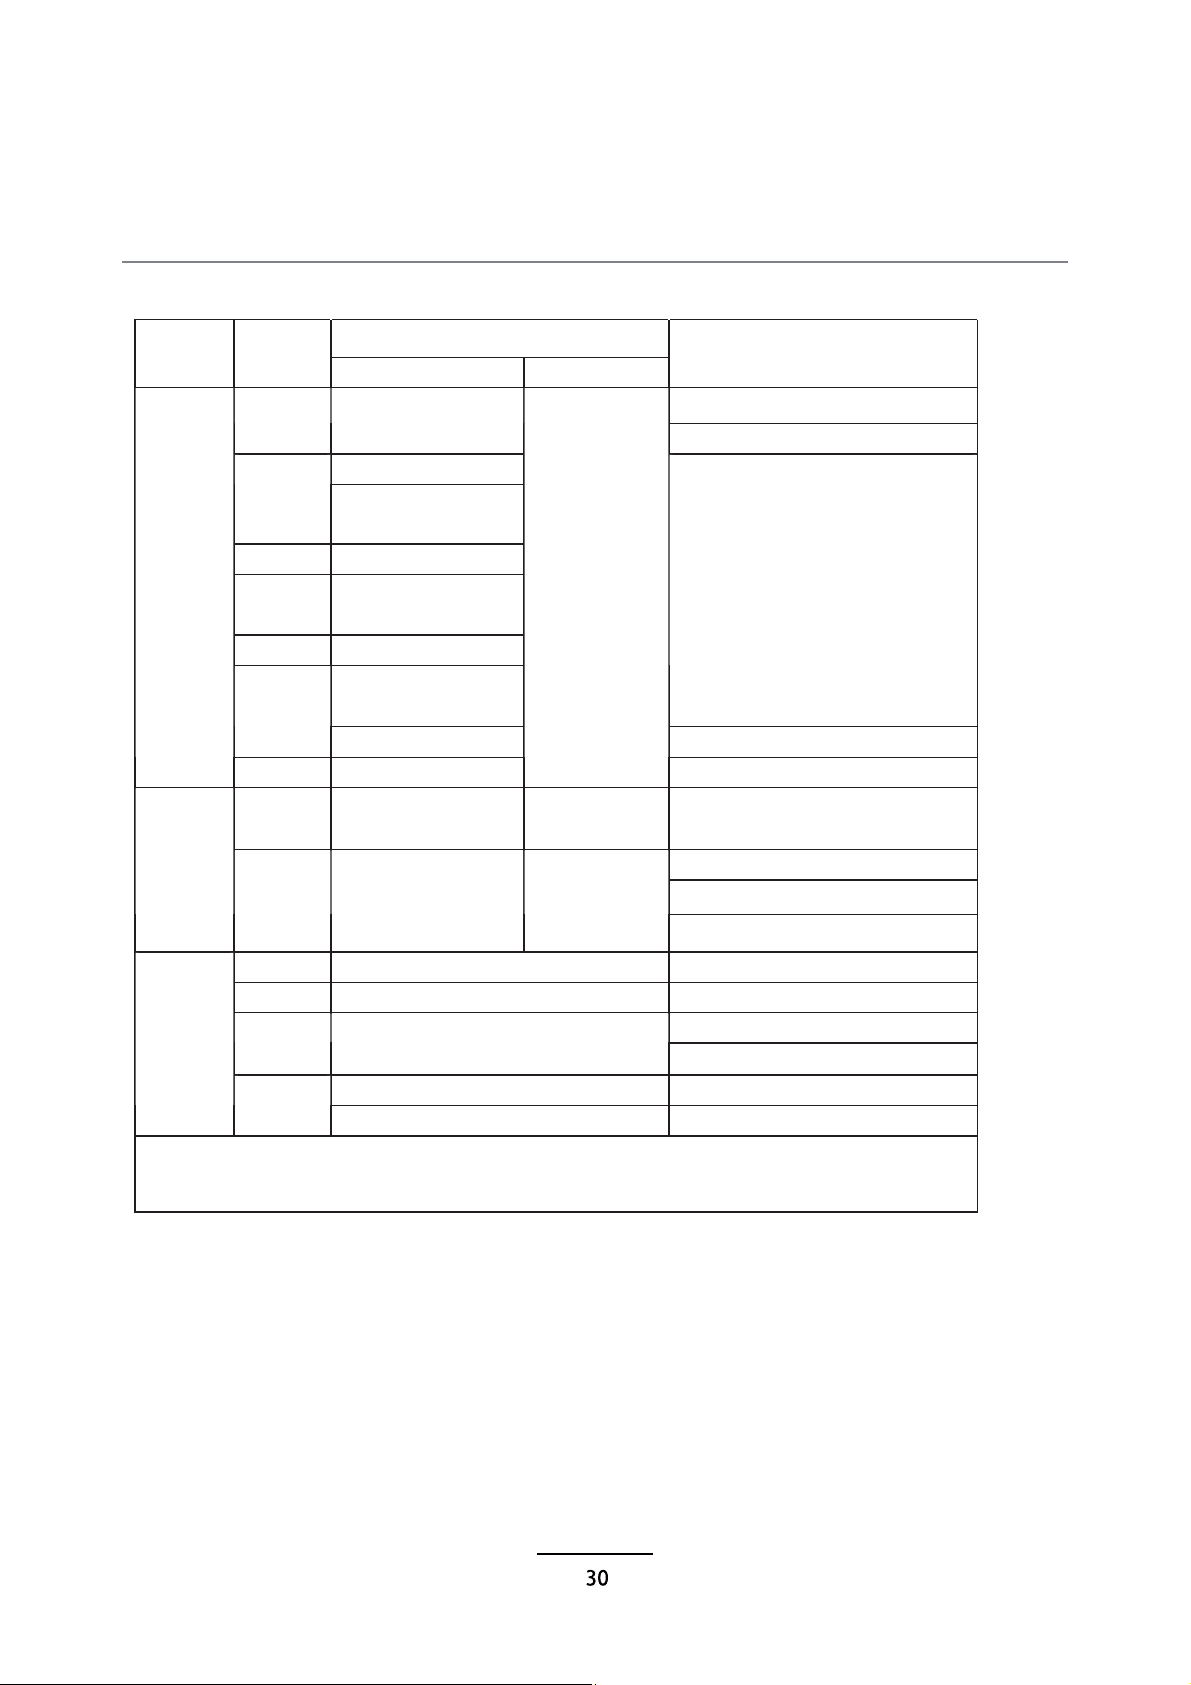
USB Multimedia Playback Format
CodecMedia File Ext.
Video Audio
Remark
Max Solution:1920×1080.mpg MPEG-1, MPEG-2
Max Data Rate: 40 Mbps
DivX,Xvid, MJPEG,.avi
MPEG-4SP/ASP,
H.264
.ts MPEG-2,H.264
.mov .
mkv
MPEG-4SP/ASP,
H.264
.dat
MPEG-1
MPEG-4SP/ASP,
H.264
Max Solution:1920×1080 Max
Data Rate:20 Mbps
.mp4
MPEG-1, MPEG-2 Max Solution: 720×576
Movie
.vob MPEG-2
MP3, AAC,
AC3,PCM
Max Data Rate: 40 Mbps
.mp3
--
MP3
SampleRate: 8K~48KHz Bit
Rate:32K~320Kbps
SampleRate:16K~48KHz
Bit Rate: 32K~442Kbps
Music
.m4a/.aac
--
AAC
Channel: Mono/Stereo
.jpg/ Progressive JPEG MaxResolution: 1024×768
.jpeg BaselineJPEG MaxResolution: 8192×8192
MaxResolution: 6500×6500.bmp BMP
Pixel Depth:1/4/8/16/24/32 bpp
Non-Interlaced MaxResolution: 3000×3000
Photo
.png
Interlaced MaxResolution:1500×1500
File system: Hi Speed FS, FAT32, FAT16, NTFS(NTFS compressed file is not supported).
PVR function: Recording standby, time-shift, EPG recording reservation.

Simple Troubleshooting
Maintenance and Service
If the display fails or performance dramatically deteriorates, check the display in accordance
with the following instructions. Remember to check the peripherals to pin point the source of
the failure.
No Power
- Press either the power button or the Standby button on the Remote control.
No Picture or Sound
- Ensure that the TV is plugged in and the power is on.
- Ensure that the aerial is connected.
-
Try a different program.
Poor Picture Quality
- Check the aerial connections and your aerial.
- Check that the channel is tuned in properly.
-Adjust the picture settings: Brightness, colour, sharpness, contrast.
- Make sure that the TV is not located close to electrical appliances that
may emit radio frequency interference.
No colour
-Adjust the colour setting.
- Check that the programme is broadcast in colour.
- Check that the channel is tuned properly.
TV does not respond to remote control
Unable to watch 4K content
-Check that you are using HDMI1/2/3(Only HDMI supproted)
-Check that your external product can output 3840x2160(24p/25p/30p).
-Note: 1. Not all Blueray players support UHD 3840x2160(24p/25p/30p) upscaling, refer to Blueray
player User Guide.
2.Not all discs can be upscaled to UHD. Refer to disc information.
-Downloaded content played via an external device will not be supported unless the above format is
used 3840x2160(24p/25p/30p).
- Check that there are no obstructions between the remote control and the unit.
- Check that the remote control is within range of the unit.
- Check that the batteries in the remote control and not weak or exhausted.
- Check all connections to the TV.
31
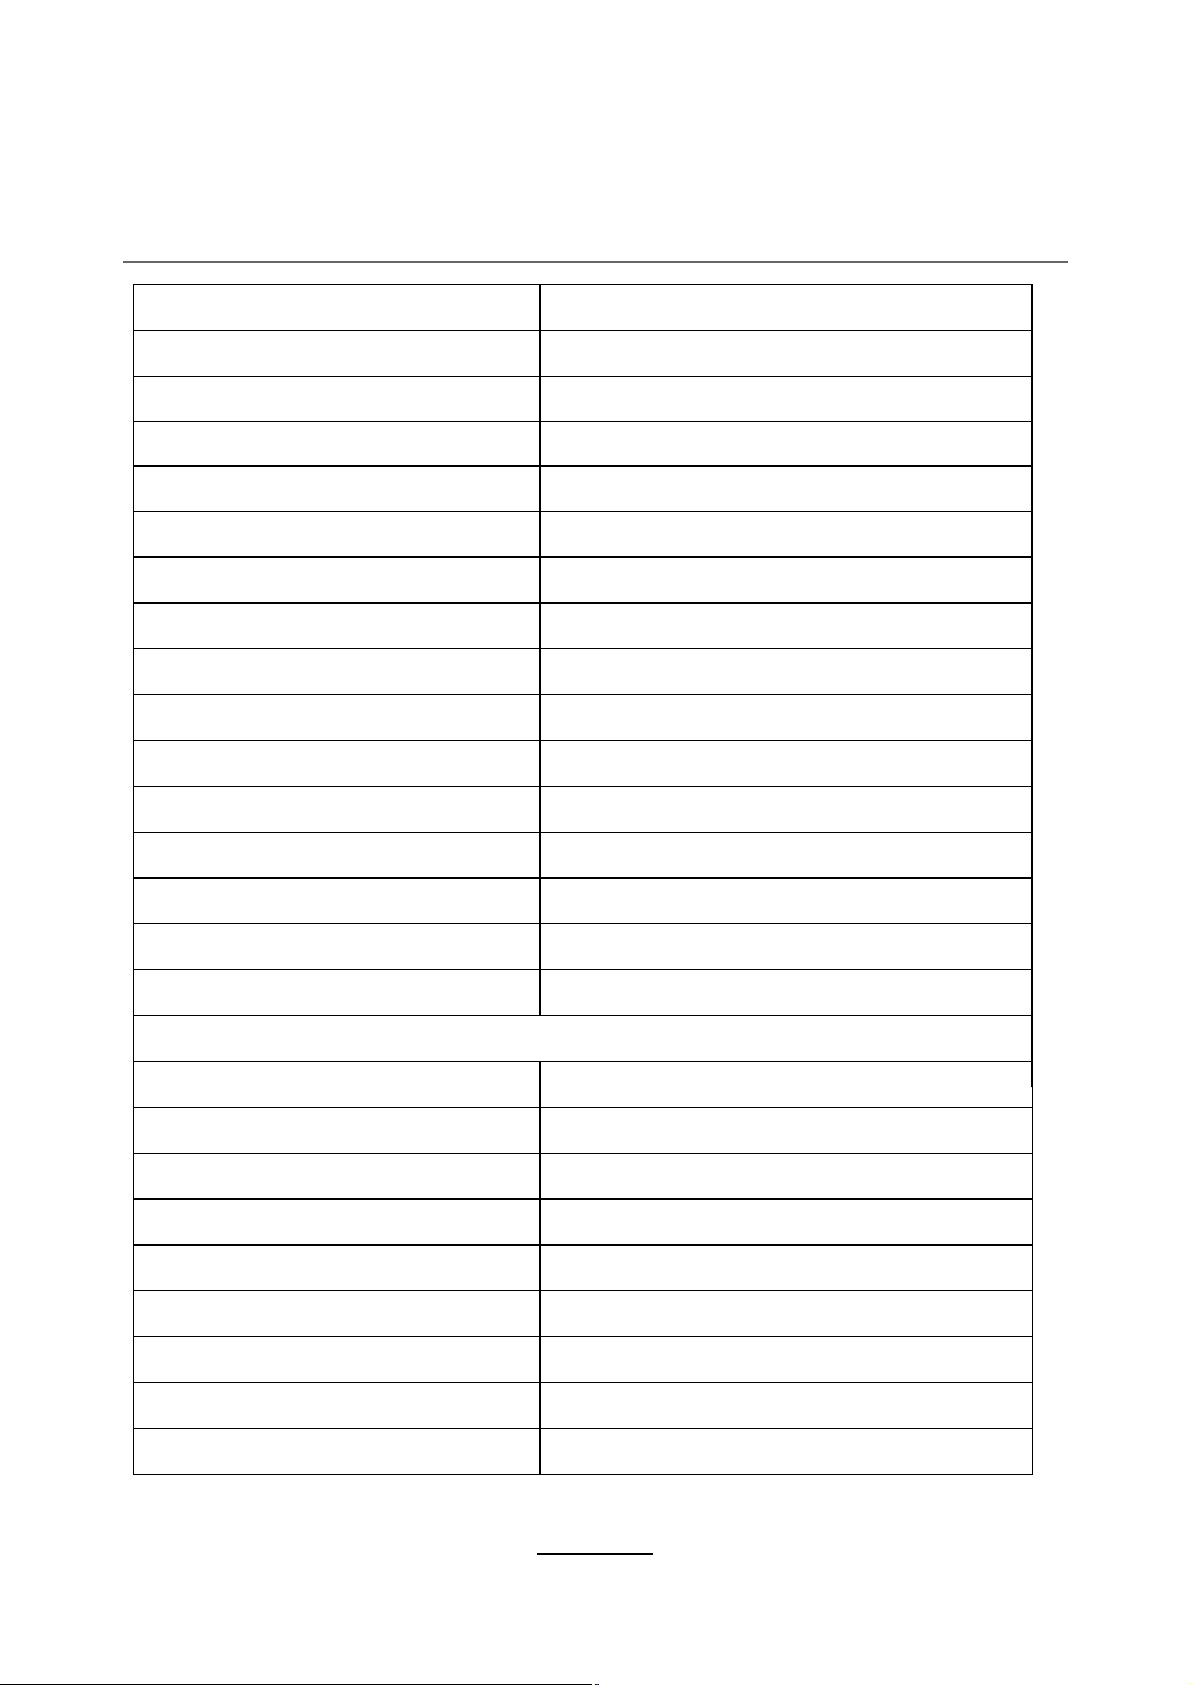
Specifications
Features and specifications are subject to change without prior notice.
Model BP5040UHD
Panel System 50 inch UHD LED TV
DisplayResolution 3840 (H) x 2160 (V) pixels (UHD 4K)
Television System PAL l/BG/DK/SECAM/BG/DKL L'
Brightness 250cd/m
2
Contrast Ratio 5000:1
Power Source AC100-240V~
Operating Power Consumption 150W
AverageAnnual Energy Consumption 353kWh
Standby PowerConsumption <0.5W
Operating Temperature 0°C - 40°C
Vesa Wall mountingsize / Screwsize 400x200mm/M6*8
Speaker Power 8W+8W
Dimension (W x D x H)withoutbase 1115x37x649mm
Dimension (W x D x H) with base 1115x250x687mm
Weight(Net) 18kg
Inputs /Output
HDMI(UHD 4K 3840x2160, 24p/25p/30p)
3
1
1
1
1
1
1
1
1
PC
PCAUDIO
YPbPr
AV
USB
Digital audioout
RF (75 ohm)
Earphone (3.5mm)
32

Ú±® ½«-¬±³»® -«°°±®¬ ¿²¼ ¬±
®»¹·-¬»® §±«® ©¿®®¿²¬§ ª·-·¬æ
©©©ò¾´¿«°«²µ¬ó¿«-¬®¿´·¿ò½±³ò¿«
Ñ«® ¹±±¼- ½±³» ©·¬¸ ¹«¿®¿²¬»»- ¬¸¿¬ ½¿²²±¬ ¾» »¨½´«¼»¼ «²¼»® ¬¸» ß«-¬®¿´·¿²
ݱ²-«³»® Ô¿©ò DZ« ¿®» »²¬·¬´»¼ ¬± ¿ ®»°´¿½»³»²¬ ±® ®»º«²¼ º±® ¿ ³¿¶±® º¿·´«®» ¿²¼ º±®
½±³°»²-¿¬·±² º±® ¿²§ ±¬¸»® ®»¿-±²¿¾´§ º±®»-»»¿¾´» ´±-- ±® ¼¿³¿¹»ò
DZ« ¿®» ¿´-± »²¬·¬´»¼ ¬± ¸¿ª» ¬¸» ¹±±¼- ®»°¿·®»¼ ±® ®»°´¿½»¼ ·º ¬¸» ¹±±¼- º¿·´ ¬± ¾» ±º
¿½½»°¬¿¾´» ¯«¿´·¬§ ¿²¼ ¬¸» º¿·´«®» ¼±»- ²±¬ ¿³±«²¬ ¬± ¿ ³¿¶±® º¿·´«®»ò
Í»°ïì ÞÐëðìðËØÜ
éèééóðï ÞÐëðìðËØÜ ÌÊ ×Þ Ý±ª»® ¿®¬ò·²¼¼ î ïëñðçñîðïì ïïæðé ¿³