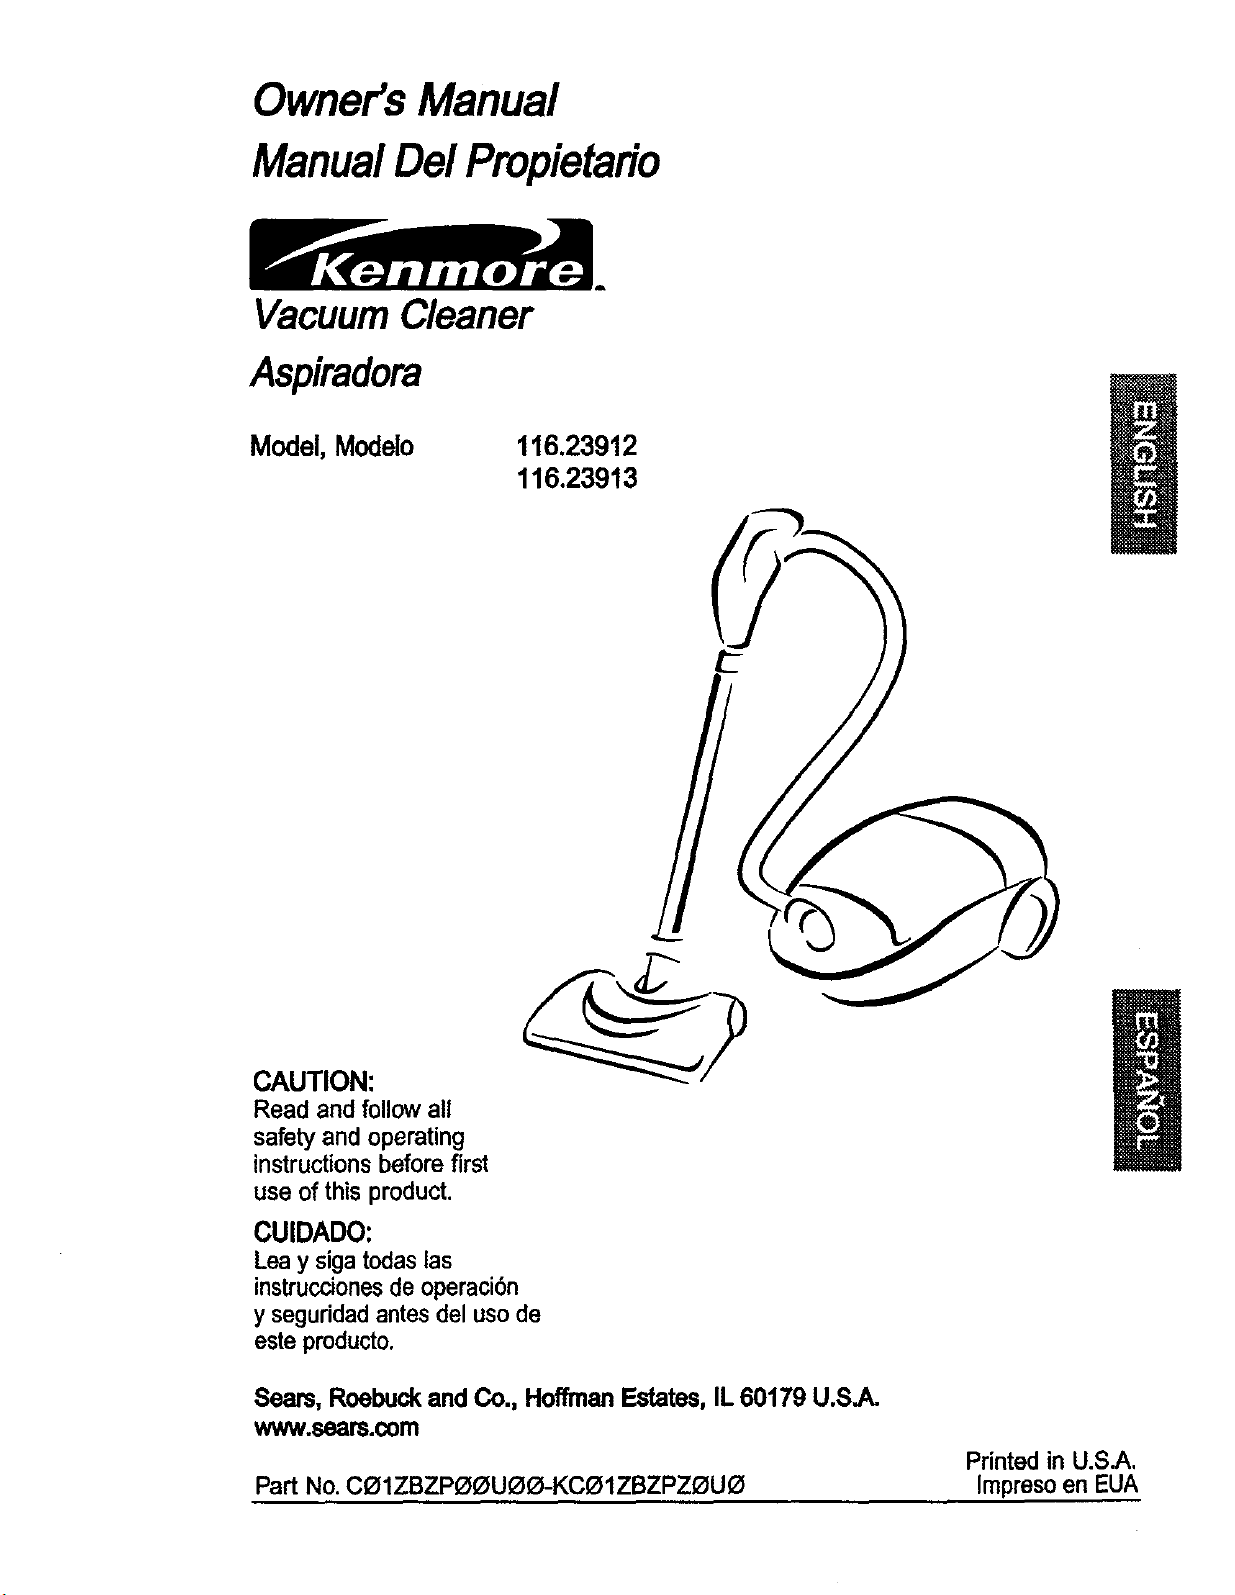
Owner's Manual
ManualDel Propieta#o
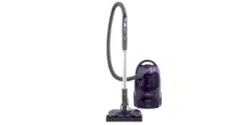
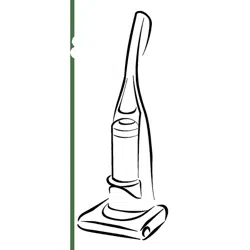
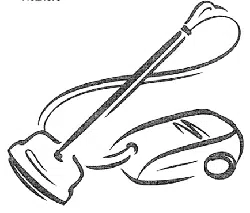
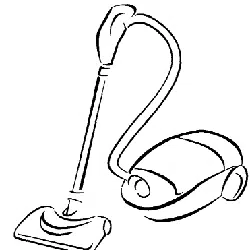
VacuumCleaner
Aspiradora
Model,Modelo
116.23912
116.23913
CAUTION:
Read and followall
safety and operating
instructionsbefore first
use of this product.
CUIDADO:
Leay sigatodaslas
instruccionesde operaci6n
y seguridadantes del uso de
esteproducto.
Sears,Roebuckand Co., HoffmanEstates,IL60179 U.S.A.
www.seam.com
Printed in U.S.A.
Part No. CO1ZBZPOOUOO-KCOIZBZPZOUO Impreso en EUA
Before Using Your New Vacuum ........ 2
Kenmore Vacuum Cleaner Warranty .... 2
Important Safety Instructions ........... 3
Parts and Features ................. 4-5
Assembly Instructions ............... 6-7
Powor-Mate Jr.®Storage ............... 7
Use ................................ 8
How toStart ...................... 8-9
Vacuuming Tips .................... 10
Suggested Pile Height Settings ........ 11
Attachments ....................... 11
Attachment Use Chart ............... 12
Performance Features ............. 12-13
How Your Vacuum Works ............ 14
Canister Care ....................... 14
Bag Changing ..................... 14
Cleaning Exterior and Attachments ..... 15
Motor Safety Fitter Changing .......... 15
Exhaust Filter Changing .............. 16
Power-Mate* Care ................... 16
Dirt Sensor ........................ 17
Belt Changing and Agitator Cleaning .. 18-19
Light BulbChanging ................. 19
Agitator Servicing ................... 20
Troubleshooting ..................... 22
Requesting Assistance
Or Service ................... Back Cover
Please read this guide. It will help you assemble and operate your new Kenmore vacuum in
the safest and most effective way.
Formore informationabout vacuum cleaner care and operation,call your nearest Sears store.
Youwill need the complete model and serial numbers when requestinginformation.Yourvacu-
um's modeland serial numbersare located onthe Model and Serial NumberPlate.
Use the space belowto record the model numberand serial number of your new Kenmore
vacuum.
Model No.
Serial No.
Date of Purchase
Keep this bookand your sales check (receipt) in a safe place for futurereference.
LIMITED ONE YEAR WARRANTY ON KENMORE VACUUM CLEANER
This warrantyisfor one year from the date of purchase, and includesonly private household
vacuum cleaner use. During the warranty year, when this vacuum cleaner is operated and
maintained according to the owner's manual instructions, Sears will repair any defects in
material or workmanship free of charge.
This warrantyexcludesvacuum bags, belts, lightbulbs,and filters,whichare expendable parts
and become worn during normal use.
Forwarrantyservice,returnthisvacuumcleanertothenearestSearsServiceCenterin the
UnitedStates.
Thiswarrantyappliesonly while this productis in use in the United States.Thiswarranty gives
you specificlegal rights,and you may also have other rightswhichvary fromstate tostate.
Seam, Roebuckand Co., D/817 WA, HoffmanEstates, IL 60179
2
Yoursafetyis importanttous,Toreducetheriskoffire,electrical shock, injuryto per-
sonsor damage when usingyour vacuum cleaner, follow basic safetyprecautions
includingthe following:
Readthis manual before assembling or using
your vacuumcleaner.
Useyour cleaneronly as described in this
manual. Use only with Sears recommended
attachments.
To reducetherisk ofelectrical shock - Do
not useoutdoorsoronwetsurfaces.
Disconnectelectricalsupplybeforeservicing
or cleaningoutagitatorarea. Failuretodo so
couldresultinelectricalshockorbrush
suddenlystarting.
di/_YS turncleaneroffbeforeconnectingor
sconnectingthe hose, Power-Mate_or
Power-MateJr?
Alwaysturncleaneroffbeforeunplugging.
Do notunplugby pullingoncord. Tounplug,
grasptheplug,not the cord.
Holdplugwhenrewindingontocord reel. Do
notallowplug towhipwhenrewinding.
Donotusewithdamagedcordor plug.If
cleanerisnotworkingas itshould,hasbeen
dropped,damaged,leftoutdoors,ordropped
intowater,returnittoa SearsServiceCenter.
Do notpullorcarry by cord,use cord as a
handle,closedooroncord,or pullcord
aroundsharpedgesor corners. Do notrun
cleanerovercord.Keepcordawayfrom
heatedsurfaces.
Do notleavecleanerwhen plugged in.
Unplug from outletwhennot in use and
beforeservicing.
Do notallowto be usedasa toy. Close
attentionisnecessarywhen usedbyor near
children.
Do nothandle plug or cleanerwithwethands.
Donotput anyobjectsintoopenings.
Do not operate the cleaner with a punctured
hose. The hose contains electrical wires.
Replace if cut or worn. Avoid picking up
sharp objects,
Do not use with any opening blocked; keep
free of dust, lint, hair and anything that may
reduce air flow.
Keep hair, loose clothing,fingers, and all
parts of body away from openings and
moving parts.
Do not use cleaner without dust bag and/or
filters in place.
Always change the dust bag after vacuuming
carpet cleaners or freshener, powders and
fine dust. These products clog the bag,
reduce airflow and can cause the bag to
burst. Failure to change bag could cause
permanent damage to the cleaner.
Do not use the cleaner to pick up sharp hard
objects, small toys, pins, paper clips, etc.
They may damage the cleaner or dust bag.
DOnot pick up anything that is burning or
smoking, such as cigarettes, matches, or hot
ashes.
Do notusecleanertopick upflammable or
combustible liquids (gasoline,cleaningfluids,
perfumes,etc.}, or use in areaswhere they
maybe present. The fumes fromthese
substances can create a fire hazard or
explosion.
Use extra care whencleaning on stairs. Do
not put on chairs, tables, etc. Keep onfloor.
You are responsible for making sure thatyour
vacuum cleaner is not used by anyone unable
to operate it properly.
Do not operate without exhaust filter or
exhaust filter coverinstalled.
SAVE THESE INSTRUCTIONS
Properassembly andsafe use of your vacuum cleanerare your responsibilities.Yourcleaner is
intended onlyfor household use.Read thisOwner's Manual carefully for important use and
safety information.Thin guidecontains safetystatementsunder warning and caution symbols.
Please payspecialattention to these boxes and follow any instructions given.WARNING
statementsalert you to suchhazards as fire, electrical shock,burns andpersonal injury.
CAUTIONstatements alertyouto such hazards as personalinjury and/or property damage.
3
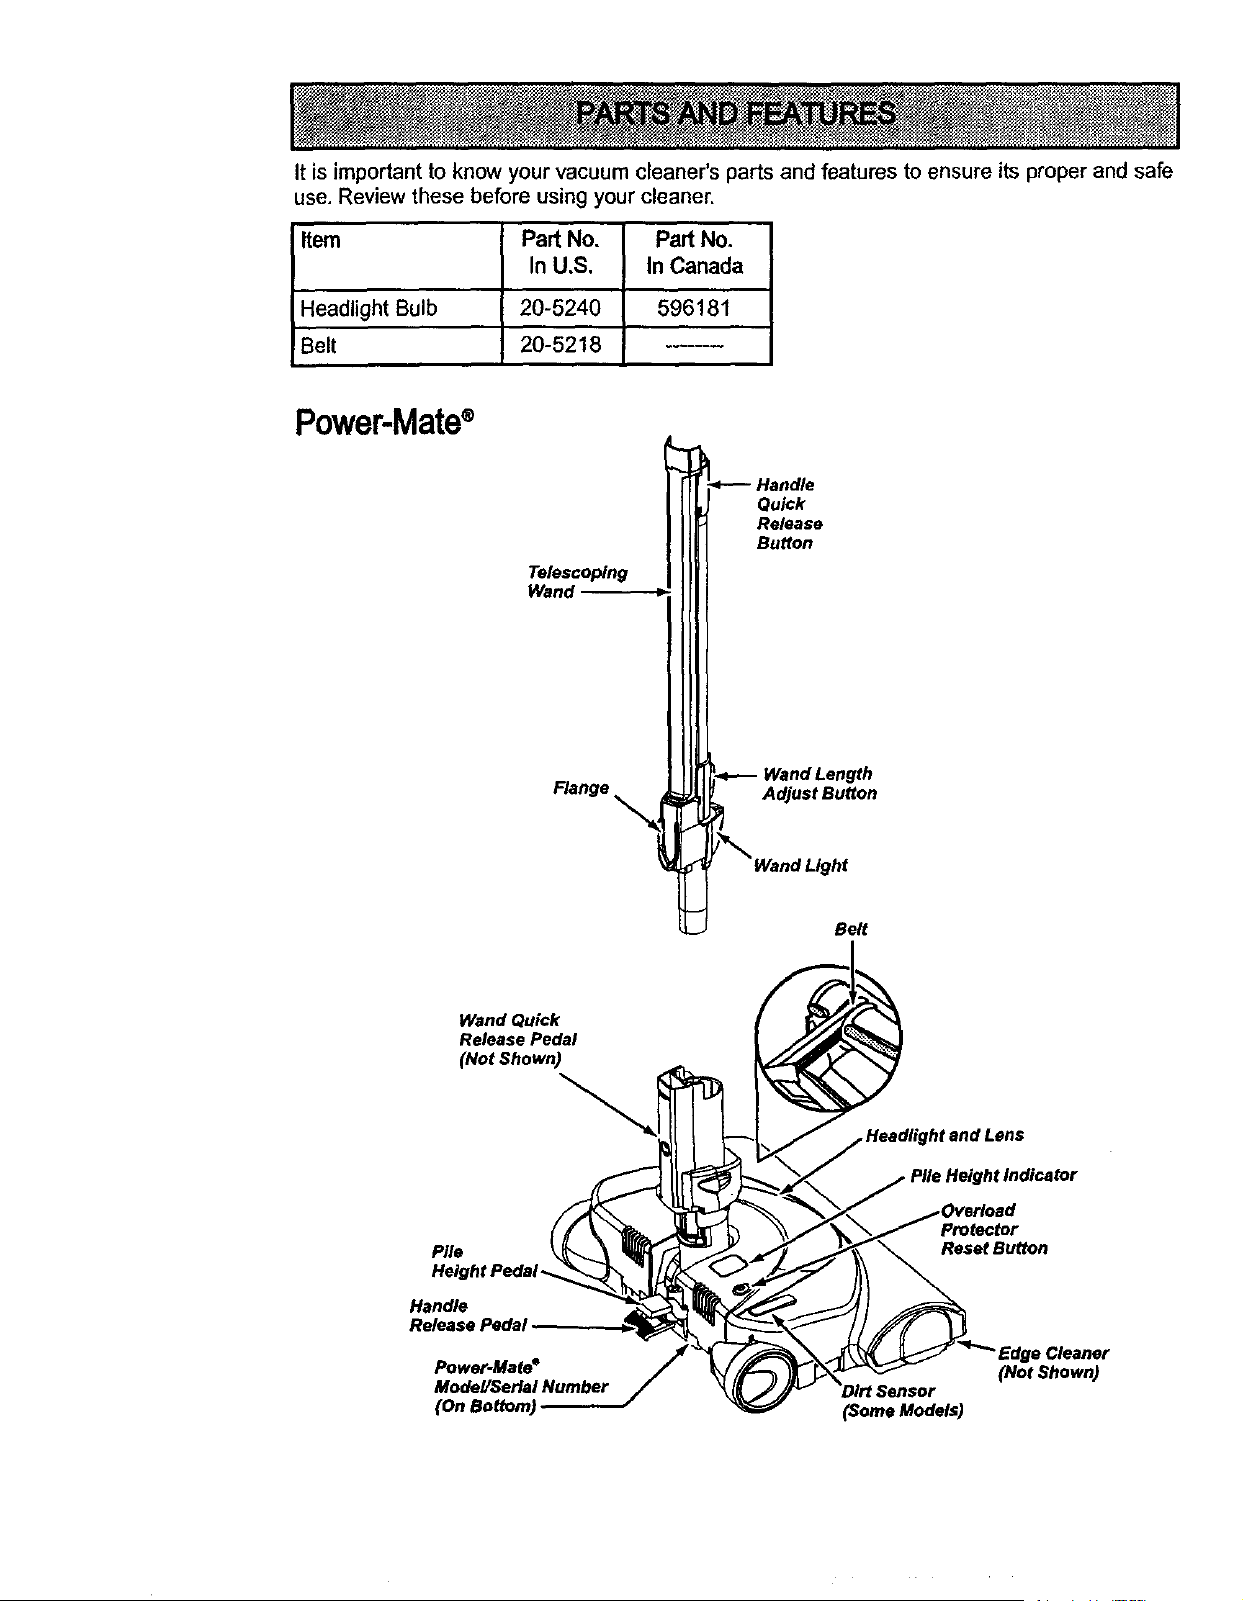
It is important to know your vacuum cleaner's parts and features to ensure its proper and safe
use, Review these before using your cleaner.
Item
Headlight Bulb
!Belt
Pad No, Pad No.
In U.S, In Canada
20-5240 I 596181
20-5218
Power-Mate®
Telescoping
Wand
Flange
_----Handle
Qu_k
Release
Button
Wand Length
Adjust Button
/_ Wand Light
Belt
Wand Quick
Release Pedal
(Not Shown)
Pile
Height Pedal-
Handle
Release PedaJ
Power-Mate °
and Lens
Pile Height Indicator
)verload
• Cleaner
(Not Shown)
(Some Models)
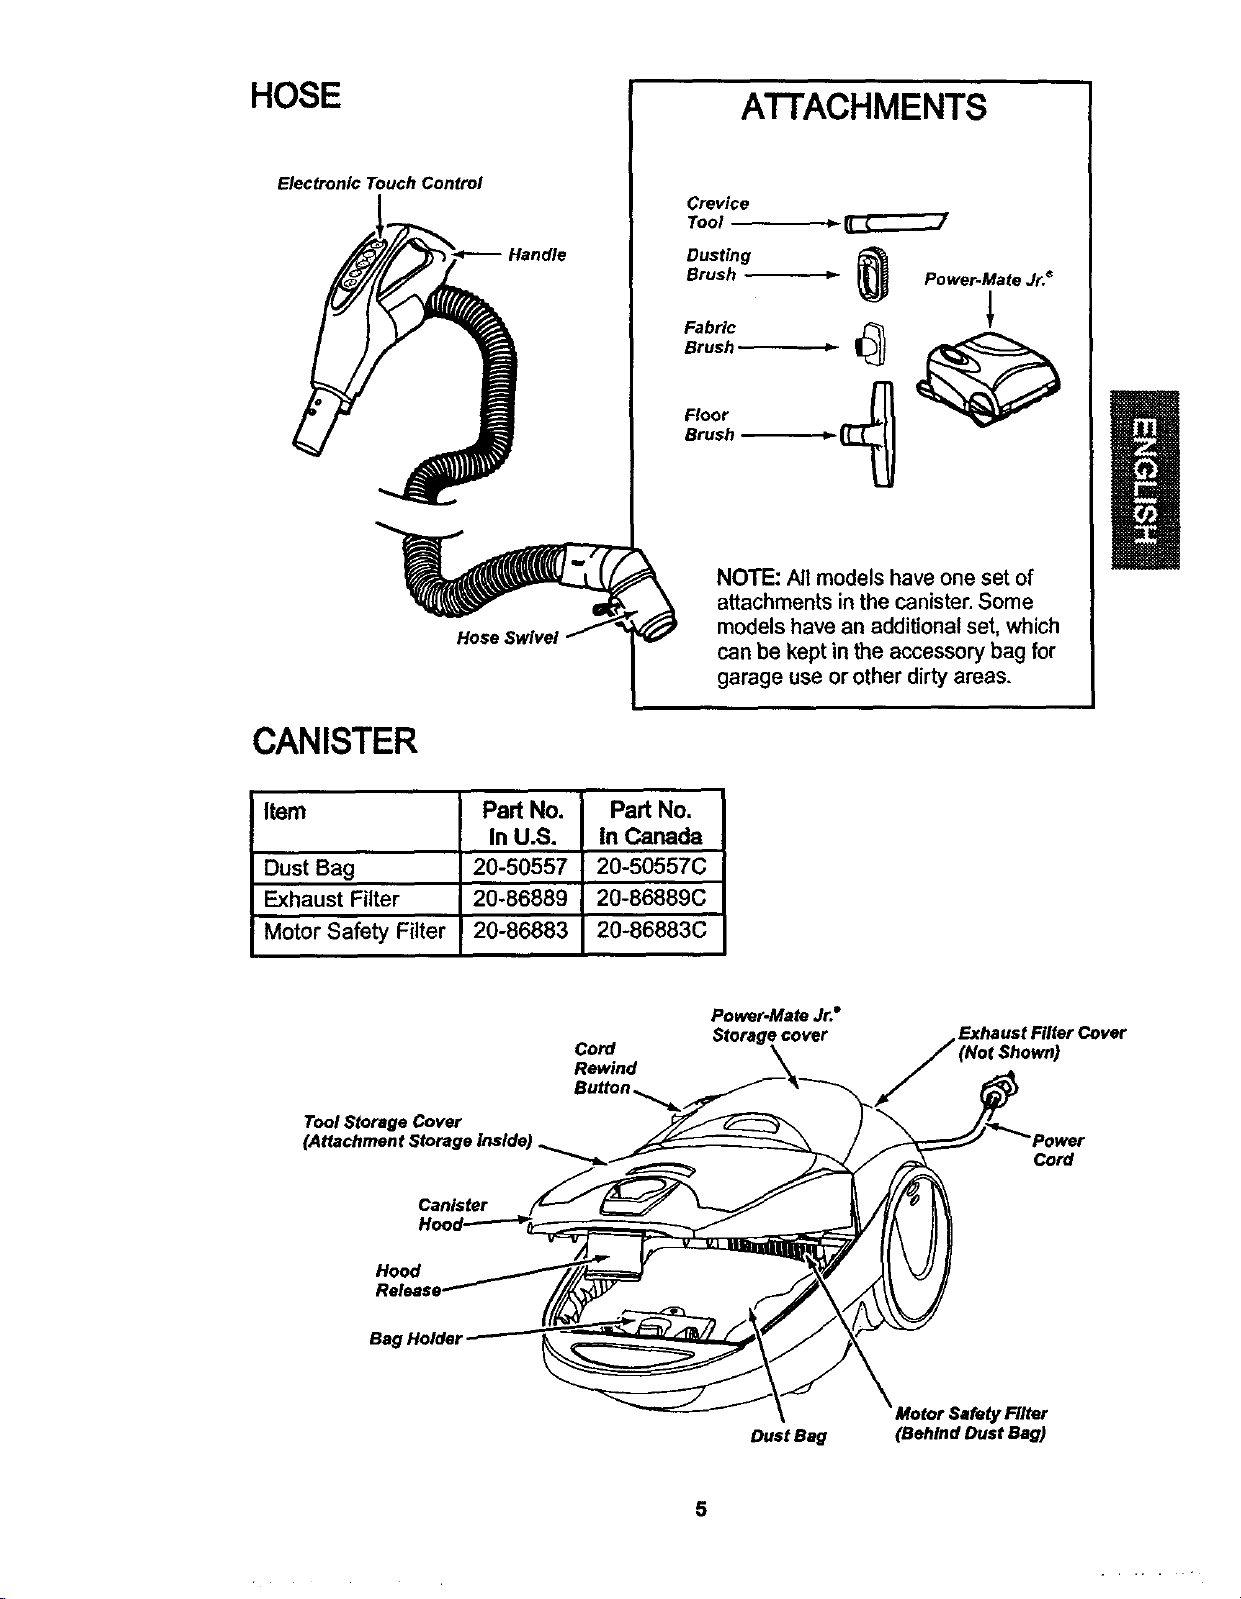
HOSE
Electronic Touch Control
Handle
Hose Swivel
A'I-FACHMENTS
Crevice
Tool _-
Dusting
BrushFabricBrUsh_ _ _P°wer'Mate Jr.*
Floor
Brush -_
NOTE: All models have one set of
attachments inthe canister.Some
models have an additionalset,which
can be keptin the accessory bag for
garage use or other dirtyareas.
CANISTER
Item
Dust Bag
Exhaust Filter
I Motor Safety Filter
Part No,
In U.S.
20-50557
20-86889
20-86883
Part No.
In Canada
20-50557C
20-86889C
20-86883C
Cord
Rewind
Power-Mete Jr.°
Storage cover
Exhaust Filter Cover
Tool Storage Cover
Canister
Cord
Hood
Bag Holder
Dust Beg (Behind Dust Bag)
5
ElectricalShock Hazard
DO NOT plug intoelectricalsupply
untilassembly is complete. Failure to
doso could resultin electricalshock or
injury.
Before assembling vacuum, check the
PACKING LIST on the cover of the separate
Repair Parts List. Use this list to verify that
you have received all the components of
your new Kenmora vacuum.
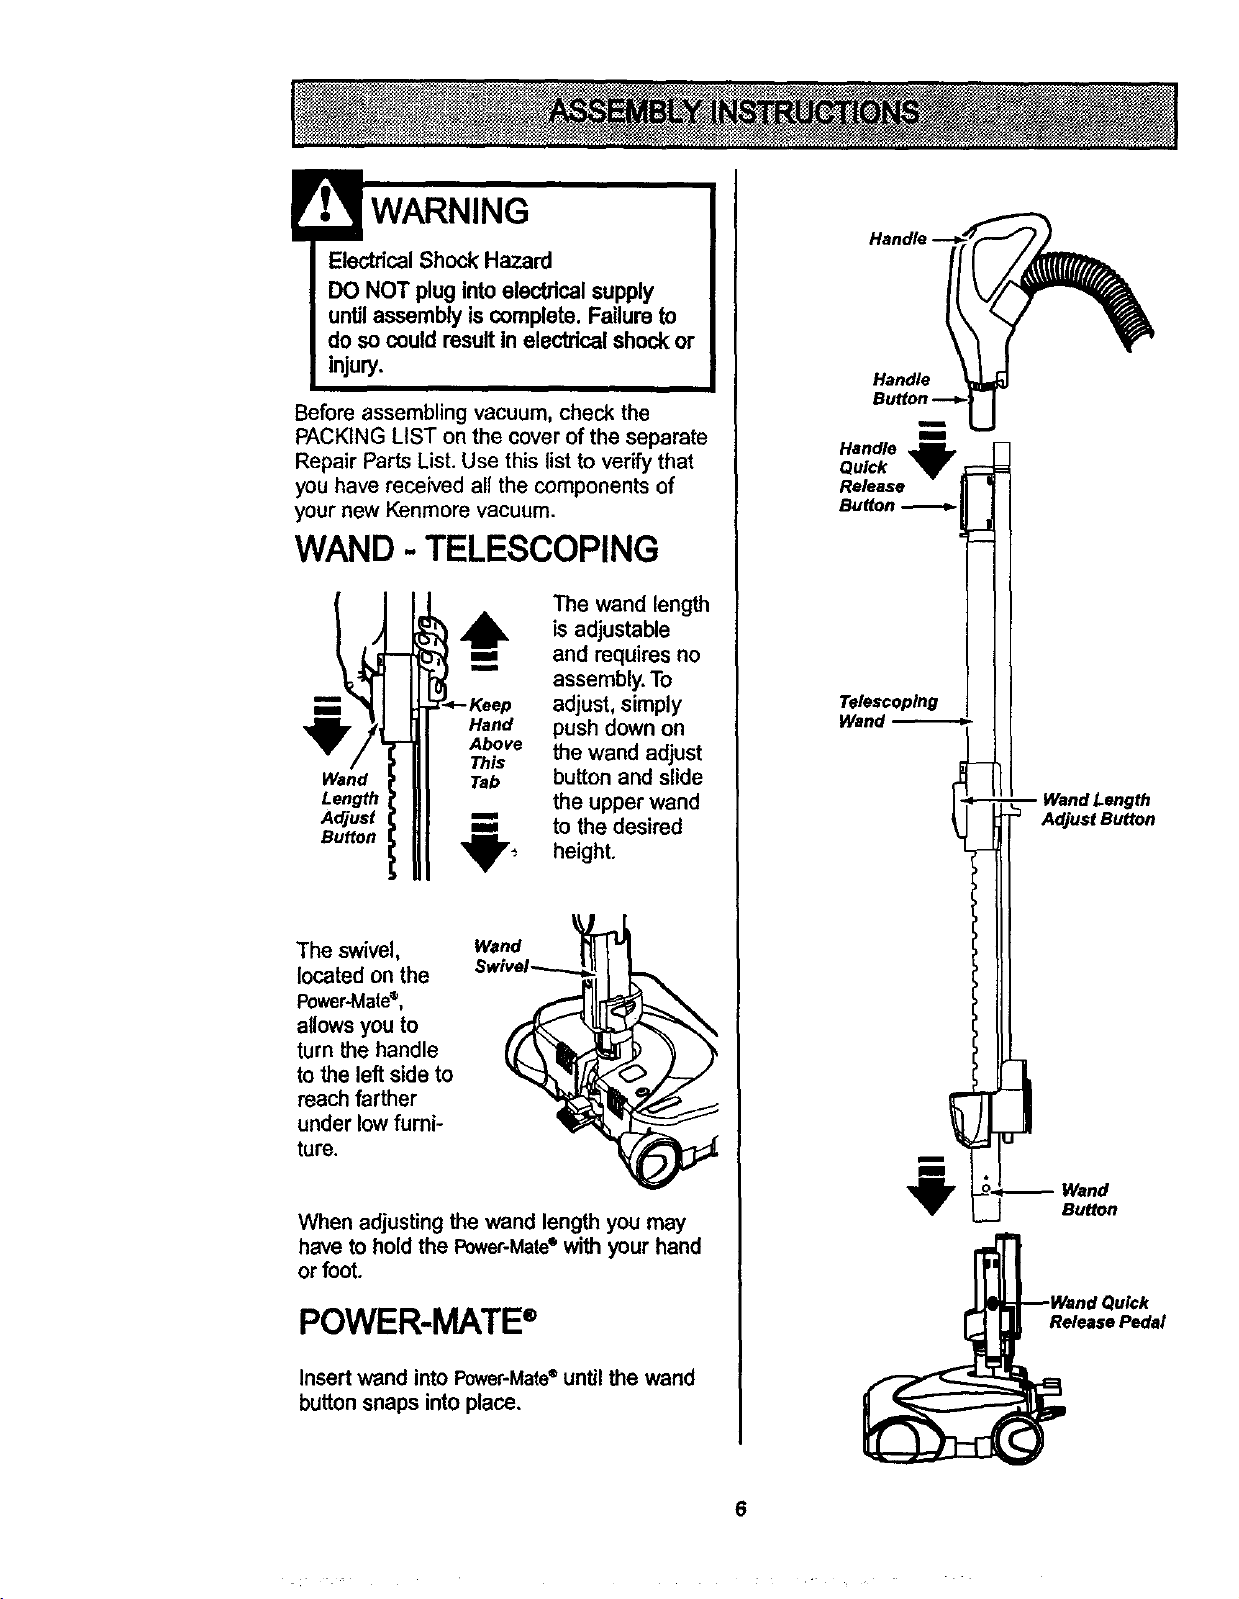
WAND - TELESCOPING
Wand
Length
Adjust
Button
The wand length
6, is adjustable
==, and requiresno
im
assembly.To
adjust,simply
Hand push downon
Above the wand adjust
This
Tab button and slide
the upper wand
=== to the desired
'_'_- height.
The swivel,
located on the
Power-Mate®,
allows you to
turn the handle
to the left side to
reach farther
under low furni-
ture.
When adjusting the wand length you may
have to hold the Power-Mate° with your hand
or foot.
POWER-MATE®
Insertwand intoPower-Mate®untilthe wand
button snaps intoplace.
Handle
m
m
Handle
Quick
Release
Button
Telescoping
i
i
Length
Adjust Button
Wand
Button
Release Pedal
6
CANISTER
1. Open the canister hood.
2. Check to see that the dust bag is proper-
ly installed. See BAG CHANGING for
instructions.
3. Check to see that the motor safety filter is
properly installed. See MOTOR SAFETY
FILTER CLEANING for instructions.
HOOD AND TOOL
STORAGE COVER
It is normal for the canister hood and tool
storage cover to come off when opened fur-
ther than needed. Line up the hinge slots,
insert the hinges into the slots, and close
the hood and tool storage cover to reinstall.
CAUTION
Never open canisterhoodwith the
tool storagecover open. This will
help to preventdamage from
occurringto the canisterhoodand/or
tool storagecover,
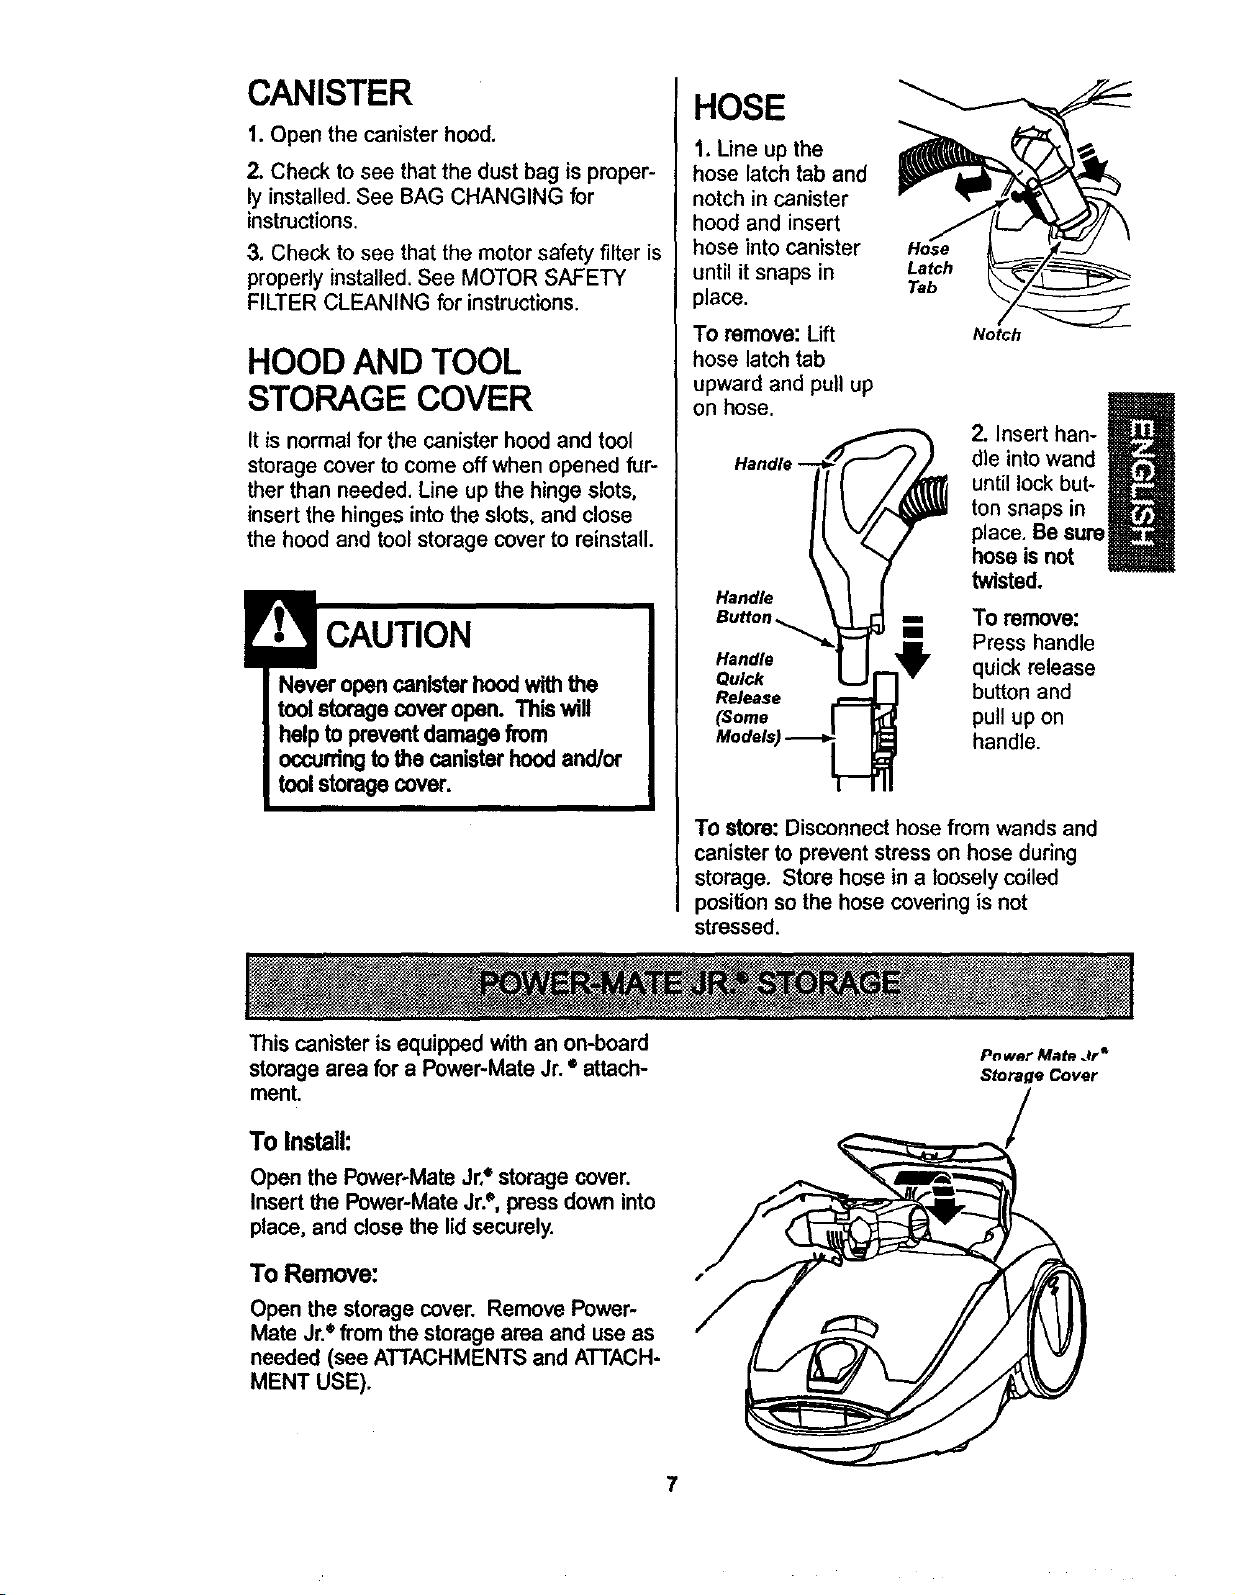
HOSE
1. Line up the
hose latch tab and
notch in canister
hood and insert
hose into canister
until it snaps in
place.
To remove: Lift
hose latch tab
upward and pull up
on hose.
Handle
Handle
Quick
Release
(Some
Hose
Latch
Tab
Notch
m
2. Insert han-
dle into wand
I
until lock but-
ton snaps in
place. Be sure
hose is not
twisted.
To remove:
Press handle
quick release
button and
pull up on
handle.
To store: Disconnect hose from wands and
canister to prevent stress on hose during
storage. Store hose in a loosely coiled
position so the hose covedng is not
stressed.
This canister is equipped withan on-board
storagearea for a Power-Mate Jr.• attach-
ment.
To Install:
Open the Power-Mate Jr,e storage cover.
Insert the Power-Mate Jr?, press down into
place, and close the lid securely.
To Remove:
Open the storage cover. Remove Power-
Mate Jr.e from the storage area and use as
needed (see ATTACHMENTS and ATTACH-
MENT USE).
P_ wet Mate Jr*
Storage Cover
7
HOW TO START
Personal Injury and Product Damage
Hazard
• DO NOT plugin if switchIs in ON
position.Personalinjuryor
damage could result.
• The cord moves rapidlywhen
rewinding.Keep childrenaway
and provide a dear path when
rewindingthe cordto prevent
personalinjury.
• DO NOT useoutletsabove
counters.Damage from cord to
itemsin surroundingarea
couldoccur.
Cord
Rewind
1. Pull cord out
of canisterto
desired length.
The cord will
not rewinduntil
the cord rewind
buttonis
pushed.
NOTE: To reduce the risk of electric shock,
this vacuum cleaner has a polarized plug;
one blade is wider than the other. This plug
will fit in a polarized outlet only one way. If
the plug does not fit fully in the outlet,
reverse the plug. If it still does not fit, con-
tact a qualified electrician to install the prop-
er outlet. Do not change the plug in any
way.
2. Plug the polarized powercord into a 120
Voltoutlet located near the floor.
To rewind:Unplug
the cleaner.Hold
the plug while
rewinding to prevent
damage or injury
from the moving
cord. Push cord
rewindbutton.
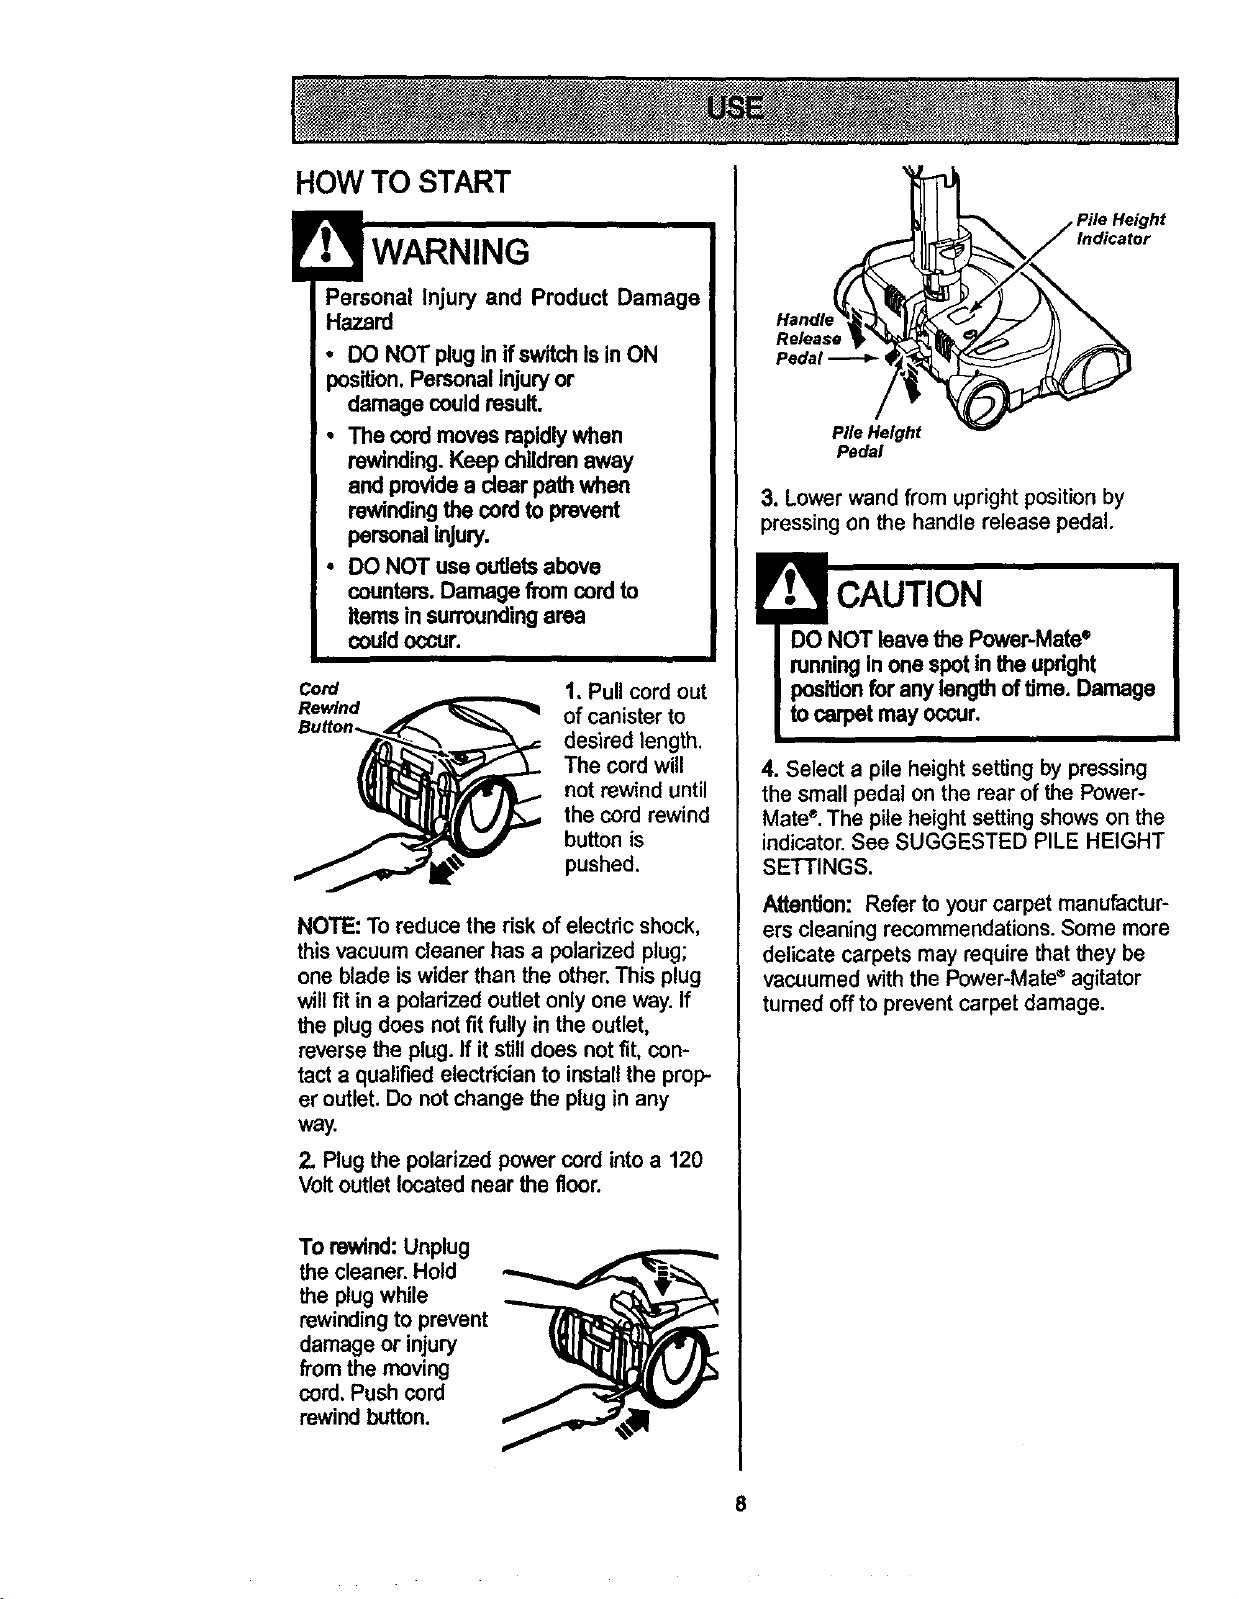
Indicator
Release
Pedal _ ,
Pile Height
Pedal
3. Lowerwand from uprightpositionby
pressing on the handle release pedal.
CAUTION
DO NOT leave the Power-Matee
runningIn one spot in the upright
positionfor anylength oftime. Damage
to carpetmay occur.
4. Select a pile height setting by pressing
the small pedal on the rear of the Power-
Mate ®.The pile height setting shows on the
indicator. See SUGGESTED PILE HEIGHT
SETTINGS.
Attention: Refer to yourcarpet manufactur-
ers cleaning recommendations. Some more
delicate carpets may require thatthey be
vacuumed withthe Power-Mate_ agitator
turned offto preventcarpet damage.
8
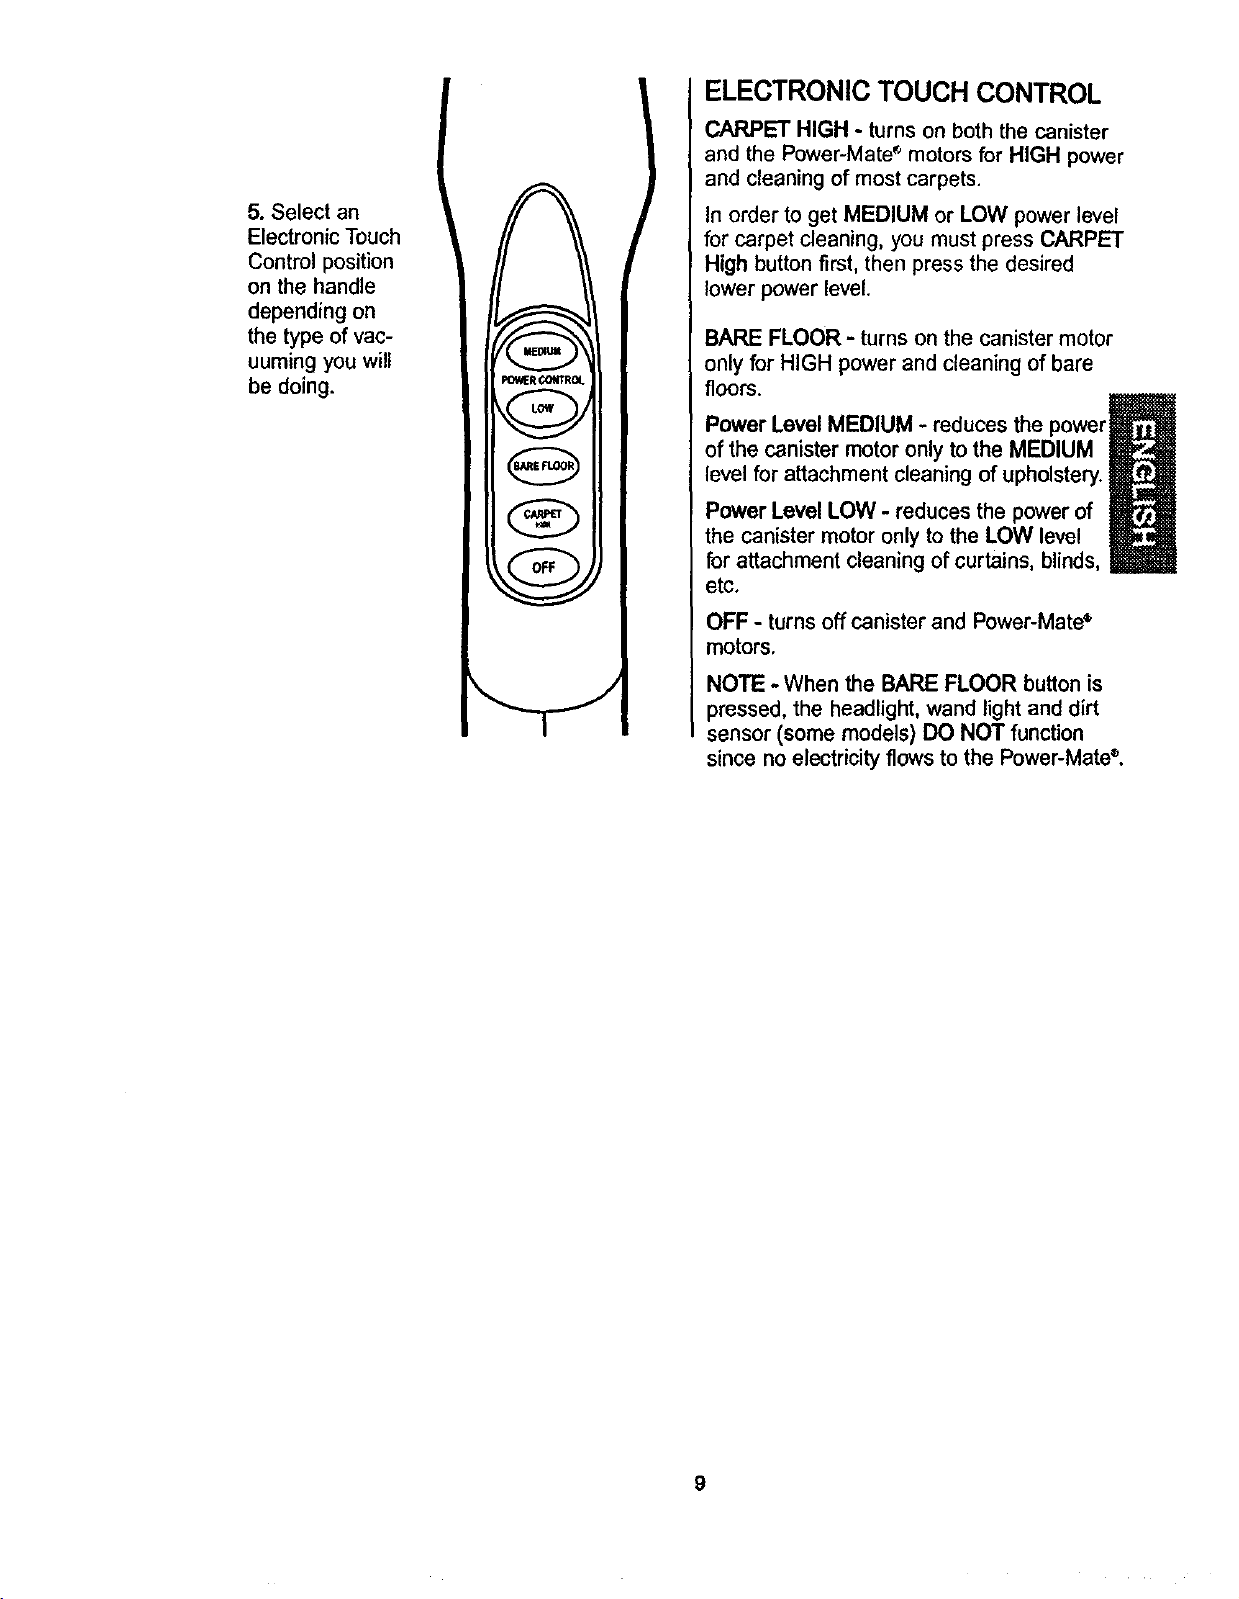
5. Select an
Electronic Touch
Control position
on the handle
depending on
the type of vac-
uuming you will
be doing.
_lt (;OffrROL
(BAREFLOOR]
f cAn.,_ _,
ELECTRONIC TOUCH CONTROL
CARPET HIGH - turns on both the canister
and the Power-Mate s motors for HIGH power
and cleaning of most carpets.
In order to get MEDIUM or LOW power level
for carpet cleaning, you must press CARPET
High button first, then press the desired
lower power level.
BARE FLOOR - turns on the canister motor
only for HIGH power and cleaning of bare
floors.
Power Level MEDIUM - reduces the power_l_
of the canister motor only to the MEDIUM
level for attachment cleaning of upholstery.
Power Level LOW - reduces the power of
the canister motor only to the LOW level
for attachment cleaning of curtains, blinds,
etc.
OFF - turns off canister and Power-Mate_
motors.
NOTE - When the BARE FLOOR button is
pressed, the headlight, wand light and dirt
sensor (some models) DO NOT function
since no electricity flows to the Power-Mate®.
9
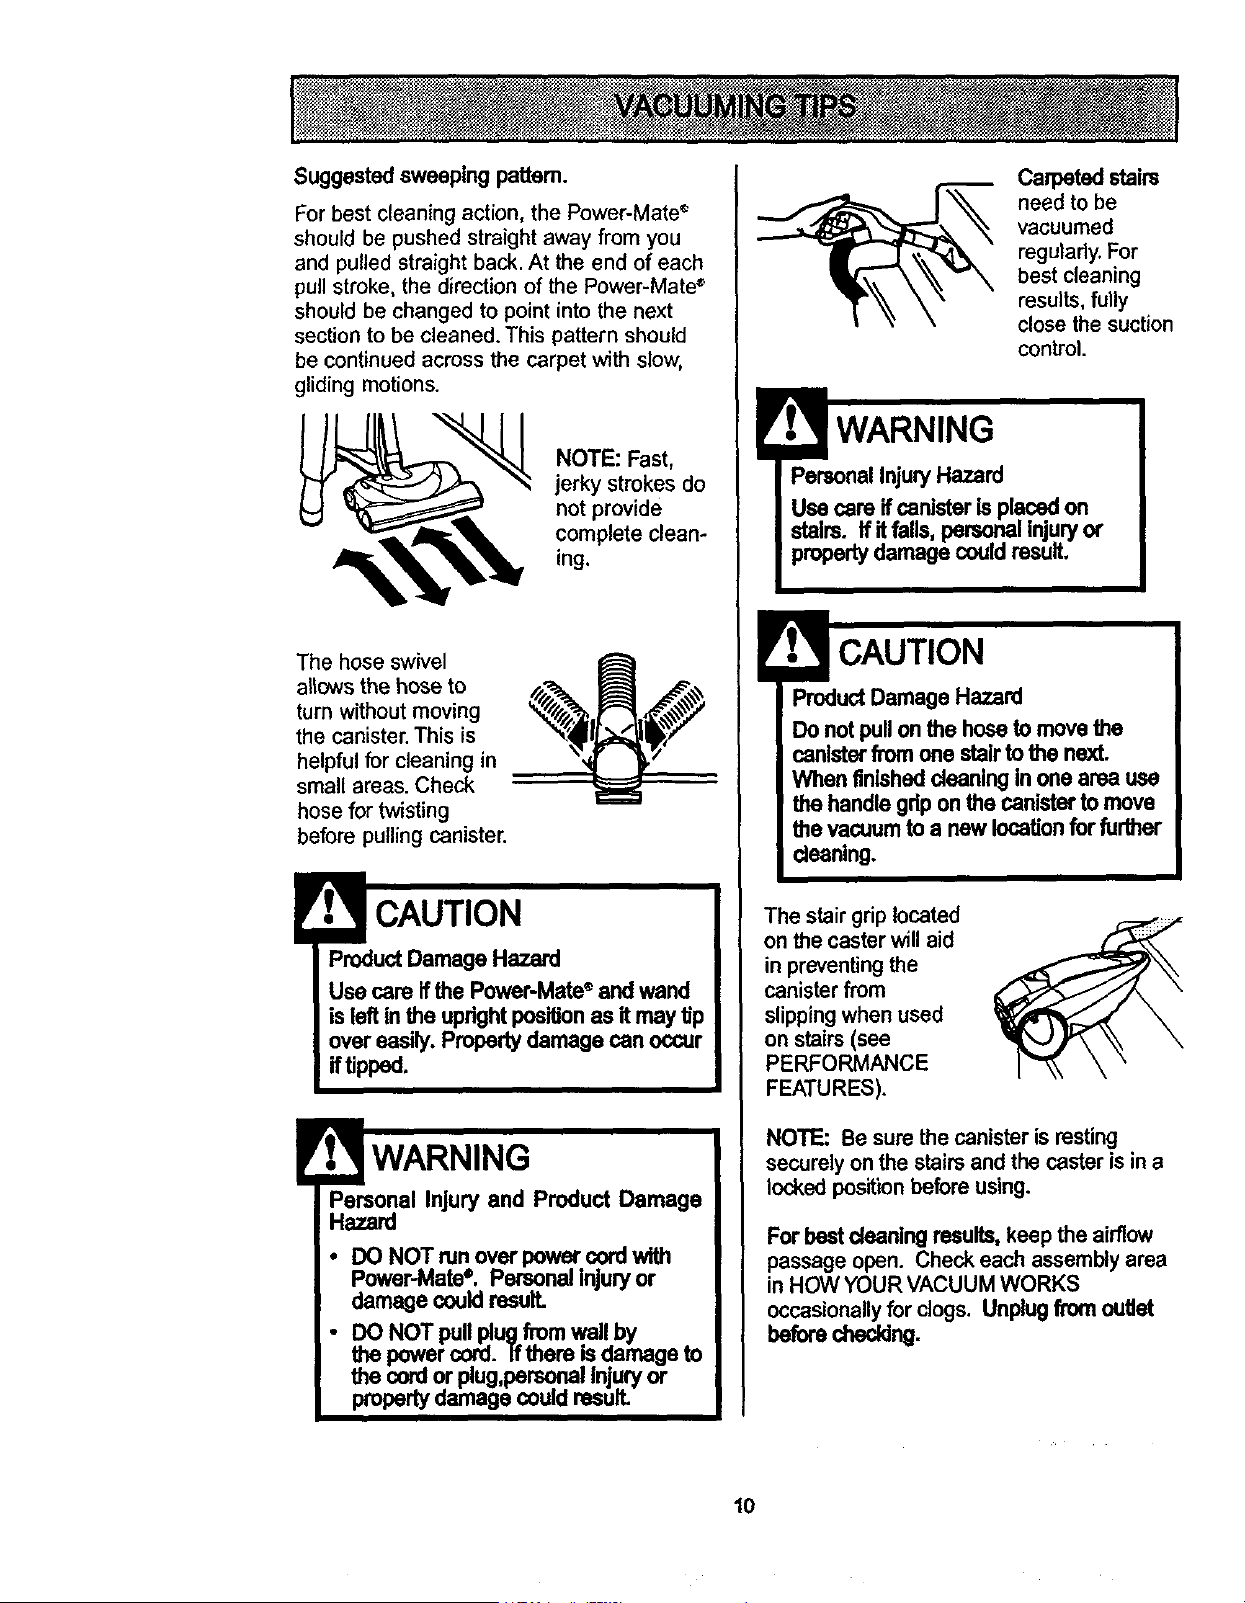
Suggestedsweeping patlem.
For best cleaning action, the Power-Mate r
should be pushed straight away from you
and pulled straight back. At the end of each
pull stroke, the direction of the Power-Mate +
should be changed to point into the next
section to be cleaned. This pattern should
be continued across the carpet with slow,
gliding motions.
NOTE: Fast,
jerky strokes do
not provide
complete clean-
ing.
The hose swivel
allows the hose to
turn without moving
the canister. This is
helpful for cleaning in
small areas. Check
hose for twisting
before pulling canister.
ProductDamage Hazard
Use care ifthe Power-Mate" and wand
isleft in the uprightpositionas itmay tip
overeasily. Propertydamage can occur
iftipped.
Personal Injury and Product Damage
Hazard
• DO NOTmn overpower cord with
Power-Mate+. Personal injuryor
damage couldresuff.
• DO NOT pullplug from wail by
the powercord. Ifthere isdamage to
the cordor plug,personalInjuryor
propertydamage couldresult.
Caq0eted stairs
need to be
vacuumed
regulady. For
best cleaning
results, fully
close the suction
control.
WARNING
PersonalInjury Hazard
Use care ifcanister isplacedon
stairs. Ifit falls, personal injuryor
propertydamage couldresult,
ProductDamage Hazard
Do notpullonthe hose to movethe
canister fromone stair to the next.
When finishedcleaningIn one area use
the handlegdp onthe canisterto move
the vacuumto a new locationfor further
cleaning,
The stair grip located
on the casterwill aid
in preventing the
canister from
slippingwhen used
on stairs(see
PERFORMANCE
FEATURES).
NOTE: Be sure the canisteris resting
securelyonthe stairsand the caster isin a
lockedposition beforeusing.
Forbest cleaningresults,keep the airflow
passageopen. Check each assemblyarea
in HOW YOURVACUUM WORKS
occasionallyfor clogs. Unplugfromoutlet
beforechecking.
10
For best deep down cleaning, use the XLO
setting. However, you may need to raise the
height to make some jobs easier, such as
scatter rugs and some deep pile carpets,
and to prevent the vacuum cleaner from
shutting off. Suggested settings are:
HI - Shag, deep pile, or scatter rugs.
MED - Medium to deep pile.
LO - Low to medium pile.
XLO - Most carpets and bare floors.
! CAUTION
DO NOT attachor remove handle or
wandswhile cleaner isON. This could
cause sparkingand damage the elec-
_1 contacts.
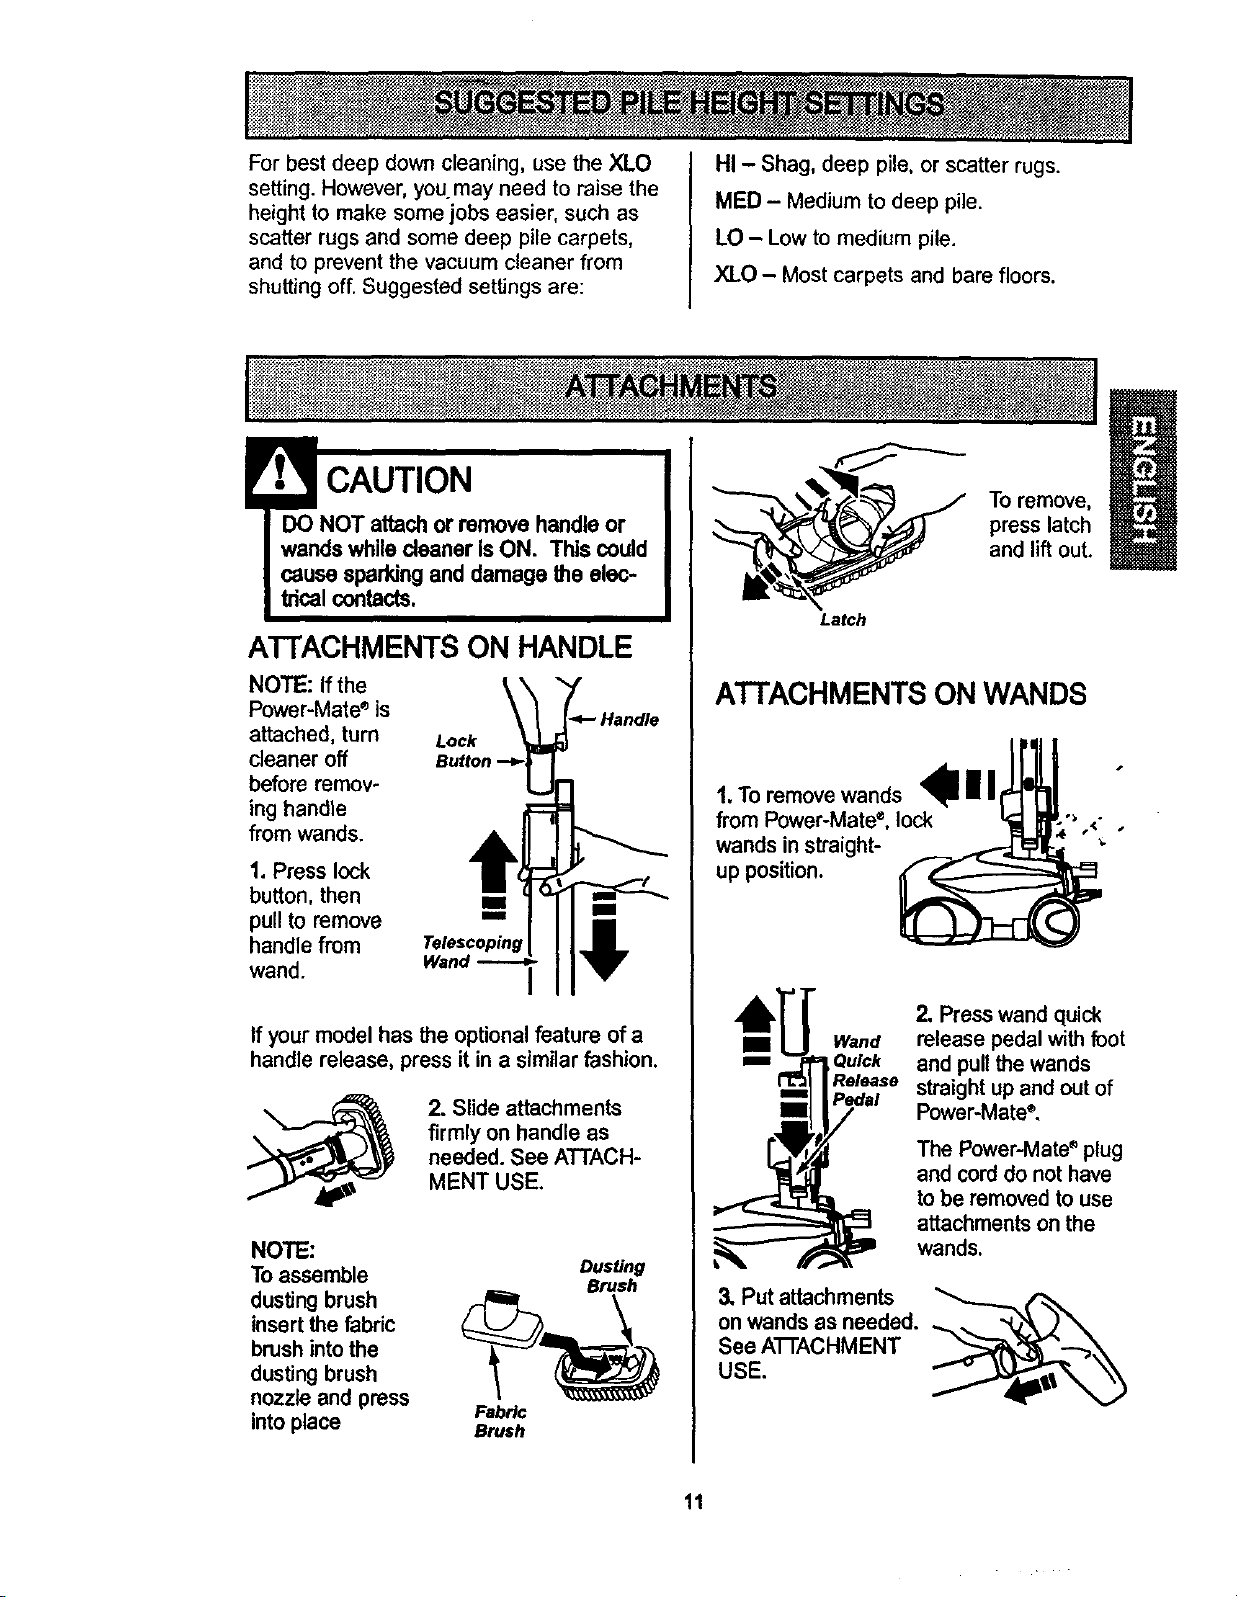
A'I-FACHMENTSON HANDLE
NOTE: Ifthe
Power-Mate_is
attached, turn
cleaner off
before remov-
ing handle
fromwands.
Lock _-4- Handle
Button "-_L_
1. Press lock
button, then
pull to remove
handle from Telescopinl_
wand. Wand -_
If your model has the optionalfeature of a
handle release, pressit in a similarfashion.
2. Slide attachments
firmly on handle as
needed. See ATTACH-
MENT USE.
NOTE:
Toassemble Dusting
Brush
dusting brush _4_
insert the fabric
brush intothe
dusting brush
nozzle and press Fabric
intoplace Brash
Latch
To remove,
press latch
and lift out.
ATTACHMENTS ON WANDS
1.TOremove wands lllr I
from Power-Mate, lock _1 IMP-"_ <-
wandsin straight- _ "_ "
up position
II Wand
m Ou_k
Release
3. Put attachments
onwands as needed.
See ATrACHMENT
USE.
2. Presswand quick
release pedalwith foot
and pullthe wands
straightupand out of
Power-Mate®.
The Power-Mate _ plug
and cord do not have
to be removed to use
attachments on the
wands.
11
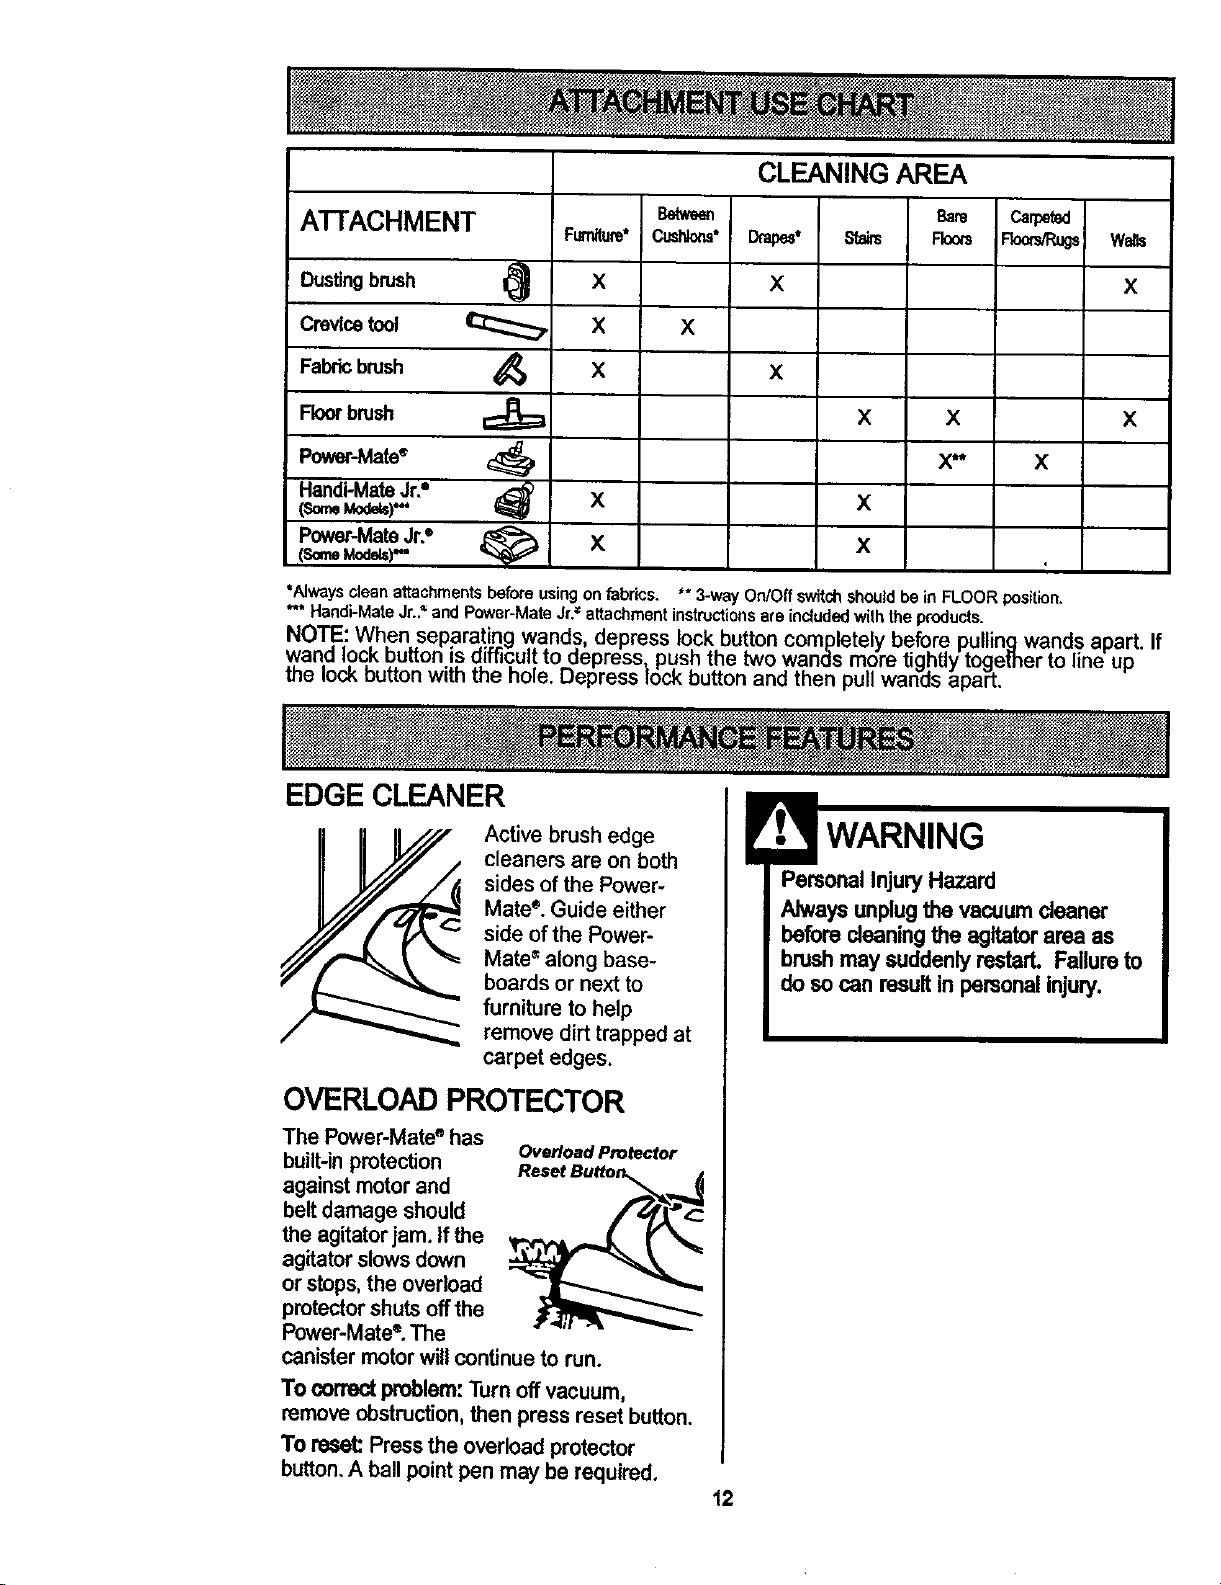
ATTACHMENT
Dustingbrush I_
Crevicetool
Fabric brush
Floorbrush
Power-Mate_
Handi-MateJr.=
Power-MateJr.°
(,someMode)"
Fum_ure*
X
X
X
X
X
Between
CijsHotls°
X
CLEANING AREA
D_l_e_ t
x
X
Bare
Stairs Fkxxs
X X
x**
X
X
Carped
Roo_R_
x
walls
X
X
tAIways cleanattachmentsbeforeusingonfabrics. ** 3-way On/Offswitchshouldbe in FLOOR position.
" Handi-MateJr.."and Power.MateJr.= attachmentinstructionsare inciudedwiththe products.
NOTE: When separa!ingwands, depress lockbutton completelybeforepullingwand.sapart.
wand I.oc,k button is aiffic,ult,to aepress_ pushthe two wandsmore tightlytogemer to line up
me lOCKouttonwith the note. uepress lock buttonand then puhwanes apart.
If
EDGE CLEANER
Active brushedge
cleaners are on both
sides of the Power-
Mate". Guide either
side ofthe Power-
Mate_along base-
boards or next to
furniture to help
remove dirt trapped at
carpet edges.
OVERLOAD PROTECTOR
The Power-Mate ° has
built-in protection
against motor and
belt damage should
the agitator jam. If the
agitator slows down
or stops, the overload
protector shuts off the
Power-Mate e.The
Overload Protector
Reset Button_._
canistermotorwillcontinueto run.
To correct problem:Turn off vacuum,
removeobstruction,then press reset button.
To reset:Press the overload protector
button.A ball pointpen may be required.
PersonalInjury Hazard
Always unplugthe vacuum cleaner
before cleaningthe agitatorarea as
brashmay suddenly restarL Failure to
do so can resultin personalinjury.
12
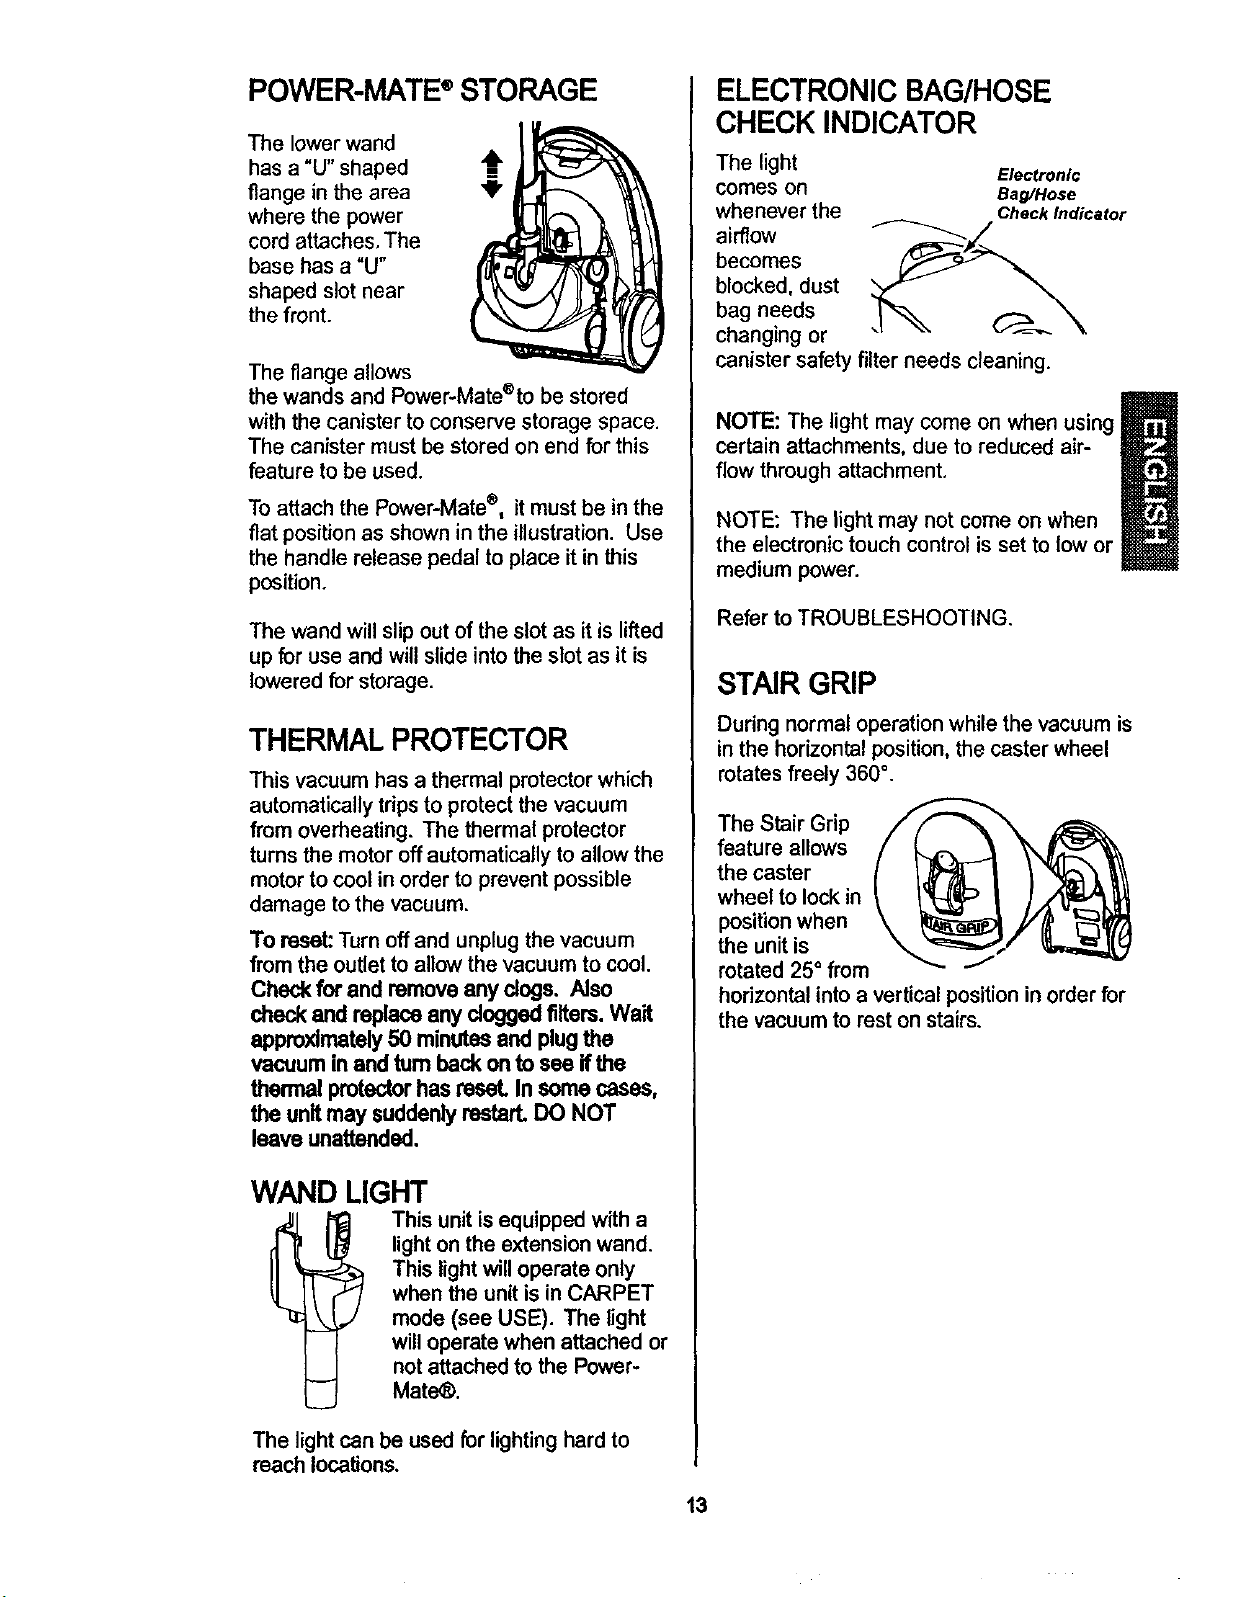
POWER-MATE®STORAGE
The lower wand
has a "U" shaped -_
flange in the area _"
where the power
cord attaches, The
base has a "U"
shaped slot near
the front.
The flange allows
the wands and Power-Mate®to be stored
with the canister to conserve storage space.
The canister must be stored on end for this
feature to be used.
To attach the Power-Mate®, itmust be in the
flat positionas shown in the illustration. Use
the handle release pedal to place it in this
position.
The wand will slip out of the slot as it is lifted
up for use and will slide into the slot as it is
lowered for storage.
THERMAL PROTECTOR
This vacuum has a thermal protector which
automatically trips to protect the vacuum
from overheating. The thermal protector
turns the motor off automatically to allow the
motor to cool in order to prevent possible
damage to the vacuum.
To reset: Turn off and unplug the vacuum
from the outlet to allowthe vacuum to cool.
Check for and removeany dogs. Also
checkand replace any dogged filters. Wait
approximately50 minutesand plug the
vacuum in and turn back onto see if the
thermal protectorhasreset. In some cases,
the unitmay suddenlyrestart. DO NOT
leave unattended,
WAND LIGHT
This unit isequippedwith a
lightonthe extension wand.
This lightwilloperate only
whenthe unitis in CARPET
mode (see USE). The light
willoperatewhen attached or
notattached to the Power-
Mate_.
The light can be used for lightinghard to
reach locations.
13
ELECTRONIC BAG/HOSE
CHECK INDICATOR
The light
comes on
whenever the
airflow
becomes
blocked, dust
bag needs
changing or
canister safety filter needs cleaning.
Electronic
Bag/Hose
Check Indicator
NOTE: The light may come on when using
certain attachments, due to reduced air-
flow through attachment,
NOTE: The light may not come on when
the electronic touchcontrol isset to low or
mediumpower.
Refer to TROUBLESHOOTING.
STAIR GRIP
During normal operation while the vacuum is
in the horizontal position, the caster wheel
rotates freely 360 °.
The Stair Grip
feature allows
the caster
wheel to lock in
position when
the unit is
rotated 25 ° from _"
horizontal into a vertical position in order for
the vacuum to rest on stairs,

Thevacuumcleaner creates suction that
picks up dirt. Rapidly moving air carries the /'f(_.._
dirt to the dust bag through the airflow pas- ///_---'_
sages. The dust bag lets the air pass /_// '
through, while it traps the dirt. ///
For best cleaning results, keep the air- ,/_!/
flow passage open. Check the stan'ed /._
areas occasionally for clogs. Unplug /'-.#/
from outlet before checking. ///
Motor
Safety
Filter Exhaust
BAG CHANGING
For best cleaning results, the dust bag
should be changed often. The electronic
bag/hose check indicator will come on when
the bag needs to be changed or the airflow
is blocked.
NOTE: See PARTS AND FEATURES for
Bag Number.
1. Unplug cord from
wall outlet
2. Remove hose
from canister.
3. Pull hood release
out and up, then lift
canister hood.
4. Disengage
cardboard tab from
red bag mount by
pulling away and
lifting up.
5. Pull bag out of
the red bag mount.
Motor
Safety
RedBag
Mount
6. Check the
motor safety
filter and
replace, if
necessary.
7, The red bag mount will flip forward after
removing bag. This will prevent the lid from
closing until a new bag is installed.
Note: DO NOT bend or crease the middle
of the cardboard when Installing the beg into
the bag mountslots.
8. Rotate red bag
mount down and
installbag intoslots
per instructions
pushingdownuntil
the cardboardtab
locksintoposition
and the holes align.
Tuckthe bag
securely intothe bag cavity so that none of it
is able to be pinchedbythe hood.
9. Close and latch canister hood.
10. Reinstallhose.
11. Plug cord intowall outlet,
NEVER REUSE A DUST BAG.Very
fine materials,suchas carpet freshener,
face powder,finedust, plaster,soot,
new carpetlint,etc. can clogthe bag
and cause itto burstbeforeit Isfull and
may causedamage tovacuum motor.
Change bag moreoftenwhen
vacuumingthese matedais.
14
1. Unplug cordfrom wall outlet. DO NOT
ddp water oncleaner.
2. Clean exterior usinga clean, soft cloth
that has been dipped in a solution of mild
liquid detergent and water, then wrung dry.
Wipe dry after cleaning.
3. To reduce static electricity and dust build-
up, wipe outer surface of cleaner and
attachments.
Check motorsafety filter occasionally and
change when dirty.
ElectricalShock Hazard
Unplugpowercordfrom electrical
outlet. Do notoperate the cleaner
withoutthe motorsafety filter. Be sure
the filter isdryand properlyinstalledto
preventmotorfailure and/or electrical
shock.
Remove the bag as outlined in the BAG
CHANGING secSon.
MOTOR SAFETY FILTER
ELECTROSTATIC
This whitefilter mustbe replacedwhen
dirty. It shouldbe replaced regulady
dependingon use conditions. The filter
CANNOT be washed as it will lose its dust
trappingability.
NOTE: See PARTS AND FEATURES for
motorsafety filternumber.
Do not useattachments ifthey are
wet. Attachmentsusedin dirty
areas, suchas under a refrigerator,
shouldnotbe usedon other
surfacesuntilthey are washed,
They couldleave marks.
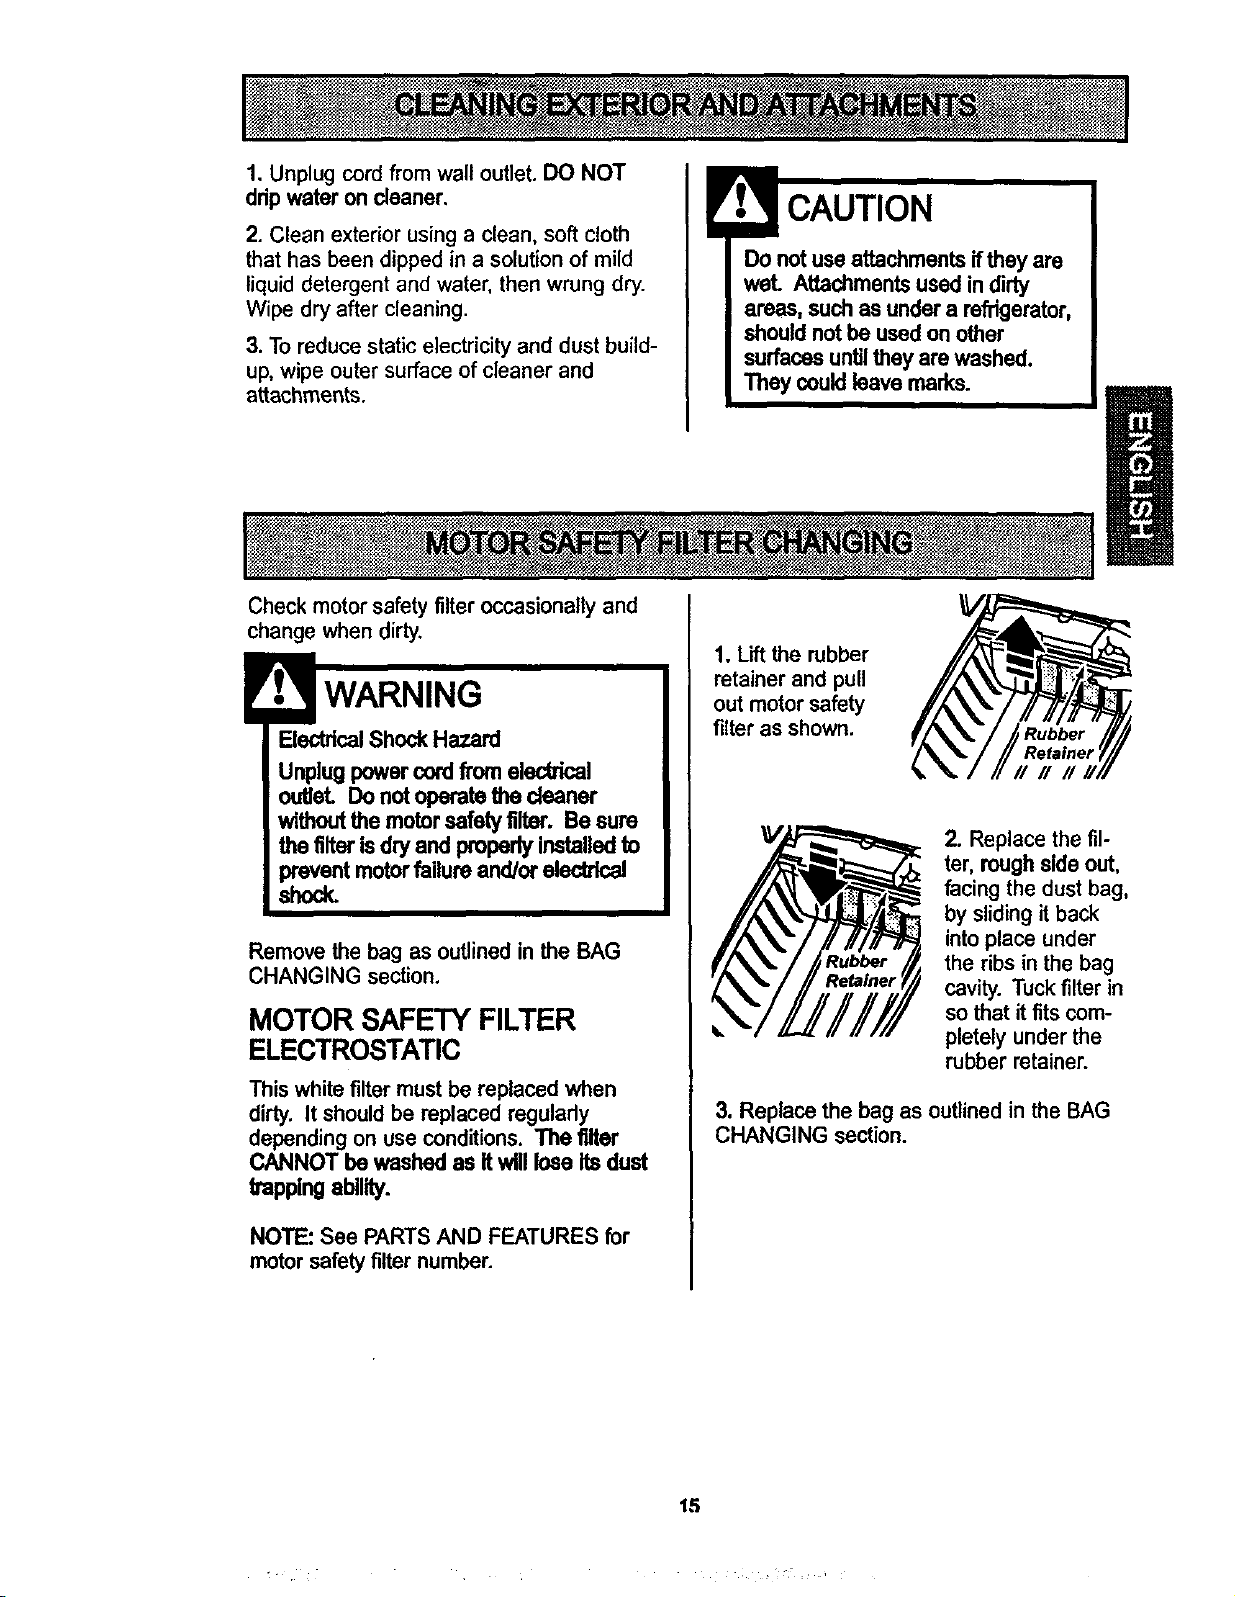
1. Lift the rubber
retainer and pull
out motor safety
filter as shown.
Rubber
Refainer
###
2. Replace the fil-
ter, roughside out,
facing the dust bag,
by slidingit back
intoplace under
the ribs in the bag
cavity. Tuckfilter in
so that it fits com-
pletelyunder the
rubberretainer.
3. Replace the bag as outlined in the BAG
CHANGING section.
15
WARNING
ElectricalShock Hazard
Donot operatewith a dogged exhaust
filterorwithoutthe exhaust filteror
exhaustfiltercover installed.
EXHAUST FILTER
HEPA
The exhaust filter cartridge must be
replaced when dirty. Replace the filter when
the entire surface area is covered evenly.
The filter CANNOT be washed as itwilllose
itsdust trappingability.
NOTE: See PARTS AND FEATURES for
exhaust filter number.
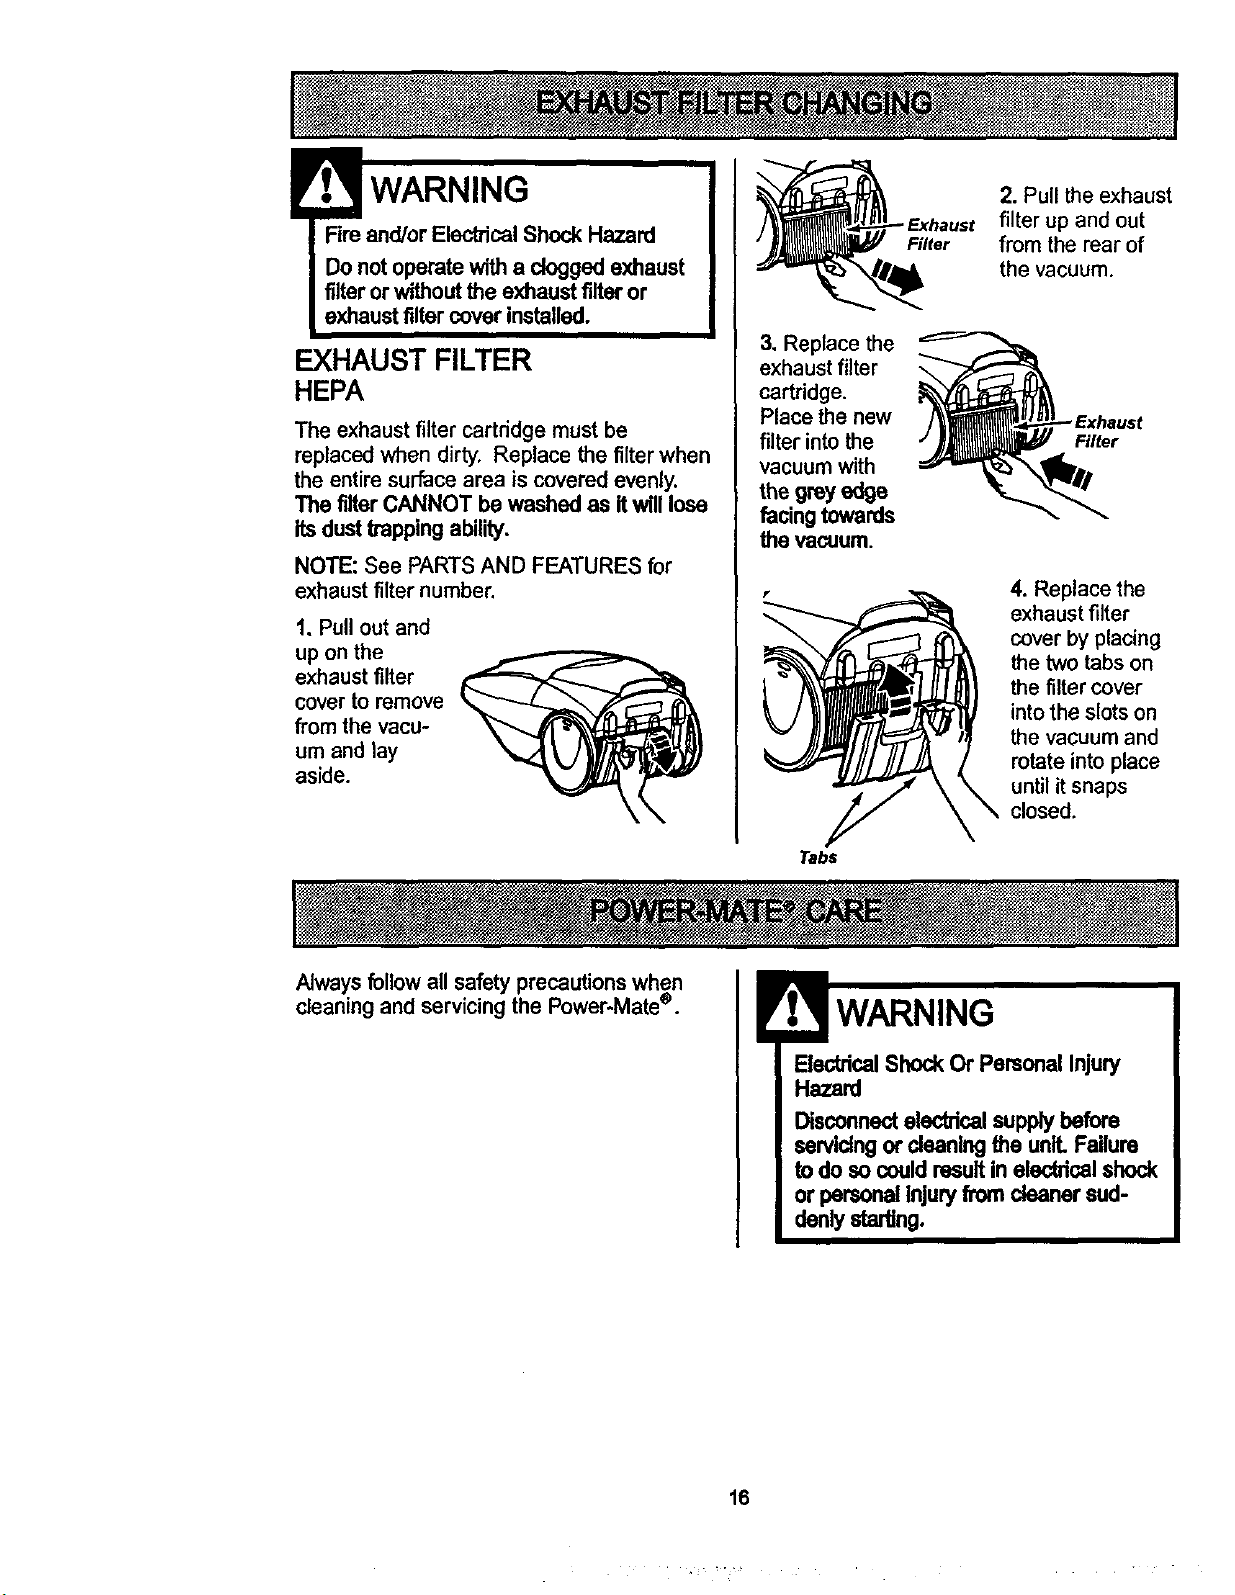
1, Pull out and
up on the
exhaust filter
cover to remove
from the vacu-
um and lay
aside.
3, Replace the
exhaust filter
cartridge.
Place the new
filter into the
vacuum with
the grey edge
facing towards
the vacuum.
Tabs
Filter
2. Pull the exhaust
filter up and out
from the rear of
the vacuum.
Filter
4. Replace the
exhaust filter
cover by placing
the two tabs on
the filter cover
into the slots on
the vacuum and
rotate into place
until it snaps
closed.
Alwaysfollow all safety precautions when
cleaning and servicingthe Power-Matee.
ElectricalShock Or Personal Injury
Hazard
Disconnecteleddcal supplybefore
sorvldng or deaning the unlLFailure
todo so couldresultin electricalshock
or personalInjuryfrom cleanersud-
denlystarting.
16
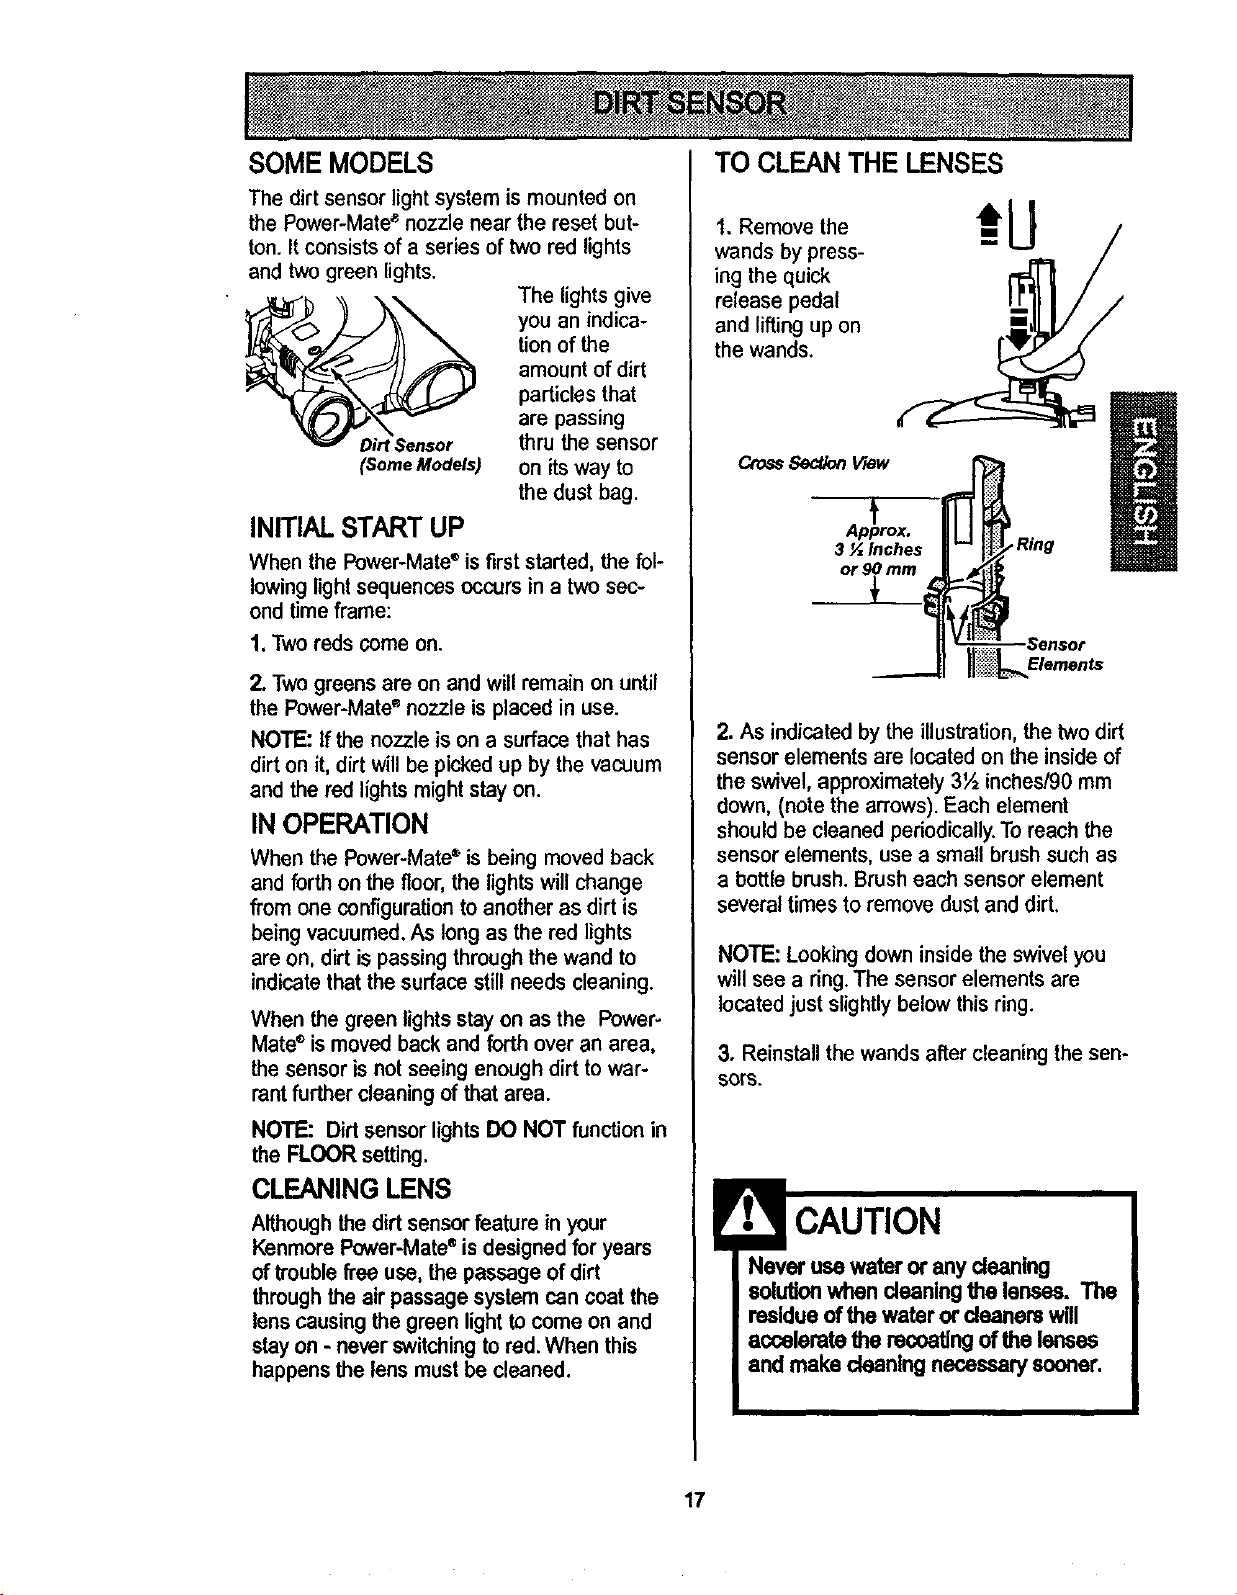
SOMEMODELS
The dirt sensor light system is mounted on
the Power-Mate ®nozzle near the reset but-
ton, It consists of a series of two red lights
and two green lights.
(Some Models)
INITIAL START UP
The lights give
you an indica-
tion of the
amount of dirt
particles that
are passing
thru the sensor
on its way to
the dust bag.
When the Power-Mate®is first started, the fol-
lowinglightsequencesoccursin a two sec-
ond timeframe:
1,Tworedscome on.
2. Twogreens are on and willremainon until
the Power-Mate®nozzle is placed in use.
NOTE: If the nozzleis ona surfacethat has
dirton it, dirtwill be pickedup by the vacuum
and the red lightsmightstay on.
IN OPERATION
When the Power-Mate'='isbeing movedback
and forth on the floor,the lights willchange
fromone configuration toanotheras dirt is
beingvacuumed.As longas the red lights
are on, dirt ispassingthroughthe wand to
indicatethatthe surfacestillneeds cleaning.
When the green lights stayon as the Power-
Mate®ismovedback and forth overan area,
the sensor is not seeing enough dirt towar-
rantfurther cleaning of that area.
NOTE: Dirtsensorlights DO NOT function in
the FLOOR setting.
CLEANING LENS
Althoughthe dirtsensorfeature in your
KenmorePower-Mate®isdesignedfor years
oftroublefree use, the passage of dirt
through the airpassagesystemcan coat the
lenscausingthe greenlighttocome onand
stayon- neverswitchingtored,When this
happensthe lens mustbe cleaned.
TO CLEAN THE LENSES
1. Remove the
wands by press-
ing the quick
release pedal
and lifting up on
the wands.
CrossSect,_n View
Ap_prox.
3 _ Inches
or 9
2. As indicated by the illustration, the two dirt
sensor elements are located on the inside of
the swivel, approximately 3½ inches/90 mm
down, (note the arrows). Each element
should be cleaned periodically. To reach the
sensor elements, use a small brush such as
a bottle brush. Brush each sensor element
several times to remove dust and dirt,
NOTE: Looking down inside the swivel you
will see a ring. The sensor elements are
located just slightly below this ring.
3. Reinstallthe wandsafter cleaningthesen-
SOTS.
Never use water or any cleaning
solutionwhen cleaningthe lenses. The
residueof the water or deanera will
accelerate the racoatlngof the lenses
and make cleaningnecessary sooner,
17

TO REMOVE BELT
\
1, Turn Power-
Mate ® upside
down.
2. Unscrew the
two (2) Power-
Mate ® cover
screws.
3. Turn Power-
Mate ® right _
side up. Press _ff_._'_.._._._\._._._f_
handle release _ _ _,. ,_-_-_"_.
pedal and _-_"__'/. _:--_
lower the \'=_ \ /_'_
swivel. Lift rear \ V
latches up, Side ear
Latch Latches
4. To remove cover,
grasp the sides and
pull out.
5. Lift agitator
assembly out
and remove
worn belt.
EndCap
6. Check and clean end cap areas. See
AGITATOR ASSEMBLY for picture of
complete agitator assembly.
TO CLEAN AGITATOR:
NOTE: In order to keep cleaning efficiency
high and to prevent damage to your vacu-
um, _h_ aaitator must be cleaned every time
the belt is changed.
The agitator must also be cleaned accord-
ing to the following schedule:
Vacuum Use Clean Aaitator
HEAVY -
(used daily)
MODERATE -
(used 2-3 times/week)
UGHT -
(used 1 time/week}
every week
every month
every 2 months
IMPORTANT
Disconnectcleaner fromelec_ical outlet.
Check and remove hair,stringand lint build-
up frequentlyin the Power-Mate'='agitator
and end cap areas.
Remove any dirt or debris in the belt path
area or in the brush roller area.
Carefully remove any string or debris
located on the agitator, or end caps,
AgitatorAssembly
Brush Unit
18

TO REPLACE BELT
1. Install new
belt over
motor drive,
then over
brush sprock-
et.
Motor
Drive
Sprocket
Agitator End Cap
NOTE: See
PARTS AND FEATURES for belt number.
2. Place agitator
assembly back into
Power-Mate®.
Cover Base
3. Line up
front of
cover and
base. Rest
cover on
front edge
of base as
shown.
4. NOTE: On dirt sensor models be sure
that the board is upright and the wires are
tucked back as shown.
5. Rotate cover back. Press cover firmly
until side and rear latches snap into
place. Turn Power-Mate ®upside
down and replace two
(2) cover
screws.
_lde Hear
t.al(:h i.a_hu_
1. Remove Power-Mate ® cover as shown in
BELT CHANGING AND AGITATOR CLEAN-
ING section.
"-_Pushln_
And Turn | |
2. Push in and tum
bulb counterclock-
wise, then pull out
to remove.
_Pushln [ _ 3. Push in and turn
AndTurnI / bulb clockwise, to
_ eplace. Bulb must
not be higher than
15 Watts(130 Volts).
4. Reinstall Power-Mate ® cover as shown in
BELT CHANGING AND AGITATOR CLEAN-
ING section.
NOTE: See PARTS AND FEATURES for
bulb number.
19
ElectricalShockOr Personal Injury
Hazard
Disconnectelectricalsupplybefore
servicingor cleaningthe unit. Failure
to do so could result in electricalshock
or personal injuryfrom cleanersud-
denly starting.
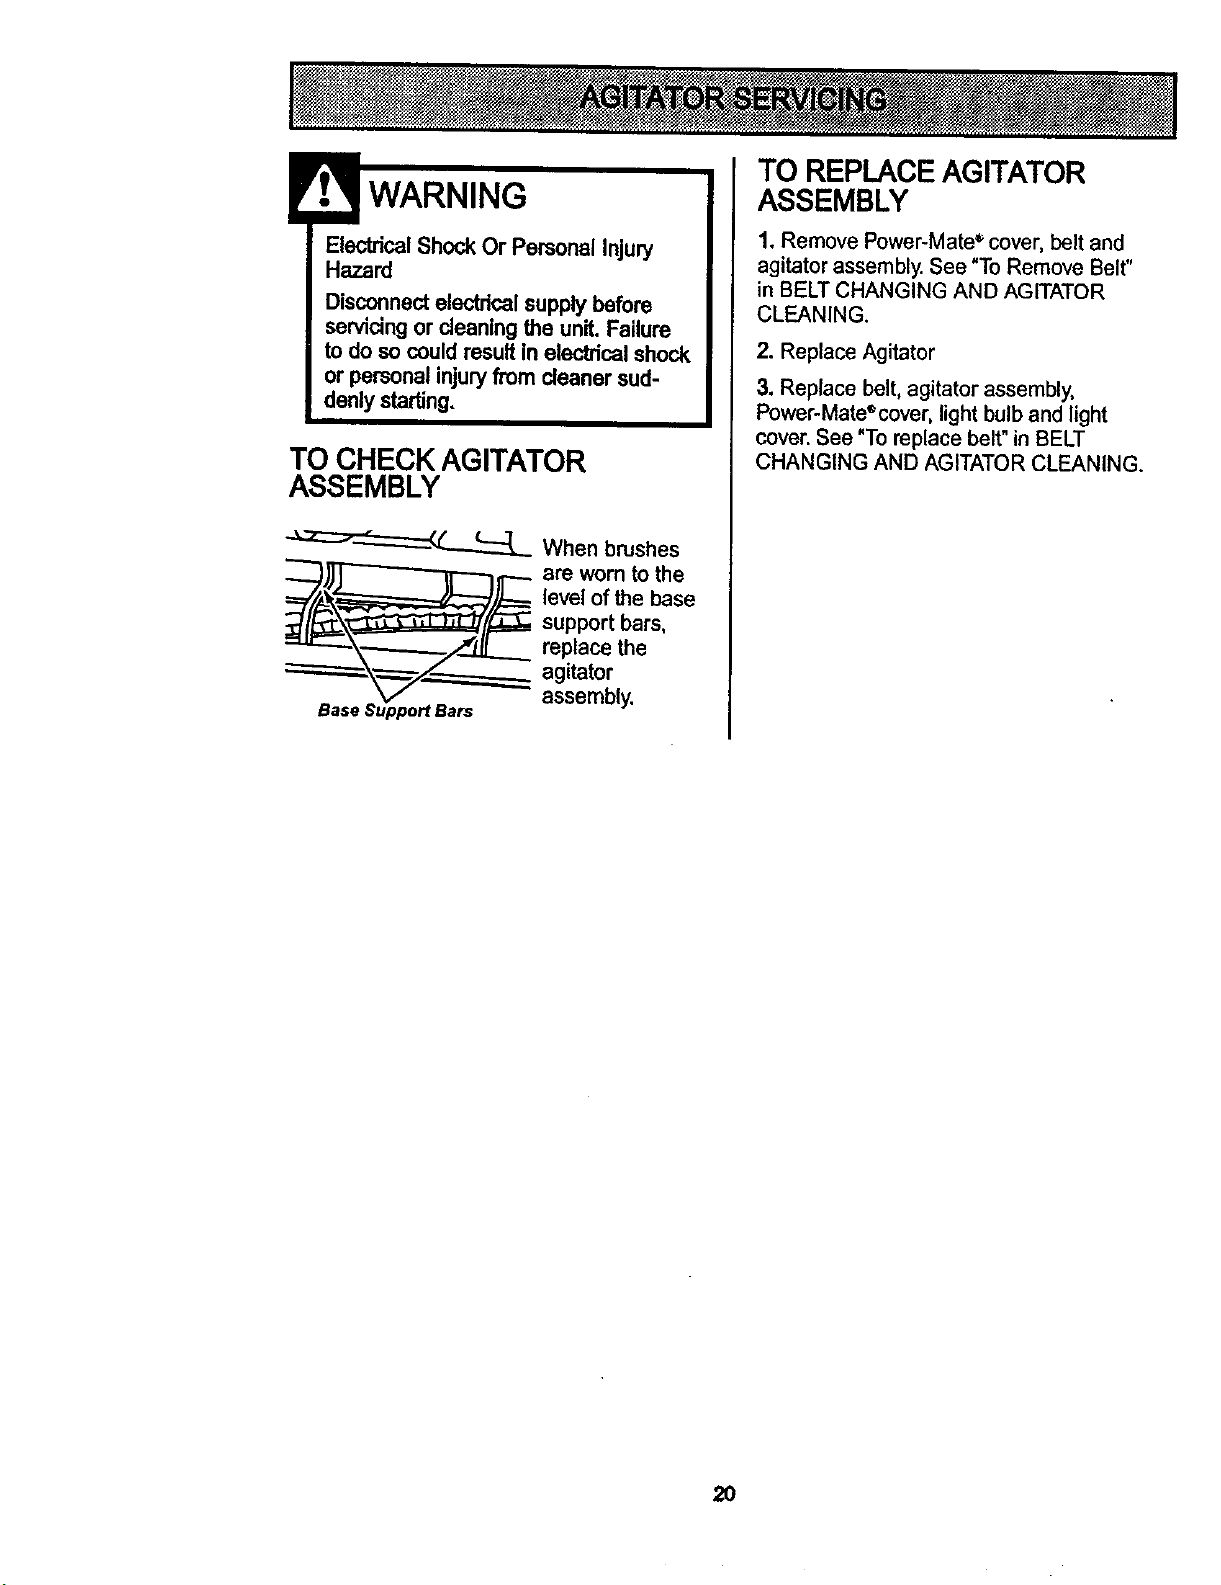
TO CHECK AGITATOR
ASSEMBLY
"-_'-_J-_'----_ When brushes
are worn to the
level of the base
supportbars,
replace the
agitator
assembly.
TO REPLACEAGITATOR
ASSEMBLY
1. Remove Power-Mate _ cover, belt and
agitator assembly. See "To Remove Belt"
in BELT CHANGING AND AGITATOR
CLEANING.
2. Replace Agitator
3. Replace belt, agitator assembly,
Power-Mate®cover, light bulb and light
cover. See "To replace belt" in BELT
CHANGING AND AGITATOR CLEANING.
2O
21
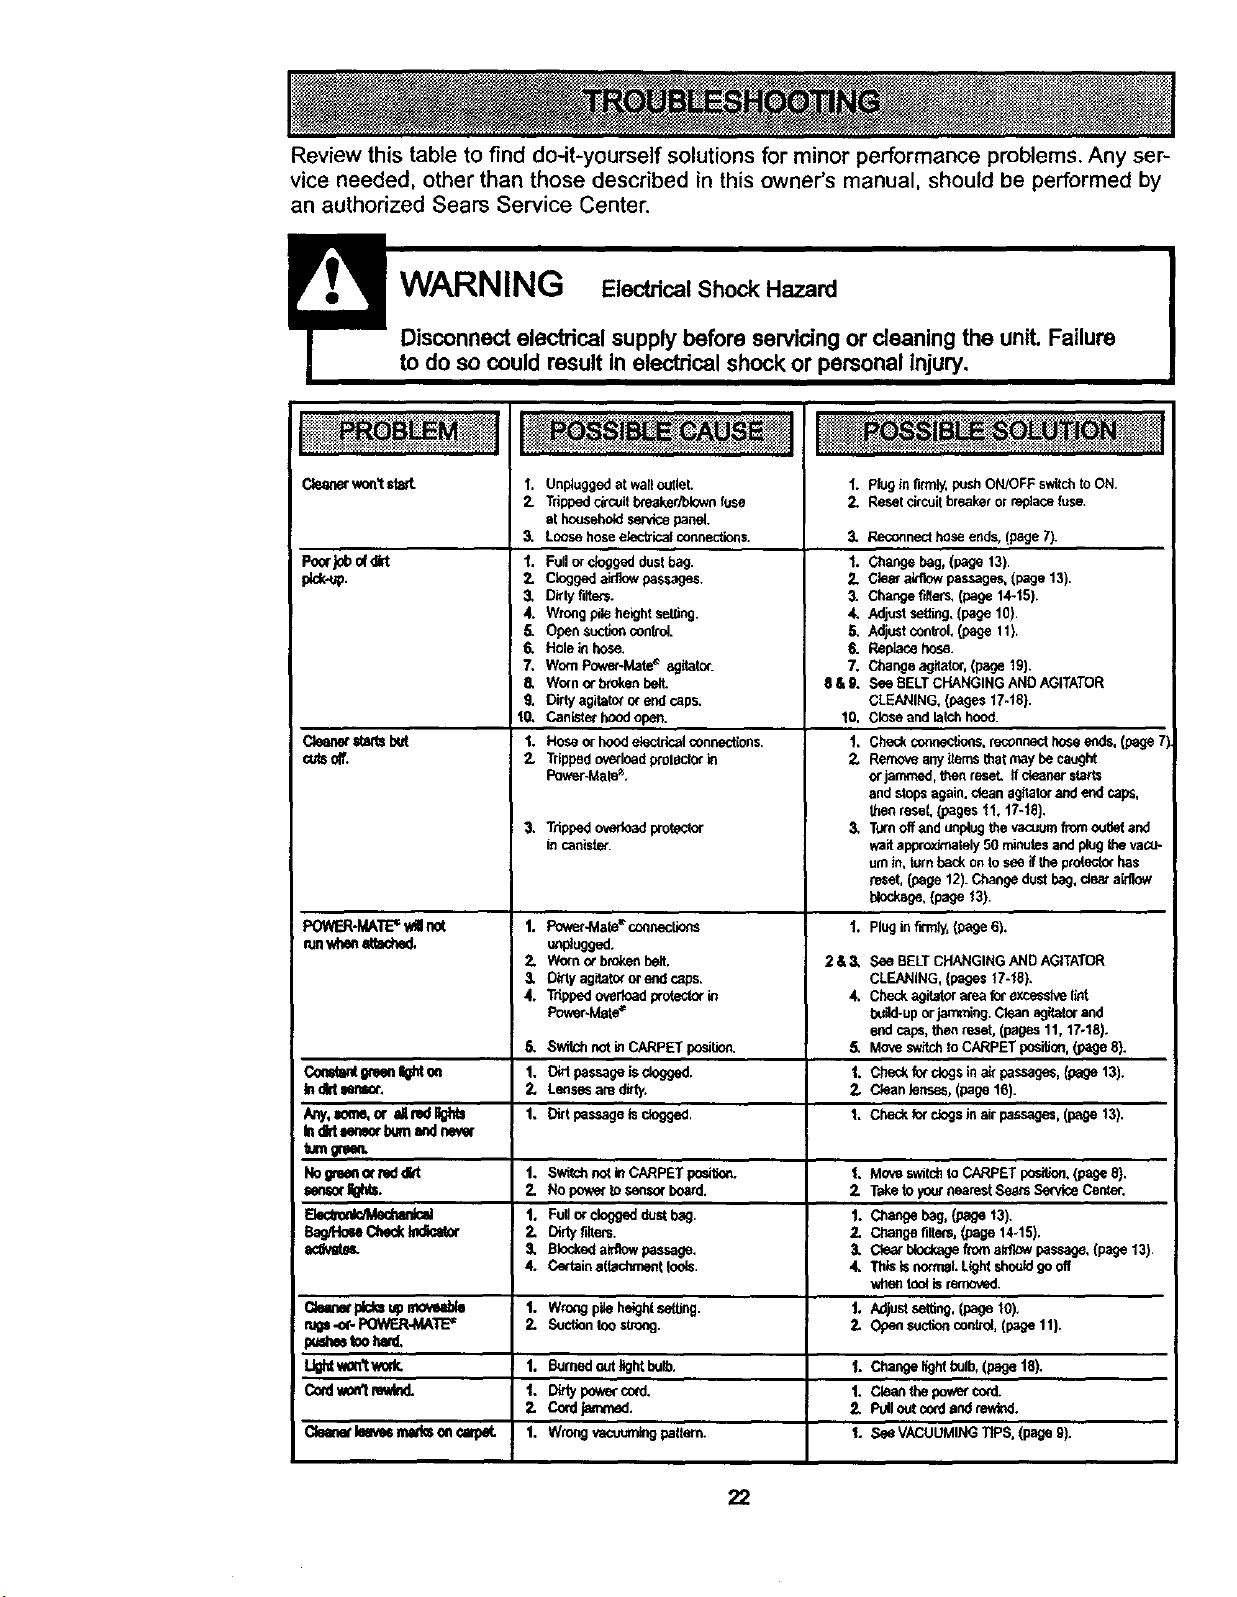
Review this table to find do-it-yourself solutions for minor performance problems. Any ser-
vice needed, other than those described in this owner's manual, should be performed by
an authorized Sears Service Center.
to do so could result in electrical shock or personal injury,
Cleanerwoo'tsteal.
Pont}0bof¢rt
#,ck.up.
Clean_=_attsIxd
_ls off.
I. Unpluggedat walloutlet.
2. Trippedci_coit_eaker/blewn fuse
at househo_lset'Acepanel.
3, Loosehoseelectricalcoonection_
1. Fullorcloggedduelbag.
2. Cloggeda_w passages.
3, Dirtyfilte_.
4. WrongpileheightseUJng
5. Opensuctioncontrol.
6. Holeinhose.
7, WornPower-Mat_ agitator.
5. Worn_ breton belt
9. Dirtyagita_ orend caps.
10, Canisterhoodopen.
1. Hoseorhoodelectricalconnections.
2. TrippedoverloadproledOrin
PowerJ.tale_'.
3, Trippedoverloadprotector
incanister.
1. pluginfirmly,pushON/OFFswitchtoON.
2. Resetcircuitbreakerorreplacefuse.
3. Reconnecthoseends.(page 7).
1. Changebag,(page 13).
2. Diemainlowpassages,(page 13).
3" Changer_ers,(page14-15).
4, Adjustsethng,(page 10).
5. Adjustcont;ol,(page11).
6. Replacehose.
7. Changeagitator,(page19).
$&6. See BELTcHANGINGANDAGITATOR
CLEANING.(pages17-t8).
10. Closeandlatchhood.
1. Checkconn_tions,reconnectbese ends,(page71
2. Remow_anyiterr_thatmaybecaught
orjammed,thenreseL ffcleanerstarts
endstopsagain,dean agitatorandend caps,
thenresel,(pages tl, t7-t8}.
3" Turnoffandunplugthevacuumfromougetand
waitapproxJmately50 minutesandplug_ va(;_
um le, turnbackon tesongtheprotecterI_s
reset,(page12).Changedustbag,deal a_]ow
blockage,(page13)
PO_F.R-I_ATE=v_Ilnot 1. Pov_r-Mate'_coonectlens 1. Plugin fkTnly,(page6).
runwhen_leched. un_ugged.
2, V_kxnorbrokenbeit. 2&3, See BELTCHANGINGANDAGITATOR
3" D_rtyagitatororendcaps. CLEANING,{pages17-'J8).
4. Tdppadovedoadproteclorle 4. Checkagitetorateaforexseselvelint
Poker-Mate= build-uporjamming.Cleanag_tor and
endcaps,thenreset,(pages11, 17.18).
6. SwitchnotinCARPETposition. 5. Moveswitchto CARPETposition,(page8).
Co_alrdgteenlghton 1. DidpassageJsclogge d. t. Che_kfotclagsina_passeges,{page13).
In dirtIonl_. 2. Lens_ am ditty. 2. Cleanlenses, (page16).
Arrj, sum_or ,dl_lF_tttl 1, Dirtpassagetsdogged. 1. Checkforclegslestrps_,(psge 13).
Indid_.mor bumondtw_w
rumgrgen.
Nogreonormddld t. S_tchoo_thCARPETpas_. 1. Moveswitohte CARPETpasttlen.(pageS}.
_or_. 2. No pawertose_sorboard. Z T_etoyoetnearestSe_rssen_eCenter.
_ I, Fuilorcloggedd_Jstbag. I. Ct_angebeg,/.page13).
Bag/Ho_ Check_ 2. Dirtyfitters. 2. Changefilter_,{page14-15).
SU_at_L 3, Blcokedeldlowpassage. 3, Clea_blockageftom a_ passage,(page13).
4. Certelna(lachmentleols. 4. ThlalsnormaI.Lightshonldgeoff
J whentoolb removed.
Qeanet_ upelovub_ 1. Wm_gpileheightse_tthg, t. Adjustse_ting.(page 10).
rub-or- POWER-MAT_ 2. Suctiontooelro_. 2. Opensuctioncontrol,(p_e 11).
pa=_ tooIwd,
L_ won'twork. I. Burned outlightb_, ]. Changelightbulb,(paget8).
Cotdtm_tre_ t. D_typawarc_d. 1. Cleanthe pawercord.
2. Cocdj_med. 2, PUiloutcord_zndrewt',d.
Cleonetleave_mlk_on_arp_. 1. Wrongvacoumlegpallern. 1. SeeVACUUMINGTtPS.(pageg).
22
Antesdeusarsuespiradora nueva ....... 1
Garantiade la aspimdorade Kenmore .... 1
InstruccionesImportantesde
seguddad ............................. 2
Piezasy caracter[stices................ 3-4
Insttucclones de
ensamblamiento ................ 5-6
Uso ............................... 7
Paracomenzar ........................ 7-8
Sugerencias para aspirar ............... 9
Sugerencias sobreel ajuste de nivel de
pelode la alfombra .................... 9
Acossorios .......................... 10
Uso de los accesodos ................. 11
Caracteristicasde rendimiento ........ 11-12
Funcionamientode su asplradora........ 13
Cuidado delrecept_culo................ 13
Cambio de la bolsa ................... 13
Limpieza del exterior y de los accesodes... 14
Cambio del filtro de seguridaddel motor ... 14
Cambio del filtro de escape ............. 15
Cuidado de la Power-Mate" ............. 15
Detector de tierra ..................... 16
Cambio de la correa y limpieza
del agitador ...................... 17-18
Cambio de la bombilla ................. 18
Cuidadodel agitader .................. 19
Reconocimiento de problemas ........... 21
Informacibn de
essistanda o sewido ....... PosteriorCubierta
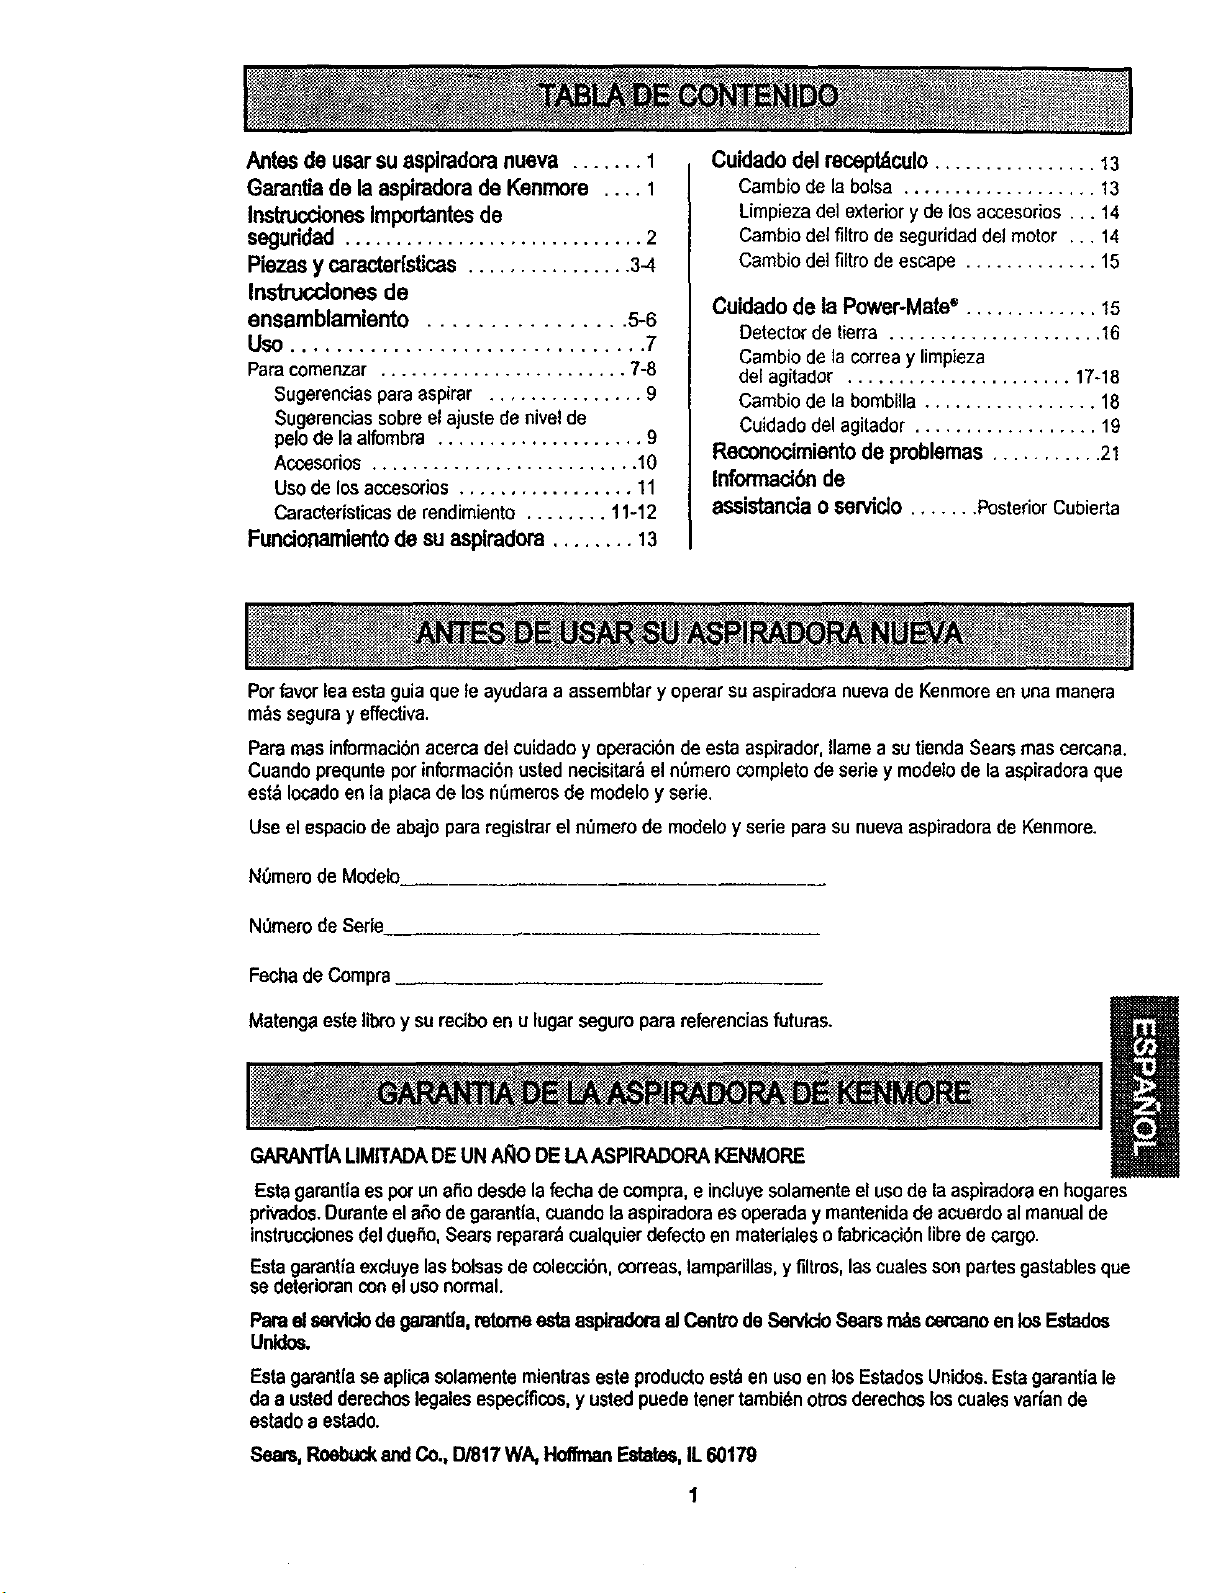
Porfavor lea esta guia que le ayudaraa assemblar y operar su aspiradora nuevade Kenmoreen una manera
m_s segura y effectiva,
Pars mas informaci6nacercadel cuidadoy operacibn de esta aspirador, flamea sutiendaSearsmas cercana.
Cuando prequntepot informaci6n usted necisitar_ el nOmerocompleto deserie y modelode la aspiradora que
est_ Iocadoen la plata de los nSmerosde modelo y serie.
Useel espaciode abajo para registrar el nOmerode modelo y serie para su nuevaaspiraderade Kenmore.
N0mem de Modelo
N0mero de Serie
Fecha de Compra
Matenga este libro y su reciboen u lugar seguroparareferenciasfuturas.
GARANT[ALIMITADADEUN AI_IODE LAASPIRADORAKENMORE
Esta garant|aes potun atio desde la fechade compra,eincluyesolamenteelusode la aspiradoraen hogares
privados.DuranteelaSode garantla,cuandolaaspiradoraes operaday mantenidade acuerdoal manualde
instruccionesdel due_o,Sears reparar_cualquierdefecto enmateriales o fabricaci6nfibredecargo.
Estagarantiaexcluyelasbolsasdecolecci6n,correas,lamparillas,y filtros, las cualessonpartes gastablesque
se deterioranconel usenormal.
Para elsentldodegamntla,retomeestaaspiradoraal Centtode Sen4doSearsrr_s cercanoenlosEstados
Unldos.
Esta garantlaseaplicasolamentemientrasesteproductoest._en usoen losEstadosUnidos.Esta garantiale
da a ustedderechoslegalesespecificas,y ustedpuedetenertambi_notrosderechosloscualesvar_ande
estado a estado.
Sears, Roebud_and Co.,13/817WA, HoffmanEstates,IL 60179
Susegurldedes muyJmportantepara nosotrea.Pararedudrel desgode incendio, choqueel_-trlco,
lesl_ corporalo dar3osal utilizarsuaspiradora,acklede acuerdocon precaucloneab_sleasde
seguddad,entre elias:
Lea estemanualantesdearmaro utilizarsuaspira-
dora.
Use suaspiradoraonicamenteen la formadescdte
enestemanual.Use,3nicamenteconaccesedos
recomendadespotSears.
Parareducirelriesgodechoqueel6ctdco,nousesu
aspiraderaalaire libranisohrssuperticiesmojadas.
Desconed_el cordonel_ctricoantesde componero
limpiareldrea delcepillo.DeIocontrario,elcepiUo
podriaarrancardeform imprevistaopodria
_oducirseun choqueel_ctrico.
Slempredebeapagarla aspiradoraantesde
conectarodesconeclarlamanguera,le Power-
Mate_'olaPower-MateJr.*
Slempredebeapagarsuaspiraderaantesdedesco-
nectarla.
Nodesconectelaaspiradoratirandedelcordonel_c-
trico.Parsdesconectada,haleelenchufe,noelcor-
don.
Sujeteelenchufeconle manoalenrollarelcordon
el6ctdco.Paradesconeclada,haleene_hufe, noel
cordon.
Nouselaaspiradorasielcordonoelenchufeest_
da_ado.Silaaspiradoranoest_funcionandoade-
cuadementeosisehadejadocaer,es_ da_ada,se
hadejadoexpuestaa laintempedeo sehadejado
seerenegua,devu61valaa un Centrodeservieiode
Sears.
Nohalenilransporte laaspiradoraporelcordon;no
useelcordOncomomango:nocierrepuertassobre
elcordon;nohaleelcordonsobrerebordesagudos
nlesquinas.No paselaaspiraderasobreel cordon.
Mantengaelcordonalejadedesuperliciescalientes.
Noabandoneleaspiradoracuandoest6conectade.
Descon_}ctelacoandenole est_usandoy antesde
dede servlcio.
NOpermitaqueseauUlizadacomojuguete.Se
requiemtartermayorcuidadocuandoseautilizade
enlaproximidaddeni_osopotniffos.
NOtoquelaaspiradoranielenchufeconlasmanos
mojades.
NOuselaaspiradorasilamangueraest-_,rota.La
mangueracontienealambresel_tricos.C,_mbielasi
est&rotao desgastada.Eviteaspirarobjetos
agudes.
Nocoloqueobje_senlesaberturas.
Noutilicalaaspiradorasialgunaaberturaestdbio-
queada;mant_ngalalibredepolvo,pelusa,cahallos
y cualquierscesaquepoddadisminuirelflujode
eire.
Matlteagaelcabello,ropa suelta,dedosytodaslas
partesdel cuerpoalejadosdelasaberturasy plazas
mec&nicas.
NOusela aspiradorasintenerins{aladala bolsa
parapolvoy/olosfiltros.
Cambieslemprelabolsaparapolvodespu_sde
espirarlimpiadorasdealfombrasodesodorantes,
talcosy polvosfines.Estospmductosatascanla
bolsa,reducenelflujode airey puedencausarque
_sta setampa.Sinocambialabolsapoddaocasio-
natda_opermanentea laaspirsdora.
Nouselaaspiradoraparalevantarobjetosagudos,
juguetespequefios,alfileres,sujetapapeles,etc.
Podriandal_arlaaspiradorao le bolsaparapolvo.
Nolevanteningunacosaqua se est6quemandoo
emitlendohumo,comocigarrillos,cerillososenizas
callentes.
Nousela aspiradoraparaaspirarllquidosinflama-
biasocombustibles(gasolina,liquidosparalim-
pleza,perfumes,etc.)nilauseenlugarasdonde
6sios podrianestarpresentes.Losvaporesde estas
sustanciaspuedencrearun peligmdeincendioo
explosion.
Tengacoldadoespecialalutilizarlaaspiradoraen
escalones.Nola coloquesobresitles,mesas,etc.
Mant_ngalaenelpiso.
Ustedesresponsabledeasegurarquesuaspira-
doranoseautilizadaper ningunapersonaqueno
puedamanejadacorrectamente.
Nooperasinelfiltro deescapenilacubiertadelfiltro
de escapeinstaledes.
GUARDEESTASINSTRUCCIONES
El armaday uso segurodesu aspiradorasonsuresponsabilided.Esta aspiradoraha sidediseflada
exdusivamentepara eso dom_stico.Laaspiradoradeber_almacenaraeenun lugarsecoyen elinterior.
LeaesteManualdel propietariodetenidamente,puescontieneInformacionimportantesobre segurldady
uso.Estaquia contleneInformaciOnsobresoguridad debajodesimbolosde advertienclacuidado.Pot
favorpongaatencionespeciala estaslns_ucciones dadas.Adveffa_la: EsteinformaciOnle alertar_con
elpoligrodefuego,choqueselectricos,quemadas y lesiones.Culd_lo: Esteinformacionle alertaraa
peligrcocomoleslonesy daRosdepropledad.
2
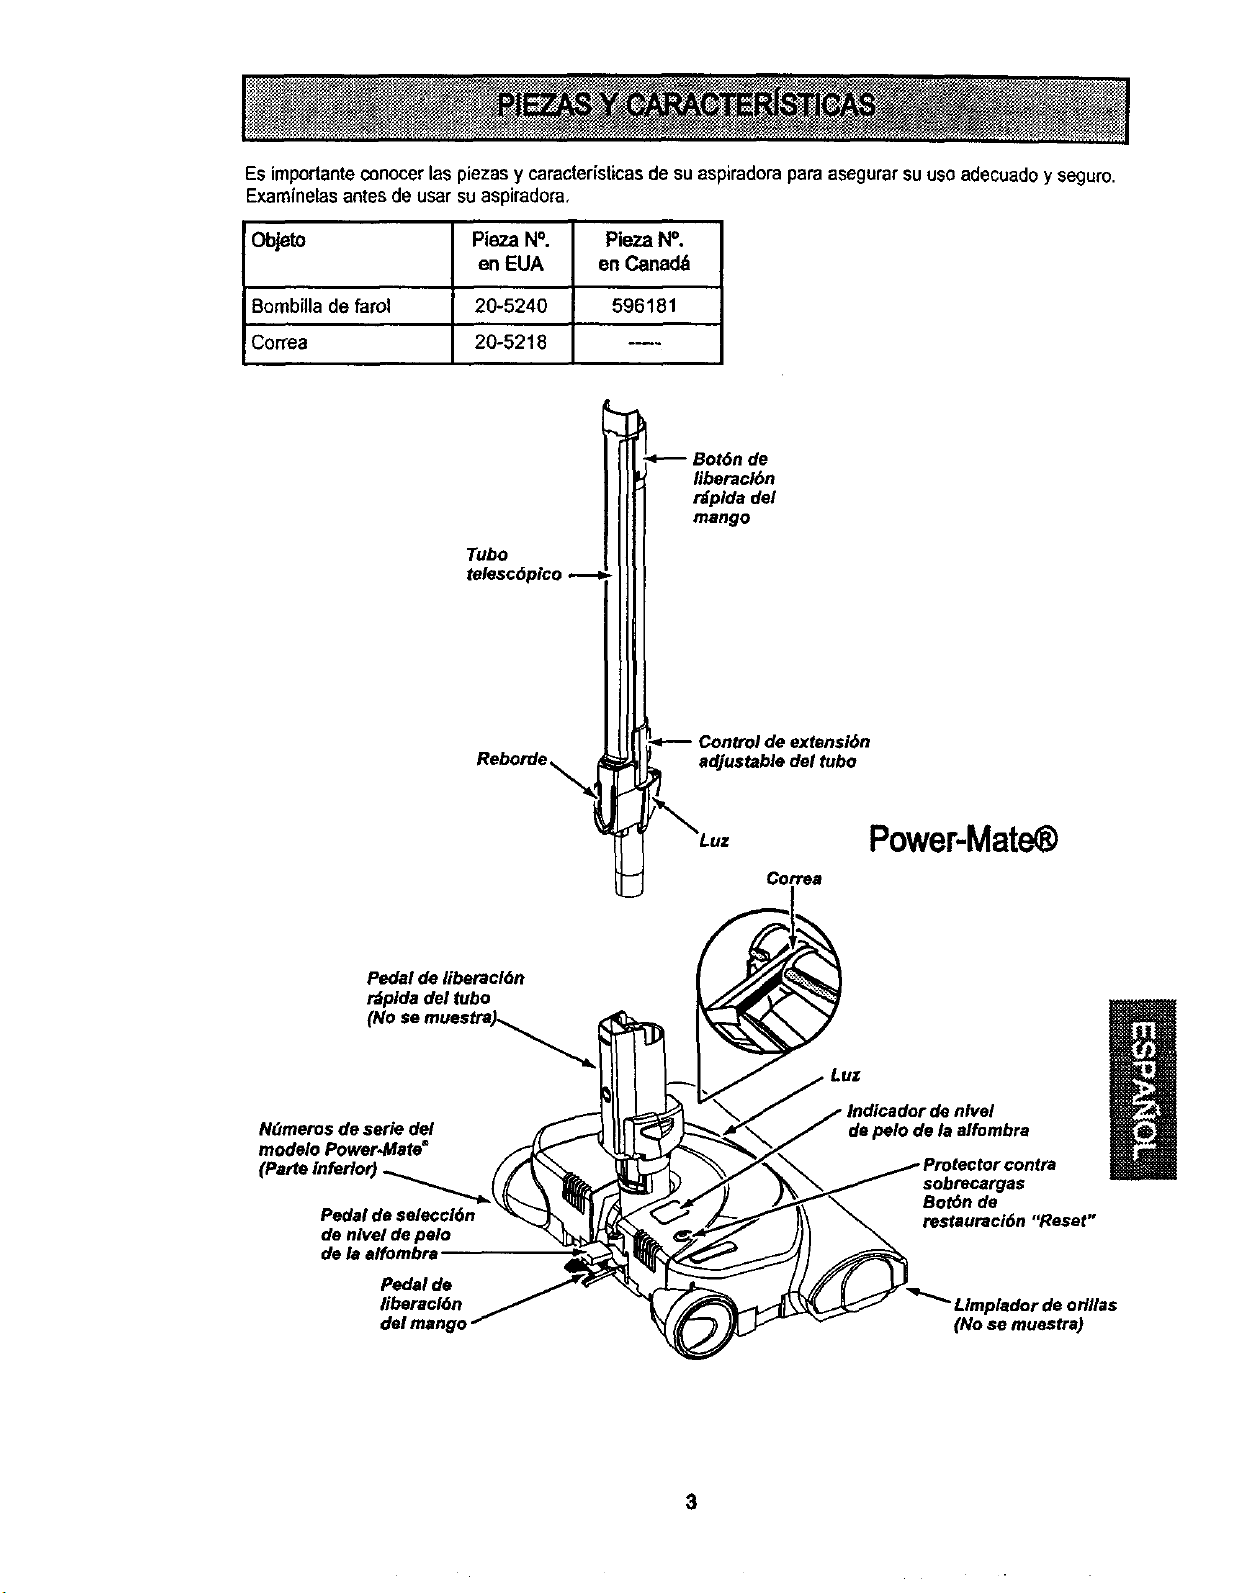
Es importante conocer las piezas y caracteristicas de su aspiradora paraasegurar suusoadecuadoy seguro.
Examinelasantes de usar su aspirado_a,
Objeto Pieza N°. Pieza N°.
en EUA en Canadd
Bombilla de farol 20-5240 596181
Correa 20-5218 ----
Tubo
Reborde
liberacl6n
tdplda del
mango
Control de extensi6n
adjustable del tubo
Cortes
Power-Mat
Pedal de liberacl6n
rdplda del tubo
(No se mues_._ .,_
N(Jmeros de serie del ,f_
modelo Power-Mate s _
de nlvel de pelo "_
de la effombra
Pedal de
liberacl6n
Luz
Indicador de nlvel
de pelo de la alfombra
sobrecargas
BorOn de
restauraci6n "Reset"
Limpledor de odllas
(No se muestre)
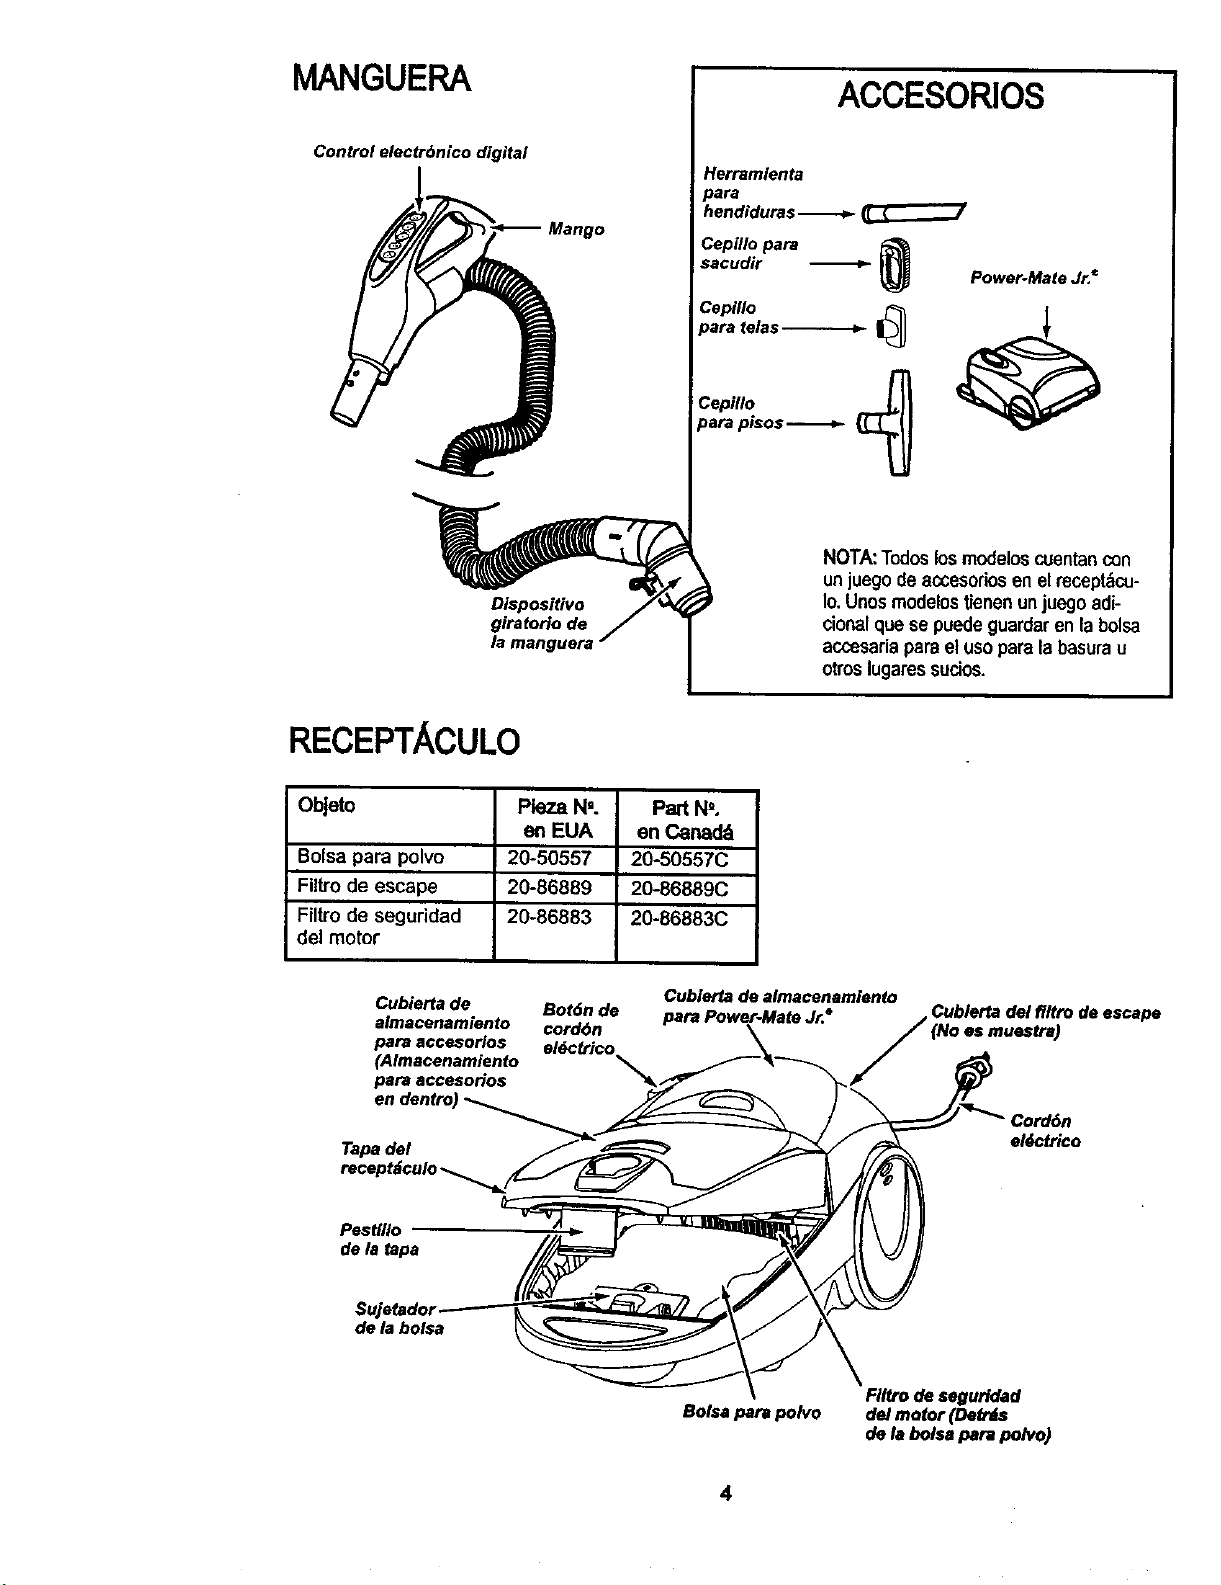
MANGUERA
Control electrbnico digital
ACCESORIOS
Herramienta
oara
hendiduras _ _
Cepfllo para
sacudir _ _ Power-Mate Jr.€
Cepiflo _
para telas _
Cepillo
para plsos _
NOTA:Todoslosmodeloscoentancon
unjuegodeaccesodosen elmceptbco-
to,Unosmodelostienenunjue9oadi-
cioealque se puedeguardaren labolsa
accesadaparael usoparalabasurau
otroslugaressucios.
RECEPTACULO
Objeto Pleza Nm. Part N'.
en EUA en Canad_
Bolsa para polvo 20-50557 20-50557C
Filtrode escape 20-86889 20-86889C
Filtro de seguridad 20-86883 20-86883C
del motor
Cubierta de
e)macenamiento
para accesorlos
(Almacenamiento
para accesorios
Cublerta de almacenamlento
Bot6n de
cord6n
e)dctrico
(No as mueslra)
de escape
Tapade)
e)_ctrico
Pesffllo
de la tapa
SujetadoJ
de ta bolsa
Bolsa para polvo
FIItrodeseguridad
de)motor(DetrJs
de labolsJpara polvo)
4
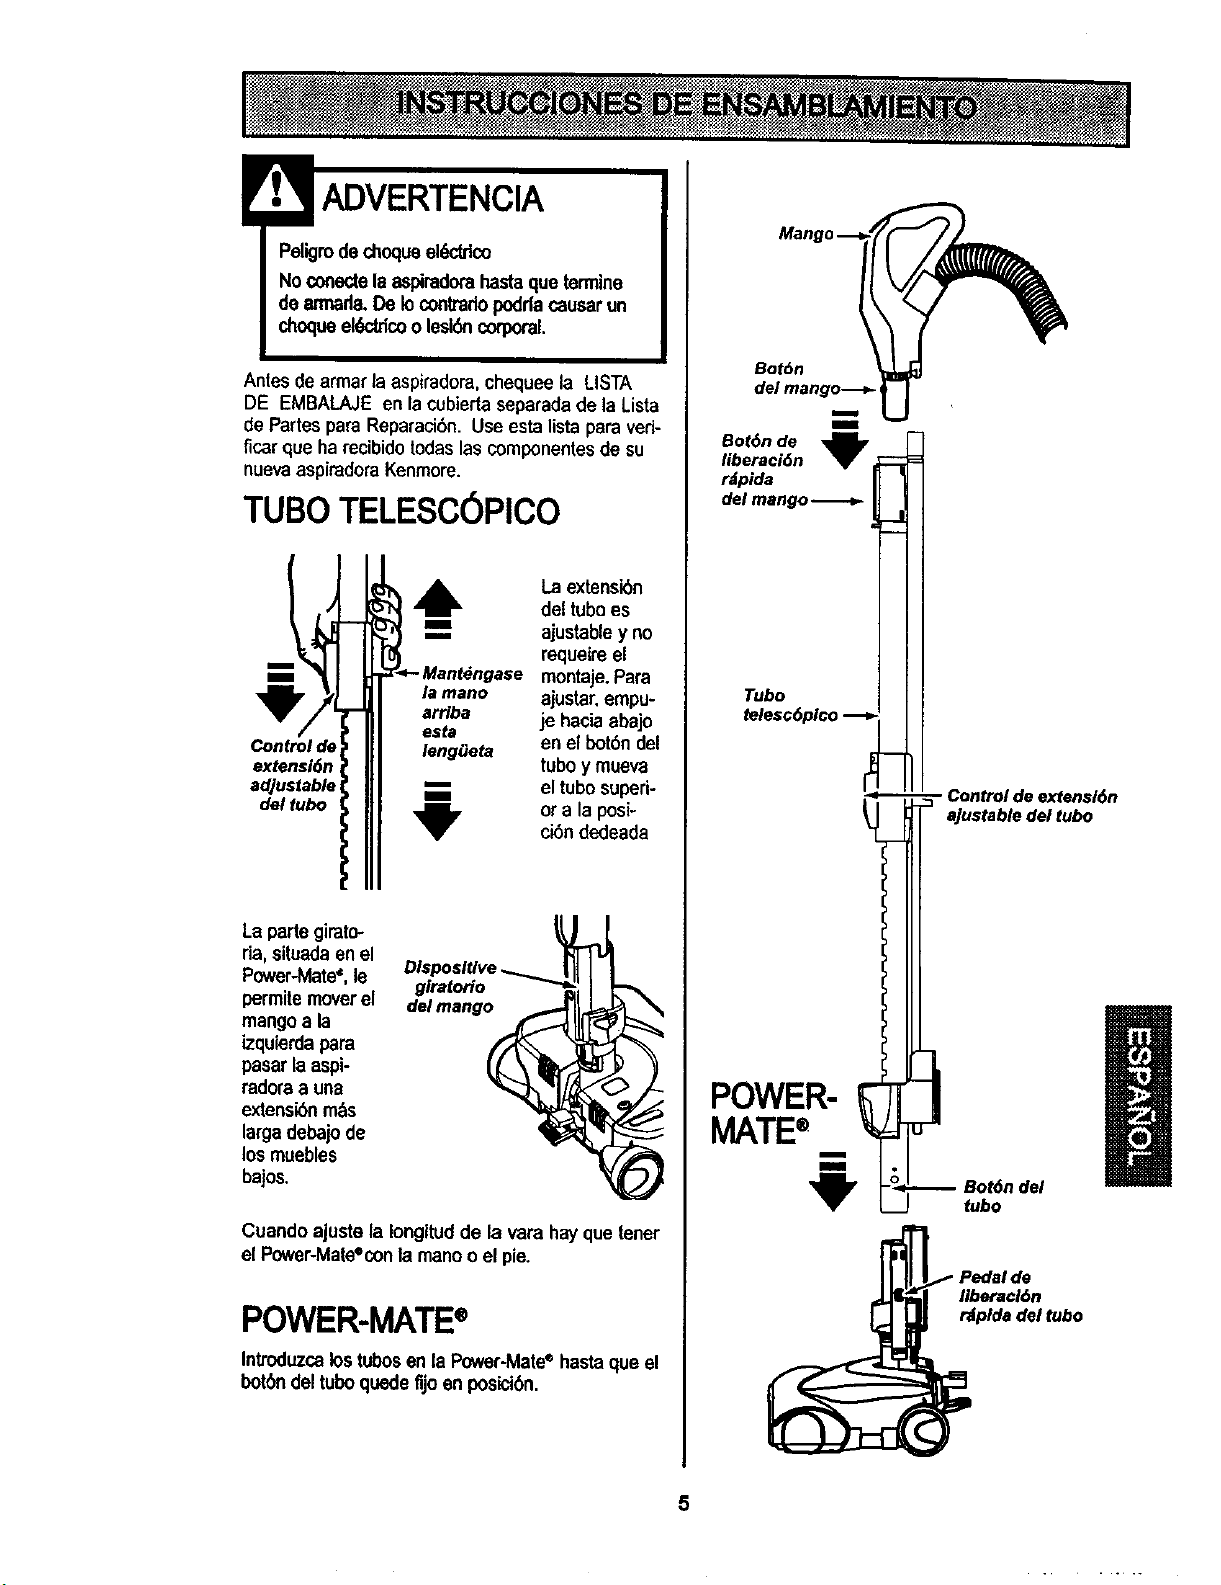
ADVERTENCIA
Peligrode chequeek_ico
No conectelaaspkadomhastaqueterrnine
dearmada.De lo conttadopoddacausarun
chequeeh_tricoo lesi6ncorporal.
Antes de armar laaspiradora, chequeela LISTA
DE EMBALAJE en la cubiertaseparada de la Lista
de Partes para Reparaci6n. Use esta lista para veri-
ficar que ha recibido todaslas componentes de su
nuevaaspiradora Kenmore.
TUBe TELESCOPICO
Control de
extensi6n
adjustable
del tubo
I
m
la mano
arrlba
esta
leng_eta
"U"
La extensibn
del tubees
ajustabley no
requeireel
montaje. Para
ajustar,empu-
je haciaabajo
enel bot6ndel
tubey mueva
eltube superi-
ora laposi-
ei6ndedeada
La partegirato-
fia, situadaen el
Power-Mate_,le glratorio
permite moverel delmango
mangoa la
izquierdapara
pasar laaspi-
rad_a a una
extensibnrn_s
largadebajode
los muebles
bajos.
Cuando ajuste la Iongitud de la vara hayque tener
el Power-Mate%onlamane o el pie.
POWER-MATE®
Introduzcalostubesenla P_er-Mate ®hastaque el
bot6ndeltube quedefijoen posici6n.
Botbn
del mango-_.-
m
i
Bot6nde
llberaci6n
r_pida
del mango
Tubo
POWER-
MATE®
- Control de extensl6n
ajustable del tubo
a
Bot6ndel
tubo
Ilberaci6n
rdplda del tubo
5
RECEPTACULO
1. Abrala tape del recept_culo.
2. Examine la boise pare polvo esta instalado correc-
tamante.Consulte las instrucciones de instalaci6nen
la CAMBIO DE LA BOLSA.
3. Examine el filtrode seguridad del motor este insta-
lade correctamante.Consulte las instrucciones de
instalaci6nen LIMPIEZA DEL FILTRO DESEGURI-
DAD DEL MOTOR.
LATAPAY LA CUBIERTA
Es normal que la tape del recept_culo se desprenda
al set abiertam&sde Ionecesario. Pare colocarnue-
vamente la tape, alinee las ranurasde la bisagra,in-
s_rtelas y cierre la tape.
! CUIDADO
Nuncadebeabdrlacapucha delcontenedor
estandolatapaableda.Asl se evitarddatlosa
lacapuchadelcontenedory/oa latape.
MANNGUERA
1.Alineelapesta,Sade
sujeciSnde lamangoera
y la ranurade la cubier-
ta del recept_culoe
introduzcalamanguem
en el receptaculobasra
que quede fija en posi-
ci6n,
Pareretie Levanteel
pestillodela manguera
y tirede la manguera.
sujecl6n
dela
manguera
Ranura
Bot6n del
Bot6n de
liberacidn
rdplda del
mango
(Algunos
2. Introduzcael
mangoen el tubo
hastaque el bot6n
quede en posicibn.
Aseg0resede quela
manguerano est6tor-
dda.
I Parare_rar:.Oprima
m el botbndeliberaci6n
r_pida del mango
pareliberar el mango
y tiredel mangohacia
arriba.
PareGuardar:Pare prevenirla precibnde la mangua
mientrasse guarda, desunala manguadeltubedela
aspiradora.Guardelamaguaen unaposieibn
enrelladayflojamentedetalmanereque latapade la
manguanose estire.
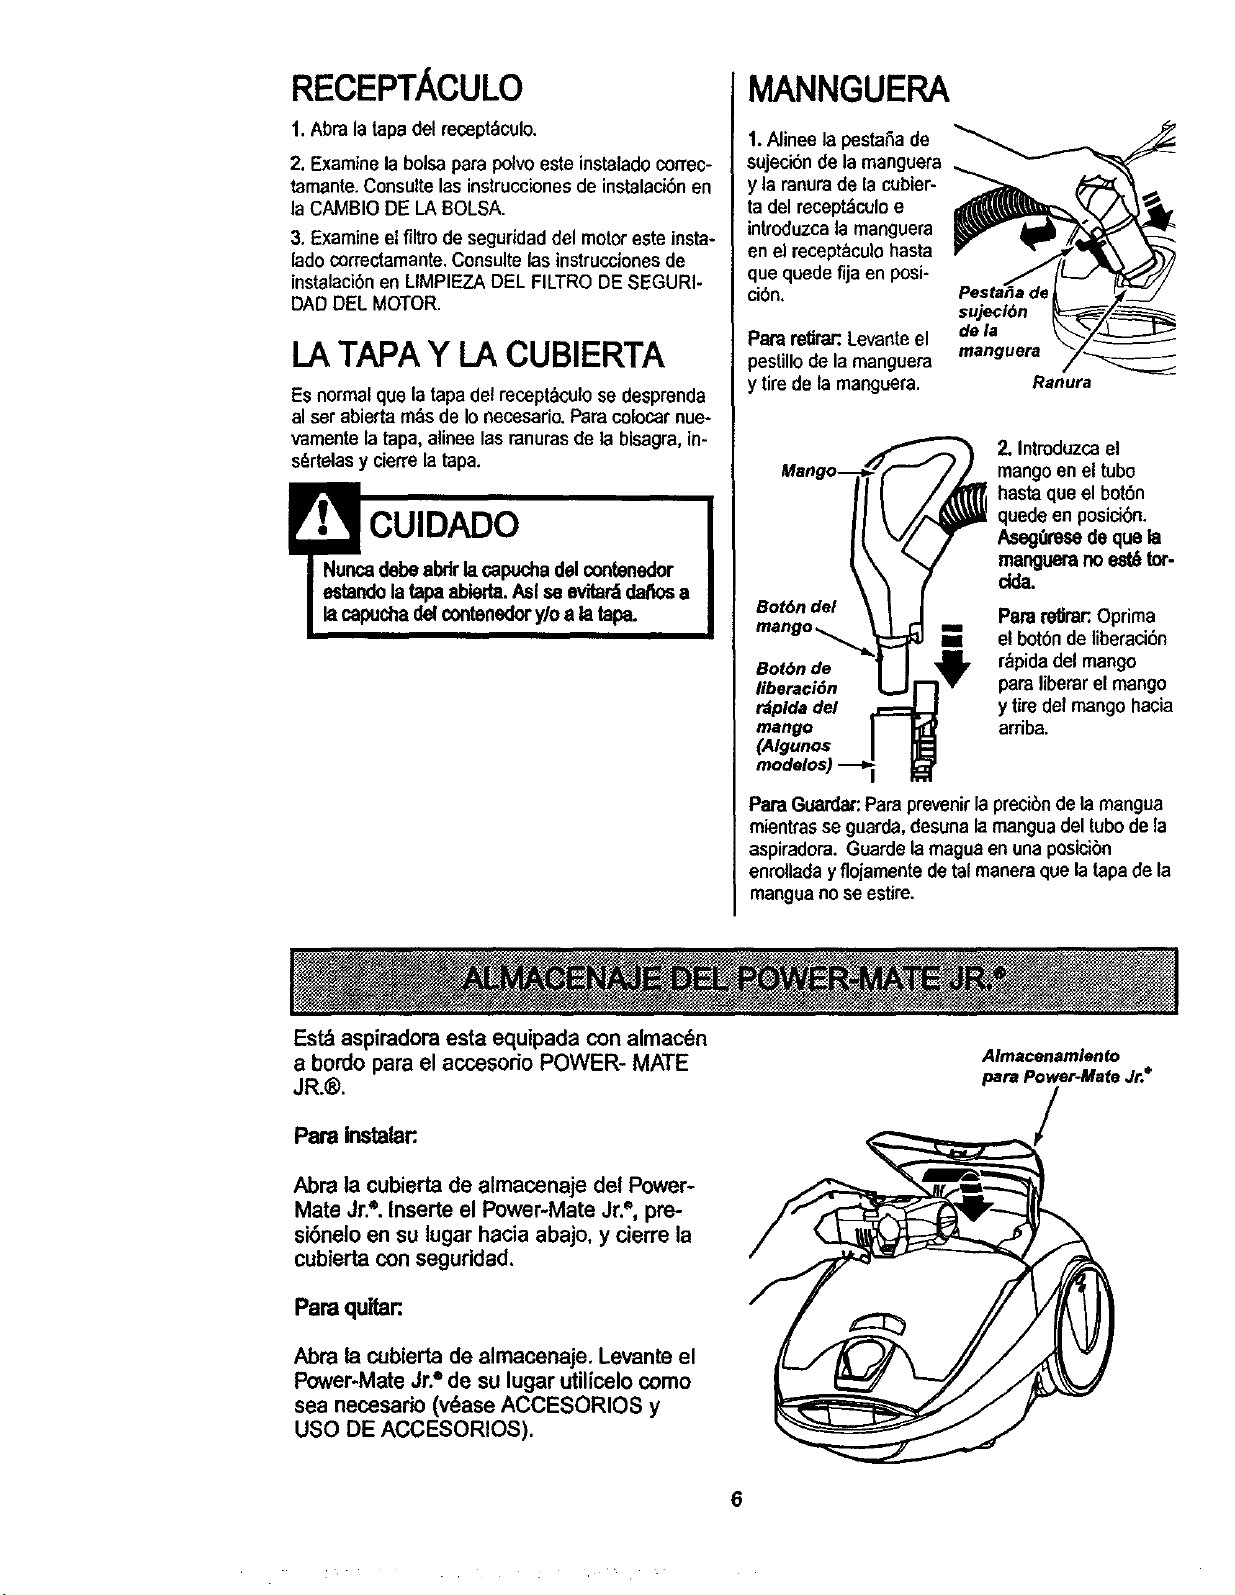
Estd aspiradoraesta equipada con almac_n
a bordo parael accesodo POWER- MATE
JR.®.
Pare instalar:
Abra la cubierta de almacenaje del Power-
Mate Jr.'=.Inserte el Power-Mate Jr.", pre-
si6neloen su lugar hacia abajo, y cierre la
cubiertacon seguddad,
Pare qultar:
Abra la cubierta de almacenaje. Levante el
Power-MateJr."de su lugar utilicelocomo
sea necesario (v_ase ACCESORIOS y
USO DE ACCESORIOS).
Almacenamlento
para Power-Mate Jr.*
6
PAPA COMENZAR
Peligrode lesiOnpersonalydafioal
producto
• NOenchufe la aspiradorasiel
Intenuptorest_en lapeelcionON.
Poddacausarlesk_ personalo da_o
elproduc_o,
• B cordonek_dco se mueve
rlq_unente duranteel emollamiento.
MantengaaleJadosa losni_osy
asegumespadofibresuflclentepare
evltarleslonespersonalesal enrollar
elcord_.
• NOuselosenchufesIocalizadossobre
losmuebles.Losobjetoscercanos
poddanresultardal_lo_.
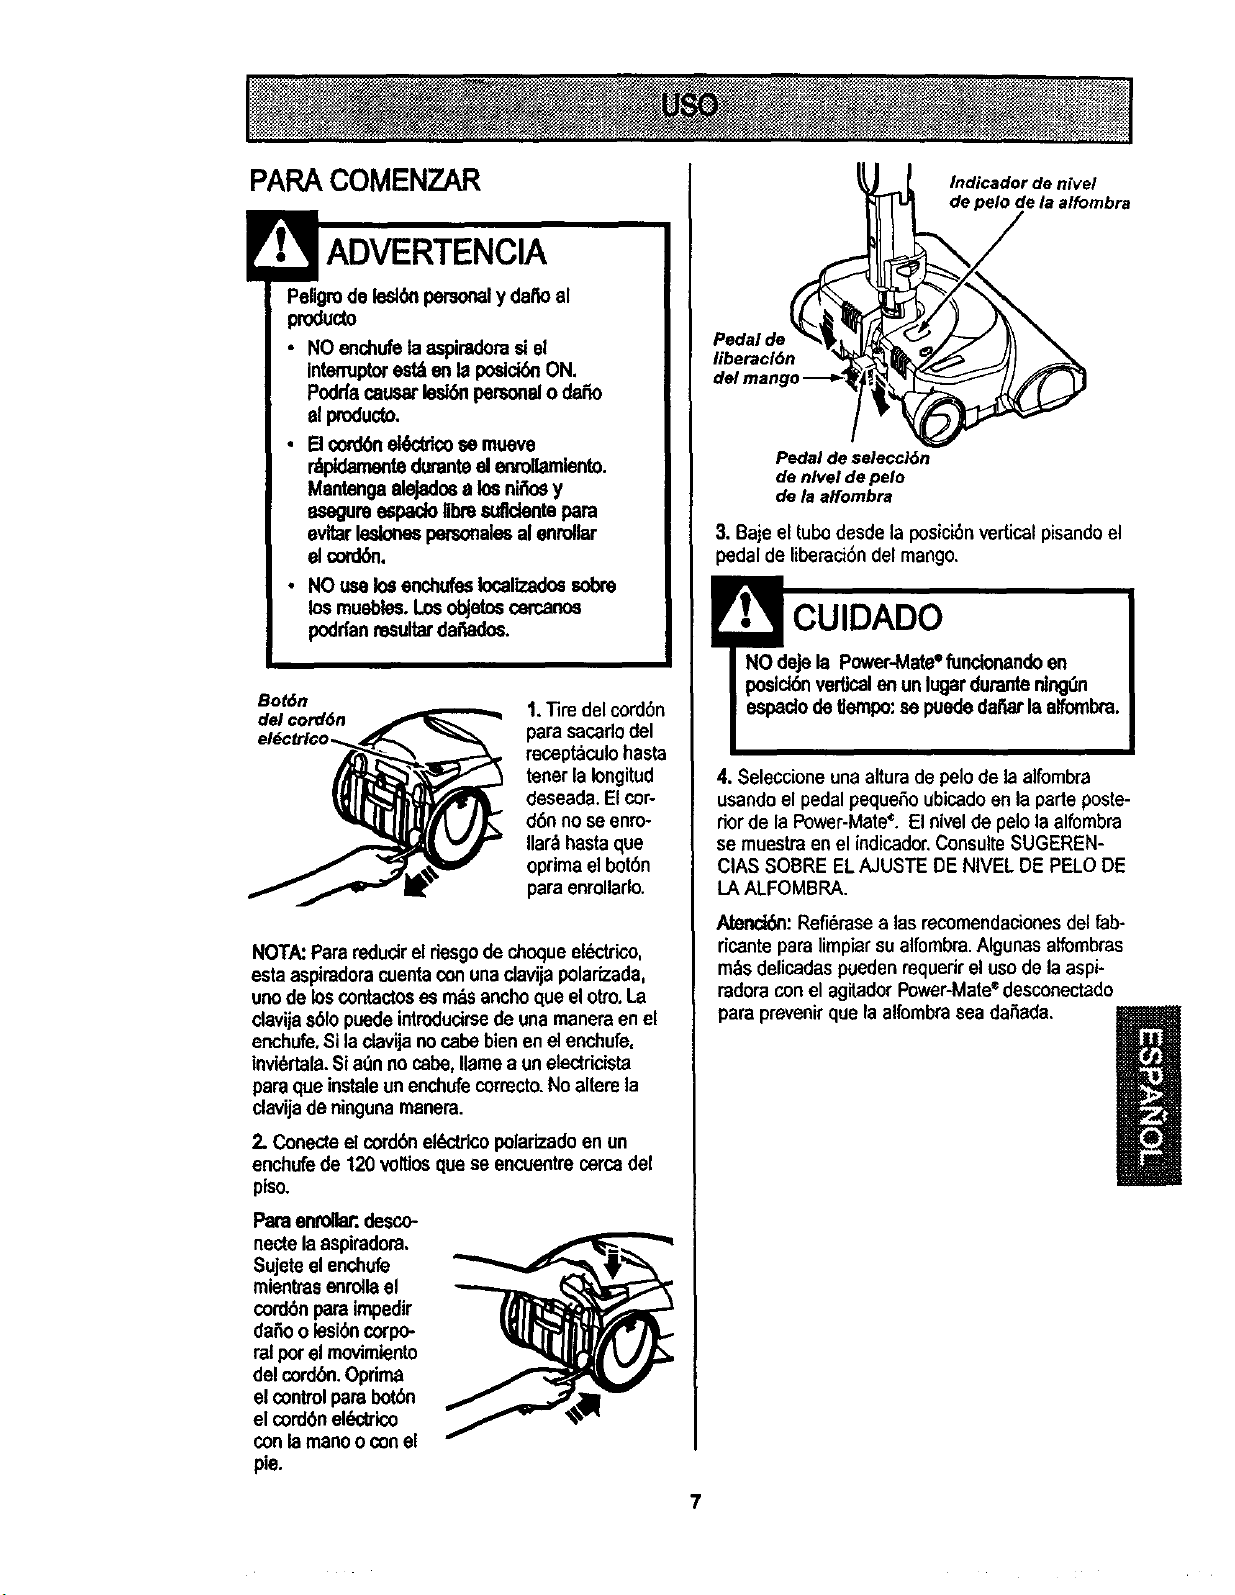
Bot6n
del cord6n
t, Tiredel cordon
parasacarlodel
receptaculohasta
tener[aIongitud
deseada.Elcor-
d6nno seenro-
Ilar._hastaque
optimael bot6n
para enmllarlo.
NOTA:Pararedudrel desgode choqueel_trico,
esta aspiradoracuentaconunaclavijapoladzada,
unode loscontactoses rodsanchoclueelotto.La
clavijas61opuedeintroducirsede unamanera en el
enchufe,Si laclavijanocabebienenelenchufe,
invi_'tala.Sia0nno cabe,flamea unelectricista
paraqueinstale un enchufecorrecto.No alterela
clavijadeningunamar=era.
2. ConecteelcordonelL_,ctrlcopolarizadoen un
enchufede 120 voltioscluese encuentrecercadel
piso.
Paraenroaar:,desco-
nectelaaspiradora.
Sujeteelenchufe
mientras enrellael
cordonpara impedir
daffoolesioncorpo-
ralper elmovimiento
del cordOn.Optima
el controlparabotbn
el cordonek_trico
con le manoo conel
pie.
libetacl6n
Indicador de nivel
de pelo de la alfombra
7
Pedal de seleccl6n
de nivel de pelo
de la affombra
3. Bajeel tubodesde la posicionverticalpisandoel
pedalde liberaci6ndel mango,
! CUIDADO
NO deje la Power-Mate*funcioflandoen
posld6nverticalenunlugardurante nlngOn
espadode t]empo:sepuededat_ laalfombra.
4. Seleccioneunaalturade pelo de le alfombra
usando el pedalpequeSoubicadoen la parteposte-
rior de la Power-Mate'_.El nivelde pelo la alfombra
se muestra en el indicador.Consulte$UGEREN-
ClAS SOBRE EL AJUSTE DE NIVEL DE PELO DE
LA ALFOMBRA.
Atenci6n:Refi6rasea los recomendaclonesdelfab-
ricante paralimpiarsualfombra.Algunasalfombras
m_sdelicadaspuedenrequerir el usodela aspi-
radoracon el agitadorPower-Mate'=desconectado
para prevenirque laalfombrasea daSada.
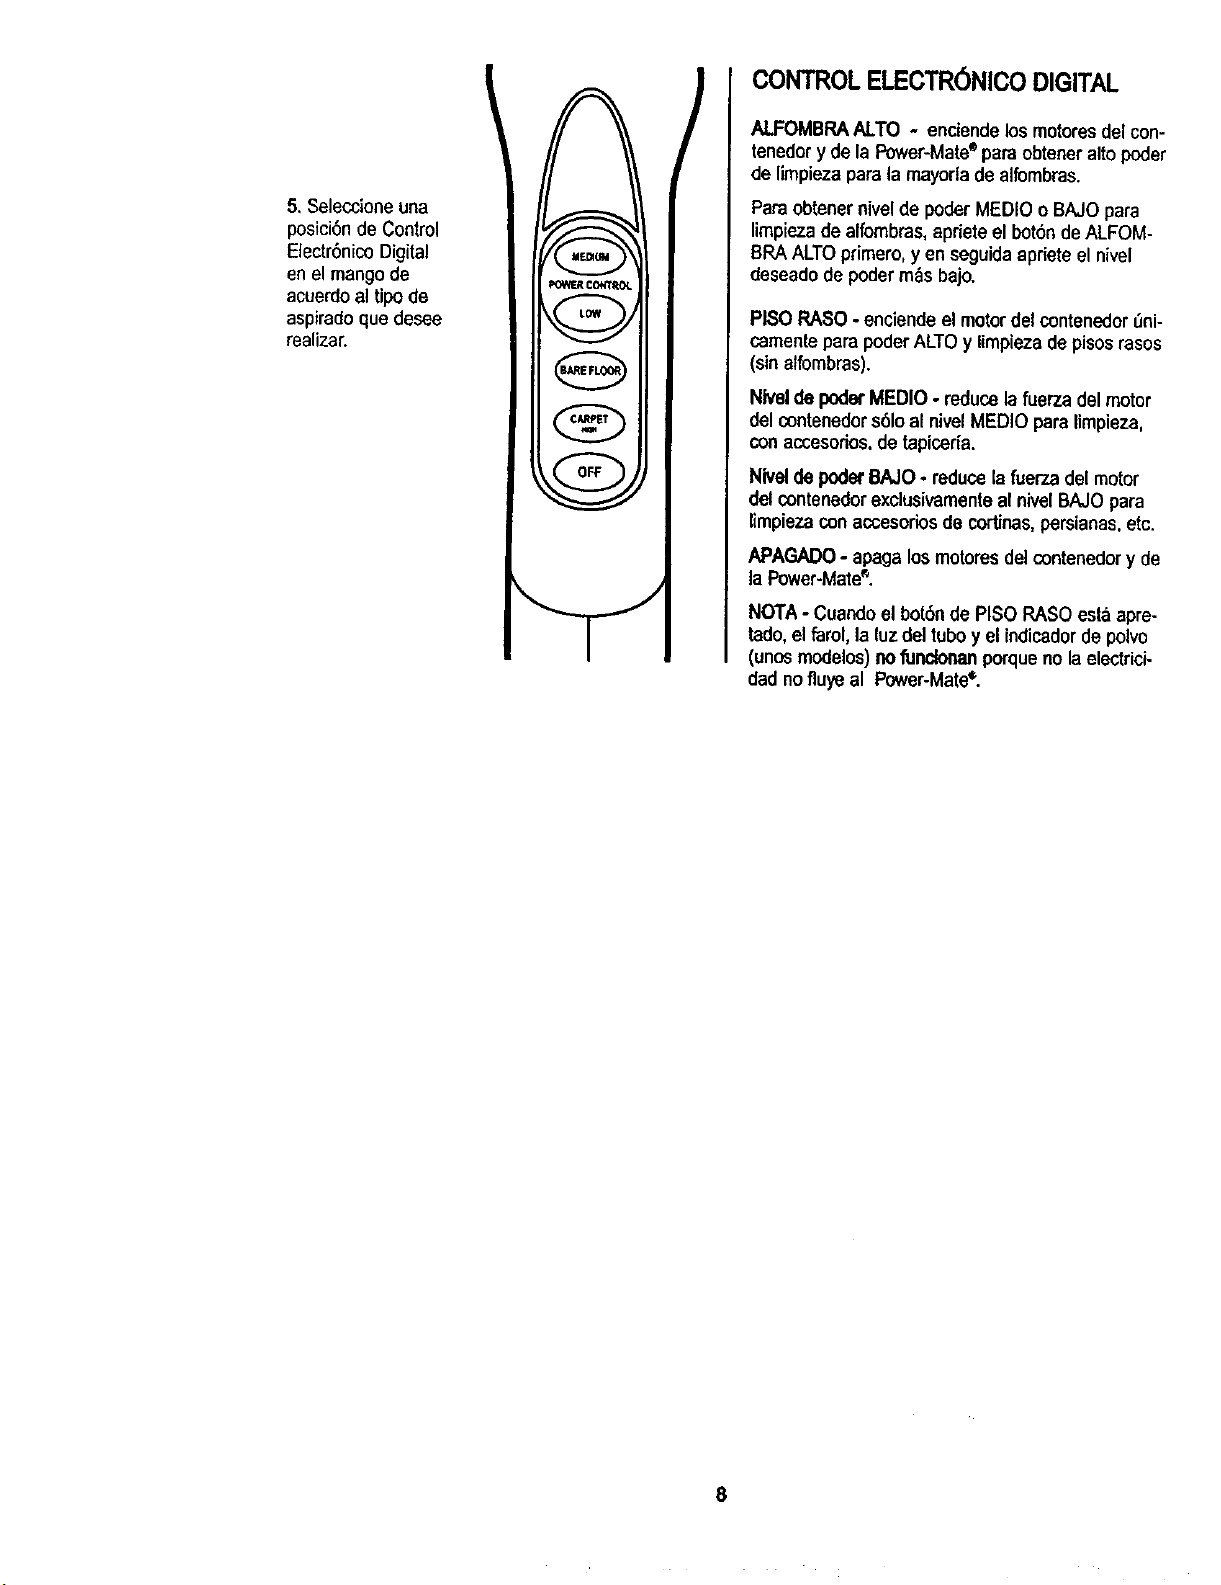
5, Selecclone una
posici6n de Control
ElectrSnicoDigital
en el mangode
acuerdoal tipo de
aspiradoque desee
realizar.
MECq(AM_
POWF.RCO*,:TROL
! L[mr i
v
A
v
f ¢/,RPET _,
_.vJ
CONTROL ELECTR6NICO DIGITAL
ALFOMBRAALTO - enciendelosmotores delcon-
tenedory de la Power-Mate*para obteneraltopoder
deIimpiezaparata mayorla de alfombras.
Paraobtener nivel de poderMEDIOo BAJOpara
limpieza dealfombras,apdeteel bot6nde ALFOM-
BRAALTOprimero, _,eo seguidaapfiete el nivel
deseadode poderm&s bajo.
PISOPASO - enciende el motordel contenedor _ni-
cementepara poder ALTOy limpieza depisosrasos
(sin atfombras).
NIvelde poderMEDIO- reduce lafuerza del motor
detcontenedors61oat nivelMEDIO para Iimpieza,
conaccesorios,de tapiceria.
Nivetde poderBAJO- reducela fuerza delmotor
delcontenedorexdusivamenteal nivelBAJOpara
limpieza con accesorios de cortinas,persianas,etc.
APAGADO- apaga losmotores delcontenedor y de
la Power-Mate®,
NOTA- Cuando elbot6nde PISOPASO esta apre-
tado,elfarol, la luz deltuboy elindicadordepolvo
(unosmodelos) nofu_ porqueno laelectrici-
cladnoflu_ al Power-Mate*.
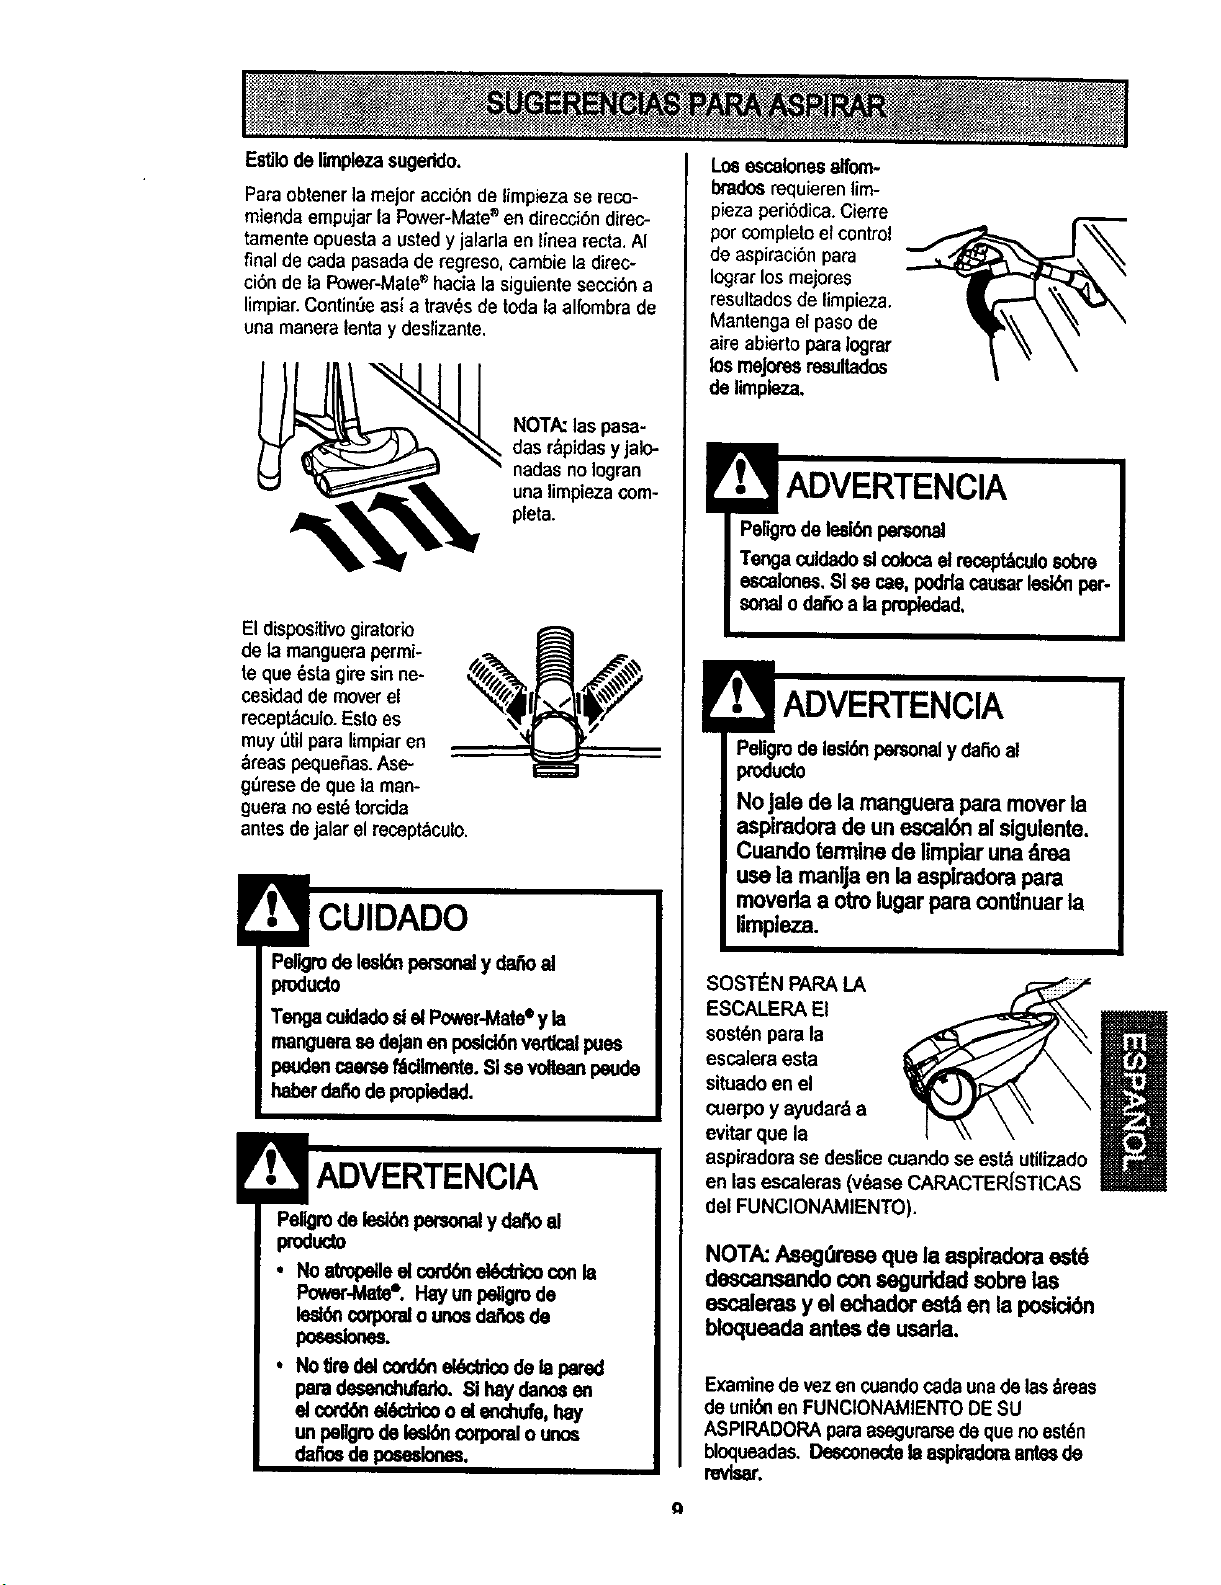
EstJlode limplezasugeddo.
Para obtener la mejoracci6n de limpieza se reco-
miendaempujarla Power-Mate_ endirecci6ndirec-
tamenteepuestaa usted y jalarla en linea recta.AI
final de cada pasada de regreso, cambie la direc-
ci6n de la Power-Mate_"hacia la siguiente secci6n a
limpiar.ContinSeasl a travesde todala alfombra de
una manera lentay deslizante.
NOTA:las pasa-
des r_pidasyjalo-
nadas no Iogran
unalimpiezacom-
pleta.
El dispositivo giratorio
de 1,3manguerapermi-
te que 6sta gim sinne-
cesidadde moverel
recept&culo.Estoes
muyOtilparalimpiaren
_reas pequeRas.Ase-
g_resedeque la man-
guerano estdtorcida
antes de jalar el recept_iculo.
Peligrodelesl_ petsonelydafioal
prodecto
TengaculdadoslelPower-Mateey la
mangueraes deJanen pesic_nventcalpues
peudencae_ f6dlrcente.SI sevdtean peude
haberde_ depropiedad.
Pellgmde lesi_ personaly _ al
produc=o
• No atropelleel con_n _ con la
Power-bl_e¶ Hay unpeligrode
lest_ncorporalo unosdm3esde
po_elo.=.
• No_redelcord6nel_dco dela pared
paradesenchufado.Sihaydanmen
el cord_el_atco oelenchufe,hay
un pellgrode_ corporalo unto
claire de poesslones.
Losescelonesalfom-
Ixados requieren lim-
pieza peri6dica.Cierre
percompleteel control
de aspiraci6npara
Iograrlosmejores
resultadosde limpieza.
Mantengael pasode
aire abierto pare logmr
los meJo_'esrmultades
de limpieza.
ADVERTENCIA
Peligrodelesl6npersonal
Tenga culdadoslcolocael recept_culosobre
escalones.$1se cae, poddacausarlesk_ par-
sonelo da_ a la propledad.
ADVERTENCIA
Peligmde lesl6npersonaly dafioal
para mover la
aspiradorade un escal6nal siguiente.
Cuandotermine de limpiaruna _rea
use la manlja en la asplmdorapara
moveda a otto lugarpara conttnuarla
limpieza.
SOST_:N PAPA LA
ESCALEPA El
sost6npara la
escalera esta
situadoen el
cuerpo y ayudarda
evitar que la
aspimdom se deslicecuando se est_ utilizado
en las escaleras (v_ase CARACTERISTICAS
del FUNCIONAMIENTO).
NOTA: Aseg0rese que la aspiradoraest_
descansando con seguridadsobrelas
escaleras y el echadorest_ en la posld6n
bloqueada antes de useda.
Q
Examinedevezen cuandocadaunadeles_ress
deuni6nen FUNCIONAMIENTODESU
ASPIRADORAparaasegurarsede que noest6n
bloqueadas. Desconectela esplmdom antesde
revlsar.
Use el ajuste XLO (bajo) para obtener la mejor tim-
piezaa fondo. Porotra parte, quiz_s se requiera ele-
varel nivel para facilitaralgunas tareas, como par
ejemplocuando se trata de tapates y algunas alfom-
brasde pelo largo,y para impedir que la aspiradora
se apague,Se sugieren los siguientes ajustes:
HI - Pelo muy largo y suelto,tapetes,alfombras
muy acojinadas,
MED - Petomedianoa largo.
LO - Pelo corto a mediano.
XLO - La mayoria de las alfombrasy pisos
descubiertos.
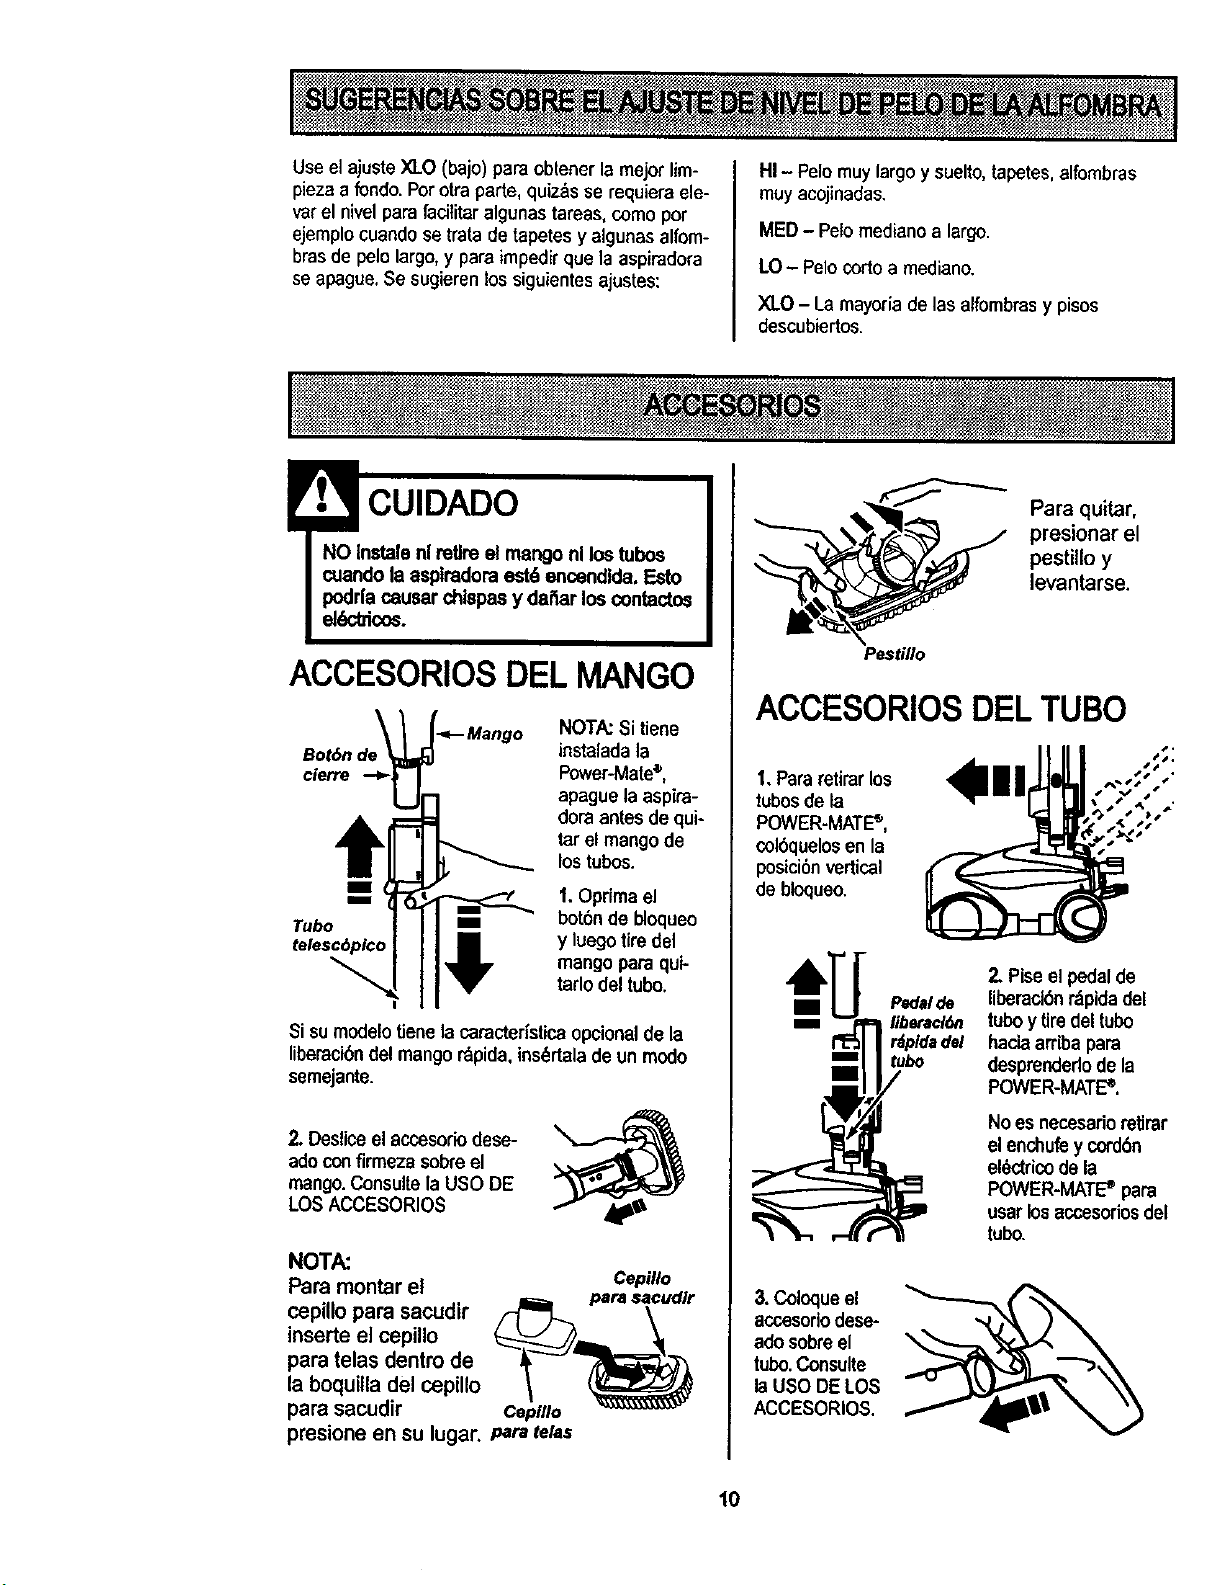
! CUIDADO
NO Instalenl retireel mango nl los tubos
cuandola aspfradoraest6 encendlda. Esto
podrlacausar chispasy dai_arlos contactos
el6ctdco_.
ACCESORIOSDEL MANGO
Bot6n
clerre
t
.<--Mango NOTA:Si tiene
instaladala
Power-Mate®,
apaguela aspira-
doraantesdequi-
tarel mangode
los tubos.
1. Opdma el
bot6nde bloqueo
y luego tiredel
mango parequi-
tarlodeltubo.
Si sumodelo tienelacaracter_sticaopcional de la
liberacibndel mangor_pida,ins_rtalade un modo
semejante.
2, Desliceel accesoriodese-
adoconfirmezasobreel
mango.Consuflela USO DE
LOSACCESORIO$
NOTA:
Para montar el
cepillopara sacudir
inserte el cepillo
paratelas dentro de
laboquilla del cepillo
parasacudir
Cepillo
Ceplllo
presione en su lugar..,_r= telas
Pestillo
Para quitar,
presionar el
pestillo y
levantarse.
ACCESORIOSDELTUBO
1. Pararetirarlos
tubosde la
POWER-MATE_,
col6quelosen la
posici6nvertical
debtoqueo.
Pedalde
liberacl6n
' rdpldadel
mE tubo
mm
2, Piseel pedalde
liberack_nr_pidadel
tuboy tiredel tubo
haciaarribapara
desprendedodela
POWER-MATE_.
No es necesadoretirar
elenchufey cord6n
el_ctricodela
POWER-MATE _ para
usarlos accesofiosdel
tubo.
3. Coloqueel
accesododese-
ado sobre el
tubo. Consulte
la USO DELOS
ACCESORIOS.
10
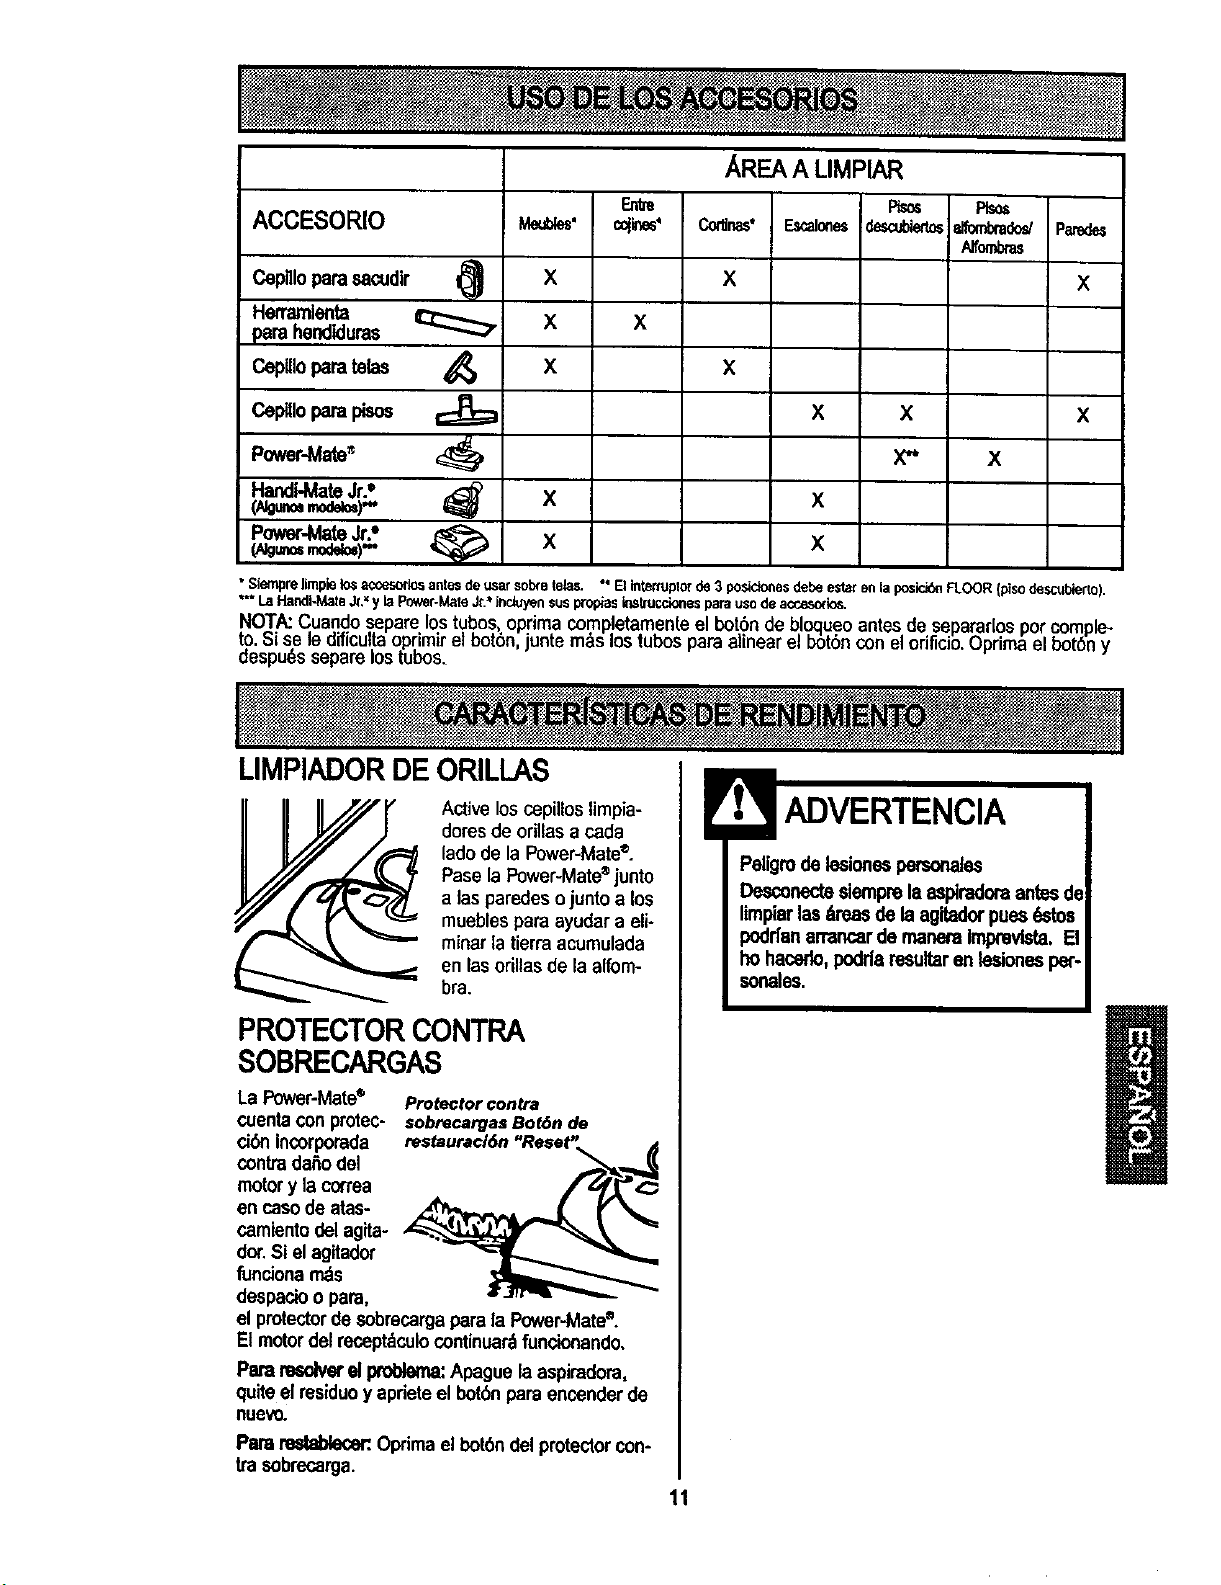
ACCESORIO
Cepnlopara sacudir I_
Herramlente
_arahendiduras
CepUloparatelas
Ceplllopara pisos
Power-Mate_
HandI-MateJr.°
Power-MateJr.*'
(AIg_ modd=)""
X
X
X
X
X
c_ines°
X
AREA A LIMPIAR
X
Fts=
desafoier_
X x
X"
X
X
Rso_
_tombrado_
Affombras
x
x
• Siemprelimplelos accesorlosantesdeusarsobretelas. " El interluptorde 3 posicionesdebeestarenla posid6_FLOOR(pisodescubierto).
"** LaHandiJ,_,te&.=yla Power-MateJr."Jnck.,yensusproptasirlstruccio_lesparauSodeaccesode_.
NOT,&.:Cuandoseparelostubos,optimacompletamenleel bot6ndebloqueoantesdesepararlosporcomple-
t9. Sise le dificultaoprimirel bot6n,juntemdslostubosparaalinear el b6t6nconelorificio.Oprimaelbot6n y
aespuesseparelOStubos.
LIMPIADORDEORILLAS
Active loscepillos limpia-
doresde orillasa cada
lade de la Power-Mate®.
Pasela Power-Mate®junto
alas paredes ojunto a los
muebles paraayudar a eli-
minar ta tierra acumulada
en las orillas de la alfom-
bra.
PROTECTORCONTRA
SOBRECARGAS
La Power-Mate® Proteclorcontra
cuentacon protec- sobrecargasBot,_nde
ci(_'lIncorpomda restauraci6n"Reset',. ,_
contradaAodel
motory lacon'ea . jrE, f_'=_
en casede atas-
camientodelagita-
dor.Si el agitador
funciona rnds
despacioo para,
el protectordesobrecargaparala Power-Mate®.
El motor delrecept_culocontinuardfuncionando.
Pararesolverel problema:Apague laaspimdora,
quite elresiduoy apdeteel bot6nparaencenderde
nuevo.
Para_ Oprimael bot6ndel protectorcon-
ira sobrecarga.
Peligmdelesionespersonates
Desconectesiemprela aspiradoraantesde
Iimpiarlas_reas de laagitedorpuesq_'tos
poddanarrancarde maneraImprevtsta,[]
ho hacede,poddaresultaren tesionespet-
sonales.
11
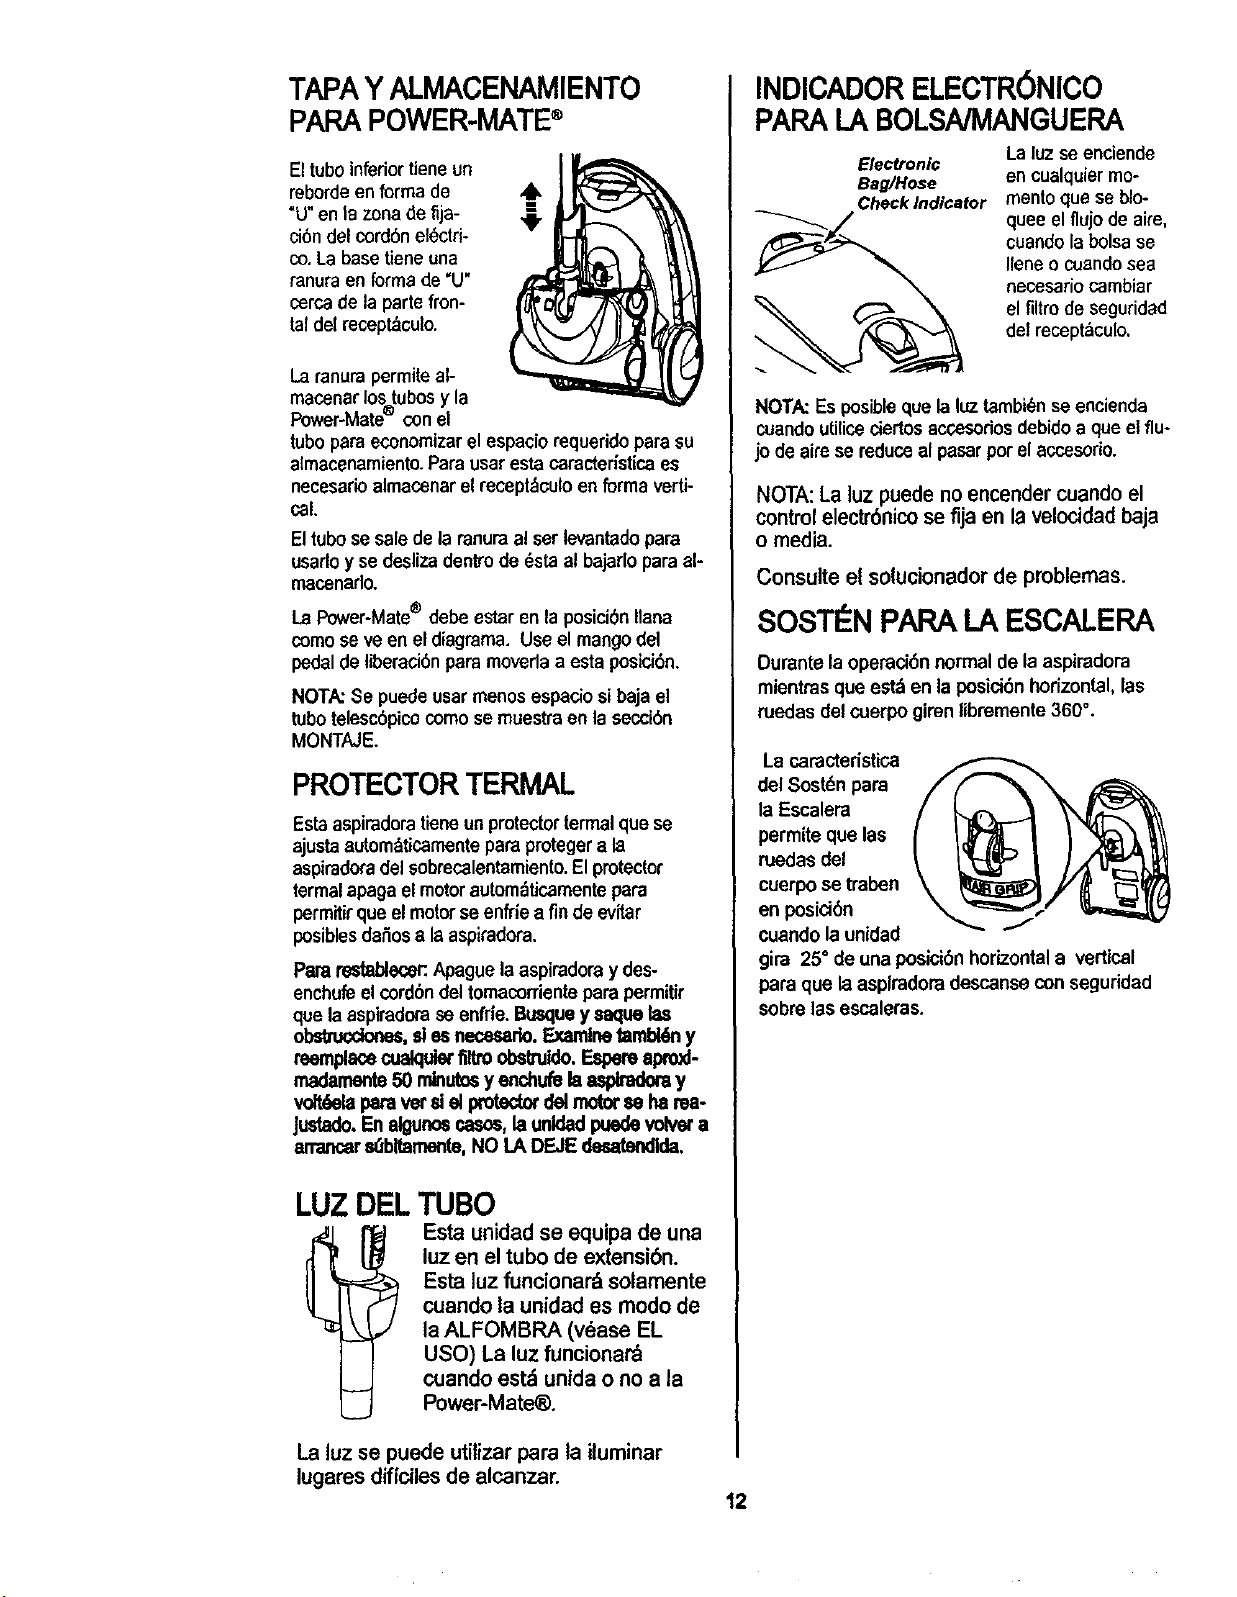
TAPAYALMACENAMIENTO
PARAPOWER-MATE®
El tuboinferiortieneun
reborde enforma de
"U"en la zona deriD-
ci6n del cord6n el_ctri-
co. La basetiene una
ranuraen forma de "U"
cercade la parte fron-
taldel recept_culo.
Laranura permiteal-
macenarlostubosy la
Power-Mate con el
tubopara economizarel espacio requerido para su
almacenamiento.Para usaresta caracterlstice es
necesario almacenar el recept_culoen forma verti-
ceL
Eltubose salede la ranuraa!serlevantado para
usarloy se desliza dentrode _sta al bajarlo para al-
macenado.
La Power-Mate® debe estaren laposici6n liana
como se ve en el diagrama. Useel mangodel
pedalde liberaci6npara moveda a esta posici6n.
NOTA:Se puede usarmenos espacio sibaja el
tubo telesc6pico como se muestTaen la secci6n
MONTAJE.
PROTECTORTERMAL
Estaaspiradoratieneunprotectorterrnalque se
ajusta autom&ticamentepara protegera la
aspiradoradel sobrecalentamiento.Elprotector
termal apaga el motorautombtisamente para
permitir que el motor seenfde a fin de evitar
posibles daSosa la aspiradora,
Pararestablecer:Apaguelaaspiradora y des-
enchufeel cord6ndel tomacorriente para permitir
que laaspiradorase enfrie.Busquey saquelas
_, sles necesado.Examinetambl6ny
reemplacecualquiertiltroobsltuldo.Espereapro_-
madamente50 min_ y enchufelaa,_ y
v_._la paravetd elproted_delrnotorseharea-
Justado.Enalgunosr,asos,launldadpuedevolvara
arrancer_bltamente, NO LA DEJEdesatendlda,
LUZ DELTUBO
1 Esta unidad se equipa de una
luz en el tubo de extensiOn.
Estaluz funcionardsolamente
cuando la unidad es modo de
la ALFOMBRA (vdase EL
USO) La luz funcionar'&
cuando est_ unida o no a la
Power-Mate_).
INDICADORELECTR6NICO
PAPALABOLSNMANGUEPA
Electronic
Bag/Hose
Check Indicator
La luzse enciende
encualquiermo-
mento que se blo-
quee el flujo de aim,
cuaedolabolsase
Ileneo cuandosea
necesario cambiar
el filtro de seguridad
del recept_,culo.
NOTA:Es posibleque la luztambi_n se encienda
cuando utiliceciertosaccesodosdebidoa que elflu-
jo de aire se reduce al pasarpor el accesorio.
NOTA:La luzpuede no encender cuando el
control electr6nico se fijaen la velocidad baja
o media.
Consulte el solucionadorde problemas.
SOSTI N PAPA LA ESCALERA
Durantela operaci6n normalde la aspiradora
mientrasque estd en la posici6nhorizontal,las
ruedasdel cuerpogirenlibremente 360°.
La caractedstica
del Sostdnpara
la Escalera
permite que las
ruedasdel
cuerpose traben
en posici6n
cuandola unidad J
gira 25" de una posici6nhorizontala vertical
para que laasplradoradescanseconseguridad
sobrelas escaleras.
La luz se puede utilizar para la iluminar
lugares diffciles de alcanzar.
12
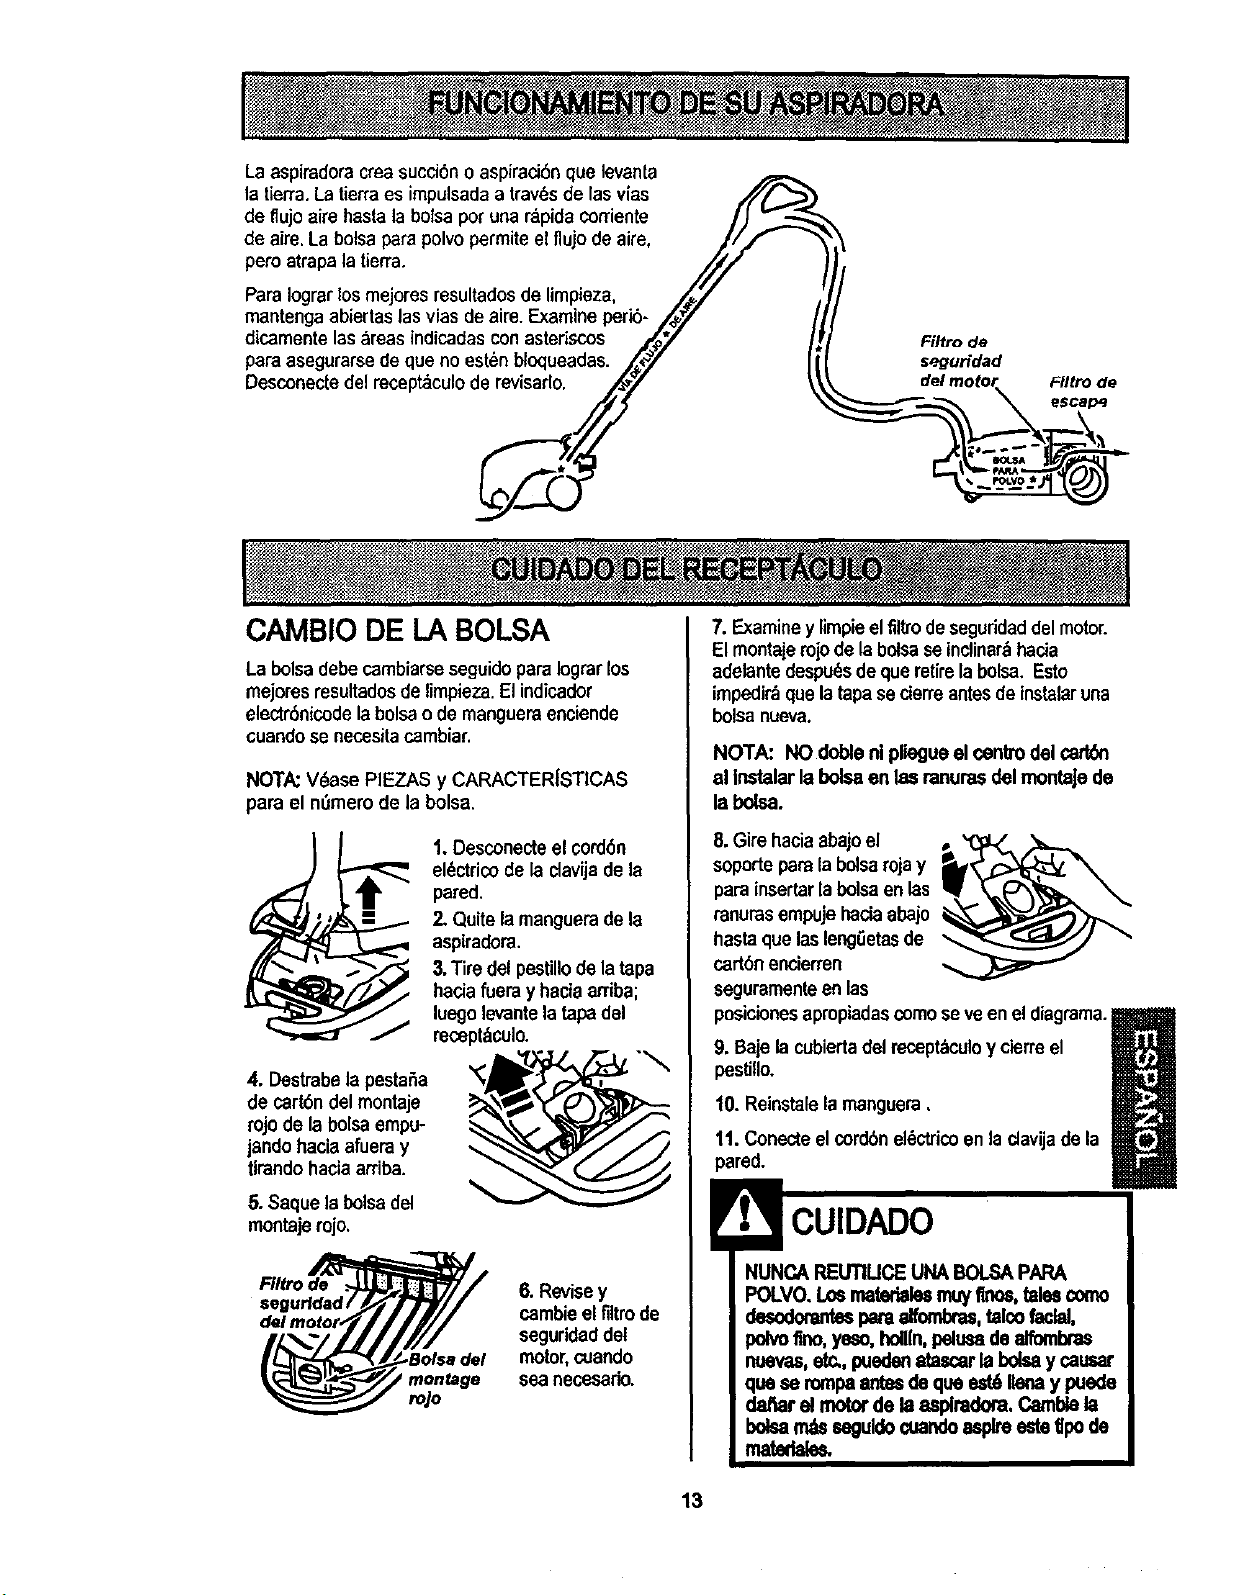
La aspiradoracrea succi6no aspiraci6nque levanta
la tierra.Latierraes impulsada a trav_sde las vias
de flujo aire basrab bolsapot una r_pidacorriente //
de aim. La bolsapara polvopermite el flujo de aim, //_
pete atrapa ,atierra. ///
Para Iograrlos mejores resultados de limpieza, /_'/
mantenga abiertas lasvias de aire.Examine perib- /#_"
dicamente las _reas indicadas con asteriscos ,_.py"
paraasegurarse de que no esten bloqueadas. _t_/
Desconectedel recept_culo de revisarlo.
Filtro de
seguridad
CAMBIO DE LA BOLSA
La bolsa debe cambiarseseguidoparaIograrlos
mejores resultadosde limpieza.El indicador
electr6nicode la bolsao de mangueraenciende
cuandose necesitacambiar.
NOTA:V_ase PIEZAS y CARACTERISTICAS
para el nOmerode la bolsa.
1. Desconecteel cord6n
el(_ctricodela clavijade la
pared,
2. Quitelamanguerade la
aspiradora.
3.Tire del pestillo de la tapa
haciafueray haciaarriba;
luegolevantelatapadel
mcept&culo.
4. Destrabela pestaSa
de cart6ndel montaje
rojo de la bolsa empu-
jando haciaafueray
tlrando haciaarriba.
5. Saque labolsadel
montaje rojo,
Filtro de ._
segurfdad/
6. Revisey
cambieel filtrode
seguridaddel
motor,cuando
sea necesario.
ro,/o
7. Examiney limpieelfiltrodeseguridaddel motor.
El montaiemjode la bolsase inclinar_hacia
adelantedespu_s de que retirela bolsa. Esto
impedi_ que la tapa secierre antesde instalaruna
bolsa nueva.
NOTA: NO doble ni pliegueel centredel cart6n
al Instalarla boleaen las ranurasdel montaJede
la bolsa.
8. Girehaciaabajoel
soporteparala bolsarojay
para insertarla bolsaenlas
ranurasempujehaciaabajo
hastaque lasleng0etasde
cartbnencierren
seguramenteen las
posicionesapropiadascomose veenel diagrama._1
m
9. Bajela cubiertadel recept_culoy cierreel
pestillo.
10. Reinstalela manguera,
11. Conecteel cordbnel_ctricoen ladavijadela
pared.
NUNCA REUTIUCE UNABOLSAPAPA
POLVO. Losmatarblesmuyfines,talescomo
_ alfombres,talco fadal,
polvoflno,yeso,holUn,pelueade alfombras
nuevas,etc,,pueden8tasearlabolsay cauear
quese rompaantesde que est6Ilenay puede
dafiar el motorde la asplradora,CamlY,e la
bolean_ esguldo¢uandoaspireeste tlpode
matatal_
13
1.Desconecteelcord6n elbctricode laclavijadela
pared.NOchoreeaguasobrela asplradora.
2. Limpieelexterior con un traposuavey limpio,que
ha side exprimido despu_s de remojar en una solu-
ci6n de agua y detergente liquido ligero.Seque el
exterior conun traposeco despu_s de limpiar.
3. Limpiela superficieexteriordel receptaculoy de
losaccesorios para reducir la electricidadest_,ticay
la acumulacibnde polvo.
CUIDADO
No uselosaccesodossles_n mojados.Los
accesodosque su utilicanen dreessudas,
debajodelrefdgemdor,no debenusarseen
otrassuperficiessinantesserlavades.
Podffandejarmamas.
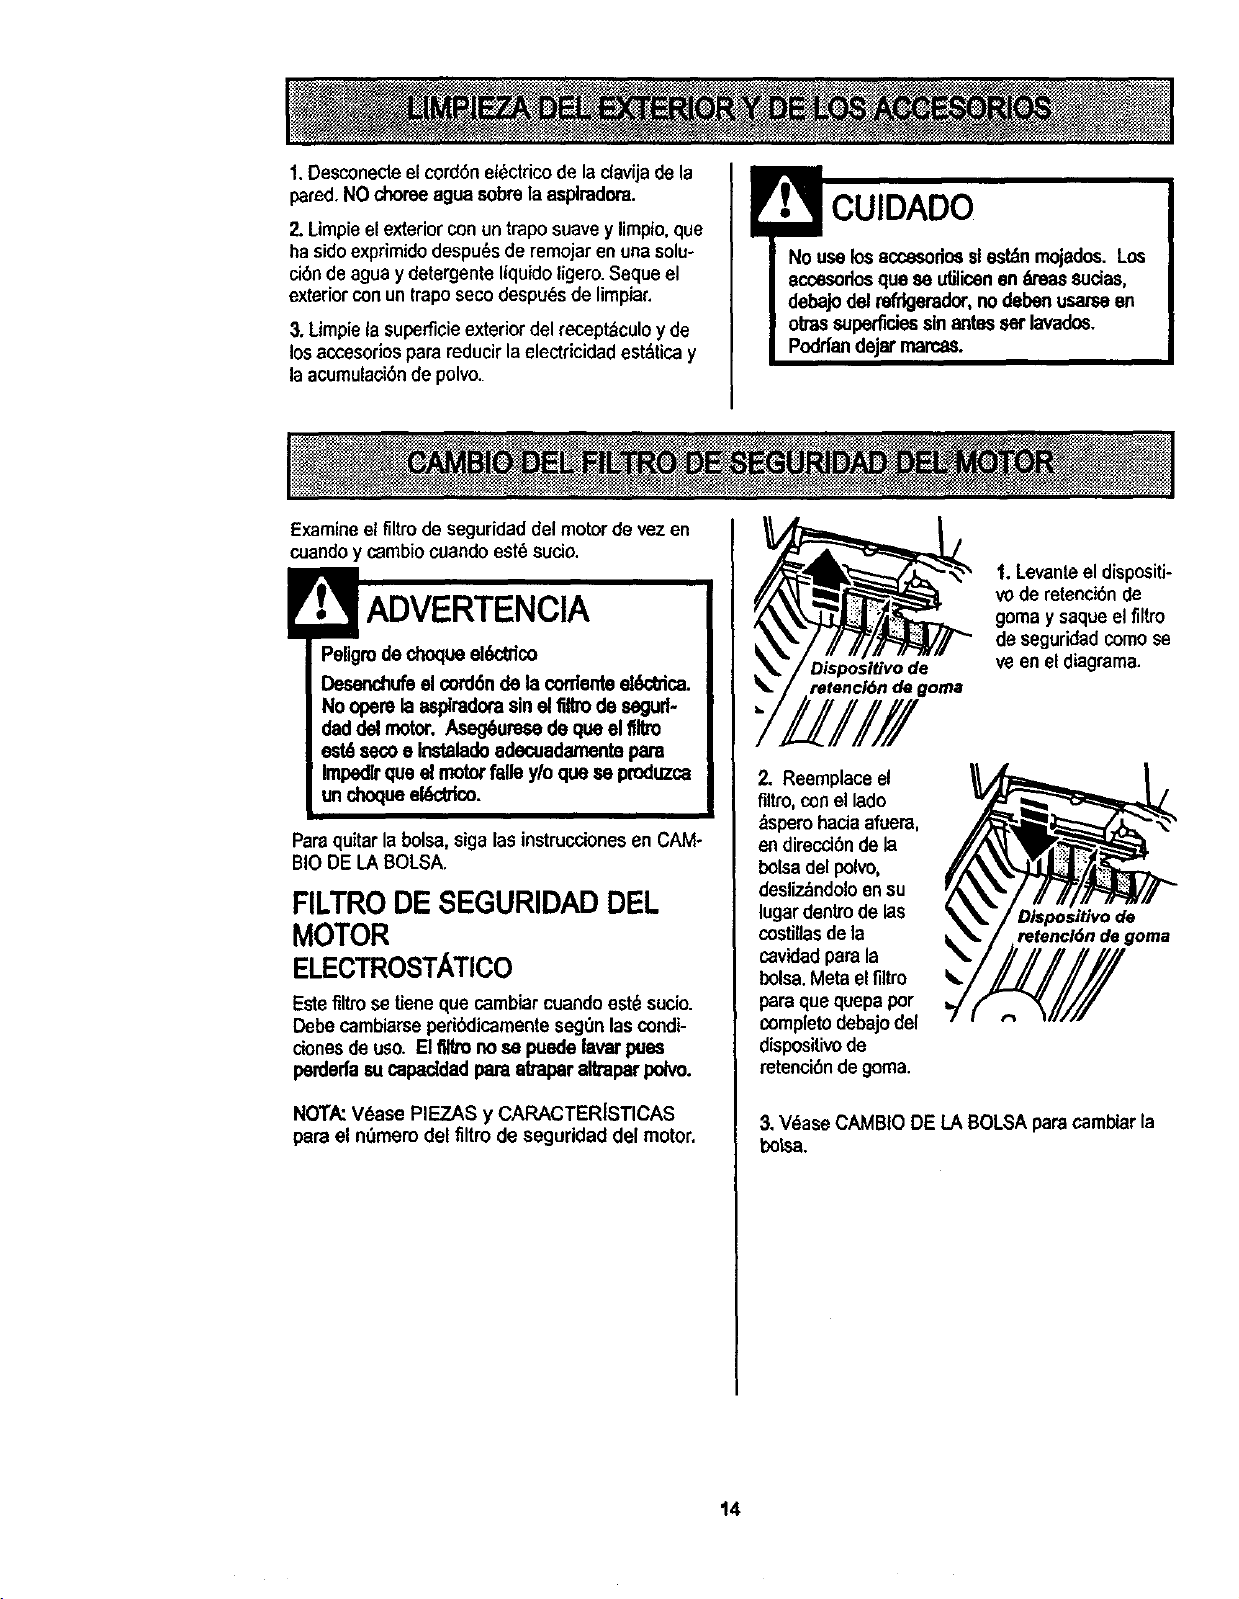
Examineel filtrode seguridad del motor de vez en
cuandoy c_mbiocuandoest6 sucio.
ADVERTENCIA
Peligrode choqueekY_dco
Desanchufeel¢ord6nde la cordanteel_ffica.
No operelaespkadora sineltiltm desegud-
daddel motor. Aseg6uresede queel flltro
$e¢oe Instalado adecuadarnentepara
Impedlrque el motorfalle y/o que se produzca
un dnoqueel_trico.
Paraquitarla bolsa, sigalas instrucciones en CAM-
BIODE LA BOLSA.
FILTRO DE SEGURIDAD DEL
MOTOR
ELECTROSTATICO
Estefiltrose Ueneque cambiarcuandoest_ sucio.
Debecambiarseperibdicamenteseg0nloscondi-
clonesdeuso. Elflltrono se puedelavarpues
perdedasu capaddad paraatraparaltraparpdvo.
NOTA:V6ase PIEZAS y CARACTER[STICAS
pare el n0mem del firm de seguridad del motor,
Dispositivo de
retenci6n de goma
1.Levante el dispositi-
vode relenci6n de
gomay saque elfiltro
de seguridedcomose
ve en eldiagrama.
2. Reemplaceel
flltro, conel lade
_spem haciaafuera,
endirecd6n dela
bolsadel polvo,
desliz_ndoloensu
lugardentrode las
costillas dela
cavidadparala
bolsa.Metaelflltro
paraque quepa per
completodebajodel
dispositivode
retenci6ndegoma.
D/spositivo de
retencl6n de goma
3, V_ase CAMBIO DE LABOLSA paracamblarla
botsa.
14
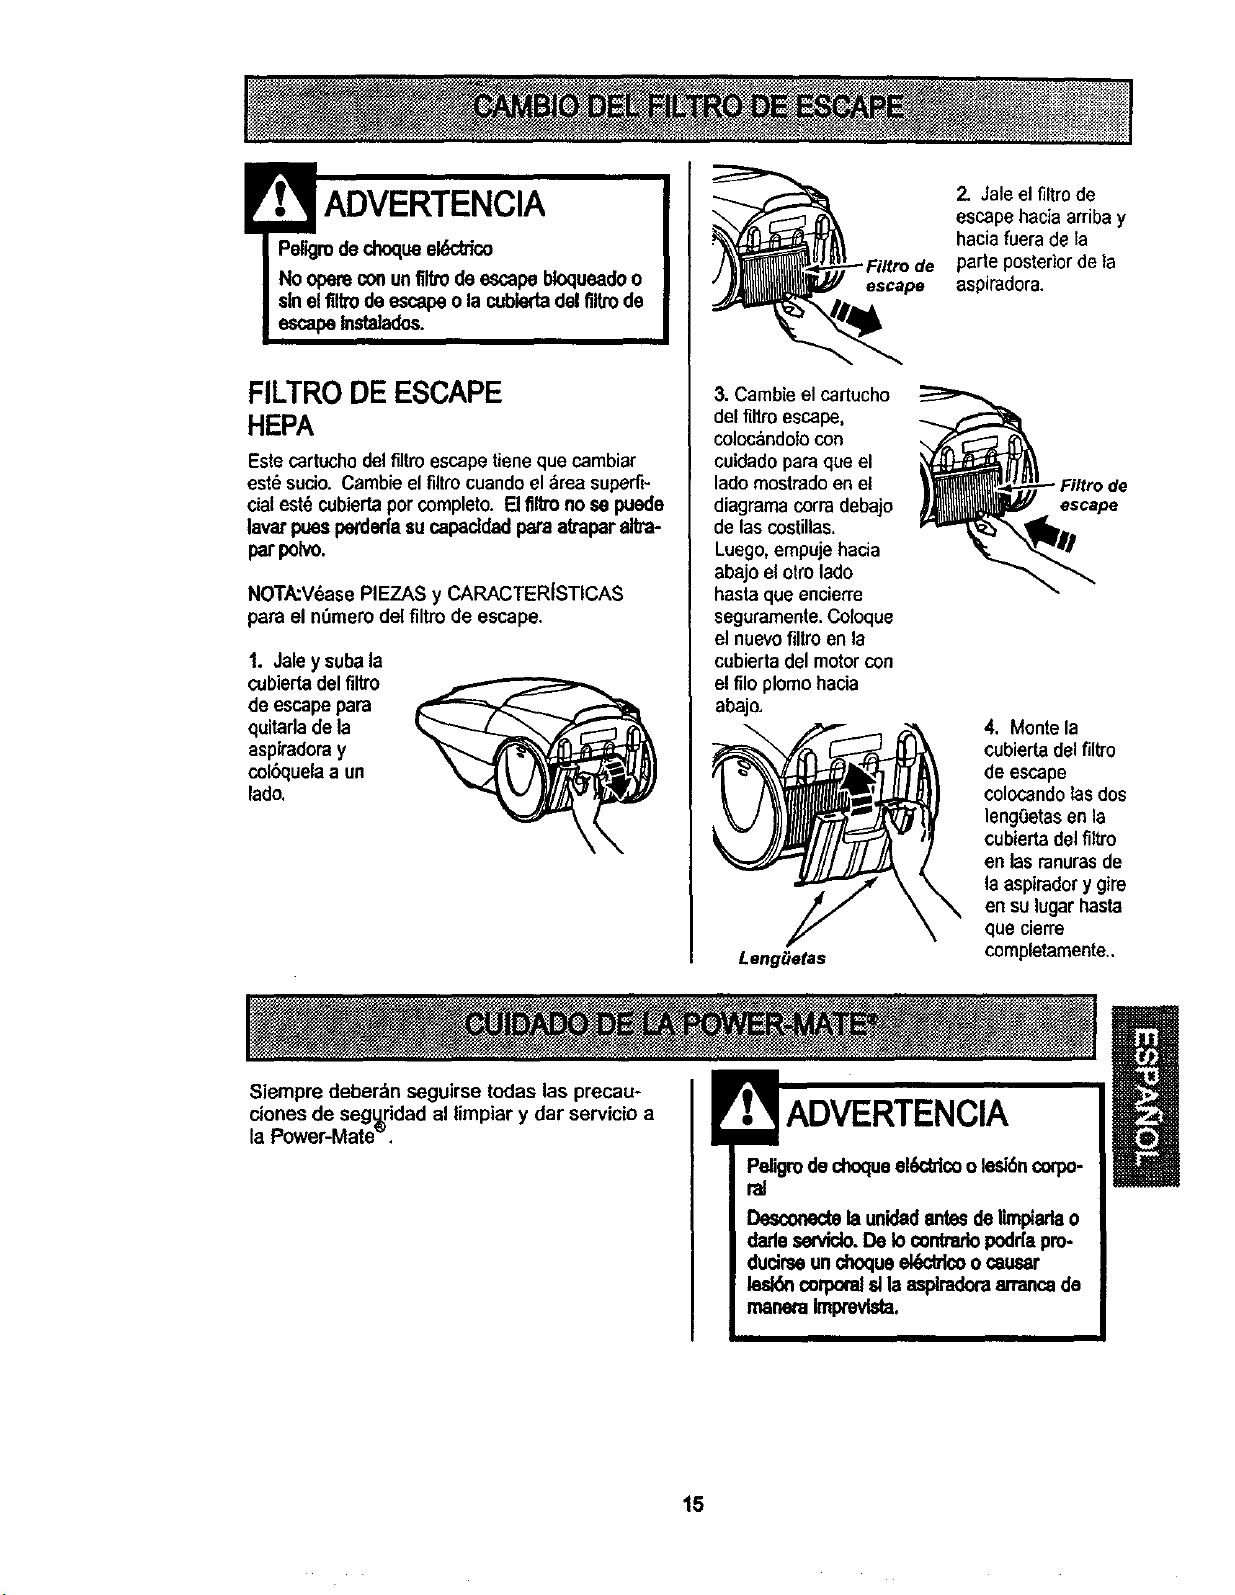
! ADVERTENCIA
Peligrodechoqueel_:_'ico
No opereconunfil_o deescapebloqueadoo
sinelfiltrode escapeo la cubie{tadelfiltrode
escape_aPados.
FILTRODEESCAPE
HEPA
Este cartuchodelfiltro escape tienequecambiar
estd sucio. Cambieel filtrocuandoel ;_reasuperfi-
cialest_ cubiertaporcompleto.[] filtronose puede
lavarpuesperdedasucapaddad 10amakapar altra-
parpolvo.
NOTA:V6ase PIEZAS y CARACTERfSTICAS
para el nt_merodel filtro de escape.
1. Jaley subala
cubiertadelfiltro
de escape para
quitarla de la
aspiradoray
colbquelaa un
lado.
escape
3. Cambie el cartucho
del filtro escape,
coloc_ndolo con
cuidado para que el
lado mostrado en el
diagrama corra debajo
de las costillas.
Luego,empuje hacia
abajo el otto lado
hasta que encierre
seguramente. Co/oque
el nuevofiltro en la
cubiertadel motor con
e!filo plomo hacia
abajo.
Leng_e_s
2, Jale el filtro de
escape haciaarriba y
haciafuera de la
parteposterior de la
aspiradora.
escape
4, Monte la
cobierta delfiltre
de escape
colocando lasdos
lengOetasen la
cubiertadelfiltro
en lasranurasde
laaspiradorygire
ensulugarhasta
que cierre
completamente..
Siempre deber_n seguirse todas las precau-
ciones de segu=ridadal limpiar y dar servicio a
la Power-Mate".
ADVERTENCIA
Pe,grodechoqueel6ddcoo lesl6ncoq)o-
ral
Desconectelaunidadantesdelimptarlao
darleservido.De Io _ntrario podr[apro-
ducirseunohoclueel6ck'icoo causar
leddn coq_oralsllaasplradoraan'ancade
maneraImpmvlsta.
15
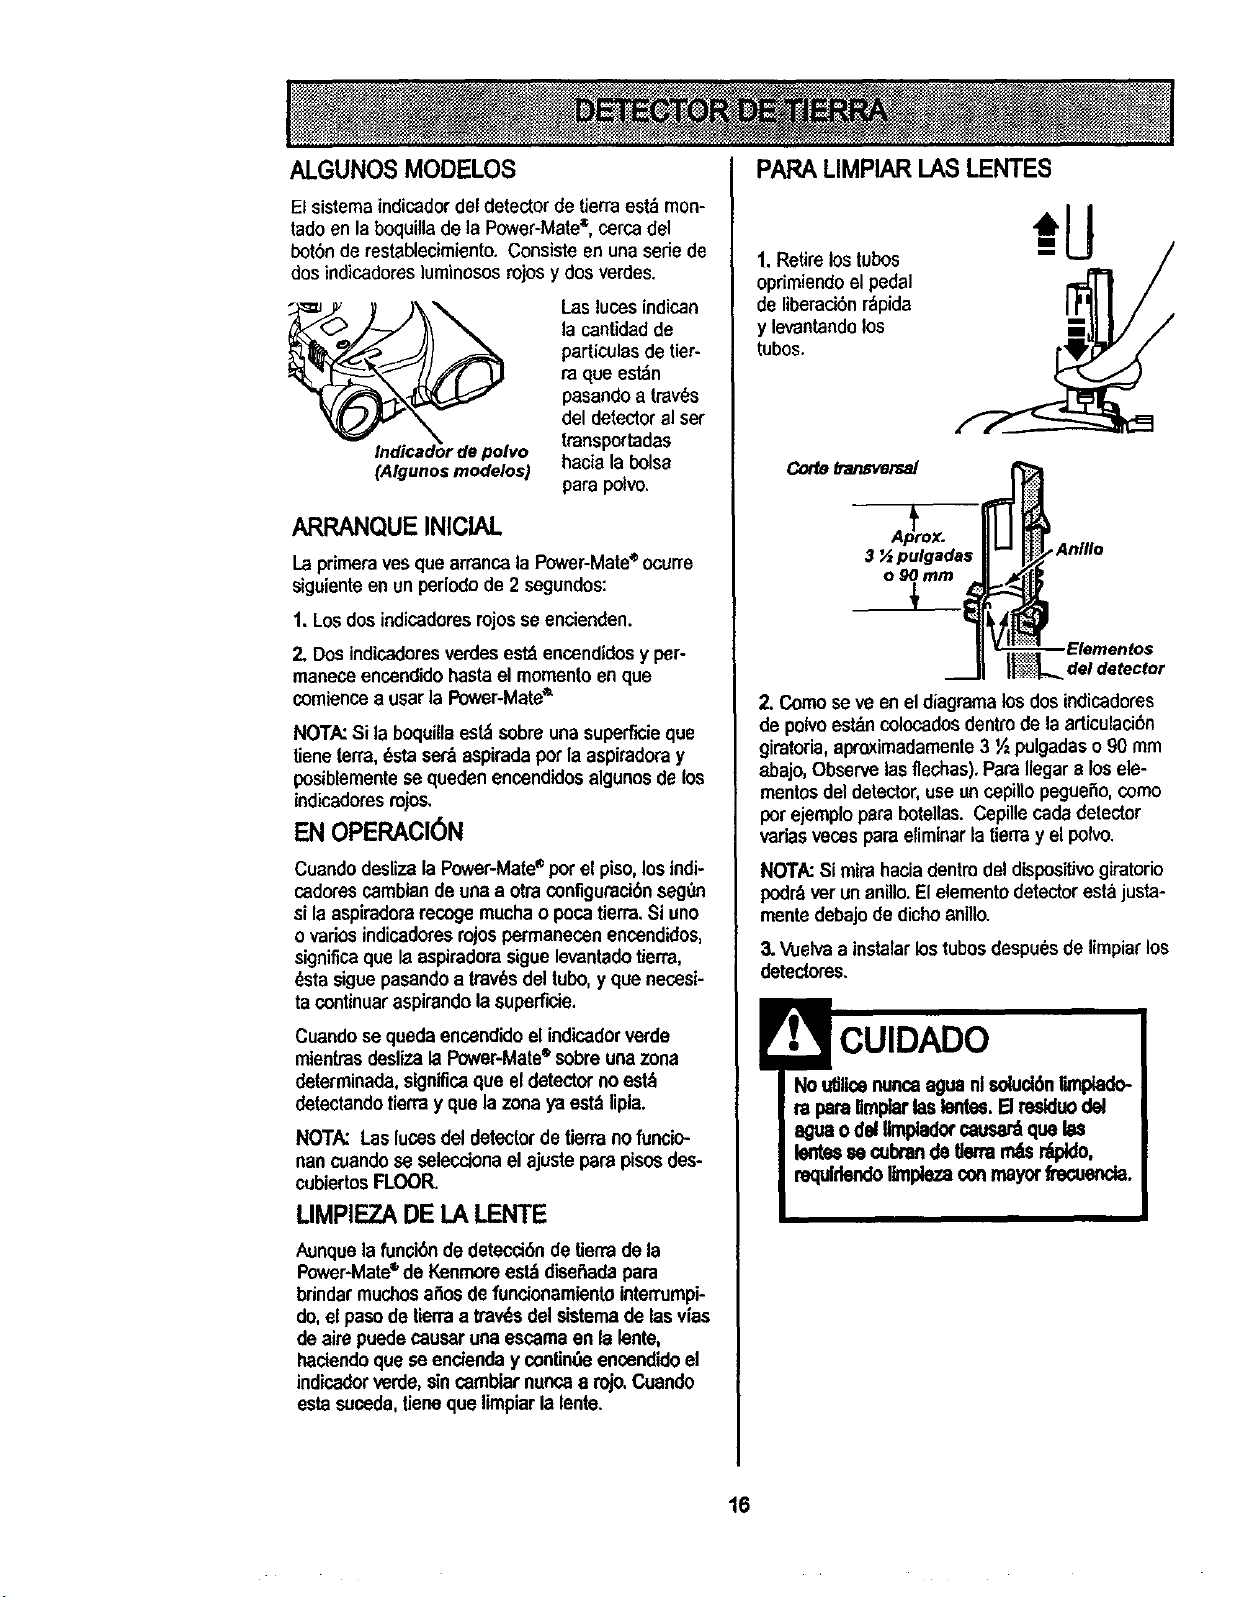
ALGUNOS MODELOS
El sistema indicadordeldetectorde tierraest_ mon-
tadoenla boquilla de la Power-Mate_, cerca del
botSnde restablecimiento, Consiste en una sede de
dosindicadoresluminososrojosy dos verdes.
(Algunos modelos)
Las luces indican
la cantidad de
particulasde tier-
ra que est_n
pasandoa traves
del detector el ser
transportadas
hacie la boise
parspolvo.
ARRANQUE INICIAL
Laprimeraves quearrancala Power-Mate®ocurre
siguienteen un periodode 2 segundes:
1, Losdosindicaderesrojosse encienden.
2. Dosindicaderesverdesest_ encendidesy per-
maneceencendidohastael mementoenque
comiencea usarla Power-Mate_
NOTA:Si la boquillaest_ sobreunasuperficieque
tieneterra,_sta set&aspiradapot la aspiradoray
posiblementese queden encendidosalgunosdelos
indicadoresrojos.
EN OPERACION
Cuendodesiizala Power-Mate• porel piso,los indi-
cadorescambiandeunea otraconfiguraci6nseg0n
si laasplraderarecogemuchao pocatierra.Si uno
ovariosindicadoresrojospermanecenencendidos,
significaque laaspiradorasiguelevantadotierra,
_sta siguepasandoa trav6sdeltubo,y que necesi-
ta continuaraspirandola superf'_ie.
Cuandose quedaencendidoel indicadorverde
mientrasdeslizalaI_r-Mate =sobreunazone
determinada,significaque eldetectornoest_
detectandotierray que lazonaya est_ lipla.
NOTA: Las luces del detectorde tierranofuncio-
nan cuandose seleccionael ajustepare pisosdes-
cubiertosFLOOR.
LIMPIEZADE LA LENTE
Aunque la funoi6nde detecci6ndeUerrade la
Power-Mate®de Kenmoreest_ diseitadapara
brindar muchosailosdefundonamientointen'umpi-
do,el pasode tierraa tray,s del sistemade lasvias
deaire puedecauseruna escamaen lalente,
hadendoque se enctenday contin_ encendidoel
indicadorverde,sincambiarnuncaa rojo.Cuando
estasuceda,tieneque limpiarlalente.
PARALIMPIAR I_ASLENTES
1. Retire los tubos
oprimiendeel pedal
de liberadbn rdpida
y levantandolos
tubes.
Corte_'an_ersal
_,/ Anillo
m ll_ Elemenfo s
2. Comose ve enel diagramalosdosindicadores
de polvoestdncolocadosdentrode la articulaci6n
giratoria, apro.ximadamente3 ½ pulgadaso 90 mm
abajo,Observelasfleohas),ParaIlegara losele-
mentosdeldetector,useuncepillopegueSo,como
potejemplopera botellas.Cepillecadadetector
variasvecesparaeliminarlatierray el polvo.
NOTA:Si mirahacia dentindeldisposifivo giratorio
podr_verunanillo,Elelementodetector estajusta-
mentedebajode clicheenillo.
3.Vuelvaa instalar lostubosdespu_sdelimpiarlos
detectores,
CUIDADO
Noutilloenuncaaguanl soluo_nUmpiado-
ra parellmpiarlaslontes.El residuodel
aguaodei limpladorcausa_ que las
lentessecubrande tlermm_s_,
requlrlendollmplezaconmayorfreouenda.
16
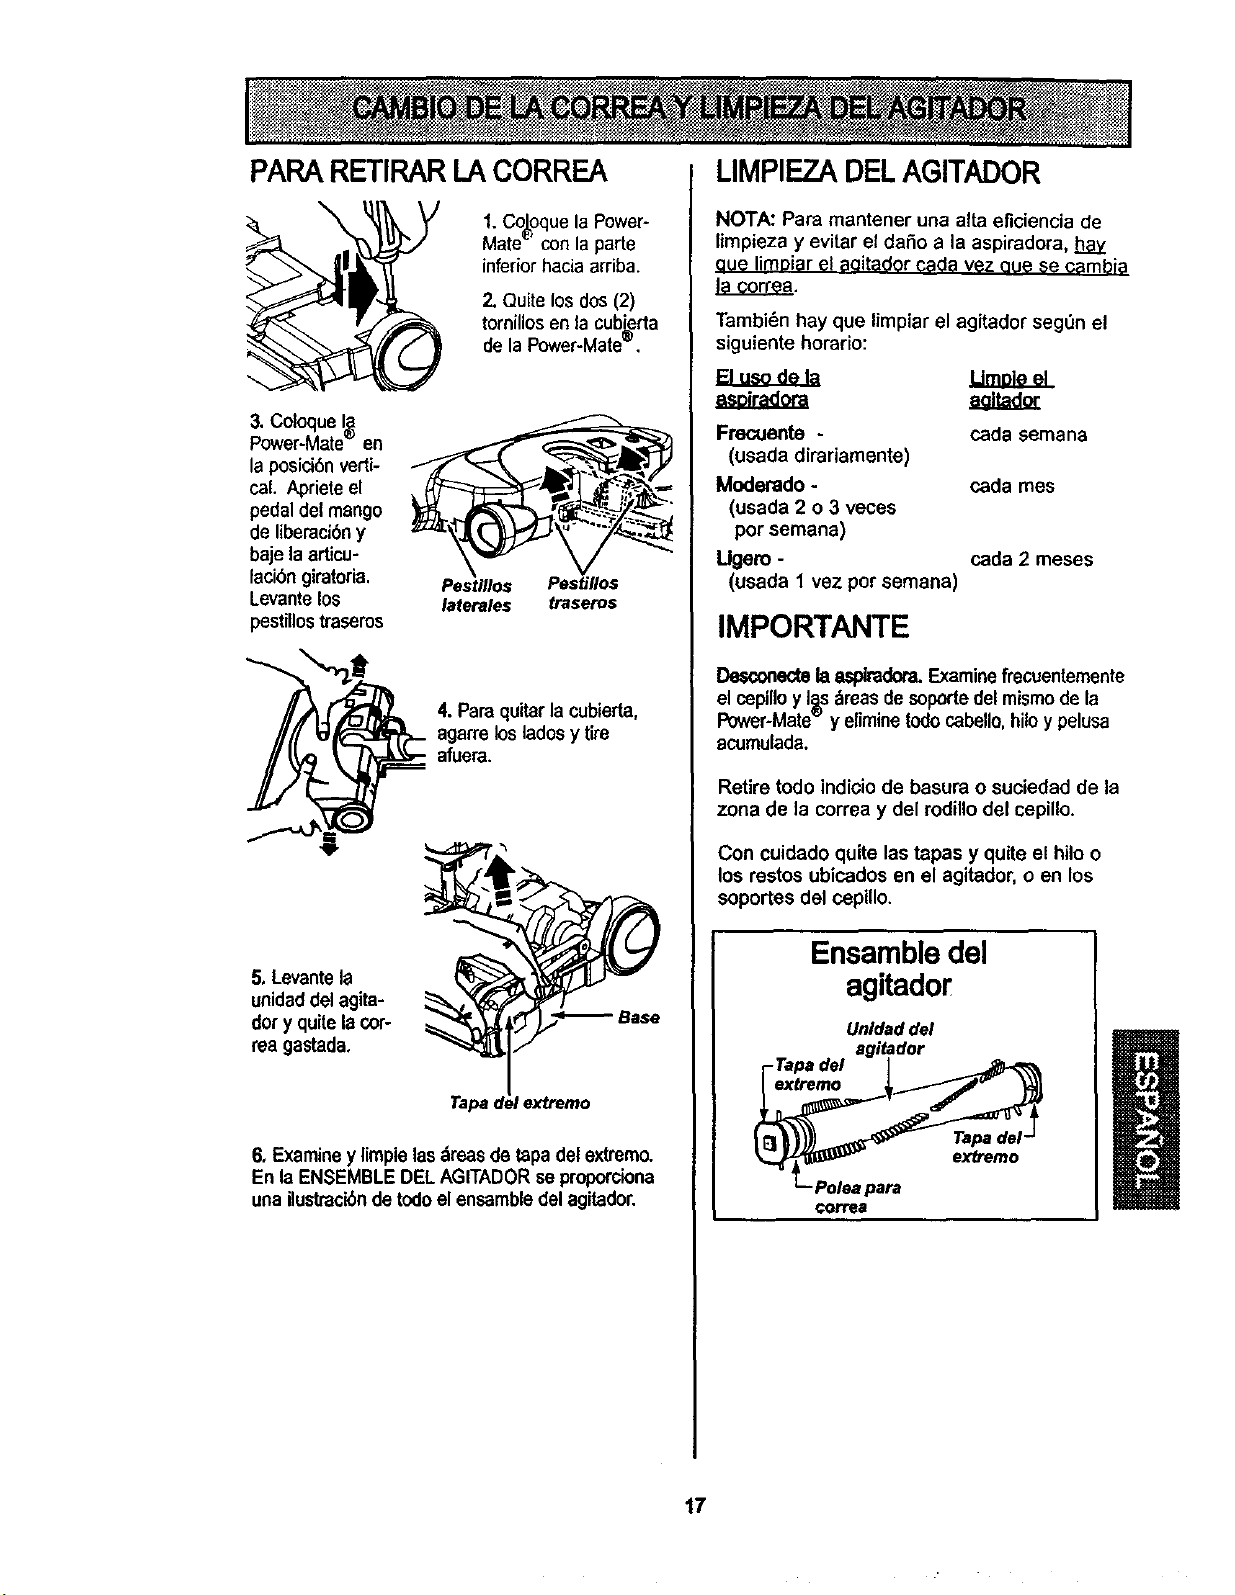
PARARETIRARLA CORREA
\
1. Co_oquela Power-
Mate" con la parle
inferiorhacia arriba.
2. Quite los dos (2)
tornillos en la cubi=erta
de la Power-Mate_',
3. Coloque I_
Power-Mate- en
la posici6n verti-
cal. Apriete el
pedaldel mango
de liberaei6ny
baje la articu-
lacibn giratoria, Pestlllos Pest#los
Levante los laterales traseros
pestillostraseros
4. Paraquitar la cubierta,
agarrelos ladesy tire
afuera.
5. Levante la
unidaddel agita-
dot y quite la cor-
rea gastada,
extretno
6, Examiney limpie los_reas de tapadel extremo.
En la ENSEMBLEDELAGITADORse proporciona
una ilustrack_nde todoelensambledel agitador.
LIMPIEZADELAGITADOR
NOTA: Para mantener una alta eficiencia de
limpieza y evitar el dafio a la aspiradora, hay
aue limDiarel aqitador coda vez oue $e eambia
la correa.
Tambi_n hay que limpiar el agitador seg_n el
siguiente horatio:
B u dela
a ir ora
Frecuente -
(usada dirariamente)
Moderado -
(usada 2 o 3 veces
por semana)
Ugero -
(usada 1 vez por semana)
cada semana
coda rues
coda 2 meses
IMPORTANTE
Desconectela aspiradom.Examinefrecuentemente
elcepilloyIss_reas desopodeGelmismode la
Power-Mate y eliminetodocabello,hiloy pelusa
acumulada,
Retire todo indloio de basura o suciedad de la
zona de la correa y del rodillo del cepillo.
Con cuidado quite las tapas y quite el hilo o
los testes ubicados en el agitador, o en los
soportes del cepillo.
Ensambledel
agitador
Unldad del
agitador
-Tapa del
extremo
Tapa del-
exb'emo
Polea para
€orrea
17
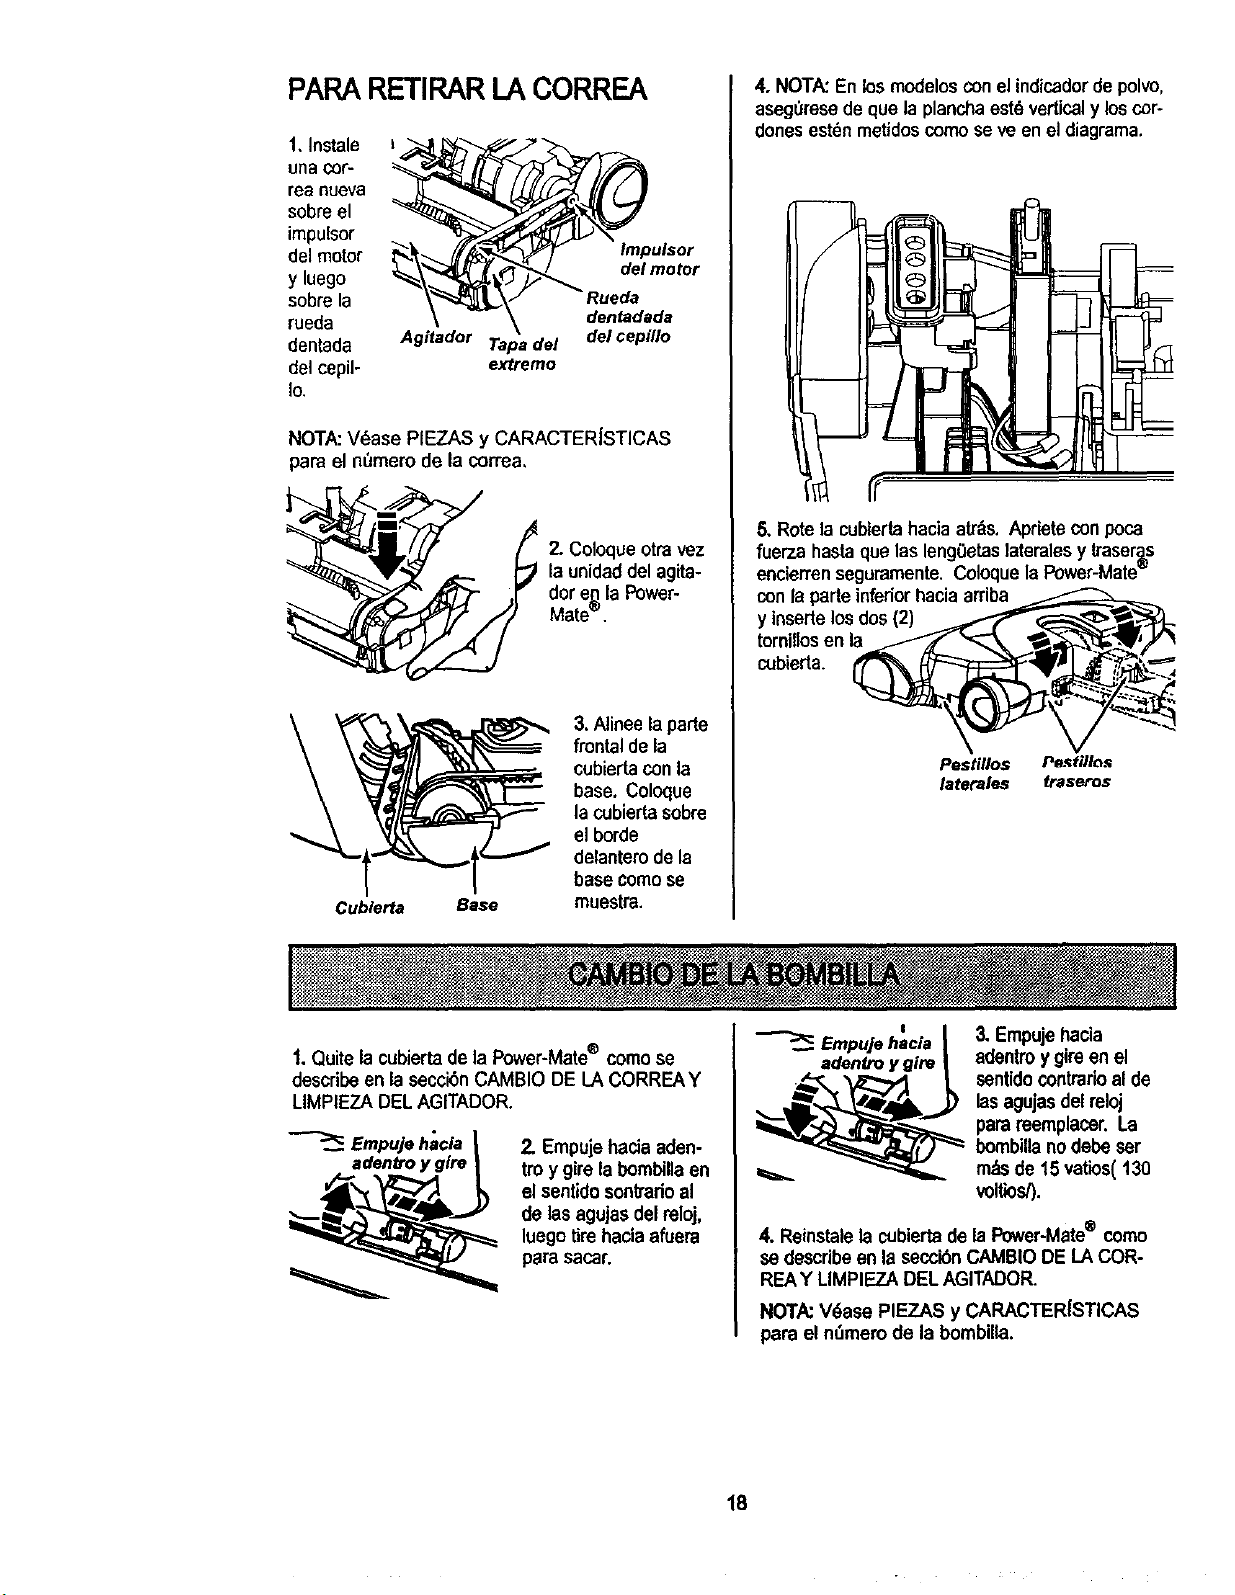
PAPARETIRARI_ACORREA
1. Instale
unaCOf'-
rea nueva
sobreel
impulsor
del motor
y luego
sobre la
rueda
dentada
del cepil-
Io
Agitador Tapa del
extremo
Impulsor
del motor
tueda
dentadada
del cepillo
NOTA:V_ase PIEZAS y CARACTERJSTICAS
pare et nOmerode la correa,
2. Coloque otra vez
la unidaddelagita-
dor e,_la Power-
Mate".
Cublerta Base
3. Alinee la parte
frontal de la
cubiertaconla
base. Coloque
la cubierta sobre
el borde
delantero de la
base comese
muestra.
4, NOTA:En losmedelosconel indicadordepolvo,
aseguresede que la planchaestd verticaly loscor-
donesestdnmetidoscomose ve enel diagrama.
5. Rotela cublertahaciaatr=_s.Aprietecon poca
fuarza hasta que las lengOetaslateralesy traser_s
encierrenseguramente. Coloquela Power-Mate_
conla parteinferior haciaarriba
y inserte los dos (2)
ternillos en la
cobierta.
Pestillos Pe._tflles
latetales frase:os
1.Quite la cubiertade ta Power-Mate® comose
describe enla secci_n CAMBIO DE LA CORREAY
LIMPIEZA DELAGITADOR.
Empujehacla |
adentroy glre |
2. Empujehaciaaden-
tm y girela bombillaen
el sentidosontradoal
de lasagujasdel reloj,
luegotirehaciaafuera
parasacar.
Empujeh=aclaI 3, Empujehacia
adenb'oygire | 8dentroy gireen el
__._ sentidocontrarioal de
lasagujasdel reloj
parareemplacer.La
bombillanodebe ser
_ m_sde 15 vatios(130
voltios/).
4. Reinstalelacubiertade laPower-Mate® come
se describeenla secck_nCAMBIODE LACOR-
REAY LIMPIEZADELAGITADOR.
NOTA:V_ase PIF_.ZASy CARACTERISTICAS
para el nSmerode la bombilta.
18
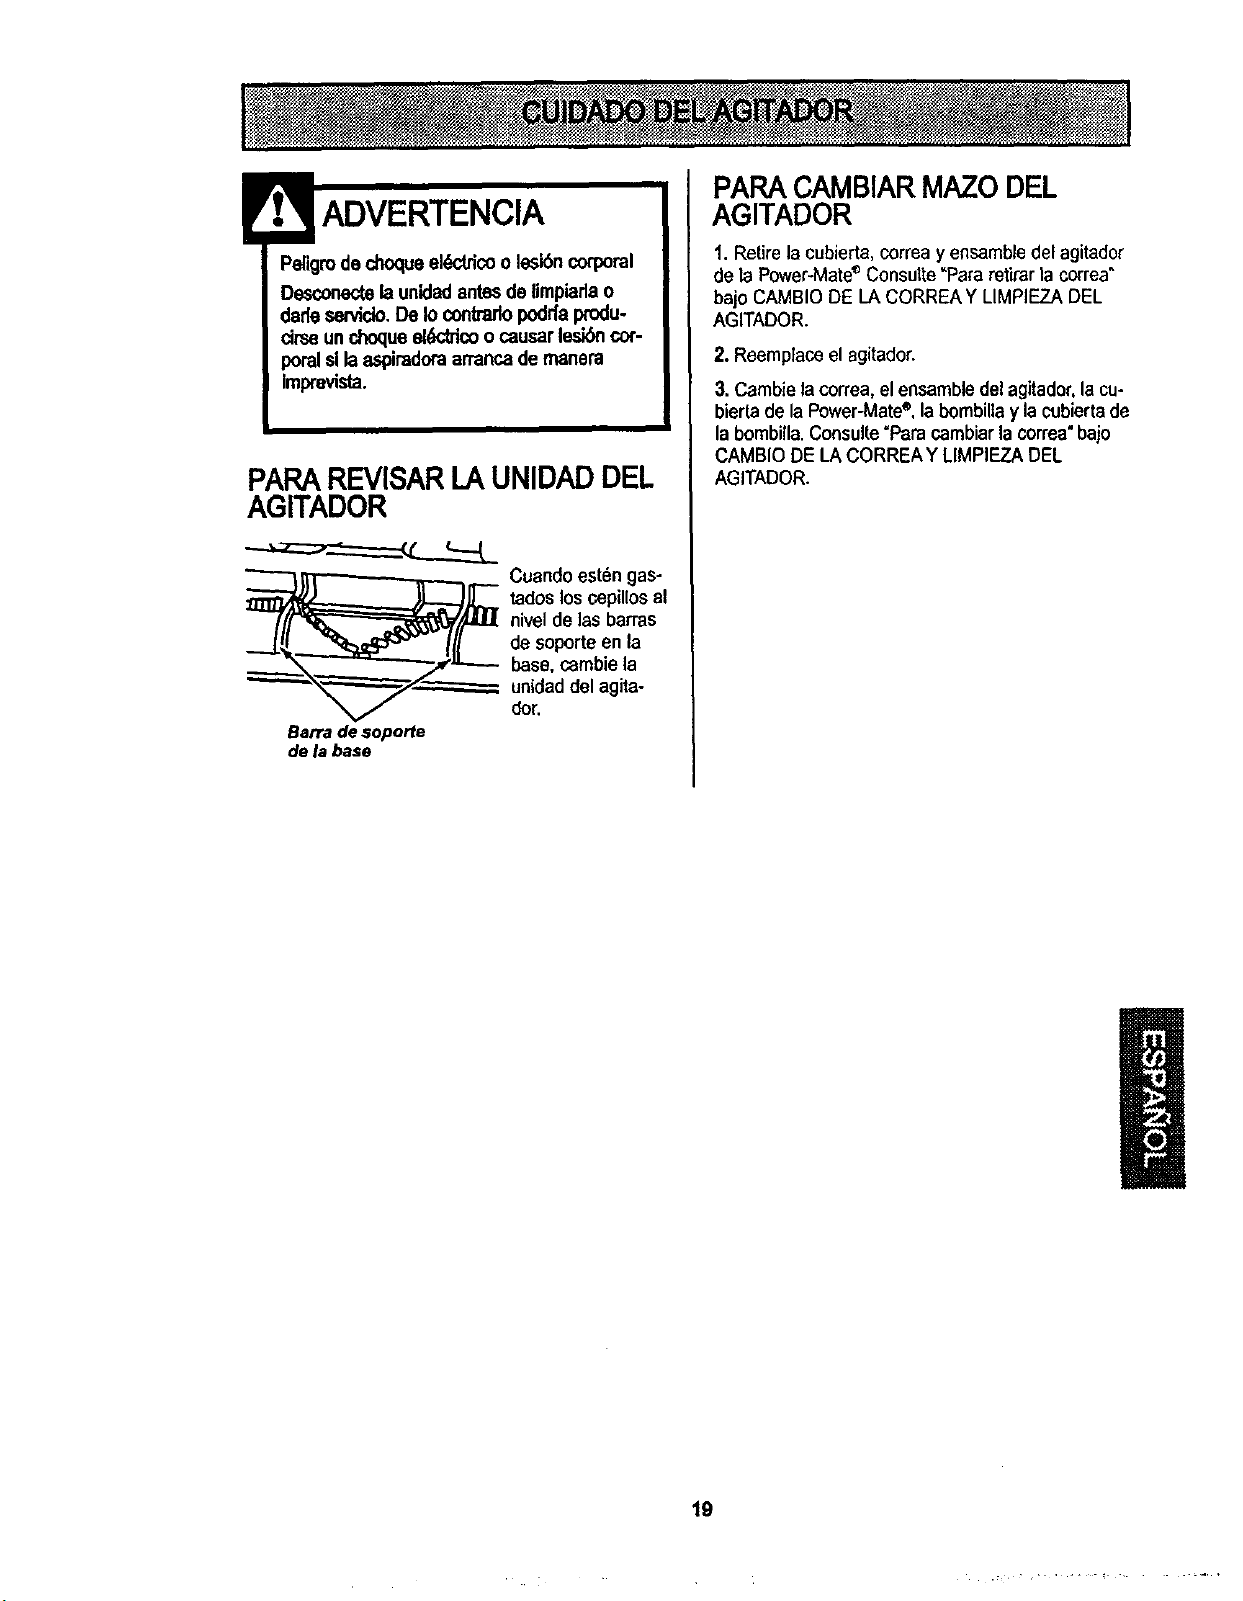
Peligroded'_oqueel_tricoole_n corporal
Desconectelaunidadantesdelimpiarlao
dadesen,icio,DeIocontrarlopoddaprodu-
cimeunchoqueeldddcoocausarlesibncor-
poralsllaaspimdoraarrancademanem
Imprevista.
PARAREVISARLAUNIDADDEL
AGITADOR
__ Cuandoest6ngas-
tadoslosc.epillosal
niveldelas barras
de soporteen la
base,cambiela
unidaddel agita-
dor,
Barradesoporte
de labase
PARACAMBIARMAZODEL
AGITADOR
1. Retire la cubierta, correa yensamble delagitador
de la Power-Mate®Consutle"Pafa retirarla correa"
bajo CAMBIO DIELA CORRIEAY LIMPIIEZADEL
AGITADOR.
2. Reemplaceel agitador.
3. Cambie lacorrea, elensambledel agitador,la cu-
bierta dela Power-Mate®,labambiltay la cubierta de
la bombilla.Consulte"Para cambiarla correa"bajo
CAMBIO DE LA CORRIEAYLIMPIEZA DIEL
AGITADOR.
19

9t_
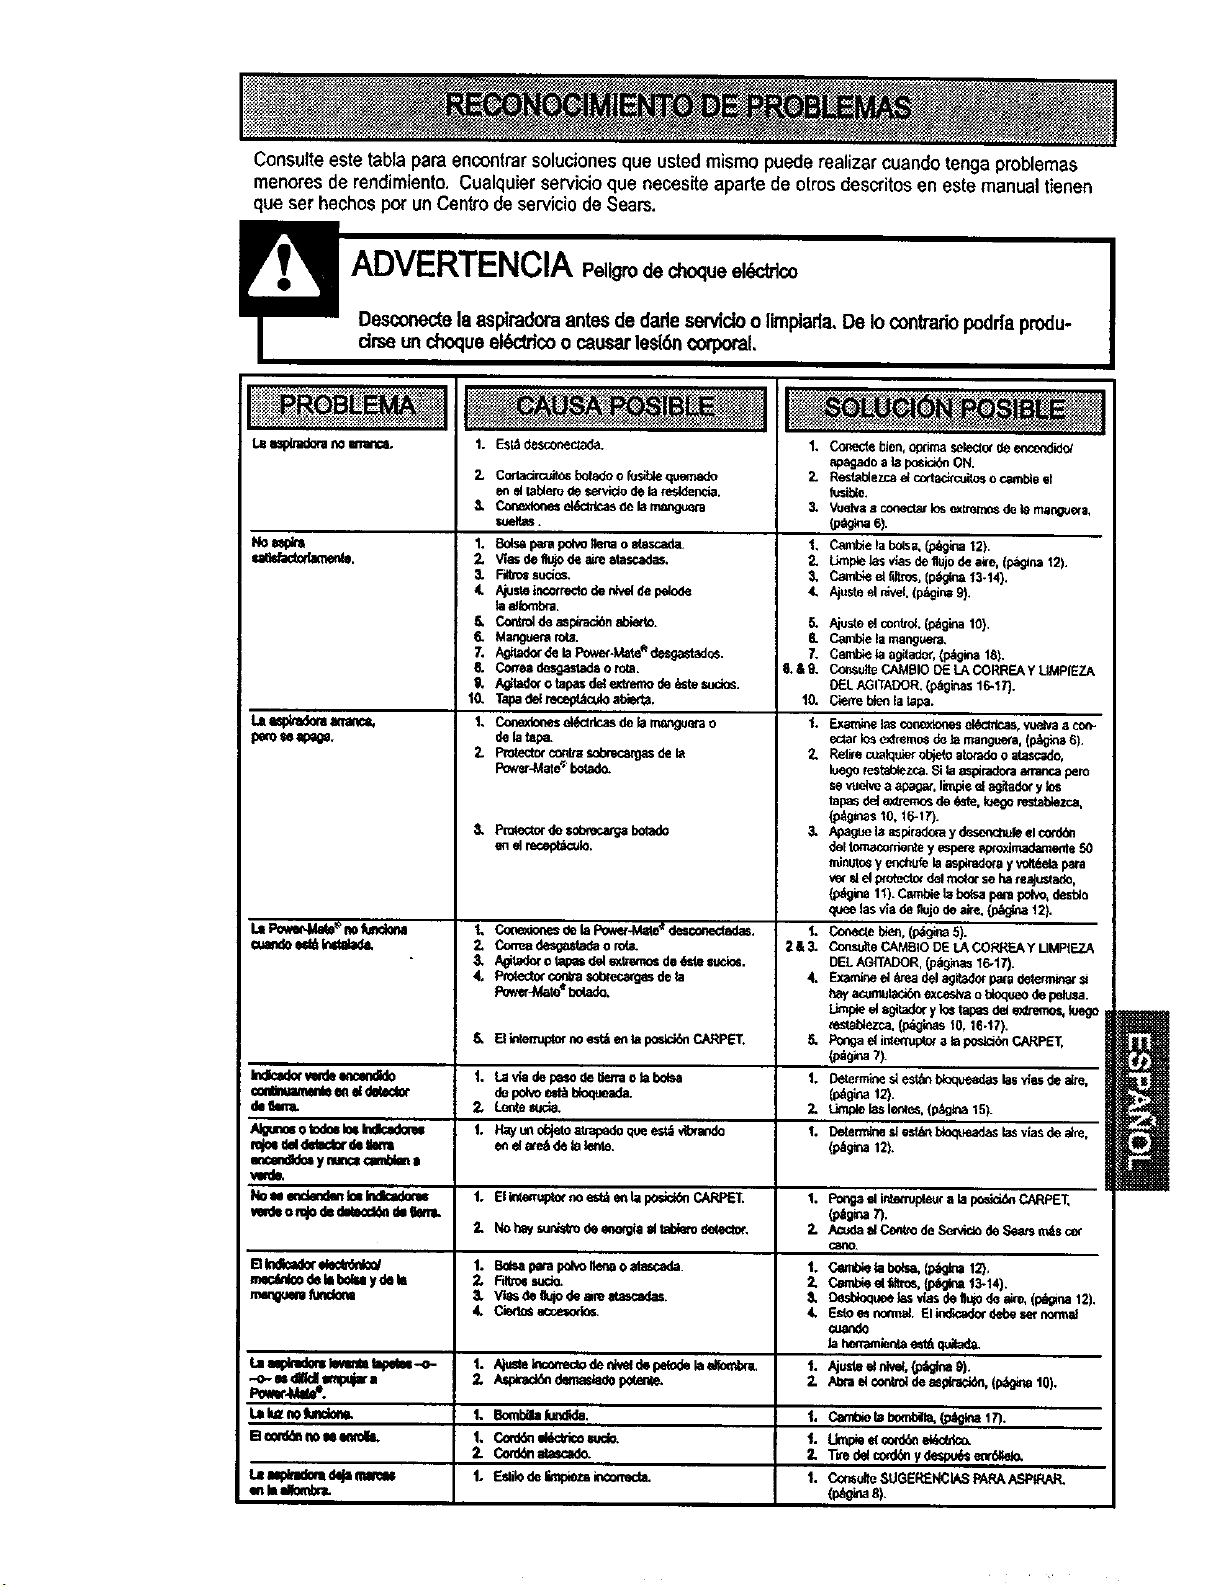
Consufteeste tablapara encontrarsoluciones que usted mismo puede realizar cuandotenga problemas
menores de rendimiento. Cualquier servicioque necesite aparte de otros descritosen este manual tienen
que ear hechos pot un Centrode serviciode Sears.
LB_ n0erra'_c0.
sa_.
peros4a_.
1. Esl_,des_on_a_a.
2. CortacircuitosbotedoofusiUequemado 2.
eneita_omdese_tldodelaresldenda.
3. Co_e_lon_ek_dcasOelanusng_era 3.
r,ueltus.
I. Balsaparapolvoflenaoelascada, 1.
2. Wasder,ujodeaiteelascadas.
3. F_tro_sud_s. 3.
4. Ajustetncorredodenk_ depdode 4.
laa_rnbra.
Cont_d_asplraci_elY,er_. 5.
Manguemro_. &
A_ _elaPower-Mate_dcsgastad_. 7.
Co_ea desgastad_o _a. 6.&9.
i_ P_'m fur_
Indl=m_ m N
W o_el _eclor
N_ otodoeI_ Indfc_d_'u
_ ynmcs_mS_na
Nou e_e_ Ic_Indic_kx_
medeomJodedW_ d_tkml.
E1Indk_kwelecS_,_/
rr,ecdnl_deImbelu ydei_
rmmouemAJnCkm
/_tadc¢otapa_dele._emode_stes_io_.
Tapadelrecep_culoel_r ta.
Conexior_esel_ctrlcasdeb rru_guer_o
dela_.
P_wer4,4at_bot¢_o.
5.
6.
7.
6.
6.
I0.
6. Pn:_e_torde_g_ bolado
1. C_e_o_es _ela Pow_-M_e'_desconec_adas.
_, Congadesgastadao ro_
3. Agitad_ro tapa=dele_dmmosde6elesucios.
4, P-_e_orcor,va sot_recar_zsdela
Power_te'%ola_.
6.
1. LavladeI_o detletraob Ix_sa
depolo e_ _da.
2. Le_tesucla,
El_erru_or noes_ entapor_r,,i_CARPET.
t. _ay_ o_jetouu-_o _,_ees_,,_a,_
e_ela_e_delalente.
I. ElintermpZor_ e_l e_ la ix_,d_ CARPET.
2. Nohayr,u,_o de=,,_gia eltabl_o delector.
1. B_sapapalx_o Iler.ao elucada
2, Ftt¢0_sudo.
3. ViasdeIk_odeam atascadas+
4. Cie_s acoe=odos.
Lalu=nolumlo_n.
1. BombaaJ,
1. C,ord_d_tti_ wclo.
t. _!o deF,_q_z__._t_ _acm_ m
_nluel_,r,b-a.
i
._m_gadoab posi_ ON.
Resfab_e;mae{cottac_cuitosocambieel
fusible.
Vue_va_ coneda_losex_ de_ama_guera,
_ 6).
Cpxnl_elab_s, (p_g_3a12}.
tJ_p_el_sv_asde'nujodea_'e,(_ns 12).
Cam_ el51tins,(p_a '_3-_4).
Ajusf_elr_vel.{p,_ina9).
1o.
1.
2.
3,
t.
2&3.
4.
5.
t.
2.
1.
1.
2.
1.
Z
&
4,
t.
2.
t.
1`
1.
Ajuste€ control(p_gm lO),
Camblelamangus_.
Cambietaagilado_,(p_g_ 18).
Co_sulloCAMI]IODELACORREAY UMPIEZA
OELAGITADOR.(p_ginas16-17).
C_re t_o_la tapa.
_xatn_elas_onex_ _, vu_a acor_.
eclatk_e)dremos_ela mangue_a,I_gina 6)+
Relkecuelquierob}_oeloradooatasc_do.
luegoresta_ez_a.Si laaspi,-adoraatmncapero
sevuekeaapaga_,llmpie_lagitado_ylos
tapasdeiextremesde_s'te.toegorestalYezca,
(p_gms_0,16-_;').
Apaguola _spiradorayd_r_hufe elcotd_
del_nte yespereap_oximad=,_le50
mlnmosyenchufelaasp_rad_ayvolt_e!apara
v_r_ el protectorde!m_t_xseha_eajusta_o,
1t). P..a_ I_Ix_a parapo_, desblo
qeeelasvladeflujodealre._ 12).
Co_e CA,'ABIODELACORREAYLIMPtEZA
DELAGfTADOR,(p=igi_as16-17).
Examineel _readelagitadorpapadet_ =
hayacumulad/_exceslvaot_oqueodepelusa.
Li_pled sgi_adoryI_ tapasdele_emos,ioego
cestablez_,(p_as 10,16-I?).
Pongaeli,_nup_ a_apos_ CARPL_,
Determined est_ bloqueadaslasv_asde_e,
L_ _asler_es,(p_k_a15).
Detem_neslesk_ btoqueadaslasvlasdealre,
(_9_na12).
F_ elinte_pleuralaposlci&_CARPET,
(p_g_a7).
.'_ elCe_ doSe_ de,_ n_sce_
CemU,e lat_P=,a,(p_na t2),
Cembieelfea-os,(l_g_a 13-14).
Eelo_ nom_el.Elin_r_cado¢debesetn_i1_
cua_de
lahe,_a,_rdaest_quaa_
Umpieel _oN,_ el_dco.
Tvedelco_d_ydesp_ eord_elo.
C<x_utteSUGEREt_IASPAPAAS_IRAR.
1
(p_nas).
_ili:i!iiiiiiiii:ii_iii_iiiiiiiiiiiiiiiii_:_
Your Home
For repair - in your home - of all major brand appliances,
lawn and garden equipment, or heating and cooling systems,
no matter who made it, no matter who sold it!
For the replacement parts, accessories and
owner's manuals that you need to do-it-yourself.
For Sears professional installation of home appliances
and items like garage door openers and water heaters.
1-800-4-MY-HOME _ Anytime, day or night
(1-800-469-4663) (U.S.A. and Canada)
www.sears.com www.sears.ca
Our Home
For repair of carry-in products like vacuums, lawn equipment,
and electronics, call or go on-line for the nearest
Sears Parts and Repair Center.
1-800-488-1222 Anytime, day or night (U.S.A. only)
www.sears.com
To purchase a protectionagreement on a product servicedby Sears:
1-800-827-6655 (u.sA) 1-800-361-6665 (Canada)
Para pedir sewicio de reparac'_Sn
adomicilio, y paraordenar piezas:
1-888-SU-HOGAR sM
Au Canada pour service en franqais:
t-800.LE-FOYER Mc
(1-8(x3-533-6937)
www.sears.ca
::_:::_:::::;:
_:_÷x+:+:
©Sear__md Co.
® Registered Trademark / _ Trademark / SMService Mark ofSeam, Roebuck and Co;
® Mama Registrada/'nu Mama de Fdbrica / _ Mama de Servido de Seam, Roebuck and Co.
_c Marque de commerce / uoMarque ddposde de Sears, Roebuck and Co.
_::::::::::