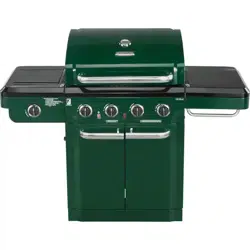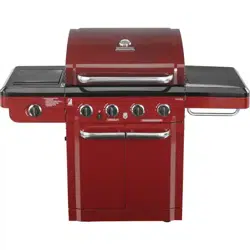
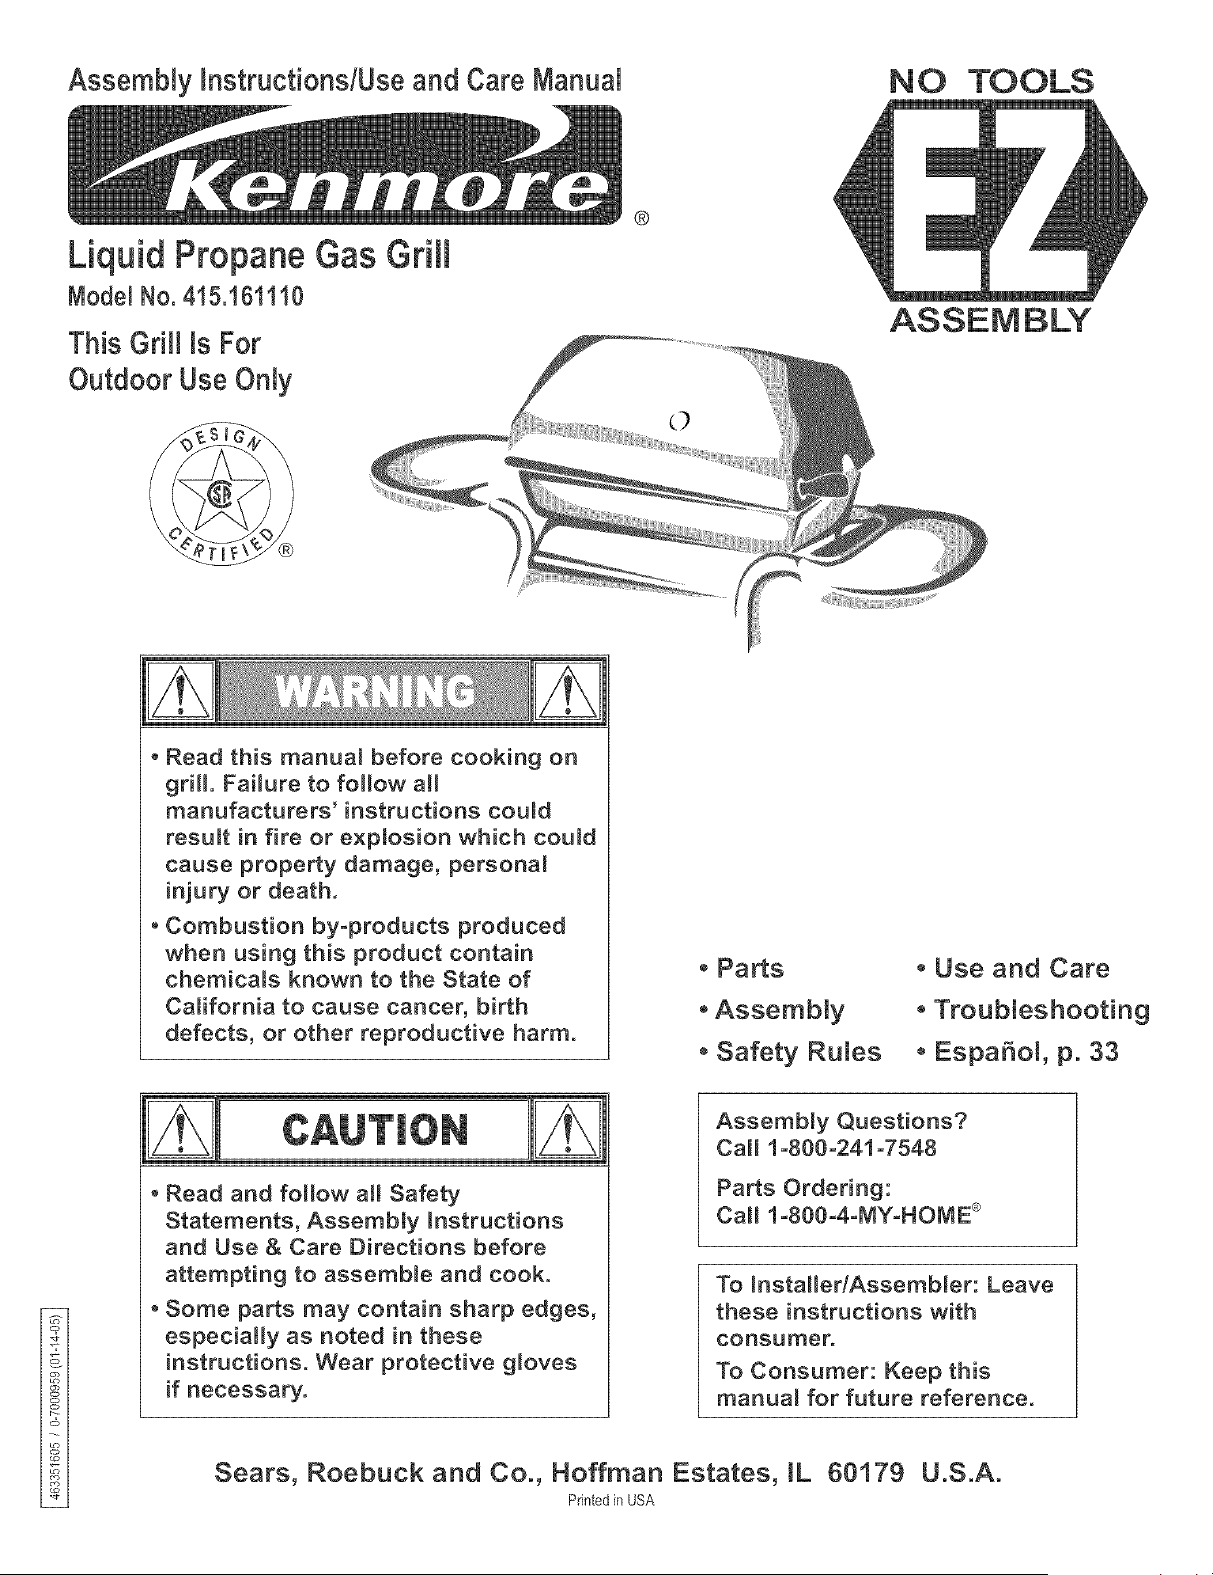
Assembly instructi0ns/Use and Care Manual NO
Liquid PropaneGasGrill
Model No. 415.t61110
This Grill is For
Outdoor Use Only
®
ASSEMBLY
* Read this manua_ before cooking on
gril, FaiJure to foJJow alJ
manufacturers' instructions could
resumt in fire or expmosion which could
cause property damage, persona_
injury or death,
o Combustion by-products produced
when using this product contain
chemicams known to the State of
California to cause cancer, birth
defects, or other reproductive harm,
CAUTION
• Read and follow alt Safety
Statements, Assembly hstructions
and Use & Care Directions before
attempting to assemble and cook,
• Some parts may contain sharp edges,
especially as noted in these
instructions, Wear protective g_oves
if necessary,
o PaRs
oAssembly
, Safety Rules
. Use and Care
* Troubleshooting
, EspaSoL p. 33
Assembmy Questions?
Cal_ i-800-24i-7548
Parts Ordering:
Call 1-800-4-MY-HOME ®
To mnstaHedAssembmer: Leave
these instructions with
consumer,
To Consumer: Keep this
manuam for future reference,
Sears, Roebuck and Co., Hoffman Estates, JL 60179 U.S.A.
P_intedin USA
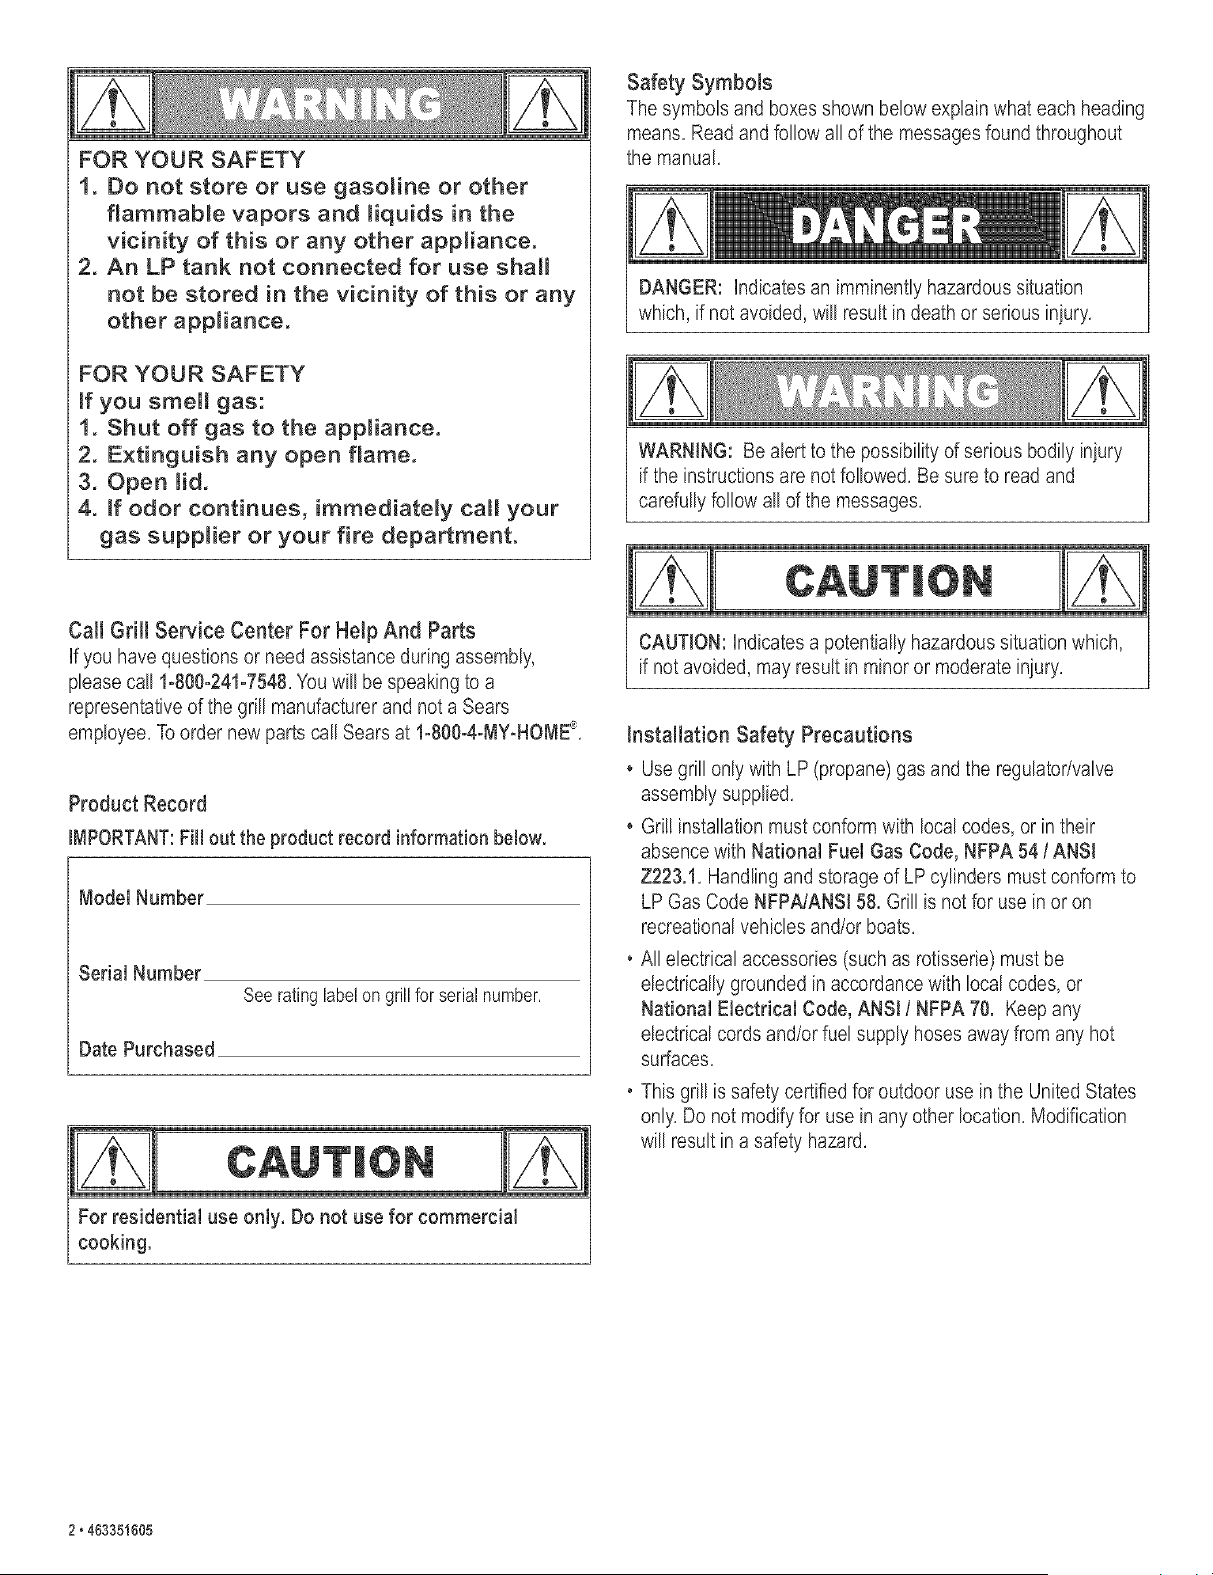
FOR YOUR SAFETY
1. Do not store or use gasoline or other
flammable vapors and liquids in the
vicinity of this or any other appliance.
2. An LP tank not connected for use shah
not be stored in the vicinity of this or any
other app(iance.
FOR YOUR SAFETY
[f you smeil gas:
1. Shut off gas to the appliance.
2. Extinguish any open flame.
3. Open lid.
4. if odor continues, immediately call your
gas supp(ier or your fire department.
Call Grill Service Center For Help And Parts
If you have questions or need assistance during assembly,
please ca!) 1o800o241o7548,Youwill be speaking to a
representative of the grill manufacturer and not a Sears
employee, To order new parts call Sears at Io800o4oMyoNOME®,
Product Record
iMPORTANT:Fillout theproductrecordinformationbelow.
Model Number
Serial Number
Date Purchased
See ratinglabelongrillfor serialnumber,
CAUT(ON
For residential use only, Do not use for commercial
cooking.
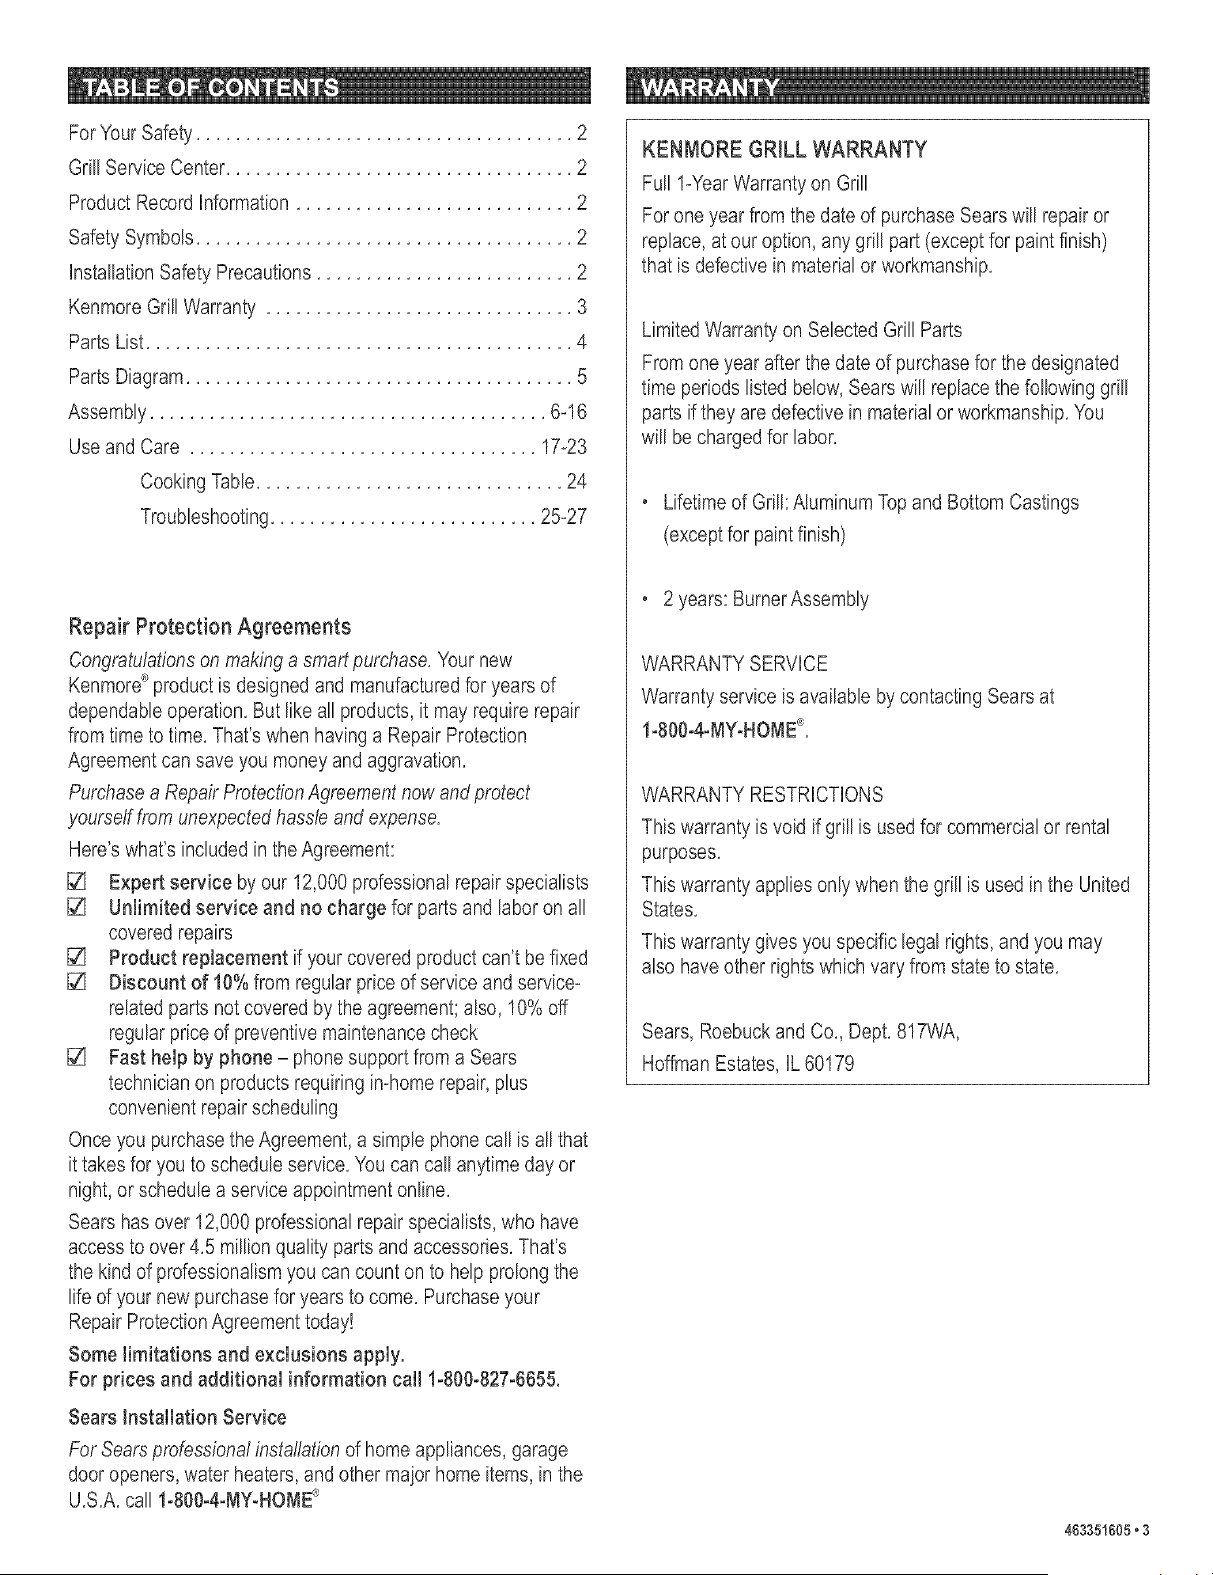
Safety Symbols
The symbols and boxes shown below explain what each heading
means, Read and follow all of the messages found throughout
the manual,
DANGER: Indicates an imminently hazardous situation
which, if not avoided, will result in death or serious iniury,
WARN(NG: Be alert to the possibility of serious bodily iniury
if the instructions are not followed, Be sure to read and
carefully follow all of the messages,
(zL( c, roD.
CAUTION: Indicates a potentially hazardous situation which,
if not avoided, may result in minor or moderate iniury,
Installation Safety Precautions
• Usegrill only with LP (propane) gas and the regulator/valve
assembly supplied,
Gril! insta)lation must conform with Ioca)codes, or in their
absence with National Fuel Gas Code, NFPA 54 / ANSI
Z223.1, Handling and storage of LP cylinders must conform to
LP Gas Code NFPNANS) 58. Gri)lis not for use in or on
recreat)onal vehicles and/or boats,
All e)ectrical accessories (such as rotisserie) must be
electrically grounded in accordance with local codes, or
National Electrical Code, ANSI / NFPA 70. Keep any
electrica) cords and/or fuel supply hoses away from any hot
surfaces,
, This grill is safety certified for outdoor use in the United States
only, Do not modify for use in any other Iocat)on, Modification
will result in a safety hazard,
2,463351605
Repair Protection Agreements
Congratulations on making a sma,,tpurc,Sase,Your new
Kenmore®product is designed and manufactured for years of
dependable operation. But like all products, it may require repair
from time to time. That's when having a Repair Protection
Agreement can save you money and aggravation.
Purc,_asea Repair Protection Agreement now and protect
yourself from unexpected hassle and expense,
Here's what's included in the Agreement:
[] Expert service by our 12,000 professional repair specialists
[] UnJimited service and no charge for parts and labor on all
covered repairs
[] Product repJacement if your covered product can't be fixed
[] Discount of 10%from regular price of service and service*
related parts not covered by the agreement; also, 10% off
regular price of preventive maintenance check
[] Fast help by phone- phone support from a Sears
technician on products requiring in-home repair, plus
convenient repair scheduling
Once you purchase the Agreement, a simple phone call is all that
it takes for you to schedule service. You can call anytime day or
night, or schedule a service appointment online.
Sears has over 12,000 professional repair specialists, who have
access to over 4.5 million quality parts and accessories. That's
the kind of professionalism you can count on to help prolong the
life of your new purchase for years to come. Purchase your
Repair Protection Agreement today!
Some limitations and exclusions apply.
For prices and additional information call 1o800o827o6655.
Sears Installation Service
For Sears professional installation of home appliances, garage
door openers, water heaters, and other major home items, in the
U.S.A. call 1-800-4-MY-HOME®
KENMORE GRILL WARRANTY
Full 1-YearWarranty on Grill
For one year from the date of purchase Sears will repair or
replace, at our option, any grill part (except for paint finish)
that is defective in material or workmanship.
Limited Warranty on Selected Grill Parts
From one year after the date of purchase for the designated
time periods listed below, Sears will replace the following grill
parts if they are defective in material or workmanship. You
will be charged for labor.
. Lifetime of Grill: Aluminum Top and Bottom Castings
(except for paint finish)
. 2 years: BurnerAssembly
WARRANTY SERVICE
Warranty service is available by contacting Sears at
1-800-4-MY-HOME®.
WARRANTY RESTRiCTiONS
This warranty is void if grill is used for commercial or rental
purposes,
This warranty applies only when the grill is used in the United
States.
This warranty gives you specific lega! rights, and you may
also have other rights which vary from state to state.
Sears, Roebuck and Co., Dept. 817WA,
Hoffman Estates, IL 60179
463351605.3
Key_
1
2
3
4
5
6
7
8
9
10
11
12
13
14
15
16
17
18
19
2O
21
22
23
24
2
1
25
2
3
1
1
2
1
2
4
1
I
5
2
2
3
4
1
1
1
1
Description Part #
LegAssembly................... 7000865
BottomShelf.................... 7000506
#10-16xl/2' Self-TapScrew ........ 7000737STD611005
LegExtender.................... 7000320
"U"Nut 1/4-20................... 7000185
1/4-20x6" TankThumbscrew....... 7000355
1/4-20FlangedHexNut ........... 7000394
#10-24xl/2" WasherHeadScrew.... 7000829
Axle Rod ....................... 7000265
Wheel ......................... 7000262
Rail ........................... 7000652
HeatShield..................... 7000388
FrontPanel..................... 7000897
PushFastener................... 4080112
GrillBottom..................... 7000846
Carrj-OverTube................. 7000278
Pal Nut ........................ 7000132
CastingBumper................. 7000184
Burner......................... 7000083
#10-I" Self-TapScrew ............ 4080716
Electrodew/WingNut............. 7000378
ControlPanel ................... 7000863
Valve/Hose/RegulatorAssembly..... 7000335
IgnitorModule................... 7000160
25
26
27
28
29
30
31
32
33
34
35
36
37
38
39
40
41
1
2
1
1
1
1
2
3
1
3
3
1
I
2
1
Description Part #
IgnitorWire ..................... 7000893
Shelves........................ 7000291
TopCasting..................... 7000654
BezelTemperatureGauge......... 4157169
TemperatureGaugew/WingNut..... 4157171
LogoPlateAssembly ............. 4157167
ShoulderBolt ................... 7000186
ControlKnob.................... 7000312
CondimentBasket................ 7000242
VaporizerTents.................. 7000044
CookingGrid,8"x15".............. 7000027
WarmingRack .................. 7000180
Handle......................... 7000199
#10-24 WingNut................. 4080063STD541610
IgnitorButtonw/Battery............ 7000162
GreaseTray .................... 7000042
GreasePan..................... 7000046
4_463351605
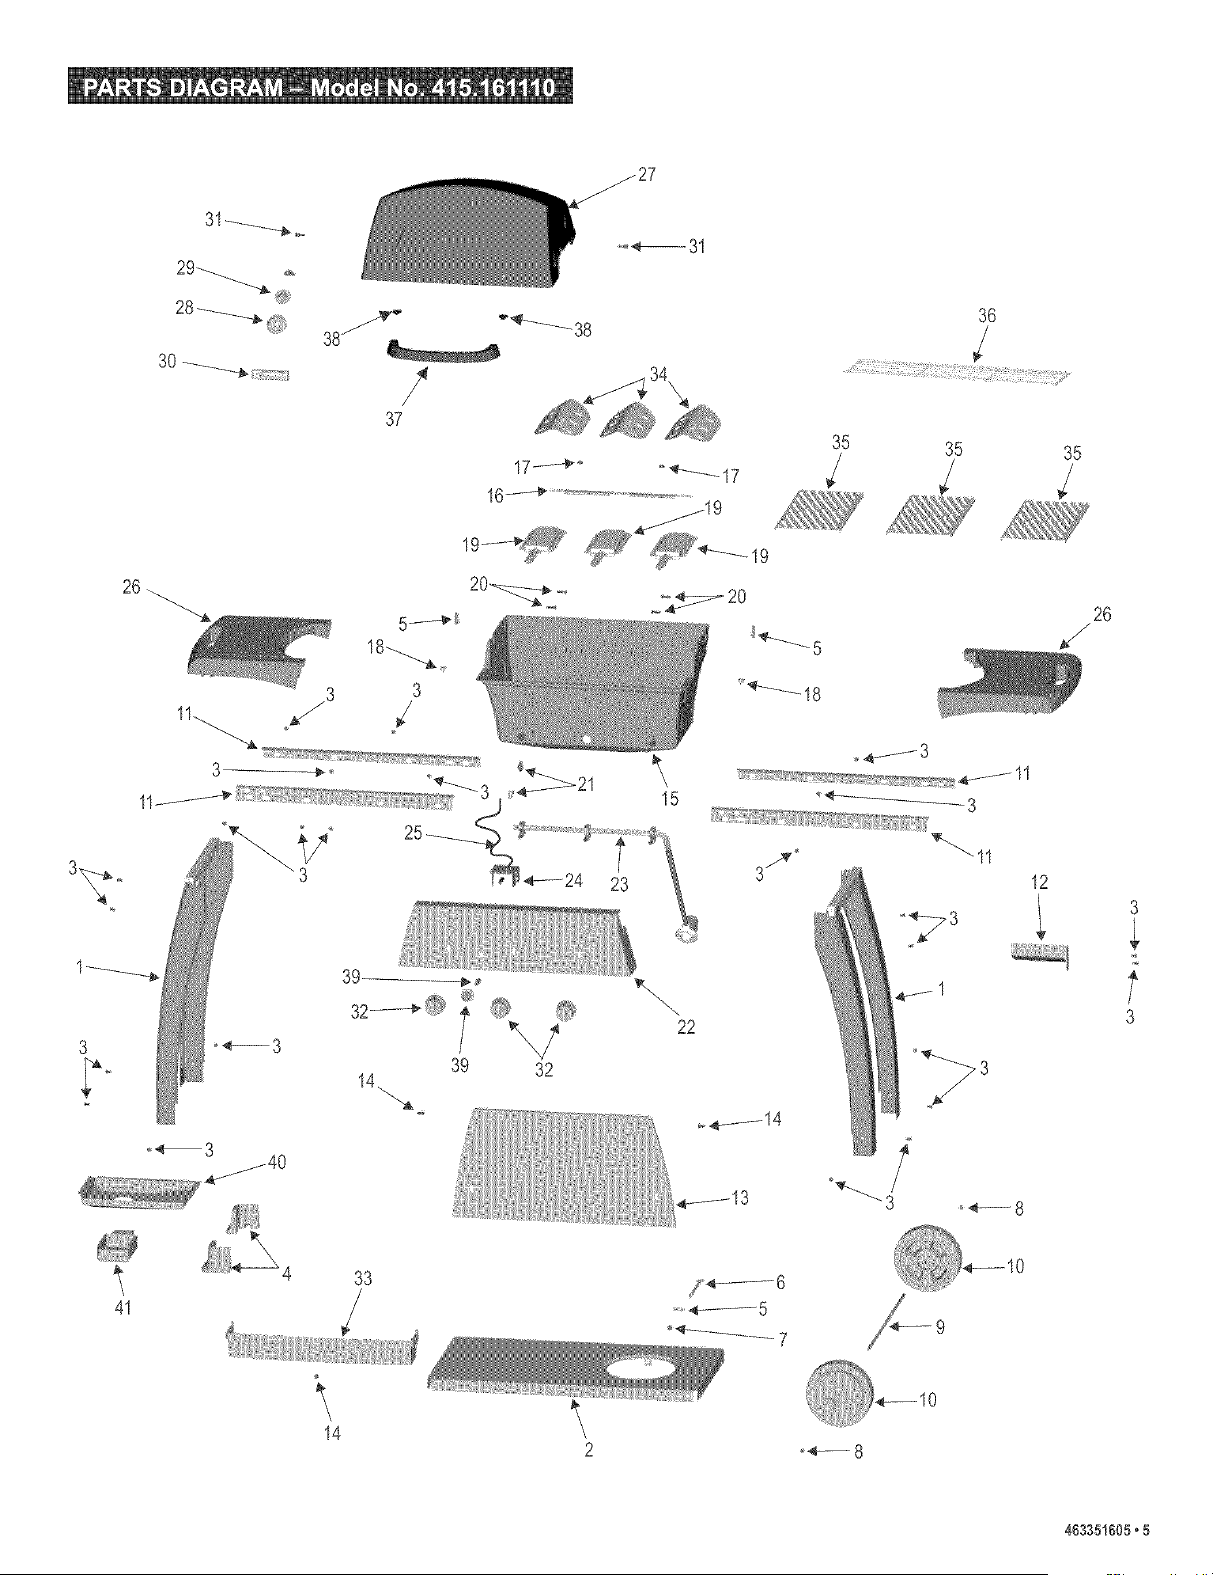
/27
_ <-----o-31
28_
36
30 -__
3 3
17_-_ °_17
19 _ _19
20_. - 4-77" 20
_--__- 18
35
4-.fJ 3
35
35
26
,/
3X---_o
3
o_3
22
3/,v _
12
3
t
41
........_ ..... 5
14
o_-_ 8
463351605_5
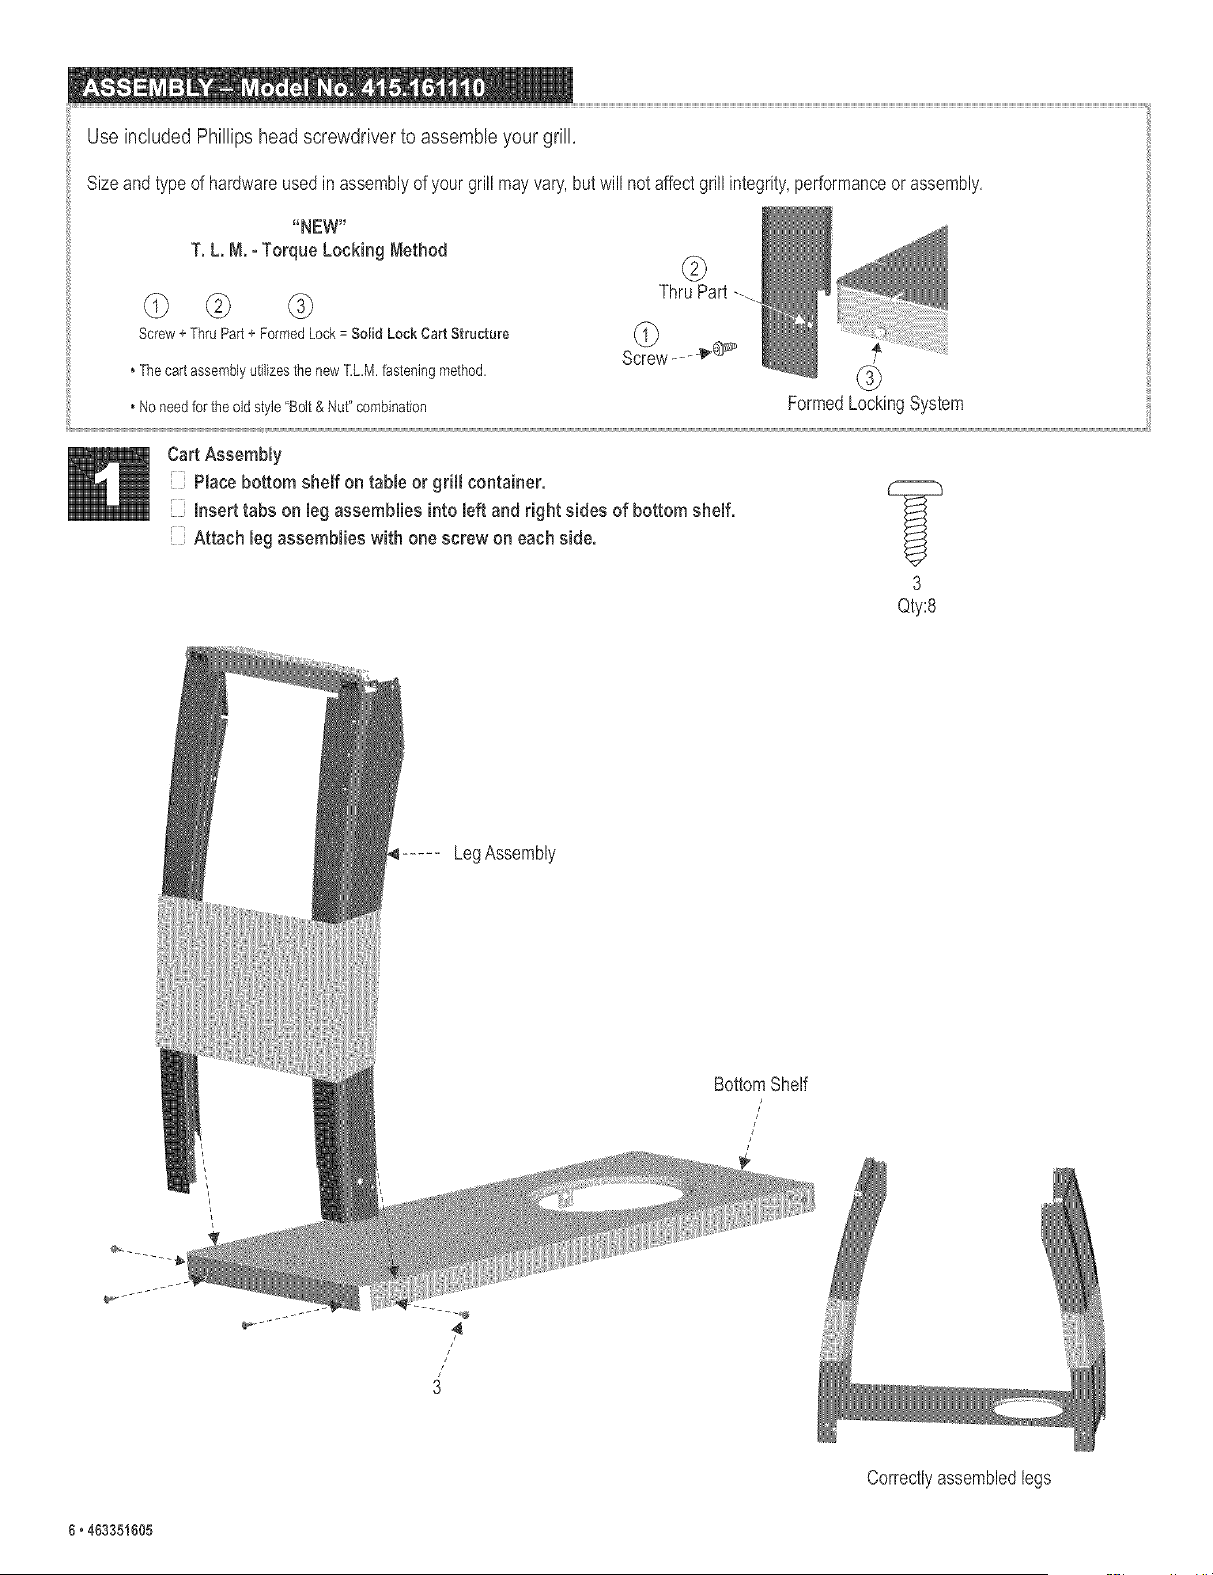
Use included Phillips head screwdriver to assemble your grill,
Sizeandtypeof hardwareusedin assemblyof your grillmayvary,butwill not affectgrillintegrity,performanceor assembly.
"NEW"
T. L M.- Torque LockingMethod
© @
Screw+ ThruPart + FormedLock= Solid Lock Cart Structure
©
ThruPart
, The cart assemblyutilizesthe new T.L.M.fasteningmethod.
, No needfor the old style"Bolt& Nut" combination
FormedLockingSystem
Cart Assembly
Placebottom shelf on table or grill container.
insert tabs on leg assembliesinto [eft and right sides of bottom shelf.
Attach leg assemblies with one screw on each side.
3
Qty:8
LegAssembly
BottomShelf
J
/
/
Correctlyassembledlegs
6_463351605
i
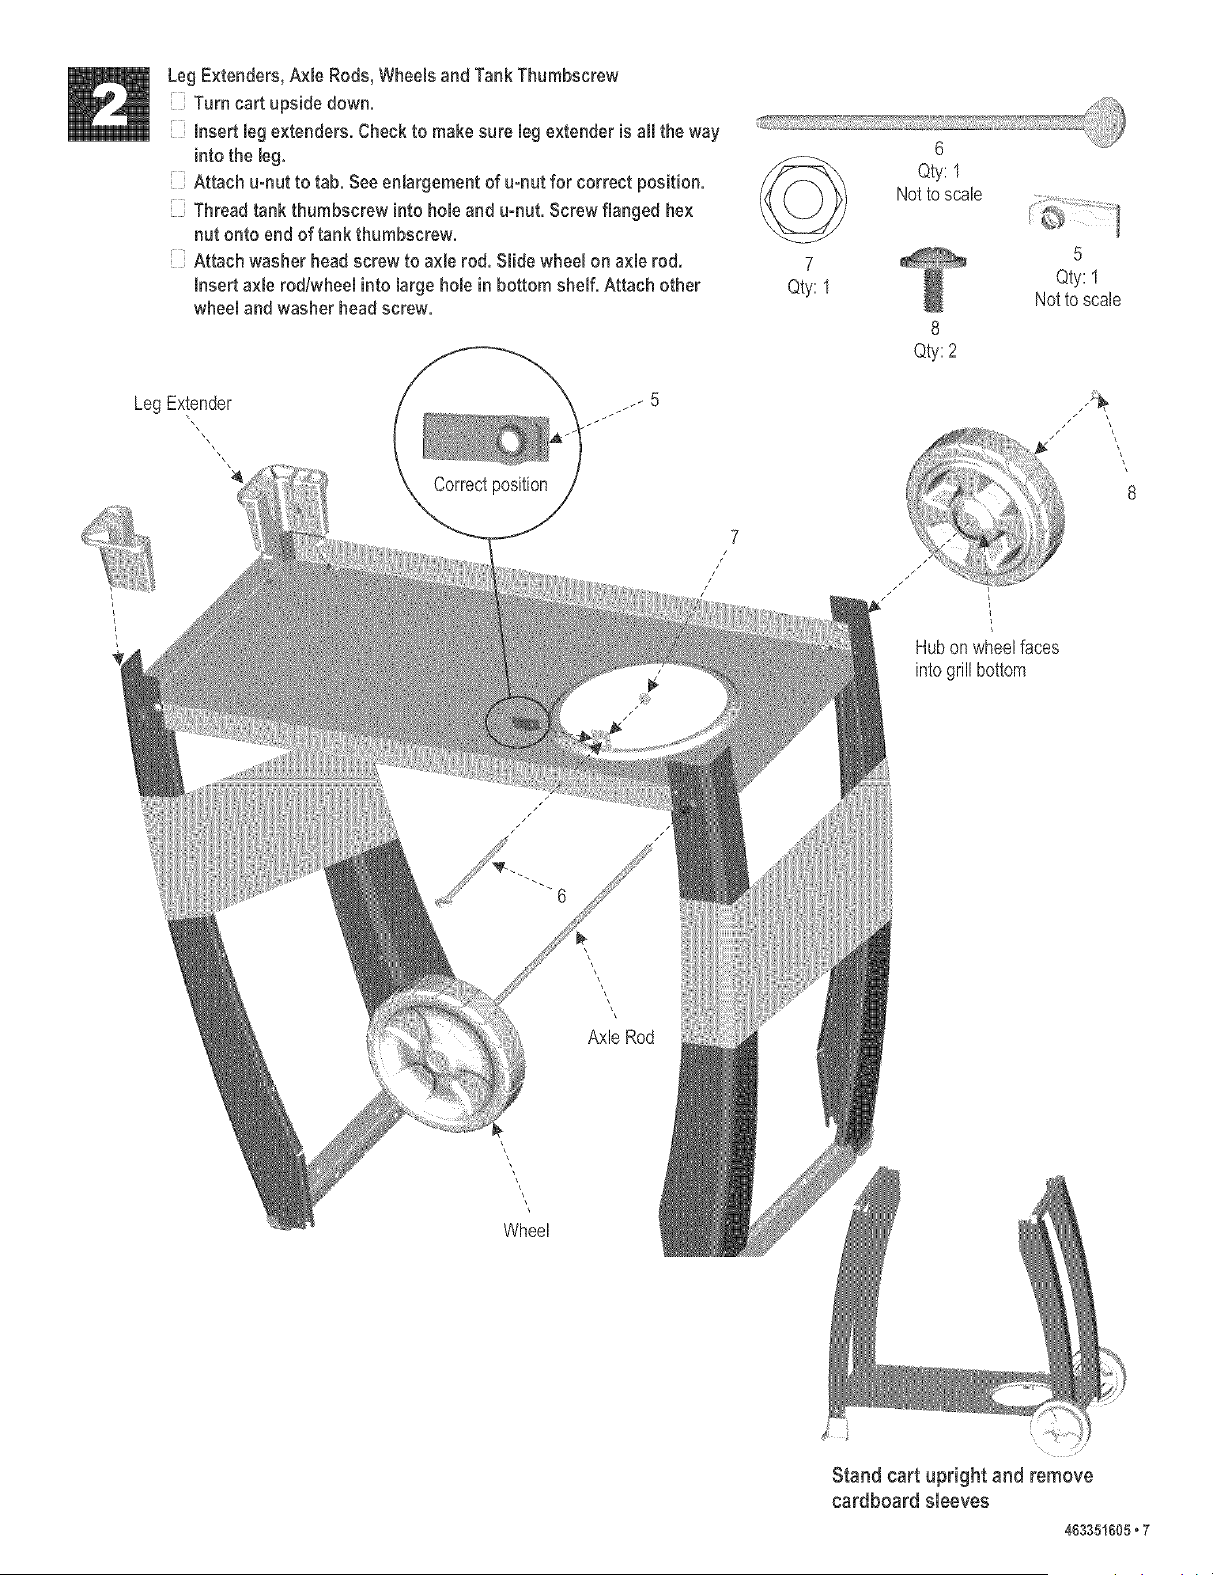
LegExtenders,Axb Rods, Wheelsand TankThumbscrew
Turn cart upside down.
insert leg extenders. Checkto make sure bg extender is all the way
into the bg. f---...
Attach u-nut to tab. Seeenlargementof u-nut for correct position.
Threadtank thumbscrew into hob and u-nut Screw flanged hex
nut onto endof tank thumbscrew.
Attach washer headscrew to axle rod. Slidewheel on axle rod. 7
Insert axle rodtwheelinto large hole in bottom shelf. Attach other Qty: 1
wheel andwasher headscrew.
LegExtender
Correctposition
7
/
/
\\
Axle Rod
\
\
Wheel
6
Qty: 1
Notto scale
5
Qty: 1
Notto scale
Qty: 2
Hubon wheelfaces
into grillbottom
8
Stand cart upright and remove
cardboard sleeves
463351605_7
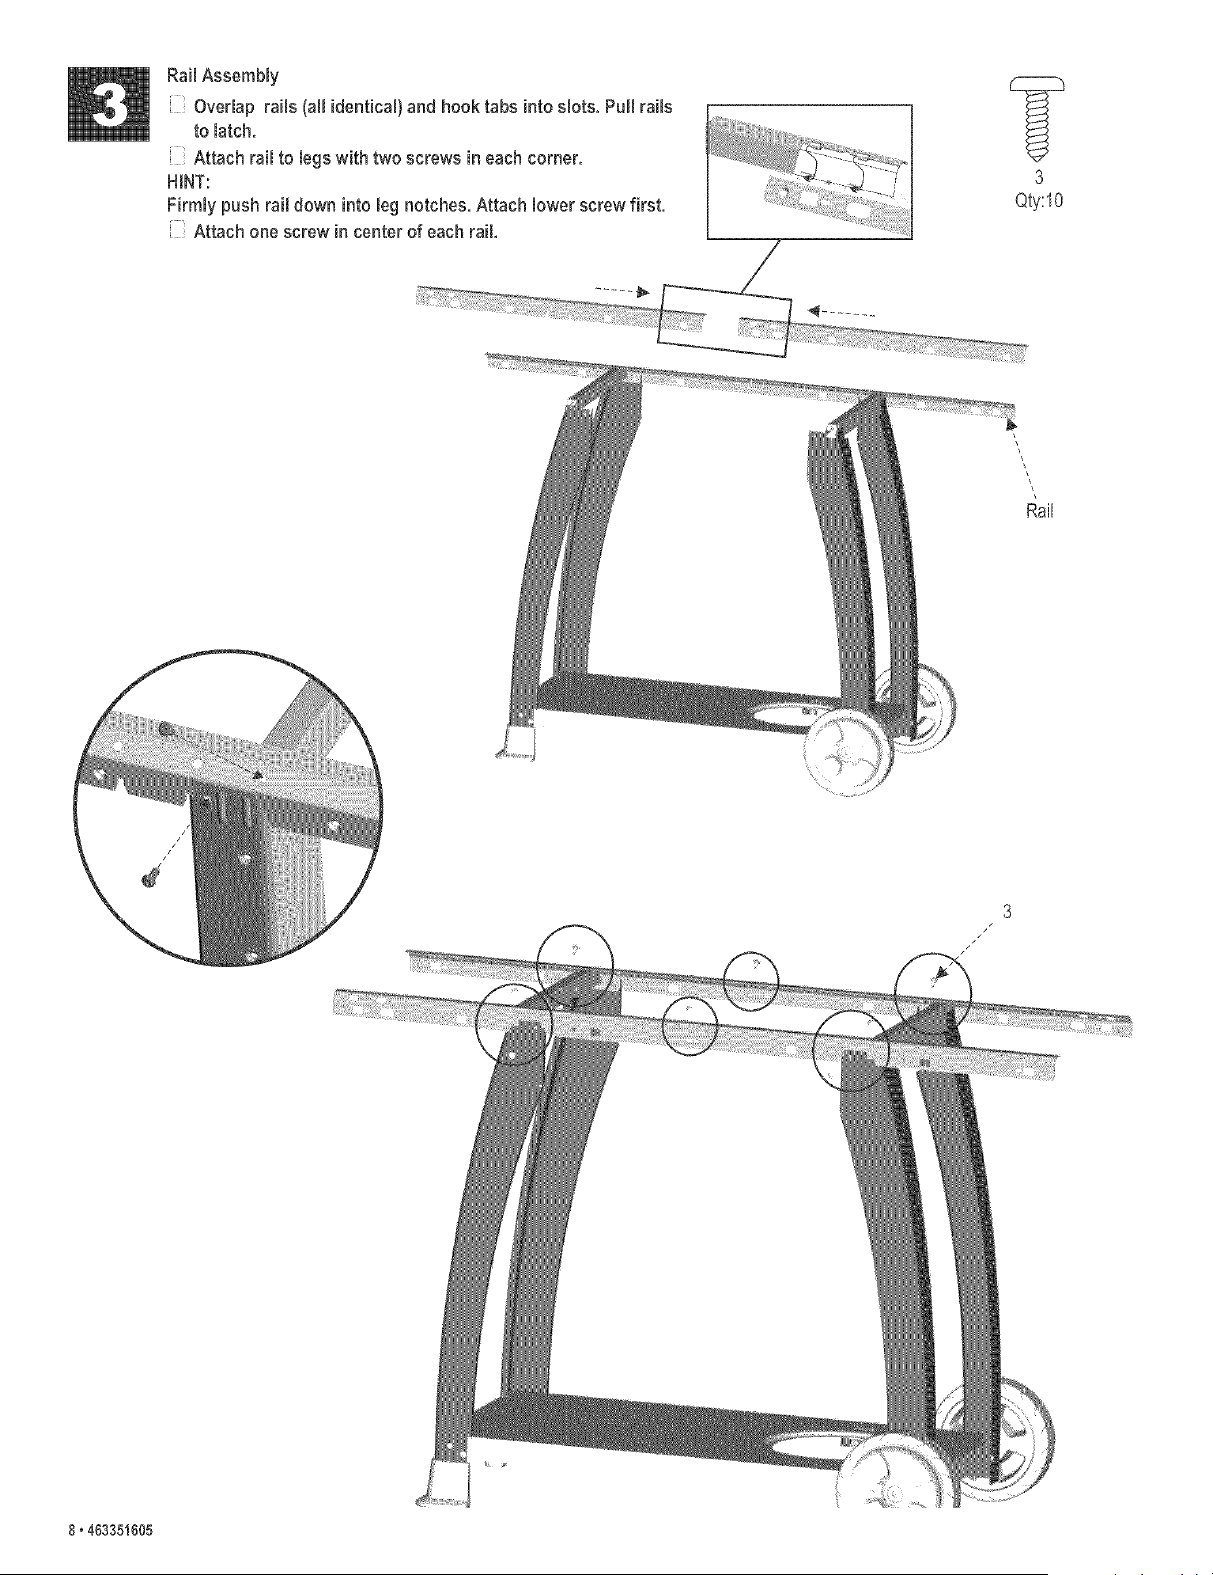
Rail Assembly
Overlap rails (all identical) and hook tabs into slots. Pull rails
to latch.
Attach rail to legs with two screws in each corner.
HINT:
Firmly push rail down into leg notches.Attach lower screw first.
Attach one screw in center of each rail.
3
Qty:10
\
\
\
Rail
8,483351805
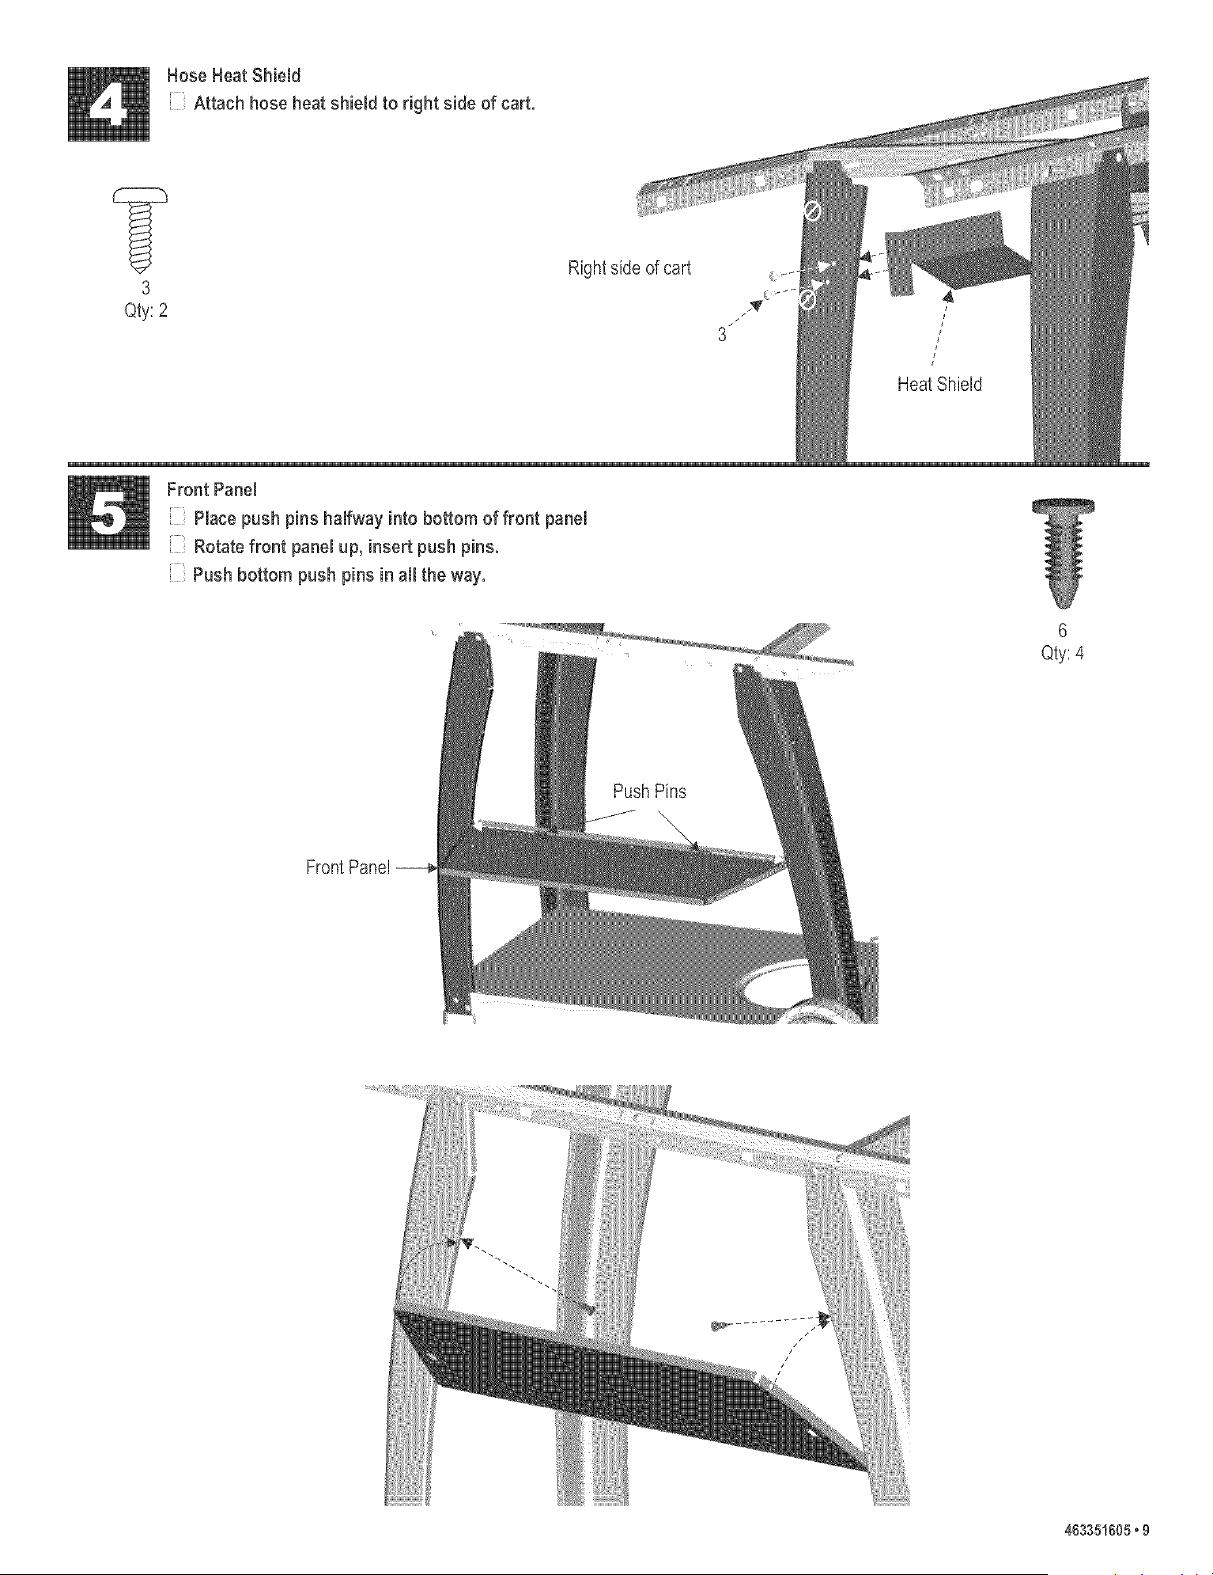
Hose HeatShieRd
Attach hose heat shield to right side of cart.
3
Qty:2
Rightsideof cart
Front Panel
Placepush pins halfway into bottom of front panel
Rotatefront panel up, insert push pins.
Push bottom push pins in all the way.
6
Qty:4
463351605,9
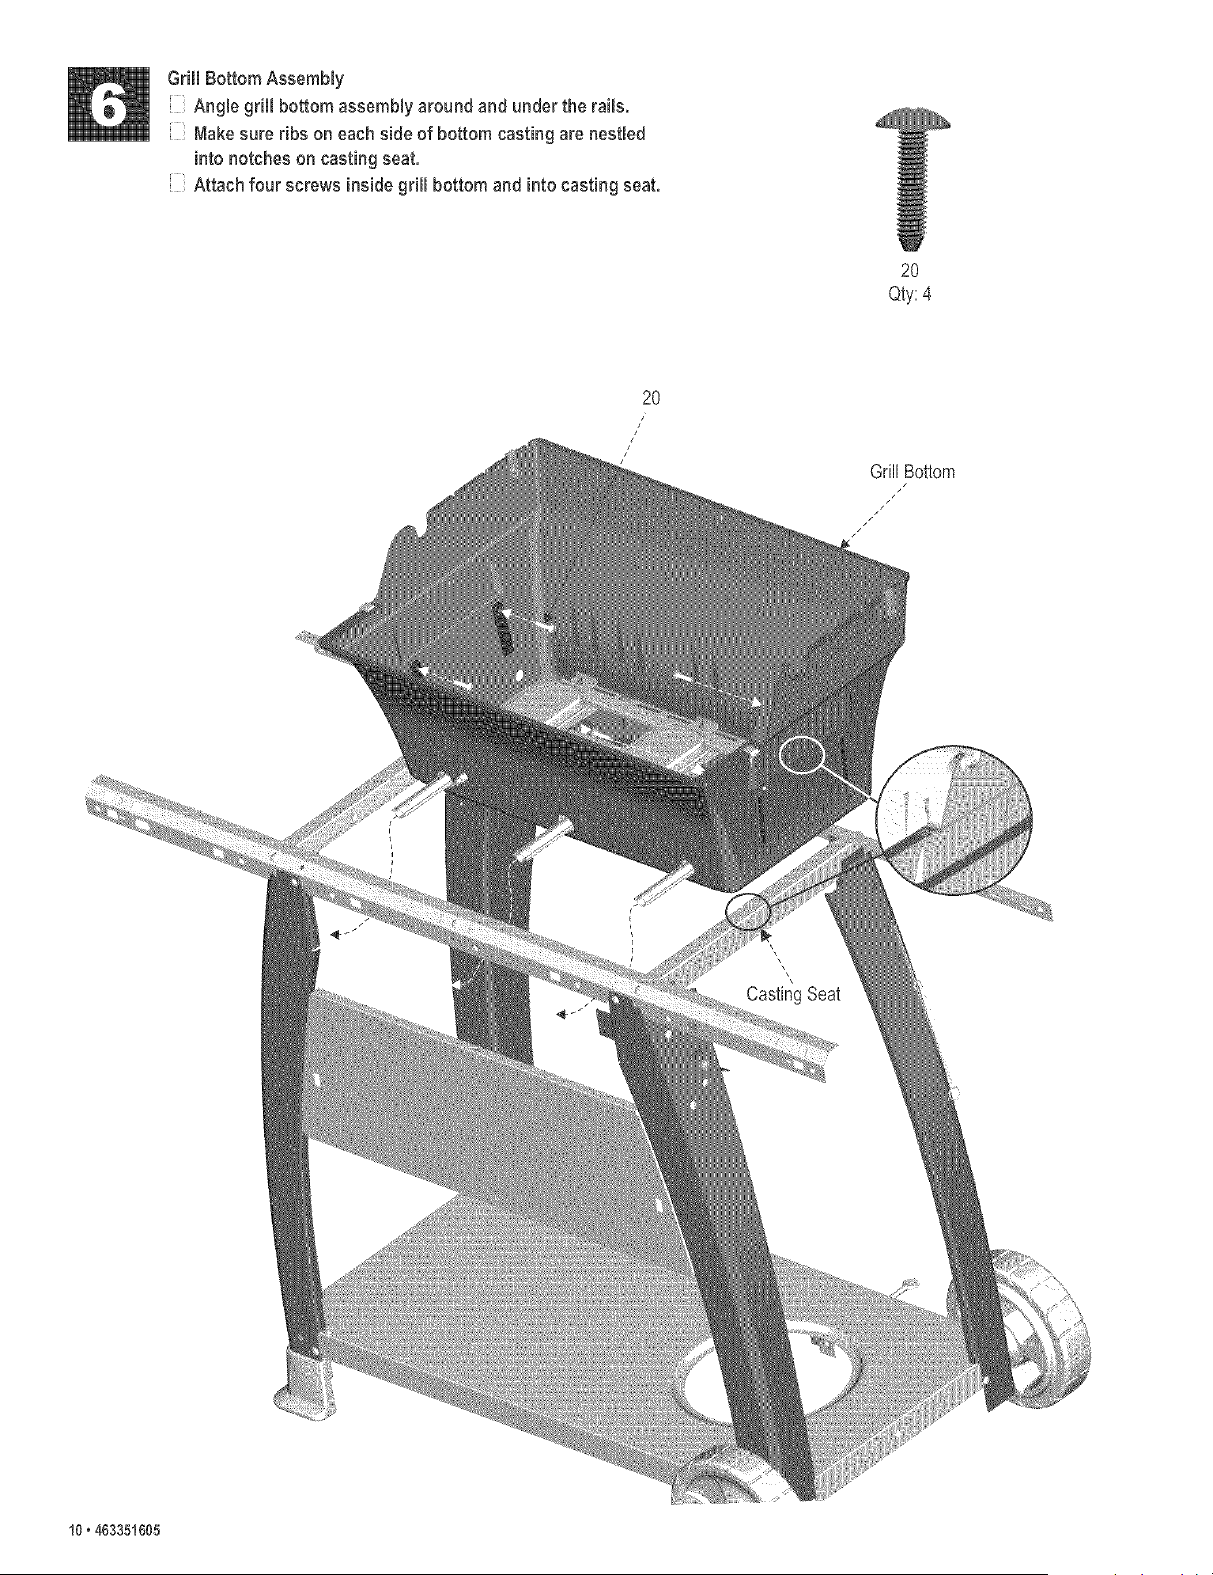
Grill Bottom Assembly
Angle grill bottom assembly around and under the rails.
Makesureribs on each side of bottom casting are nestled
into notches on casting seat.
Attach four screws inside grill bottom and into casting seat.
20
Qty:4
2O
i
CastingSeat
Grill Bottom
10,463351605
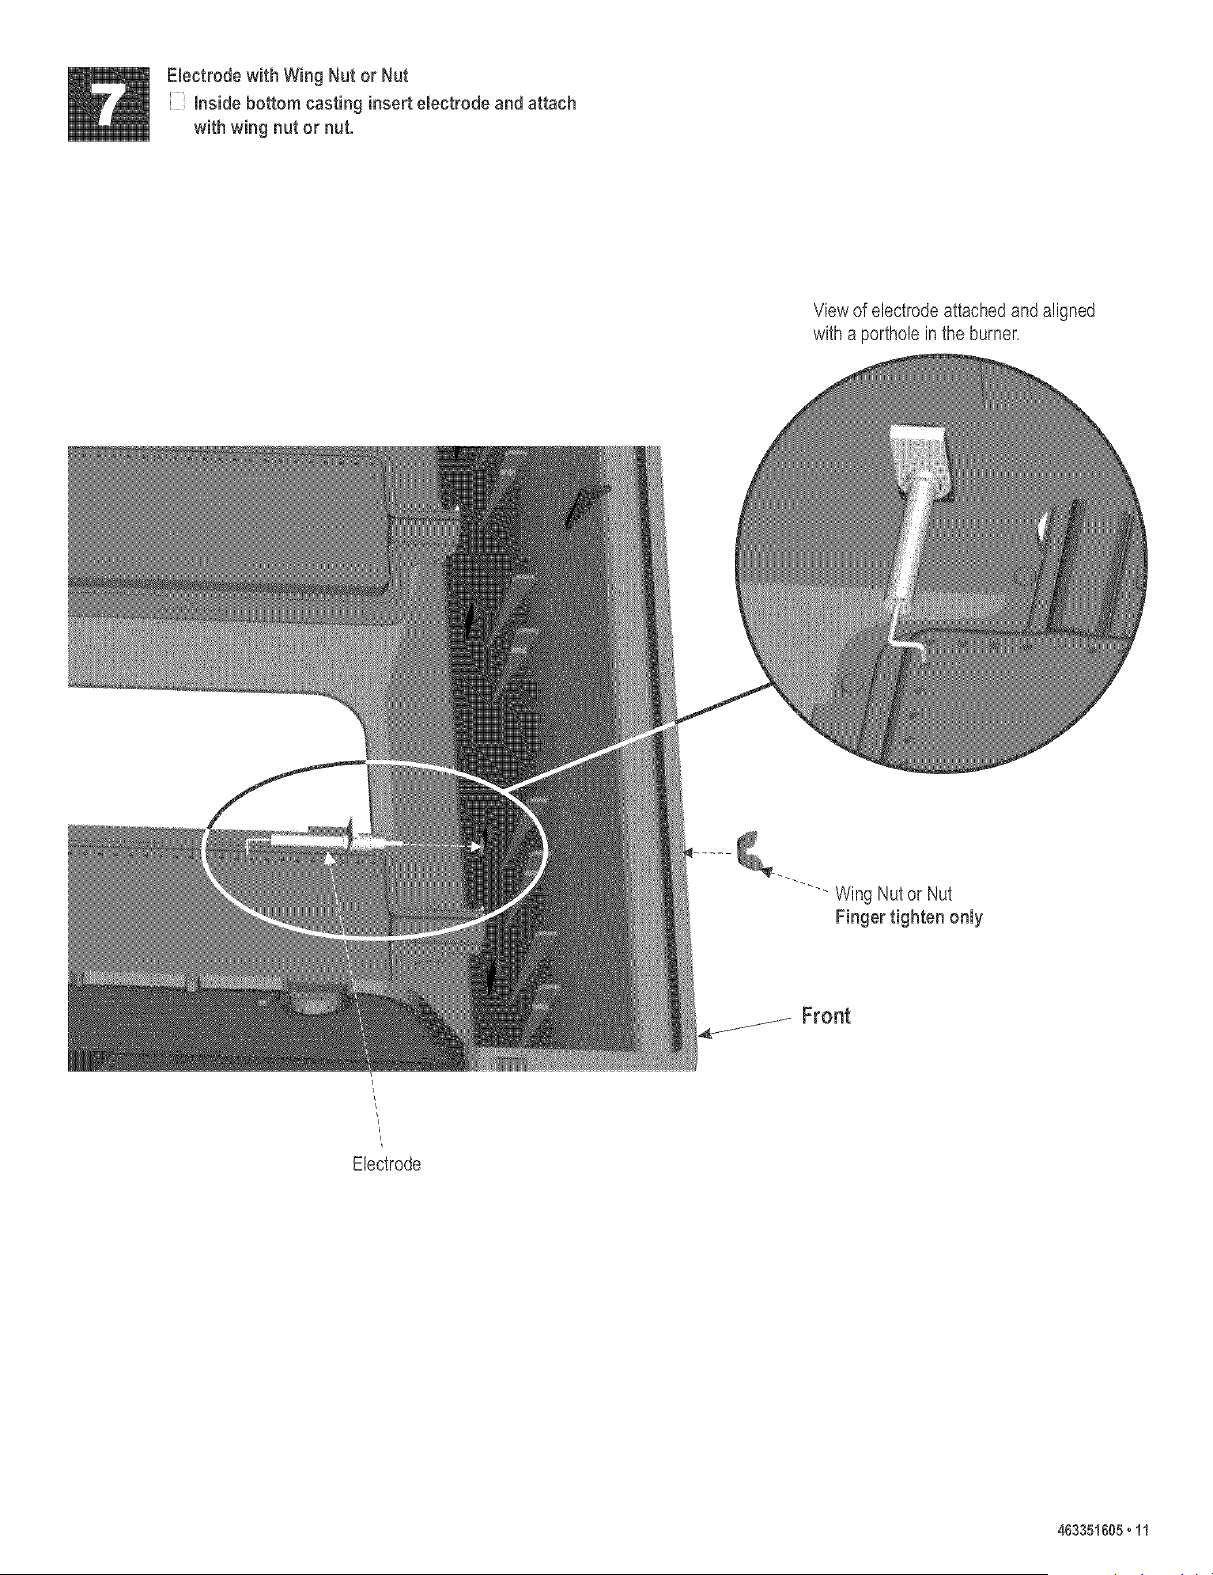
Electrodewith Wing Nut or Nut
inside bottom casting insert electrode and attach
with wing nut or nut.
Viewof electrodeattachedand aligned
witha portholeinthe burner.
..... WingNutor Nut
Finger tighten only
Front
Electrode
463351605_11
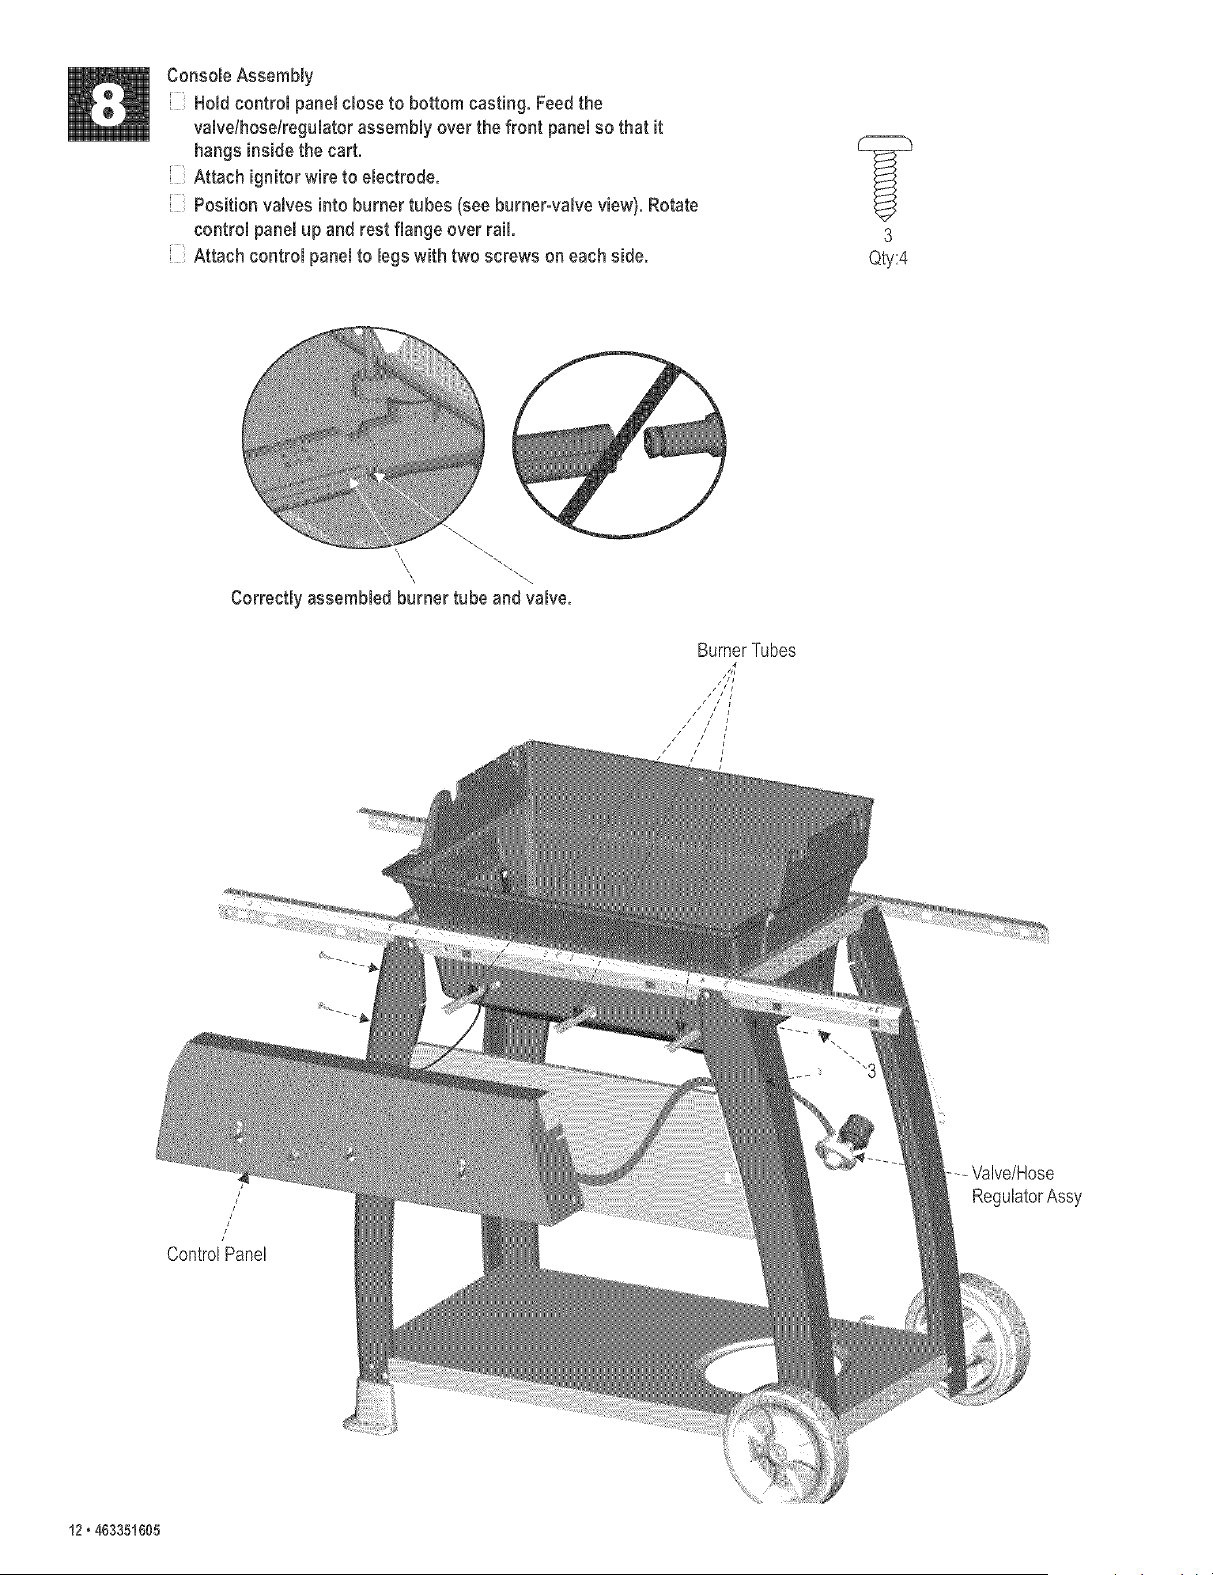
Console Assembly
Hold control panel dose to bottom casting, Feedthe
vaive/hoselreguiatorassembly over the front panel so that it
hangs inside the cart.
Attach ignitor wire to electrode.
Position valves into burner tubes (see burner-valveview). Rotate
control panel up and rest flange over rail.
Attach control panel to legs with two screws on each side.
3
Qty:4
Correctly assembled burner tube andvalve.
BurnerTubes
/
/ /
ControlPanel
--- Valve/Hose
RegulatorAssy
12 _4{}3351605
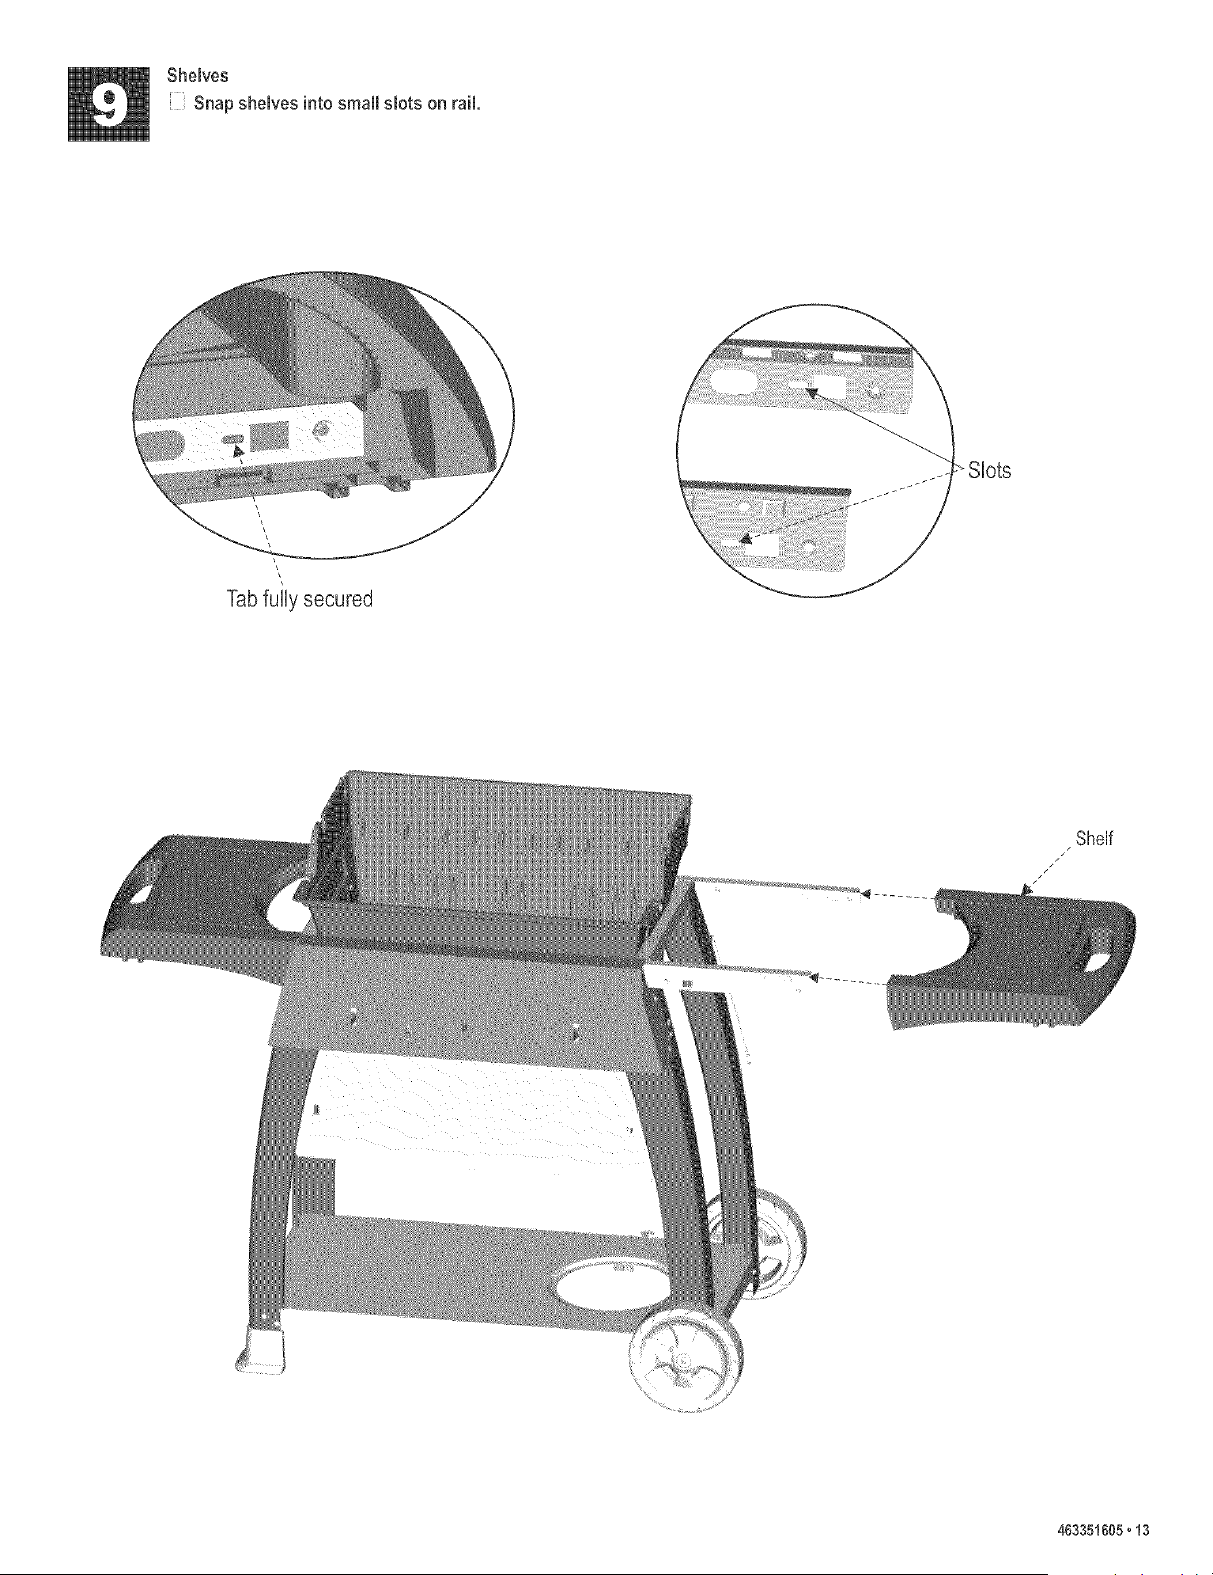
Shelves
Snapshelves into small slots on rail.
Tab fully secured
Shelf
4¢3351605_13
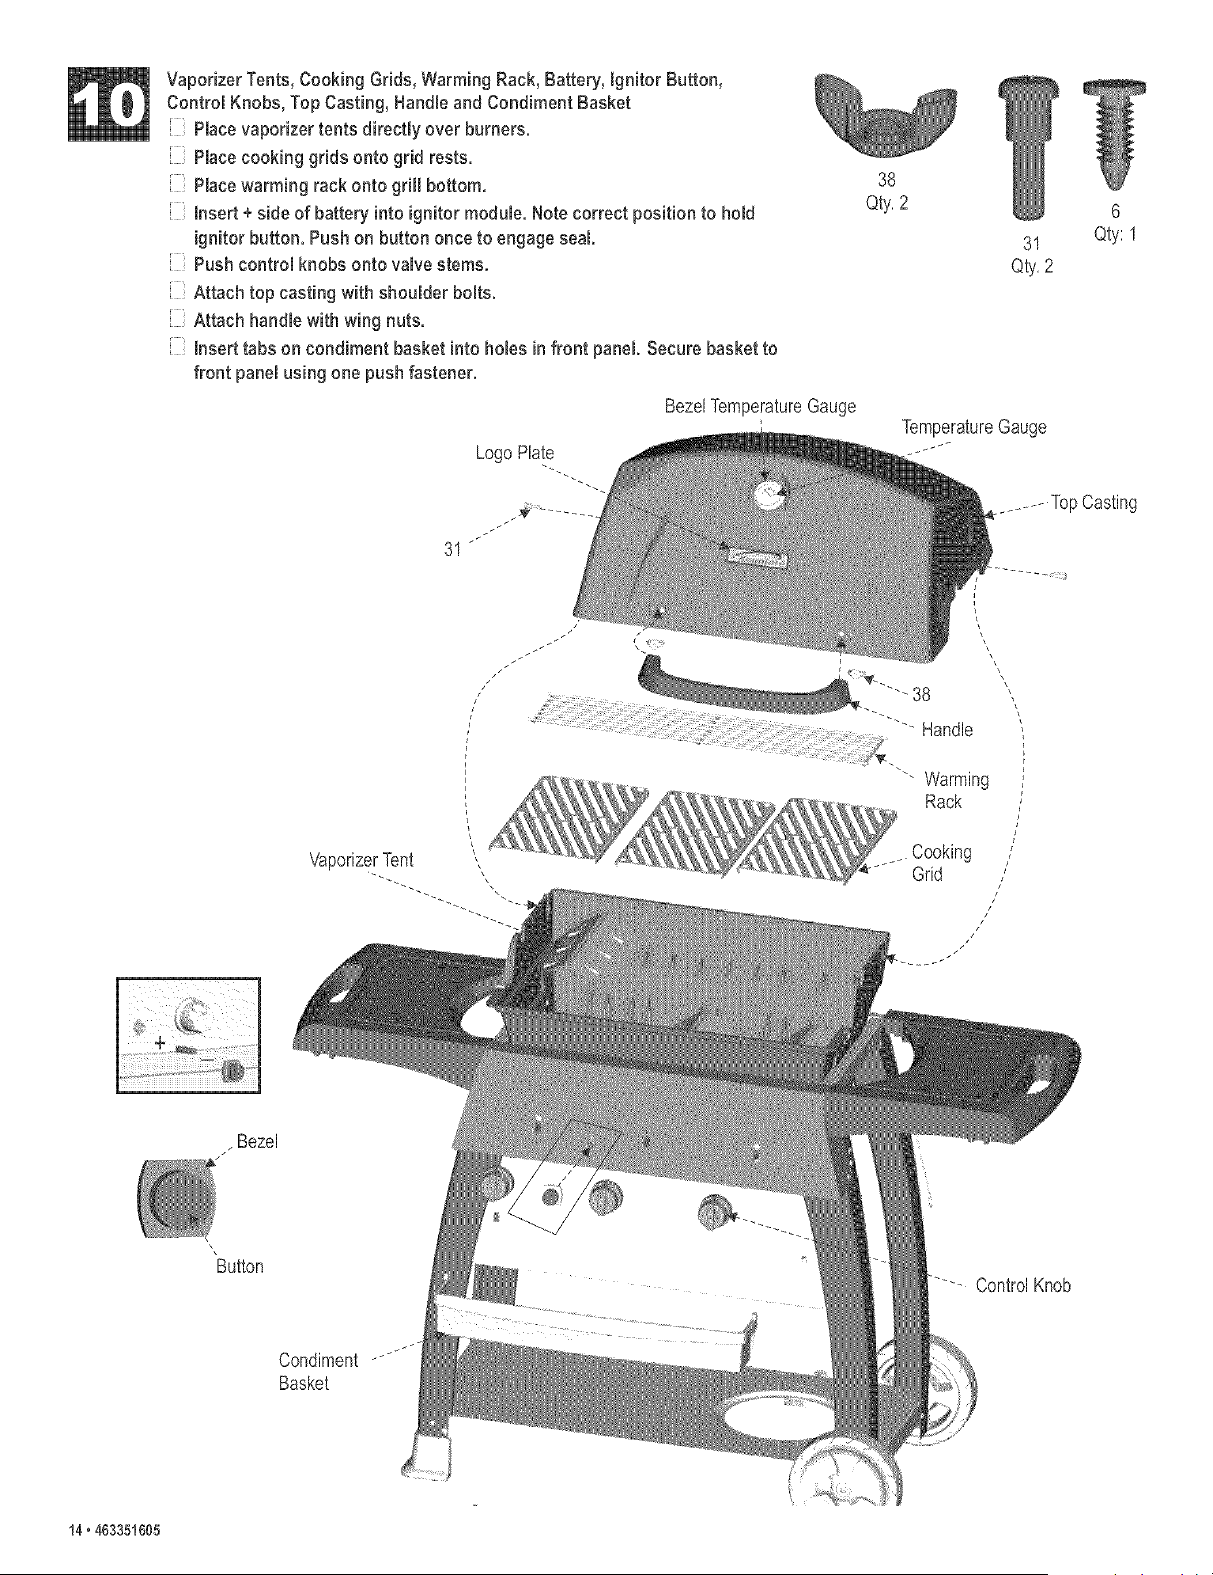
Vaporizer Tents,Cooking Grids, Warming Rack,Battery, Ignitor Button,
Control Knobs, Top Casting, Handleand Condiment Basket
Placevaporizer tents directly over burners.
Placecooking grids onto grid rests.
Placewarming rack onto gd[[ bottom.
Insert + side of battery into ignitormodule. Notecorrect position to hold
ignitor button. Push on button once to engage seal.
Push control knobs onto valve stems.
Attach top casting with shoulder bolts.
Attach handle with wing nuts.
Insert tabs on condiment basket into holes in front pane[. Secure basket to
front panelusing one push fastener.
BezelTemperatureGauge
LogoPlate
//
31"
38
Qty,2
31
Qty,2
TemperatureGauge
6
Qty: 1
VaporizerTent
Rack
Cooking /
Grid ,'
/
/
/
/ z
/ Bezel
Button
.... ControlKnob
Condiment -"'J-
Basket
14_ 463351605
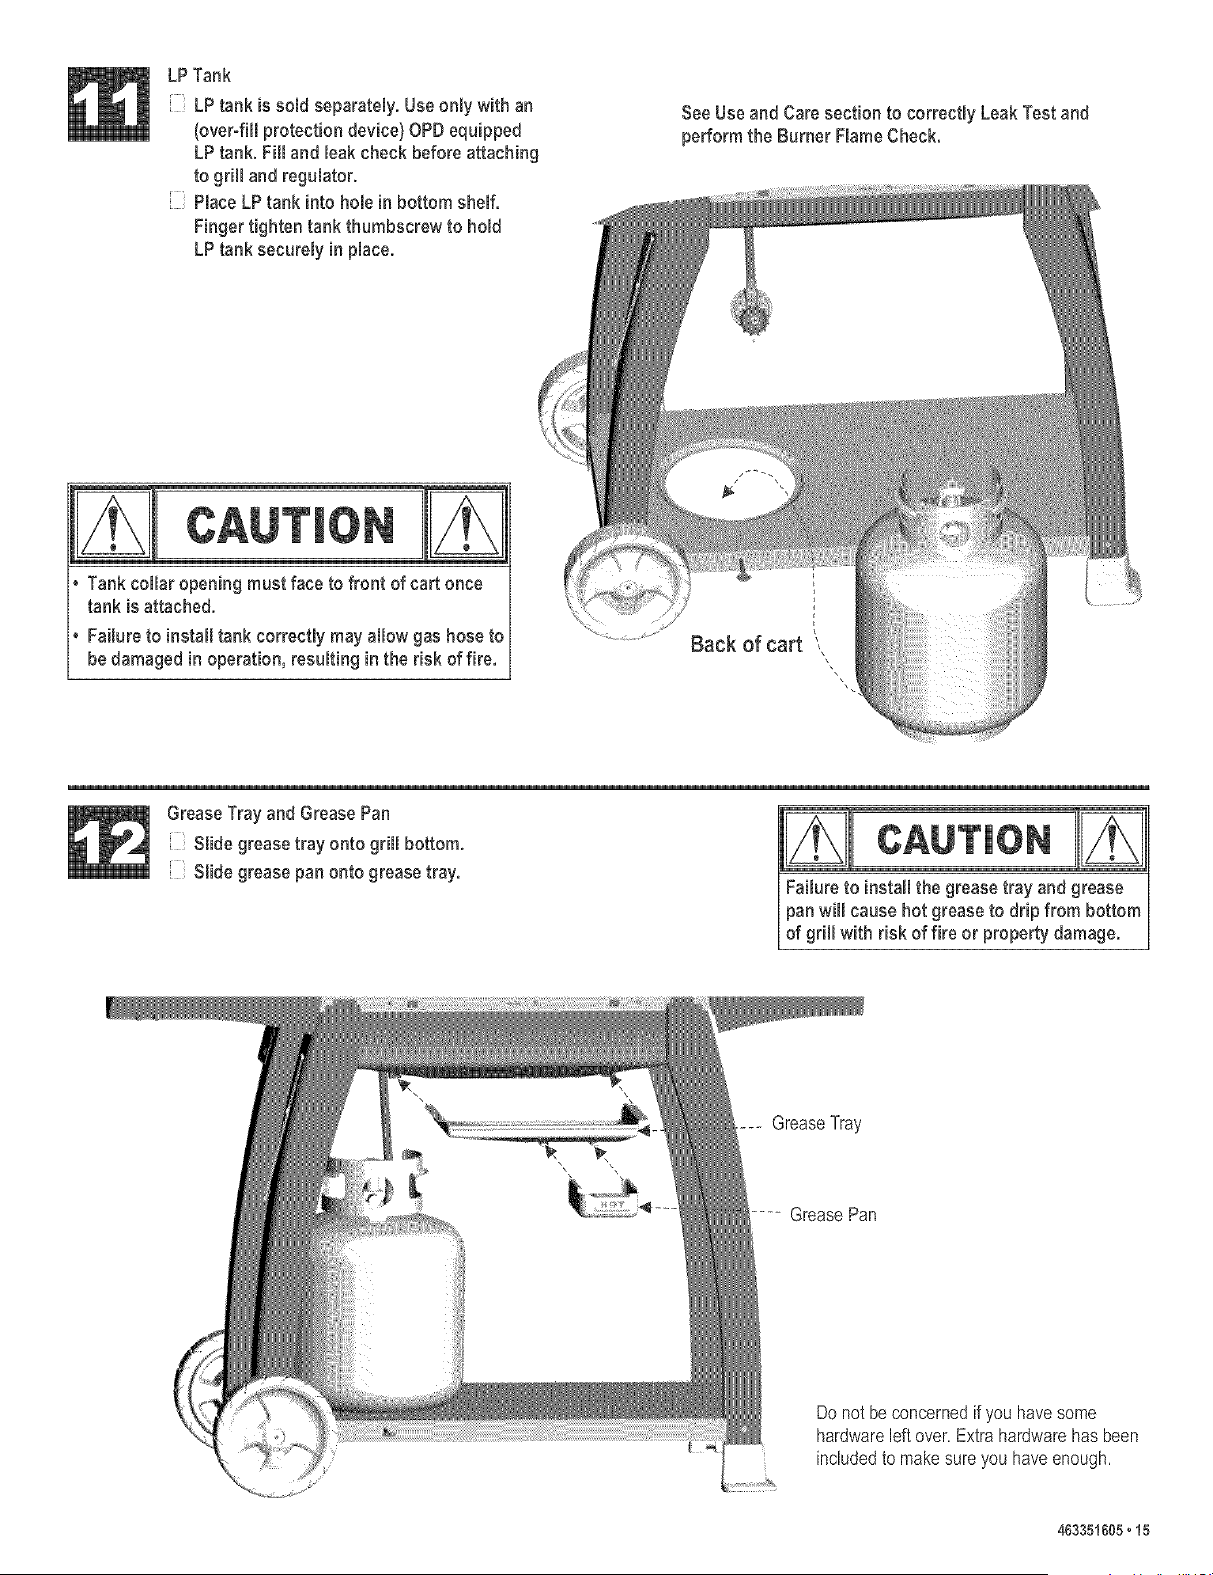
LPTank
LPtank is sold separately. Use only with an
(over-fill protection device) OPDequipped
LPtank. Fill and leak check before attaching
to grill and regulator.
PlaceLP tank into hole in bottom shelf.
Finger tighten tank thumbscrew to hold
LPtank securely in place.
CAUTION
° Tankcollar opening must face to front of cart once
tank is attached.
• Failure to install tank correctly may allow gas hose to
bedamaged in operation, resulting in the risk of fire.
SeeUseand Care section to correctly Leak Testand
perform the Burner FlameCheck,
GreaseTrayand GreasePan
Slidegrease tray onto grill bottom.
Slidegrease pan onto grease tray.
Failureto install the grease tray and grease
panwill cause hot grease to drip from bottom
of grill with risk of fire or property damage.
GreaseTray
GreasePan
Do notbeconcernedif you havesome
hardwareleft over. Extrahardwarehas been
includedto makesureyou haveenough,
463351605_15
Never fill the cyJinder beyond 80% full. An overfiiled
spare LP tank is hazardous due to possible gas
released from the safety relief valve.
• When LP tank is over 80% full, the safety relief valve on
the LP tank could activate, releasing gas and cause an
intense fire with risk of property damage, serious
injury or death.
• NEVER store a spare LP tank under or near grill or in
enclosed areas.
• Jfyou see, smell or hear escaping gas, immediately get
away from the LP tank/grill and call your fire
department.
• All spare LP tanks must have safety caps installed on
the LP tank outlet.
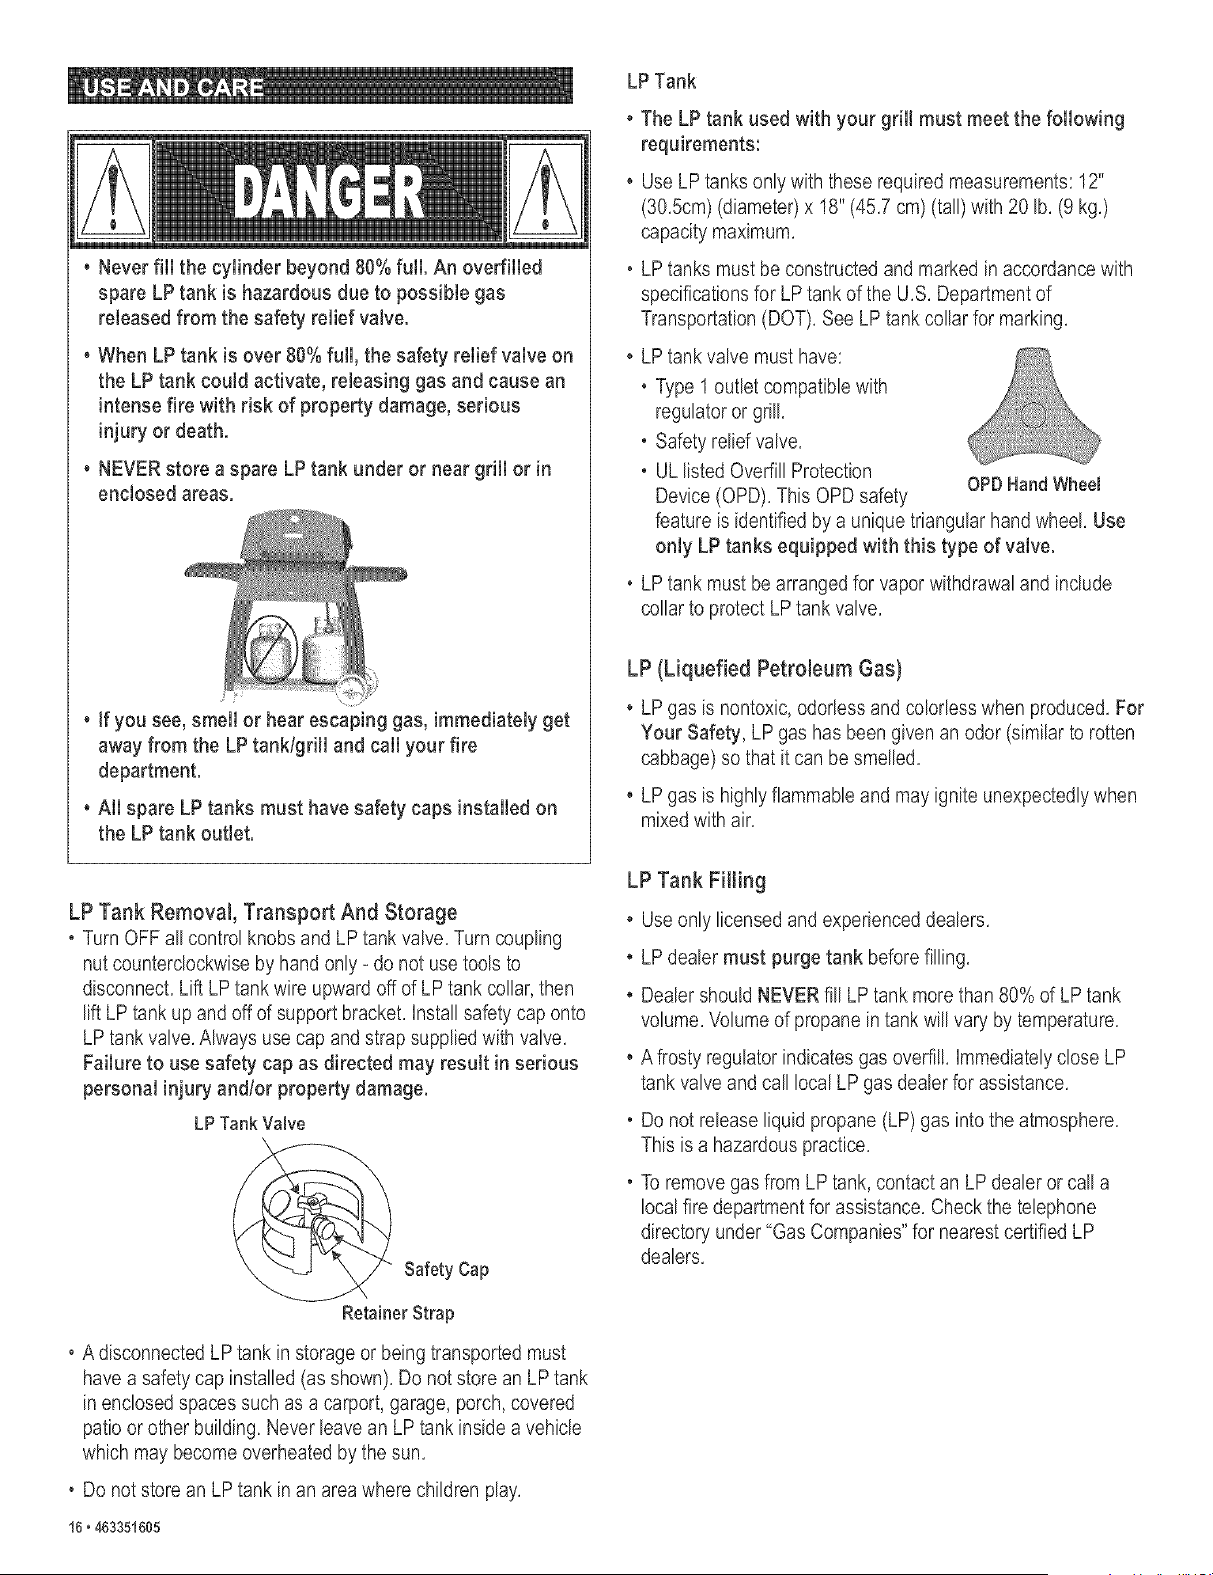
LP Tank Removal Transport And Storage
. Turn OFF all control knobs and LP tank valve. Turn coupling
nut counterclockwise by hand only - do not use tools to
disconnect. Lift LP tank wire upward off of LP tank collar, then
lift LP tank up and off of support bracket. Install safety cap onto
LP tank valve. Always use cap and strap supplied with valve.
Failure to use safety cap as directed may result in serious
personal injury and/or property damage.
LP TankValve
Safety Cap
Retainer Strap
. A disconnected LP tank in storage or being transported must
have a safety cap installed (as shown). Do not store an LP tank
in enclosed spaces such as a carport, garage, porch, covered
patio or other building. Never leave an LP tank inside a vehicle
which may become overheated by the sun.
. Do not store an LP tank in an area where children play.
16,463351605
LP Tank
• The LP tank used with your grill must meet the following
requirements:
• Use LP tanks only with these required measurements: 12"
(30.5cm) (diameter) x 18" (45.7 cm) (tall) with 20 Ib. (9 kg.)
capacity maximum.
. LP tanks must be constructed and marked in accordance with
specifications for LP tank of the U.S. Department of
Transportation (DOT). See LP tank collar for marking.
• LP tank valve must have:
. Type I outlet compatible with
regulator or grill.
. Safety relief valve.
. UL listed Overfill Protection
OPDHand Wheel
Device (OPD). This OPD safety
feature is identified by a unique triangular hand wheel. Use
only LP tanks equipped with this type of valve.
. LP tank must be arranged for vapor withdrawal and include
collar to protect LP tank valve.
LP (Liquefied Petromeum Gas)
• LP gas is nontoxic, odorless and colorless when produced. For
Your Safety, LP gas has been given an odor (similar to rotten
cabbage) so that it can be smelled.
• LP gas is highly flammable and may ignite unexpectedly when
mixed with air.
LP Tank Filling
• Useonly licensed and experienced dealers.
• LP dealer must purge tank before filling.
• Dealer should NEVERfill LP tank more than 80% of LP tank
volume. Volume of propane in tank will vary by temperature.
• A frosty regulator indicates gas overfil!. Immediately dose LP
tank valve and call local LP gas dealer for assistance.
. Do not release liquid propane (LP) gas into the atmosphere.
This is a hazardous practice.
. To remove gas from LP tank, contact an LP dealer or call a
local fire department for assistance. Check the telephone
directory under "Gas Companies" for nearest certified LP
dealers.
LP Tank Exchange
, Many retailers that sell grills offer you the option of replacing
your empty LP tank through an exchange service, Use only
those reputable exchange companies that inspect, precision fill,
test and certify their cylinders, Exchange your tank only for
an OPD safety feature.equipped tank as described in the
"LP Tank" section of this manual,
Always keep new and exchanged LP tanks in upright position
during use, transit or storage.
, Leak test new and exchanged LP tanks BEFORE
connecting to grill.
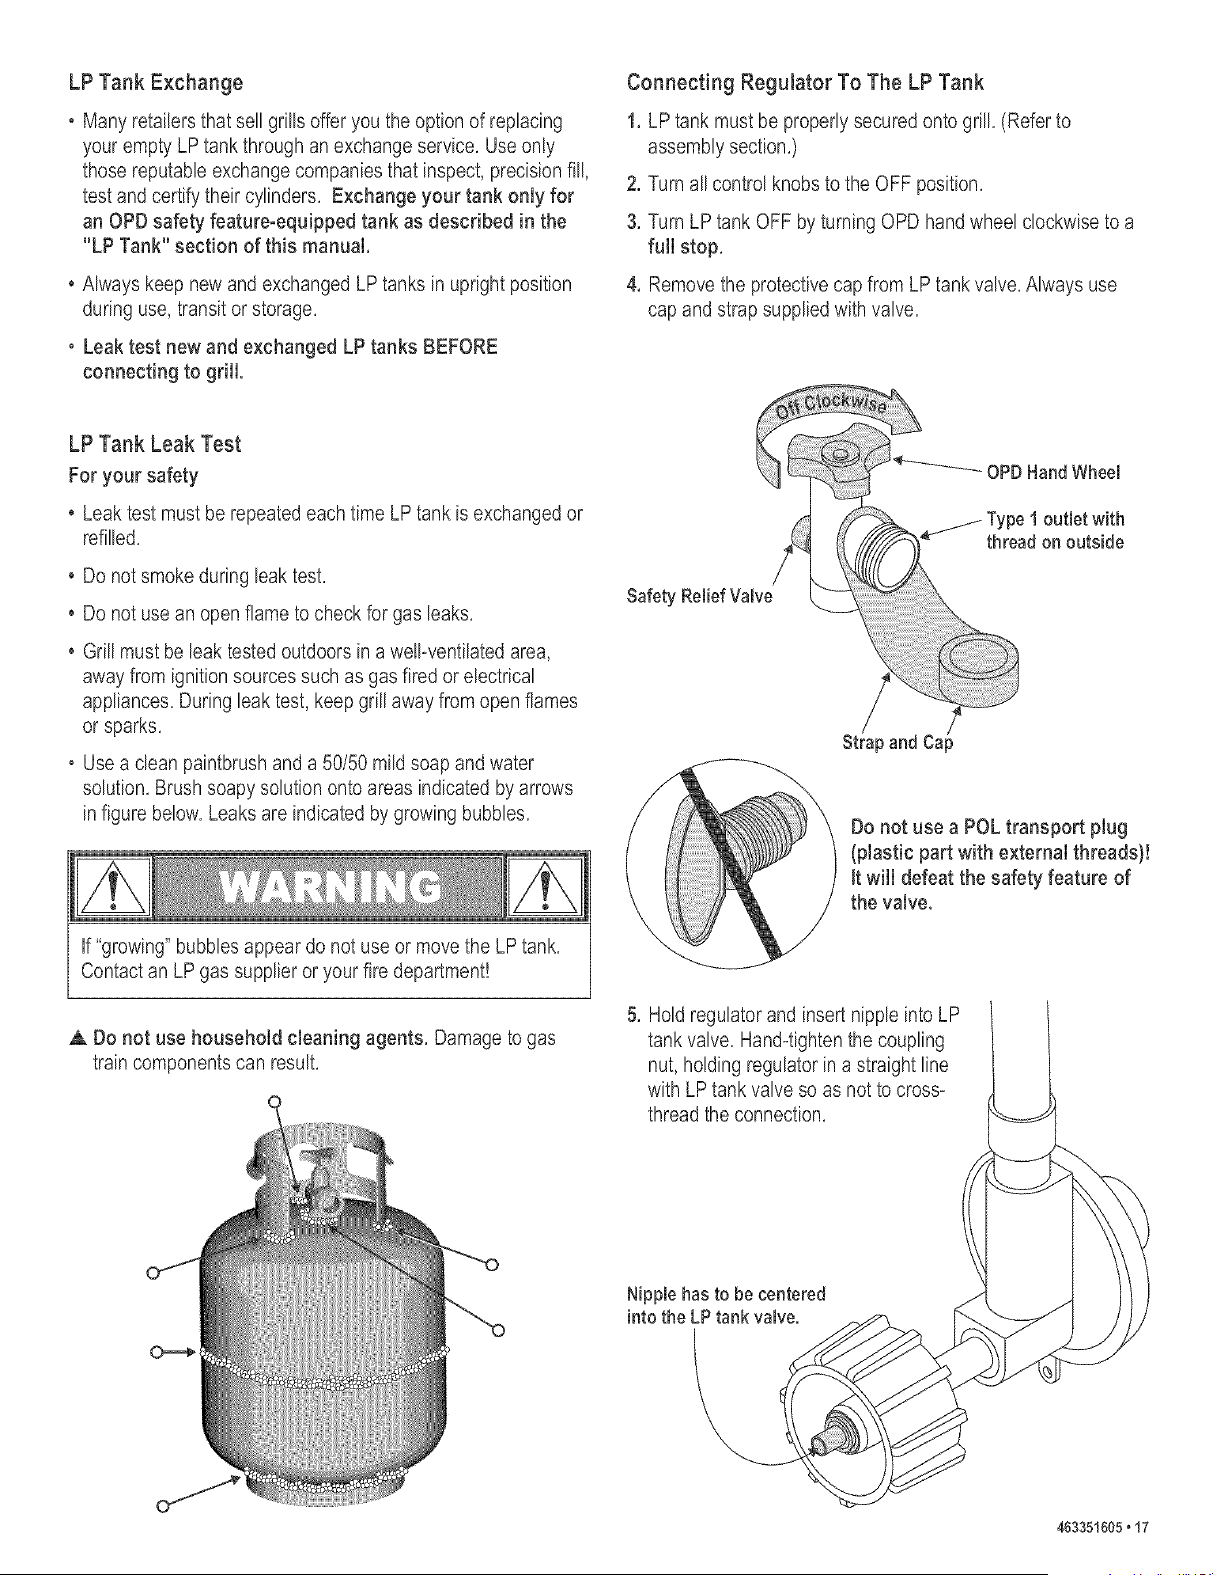
Connecting Regulator To The LP Tank
1. LP tank must be properly secured onto grill. (Refer to
assembly section.)
2. Turn all control knobs to the OFF position.
3. Turn LP tank OFF by turning OPD hand wheel clockwise to a
full stop,
4. Remove the protective cap from LP tank valve. Always use
cap and strap supplied with valve.
LP Tank Leak Test
For your safety
• Leaktestmustbe repeatedeachtimeLPtank isexchangedor
refilled,
Do not smoke during leak test.
• Do not use an open flame to check for gas leaks.
• Grill must be leak tested outdoors in a weIFventilated area,
away from ignition sources such as gas fired or electrical
appliances. During leak test, keep grill away from open flames
or sparks,
, Use a clean paintbrush and a 50/50 mild soap and water
solution. Brush soapy solution onto areas indicated by arrows
in figure below. Leaks are indicated by growing bubbles.
If "growing" bubbles appear do not use or move the LP tank.
Contact an LP gas supplier or your fire department!
,& Do not use household cleaning agents. Damage to gas
train components can result.
Safety ReliefValve
...... OPDHandWheel
Type1 outlet with
thread on outside
Strap and Cap
Do not use a POL transport plug
(plastic part with external threads)!
It will defeat the safety feature of
the valve.
5. Hold regulator and insert nipple into LP
tank valve. Hand-tighten the coupling
nut, holding regulator in a straight line
with LP tank valve so as not to cross*
thread the connection.
Nipple has to be centered
into the LPtank valve.
463351605,17
Hold coupling nut and regulator
as shown for proper connection
to LP tank valve.
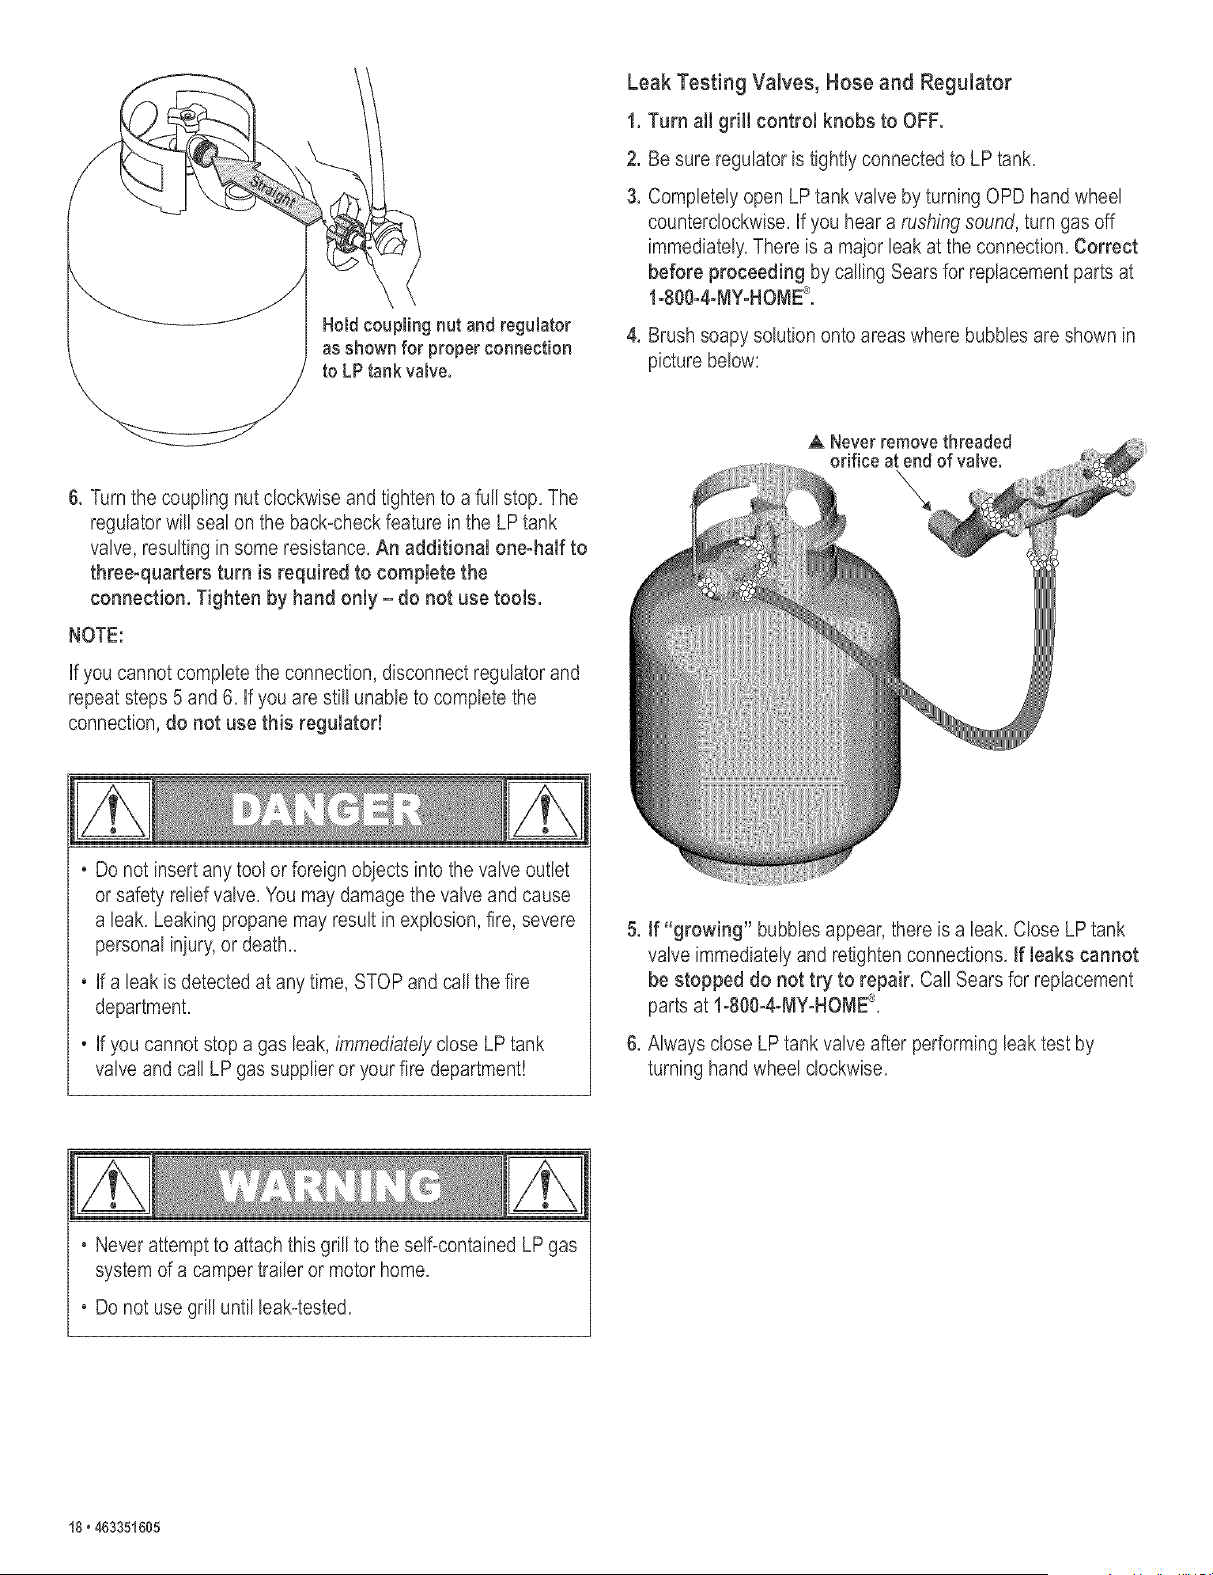
Leak Testing Valves, Hose and Regulator
1, Turn aHgrilJcontrol knobs to OFF.
,
3.
Be sure regulator is tightly connected to LP tank.
Completely open LP tank valve by turning OPD hand wheel
counterclockwise, if you hear a rushing sound, turn gas off
immediately. There is a major leak at the connection. Correct
before proceeding by calling Sears for replacement parts at
1-800-4-MY-HOME®.
4, Brush soapy solution onto areas where bubbles are shown in
picture below:
6. Turn the coupling nut clockwise and tighten to a full stop. The
regulator will seal on the back*checkfeature in the LP tank
valve, resulting in some resistance. An additional one-half to
three-quarters turn is required to complete the
connection. Tighten by hand only - do not use tools.
NOTE:
if you cannot complete the connection, disconnect regulator and
repeat steps 5 and 6. if you are still unable to complete the
connection, do not use this regulator!
. Do not insert any tool or foreign obiects into the valve outlet
or safety relief valve. You may damage the valve and cause
a leak. Leaking propane may result in explosion, fire, severe
personal injury,or death..
If a leak is detected at any time, STOP and call the fire
department.
If you cannot stop a gas leak, immediatety dose LP tank
valve and call LP gas supplier or your fire department!
A Never remove threaded
orifice at end of valve.
\
5. If "growing" bubbles appear, there is a leak. Close LP tank
valve immediately and retighten connections. If leaks cannot
be stopped do not try to repair. Call Sears for replacement
parts at 1-800-4-MY-HOME®,
6. Always dose LPtank valve after performing leak test by
turning hand wheel clockwise.
. Never attempt to attach this grill to the self-contained LP gas
system of a camper trailer or motor home.
. Do not use grill until leak-tested.
18,463351605
For Safe Use Of Your Gritl And To Avoid Serious
Injury:
• Do not let children operate or play near grill,
• Keep grill area clear and free from materials that burn,
• Do not block holes in bottom or back of grill,
• Check burnerflames regularly,
• Use grill only in well*ventilated space, NEVER use in
enclosed space such as carport, garage, porch, covered
patio, or under an overhead structure of any kind,
• Do not use charcoal or ceramic briquets in a gas grill,
(Unless briquets are supplied wib your grilL)
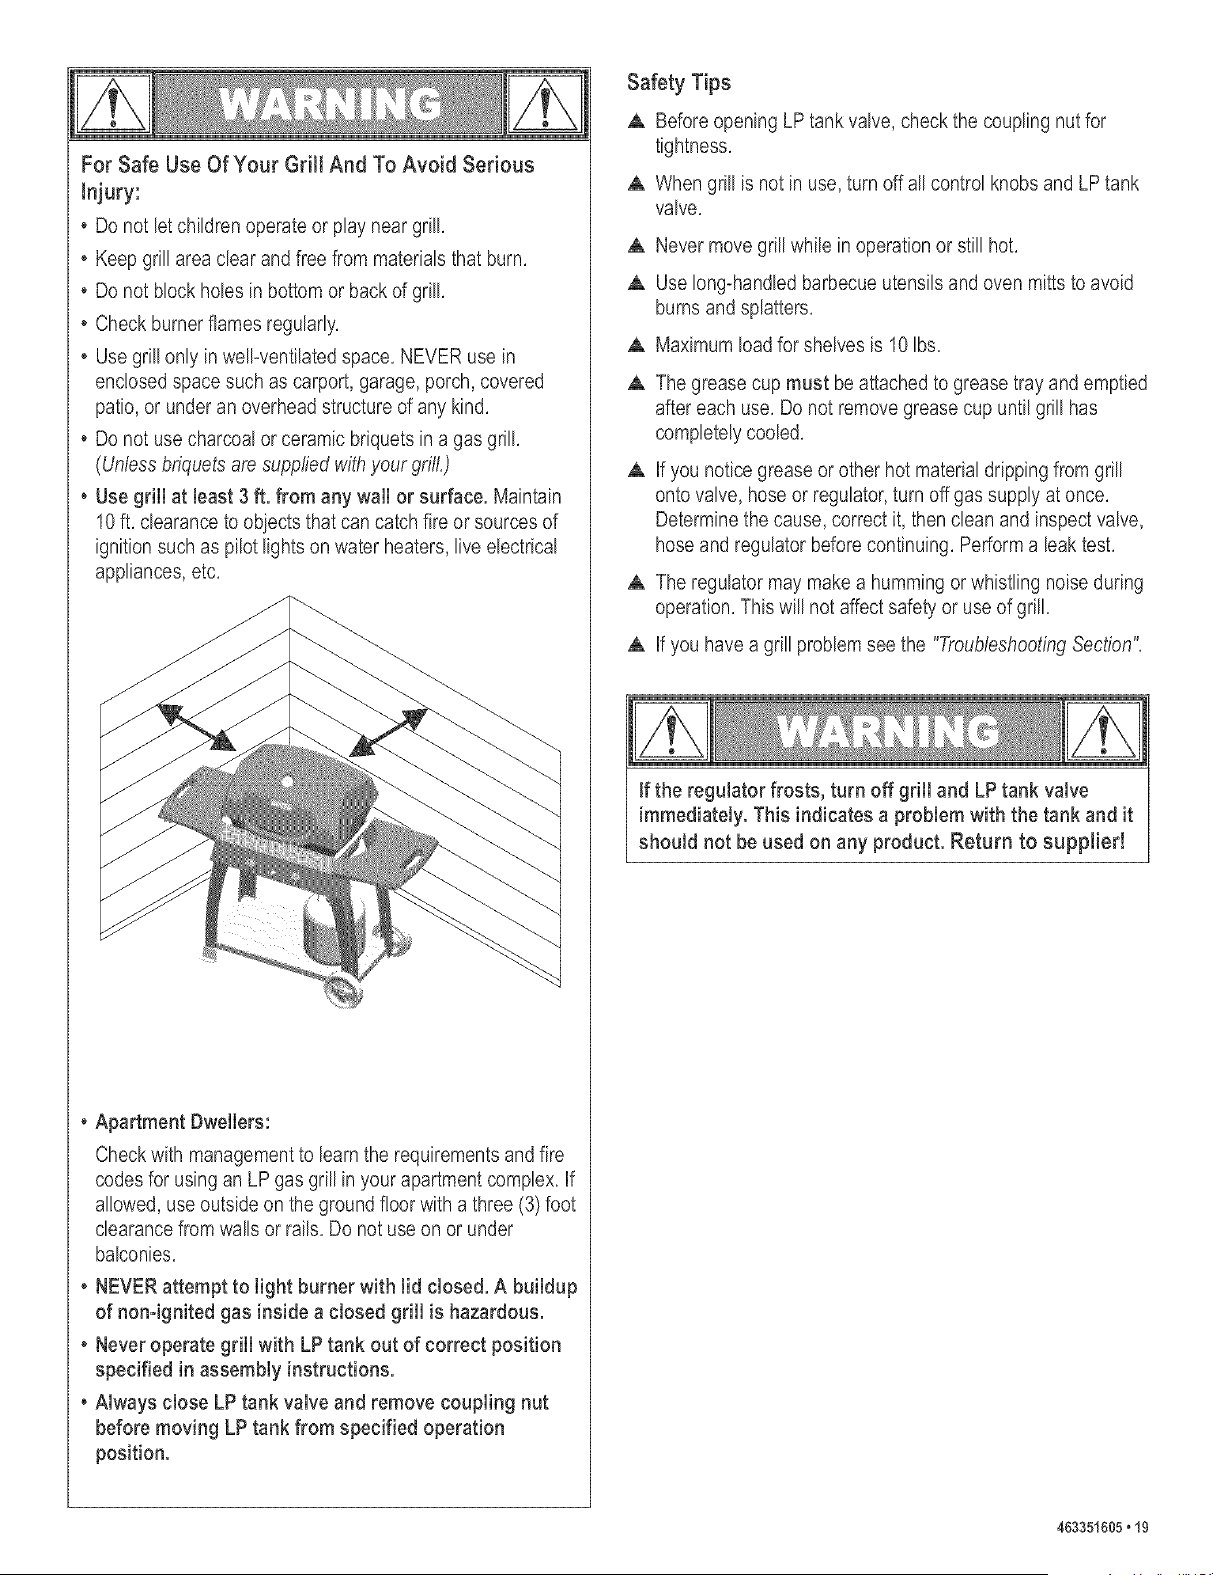
• Use grill at Jeast 3 ft. from any wall or surface. Maintain
10ft. clearance to objects that can catch fire or sources of
ignition such as pilot lights on water heaters, live electrical
appliances, etc,
• Apartment Dwellers:
Check with management to learn the requirements and fire
codes for using an LP gas grill in your apartment complex. If
al!owed, use outside on the ground floor with a three (3) foot
clearance from walls or rails, Do not use on or under
balconies,
• NEVER attempt to light burner with lid closed. A buildup
of non-ignited gas inside a closed grill is hazardous.
• Never operate grill with LP tank out of correct position
specified in assembly instructions.
Always close LP tank valve and remove coupling nut
before moving LP tank from specified operation
position.
Safety Tips
,& Before opening LP tank valve, check the coupling nut for
tightness,
,& When grill is not in use, turn offall control knobs and LP tank
valve,
,& Never move grill while in operation or still hot,
,& Use long*handled barbecue utensils and oven mitts to avoid
burns and splatters,
,& Maximum load for shelves is 10 Ibs,
,& The grease cup must be attached to grease tray and emptied
after each use, Do not remove grease cup until grill has
completely cooled,
,& If you notice grease or other hot material dripping from grill
onto valve, hose or regulator, turn off gas supply at once,
Determine the cause, correct it, then dean and inspect valve,
hose and regulator before continuing, Perform a leak test,
,& The regulator may make a humming or whistling noise during
operation, This will not affect safety or use of grill,
,& If you have a grill problem see the "Troubleshooting Section",
If the regulator frosts, turn off grill and LP tank valve
immediately. This indicates a problem with the tank and it
should not be used on any product. Return to suppmier!
463351605,19
CAUTION
• Putting out grease fires by closing the lid is not
possible. Grills are we)) ventilated for safety reasons.
• Do not use water on a grease fire. Personal injury may
result. If a grease fire develops, turn knobs and LP tank
off.
• Do not leave gri)) unattended while preheating or
burning off food residue on high. If gri)) has not been
regularly cleaned, a grease fire can occur that may
damage the product. Follow instructions on General
Grill Cleaning and Cleaning The Burner Assembly to
prevent grease fires.
Match-Lighting
A Do not lean over grill while lighting.
1, Open lid. Turn on gas at LP tank.
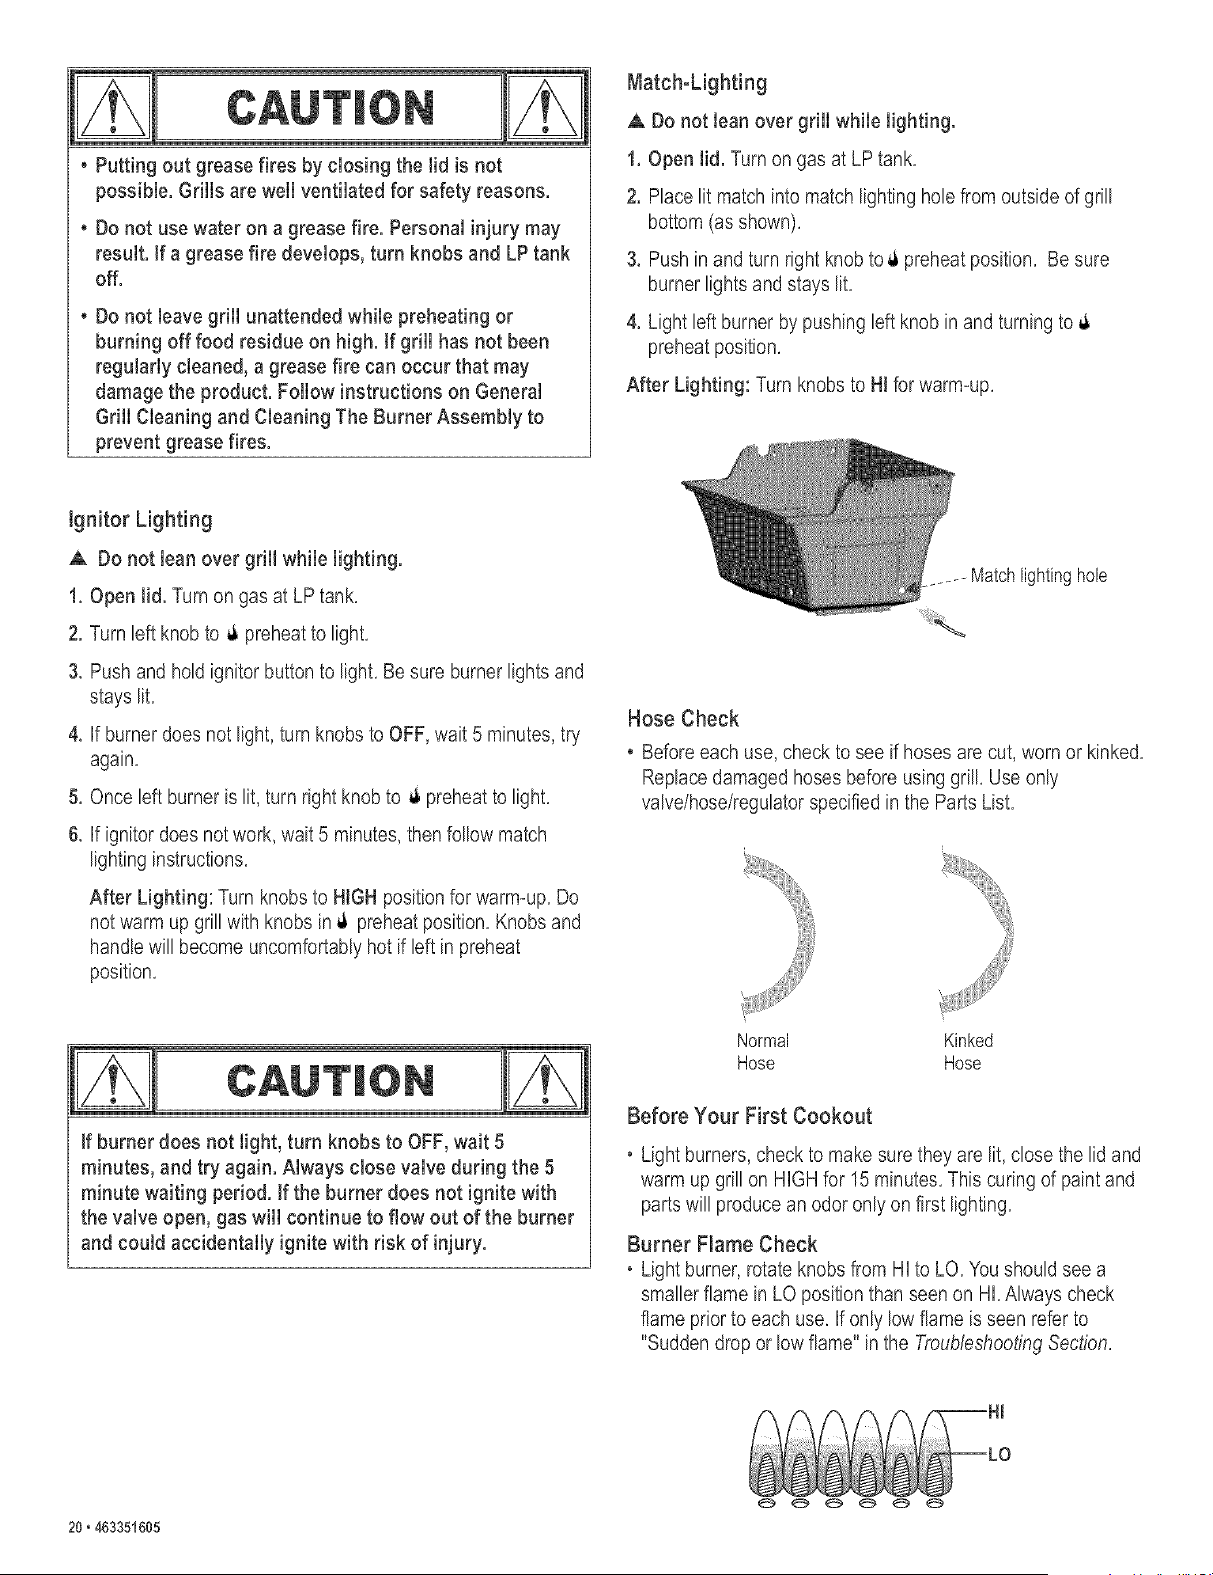
2. Place lit match into match lighting hole from outside of grill
bottom (as shown).
3. Push in and turn right knob to _i preheat position. Be sure
burner lights and stays lit.
4. Light left burner by pushing )eft knob in and turning to
preheat position.
After Lighting: Turn knobs to HI for warm-up.
Ignitor Lighting
A Do not lean over grill while lighting.
1. Open lid. Turn on gas at LP tank.
2. Turn )eft knob to _ preheat to light.
3. Push and hold ignitor button to light. Be sure burner lights and
stays )it.
4. If burner does not light, turn knobs to OFF, wait 5 minutes, try
again.
5, Once left burner is lit, turn right knob to _ preheat to light.
6. If ignitor does not work, wait 5 minutes, then follow match
lighting instructions.
After Lighting: Turn knobs to HIGH position for warm-up. Do
not warm up grill with knobs in _ preheat pos)tion. Knobs and
handle will become uncomfortably hot if left in preheat
position.
-_ Matchlightinghole
Hose Check
Before each use, check to see if hoses are cut, worn or kinked.
Replace damaged hoses before using grill. Use only
valve/hose/regulator specified in the Parts List.
CAUT(ON
If burner does not light, turn knobs to OFF, wait 5
minutes, and try again. Always close valve during the 5
minute waiting period. If the burner does not ignite with
the valve open, gas will continue to flow out of the burner
and could accidentally ignite with risk of injury.
Normal Kinked
Hose Hose
Before Your First Cookout
Light burners, check to make sure they are lit, dose the lid and
warm up grill on HIGH for 15 minutes. This curing of paint and
parts will produce an odor only on first lighting.
Burner Flame Check
. Light burner, rotate knobs from HI to LO. Youshould see a
smaller flame in LO position than seen on HI. Always check
flame pdor to each use. If only low flame is seen refer to
"Sudden drop or low flame" in the Troubleshooting Section.
20,463351605
Turning GriJl Off
. Turn al! knobs to OFF position. Turn LP tank off by turning
OPD hand wheel clockwise to a full stop.
ignitor Check
• Turn gas off at LP tank. Press and hold ignitor button. "Click"
should be heard and spark seen each time between collector
box or burner and electrodes. See "Troubleshooting" if no click
or spark.
Valve Check
• Important: Make sure gas is off at LP tank before checking
valves. Knobs lock in OFF position. To check valves, first
push in knobs and release, knobs should spring back. If knobs
do not spring back, replace valve assembly before using grill.
Turn knobs to LO position then turn back to OFF position.
'valves should turn smoothly.
General GrimmCmeaning
. Keep the outside of your grill looking new by cleaning it once a
month with warm soap and water or a non-abrasive cleaner. If
you don't have a grill cover, wipe off dust and grime before
starting your grill.
. Coating the cooking grids with spray-on cooking oil will keep the
food from sticking and make clean up easier. After cooking,
scrape the grates with a long handled, brass wire bristle brush.
. Check inside the grill bottom for grease build up and dean
often, especially after cooking fatty meat.
. Do not mistake brown or black accumulation of grease and
smoke for paint. Interiors of gas grills are not painted at the
factory (and should never be painted). Apply a strong solution
of detergent and water or use a grill cleaner with scrub brush
on insides of grill lid and bottom. Rinse and allow to completely
air dry. Do not apply a caustic grill/oven cleaner to painted
surfaces.
• Plated wire grates: Wash grates and V-bar with concentrated
gril! cleaner or use soap and water solution. Dry thoroughly and
store indoors between cookouts.
. PJastic parts: Wash with warm soapy water and wipe dry.
A Do not use citrisol, abrasive cleaners, degreasers or a
concentrated grill cleaner on plastic parts. Damage to and
failure of parts can result.
• Porcelain grates: Because of glass-like composition, most
residue can bewiped away with baking soda/water solution or
specially formulated cleaner. Use non-abrasive scouring
powder for stubborn stains.
Repainting Your Grill
After extended use and exposure to weather, paint on grill may
deteriorate or become spotted.Although this detracts from
grill's appearance, it will not impair its performance.
To refinish your grill brush outside of grill lid and bottom with
wire brush and lightly sand with fine grit sandpaper. Sanding
allows new paint to adhere more easily. Wash grill lid and
bottom with soap and water to remove dust and grease. Do not
use a grill cleaner on outside of grill. Wipe with vinegar.
Refinish outside with heat-resistant paint. Do not paint inside
of grill.
NATURAL HAZARD ,, $PmDER$
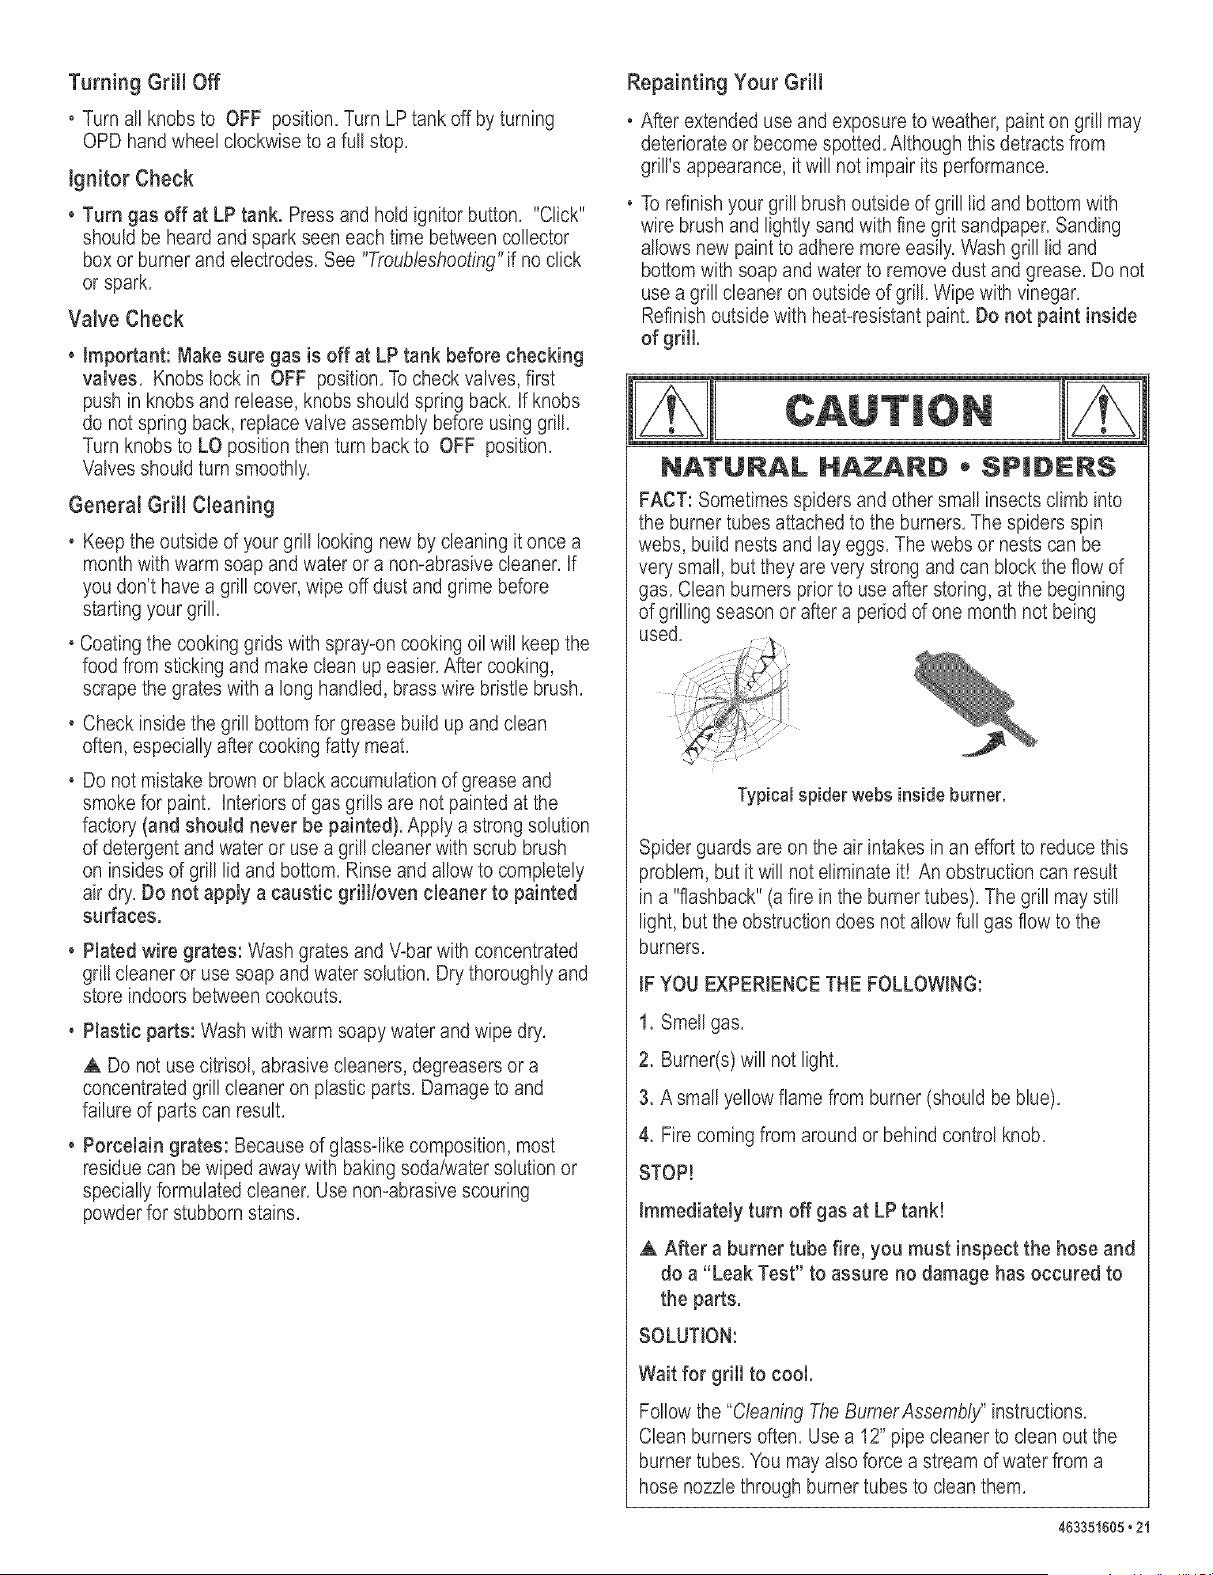
FACT: Sometimes spiders and other small insects climb into
the burner tubes attached to the burners. The spiders spin
webs, build nests and lay eggs. The webs or nests can be
very small, but they are very strong and can block the flow of
gas. Clean burners prior to use after storing, at the beginning
of grilling season or after a period of one month not being
used.
Typical spider webs inside burner.
Spider guards are on the air intakes in an effort to reduce this
problem, but it will not eliminate it! An obstruction can result
in a "flashback" (a fire in the burner tubes). The gri!l may still
light, but the obstruction does not allow full gas flow to the
burners.
IF YOU EXPERIENCE THE FOLLOWING:
1. Smell gas.
2. Burner(s) will not light.
3. A small yellow flame from burner (should be blue).
4. Fire coming from around or behind control knob.
STOP!
Immediately turn off gas at LP tank!
,& After a burner tube fire, you must inspect the hose and
do a "Leak Test" to assure no damage has occured to
the parts.
SOLUTION:
Wait for grill to cool.
Follow the "Cleaning T,_eBumer Assembly" instructions.
Clean burners often. Use a 12" pipe cleaner to dean out the
burner tubes. You may also force a stream of water from a
hose nozzle through burner tubes to clean them.
4¢3351605,21
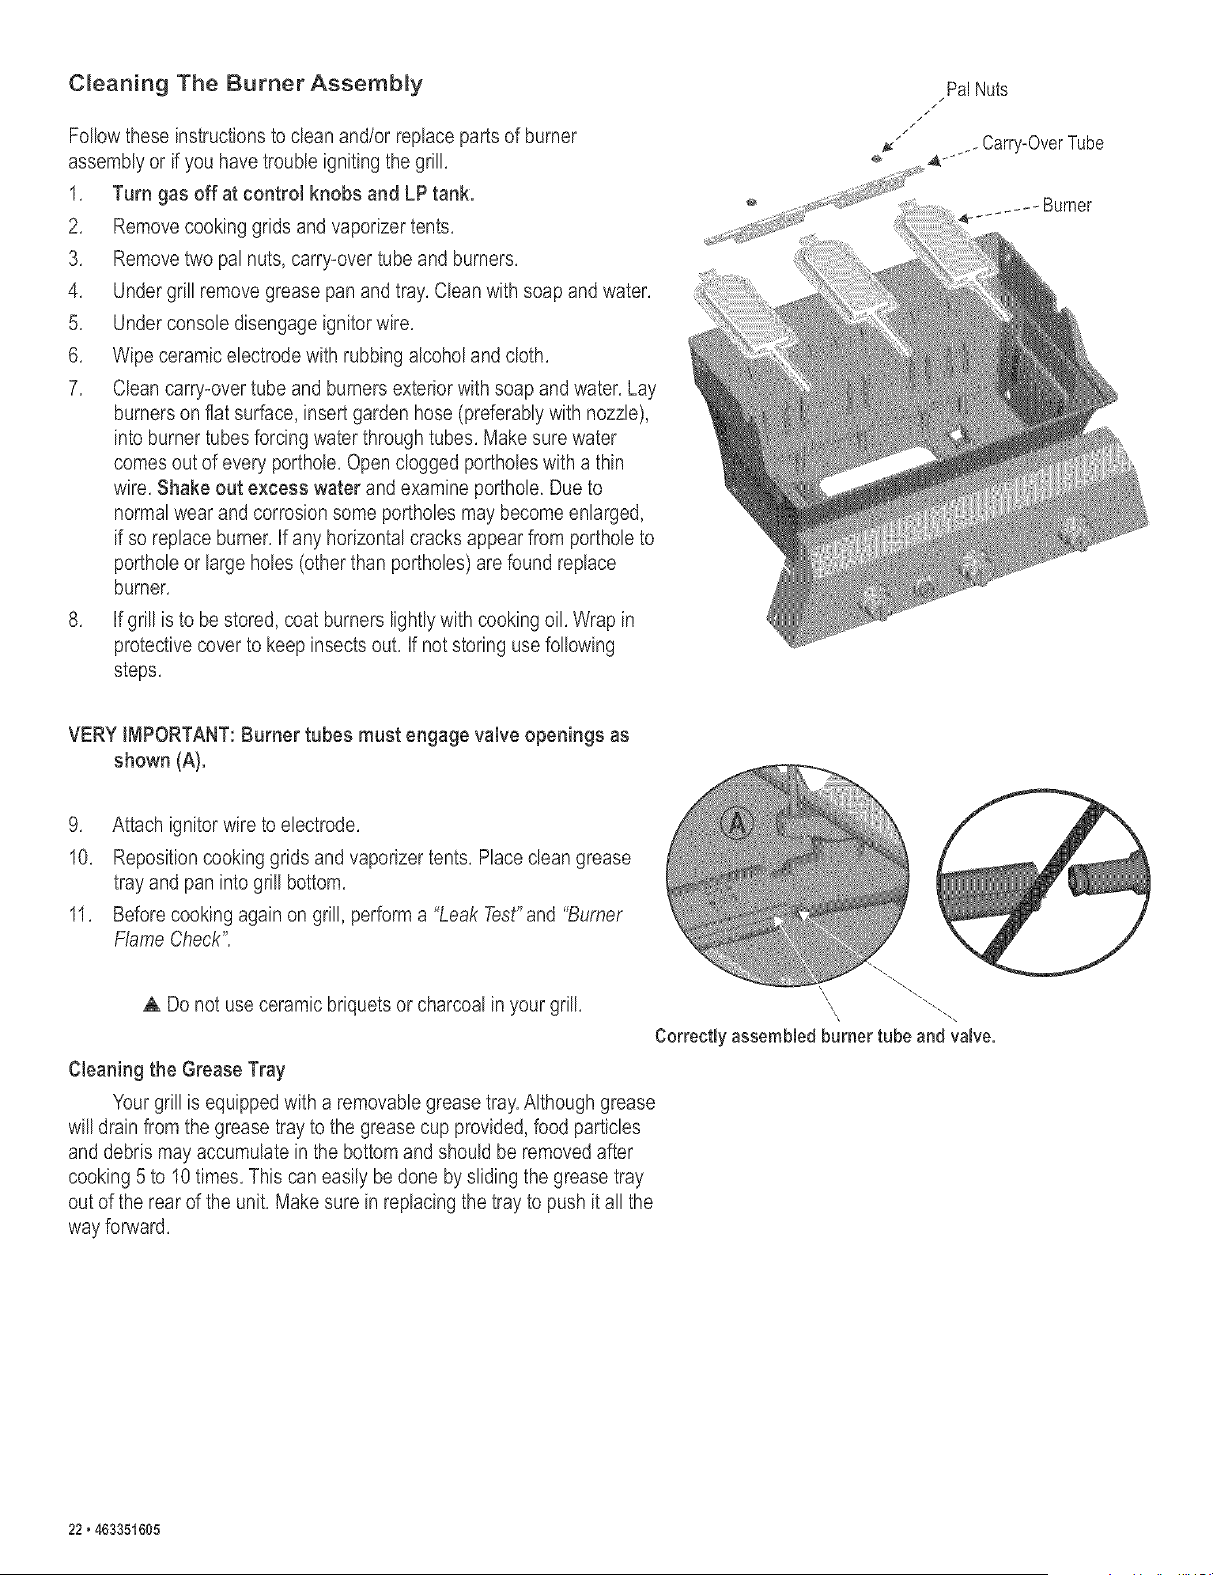
C_eaning The Burner Assembly
Follow these instructions to clean and/or replace parts of burner
assembly or if you have trouble igniting the grill,
1, Turn gas off at controJ knobs and LP tank.
2, Remove cooking grids and vaporizer tents,
3, Remove two pal nuts, carry-over tube and burners,
4, Under grill remove grease pan and tray, Clean with soap and water,
5, Under console disengage ignitor wire,
6, Wipe ceramic electrode with rubbing alcohol and cloth,
7, Clean carry-over tube and burners exterior with soap and water, Lay
burners on flat surface, insert garden hose (preferably with nozzle),
into burner tubes forcing water through tubes, Make sure water
comes out of every porthole, Open clogged portholes with a thin
wire, Shake out excess water and examine porthole, Due to
normal wear and corrosion some portholes may become enlarged,
if so replace burner, If any horizontal cracks appear from porthole to
porthole or large holes (other than portholes) are found replace
burner,
8, If grill is to be stored, coat burners lightly with cooking oil, Wrap in
protective cover to keep insects out, If not storing use following
steps,
PalNuts
/J/
Tube
_: ..L,arry-uver
VERY IMPORTANT: Burner tubes must engage valve openings as
shown (A).
9, Attach ignitor wire to electrode,
10, Reposition cooking grids and vaporizer tents, Place clean grease
tray and pan into grill bottom,
11, Before cooking again on grill, perform a "Leak Test"and "Burner
Flame Check",
,& Do not use ceramic briquets or charcoal in your grill, -..
Correctly assembled burner tube and valve.
Cleaning the Grease Tray
Your grill is equipped with a removable grease tray,Although grease
will drain from the grease tray to the grease cup provided, food particles
and debris may accumulate in the bottom and should be removed after
cooking 5 to 10 times, This can easily be done by sliding the grease tray
out of the rear of the unit, Make sure in replacing the tray to push it all the
way forward,
22,463351605
Storing Your Grill
, Clean cooking grates,
, Store in dry location,
, When LP tank is connected to grill, store outdoors in well-
ventilated space and out of reach of children,
, Cover grill if stored outdoors,
, Store grill indoors ONLY if LP tank is turned off and
disconnected, removed from grill and stored outdoors,
, When removing grill from storage follow "Cleaning Burner
Assembly" instructions before starting grill,
Food Safety
Food safety is a very important part of enjoying the outdoor
cooking experience, To keep food safe from harmful bacteria,
follow these four basic steps:
Ctean: Wash hands, utensils, and surfaces with hot soapy water
before and after handling raw meat and poultry,
Separate: Separate raw meats and poultry from ready*to-eat
foods to avoid cross contamination, Usea dean platter and
utensils when removing cooked foods,
Cook: Cook meat and poultry thoroughly to kill bacteria, Use a
thermometer to ensure proper internal food temperatures,
Chill: Refrigerate prepared foods and leftovers promptly,
For more information call: USDA Meat and Poultry Hotline at
1o800o535o4555in Washington, DC (202) 720-3333, 10:00 amo
4:00 pm EST.
How To Tell If Meat Js Grilled ThorougMy
• Meat and poultry cooked on a grill often browns very fast on the
outside, Use a meat thermometer to be sure food has reached
a safe internal temperature, and cut into food to check for
visual signs of doneness,
• Whole poultry should reach 180° F; breasts, 170° F,Juices
should run dear and flesh should not be pink,
• Hamburgers made of any ground meat or poultry should reach
160° F,and be brown in the middle with no pinkiuices, Beef,
veal and lamb steaks, roasts and chops can be cooked to 145°
F,All cuts of pork should reach 160° R
• NEVER partially gri!l meat or poultry and finish cooking later,
Cook food completely to destroy harmful bacteria,
• When reheating takeout foods or fully cooked meats like hot
dogs, grill to 165° F,or until steaming hot,
463351¢05.23
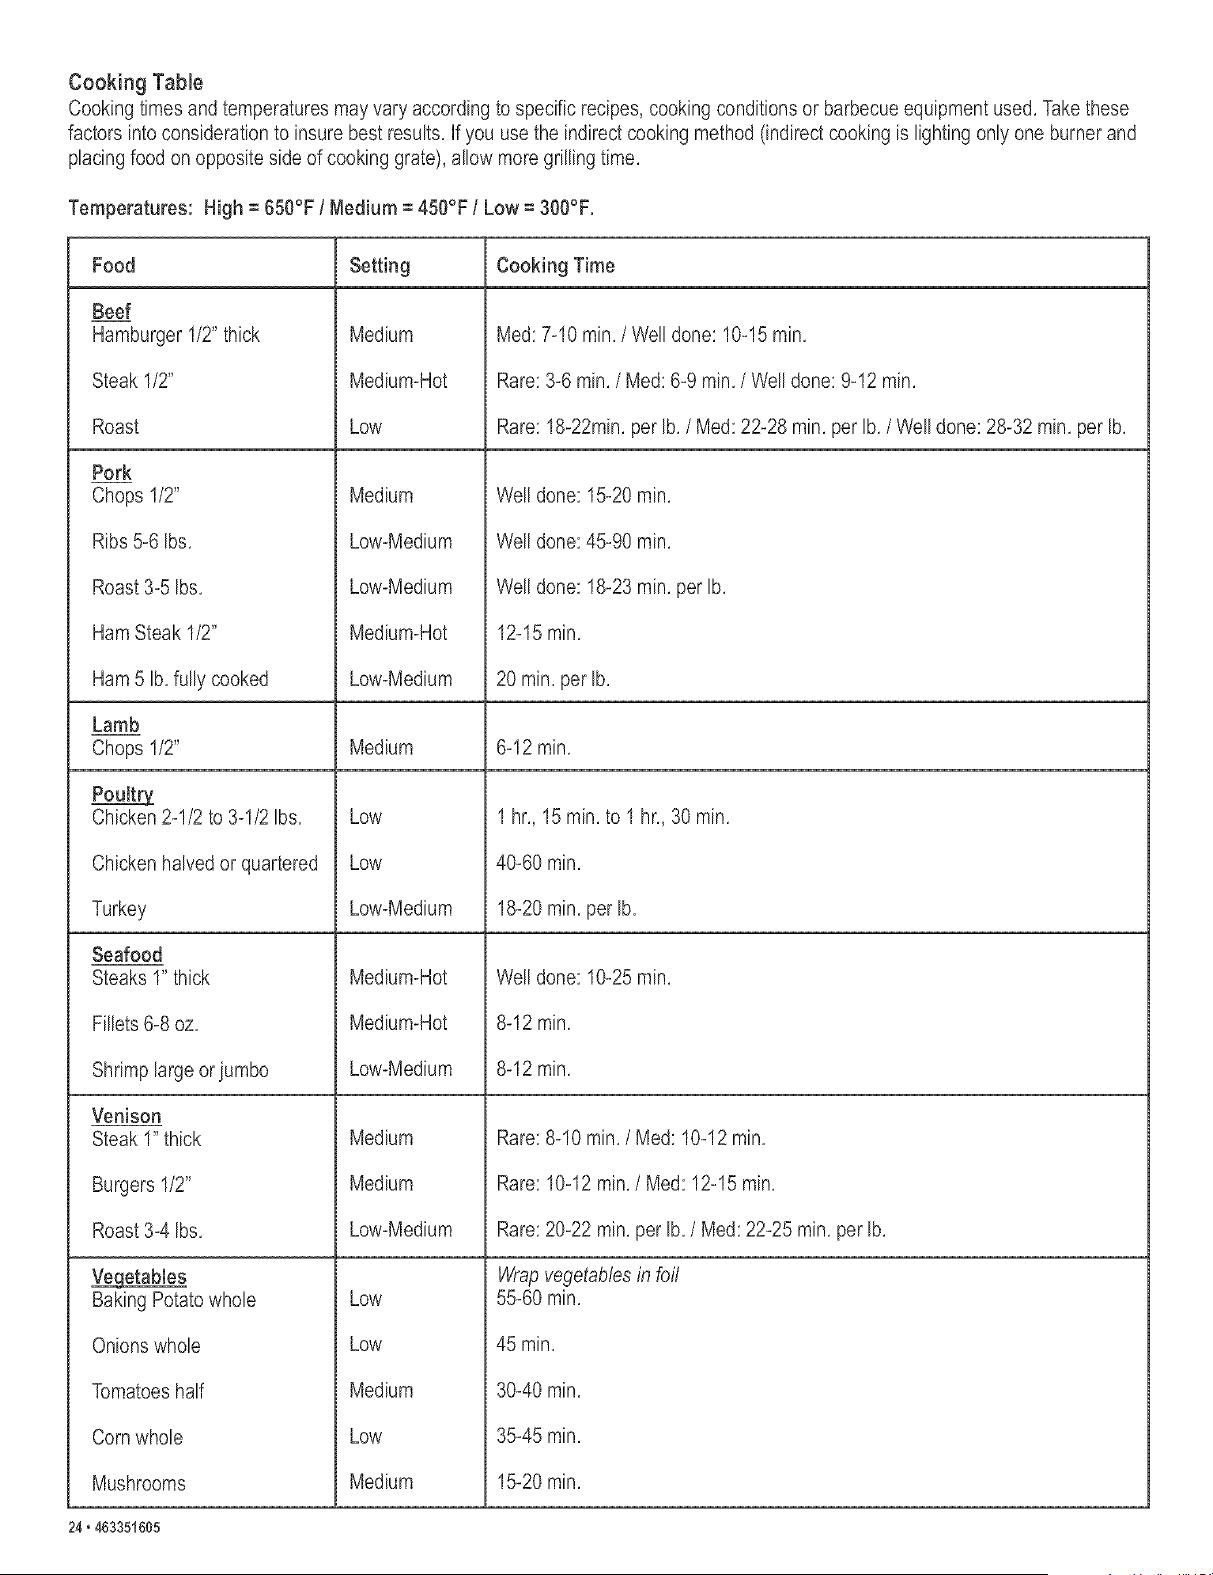
Cooking Tabme
Cooking times and temperatures may vary according to specific recipes, cooking conditions or barbecue equipment used, Take these
factors into consideration to insure best results, If you use the indirect cooking method (indirect cooking is lighting only one burner and
placing food on opposite side of cooking grate), allow more grilling time,
Temperatures: High = 650°F / Medium = 450°F / Low = 300°F.
Food
Beef
Hamburger 1/2" thick
Steak I/2"
Roast
Pork
Chops 1/2"
Ribs 5-6 Ibs,
Roast 3-5 Ibs,
Ham Steak 1/2"
Ham 5 Ib, fully cooked
Lamb
Chops 1/2"
Poultry
Chicken 2-1/2 to 3-1/2 Ibs,
Chicken halved or quartered
Turkey
Seafood
Steaks I" thick
Fillets 6-8 oz,
Shrimp large or jumbo
Venison
Steak 1" thick
Burgers I/2"
Roast 3-4 Ibs,
Vegetables
Baking Potato whole
Onions whole
Tomatoeshalf
Corn whole
Mushrooms
Setting Cooking Time
Medium
Medium-Hot
Low
Medium
Low-Medium
Low-Medium
Medium-Hot
Low-Medium
Medium
Low
Low
Low-Medium
Medium-Hot
Medium-Hot
Low-Medium
Medium
Medium
Low-Medium
Low
Low
Medium
Low
Medium
Med: 7-10 min,/Well done: 10-15 min,
Rare: 3-6 min, / Med: 6-9 min,/Well done: 9-12 rain,
Rare: 18-22rain, per Ib, / Med: 22-28 rain, per Ib,/ Well done: 28-32 rain, per Ib,
Well done: 15-20 min,
Well done: 45-90 min,
Well done: 18-23 rain, per Ib,
12-15 min,
20 min, per Ib,
6-12 min,
1 hr,, 15 rain, to 1 hr. 30 rain,
40-60 min,
18-20 min, per Ib,
Well done: 10-25 min,
8-12 min,
8-12 min,
Rare: 8-10 min,/Med: 10-12 min,
Rare: 10-12 min,/Med: 12-15 rain,
Rare: 20-22 min, per Ib,/Med: 22-25 min, per Ib,
Wrap vegetables i,'_foil
55-60 min,
45 min,
30-40 rain,
35-45 min,
15-20 min,
24,463351¢05
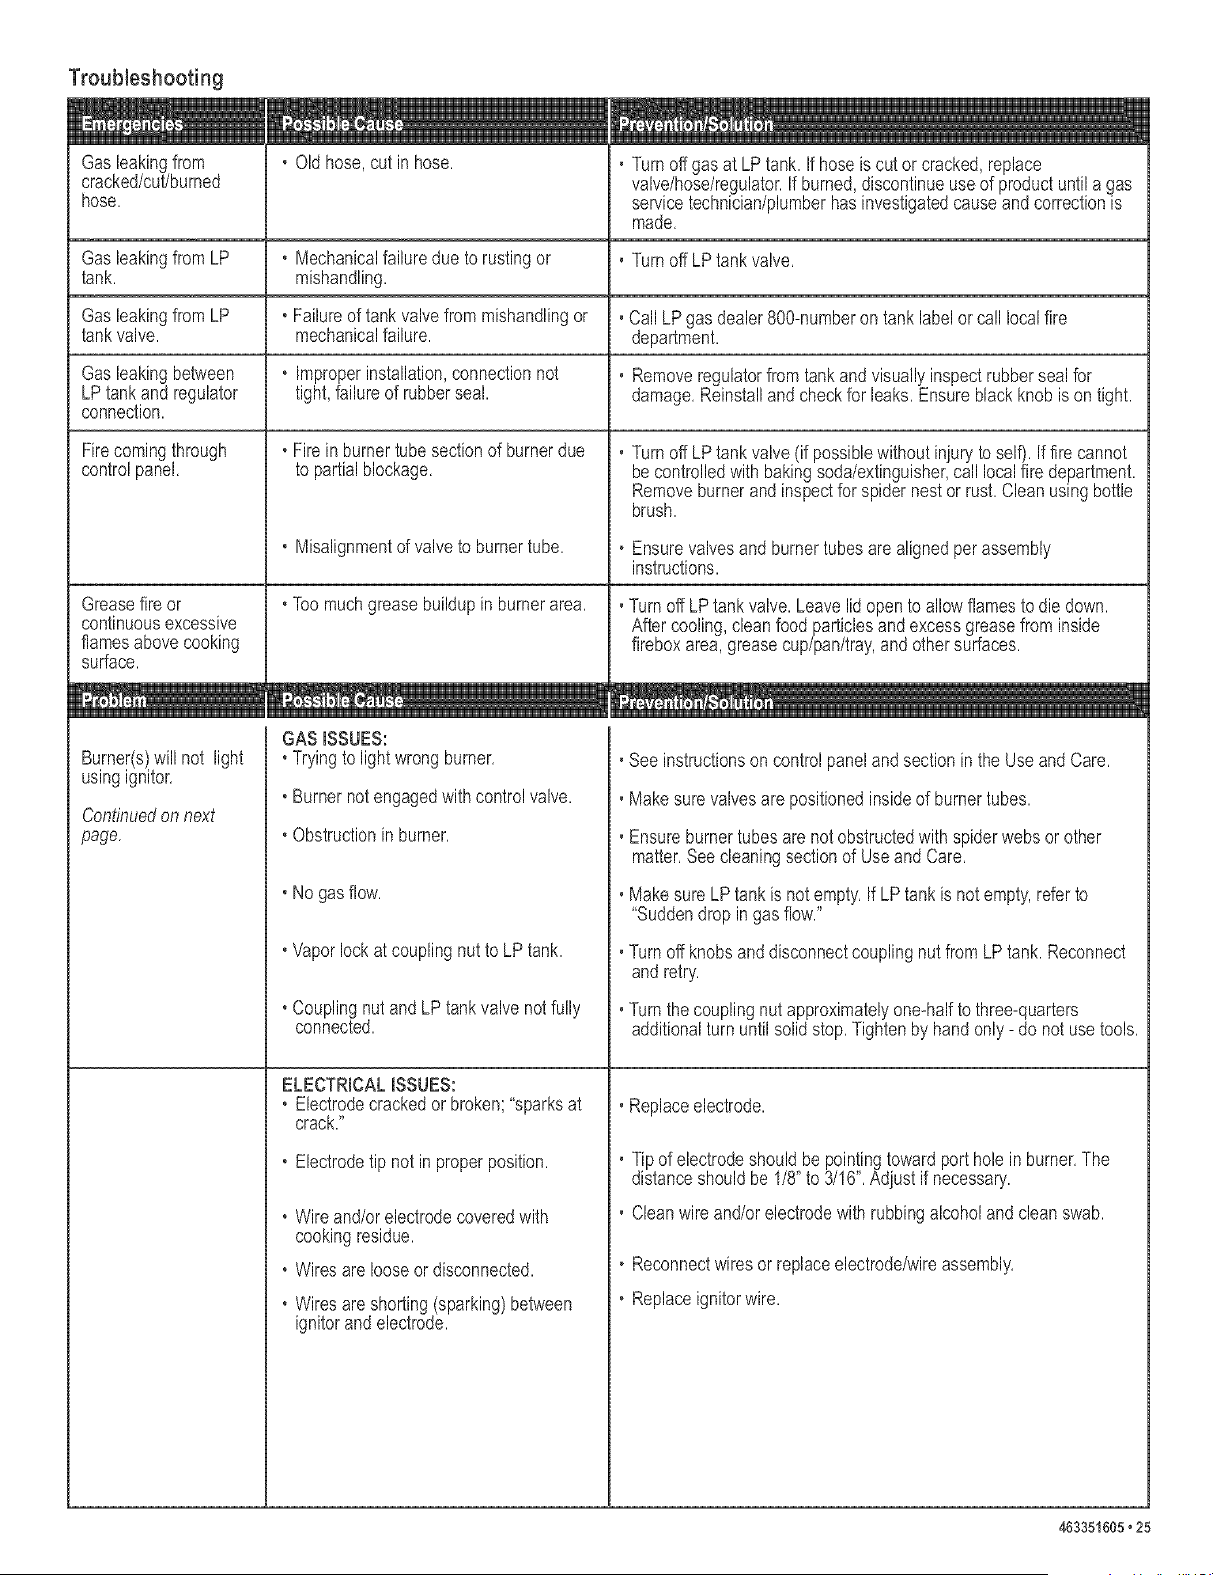
Troubleshooting
Gasleakingfrom
cracked/cu_burned
hose.
o Oldhose,cutin hose.
, Turnoffgas at LP tank. If hoseis cut orcracked,replace
valve/hose/regulator.Ifburned,discontinueuseof productuntilagas
servicetechnician/plumberhasinvestigatedcauseandcorrectionis
made.
GasleakingfromLP , Mechanicalfailuredue to rustingor , Turnoff LPtankvalve.
tank. mishandling.
GasleakingfromLP , Failureof tankvalvefrom mishandlingor , Call LP gasdealer800-numberon tanklabelor call localfire
tankvalve, mechanicalfailure, department.
Gasleakingbetween , Improperinstallation,connectionnot , Removeregulatorfrom tankand visuallyinspectrubberseal for
LPtankandregulator tight,failureof rubberseal. damage.Reinstalland checkfor leaks.Ensureblackknob ison tight.
connection.
Firecomingthrough
controlpanel.
oFire inburnertubesectionof burnerdue
to partialblockage.
o Misalignmentof valveto burnertube.
, Toomuchgreasebuildupin burnerarea.
Greasefire or
continuousexcessive
flamesabovecooking
surface.
, Turnoff LPtankvalve(if possiblewithoutinjurytoself). If fire cannot
becontrolledwith bakingsoda/extinguisher,call localfire department.
Removeburnerand inspectfor spidernest or rust.Cleanusingbottle
brush.
, Ensurevalvesandburnertubes are alignedperassembly
instructions.
, TurnoffLPtankvalve.Leavelid opento allowflamesto diedown.
Aftercooling,cleanfood particlesand excessgreasefrom inside
fireboxarea,greasecup/pan/tray,andothersurfaces.
Burner(s)will not light
usingignitor.
Continuedonnext
page.
GASISSUES:
, Tryingto lightwrongburner.
, Burnernotengagedwith controlvalve.
, Obstructionin burner.
, No gasflow.
oVaporlockat couplingnut to LPtank.
oCouplingnutandLPtankvalvenotfully
connected.
ELECTRICALISSUES:
, Electrodecrackedor broken;"sparksat
crack."
° Electrodetip not in properposition.
oWireand/orelectrodecoveredwith
cookingresidue.
° Wiresare looseor disconnected.
oWiresareshorting(sparking)between
ignitorandelectrode.
, Seeinstructionson controlpanelandsectioninthe Use and Care.
, Makesure valvesarepositionedinsideof burnertubes.
, Ensureburnertubes are notobstructedwith spiderwebs or other
matter.See cleaningsectionof Useand Care.
, Makesure LPtankis notempty.If LP tank is notempty,referto
"Suddendropingasflow."
, Turnoffknobsanddisconnectcouplingnutfrom LP tank.Reconnect
and retry.
, Turnthecouplingnut approximatelyone*halfto three-quarters
additionalturnuntil solidstop.Tightenby handonly- donot usetools.
, Replaceelectrode.
, Tip of electrodeshouldbepointingtowardportholein burner.The
distanceshouldbe 1/8"to 3/16".Adjust if necessary.
, Cleanwireand/orelectrodewithrubbingalcoholandcleanswab.
, Reconnectwiresor replaceelectrode/wireassembly.
, Replaceignitorwire.
463351605,25
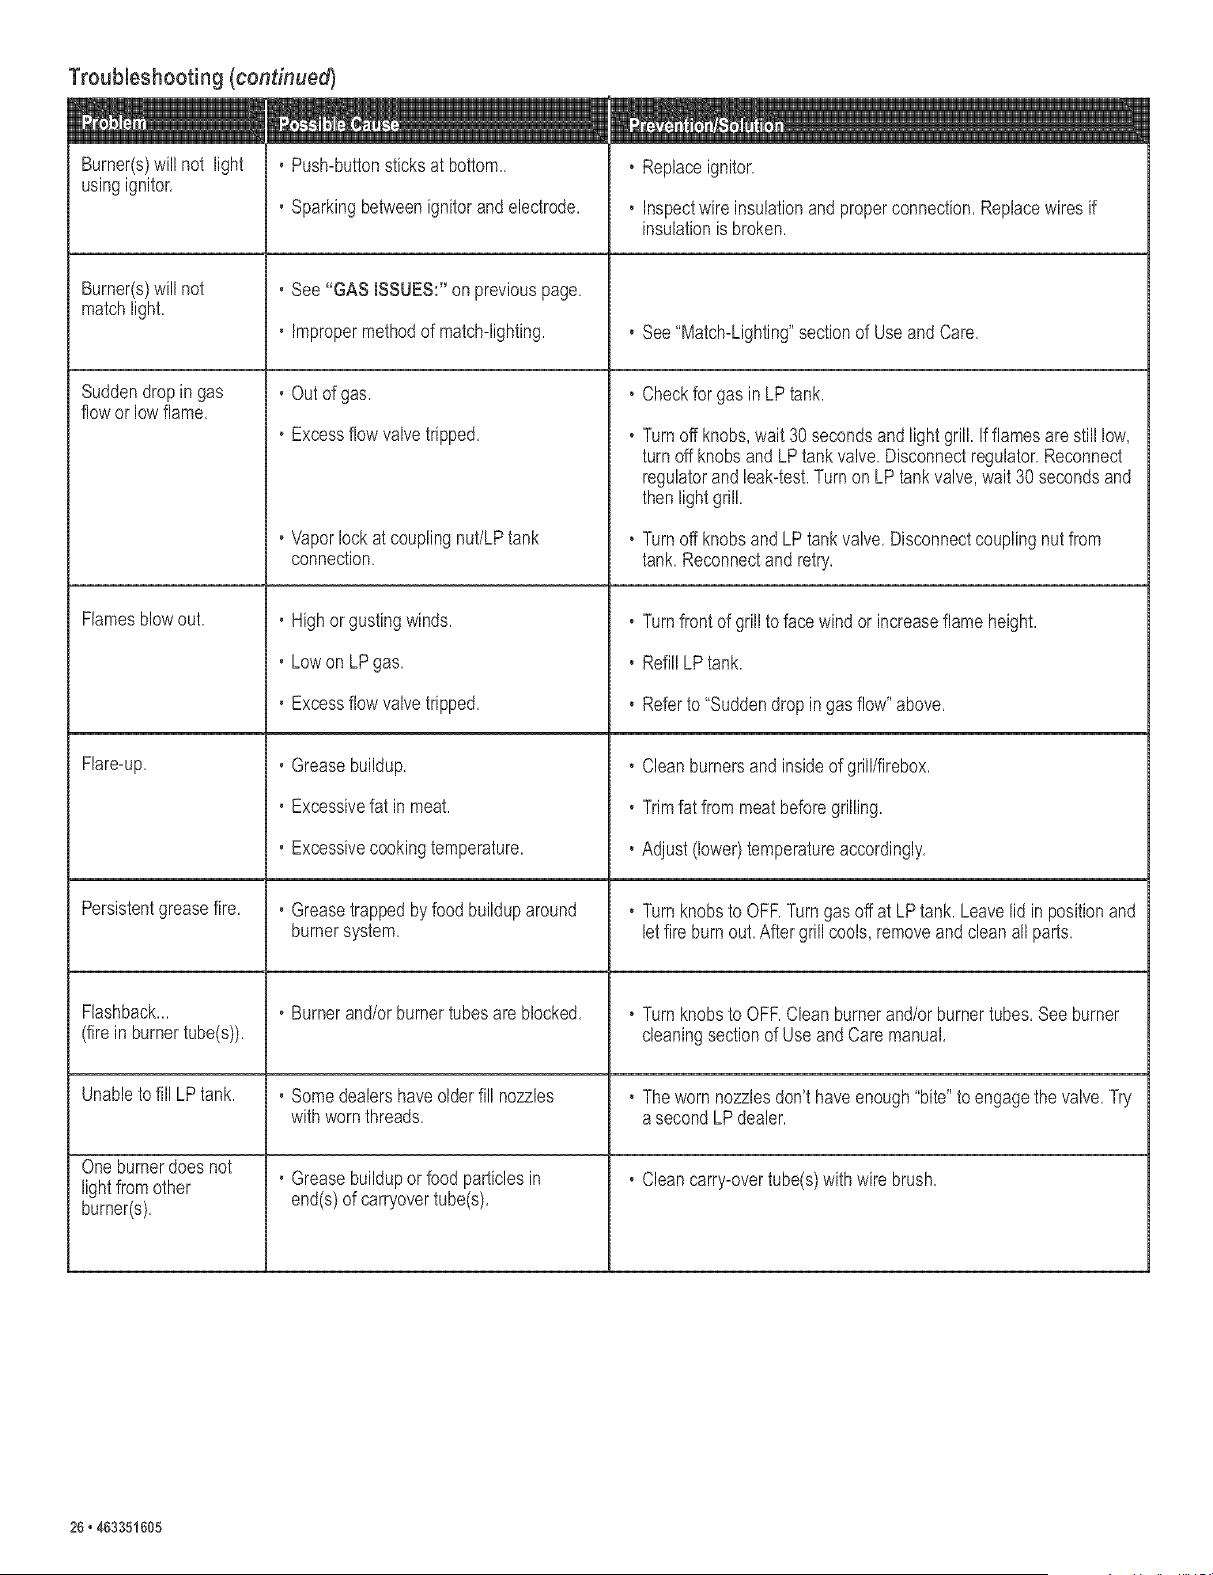
Troubleshooting (centinued)
i Bl_m imlm _BB BEmBU
Burner(s)will not light , Push-buttonsticksat bottom., o Replaceignitor.
usingignitor,
, Sparkingbetweenignitorand electrode, , Inspectwire insulationandproperconnection,Replacewires if
insulationis broken.
Burner(s)will not , See "GAS iSSUES:"onpreviouspage,
matchlight.
, Impropermethodof match-lighting. , See"Match-Lighting"sectionof UseandCare,
Suddendropingas , Checkfor gas inLPtank.
flowor lowflame,
Flamesblowout.
Flare-up,
Persistentgreasefire,
Flashback...
(firein burnertube(s)),
Unabletofill LPtank.
Oneburnerdoesnot
lightfromother
burner(s),
, Outof gas.
, Excessflow valvetripped,
° Vaporlockat couplingnut/LPtank
connection,
, Highorgustingwinds,
, LowonLPgas,
, Excessflow valvetripped,
, Greasebuildup,
, Excessivefat in meat.
, Excessivecookingtemperature,
, Greasetrappedbyfood builduparound
burnersystem,
o Burnerand/orburnertubesareblocked,
, Somedealershaveolderfill nozzles
withwornthreads,
, Greasebuildupor foodparticlesin
end(s)of carryovertube(s),
, Turnoff knobs,wait30secondsandlight grill.Ifflamesare still low,
turnoff knobsand LPtank valve.Disconnectregulator.Reconnect
regulatorand leak-test.Turnon LP tank valve,wait 30 secondsand
thenlightgrill.
° Turnoff knobsandLP tank valve,Disconnectcouplingnutfrom
tank.Reconnectandretry,
, Turnfrontof grillto facewindor increaseflameheight.
, RefillLPtank.
, Referto "Suddendropingas flow"above,
, Cleanburnersand insideof grill/firebox,
, Trimfat from meat beforegrilling.
, Adjust(lower)temperatureaccordingly,
, Turnknobsto OFF.Turngas offat LPtank. Leavelid in positionand
letfire burnout.Aftergrillcools,removeandcleanall parts,
° Turnknobsto OFF.Cleanburnerand/orburnertubes,See burner
cleaningsectionof UseandCare manual,
, Thewornnozzlesdon'thaveenough"bite"to engagethe valve,Try
asecondLPdealer,
, Cleancarry-overtube(s)with wire brush.
26,463351605
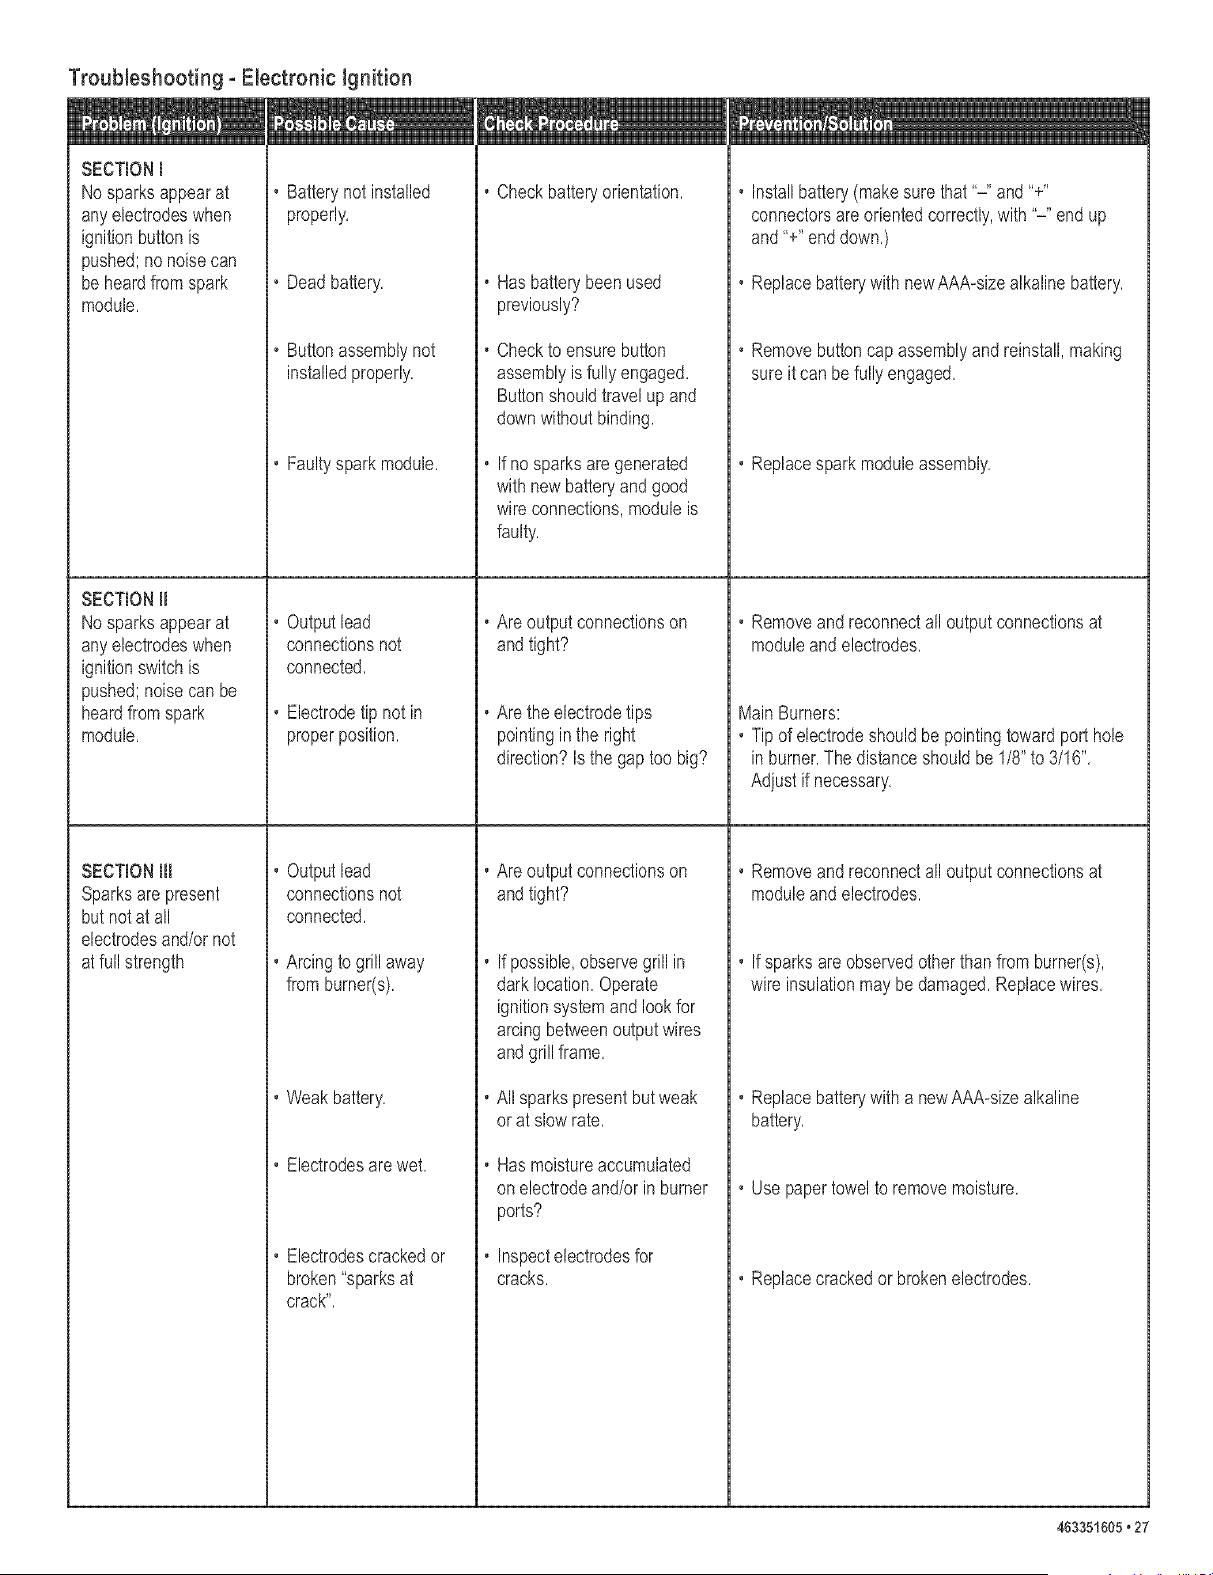
Troubleshooting - Electronic Ignition
SECTION1
Nosparksappearat
any electrodeswhen
ignitionbuttonis
pushed;no noisecan
beheardfromspark
module,
SECTIONII
Nosparksappearat
any electrodeswhen
ignitionswitchis
pushed;noisecan be
heardfrom spark
module,
SECTIONIll
Sparksarepresent
butnotat all
electrodesand/ornot
at full strength
, Batterynot installed
properly,
, Deadbattery,
,o Buttonassemblynot
installedproperly,
,o Faultyspark module,
, Outputlead
connectionsnot
connected,
, Electrodetip not in
properposition,
,o Outputlead
connectionsnot
connected,
,o Arcingtogrillaway
fromburner(s),
,o Weakbattery,
,o Electrodesare wet.
,, Electrodescrackedor
broken"sparksat
crack",
oCheckbatteryorientation,
oHasbatterybeenused
previously?
oCheckto ensurebutton
assemblyis fully engaged.
Buttonshouldtravelup and
downwithoutbinding.
, Ifnosparksaregenerated
withnewbatteryand good
wireconnections,moduleis
faulty,
oAreoutputconnectionson
andtight?
, Arethe electrodetips
pointingin the right
direction?Is the gap too big?
oAreoutputconnectionson
andtight?
, Ifpossible,observegrill in
darklocation.Operate
ignitionsystemand lookfor
arcingbetweenoutputwires
andgrillframe,
oAllsparkspresentbutweak
or at slowrate,
oHasmoistureaccumulated
onelectrodeand/orin burner
ports?
o Inspectelectrodesfor
cracks,
o Installbattery(makesure that"-" and "+"
connectorsareorientedcorrectly,with "-" endup
and"+" enddown,)
, Replacebatterywith newAAA-sizealkalinebattery,
, Removebuttoncapassemblyand reinstall,making
sureit canbefullyengaged,
, Replacespark moduleassembly,
oRemoveandreconnectall outputconnectionsat
moduleandelectrodes,
MainBurners:
, Tip of electrodeshouldbe pointingtowardporthole
in burner.The distanceshouldbe 1/8"to 3/16",
Adjustif necessary,
oRemoveandreconnectall outputconnectionsat
moduleandelectrodes,
, Ifsparksare observedotherthanfrom burner(s),
wire insulationmaybe damaged,Replacewires,
oReplacebatterywith a newAAA-sizealkaline
battery,
oUsepapertowelto removemoisture,
oReplacecrackedor brokenelectrodes,
463351605,27

28,463351605

463351605_29

30,463351605

463351605,31
Please register your grill online at:
Sirvase registrar su parriJJaen Jinea,en:
(If you register online, you do not need to send in this registration card.!Si la registra en linea, no es necesario que envie esta tarjeta de registro.)
PLEASEFULLOUTTHiSCARDANDRETURNIT WtTNtN10DAYSOFPURCHASE.FAILURETORETURNMAYAFFECTYOURWARRANTYCOVERAGE.
LLENEESTATARJETAYDEVUELVALADENTRODELOS10DiASDELACOMPRA,StNOLADEVUELVE,PUEDEVERSEAFECTADASUCOBERTURADEGARANTiA,
VEUILLEZCOMPLETERCETTECARTEETLA RETOURNERDANSLES10JOURSSUIVANTL'ACHAT,
LACOUVERTUREDEVOTREGARANTIEPOURRAITENE.TREAFFECTEESiVOUSNELEFA/TESPAS.
First Name/Nembre/Pr6nem JnitiaJ/JniciahinitiaJsLastName/ApeJiide/Nemde famine
11 II II II II II II III LJ Ill II II II II II
Address(number and street)iDiree_i6e(n_mero y calle)/Adresne(num6ro et rue)
I III II II II II II II II II II II II II
Sity/Ciedad/Vilie StatetEntade/Previeee
II ill II II II II II I_
2 E=mailAddrens/Direcci6ndecertes eleetr6nicoiAdresne_leetreniqee
ff you voluntarily provide us with your email address, you give us permission to use your email address to send you offers that may interest you.
Si nos #3forma _oluntariarnente su direccian de correo electronlco, nee da permiso psra usarlo a fin de enviarle ofertas que pueden inleresarle.
Si vous choisissez de noes rourne' vo_re adresse #lectronique, vous nous donnez [a permission de I'ueliser pour vous fairs parr dbffre$ apes/ales susceptib/es
de vous int#resse_
[ J
(Example: your name @your host.cam) (Ejemplm su hombre@su host.cam) (Exempts : votre nora @votre hSte.cam)
3 PhoneNernber/N_rnsrotelet6niee/Nem_rede t_mephene
JNPORTANT[/ilNPORTANTE!/JNPORTANT!
_# Write Serial Number and Model Number in spaces below
Eseriba en toe espacios de abajo et n#mero de sede y el n#mero
de modeto.
inscdvez te numero de eerie et ie numero de models dane/es
espaces ci-deseous,
AptNernheriN_de apart,/N-°d'eppt,
I I I I I I
Zip Code/O6digezip!Oo_epeele|
Dateef Percheao/Foehado cernpraiDatede rasher
± ±_
7 StareNams/Nembredo Jatienda/Nemde magesin
II II Illl II Ill II II I
PerchasePrice/Preoiode cempra/Prixd'achat
$_ .08
5 Year Goader/So seae/Seae:
1.[] Male/Masculino/Masculin 2.[] Fema_e/Femenino/F6minin
Which productare year registering?
ZQu6 prodecte est,1tegistraede?
Qaei pre_leit earegistrez=veas?
1.[] Gas GriJl/Parrilla de gas/
Gri_ au gaz
2.[] Electric Gr[fl/Parrilla el#ctricW
Gril emectrique
3. [] Smoker/Ahumadora/Fumoir
4. [] Charcoal GriWParrilmade carb6n/
Barbecue au charbon
5.[] CharcoamSmoker/Ahumadora de
carb6n/Fumoir au charbon
6.[] Outdoor Fireplace/Hogar para
exteriores/Foyer exterieur
7. [] Cooker/Fryer / Cocina/freidora /
Cuiseur/Friteuse
8. [] Other/Otro/Autre
Mai_ to:
Product Registration Dept,
PO BOX 1240
CoJumbus, Georgia 31902o1240
1 _ Which of these coarses influenced year #ecisian te hay this pr0#act? (check all that apply)
i,Ca_l _e estas taenfes infiueeci_ e su _ecisi6a de scepter este pre_Jacte?([_erqae te[Jes lee
qua serrespeadan)
Parmi lee _i_enents ci=_esseaS,qe'est-ce qui a influence vetre decision _'acheter ce praaait?
(Cachez teas _es_l_rneets s'app_iqaaet)
1.[] Magazine/newspaper advertisement / Propaganda en revista/peri6dico /
Publicit# dans un magazine ou dans un journa_
2.[] Television commercia_/Comercial televisivo/Publicite a la tSlevision
3.[] Grill was assembled/Parri_la ensamblada/Le gril 8tait d_j& assemble
4.[] _n-store display/Exhibidor en la t[enda/Promotion sur le lieu de vents
5.[] Store circular/Circular de la t[enda/Prospectus de magasin
6.[] Brand name/MarcWMarque
7.[] Product sty_e/Est[Io del producto/Sty_e du produ[t
8.[] Pr[ce/va_ue / Precio/va_or / Rapport prix/valeur
9.[] Product quality/Calidad del producto/Qualite du produit
10.[] Friend/Relative recommendation / Recomendaci6n de amigo o pariente /
Recommandation d'un(e) ami(e)/parent(e)
11.[] Salesperson recommendation/Recomendaci6n del vendedori
Recommandation d'un(e) prepos_(e) a la vente
12. [] Grifl size/Tamale de _a parrifl&/Tail_e du gril
13. [] Product warranty/Garantia del producto/Garantie du produit
14. [] Store demonstration!Demostraci6n en la t[enda/Demonstration en magasin
15. [] Point of purchase/Punto de compra/Lieu de vente
16. [] Other/Otras/Autre:
Thank you for completing this questionnaire. Your answers will help us and other companies reach you with offers that
may interest you. If you prefer not to receive these offers, please check here [].
Gracias per completar este cuestionar[o. Sus respuestas nos ayudaran, a nosotros y a otras compaSfas, a Ilegar a
ustedes con ofertas que puedan resultades de interns. Si prefiere no recibir estas ofertas, per favor marque aqui [].
Merci d'avoir bien voulu remplir ce questionnaire. Vos r_ponses nous aideront et aideront d'autres compagnies & vous
communiquer des offres speciales susceptibles de vous interesser. Si vous preferez ne pas recevoir d'informations
concernant ces offres sp_ciales, veuiHez cocher ici [].
32,4_3351_05