31-1000539 Rev. 0 02-21 GEA
Installation
Instructions
Stainless Steel
Door Panel Kit
Before you begin - Read these instructions completely
and carefully.
Note to Installer: Be sure to leave these instructions with
the Consumer.
Note to Consumer: Keep these instructions with your
Installation Instructions for future reference.
This kit provides for the installation of the Stainless Steel Door Panel Assemblies
Tools and Materials Required:
T10, T20 and T30 Torx driver / bits
Instructions for this kit are also
included in the full installation
instructions included with the unit.
WARNING
Tip Over Hazard.
These appliances are top heavy, especially with any
doors open, and must be secured to prevent tipping
forward which could result in death or serious injury.
Read and follow the entire installation instructions for
securing the appliance with the anti-tip system before
installing door panel kit.
WARNING
d
Door Trim Pinch Point
Hazard
Improper installation can lead to a finger pinch point
hazard between the side door trim and the cabinets
when operating the door, especially with children.
To minimize this risk you must follow the installation
instructions for cabinet dimensions, trim assembly, and
door stop angle.
AVERTISSEMENT
d
Risque de pincement
sur la garniture de porte
Une installation mal effectuée représente un risque
de pincement de doigts entre la garniture latérale de
porte et les armoires lors de la manipulation de la porte,
spécialement pour les enfants. Pour minimiser le risque,
vous devez respecter les instructions d’installation
selon les dimensions de l’armoire, l’assemblage de
garniture et l’angle de butée de la porte.
ADVERTENCIA
d
Riesgo de
Lastimadura con el Borde de la Puerta
Una instalación inadecuada puede conducir a riesgos
de pellizcos de dedos entre el borde lateral de la puerta
y los gabinetes al utilizar la puerta, especialmente
con los niños. A fin de minimizar este riesgo, usted
deberá seguir las instrucciones de instalación para
dimensiones de gabinetes, ensambles de bordes y
ángulos de detención de puertas.
ZK1SN189NLH LH 18” STAINLESS STEEL DOOR PANEL
ZK1SN184NRH RH 18” STAINLESS STEEL DOOR PANEL
ZK1SN249NLH LH 24” STAINLESS STEEL DOOR PANEL
ZK1SN244NRH RH 24” STAINLESS STEEL DOOR PANEL
ZK1SN309NLH LH 30” STAINLESS STEEL DOOR PANEL
ZK1SN304NRH RH 30” STAINLESS STEEL DOOR PANEL
ZK1SN369RLH LH 36” STAINLESS STEEL DOOR PANEL
ZK1SN364RRH RH 36” STAINLESS STEEL DOOR PANEL
ZKSP1H1CNSS MINIMALIST HANDLE FOR STAINLESS STEEL PANELS ONLY
ZKSP1H1PNSS STATEMENT HANDLE FOR STAINLESS STEEL PANELS ONLY
AVERTISSEMENT
Risque de
basculement
Ces électroménagers sont lourds dans le haut, en
particulier avec une porte ouverte, de sorte qu’ils
doivent être fixés afin de prévenir un basculement vers
l’avant pouvant occasionner des blessures graves ou
la mort. Veuillez lire et suivre la totalité des instructions
d’installation afin de fixer votre électroménager par un
dispositif antibasculement avec le système anti-bascule
avant d’installer le kit de panneau de porte..
ADVERTENCIA
Riesgo de Caídas
Estos electrodomésticos son inestables, especialmente
cuando una puerta se encuentre abierta, y deben estar
asegurados a fin de evitar caídas hacia adelante que
podrían resultar en la muerte o en lesiones graves.
Lea y siga todas las instrucciones de instalación para
asegurar el aparato con el sistema antivuelco antes de
instalar el kit del panel de la puerta.
Installation Instructions
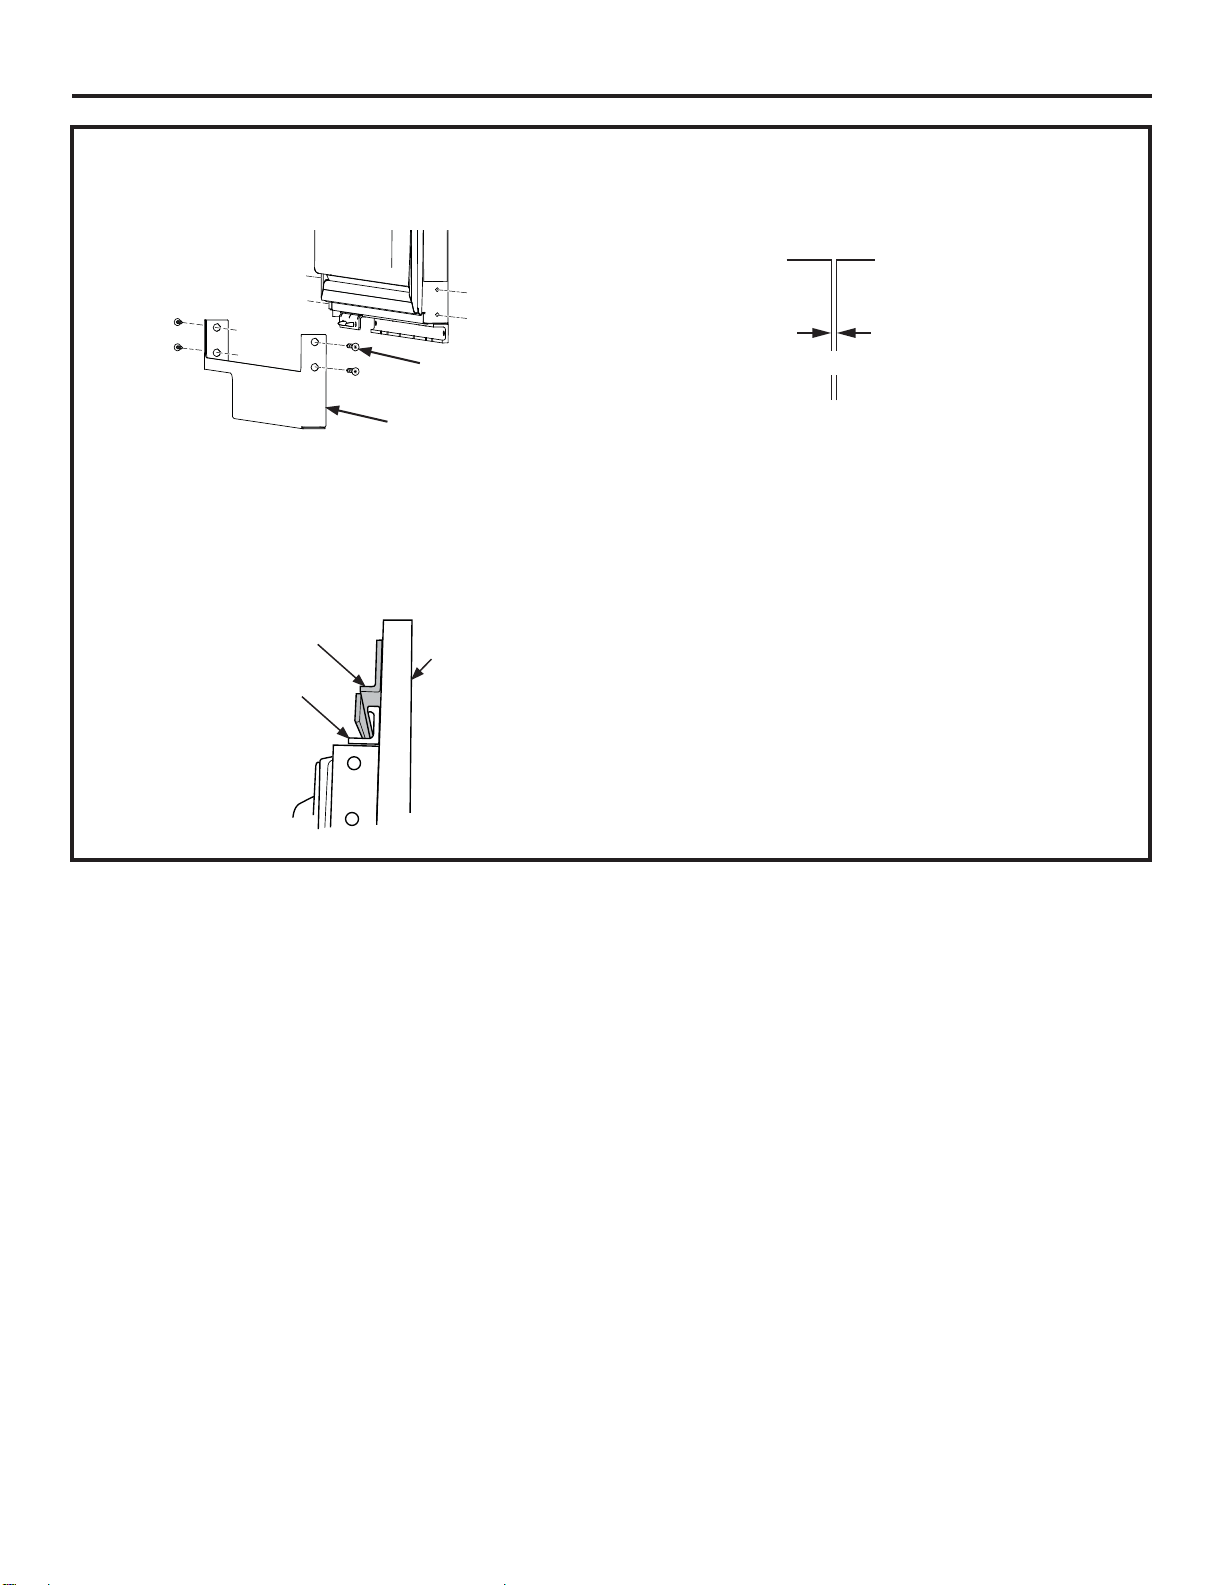
INSTALL STAINLESS PANEL
Ŷ Remove bottom hinge cover and retain the 4 T30 Torx
screws for later installation.
Ŷ Open door to 90°. Slide the panel onto the door with
the panel brackets interlocking on top and bottom with
the door brackets (make sure not to slide the panel into
the cabinetry surround). Center the panel on the door,
then slowly close the door while watching to make sure
the panel does not contact the surrounding cabinetry.
Ŷ With the door fully closed, carefully slide the panel
towards the cabinetry with the goal gap of 1/8”.
Bottom
hinge
cover
T30 Torx
screws
Door
Bracket
Panel
Bracket
Panel
1/8” gap
Cabintery
Surround
Overlay
Panel
FOLLOW THE REMAINDER OF THE STAINLESS DOOR
PANEL INSTALLATION INSTRUCTIONS IN THE UNIT
INSTALLATION INSTRUCTIONS TO ADJUST AND
SECURE THE DOOR PANEL.