Operator's Manual
CRRFT 4RN
1.4 cu.in./24cc 2-Cycle
195 MPH/405 CFM
GASOLINE POWERED BLOWER
Model No.
358,797320
_11 AFINING:
: Read and follow all Safety Rules and Operating
Instructions before first use of this product.
For answers to your questions about this product:
Call 7 am-7 pm, Mon.-Sat., or 10 am-7 pm, Sun.
Sears, Roebuckand Co., HoffrnanEstates,IL60179 USA
Warranty Statement 2 Storage 9
Safety Rules 2 TroubleshootingChart 10
Assembly 4 Parts List 12
Operation 5
Maintenance 8 Spanish 15
Service & Adjustments 9 Parts and Ordedng Back
FULL TWO YEAR WARRANTY ON CRAFTSMAN ® GAS BLOWER
For two(2) years from date ofpurchase, when this Gas Bloweris maintained,
lubdceted, end tuned upaccordingto the instructionsInthe operator's manual,
Sears willrepair,free of charge, any defects in matedal orworkmanship.
This warranty excludes blowertubes, spark plug, and air cleaner, which are ex-
pondable parisand become worn dudngnormaluse.
Ifthisblowerisusedforcommercialpurposes,thiswarrantyappliesfor90 daysfrom
the date ofpurchase. Ifthis Blowerisusedforrentalpurposes,this warrantyapplies
for30 daysfromthe date of purchase.This warrantyapplies onlywhilethis product
isin use inthe United States.
WARRANTYSERVICEISAVAILABLEBYRETURNINGTHE BLOWERTO THE NEAREST
SEARSSERVICECENTERIN THEUNITEDSTATES.
This warranty givesyou specificlegal rights,and you may also have other rights
which vary fromstate to state.
Sears, Roebuck and Co. D/817WA Hoffman Estates, IL 60179
FailuretofollowallSafety Rulesand Pre-
cautionscan resultin serious injury.
KNOW YOUR UNIT
• Read yourOporator's Manual care-
fully untilyou completely understand
and canfollow all warnings and
safety rules before operating the unit.
• Restrictunitto users who understand
and willfollow all warnings and safety
_ rules inthis manual.
PLAN AHEAD
• Alwayswear eye protectionwhenop-
erating,servicing,or performingmain-
tanance onunit.Wearingeye protec-
tionwill help to preventrocksor debris
frombeing blownor rico_ into
eyes andface which can resultin
blindnessand/orserious injury.
• Always wear respirator or face mask
when workingwithunit industyenvi-
ronments.
• Secure hair above shoulderlength.
Secure or remove jewelry, loose
-- clothing,or clothingwith loosely
hanging straps,ties, tassels, etc.
They can be caught in movingparts.
• Do notoperateunitwhen you are tired,
i11,upset,orifyou are underthe influ-
ence of alcohol,drugs,ormedicaticn.
• Keep children,bystanders, and anF
realsaway from workarea a mini-
mum of 50 feet (15 m) when starting
or operating unit.
• inspectarea beforestartingunit.Re-
movealldebrisand hardobjectssuch
as rocks,glass,wire, etc.thatcan rico-
chet,be thrown, or otherwisecause
injuryordamage duringoperation.
HANDLE FUEL WITH CAUTION
• Eliminateall sourcesof sparksor
flame (includingsmoking,open
flames, orwork that can cause
sparks) in the areas where fuel is
mixed,poured, or stored.
• Mix end pourfuel in en outdoorarea;
storefuel In a cool, dry,woll venhlated
place;useanapproved,markedcon-
tainerforallfuet,_.,rpose_
• Do notsmoke who• hand lngfuel or
while operatingthe unit.
• Do nottillfuel tank whileengine is
running.
-2-
• Wipe up fuel spills before startingen-
gine.
• Move at least 10 feet (3 meters)
away fromfuel and fueling site before
starling engine. -,, :....
- OPERATE YOUR UNIT SAFELY
• Stopthe engine before opening the
vacuum inlet door.The engine must
be stopped and the impellerblades
no longerturningto avoid serious in-
juryfromthe rotatingblades.
• Inspect unitbefore each use for
worn, loose,missing, or damaged
parts. Do not use untilunit isin
proper workingorder.
• Keep outsidesurfacas fres from oil
and fuel.
• Never start or run engine inside a
closed roomor building.Breathing
exhaust fumes can kill.
• Toavoid staticelectricityshock, do
notwear rubber gloves orany other
insulatedgloves while operating unit.
• Do notset'unit on any surface except
a clean, hard area while engine is
running.Debris such as gravel, sand,
dust, grass, etc. could be picked up
by the air intake and thrown out
throughdischarge opening, damag-
ing unit,pmperb], or causing sedous
injuryto bystanders or operator.
• Avoiddangerous environments. Do
not use in unventilated areas or
where explosive vapors or carbon
monoxide build upcould be present.
• Do not overreach or use from unsta-
ble surfacessuch as ladders, trees,
steep slopes, rooftops,etc. Keep firm
footingand balance at all times.
• Never place objects insidethe blower
tube._;;'a_aysdirectthe blowingde-
brisaway from people, animals,
glass, and solid objects suchas
trees, automobiles, walls, etc. The
force of air can cause rocks,dirt, or
sticksto be thrown orto ricochet
which can hurt people or animals,
break glass, or cause other damage.
• • Never run unitwithoutthe proper
equipment attached. When usi'ng
your unitas a blower, always _nstell
blowertubes. When using the option-
al vacuum kit, always installvacuum
tubes_and vacuum bag assembly.
Makt"s'urevacuum bag assembly is
completelyzipped.
• Check air intake opening, blower
tubes, andvacuum tubes frequently,
always with enginestopped and
spark plugdisconnected.Keep vents
and dischargetubes free ofdebris
which can accumulateand restrict
proper air flow.
• Neverl_ca Imyobje_ in 8it ir_ke
openingesthiscculdreslzictprcperair
flowand cause _ to the urd.
• Never usefor spreading chemicals,
fertilizers,or other substances which
may containtoxicmaterials.
• Toavoid spreading fire, donot use
near leaf or brush rims,fireplaces,
barbecue pits, ashtrays,etc.
• Use onlyforjobs explainedin this
manuel.
MAINTAIN YOUR UNIT PROPERLY
• Have all maintenance other than the
recommended procedures descdbed
in the Operator's Manuel performed
by Sears Service.
• Disconnect spark plug before per-
forming maintenance except for car-
buretor adjustments.
• Use only recommended CRAFTS-
MAN® replacement parts; use of any
other parts may void your warranty
and cause damage to your unit.
• Empty fuel tank before stodng the unit.
Use up fuel left in carburetor by staning
engine and letting it run until it stops.
• Do notuseany accessoryor attach-
ment otherthan thoserecommended
by manufacturerforusewithyourun'_
• Do notstorethe unitorfuel ina
closed area where fuel vapors can
reach sparksor an open flame from
hotwater heaters, electricmotorsor
switches,furnaces, etc.
• Store in a dryarea out of reach of
children.
SPECIAL NOTICE: For users on U.S.
Forest Land and in somestates, in-
cludingCalifornia(PublicResources
Codes 4442 and 4443), Idaho, Maine,
Minnesota, New Jersey, Oregon, and
Washington:Certain internalcombus-
tionengines operated onforest, brush,
and/or grasscovered land inthe above
areas are requiredto _ equipped with
a spark arrestor,maintained in effective
workingorder,or the engine m.ust.be
constructed,equipped, and maintained
forthe prevention oftire. Checkwith
your state orlocal authoritiesfor regu-
lationspertainingtothese require-
ments. Failureto followthese require-
ments is a violationofthe law. Thi_ unit
isnotfactoryequippedwithasparkar-
restor;however, a spark arrestor is
available as an optional part. If a spark
arrestor isrequiredin your area, con-
tact Sears Service forthe correct kit.
The spark arrestor,blowertubes, and
nozzlesmust I_ assembled to unitto
be in full compliance with regulations.
SPECIAL NOTICE: Exposureto vibra-
tionsthrou9|l prolongeduse ofgasoline
poweredhand toolscouldcauseblood
vesselorne_e damage in the fingers,
hands,and jointsof peopleproneto cir-
culationdisordersor abnormalsweging.
Prolongeduse incoldweather hasbeen
linkedto bloodvesseldamage in other-
wisehealthypeople. Ifsymptomsoccur
suchas numbness, pain,lossof
strength,change in sldncolor ortexture,
or lossof feelinginthe fingers,hands,or
•joints,dscor_e the use of this tool
a_ ssek _ att_ An
an_tJon systemdoes notguarantee
the avoidanceofthese problems.Users
who operatepowertoolsona continual
and regularbasis mustmonitorclosely
their physicalcondition andthe condtion
ofthis tool.
CARTON CONTENTS
Check cartoncontents againstthe fol-
lowinglist.
Model 358.797320
• Blower
• Blowertube
• 2-Cycle Engine Oil
NOTE: Itis normalfor the fuel filterto
rattleinthe empty fuel tank.
ASSEMBLY
WARNING: If received assembled,
repeat all steps to ensure your unitis
properlyassembled and all fasteners
are secure.
• No tools are required forassembly.
BLOWER TUBE ASSEMBLY
Ifyou have already assembled your
unitfor use as a vacuum, remove the
vacuum tubes and collectionbag.
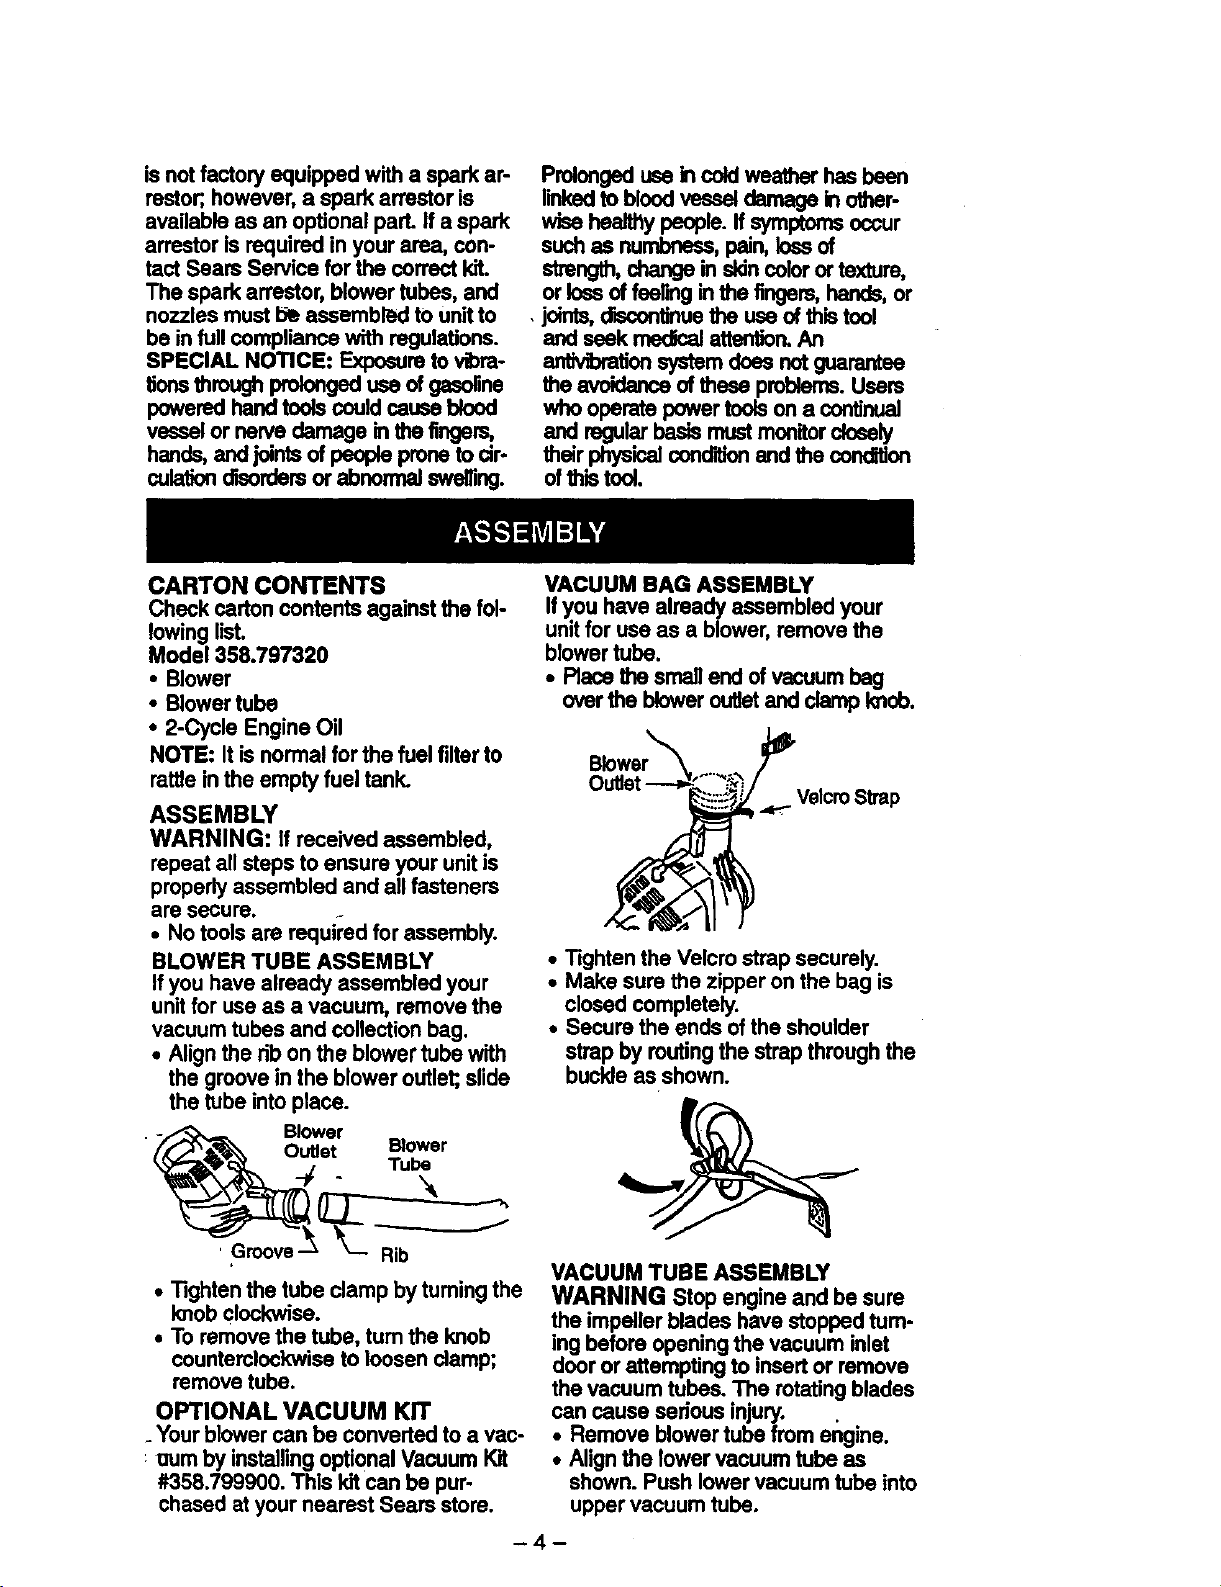
• Alignthe rib on the blowertube with
the groovein the bloweroutlet;,slide
the tube intoplace.
- _ Blower
///"_ _'_ Outlet Blower
_3_ql_t,. _.; Tube
_ Rib
• Tighten the tube clamp by tuming the
knob clockwise.
• To remove the tube, turn the knob
counterclockwise to loosen clamp;
remove tube.
OPTIONAL VACUUM KIT
. Yourblowercan be converted to a vac-
uum by installingoptional Vacuum Kit
#358.799900. This kitcan be pur-
chased at your nearest Sears store.
VACUUM BAG ASSEMBLY
Ifyou have already assembled your
unitfor use as a blower,remove the
blowertube.
• Race the smallend ofvacuum bag
overthe bloweroutletand clamp knob.
Blower
Velcm Strap
• Tighten the Velcro strap securely.
• Make sure the zipper onthe bag is
closed completely.
• Secure the ends of the shoulder
strap by routingthe strap through the
buckle as shown.
VACUUM TUBE ASSEMBLY
WARNING Stop engine and be sure
the impeller blades have stopped tum-
ing before opening the vacuum inlet
door or attempting to insert or remove
the vacuum tubes. The rotating blades
can cause serious injury.
• Remove blower tube from engine.
• Align the lower vacuum tube as
shown. Push lower vacuum tube into
upper vacuum tube.
-4-

Lower
VacuumTube
• inserta screwdriver intothe latch
area on the vacuum inletcover.
• Gentlyflitthe handle of the screwdriv-
er towardthe back ofthe unitwhile
pullingup onthe vacuum inletcover
with your otherhand.
• Holdthe vacuum Inlet cover open un-
til upper vacuum tube isinstalled.
Vacuum Inlet
Hooks
• When converting back to the blower
feature, makesure latchonthe vacu-
um inlet cover issacumly fastened.
SHOULDER STRAP ADJUSTMENT
(for vacuum use only)
• Holdthe unitas shown.
• Pass the shoulderstrapoveryour
head and ontoyour left shoulder.
• Snap the hookontothe retainer on
thetophandle.
• Extendyoudghtarmtowardthe rear
of the vacuum bag.
• Adjustshoulderstrap untilthe vacu-
um bag/shoulder strapseam lies be-
tween yourthumb and indexfinger.
• Make sure airflowsfreely from the
elbowtube intobag. If bag iskinked,
the unitwillnotoperaterproperly.
RetainingPost
Vacuum x,_
Inlet
Cover
• Placethe hookson the vacuum tube
on the retainingposts; pivottube into
position.Secure vacuum tube by
turning-theImob clockwise untiltight.
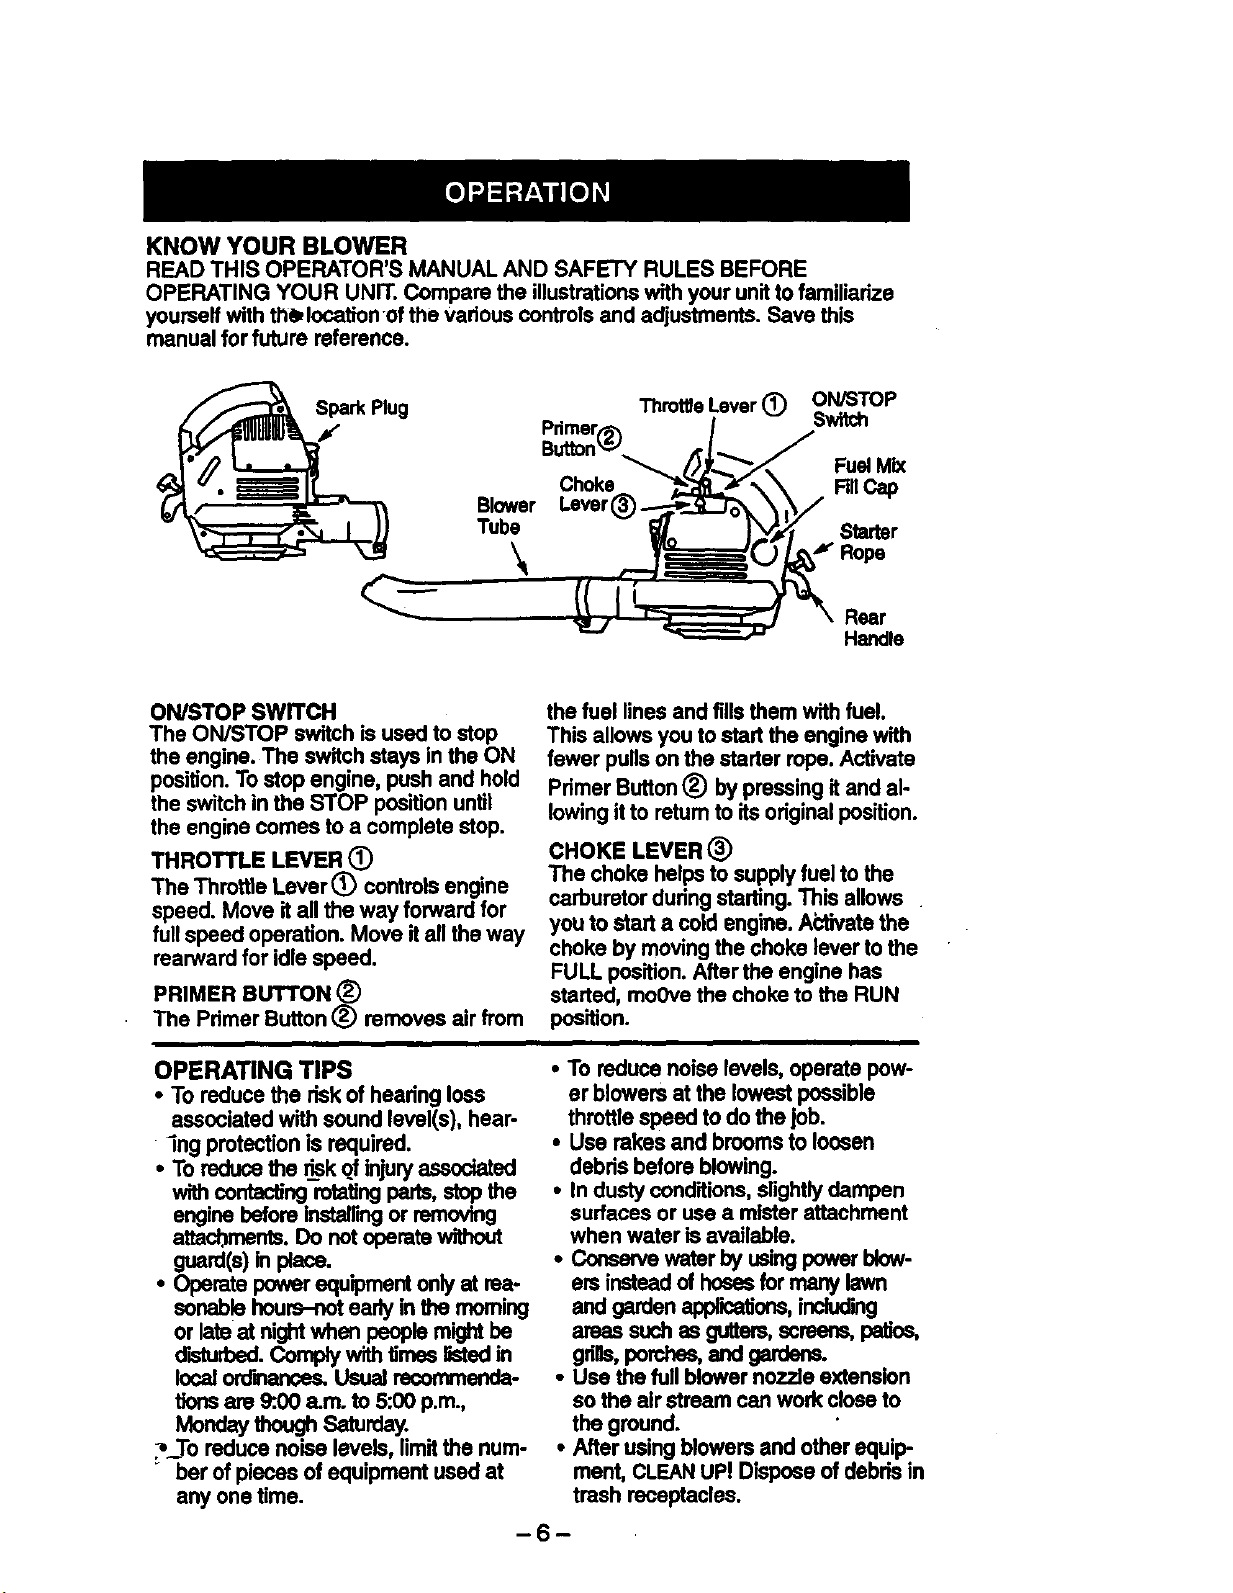
KNOW YOUR BLOWER
READTHISOPERATOR'S MANUAL AND SAFETY RULES BEFORE
OPERATING YOUR UNIT. Compare the illustrationswithyour unitto familiarize
youmeit withth_ location-ofthe vadous controlsand adjustments.Save this
manual for future reference.
Blower
Tube
\
ThrottleLever (_) ON/STOP
Pdmert_._ Switch
Button'_'_ Fuel Mix
Choke Rfl Cap
Lever
Starter
Rope
Rear
Handle
ON/STOP SWITCH
The ON/STOP switch is used to stop
the engine. The switch stays in the ON
position. To stop engine, push and hold
the switch in the STOP position until
the engine comes to a complete stop.
THROTTLE LEVER (_)
The Throttle Lever(_ controls engine
speed. Move it all the way forward for
full speed operation. Move it all the way
rearward for idle speed.
PRIMER BUTTON (_)
The Pdmer Button (_) removes air from
the fuel lines and fillsthem with fuel.
This allows youto start the enginewith
fewer pullson the starter rope.Activate
Primer Button_) by pressingit and al-
lowingit to returnto its originalposition.
CHOKE LEVER (_)
The choke helpsto supplyfuel to the
carburetor duringstarting. This allows
you to start a cold engine. A_ctivatethe
choke by movingthe choke lever tothe
FULL position.Afterthe engine has
started,mo0ve the choke to the RUN
position.
OPERATING TIPS
• To reduce the risk of hearingloss
associated with sound level(s), hear-
-ingprotection is required.
• Toreducethe "_riskof injuryassociated
withcontacting rotatingparts,stopthe
enginebeforeinstallingorremoving
attachments.Do notoperatewithout
guard(s)Inp e.
• Operate powerequipmentonlyat rea-
sonablehours-notearlyin the morning
or lateat nightwhen peoplemightbe
disturbed Complywith times listedin
localordinanoss.Usual recommenda-
tionsare 9.00 a.m. to 5:00 p.m.,
MondaythoughSaturday.
.__Toreduce noise levels, limitthe num-
ber of piecesof equipment usedat
any one time.
• To reduce noise levels,operate pow-
er blowersat the lowestpossible
throttlespeed to dothe job.
• Use rakes and broomsto loosen
debrisbefore blowing.
• In dusty conditions, slightlydampen
surfacesor use a misterattachment
when water is available.
• Conservewater by usingpower blow-
em insteadof hosesfor many lawn
andgardenap_ic_ons,including
areassuchss guttem,scrsens,pa_os,
gdgs,porches,end gardens.
• Use the fullblowernozzle extension
so the air stream can work closeto
the ground.
• After usingblowersand otherequip
ment, CLEANUP! Dispose of debrisin
trash receptacles.
-6-
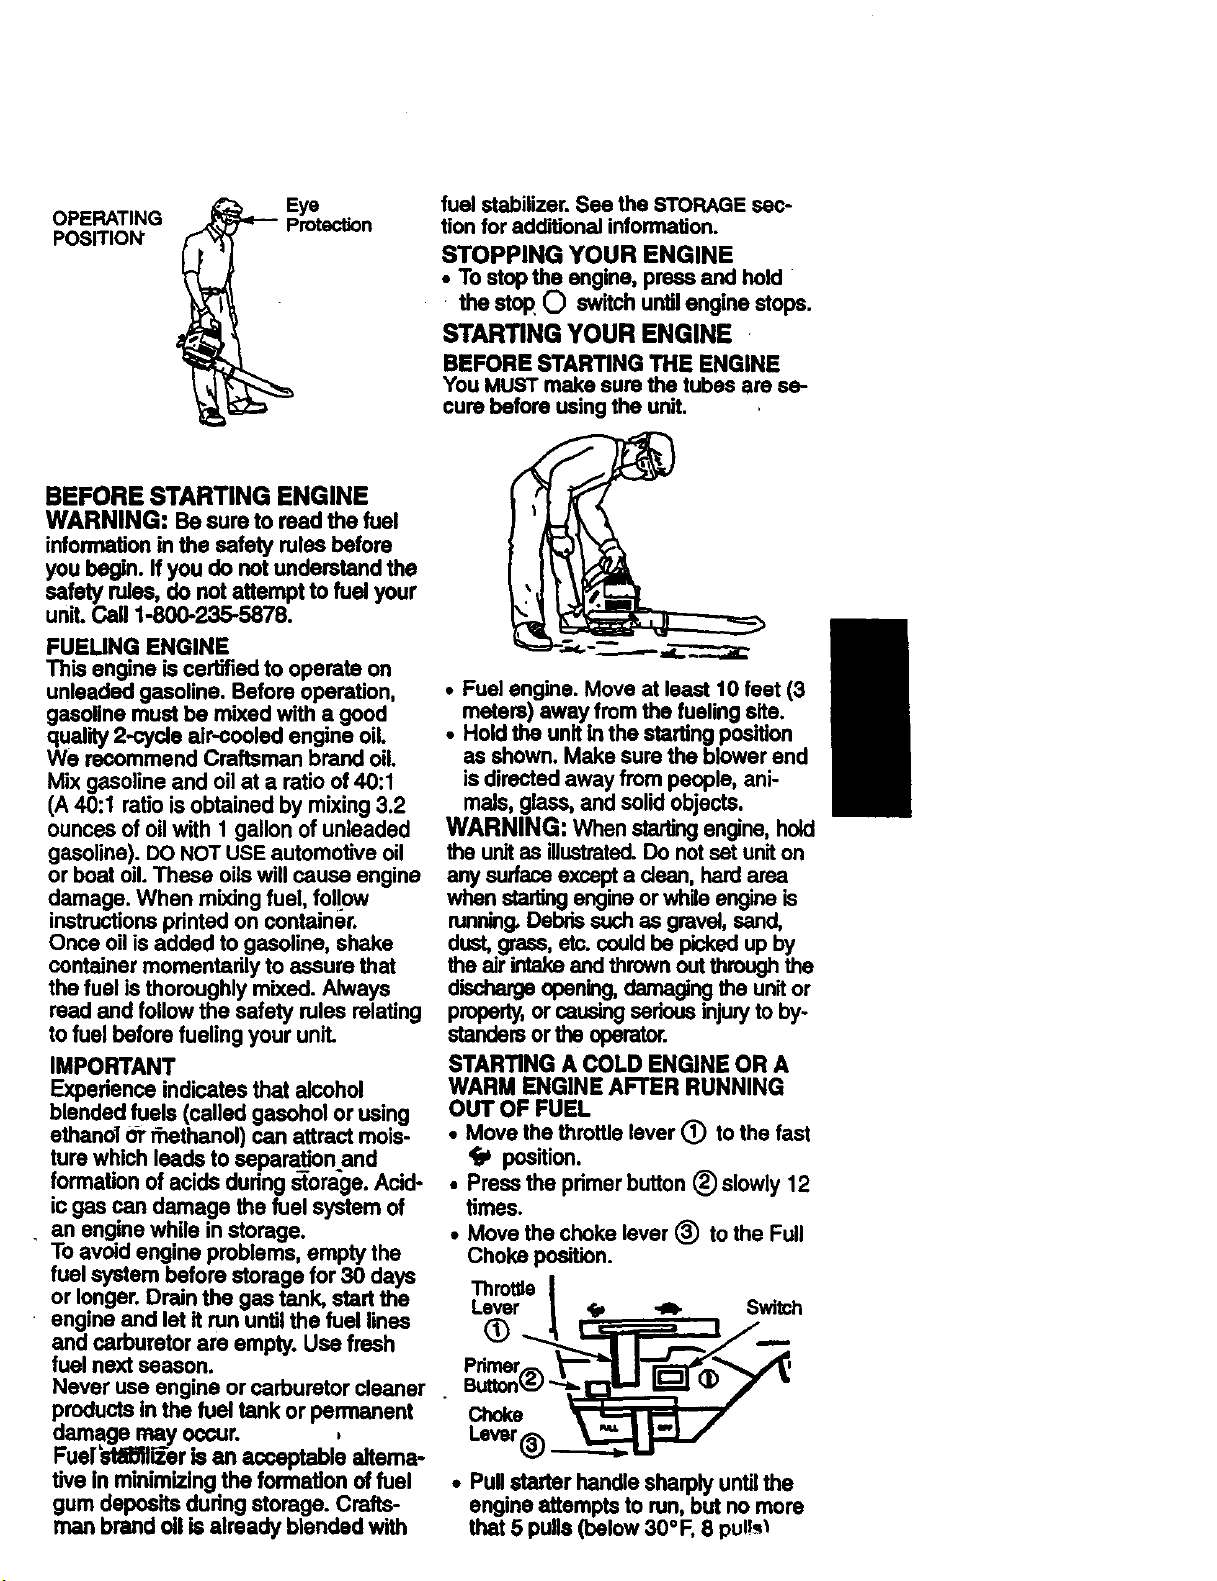
OPERATING
POSITION"
fuel stabilizer. See the STORAGE sec-
tion for additional information.
STOPPING YOUR ENGINE
• To stopthe engine, pr.._ and hold
the stop 0 switchuntilengine stops.
STARTINGYOUR ENGINE
BEFORE STARTING THE ENGINE
You MUSTmake sure the tubes are se-
curebefore usingthe unit.
BEFORE STARTING ENGINE
WARNING: Be sure to read the fuel
informationin the safety rulesbefore
you begin. Ifyou do notunderstandthe
safety rules, do notattempt to fuel your
unit.Call 1-800-235-5878.
FUELING ENGINE
This engine iscertifiedto operate on
unleaded gasoline. Before operation,
gasolinemustbe mixed with a good
quality2-cycle alr-cooled engine oil.
We recommend Craftsman brand oil.
Mix gasolineand oil at a ratio of40:1
(A 40:1 ratiois obtained by mixing3.2
ounces of oil with 1 gallon ofunleaded
gasoline). DONOTUSEautomotive oil
or boat oil.These oilswillcause engine
damage. When mixing fuel, fol!ow
instructionsprintedon container.
Once oil is added to gasoline, shake
container momentadly to assure that
the fuel isthoroughly mixed. Always
read and followthe safety rules relating
to fuel before fuelingyour unit.
IMPORTANT
Experience indicatesthat alcohol
blended fuels (called gasoholor using
ethanol or rhethanol) can attract mois-
ture which leads to separation and
formationof acids during_ora'ge. Acid-
ic gascan damage the fuel system of
an enginewhile in storage.
• Toavoid engine problems, empty the
fuel system before storage for 30 days
or longer.Drainthe gas tank, start the
• engine and let it run untilthe fuel lines
and carburetor are empty.Use fresh
fuel next season.
Never use engine or carburetor cleaner
productsin the fuel tank or permanent
damage may occur.
Fuef_ll_er b an acceptable alterna-
tive in minimizing.theformationoffuel
gum depositsdunng storage. Crafts-
man brand o11is already blendedwith
• Fuel engine. Move at least 10feet (3
meters)away fromthe fuelingsite.
• Holdthe unitin the startingposition
as shown.Make sure the blowerend
isdirected away frompeople, ani-
mals, glass,and solidobjects.
WARNING: Whenstartingengine,hold
the unitas illustrated.Do notset uniton
anysurfaceexcepta dean, hardarea
whenstartingengineor while engineis
running.Debrissuchas gravel,sand,
dust,grass,etc.couldbe pickedup by
the air intakeand thrown outthrough the
d_ opening,damagingthe unitor
property,or causing sedous injury to by-
standersorthe operator.
STARTING A COLD ENGINE OR A
WARM ENGINE AFTER RUNNING
OUT OF FUEL
• Move thethrottlelever (_) to the fast
position.
• Pressthe primerbutton(_) slowly 12
times.
• Move thechoke lever(_) to the Full
Choke position.
ThmtUe
Lever _,
®
Choke
Lever
Switch
engineattempts to run,but no more
that 5 pulis(below 30°F, 8 pu!!_
• Pullstarter handlesharplyuntilthe
NOTE: If the engine attemptsto start
before the 5th pull,go to the next
step immediately.
• Move choke lever (_ to Half Choke.
• Pullthe starter handle sharply until
the engine runs,but no morethan 5
pulls(below3Q°F, tOpulfs).
• After a 5 second warm-up, move the
choke lever (_ tothe Run position.
• Allow the unitto runfor 30 more se-
condsat Run before moving the
throttlelever (_ to the -_ position.
Ifthe engine has not started after5
pulls (at Half Choke), repeat the Start-
ing a Cold En_ne Procedure. If the en-
ginestilldoes not start, proceed to
Startinga Flooded Engine.
• Tostop the engine, press and hold
the stop (_) switchuntilengine stops.
FOR A WARM ENGINE
• Move the throttle lever (_) to the fast
position.
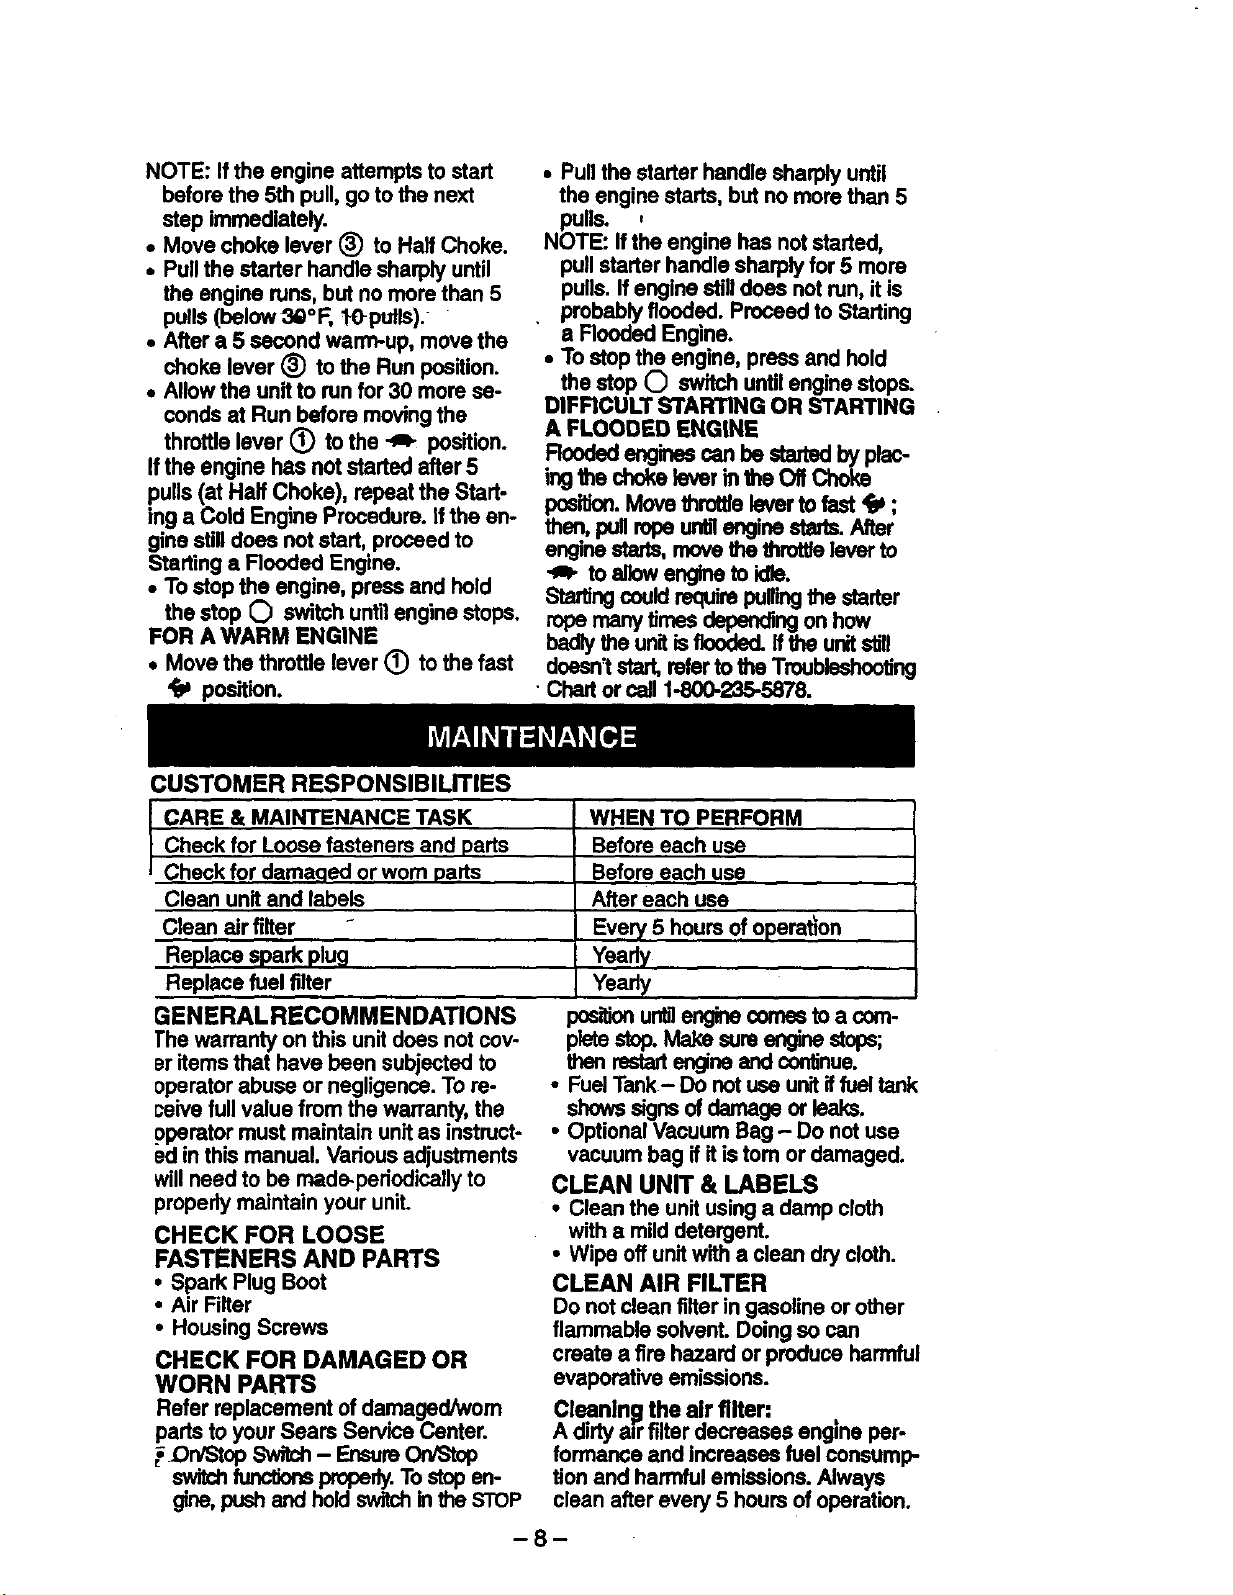
CUSTOMER RESPONSIBILITIES
• Pullthe starter handle sharplyuntil
the engine starts, but no morethen 5
pulls. ,
NOTE: If the engine has notstarted,
pullstarter handlesharplyfor 5 more
pulls.If enginestill does not run, it is
probablyflooded. Proceed to Starting
a Flooded Engine.
• Tostop the engine, press and hold
the stop O switch untilenginestops.
DIFFICULT STARTING OR STARTING
A FLOODED ENGINE
Rood anguscanbestm'edbyp c-
in9the chokeleverin1heOil Choke
position.Move throttlelevertofast _ ;
then, pullropeuntilenginestarts.After
enginestsds,rnovethe throttla leverto
.A. toallowenginetoldla.
Starlingcouldrequirepullingthe starter
ropemeny lfmesdependingon how
badlythe unitisflooded,it the unitstill
doesn'tstart,refertothe Troubleshooting
•Chartor cell 1-800-235-5878.
CARE & MAINTENANCE TASK
Check for Loosefasteners and parts
Check for damaged or worn parts ,
Clean unitand labels
Clean air filter
R.eplace spark plug
Replace fuel filter
GENERALRECOMMENDATIONS
The warranty onthis unitdoes notcov-
eritems that have been subjectedto
operatorabuse or negligence. To re-
ceivefullvalue fromthe warranty,the
operatormustmaintain unitas instruct-
ed in this manual. Variousadjustments
willneed to be made-periodicallyto
properlymaintain your unit.
CHECK FOR LOOSE
FASTENERS AND PARTS
• Spark Plug Boot
• Air Filter
• Housing Screws
CHECK FOR DAMAGED OR
WORN PARTS
Refer replacement ofdamaged/worn
parts to your Sears Sennce Center.
_On/Stop Switch- EnsureOn/stop
switchfunclkx_ properly.Tostop en-
gine,pushand holdswitchb the STOP
WHEN TO PERFORM
Before each use
Beforeeach use
After each use
Every 5 hoursof opemdon
Yearly
Yearly
_sitionuntilenginecemss toa com-
pletestop.Make sureenginestops;
thenrestartangine and continue.
• FuelTank- Do notuse unitiffuettank
• OptionalVacuum Bag Do notuse
vacuum bag if it istom or damaged.
CLEAN UNIT & LABELS
• Clean the unitusinga damp cloth
with a milddetergent.
• Wipe off unitwith a clean dry cloth.
CLEAN AIR FILTER
Do notclean filteringasoline or other
flammable solvent.Doingso can
create a fire hazard or produceharmful
evaporative emissions.
Cleaning the air filter: ,
A dirtyair filterdecreases engine psr-
formanse and increases fuel consump-
tionand harmfulemissions.Always
clean after every 5 hoursof operation.
-8-
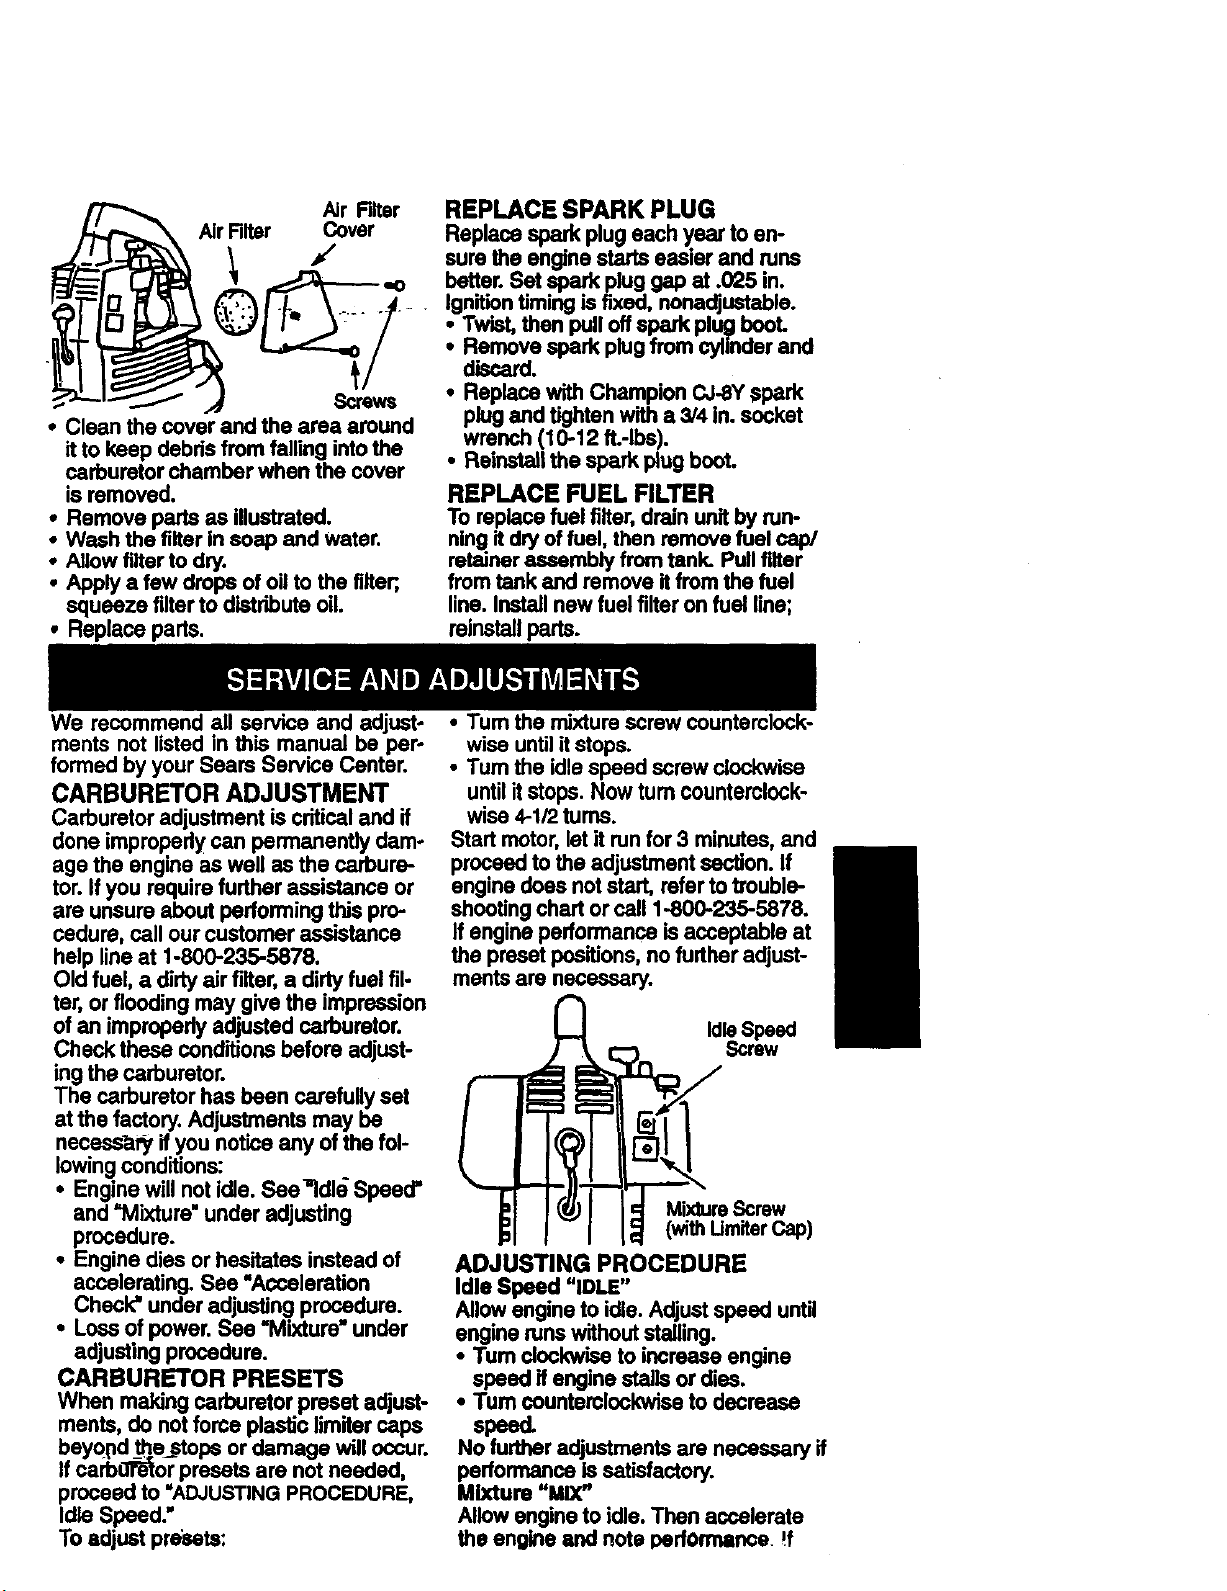
Air Filter
AirFilter Cover
Scr6ws
• Clean the cover and the area around
itto keep debds from fallingintothe
carburetor chamber when the cover
isremoved.
• Remove parts as illustrated.
• Wash the filter insoap and water.
• Allow filterto dw.
• Apply a few drops of oilto the filter;,
squeeze filterto distributeoil.
• Replace parts.
REPLACE SPARK PLUG
Replace spark plug each year toen-
sure the engine startseasier and runs
better. Set spark pluggap at .025 in.
Ignitiontimingisfixed, nonadjustable.
• Twist,then pull offspark plugbooL
• Remove spark plugfrom cylinderand
discard.
• Replacewith Champion CJ-SYspark
plugand tightenwith a 3/4 in. socket
wrench (10-12 ft.-lbs).
• Reinstallthe sparkplugbooL
REPLACE FUEL RLTER
To replacefuel filter,drain unitby run-
ningitdry offuel, then removefuel cap/
retainerassemblyfromtank. Pullfilter
from tank and remove itfromthe fuel
line. Installnew fuelfilter onfuel line;
reinstallparts.
We recommend all service and adjust-
ments not listedin this manual be pep
formed by your Sears Service Center.
CARBURETOR ADJUSTMENT
Carburetor adjustment iscriticaland if
done impropedy can permanentlydam-
age the engine as well as the carbure-
tor.Ifyou require furtherassistance or
are unsureabout performingthispro-
cedure, call our customer assistance
help lineat 1-800-235-5878.
Old fuel, a dirtyairfilter, a dirtyfuel fil-
ter, or floodingmay give the impression
of an improperlyadjustedcarburetor.
Check these conditions before adjust-
ingthe carburetor.
The carburetor has been carefullyset
at the factory.Adjustments may be
necesshryif you noticeany of the fol-
lowingconditions:
• Enginewill not idle. See_ldld Spaed,
and "Mixture" under adjusting
procedure.
• Engine diesor hesitates instead of
accelerating. See =Acceleration
Check" under adjustingprocedure.
• Lossof power. See "Mixture"under
adjustingprocedure.
CARBURETOR PRESETS
When making carburetor preset adjust-
ments, do notforce plasticlimitercaps
beyopd_the_stopsor damage willoccur.
Ifcarbu'Fe-'torpresets are not needed,
proceed to "ADJUSTINGPROCEDURE,
Idle Speed."
Toadjust presets:
• Turnthe mixturescrew counterclock-
wise untilit stops.
• Turnthe idlespeed screw clockwise
untilitstops. Nowturn counterclock-
wise 4-1/2turns.
Start motor, let itrun for3 minutes, and
proceed tothe adjustmentsection. If
engine does notstart, referto trouble-
shootingchad or call 1-800-235-5878.
If engineperformanceis acceptable at
the preset positions,no furtheradjust-
mentsare necessary.
IdleSpeed
Screw
MixtureScrew
(withUmiterCap)
ADJUSTING PROCEDURE
Idle Speed "IDLE"
Allowengine to idle. Adjustspeed until
engine runswithoutstalling.
• Turnclockwiseto increaseengine
speed if engine stallsordies.
• Turn counterclockwise to decrease
speed.
No further adjustmentsare necessary if
performanceis satisfactory.
Mixture "MIX"
Allow engineto idle.Then accelerate
the engine and note pedormanoe !f
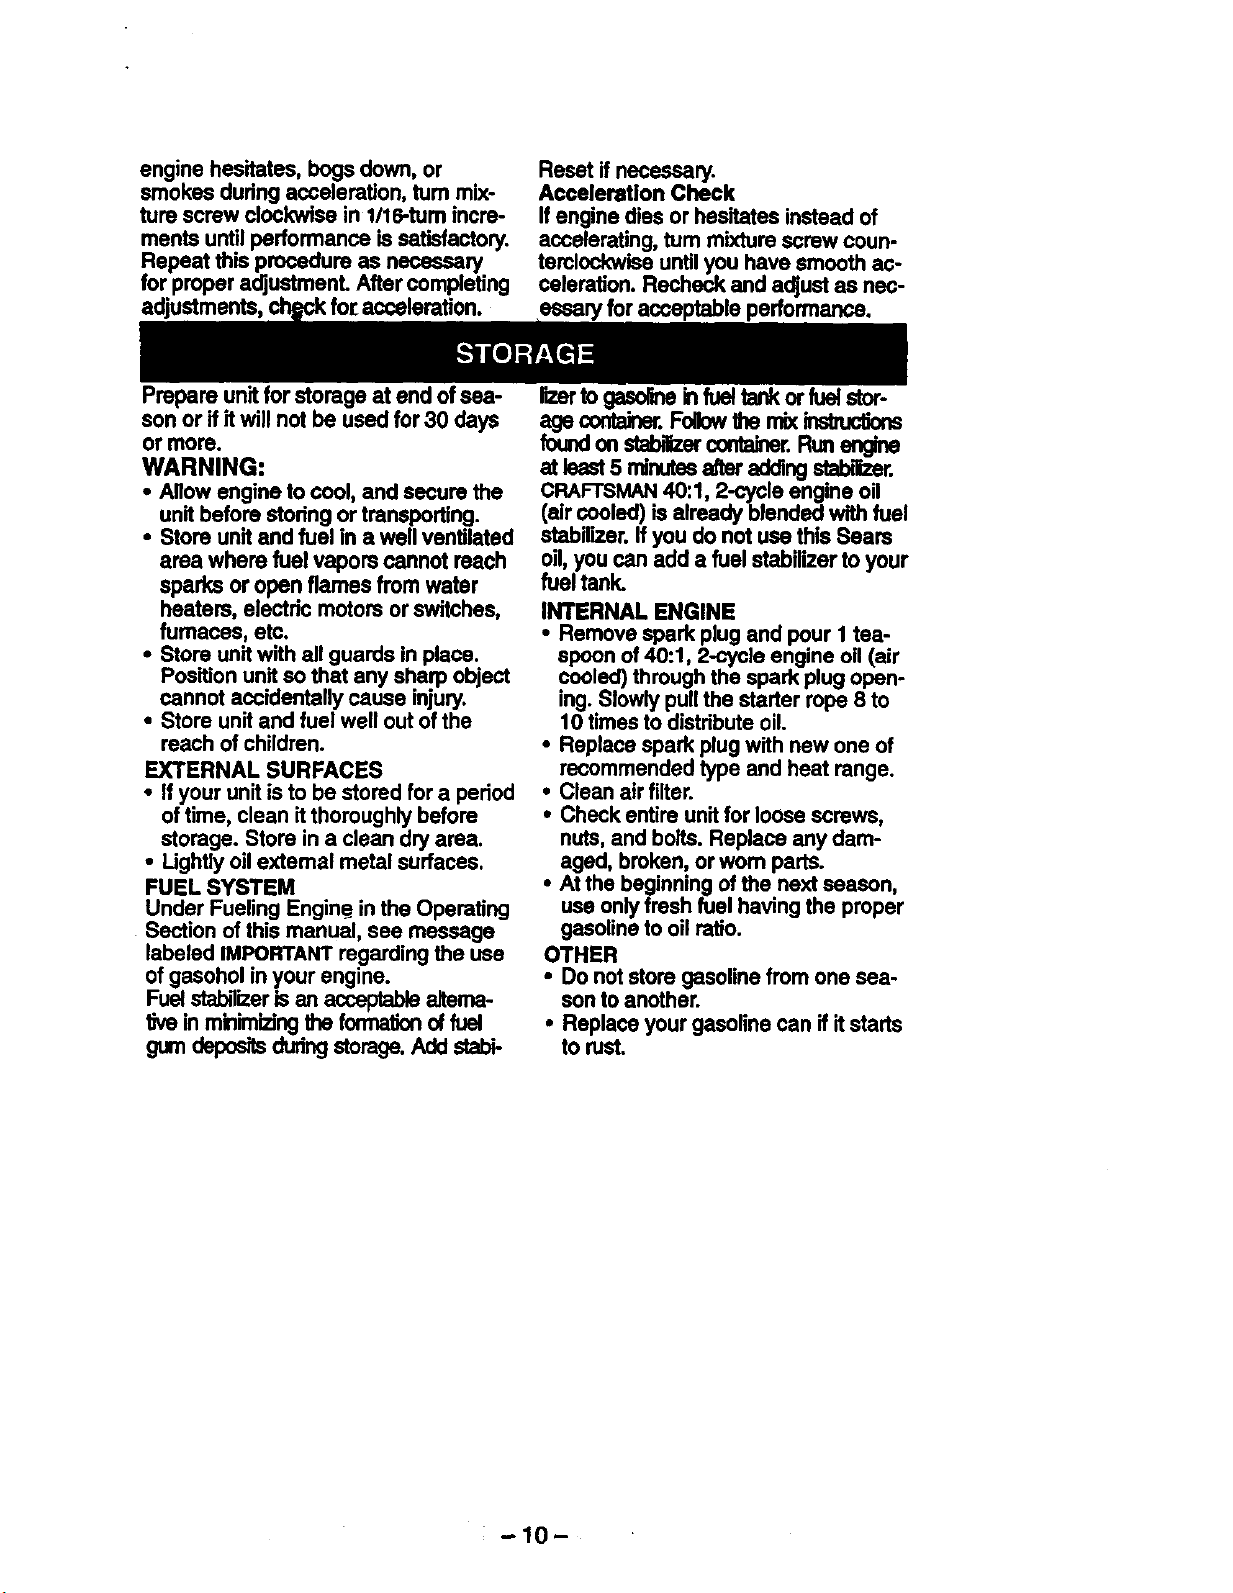
engine hesitates, bogs down, or
smokes dudngacceleration, tum mix-
ture screw clockwisein 1/16-turnincre-
ments until performance is satisfactory.
Repeat this procedure as necessary
for properadjustment.After completing
Reset ifnecessary.
Acceleration Check
Ifengine diesor hesitatesinstead of
accelerating,turn mixture screw coun-
terclookwiseuntilyou have smoothac-
celeration. Recheck and adjust as nec-
essaryforacceptable performance.
Prepare unitfor storage at end of sea-
son orif it will not be usedfor 30 days
or more.
WARNING:
• Allow engine to cool, and secure the
unitbefore stodngor transporting.
• Store unitand fuel in a well ventilated
area where fuel vapors cannot reach
sparks or open flames from water
heaters, electric motors orswitches,
fumaces, etc.
• Store unitwith all guards in place.
Pos'dionunitso that any sharp object
cannot accidentallycause injury.
• Store unitand fuel well out of the
reach of children.
EXTERNAL SURFACES
• Ifyour unitis to be stored for a period
oftime, clean itthoroughlybefore
storage. Store in a clean dry area.
• Lightlyoil external metal surfaces.
FUEL SYSTEM
Under Fueling Engine in the Operating
Section of thismanual, see message
labeled IMPORTANTregarding the use
of gasohol in your engine.
Fuelstabgizerisan acceptablealterna-
tivein minimizingthe formationof fuel
gumdepositsduringstorage.Addstabi-
lizertogasormeinfuettankorfuelstor-
fo_lccntainer.Fdlow h_ernix[_buc_.
on stabilizercontainer.Runengne
at lesst5 rninutesafler addingstabizer.
CRAFTSMAN40:1, 2-cycle engine oil
(air cooled)is already blendedwithfuel
stabilizer.If you do not usethis Sears
oil,you can add a fuel stabilizerto your
fuel tank.
INTERNAL ENGINE
• Remove spark plugand pour 1tea-
spoonof 40:1, 2-cycle engine oil (air
cooled)throughthe spark plug open-
ing. Slowlypullthe starter rope 8 to
10 timesto distributeoil.
• Replacespark plugwithnew one of
recommendedtype and heat range.
• Cleanair filter.
• Check entire unitfor loosescrews,
nuts,and bolts.Replace any dam-
aged, broken,or worn parts.
• At the beginning of the next season,
use only fresh fuel having the proper
gasoline to oil ratio.
OTHER
• Do notstore gasoline fromone sea-
son to another.
• Replace yourgasoline can if itstarts
to rust.
-10-
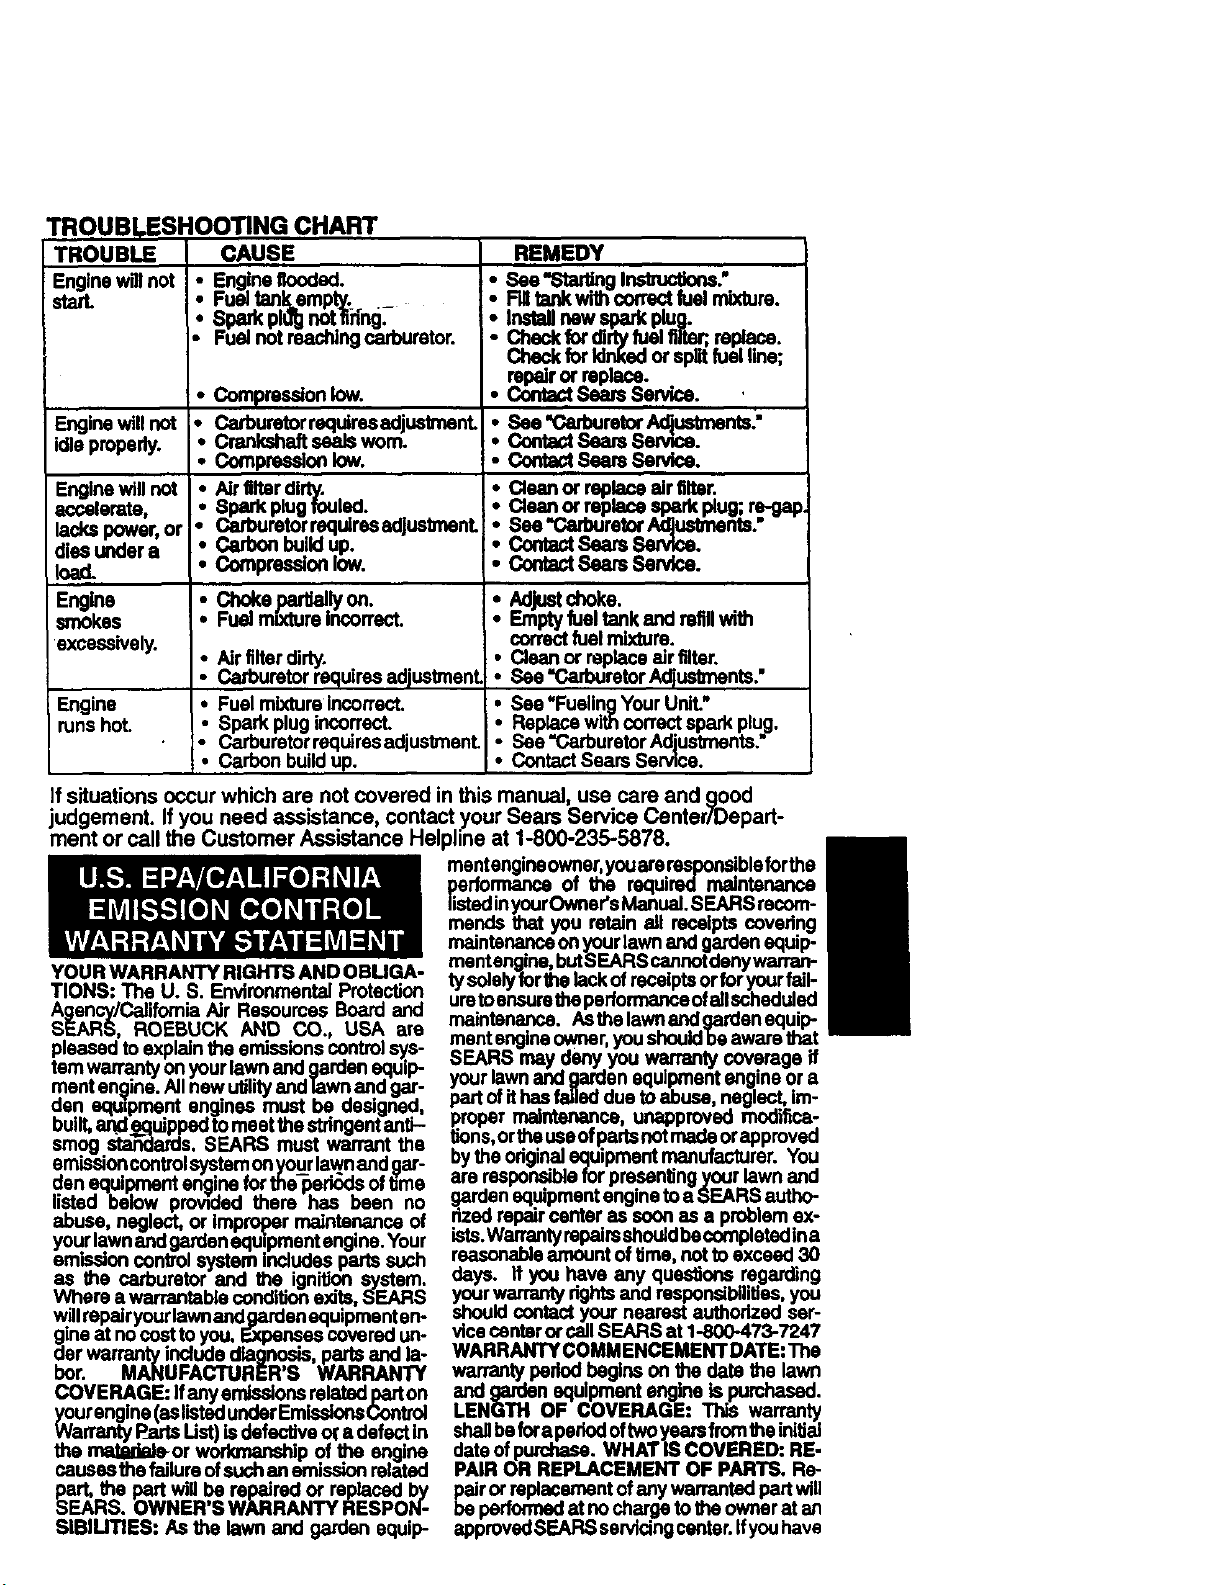
TROUBLESHOOTING CHART
TROUBLE CAUSE
Enginevallnot
starL
Enginewillnot
idle properly.
Enginewillnot
accelerate,
lackspower, or
dies under a
load.
Engine
smokes
excessively.
Engine
runshot.
i ngine_:led.
Fu_ tanl_empty__ ._
Sparkpl_ notn_ing.
Fuelnot roachingcarburetor.
• Compressionlow.
• Carburetorrequiresedjustmant.
Crankshaftseals worn.
• Compressionlow.
_' _r dirty.
Spark plug fouled.
Carbumforrequiresadjustment.
Carbonbuildup.
Compressionlow.
Chokepar /on.
: Fuel mixtureIncorrect.
Airfilterdirty.
•" Carburetorrequiresadjustment.
• FuelmixtureIncorrect.
• Spark plug incorrect.
• Carburetorrequirasadjustment.
• Carbon buildup.
REMEDY
: See "Stalling Instxuctior_."
RII tankwi_ correct fuel mixture.
:
Checkfor ld_/_ or=bar;rel_ca"
;)lltfuel line;
•
See "CarburetorAdjuslmeots."
; ContaofSears Ser_ce.
• ContestSeare Servine.
Clean or replaceair filter.
Clean or replacespark plug;regal:
Emptyfuel tankand refillwith
correctfuel mixture.
• Cleanor replaceair filter,
See "Carburetor A_ustments."
• See'Fuailng YourUnit."
• Replacewithcorrectspark plug.
• See "CarburetorAdjustments.-
• ContactSears Service.
Ifsituationsoccurwhich are not covered in this manual, usecare and good
judgement. If you need assistance, contactyour Sears Service Center/Depart-
ment or call the Customer Assistance Helplineat 1-800-235-5878.
YOUR WARRANTY RIGHTS AND OBUGA-
TIONS: The U. S. EnvironmentalProtection
Agency/CaliforniaAir Rasourcas Board and
SEARS, ROEBUCK AND CO., USA are
pleased toexplainthe emissionscontrolsys-
tem warrantyon yourlawn and garden equip
menten_line.Allnew utilityand lawn and gar-
den equipment engines must be designed,
built,and eguippedtomeet the stringentanti-
smog stewards. SEARS must warrant the
emissioncontrolsystemonyourlawnand_ar-
den equipment engine for the_eri6ds oftime
listed below provided there has been no
abuse, neglect, or improper maintenance of
yourlawnandgardenequipment engine.Your
em".=sioncortl_olsystem includesparts,such
as me carburetor and the igni_on system.
Where a warrantableconditionexits, SEARS
willrepairyour lawnand_gardenequipmentan-
gineat nocosttoyou. P.xpaneascovered un-
der warrantyincludediagnosis,parts and la-
bor. MANUFACTURER'S WARRANTY
COVERAGE: Ifany emissionsrelatedpatton
yourengine(aslistedunderEmiselonsControl
Warranty P_utsList)isdefectiveo{ a defectin
the ._..or workmanship of the engine
causesme failureofsuchan emissionrelated
Psart,the part wigbe repaired or replaced by
EARS. OWNER'SWARRANTY RESPON-
SIBILITIES: As the lawn and garden equip
mentangineowner,youarerecponelbleforthe
performance of the required maintenance
listedinyourOwnar'sManual.SEARS recom-
mends that you retain all receipts covering
maintenanceon your lawn and gardenequip
mentengine,butSEARScannotdenywarran-
ty solelyforthe lackofreceiptsor foryourfail-
uretoansuretheperformanceofallscheduied
maintenance. As thelawnandgardenequip
merit engineowner,youshouidbe aware that
SEARS may deny you warranty coverage if
yourlawnand garden equipment engine ora
partofithasfailed due toabuse, neglect, im-
proper maintenance, unapproved rnodifica-
tions,ortheuseof partsnotmede orapproved
bythe odginelequipment manufacturer. You
are responsiblefor presentingyourlawn and
gardenequipment enginetoa SEARS autho-
rizedrepaircenter as soonas • problemex-
ists.Wanantyrepalrsshouldbecompleted ina
reasonableamountoflime, not toexceed 30
days. if you have any questionsregarding
yourwarrantyrightsand responsibilities, you
shouldcontact yournearest authorized sar-
vicecenteror call SEARS at 1-800-473-7247
WARRANTY COMMENCEMENT DATE:Tha
warrantyperiodbegins on the date the lawn
and ga_isn equipment eng_e ispurchased.
LENGTH OF COVERAGE. This warranty
shallbefora periodoftwoyearefromtheinitial
dateof purchase.WHAT IS COVERED: RE-
PAIR OR REPLACEMENT OF PARTS. Re-
pairor replacement ofany warrantedpart will
be Pedormed at nochargefo theownerat an
approvedSEARSservicingcanter. Ifyouhave
anyquestionsregardingyourw.arrantyfights canbegroundsfords_lowlnga warrantyclaim.
rasponsibll_as:you s.noula_ you..r SEARS Is notliable to coverfailures oTwar-
nearest euthodzea sennce center or ca== rantedparts/:aused by the useof _d-on or
SEARSat 1-800-473-'/247. WARRANTY PE- modilledparts.HOWTO RLE ACLAIM: Ifyou
RIOD: Anywarranted partwhlchls notsched- have any que_ons regardingyour warranty
uledforrep]acementasrequiredmalnt.end, rightsand rasponslbtl_.as,you shouldcon_.
orwhich isscheduledonly for.mgu_r mspec- yournearesteuthorlzeoservicecanteror ca,
tlontothe effectof'repair orrepeacea._necas- SEARS at 1,800-473-7247. WltERE TO GET
sani'shallbewarrentedfor2y_._..P_ywar- _pairs_ beproededateliSEARSsense
as required rnal.ntenancp_._ll oe .... cente_calI.1-800-473-?247,MAINTENANCE,
fortheperiodoftimeup tome fltet scne_uzeo REPLACEMENTANDREPAIROFEMISSION
replacemantp0tntforthatparL DIAGNO:SI_: RELATEDPARTS:AffySEARSspprovedm-
The ownershallnotbechargedfordlagnos_ ptacementpartusodlntheparforrnance ofany
laborwhichleads tothe datermlnabonthat a
warranted part is defective if the diagnostic warrantymaintenance or repair on emissk)n
work is performed at an roved .
servldng center. CONSEQ_ SEARS re_atedpartswillbeprov'Kledw'_l_>utchargnzo
NTIAL DAM theownerifthepartis uoderwarranty. EMIS-
AGES. SEARS may beliablefor damages to SlON CONTROLWARRANTY PARTS US_.
otherengine components¢ausecl.bythe fai.'l- Carburetor,IgnitionSystem:SparkPlug{cov-
ure of a warranted part stillunaer warranty, ered up to maintenance schedule), Ignition
WHATISNOTCOVERED:AIIfaliumscaused Module. MAINTENARCE STATEMENT: The
by abuse, negleCt,or Impr_o_ real.nte._.nan_,.eownerIsresponsiblefortheperformanceof_11
am not covema. *tuu--,Jr* ,Jn muu,r,;u requiredmaintenanceas definedin the own-
PARTS: The use of add-on or _ pads er's manual.
-12-
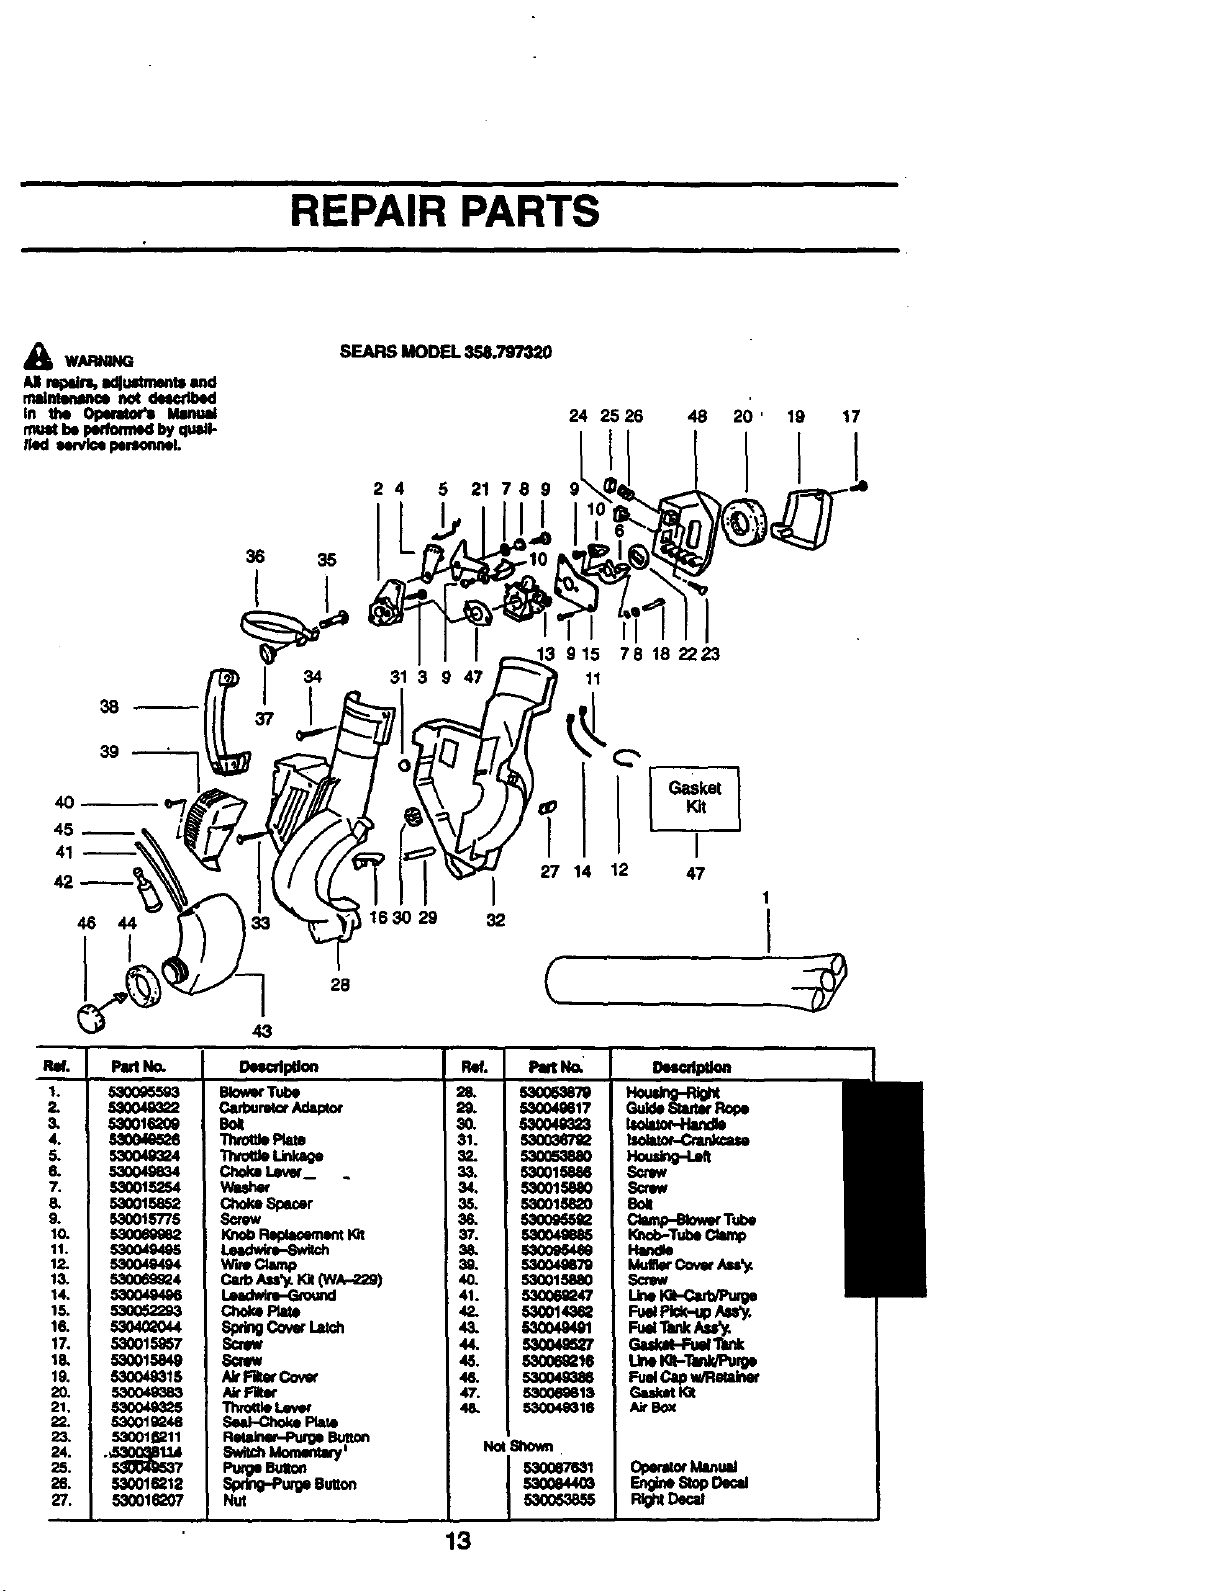
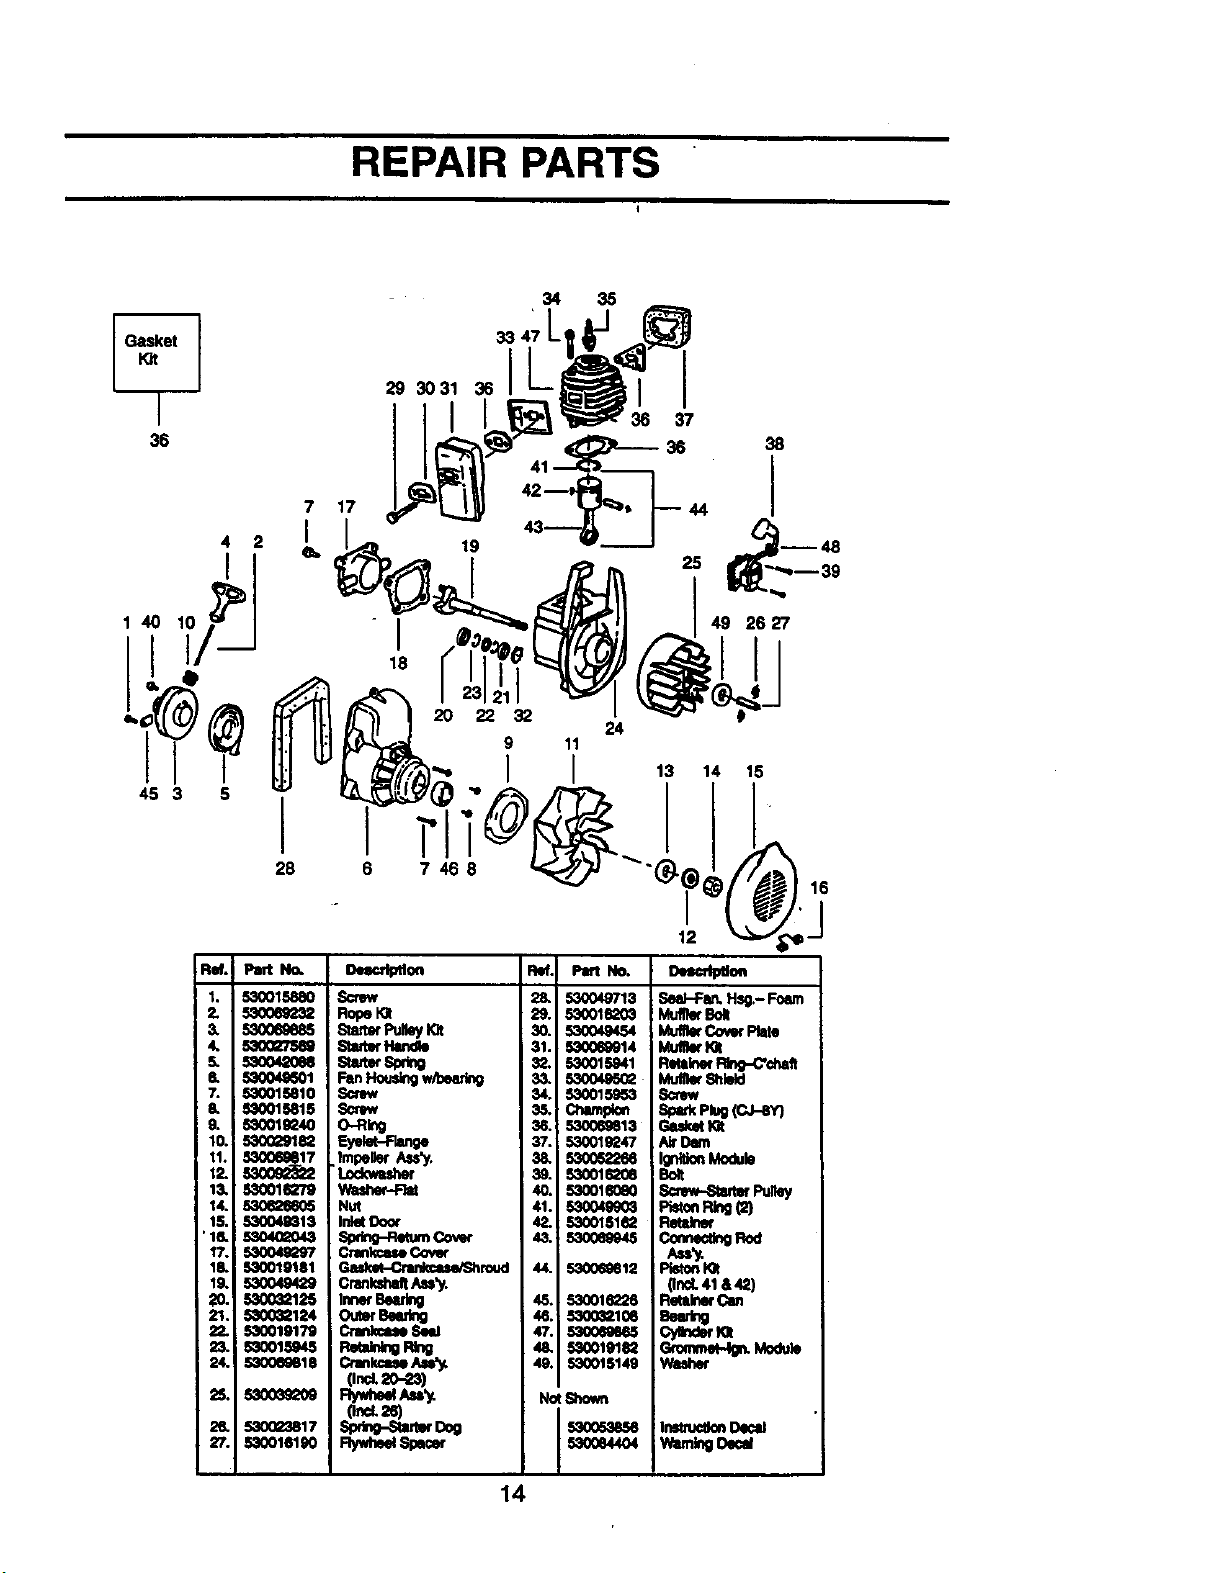
REPAIR PARTS
,_ WARHING
SEARSMODEL3,58,797320
24 5 21 789
24 25 26 18 17
I
4O
45
41
46
_o
1÷
2.
&
4.
5.
6.
7.
8.
g.
10.
11.
12.
13.
14.
15.
16,
17.
18.
19.
20.
21.
22.
23.
26.
38
39
36 35
34
I t
37
44
28
43
31 3 9 47
1630 29 32
I
g 15 78 18 2223
11
I
27 14 12 47
PanNo.
$3004Q_2
r_qOOl(_og
S300/,_26
S3004_.4
S3001S2S4
53OO15852
530015775
53006mW2
53OO494O5
S3004e494
Sa006S_4
S300494_
5,3O052293
5304_L_4
530015S67
rl3001,_49
$3004_1S
S3004S3a3
S300493_
53001 g246
53001_11
_1_12
"rl_ Pkm
Ch_l Levw_
W',.d_
c_oMSp_r
Screw
Kn_ Re_mmmt _
t.udwke-Swi_
Ch_l Pk_te
Spm_Co_ I.a_h
Screw
8€_w
Nr RIt_
Seal-CtmkePrate
Rela_r0e Bun_
urge6uuon
Nu_
Ref. P_I I_.
28. Sa00_
29. m17
30. S,_04_23
31. 5300_'nl2
32_ 53005388O
33. 530O15886
34. 530015880
35. 530015820
36. 5,30095_2
37.
38. S300954_
3_. 53004_
40. 530015880
41. _47
42. 5300143_
43. S,_0494_1
44, S30041_7
45. 53006g216
445. 530041m6
47. _30_13
48. 530048318
NotS;_*m
ml
53O053855
_Co,_ _,,'_
_1 mk
UneI_',-.Tml_urge
Fu_ Capw4_mner
G_klt I_t
AirB00(
Q_m_rManW
F.n_eSm_
R_
13
REPAIR PARTS
I
Gasket
Kit
1
36
34
293031 361
35
36 37
38
45 3 5
7 17
I
28 6
-I
18
25
49 2627
15
16
1. 530015880
2. 53006S2_
& 53(x)6ses5
4. 53002"/5w
s. sa_420ee
6. 53004s601
7. 530015810
8. 530015815
9. _10019240
10. 530_192
11. B_10068817
I_'
14.
15. 53004_13
'16. 5_4_R043
17.
18. 530019181
19. 53O049429
2O. 5300_12S
21. 5300_124
22. 530019179
23. S3001S04S
24. 5300m818
25. U
26. 530023817
27. 830016190
Dem:rl_on
Screw
Rope_
Stwtm'_
suL_ s_,o
FanHo_s_gw_
o.-R_
E_
_mpellerAss'y.
l._:kwasher
Nut
Inl_ Door
Crankcue
Ges_mud
Cranksha_am'y.
(Ind. 20-23)
Rid'. Pm'l K_.
28. 530049713
29. 53001eL_03
30. 530049454
31. 5300_14
32. 530015941
33. 53004_
34. S30015_53
_S. Ctw,pi_
36. 530069813
37. 830019247
38. 53_0_2266
39. S3(X)li820e
40. 5300160eO
41..S300499_
42. 5300151e2
43. 530069945
44. ,53¢(_12
4,5. 530016226
46. 5300_10e
47. 53006_5
48. 530019182
49. S30015149
NotS_,own
U
S30Qe4404
SeaI-FI¢_ Hsg.- Foam
Muf_ Bol
UuffiorCo',_orPk_te
MulP_ mt
Rlllk_ mbO-C+cha_
Shkl_
Sp_k Pl_g{CJ-SY)
Nt Darn
I_n_n Module
Bolt
SCnm-SW_ P.l_y
P_n P_ _)
Rm;r_r
c_n_ng _od
14
REPAIR PARTS
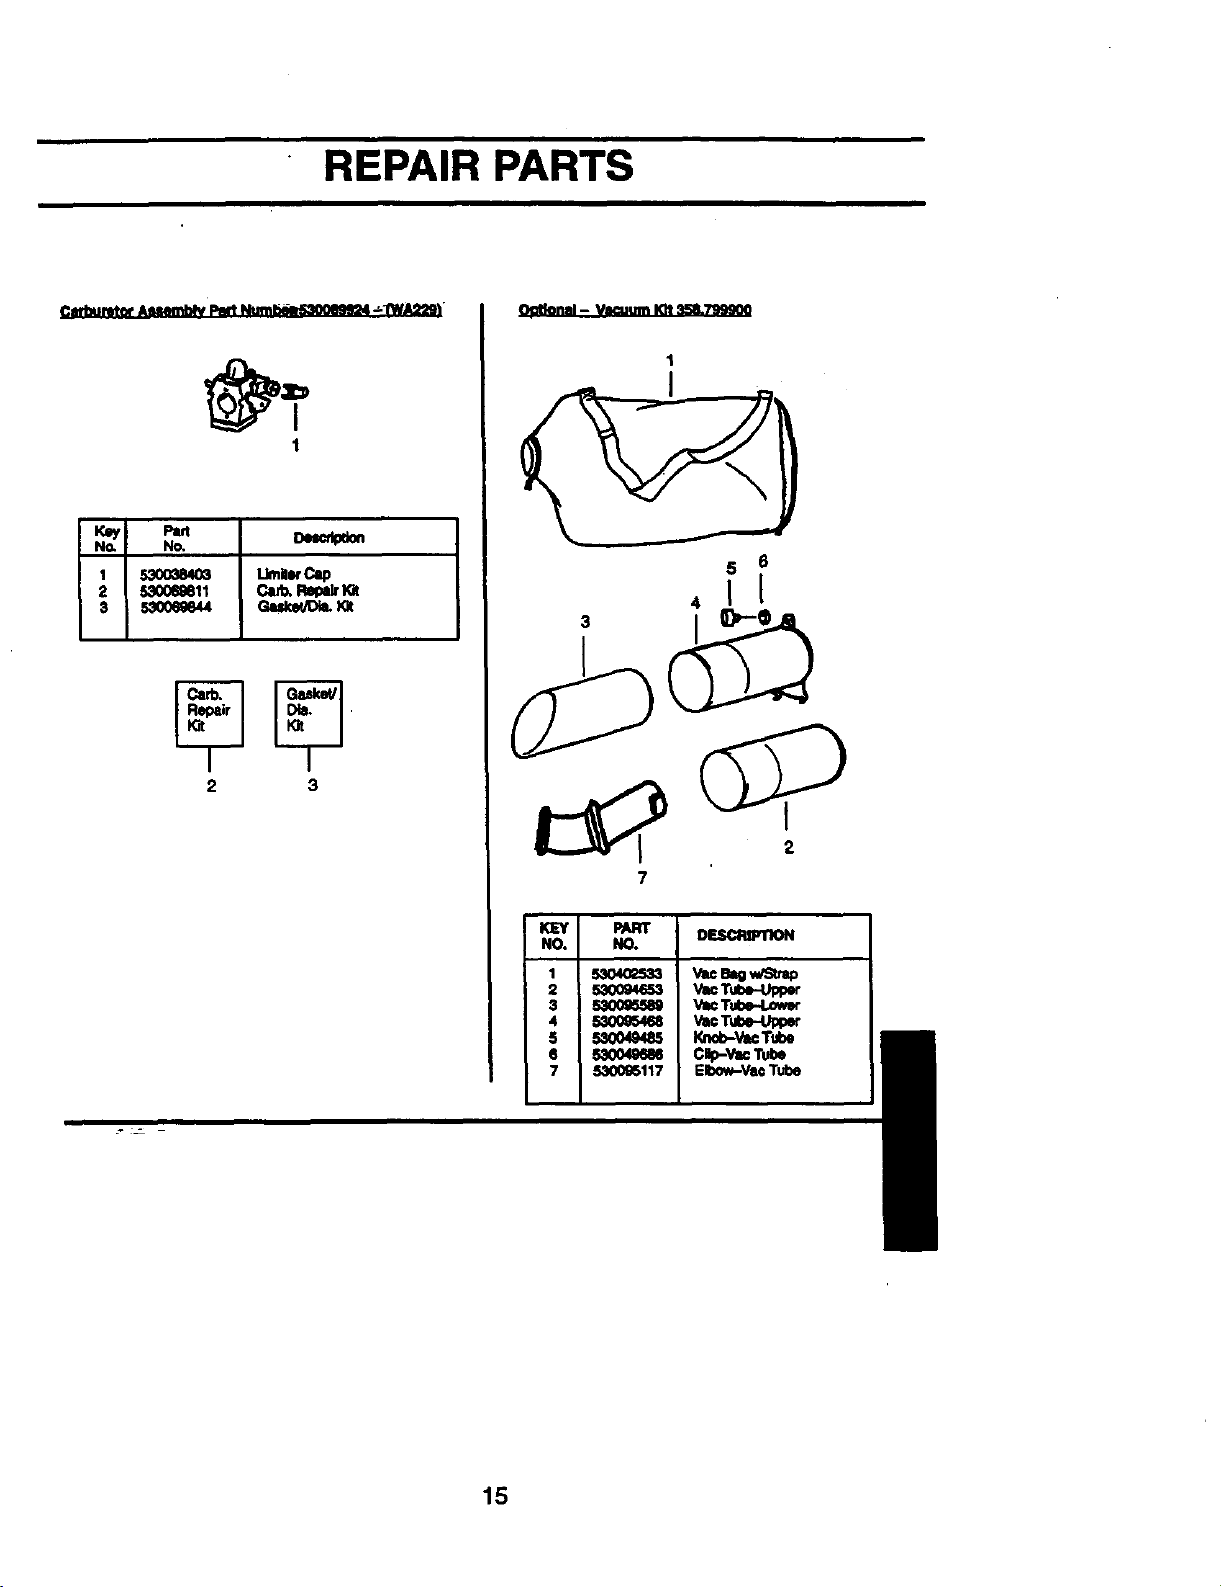
Carburetor ASininely Pitt Numl_rE3_M_ -_IW_"
NO.
1 _ IJmilerCap
2 53006_11 Cad=.Re_lr Kit
2 3
Oo_onal - Va_JUm Klt _8._B4JO0
15
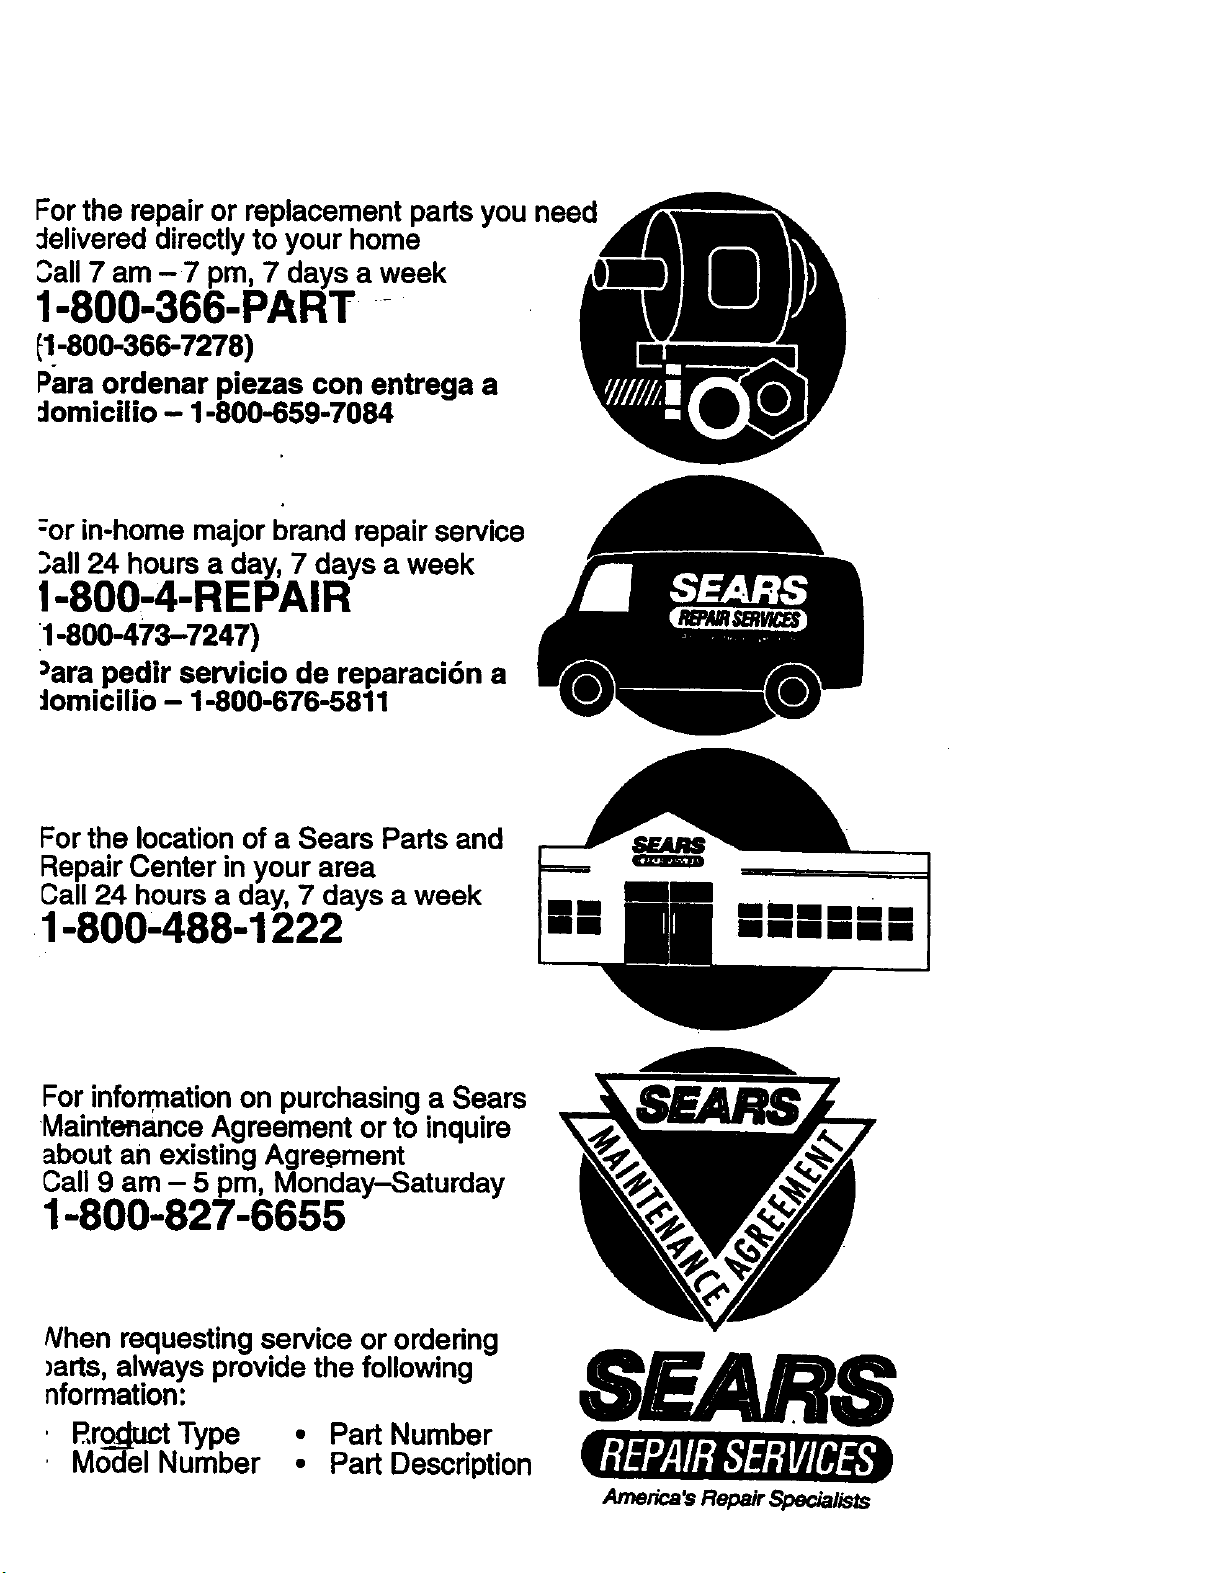
Forthe repair or replacement parts you need
:lelivereddirectly to your home
3all 7 am - 7 pm, 7 days a week
1-800-366-PART -
€1-800-366-7278)
Para ordenar piezas con entrega a
:lomicUio - 1-800-859-7084
:or in-home major brand repair service
3all24 hours a day, 7 days a week
!-800-4-REPAIR
11-800-473-7247)
)ara pedir servicio de reparaci6n a
_omicilio - 1-800-676-5811
Forthe location of a Sears Parts and
Repair Center in your area
Call 24 hours a day, 7 days a week
1-800-488-1222
Blllm
mll
==BBmm
Illllll
For information on purchasing a Sears
Maintenance Agreement or to inquire
about an existing Agreement
Call 9 am - 5 pm, Monday-Saturday
1-800-827-6655
/Vhen requesting service or ordering
)arts, always provide the following
nformation:
P,roductType • Part Number
ModelNumber • PartDescription
SEARS
America_ Repair Specialists


