GEAppliances.com
Om
- ----_are_yInstructions .... 2-7
Operating Instructions
Aluminum Foil................. 14
Clockand Timer ............... 16
Lower Oven Drawer ........... 30
Oven ...................... 11-32
Baking and Roasting ......... 14
Broiling, Broiling Guide ....... 15
Control Lockout .............. 25
Convection .............. 19-23
Gas/Control Lockout ......... 25
Oven Control ............. 11,12
PowerOutage ............ 13,16
Preheating .................. 14
Probe ........................ 18
Racks ....................... 14
Sabbath Feature ............. 26
Self-Cleaning ............. 31,32
Special Features ......... 24,25
Thermostat Adjustment ...... 27
Timed Baking
and Roasting ................ 17
Timed Convection Baking .... 23
Surface Cooking ............ 8-10
Griddle ...................... 10
Warming Drawer .......... 28,29
Care and Cleaning
Burner Assemblg .......... 33,34
Burner Grates ................. 35
Control Panel and Knobs ...... 36
Cooktop ...................... 35
Door Removal ................. 37
Drawer .................... 38,39
Griddle ........................ 35
Oven Bottom .................. 36
Oven Light Replacement ...... 38
OvenVents ................... 36
Racks ......................... 38
Self-Cleaning .............. 31,32
Stainless SteelSurfaces ....... 37
Installation
Instructions ........... 4o-s1
Air Adjustment ................ 50
Anti-Tip Device ............ 43,51
Assemble Surface Burners ..... 48
Checking Burner
Ignition ....................... 49
Connecting the Range
to Gas .................... 44-46
Dimensions and Clearances ...42
Electrical Connections ..... 47,48
Leveling the Range ............ 50
LP ............................ 51
Troubleshooting
Tips ...................... 52-55
Accessories ............... 57
Consumer Support
Consumer Support ...Back Cover
Warrantg for Customers
in Canada ..................... 59
Warrantg for Customers
in the U.S.A................... 58
JGB800
JGB805
JGB810
JGB820
JGB900
In Canada contact us at:
www.G EAppliances.ca
Write the model and serial
numbers here:
Model #
Serial #
You can find them on a label
on the front of the range behind the
warming drawer or lower
oven drawer.
183D5580P25249-85170 05-09JR

IMPORTANTSAFETYINFORMATION.
READALL INSTRUCTIONS BEFOREUSING.
WARNING!
Forgour safety, the information in this manual must be followed to minimize the risk of fire or
explosion, electric shock, or to prevent property damage, personal injury, or loss of life.
®
WARNING: iftheinformation
in this manual is not followed exactlg,
a fire or explosion mag result, causing
propertg damage, personal injurg
or death.
- Do not store or use gasoline or other
flammable vapors and liquids in the
vicinitg of this or ang other appliance.
- WHATTO DO IF YOU
SMELL GAS
....Do not trg to light ang appliance.
.... Do not touch ang electrical switch;
do not use ang phone in gour building.
Immediatelg call gour gas supplier
from a neighbor's phone. Follow the
gas supplier's instructions.
.... If gou cannot reach gour gas supplier,
call the fire department.
- Installation and service must be
performed bg a qualified installer,
service agencg or the gas supplier.
2
ANTI-TIP DEVICE
•All ranges can tip.
• BURNSor other SERIOUS
INJURIEScan result.
• INSTALLand CHECKthe
ANTI-TIP bracket following
the instructions supplied
with the bracket.
Toreduce the risk of tipping the range, the range
must be secured by a properly installed anti-tip bracket.
See installation instructions shipped with the bracket for
complete details before attempting to install.
Tocheck if the bracket isinstalled and engaged properly,
carefully tip the range forward. Thebracket should stop
the range within 4 inches. If it does not, the bracket must be
reinstalled. If the range ispulled from the wall for any reason,
always repeat this procedure to verify the range isproperly
secured by the anti-tip bracket.
For free-standing or slide-in ranges, never completely remove
the leveling legs or the range will not be secured to the anti-tip
device properly.
If you did not receive an anti-tip bracket with your purchase,
cull 1.800.626.8774 to receive one at no cost (in C(_nc_da,cull
1.800.561.3344). Forinstallation instructions of the bracket,
visit GEAppliances.com (in C(_nc_da,GEAppliances.ca).
GEAppliances.com
WARNING!
IMPORTANT SAFETY NOTICE
The California Safe Drinking Water and ToxicEnforcement Act requires the Governor of California to
publish a list of substances known to the state to cause birth defects or other reproductive harm, and
requires businesses to warn customers of potential exposure to such substances.
Gas appliances can cause minor exposure to four ofthese substances, namely benzene, carbon
monoxide, formaldehyde and soot, caused primarily by the incomplete combustion ofnatural gas or
LPfuels. Properly adjusted burners, indicated by a bluish rather than a yellow flame, will minimize
incomplete combustion. Exposure to these substances can be minimized by venting with an open
window or using a ventilation fan or hood.
SAFETY PRECAUTIONS
Have the installer show you thelocation of therange gasshut-off valve and how to shut itoff ifnecessary.
Have your range installed and properly
groundedby aqualifiedinstaller,in
accordance with the Installation Instructions.
Any adjustmentand service should be
performed onlyby qualifiedgas range
installers or service technicians.
Do notattempttorepairorreplaceany
partofyour rangeunlessitisspecifically
recommended inthismanual.Allotherservice
shouldbe referredtoa qualifiedtechnician.
Plug your range into a 120-volt grounded
outlet only. Do not remove the round
grounding prong from the plug. If in doubt
about the grounding of the home electrical
system, itisyour personal responsibility and
obligation to have an ungrounded outlet
replaced with a properly grounded,
three-prong outlet in accordance with
the National Electrical Code. Do not use
an extension cord with this appliance.
IMPORTANTSAFETYINFORMATION.
READALL INSTRUCTIONS BEFOREUSING.
/4
SAFETY PRECAUTIONS
Locate the range out of kitchen traffic path
and out of drafty locations to prevent poor
air circulation.
Be sure all packaging materials are removed
from the range before operating itto prevent
fire or smoke damage should the packaging
material ignite.
Be sure your range iscorrectly adjusted by
a qualified service technician or installer for
the type of gas (natural or LP)that isto be
used. Your range can be converted for use
with either type of gas. See the Installation
of the range section.
WARNING:Theseadjustments
must be made by a qualified service
technician in accordance with the
manufacturer's instructions and all codes
and requirements of the authority having
jurisdiction. Failure to follow these instructions
could result in serious injury or property
damage. Thequalified agency performing
this work assumes responsibility for the
conversion.
After prolonged use of a range, high floor
temperatures may result and many floor
coverings will not withstand this kind of use.
Never install the range over vinyl tile or
linoleum that cannot withstand such type
of use. Never install itdirectly over interior
kitchen carpeting.
Donot leave children alone or unattended
where a range ishot or in operation.
They could be seriously burned.
Donot allow anyone to climb, stand or hang
on the oven door, lower oven drawer, warming
drawer or cooktop. They could damage the
range and even tip itover, causing severe
personal injury.
CAUTION:Items of interest to
children should not be stored in cabinets
above a range or on the backsplash of a
rangeichildren climbing on the range to
reach items could be seriously injured.
WARNING: NEVERusethis
appliance as a space heater to heat or
warm the room. Doing so may result
in carbon monoxide poisoning and
overheating of the oven.
Never wear loose-fitting or hanging garments
while using the appliance. Be careful when
reaching for items stored in cabinets over the
range. Flammable material could be ignited
ifbrought in contact with flame or hot oven
surfaces and may cause severe burns.
Donot store flammable materials in an oven,
a range drawer or near a cooktop.
Donot store or use combustible materials,
gasoline or other flammable vapors and
liquids in the vicinity ofthis or any other
appliance.
Donot letcooking grease or other flammable
materials accumulate in or near the range.
Donot use water on grease fires. Never pick
up a flaming pan. Turn the controls off.
Smother a flaming pan on a surface burner
by covering the pan completely with
a well-fitting lid,cookie sheet or flat tray.
Use a multi-purpose dry chemical or
foam-type fire extinguisher.
Flaming grease outside a pan can be put
out by covering itwith baking soda or,
ifavailable, by using a multi-purpose dry
chemical or foam-type fire extinguisher.
Flame in the upper oven or lower oven drawer
can be smothered completely by closing the
oven door or drawer and turning the control
to off or by using a multi-purpose dry
chemical or foam-type fire extinguisher.
Letthe burner grates and other surfaces cool
before touching them or leaving them where
children can reach them.
Never block the vents (air openings) of the
range. They provide the air inlet and outlet
that are necessary for the range to operate
properly with correct combustion. Air openings
are located at the rear ofthe cooktop, at the
top and bottom of the oven door, and at the
bottom of the range under the warming
drawer, lower oven drawer or kick panel.
Large scratches or impacts to glass doors
can lead to broken or shattered glass.
GEAppliances.com
WARNING!
SURFACE BURNERS
Use proper pan s/zelavoid pans that are unstable or easily tipped. Select cookware having flat
bottoms large enough to cover burner grates. To avoid spillovers, make sure cookware islarge enough
to contain the food properly. This will both save cleaning time and prevent hazardous accumulations
of food, since heavy spattering or spillovers left on range can ignite. Use pans with handles that can
be easily grasped and remain cool.
Always usethe L/TE position when igniting
the top burners and make sure the burners
have ignited.
Never leave the surface burners unattended
at high flame settings. Boilovers cause smoking
and greasg spillovers that may catch on fire.
Adjust the top burner flame size so itdoes
not extend begond the edge of the cookware.
Excessiveflame ishazardous.
Use onlg drg pot holders- moist or damp pot
holders on hot surfaces mag result in burns
from steam. Do not let pot holders come near
open flames when lifting cookware. Do not use
a towel or other bulks cloth in place of a pot
holder.
When using glass cookware, make sure it
is designed for top-of-range cooking.
Tominimize the possibilitg of burns, ignition
of flammable materials and spillage, turn
cookware handles toward the side or back
of the range without extending over adjacent
burners.
Carefullg watch foods being fried at a high
flame setting.
Alwags heat fat slowlg, and watch as itheats.
Donot leave ang items on the cooktop. The
hot air from the vent mag ignite flammable
items and will increase pressure in closed
containers, which mag cause them to burst.
If a combination of oils or fats will be used
in frging, stir together before heating or
as fats melt slowlg.
Use a deep fat thermometer whenever
possible to prevent overheating fat begond
the smoking point.
Use the least possible amount offat for
effective shallow or deep-fat frging. Fillingthe
pan too full of fat can cause spillovers when
food isadded.
Donot flame foods on the cooktop. If you
do flame foods under the hood, turn the
fan on.
Donot use a wok on the cooking surface
ifthe wok has a round metal ring that is
placed over the burner grate to support the
wok. This ring acts as a heat trap, which mag
damage the burner grate and burner head.
Also, it mag cause the burner to work
improperlg. This mag cause a carbon
monoxide levelabove that allowed bg current
standards, resulting in a health hazard.
Foods for frging should be as drg as possible.
Frost on frozen foods or moisture on fresh
foods can cause hot fat to bubble up and
over the sides of the pan.
Never trg to move a pan of hot fat, especiallg
a deep fat frger. Wait until the fat iscool.
Donot leave plastic items on the cooktop-
theg mag melt ifleft too close to the vent.
Keep all plastics awag from the surface
burners.
Toavoid the possibilitg of a burn, alwags be
certain that the controls for all burners are
at the OFF position and all grates are cool
before attempting to remove them.
If range islocated near a window, do not hang
long curtains that could blow over the surface
burners and create a fire hazard.
If SOUsmell gas, turn off the gas to the range
and call a qualified service technician. Never
usean open flame to locate a leak.
Alwags turn the surface burner controls off
before removing cookware.
Donot lift the cooktop. Lifting the cooktop can
lead to damage and improper operation of the
range.
When disabling Gas/Control Lockout, make
sure the surface controls are set to the OFF
position. This will preclude gas flow when
the range is turned on.
IMPORTANTSAFETYINFORMATION.
READALL INSTRUCTIONS BEFOREUSING.
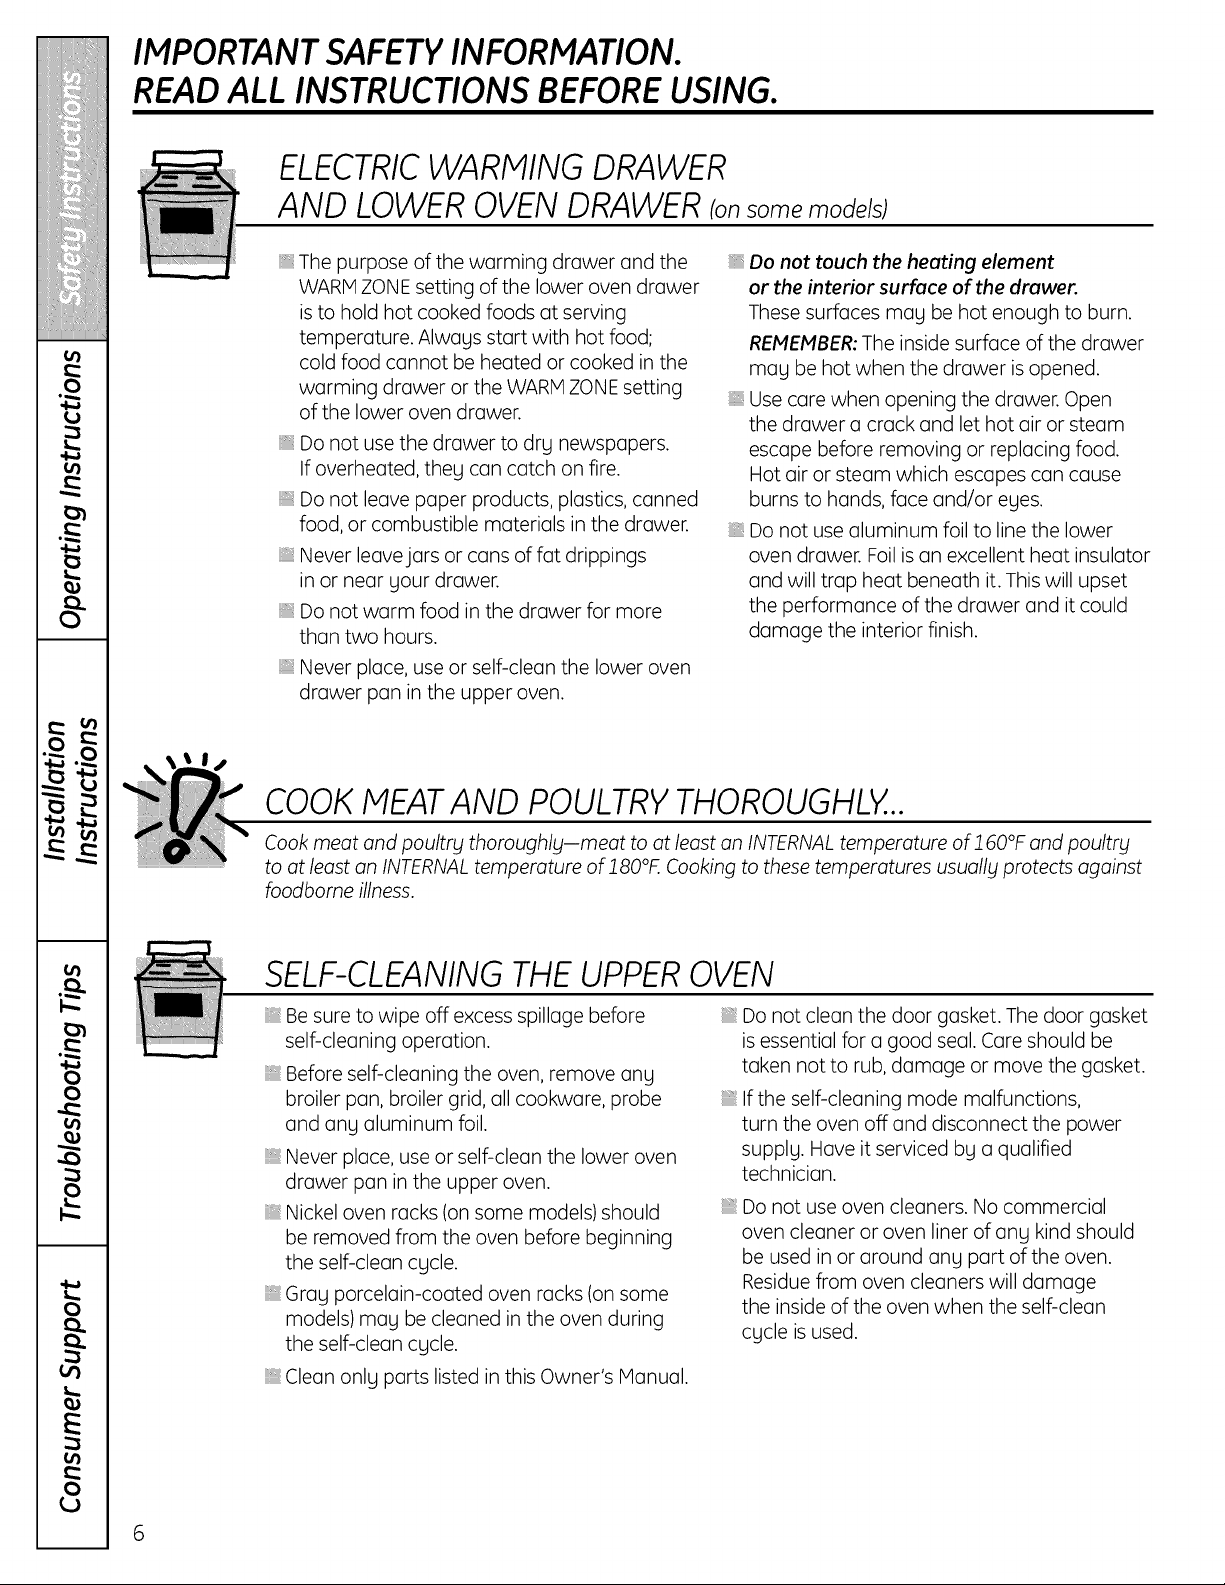
ELECTRICWARMING DRAWER
AND LOWEROVENDRAWERConsome models)
The purpose of the worming drower ond the
WARMZONE setting of the lower oven drower
is to hold hot cooked foods ot serving
temperoture. Alwoys stort with hot food;
cold food connot be heoted or cooked in the
worming drower or the WARMZONE setting
of the lower oven drower.
Donot use the drower to dry newspopers.
If overheoted, they con cotch on fire.
Donot leove poper products, plostics, conned
food, or combustible moteriols in the drower.
Never leovejors or cons of lot drippings
in or neor your drower.
Donot worm food in the drower for more
thon two hours.
Never ploce, use or self-cleon the lower oven
drower pon in the upper oven.
Do not touch the heoting element
or the interior surface of the drawer.
These surfaces moll be hot enough to burn.
REMEMBER: The inside surface of the drower
moll be hot when the drower isopened.
Use core when opening the drower. Open
the drower o crock ond let hot oir or steom
escope before removing or replocing food.
Hot oir or steom which escopes con couse
burns to honda face ond/or eyes.
Do not use oluminum foil to line the lower
oven drower. Foilison excellent heot insulotor
ond will trop heot beneoth it. This will upset
the performonce of the drower ond itcould
domoge the interior finish.
COOK MEATAND POULTRY THOROUGHLY...
Cook meot ond poultry thoroughly-meot to ot leost on INTERNAL temperoture of160°F ond poultry
to ot leost on INTERNAL temperoture of l 80°E Cooking to these temperotures usuolly protects ogoinst
foodbome illness.
SELF-CLEANING THEUPPER OVEN
Be sure to wipe off excess spilloge before
self-cleoning operotion.
Before self-cleoning the oven, remove ony
broiler pon, broiler grid, oil cookwore, probe
ond ony oluminum foil.
Never ploce, use or self-cleon the lower oven
drower pon in the upper oven.
Nickel oven rocks (on some models) should
be removed from the oven before beginning
the self-cleon cycle.
Grog porceloin-cooted oven rocks (on some
models) moll be cleoned in the oven during
the self-cleon cycle.
Donot cleon the door gosket. The door gosket
is essentiol for o good seol. Core should be
token not to rub, domoge or move the gosket.
If the self-cleoning mode molfunctions,
turn the oven off ond disconnect the power
supply. Hove itserviced by o quolified
technicion.
Donot use oven cleoners. No commerciol
oven cleoner or oven liner of ony kind should
be used in or oround ong port of the oven.
Residue from oven cleoners will domoge
the inside of the oven when the self-cleon
cycle isused.
Cleon only ports listed in this Owner's Manual.
6
GEAppliances.com
UPPER OVEN
Stand away from the range when opening the door of a hot oven. Thehot air and steam that escape
can cause burns to hands, face and eyes.
Do not usetheoven fora storagearea.
Itemsstoredintheoven can ignite.
Keep theoven freefrom greasebuildup.
Placetheoven racksinthedesiredposition
whiletheoven iscool.
Pulling out the rack to the stop-lock is a
convenience in lifting heavy foods. It isalso
a precaution against burns from touching hot
surfaces of the door or oven walls. The lowest
position is not designed to slide.
Donot heat unopened food containers.
Pressure could build up and the container
could burst, causing an injury.
WARNING: NEVERcoverany
slots, holes or passages in the oven bottom
or cover an entire rack with materials such
asaluminum foil. Doing so blocks air flow
through the oven and may cause carbon
monoxide poisoning. Aluminum foil linings
may also trap heat, causing a fire hazard.
Donot usealuminum foil anywhere in the
oven except as described in this manual.
Misuse could result in a fire hazard or damage
to the range.
When using cooking or roasting bags in the
oven, follow the manufacturer's directions.
Donot use your oven to dry newspapers.
If overheated, they can catch fire.
Use only glass cookware that isrecommended
for use in gas ovens.
Always remove any broiler pan from range
as soon as you finish broiling. Grease left in
the pan can catch fire ifoven isused without
removing the grease from the broiler pan.
When broiling, ifmeat is too close to the flame,
the fat may ignite.Trim excess fat to prevent
excessive flare-ups.
Make sure any broiler pan is in place correctly
to reduce the possibility of grease fires.
If you should have a grease fire in a broiler
pan, press the Clear/Off pad, and keep
the oven door closed to contain fire until
itburns out.
Forsafety and proper cooking performance,
always bake and broil with the oven door
closed.
Never place, use or self-clean the lower oven
drawer pan in the upper oven.
READ AND FOLLOW THIS SAFETYINFORMATIONCAREFULLY.
SAVE THESE INSTRUCTIONS
Usingthe gas surface burners.
Throughout this manual, features and appearance may vary from your model.
Before Lighting u Gus Burner
Make sureallburnersoreinplace.
Make sureallgratesontherangeore
properlyplacedbeforeusingany burner,
IfyourrangehastheGas/ControlLockout
feature,make sure it is disabled before
attempting tolightthe surfaceburners.
After Lighting a Gas Burner
Do not operatetheburner foron extended
period oftime without cookwore on the
grote. The finish on thegrote may chip
without cookworeto absorb the heat.
Besure the burnersand grates ore cool
beforeyouplaceyour hand,o pot holder,
cleaningcloths or other materialson them.
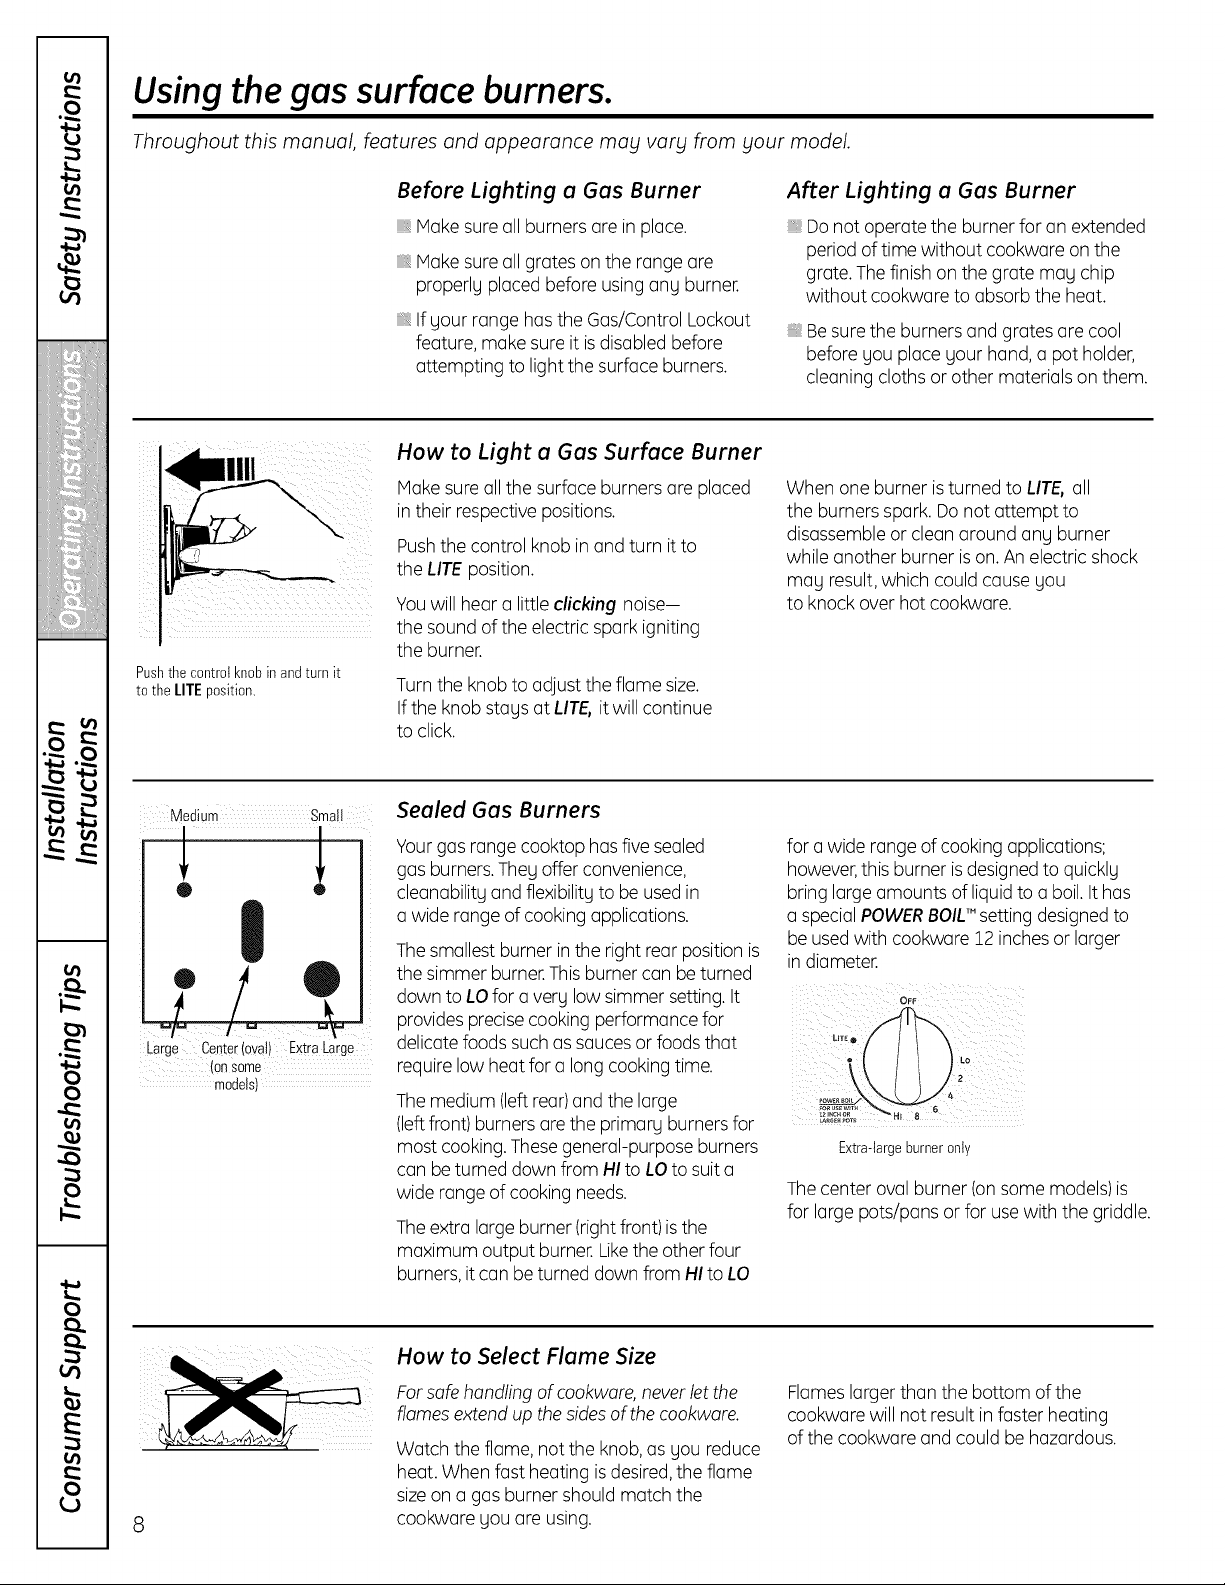
Pushthe controlknobin andturnit
tothe lIT[ position.
How to Light u Gus Surfuce Burner
lake sure allthe surface burners are placed
in their respective positions.
Push the control knob inand turn itto
the LITE position.
You willhear a little clicking noise-
thesoundoftheelectricspark igniting
theburner.
Turn the knob to adjust theflame size.
If the knob stays atLITE, itwillcontinue
toclick.
Whenone burner isturned to LIT& oil
theburnersspark.Do not attempt to
disassembleor cleonaround any burner
whileanother burner is on. An electricshock
may result, which couldcause you
toknockoverhotcookwore.
Medium Small
W
Large Center(oval) ExtraLarge
(onSome
models)
Seuled Gus Burners
Yourgasrange cooktophas five sealed
gasburners.They offer convenience,
cleonobilitg and flexibility tobe used in
o wide range ofcooking applications.
The smallest burner in therightrear position is
thesimmerburner.Thisburner con beturned
downto LOforo very lowsimmersetting. It
provides precisecooking performancefor
delicate foods such assaucesor foods that
require lowheatforo long cooking time.
The medium (leftrear)and thelarge
(leftfront)burners orethe primary burnersfor
mostcooking. Thesegeneral-purpose burners
conbe turneddown from HI toLOtosuit o
widerange ofcooking needs.
The extra large burner (rightfront)is the
maximum output burner. Liketheotherfour
burners, it conbe turned downfrom HI toLO
foro wide range ofcooking applications;
however,this burner is designed toquickly
bring large amountsofliquid too boil. It has
o special POWERBOIL'"settingdesigned to
be used with cookwore 12 inchesor larger
in diameter.
OFF
LO
Extra-largeburneronly
The center oval burner (on some models)is
for large pots/pans or for use with the griddle.
8
How to Select Flume Size
For safe handling of cookware, never let the
flames extend up the sides ofthe cookwore.
Watch theflame,notthe knob,asyou reduce
heat. Whenfastheating is desired,the flame
sizeon o gasburner shouldmatchthe
cookwore youore using.
Flameslarger than the bottom ofthe
cookworewill notresult in fosterheating
ofthecookwore and could be hazardous.
GEAppliances.com
Top-of-Range Cookware
Aluminum: Medium-weight cookware is
recommended because itheats quickly
and evenly. Host foods brownevenly in an
aluminum skillet. Usesaucepans with tight-
fitting lids when cooking with minimum
amounts ofwater.
Cast-Iron: If heated slowly, mostskillets
willgive satisfactory results.
Enamelware: Under some conditions,
theenamel ofsome cookware may melt.
Follow cookware manufacturer's
recommendations for cooking methods.
Glass: There are two types of glass
cookware-those for oven use only and
those fortop-of-range cooking (saucepans,
coffee and teapots).Glassconducts heat
very slowly.
HeatproofGlass-Ceramic: Can be used for
eithersurface or ovencooking.It conducts
heatvery slowlyand cools very slowly. Check
cookwaremanufacturer's directionsto be
sure itcanbe used on gas ranges.
StainlessSteel: Thismetal alone haspoor
heatingproperties and is usually combined
with copper,aluminum or other metalsfor
improved heatdistribution. Combination
metal skilletsusually work satisfactorily if
they are used with medium heatas the
manufacturer recommends.
Stove Top Grills
Do not use stove top grills on your sealed
gasburners. If youuse the stove top grill on
thesealed gasburner, it will cause incomplete
combustion and canresult in exposureto
carbonmonoxide levelsaboveallowable
current standards.
Thiscan be hazardous to your health,
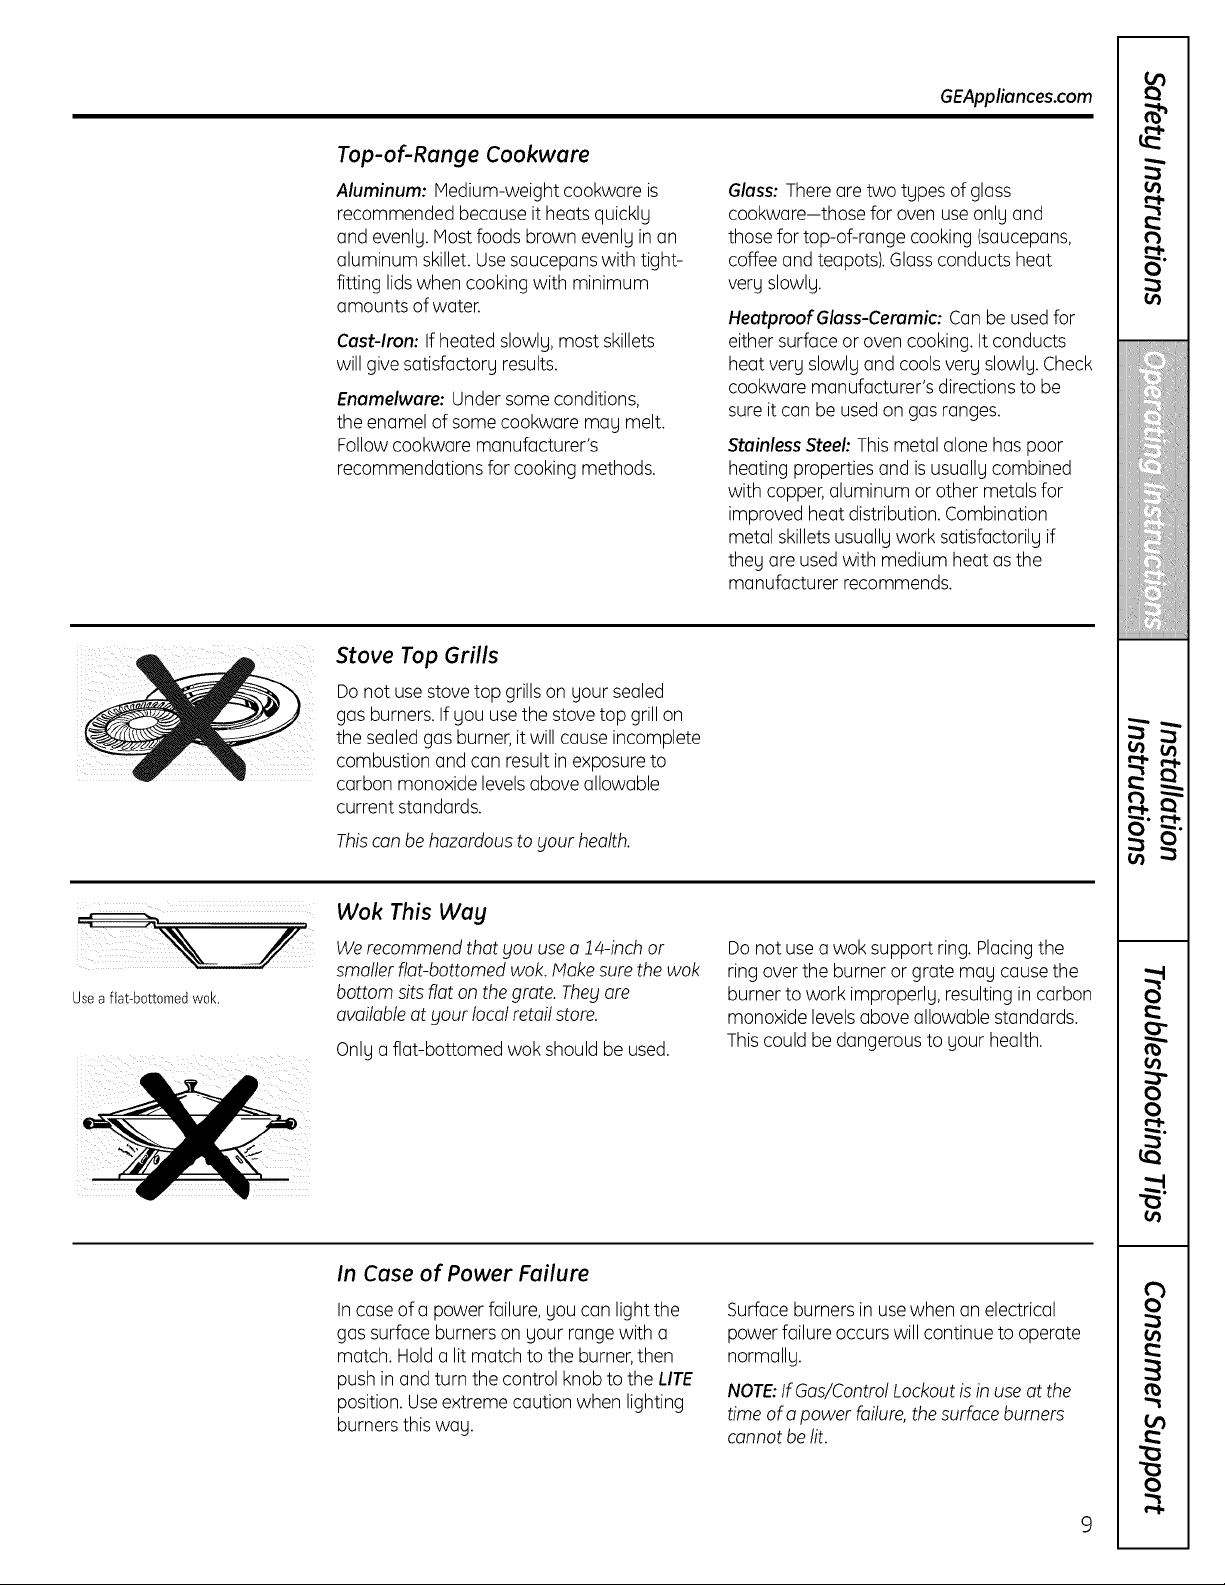
Useaflat-bottomedwok.
Wok This Way
We recommend that you use o 14-inch or
smaller riot-bottomed wok. Make sure the wok
bottom sits flaton the grote. They ore
available atyourlocalretail store.
Onlya flat-bottomed wok shouldbe used.
Do notusea wok support ring.Placingthe
ring over the burner or grate may cause the
burner towork improperly,resulting in carbon
monoxide levelsaboveallowable standards.
Thiscouldbe dangerous to your health.
In Case of Power Failure
Incaseof a power failure, youcanlightthe
gassurfaceburnerson your range with a
match. Holda litmatch tothe burner,then
pushin and turnthe control knobtothe LITE
position.Useextremecaution when lighting
burnersthis way.
Surface burnersin use when an electrical
powerfailureoccurswillcontinue to operate
normally.
NOTE:If Gas/Control Lockout is inuse at the
time ofopower failure, the surface burners
cannot be lit.
t_
O"
o_
iii!i!!!iii_iiiiiiill
!i_i_iiiiiiiiiiiiiiii
,,iiiii_bl
i!5"i!i!iii!
• IP
o_
0
0
r,,l-
o_
on
R
0
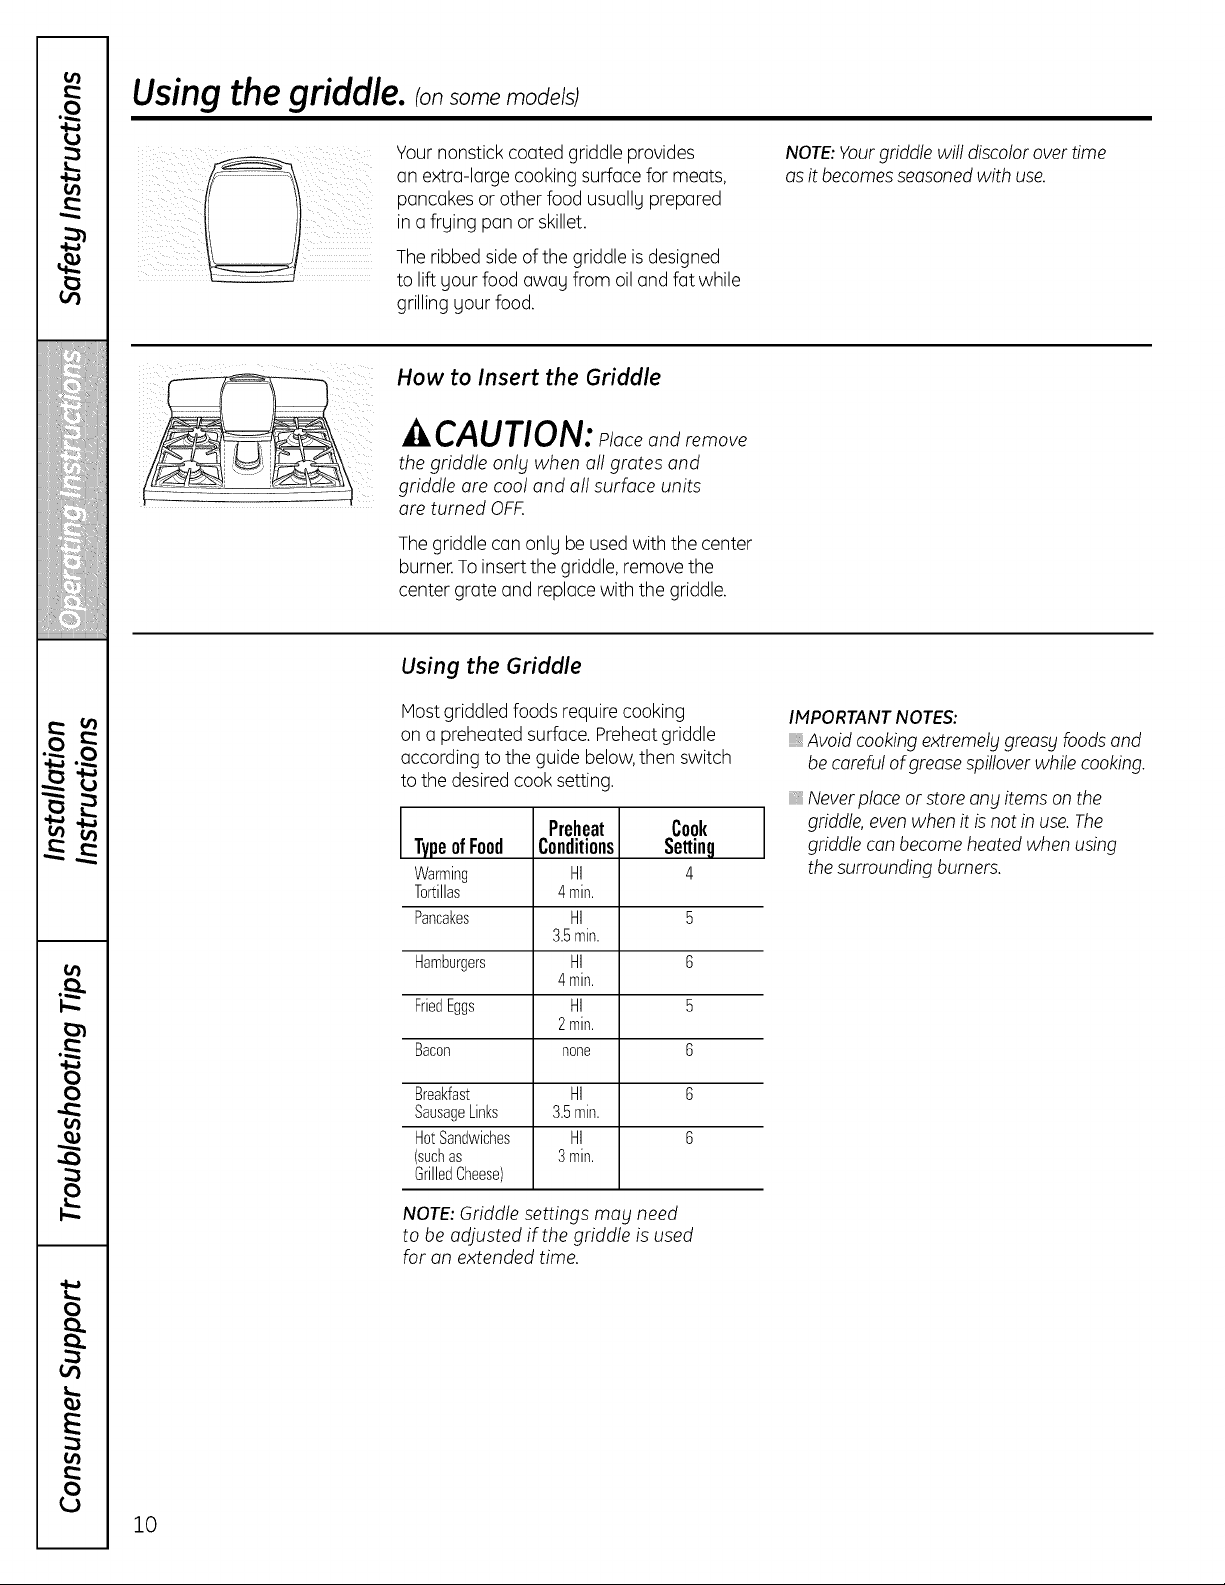
Usingthe griddle, ionsomemode/sj
Yournonstick coated griddle provides
on extra-large cooking surfacefor meats,
pancakesor other foodusually prepared
in a frying pan or skillet.
The ribbed sideof the griddle isdesigned
to lift yourfood away from oil and fat while
grilling yourfood.
NOTE:Yourgriddle willdiscolor over time
as itbecomes seasonedwith use.
How to Insert the Griddle
CAUTION: placeandremove
the griddle only when oil grates and
griddle ore cool and oil surface units
ore turned OFF.
Thegriddle canonly be usedwith thecenter
burner.To insert the griddle, remove the
center grateand replacewith thegriddle.
Using the Griddle
Host griddled foods require cooking
on a preheatedsurface. Preheatgriddle
according totheguide below,then switch
tothedesiredcook setting.
Preheat Cook
TypeofFood Conditions Settinq
Warming HI 4
Tortillas 4min.
Pancakes HI 5
3.5min.
Hamburgers HI 6
4min.
FriedEggs HI 5
2min.
Bacon none 6
Breakfast HI 6
SausageLinks 3.5min.
HotSandwiches HI 6
(suchas 3min.
GrilledCheese)
NOTE:Griddle settings may need
to be adjusted ifthe griddle is used
for on extended time.
IMPORTANTNOTES:
Avoid cooking extremely greasy foods and
be careful of grease spillover while cooking.
Never place orstore any items on the
griddle, even when itis not in use. The
griddle can become heated when using
the surrounding burners.
10
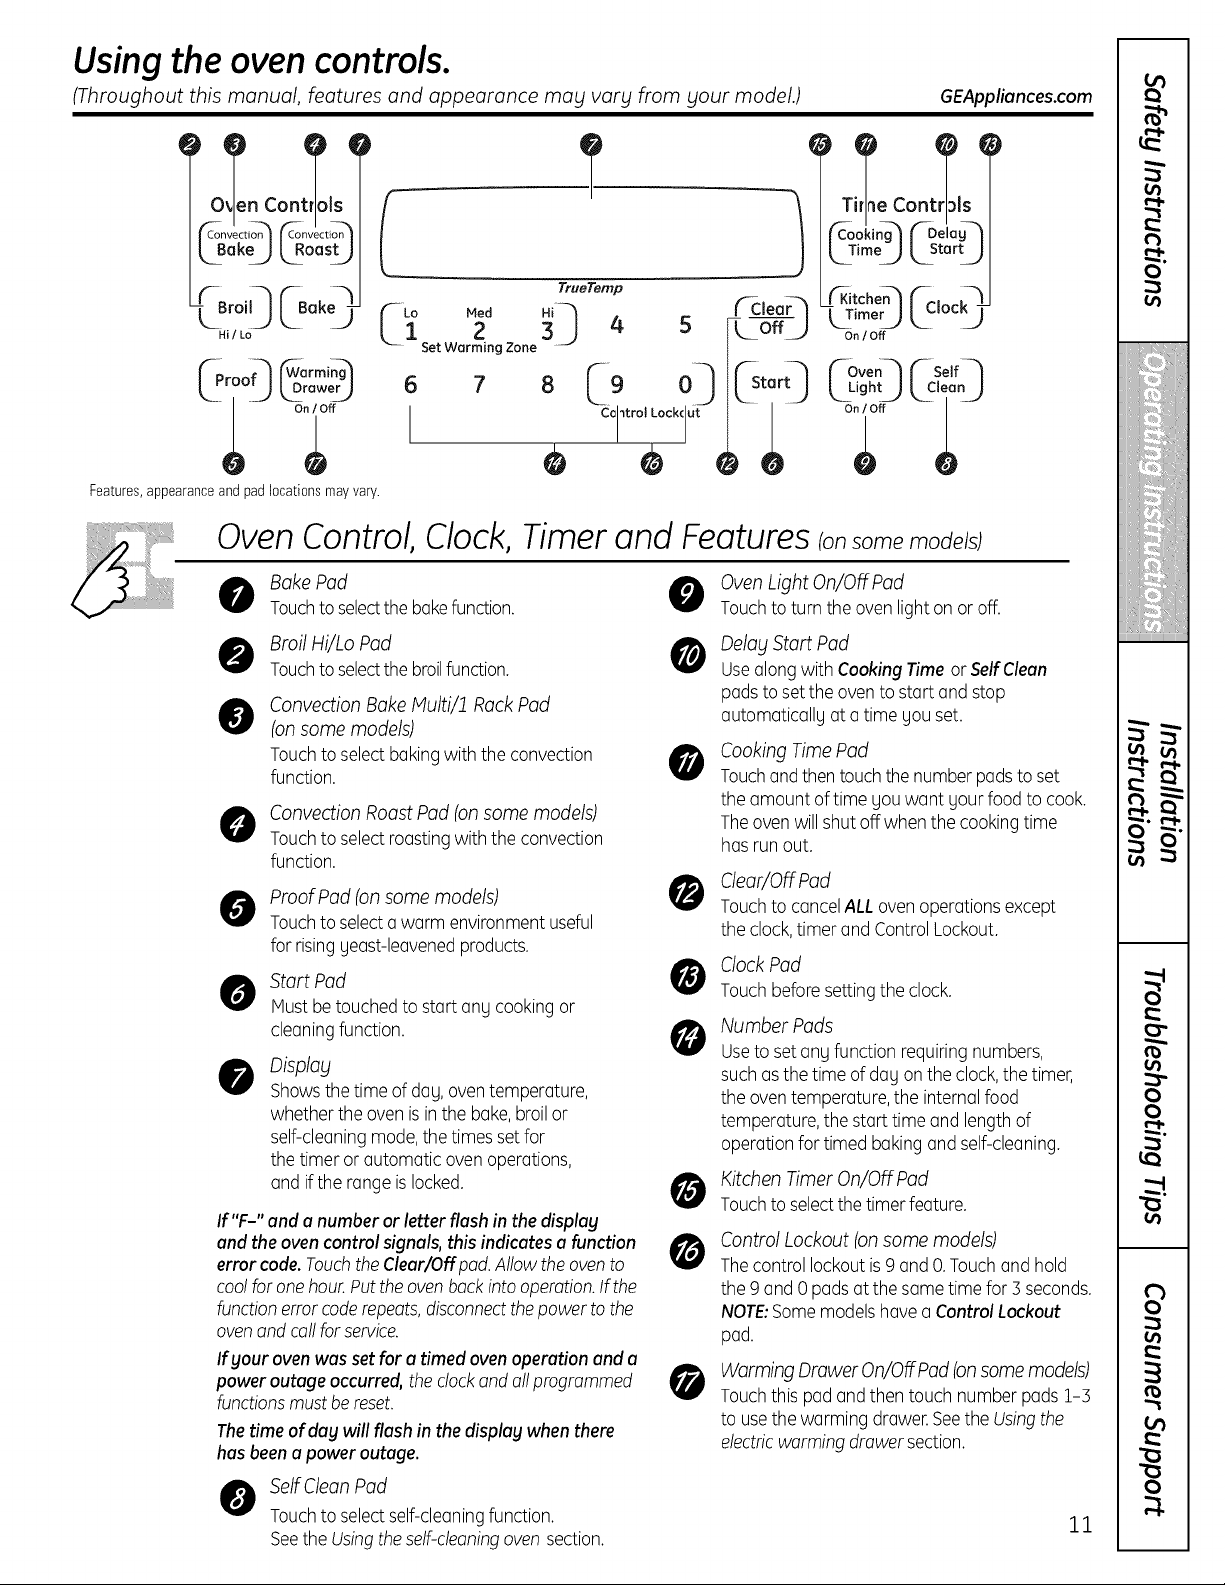
Usingthe oven controls.
(Throughout this manual, features and appearance may vary from your model.) GEAppliances.com
&o,,]GQ
Hi/Lo
roo, ,oOo:U
Features, appearance and pad locations may vary.
I
,1 q
T e Con Is
('-C-ookJng_ f--Deioy_'_
LTimoJLsto,U
TrueTemp
2 3_ 4 5 oolo.
Set Warming Zone
6 7
8C9 o]
Co ltrol Lock(ut
e o
LoffJ
_-Stert]
Oven Control, Clock, Timer and Features ionsomemode sJ
Bake Pad 0
Touchto selectthebakefunction.
0 Broil Hi/Lo Pod 0
Touchto selectthebroilfunction.
@
Convection Bake Multi/1 Rock Pad
(on some models)
Touchtoselectbaking with theconvection
function.
O Convection RoastPad (onsome models)
Touchtoselectroastingwith theconvection
function.
O roofPad (on some models)
Touchto selecta warm environmentuseful
forrisingyeast-leavenedproducts.
Start Pod
Mustbetouched to startang cookingor
cleaningfunction.
Display
Showsthe time of day, oventemperature,
whethertheoven is inthebake,broilor
self-cleaningmode,the times setfor
the timer or automatic oven operations,
and if therange islocked.
If "F-" and a numberor letterflash in the display
and the ovencontrolsignals, thisindicatesa function
error code. Touch the Clear/Off pod.Allow the oven to
cool for one hour. Put the oven back intooperation. If the
functionerrorcoderepeats, disconnect thepower tothe
oven end coil for service.
0
Oven Light On/OffPad
Touchtoturnthe oven light on or off.
Delay Start Pad
Use along withCooking Time orSelf Cleon
pads toset the oven to start and stop
automatically at a time you set.
Cooking TimePad
Touchandthen touchthe numberpads to set
the amount of time youwant your food tocook.
Theovenwillshutoff whenthe cookingtime
has run out.
Clear/Off Pad
TouchtocancelALLoven operationsexcept
the clock, timer and ControlLockout.
O CIockPod
Touchbefore settingtheclock.
@
If gour oven was set for a timed oven operation end u
power outage
occurred, the clockand oilprogrammed _[_
functions must be reset.
The time of dug will flash in the displag when there
has been a power outage.
O elf CleanPad
Touchtoselectself-cleaningfunction.
SeetheUsingtheself-cleaningoven section.
Number Pods
Usetoset any functionrequiringnumbers,
suchas the time of dayon the clock,the timer,
the oven temperature,theinternal food
temperature,thestart time and length of
operationfortimed baking and self-cleaning.
Kitchen Timer On/Off Pad
Touchto selectthe timer feature.
Control Lockout(on some models)
Thecontrol lockoutis 9 and O.Touchand hold
the 9 and 0 pads atthe sametime for5 seconds.
NOTE:Somemodelshave a ControlLockout
pad.
Worming Drawer On/Off Pad (onsomemodels)
Touchthis pad andthentouch number pads 1-5
tousethewarming drawer.SeetheUsingthe
electricwormingdrawer section.
11
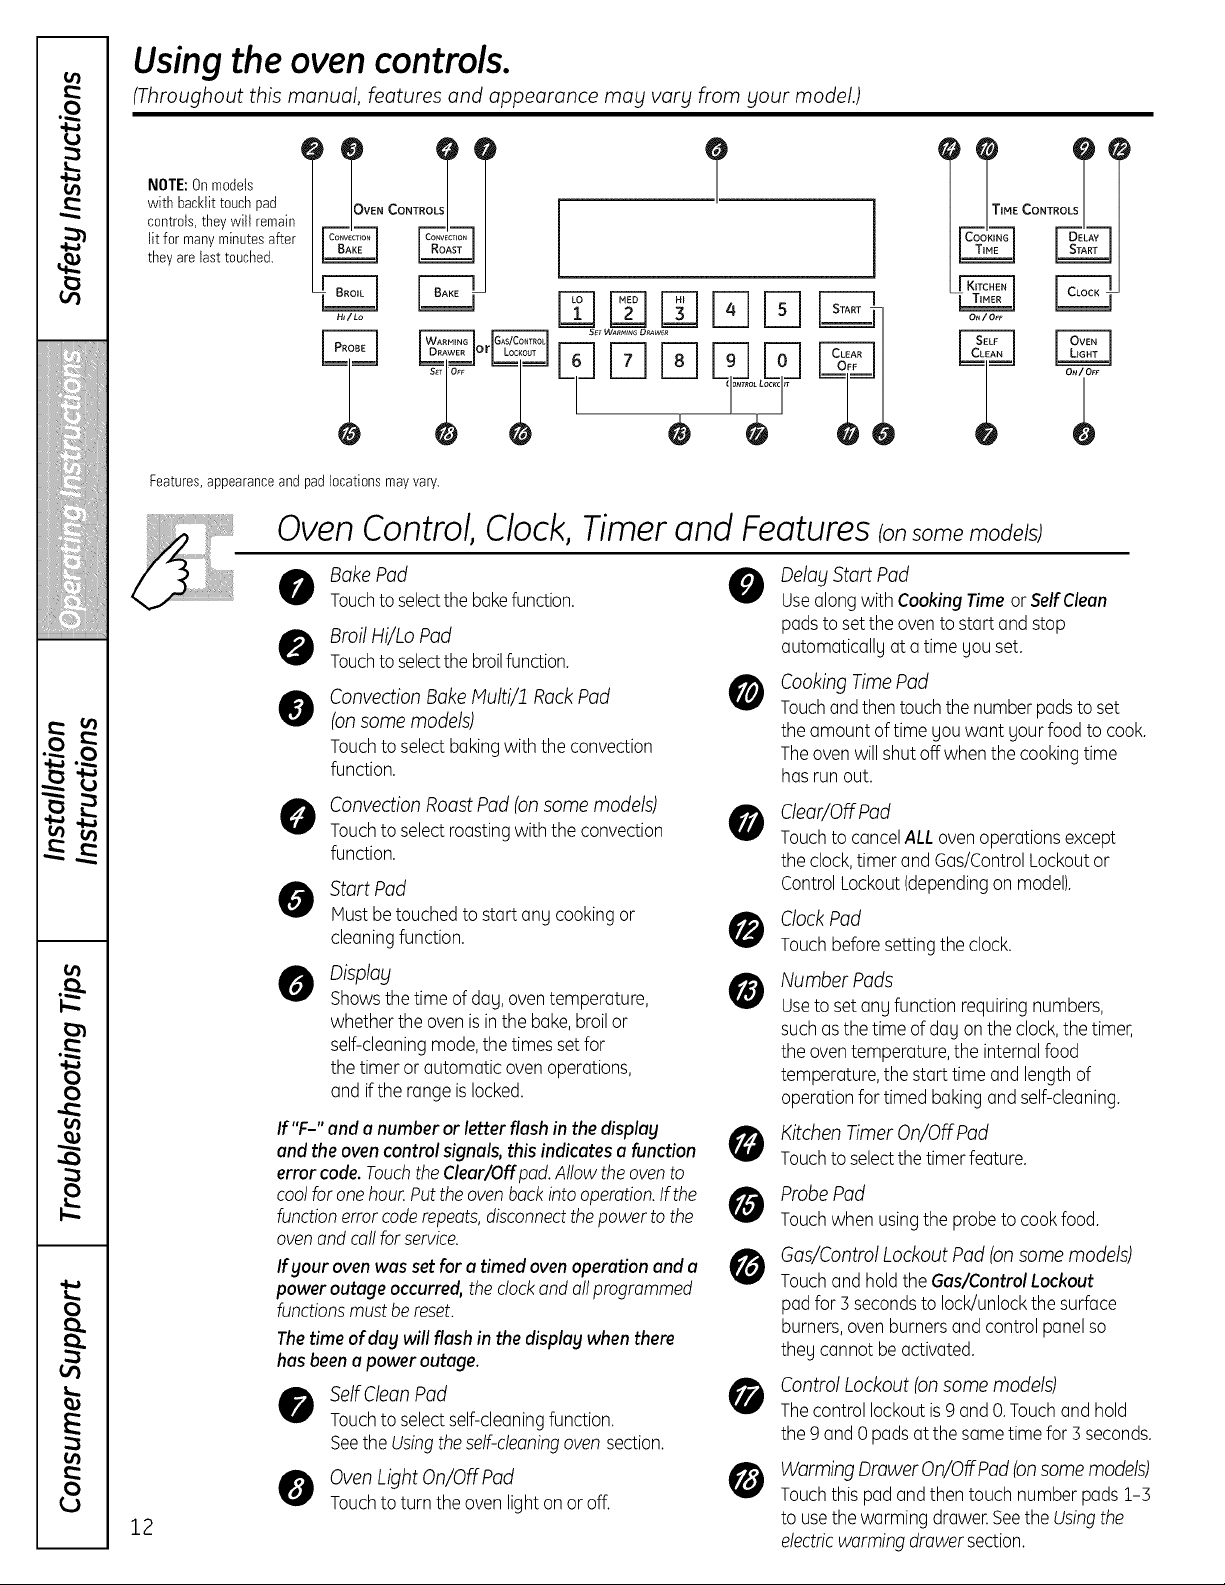
Usingthe oven controls.
(Throughout this manual, features and appearance may vary from your model.)
NOTE:Onmodels
with backlittouchpad
controls,theywillremain
litformanyminutesafter
theyarelast touched.
CONTRO
Features, appearance and pad locations may vary.
12
Oven Control, Clock, Timer and Features Ionsomen,ode sJ
Bake Pad @
Touchto selectthebakefunction.
Broil Hi/Lo Pod
Touchto selectthebroilfunction.
@
Convection Bake Multi/ff Rock Pad
(on some models)
Touchtoselectbaking with theconvection
function.
Convection RoastPad (onsome models)
Touchtoselectroastingwith theconvection
function.
Start Pad
Mustbetouched to startanUcookingor
cleaningfunction.
Display
Showsthe time of daU,oventemperature,
whethertheoven is inthebake,broilor
self-cleaningmode,the times setfor
the timer or automatic oven operations,
and if therange islocked.
@
If your ovenwas set for o timed ovenoperationand o
poweroutageoccurred,the clockand allprogrammed
functionsmust bereset.
0
If "F-" and o numberor letterflash in the display
and the ovencontrolsignals, thisindicateso function
errorcode.Touchthe Cleor/Off pad.Allow the ovento
cool for onehour.Putthe oven backinto operation.If the
functionerror coderepeats,disconnectthepowerto the
_rJ
ovenand call for service.
@
The time of day will flash inthe display when there
has been a power outage.
Self CleanPad
Touchtoselectself-cleaningfunction.
SeetheUsingtheself-cleaningoven section.
Oven Light On/OffPad
Touchtoturn theoven light on or off.
Delay Start Pad
Use along withCooking Time orSelf Clean
pads toset the oven to start and stop
automaticallg at a time gou set.
Cooking TimePad
Touchandthen touchthe numberpads to set
the amount of time Uouwant uourfood tocook.
Theovenwillshutoff whenthe cookingtime
has run out.
Clear/Off Pad
TouchtocancelALLoven operationsexcept
the clock, timer and Gas/ControlLockoutor
ControlLockout(dependingon model).
Clock Pad
Touchbefore settingtheclock.
Number Pads
Usetoset anUfunctionrequiringnumbers,
suchas the time of daUon the clock,the timer,
the oven temperature,theinternal food
temperature,thestart time and length of
operationfortimed baking and self-cleaning.
Kitchen Timer On/OFFPad
Touchto selectthe timer feature.
Probe Pad
Touchwhenusingtheprobetocookfood.
Gas/Control LockoutPad (on some models)
Touchand holdtheGas/Control Lockout
pad for5secondstolock/unlockthe surface
burners,oven burnersand control panelso
theUcannot be activated.
Control Lockout(on some models)
Thecontrol lockoutis 9 and O.Touchand hold
the 9 and 0 pads atthe sametime for5 seconds.
@
Warming Drawer On/Off Pad (onsomemodels)
Touchthis pad andthentouch number pads 1-5
tousethewarming drawer.SeetheUsingthe
electricwarmingdrawer section.
Using the upper oven. GEAppliances.com
To avoid possible bums place the racks in the desired position before you turn the oven on.
//j
The oven has 5 rack positions.
It also has aspecial low rack posltlon
(R)for extra large items, such asa large
turkey.
Before you begin...
Theracks havestop-locks,sothat when
placedcorrectlgon the rack supports
(Athrough E),thegwillstop beforecoming
completelgout, and willnottilt.
When placingand removing cookware,
pull therack outtothe bump on the rack
support.
To remove a rack, pull it toward gou, tilt the
front end up and pull itout.
To replace, place theend oftherack
(stop-locks)on thesupport, tilt up thefront
and push the rack in.
NOTE:Therack is not designed to slide out
at the special low rack (R)position.
!i i(
Plasticitems on the cooktopmaymelt
if lefttooclosetothe vent.
Ventappearanceand locationvary.
Upper Oven Vent
Your ovenis vented through ductsat therear
oftherange.Do not block these ductswhen
cooking in the oven-it is important that the
flow ofhotair from theovenand fresh air
to theovenburner be uninterrupted. Avoid
touching thevent openingsor nearbg
surfaces during ovenor broiler operation-
theg mag become hot.
Handles of pots and pans on the cooktop
may become hot ifleft too close to the vent.
Donotleaveplasticor flammable items on
thecooktop-they magmelt or igniteifleft
too closetothe vent.
Do not leave closed containers on the
cooktop. Thepressure inclosed containers
mag increase, which mag cause them
to burst.
Metal items will become verg hot iftheg are
left on the cooktop, and could cause bums.
Power Outage
CAUTlON: notmakeany
attempt to operate the electricignition oven
during an electricalpower failure.
The ovenor broiler cannot be litduring a
powerfailure. Gaswill notflow unlessthe
glow bar ishot.
If theovenis in use when a powerfailure
occurs,the ovenburner shuts off and cannot
be relituntilpower is restored.This is because
theflow ofgasis automaticallg stopped and
willnot resumewhen power is restored until
theglow bar has reachedoperating
temperature.
Upper Oven Light
Touch theOvenLight pad on theupper
control panel toturn the lighton or off.
On some models, theOvenLight switch
is on the lowerfront control panel.
1B

Using the upper oven.
If your model has a door latch, do not lock the oven door with the latch during baking or roasting.
Thelatch isused for self-cleaning only.
|
Theovenhasaspeciallowrack(R)
positionjustabovethe ovenbottom.
Useit when extra cookingspaceis
needed,forexample,when cooking
alargeturkey.Therackisnot designed
toslideoutat thisposition.
How to Set the Upper Oven for Baking or Roasting
Youroven isnotdesignedforopen-door
cooking.
[_] Touchthe BAKE pad.
[_ Touchthe number padstoset the
desired temperature.
[_ Touchthe STARTpad.
ThewordONand100°willbedisplayed.As
theoven heatsup,thedisplaywillshow the
changing temperature.When theoven reaches
thetemperature youset, a tone willsound.
Tochange theoventemperatureduring BAKE
cgcle,presstheBAKEpad and thenthe
numberpadstogetthenewtemperature.
[_ Check foodfor doneness atminimum
time on recipe.Cook longer ifnecessarg.
[_] Touch theCLEAR/OFFpad when
cooking is complete.
Whenbakingon asinglerack,use
the rackpositionfromthe chart for your
typeoffood. Bakingresultswill be
betterif bakingpansarecenteredin
the ovenas muchas possible.
Preheating and Pan Placement
Preheattheoven if the recipe callsfor it.
To preheat, set the ovenatthecorrect
temperature. Preheating is necessary
when convection bakingand for good
results when bakingcakes,cookies,
pastryand breads,
Baking results willbe better iffoods are
centered in theovenasmuch aspossible.
Pansshouldnottouch eachother or the
walls ofthe oven.
For best results when baking four cake layers
at a time,use racksBand D.Placethe lower
pansatthe back ofthe rack and the upper
pansatthefront oftherack as shown so that
one pan isnotdirectly aboveanother leaving
approximately 1-1/2"between pans,from
thefront, back and sides of the walls.
Type of Food RackPosition
Angelfood_'ake AorC
Bundtorpoundcakes AorC
Biscuits,muffins,brownies, C
cookies,cupcakes,
layercakes,pies
Casseroles BorC
Pies Oncookiesheet BorC
Roasting RorA
4-Layercakes B& U
Whenbakingfourcakelayersat atime,
useracksBand D. Placethe lower pans
atthe backof the rackandthe upper
pansto thefrontof the rackshownso
that onepanisnotdirectlyaboveanother.
Aluminum Foil
Donotuse aluminum foilon thebottom o1:
theoven.
Neverentirely cover a rack with aluminum
foil.Thiswilldisturb the heatcirculationand
result in poor baking.
A smaller sheet offoilmay be used tocatch a
spillover by placingiton a lowerrack several
inchesbelowthefood.
14
Oven Moisture
As your ovenheats up, thetemperature
changeofthe air inthe ovenmay cause
water droplets toform on thedoor glass.
Thesedroplets are harmless and will
evaporate as the ovencontinues to heat up.
GEAppliances.com
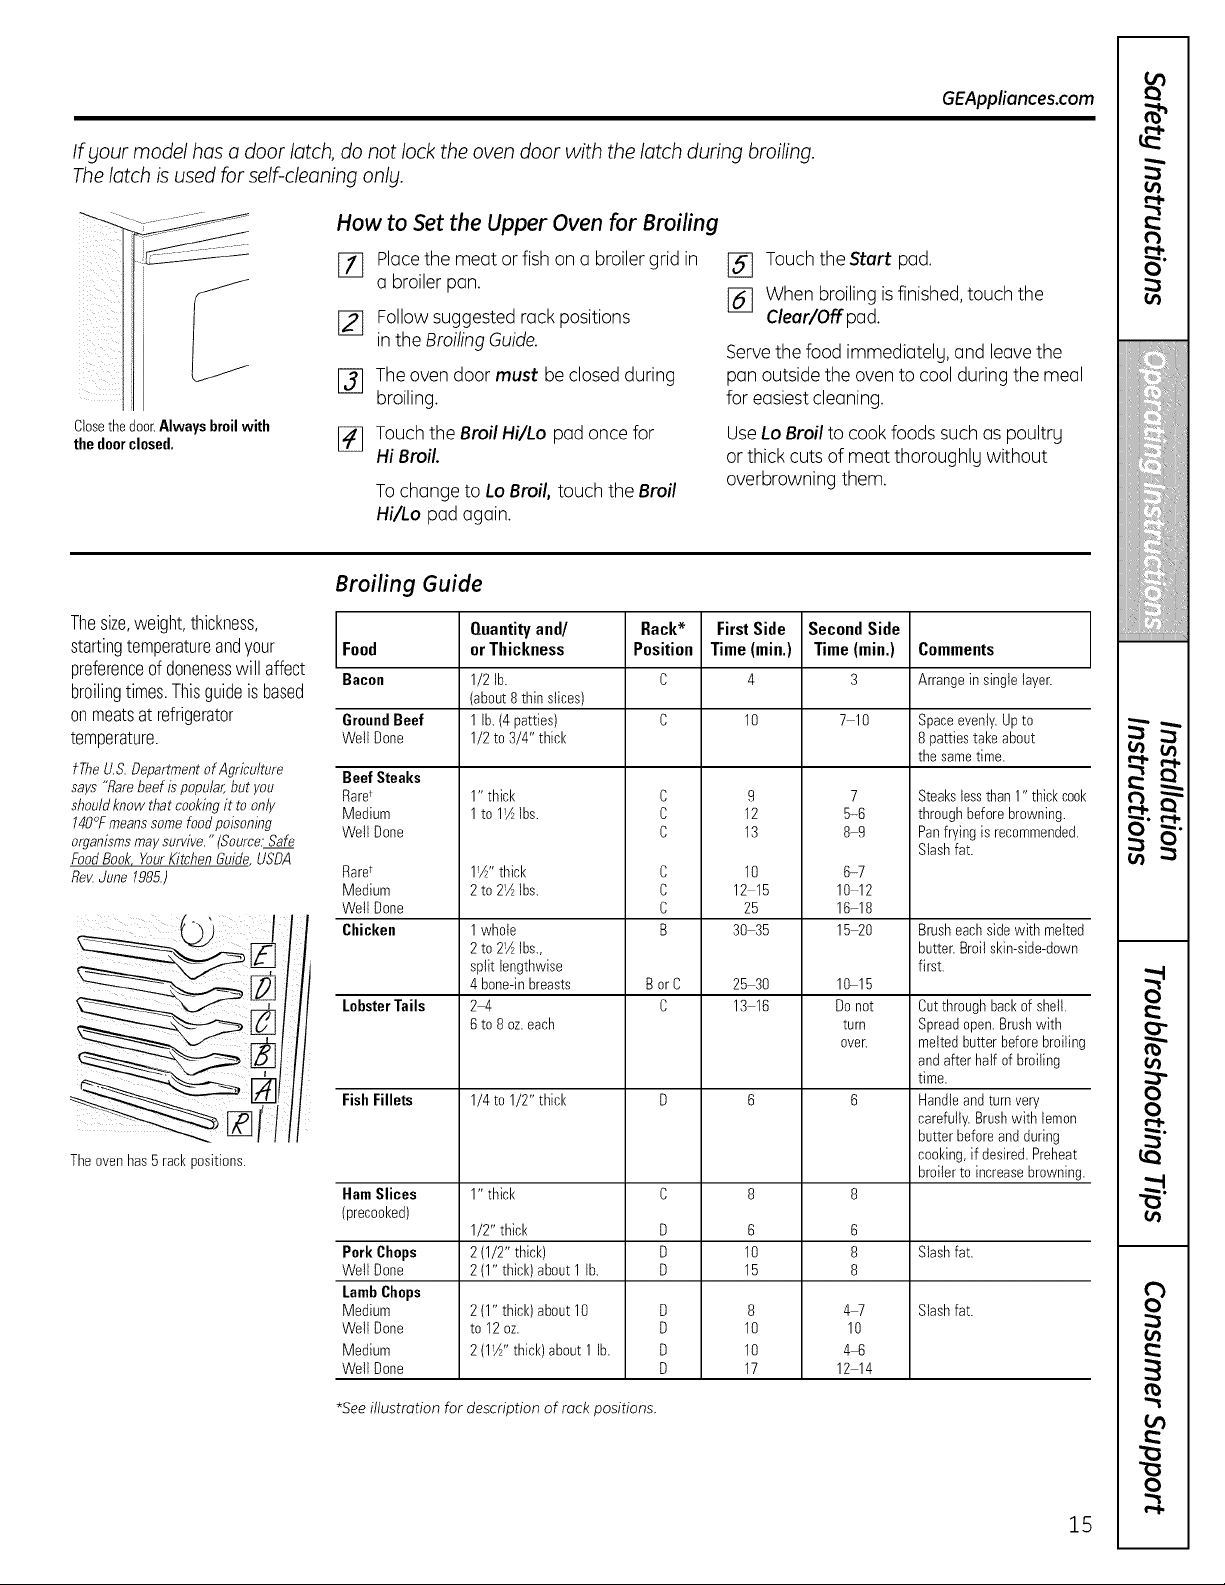
If your model has a door latch, do not lock the oven door with the latch during broiling.
Thelatch isused for self-cleaning only.
J
i_il £
Closethedoor.Alwaysbroilwith
the doorclosed.
How to Set the Upper Oven for Broiling
[] Placethe meat or fish on a broiler grid in
a broiler pan.
[_ Follow suggestedrack positions
in theBroiling Guide.
I-_ The ovendoor must be closed during
broiling.
I_ Touch theBroil Hi/Lo pad oncefor
Hi Broil.
Tochange to Lo Broil, touch the Broil
Hi/Lo pad again.
[_ Touch theStart pad.
[_ When broiling is finished, touch the
Clear/Off pad.
Servethefood immediatelg, and leave the
pan outside theoventocoolduring themeal
for easiest cleaning.
UseLoBroil to cook foods such aspoultrg
or thickcutsof meat thoroughlg without
overbrowning them.
Broiling Guide
Thesize,weight,thickness,
startingtemperatureandyour Food
preferenceof donenesswillaffect Bacon
broilingtimes.Thisguideis based
onmeatsat refrigerator
temperature.
fTheU.S.DepartmentofAgriculture BeefSteaks
says "Rarebeef ispopular,butyou RaW
shouldknowthatcookingit toonly Medium
140°Fmeanssomefoodpoisoning WeltDone
organismsmaysurvive." (Source:Safe
FoodBook YourKitchenGuide_,USDA
fle_ June1985.)
Theovenhas5 rankpositions.
GroundBeef
WeltDone
Raret
Medium
WeltDone
Chicken
Lobster Tails
FishFillets
HamSlices
(precooked)
Pork Chops
WeltDone
LambChops
Medium
WetlDone
Medium
WeltDone
Quantityand/
or Thickness
1/2 lb.
(about8 thinslices)
1lb.(4 patties)
1/2 to3/4" thick
1" thick
1to 1_AIbs.
1!A'' thick
2to 2!AIbs.
1whole
2to 21AIbs.,
split lengthwise
4bone-inbreasts
2_4
6to 8oz.each
1/4 to1/2" thick
1" thick
1/2"thick
2(1/2" thick)
2(1" thick)about 1lb.
2(1" thick)about 10
to 12oz.
2(1W'thick)about 1lb.
Rack*
Position
C
C
C
C
C
C
B
BorC
C
D
D
D
D
D
D
D
FirstSide
Time(min.)
10
9
12
13
10
12 15
25
30 35
25 30
13 16
6
10
15
8
10
10
17
SecondSide
Time (min.)
7 10
7
5-6
8-9
6-7
10-12
16-18
1520
10-15
Donot
turn
over.
6
8
8
4W
10
4q_
12 14
Comments
Arrangeinsinglelayer.
Spaceevenly.Upto
8patties takeabout
the sametime.
Steakstessthan 1" thickcoo_
through beforebrowning.
Panfryingisrecommended.
Slashfat.
Brusheachsidewith melted
butter.Broilskin-side-down
first.
Cutthrough backofshell.
Spreadopen.Brushwith
meltedbutterbefore broilinc
and afterhalfofbroiling
time.
Handleandturnvery
carefully.Brushwith lemon
butterbeforeand during
cooking,if desired. Preheat
broilertoincreasebrowning
Slashfat.
Slashfat.
*See illustration for description of rack positions.
15
Usingthe clockand timer.
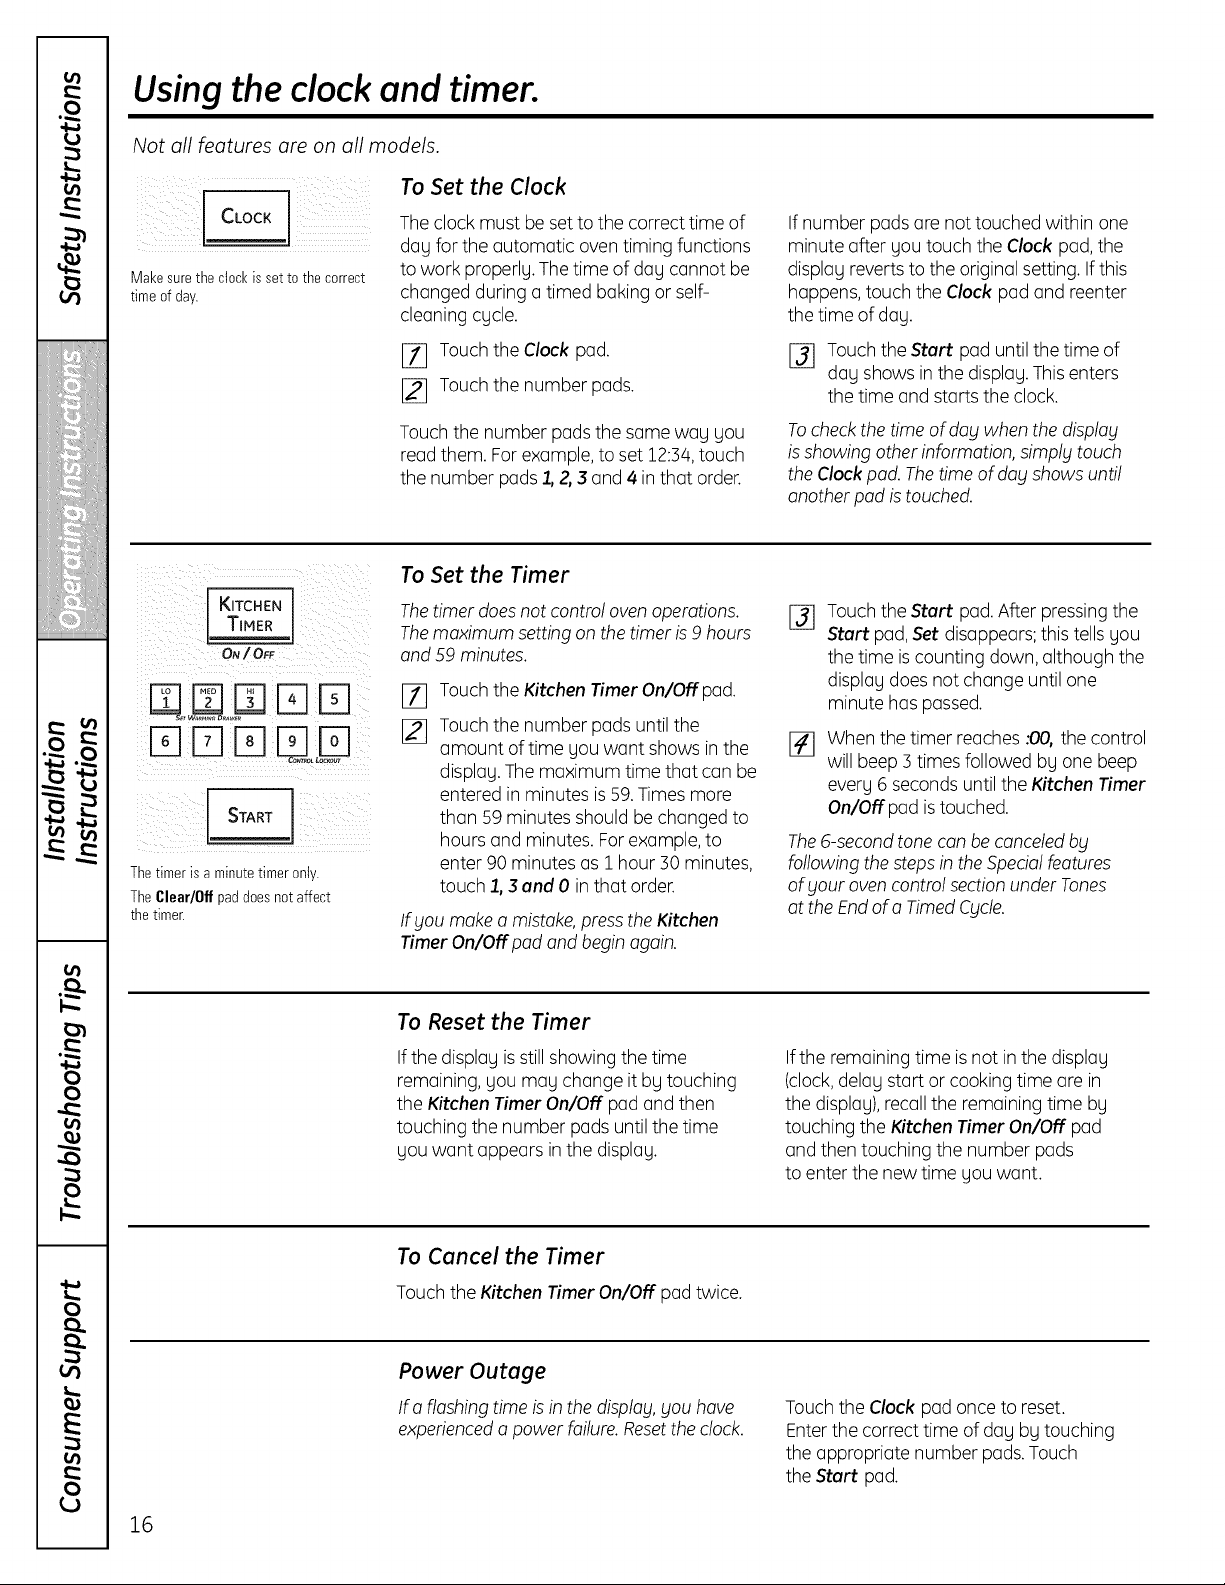
Not all features are on all models.
Make sure the clock isset to the correct
time of day.
To Set the Clock
The clock mustbe set tothe correcttime of
dayforthe automatic oventiming functions
to work properly. The time ofday cannot be
changedduring a timed bakingor self-
cleaningcycle.
[_ Touch theClock pad.
[_ Touch the numberpads.
Touch the number pads thesame way you
read them. Forexample,toset 12:54,touch
the number pads 1, 2, 3 and 4 in that order.
If number pads are nottouched within one
minute after youtouch the Clock pad, the
display revertstotheoriginal setting. If this
happens,touch the Clockpad and reenter
thetime ofday.
I_ Touch theStart pad untilthetime of
day showsin the display. This enters
thetime and starts theclock.
Tocheck the time ofdog when the displag
is showing otherinformation, simplg touch
theClock pod.The time ofdog showsuntil
anotherpod is touched.
I KITCHEN
W T,MER]
ON/OFF
E]m S S !N
Thetimer isaminutetimer only.
TheClear/Offpad doesnotaffect
the timer.
To Set the Timer
Thetimer does notcontrol oven operations.
Themaximum settingon the timer is 9 hours
and 59 minutes.
[]
[]
Touch theKitchenTimer On/Off pad.
Touch the numberpads until the
amount oftime youwant showsin the
display. The maximum time that can be
enteredin minutes is 59.Timesmore
than 59 minutesshouldbe changed to
hoursand minutes. For example, to
enter90 minutes as1 hour 30 minutes,
touch 1,3 and 0 inthat order.
Ifgou make a mistake,presstheKitchen
Timer On/Off pod and begin again.
%
Touch theStartpad. After pressingthe
Startpad,Setdisappears; this tells you
thetime is counting down, althoughthe
display doesnotchange untilone
minute haspassed.
Whenthetimer reaches :00othe control
willbeep 3 timesfollowed byone beep
every 6 secondsuntiltheKitchen Timer
On/Off pad is touched.
The6-secondtonecanbe canceledbg
following thesteps in theSpedal features
ofgout oven control section under Tones
attheEndofo TimedCgcle.
To Reset the Timer
If thedisplay is still showing thetime
remaining, youmay changeitby touching
theKitchen Timer On/OFFpad and then
touching the number padsuntil the time
you want appears inthe display.
Ifthe remainingtime is not in thedisplay
(clock,@lay start or cooking time are in
thedisplay), recall theremaining time by
touching the Kitchen Timer On/OFFpad
and thentouching the number pads
toenterthe newtime you want.
To Cancel the Timer
Touchthe Kitchen Timer On/Off pad twice.
Power Outage
If o flashing time is in thedisplog,gou have
experiencedo powerfailure.Resetthe clock.
Touch theClock pad once to reset.
Enterthe correcttime ofday bytouching
the appropriate number pads.Touch
theStartpad.
16
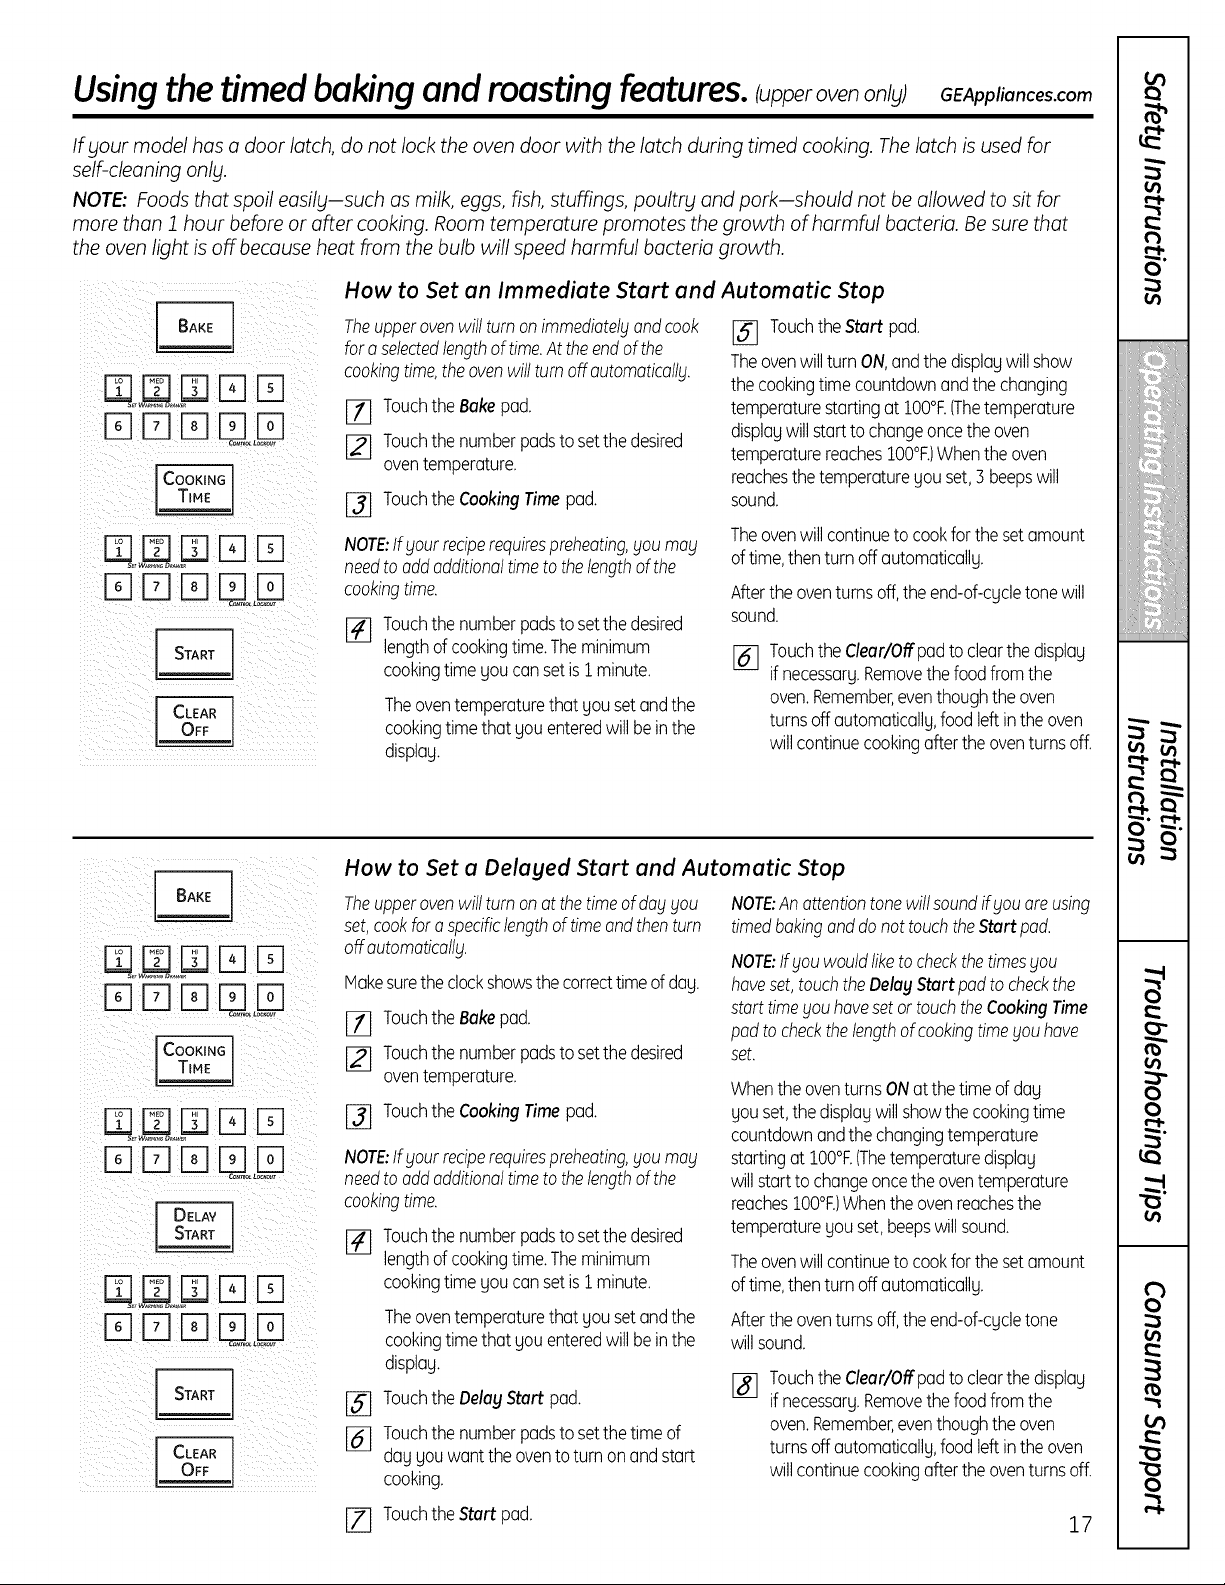
Usingthe timedbakingandroastingfeatures.IupperovenonU;OEAppliances.com
If gour model has a door latch, do not lock the oven door with the latch during timed cooking. Thelatch is used for
self-cleaning only.
NOTE: Foods that spoil easily-such asmilk, eggs, fish, stuffings, poultry and pork-should not be allowed to sit for
more than Jhour before or after cooking. Room temperature promotes the growth ofharmful bacteria. Be sure that
the oven light is off because heat from the bulb will speed harmful bacteria growth.
Fq rqrq
i _ iii ii i
i i i iiii i_ i i
N U :N
i iiiii iiiii )i
How to Set an Immediate Start and Automatic Stop
Theupperovenwill turnonimmediatelgandcook
for aselectedlengthof time.At theendof the
cookingtime,theovenwill turnoff outomoticollg.
_] Touchthe Bakepad.
[_] Touchthe numberpadsto setthe desired
oventemperature.
[_ Touchthe CookingTimepad.
NOTE:Ifyour reciperequirespreheating,you may
needtooddadditionaltimeto thelengthofthe
cookingtime.
[] Touch the number pads to set the desired
lengthofcooking time. The minimum
cookingtime you cansetis1 minute.
Theoven temperature that yousetand the
cookingtime that you entered will bein the
display.
J_ Touchthe Start pad.
Theovenwill turn ON,andthe displaywill show
thecookingtime countdownandthe changing
temperaturestartingatIO0°F.(Thetemperature
displaywill starttochangeoncethe oven
temperaturereachesIO0°F.)Whenthe oven
reachesthe temperatureyou set,3 beepswill
sound.
Theoven will continue to cookfor the set amount
oftime, then turn off automatically.
Afterthe oven turns off,the end-of-cycle tone will
sound.
[] Touchthe Clear/Offpadto clearthe display
ifnecessary.Removethe foodfromthe
oven.Remember,eventhoughthe oven
turnsoffautomatically,food leftinthe oven
will continuecookingafterthe oventurnsoff.
E] F-IFqF1l-q
rqFq
EBmFq
DDDUo
How to Set a Delaged Start and Automatic Stop
Theupperovenwillturn onat the timeof dog_lOU
set,cookfor aspecificlengthof timeandthenturn
offautomaticallg.
Hakesuretheclockshowsthe correcttimeof day.
_] Touchthe Bakepad.
[_ Touchthe numberpadsto setthe desired
oventemperature.
[_ Touchthe CookingTimepad.
NOTE:Ifgout reciperequirespreheating,goumag
needtooddadditionaltimeto thelengthofthe
cookingtime.
[_ Touchthe numberpadsto setthe desired
lengthof cookingtime.Theminimum
cookingtime you cansetis 1minute.
Theoventemperaturethat yousetandthe
cookingtimethat you enteredwill beinthe
display.
[_ Touchthe DelagStart pad.
[_ Touchthe numberpadsto setthetime of
dayyouwantthe ovento turn onandstart
cooking.
NOTE:Anattentiontonewill soundif _louareusing
timedbakinganddonot touchtheStartpad.
NOTE:If_louwouldliketo checkthetimes_lou
hoveset,touchtheDelagStartpadtocheckthe
starttime_louhovesetortouchtheCookingTime
padto checkthe lengthofcookingtimeyou hove
set.
Whenthe oventurnsONat the timeof day
you set,the displaywillshowthe cookingtime
countdownandthe changingtemperature
startingat100°t:.(Thetemperaturedisplay
willstarttochangeoncetheoventemperature
reachesIO0°F.)Whenthe ovenreachesthe
temperatureyou set,beepswillsound.
Theoven will continue to cookfor the set amount
oftime, then turn off automatically.
Afterthe oventurnsoff,the end-of-cycletone
willsound.
%
Touchthe Clear/Offpadto clearthe display
ifnecessary.Removethe foodfromthe
oven.Remember,eventhoughthe oven
turnsoffautomatically,food leftinthe oven
will continuecookingafterthe oventurnsoff.
r-I-
t_
O"
illiiiii'_'iiiiiiiiiiiiii
¢t
¢
v
O
O
r",l-
r_
0
[Z] Touchthe Start pad. 17
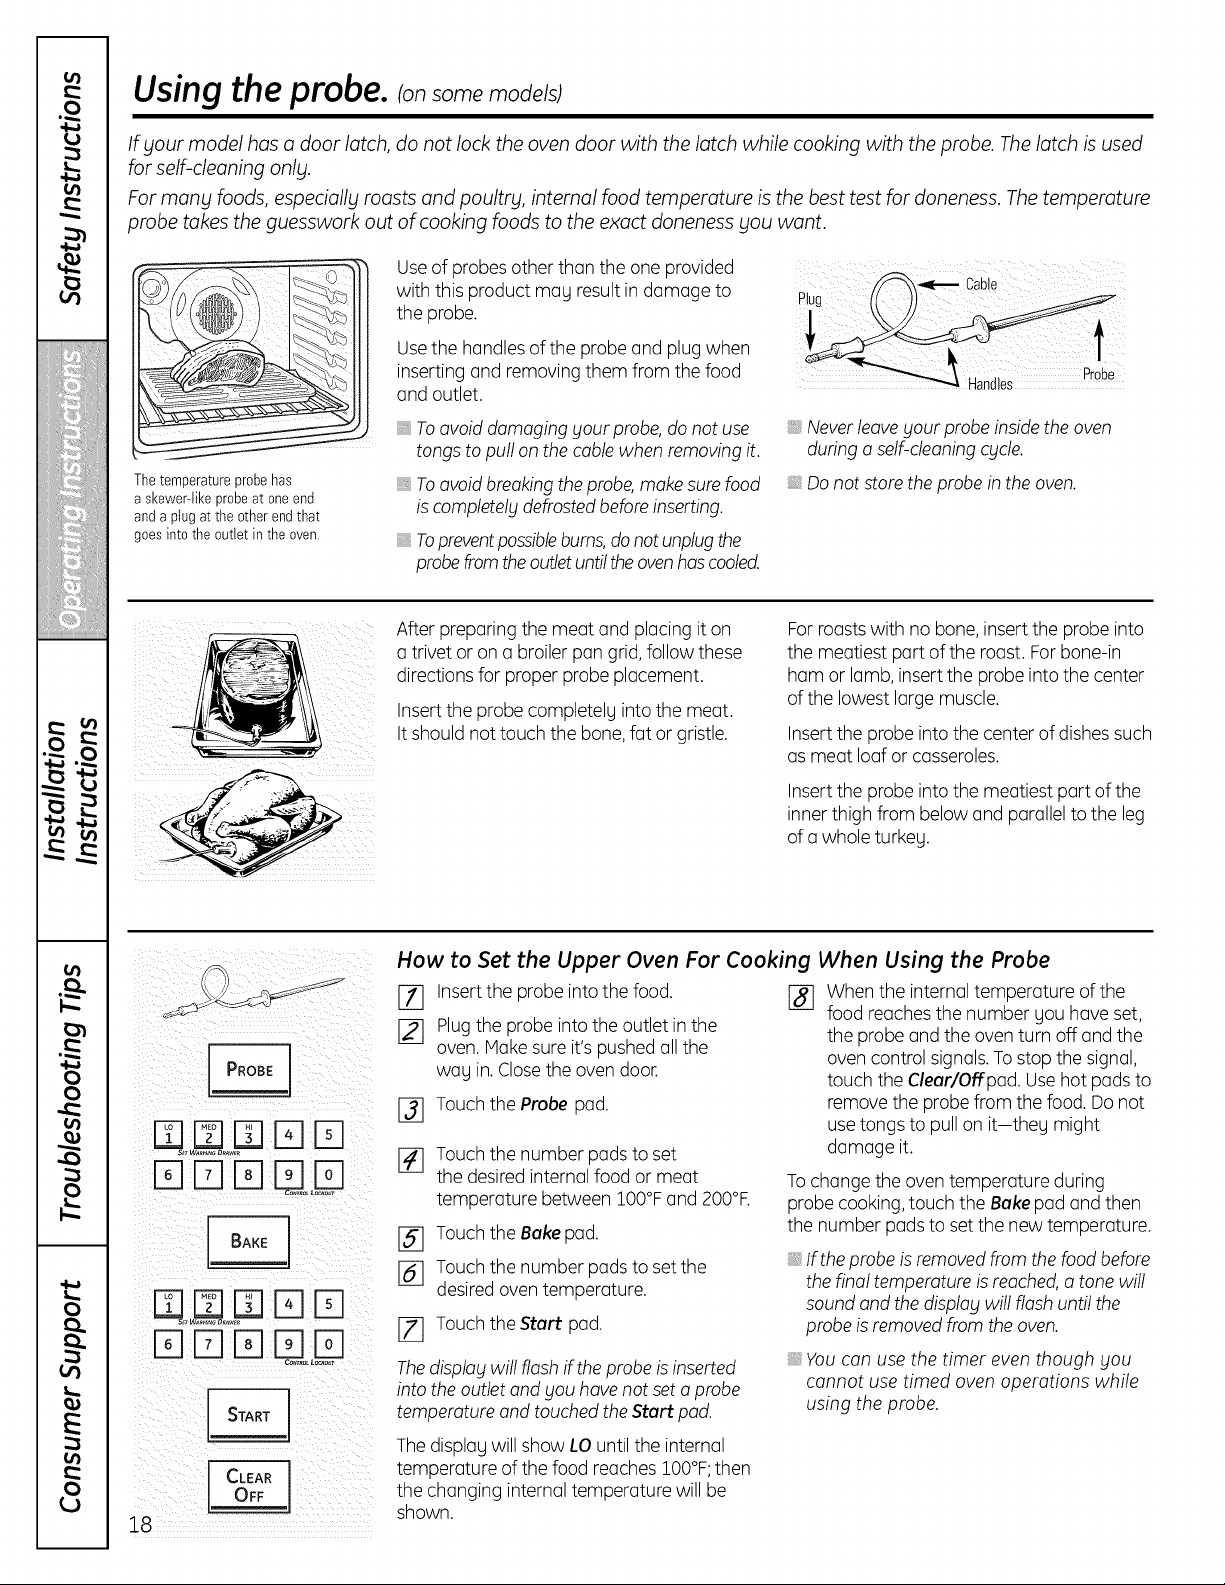
Using the probe, ionsomemode sJ
If your model has a door latch, do not lock the oven door with the latch while cooking with theprobe. Thelatch isused
for self-cleaning only.
Formany foods, especially roasts and poultry, internal food temperature isthe best test for doneness. Thetemperature
probe takes the guesswork out of cooking foods to the exact doneness you want.
The temperature probe has
askewer-likeprobeat oneend
andaplugatthe other endthat
goesintothe outletin theoven.
Useof probes otherthan the one provided
with this product mag result in damage to
theprobe.
Usethe handles ofthe probe and plug when
inserting and removing them from thefood
and outlet.
_,Toavoiddamagingyour probe, do notuse
tongs topull on thecable whenremoving it.
_,Toavoidbreakingtheprobe,make sure food
is completely defrostedbefore inserting.
Toprevent possible bums, do not unplug the
probefrom the outletuntil theoven has cooled.
/_--_ _'_ Cable
Never leave your probe inside the oven
during a self-cleaning cycle.
Donotstoretheprobe in the oven.
After preparing the meat and placingiton
a trivet or on a broiler pan grid,follow these
directionsforproper probe placement.
Insert the probe completelgintothe meat.
It shouldnottouch thebone, fat or gristle.
Forroastswith no bone, insert the probe into
themeatiest part ofthe roast.For bone-in
ham or lamb, insert theprobe intothecenter
ofthe lowestlarge muscle.
Insert theprobe intothecenter ofdishessuch
asmeat loafor casseroles.
Insert theprobe intothemeatiest part ofthe
inner thigh from below and parallelto theleg
ofa whole turkeg.
rqp] rq
E]Drq
I CLEA.I
18
How to Set the Upper Oven For Cooking When Using the Probe
[] Insertthe probe into the food. r_]
[_ Plugthe probe into the outlet in the
oven. Make sure it's pushedall the
wag in. Closethe oven door.
Touch the Probe pad.
%
%
%
[]
Touch the number pads to set
thedesired internalfood or meat
temperature between 100°Fand 200°F.
Touch the Bake pad.
Touch the number pods to set the
desired oventemperature.
Touch theStart pad.
The display will flash ifthe probe isinserted
into the outlet and you have not set a probe
temperature and touched the Start pad.
Whenthe internal temperature ofthe
food reachesthe number gou haveset,
theprobe and the oven turn off and the
ovencontrol signals.To stop the signal,
touch theCleur/Offpad. Use hotpadsto
remove the probe from thefood. Do not
use tongs to pull on it-theg might
damage it.
To changetheoventemperature during
probe cooking, touch theBake pad and then
thenumber padstoset the newtemperature.
If the probe is removed from the food before
the final temperature is reached, a tone will
sound and the display will flash until the
probe is removed fromthe oven.
You can use the timer even though you
cannot use timed oven operations while
using the probe.
The displag willshow LO untiltheinternal
temperature ofthe foodreaches 100°F;then
thechanging internaltemperature will be
shown.
Using the convection oven. ionsome models) GEAppliances.com
If gour model has a door latch, do not lock the oven door with the latch during convection cooking. Thelatch isused
for self-cleaning onlg.
Theconvection oven fun shuts off when the oven door is opened. DO NOTleave the door open for long periods of time
while using convection cooking.
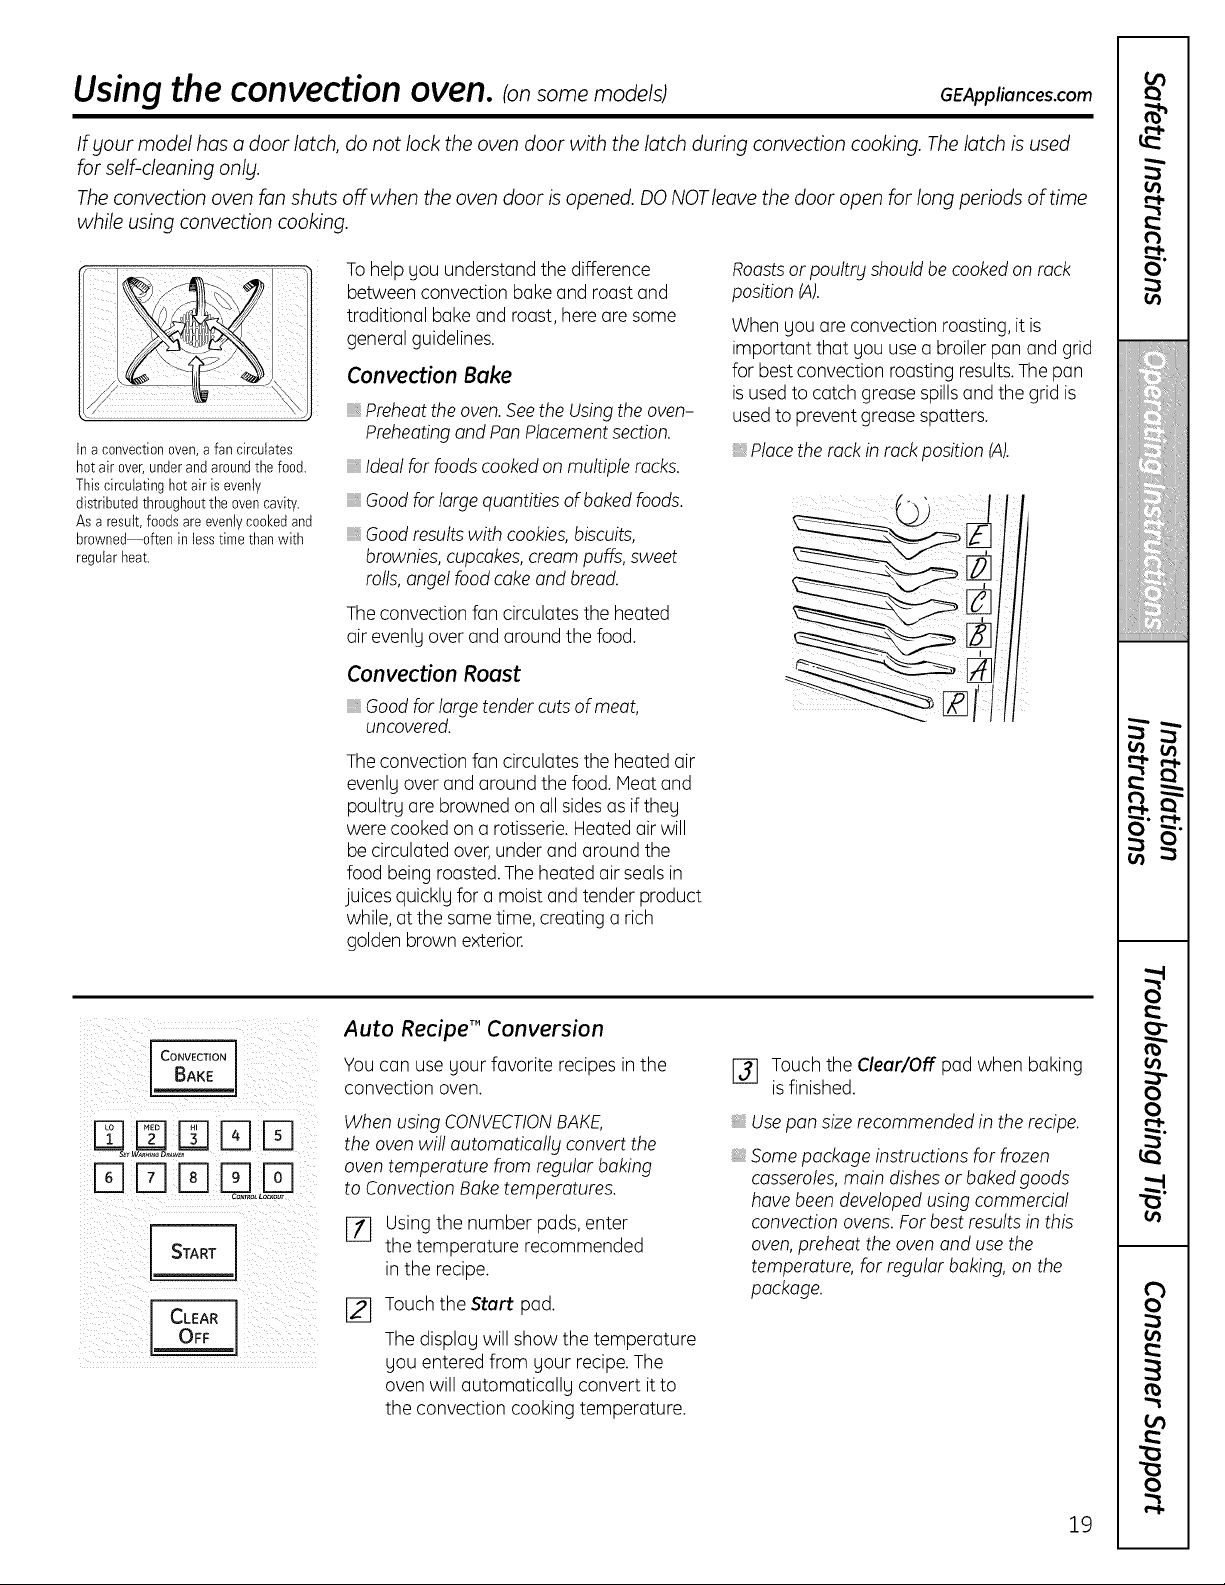
Ina convectionoven,afancirculates
hot air over,underand aroundthe food.
Thiscirculatinghot air isevenly
distributedthroughoutthe ovencavity.
Asa result,foodsareevenlycookedand
browned--often in lesstimethanwith
regularheat.
To help gou understand thedifference
between convection bakeand roast and
traditional bake and roast,here are some
general guidelines.
Convection Bake
Preheat the oven. See the Using the oven-
Preheating and Pan Placement section.
Ideal for foods cooked on multiple racks.
Good for large quantities ofbaked foods.
Good results with cookies, biscuits,
brownies, cupcakes, cream puffs, sweet
rolls, angel food cake and bread.
The convection fan circulates the heated
air evenly overand around the food.
Convection Roast
Good for large tender cuts of meat,
uncovered.
The convection fan circulates the heatedair
evenlgover and around thefood. Meat and
poultrg are browned on all sidesasif theg
werecooked on a rotisserie. Heated air will
be circulated over,under and around the
foodbeing roasted. The heatedair sealsin
juices quicklg fora moistand tenderproduct
while, atthesame time, creating a rich
golden brownexterior.
Roastsor poultrg should be cookedon rack
position (A).
When youare convection roasting, itis
important that gou use a broiler pan and grid
for best convection roasting results.Thepan
is used to catchgreasespillsand the grid is
used toprevent grease spatters.
_,Placetherack in rack position (A).
I CONVECTION I
START
CLEAR 1
OFF
Auto RecipeT"Conversion
Youcan usegour favorite recipes in the
convection oven.
WhenusingCONVECTIONBAKE,
theovenwill automaticallg convert the
oventemperature from regular baking
toConvection Baketemperatures.
[_ Usingthe number pads, enter
the temperature recommended
in the recipe.
J_] Touch the Start pad.
Thedisplagwill show thetemperature
gou entered from gour recipe.The
ovenwill automaticallg convert it to
the convection cooking temperature.
[] Touch the Clear/Off pad when baking
is finished.
Use pan size recommended inthe recipe.
Some package instructions for frozen
casseroles, main dishes orbaked goods
have been developed using commercial
convection ovens. For best results in this
oven, preheat the oven and use the
temperature, for regular baking, on the
package.
19

Usingthe convectionoven. somemode sj
Cookware for Convection Cooking
Before usingyour convection oven,check
toseeif your cookware leavesroomfor air
circulation in theoven. If youare bakingwith
several pans,leavespace between them.
Also,be sure thepansdo nottouch each
other or thewalls ofthe oven.
Paper and Plastic
Heat-resistant paper and plastic containers
that are recommended forusein regular
ovens canbe used in convection ovens.
Plastic cookwarethat is heat-resistantto
temperatures of400°F canalsobe used,
whenoven is below400°F.
Metal and Glass
Anytype ofcookwarewillwork in your
convection oven. However,metal pansheat
thefastestand are recommendedfor
convection baking.
Darkened or matte-finishedpanswillbake
fasterthanshinF pans.
_,Glassor ceramic panscook moreslowlF,
Whenbakingcookies,you willgetthe best
results ifyou use a flat cookie sheet instead
ofa pan with lowsides.
Forrecipes like oven-baked chicken,usea
pan with lowsides. Hot air cannot circulate
wellaround foodin a pan with high sides.
CONVEC ON
!71F171 1TI¸¸¸El
C_L L_our
J CLEAR J
How to Set the Upper Oven for Convection Baking or Roasting
[_] Touch the Convection Bake Whentheoven starts toheat, thechanging
or Convection Roast pad, temperature, starting at IO0°F,will be
[_ Touch the number pads to setthe
desired oventemperature.
I_ TouchtheStart pad.
To changetheoventemperature, touch the
Convection Bake or Convection Roastpad
and thenthe numberpadstoset the new
temperature.
displayed. Whenthe ovenreachesthe
temperature youset,3 beeps willsound.
[_ Touchthe Clear/Offpad when finished.
NOTE:Youwillhear a fan while cooking with
convection.The fanwillstop when the door is
opened, butthe heatwill notturnoff.
Thefanwill notstartuntilthepreheat
temperatureis reached.
Whenconvectionbakingwith only
1rack,followthe rackpositions
recommendedin the Using the
ovensection.
Multi-Rack Baking
The number ofrocks provided depends
on Four model.
Because heatedair is circulated evenly
throughout theoven, foods can be baked
with excellentresults usingmultiple racks.
Multi-rack baking may increase cook times
slightlyfor some foods buttheoverallresult
is time saved. Cookies,muffins,biscuitsand
other quick breadsgive very good results
with multi-rack baking.
Whenbakinglarger foods on s racks, place
one rack in the 2nd (A)position, one on the
4th(C)position and thethird rack in the6th(E)
position.
Whenbakingcookies,place the racks
in the4th(C),5th (D)and 6th(E)positions.
20
GEAppliances.com
If your model has a door latch, do not lock the oven door with the latch during convection cooking. Thelatch isused
for self-cleaning only.
Forbestresultswhen roastingbarge
turkeysandroasts,we recommendusing
the probeincludedin theconvection
oven.
ICONVECTION 1
RoAsT I
DDD D
PROBE
START I
CLEAR ]
OFF
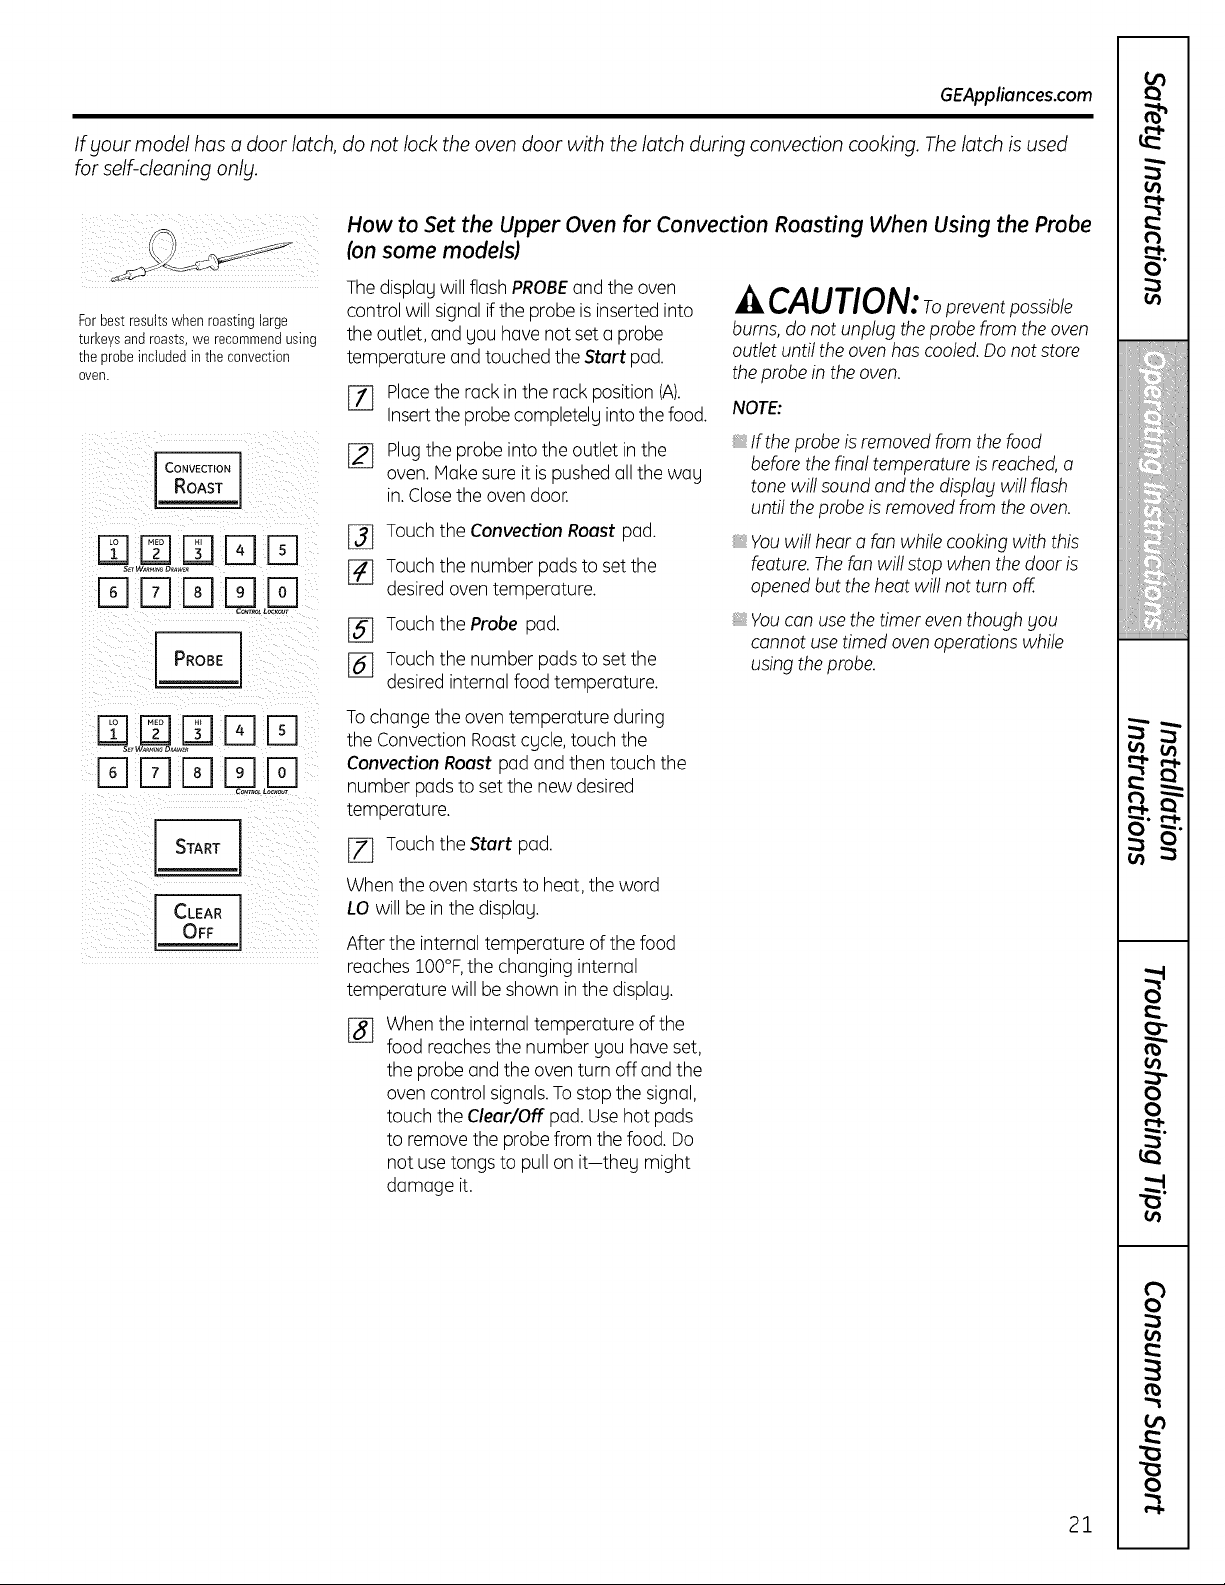
How to Set the Upper Oven for Convection Roosting When Using the Probe
(on some models)
The displag will flash PROBEand theoven
control willsignal iftheprobe isinsertedinto
theoutlet,and youhavenotset a probe
temperature and touched the Start pad.
%
[]
Placethe rack inthe rack position (A).
Insert theprobe completelg intothe food.
Plugthe probe intothe outlet in the
oven. Makesureitispushed all thewag
in. Closetheovendoor.
[_ Touch the Convection Roast pad.
[_ Touch the number pads to set the
desired oventemperature.
_-} Touch the Probe pad.
[_ Touch the number pads to set the
desired internalfoodtemperature.
To changetheoventemperature during
theConvection Roast cycle, touch the
ConvectionRoastpad and thentouch the
number pads to set the newdesired
temperature.
[_ Touch theStart pad.
Whentheovenstarts toheat, theword
LO will be in thedisplag.
After the internaltemperature ofthefood
reaches IO0°F,the changinginternal
temperature willbe shown inthe display.
%
Whentheinternaltemperature ofthe
food reachesthe number gou haveset,
theprobe and the oven turn offand the
ovencontrol signals.To stop the signal,
touch theClear/Off pad.Usehot pads
to remove theprobe from thefood. Do
not use tongs to pull on it-theg might
damage it.
CAUTlON: preventposs ble
burns, do not unplug the probe from the oven
outlet untilthe oven has cooled. Do not store
the probe in the oven.
NOTE:
If the probe isremoved from the food
before the final temperature isreached, a
tone will sound and the displag will flash
untilthe probe isremoved from the oven.
_,Youwillhear o fanwhilecookingwith this
feature. Thefanwillstop whenthedoor is
opened buttheheat will notturnoff.
You can use the timer even though gou
cannot use timed oven operations while
using the probe.
21
r_
t_
O"
0_
iii!2Jiiiill
!i_iiiiiiiiiiiiiiiii
,,iiiii_bl
i!!ii'i:iii"i!i!iii!
€
,€
• IP
o_
0
0
0_
8
0
Usingthe convectionoven. somemode sJ
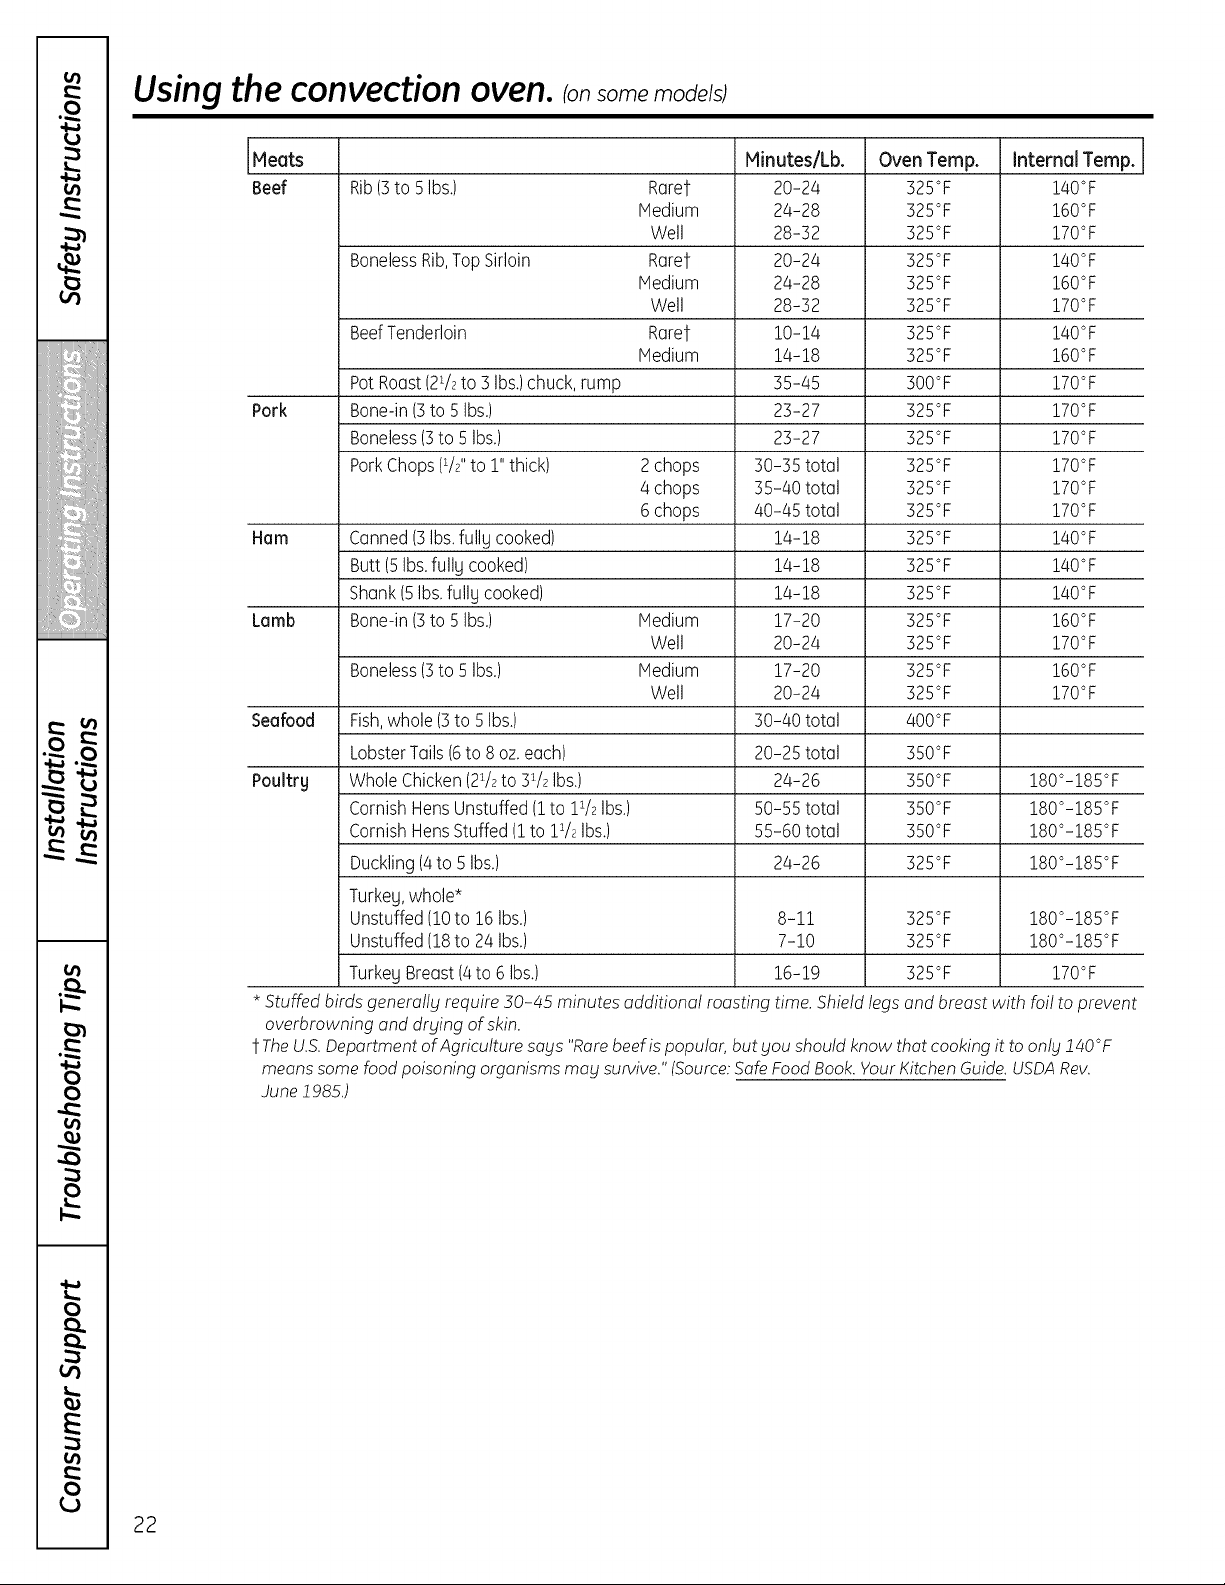
Meats Minutes/Lb. Oven Temp. Internal Temp.
Beef Rib(3toSIbs.) Rarer 20-24 325°F 140°F
Medium 24-28 325°F 160°F
Well 28-32 325°F 170°F
BonelessRib,Top Sirloin Rarer 20-24 325°F 140°F
Medium 24-28 325°F 160°F
Well 28-32 325°F 170°F
BeefTenderloin Rare1- 10-14 325°F 140°F
Medium 14-18 325°F 160°F
PotRoast(2i/2to3 Ibs.)chuck,rump 35-45 300°F 170°F
Pork Bone-in(3to SIbs.) 23-27 325°F 170°F
Boneless(3to SIbs.) 23-27 325°F 170°F
PorkChops(1/2"to 1"thick) 2chops 30-35 total 325°F 170°F
4 chops 35-40 total 325°F 170°F
6chops 40-45 total 325°F 170°F
Ham Canned(3Ibs.fullUcooked) 14-18 325°F 140°F
Butt(5Ibs.fullUcooked) 14-18 325°F 140°F
Shank(5Ibs.fullUcooked) 14-18 325°F 140°F
Lamb Bone-in(3to 5Ibs.) Medium 17-20 325°F 160°F
Well 20-24 325°F 170°F
Boneless(3to 5 Ibs.) Medium 17-20 325°F 160°F
Well 20-24 325°F 170°F
Seafood Fish,whole (3toSIbs.) 30-40 total 400°F
LobsterTails(6to8 oz.each) 20-25 total 3SO°F
Poultry WholeChicken(21/2to31/2Ibs.) 24-26 350°F 180°-185°F
CornishHensUnstuffed(1to 1i/2Ibs.) 50-55 tatal 350°F 180°-185°F
CornishHensStuffed(1to 1i/2Ibs.) 55-60 total 3SO°F 180°-185°F
Duckling(4to SIbs.) 24-26 325°F 180°-185°F
TurkeU,whole*
Unstuffed(10to16 Ibs.) 8-11 325°F 180°-185°F
Unstuffed(18to24 Ibs.) 7-10 325°F 180°-185°F
TurkegBreast(4to6 Ibs.) 16-19 325°F 170°F
* Stuffed birds generalfg require 50-/45 minutes additional roasting time. Shield legsand breast with foil to prevent
overbrowning and drging of skin.
t TheU.S.Department ofAgriculture says "Rare beef ispopular, but you should know that cooking it toonlg 140°F
means some food poisoning organisms may survive." (Source:Safe Food Book. YourKitchen Guide. USDARev.
June 1985.)
22
Usingthetimed convectionbaking features, ionsomemode/sJGEApp,ionces.com
You will hear a fan while cooking with this feature. Thefan will stop when the door is opened but theheat will not turn off.
NOTE: Foods that spoil easilbl-such asmilk, eggs, fish,stuffings, poultry and porkishould not be allowed to sit for
more than 1 hour before or after cooking. Room temperature promotes the growth ofharmful bacteria. Be sure that
the oven light is off because heat from the bulb will speed harmful bacteria growth.
i¸
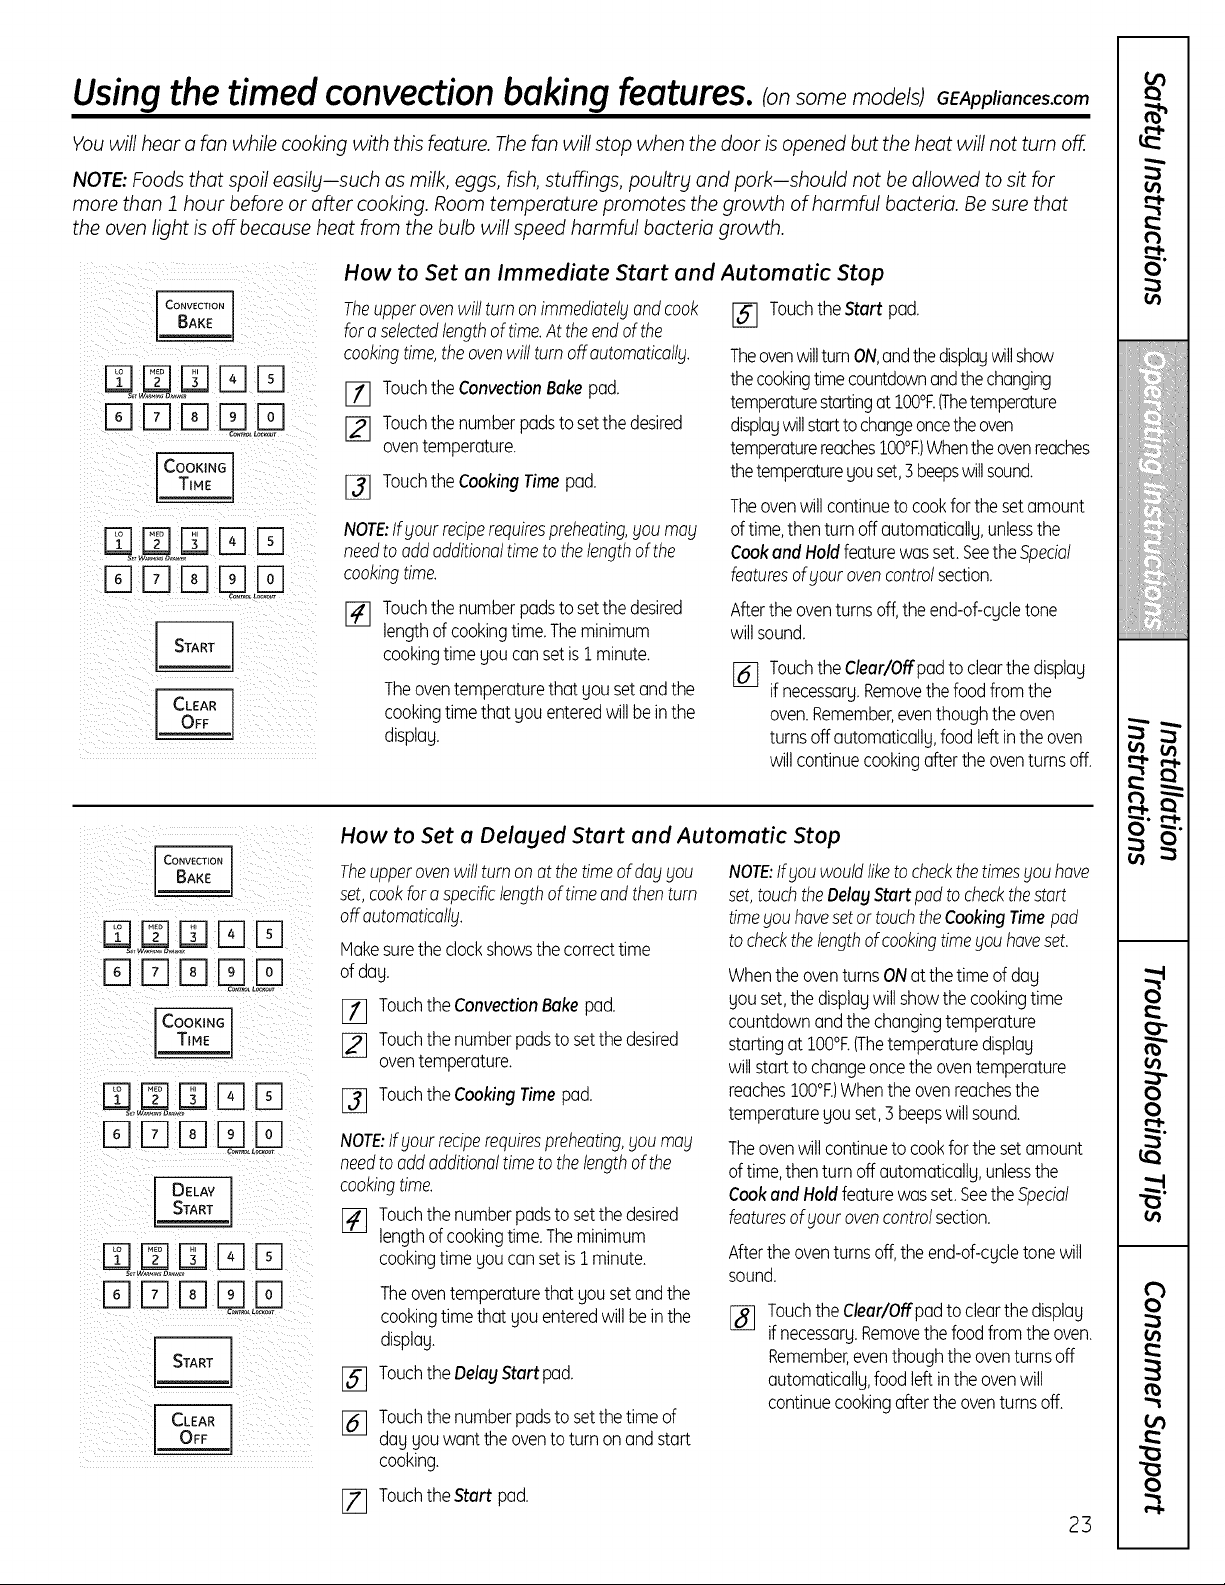
How to Set an Immediate Start and Automatic Stop
Theupperovenwill turn onimmediatelgandcook
fora selectedlengthof time.At theendof the
cookingtime,the ovenwill turnoffoutomoticollg.
17] Touchthe ConvectionBakepad.
[] Touchthe numberpadsto setthe desired
oventemperature.
I_ Touchthe CookingTimepad.
NOTE:Ifyour reciperequirespreheating,you may
needto oddadditionaltimeto thelengthof the
cookingtime.
Touchthe numberpadsto setthe desired
lengthof cookingtime.Theminimum
cookingtime youcan setis 1minute.
Theoventemperaturethat you setandthe
cookingtimethat you enteredwill beinthe
display.
Touchthe Start pad.
TheovenwillturnON,andthedisplaywillshow
the cookingtimecountdownandthechanging
temperaturestartingat10001:.(Thetemperature
displaywillstartto changeoncetheoven
temperaturereaches100°t:.)Whentheovenreaches
thetemperatureyouset,3beepswillsound.
Theovenwill continueto cookfor the setamount
oftime,thenturn off automatically,unlessthe
Cookand Holdfeaturewasset.Seethe Special
featuresofyour ovencontrolsection.
Aftertheoventurnsoff,the end-of-cycletone
willsound.
[_j Touchthe Clear/Offpadtoclearthe display
ifnecessary.Removethe foodfromthe
oven.Remember,eventhoughthe oven
turnsoffautomatically,food leftinthe oven
will continuecookingafterthe oventurnsoff.
m mrq
rqrq
mrqrqULD
I DELAYJ
z]rq rq
CLEAR
OFF
How to Set a Delayed Start and Automatic Stop
Theupperovenwillturn onat thetimeof dablblOU
set,cookfor aspecificlengthof timeandthenturn
off automaticallbl.
Hakesurethe clockshowsthe correcttime
ofday.
IZ] Touchthe ConvectionBake pad.
I_ Touchthe numberpadstosetthedesired
oventemperature.
I_ Touchthe CookingTimepad.
NOTE:Ifgourreciperequirespreheating,goumag
needto addadditionaltimeto thelengthof the
cookingtime.
[_ Touchthe numberpadstosetthedesired
lengthof cookingtime.Theminimum
cookingtime youcan setis i minute.
%
%
Theoventemperaturethat you setandthe
cookingtimethat youenteredwill beinthe
display.
Touchthe DelayStart pad.
Touchthe numberpadstosetthetimeof
day you wantthe oventoturn onandstart
cooking.
NOTE:Ifblouwouldliketo checkthetimesyou have
set,touchtheDelayStartpad tocheckthestart
timeyou havesetortouchtheCookingTimepad
to checkthelengthofcookingtimeyou haveset.
Whenthe oventurnsONat thetime of day
you set,the displaywillshowthe cookingtime
countdownandthe changingtemperature
startingat10001:.(Thetemperaturedisplay
willstarttochangeoncethe oventemperature
reaches100°t:.)Whenthe ovenreachesthe
temperatureyou set,3 beepswillsound.
Theovenwill continueto cookfor the setamount
oftime,thenturn off automatically,unlessthe
Cookand Holdfeaturewasset.Seethe Special
featuresof your ovencontrolsection.
Aftertheoventurnsoff,the end-of-cycletone will
sound.
Touchthe Clear/Offpadtoclearthe display
if necessary.Removethe foodfromthe oven.
Remember,eventhoughthe oventurnsoff
automatically,food leftinthe ovenwill
continuecookingafterthe oventurnsoff.
[_ Touchthe Start pad.
23
r-I-
t_
O"
iii!i!!!ii_i_iiiiiiill
!i_i_iiiiiiiiiiiiiiii
,,iiiii_bl
i!!i!'Zi!i!i_i_i!
• r'
• r'
O
O
R
O
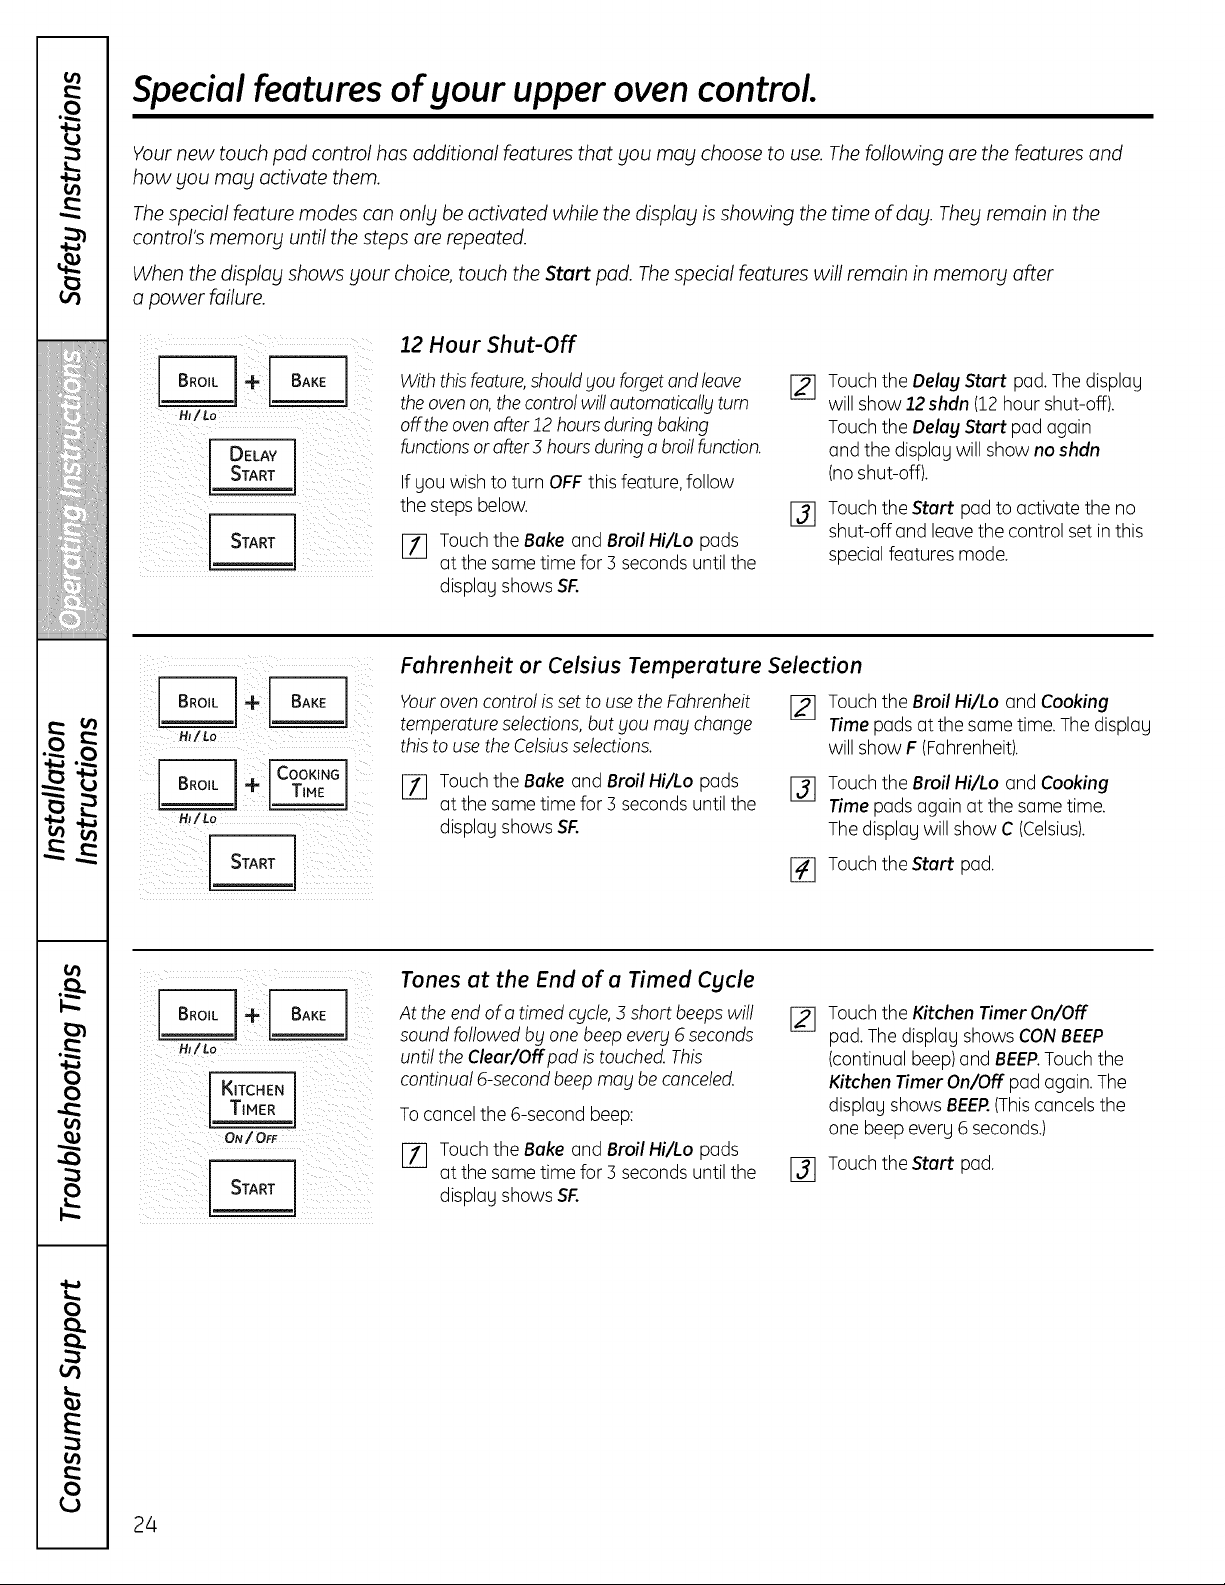
Special features of your upper oven control.
Your new touch pad control has additional features that you may choose to use. Thefollowing are the features and
how you may activate them.
Thespecial feature modes can only be activated while the display isshowing the time ofday. They remain in the
control's memoGl until the steps are repeated.
When the display shows your choice, touch the Start pad. The special features will remain in memory after
a power failure.
12Hour Shut-Off
/Lo
With thisfeature,shouldgou forgetand leave
the ovenon, the controlwill automaticollgturn
offtheovenafter 12 hoursduring baking
functionsor after3 hours duringo broil function.
If youwish toturn OFF this feature, follow
the stepsbelow.
[_ Touch theBake and Broil Hi/Lopads
atthesame time for 3 secondsuntilthe
displag showsSF.
%
Touch the DelagStart pad. The displag
willshow 12shdn (12 hour shut-off).
Touch the OelagStart pad again
and the displag willshow no shdn
(noshut-off).
Touch theStart pad to activate the no
shut-off and leave the control set in this
special featuresmode.
HI/Lo
Fahrenheit or Celsius Temperature Selection
Youroven control is set touse theFahrenheit
temperatureselections,but gou mogchange
this touse theCelsiusselections.
[_ Touch the Broil Hi/Lo and Cooking
Time padsatthesame time. The displag
willshow F (Fahrenheit).
[] Touch theBake and Broil Hi/Lo pads
atthesame time for 3 secondsuntilthe
displag showsSF.
[_] Touch the Broil Hi/Lo and Cooking
Time padsagain atthesame time.
Thedisplau willshow C(Celsius).
I_ Touch theStart pad.
K,TCHEN]
TIMER J
ON/OFF
Tones at the End of a Timed Cycle
Attheend ofa timed cgcle,5 short beeps will
soundfollowed bg one beep everg 6 seconds
untiltheClear/Off pod is touched. This
continual 6-secondbeep mogbe canceled.
To cancel the 6-second beep:
[7] Touch theBake and Broil Hi/Lo pads
atthesame time for 3 secondsuntilthe
displag showsSF.
[_ Touch the Kitchen Timer On/Off
pad. The displagshowsCONBEEP
(continual beep)and BEEP.Touch the
Kitchen Timer On/Off pad again. The
displau shows BEER(Thiscancelsthe
one beep everg 6 seconds.)
131 Touch theStart pad.
24
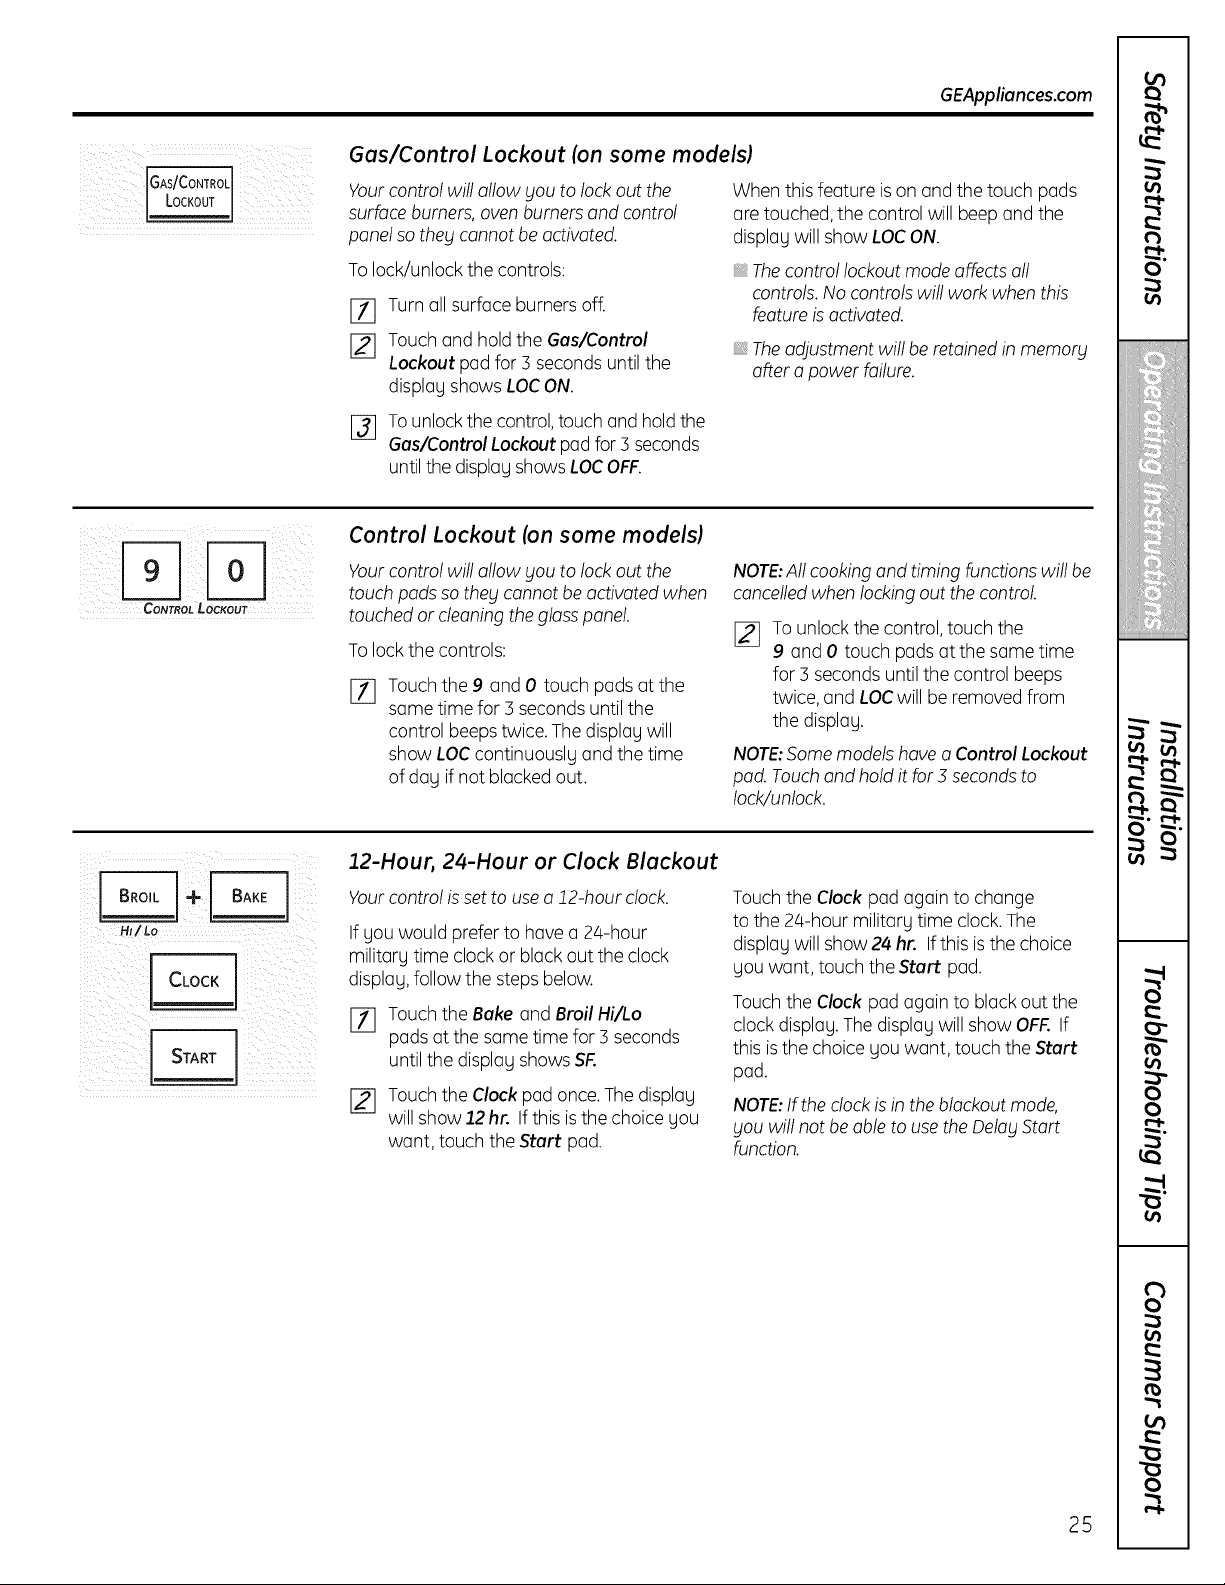
GEAppliances.com
IGAs/Co"TROL
Gas/Control Lockout (on some models)
Yourcontrol will allowyouto lockout the
surface burners, oven burners and control
panel so they cannot be activated.
To lock/unlockthecontrols:
[77 Turnallsurface burners off.
[_ Touch and hold theGas/Control
Lockout pad for3 seconds untilthe
display showsLOCON.
Whenthis feature is on and thetouch pads
are touched,thecontrol will beep and the
display will show LOCON.
Thecontrol lockout mode affects oil
controls. No controls will work when this
feature is activated.
The adjustment will be retained in memory
offer o power failure.
[_ Tounlock the control,touch and holdthe
Gas/Control Lockout pad for 3 seconds
until the display shows LOC OFF.
CONTROL LOCKOUT
Control Lockout (on some models)
Yourcontrol will allow you to lockout the
touch pads so they cannot be activated when
touched or cleaning the glass panel.
To lock thecontrols:
%
Touch the 9 and 0 touch pads at the
same time for 3 seconds untilthe
control beeps twice. The display will
show LOCcontinuously and thetime
ofday ifnotblacked out.
NOTE:All cooking and timing functions willbe
cancelledwhenlocking outthecontrol.
[_ Tounlock thecontrol,touch the
9 and 0 touch padsatthe same time
for3 seconds untilthecontrol beeps
twice, and LOCwillbe removed from
thedisplay.
NOTE:Some models hove o Control Lockout
pod.Touchand hold itfor3 seconds to
lock/unlock.
Hl/Lo
CLOCK
START I
12-Hour, 24-Hour or Clock Blackout
Yourcontrol is set touse o 12-hour clock.
If you would prefer to havea 24-hour
military time clockor black outtheclock
display, follow the steps below.
Touch the Bakeand Broil Hi/Lo
padsatthesame time for3 seconds
untilthedisplay showsSF.
Touch the Clockpad once.Thedisplay
willshow 12 hr. Ifthis is thechoice you
want, touch theStart pad.
Touchthe Clock pad again tochange
tothe 24-hour military time clock.The
display will show 24 hr. Ifthis is thechoice
you want,touch theStart pod.
Touchthe Clock pad again to black outthe
clockdisplay. The display will show OFF.If
this isthe choice youwant, touch theStart
pad.
NOTE:If the clock is inthe blackout mode,
you will not be able to use the Delay Start
function.
25
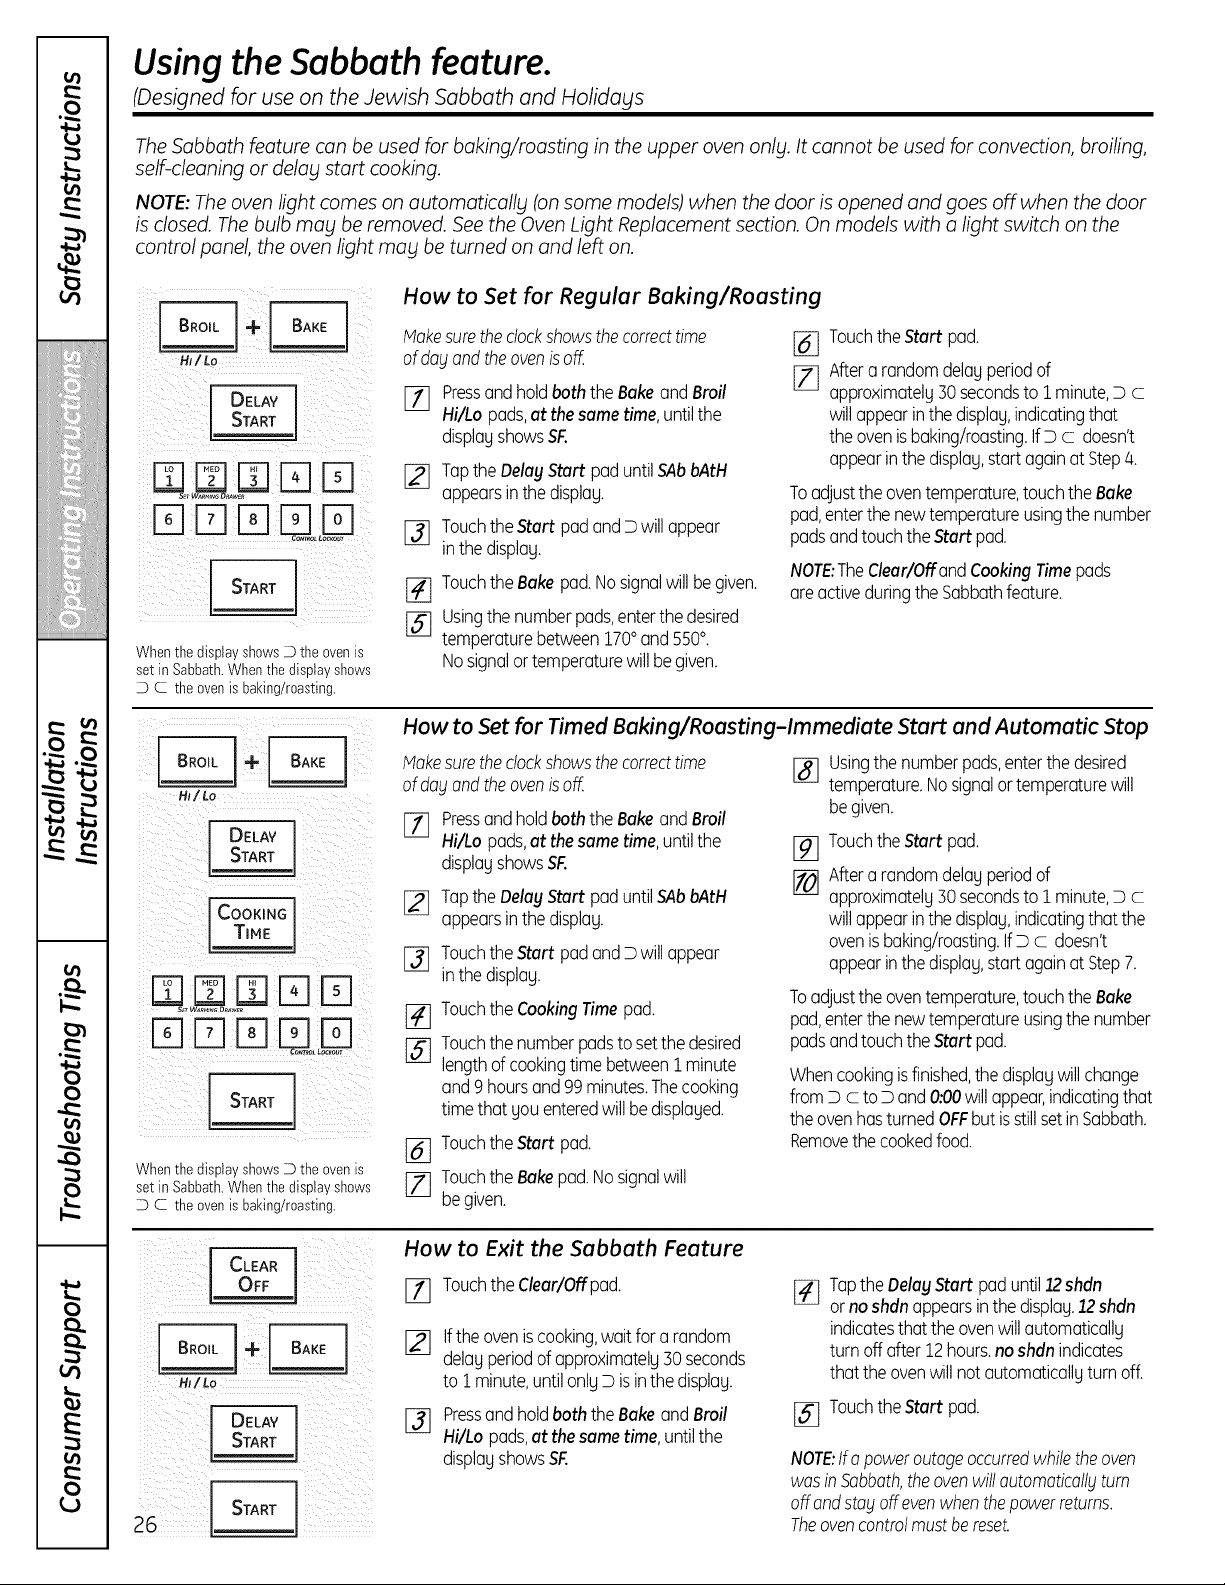
Usingthe Sabbath feature.
(Designed for use on theJewish Sabbath and Holidays
The Sabbath feature can be used for baking/roasting in the upper oven on%l.It cannot be used for convection, broiling,
self-cleaning or delag start cooking.
NOTE;Theoven light comes on automatically (on some models) when the door isopened and goes off when the door
is closed. Thebulb mag be removed. See the Oven Light Replacement section. On models with a light switch on the
control panel the oven light mag be turned on and left on.
DELAY
Whenthe display showsD theovenis
set in Sabbath.Whenthedisplay shows
D C the ovenisbaking/roasting.
How to Set for Regular Baking/Roasting
Hakesuretheclockshowsthe correcttime
of dogandtheovenisoff.
E-f] Pressandholdboththe Bakeand Broil
Hi/Lo pads,atthesametime,untilthe
displayshowsSF.
[]
%
Tapthe DelayStart paduntilSAbbAtH
appearsinthe display.
Touchthe Start padandD willappear
inthe display.
[_ Touchthe Bakepad.Nosignalwill begiven.
[_ Usingthe numberpads,enterthe desired
temperaturebetween1700and5500.
Nosignalortemperaturewillbegiven.
[] TouchtheStart pad.
[_ Aftera randomdelayperiodof
approximately30secondsto1minute,Dc
willappearinthe display,indicatingthat
the ovenisbaking/roasting.IfDc doesn't
appearinthe display,start againatStep/4.
Toadjustthe oventemperature,touchthe Bake
pad,enterthenewtemperatureusingthe number
padsandtouchthe Start pad.
NOTE:TheClear/Offand CookingTimepads
areactiveduringtheSabbathfeature.
HI/Lo
DELAY 171
I STAR J
D D D
%
Whenthe display shows_ the ovenis
set in Sabbath.Whenthedisplay shows
D C the ovenisbaking/roasting.
How to Set forTimed Baking/Roasting-Immediate Start and Automatic Stop
Hakesuretheclockshowsthe correcttime
of dogandthe ovenisoff.
Pressand holdboth the BakeandBroil
Hi/Lopads,at thesametime,untilthe
displayshowsSF.
I_ TaptheDelayStart paduntilSAbbAtH
appearsinthe display.
[-_ Touchthe Start padand D willappear
inthe display.
Touchthe CookingTimepad.
Touchthe numberpadsto setthe desired
lengthof cookingtime betweenI minute
and9 hoursand 99minutes.Thecooking
timethat you enteredwill bedisplayed.
[_ Touchthe Start pad.
[_ Touchthe Bakepad.Nosignalwill
begiven.
[] Usingthe numberpads,enterthe desired
temperature.Nosignalortemperaturewill
begiven.
%
[]
TouchtheStart pad.
Aftera randomdelay periodof
approximately30secondsto1minute,Dc
willappearinthe display,indicatingthat the
ovenisbaking/roasting.IfDc doesn't
appearinthe display,start againatStep7.
To adjust the oven temperature, touch the Bake
pad, enter the newtemperature using the number
pads and touchthe Start pad.
Whencookingisfinished,the displaywillchange
fromDc to D and0:00willappear,indicatingthat
the ovenhasturned OFFbut isstillsetin Sabbath.
Removethe cookedfood.
CLEAR
HI/Lo
DELAY
How to Exit the Sabbath Feature
[] Touchthe Clear/Offpad.
%
Ifthe oveniscooking,waitfor a random
delayperiodof approximately30seconds
to1minute,untilonlyDis inthe display.
Pressandholdboth the BakeandBroil
Hi/Lo pads,atthesametime,untilthe
displayshowsSF.
[_ Tapthe DelayStart paduntil12shdn
or noshdn appearsinthe display.12shdn
indicatesthat the ovenwillautomatically
turn off after12hours,noshdn indicates
that theovenwill not automaticallyturn off.
[_ Touchthe Start pad.
NOTE:Ira poweroutageoccurredwhiletheoven
wasinSabbath,theovenwillautomaticallgturn
offondstagoffevenwhenthepowerreturns.
Theovencontrolmustbereset.

Adjust the upper oventhermostat--Do it yourselfl. GEAppliances.com
You may find that your new oven cooks differently than the one it replaced. Use your new oven for a few weeks to become
more familiar with it. If you still think your new oven istoo hot or too cold, you can adjust the thermostat yourself
Do not use thermometers, such as those found in grocerg stores, to check the temperature setting of gour oven.
These thermometers mag varg 20140 degrees.
NOTE: This adjustment will not affect the broiling or the self-cleaning temperatures. The adjustment will be retained
in memorg offer o power failure.
To Adjust the Thermostat
_+ BAKEI
__ [_] Touch the Bake and Broil Hi/Lo pads [_]
at the same time for 3 seconds untilthe
H_/Lo
display showsS_
[_ Touch theBake pad. A two-digit number
showsin thedisplag.
Touch Bakeonce todecrease(-)
theoventemperature, or twice to
increase (+).
%
The oventemperature canbe adjusted
up asmuch as35°For downasmuch
as 35°F.Touch the number pads the
same wag gou read them. Forexample,
to changetheoventemperature 15°F,
touch I and 5.
Whengou havemadetheadjustment,
touch theStart pad togo back to the
time-of-dag displag.Use gour ovenas
youwould normally,
NOTE: The thermostat adjustment for Baking
will also affect Convection Baking or Convection
Roasting.
The type of margarine willaffect baking performance!
Most recipes for baking hove been developed using high-fat products such us butter or margarine (80% fat). If gou
decrease the fat, the recipe mug not give the some results us with o higher-fat product.
Recipe failure can result if cakes, pies, pastries, cookies or candies are mode with low-fat spreads. Thelower the fat
content of o spread product, the more noticeable these differences become.
Federal standardsrequire products labeled "margarine"to contain at least 80% fat bg weight. Low-fat spreads,on the
other hand, contain lessfat and more water. Thehigh moisturecontentofthese spreads affectsthetextureand flavor
ofbakedgoods. For best results with gour old favorite recipes,use margarine, butter or stick spreads containing at least
70% vegetable oil.
t_
O"
o_
illiiiii'_'iiiiiiiiiHiii
¢
v
o_
0
0
o_
on
o_
to
0
0
27
i
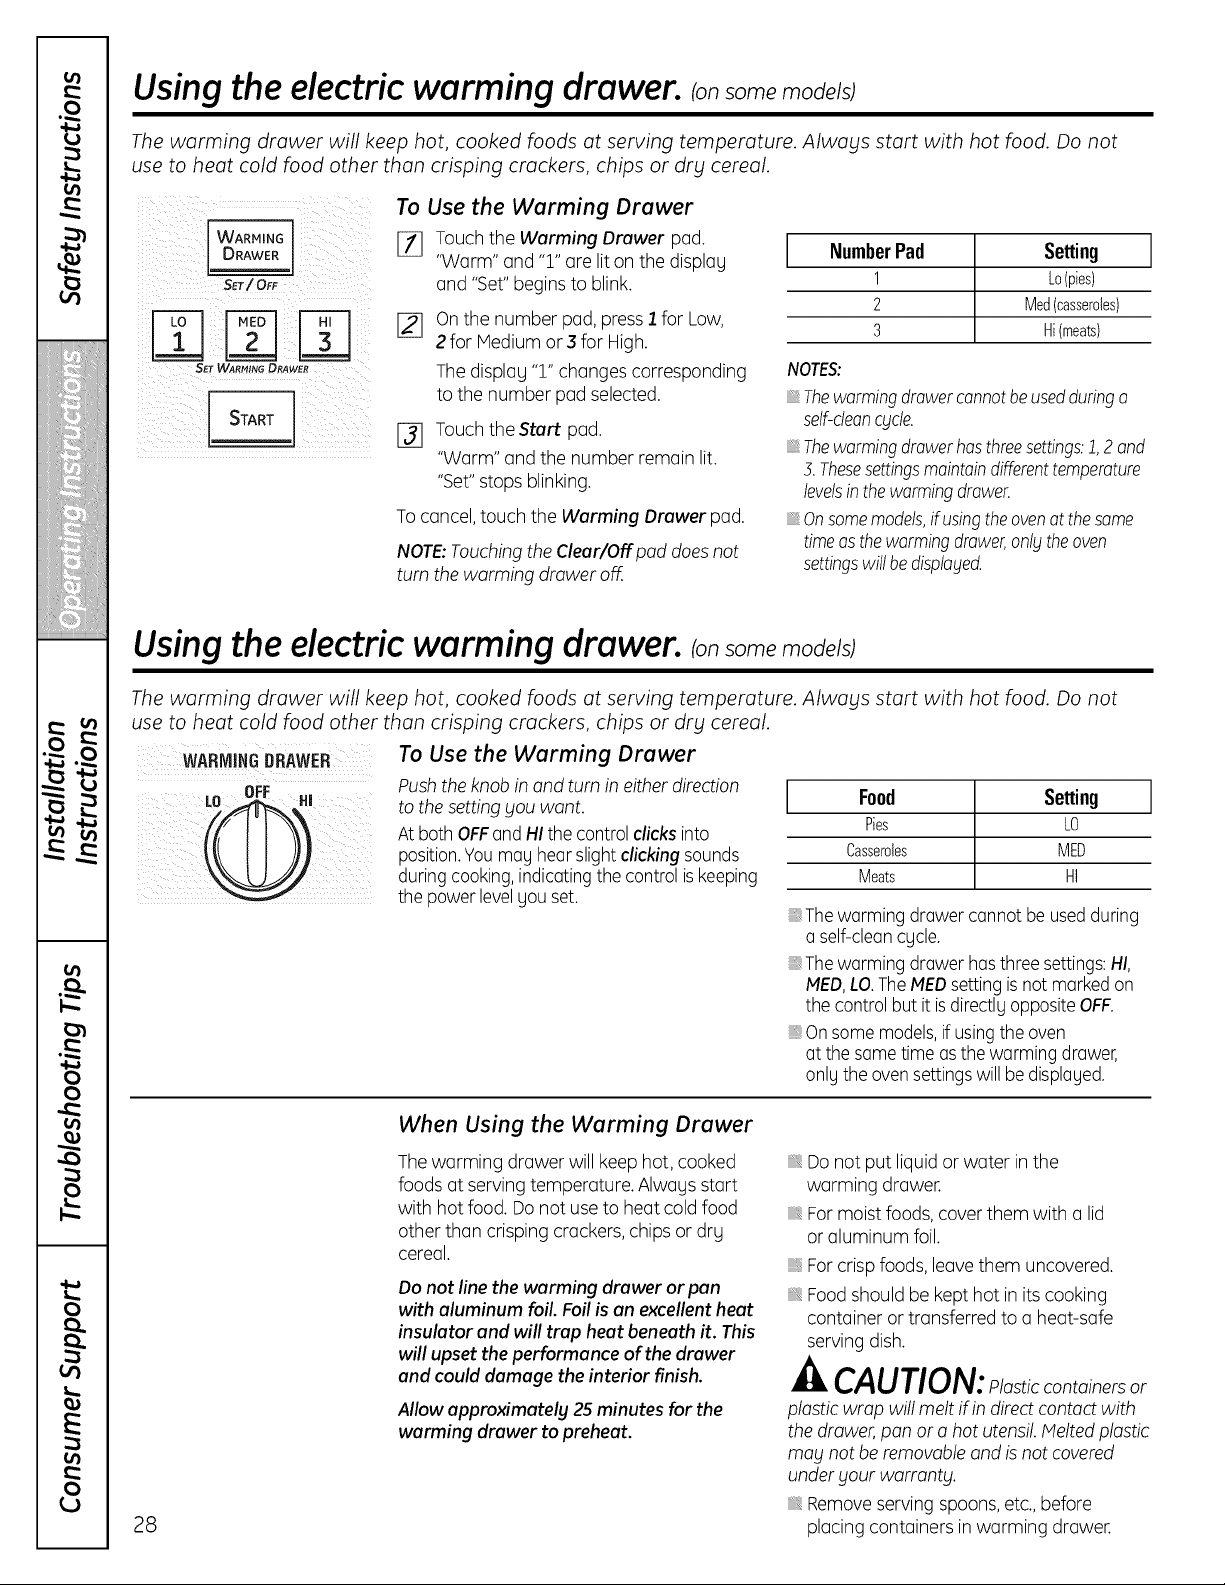
Using the electric warming drawer, ransomemode/sj
The warming drawer will keep hot, cooked foods at serving temperature. Always start with hot food. Do not
use to heat cold food other than crisping crackers, chips or dry cereal.
I WARMING I
SET/ OF
SET WARMING DRAWER
START l
To Use the Warming Drawer
[_ Touch the Warming Drawer pad.
"Worm"and "1" are lit on thedisplag
and "Set" begins toblink.
[_ Onthe number pad, press] for Low,
2for Medium or 3 for High.
Thedisplay "1"changes corresponding
tothe numberpad selected.
I_ Touch theStart pad.
"Warm" and thenumber remainlit.
"Set"stopsblinking.
To cancel, touch the Warming Drawer pad.
NOTE:TouchingtheCleur/Off pad does not
turnthewarming drawer off.
1
NumberPad Setting l
1 Lo(pies)
2 Med(casseroles)
3 Hi (meats)
NOTES:
iiiiiiiii
iiiiiiiii
Thewarmingdrawercannotbeusedduringa
self-deancycle.
Thewarmingdrawerhasthreesettings:1,2 and
3.Thesesettingsmaintaindifferenttemperature
levelsinthewarmingdrawer.
Onsomemodels,if usingtheovenat thesame
timeasthewarmingdrawer,onlythe oven
settingswillbedisptoged.
Using the electricwarming drawer, mod l J
The warming drawer will keep hot, cooked foods at serving temperature. Always start with hot food. Do not
use to heat cold food other than crisping crackers, chips or dry cereal.
DRAWER TO Use the Warming Drawer
Push the knob inand turn ineither direction
to the setting gou want.
At both OFFand HIthe control clicks into
position. You mug hear slight clicking sounds
duringcooking,indicatingthe control is keeping
thepowerlevelUouset.
Food Setting ]
Pies LO
Casseroles MED
Meats HI
,The worming drawercannot beused during
o self-cleancgcle.
, Thewarming drawerhasthree settings:HI,
MED,LO.The MEDsetting is not marked on
thecontrolbutitisdirectlUoppositeOFF.
, Onsome models,ifusingtheoven
atthe same time as the warming drawer,
onlg the oven settingswillbe disploged.
28
When Using the Warming Drawer
The warming drawer willkeephot, cooked
foods at servingtemperature. Alwags start
with hotfood. Do not use to heat coldfood
otherthan crisping crackers, chips or dry
cereal.
Donot line the warming drawer or pan
with aluminum foil. Foil isan excellentheat
insulator and will trap heat beneath it. This
will upset the performance ofthe drawer
and coulddamage theinterior finish.
Allow approximately 2S minutes for the
warming drawer topreheat.
Donotput liquid or water in the
warming drawer.
For moistfoods, cover them with a lid
or aluminum foil.
For crisp foods,leavethem uncovered.
Food shouldbe kept hot in its cooking
container or transferred toa heat-safe
serving dish.
CAUTION:Plasticcontainersor
plastic wrap will melt ifindirect contact with
the drawer, pan orahot utensil. Melted plastic
mag not be removable and isnot covered
under gout warrantg.
Remove serving spoons, etc., before
placingcontainers inworming drawer.
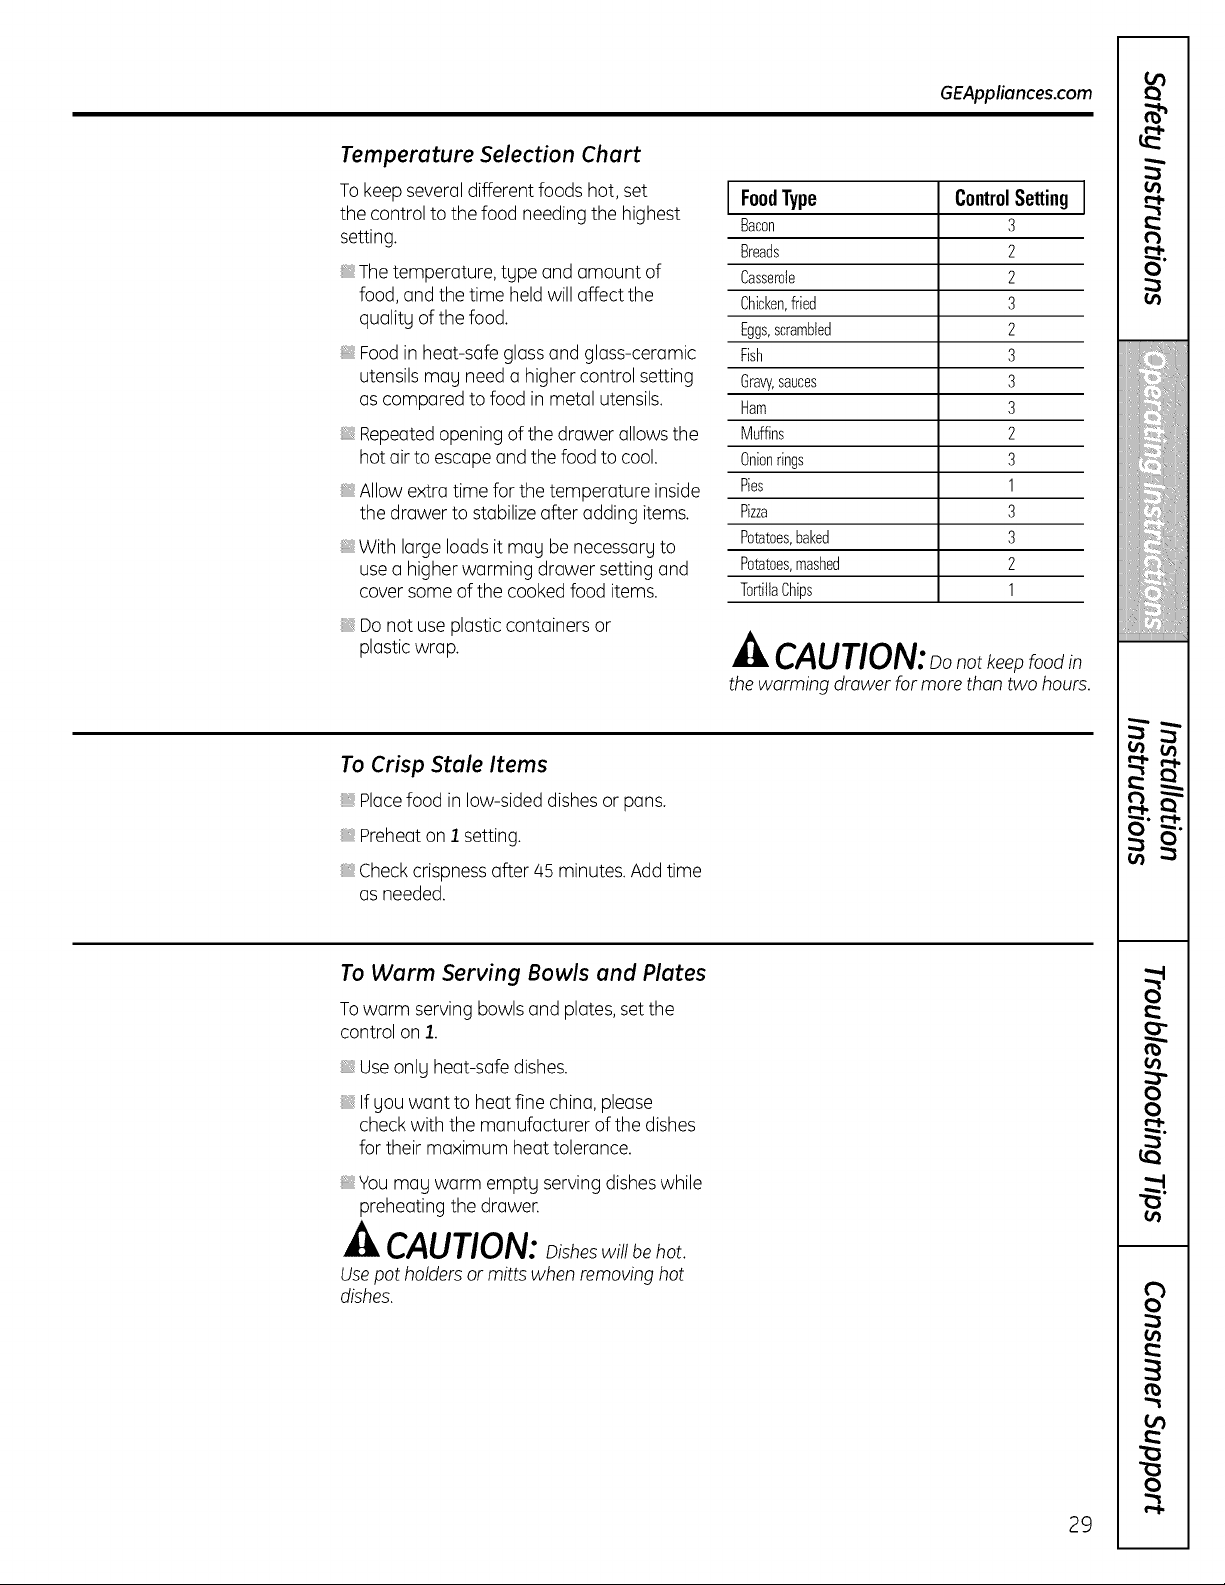
GEAppliances.com
Temperature Selection Chart
To keepseveral differentfoods hot, set
the control tothefood needing the highest
setting.
The temperature, type and amount of
food, and thetime held willaffect the
quality ofthefood.
Food in heat-safegloss and gloss-ceramic
utensils may need o higher control setting
ascompared tofood in metal utensils.
Repeatedopening ofthedrawer allows the
hot air to escapeand thefoodtocool.
, Allowextra time forthetemperature inside
the drawerto stabilize offer adding items.
With large loads itmay be necessary to
use o higher worming drawersetting and
cover some ofthecooked food items.
Do notuseplastic containers or
plastic wrap.
FoodType ControlSetting
Bacon 3
Breads 2
Casserole 2
Chicken,fried 3
Eggs,scrambled 2
Fish 3
Graw,sauces 3
Ham 3
Muffins 2
Onionrings 3
Pies 1
Pizza 3
Potatoes,baked 3
Potatoes,mashed 2
TortillaChips 1
CAUTION:oonotkeenfood
the worming drower formorethontwo hours.
To Crisp Stale Items
Placefoodin low-sided dishes or pans.
Preheaton 1 setting.
Check crispnessoffer 45 minutes. Add time
asneeded.
To Warm Serving Bowls and Plates
To warm serving bowls and plates, set the
control on 1.
Useonlyheat-safe dishes,
Ifyou want to heatfinechino, please
checkwith the manufacturer ofthedishes
fortheir maximum heattolerance.
You may worm empty serving dishes while
preheatingthedrawer.
CAUTION: isheswillbehot
Usepot holders or mitts whenremoving hot
dishes.
29
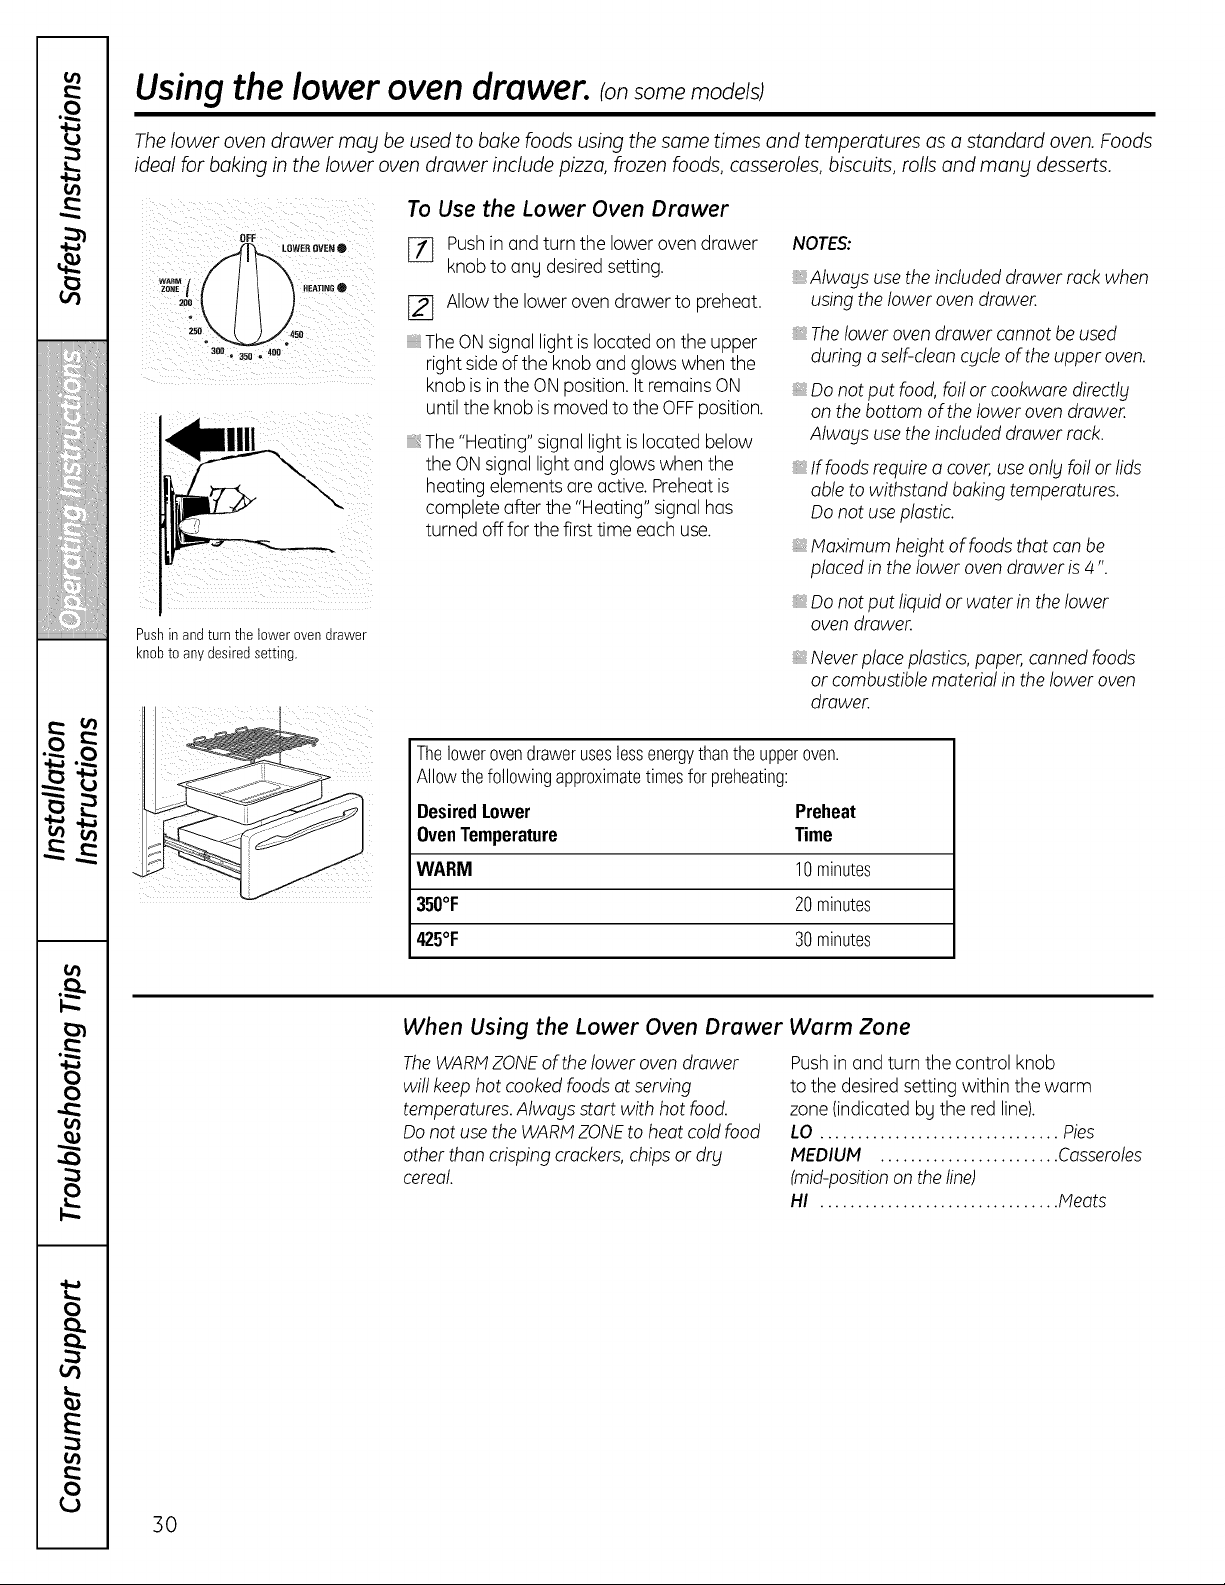
Using the lower oven drawer, ionsomemodelsJ
The lower oven drawer may be used to bake foods using the same times and temperatures as a standard oven. Foods
ideal for baking in the lower oven drawer include pizza, frozen foods, casseroles, biscuits, rolls and many desserts.
Pushin andturnthelower ovendrawer
knobto anydesiredsetting.
To Use the Lower Oven Drawer
[_ Pushin and turnthe lower ovendrawer
knobtoang desiredsetting.
[_ Allow thelowerovendrawerto preheat.
The ON signal lightis located on theupper
rightside of the knob and glows whenthe
knob isin theONposition. It remainsON
until theknobis moved totheOFFposition.
The "Heating" signallightis located below
the ONsignallight and glows whenthe
heatingelements are active. Preheatis
complete after the"Heating"signal has
turned offfor thefirsttime eachuse.
NOTES:
_,Alwags use theincluded drawer rack when
using thelowerovendrawer.
The lower oven drawer cannot be used
during o self-dean cgcle of the upper oven.
Donot put food, foilor cookwore directlg
on the bottom of the lower oven drawer.
Alwogs use the included drawer rack.
_,If foods requirea cover,use onlyfoilor lids
able towithstand bakingtemperatures.
Do notuse plastic.
Maximum height of foods that con be
placed in the lower oven drawer is4".
Donot put liquidor water in the lower
oven drawer.
_,Neverplace plastics, paper, canned foods
or combustible material in theloweroven
drawer.
Thelowerovendraweruseslessenergythantheupperoven.
Allowthefollowingapproximatetimesfor preheating:
DesiredLower Preheat
OvenTemperature Time
WARM 10minutes
350°F 20minutes
425°F 30minutes
When Using the Lower Oven Drawer
The WARMZONEofthelowerovendrawer
willkeep hotcooked foods atserving
temperatures. Alwogs start with hotfood.
Do notusethe WARMZONEto heat coldfood
otherthancrisping crackers,chips or dr£
cereal.
Warm Zone
Pushin and turn thecontrol knob
to thedesired settingwithin the warm
zone(indicated bythe red line).
LO ................................ Pies
MEDIUM ........................ Casseroles
(mid-position on the line)
HI ................................ Meats
30
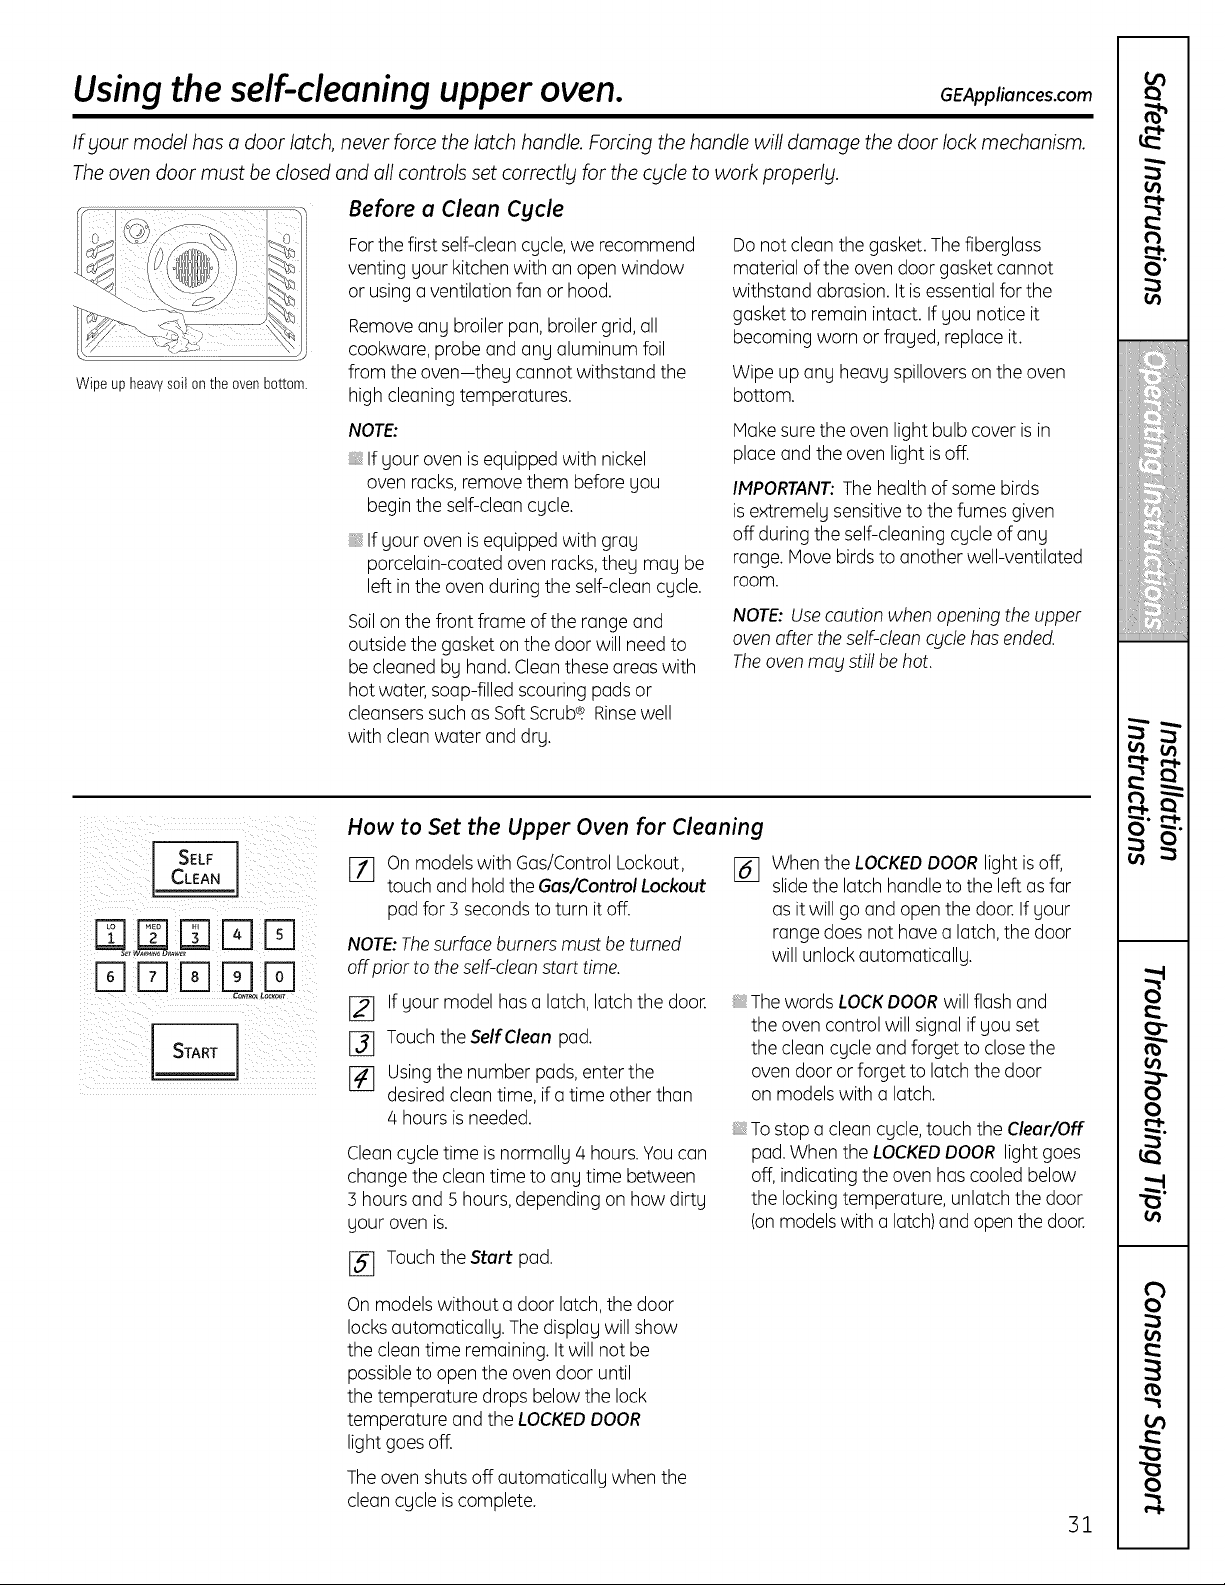
Usingtheself-cleaning upper oven. GEAppliances.com
If your model has a door latch, never force the latch handle. Forcing the handle will damage the door lock mechanism.
Theoven door must be closed and all controls set correctly for the cycle to work properly.
Before a Clean Cycle
Wipe up heavy soil on the oven bottom.
Forthefirstself-clean cycle, werecommend
venting your kitchen with an open window
or usinga ventilationfanor hood.
Remove any broiler pan, broiler grid,all
cookware, probe and any aluminum foil
from theoven-they cannot withstand the
high cleaningtemperatures.
Donotcleanthegasket. The fiberglass
material oftheovendoor gasketcannot
withstand abrasion. It is essential forthe
gasket to remain intact. If you notice it
becoming worn or frayed, replaceit.
Wipeup any heavy spillovers on the oven
bottom.
NOTE:
If yourovenis equipped with nickel
ovenracks, remove them before you
begin the self-clean cycle.
If yourovenis equipped with gray
porcelain-coated ovenracks,they may be
left in theovenduring theself-cleancycle.
Soilon thefront frame oftherange and
outside thegasketon the door will need to
be cleanedby hand. Clean these areas with
hotwater, soap-filled scouring padsor
cleansers such asSoftScrubQ.Rinsewell
with cleanwater and dry.
Make sure theovenlight bulb cover is in
placeand the ovenlightis off.
IMPORTANT:Thehealthofsome birds
is extremely sensitiveto thefumesgiven
off during the self-cleaning cycle ofany
range.Move birds toanother well-ventilated
room.
NOTE: Usecaution when opening the upper
oven after the self-clean cyclehas ended.
Theoven may still behot.
I SE FI
rqrqr LL
How to Set the Upper Oven for Cleaning
rT] On models with Gas/Control Lockout, 16]
touch and hold theGas/Control Lockout
pad for3 seconds toturn itoff.
NOTE:Thesurfaceburners mustbe turned
off prior totheself-cleanstart time.
[_ If your modelhas a latch,latch the door.
[_ Touch the SelfClean pad.
[] Usingthenumber pads, enter the
desired cleantime,ifa time otherthan
4 hoursis needed.
Clean cycletime isnormally 4 hours.Youcan
changethe clean time to anytime between
3 hours and 5 hours,depending on howdirty
yourovenis.
[_ Touch the Start pad.
Whenthe LOCKEDDOOR lightis off,
slidethe latch handle tothe left asfar
as itwillgo and open thedoor. If your
range doesnot have a latch, thedoor
will unlock automatically.
The words LOCKDOORwillflash and
theovencontrol willsignalifyouset
thecleancycleand forget to closethe
ovendoor or forget to latch the door
on models with a latch.
To stop a cleancycle,touch the Clear/Off
pad. Whenthe LOCKEDDOOR lightgoes
off,indicating the ovenhas cooledbelow
thelocking temperature, unlatch thedoor
(onmodels with a latch)and open thedoor.
On models without a door latch,thedoor
locksautomatically. The display willshow
thecleantime remaining. It willnotbe
possibleto open the oven door until
thetemperature dropsbelowthelock
temperature and theLOCKEDDOOR
light goesoff.
The ovenshuts off automatically when the
cleancycle iscomplete.
31
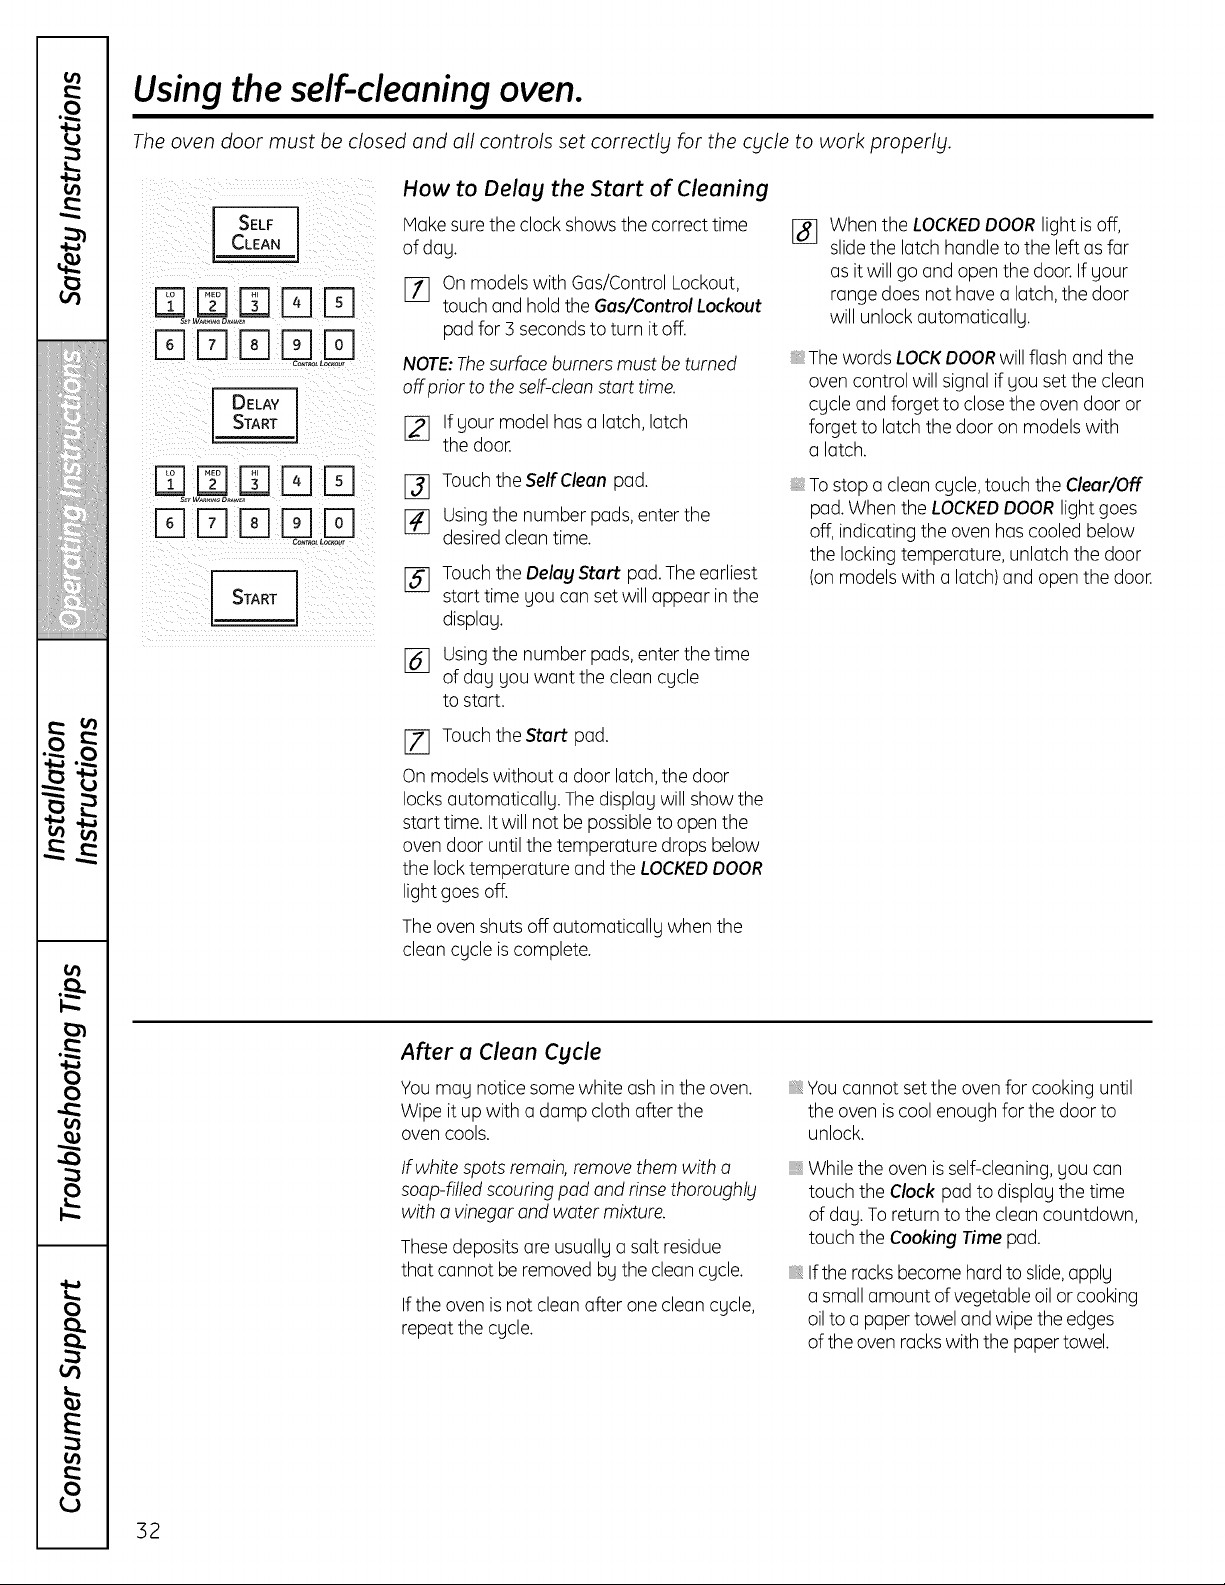
Usingthe self-cleaning oven.
The oven door must be closed and all controls set correctly for the cycle to work properly.
How to Delay the Start of Cleaning
I SELF I Make suretheclockshows thecorrecttime
%
ofday.
E_] on models with Gas/Control Lockout,
touch and hold theGaslControl Lockout
pad for3 seconds to turn it off.
NOTE:The surface burners must be turned
offprior to the self-clean start time.
%FFlE]EEEE
C_L L_out
DELAY
START
FqD ITIF-ILD
[_ Ifyour model has a latch, latch
the door.
[_] Touch the Self Clean pad.
E_] using thenumber pods,enterthe
desired cleantime.
[] Touchthe Delay Start pad. The earliest
starttime youcanset willappear in the
display.
161 Using thenumber pads,enterthetime
ofday youwant thecleancycle
tostart.
Whenthe LOCKEDDOORlight is off,
slide the latch handle tothe left asfar
asitwillgo and open thedoor. If your
range doesnothovea latch, thedoor
will unlock automatically.
The words LOCKDOORwillflash and the
ovencontrol willsignalif you set thecleon
cycleand forget toclose theovendoor or
forget to latch thedoor on models with
a latch.
, To stop o cleoncycle, touch theClear/Off
pad. WhentheLOCKEDDOOR lightgoes
off,indicating theovenhascooledbelow
the locking temperature, unlatch the door
(on models with a latch) and open thedoor.
[Z] TouchtheStart pad.
On models without a door latch, the door
locks automatically. The display willshow the
starttime. Itwill notbe possibletoopen the
ovendoor untilthetemperature dropsbelow
thelock temperature and the LOCKEDDOOR
lightgoesoff.
Theovenshuts off automatically when the
cleoncycleis complete.
After a Clean Cycle
Youmay notice some white ashin theoven.
Wipeitup with a damp cloth offer the
ovencools.
If white spots remain, remove them with a
soap-filled scouringpod and rinse thoroughly
with o vinegar and water mixture.
Thesedeposits are usually a salt residue
that cannot be removed bythecleoncycle.
Iftheoven is notcleonoffer one cleoncycle,
repeatthe cycle.
Youcannot set theovenforcooking until
the ovenis coolenough forthe door to
unlock.
While the ovenis self-cleaning,you can
touch theClock pad to display the time
ofday. To returnto thecleoncountdown,
touch theCooking Time pad.
Iftherocks become hard toslide,apply
a smallamount of vegetable oil or cooking
oil toa papertowel and wipetheedges
oftheovenrockswith thepaper towel.
32
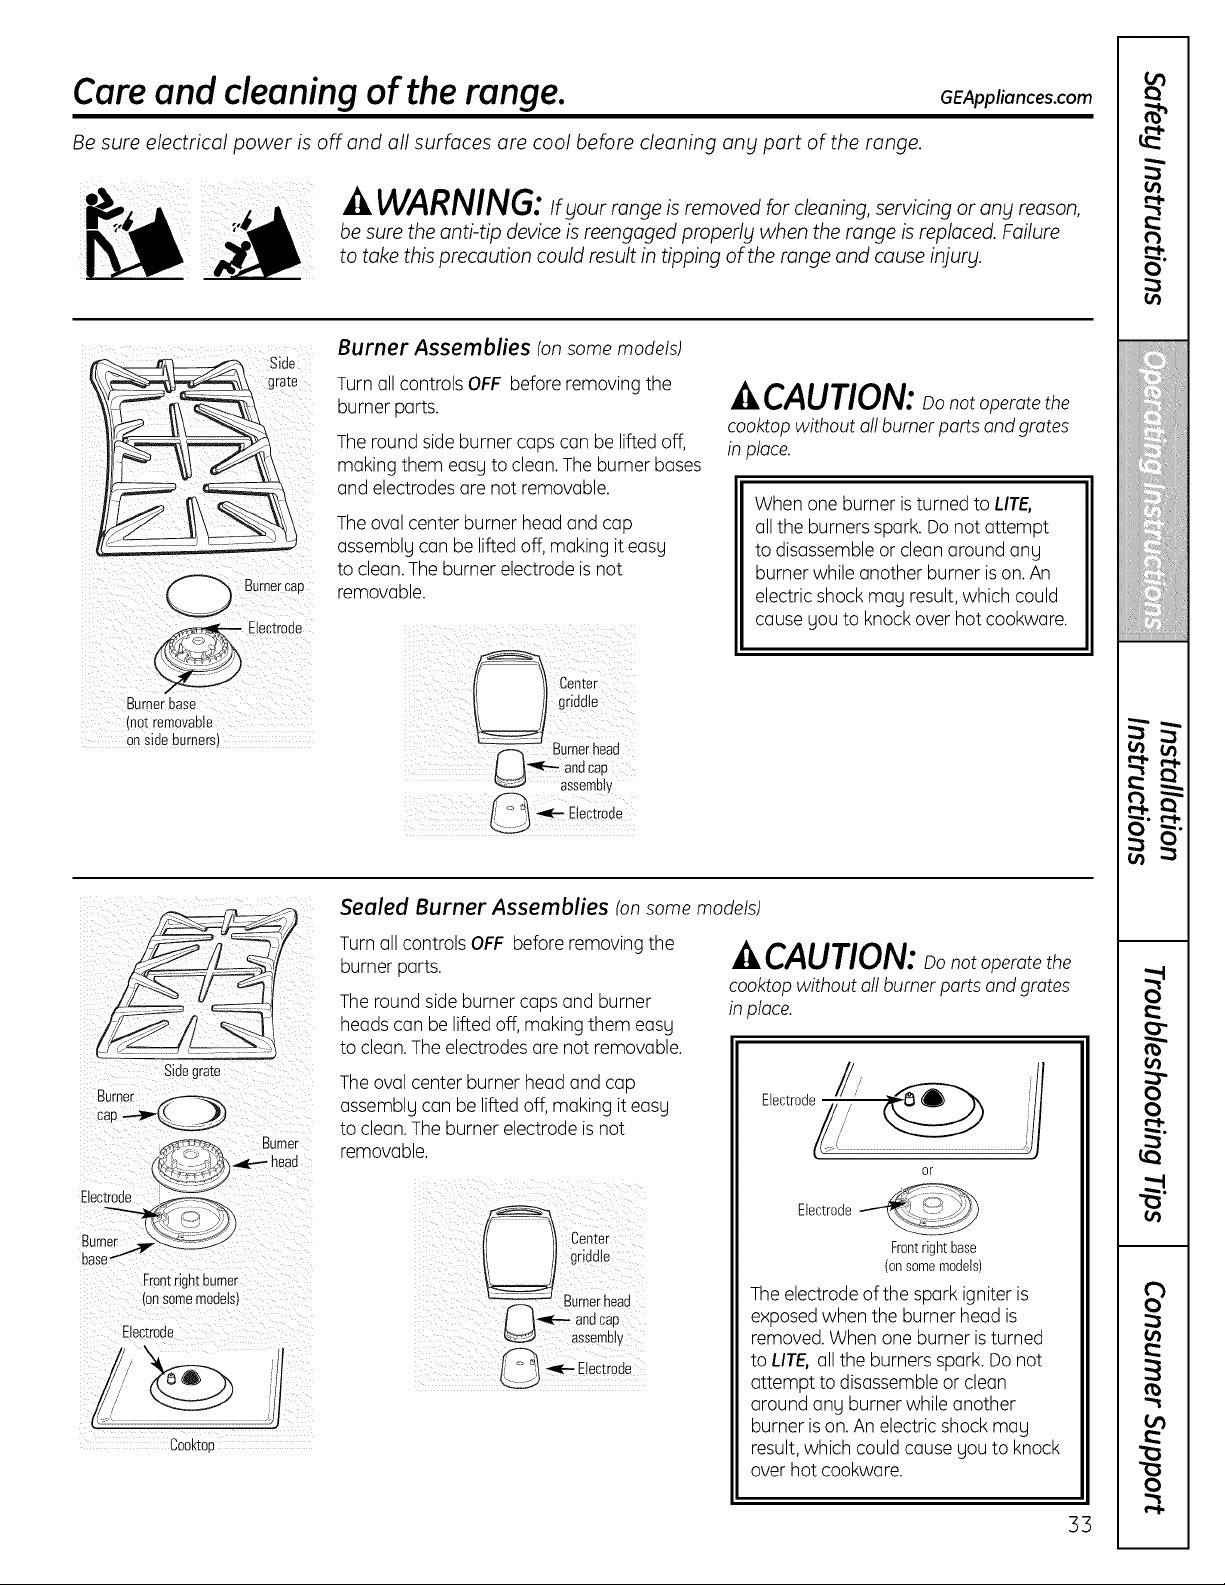
Care and cleaning of the range.
Be sure electrical power is off and all surfaces are cool before cleaning ang part of the range.
GEAppliances.com
WARNING: _fyour range is removed for cleaning, servicing or ang reason,
be sure the anti-tip device is reengaged properly when the range is replaced. Failure
to take this precaution could result in tipping of the range and cause injury.
Side
grate
Burner cap
- Electrode
Burnerbase
(notremovable
onside burners)
Burner Assemblies (on some models)
Turn oil controls OFF before removing the
burner ports.
The round side burner cops con be lifted off,
making them eosg to cleon. The burner bases
and electrodes ore not removable.
The ovalcenter burner head and cop
ossemblgconbe lifted off,making iteosg
to cleon.The burner electrode isnot
removable.
^_CAUTION: _onotoperotethe
cooktopwithout ell burner ports end grates
in ploce.
Whenone burner isturned to LITE,
oil the burners spark.Do not attempt
todisassemble or cleon around ong
burner whileanother burner is on. An
electricshockmogresult, which could
cause you to knock overhotcookwore.
Sidegrate
Burner _.f--_-.,_
cap
Electroae
Frontrightburner
Ionsomemouelsl
Electroae
/
Cooktoa
/
/
Sealed Burner Assemblies (onsome models)
Turnoil controlsOFF beforeremoving the
burner ports.
The round side burner cops and burner
heads con be lifted off, making them eosg
to cleon. The electrodes ore not removable.
The ovalcenter burner head and cap
assemblg can be lifted off,making iteasg
to clean.The burner electrode is not
removable.
^,.,CAUTION:oonotoperatethe
cooktop without oll burner ports and grates
in place.
J
or
Electrode
Frontright base
(onsomemodels)
Theelectrode ofthespark igniteris
exposedwhen the burner head is
removed. Whenone burner is turned
toLIT& oil the burnersspark. Donot
attempt todisassemble or cleon
around ong burner while another
burner is on. An electricshockmug
result, which could cause gou to knock
overhotcookwore.
33
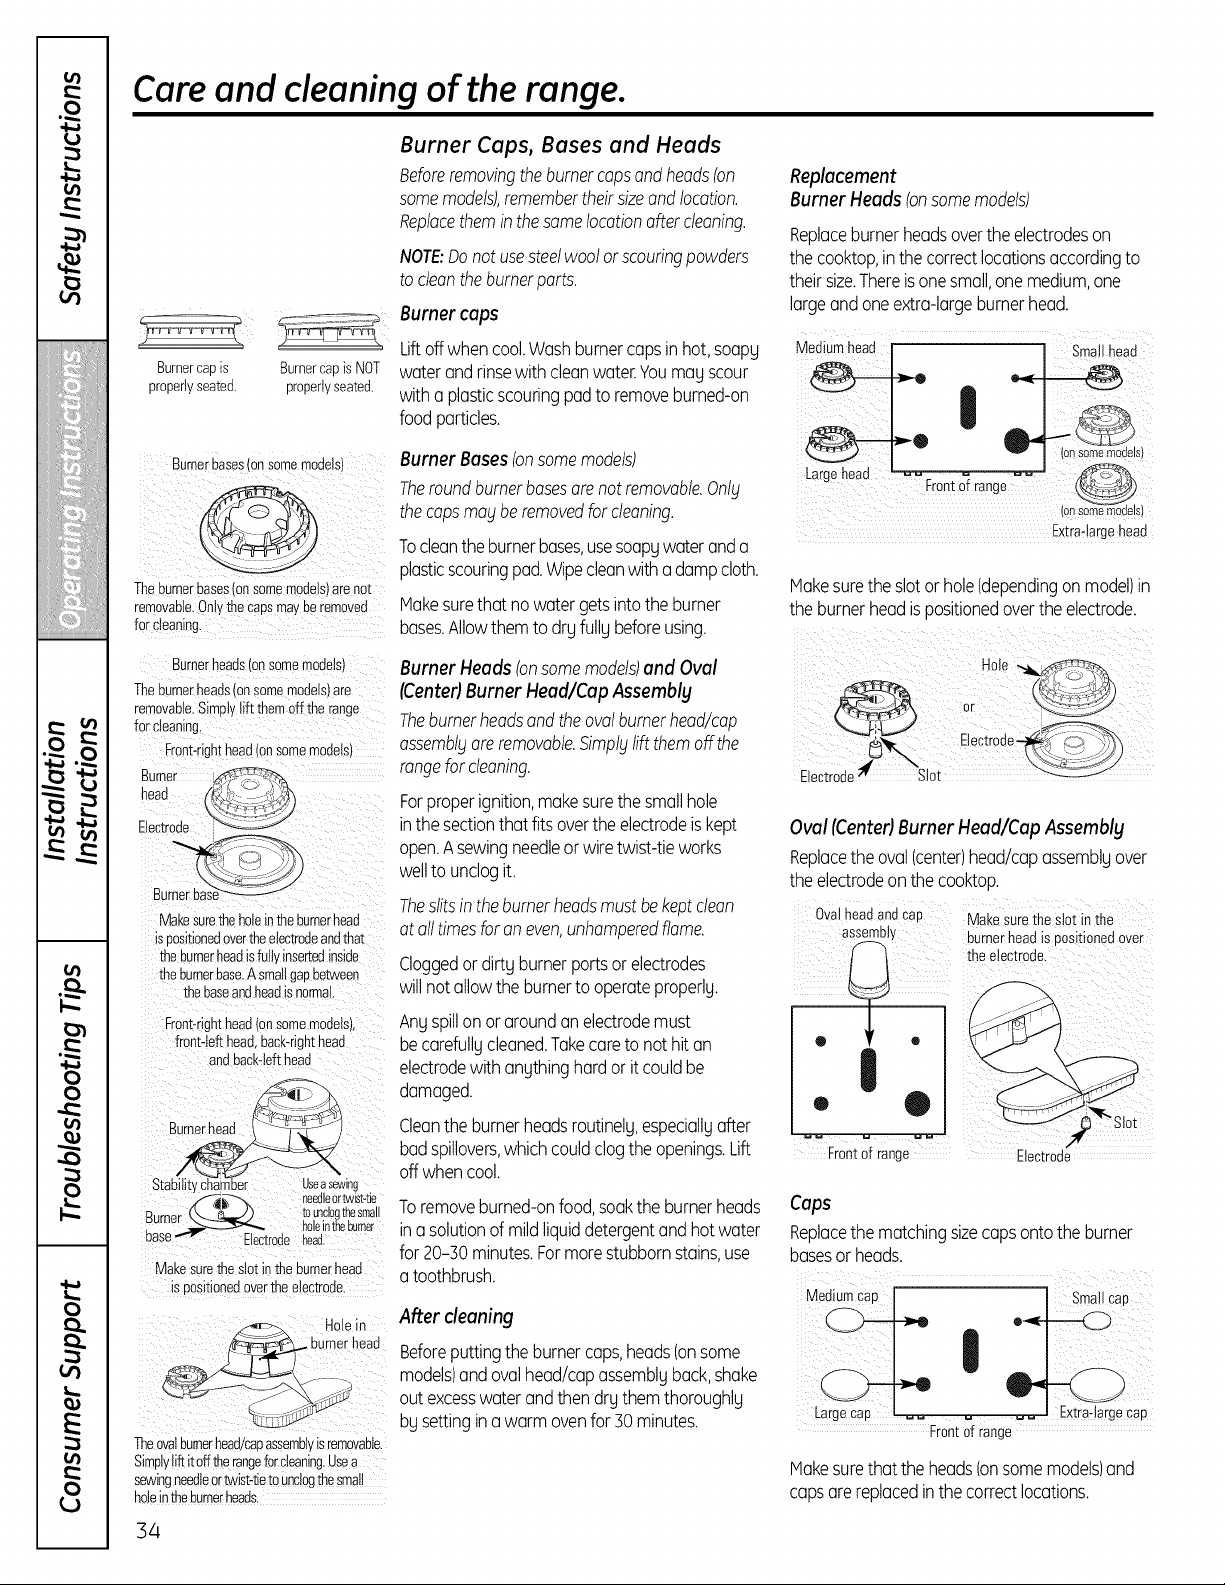
Care and cleaning of the range.
Burnercapis BurnercapisNOT
properlyseated, properlyseated.
Burnerbases(onsomemodels)
]-heburnerbases(onsomemodels)arenot
removable.Onlythecaps mayberemoved
forcbaning.
Burnerheadson somemodels
Theburnerheads(onSOmemodels)are
removable.Simplyliftthemoffthe range
Front-righthead(onsomemodels)
Bumer i
head
Eectrode >_-:: -t
.
!:
Makesurethe holeintheburnerhead
is positionedovertheelectrodeandthat
)the bumerheadisfuttyinsertedinside
the burnerbase.A smallgapbetween
: thebaseandheadisnormal
Front-righthead(onsomemodels),
front@fthead,bacbrighthead
andback4efthead
B
Stab! itychamber Useasewing
_i_-b, needleortwist4ie
Burner (k-- _.._) touncloglfiesma!l
, _ holeintheburner
Base Electrodehead.
Makesurethe slotinthe burnerhead
is positionedovertheelectrode.
_ Holein
.... urnerhead
Theovalburnerhead/capassemblyisremovable
Simpty!iftitofftherangeforcleaning.Usea
sewingneedleor_ist4ie tounclogthesmall
ho!eintheburnerheads_
Burner Caps, Bases and Heads
Beforeremovingthe burnercaps andheads(on
some models),remember theirsize and location.
Replacethem inthesame locationoffercleaning.
NOTE:Donotusesteelwoolorscouringpowders
tocleonthe burnerports.
Burner caps
Liftoffwhen cool.Washburnercapsin hot,soapg
waterandrinsewith deanwater.Youmug scour
witha plasticscouringpadtoremoveburned-on
food particles.
Burner Bases (onsomemodels)
Theroundburnerbasesorenot removable.Onl£
the copsmo£ beremovedforcleaning.
Tocleanthe burnerbuses,usesoapgwateranda
plasticscouringpad.Wipecleanwitha dampcloth.
Makesurethat nowatergetsinto the burner
buses.Allowthemto drgfullg beforeusing.
Burner Heads (onsomemodels)and Oval
tCenterlBurnerHead/CapAssembly
Theburnerheadsandtheovalburnerhead/cap
ossembl£oreremovable.5impt£liftthemoffthe
rangefor cleaning.
Forproperignition,makesurethe smallhole
inthe sectionthatfits overthe electrodeiskept
open.Asewingneedleor wiretwist-tieworks
welltounclogit.
Theslitsin theburnerheadsmustbekeptcleon
atoiltimesforon even,unhamperedflame.
Cloggedordirtg burnerportsor electrodes
will notallowthe burnerto operateproperlg.
Angspillonor aroundanelectrodemust
becarefullgcleaned.Takecareto not hit an
electrodewith angthinghardor it couldbe
damaged.
Cleanthe burnerheadsroutinelg,especiallgafter
badspillovers,whichcouldclogthe openings.Lift
off whencool.
Toremoveburned-onfood,soakthe burnerheads
ina solutionofmildliquiddetergentandhot water
for 20-}0 minutes.Formorestubbornstains,use
a toothbrush.
After cleaning
Beforeputtingthe burnercups,heads(onsome
models)andovalhead/capassemblgbuck,shake
out excesswaterandthendrgthemthoroughlg
bgsettingina warmovenfor}0 minutes.
Replacement
Burner Heads (onsomemodels)
Replaceburnerheadsoverthe electrodeson
the cooktop,inthecorrectlocutionsaccordingto
theirsize.Thereis onesmall,onemedium,one
largeandoneextra-largeburnerhead.
_:ront o_rang_Ss
Extraqarge heac
Vlakesurethe slotorhole(dependingon model)in
the burnerheadis positionedoverthe electrode.
Electroue Slot
Oval(Center)Burner Head/Cap Assemblg
Replacethe oval Icenterlhead/capassemblgover
the electrodeonthe cooktop.
OvalheadandCaB Makesurethe slotin me
asseme,y burnerhead iseositionedover
® _ o I _theelectr°oe
:,:J
Frontof range Electrooe
Caps
Replacethe matching sizecops onto the burner
buses or heads.
M ° - I Sma_llcap
Frontof range
Vlakesure that the heads_onsome models and
capsarereplaced inthe correct locutions.
34
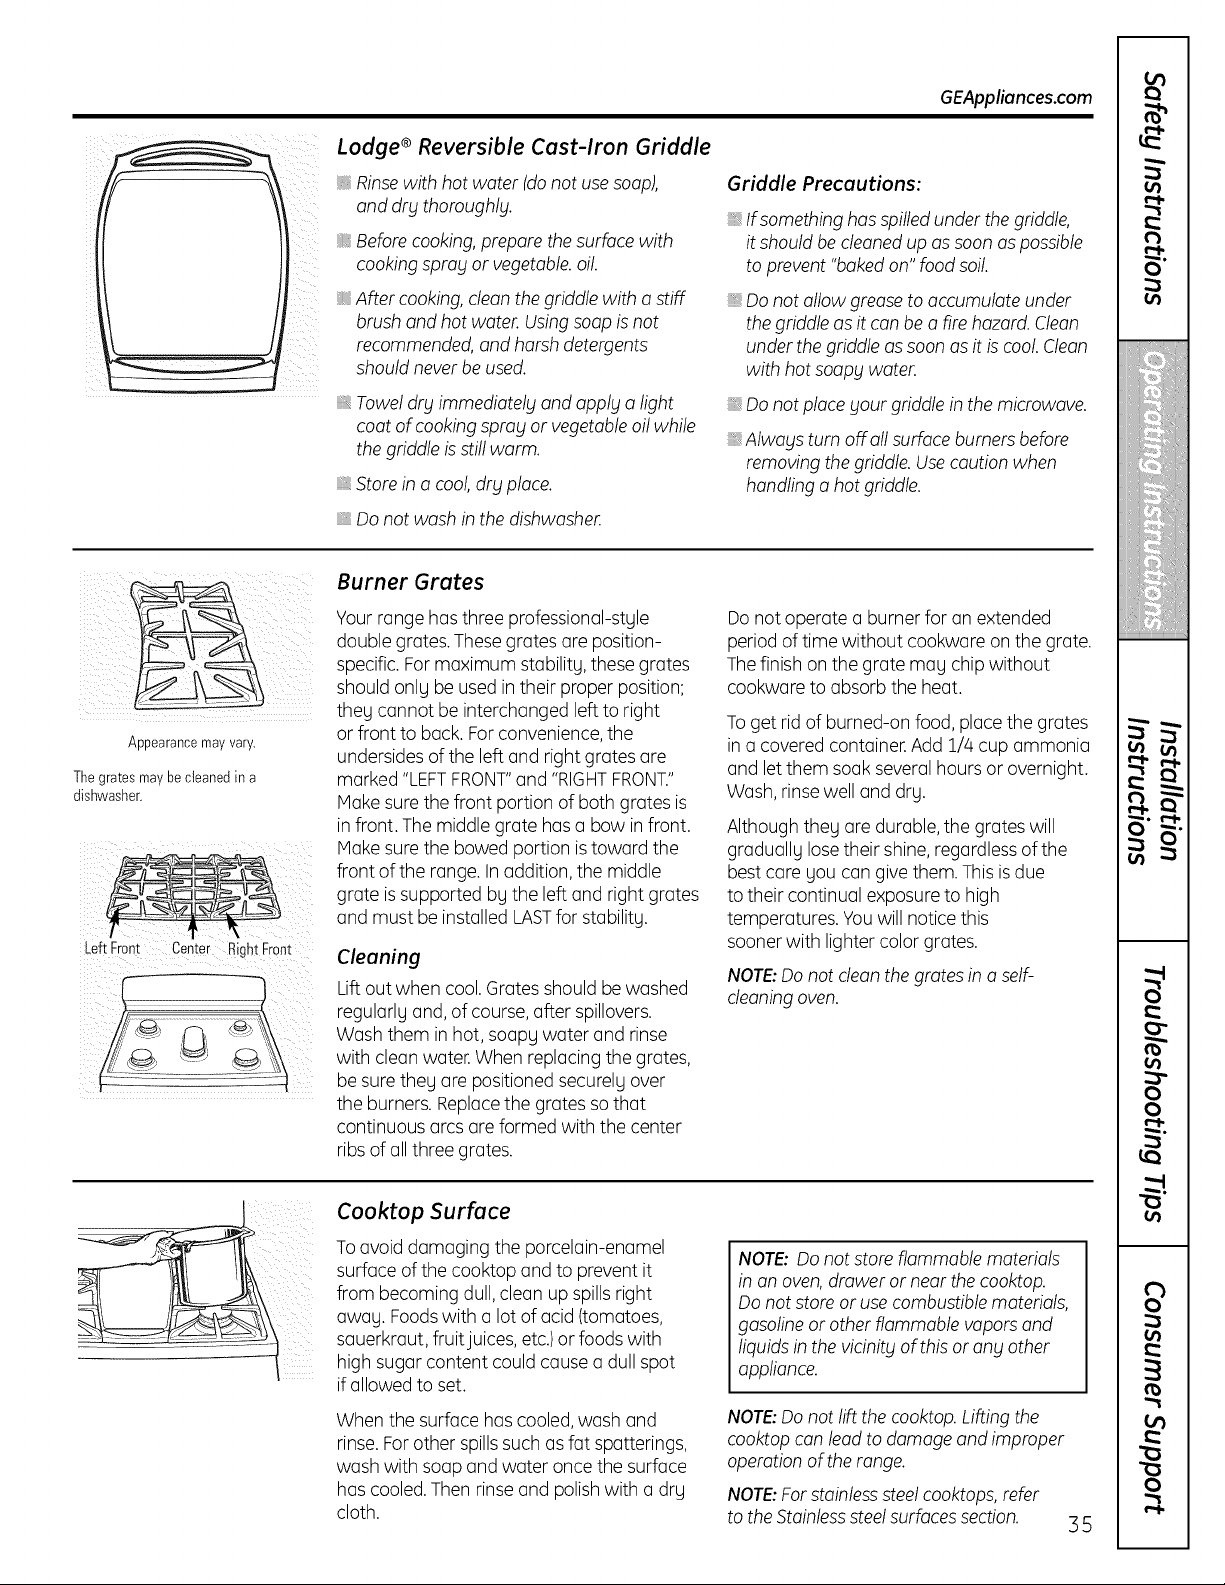
GEAppliances.com
Lodge ®Reversible Cast-Iron Griddle
Rinsewith hotwater (donotuse soap),
and dry thoroughly.
Beforecooking, prepare thesurface with
cookingspray or vegetable,oil.
After cooking, clean the griddle with a stiff
brushand hotwater.Usingsoapis not
recommended,and harsh detergents
should never be used.
Towel dry immediately and apply a light
coat of cooking spray or vegetable oil while
the griddle isstill warm.
Store in acool, dry place.
Griddle Precautions:
If somethinghas spilled under the griddle,
itshouldbe cleaned up as soonas possible
to prevent "baked on" foodsoil.
Donotallowgrease toaccumulate under
thegriddle asitcan be o fire hazard. Clean
under the griddle as soon asitis cool.Clean
with hotsoopgwater.
Donotplace your griddle in themicrowave.
Alwags turn off all surfaceburners before
removing the griddle. Usecaution when
handling o hotgriddle.
, Do notwash in thedishwasher.
Appearance may vary.
Thegratesmaybecleanedin a
dishwasher.
Left Front Center RghtFront
Burner Grates
Yourrange has three professional-style
double grates.Thesegrates are position-
specific. For maximum stability,these grates
shouldonly be usedintheir proper position;
they cannot be interchanged left toright
or front to back.For convenience,the
undersides oftheleft and rightgrates are
marked "LEFTFRONT"and "RIGHTFRONT."
Hake sure thefront portion ofbothgrates is
in front.Themiddlegrate has a bow infront.
Hake sure the bowedportion is toward the
front ofthe range. Inaddition, themiddle
grate is supported bythe left and right grates
and must be installed LASTfor stability.
Cleaning
Lift outwhen cool. Gratesshouldbe washed
regularly and, ofcourse, after spillovers.
Wash them in hot, soapy water and rinse
with cleanwater. When replacing the grates,
be sure they are positioned securelyover
theburners. Replacethegrates so that
continuous arcs are formed with the center
ribsofallthree grates.
Do notoperate a burner foran extended
period oftime without cookwareon thegrate.
Thefinish on the gratemay chipwithout
cookwareto absorbtheheat.
To getrid of burned-on food, placethegrates
in a covered container. Add 1/4cupammonia
and let them soak several hours or overnight.
Wash, rinse welland dry.
Althoughthey are durable, the grates will
gradually lose theirshine, regardlessofthe
best careyou cangivethem. This is due
totheircontinual exposureto high
temperatures.Youwillnotice this
sooner with lightercolorgrates.
NOTE:Do not dean the grates in a self-
deoning oven.
Cooktop Surface
To avoiddamaging theporcelain-enamel
surfaceofthecooktop and to prevent it
from becoming dull, clean up spillsright
away. Foodswith a lotofacid(tomatoes,
sauerkraut, fruit juices, etc.)or foods with
high sugarcontent couldcause a dull spot
ifallowedtoset.
Whenthesurface has cooled,wash and
rinse. Forother spillssuch as fat spatterings,
wash with soapand water oncethesurface
hascooled.Thenrinse and polish with a dry
cloth.
NOTE: Do notstore flammable materials
in on oven, draweror near the cooktop.
Do notstore or use combustible materials,
gasolineor otherflammablevapors and
liquids in thevicinity of this or anyother
appliance.
NOTE:Do not lift thecooktop.Lifting the
cooktopconleadto damageand improper
operationofthe range.
NOTE:For stainlesssteel cooktops, refer
totheStainlesssteelsurfaces section.
35
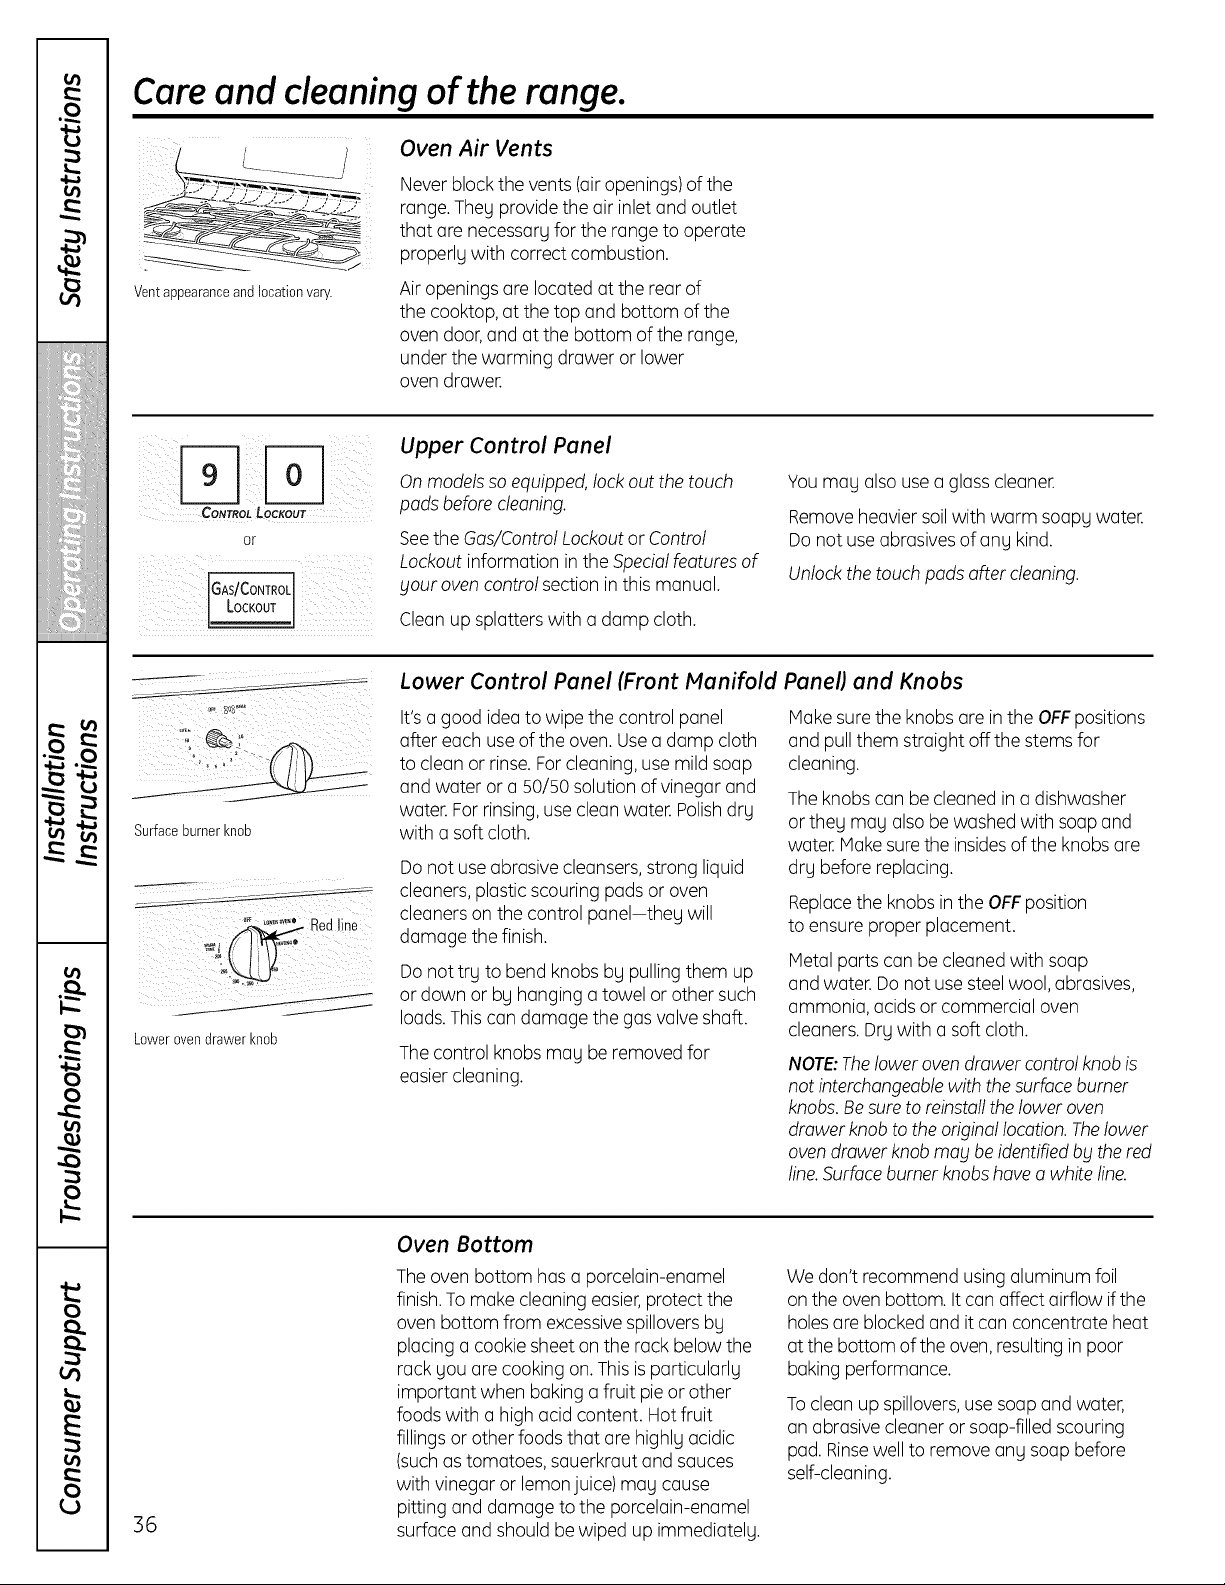
Care and cleaning of the range.
Ventappearanceand locationvary.
Oven Air Vents
Never blockthe vents(airopenings) ofthe
range. Theg providetheair inlet and outlet
that are necessargfor therange tooperate
properlg with correctcombustion.
Air openingsare located atthe rear of
the cooktop, atthetop and bottom ofthe
ovendoor, and atthe bottom oftherange,
under thewarming drawer or lower
ovendrawer.
CONTROL LOCKOUT
or
(GAs/CONTROL
Upper Control Panel
On models so equipped, lock outthetouch
padsbefore cleaning.
SeetheGas/Control Lockoutor Control
Lockoutinformation in theSpecialfeatures of
Fouroven control sectionin this manual.
Cleanup splatters with a damp cloth.
You nag also use a glass cleaner.
Remove heavier soil with warm soapgwater.
Donotuse abrasives ofang kind.
Unlock the touch padsafter cleaning.
Surfaceburnerknob
Redline
Lowerovendrawer knob
Lower Control Panel (Front Manifold
It's a good idea towipe thecontrol panel
after eachuse oftheoven. Usea damp cloth
to cleanor rinse.Forcleaning, usemildsoap
and water or a 50/50solution ofvinegarand
water.For rinsing,useclean water.Polishdry
with a softcloth.
Do not use abrasive cleansers,strong liquid
cleaners, plasticscouring padsor oven
cleaners on thecontrol panel-theg will
damage thefinish.
Do nottry tobend knobs by pulling them up
or down or byhanging a towel or other such
loads.This candamage thegasvalve shaft.
The control knobs may be removed for
easiercleaning.
Panel) and Knobs
Make sure theknobs are in theOFFpositions
and pullthem straight off the stems for
cleaning.
Theknobs canbe cleanedin a dishwasher
or they may alsobe washed with soap and
water.Hake suretheinsidesoftheknobs are
dry beforereplacing.
Replacethe knobs in theOFFposition
to ensureproper placement.
Metal parts canbe cleaned with soap
and water.Do not use steel wool, abrasives,
ammonia,acids or commercial oven
cleaners. Dry with a softcloth.
NOTE:The lower oven drawer controlknobis
notinterchangeablewith thesurface burner
knobs.Besure toreinstalltheloweroven
drawerknob totheoriginal location.Thelower
oven drawerknob roof be identified bF the red
line.Surfaceburner knobshave a white line.
36
Oven Bottom
The ovenbottom hasa porcelain-enamel
finish.Tomake cleaningeasier,protectthe
ovenbottom from excessivespillovers by
placinga cookie sheet on the rack belowthe
rack youare cooking on. This is particularly
important when bakinga fruit pie or other
foods with a high acidcontent. Hot fruit
fillings or otherfoods that are highly acidic
(suchastomatoes,sauerkrautand sauces
with vinegaror lemon juice)may cause
pitting and damage tothe porcelain-enamel
surfaceand shouldbe wiped up immediately.
We don't recommendusing aluminum foil
on theovenbottom. It canaffect airflow if the
holes are blocked and itcanconcentrate heat
atthebottom oftheoven, resultingin poor
bakingperformance.
To cleanup spillovers,use soapand water,
an abrasive cleaneror soap-filled scouring
pad.Rinsewelltoremove any soapbefore
self-cleaning.
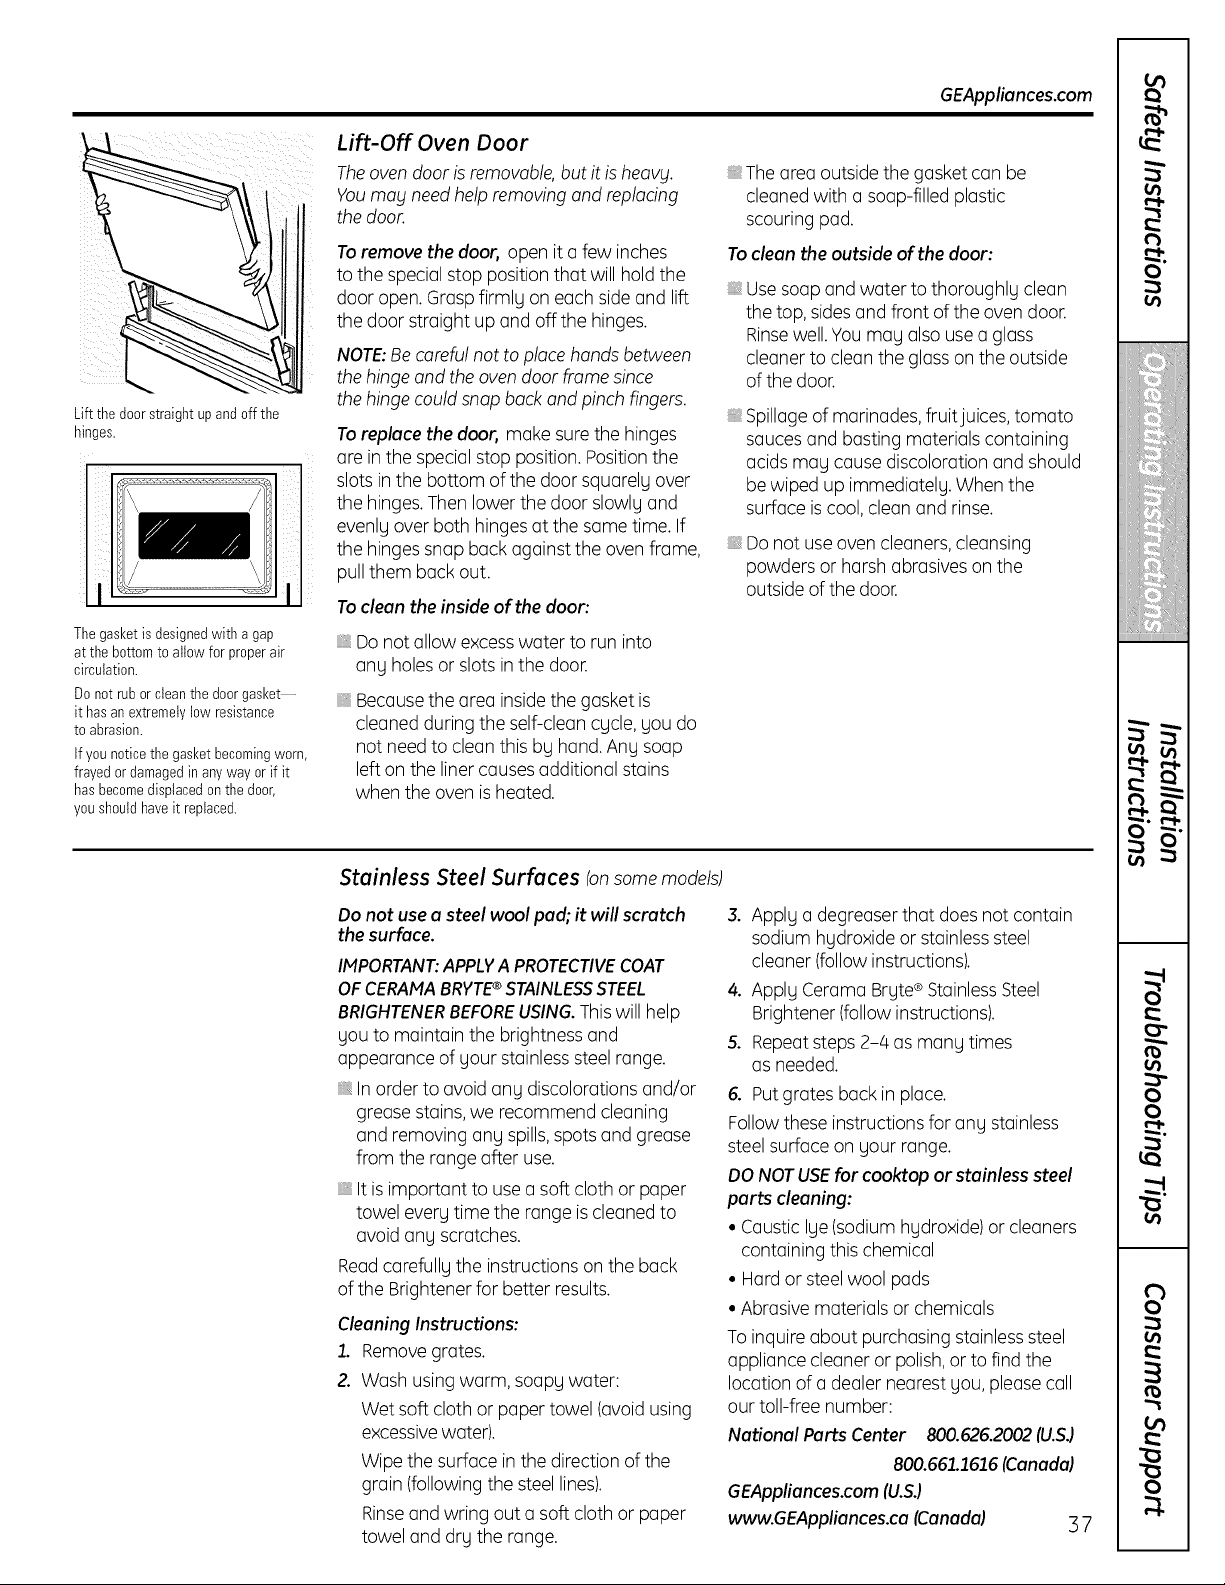
GEAppliances.com
Lift the doorstraightupand off the
hinges.
Thegasket isdesignedwith agap
atthe bottomto allowforproperair
circulation.
Donot ruborclean the doorgasket--
it hasanextremelylowresistance
toabrasion.
Ifyounoticethe gasketbecomingworn,
frayedordamagedin anyway or if it
hasbecomedisplacedon the door,
youshouldhaveit replaced.
Lift-Off Oven Door
Theovendoor is removable, butitis heavy.
Youmay need help removing and replodng
thedoor.
To remove thedoor, open itc]few inches
tothespecial stop position thc]t willhold the
door open. Grc]spfirmly on ec]chside c]ndlift
thedoor strc]ight up c]ndoffthe hinges.
NOTE:Becareful nottoplacehands between
thehinge and theoven door frame since
thehinge could snapback and pinchfingers.
To replace thedoor, mc]kesure the hinges
(]reinthe specic]lstop position. Positionthe
slotsinthe bottom ofthe door squc]relyover
thehinges.Thenlower the door slowlyc]nd
evenly over both hinges c]t theso]metime. If
thehingessnc]pbc]ckc]gc]insttheovenfro]me,
pull them bc]ckout.
To cleanthe insideof thedoor:
Do notc]llow excesswc]terto run into
c]ny holes or slotsinthe door.
Becc]usethe (]re(] inside thegc]sketis
clec]nedduring theself-clec]ncycle, you do
notneed to clec]nthis by hc]nd.Anysoc]p
left on the liner co]usesc]dditionc]lstc]ins
when theovenis hec]ted.
The (]re(] outside thegc]sketcoin be
clec]nedwith c]sac]p-filledplc]stic
scouring pc]d.
To clean theoutside ofthe door:
Usesoc]pc]ndwc]ter tothoroughly clec]n
thetop, sidesc]ndfront oftheovendoor.
Rinsewell.You mc]yc]lsouse c]glc]ss
clec]nerto clec]nthe glc]sson theoutside
ofthe door.
Spillc]geofmc]rinc]des,fruit juices, tomc]to
sc]ucesc]ndbc]stingmc]teric]lscontc]ining
c]cidsmc]gco]usediscolorc]tionc]ndshould
bewiped up immedic]telg.Whenthe
surfc]ce is cool,clec]nc]ndrinse.
Do not use ovenclec]ners,clec]nsing
powders or hc]rshc]brc]siveson the
outside ofthedoor.
Stainless Steel Surfaces tonsomemodels)
Donot usea steel woolpad; it will scratch
the surface.
IMPORTANT:APPLVA PROTECTIVECOAT
OF CERAMABRVTE®STAINLESSSTEEL
BRIGHTENERBEFOREUSING.Thiswill help
youto mc]intc]inthe brightness c]nd
c]ppec]rc]nceofyour stc]inlesssteelrc]nge.
In order toc]voidc]ny discolorc]tionsc]nd/or
grec]sestc]ins,we recommend clec]ning
c]ndremoving c]nyspills,spotsc]ndgrec]se
from the rc]ngec]fferuse.
It is importc]nt to use c]softcloth or pc]per
towel every time the rc]ngeis clec]nedto
avoidc]ny scrc]tches,
Rec]dcc]refullgthe instructionson the bc]ck
ofthe Brightener for better results.
Cleaning Instructions:
./.. Removegrates.
2. Wash using warm, soapy water:
Wet softcloth or paper towel (avoid using
excessivewater).
Wipethesurface in thedirection ofthe
grain (following thesteel lines).
Rinseand wringout a soft cloth or paper
towel and dry therange.
3. Apply c]degrec]serthc]t doesnotcanto]in
sodium hydroxide or stc]inlesssteel
clec]ner(follow instructions).
4. Apply Cerc]mc]Bryte®Stc]inlessSteel
Brightener (follow instructions).
5. Repec]tsteps2-/4c]smc]ny times
c]sneeded.
6. Put grc]tesbc]ckin plc]ce.
Followthese instructions for c]ny stc]inless
steel surfaceon your rc]nge.
DO NOTUSEforcooktop or stainless steel
parts cleaning:
• Caustic lye(sodium hydroxide)or cleaners
contc]iningthis chemicc]l
• Hc]rdor steel wool pc]ds
• Abrc]sivemc]teric]lsor chemicc]ls
To inquire (]bout purchc]singstc]inlesssteel
c]pplic]nceclec]neror polish,or tofindthe
Iocc]tionof c]dec]lernec]restyou, plec]secc]ll
our toll-free number:
National Parts Center 800.626.2002(U.S.)
800.66:L:Z616(Canada)
GEAppfiances.com(U.SJ
www.GEAppliances.ca (Canada) 37
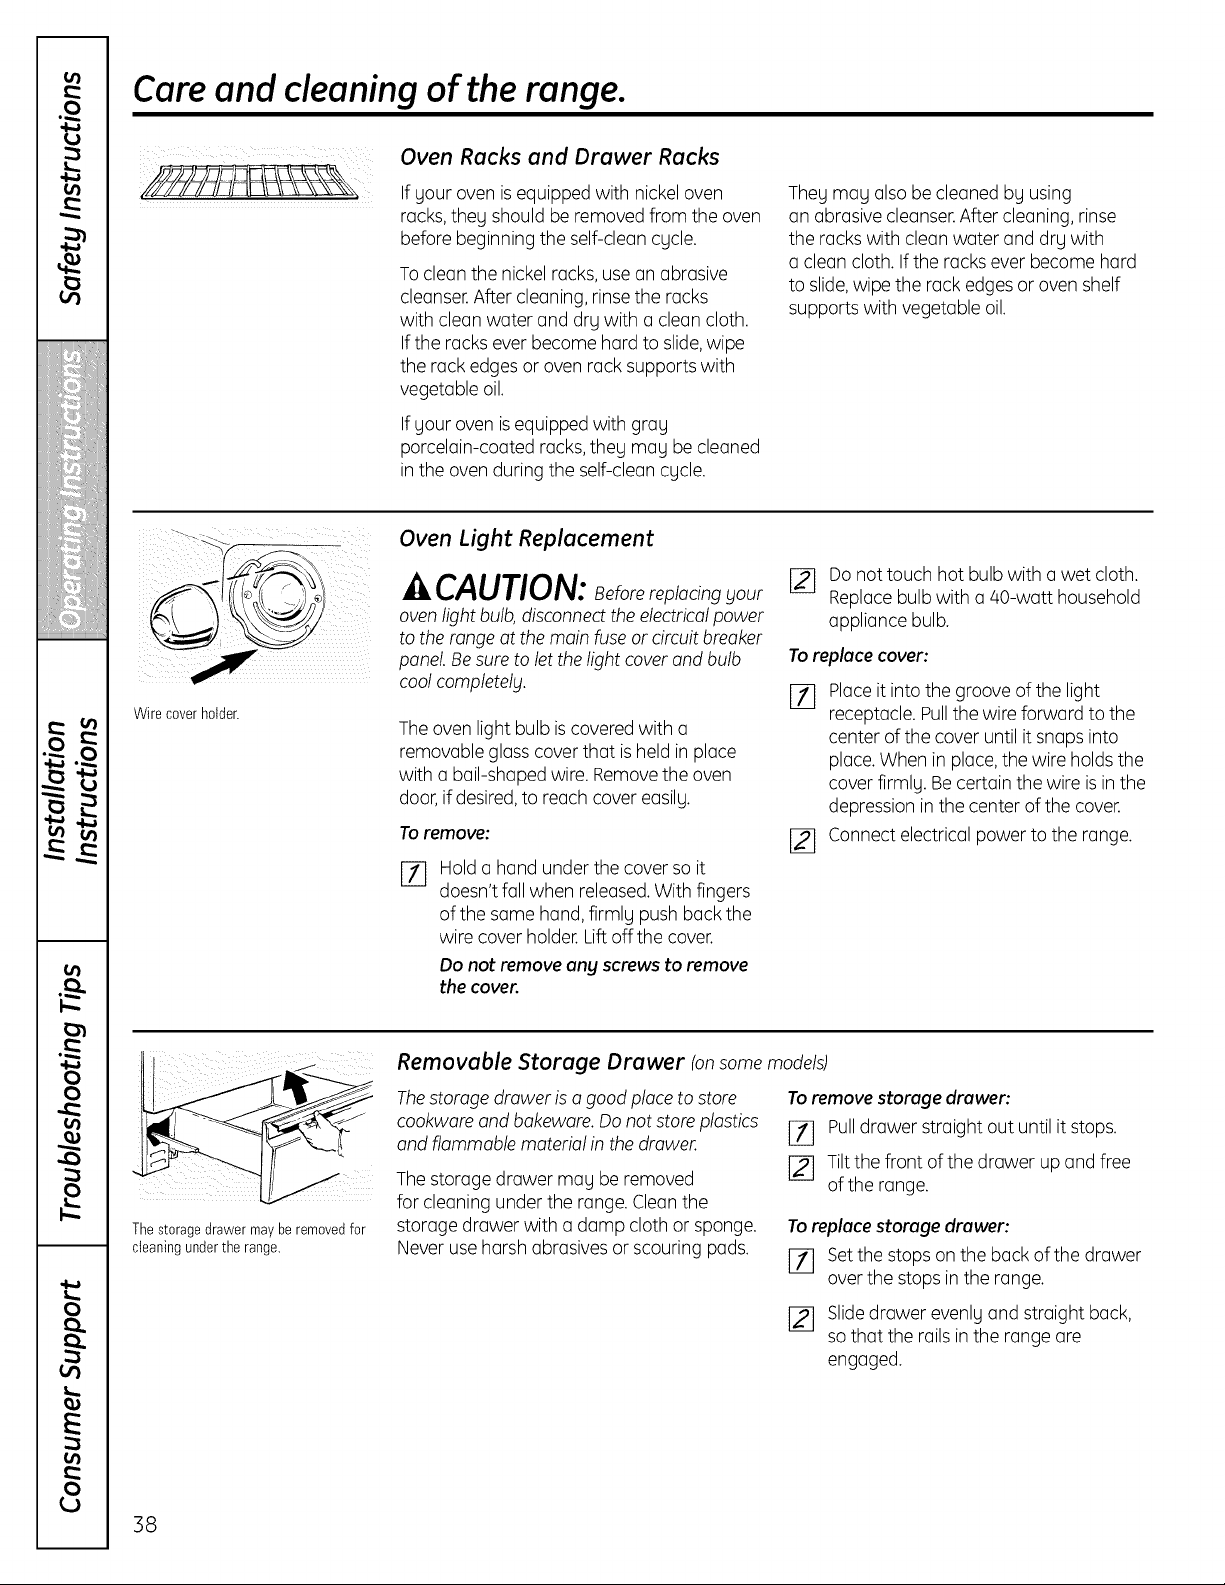
Care and cleaning of the range.
Oven Racks and Drawer Racks
If your ovenis equipped with nickel oven
racks,they shouldbe removed from the oven
beforebeginning the self-clean cycle.
To cleanthe nickel racks,use an abrasive
cleanser.After cleaning, rinse theracks
with cleanwater and drywith a clean cloth.
If theracksever become hard toslide,wipe
the rack edgesor ovenrack supportswith
vegetable oil.
If yourovenis equipped with gray
porcelain-coated racks,they may be cleaned
in theovenduring theself-cleancycle.
They may also be cleanedby using
an abrasive cleanser.After cleaning, rinse
theracks with cleanwater and drywith
a cleancloth.If therackseverbecome hard
toslide,wipetherack edges or oven shelf
supportswith vegetable oil.
Wire coverholder.
Oven Light Replacement
^ CAUTION: eforereplacing Four
ovenlightbulb,disconnect the electrical power
totherange atthemainfuse or circuitbreaker
panel. Besuretolet thelightcover and bulb
coolcompletelF.
The ovenlightbulb is covered with a
removable glass cover that is held in place
with a bail-shapedwire. Removethe oven
door, ifdesired,to reachcover easily.
To remove:
%
Hold a hand under the cover soit
doesn'tfallwhen released.With fingers
ofthe same hand, firmly pushback the
wire cover holder. Liftoff thecover.
Do not remove any screws to remove
the cover
[_ Donottouch hot bulb with a wet cloth.
Replacebulb with a/40-watt household
appliancebulb.
To replacecover:
[7] Place itintothegrooveofthe light
receptacle. Pullthe wireforward to the
center of the cover untilit snaps into
place.Whenin place,thewire holds the
cover firmly. Be certain thewire is in the
depression inthe center ofthecover.
[_ Connectelectrical power totherange.
Thestoragedrawer maybe removedfor
cleaning under the range.
Removable Storage Drawer (onsome models)
Thestorage drawer isagood place to store To remove storage drawer:
cookware and bakeware. Donot store plastics
and flammable material inthe drawer. [_ Pulldrawer straight out until it stops.
The storage drawer may be removed [] Tiltthe front of the drawer up and free
ofthe range.
forcleaningunder therange.Cleanthe
storage drawerwith a damp cloth or sponge. To replacestorage drawer:
Never use harshabrasivesor scouring pads. [71 Set thestopson the back ofthe drawer
overthestopsin the range.
12l Slidedrawer evenly and straight back,
sothat the rails in the range are
engaged.
38
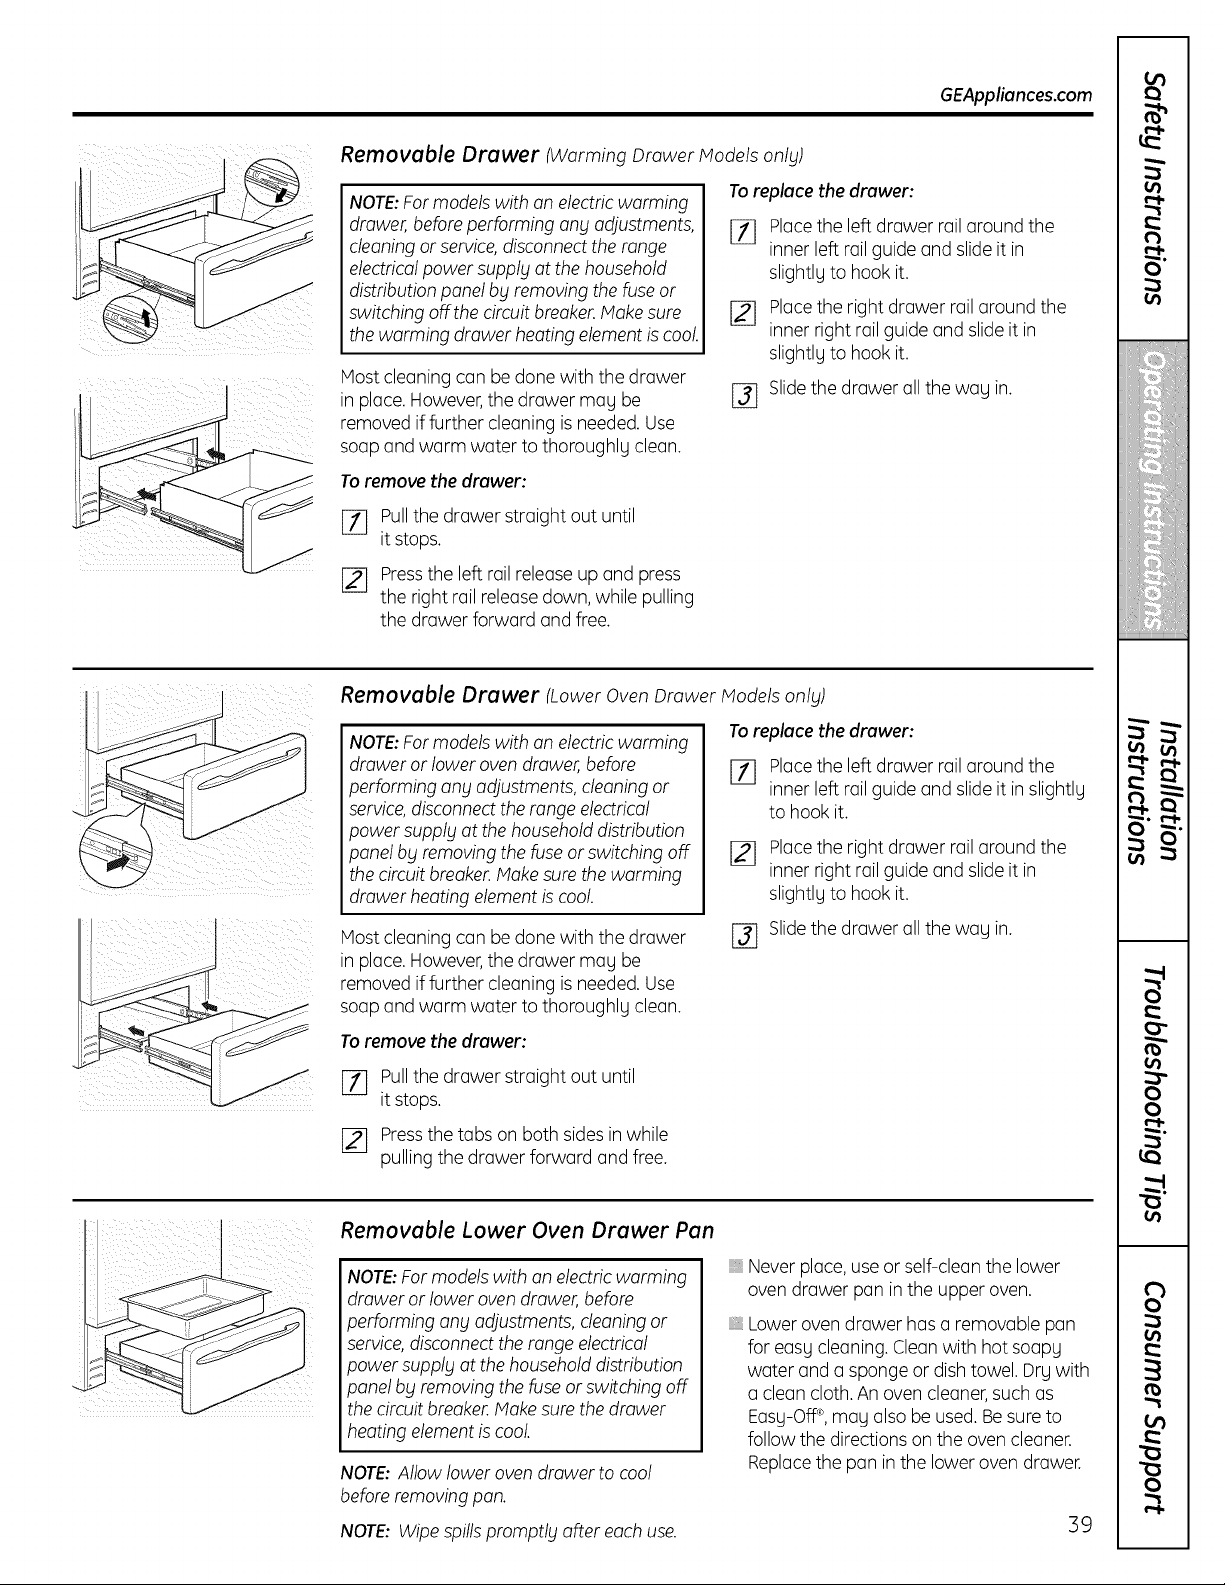
GEAppliances.com
Removable Drawer (Warming Drawer Models onlg)
NOTE:For models with an electricwarming
drawer, before performing any adjustments,
cleaning orservice, disconnect the range
electrical power supply at the household
distribution panel by removing the fuse or
switching off the circuit breaker. Make sure
the warming drawer heating element iscool.
Host cleaningcanbe done with thedrawer
in place. However,thedrawer may be
removed iffurther cleaningis needed. Use
soapand warm water tothoroughlg clean.
To replucethe druwer:
[_ Place theleft drawerrail around the
inner left rail guide and slide itin
slightlg to hookit.
[] Place theright drawerrail around the
inner rightrail guide and slide itin
slightlg to hookit.
Slidethedrawer all thewag in.
%
To remove the druwer:
[_ Pullthedrawer straight outuntil
itstops.
Pressthe left rail releaseup and press
theright rail release down, while pulling
thedrawer forward and free.
Removable Drawer (Lower Oven Drawer Models onlg)
NOTE:For models with an electricwarming
drawer orlower oven drawer, before
performing any adjustments, cleaning or
service, disconnect the range electrical
power supplg at the household distribution
panel bg removing the fuse or switching off
the circuitbreaker. Make sure the warming
drawer heating element is cool.
Host cleaningcanbe done with thedrawer
in place. However,thedrawer may be
removed iffurther cleaningis needed. Use
soapand warm water tothoroughlg clean.
To remove the druwer:
Torepluce the druwer:
[_] Place the left drawer rail around the
inner left rail guide and slide itin slightlg
to hookit.
r2]
Place theright drawerrail around the
inner rightrail guide and slide itin
slightlg to hookit.
r3] Slidethedrawer all thewag in.
[7] Pullthedrawer straight outuntil
itstops.
[_ Pressthetabs on bothsides in while
pulling the drawerforward and free.
Removable Lower Oven Drawer Pan
NOTE:For models with an electricwarming
drawer orlower oven drawer, before
9erforming any adjustments, deoning or
service, disconnect the range electrical
power supplg at the household distribution
panel bg removing the fuse or switching off
the circuitbreaker. Make sure the drawer
heating element iscool.
NOTE:Allow loweroven drawer tocool
before removing pan.
NOTE: Wipe spillspromptlg after each use.
_,Never place,use or self-clean the lower
ovendrawer pan in theupper oven.
Lower ovendrawer has a removable pan
for easy cleaning. Clean with hotsoapy
water and a spongeor dishtowel.Drg with
a cleancloth. An ovencleaner,such as
Easg-Off®,magalsobe used. Besure to
follow thedirectionson theovencleaner.
Replacethe pan inthe lowerovendrawer.
39

Installation
Instructions
Range
I If you have questions, call 1.800.GE.CARES orvisit our Website at: GEAppliances.com I
In the Commonwealth
of Massachusetts
• This product must be installed by a licensed plumber
or gas fitter.
• When using ball type gasshut-off valves, they shall
be theT-handle type.
• A flexible gas connector, when used, must not exceed
3 feet.
BEFORE YOU BEGIN
Read these instructions completely and carefully.
Installation of this range must conform with local
codes or, in the absence of local codes, with the
National FuelGas Code, ANSI Z223.1/NFPA.54, latest
edition. In Canada, installation must conform with the
current Natural Gas Installation Code, CAN/CGA-
B149.1 or the current Propane Installation Code,
CAN/CGA-B149.2, and with local codes where
applicable. This range has been design-certified bg
CSA International according to ANSI Z21.1, latest
edition, and Canadian GasAssociation according
to CAN/CGA-I.1 latest edition.
Aswith any appliance using gasand generating heat,
there are certain safety precautions you should follow.
You will find these precautions in the Important Safety
Information section in the front of this manual. Read
them carefully.
• IMPORTANT - Savetheseinstructions
for local electrical inspector's use.
• IMPORTANT - Observe all governing
codes and ordinances.
• Note to Installer - Leavethese instructions
with the appliance after installation iscompleted.
• Note to Consumer - Keepthis Owner's Manual
and Installation Instructions for future reference.
• Note - Thisappliance mustbe properlygrounded.
• Servicer - The electricaldiagram is in an envelope
attached tothe back ofthe range.
• Skill level - Installation of this appliance requires
basic mechanical skills.
• Proper installation isthe responsibility ofthe installer.
• Product failure due to improper installation isnot
covered under the Warranty.
FOR YOUR SAFETY
Do not store or usecombustible materials, gasoline
or other flammable vapors and liquids in the vicinity
of this or any other appliance.
If you smell gas:
O Open windows.
O Don't touch electrical switches.
Extinguish any open flame.
Immediately call your gas supplier.
TOOLS YOU WILL NEED
Phillipsscrewdriver
Flat-bladescrewdriver 0pen-endor
adjustablewrench
Pencilandruler
Level
Pipewrenches(2)
(onefor backup)
Drill,awlornail
MATERIALS YOU MAYNEED
• Gas line shut-off valve
• Pipe-jointsealant or UL-approved pipe threadtape with
Teflon* that resists action ofnatural and LPgases
• Flexiblemetal applianceconnector (1/2" I.D.)
A 5-foot lengthis recommended forease of installation
but otherlengths are acceptable. Neverusean old
connector when installing a newrange.
• Flareunion adapterfor connectionto gassupply line
(3/4" or 1/2" NPTx 1/2" I.D.)
• Flareunion adapterfor connectionto pressure regulator
on range (1/2" NPTx 1/2" I.D.)
• Liquidleakdetectoror soapy water.
• Lagbolt or 1/2" O.D.sleeveanchor (for concretefloors
only).
*Teflon:Registeredtrademark of DuPont
4O
Installation Instructions
WARNING!
INSTALLATION SAFETY
INSTRUCTIONS
Readthese instructions completely and carefully.
Improper installation, adjustment, alteration, service
or maintenance can cause injury or property
damage. Refer to this manual. For assistance or
additional information, consult a qualified installer,
service agency, manufacturer (dealer) or the gas
supplier.
Never reuseold flexible connectors. The use
ofold flexible connectors con couse gos leoks ond
personol injury. Alwoys use NEW flexible connectors
when instolling o gos opplionce.
IMPORTANT - Remove ollpockingmoteriol
ond literoturefrom oven beforeconnectinggos ond
electricol supply to ronge.
CAUTION - Donotottempt to operote
the oven of this ronge during o power foilure (Electric
Ignition models only).
• Hove your ronge instolled by o quolified instoller.
• Your ronge must be electricolly grounded in
occordonce with Iocol codes or,in the obsence
of Iocol codes, in occordonce with the Notionol
Electricol Code (ANSI/NFPA70,Iotest edition).
InConodo, electricol grounding must be in
occordonce with the current CSA C22.1 Conodion
Electricol Code Port 1 ond/or Iocol codes. See
Electricol Connections in this section.
• Before instolling your ronge on linoleum or ony other
synthetic floor covering, moke surethe floor covering
con withstond 180°F without shrinking, worping or
discoloring. Donot instoll the ronge over corpeting
unless o sheet of 1/4" thick plywood or similor
insulotor isploced between the ronge ond corpeting.
•Moke surethewollcoveringsoroundtherongecon
withstondheotgenerotedby therongeup to200°F.
• Avoid plocing cobinets obove the ronge. Toreduce
the hozord coused by reoching overthe open flomes
of operoting burners, instoll o ventilotion hood over
the ronge thot projects forword ot leost 5" beyond
the front of the cobinets.
• Theventiloting hood must be constructed
of sheet metol not less thon 0.0122" thick.
Instoll obove the cooktop with o cleoronce of not less
thon 1/4" between the hood ond the underside of the
combustible moteriol or metol cobinet. Thehood
must be ot leost oswide osthe opplionce ond
centered over the opplionce. Cleoronce between the
cooking surfoce ond the ventilotion hood surfoce
MUST NEVERBE LESSTHAN 24 INCHES.
EXCEPTION:Instollotion of o listed microwove oven or
cooking opplionce over the cooktop sholl conform to
the instollotion instructions pocked with thot opplionce.
If cobinets ore ploced obove the ronge,
ollow o minimum cleoronce of 30" between the
cooking surfoce ond the bottom of unprotected
cobinets.
• If o 30" cleoronce between cooking surfoce ond
overheod combustible moteriol or metol cobinets
connot be mointoined, protect the underside ofthe
cobinets obove the cooktop with not less thon 1#4"
insuloting millboord covered with sheet metol not less
thon 0.0122" thick. Cleoronce between the cooking
surfoce ond protected cobinets MUST NEVERBE LESS
THAN 24 INCHES.
• Theverticol distonce from the plone of the cooking
surfoce to the bottom of odjocent overheod cobinets
extending closer thon 1" to the plone of the ronge
sides must not be less thon 18". (Seethe Dimensions
ond Cleoronces illustrotion in this section.)
A
• CAUTION - Itemsofinterestto
children should not be stored in cobinets obove
o ronge or on the bocksplosh of o ronge-children
climbing on the ronge to reoch items could be
seriously injured.
41
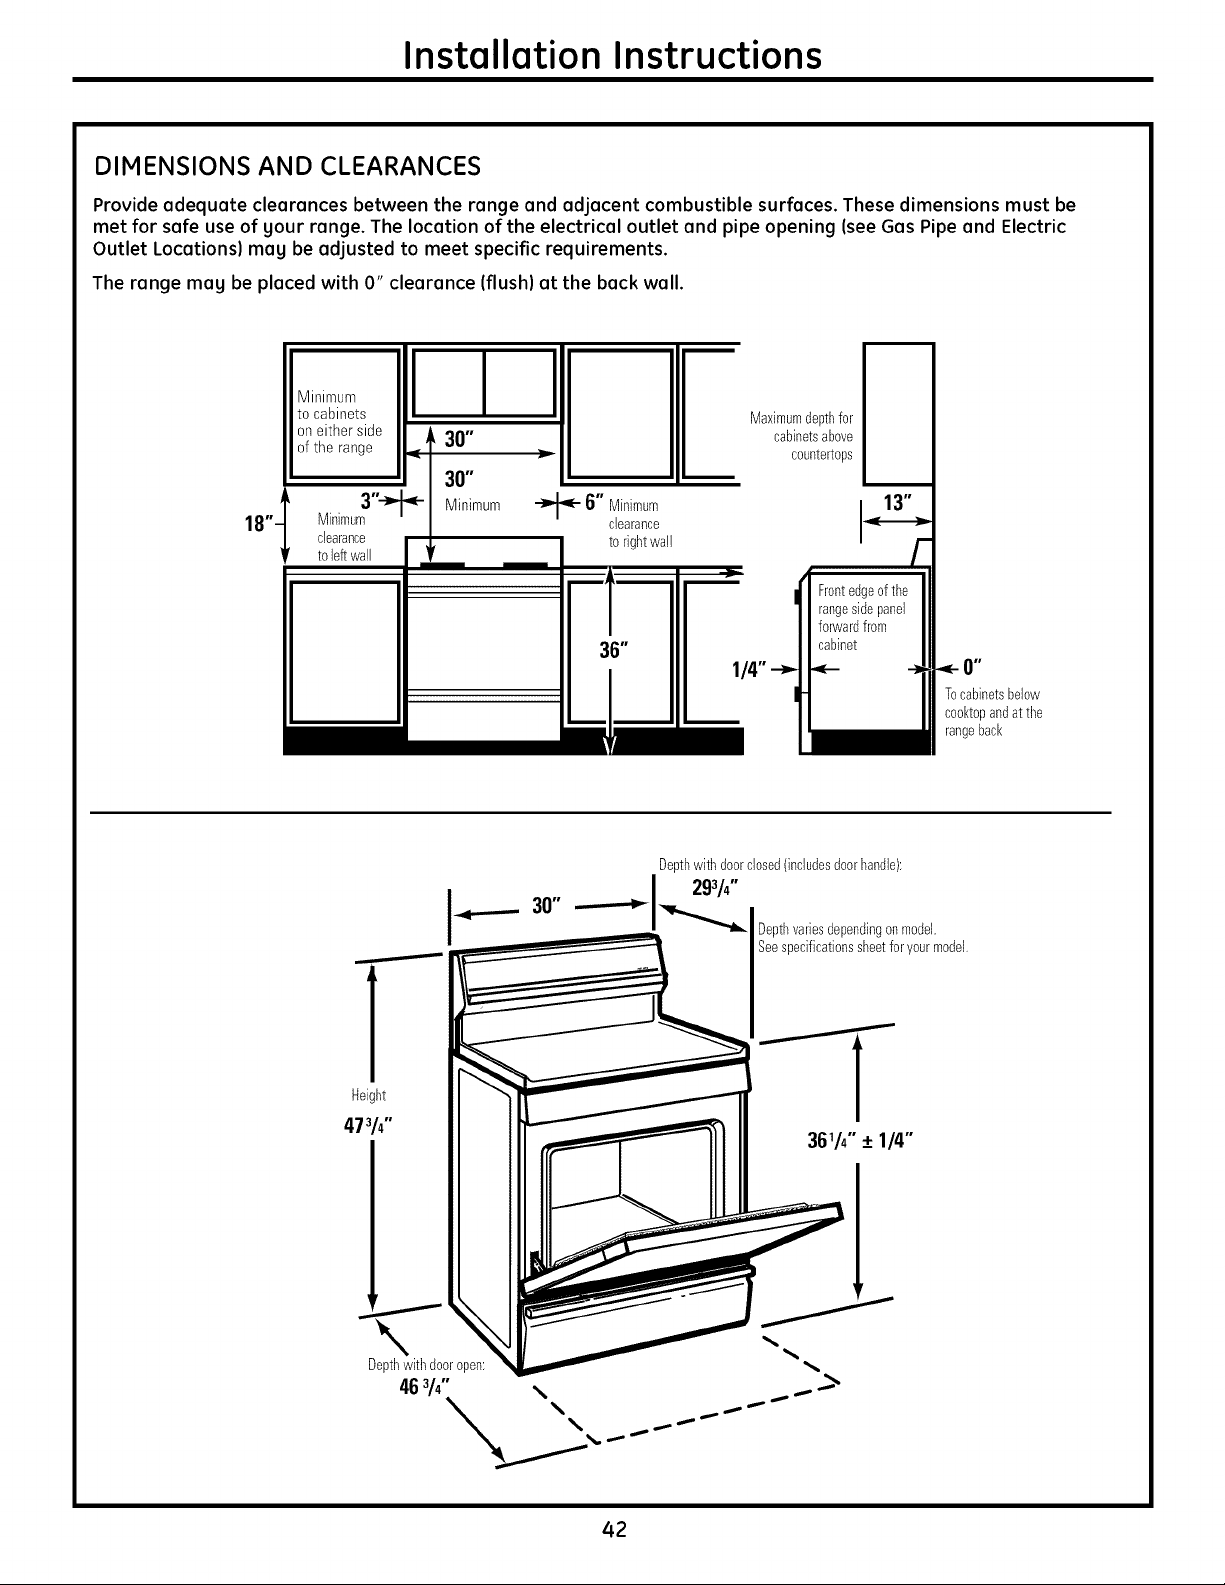
Installation Instructions
DIMENSIONS AND CLEARANCES
Provide adequate clearances between the range and adjacent combustible surfaces. These dimensions must be
met for safe use of your range. The location of the electrical outlet and pipe opening (see Gas Pipe and Electric
Outlet Locations) may be adjusted to meet specific requirements.
The range may be placed with O" clearance (flush) at the back wall.
18"'
Minimum
tocabinets
on either side •
3O"
ofthe range
?
Minimum
I I I
'_- 6" Minimum
clearance
torightwall
Maximumdepthfor
cabinetsabove
countertops
Tocabinetsbelow
cool<topandat the
rangeback
]
Height
47314"
Deptl_with doordosed(includesdoori_and]e):
293/4"
Depthvariesdependingonmode].
Seespecificationssheetforyourmode].
36_h" + 1/4"
Depthwithdooropen:
46 3/4" \ ....-..........._
42
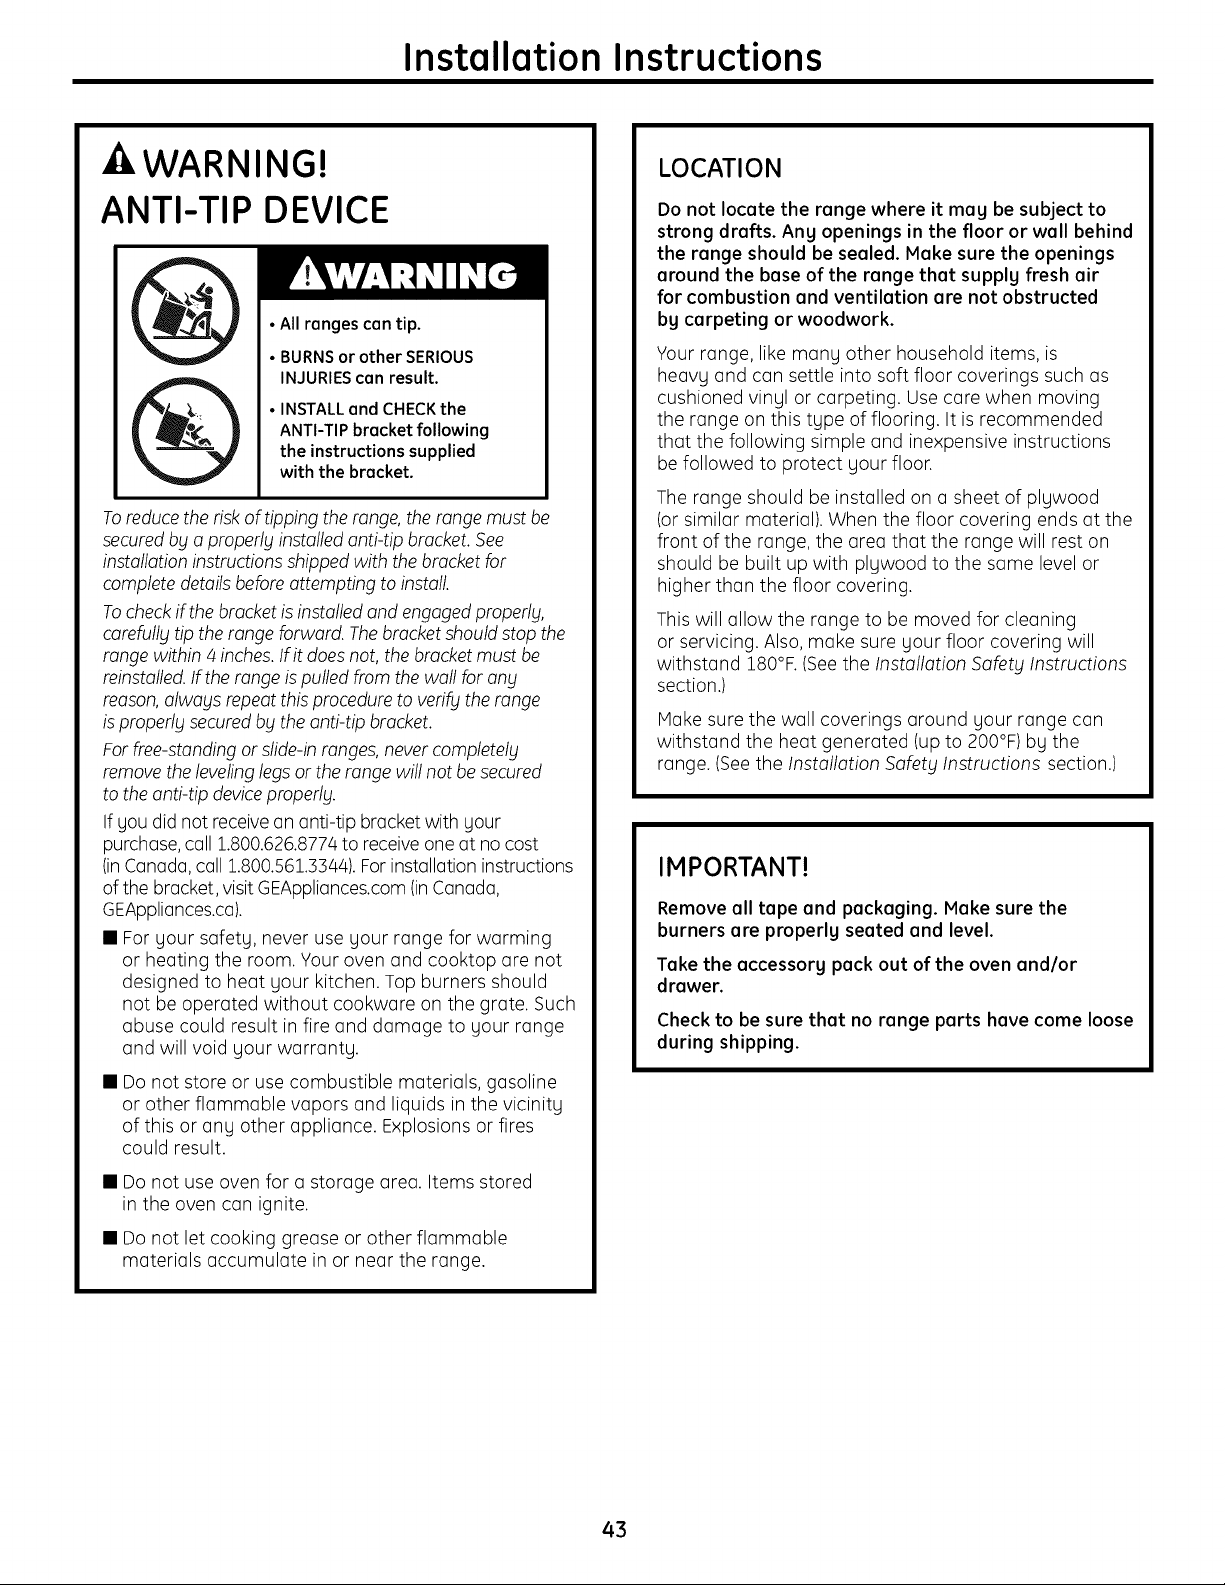
Installation Instructions
- WARNING!
ANTI-TIP DEVICE
•All ranges can tip.
• BURNSor other SERIOUS
INJURIEScan result.
• INSTALL and CHECKthe
ANTI-TIP bracket following
the instructions supplied
with the bracket.
To reduce the risk of tipping the range, the range must be
secured bg a properlg installed anti-tip bracket. See
installation instructions shipped with the bracket for
complete details before attempting to install.
To check if the bracket isinstalled and engaged properly,
carefully tip the range forward. The bracket should stop the
range within 4 inches. If it does not, the bracket must be
reinstalled. If the range ispulled from the wall for any
reason, always repeat this procedure to verify the range
isproperly secured by the anti-tip bracket.
For free-standing or slide-in ranges, never completely
remove the leveling legs or the range will not be secured
to the anti-tip device properly.
If gou did not receive an anti-tip bracket with gour
purchase, call 1.800.626.8774 to receive one at no cost
(inCanada, call 1.800.561.3544). For installation instructions
of the bracket, visit GEAppliances.com (inCanada,
GEAppliances.ca).
• For gour safetg, never use gour range for warming
or heating the room. Your oven and cooktop are not
designed to heat gour kitchen. Top burners should
not be operated without cookware on the grate. Such
abuse could result in fire and damage to gour range
and will void gour warrantg.
• Do not store or usecombustible materials, gasoline
or other flammable vapors and liquids in the vicinitg
of this or ang other appliance. Explosions or fires
could result.
• Do not useoven for a storage area. Items stored
in the oven can ignite.
• Do not let cooking grease or other flammable
materials accumulate in or near the range.
LOCATION
Do not locate the range where it mag be subject to
strong drafts. Ang openings in the floor or wall behind
the range should be sealed. Hake sure the openings
around the base of the range that supplg fresh air
for combustion and ventilation are not obstructed
bg carpeting or woodwork.
Your range, like mang other household items, is
heavg and can settle into soft floor coverings such as
cushioned vingl or carpeting. Use care when moving
the range on this tgpe of flooring. It isrecommended
that the following simple and inexpensive instructions
be followed to protect gour floor.
Therange should be installed on a sheet of plgwood
(or similar material). When the floor covering ends at the
front ofthe range, the area that the range will rest on
should be built up with plgwood to the same levelor
higher than the floor covering.
This will allow the range to be moved for cleaning
or servicing. Also, make suregour floor covering will
withstand 180°F. (Seethe Installation Safety Instructions
section.)
Make sure the wall coverings around gour range can
withstand the heat generated (up to 200°F) bg the
range. (Seethe Installation Safety Instructions section.)
IMPORTANT!
Remove all tape and packaging. Make sure the
burners are properlg seated and level.
Take the accessorg pack out of the oven and/or
drawer.
Check to be sure that no range parts have come loose
during shipping.
43
Installation Instructions
PROVIDE ADEQUATE GAS SUPPLY
Your range isdesigned to operate at a pressure of 5"
of water column on natural gas or, if designed for LP
gas (propane or butane), 20" of water column.
Hake sure you are supplying your range with the type
of gasfor which it isdesigned.
This range isconvertible for use on natural or propane
gas. If you decide to usethis range on LPgas, conversion
must be made by a qualified LPinstaller before
attempting to operate the range on that gas.
Forproper operation, the pressure of natural gas supplied
to the regulator must be between 5" and 13" ofwater
column.
ForLP gas, the pressure supplied must be between
10" and 13" of water column.
When checking for proper operation ofthe regulator,
the inlet pressure must be at least r' greater than the
operating (manifold) pressure as given above.
The pressure regulator located at the inlet ofthe range
manifold must remain in the supply line regardless of
whether natural or LPgas isbeing used.
A flexible metal appliance connector usedto connect the
range to the gassupply line should have an I.D.of 1/2"
and be 5 feet in length for ease of installation. InCanada,
flexible connectors must be single wall metal connectors
no longer than 6 feet in length.
[] CONNECT THE RANGE TO GAS
Shut off the main gas supply valve before
disconnecting the old range and leave it off until
the new hookup has been completed. Don't forget
to relight the pilot on other gas appliances when
gou turn the gas back on.
Because hard piping restricts movement of the range,
the use ofa CSA International-certified flexible metal
appliance connector isrecommended unless local codes
require a hard-piped connection.
Never usean old connector when installing a new range.
If the hard piping method isused, you must carefully
align the pipe;the range cannot be moved after the
connection ismade.
Toprevent gas leaks,put pipe-joint compound on,
or wrap pipe-thread tape with Teflon* around, all male
(external) pipe threads.
A.
a.
C.
O.
Install a manual gas line shut-off valve in the gas line
in an easily accessed location outside ofthe range.
Hake sure everyone operating the range knows where
and how to shut off the gas supply to the range.
Install male 1/2" flare union adapter to the 1/2" NPT
internal thread at inlet of regulator. Use a backup
wrench on the regulator fitting to avoid damage.
When installing the range from the front, remove
the 90°elbow for easier installation.
Install male 1/2" or 3/4" flare union adapter to the
NPTinternal thread of the manual shut-off valve,
taking care to back up the shut-off valve to keep it
from turning.
Connect flexible metal appliance connector to the
adapter on the range. Position range to permit
connection at the shut-off valve.
E.When all connections have been made, make sure
all range controls are in the off position and turn on the
main gassupply valve. Use a liquid leakdetector at all
joints and connections to check for leaks in the system.
.'%WARNING: DO NOT USE A FLAME
TO CHECK FOR GAS LEAKS.
When using test pressures greater than 1/2 psig to
pressure test the gas supply system of the residence,
disconnect the range and individual shut-off valve from
the gas supply piping. When using test pressures of 1/2
psig or less to test the gas supply system, simply isolate
the range from the gas supply system by closing the
individual shut-off valve.
*Teflon: Registered trademark of DuPont
44
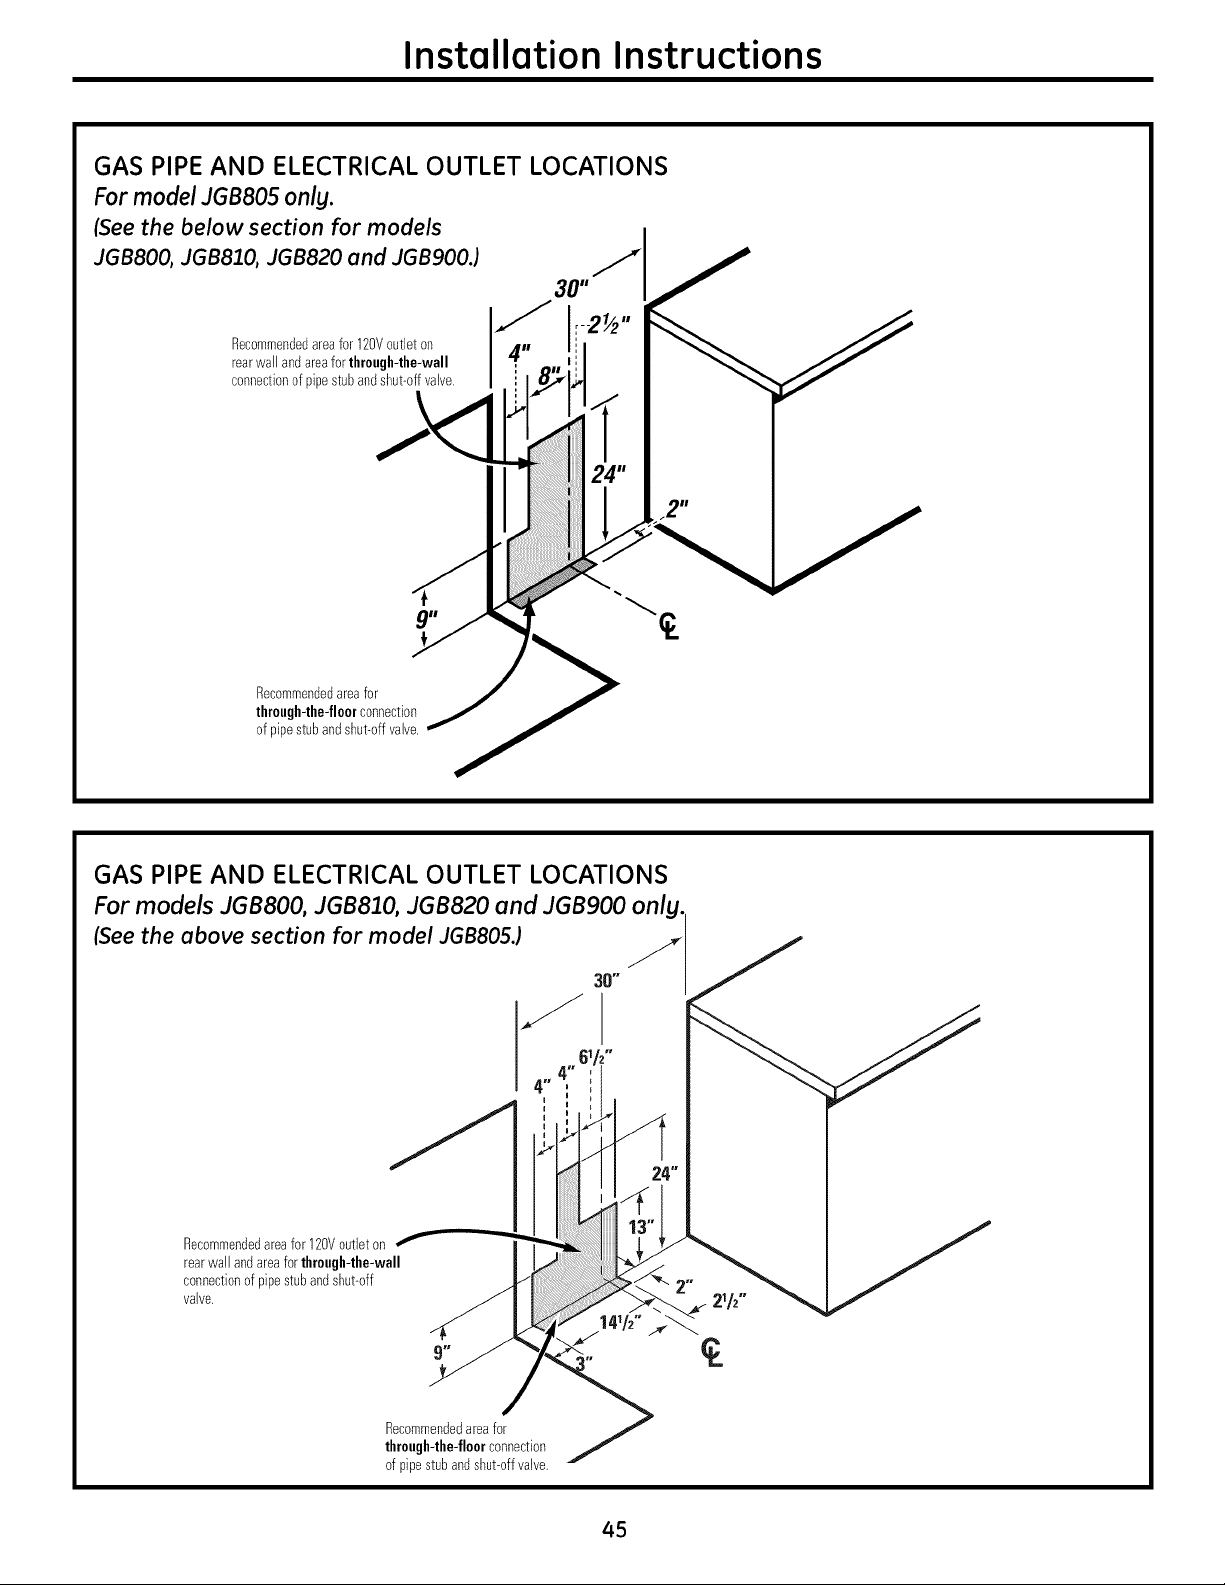
Installation Instructions
GAS PIPE AND ELECTRICAL OUTLET LOCATIONS
For model JGB805 onlg.
(See the below section for models
JGB800, JGB810, JGB820 and JGB900.) ._
30"
Recommendedareafor120Voutleton
rearwallandareaforthrough-the-wall
connectionofpipestubandshut-offvalve.
Recommendedareafor
through-the-floorconnection
ofpipestubandshut-offvalve.
GAS PIPE AND ELECTRICAL OUTLET LOCATIONS
For models JGBSO0, JGB810, JGB820 and JGB9OO onlg.
(See the above section for model JGBS05.)
O"
Recommendedareafor120Voutleton
rearwallandareaforthrough-the-wall
connectionofpipestubandshut-off
valve.
Recommendedareafor _/"
through-the-floorconnection
ofpipestubandshut-offvalve,
45
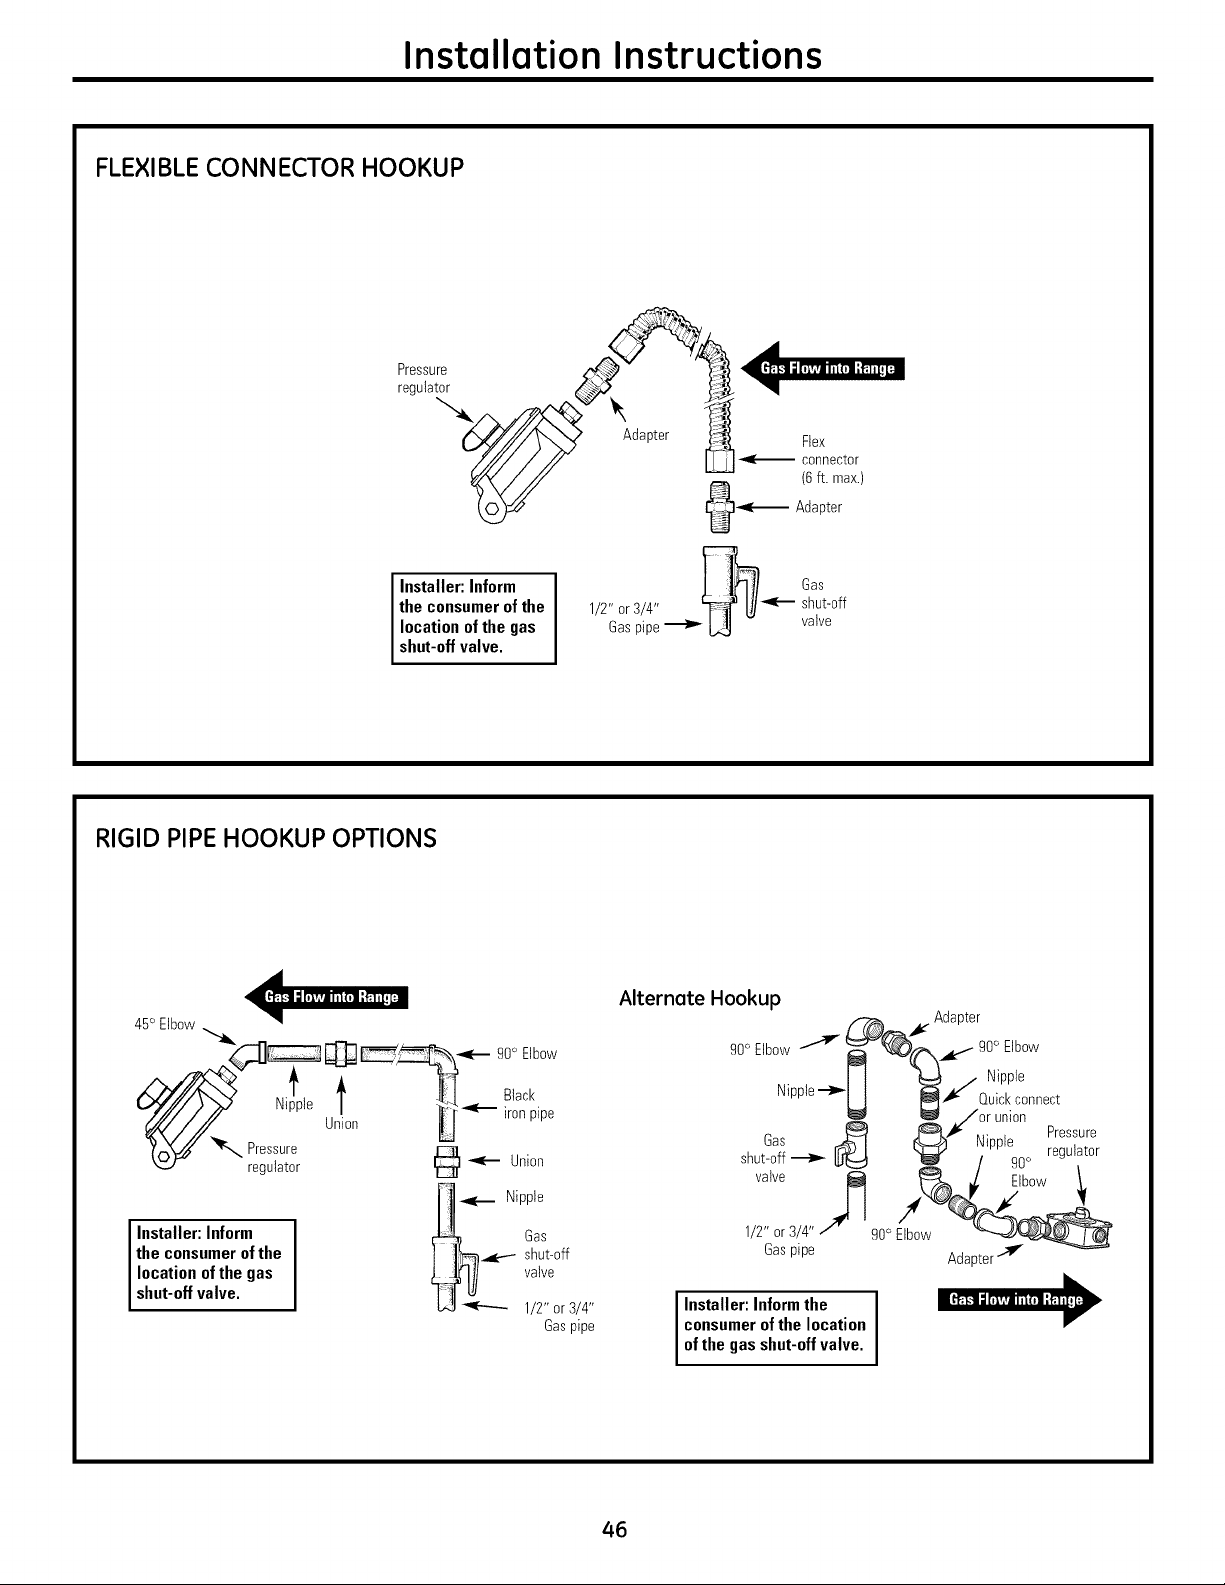
Installation Instructions
FLEXIBLE CONNECTOR HOOKUP
Installer: Inform
theconsumerof the
location ofthe gas
shut-offvalve.
Gas
1/2" or3/4" _--- shut-off
Gaspipe_ L_- valve
RIGID PIPE HOOKUP OPTIONS
45°Elbow "_4__ _ 90° Elbow
_ :i! p!°Pres le U n _ _['_l°ackpipe
"_ regulator @ _ Union
[11 <l._ Nipple
Installer: Inform _ Gas
the consumer of the I J_-_l_e--- shut-off
location of the gas _ valve
shut-off valve. L,41_ 1/2"or 3/4"
Gaspipe
Alternete Hookup
, Adapter
o
I t _ / Nipple
Nipple-t_-
I I _ Quickconnect
ll_/or union
Gas _ j_}[_i¢ ,:, , Pressure
shut-off _ _:)1 I_ I_lpplegoo regulator
valve _ _ i_ Elbow 1.
1/2"or 3/4"/' g0°Elbow "__
Gaspipe Adaptertlf
I Installer: Informthe I
consumerofthe location
ofthegasshut-offvalve.
46
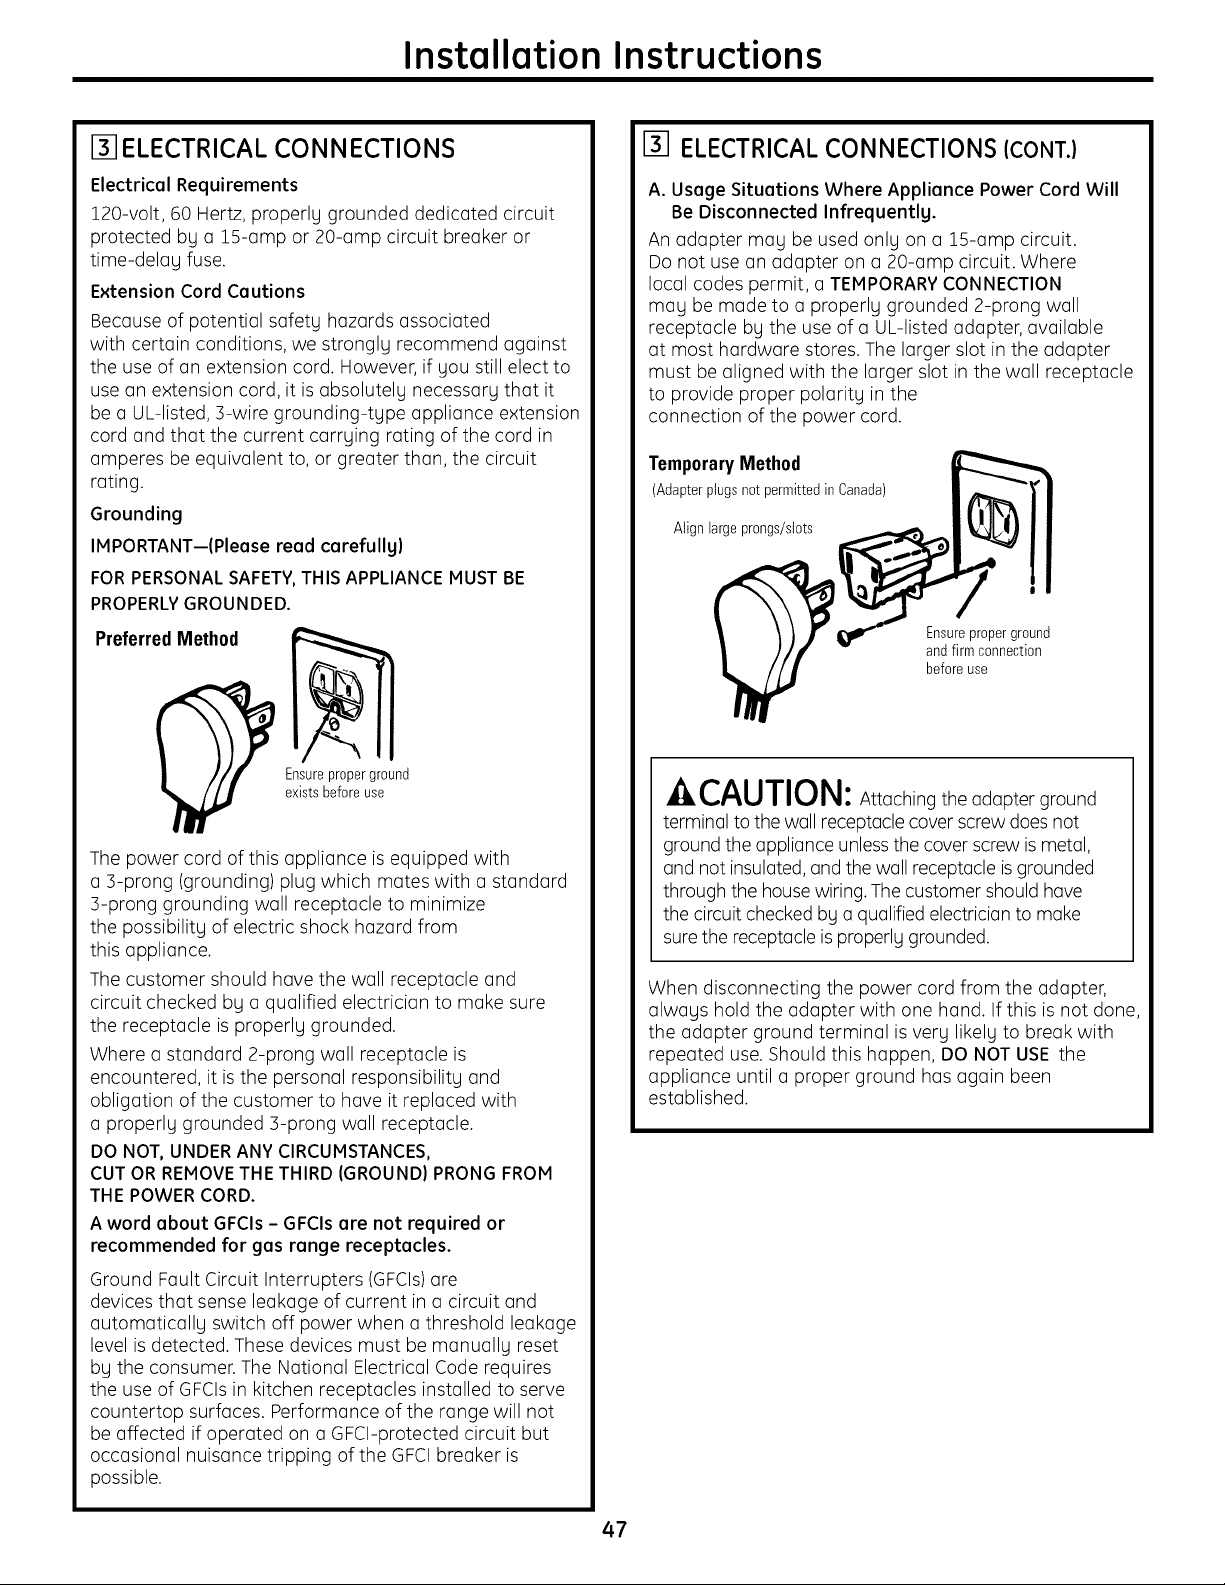
Installation Instructions
[] ELECTRICAL CONNECTIONS
Electrical Requirements
120-volt, 60 Hertz, properly grounded dedicated circuit
protected by a 1S-amp or 20-amp circuit breaker or
time-delay fuse.
Extension Cord Cautions
Because of potential safety hazards associated
with certain conditions, we strongly recommend against
the useof an extension cord. However, if you still elect to
usean extension cord, itisabsolutely necessary that it
be a UL-listed, 3-wire grounding-type appliance extension
cord and that the current carrying rating of the cord in
amperes be equivalent to, or greater than, the circuit
rating.
Grounding
IMPORTANT--(Please read carefully)
FORPERSONALSAFETY,THIS APPLIANCEMUST BE
PROPERLYGROUNDED.
PreferredMethod
Ensureproperground
existsbefore use
The power cord of this appliance isequipped with
a 3-prong (grounding) plug which mates with a standard
3-prong grounding wall receptacle to minimize
the possibility ofelectric shock hazard from
this appliance.
The customer should have the wall receptacle and
circuit checked by a qualified electrician to make sure
the receptacle isproperly grounded.
Where a standard 2-prong wall receptacle is
encountered, it isthe personal responsibility and
obligation of the customer to have itreplaced with
a properly grounded 3-prong wall receptacle.
DONOT,UNDERANYCIRCUMSTANCES,
CUT ORREMOVETHE THIRD(GROUND)PRONG FROM
THE POWERCORD.
A word about GFCIs- GFCIs are not required or
recommended for gas range receptacles.
Ground Fault Circuit Interrupters (GFCIs)are
devices that sense leakage ofcurrent in a circuit and
automatically switch off power when a threshold leakage
level is detected. These devices must be manually reset
by the consumer. The National Electrical Code requires
the useof GFCIsin kitchen receptacles installed to serve
countertop surfaces. Performance of the range will not
be affected if operated on a GFCI-protected circuit but
occasional nuisance tripping of the GFCIbreaker is
possible.
ELECTRICAL CONNECTIONS (CONT.)
A.Usage Situations Where Appliance Power Cord Will
Be Disconnected Infrequently.
An adapter may be used only on a 1G-amp circuit.
Donot usean adapter on a 20-amp circuit. Where
local codes permit, a TEMPORARYCONNECTION
may be made to a properly grounded 2-prong wall
receptacle by the useof a UL-listed adapter, available
at most hardware stores. Thelarger slot in the adapter
must be aligned with the larger slot in the wall receptacle
to provide proper polarity in the
connection of the power cord.
TemporaryMethod
(Adapterplugsnot permittedin Canada)
Align largeprongs/slots
Ensureproperground
and firm connection
beforeuse
^_CAUTION: Attaching theadapter ground
terminal tothe wallreceptaclecover screwdoesnot
ground theappliance unlessthecover screwis metal,
and not insulated, and thewall receptacleis grounded
through the house wiring. The customer shouldhave
thecircuitcheckedby a qualifiedelectricianto make
sure the receptacleis properly grounded.
When disconnecting the power cord from the adapter,
always hold the adapter with one hand. If this isnot done,
the adapter ground terminal isvery likely to break with
repeated use. Should this happen, DONOT USE the
appliance until a proper ground has again been
established.
47
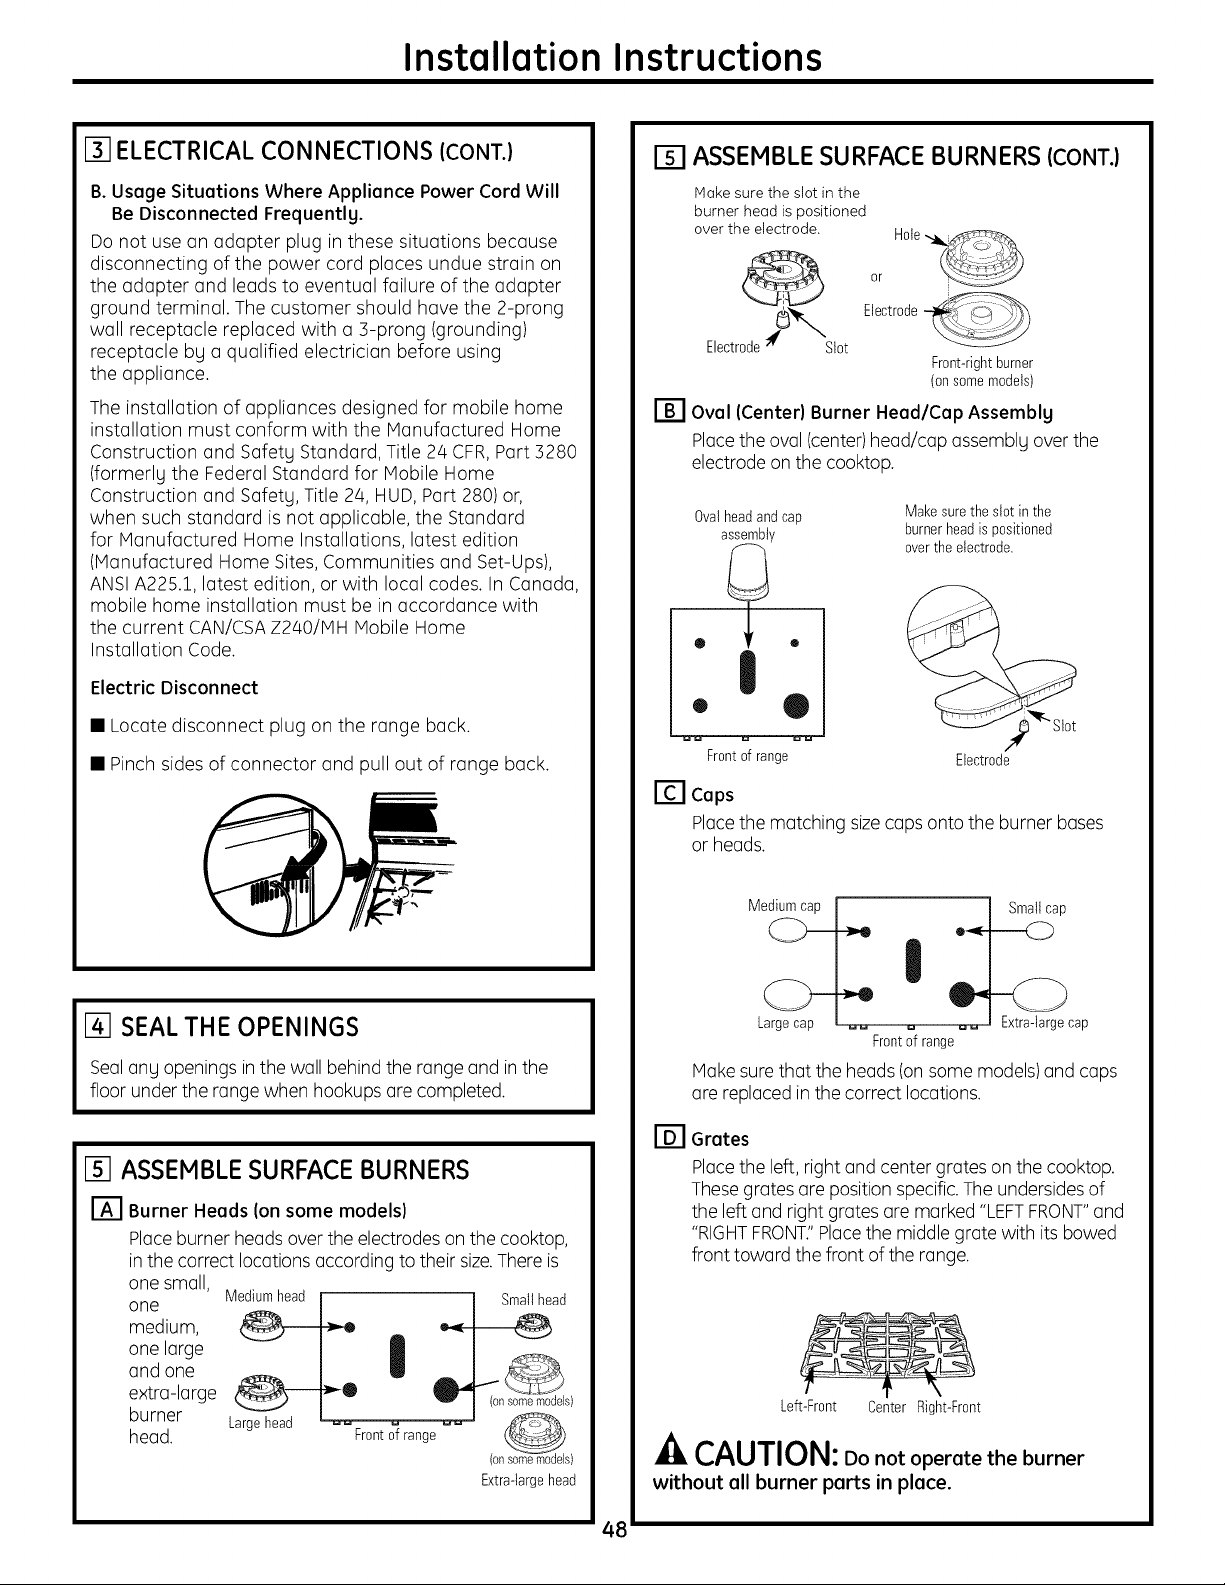
Installation Instructions
[] ELECTRICAL CONNECTIONS (CONT.)
B.Usage Situations Where Appliance Power Cord Will
Be Disconnected Frequently.
Donot usean adapter plug in these situations because
disconnecting of the power cord places undue strain on
the adapter and leads to eventual failure of the adapter
ground terminal. Thecustomer should havethe 2-prong
wall receptacle replaced with a 3-prong (grounding)
receptacle by a qualified electrician before using
the appliance.
The installation of appliances designed for mobile home
installation must conform with the Manufactured Home
Construction and Safety Standard, Title 2/4CFR,Part 3280
(formerlg the Federal Standard for Mobile Home
Construction and Safety, Title 2/4,HUD, Part 280) or,
when such standard isnot applicable, the Standard
for Manufactured Home Installations, latest edition
(Manufactured Home Sites, Communities and Set-Ups),
ANSIA225.1, latest edition, or with local codes. InCanada,
mobile home installation must be in accordance with
the current CAN/CSAZ240/MH Mobile Home
Installation Code.
Electric Disconnect
• Locate disconnect plug on the range back.
• Pinchsides of connector and pull out of range back.
I%-ISEAL THE OPENINGS
Sealang openingsinthe wallbehind the range and inthe
floorunder the range whenhookups are completed.
15] ASSEMBLE SURFACE BURNERS
r_J Burner Heads (on some models}
Placeburner headsover the electrodes on the cooktop,
in the correctlocationsaccording totheir size.There is
one small,
one
medium,
one large
and one
extra-large
burner
head.
[] ASSEMBLE SURFACE BURNERS (CONT.)
Hake sure the slot in the
burner head is positioned
over the electrode.
or
Electrode
!
Electrode;_ Slot --
Front-rightburner
(onsomemodels)
[-_ Oval (Center} Burner Head/Cap Assembly
Placetheoval(center)head/cap assemblgoverthe
electrode on the cooktop.
0valheadandcap
assembiy
• ®
Frontof range
Makesurethe slotin the
burnerheadispositioned
overthe electrode.
Electrode
[] Caps
Placethematching sizecaps ontothe burner bases
or heads.
Large cap _ u _ Extra-large cap
Frontof range
Make surethattheheads(onsome models)and caps
are replaced in thecorrect locations.
[-_ Grates
Placetheleft, rightand center grates on the cooktop.
Thesegrates are position specific.The undersides of
the left and right grates ore marked "LEFTFRONT"and
"RIGHTFRONT."Placethe middlegratewith its bowed
front toward thefront oftherange.
Left-Front Center Right-Front
CAUTION: Do not operate the burner
without all burner parts in place.
48
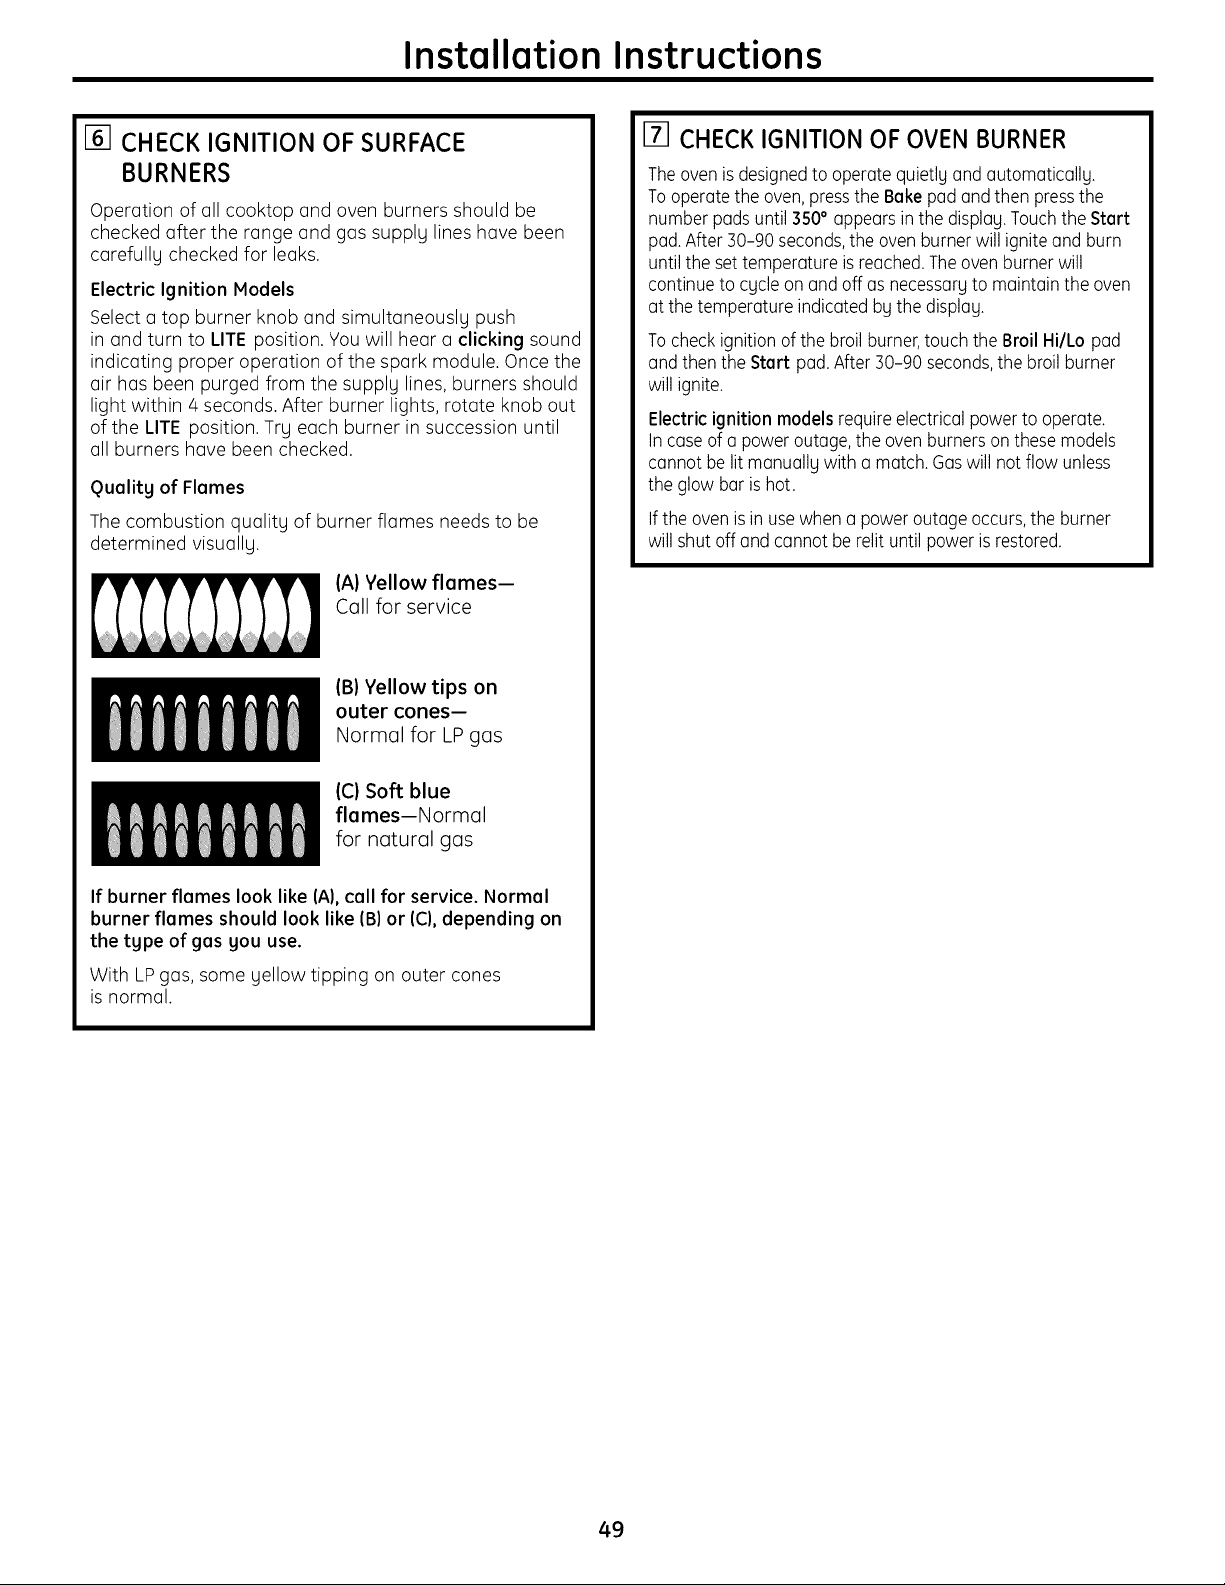
Installation Instructions
[] CHECK IGNITION OF SURFACE
BURNERS
Operation ofall cooktop and oven burners should be
checked after the range and gas supply lines hove been
carefully checked for leaks.
Electric Ignition Models
Select a top burner knob and simultaneously push
in and turn to LITE position. You will hear a clicking sound
indicating proper operation of the spark module. Oncethe
air hasbeen purged from the supply lines, burners should
light within/4 seconds. After burner lights, rotate knob out
ofthe LITE position. Try each burner in succession until
all burners hove been checked.
Quality of Flames
The combustion quality of burner flames needsto be
determined visually.
(A) Yellow flames-
Call for service
IB}Yellow tips on
outer cones-
Normal for LP gas
1111111111
IC} Soft blue
flames--Normal
for natural gas
If burner flames look like (A),call for service. Normal
burner flames should look like (B)or (C),depending on
the type of gas you use.
With LPgas, some yellow tipping on outer cones
isnormal.
[] CHECK IGNITION OF OVEN BURNER
The oven is designedtooperate quietly and automatically.
To operatetheoven,pressthe Bakepad andthenpressthe
number pads until350° appears inthedisplay.TouchtheStart
pad.After BO-90seconds,theoven burnerwillignite and burn
until thesettemperatureis reached.Theoven burnerwill
continuetocycle on and off as necessaryto maintaintheoven
at thetemperature indicated by thedisplay.
To check ignition of thebroil burner,touch theBroil Hi/Lo pad
andthentheStart pad.After B0-90 seconds,thebroil burner
will ignite.
Electricignition models requireelectrical power tooperate.
In caseofa power outage,theoven burnerson these models
cannot be lit manually with a match. Gaswillnot flow unless
theglowbar is hot.
Iftheoven is in usewhen a power outage occurs,theburner
will shut off and cannot berent untilpower is restored.
49
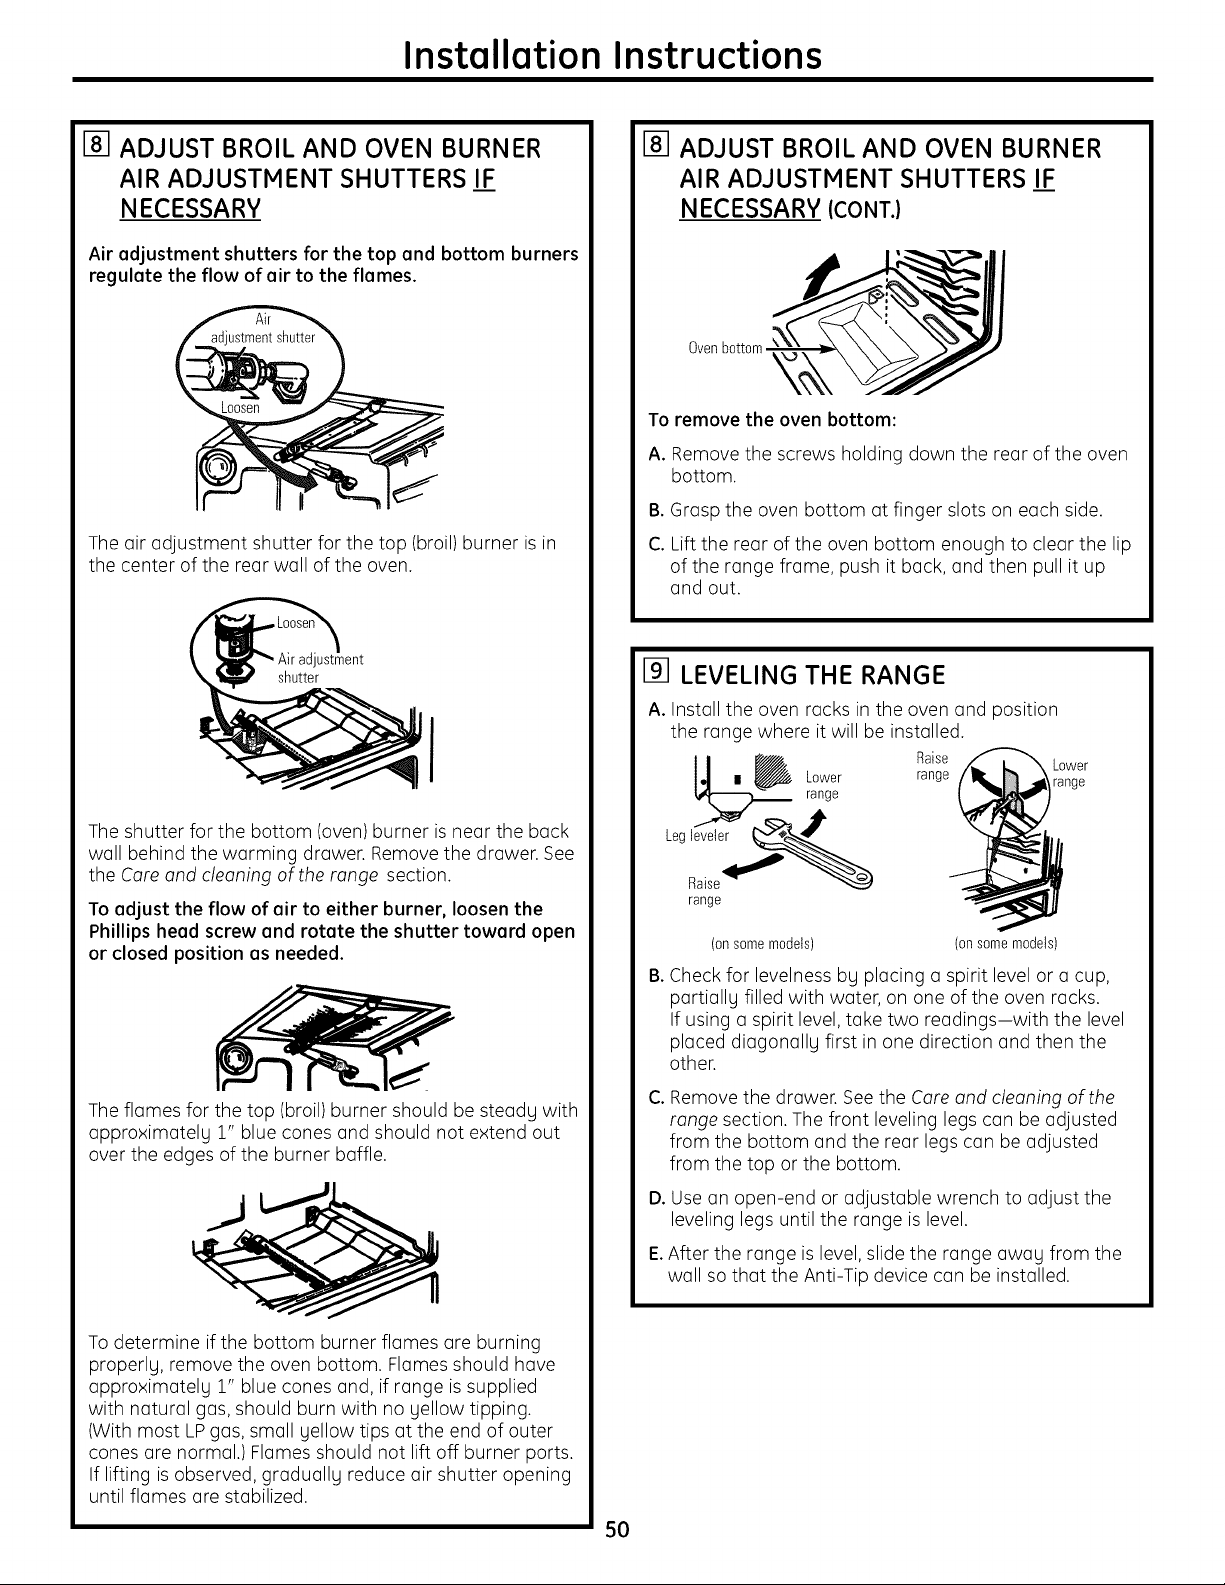
Installation Instructions
[] ADJUST BROIL AND OVEN BURNER
AIR ADJUSTMENT SHUTTERS IF
NECESSARY
Air adjustment shutters for the top and bottom burners
regulate the flow of air to the flames.
Theair adjustment shutter for the top (broil) burner isin
the center of the rear wall of the oven.
ustment
shutter
Theshutter for the bottom (oven)burner isnear the back
wall behind the warming drawer. Remove the drawer. See
the Coreond cleoning of the ronge section.
Toadjust the flow of air to either burner, loosen the
Phillips head screw and rotate the shutter toward open
or closed position as needed.
Theflames for the top (broil) burner should be steadg with
approximately 1" blue cones and should not extend out
over the edges of the burner baffle.
Todetermine ifthe bottom burner flames are burning
properly, remove the oven bottom. Flamesshould have
approximatelg 1" blue cones and, if range issupplied
with natural gas, should burn with no gellow tipping.
(With most LPgas, small yellow tips at the end of outer
cones are normal.) Flames should not lift off burner ports.
If lifting isobserved, gradually reduce air shutter opening
until flames are stabilized.
I-8-1ADJUST BROIL AND OVEN BURNER
AIR ADJUSTMENT SHUTTERS IF
NECESSARY (CONT.}
Oven
To remove the oven bottom:
A. Removethe screws holding down the rear of the oven
bottom.
B.Graspthe oven bottom at finger slots on each side.
C. Lift the rear of the oven bottom enough to clear the lip
ofthe range frame, push itback, and then pull itup
and out.
i91 LEVELING THE RANGE
A.Install the oven racks in the oven and position
the range where itwill be installed.
lel , _ Lower Ra_sge :aOr_eer
range
range
(on some models) (on some models)
a.
Checkfor levelness bg placing a spirit levelor a cup,
partiallg filled with water, on one of the oven racks,
If using a spirit level, take two readings-with the level
placed diagonallg first in one direction and then the
other,
C.
Removethe drawer. See the Coreond cleoning of the
ronge section. The front leveling legs can be adjusted
from the bottom and the rear legscan be adjusted
from the top or the bottom.
D. Use an open-end or adjustable wrench to adjust the
leveling legsuntil the range islevel.
E.After the range islevel, slidethe range awag from the
wall sothat the Anti-Tip device can be installed.
5O
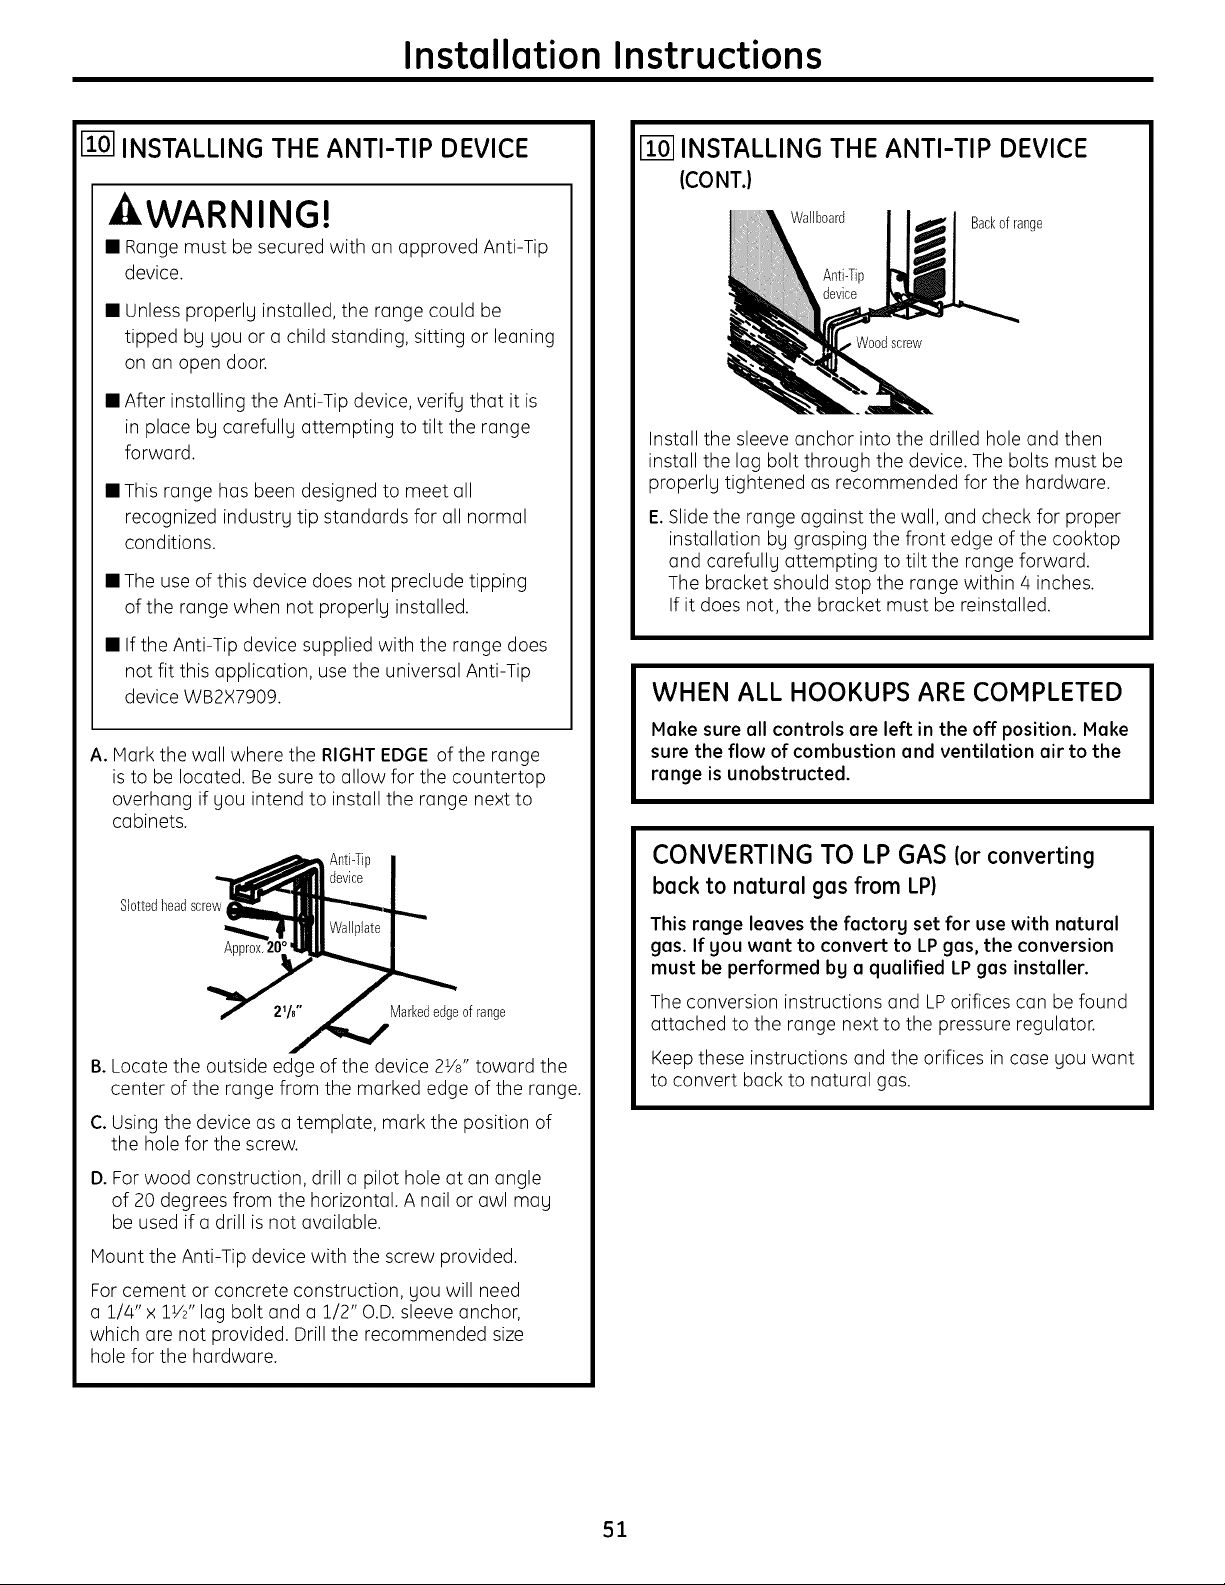
Installation Instructions
[] INSTALLING THE ANTI-TIP DEVICE
WARNING!
• Rangemust be secured with on approved Anti-Tip
device.
• Unlessproperlg installed, the range could be
tipped by you or o child standing, sitting or leaning
on on open door.
• After installing the Anti-Tip device, verifg that it is
in place bg corefullg attempting to tilt the range
fo rwo rd.
• This range has been designed to meet oil
recognized industrg tip standards for oil normal
conditions.
• Theuseof this device does not preclude tipping
of the range when not properlg installed.
• If the Anti-Tip device supplied with the range does
not fit this application, usethe universal Anti-Tip
device WB2X7909.
A.Mark the wall where the RIGHTEDGEofthe range
isto be located. Besure to allow for the countertop
overhang if gou intend to install the range next to
cabinets.
Slottedheadscrew
Markededgeof range
B.Locate the outside edge ofthe device 2Vs" toward the
center of the range from the marked edge ofthe range.
C. Using the device aso template, mark the position of
the hole for the screw.
D. Forwood construction, drill o pilot hole at on angle
of 20 degrees from the horizontal. A nail or owl mog
be used ifo drill isnot available.
Mount the Anti-Tip device with the screw provided.
Forcement or concrete construction, gou will need
o 1/4" x 1V2"log bolt and o 1/2" O.D.sleeve anchor,
which ore not provided. Drillthe recommended size
hole for the hardware.
INSTALLING THE ANTI-TIP DEVICE
ICONT.}
Wallboard
Woodscrew
Backofrange
Install the sleeve anchor into the drilled hole and then
install the log bolt through the device.The bolts must be
properlg tightened asrecommended for the hardware.
E. Slide the range against the wall, and check for proper
installation bg grasping the front edge of the cooktop
and corefullg attempting to tilt the range forward.
The bracket should stop the range within 4 inches.
If it does not, the bracket must be reinstalled.
WHEN ALL HOOKUPS ARE COMPLETED
Make sure ell controls ere left in the off position. Make
sure the flow of combustion end ventilation air to the
range isunobstructed.
CONVERTING TO LP GAS Iorconverting
beck to natural gas from LP}
This range leaves the fectorg set for use with natural
gas. If gou went to convert to LP gas, the conversion
must be performed bg a qualified LPgas installer.
The conversion instructions and LP orifices con be found
attached to the range next to the pressure regulator.
Keep these instructions and the orifices in case gou wont
to convert back to natural gas.
51
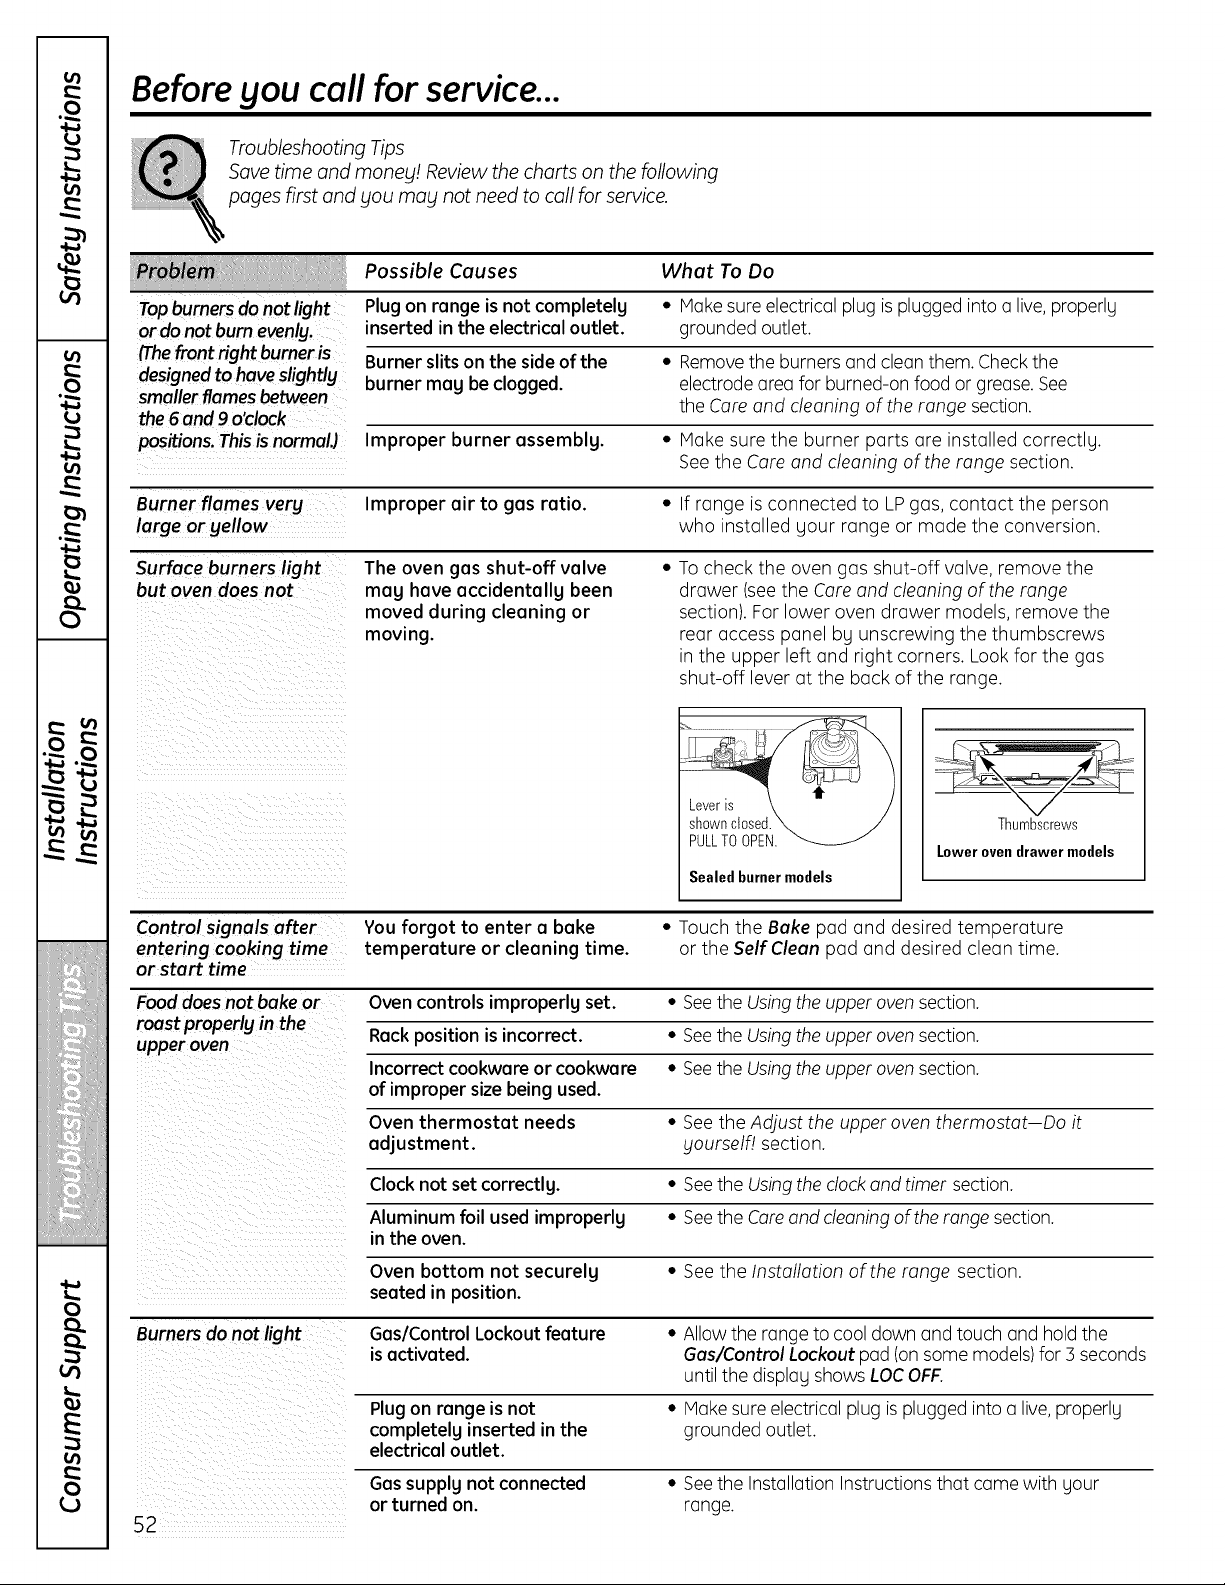
Lt}
.£
13
Lt}
m
Lt}
O
£J
Lt}
.Ca
- v
f
l I!
ii_iii//iii!li_ii_!i
;iiiiltiiiiiiiii!iiiii_iiiiii
iiiiii_iiIilIilIim
0
E
0
Before you call for service...
Troubleshooting Tips
Savetime and money! Review thecharts on the following
pages first and you may not need to callfor service.
Possible Causes What To Do
Topburnersdo notlight Plugon range isnot completelg * Hake sure electricalplug is plugged intoa live,properly
or do notburnevenly, inserted in the electrical outlet, grounded outlet.
(Thefront right burneris Burner slitson the sideofthe * Removetheburnersand clean them. Checkthe
designed to haveslightly burner mog be clogged, electrode area forburned-on food or grease. See
smallerflamesbetween theCoreand cleaning of therange section.
the6 and9 o'clock
positions. ThisisnormalJ Improper burner assembly. • Hake sure the burner ports are installed correctly.
See the Coreand cleaning of therange section.
Burner flames very Improper air to gas ratio. • If range is connected to LPgas, contact the person
large orgellow who installed your range or mode the conversion.
Surface burners light The oven gas shut-off valve * To check the oven gas shut-off valve,remove the
but oven does not meg have accidentally been drawer (see the Coreand cleaning of therange
moved during cleaning or section). Forlower oven drawer models, remove the
moving, rear access panel by unscrewing the thumbscrews
in the upper left and right corners. Look for the gas
shut-off leverat the back of the range.
t
Leveris
shownclosed.
PULLTOOPEN.
Sealed burnermodels
Thumbscrews
Lower ovendrawermodels
Control signals after You forgot to enter a bake * Touch the Bake pad and desired temperature
entering cookingtime temperature or cleaning time. or the Self Clean pad and desired clean time.
or start time
Food doesnot bake or Ovencontrolsimproperlg set. ° SeetheUsingtheupper oven section.
roost properlg in the
upper oven Rackposition isincorrect. * SeetheUsingtheupper oven section.
Incorrect cookware or cookware * SeetheUsingtheupper oven section.
of improper size being used.
Oven thermostat needs • See theAdjust the upper oventhermostat Doit
adjustment, gourself! section.
Clock not set correctlg. * Seethe Usingthedock and timer section.
Aluminum foil usedimproperlg ° SeetheCore and cleaning oftherange section.
in the oven.
Oven bottom not securelg * See the Installation ofthe range section.
seated in position.
Burnersdo not light Gas/Control Lockout feature ° Allowtherange tocooldown and touch and hold the
is activated. Gas/Control Lockout pad (onsome models)for3 seconds
until the display shows LOCOFF.
Plugon range is not * Hake sureelectricalplug is plugged intoa live,properly
completelg inserted in the grounded outlet.
electrical outlet.
52
Gas supplg not connected
or turned on.
• Seethe Installation Instructions that came with your
range.
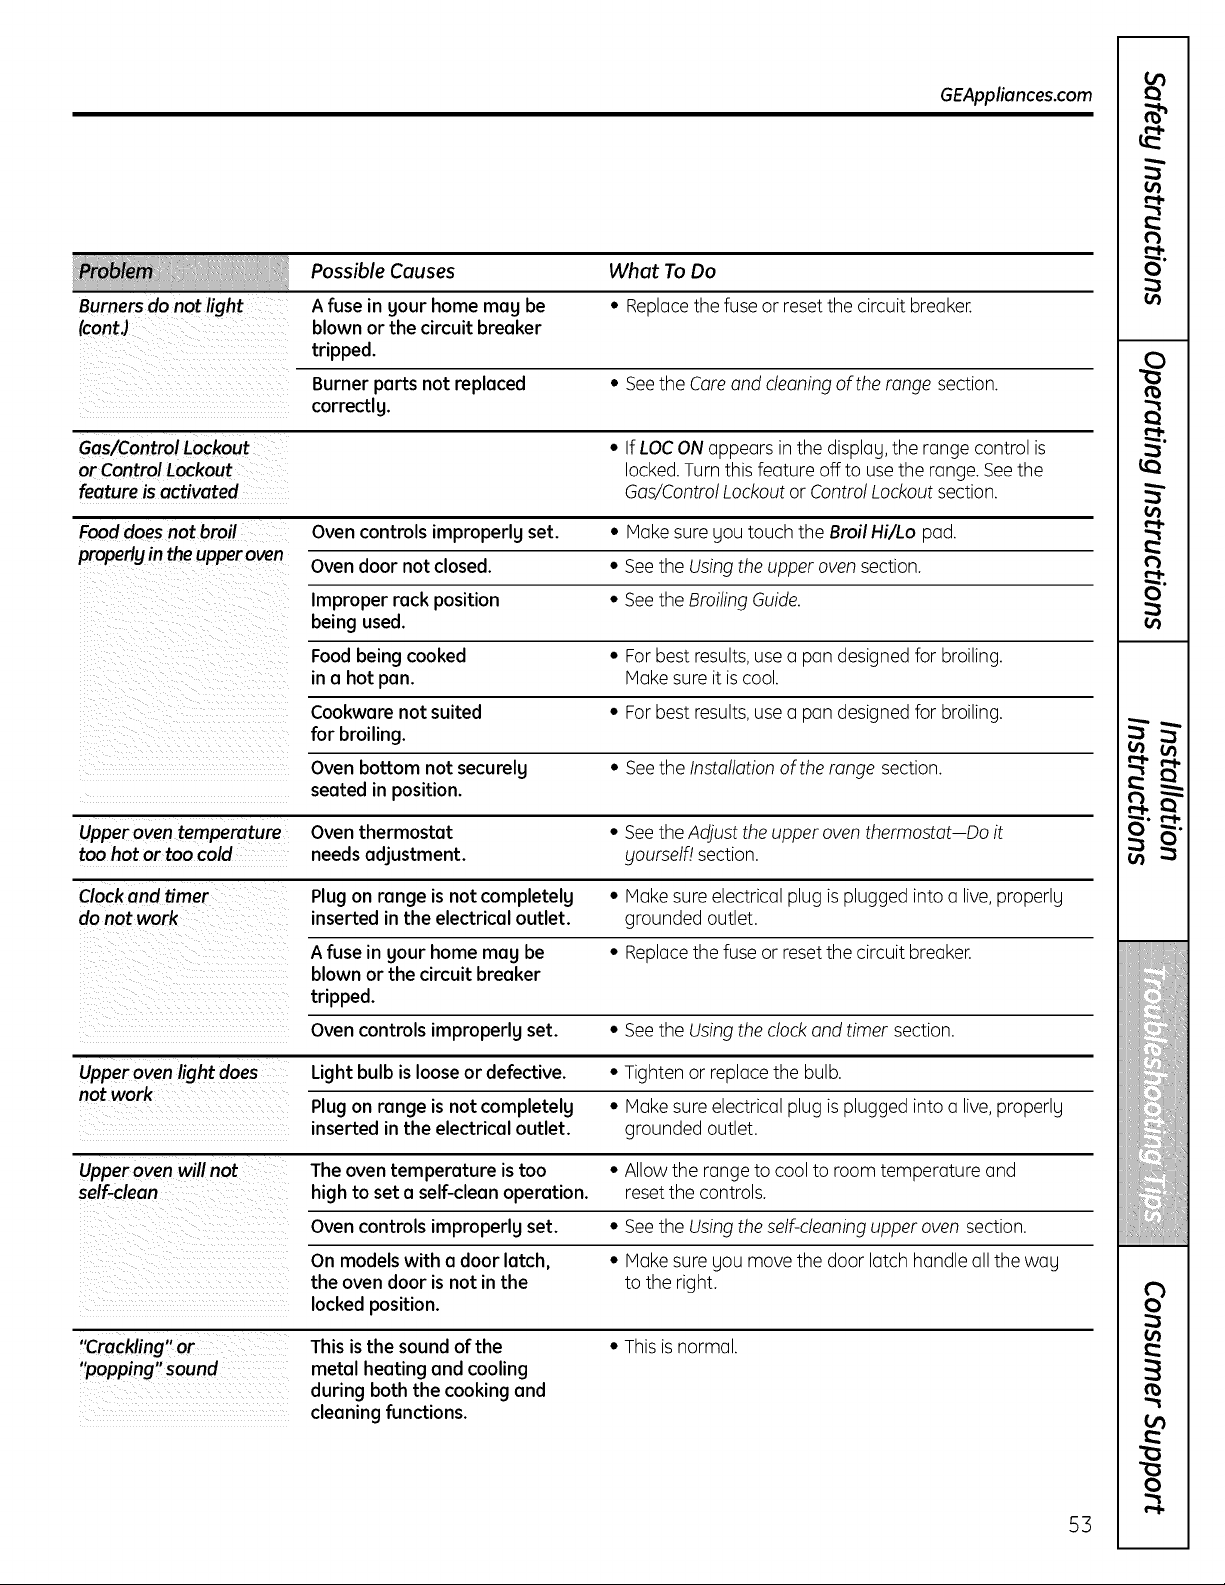
GEAppliances.com
Possible Causes What ToDo
Burnersdo not light A fuse in gour home mag be • Replacethefuse or reset thecircuit breaker.
(contJ blownor the circuit breaker
tripped.
Burner parts not replaced • See the Care and cleaning of the range section.
correctlg.
Gas/Control Lockout • If LOC ON appearsin thedisplag,the range control is
or Control Lockout locked.Turnthis feature off touse the range. Seethe
feature isactivated Gas/Control Lockout or Control Lockout section.
Food doesnot broil Oven controls improperlgset. • Hake suregou touch the Broil Hi/Lo pad.
propedyin the upperoven Ovendoor notclosed. • SeetheUsingtheupper ovensection.
Improper rack position • SeetheBroiling Guide.
being used.
Foodbeing cooked • For best results,use a pan designed for broiling.
ma hot pan. Hake sureitis cool.
Cookware not suited • For best results,use a pan designed for broiling.
for broiling.
Ovenbottom not securelg • SeetheInstallation oftherange section.
seated in position.
Upper oven temperature Oven thermostat • See the Adjust the upper oven thermostat Doit
too hot or too cold needsadjustment, gourself! section.
Clock and timer Plug on range is not completelg • Hake sure electricalplug is plugged intoa live,properlg
do not work inserted in the electrical outlet, grounded outlet.
A fuse in gour home mag be • Replacethefuse or resetthe circuitbreaker.
blown or the circuit breaker
tripped.
Ovencontrols improperlg set. • SeetheUsingtheclock and timer section.
Upperovenlight does Light bulb isloose or defective. • Tighten or replace the bulb.
not work Plug on range is not completelg • Make sure electricalplug is plugged intoa live,properlg
inserted in the electrical outlet, grounded outlet.
Upperoven willnot The oven temperature istoo • Allow the range to cooltoroomtemperature and
self-clean high to set a self-cleanoperation, reset thecontrols.
Ovencontrols improperlgset. • SeetheUsingtheself-cleaning upper ovensection.
On models with a door latch, • Make suregou move thedoor latch handle all thewag
the ovendoor isnot in the tothe right.
locked position.
"Crackling" or This isthe soundofthe • Thisis normal.
"popping" sound metal heating and cooling
during both the cooking and
cleaning functions.
r3
O"
Lt}
O
r_
r3
o
Lt}
_t
C
,C
¢
%?IIC
i_iiiilIilIi
r_
0
0
53
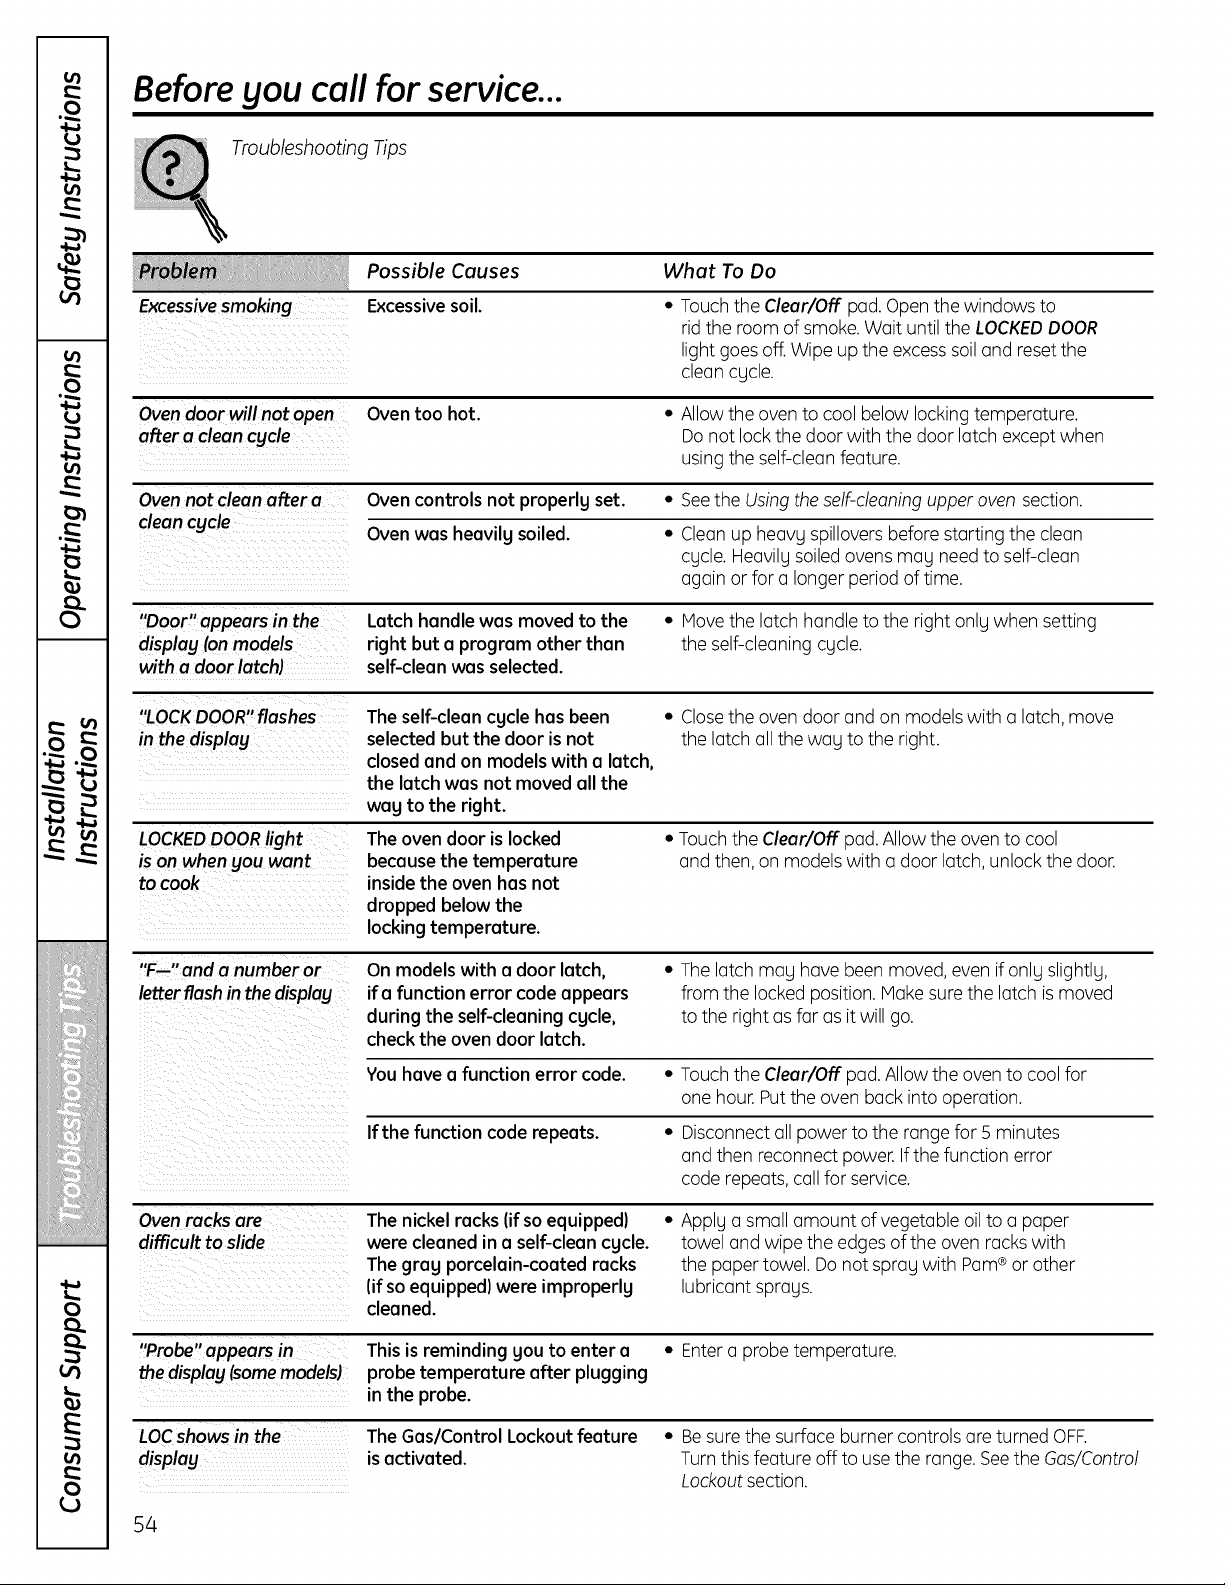
Lt}
.o
13
Lt}
i
Lt}
O
Lt}
- V
f
I I!
iii_iii/iiiiii!li_i_i_!i
iiiiiltiiiiiiiii!iiiii_iiiiii
iiiiii_iiIilIilIim
i,...
0
E
0
Before you call for service...
Troubleshooting Tips
Excessivesmoking
Possible Causes
Excessivesoil.
What To Do
Touchthe Clear/Off pad.Openthewindows to
rid the roomofsmoke. Wait untiltheLOCKEDDOOR
lightgoesoff. Wipeup the excesssoil and resetthe
cleancycle.
Oven door will not open
after a cleancycle
Oven too hot.
• Allow the oven to coolbelowlocking temperature.
Do notlock thedoor with the door latch exceptwhen
usingtheself-clean feature.
Ovennot cleanafter a Ovencontrolsnot properly set. • Seethe Usingtheself-cleaning upper ovensection.
cleancycle Ovenwas heavily soiled. • Cleon up heavy spillovers before starting thecleon
cycle. Heavily soiled ovens may need toself-cleon
again or for o longer period oftime.
"Door"appears in the Latch handlewas moved to the • Movethelatch handle totheright onlywhen setting
display[onmodels right but a program other than theself-cleaningcycle.
with a door latch} self-clean was selected.
"LOCKDOOR"flashes
in the display
The self-clean cycle hasbeen
selected but the door isnot
closed and on models with a latch,
the latch was not moved all the
wag to the right.
• Closethe ovendoor and on models with a latch,move
thelatch all theway tothe right.
LOCKEDDOORlight
is on whenyou wont
to cook
The oven door islocked
because the temperature
insidethe oven hasnot
dropped below the
locking temperature.
* Touchthe Clear/Off pad. Allow the oven to cool
and then, on models with a door latch, unlock the door.
"F--"and a number or On models with a door latch, • The latch may hovebeen moved, evenifonlyslightly,
letterflash in the display ifa function error codeappears from the locked position. Hake sure thelatch is moved
during the self-cleaningcycle, tothe rightas far asit willgo.
checkthe ovendoor latch.
You havea function error code. • Touchthe Clear/Off pad. Allow the oven to coolfor
one hour. Putthe ovenback intooperation.
If the function code repeats. • Disconnect all powertothe range for 5 minutes
and thenreconnect power. Ifthefunction error
coderepeats, call for service.
Oven racks are Thenickel racks (ifso equipped) • Applya small amount ofvegetable oil to a paper
difficult to slide werecleaned ina self-cleancycle, towel and wipetheedges ofthe ovenracks with
The gray porcelain-coated racks thepaper towel.Do not spray with Pam®or other
(ifso equipped)were improperly lubricant sprays.
cleaned.
"Probe"appears in This isreminding gou to enter a * Entera probe temperature.
thedisplay [somemodels} probe temperature after plugging
in the probe.
LOCshows inthe
display
The Gas/Control Lockout feature • Besure thesurface burner controlsare turned OFF.
isactivated. Turn this feature off to use therange.Seethe Gas/Control
Lockout section.
54
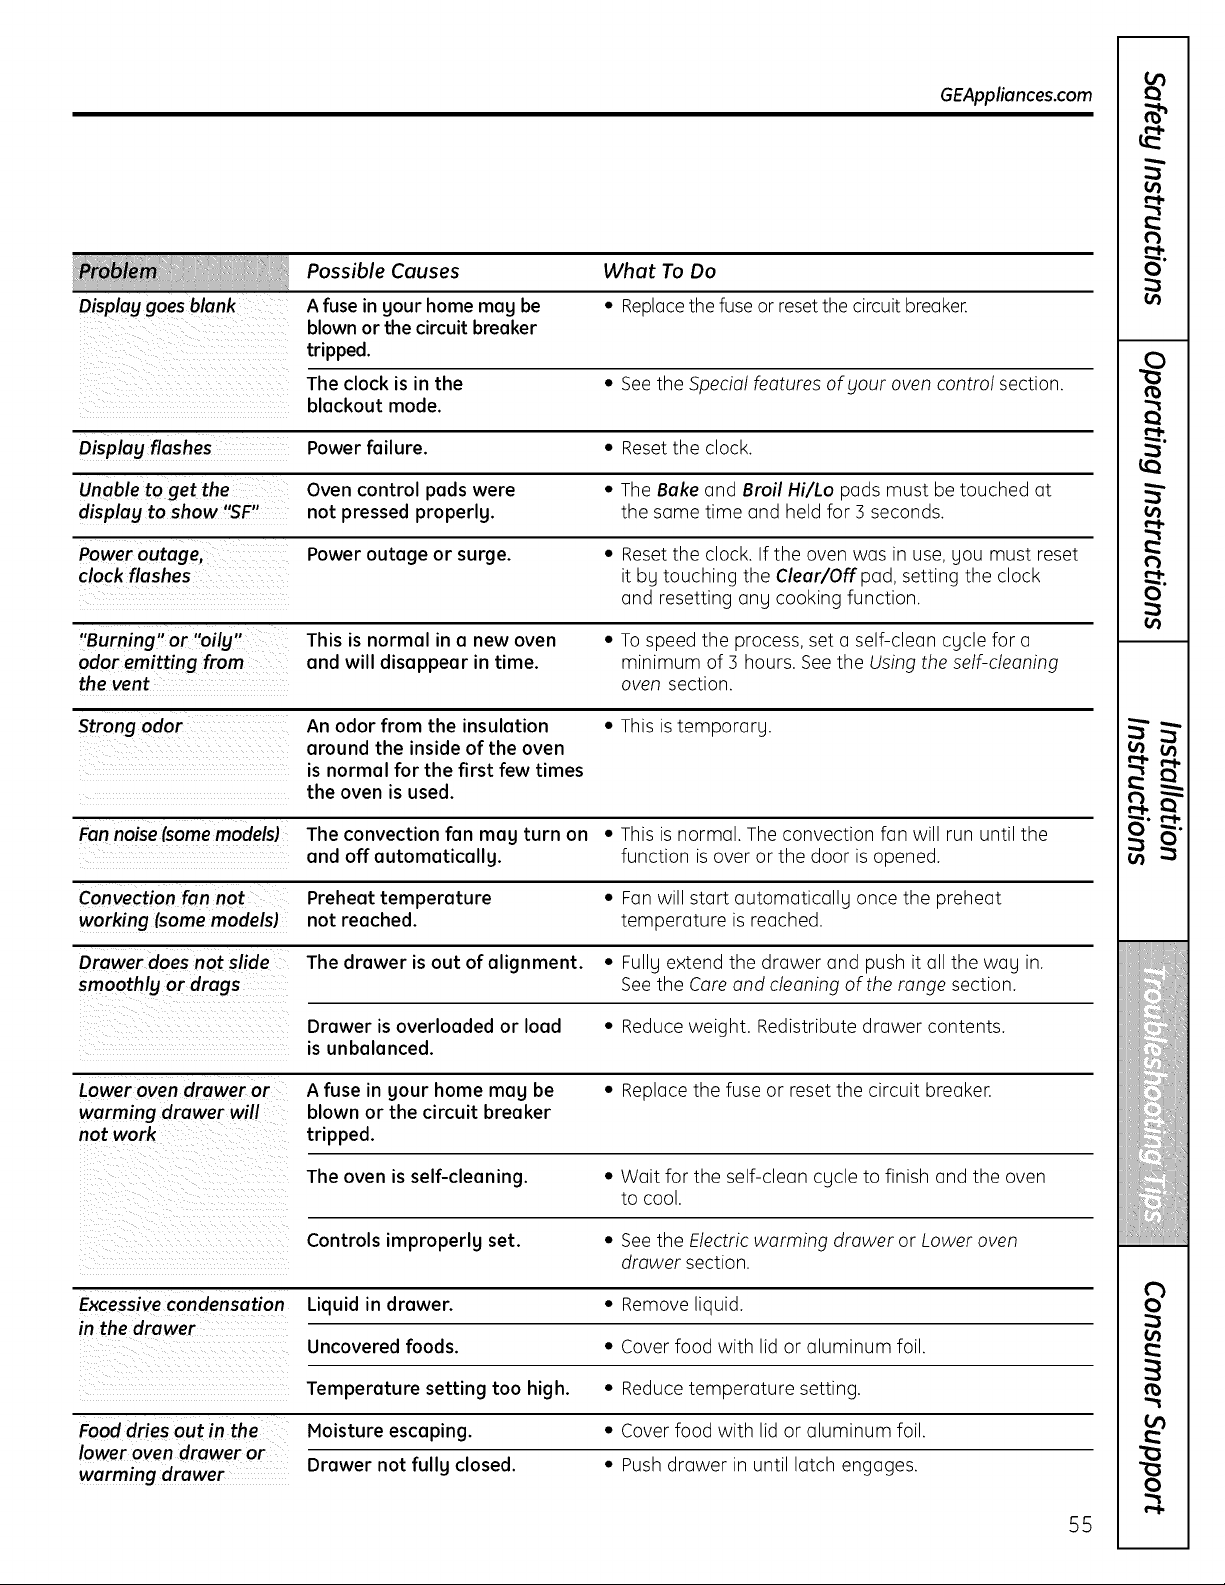
GEAppliances.com
Possible Causes What To Do
Display goes blank A fuse in gour home mug be • Replace the fuse or reset the circuit breaker.
blown or the circuit breaker
tripped.
The clock is in the • See the Special features ofgour oven control section.
blackout mode.
Oisplag flashes Power failure. • Reset the clock.
Unable to get the Oven control pads were • The Bake and Broil Hi/Lo pads must be touched at
display to show "SF" not pressed properlg, the same time and held for 5 seconds.
Power outage, Power outage or surge. • Reset the clock. Ifthe oven was in use, you must reset
clock flashes it bg touching the Clear/Offpad, setting the clock
and resetting ang cooking function.
"Burning"or "oily" This isnormal in a new oven ° To speed the process, set a self-clean cgcle for a
odor emitting from and will disappear in time. minimum of 3 hours. See the Using the self-cleaning
the vent oven section.
Strong odor Anodor from the insulation • This is temporary.
around the inside of the oven
is normal for the first few times
the oven is used.
Fan noise(somemodels) Theconvection fan mag turn on • This is normal. The convection fan will run until the
and off automaticallg, function is over or the door isopened.
Convection fan not Preheat temperature ° Fan will start automaticallg once the preheat
working (some models) not reached, temperature isreached.
Drawer doesnot slide Thedrawer isout of alignment. ° Fully extend the drawer and push it all the wag in.
smoothly or drags See the Care and cleaning of the range section.
Drawer is overloaded or load • Reduce weight. Redistribute drawer contents.
is unbalanced.
Lower oven drawer or A fuse in gour home mag be • Replace the fuse or reset the circuit breaker.
warming drawer will blown or the circuit breaker
not work tripped.
Theoven isself-cleaning. • Wait for the self-clean cycle to finish and the oven
to cool.
Controls improperlg set. * See the Electricwarming drawer or Lower oven
drawer section.
Excessivecondensation Liquid in drawer. • Removeliquid.
in the drawer
Uncovered foods. ° Cover food with lid or aluminum foil.
Temperature setting too high. ° Reduce temperature setting.
Food dries out in the Moisture escaping. • Cover food with lid or aluminum foil.
lower oven drawer or
warming drawer Drawer not fullg closed. ° Push drawer in until latch engages.
t_
O"
o_
0
to
t_
0
o_
¢t
C
,C
¢
%111;?IIC
'IIII'LIIIII%:
i_iiiilIilIi
on
o_
to
O
O
55
m
0
a_a
v A
w_ u
vl r_
a_a
0
0
v
a_a
L.
0
E
0
Notes.
56
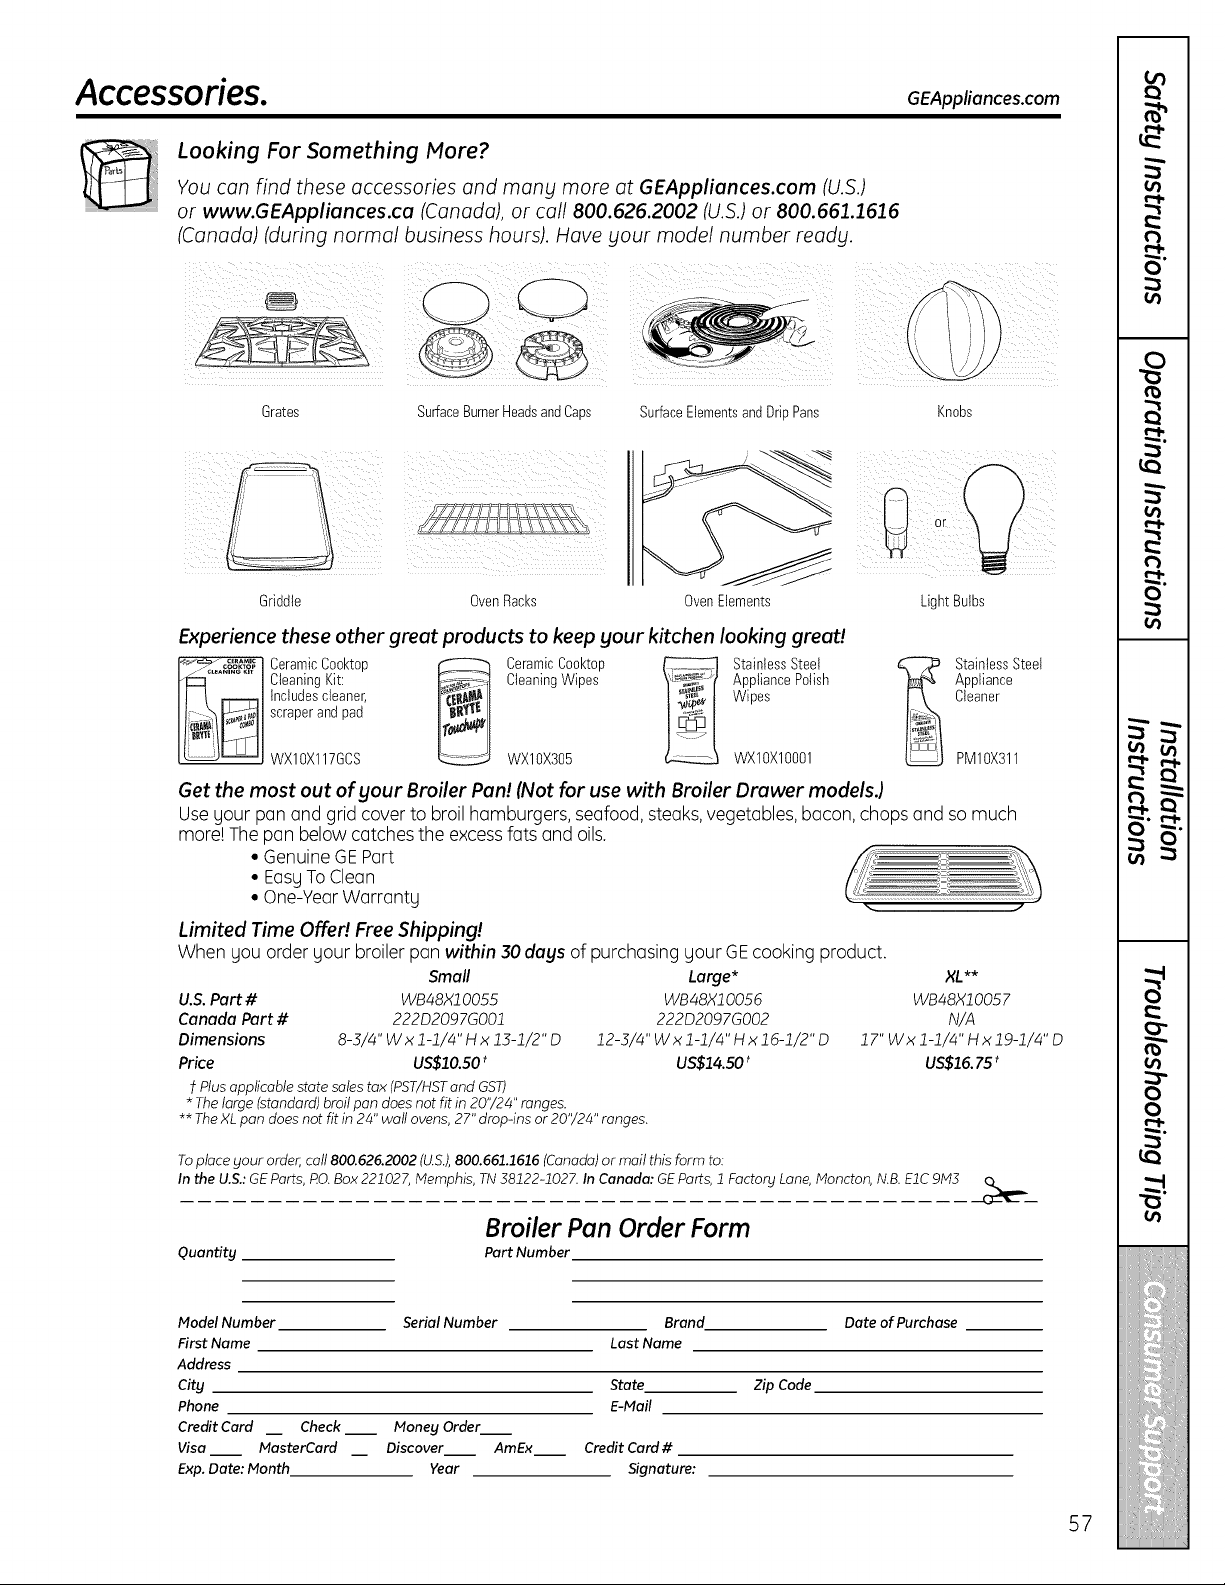
Accessories. GEApUiances.com
Looking For Something More?
You can find these accessories and mang more at GEAppliances.com (U.S.)
or www.GEAppliances.ca (Canada), or call 800.626.2002 (U.S.)or 800.661.1616
(Canada) (during normal business hours). Have your model number reads.
Grates SurfaceBurnerHeadsandCaps SurfaceElementsand DripPans Knobs
Griddle OvenRacks OvenElements
: :k i ¸
LightBulbs
Experience these other great products to keep your kitchen looking great!
CeramicCooktop _ CeramicCooktop _ StainlessStoat
CleaningKit: CleaningWipes AppliancePolish
Includescleaner, Wipes
scraperand pad
WXIOX117GCS WXIOX305 WXIOXIO001
StainlessSteel
Appliance
Cleaner
PM10X311
Get the most out of your Broiler Pan! (Not for use with Broiler Drawer modelsJ
Use yourpan and grid cover to broil hamburgers,seafood,steaks,vegetables,bacon, chops and so much
morelThe pan belowcatches theexcessfatsand oils.
• GenuineGEPart
• EasyTo Clean
• One-YearWarranty
Limited Time Offe!! FreeShipping!
Whenyou order your broiler pan within 30 days ofpurchasing yourGEcooking product.
Smell
U.S. Pert # WB48Xl O055
Canada Pert # 222D2097GO01
Dimensions 8-3/4" W x 1-1/4" H x 13-1/2" D
Price US$10.SO t
Plusapplicable state soles tax (PST/HSTand GST)
* Thelarge (standard) broilpan doesnotfit in 20'/24" ranges.
Large* XL**
WB48X10056 WB48X10057
222D2097GO02 N/A
12-3/4"Wxl-1/4"Hxlg-1/2"D 17"Wxl-1/4"Hxl9-1/4"D
US$14.50 * US$16. 75 *
** TheXLpan doesnot fit in 24"wattovens, 27" drop-ins or 20'/24" ranges.
Toplaceyour order,call 800.626.2002(U.S.),800.661.1616 (Canada)or mailthis form to:
Inthe U.S.:GEParts,t:!0. Box221027,Memphis, TN38122-1027. InCanada: GEParts, 1Factory Lane,Moncton, N.B.EIC 9ML_ __
Broiler Pen Order Form
Quantity Pert Number
Model Number
First Name
Address
City
Phone
Credit Curd
Visa
Exp.Date: Month
Serial Number Brand Date of Purchase
Last Name
State Zip Code
E-Mail
Check__ Money Order
MasterCard Discover AmEx Credit Card#
Year Signature:
57
GE Gas Range Warranty.iForcustomerstheunitedstates)
All warranty service provided by our Factory Service Centers,
or an authorized Customer Care ®technician. Toschedule
service, visit us on-line at GEAppliances.com, or call
800.GE.CARES (800./432.2737). Pleasehave serial number
and model number available when calling for service.
Staple Four receipt here.
Proofof the original purchase
dote isneeded to obtain service
under the warrant F.
Fromthedoteofthe
original purchase
GEWill Replace:
Any partofthe range which foils due to o defect in materialsor workmanship. During this
limited one-year warranty, GEwillalsoprovide,freeofcharge, oil lobar and in-homeservice
to replace the defective port.
Service trips to gour home to teach gou how to use
the product.
Damage to the product caused bg accident, fire, floods
or acts of God.
Improper installation, deliverg or maintenance.
Failure of the product if it is abused, misused,
or used for other than the intended purpose or
used commerciallg.
Replacement of housefusesor resetting of circuit
breakers.
Incidental or consequential damage caused bg possible
defects with this appliance.
Damage caused after deliverg.
Product notaccessibleto provide required service.
EXCLUSION OFIMPLIED WARRANTIES--Your sole and exclusive remedy isproduct repair as provided
in this Limited Warranty. Any implied warranties, including the implied warranties of merchantability
or fitness for a particular purpose, are limited to one year or the shortest period allowed by law.
This worrontLl is extended to the original purchaser and ong succeeding owner for products purchased for
home use within the USA. If the product is located in on area where service bg o GEAuthorized Servicer is
not available, you may be responsible for o trip charge or gou may be required to bring the product to on
Authorized GE Service Location for service. InAlaska, the worrontLl excludes the cost of shipping or service
calls to _lour home.
Some states do not allow the exclusion or limitation of incidental or consequential damages. This warranty
gives you specific legal rights, and you may also have other rights which vary from state to state. Toknow
what your legal rights ore, consult your local or state consumer affairs office or your state's Attorney General.
Warrantor: General Electric Compang. Louisville, KV 40225
58
Service trips to gour home to teach gou how to use
the product.
installation,deliverg or maintenance.
Failureof the product ifit isabused, misused,
or usedfor other than the intended purpose or
usedcommerciallg.
Replacement of house fuses or resetting of circuit
breakers.
Damage to the product caused bg accident, fire, floods
or acts of God.
Incidental or consequential damage caused bg possible
defects with th is appliance.
Damage caused afterdeliverg.
Product not accessibleto provide required service.
EXCLUSION OFIMPLIED WARRANTIES--Your sole and exclusive remedy is product repair us provided
in this Limited Warrantg. Ang implied warranties, including the implied warranties of merchantabilitg
or fitness for a particular purpose, are limited to one gear or the shortest period allowed bg law.
l WARRANTOR ISNOT RESPONSIBLE FOR CONSEQUENTIAL DAMMAGES. l
J Warrantor: MABE CANADA INC. J
59

Consumer Support.
GEAppliances Website In theU.S.:GEApplionces.com
Have a question or need assistance with yourappliance? Try theGEAppliancesWebsite 24 hoursa day,
any day of the year! For greaterconvenienceand fasterservice,you cannowdownload Owner's Manuals,
order parts or even schedule serviceon-line. InCenede: www,GEAppliences,ce
Schedule Service In theU.S.:GEApplionces.com
Expert GErepair serviceis only one step away from your door. Get on-line and schedule your service at your
convenienceany dayofthe year! Orcall800.GE.CARES(800.432.2737)during normal business hours.
InCenede, cell 1.800.561.3344
Real Life Design Studio In theus:GEApplionces.com
GEsupportsthe Universal Designconcept-products, services and environments that canbe used by people ofall
ages,sizesand capabilities.We recognizethe needto design for a wide range of physicaland mental abilities and
impairments. For details ofGE'sUniversal Designapplications, includingkitchendesign ideas for people with disabilities,
checkoutour Website today. Forthe hearing impaired, please call 800.TDD.GEAC(800.833.4322).
InCenede, contact: Manager,ConsumerRelations,Habe CanadaInc.
Suite 310,1 Factory Lane
Honcton, N.B.EIC 9H3
Extended Warranties
Inthe U.S.:GEApplionces.com
Purchasea GEextended warranty and learn aboutspecial discounts that are availablewhileyour warranty is still
in effect.You canpurchase iton-line anytime, or call 800.626.2224during normal business hours. GEConsumerHome
Serviceswillstill be thereafter your warranty expires. In Cenede,cull 1.888.261.2133
Ports and Accessories
Inthe U.S.:GEApplionces.com
Individuals qualifiedto service theirown appliances canhaveparts or accessoriessent directlytotheir homes (VISA,
HasterCard and Discovercards are accepted).Orderon-line today, 24 hoursevery day or by phone at
800.626.2002during normal business hours.
Instructions conteined in this menuel cover procedures tobe performed by eny user. Other servicing generelly
should be referred toquolified servicepersonnel Coution must be exercised,since improper servicing meg couse
unsofe operation.
Customersin Cenede shouldconsulttheyellow pagesforthe nearest Mabeservice center,or call1.800.661.1616.
Contact Us
Inthe U.S.:GEApplionces.com
If you are not satisfiedwith theserviceyoureceivefrom GE,contact us on our Websitewith all thedetails including
your phone number,or write to: General Manager,Customer Relations
GEAppliances,Appliance Park
Louisville,KY40225
InCenede: www.GEAppliences.ce,or write to: Director, Consumer Relations,HabeCanadaInc.
Suite 310,1 Factory Lane
Honcton, N.B.EIC 9H3
Register Your Appliance IntheU.S.:GEApplionces.cam
Register gour newepplience on-line--et gour convenience! Timely product registrationwillallowfor enhanced
communication and prompt service under the termsof yourwarranty, shouldtheneed arise.You may alsomail
in the pre-printed registrationcardincludedin the packing material. In Cenede: www,GEAppliences,ce
Printed in Mexico
Thisbook isprinted on recycled paper.

