Loading ...
2
FIRST TIME USE
SETTING MENU AND SALT
ADVICE REGARDING THE FIRST TIME USE
After installation, remove the stoppers from the racks and the retaining
elastic elements from the upper rack.
SETTING MENU
1. Switch on the appliance by pressing the ON/OFF button.
2. Switch o the appliance by pressing the ON/OFF button.
3. Hold down START button for 5 seconds, until you hear a beep.
4. The display shows the rst available setting (letter „A”), followed by
its value (for example: 3).
5. Press PREVIOUS/NEXT button to scroll the list of the available settin-
gs and to see their value (see the below table), then press START if you
want to change the value of the displayed setting: its value will start
blinking.
6. Use PREVIOUS/NEXT button to change the blinking value of the se-
lected settings, then press START to save the new value: it will stop
blinking.
7. To change another settings repeat steps 5-6.
8. To exit settings menu - press ON/OFF button.
LETTER SETTING
VALUES
(Default - in bold)
Water Hardness Level
(see “setting the water hardness”
and “water hardness table”)
1 | 2 | 3 | 4 | 5
Rinse Aid Level
(see “ADJUSTING THE DOSAGE OF
RINSE AID”)
1 | 2 | 3 | 4 | 5
Start Program
To set the cycle to show at switch on
of the appliance.
“E”= Eco, “L”= Last cycle run
E | L
Brightness Level
To adjust the brightness
level of the display.
“Lo”=Low, “Hi”= High
Lo | Hi
Sound Level
To adjust the volume of the sounds.
“OF” = sounds o, “Lo” = low volume,
“Hi” = high volume.
OF | Lo | Hi
Internal Lights
(see OPTIONS AND FUNCTIONS)
“On” = On, “OF” = O
On | OF
Light on the Floor
(see OPTIONS AND FUNCTIONS)
“On” = On, “OF” = O
On | OF
Factory Settings
To restore to the factory default all
the values of the settings includ-
ed in the settings menu. After the
activation of this setting (ON), the
machine switches OFF and restores
the factory settings.
“On” = On, “OF” = O
On | OF
ActiveDry
(see “Options And Functions”)
“On” = On, “OF” = O
On | OF
FILLING THE SALT RESERVOIR
The use of salt prevents the formation of LIMESCALE on the dishes and
on the machine’s functional components.
• It is mandatory that THE SALT RESERVOIR NEVER BE EMPTY.
• It is important to set the water hardness.
The salt reservoir is located in the lower part of the dishwasher
(see PRODUCT DESCRIPTION) and must be lled when the SALT REFILL
indicator light
in the control panel is lit.
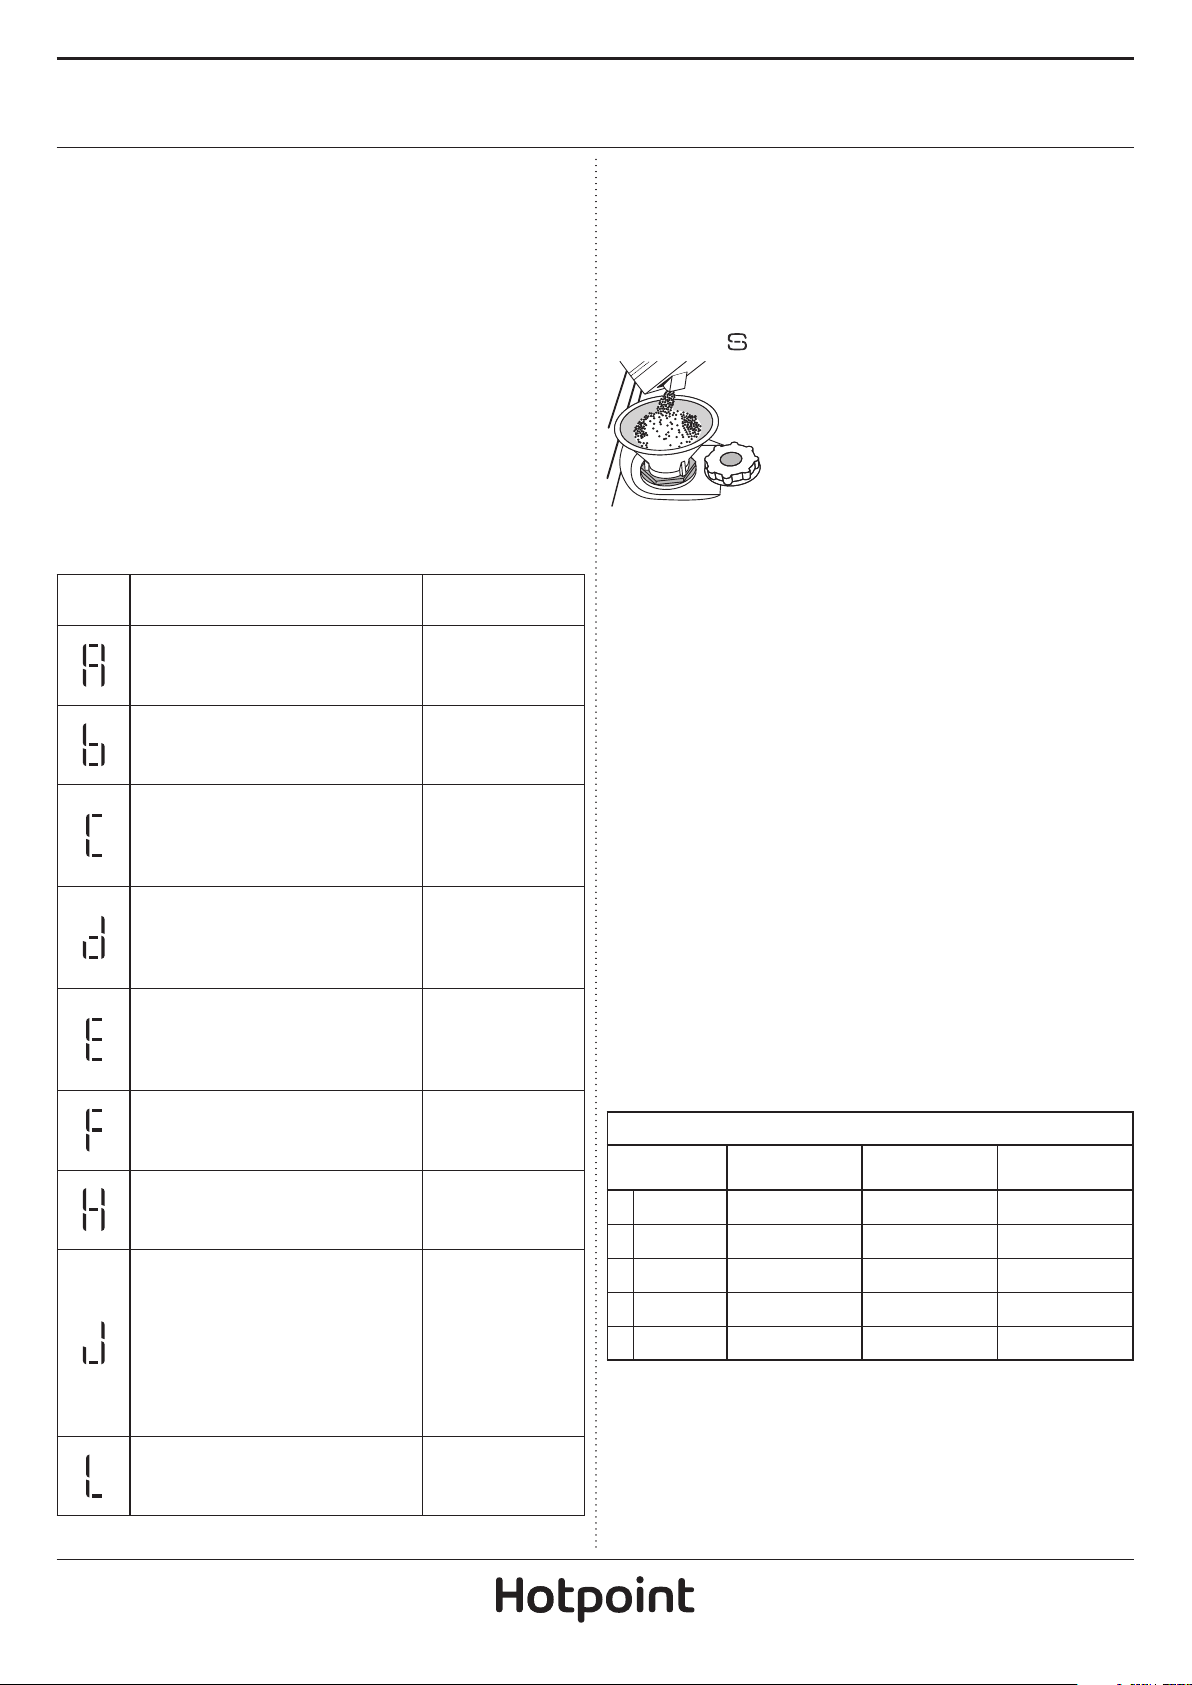
1. Remove the lower rack and unscrew the
reservoir cap (anticlockwise).
2. Only the rst time you do this: ll the salt
reservoir with water.
3. Position the funnel (see gure) and ll the salt
reservoir right up to its edge (approximately
1 kg); it is not unusual for a little water to leak
out.
4. Remove the funnel and wipe any salt residue
away from the opening.
Make sure the cap is screwed on tightly, so that no detergent can get
into the container during the wash program (this could damage the
water softener beyond repair).
As soon as this procedure is complete, run a program without loading.
The “Pre-Wash” program alone is not sucient.
Residual saline solution or grains of salt can lead to corrosion, irreparably
damaging the stainless steel components.
The guarantee is not applicable if faults are caused by such circumstances.
After the salt has been poured into the machine, the SALT REFILL indi-
cator light switches o.
If the salt container is not lled, the water softener and the heating
element may be damaged as a result of limescale accumulation.
Using of Salt is recommended with any type of dishwasher detergent.
Whenever you need to add salt, it is mandatory to complete the pro-
cedure before the beginning of the washing cycle to avoid corrosion.
SETTING THE WATER HARDNESS
To allow the water softener to work in a perfect way, it is essential that
the water hardness setting is based on the actual water hardness in
your house. This information can be obtained from your local water
supplier.
The factory setting is “3” for average water hardness.
To change, follow instructions in section “SETTING MENU”.
Water Hardness Table
Level
°dH
German degrees
°fH
French degrees
°Clark
English degrees
1 Soft 0 - 6 0 - 10 0 - 7
2 Medium 7 - 11 11 - 20 8 - 14
3 Average 12 - 16 21 - 29 15 - 20
4 Hard 17
- 34 30 - 60 21 - 42
5 Very hard 35 - 50 61 - 90 43 - 62
Loading ...
Loading ...
Loading ...