Loading ...
Loading ...
Loading ...
• 6 •
CHARGING A BATTERY OUTSIDE OF THE VEHICLE
1. Place battery in a well-ventilated area.
2. Clean the battery terminals.
3. Connect the battery, following the precautions listed in sections 6 and 7.
4. Connect the charger to a live grounded 120V AC outlet.
5. The green Power LED will light.
6. When charging is complete, disconnect the charger from the AC power, disconnect the negative clamp, and nally the positive clamp.
7. A marine (boat) battery must be removed and charged on shore.
USING THE QUICK-CONNECT CABLE CONNECTORS
Connect either of the two (2) output cable leads to the charger. Make sure to place the charger on a dry, non-ammable surface.
WARNING: Never connect the clamp and ring terminal connectors together for use in other applications, such as external battery or other power source charging, or to
extend the output cable length, as reverse polarity and/or overcharge conditions will occur.
BATTERY CLAMP QUICK-CONNECT
1. Connect the end of the charger output cable to the end of the battery cable quick-connect and clamps.
2. Follow the steps in sections 6 and 7, to connect the output clamps to the battery.
3. Connect the charger to a live 120V AC outlet.
RING TERMINAL QUICK-CONNECT
1. To permanently attach to a battery, loosen and remove each nut from the bolt at the battery terminal.
2. Connect the red POSITIVE connector ring to the POSITIVE battery terminal.
3. Connect the black NEGATIVE connector ring to the NEGATIVE battery terminal.
4. Replace and tighten the nuts to secure.
5. Connect the cable to the end of the charger output cord. Take care to keep the wires and plug away from metal and moving parts.
6. Connect the charger to a live grounded 120V AC outlet.
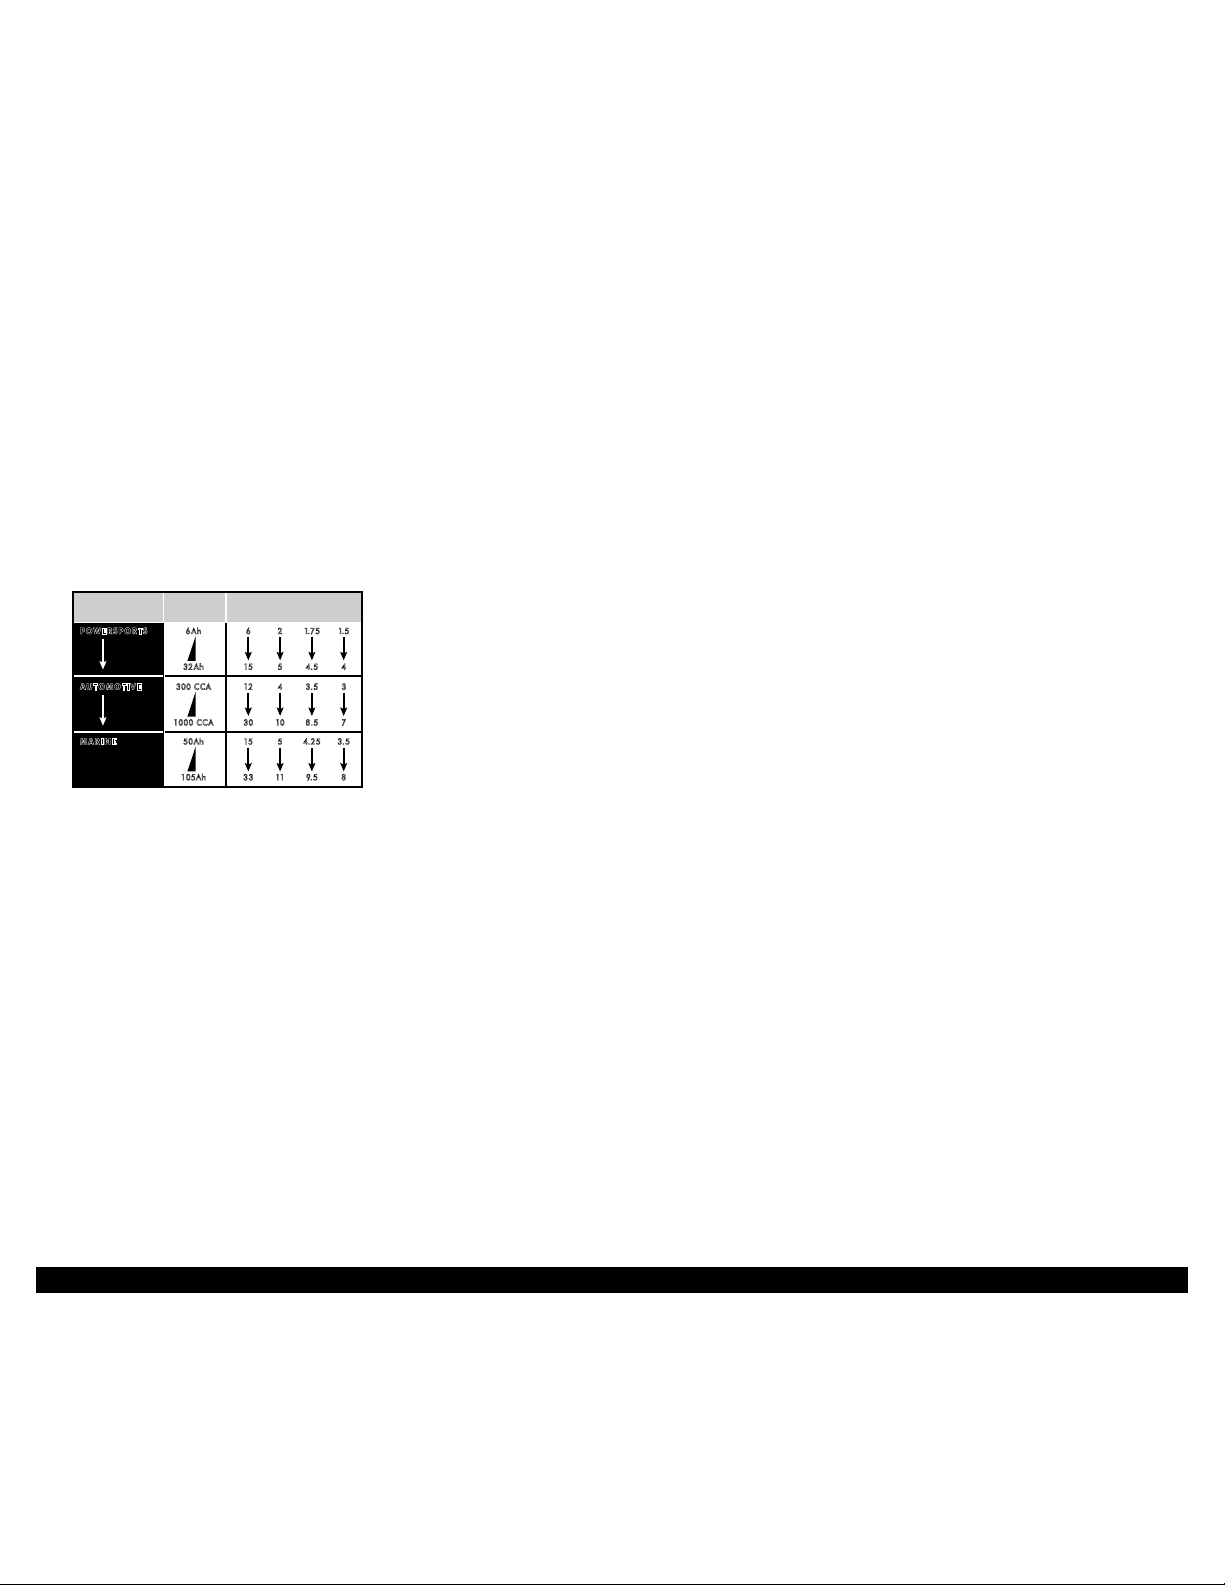
BATTERY CHARGING TIMES
APPLICATION
BATTERY
SIZE
CHARGING TIME (Hours)
2A 6A 8A 10A
POWERSPORTS
6Ah 6
32 Ah 15
AUTOMOTIVE
300 CCA 12
1000 CCA 30
MARINE
50 Ah 15
105Ah 33
2
5
4
10
5
11
1.75
4.5
3.5
8.5
4.25
9.5
1.5
4
3
7
3.5
8
Times are based on a 50% discharged battery and may change, depending on age and condition of battery.
AUTOMATIC CHARGING MODE
When an automatic charge is performed, the charger switches to the maintain mode automatically after the battery is charged.
BAD BATTERY
If charging cannot be completed normally, the charger’s output is shut off and the red Bad Battery LED will light. Do not continue attempting to charge this battery. Check
the battery and replace, if necessary.
DESULFATION MODE
If the battery is left discharged for an extended period of time, it could become sulfated and not accept a normal charge. If the charger detects a sulfated battery, the
charger will switch to a special mode of operation designed for such batteries. If successful, normal charging will resume after the battery is desulfated. Desulfation could
take 8-10 hours. If desulfation fails, the red Bad Battery LED will light.
COMPLETION OF CHARGE
Charge completion is indicated by the green Charged LED. When lit, the charger has switched to the maintain mode of operation.
MAINTAIN MODE (FLOAT MODE MONITORING)
When the green Charged LED is lit, the charger has started maintain mode. In this mode, the charger keeps the battery fully charged by delivering a small current when necessary. If
the charger has to provide its maximum maintain current for a continuous 12 hour period, it will go into abort mode (see Bad Battery section). This is usually caused by a drain on the
battery or the battery could be bad. Make sure there are no loads on the battery. If there are, remove them. If there are none, have the battery checked or replaced.
MAINTAINING A BATTERY
The unit maintains both 6 and 12 volt batteries, keeping them at full charge. It is not recommended for industrial applications.
NOTE: The maintain mode technology allows you to safely charge and maintain a healthy battery for extended periods of time. However, problems with the battery, electrical
problems in the vehicle, improper connections or other unanticipated conditions could cause excessive current draws. As such, occasionally monitoring your battery and the
charging process is recommended.
12. MAINTENANCE AND CARE
A minimal amount of care can keep your battery charger working properly for years.
12.1 Clean the clamps each time you are nished charging. Wipe off any battery uid that may have come in contact with the clamps, to prevent corrosion.
12.2 Occasionally cleaning the case of the charger with a soft cloth will keep the nish shiny and help prevent corrosion.
12.3 Coil the input and output cords neatly when storing the charger. This will help prevent accidental damage to the cords and charger.
12.4 Store the charger unplugged from the AC power outlet in an upright position.
12.5 Store inside, in a cool, dry place. Do not store the clamps clipped together, on or around metal, or clipped to the cables.
Loading ...
Loading ...
Loading ...