Instruction Manual
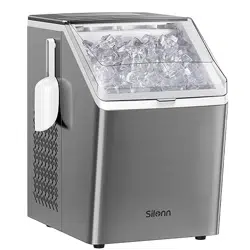
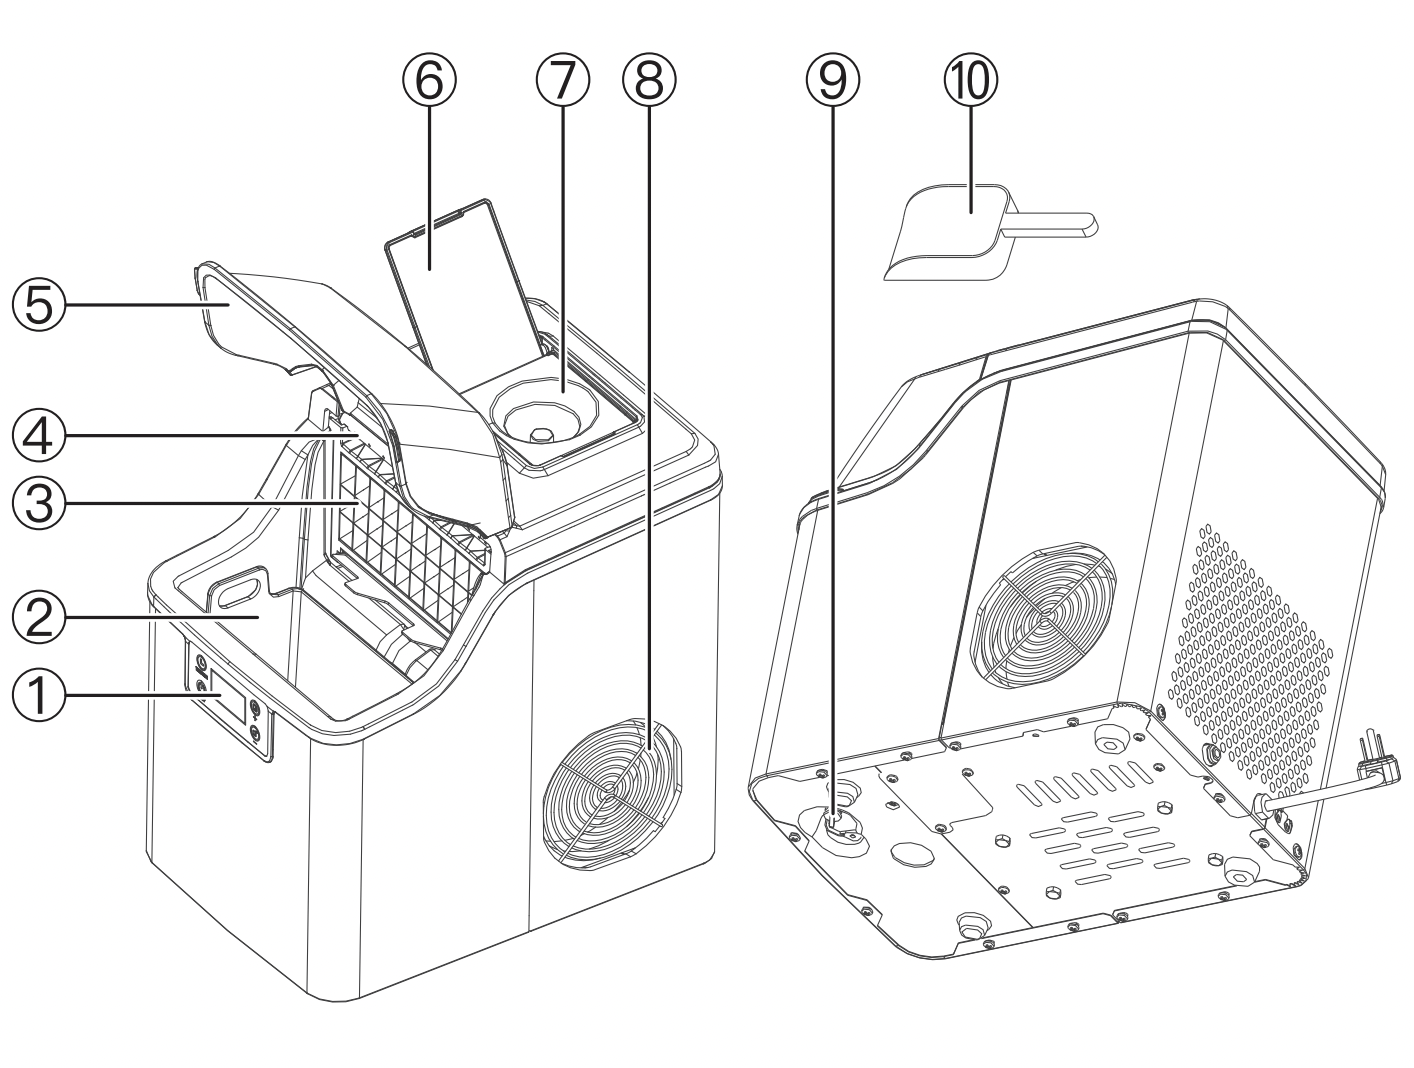
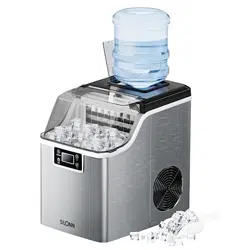
PRODUCT DESCRIPTION
- Control Panel
- Ice Basket
- Evaporator
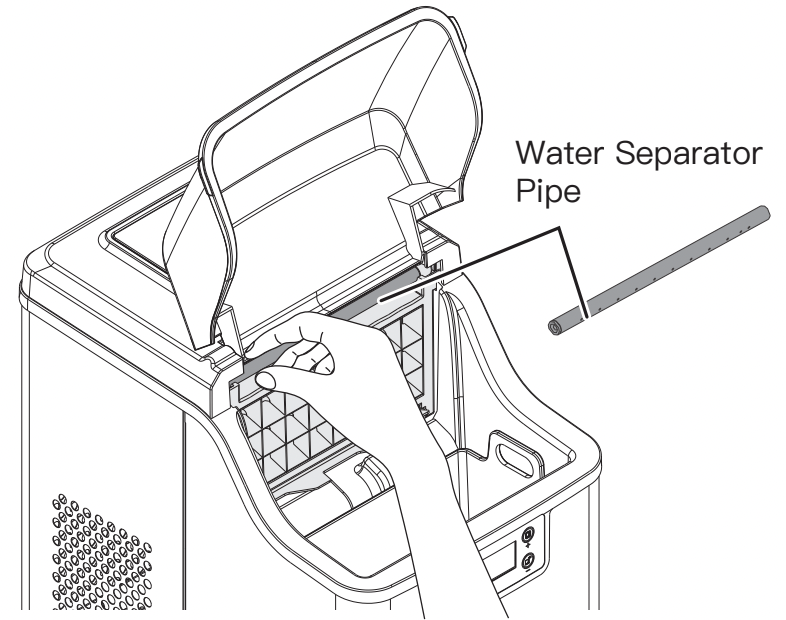
- Water Separator Pipe
- Top Cover
- Cover For Water Reservoir
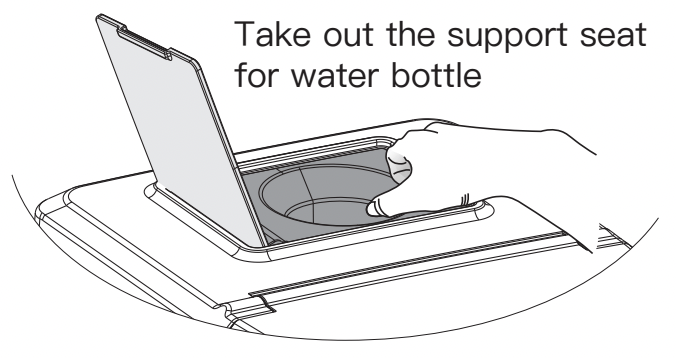
- Support Seat For Water Bottle (Optional, Special For The Unit Supplied By Bottled Water)
- Hot Air Outlet
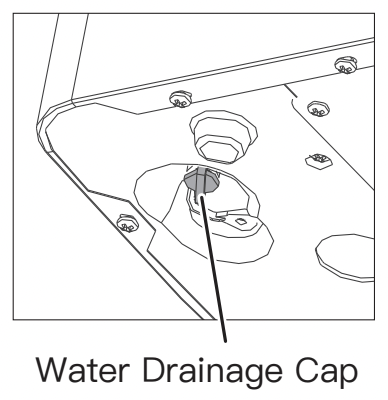
- Water Draining Cap: To Draining Out The Water From The Ice Maker
- Ice Scoop
CLEANING AND MAINTAINING YOUR ICE MAKER
BEFORE FIRST USE
Before using the ice maker, it is highly recommended to clean it thor- oughly.
- Remove the exterior and interior packaging. Check that the ice basket and ice scoop are included. If any parts are missing, please contact our customer service.
- Take out the ice basket and clean it with hot water, detergent and a non-abrasive sponge.
- Clean the interior with diluted detergent, warm water and a soft cloth. Then use the water to rinse the inside parts, Unplug the water drainage cap on the bottom of the ice maker to empty the water in the water tank. If you need to empty the water in the reservoir, you need to plug the power but not turn on it, then unplug the water drainage cap to empty the water.
- Wipe the outside of the ice maker with a mild detergent solution and warm water.
- Dry the interior and exterior of the ice maker with a soft cloth.
AFTER LONG-TERM USE
After using the ice maker for a long time, we also suggest you should clean it. In particular, you must clean the water separator pipe and the water filters periodically.
Cleaning the Separator Pipe:
If the compressor and water pump work normally, but there is little or no water running down from the separator pipe, please remove the separator pipe to check if it is blocked.
- Press the ON/OFF button to turn off the ice maker.
- Pinch the left end of the separator pipe and pry it out.
- Clean each holes on the separator pipe.
- Connect the separator pipe to the hose on the right side, then clip the left end of the separator pipe into the slot on the left side. Please make sure the holes point to down.
How to drain out the water from the water tank and water reservoir completely?
Because the water in the water reservoir is blocking to drain port by the draining plug, if you want to drain away all the water, please plug in the ice maker and but don’t turn on it, then remove the water draining cap at the bottom. Wait a few minutes while all of the water is let out.
Clean the Water Tank and the Water Reservoir:
- Clean them with diluted detergent, warm water and a soft cloth.
- Then use the water to rinse the inside, and drain out the water. It will help you keep the ice maker and ice cube hygienically, and also make the ice maker work normally.
Please Note: When cleaning, if find that the ice cubes left on the evapo- rator and can not be taken out easily, you can turn on the ice maker to let it enter the ice making process, then press “ON/OFF” button for more than 5 seconds to let the ice maker starts ice harvest process to melt the ice cubes. It will help you remove the hard ice cubes.
STORAGE
- The outside of the ice maker should be cleaned regularly with a mild detergent solution and warm water.
- When the ice maker is not in use for a long time, drain out the water.
OPERATION PANEL AND DISPLAY AREA
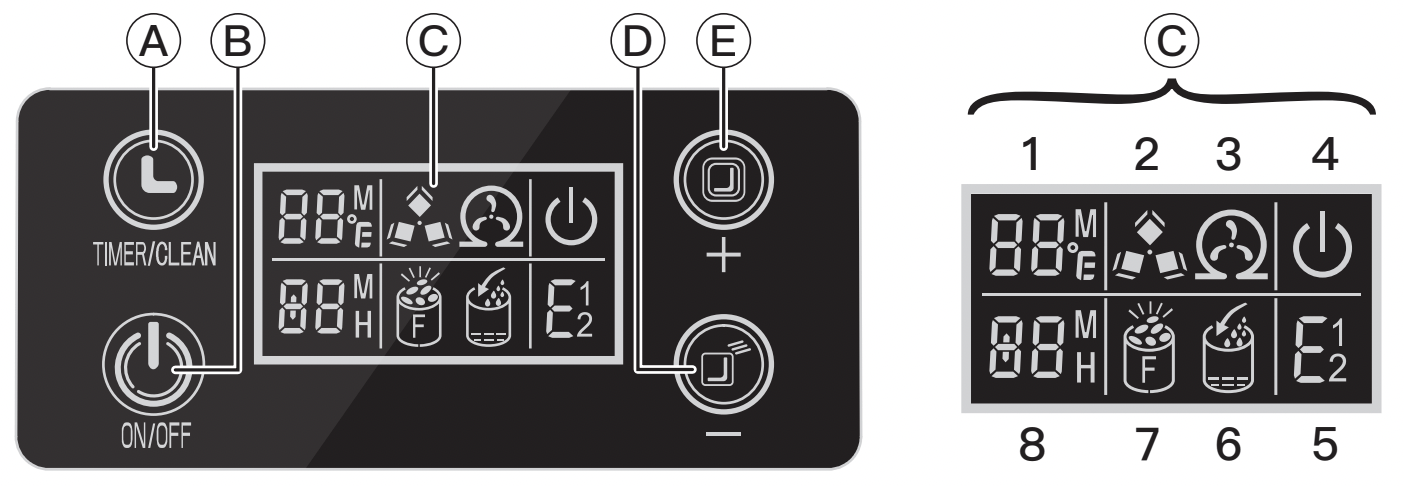
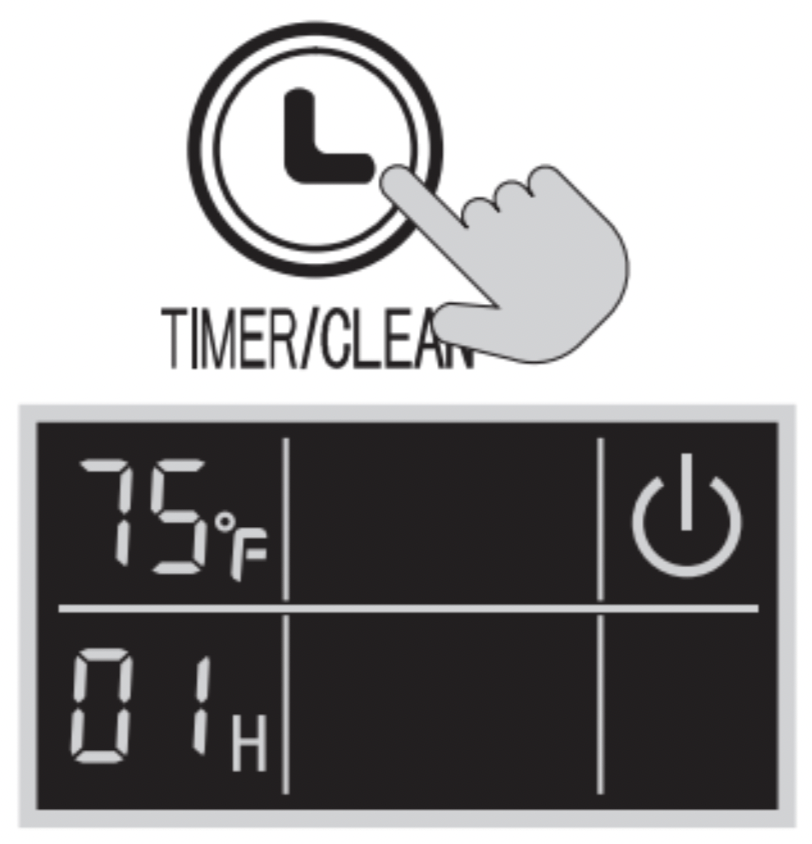
A. TIMER/CLEAN button
Short press this button once to enter the timer setting program; Long press this button for more than 5 seconds to start the self-cleaning function.
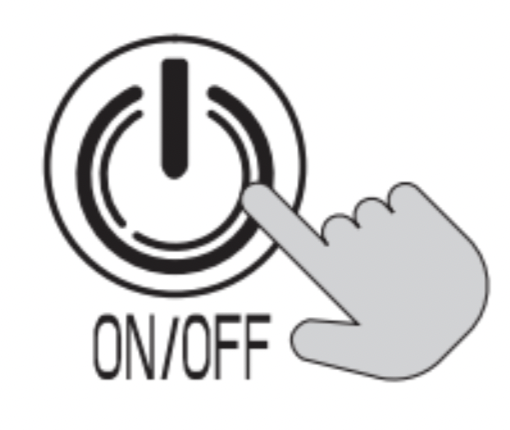
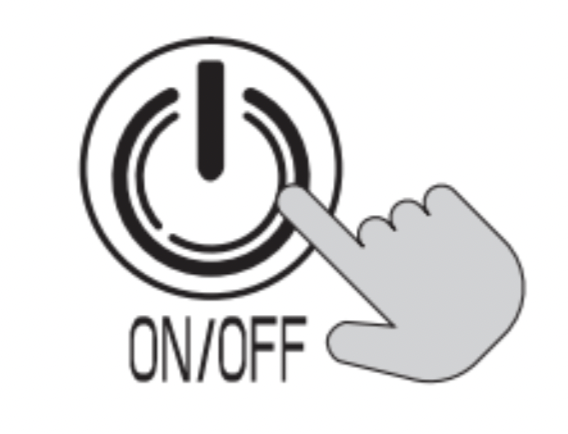
B. ON/OFF button
When the ice maker is off, press this button to turn on the ice maker; When the ice maker is making the ice cubes, long press this button for more than 5 seconds and the ice maker will switch to ice harvest process by force.
C. LCD Display window
- Countdown symbol for ambient temperature and ice-making: When the display shows , it means the countdown for ice-making; when the display shows <°F>, it means ambient temperature.
- Ice cube symbol: When the symbol is rotating, the ice maker is making ice cubes; When the symbol flashes, the ice maker is har- vesting ice cubes.
- Automatic self-cleaning symbol display.
- ON/OFF symbol.
- The error code:
E1: Failure of the ambient temperature sensor.
E2: Failure of the water temperature sensor.
E: Ice formation anomaly or refrigerant leaked.
- Lack water warning symbol.
- Ice full warning symbol.
- Time setting display area. When the screen window shows , timer unit ON/OFF; When the screen window shows , setting ice-making time.
D. Ice making and timer reduce
E. Ice making and timer increase
USING YOUR ICE MAKER
PREPARING FOR USE
- Find a location for the ice maker that is protected from direct sunlight and other sources of heat (i.e.: stove, furnace, radiator). Place the ice maker on a leveled surface. Maker sure that there is at least 6 inches of space between the back and sides of your ice maker and the wall.
- The ice maker must be positioned so that the plug is accessible.
- Allow one hour for the refrigerant fluid to settle before plugging the ice maker in.
WARNING: fill with drinkable water only.
WARNING:
A. Check and clean the water tank, reservoir, filter screen and separator pipe regularly so as to ensure it is not blocked by any dirty impurities.
B. The ice-making capacity depends on the water temperature. The colder the water, the more ice is produced.
C. The ice-making capacity depends on the ambient temperature where the ice maker is placed. The colder ambient temperature, the more ice is produced.
D. The quality of the water used will affect the working life of the circulat-ing pump. It is best to use pure water or distilled water. Some abnormal sounds in the pump working process are caused by impurities in the water, which is a normal phenomenon and does not affect the use of the ice maker.
E. There will be a delay of 3 minutes when the compressor restarts during the working process.
ICE MAKING OPERATION
- Remove Cover And Pour Into Water
Remove the cover of the water reservoir and pour drinkable water into water reservoir. And be sure to keep water level below the max. level with FULL mark displayed in following picture.
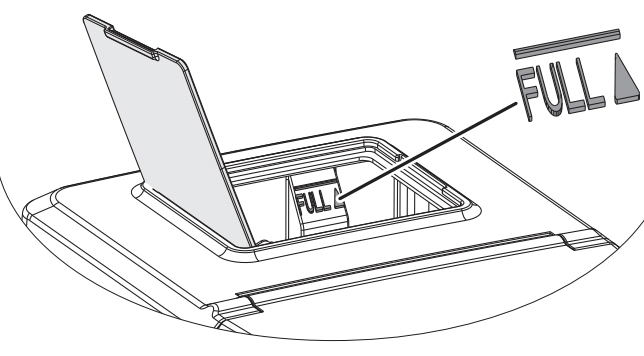
Warning: Do not pour the water into the water tank located underneath the ice basket which will effect the ice making performance.
- Turn On The Ice Maker
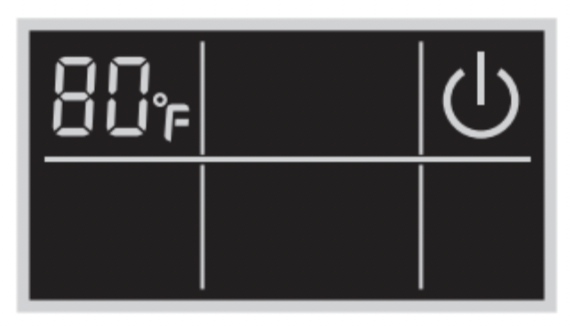
1. Plug the ice maker, the electric power symbol  will start to flash, and the ambient temperature will display at the top left corner of the screen window. For example,
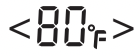
 digits means the 80 Fahrenheit ambient.
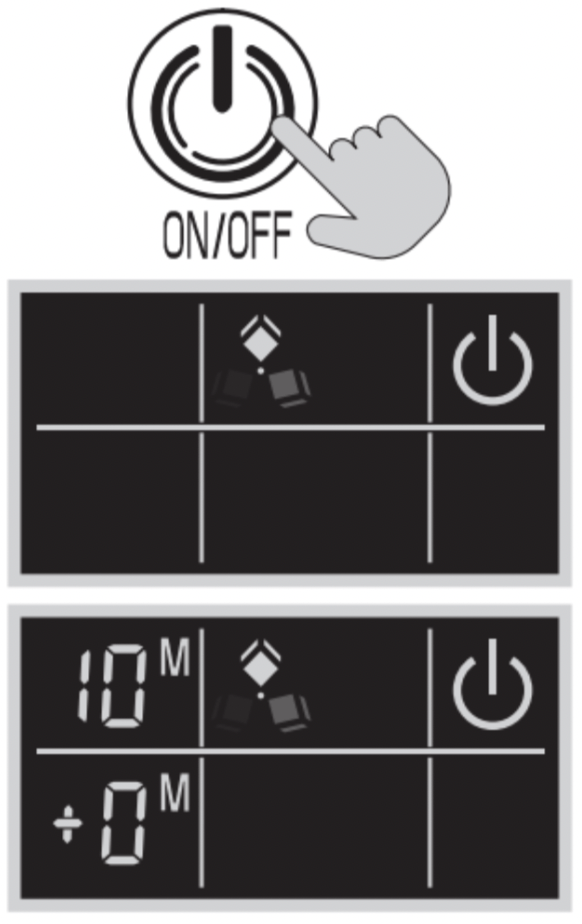
2. Press the “ON/OFF” button to turn on the ice maker. The water will flow into the water tank to the standard water level, then the compressor start to make ice cubes. The screen window will display as below: Power symbol  turns into always on state; Ice-cube symbol
 turns into rotating state; The ambient temperature display will disappear. After some minutes of ice-making duration, the ambient temperature displaying area will display flashing digit. For example, the flashing digit
  means that it will take 10 minutes to complete this ice-making process.
3. When ice maker harvest, symbol 
 flashes. After the ice maker harvest, it will automatically goes into the next ice-making process. The water will flow from the water reservoir to water tank through solenoid valve, and the symbol
  will be on. The symbol
  will be off if the water in the water tank is full, then the next ice-making cycle start again.

Please Note:
- When there is no water in the water reservoir, the symbol
 will keep on. Press “ON/OFF” button to turn off the ice maker and fill water again, then press “ON/OFF” button again to turn on to make ice cubes. Or fill water directly and wait 20mins, the ice maker will restart by itself.
- Each ice-making cycle lasts about 13 to 25 minutes which depends on the ambient and water temperature. For the first time you use, it takes more time to make ice cubes for the initial water temperature. In the extremely hot room temperature, it takes more time but will be within 35 minutes to make ice cubes.
- When the
 symbol lights on, the ice maker will turn off by itself and it will turn on by itself if you take the ice cubes away from the water tank.
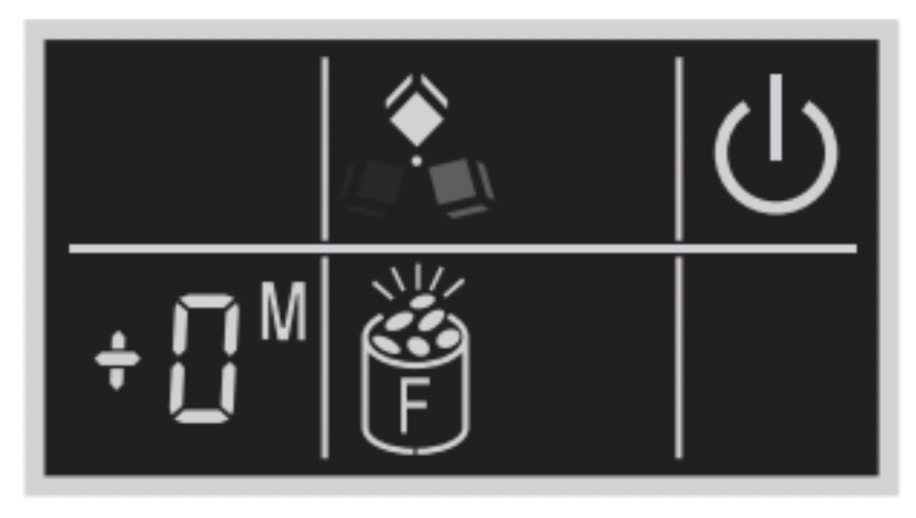
- How To Set The Thickness Of The Ice Cubes
Press the “+” or “-” buttons to set the time of the ice-making process. The more time it takes, the thicker ice cubes it will produce. 1 minute adjustment for each press of the “+” or “-” buttons.
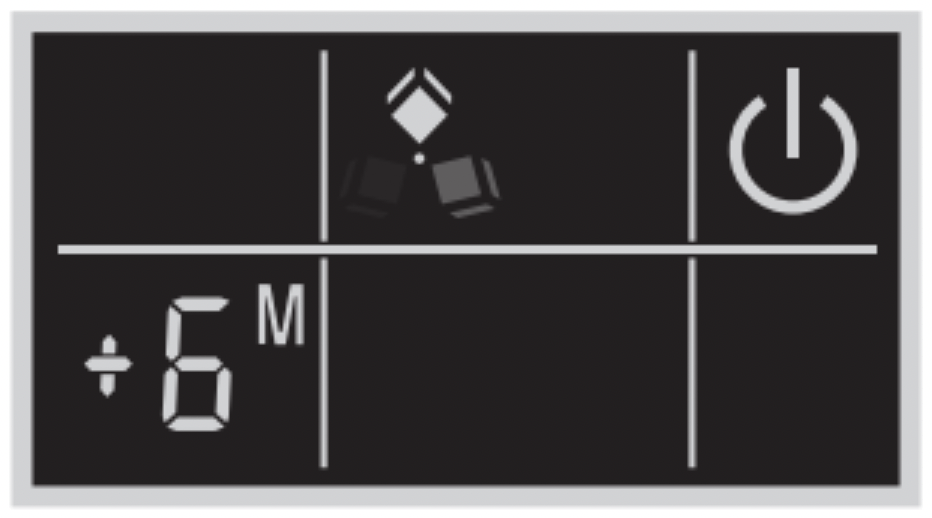
Please Note:
- You can increase the time up to 6 minutes.
- This can only start from the new ice-making cycle.
- If you restart the ice maker again, it turns into the default setting 0. You need to re-set the ice-making time.
- How To Harvest The Ice Cubes During The Ice-making Process
Long press the button “ON/OFF” more than 5 seconds when the ice maker is working, the unit will start to harvest. Press “ON/OFF” button again, the ice maker will turn off.
- How To Use The Self-cleaning Function
Start the self-cleaning program: Plug on the unit, and press the “TIMER/CLEAN” button for more than 5 seconds to enter the self-cleaning program which takes 20 minutes. the symbol  rotates on screen window, the countdown area at the left top displays 20M.
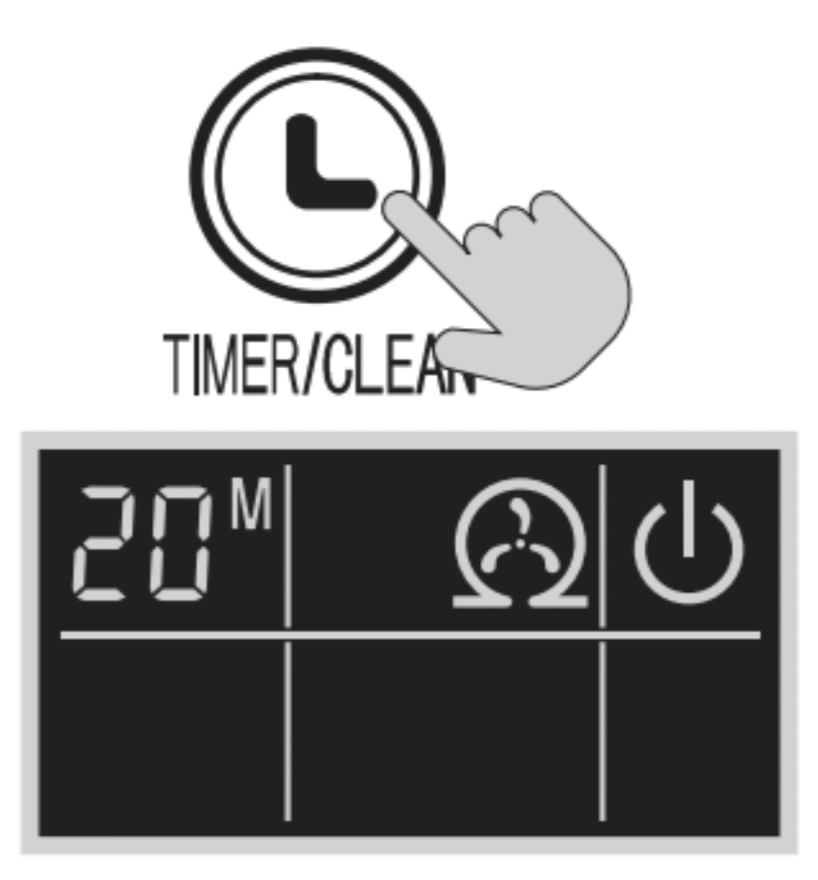
Cancel the self-cleaning program: It takes about 20 minutes to complete one self-cleaning program. When the program is over, the system will be in off-state automatically. And also you can press the “ON/OFF” button to cancel the self-cleaning program by force.
- How To Set The Timer
1. Press the “TIMER” button, and the display will show  .
.
2. Then press “+” and “-” buttons to set the time. 1 hour adjustment for each press of the “+” or “-” buttons. During the setting, the is flashing. The will keep on after 5 seconds which means setup complete.
Please Note:
- If the lower left corner displays 5H in standby state, it means that the ice maker will automatically turn on after 5 hours;
- If the lower left corner displays 5H in the ice-making process, it means that the ice maker will automatically turn off after 5 hours.
- The “H” on the display indicates that the ice maker is in the timing function. When the digits will get smaller and smaller. When it reaches 0, the ice maker cancels timing function.
- When the ice maker is in timing function, the screen window will show the ice-making time and timing time which will switch every 5 seconds.
- How To Cancel The Timer
1. When the ice maker is in the timing function (xx H on the screen), press the “Timer” button and the both digits and “H” on the screen are off, which means the timing function is canceled.
2. You can also directly press the “ON/OFF" button on the screen to forcibly turn off the timing startup function and also turn off the ice-making process.
- How To Drain Out The Water
1. Plug in the power.
2. Unplug the draining plug at the bottom of the ice maker but not turn it on.
3. After the drainage is completed, reset the drainage plug.
Please Note:
You can empty the water in the water tank by unplugging the water drain-ing cap at the bottom of the ice maker. If you need to empty the water in the reservoir, you need to plug the power but not turn it on, then unplug the water drainage cap to empty the water.
TROUBLESHOOTING
TECHNICAL PARAMETERS & CIRCUIT DIAGRAM
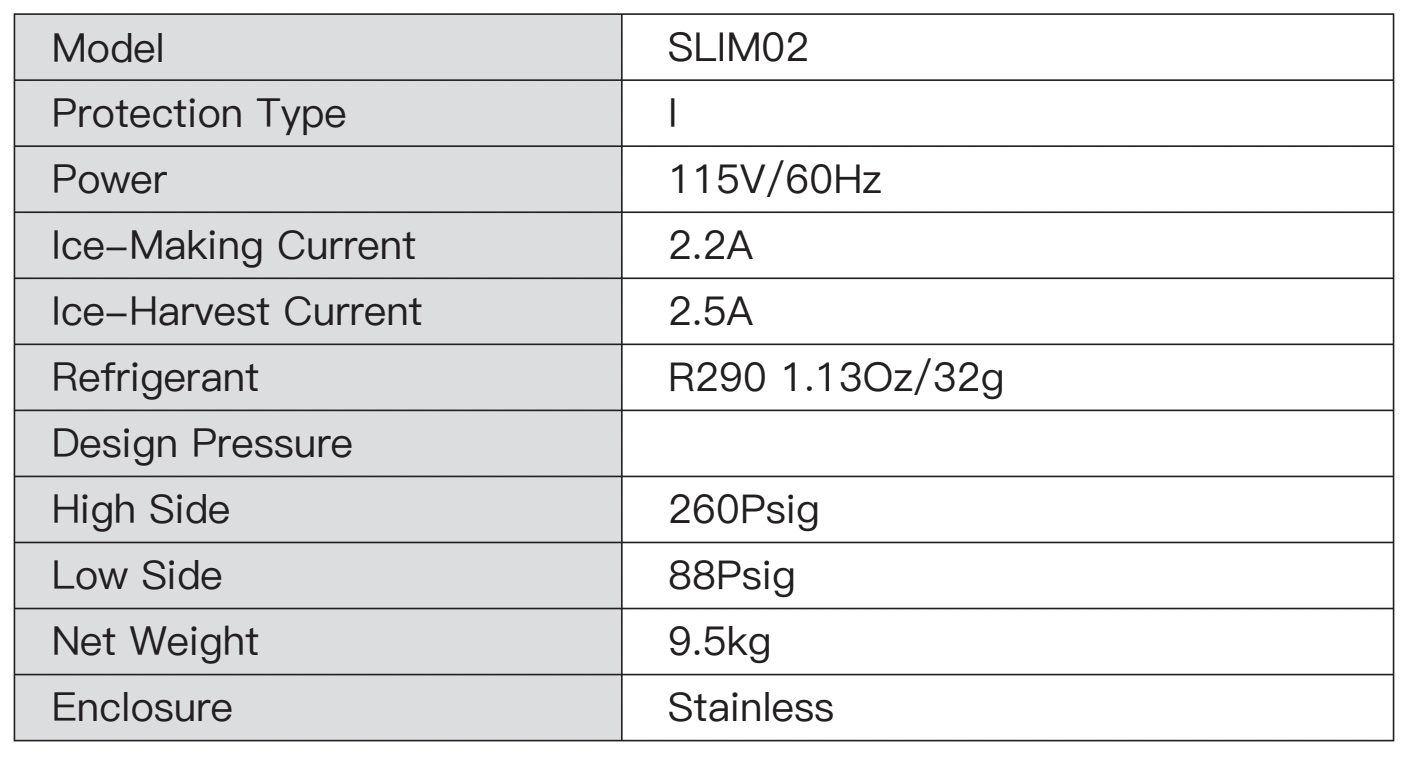
TECHNICAL PARAMETERS
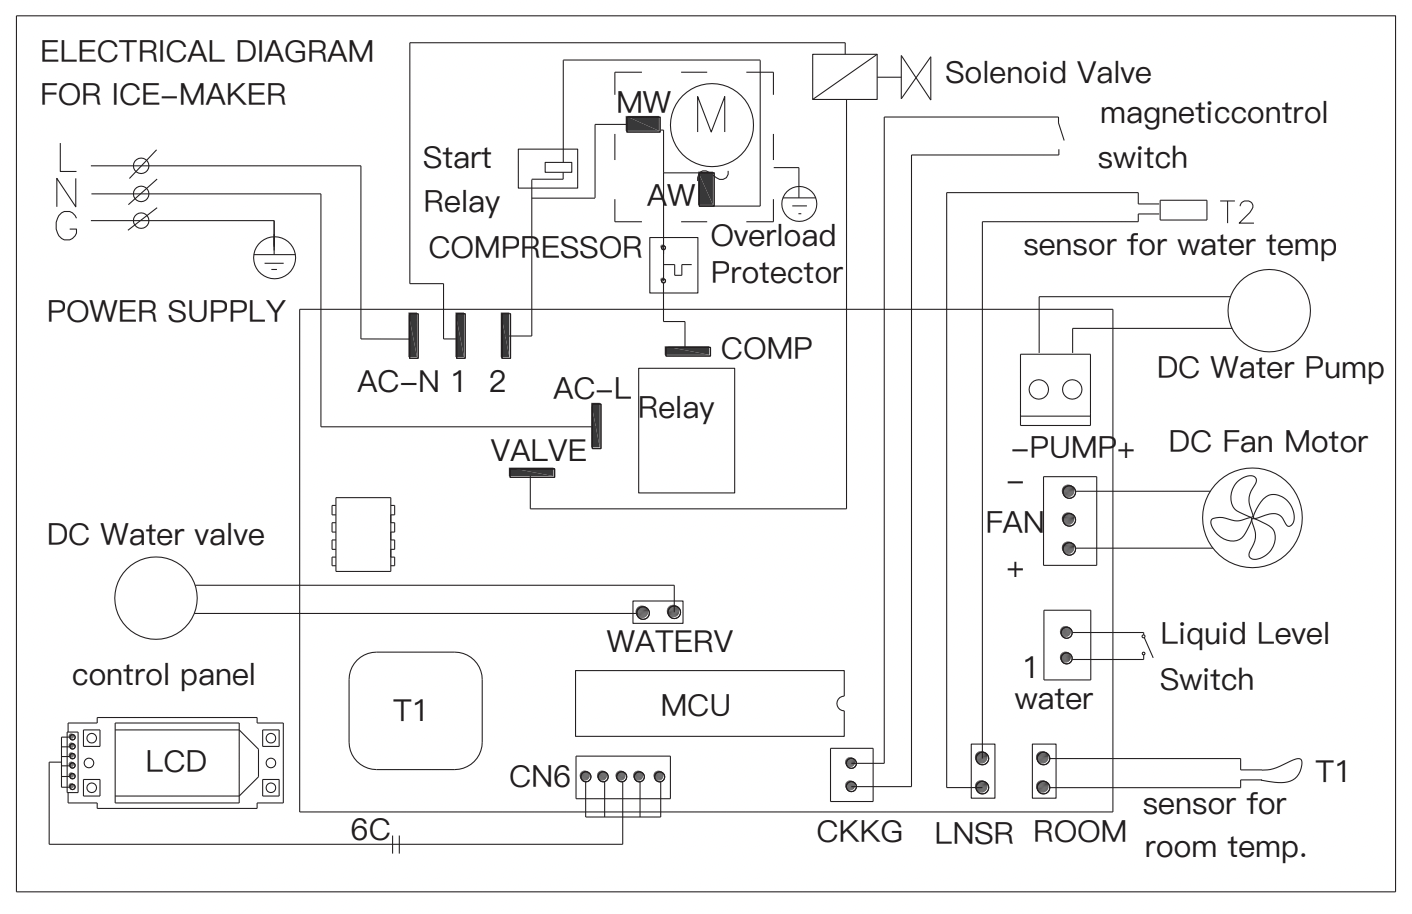
CIRCUIT DIAGRAM
 is on
is on is on
is on is on
is on is on
is on is on
is on