Electric
Visit the Frigidaire Web Site at:
http://www.frigidaire.com
CONTENTS Page
VersiOnen espa_ol...........................................................2
Product Registration ........................................................2
Important Safety Instructions ...................................... 3-5
Selecting SurfaceCooking Utensils .................................. 6
Specialty Pans& Trivets ...................................................6
CanningTips & information .............................................7
Setting Surface Controls............................................... 7-9
To OperatetheWarmer Zone .........................................10
OvenVent(s) and Racks.................................................11
Air Circulation in the Oven..............................................11
OvenBakingInformations .............................................. 12
Broiling Informations......................................................13
Convection Cooking and Baking.....................................14
Convection Roasting ......................................................14
Setting Side OvenControl .............................................. 15
Self-CleanOvenCycle.....................................................16
PorcelainEnamelOven
Cleaning(Side Oven,if equipped) .................................. 17
To Cleanthe OvenBottom..............................................17
To Cleanthe CooktopGlass...................................... 18-19
CleaningVarious Partsof your Range...................... 20-22
To Removeand ReplaceRight OvenDoor .....................22
To Removeand ReplaceStorage Drawer .......................22
ChangingCooktopand / or OvenLight...........................23
Avoid ServiceChecklist ............................................ 24-25
Notes........................................................................ 26-27
Warranty.........................................................................28
READ AND SAVE THESE INSTRUCTIONS 318200710(0703) Rev. A
Product Registration
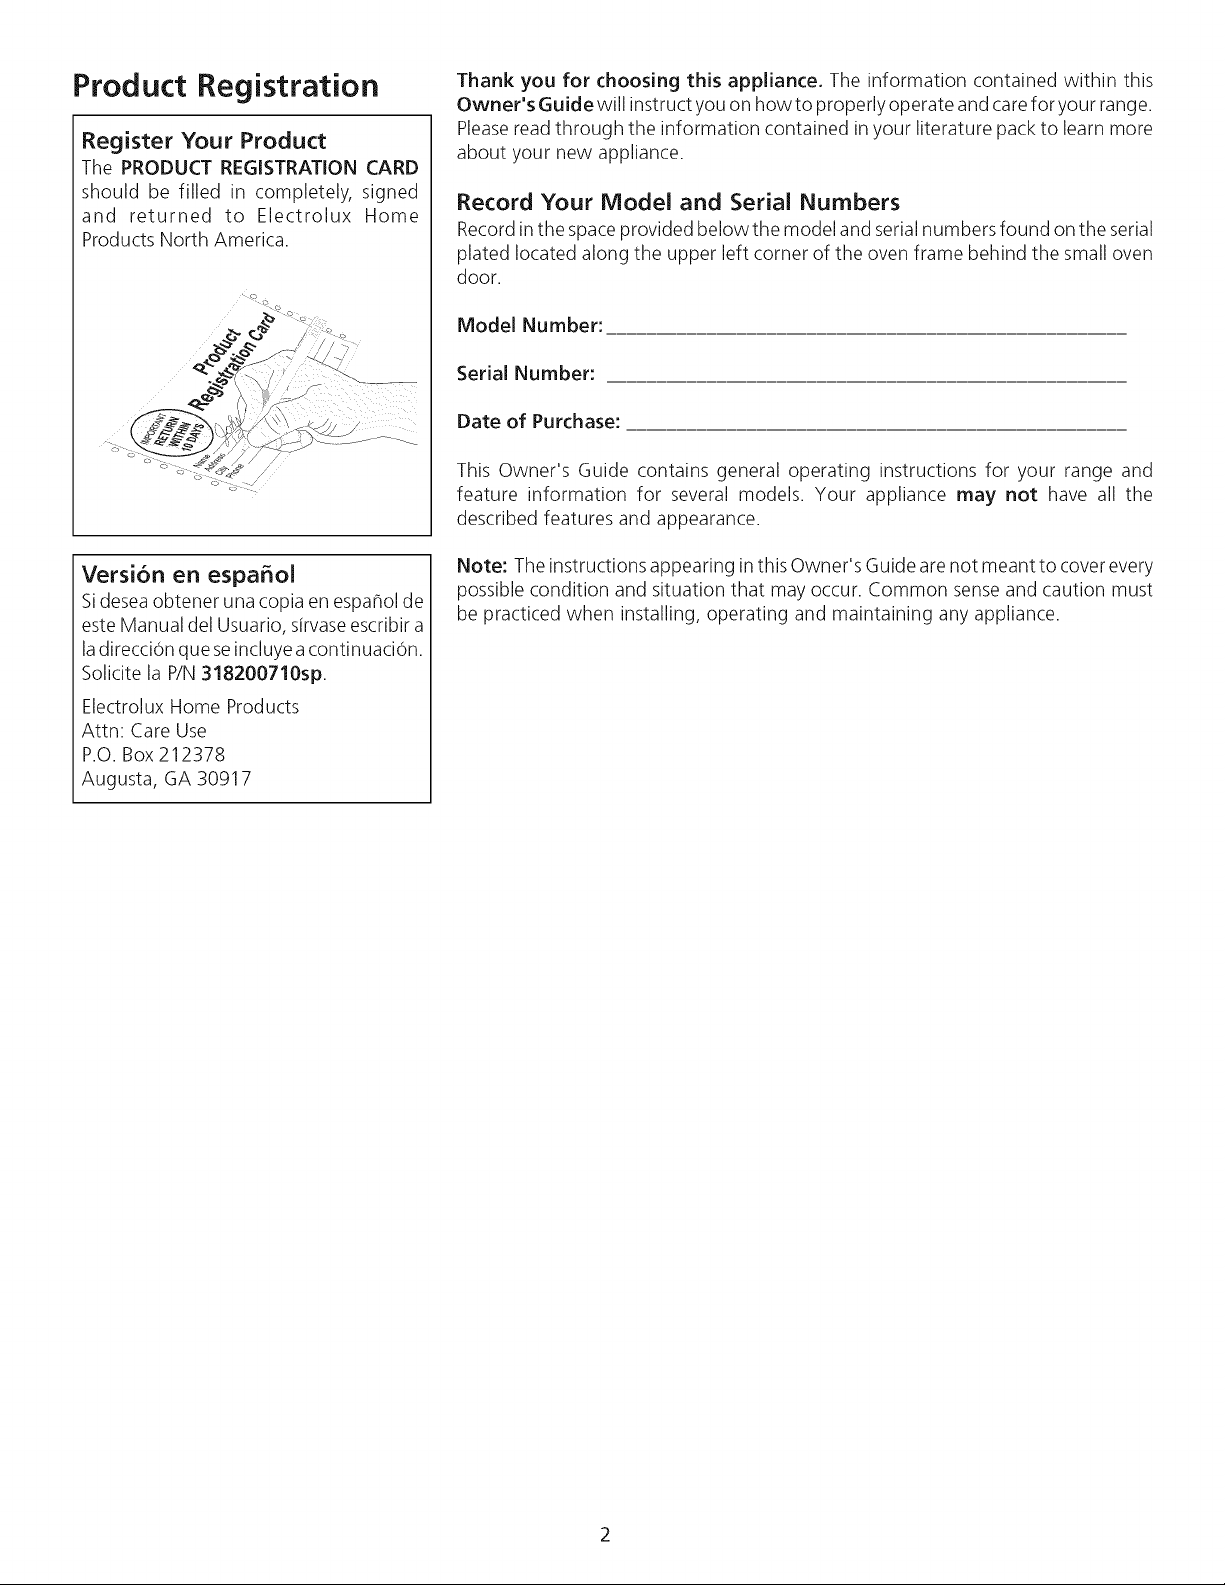
Register Your Product
The PRODUCT REGISTRATION CARD
should be filled in completely, signed
and returned to Electrolux Home
Products North America.
Versi6n en espahol
Sideseaobtener una copia en espahol de
este Manual del Usuario, sirvaseescribir a
ladirecci0n que seincluye a continuaci0n.
Solicite la P/N318200710sp.
Electrolux Home Products
Attn: Care Use
P.O. Box 212378
Augusta, GA 30917
Thank you for choosing this appliance. The information contained within this
Owner's Guide will instruct you on how to properly operate and carefor your range.
Pleaseread through the information contained in your literature packto learn more
about your new appliance.
Record Your Model and Serial Numbers
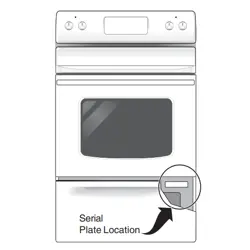
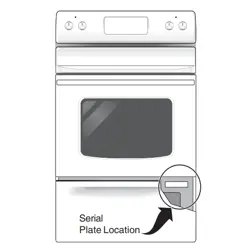
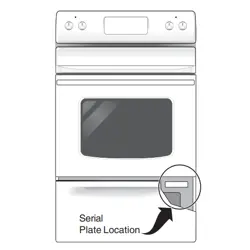
Record in the space provided belowthe model and serial numbers found on the serial
plated located along the upper left corner of the oven frame behind the small oven
door.
Model Number:
Serial Number:
Date of Purchase:
This Owner's Guide contains general operating instructions for your range and
feature information for several models. Your appliance may not have all the
described features and appearance.
Note: Theinstructions appearing in this Owner's Guide arenot meant to cover every
possible condition and situation that may occur. Common sense and caution must
be practiced when installing, operating and maintaining any appliance.
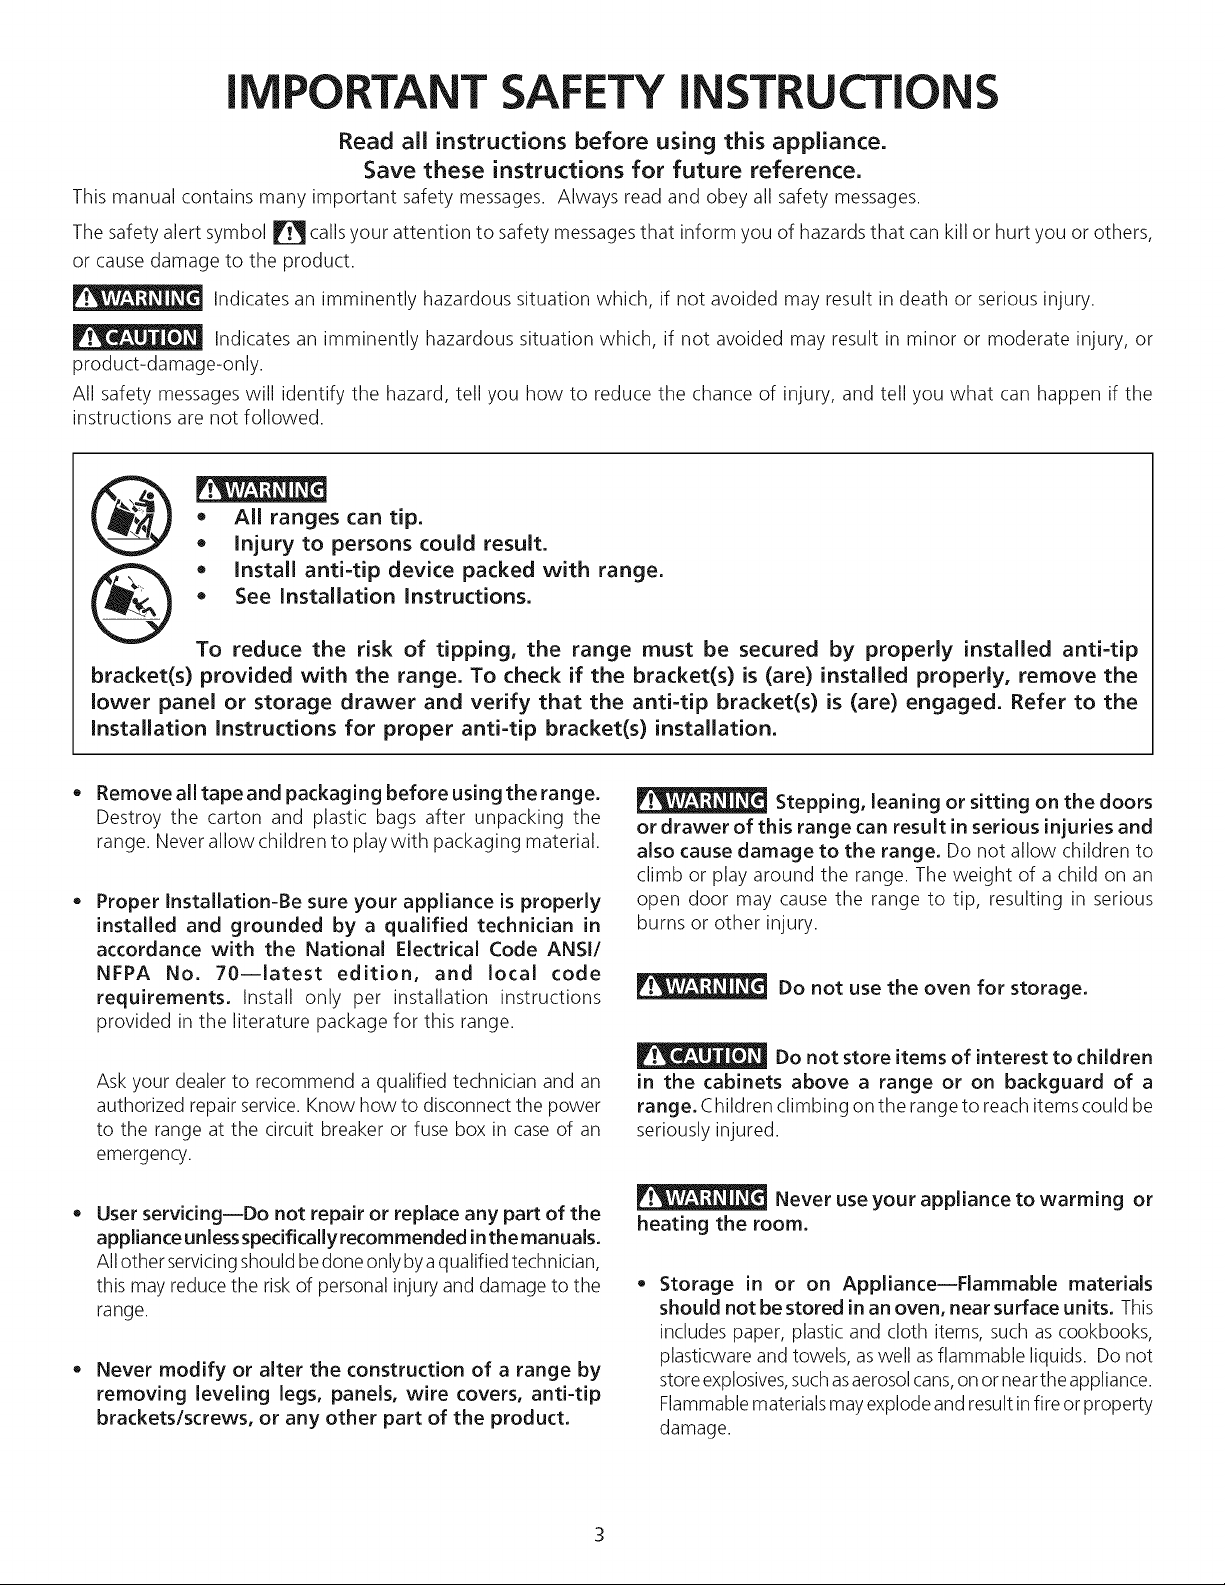
IM RTANT SAFETY iNSTRUCTiONS
Read all instructions before using this appliance.
Save these instructions for future reference.
This manual contains many important safety messages. Always read and obey all safety messages.
The safety alert symbol _ callsyour attention to safety messagesthat inform you of hazards that can kill or hurt you or others,
or cause damage to the product.
Indicates an imminently hazardous situation which, if not avoided may result in death or serious injury.
Indicates an imminently hazardous situation which, if not avoided may result in minor or moderate injury, or
product-damage-only.
All safety messages will identify the hazard, tell you how to reduce the chance of injury, and tell you what can happen if the
instructions are not followed.
@
,, All ranges can tip.
,, Injury to persons could result.
,, Install anti-tip device packed with range.
• See Installation Instructions.
To reduce the risk of tipping, the range must be secured by properly installed anti-tip
bracket(s) provided with the range. To check if the bracket(s) is (are) installed properly, remove the
lower panel or storage drawer and verify that the anti-tip bracket(s) is (are) engaged. Refer to the
Installation Instructions for proper anti-tip bracket(s) installation.
Remove all tape and packaging before using the range.
Destroy the carton and plastic bags after unpacking the
range. Never allow children to play with packaging material.
Proper Installation-Be sure your appliance is properly
installed and grounded by a qualified technician in
accordance with the National Electrical Code ANSI/
NFPA No. 70--latest edition, and local code
requirements. Install only per installation instructions
provided in the literature package for this range.
Ask your dealer to recommend a qualified technician and an
authorized repair service. Know how to disconnect the power
to the range at the circuit breaker or fuse box in case of an
emergency.
User servicing--Do not repair or replace any part of the
appliance unless specifically recommended inthemanuals.
All other servicingshould be done only bya qualified technician,
this may reduce the risk of personal injury and damage to the
range.
Never modify or alter the construction of a range by
removing leveling legs, panels, wire covers, anti-tip
brackets/screws, or any other part of the product.
Stepping, leaning or sitting on the doors
or drawer of this range can result in serious injuries and
also cause damage to the range. Do not allow children to
climb or play around the range. The weight of a child on an
open door may cause the range to tip, resulting in serious
burns or other injury.
Do not use the oven for storage.
Do not store items of interest to children
in the cabinets above a range or on backguard of a
range. Children climbing on the range to reach items could be
seriously injured.
Never use your appliance to warming or
heating the room.
Storage in or on Appliance--Flammable materials
should not be stored inan oven, near surface units. This
includes paper, plastic and cloth items, such ascookbooks,
plasticware and towels, aswell asflammable liquids. Do not
store explosives,suchasaerosolcans,on or nearthe appliance.
Flammablematerialsmay explodeand result infire or property
damage.
IM RTANT SAFETY iNSTRUCTiONS
Do not leave children alone--Children should not be
left alone or unattended in the area where appliance
is in use. They should never be allowed to sit or stand on
any part of the appliance.
IMPORTANT INSTRUCTIONS FOR USING YOUR
COOKTOP
• Know which knob controls each surface heating unit.
DO NOT TOUCH SURFACE UNITS, AREAS NEAR THESE
UNITS, OVEN HEATING ELEMENTS OR INTERIOR
SURFACES OFTHE OVEN. Both surface and oven heating
elements may be hot even though they are dark in color.
Areas near surface units may become hot enough to cause
burns. During and after use, do not touch, or let clothing or
other flammable materials touch these areas until they
have had sufficient time to cool. Among these areasare the
cooktop, surfaces facing the cooktop, the oven vent
openings and surfaces near these openings, oven door and
window.
Use proper pan size. Thisappliance isequipped with one
or more surface units of different sizes. Select utensils
having flat bottoms large enough to cover the surface unit.
The use of undersized utensils will expose a portion of the
surface heating to direct contact and may result in ignition
of clothing. Proper relationship of utensil tothe surface unit
will also improve efficiency.
Do Not Immerse or Soak Removable Heating
Elements-- Heating elements should never be
immersed in water. Heating elements clean themselves
during normal operation.
Wear proper apparel--Loose-fitting or hanging
garments should never be worn while using the
appliance. Donot let clothing or other flammable materials
contact hot surfaces.
Do not use water or flour on grease fires--Smother
the fire with a pan lid, or use baking soda, a dry
chemical or foam-type extinguisher.
When heating fat or grease, watch it closely. Fat or
grease may catch fire if allowed to become too hot.
Use only dry potholders--Moist or damp potholders
on hot surfaces may result in burns from steam. Do not
let potholders touch hot heating elements. Do not use a
towel or other bulky cloth instead of a potholder.
Do not heat unopened food containers--Build-up of
pressure may cause container to burst and result in
injury.
Remove the oven doors from any unused range if it is
to be stored or discarded.
IMPORTANT--Do not attempt to operate the oven during
a power failure. If the power fails, always turn the ovens
off. If the ovens are not turns off and the power resumes, the
oven may begin to operate again. Food left unattended could
catch fire or spoil.
Electronic controllers can be damaged by
cold temperatures. When you use your appliance for the
first time, or if it has not been used for a long period of
time, make sure that it has been exposed to a temperature
above 0°C/32°F for at least 3 hours before connecting it
to the power supply.
Make sure Drip Pans or Drip Bowls Are in Place--
Absence of these pans or bowls during cooking may subject
wiring or components underneath to damage.
Utensil handles should be turned inward and not
extend over adjacent surface units--To reduce the risk
of burns, ignition of flammable materials, and spillage due
to unintentional contact with the utensil. The handle of the
utensil should be positioned sothat it isturned inward, and
does not extend over adjacent surface units.
Never leave surface units unattended at high heat
settings--Boilovers cause smoking and greasy spillovers
that may ignite, or a pan that has boiled dry may melt.
Protective liners--Do not use aluminum foil to line oven
bottom or any other part of the appliance. Only use
aluminum foil as recommended for baking if used as a
cover placed on the food. Any other useof protective liners
or aluminum foil may result in a risk of electric shock or fire
or short circuit.
Glazed cooking utensils--Only certain types of glass,
glass/ceramic,ceramic, earthenware, or other glazed utensils
are suitable for rangetop service without breaking due to
the sudden change in temperature. Check the
manufacturer's recommendations for rangetop use.
Do not use decorative surface element covers If an
element isaccidentally turned on, the decorative cover will
become hot and possibly melt. Burns will occur if the hot
covers are touched. Damage may also be done to the
cooktop.
IM RTANT SAFETY iNSTRUCTiONS
FOR GLASS COOKTOPS ONLY
• Do not clean or operate a broken cooktop--lf cooktop
should break, cleaning solutions and spilloversmay penetrate
the broken cooktop and create a risk of electric shock.
Contact a qualified technician immediately.
Clean cooktop glass with caution--If a wet sponge or
cloth isused to wipe spills on a hot cooking area, be careful
to avoid a steam burn. Some cleaners can produce harmful
fumes if applied to a hot surface.
Do not place hot cookware on cold cooktop glass. This
could cause glass to break.
• Avoid scratching the cooktop glass with sharp objects.
Do not touch a hot light bulb with a damp cloth, Doing
so could cause the bulb to break. Disconnect the appliance
or turn off the power to the appliance before removing and
replacing light bulb.
IMPORTANT INSTRUCTIONS FOR CLEANING
YOUR RANGE
Clean the range regularly to keep all parts free of
grease that could catch fire. Exhaust fan ventilation
hoods and grease filters should be kept clean. Do not allow
grease to accumulate on hood or filter. Greasy deposits in
the fan could catch fire. When you are flaming food under
the hood, turn the fan on. Referto the hood manufacturer's
instructions for cleaning.
IMPORTANT INSTRUCTIONS FOR USING YOUR
OVEN
Use care when opening oven door--Stand to the side of
the range when opening the door of a hot oven. Let hot air
or steam escape before you remove or replace food in the
oven.
• Keep ovens vents unobstructed. Eachvent has its own
vent located on the top, near each side and towards the
back of the cooktop. Touching the surfaces in this area
when the oven isoperating may cause severe burns. Also,
do not place plastic or heat-sensitive items on or near an
oven vent. These items could melt or ignite.
• Placement of ovens racks, Always place oven racks in
desired location while ovens are cool. If rack must be moved
while oven is hot use extreme caution. Use potholders and
grasp the rack with both hands to reposition. Do not let
potholders contact the hot heating elements in the ovens.
Remove all utensils from the rack before moving.
• Do not use a broiler pan without its grid. Broiler pan and
its grid allow dripping fat to drain and be kept away from the
high heat of the broiler.
• Do not cover the broiler grid with aluminum foil.
Exposed fat and grease could ignite.
• Kitchen cleaners and aerosols--Always follow the
manufacturer's recommended directions for use. Be aware
that excess residue from cleaners and aerosols may ignite
causing damage and injury.
SELF CLEANING OVENS
• In the self=Cleaning cycle only clean the parts listed in
this Use and Care Guide. Before self cleaning the oven,
remove all utensils or foods from the oven.
• Do not use oven cleaners--No commercial oven cleaner
or ovens liner protective coating of any kind should be used
in or around any part of the oven.
• Do not clean door gasket--The door gasket is essential
for a good seal. Care should be taken not to rub, damage
or move the gasket.
• Remove oven racks. Oven rackscolor will change if left in
the oven during a self-cleaning cycle.
_The health of some birds isextremely sensitive
to the fumes given off during the self-cleaning cycle of any
range. Move birds to another well ventilated room.
IMPORTANT SAFETY NOTICE
The California Safe Drinking Water and Toxic Enforcement Act requires the Governor of California to publish a list of substances known
to the state to cause cancer, birth defects or other reproductive harm, and requires businesses to warn customers of potential exposure
to such substances.
SAVE THESE INSTRUCTIONS
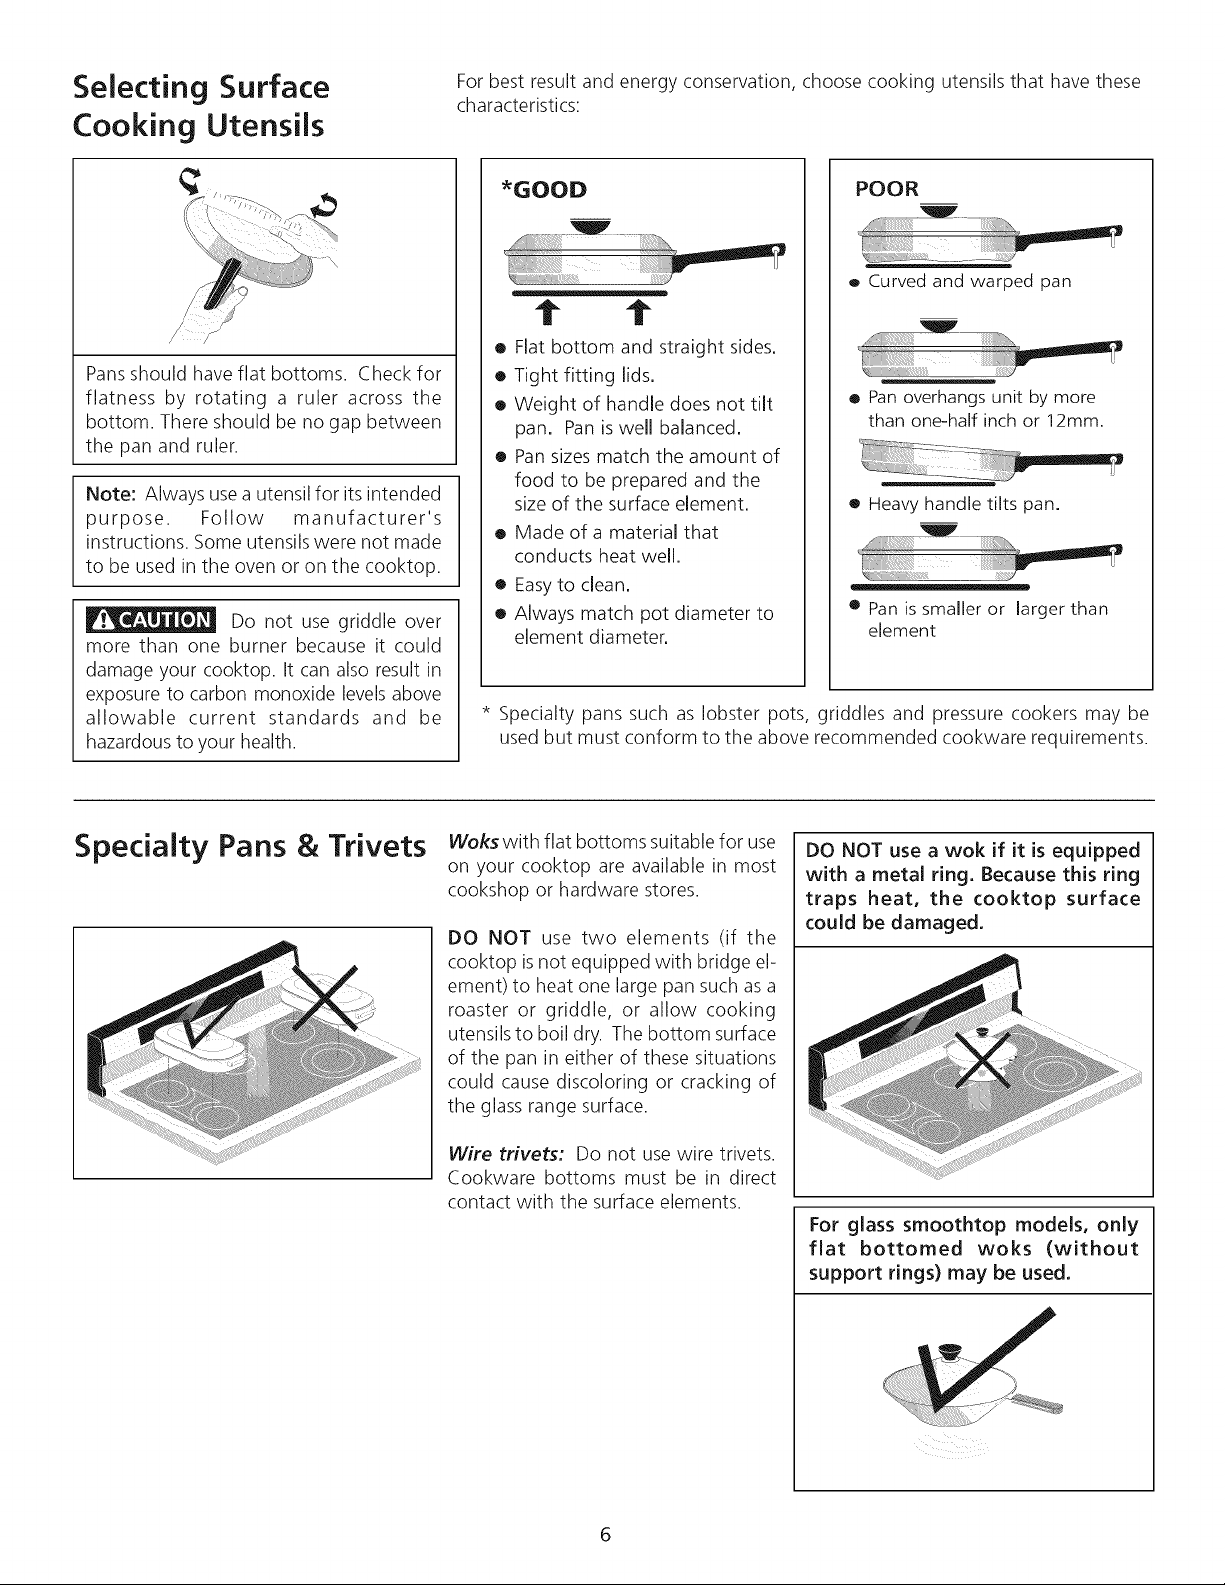
Selecting Surface
Cooking Utensils
Pansshould have flat bottoms. Check for
flatness by rotating a ruler across the
bottom. There should be no gap between
the pan and ruler.
Note: Always usea utensil for itsintended
purpose. Follow manufacturer's
instructions. Some utensils were not made
to be used in the oven or on the cooktop.
Do not use griddle over
more than one burner because it could
damage your cooktop. It can also result in
exposure to carbon monoxide levels above
allowable current standards and be
hazardous to your health.
For best result and energy conservation, choose cooking utensils that have these
characteristics:
*GOOD
t t
e Flat bottom and straight sides.
• Tight fitting lids.
e Weight of handle does not tilt
pan. Pan is well balanced.
• Pan sizes match the amount of
food to be prepared and the
size of the surface element.
o Made of a material that
conducts heat well.
• Easyto clean.
• Always match pot diameter to
element diameter.
POOR
o Curved and warped pan
o Pan overhangs unit by more
than one-half inch or 12mm.
o Heavy handle tilts pan.
W
• Pan issmaller or larger than
element
* Specialty pans such as lobster pots, griddles and pressure cookers may be
used but must conform to the above recommended cookware requirements.
Specialty Pans & Trivets
Wokswith flat bottoms suitable for use
on your cooktop are available in most
cookshop or hardware stores.
DO NOT use two elements (if the
cooktop isnot equipped with bridge el-
ement) to heat one large pan such as a
roaster or griddle, or allow cooking
utensils to boil dry. The bottom surface
of the pan in either of these situations
could cause discoloring or cracking of
the glass range surface.
Wire trivets: Do not use wire trivets.
Cookware bottoms must be in direct
contact with the surface elements.
DO NOT use a wok if it is equipped
with a metal ring. Because this ring
traps heat, the cooktop surface
could be damaged.
For glass smoothtop models, only
flat bottomed woks (without
support rings) may be used.
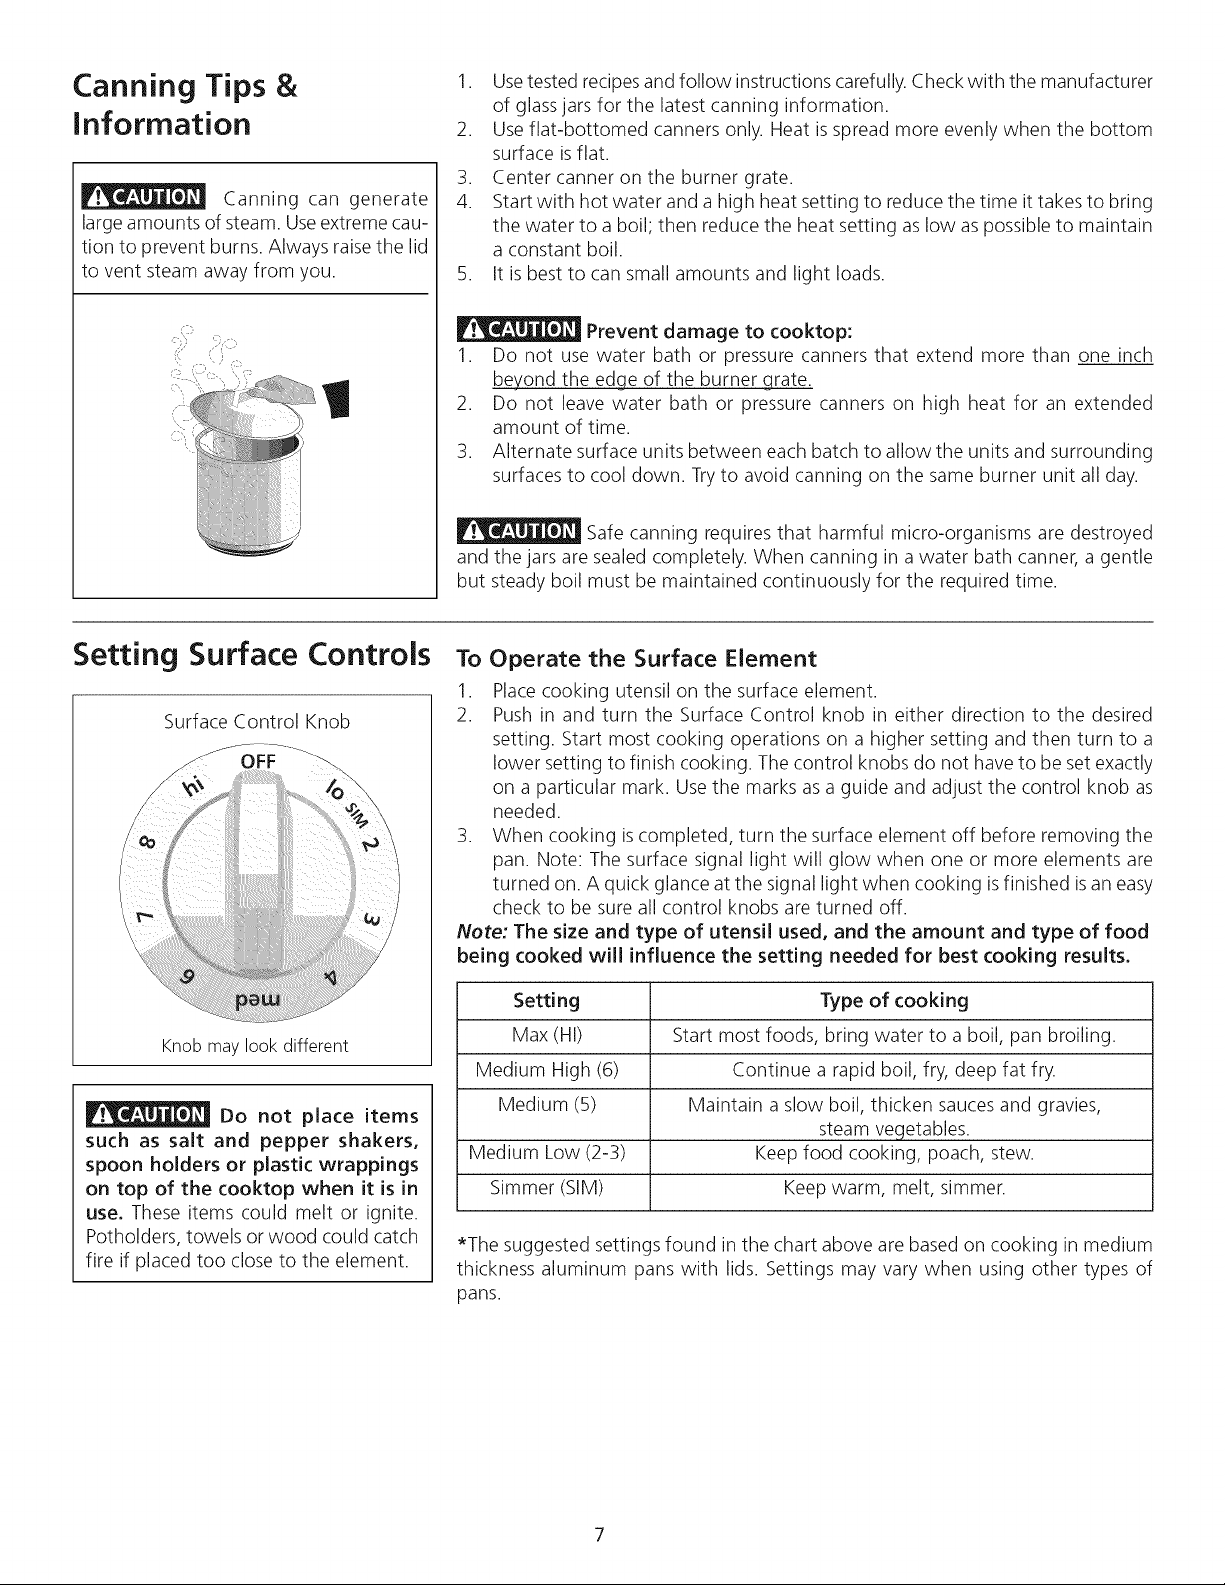
Canning Tips &
Information
Canning can generate
large amounts of steam. Useextreme cau-
tion to prevent burns. Always raisethe lid
to vent steam away from you.
1. Usetested recipesand follow instructions carefully. Check with the manufacturer
of glassjars for the latest canning information.
2. Use flat-bottomed canners only. Heat is spread more evenly when the bottom
surface isflat.
3. Center canner on the burner grate.
4. Start with hot water and a high heat setting to reduce the time it takes to bring
the water to a boil; then reduce the heat setting as low aspossible to maintain
a constant boil.
5. It is best to can small amounts and light loads.
Prevent damage to cooktop:
1. Do not use water bath or pressure canners that extend more than one inch
beyond the edge of the burner grate.
2. Do not leave water bath or pressure canners on high heat for an extended
amount of time.
3. Alternate surface units between each batch to allow the units and surrounding
surfaces to cool down. Try to avoid canning on the same burner unit all day.
Safe canning requires that harmful micro-organisms are destroyed
and the jars are sealed completely. When canning in a water bath canner, a gentle
but steady boil must be maintained continuously for the required time.
Setting Surface Controls
Surface Control Knob
OFF
Knob may look different
Do not place items
such as salt and pepper shakers,
spoon holders or plastic wrappings
on top of the cooktop when it is in
use. These items could melt or ignite.
Potholders, towels or wood could catch
fire if placed too close to the element.
To Operate the Surface Element
1. Placecooking utensil on the surface element.
2. Push in and turn the Surface Control knob in either direction to the desired
setting. Start most cooking operations on a higher setting and then turn to a
lower setting to finish cooking. The control knobs do not have to be set exactly
on a particular mark. Usethe marks asa guide and adjust the control knob as
needed.
3. When cooking iscompleted, turn the surface element off before removing the
pan. Note: The surface signal light will glow when one or more elements are
turned on. A quick glance at the signal light when cooking isfinished isan easy
check to be sure all control knobs are turned off.
Note: The size and type of utensil used, and the amount and type of food
being cooked will influence the setting needed for best cooking results.
Setting Type of cooking
Max (HI) Start most foods, bring water to a boil, pan broiling.
Medium High (6) Continue a rapid boil, fry, deep fat fry.
Medium (5) Maintain a slow boil, thicken saucesand gravies,
steam vegetables.
Medium Low (2-3) Keep food cooking, poach, stew.
Simmer (SIM) Keep warm, melt, simmer.
*The suggested settings found in the chart above are based on cooking in medium
thickness aluminum pans with lids. Settings may vary when using other types of
pans.
7
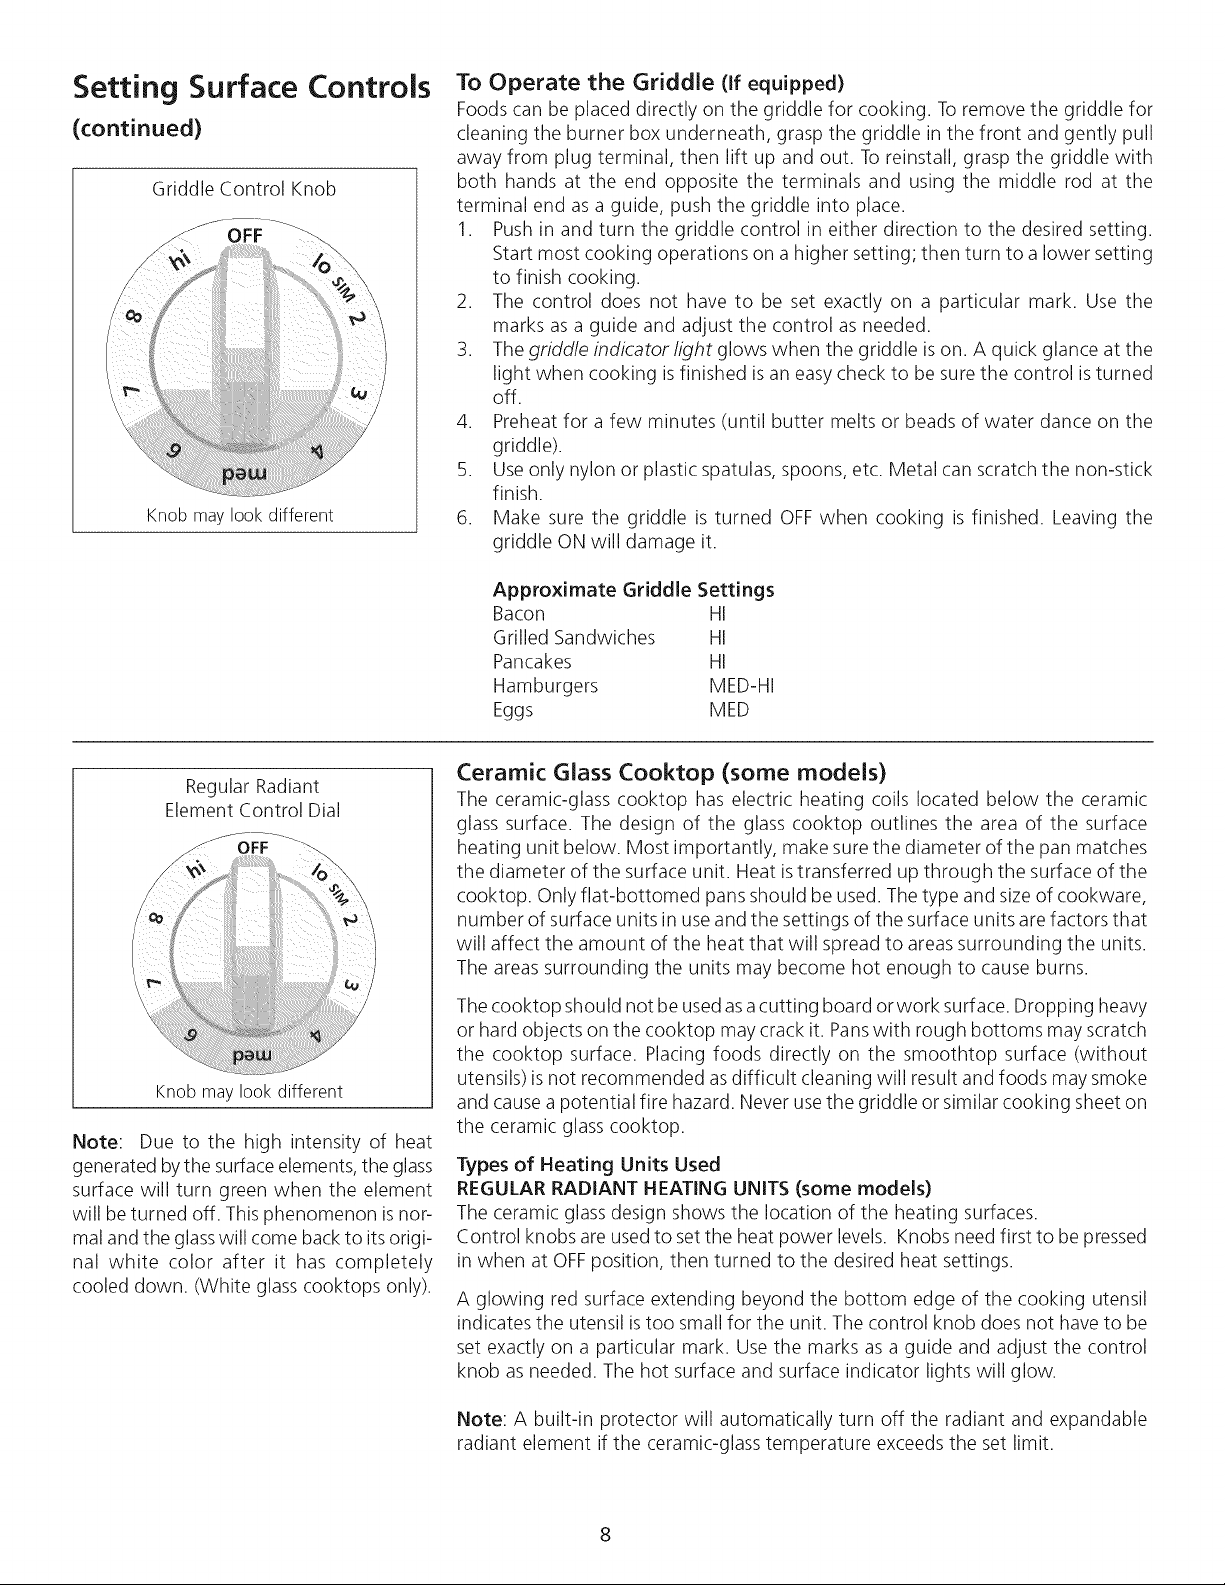
Setting Surface Controls
(continued)
Griddle Control Knob
OFF _:_
Knob may look different
To Operate the Griddle (If equipped)
Foods can be placed directly on the griddle for cooking. Toremove the griddle for
cleaning the burner box underneath, grasp the griddle in the front and gently pull
away from plug terminal, then lift up and out. Toreinstall, grasp the griddle with
both hands at the end opposite the terminals and using the middle rod at the
terminal end as a guide, push the griddle into place.
1. Push in and turn the griddle control in either direction to the desired setting.
Start most cooking operations on a higher setting; then turn to a lower setting
to finish cooking.
2. The control does not have to be set exactly on a particular mark. Use the
marks asa guide and adjust the control as needed.
3. The griddle indicator light glows when the griddle ison. A quick glance at the
light when cooking isfinished isan easy check to be sure the control isturned
off.
4. Preheat for a few minutes (until butter melts or beads of water dance on the
griddle).
5. Use only nylon or plastic spatulas, spoons, etc. Metal can scratch the non-stick
finish.
6. Make sure the griddle is turned OFFwhen cooking is finished. Leaving the
griddle ON will damage it.
Approximate Griddle Settings
Bacon HI
Grilled Sandwiches HI
Pancakes HI
Hamburgers MED-HI
Eggs MED
Regular Radiant
Element Control Dial
Knob may look different
\
Note: Due to the high intensity of heat
generated bythe surface elements, the glass
surface will turn green when the element
will be turned off. This phenomenon isnor-
mal and the glasswill come back to its origi-
nal white color after it has completely
cooled down. (White glass cooktops only).
Ceramic Glass Cooktop (some models)
The ceramic-glass cooktop has electric heating coils located below the ceramic
glass surface. The design of the glass cooktop outlines the area of the surface
heating unit below. Most importantly, make sure the diameter of the pan matches
the diameter of the surface unit. Heat istransferred up through the surface of the
cooktop. Only flat-bottomed pans should be used. Thetype and size of cookware,
number of surface units in use and the settings of the surface units are factors that
will affect the amount of the heat that will spread to areas surrounding the units.
The areas surrounding the units may become hot enough to cause burns.
Thecooktop should not be usedasa cutting board or work surface. Dropping heavy
or hard objects on the cooktop may crack it. Panswith rough bottoms may scratch
the cooktop surface. Placing foods directly on the smoothtop surface (without
utensils) is not recommended asdifficult cleaning will result and foods may smoke
and cause a potential fire hazard. Never usethe griddle or similar cooking sheet on
the ceramic glass cooktop.
Types of Heating Units Used
REGULAR RADIANT HEATING UNITS (some models)
The ceramic glass design shows the location of the heating surfaces.
Control knobs are usedto set the heat power levels. Knobs need first to be pressed
in when at OFFposition, then turned to the desired heat settings.
A glowing red surface extending beyond the bottom edge of the cooking utensil
indicates the utensil istoo small for the unit. The control knob does not have to be
set exactly on a particular mark. Use the marks as a guide and adjust the control
knob as needed. The hot surface and surface indicator lights will glow.
Note: A built-in protector will automatically turn off the radiant and expandable
radiant element if the ceramic-glass temperature exceeds the set limit.
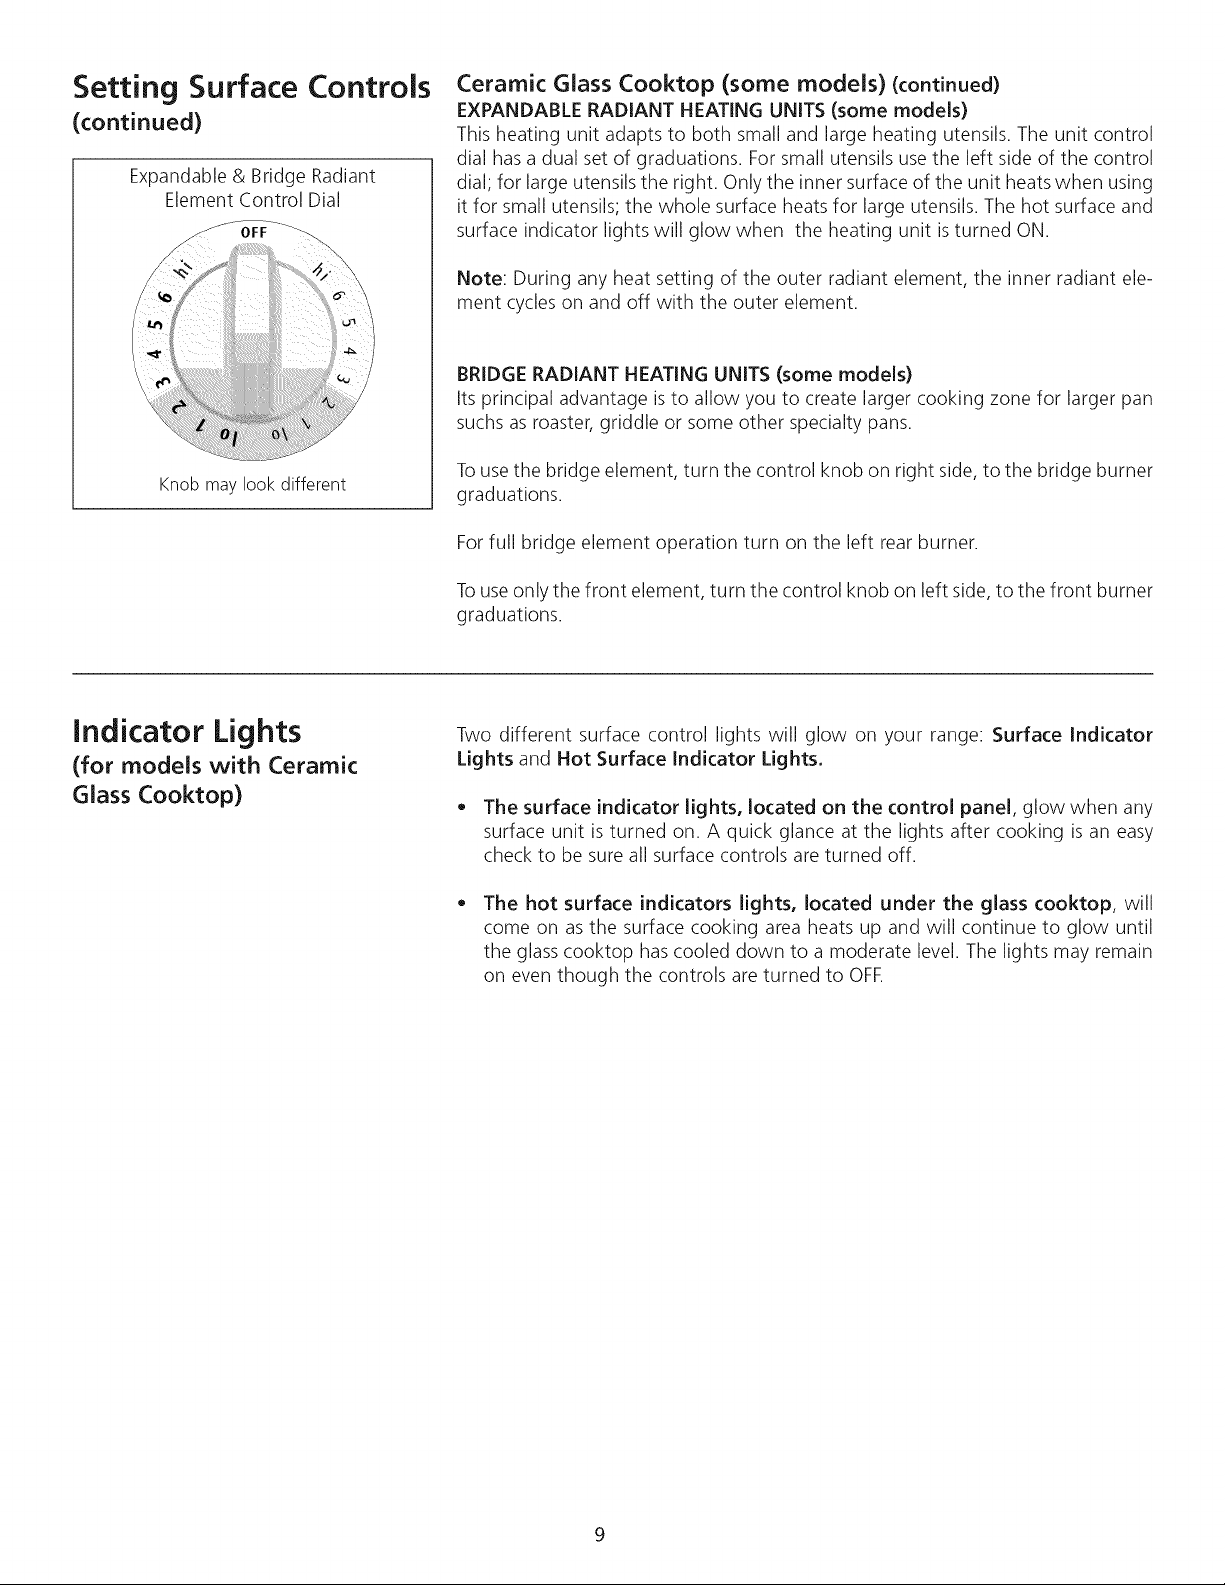
Setting Surface Controls
(continued)
Expandable & Bridge Radiant
Element Control Dial
Knob may look different
Ceramic Glass Cooktop (some models) (continued)
EXPANDABLE RADIANT HEATING UNITS (some models)
This heating unit adapts to both small and large heating utensils. The unit control
dial has a dual set of graduations. For small utensils usethe left side of the control
dial; for large utensils the right. Only the inner surface of the unit heats when using
it for small utensils; the whole surface heats for large utensils. The hot surface and
surface indicator lights will glow when the heating unit isturned ON.
Note: During any heat setting of the outer radiant element, the inner radiant ele-
ment cycles on and off with the outer element.
BRIDGE RADIANT HEATING UNITS (some models)
Its principal advantage is to allow you to create larger cooking zone for larger pan
suchs as roaster, griddle or some other specialty pans.
Tousethe bridge element, turn the control knob on right side, to the bridge burner
graduations.
For full bridge element operation turn on the left rear burner.
Touseonly the front element, turn the control knob on left side, to the front burner
graduations.
Indicator Lights
(for models with Ceramic
Glass Cooktop)
Two different surface control lights will glow on your range: Surface Indicator
Lights and Hot Surface Indicator Lights.
• The surface indicator lights, located on the control panel, glow when any
surface unit is turned on. A quick glance at the lights after cooking is an easy
check to be sure all surface controls are turned off.
The hot surface indicators lights, located under the glass cooktop, will
come on as the surface cooking area heats up and will continue to glow until
the glass cooktop has cooled down to a moderate level. The lights may remain
on even though the controls are turned to OFE
9
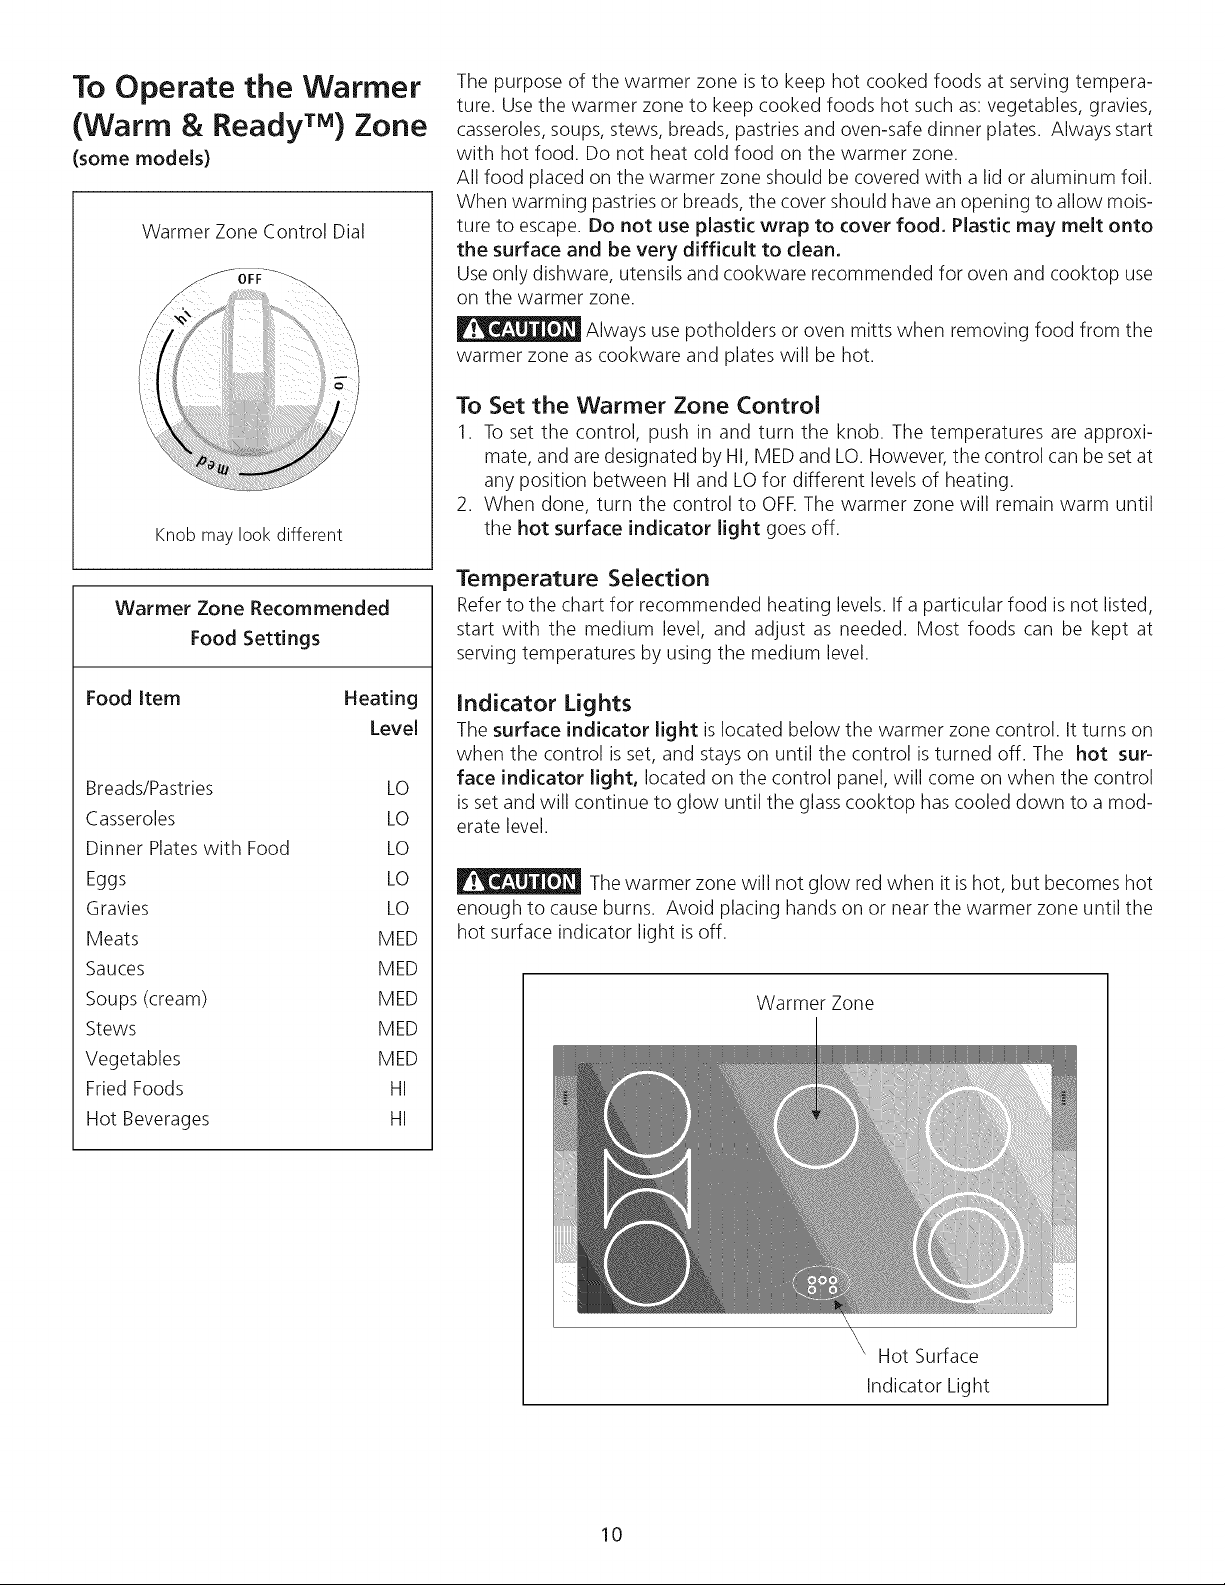
To Operate the Warmer
(Warm & Ready TM) Zone
(some models)
Warmer Zone Control Dial
Knob may look different
Warmer Zone Recommended
Food Settings
Food Item Heating
Level
Breads/Pastries LO
Casseroles LO
Dinner Plateswith Food LO
Eggs LO
Gravies LO
Meats MED
Sauces MED
Soups (cream) MED
Stews MED
Vegetables MED
Fried Foods HI
Hot Beverages HI
The purpose of the warmer zone is to keep hot cooked foods at serving tempera-
ture. Use the warmer zone to keep cooked foods hot such as: vegetables, gravies,
casseroles,soups, stews, breads, pastries and oven-safe dinner plates. Always start
with hot food. Do not heat cold food on the warmer zone.
All food placed on the warmer zone should be covered with a lid or aluminum foil.
When warming pastries or breads, the cover should have an opening to allow mois-
ture to escape. Do not use plastic wrap to cover food. Plastic may melt onto
the surface and be very difficult to clean.
Use only dishware, utensils and cookware recommended for oven and cooktop use
on the warmer zone.
Always use potholders or oven mitts when removing food from the
warmer zone as cookware and plates will be hot.
To Set the Warmer Zone Control
1. To set the control, push in and turn the knob. The temperatures are approxi-
mate, and are designated by Hi, MED and LO. However, the control can be set at
any position between HI and LO for different levels of heating.
2. When done, turn the control to OFF The warmer zone will remain warm until
the hot surface indicator light goes off.
Temperature Selection
Refer to the chart for recommended heating levels. If a particular food isnot listed,
start with the medium level, and adjust as needed. Most foods can be kept at
serving temperatures by using the medium level.
Indicator Lights
The surface indicator light is located below the warmer zone control. It turns on
when the control is set, and stays on until the control is turned off. The hot sur=
face indicator light, located on the control panel, will come on when the control
is set and will continue to glow until the glass cooktop has cooled down to a mod-
erate level.
The warmer zone will not glow red when it is hot, but becomes hot
enough to cause burns. Avoid placing hands on or near the warmer zone until the
hot surface indicator light is off.
Warmer Zone
10
'\ Hot Surface
indicator Light
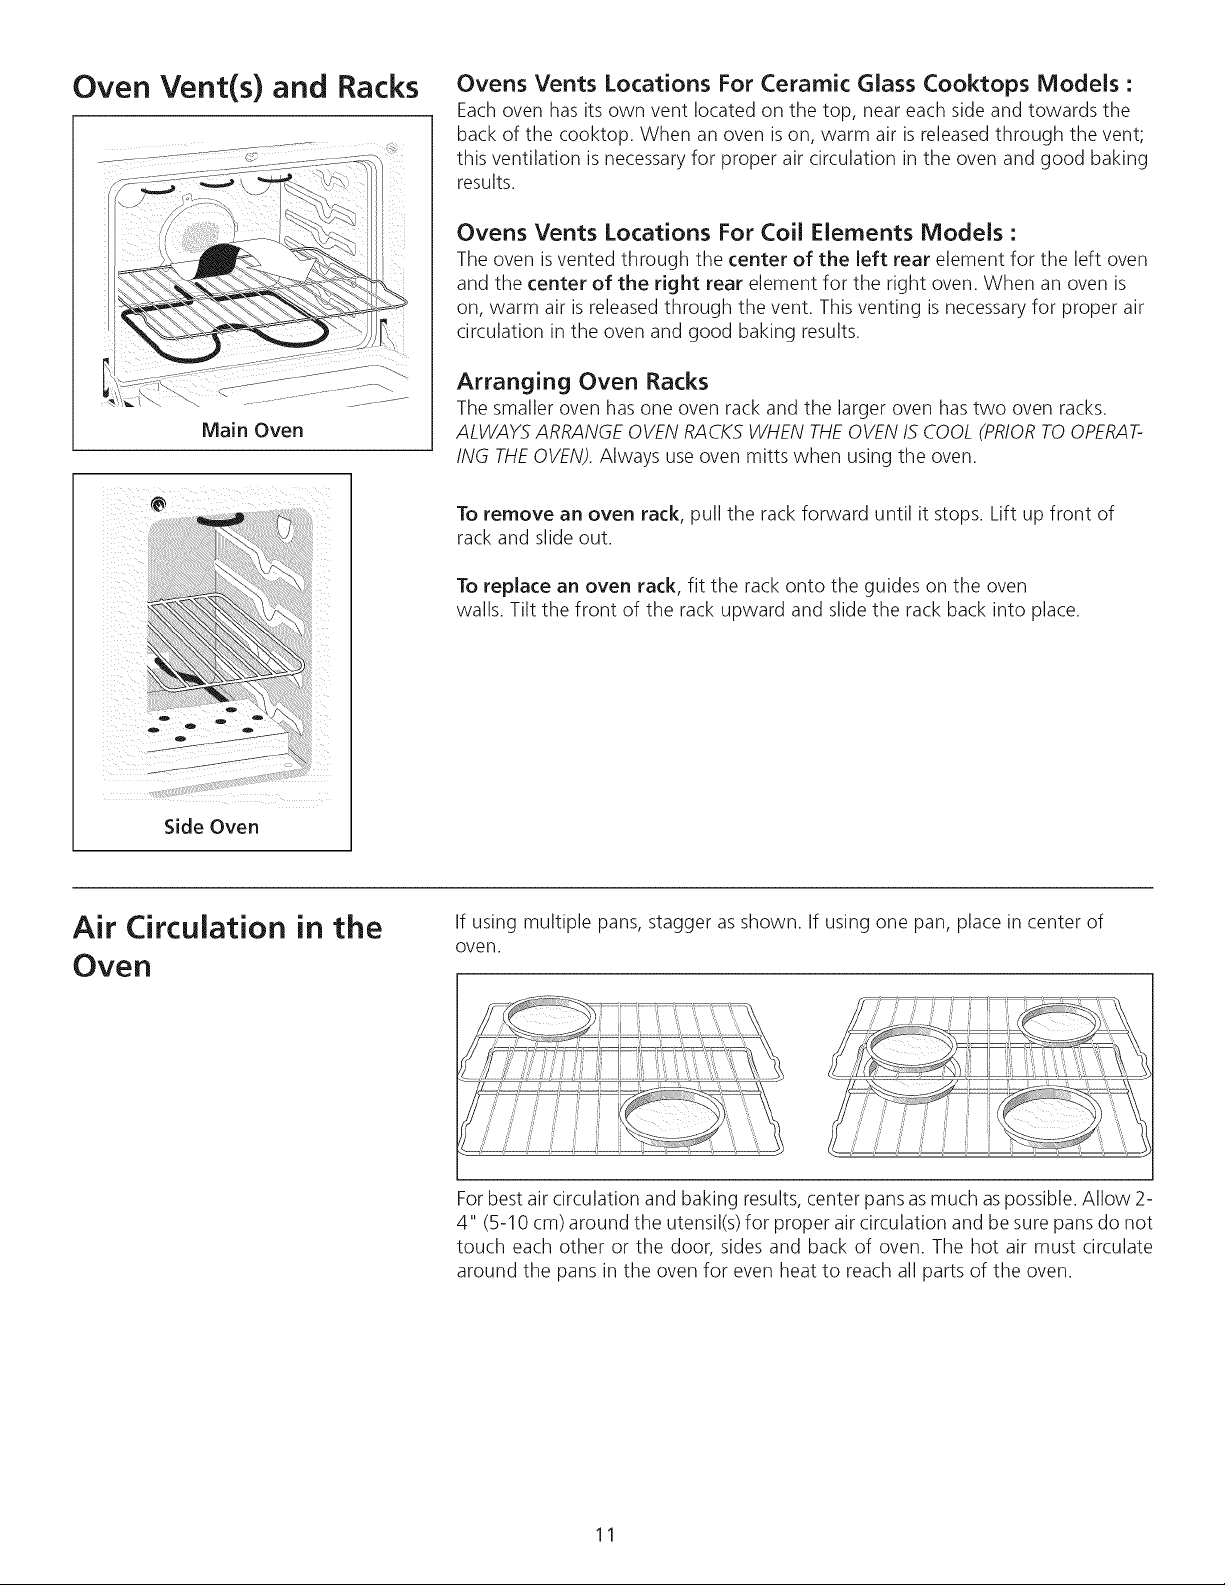
Oven Vent(s) and Racks
Main Oven
Side Oven
Ovens Vents Locations For Ceramic Glass Cooktops Models :
Each oven has its own vent located on the top, near each side and towards the
back of the cooktop. When an oven ison, warm air is released through the vent;
this ventilation is necessary for proper air circulation in the oven and good baking
results.
Ovens Vents Locations For Coil Elements Models :
The oven isvented through the center of the left rear element for the left oven
and the center of the right rear element for the right oven. When an oven is
on, warm air is released through the vent. This venting is necessary for proper air
circulation in the oven and good baking results.
Arranging Oven Racks
The smaller oven has one oven rack and the larger oven has two oven racks.
ALWAYS ARRANGE OVENRACKS WHEN THE OVENISCOOL (PRIORTO OPERAT-
ING THEOVEN), Always use oven mitts when using the oven.
To remove an oven rack, pull the rack forward until it stops. Lift up front of
rack and slide out.
To replace an oven rack, fit the rack onto the guides on the oven
walls. Tilt the front of the rack upward and slide the rack back into place.
Air Circulation in the
Oven
If using multiple pans, stagger as shown. If using one pan, place in center of
oven.
For best air circulation and baking results, center pans asmuch aspossible. Allow 2-
4" (5-10 cm) around the utensil(s) for proper air circulation and be sure pans do not
touch each other or the door, sides and back of oven. The hot air must circulate
around the pans in the oven for even heat to reach all parts of the oven.
11
Oven
tions
Baking Informa-
For best results, preheat the oven before baking cookies, breads, cakes, pies or
pastries, etc. There is no need to preheat the oven for roasting meat or baking
casseroles.
The cooking times and temperatures needed to bake a product may vary slightly
from your previously owned appliance.
See step-by-step baking instructions for right oven in the Electronic Oven Control
section.
See left oven step-by-step instructions in the "Setting Left Oven Control" section.
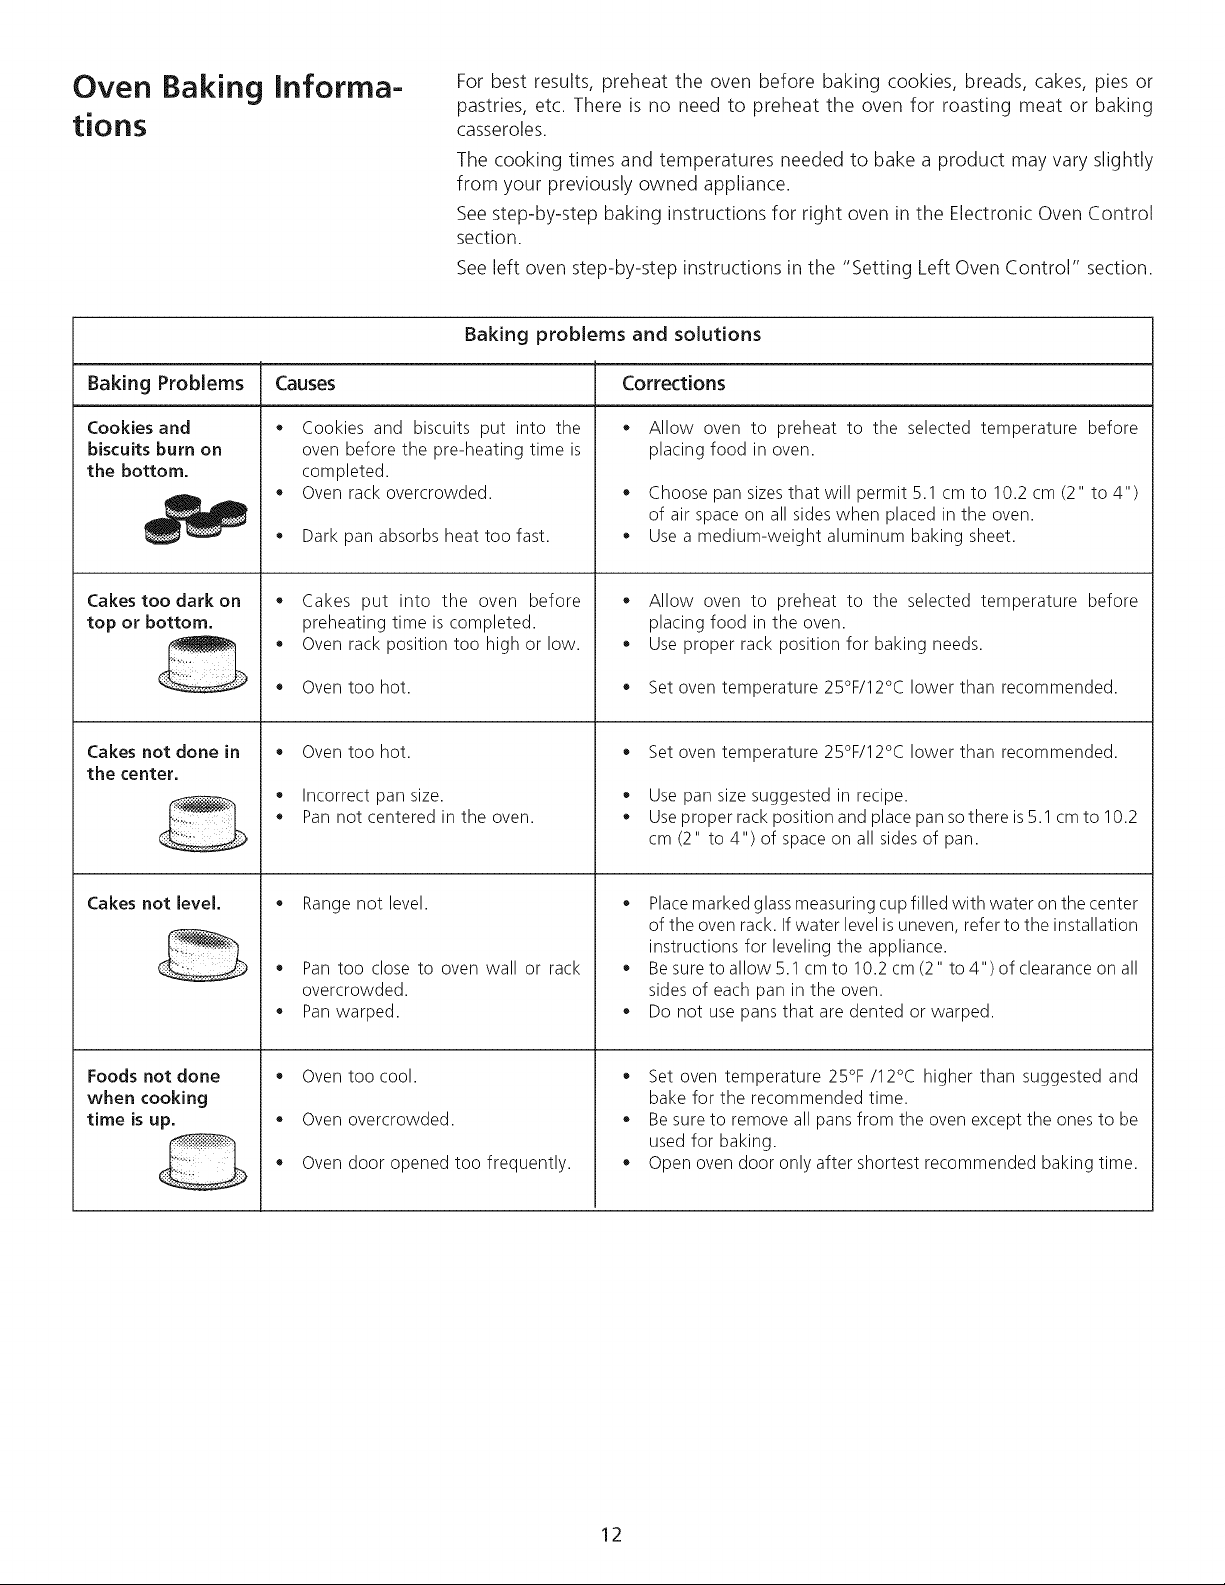
Baking problems and solutions
Baking Problems Causes Corrections
o
Cookies and
biscuits burn on
the bottom.
Cakes too dark on
top or bottom.
Cakes not done in
the center.
Cakes not level.
Foods not done
when cooking
time is up.
o
o
o
o
o
Cookies and biscuits put into the
oven before the pre-heating time is
completed.
Oven rack overcrowded.
Dark pan absorbs heat too fast.
Cakes put into the oven before
preheating time is completed.
Oven rack position too high or low.
Oven too hot.
, Oven too hot.
, Incorrect pan size.
• Pan not centered in the oven.
Range not level.
, Pan too close to oven wall or rack
overcrowded.
• Pan warped.
, Oven too cool.
, Oven overcrowded.
• Oven door opened too frequently.
, Allow oven to preheat to the selected temperature before
placing food in oven.
, Choose pan sizes that will permit 5.1 cm to 10.2 cm (2" to 4")
of air space on all sides when placed in the oven.
, Use a medium-weight aluminum baking sheet.
o
o
o
Allow oven to preheat to the selected temperature before
placing food in the oven.
Use proper rack position for baking needs.
Set oven temperature 25°F/12°C lower than recommended.
o
o
o
Set oven temperature 25°F/12°C lower than recommended.
Use pan size suggested in recipe.
Use proper rack position and place pan sothere is5.1 cm to 10.2
cm (2" to 4") of space on all sides of pan.
, Place marked glass measuring cup filled with water on the center
of the oven rack. If water level is uneven, refer to the installation
instructions for leveling the appliance.
, Be sure to allow 5.1 cmto 10.2cm(2" to 4") of clearance on all
sides of each pan in the oven.
, Do not use pans that are dented or warped.
, Set oven temperature 25°F/12°C higher than suggested and
bake for the recommended time.
, Be sure to remove all pans from the oven except the ones to be
used for baking.
, Open oven door only after shortest recommended baking time.
12
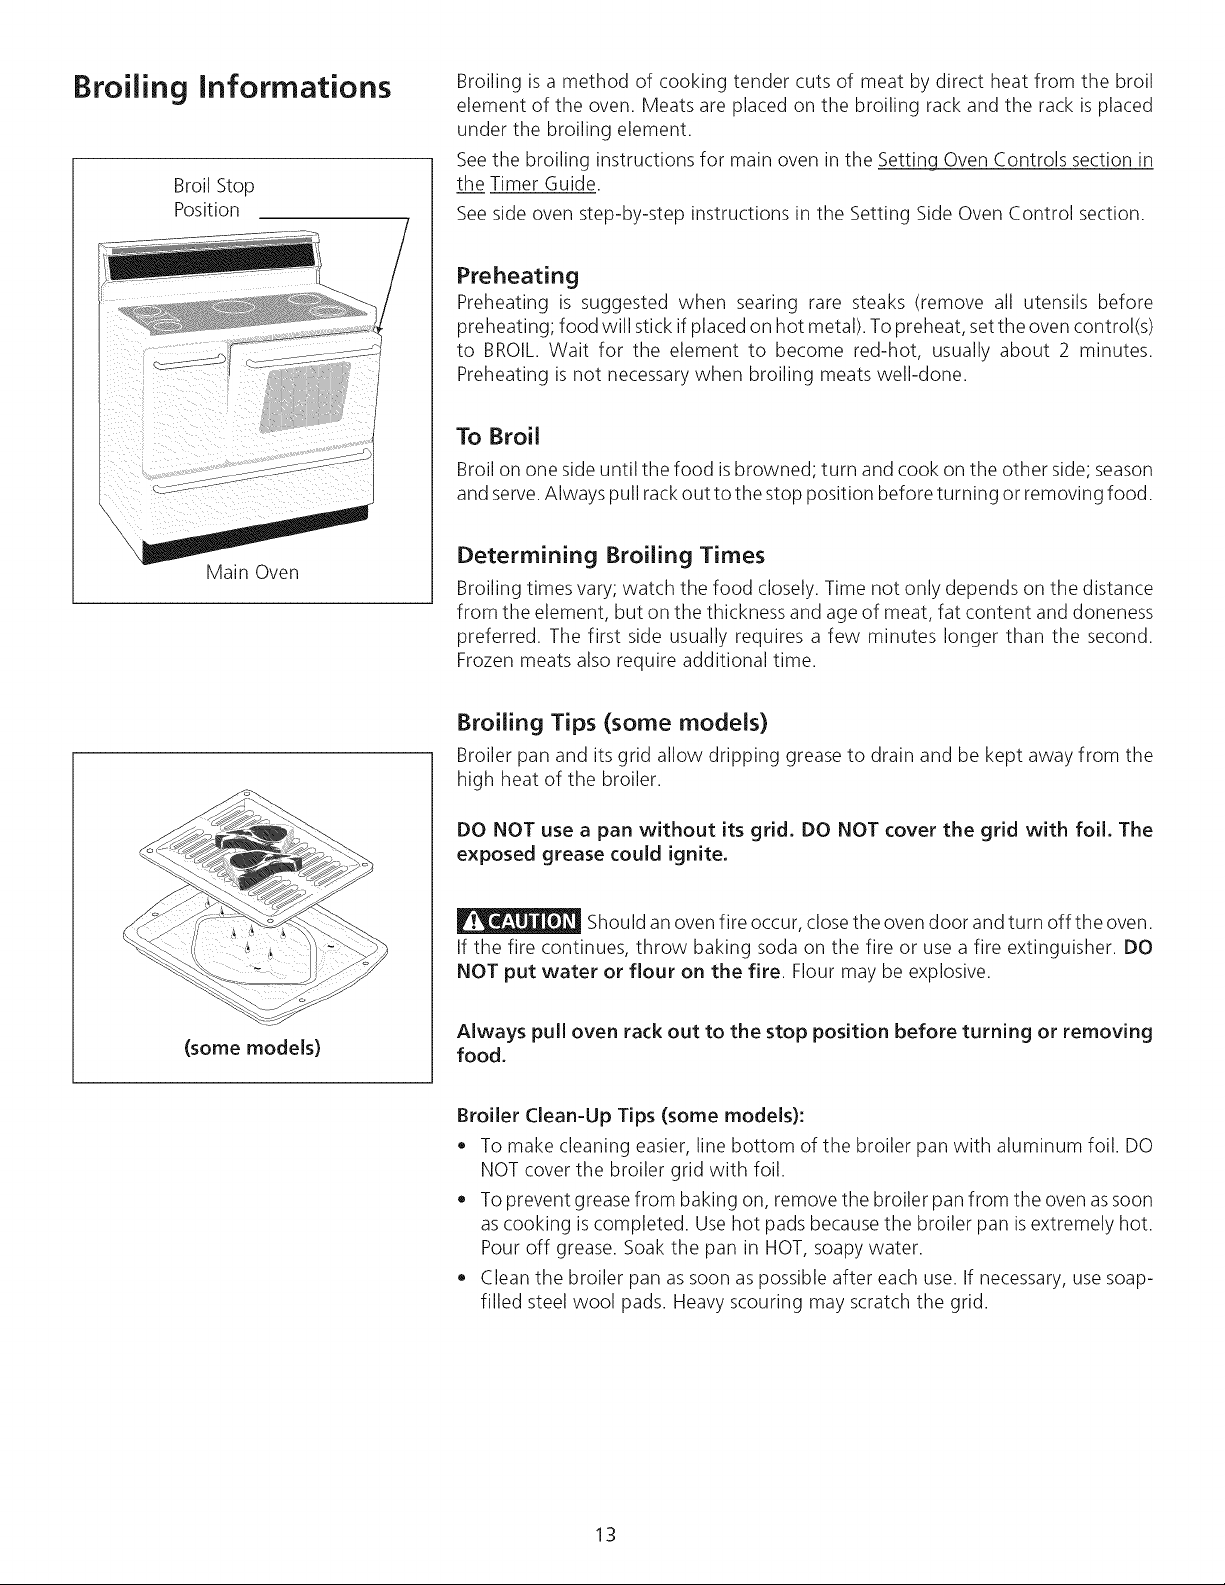
Broiling Informations
Broil Stop
Position
Main Oven
Broiling is a method of cooking tender cuts of meat by direct heat from the broil
element of the oven. Meats are placed on the broiling rack and the rack isplaced
under the broiling element.
See the broiling instructions for main oven in the Setting Oven Controls section in
the Timer Guide.
See side oven step-by-step instructions in the Setting Side Oven Control section.
Preheating
Preheating is suggested when searing rare steaks (remove all utensils before
preheating; food will stick if placed on hot metal). To preheat, set the oven control(s)
to BROIL. Wait for the element to become red-hot, usually about 2 minutes.
Preheating is not necessary when broiling meats well-done.
To Broil
Broil on one side until the food isbrowned; turn and cook on the other side; season
and serve.Always pull rack out to the stop position before turning or removing food.
Determining Broiling Times
Broiling times vary; watch the food closely. Time not only depends on the distance
from the element, but on the thickness and age of meat, fat content and aloneness
preferred. The first side usually requires a few minutes longer than the second.
Frozen meats also require additional time.
Broiling Tips (some models)
Broiler pan and its grid allow dripping grease to drain and be kept away from the
high heat of the broiler.
DO NOT use a pan without its grid. DO NOT cover the grid with foil. The
exposed grease could ignite.
Should an oven fire occur, close the oven door and turn off the oven.
If the fire continues, throw baking soda on the fire or use a fire extinguisher. DO
NOT put water or flour on the fire. Flour may be explosive.
(some models)
Always pull oven rack out to the stop position before turning or removing
food.
Broiler Clean-Up Tips (some models):
• To make cleaning easier, line bottom of the broiler pan with aluminum foil. DO
NOT cover the broiler grid with foil.
• To prevent grease from baking on, remove the broiler pan from the oven assoon
ascooking iscompleted. Usehot pads because the broiler pan isextremely hot.
Pour off grease. Soak the pan in HOT, soapy water.
Clean the broiler pan assoon as possible after each use. If necessary, usesoap-
filled steel wool pads. Heavy scouring may scratch the grid.
13
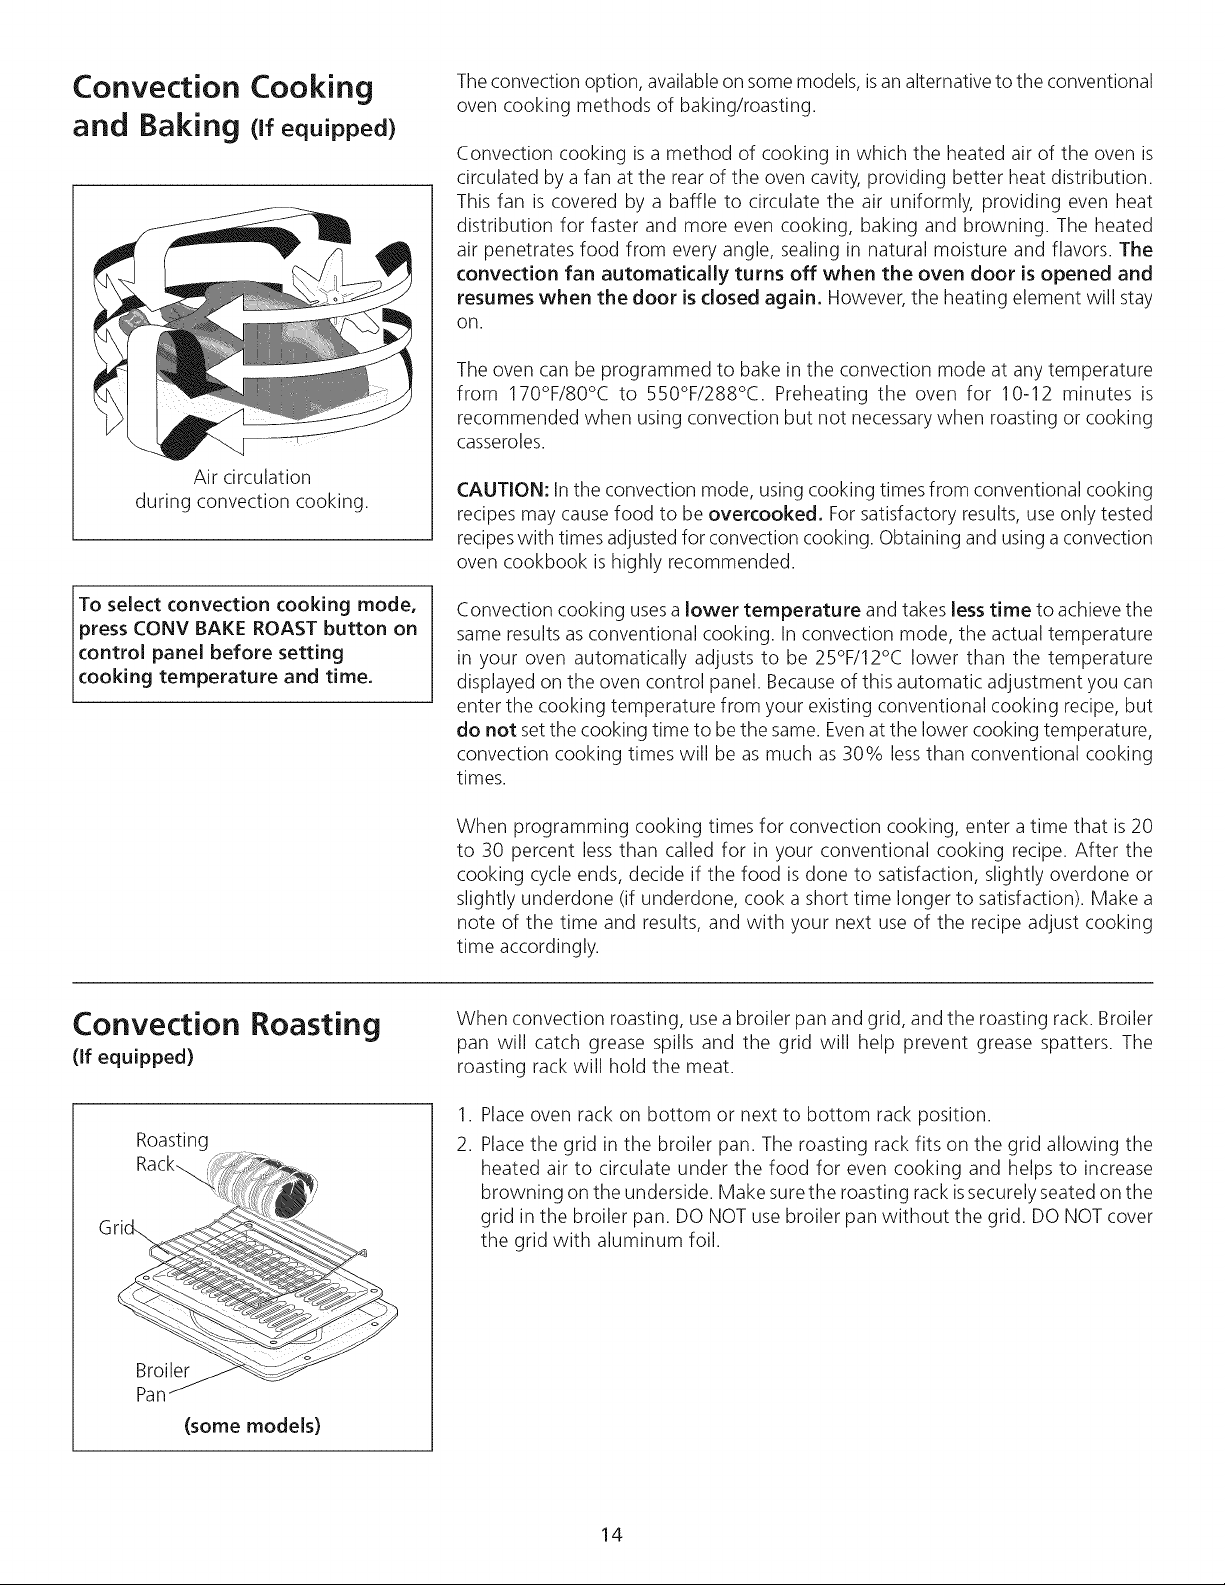
Convection Cooking
and Baking (ifequipped)
Air circulation
during convection cooking.
To select convection cooking mode,
press CONV BAKE ROAST button on
control panel before setting
cooking temperature and time.
Theconvection option, available on some models, isan alternative to the conventional
oven cooking methods of baking/roasting.
Convection cooking is a method of cooking in which the heated air of the oven is
circulated by a fan at the rear of the oven cavity, providing better heat distribution.
This fan is covered by a baffle to circulate the air uniformly, providing even heat
distribution for faster and more even cooking, baking and browning. The heated
air penetrates food from every angle, sealing in natural moisture and flavors. The
convection fan automatically turns off when the oven door is opened and
resumes when the door is closed again. However, the heating element will stay
OR.
The oven can be programmed to bake in the convection mode at any temperature
from 170°F/80°C to 550°F/288°C. Preheating the oven for 10-12 minutes is
recommended when using convection but not necessary when roasting or cooking
casseroles.
CAUTION: Inthe convection mode, using cooking times from conventional cooking
recipes may cause food to be overcooked. For satisfactory results, useonly tested
recipeswith times adjusted for convection cooking. Obtaining and using a convection
oven cookbook is highly recommended.
Convection cooking usesa lower temperature and takes less time to achieve the
same results as conventional cooking. In convection mode, the actual temperature
in your oven automatically adjusts to be 25%/12°C lower than the temperature
displayed on the oven control panel. Because of this automatic adjustment you can
enter the cooking temperature from your existing conventional cooking recipe, but
do not set the cooking time to be the same. Evenat the lower cooking temperature,
convection cooking times will be as much as30% lessthan conventional cooking
times.
When programming cooking times for convection cooking, enter a time that is 20
to 30 percent less than called for in your conventional cooking recipe. After the
cooking cycle ends, decide if the food is done to satisfaction, slightly overdone or
slightly underdone (if underdone, cook a short time longer to satisfaction). Make a
note of the time and results, and with your next use of the recipe adjust cooking
time accordingly.
Convection Roasting
(If equipped)
Roasting
Rack_,
Broiler
Pan
(some models)
When convection roasting, usea broiler pan and grid, and the roasting rack. Broiler
pan will catch grease spills and the grid will help prevent grease spatters. The
roasting rack will hold the meat.
1. Place oven rack on bottom or next to bottom rack position.
2. Placethe grid in the broiler pan. The roasting rack fits on the grid allowing the
heated air to circulate under the food for even cooking and helps to increase
browning on the underside. Make surethe roasting rack issecurely seated on the
grid in the broiler pan. DO NOT use broiler pan without the grid. DO NOT cover
the grid with aluminum foil.
14
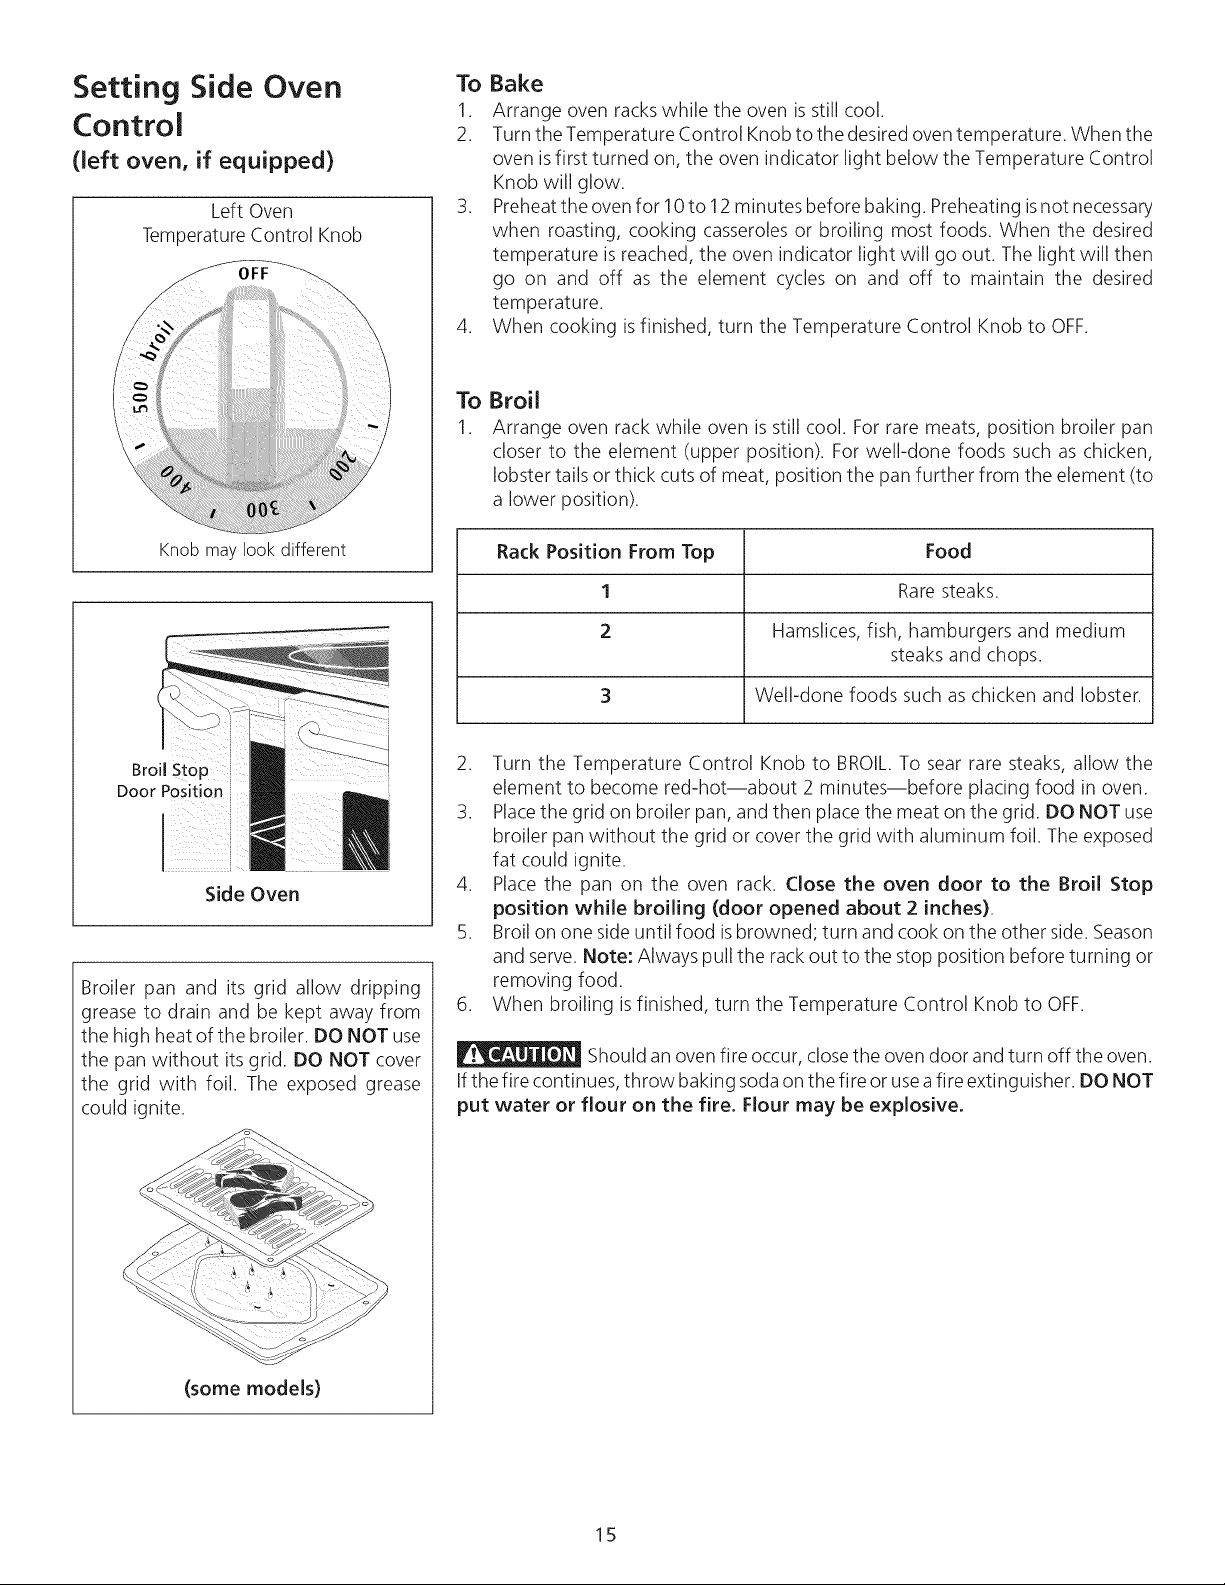
Setting Side Oven
Control
(left oven, if equipped)
Left Oven
Temperature Control Knob
Knob may look different
Broil Stop
Door Position
Side Oven
Broiler pan and its grid allow dripping
grease to drain and be kept away from
the high heat of the broiler. DO NOT use
the pan without its grid. DO NOT cover
the grid with foil. The exposed grease
could ignite.
(some models)
To Bake
1. Arrange oven rackswhile the oven is still cool.
2. Turn the Temperature Control Knob to the desired oventemperature. When the
oven isfirst turned on, the oven indicator light below the Temperature Control
Knob will glow.
3. Preheat the oven for 10to 12 minutes before baking. Preheating isnot necessary
when roasting, cooking casseroles or broiling most foods. When the desired
temperature is reached, the oven indicator light will go out. The light will then
go on and off as the element cycles on and off to maintain the desired
temperature.
4. When cooking isfinished, turn the Temperature Control Knob to OFF.
To Broil
1. Arrange oven rack while oven is still cool. For rare meats, position broiler pan
closer to the element (upper position). For well-done foods such as chicken,
lobster tails or thick cuts of meat, position the pan further from the element (to
a lower position).
Rack Position From Top Food
1 Raresteaks.
2 Hamslices, fish, hamburgers and medium
steaks and chops.
3 Well-done foods such as chicken and lobster.
2. Turn the Temperature Control Knob to BROIL.To sear rare steaks, allow the
element to become red-hot--about 2 minutes--before placing food in oven.
3. Placethe grid on broiler pan, and then place the meat on the grid. DO NOT use
broiler pan without the grid or cover the grid with aluminum foil. The exposed
fat could ignite.
4. Place the pan on the oven rack. Close the oven door to the Broil Stop
position while broiling (door opened about 2 inches).
5. Broil on one side until food isbrowned; turn and cook on the other side. Season
and serve. Note: Always pull the rack out to the stop position before turning or
removing food.
6. When broiling is finished, turn the Temperature Control Knob to OFF.
Should an oven fire occur, close the oven door and turn off the oven.
If the fire continues, throw baking soda on the fire or useafire extinguisher. DO NOT
put water or flour on the fire. Flour may be explosive.
15
Self-Clean Oven Cycle
(Main Oven)
_The health of some birds
isextremely sensitive to the fumes given
off during the self-cleaning cycle of any
range. Move birds to another well
ventilated room.
During the self-clean
cycle,the outside of thewall can become
very hot to touch. DO NOT leave small
children unattended near the appliance.
Aventilation systemstarts automatically;
it isnormal for the hot air to beevacuated
through the front of the appliance.
Before cleaning any part
of the oven, be sure the electronic oven
control isturned off or elsepush CANCEL
pad. Wait until the oven is cool.
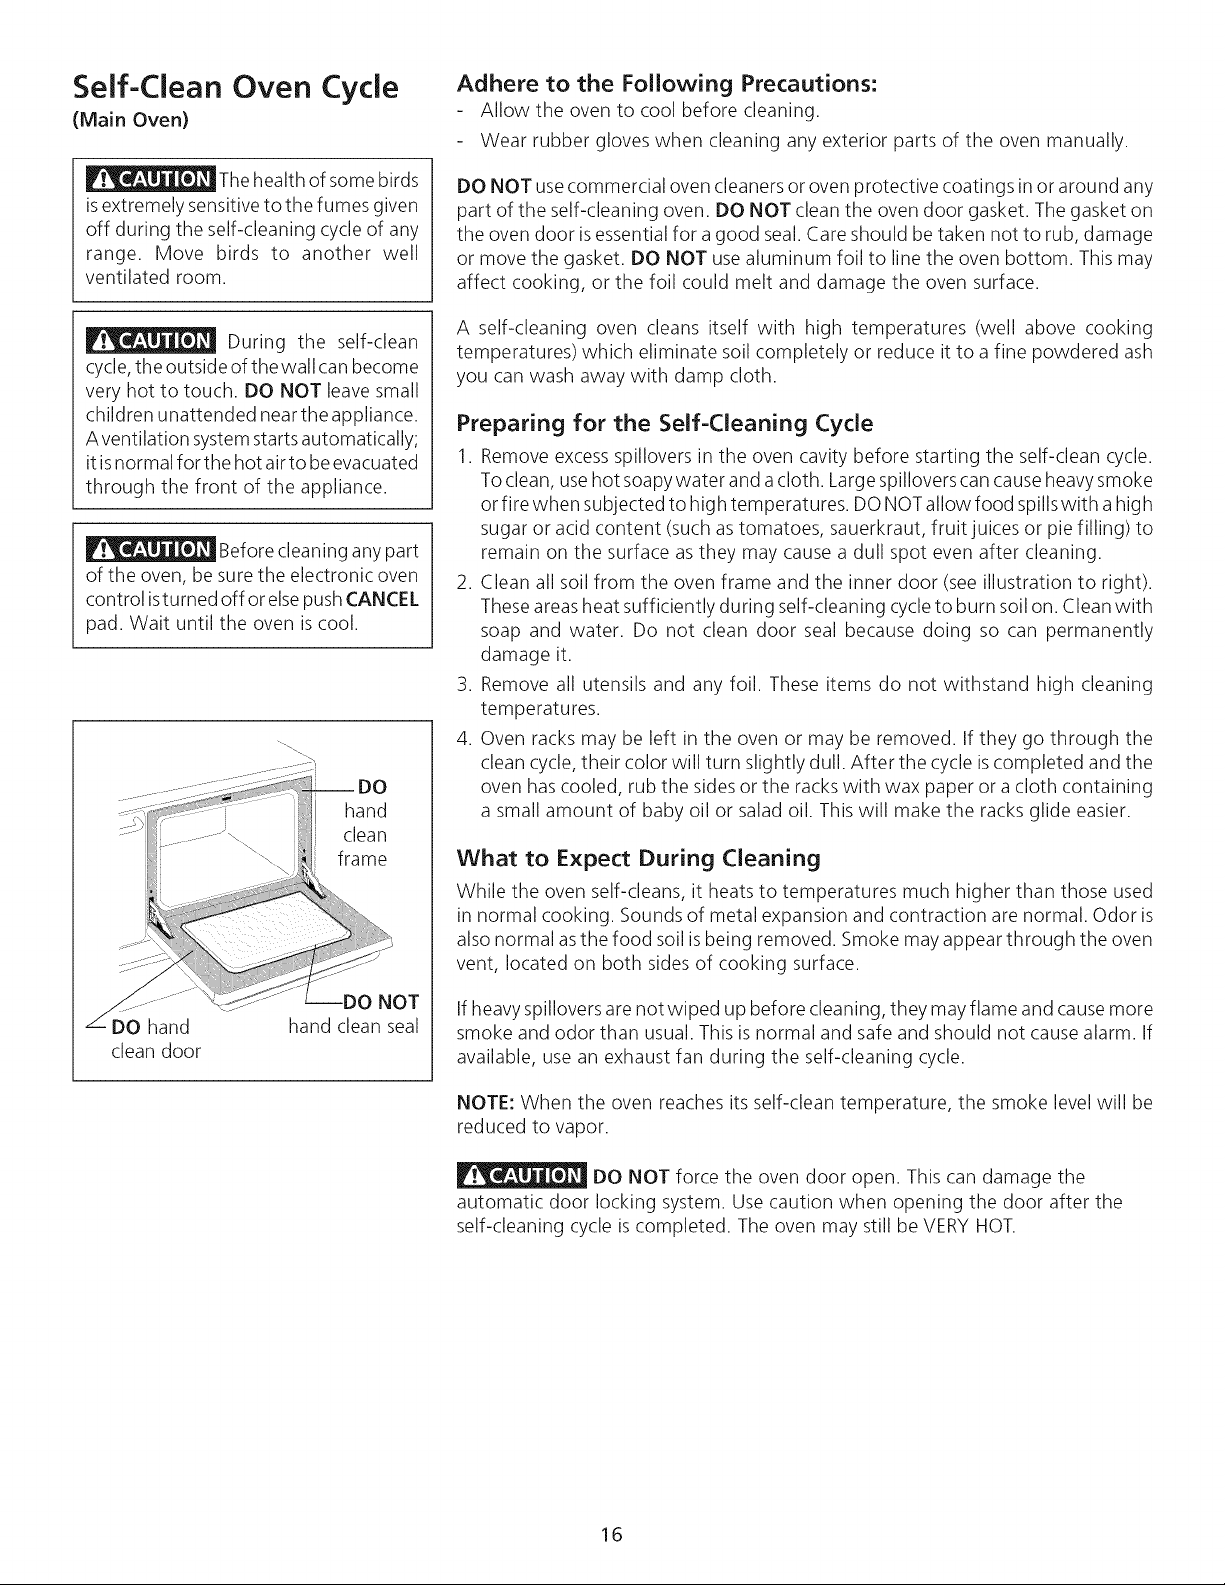
--DO
hand
clean
frame
DO hand
clean door
--DO NOT
hand clean seal
Adhere to the Following Precautions:
Allow the oven to cool before cleaning.
Wear rubber gloves when cleaning any exterior parts of the oven manually.
DO NOT usecommercial oven cleaners or oven protective coatings in or around any
part of the self-cleaning oven. DO NOT clean the oven door gasket. The gasket on
the oven door isessential for a good seal. Care should be taken not to rub, damage
or move the gasket. DO NOT usealuminum foil to line the oven bottom. This may
affect cooking, or the foil could melt and damage the oven surface.
A self-cleaning oven cleans itself with high temperatures (well above cooking
temperatures) which eliminate soil completely or reduce it to a fine powdered ash
you can wash away with damp cloth.
Preparing for the Self-Cleaning Cycle
1. Remove excess spillovers in the oven cavity before starting the self-clean cycle.
Toclean, usehot soapy water and acloth. Large spillovers can cause heavy smoke
or fire when subjected to high temperatures. DO NOTallow food spillswith ahigh
sugar or acid content (such as tomatoes, sauerkraut, fruit juices or pie filling) to
remain on the surface as they may cause a dull spot even after cleaning.
2. Clean all soil from the oven frame and the inner door (see illustration to right).
Theseareas heat sufficiently during self-cleaning cycle to burn soil on. Clean with
soap and water. Do not clean door seal because doing so can permanently
damage it.
3. Remove all utensils and any foil. These items do not withstand high cleaning
temperatures.
4. Oven racks may be left in the oven or may be removed. If they go through the
clean cycle, their color will turn slightly dull. After the cycle iscompleted and the
oven has cooled, rub the sides or the rackswith wax paper or a cloth containing
a small amount of baby oil or salad oil. This will make the racks glide easier.
What to Expect During Cleaning
While the oven self-cleans, it heats to temperatures much higher than those used
in normal cooking. Sounds of metal expansion and contraction are normal. Odor is
also normal asthe food soil isbeing removed. Smoke may appear through the oven
vent, located on both sides of cooking surface.
If heavy spillovers are not wiped up before cleaning, they may flame and cause more
smoke and odor than usual. This isnormal and safe and should not cause alarm. If
available, use an exhaust fan during the self-cleaning cycle.
NOTE: When the oven reaches its self-clean temperature, the smoke level will be
reduced to vapor.
DO NOT force the oven door open. This can damage the
automatic door locking system. Use caution when opening the door after the
self-cleaning cycle iscompleted. The oven may still be VERYHOT.
16
Porcelain Enamel Oven
Cleaning (Side Oven)
(If equipped)
Adhere to the following cleaning
precautions:
• Allow the oven to cool before
cleaning.
Wear rubber gloves when cleaning
the appliance manually.
Remove spillovers and heavy soils as
soon as possible. Regular deanings
will reduce the number of future
major deanings.
_Ammonia must be rinsed
before operating the oven. Provide
adequate ventilation.
Porcelain has a smooth finish and isa type of glass fused to metal. Oven cleaners
can be used on all interior oven surfaces.
General Cleaning
Remove soils using hot, soapy water. Do not allow food spills with a high sugar or
acid content (such as milk, tomatoes, saukerkraut, fruit juices or pie filling) to re-
main on the surface asthey may cause a dull spot even after cleaning.
To Remove Heavy Soil
1. Allow a dish of ammonia to sit in the oven overnight or for several hours with
the oven door closed. Clean softened spots using hot, soapy water. Rinsewell
with water and a clean cloth.
2. If soil remains, use a soap-filled scouring pad or a nonabrasive cleaner. If neces-
sary, use an oven cleaner following manufacturer's instructions. DO NOT mix
ammonia with other cleaners.
Adhere to the following precautions when using oven cleaners:
1. DO NOT spray on the electrical controls or switches because it could cause a
short circuit and result in sparking or fire.
2. DO NOT allow a film from the cleaner to build up on the temperature sensing
bulb located at the top left rear corner of the oven; it could cause the oven to
heat improperly. Carefully wipe the bulb clean after each oven cleaning, being
careful not to move the bulb. A change in its position could affect how the oven
bakes. Avoid bending the bulb and capillary tube.
3. DO NOT spray any cleaner on the oven door trim or gasket, handles or any
exterior surfaces of the range, wood or painted surfaces. The cleaner can dam-
age these surfaces.
To Clean the Oven Bottom
Clean using hot, soapy water, a mild abrasive cleanser,a soap-filled abrasive pad or
oven cleaner following oven cleaner manufacturer's instructions.
DO NOT line the oven walls, bottom, racks or any other part of the
appliance with aluminum foil. Doing so will destroy heat distribution, produce poor
baking results and cause permanent damage to the oven interior (aluminum foil
will melt to the interior surface of the oven).
17
To Clean the Cooktop
Glass
THIS COOKTOP IS NOT REMOVABLE.
Do not attempt to remove or lift the
cooktop.
The cooktop isdesigned to make cleaning easier.Cleanups are easywhen spillovers
are cleaned up immediately. Toclean, wipe with a clean, damp cloth and wipe dry.
Correct and consistent leaning is essential to maintaining your heat-resistant glass
top. Spills and spatters should be wiped up using a clean paper towel and sudsy
water. This should be done either as soon as possible after the spill occurs, after
cooking is completed, or at the latest, before using the cooktop again. Usecaution
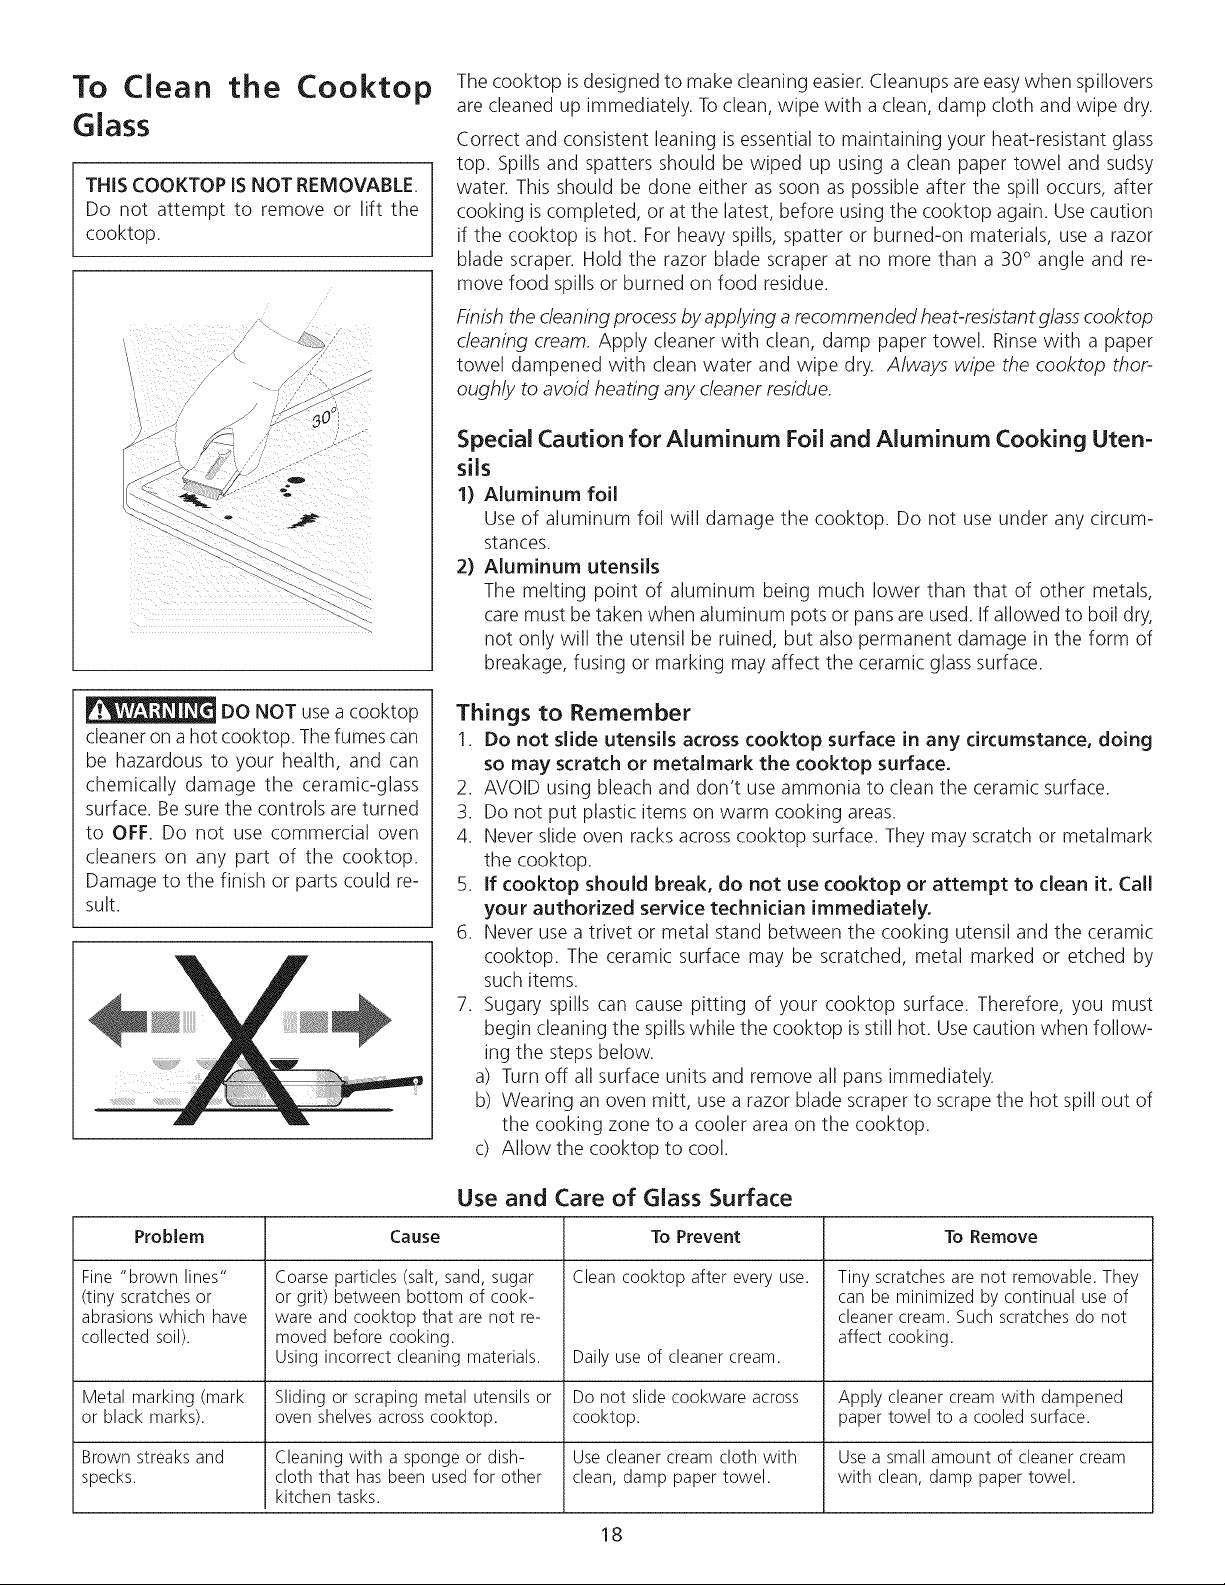
if the cooktop is hot. For heavy spills, spatter or burned-on materials, use a razor
blade scraper. Hold the razor blade scraper at no more than a 30° angle and re-
move food spills or burned on food residue.
Finish the cleaning process by applying arecommended heat-resistant glass cooktop
cleaning cream, Apply cleaner with clean, damp paper towel. Rinse with a paper
towel dampened with clean water and wipe dry. Always wipe the cooktop thor-
oughly to avoid heating any cleaner residue,
Special Caution for Aluminum Foil and Aluminum Cooking Uten-
sils
1) Aluminum foil
Use of aluminum foil will damage the cooktop. Do not use under any circum-
stances.
2) Aluminum utensils
The melting point of aluminum being much lower than that of other metals,
care must be taken when aluminum pots or pans are used. If allowed to boil dry,
not only will the utensil be ruined, but also permanent damage in the form of
breakage, fusing or marking may affect the ceramic glass surface.
DO NOT use a cooktop
cleaner on a hot cooktop. The fumes can
be hazardous to your health, and can
chemically damage the ceramic-glass
surface. Be sure the controls are turned
to OFF. Do not use commercial oven
cleaners on any part of the cooktop.
Damage to the finish or parts could re-
suit.
Things to Remember
1. Do not slide utensils across cooktop surface in any circumstance, doing
so may scratch or metalmark the cooktop surface.
2. AVOID using bleach and don't use ammonia to clean the ceramic surface.
3. Do not put plastic items on warm cooking areas.
4. Never slide oven racks across cooktop surface. They may scratch or metalmark
the cooktop.
5. If cooktop should break, do not use cooktop or attempt to clean it. Call
your authorized service technician immediately.
6. Never use a trivet or metal stand between the cooking utensil and the ceramic
cooktop. The ceramic surface may be scratched, metal marked or etched by
such items.
7. Sugary spills can cause pitting of your cooktop surface. Therefore, you must
begin cleaning the spills while the cooktop isstill hot. Use caution when follow-
ing the steps below.
a) Turn off all surface units and remove all pans immediately.
b) Wearing an oven mitt, use a razor blade scraper to scrape the hot spill out of
the cooking zone to a cooler area on the cooktop.
c) Allow the cooktop to cool.
Use and Care of Glass Surface
Problem Cause To Prevent To Remove
Cleancooktop after everyuse.
Fine "brown lines"
(tiny scratches or
abrasions which have
collected soil).
Coarse particles (salt, sand, sugar
or grit) between bottom of cook-
ware and cooktop that are not re-
moved before cooking.
Using incorrect cleaning materials.
Tiny scratches are not removable. They
can be minimized by continual use of
cleaner cream. Such scratches do not
affect cooking.
Daily use of cleaner cream.
Metal marking (mark Sliding or scraping metal utensils or Do not slide cookware across Apply cleaner cream with dampened
or black marks), oven shelves across cooktop, cooktop, paper towel to a cooled surface.
Brown streaks and Cleaning with a sponge or dish- Use cleaner cream cloth with Usea small amount of cleaner cream
specks, cloth that has been used for other clean, damp paper towel, with clean, damp paper towel.
kitchen tasks.
18
To Clean the Cooktop
Glass (continued)
Do not usecleaners on a
heated surface. Fumes could be
hazardous. Wait for area to cool before
cleaning. Do not use cleaner cream to
clean porcelain, paint or aluminum
because it can damage the surface.
Cleaning Materials for Ceramic-Glass Cooktop
Some cleaning materials may contain an ingredientwhich can damage the cooktop.
Use recommended cleaning products only (see below). Cleaner cream should be
used regularly. First use recommended products listed below, then use cleaner
cream.
Use only recommended cleaning products and follow these basic cleaning
suggestions.
1. Before the cooktop is used, thoroughly clean and saturate the cooktop with
cleaner cream.
a) Dampen clean paper towel and clean unit.
b) Wipe off with another clean, damp paper towel; then wipe dry.
2. Fornormal daily cleaning, apply adab of cleaner cream in the center of each unit-
area to be cleaned. Start with approximately 1/8 teaspoon (apply more if
needed). Then, proceed as stated above in a and b.
3. Make sure bottom of cookware and cooking area are clean and dry.
4. Select heat settings and cookware large enough for food and liquid.
5. Wipe up food spills and spatters before they burn into surface.
IMPORTANT: Regularly use cleaner cream. If you run out of cream, use one of the
cleaners listed. Be sure to get a new supply of cleaner cream.
Never mix cleaning products! Mixtures may interact, with damaging
or hazardous results.
Recommended deaning products for ceramic-glass cooktop
1. Baking soda.
2. Non-impregnated plastic and nylon pads.
3. Forburned on material, scrape with single-edged razor blade, held at a 30° angle.
4. Ceramic glass cleaning cream.
Do not use on ceramic-glass cooktop
1. Avoid pads, that can leave marks and scratches.
2. Avoid heavy-duty cleaning powders; these can scratch, depending on their
abrasiveness and cleaning pressure applied.
3. Avoid chemical oven cleaners. These can etch the cooktop surface and are
caustic.
4. Avoid rust stain removers containing hydrofluoric acid.
5. Avoid using bleach and do not use ammonia.
Special Cleaning Instructions for Mineral Deposits and Discolorations
Problem: Condensation, when cooking, often collects and drips from cookware.
The minerals found in water may cause a gray or brown film to develop
on cooktop. This film is very thin and appears to be under cooktop.
Prevention: Daily and proper use of cleaner cream. Stain from mineral deposits
must be removed from the cooktop assoon as possible.
Removal:
• Wet surface with water and apply cleaner cream.
• Scrub with clean, damp paper towel until stain disappears.
Clean remaining paste away with damp paper towel.
Apply dab of cleaner cream and polish with clean paper towel.
19
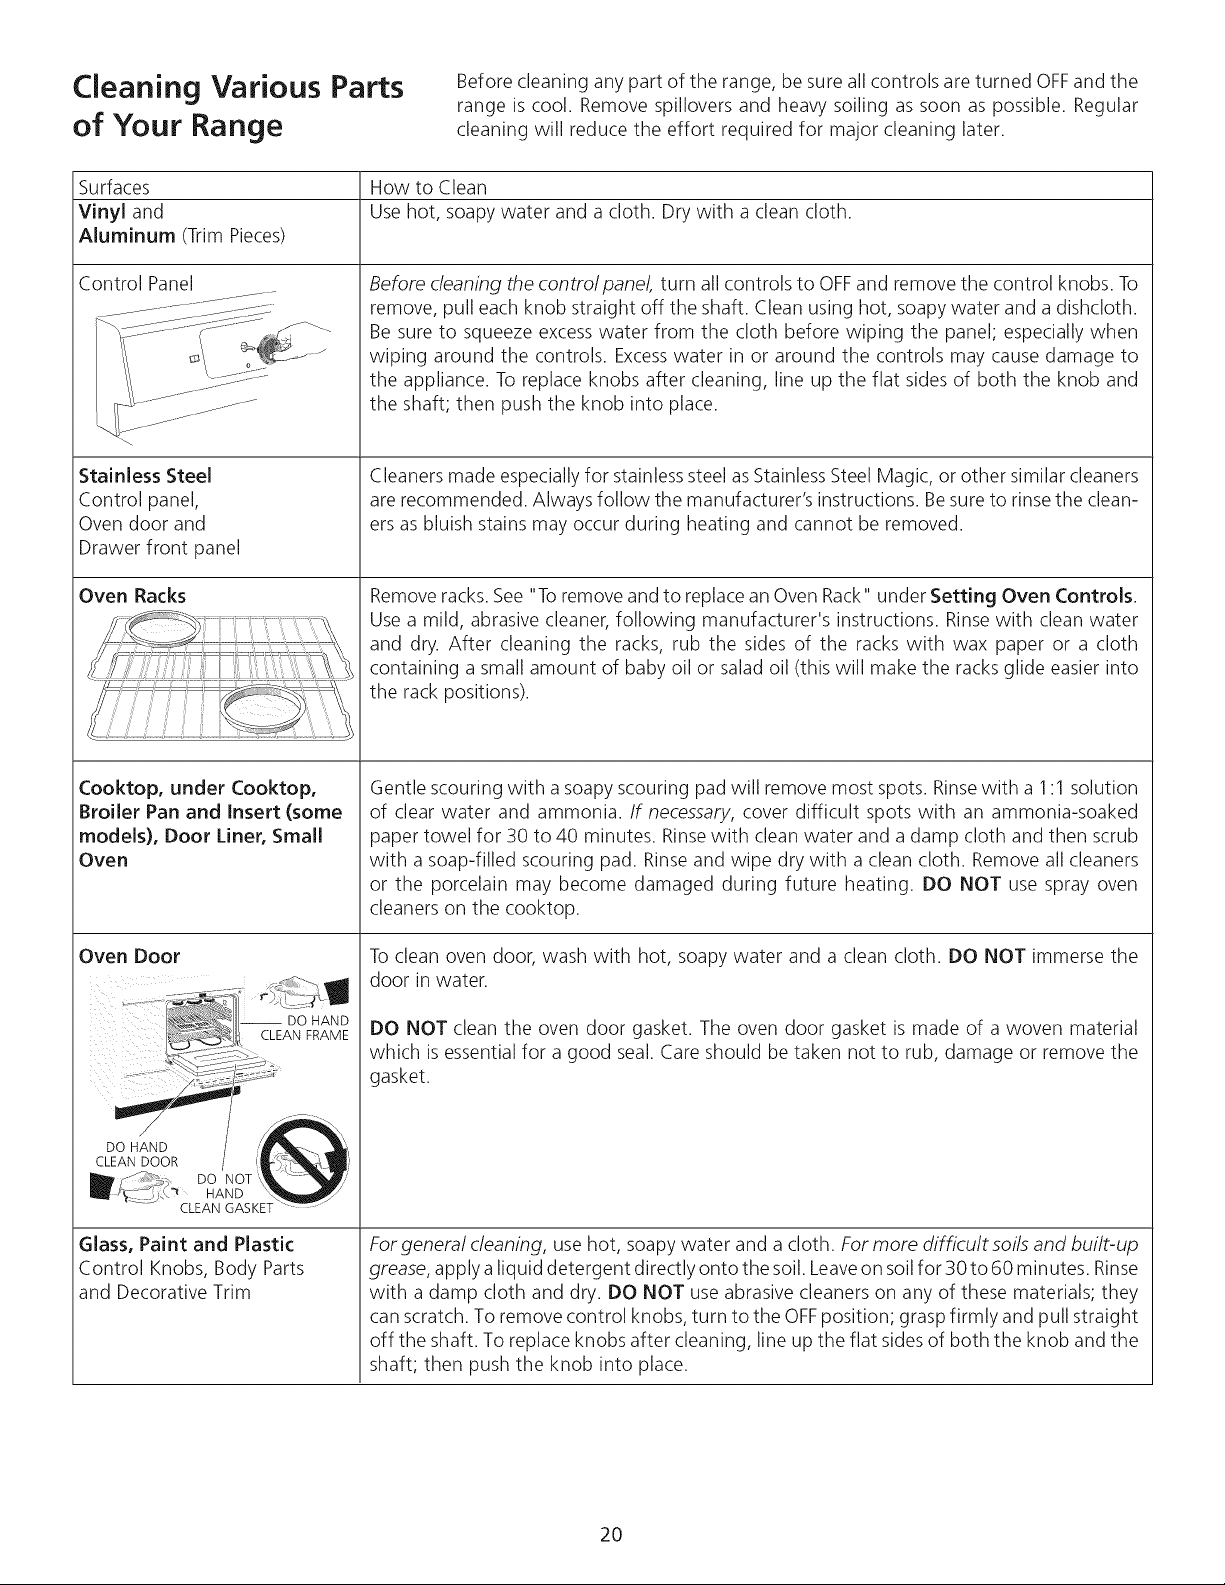
Cleaning Various Parts
of Your Range
Before cleaning any part of the range, be sure all controls are turned OFFand the
range is cool. Remove spillovers and heavy soiling as soon as possible. Regular
cleaning will reduce the effort required for major cleaning later.
Surfaces How to Clean
Vinyl and Use hot, soapy water and a cloth. Dry with a clean cloth.
Aluminum (Trim Pieces)
Control Panel
Stainless Steel
Control panel,
Oven door and
Drawer front panel
Oven Racks
Cooktop, under Cooktop,
Broiler Pan and Insert (some
models), Door Liner, Small
Oven
Oven Door
-- DO HAND
CLEAN FRAME
DO HAND / ...._,,
CLEANDOOR / (|?:,_W
r-f, ":}:5> DO NOT "--_h_/"
--- CLEAN GASKET "- ......
Glass, Paint and Plastic
Control Knobs, Body Parts
and Decorative Trim
Before cleaning the controlpanel, turn all controls to OFFand remove the control knobs. To
remove, pull each knob straight off the shaft. Clean using hot, soapy water and a dishcloth.
Be sure to squeeze excess water from the cloth before wiping the panel; especially when
wiping around the controls. Excesswater in or around the controls may cause damage to
the appliance. To replace knobs after cleaning, line up the flat sides of both the knob and
the shaft; then push the knob into place.
Cleaners made especially for stainless steel asStainless Steel Magic, or other similar cleaners
are recommended. Always follow the manufacturer's instructions. Besure to rinse the clean-
ersas bluish stains may occur during heating and cannot be removed.
Removeracks. See "To remove and to replace an Oven Rack" under Setting Oven Controls.
Use a mild, abrasive cleaner, following manufacturer's instructions. Rinsewith clean water
and dry. After cleaning the racks, rub the sides of the racks with wax paper or a cloth
containing a small amount of baby oil or salad oil (this will make the racks glide easier into
the rack positions).
Gentle scouring with a soapy scouring pad will remove most spots. Rinsewith a 1:1 solution
of clear water and ammonia. If necessary, cover difficult spots with an ammonia-soaked
paper towel for 30 to 40 minutes. Rinsewith clean water and a damp cloth and then scrub
with a soap-filled scouring pad. Rinseand wipe dry with a clean cloth. Remove all cleaners
or the porcelain may become damaged during future heating. DO NOT use spray oven
cleaners on the cooktop.
To clean oven door, wash with hot, soapy water and a clean cloth. DO NOT immerse the
door in water.
DO NOT clean the oven door gasket. The oven door gasket is made of a woven material
which is essential for a good seal. Care should be taken not to rub, damage or remove the
gasket.
Forgeneral cleaning, use hot, soapy water and a cloth. Formore difficult soils and built-up
grease, apply a liquid detergent directly onto the soil. Leaveon soilfor 30 to 60 minutes. Rinse
with a damp cloth and dry. DO NOT use abrasive cleaners on any of these materials; they
can scratch. To remove control knobs, turn to the OFFposition; grasp firmly and pull straight
off the shaft. To replace knobs after cleaning, line up the flat sides of both the knob and the
shaft; then push the knob into place.
20
Cleaning Various Parts
of Your Range (continued)
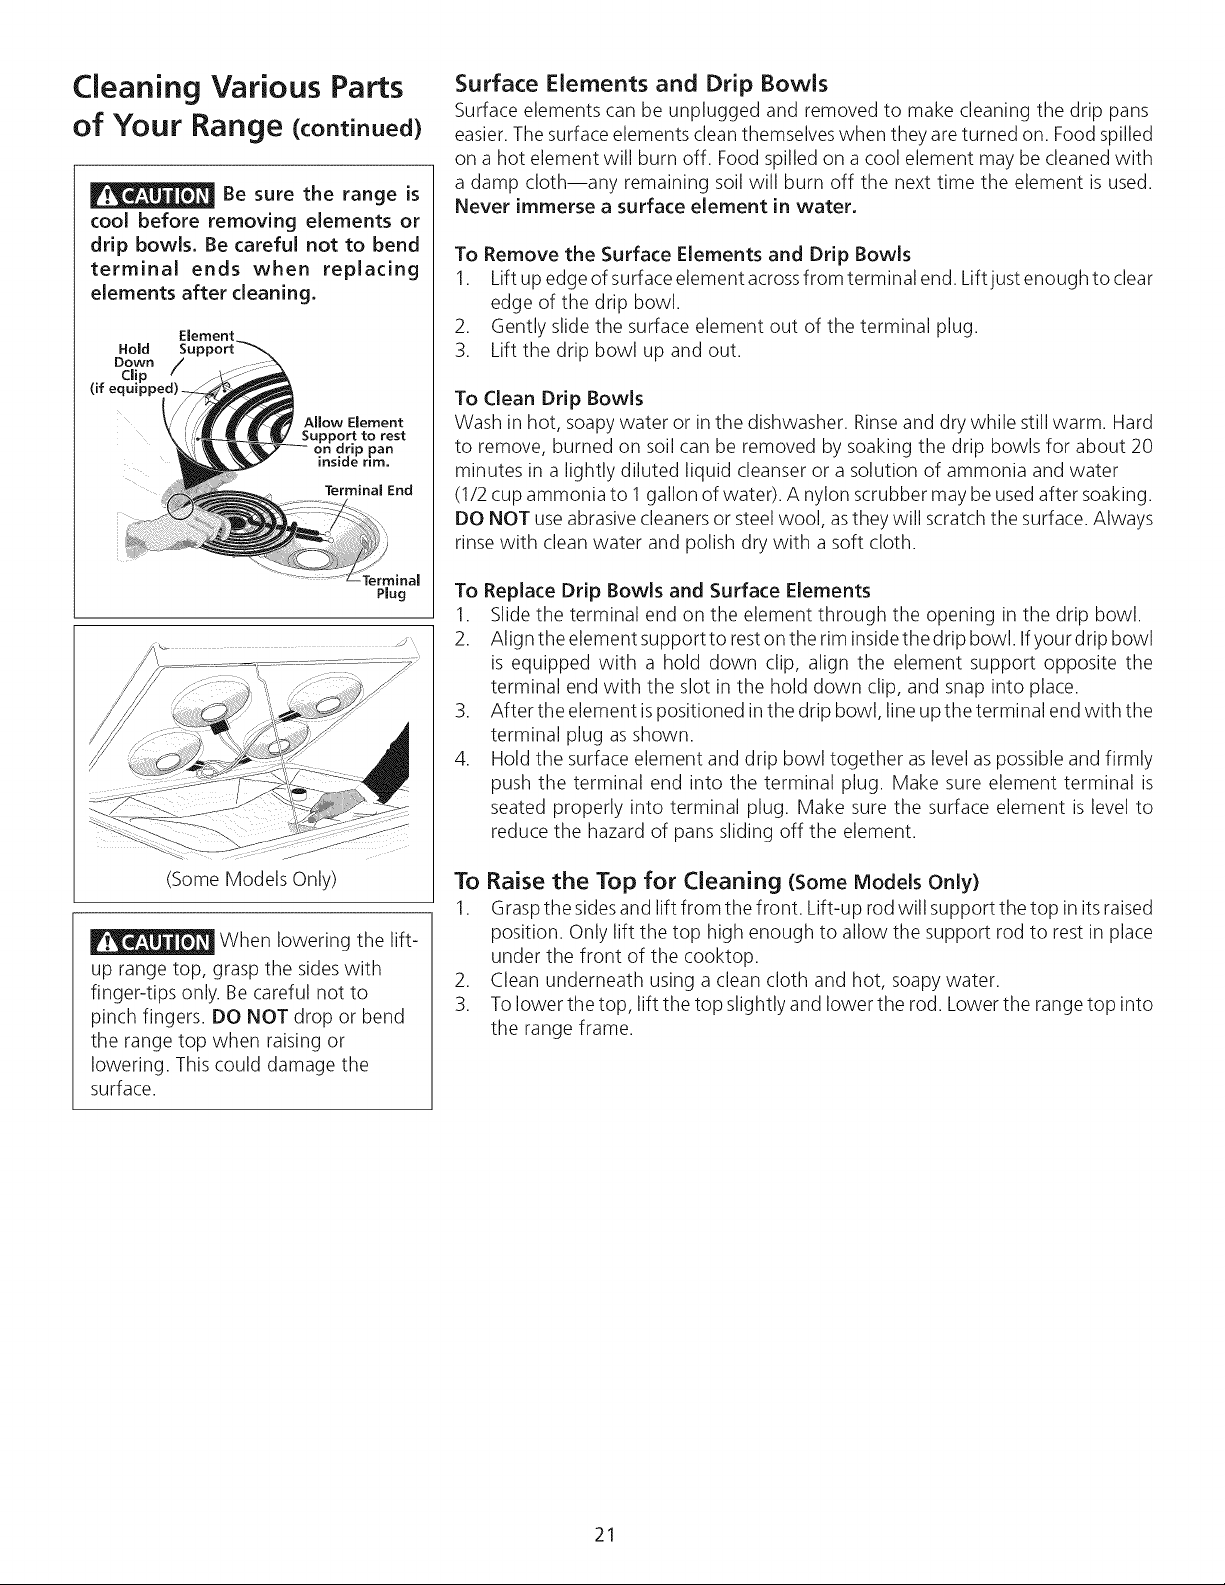
Be sure the range is
cool before removing elements or
drip bowls. Be careful not to bend
terminal ends when replacing
elements after cleaning.
Element
Hold Su
Down
Allow Element
to rest
6ri drip pan
inside rim.
Terminal End
(Some Models Only)
When lowering the lift-
up range top, grasp the sides with
finger-tips only. Be careful not to
pinch fingers. DO NOT drop or bend
the range top when raising or
lowering. This could damage the
surface.
Surface Elements and Drip Bowls
Surface elements can be unplugged and removed to make cleaning the drip pans
easier. The surface elements clean themselves when they are turned on. Foodspilled
on a hot element will burn off. Food spilled on a cool element may be cleaned with
a damp cloth--any remaining soil will burn off the next time the element is used.
Never immerse a surface element in water,
To Remove the Surface Elements and Drip Bowls
1. Lift up edge of surface element acrossfrom terminal end. Lift just enough to clear
edge of the drip bowl.
2. Gently slide the surface element out of the terminal plug.
3. Lift the drip bowl up and out.
To Clean Drip Bowls
Wash in hot, soapy water or in the dishwasher. Rinseand dry while still warm. Hard
to remove, burned on soil can be removed by soaking the drip bowls for about 20
minutes in a lightly diluted liquid cleanser or a solution of ammonia and water
(1/2 cup ammonia to 1 gallon of water). A nylon scrubber may be used after soaking.
DO NOT useabrasive cleaners or steel wool, asthey will scratch the surface. Always
rinse with clean water and polish dry with a soft cloth.
To Replace Drip Bowls and Surface Elements
1. Slide the terminal end on the element through the opening in the drip bowl.
2. Align the element supportto reston the rim insidethe drip bowl. Ifyour drip bowl
is equipped with a hold down clip, align the element support opposite the
terminal end with the slot in the hold down clip, and snap into place.
3. After the element ispositioned in the drip bowl, line up the terminal end with the
terminal plug as shown.
4. Hold the surface element and drip bowl together aslevel as possible and firmly
push the terminal end into the terminal plug. Make sure element terminal is
seated properly into terminal plug. Make sure the surface element is level to
reduce the hazard of pans sliding off the element.
To Raise the Top for Cleaning (Some Models Only)
1. Graspthe sidesand lift from the front. Lift-up rod will support the top in its raised
position. Only lift the top high enough to allow the support rod to rest in place
under the front of the cooktop.
2. Clean underneath using a clean cloth and hot, soapy water.
3. To lower the top, lift the top slightly and lower the rod. Lower the range top into
the range frame.
21
Cleaning Various Parts
of Your Range (continued)
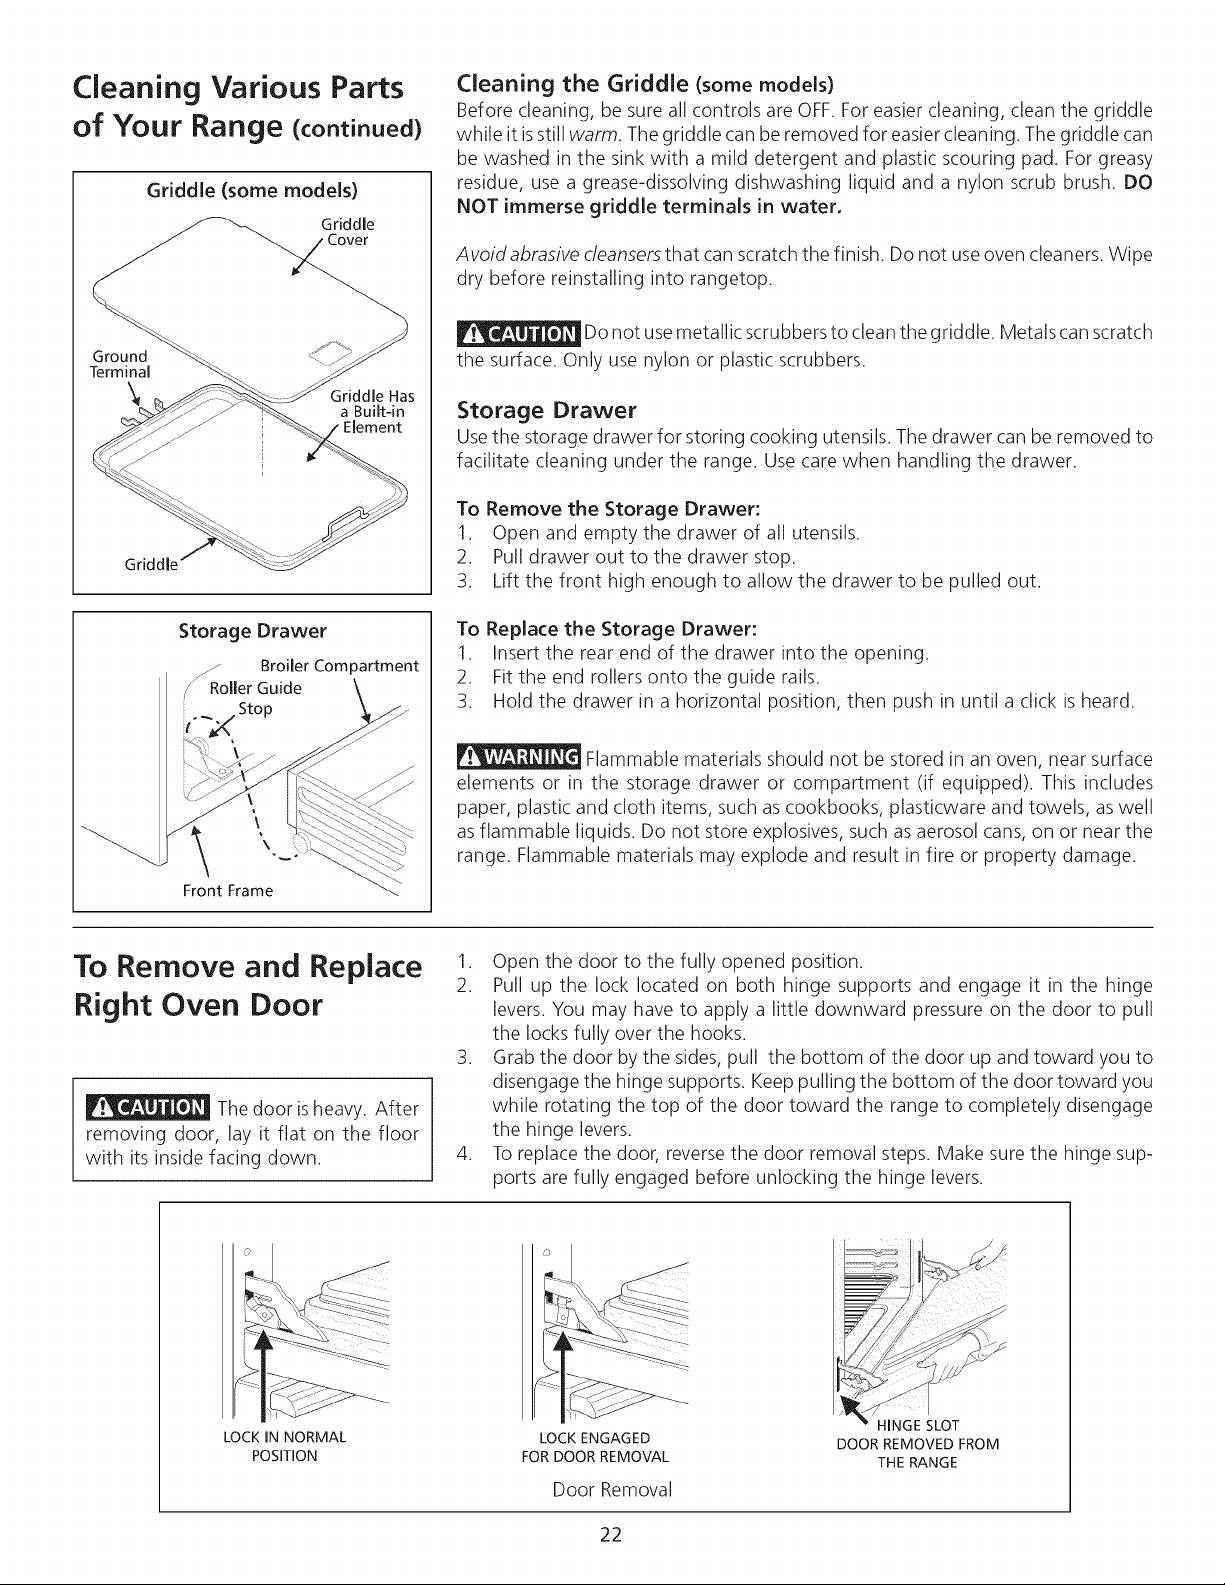
Griddle (some models)
Griddle
Cover
Ground
Terminal
Griddle Has
a Built-in
Element
Griddle
Storage Drawer
f.z Broiler Compartment
/ Roller Guide
Stop
\
Front Frame
Cleaning the Griddle (some models)
Before cleaning, be sure all controls are OFF.For easier cleaning, clean the griddle
while it isstill warm. The griddle can be removed for easiercleaning. Thegriddle can
be washed in the sink with a mild detergent and plastic scouring pad. For greasy
residue, use a grease-dissolving dishwashing liquid and a nylon scrub brush. DO
NOT immerse griddle terminals in water.
Avoid abrasive cleansersthat can scratch the finish. Do not useoven cleaners. Wipe
dry before reinstalling into rangetop.
Do not usemetallic scrubbers to clean the griddle. Metals can scratch
the surface. Only use nylon or plastic scrubbers.
Storage Drawer
Use the storage drawer for storing cooking utensils. The drawer can be removed to
facilitate cleaning under the range. Use care when handling the drawer.
To Remove the Storage Drawer:
1. Open and empty the drawer of all utensils.
2. Pull drawer out to the drawer stop.
3. Lift the front high enough to allow the drawer to be pulled out.
To Replace the Storage Drawer:
1. Insert the rear end of the drawer into the opening.
2. Fit the end rollers onto the guide rails.
3. Hold the drawer in a horizontal position, then push in until a click is heard.
Flammable materials should not be stored in an oven, near surface
elements or in the storage drawer or compartment (if equipped). This includes
paper, plastic and cloth items, such ascookbooks, plasticware and towels, aswell
asflammable liquids. Do not store explosives, such as aerosol cans, on or near the
range. Flammable materials may explode and result in fire or property damage.
To Remove and Replace
Right Oven Door
The door isheavy. After
removing door, lay it flat on the floor
with its inside facing down.
1. Open the door to the fully opened position.
2. Pull up the lock located on both hinge supports and engage it in the hinge
levers. You may have to apply a little downward pressure on the door to pull
the locks fully over the hooks.
3. Grab the door by the sides, pull the bottom of the door up and toward you to
disengage the hinge supports. Keep pulling the bottom of the door toward you
while rotating the top of the door toward the range to completely disengage
the hinge levers.
4. Toreplace the door, reverse the door removal steps. Make sure the hinge sup-
ports are fully engaged before unlocking the hinge levers.
LOCK IN NORMAL
POSITION
LOCK ENGAGED
FOR DOOR REMOVAL
Door Removal
HINGE SLOT
DOOR REMOVED FROM
THE RANGE
22
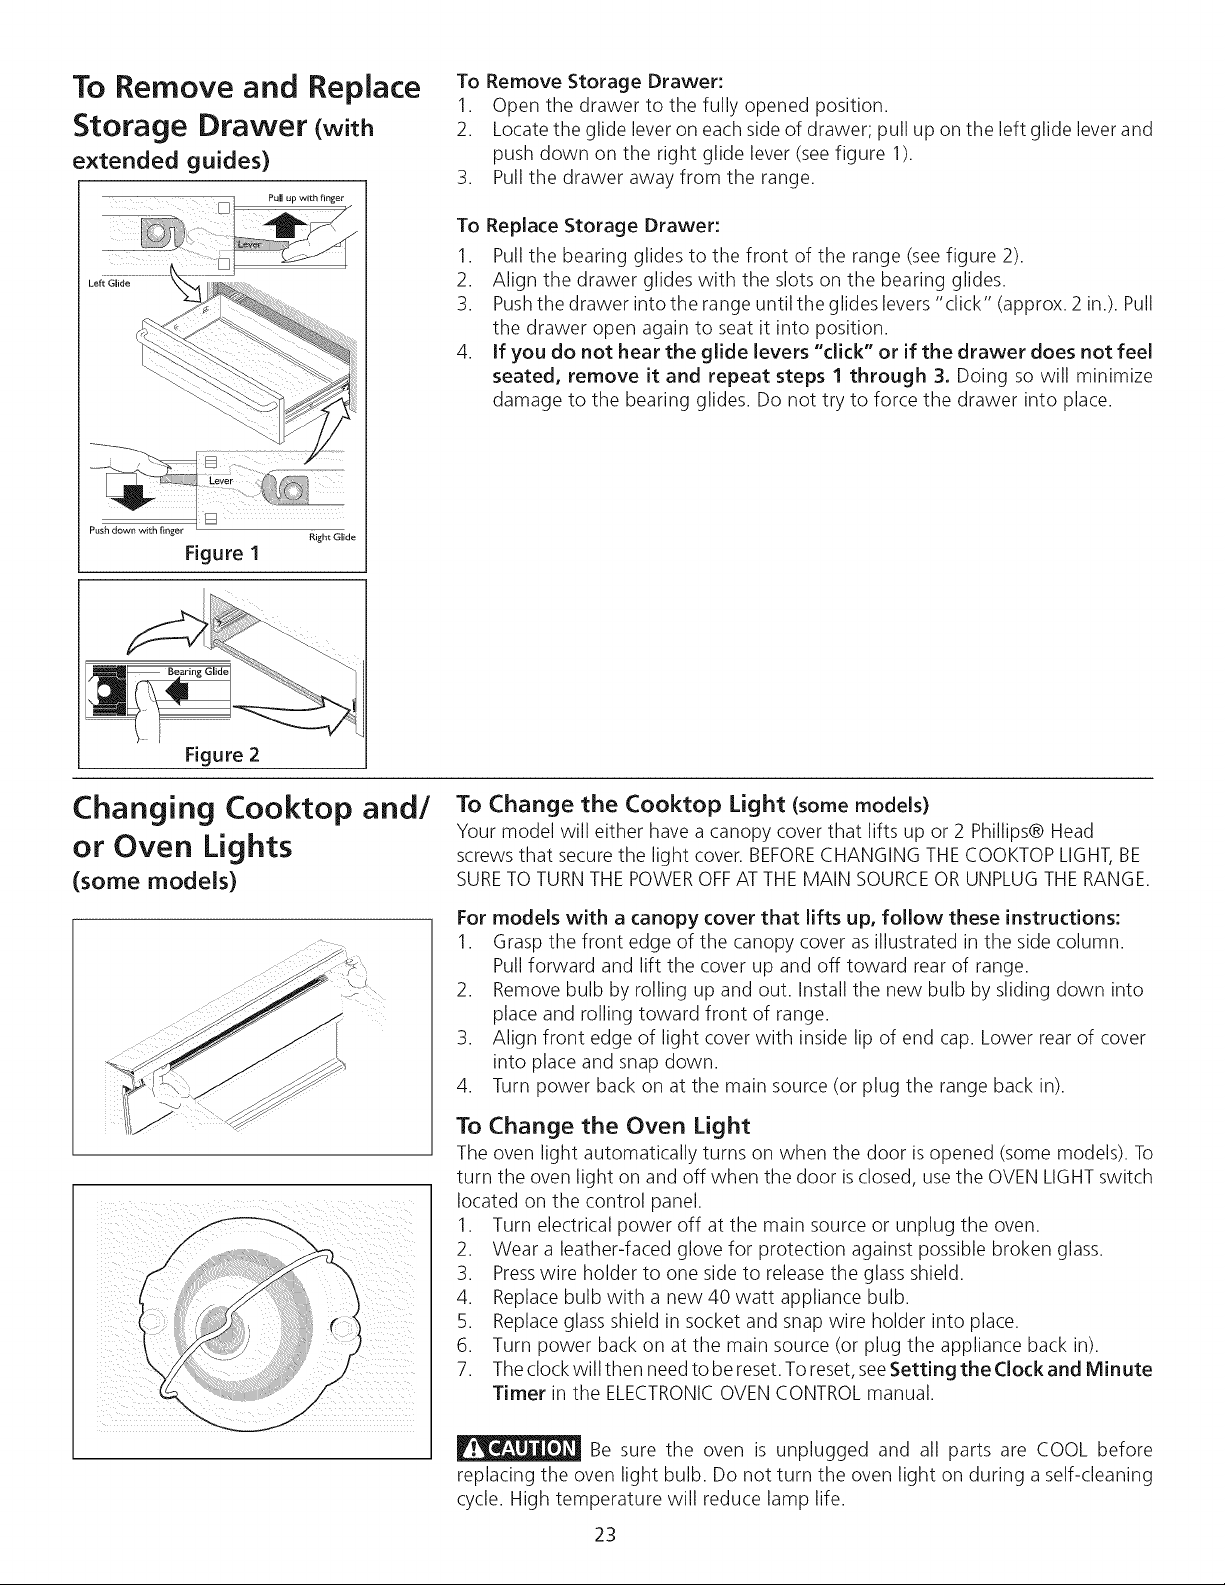
To Remove and Replace
Storage Drawer (with
extended guides)
[ Pull up with finger
Left Glide
Push down with finger Right Glide
Figure 1
To Remove Storage Drawer:
1. Open the drawer to the fully opened position.
2. Locate the glide lever on each side of drawer; pull up on the left glide lever and
push down on the right glide lever (see figure 1).
3. Pull the drawer away from the range.
To Replace Storage Drawer:
1. Pull the bearing glides to the front of the range (seefigure 2).
2. Align the drawer glides with the slots on the bearing glides.
3. Pushthe drawer into the range until the glides levers "click" (approx. 2 in.). Pull
the drawer open again to seat it into position.
4. If you do not hear the glide levers "click" or if the drawer does not feel
seated, remove it and repeat steps I through 3, Doing so will minimize
damage to the bearing glides. Do not try to force the drawer into place.
Figure 2
Changing Cooktop and/
or Oven Lights
(some models)
To Change the Cooktop Light (some models)
Your model will either have a canopy cover that lifts up or 2 Phillips® Head
screws that secure the light cover. BEFORECHANGING THE COOKTOP LIGHT,BE
SURETO TURNTHE POWEROFFAT THE MAIN SOURCEORUNPLUGTHE RANGE.
For models with a canopy cover that lifts up, follow these instructions:
1. Grasp the front edge of the canopy cover as illustrated in the side column.
Pull forward and lift the cover up and off toward rear of range.
2. Remove bulb by rolling up and out. Install the new bulb by sliding down into
place and rolling toward front of range.
3. Align front edge of light cover with inside lip of end cap. Lower rear of cover
into place and snap down.
4. Turn power back on at the main source (or plug the range back in).
To Change the Oven Light
The oven light automatically turns on when the door isopened (some models). To
turn the oven light on and off when the door is closed, usethe OVEN LIGHTswitch
located on the control panel.
1. Turn electrical power off at the main source or unplug the oven.
2. Wear a leather-faced glove for protection against possible broken glass.
3. Presswire holder to one side to releasethe glass shield.
4. Replace bulb with a new 40 watt appliance bulb.
5. Replace glass shield in socket and snap wire holder into place.
6. Turn power back on at the main source (or plug the appliance back in).
7. Theclock will then need to be reset.Toreset, seeSetting the Clock and Minute
Timer in the ELECTRONICOVENCONTROL manual.
Be sure the oven is unplugged and all parts are COOL before
replacing the oven light bulb. Do not turn the oven light on during a self-cleaning
cycle. High temperature will reduce lamp life.
23
Avoid Service Checklist
You may save the cost and inconvenience of an unnecessary service call by first
reviewing this Checklist of commonly encountered problem situations.
You will be charged for a servicecall while the appliance isin warranty ifthe problem
is not caused by defective product workmanship or materials.
Your new appliance isa carefully engineered product. Many times, what appears
to be a reason to call service requires nothing more than a simple adjustment you
can easily make in your own home.
OCCURRENCE
Range is not level.
POSSIBLE CAUSE/SOLUTION
Poor installation. To level range, refer to Leveling Guide,in the Installation Instructions.
When range is level, cooktop may appear out of alignment if countertop is not level.
Weak, unstable floor. Be sure floor is level and can adequately support range. Contact
a carpenter to correct sagging or sloping floor.
Kitchen cabinet misalignment may make range appear to be unlevel. Be sure cabinets
are square and have sufficient room for range clearance.
Cannot move appliance easily. Appliance Cabinets not square or are built in too tight. Contact a cabinet maker to correct the
must be accessible for service, problem.
Contact builder or installer to make appliance accessible.
Carpeting interferes with range. Provide sufficient space so range can be lifted over
carpet.
Entire range or oven does not operate. Make sure cord/plug is tightly into outlet.
Service wiring is not complete. Contact your dealer, installing agent or authorized
servicer.
Power outage. Check house lights to be sure. Call your local electric company for service.
*Oven control beeps and displays F1, F3 or Electronic control has detected a fault condition. Push CLEAR to clear the display and
F9. stop beeping. Program oven again. Iffault recurs, record fault number. Push CLEAR and
contact an authorized servicer.
Oven and/or cooktop lights does not work. Replace or tighten bulb. See "Changing Oven Light" in this Guide for instructions.
Surface unit does not heat. Element not making contact in block. Follow instructions under "Surface Elements
and Drip Bowls" in the General Cleaning section.
No power to the appliance. Cbeck steps under "Enti re Range or Oven DoesNot Operate"
in this Avoid Service Checklist.
Incorrect control setting. Make sure the correct control is on for the surface unit to be
used.
Scratches or abrasion on cooktop surface. Coarse particules such as salt and sand between cooktop and utensils can cause
scratches. Besure cooktop surface and bottoms of utensils are clean before usage. Small
scratches do not affect cooking and will become lessvisible with time.
Cleaning materials not recommended for ceramic-glass cooktop have been used. See
"To Clean the GlassCooktop" section under General Cleaning.
Surface element too hot or not hot
enough.
Cookware with rough bottom has been used. Use smooth, flat-bottomed cookware.
Incorrect control setting. Make sure the correct control is on for the surface element to be
used.
24
Metalmarks.
Sliding or scraping of metal utensils on cooktop surface. Do not slide metal utensils on
cooktop surface. Use a ceramic-glass cooktop cleaning cream to remove the marks. See
"To Clean the Cooktop Glass" section under General Cleaning.
Brown streaks or specks. Boilovers are cooked onto surface. Use razor scraper to remove soil. See "To Clean the
Cooktop Glass'section under General Cleaning.
Areas of discoloration with metallic Mineral deposits from water and food. Remove using a ceramic-glass cooktop cleaning
sheen, cream. Use cookware with clean, dry bottoms.
Poor baking results.
Many factors affect baking results. Make sure the proper rack position isused. Center food
in the oven and space pans to allow air to circulate. Allow the oven to preheat to the set
temperature before placing food in the oven. Try adjusting the recipes' recommended
temperature or baking time. Ifyou feel the oven is too hot or cool, see "Adjusting Oven
Temperature" in the ELECTRONICOVEN CONTROL section.
Flames inside oven or smoking from vent.
Excessive spillovers in oven. Set self-clean cycle for a longer cleaning time.
Excessivespillovers in oven. This isnormal, especially for pie spillovers or large amounts of
grease on the oven bottom. Wipe up excessive spillovers before starting the self-dean
cycle. Ifflames or excessivesmoke are present, stop the self-clean cycle and follow the steps
under "Stopping or Interrupting the Self-Cleaning Cycle" in the ELECTRONICOVEN
CONTROL section.
Oven smokes excessively du ring broiling.
Control(s) not set properly. Follow instructions under "Setting Oven Controls" in the
ELECTRONICOVEN CONTROL section.
Make sure oven door is opened to the Broil Stop Position.
Meat too close to the element. Reposition the rack to provide proper clearance between
the meat and the element. Preheat broil element. Preheat broil element for searing.
Grid on broiler pan wrong side up and grease not draining. Always place grid on broiler
pan with ribs up and slots down to allow grease to drip into pan.
Grease has built up on oven surfaces. Regular cleaning is necessary when broiling
frequently. Old grease or food spatters cause excessive smoking.
Self-cleaning cycle does not work.
Control(s) not setproperly. Follow instructions under"Oven Cleaning" in the ELECTRONIC
OVEN CONTROL section.
Self-cleaning cycle was interrupted. Stop time must be 3 to 4 hours past the start time.
Follow steps under "Stopping or Interrupting the Self-Cleaning Cycle" in the
ELECTRONICOVEN CONTROL section.
Soil not completely removed after self-
cleaning cycle.
Failure to clean bottom, front top or oven, frame or door area outside oven seal. These
areas are not in the self-cleaning area, but get hot enough to burn on residue. Clean these
areas before the self-cleaning cycle isstarted. Burned-on residue can be cleaned with astiff
nylon brush and water or nylon scrubber. Be careful not to damage the oven seal.
Drip bowls are pitting or rusting.
Foods with acids, such as tomatoes, if allowed to stand in/on bowls will cause corrosion.
Remove and wash drip bowls as soon as possible after a spillover.
Normal environment. Houses along sea coast are exposed to salt air. Protect bowls as
much as possible from direct exposure to salt air.
Drip bowls turning color or distorted
out of shape.
Bottom surface of cookware extends beyond surface elements and touches cooktop
surface. This can cause high enough temperatures to discolor the drip bowls. DO NOT use
cookware of this type. Pan sizesshould be matched to the size of the element.
Replacement drip bowls may be purchased from your dealer.
Cooktop and/or Oven light (some Replace or tighten bulb. See Changing Cooktop and/or Oven Lights (some
models) does not work. models) in this Owner's Guide for instructions.
25

NOTES
26

NOTES
27
Your appliance is covered by a one year limited warranty. For one year from your original date of
purchase, Electrolux will pay all costs for repairing or replacing any parts of this appliance that prove to be
defective in materials or workmanship when such appliance is installed, used and maintained in
accordance with the provided instructions.
Exclusions
This warranty does not cover the following:
1. Products with original serial numbers that have been removed, altered or cannot be readily determined.
2. Product that has been transferred from its original owner to another party or removed outside the USA or
Canada.
3. Rust on the interior or exterior of the unit.
4. Products purchased "as-is" are not covered by this warranty.
5. Food loss due to any refrigerator or freezer failures.
6. Products used in a commercial setting.
7. Service calls which do not involve malfunction or defects in materials or workmanship, or for appliances
not in ordinary household use or used other than in accordance with the provided instructions.
8. Service calls to correct the installation of your appliance or to instruct you how to use your appliance.
9. Expenses for making the appliance accessible for servicing, such as removal of trim, cupboards,
shelves, etc., which are not a part of the appliance when it is shipped from the factory.
10. Service calls to repair or replace appliance light bulbs, air filters, water filters, other consumables, or
knobs, handles, or other cosmetic parts.
11. Surcharges including, but not limited to, any after hour, weekend, or holiday service calls, tolls, ferry trip
charges, or mileage expense for service calls to remote areas, including the state of Alaska.
12. Damages to the finish of appliance or home incurred during installation, including but not limited to
floors, cabinets, walls, etc.
13. Damages caused by: services performed by unauthorized service companies; use of parts other than
genuine Electrolux parts or parts obtained from persons other than authorized service companies; or
external causes such as abuse, misuse, inadequate power supply, accidents, fires, or acts of God.
DISCLAIMER OF IMPLIED WARRANTIES; LIMITATION OF REMEDIES
CUSTOMER'S SOLE AND EXCLUSIVE REMEDY UNDER THIS LIMITED WARRANTY SHALL BE PRODUCT
REPAIR OR REPLACEMENT AS PROVIDED HEREIN. CLAIMS BASED ON IMPLIED WARRANTIES,
INCLUDING WARRANTIES OF MERCHANTABILITY OR FITNESS FOR A PARTICULAR PURPOSE, ARE
LIMITED TO ONE YEAR OR THE SHORTEST PERIOD ALLOWED BY LAW, BUT NOT LESS THAN ONE
YEAR. ELECTROLUX SHALL NOT BE LIABLE FOR CONSEQUENTIAL OR INCIDENTAL DAMAGES SUCH
AS PROPERTY DAMAGE AND INCIDENTAL EXPENSES RESULTING FROM ANY BREACH OF THIS
WRITTEN LIMITED WARRANTY OR ANY IMPLIED WARRANTY. SOME STATES AND PROVINCES DO NOT
ALLOW THE EXCLUSION OR LIMITATION OF INCIDENTAL OR CONSEQUENTIAL DAMAGES, OR
LIMITATIONS ON THE DURATION OF IMPLIED WARRANTIES, SO THESE LIMITATIONS OR EXCLUSIONS
MAY NOT APPLY TO YOU. THIS WRITTEN WARRANTY GIVES YOU SPECIFIC LEGAL RIGHTS. YOU MAY
ALSO HAVE OTHER RIGHTS THAT VARY FROM STATE TO STATE.
If You Need
Service
Keep your receipt, delivery slip, or some other appropriate payment record to establish the warranty period
should service be required. If service is performed, it is in your best interest to obtain and keep all receipts.
Service under this warranty must be obtained by contacting Electrolux at the addresses or phone
numbers below.
This warranty only applies in the USA and Canada. In the USA, your appliance is warranted by Electrolux Major Appliances
North America, a division of Electrolux Home Products, Inc. In Canada, your appliance is warranted by Electrolux Canada Corp.
Electrolux authorizes no person to change or add to any obligations under this warranty. Obligations for service and parts under
this warranty must be performed by Electrolux or an authorized service company. Product features or specifications as
described or illustrated are subject to change without notice.
USA
1.800.944.9044
Electrolux Major Appliances
North America
P.O. Box 212378
Augusta, GA 30907
Electrolux
Canada
1.800.668.4606
Electrolux Canada Corp.
5855 Terry Fox Way
Mississauga, Ontario, Canada
L5V 3E4