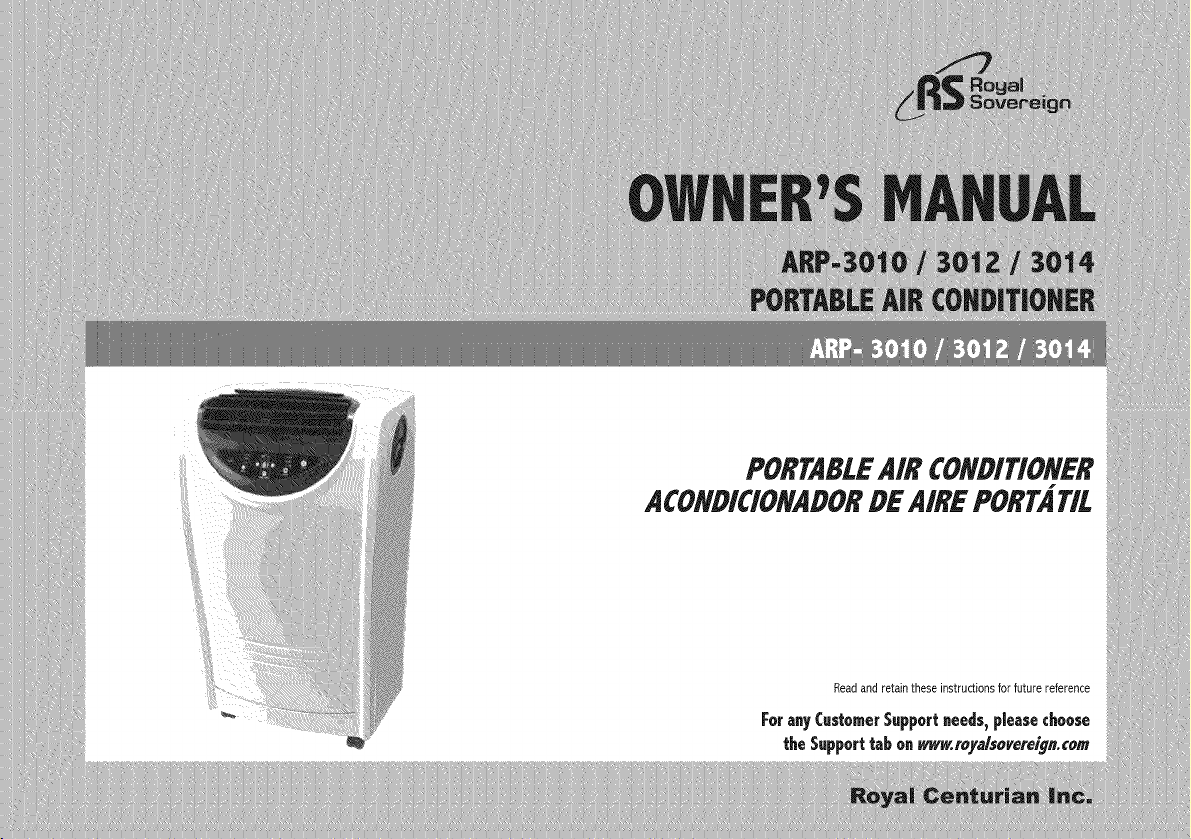
PORTABLEAIR CONDITIONER
ACONDICIONADORDE AIRE PORTATIL

[qodelARP_3010 / 3012 / 3014
Page
Precautionsfor use........................................................................................................................................ 4
Noteson operation and identificationof parts.................................................................................................. 5
Installation instructions............................................................................................................................... 6-7
Operation.................................................................................................................................................. 8-9
Remotecontrol ...................................................................................................................................... 10-11
Maintenance................................................................................................................................................ 12
Troubleshooting........................................................................................................................................... 13
Specifications............................................................................................................................................... 14
Warranty...................................................................................................................................................... 15
Contact information...................................................................................................................................... 16
P{igina en Espafiol ....................................................................................................................................... 17
Precautionsfor use
Electrical Specifications and Power Cord
Checkto ensurethat the electricalservicebeingusedis adequatefor the modalyou'vechosen, Theelectricalra%g of your newair conditioneris
definedon the serialplateof the unit, Pleasereferto the ratingwhencheckingelectricalrequirementsto ensuretheymeetthe dectricalcodesof
yourlocation,
• Installtheair conditioneraccordingto the installationinstructionssupplied.
• Do not modi_/antspart of this product.
• Do not insertantsobjectsintothe produd or blockthe air%win antsway.
• Ensurethat the powersupplypu use hasan appropriatevoltagerating
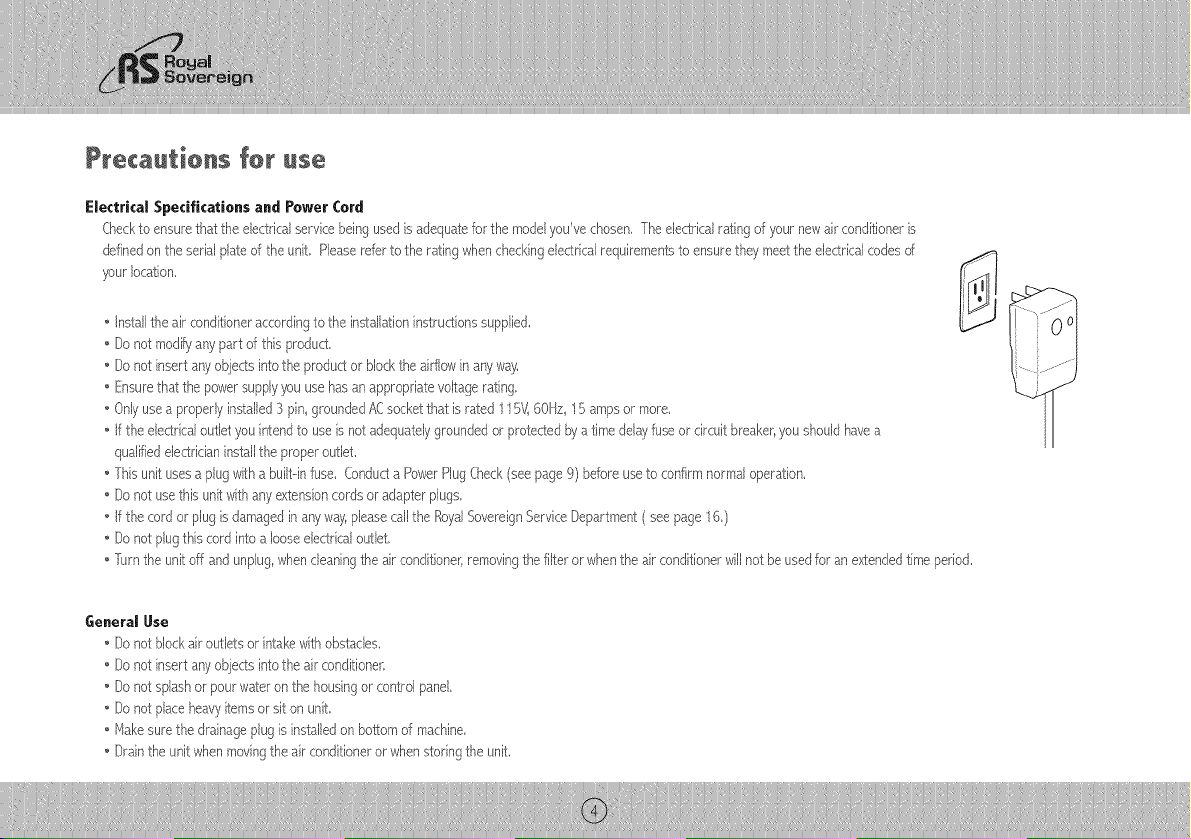
• Onlyusea properlyinstalled:3pin groundedACsocketthat is rated 11r:i_60Hz 1r:iarnpsor more.
• If the electricaloutletyouintendto useis notadequatelygroundedorprotectedbya time delayfuseor circuitbreaker,youshouldhavea
qualifiedelectridaninstallthe properoutlet.
• Thisunit usesa plugwitha built--infuse. Conducta PowerPlugCheck(seepage9) beforeuseto confirmnormaloperation.
• Do not usethis unitwithanyextensioncords or adapterplugs.
• If the cord or plugis damagedinanyway_pleasecallthe %yalSovereignServiceDepartment( seepage 16.)
• Do not plugthis cordintoa looseelectricaloutlet.
• furn the unit off andunplug whencleaningthe airconditioner]removingthefilter or whenthe air conditionerwillnot be usedforan extendedtime period.
General Use
Do not blockairoutletsor intak_withobstacles.
Do not insertanyobjectsintothe air conditioner.
Do notsplashor pourwateronthe housingor controlpanel.
Do not placeheavyitemsor sit on unit.
Makesurethe drainageplugisinstalledon bottomof machine.
[)rainthe unitwhenmovingthe air conditioneror whenstoringthe unit.
Hotes oH operation
if youturn the air conditioneroff andimmediatelyrestart it, allow3 minutesfor the compressorto restart cooling, in the eventof a powerfailure,wait 3 minutesbeforerestarting
unit,
laenti(icatien o( parts
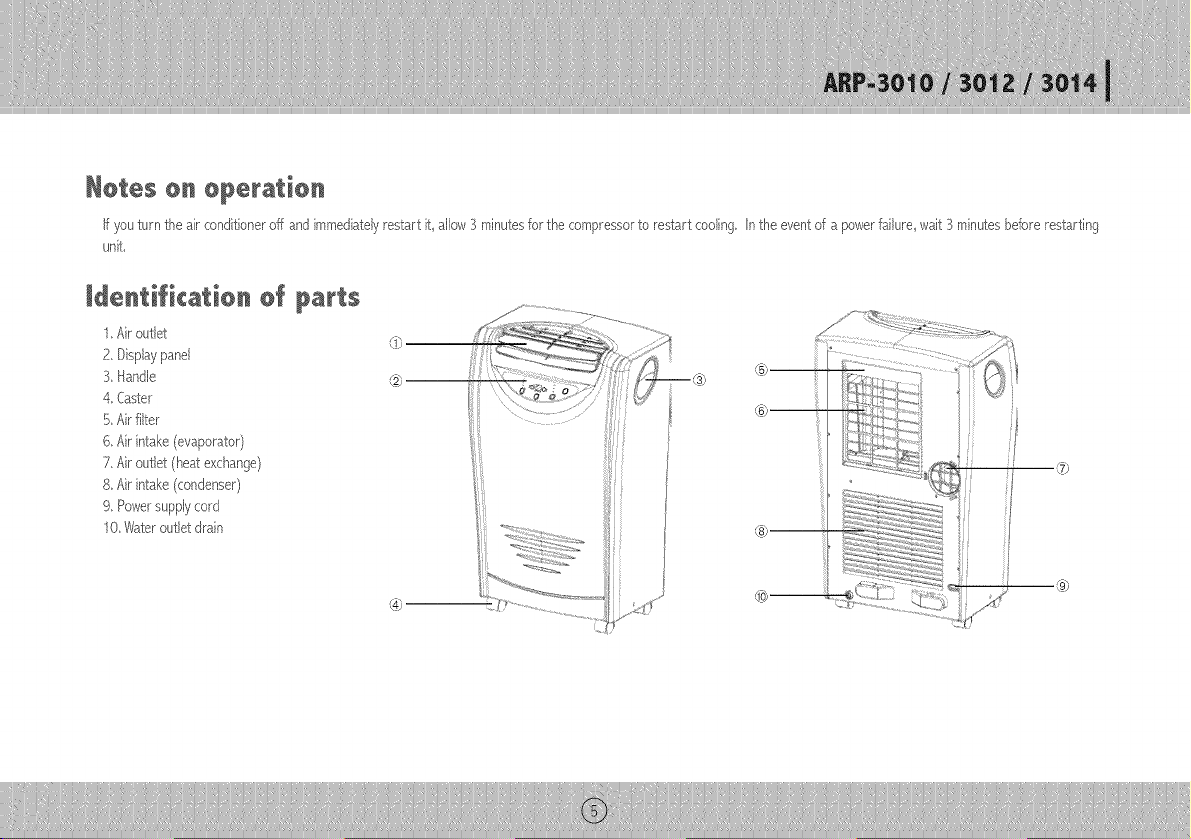
1,Airoutbt
2. Displaypanel
3, Handle
4, Caster
_.i,Airilter
6, Air intake(evaporator)
7, Airoutlet (heat exchange)
8, Air intake(condenser)
9, Powersupplycord
10,Wateroutlet drain
®
u®
®
Unpackput newPortableAirConditionerand letthe machinestanduprightfor2 hoursbeforestarting.
Unpackall parts listedbelow.I anyparts are missingdo not returnthis product to the placeof purchase.
Pleasevisit our website_,t¢,_,r ncom andclickon the "CustomerSupport' tab and
"ltake a,Request'to requestmissingpartsor call1-800-S97-1025andpressoption ¢44tc
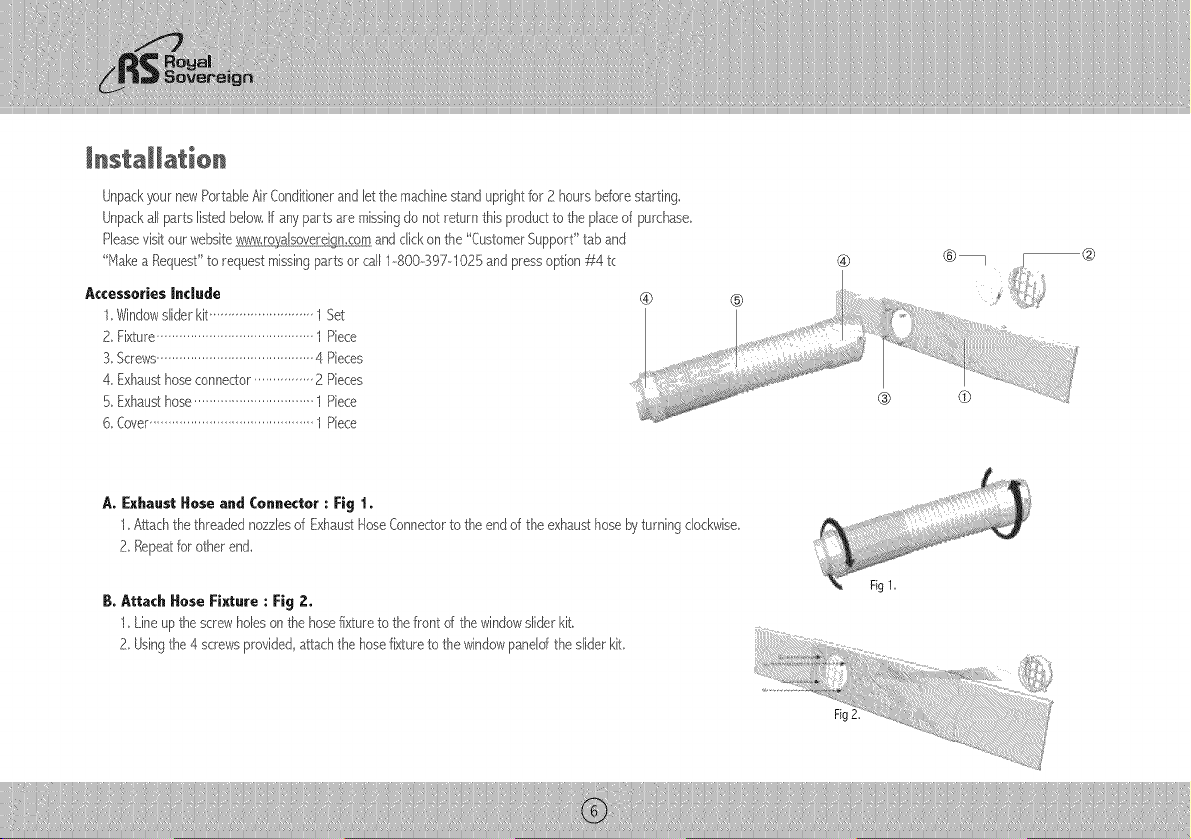
Accessories Indude
1 Windowsliderkit 1 Set
2, Fixture..........................................1 Piece
3, Screws..........................................4 Pieces
4 Exhausthoseconnector................2 Pieces
5, Exhausthose................................1 Piece
6, Cover............................................/ Piece
A, Exhaust Hose and Connector : Fig 1,
1,Attachthethreadednozzlesof ExhaustHoseConne<_orto theend of the exhausthosebyturningclockwise,
2, Repeatfor other end,
B. Attach Hose Fixt-re : Fig 2,
1, Lineup the screwholeson the hosefixtureto thefront d the windowsliderkit.
2, Usingthe 4 screwsprovided,attachthe hosefixtureto thewindowpaneldthe sliderkit
Fig2
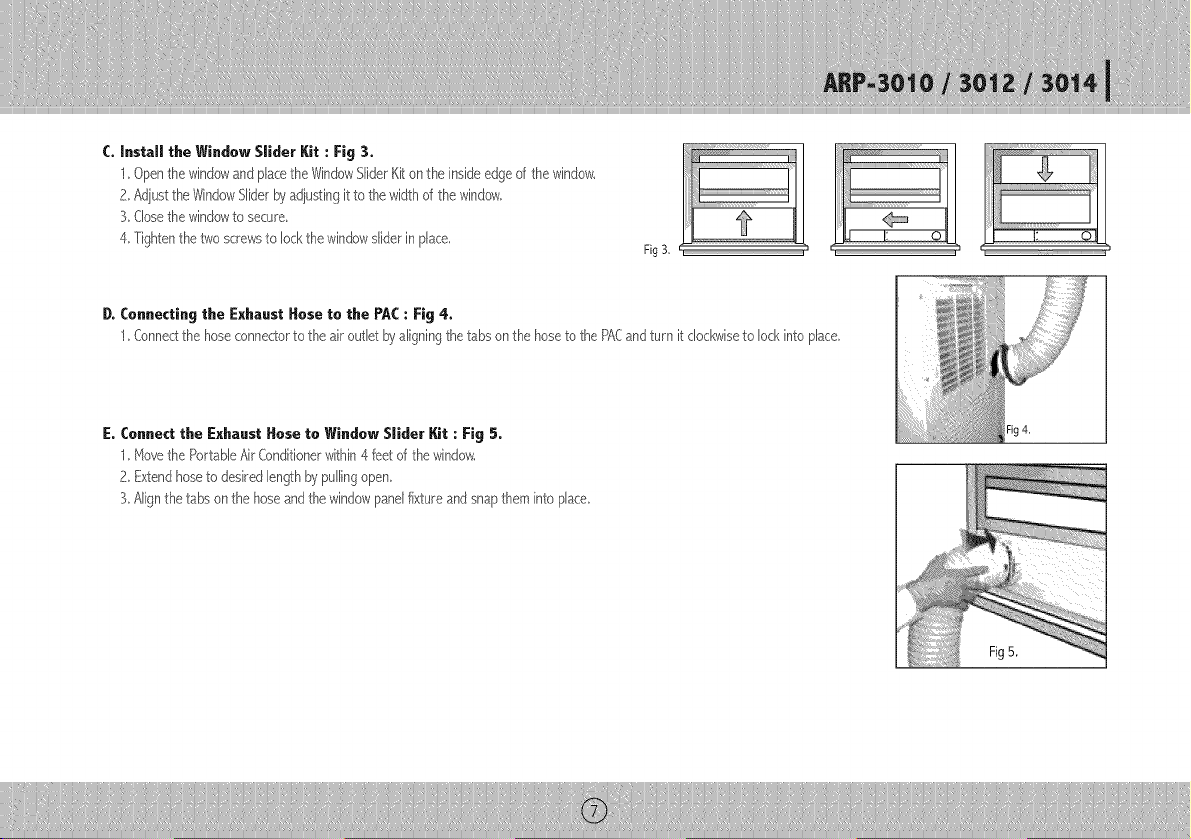
C. Install the Window Slider Kit : Fig 3.
1 Openthe windowandplacethe WindowSliderKit on the insideedgeof the window,
2,Adjust_heWindowSliderbyadjustingit to thewidthof the window,
3, Closethe windowto secure
4, Tightenthe twoscrewsto lockthe windowsliderin place,
D, Connecting the Exhaust Hose to the PAC : Fig 4,
1, Connersthe hoseconne(Sorto the air outld byaligningthe tabs on the hoseto the PA,Candturn it clockwiseto lockinto pJace,
E. Connect the Exhaust Hose to Window Slider Kit : Fig 5.
1 Move,the PortableAirConditionerwithin4 feet of the window.
2, Extendhoseto desir_,dlengthbypullingopen
3,Alignthetabs onthe hose,andthewindowpandfixture andsnaptheminto place,
Fig4.
FigB.
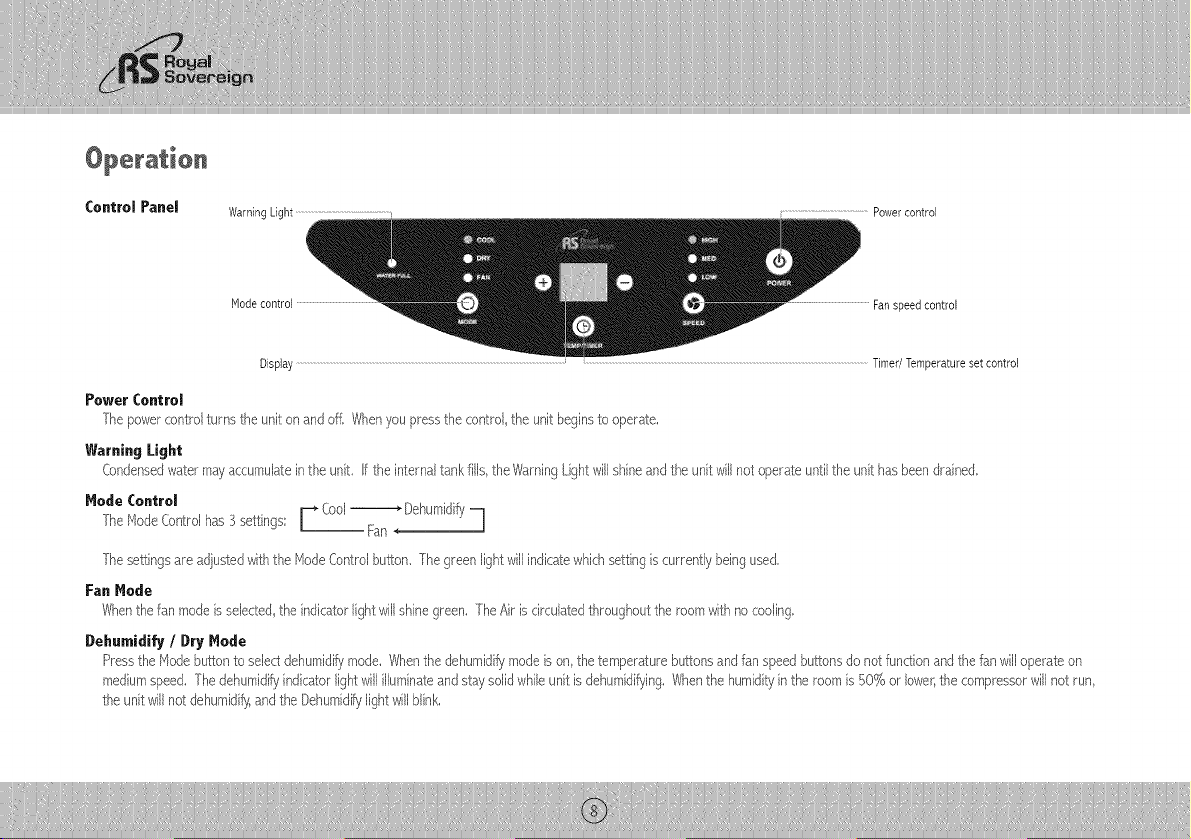
Co.trol Panel WarningLight Power control
Mode control Fan speed control
Display ..............................................................................................................................................................................................................................................................................................................................................................................................Timer/Temperature set control
Power Control
Thepowercontrolturnsthe unit on andoff, Whenyoupressthe control,the unit beginsto operate,
Warning Light
Condensedwatermayaccumulateinthe unit. f the internaltank fills,the WarningIJghtwillshineand the unitwill notoperateuntilthe unithasbeendrained.
Hode Control
Cool
_ Dehumidi_
[he ModeControlha 3 settings [
q
-- Fan ,
[he settingsareadjustedwiththe ModeControlbutton. Thegreen lightwillindicatewhichsettingis currentlybeingused.
Fan Hede
Whenthe fan modeisselected,the indicatorlightwillshinegreen. TheAir is circulatedthroughoutthe room withnocooling
Dehumidify / Dry Hode
Pressthe Modebuttonto selectdehumidi_/mode./_Jhenthe dehumidifymodeis on thetemperaturebuttonsandfan speedbuttonsdo notfunctionandthe fanwill operateon
mediumspeed. [he dehumidi_/indicatorlightwill ilhminateandstay solidwhileunitis dehumidifying.Whenthe humidityinthe roomis 50% or lower,the compressorwillnot run
the unitwill not dehumidify,andthe Dehumidi_slight willblink,
CoolMode
WheninCoolmodetheindicatorlightwillshinegreen.
1.Duringoperatingtheunitdisplays_'presentroomtemperature._
Z.Whensettingthetemperaturetheunitwilldisplaythetemperatureset.1-emperaturerangeis61°Fto89%
XInCodmodeusethe"÷' or "%utton to adjustandsetthe desiredtemperaturefor the room./Vter5 secondsthe displaywill revert backto the currentroomtemperature.
femperaturecan onlybe adjustedin Coolmode.The timeis adjustabbbetween1-_24 hours.
Fan Speed Control
TheFanspeedhas3 settings:_igh, Mediumand Low
Changin 9 Temperature Readin9 from Celsius to Fahrenheit
Pressthe Timerand lemperatureset buttonsat the sametimeto displaythetemperaturereadingyou wouldliketo use,
Timer
fhere are 2 differenttimer programs,Youcansetthe numberof hoursbeforethe air conditionerautomaticaB/turnsOFFor youcanset the numberof hoursthat willelapse
beforethe unitturns ON.
Whenthe air conditioner is turned off, you can choose to turn it on in one hour intervals,
1, Press the G button on the remote to turn on the timer fundion
2, Press the + or --button on the remote to set the desired hour,
3, The unit will turn on when the set time elapses,
Whenthe air conditioner- is turned on you can choose to turn it off in one hour intervals,
1, Press the (_ button on the remote to turn on the timer function
2, Press the + or --button on the remote to set the desired hour,
3, The unit will turn off when the set time elapses,
Automatic Restart:
n the event of a power failure: The settings ,/viiireturn to the previously set operating modes once the power is restored.
Power Plug Chech
1. Press the %%[ button.
2. Insert the power plug into the electrical outlet.
3. Press the ESI- button. If the circuit breaker is working youll hear a click.
4. Press the RESETbutton until you hear another click. The circuit breaker in the plug is now activated.
5. Do not use the air conditioner if the above procedure cannot be successfully pe_orme&
After switching the air conditioner off_ wait 3 minutes before switching it bacl_ on again,
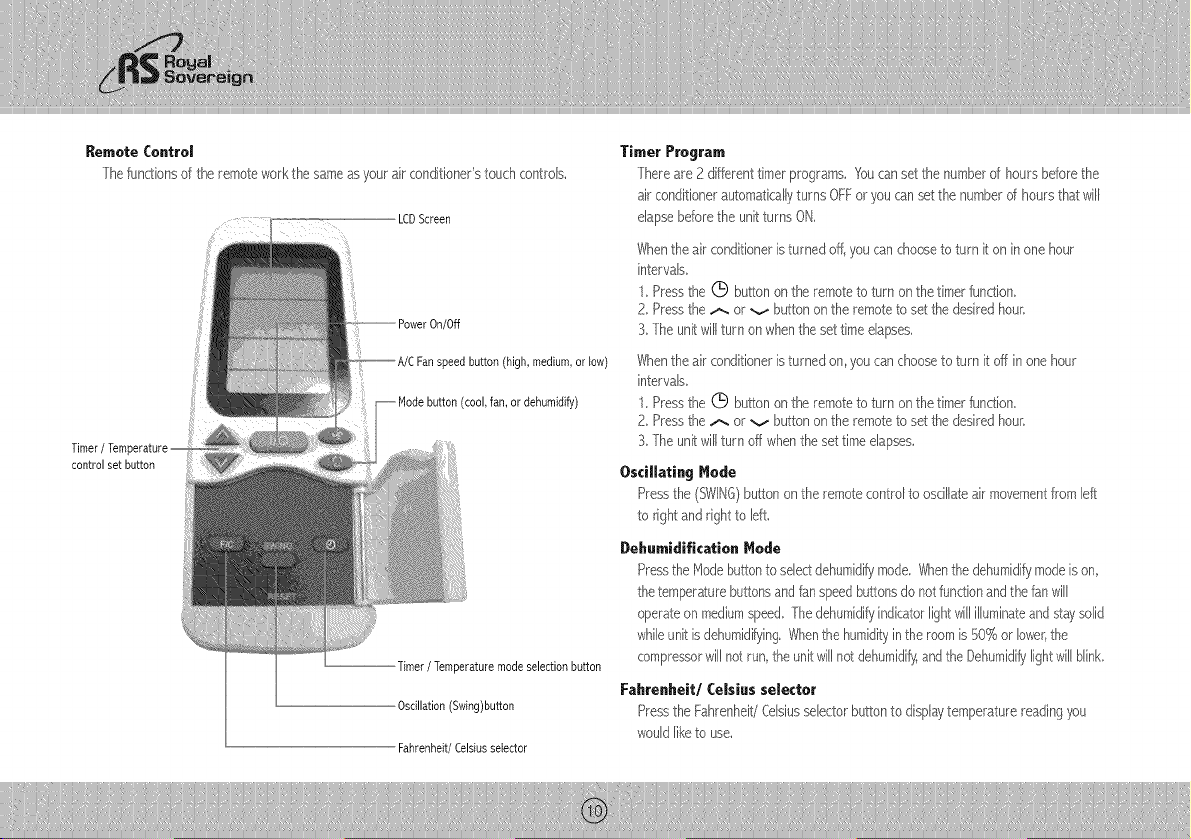
Remote Control
Thefun(£ionsof the remoteworkthe sameasyourair conditionerstouchcontrols,
LCDScreen
Timer
control set button
/off
peedbutton(high,medium,or low)
(cool,fan, or dehumidify)
rimer / Temperature mode selection button
Oscillation (Swing)button
Fahrenheit/Celsius selector
Timer Program
Thereare 2 differenttimerprograms, Youcansetthe numberof hoursbeforethe
air conditionerautomaticallyturns OFFor youcansetthe numberd hoursthat will
elapsebeforethe unitturnsON,
Whenthe air conditioneristurned off,youcanchooseto turn it on inone hour
intervals,
1, Pressthe (_ buttonon the remoteto turn onthe timerfunction,
2, Pressthe t-. or v buttonon the remoteto setthe desiredhour.
3,The unitwiI[turn on whenthe set timeelapses,
Whenthe air conditioneristurned on,youcanchooseto turn it off inone hour
in_ervaJs
1, Pressthe (_ buttonon the remoteto turn onthe timerfunction,
2, Pressthe t-. or v buttonon the remoteto setthe desiredhour.
3,The unitwiI[turn off whenthe settime elapses,
Oscillalin 9 I_lede
Pressthe (SWING)buttonon the remotecontrolto osci%teair movementfrom left
to rightand rightto left
Deh.midifkation Mode
Pressthe Modebuttonto selectdehumidifymode. Whenthe dehumidifymodeis on,
thetemper_Zurebutlonsandfanspeedbuttonsdo notfunctionandthe fanwill
operateon mediumspeed Thedehumidifyindicatorlightwillilluminateandstaysolid
whileunitisdehumidifyingWhenthe humi@yinthe roomis %% or lowershe
compressorwillnot run,the unit willnotdehumidify,andthe Dehumidifylightwill blink
Fahrenheil/Celsius selecler
Pressthe Fahrenheit/Celsiusselectorbuttonto disphy temperaturereadingyou
wouldliketo use.
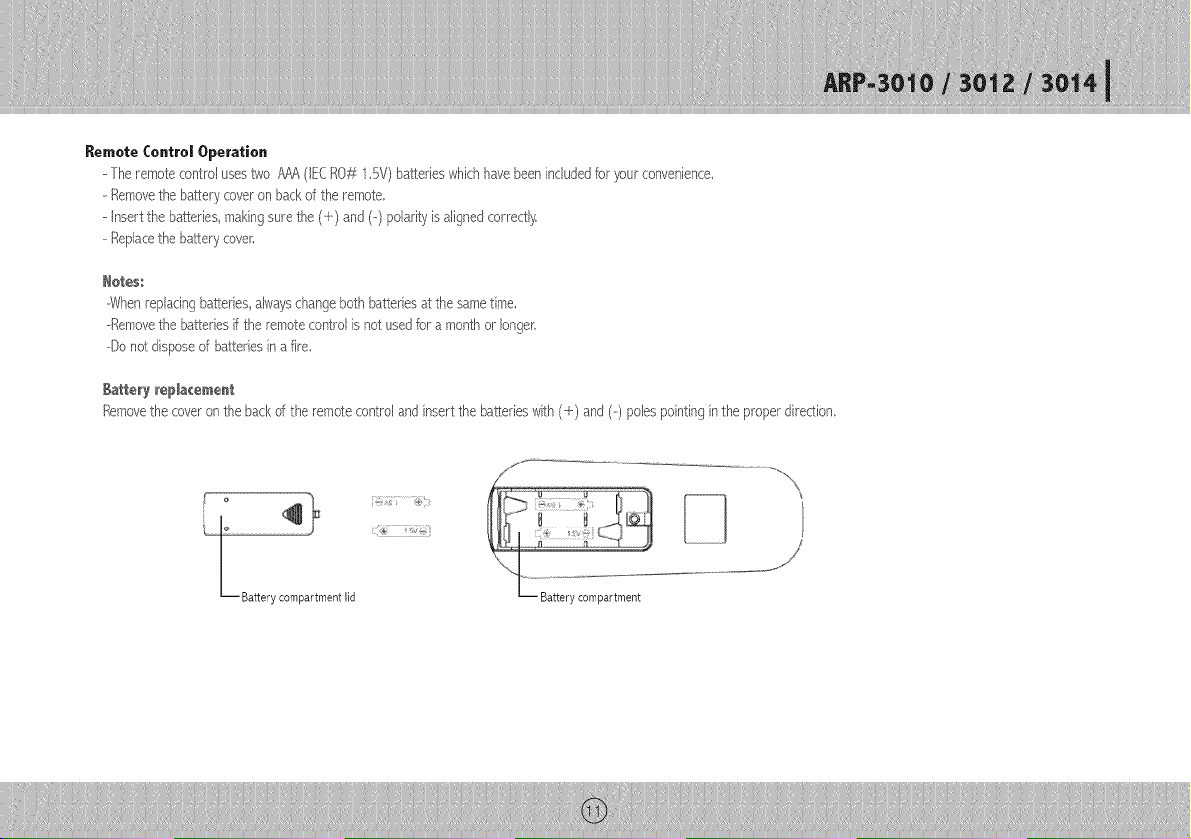
Remote Control Operation
- Theremotecontrolusestwo ,_¢&(IECROf-_1,5V)batterieswhichhave beenincludedforyourconvenience,
- Removethe batterycoveron backof the remote,
- nsert the batteries makingsure the (_--)and (_-)polarityis alignedcorrectly,
--Replacethe batterycover:
tto_es:
--Whenreplacingbatteries,alwayschangeboth batteriesat the sametime.
--Removethe batteriesif the remotecontrolis notusedfor a monthor longer,
--Donotdisposeof batteriesin a fire.
Balt_eryrepJa_eme_
Removethe coveron the backof the remotecontroland insertthe batterieswith (+) and (--)polespointinginthe proper direction.
L Battery compartment lid
f,j
'X"_"L Battery compartment
Drainage
Occasionally_youmayneedto drainthe unit.
1.[)rain the unitif the WarningLight onthe displaypanelof the air conditioneris on.
2. 7urn off the powerto the unit and unplug.
3. Placea shallowdish underthe draina% plug to collectwater:
4, Removethe drainageplug
5, Replacethe plug whendrainagewaterstopsflowing
Cleaning the filter
Thefiltershouldbe cleanedevery2 weeksor 100 hoursof usein orderto maintainproperair%w,
1.Removethe filter: Gentlypullthe filter assemblyfromthe backof the unit andthenremovethefilter from the assembly,
2. Cleanthefilter byvacuumingor a soft cloth. If the filteris verydirty,it canbeeasilywashedwitha milddeter%nt andrinsedthoroughlywithcleanwater, Drythe filterbefore
replacement.
3. Reinstallthefilter inthe filterassembly,
4. Replacethefilter assemblyon the backof the machine.
Hot÷ : Neveroperatethe air conditionerwithoutthe filter in place. Thismaydamagethe unit.
Cleaning and maintaining the air conditioner
[urn the air conditioner off and remove the eledrical plug. Wipe with a soft, dry, or damp cloth. A mild detergent can be used. Be sure to remove any residue and dry completely,
Do not use harsh chemicals abrasive cleaners or volatile substance (such as gasoline). Avoid splashing water on the air conditioner as this can seriously dama% the unit.
Storing the air conditioner
If the unitwill not beusedfor a longtime,be sureto drainthe aircon@ioner_cleanthe air filtel;pull out the powersupplyplug and removethe batteriesfromthe remotecontrol
beforestorage.Afterdraining keepthe air conditionerrunningon %N modefor at least8 hoursto dry the unitcompletelyto preventmold.
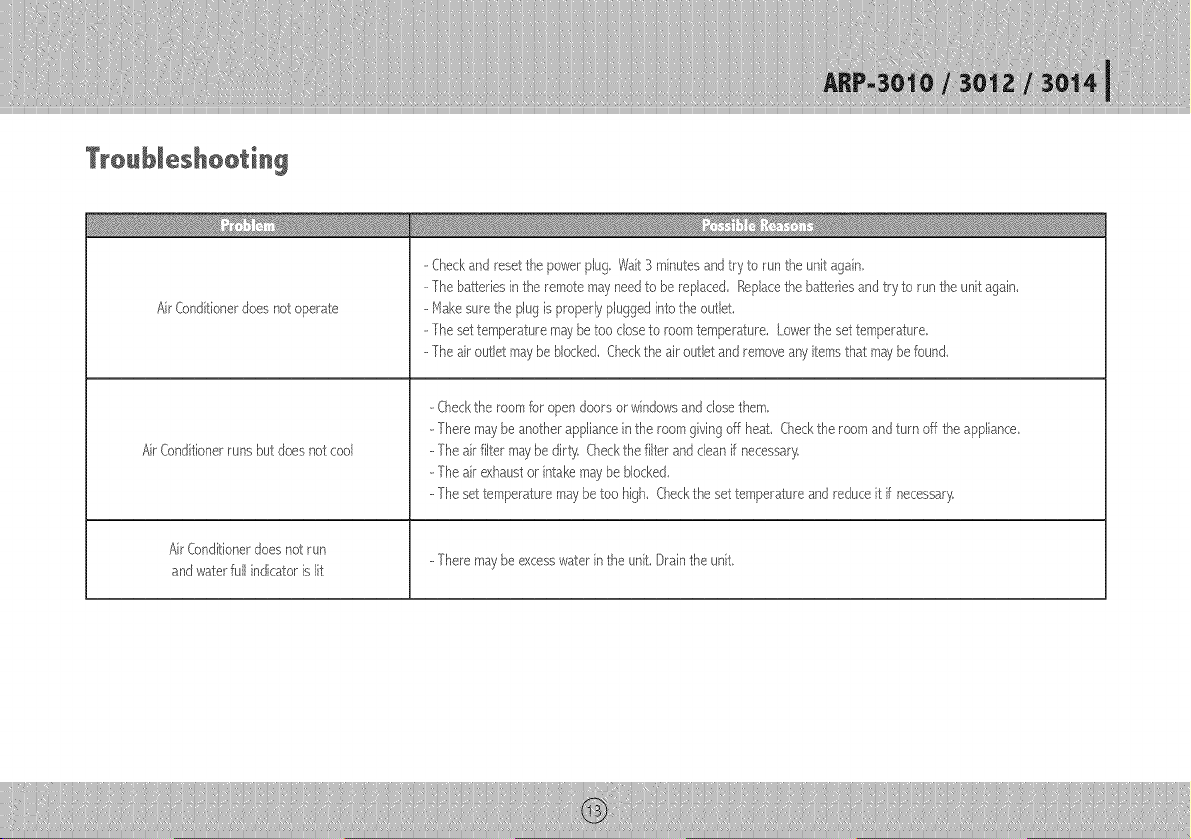
AirConditionerdoesnotoperate
AirConditionerrunsbutdoesnotcool
AirConditionerdoesnotrun
andwaterfullindicatorislit
- Check and reset the power plug,Wait 3 minutes and try to run the unit again,
-- The batterbs in the remote may need to be replaced, Replace the batteries and try to run the unit again,
-- Make sure the plug is properly plugged into the outlet,
-- The set temperature may be too close to room temperature, Lower-the set temperature,
-- The air outlet may be blocked, Check the air outlet and remove any items that may be found,
- Checkthe roomfor opendoorsor windowsand closethem,
- Theremaybe anotherapplb,nceinthe roomgivingoff heat, Checkthe roomandturn off the app%nce,
- The air filter maybe dirty, Checkthe filterandcban if necessary,
--Theair exhaustor intakemay be blocked.
--Thesettemperaturemaybetoo high. Checkthe settemperatureand reduceit if necessary,
- Theremaybe excesswaterin the unit, Drainthe unit.
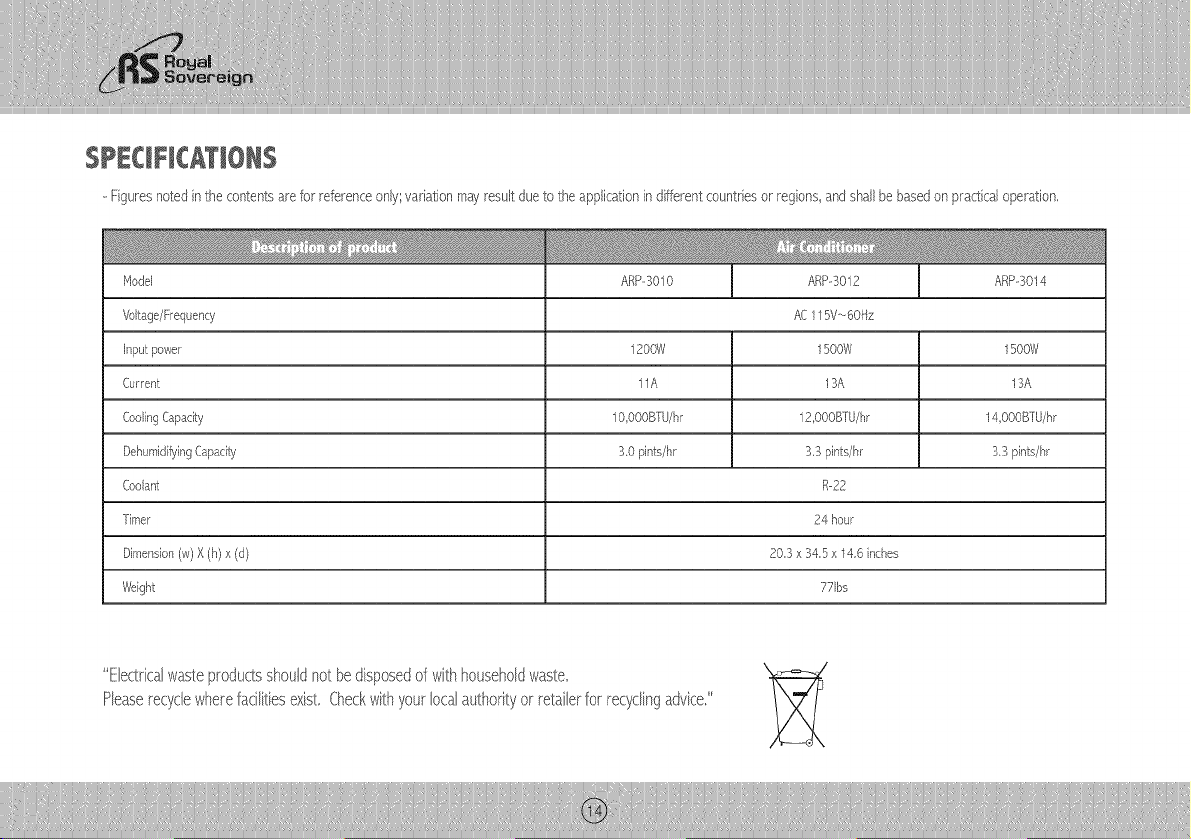
--Figuresnotedinthecontentsareforreferenceonly;variationmayresultduetotheapplicationindifferentcountriesorregions,andshallbebasedonpracticaloperation,
Model ARP-3010 ARP-3012 ARP-3014
Voltage/Frequency AC115V-_60/-_z
Inputpower 1200W 1500W 1500W
Current 11A 13A 13A
CoolingCapacity 10,O00B_U/hr 12 O00B[U/hr 14 O00B[U/hr
Dehum}dif}/ingCapacity 30 pints/hr 3,3 pints/hr 3,3pints/hr
Coolant R-22
Timer 24 hour
Dimension(w) X (h) x (d) 20,3 x 34,5 x 14,6 inches
Weight 771bs
ElectricalNasteprodudsshouldnot bedisposedof withhouseholdwaste,
Pleaserecyclewherefaclitiesexist, Checkwithyourlocalauthorityo retaibrfo recyclingadvice,"
FULLONEYEARWARRANTY
%yalSovereignwarrantseach PortableAir Conditionerto be free from defectsinmaterialandworkmanship,Ourobligationunderthis warrantyis limitedto the repairor
replacementfree of charge whendeliveredto anauthorized%yal Sovereignservicecenter;of anydefectivepart(s) thereof other thanparts damagedintransit,Thiswarrantyis
ineffectto the originalpurchase_for a periodof oneyear fromthe dateof purchaseandis nottransferable,Thiswarrantyshallapplyonly if the air conditioneris usedon
AlternatingCurrent(AC)circuit inaccordancewiththefactory providedinstructionswhichaccompanyit,
LiMiTEDFIVEY£ARWARRANTY(COMPRESSOR)
_or a periodof five yearsfromthe dateof purchase,whenthis %yal SovereignPortableAir Conditioneris operatedandmaintainedaccordingto the instrudionmanualprovided
withthe product %yal Sovereignwill supplya replacementcompressor(parts only) free of charge if the originalcompressoris determinedto be defectivein workmanshipor
material,f repairbecomesnecessari_pleasecontactourcustomerservicecentei:Youwill beresponsibleforall freight insuranceand anyother transportationchargesto get the
unitto our factory or servicecenter:f shippingis required be sureto packthe unit properlyto avoidshippingdamagesaswewillnot be responsiblefor suchdamages,
Thiswarrantyexcludesand doesnot coverdefects malfunctionsor failuresof yourRoyalSovereignPortableAir Conditioner;causedbyrepairsbyunauthorizedpersonsor service
centers mishandlingimproperinstallationmodificationor unreasonableuseincludingincorrectvoltage actsof God orfailureto providereasonableand necessarymaintenance.
fhis warrantyis in lieuof anyand all expressedwarranties.In no eventshall%yal Sovereignbe liablefor consequentialor incidentaldamages.This limitationwouldnot applyif you
liveina locationthasdoesnot permitthe exclusionof limitationof incidentalor consequentialdamages,Ibis warrantygivesyouspecificlegalrightsandyoumayalsohaveother
rightswhichvaryfromstate to state,
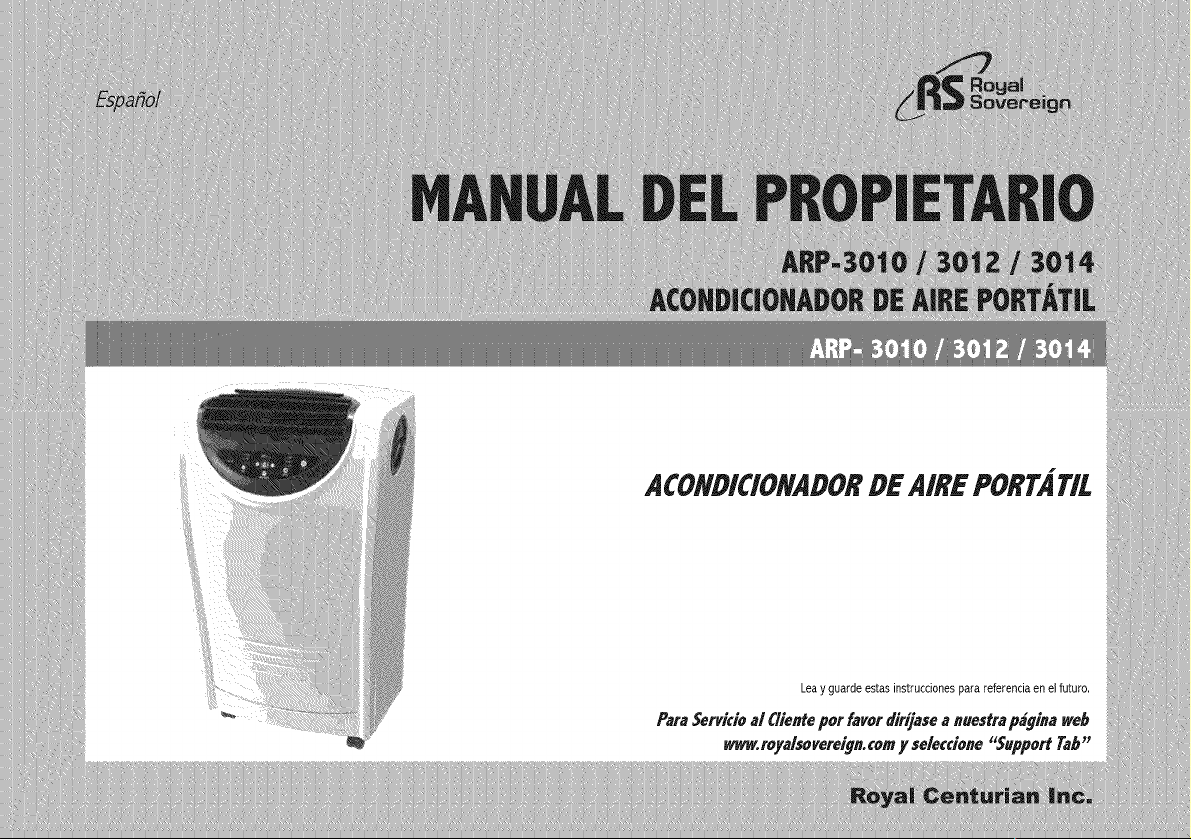
ACONDICIONADORDE AIRE PORTATIL
Lea y guarde estas instrucciones para referencia en el futuro,
Para_rvicio al Clientepot favordirijase a ,uestra p_gina web
wwv.royalsovereign.comy seleccione_Support Tab"
HodeloARP-3010/ 3012 / 3014
m_stico_PotfaVOr,: _lealasinstrucdonesp,
:: muchosa_oSde0i_eraci6n:librede pr0blema3:.::::::
,n,Esun:siStemade:c6moda:ventilad6n:muiti-fund0naiqueleofrecemodosde AireAcondiciOnado;Deshumedecedory Circulaci6nde
i_informaci6iivalUabl_ " _propiadoy mantenimientode::Sunuevo
propiadamente;su electrOdom_sticoledar_.
Pagina
Precaucionesde Uso ................................................................................................................................... 20
NotasSobre el Funcionamientoe Identificaci6nde las Partes .......................................................................... 21
Instruccionespara la Instalaci6n ............................................................................................................ 22_23
Funcionamiento...................................................................................................................................... 24_25
Control Remoto...................................................................................................................................... 26_27
klantenimiento ............................................................................................................................................ 28
Identificaci6ny Soluci6nde Problemas........................................................................................................... 29
Especificaciones........................................................................................................................................... 30
Garantia ..................................................................................................................................................... 31
Contactos.................................................................................................................................................... 32
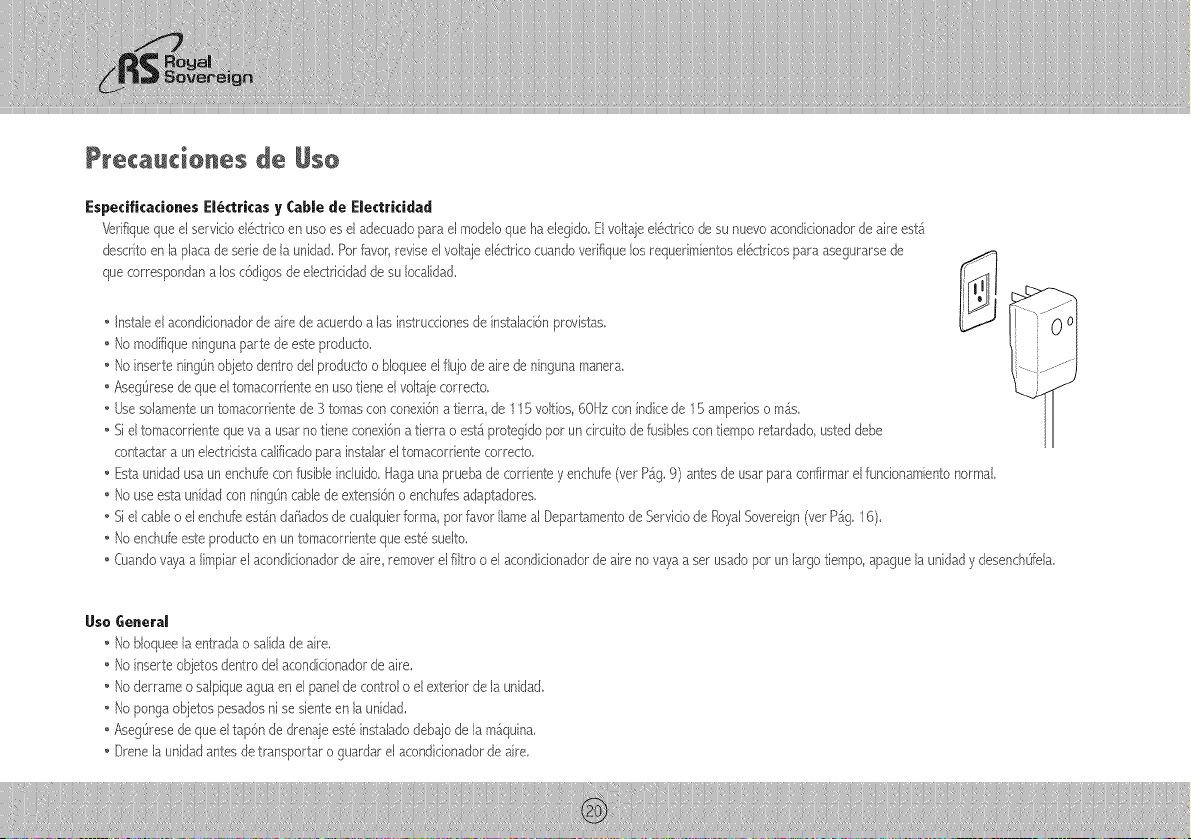
Precaudonesde @so
Especificaciones El_ctrkas y Cable de Electrkidad
\!erifiqueque elservido d6ctricoen usoes eladecuadoparael moddoque hadegido, Elvoltajed6ctricode su nuevoacondidonadorde a.ireesta.
descritoen [aplacadeserie de launidad,Porfavor_reviseel voltajed@tricocuandoverifiquelos requerimientosd_,_ctricospa.raasegurarsede
quecorrespondana.los c6digosdee[ectriddaddesu [ocalidad,
• nstaJeeJacondicionadorde aimde acuerdoa las instruccionesde instaJaci6npmvistas,
• No modifiqueningunaparte deeste produdo,
• No inserteningOnobjeto dentrodelproductoo bloqueeel%jo de a.irede ningunamanera,
• Asegtiresede queel tomacorrienteen usotieneelvoltajecorrecto,
• Usesdamenteuntomacorrientede 3 tomasconconexi6na %rra de 115vdtios 60Hzconindicede 15 amperioso mas,
• Sieltomacorrientequewe.a usarno tieneconexi6na tierra o esta.protegidopor undrcuito de fusiblescontiempo retardado usteddebe
contactara un electricistacalificadopara instalareltomacorrientecorrecto.
• Estaunidadusaun enchufecon fusibleinchido.Hagaunapruebade corrientey enchufe(verPa.g9) antesde usarparaconfirmarelfuncionamientonormal.
• No useestaunidadconningOncabledeextensi6no enchufesadaptadores.
• Sielcableo el enchufeesta.ndafiadosde cualquierforma porfavor Ilameal Departamentode Servidode RoyalSovereign(vetPa.g.16).
• Noenchufeesteproductoen untomacorrienteque est@sudto.
• {uandovayaa limpiarelacondicionadordeaire, removerelfiltroo el acondicionadorde aireno vayaa set usadoporun largotiempo,apaguelaunidady desenchOfda_
Uso General
• No bloqueelaentradao saJidade aim.
• No inserteobjetosdentrodel acondicionadorde aire.
• Noderrameo salpiqueaguaen el panelde controlo el exteriorde la unidad.
• No pongaobjetospesadosnise sienteen la unidad.
• Aseg@esede queel tap6nde dren_e est6 instaladodebaiode la maquina.
• I)renelaunidadantesdetransportar o guardarel acondidonadorde aire.
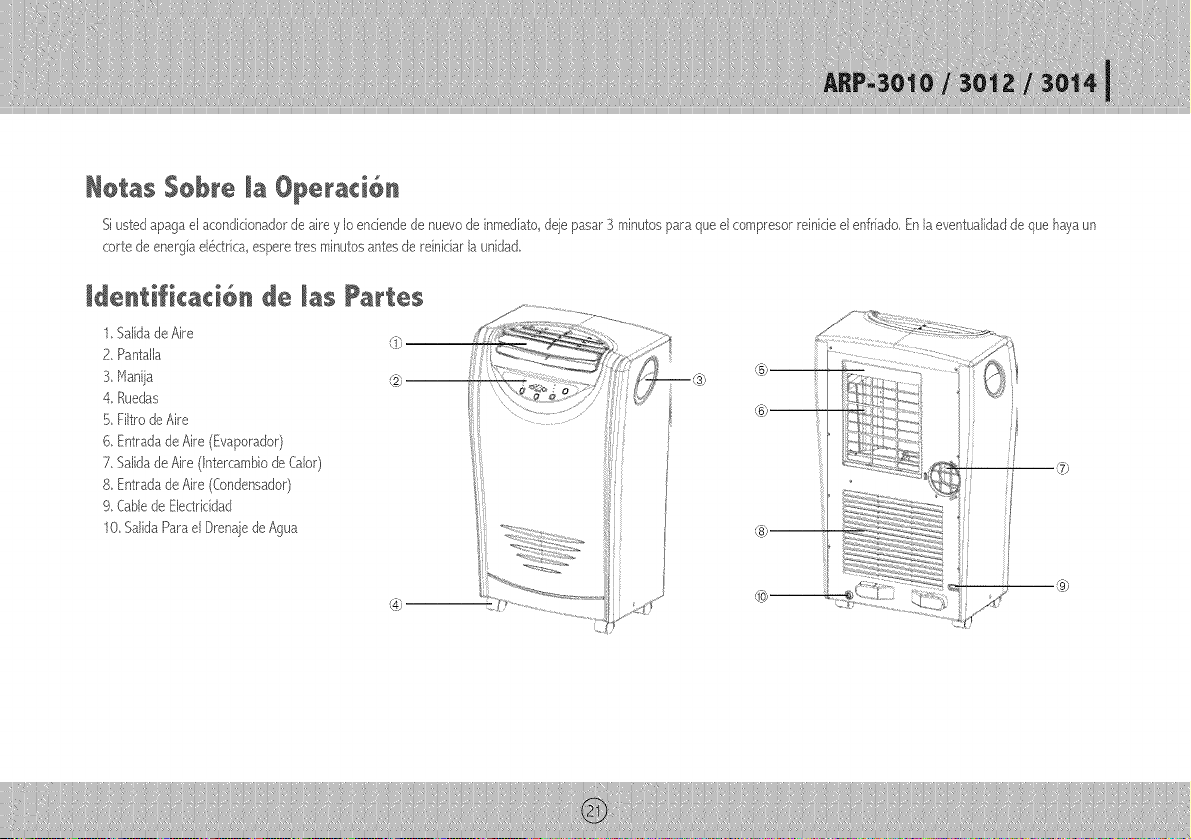
Notas $obr÷ ia Op÷ra¢i6n
Si usted apaga el acondidonador de aire y Io endende de nuevo de inmediato, deje pasar 3 minutos para que el cornpresor reinide el enfriado, En la eventualidad de que haya un
corte de energia el6ctrica espere tres rninutos antes de reinidar la unidad,
Ja÷ntifica¢i_n ae _as Partes
1,SaHdadeAire
2, PantaJla
3, Manija
4, Ruedas
b, Filtrode Aire
6, Entradade Aire(Evaporador)
7, SalidadeAire (Intercambiode Calor)
8, Entradade Aire(Condensador)
9. Cablede Electricidad
10.SalidaParael Drena:iedeAgua
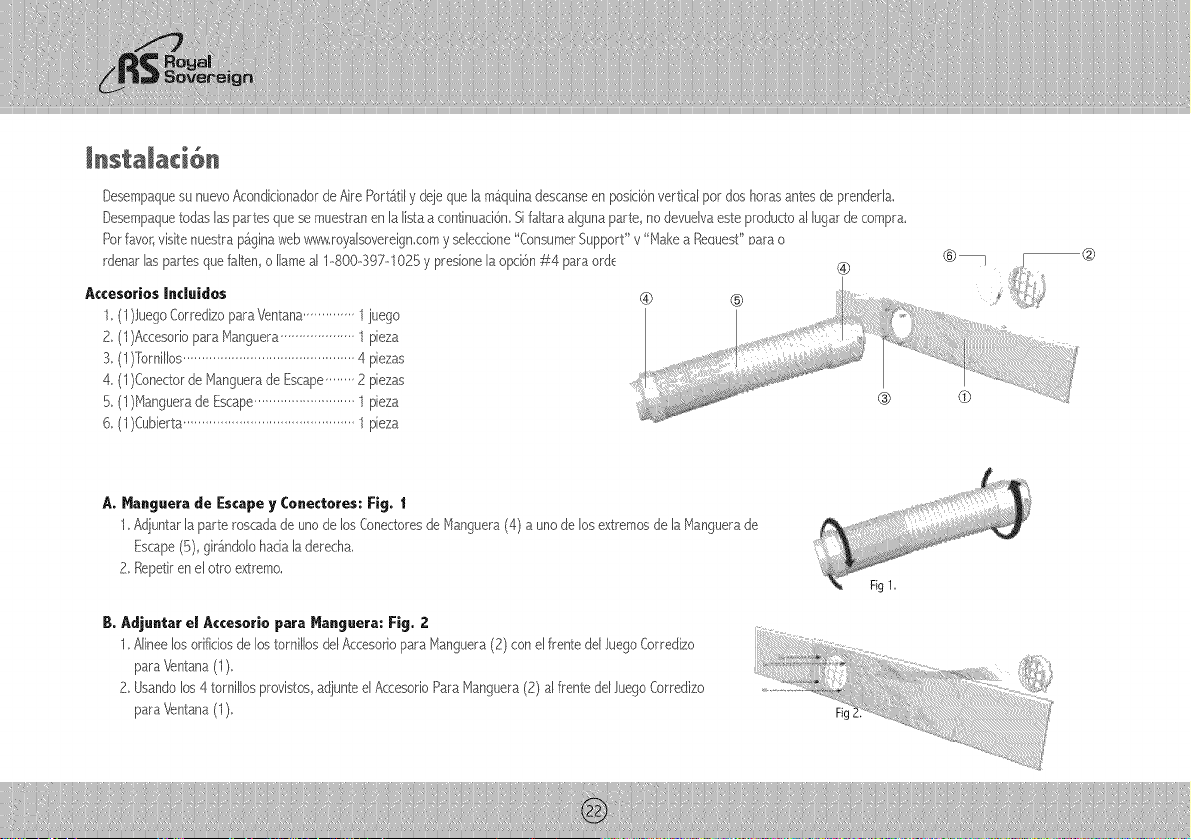
DesempaquesunuevoAcondicionadordeAimPort£tilydqequelamgquinadescanseenposici6nverticalpotdoshora_santesdeprenderla,
Desempaquetodaslaspartesquesemuestranenlalistaacontinuaci(_nSifaltaraalgunapartenodevuelvaesteproductoalhgardecompra,
Potfavorvisite,nuestrapgginawebwww.royalsovereigncornyscleccione"Consume_,rSupport'v"MakeaRe_uest' Datao
rd_,narlasparte,squcfaltenoIlameal1--800--397--1025y presionelaopci6n-/_4paraord_
A¢cesorios Incluidos
1. (1)JuegoCorredizoparaVe,ntana..............1 jue9o
2, (1)Acct_,soriopara Manguera 1 pieza
3, (1)Torrtilk_s..............................................4 piezas
4 (1/Conectorde 1'4anguerade,Escape........ 2 piezas
5, (1)Manguerade Escape...........................1 pieza
6, (1)Cubierta.............................................1 pieza
A, Hanguera de Escape y Conectores: Fig. 1
1,Adjuntarla parte roscadade unode los Conectoresde Manguera(4) a unode los e×tremosde la Manguerade
Escape(5) girS_ndolohada laderecha
2, Repetiren el otro e×tremo,
B, _,€ljuntar el Accesorio para Hanguera: Fig. 2
1.Alineelos orificiosde lostornillos delAccesoriopara Manguera(2) con elfrente delJue9oCorredizo
paraVentana(1).
2. Usandolos4 tornillosprovistos,adjunteel AccesorioParaManguera(2) alfrente delJuegoCorredizo
para Ve,ntana(1).
Fig

C. Instalar el Juego Corredizo para ventana: Fig. 3
1,Abra la,ventana,y ponga,elJuegoCorredizoparaVerlta,na,(1) dentrode laoriHade la
ventana
2,Ajusteel JuegoCorredizoa,just_ndoba[anchode laventana
3, Cierrelaventanaparaasegurarlo
4, A]tlstelosdostornillos paraasegura_rel ]uegoCorredizoen su lugar,
Fig3, _
D. Conectando la Hanguera de Escapeal Acondidonador de Aire Port_itil (AAP) : Fig. 4
1, Conecteelcone(_orde la rnangueraalheandolas ufietasde la rnangueraal AAPy presionehastaque quedeensu luga_
E, Cone_ar la Hanguera de Escape al Juego Corredizo para Ventana: Fig, 5
1 Acerqued Acondidorm,dor deAirePort_ti[a,4 piesde la ventanao merlos
2,Abra [a rnangueray estirelahastalaIongitudnecesaria
3.Alineelas u_ietasde la mangueraconlasdel paneldeventanay presionehastaque quedeensu hgar,
Fig4,
Fig 5,
Fun¢ionamiento
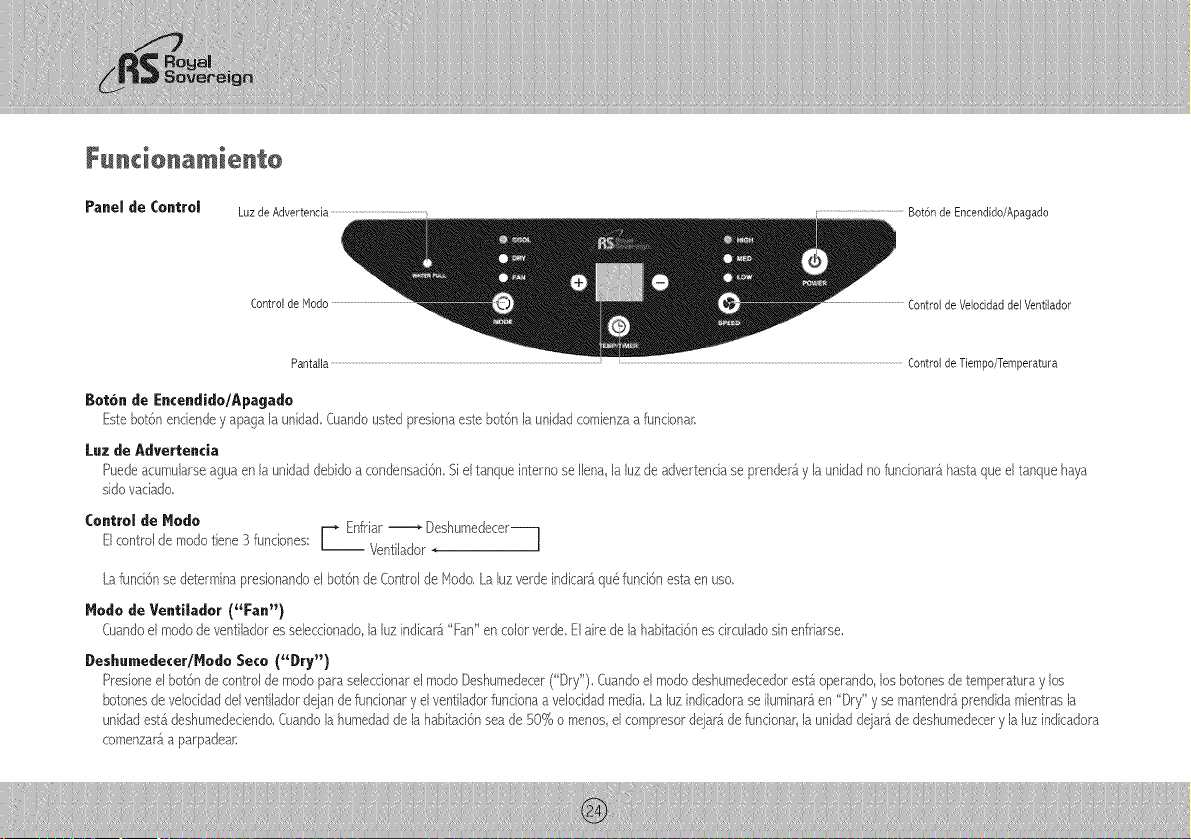
Panel de Control Luzde Advertencia
i.............................................Bot6n de Encendido/Apagado
Control de Modo Control de Velocidad del Ventilador
Pantalla .........................................................................................................................................................................................
Control de Tiempo/Temperatura
Botdn de Encendido/Apagado
Estebotdnendendey apagala unidad,Cuandoustedpresionaeste botdnlaunidadcombnzaa fundonan
Luz de Advertenda
Puedeacumularseaguaen la unidaddebidoa condensaddn.Sieltanqueinternose %na,la luzde advertendaseprende@_y launidadnofuncbnara_hastaqueeltanquehaya
sidovaciado.
Control de Modo
Elcontrolde modotbne 3 funcbnes _| Enfriar_ Deshumedecer/--
Vent[lador_
La fund6n se determina presionando el bot6n de Control de Modo, La luz verde indicara_qu6 fund6n esta en uso,
Modo de Ventilador (_Fan')
Cuandoel modo deventiladoressebcdonado la[uzindicara_"Fan" en colorverde.El airede la habitad6nes drculadosin enfriarse.
Deshnmedecer/Modo Seco (_Dry')
Presione el bot6n de control de modo para sebcdonar el modo Deshumedecer ("Dry"), Cuando el modo deshumedecedor esta. operando, los botones de temperatura y los
botones de veloddad del ventilador @jan de fundonar y el ventilador fundona a veloddad media. La luz indicadora se ihminara_en "Dry" y se mantendra_prendida mbntras la
unidad estb,deshumededendo, Cuando la humedad de la habitad6n sea de 50% o menos, el compresor dejarg,de fundonar, la unidad dejarg,de deshumedecer y la luz indicadora
comenza@,a parpadean
Modo Enfriar('_Cool")
Cuando[aunidadestaen rnodoEnfriar[a [uzindicadoraestara,verdeindicando"Cool',
1,Mientrasla unidadestg.enfuncionamientolapantallarnostrara,latemperaturaadual de [a habitad6n,
2, Hientrasustedest6ajustandolatemperatura la unidadmuestralatemperaturasiendoestablecida,Eltangode [atemperaturaes de 61 °F a 89 %
3, EnrnodoEnfriar("Cool') use losbotones"+' o "--_'paraestablecerlatemperaturadeseadaen lahabitaci6n,5 segundosdespu@sel indicadorregresara,a mostrarla
temperaturaadual de la habitaci6n,LatemperaturasolarnentepuedesetajustadaenmodoEnfriai:Eltiempoes ajustableentre 1 y 24 horas,
Control de Veloddad del VentJla¢lor
Elventiladortiene3 veloddades:Alta Mediay Baja
Cambiar la Lectnra de la Temperatnra de Celsius a Fahrenheit
Presioneel los botonesde _"Timer' (Sincronizador/ if "Iemperature' (Temperatura)al rnisrnodempoparamostrary cambiar[adase de [ectura,
Sincronizador
Haydosformasde programarel sincronizadonUstedpuedeprogramareln_merode horashastaque elacondidonadordeaire seapagueautoma_%amenteo el n_merode horas
hastaqueel acondidonadorde airese prendaautoma_ticamente,
Cuandoel acondidonadorde aire esta_apagado ustedpuedeprogramar[opara queseprendaen intervalosde 1 hora,
1,Presioneelbot6n (_ en elcontrolrernotopara activarlafund6nde sincronizador,
2, Presionelos botonesde -f-o --hastaquese muestreel n@nerode horasdeseado,
3, El acondicionadorde aire seprendera,cuandoel nQmerode horasindicadohayatranscurrido,
Cuandoel acondidonadorde aire esta_prendido ustedpuedeprogramar[opara queseapagueen intervalosde 1 hora_
1,Presioneelbot6n (_ en elcontrolremotopara activarlafund6nde sincronizador,
2, Presionelos botonesde -f-o --hastaquese muestreel nQmerode horasdeseado,
3, El acondidonadorde aire seapagara,cuandoel nQmerode horasindicadohayatranscurrido,
EncendJdo Antorn_tko
En la eventuaJidad de un corte de energia eJ_ctrica;la programad6n regresara_a los modos estabJecidos previamente cuando Jaenergia sea reestabJecida,
Comprobad6n del Enchnfe
1,Presioneelbot6n"RESET'
2, nserteelenchufeeneltomacorriente,
:'_,Presioneelbot6n_'TEST',Sieldrcuitoesta_funcionandoustedoirS_unsonidode_'clic,'
4,Presioneelbot6nde"RESET'basraqueescucheotro"dic',EldrcuitodeJenchufehasidoactivado,
5,1touseelacondidonadordeairesiesteprocesonopuedeserHevadoa cabo,
Despu_s de apaqar el acondidonador de aire_ espere 3 minntos para encenderlo de nuevo,
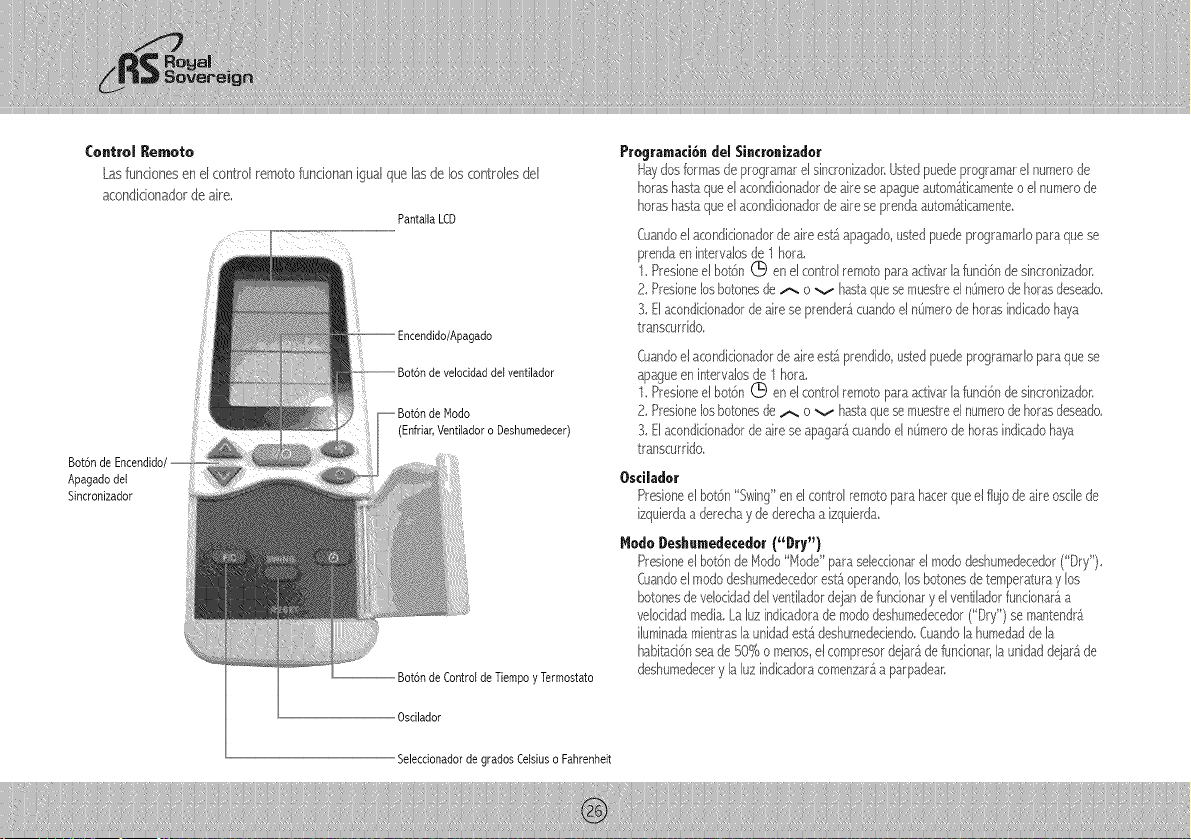
Control Remoto
La,s fundonesenel controlre_motofundonanigua[que[asde loscontrdes del
acondidonadorde aire,
Pantalla LCD
pagado
Bot6n de Encendidc
Apagado del
Sincronizador
(Enfriar, Ventilador o Deshumedecer)
-- Bot6n de Control de Tiempo y Termostato
Pregramad6ndel SincronJzador
Haydosformasde programarelsincronizadonUstedpuedeprogramarel numerode
horashastaqueelacondicionadorde aireseapagueautom_ticamenteo elnumerode
horashastaqueelacondicionadorde aireseprendaautornaticarnente.
Cuandoela(ondicionadordeaireestAapagado,us.tedpuedeprogramarloparaquese
prendaenintervalosde 1 hora.
1 Presioneel bot6nG enel conrol remotoparaactivarlafunci6ndesincroniza@:
2. PresionelosbotonesdeA o v hastaquesemuestreelnOmerodehorasdese_do
3.El acondicionadordeaireseprender_cuandoeln_imerode horasindicadohaya
transcurrido.
Cuandoelacondicionadordeairee4Aprendido,u¢¢:edpuedeprogramarloparaquese
apagueenintervalosde 1 hora.
1 Presioneel bot6n(_ enel conrol rernotoparaactivar[afunci6ndesincronizadon
2. PresionelosbolonesdeA o v ha4aquesemuestreelnumerodehorasdeseado
3.El acondicionadordeaireseapagar_cuandoeln_imerode horasindicadohaya
transcurrido.
Osdlador
Presioneel bot6n"Swing"enel controlremotoparahaterqueel flu]ode aireosciiede
izquierdaa derechay dederechaa izquierda.
Medo Desh.medecedor("Dry")
Presioneel bot6nde Hodo"llodd' paraseleccionarelmododeshumedecedor("Dry"}.
Cuandod mododest_umedecedoresL_operando,bs botonesdetemperaturay bs
botonesdevelocidaddd ventihdor@jande funcionaryelvenlihdorfuncionar_a
vdocidadmedia.La[uz indicadorademododeshumedecedor('Dry'} seman_endr_
iluminadamienlraslaunidadest_deshumedeciendo.Cuandolahumedaddela
habitaci6nseade !i0%o menos,elcompresordejar_deBncionar,la unidaddejar_de
deshumedecery lahz indicadoracomenzar_a parpadean
Oscilador
Seleccionador de grados Celsius o Fahrenheit
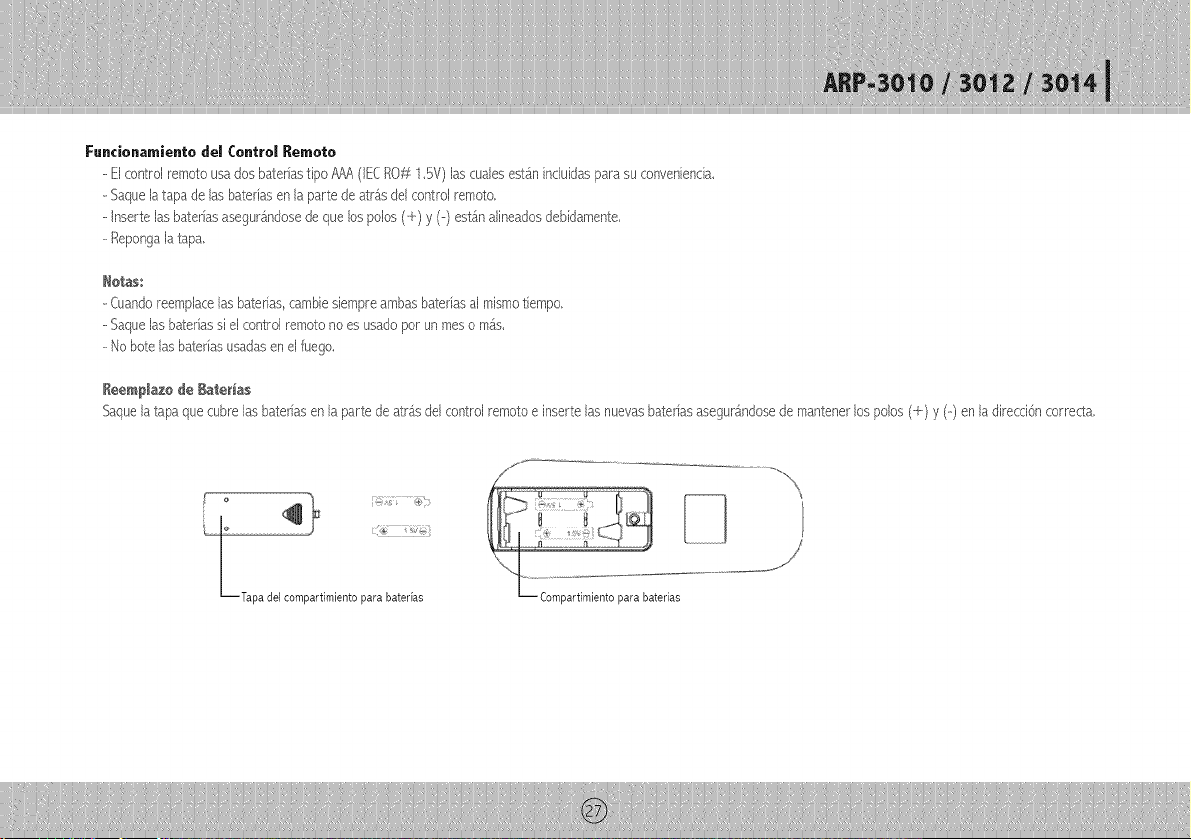
Fun¢ionamiento del Control Remoto
--Elcontrolremotousa dos bateriasdpo;'_A (IECROf_1,5V)lascualesesta_nincluidasparasu conveniencL
- Saquelatapa de las bateriasen laparte de arraysdelcontrol remoto,
- nserte lasbateriasasegura_ndosede que lospolos(e) y (-) esta_nalineadosdebidamente,
--Repongalatapa,
He, as:
--{uando reemplace las baterias, cambie siempre arnbas baterias al rnismo tiempo,
--Saque las baterias si el control remoto no es usado por un rnes o ma.s,
--No bote las baterias usadas en el fuego,
Reempla£o de Baf_e_as
Saque la tapa que cubre las hater as en la parte de atra.s del control rernoto e inserte las nuevas baterias asegura.ndose de mantener los polos (+) y (--) en la direcd6n correcta_
LTapa del compartimiento para baterias
Drelllaje
OcasionaJmenteustedpuedenecesitardrenar[aunidad,
1,Drenela unidadsi [a[uzde advertendade JapantaJJade[ acondidonadorde aireesta_prendida,
2, Apague[aunidady desench_fela,
3, Rernueva[atapa dedrenaje,
4, CuandoeJaguadrenadaparede fJuir,repongaJatapade drenaje,
JimpJeza deJ Filtro
Elfiltro debe Hmpiarse cada dos semanas o 1O0 horas para mantener el fh]o de aire apropiado,
1, Remueva el filtro, Cuidadosamente jab el ensamblaje del fiJtro des@ la parte posterior de la unidad, y luego remueva el filtro dd ensamblaje,
2, Lirnpb el fiJtro con una aspiradora o con un trapo suave, S} el fiJtro e£a rnuy sudo puede Javarb ft_£iJrnentecon detergente y erljuagal-JocornpJetarnente con agua_Dqelosecar
antes de reponerJo,
3, Reinstale eJfiJtro en eJensarnblaje,
4, Reponga eJensarnblaje deJfiJtro en la parte po£erior de la maquina,
HOTA: Nunca haga funcionar eJacondicionador de aire sin eJfiltro en su Jugal: Podria daiiarlo,
LimpJando y Hanteniendo el acondidonador de aJre
Apagueelacond[cbnadorde airey desench0feb,/..irnpbloconuntrapo suave,secoo mojado,Puedeusarun detergenteIigero,Aseg0resede Iirnpb_rcuaJqubrresiduoy secarJa_
unidadcompletamente,Nousequirnicosfuertes lirnpiadoresabrasivoso substanciasvola.tiles(comogasolina),Evitesalpicaraguaen el acondicionadorde aire porqueesto
puededa_arla unidadseriamente,
Guardando el A¢ondkionador de Aire
Sinova a usarla unidadpot un largoperiododetiempo,aseg0resede drenaria limpiarel filtro, desenchufariay sacarielas bateriasalcontrol remotoantes deguardarel
acondidonadorde aire,Despu6sde drenar,hagafundonarel acondidonadordeaire en modoVentilador("Fan') por Io menospor 8 horasparasecarla unidadcompletamentey
prevenirlaformad6nde moho,
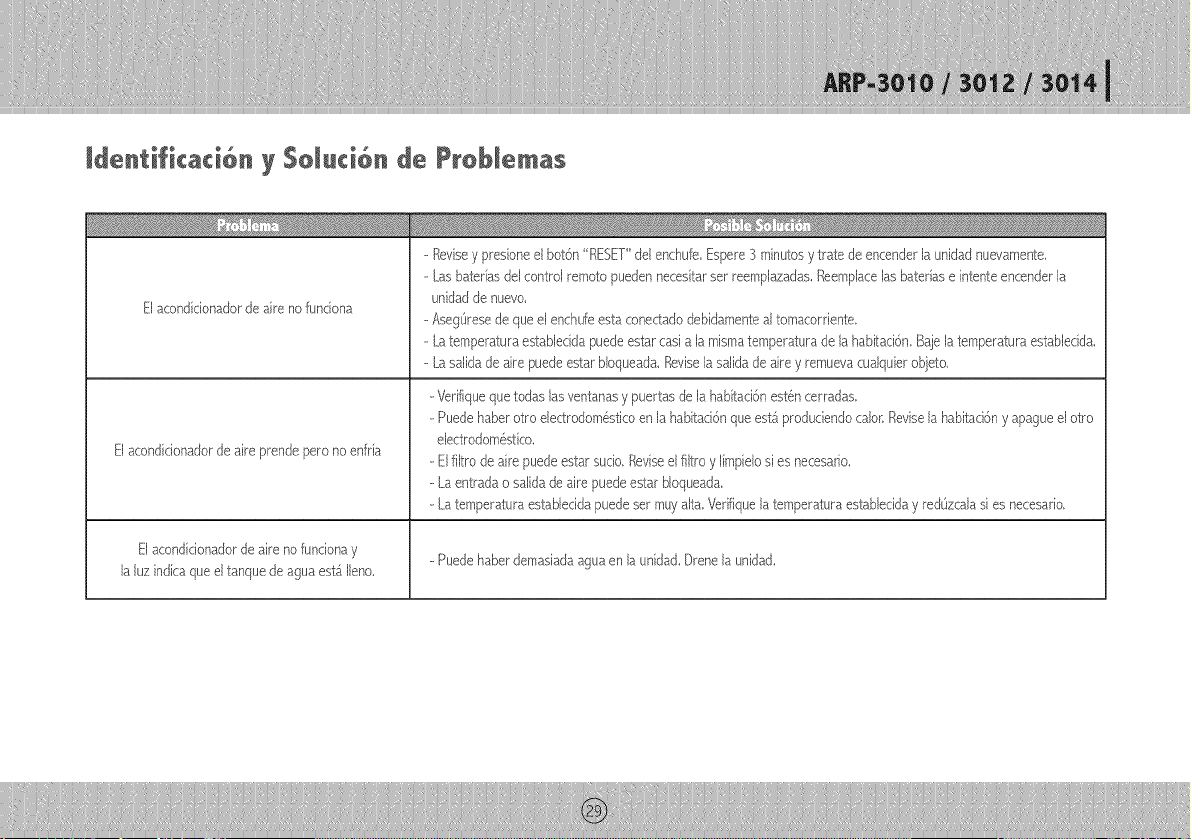
II÷ntiIca¢i n y 5olu¢i n I÷ Probi÷mas
Elacondidonadorde aire nofundona
EIacondidonadorde aireprendepero noenffia
Elaconcfdonadorde aimno fundonay
la luz indLaque eltanquede aguaesta_teno,
- Revise y presione el bot6n "RESET" del enchufe, Espere 3 minutos y trate de encencler la unidad nuevarnente,
-- Las baterb.s del controJ rernoto pueden necesitar set reemplazadas, Reemplace las baterias e intente encender la
unidad de nuevo,
-- _segOrese de que el enchufe esta conectado debicBrnente al tornacorriente,
-- La temperatura establecicla puede estar casi a la rnisma ternperatura de la habitaci6n, Baje la ternperatura establecida,
-- La salida de aire puede e£ar bloqueada, Revisela salida de aire y rernueva cualquier objeto,
- Verifique que todas las ventanas y puertas de la habitaci6n esti_n cerradas,
-- Puede haber otto electrodom6stico en la habitaci6n que esta. produciendo talon: Revise la habitaci6n y @ague el otto
electroclorn6stico,
-- Elfiltro de aire puecle estar sucio, Revise el fltro y lirnpielo si es necesario,
-- La entrada o salda de aire puede estar bloqueada
-- La ternperatura establecida puede set muy alta, Verifique la ternperatura establecida y red£zcala si es necesario,
- Puede haber demasiada agua en la unidad, Drene la unidad,
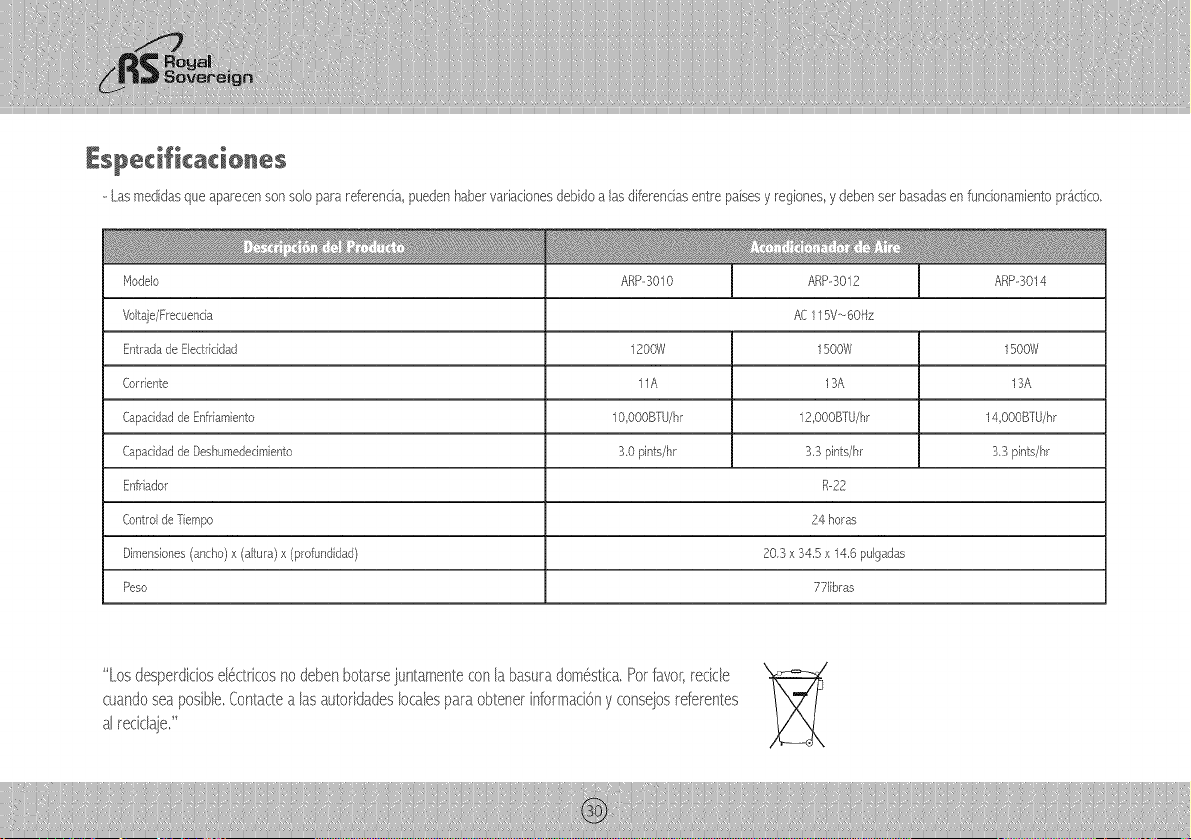
-Lasmedidasqueaparecensonsoloparareferendapuedenhabervariadonesdebidoalasdiferendasentrepaisesyregionesy@benserbasadasenfundonamientopraxtico,
ModeJo ARP-3010 ARP-3012 ARP-3014
Voltaje/Frecuenda AC115V--60/qz
EntradadeElectricidad 1200W 1500W 1500W
Corrente 11A 13A 13A
Capacdad de Enffiamiento IO,O00BTU/hr 12 O00BTU/hr 14 O00BTU/hr
Capacidadde Deshumededmiento 30 pints/hr 3,3 pints/hr 3,3pints/hr
Enfrador R-22
Controlde Tiempo 24 horas
Dimensiones(ancho)x (altura) x (profunddad) 203 x 34,5 x 14,6 pulgadas
Peso 771ibras
"LosdesperdkioseBctrkosno @benbotarse}untamenteconlabasuradom6stica.Potfavor;recicb
cuandoseaposbb Contadea as autoddadesocabs paraobtener nformad6ny consejosreferentes

Garant a Comp eta pot Un A os
RoyaJSovereign garantiza que cada Acondidonador de Aire Portg_ti[estg_[ibre de defectos en cuanto a materiaJes y fabricad6n, Nuestra ob[igad6n bajo esta garantia estg_[imitada
a la reparad6n o sustitud6n sin costo de cuaJqubr parte(s) defectuosa(s) que no se haya dafiado en el transporte cuando el producto sea entregado a un Centro de Servido de
Ro3/aJSovereign, Esta garantia cubre aJcomprador original por un afios des@ [a fecha de compra y no es tranc¢_rib[e, Esta garantia se aplica sob si el acondicionador de aire se
usa en un circuito de {orriente AIterna de acuerdo a [as instrucciones de faSrica que acompafian al producto,
Garant a Limitada p@r Cin¢@ A @s (C@mpres@r)
Por un periodo de cinco a_os desde la _cha de cornpra siernpre y cuan8o este Acondicionador de Aire Port£iJ Royal Sovereign sea operado y rnanteni8o de acuerdo aJrnanuaJde
instrucciones provisto con el producto RoyalSovereign suplira_un cornpresor de reernplazo (soJarnente la parte) sin costo si se 8eterrnina que el cornpresor originaJ tiene una
faJJaen cuanto a rnano de obra o materiales, Si es necesaria Jareparaci6n por favor contacte a nuestro centro de servicio al diente, Listed sera_responsabb pot eJ envio seguro y
cualquier otto ga4o de transporte para hacer JlegarJaunidad a nue£ra fabrica o centro de servido, Sies necesario eJenvio aseg@ese de ernpacar Jaunidad correctarnente para
evitar 6aiios en el transporte pues nosotros no serernos responsabbs pot aqueJJos8afios,
Esta garantia exchye y no cubre defectos, maJfundonambnto o faJlas de su Acondidonador de Aire Porta_tilRoyal Sovereign causadas por reparadones hechas por personas o
centros de seMdo desautorizados manqo inadecuado instalad6n inapropiada modificad6n o use irrazonabJe de voltaie incorrecto fuerzas de la naturaJeza o @jar de hacer el
mantenirnbnto razonable y necesario, Esta garantia es en hgar de todas y cada una de las garantias expresas, En ninguna eventuaJidad RoyalSovereign sera.responsable por
daiios inddentaJes o consecuentes, Esta lirnitad6n no se apJicasi usted rive en un lugar en donde no es perrnitida la limitad6n de dafios inddentabs o consecuentes, E£a garantia
le da derechos JegaJesespecificos y usted puede tener otros derechos los cuales varian de e£ado a estado,