User Manual Joyoung JYZ-E3C Super Cyclone Masticating Juicer
IMPORTANT SAFEGUARDS
1. Read all instructions.
2. Do not put the main body in water or other Liquids. or rinse it with water or other liquids to prevent electric leakage or product damage. 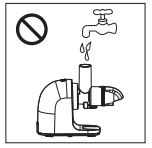
3. In order to avoid injury or damaging the product. when
Product is working. itis strictly forbidden to extend the hand or sharp object into the feeding port; It is strictly forbidden to use any object instead of the pushing rod; It is strictly forbidden to contact moving parts such as screws and motors. 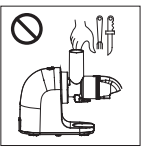
4. It is forbidden to put overheated ingredients ( temperature over 140 T ) into the feeding port or cup to avoid cracking. splashing and scalding. 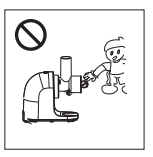
5. Do not plug/unplug the power cord with wet hands. as this may cause electric shock. 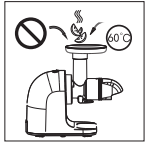
6. Do not place on or near a hot gas or electric burner. or in a heated oven.
7. All accessories of this product are not allowed to be disinfected by microwave oven to avoid the damage from thermal deformation.
8. Close supervision is necessary when any appliance is used by or near children.
9. Unplug from outlet when not in use and before cleaning. Allow to cool before putting on ortaking off parts. and before cleaning the appliance.
10. Avoid contacting moving parts.
11. Do not use outdoors.
12. Do not operate any appliance with a damaged cord or plug or after the appliance malfunctions. or is dropped or damaged in any manner. Return appliance to the nearest authorized service facility for examination. repair or electrical or mechanical adjustment.
13. The use of attachments not recommended or sold by the manufacturer may cause fire. electric shock or injury to persons.
14. Do not let cord hang over edge of table or counter. or touch hot surfaces.
15. Always attach plug to appliance first. then plug cord into the wall outlet. To disconnect. turn any control to” off. then remove plug from wall outlet.
16. Do not use appliance for other than intended use.
17. A short power-supply cord (or detachable power-supply cord] is to be provided to reduce risks resulting from becoming entangled in or tripping over a longer cord.
CAUTIONS
1.This product is a Class | electrical appliance. To prevent electric leakage. please ensure that the grounding wire is well grounded before installation.
2. The input voltage of this product is 120V. Before connecting the product to the power supply. please check whether it is consistent with the local power supply voltage. If the voltage is higher or Lower. the component will be damaged. To avoid the loss. itis recommended to use the voltage regulator. }.
3.The running speed of this product has been set to the ideal state. no speed adjustment is required.
4. To avoid danger. if the power cord is damaged. it must be replaced by a professional from the manufacturer. its service department. or similar department.
5. Before turning on the power. please make sure that the detachable parts are installed in place. the feeding tube cover and the feeding tube must be fully tightened to avoid abnormality such as leakage of juice and falling of the feeding tube cover during operation.
6. After the product is assembled and starts working. if the feeding cylinder part emits {a slight abnormal sound. it means the connecting part of the screw and the main body is not in place. so cause the friction between the auger and the juicer; You need to gently push the auger into the main body from the slag hole and put the ingredients. then the abnormal sound will disappear.
7. This product is equipped with a smart protection chip. so it will automatically stop after 12 minutes of continuous operation. To extend the service life of the product please cool it down for 20-30 minutes before work again.
8. During the working process of the product. if there is overload or blockage. it will automatically reverse for a few seconds and then stop. and there will be a “beep” sound. the product can be used after the sound stops. Ifit is still blocked. it is recommended to clean the ingredients in the feed cylinder before usage.
9. IF there is a long beep alarm and the button fails after the product is connected to the power supply or during the work. please turn off the power and check if there is any material blocked or stuck. After cleaning. please turn the power on again. If there is still an alarm. please contact our customer service.
10. Do not use this product to extract lemon juice directly.
11. The ingredients should be cut into small pieces so that they can be placed into the feeding tube; For those with stones. hard seeds. thick skin or hard shell. please remove them before processing. otherwise the machine may be damaged.
12. To avoid accidents. itis strictly forbidden to keep your eyes close to the feeding inlet when the product is working.
13. The materials that touches the ingredients meet the food grade certification requirements. clean. hygienic and reliable.
14. The juicer. auger. top cover. juice cup. pulp bucket and other accessories may be dyed after pressing some ingredients. This is a normal phenomenon. does not affect edible. and is not harmful to health.
15. Please operate on the level countertop instead of flammable materials such as carpets. towels. plastics. paper. etc.
16. To avoid accidents. do not use this product on a stoping or unstable surface.
17. To avoid injury. please be care during the removal. cleaning of the detachable parts.
18. Do not use steel wool. abrasive cleaners o corrosive liquids such as benzine or acetone to clean the product.
19. The auger material is ceramic and its fragile. please handle it carefully and do not. drop
20. The product is heavy. be sure to hold the bottom of the product with both hands when moving the product. If you only hold the part of the juicer. the main part may fall off easily. and will cause personal injury or product damage.
21. The product should be stored in a place that children can not reach. Do not allow people who are physically impaired. have sensory or mental disabilities. or lack relevant experience and knowledge to use this product.
22. To avoid damage caused by a short circuit. be sure to turn off the switch and disconnect the power supply when itis not in use.
23. This product is for home use only and needs to be used in accordance with the guidelines in this manual.
24. Do not heat the parts of this product directly.
25. Do not use parts other than this product to avoid affecting product performance or accidents.
26. Please give it to the relevant qualification department for recycling when discarding this product.
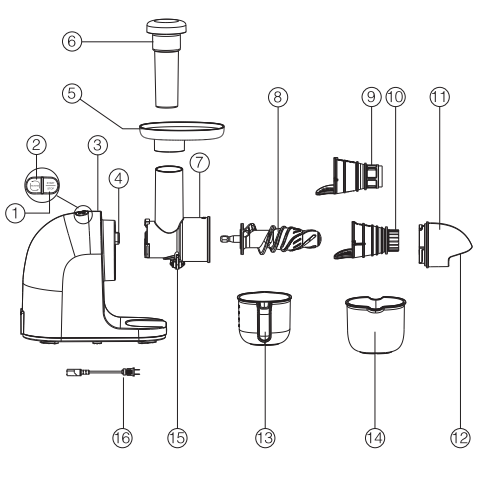
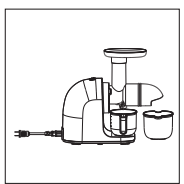
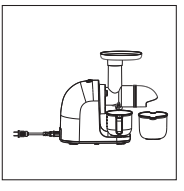
PARTS AND FUNCTIONS
USAGE
Thoroughly clean the parts that come into contact with the ingredients before using the product for the first time.
Button and lock operation instructions:
+ "Start/Stop” button: Press this button lightly to start working. and stop automatically after 12 minutes of continuous operation; If you need to stop halfway. press again.

+ "Reverse" button: When the slag discharge is not smooth or blocked. gently press and hold the “reverse” button. the screw starts to reverse. release the button. stop the reverse; Then press the “Start/Stop” button. you will resume normal rotation and continue working.
+ Lock: When you need to remove the feed tube from the main body. press and hold the lock while rotating the feed tube clockwise. Ifthe lock is not pressed. the feed can not be removed.
Please follow the steps below to install and use the product :
1. Connect the feed barrel to the main body:
1) Push the three buckles of the feeding cylinder into the three card slots on the main body;
2) Then rotate counterclockwise to rotate the feed cylinder from “unlocked” to “locked”. When you hear a “click’ sound. it indicates that it is connected.
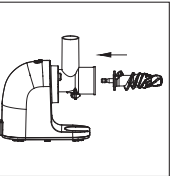
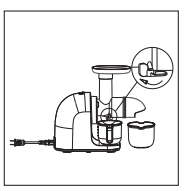
2. Align the hexagonal screw shaft with the hole on the main body and push it to the bottom.
If not aligned. you can turn the screw a little.
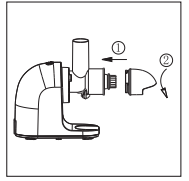
3. Align the semicircular metal piece of the juicer with the groove in the bottom of the feed tube. push flat until it is stuck.
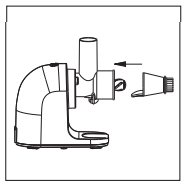
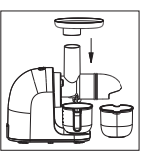
4. Screw the feed cylinder cover and the feed cylinder tightly:
1) Stagger the three buckles on the feed cylinder cover and the three buckles on the feed cylinder. and push them in evenly;
2) Then rotate counterclockwise until the “A” mark on the feed cylinder cover is aligned with the" & “mark on the feed cylinder. indicating that it has been screwed into place. If the screw is not in place. the feed cap will fall off after the machine starts working.
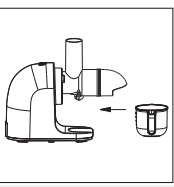
5. Place the Juice cup on the groove at the bottom of the body.
6. Place the pomace bucket under the slag tap. close to the juice cup.
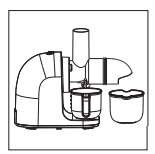
7. Attach the tray to the top of the feed barrel.
Tray can make feeding more convenient. especially when processing small pellets such as grapes and strawberries.
8. Plug in the power cord.

9. Toggle to the left to open the juice lid.
Make sure the juice nozzle cover is open before product starts working.
10. Wash the food and cut them into the size of the feed port. which can be placed on the tray for later use.
1) When pressing spinach. cut it into small pieces before processing. and properly control the feeding speed.
2) Fruits and vegetables with nuclear. hard seeds. thick skin or hard shell. please remove them first. 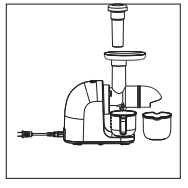
11. Press the "Start/Stop” button and the product starts working. Product is equipped with an intelligent chip. so it ill stop automatically after 20 minutes of continuous operation. If you need to stop halfway. press the “Start/Stop” button again. 
12. Place the ingredients in the feed port at the top of the feed cylinder and use the pusher to feed the ingredients slowly.
When pushing the ingredients. please do not use too much force. so that the ingredients can be cut off. 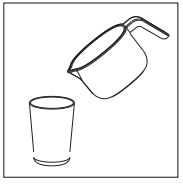
13. When the ingredients are processed. and no juice flowing out. close switch. disconnect the power supply. Close the juice mouth cover (toggle to the right) after the motor and the screw stop working completely. and then take the cup and the pomace bucket out of the juice mouth and the slag mouth. 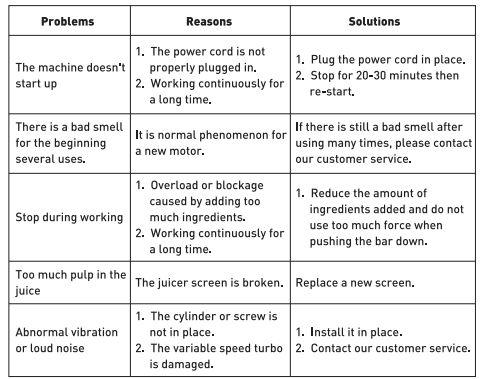
14. Pour the fruit and vegetable juice in the juice cu drinking cup to drink fresh fruit and vegetable juice
Squeezed juice is recommended to be consumed as soon as possible. Exposure to the air for too long. the taste and nutri tional value will be affected. [IMAGE]
Fruit and vegetable selection tip:
1. Select fresh fruits and vegetables that contain more juice. Such as: pears. melons {watermeton. antaloupe..J. celery sticks. beetroot. carrots. spinach and so on.
2. Peel ingredients like cantaloupe. beetroot and so on. The seeds of citrus fruits will make the juice bitter and itis recommended to eliminate it.
3. The amount and taste of apples depends on the type and season of apples selected
Freshly squeezed apple juice will oxidize and discolor. this is normal. adding a few drops of lemon juice can slow down the oxidation process.
4. Leafy vegetables (such as celery. peeled lettucel can also be used for juicing.
5. Fleshy and soft ingredients. such as tomatoes. pineapples. kiwis. etc. with less juice. please juice with harder and more juicy ingredients. and squeeze softer ingredients first. then harder ingredients.
6. Starchecontaining ingredients such as bananas. papayas. avocados. figs and mangoes are not suitable for juicing. but can be processed with food processors or cooking machines.
Maintenance
1. Always turn off the switch and disconnect the power before cleaning the product.
2. Please clean the product in time after using it. please wash the area inside with water which contacts food or ingredient directly.
3. Wipe out the water outside of the whole juicer with a damp cloth. Do not put the whole juicer in water or other liquids. or rinse it under water or other liquids.
4. This product should be stored in a dry place and protected from direct UV radiation.
5. Make sure the product is clean and dry before storing it.
TROUBLESHOOTING
[IMAGE]