User Guide Smeg SY103I Induction Hob
Table of contents
- PRECAUTIONS
- General safety instructions
- Installation
- Appliance purpose
- This user manual
- Manufacturer’s liability
- Identification plate
- Disposal
- Information for European Control Bodies
- Energy efficiency technical data
- To save energy
- Light sources
- How to read the user manual
- DESCRIPTION
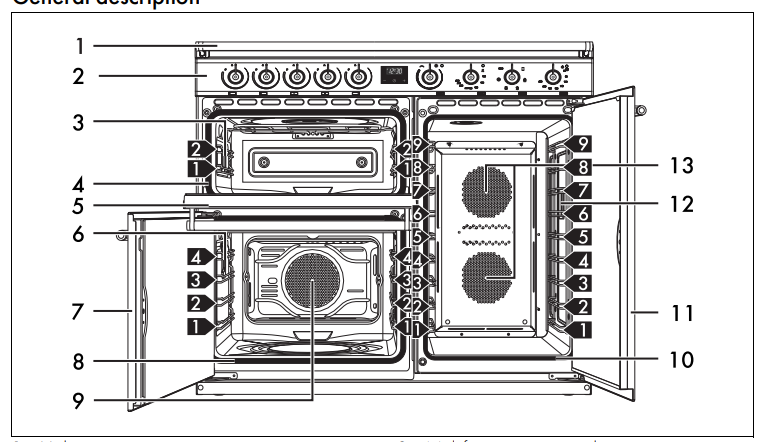
- General description
- Hob
- Control panel
- Other parts
- Accessories
- USE
- Preliminary operations
- Using the accessories
- Using the hob
- Using the storage compartment (where present)
- Using the oven
- Digital programmer
- Cooking advice
- Cooking information table (multifunction oven)
- Cooking information table (auxiliary oven)
- Cooking information table (vertical oven)
- CLEANING AND MAINTENANCE
- Cleaning the appliance
- Cleaning the glass ceramic hob
- Knobs
- Cleaning the door
- Cleaning the oven cavity
- Cleaning the roof of the oven (only for some
- models/cavities)
- Vapor Clean (on some models only)
- Extraordinary maintenance
- INSTALLATION
- Positioning
- Electrical connection
- Instructions for the installer
SPACE HEATER.
• Do not use plastic kitchenware or containers for cooking.
• Do not put sealed tins or containers in the oven.
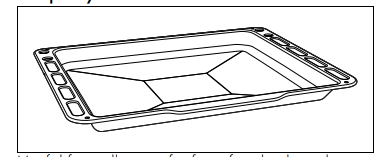
• Remove all trays and racks which are not required during cooking.
• Do not cover the bottom of the oven cavity with aluminium or tin foil sheets.
• Do not place pans or trays directly on the bottom of the oven cavity.
• If necessary. you can use the tray rack (supplied or sold separately. depending on the model) by placing it on the bottom as a support for cooking.
• If you wish to use greaseproof paper. place it so that it will not interfere with the hot air circulation inside the oven.
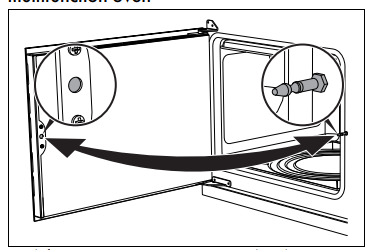
• Do not use the open door to rest pans or trays on the internal glass pane.
• Cooking vessels or griddle plates should be placed inside the perimeter of the hob.
• All pans must have smooth. flat bottoms.
• If any liquid does boil over or spill. remove the excess from the hob.
• Take care not to spill acid substances such as lemon juice or vinegar on the hob.
• Do not spill sugar or sweet
To dispose of the appliance:
• Cut the power cable and remove it.
• Deliver the appliance to the appropriate recycling centre for electrical and electronic equipment waste. or return it to the retailer when purchasing an equivalent product. on a one for one basis.
• Our appliances are packaged in non-polluting and recyclable materials.
• Deliver the packing materials to the appropriate recycling centre.
To save energy
• Only preheat the appliance if the recipe requires you to do so.
• Unless otherwise indicated on the package.
• The light sources contained in the appliance are declared suitable for operation at ambient temperature ≥300°C and intended for use in high temperature applications such as ovens.
• This appliance contains light sources of efficiency class "G".
Advantages of induction cooking
- • Energy saving thanks to the direct transmission of energy to the pan (suitable magnetisable cookware is required) compared to traditional electric cooking.
- • Improved safety as the energy is only transmitted to the pan placed on the hob.
- • High level of energy transmitted from the induction cooking zone to the base of the pan.
- • Rapid heating speed.
- • Reduced danger of burns as the cooking surface is only heated under the base of the pan; foods which overflow do not stick.
Power control
- The hob is fitted with a power control module that optimises/limits consumption.
- If the overall set power level exceeds the maximum limit permitted. the electronic circuit board will automatically manage the power supplied by the hot plates. The module tries to maintain the maximum deliverable power levels. Levels set by the automatic control will appear on the display.
Control panel
- 1 Hob cooking zone knobs Useful for controlling the cooking zones of the induction hob. Press and turn the knobs clockwise to adjust the operating power of the hot plate from a minimum of 1 to a maximum of 9. The working power is indicated on the display on the hob.
- 2 Programmer clock For displaying the current time. setting programmed cooking operations and the
- 3 Auxiliary oven variable grill knob It turns on the light inside the oven or starts the grill heating element to a temperature ranging from a minimum of 50°C to a maximum of 245°C.
Power draw in Booster function (W)*
- The appliance is equipped with an induction generator for each cooking zone. Each generator located under the glass ceramic cooking surface creates an electromagnetic field which induces a thermal current in the base of the pan.
- This means the heat is no longer transmitted from the hob to the pan but created directly inside the pan by the inductive current.
- Priority is given to the first zone that is set in chronological order.
- The power control module does not affect the total power consumption of the appliance.
- The programmer clock only controls the lower multifunction oven.
Light sources
• This appliance contains user-replaceable light sources.
• The light sources contained in the appliance are declared suitable for operation at ambient temperature ≥300°C and intended for use in high temperature applications such as ovens.
• This appliance contains light sources of efficiency class "G".
Power control
- The hob is fitted with a power control module that optimises/limits consumption. If the overall set power level exceeds the maximum limit permitted, the electronic circuit board will automatically manage the power supplied by the hot plates.
- The module tries to maintain the maximum deliverable power levels. Levels set by the automatic control will appear on the display
Hob cooking zone knobs
- Useful for controlling the cooking zones of the induction hob. Press and turn the knobs clockwise to adjust the operating power of the hot plate from a minimum of 1 to a maximum of 9. The working power is indicated on the display on the hob.
- Programmer clock For displaying the current time, setting programmed cooking operations and the minute minder timer.
- Auxiliary oven variable grill knob It turns on the light inside the oven or starts the grill heating element to a temperature ranging from a minimum of 50°C to a maximum of 245°C.
Auxiliary oven variable grill indicator light
- The indicator light comes on to indicate that the auxiliary oven is heating up. It turns off as soon as it reaches the set temperature. It flashes regularly to indicate that the temperature set inside the oven is kept constant.
- Left multifunction oven left temperature knob
- This knob allows you to select the cooking temperature and the Vapor Clean temperature.
- Turn the knob clockwise to the required value, between the minimum and maximum setting.
- Left multifunction oven indicator light
- The indicator light comes on to indicate that the oven is heating up. It turns off as soon as it reaches the set temperature. It flashes regularly to indicate that the temperature set inside the oven is kept constant.
- Left multifunction oven left functions knob
- The oven’s various functions are suitable for different cooking modes. After selecting the required function, set the cooking temperature using the temperature knob.
- Vertical oven function/temperature knob
- It turns on the light inside the oven cavity or starts the circulaire heating elements to a temperature ranging from a minimum of 50°C to a maximum of 245°C.
- Vertical oven indicator light
- The indicator light comes on to indicate that the oven is heating up. It turns off as soon as it reaches the set temperature. It flashes regularly to indicate that the temperature set inside the oven is kept constant.
Shelves
- The appliance features shelves to position trays and racks at different heights. The insertion heights are indicated from the bottom upwards see General description).
Cooling fan
- The fan cools the oven and comes into operation during cooking. The fan causes a steady outflow of air that exits from the rear of the appliance and which may continue for a brief period of time even after the appliance has been turned off.
Interior lighting
- The appliance’s interior lighting comes on:
- Multifunction oven: when any function is selected, apart from the function.
- Auxiliary oven: when the variable grill knob is turned to the symbol or to the cooking temperature.
- Vertical oven: when the function/ temperature knob is turned to the symbol or to the cooking temperature.
Accessories
- Not all accessories are available on some models.
- The accessories intended to come into contact with food are made of materials that comply with the provisions of current legislation.
- Original supplied and optional accessories can be requested to Authorised Assistance
- Centres. Use only original accessories supplied by the manufacturer.
First heating
- Set a cooking time of at least one hour (see paragraph "Using the oven").
- Heat the empty oven compartment at the maximum temperature to burn off any residues left by the manufacturing process.
- When heating the appliance air the room; don't stay.
- Using the accessories
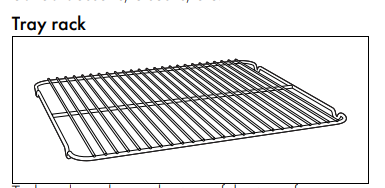
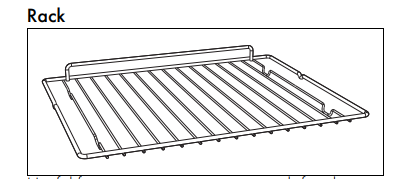
- Racks and trays
- Racks and trays have to be inserted into the side guides until they come to a complete stop.
- The mechanical safety locks that prevent the rack from being removed accidentally must face downwards and towards the back of the oven cavity.
Plate rack
- Insert the plate rack without plates in the first shelf of the side oven.
- Position the plates as shown in the figure.
- Heat the oven to a temperature no greater than 50°C for no more than 15 minutes.
- After heating, partially remove the support, leaving it resting on the guides.
- Ensure that the support is stable and balanced, then remove the plates.
Using the hob
- All the appliance’s control and monitoring devices are located together on the front panel.
- The relevant cooking zone is indicated next to each knob. Just turn the knob clockwise to the required power setting.
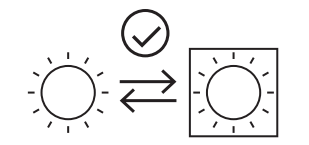
- Cookware suitable for use in induction cooking
- Cookware used on the induction cooking surface must be made of metal, with magnetic properties and a sufficiently large base.
Suitable cookware:
- Enamelled steel cookware with thick bases.
- Cast iron cookware with an enamelled base.
- Cookware in multilayer stainless steel, ferritic stainless steel and aluminium with a special base.
Unsuitable cookware:
- Copper, stainless steel, aluminium, fireproof glass, wood, ceramic and terracotta cookware.
- To see whether the pan is suitable, bring a magnet close to the bottom: if it is attracted, the pan is suitable for induction cooking.
- If you do not have a magnet, you can put a small amount of water in the pan, place it on a cooking zone and start the hot plate. If the symbol appears on the display, it means the pan is not suitable.
Cookware recognition
- When there is no saucepan on a cooking zone or if the saucepan is too small, no energy will be transmitted and the symbol will appear on the display.
- If there is a suitable saucepan on the cooking zone, the recognition system detects it and switches on the hob to the power level set using the knob.
- Energy transmission is also interrupted when the saucepan is removed from the cooking zone (the symbol will be shown on the display). If the cookware recognition function is activated in spite of the
Use oven gloves when handling dishes.
- On first connection to the electrical mains, an automatic check will be carried out that will switch on all indicator lights for a few seconds.
- After use, turn off the hot plates that were used by moving the relative knob back to position 0. Never rely solely on the cookware detector.
- Use only cookware with a perfectly flat bottom which is suitable for induction hot plates. Using cookware with an irregular bottom could jeopardise the efficiency of the heating system and prevent cookware from being detected on the hot plate.
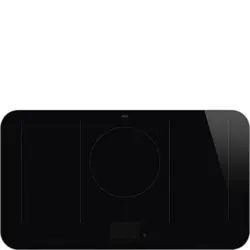
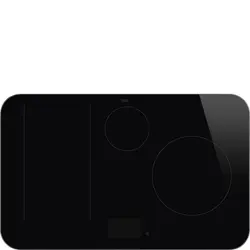
Saucepan recognition limits
- The minimum diameter of the pan base is indicated by the cross on the cooking zone.
- Pans with smaller diameters risk not being detected and therefore not activating the inductor.
Limiting the cooking duration
- The hob has an automatic device which limits the duration of use. If the cooking zone settings are not changed, the maximum duration of operation for each zone depends on the power level selected.
- When the device for limiting the duration of use is activated, the cooking zone turns off, a short alert sounds and, if the zone is hot, the symbol appears on the display.
Protection from overheating
- If the hob is used on full power for a long period, the electronics will have trouble cooling down if the room temperature is high.
- To avoid excessively high temperatures forming in the electronics, the power to the cooking zone is reduced automatically.
Residual heat
- If the cooking zone is still hot after being switched off, the symbol will be displayed on the display. The symbol clears once the temperature drops below 60°C.
Heating accelerator
- This function allows the selected power to be achieved in the shortest amount of time.
- Turn the knob anticlockwise to position A and then release it. The display shows the symbol.
- Select the required heating power (1..8) within 3 seconds. The selected power and the symbol will flash alternately on the display.
- The power level can be increased at any moment. The “maximum power” period will automatically be modified. Once the acceleration period is over the power level will remain the same as the one previously selected.
Booster function
- The booster function allows the cooking zone to be activated at maximum power for as long as minutes. It can be used to bring a large quantity of water to a boil rapidly or to broil meat.
- To activate the Booster function, turn the knob clockwise to position P, keep it there until the symbol appears on the corresponding display and then release the knob.
- After 5 minutes of continuous operation, the
- Booster function will be disabled automatically and cooking will continue at power level 9.
- Select any other power level to deactivate the Booster function.
- Only for some zones: the Booster function is always enabled and has to be disabled manually using the corresponding knob.
- The induction hob is configured to operate at kW, but it can be set to operate at 4.8 kW or 3.7 kW.
- Disconnect the appliance from the mains power supply and wait 10 seconds before turning the power back on.
- Turn the front left and front right cooking zone knobs anticlockwise at the same time to position “A” respectively), and keep them in this position for 3 seconds.
- The rear left and rear right cooking zone displays indicate “7.” and “4” (power 7.4 kW).
Release the knobs.
- Repeat steps 2 and 3 to change the power limitation until "4." and "8” (4.8 kW power) or "3." and "7" (3.7 kW power) appear on the respective displays.
- After having released the knobs on the required power level, wait until the displays turn off to save the changes.
Controls lock
- The controls lock is a device that protects the appliance from accidental or inappropriate use.
- With all cooking zones switched off, turn the two knobs corresponding to the front and rear left zones to position “A”.
- Keep them turned until the symbols appear on the display.
Release the knobs.
- In order to remove the controls lock, repeat the same operations that were described previously.
Error codes
- The symbol indicates that one or more knobs have been held in the “A” positions for more than 30 seconds. Release the knobs to make the error message disappear. If the display shows error code or , contact technical assistance.
Using the storage compartment where present
- The storage compartment is in the bottom of the cooker. To open it, pull it towards you. It can be used to store cookware or metallic objects necessary when using the appliance.
Using the oven
- STATIC
- CIRCULAIRE + BOTTOM
- GRILL
- RAPID DEFROST
- FAN ASSISTED
- CIRCULAIRE
- ECO
- VAPOR CLEAN (on some models only)
- Digital programmer
- Decrease key
- Clock key
- Increase key
Setting the time
- On the first use, or after a power failure, the digits will be flashing on the appliance’s display.
- Make sure that the digital programmer shows the cooking duration symbol otherwise it will not be possible to turn on the oven. Press the button to reset the programmer clock.
- Not all functions are available on some models.
- Traditional cooking, ideal for preparing a single dish. For example cooking roast meats, fatty meats, bread, pies.
- Allows you to quickly finish cooking food that is already cooked on the surface but not internally. Ideal for quiches, suitable for all kinds of dishes.
- Produces excellent grilling and gratinating results. When used at the end of cooking, gives a uniform browning to dishes.
- Activating the fan on its own ensures a uniform distribution of room temperature air inside the oven, allowing any type of food to be defrosted.
- Intense and uniform cooking. Ideal for biscuits, cakes and cooking on more than one level.
- The heat is distributed quickly and uniformly. Suitable for all dishes, ideal for cooking on multiple levels without mixing smells or flavours.
General advice
- Use a fan assisted function to achieve consistent cooking at several levels.
- It is not possible to shorten cooking times by increasing the temperature (the food could be overcooked on the outside and undercooked on the inside).
Advice for cooking meat
- Cooking times vary according to the thickness and quality of the food and to consumer taste.
- Turn the food to brown on both sides.
- Use a meat thermometer when roasting meat, or simply press on the roast with a spoon. If it is hard, it is ready; if not, it needs to be cooked for a few more minutes.
- Advice for cooking with the Grill
- Meat can be grilled even when it is put into the cold oven or into the preheated oven if you wish to change the effect of the cooking.
- With the Fan with grill function (if present), we recommend that you preheat the oven before grilling.
- We recommend placing the food at the centre of the rack.
- With the Grill function, we recommend that you set the temperature to the maximum value to optimise cooking.
Advice for cooking desserts/pastries and biscuits
- Use dark metal moulds: They help to absorb the heat better.
- The temperature and the cooking time depend on the quality and consistency of
- It is not possible to set a cooking time of more than 10 hours.
- It is not possible to set a programmed cooking time of more than 24 hours.
- After setting, hold the clock key down for 2 seconds to display the cooking time remaining. Press the clock key again. The display shows the text and the remaining cooking time in sequence.
- The minute minder timer does not stop the cooking operation but rather informs the user when the set time has run out.
- The minute minder timer can be set from minute to a maximum of 23 hours and minutes.
- To check whether the dessert is cooked right through: At the end of the cooking time, put a toothpick into the highest point of the dessert. If the dough does not stick to the toothpick, the dessert is cooked.
- If the dessert collapses when it comes out of the oven, on the next occasion reduce the set temperature by about 10°C, selecting a longer cooking time if necessary.
Advice for cooking on two shelves:
- We recommend using two racks (they can be obtained from Authorised Assistance Centres).
- To facilitate the flow of air, place the moulds/ovenware at the centre of the racks and make sure that their width/diameter does not exceed 30 cm.
- Position the racks keeping an empty shelf between them.
- Depending on the type of food and the increased quantity in the oven, cooking on two levels may take slightly longer compared to cooking on a single shelf.
- We suggest using the following functions when cooking on two shelves: CIRCULAIRE and CIRCULAIRE+BOTTOM.
- Advice for defrosting and proving
- Place frozen foods without their packaging in a lidless container on the first shelf of the oven.
Avoid overlapping the food.
- To defrost meat, use the rack placed on the second level and a tray on the first level. In this way, the liquid from the defrosting food drains away from the food.
- The most delicate parts can be covered with aluminium foil.
- For successful proving, a container of water should be placed in the bottom of the oven.
Cleaning the surfaces
To keep the surfaces in good condition, they should be cleaned regularly after use. Let them cool first.
- Ordinary daily cleaning
- Always and only use specific products that do not contain abrasives or chlorine-based acids.
- Pour the product onto a damp cloth and wipe the surface, rinse thoroughly and dry with a soft cloth or a microfibre cloth.
- Food stains or residues
- Do not use steel sponges and sharp scrapers as they will damage the surface.
- Use normal, non-abrasive products and a wooden or plastic tool, if necessary. Rinse thoroughly and dry with a soft cloth or a microfibre cloth.
- Do not allow residues of sugary foods (such as jam) to set inside the oven. If left to set for too long, they might damage the enamel lining of the oven.
Cleaning the glass ceramic hob
- Clean and maintain the hob using an ordinary glass ceramic cleaning product. Always follow the manufacturer’s instructions.
- The silicon in these products creates a protective, waterrepellent membrane which also resists dirt. All marks stay on the membrane and can therefore be removed easily.
- After cleaning, dry the surface with a clean cloth. Make sure that there is no detergent left on the cooking surface as it might undergo an aggressive reaction when heated up and could modify the structure of the cooking surface.
Food stains or residues
- Light coloured marks from pans with aluminium bases can be easily cleaned off with a cloth moistened in vinegar. Remove any burnt-on residues after cooking; then rinse with water and dry thoroughly with a clean cloth. Dirt, which may have fallen on the hob while cleaning lettuce or potatoes, can scratch the hob when moving pans.
- Consequently, remove any dirt from the cooking surface immediately. Changes in colour do not affect the operation and stability of the glass. These are not alterations to the material of the hob but just residues which have not been removed and have then carbonised.
- Shiny surfaces can form due to the bases of pans, especially aluminium ones, rubbing on the surface, and due to the use of unsuitable detergents.
- They are difficult to remove using conventional cleaning products. It may be necessary to repeat the cleaning process several times. Use of corrosive detergents or rubbing of pan bases can wear away the decoration on the hob over time and contribute to the formation of stains.
Cleaning the oven cavity
- In order to keep your oven in the best possible condition, clean it regularly after letting it cool down.
- Avoid letting food residue dry inside the oven cavity, as this could damage the enamel.
- Take out all removable parts before cleaning.
- For easier cleaning, it is recommended to remove: the door;
- The rack/tray support frames
Drying
- Cooking food generates moisture inside the appliance. This is a normal phenomenon and does not affect the appliance’s operation in any way.
- Each time you finish cooking:
- Let the appliance cool down.
- Remove any dirt from inside the appliance.
- Dry the interior of the appliance with a soft cloth.
- Leave the door open until the inside of the appliance has dried completely.
Vapor Clean End
- Turn the function knob to 0 to exit from the function.
- Open the door and wipe away the less stubborn dirt with a microfibre cloth.
- Use a non-scratch sponge with brass filaments on hard to remove deposits.
- In case of grease residues use specific oven cleaning products.
- Remove the residual water inside the oven.
- Replace the self-cleaning panels and the rack/tray support frames, if fitted.
- For greater hygiene and to avoid foods taking on unpleasant odours:
- We recommend drying the inside of the oven with a fan assisted function at 160°C for around 10 minutes.
- If self-cleaning panels are fitted, we recommend that you dry the inside of the oven with a simultaneous catalytic cycle.
Installation
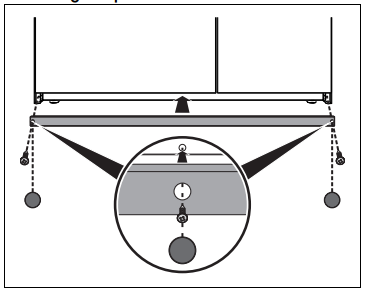
Mounting the plinth
The plinth must always be positioned and secured correctly on the appliance.
1. Place the plinth in the front bottom part of the appliance.
2. Screw the two side screws to fasten the plinth to the appliance.
3. Cover the holes of the plinth with the plugs provided.
Electrical connection
- Check the mains characteristics against the data indicated on the plate.
- The identification plate bearing the technical data, serial number and brand name is visibly positioned on the appliance. Do not remove this plate for any reason.
- The appliance must be connected to ground using a wire that is at least 20 mm longer than the other wirese