
h ncj
user manual
Thank you for purchasing this Samsung product.
To receive more complete service or accessory
parts, please register your product at or contact
www.samsung.com!register
1-800-SAMSUNG (726-7864)
ros of your now
PowerFoam TM
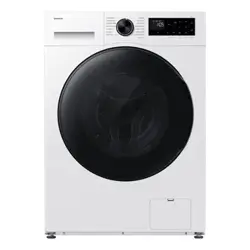
The Largest Capacity
Samsung's extra-large capacity laundry machine can wash a full set of your Bedding, PLUS
a kingsize comforter or up to 32 bath towels in a single load. Since you don't have to do as
many loads, you save time, money, water and energy.
8" LCD Touch Screen Display
The brilliant 8" Color LCD Touch Screen displays cycle information, settings, options, and
more. The easy-to-use interface allows you to scroll through all wash cycles with the slightest
touch.
Smart Control
Samsung's innovative Smart Control technology enables you to control your washer through
personal technology devices such as smart phones. You don't have to be on standby until
the cycle ends. Smart Control allows you to monitor the washing process and lets you know
when the cycle is complete.
Smart Care
Samsung's Smart Care, an automatic error-monitoring system, detects and diagnoses
problems at an early stage and provides a quick and easy solution through the LCD screen.
With the innovative Smart Control technology, you can also be alerted via your smart phone
when a problem occurs.
PowerFoam TM
Samsung's effective PowerForm delivers improved cleanliness with advanced fabric care.
PowerFoam allows detergent to disperse evenly and penetrate fabrics faster and deeper.
SpeedSpray
Samsung's new SpeedSpray technology saves you up to 25%* more time when doing
laundry by shortening the wash times while still keeping all segments of the washing process
and getting your clothes clean.
*Based on 8 pounds loads, Normal cycle (under Normal Soil level without any options), on
previous and existing 4.3 cu.ft. Samsung front loading washers released until 2011 without
SpeedSpray.
**SpeedSpray performs in Normal, Bedding PLUS, Deep Steam, Stain Away and Eco Cold
cycle and the saving time may vary by cycles and various load and option compositions.
VRTplus TM _ibration Reduction Technology)
This Samsung washer minimizies noise and vibrations with dual 3D vibration sensors and
smart control technology, ensuring a quiet operation.
Deep Steam
The Deep Steam feature boosts cleaning performance and loosens grime and dirt, remove
thus providing a superior cleaning result.
Pure Cycle TM (Tub Cleaning cycle)
Clean your drum with a single button! This Pure Cycle is specially designed to remove
detergent residue and dirt buildup in the tub, diaphragm and on the door glass without the
need for special chemical detergents.
2 Key features of your new Smart Pow@rFoamTM was/ler
Diamond Drum TM
Takes gentle care of your fabrics. With inside holes 36% smaller than those of conventional
drums, the diamond drum prevents fabrics from sticking out through the holes and
consequently being damaged.
DD Motor
The power to handle anything! Our direct-drive inverter motor delivers power right to the
washer tub from a variable speed, reversible motor. A beltless direct-drive motor generates a
higher spin speed of 1,300 rpm for a more effective, quieter operation. The washer also has
fewer moving parts, meaning fewer repairs.
• Sanitize
When you select the NSF certified Sanitize cycle, the water is heated to an extra high
temperature and removes 99.9% of certain bacteria typically found ors clothing, bedding or
towels. This certification is awarded by NSF International, an independent third-party testing
and certification organization.
Please check the garment care label to avoid garment damage. Only sanitizing cycles have
beers designed to meet the requirements of this protocol for sanitization efficacy.
_iF, _ NSF Protocol P172 1
Sanitization Performance of Residential and
CommerciaL, Family-Sized CLothes Washers
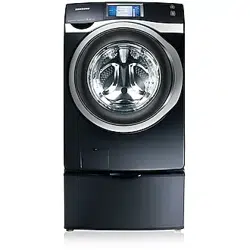
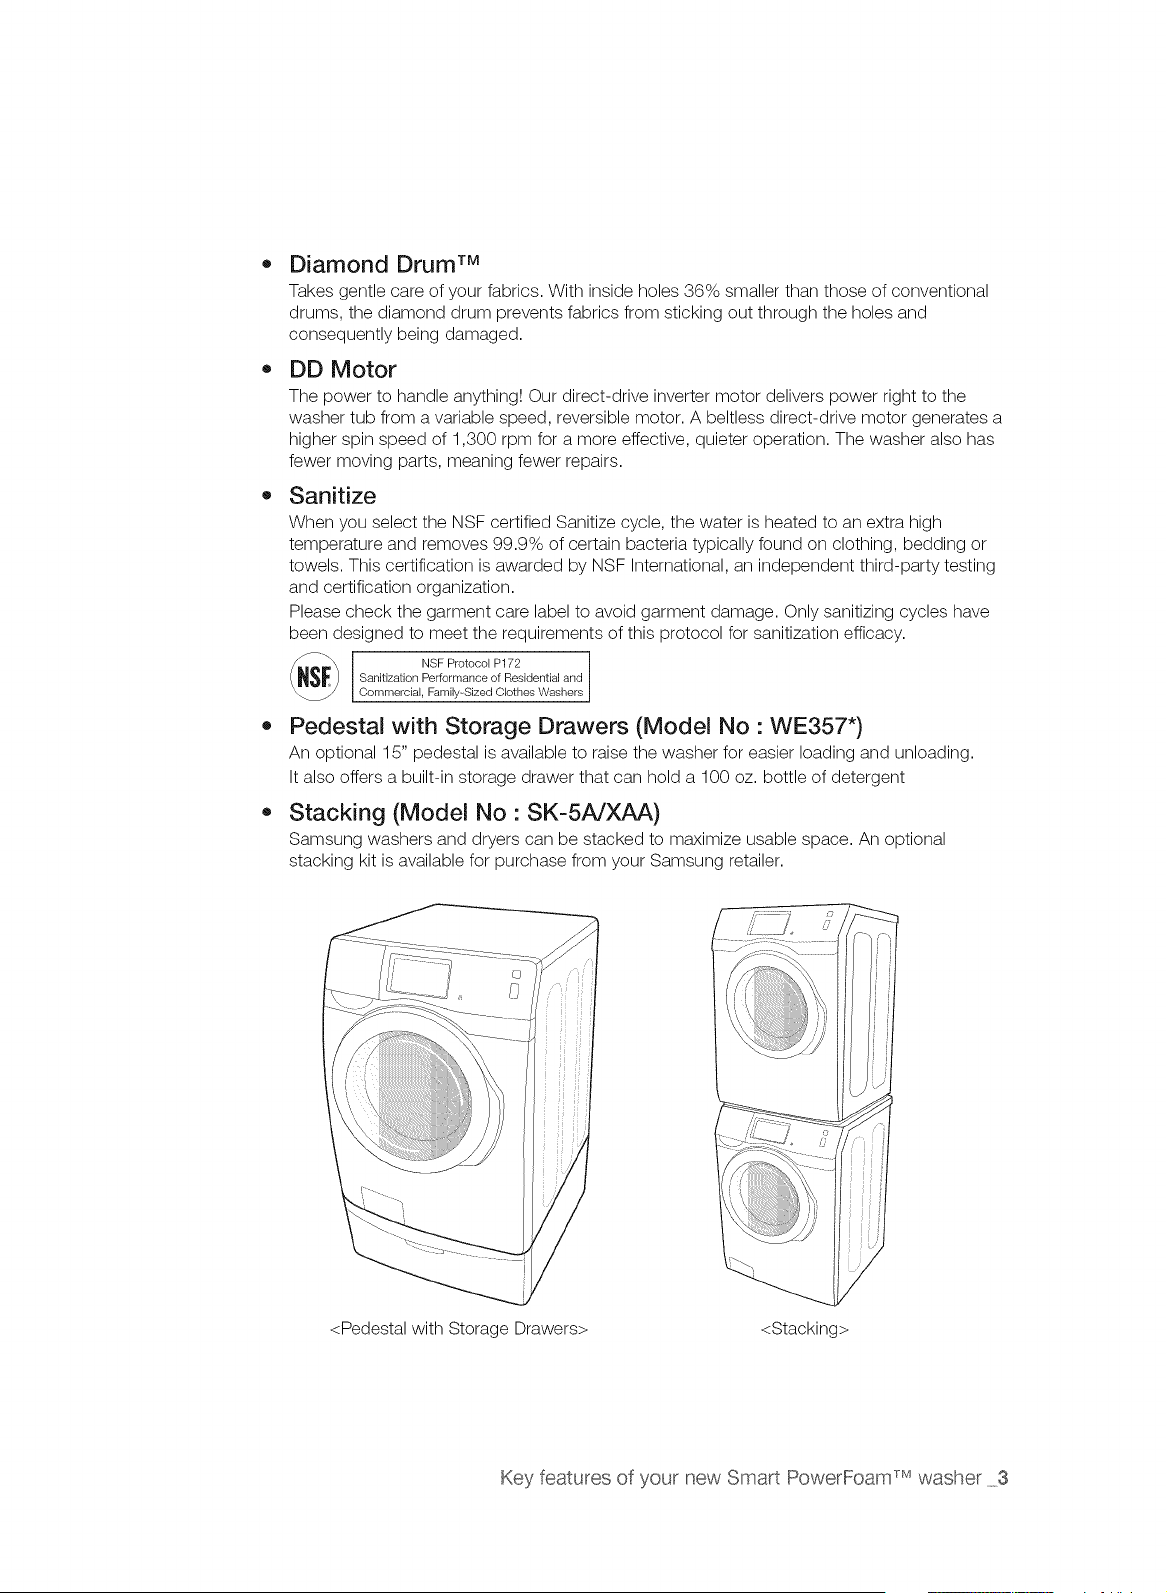
• Pedestal with Storage Drawers (Model No : WE357")
An optional 15" pedestal is available to raise the washer for easier loading and unloading.
It also offers a built-in storage drawer that can hold a 100 oz. bottle of detergent
Stacking (Model No : SK-5A/XAA)
Samsung washers and dryers can be stacked to maximize usable space. An optional
stacking kit is available for purchase from your Samsung retailer.
<Pedestal with Storage Drawers> <Stacking>
Key features of your new Smart PowerFoam _Mwasher 3
Sa tv nforrnat on
J
Congratulations on your new Samsung washer, This manual contains important
information on the installation, use and care of your appliance, Please take time to
read this manual to take full advantage of your washer's many benefits and features,
WHAT YOU NEED TO KNOW ABOUT SAFETY INSTRUCTIONS
The Warnings and Important Safety Instructions in this manual do not cover all possible conditions and
situations that may occur. It is your responsibility to use common sense, caution, and care when installing,
maintaining and operating your washer.
IMPORTANT SAFETY SYMBOLS AND PRECAUTIONS
What the icons and signs in this user manual mean:
Hazards or unsafe practices that may result in severe personal injury
or death.
WARNING To reduce the risk of fire, explosion, electric shock, or personal injury
when using your washer, follow these basic safety precautions:
A Hazards or unsafe practices that may result in minor personal injury
CAUTION or property damage.
] Do NOT attempt.
Do NOT disassemble.
Do NOT touch.
Follow directions explicitly.
Unplug the power plug from the wall socket.
Make sure the machine is grounded to prevent electric shock.
Call the service center for help.
Note
These warning signs are here to prevent injury to you and others.
Please follow them explicitly.
After reading this section, keep it in a safe place for future reference.
SAVE THESE INSTRUCTIONS
4 Safety instructions
WARNING
WARNING
To reduce the risk of fire, electric shock, or injury to persons when using your appliance, follow
basic precautions, including the following:
1=
2,
Read all instructions before using the appliance.
Do not wash or dry articles that have been previously cleaned in, washed in, soaked in, or
spotted with gasoline, dry-cleaning solvents, other flammable or explosive substances as
they give off vapors that could ignite or explode.
3. Do not allow children to play on or in the appliance. Close supervision of children is
necessary when the appliance is used near children.
4. Before the appliance is removed from service or discarded, remove the door to the washing
or drying compartment.
5. Do not reach into the appliance if the drum is moving.
6. Do not install or store this appliance where it will be exposed to the weather.
7. Do not tamper with controls.
8. Do not repair or replace any part of the appliance or attempt any servicing unless specifically
recommended in the user-maintenance instructions or in published user-repair instructions
that you understand and have the skills to carry out.
9. Do not add gasoline, dry-cleaning solvents, or other flammable or explosive substances to
the wash water. These substances give off vapors that could ignite or explode.
ik
WARNING
10. Under certain conditions, hydrogen gas may be produced in a hot water system that has not
been used for 2 weeks or more. HYDROGEN GAS IS EXPLOSIVE. If the hot water system
has not been used for such a period, before using a washer or combination washer-dryer,
turn on all hot water faucets and let the water flow from each for several minutes. This will
release any accumulated hydrogen gas. As the gas is flammable, do not smoke or use an
open flame during this time.
State of California Proposition 65 Warnings:
WARNING:This product contains chemicals known to the State of California to cause cancer and
reproductive toxicity.
SAVE THESE INSTRUCTIONS
Safety instructons 5
CRITICAL INSTALLATION WARNINGS
WARNING
Plug the power cord into an AC 120 V / 60 Hz / 15 A wall socket or higher and use the
socket for this appliance only. In addition, do not use an extension cord.
Sharing a wall socket with other appliances, using a power strip, or using an extension
cord may result in electric shock or fire.
Do not use an electric transformer. It may result in electric shock or fire.
Ensure that the voltage, frequency, and amperage provided at the wall socket match the
power specifications of the product.
The installation of this appliance must be performed by a qualified technician or service
company.
Failing to do so may result in electric shock, fire, an explosion, problems with the
product, or injury.
Remove all foreign substances such as dust or water from the power plug terminals and
contact points using a dry cloth on a regular basis.
Unplug the power plug and clean it with a dry cloth.
Failing to do so may result in electric shock or fire.
Plug the power plug into the wall socket in the right direction so that the cord runs towards
the floor.
If you plug the power plug into the socket in the opposite direction, the electric wires
within the cable may be damaged and this may result in electric shock or fire.
This appliance must be properly grounded.
Do not ground the appliance to a gas pipe, plastic water pipe, or telephone line.
Improper grounding may result in electric shock, fi re, an explosion, or problems with the
product.
Never plug the power cord into a socket that is not grounded correctly and make sure
that it is in accordance with local and national codes.
@
Do not install this appliance near a heater or inflammable material.
Do not install this appliance in a humid, oily or dusty location, or in a location exposed to
direct sunlight and water (rain drops).
Do not install this appliance in a location where gas may leak.
This may result in electric shock or fire.
Plug the power plug into the wall socket firmly. Do not use a damaged power plug,
damaged power cord, or loose wall socket.
This may result in electric shock or fire.
Do not pull or excessively bend the power cord.
Do not twist or tie the power cord.
Do not hook the power cord over a metal object, place a heavy object on the power cord,
insert the power cord between objects, or push the power cord into the space behind the
appliance.
This may result in electric shock or fire.
SAVE THESE INSTRUCTIONS
6 Safety instructions
CAUTION
Do not pull the power cord when unplugging the power plug.
Unplug the power plug by holding the plug.
Failing to do so may result in electric shock or fire.
power plug or power damaged, contact your nearest center.
If the cord is service
INSTALLATION CAUTIONS
Position the that the is accessible.
appliance
so
power
plug easily
Failing to do so may result in electric shock or fire due to electric leakage.
Install your appliance on a level and hard floor that can support its weight.
Failing to do so may result in abnormal vibrations, noise, or problems with the product.
Unplug the power plug when the appliance is not being used for long periods of time or
during a thunder/lightning storm.
Failing to do so may result in electric shock or fire.
A CRITICAL USAGE WARNINGS
WARNING
If the appliance is flooded, cut the power immediately and contact your nearest service
center.
If the appliance emits a strange noise, a burning smell, or smoke,, unplug the power plug
immediately and contact your nearest service center.
Failing to do so may result in electric shock or fire.
In the event of a gas leak (such as propane gas, LP gas, etc.), ventilate immediately without
touching the power plug. Do not touch the appliance or power cord.
Do not use a ventilating fan.
A spark may result in an explosion or fire.
Do not wash items contaminated with gasoline, kerosene, benzene, paint thinner, alcohol or
other flammable or explosive substances.
This may result in electric shock, fire or an explosion.
Do not open the washer door by force while the washer is operating (high-temperature
washing/drying/spinning).
Water flowing out of the washer may result in burns or cause the floor to be slippery.
This may result in injury.
Opening the door by force may result in damage to the product or personal injury.
Make sure to remove the packaging (sponge, styrofoam) attached to the bottom of the
washer before using it.
Do not insert your hand under the washer.
This may result in injury.
SAVE THESE INSTRUCTIONS
Safety instructons 7
@
@
Do not touch the power plug with wet hands.
This may result in electric shock.
Do not turn the appliance off by unplugging the power plug while an operation is in
progress.
Plugging the power plug into the wall socket again may cause a spark and result in
electric shock or fire.
Keep all packaging materials well out of the reach of children, as packaging materials can
be dangerous to children.
If a child places a bag over its head, it may result in suffocation.
Do not let children or infirm persons use this washer unsupervised.
Failing to do so may result in electric shock, burns or injury.
Do not insert your hand or a metal object under the washer while it is operating.
This may result in injury.
Make sure the detergent drawer is closed before you put laundry into the washer or remove
laundry from the washer.
If the detergent drawer is open, you could strike the drawer with your head and injure
yourself.
Do not attempt to repair, disassemble, or modify the appliance yourself.
Do not use any fuse (such as cooper, steel wire, etc.) other than the standard fuse.
If you need to repair or reinstall the appliance, contact your nearest service center.
Failing to do so may result in electric shock, fire, problems with the product, or injury.
If water has enters the appliance anywhere but the drum, unplug the power plug and
contact your nearest service center.
Failing to do so may result in electric shock or fire.
When the water supply hose comes loose from the faucet and floods the appliance, unplug
the power plug.
Failing to do so may result in electric shock or fire.
If any foreign substance enters the appliance, unplug the power plug and contact you
nearest service center.
Failing to do so may result in electric shock or fire.
USAGE CAUTIONS
CAUTION
®
If the the washer is contaminated by a foreign substance such as detergent, dirt, food
waste, etc., unplug the power plug and clean the washer using a damp, soft cloth.
Failing to do so may result in discoloration, deformation, damage or rust.
If struck hard, the front glass can break. Take care when using the washer.
If the glass is broken, it may result in injury.
SAVE THESE INSTRUCTIONS
8 Safety instructions
After a water supply failure or when reconnecting the water supply hose, open the faucet
slowly.
Open the faucet slowly after a long period of non-use.
The air pressure in the water supply hose or the water pipe may result in damage to a
part or in water leakage.
If a drain error occurs during an operation, check if there is a drainage problem.
If the washer is used when it is flooded because of a drainage problem,, it may result in
electric shock or fire due to electric leakage.
Insert the laundry into the washer completely so that laundry does not get caught in the
door.
If laundry gets caught in the door, it may result in damage to the laundry or the washer,
or result in water leakage.
Ensure that the faucet is turned off when the washer is not being used.
Ensure that the screw on the water supply hose connector is firmly connected to the
faucet and properly tightened.
Failing to do so may result in property damage or injury.
Take care that the Rubber Seal and the Front Door Glass are not contaminated by a foreign
substance (e.g. waste, thread, hair, etc.)
If a foreign substance is caught in the door or the door is not completely closed, it may
cause water leakage.
Open the faucet and check if the water supply hose connector is firmly tightened and that
there is no water leaking before using the product.
If the water supply hose connectors are loose, it may result in water leakage.
The product you have purchased is designed for domestic use only.
The use for business purposes qualifies as product misuse. In this case, the product will
not be covered by the standard warranty provided by Samsung and no responsibility can
be attributed to Samsung for malfunctions or damages resulting from such misuse.
If the wash is not performed and the laundry is left for a period of time after adding
detergent or applying stain remover or pre-treatment onto the laundry, the laundry may be
discolored.
Select the recommended cycle and temperature on the basis of the laundry items, sort the
laundry by color on the basis of its colorfastness and select the appropriate cycle.
Make sure that foreign objects such as pins, buttons and coins are removed from clothing
items when adding laundry into the washer. Wash dirty laundry separately from relatively
clean items and wash fragile items separately from tougher textiles.
If an item is stained, wash it as fast as possible. Use stain remover or detergent only after
testing the colorfastness of the item by applying a small quantity to an inside seam.
SAVE THESE INSTRUCTIONS
Safety instructons 9
Q
Do not stand on top of the appliance or place objects (such as laundry, lighted candles,
lighted cigarettes, dishes, chemicals, metal objects, etc.) on the appliance.
This may result in electric shock, fire, problems with the product, or injury.
Do not operate the appliance with wet hands.
This may result in electric shock.
Do not spray volatile material such as insecticide onto the surface of the appliance.
As well as being harmful to humans, it may also result in electric shock, fire or problems
with the product.
Do not place an object that generates a electromagnetic field near the washer.
This may result in injury due to a malfunction.
Since the water drained during a high-temperature wash or drying cycle is hot, do not touch
the water.
This may result in burns or injury.
Do not wash, spin or dry water-proof seats, mats or clothing (*).
Do not wash thick, hard mats even if the washer mark is on the care label.
This may result in injury or damage to the washer, walls, floor or clothing due to
abnormal vibrations.
* Woolen bedding, rain covers, fishing vests, ski pants, sleeping bags, diaper covers,
sweat suits, and bicycle, motor cycle, car covers, etc.
Do not operate the washer when the detergent box is removed.
This may result in electric shock or injury due to water leakage.
Do not touch the inside of the tub during or just after drying as it is hot.
This may result in burns.
Do not insert your hand into the detergent dispenser after opening it.
This may result in injury as your hand may be caught.
Do not place any non-laundry objects, such as shoes, food waste, or animals into the
washer.
This can cause abnormal vibrations that can damage the washer, and, in the case of
pets, cause severe injury or death.
Do not press the buttons using sharp objects such as pins, knifes, fingernails, etc.
This may result in electric shock or injury.
Do not wash laundry contaminated by oils, creams or lotions usually found in skincare
shops or massage clinics.
This may result in the rubber seal becoming deformed and water leakage.
Do not leave metal objects (safety pins, hair pins, etc.) or bleach in the tub for long periods
of time.
This may cause the tub to rust.
If rust appears on the surface of the tub, apply a neutral cleansing agent to the surface
and use a sponge to clean it. Never use a metal brush.
SAVE THESE INSTRUCTIONS
10 Safety instructions
Do not use dry cleaning detergent directly and do not wash, rinse, or spin laundry
contaminated by dry cleaning detergent.
This may result in spontaneous combustion or ignition due to the heat from the oxidation
of the oil.
Do not use hot water from water cooling/heating devices.
This may result in problems with the washer.
Do not use natural hand-washing soap in the washer.
If it hardens and accumulates inside the washer, it may result in problems with the
product, discoloration, rust or bad odors.
Do not wash large laundry items such as bedding in the washing net.
Failing to do so may result in injury due to abnormal vibrations.
Place smaller items, such as lace socks and lingerie in the washing net.
Do not use hardened detergent.
If it accumulates inside the washer, it may cause water leakage.
Do not wash throw rugs or doormats.
If you wash throw rugs or doormats, sand will accumulate inside the washer. It may
result in errors such as no draining.
Take care that children's fingers are not caught in the door when closing it.
This may result in injury.
CRITICAL CLEANING INSTRUCTIONS
WARNING
Do not clean the appliance by spraying water directly onto it.
Do not use the strong acid cleaning agent.
Do not use benzene, thinner or alcohol to clean the appliance.
This may result in discoloration, deformation, damage, electric shock or fire.
Before cleaning or performing maintenance, unplug the appliance from the wall socket.
Failing to do so may result in electric shock or fire.
SAVE THESE INSTRUCTIONS
Safety instructions 11
REGULATORY NOTICE
1. FCC Notice
_FCC CAUTION:
CAUTION
Any changes or modifications not expressly approved by the party responsible for compliance
could void the user's authority to operate the equipment.
This device complies with Part 15 of FCC Rules. Operation is Subject to following two
conditions:
1. This device may not cause harmful interference, and
2. This device must accept any interference received including interference that cause
undesired operation.
For product available in the USA/Canada market, only channel 1-11 can be operated. Selection
of other channels is not possible.
FCC STATEM ENT:
This equipment has been tested and found to comply within the limits for a Class B digital
device, pursuant to part 15 of the FCC Rules. These limits are designed to provide reasonable
protection against harmful interference in a residential installation.
This equipment generates, uses, and can radiate radio frequency energy and, if not installed
and used in accordance with the instructions, may cause harmful interference to radio
communications. However, there is no guarantee that interference will not occur in a particular
installation. If this equipment does cause harmful interference to radio or television reception,
which can be determined by turning the equipment off and on, the user is encouraged to try to
correct the interference by one or more of the following measures:
,, Reorient or relocate the receiving antenna
,, Increase the separation between the equipment and receiver
,, Connect the equipment into an outlet on a different circuit from that to which the receiver is
connected
,, Consult the dealer or an experienced radio/TV technician for help.
FCC RADIATION EXPOSURE STATEMENT:
This equipment complies with FCC radiation exposure limits set forth for an uncontrolled
environment. This equipment should be installed and operated with a minimum distance of 20cm
between the radiator and your body. This device and its antenna(s) must not be co-located or
operation in conjunction with any other antenna or transmitter.
SAVE THESE iNSTRUCTiONS
12 Safety instructions
2. IC Notice
The term "IC" before the radio certification number only signifies that Industry Canada technical
specifications were met. Operation is subject to the following two conditions: (1) this device may
not cause interference, and (2) this device must accept any interference, including interference
that may cause undesired operation of the device.
This Class B digital apparatus complies with Canadian ICES-003.
Cet appareil num_rique de la classe Best conforme dtla norme NMB-003 du Canada.
For product available in the USA/Canada market, only channel 1-11 can be operated. Selection
of other channels is not possible.
IC RADIATION EXPOSURE STATEMENT:
This equipment complies with IC RSS-102 radiation exposure limits set forth for an uncontrolled
environment. This equipment should be installed and operated with minimum distance 20cm
between the radiator & your body. This device and its antenna(s) must not be co-located or
operation in conjunction with any other antenna or transmitter.
Open Source License Notice
This device uses open source software. Open Source Licenses are available on the product
menu.
Tap "Settings > Network > Software Update > Legal Information" on the device for more details.
SAVE THESE INSTRUCTIONS
Safety instructions 13
Oont nt
INSTALLING YOUR WASHER 16 Unpacking your washer
16 Overview of your washer
17 Meeting the installation requirements
17 Electrical supply and grounding
17 Water supply
18 Drain
18 Flooring
18 Surrounding temperature
18 Alcove or closet installation
20 installing your washer
20 Installation flow chart
25 Setting up your washer for the first time
25 Choosing the language
25 Setting the current date
26 Setting the current time
26 Setting the Automatic Update
WASHING A LOAD OF LAUNDRY 27 Washing for the first time
27 Basic instructions
28 Using the control panel
29 Available cycles
30 Specialty Cycles
30 Available options
31 Available actions
33 Washing your laundry using the Cycle
Selection screen
35 Using the My Cycle function
36 Using the Delay Start function
37 Using the Child Lock function
38 Turning the Light On and Off
38 Controlling the sound volume
38 DEEP STEAM
39 Controlling the brightness level
40 Using the Stain Guide
41 Viewing the Energy Efficiency
41 Using the Smart Grid
42 ATC (Auto Temperature Control)
43 Detergent use
43 Using the detergent drawer
43 Automatic dispenser
43 Detergent compartment
44 Pre wash compartment
44 Bleach compartment
44 Fabric softener compartment
14 Contents
USING YOUR MOBILE PHONE
45 Configuring your washer's network settings
and connecting to your network
45 Configuring the IP address settings
46 Connecting your washer to the network
46 Turning on your washer's Wi-Fi networking
function
47 How to update the software
48 Downloading and running the mobile app,
Samsung Smart Washer/Dryer App
50 Using the mobileApp
50 Disconnecting the connection
51 Starting a new wash
52 Registering your washer
54 Overview for Wi-Fi Settings and AP
Connection
MAINTAINING YOUR WASHER
,i=
55 Cleaning the exterior
55 Cleaning the interior
55 Cleaning the dispensers
55 Storing your washer
56 Cleaning the debris filter
57 Cleaning the door seal/bellow
57 Preserving the top cover and the front frame
58 Pure Cycle TM
TROUBLESHOOTING 59 Check these points if your washer...
.... 61 Information codes
, ...... 63 Network Setup Q&A
APPENDIX
65 Fabric care chart
66 Cycle chart
68 Helping the environment
68 Declaration of conformity
68 Specifications
UNPACKING YOUR WASHER
Unpack your washer and inspect it for shipping damage. Make sure you have received all the items
shown below. If your washer was damaged during shipping, or you do not have all the items, contact
1-800-SAMSUNG (726-7864).
To prevent personal injury or strain, wear protective gloves whenever lifting or carrying the unit.
The packaging materials can be dangerous to children; keep all packaging material (plastic bags,
polystyrene, etc.) well out of the reach of children.
OVERVIEW OF YOUR WASHER
Hot water supply
Cold water supply
Detergent drawer
Control panel
Door
Tub
Debris filter
Drain tube
Filter cover
Drain Hose
Adjustable legs
OOO
Wrench Bolt hole covers Water supply hoses
User manual Plastic zip hose tie
Tools needed
Pliers Flat screwdriver
Hose guide
16 Hnstalling your washer
MEETING THE iNSTALLATiON REQUIREMENTS
Electrical supply and grounding
_ Never use an extension cord.
WARN,NGUse only the power cord that comes with your washer.
When preparing the installation, ensure that your power supply offers:
An AC 120 V / 60 Hz / 15-amp fuse or circuit breaker
An individual branch circuit dedicated to your washer
Your washer must be grounded. If your washer malfunctions or breaks down, grounding will
reduce the risk of electric shock by providing a path of least resistance for the electric current.
Your washer comes with a power cord that has a three-prong grounding plug for use in a
properly installed and grounded outlet.
Z_ Never connect the ground wire to plastic plumbing lines, gas lines or hot water pipes.
WARNING
Z_ Improperly connecting the equipment-grounding conductor can result in electric shock.
WARN,NGCheck with a qualified electrician or serviceman if you are unsure if the washer is properly
grounded.
ADo not modify the plug provided with the washer. If it does not fit the outlet, have a proper
OAGT,ONoutlet installed by a qualified electrician.
Important safety precautions
z_To prevent unnecessary risk of fire, electrical shock or personal injury, all wiring and
OAGT,ONgrounding must be done in accordance with the National Electrical Code ANSI/FNPA, No.
70 Latest Revision and local codes and ordinances. It is the personal responsibility of the
appliance owner to provide adequate electrical service for this appliance.
Water supply
Your washer will fill properly when your water pressure is between 20 psi (137 kPa) to 116 psi
(800 kPa). A water pressure less than 20 psi (137 kPa) may cause a water valve failure and not
allow the water valve to shut off completely. Alternatively, it may take the washer than allowed
by the controls, causing your washer to turn off. (A fill-time limit has been built into the controls,
designed to prevent overflows or flooding if an internal hose becomes loose.)
The water taps must be within 4 feet (122 cm) of the back of your washer for the provided water
supply hoses to reach your washer.
®
®
/k
WARNING
Most plumbing supply stores sell water supply hoses of various lengths up to 10 feet
(305 cm)long.
You can reduce the risk of leaks and water damage by:
,, Making water taps easily accessible.
,, Turning off water taps when the washer is not in use.
Periodically checking the water supply hose fittings for leaks.
Before using your washer for the first time, check all connections at the water valve and
taps for leaks.
_ Using hard water or bad quality water may cause the water supply valve to operate
CAUTION abnormally.
In._tallinr_ volt w_tfCh_qr 17
Drain
Samsung recommends a standpipe height of 18 in (46 cm). The drain hose must be routed
through the drain hose clip to the standpipe. The standpipe must be large enough to accept the
outside diameter of the drain hose. The drain hose is attached at the factory.
Flooring
For best performance, your washer must be installed on a solidly constructed floor. Wooden
floors may need to be reinforced to minimize vibrations and/or unbalanced loads. Carpeting and
soft tile surfaces are contributing factors to vibrations and the tendency for your washer to move
slightly during the spin cycle.
_ Never install your washer on a platform or poorly supported structure.
WARNING
Surrounding temperature
Do not install your washer in areas where water may freeze, since your washer always retain
some water in the water valve, pump and hose areas. Frozen water in the lines can cause
damage to the belts, the pump and other components.
Alcove or closet installation
To operate safely and properly, your new washer requires the following minimum clearances:
Sides 1 in / 25 mm Rear 5.9 in / 150mm
17 in/432 mm Front 2 in / 51 mm
If both the washer and a dryer are installed together, the front of the alcove or closet must have
an unobstructed air opening of at least 72 in2(465 cm2). Your washer by itself does not require a
specific air opening.
1 in.
(2.5 cm)
---_1I-,_-
, /
l io.---_ 27in. _ 27in. ÷÷1io.
(2.5 cm) (68.6 cm) (68.6 cm) (2.5 era)
Recessed area
17in. I
(43.2 cm)
2 in. --_l_l_ 34.1 in. _t_,'*l_-- 5.9 in.
i i
(5 cm) (86.5 cm) (15 cm)
Side view - closet or confined area
18 Installing your washer
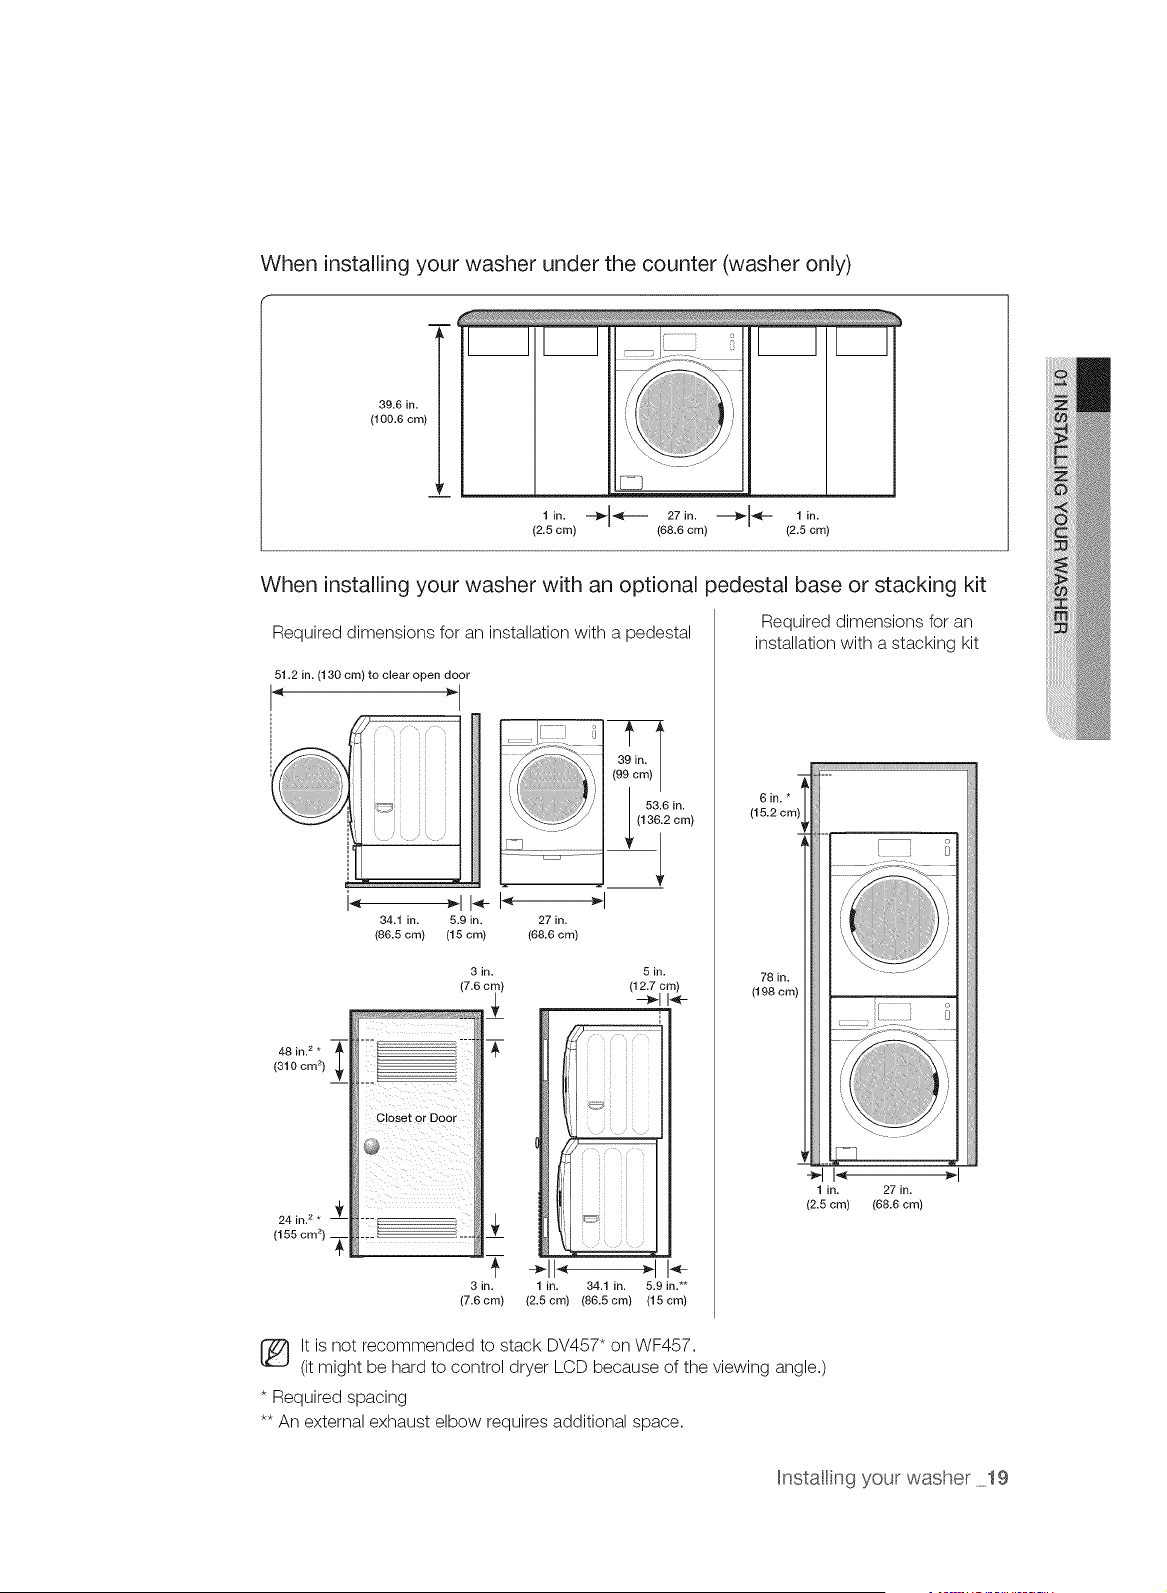
When installing your washer under the counter (washer only)
39.6 in.
(100.6 cm)
1 in.
(2.5 cm)
÷1--- 271o.
(68.6 cm)
1 in.
(2.5 cm)
When installing your washer with an optional pedestal base or stacking kit
Required dimensions for an installation with a pedestal
51.2 in. (130 cm) to clear open door
! "
34.1 in. 5.9 in.
(86.5 cm) (15 cm)
(: )
27 in.
(68.6 cm)
T
48 in. 2 *
{310 cm 2)
3in. 5 in.
(12.7 cm)
"T--
i ii ii _
i ii ii ,
! i_i ii,
3 in. 1 in. 34.1 in. 5.9 in.**
{7.6cm) (2.5cm) (86.5cm) (15cm)
Required dimensions for an
installation with a stacking kit
6in.*
(15.2 crr
78 in.
(198 cm)
C3
1 in. 27 in.
(2.5 cm) (68.6 cm)
It is not recommended to stack DV457" on WF457.
(it might be hard to control dryer LCD because of the viewing angle.)
* Required spacing
** An external exhaust elbow requires additional space.
Hnstallin9 your washer 19
INSTALLING YOUR WASHER
_ Before STEP 5 is complete, do not plug the power cord into a wall socket.
CAUTION
Z_ Packaging materials can be dangerous to children; keep all packaging material (plastic bags,
WAR,_,Gpolystyrene, etc.) well out of the reach of children.
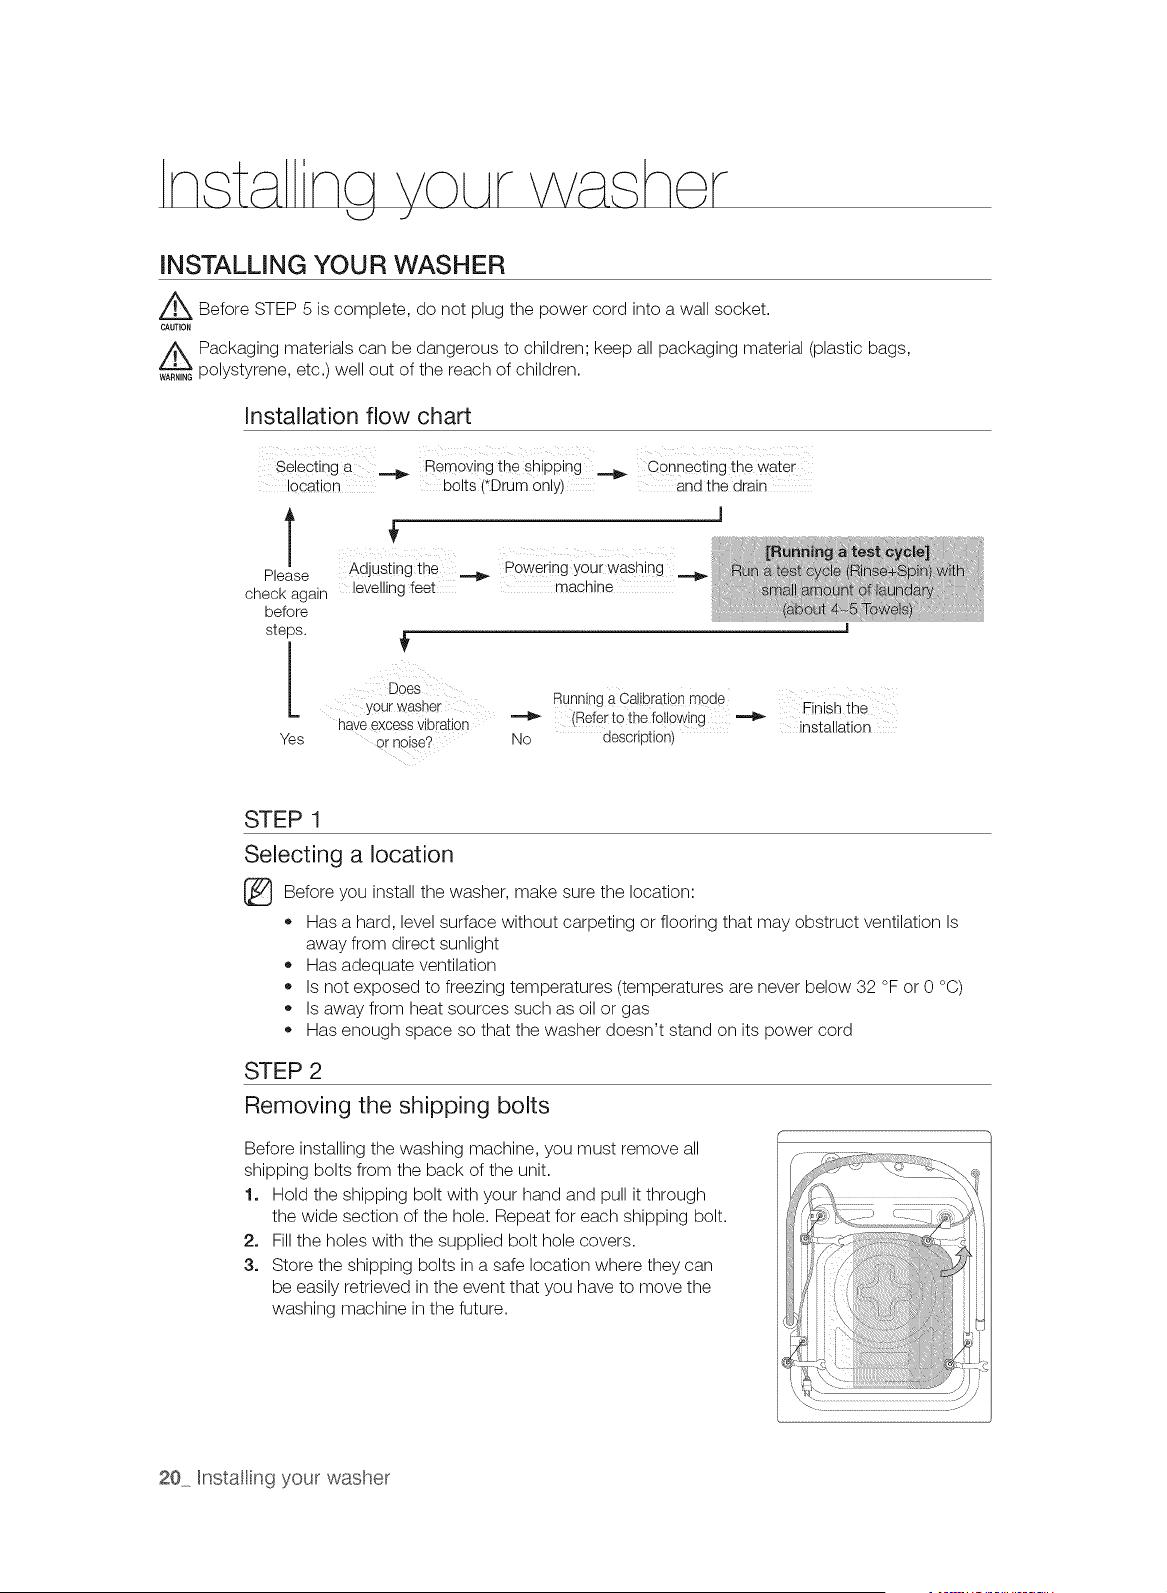
Installation flow chart
Selecting a _ Removing theshipping Connectingthe water
location bolts (*Drumonly) and the drain
T
Please
check again
before
steps.
[
Yes
Adjusting the _ Poweringyour washing
levelling feet machine
Does
Yourwasher
haveexcessvibration
ornoise?
Running a Calibration mode Finish the
(Referto the following
No description) installation
STEP 1
Selecting a location
Before install the make the location:you
washer, sure
Has a hard, level surface without carpeting or flooring that may obstruct ventilation Is
away from direct sunlight
Has adequate ventilation
Is not exposed to freezing temperatures (temperatures are never below 32 °F or 0 °C)
Is away from heat sources such as oil or gas
Has enough space so that the washer doesn't stand on its power cord
STEP 2
Removing the shipping bolts
Before installing the washing machine, you must remove all
shipping bolts from the back of the unit.
1. Hold the shipping bolt with your hand and pull it through
the wide section of the hole. Repeat for each shipping bolt.
2. Fill the holes with the supplied bolt hole covers.
3. Store the shipping bolts in a safe location where they can
be easily retrieved in the event that you have to move the
washing machine in the future.
20 Hnstalling your washer
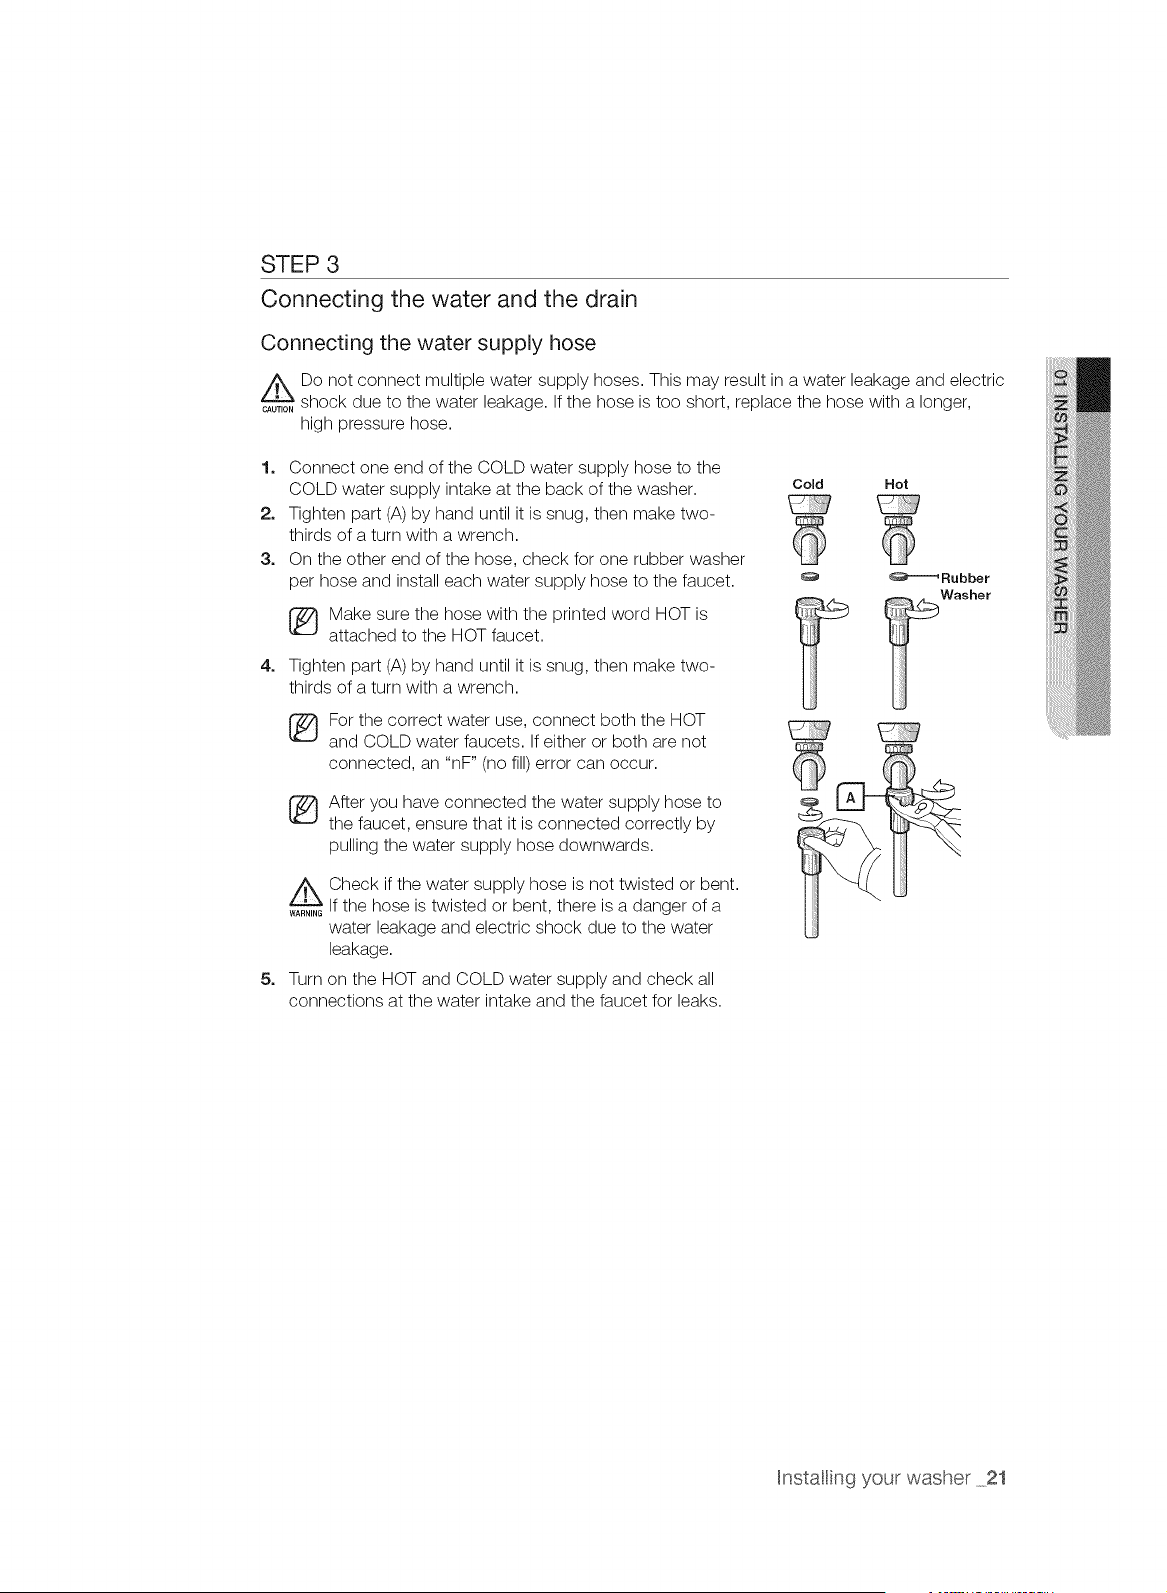
STEP 3
Connecting the water and the drain
Connecting the water supply hose
z_Do not connect multiple water supply hoses. This may result in a water leakage and electric
CAUT_O,shock due to the water leakage. If the hose is too short, replace the hose with a longer,
high pressure hose.
1. Connect one end of the COLD water supply hose to the
COLD water supply intake at the back of the washer. Cold
2. Tighten part (A) by hand until it is snug, then make two-
thirds of a turn with a wrench.
3. On the other end of the hose, check for one rubber washer
per hose and install each water supply hose to the faucet.
4=
5=
[_ Make sure the hose with the printed word HOT is
attached to the HOT faucet.
Tighten part (A) by hand until it is snug, then make two-
thirds of a turn with a wrench.
[_For the correct water use, connect both the HOT
and COLD water faucets. If either or both are not
connected, an "nF" (no fill) error can occur.
_ fter you have connected the water supply hose to
the faucet, ensure that it is connected correctly by
pulling the water supply hose downwards.
_ Check if the water supply hose is not twisted or bent.
WARN_,_If the hose is twisted or bent, there is a danger of a
water leakage and electric shock due to the water
leakage.
Turn on the HOT and COLD water supply and check all
connections at the water intake and the faucet for leaks.
Hot
_Rubber
Washer
Hnstalling your washer 21
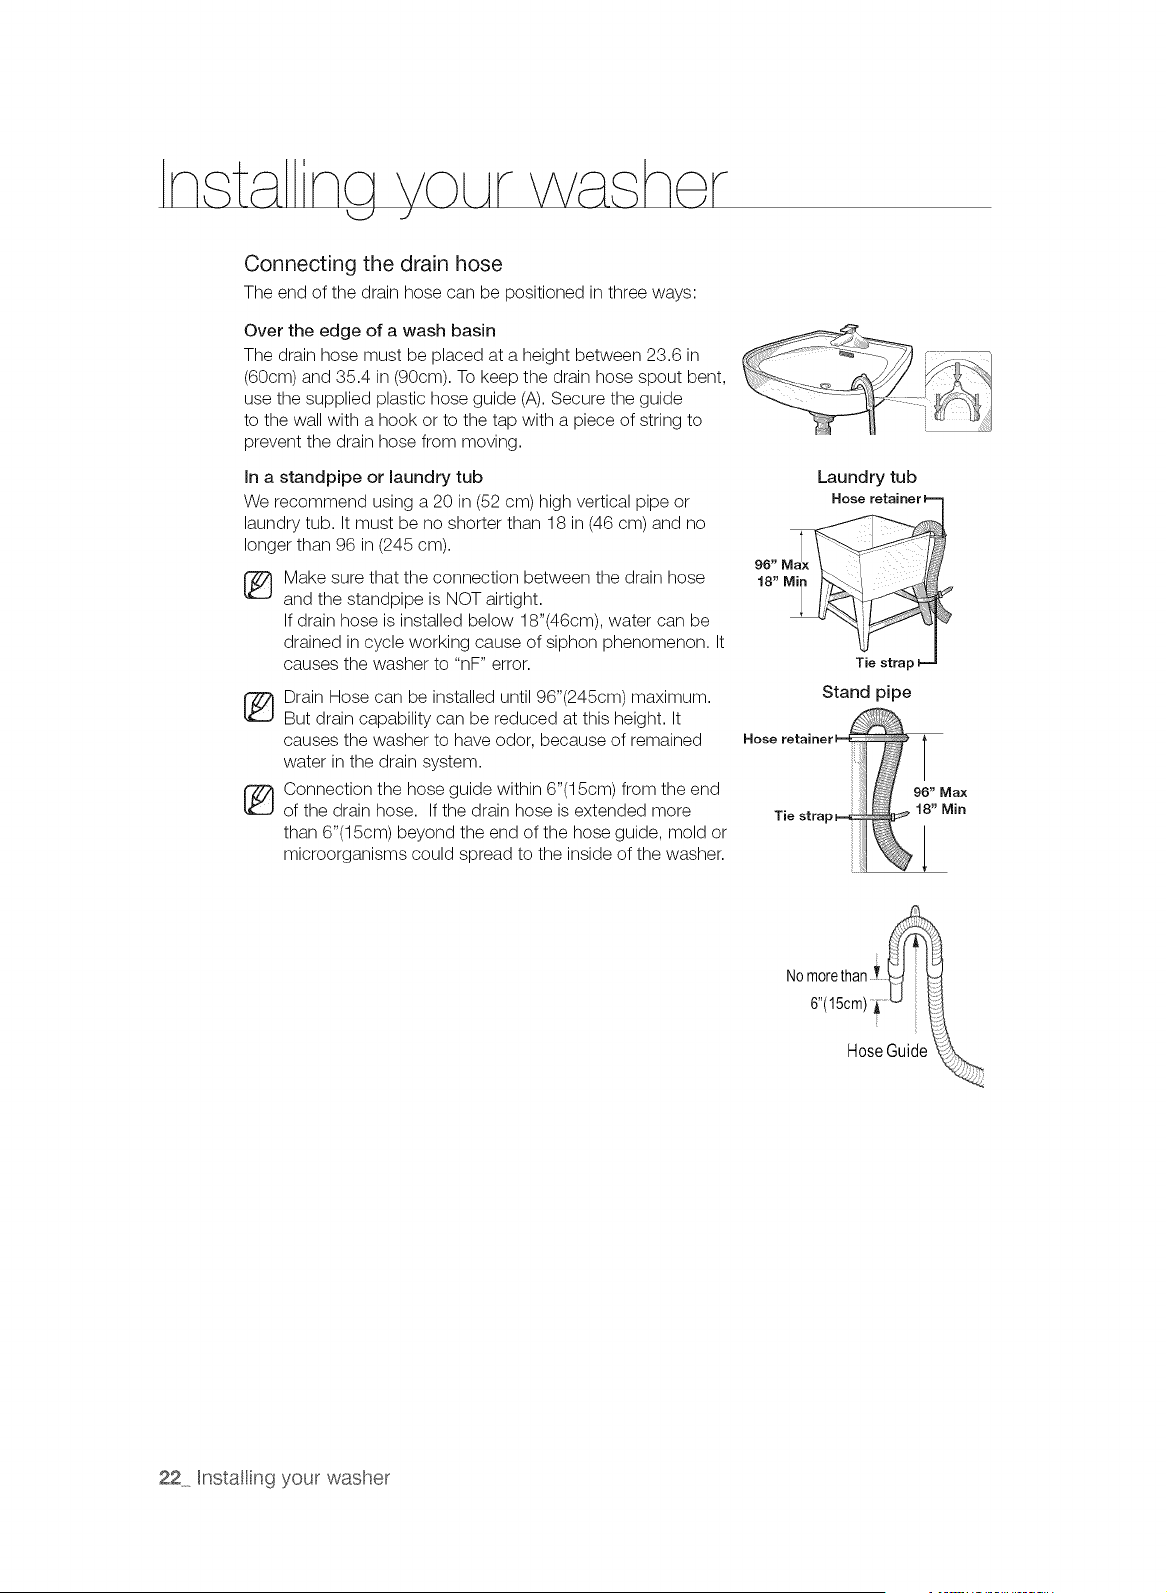
Connecting the drain hose
The end of the drain hose can be positioned in three ways:
Over the edge of a wash basin
The drain hose must be placed at a height between 23.6 in
(60cm) and 35.4 in (90cm). To keep the drain hose spout bent,
use the supplied plastic hose guide (A). Secure the guide
to the wall with a hook or to the tap with a piece of string to
prevent the drain hose from moving.
In a standpipe or laundry tub
We recommend using a 20 in (52 cm) high vertical pipe or
laundry tub. It must be no shorter than 18 in (46 cm) and no
longer than 96 in (245 cm).
®
Make sure that the connection between the drain hose
and the standpipe is NOT airtight.
If drain hose is installed below 18"(46cm), water can be
drained in cycle working cause of siphon phenomenon. It
causes the washer to "nF" error.
_ rain Hose can be installed until 96"(245cm) maximum.
But drain capability can be reduced at this height. It
causes the washer to have odor, because of remained
water in the drain system.
i_ Connection the hose guide within 6"(15cm) from the end
of the drain hose. If the drain hose is extended more
than 6"(15cm) beyond the end of the hose guide, mold or
microorganisms could spread to the inside of the washer.
Laundry tub
96" M!x
18" Mi I
Tie strar
Stand pipe
NOmorethan i
6"(15cm) i ......
Hose Guide
22 Hnstallin9 your washer
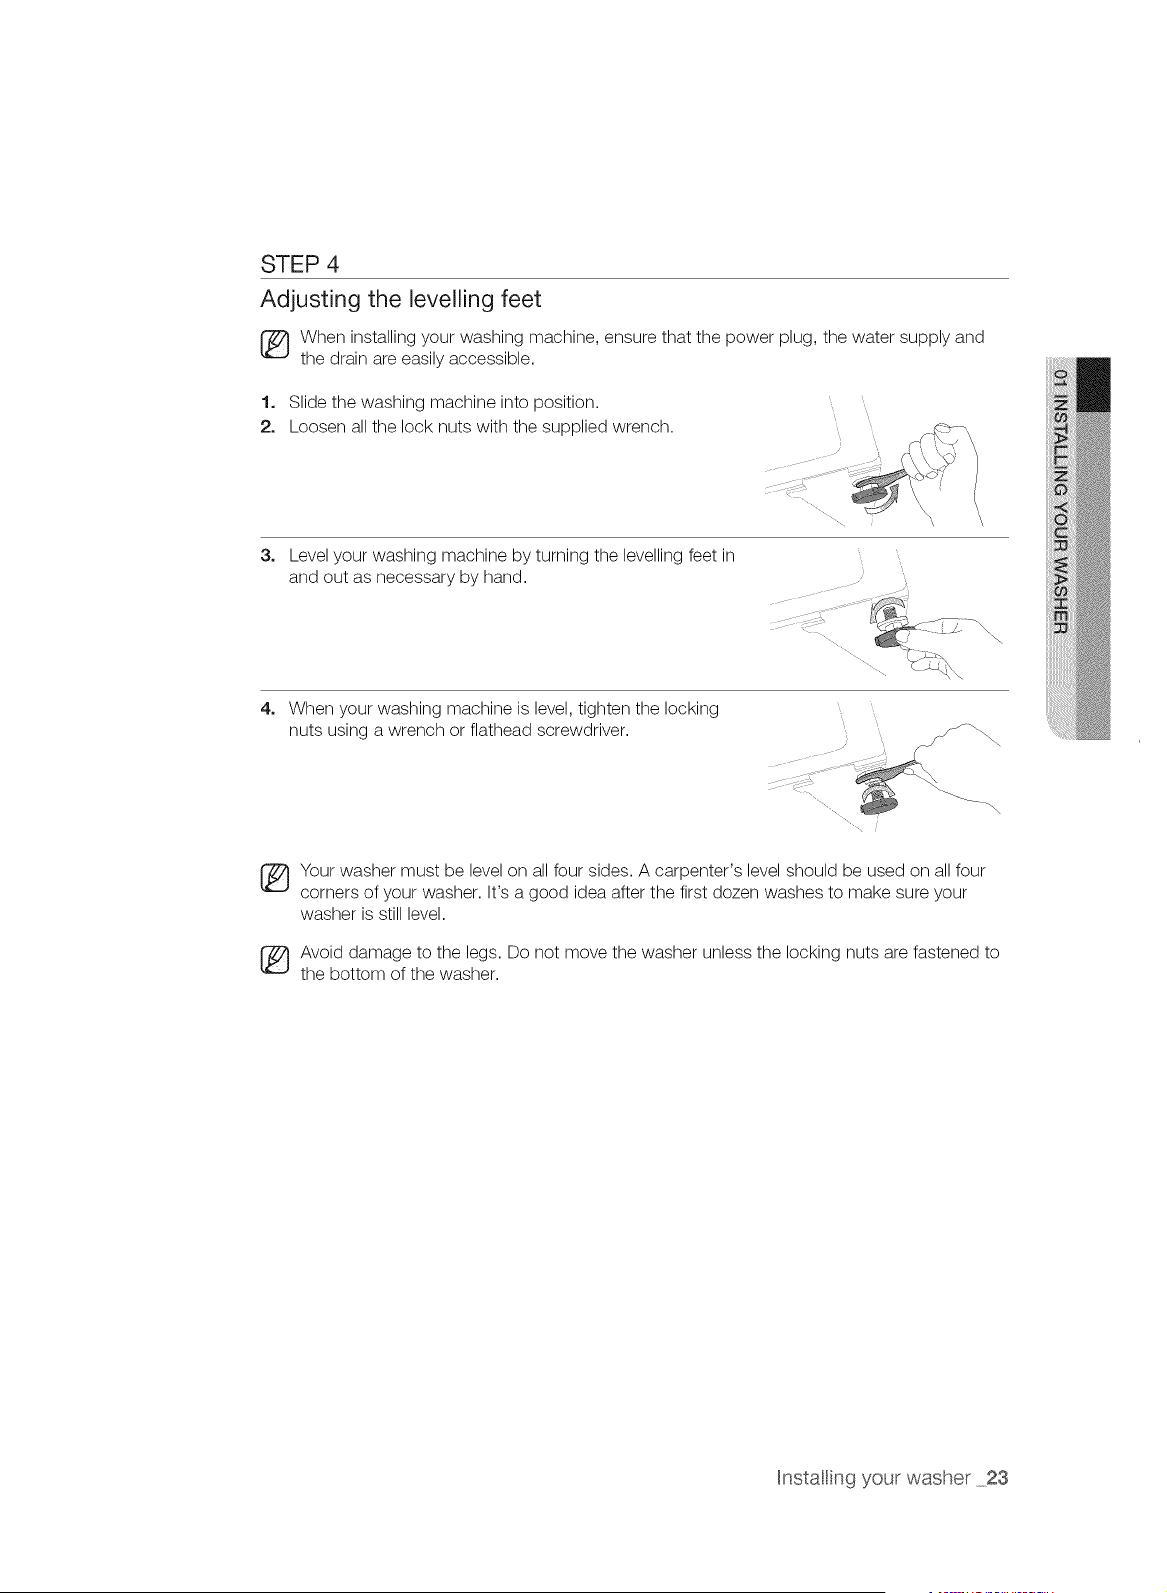
STEP 4
Adjusting the levelling feet
[_ When installing your washing machine, ensure that the power plug, the water supply and
the drain are easily accessible.
1. Slide the washing machine into position.
2. Loosen all the lock nuts with the supplied wrench.
3.
Level your washing machine by turning the levelling feet in
and out as necessary by hand.
4. When your washing machine is level, tighten the locking
nuts using a wrench or flathead screwdriver.
Your washer must be level on all four sides. A carpenter's level should be used on all four
corners of your washer. It's a good idea after the first dozen washes to make sure your
washer is still level.
_ void damage to the legs. Do not move the washer unless the locking nuts are fastened to
the bottom of the washer.
Hnstalling your washer 23
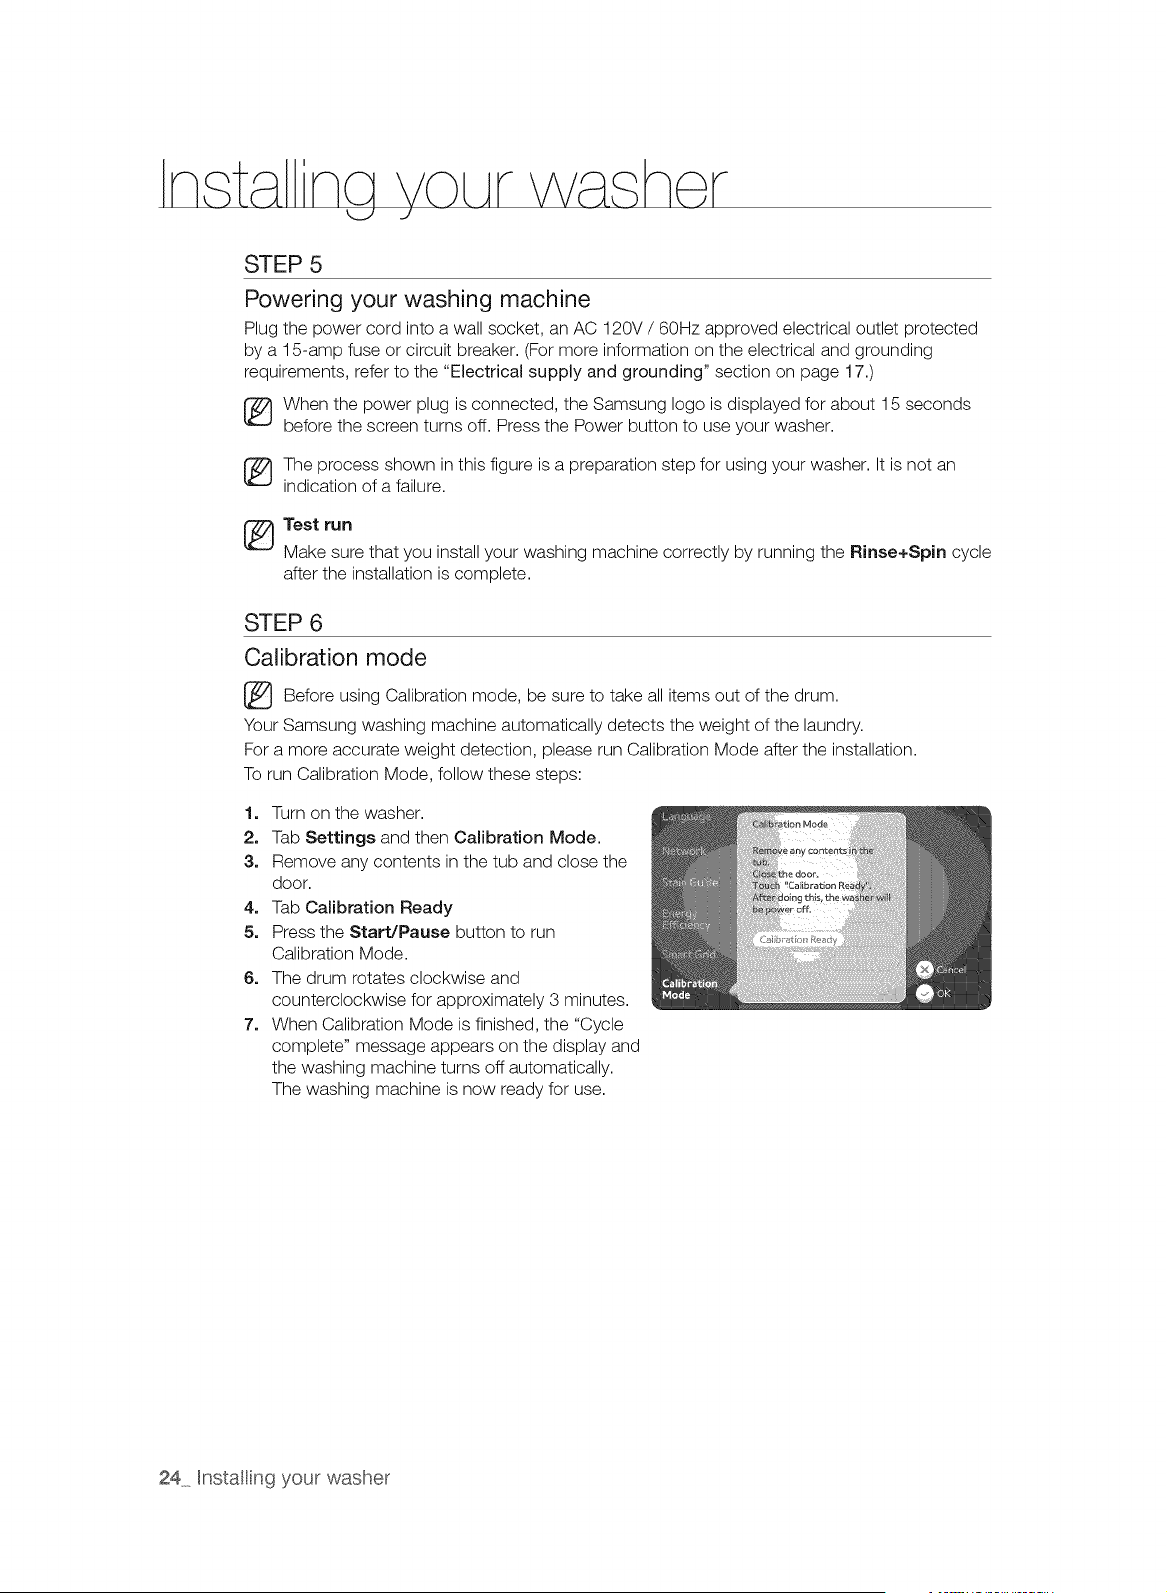
STEP 5
Powering your washing machine
Plug the power cord into a wall socket, an AC 120V / 60Hz approved electrical outlet protected
by a 15-amp fuse or circuit breaker. (For more information on the electrical and grounding
requirements, refer to the "Electrical supply and grounding" section on page 17.)
[_ When the power plug is connected, the Samsung logo is displayed for about 15 seconds
before the screen turns off. Press the Power button to use your washer.
The process shown in this figure is a preparation step for using your washer. It is not an
indication of a failure.
Test run
Make sure that you install your washing machine correctly by running the Rinse+Spin cycle
after the installation is complete.
STEP 6
Calibration mode
[_ Before Calibration be take all items of the drum.
using mode,
sure to out
Your Samsung washing machine automatically detects the weight of the laundry.
For a more accurate weight detection, please run Calibration Mode after the installation.
To run Calibration Mode, follow these steps:
1. Turn on the washer.
2. Tab Settings and then Calibration Mode.
3. Remove any contents in the tub and close the
door.
4. Tab Calibration Ready
5. Press the Start/Pause button to run
Calibration Mode.
6. The drum rotates clockwise and
counterclockwise for approximately 3 minutes.
7. When Calibration Mode is finished, the "Cycle
complete" message appears on the display and
the washing machine turns off automatically.
The washing machine is now ready for use.
24 Hnstating your washer
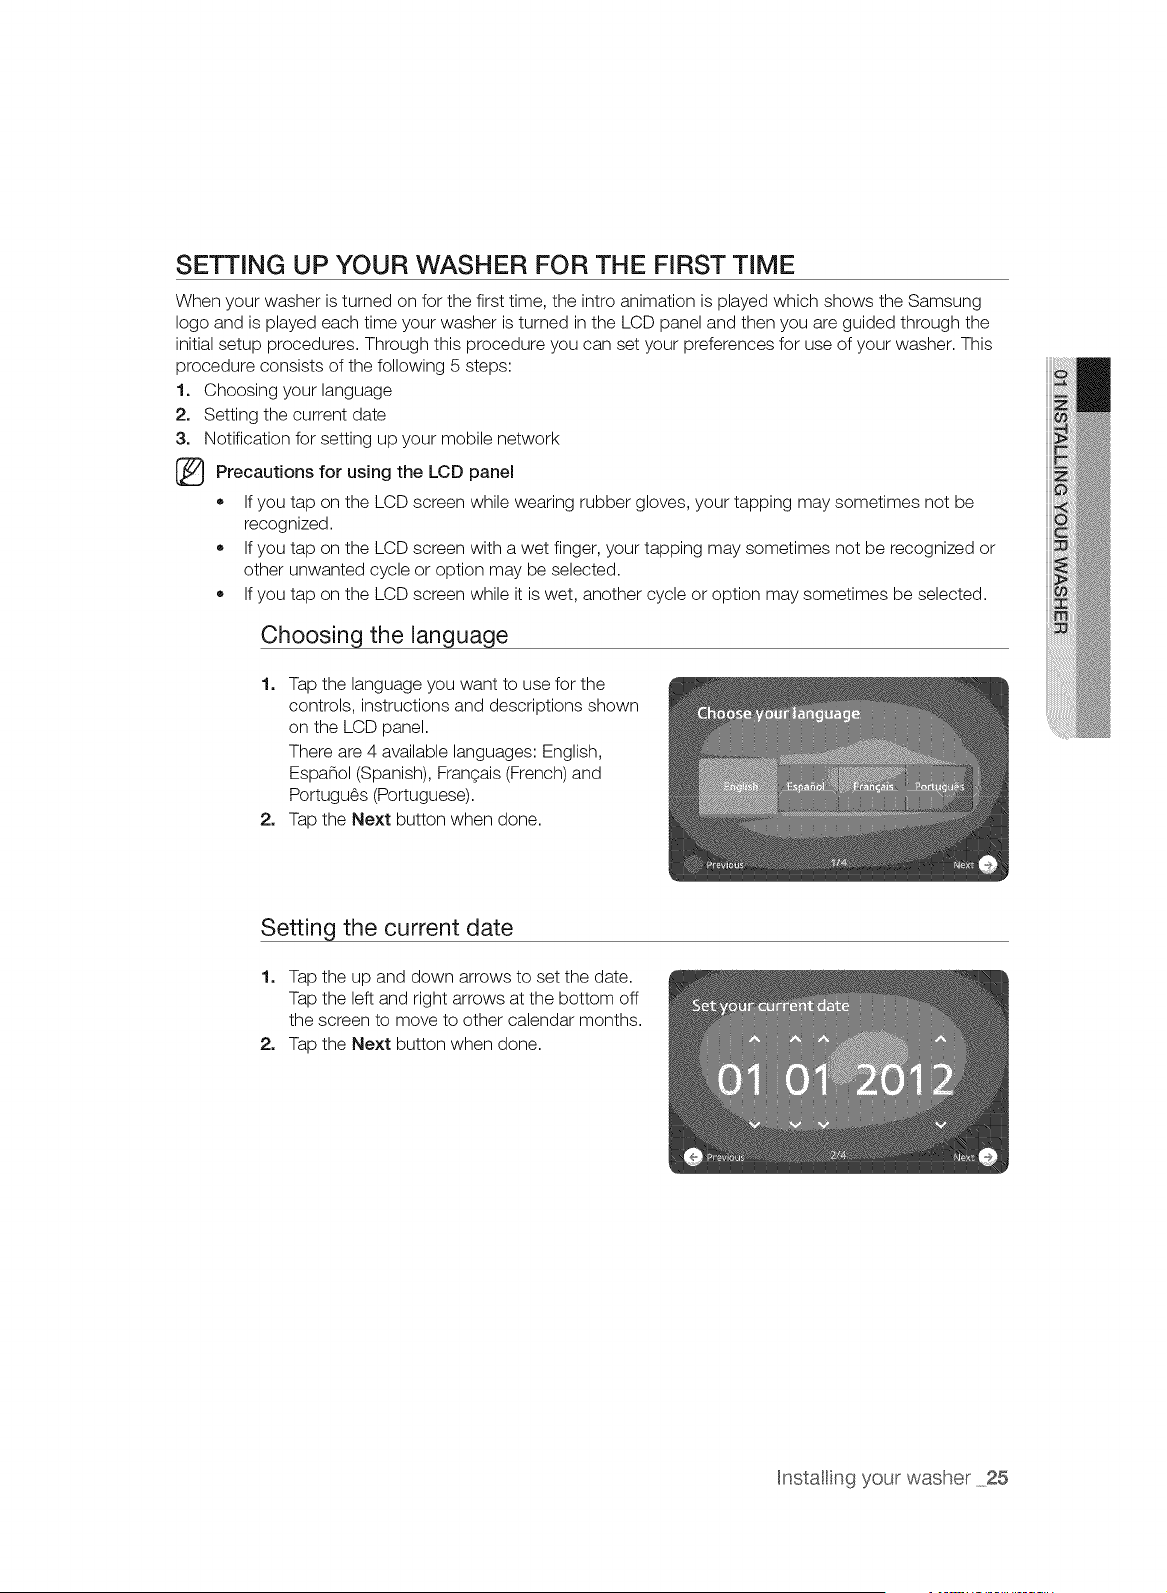
SETTING UP YOUR WASHER FOR THE FIRST TiME
When your washer is turned on for the first time, the intro animation is played which shows the Samsung
logo and is played each time your washer is turned in the LCD panel and then you are guided through the
initial setup procedures. Through this procedure you can set your preferences for use of your washer. This
procedure consists of the following 5 steps:
1. Choosing your language
2. Setting the current date
3. Notification for setting up your mobile network
Precautions for the LCD
using panel
• If you tap on the LCD screen while wearing rubber gloves, your tapping may sometimes not be
recognized.
If you tap on the LCD screen with a wet finger, your tapping may sometimes not be recognized or
other unwanted cycle or option may be selected.
If you tap on the LCD screen while it is wet, another cycle or option may sometimes be selected.
Choosing the language
1. Tap the language you want to use for the
controls, instructions and descriptions shown
on the LCD panel.
There are 4 available languages: English,
Espa_ol (Spanish), FranGais (French) and
Portugu_s (Portuguese).
2. Tap the Next button when done.
Setting the current date
1. Tap the up and down arrows to set the date.
Tap the left and right arrows at the bottom off
the screen to move to other calendar months.
2. Tap the Next button when done.
Hnstating your washer 25
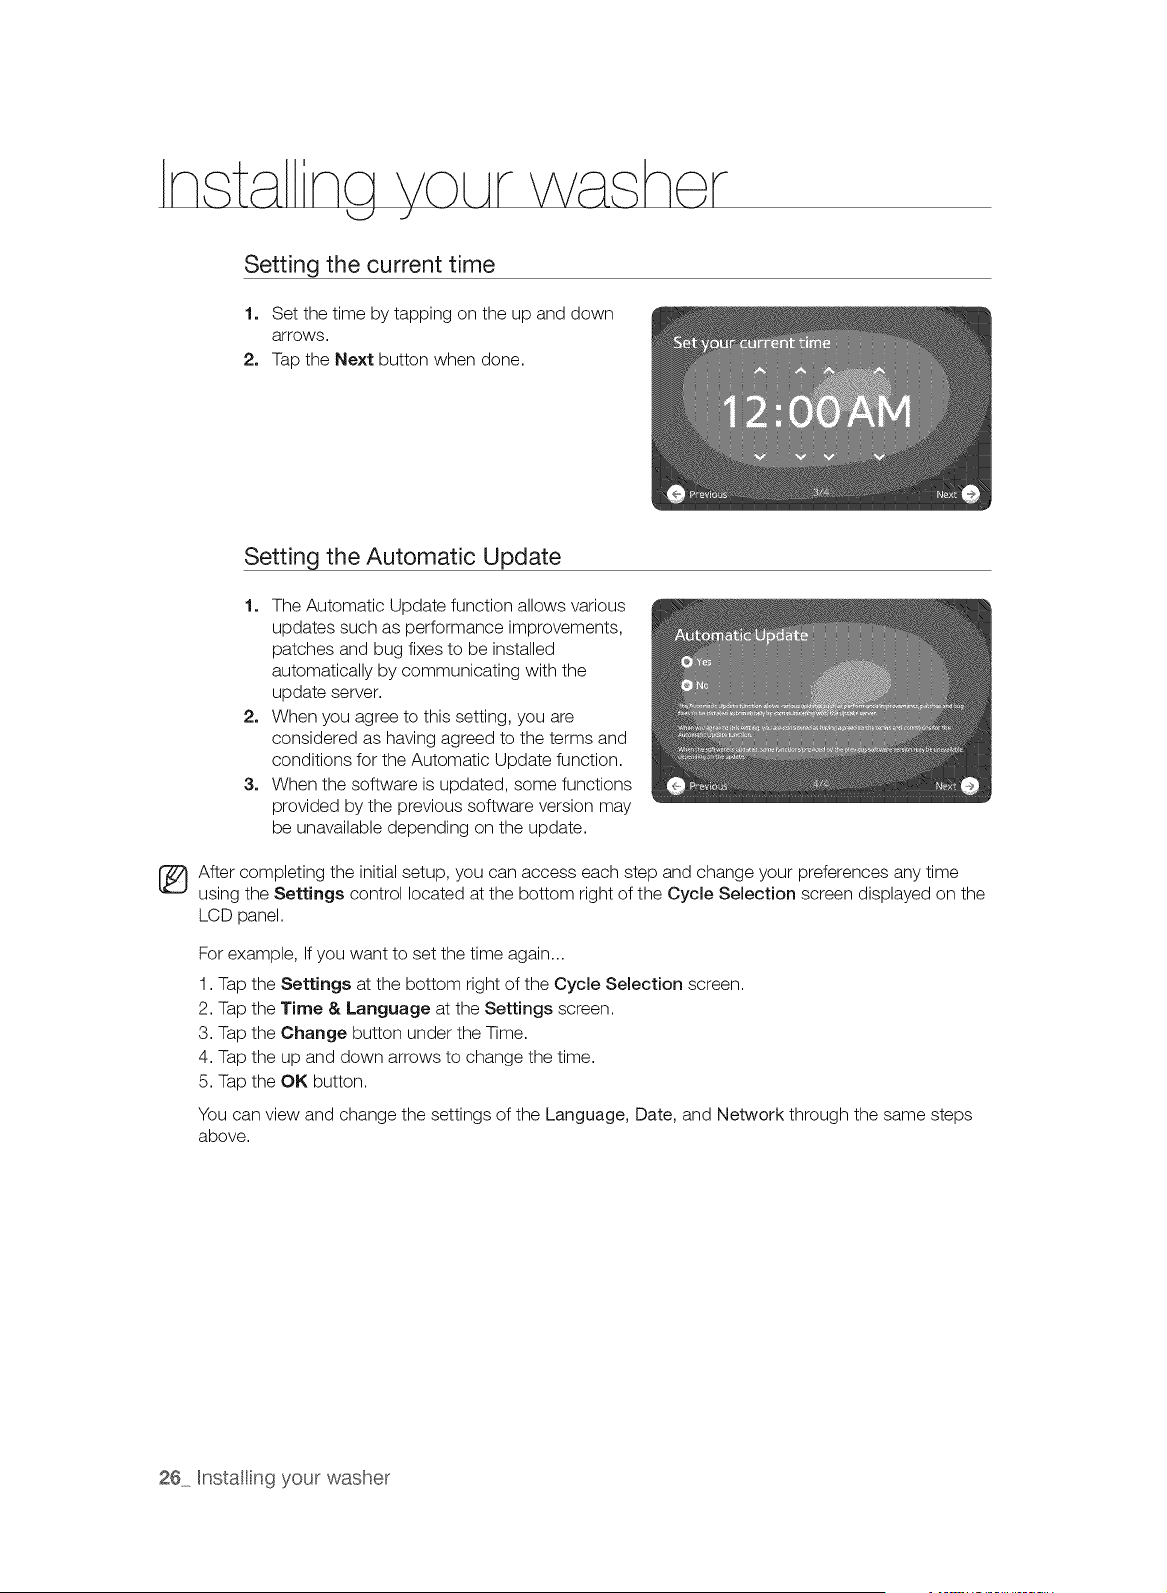
Setting the current time
1, Set the time by tapping on the up and down
arrows.
2, Tap the Next button when done.
Setting the Automatic Update
1. The Automatic Update function allows various
updates such as performance improvements,
patches and bug fixes to be installed
automatically by communicating with the
update server.
2. When you agree to this setting, you are
considered as having agreed to the terms and
conditions for the Automatic Update function.
3. When the software is updated, some functions
provided by the previous software version may
be unavailable depending on the update.
_ After completing the initial setup, you can access each step and change your preferences any time
using the Settings control located at the bottom right of the Cycle Selection screen displayed on the
LCD panel.
For example, If you want to set the time again...
1. Tap the Settings at the bottom right of the Cycle Selection screen.
2. Tap the Time & Language at the Settings screen.
3. Tap the Change button under the Time.
4. Tap the up and down arrows to change the time.
5. Tap the OK button.
You can view and change the settings of the Language, Date, and Network through the same steps
above.
26 Hnstating your washer

\
With your new Samsung washer, the hardest part of doing laundry will be deciding
which load to wash first,
To reduce the risk of fire, electric shock, or injury to persons, read the IMPORTANT SAFETY
*ARN_N_INSTRUCTIONS before operating this appliance.
WASHING FOR THE FIRST TIME
Before washing laundry for the first time, you must run a complete cycle with the washer empty.
1, Press the Power button.
2, Add a little detergent to the detergent compartment @ in
the detergent drawer.
3, Turn on the water supply to the washer.
4, Press the Start/Pause button.
The washer runs the Normal cycle, this is the factory
default cycle the washer will run until you select
another cycle. The first empty cycle removes any
water that might be left over in the machine from the
manufacturer's test run.
Compartment (_
Compartment @
Compartment (_
Compartment (_)
BASIC INSTRUCTIONS
Detergent for Prewash or Starch.
Detergent for Main Wash, water softener.
Bleach.
To use liquid detergent, use the liquid detergent compartment. Do not
add powdered detergent to the liquid detergent box.
For additives, for example, fabric softener. Fill no higher than the lower edge
(labeled MAX).
Before washing laundry for the first time, you must run a cycle with the washer empty.
1. Press the Power button.
2. Load your laundry into the washer.
Do not overload the washer.
To determine the load capacity for each type of laundry, refer to the "Cycle chart"
section on page 66.
(_ ,, Make sure that laundry is not caught in the door, as this can cause a leak.
,, Washing detergent may remain in the front rubber part of the washer after a wash
cycle. Remove any remaining detergent, as this can cause a leak.
Do not touch the door glass while your washer is running as it may be hot.
Do not open the detergent drawer or the debris filter while your washer is running.
You may be exposed to hot water or steam.
,, Be sure to wash water-proofed items using the Picnic & Camping cycle.
3. Close the door until it latches.
4. Add detergent and additives to the detergent drawer.
5. Select the appropriate cycle and options on the LCD panel. The selected cycle and its
selected options light up and the estimated cycle time appears at the top right of the LCD
panel.
6. Press the Start/Pause button.
Washng a cad of aundry 27
USING THE CONTROL PANEL
_____________________________________________________________________________________________________________________________________________
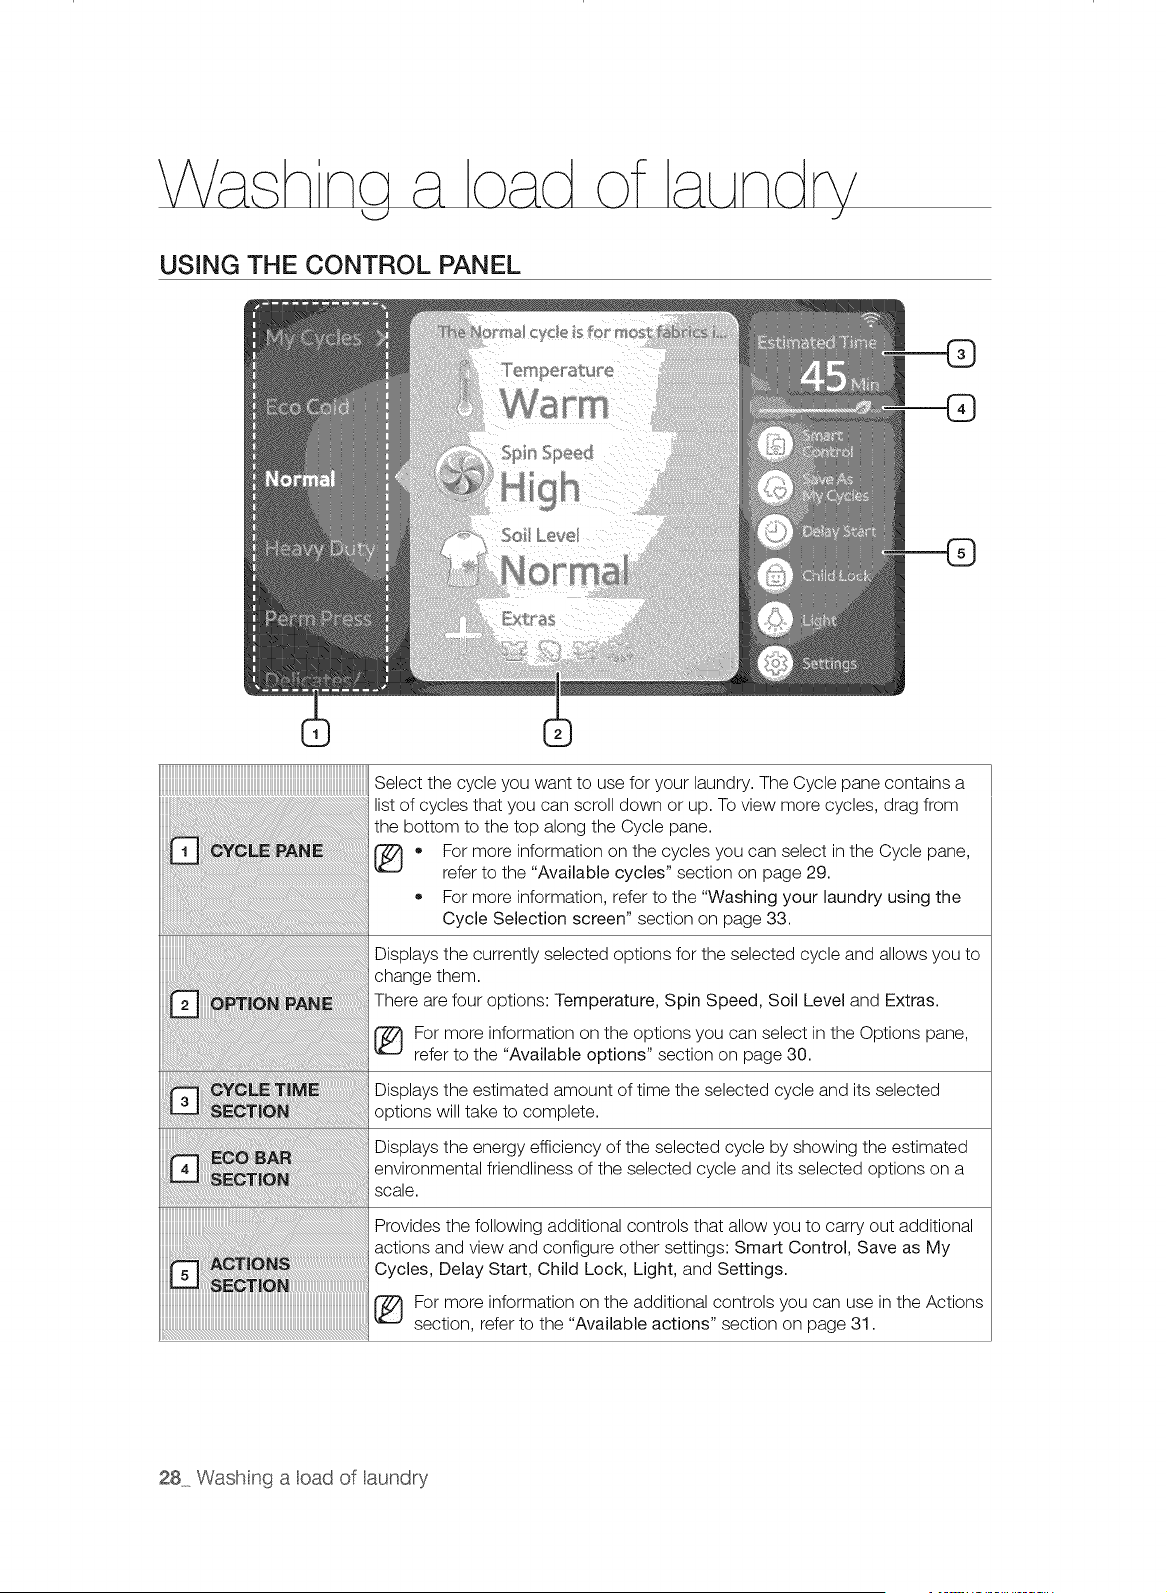
Select the cycle you want to use for your laundry. The Cycle pane contains a
list of cycles that you can scroll down or up. To view more cycles, drag from
the bottom to the top along the Cycle pane.
• For more information on the cycles you can select in the Cycle pane,
refer to the "Available cycles" section on page 29.
For more information, refer to the "Washing your laundry using the
Cycle Selection screen" section on page 33.
Displays the currently selected options for the selected cycle and allows you to
change them.
There are four options: Temperature, Spin Speed, Soil Level and Extras.
[_ For more information on the options you can select in the Options pane,
refer to the "Available options" section on page 30.
Displays the estimated amount of time the selected cycle and its selected
options will take to complete.
Displays the energy efficiency of the selected cycle by showing the estimated
environmental friendliness of the selected cycle and its selected options on a
scale.
Provides the following additional controls that allow you to carry out additional
actions and view and configure other settings: Smart Control, Save as My
Cycles, Delay Start, Child Lock, Light, and Settings.
For more information on the additional controls you can use in the Actions
section, refer to the "Available actions" section on page 31.
28 Wash nga oad of aundry
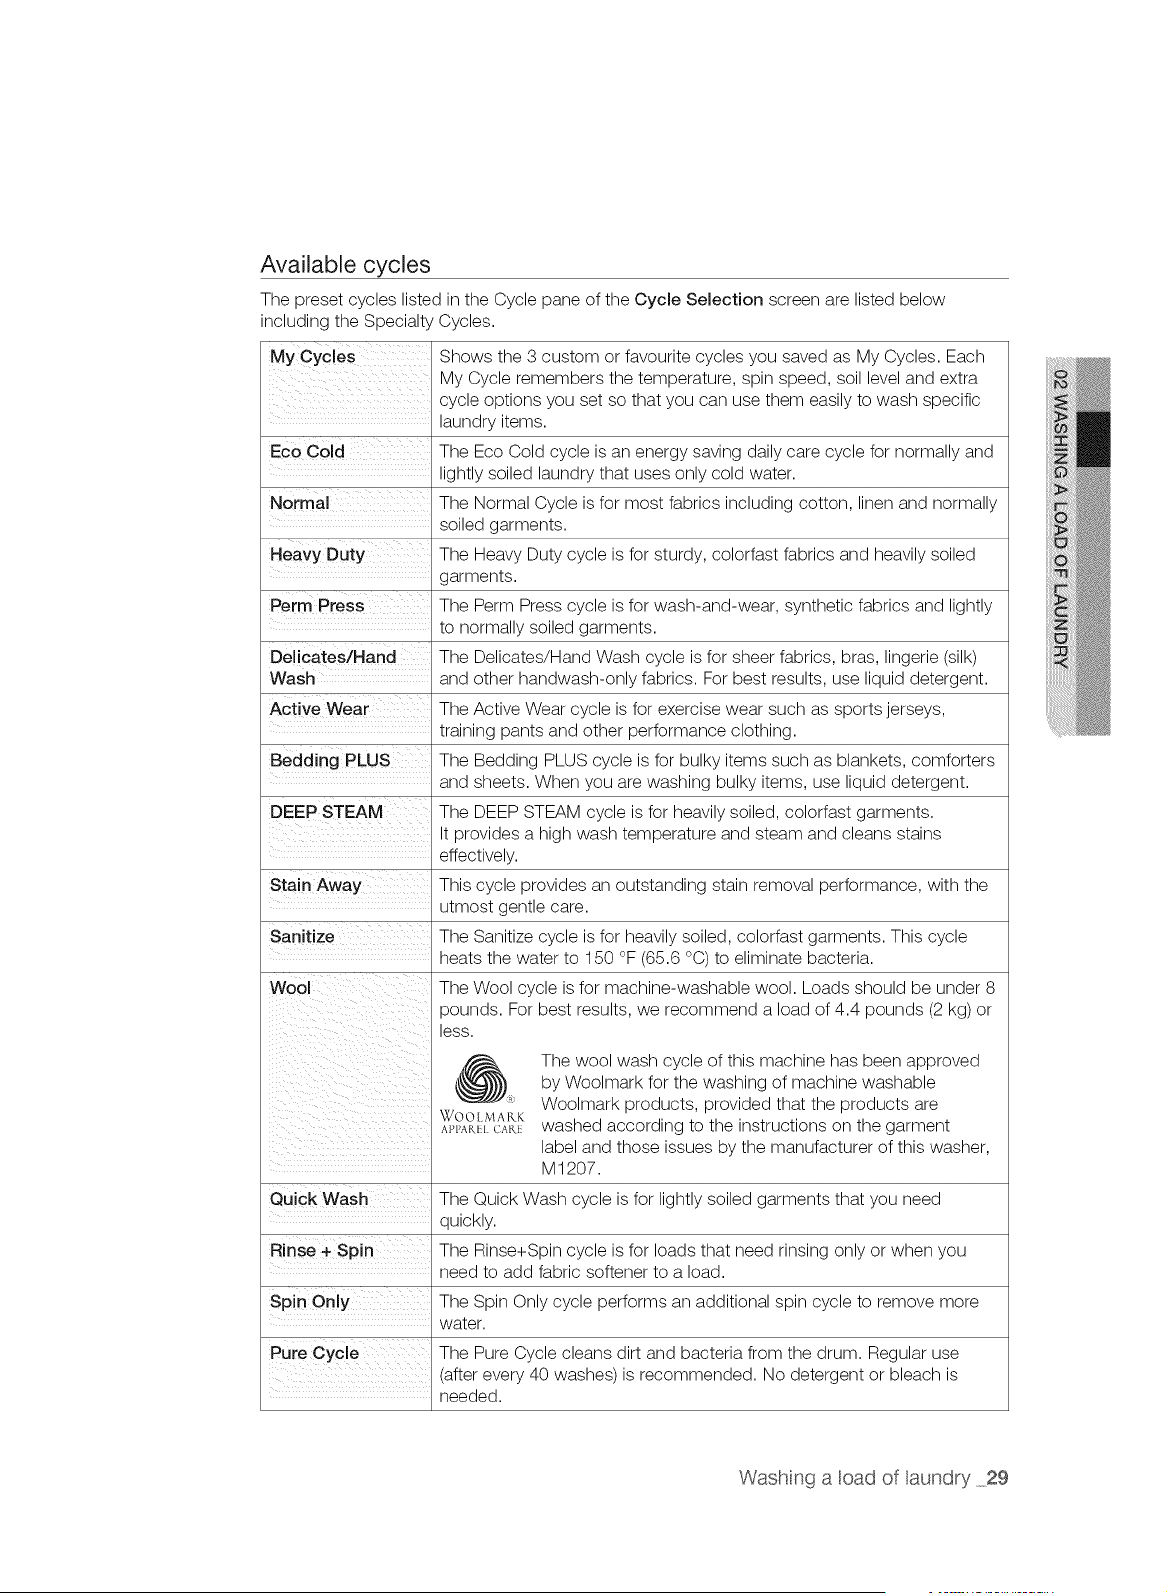
Available cycles
The preset cycles listed in the Cycle pane of the Cycle Selection screen are listed below
including the Specialty Cycles.
My Cycles Shows the 3 custom or favourite cycles you saved as My Cycles. Each
My Cycle remembers the temperature, spin speed, soil level and extra
cycle options you set so that you can use them easily to wash specific
laundry items.
Eco Cold The Eco Cold cycle is an energy saving daily care cycle for normally and
lightly soiled laundry that uses only cold water.
Normal The Normal Cycle is for most fabrics including cotton, linen and normally
soiled garments.
Heavy Duty The Heavy Duty cycle is for sturdy, colorfast fabrics and heavily soiled
garments.
Perm Press The Perm Press cycle is for wash-and-wear, synthetic fabrics and lightly
to normally soiled garments.
Delicates/Hand The Delicates/Hand Wash cycle is for sheer fabrics, bras, lingerie (silk)
Wash and other handwash-only fabrics. For best results, use liquid detergent.
Active Wear The Active Wear cycle is for exercise wear such as sports jerseys,
training pants and other performance clothing.
Bedding PLUS The Bedding PLUS cycle is for bulky items such as blankets, comforters
and sheets. When you are washing bulky items, use liquid detergent.
DEEP STEAM The DEEP STEAM cycle is for heavily soiled, colorfast garments.
It provides a high wash temperature and steam and cleans stains
effectively.
Stain Away This cycle provides an outstanding stain removal performance, with the
utmost gentle care.
Sanitize The Sanitize cycle is for heavily soiled, colorfast garments. This cycle
heats the water to 150 °F (65.6 °C) to eliminate bacteria.
Wool The Wool cycle is for machine-washable wool. Loads should be under 8
pounds. For best results, we recommend a load of 4.4 pounds (2 kg) or
less.
(_) The wool wash cycle of this machine has been approved
by Woolmark for the washing of machine washable
" Woolmark products, provided that the products are
WOO[ MARK
A_,P,_ cart washed according to the instructions on the garment
label and those issues by the manufacturer of this washer,
M 1207.
Quick Wash The Quick Wash cycle is for lightly soiled garments that you need
quickly.
Rinse + Spin The Rinse+Spin cycle is for loads that need rinsing only or when you
need to add fabric softener to a load.
Spin Only The Spin Only cycle performs an additional spin cycle to remove more
water.
Pure Cycle The Pure Cycle cleans dirt and bacteria from the drum. Regular use
(after every 40 washes) is recommended. No detergent or bleach is
needed.
Washng a cad of aundry 29
Specialty Cycles
Specialty Cycles provide 6 ready-to-use cycles to meet all your laundry needs.
For laundry that goes beyond the "everyday" type of wash, Specialty Cycles provide the optimal
settings to clean all potential stains and dirt based on the type of stain.
1. Tap Specialty Cycles in the Cycle pane. 6 cycles will be displayed.
2. Select cycles.
3. Specialty Cycles provide the optimal wash settings to clean stained clothes depending on
the type of stain without setting the soil level, water temperature and other options.
Depending on the selected cycle, some settings and options are unavailable and are shown as
disabled.
Adjusting the water temperature is unavailable as Specialty Cycles provide the optimal
temperature setting to clean each type of stain. However, if you have heavily or lightly soiled
garments, you can adjust the soil, and the Specialty Cycles will automatically adjust the water
temperature, washing time and other options for the best stain removal performance.
Cooking & Dining
Gardening & Yard
Working &
Everyday
The Cooking & Dining cycle is for most fabrics used with food or
cooking. This cycle removes food and cooking stains effectively.
use cycle laundry by oil/grease.
DO NOT this for contaminated
The Gardening & Yard Work cycle is for gardening clothes. This cycle
removes grass, mud/dirt stains and cleans sweat and sebum effectively.
(_ use cycle laundry by oil/grease.
DO NOT this for contaminated
The Working & Everyday cycle is for lightly soiled clothing including
synthetics. This cycle removes slightly soiled ink stains and cleans daily
dirt effectively.
use cycle laundry by oil/grease.
DO NOT this for contaminated
The Outdoors & Travel cycle is for normally soiled outdoor clothing
Outdoors & Travel
including synthetics. This cycle removes grass, mud/dirt, slightly soiled
food stains and cleans sweat and make-up stains effectively.
Active Kids The Active Kids cycle is for most kids wear. This cycle removes food,
beverage, mud/dirt and ink/crayon stains effectively.
Baby Care The Baby Care cycle is for baby items including baby clothes,
underwear, pillow covers, bed sheets, cloth diapers. This cycle removes
urine/feces, vomit stains etc. effectively.
Available options
You can view the currently selected options for the selected cycle and change them in the
Options pane of the Cycle Selection screen.
There are four options: Temperature, Spin speed, Soil level, and Extras.
Temperature
Tap this option to change the currently selected temperature setting. The available temperature
settings are Cold, Eco Warm, Warm, Hot, and Extra Hot. However, depending on the selected
cycle, some of them are unavailable and are shown as disabled.
30 Wash nga cad of aundry
Spin Speed
Tap this option to change the currently selected spin speed setting• The available spin speed
settings are No spin, Low, Medium, High, and Extra High. However, depending on the selected
cycle, some of them are unavailable and are shown as disabled•
Soil level
Tap this option to change the currently selected soil level setting• The available soil level settings
are Extra Light, Light, Normal, Heavy, and Extra Heavy. However, depending on the selected
cycle, some of them are unavailable and are shown as disabled• Use this option to remove stains
from your laundry effectively•
Extras
Tap this option to add or remove the extra cycles to or from the selected cycle. The available
extra cycles are Prewash, Steam, Extra Rinse, and Extra Spin. However, depending on the
selected cycle, some of them are unavailable and are shown as disabled. An extra cycle added
to the selected cycle is shown with a checked icon. For example, is displayed when the
Prewash cycle is added, is displayed when it is removed. Tap each enabled extra cycle to
add it or remove it from a selected cycle.
Available actions
You can carry out additional actions and view and configure other settings using the controls
provided in the Actions section of the Cycle Selection screen.
There are six controls: Smart Control, Save as My Cycles, Delay Start, Child Lock, Light, and
Settings.
Smart Control
Tap this control to turn the Smart Control function on or off. When this function is turned on, you
can control the washer using your mobile phone•
When this function is turned off, the icon is When it is turned on, the icon is __.
Turn this control on if you want to control your washer using your mobile phone•
Any actions performed on your washer will turn off the Smart Control Function (tapping the
LCD panel, pushing buttons, etc.).
Save As My Cycles
Save your favourite cycles including the temperature, spin speed, soil level and extra cycle
options. You can save up to 3 My Cycles.
more information, to "Using My Cycle on page
For refer the the function" section 35.
Delay Start
Tap this control to delay the start of the selected cycle by setting a specific start time. If the
washer recognizes that the Smart Grid is available, the options for turning variable energy use on
or off are accessible• When Delay Start is turned on, the icon changes from @ to @_
For refer the the Start function" section 36.
more information,
to
"Using Delay on
page
Washing a cad of aundry 31
Child Lock
Activate and deactivate the Child Lock function using this control.
• Tap this control to activate the deactivated Child Lock function (8).
Hold down this control for 6 seconds to deactivate the activated Child Lock function (, _).
The Child Lock function can be also enabled temporarily and the icon is displayed in this
case.
_} or detailed information on the Child Lock function, refer to the "Using the Child Lock
function" section on page 37.
Light
Tap this control to turn the light on or off. When the light is turned off, the icon is ,_j. When it is
d
turned on, the icon is ,<_:_.
For more information, refer to the "Turning the Light On and Off" section on page 38.
Settings
Tap this control to navigate to the Settings screen where you can configure the washer
according to your preferences or view information on how to remove stains effectively from your
laundry.
The Settings screen provides the following options:
Display & Sound Tap this control to change the LCD brightness level and sound volume
of the washer. The LCD brightness level range is 5 levels from Level 1 to
Level 5. The sound volume range is 5 levels from Mute to Level 4.
Time & Language
Network
Stain Guide
Energy Eft ciency
Smart Grid
For more information, refer to the "Controlling the sound volume"
section on page 38 and the "Controlling the brightness level"
section on page 39.
Tap this control to change the current date and time of the washer and
the LCD language.
Tap this control to configure your Wi-Fi network, turn it on or off, view the
health of your Wi-Fi network connectivity and/or update the networking
software. After you have configured the washer's Wi-Fi connection and
turned it on, you can control some functions of your washer using your
mobile phone if the Samsung Smart Washer/Dryer App is installed on
your phone.
Tap this control to view the information on how to remove various kinds
of stains effectively from your laundry using your washer.
For more information, refer to the "Using the Stain Guide" section
on page 40.
Tap this control to view the current average energy efficiency of your
washer, which is determined by your water and energy usage.
For more information, refer to the "Viewing the Energy Efficiency"
section on page 41.
Tap this control to control and save energy and money by adjusting the
smart grid settings.
For more information, refer to the "Using the Smart Grid" section
on page 41.
32 Wash nga oad of aundry
Washing your laundry using the Cycle Selection screen
Your new washer with its user friendly LCD control panel makes washing laundry easy. When
you select a wash cycle, your washer will automatically select your last used temperature, spin
speed, soil level, and extra cycles.
1. Turn the water supply on.
2. Press the Power button.
3. Open the door.
4. Load the articles loosely into the drum, without overfilling it.
5. CIosethe door.
6. Add detergent, softener, and pre-wash detergent (if necessary) into the appropriate
compartments.
7_
8_
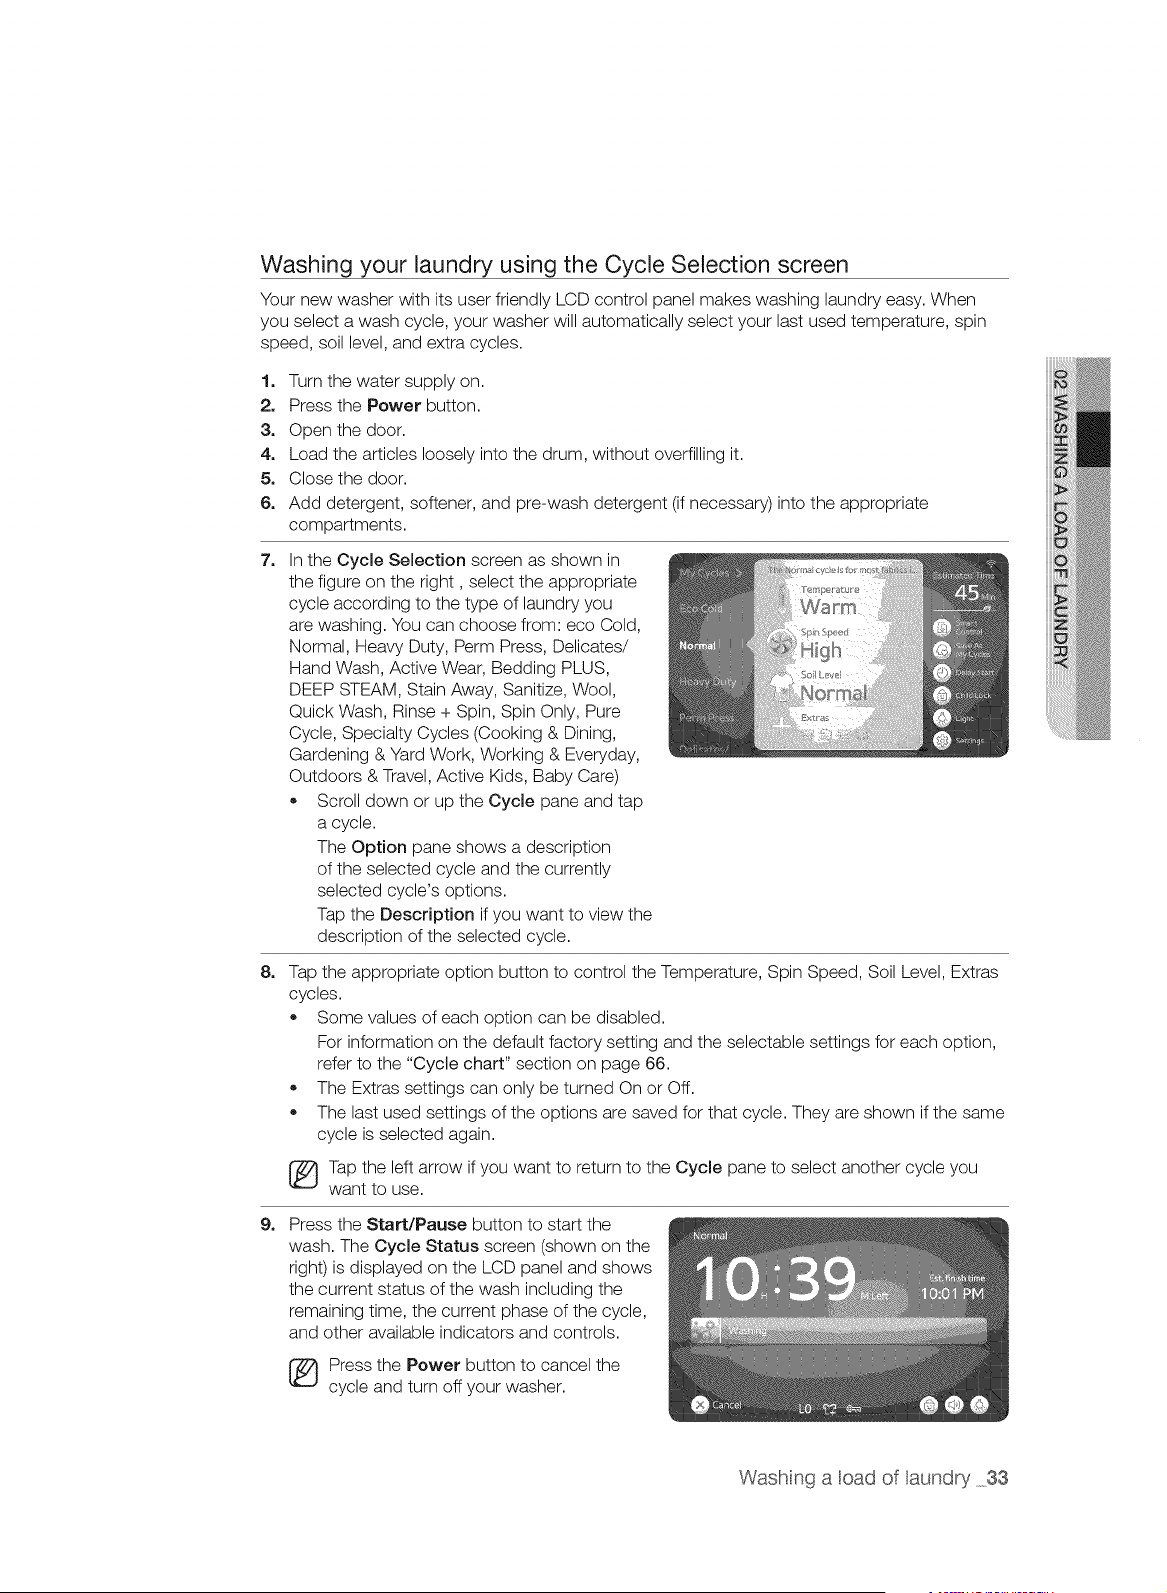
In the Cycle Selection screen as shown in
the figure on the right, select the appropriate
cycle according to the type of laundry you
are washing. You can choose from: eco Cold,
Normal, Heavy Duty, Perm Press, Delicates/
Hand Wash, Active Wear, Bedding PLUS,
DEEP STEAM, Stain Away, Sanitize, Wool,
Quick Wash, Rinse + Spin, Spin Only, Pure
Cycle, Specialty Cycles (Cooking & Dining,
Gardening & Yard Work, Working & Everyday,
Outdoors & Travel, Active Kids, Baby Care)
• Scroll down or up the Cycle pane and tap
a cycle.
The Option pane shows a description
of the selected cycle and the currently
selected cycle's options.
Tap the Description if you want to view the
description of the selected cycle.
Tap the appropriate option button to control the Temperature, Spin Speed, Soil Level, Extras
cycles.
Some values of each option can be disabled.
For information on the default factory setting and the selectable settings for each option,
refer to the "Cycle chart" section on page 66.
The Extras settings can only be turned On or Off.
The last used settings of the options are saved for that cycle. They are shown if the same
cycle is selected again.
Tap the left arrow if you want to return to the Cycle pane to select another cycle you
want to use.
9_ Press the Start/Pause button to start the
wash. The Cycle Status screen (shown on the
right) is displayed on the LCD panel and shows
the current status of the wash including the
remaining time, the current phase of the cycle,
and other available indicators and controls.
[_) Press the Power button to cancel the
cycle and turn off your washer.
Washing a cad of aundry 33
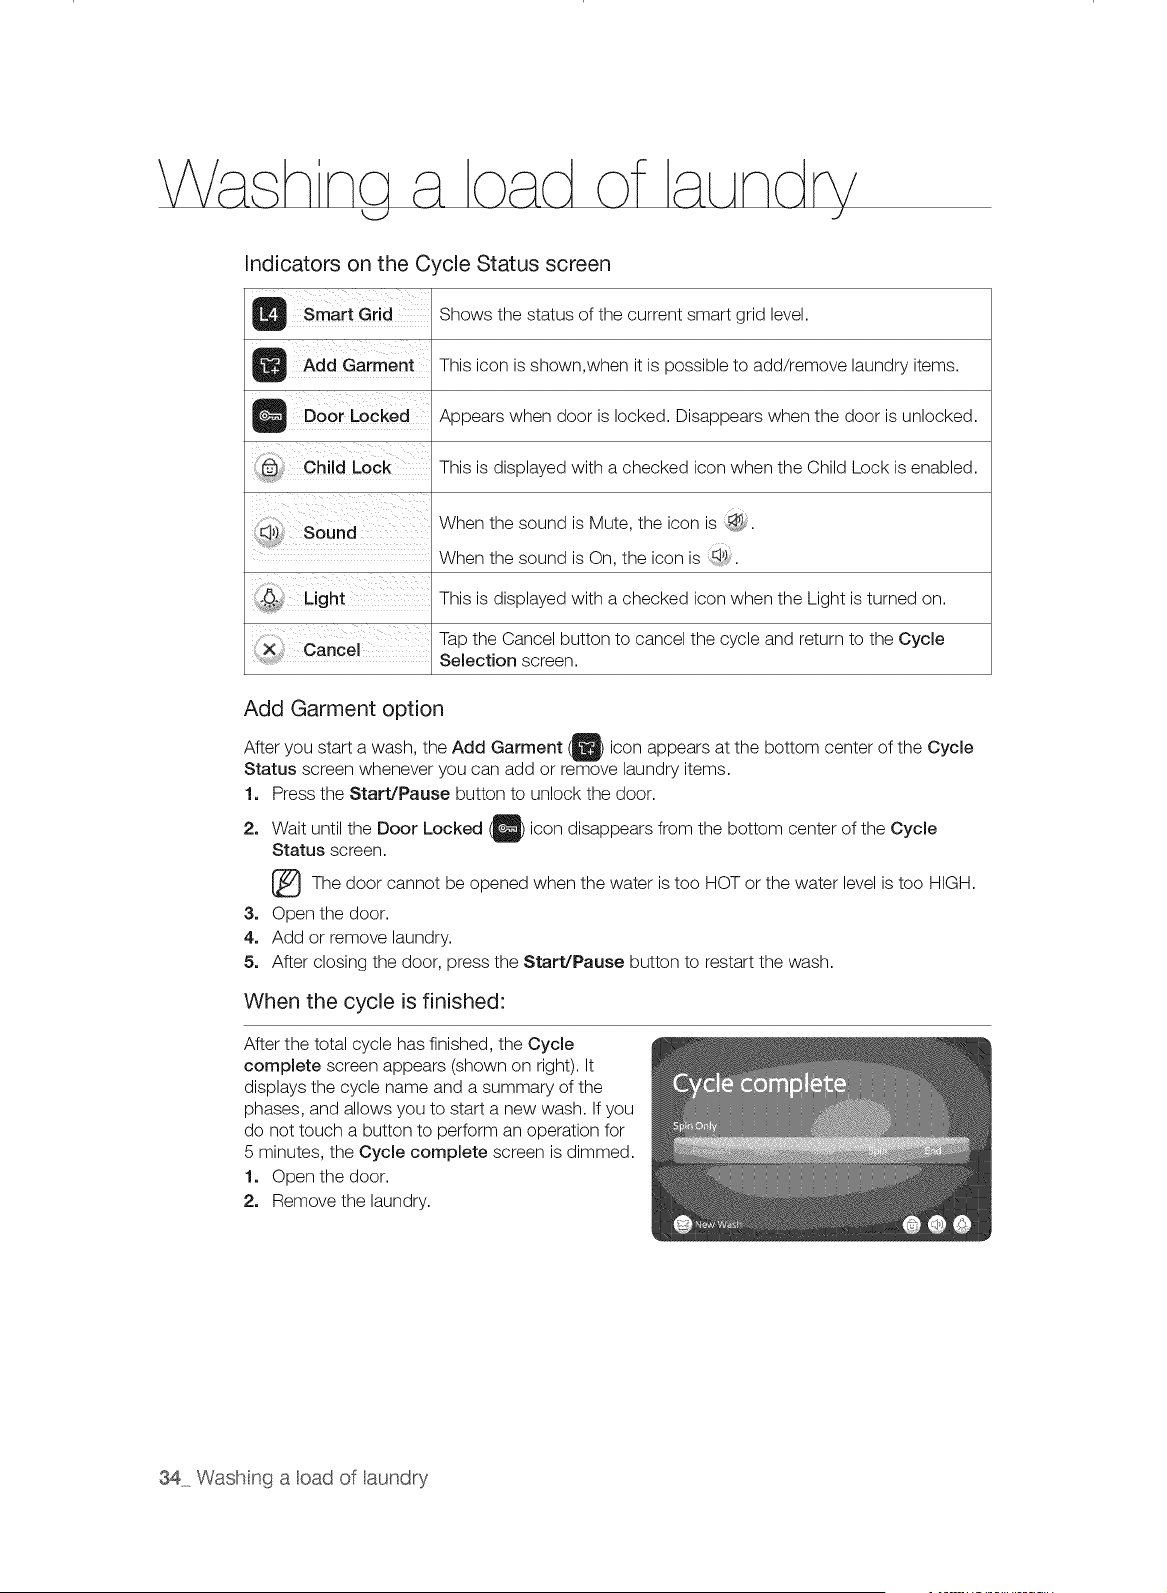
Indicators on the Cycle Status screen
B Smart Grid Shows the status of the current smart grid level.
Add Garment This icon is shown,when it is possible to add/remove laundry items.
O Door Locked Appears when door is locked. Disappears when the door is unlocked.
This is displayed with a checked icon when the Child Lock is enabled.
When the sound is Mute, the icon is _.
When the sound is On, the icon is _I,)_
This is displayed with a checked icon when the Light is turned on.
Tap the Cancel button to cancel the cycle and return to the Cycle
X Cance Selection screen.
Add Garment option
After you start a wash, the Add Garment _ icon appears at the bottom center of the Cycle
Status screen whenever you can add or remove laundry items.
!. Press the Start/Pause button to unlock the door.
2. Wait until the Door Locked _) icon disappears from the bottom center of the
Cycle
Status screen.
[_The door be when the is HOT the level is HIGH.
cannot
opened
water too or water too
3. Open the door.
4o Add or remove laundry.
5. After closing the door, press the Start/Pause button to restart the wash.
When the cycle is finished:
After the total cycle has finished, the Cycle
complete screen appears (shown on right). It
displays the cycle name and a summary of the
phases, and allows you to start a new wash. If you
do not touch a button to perform an operation for
5 minutes, the Cycle complete screen is dimmed.
1. Open the door.
2. Remove the laundry.
34 Wash nga cad of aundry

Using the My Cycle function
The My Cycle function allows you to activate a custom wash (temperature, spin, soil level, and
extra cycles) with a single button. You can save up to 3 My Cycles.
Saving a My Cycle
Follow the steps below to save your favourite custom wash as a My Cycle.
1.
2_
Tap the My Cycle button on the left side of
the Cycle Selection screen. The selection
expands showing three None buttons (None1
through None3) on the left of the screen. Refer
to the illustration on the right.
Select a cycle and its options, such as the
temperature, spin speed, soil level and extra
cycles, in the Cycle Selection screen. In this
example, we selected the Normal cycle, set the
temperature to Warm, the spin speed to High,
the soil level to Normal, and selected Extra
Rinse and Steam as the extra cycles to add.
See the "Cycle chart" section on page 66 for
the available settings for each cycle.
3. Tap the Save As My Cycles button located at
the right center of the Cycle Selection screen.
4. Select the My Cycle button you want to
overwrite with the selected cycle and its
options. In this example, we selected My Cycle
1: None. When done, tap the Next button.
5. The Name your My Cycle screen appears.
Enter a name for the My Cycle. In this example,
we entered "J's Wash". When done, tap the
Save button.
6. A summary of the My Cycle that will overwrite
the existing cycle is displayed, as shown in the
figure on the right. Tap the OK button.
Washing a cad of aundry 35
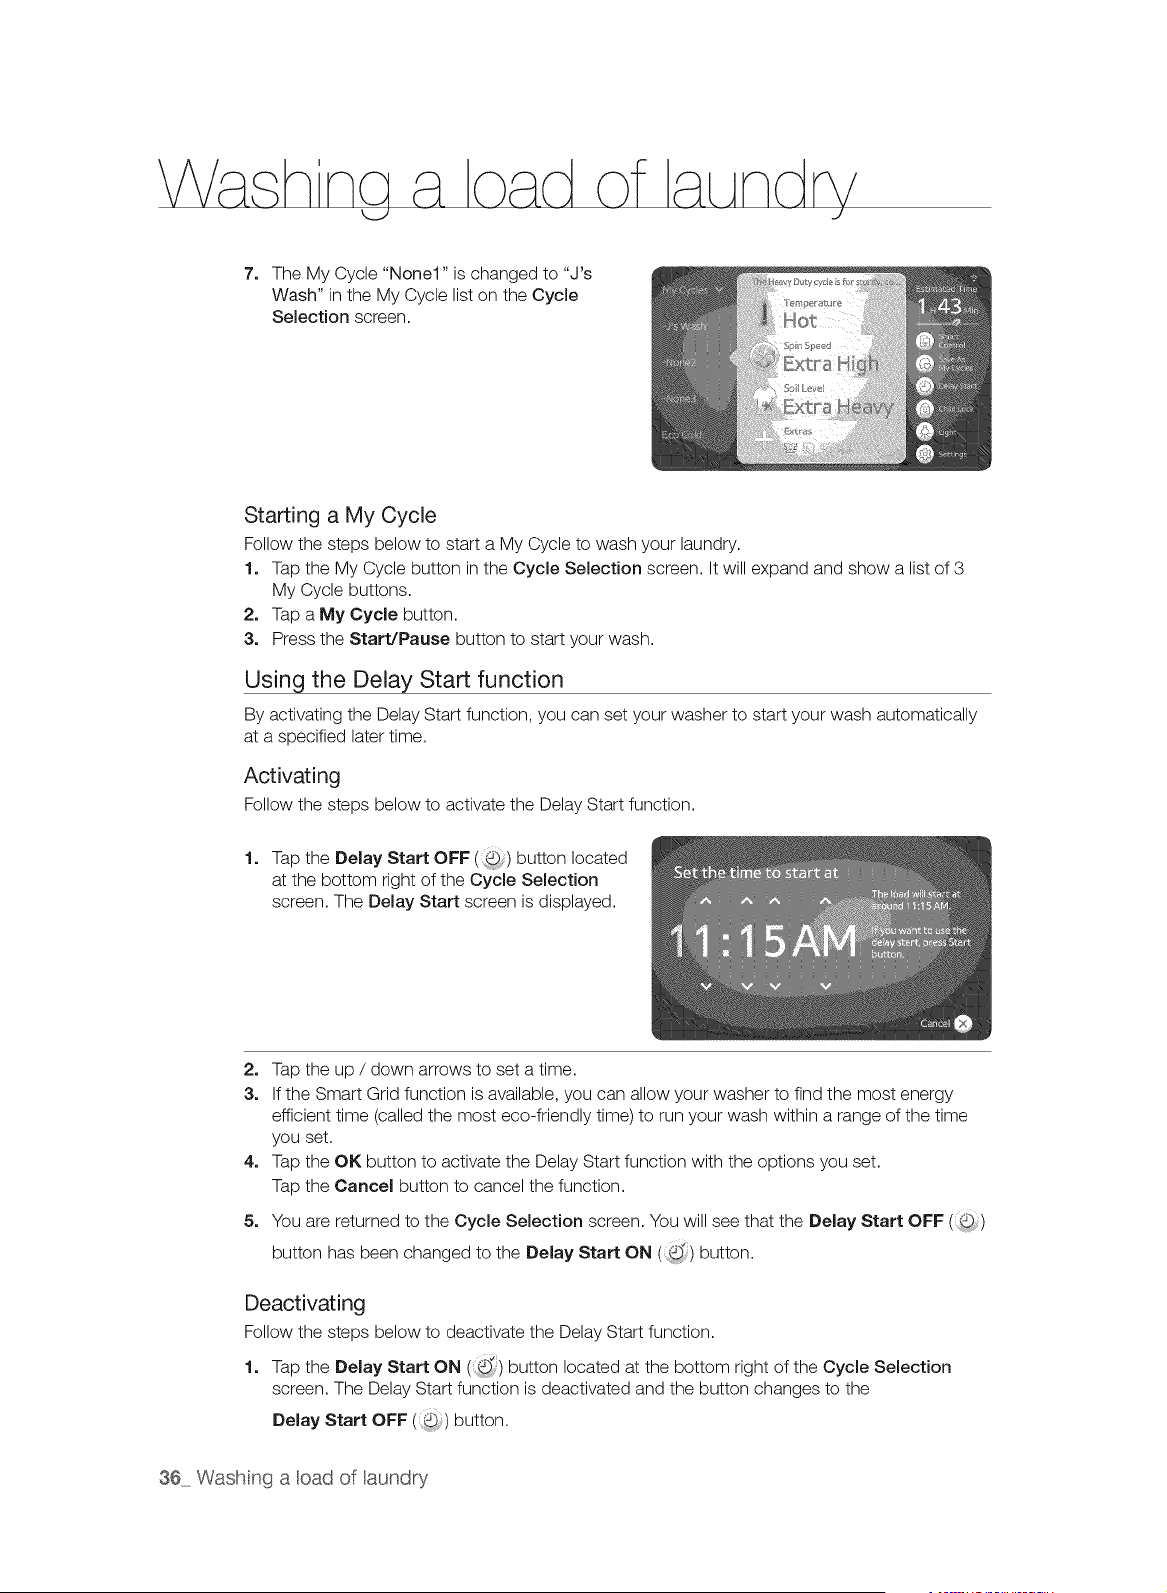
7. The My Cycle "None1" is changed to "J's
Wash" in the My Cycle list on the Cycle
Selection screen.
Starting a My Cycle
Follow the steps below to start a My Cycle to wash your laundry.
1. Tap the My Cycle button in the Cycle Selection screen. It will expand and show a list of 3
My Cycle buttons.
2. Tap a My Cycle button.
3. Press the Start/Pause button to start your wash.
Using the Delay Start function
By activating the Delay Start function, you can set your washer to start your wash automatically
at a specified later time.
Activating
Follow the steps below to activate the Delay Start function.
1. Tap the Delay Start OFF (:(5;) button located
at the bottom right of the Cycle Selection
screen. The Delay Start screen is displayed.
2. Tap the up / down arrows to set a time.
3. If the Smart Grid function is available, you can allow your washer to find the most energy
efficient time (called the most eco-friendly time) to run your wash within a range of the time
you set.
4. Tap the OK button to activate the Delay Start function with the options you set.
Tap the Cancel button to cancel the function.
5. You are returned to the Cycle Selection screen. You will see that the Delay Start OFF ()
d
button has been changed to the Delay Start ON (,,) button.
Deactivating
Follow the steps below to deactivate the Delay Start function.
d
1. Tap the Delay Start ON (i,) button located at the bottom right of the Cycle Selection
screen. The Delay Start function is deactivated and the button changes to the
Delay Start OFF ( ) button.
36 Wash nga cad of aundry
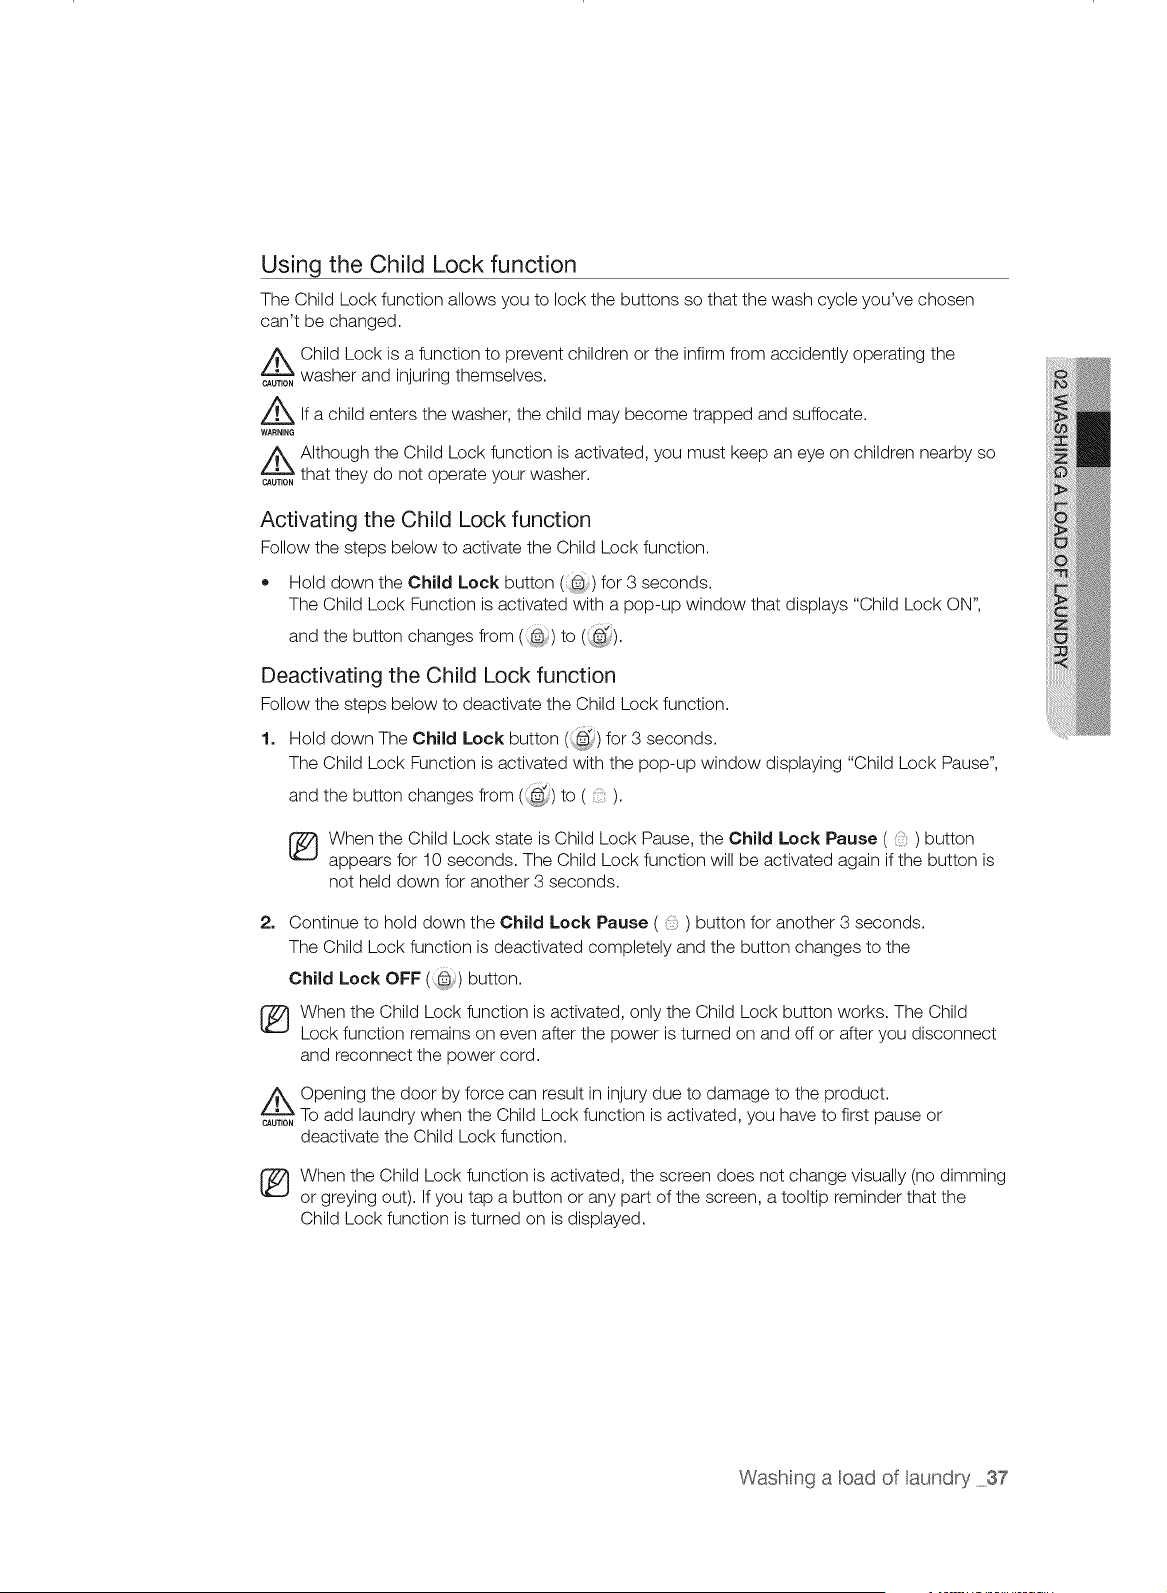
Using the Child Lock function
The Child Lock function allows you to lock the buttons so that the wash cycle you've chosen
can't be changed.
/_ Child Lock is a function to prevent children or the infirm from accidently operating the
tAUT,O,washer and injuring themselves.
Z_lf a child enters the washer, the child may become trapped and suffocate.
WARNING
Z_ Although the Child Lock function is activated, you must keep an eye on children nearby so
tAUT,O,that they do not operate your washer.
Activating the Child Lock function
Follow the steps below to activate the Child Lock function.
• Hold down the Child Lock button (8:) for 3 seconds.
The Child Lock Function is activated with a pop-up window that displays "Child Lock ON",
and the button changes from (@) to (::@_).
Deactivating the Child Lock function
Follow the steps below to deactivate the Child Lock function.
1. Hold down The Child Lock button (_) for 3 seconds.
The Child Lock Function is activated with the pop-up window displaying "Child Lock Pause",
and the button changes from (, @_)to ().
[_ hen the Child Lock state is Child Lock Pause, the Child Lock Pause ( ) button
appears for 10 seconds. The Child Lock function will be activated again if the button is
not held down for another 3 seconds.
2. Continue to hold down the Child Lock Pause ( ) button for another 3 seconds.
The Child Lock function is deactivated completely and the button changes to the
Child Lock OFF (2) button.
TJ hen the Child Lock function is activated, only the Child Lock button works. The Child
Lock function remains on even after the power is turned on and off or after you disconnect
and reconnect the power cord.
Z_ Opening the door by force can result in injury due to damage to the product.
tAUT,O,TOadd laundry when the Child Lock function is activated, you have to first pause or
deactivate the Child Lock function.
When the Child Lock function is activated, the screen does not change visually (no dimming
or greying out). If you tap a button or any part of the screen, a tooltip reminder that the
Child Lock function is turned on is displayed.
Washing a cad of aundry 37

Turning the Light On and Off
You can turn the light or off at any time.
Turning the light on
Tap the Light OFF (:9;,,) button located at the bottom right of the Cycle Selection or Cycle Status
screen. The light is turned on immediately and the button changes to the Light ON (:_) button.
Turning the light off
Tap the Light ON (_,_) button. The light is turned off immediately and the button changes to the
Light OFF (<_) button.
Controlling the sound volume
You can control the volume of the sound interactions of your washer. There are 5 volume levels
from Mute to Level 4. Even if the power is turned on and off repeatedly, the setting is retained.
Follow the steps below to control the volume level.
1. Tap the Settings button in the Cycle Selection
screen. The Settings screen is displayed.
2. Tap the Display & Sound button in the
Settings screen.
3. Tap the Volume section.
4. Tap the desired volume level button.
5. Tap the OK button to apply the changes.
DEEP STEAM
DEEPSTEAM (Magic Steam)
The Deep Steamfeature boosts cleaning performanceand loosens grime and dirt, providing superior
cleaning results.
For heavilysoiled, colorfast garments, this cycle providesa high washing temperatureand steam and is
effectivefor cleaning stains,
How DEEPSTEAMworks
Ifyou selectsteam, the steam acts at the most effective timesfor the detected amount of laundry,
maximizingthe effect of the steam, increasingthe wash temperature, enhancing the Soak effect, and
improving wash performance.
Press Steambutton to usethe Steam Wash function. Steam Wash is availablewith the Normal, Heavy
Duty, Bedding PLUS, Sanitize,Stain Away and DeepSteam cycles, For heavilysoiled,colorfast garments,
SteamWash improves stain treatment and uses lesswater,
38 Wash ng a cad of aundry

Washertakes small amounts of water in tub and Heater heats water into evaporation.
To use the Steam function, perform the following steps:
1, Load the washer.
2, Press the Power button.
3, Turn the Cycle Selector and select a steam cycle. (The Deep Steam cycle automatically
selects the Steam Wash function.)
4, Press the Steam button.
5, Add detergent into the dispenser tray for a wash, and add fabric softener up to the marked
line.
6, Press the Start/Pause button.
: The washer automatically selects the optimal wash conditions by sensing the weight of the
laundry.
(_ team may not necessarily be visible during the steam cycles.
Steam may not be present during entire steam wash cycle.
Z_e Too much steam could Do not steam with delicatefabrics such wool, silk
damage clothing.
use as
....... or easilydiscolored fabrics.
• Steam may not be present during entire steam wash cycle.
• Do not touch the door. The door surface can become very hot.
Controlling the brightness level
You can control the brightness level of the LCD panel. There are 5 brightness levels from Level 1
to Level 5. Even if the power is turned on and off repeatedly, the setting is retained.
Follow the steps below to control the brightness level,
1, Tap the Settings button in the Cycle Selection
screen. The Settings screen is displayed.
2. Tap the Display & Sound button in the
Settings screen.
3, Tap the Brightness section.
4, Tap the desired brightness level button.
5, Tap the OK button to apply the changes.
Washing a oad of aundry 39
Using the Stain Guide
The Stain guide provides information on how to clean stains on different types of clothing. Using
the Stain Guide, you can easily learn how to effectively clean specific stains from your laundry.
Follow the steps below to view the Stain Guide.
1=
2.
3,
Tap the Settings button in the Cycle
Selection screen.
Tap the Stain Guide button in the Settings
screen.
Tap the Launch Stain Guide button. The table
of contents of the stain guide is displayed as
shown in the figure on the right.
Tap the right arrow button to navigate to the
next page of the table of contents.
Tap the Dismiss button to return to the
Settings screen.
4. Select the stain that you want information
about. For example, tap the Acids button.
5. The informationon how to remove acid stains
from your laundry appears, as shown right.
6. Tap the Table of Contents button to return to
the Table of Contents screen.
Tap the left or right arrow to move the previous
or next page.
Tap the Dismiss button to return to the
Settings screen.
40 Wash nga cad of aundry
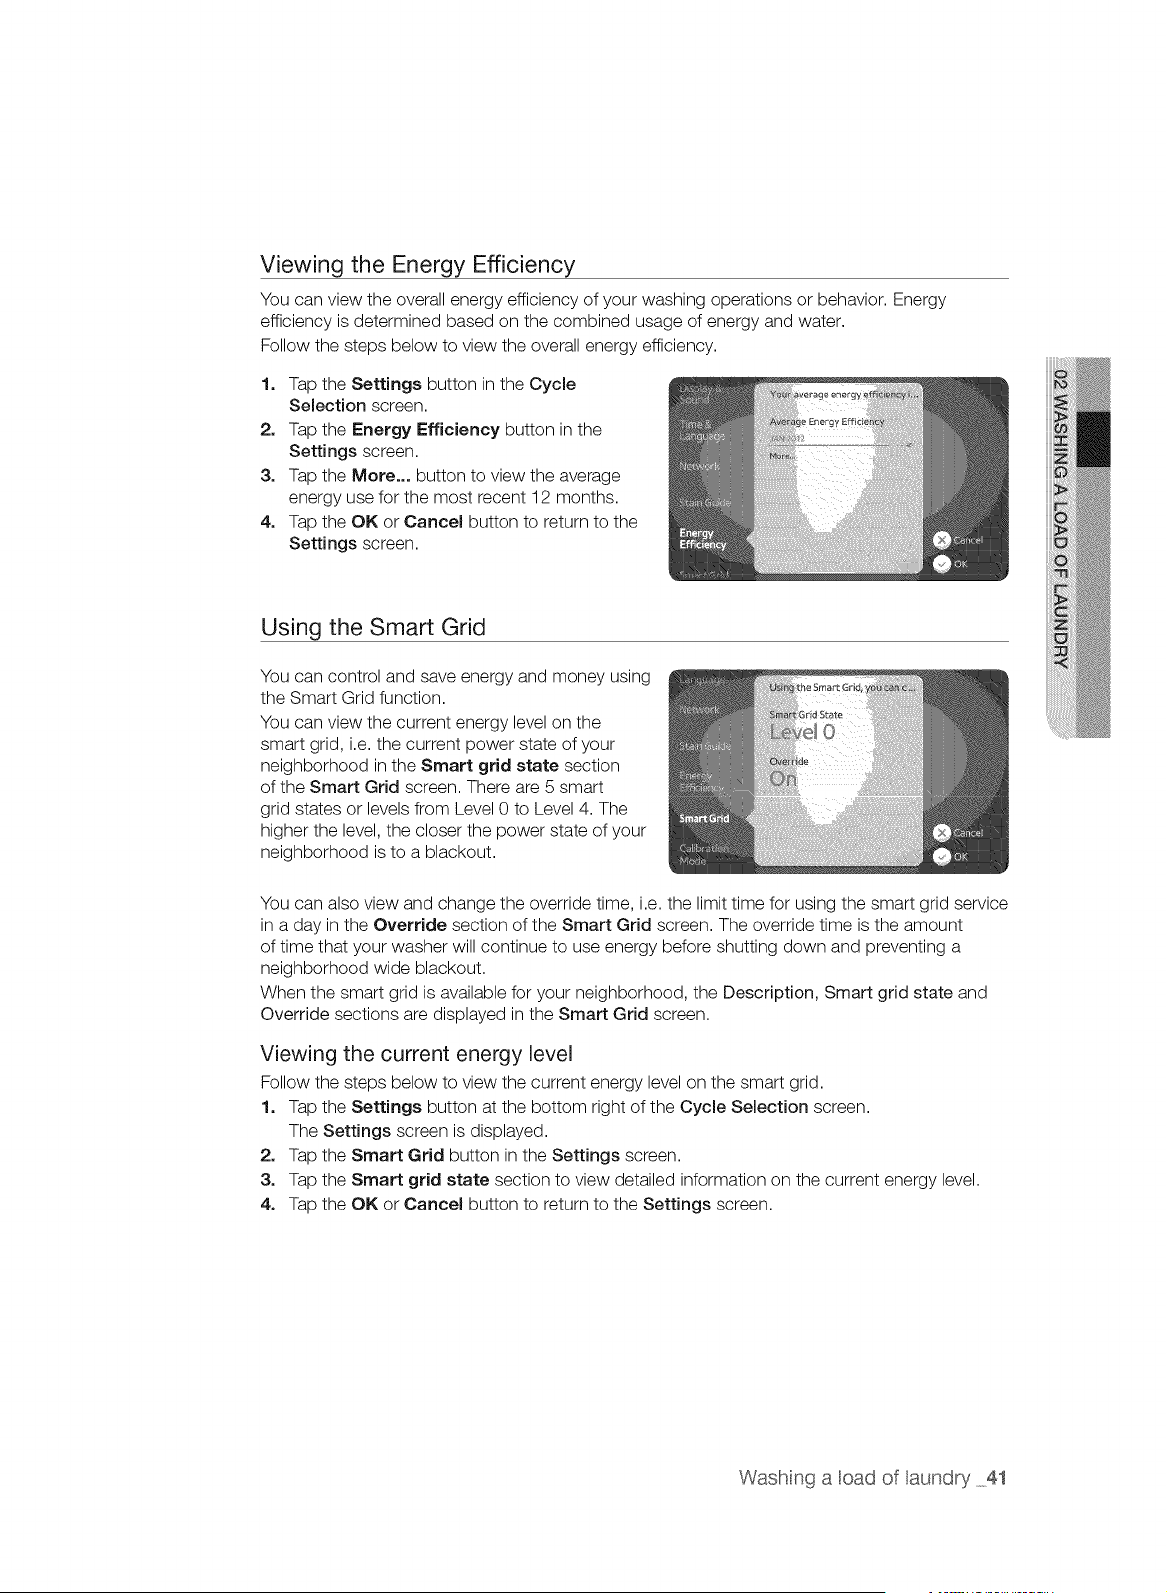
Viewing the Energy Efficiency
You can view the overall energy efficiency of your washing operations or behavior. Energy
efficiency is determined based on the combined usage of energy and water.
Follow the steps below to view the overall energy efficiency.
1. Tap the Settings button in the Cycle
Selection screen.
2. Tap the Energy Efficiency button in the
Settings screen.
3. Tap the Mere... button to view the average
energy use for the most recent 12 months.
4. Tap the OK or Cancel button to return to the
Settings screen.
Using the Smart Grid
You can control and save energy and money using
the Smart Grid function.
You can view the current energy level on the
smart grid, i.e. the current power state of your
neighborhood in the Smart grid state section
of the Smart Grid screen. There are 5 smart
grid states or levels from Level 0 to Level 4. The
higher the level, the closer the power state of your
neighborhood is to a blackout.
You can also view and change the override time, i.e. the limit time for using the smart grid service
in a day in the Override section of the Smart Grid screen. The override time is the amount
of time that your washer will continue to use energy before shutting down and preventing a
neighborhood wide blackout.
When the smart grid is available for your neighborhood, the Description, Smart grid state and
Override sections are displayed in the Smart Grid screen.
Viewing the current energy level
Follow the steps below to view the current energy level on the smart grid.
1. Tap the Settings button at the bottom right of the Cycle Selection screen.
The Settings screen is displayed.
2. Tap the Smart Grid button in the Settings screen.
3. Tap the Smart grid state section to view detailed information on the current energy level.
4. Tap the OK or Cancel button to return to the Settings screen.
Washing a oad of aundry 41

Viewing and changing the override time
Follow the steps below to view and change the override time.
1o Tap the Settings button at the bottom right of
the Cycle Selection screen.
2. The Settings screen is displayed.
3o Tap the Smart Grid button in the Settings
screen.
4o Tap the Override section.
5o Tap an override time.
6o Tap the OK button to apply the changes.
7o You are returned to the Settings screen.
When the smart grid is unavailable for your
neighborhood, the description as shown
in the figure on the right is displayed in the
Smart Grid screen.
When the Smart Grid function is unavailable
because of a problem with your power utility,
the description as shown in the figure on the
right is displayed in the Smart Grid screen.
ATC (AUTO TEMPERATURE CONTROL)
ATC is the control function that the washer controls water temperature with temperature sensor (thermistor).
_ ecause there are numerous water temperatures depending on the customer's environments(cold
areas, warm areas, various water temperature, settings of heater temperature, etcs), ATC function in
our washer maintains the certain level of wash temperature to output the best washing performance at
each cycle.
lf you select normal & heavy duty course, those courses are the regulation and UL course. Since new
washer must reduce the amount of energy usage at first priority, customer will notice more cold water
entering the washer. But This is Normal, not a problem.
ln those regulation course, Hot temperature is similar to acceptable adult bath-water temperature and
warm temperature is similar to comfortable swimming-pool water temperature.
If customer want to wash clothes in specific water temperature, customer should choose a different
course at each temperature(Hot/Warm/Eco Warm)
42 Wash ng a cad of aundry
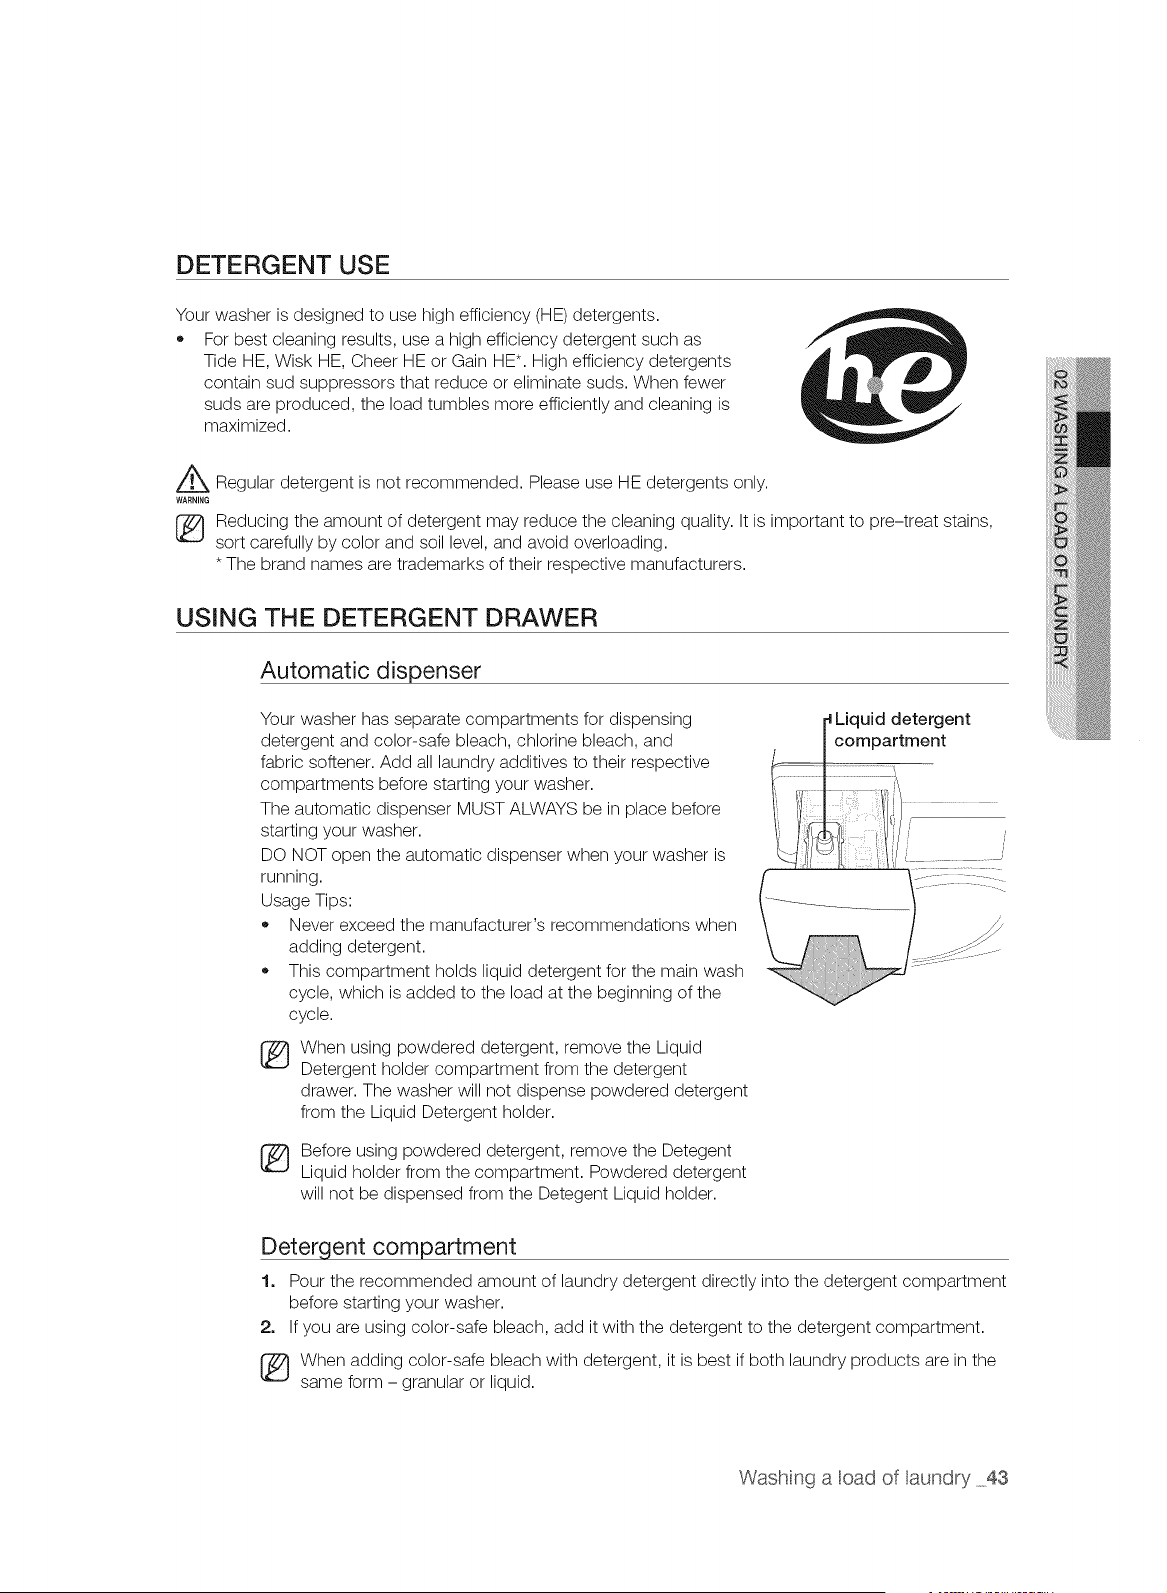
DETERGENT USE
Your washer is designed to use high efficiency (HE) detergents.
,, For best cleaning results, use a high efficiency detergent such as
Tide HE, Wisk HE, Cheer HE or Gain HE*. High efficiency detergents
contain sud suppressors that reduce or eliminate suds. When fewer
suds are produced, the load tumbles more efficiently and cleaning is
maximized.
Z_ Regular detergent is not recommended. Please use HE detergents only.
WARNING
Reducing the amount of detergent may reduce the cleaning quality. It is important to pre-treat stains,
sort carefully by color and soil level, and avoid overloading.
* The brand names are trademarks of their respective manufacturers.
USING THE DETERGENT DRAWER
Automatic dispenser
Your washer has separate compartments for dispensing
detergent and color-safe bleach, chlorine bleach, and
fabric softener. Add all laundry additives to their respective
compartments before starting your washer.
The automatic dispenser MUST ALWAYS be in place before
starting your washer.
DO NOT open the automatic dispenser when your washer is
running.
Usage Tips:
,, Never exceed the manufacturer's recommendations when
adding detergent.
,, This compartment holds liquid detergent for the main wash
cycle, which is added to the load at the beginning of the
cycle.
When using powdered detergent, remove the Liquid
Detergent holder compartment from the detergent
drawer. The washer will not dispense powdered detergent
from the Liquid Detergent holder.
Before using powdered detergent, remove the Detegent
Liquid holder from the compartment. Powdered detergent
will not be dispensed from the Detegent Liquid holder.
Liquid detergent
compartment
Detergent compartment
1. Pour the recommended amount of laundry detergent directly into the detergent compartment
before starting your washer.
2. If you are using color-safe bleach, add it with the detergent to the detergent compartment.
[_ When adding color-safe bleach with detergent, it is best if both laundry products are in the
same form - granular or liquid.
Washng a oad of aundry 43
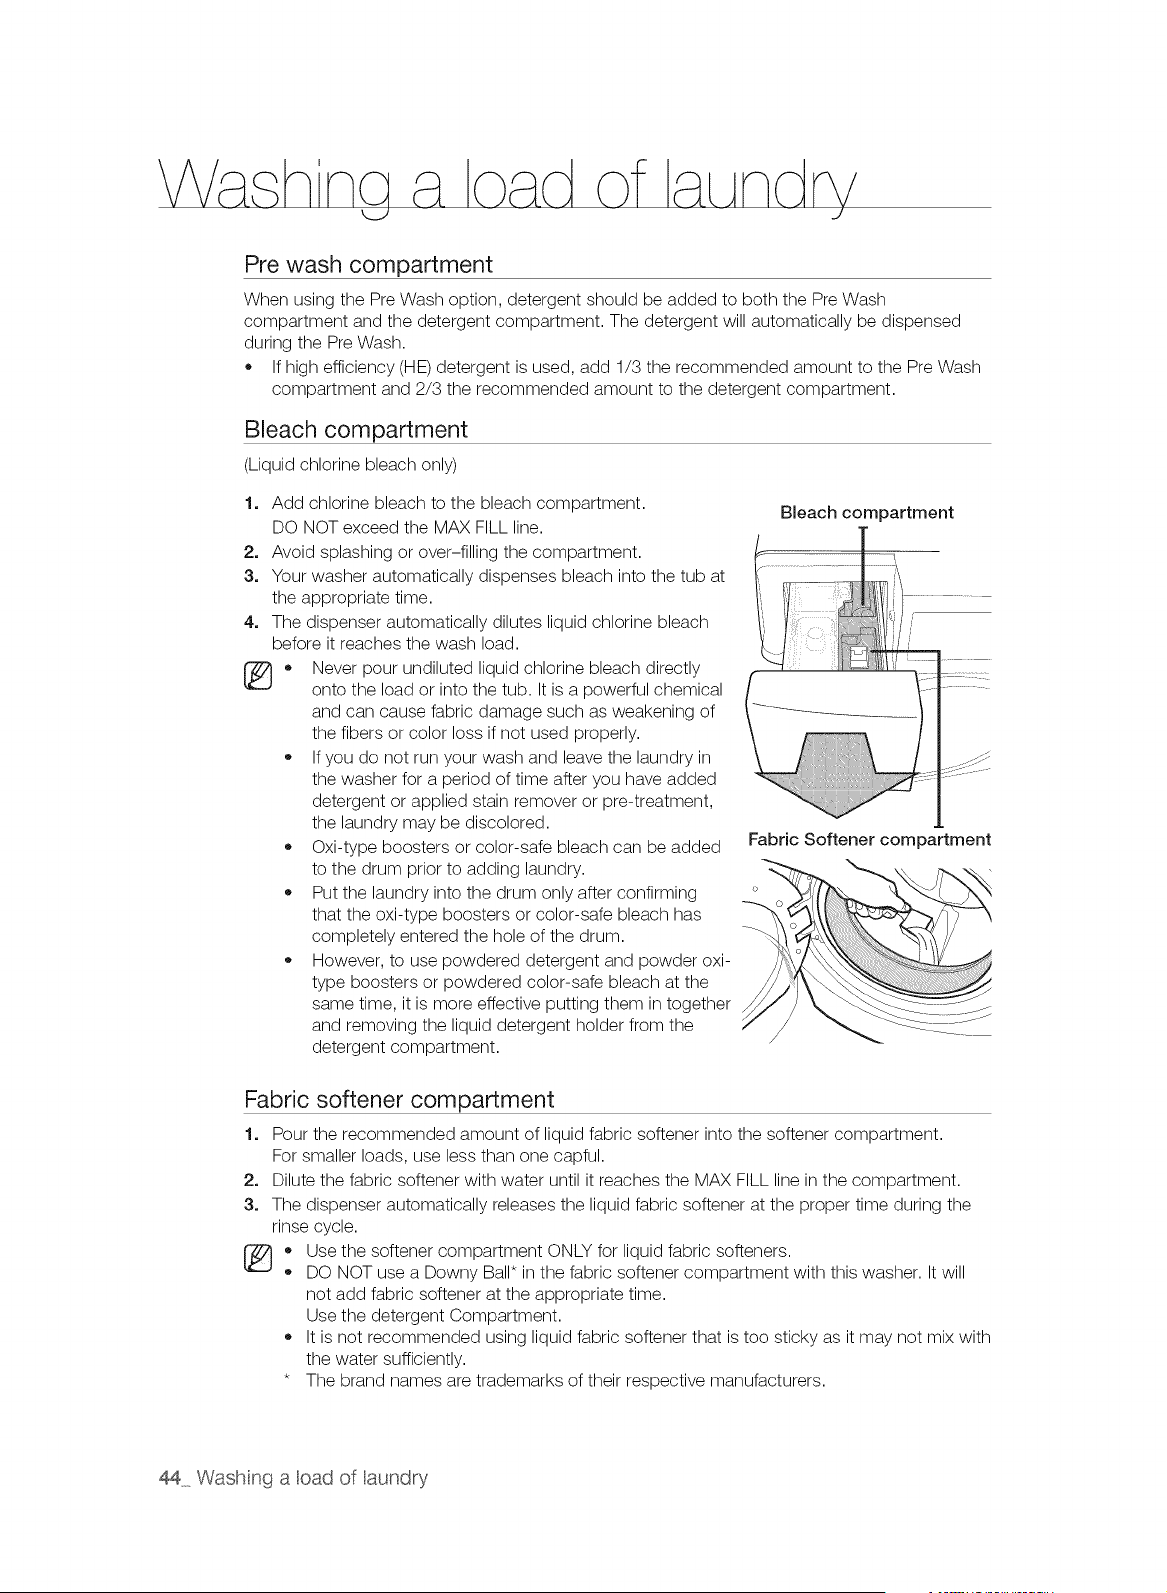
Pre wash compartment
When using the Pre Wash option, detergent should be added to both the Pre Wash
compartment and the detergent compartment. The detergent will automatically be dispensed
during the Pre Wash.
If high efficiency (HE) detergent is used, add 1/3 the recommended amount to the Pre Wash
compartment and 2/3 the recommended amount to the detergent compartment.
Bleach compartment
(Liquid chlorine bleach only)
1. Add chlorine bleach to the bleach compartment.
DO NOT exceed the MAX FILL line.
2. Avoid splashing or over-filling the compartment.
3. Your washer automatically dispenses bleach into the tub at
the appropriate time.
4. The dispenser automatically dilutes liquid chlorine bleach
before it reaches the wash load.
[_ * Never pour undiluted liquid chlorine bleach directly
onto the load or into the tub. It is a powerful chemical
and can cause fabric damage such as weakening of
the fibers or color loss if not used properly.
If you do not run your wash and leave the laundry in
the washer for a period of time after you have added
detergent or applied stain remover or pre-treatment,
the laundry may be discolored.
Oxi-type boosters or color-safe bleach can be added
to the drum prior to adding laundry.
Put the laundry into the drum only after confirming
that the oxi-type boosters or color-safe bleach has
completely entered the hole of the drum.
However, to use powdered detergent and powder oxi-
type boosters or powdered color-safe bleach at the
same time, it is more effective putting them in together
and removing the liquid detergent holder from the
detergent compartment.
Bleach compartment
Fabric Softener compartment
Fabric softener compartment
1. Pour the recommended amount of liquid fabric softener into the softener compartment.
For smaller loads, use less than one capful.
2. Dilute the fabric softener with water until it reaches the MAX FILL line in the compartment.
3. The dispenser automatically releases the liquid fabric softener at the proper time during the
rinse cycle.
* Use the softener compartment ONLY for liquid fabric softeners.
DO NOT use a Downy Ball* in the fabric softener compartment with this washer. It will
not add fabric softener at the appropriate time.
Use the detergent Compartment.
It is not recommended using liquid fabric softener that is too sticky as it may not mix with
the water sufficiently.
* The brand names are trademarks of their respective manufacturers.
44 Wash nga oad of aundry
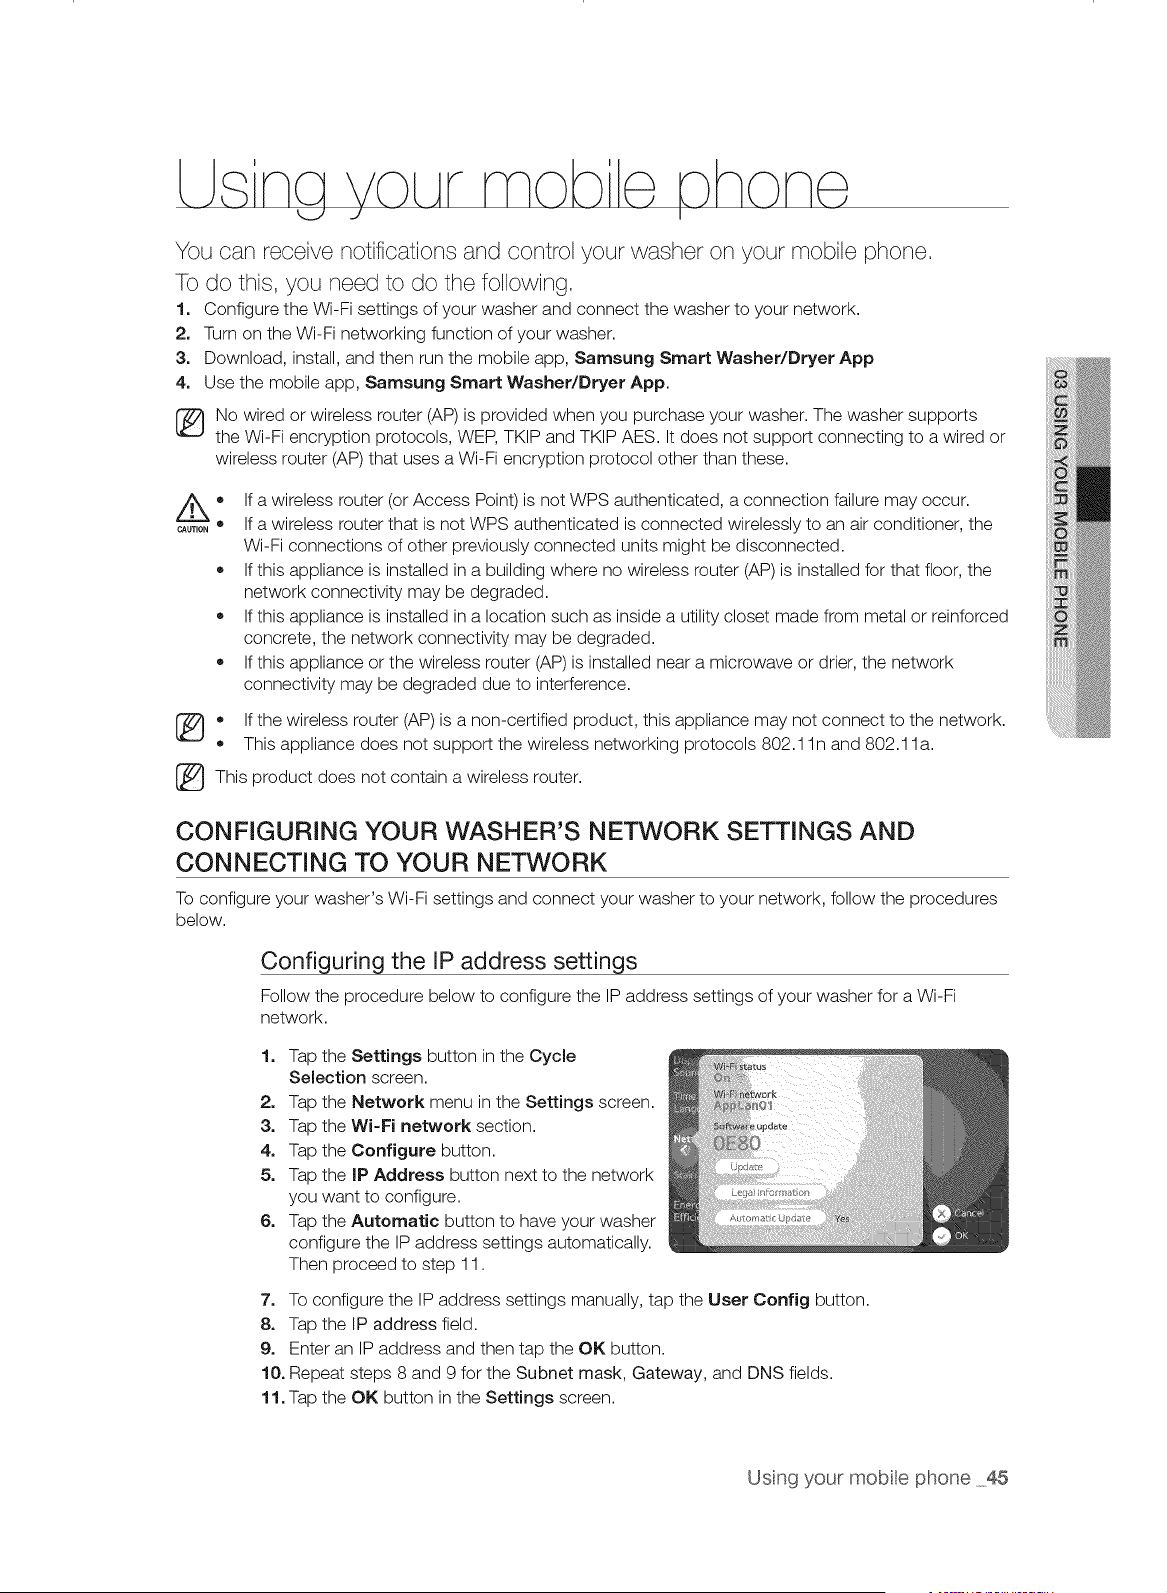
LLsna VoLArmob e hone
<_J J I
You can receive notifications and control your washer on your mobile phone.
To do this, you need to do the following.
1. Configure the Wi-Fi settings of your washer and connect the washer to your network.
2. Turn on the Wi-Fi networking function of your washer.
3. Download, install, and then run the mobile app, Samsung Smart Washer/Dryer App
4. Use the mobile app, Samsung Smart Washer/Dryer App.
No wired or wireless router (AP) is provided when you purchase your washer. The washer supports
the Wi-Fi encryption protocols, WEP, TKIP and TKIP AES. It does not support connecting to a wired or
wireless router (AP) that uses a Wi-Fi encryption protocol other than these.
CAUTION •
®
®
®
If a wireless router (or Access Point) is not WPS authenticated, a connection failure may occur.
If a wireless router that is not WPS authenticated is connected wirelessly to an air conditioner, the
Wi-Fi connections of other previously connected units might be disconnected.
If this appliance is installed in a building where no wireless router (AP) is installed for that floor, the
network connectivity may be degraded.
If this appliance is installed in a location such as inside a utility closet made from metal or reinforced
concrete, the network connectivity may be degraded.
If this appliance or the wireless router (AP) is installed near a microwave or drier, the network
connectivity may be degraded due to interference.
* If the wireless router (AP) is a non-certified product, this appliance may not connect to the network.
This appliance does not support the wireless networking protocols 802.1 In and 802.1 la.
_This product does not contain a wireless router.
CONFIGURING YOUR WASHER'S NETWORK SETTINGS AND
CONNECTING TO YOUR NETWORK
To configure your washer's Wi-Fi settings and connect your washer to your network, follow the procedures
below.
Configuring the IP address settings
Follow the procedure below to configure the IP address settings of your washer for a Wi-Fi
network.
1. Tap the Settings button in the Cycle
Selection screen.
2. Tap the Network menu in the Settings screen.
3. Tap the Wi-Fi network section.
4. Tap the Configure button.
5. Tap the IP Address button next to the network
you want to configure.
6. Tap the Automatic button to have your washer
configure the IP address settings automatically.
Then proceed to step 11.
7. To configure the IP address settings manually, tap the User Config button.
8. Tap the IP address field.
9. Enter an IP address and then tap the OK button.
10. Repeat steps 8 and 9 for the Subnet mask, Gateway, and DNS fields.
11. Tap the OK button in the Settings screen.
Usng your mobte phone 45
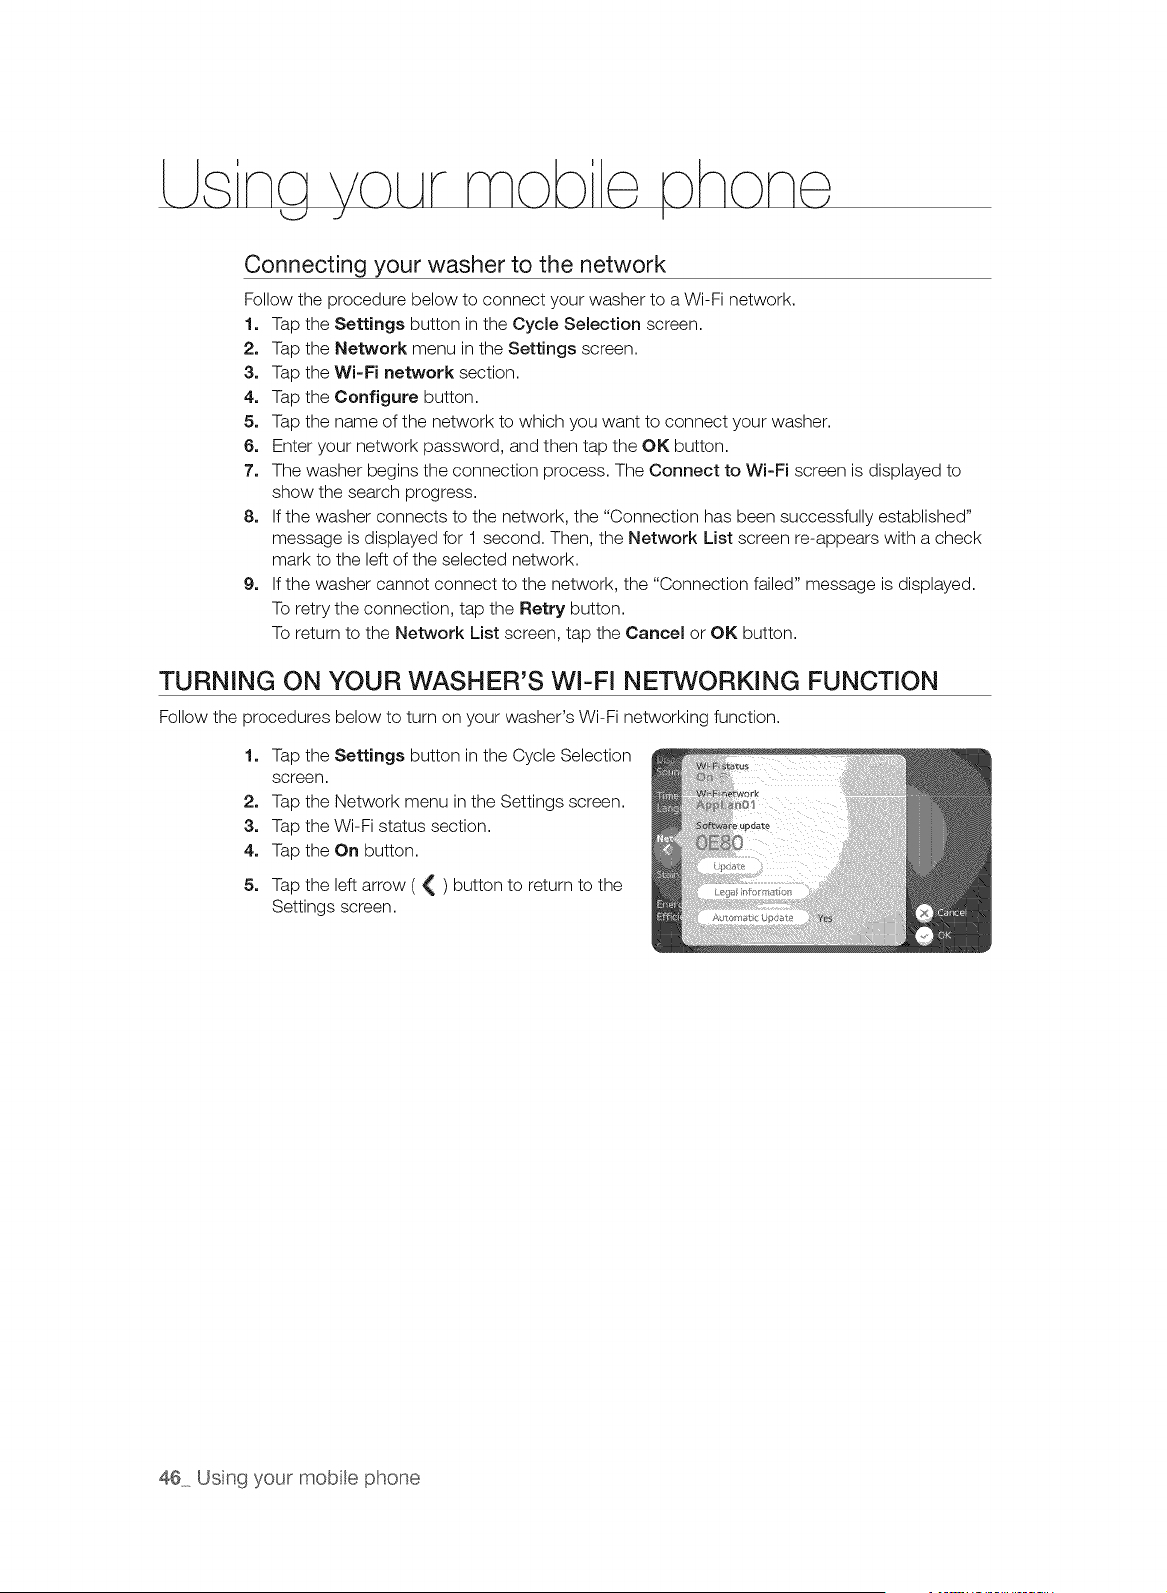
LLsna VoLArmob e, hone,
U -./ I
Connecting your washer to the network
Follow the procedure below to connect your washer to a Wi-Fi network.
1. Tap the Settings button in the Cycle Selection screen.
2. Tap the Network menu in the Settings screen.
3. Tap the Wi-Fi network section.
4. Tap the Configure button.
5. Tap the name of the network to which you want to connect your washer.
6. Enter your network password, and then tap the OK button.
7. The washer begins the connection process. The Connect to Wi-Fi screen is displayed to
show the search progress.
8. If the washer connects to the network, the "Connection has been successfully established"
message is displayed for 1 second. Then, the Network List screen re-appears with a check
mark to the left of the selected network.
9. If the washer cannot connect to the network, the "Connection failed" message is displayed.
To retry the connection, tap the Retry button.
To return to the Network List screen, tap the Cancel or OK button.
TURNING ON YOUR WASHER'S WI-FI NETWORKING FUNCTION
Follow the procedures below to turn on your washer's Wi-Fi networking function.
1. Tap the Settings button in the Cycle Selection
screen.
2. Tap the Network menu in the Settings screen.
3. Tap the Wi-Fi status section.
4. Tap the On button.
5. Tap the left arrow ( { ) button to return to the
Settings screen.
46 Usng your mobte phone

HOW TO UPDATE THE SOFTWARE
• When a user tries to check if updates are available, the function is executed by selecting the update
function.
This function does not work in the normal state.
If a user runs the update function, the LCD shows the update progress bar and announces that the
product will be restarted when the update is completed.
If the power cord of the product is unplugged, the AP power is cut, the download fails or the user
presses the Cancel button while the update file is being downloaded, the file is discarded.
The version prior to the update is maintained.
If the download progress of the update file does not change for 10 minutes, a connection error message
is displayed. When a user runs the update function, and the file is already up-to-date (if the FIRMWARE
CODE is the same), a message stating this is displayed.
Usng your mobte phone 47
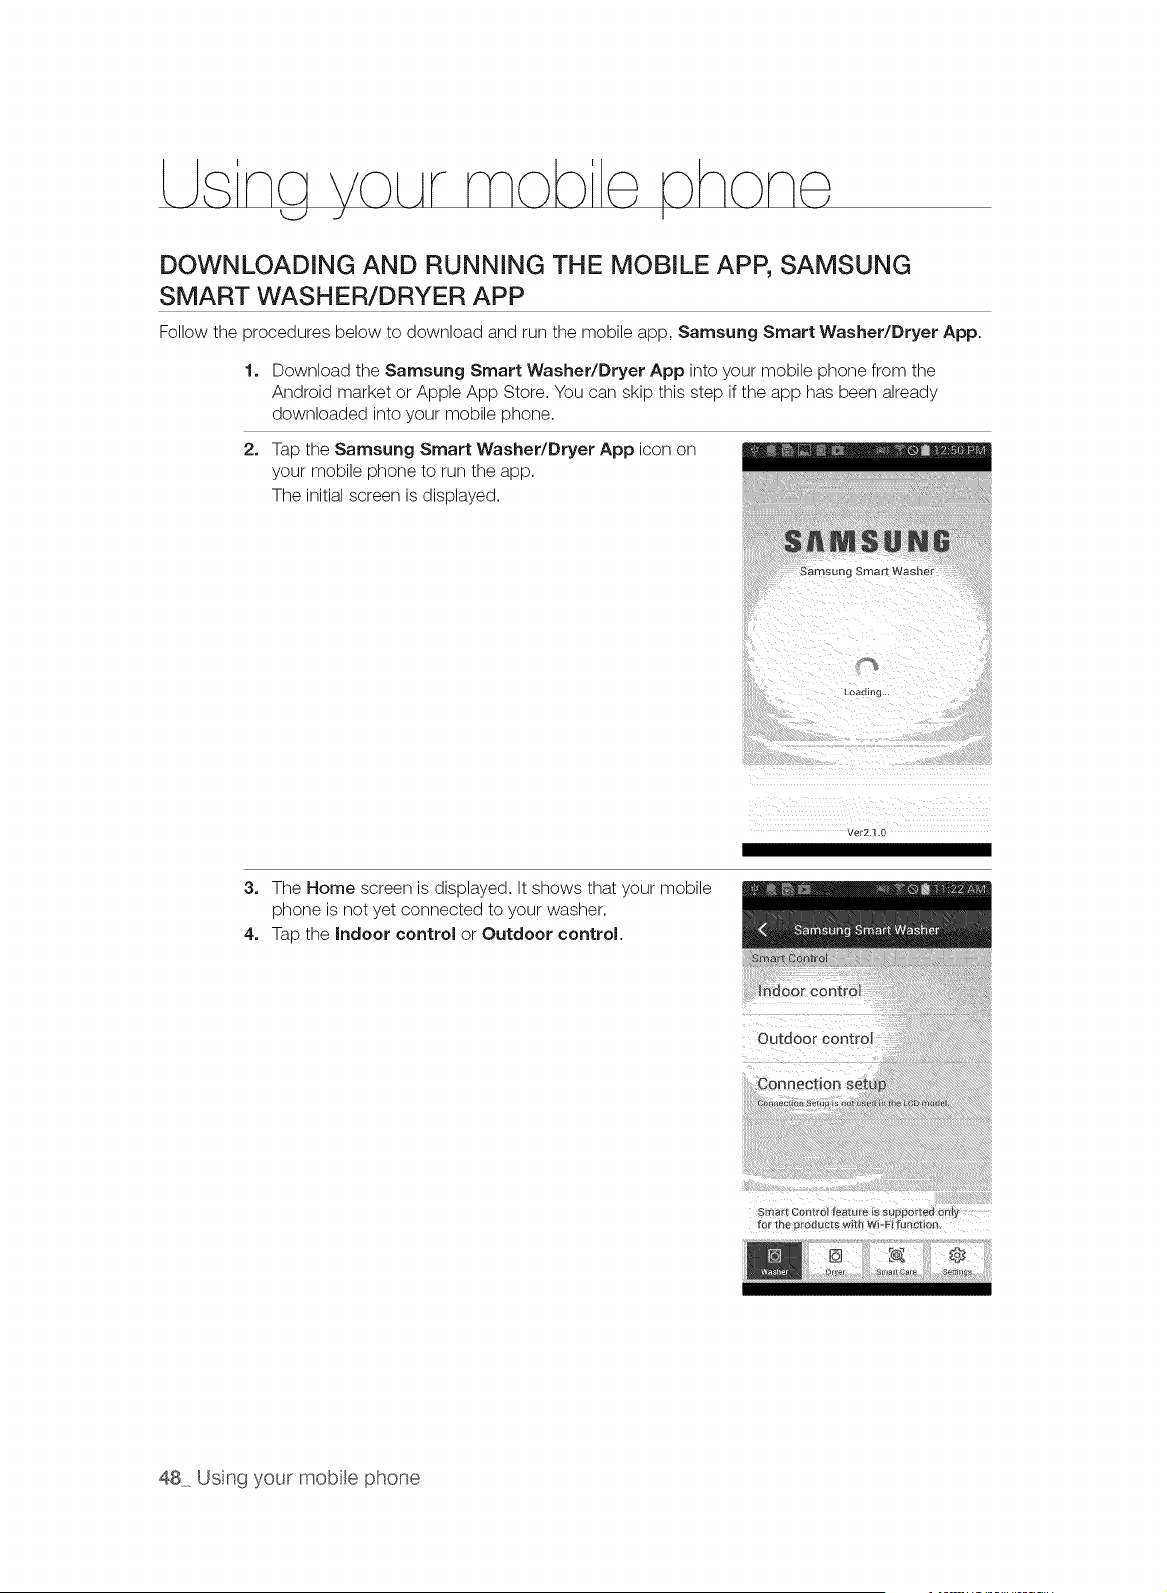
L na VoLArmob
DOWNLOADING AND RUNNING THE MOBILE APP, SAMSUNG
SMART WASHER/DRYER APP
Follow the procedures below to download and run the mobile app, Samsung Smart Washer/Dryer App.
1. Download the Samsung Smart Washer/Dryer App into your mobile phone from the
Android market or Apple App Store. You can skip this step if the app has been already
downloaded into your mobile phone.
2, Tap the Samsung Smart Washer/Dryer App icon on
your mobile phone to run the app.
The initial screen is displayed.
Samsung Smart Washe_
Loadln[i
3. The Home screen is displayed. It shows that your mobile
phone is not yet connected to your washer.
4. Tap the Indoor control or Outdoor control.
Outdoor Control
48 Usng your mobte phone
iiiiiiiiii!ili_il;iiii;i;i;i;i;i;;i;i;i;i;i;iiiiiii!;iiiiiii_!!ill
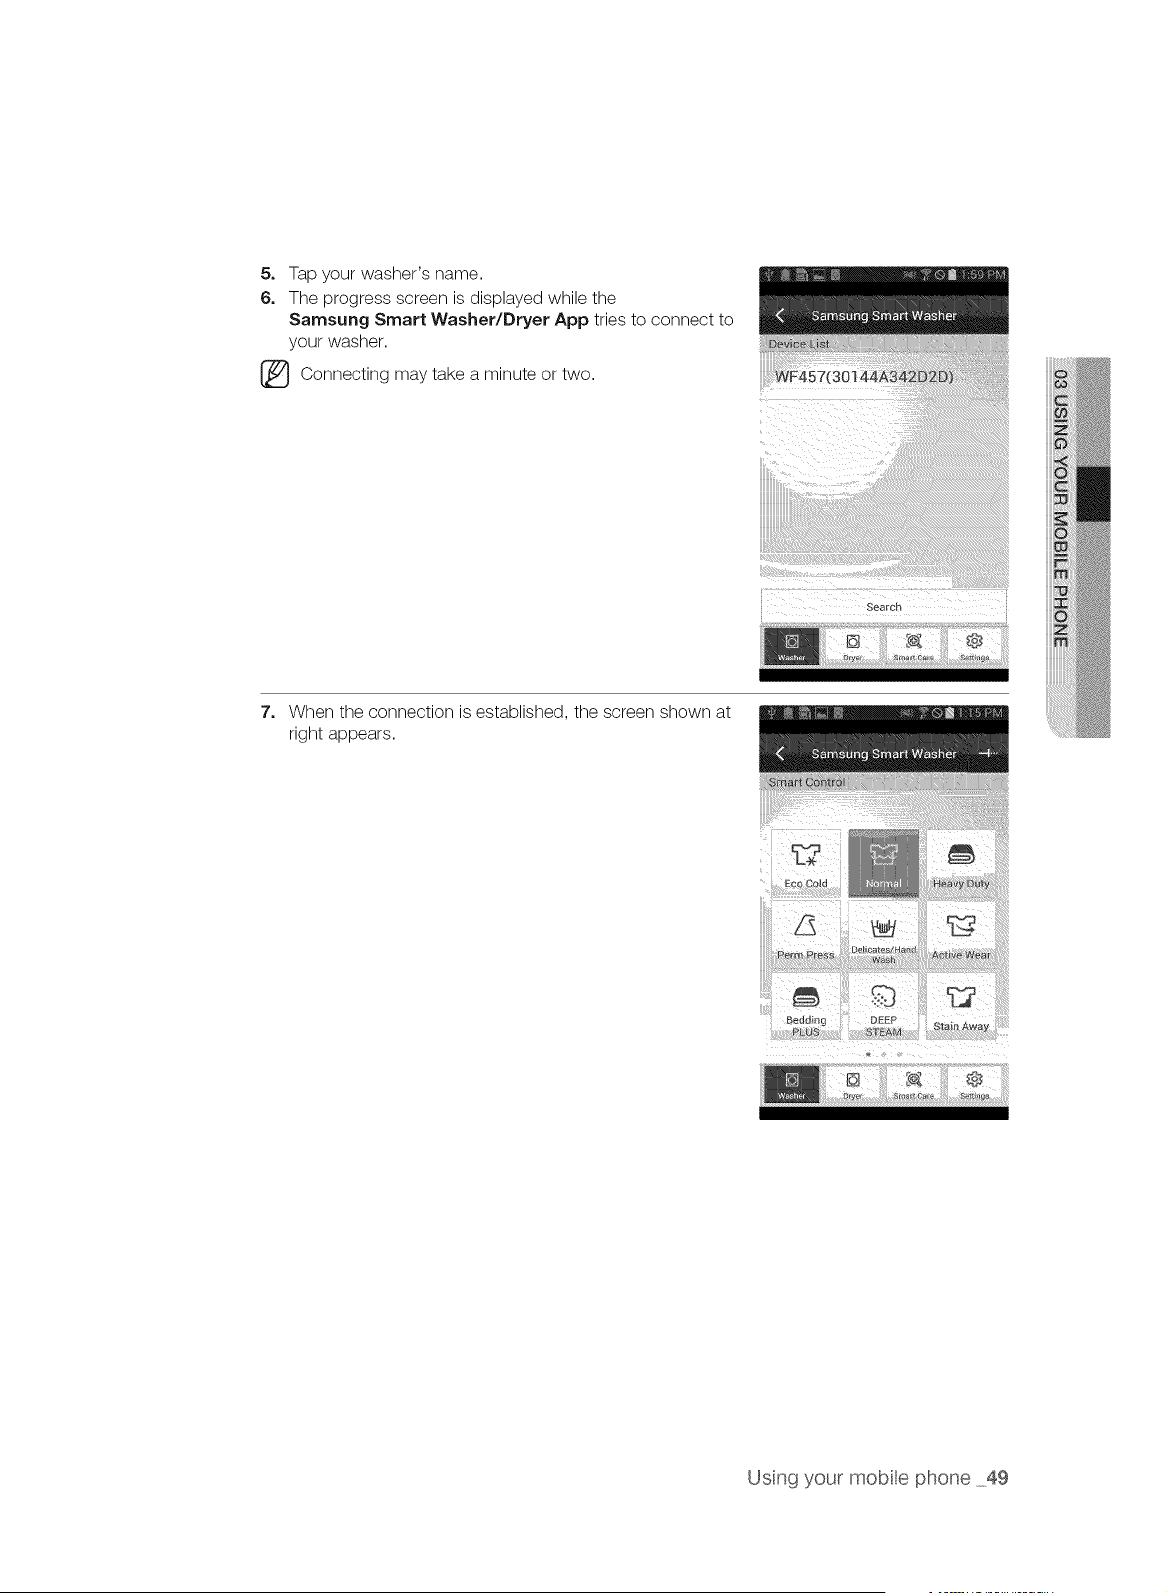
5, Tap your washer's name.
6, The progress screen is displayed while the
Samsung Smart Washer/Dryer App tries to connect to
your washer.
[_ Connecting may a or two.
take minute
7, When the connection is established, the screen shown at
right appears.
Usng your mobte phone 49

LLsna VOLArmob e,_hone,
U J I
USING THE MOBILE APP
After your washer has been connected, you can perform the following operations using the
Samsung Smart Washer/Dryer App.
• Disconnect the connection
View and edit your washer's profile
Start a new wash (including receiving notifications and controlling your washer)
Disconnecting the connection
Follow the procedure below to disconnect the connection to your washer.
1. Tab the Disconnect button.
Heavy DU_
PermPress
Beddmg
PL JS
DEEP
SI'EA_
A_tlve Wear
Stain Awa_
50 Usng your mobte phone

Starting a new wash
Follow the procedure below to start a new wash from your mobile app.
1, The Choose cycle screen is displayed.
(_ In your washer, you must tap the Smart Control button in
the Cycle Selection screen to turn on the Smart Control
function.
2, Select the cycle you want, and then top the Start button.
High
Spin Soi_k_vel
3_
The cycle status including cycle progress and estimated
finish time are shown on the screen.
Tap the Pause button to pause the cycle.
" ::::::::::i:::::::::::::t? ::iii:::it::::::::¸¸tlt::¸:t::i:b: !S:::ii:: ?:::: ::i:i!!!!!¸!!!!!i!i!!i!i!!!!!!!!!!!!!!!!!i!!_il
II
Usng your mobte phone 51
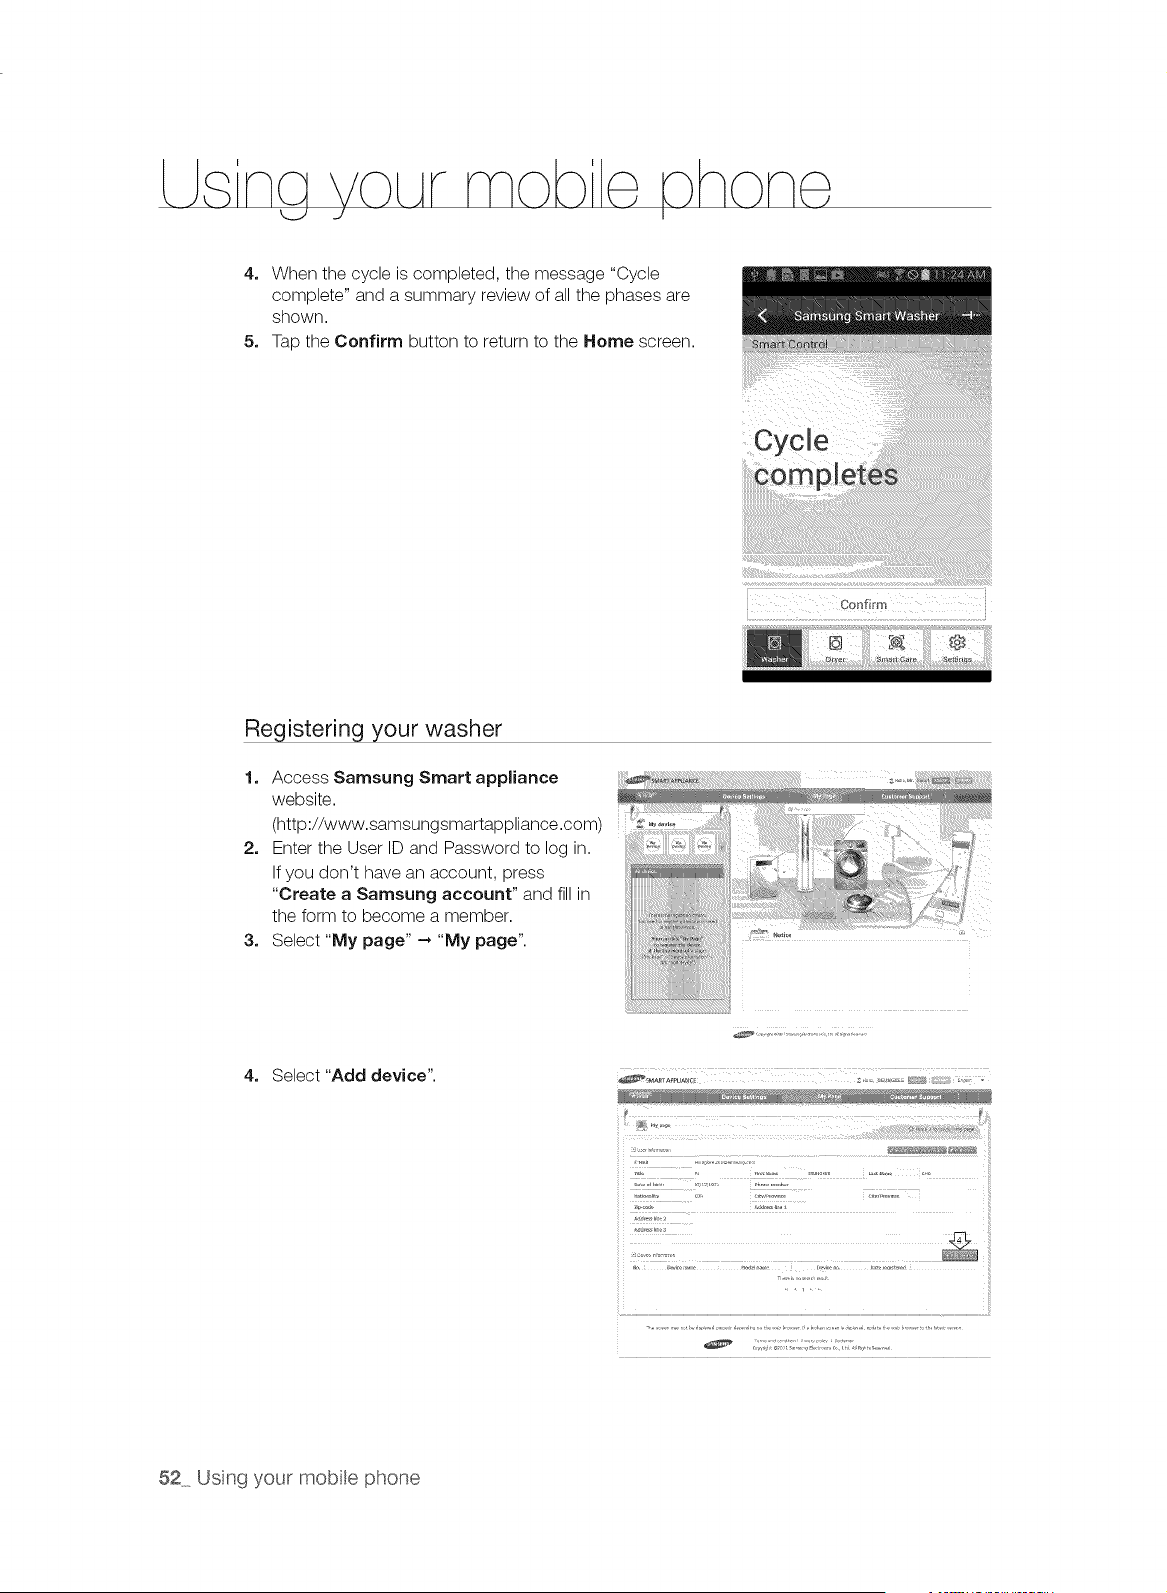
L na VoLArmob : hon
4, When the cycle is completed, the message "Cycle
complete" and a summary review of all the phases are
shown.
5. Tap the Confirm button to return to the Home screen.
Cycle
Registering your washer
1. Access Samsung Smart appliance
website.
(http://www.samsungsmartappliance.com)
2. Enter the User ID and Password to log in.
If you don't have an account, press
"Create a Samsung account" and fill in
the form to become a member.
3. Select "My page" --* "My page".
....ttt!t !!!!t t t :¸tt:: :!f!¸!¸¸!ttt f! t!¸!!!!t! t !t!tt!!!!!!!t!Z:tt ¸!tt!! !t i!!!!i!]!!!!!!i!;J!!!!!!i!i!!!!!i;!!!i!_i
;.,. ,r
!
) /,;[_
; ,.,_:_,
}[i} :
4. Select"Add device".
.,,_r ............
52 Usng your mobte phone
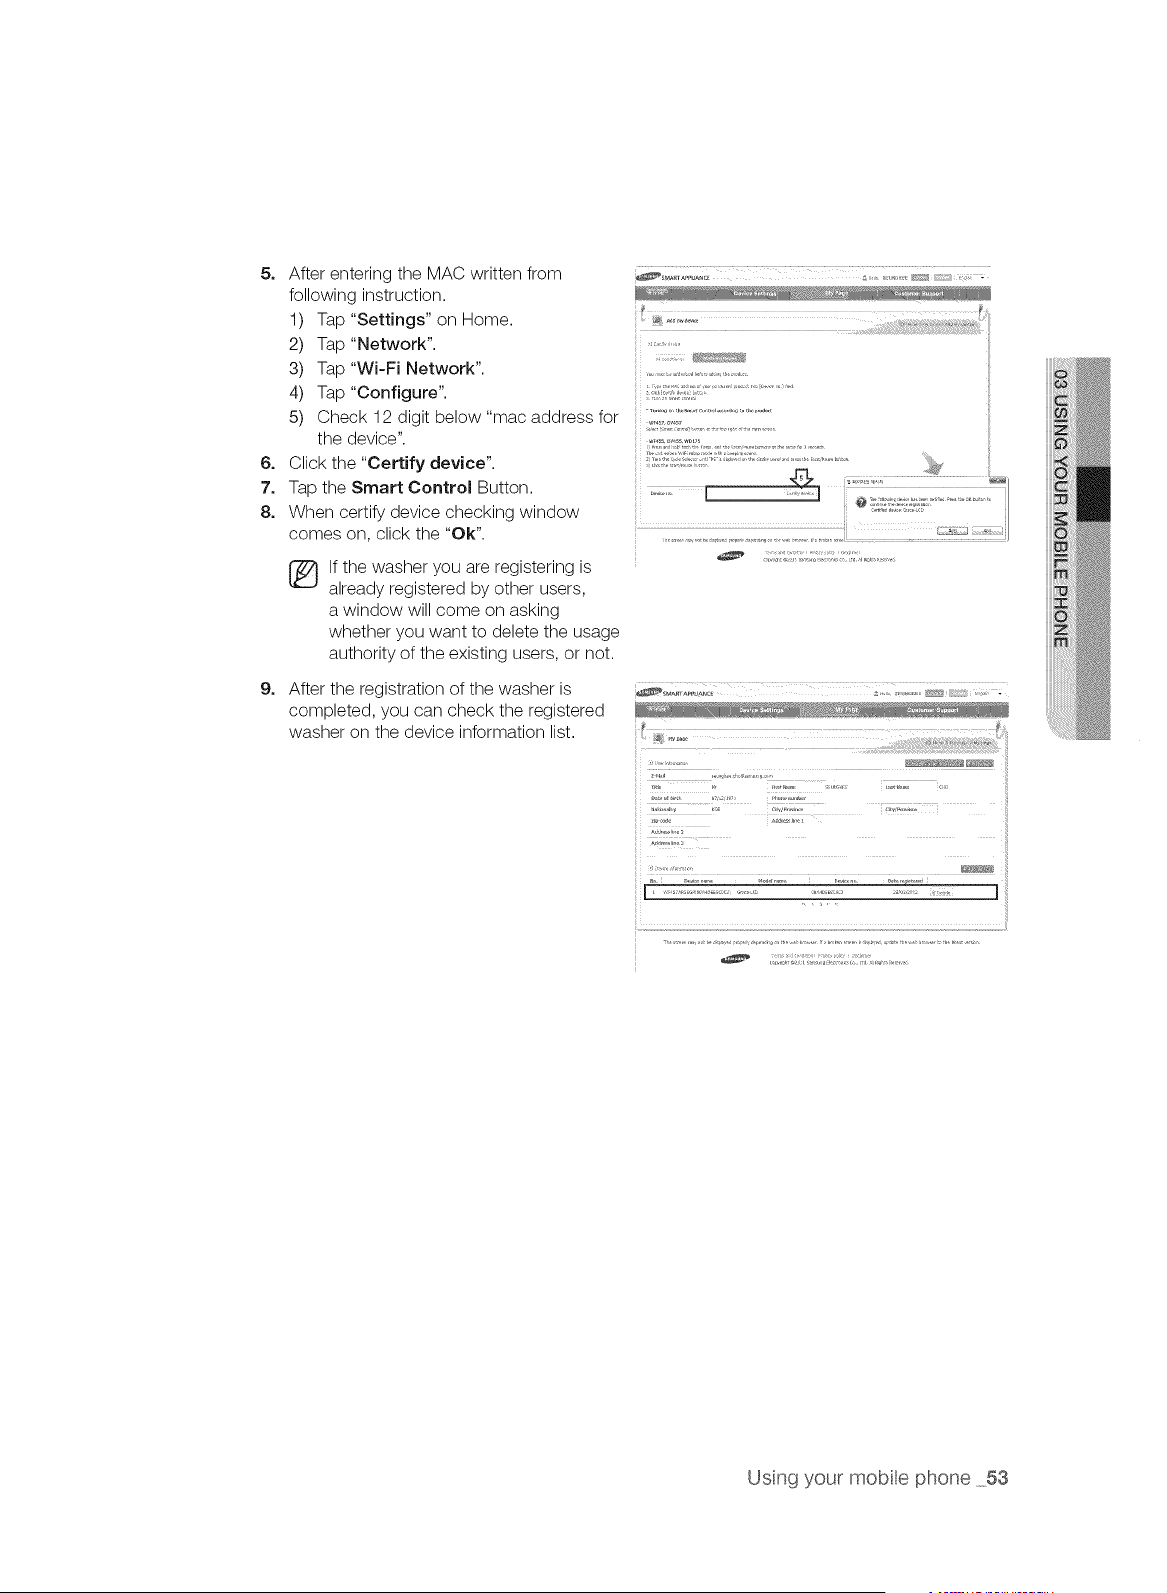
5o After entering the MAC written from
following instruction.
1) Tap "Settings" on Home.
2) Tap "Network".
3) Tap"Wi-Fi Network".
4) Tap "Configure".
5) Check 12 digit below "mac address for
the device".
6. Click the "Certify device".
7. Tap the Smart Control Button.
8. When certify device checking window
comes on, click the "Ok".
[_ f the washer you are registering is
already registered by other users,
a window will come on asking
whether you want to delete the usage
authority of the existing users, or not.
9.
After the registration of the washer is
completed, you can check the registered
washer on the device information list.
[ ................... ]
Usng your mobte phone 53
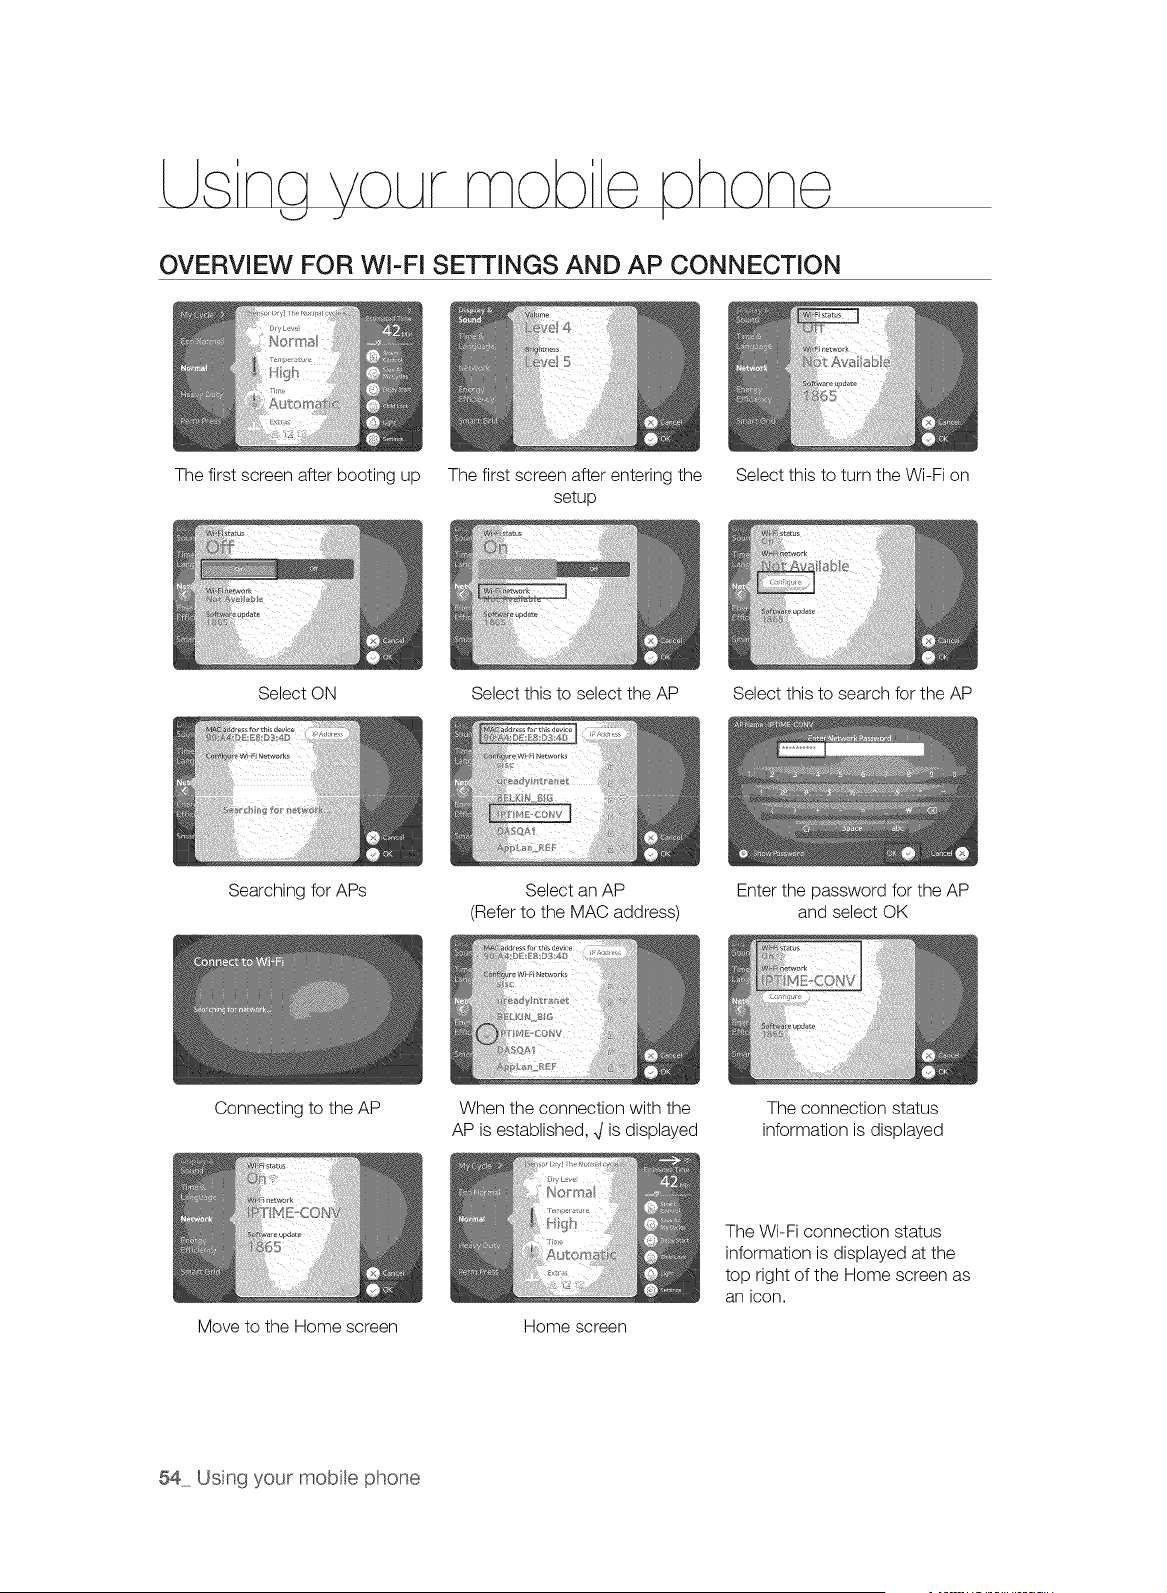
LLsna VOLArmob e, hone,
U J I
OVERVIEW FOR WI-FI SETTINGS AND AP CONNECTION
The first screen after booting up The first screen after entering the
setup
Select this to turn the Wi-Fi on
Select ON Select this to select the AP Select this to search for the AP
Searching for APs
Select an AP
(Refer to the MAC address)
Enter the password for the AP
and select OK
Connecting to the AP
When the connection with the
AP is established, ,Jis displayed
The connection status
information is displayed
Move to the Home screen Home screen
The Wi-Fi connection status
information is displayed at the
top right of the Home screen as
an icon.
54 Us% your mobte phone

CLEANING THE EXTERIOR
Turn off the water faucets after finishing the day's washing.
This will shut off the water supply to your washer and prevent the unlikely possibility of damage from
escaping water. Leave the door open to allow the inside of your washer to dry out.
Use a soft cloth to wipe up all detergent, bleach or other spills as they occur.
Cleaning the following is recommended:
Control Panel Clean with a soft, damp cloth. Do not use abrasive powder or cleaning pads. Do not
spray cleaner directly on the panel.
Cabinet Clean with soap and water.
CLEANING THE INTERIOR
Clean the interior of your washer periodically to remove any dirt, soil, odor, mold, mildew, or bacterial
residue that may remain in your washer as a result of washing clothes.
Failure to follow these instructions may result in unpleasant conditions, including odors and/or permanent
stains on your washer or laundry.
Hard water deposits may be removed, if needed. Use a cleaner labeled "Washer safe".
CLEANING THE DISPENSERS
The automatic dispenser may need to be cleaned periodically due to remove laundry additive buildup.
1. Pull the Liquid Detergent holder out of the detergent 1
compartment.
2. Remove the siphon cap from the fabric softener and bleach
compartments.
3. Wash all of the parts under running water.
4. Clean the dispenser recess with a soft brush.
5. Reinsert the siphon cap and push it firmly into place.
6. Push the Liquid Detergent holder back into place. 2
7. Run a Rinse+Spin cycle without any load in your washer.
STORING YOUR WASHER
Washers can be damaged if water is not removed from hoses and internal components before storage.
Prepare your washer for storage as follows:
* Select the Quick Wash cycle and add bleach to the automatic dispenser. Run your washer through the
cycle without a load.
* Turn the water faucets off and disconnect the inlet hoses.
* Unplug your washer from the electrical outlet and leave your washer door open to let air circulate inside
the tumbler.
* If you store your washer in below freezing temperatures, make sure you allow time for any leftover water
in your washer to thaw before use.
Maintainng your washer 55
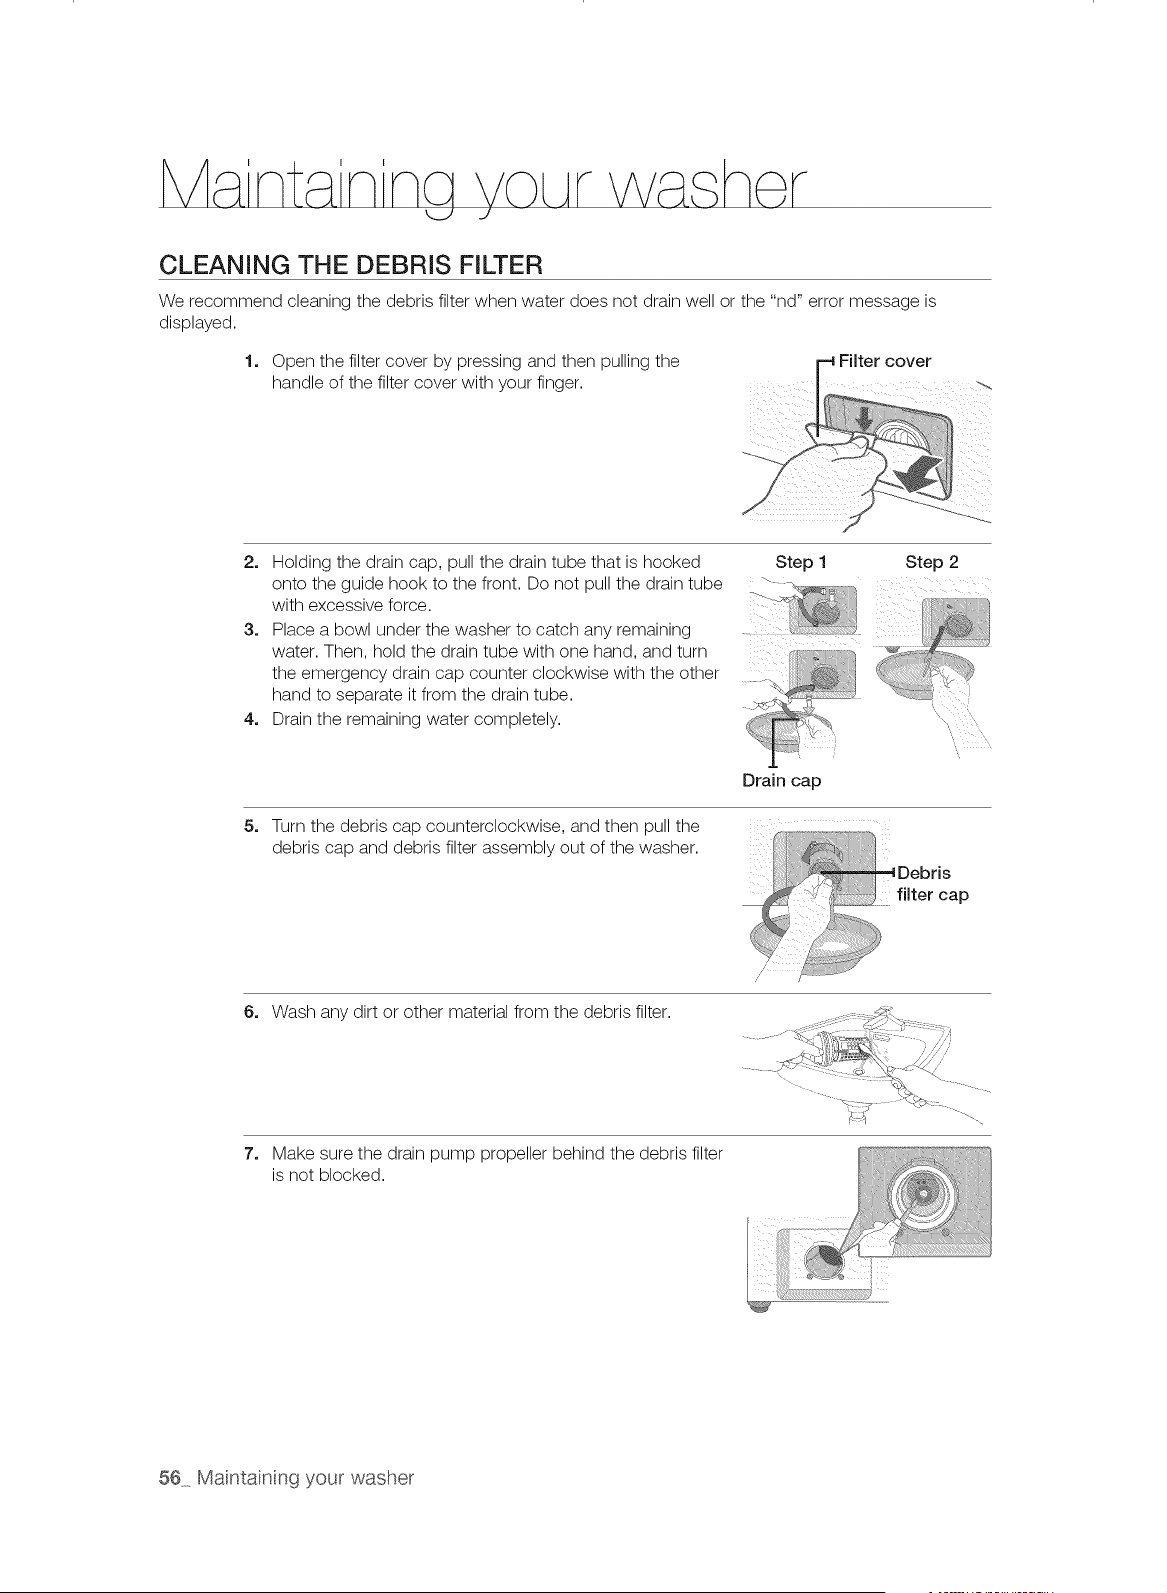
CLEANING THE DEBRIS FILTER
We recommend cleaning the debris filter when water does not drain well or the "nd" error message is
displayed.
1, Open the filter cover by pressing and then pulling the
handle of the filter cover with your finger.
2, Holding the drain cap, pull the drain tube that is hooked Step 1 Step 2
onto theguide hooktothe front. Do not pull the draintube . '- -
with excessive force.
3, Place a bowl under the washer to catch any remaining ....
water. Then, hold the drain tube with one hand, and turn
the emergency drain cap counter clockwise with the other
hand to separate it from the drain tube.
4, Drain the remaining water completely.
Drain cap
5. Turn the debris cap counterclockwise, and then pull the :, ,:,_::........
debris cap and debris filter assembly out of the washer. I,t
Debris
........ filter cap
6. Wash any dirt or other material from the debris filter.
7_
Make sure the drain pump propeller behind the debris filter
is not blocked.
56 Maintainng your washer
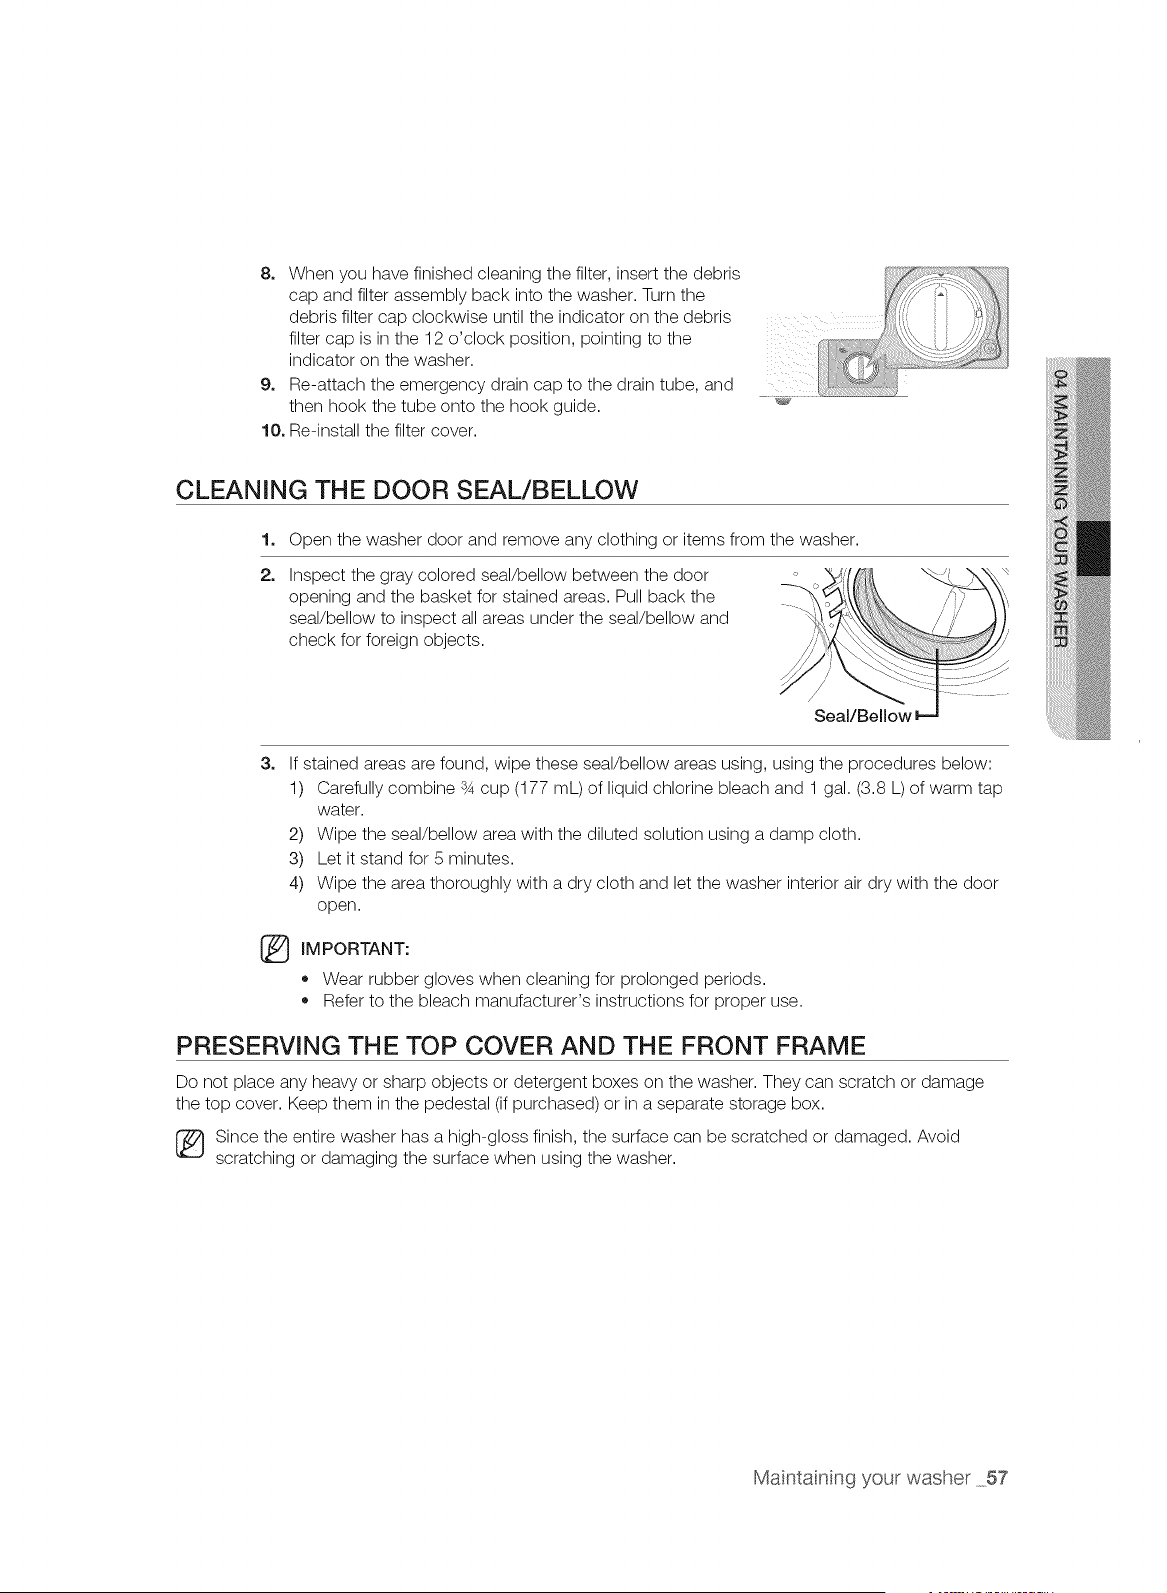
8, When you have finished cleaning the filter, insert the debris
cap and filter assembly back into the washer. Turn the
debris filter cap clockwise until the indicator on the debris
filter cap is in the 12 o'clock position, pointing to the
indicator on the washer.
9, Re-attach the emergency drain cap to the drain tube, and
then hook the tube onto the hook guide.
10, Re-install the filter cover.
_, J
CLEANING THE DOOR SEAL/BELLOW
1. Open the washer door and remove any clothing or items from the washer.
2,
Inspect the gray colored seal/bellow between the door
opening and the basket for stained areas. Pull back the
seal/bellow to inspect all areas under the seal/bellow and
check for foreign objects.
Seal/Bellow
3,
If stained areas are found, wipe these seal/bellow areas using, using the procedures below:
1) Carefully combine s4 cup (177 mL) of liquid chlorine bleach and 1 gal. (3.8 L) of warm tap
water.
2) Wipe the seal/bellow area with the diluted solution using a damp cloth.
3) Let it stand for 5 minutes.
4) Wipe the area thoroughly with a dry cloth and let the washer interior air dry with the door
open.
IMPORTANT:
,, Wear rubber gloves when cleaning for prolonged periods.
,, Refer to the bleach manufacturer's instructions for proper use.
PRESERVING THE TOP COVER AND THE FRONT FRAME
Do not place any heavy or sharp objects or detergent boxes on the washer. They can scratch or damage
the top cover. Keep them in the pedestal (if purchased) or in a separate storage box.
Since the entire washer has a high-gloss finish, the surface can be scratched or damaged. Avoid
scratching or damaging the surface when using the washer.
Maintainng your washer 57
PURE CYCLE TM
Pure Cycle is a self-cleaning cycle that removes mold that may occur inside the washer.
1. Press the Power button.
2, Select the Pure Cycle.
Once the Pure Cycle is chosen, the only function that can be set is Delay Start.
3, Press the Start/Pause button.
When you press the Start/Pause button, the Pure Cycle begins.
®
CAUTION
Using the Pure Cycle, you can clean the drum without using a cleaning agent.
Never use the Pure Cycle when laundry is in the washer. It may cause damage to the
laundry or a problem with the washer.
If you want to use a drum cleaning agent, use only 1/10 the amount of the drum
cleaning agent recommended by the cleaning agent manufacturer. (When using a
powder-type cleaning agent, remove the liquid detergent compartment.)
The Pure Cycle Auto Notification
If cleaning the tub (drum) is required, the Pure Cycle auto notification screen appears.
When this remove the laundry from the washer, turn the power on, and clean the drum
by running the Pure Cycle.
If you do not run the Pure Cycle, the Pure Cycle auto notification screen will be shown
again after two washes. Not running the Pure Cycle at this point will not cause a problem
with the washer.
Although the Pure Cycle auto notification screen appears once a month or so, the
frequency may differ depending on the number of times the washer is used.
®
58 Maintainng your washer
rro Abe hootng
CHECK THESE POINTS IF YOUR WASHER...
Will not start.
Has no water or not enough
water.
Has detergent remaining
in the automatic dispenser
after the wash cycle is
complete,
Vibrates or is too noisy.
Stops
,, Make sure the door is firmly closed.
,, Make sure your washer is plugged in.
,, Make sure the water faucets are open.
• Make sure to press the Start/Pause button to start your washer.
,, Make sure Child Lock is not activated; see page 37.
Before your washer starts to fill, it will make a series of clicking noises
to check the door lock and do a quick drain.
,, Check the fuse or reset the circuit breaker
Turn both faucets on fully.
Make sure the door is tightly closed.
,, Straighten the water inlet hoses.
,, Disconnect the hoses and clean the hose filter screens. The hose
filter screens may be clogged.
Open and close the door, then press the Start/Pause Button.
Make sure your washer is running with sufficient water pressure.
Make sure the Detergent Selector dial is in the upper position when
using granular detergent.
,, Make sure your washer is set on a level surface. If the surface is not
level, adjust your washer's feet to level the appliance.
Make sure that the shipping bolts are removed.
Make sure your washer is not touching any other object.
Make sure the laundry load is balanced.
,, Plug the power cord into a live electrical outlet.
,, Check the fuse or reset the circuit breaker.
Close the door and press the Start/Pause Button to start your
washer.
For your safety, your washer will not tumble or spin unless the door is
closed.
Before your washer starts to fill, it will make a series of clicking noises
to check the door lock and do a quick drain.
,, There may be a pause or soak period in the cycle. Wait briefly to see
if it starts.
,, Check the screens on the inlet hoses at the faucets for obstructions.
Clean the screens periodically.
Troubleshooting 59
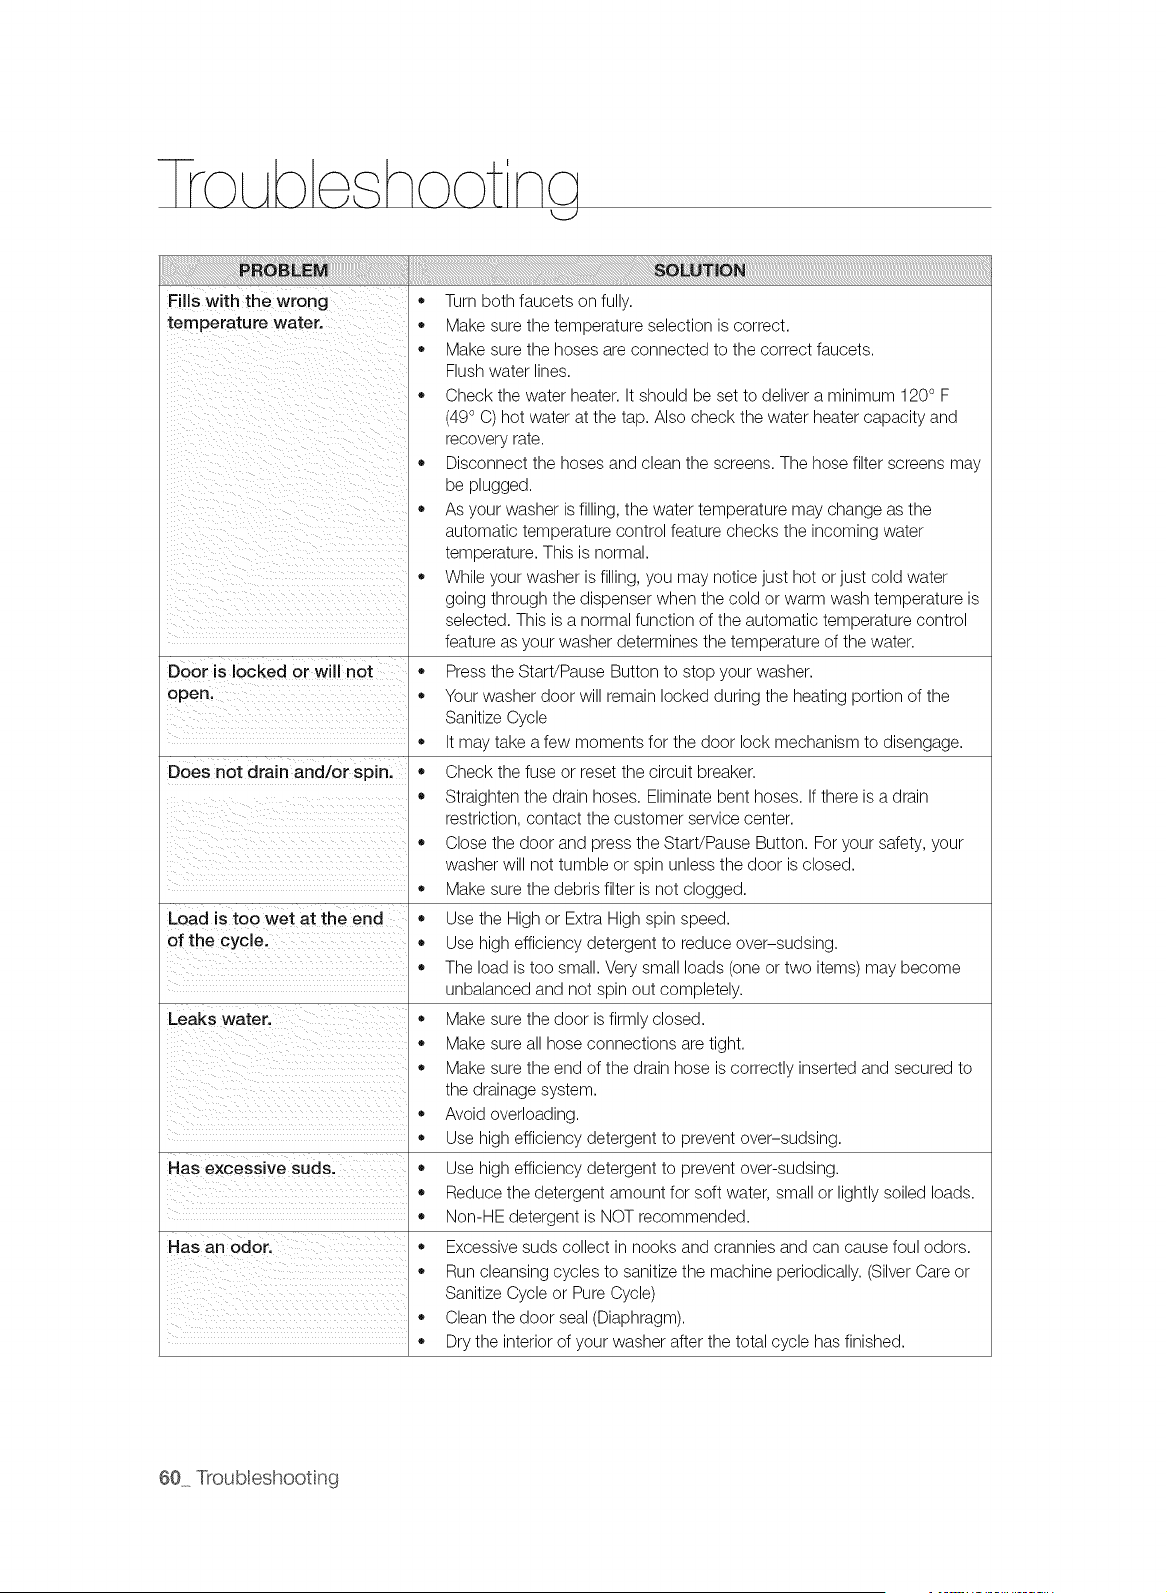
F, Sw th Wro"g
temperature water.
ii i i i i i i i i i i i i i i
il iii i_i
il i iiiii ii ii ii ii ii ii ii ii ii ii ii ii ii ii ii ii
Door is locked or will not *
open, ,,
Does not drain and/or spin,
Load is too wet at the end
of the cycle.
Has excessive suds.
Has an odoc
* Turn both faucets on fully.
* Make sure the temperature selection is correct.
,, Make sure the hoses are connected to the correct faucets.
Flush water lines.
,, Check the water heater. It should be set to deliver a minimum 120° F
(49° C) hot water at the tap. Also check the water heater capacity and
recovery rate.
,, Disconnect the hoses and clean the screens. The hose filter screens may
be plugged.
,, As your washer is filling, the water temperature may change as the
automatic temperature control feature checks the incoming water
temperature. This is normal.
,, While your washer is filling, you may notice just hot or just cold water
going through the dispenser when the cold or warm wash temperature is
selected. This is a normal function of the automatic temperature control
feature as your washer determines the temperature of the water.
Press the Start/Pause Button to stop your washer.
Your washer door will remain locked during the heating portion of the
Sanitize Cycle
,, It may take a few moments for the door lock mechanism to disengage.
,, Check the fuse or reset the circuit breaker.
,, Straighten the drain hoses. Eliminate bent hoses. If there is a drain
restriction, contact the customer service center.
,, Close the door and press the Start/Pause Button. For your safety, your
washer will not tumble or spin unless the door is closed.
,, Make sure the debris filter is not clogged.
,, Use the High or Extra High spin speed.
,, Use high efficiency detergent to reduce over-sudsing.
,, The load is too small. Very small loads (one or two items) may become
unbalanced and not spin out completely.
,, Make sure the door is firmly closed.
,, Make sure all hose connections are tight.
,, Make sure the end of the drain hose is correctly inserted and secured to
the drainage system.
,, Avoid overloading.
,, Use high efficiency detergent to prevent over-sudsing.
,, Use high efficiency detergent to prevent over-sudsing.
,, Reduce the detergent amount for soft water, small or lightly soiled loads.
,, Non-HE detergent is NOT recommended.
,, Excessive suds collect in nooks and crannies and can cause foul odors.
,, Run cleansing cycles to sanitize the machine periodically. (Silver Care or
Sanitize Cycle or Pure Cycle)
,, Clean the door seal (Diaphragm).
,, Dry the interior of your washer after the total cycle has finished.
60 Troubleshooting
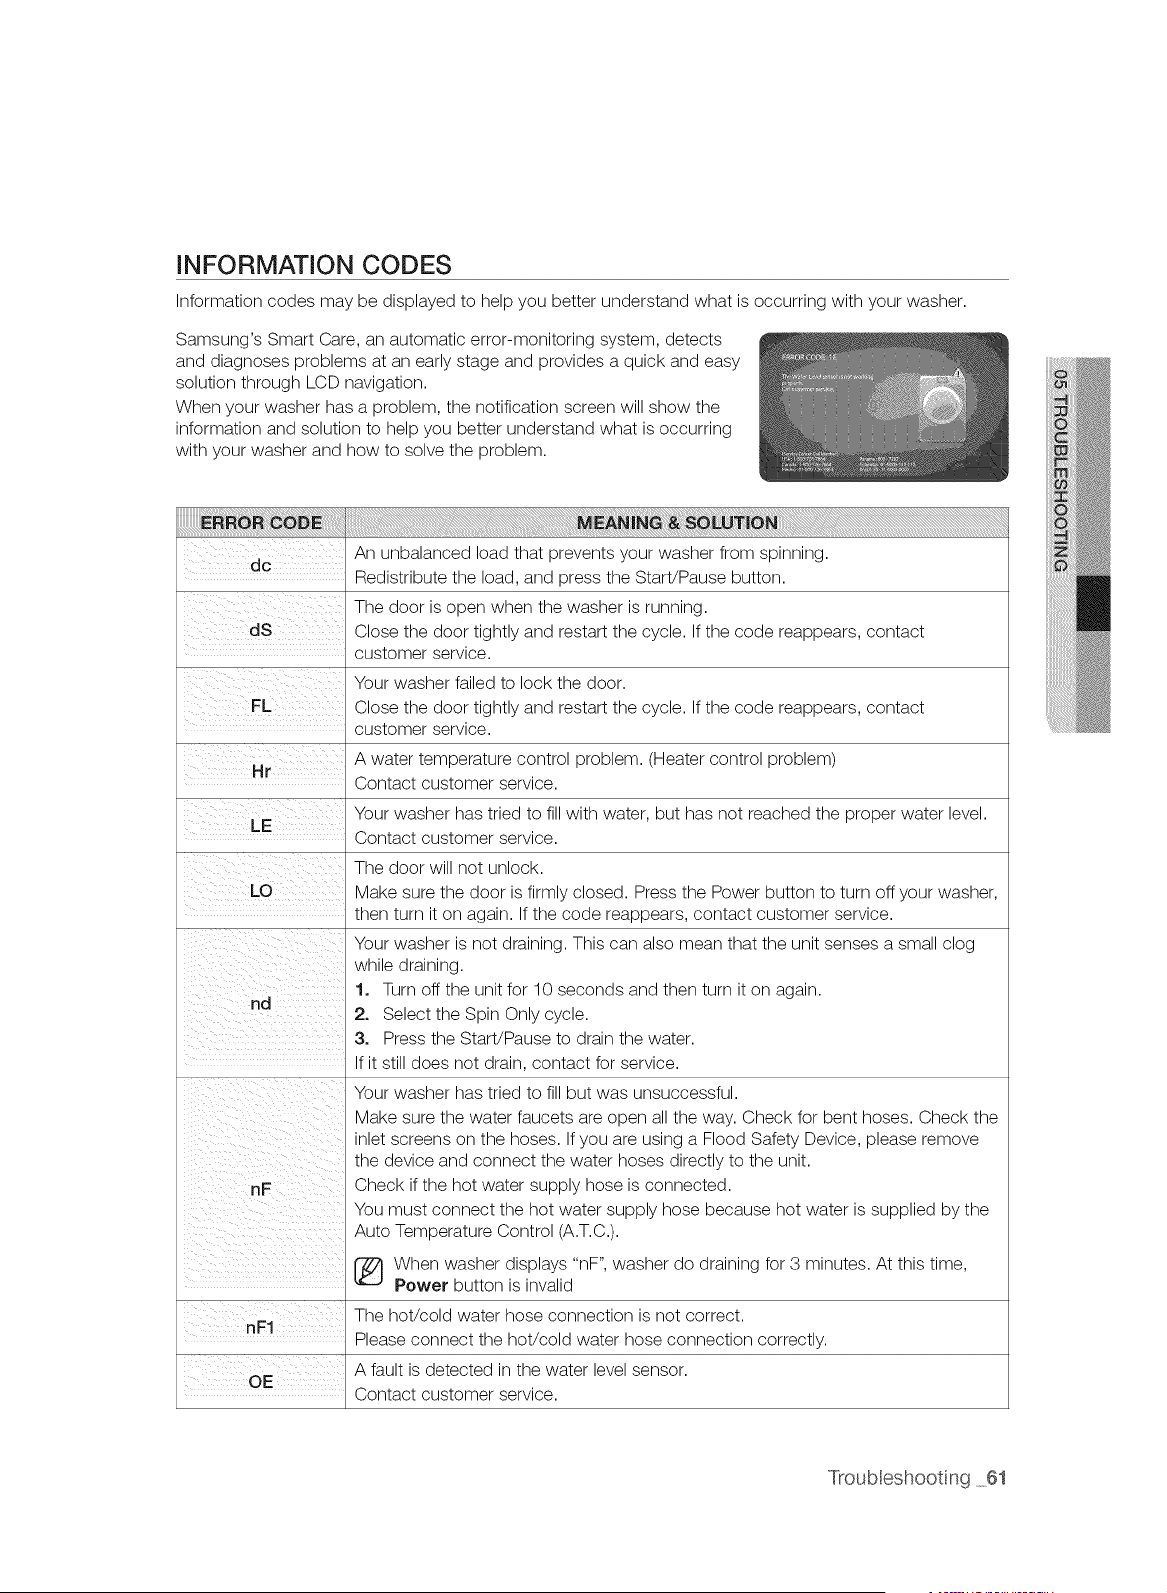
INFORMATION CODES
Information codes may be displayed to help you better understand what is occurring with your washer.
Samsung's Smart Care, an automatic error-monitoring system, detects
and diagnoses problems at an early stage and provides a quick and easy
solution through LCD navigation.
When your washer has a problem, the notification screen will show the
information and solution to help you better understand what is occurring
with your washer and how to solve the problem.
An unbalanced load that prevents your washer from spinning.
dc
Redistribute the load, and press the StaWPause button.
The door is open when the washer is running.
Close the door tightly and restart the cycle. If the code reappears, contact
customer service.
Your washer failed to lock the door.
Close the door tightly and restart the cycle. If the code reappears, contact
customer service.
A water temperature control problem. (Heater control problem)
Hr
Contact customer service.
Your washer has tried to fill with water, but has not reached the proper water level.
Contact customer service.
The door will not unlock.
Make sure the door is firmly closed. Press the Power button to turn off your washer,
then turn it on again. If the code reappears, contact customer service.
Your washer is not draining. This can also mean that the unit senses a small clog
while draining.
1. Turn off the unit for 10 seconds and then turn it on again.
2. Select the Spin Only cycle.
3. Press the StaWPause to drain the water.
If it still does not drain, contact for service.
Your washer has tried to fill but was unsuccessful.
Make sure the water faucets are open all the way. Check for bent hoses. Check the
inlet screens on the hoses. If you are using a Flood Safety Device, please remove
the device and connect the water hoses directly to the unit.
Check if the hot water supply hose is connected.
You must connect the hot water supply hose because hot water is supplied by the
Auto Temperature Control (A.T.C.).
[_ When washer displays "nF", washer do draining for 3 minutes. At this time,
Power button is invalid
The hot/cold water hose connection is not correct.
nF1
Please connect the hot/cold water hose connection correctly.
A fault is detected in the water level sensor.
OE
Contact customer service.
Troubleshooting 61
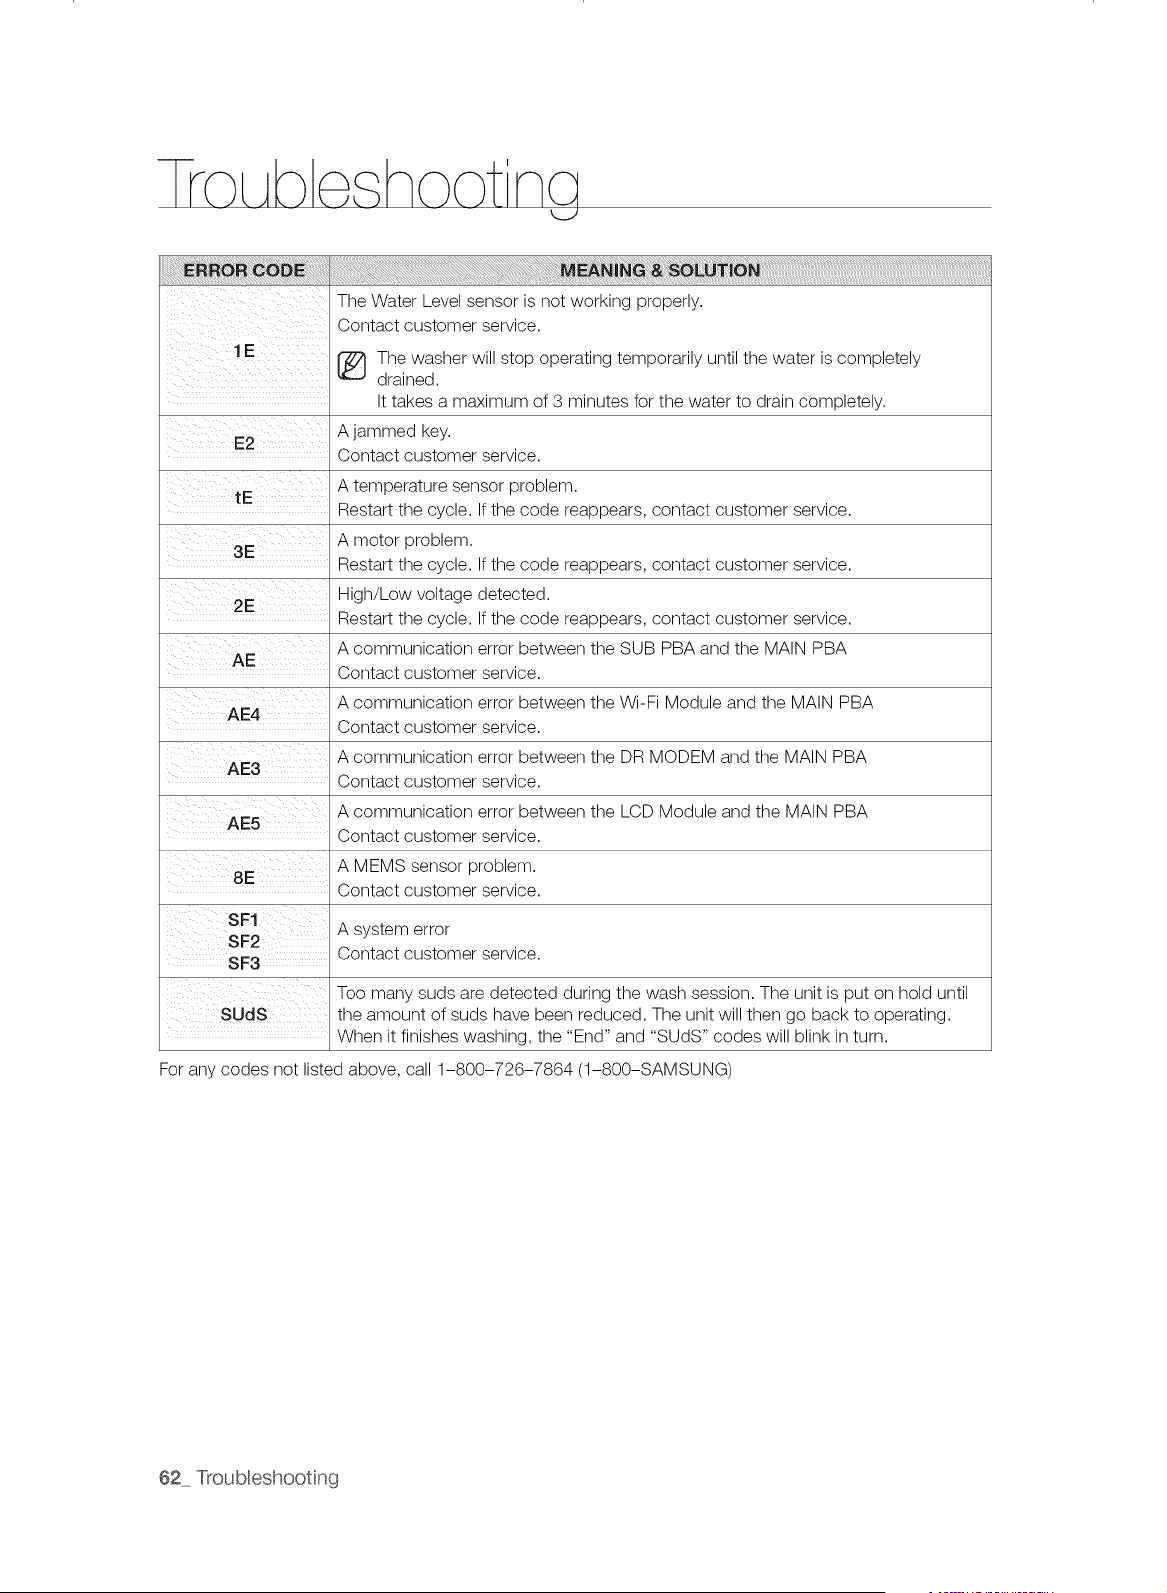
The Water Level sensor is not working properly.
Contact customer service.
1 E _ The washer will stop operating temporarily until the water is completely
......... drained.
It takes a maximum of 3 minutes for the water to drain completely.
A jammed key.
E2
Contact customer service.
A temperature sensor problem.
tE
Restart the cycle. If the code reappears, contact customer service.
A motor problem.
3E
Restart the cycle. If the code reappears, contact customer service.
2E High/Low voltage detected.
Restart the cycle. If the code reappears, contact customer service.
A communication error between the SUB PBA and the MAIN PBA
AE
Contact customer service.
A communication error between the Wi-Fi Module and the MAIN PBA
AE4
Contact customer service.
AE3 A communication error between the DR MODEM and the MAIN PBA
Contact customer service.
A communication error between the LCD Module and the MAIN PBA
AE5
Contact customer service.
A MEMS sensor problem.
8E
Contact customer service.
A system error
SF3 Contact customer service.
Too many suds are detected during the wash session. The unit is put on hold until
SUdS the amount of suds have been reduced. The unit will then go back to operating.
When it finishes washing, the "End" and "SUDS" codes will blink in turn.
For any codes not listed above, call 1-800-726-7864 (1-800-SAMSUNG)
62_ Troubleshooting
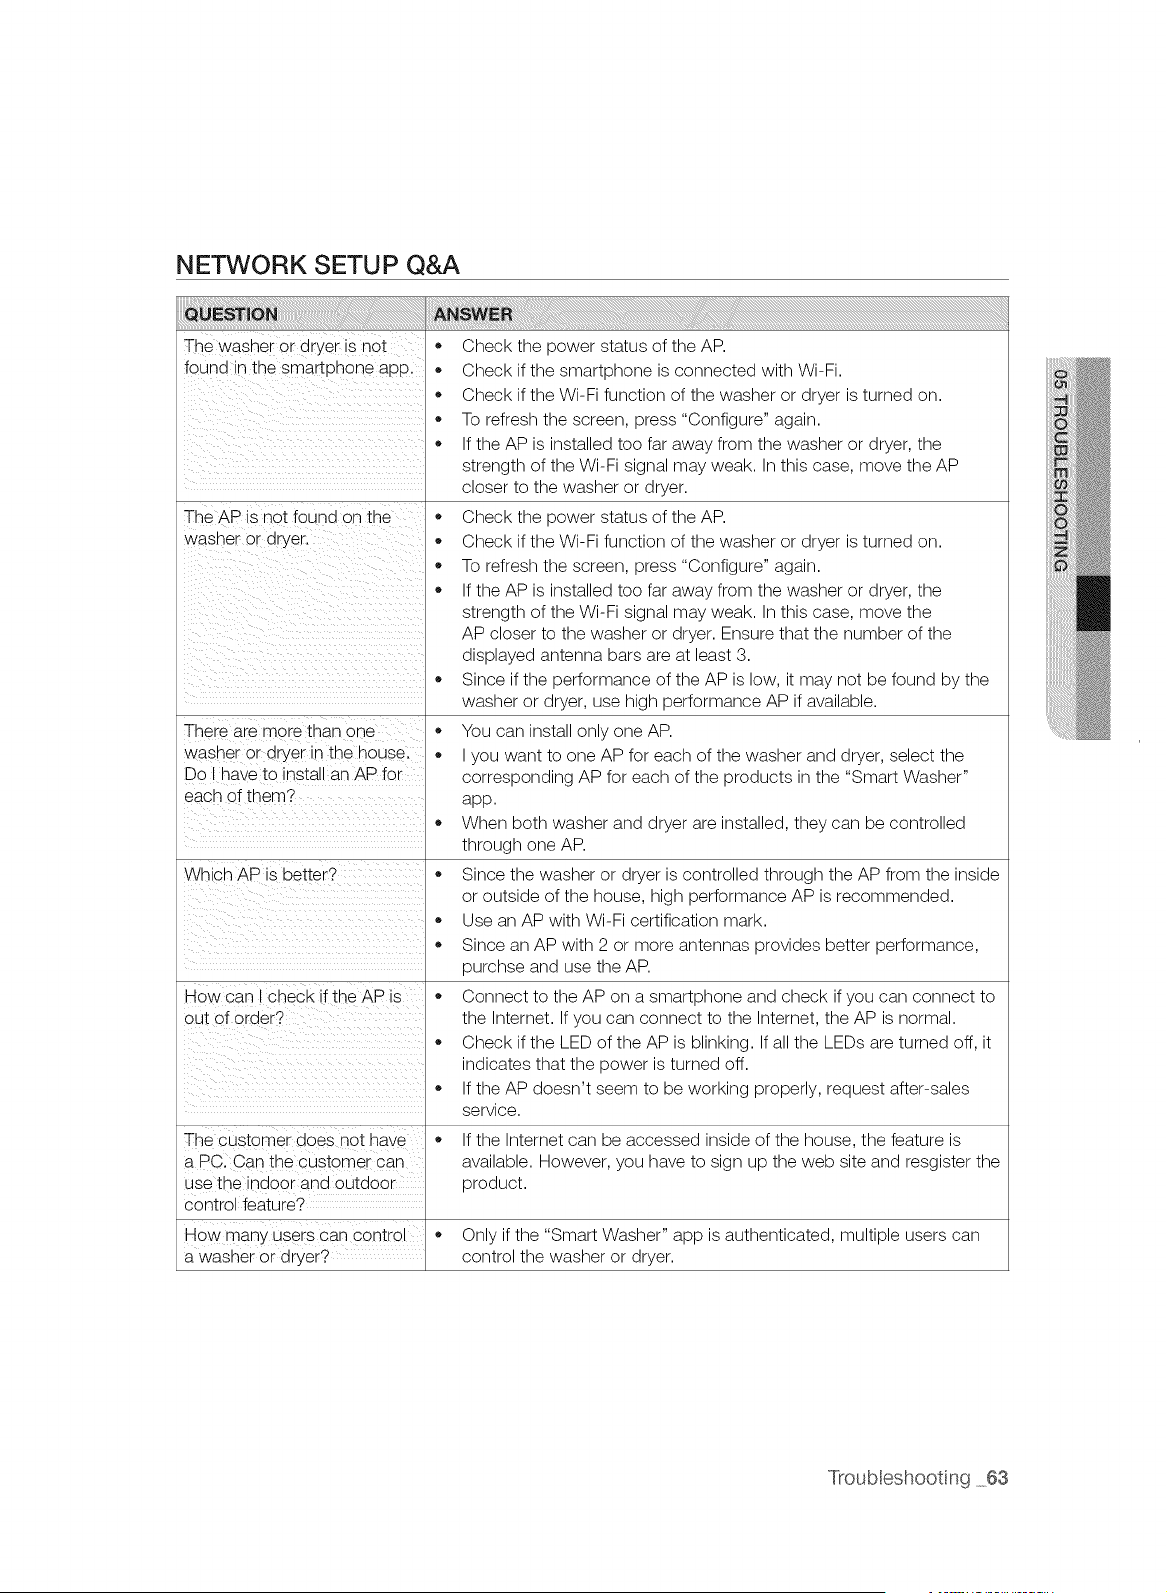
NETWORK SETUP Q&A
The washer or dryer is not
found _nthe smartuhone aDD.
The AP is not found on the
wasner or dryer.
There are more than one
wasner or dryer In the house.
Do I qave to install an AP for
each of them?
Which AP is setter?
How can check f the AP is
out of order?
The customer does hot nave
a PC. Can the customer can
use the indoor and outdoor
control feature?
How man'> users can control
a wasner or dryer?
Check the power status of the AP.
Check if the smartphone is connected with Wi-Fi.
Check if the Wi-Fi function of the washer or dryer is turned on.
To refresh the screen, press "Configure" again.
If the AP is installed too far away from the washer or dryer, the
strength of the Wi-Fi signal may weak. In this case, move the AP
closer to the washer or dryer.
Check the power status of the AP.
Check if the Wi-Fi function of the washer or dryer is turned on.
To refresh the screen, press "Configure" again.
If the AP is installed too far away from the washer or dryer, the
strength of the Wi-Fi signal may weak. In this case, move the
AP closer to the washer or dryer. Ensure that the number of the
displayed antenna bars are at least 3.
Since if the performance of the AP is low, it may not be found by the
washer or dryer, use high performance AP if available.
You can install only one AP.
I you want to one AP for each of the washer and dryer, select the
corresponding AP for each of the products in the "Smart Washer"
app.
When both washer and dryer are installed, they can be controlled
through one AP.
Since the washer or dryer is controlled through the AP from the inside
or outside of the house, high performance AP is recommended.
Use an AP with Wi-Fi certification mark.
Since an AP with 2 or more antennas provides better performance,
purchse and use the AP.
Connect to the AP on a smartphone and check if you can connect to
the Internet. If you can connect to the Internet, the AP is normal.
Check if the LED of the AP is blinking. If all the LEDs are turned off, it
indicates that the power is turned off.
If the AP doesn't seem to be working properly, request after-sales
service.
If the Internet can be accessed inside of the house, the feature is
available. However, you have to sign up the web site and resgister the
product.
Only if the "Smart Washer" app is authenticated, multiple users can
control the washer or dryer.
Troubleshooting 63
lro Abe hoot ncj
Where are the proper place to
install a washer or dryer?
How can I connect the
washer or dryer with a
smartphone stably?
Since a washer or dryer is heavy and connected with water, it should
be installed in the proper place. Installing the AP near the washer or
dryer is recommended. You can check the signal strength through
the setup screen of the washer or dryer or a smartphone.
Since the performance is seriously affected by a door or steel wall,
install the product in an open place. If there is door in front of the
installed product, open the door when using the product.
Do not place an object maden with steel or glass in front of the front
LCD of the washer since it blocks the radio signal.
Note that the radio signal may be weaken or interfered and the
communication with the smartphone may fail when a microwave oven
is used in the house.
Install the washer or dryer so that the front of the product faces the
AP if available.
When the signal strength that is displayed on the LCD of the washer
or dryer is weak, the control may fail. Check the mark as follows or
measure the signal strength.
At least 3 antenna bars should be displayed on the LCD of the
washer or dryer.
At least 3 antenna bars for the Wi-Fi connection should be
displayed on the smartphone.
When the signal strength is measured with a smartphone app that
shows the Wi-Fi signal strength, the signal strength should be
stronger than -65 dBm. (E.g. -60 dBm and -50 dBm are stronger
than -65 dBm.)
What should I have to
do when the number of
the antenna bars that are
displayed on the LCD of the
washer or dryer is 1?
When the signal strength that is displayed on the LCD of the washer
or dryer is weak, the control may fail. In this case, take the following
measures for normal operation.
Move the AP closer to the washer or dryer.
(At least 3 antenna bars should be dislayed in the network setup
of the washer for proper operation.)
Since old AP may provide lower performance, use new one if
available.
Stand the antenna of the AP if available so that the radio signal is
more easily propagated.
64 Troubleshooting
FABRIC CARE CHART
The following symbols provide garment care directions. The Clothing care labels include symbols for
washing, bleaching, drying and ironing, or dry cleaning when necessary. The use of symbols ensures
consistency among garment manufacturers of domestic and imported items. Follow the care label
directions to maximize garment life and reduce laundering problems.
iiiiii: i !! ii! ii!i i!ii!ii!ii!ii!i!iiji! !i i i ! ili i !i!i iii
Normal Line Dry/Hang to Dry Do Not Wash
Permanent Press /
Wrinkle Resistant / [] Drip Dry Do Not Wring
Wrinkle Control
Gentle/Delioates Dry Flat _ Do Not Bleach
Hand Wash Do Not Tumble Dry
No Steam (added to
High iron)
• _o Hot Medium Do Not Iron
....co Warm Low
Cold O Any Heat O Dry Clean
@ No Heat/Air Do Not Dry Clean
Any Bleach (when
needed)
Only Non-Chlorine
(color-safe) High
Bleach (when needed)
Tumble Dry Cycle Medium
Io-1
Wrinkle Resistant/
Wrinkle Control
Gentle/Delioates
Low
Line Dry/Hang to Dry
Drip Dry
Dry Flat
For machine-washable
wool. Loads should be
under 8 pounds.
** The dot symbols represent the appropriate wash water temperatures for various items. The temperature
range for Hot is 105-125 °F / 41-52 °C, for Warm 85-105 °F / 29-41 °C and for Cold 60-85 °F / 16-
29 °C. (The wash water temperature must be a minimum of 60 °F / 16 °C for detergent activation
and effective cleaning.) The washer may not ensure these temperatures because the actual water
temperatures entering your washer are dependent on water heater settings and regional water supply
temperatures. For example, cold water entering the home in the northern states during winter may be 40
°F / 4 °C which is too cold for effective cleaning. The water temperature in this situation will need to be
adjusted by selecting a warm setting, adding some hot water to the MAX FILL line or using your washer's
heating option, if available.
Append x 65
CYCLE CHART
Use this chart to set the best cycle and options for your laundry.
(®: Factory setting, O: Selectable, x: Not available)
Normal x O ® O O O ® O O O
Heavy Duty x • O O O O O O O O
Perm Press x x • O O x O O • O
Sanitize • x x x x O O O O O
Bedding Plus x x • 0 0 x x 0 • 0
Deep Steam x • x x x O • O O O
Rinse+ Spin x x x x O O O O O O
Spin only x x x x x o o o o o
Quick Wash x O • O O O O O O O
Wool x x • 0 0 x x x • 0
Delicates/Hand wash x x 0 0 0 x x x • 0
Stain Away x O • O O O O O O O
Active Wear x x • O O x x O • O
eco Cold x x x x • O O O O O
Pure Cycle O x x x x x x x • x
Cooking & Dining x x • x x O O O O O
Gardening &Yard Work x x • x x 0 0 0 0 0
Working & Everyday x x x • x O O O • O
Outdoors & Travel x x O x x O O O O O
Active Kids x x O x x O O O O O
Baby care x x O x x O O O O O
66 Append x
CYCLE CHART
Use this chart to set the best cycle and options for your laundry.
(0: Factory setting, O: Selectable, x:Not available)
Normal
Heavy Duty
Perm Press
o o ® o
o o o
o o o o
o o _ o
o o _ o
x x x
o
o
o
o
o
X
Bedding Plus
Deep Steam
Rinse+Spin
Spin only
Quick Wash 0 0 0 0
Wo0i x x 0 x x
Dedicates/Hand wash 0 0 _ 0 0
Stain Away _ O O O O
Active Wear O O _ O O
eco Cold x x ® O O
Pure Cycle
Cooking & Dining O • O O O
Gardening & Yard Work O • O O O
Working&EYe.day × o o ® o
Outdoors & Travel x 0 • 0 0
Active Kids 0 • 0 0 0
Baby Care 0 0 • 0 0
0 0 0 0 0 0
0 0 0 _ 0 0
0 0 0 0 0 x
0 0 0 0 0 0
0 0 0 0 0 0
0 0 0 0 0
0 0 0 x 0 x
x 0 0 x 0 x
0 x 0 x 0 x
x x 0 x 0 x
0 x 0 x 0 x
0 0 0 0 0 0
0 0 0 0 0 x
0 0 0 0 0 x
x x 0 x 0 x
® 0 0 0 0 0
® 0 0 0 0 0
0 0 0 0 0 x
0 0 0 0 0 x
® 0 0 0 0 0
® 0 0 0 0 0
Append x 67
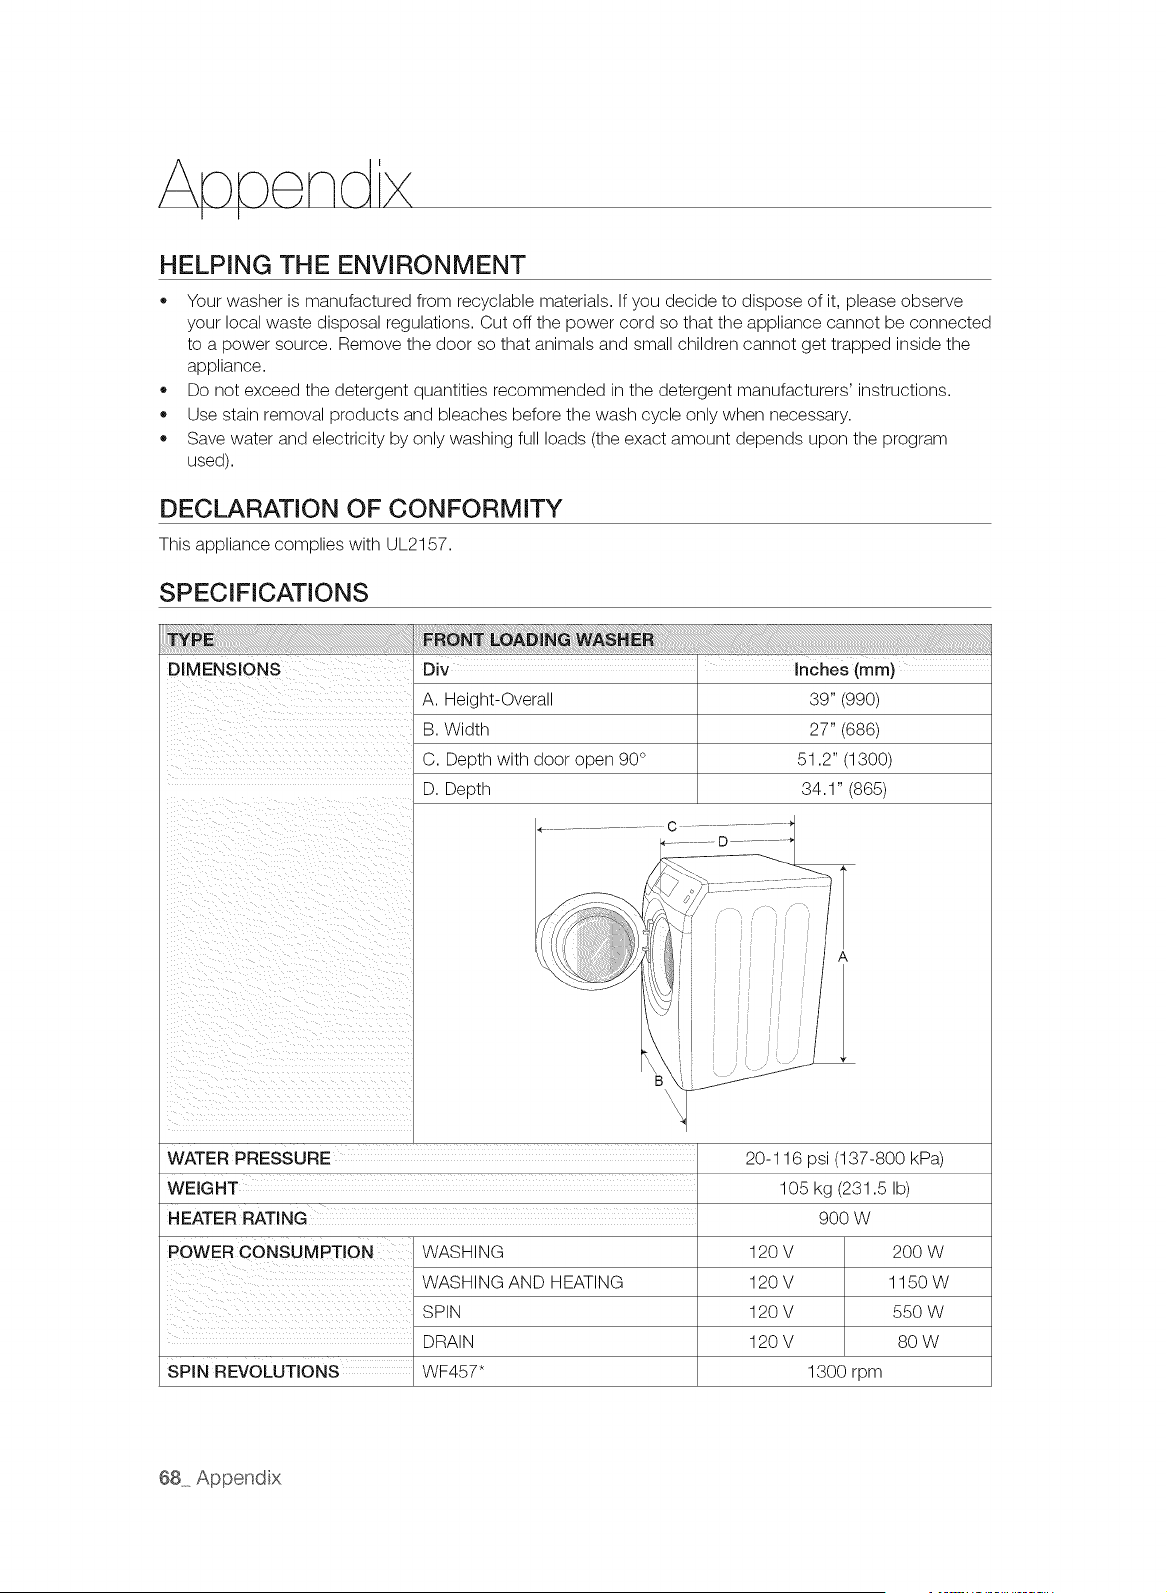
HELPING THE ENVIRONMENT
,, Your washer is manufactured from recyclable materials. If you decide to dispose of it, please observe
your local waste disposal regulations. Cut off the power cord so that the appliance cannot be connected
to a power source. Remove the door so that animals and small children cannot get trapped inside the
appliance.
,, Do not exceed the detergent quantities recommended in the detergent manufacturers' instructions.
Use stain removal products and bleaches before the wash cycle only when necessary.
,, Save water and electricity by only washing full loads (the exact amount depends upon the program
used).
DECLARATION OF CONFORMITY
This appliance complies with UL2157.
SPECIFICATIONS
DIMENSIONS Div Inches (mm)
A. Height-Overall 39" (990)
B. Width 27" (686)
C. Depth with door open 90 ° 51.2" (1300)
D. Depth 34.1" (865)
WATER PRESSURE 20-116 psi (137-800 kPa)
WEIGHT 105 kg (231.5 Ib)
HEATER RATING
POWER CONSUMPTION
SPiN REVOLUTIONS
WASHING
WASHING AND HEATING
SPIN
DRAIN
WF457"
9OO W
120V
120V
120V
120V
1300 rpm
2OOW
1150W
550 W
8O W
68 Append x
\
SAMSUNG WASHER
LIMITED WARRANTY TO ORiGiNAL PURCHASER
This SAMSUNG brand product, as supplied and distributed by SAMSUNG ELECTRONICS AMERICA, INC.
(SAMSUNG) and delivered new, in the original carton to the original consumer purchaser, is warranted by
SAMSUNG against manufacturing defects in materials and workmanship for a limited warranty period of:
One (1) year part and labor, Two (2) years Control Board Parts, Three (3) years stainless tub part, Ten (10)
years washing motor part
This limited warranty begins on the original date of purchase, and is valid only on products purchased and
used in the United States. To receive warranty service, the purchaser must contact SAMSUNG for problem
determination and service procedures. Warranty service can only be performed by a SAMSUNG authorized
service center. The original dated bill of sale must be presented upon request as proof of purchase to
SAMSUNG or SAMSUNG's authorized service center. SAMSUNG will provide in-home service during the
warranty period at no charge, subject to availability within the contiguous United States. In-home service is
not available in all areas.
To receive in-home service, product must be unobstructed and accessible to the service agent. If service
is not available, SAMSUNG may elect to provide transportation of the product to and from an authorized
service center.
SAMSUNG will repair, replace, or refund this product at our option and at no charge as stipulated herein,
with new or reconditioned parts or products if found to be defective during the limited warranty period
specified above. All replaced parts and products become the property of SAMSUNG and must be returned
to SAMSUNG. Replacement parts and products assume the remaining original warranty, or ninety (90)
days, whichever is longer.
This limited warranty covers manufacturing defects in materials and workmanship encountered in normal,
noncommercial use of this product and shall not apply to the following: damage that occurs in shipment;
delivery and installation; applications and uses for which this product was not intended; altered product or
serial numbers; cosmetic damage or exterior finish; accidents, abuse, neglect, fire, water, lightning, or other
acts of nature or God; use of products, equipment, systems, utilities, services, parts, supplies, accessories,
applications, installations, repairs, external wiring or connectors not supplied or authorized by SAMSUNG
that damage this product or result in service problems; incorrect electrical line voltage, fluctuations and
surges; customer adjustments and failure to follow operating instructions, maintenance and environmental
instructions that are covered and prescribed in the instruction book; product removal and reinstallation;
problems caused by pest infestations.
This limited warranty does not cover problems resulting from incorrect electric current, voltage or supply,
light bulbs, house fuses, house wiring, cost of a service call for instructions, or fixing installation errors.
SAMSUNG does not warrant uninterrupted or error-free operation of the product.
Warranty 69
EXCEPT AS SET FORTH HEREIN, THERE ARE NO WARRANTIES ON THIS PRODUCT EITHER EXPRESS
OR IMPLIED, AND SAMSUNG DISCLAIMS ALL WARRANTIES INCLUDING, BUT NOT LIMITED TO, ANY
IMPLIED WARRANTIES OF MERCHANTABILITY, INFRINGEMENT OR FITNESS FOR A PARTICULAR
PURPOSE.
NO WARRANTY OR GUARANTEE GIVEN BY ANY PERSON, FIRM, OR CORPORATION WITH RESPECT
TO THIS PRODUCT SHALL BE BINDING ON SAMSUNG. SAMSUNG SHALL NOT BE LIABLE FOR LOSS
OF REVENUE OR PROFITS, FAILURE TO REALIZE SAVINGS OR OTHER BENEFITS, OR ANY OTHER
SPECIAL, INCIDENTAL OR CONSEQUENTIAL DAMAGES CAUSED BY THE USE, MISUSE, OR INABILITY
TO USE THIS PRODUCT, REGARDLESS OF THE LEGAL THEORY ON WHICH THE CLAIM IS BASED,
AND EVEN IF SAMSUNG HAS BEEN ADVISED OF THE POSSIBILITY OF SUCH DAMAGES.
NOR SHALL RECOVERY OF ANY KIND AGAINST SAMSUNG BE GREATER IN AMOUNT THAN THE
PURCHASE PRICE OF THE PRODUCT SOLD BY SAMSUNG AND CAUSING THE ALLEGED DAMAGE.
WITHOUT LIMITING THE FOREGOING, PURCHASER ASSUMES ALL RISK AND LIABILITY FOR LOSS,
DAMAGE, OR INJURY TO PURCHASER AND PURCHASER'S PROPERTY AND TO OTHERS AND THEIR
PROPERTY ARISING OUT OF THE USE, MISUSE, OR INABILITY TO USE THIS PRODUCT. THIS LIMITED
WARRANTY SHALL NOT EXTEND TO ANYONE OTHER THAN THE ORIGINAL PURCHASER OF THIS
PRODUCT, IS NONTRANSFERABLE AND STATES YOUR EXCLUSIVE REMEDY.
Some states do not allow limitations on how long an implied warranty lasts, or the exclusion or limitation
of incidental or consequential damages, so the above limitations or exclusions may not apply to you. This
warranty gives you specific rights, and you may also have other rights, which vary from state to state.
To obtain warranty service, please contact SAMSUNG at:
Samsung Electronics America, inc.
85 Challenger Road Ridgefield Park, NJ 07660
1-800-SAMSUNG (726-7864)
www, samsung,com
Visits by a Service Engineer to explain functions, maintenance or installation is not covered by warranty.
Please contact your Samsung call agent for help with any of these issues.
70 Warranty
\
SAMSUNG WASHER
LiMiTED WARRANTY TO ORiGiNAL PURCHASER
This SAMSUNG brand product, as supplied and distributed by SAMSUNG ELECTRONICS CANADA, INC.
(SAMSUNG) and delivered new, in the original carton to the original consumer purchaser, is warranted by
SAMSUNG against manufacturing defects in materials and workmanship for a limited warranty period of:
One (1) year part and labor, Ten (10) years washing motor part
This limited warranty begins on the original date of purchase, and is valid only on products purchased
and used in the Canada. To receive warranty service, the purchaser must contact SAMSUNG for problem
determination and service procedures. Warranty service can only be performed by a SAMSUNG authorized
service center. The original dated bill of sale must be presented upon request as proof of purchase to
SAMSUNG or SAMSUNG's authorized service center. SAMSUNG will provide in-home service during the
warranty period at no charge, subject to availability within the Canada. In-home service is not available in all
areas.
To receive in-home service, product must be unobstructed and accessible to the service agent. If service
is not available, SAMSUNG may elect to provide transportation of the product to and from an authorized
service center.
SAMSUNG will repair, replace, or refund this product at our option and at no charge as stipulated herein,
with new or reconditioned parts or products if found to be defective during the limited warranty period
specified above. All replaced parts and products become the property of SAMSUNG and must be returned
to SAMSUNG. Replacement parts and products assume the remaining original warranty, or ninety (90)
days, whichever is longer.This limited warranty covers manufacturing defects in materials and workmanship
encountered in normal, noncommercial use of this product and shall not apply to the following: damage
that occurs in shipment; delivery and installation; applications and uses for which this product was not
intended; altered product or serial numbers; cosmetic damage or exterior finish; accidents, abuse, neglect,
fire, water, lightning, or other acts of nature or God; use of products, equipment, systems, utilities, services,
parts, supplies, accessories, applications, installations, repairs, external wiring or connectors not supplied
or authorized by SAMSUNG that damage this product or result in service problems; incorrect electrical
line voltage, fluctuations and surges; customer adjustments and failure to follow operating instructions,
maintenance and environmental instructions that are covered and prescribed in the instruction book;
product removal and reinstallation; problems caused by pest infestations. This limited warranty does not
cover problems resulting from incorrect electric current, voltage or supply, light bulbs, house fuses, house
wiring, cost of a service call for instructions, or fixing installation errors. SAMSUNG does not warrant
uninterrupted or error-free operation of the product.
Warranty 71
EXCEPT AS SET FORTH HEREIN, THERE ARE NO WARRANTIES ON THIS PRODUCT EITHER EXPRESS
OR IMPLIED, AND SAMSUNG DISCLAIMS ALL WARRANTIES INCLUDING, BUT NOT LIMITED TO, ANY
IMPLIED WARRANTIES OF MERCHANTABILITY, INFRINGEMENT OR FITNESS FOR A PARTICULAR
PURPOSE.
NO WARRANTY OR GUARANTEE GIVEN BY ANY PERSON, FIRM, OR CORPORATION WITH RESPECT
TO THIS PRODUCT SHALL BE BINDING ON SAMSUNG. SAMSUNG SHALL NOT BE LIABLE FOR LOSS
OF REVENUE OR PROFITS, FAILURE TO REALIZE SAVINGS OR OTHER BENEFITS, OR ANY OTHER
SPECIAL, INCIDENTAL OR CONSEQUENTIAL DAMAGES CAUSED BY THE USE, MISUSE, OR INABILITY
TO USE THIS PRODUCT, REGARDLESS OF THE LEGAL THEORY ON WHICH THE CLAIM IS BASED,
AND EVEN IF SAMSUNG HAS BEEN ADVISED OF THE POSSIBILITY OF SUCH DAMAGES.
NOR SHALL RECOVERY OF ANY KIND AGAINST SAMSUNG BE GREATER IN AMOUNT THAN THE
PURCHASE PRICE OF THE PRODUCT SOLD BY SAMSUNG AND CAUSING THE ALLEGED DAMAGE.
WITHOUT LIMITING THE FOREGOING, PURCHASER ASSUMES ALL RISK AND LIABILITY FOR LOSS,
DAMAGE, OR INJURY TO PURCHASER AND PURCHASER'S PROPERTY AND TO OTHERS AND THEIR
PROPERTY ARISING OUT OF THE USE, MISUSE, OR INABILITY TO USE THIS PRODUCT. THIS LIMITED
WARRANTY SHALL NOT EXTEND TO ANYONE OTHER THAN THE ORIGINAL PURCHASER OF THIS
PRODUCT, IS NONTRANSFERABLE AND STATES YOUR EXCLUSIVE REMEDY.
Some provinces do not allow limitations on how long an implied warranty lasts, or the exclusion or limitation
of incidental or consequential damages, so the above limitations or exclusions may not apply to you.
This warranty gives you specific rights, and you may also have other rights, which vary from province to
province.
To obtain warranty service, please contact SAMSUNG at:
Samsung Electronics Canada inc.,
Customer Service 55 Standish Court Mississauga, Ontario LSR 4B2 Canada
1-800-SAMSUNG (726-7864)
www, samsung,com/ca
www.samsung.com/ca_fr (French)
Visits by a Service Engineer to explain functions, maintenance or installation is not covered by warranty.
Please contact your Samsung call agent for help with any of these issues.
72 Warranty


bit.ly/sa msungwashers
Scan the QR code* or visit
www.samsung.com/spsn
to view our helpful
How-to Videos and Live Shows
*Requires reader to be instaLLed on your smartphone
QUESTIONS OR COMMENTS?
U.S.A 1-800-SAMSUNG (726-7864) www.samsung.com
MEXICO 01-800-SAMSUNG (726-7864) www.samsung.com
CANADA 1-800-SAMSUNG (726-7864) www.samsung.com/ca
www.samsung.com/ca_fr (French)
Visits by a Service Engineer to explain functions, maintenance or installation is not covered by warranty.
Please contact your Samsung call agent for help with any of these issues.
Code No. DC68-03153A-07_EN
L v do a
manua de usuaro
Gracias pot adquirir este producto Samsung.
Para recibir un servicio ma.scompleto o los
accesorios, registre su producto en o contacte con
www.samsung.com/register
1-800-SAMSUNG (726-7864)

TM
Su Gran Capacidad
La capacidad extra grande de la lavadora Samsung lepermite lavarun juego completo de ropa de
cama, MiS un edred6n king-size o hasta 32 toallas de bano en una sola carga. Si no ha de realizar
muchas cargas, se ahorratiempo, dinero, agua y ener@a.
Pantalla t_.ctil LCD de 8"
La brillantepantalla LCD ta.ctila color de 8" muestra la informaci6n del ciclo, ajustes, opcionesy ma.s.
La interfazde fa.ciluso le permite explorarlos ciclos de lavado con un ligerotoque.
Control inteligente
La tecnolo@ainnovadoradel control inteligentede Samsung le permite controlar su lavadoramediante
dispositivos tecnol6gicos como lostelefonos inteligentes.No necesita esperara que el ciclo termine.
Elcontrol inteligentele permite controlar el proceso de lavado y le informa una vez que el ciclo haya
finalizado.
Smart Care
Elsistema automa.ticode supervisionde fallas Smart Care de Samsung detecta y diagnostica
problemas tempranamente y proporciona una soluciOnfa.cily ra.pidaa traves de la pantallaLCD.Con
la innovadoratecnolo@ade control inteligente,puede recibir alertasmediante su teldono inteligente
cuando hay un problema.
PowerFoam TM
Graciasal eficaz PowerFoamde Samsung se consigue una mejor limpiezacon los cuidados ma.s
avanzados para el tejido.
PowerFoampermite que el detergente se disperseuniformementey que penetre lastelas con mayor
rapidezy profundidad.
SpeedSpray
La nuevatecnoloda SpeedSprayde Samsung leahorra hasta un 25%* ma.sde tiempo en el lavado de
la ropa al acortar la duraciOndel lavado, aunque se mantienenlos mismos segmentos del proceso y la
ropa queda igualmente limpia.
*Basado en cargas de 8 libras (3.62 kg),ciclo Normal (con un nivelde suciedad Normal sin opciones)
de las lavadorasde carga frontal de 4.3 pies c@bicosanterioresy existentesfabricadas hasta 2011 sin
SpeedSpray.
**SpeedSprayfunciona en los ciclos Normal, Ropade cama, VaporizaciOnprofunda, EliminaciOnde
manchas y Lavado ecolOgicofrb y el ahorro detiempo puede variar de acuerdo con los ciclos y los
diversos tipos de carga y opciones.
VRTplus TM (Tecnologia de Reducci6n de la Vibraci6n)
Esta lavadoraSamsung minimizael ruido y lasvibraciones con sensores de vibraciOn3D y tecnolo@a
de control inteligentepara garantizarun funcionamientosilencioso.
Vaporizaci6n profunda
La funciOnVaporizaciOnprofunda mejorala calidad de la limpiezay eliminatodo tipo de suciedad, para
brindar unos resultados superiores de limpieza.
Pure Cycle TM (ciclo de lavado del tambor)
iLimpie su tambor con un solo botOn! PureCyclese ha disenado especialmente para eliminar la
acumulaciOnde restos de detergentey suciedad en el tambor, el limitadory el vidrio de la puerta sin
detergentesespeciales.
2 Caracteristicas dave de su nueva lavadora inteligente PowerFoam TM
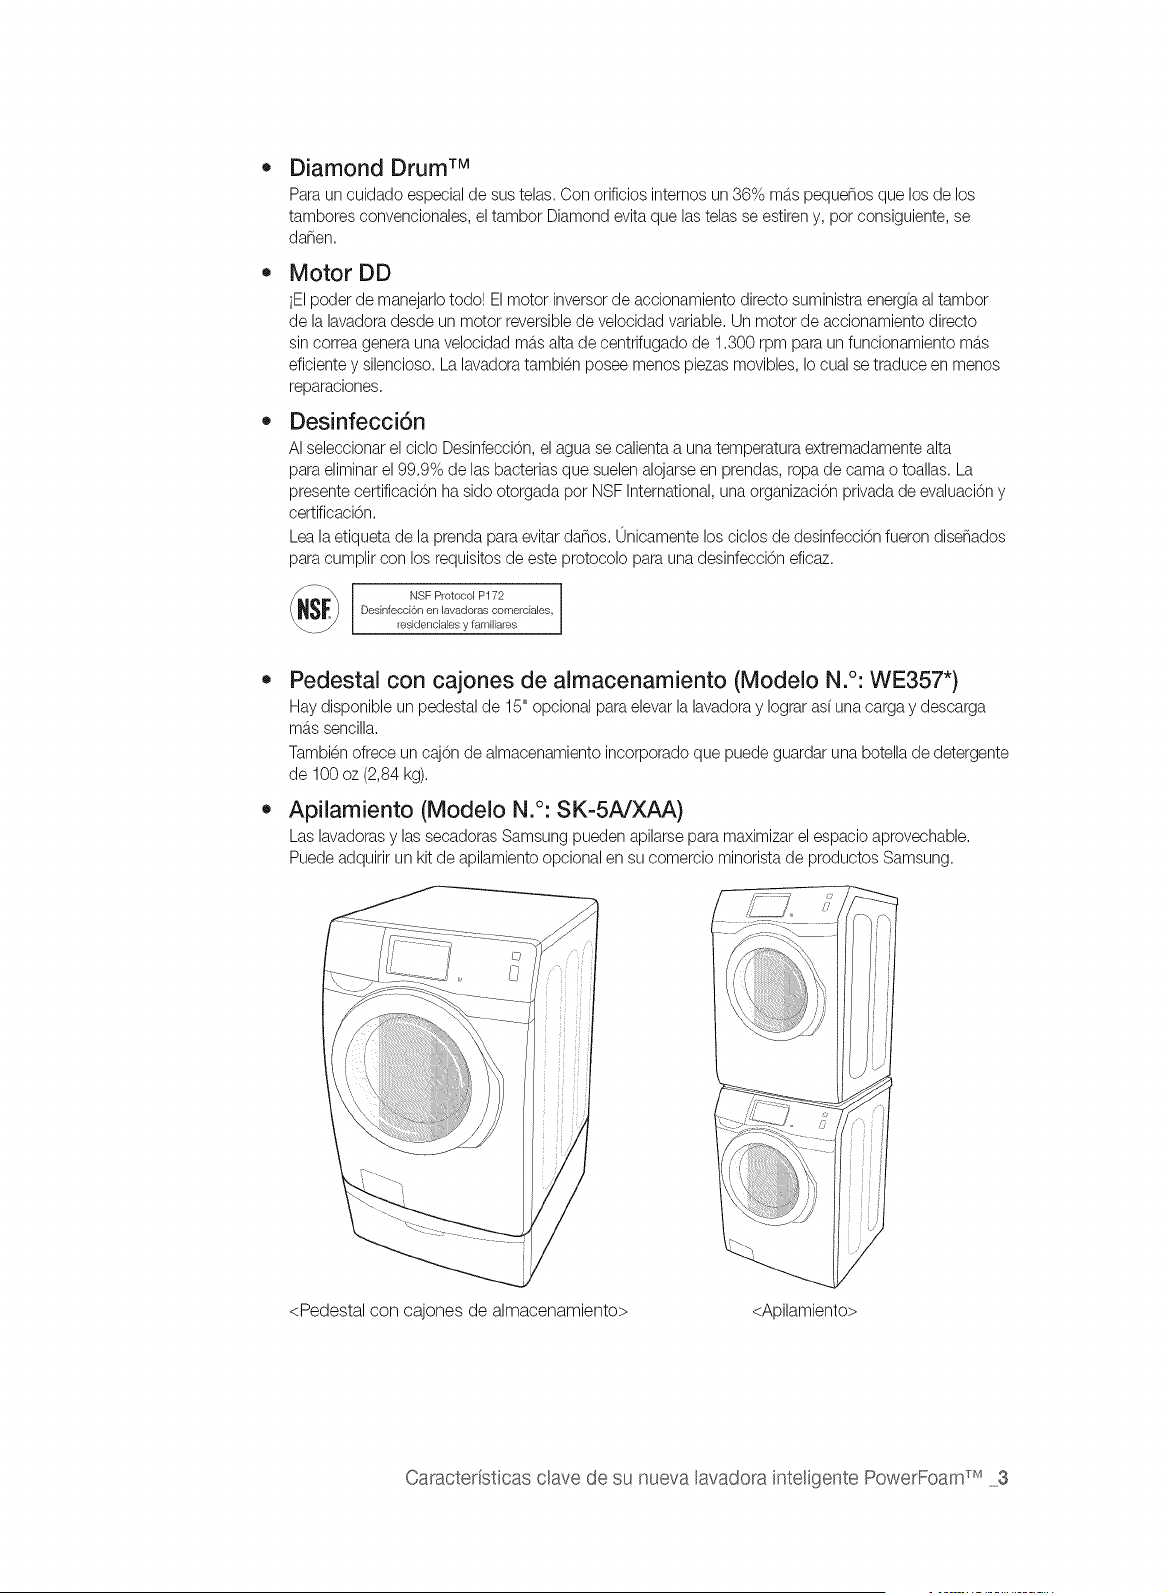
Diamond Drum TM
Paraun cuidado especialde sus telas. Con orificios internos un 36% mb.spequenos que los de los
tambores convencionales,el tambor Diamond evita que las telas se estiren y, pot consiguiente,se
darien.
Motor DD
iEIpoder de manejarlotodo! El motor inversor de accionamiento directo suministraenergfaal tambor
de la lavadoradesde un motor reversiblede velocidad variable. Un motor de accionamientodirecto
sin correa genera una velocidad ma.salta de centrifugado de 1.300 rpm para un funcionamiento ma.s
eficiente y silencioso. La lavadoratambien posee menos piezas movibles, Io cual se traduce en menos
reparaciones.
Desinfecci6n
AI seleccionar el ciclo DesinfecciOn,el agua se calientaa una temperaturaextremadamente alta
para eliminarel 99.9% de las bacterias que suelen alojarse en prendas, ropa de cama o toallas. La
presente certificaciOnha sido otorgada pot NSF International,una organizaciOnprivada de evaluaciOny
certificaci6n.
Leala etiqueta de la prenda para evitar danos. 0nicamente los ciclos de desinfecciOnfueron disenados
para cumplir con los requisitos de este protocolo para una desinfecciOneficaz.
_i_ NSF Protocol P172
Desinfecci6n en lavadoras comerciales,
residenciales y familiares
Pedestal con cajones de almacenamiento (Modelo N.°: WE357")
Haydisponible un pedestal de 15" opcional para elevar la lavadora y Iograrasf unacarga y descarga
mb.ssencilla.
Tambienofrece un cajOnde almacenamiento incorporado que puede guardar una botella de detergente
de 100 oz (2,84 kg).
Apilamiento (Modelo N.°: SK-5AJXAA)
Las lavadorasy lassecadoras Samsung pueden apilarse para maximizarel espacio aprovechable.
Puedeadquirir un kit de apilamiento opcional en su comercio minorista de productos Samsung.
<Pedestal con cajones de almacenamiento> <Apilamiento>
Caracteristicas dave de su nueva lavadora inteligente PowerFoam TM 3
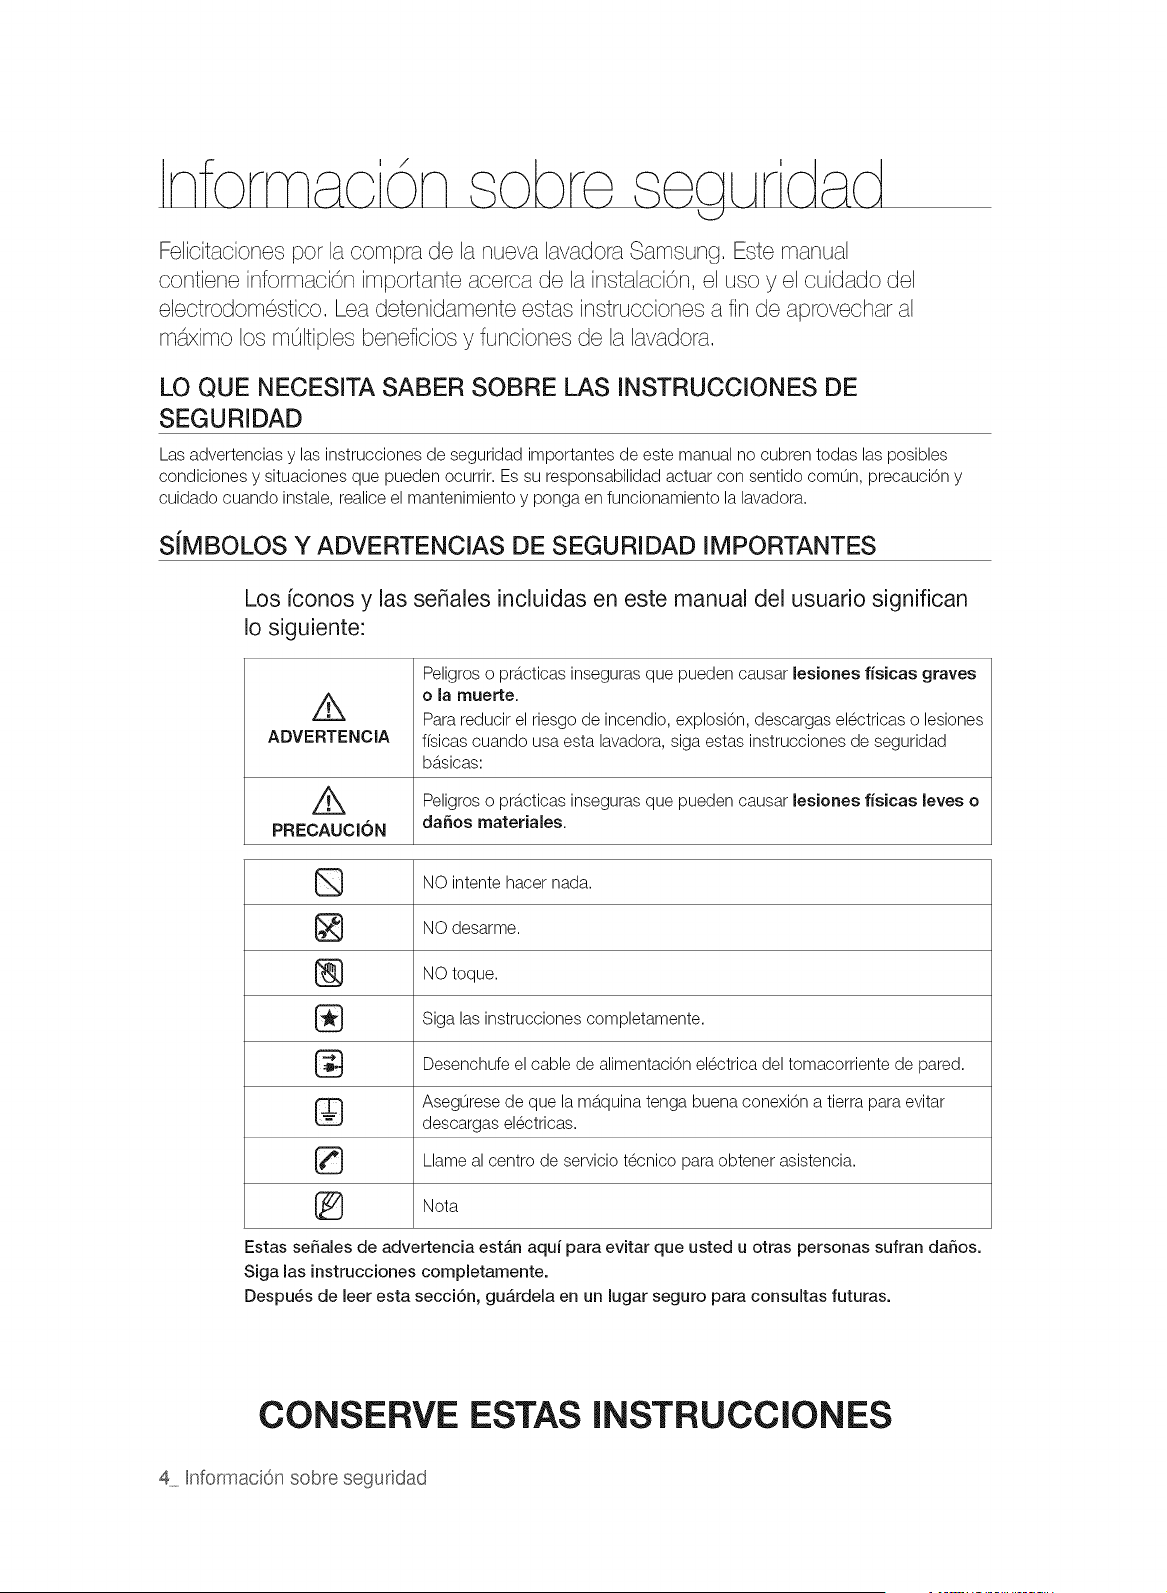
Felicitaciones pot la compra de la nueva lavadora Samsung. Este manual
contiene informaciOn importante acerca de la instalaciOn, el uso y el cuidado del
electrodomestico. Lea detenidamente estas instrucciones a fin de aprovechar al
m_imo los mOltiples beneficios y funciones de la lavadora.
LO QUE NECESITA SABER SOBRE LAS INSTRUCCIONES DE
SEGURIDAD
Las advertencias y las instrucciones de seguridad importantes de este manual no cubren todas las posibles
condiciones y situaciones que pueden ocurrir. Es su responsabilidad actuar con sentido comun, precauci6n y
cuidado cuando instale, realice el mantenimiento y ponga en funcionamiento la lavadora.
S{MBOLOS Y ADVERTENCIAS DE SEGURIDAD IMPORTANTES
Los fconos y las seSales incluidas en este manual del usuario significan
Io siguiente:
ADVERTENCIA
Peligros o prb.cticasinseguras que pueden causar lesiones fisicas graves
o la muerte.
Para reducir el riesgo de incendio, explosi6n, descargas electricas o lesiones
fisicas cuando usa esta lavadora, siga estas instrucciones de seguridad
bb.sicas:
//_ Peligros o pra.cticasinseguras que pueden causar lesiones fisicas leves o
PRECAUCION da_os materiales.
NO intente hacer nada.
NO desarme.
[_) NO toque.
Siga las instrucciones completamente.
Desenchufe el cable de alimentaci6n electrica del tomacorriente de pared.
Asegurese de que la mb.quina tenga buena conexi6n a tierra para evitar
descargas electricas.
Llame al centro de servicio tecnico para obtener asistencia.
Nota
Estas seSales de advertencia estAn aqu{ para evitar que usted u otras personas sufran daSos.
Siga las instrucciones completamente.
Despu_s de leer esta secci6n, guardela en un lugar seguro para consultas futuras.
CONSERVE ESTAS INSTRUCCIONES
4 Informaci6n sobre segundad
ADVERTENCIA
AP/Ei_TEN¢_
Para reducir el riesgo de incendio, descargas eJ_ctricas o lesiones fisicas cuando usa este
eiectrodomdstico, siga las instrucciones de seguridad b_sicas que figuran a continuaci6n:
1=
2.
3=
Lea todas las instrucciones antes de usar el electrodomestico.
No lave o seque prendas que han sido previamente limpiadas, lavadas, remojadas o salpicadas
con gasolina, solventes de limpieza en seco u otras sustancias inflamables o explosivas, ya que
emiten vapores que pueden prenderse fuego o explotar.
No permita que los ninos jueguen sobre la lavadora o dentro de ella. Se requiere de supervisi6n
cuando el electrodomestico es utilizado cerca de los ninos.
4. Antes de descartar el electrodomestico o de trasladarlo para que se le efectue el servicio tecnico,
retire la puerta del compartimiento de la lavadora o la secadora.
5. No introduzca la mano en el electrodomestico si el tambor estb.en movimiento.
6=
7.
8.
9=
10.
No instale o guarde este electrodomestico donde quede expuesto a factores climb.ticos.
No modifique los controles.
No repare, reemplace ni intente realizar el mantenimiento de cualquier pieza del electrodomestico
salvo que este recomendado espec(ficamente en las instrucciones de mantenimiento del usuario
o en las instrucciones de reparaci6n para el usuario publicadas y que, a su juicio, usted tenga la
habilidad para Ilevarlas a cabo.
No agregue gasolina, solventes de limpieza en seco u otras sustancias inflamables o explosivas al
agua del lavado. Estas sustancias emiten vapores que pueden prenderse fuego o explotar.
En ciertas circunstancias, puede producirse gas hidr6geno en un sistema de agua caliente que
no se ha usado durante 2 semanas o mb.s. EL GAS HIDROGENO ES EXPLOSIVO. Si el sistema
de agua caliente no fue utilizado durante dicho per(odo, antes de usar la lavadora o la lavadora y
la secadora combinadas, abra las Ilaves de agua caliente y deje cotter el agua pot varios minutos.
De esta manera, se eliminarb,el gas hidr6geno acumulado. Dado que el gas es inflamable, no
fume ni use una llama abierta en ese momento.
//_ Advertencias de la disposici6n 65 del Estado de California:
ADVERTENCIA:Este producto contiene qdmicos que se sabe en el estado de California que causan
cb.ncery toxicidad reproductiva.
CONSERVE ESTAS INSTRUCCIONES
Informaci6n sobre segundad 5
ADVERTENCIAS FUNDAMENTALES PARA LA INSTALACION
®
Enchufe el cable de alimentaciOn en un tomacorriente de pared de 120 V / 60 Hz / 15 A CA o
superior y utilice el tomacorriente sOlocon este electrodomestico. No use un cable prolongador.
Compartir el tomacorriente de pared con otros electrodomesticos, utilizando un
multicontacto o un cable prolongandor, puede provocar un incendio o una descarga
electrica.
No utilice un transformador electrico. Puede provocar un incendio o una descarga electrica.
Asegurese de que el voltaje, la frecuencia y el amperaje del tomacorriente de pared coincidan
con las especificaciones electricas del producto.
La instalaciOn de este electrodomestico la debe efectuar un tecnico cualificado o una empresa
de servicios.
Si no Io hace, puede provocar una descarga electrica, un incendio, una explosion, problemas
con el producto o lesiones.
Retire regularmente todas las sustancias extraflas, como polvo o agua, de los terminales y los
puntos de contacto de la alimentaciOn con un patio seco.
Desenchufe el cable de alimentaciOn y I(mpielo con un patio seco.
Si no Io hace puede provocar un incendio o una descarga electrica.
Enchufe el cable de alimentaciOn en un tomacorriente de pared en la direcciOn adecuada de
manera que el cable baje hacia el suelo.
Si enchufa el cable de alimentaciOn en el tomacorriente en la direcciOn opuesta, los cables
electricos del interior del cable pueden daflarse y provocar un incendio o una descarga
electrica.
Este electrodomestico debe conectarse a tierra correctamente.
La toma de tierra no se ha de conectar a una conducciOn de gas o de agua ni a la I(nea
telefOnica.
G
La conexiOn a tierra inadecuada puede provocar un incendio, una descarga electrica, un
incendio o problemas con el producto.
Nunca enchufe el cable de alimentaciOn a un tomacorriente que no este conectado a tierra
correctamente y asegurese de que guarde conformidad con los cOdigos locales y nacionales.
No instale este electrodomestico cerca de un calefactor o materiales inflamables.
No instale este electrodomestico en un lugar humedo, grasiento o cubierto de polvo, ni Io
exponga a la luz directa del sol o al agua (gotas de Iluvia).
No instale este electrodomestico en un lugar donde pueda haber fugas de gas.
Puede provocar un incendio o una descarga electrica.
Enchufe el cable de alimentaciOn firmemente en el tomacorriente de pared. No utilice un cable
de alimentaciOn daflado ni un tomacorriente que este flojo.
Puede provocar un incendio o una descarga electrica.
No tire del cable de alimentaciOn ni Io doble excesivamente.
No tuerza ni ate el cable de alimentaciOn.
No cuelgue el cable de alimentaciOn de un objeto metb.lico, no coloque objetos pesados sobre
el, no inserte el cable de alimentaciOn entre objetos ni Io empuje en un espacio detrb.s del
electrodomestico.
Puede provocar un incendio o una descarga electrica.
CONSERVE ESTAS INSTRUCCIONES
6 InformaciOn sobre seguridad
No tire del cable de alimentaci6n para desenchufarlo.
Desenchufe el cable de alimentaci6n sujetb.ndolo pot el enchufe.
Si no Io hace puede provocar un incendio o una descarga electrica.
Si el enchufe o el cable de alimentaci6n estb.n da_ados, comun(quese con el centro de servicio
mas cercano.
PRE_U_ON
PRECAUCIONES PARA LA INSTALACION
_ Coloque el electrodomestico de tal acceder fb.cilmente al tomacorriente.
manera
que
se
pueda
Si no Io hace puede provocar un incendio o una descarga causados pot fugas electricas.
Instale el electrodomestico sobre una superficie nivelada que pueda soportar su peso.
Si no Io hace pueden producirse vibraciones anormales, ruidos o problemas con el producto.
Desenchufe el electrodomestico si no Io va a utilizar durante un perfodo prolongado o durante
una tormenta con aparato electrico.
Si no Io hace puede provocar un incendio o una descarga electrica.
ADVERTENCIAS FUNDAMENTALES PARA EL USO
A_tER_N_
Si el electrodomestico se inunda, desconectelo inmediatamente y Ilame al centro de servicio
mas cercano.
Si el electrodomestico genera ruidos extra_os, olores a quemado o humo, desconectelo
inmediatamente y Ilame al centro de servicio mb.scercano.
Si no Io hace puede provocar un incendio o una descarga electrica.
En caso de fugas de gas (como propano, LP, etc.), ventile inmediatamente sin tocar el enchufe.
No toque el electrodomestico ni el cable de alimentaci6n.
No utilice un ventilador.
Una chispa puede provocar un incendio o una explosi6n.
No lave prendas contaminadas con gasolina, queroseno, benceno, disolventes de pinturas,
alcohol u otras sustancias inflamables o explosivas.
Puede provocar una descarga electrica, un incendio o una explosi6n.
No abra la puerta de la lavadora pot la fuerza mientras este en funcionamiento (lavado a alta
temperatura/secado/centrifugado).
Elagua que salga de la lavadora puede causar quemaduras o convertir el suelo en
resbaladizo.
Puede causar lesiones personales.
Abrir la puerta pot la fuerza puede da_ar el producto o causar lesiones personales.
Asegurese de quitar el embalaje (goma espuma, poliestireno) del fondo de la lavadora antes de
utilizarla.
No introduzca las manos bajo la lavadora.
Puede provocar lesiones personales.
CONSERVE ESTAS INSTRUCCIONES
Informaci6n sobre seguridad 7
Q
@
No toque el enchufe con las manos mojadas.
Puede causar lesiones personales.
No apague el electrodomestico desenchufb.ndolo mientras este en funcionamiento.
Si vuelve a enchufar el electrodomestico en el tomacorriente puede originar una chispa y
causar una descarga electrica o un incendio.
Mantenga los materiales del embalaje fuera del alcance de los ninos, ya que son peligrosos para
estos.
Si un nino introduce la cabeza en una bolsa puede asfixiarse.
No permita que los ninos o las personas inestables utilicen la lavadora sin supervisi6n.
Si Io hace puede provocar una descarga electrica, quemaduras o lesiones.
No introduzca la mano ni objetos de metal bajo la lavadora mientras este en funcionamiento.
Puede provocar lesiones personales.
Antes de poner la ropa a lavar o de sacar la ropa limpia, compruebe que el caj6n para
detergente este cerrado.
Si el caj6n para detergente estb.abierto, se podr(a golpear la cabeza con el y lesionarse.
No trate de reparar, desensamblar ni modificar la lavadora usted mismo.
No utilice un fusible (de cobre, cable de acero, etc) que no este normalizado.
Si necesita reparar o volver a instalar el electrodomestico, comun(quese con el centro de
servicio mb.scercano.
Si no Io hace puede provocar una descarga electrica, un incendio, problemas con el
producto o lesiones.
Si entra agua en cualquier parte del electrodomestico que no sea el tambor, desenchufe el cable
de alimentaci6n y comun(quese con el centro de servicio mb.scercano.
Si no Io hace puede provocar un incendio o una descarga electrica.
Si se afloja la manguera de suministro de agua del grifo y se inunda el electrodomestico,
desenchufe el cable de alimentaci6n.
Si no Io hace puede provocar un incendio o una descarga electrica.
Si entra alguna sustancia extra_a en la mb.quina,desenchufe el cable de alimentaci6n y
comun(quese con el centro de servicio mb.scercano.
Si no Io hace puede provocar un incendio o una descarga electrica.
PRECAUCIONES DE USO
P_ECA_
®
Si la lavadora estb.contaminada pot sustancias extra,as, tales como detergente, tierra, restos
de alimentos, etc., desenchufe el cable de alimentaci6n y limpie la lavadora con un paso suave
humedecido.
Si no Io hace puede producirse decoloraci6n, deformaci6n, da_os u 6xido.
Si se Io golpea con fuerza, el vidrio frontal puede romperse. Sea cuidadoso cuando utilice la
lavadora.
La rotura del cristal puede causar lesiones.
CONSERVE ESTAS INSTRUCCIONES
8 Informaci6n sobre segundad

Ante una falla de suministro de agua o cuando se vuelve a conectar la manguera de suministro,
abra lentamente la Ilave del agua.
Abra lentamente la Ilave del agua tras un periodo prolongado de falta de uso.
La presi6n del aire de la manguera de suministro o de la conducci6n de agua puede daflar
una pieza o provocar fugas de agua.
Si durante el funcionamiento hay una falla en el drenaje, contr61elo.
Si se utiliza la lavadora inundada pot una falla en el drenaje, puede provocar una descarga
electrica o un incendio.
Introduzca completamente la ropa en la lavadora para que no pueda quedar atrapada pot la
puerta.
Si la ropa queda atrapada pot la puerta, puede daflarse la ropa o la lavadora, o puede haber
fugas de agua.
Asegurese de que la Ilave del agua este cerrada cuando la lavadora no se utiliza.
Asegurese de que el tornillo del conector de la manguera de suministro del agua este
conectado firmemente a la canilla y correctamente apretado.
Si no Io hace puede provocar daflos materiales o lesiones.
Procure que la junta de goma y el vidrio de la puerta frontal no esten contaminados pot
sustancias extraflas (como restos, hilos, cabellos, etc.)
Si una sustancia extrafla queda atrapada en la puerta o si la puerta no estb.bien cerrada,
puede producirse una fuga de agua.
Antes de utilizar el producto, abra la Ilave del agua y compruebe si el conector de la manguera
de suministro del agua estb.firmemente asegurado y que no haya fugas de agua.
Si los conectores de la manguera de suministro del agua estb.nflojos, puede haber fugas de
agua.
El producto adquirido estb.diseflado exclusivamente para uso domestico.
Su utilizaci6n con fines comerciales se considera un uso incorrecto del producto. En tal caso
el producto no quedarb,cubierto pot la garantfa estb.ndar que ofrece Samsung y no se podrb.
atribuir a Samsung ninguna responsabilidad pot el malfuncionamiento o los daflos resultantes
de este uso incorrecto.
Si no se realiza el lavado y la ropa se deja pot un tiempo despues de agregar detergente o
aplicar productos quitamanchas o de tratamiento previo, la ropa puede decolorarse.
Seleccione el ciclo y la temperatura recomendados dependiendo de la ropa que va a lavar,
clasifique las prendas segun la solidez del color y seleccione el ciclo apropiado.
Asegurese de que no haya objetos extraflos como clips, botones o monedas en la ropa que
va a lavar. Antes del lavado separe lave la ropa sucia de la que estb.relativamente limpia, y la
delicada de las telas mb.sresistentes.
Si una prenda estb.manchada, Ib.velaIo mb.spronto posible. Antes de utilizar productos
quitamanchas o detergente, pruebe la solidez del color aplicando una pequefla cantidad en una
costura interior.
CONSERVE ESTAS INSTRUCCIONES
Informaci6n sobre seguridad 9
Q
No se para encima del aparato ni coloque objetos (como ropa, velas o cigarrillos encendidos,
platos, productos qu(micos, objetos metb.licos,etc.) encima de este.
Puede provocar una descarga electrica, un incendio, problemas con el producto o lesiones.
No haga funcionar el electrodomestico con las manos mojadas.
Puede causar lesiones personales.
No rode materiales volb.tiles,como insecticidas, en la superficie del electrodomestico.
Ademb.s de set perjudiciales para las personas, tambien pueden provocar una descarga
el@trica, un incendio o problemas con el producto.
No coloque objetos que generen campos electromagneticos cerca de la lavadora.
Puede causar lesiones pot un malfuncionamiento.
No toque el agua que se drena durante el lavado a alta temperatura o durante el ciclo de secado
ya que estb.caliente.
Puede causar lesiones personales o quemaduras.
No lave, centrifugue ni seque alfombrillas o prendas impermeables(*).
No lave alfombrillas gruesas y espesas aunque Ileven la marca de lavado en la etiqueta.
Se pueden causar lesiones o da_ar la lavadora, las paredes, el suelo o la ropa debido a
vibraciones anormales.
* Ropa de cama de lana, fundas de Iluvia, ropa para pescar, pantalones de esqu(, bolsas de
dormir, cubiertas de pa_ales, chb.ndales, cubiertas de bicicletas, motos y autom6viles, etc.
No haga funcionar la lavadora sin el caj6n del detergente.
Se puede provocar una descarga electrica o lesiones debido a fugas de agua.
No toque el interior de la tina durante o inmediatamente despues del secado, ya que estb.
caliente.
Puede causar quemaduras.
No introduzca las manos en el dosificador de detergente despues de abrirlo.
Se puede causar lesiones en la mano siesta queda atrapada.
No introduzca ningun objeto que no sea ropa (pot ejemplo, zapatos, restos de comida o
animales) en la lavadora.
Esto puede causar vibraciones anormales que pueden da_ar la lavadora y, en el caso de las
mascotas, puede provocar lesiones graves, o incluso la muerte.
No presione los botones con objetos afilados, como alfileres, cuchillos, las unas, etc.
Puede provocar una descarga electrica o lesiones personales.
No lave ropa contaminada pot aceites, cremas o Iociones que se utilizan normalmente en los
establecimientos para el cuidado de la piel o en las cl(nicas de masajes.
Se puede deformar lajunta de goma y provocar fugas de agua.
No deje objetos de metal (tales como clips, horquillas, etc.) ni lej(aen el tambor durante per(odos
prolongados.
Se puede oxidar el tambor.
Si aparece 6xido en la superficie del tambor, aplique un agente limpiador neutro sobre la
superficie y utilice una esponja para limpiarla. Nunca utilice un cepillo de metal.
CONSERVE ESTAS INSTRUCCIONES
10 Informaci6n sobre segundad
ik
No utilice detergentes de limpieza en seco directamente ni lave, enjuague ni centrifugue ropa
contaminada pot detergentes de limpieza en seco.
Se puede producir una combusti6n espontb.nea o un incendio pot el calor de la oxidaci6n del
aceite.
No utilice agua caliente de los dispositivos de calentamiento o enfriamiento del agua.
Podffa tenet problemas con la lavadora.
No utilice jab6n natural para lavado a mano en la lavadora.
Si se endurece y se acumula en el interior de la lavadora, puede causar problemas en el
producto, como decoloraci6n, 6xido y malos olores.
No lave prendas grandes como ropa de cama dentro de una red.
De no hacerlo se pueden producir lesiones personales pot las vibraciones anormales.
Coloque los artfculos mb.speque_os, como las medias y la lenceffa, dentro de una red.
No utilice detergente endurecido.
Si se acumula en el interior de la lavadora, puede provocar fugas de agua.
No lave alfombras ni felpudos.
Si lava alfombras o felpudos, se acumularb, arena en el interior de la lavadora. Puede
provocar errores como la falta de drenaje.
AI cerrar la puerta tenga cuidado de no atrapar los dedos de los ninos.
Puede provocar lesiones personales.
INSTRUCCIONES FUNDAMENTALES PARA LA LIMPIEZA
No limpie el electrodomestico rociando directamente agua dentro de el.
No utilice un agente limpiador muy b.cido.
No utilice benceno, disolventes ni alcohol para limpiar el electrodomestico.
Puede provocar decoloraci6n, deformaci6n, da_os, incendio o descarga electrica.
Antes de la limpieza o las tareas de mantenimiento, desenchufe el electrodomestico del
tomacorriente de la pared.
Si no Io hace puede provocar un incendio o una descarga electrica.
CONSERVE ESTAS INSTRUCCIONES
[nformaci6n sob_'eseguddad 1t

AVISO REGULATORIO
1. Aviso para FCC
/_ PRECAUCI6N FCC:
Todos los cambios y modificaciones que no cuenten con la aprobaci6n expresa de la parte
responsable del cumplimiento invalidarb,la autoridad del usuario para operar el equipo.
Este dispositivo cumple con la Parte 15 de las Normas de la FCC. El funcionamiento se encuentra
sujeto alas siguientes dos condiciones:
1. Este aparato no puede causar interferencia da_ina, y
2. Este aparato debe aceptar la recepci6n de cualquier interferencia, incluidas aquellas que puedan
causar un funcionamiento indeseado.
Producto disponible en el mercado de Estados Unidos/Canadb., s61opuede operarse el canal 1-1 1.
No es posible seleccionar otros canales.
DECLARACION DE LA FCC:
Este equipo ha sido sometido a pruebas y se ha determinado que se encuentra dentro de los Ifmites
para los dispositivos digitales clase B, de acuerdo con la parte 15 de las Normas de la FCC. Dichos
Ifmites han sido dise_ados para proporcionar una protecci6n razonables contra la interferencia da_ina
en una instalaci6n residencial.
Este equipo genera, utiliza y puede irradiar energfa de frecuencias de radio y, si no se Io instala y
utiliza de acuerdo con las instrucciones, puede provocar interferencia da_ina alas comunicaciones
de radio. Sin embargo, no existe garantfa alguna de que no habrb,interferencia en una instalaci6n
determinada. Si el equipo provoca interferencia da_ina a la recepci6n de radio o televisi6n, que
puede determinarse al encender y apagar el equipo, se sugiere que el usuario trate de corregir la
interferencia mediante una o mb.sde las siguientes medidas:
- Reoriente o reubique la antena receptora
- Aumente la distancia entre el equipo y el receptor
- Conecte el equipo en una toma de un circuito diferente de aquel donde estb.conectado el
receptor
- Consulte a su distribuidor o a un tecnico experimentado en radio/TV para obtener ayuda.
DECLARACION DE LA FCC SOBRE LA EXPOSICION A LA RADIACION:
Este equipo cumple con los Ifmites de exposici6n a la radiaci6n establecidos pot la FCC para un
entorno no controlado. Este equipo debe instalarse y utilizarse con una distancia mfnima de 20cm
entre el radiador y su cuerpo. Este aparato y su/s antena/s no deben ubicarse ni utilizarse junto con
cualquier otra antena o transmisor.
CONSERVE ESTAS INSTRUCCIONES
12 Informaci6n sobre seguridad
2. Aviso IC
Eltermino "IC" antes del numero de certificaci6n de radio significa unicamente que se han cumplido
las especificaciones tecnicas
de la Industria Canadiense. El funcionamiento se encuentra sujeto alas siguientes dos condiciones:
(1) este aparato no puede causar interferencia y (2) este aparato debe aceptar cualquier interferencia,
incluidas aquellas que puedan causar un funcionamiento indeseado.
Este aparato digital Clase B cumple con la norma canadiense ICES-003.
Cet appareil numerique de la classe Best conforme b.la norme NMB-003 du Canada.
Producto disponible en el mercado de Estados Unidos/Canadb., s61opuede operarse el canal 1-11.
No es posible seleccionar otros canales.
DECLARACION DE LA IC SOBRE LA EXPOSICION A LA RADIACION:
Este equipo cumple con los Ifmites de exposici6n a la radiaci6n RSS-102 establecidos pot la IC para
un entorno no controlado. Este equipo debe instalarse y utilizarse con una distancia minima de 20cm
entre el radiador y su cuerpo. Este aparato y su/s antena/s no deben ubicarse ni utilizarse junto con
cualquier otra antena o transmisor.
Aviso de licencia de c6digo abierto
Este dispositivo utiliza software de cOdigo abierto. Las licencias de cOdigo abierto se encuentran
disponibles en el menu del producto.
Toque "Configuracion > Red > Actualizacion de software > Informacion legal" en el dispositivo para
obtener mb.sinformaci6n.
CONSERVE ESTAS INSTRUCClONES
Informaci6n sobre seguddad 13
Cs nt n do
INSTALACI6N DE LA LAVADORA
16 Desembalaje de la lavadora
16 Descripci6n general de la lavadora
17 Cumplir con los requisitos de instalacidn
17 Suministro electrico y conexi6n a tierra
17 Suministro de agua
18 Drenaje
18 Suelo
18 Temperatura circundante
18 Instalaci6n del electrodomestico en un
gabinete o en un hueco
20 Instalaci6n de la lavadora
25 Primera puesta a punto de de la lavadora
25 Selecci6n del idioma
25 Configurar la fecha actual
26 Configurar la hora actual
LAVADO DE LINA CARGA DE ROPA 27 Lavar pot primera vez
27 Instrucciones bb,sicas
28 Uso del panel de control
29 Ciclos disponibles
30 Ciclos especiales
30 Opciones disponibles
31 Acciones disponibles
33 Lavar su ropa utilizando la pantalla Selecci6n
de ciclo
35 Uso de la funci6n Mi ciclo
36 Uso de la funci6n Inicio retardado
37 Uso de la funci6n Seguro para niflos
38 Encender y apagar la luz
38 Controlar el volumen
38 DEEP STEAM(VAPOR PROFUNDO)
39 Control del nivel de brillo
40 Uso de la Gufa de manchas
41 Visualizaci6n de la Eficiencia energetica
41 Uso de la Red inteligente
42 ATC (control autom_.tico de temperatura)
43 Uso del detergente
43 Uso del caj6n del detergente
43 Dosificador automb.tico
43 Compartimiento para el detergente
43 Compartimiento para prelavado
44 Compartimiento para el blanqueador
44 Compartimiento para el suavizante de telas
14 Contenido
USO DE SU TELEFONO MOVIL
45 Configurar los ajustes de red de su lavadora y
conectarla a su red
45 Configurar los path.metros de direcci6n IP
46 Conectar la lavadora a la red
46 Activar la funci6n de red Wi-Fi de su lavadora
47 C6mo actualizar el software
48 Descargar y ejecutar la aplicaci6n m6vil,
Aplicaci6n para la lavadora/secadora
inteligente Samsung
50 Uso de la aplicaci6n m6vil
50 Desconectar la conexi6n
51 Iniciar un nuevo lavado.
52 Registrar su lavadora
54 Descripci6n general de la configuraci6n Wi-Fi
y la conexi6n AP
MANTENIMIENTO DE LA LAVADORA 55 Limpieza del exterior
55 Limpieza del interior
55 Limpieza de los dosificadores
55 C6mo guardar la lavadora
56 Limpieza del filtro de residuos
57 Limpieza del sello/fuelle de la puerta
57 Mantenimiento de la cubierta superior y del
marco frontal
58 Pure CycleTM
SOLUCION DE PROBLEMAS 59 Controle estos puntos si su lavadora...
61 C6digos de informaci6n
63 Preguntas y respuestas sobre la configuraci6n
de red
APENDICE
\ \
65 Tabla de indicaciones sobre la tela
66 Tabla de cicIos
68 Ayuda al medioambiente
68 Declaraci6n de conformidad
68 Especificaciones
DESEMBALAJE DE LA LAVADORA
Desembale la lavadora e inspecci6nela para controlar que no se hayan producido da_os durante el transporte.
Compruebe que haya recibido todos los elementos que se muestran a continuaci6n. Si la lavadora sufri6 da_os
durante el transporte, o si falta algun elemento, comunfquese con el 1-800-SAMSUNG (726-7864).
Para evitar lesiones fisicas o tirones, use guantes protectores cada vez que levante o transporte la unidad.
Los materiales de embalaje pueden set peligrosos para los ninos; mantenga todo el material de embalaje
(bolsas de plb.stico, poliestireno, etc.) fuera del alcance de los ninos.
DESCRIPCION GENERAL DE LA LAVADORA
Caj6n para
detergente
Panel de control
PueAa
Manguera de
de agua caliente
Manguera de
suministro de aguafda
Tambor,
Filtro de residuos
Tubo de drenaje
Cubierta del filtro,
Manguera de
drenaje
Paras ajustables
Llave inglesa
OO©
O©O
Tapones para los orificios de los
tornillos
Mangueras de suministro de agua
Abrazadera plb.sticade sujeci6n de
Gufa de la manguera Manual del usuario
la manguera
Herrarnientas necesarias
Pinzas Destornillador piano
16 Instalaci6n de la lavadora
CUMPLIR CON LOS REQUISITOS DE INSTALACION
Suministro el@trico y conexi6n a tierra
No utilice cables de extensi6n.
_ERTE,_AUtilice unicarnente el cable de alimentaci6n provisto con su lavadora.
Cuando se prepare para la instalaci6n, asegurese de que su suministro electrico ofrezca:
,, Un fusible o disyuntor de CA de 120V / 60 Hz / 15-amp
,, Un circuito derivado individual destinado unicamente a su lavadora
Su lavadora debe estar conectada a tierra. En caso de que su lavadora funcione mal o se
descomponga, la conexi6n a tierra reducirb,el riesgo de descarga electrica al ofrecer una via de
menos resistencia a la corriente electrica.
Su lavadora estb.equipada con un cable de alimentaci6n que cuenta con un enchufe de tres pines
con conexi6n a tierra para utilizar en un tomacorriente con conexi6n a tierra correctamente instalado.
_E_EN_A
,4',
_NEgrEN_A
Nunca conecte el cable a tierra alas tuber(as de plb.stico, las tuber(as de gas o alas ca_er[as de
agua caliente.
La conexi6n inadecuada del conductor de conexi6n a tierra del equipo puede generar una
descarga electrica.
Consulte a un electricista o tecnico calificado si no estb.seguro de si la conexi6n a tierra de la
lavadora es la adecuada.
No modifique el enchufe provisto con la lavadora. Si no entra en el tomacorriente, solicite a un
PRE_U_O,electricista calificado que instale el tomacorriente adecuado.
Precauciones de seguridad importantes
/_ Para evitar el riesgo de incendio innecesario, descarga electrica o lesiones fisicas, todo el
PRE_U_O,cableado y la conexi6n a tierra deben realizarse en conformidad con el C6digo Electrico
Nacional, ANSI/FNPA, Nro. 70, la revisi6n mb.sreciente, y los c6digos y ordenanzas locales. Es
exclusiva responsabilidad del propietario del electrodomestico proveer los servicios el@tricos
adecuados para este electrodomestico.
Suministro de agua
Su lavadora se Ilenarb.correctamente cuando su presi6n de agua sea de 20 psi (137 kPa) a 116 psi
(800 kPa). Una presi6n de agua inferior a 20 psi (137 kPa) puede ocasionar fallas en la vb.lvulade
agua o impedir que la vb.lvulade agua se cierre completamente. Como altemativa, puede demorar
mb.sde Io permitido por los controles y, en consecuencia, hacer que se apague. (En los controles,
hay un I[mite de tiempo de Ilenado disenado para evitar que se produzcan derrames o inundaciones si
se afloja una manguera interna).
Las Ilavesde agua deben estar colocadas dentro de los 4 pies (122 cm) de distancia de la parte
posterior de la lavadora para que las mangueras de entrada provistas Ileguen hasta la lavadora.
®
®
ik
_ERTENCIA
La mayor[a de las tiendas venta de elementos plomer[a venden mangueras de suministro de
agua de diversas longitudes de hasta 10 pies (305 cm.) de Iongitud.
Puede disminuir el riesgo de perdidas y de da_os ocasionados por el agua:
,, Facilitando el acceso a las Ilaves de agua.
,, Cerrando las Ilaves cuando la lavadora no este en uso.
,, Verificando peri6dicamente que no haya perdidas de agua en los accesorios de la manguera
de entrada de agua.
Antes de utilizar la lavadora por primera vez, controle que todas las conexiones de la vb.lvulay
de la Ilave de agua no presenten perdidas.
Z_ Usar aguas duras puede provocar que la vb.lvulade suministro de agua no funcione
PRE_U_correctamente.
Instalaci6n de la lavadora 17
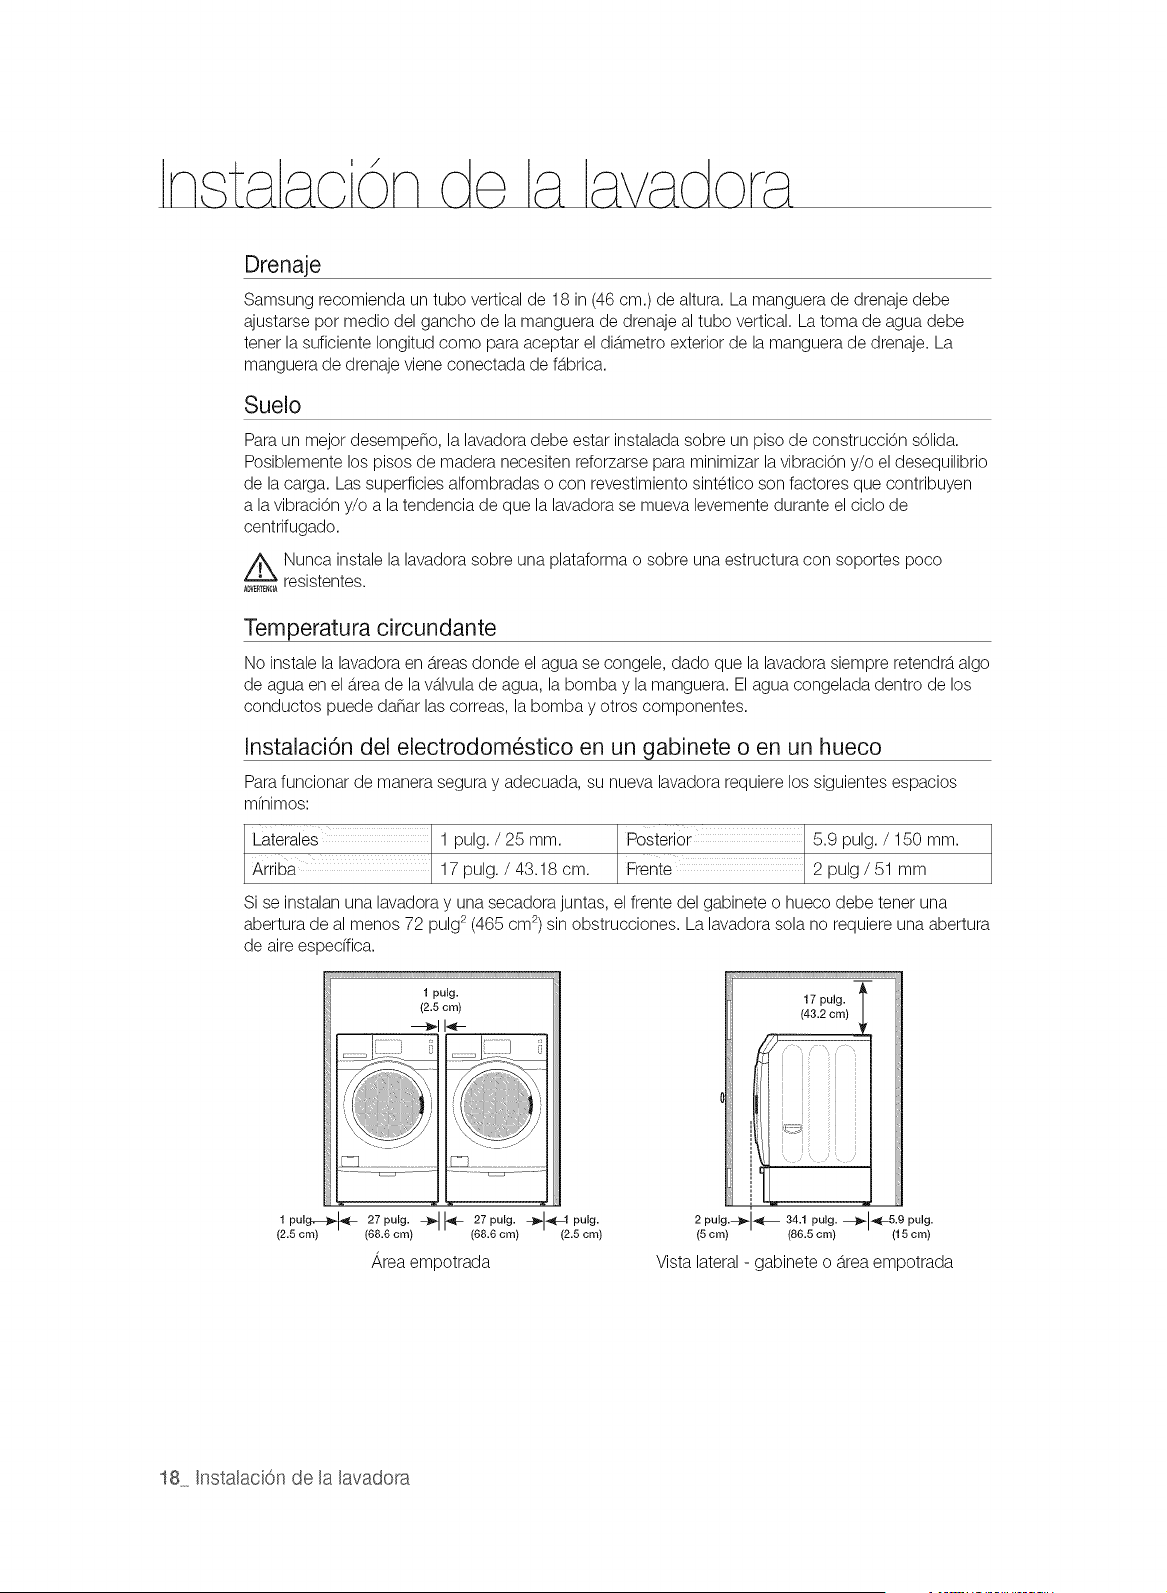
Drenaje
Samsung recomienda un tubo vertical de 18 in (46 cm.) de altura. La manguera de drenaje debe
ajustarse por medio del gancho de la manguera de drenaje al tubo vertical. La toma de agua debe
tener la suficiente Iongitud como para aceptar el dib.metro exterior de la manguera de drenaje. La
manguera de drenaje viene conectada de fb.brica.
Suelo
Para un mejor desempe_o, la lavadora debe estar instalada sobre un piso de construcciTn s61ida.
Posiblemente los pisos de madera necesiten reforzarse para minimizar la vibraciTn y/o el desequilibrio
de la carga. Las superficies alfombradas o con revestimiento sintetico son factores que contribuyen
a la vibraciTn y/o a la tendencia de que la lavadora se mueva levemente durante el ciclo de
centrifugado.
Z_ Nunca instale la lavadora sobre una plataforma o sobre una estructura con soportes poco
ADVERS_C_resistentes.
Temperatura circundante
No instale la lavadora en b.reasdonde el agua se congele, dado que la lavadora siempre retendrb,algo
de agua en el b.reade la vb.lvulade agua, la bombay la manguera. El agua congelada dentro de los
conductos puede da_ar las correas, la bombay otros componentes.
[nstalaci6n de[ electrodom_stico en un gabinete o en un hueco
Para funcionar de manera segura y adecuada, su nueva lavadora requiere los siguientes espacios
mfnimos:
Laterales 1 pulg. / 25 mm. Posterior 5.9 pulg. / 150 mm.
Arriba 17 pulg. / 43.18 cm. Frente 2 pulg/51 mm
Si se instalan una lavadora y una secadora juntas, el frente del gabinete o hueco debe tener una
abertura de al menos 72 pulg 2 (465 cm 2)sin obstrucciones. La lavadora sola no requiere una abertura
de aire espedfica.
1 pulg,--_ _ 27 pulg. -_
(2.5 cm) (88.6 cm)
1 pulg.
(2.5 cm)
--_1 I-_-
27 pulg. -_ _L1 pulg.
(68.6 cm) (2.5 cm)
Area empotrada
17 pulg. 1_
(43.2 cm)
2 pulg.--_-[_ 34.1 pulg. _.-[_-5.9 pulg.
(5cm) (86.5cm) (15cm)
Vista lateral - gabinete o b.reaempotrada
18 [nstalaci6n de la lavadora
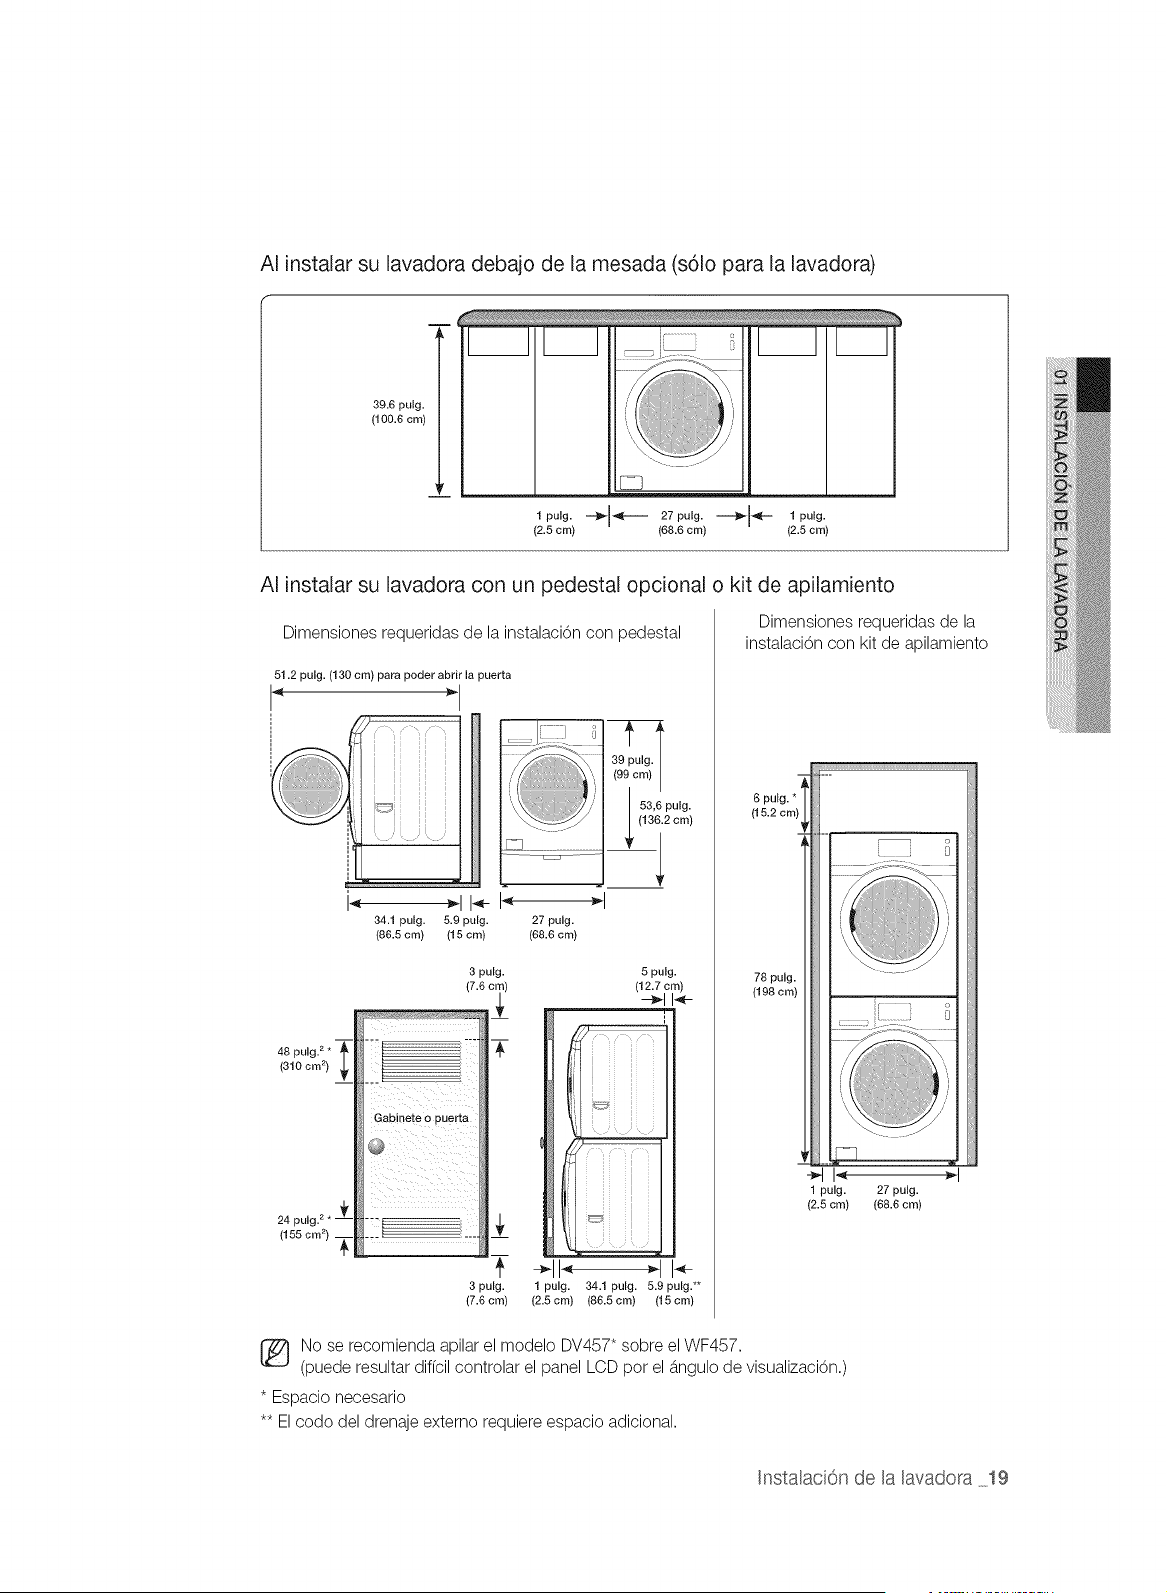
AI instalar su lavadora debajo de la mesada (s61o para la lavadora)
39.6 pulg.
(100.6 cm)
v
l pulg. --}_I_F----- 27pulg.-"""",_I_F- l pulg.
(2.5 cm) (68.6 cm) (2.5 cm)
AI instalar su lavadora con un pedestal opcional o kit de apilamiento
Dimensiones requeridas de la instalaci6n con _edestal
51.2 pulg. (130 cm) para poder abrir la puerta
34.1 pulg. 5.9 pulg.
(86.5 cm) (15 cm)
(i )
27 pulg.
(68.6 cm)
/991c I
48 pulg. 2*
(310 cm 2)
3 pulg. 5 pulg.
(7.6 cr (12.7 cm)
-_114-
÷1I" "t I_-
3 pulg. 1 pulg. 34.1 pulg. 5.9 pulg.**
(7.6 cm) (2.5 cm) (86.5 cm) (15 cm)
Dimensiones requeridas de la
instalaci6n con kit de a _ilamiento
6 pulg. *
(15.2 cm)
78 pulg
(198 cm)
1 pulg. 27 pulg.
(2.5 cm) {68.6 cm)
No se recomienda apilar el modelo DV457" sobre el WF457.
(puede resultar diffcil controlar el panel LCD pot el b.ngulode visualizaci6n.)
* Espacio necesario
** El codo del drenaje externo requiere espacio adicional.
InstalaciOn de la lavadora 19
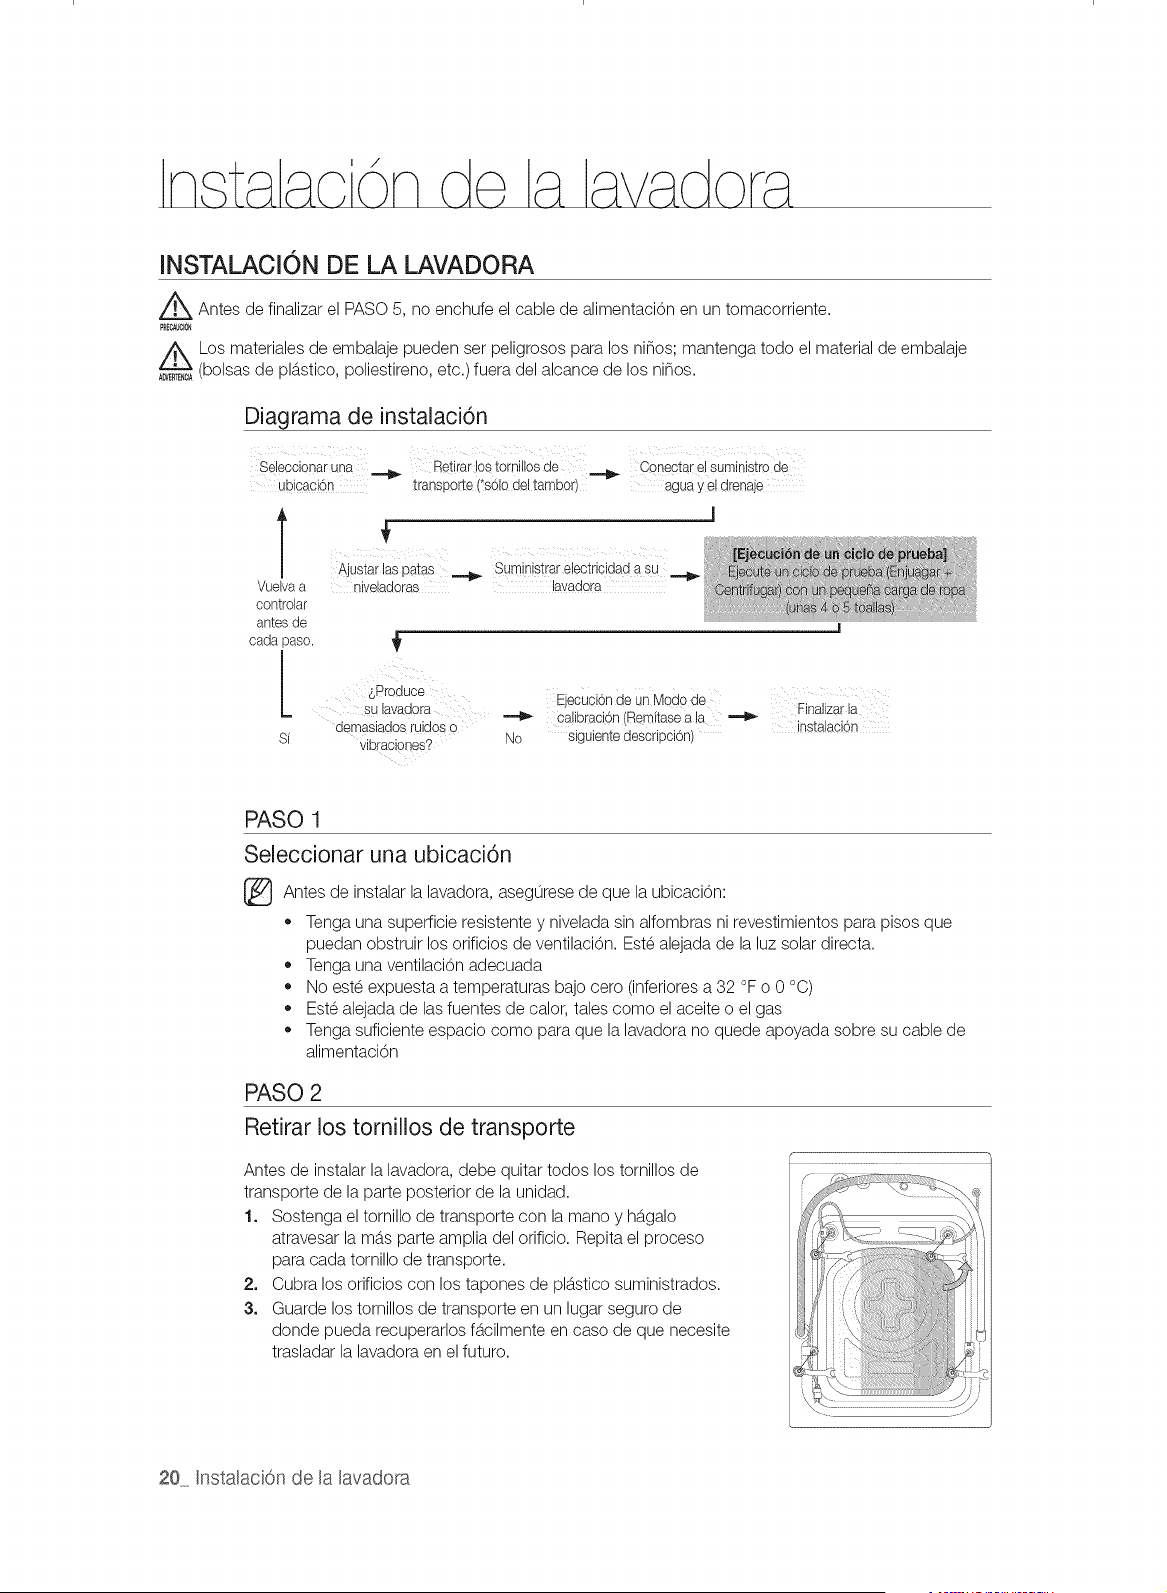
INSTALACION DE LA LAVADORA
_ Antes de finalizar el PASO 5, no enchufe el cable de alimentaci6n en un tomacorriente.
Los materiales de embalaje pueden set peligrosos para los ninos; mantenga todo el material de embalaje
(bolsas de plb.stico, poliestireno, etc.) fuera del alcance de los ninos.
Diagrama de instalaci6n
Sebccionaruna _ Retirarlostomillosde _ Conectarelsuministrode
ubbaci6n transport÷ (*s6!o del tambor) agua y ÷l drenaje
Vuelva a
controlar
antes de
cada paso.
SProduce
su lavadora
demasiado8 ruidos o
Si vihraoiones?
_iI iii i i _ i _ x ii ii _ ii iii
Ajustarlaspatas _ Suministrarebctriddadasu
niveladoras lavadora
_ecci6n'e nMeS0deLj u a u a
calibracbn (Remitasea la _ Finalizarla
instalaobn
No siguientedescripci6n)
PASO 1
Seleccionar una ubicaci6n
Antes de instalar la de la ubicaci6n:
lavadora, asegurese
que
,, Tenga una superficie resistente y nivelada sin alfombras ni revestimientos para pisos que
puedan obstruir los orificios de ventilaci6n. Este alejada de la luz solar directa.
,, Tenga una ventilaci6n adecuada
,, No este expuesta a temperaturas bajo cero (inferiores a 32 °F o 0 °C)
,, Este alejada de las fuentes de calor, tales como el aceite o el gas
,, Tenga suficiente espacio como para que la lavadora no quede apoyada sobre su cable de
alimentaci6n
PASO 2
Retirar los tornillos de transporte
Antes de instalar la lavadora, debe quitar todos los tornillos de
transporte de la parte posterior de la unidad.
1. Sostenga el tornillo de transporte con la mano y hb.galo
atravesar la mb.sparte amplia del orificio. Repita el proceso
para cada tornillo de transporte.
2. Cubra los orificios con los tapones de plb.sticosuministrados.
3. Guarde los tornillos de transporte en un lugar seguro de
donde pueda recuperarlos fb.cilmente en caso de que necesite
trasladar la lavadora en el futuro.
20 Instalaci6n de la lavadora
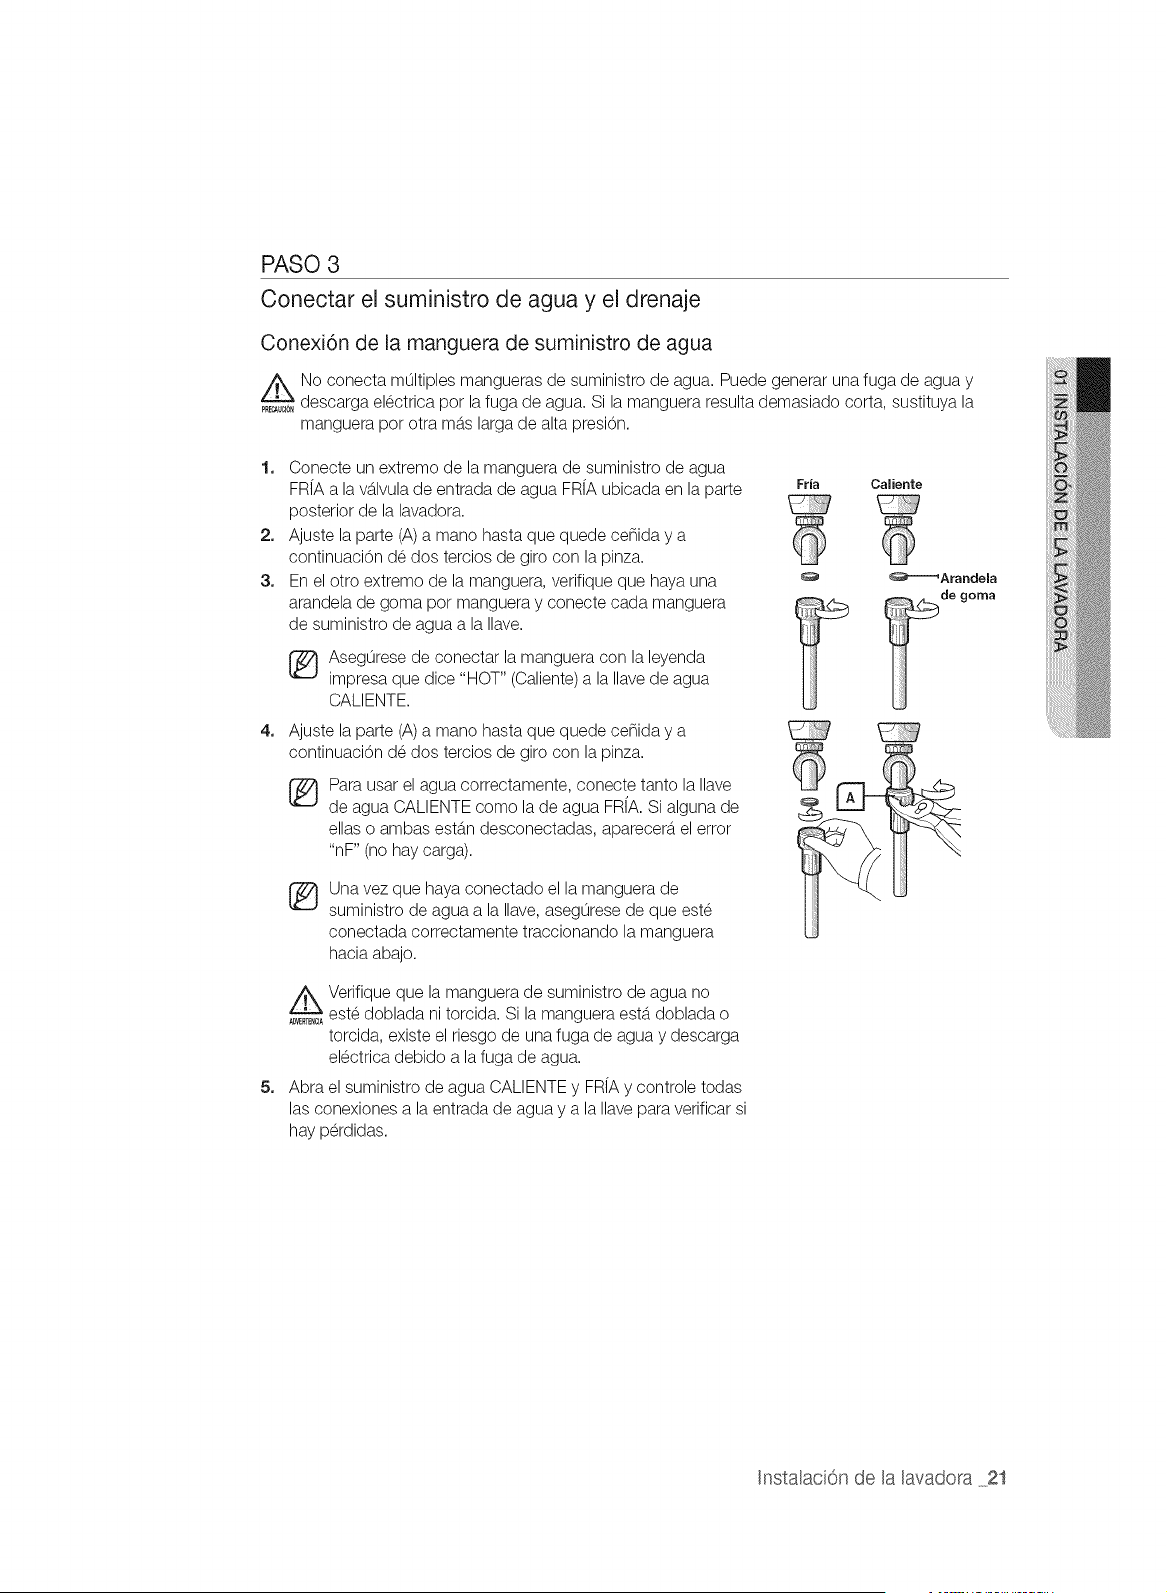
PASO 3
Conectar el suministro de agua y el drenaje
Conexi6n de la manguera de suministro de agua
No conecta multiples mangueras de suministro de agua. Puede generar una fuga de agua y
PRE_U_O_descarga electrica pot la fuga de agua. Si la manguera resulta demasiado corta, sustituya la
manguera pot otra mb.slarga de alta presi6n.
1. Conecte un extremo de la manguera de suministro de agua
FR[Aa la vb.lvulade entrada de agua FR[A ubicada en la parte Fria
posterior de la lavadora.
2. Ajuste la parte (A) a mano hasta que quede ce_ida y a
continuaci6n de dos tercios de giro con la pinza.
3. En el otro extremo de la manguera, verifique que haya una
arandela de goma pot manguera y conecte cada manguera
de suministro de agua a la Ilave.
4=
[_ Asegorese de conectar la manguera con la leyenda
impresa que dice "HOT" (Caliente)a la Ilave de agua
CALlENTE.
Ajuste la parte (A) a mano hasta que quede ce_ida y a
continuaci6n de dos tercios de giro con la pinza.
®
Para usar el agua correctamente, conecte tanto la Ilave
de agua CALIENTE como la de agua FRfA. Si alguna de
elias o ambas estb.n desconectadas, aparecerb,el error
"nF" (no hay carga).
®
Una vez que haya conectado el la manguera de
suministro de agua a la Ilave, asegurese de que este
conectada correctamente traccionando la manguera
hacia abajo.
Caliente
_Arandela
de goma
5=
_ Verifique que la manguera de suministro de agua no
este doblada ni torcida. Si la manguera estb.doblada o
torcida, existe el riesgo de una fuga de agua y descarga
electrica debido a la fuga de agua.
Abra el suministro de agua CALIENTEy FRiA y controle todas
las conexiones a la entrada de agua y a la Ilave para verificar si
hay perdidas.
Instalaci6n de la lavadora 2t
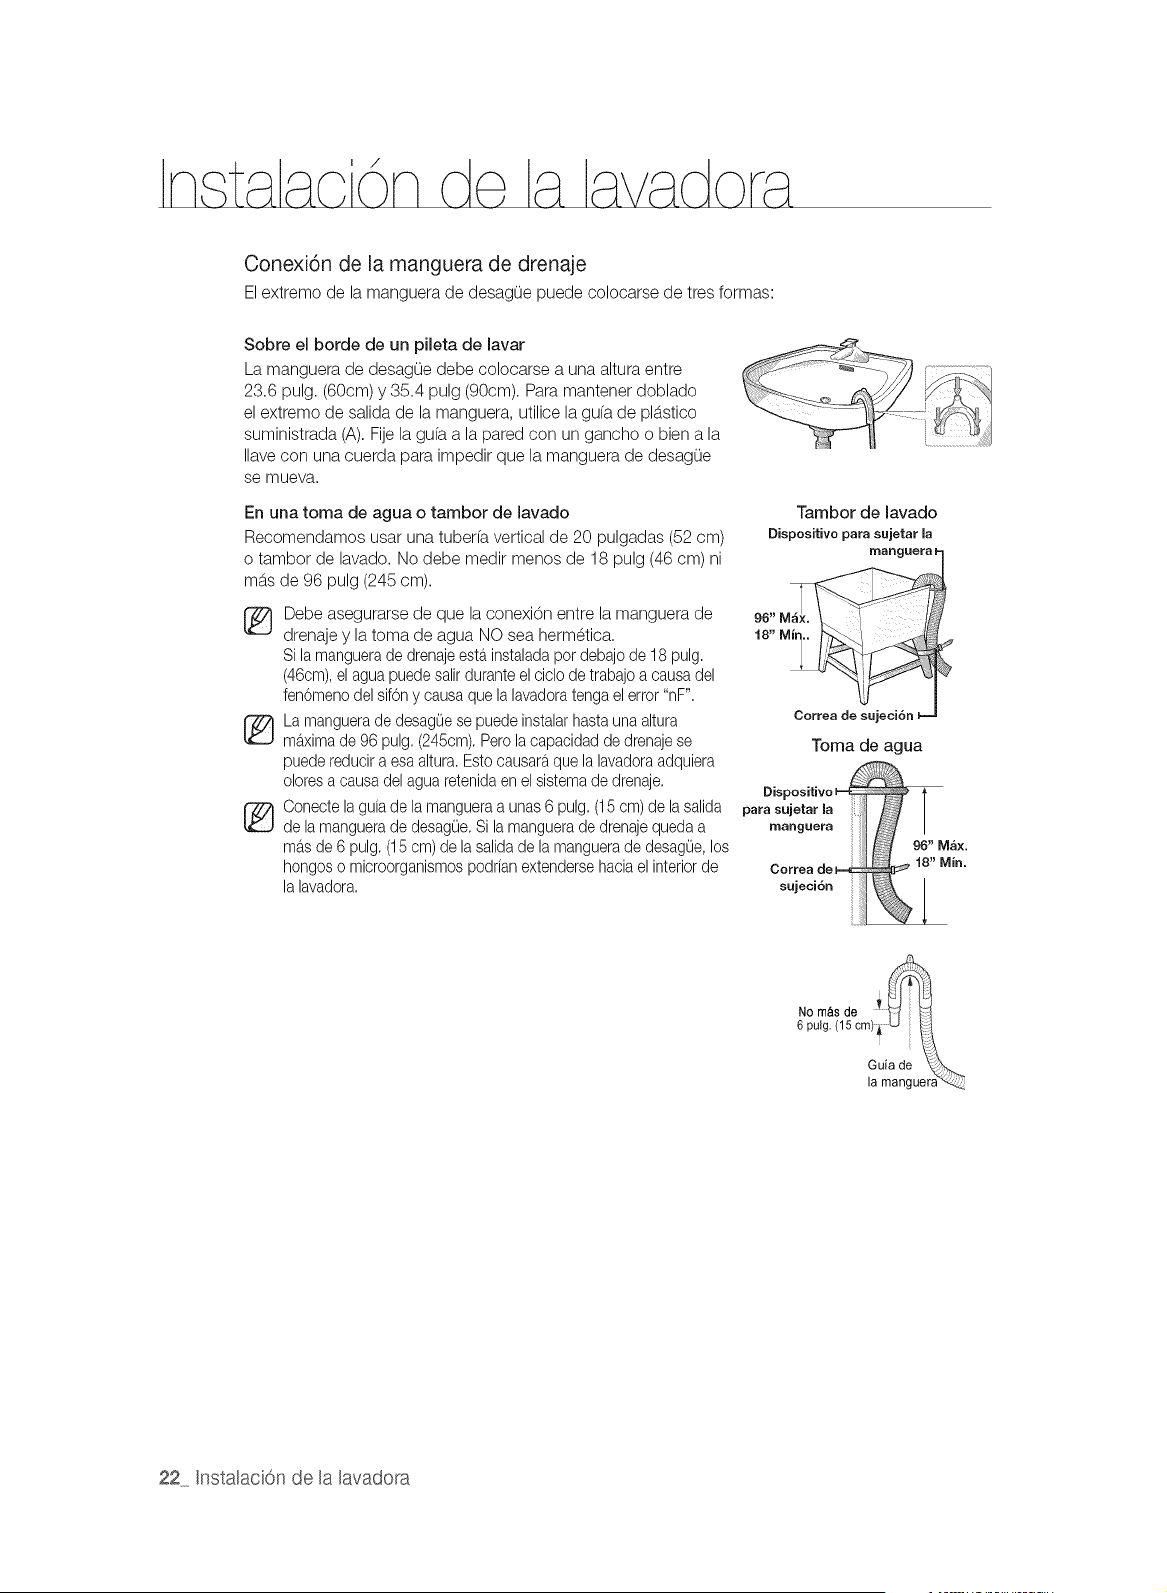
Conexi6n de [a manguera de drenaje
El extremo de la manguera de desagOe puede colocarse de tres formas:
Sobre el borde de un pileta de lavar
La manguera de desagOe debe colocarse a una altura entre
23.6 pulg. (60cm) y 35.4 pulg (90cm). Para mantener doblado
el extremo de salida de la manguera, utilice la gufa de plb.stico
suministrada (A). Fije la gufa a la pared con un gancho o bien a la
Ilave con una cuerda para impedir que la manguera de desagOe
se mueva.
En una toma de agua o tambor de lavado
Recomendamos usar una tuberfa vertical de 20 pulgadas (52 cm)
o tambor de lavado. No debe medir menos de 18 pulg (46 cm) ni
mb.sde 96 pulg (245 cm).
Tambor de lavado
Dispositivo para sujetar la
Debe asegurarse de que la conexi6n entre la manguera de 96"
drenaje y la toma de agua NO sea hermetica. 18,,Mir
Silamanguerade drenajeesta.instaladapor debajode 18 pulg.
(46cm),el aguapuedesalirduranteelciclo de trabajoa causadel
fen6menodelsif6n y causaquela lavadoratengael error "nF".
La manguerade desag0ese puedeinstalarhastauna altura
ma.ximade 96 pulg.(245cm).Pero la capacidadde drenajese
puedereducira esa altura.Estocausaraque la lavadoraadquiera
oloresa causadelagua retenidaen el sistemade drenaje.
Oonectelaguia de lamangueraa unas6 pulg.(15 cm)de lasalida
de la manguerade desag0e.Si la manguerade drenajequedaa
ma.sde 6 pulg.(15cm) de la salidade la manguerade desagOe,los
hongoso microorganismospodrianextendersehacia elinteriorde Oorrea
lalavadora, sujeci6n
Correa de sujeci6n
Toma de agua
para sujetar [a
manguera
NO m&s de y _ il
6 pulg. (15 cm)_, .... Ii_
Guia de \{_}....
la manguera"_,
22 [nstalaci6n de la lavadora
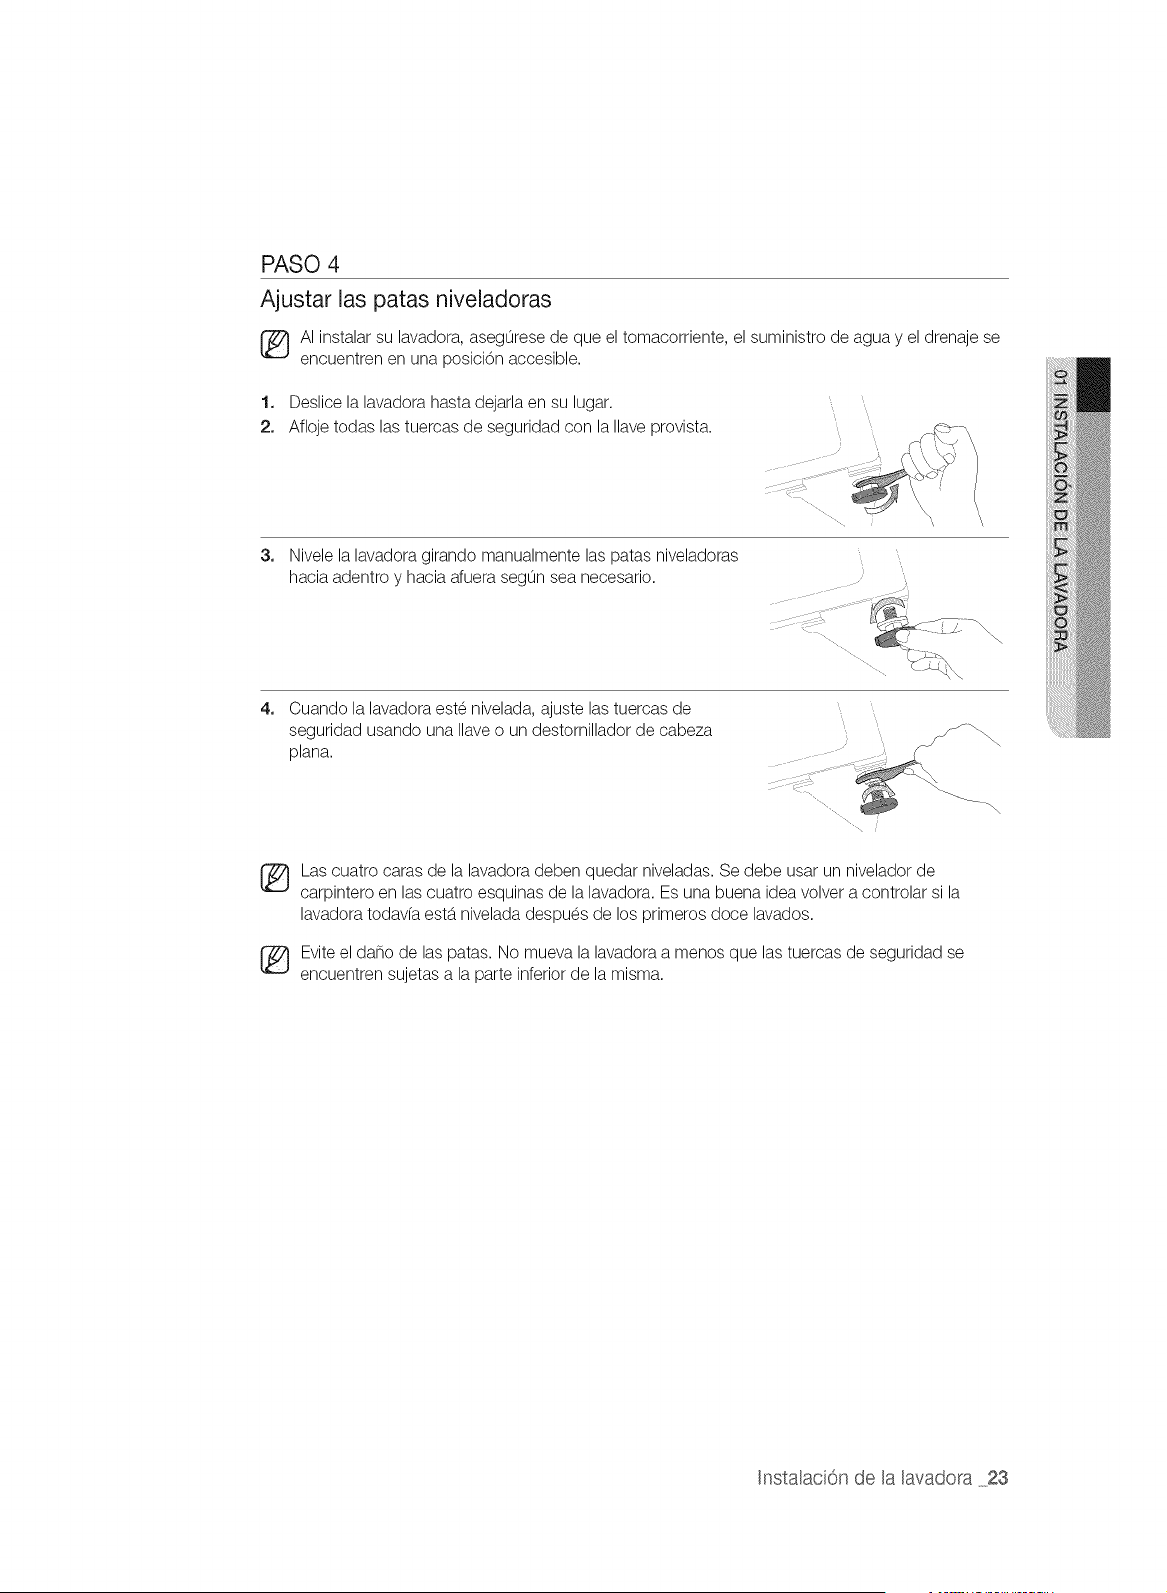
PASO 4
Ajustar las patas niveladoras
AI instalar su lavadora, asegurese de que el tomacorriente, el suministro de agua y el drenaje se
encuentren en una posici6n accesible.
1. Deslice la lavadora hasta dejarla en su lugar.
2. Afloje todas las tuercas de seguridad con la Ilave provista.
3,
Nivele la lavadora girando manualmente las patas niveladoras
hacia adentro y hacia afuera segun sea necesario.
4,
Cuando la lavadora este nivelada, ajuste las tuercas de
seguridad usando una Naveo un destornillador de cabeza
plana.
Las cuatro caras de la lavadora deben quedar niveladas. Se debe usar un nivelador de
carpintero en las cuatro esquinas de la lavadora. Es una buena idea volver a controlar si la
lavadora todavfa estb.nivelada despues de los primeros doce lavados.
Evite el daflo de las patas. No mueva la lavadora a menos que las tuercas de seguridad se
encuentren sujetas a la parte inferior de la misma.
Instalaci6n de la lavadora 23
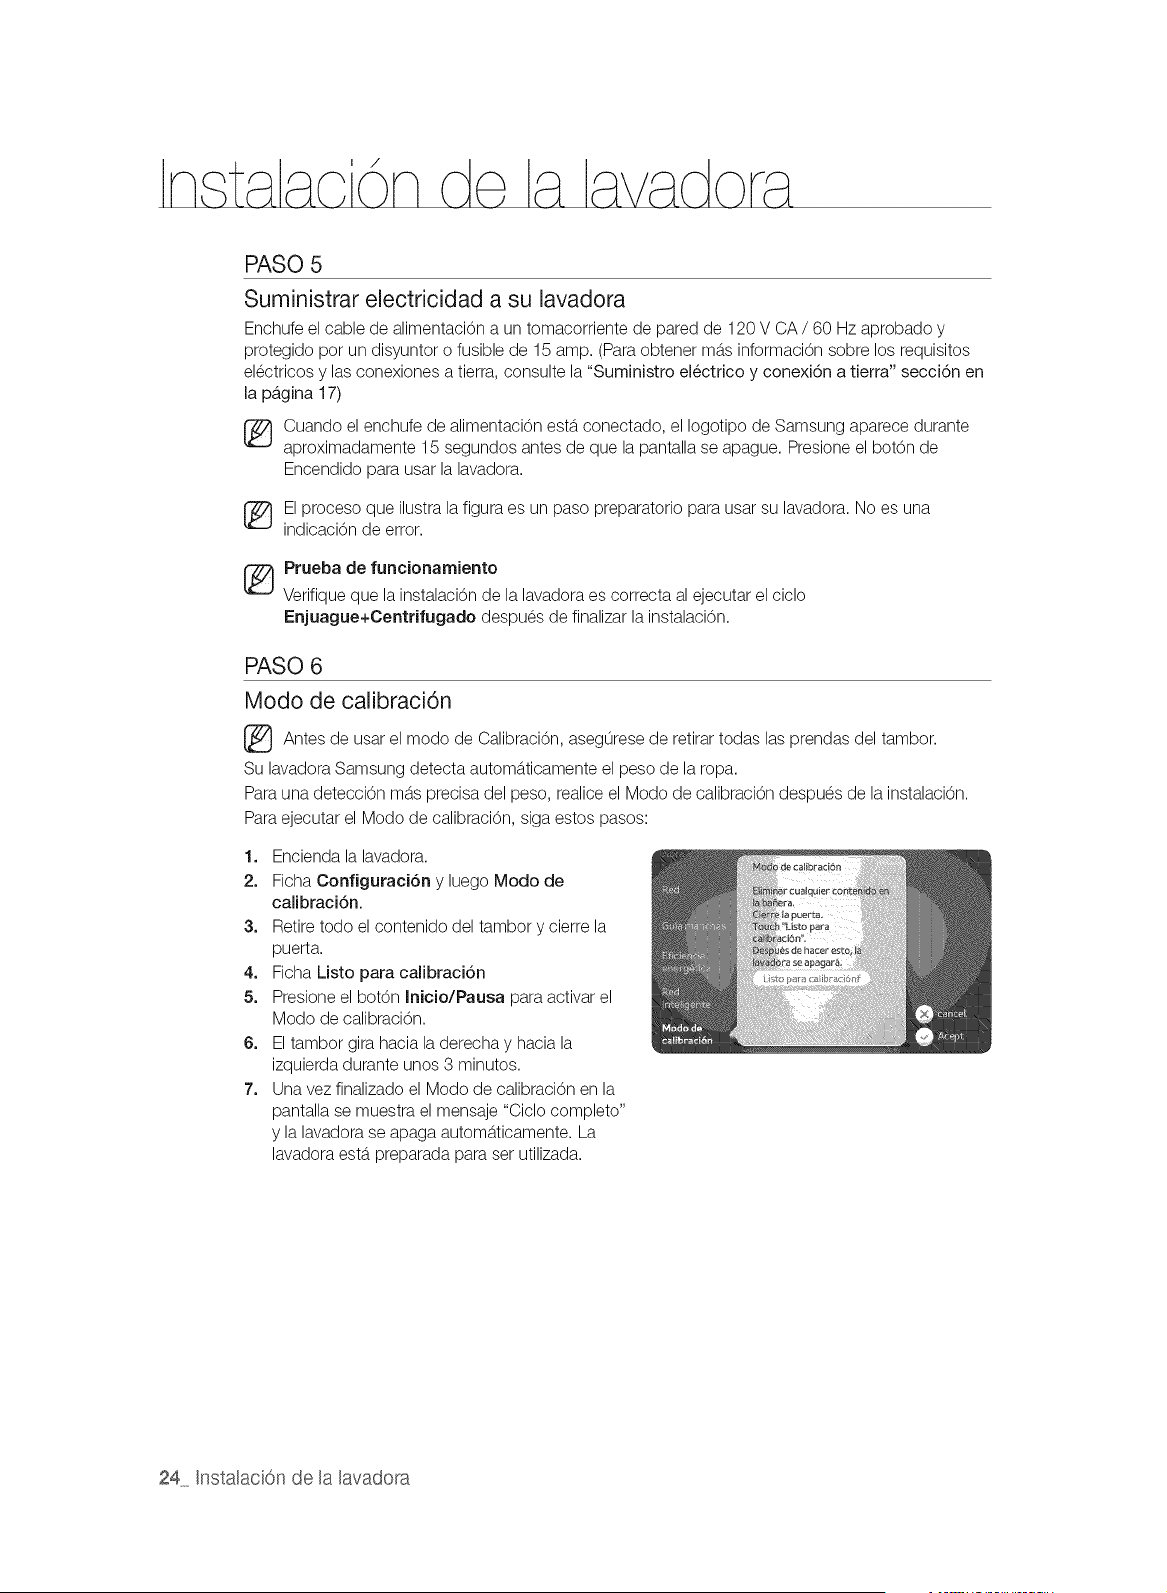
PASO 5
Suministrar electricidad a su lavadora
Enchufe el cable de alimentaci6n a un tomacorriente de pared de 120 V CA / 60 Hz aprobado y
protegido por un disyuntor o fusible de 15 amp. (Para obtener mb.sinformaci6n sobre los requisitos
electricos y las conexiones a tierra, consulte la "Suministro electrico y conexi6n a tierra" secci6n en
la p_,gina 17)
Cuando el enchufe de alimentaci6n estb.conectado, el Iogotipo de Samsung aparece durante
aproximadamente 15 segundos antes de que la pantalla se apague. Presione el bot6n de
Encendido para usar la lavadora.
El proceso que ilustra la figura es un paso preparatorio para usar su lavadora. No es una
indicaci6n de error.
_ Prueba de funcionamiento
Verifique que la instalaci6n de la lavadora es correcta al ejecutar el ciclo
Enjuague+Centrifugado despues de finalizar la instalaci6n.
PASO 6
Modo de calibraci6n
Antes de el modo de de retirar todas las del tambor.
usar Calibraci6n,
asegurese prendas
Su lavadora Samsung detecta automb.ticamente el peso de la ropa.
Para una deteccion mb.sprecisa del peso, realice el Modo de calibracion despues de la instalacion.
Para ejecutar el Modo de calibraci6n, siga estos pasos:
1. Encienda la lavadora.
2. Ficha Configuraci6n y luego Modo de
calibraci6n.
3. Retire todo el contenido del tambor y cierre la
puerta.
4. Ficha Listo para calibraci6n
5. Presione el bot6n Inicio/Pausa para activar el
Modo de calibraci6n.
6. El tambor gira hacia la derecha y hacia la
izquierda durante unos 3 minutos.
7. Una vez finalizado el Modo de calibraci6n en la
pantalla se muestra el mensaje "Ciclo completo"
y la lavadora se apaga automb.ticamente. La
lavadora estb.preparada para ser utilizada.
24 Instalaci6n de la lavadora
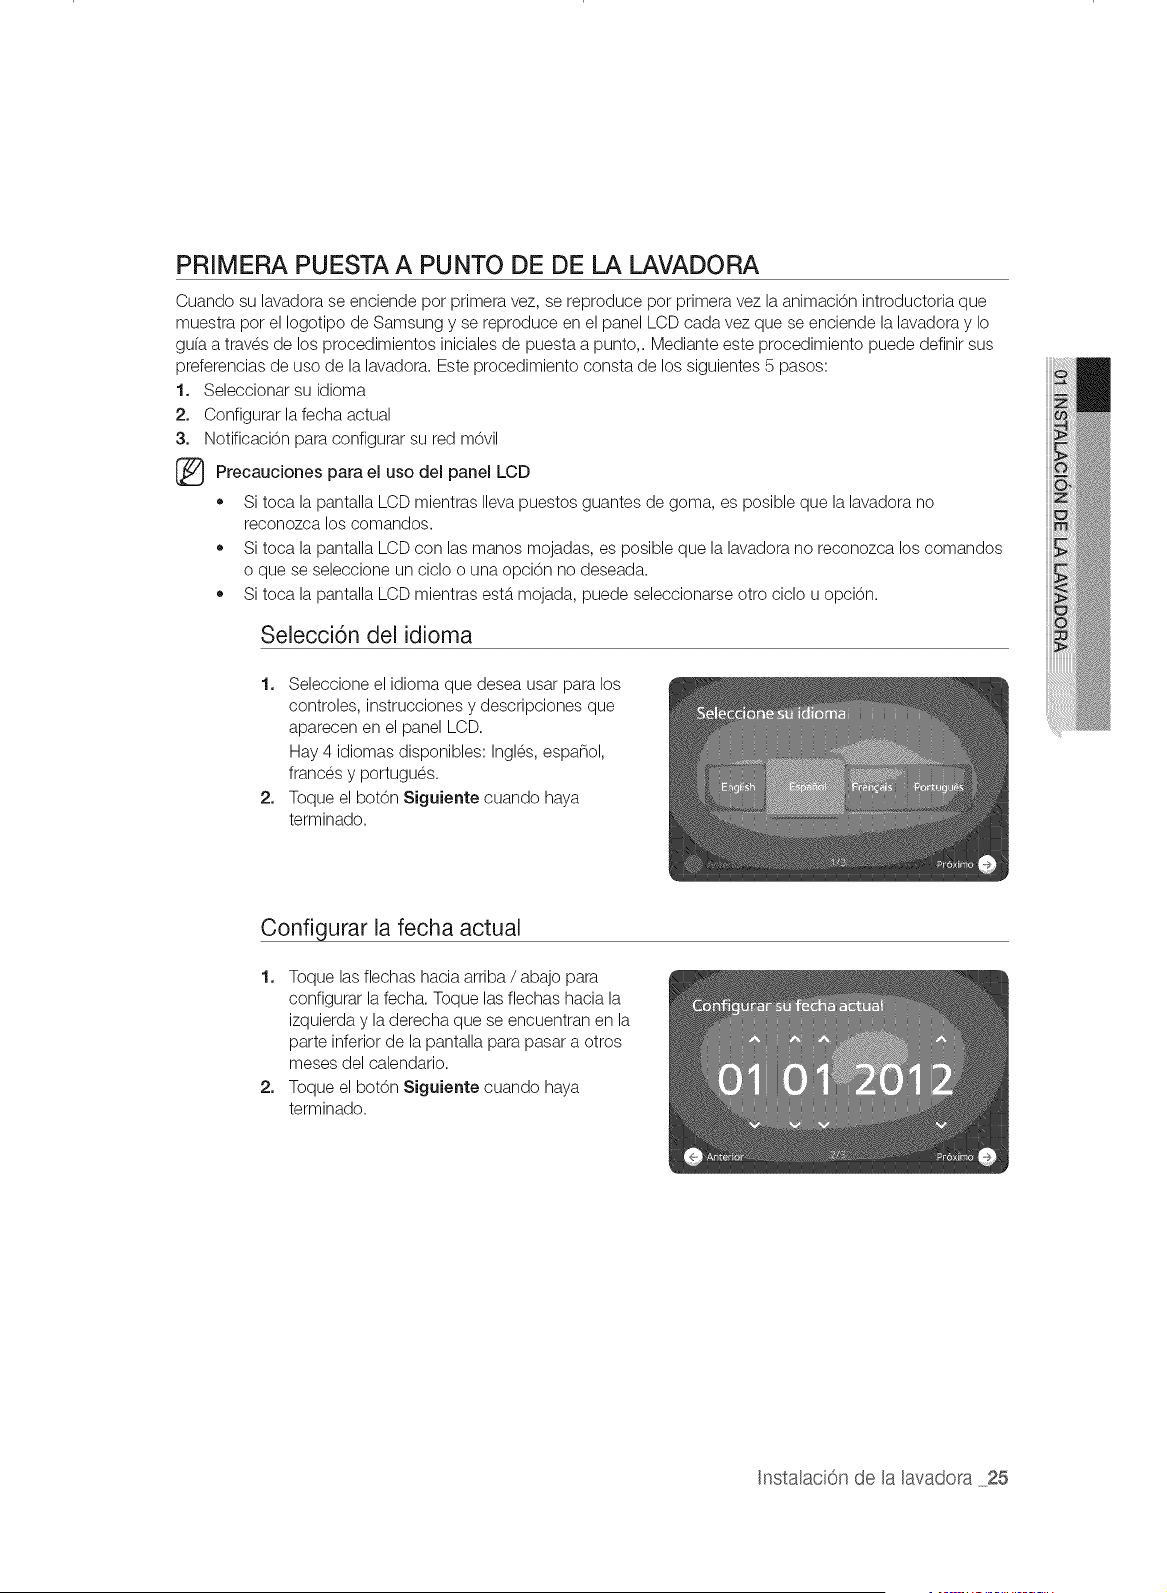
PRIMERA PUESTA A PUNTO DE DE LA LAVADORA
Cuando su lavadora se enciende por primera vez, se reproduce por primera vez la animaci6n introductoria que
muestra pot el Iogotipo de Samsung y se reproduce en el panel LCD cada vez que se enciende la lavadora y Io
gu(a a traves de los procedimientos iniciales de puesta a punto,. Mediante este procedimiento puede definir sus
preferencias de uso de la lavadora. Este procedimiento consta de los siguientes 5 pasos:
1. Seleccionar su idioma
2. Configurar la fecha actual
3. Notificaci6n para configurar su red m6vil
(_ Precauciones el del LCDpara
uso panel
,, Si toca la pantalla LCD mientras Ilevapuestos guantes de goma, es posible que la lavadora no
reconozca los comandos.
,, Si toca la pantalla LCD con las manos mojadas, es posible que la lavadora no reconozca los comandos
o que se seleccione un ciclo o una opci6n no deseada.
,, Si toca la pantalla LCD mientras estb.mojada, puede seleccionarse otto ciclo u opci6n.
Selecci6n del idioma
1. Seleccione el idioma que desea usar para los
controles, instrucciones y descripciones que
aparecen en el panel LCD.
Hay 4 idiomas disponibles: Ingles, espa_ol,
frances y portugues.
2. Toque el bot6n Siguiente cuando haya
terminado.
Configurar la fecha actual
1. Toque las flechas hacia arriba / abajo para
configurar la fecha. Toque las flechas hacia la
izquierda y la derecha que se encuentran en la
parte inferior de la pantalla para pasar a otros
meses del calendario.
2. Toque el botOn Siguiente cuando haya
terminado.
Instalaci6n de la lavadora 25

Configurar la hora actual
1. Configure la hora tocando las flechas hacia arriba
y hacia abajo.
2. Toque el bot6n Siguiente cuando haya
terminado.
Configuraci6n de la actualizaci6n automAtica
1. La funci6n Actualizaci6n automb.tica permite que
algunas actualizaciones tales como mejoras de
rendimiento, revisiones y correcciones de errores
se instalen automb.ticamente comunicandose con
el servidor de actualizaciones.
2. Si acepta esta confi guraci6n, se considerara que
acepta los terminos y condiciones de la funci6n
Actualizaci6n automb.tica.
3. Una vez actualizado el software, es posible que
algunas funciones proporcionadas con la versi6n
anterior no esten disponibles.
Una vez finalizada la puesta a punto inicial, puede acceder a todos los pasos y cambiar sus preferencias en
cualquier momento utilizando el control Configuraci6n ubicado en la parte inferior derecha de la pantalla
Selecci6n de ciclo en el panel LCD.
Por ejemplo, si desea configurar la hora nuevamente...
1. Toque el bot6n Configuraci6n en la parte inferior derecha de la pantalla de Selecci6n de ciclo.
2. Toque el bot6n Nora e Idioraa de la pantalla Configuraci6n.
3. Toque el bot6n Carabiar en la secci6n Hora.
4. Toque las flechas hacia arriba / abajo para configurar la hora.
5. Toque el bot6n Aceptar.
Puede very cambiar los parametros de el Idiom& Fecha y Red mediante los pasos descritos
anteriormente.
26 Instalaci6n de HaRavadora
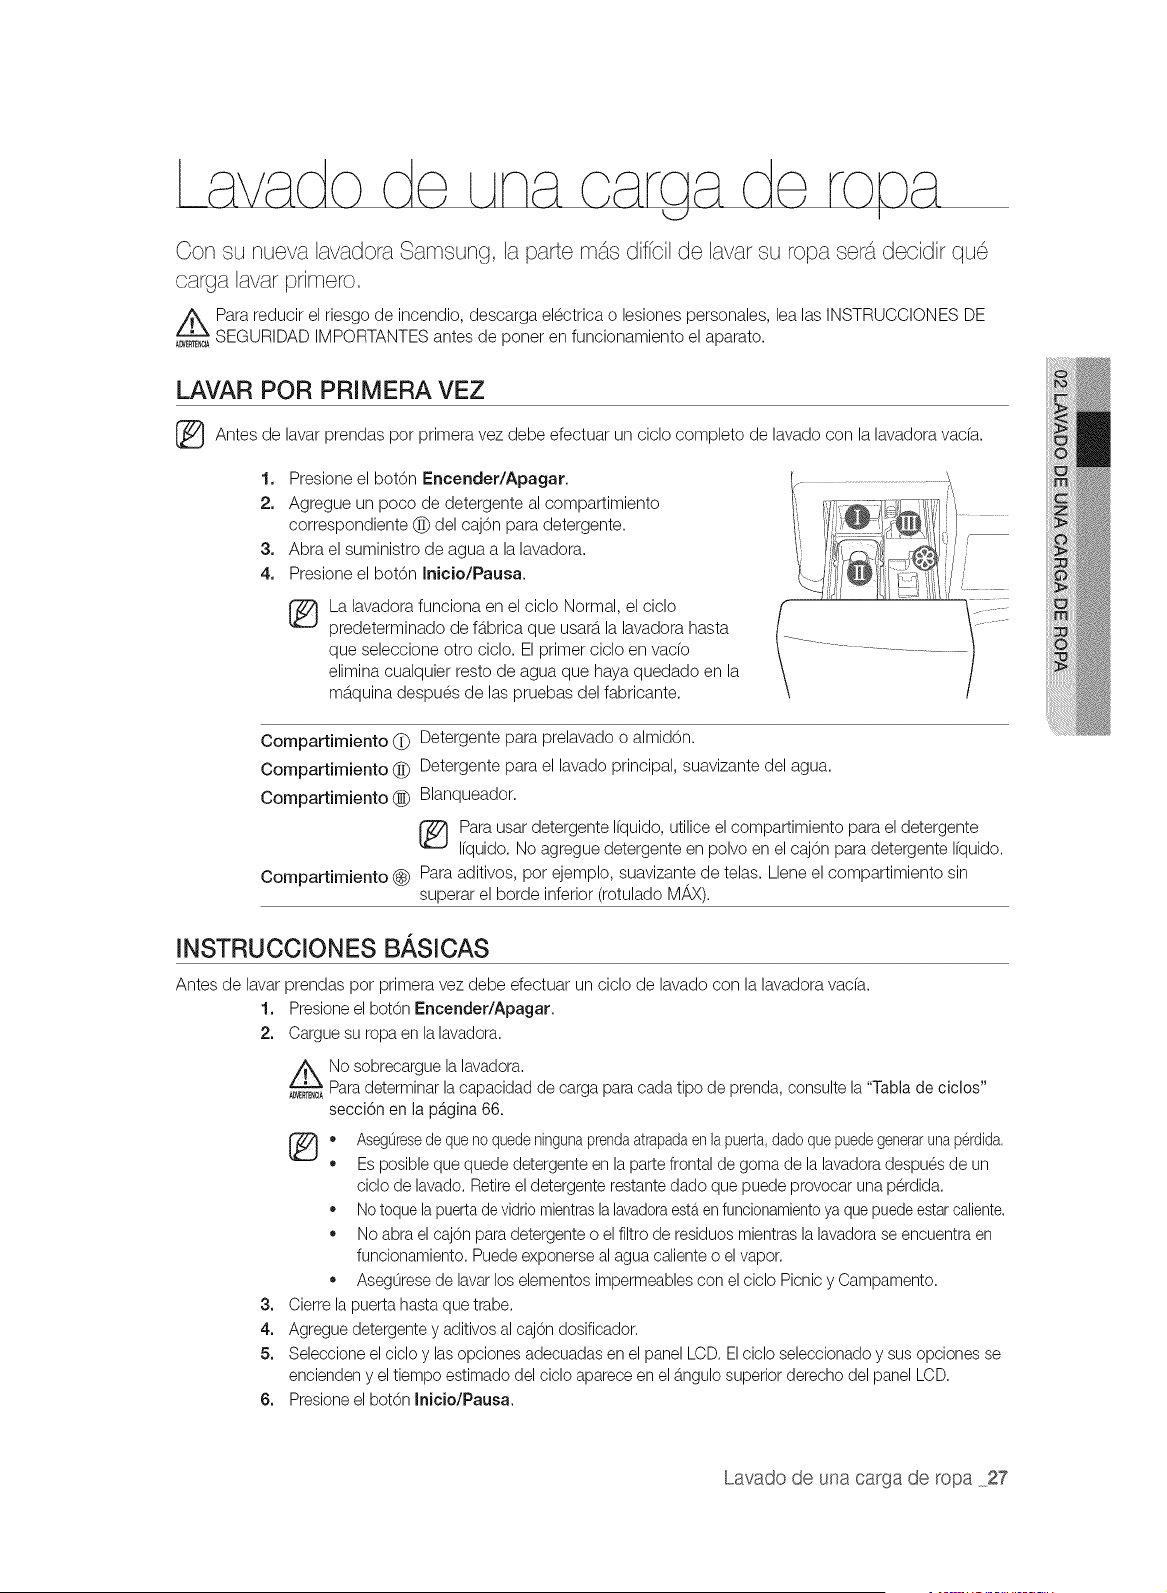
Con su nueva lavadora Samsung, la parte m_s diffcil de lavar su ropa sets1decidir que
carga lavar primero.
Para reducir el riesgo de incendio, descarga electrica o lesiones personales, lea las INSTRUCCIONES DE
A_E_ SEGURIDAD IMPORTANTES antes de poner en funcionamiento el aparato.
LAVAR POR PRIMERA VEZ
Antes de lavar prendas por primera vez debe efectuar un ciclo completo de lavado con la lavadora vac(a.
1. Presione el bot6n Encender/Apagar.
2. Agregue un poco de detergente al compartimiento
correspondiente @ del caj6n para detergente.
3. Abra el suministro de agua a la lavadora.
4. Presione el botOn Inicio/Pausa.
La lavadora funciona en el ciclo Normal, el ciclo
predeterminado de fb.brica que usarb,la lavadora hasta
que seleccione otro ciclo. El primer ciclo en vado
elimina cualquier resto de agua que haya quedado en la
mb.quina despues de las pruebas del fabricante.
Compartimiento (_ Detergente para prelavado o almid6n.
Compartimiento @ Detergente para el lavado principal, suavizante del agua.
Compartimiento (_ Blanqueador.
Para usar detergente Ifquido, utilice el compartimiento para el detergente
Ifquido. No agregue detergente en polvo en el cajon para detergente Ifquido.
Compartimiento _) Para aditivos, por ejemplo, suavizante de telas. Llene el compartimiento sin
superar el borde inferior (rotulado M/_X).
INSTRUCCIONES BASICAS
Antes de lavar
1.
2.
3=
4.
5.
6=
prendas por primera vez debe efectuar un ciclo de lavado con la lavadora vac(a.
Presioneel bot6n Encender/Apagar.
Cargue su ropa en la lavadora.
No sobrecargue la lavadora.
_E_A Paradeterminar lacapacidad de carga para cada tipo de prenda, consulte la"Tabla de ciclos"
secci6n en la pagina 66.
(_ • AsegOresedequeno quedeningunaprendaatrapadaenlapuerta,dadoquepuedegenerarunaperdida,
Es posibleque quede detergente en la parte frontal de goma de la lavadora despues de un
ciclo de lavado. Retireel detergente restante dado que puede provocar una perdida.
Notoquela puertade vidrio mientrasla lavadoraesteren funcionamientoya quepuedeestarcaliente.
No abra elcajOn para detergente o el filtro de residuos mientras la lavadorase encuentra en
funcionamiento. Puede exponerseal agua calienteo el vapor.
Aseguresede lavarlos elementos impermeablescon el ciclo Picnic y Campamento.
Cierre lapuerta hasta que trabe.
Agregue detergentey aditivosal cajOndosificador.
Seleccione elciclo y lasopciones adecuadas en el panel LCD. Elciclo seleccionado y sus opciones se
encienden y eltiempo estimado del ciclo aparece en el b,ngulo superior derecho del panel LCD.
Presioneel bot6n Inicio/Pausa.
Lavado de una carga de ropa 27
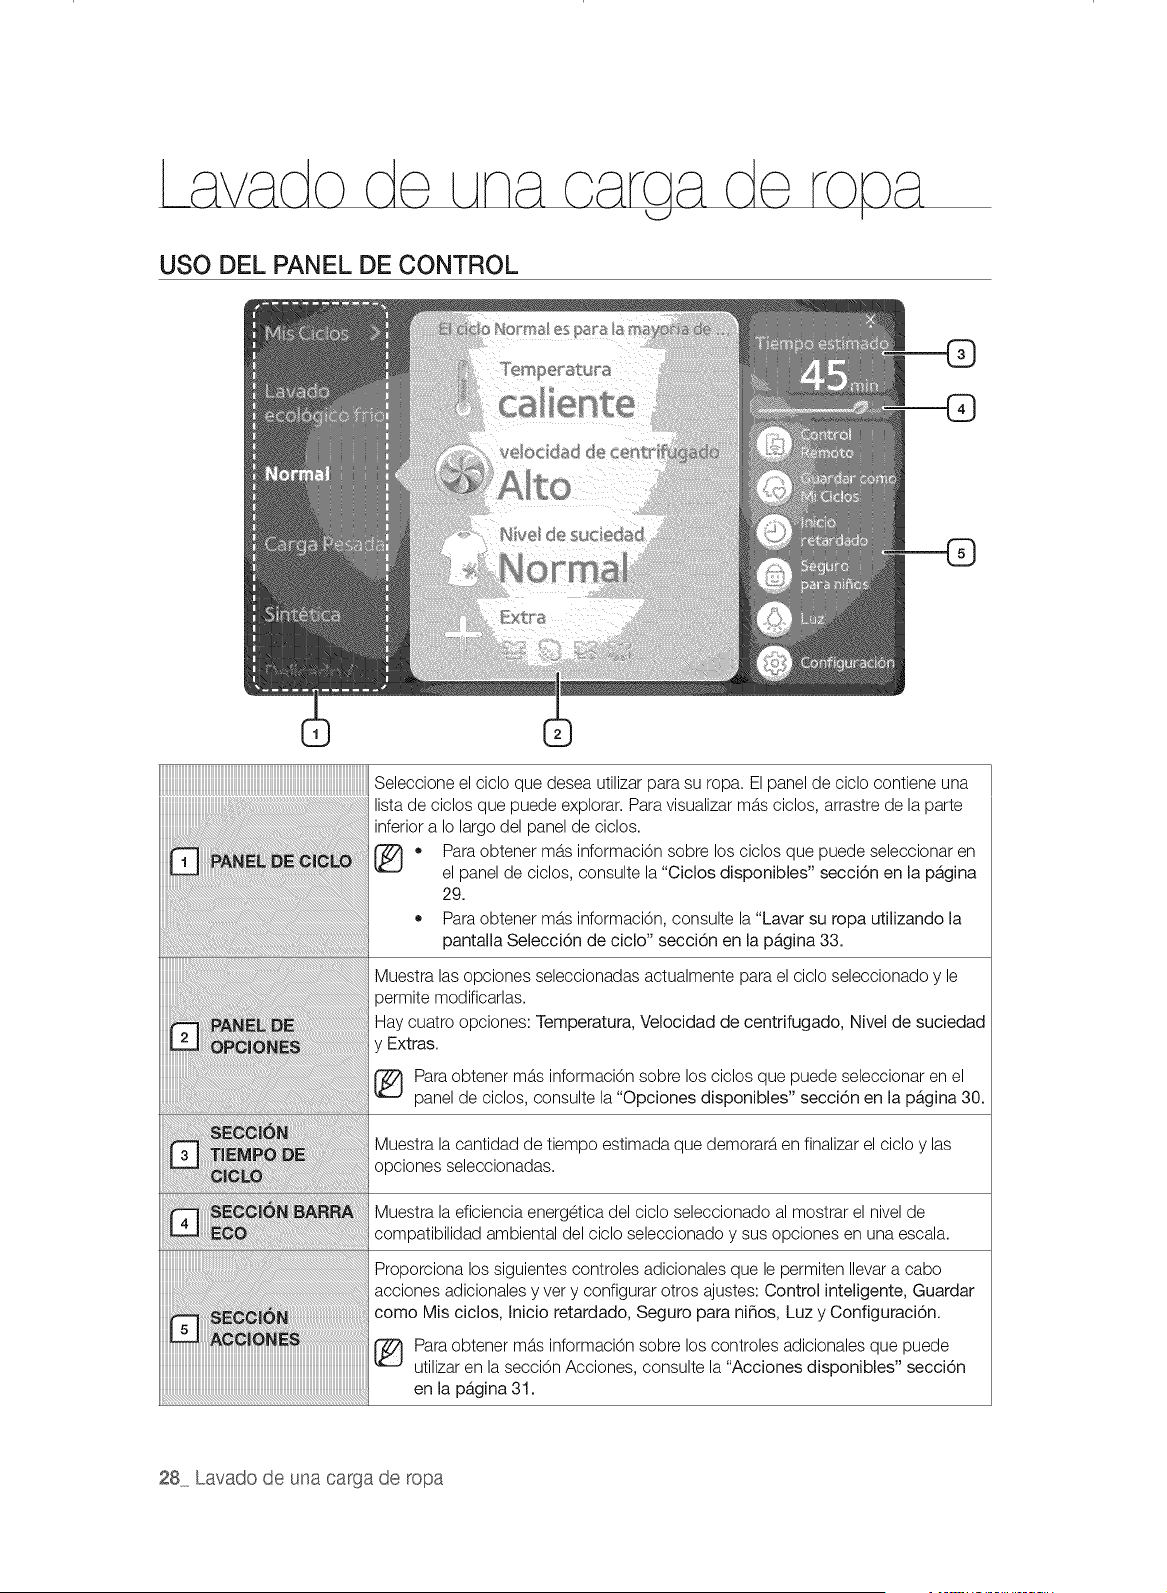
USO DEL PANEL DE CONTROL
_____________________________________________________________________________________________________________________________________________
Seleccione el ciclo que desea utilizar para su ropa. El panel de ciclo contiene una
lista de ciclos que puede explorar. Para visualizar mas ciclos, arrastre de la parte
inferior a Io largo del panel de ciclos.
• Para obtener mb,s informaci6n sobre los ciclos que puede seleccionar en
el panel de ciclos, consulte la "Ciclos disponibles" secci6n en la pb,gina
29.
.............................................• Para obtener mas informaci6n, consulte la "Lavar su ropa utilizando la
pantalla Selecci6n de ciclo" secci6n en la pb,gina 33.
Muestra las opciones seleccionadas actualmente para el ciclo seleccionado y le
oermite modificarlas.
Hay cuatro opciones: Temperatura, Velocidad de centrifugado, Nivel de suciedad
y Extras.
(_ Para obtener mas informaciOn sobre los ciclos que puede seleccionar en el
panel de oiclos, consulte la "Opciones disponibles" secci6n en la pb,gina 30.
Muestra la cantidad de tiempo estimada que demorara en finalizar el ciclo y las
opciones seleccionadas.
Muestra la eficiencia energetiea del cielo seleceionado al mostrar el nivel de
........ compatibilidad ambiental del ciclo seleccionado y sus opciones en una escala.
Proporciona los siguientes controles adicionales que le permiten Ilevara cabo
acciones adicionales y very configurar otros ajustes: Control inteligente, Guardar
como Mis ciclos, Inicio retardado, Seguro para ni_os, Luz y Configuraci6n.
Para obtener mas informaciOn sobre los controles adicionales que puede
utilizar en la secci6n Acciones, consulte la "Acciones disponibles" secci6n
en la pb,gina 31.
28 Lavado de una carga de ropa
Ciclos disponibles
los ciclos preseleccionados que aparecen en el panel Ciclo de la pantalla SelectiOn de ciclo se
enumeran a continuaci0n e incluyen los Ciclos especiales.
Mis Ciclos Muestra los 3 ciclos personalizados o favoritos que guard0 como Mis ciclos.
Cada uno de los ciclos de Mi ciclo recuerda las opciones de temperatura,
velocidad de centrifugado y ciclo extra que defini0 para que pueda utilizarlas
para lavar prendas especfficas.
Eco Cold (Lavado El lavado ecol0gico fr[o es un ciclo de cuidado diario que ahorra energ[a
ecolOgico frio) para prendas ligera o medianamente sucias que usa 0nicamente agua fr(a.
Normal Elciclo normal es para la mayor(a de telas, incluyendo algod0n, lino y
prendas moderadamente sucias.
Acci6n fuerte Elciclo Acci0n fuerte es para telas resistentes que no destinen y prendas
muy sucias.
SintOtica Elciclo Sintetica es para telas sinteticas que no necesitan planchado y
prendas ligeramente a moderadamente sucias.
Delicado/Lavado a Elciclo Delicado/Lavado a mano es para telas finas, sujetadores, lencer(a
mano (de seda) y otras telas que deben set lavadas a mano 0nicamente. Para
obtener mejores resultados, use detergente I(quido.
Ropa deportiva El ciclo Ropa deportiva es para prendas para hacer ejercicio tales
como jerseys de deporte, pantalones deportivos u otras prendas de
entrenamiento.
Ropa de cama Elciclo Ropa de cama es para prendas voluminosas, tales como las
frazadas, los edredones y las sb.banas. Cuando lave prendas voluminosas,
utilice detergente I(quido.
VAPORIZAOION Elciclo VAPORIZACION PROFUNDA es para prendas muy sucias y que
PROFUNDA no destinen. Ofrece una alta temperatura de lavado y vapor y limpia las
manchas con eficacia.
Eliminaci6n de Este cicIo proporciona un rendimiento excepcional en la eliminaci0n de
manchas manchas, con el mayor cuidado especial.
Esterilizar El ciclo Esterilizar es para prendas muy sucias y que no destinen. Este ciclo
calienta el agua a 150 °F (65.6 °C) para eliminar las bacterias.
Elciclo Lana es sOlo para lana que pueda lavarse en lavadora. Las cargas
deben tenet un peso inferior alas 8 lb. Para obtener los mejores resultados
se recomiendan cargas de 4,4 Ib (2 kg) o menos.
_) l ciclo de lavado de lana de este artefacto ha sido aprobado
pot Woolmark para el lavado de productos Woolmark
"* lavables en lavadora siempre y cuando los productos se laven
WOOI MAKK
AH'AIULCARt conforme alas instrucciones de la etiqueta de la prenda y
aquellas del fabricante de la lavadora, M1207.
Lavado Rb.pido Elciclo de Lavado Rb.pido es para prendas ligeramente sucias que necesita
rb.pidamente.
Enjuague + Elciclo Enjuague+Centrifugado es para cargas que necesitan 0nicamente
Centrifugado enjuague o para cuando desea agregar suavizante de telas a la carga.
$61o centrifugado El ciclo S01ocentrifugado realiza un ciclo de centrifugado adicional para
eliminar mb.sagua.
Lavado de tambor El Lavado de tambor limpia la suciedad y las bacterias del tambor. Se
recomienda el uso regular (despues de 40 lavados). No es necesario
detergente ni lej[a.
Lavado de una carga de ropa 29
Ciclos especiales
Los Ciclos especiales proporcionan 6 ciclos listos para usar para satisfacer todas sus necesidades de
lavado.
Para prendas que van mb.sallb.del lavado "diario", los Ciclos especiales ofrecen los parb.metros
0ptimos para eliminar todas las manchas posibles y la suciedad de acuerdo con el tipo de mancha.
1. Toque la opci0n Ciclos especiales en el panel Ciclo. Aparecerb.n 6 ciclos.
2. Seleccione los ciclos.
3. Los Ciclos especiales proporcionan los parb.metrosde lavado 0ptimos para lavar prendas
manchadas dependiendo del tipo de mancha sin configurar las opciones de nivel de suciedad,
temperatura del agua y otras opciones.
Dependiendo del ciclo seleccionado, algunos parb.metrosy opciones no estb.ndisponibles y aparecen
desactivados.
Ajustar la temperatura del agua no estb.disponible dado que los Ciclos especiales proporcionan
el parb.metro de temperatura para limpiar cada tipo de mancha. Sin embargo, si tiene prendas
levemente o muy sucias, puede ajustar el nivel de suciedad y los Ciclos automb.ticos ajustarb.n
automb.ticamente la temperatura del agua, tiempo de lavado y otras opciones para la mejor remoci0n
de manchas.
Cocina
Jardineffa
Oficina
Ropa exterior
Ropa de niffos
Programa Beb6
El ciclo Cocina es para la mayorfa de las telas que se utilizan en la cocina.
Este ciclo elimina las manchas de alimentos y de cocina con eficacia.
este para prendas con aceite/grasa.
NO utilice cicIo contaminadas
El ciclo Jardinerfa es para ropa de jardinerfa. Este ciclo quita las manchas de
cesped, barro/suciedad y limpia el sudor y el sebo con eficacia.
este para prendas con aceite/grasa.
NO utilice ciclo contaminadas
El ciclo Oficina es para prendas con un nivel de suciedad leve, incluso
tejidos sinteticos. Este ciclo elimina las manchas leves de tinta y limpia la
suciedad diaria con eficacia.
este para prendas con aceite/grasa.
NO utilice ciclo contaminadas
El ciclo Ropa exterior es para prendas exteriores con un nivel de suciedad
normal, incluso tejidos sinteticos. Este ciclo quita las manchas de cesped,
barro/suciedad, manchas de comida levemente sucias y limpia el sudor y el
maquillaje con eficacia.
El ciclo Ropa de ninos es para la mayorfa de las prendas de ninos. Este
ciclo quita las manchas de alimentos, bebidas, barro, suciedad y tinta/
crayon con eficacia.
El ciclo Programa bebe es para es para elementos de bebe, incluida la ropa,
la ropa interior, las fundas de almohadas, las sb.banas, los pa_ales de tela.
Este ciclo elimina manchas de orina, heces, vOmito, etc. con eficacia.
Opciones disponibles
Puede ver las opciones seleccionadas actualmente para el ciclo seleccionado y cambiarlas en el
panel de Opciones de la pantalla Selecci6n de cicio.
Hay cuatro opciones: Temperatura, Velocidad de centrifugado, Nivel de suciedad y Extras.
Temperatura
Toque esta opciOn para cambiar el nivel de temperatura seleccionado actualmente. Los path.metros
de temperatura disponibles son Frfa, Lavado ecolOgico cb.lido,Tibia, Caliente y Muy caliente.
Dependiendo del ciclo seleccionado, algunos de ellos no estb.ndisponibles y aparecen desactivados.
30 Lavado de una carga de ropa

Velocidad centrifugado
Toque esta opci6n para cambiar la velocidad de centrifugado seleccionada actualmente. Las
velocidades de centrifugado disponibles son Sin centrifugado, Baja, Media, Alta, Muy alta.
Dependiendo del ciclo seleccionado, algunos de ellos no estan disponibles y aparecen desactivados.
Nivel de suciedad
Toque esta opci6n para cambiar el nivel suciedad seleccionado actualmente. Los niveles de suciedad
disponibles son Muy limpia, Limpia, Normal, Sucia, Muy sucia. Dependiendo del ciclo seleccionado,
algunos de ellos no estb.ndisponibles y aparecen desactivados. Utilice esta opci6n para eliminar
manchas de sus prendas eficazmente.
Extras
Toque esta opci6n para agregar o eliminar ciclos extra al ciclo seleccionado. Los ciclos extra
disponibles son Prelavado, Vapor, Enjuague extra y Centrifugado extra. Dependiendo del ciclo
seleccionado, algunos de ellos no estan disponibles y aparecen desactivados. Los ciclos extra
agregados al ciclo seleccionado aparecen con un icono seleccionado. Por ejemplo, _-_ aparece
cuando se agrega el ciclo de Prelavado. _ aparece cuando se elimina. Toque cada uno de los
ciclos extra activados para agregarlo o eliminarlo de un ciclo seleccionado.
Acciones disponibles
Puede Ilevar a cabo acciones adicionales y very configurar otros parametros mediante los controles
provistos en la secci6n Acciones de la pantalla Selecci6n de ciclo.
Existen seis controles: Control inteligente, Guardar como Mis ciclos, Inicio retardado, Seguro para
ni_os, Luz y Configuraci6n.
Control inteligente
Toque este control para activar o desactivar la funci6n Control inteligente. Cuando esta funci6n esta
activada, puede controlar la lavadora desde su teldono m6vil.
Cuando esta funci6n esta desactivada, el icono es :L_. Cuando esta funci6n esta activada, el icono
es
Active este control si desea controlar su lavadora con su teldono mdvil.
Las acciones que realice en su lavadora desactivaran la funci6n de Control inteligente (tocar el
panel LCD, presionar botones, etc.).
Guardar como Mis ciclos
Guarde sus ciclos preferidos incluso la temperatura, velocidad de centrifugado, nivel de suciedad y
opciones de ciclos extra. Puede guardar hasta 3 Mi ciclos.
Para obtener mas consulte la "Uso de la funci6n Mi ciclo" secci6n la 35.
informaci6n,
en
pb,gina
Inicio retardado
Toque este control para demorar el inicio del ciclo seleccionado al definir una hora de inicio especffica.
Si la lavadora reconoce que la red inteligente estb.disponible, podra acceder alas opciones para
activar o desactivar el uso variable de energfa. Cuando el Inicio retardado esta activado, el fcono pasa
de _D a Q_
(_ ara obtener mas informaciOn, consulte la "Uso de la funci6n Inicio retardado" secci6n en la
pb,gina 36.
Lavado de una carga de ropa 31
Seguro para ni_os
Active o desactive la funciOn de Seguro para ni_os mediante este control.
• Toque este control para activar lafunciOn de Seguro para ni_os desactivada (@).
Mantenga presionado este control durante 6 segundos para desactivar la funciOn Seguro para
ni_os activada (;_@_).
La funciOn de Seguro para ni_os tambien puede activarse temporalmente yen este caso aparece
en icono .
[_ Paraobtener informaciOn detallada sobre la funciOn Seguro para ni_os, consulte la "Uso de la
funci6n Seguro para ni_os" secci6n en la pb,gina 37.
Luz
Toque este control para encender o apagar la luz. Cuando esta funciOnestb.desactivada, el icono es :_:_j.
Cuando esta funciOnestb.activada, el icono es <_:_.
Para obtener mas informaciOn, consulte la "Encender y apagar la luz" secci6n en la pb,gina 38.
Configuraci6n
Toque este control para navegar por la pantalla Configuraci6n donde puede configurar la lavadora
de acuerdo con sus preferencias over informaciOn sobre cOmo eliminar las manchas de su ropa de
manera eficaz.
La pantalla Conflguraci6n brinda las siguientes opciones:
Pantalla y Sonido
Hora e Idioma
Red
Gufa de manchas
Eficiencia
energ_tica
Red Inteligente
Toque este control paracambiar el nivelde brillode la pantallaLCD y el nivelde
volumen de la lavadora. El rangode nivelde brillo de la pantallaLCDes 5 niveles
del Nivel 1 al Nivel5. Elrango de volumen es de 5 niveles, de Mudo al Nivel 4.
Para obtener mb.sinformacion, consulte la "Controlar el volumen" secci6n
en la pagina 38 y la "Control del nivel de brillo" secci6n en la pagina 39.
Toque este control paracambiar lafecha y la hora actual de la lavadoray el
idioma de la pantalla LCD.
Toque este control paraconfigurar su red Wi-Fi, encenderlay apagarla,
ver el estado de la conectividad de su red Wi-Fi y/o actualizarel software
de red. Una vez que hayaconfigurado la conexionWi-Fi de su lavadora,
mientras este encendida y con un buen estado, podrb,controlaralgunas
funciones de su secadora desde su teldono movil cuando tenga instaladala
Aplicacion para la lavadora/secadora inteligenteSamsung en su teldono.
Toque este control paraver la informacion sobre como eliminar eficazmente
diversos tipos de manchas utilizando su lavadora.
(_ ara obtener mb.sinformacion, consulte la "Uso de la Guia de manchas"
secci6n en la pagina 40.
Toque este control paravet la eficienciaenergetica actual de su lavadora, lacual
estb.determinada pot su uso de energfa.
Para obtener mb.sinformacion, consulte la "Visualizaci6n de la Eficiencia
energ6tica" secci6n en la pagina 41.
Toque este control paracontrolar y ahorrar energfay dinero al ajustar los
parb.metrosde la red inteligente.
Para obtener mb.sinformacion, consulte la "Uso de la Red inteligente"
secci6n en la pagina 41.
32 Lavado de una carga de ropa
Lavar su ropa utilizando la pantalla SelecciOn de ciclo
Su nueva lavadora con su panel de control LCD de fb.ciluso hace que lavar su ropa sea sencillo.
AI seleccionar un ciclo de lavado, su lavadora seleccionarb, automb.ticamente los ultimos ajustes de
temperatura, velocidad de centrifugado, nivel de suciedad y ciclos extras utilizados.
1. Abra el suministro de agua.
2. Presione el botOn Encender/Apagar.
3. Abra la puerta.
4. Cargue las prendas extendidas en el tambor, sin Ilenarlo demasiado.
5. Cierre la puerta.
6. Agregue el detergente, el suavizante y el detergente para prelavado (si es necesario) en el
compartimiento adecuado.
7_
En la pantalla SelecciOn de ciclo que aparece
en la figura de la derecha, seleccione el ciclo
adecuado de acuerdo con el tipo de ropa que
va a lavar. Puede elegir: Lavado ecolOgico fr(o,
Normal, Carga pesada, Sintetica, Delicado/
Lavado a mano, Ropa deportiva, Ropa de cama,
VAPORIZACION PROFUNDA, EliminaciOnde
manchas, Esterilizar, Lana, Lavado Rb.pido,
Enjuague + Centrifugado, SOlo centrifugado,
Pure Cycle, Ciclos especiales (Cocina, Jardinerfa,
Oficina, Ropa exterior, Ropa de ninos, Programa
Bebe)
,, Despl_tcesehacia abajo o hacia arriba en el
panel Ciclo y toque un ciclo.
El panel OpciOn muestra una descripciOn del
ciclo seleccionado y las opciones del ciclo
seleccionado actualmente.
Toque la DescripciOn si desea vet la
descripciOn del ciclo seleccionado.
8_
Toque el botOn de opciOn adecuado para controlar la Temperatura, Velocidad de centrifugado,
Nivel de suciedad, Ciclos extra.
,, Algunos valores de cada opciOn pueden aparecer desactivados.
Para obtener informaciOn sobre la configuraciOn predeterminada de fb.bricay los ajustes
seleccionables para cada opciOn, consulte la "Tabla de ciclos" secciOn en la pb,gina 66.
,, Los ajustes Extra sOlo pueden activarse o desactivarse.
,, Los ultimos path.metros utilizados para las opciones se guardan para dicho ciclo. Aparecen si
el se selecciona nuevamente el mismo ciclo.
_ oque la flecha hacia la izquierda si desea volver al panel Ciclo para seleccionar otto ciclo
que desee usar.
9_
Presione el botOn Inicio/Pausa para iniciar el
lavado. La pantalla Estado del ciclo (aparece a
la derecha) aparece en el panel LCD y muestra
el estado actual del lavado incluyendo el
tiempo restante, la fase actual del ciclo y otros
indicadores y controles disponibles.
[_ Presione el botOn Encender/Apagar para
cancelar el ciclo y apagar su lavadora.
Lavado de una carga de ropa 33
Indicadores de la pantalla Estado de ciclo
_ inteljgent e Muestra el estado del nivel actual de la red inteligente.
Agregar Este icono aparece cuando es posible agregar/retirar prendas.
prenda
Q pue_ a trabad a Aparece cuando la puerta esta trabada. Desaparece cuando se destraba
la puerta.
Seguro Aparece con un icono seleccionado cuando se activa el Seguro para
n nos n nos.
Cuando el sonido esta en Mudo, el icono es _,.
Cuando el sonido esta activado, el icono es
Aparece con un icono seleccionado cuando se enciende la luz.
Toque el botOn Cancelar para cancelar el ciclo y volver a la pantalla
Selecci6n de ciclo.
Opci6n Agregar prenda
vez que inicia un lavado, el icono Agregar prenda O aparece en la parte
Una inferior central de la
pantalla Estado del ciclo siempre que pueda agregar o retirar prendas.
1. Presione el bot6n Inicio/Pausa para destrabar la puerta
2. Espere a que el icono de Puerta trabada _ desaparezca de la parte inferior central de la
pantalla Estado de ciclo.
La puerta no puede abrirse cuando el agua esta demasiado CALIENTE o el nivel del agua es
demasiado ALTO.
3. Abra la puerta.
4. Agregue o retire prendas.
5. Despues de cerrar la puerta, presione el bot6n Inicio/Pausa para reiniciar el lavado.
Cuando el ciclo ha finalizado:
Una vez finalizado el ciclo total, aparece la pantalla
Ciclo completo (aparece a la derecha). Muestra
el nombre del ciclo y un resumen de las fases y le
permite iniciar un nuevo lavado. Si no toca un bot6n
para realizar una operaci6n durante 5 minutos, la
pantalla Ciclo completo se atenLia.
1. Abra la puerta.
2. Saque la ropa limpia.
34 Lavado de una carga de ropa
Uso de la funci6n Mi ciclo
La funciOn Mi ciclo le permite activar un lavado personalizado (temperatura, centrifugado, nivel de
suciedad y ciclos extra) con un solo botOn. Puede guardar hasta 3 Mi ciclos.
Guardar un Mi ciclo
Siga los pasos que figuran a continuaciOn para guardar su lavado personalizado favorito como un Mi
ciclo.
1.
2.
Toque el bot6n Mi ciclo a la izquierda de la
pantalla de Selecci6n de ciclo. La selecci6n
se expande y muestra tres botones Ninguno
(Ningunol a Ninguno3) en la parte izquierda de la
pantalla. Consulte la ilustraci6n de la derecha.
Seleccione un ciclo y sus opciones, como la
temperatura, velocidad de centrifugado, nivel de
suciedad y oicIos extra en la pantalla Selecci6n
de ciclo. En este ejemplo, seleccionamos el ciclo
Normal, definimos la temperatura como Tibia, la
velocidad de centrifugado como Alta y el nivel
de suciedad como Normal, y seleccionamos
Enjuague extra y Vapor como los ciclos extra.
_ Consulte la "Tabla de ciclos" secci6n en la
pagina 66 para conocer los ajustes disponibles
para cada ciclo.
3. Toque el botOn Guardar corno Mis ciclos en la
parte central derecha de la pantalla de Selecci6n
de ciclo.
4. Seleccione el bot6n Mi ciclo que desea
sobrescribir con el ciclo seleccionado y sus
opciones. En este ejemplo, hemos seleccionado
Mi ciclo 1: Ninguno. Cuando haya terminado,
toque el bot6n Siguiente.
5. Aparece la pantalla Name your My Cycle (Nombre
de Mi ciclo). Ingrese un nombre para Mi ciclo. En
este ejemplo, ingresamos "Lavado de J". Cuando
haya terminado, toque el bot6n Guardar.
6. Aparece un resumen del Mi ciclo que
sobrescribirb, el ciclo existente como Io ilustra la
figura de la derecha. Toque el bot6n Aceptar.
Lavado de una carga de ropa 35
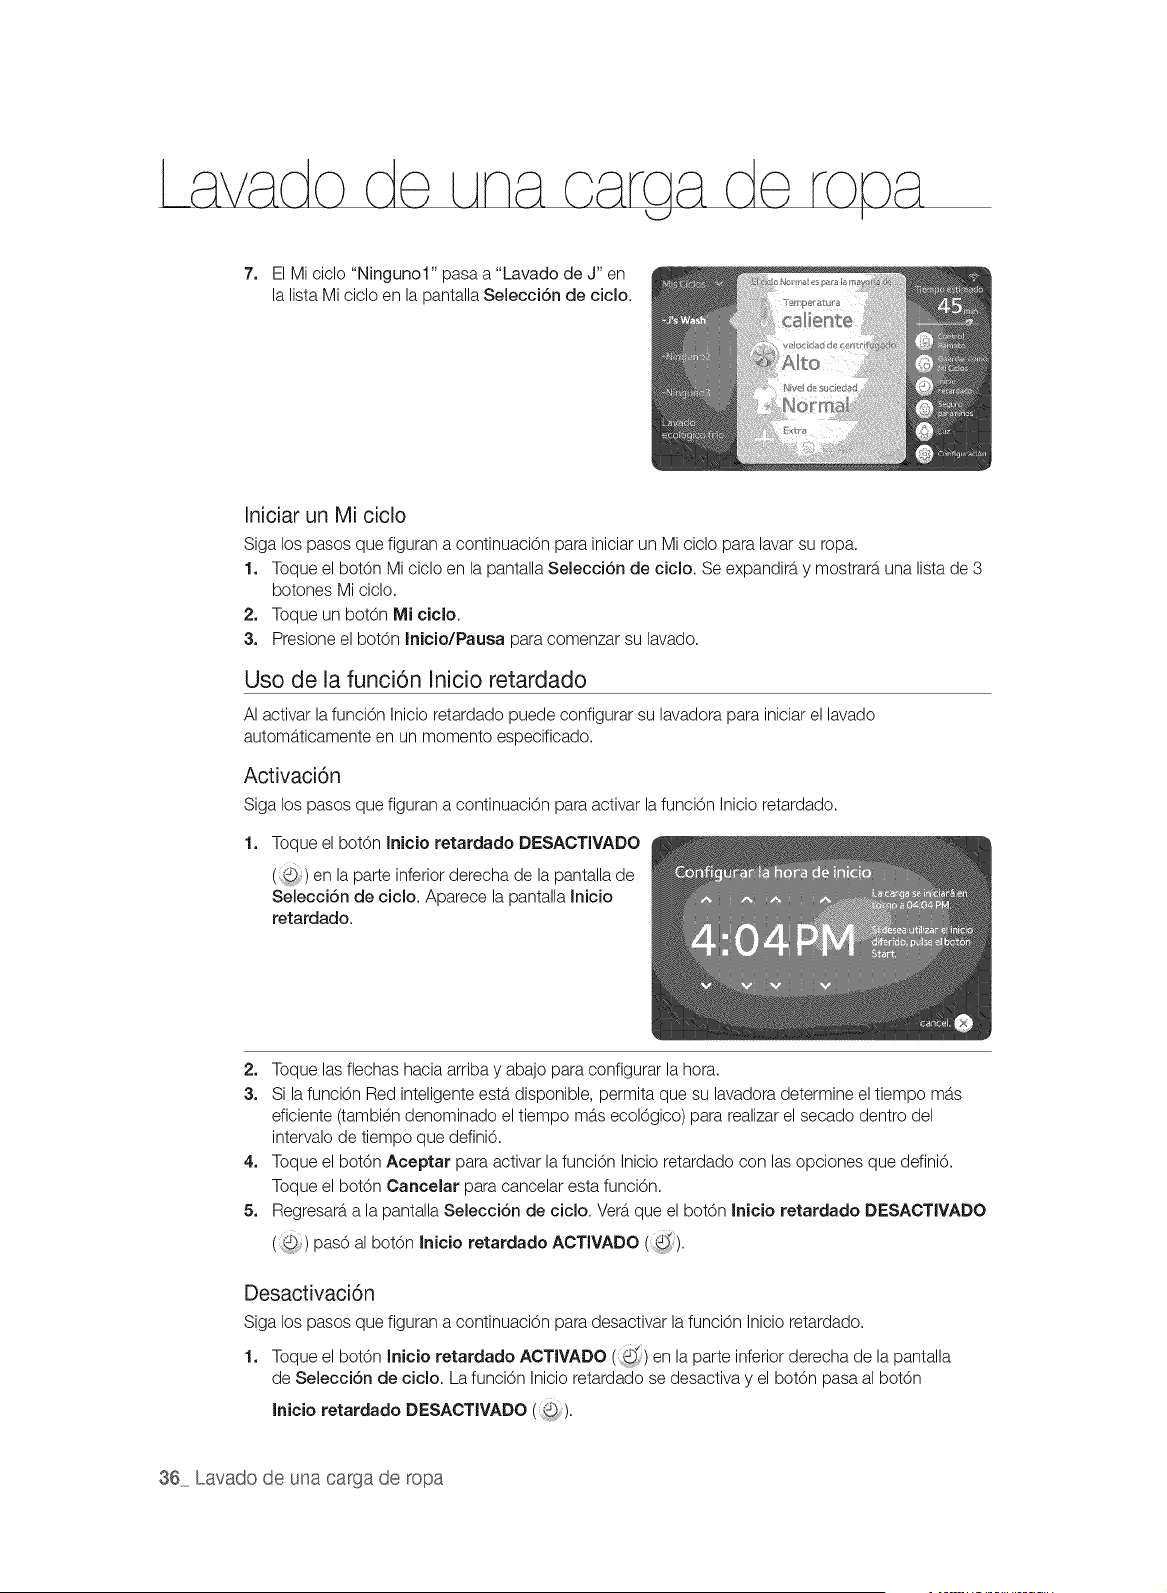
7. El Mi ciclo "Ningunol" pasa a "Lavado de J" en
la lista Mi ciclo en la pantalla Selecci6n de cicio.
Iniciar un Mi ciclo
Siga los pasos que figuran a continuaciOn para iniciar un Mi ciclo para lavar su ropa.
1. Toque el bot6n Mi ciclo en la pantalla Selecci6n de cicio. Se expandira y mostrara una lista de 3
botones Mi ciclo.
2. Toque un bot6n Mi ciclo.
3. Presione el bot6n Inicio/Pausa para comenzar su lavado.
Uso de la funci6n Inicio retardado
AI activar la funci6n Inicio retardado puede configurar su lavadora para iniciar el lavado
automaticamente en un momento especificado.
Activaci6n
Siga los pasos que figuran a continuaci6n para activar lafunci6n Inicio retardado.
1. Toque el bot6n Inicio retardado DESACTIVADO
(:,@) en la parte inferior derecha de la pantalla de
Selecci6n de cicio. Aparece la pantalla Inicio
retardado.
2, Toque las flechas hacia arriba y abajo para configurar la hora.
3. Si la funci6n Red inteligente estb,disponible, permita que su lavadora determine el tiempo mas
eficiente (tambien denominado el tiempo mas ecol6gico) para realizar el secado dentro del
intervalo de tiempo que defini6.
4. Toque el bot6n Aceptar para activar la funci6n Inicio retardado con las opciones que defini6.
Toque el bot6n Cancelar para cancelar esta funci6n.
5. Regresara a la pantalla Selecci6n de ciclo. Vera que el bot6n Inicio retardado DESACTIVADO
( ) pas6 al bot6n Inicio retardado ACTIVADO (_'_).
Desactivaci6n
Siga los pasos que figuran a continuaci6n para desactivar la funci6n Inicio retardado.
d
1. Toque el bot6n Inicio retardado ACTIVADO (i:,) en la parte inferior derecha de la pantalla
de Selecci6n de ciclo. La funci6n Inicio retardado se desactiva y el bot6n pasa al bot6n
Inicio retardado DESACTIVADO (_).
36 Lavado de una carga de ropa
Uso de la funci6n Seguro para niSos
La funciOn Seguro para ni_os le permite bloquear los botones para que el oiolo de lavado
seleccionado no pueda ser modificado.
,_La funciOn Seguro para ni_os impide que los ni_os o las personas discapacitadas pongan en
_R[_u_,funcionamiento la lavadora accidentalmente y se lesionen.
Z_Si un ni_o entra a la lavadora, puede quedar atrapado y asfixiarse.
_E_EN_A
Z_ Aunque la funciOn Seguro para ni_os este activada, debe controlar a los ni_os para que no
_,[_u_,utilicen su lavadora.
Activaci6n de la funci6n Seguro para ni_os
Siga los pasos que figuran a continuacidn para activar la funciOn Seguro para ni_os.
,, Mantenga presionado el botOn Seguro para niSos (_) durante 3 segundos.
La funcidn Seguro para ni_os se activa con una ventana emergente que dice "Seguro para ni_os
ENCENDIDO" y el botdn cambia de (@,) a (_,_).
Desactivaci6n de la funci6n Seguro para ni_os
Siga los pasos que figuran a continuaci6n para desactivar la funci6n Seguro para ni_os.
1. Mantenga presionado el bot6n Seguro para niSos (i/@_)durante 3 segundos.
La funci6n Seguro para ni_os se activa con una ventana emergente que dice "Seguro para ni_os
pausado" y el bot6n cambia de (,,_) a ().
_ Cuando el estado del Seguro para ni_os es Seguro para ni_os pausado, el
Pausa Seguro para niSos ( ) bot6n aparece durante 10 segundos. La funci6n Seguro
para ni_os se activara nuevamente si el bot6n no se mantiene presionado durante otros 3
segundos.
2. Contin0e manteniendo presionado el bot6n Pausa Seguro para niSos ( ) durante otros 3
segundos.
La funci6n Seguro para ni_os se desactiva por completo y el bot6n pasa al bot6n
Seguro para ni_os DESACTIVADO (@).
_ uando se activa la funciOn Seguro para ni_os, solo funciona el botOn Seguro para ni_os.
La funoiOn Seguro para ni_os permanece activada inoluso cuando la lavadora se apaga y se
enciende o despues de desconectar y volver a conectar el cable de alimentaciOn.
Z_ Abrir la puerta por la fuerza puede da_ar el producto y causar lesiones personales.
_,_u_,Para agregar ropa cuando la funci6n Seguro para ni_os esta activada, primero se debe poner en
pausa o desactivar dicha funci6n.
[_ uando la funci6n Seguro para ni_os esta activada, la pantalla no cambia visualmente (no
se aten0a ni se torna gris). Si toca un bot6n o cualquier parte de la pantalla, aparece un
recordatorio de que la funci6n Seguro para ni_os esta activada.
Lavado de una carga de ropa 37
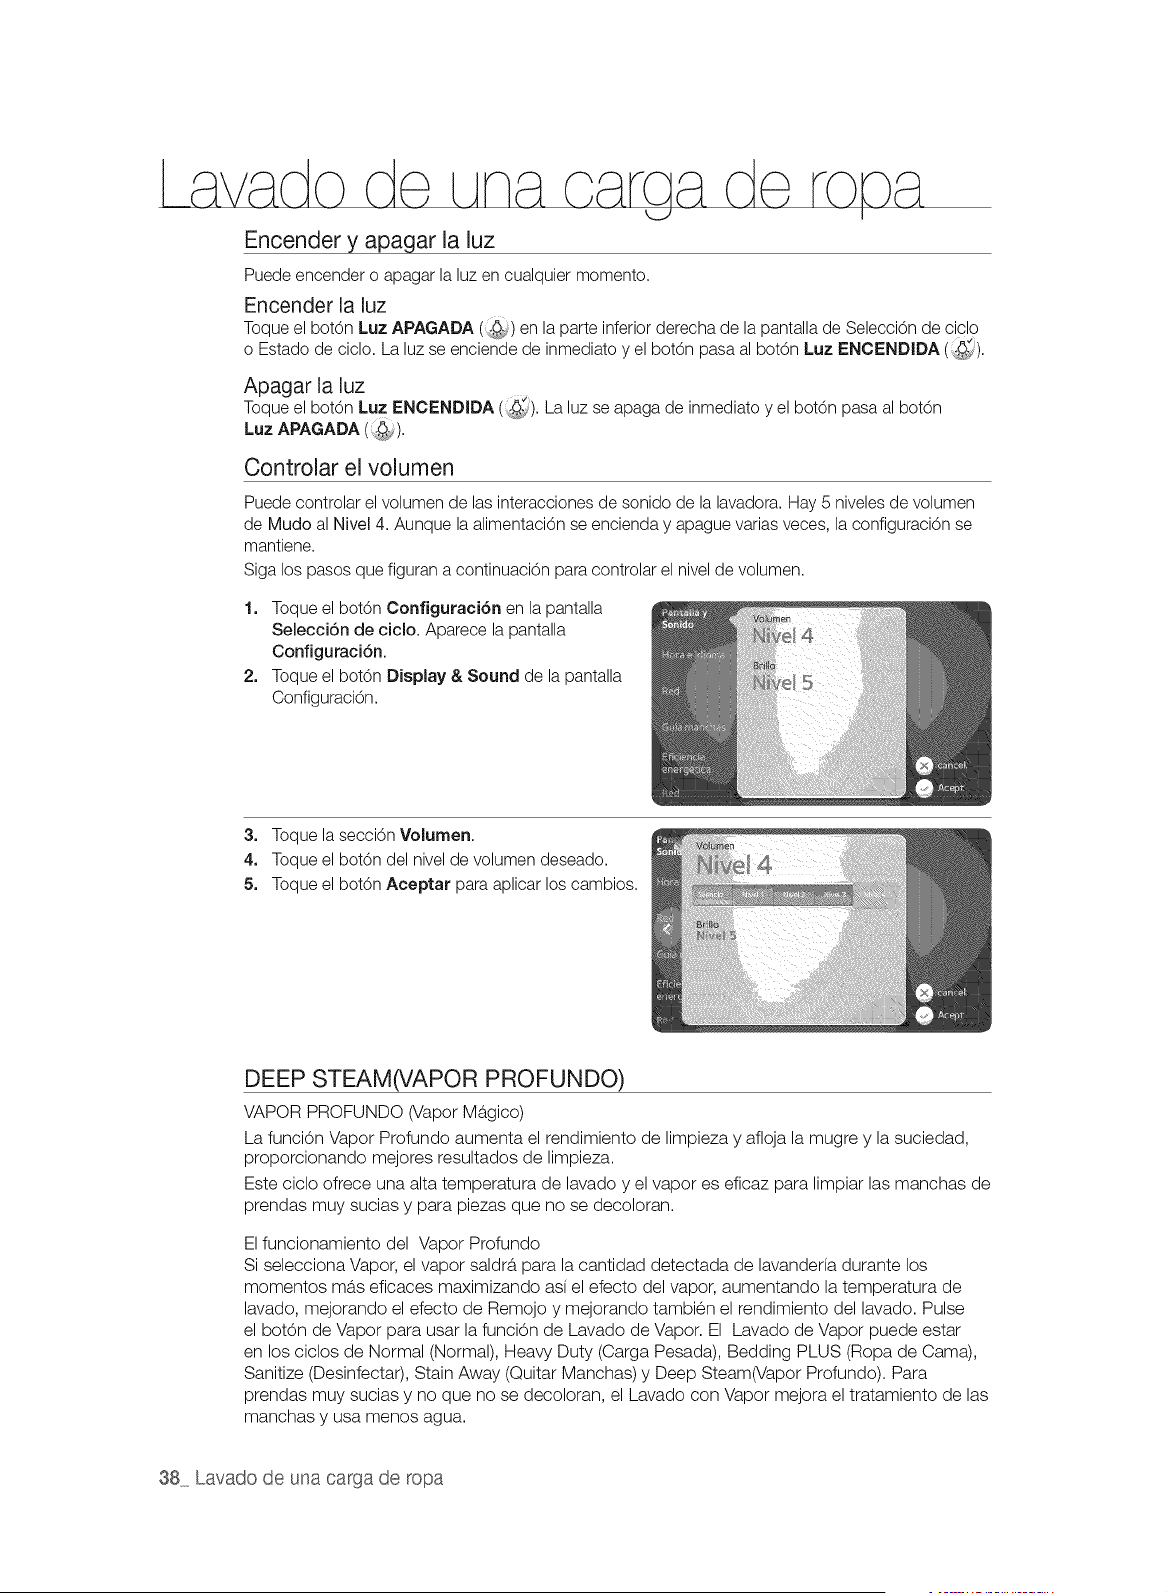
Encender y apagar la luz
Puede encender o apagar la luz en cualquier momento.
Encender la luz
Toque el botOn Luz APAGADA (,._,) en la parte inferior derecha de la pantalla de Seleccbn de ciclo
o Estado de ciclo. La luz se enciende de inmediato y el botOn pasa al botOn Luz ENCENDIDA (_[).
Apagar la luz
Toque el botOn Luz ENCENDIDA (:_:_). La luz se apaga de inmediato y el botOn pasa al botOn
Luz APAGADA (::@_).
Controlar el volumen
Puede controlar el volumen de las interacciones de sonido de la lavadora. Hay 5 niveles de volumen
de Mudo al Nivel 4. Aunque la alimentaci6n se encienda y apague varias veces, la configuraci6n se
mantiene.
Siga los pasos que figuran a continuaci6n para controlar el nivel de volumen.
1. Toque el bot6n Configuraci6n en la pantalla
Selecci6n de ciclo. Aparece la pantalla
Configuraci6n.
2. Toque el bot6n Display & Sound de la pantalla
Configuraci6n.
3. Toque la secciOn Volumen.
4. Toque el bot6n del nivel de volumen deseado.
5. Toque el bot6n Aceptar para aplicar los cambios.
DEEP STEAM(VAPOR PROFUNDO)
VAPOR PROFUNDO (Vapor Magico)
La funcion Vapor Profundo aumenta el rendimiento de limpieza y afloja la mugre y la suciedad,
proporcionando mejores resultados de limpieza.
Este oiclo ofrece una alta temperatura de lavado y el vapor es eficaz para limpiar las manchas de
prendas muy sucias y para piezas que no se decoloran.
El funcionamiento del Vapor Profundo
Si selecciona Vapor, el vapor saldrb, para la cantidad detectada de lavanderfa durante los
momentos mb.s eficaces maximizando ad el efecto del vapor, aumentando la temperatura de
lavado, mejorando el efecto de Remojo y mejorando tambien el rendimiento del lavado. Pulse
el botOn de Vapor para usar la funcion de Lavado de Vapor. El Lavado de Vapor puede estar
en los ciclos de Normal (Normal), Heavy Duty (Carga Pesada), Bedding PLUS (Ropa de Cama),
Sanitize (Desinfectar), Stain Away (Quitar Manchas) y Deep Steam(Vapor Profundo). Para
prendas muy sucias y no que no se decoloran, el Lavado con Vapor mejora el tratamiento de las
manchas y usa menos agua.
38 Lavado de una carga de ropa

La lavadora toma pequenas cantidades de agua en su tina y el calentador calienta el agua hasta la
evaporaci6n.
Para utilizar la funcion vapor, Ileve a cabo los siguientes pasos :
1. Cargue la lavadora.
2. Presione el botOn Power (Encendido}.
3o Active el Selector de ciclos y seleccione un ciclo de vapor. (El ciclo Deep Steam
(Vaporizaci6n profunda) automa,ticamente selecciona la funci6n de lavado al vapor.)
4o Presione el bot6n Steam (Vapor}.
5, Vierta detergente en la bandeja del dosificador para el lavado y vierta suavizante de telas
hasta la Iinea marcada.
6. Presione el bot6n Start/Pause (Inicio/Pausa).
: La lavadora selecciona automaticamente las condiciones de lavado 6ptimas al detectar el
peso de la ropa.
El vapor puede no set necesariamente visible durante los ciclos de vapor.
Es posible que el vapor no este presente en todo el ciclo de lavado al vapor.
Z_ vapor puede ropa. use vapor en como lana,
®
Demasiado danar la No telas delicadas la
.......... seda o telas que se decoloran fa,cilmente.
• El vapor puede no estar presente durante todo el ciclo de lavado con vapor.
No toque la puerta. La superficie de la puerta se puede calentar demasiado.
Control del nivel de brillo
Puede controlar el nivel de brillo del panel LCD. Hay 5 niveles de brillo del Nivel 1 al Nivel 5. Aunque
la alimentaci6n se encienda y apague varias veces, la configuraci6n se mantiene.
Siga los pasos que figuran a continuaci6n para controlar el nivel de brillo.
1. Toque el bot6n Configuraci6n en la pantalla
Selecci6n de ciclo. Aparece la pantalla
Configuraci6n.
2. Toque el bot6n Display & Sound de la pantalla
Configuraci6n.
3. Toque la secci6n Brillo.
4. Toque el bot6n del nivel de brillo deseado.
5. Toque el bot6n Aceptar para aplicar los cambios.
Lavado de una carga de ropa 39
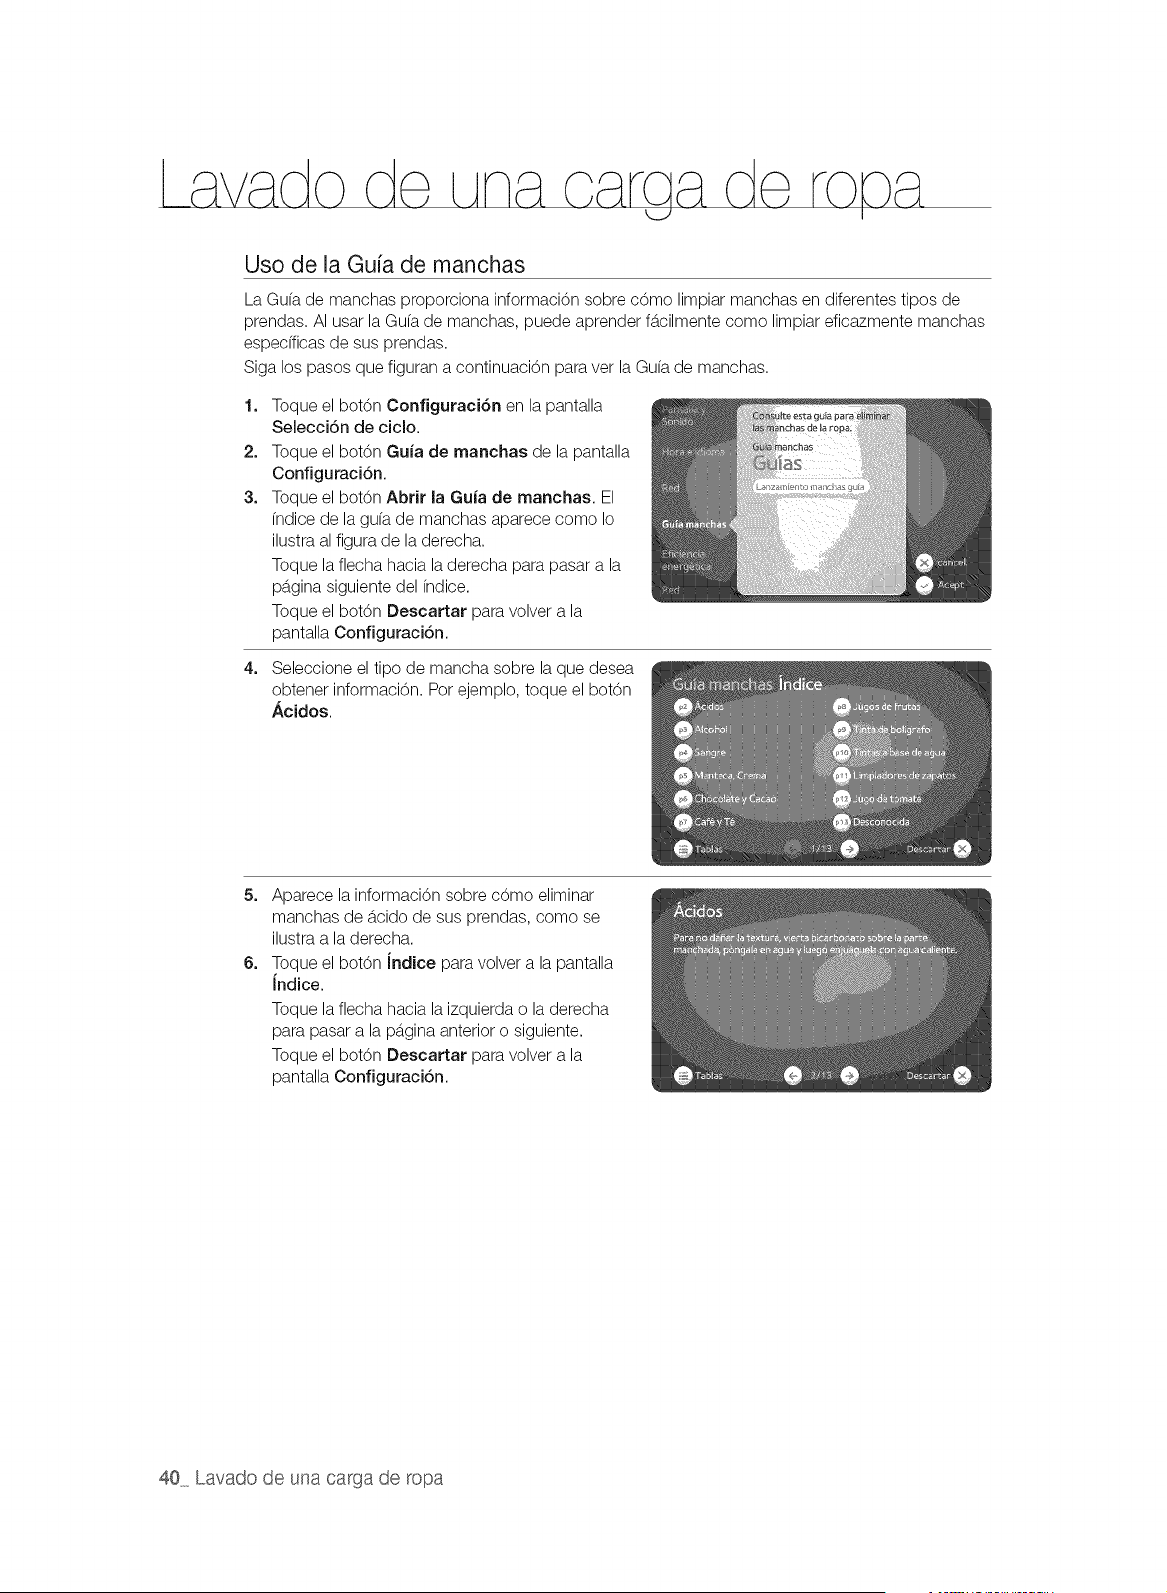
Uso de la Guia de manchas
La Gu(a de manchas proporciona informaci6n sobre c6mo limpiar manchas en diferentes tipos de
prendas. AI usar la Gu(a de manchas, puede aprender fb.cilmente como limpiar eficazmente manchas
especfficas de sus prendas.
Siga los pasos que figuran a continuaci6n para vet la Gu(a de manchas.
1=
2.
3.
Toque el bot6n Configuraci6n en la pantalla
Selecci6n de ciclo.
Toque el bot6n Guia de manchas de la pantalla
Configuraci6n.
Toque el bot6n Abrir la Guia de manchas. El
(ndice de la gu(a de manchas aparece como Io
ilustra al figura de la derecha.
Toque la flecha hacia laderecha para pasar a la
pb.ginasiguiente del (ndice.
Toque el bot6n Descartar para volver a la
pantalla Configuraci6n.
4. Seleccione el tipo de mancha sobre la que desea
obtener informaci6n. Pot ejemplo, toque el bot6n
Acidos.
5=
6=
Aparece la informaci6n sobre c6mo eliminar
manchas de b.cidode sus prendas, como se
ilustra a la derecha.
Toque el bot6n Jndice para volver a la pantalla
Indice.
Toque la flecha hacia la izquierda o la derecha
para pasar a la pb.ginaanterior o siguiente.
Toque el bot6n Descartar para volver a la
pantalla Configuraci6n.
40 Lavado de una carga de ropa

Visualizaci6n de la Eficiencia energ_tica
Puede visualizar la eficiencia energetica general de sus operaciones o conducta de lavado. La
eficiencia energetica se determina de acuerdo con el uso combinado de energfa y agua.
Siga los pasos que figuran a continuaci6n para ver la eficiencia energetica general.
1. Toque el botOn Configuraci6n en la pantalla
Selecci6n de ciclo.
2. Toque el bot6n Eficiencia energ_tica de la
pantalla Configuraci6n.
3. Toque el bot6n M&s... para vet el promedio de
uso de energfa para los ultimos 12 meses.
4. Toque el bot6nAceptar o Cancelar para volver a
la pantalla Configuraci6n.
Uso de la Red inteligente
Puede controlar y ahorrar energfa y dinero al utilizar la
funci6n Red inteligente.
Puede vet el nivel actual de energ(a en la red
inteligente, es decir, el estado energetico de
su vecindario en la secci6n Estado de la red
inteligente de la pantalla Red inteligente. Hay 5
estados o niveles de red inteligente del nivel 0 al nivel
4. Cuanto mb.salto el nivel, mb.scercano al apag6n
estb.el estado energetico de su vecindario.
Tambien puede visualizar y cambiar el tiempo de anulaci6n, es decir, el I(mite de tiempo para utilizar el
servicio de red inteligente en un d(a en la secci6n Anulaci6n de la pantalla Red inteligente. El tiempo
de anulaci6n es la cantidad de tiempo que su lavadora continuarb, usando energ(a antes de apagarse
y evitar un apag6n en todo el vecindario.
Cuando la red inteligentes estb.disponible para su vecindario, las secciones Descripci6n, Estado de
la red inteligente y Anular aparecen en la pantalla Red inteligente.
Visualizaci6n del nivel de energfa actual
Siga los pasos que figuran a continuaci6n para visualizar el nivel actual de energ(a en la red
inteligente.
1. Toque el botOn Configuraci6n en la parte inferior derecha de la pantalla de Selecci6n de ciclo.
Aparece la pantalla Configuraci6n.
2. Toque el bot6n Red Inteligente de la pantalla Configuraci6n.
3. Toque la secci6n Estado de la red inteligente para vet informaci6n detallada sobre el nivel
actual de energ(a.
4. Toque el botOnAceptar o Cancelar para volver a la pantalla Configuraci6n.
Lavado de una carga de ropa 41
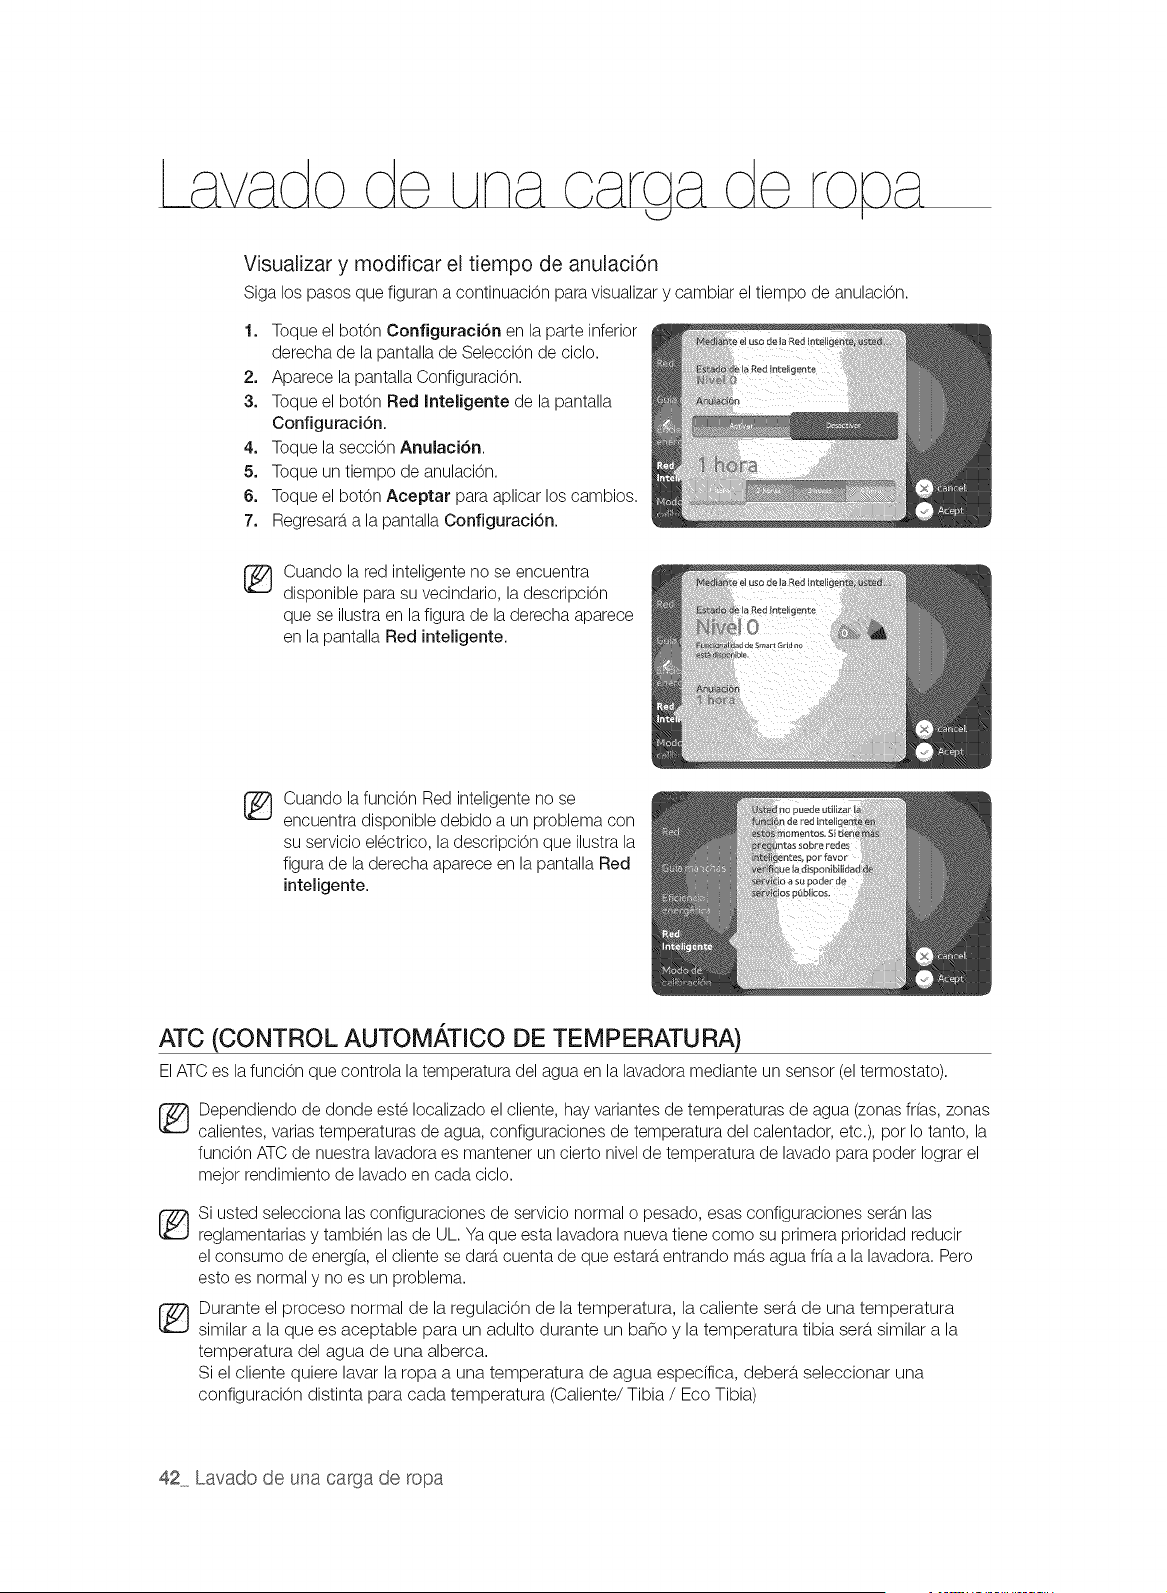
Visualizar y modificar el tiempo de anulaci6n
Siga los pasos que figuran a continuaci6n para visualizar y cambiar el tiempo de anulaci6n.
1. Toque el bot6n Configuraci6n en la parte inferior
derecha de la pantalla de Selecci6n de ciclo.
2. Aparece la pantalla Configuraci6n.
3. Toque el bot6n Red Inteligente de la pantalla
Configuraci6n.
4. Toque la secci6n Anulaci6n.
5. Toque un tiempo de anulaci6n.
6. Toque el bot6n Aceptar para aplicar los cambios.
7. Regresarb,a la pantalla Configuraci6n.
®
Cuando la red inteligente no se encuentra
disponible para su vecindario, la descripci6n
que se ilustra en la figura de la derecha aparece
en la pantalla Red inteligente.
®
Cuando la funcion Red inteligente no se
encuentra disponible debido a un problema con
su servicio electrico, la descripci6n que ilustra la
figura de la derecha aparece en la pantalla Red
inteligente.
ATC (CONTROL AUTOM,&,TICO DE TEMPERATU RA)
ElATC es la funci6n que controla la temperatura del agua en la lavadora mediante un sensor (el termostato).
_ ependiendo de donde este Iocalizado el cliente, hay variantes de temperaturas de agua (zonas if(as, zonas
calientes, varias temperaturas de agua, configuraciones de temperatura del calentador, etc.), pot Io tanto, la
funci6n ATC de nuestra lavadora es mantener un cierto nivel de temperatura de lavado para poder Iograr el
mejor rendimiento de lavado en cada ciclo.
Si usted selecciona las configuraciones de servicio normal o pesado, esas configuraciones serb,n las
reglamentarias y tambien las de UL. Ya que esta lavadora nueva tiene como su primera prioridad reducir
el consumo de energ(a, el cliente se darb,cuenta de que estarb,entrando mb,s agua fr(a a la lavadora. Pero
esto es normal y no es un problem&
_ Durante el proceso normal de la regulaci0n de la temperatura, la caliente sera, de una temperatura
similar a la que es aceptable para un adulto durante un bano y la temperatura tibia sera,similar a la
temperatura del agua de una alberca.
Si el cliente quiere lavar la ropa a una temperatura de agua especifica, debera, seleccionar una
configuraci0n distinta para cada temperatura (Caliente/Tibia / Eco Tibia)
42 Lavado de una carga de ropa
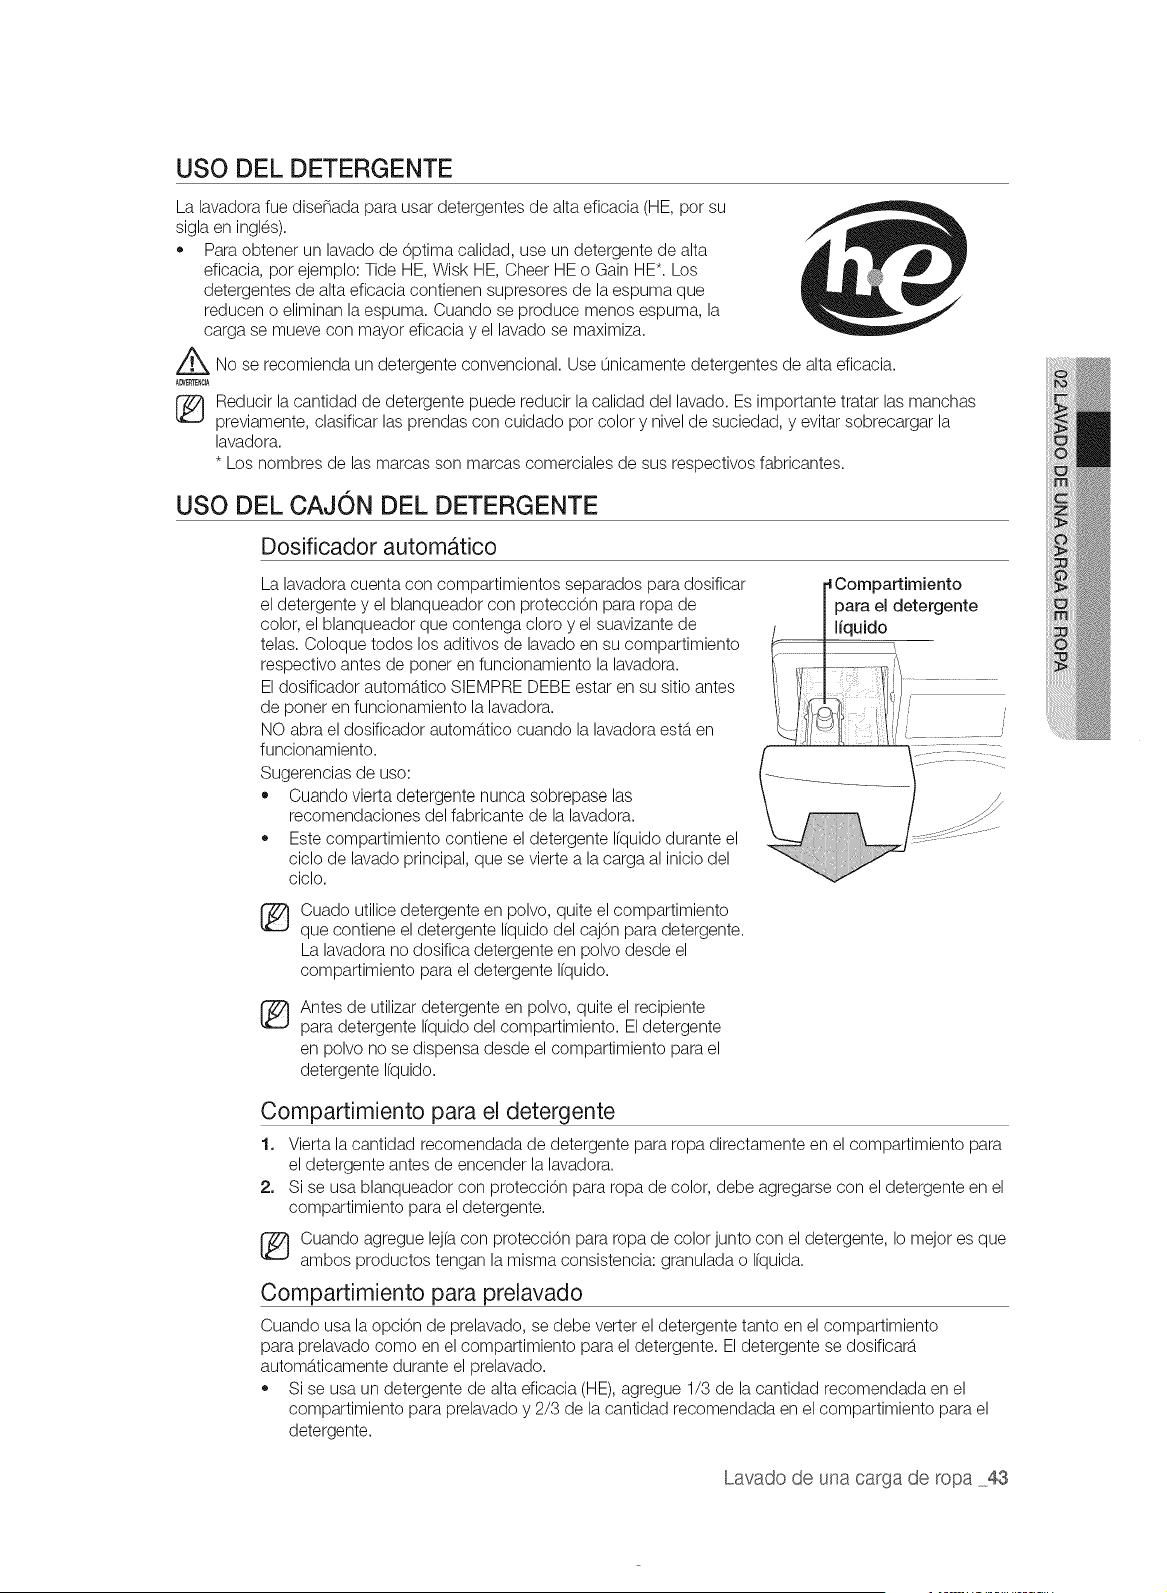
USO DEL DETERGENTE
La lavadora fue dise_ada para usar detergentes de alta eficacia (HE, pot su
sigla en ingles).
,, Para obtener un lavado de 6ptima calidad, use un detergente de alta
eficacia, pot ejemplo: Tide HE, Wisk HE, Cheer HE o Gain HE*. Los
detergentes de alta eficacia contienen supresores de la espuma que
reducen o eliminan la espuma. Cuando se produce menos espuma, la
carga se mueve con mayor eficacia y el lavado se maximiza.
_No se recomienda un detergente convencional. Use unicamente detergentes de alta eficacia.
A#tBTENC_,
(_ Reducir la cantidad de detergente puede reducir la calidad del lavado. Es importante tratar las manchas
previamente, clasificar las prendas con cuidado pot color y nivel de suciedad, y evitar sobrecargar la
lavadora.
* Los nombres de las marcas son marcas comerciales de sus respectivos fabricantes.
USO DEL CAJON DEL DETERGENTE
Dosificador autom_.tico
La lavadora cuenta con compartimientos separados para dosificar
el detergente y el blanqueador con protecci6n para ropa de
color, el blanqueador que contenga cloro y el suavizante de
telas. Coloque todos los aditivos de lavado en su compartimiento
respectivo antes de poner en funcionamiento la lavadora.
Eldosificador automb.tico SIEMPRE DEBE estar en su sitio antes
de poner en funcionamiento la lavadora.
NO abra el dosificador automb.tico cuando la lavadora estb.en
funcionamiento.
Sugerencias de uso:
,, Cuando vierta detergente nunca sobrepase las
recomendaciones del fabricante de la lavadora.
,, Este compartimiento contiene el detergente I(quido durante el
ciclo de lavado principal, que se vierte a la carga al inicio del
ciclo.
3artimiento
para el detergente
liquido
Cuado utilice detergente en polvo, quite el compartimiento
que contiene el detergente I(quidodel caj6n para detergente.
La lavadora no dosifica detergente en polvo desde el
compartimiento para el detergente I(quido.
®
Antes de utilizar detergente en polvo, quite el recipiente
para detergente I(quido del compartimiento. Eldetergente
en polvo no se dispensa desde el compartimiento para el
detergente Ifquido.
Compartimiento para el detergente
1. Vierta la cantidad recomendada de detergente para ropa directamente en el compartimiento para
el detergente antes de encender la lavadora.
2. Si se usa blanqueador con protecci6n para ropa de color, debe agregarse con el detergente en el
compartimiento para el detergente.
_ uando agregue lejfa con protecci6n para ropa de color junto con el detergente, Io mejor es que
ambos productos tengan la misma consistencia: granulada o I(quida.
Compartimiento para prelavado
Cuando usa la opci6n de prelavado, se debe verter el detergente tanto en el compartimiento
para prelavado como en el compartimiento para el detergente. El detergente se dosificarb.
automb.ticamente durante el prelavado.
,, Si se usa un detergente de alta eficacia (HE), agregue 1/3 de la cantidad recomendada en el
compartimiento para prelavado y 2/3 de la cantidad recomendada en el compartimiento para el
detergente.
Lavado de una carga de ropa 43
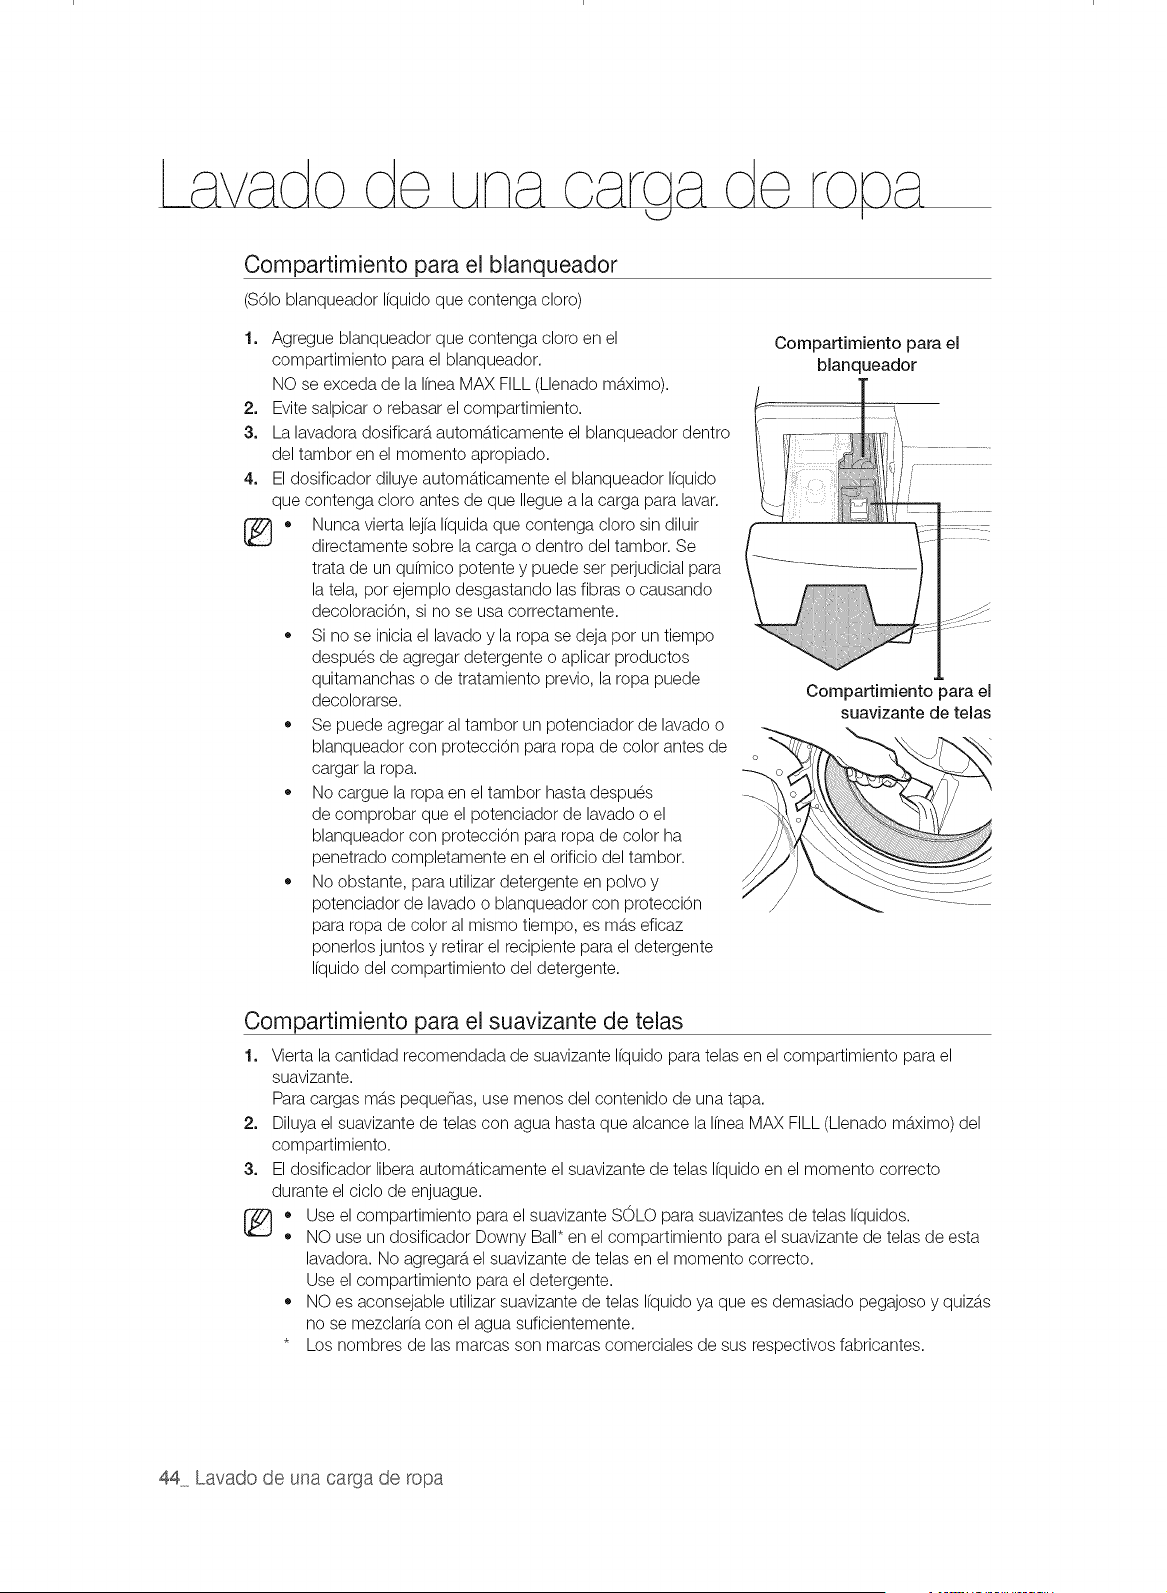
Compartimiento para el blanqueador
($61oblanqueador Ifquido que contenga cloro)
1+
2.
3.
4.
®.
Agregue blanqueador que contenga cloro en el
compartimiento para el blanqueador.
NO se exceda de la Ifnea MAX FILL (Llenado mb.ximo).
Evite salpicar o rebasar el compartimiento.
La lavadora dosificarb,automb.ticamente el blanqueador dentro
del tambor en el momento apropiado.
El dosificador diluye automb.ticamente el blanqueador Ifquido
que contenga cloro antes de que Ilegue a la carga para lavar.
Nunca vierta lejfa Ifquida que contenga cloro sin diluir
directamente sobre la carga o dentro del tambor. Se
trata de un qufmico potente y puede set perjudicial para
la tela, pot ejemplo desgastando las fibras o causando
decoloraci6n, si no se usa correctamente.
,, Si no se inicia el lavado y la ropa se deja pot un tiempo
despues de agregar detergente o aplicar productos
quitamanchas o de tratamiento previo, la ropa puede
decolorarse.
,, Se puede agregar al tambor un potenciador de lavado o
blanqueador con protecci6n para ropa de color antes de
cargar la ropa.
,, No cargue la ropa en el tambor hasta despues
de comprobar que el potenciador de lavado o el
blanqueador con protecci6n para ropa de color ha
penetrado completamente en el orificio del tambor.
,, No obstante, para utilizar detergente en polvo y
potenciador de lavado o blanqueador con protecci6n
para ropa de color al mismo tiempo, es mb.seficaz
ponerlos juntos y retirar el recipiente para el detergente
Ifquido del compartimiento del detergente.
Compartimiento para el
blanqueador
Compartimiento para el
suavizante de telas
Compartimiento para el suavizante de telas
1+
2+
3.
®.
o
Vierta la cantidad recomendada de suavizante Ifquido para telas en el compartimiento para el
suavizante.
Para cargas mb.spequenas, use menos del contenido de una tapa.
Diluya el suavizante de telas con agua hasta que alcance la Ifnea MAX FILL (Llenado mb.ximo) del
compartimiento.
El dosificador libera automb.ticamente el suavizante de telas Ifquido en el momento correcto
durante el ciclo de enjuague.
Use el compartimiento para el suavizante SOLO para suavizantes de telas Ifquidos.
NO use un dosificador Downy Ball* en el compartimiento para el suavizante de telas de esta
lavadora. No agregarb,el suavizante de telas en el momento correcto.
Use el compartimiento para el detergente.
,, NO es aconsejable utilizar suavizante de telas Ifquido ya que es demasiado pegajoso y quizb.s
no se mezclarfa con el agua suficientemente.
* Los nombres de las marcas son marcas comerciales de sus respectivos fabricantes.
44 Lavado de una carga de ropa

Puede reoibir notifioaoion@8y controlar la lavadora desde su tel6fono m©vil,
Para haoerlo, debe haoer Io siguiente,
1. Configure los para.metrosWi-Fi de su lavadoray conecte la lavadora a su red.
2. Active la funci6n Red Wi-Fi de su lavadora.
3. Descarga, instaley ejecute la aplicaci6n m6vil, Aplicaci6n para la lavadora/secadora inteligente Samsung
4. Use la aplicaci6n m6vil Aplicaci6n para la lavadora/secadora inteligente Samsung.
No se incluye un enrutador alb.mbrico ni inalb.mbrico(AP)con la compra de su lavadora. La lavadora es
compatible con los protocolos de encriptaci6n Wi-Fi WEP,TKIP y TKIP AES. No es compatible con la conexi6n
a un enrutador alb.mbricoo inalb.mbrico(AP)que utilice un protocolo de encriptaci6n Wi-Fi que no sea este.
®
®
®
Si un enrutador (o Punto de acceso) no tiene una autenticaci6n WPS, puede ocurrir un error de conexi6n.
Si un enrutador inalb.mbricoque no tiene una autenticaci6n WPS estb.conectado por conexi6n inalb.mbrica
a un acondicionador de aire, las conexiones Wi-Fi de otros dispositivos conectados anteriormente pueden
desconectarse.
Si el dispositivo estb.instalado en un edificio donde no hay un enrutador inalb.mbricoinstalado para ese
piso, la conectividad de red puede verse degradada.
Si el dispositivo estb.instalado en un lugar como un armario meta.licoo cemento reforzado, la conectividad
de red puede verse degradada.
Si este dispositivo o el enrutado inala.mbricoesta.instalado cerca de un microondas o secadora, la
conectividad de red puede verse degradada por la inter[erencia.
+ Si el enrutador inala.mbricono es un producto certificado, es posible que no se conecte a la red.
+ Este dispositivo no es compatible con los protocolos de red inalb.mbricos802.1In y 802.1 la.
Este producto no contiene un enrutador inalb.mbrico.
CONFIGURAR LOS AJUSTES DE RED DE SU LAVADORA Y
CONECTARLA A SU RED
Para configurar los ajustes Wi-Fi de su lavadora y conectar su lavadora a la red, siga los procedimientos que
figuran a continuaci6n.
Configurar los parAmetros de direcci6n IP
Siga el procedimiento que figura a continuaci6n para configurar los parb.metrosde direcci6n IP de su
lavadora para una red Wi-Fi.
1. Toque el bot6n Configuraci6n en la pantalla
Selecci6n de ciclo.
2. Toque el menLiRed en la pantalla Configuraci6n.
3. Toque la secci6n Red Wi-Fi.
4. Toque el bot6n Configurar.
5. Toque el bot6n Direcci6n IP junto a la red que
desea configurar.
6. Toque el bot6n Autom_tico para que su
lavadora configure los parb.metros de direcci6n IP
automb.ticamente. Luego continOe con el paso 11.
7. Para configurar los path.metros de direcci6n IP en forma manual, toque el bot6n Config. Usuario.
8. Toque el campo Direcci6n IP.
9. Ingrese una direcci6n IP y luego toque el bot6n Aceptar.
10. Repita los pasos 8 y 9 para los campos Mb,scara de subred, Puerta de enlace y DNS.
11. Toque el bot6n Aceptar de la pantalla Configuraci6n.
Uso de su telefono m6viH45

/
Conectar la lavadora a la red
Siga el procedimiento que figura a continuaci6n para conectar su lavadora a una red Wi-Fi.
1. Toque el bot6n Configuraci6n en la pantalla Selecci6n de ciclo.
2. Toque el menLi Red en la pantalla Configuraci6n.
3. Toque la secci6n Red Wi=Fi.
4. Toque el bot6n Configurar.
5. Toque el nombre de la red a la que desea conectar su lavadora.
6. Ingrese su contrase_a de red y luego toque el botOn Aceptar.
7. La lavadora inicia el proceso de conexi6n. La pantalla Conectar a Wi-Fi aparece para mostrar el
avance de la bLisqueda.
8. Si la lavadora se conecta a la red, aparece el mensaje "La conexi6n se ha establecido con exito"
durante 1 segundo. Luego, reaparece la pantalla Lista de redes con una marca de verificaci6n a
la izquierda de la red seleccionada.
9. Si la lavadora no puede conectarse a la red, aparece el mensaje "La conexi6n fall6".
Para reintentar la conexi6n, toque el bot6n Reintentar.
Para volver a la pantalla Lista de redes, toque el bot6n Cancelar o Aceptar.
ACTIVAR LA FUNCION DE RED WI-FI DE SU LAVADORA
Siga los procedimientos que figuran a continuaci6n para activar la funciOn de Red Wi-Fi de su lavadora.
1. Toque el bot6n Configuraci6n en la pantalla
Selecci6n de ciclo.
2. Toque el men0 Red en la pantalla Configuraci6n.
3. Toque la secci6n estado Wi-Fi.
4. Toque el bot6n Encendido.
5. Toque el botOn ( { ) para volver a la pantalla
Configuraci6n.
46 Uso de su tel6fono m6vil
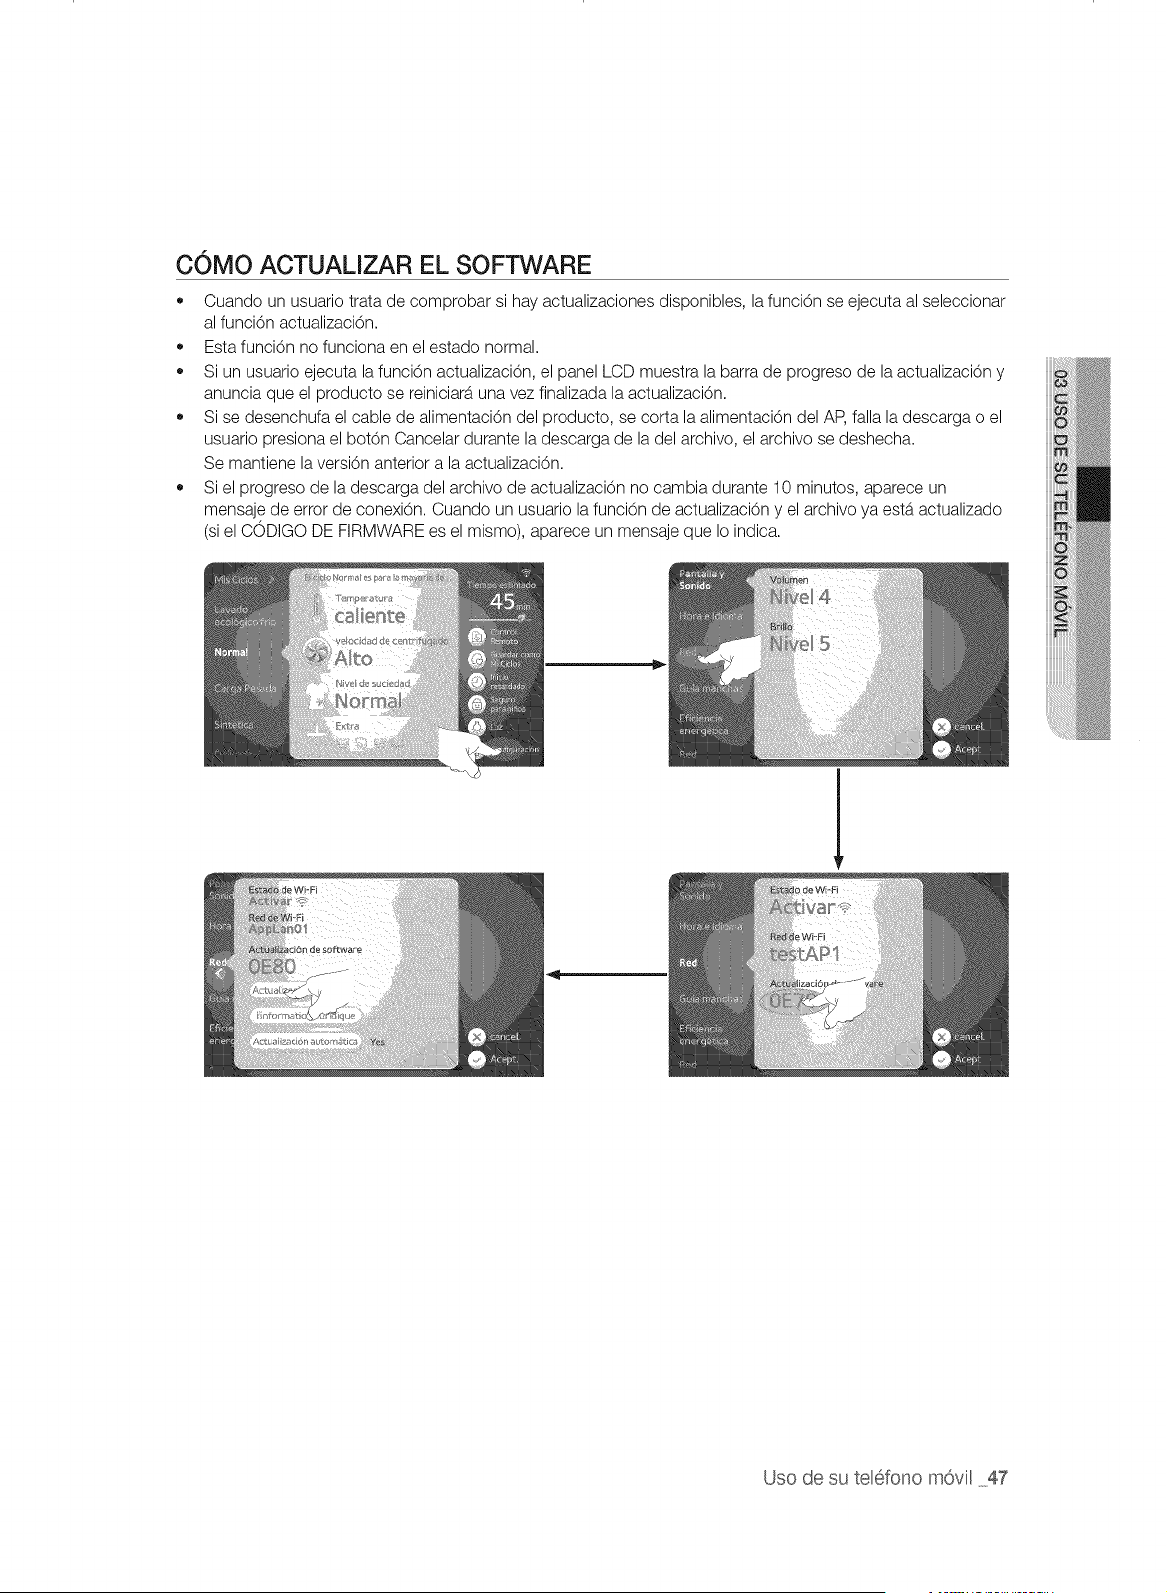
COMO ACTUALIZAR EL SOFTWARE
• Cuando un usuario trata de comprobar si hay actualizaciones disponibles, la funci6n se ejecuta al seleccionar
al funci6n actualizaci6n.
,, Esta funci6n no funciona en el estado normal.
,, Si un usuario ejecuta la funci6n actualizaci6n, el panel LCD muestra la barra de progreso de la actualizaci6n y
anuncia que el producto se reiniciara una vez finalizada la actualizaci6n.
,, Si se desenchufa el cable de alimentaci6n del producto, se corta la alimentaci6n del AP, falla la descarga o el
usuario presiona el bot6n Cancelar durante la descarga de la del archivo, el archivo se deshecha.
Se mantiene la versi6n anterior a la actualizaci6n.
• Si el progreso de la descarga del archivo de actualizaci6n no cambia durante 10 minutos, aparece un
mensaje de error de conexiOn. Cuando un usuario la funci6n de actualizaciOn y el archivo ya estb.actualizado
(si el CODIGO DE FIRMWARE es el mismo), aparece un mensaje que Io indica.
Uso de su teBfono m6vil 47

/
DESCARGAR Y EJECUTAR LA APLICACI6N MOVIL, APLICACI6N PARA
LA LAVADORA/SECADORA INTELIGENTE SAMSUNG
Siga los procedimientos que aparecen a continuaci6n para descargar y ejecutar la aplicaci6n m6vil
Aplieaei6n para la lavadora/secadora inteligente Samsung.
1. Descargue la Aplicaci6n para la lavadora/secadora inteligente Samsung en su telefono
m6vil desde el Android Market o Apple App store. Puede omitir este paso si ya ha descargado
la aplicaci6n a su teldono m6vil.
2=
Toque el icono Aplicaci6n para la lavadora/secadora
inteligente Samsung en su telefono m6vil para ejeoutar la
aplicaci6n.
Apareoe la pantalla inioial.
SamSLtl]g Smart Washel
Cargan_n.
Versi61s2 1 0
3. Aparece la pantalla Inicio. Muestra que su telefono m6vil
todavfa no esta conectado a su lavadora.
4. Toque el Control del interior o Control de exterior.
Control
La funcibn Smart Contro s6!0 la admiten
Io8 productOs coo func 6r_ Wi_Fi
48 Uso de su telefono m6vil
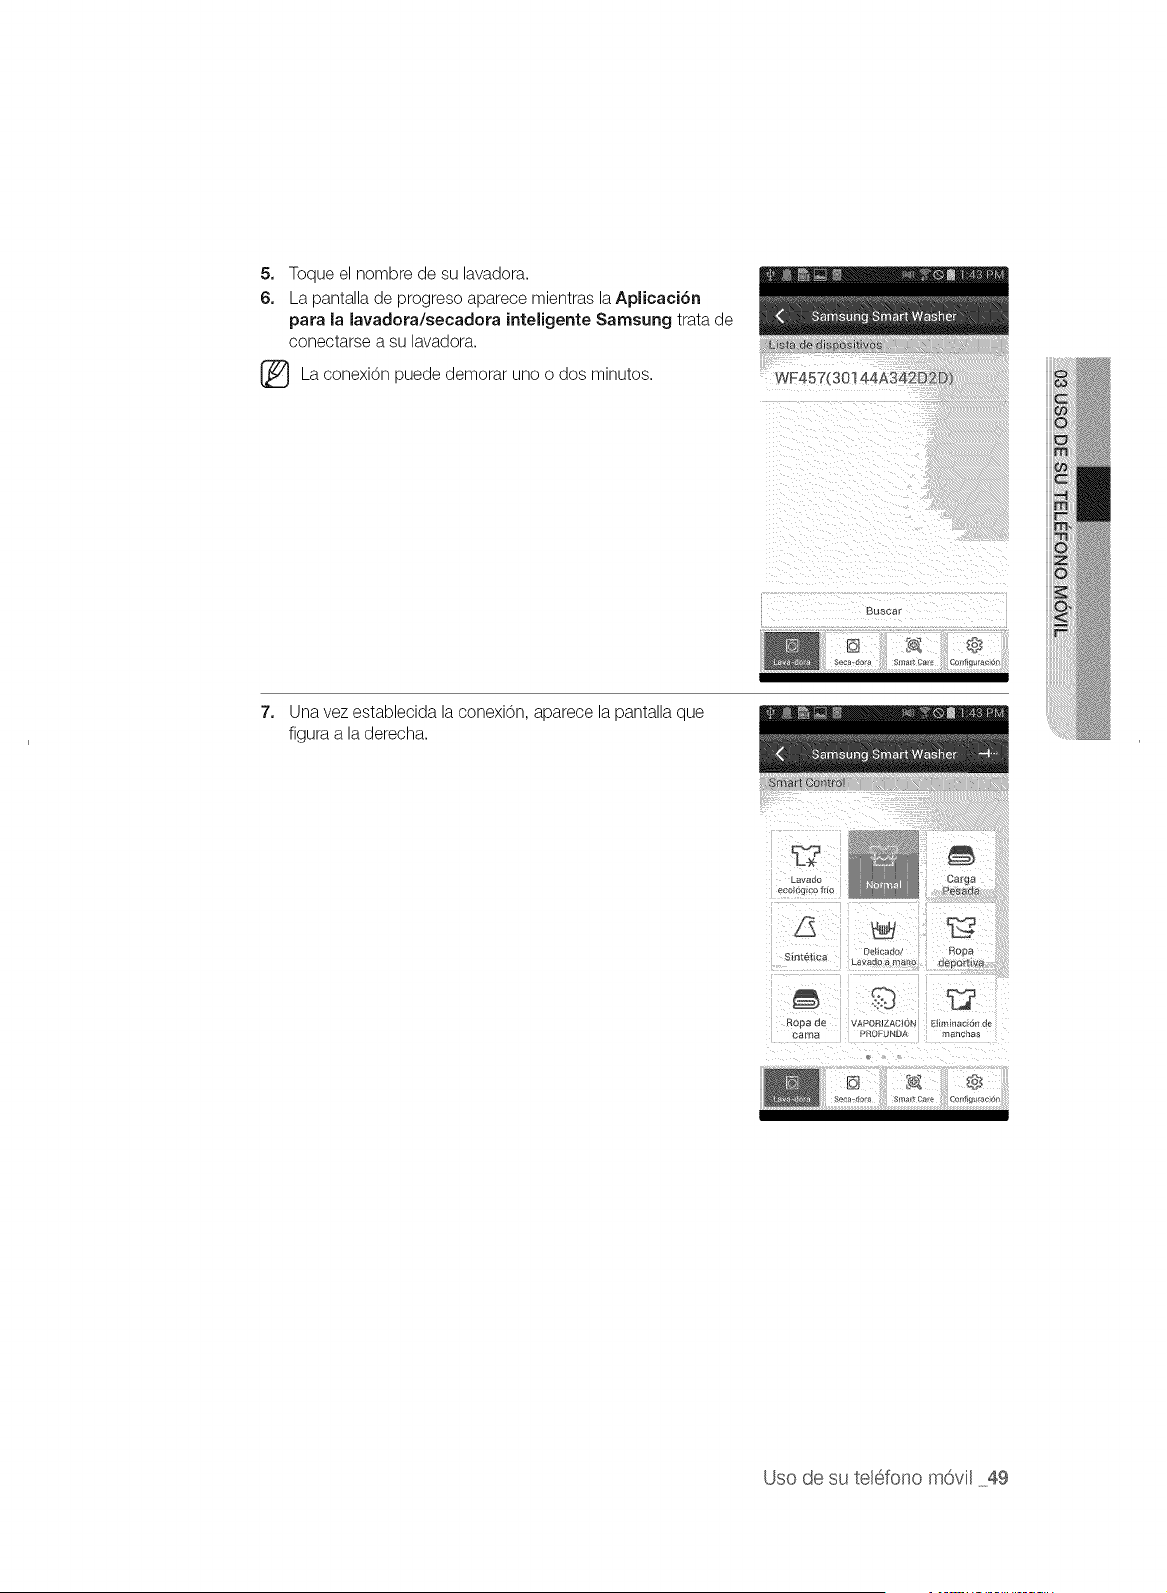
5. Toque el nombre de su lavadora.
6. La pantalla de progreso aparece mientras laAplicaci6n
pata la lavadota/secadota inteligente Samsung trata de
conectarse a su lavadora.
(_ La conexi6n demorar dos minutos.puede
uno o
7. Una vez establecida la conexi6n, aparece la pantalla que
figura a la derecha.
L_Vaer*
ec{)k}gEco fr(o
. . Oel carlo/ Rooa
S_f_te14ca Lavado a mano :Jenor_v;_
C/ooa de VAPORIZACION Ei{mEnac_on d_
_a ma PROFUNDA Tlanc_a_
Uso de su telefono m6vil 49
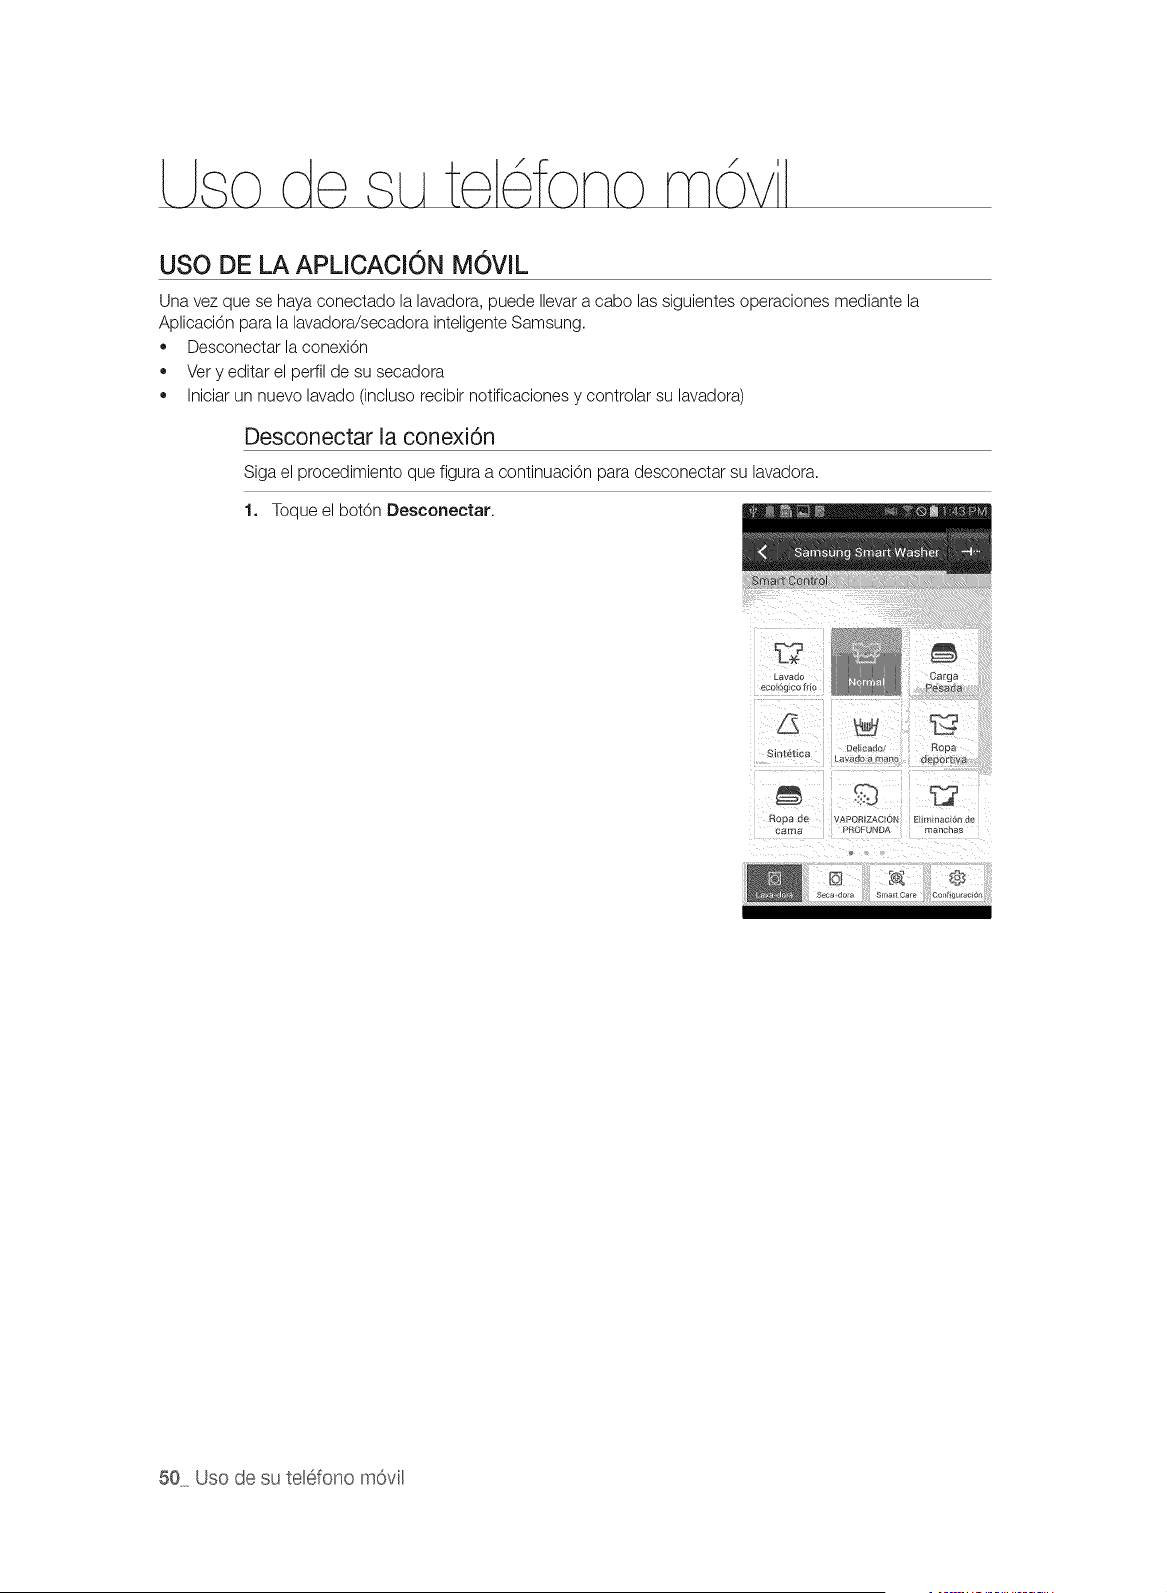
/
USO DE LA APLICACION MOVIL
Una vez que se haya conectado la lavadora, puede Ilevar a eabo las siguientes operaciones mediante la
AplicaciOn para la lavadora/secadora inteligente Samsung.
• Desconectar la conexiOn
• Very editar el perfil de su secadora
• Iniciar un nuevo lavado (incluso recibir notificaciones y controlar su lavadora)
Desconectar la conexi6n
Siga el procedimiento que figura a continuaciOn para desconectar su lavadora.
1. Toque el botOn Desconectar.
_avac_c
ecolog_co frio
Sin_ebca La_l_c_':_ ° .............
%2
Rosa de APORtZACI(3N EIlm_nacE6n de
caJ_e_ PROFUNDA mancnas
50 Uso de su telefono mOvil
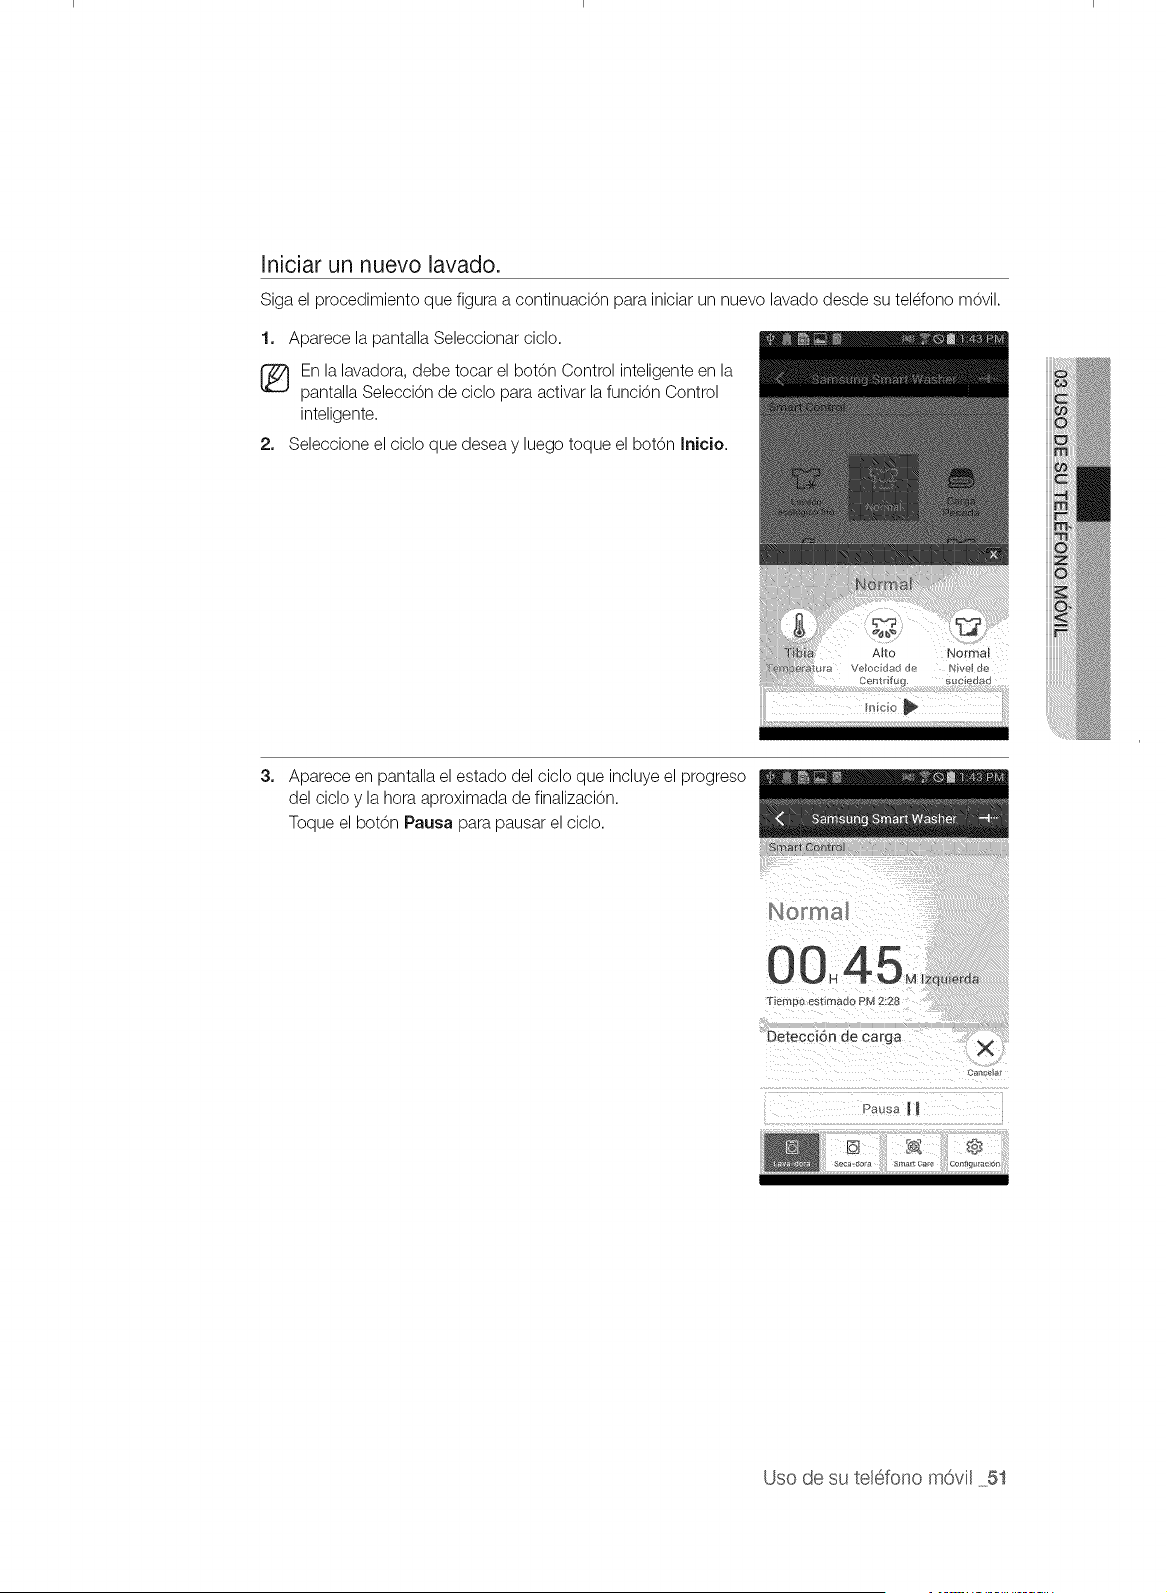
Iniciar un nuevo lavado.
Siga el procedimiento que figura a continuaci6n para iniciar un nuevo lavado desde su teldono m6vil.
1. Aparece la pantalla Seleccionar cicIo.
En la lavadora, debe tocar el bot6n Control inteligente en la
pantalla Selecci6n de ciclo para activar la funci6n Control
inteligente.
2, Seleccione el ciclo que desea y luego toque el botOn Irflcio.
Alto
Veloc dad de Nve de
Centrif_ g. Suc edad
3_
Aparece en pantalla el estado del ciclo que incluye el progreso
del ciclo y la hora aproximada de finalizacion.
Toque el botOn Pausa para pausar el ciclo.
Can@at
Uso de su teH6fonom6vil _5t
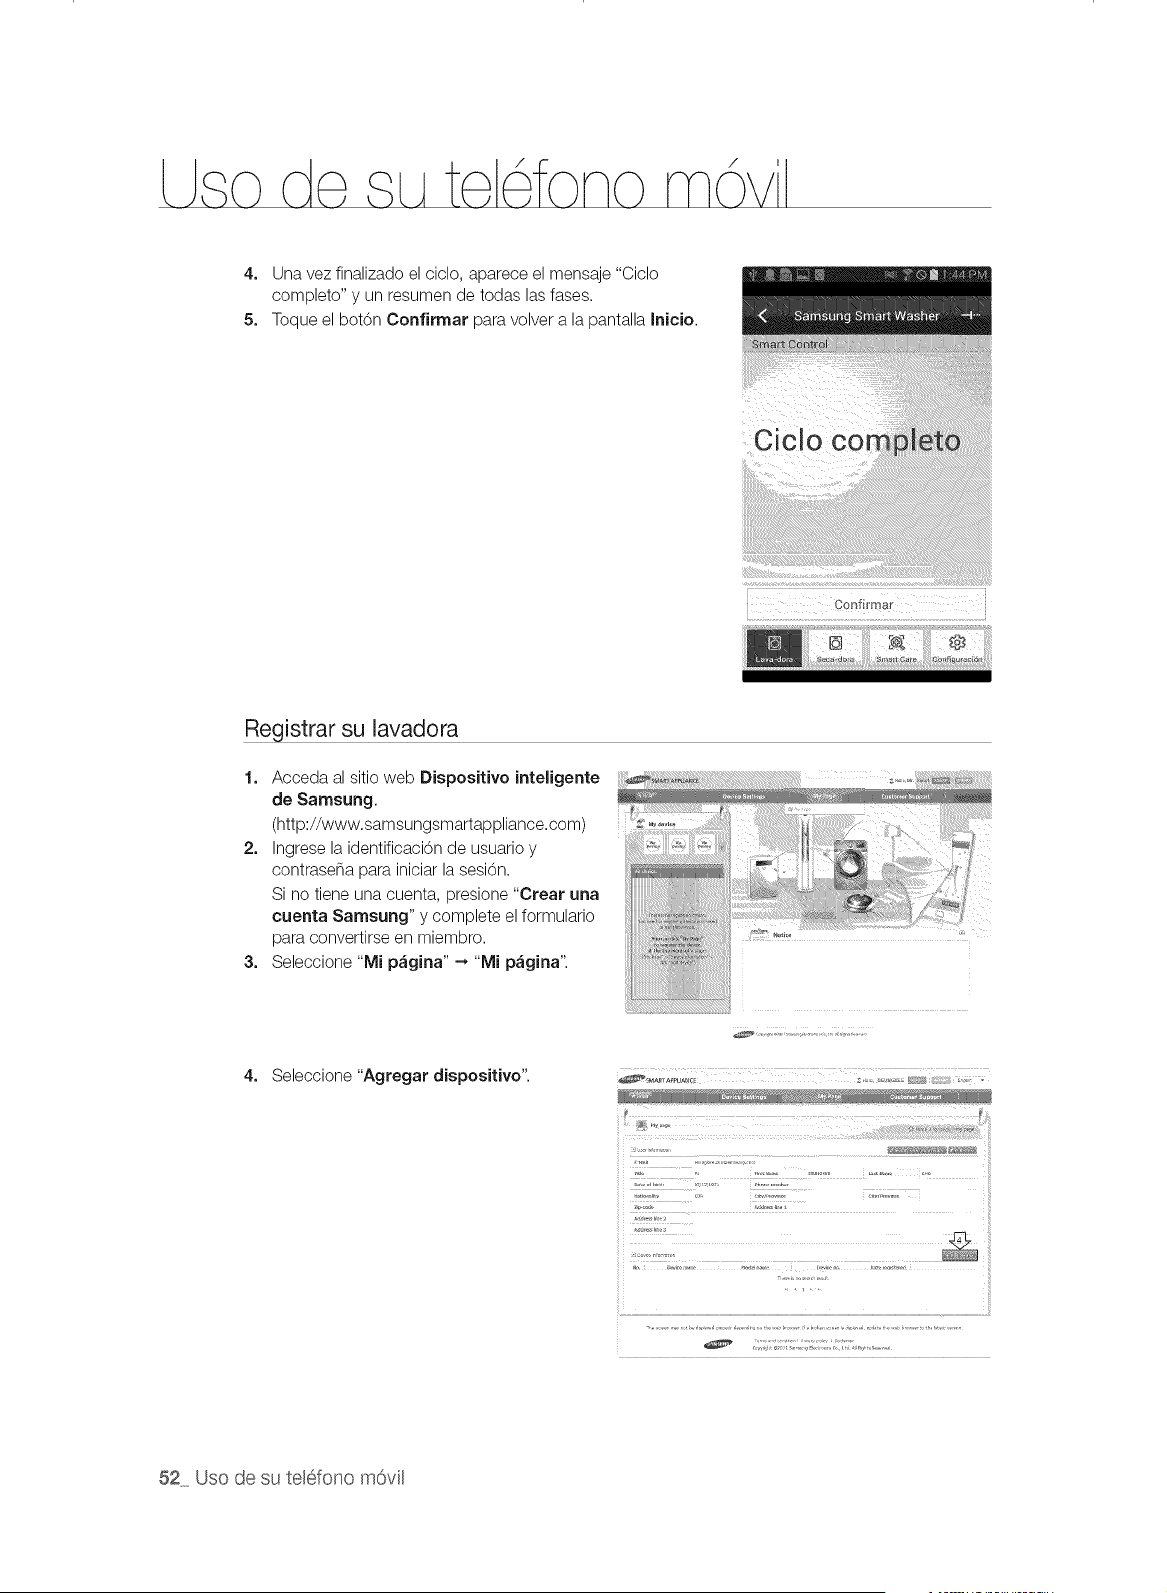
/
4. Una vez finalizado el ciclo, aparece el mensaje "Ciclo
completo" y un resumen de todas las fases.
5. Toque el bot6n Oorffirmar para volver a la pantalla Inicio.
Registrar su lavadora
1. Acceda al sitio web Dispositivo inteligente
de Samsung.
(http://www.samsungsmartappliance.com)
2. Ingrese la identificacbn de usuario y
contraseSa para iniciar la sesi6n.
Si no tiene una cuenta, presione "Crear una
cuenta Samsung" y complete el formulario
para convertirse en miembro.
3. Seleccione "Mi p&gina" ---,"Mi p&gina".
4. Seleccione "Agregar dispositivo".
.......!t!! !! !! !!:! !!! !!!!!:!i:!! :!!:!:!!!!::!! ! !! !!! !¸!¸¸¸¸!! :t: !!:!! !ii!i_!i!!!!!!_ii!i!!!!!i!!!!!!!!!i!!!!!!i_i!ii
,,,_r ............
52 Uso de su telefono m6vil
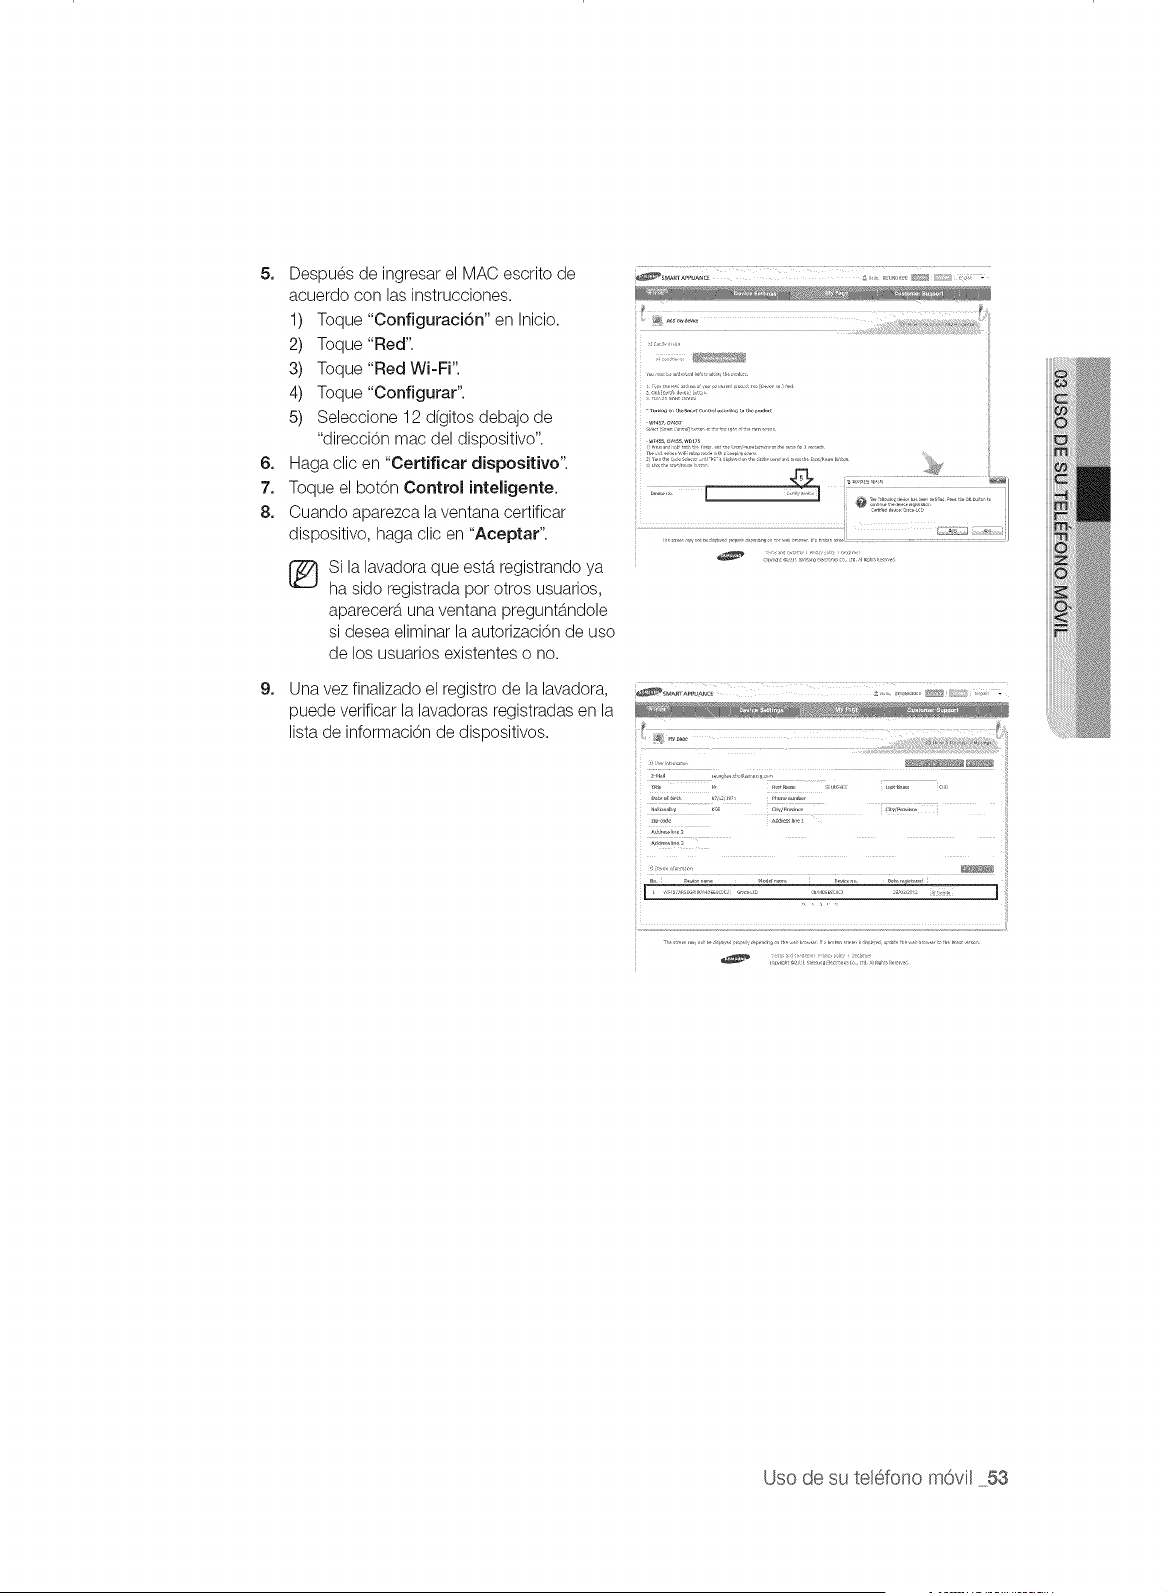
5. Despues de ingresar el MAC escrito de
acuerdo con las instrucciones.
1) Toque "Configuraci6n" en Inicio.
2) Toque "Red".
3) Toque "Red Wi-Fi".
4) Toque "Configurar".
5) Seleccione 12 dfgitos debajo de
"direcci6n mac del dispositivo".
6. Haga clic en "Certificar dispositivo".
7. Toque el bot6n Control inteligente.
8. Cuando aparezca la ventana certificar
dispositivo, haga clic en "Aceptar".
Si la lavadora que estb.registrando ya
ha sido registrada pot otros usuarios,
aparecerb, una ventana preguntb.ndole
si desea eliminar la autorizaci6n de uso
de los usuarios existentes o no.
9.
Una vez finalizado el registro de la lavadora,
puede verificar la lavadoras registradas en la
lista de informaci6n de dispositivos.
[ ................... ]
Uso de su telefono m6vil 53

/
DESCRIPCION GENERAL DE LA CONFIGURACI6N WI-FI Y LA
CONEXION AP
La primera pantalla despues del
arranque
La primera pantalla despues de
ingresar a la configuraci6n
Seleccione para activar el Wi-Fi
Seleccione ENCENDIDO
Seleccione para seleccionar el AP Seleccione para buscar el AP
Buscar AP Seleccione un AP
(Consulte la direcciOn MAC)
Ingrese la contrase_a para el AP y
seleccione Aceptar
Conectar al AP Una vez establecida la conexi6n
con el AP aparece un _/
Aparece la informaci6n de estado
de la conexi6n
Pasea la pantalla de Inicio
Pantalla de Inicio
La informaci6n de estado de la
conexi6n Wi-Fi aparece en la parte
superior derecha de la pantalla de
Inicio como un icono.
54 Uso de su telefono m6vil
\\TY457AR(]0315_IA07 MESindd 54 201_i]2 l[i ]0:40:00
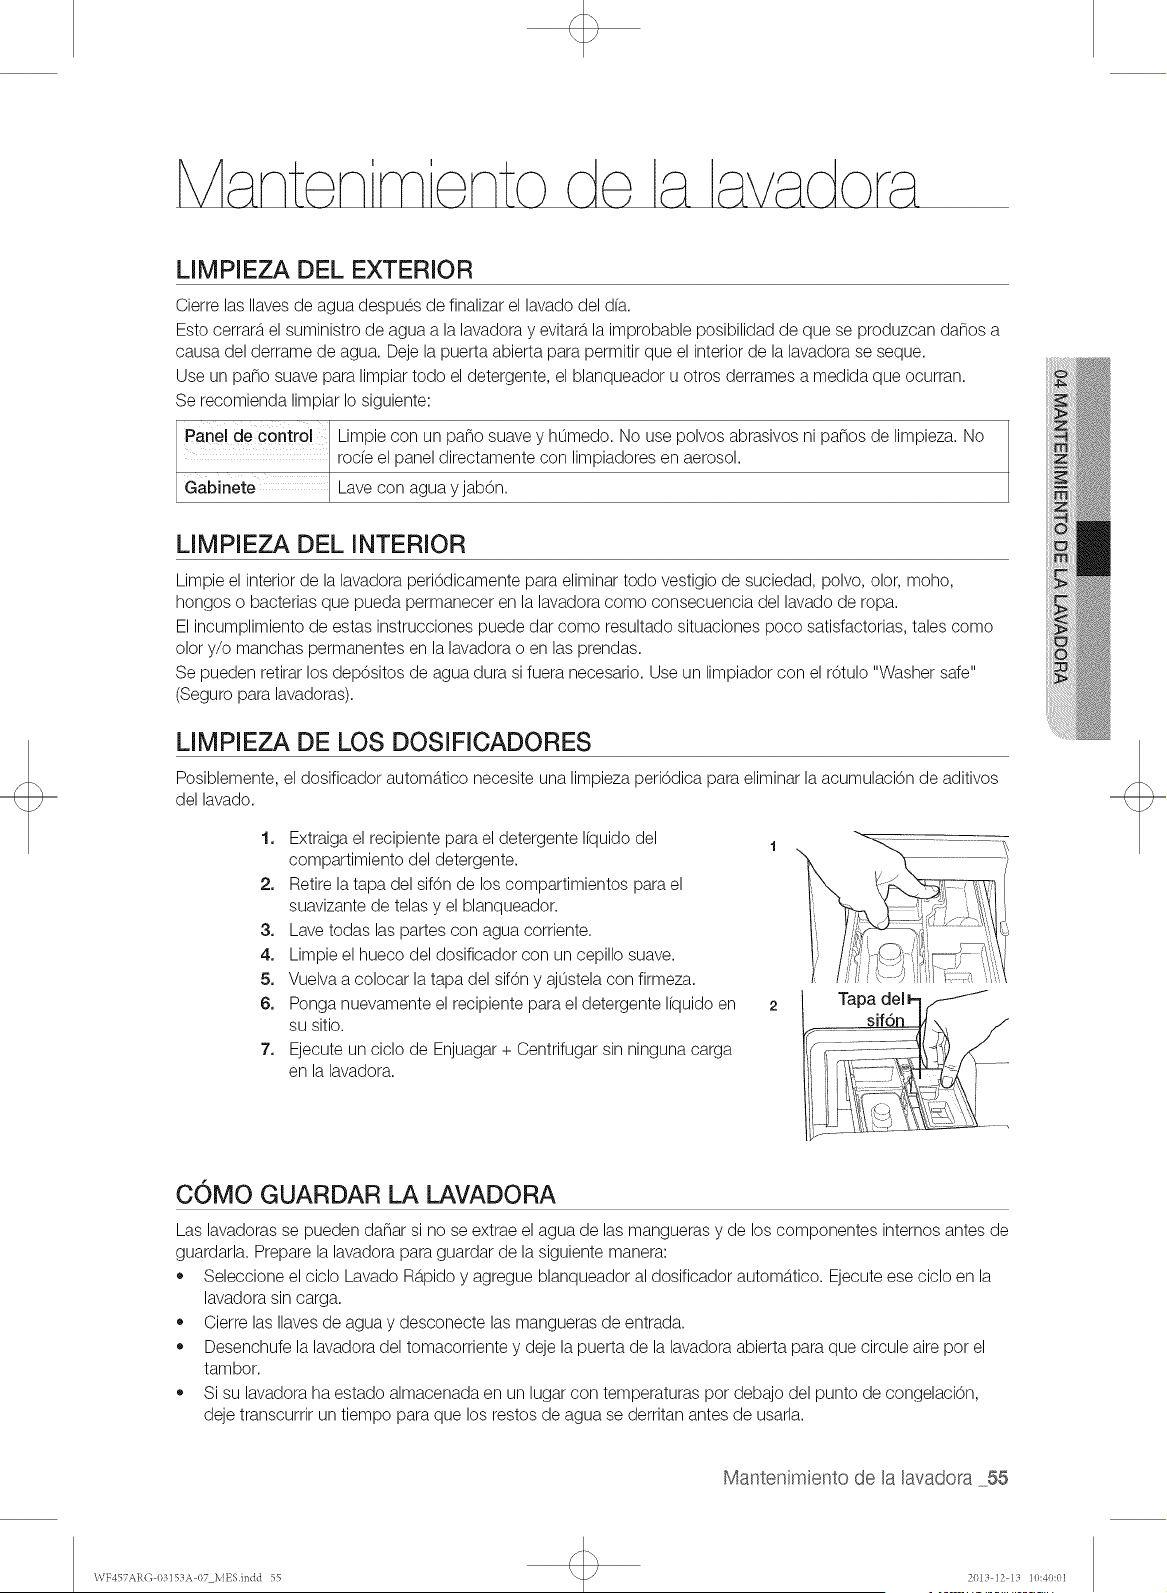
LIMPIEZA DEL EXTERIOR
Cierre las Ilaves de agua despues de finalizar el lavado del d(a.
Esto cerrarb,el suministro de agua a la lavadora y evitarb,la improbable posibilidad de que se produzcan da_os a
causa del derrame de agua. Deje la puerta abierta para permitir que el interior de la lavadora se seque.
Use un paso suave para limpiar todo el detergente, el blanqueador u otros derrames a medida que ocurran.
Se recomienda limpiar Io siguiente:
Panel de control Limpie con un paso suave y humedo. No use polvos abrasivos ni pa_os de limpieza. No
rode el panel directamente con limpiadores en aerosol.
Gabinete Lave con agua y jab6n.
LIMPIEZA DEL INTERIOR
Limpie el interior de la lavadora peri6dicamente para eliminar todo vestigio de suciedad, polvo, olor, moho,
hongos o bacterias que pueda permanecer en la lavadora como consecuencia del lavado de ropa.
El incumplimiento de estas instrucciones puede dar como resultado situaciones poco satisfactorias, tales como
olor y/o manchas permanentes en la lavadora o en las prendas.
Se pueden retirar los dep6sitos de agua dura si fuera necesario. Use un limpiador con el r6tulo "Washer safe"
(Seguro para lavadoras).
Posiblemente,
del lavado.
LIMPIEZA DE LOS DOSIFICADORES
el dosificador automb.tico necesite una limpieza periOdica para eliminar la acumulaciOn de aditivos
1. Extraiga el recipiente para el detergente I(quido del
1
compartimiento del detergente.
2. Retire la tapa del sifOn de los compartimientos para el
suavizante de telas y el blanqueador.
3. Lave todas las partes con agua corriente.
4. Limpie el hueco del dosificador con un cepillo suave.
5. Vuelva a colocar la tapa del sifOny ajustela con firmeza.
6. Ponga nuevamente el recipiente para el detergente I(quido en 2
su sitio.
7. Ejecute un ciclo de Enjuagar + Centrifugar sin ninguna carga
en la lavadora.
COMO GUARDAR LA LAVADORA
Las lavadoras se pueden da_ar si no se extrae el agua de las mangueras y de los componentes internos antes de
guardarla. Prepare la lavadora para guardar de la siguiente manera:
,, Seleccione el ciclo Lavado Rb.pidoy agregue blanqueador al dosificador automb.tico. Ejecute ese ciclo en la
lavadora sin carga.
,, Cierre las Ilaves de agua y desconecte las mangueras de entrada.
,, Desenchufe la lavadora del tomacorriente y deje la puerta de la lavadora abierta para que circule aire pot el
tambor.
,, Si su lavadora ha estado almacenada en un lugar con temperaturas pot debajo del punto de congelaciOn,
deje transcurrir un tiempo para que los restos de agua se derritan antes de usarla.
Mantenimiento de la lavadora 55
\\TY457AR(]03]SZIA07 MESindd 55 201_i]2 l:t ]0:40:01
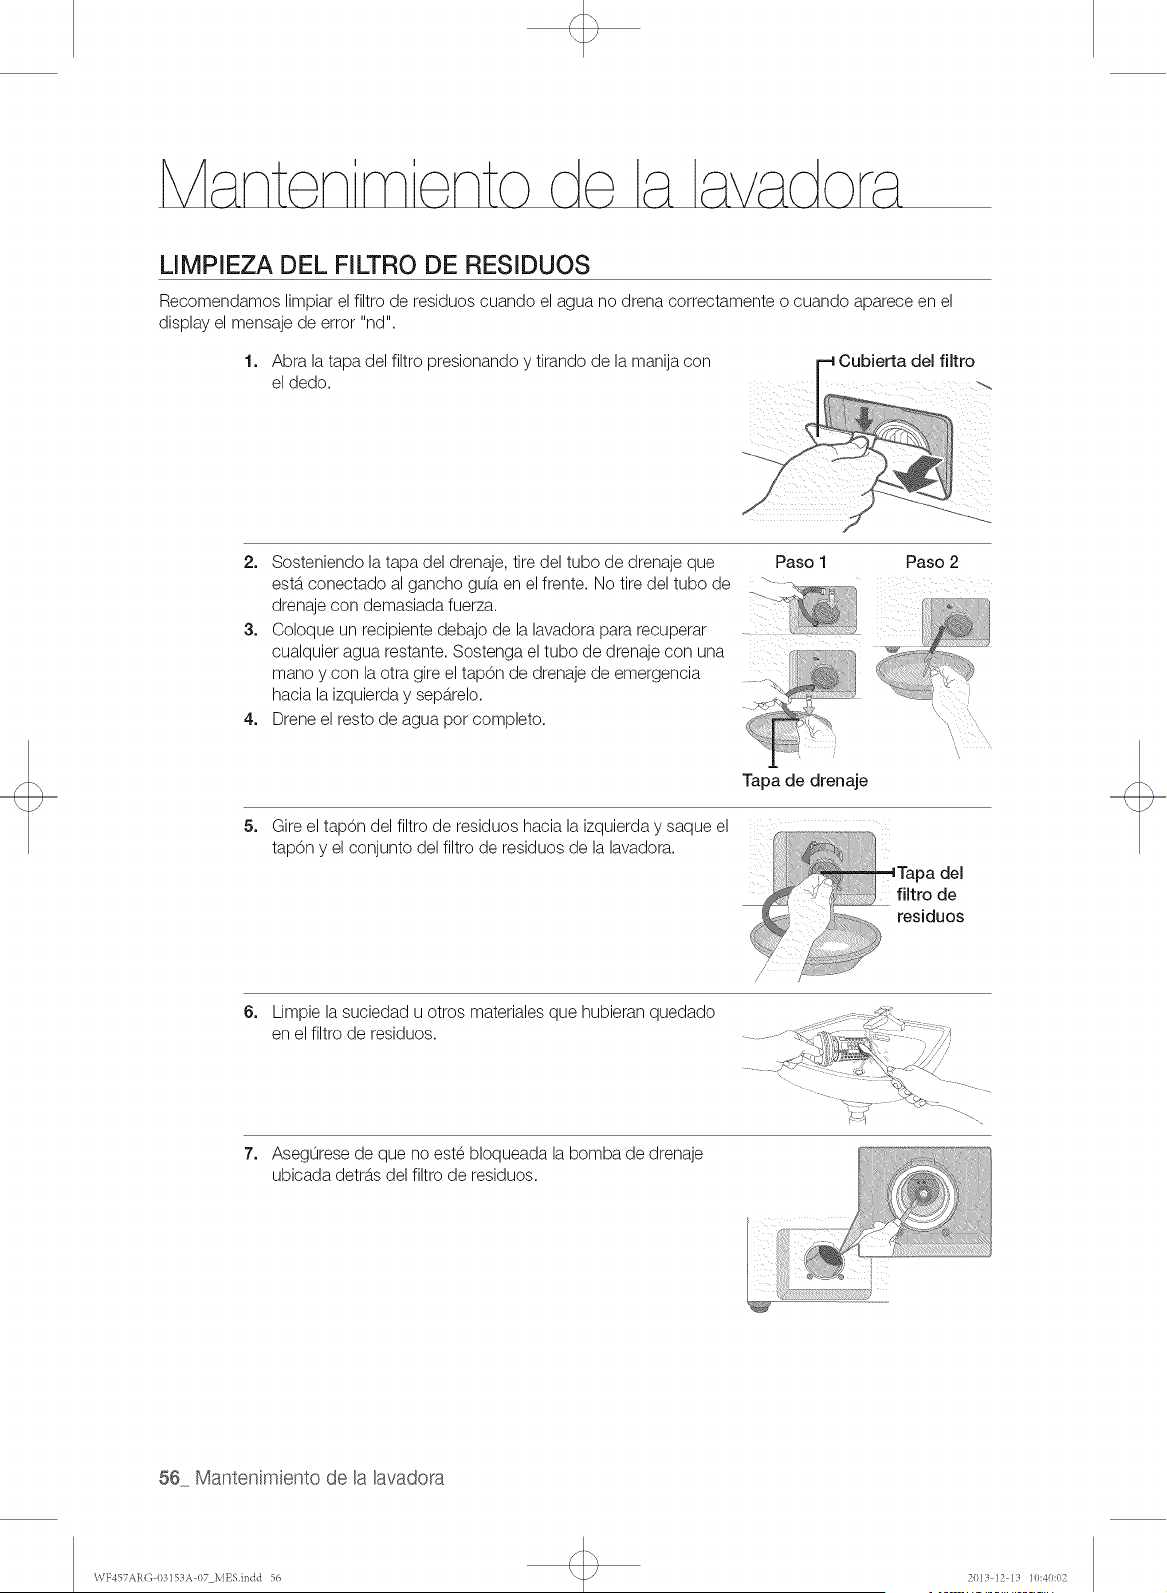
LIMPIEZA DEL FILTRO DE RESIDUOS
Recomendamos limpiar el filtro de residuos cuando el agua no drena correctamente o cuando aparece en el
display el mensaje de error "nd".
1. Abra la tapa del filtro presionando y tirando de la manija con
el dedo.
2. Sosteniendo la tapa del drenaje, tire del tubo de drenaje que Paso 1 Paso 2
estb.conectado al gancho gu(a en el frente. No tire del tubo de .
drenaje con demasiada fuerza.
3. Coloque un recipiente debajo de la lavadora para recuperar ....
cualquier agua restante. Sostenga el tubo de drenaje con una
mano y con la otra gire el tap6n de drenaje de emergencia
hacia la izquierda y sepb.relo.
4. Drene el resto de agua pot completo.
5_
6_
7_
Tapa de drenaje
Gire el tap6n del filtro de residuos hacia la izquierda y saque el f. :. :.<........
Y
tap6n el conjunto del filtro de residuos de la lavadora. ,,,
Tapa del
filtro de
residuos
Limpie la suciedad u otros materiales que hubieran quedado
en el filtro de residuos.
Asegurese de que no este bloqueada la bomba de drenaje
ubicada detrb.sdel filtro de residuos.
56 Mantenimiento de la lavadora
\VY457AR(] 03153A 07 MESindd 56 201_i]2 l[i ]0:40:02

8. Una vez realizada la limpieza del filtro, inserte de nuevo el
tapOn y el conjunto del filtro de residuos en la lavadora. Gire el
tapOn del filtro de residuos en el sentido de las agujas del reloj
hasta que el indicador del tapOn del filtro de residuos se situe
en la posiciOn de las 12 horas; el indicador debe apuntar a la
lavadora.
9. Vuelva a montar el tapOn del desagOe de emergencia en el
tubo de drenaje y cuelgue el tubo en el gancho gu(a.
10. Vuelva a instalar la tapa del filtro.
,'7 ;
LIMPIEZA DEL SELLO/FUELLE DE LA PUERTA
1. Abra la puerta de la lavadora y saque la ropa o cualquier otro objeto.
2,
Inspeccione el sello/fuelle de color gris entre la apertura de la
puerta y la canasta para buscar zonas manchadas. Hale el
sello/fuelle para inspeccionar todas las b.reasdebajo del sello/
fuelle y comprobar si hay objetos extra_os.
3_
Si hay manchas en el b.readel sello/fuelle, I(mpielassiguiendo este procedimiento:
1) Mezcle una soluciOn diluida de s4de taza (177 mL) de blanqueador Ifquido con cloro y 1 gal.
(3.8 L) de agua corriente caliente.
2) Limpie el b.readel sello/fuelle con esta soluciOn mediante un paso humedo.
3) Deje reposar durante 5 minutos.
4) Limpie meticulosamente el b.reacon un paso seco y deje la suerta abierta para que se seque
el interior de la lavadora.
IMPORTANTE:
,, POngaseguantes de goma cuando vaya a realizar una limpleza prolongada.
,, Consulte las instrucciones del fabricante del blanqueador para un uso adecuado.
MANTENIMIENTO DE LA CUBIERTA SUPERIOR Y DEL MARCO
FRONTAL
No coloque objetos pesados ni afilados ni tampoco el paquete de detergente sobre la lavadora. Pueden rayar o
da_ar la cubierta superior. Mantengalos apartados en el pedestal (si Io adquiri6) o en una caja de almacenaje pot
separado.
[_Ya que toda la lavadora tiene un acabado brillante, la superficie se puede rayar o da_ar fb.cilmente. Evite
rayar o da_ar la superficie cuando use la lavadora.
Mantenimiento de la lavadora 57
\VF457ARG 03153A 07 MESindd 57 2013 ]2 13 ]0:40:03
PURE CYCLE TM
Pure Cycle es un programa de autolimpieza que elimina el moho que puede
1,
2,
3,
sroducirse dentro de la lavadora.
Presione el bot6n Encender/Apagar.
Seleccione el Pure Cycle
,, Una vez seleccionado el bot6n Pure Cycle, la unica funci6n que se puede configurar es el
Inicio Retardado.
Presione el bot6n Inicio/Pausa.
,, Cuando presiona el bot6n Inicio/Pausa comienza el programa Pure Cycle.
o
o
Con el programa Pure Cycle, puede limpiar el tambor sin usar un agente limpiador.
Nunca use Pure Cycle cuando haya ropa en la lavadora. Esto puede da_ar la ropa o causar
un problema en la lavadora.
* Si desea utilizar agente limpiador para tambores, use s61o 1/10 de la cantidad de
agente limpiador recomendada pot el fabricante.(Cuando utilice un agente limpiador en
polvo, retire el compartimiento para el detergente Ifquido.)
La notificaci6n automatica del Pure Cycle
* Siva a limpiar el tambor, aparece la pantalla de notificaci6n automb.tica del Pure Cycle. En
este caso, retire la ropa de la lavadora, presione el botOn de encendido y limpie el tambor
activando el programa Pure Cycle.
* Si no desea ejecutar el Pure Cycle, la pantalla de notificaci6n automb.tica del Pure Cycle
aparecerb,nuevamente despues de dos lavados. No ejecutar Pure Cycle en este momento
no causarb,ningun problema en la lavadora.
* Si bien la pantalla de notificaci6n automb.tica de Pure Cycle aparece una vez por rues
aproximadamente, la frecuencia puede variar dependiendo de la cantidad de veces que se
utilice la lavadora.
®
58 Mantenimiento de la lavadora
WY457ARG 03153A 07 MESindd 58 2013 ]2 13 ]0:40:03
/
CONTROLE ESTOS PUNTOS Sl SU LAVADORA...
No enciende...
No tiene agua o no tiene
suficiente agua.
Tiene restos de detergente
en el dosificador automatico
despu6s de que ha finalizado
el ciclo de lavado.
Vibra o hace demasiado
ruido.
Se detiene
,, Asegurese de que la puerta este bien cerrada.
,, Verifique que la lavadora este enchufada.
,, Verifique que las Ilaves de agua esten abiertas.
,, Asegurese de presionar el bot6n Inicio/Pausa para encender la lavadora.
,, Verifique que lafunci6n Seguro para ni_os no este activada;
consultepa.gina37.
,, Antes de que la lavadora comience a Ilenarse, se escuchara,una serie de
sonidos semejantes a un "clic" para controlar la traba de la puerta y que
se efectue un drenaje ra.pido.
,, Controle el fusible o reinicie el disyuntor.
,, Abra las dos Ilavescompletamente.
,, Asegurese de que la puerta este bien cerrada.
,, Enderece las mangueras de entrada de agua.
,, Desconecte las mangueras y limpie los filtros de las mangueras.
Posiblemente, los filtros de las mangueras esten tapados.
,, Abra y cierre la puerta y, a continuaci6n, presione el botOn Inicio/Pausa.
,, Asegurese de que la lavadora funcione con suficiente presi6n de agua.
,, Asegurese de que el disco selector de detergente se encuentre en la
posici6n superior cuando usa detergente en polvo.
,, Compruebe que la lavadora este ubicada sobre una superficie nivelada. Si
la superficie no esta.nivelada, ajuste las patas de la lavadora para nivelar
el electrodomestico.
,, Asegurese de que se hayan retirado los tornillos de transporte.
,, Asegurese de que la lavadora no toque ningun otto objeto.
,, Verifique que lacarga de ropa sea equilibrada.
,, Enchufe el cable de alimentaci6n a un tomacorriente que funcione.
,, Controle el fusible o reinicie el disyuntor.
,, Cierre la puerta y presione el botOn Inicio/Pausa para hacer funcionar la
lavadora.
Pot su seguridad, la lavadora no lavara,ni centrifugara,salvo que la puerta
este cerrada.
,, Antes de que la lavadora comience a Ilenarse, se escuchara,una serie de
sonidos semejantes a un "clic" para controlar la traba de la puerta y que
se efectue un drenaje ra.pido.
,, Se puede producir una pausa o un perfodo de remojo en el ciclo. Espere
brevemente para vet si se inicia.
,, Controle que los filtros de las mangueras de entrada a la altura de las
Ilaves no presenten obstrucciones.
Limpie los filtros peri6dicamente.
SoMuci6nde probaemas 59
WF457ARO 03153A 07 MESindd 59 2013 12 13 10:40:01t
Se Ilena con agua a una
temperatura incorrect&
o
o
o
o
o
La puerta est#, trabada y no
se abre.
o
No drena y/o no centrifuga.
o
o
o
Deja la carga demasiado
htTmeda al finalizar el ciclo. •
o
o
o
o
o
o
Tiene espuma en exceso.
o
o
Tiene olor.
o
o
o
Abra lasdos Ilavescompletamente.
Aseguresede que laselecci0nde temperaturasea lacorrect&
Aseguresede que lasmanguerasestenconectadasalas Navescorrectas.
Purguelascaherfas.
Controleel calentadorde agua.Deberfaestar configuradopara proveeragua
calienteen lasalidade aguaa unatemperaturamfnimade 120 °F (49°C).
Asimismo,verifiquelacapacidaddel calentadorde agua y lavelocidadde
recuperaci0n.
Desconectelasmanguerasy limpielosfiltros.Posiblemente,losfiltros de las
manguerasestentapados.
A medidaque lalavadorase Ilena,la temperaturadel agua puedevariardebido
a que lafunci0n autom_,ticade controlde latemperaturacontrolalatemperatura
del agua que ingresa.Esto es normal.
Mientrasla lavadorase Ilena,es posibleque observeque por eldosificadorpasa
s01oagua calientey/o,s01oaguafrfacuandose seleccionanlastemperaturas
de lavadofrfao tibia. Estaes unafunci0nnormalquecumple el controlde
temperaturaautom_,ticodado que la lavadoradeterminala temperaturadel agua.
Presioneel botOnInicio/Pausaparadetenerlalavadora.
La puertade lalavadorapermanecer_,trabadadurantelafasede calentamiento
del ciclo Esterilizar
PuedeIlevaralgunos minutosqueel mecanismode cierrede lapuertase
desconecte.
Controleel fusibleo reinicieeldisyuntor.
Enderecelasmanguerasde drenaje.Eliminelasmanguerasenroscadas.Si hay
unarestricciOnde drenado,comunfquesecon elcentrode atenciOnalcliente.
Cierrela puertay presioneelbotOnInicio/Paus&Porsu seguridad,lalavadorano
girard,nicentrifugar_,salvoque lapuertaestecerrada.
Compruebeque elfiltrode residuosno esteobstruido.
Uselavelocidadde centrifugadoAlta o Muy alta.
Useun detergentede altaeficaciaparareducirlaformaciOnde espumaen
exceso.
La cargaes demasiadopeque_a.Las cargasmuy peque_as(unao dos prendas)
se puedendesequilibrary no centrifugarseen absoluto.
Aseguresede que lapuertaeste biencerrada.
Aseguresede quetodas lasconexionesde las manguerasestenajustadas.
Aseguresede queel extremode lamanguerade drenajeestecorrectamente
conectadoy aseguradoal sistemade drenaje.
Evitesobrecargarlalavadora.
Useun detergentede altaeficaciaparaevitarlaformaciOnde espumaen exceso.
Useun detergentede altaeficaciaparaevitarlaformaciOnde espumaen exceso.
Reduzcalacantidadde detergenteparael agua bland& lascargasligeramente
suciaso peque_as.
NO se recomiendaun detergentede bajaeficacia.
Elexcesode espumaacumuladaen los rinconespuedecausar malosolores.
Realiceciclos de limpiezapara desinfectarla m_,quinaperiOdicamente.(Silver
Careo SanitizeCycleo PureCycle)
Limpieel sellode la puerta(Diafragma).
Sequeel interiorde la lavadoraunavez quefinanceelciclo completo.
60_ SoluciGn de problemas
WY457AR(] 0315%% 07 MESindd 60 20LI ]2 l_i ]0:40:(LI
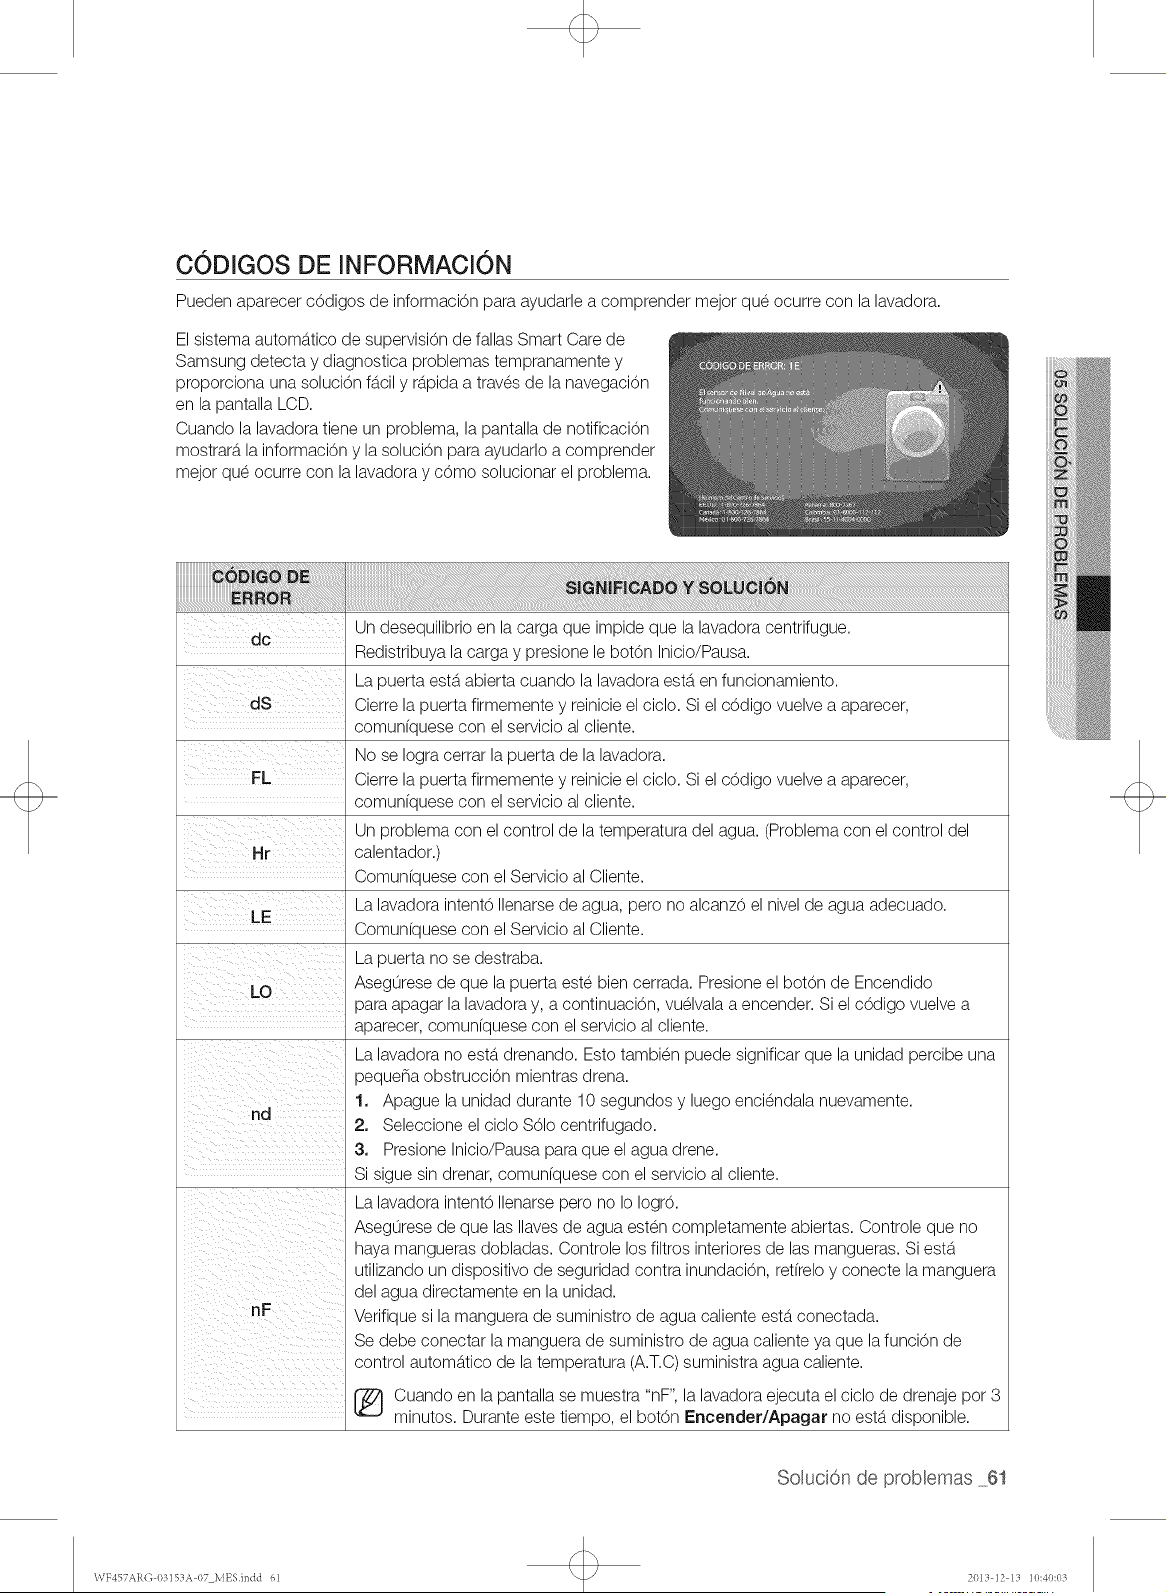
C0DIGOS DE INFORMACl0N
Pueden aparecer cOdigos de informaciOn para ayudarle a comprender mejor que ocurre con la lavadora.
El sistema automb.tico de supervision de fallas Smart Care de
Samsung detecta y diagnostica problemas tempranamente y
proporciona una soluciOn fb.cily rb.pidaa traves de la navegaciOn
en la pantalla LCD.
Cuando la lavadora tiene un problem& la pantalla de notificaciOn
mostrarb, la informaciOn y la soluciOn para ayudarlo a comprender
mejor que ocurre con la lavadora y cOmo solucionar el problema.
s GNmnA osowc 6N
Un desequilibrio en la carga que impide que la lavadora centrifugue.
Redistribuya la carga y presione le bot6n Inicio/Pausa.
La puerta estb.abierta cuando la lavadora estb.en funcionamiento.
Cierre la puerta firmemente y reinicie el cicIo. Si el c6digo vuelve a aparecer,
comun[quese con el servicio al cliente.
No se Iogra cerrar la puerta de la lavadora.
FL Cierre la puerta firmemente y reinicie el ciclo. Si el cOdigo vuelve a aparecer,
comun[quese con el servicio al cliente.
Un problema con el control de la temperatura del agua. (Problema con el control del
calentador.)
Comun(quese con el Servicio al Cliente.
La lavadora intent6 Ilenarse de agua, pero no alcanz6 el nivel de agua adecuado.
LE
Comun(quese con el Servicio al Cliente.
La puerta no se destraba.
Asegurese de que la puerta este bien cerrada. Presione el botOn de Encendido
para apagar la lavadora y, a continuaciOn, vuelvala a encender. Si el cOdigo vuelve a
aparecer, comun(quese con el servicio al cliente.
La lavadora no estb.drenando. Esto tambien puede significar que la unidad percibe una
pequena obstrucciOn mientras drena.
1. Apague la unidad durante 10 segundos y luego enciendala nuevamente.
nd
2. Seleccione el ciclo $61o centrifugado.
3. Presione Inicio/Pausa para que el agua drene.
Si sigue sin drenar, comun(quese con el servicio al cliente.
La lavadora intent6 Ilenarse pero no Io Iogr6.
Asegurese de que las Ilaves de agua esten completamente abiertas. Controle que no
haya mangueras dobladas. Controle los filtros interiores de las mangueras. Si estb.
utilizando un dispositivo de seguridad contra inundaciOn, ret(reloy conecte la manguera
del agua directamente en la unidad.
Verifique si la manguera de suministro de agua caliente estb.conectada.
Se debe conectar la manguera de suministro de agua caliente ya que la funciOn de
3
control automb.tico de la temperatura (A.T.C) suministra agua caliente.
[_ uando en la pantalla se muestra "nF", la lavadora ejecuta el ciclo de drenaje pot
minutos. Durante este tiempo, el botOn Encender/Apagar no estb.disponible.
SoMuci6nde proMemas 6t
WY457AR(] 0315:1A07 MESindd 61 201:i]2 l:i ]0:40:0:i
La conexi6n de la manguera de agua caliente/frfa no es correcta.
nF1
Conecte la manguera de agua caliente/fr(a correctamente.
Se detecta una falla en el sensor del nivel de agua.
OF:
Comunfquese con el Servicio al Cliente.
El sensor de Nivel de Agua no estb.funcionando bien.
Comunfquese con el Servicio al Cliente.
1E
r_ La lavadora se detendrb, temporalmente hasta que el agua se vacfe pot completo.
Vaciarse el agua completamente puede tardar un mb.ximode 3 minutos. Espere
E2
tE
3E ¸¸
2E ¸ ///
AE4
AE3
AE5
8E
11% ii / i
SUdS
hasta que se vac(e el agua.
Una tecla atascada.
Comunfquese con el Servicio al Cliente.
Un problema con el sensor de temperatura.
Reinicie el ciclo. Si el c6digo vuelve a aparecer, comun(quese con el servicio al cliente.
Un problema con el motor.
Reinicie el ciclo. Si el c6digo vuelve a aparecer, comun(quese con el servicio al cliente.
Se detect6 alto/bajo voltaje.
Reinicie el ciclo. Si el c6digo vuelve a aparecer, comunfquese con el servicio al cliente.
Un error de comunicaci6n entre el PBA principal y secundario
Comun(quese con el Servicio al Cliente.
Un error de comunicaci6n entre el M6dulo Wi-Fi y la PBA principal
Comun(quese con el Servicio al Cliente.
Un error de comunicaci6n entre el MODEM PARA DR y el PBA principal
Comun(quese con el Servicio al Cliente.
Un error de comunicaci6n entre el M6dulo de LCD y el PBA PRINCIPAL
Comunfquese con el Servicio al Cliente.
Un problema con el sensor de MEMS.
Comun(quese con el Servicio al Cliente.
Un error del sistema
Comun(quese con el Servicio al Cliente.
Detect6 demasiada espuma durante la sesi6n de lavado. La unidad ingresarb,en
estado de espera hasta que haya disminuido la cantidad de espuma. La unidad volverb.
a funcionar. Cuando termine el lavado, pot su parte, los c6digos "End" y "SUDS" se
iluminarb.n.
Para los c6digos que no figuran mb.sarriba, Ilame al 1-800-726-7864 (1-800-SAMSUNG)
62_ SoluciGn de problemas
\VY457Al{(]03]SZIA07 MESJndd 62 20111]2 111 ]0:40:04
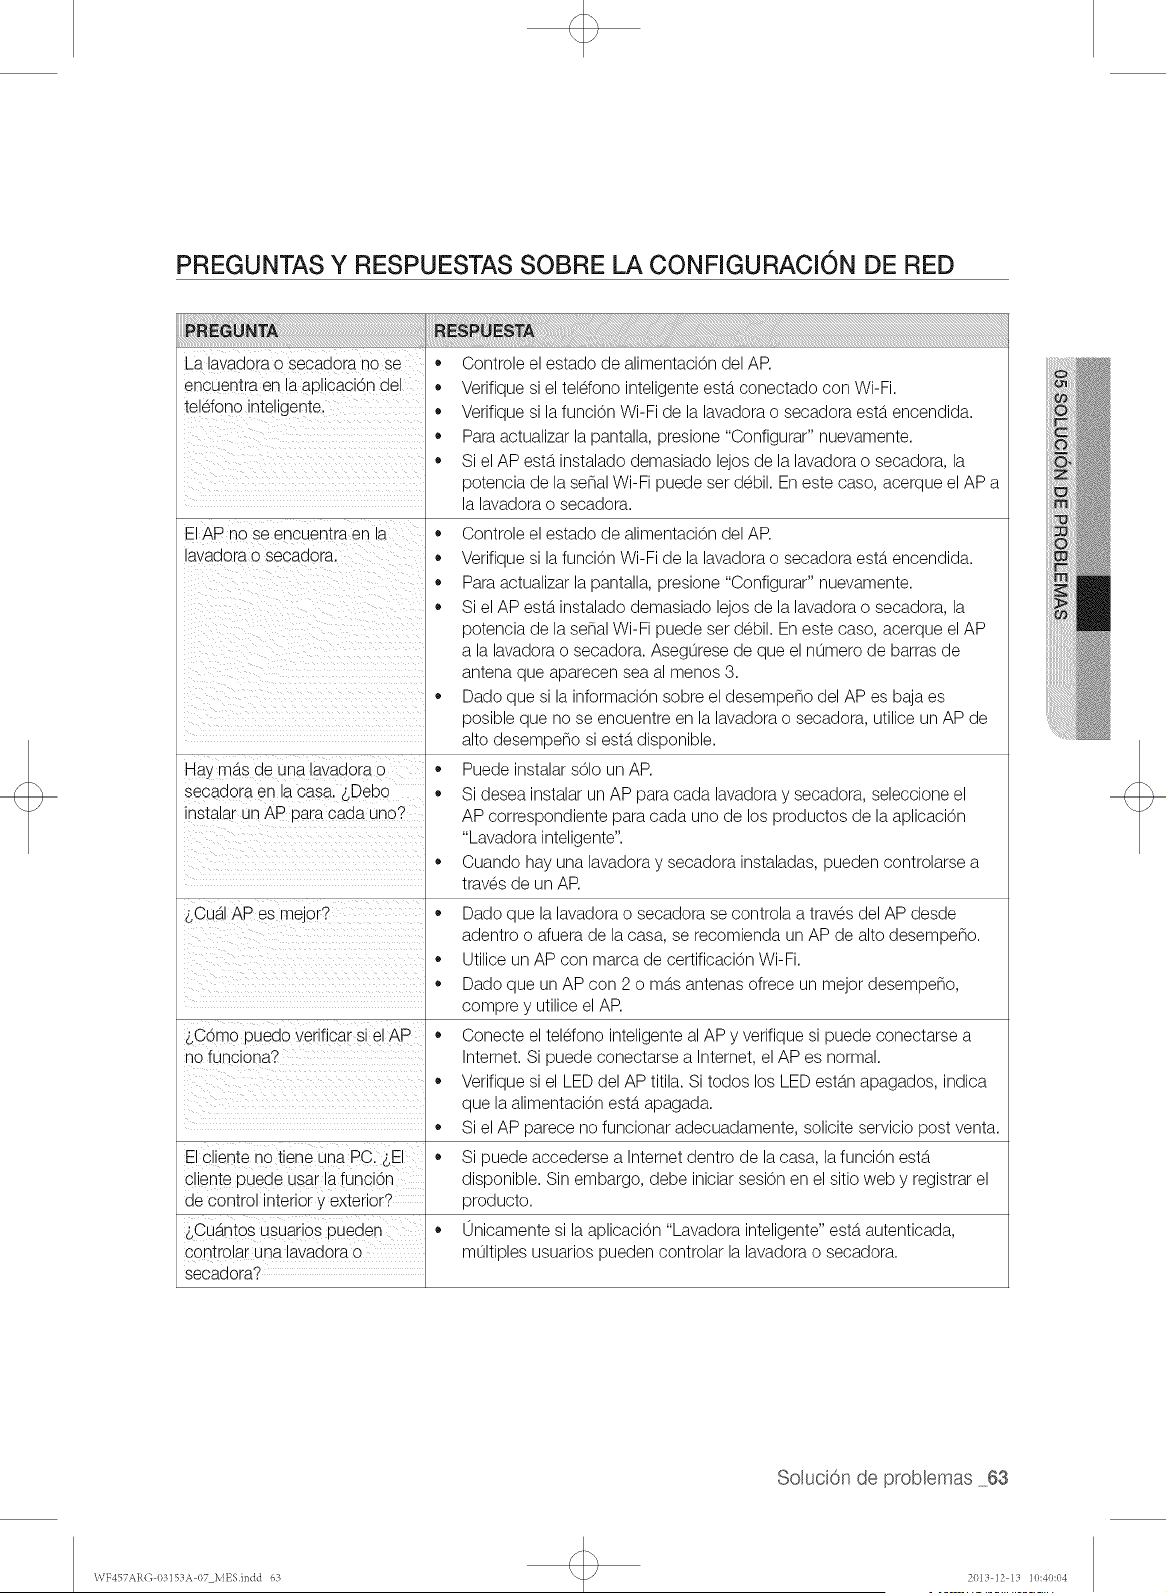
PREGUNTAS Y RESPUESTAS SOBRE LA CONFIGURACION DE RED
La lavadora o secadora no se
encuentra en la aplicacbn del
teldono inteligente.
El AP no se encuentra en la
lavadora o secadora.
Hay mb.sde una lavadora o
secadora en la casa. sDebo
instalar un AP para cada uno?
_,CualAPes mejor?
$C6mo puedo verificar si el AP
no funciona?
El cliente no tiene una PC. _,EI
cliente puede usar la funci6n
de control interior y exterior?
$Cuantos usuarios pueden
controlar una lavadora o
secadora?
,, Controle el estado de alimentaci6n del AR
,, Verifique si el teldono inteligente estb.conectado con Wi-Fi.
,, Verifique si la funci6n Wi-Fi de la lavadora o secadora estb.encendida.
,, Para actualizar la pantalla, presione "Configurar" nuevamente.
,, Si el AP estb.instalado demasiado lejos de la lavadora o secadora, la
potencia de la serial Wi-Fi puede set debil. En este caso, acerque el AP
la lavadora o secadora.
,, Controle el estado de alimentaci6n del AR
,, Verifique si la funci6n Wi-Fi de la lavadora o secadora estb.encendida.
,, Para actualizar la pantalla, presione "Configurar" nuevamente.
,, Si el AP estb.instalado demasiado lejos de la lavadora o secadora, la
potencia de la sepal Wi-Fi puede set debil. En este caso, acerque el AP
a la lavadora o secadora. Asegurese de que el numero de barras de
antena que aparecen sea al menos 3.
,, Dado que si la informaci6n sobre el desempe_o del APes baja es
posible que no se encuentre en la lavadora o secadora, utilice un AP de
alto desempe_o si estb.disponible.
,, Puede instalar s61oun AP.
Si desea instalar un AP para cada lavadora y secadora, seleccione el
AP correspondiente para cada uno de los productos de la aplicacbn
"Lavadora inteligente".
,, Cuando hay una lavadora y secadora instaladas, pueden controlarse a
traves de un AR
,, Dado que la lavadora o secadora se controla a traves del AP desde
adentro o afuera de la casa, se recomienda un AP de alto desempeno.
,, Utilice un AP con marca de certificacbn Wi-Fi.
,, Dado que un AP con 2 o mb.santenas ofrece un mejor desempe_o,
compre y utilice el AR
,, Conecte el teldono inteligente al AP y verifique si puede conectarse a
Internet. Si puede conectarse a Internet, el AP es normal.
,, Verifique si el LED del AP titila. Si todos los LED estb.napagados, indica
que la alimentacbn estb.apagada.
,, Si el AP parece no funcionar adecuadamente, solicite servicio post venta.
,, Si puede accederse a Internet dentro de la casa, la funci6n estb.
disponible. Sin embargo, debe iniciar sesbn en el sitio web y registrar el
producto.
,, 0nicamente si la aplicaci6n "Lavadora inteligente" estb.autenticada,
multiples usuarios pueden controlar la lavadora o secadora.
SoMuci6nde probaemas 63
WY457AR(] 0315%% 07 MESindd 63 20LI ]2 l_i ]0:40:04
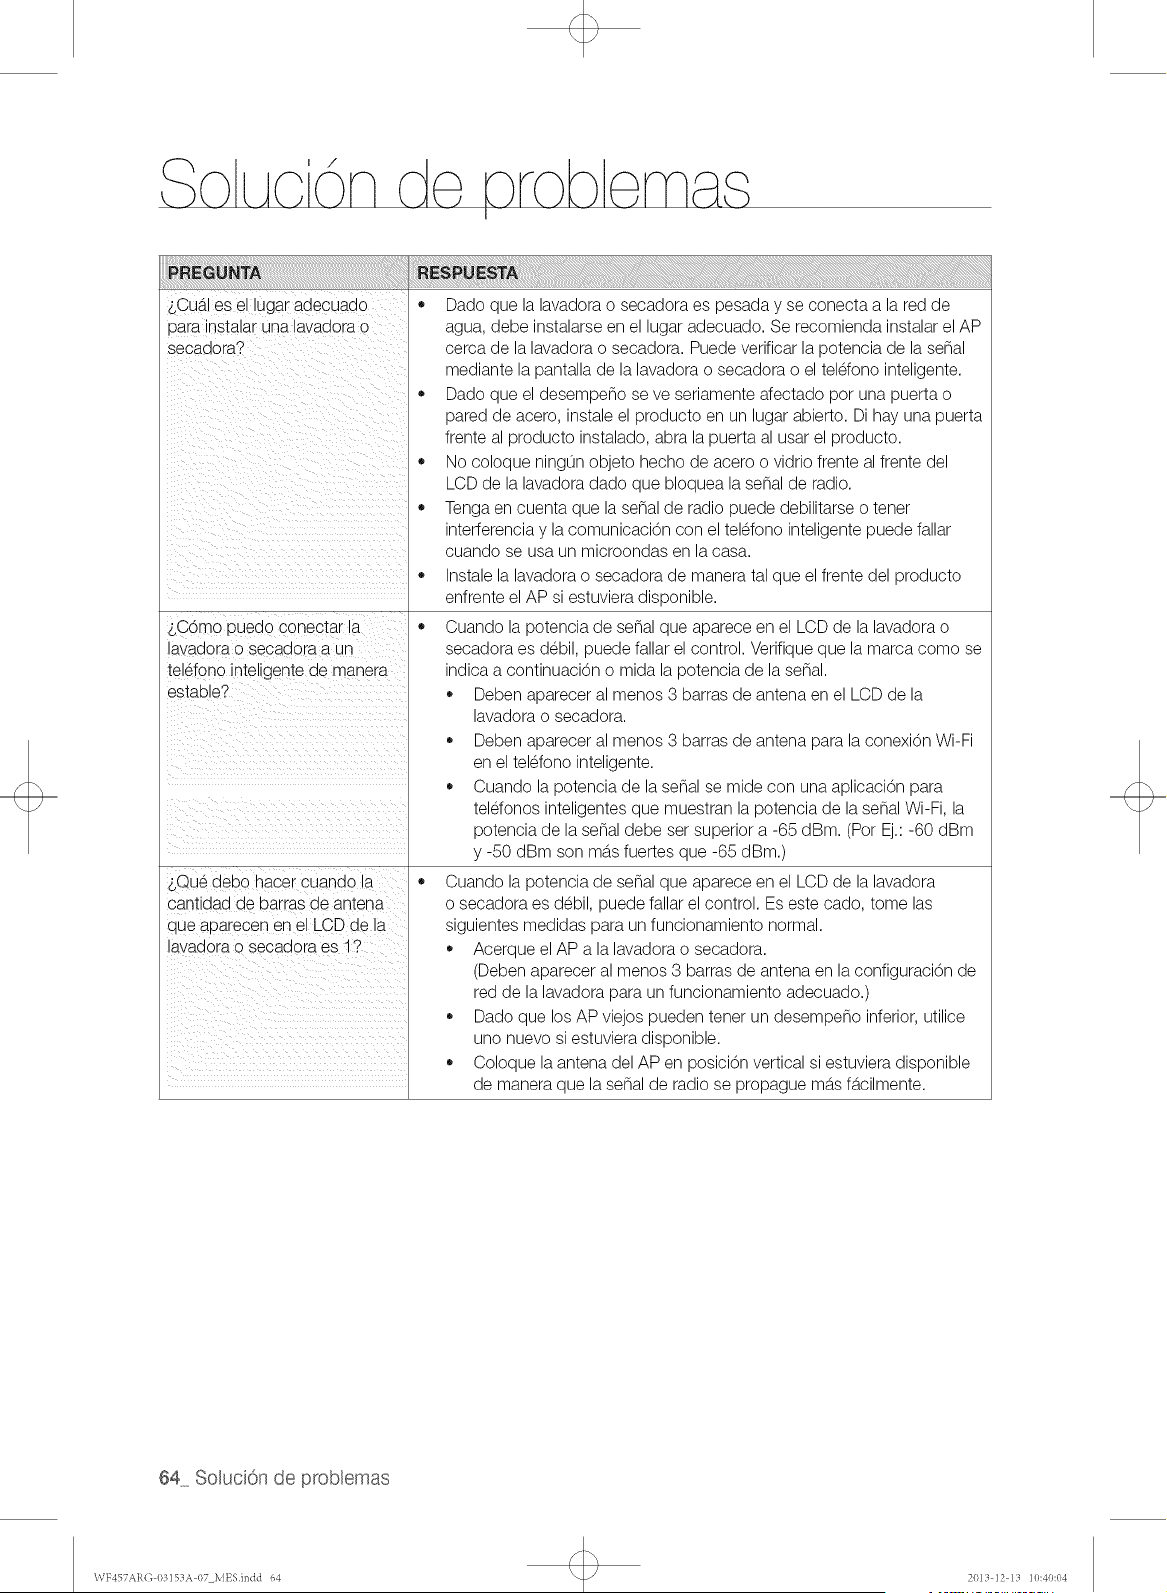
$Cub.Ies ei lugar aaecuaao
oara nstalar una lavaaora o
secadoral
_,C6mo uuedo conectar la
avaaora o seoaaora a un
telefono Jntellgentede manera
estable?
_,QueaeDo nacer cuanao 18
santidad de barras de antena
que aparecen en el LCD ae la
avaaora o secaaora es 1?
,, Dado que la lavadora o secadora es pesada y se conecta a la red de
agua, debe instalarse en el lugar adecuado. Se recomienda instalar el AP
cerca de la lavadora o secadora. Puede verificar la potencia de la sepal
mediante la pantalla de la lavadora o secadora o el teldono inteligente.
,, Dado que el desempeno se ve seriamente afectado pot una puerta o
pared de acero, instale el producto en un lugar abierto. Di hay una puerta
frente al producto instalado, abra la puerta al usar el producto.
,, No coloque ningun objeto hecho de acero o vidrio frente al frente del
LCD de la lavadora dado que bloquea la senal de radio.
,, Tenga en cuenta que la sepal de radio puede debilitarse o tenet
interferencia y la comunicaci6n con el telefono inteligente puede fallar
cuando se usa un microondas en la casa.
,, Instale la lavadora o secadora de manera tal que el frente del producto
enfrente el AP si estuviera disponible.
,, Cuando la potencia de sepal que aparece en el LCD de la lavadora o
secadora es debil, puede fallar el control. Verifique que la marca como se
indica a continuaci6n o mida la potencia de la sen&
,, Deben aparecer al menos 3 barras de antena en el LCD de la
lavadora o secadora.
,, Deben aparecer al menos 3 barras de antena para la conexi6n Wi-Fi
en el telefono inteligente.
,, Cuando la potencia de la senal se mide con una aplicaci6n para
teldonos inteligentes que muestran la potencia de la senal Wi-Fi, la
potencia de la senal debe set superior a -65 dBm. (Pot Ej.: -60 dBm
y -50 dBm son mb,s fuertes que -65 dBm.)
,, Cuando la potencia de sepal que aparece en el LCD de la lavadora
o secadora es debil, puede fallar el control. Es este cado, tome las
siguientes medidas para un funcionamiento normal.
,, Acerque el AP a la lavadora o secadora.
(Deben aparecer al menos 3 barras de antena en la configuraci6n de
red de la lavadora para un funcionamiento adecuado.)
,, Dado que los AP viejos pueden tenet un desempeno inferior, utilice
uno nuevo si estuviera disponible.
,, Coloque la antena del AP en posici6n vertical si estuviera disponible
de manera que la senal de radio se propague mb,s fb,cilmente.
64_ Soluci6n de problemas
WF457ARG 03153A 07 MESindd 64 2013 12 13 10:40:04
Apendce
TABLA DE INDICACIONES SOBRE LA TEL&
Los siguientes dmbolos ofrecen indicaciones acerca del cuidado de las prendas. La etiqueta de indicaciones de la
prenda incluye dmbolos para lavado, blanqueado, secado y planchado, o limpieza a seco cuando sea necesaria.
El uso de dmbolos garantiza la consistencia entre los fabricantes textiles de art(culos nacionales e importados.
Siga las indicaciones de la etiqueta para prolongar la vida util de la prenda y reducir los problemas del lavado.
iiiii_i_:__J!_id_i_i_i_____ad___________________________________________________________________________________________________________4__iiiiiiil_U_ ¸i_i!i!ii_i_!_i ¸_ _i_i_i_i_@_iiiiiiiiiii_i_i_i_i_i_i_i_i_i_i_i_i_i_i_i_i_i_i_i_i_i_i_i_i_i_i_i_i_@_i_<__________;________;_;_;;;;;;;;;;__________________________________________________________________________________________________________________________________________________________________________________________________________________
,_!_i_i_i_i_iii_i_i_!_!ii_iii!ii_!!i_ii!iii_!!_i_ii_iii_i!iiiii_iii_!ii!!iiii_{_{i_i_i_ii_!i!!!!!!!!!!!!!!!!!!!!!!!!!!!!!!!!!!!!!!!!!!!!!!!!!!!!!!!!!!!!!!!!!!!!!!!!!!!!!!!!!!!!!!!!!!!!!!!!!!!!!!!!!!!!!!!!!!!!!!!!!!!!!!!!!!!!!!!!!!!!!!!!!!!!!!!!!!!!!!!!!!!!!!!!!!!!!!!!!!!!!!!!!!!!!!!!!!!!!!!!!!!!!!!!!!!!!!!!!!!!!!!!!!!!!!!!!!i!_!_!::<'!i!iii!iii!iii!iii!iii!iii!iii!iii!iii!ii_!!!iiii!!iII_i_ii_iiii!i!iiiiiiiiil!!_!i!i!i!i!i!i!i!i!i!i!!l_ll_i_lll_ll_iiiiiiiiiiiiiiiiiiiiiiiiiiiiiiiiiiiiiiiiiiiiiiiill_¸¸¸¸¸_l_l_l_;;::lllli:i:i:i:i:i:i:i:i:i:i:i:i:i:i:i:i:i:i:i:i:i:i:i:i:i:i:i:i:i:i:i:i:i:i:i:i:i_i;i_,i!i!iiii:i!_!_idi_i;_i!;_il;_i!;_iiiiililililiiii_iiiii_ii{iiii!il_I_I_I_I_I_I_I_I_I_I_I_I_I_iilil_I_Iiiii!iiiiilii¸i¸i¸i¸i¸i¸i¸i¸i¸i¸i¸i¸i¸i¸i¸i¸i¸i¸i¸i¸i¸i¸i¸i¸i¸i¸i¸i¸i¸i¸i¸i¸i¸i¸i¸i¸i¸i¸i¸i¸i¸i¸i¸i¸i¸i¸i¸i¸i¸i¸i¸i¸i¸i¸i¸i¸i¸i¸i¸i¸i¸i¸i¸i¸i¸i¸i¸i¸i¸i¸i¸i¸i¸i¸i¸i¸i¸i¸i¸i¸i¸i¸i¸i¸i¸i¸i¸i¸i¸i¸i¸i¸i¸i¸i¸i¸i¸i¸i¸_I_!
Normal Secarcolgado/tender Nolavar
Planchadopermanente/
Antiarrugas/ Controlde Colgarparaqueescurra
arrugas
Prendassuaves/ delicadas Secarenposicionhorizontal
Uelicada/havado a [nano
Alto
_ Caliente
Noretorcer
_ Tibia
® Fria
Bajo
O Cualquier calor
Sin calor / aire
Nousarblanqueador
Nosecaren secadora
Sinvapor(agregadoa la
plan@a)
NopBnchar
Cua, u,erb,an ueaOor
(cuandoseanecesario)
$61oblanqueadorsincloro
(conproteccionpararopade
co,or)
Banqueador(cuandosea
necesario)
Gdo de secadoenseeadora
_3 Antiarrugas/ Controlde
arrugas
Prendassuaves/ delicadas
Alto
Medio
Bajo
0 Limpiaren seco
Nolimpiarenseco
Secarcolgado/tender
Colgar para que escurra
Secar en posicion horizontal
Paralanasquese puedanlavar
en lavadora.Lascargasdeben
tenerunpesoinferioralas 8 lb.
Los simboloscon punto representanlastemperaturasdel agua del lavadoapropiadasparadiversasprendas.Elrangode
temperaturapara Calientees de 105-125°F / 41-52 °C, paraTibiaes de 85-105 °F / 29-41 °C y paraFriaes de 60-85 °F /
16-29 °C. (Latemperaturadel aguadel lavadodebealcanzarun minimode 60 °F / 16 °C paraque seactive eldetergente
y so Iogreunlavadoeficaz).Posiblementela lavadorano garanticeestas temperaturasporquelastemperaturasrealesdel
aguaque ingresaen la lavadoradependende laconfiguraciondel calentadorde aguay de lastemperaturasdelsuministro
de aguaregional.Porejemplo,el aguafriaque ingresaon lascasasde los Estadosdel Nortedurante elinviernopuede
serde 40 °F/4 °C,la cuales demasiadofria paraque se Iogreun lavadoeficaz.En estecaso, serapreciseajustarla
temperaturadel aguaseleccionandolaopcion de temperatura@]ida,agregandoalgode aguacalientea la lineaMAXFILL
(Llenadomaximo)o usandola opcionde calentamientode lalavadora,si so disponede ella.
WY457AR(] 0315)A 07 MESindd 65 2013 ]2 13 ]0:40:05
TABLA DE CICLOS
Use esta tabla para configurar el mejor cicIo y las opciones para su lavadora.
(®: configurado en fb.brica, O: Seleccionable, x No disponible)
Normal × 0 ® 0 0 0 ®
Acci6n fuerte × @ 0 0 0 ® 0
Sintetica × × ® 0 0 × 0
Esterilizar @ x x x x ® 0
Ropade cama x x • 0 0 x x
Vaporizaci6nprofunda x @ x x x 0 @
Enjuague+ Centrifugado x x x x ® 0 @
$61ocentrifugado x x x x x 0 @
Lavado R&pido x 0 ® 0 0 0 @
Lana x x • 0 0 x x
DelicadoiLavadoa mano x x 0 0 ® x x
Eliminaci6nde manchas x 0 ® 0 0 0 @
Ropa deportiva x x ® 0 0 × x
Lavado eeoBgico frio x x x x ® 0 @
Lavadode tambor @ x × × × × x
Cocina x x ® x x 0 @
Jardineria x x ® x x ® 0
Oficina x x x ® x 0 0
Ropaexterior x x ® × × 0 0
Ropade nihos x x ® x x 0 @
ProgramaBeb_ x x ® x x 0 @
o
o
o
o
o
o
o
o
o
X
X
o
o
o
X
o
o
o
o
o
o
o
o
®
o
®
o
o
o
o
®
®
o
®
o
®
o
o
®
®
o
o
o
o
o
o
o
o
o
o
o
o
o
o
o
o
X
o
o
o
o
o
o
\VY457AR(] 1/3153A 07 MESindd 66 2013 ]2 13 ]0:40:06
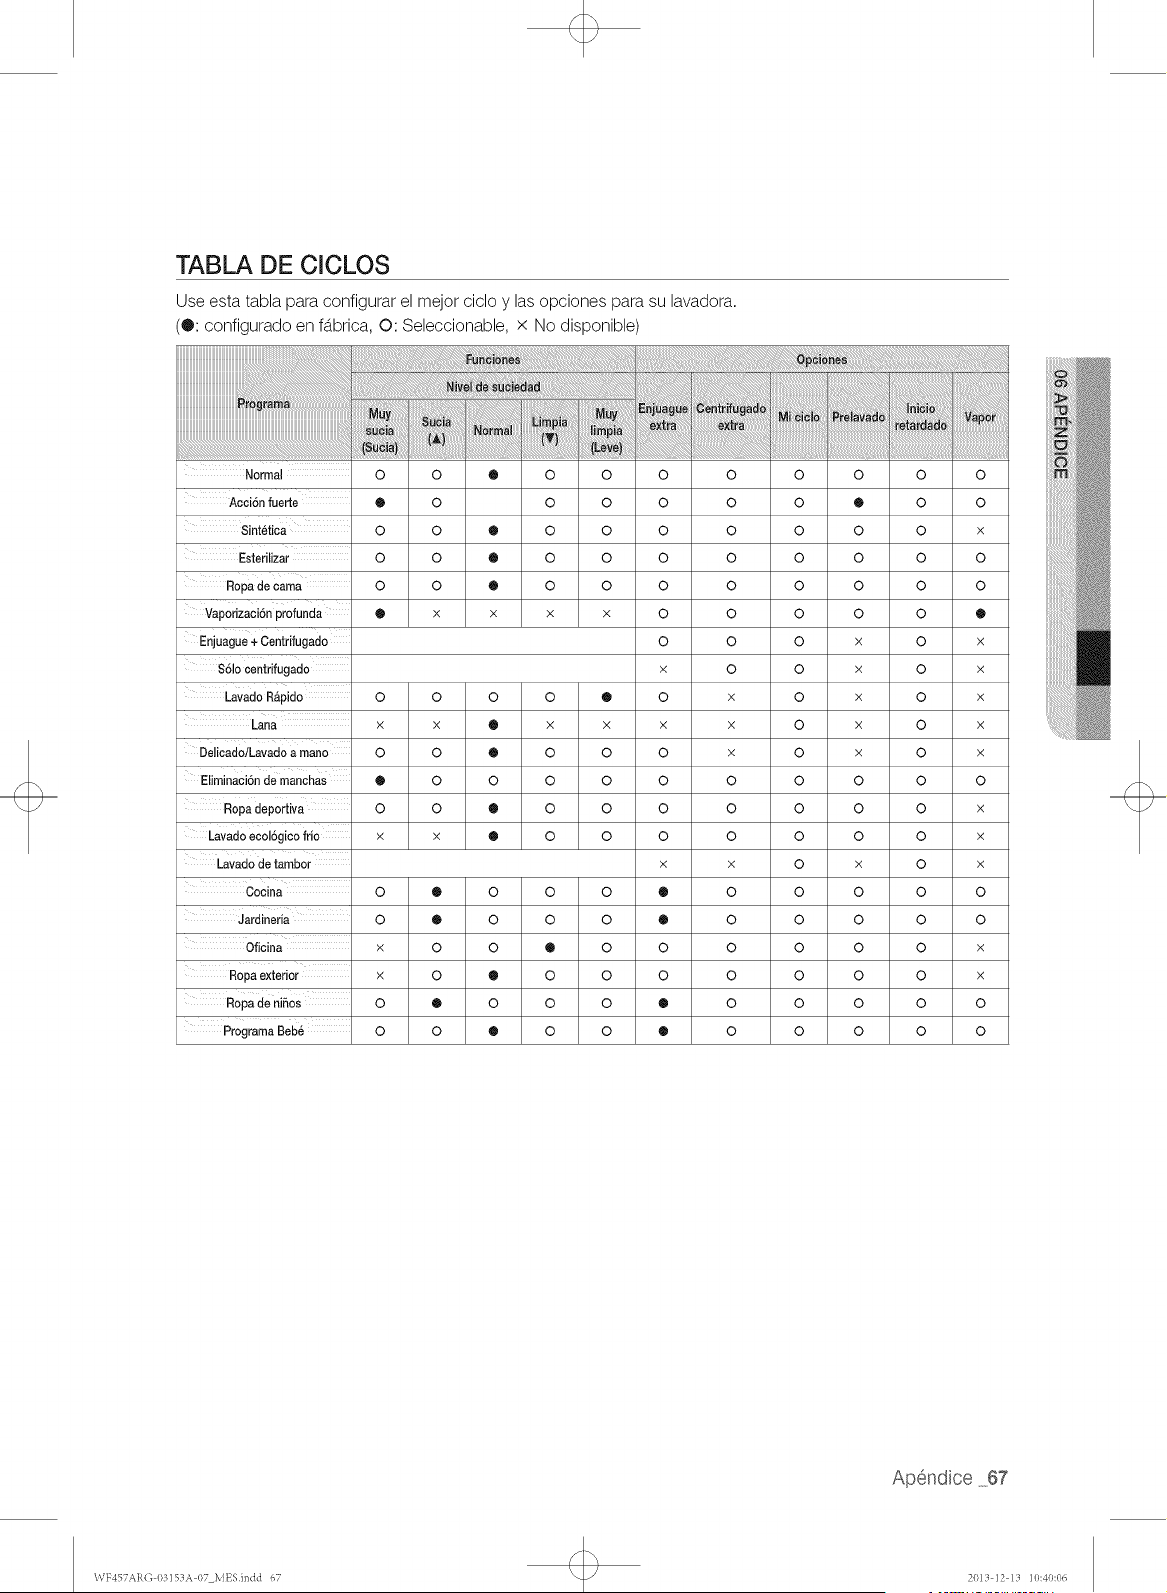
TABLA DE CICLOS
Use esta tabla para configurar el mejor ciclo y las opciones para su lavadora.
(®: configurado en fb.brica, O: Seleccionable, x No disponible)
.........iiii!!iiiiiiiii!i!iiiiiiiiiili!i!iiii!!!
Normal
Acai6n fuerte
Sintetiea
Esterilizar
Ropade cama
Vaporizaei6n profunda
Enjuague+ Oentrifugado
S61ocentrifugado
i!!!i!i!i!i!!!_!!_!_!_!_i!i!!i_!i!_iii!i!ii!iiiiii!i!!ii_i_i_ii_i_!!_i_i_i_i_i_i_ii_iiii_ii_ii_ii!_!_i!_i!_i!_i!!i!_i_!i_ii_ii_i_i_ii_i_i_ii_ii_ii_ii!ii!ii!ii!iiiiiiiiiiiiiiiii_i_i_!i_!!_:_:_:_!_!i_!_!_!!_!!_!!_!!_!!_!!_!_!i!!i_!i_i_i_!i_i_!_!_!_!_!_!_!_!_i_i_i_i_!i!i!_i!i!!_!_i!!i!i_!!_!!!!!!_!_!_!!_!!_!!_!!_!!_!!_!!_!!_!!_!!_!_i!ii!i_!_!!_!_!_!i_!i_!i_!i_ii_!i_!i¸!i_ii¸!_i
0 0 ® 0 0
® 0 0 0
0 0 ® 0 0
0 0 ® 0 0
0 0 ® 0 0
® x x x x
Lavado R_pido O O O O ®
x x ® x x
Delicad0/Lavad0a mano O O ® O O
Eliminaci6n de manchas @ 0 0 0 0
Ropadeportiva O O ® O O
Lavad0 ecol6gico frio x x ® O O
Lavado de tambor
0 ® 0 0 0
Jardineria 0 ® 0 0 0
Oficina x 0 0 ® 0
Ropa exterior x 0 ® 0 0
Ropade niSOs 0 @ 0 0 0
ProgramaBeb6 0 0 ® 0 0
o o
o o
o o
o o
o o
o o
o o
x 0
0 x
X X
0 x
0 0
0 0
0 0
X X
® o
® o
o o
o o
® o
® o
o
o
o
o
o
o
o
o
o
o
o
o
o
o
o
o
o
o
o
o
o
o
®
o
o
o
o
X
X
X
X
X
o
o
o
X
o
o
o
o
o
o
o
o
o
o
o
o
o
o
o
o
o
o
o
o
o
o
o
o
o
o
o
o
o
X
o
o
®
X
X
X
X
X
o
X
X
X
o
o
X
X
o
o
\VY457AR(] 03153A 07 MESindd 67 2013 ]2 13 ]0:40:06

Apendco
AYUDA AL MEDIOAMBIENTE
o
o
o
Esta lavadora se fabrica con materiales reciclables. Si decide deshacerse de ella siga la normativa local
relacionada con la eliminaci0n de desechos. Corte el cable de alimentaci0n para que el electrodomestico no
pueda conectarse a una fuente de alimentaci0n. Quite la puerta para que los animales y los ninos peque_os
no puedan quedar atrapados dentro del electrodomestico.
No utilice cantidades de detergente mayores alas recomendadas pot el fabricante del detergente.
Utilice productos quitamanchas y blanqueadores antes del ciclo de lavado y sOlo cuando sea necesario.
Ahorre agua y electricidad utilizando la capacidad total de la lavadora (la cantidad exacta depende del
programa que se utilice).
DECLARACION DE CONFORMIDAD
Este aparato cumple con la norma UL2157.
ESPECIFICACIONES
DIMENSIONES
A. Altura - General
B. Ancho
C. Profundidadcon la puertaabierta900
D. Profundidad
._ ........ C .........
PRESI6N DEL AGUA
PESO
POTENCIA DEL CALENTADOR
CONSUMO DE ENERGiA
LAVADO
LAVADO Y CALENTAMIENTO
CENTRIFUGADO
DRENAJE
WF457"
REVOLUClONES DEL
CENTRJFUGADO
39" (990)
27" (686)
51.2" (1300)
34.1" (865)
20-116 psi (137-800 kPa)
105 kg (105.01 kg)
900 W
120V
120V
120V
120V
1300 rpm
2OOW
1150W
550 W
8O W
\VF457AR(] 03]SZIA07 MESindd 68 2013 ]2 13 ]0:40:07
LAVADORA SAMSUNG
GARANT[A LIMITADA PARA EL COMPRADOR ORIGINAL
El presente producto de la marca SAMSUNG, tal como Io provee y distribuye SAMSUNG ELECTRONICS
AMERICA, INC. (SAMSUNG) y Io entrega nuevo, en su embalaje de cart6n original al comprador o consumidor
original, estb.garantizado pot SAMSUNG contra defectos de fabricaci6n de los materiales y la mano de obra
durante el peffodo limitado de la garant(a de:
Un (1) aSo para las piezas y la mano de obra. Dos (2) aSos para las piezas del panel de control. Tres (3) aSos para
las piezas del tambor inoxidable. Diez (10) aSos para las piezas del motor
La presente garant(a limitada comienza en la fecha original de compra yes vb.lidaunicamente para productos
comprados y usados en los Estados Unidos. Para recibir el servicio tecnico de la garant(a, el comprador debe
comunicarse con SAMSUNG con el fin de que se determine el problema y los procedimientos del servicio.
El servicio tecnico de la garant(a s61opuede set prestado pot un centro de servicio tecnico autorizado de
SAMSUNG. Se debe presentar la factura de compra original como prueba de compra a SAMSUNG o al servicio
tecnico autorizado de SAMSUNG. SAMSUNG prestarb,servicio tecnico a domicilio durante el peffodo de la
garant(a sin costo, sujeto a la disponibilidad dentro de los Estados Unidos contiguos. Elservicio tecnico a
domicilio no estb.disponible en todas las b.reas.
Para recibir el servicio tecnico a domicilio, el producto no debe presentar obstrucciones y debe set accesible
para el agente del servicio tecnico. Si el servicio tecnico no estb.disponible, SAMSUNG puede optar pot
transportar el producto hasta y desde el servicio tecnico autorizado.
SAMSUNG reparar& reemplazarb,el producto u ofrecerb,un reembolso a su criterio y sin cargo adicional, tal
como se establece en la presente garant(a, con piezas o productos nuevos o reacondicionados si se comprueba
que es defectuoso durante el peffodo limitado de la garant(a especificado anteriormente. Todas las piezas y los
productos reemplazados pasan a set propiedad de SAMSUNG y deben set devueltos a SAMSUNG. Las piezas y
los productos reemplazados asumen la garant(a original que testa, o noventa (90) d(as, el peffodo que sea el mb.s
prolongado.
La presente garant(a limitada cubre defectos de fabricaci6n de los materiales y la mano de obra encontrados
durante el uso normal y domestico de este producto y no seth.vb.lidapara Io siguiente: daSos que ocurran
durante el env(o; entrega e instalaci6n; aplicaciones y usos para los cuales el presente producto no fue
destinado; numeros de serie o producto alterados; daSo cosmetico o acabado exterior; accidentes, abuso,
descuido, incendio, inundaci6n, cafda de rayos, u otros casos fortuitos o de fuerza mayor; uso de productos,
equipo, sistemas, utilidades, servicios, piezas, suministros, accesorios, aplicaciones, instalaciones, reparaciones,
cableado externo o conectores no provistos ni autorizados pot SAMSUNG que daSen este producto o que
acarreen problemas en el servicio; voltaje de la I[neaelectrica incorrecto, fluctuaciones y sobretensi6n; ajustes
del cliente e incumplimiento de Io establecido en el manual de instrucciones, instrucciones de mantenimiento
y ambientales que estb.ncubiertas y recomendadas en el manual de instrucciones; traslado y reinstalaci6n del
producto; problemas causados pot plagas.
La presente garant(a limitada no cubre problemas derivados de la corriente, el voltaje o el suministro electrico
incorrectos, las bombillas de luz, los fusibles de la casa, el cableado de la casa, el costo del servicio tecnico para
recibir instrucciones o corregir errores en la instalaci6n.
SAMSUNG no garantiza el funcionamiento ininterrumpido o sin errores del producto.
WF457ARO 03153A 07 MESindd 69 2013 12 13 10:40:07

G rant a
SALVO LO ESTABLECIDO EN LA PRESENTE GARANT[A, NO EXISTENGARANT[AS SOBRE EL PRESENTE
PRODUCTO, YA SEAN EXPRESASO T,4CITAS,Y SAMSUNG DESCONOCE TODAS LAS GARANT[AS QUE
INCLUYEN, AUNQUE NO EN CARACTER TAXATIVO,CUALQUIER GARANT[A T,4CITADE QUE EL PRODUCTO
SE ENCUENTRA EN CONDICIONES APTAS PARA LA VENTA, DE DEFRAUDACION DE DERECHOS O DE QUE
EL PRODUCTO SE ADECUA A LOS FINES ESPEC[FICOS PARA LOS CUALES SE ADQUIERE.
NINGON AVAL O GARANT[A OTORGADOS POR PERSONA, COMPANiA O CORPORACION ALGUNA CON
RESPECTO AL PRESENTE PRODUCTO REVESTIRACARACTER VINCULANTE PARA SAMSUNG. SAMSUNG
NO SERA RESPONSABLE POR PI£RDIDA DE INGRESOS O LUCRO CESANTE, IMPOSIBILIDAD DE GENERAR
AHORROS U OBTENER OTROS BENEFICIOS, O CUALQUIER DANO DERIVADO DE CIRCUNSTANCIAS
ESPECIALES, DANO IMPREVISTO O DERIVADO CAUSADO POR EL USO, USO INCORRECTO, O
INCAPACIDAD PARA USAR EL PRESENTE PRODUCTO, INDEPENDIENTEMENTE DE LA TEOR[A LEGAL EN
QUE SE FUNDE EL RECLAMO Y AUN CUANDO SE LE HAYA NOTIFICADO A SAMSUNG DE LA POSIBILIDAD
DETALES DANOS.
NINGON RESARCIMIENTO DE NINGUNA [NDOLE CONTRA SAMSUNG SUPERARA EL MONTO DE
COMPRA DEL PRODUCTO VENDIDO POR SAMSUNG Y CAUSANTE DEL PRESUNTO DANO. SIN LIMITAR
LO PRECEDENTE, EL COMPRADOR ASUME TODO EL RIESGO Y LA RESPONSABILIDAD POR PI£RDIDA,
DANO O LESION AL COMPRADOR Y A LOS BIENES DEL COMPRADOR Y A TERCEROS Y A SUS BIENES
DERIVADOSDEL USO, USO INCORRECTO O INCAPACIDAD PARA USAR EL PRESENTE PRODUCTO. LA
PRESENTEGARANT[A LIMITADANO SE EXTENDER,4A NINGUNA PERSONA DISTINTA DEL COMPRADOR
ORIGINAL DEL PRESENTE PRODUCTO, ES INTRANSFERIBLEY ESTABLECESU EXCLUSIVA REPARACION.
Algunos Estados no permiten limitaciones en cuanto al plazo de una garant(a impl(cita, o la exclusi6n o limitaci6n
de daflos imprevistos o derivados, pot Io tanto las limitaciones o exclusiones antedichas pueden no aplicarse en
su caso. Esta garant(a le otorga derechos espec(ficos, y ademb.s puede tenet otros derechos que vat(an segun el
Estado en el que se encuentre.
Para recibir un servicio t_cnico de garantia, comuniquese con SAMSUNG a:
Samsung Electronics America, Inc.
85 Challenger Road Ridgefield Park, NJ 07660
I=800=SAMSUNG (726=7864)
www,samsung,com
Las visitas del personal de servicio tecnico para explicar funciones, mantenimiento o instalaci6n no estb.n
cubiertas pot la garantfa.
P6ngase en contacto con su agente del centro de Ilamadas Samsung para que le asesore.
70 Garantia
WF457ARG 03153A 07 MESindd 70 2013 12 13 10:40:07
LAVADORA SAMSUNG
GARANT|A L[MITADA PARA EL COMPRADOR ORIGINAL
El presente producto de la marca SAMSUNG, tal como Io provee y distribuye SAMSUNG ELECTRONICS
CANADA, INC. (SAMSUNG) y Io entrega nuevo, en su embalaje de cart6n original al comprador o consumidor
original, estb.garantizado pot SAMSUNG contra defectos de fabricaci6n de los materiales y la mano de obra
durante el peffodo limitado de la garant(a de:
Un (1) a_o para las piezas y la mano de obra. Diez (10) a_os para las piezas del motor de la lavadora.
La presente garant(a limitada comienza en la fecha original de compra yes vb.lidaunicamente para productos
comprados y usados en Canadb.. Para recibir el servicio tecnico de la garant(a, el comprador debe comunicarse
con SAMSUNG con el fin de que se determine el problema y los procedimientos del servicio. El servicio tecnico
de la garant(a s61opuede set prestado pot un centro de servicio tecnico autorizado de SAMSUNG. Se debe
presentar la factura de compra original como prueba de compra a SAMSUNG o al servicio tecnico autorizado de
SAMSUNG. SAMSUNG prestarb,servicio tecnico a domicilio durante el peffodo de la garant(a sin costo, sujeto a
la disponibilidad dentro de Canadb.. El servicio tecnico a domicilio no estb.disponible en todas las b.reas.
Para recibir el servicio tecnico a domicilio, el producto no debe presentar obstrucciones y debe set accesible
para el agente del servicio tecnico. Si el servicio tecnico no estb.disponible, SAMSUNG puede optar pot
transportar el producto hasta y desde el servicio tecnico autorizado.
SAMSUNG reparar& reemplazarb,el producto u ofrecerb,un reembolso a su criterio y sin cargo adicional, tal
como se establece en la presente garant(a, con piezas o productos nuevos o reacondicionados si se comprueba
que es defectuoso durante el peffodo limitado de la garant(a especificado anteriormente. Todas las piezas y los
productos reemplazados pasan a set propiedad de SAMSUNG y deben set devueltos a SAMSUNG. Las piezas
y los productos reemplazados asumen la garant(a original que testa, o noventa (90) d(as,el peffodo que sea el
mb.sprolongado. La presente garant(a limitada cubre defectos de fabricaci6n de los materiales y la mano de
obra encontrados durante el uso normal y domestico de este producto y no seth.vb.lida para Io siguiente: da_os
que ocurran durante el env(o; entrega e instalaci6n; aplicaciones y usos para los cuales el presente producto no
fue destinado; numeros de serie o producto alterados; da_o cosmetico o acabado exterior; accidentes, abuso,
descuido, incendio, inundaci6n, cafda de rayos, u otros casos fortuitos o de fuerza mayor; uso de productos,
equipo, sistemas, utilidades, servicios, piezas, suministros, accesorios, aplicaciones, instalaciones, reparaciones,
cableado externo o conectores no provistos ni autorizados pot SAMSUNG que da_en este producto o que
acarreen problemas en el servicio; voltaje de la I[neaelectrica incorrecto, fluctuaciones y sobretensi6n; ajustes
del cliente e incumplimiento de Io establecido en el manual de instrucciones, instrucciones de mantenimiento
y ambientales que estb.ncubiertas y recomendadas en el manual de instrucciones; traslado y reinstalaci6n del
producto; problemas causados pot plagas. La presente garantfa limitada no cubre problemas derivados de la
corriente, el voltaje o el suministro electrico incorrectos, las bombillas de luz, los fusibles de la casa, el cableado
de la casa, el costo del servicio tecnico para recibir instrucciones o corregir errores en la instalaci6n. SAMSUNG
no garantiza el funcionamiento ininterrumpido o sin errores del producto.
WF457ARO 03153A 07 MESindd 71 2013 12 13 10:40:07
G rant a
SALVO LO ESTABLECIDO EN LA PRESENTE GARANT[A, NO EXISTENGARANT[AS SOBRE EL PRESENTE
PRODUCTO, YA SEAN EXPRESASO TACITAS, Y SAMSUNG DESCONOCE TODAS LAS GARANT[AS QUE
INCLUYEN, AUNQUE NO EN CARACTER TAXATIVO,CUALQUIER GARANT[A TACITA DE QUE EL PRODUCTO
SE ENCUENTRA EN CONDICIONES APTAS PARA LA VENTA, DE DEFRAUDACION DE DERECHOS O DE QUE
EL PRODUCTO SE ADECUA A LOS FINES ESPEC[FICOS PARA LOS CUALES SE ADQUIERE.
NINGON AVAL O GARANT[A OTORGADOS POR PERSONA, COMPANiA O CORPORACION ALGUNA CON
RESPECTO AL PRESENTE PRODUCTO REVESTIRACAR,_CTERVINCULANTE PARA SAMSUNG. SAMSUNG
NO SERA RESPONSABLE POR PI£RDIDA DE INGRESOS O LUCRO CESANTE, IMPOSIBILIDAD DE GENERAR
AHORROS U OBTENER OTROS BENEFICIOS, O CUALQUIER DANO DERIVADO DE CIRCUNSTANCIAS
ESPECIALES, DANO IMPREVISTO O DERIVADO CAUSADO POR EL USO, USO INCORRECTO, O
INCAPACIDAD PARA USAR EL PRESENTE PRODUCTO, INDEPENDIENTEMENTE DE LA TEOR[A LEGAL EN
QUE SE FUNDE EL RECLAMO Y AUN CUANDO SE LE HAYA NOTIFICADO A SAMSUNG DE LA POSIBILIDAD
DETALES DANOS.
NINGON RESARCIMIENTO DE NINGUNA [NDOLE CONTRA SAMSUNG SUPERARA EL MONTO DE
COMPRA DEL PRODUCTO VENDIDO POR SAMSUNG Y CAUSANTE DEL PRESUNTO DANO. SIN LIMITAR
LO PRECEDENTE, EL COMPRADOR ASUME TODO EL RIESGO Y LA RESPONSABILIDAD POR PI£RDIDA,
DANO O LESION AL COMPRADOR Y A LOS BIENES DEL COMPRADOR Y A TERCEROS Y A SUS BIENES
DERIVADOSDEL USO, USO INCORRECTO O INCAPACIDAD PARA USAR EL PRESENTE PRODUCTO. LA
PRESENTEGARANT[A LIMITADANO SE EXTENDERAA NINGUNA PERSONA DISTINTA DEL COMPRADOR
ORIGINAL DEL PRESENTE PRODUCTO, ES INTRANSFERIBLEY ESTABLECESU EXCLUSIVA REPARACION.
Algunas provincias no permiten limitaciones en cuanto al plazo de una garant(a impl(cita, o la exclusi6n o
limitaci6n de daflos imprevistos o derivados, pot Io que las limitaciones o exclusiones antedichas pueden no
aplicarse en su caso. Esta garant(a le otorga derechos espec(ficos, y ademb.s puede tenet otros derechos que
vat(an segun la provincia en la que se encuentre.
Para recibir un servicio t_cnico de garantia, comuniquese con SAMSUNG a:
Samsung Electronics Canada Inc.,
Customer Service 55 Standish Court Mississauga, Ontario L5R 4B2 Canada
I=800=SAMSUNG (726=7864)
www,samsung,com/ca
www.samsung.com/ca_fr (French)
Las visitas del personal de servicio tecnico para explicar funciones, mantenimiento o instalaci6n no estb.n
cubiertas pot la garantfa.
P6ngase en contacto con su agente del centro de Ilamadas Samsung para que le asesore.
72 Garantia
WF457ARG 03153A 07 MESindd 72 2013 12 13 10:40:07

\\TF457AR(]03153A 07 MESindd 73 2013 ]2 13 ]0:40:07

\\TF457AR(]03153A07MESindd74 2013]213]0:40:07
\\TF457AR(]03153A07MESindd75 2013]213]0:40:07
sTIENE PREGUNTAS 0 COMENTARIOS?
U.S.A 1-800-SAMSUNG (726-7864) www.samsung.com
MEXICO 01-800-SAMSUNG (726-7864) www.samsung.com
www.samsung.com/ca
CANADA 1-800-SAMSUNG (726-7864) www.samsung.com/ca fr (French)
Las visitas del personal de servicio tecnico para explicar funciones, mantenimiento o instalaci6n no estb.n
cubiertas pot la garantfa.
P6ngase en contacto con su agente del centro de Ilamadas Samsung para que le asesore.
N.° de c6digo: DC68-03153A-07 MES
\VF457Al<(]03153A 07 MESindd 76 2013 ]2 13 ]0:40:07