Tosot GDN50BA-A3EBA2D Dehumidifier
Product's Documents
Below are documents related to this product, you can read online or download:
- Owner's manual - (English) Read Online | Download pdf

User Manual Dehumidifier
GDN20AZ-A3EBA2A, GDN35BB-A3EBA2A, GDN50BA-A3EBA2D, GDN50BA-A3EBA2F
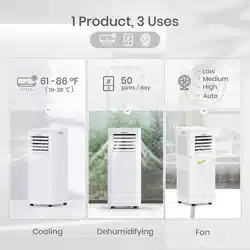
Tips for First-Time Use
1. Allow the unit to sit upright for at least 3-4 hours before powering on. Shipping carriers may set the unit on its side. which causes the refrigerant to pool in certain areas.
Standing the unit upright for 3-4 hours allows the refrigerant to move freely within the coils.
2. Run the unit continuously for 24 hours after letting the unit to stand upright for 3-4 hours. This allows the unit to work out any "kinks" that may have resulted during shipping from our factory or to your doorstep. o
If you have any questions. please email us at [email protected] before making a return request.
Our support team is based in the US and replies within 24 hours. usually sooner. If you haven't received a reply. check your spam or junk folder as sometimes our replies get lost in customer's inboxes!
Please read all instructions before use and save this user manual for future reference. A digital version can be found by visiting the product pages on our website. www.tosotdirect.com. or by contacting [email protected] to ask for a digital version.
Your safety and the safety of others are very important to us. We have provided many important safety messages thought out this manual and on the appliance itself. Always read and follow all posted safety messages. If you have any doubt. please contact [email protected] with any questions.
To reduce the risk of fire. electric shock. injury. or death to persons using or near this appliance. please follow some basic safety precautions. These precautions include. but are not limited to. the following:
This unit is rated to the level of IXPO in accordance with IEC 605269. This means that the unit should only be operated indoors. excluding in rooms where laundry machines are present.


1. Power Button
a. Press to power the dehumidifier On or Off
2. Filter Button
a. After 250 hours of operation the Filter indicator will illuminate to remind you to remove and clean the filter.
3. Humidity Control Buttons (-/+)
a. The humidity level can be set in 5% increments from 35%-80% relative humidity. To activate nonstop operation. repeatedly press the — pad until the screen reads "NS" The screen will read "NS" once you go below 35%.
b. Note about Nonstop mode: this option means that the dehumidifier will ignore the current humidity level and operate continuously. If you are using the drain bucket. the dehumidifier will stop operation once the bucket is full. If you are using the gravity drain or internal pump features. the unit will operate continuously.
4. Display Screen
a. When using the -/+ buttons. this screen will display the target humidity setting you choose. After a few seconds. the screen will revert to show the current humidity level in your room within 5% accuracy.
5. Fan Speed
a. Press to cycle through High. Medium. or Low fan modes. Higher fan speeds lead to increased moisture removal. When humidity has been reduced or quiet operation is preferred. set the fan to Medium or Low.
6. Timer
a. Delay off—while the dehumidifier is in operation. press the timer pad to have the unit power off later in 2 or 4 hours.
b. Delay on—while the dehumidifier is not in operation (but plugged in). press the timer pad to have the unit power on later in 2 or 4 hours.
7. Pump (Only available on select models)
a. With the dehumidifier powered on and a 1/4 inch drain hose connected to the internal pump drainage joint. press and hold this button for 3 seconds to activate the internal pump mode. The Pump button on top of the unit will illuminate once this feature is activated.
b. Note: If the Pump feature is powered on but there is no hose or drain plug inserted in the drainage joint. the unit will leak onto the floor.
1. Full Indicator Light
a. Illuminates when the bucket is ready to be emptied or when the bucket is removed from the unit for extended period. If bucket is replaced incorrectly. the light will stay illuminated.
2. Alarm Sound
a. If the bucket is full or missing for more than 3 minutes an alarm will beep for 10 seconds to remind you to empty and/or replace the drain bucket.
3. Auto Shut Off
a. The unit will stop operation if the bucket is full or if the bucket is removed/ improperly installed.
4. Auto Defrost Mode
a. Through normal operation. frost may build on the evaporator coils. In this case. the compressor will power off while the fan stays running. You can
usually tell if this is the case when the air exhaust emits cool air instead of warm air.
5. Power Outage Restart
a. In the event of a power outage or interruption. the unit will automatically revert to the last settings you choose before the power outage and restart operations.

There are 3 options to remove water collected by your dehumidifier:
Option 1: Drain Bucket
Step 1: Grab both sides of drain bucket and remove from unit following the arrow below. Removing the bucket just after stopping operation may results in drips of water on floor.

Step 2: Empty the bucket by grasping the handle on top of the bucket with one hand. while supporting the bottom of the bucket with other hand.

Step 3: After emptying. replace the bucket in dehumidifier following the arrow direction below.

Option 2: Gravity Drain Hose
Note:
Water can be automatically emptied into a floor drain by attaching a drain hose with 3/4 " inner diameter (not included) which attaches to a male nozzle on the left side of the unit.
Step 1: Remove drain bucket from unit. Open drain cover door on right side of unit. Thread the 3/4" drain hose (not included) onto the nozzle. Replace drain bucket into the unit.

Step 2: Position the gravity drain hose into the floor drain or other water receptacle. Ensure that the gravity drain hose is directed downwards. If the drain hose is directed upwards or horizontally. water will not exit the drain hose and instead will collect in the drain bucket.

Option 3: Internal Pump
Not all models have an internal pump feature. Please check your model number or contact customer support if you are unsure.
The internal pump can pump water up to 15 feet in any direction: vertically or horizontally. Water will still collect in the drain bucket during operation. As the bucket starts to reach maximum capacity the pump will power on to remove water from the drain bucket.
If the pump feature is powered on and there is no drain plug or drainage hose in the drainage joint. water will leak from the drainage joint. If the pump feature is powered off while the unit is operating. water will not leak from the drainage joint. Please contact customer support if you have lost or misplaced your green drain plug.
Step 1: Depress the gray plastic area using your fingertip or a small. flat object.

Step 2: While depressing the gray plastic area. remove the green drain plug.

Step 3: Insert the included drain hose into the drainage joint.

Before cleaning. turn off the dehumidifier and disconnect power cord from power outlet. Do not spray or douse the dehumidifier with water. and do not use volatile liquids (e.g. gasoline. paint thinner. etc.) to clean the dehumidifier.
White Plastic Exterior: Wipe down the plastic areas by using a soft rag dipped in warm. soapy water. Do not use harsh chemicals (e.g. bleach) or abrasive pads.
Air Intake Grille: Use a dust catcher or vacuum nozzle attachment.
Water Bucket: Every few weeks you should clean the bucket to prevent the growth of bacteria. mold. and mildew. Partially fill the bucket with clean water and a mild detergent and use a soft brush to scrub down the walls of the bucket.
Do not use a dishwasher to clean the bucket as this may warp the plastic.
You will first need to remove the handle from the drain bucket.
Step 1: Remove the handle by aligning the two ends of the handle with the openings on the drain bucket lid
Step 2: Remove the drain bucket lid by depressing the four (4) buckles on the drain bucket.


Step 3: Remove the float from the drain lid.
Air Filter
After 250 hours of operation the Filter indicator light will illuminate on top of your dehumidifier. After cleaning the filter. place the Filter button again to reset the 250-hour timer. Do not forget to replace the filter before resuming operation. This may cause the evaporator coils to attract dust. which will harm the performance of your unit.
Clean the filter using war. soapy water. Rinse thoroughly and air dry completely.
Do not dry the air filter with a source of heat. such as a lighter or hair dryer. as this may damage the filter.
Filter access:
Remove the drain bucket. The Filter is a light white plastic tab near the bottom of the air intake grille. Pull the filter straight down to remove.

Mainten Checklist
Pre-Season Maintenance Checklist
Post-Season Maintenance Checklist
Long-Term Storage Checklist
If your unit displays one of the following codes. please contact [email protected] with your Malfunction Code. Please fill out the warranty registration form on our website for faster service.
Display Code F1 - Ambient Temperature Sensor Malfunction
Compressor and fan motor stop; The buttons are invalid.
Display Code F2 - Tube Temperature Sensor Malfunction
Compressor and fan motor stop; The buttons are invalid.
Display Code F5 - Discharge Temperature Sensor Malfunction
Compressor and fan motor stop; The buttons are invalid.
Display Code L1 - Humidity Sensor Malfunction
Compressor and fan motor stop; The buttons are invalid.
Display Code F0 - Freon-lacking protection
The compressor stop; the fan motor stops after 30 seconds.
Display Code H3 - High - temperature overload protection
The compressor stop; the fan motor stops after 30 seconds.
Display Code E4 High discharge temperature protection of compressor
The compressor stop; the fan motor stops after 30 seconds.
Display Code E0 - Pump Malfunction
The compressor stop; the pump and the fan stop immediately.
Not all the following problems are malfunctions.
Dehumidifier is not operating. Controls can not be set.
Noise suddenly rises during operation.
Humidity does not drop.
Humidity does not drop.
Little or no effect in humidity
When first operated. the emitted has musty-odor.
Unit has noises.
Swooshing sound is heard.
Problem of Water Leakage.
When using drain hose, there is water in the bucket.
Examine the drainage
Drain hose is not correctly installed.
Dehumidifier does not start.
Power indicator is not lit when power is connected.
Power is not supplied for| power circuit or power socket the dehumidifier othe power| has been damaged. plug is not well inserted.
Fuse is blown.
Bucket full indicator is lit up.
Buckets not properly placed. Water is full in the bucket. Bucket has been removed.
Unit is powered on but is not dehumidifying the air.
Humidity is set too high.
Dehumidifier does not dry air as intended.
Bad dehumidifying performance
Check whether there is any obstacle around the unit.
Air filter is dusty or blocked.
Doors and windows are left open.
Room temperature is too low.
1. 1-Year warranty:
TOSOT Dehumidifier comes with a 1-year warranty from the date of purchase.
This warranty covers manufacturing and material defects. Please visit https://tosotdirect.com/warranty for more terms&policy.
2. Additional 6-Month warranty extension:
You can get a 6-month warranty extension by registering your new product at www.tosotdirect.com/extend and answering a short questionnaire.
Customer Support
Questions? We are here to help

Reference file: Tosot GDN50BA-A3EBA2D Dehumidifier
Additionally, the document applies to other Tosot models: GDN20AZ-A3EBA2A, GDN35BB-A3EBA2A, GDN50BA-A3EBA2F