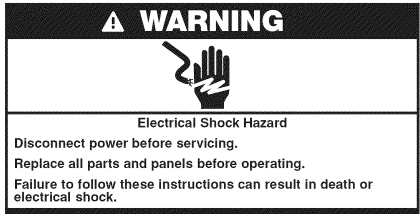
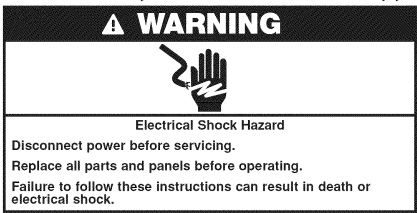
YOUR SAFETY AND THE SAFETY OF OTHERS ARE VERY IMPORTANT.
We have provided many important safety messages in this manual and on your appliance. Always read and obey all safety messages.
This is the safety alert symbol. This symbol alerts you to potential hazards that can kill or hurt you and others.
All safety messages will follow the safety alert symbol and either the word "DANGER" or "WARNING." These words mean:
DANGER: You can be killed or seriously injured if you don't immediately follow instructions.
WARNING: You can be killed or seriously injured if you don't follow instructions.
All safety messages will tell you what the potential hazard is, tell you how to reduce the chance of injury, and tell you what can happen if the instructions are not followed.
iNSTRUCTIONS PERTAINING TO RISK OF FIRE, ELECTRIC SHOCK, OR INJURY TO PERSONS
WARNING: When using electric disposers, basic precautions are always to be followed, including the following:
Read all instructions before using the appliance.
When attempting to remove objects from a disposer use long-handled tongs or pliers. For a disposer that is magnetically actuated, use nonmagnetic tools.
To reduce the risk of injury, close supervision is required when a disposer is used near children.
Do not put fingers or hands into a disposer.
Turn the power switch to the off position before attempting to clear a jam or remove an object from the disposer.
When attempting to loosen a jam in a disposer, use a long wooden object such as a spoon or the wooden handle of a broom or mop.
When not operating a disposer, leave the drain cover in place to reduce the risk of objects falling into the disposer.
To reduce the risk of injury by materials that are expellable by a disposer do not put the following into a disposer: clam or oyster shells, caustic drain cleaners or similar products, glass, china, or plastic, large (whole) bones, metal (such as bottle caps, steel shot, tin cans, or utensils), hot grease or other hot liquids.
INSTALLATION INSTRUCTIONS
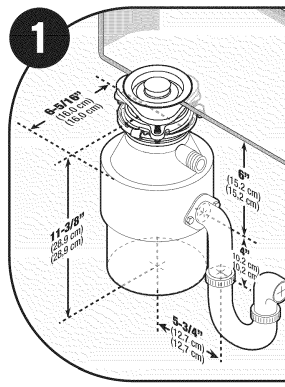
Check installation dimensions
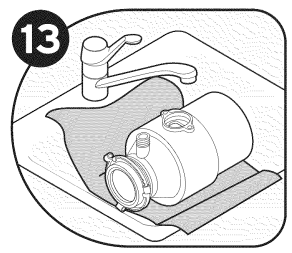
1. Are you replacing an existing disposer?
If YES, continue to “Remove existing disposer” section.
If NO, disconnect sink drain and skip to “Install flange in the sink hole” section.
Remove existing disposer
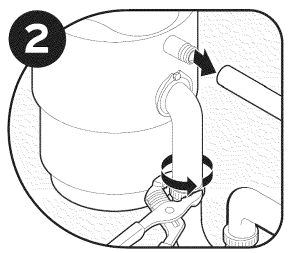
2. Disconnect electrical power at fuse box or circuit breaker box. Disconnect drain trap from waste discharge tube. Disconnect dishwasher if connected to the disposer.
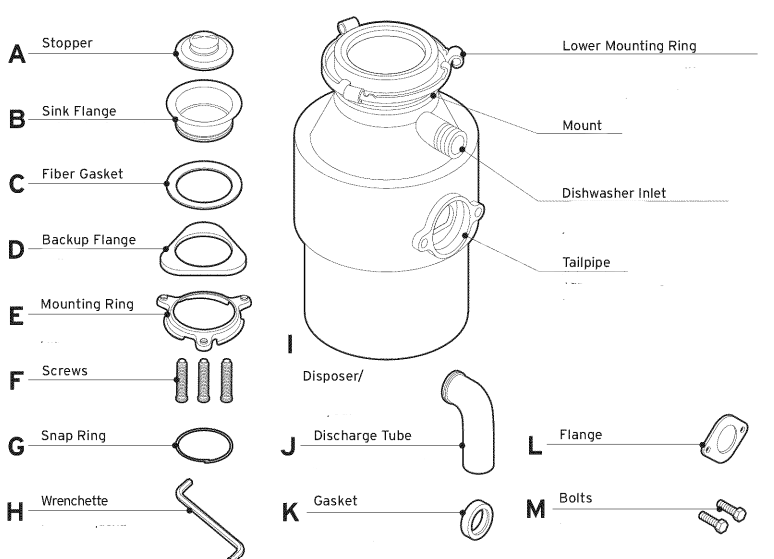
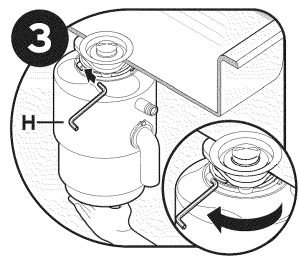
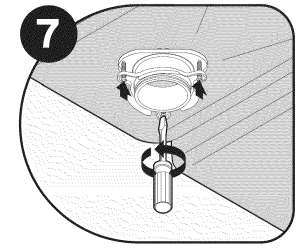
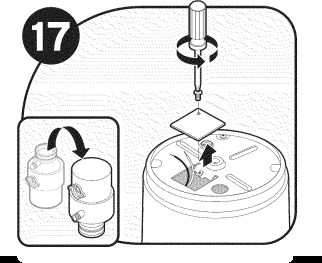
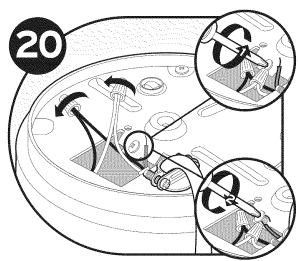
3. Support disposer, insert end of wrenchette (H) into right side of mounting lug, and turn. Disposer will fall free.
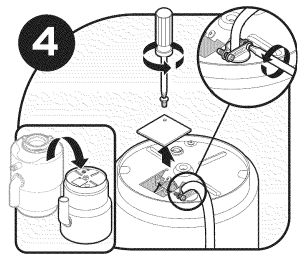
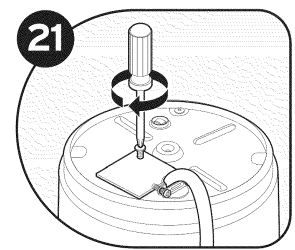
4. Flip disposer over and remove electrical cover plate. Save cable connector if applicable./
5. Disconnect the disposer wires from the electrical supply.
6. Is the new disposer mounting the same as the old one?
If YES, skip to step 16. If NO, continue to step 7.
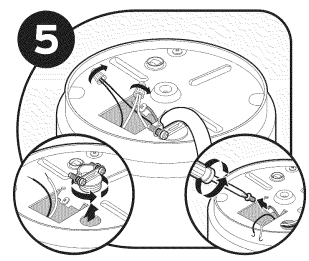
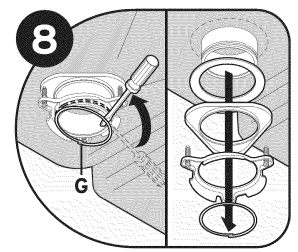
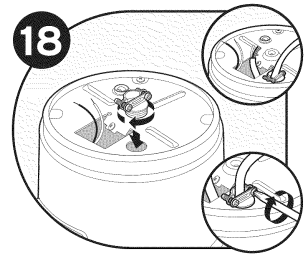
7. Using a flathead screwdriver, loosen the 3 screws on the mounting assembly.
8. Using a flathead screwdriver, pry off the snap ring (G)./ Con un destornillador de punta plana, saque el anillo de cierre (O).
9. Remove flange from sink.
Install flange in sink hole
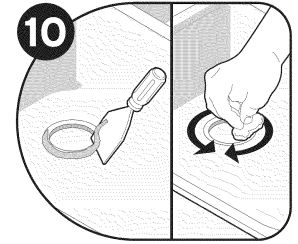
10. Remove old plumber's putty from sink with putty knife.
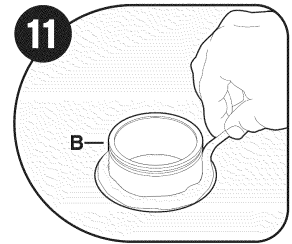
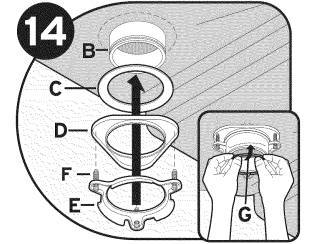
11. Evenly apply 1/2" thick rope of plumber's putty around flange (B).
13. Place a weight, such as the disposer, on the sink flange to hold it in place. Use a towel to avoid scratching sink.
14. Insert fiber gasket (C), backup flange (D) and mounting ring (E). Hold in place while inserting snap ring (O). Pull snap ring (O) open and press firmly until it snaps into place.
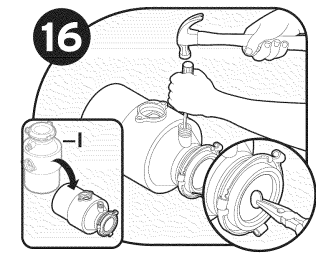
16. Turn disposer (I) onto side and knock out drain plug with screwdriver. Remove plug from inside of disposer with pliers.
IMPORTANl: Dishwasher connection only
Connect disposer to electrical supply
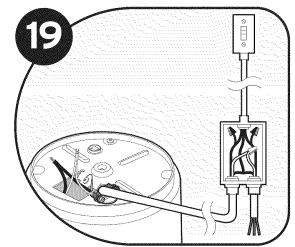
17. Turn disposer over and remove electrical cover plate. Pull out wires.
IMPORTANT: Do not remove cardboard shield.
18. Insert cable connector (not included) and run electrical cable through access hole on bottom of disposer. Tighten cable connector.
19. This disposer requires a switch with a marked "Off" position (wired to disconnect all ungrounded supply conductors) installed within sight of the disposer sink opening (1 hp minimum rating).
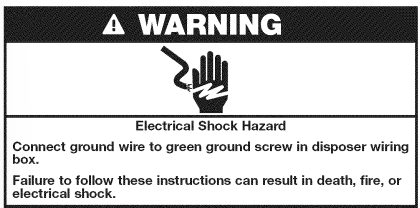
20. Connect ground wire to green ground screw in disposer wiring box. Connect white wire from disposer to white (neutral) supply wire. Connect black wire from disposer to black (hot) supply wire with wire nuts (not included).
21. Push wires into disposer (do not displace cardboard shield) and replace electrical cover plate./
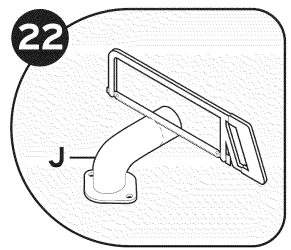
22. You may need to trim discharge tube (J) to ensure proper fit.
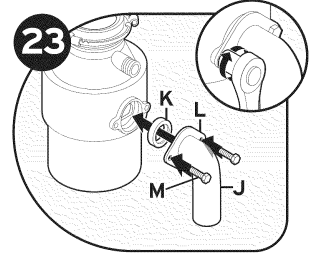
23. Slide flange (L) over discharge tube (J). Insert gasket (K) into discharge outlet. Secure flange and discharge tube to disposer with two bolts (M). Although the supplied discharge tube is preferred, a straight discharge tube may be used.
Connect disposer to mounting assembly
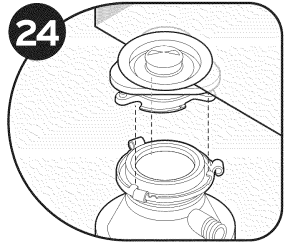
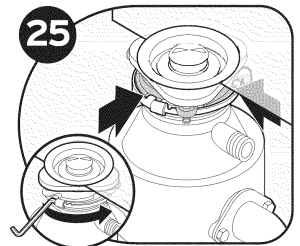
24. Hang disposer by aligning 3 mounting tabs with slide-up ramps on mounting ring.
25. Turn mounting ring until all 3 mounting tabs lock over the ridges on the slide-up ramps.
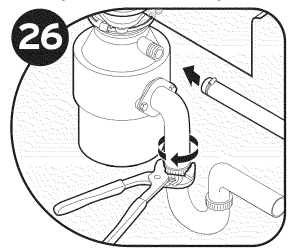
26. Reconnect plumbing (and dishwasher connection if used). Make sure discharge tube mount is straight.
27. Insert stopper (A) into sink opening. Fill sink with water, then test for leaks.
OPERATING INSTRUCTIONS
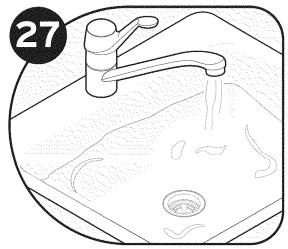
Remove stopper from sink opening and run strong flow of cold water.
Turn on wall switch to start disposer.
Slowly insert food waste into disposer and position stopper to minimize possible ejection of material while grinding. After grinding is complete, turn disposer off and run water for a few seconds to flush drain line.
DO...
First turn on a moderate to strong flow of cold water and then turn on the disposer. Continue running cold water for a few seconds after grinding is completed to flush the drain line.
Grind virtually any food material.
Grind hard materials such as small bones, fruit pits, and ice. A scouring action is created by the particles inside the grind chamber.
Grind peelings from citrus fruits to freshen up drain smells.
Use a disposer cleaner, degreaser, or deodorizer as necessary to relieve objectionable odors caused by grease build-up.
DON'T...
Don't pour grease or fat down your disposer or any drain. It can build up in pipes and cause drain blockages. Put grease in a jar or can and dispose in the trash.
Don't use hot water when grinding food waste. It is OK to drain hot water into the disposer between grinding periods.
Don't grind large amounts of egg shells at one time. They will be ground by the disposer, but can build up in pipes.
Don't turn off disposer until grinding is completed and only sound of motor and water is heard.
IMPORTANT: Regularly inspect disposer and plumbing fittings for water leaks, as water leaks can cause property damage. Manufacturer cannot be held responsible for property damage as a result of water leaks.
IMPORTANT: Do not use plumber's putty on any other disposer connection other than sink flange. Do not use thread sealants or pipe dope. These may harm disposer and cause property damage.
USER-MAINTENANCE INSTRUCTIONS
CLEANING DISPOSER
Over time, food particles may accumulate in the grind chamber and baffle. An odor from the disposer is usually a sign of grease and food buildup, caused by insufficient water flow during and after disposer use. To clean disposer:
Turn off disposer at switch.
Place stopper in sink opening and fill sink halfway with warm water.
Mix 1/4 cup baking soda with water. Turn disposer on and remove stopper from sink at same time to wash away loose particles.
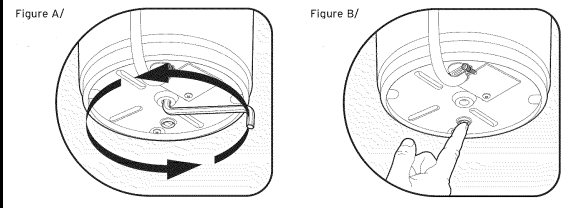
RELEASING DISPOSER JAM
If motor stops while disposer is operating, disposer may be jammed. To release jam:
Turn off disposer and water.
Insert one end of wrenchette into center hole on bottom of disposer (see Figure A). Work wrenchette back and forth until it turns one full revolution. Remove wrenchette.
With tongs reach into disposer and remove object(s). Allow disposer motor to cool for 3 - 5 minutes, then lightly push red reset button on disposer bottom (see Figure B). (If motor remains inoperative, check service panel for tripped circuit breakers or blown fuses.)