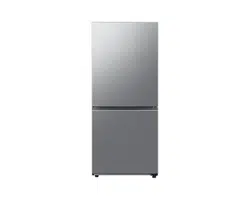
Refrigerator
User manual
Free Standing Appliance
Untitled-4 1 2017-01-19 11:56:45
English2
Contents
Contents
Safety information
4
Important safety symbols and precautions: 4
State of California Proposition 65 Warning (US only) 4
Critical installation warnings 5
Installation cautions 7
Critical usage warnings 7
Usage cautions 11
Cleaning cautions 12
Critical disposal warnings 13
1. Regulatory Notice 14
Installation
16
Your refrigerator at a glance 16
Door removal for entrance 18
Step-by-step installation 26
Operations
35
User interface 35
Samsung Smart Home 44
SMART GRID Function (Demand Response) 47
Recommendations for voice recognition 51
Samsung Family Hub 51
Special features 53
Maintenance
58
Handling and care 58
Cleaning 62
Replacement 63
Untitled-4 2 2017-01-19 11:56:45

English4
Safety information
• Before using your new Samsung Refrigerator, please read this manual thoroughly
to ensure that you know how to operate the features and functions that your new
appliance offers safely and efciently.
• This appliance is not intended for use by persons (including children) with reduced
physical, sensory, or mental capabilities, or those who lack experience and knowledge,
unless they have been given supervision or instruction concerning the use of the
appliance by a person responsible for their safety.
• Because the following instructions cover various models, the characteristics of your
refrigerator may differ slightly from the refrigerator described in this manual.
• If you have any question, contact us at 1-800-SAMSUNG or nd help and information
online at www.samsung.com.
• R-600a or R-134a is used as a refrigerant. Check the compressor label on the rear of
the appliance or the rating label inside the fridge to see which refrigerant is used for
your refrigerator. If this product contains ammable gas (Refrigerant R-600a), contact
your local authority in regard to safe disposal of this product.
• It is hazardous for anyone other than an Authorized Service Person to service this
appliance.
Important safety symbols and precautions:
Please follow all safety instructions in this manual. This manual uses the following safety
symbols.
WARNING
Hazards or unsafe practices that may result in severe personal injury, property damage,
and/or death.
CAUTION
Hazards or unsafe practices that may result in severe personal injury and/or property
damage.
NOTE
Useful information that helps users understand or benet from the refrigerator.
These warning signs are here to prevent injury to you and others.
Please follow them carefully.
After reading this section, keep it in a safe place for future reference.
State of California Proposition 65 Warning (US only)
WARNING : This product contains chemicals known to the State of California to cause
cancer and birth defects or other reproductive harm.
Safety information
Untitled-4 4 2017-01-19 11:56:46

English 5
Safety information
Critical installation warnings
WARNING
• Do not install the refrigerator in a damp location or place where it may come in contact
with water.
- Deteriorated insulation on electrical parts may cause an electric shock or re.
• Do not place this refrigerator in direct sunlight or expose it to the heat from stoves,
room heaters, or other appliances.
• Do not plug several appliances into the same multiple power strip. The refrigerator
should always be plugged into its own individual electrical outlet which has a voltage
rating that matches the voltage listed on the refrigerator’s rating plate.
- This provides the best performance and also prevents overloading of house wiring
circuits, which could overheat the wires and cause a re hazard.
• If the wall socket is loose, do not insert the power plug.
- There is a risk of electric shock of re.
• Do not use a power cord that has cracks or abrasion damage along its length or at
either end.
• Do not bend the power cord excessively or place heavy objects on it.
• Do not pull or excessively bend the power cord.
• Do not twist or tie the power cord.
• Do not hook the power cord over a metal object, place a heavy object on the power
cord, insert the power cord between objects, or push the power cord into the space
behind the appliance.
• When moving the refrigerator, be careful not to roll over or damage the power cord.
- This may result in an electric shock or re.
• Never unplug your refrigerator by pulling on the power cord. Always grip the plug
rmly and pull straight out from the outlet.
- Damage to the cord may cause a short-circuit, re, and/or electric shock.
• Do not store explosive substances such as aerosol cans with a ammable propellant in
this appliance.
• Do not install this appliance near a heater or ammable material.
• Do not install this appliance in a location where gas may leak.
- This may result in an electric shock or re.
• This refrigerator must be properly located and installed in accordance with the
instructions in this manual before you use it.
• Connect the power plug in the proper position with the cord hanging down.
- If you connect the power plug upside down, the wire can get cut off and cause a re
or electric shock.
Untitled-4 5 2017-01-19 11:56:46

Safety information
English6
Safety information
• Make sure that the power plug is not crushed or damaged by the back of the
refrigerator.
• Keep the packing materials out of reach of children.
- There is a risk of death from suffocation if a child puts the packing materials on his
or her head.
• The appliance must be positioned so that the plug is accessible after installation.
- Failing to do so may result in an electric shock or re due to electric leakage.
• Do not install this appliance in a humid, oily or dusty location, or in a location exposed
to direct sunlight or to water (rain drops).
- Deteriorated insulation on electrical parts may cause an electric shock or re.
• If large amounts of dust or water enter the refrigerator, disconnect the power plug and
contact your Samsung Electronics service center.
- Otherwise there is a risk of re.
• Do not stand on top of the appliance or place objects (such as laundry, lighted candles,
lighted cigarettes, dishes, chemicals, metal objects, etc.) on the appliance.
- This may result in an electric shock, re, problems with the product, or injury.
• You need to remove all the protective plastic lm before you initially plug the product
in.
• Children should be supervised to ensure that they do not play with the snap rings used
for door adjustment or the water tube clips.
- There is risk of death by suffocation if a child swallows a snap ring or water tube
clip. Keep the snap rings and water tube clips out of children's reach.
• The refrigerator must be safely grounded.
- Always make sure that you have grounded the refrigerator before attempting to
investigate or repair any part of the appliance. Power leakages can cause severe
electric shock.
• Never use gas pipes, telephone lines, or other potential lightning attractors as an
electrical ground.
- You must ground the refrigerator to prevent any power leakages or electric shocks
caused by current leakage from the refrigerator.
- This may result in an electric shock, re, explosion, or problems with the product.
- Improper use of the grounding plug can result in a risk of electric shock. If it is
necessary to use an extension cord, use only a 3-wire extension cord that has a
3-blade grounding plug and a 3-slot receptacle that will accept the plug on the
appliance. The marked rating of the extension cord should be AC 115-120 V, 10
A, or more. If a grounding adapter is used, make sure the receptacle box is fully
grounded.
Untitled-4 6 2017-01-19 11:56:46
English 7
Safety information
• Plug the power plug into the wall socket rmly. Do not use a damaged power plug,
damaged power cord, or loose wall socket.
- This may result in an electric shock or re.
• If the power cord is damaged, have it replaced immediately by the manufacturer or
one of its service agents.
• Only a qualied technician or service company should be allowed to change the fuse in
the refrigerator.
- Failing to do so may result in an electric shock or personal injury.
Installation cautions
CAUTION
• Allow sufcient space around the refrigerator and install it on a at surface.
- Keep the ventilation space in the appliance enclosure or mounting structure clear of
obstructions.
• After you have installed the refrigerator and turned it on, allow the appliance to stand
for 2 hours before loading it with food.
• We strongly recommend you have a qualied technician or service company install the
refrigerator.
- Failing to do so may result in an electric shock, re, explosion, problems with the
product, or injury.
• Overloading one door may make the refrigerator fall, causing physical injury.
Critical usage warnings
WARNING
• Do not insert the power plug into a wall socket with wet hands.
- This may result in an electric shock.
• Do not store articles on the top of the appliance.
- When you open or close the door, the articles may fall and cause personal injury
and/or material damage.
• Do not insert hands, feet or metal objects (such as chopsticks, etc.) into the bottom or
the back of the refrigerator.
- This may result in an electric shock or injury.
- Any sharp edges may cause a personal injury.
Untitled-4 7 2017-01-19 11:56:46

Safety information
English8
Safety information
• Do not touch the inside walls of the freezer or products stored in the freezer with wet
hands.
- This may cause frostbite.
• Do not put a container lled with water on the refrigerator.
- If spilled, there is a risk of re or electric shock.
• Do not keep volatile or ammable objects or substances (benzene, thinner, propane
gas, alcohol, ether, LP gas, and other such products) in the refrigerator.
- This refrigerator is for storing food only.
- This may result in re or explosion.
• Children should be supervised to ensure that they do not play with the appliance.
- Keep ngers out of “pinch point” areas. Clearances between the doors and cabinet
are necessarily small. Be careful when you open the doors if children are in the area.
• Do not let children hang on the door or door bins. A serious injury may occur.
• Do not let children go inside the refrigerator. They could become trapped.
• Do not insert your hands into the area under the appliance.
- Any sharp edges may cause personal injury.
• Do not store pharmaceutical products, scientic materials, or temperature sensitive
products in the refrigerator.
- Products that require strict temperature controls must not be stored in the
refrigerator.
• Do not place or use electrical appliances inside the refrigerator/freezer, unless they are
of a type recommended by the manufacturer.
• If you smell smoke, pull out the power plug immediately, and then contact your
Samsung Electronics service center.
• If large amounts of dust or water enter the refrigerator, disconnect the power plug and
contact your Samsung Electronics service center.
- Otherwise there is a risk of re.
• Do not let children step on a drawer.
- The drawer may break and cause them to slip.
• Do not leave the doors of the refrigerator open while the refrigerator is unattended
and do not let children enter the refrigerator.
• Do not allow babies or children go into a drawer.
- It can cause death from suffocation by entrapment or personal injury.
• Do not overll the refrigerator with food.
- When you open the door, an item may fall out and cause personal injury or material
damage.
• Do not spray volatile material such as insecticide onto the surface of the appliance.
- As well as being harmful to humans, it may also result in an electric shock, re, or
problems with the product.
Untitled-4 8 2017-01-19 11:56:46

English 9
Safety information
• Never put ngers or any objects into the water dispenser outlet, ice chute, or ice maker
bucket.
- It may cause a personal injury or material damage.
• Do not use or place any substances sensitive to temperature such as ammable sprays,
ammable objects, dry ice, medicine, or chemicals near or inside the refrigerator.
• Do not use a hair dryer to dry the inside of the refrigerator. Do not place a lighted
candle in the refrigerator to remove bad odors.
- This may result in an electric shock or re.
• Fill the water tank, ice tray, and water cubes with potable water only (tap water,
mineral water, or puried water).
- Do not ll the tank with tea, juice, or a sports drink. They can damage the
refrigerator.
• Do not stand on top of the appliance or place objects (such as laundry, lighted candles,
lighted cigarettes, dishes, chemicals, metal objects, etc.) on the appliance. This may
result in an electric shock, re, problems with the product, or injury. Do not put a
container lled with water on the appliance.
- If spilled, there is a risk of re or electric shock.
• Do not use mechanical devices or any other means to accelerate the defrosting process,
other than those recommended by the manufacturer.
• Do not damage the refrigerant circuit.
• Never stare directly at the UV LED lamp for long periods of time.
- This may result in eye strain due to the ultraviolet rays.
• Do not put a fridge shelf into the refrigerator upside down. The shelf stopper will not
work.
- The glass shelf could fall and cause personal injury.
• Keep ngers out of “pinch point” areas. Clearances between the doors and cabinet are
necessarily small. Be careful when you open the doors if children are in the area.
• If a gas leak is detected, avoid any naked ames or potential sources of ignition, and
air the room in which the appliance is standing for several minutes.
- Do not touch the appliance or power cord.
- Do not use a ventilating fan.
- A spark may result in an explosion or re.
• Use only the LED Lamps provided by the manufacturer or its service agents.
• Bottles should be stored tightly together so that they do not fall over or out.
• This product is intended only for the storage of food in a domestic environment.
• Never put ngers or any objects into the water dispenser outlet, ice chute, or ice maker
bucket.
- This can cause a personal injury or material damage.
Untitled-4 9 2017-01-19 11:56:46

Safety information
English10
Safety information
• Do not attempt to repair, disassemble, or modify the refrigerator yourself.
- Unauthorized modications can cause safety problems. To reverse an unauthorized
modication, we will charge the full cost of parts and labor.
• Do not use any fuse (such as cooper, steel wire, etc.) other than a standard fuse.
• If your refrigerator needs to be repaired or reinstalled, contact your nearest service
center.
- Failing to do so may result in an electric shock, re, problems with the product, or
injury.
• If the interior or exterior LED lamp has gone out, contact your nearest Samsung service
center.
• If the refrigerator emits a burning smell or smoke, unplug the refrigerator immediately
and contact a Samsung service center.
- Failing to do so may result in an electric or re hazards.
• Pull the power plug out of the socket before changing the interior lamps of the
refrigerator.
- Otherwise, there is a risk of electric shock.
• If you experience difculty changing a non-LED light, contact a Samsung service
center.
• If the product is equipped with LED lamps, do not disassemble the Lamp Covers and
LED lamps yourself.
- Contact a Samsung service center.
• Plug the power plug into the wall socket rmly.
• Do not use a damaged power plug, damaged power cord, or loose wall socket.
- This may result in an electric shock or re.
Untitled-4 10 2017-01-19 11:56:46

English 11
Safety information
Usage cautions
CAUTION
• Do not re-freeze frozen foods that have thawed completely. Do not place carbonated
or zzy drinks in the freezer compartment. Do not put bottles or glass containers in the
freezer.
- When the contents freeze, the glass may break and cause personal injury.
• Use only the ice maker provided with the refrigerator.
• To get the best performance from the product:
- Do not place food too close to the vents at the rear of the refrigerator as this can
obstruct free air circulation in the refrigerator compartment.
- Wrap food up properly or place it in airtight containers before putting it into the
refrigerator.
- Do not put glass bottles or carbonated beverages into the freezer. They can freeze
and break. Broken beverage containers can cause injury.
- Please observe maximum storage times and expiration dates of frozen goods.
• Do not put glass containers or bottles or carbonated beverages into the freezer.
- The container may freeze and break, and this may result in injury.
• Service Warranty and Modication.
- Any changes or modications performed by a 3rd party on this nished appliance
are not covered under Samsung warranty service, nor is Samsung responsible for
safety issues that result from 3rd party modications.
• Do not block the air vents inside the refrigerator.
- If the air vents are blocked, especially with a plastic bag, the refrigerator can be
over cooled. If a cooling period lasts too long, the water lter may break and cause
water leakage.
• If the refrigerator is disconnected from the power supply, you should wait for at least
ve minutes before plugging it back in.
• If large amounts of water enter the refrigerator, pull out the power plug and contact a
Samsung service center.
• Do not strike or apply excessive force to any glass surface.
- Broken glass may result in a personal injury and/or property damage.
• Fill the water tank and ice cube trays with potable water only (tap water, mineral
water, or puried water).
- Do not ll the tank with tea, juice, or a sports drink. They can damage the
refrigerator.
• If the refrigerator is ooded, shut off the power to the refrigerator and contact your
nearest Samsung service center.
- There is a risk of electric shock or re.
Untitled-4 11 2017-01-19 11:56:46

Safety information
English12
Safety information
Cleaning cautions
CAUTION
• Do not spray water directly on the inside or outside the refrigerator.
- There is a risk of re or electric shock.
• Do not use a hair dryer to dry the inside of the refrigerator.
• Do not place a lighted candle in the refrigerator to remove bad odors.
- This may result in an electric shock or re.
• Do not spray cleaning products directly on the display.
- Printed letters on the display may come off.
• If any foreign substance such as water has entered the appliance, unplug the power
plug and contact your nearest service center.
- Failing to do so may result in an electric shock or re.
• Use a clean, dry cloth to remove any foreign matter or dust from the power plug
blades. Do not use a wet or damp cloth when cleaning the plug.
- Otherwise, there is a risk of re or electric shock.
• Do not clean the appliance by spraying water directly onto it.
• Do not use benzene, thinner, or Clorox (bleach) to clean the refrigerator.
- They may damage the surface of the appliance and may cause a re.
• Never put ngers or any objects into the dispenser outlet.
- This can cause a personal injury or material damage.
• Before cleaning or performing maintenance, unplug the appliance from the wall socket.
- Failing to do so may result in an electric shock or re.
Untitled-4 12 2017-01-19 11:56:46
English 13
Safety information
Critical disposal warnings
WARNING
• DANGER : Risk of child entrapment. Before you throw away your old refrigerator or
freezer:
- Take off the doors and door latch.
- Leave the shelves in place so that children cannot easily climb inside.
- Children trapped inside a refrigerator can hurt themselves or suffocate to death.
• Please dispose of the packaging material from this product in an environmentally
friendly manner.
• Ensure that none of the pipes on the back of the refrigerator are damaged prior to
disposal.
• R-600a or R-134a is used as a refrigerant. Check the compressor label on the rear of
the appliance or the rating label inside the fridge to see which refrigerant is used for
your refrigerator. If this refrigerator contains ammable gas (Refrigerant R-600a),
contact your local authority in regard to the safe disposal of this product.
• When disposing of this refrigerator, remove the door/door seals and door latch so that
small children or animals cannot become trapped inside. Children should be supervised
to ensure that they do not play with the appliance.
- If trapped inside, the child could be injured or suffocate to death.
• Cyclopentane is used in the insulation. The gases in the insulation material require
a special disposal procedure. Please contact your local authorities in regard to the
environmentally safe disposal of this product.
• Keep all packaging materials well out of the reach of children, as packaging materials
can be dangerous to children.
- If a child places a bag over his or her head, the child could suffocate.
Untitled-4 13 2017-01-19 11:56:46

Safety information
English14
Safety information
1. Regulatory Notice
1.1 FCC Notice
FCC CAUTION:
Any changes or modications not expressly approved by the party responsible for
compliance could void the user’s authority to operate the equipment.
Contains Transmitter Module FCC ID: A3LWCM730Q
This device complies with Part 15 of FCC Rules. Operation is Subject to the following two
conditions:
(1) This device may not cause harmful interference, and
(2) This device must accept any interference received including interference that cause
undesired operation.
For products available in the US and Canadian markets, only channels 1~11 are available.
You cannot select other channels.
FCC STATEMENT:
This equipment has been tested and found to comply within the limits for a Class B
digital device, pursuant to part 15 of the FCC Rules. These limits are designed to provide
reasonable protection against harmful interference in a residential installation.
This equipment generates, uses, and can radiate radio frequency energy and, if not
installed and used in accordance with the instructions, may cause harmful interference
to radio communications. However, there is no guarantee that interference will not occur
in a particular installation. If this equipment does cause harmful interference to radio or
television reception, which can be determined by turning the equipment off and on, the
user is encouraged to try to correct the interference by one or more of the following
measures:
• Reorient or relocate the receiving antenna
• Increase the separation between the equipment and receiver
• Connect the equipment to an outlet that is on a different circuit than the receiver.
• Consult the dealer or an experienced radio/TV technician for help.
FCC RADIATION EXPOSURE STATEMENT:
This equipment complies with FCC radiation exposure limits set forth for an uncontrolled
environment.
This equipment should be installed and operated so there is at least 8 inches (20 cm)
between the radiator and your body. This device and it’s antennas must not be co-located
or operated in conjunction with any other antenna or transmitter except in accordance
with FCC multi-transmitter product procedures.
Untitled-4 14 2017-01-19 11:56:46

English 15
Safety information
1.2 IC Notice
Contains Transmitter Module IC: 649E-WCM730Q
The term “IC” before the radio certication number only signies that Industry Canada
technical specications were met. Operation is subject to the following two conditions : (1)
this device may not cause interference, and (2) this device must accept any interference,
including interference that may cause undesired operation of the device.
This Class B digital apparatus complies with Canadian ICES-003.
Cet appareil numérique de la classe B est conforme á la norme NMB-003 du Canada.
For products available in the US and Canadian markets, only channels 1~11 are available.
You cannot select other channels.
IC RADIATION EXPOSURE STATEMENT:
This equipment complies with IC RSS-102 radiation exposure limits set forth for an
uncontrolled environment. This equipment should be installed and operated so there is at
least 8 inches (20 cm) between the radiator and your body. This device and it’s antennas
must not be co-located or operated in conjunction with any other antenna or transmitter
except in accordance with FCC multi-transmitter product procedures.
SAVE THESE INSTRUCTIONS
Untitled-4 15 2017-01-19 11:56:46
English16
Installation
Follow these instructions carefully to prevent accidents and to ensure the proper
installation of this refrigerator.
WARNING
• Use the refrigerator only for its intended purpose as described in this manual.
• Any servicing must be performed by a qualied technician.
• Dispose of the product packaging material in compliance with the local regulations.
• To prevent electric shock, unplug the power cord before servicing.
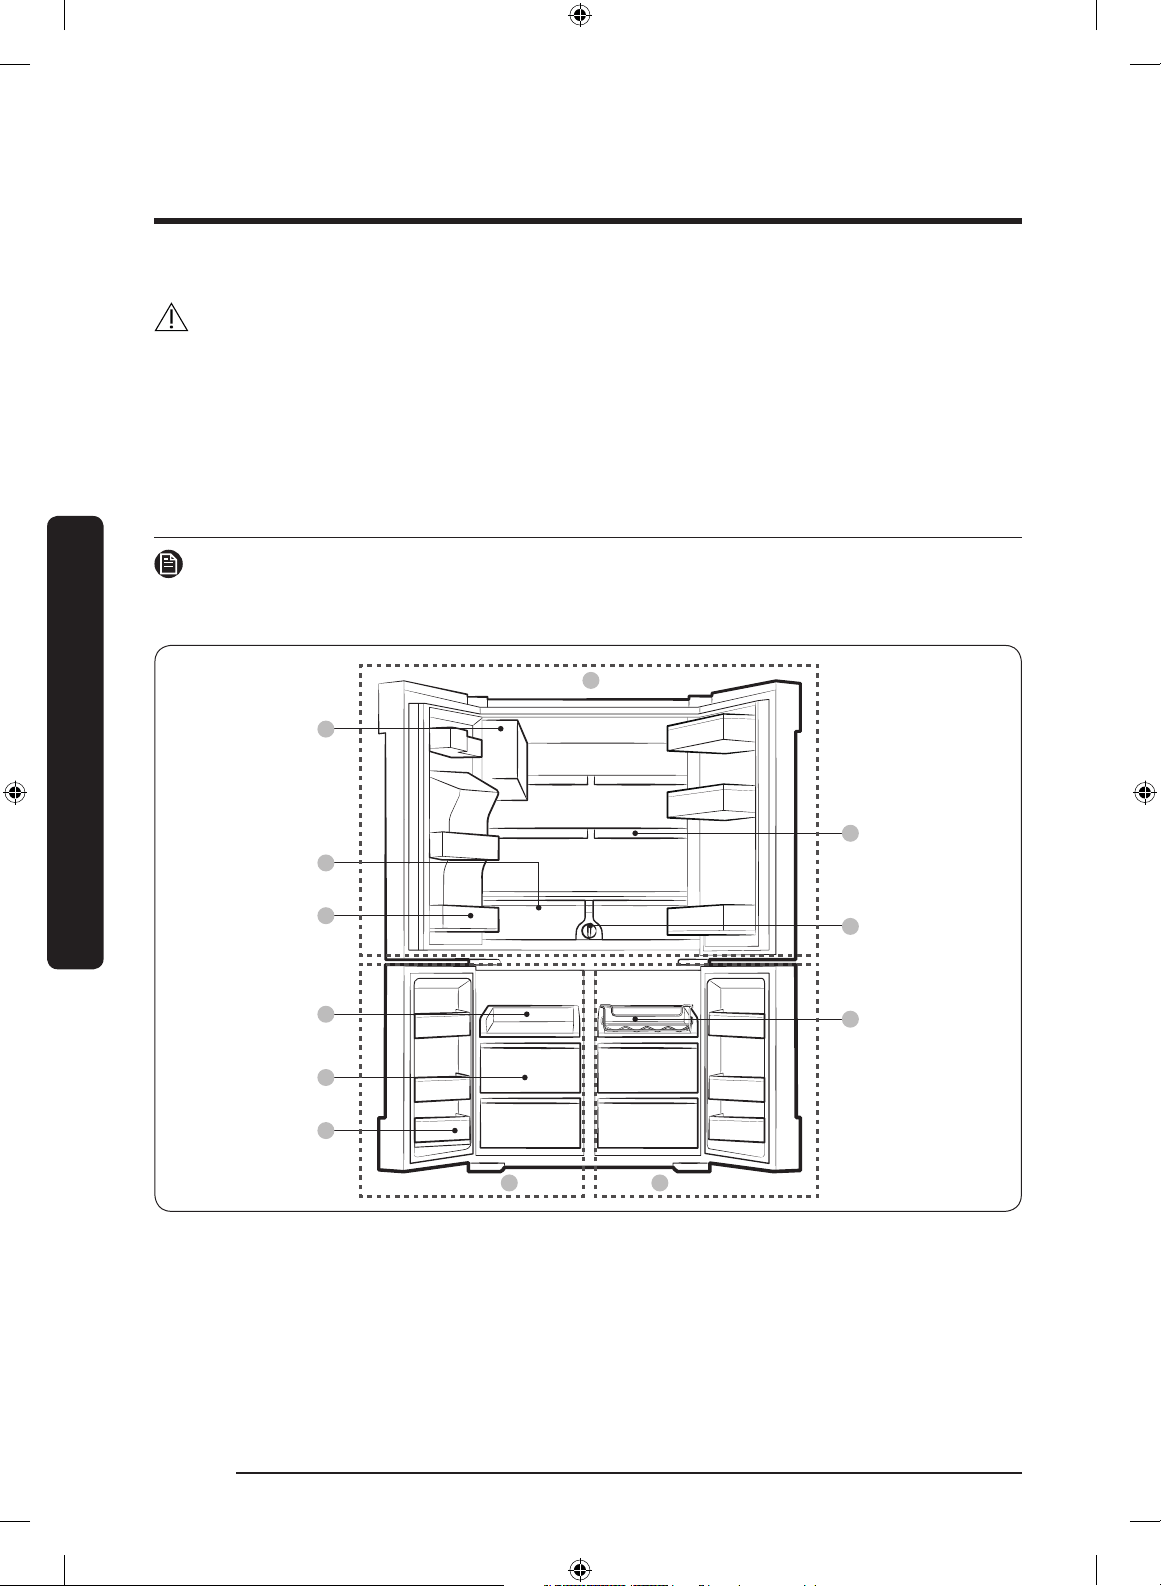
Your refrigerator at a glance
NOTE
Your refrigerator and the provided component parts of your refrigerator may differ from
the illustrations in this manual, depending on the model and your country.
01
07
09
08
A
B C
02
03
04
05
06
Installation
Untitled-4 16 2017-01-19 11:56:46

English 17
Installation
01 Auto Ice Maker (Ice Master)
02 EZ Fresh Vegetable & Fruit Drawers
03 Fridge Multi-Purpose Guard
04 Easy Slide-Shelf
05 Dry Food and Meat Storage Drawers
06 Freezer door Bins
07 Quick Space Shelf
08 Water lter
09 Wine Rack
A. Fridge
B. Freezer
C. FlexZone
NOTE
• For energy efciency, keep all shelves, drawers, and baskets in their original positions.
• When closing the door, make sure the vertical hinged section is in the correct position
to avoid scratching the other door.
• If the vertical hinged section is reversed, put it back into the correct position, and then
close the door.
• Moisture may form at times on the vertical hinged section.
• If you close a door forcefully, the other door may open.
• When the door is opened, the interlock switch automatically disables the auger motor
of the ice maker for safety reasons.
• If the internal or external LED lamp is out of order, contact a local Samsung service
center.
Untitled-4 17 2017-01-19 11:56:46
Installation
English18
Installation
Door removal for entrance
If the refrigerator cannot pass through the entrance to your home or kitchen due to its
size, follow these instructions to remove and then re-install the refrigerator's doors. If you
do not need to remove the doors, go to page 26 for the installation instructions.
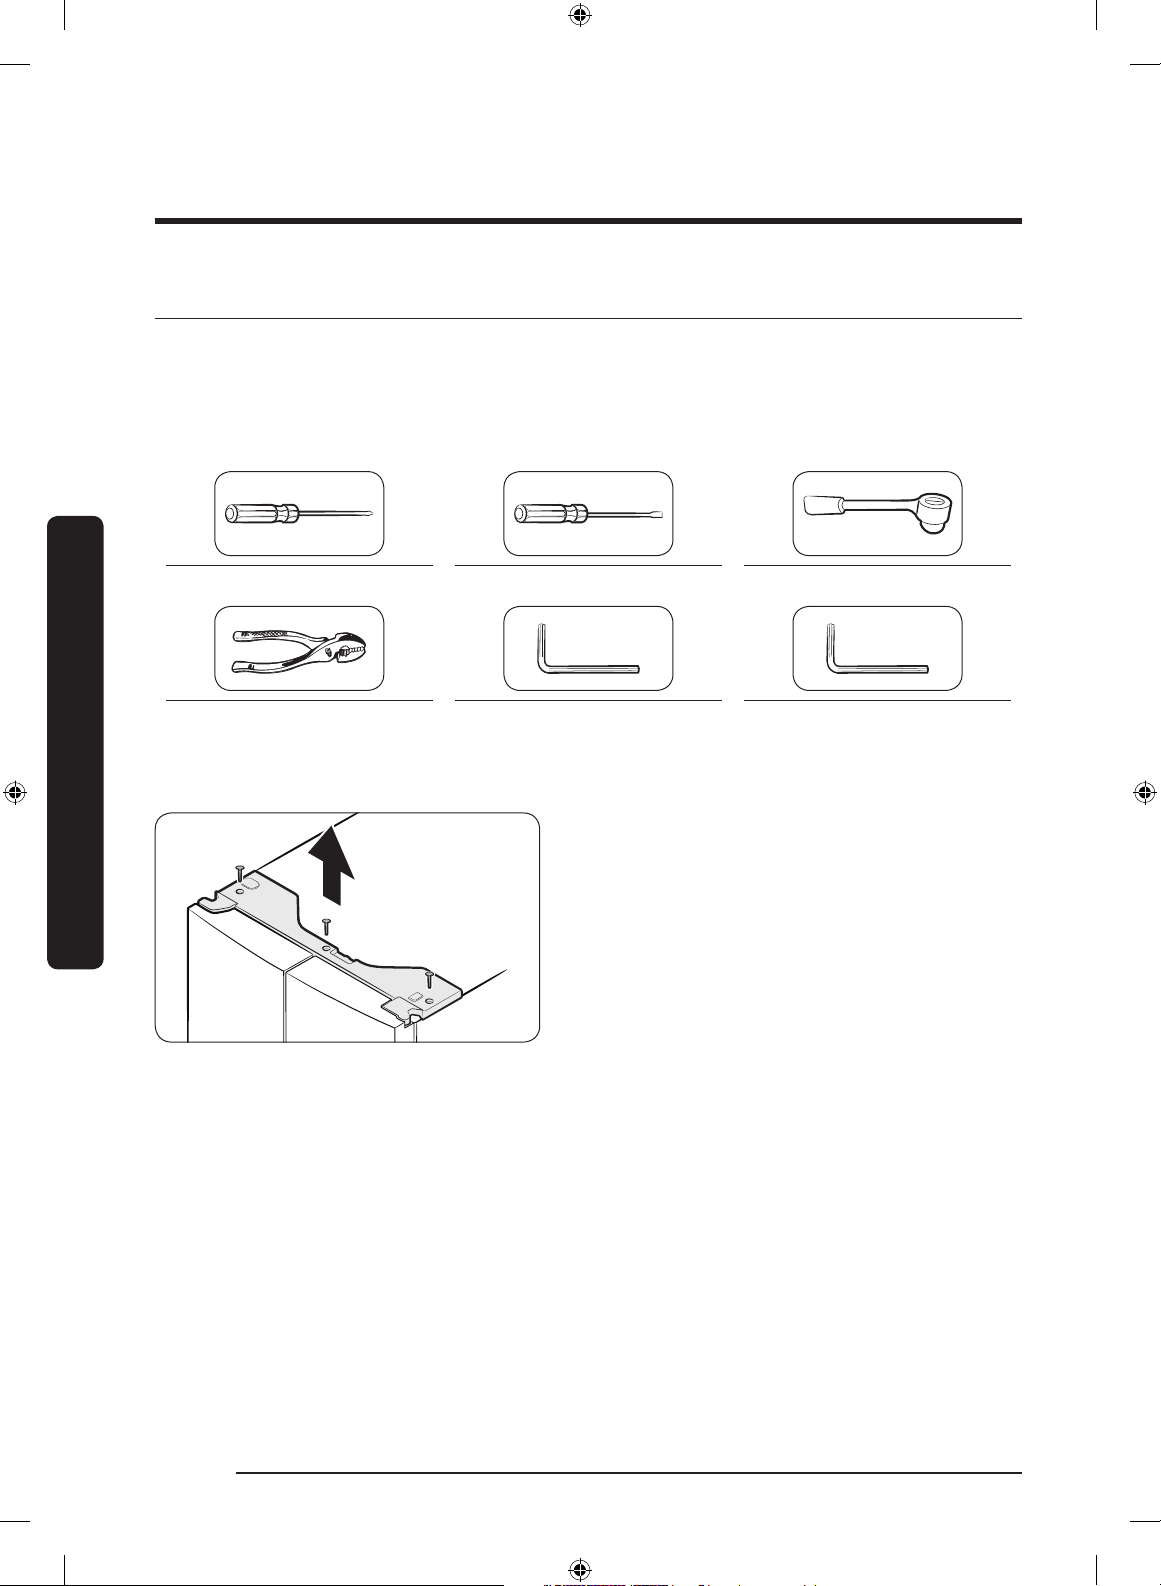
Tools required (not provided)
Phillips head screwdriver Flat-heat screwdriver Socket wrench (10 mm)
Pliers Allen wrench (4 mm) Allen wrench (5 mm)
Detaching the fridge doors
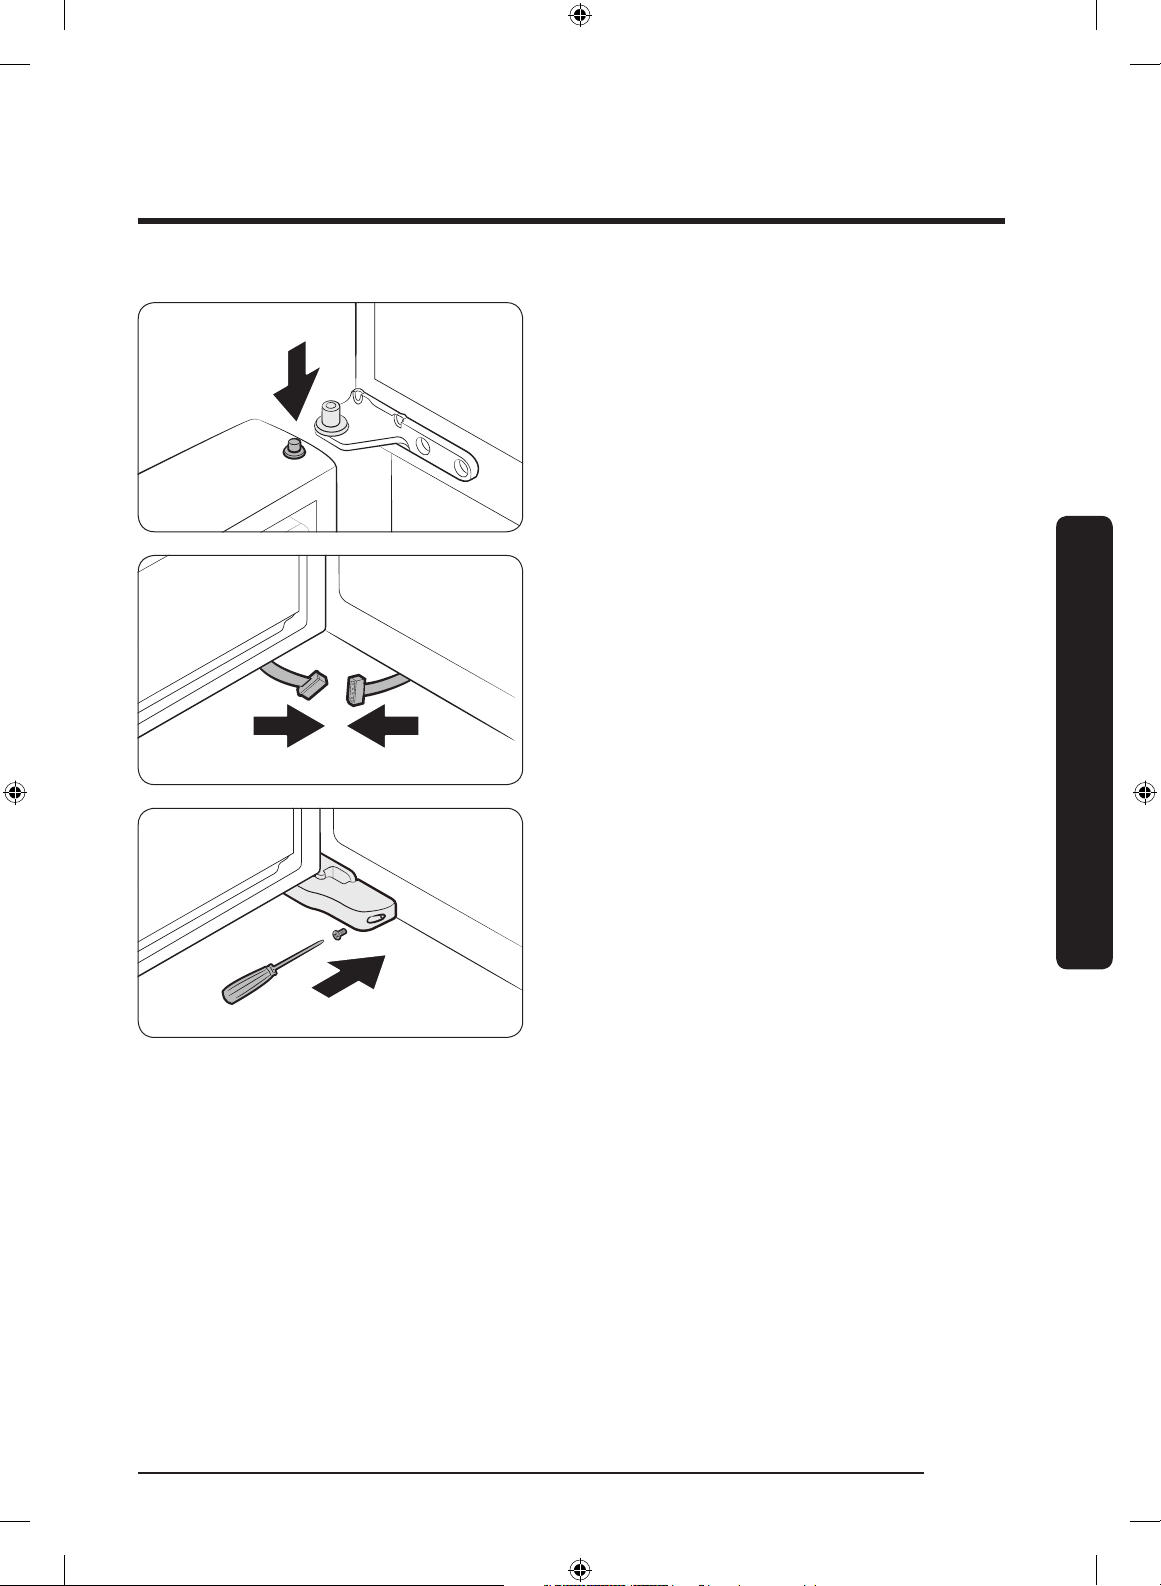
1. With the door closed, use a Phillips
head screwdriver to remove the
screws (x3) from the top cover. Pull
up and remove the top cover with the
connectors.
Untitled-4 18 2017-01-19 11:56:47
English 19
Installation
2. Disconnect the two wire connectors
on the left door. The position of the
connectors differs with the model.
CAUTION
• Do not remove both doors
simultaneously. Make sure to remove
one door at a time. Otherwise, one or
both of the doors may fall and cause
physical injury.
• Make sure the refrigerator is off before
disconnecting the connectors.
3. Disconnect the water tube from the
coupler on the left door as shown.
4. Gently draw up the clamp in several
steps. To prevent nger injuries, do not
apply a sudden force to the clamp.
5. Pull up the clamp to remove.
Untitled-4 19 2017-01-19 11:56:47

Installation
English20
Installation
6. Open the door 90 degrees. While
holding the door, pull up and remove
the top hinge. Be careful not to damage
the connector wires when you remove
the hinge.
7. Gently pull up the door vertically to
remove. Do not apply excessive force
to the door. The door may fall, causing
physical injury.
8. Lay the door down on a at surface.
9. Repeat the steps above for the other
door, except for Step 3. There is no
water tube on the right side door.
Untitled-4 20 2017-01-19 11:56:48
English 21
Installation
Detaching the freezer doors
CAUTION
• Be sure to remove the fridge doors before removing the freezer doors.
• Use caution when disconnecting the bottom connectors.
A
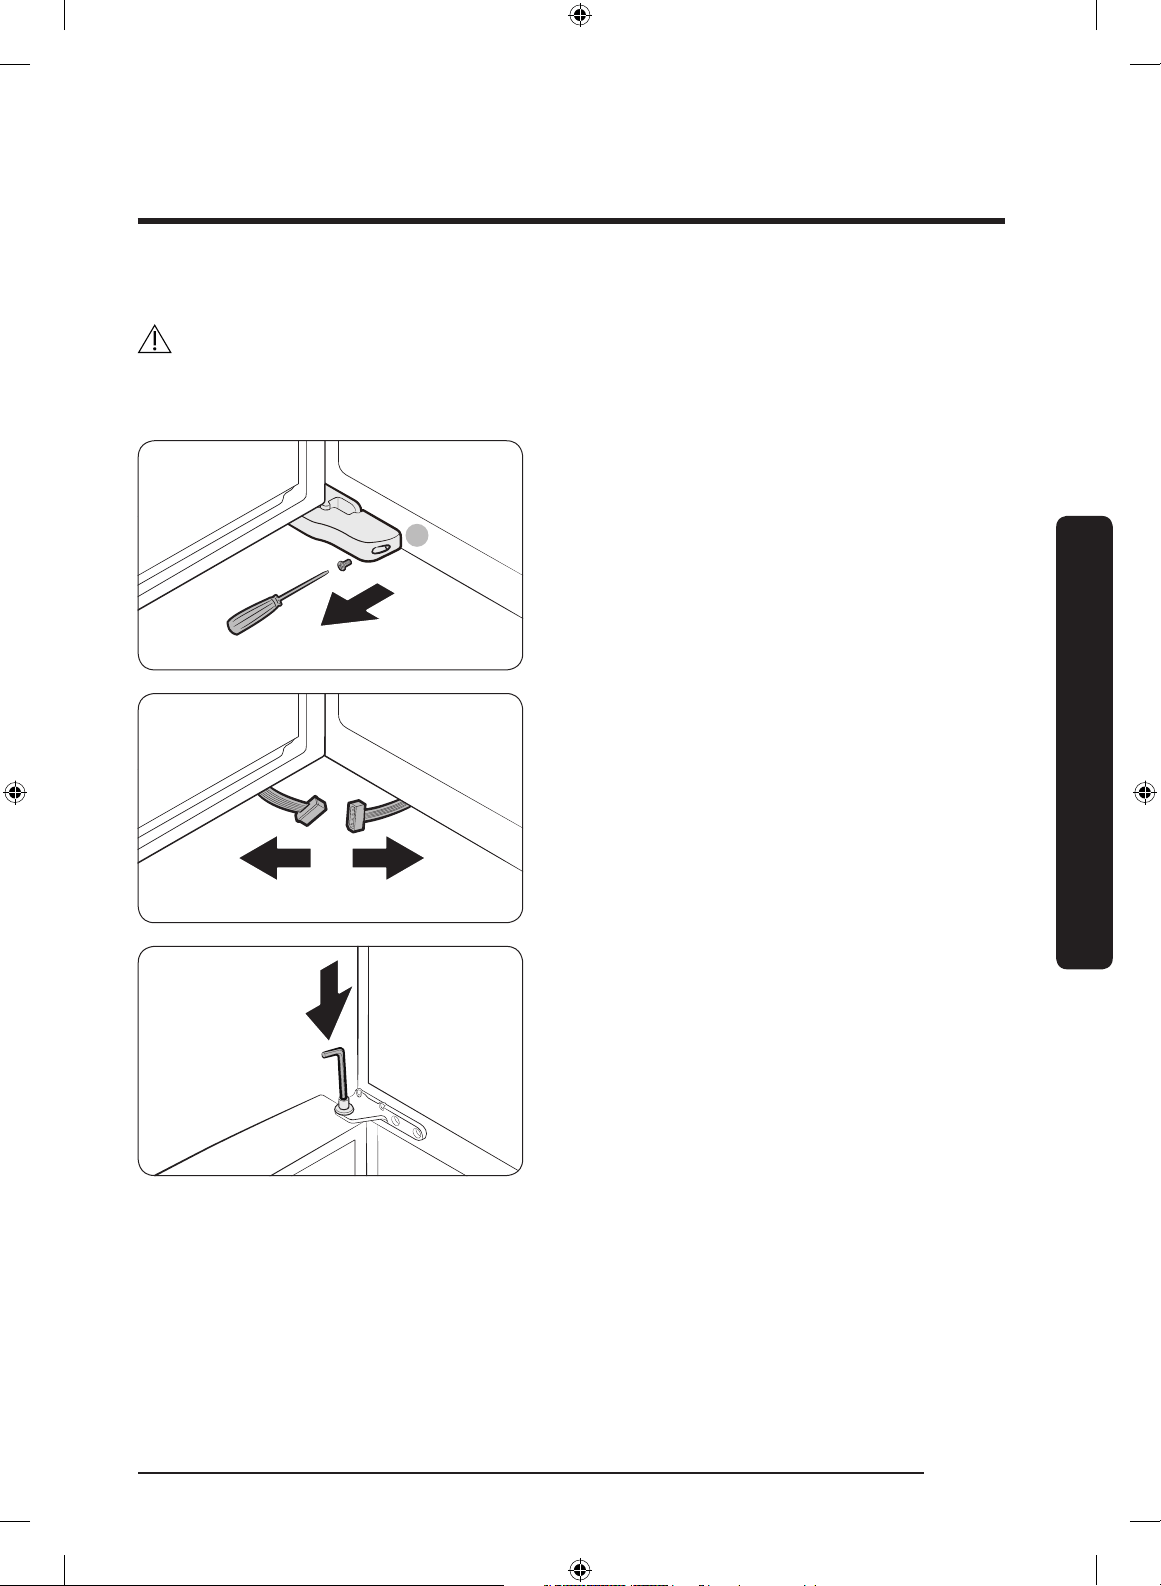
1. With the freezer door open, use a
Phillips head screwdriver to remove
the screw holding the cover (A) of the
adjustable leg.
2. Disconnect the wire connectors.
3. Locate the hinge shaft. While holding
the door with one hand, use a at-head
screwdriver or wrench to press the
shaft down. Make sure to hold the door
to prevent the door from falling.
Untitled-4 21 2017-01-19 11:56:48
Installation
English22
Installation
4. To prevent contact with the middle
hinge, slightly tilt the door to the front,
and then lift it up to remove.
5. Repeat the steps above for the other
door.
Re-attaching the freezer doors
CAUTION
• Before re-attaching the doors, make sure all the electrical connectors are properly
connected.
• The freezer doors must be re-attached before the fridge doors.
• Be careful not to damage or step on the wires during this process.
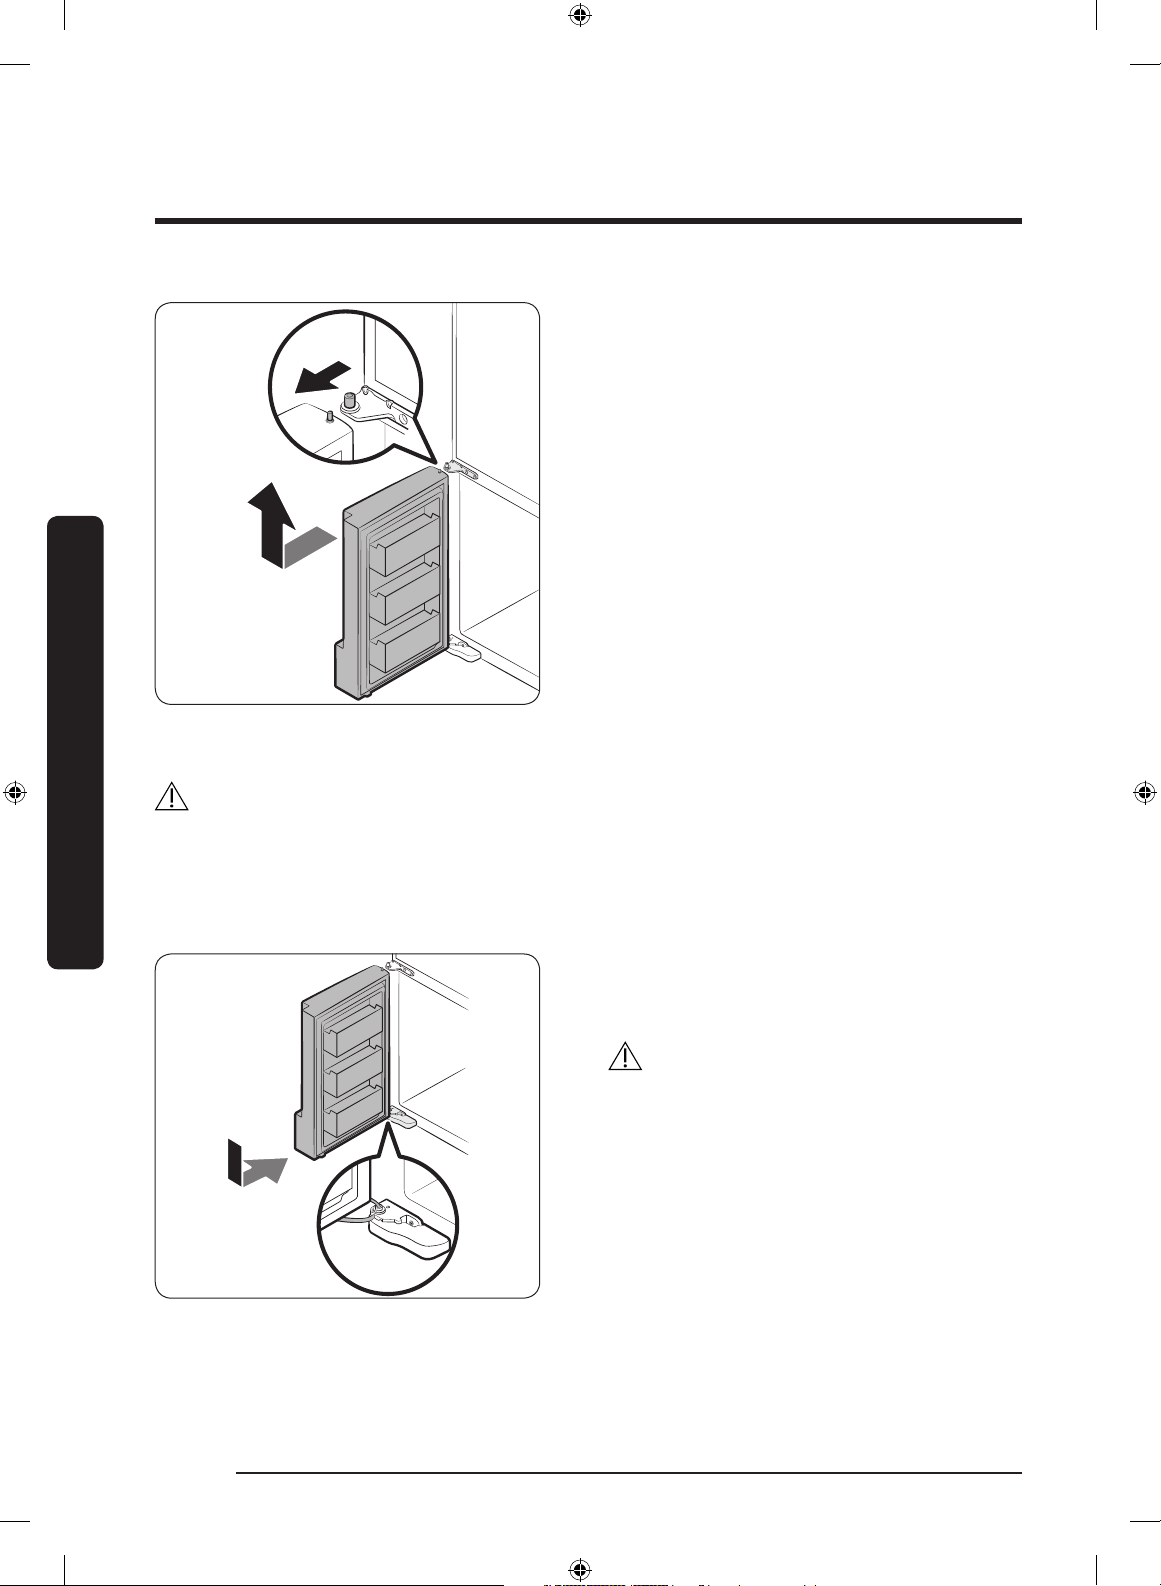
1. Insert the freezer door into the bottom
hinge while pushing the freezer door in
the direction of the arrow.
CAUTION
• Be careful not to damage or step on the
wires during this process.
Untitled-4 22 2017-01-19 11:56:48
English 23
Installation
2. While pressing the hinge shaft down,
position the door so that the hinge shaft
is below the shaft hole in the middle
hinge. Release the hinge shaft so that it
enters the shaft hole.
3. With the door open, connect the bottom
connectors in the direction of the
arrows.
4. Attach the levelling foot cover using
a Phillips head screwdriver. Be
careful not to damage or step on the
connectors.
5. Repeat the steps above for the other
door.
Untitled-4 23 2017-01-19 11:56:48

Installation
English24
Installation
Re-attaching the fridge doors
1. While holding the door open by more
than 90 degrees, insert the shaft on
the middle hinge into the hole on the
bottom of the door.
2. Put the top hinge into position on the
top of the refrigerator, and then insert
the hinge shaft into the top hole of the
door. Make sure the wires from the
door pass through the hole in the hinge
shaft.
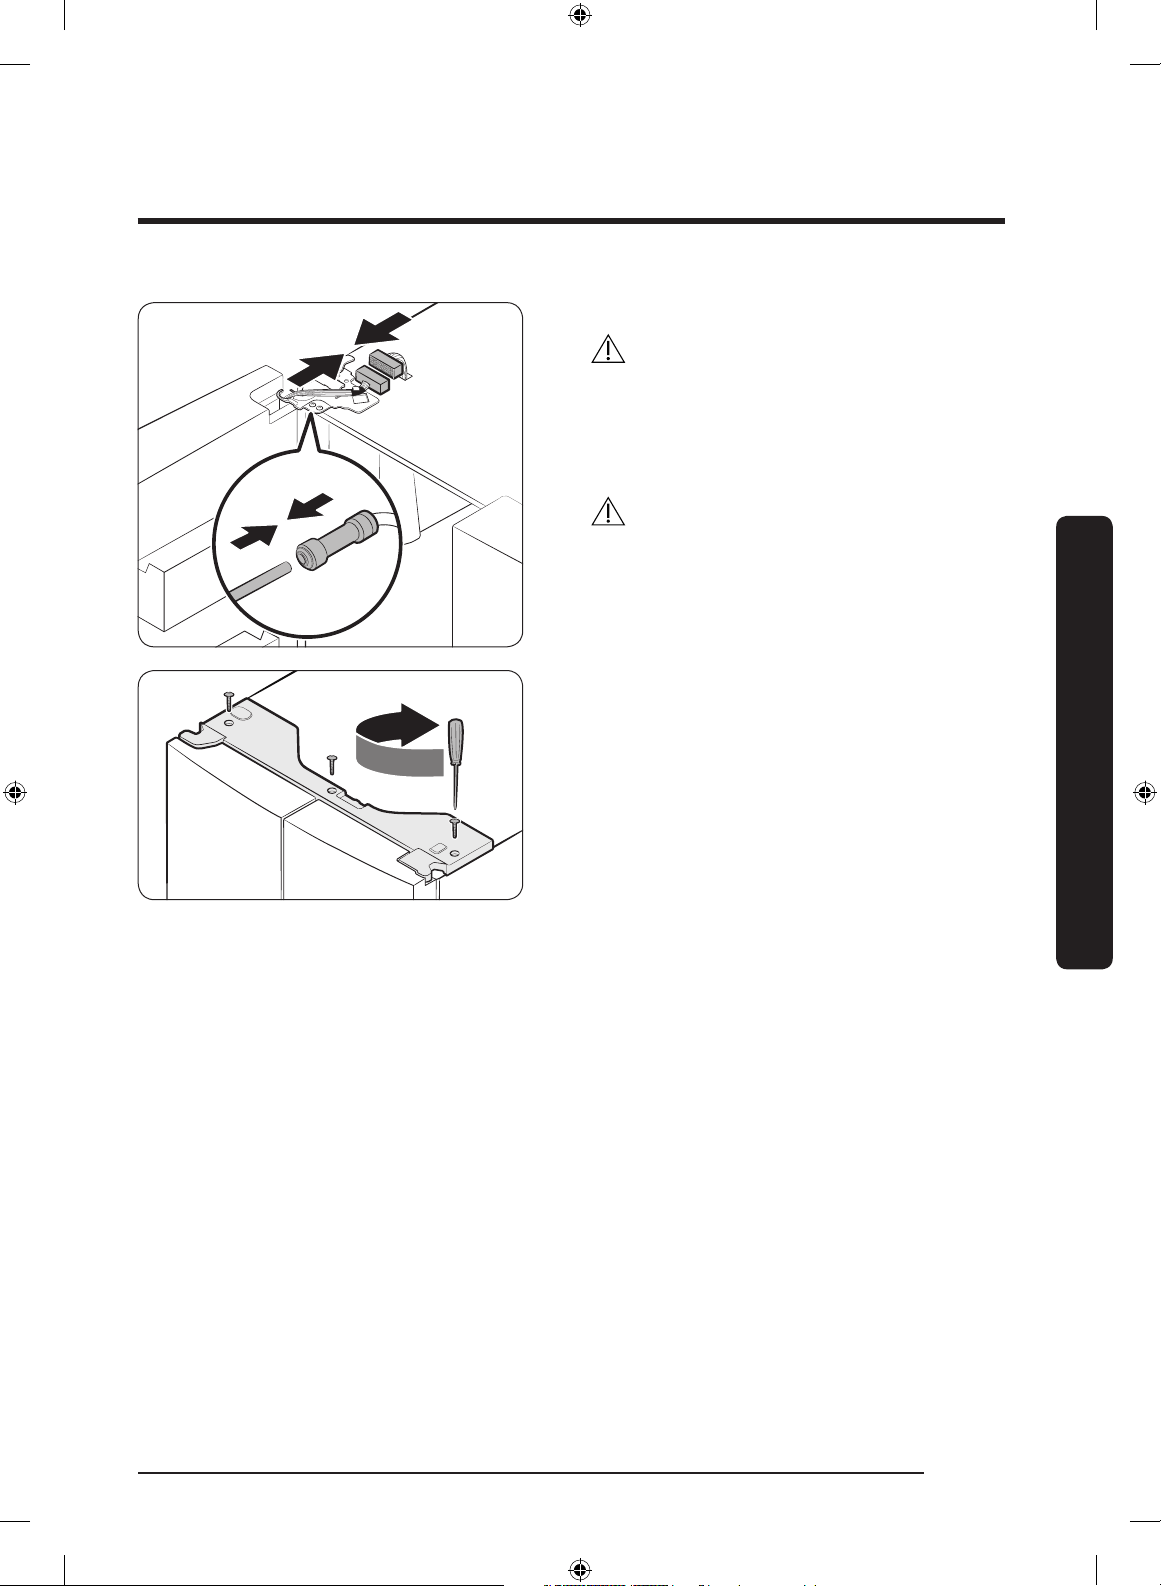
3. Insert the clamp in the direction of the
arrow.
4. Push back the clamp as shown.
Untitled-4 24 2017-01-19 11:56:49
English 25
Installation
5. Connect the wire connectors.
CAUTION
• Make sure the wire connectors are
connected properly. Otherwise, the
display will not operate.
6. Connect the water tube.
CAUTION
• To prevent water leaks, make sure the
red clips tighten the coupler properly.
• Keep the clips out of children’s reach.
7. Repeat the above steps for the other
door, except for Step 6. The right door
does not have a water tube.
8. Attach the top cover with the front side
rst, and then press down on its back
to get it into position. Then, tighten the
screws (x3).
Untitled-4 25 2017-01-19 11:56:49
Installation
English26
Installation
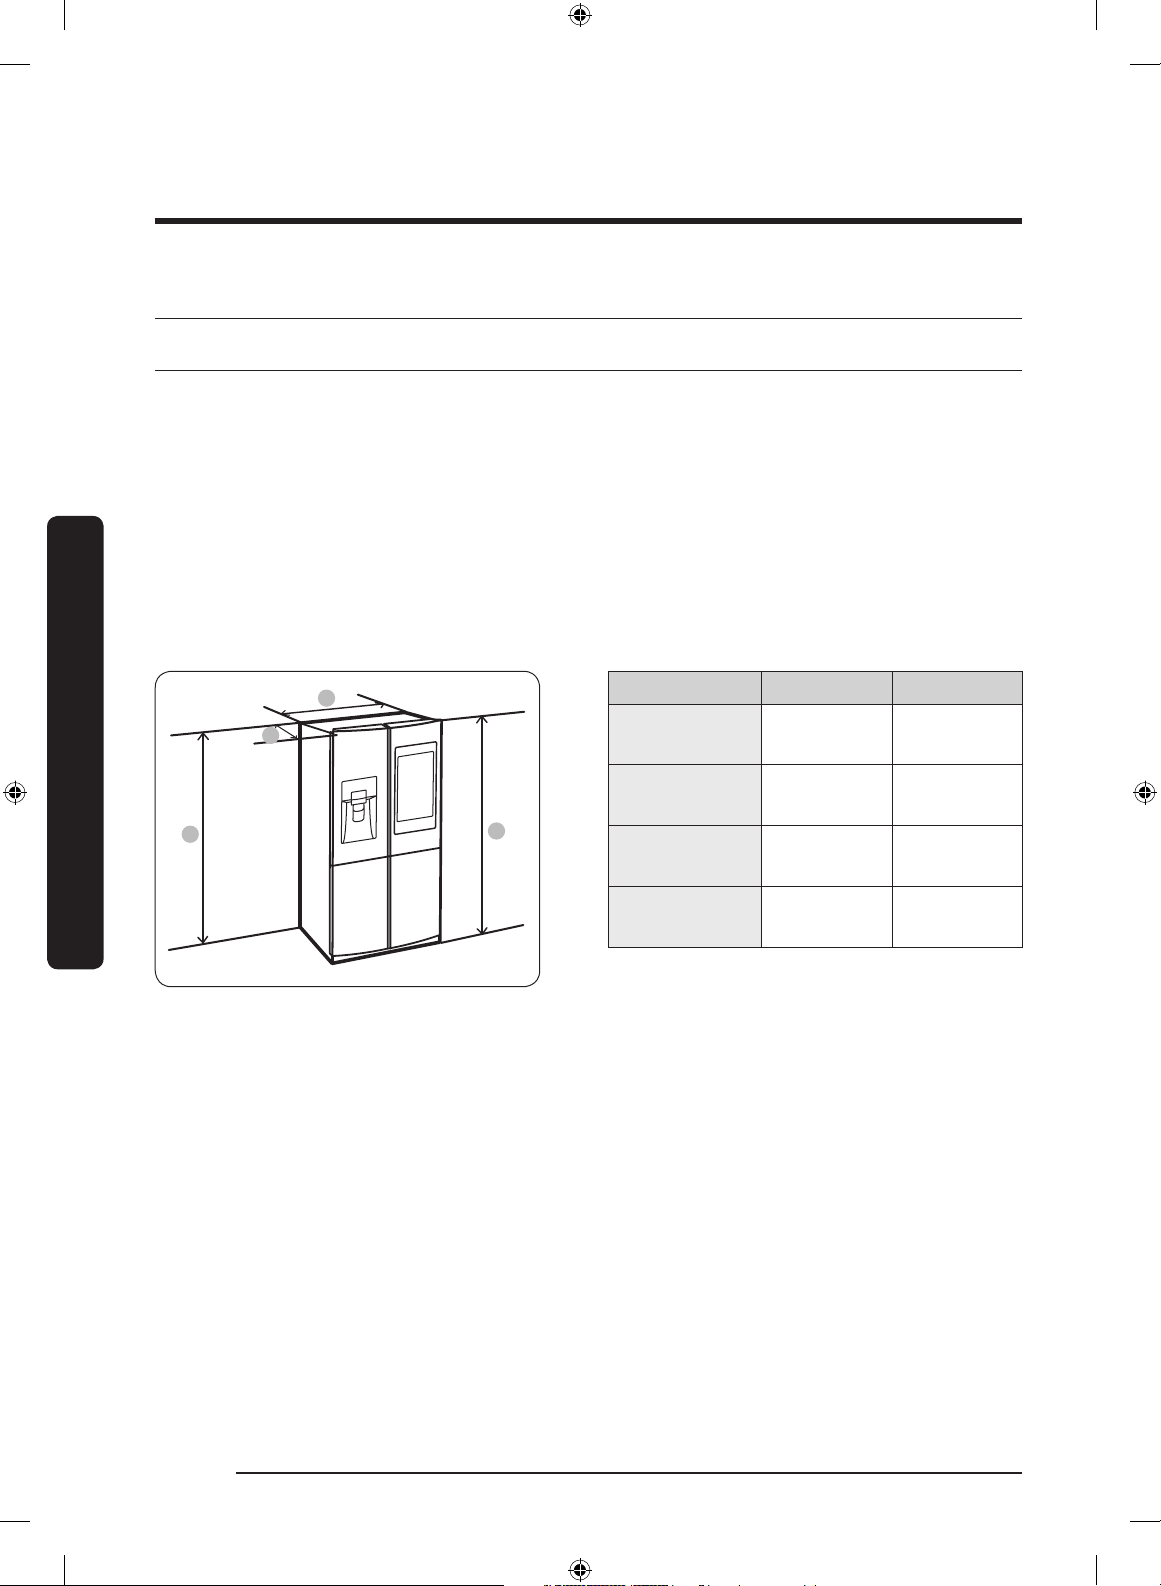
Step-by-step installation
STEP 1 Select a site
The site must:
• Have a solid level surface without carpeting or ooring that may obstruct ventilation
• Be out of direct sunlight
• Have adequate room for opening and closing the door
• Be away from any heat source
• Provide room for maintenance and servicing
• Have a temperature range between 50 °F (10 °C) and 110 °F (43 °C)
Clearance
See the pictures and table below and on the next page for installation space requirements.
B
C
D
A
Model RF22M* RF28M*
Depth “A”
28
7
/8"
(733 mm)
34
1
/4"
(871 mm)
Width “B”
35
3
/4"
(908 mm)
35
3
/4"
(908 mm)
Height “C”
70
3
/4"
(1797 mm)
70
3
/4"
(1797 mm)
Overall
Height “D”
71
7
/8"
(1825 mm)
71
7
/8"
(1825 mm)
Untitled-4 26 2017-01-19 11:56:49
English 27
Installation
01
02 02
04 04
05
03
06
08
0907
10
RF22M* RF28M*
01 2" (50 mm) 2" (50 mm)
02 125° 125°
03
59
5
/8"
(1515 mm)
59
5
/8"
(1515 mm)
04
11
7
/8"
(303 mm)
11
7
/8"
(303 mm)
05 12" (305 mm) 12" (305 mm)
06
35
3
/4"
(908 mm)
35
3
/4"
(908 mm)
07 24" (610 mm)
29
3
/8"
(748 mm)
08 2
3
/4" (70 mm) 2
3
/4" (70 mm)
09 1
3
/4" (43 mm) 1
3
/4" (43 mm)
10
42
5
/8"
(1083 mm)
48
1
/8"
(1221 mm)
NOTE
The measurements of your refrigerator may differ from those listed above, depending on
the measuring method.
Untitled-4 27 2017-01-19 11:56:49

Installation
English28
Installation
STEP 2 Flooring
• The surface of the installation location
must support a fully loaded refrigerator.
• To protect the oor, put a large piece
of cardboard under each leg of the
refrigerator when you move it for
installation.
• To protect the oor once the
refrigerator is in its nal position, do
not move it unless necessary. If you
have to move it, place thick paper or
cloth such as an old carpet, along the
movement path.
NOTE
If the refrigerator cannot pass through entrance to your home or kitchen due to its size,
see Door removal for entrance on page 18.
Untitled-4 28 2017-01-19 11:56:50
English 29
Installation
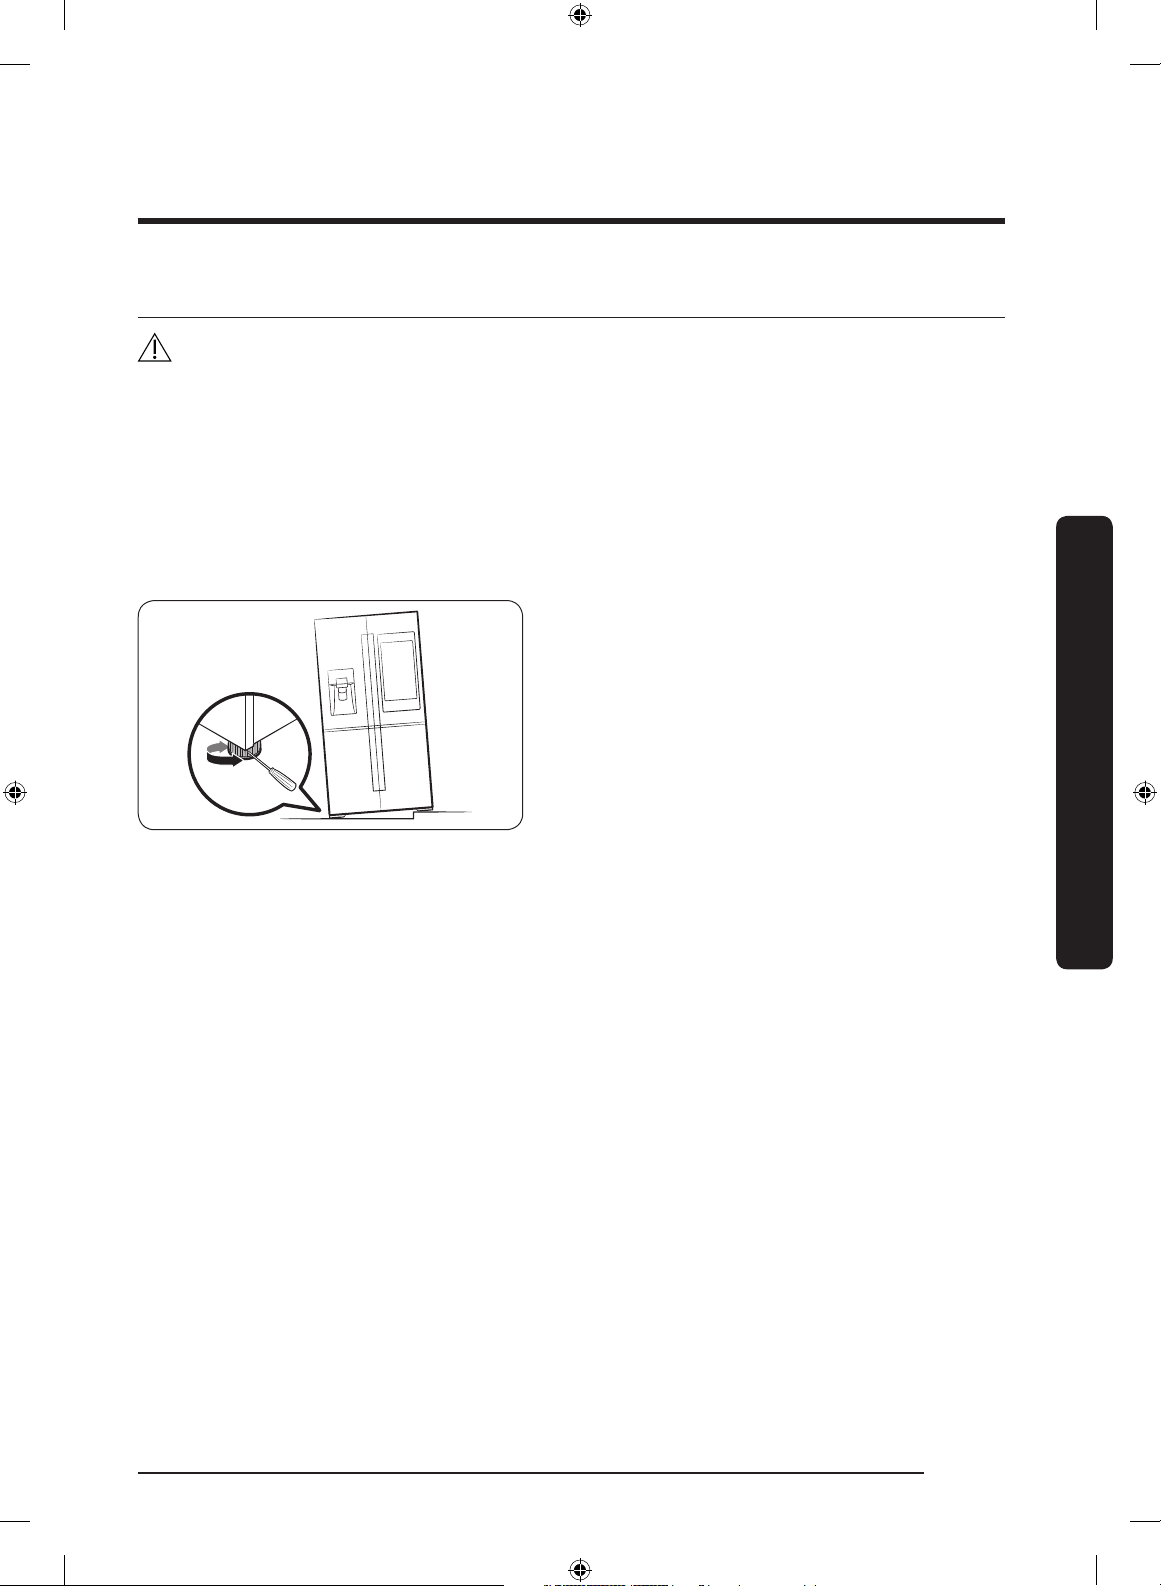
STEP 3 Adjust the levelling feet
CAUTION
• When installed, the refrigerator must be leveled on a at, solid oor. Not leveling the
refrigerator can cause damage to the refrigerator or physical injury.
• Levelling must be performed with the refrigerator empty. Make sure no food items are
inside the refrigerator.
• For safety reasons, adjust the front side a little higher than the rear side.
Level the refrigerator using the special screws (levellers) on the front legs. Use a at-head
screwdriver to turn the levellers.
• To adjust the height of the left side:
Insert a at-head screwdriver into the
leveller of the left side front leg. Turn
the leveller clockwise to raise or turn it
counterclockwise to lower.
• To adjust the height of the right side:
Insert a at-head screwdriver into the
leveller of the right side front leg. Turn
the leveller clockwise to raise or turn it
counterclockwise to lower.
Untitled-4 29 2017-01-19 11:56:50
Installation
English30
Installation
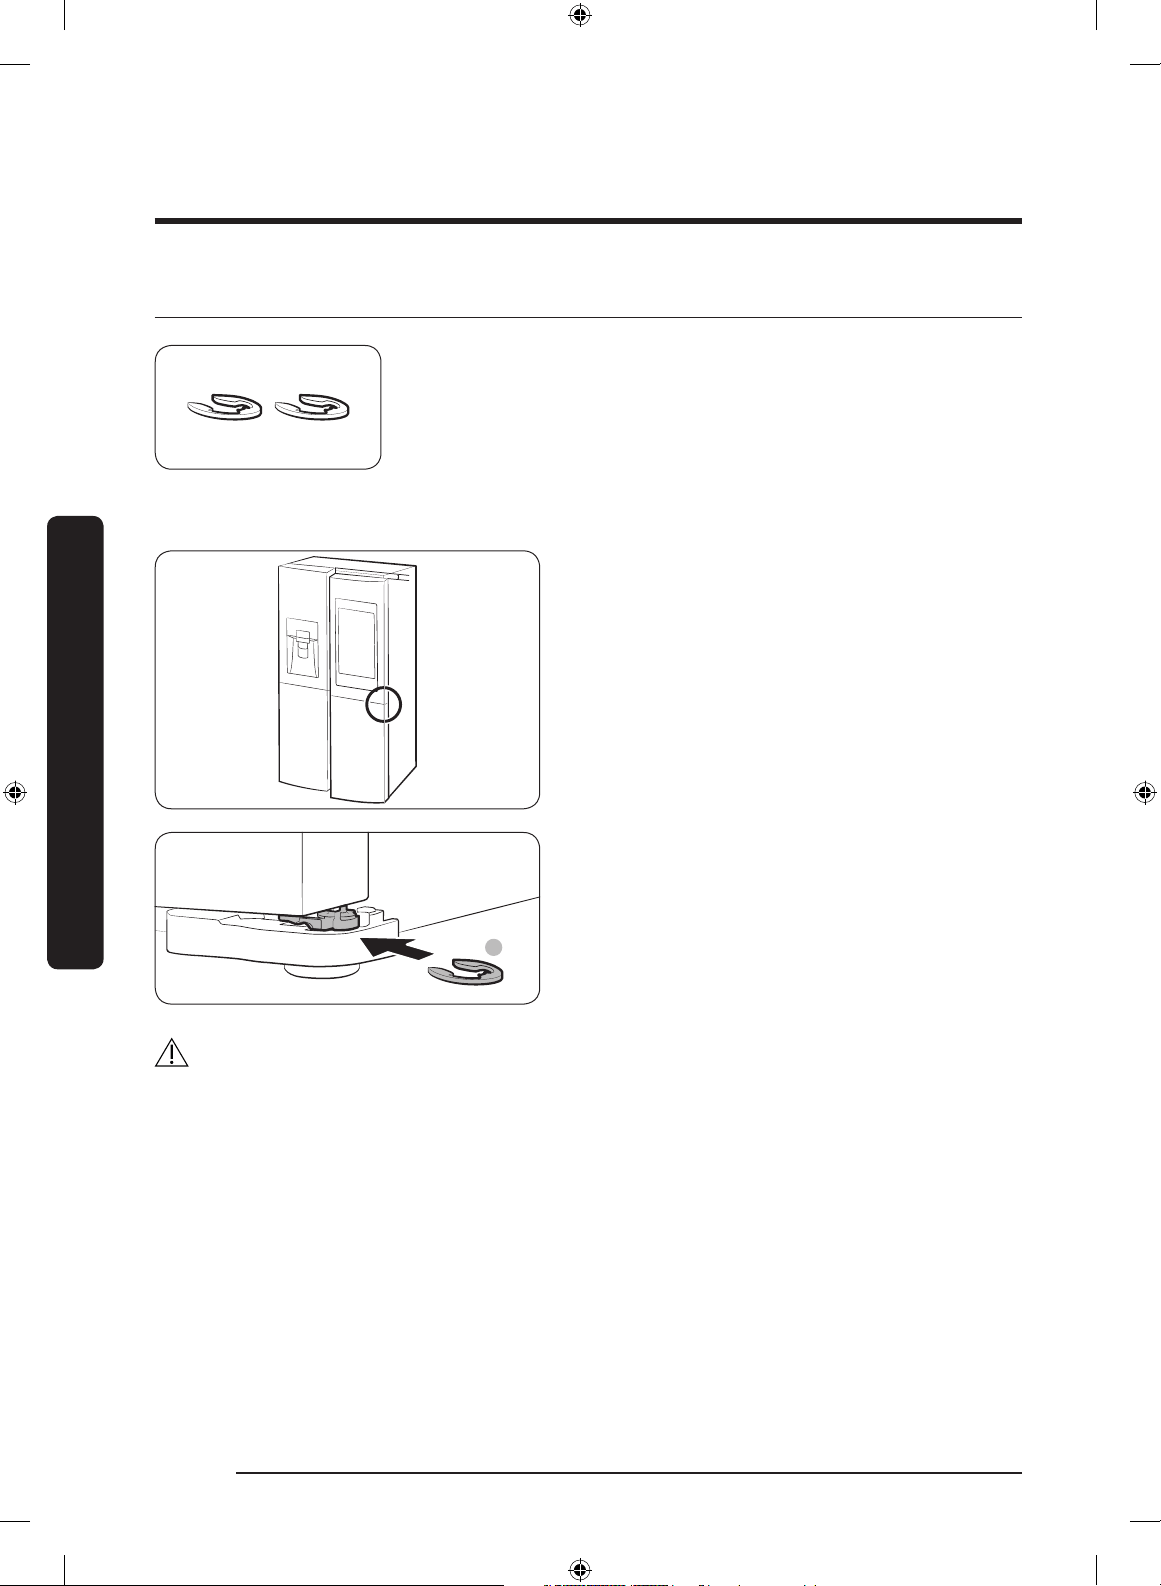
STEP 4 Adjust the door height as well as the door gap
Snap ring
The height of a door can be adjusted using the provided snap
rings, which come in 4 different sizes (1 mm, 1.5 mm, 2 mm,
and 2.5 mm).
To adjust the height of a door
1. Check the height difference between
the doors, and then raise and hold the
lower door.
A
2. Insert a suitable-sized snap ring (A)
between the door and the hinge as
shown.
CAUTION
• Insert only one snap ring. If you insert two or more snap rings, the rings may slip out
or make a rubbing noise.
• Keep the snap rings out of children’s reach and keep them for future use.
• Do not raise the door too much. The door can contact and damage the top cover.
Untitled-4 30 2017-01-19 11:56:50
English 31
Installation
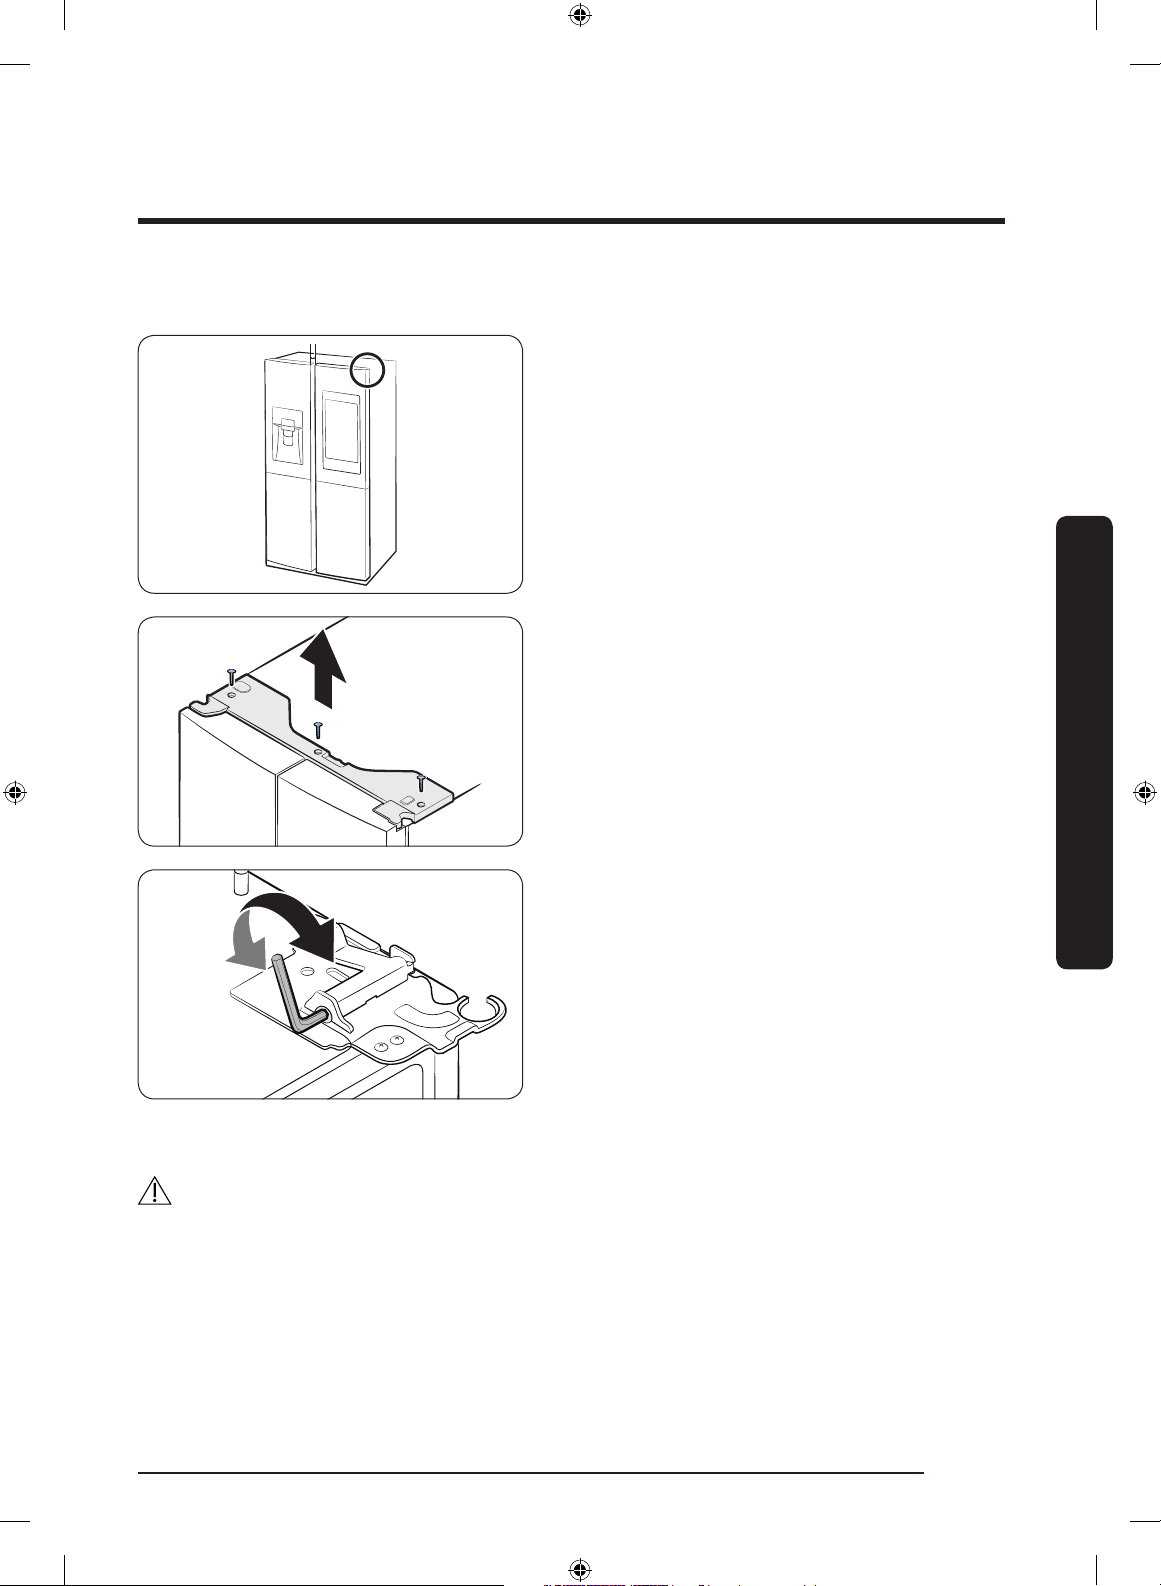
To correct the door gap
Door gaps can be corrected using the
gap bolt on the top right corner of the
refrigerator.
1. With the door closed, use a Phillips
head screwdriver to remove the 6
screws in the top cover. Then, carefully
remove the top cover along with the
wire connectors.
2. Use a 4 mm Allen wrench (not
provided) to correct the door gap
between two doors.
- To widen the gap, turn the gap bolt
clockwise.
- To narrow the gap, turn the gap bolt
counterclockwise.
3. When done, reinsert the top cover, and
then reinsert the screws that hold it in
place. Tighten the screws.
CAUTION
The electrical connectors must be left intact during this process. Use caution so you don't
tangle the connector wires or peel off the coating.
Untitled-4 31 2017-01-19 11:56:50
Installation
English32
Installation
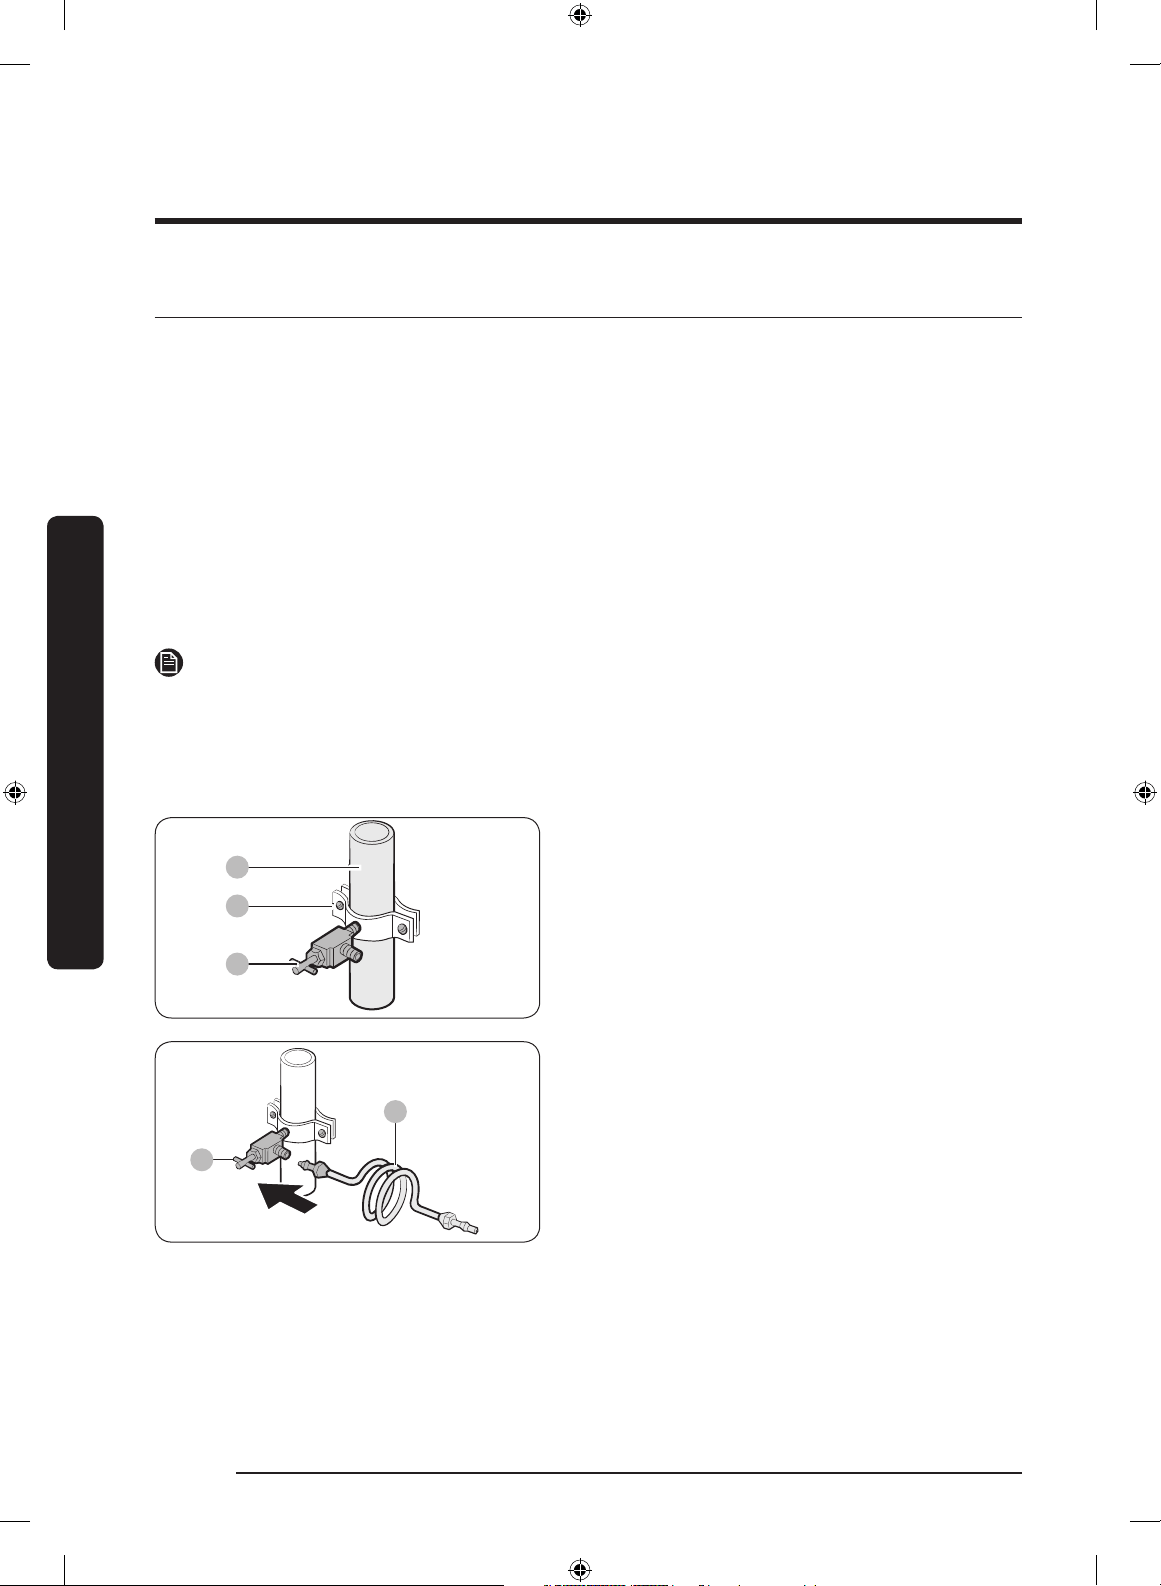
STEP 5 Connect the water dispenser line
A water dispenser with a lter is one of the helpful features on your new refrigerator. To
help promote better health, the water lter removes unwanted particles from your water.
However, it does not sterilize or destroy microorganisms. You may need to purchase a
water purifying system to do that.
The water line also connects to the ice maker. For the ice maker to operate properly, a
water pressure of 20-125 psi is required.
If the refrigerator is installed in an area with low water pressure (below 20 psi), you can
install a booster pump to compensate for the low pressure.
After you have connected the water line, make sure the water storage tank inside the
refrigerator is properly lled. To do this, press the water dispenser lever until the water
runs from the water outlet.
NOTE
• Water line installation kits are available at extra cost from your retailer. We
recommend using a water line installation kit that contains copper tubing and a 6 mm
(
1
/4”) compression nut.
• Use the new hose-sets supplied with the appliance only. Do not re-use an old hose set.
A
B
C
1. Shut off the main water source.
2. Insert the pipe clamp (B) and the shut
off valve (C) into the cold water line (A).
A
B
3. Connect the water line installation kit
(A) to the shut off valve (B).
Untitled-4 32 2017-01-19 11:56:51

English 33
Installation
Connect the water supply line to the refrigerator
There are several items you must purchase to complete this connection. You may nd
these items sold as a kit at your local hardware store.
Copper Tubing
•
1
/4” copper tubing
•
1
/4” compression nut (1 pc)
• Ferrule (2 pc)
Plastic Tubing
•
1
/4” plastic tubing Molded end (Bulb)
•
1
/4” compression nut (1pc)
A
01
02
03 08
04
05
06
07
B
A. Refrigerator
B. Household water supply line
01 Compression Nut (
1
/4”) (Assembled)
02 Ferrule (Not supplied)
03 Copper tubing (Not supplied)
04 Plastic Tubing (Assembled)
05 Compression Fitting (Assembled)
06 Molded end (Bulb)
07 Compression nut (B) (
1
/4”) (Not
supplied)
08 Plastic Tubing (A) (Not supplied)
1. Connect the household water line to the assembled compression tting.
- If you are using copper tubing, slip the compression nut (B) (not supplied) and
ferrule (not supplied) on the copper tubing (not supplied) as shown.
- If you are using plastic tubing (A), insert the molded end (Bulb) of the plastic tubing
(A) into the compression tting.
CAUTION
If you use plastic tubing, (A) do not use it without the molded end (Bulb).
2. Tighten the compression nut (B) onto the compression tting. Do not over-tighten the
compression nut (B).
3. Turn the water on and check for any leakage. If you nd water drops or leakage in
the connection areas, turn off the main water supply. Check the connections and, if
necessary, tighten.
Untitled-4 33 2017-01-19 11:56:51

Installation
English34
Installation
4. Flush 1 gallon of water through the lter before drinking or using the water from
the refrigerator. (Flush approximately 6 minutes.) To ush, press a large glass or cup
against the water dispenser lever. Fill the glass, empty it, and then repeat.
5. After you turn on the refrigerator, let the ice maker make ice for 1 to 2 days. Over that
period of time, throw out the rst 1 or 2 buckets of ice the ice maker makes to ensure
all impurities have been removed from the water line.
NOTE
Only connect the water line to a potable water source.
• If you have to repair or disassemble the water line, cut off
1
/4“ of the plastic tubing to
make sure you get a snug, leak-free connection.
• You can test the water line quickly using a paper cup. Under normal conditions, the
water dispenser can ll a 5 3/4 oz. (170 cc) cup in about 10 seconds.
STEP 6 Initial settings
After you complete the following steps, the refrigerator should be fully functional.
1. Plug the power cord into the wall socket to turn the refrigerator on.
2. Open the door, and check if the interior light lights up.
3. Set the temperature to the coldest setting, and then wait for about an hour. Then, the
freezer will be slightly chilled, and the motor should be running smoothly.
4. Wait until the refrigerator reaches the set temperature. Now the refrigerator is ready
to use.
STEP 7 Final check
When installation is complete, conrm that:
• The refrigerator is plugged into an electrical outlet and grounded properly.
• The refrigerator is installed on a at, level surface with appropriate clearance between
it and any walls or cabinets.
• The refrigerator is level and is sitting rmly on the oor.
• The door opens and closes freely, and the interior light turns on automatically when
you open the door.
Untitled-4 34 2017-01-19 11:56:51
English 35
Operations
User interface
NOTE
• For detailed information about the refrigerator's functions, and apps, see the on-screen
user manual available on the LCD display of your refrigerator.
• The content of apps and widgets and their design is subject to change. Support for apps
and widgets may be discontinued without notice, depending on the content provider’s
policy.
• Children's use of the refrigerator's functions, apps, and services must be supervised by
adults.
• The PANDORA apps are only available in the United States.
01
02
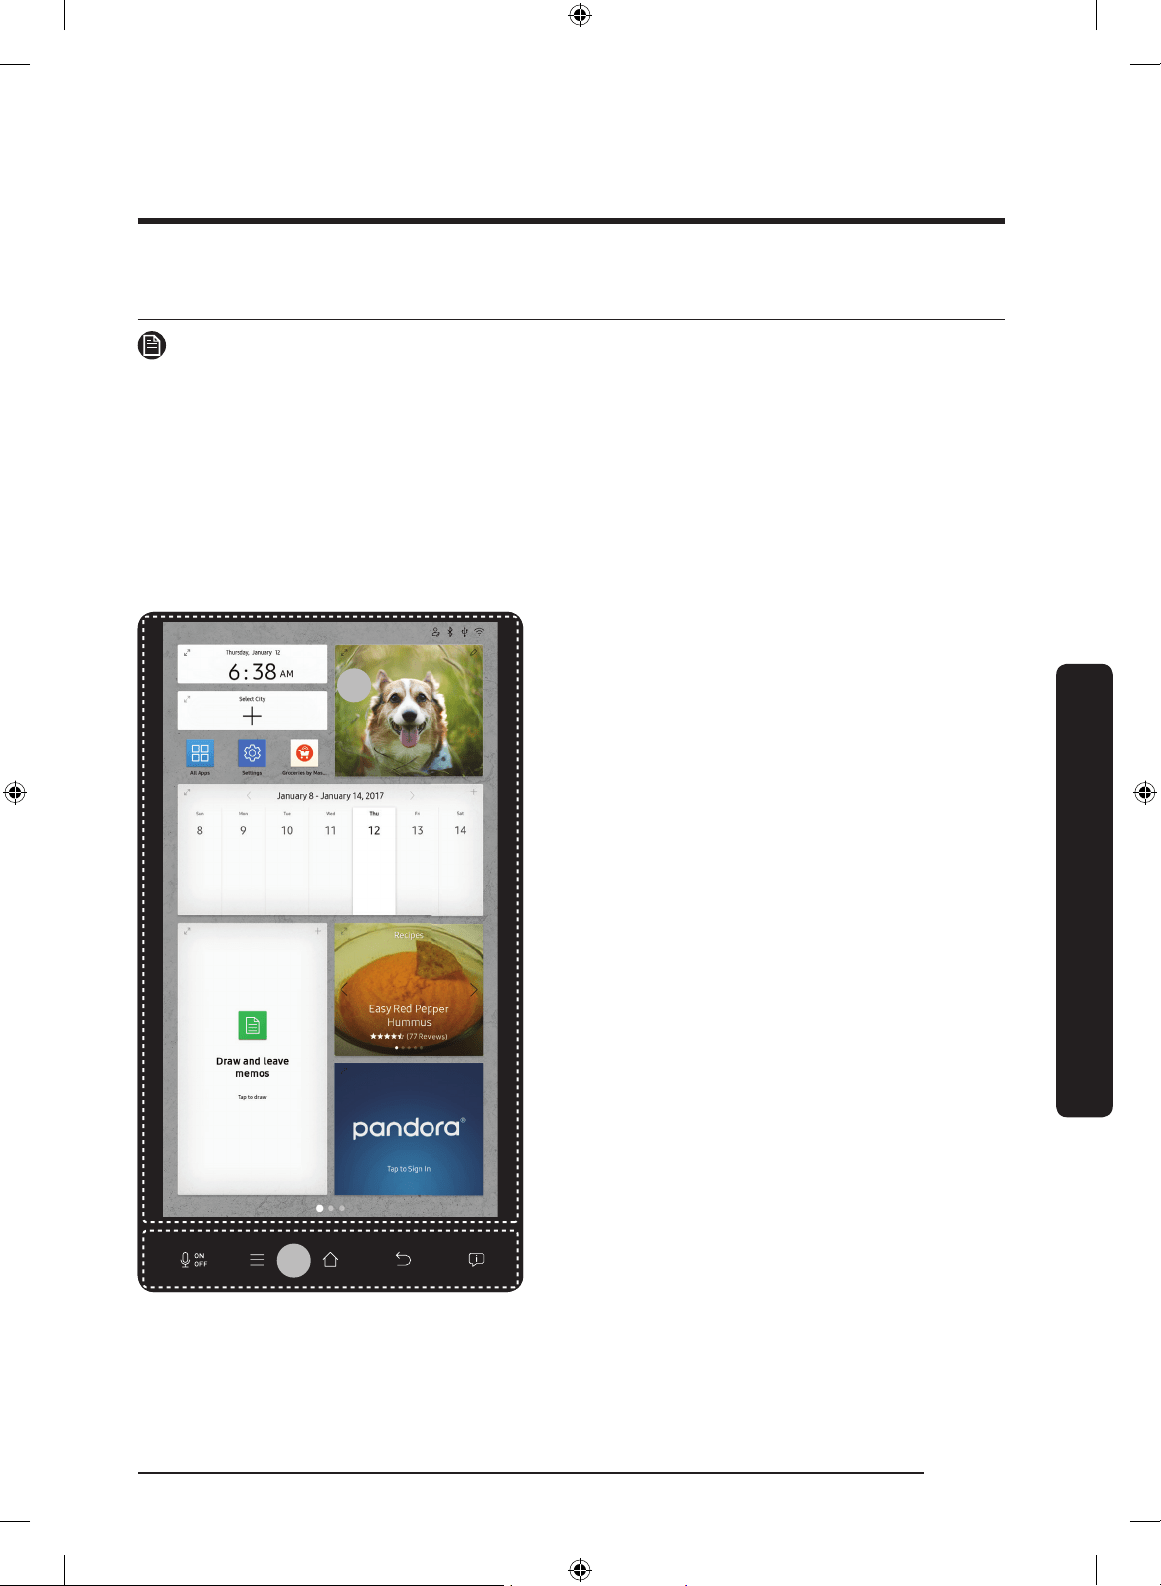
01 Home screen
02 Task bar
Operations
Untitled-4 35 2017-01-19 11:56:51
Operations
English36
Operations
01 Home screen
01
02
01 Apps & Widgets
• Tap a desired app or widget to launch
it.
• Tap and hold an app or widget to enter
Edit mode. A grid appears. In Edit mode,
you can drag and drop an app or widget
to a new position on the grid. When you
move the app or widget to a new grid
location, the location turns blue if it is
available. If it is not available, it turns
red.
• You can add an app or widget that has
been removed from the All Apps list.
02 Status bar
•
Bluetooth (
): Indicates Bluetooth
connection status.
• USB ( ): Indicates USB connection
status.
• Remote Management ( ): Turns on
when Remote Management is enabled
and running.
NOTE
The refrigerator supports USB memory
that is formatted in the FAT32 or exFAT
le systems. NTFS is not supported. Be
sure to convert NTFS to FAT32 or exFAT
before use.
• Network (
): Indicates network
connection status in 5 levels (Off, 1-4).
Untitled-4 36 2017-01-19 11:56:52
English 37
Operations
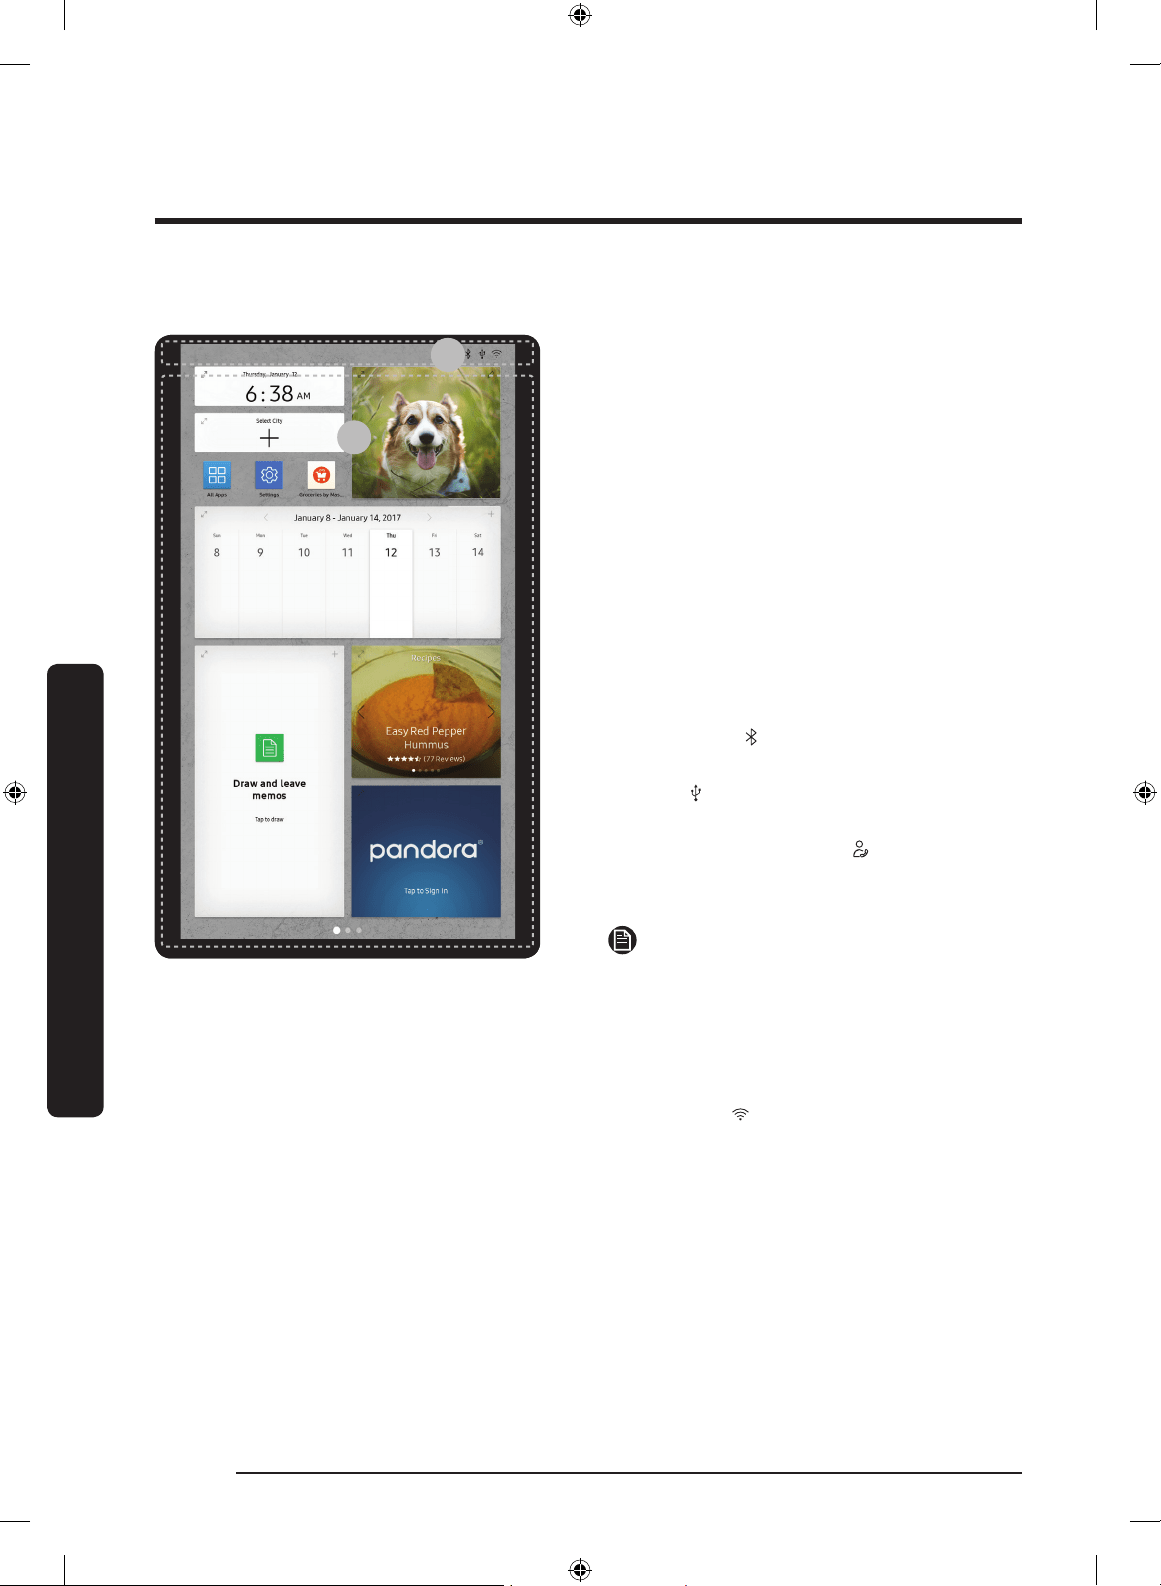
02 Task bar
01 02 03 04 05
01 Microphone
Tap to turn on or
turn off the voice
recognition function.
The microphone icon
turns red when it is
turned off.
02 Menu
Tap to display the
menus available.
03 Home
• Tap to open the
Home screen.
• Tap and hold to
open the Task
Manager. See the
Task Manager
section for details.
04 Return
Tap to return to the
previous screen.
05 Notication
Tap to display the
Quick Panel.
Untitled-4 37 2017-01-19 11:56:53
Operations
English38
Operations
Fridge Manager
To access Fridge Manager, swipe the Home screen to the left, and then tap the
Fridge
Manager widget.
• On the Fridge Manager widget, the
current fridge and freezer temperatures
as well as active special functions are
displayed.
• For detailed settings, tap the widget to
open the Fridge Manager.
Untitled-4 38 2017-01-19 11:56:53
English 39
Operations
01
02
04
03
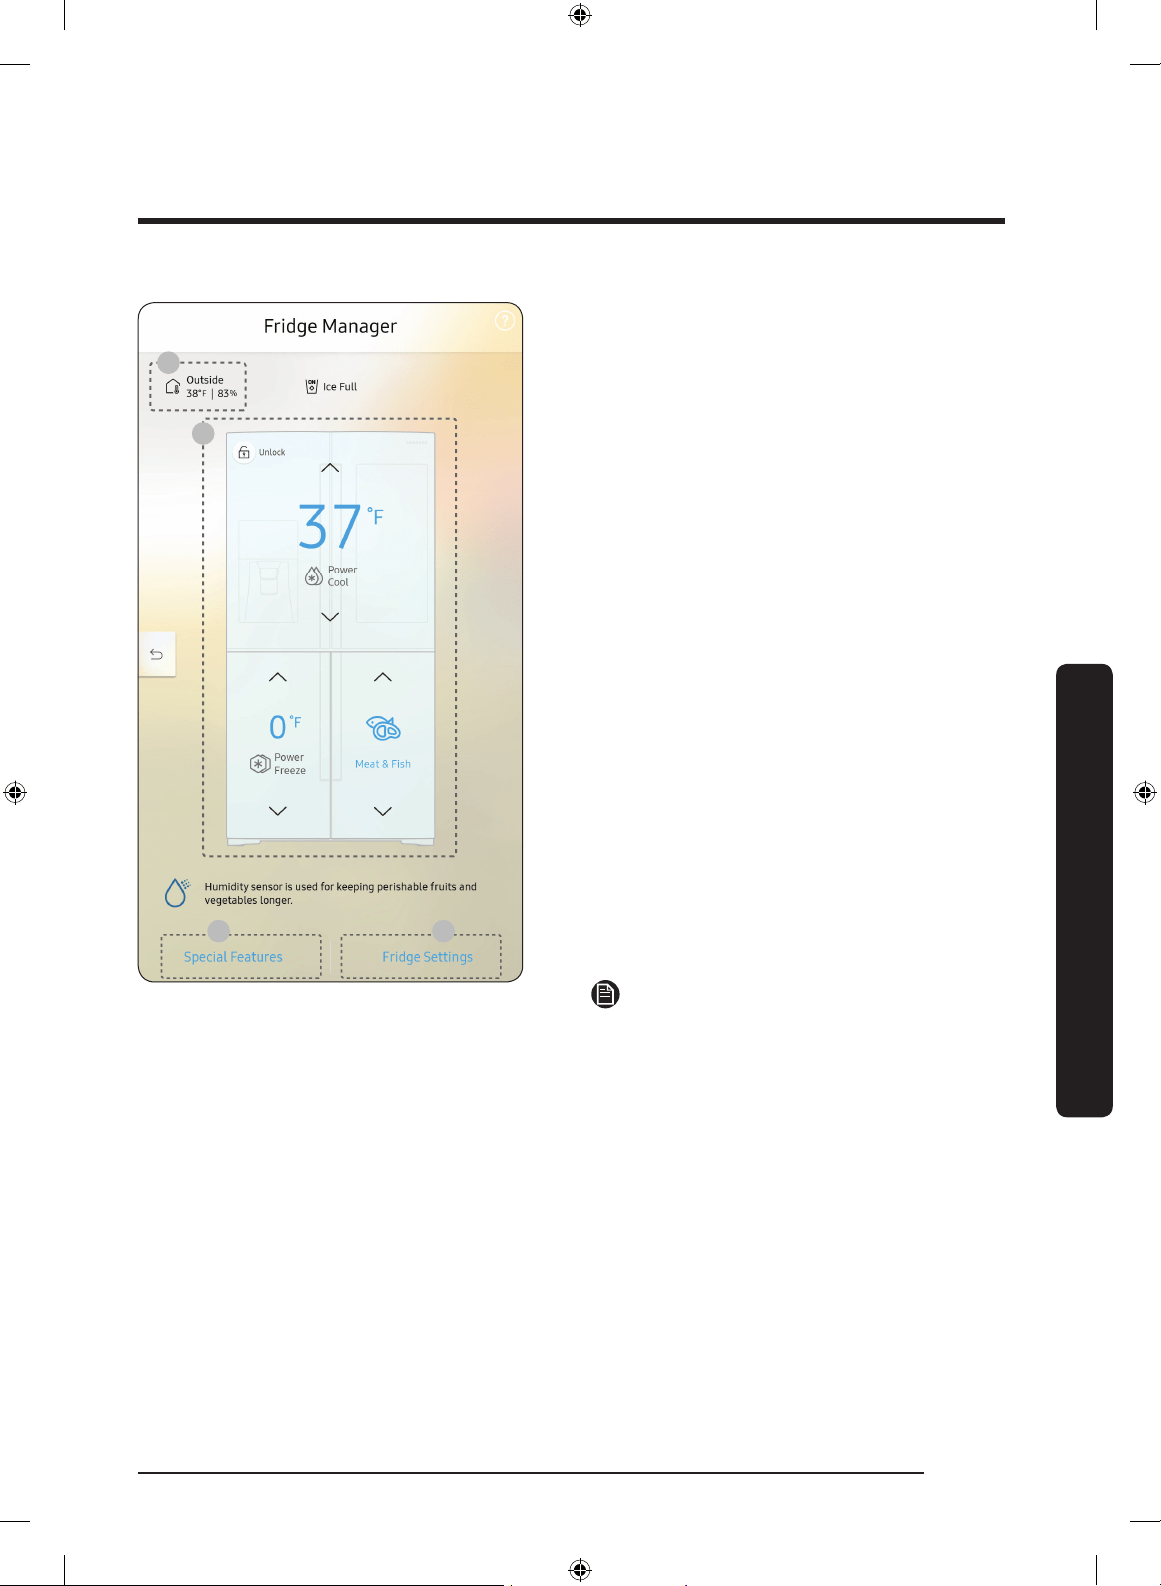
The Fridge Manager is a graphical
representation of your refrigerator.
The top half represents the refrigerator
compartment, the bottom left the freezer
compartment, and the bottom right the
FlexZone. The temperature or mode
settings for each are displayed over each
section.
Fridge Manager At a Glance
01 Temperature
Change the set temperature in the
fridge, freezer, and FlexZone. You
can also turn on and turn off the
refrigerator's Power Cool function and
the freezer's Power Freeze function.
- Power Freeze speeds up the freezing
process at maximum fan speed. The
freezer keeps running at full speed
for several hours and then returns to
the previous temperature.
- To freeze large amounts of food,
activate Power Freeze at least 20
hours before putting food in the
freezer.
NOTE
Using Power Freeze increases power
consumption. Make sure you turn it off
so the freezer returns to its previous
temperature if you do not need it any
longer.
02 Special Features
View a short explanation of some of the refrigerator's special features.
03 Fridge Settings
Change many of the fridge's settings including settings for ice making, the door alarm,
and the temperature units (°F or °C). See the next page for details.
04 External Conditions
Displays the external (ambient) temperature and humidity.
Untitled-4 39 2017-01-19 11:56:53
Operations
English40
Operations
NOTE
The displayed conditions may differ from the actual temperature and humidity.
NOTE
Also displayed is the Ice Off (ice making off) indicator at the top, center. When the
indicator displays Ice Off, the refrigerator's ice maker is turned off.
Ice Maker
Turns the icemaker on and off. Tap and drag the button to turn
on or off. Note that if the ice bucket is full of ice, the refrigerator
will not start making ice when you drag the button to On.
Instead, it displays the Ice Making Off indicator on the main
screen.
Dispenser Lock
Turns the ice and water dispensers on and off. Tap and drag the
button to turn on or off.
Door Alarm
The door alarm sounds if you leave the door open. Tap and drag
the button to turn on or off.
Temp. Unit
Switch the temperature scale between Celsius and Fahrenheit.
Touch °F or °C to change the scale.
Water Filter
Provides a water lter replacement tutorial and lets you reset
the water lter replacement indicator. Tap to open.
NOTE
After installing the water lter, tap Water Filter, and then tap
RESET. Tapping RESET re-initializes the function that measures
the time remaining until the water lter needs to be replaced
again.
Self Check
Self Check is a self diagnoses function. Tap to open. Tap START to
run.
Demand Response
Works with the Smart Grid energy saving manager. Tap to open.
Tap and drag the button to turn on or off. See the Smart Grid
section in this manual for more information.
Cooling Off
Cooling Off mode (also called Shop mode), is designed for use
by retailers when they are displaying refrigerators on the shop
oor.
In Cooling Off mode, the refrigerator’s fan motor and lights work
normally, but the compressors do not run, and the refrigerator
and freezer do not get cold. If Cooling Off is turned on, all
cooling controls will turn to OFF on the Fridge Manager.
Tap and drag the button to turn on or off.
Untitled-4 40 2017-01-19 11:56:53
English 41
Operations
Settings
Display
• You can set the screen brightness, wallpapers, auto wake-up,
motion detector, and theme, duration and start time of the screen
saver.
Sound
• Set the volume and equalizer and turn on or turn off the touch
sound.
Wi-Fi
• Turn on or turn off a Wi-Fi connection. The current Wi-Fi network is
listed rst in the access point (AP) list.
Bluetooth
• Up to 4 recently paired Bluetooth devices are listed.
• To add a new device when 4 paired devices are listed, rst unpair a
paired device from the device list.
• Available devices are Bluetooth-enabled headsets, headphones, and
speakers.
Voice
• Set the language of the Voice function and turn on or turn off voice
feedback and voice wakeup.
Proles • You can add, edit, or delete a prole.
Parental
Controls
• Enable or disable restrictions on Family Hub features and apps.
Language
• Select a preferred language. Available languages depend on the
sales region.
Date and Time
• Make sure the Auto update function is on with a proper Wi-Fi
network connection. Open the fridge door and locate the display
reset button on the inner side of the door. Press the button and
press again to reset the display. Then, the date and time will be
synced by the time server.
• You can change the time zone through the Time zone menu.
About Device
• Make sure the Software Update function is on with a proper Wi-Fi
network connection.
• When updates are available, the Update button becomes active.
When updates are complete, the refrigerator restarts automatically.
• Legal information displays the Open Source License Agreement. Tap
the list item to open the Open Source Announcement.
Easy
Connection
• Easy Connection can be used with Samsung Smartphone apps, and
allows you to connect your device to the same home Wi-Fi network
that your smartphone is connected to.
Untitled-4 41 2017-01-19 11:56:53

Operations
English42
Operations
Device
Authentication
• Device Authentication can be used with Samsung Smart TV apps
where the privacy information on the refrigerator can be shared to
the TV.
• Availability of this function depends on the device model.
Clean screen
mode
• Turn on so you can clean the screen without activating any apps.
Accessibility
• Set to turn on or off the screen reader function for blind and low-
vision users.
Online Manual
• The online manual will walk you through various menus and apps
that the refrigerator provides directly on the display.
Factory Reset
• Tap Reset to restart the refrigerator in Factory Data Reset mode. All
user data will be removed permanently. Data that will be removed
includes account information, memos, photos, and user settings.
CAUTION
Once factory reset is complete, no user data can be recovered.
Remote
Management
• Use Remote Management to allow a service representative to
remotely diagnose problems and provide solutions.
• Remote Management requires a Wi-Fi connection.
• The Remote Management menu does not appear on models that do
not support Remote Management.
Untitled-4 42 2017-01-19 11:56:53
English 43
Operations
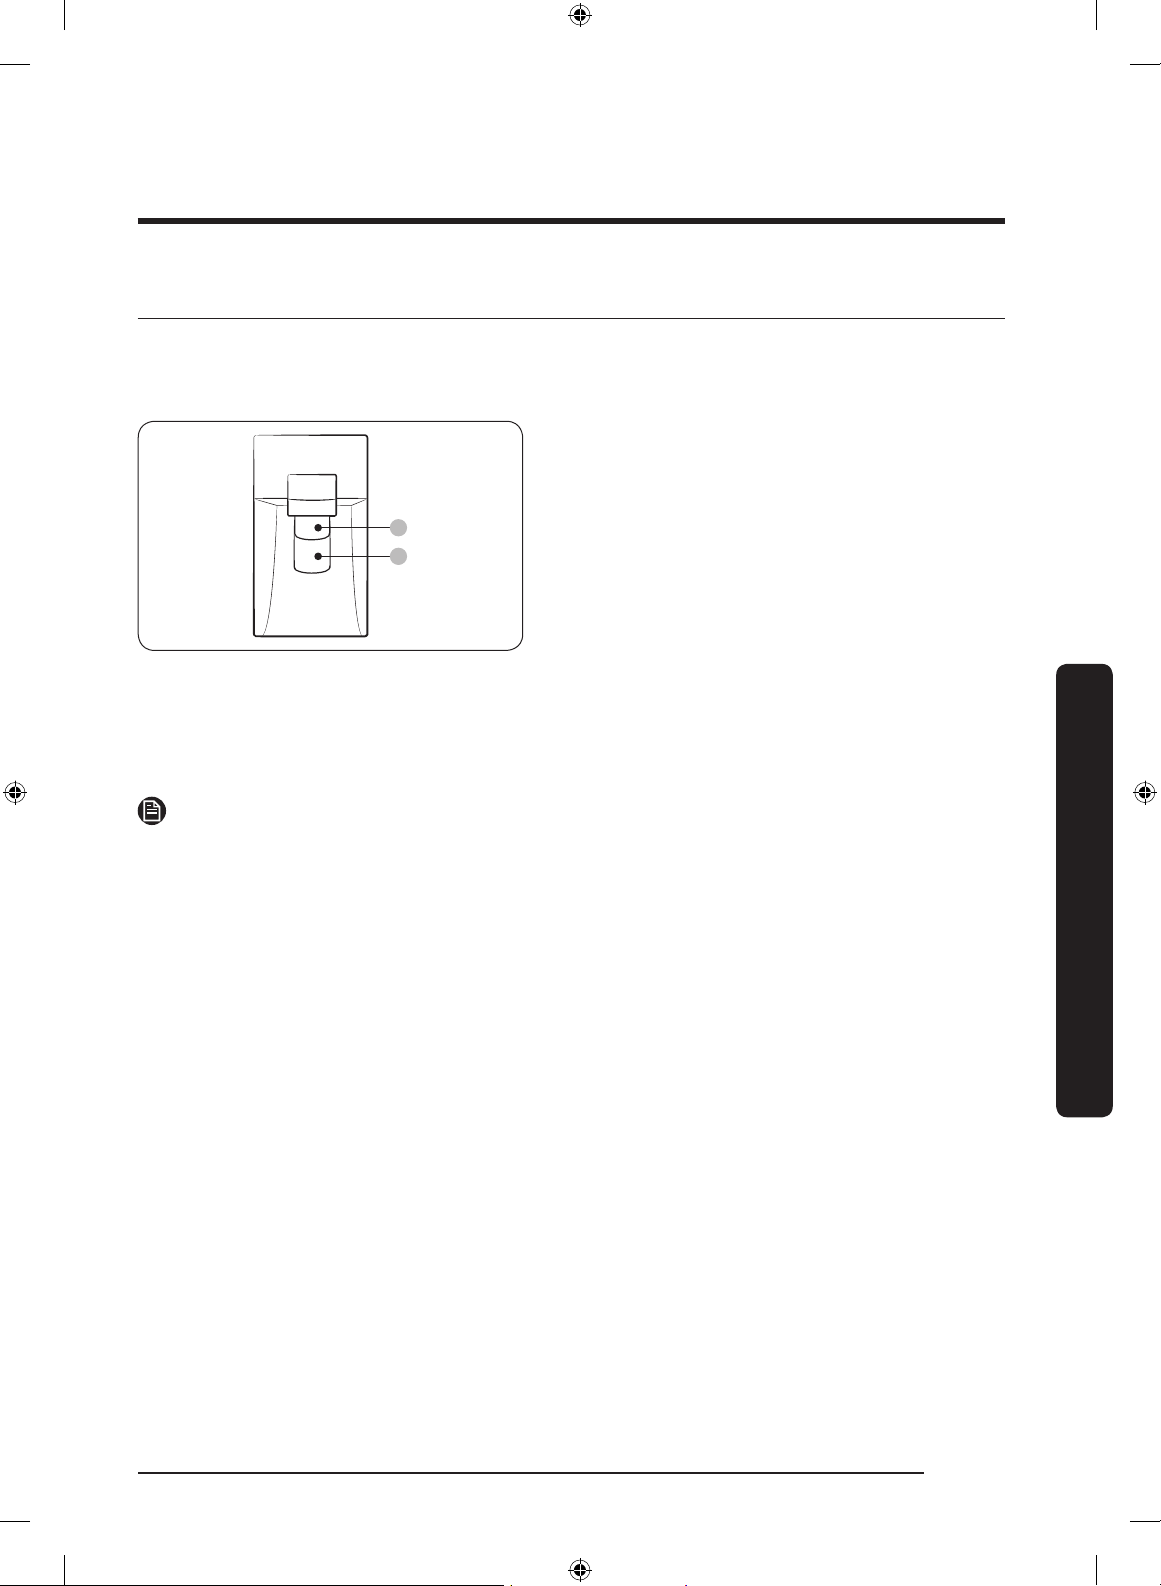
Display reset (applicable models only)
If the display is not working correctly, try resetting the display. This may resolve the
problem.
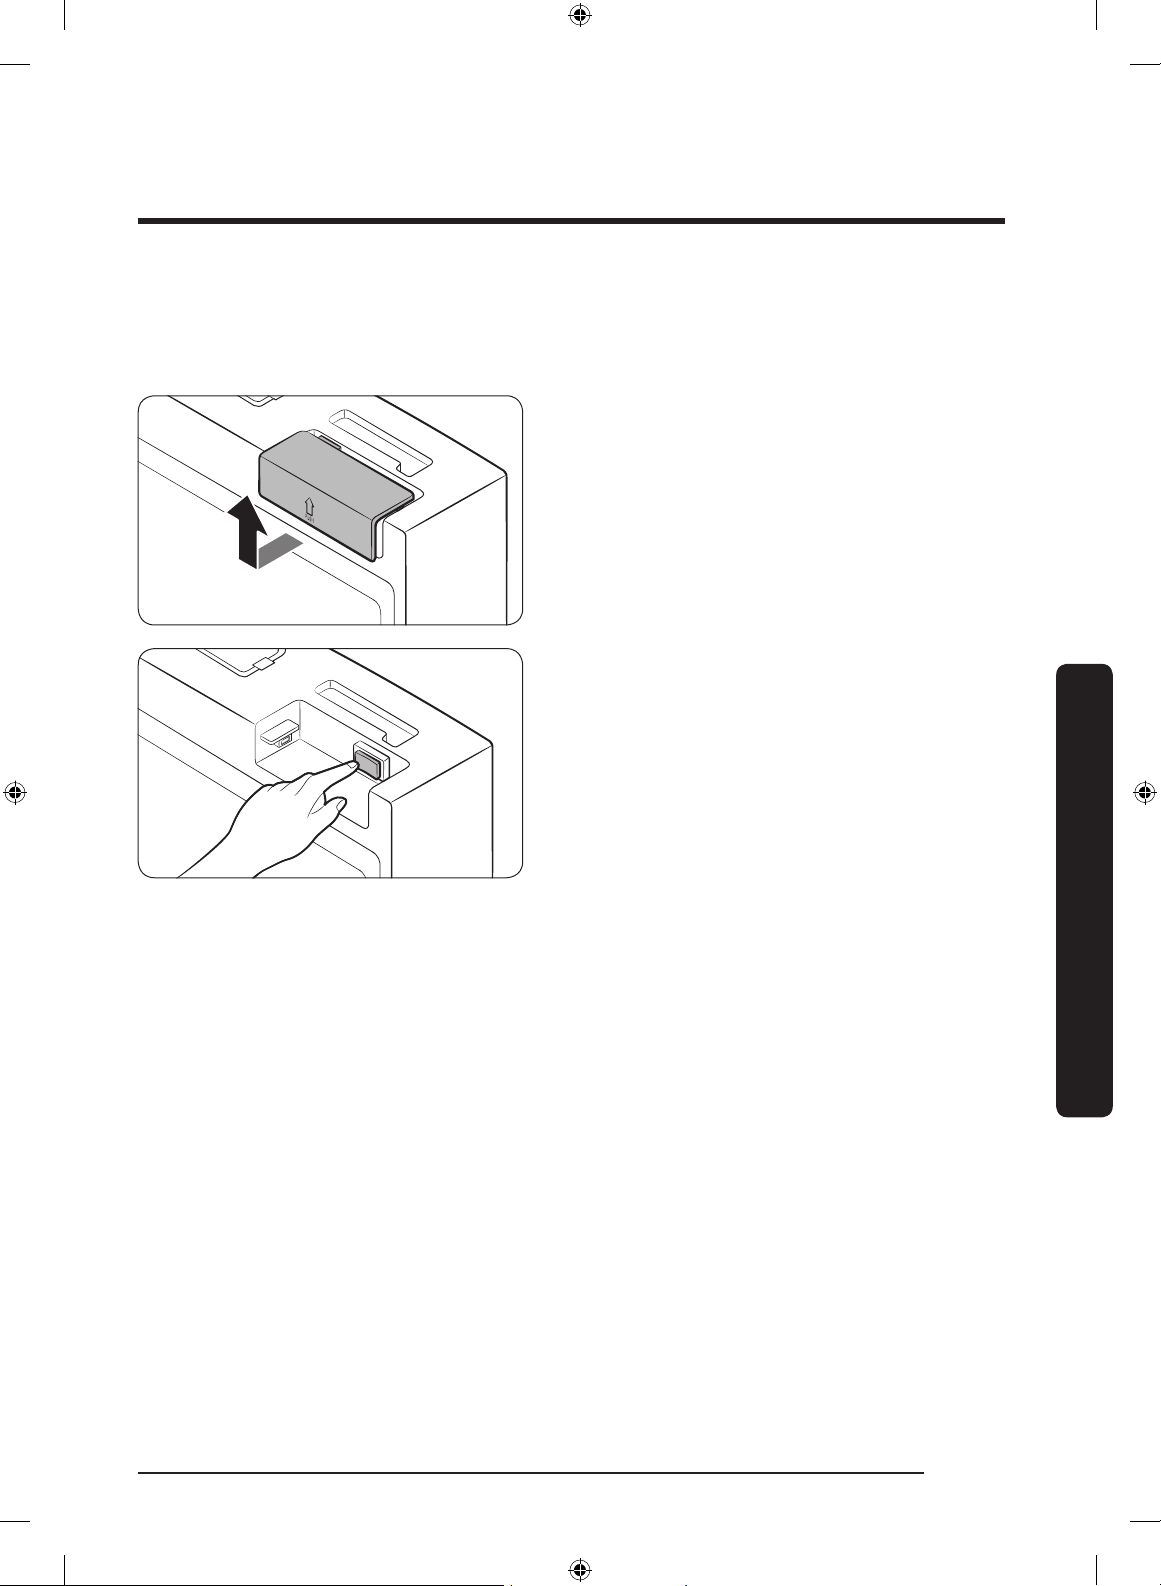
1. Open the right-side fridge door and
locate the switch cover on the top right
corner of the door.
2. Push up the cover to reveal the power
switch.
3. Turn the switch off, and then turn it on
again.
4. Reinsert the switch cover. You will hear
a click when the cover is in place.
Untitled-4 43 2017-01-19 11:56:53

Operations
English44
Operations
Samsung Smart Home
Installation
Visit the Google Play Store, Galaxy Apps, or Apple App Store and search for “Samsung
Smart Home”. Download and install the Samsung Smart Home app provided by Samsung
Electronics to your smart device.
NOTE
• The Samsung Smart Home app is designed for Android 4.0 (ICS) or higher, or iOS 8.0 or
higher, and is optimized for Samsung smartphones (Galaxy S and Galaxy Note series).
• For improved performance, the Samsung Smart Home app is subject to change without
notice or discontinued support according to the manufacturer’s policy.
• Recommended encryption systems include WPA/TKIP and WPA2/AES. Any newer or
non-standard Wi-Fi authentication protocols are not supported.
• Wireless networks may be affected by the surrounding wireless communication
environment.
• If your Internet service provider has registered the MAC address of your PC or modem
for identication, your Samsung Smart Refrigerator may fail to connect to the Internet.
If this happens, contact your Internet service provider for technical assistance.
• The rewall settings of your network system may prevent your Samsung Smart
Refrigerator from accessing the Internet. Contact your Internet service provider for
technical assistance. If this symptom continues, contact a local Samsung service center
or retailer.
• To congure the wireless access point (AP) settings, see the user manual of the AP
(router).
• Samsung Smart Refrigerators support both Wi-Fi 2.4 GHz with IEEE 802.11 b/g/n and
Soft-AP protocols. (IEEE 802.11 n is recommended.)
• Unauthorized Wi-Fi wireless routers may fail to connect to applicable Samsung Smart
Refrigerators.
Untitled-4 44 2017-01-19 11:56:53

English 45
Operations
Samsung account
You are required to register your Samsung account to use the app. If you don’t have a
Samsung account, follow the app’s onscreen instructions to create a free Samsung account.
Getting started
1. Run the Samsung Smart Home app and log in with your Samsung account. iPhone users
are required to provide the login information each time they access the app.
2. Select Add Device and then tap Refrigerator.
3. Follow the onscreen instructions to provide the necessary information about the
router, and then tap Next.
4. On the display of the refrigerator, access Settings, and then select Easy Connection.
5. When device registration is complete, the refrigerator icon will appear on the Samsung
Smart Home app.
6. Tap the refrigerator icon to open the refrigerator page.
Refrigerator app
Integrated control
You can monitor and control your refrigerator at home and on the go.
• Tap the
refrigerator icon in Samsung Smart Home to open the Refrigerator page.
• Check the operation status or notications related to your refrigerator, and then
change options or settings if necessary.
NOTE
Some options or settings of the refrigerator may not be available for remote control.
Untitled-4 45 2017-01-19 11:56:53
Operations
English46
Operations
Category Item Description
Monitoring
Fridge temperature
Displays the current temperature setting of the
fridge.
Freezer temperature
Displays the current temperature setting of the
freezer.
FlexZone™ settings Displays the settings of the FlexZone™.
Diagnosis
Detects abnormal operations of the
refrigerator.
Energy monitoring
Checks the accumulated power consumption of
the refrigerator for the last 180 days.
Functions
Ice making
You can turn the ice making function on or off,
and check the current settings of the function.
You can also check the status and progress of
ice making.
Power Cool
You can turn Power Cool on or off, and check
the current settings.
Power Freeze
You can turn Power Freeze on or off, and
check the current settings.
Alarms
Abnormally high
temperature
This alarm is triggered when the fridge, the
freezer, or the FlexZone™ has abnormally high
temperatures.
Door opening
This alarm is triggered if the fridge or freezer
door or the FlexZone™ door is left open for a
specic time.
Water lter
replacement
This alarm reminds you that the water lter
must be replaced.
View Inside
You can view the inside of the refrigerator
and, by creating visible labels assigned to
specic items with item-specic storage
periods, keep track of item expiration dates so
that you can use up and replace food items in
a timely manner.
Shopping List You can create and edit a shopping list.
Untitled-4 46 2017-01-19 11:56:54

English 47
Operations
SMART GRID Function (Demand Response)
When the refrigerator operates in SMART GRID (Demand Response) mode, the Energy
Management Refrigerator function can control energy usage or delay the operation of
some functions to save money when energy prices or demand are the highest.
NOTE
• You can deactivate the SMART GRID (Demand Response) function at any time using the
Override On/Off function.
• To use the SMART GRID (Demand Response) function, you need a separate contract with
your electric utility company.
In addition, to use the Smart Grid (Demand Response) function, you must register for the
service with your electric company. The company must have an EMS (Energy Management
System) that supports SEP (Smart Energy prole).
Using the SMART GRID (Demand Response) Function
This feature monitors energy prices and demand information from your utility company
and sends notications to the refrigerator to run high energy consuming tasks during off-
peak times when electricity costs and demand are lower.
If the refrigerator receives a control signal from the utility company, the refrigerator will
display the DAL (L3) ~ TALR (L4) levels on the refrigerator display and control the power
consumption according to the level.
Exception condition: The DAL and TALR control signals from a utility company work as
long as product performance is maintained.
If the refrigerator receives the SMART GRID (Demand Response) signal (DAL or TALR), the
refrigerator will operate in Delay Appliance Load or Temporary Appliance Load Reduction
mode.
• Delay Appliance Load (L3): The refrigerator responds to a DAL signal by providing a
moderate load reduction for the duration of the delay period. This function controls
functions that consume a lot of energy such as adjusting the Cooling system, running
the defrost cycle, and making ice.
- DAL mode is automatically deactivated after it lasts for the amount of time
stipulated by the DAL signal (max. 4.5 hours) or when the Override function is
turned on.
Untitled-4 47 2017-01-19 11:56:54

Operations
English48
Operations
• Temporary Appliance Load Reduction (L4): The refrigerator responds to a TALR signal
by aggressively reducing the load for a short time period. This function reduces energy
consumption by stopping the compressor and controlling the functions that consume a
lot of energy such as the defrost cycle and making ice.
- TALR (L4) mode is automatically deactivated after it lasts for the received duration
(max. 15 minutes), or when the Override function is turned on. The mode is
immediately deactivated and the refrigerator returns to the normal state when the
door is opened or closed, or the dispenser is used.
To check the MAC address
1. Tap the Settings icon on the Home screen.
2. Scroll down to and open About Device.
3. The screen displays (among others) the Wi-Fi MAC address.
Override Mode
When you want the refrigerator to ignore the SMART GRID (Demand Response) signal
from the utility company, you can activate OVERRIDE mode.
When you activate OVERRIDE mode, the refrigerator ignores the SMART GRID (Demand
Response) signal and is not controlled by the utility company.
Activating and deactivating Override mode
1. Tap the Fridge Manager icon.
2. On the bottom of the Fridge Manager screen, tap the Fridge Settings icon.
3. Tap Demand Response.
4. Slide the DAL/TALR override button to the ON or OFF position.
NOTE
• Alternatively, you can activate or deactivate OVERRIDE mode using the Samsung Smart
Home app and the Energy Management function. See the next page.
Untitled-4 48 2017-01-19 11:56:54

English 49
Operations
Using the Energy Management Function
The Energy Management function enables you to control and monitor your Energy
Management refrigerator using the Smart Home app for your convenience.
NOTE
• To use the Energy Management refrigerator functions, you have to install the
corresponding app rst.
1. Operational Status
- You can check the DR and Override status.
2. Energy Consumption Reporting
- Shows the accumulated power consumption. Power consumption data is updated
every 5 minutes.
NOTE
The energy consumption report may differ from the power consumption specications of
the product depending on the operating environment and the quantity and type of stored
food.
3. Delay Defrost Capability
- The Delay Defrost Capability function saves energy by delaying the defrost
operation to a time specied by the user. You can congure the time. and this
function will save energy during the specied period in a 24 hour cycle. If the
time is not set, the function works with the default time settings. The default time
settings are below:
- 6 am to 10 am: November 1st to April 30th.
- 3 pm to 7 pm: May 1st to October 31st.
To change the time setting for the Delay Defrost Capability
You can change the time setting for the Delay Defrost Capability on the app.
Untitled-4 49 2017-01-19 11:56:54

Operations
English50
Operations
Provision for Open Access to the Connected Product Requirements
1. SGIP Open Standards (Smart Energy Prole 2.0 - http://www.csep.org/)
- Energy Consumption Reporting
- Demand Response
2. Samsung OPEN API
- Operational Status, User Settings & Messages
- ICE Maker Status: GET /devices/0/fridge/iceMaker
- Door Open Alarm: GET /devices/0/Door/openState
- DR Status: GET /devices/0/drlc
- Delay Defrost Capability
- Set Schedule of the Defrost Delay: POST /devices/0/fridge/defrostreservations
- Get Schedule of the Defrost Delay : GET /devices/0/fridge/defrostreservations
- Delete Schedule of the Defrost Delay: DELETE /devices/0/fridge/
defrostreservations/<<id>>
- Defrost Delay On/OFF: PUT /devices/0/fridge
Untitled-4 50 2017-01-19 11:56:54

English 51
Operations
Recommendations for voice recognition
Around the 'MIC' marked area of the refrigerator's display is a built-in microphone.
• Speak loud and clear towards the built-in microphone within 1 m from the
refrigerator's display.
• Voice recognition may not be triggered or enabled at distances over 1 m or with low
voices.
• Speak clearly at a regular pace. Reduce ambient noises, such as from the living-room
TV.
Samsung Family Hub
Installation
Visit the Google Play Store, Galaxy Apps, or Apple App Store and search for “Samsung
Family Hub”. Download and install the Samsung Family Hub app provided by Samsung
Electronics to your smart device.
NOTE
• The Samsung Family Hub app is designed for Android 4.4 (KitKat) or higher, or iOS
8.0 or higher, and is optimized for Samsung smartphones (Galaxy S and Galaxy Note
series).
• For improved performance, the Samsung Family Hub app is subject to change without
notice or support may be discontinued according to the manufacturer’s policy.
• Wireless networks may be affected by the surrounding wireless communication
environment.
• If your Internet service provider has registered the MAC address of your PC or modem
for identication, your Samsung Smart Refrigerator may fail to connect to the Internet.
If this happens, contact your Internet service provider for technical assistance.
• The rewall settings of your network system may prevent your Samsung Smart
Refrigerator from accessing the Internet. Contact your Internet service provider for
technical assistance. If this symptom continues, contact a local Samsung service center
or retailer.
Untitled-4 51 2017-01-19 11:56:54
Operations
English52
Operations
Samsung account
You are required to register your Samsung account to use the app. If you don’t have a
Samsung account, follow the app’s onscreen instructions to create a free Samsung account.
NOTE
To connect your smartphone and the refrigerator, register your Samsung account in
Settings Proles.
Item Description
Calendar You can share your schedule with your family.
To Do You can create and edit a to-do list to your needs.
Memo You can create and edit a memo to specic users.
Whiteboard You can send White Board contents created from the refrigerator
to your smartphone or vice versa.
Photo You can send photos from your smartphone to the refrigerator.
View Inside You can check the inner view of the refrigerator, and use
different labels to register item-specic storage periods and
keep track of them for managerial purposes.
Shopping List You can create and edit a shopping list to your needs.
Untitled-4 52 2017-01-19 11:56:54
English 53
Operations
Special features
Water dispenser
With the water dispenser, you can dispense water without opening the fridge door.
A
B
The water dispenser offers 3 options:
chilled water, cubed ice, and crushed ice.
If you do not want to dispense ice, simply
press the water lever (B).
With the Ice Maker enabled,
1. Press to select an ice type.
2. Put a water glass on the ice lever (A)
and push it. Ice is dispensed from the
dispenser.
3. If you want water, put the glass on the
water lever (B) and push it. Water is
dispensed from the dispenser.
NOTE
• To get ice and water, push the ice lever (A) rst for ice, then move your glass down and
press the water lever (B) for water.
• If you push both levers at once, only the rst pushed lever operates.
• To prevent spills, wait 1 second before removing the glass after dispensing.
• Make sure the glass is in line with the dispenser to prevent the dispensed water from
spilling out.
• If you do not use the water dispenser for 2-3 days, the dispensed water may have an
abnormal smell or taste. This is not a system failure. Discard the rst 1-2 glasses of
water.
Untitled-4 53 2017-01-19 11:56:54
Operations
English54
Operations
Ice maker
The refrigerator has a built-in ice maker that automatically dispenses ice so that you can
enjoy ltered water with cubed or crushed ice.
Ice making
After you have installed your refrigerator and plugged it in, follow these instructions to
ensure proper ice making and to keep the ice bucket full of ice:
1. Let the refrigerator run at least 24 hours without dispensing ice for optimal
performance.
2. Dispense the rst 4 to 6 ice cubes into a glass.
3. Wait another 8 hours and dispense another 4 to 6 ice cubes.
4. Then, wait another 16 hours and dispense the rst glass-full of ice.
NOTE
• If you consume all the ice at once, you must wait 8 hours before dispensing the rst 4
to 6 cubes. This ensures that the ice bucket is lled with ice properly.
• Ice cubes generated rapidly may look white, which is normal.
Diagnosis
If ice does not dispense, rst check the ice
maker.
To check the ice maker
1. Press Test on the side of the ice maker.
You will hear a chime (ding-dong) when
you press the button.
2. You will hear another chime if the ice
maker is operating properly.
CAUTION
• If the ice making chime rings repeatedly, contact the waterline installer or a local
Samsung service center.
• Do not press Test repeatedly after the ice tray is lled with ice or water. Water may
overow or ice may jam.
• Do not put food in the ice bucket. The frozen food may damage the ice maker,
especially when you open or close the door.
• When the refrigerator recovers power after a power failure, the ice bucket may contain
a mix of melted and jammed ice cubes, which can prevent the ice maker from working
properly. To prevent this, make sure to empty the ice bucket before using the ice
maker again.
Untitled-4 54 2017-01-19 11:56:54
English 55
Operations
• Do not put ngers or any objects into the dispenser outlet or the ice maker. This can
cause physical injury or property damage.
• When reinserting the ice maker tray, make sure that the tray is properly centered at
the entrance. Otherwise, the tray can get stuck.
Ice Maker Off
To disable the icemaker, tap
Fridge Manager > Fridge Settings > Ice Making on the Home
screen, and then select Off. Make sure to empty the ice bucket.
Remaining ice cubes may clump together, making it difcult to remove them.
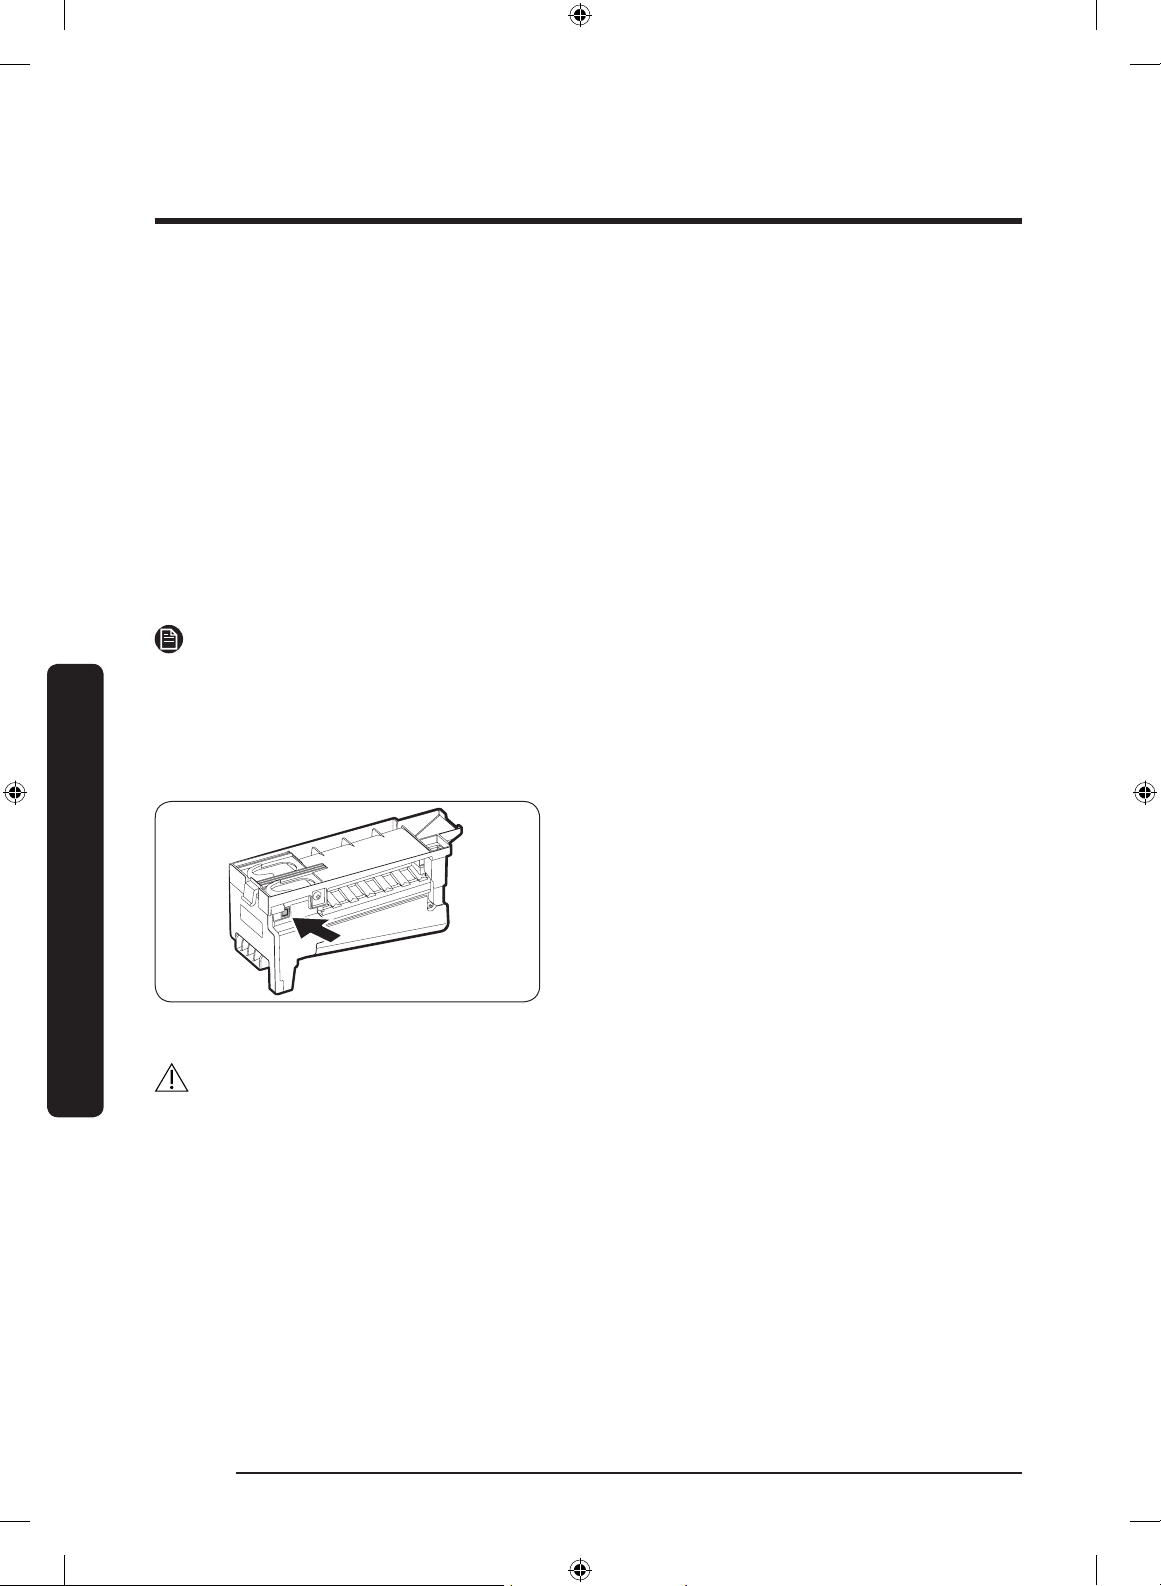
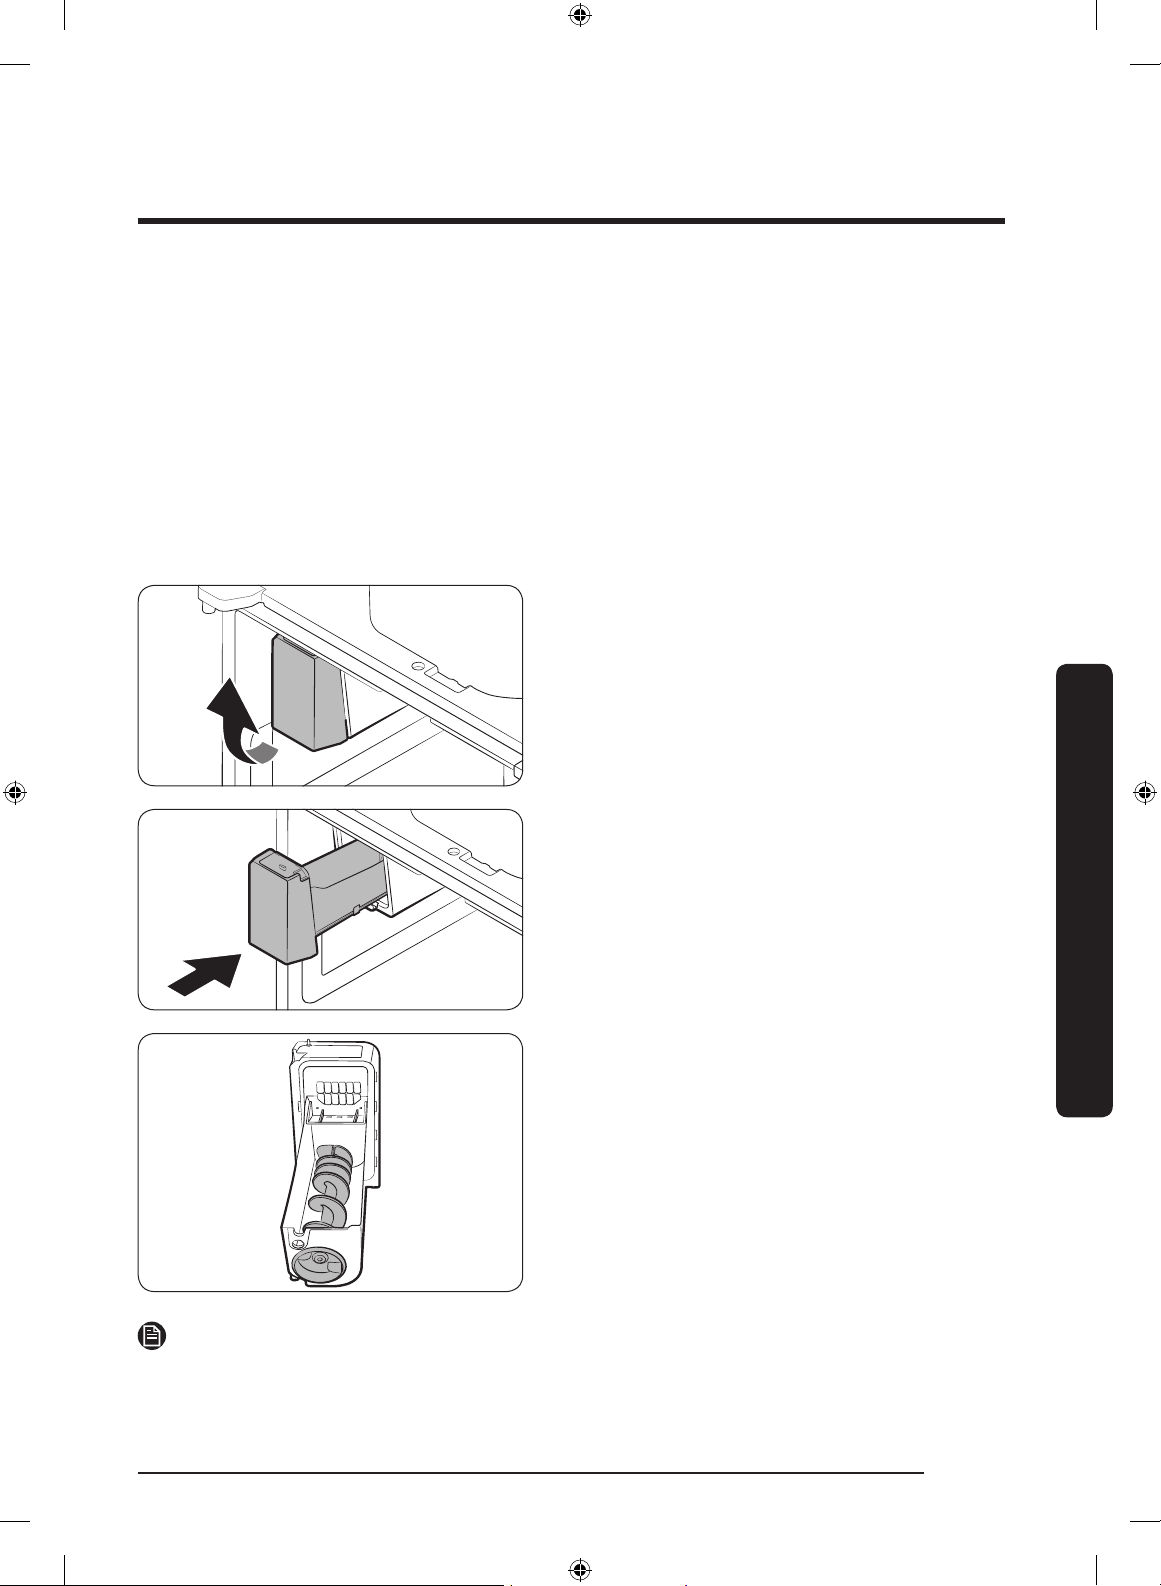
To remove the ice bucket
1. Hold the bottom of the ice bucket with
one hand and hold the side with the
other hand.
2. Gently lift it up and pull out.
3. Remove the remaining ice cubes, and
then put the ice bucket back into place.
If the bucket does not t in, turn the helix
screw 90 degrees, and then try again.
NOTE
• Removal of the ice bucket does not affect the thermal and mechanical performance of
the refrigerator.
Untitled-4 55 2017-01-19 11:56:54

Operations
English56
Operations
Water clouding
Water supplied to the refrigerator ows through a core alkaline lter. During this ltering
process, the water pressure of the water increases and the water becomes saturated with
oxygen and nitrogen. This causes the water to look misty or cloudy temporarily when
dispensed. This is normal and the water will look clear after a few seconds.
Wine Rack
The refrigerator ships with a wine rack, which can be positioned in one of 3 positions:
under the shelf, in the partition guide, or on top of the sliding shelf of the FlexZone. The
position or positions available to you depends on your model.
CAUTION
When you remove or insert the wine rack, make sure that the wine rack is empty.
Under the shelf
Insert the wine rack under the shelf of the
fridge. Make sure to insert it all the way to
the end as shown in the gure.
In the partition guide
Insert the wine rack in the partition guide
of the FlexZone.
• Make sure the front of the wine rack
ts in the partition guide on the inner
left-hand side of the FlexZone.
• Set the temperature of the FlexZone to
White Wine.
Untitled-4 56 2017-01-19 11:56:55
English 57
Operations
On the sliding shelf
Insert the wine rack on top of the sliding
shelf of the FlexZone, which is normally
below the partition guide.
• Set the temperature of the FlexZone to
White Wine.
CAUTION
• Do not store wine bottles in the freezer. The bottles can freeze and break, causing
physical injury.
• Do not store wine bottles in two rows. The bottles may fall, causing physical injury.
• Do not store wine bottles taller than 13 in (330 mm) in height. The bottles may break
when you close the door, causing physical injury.
Untitled-4 57 2017-01-19 11:56:55

English58
Maintenance
Handling and care
Ice bucket
If you do not dispense ice for an extended period, ice may form clumps inside the bucket.
If this happens, remove and empty the ice bucket.
1. To remove the ice bucket, gently lift
it up, and then pull it out slowly while
holding the bottom of the bucket with
one hand and the side with the other
hand.
2. Empty the bucket.
3. When done, put the bucket back into
position. If the bucket does not t in,
turn the helix screw 90 degrees, and
then try again.
CAUTION
• Do not apply excessive force to the bucket cover. The cover may break.
• Do not forcefully close the door. Water may spill over the ice maker.
• To prevent injury, make sure to clean up any ice or water that has fallen on the oor.
• To prevent accidents or injury, do not let children play with the water dispenser or the
ice maker.
• Do not put your hand or an object into the ice chute. This may cause physical injury or
product damage.
• Use only the provided ice bucket. Third-party ice buckets may cause a system failure.
• Use only potable water that is connected to the water supply line.
NOTE
• The water pressure required for ice making is between 20 psi and 125 psi.
• Noise coming from the ice maker as it produces ice during the ice making process is
normal.
• While the door is open, neither the ice maker nor the water dispenser operates.
Maintenance
Untitled-4 58 2017-01-19 11:56:55
English 59
Maintenance
Tempered glass shelves (fridge)
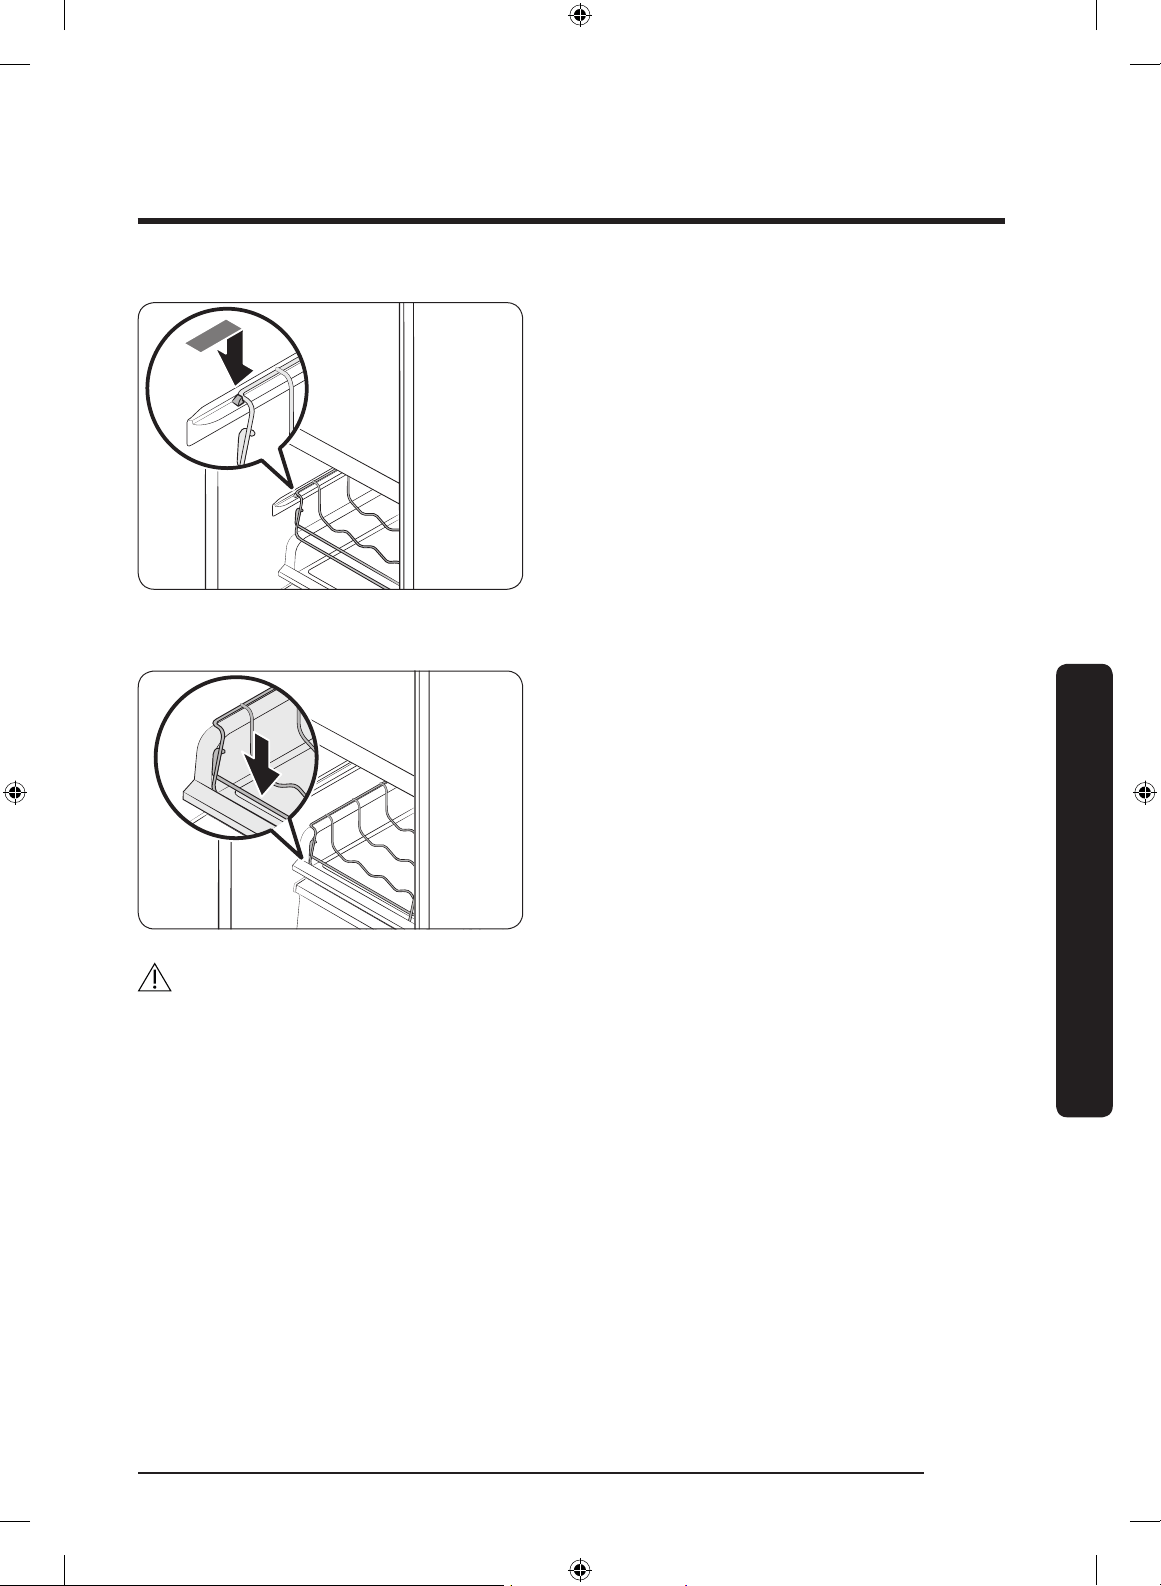
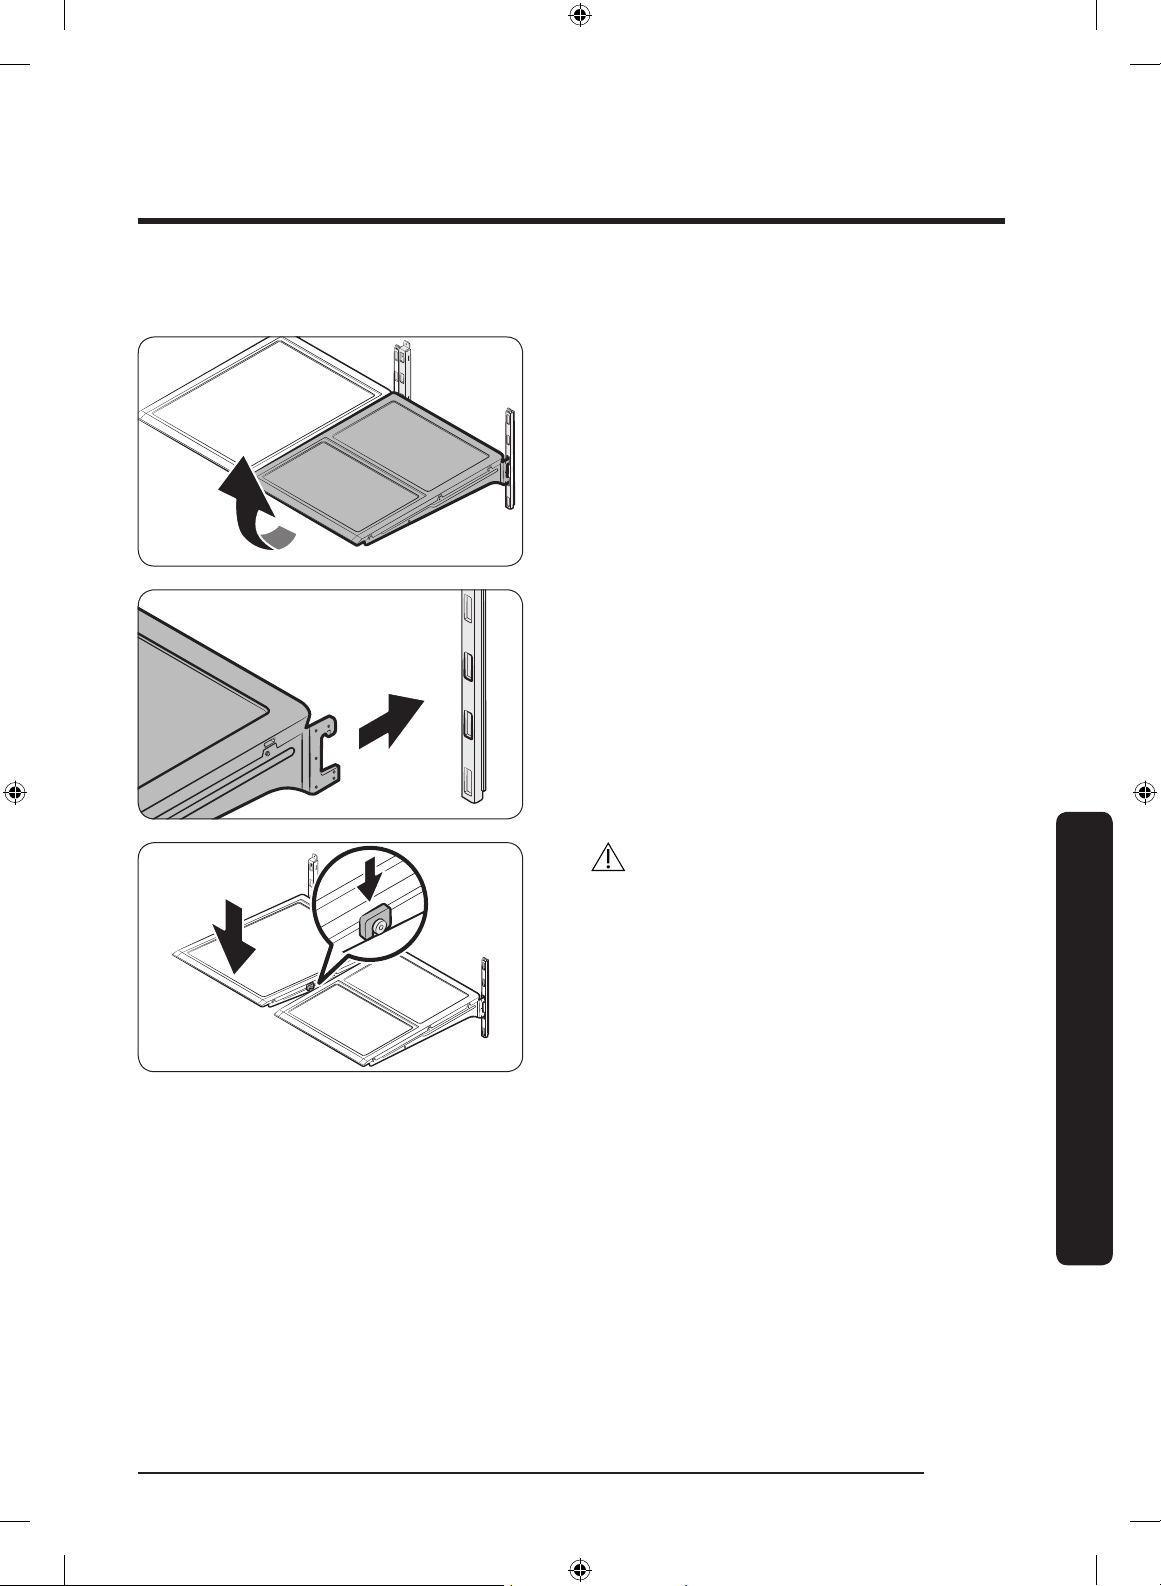
• To remove a shelf, fully open the
corresponding door. Hold the front of
the shelf, and then gently lift up and
slide out.
• To reinsert, hold the shelf at an angle
so the front is higher than the back, and
then insert the top hook into the top
shelf notch. Then, lower the shelf and
insert the bottom shelf hook into the
bottom shelf notch.
CAUTION
• The tempered glass shelves are heavy.
Use caution when removing them.
• The shelf must be inserted correctly. Do
not insert upside down.
• Glass containers may scratch the
surface of glass shelves.
Untitled-4 59 2017-01-19 11:56:55

Maintenance
English60
Maintenance
Door bins
The top door bin section has a marked line to ensure easy removal and proper reinsertion.
Lift up the door bin, and then pull out
straight.
CAUTION
Do not allow children to play with the bins. Sharp-edged corners may cause injury.
Vegetable & fruit drawers (EZ fresh zone)
Gently lift up the front of the drawer and
slide out.
We recommend that you remove the door
bins before removing the drawer. This is to
prevent damage to the door bins.
Untitled-4 60 2017-01-19 11:56:56
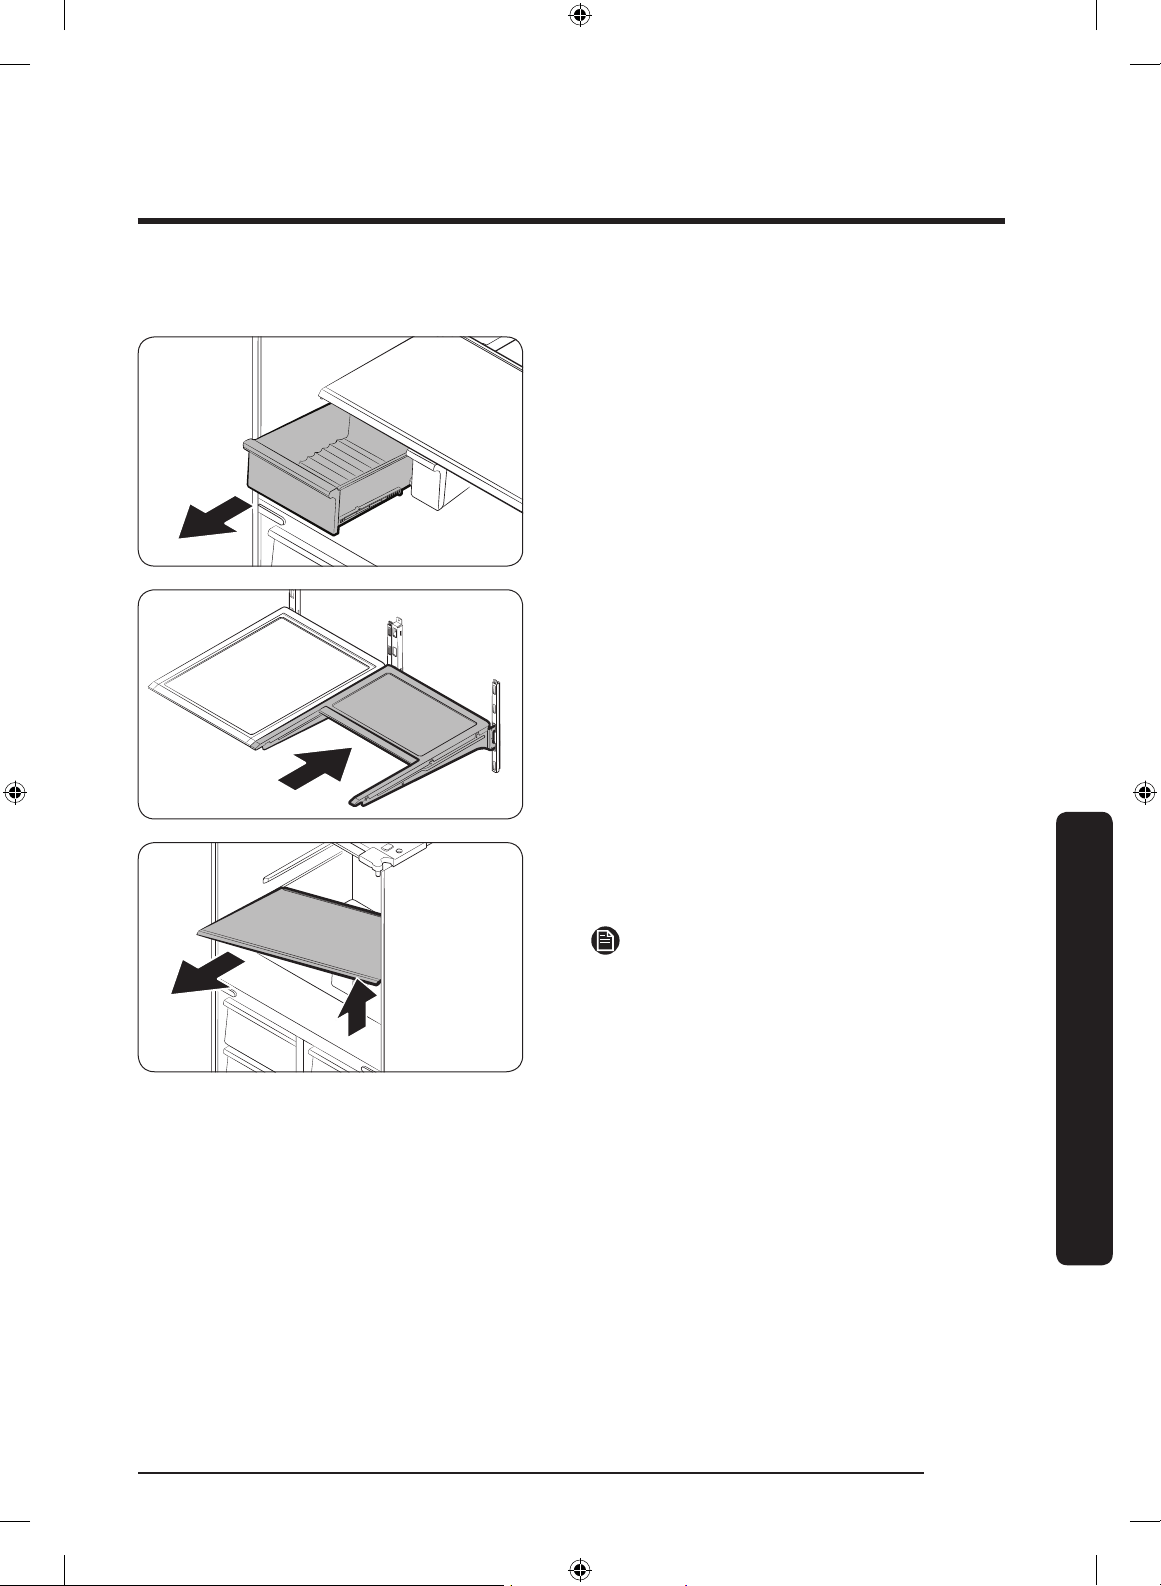
English 61
Maintenance
Vegetable shelf
1. Slide out the left-side vegetable drawer.
2. Slide in the right-side foldable shelf.
3. While supporting the vegetable shelf
with one hand, slide it out with the
other hand.
NOTE
To use the space that is opened up after
removing the foldable shelf, take out the
vegetable shelf.
To reinsert, follow the steps above in the
reverse order.
Ice bucket
To remove the ice bucket, see the Maintenance section on page 58.
Untitled-4 61 2017-01-19 11:56:56
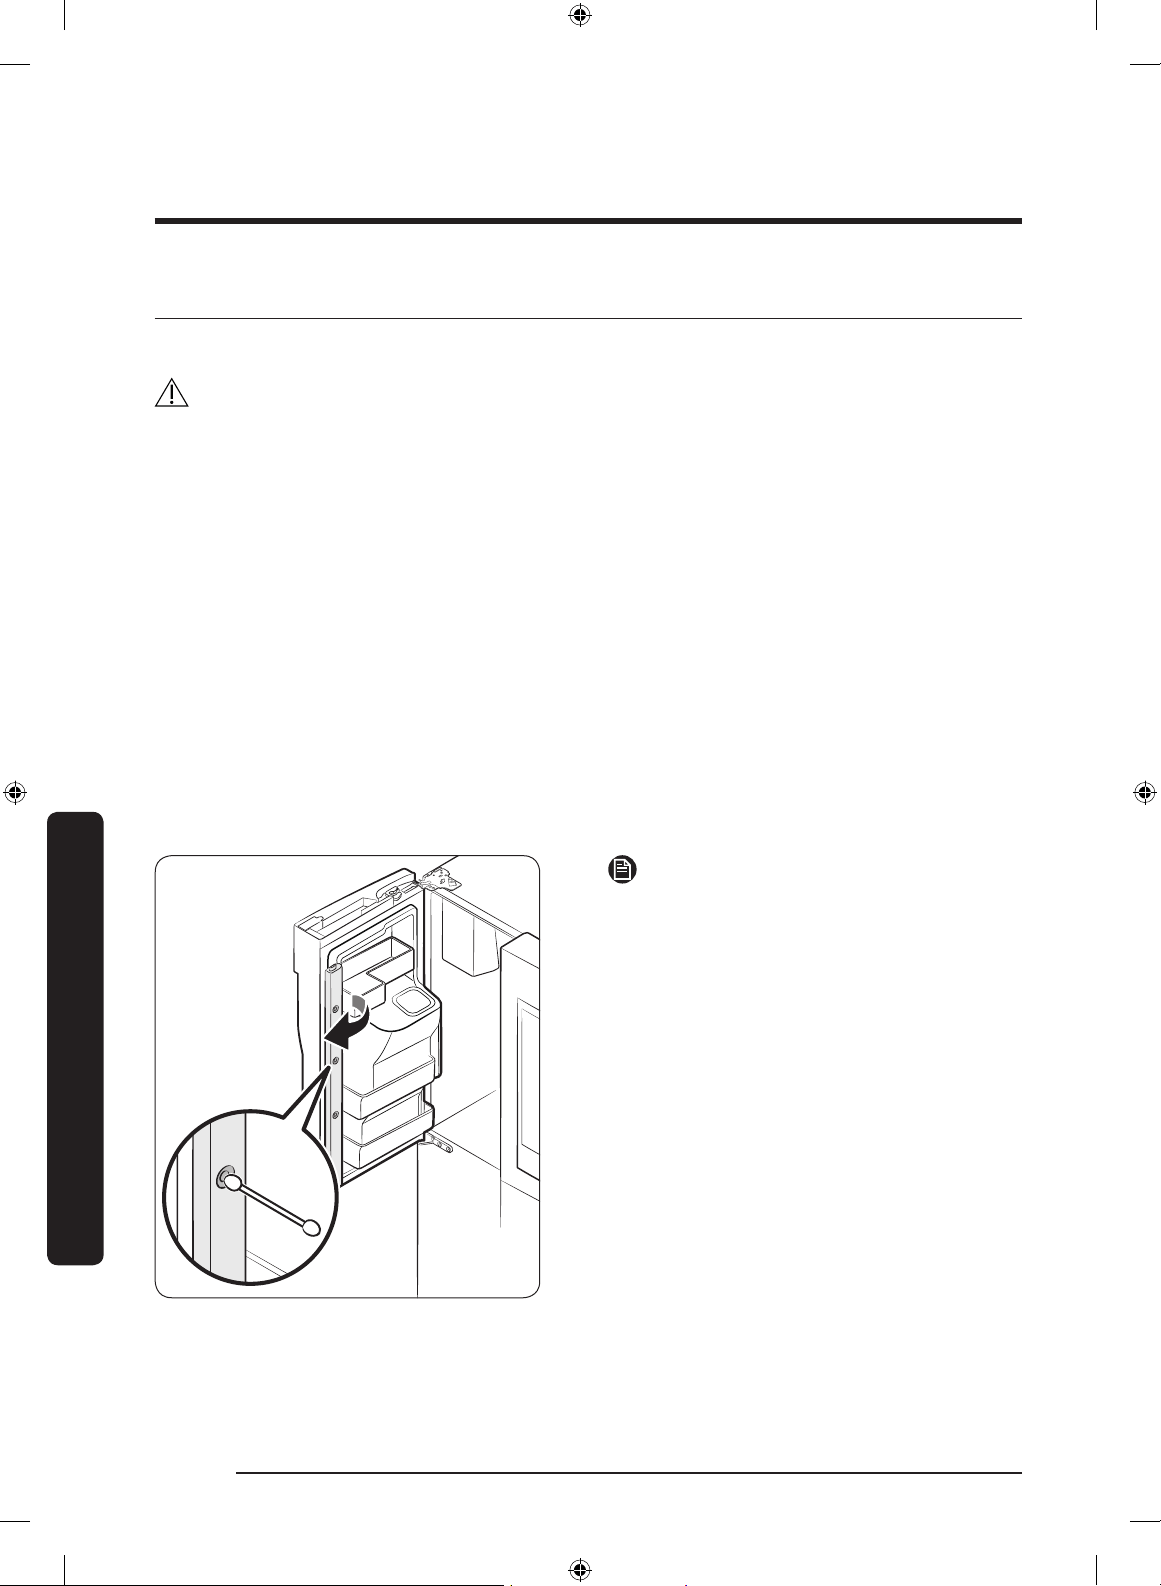
Maintenance
English62
Maintenance
Cleaning
Interior and exterior
WARNING
• Do not use benzene, thinner, home/car detergent, or Clorox™ to clean the refrigerator.
They may damage the surface of the refrigerator or cause a re.
• Do not spray water onto the refrigerator. This may cause electric shock.
• Do not put ngers or any objects into the dispenser outlet.
Regularly use a dry cloth to remove all foreign substances such as dust or water from the
power plug terminals and contact points.
To clean the refrigerator
1. Unplug the power cord.
2. Use a moistened, soft, lint-free cloth or paper towel to clean the refrigerator’s interior
and exterior.
3. When done, use a dry cloth or paper towel to dry well.
4. Plug in the power cord.
Inner-view camera
NOTE
Use a cotton swab or microber cloth to
clean the camera on the left-side door of
the fridge.
Untitled-4 62 2017-01-19 11:56:56
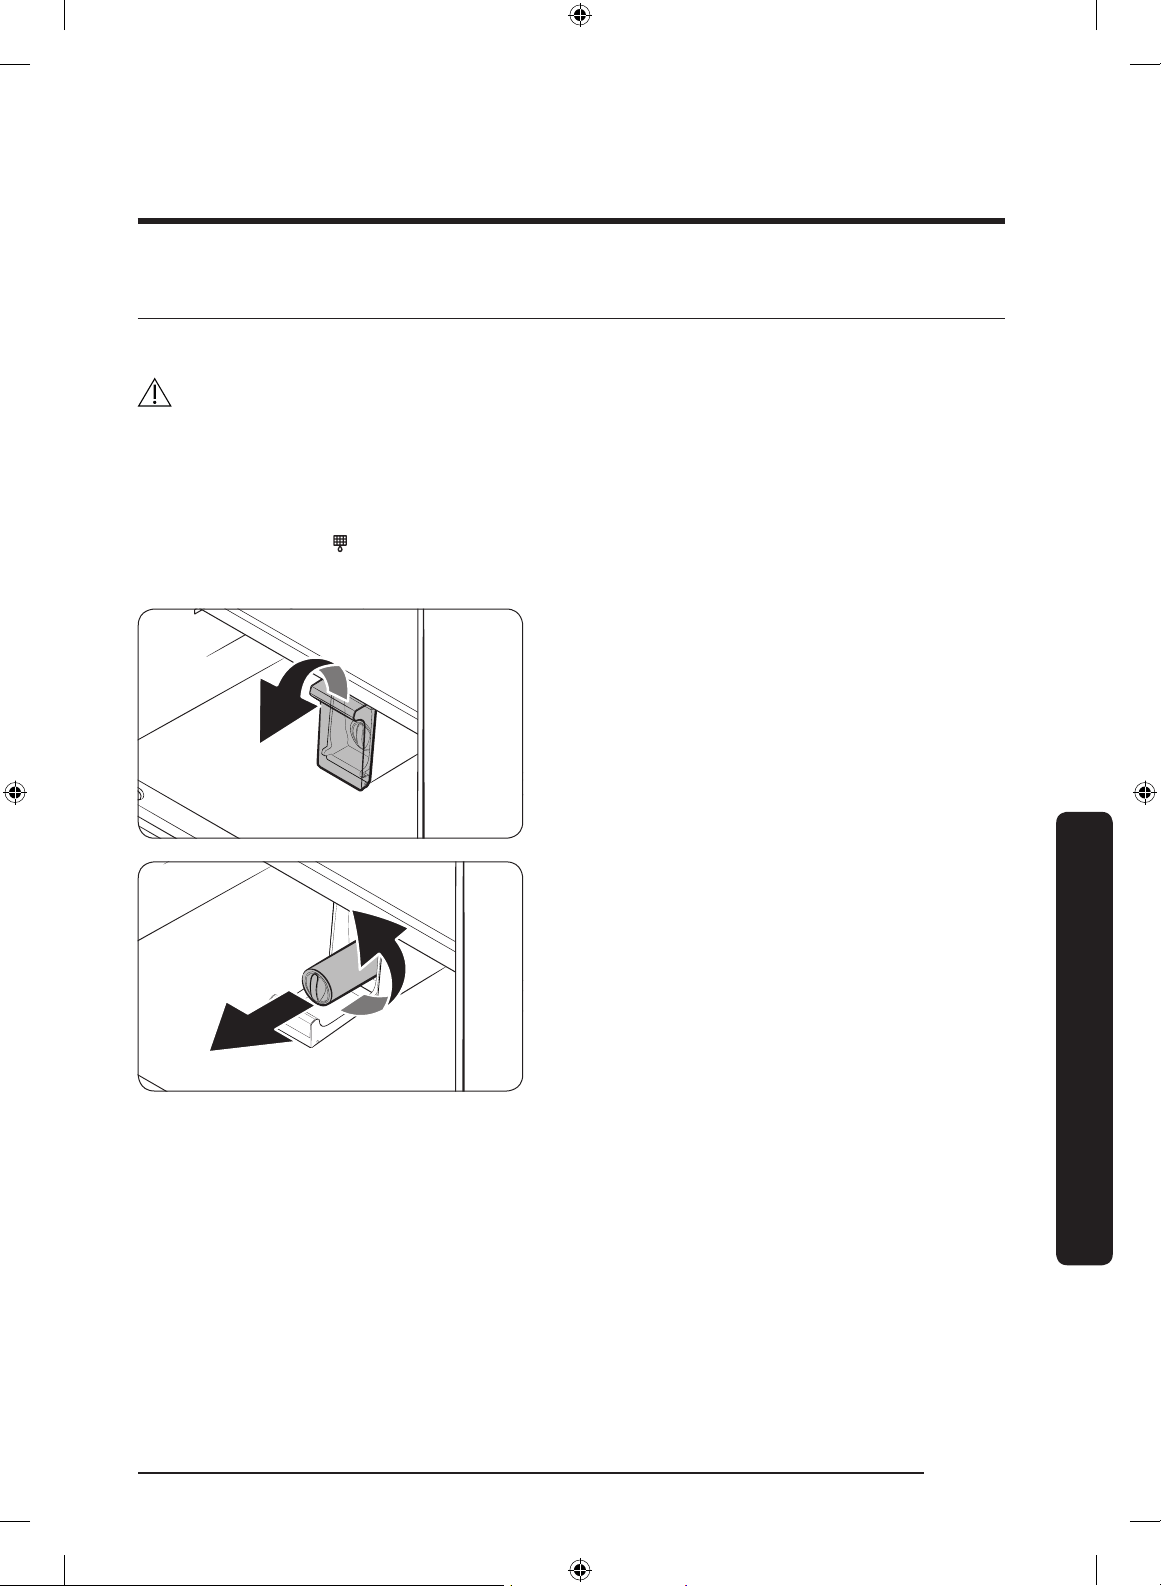
English 63
Maintenance
Replacement
Water lter
WARNING
• Do not use third-party water lters. Use only Samsung-provided or -approved lters.
• Unapproved lters may leak and damage the refrigerator, causing electric shock.
Samsung is not responsible for any damage that may occur from use of third-party
water lters.
The lter indicator (
) turns red to let you know it is time to replace the water lter.
Before replacing the lter, make sure the water supply line is shut off.
1. Open the lter cover.
- Some models may not have a lter
cover. If your model does not, skip
this step.
2. Turn the knob of the lter cartridge
counter clockwise 90 degrees (1/4
turn). The lter cartridge unlocks.
3. Pull out to remove the cartridge.
- If the water lter is severely
contaminated, the cartridge may not
be easy to remove. If that is the case,
use force to remove the cartridge.
- To prevent water leaks from the
lter opening, pull the cartridge
straight out while removing it.
Untitled-4 63 2017-01-19 11:56:56
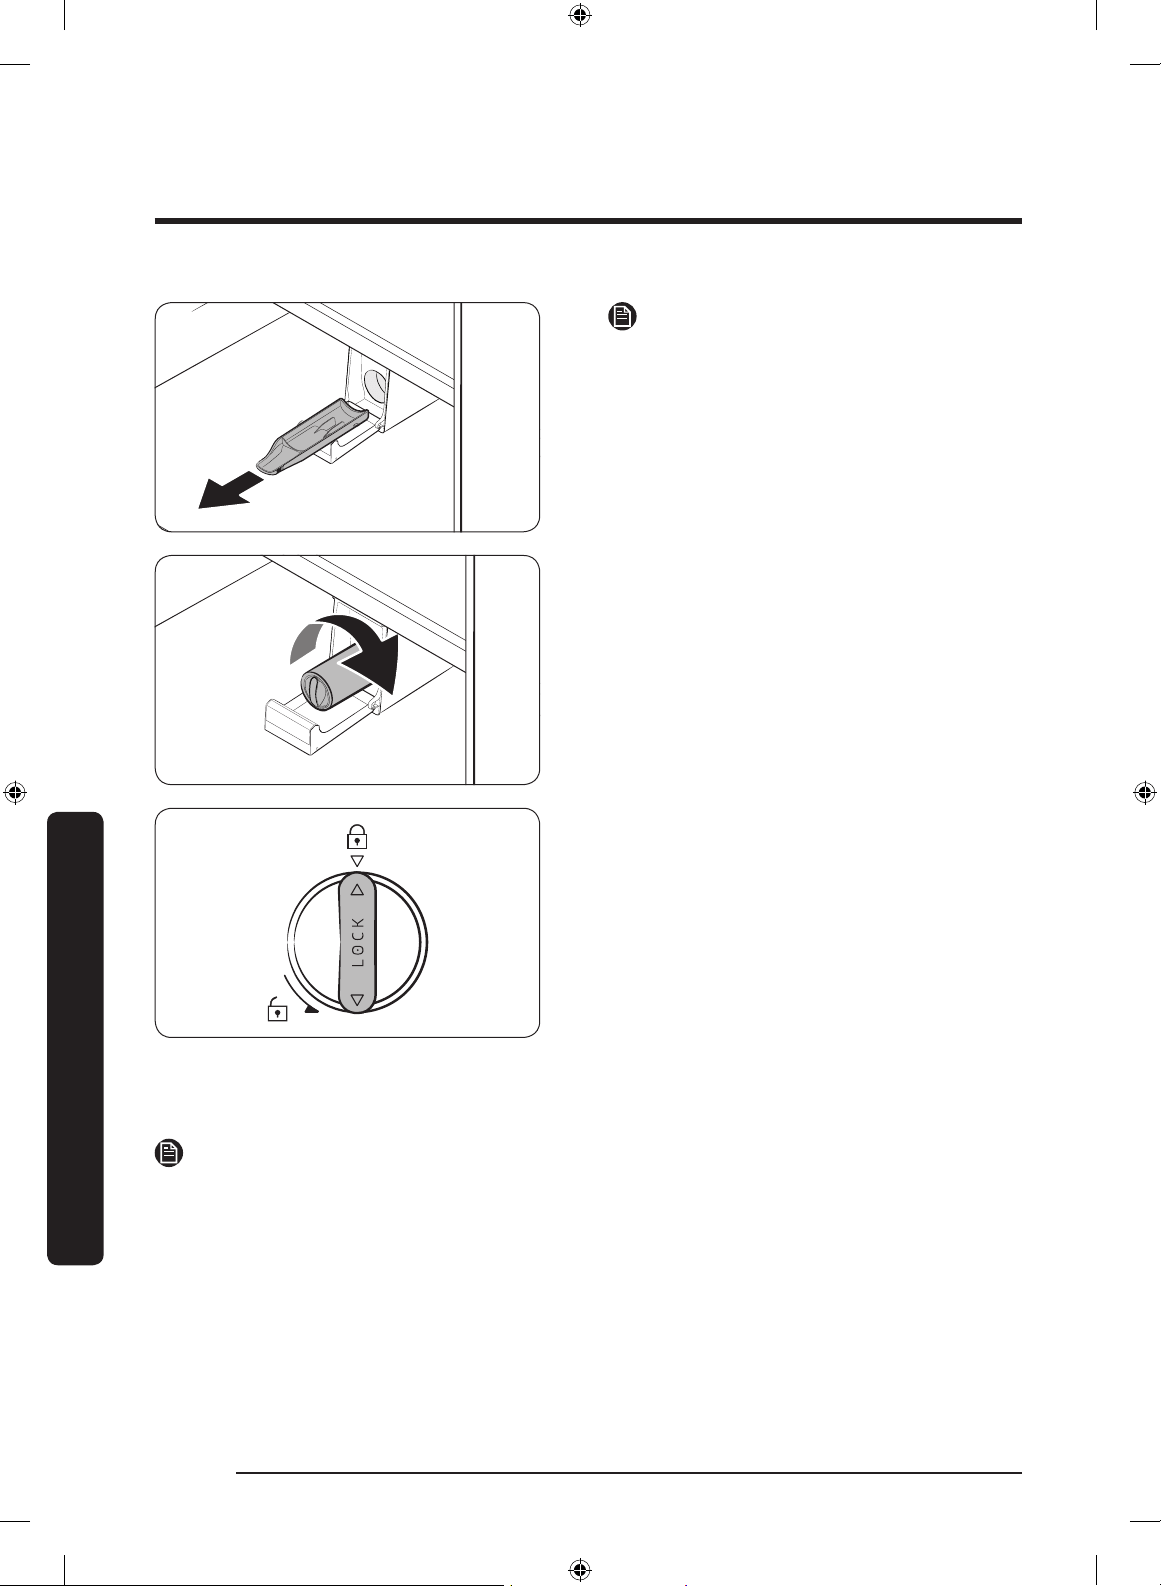
Maintenance
English64
Maintenance
NOTE
To prevent overow, empty and dry the
water lter tray.
4. Insert a new lter cartridge. Use only
Samsung-provided or approved lters.
5. Turn the cartridge knob clockwise to
lock into place.
6. On the Home screen, tap Fridge
Manager > Fridge Settings > Water
Filter, and then select RESET.
The lter indicator turns off.
7. When you are done replacing the lter,
open the water valve and run water
through the dispenser for about 7
minutes. This is to remove impurities
and air from the water line.
NOTE
• A newly installed lter may cause the water dispenser to spurt water briey. This is
because air has entered the waterline.
• The replacement process may cause the water dispenser to drip for a short period of
time. If it drips, simply wipe up any water on the oor with a dry towel.
Untitled-4 64 2017-01-19 11:56:57

English 65
Maintenance
Reverse osmosis water ltration system
The water pressure of the water supply system to a reverse osmosis water ltration
system must be between 35 psi and 120 psi (241 kPa and 827 kPa).
The water pressure of the reverse osmosis water ltration system to the refrigerator’s
cold water line must be at least 40 psi (276 kPa). If the water pressure is below these
specications:
• Check if the sediment lter in the reverse osmosis system is blocked. Replace the lter
if necessary.
• Rell the water tank in the reverse osmosis system with water.
• If your refrigerator has a water lter, it may further reduce the water pressure when
used in conjunction with a reverse osmosis system. Remove the water lter.
For more information or servicing, contact a licensed plumbing professional.
Ordering a new lter
To purchase a new water lter, contact a local Samsung service center or visit www.
samsungparts.com on the web.
LED Lights
To replace the LED lights on the refrigerator, contact a local Samsung service center.
WARNING
The LED lights are not user-serviceable. Do not attempt to replace an LED light yourself.
This can cause electric shock.
Untitled-4 65 2017-01-19 11:56:57
English66
Troubleshooting
Before calling for service, review the checkpoints below. Any service calls regarding
normal situations (No Defect Cases) will be charged to users.
General
Temperature
Symptom Possible causes Solution
Fridge/freezer does
not operate.
Fridge/freezer
temperature is warm.
• Power cord is not plugged
in properly.
• Properly plug in the power
cord.
• Temperature control is not
set correctly.
• Set the temperature lower.
• Refrigerator is located near
a heat source or direct
sunlight.
• Keep the refrigerator away
from direct sunlight or a
heat source.
• Not enough clearance
between refrigerator and
nearby walls or cabinets.
• Make sure there is a gap of
at least 2.5 inches (5 cm)
between the refrigerator
back and sides and any
nearby walls or cabinets.
• The refrigerator is
overloaded. Food is
blocking the refrigerator
vents.
• Do not overload the
refrigerator. Do not allow
food to block ventilation.
Fridge/freezer is
over-cooling.
• Temperature control is not
set correctly.
• Set the temperature higher.
Interior wall is hot.
• Refrigerator has heat-proof
piping in the interior wall.
• To prevent condensation
from forming, the
refrigerator has heat-proof
piping in the front corners.
If the ambient temperature
rises, this equipment may
not work effectively. This is
not a system failure.
Troubleshooting
Untitled-4 66 2017-01-19 11:56:57
English 67
Troubleshooting
Odors
Symptom Possible causes Solution
Refrigerator has
odors.
• Spoiled food.
• Clean the refrigerator and
remove any spoiled food.
• Food with strong odors.
• Make sure strong smelling
food is wrapped airtight.
Frost
Symptom Possible causes Solution
Frost around the
vents.
• Food is blocking the vents.
• Make sure no food blocks
the refrigerator vents.
Frost on interior
walls.
• Door is not closed properly.
• Make sure food does not
block the door. Clean the
door gasket.
Fruits or vegetables
are frozen.
• Fruits or vegetables are
stored in the Flex Zone and
the temperature was set too
low.
• Set the temperature of the
Flex Zone to a temperature
appropriate for fruits or
vegetables.
Condensation
Symptom Possible causes Solution
Condensation forms
on the interior walls.
• If door is left open, moisture
enters the refrigerator.
• Remove the moisture and
do not leave a door open
for extended periods of
time.
• Food with high moisture
content.
• Make sure food is wrapped
airtight.
Untitled-4 67 2017-01-19 11:56:57
Troubleshooting
English68
Troubleshooting
Water/ice (dispenser models only)
Symptom Possible causes Solution
Water ow is weaker
than normal.
• Water pressure is too low.
• Make sure the water
pressure is between 20 to
120 psi.
Ice maker makes a
buzzing sound.
• The ice maker function is
activated, but the water
supply to the refrigerator
has not been connected.
• Press
Ice Maker off .
Ice maker does not
make ice.
• Ice maker has just been
installed.
• You must wait 12 hours for
the refrigerator to make ice.
• Freezer temperature is too
low.
• Set the freezer temperature
below 0 °F (-18 °C) or -4 °F
(-20 °C) in warm, ambient
air.
• Dispenser Lock is activated. • Deactivate Dispenser Lock.
• Ice maker is off. • Turn on the ice maker.
Ice does not dispense.
• Ice may jam if the ice
dispenser is not used for a
long time (approx. 3 weeks).
• If you won't be using the
refrigerator for a long time,
empty the ice bucket and
turn off the ice maker.
• Ice bucket is not properly
inserted.
• Make sure the ice bucket is
properly inserted.
• Water line is not connected
properly or water supply is
not on.
• Check if the water line is
installed correctly. Check if
the water line stop cock is
closed.
Untitled-4 68 2017-01-19 11:56:57
English 69
Troubleshooting
Symptom Possible causes Solution
Water does not
dispense.
• Water line is not connected
properly or water supply is
not on.
• Check the water installation
conditions.
• Dispenser Lock is activated. • Deactivate Dispenser Lock.
• A third-party water lter
was installed.
• Use only Samsung-provided
or approved lters.
• Unapproved lters may
leak and damage the
refrigerator.
• Water lter indicator turns
on or blinks.
• Replace the water lter.
After replacing, reset the
lter indicator sensor.
Untitled-4 69 2017-01-19 11:56:57
Troubleshooting
English70
Troubleshooting
Samsung Smart Home
Symptom Action
Could not nd
“Samsung Smart
Home” in the app
market.
• The Samsung Smart Home app is available for smartphones
that run Android 4.0 (ICS) or higher, or iOS 8.0 or higher.
The Samsung Smart
Home app fails to
operate.
• The Samsung Smart Home app is available for applicable
models only.
• The old Samsung Smart Refrigerator app cannot connect with
Samsung Smart Home models.
The Samsung Smart
Home app is installed
but is not connected
to my refrigerator.
• You must log into your Samsung account to use the app.
• Make sure that your router is operating normally.
• If you have not connected your refrigerator to the Samsung
Smart Home App after the app was installed, you must make
the connection using the device registration function of the
app.
Could not log into the
app.
• You must log into your Samsung account to use the app.
• If you don’t have a Samsung account, follow the app’s
onscreen instructions to create one.
An error message
appears when I
try to register my
refrigerator.
• Easy Connection may fail due to the distance from your
access point (AP) or electrical interference from the
surrounding environment. Wait a moment and try again.
The Samsung
Smart Home app
is successfully
connected to my
refrigerator but does
not run.
• Exit and restart the Samsung Smart Home app or disconnect
and reconnect the router.
• Unplug the power cord of the refrigerator, and then plug it in
again after 1 minute.
Untitled-4 70 2017-01-19 11:56:57
English 71
Troubleshooting
Samsung Family Hub
Symptom Action
Could not nd
“Samsung Family
Hub” in the app
market.
• The Samsung Family Hub app is available for smartphones
that run Android 4.4 (KitKat) or higher, or iOS 8.0 or higher.
Could not log into the
app.
• You must log into your Samsung account to use the app.
• If you don’t have a Samsung account, follow the app’s
onscreen instructions to create one.
Untitled-4 71 2017-01-19 11:56:57
Troubleshooting
English72
Troubleshooting
Smart Grid
Symptom Action
What Do I Need
to use the Energy
Management and
Smart Grid functions?
To use the Smart Grid (Demand Response) and Energy
Management functions on your refrigerator, you need the
following:
Devices
• A wireless access point (router)
• A Samsung Energy Management-supported refrigerator
• A smartphone
Registration
• Connect your refrigerator to your home Wi-Fi network.
• Register for the EMS service with your electric company.
Your electric company must have an EMS (Energy
Management System) supporting SEP (Smart Energy prole).
App
• Download the Samsung Smart Home app from the Google
Play Store, Apple App Store, or Samsung Galaxy Apps.
• Install and run the Samsung Smart Home app on your
smartphone.
Why isn’t the Energy
Management function
working normally?
• Make sure that your home router is operating normally with
proper Internet service and connection.
• Make sure that the refrigerator is connected to the AP
(router).
Checkpoints
• Connect your smartphone to the router (AP, Access Point),
and then check if you can browse the Internet on the
smartphone.
Why isn’t the Delay
Defrost Capability
working normally?
• Make sure that your home router is operating normally with
proper Internet service and connection.
Untitled-4 72 2017-01-19 11:56:57
English 73
Troubleshooting
LCD
Symptom Action
Cannot connect to my
TV.
• This refrigerator can connect only with Samsung Smart TV
6400 series or higher models released since 2015. Please
check the model name of your TV rst.
• Network connections may suffer temporary interruptions.
Turn your TV off, and then try again.
The inner view
picture looks bulged
out or incomplete.
• The edges of the inner view may look bulged out. The
bulging is caused by the convex lens of the camera.
• The inner view may be incomplete due to the blind spots
on the left and right corners or screened depending on the
layout of food items. Make sure to place food items in the
front center.
The displayed
measurement on the
Fridge Manager is not
correct.
• The displayed conditions may differ from the actual
temperature and humidity.
Untitled-4 73 2017-01-19 11:56:57
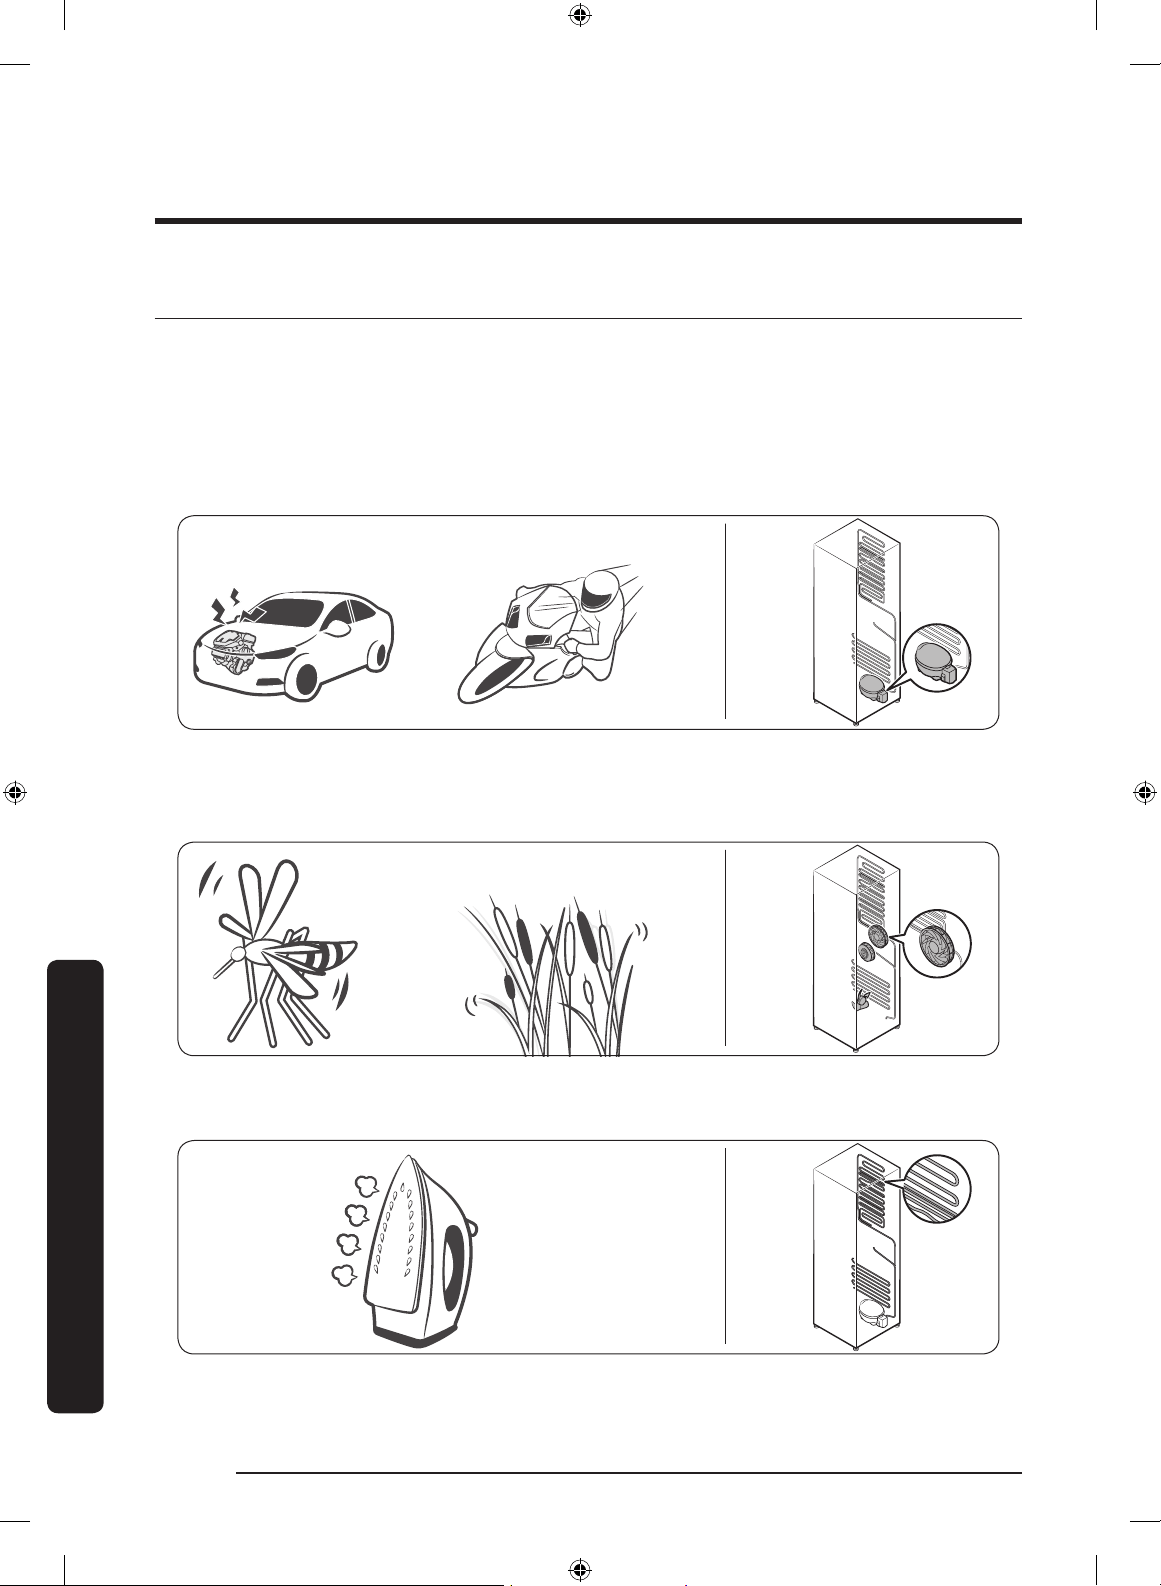
Troubleshooting
English74
Troubleshooting
Do you hear abnormal sounds from the refrigerator?
Before calling for service, review the checkpoints below. Any service calls related to
normal sounds will be charged to the user.
These sounds are normal.
• When starting or ending an operation, the refrigerator may make sounds similar to a
car engine ignition. As the operation stabilizes, the sounds will decrease.
Clicking!
or Chirping!
Buzzing!
• While the fan is operating, these sounds may occur. When the refrigerator reaches the
set temperature, the fan sound will stop.
SSSRRR!
Whir!
• During a defrost cycle, water may drip on the defrost heater, causing sizzling sounds.
HiSS!
Untitled-4 74 2017-01-19 11:56:58
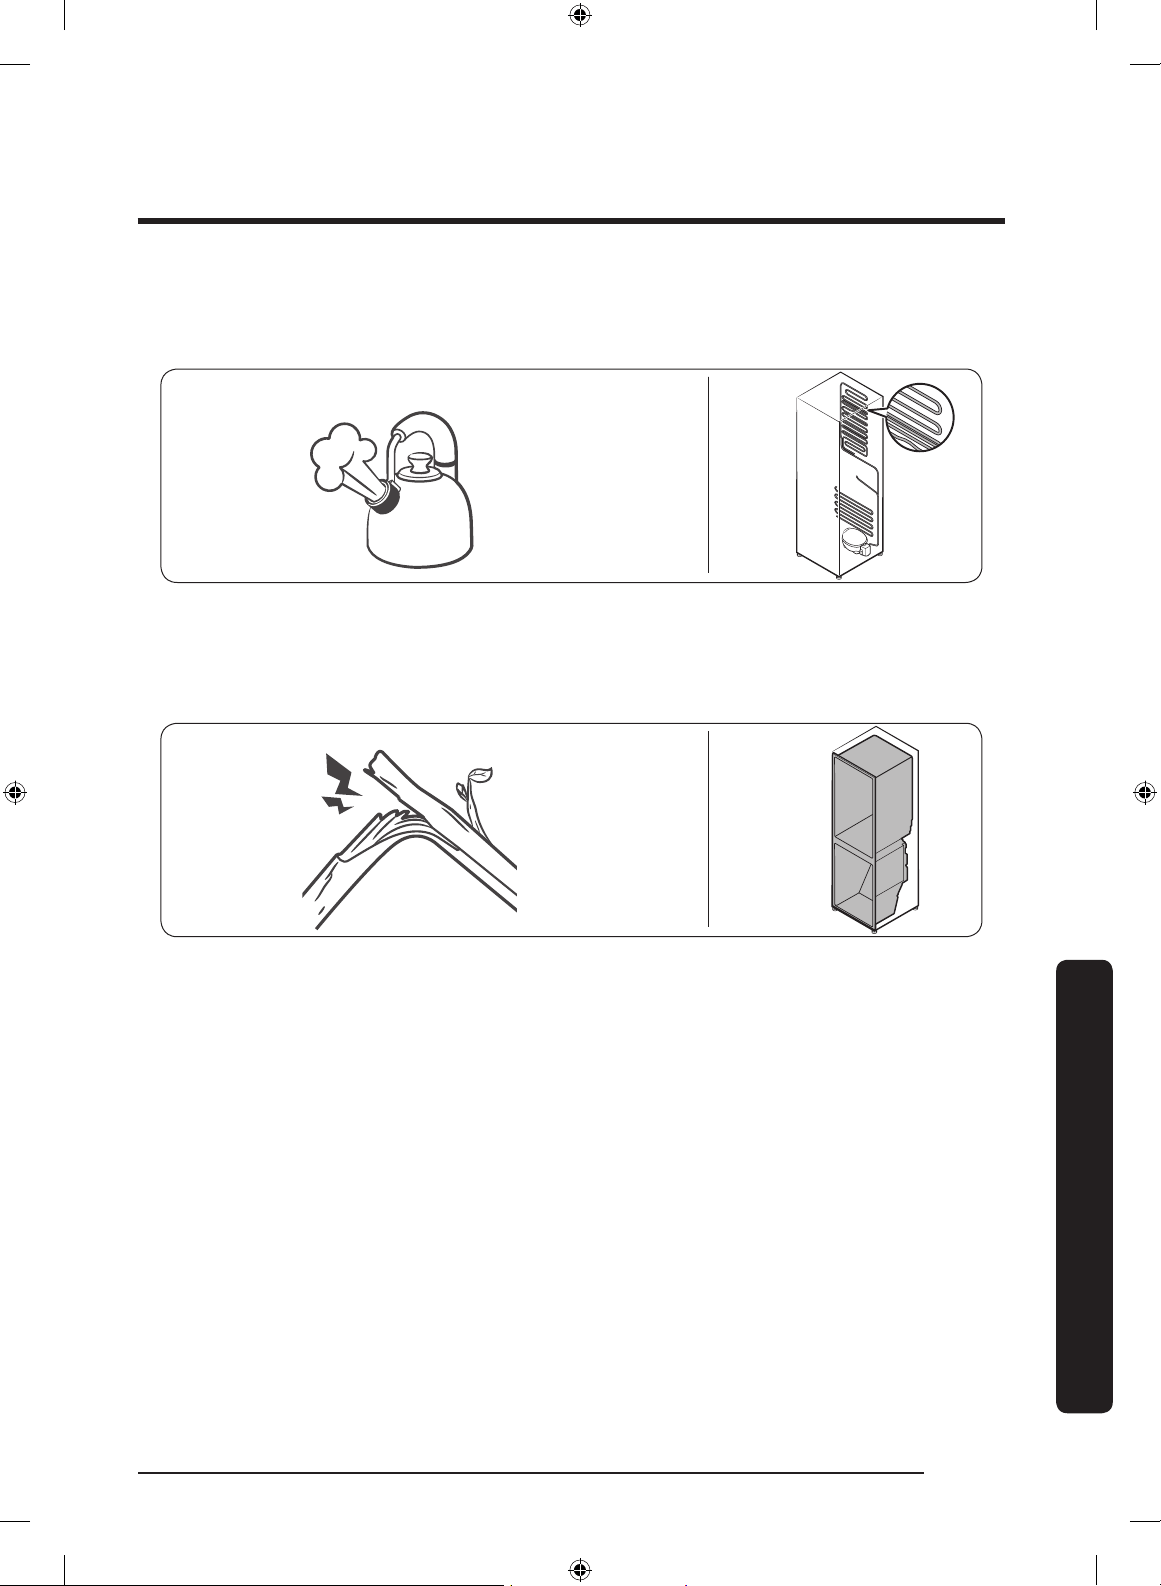
English 75
Troubleshooting
• As the refrigerator cools or freezes, refrigerant gas moves through sealed pipes,
causing bubbling sounds.
Bubbling!
• As the refrigerator temperature increases or decreases, plastic parts contract and
expand, creating knocking noises. These noises occur during the defrosting cycle or
when electronic parts are working.
Cracking!
• For ice maker models: When the water valve opens to ll the ice maker, buzzing
sounds may occur.
• Due to pressure equalizing when you open and close the refrigerator door, whooshing
sounds may occur.
Untitled-4 75 2017-01-19 11:56:58

English76
Warranty (USA)
WARRANTY ON SAMSUNG REFRIGERATOR
LIMITED WARRANTY TO ORIGINAL PURCHASER
This Samsung brand product, as supplied and distributed by Samsung Electronics
America, Inc. (Samsung) and delivered new, in the original carton to the original consumer
purchaser, is warranted by Samsung against manufacturing defects in materials and
workmanship for a limited warranty period of:
One (1) year Parts and Labor on Refrigerator
Five (5) years Parts and Labor on sealed Refrigeration system only*
Ten (10) years Parts and Five (5) years Labor on Digital Inverter Compressor
(*Compressor, evaporator, condenser, drier, connecting tubing)
This limited warranty begins on the original date of purchase, and is valid only on
products purchased and used in the United States. To receive warranty service, the
purchaser must contact Samsung for problem determination and service procedures.
Warranty service can only be performed by a Samsung authorized service center.
The original dated bill of sale must be presented upon request as proof of purchase to
Samsung or Samsung authorized service center.
Samsung will repair or replace any part found to be defective, at our option and at no
charge as stipulated herein, with new or reconditioned parts during the limited warranty
period specied above. All replaced parts and products become the property of Samsung
and must be returned to Samsung. Replacement parts and products assume the remaining
original warranty, or ninety (90) days, whichever is longer.
In-home service will be provided during the warranty labor period subject to availability
within the contiguous United States. In-home service is not available in all areas. To
receive in-home service, the product must be unobstructed and accessible from oor
level to service personnel. If during in-home service repair cannot be completed, it may
be necessary to remove, repair and return the product. If in-home service is unavailable,
Samsung may elect, at our option, to provide for transportation of our choice to and from
a Samsung authorized service center. Otherwise, transportation to and from the Samsung
authorized service center is the responsibility of the purchaser.
Untitled-4 76 2017-01-19 11:56:58

English 77
This limited warranty covers manufacturing defects in materials and workmanship
encountered in normal, noncommercial use of this product, and shall not apply to the
following, including, but not limited to: damage which occurs in shipment; delivery
and installation; applications and uses for which this product was not intended; altered
product or serial numbers; cosmetic damage or exterior nish; accidents, abuse, neglect,
re, water, lightning or other acts of nature; use of products, equipment, systems,
utilities, services, parts, supplies, accessories, applications, installations, repairs, external
plumbing and leaks, external wiring, circuit breakers, fuses or connectors not supplied
and authorized by Samsung, or which damage this product or result in service problems;
incorrect electrical line voltage, uctuations and surges; customer adjustments and failure
to follow operating instructions, cleaning, maintenance and environmental instructions
that are covered and prescribed in the instruction book; loss of food due to spoilage;
consumable items including lters and light.
THERE ARE NO EXPRESS WARRANTIES OTHER THAN THOSE LISTED AND DESCRIBED
ABOVE, AND NO WARRANTIES WHETHER EXPRESS OR IMPLIED, INCLUDING, BUT NOT
LIMITED TO, ANY IMPLIED WARRANTIES OF MERCHANTABILITY OR FITNESS FOR A
PARTICULAR PURPOSE, SHALL APPLY AFTER THE EXPRESS WARRANTY PERIODS STATED
ABOVE, AND NO OTHER EXPRESS WARRANTY OR GUARANTY GIVEN BY ANY PERSON,
FIRM OR CORPORATION WITH RESPECT TO THIS PRODUCT SHALL BE BINDING ON
SAMSUNG. SAMSUNG SHALL NOT BE LIABLE FOR LOSS OF REVENUE OR PROFITS, FAILURE
TO REALIZE SAVINGS OR OTHER BENEFITS, OR ANY OTHER SPECIAL, INCIDENTAL OR
CONSEQUENTIAL DAMAGES CAUSED BY THE USE, MISUSE OR INABILITY TO USE THIS
PRODUCT, REGARDLESS OF THE LEGAL THEORY ON WHICH THE CLAIM IS BASED, AND
EVEN IF SAMSUNG HAS BEEN ADVISED OF THE POSSIBILITY OF SUCH DAMAGES. NOR
SHALL RECOVERY OF ANY KIND AGAINST SAMSUNG BE GREATER IN AMOUNT THAN THE
PURCHASE PRICE OF THE PRODUCT SOLD BY SAMSUNG AND CAUSING THE ALLEGED
DAMAGE. WITHOUT LIMITING THE FOREGOING, PURCHASER ASSUMES ALL RISK AND
LIABILITY FOR LOSS, DAMAGE OR INJURY TO PURCHASER AND PURCHASER’S PROPERTY
AND TO OTHERS AND THEIR PROPERTY ARISING OUT OF THE USE, MISUSE OR INABILITY
TO USE THIS PRODUCT SOLD BY SAMSUNG NOT CAUSED DIRECTLY BY THE NEGLIGENCE
OF SAMSUNG. THIS LIMITED WARRANTY SHALL NOT EXTEND TO ANYONE OTHER THAN
THE ORIGINAL PURCHASER OF THIS PRODUCT, IS NONTRANSFERABLE AND STATES YOUR
EXCLUSIVE REMEDY.
Some states do not allow limitations on how long an implied warranty lasts, or the
exclusion or limitation of incidental or consequential damages, so the above limitations
or exclusions may not apply to you. This warranty gives you specic legal rights, and you
may also have other rights, which vary from state to state. To obtain warranty service,
please contact Samsung at:
Untitled-4 77 2017-01-19 11:56:58

Warranty (USA)
English78
SAMSUNG CUSTOMER CARE CENTER
Samsung Electronics America, Inc.
85 Challenger Road
Ridgeeld Park, NJ 07660
1-800-SAMSUNG (726-7864)
www.samsung.com/us/support
Untitled-4 78 2017-01-19 11:56:58
English 79
Open Source Announcement
The software included in this product contains open source software. You may obtain the
complete corresponding source code for a period of three years after the last shipment of
this product by sending an email to mailto:[email protected].
It is also possible to obtain the complete corresponding source code in a physical medium
such as a CD-ROM; a minimal charge will be required.
The following URL http://opensource.samsung.com/opensource/F_HUB/seq/0 leads to the
download page of the source code made available and open source license information as
related to this product. This offer is valid to anyone in receipt of this information.
Untitled-4 79 2017-01-19 11:56:58
Scan the QR code* or visit
www.samsung.com/spsn
to view our helpful
How-to Videos and Live Show
s
* Requires reader to be installed on your
smartphone
Contact SAMSUNG WORLD WIDE
If you have any questions or comments relating to Samsung products, please contact the
SAMSUNG customer care center.
Country Contact Center Web Site
U.S.A
1-800-SAMSUNG (726-7864)
1-844-SAM-PAYS (726-7297)
www.samsung.com/us/support
CANADA 1-800-SAMSUNG (726-7864)
www.samsung.com/ca/support (English)
www.samsung.com/ca_fr/support (French)
DA68-03460F-00
Untitled-4 80 2017-01-19 11:56:58