Table of Contents
ENSURING PROPER AIR CIRCULATION
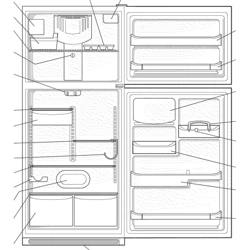
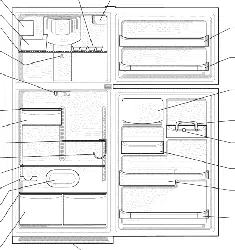
In order to ensure proper temperatures, air must flow between the refrigerator and freezer sections. As shown in the illustration below, cool air enters through the bottom of the freezer section and moves up. Most of the air then flows through the freezer section vents and recirculates under the freezer floor. The rest of the air enters the refrigerator section through the top vent.
FRONTCHILL DOOR COOLING (on some models)
DOOR COOLING
• To provide cool air everywhere, there are cool air vents on all four internal walls in Frontchill Door Cooling and on two internal wall in Door Cooling.
• This allows for more powerful and effective Cooling. Especially noticeable when new food is placed in the refrigerator compartment.
IMPORTANT:
• Do not block any of these ventsWith food packages. If the vents are blocked, airflow will be interrupted and temperature and moisture problems may occur.
• If water or foreign substances enter the cool air vent while cleaning, efficiency will be lowered. In addition, if gasket is damaged, efficiency may be lowered because of escaping cool air.
SETTING THE CONTROLS (on some models)
• Your refrigerator has two controls that let you regulate the temperature in the freezer and refrigerator compartments.
• Initially set the REFRIGERATOR CONTROL at 37°F (3°C) and the FREEZER CONTROL at 0°F (-18°C). Leave it at this setting for 24 hours (one day) to stabilize. Then adjust the compartment temperature as desired.
• Refrigerator control: 32°F to 47°F (0°C to 8°C) The lower the number setting, the colder the refrigerator compartment wilt become.
NOTE: You can lock the controls so the settings cannot be changed.
To lock the control:
1. Set the control to the desired settings.
2. Press and hold the lock pad for 3 seconds. When the controls are locked, the indicator light wilt be on and the cold and colder controls will not operate.
To unlock the control:
1. Press and hold the lock pad for 3 seconds. After unlocking the controls, the temperature settings wilt be displayed, the lock indicator light will be out, and the settings can be changed.
• Freezer control: - 6°F to 8°F (-21°C to - 13°C)
When the setting is at a lower number, the freezer compartment becomes colder. But the refrigerator compartment becomes warmer because less cold air flows into the refrigerator.
NOTE: °F/°C display control-press this control to change the displayed temperature to °F or °C.
NOTE: To turn the refrigerator off, press and hold the °F / °C button for 3 seconds and it will show "FF" in the display To turn the refrigerator on, press and hold the °F / °C button for 3 seconds again, and it will return to start-up status.
SETTING THE CONTROLS
• Your refrigerator has two controls that let you regulate the temperature in the freezer and refrigerator compartments.
• Initially set the REFRIGERATOR CONTROL at 4th position 37°F (3°C) and the FREEZER CONTROL at 4th position 0°F(-18°C) Leave it at this setting for 24 hours (one day) to stabilize. Then adjust the compartment temperature as desired.
• Refrigerator control: Position 1 to 7 (30°F to 48°F or - 1°C to 9°C) The higher position setting, the colder the refrigerator compartment will become.
NOTE: You can lock the controls so the settings cannot be changed.
To lock the control:
1. Set the control to the desired settings.
2. Press and hold the lock pad for 3 seconds. When the controls are locked, the indicator light will be on and the cold and colder controls will not operate.
To unlock the control:
1. Press and hold the lock pad for 3 seconds. After unlocking the controls, the lock indicator light wil be out, and the setting can be changed.
• Freezer control: Position 1 to 7 (-6°F to 8°F or -21°C to -13.5°C) When the setting is at a higer position, the freezer compartment becomes colder. But the refrigerator compartment becomes warmer because less cold air flows into the refrigerator.
NOTE: Pressing OFF control key, we setting the refrigerator for exhibition mode. Only the refrigerator lights wilt work, not the refrigerator
NOTE: To turn the refrigerator off, press and hold the OFF button for 3 seconds. To turn the refrigerator ON, press and hold the OFF button for 3 seconds again.
ADJUSTING CONTROL SETTINGS
Give the refrigerator time to cool down completely before adding food. It is best to wait 24 hours before you put food into the refrigerator. The mid-settings indicated in the previous section should be correct for normal household refrigerator usage. The controls are set correctly when milk or juice is as cold as you like and when ice cream is firm.
The refrigerator control functions as the thermostat for the entire appliance (refrigerator and freezer sections.) The higher the number setting, the longer the compressor will run to keep the temperature colder. The freezer control adjusts the cold air flow from the freezer to the refrigerator. Setting the freezer control to a lower temperature keeps more cold air in the Freezer compartment to make it colder.
If you need to adjust temperatures in the refrigerator or freezer, start by adjusting the refrigerator first. Wait 24 hours after the refrigerator adjustment to check the freezer temperature. If it is too warm or too cold, then adjust the freezer control as well.
Use the settings listed in the chart below as a guide. Always remember to wait at least 24 hours between adjustments.
FOOD STORAGE GUIDE
Storing Fresh Food
Wrap or store food in the refrigerator in airtight and moisture-proof material unless otherwise noted. This prevents food odor and taste transfer throughout the refrigerator. For dated products, check code date to ensure freshness.
Butter or margarine
Keep opened butter in a covered dish or closed compartment. When storing an extra supply, wrap in freezer packaging and freeze.
Cheese
Store in the original wrapping until you are ready to use it. Once opened, rewrap tightly in plastic wrap or aluminum foil.
Milk
Wipe milk cartons. For best storage, place milk on interior shelf, not on door shelf.
Eggs
Store in original carton on interior shelf, not on door shelf.
Fruit
Wash, let dry and store in refrigerator in plastic bags or crisper. Do not wash or hull berries until they are ready to use. Sort and keep berries in original container in a crisper, or store in a loosely closed paper bag on a refrigerator shelf.
Leafy vegetables
Remove store wrapping and trim or tear off bruised and discolored areas. Wash in cold water and drain. Place in plastic bag or plastic container and store in crisper.
Vegetables with skins (carrots, peppers)
Place in plastic bags or plastic container and store in crisper.
Fish
Use fresh fish and shellfish the same day purchased.
Meat
Store most meat in original wrapping as long as it is airtight and moisture-proof. Rewrap if necessary. See the following chart for storage times. When storing meat longer than the times given, freeze the meat.
NOTE: For further information about preparing food for freezing or food storage times, check a freezer guide or reliable cookbook.
Packaging
Successful freezing depends on the correct packaging. When you close and seal the package, it must not allow air or moisture in or out. If you do, you could have food odor and taste transfer throughout the refrigerator, and also dry out frozen food.
Packaging recommendations:
• Rigid plastic containers with tight-fitting lids
• Straight-sided canning/freezing jars
• Heavy-duty aluminum foil
• Plastic-coated paper
• Non-permeable plastic wraps
• Specified freezer-grade self-sealing plastic bags
Follow package or container instructions for proper freezing methods.
Do not use:
• Bread wrappers
• Non-polyethylene plastic containers
• Containers without tight lids
• Wax paper or wax-coated freezer wrap
• Thin, semi-permeable wrap
Freezing
Your freezer will not quick-freeze any large quantity of food. Do not put more unfrozen food into the freezer than will freeze within 24 hours (no more than 2 to 3 Ibs of food per cubic foot [907-1350 g per liter] of freezer space). Leave enough space in the freezer for air to circulate around packages. Be careful to leave enough room at the front so the door can close tightly. Storage times will vary according to the quality and type of food, the type of packaging or wrap used (airtight and moisture-proof) and the storage temperature. Ice crystals inside a sealed package are normal. This simply means that moisture in the food and air inside the package have condensed, creating ice crystals.
NOTE: Allow hot foods to cool at room temperature for 30 minutes, then package and freeze. Cooling hot foods before freezing saves energy.
NOTE: Do not store food near the sensor; it may cause the sensor to malfunction.
Reference file: Kenmore 79573266300 top-mount refrigerator
Additionally, the document applies to other Kenmore models: 795.73262300, 795.73962300, 795.73252300, 795.73952300, 795.73269300, 795.73969300, 795.73259300, 795.73959300, 795.73264300, 795.73964300, 795.73254300, 795.73954300, 795.73266300, 795.73966300, 795.73263300, 795.73963300