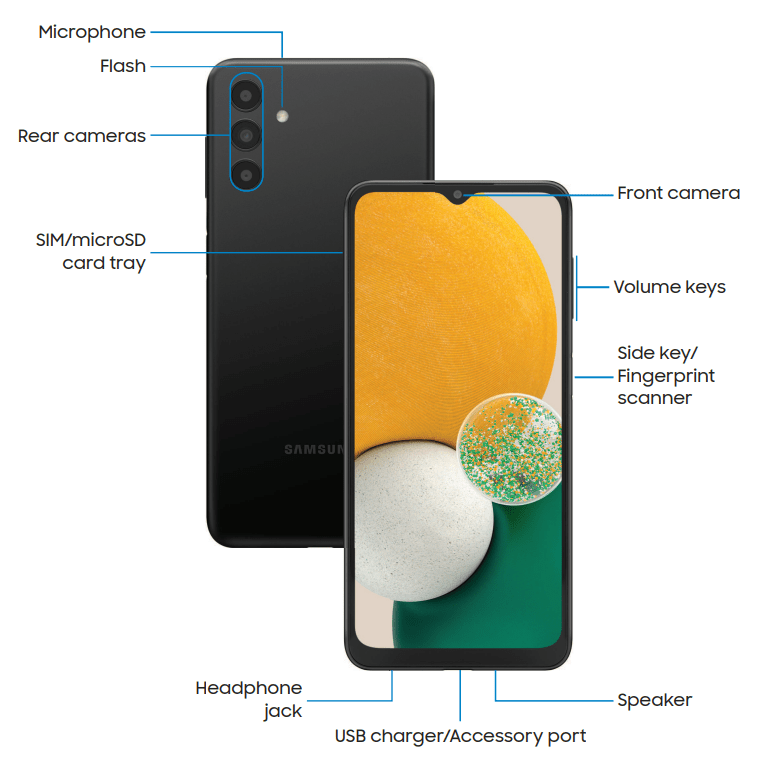
Device layout
Set up your device

Charge the battery
Your device uses a nano-SIM card. A SIM card may be preinstalled, or you may be able to use your previous SIM card. Network indicators for 5G service are based on your carrier’s specifications and network availability. Contact your carrier for more details.
NOTE Use only Samsung-approved chargers and cables. To avoid injury or damage to your device, do not use incompatible, worn or damaged batteries, chargers or cables. Using other charging devices and batteries may void your warranty and may cause damage.
Start using your device
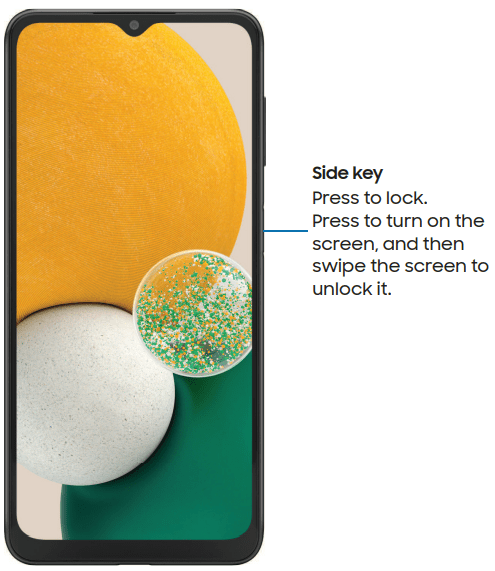
Turn on your device
Use the Side key to turn your device on. Do not use the device if the body is cracked or broken. Use the device only after it has been repaired.
Press and hold the Side key to turn the device on.
- To turn the device off, press and hold the Side key >
 Power off. Confirm when prompted.
 - To restart your device, press and hold the Side key >
 Restart. Confirm when prompted.
NOTE Best 5G performance requires optimal 5G connection and unobstructed antennas (rear of device); see carrier for network availability; 5G performance may be impacted by a case or cover.
Bring data from an old device
Download Smart Switch™ to transfer contacts, photos, music, videos, messages, notes, calendars, and more from your old device. Smart Switch can transfer your data via USB cable, Wi-Fi, or computer.
- From Settings, tap Accounts and backup > Bring data from old device.
- Follow the prompts and select the content to transfer.
Lock or unlock your device
Use your device’s screen lock features to secure your device. By default, the device locks automatically when the screen times out.
Multi window
Multitask by using multiple apps at the same time. Apps that support Multi window™ can be displayed together on a split screen. You can switch between the apps and adjust the size of their windows.
Device Maintenance
View the status of your device’s battery, storage, and memory. You can also automatically optimize your device’s system resources.
The quick optimization feature improves device performance through the following actions:
- Identifying apps that use excessive battery power and clearing unneeded items from memory.
- Deleting unnecessary files and closing apps running in the background.
- Scanning for malware.
To use the quick optimization feature:
- From Settings, tap
 Battery and device care > Optimize now.
Battery
View how battery power is used for your various device activities.
From Settings, tap Battery and device care > Battery for the following options:
- Usage since last full charge: View your recent battery usage by time, app, and service.
- Power saving mode: Save battery life by limiting background network usage, syncing, and location checking. Choose from additional power saving options to save more power when this mode is enabled.
- Background usage limits: View apps that you don’t use often and limit their battery usage. To disable this feature, tap Put unused apps to sleep.
- More battery settings: Configure additional battery settings and notifications
Storage
View your storage capacity and detailed usage by category and file type. You can also mount, unmount, or format an optional memory card (not included).
From Settings, tap Battery and device care > Storage.
- Tap a category to view and manage files.
Memory card
Once an optional microSD memory card (not included) has been installed in your device, the card memory is displayed in the Storage setting.
Mount a memory card
When you install an optional memory card, it is automatically mounted (connected to the device) and prepared for use. However, should you unmount the card without removing it from the device, you need to mount it before it can be accessed.
- From Settings, tap Battery and device care > Storage > More options > Advanced.
- Tap your SD card, and then tap Mount.
Remove a memory card
To prevent damage to information stored on the memory card, unmount the card before removing it from the device.
- From Settings, tap Battery and device care > Storage > More options > Advanced.
- Tap your SD card, and then tap Unmount.
- Remove your memory card from the device.
Format a memory card
When formatting an SD card, you should back up your music and photo files that are stored on the card because formatting the SD card deletes ALL stored files.
- From Settings, tap Battery and device care > Storage > More options > Advanced.
- Tap your SD card, tap Format, and then follow the prompts.
Memory
Check the amount of available memory. You can close background apps and reduce the amount of memory you are using to speed up your device.
From Settings, tap Battery and device care > Memory. The used and available memory are shown.
- Tap Clean now to free up as much memory as possible.
- Tap View more to view the full list of apps and services using memory. Tap
 to include or exclude these apps and services.
 - Tap Apps not used recently to view apps and services that are included in this group. Tap to include or exclude these apps and services.
- Tap Excluded apps to view a list of apps that have been excluded. Tap
 Add apps to choose apps to exclude from memory usage checks.
Advanced device care options
Other Device care features are available in the Advanced menu.
From Settings, tap  Battery and device care. The following options are available:
 Search: Find panels that are either installed or available to install.
 Care report: View information about the restart history and charging and temperature tips.
 More options:
– Add to Apps screen: Display the icon for Device care on the Apps screen.
– Automation: Optimize your device automatically at set times based on your usage patterns.
– Contact us: Contact Samsung support through Samsung members.
– About Device care: View version and license information about the Device care feature.
Language and input
Configure your device’s language and input settings.
Change the device language
You can add languages to your list and organize them according to preference. If an app does not support your default language, then it will move to the next supported language in your list.
- From Settings, tap
 General management > Language.
 - Tap
 Add language, and select a language from the list.
 - Tap Set as default to change the device language.
- To switch to another language on the list, tap the desired language, and then tap Apply.
Text-to-speech
Configure your Text-to-Speech (TTS) options. TTS is used for various accessibility features, such as Voice Assistant.
From Settings, tap General management > Text-to-speech for options:
- Preferred engine: Choose either the Samsung or Google Text-to-speech engine. Tap
 Settings for options.
 - Language: Set the default speech language.
- Speech rate: Set the speed at which the text is spoken.
- Pitch: Set the pitch of the speech.
- Play: Tap to play a short demonstration of speech synthesis.
- Reset: Reset the speech rate and pitch.
Keyboard list and default
Change your default keyboard, modify built-in keyboards, and change keyboard settings.
From Settings, tap General management > Keyboard list and default for the following options:
- Default keyboard: Choose a default keyboard for your device’s menus and keyboards.
- Samsung keyboard: Modify settings for the Samsung keyboard.
- Google voice typing: Modify settings for Google Voice input.
- Keyboard button on navigation bar: Enable a button on the Navigation bar to quickly switch between keyboards.
Physical keyboards
Customize options when you have a physical keyboard connected to your device (sold separately).
- From Settings, tap General management.
- Tap Physical keyboard, and then choose an option:
- Show on-screen keyboard: Show the on-screen keyboard while a physical keyboard is also being used.
- Keyboard shortcuts: Show explanations of the keyboard shortcuts on the screen.
- Change language shortcut: Enable or disable language key shortcuts for your physical keyboard.
Mouse and trackpad
Configure pointer speed and button assignments for an optional mouse or trackpad (not included).
From Settings, tap General management > Mouse and trackpad.
- Pointer speed: Drag the slider to the right to go faster or to the left to go slower.
- Wheel scrolling speed: Drag the slider to the right to scroll faster or to the left to scroll slower.
- Enhance pointer precision: Enable to make the mouse cursor move faster or slower depending on how fast you move your mouse.
- Primary mouse button: Choose either the Left or Right mouse button to be your primary button.
- Secondary button: Choose the action of your secondary mouse button.
- Middle button: Choose the action of your middle mouse button.
- Additional button 1: Choose an action for another available mouse button.
- Additional button 2: Choose an action for another available mouse button.
Autofill service
Save time entering information using autofill services.
- From Settings, tap General Management.
- Tap Autofill service to view your selected service.
- Tap Settings to customize your service.
- Tap Autofill service to change your default service.
Date and time
By default, your device receives date and time information from the wireless network. Outside of network coverage, you can set the date and time manually.
From Settings, tap General management > Date and time. The following options are available:
- Automatic date and time: Receive date and time updates from your wireless network. When Automatic date and time is disabled, the following options are available:
– Select time zone: Choose a new time zone.
– Set date: Enter the current date.
– Set time: Enter the current time.
- Use 24-hour format: Set the format for displaying time.
Troubleshooting
You can check for software updates and, if necessary, reset services on your device.
Software update/System updates
Check for and install available software updates for your device. Options may vary by carrier.
From Settings, tap Software update/System updates for the following options:
- Check for updates: Manually check for software updates.
- Continue update: Resume an update that was interrupted
Reset
Reset device and network settings. You can also reset your device to its factory defaults.
Reset all settings
You can reset your device to its factory default settings, which resets everything except the security, language, and account settings. Personal data is not affected.
- From Settings, tap General management > Reset > Reset all settings.
- Tap Reset settings, and confirm when prompted.
Reset network settings
You can reset Wi-Fi, mobile data, and Bluetooth settings with Reset network settings.
- From Settings, tap General management > Reset > Reset network settings.
- Tap Reset settings, and confirm when prompted.
Reset accessibility settings
You can reset device accessibility settings. Accessibility settings in downloaded apps and your personal data are not affected.
- From Settings, tap General management > Reset > Reset accessibility settings.
- Tap Reset settings, and confirm when prompted.
Auto restart at set times
Optimize your device by restarting it automatically at set times. Any unsaved data will be lost when the device restarts.
- From Settings, tap General management > Reset > Auto restart at set times.
- Tap
 to activate Auto restart, and then set the following parameters:
- Days: Select the day of the week to automatically restart your device.
- Time: Set the time of day to restart your device.
Factory Data Reset
You can reset your device to factory defaults, erasing all data from your device.
This action permanently erases ALL data from the device, including Google or other account settings, system and application data and settings, downloaded applications, as well as your music, photos, videos, and other files. Any data stored on an external SD card is not affected.
If you sign in to a Google Account on your device and set a Lock screen, Google Device Protection is automatically enabled.
NOTE If you reset your Google Account password, it can take 24 hours for the password reset to sync with all devices registered to the account.
Before resetting your device:
- Verify that the information you want to keep has transferred to your storage area.
- Log in to your Google Account and confirm your user name and password.
To reset your device:
- From Settings, tap General management > Reset > Factory data reset.
- Tap Reset and follow the prompts to perform the reset.
- When the device restarts, follow the prompts to set up your device.
Google Device Protection
When you sign in to a Google Account on your device and set a Lock screen, Google Device Protection is enabled. This service protects your phone from unauthorized factory data resets by requiring your Google account information to verify your identity.
Enable Google Device Protection
Adding a Google Account to your device and setting a Lock screen automatically activates Google Device Protection.
Disable Google Device Protection
To disable Google Device Protection, you can either remove all Google Accounts from the device or remove the Lock screen.
To remove Google accounts:
- From Settings, tap
 Accounts and backup > Manage accounts > [Google Account].
 - Tap Remove account.
To remove a secure Lock screen:
- From Settings, tap
 Lock screen > Screen lock type.
 - Tap either Swipe or None.