Loading ...
Loading ...
Loading ...
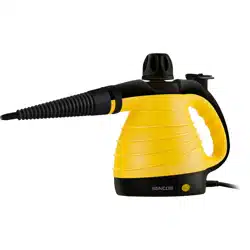
Steam Cleaner
SSC 3001YL
EN
EN-9
Copyright © 2020, Fast ČR, a.s. Revision 05/2020
FILLING THE WATER TANK
1. Filling the water tank before use
• Make sure that the steam cleaner is turned off and disconnected from the power socket.
• Unscrew the safety valve A1 anticlockwise out of the steam cleaner.
• Fill the measuring cup A4 with clean water up to the 175 ml mark. Place the funnel A5 into the
lling opening and hold it there. Pour the water from the measuring cup A4 into the water tank
A3. You may add another 75 ml of water into the water tank A3. This will utilise the maximum
capacity of the water tank A3, i.e. 250 ml of water. Do not overll the water tank A3 with more
water, otherwise steam will not be able to form inside it and the steam cleaner will not work
correctly.
• Again, close the lling opening with the safety valve A1. Firmly tighten the safety valve A1 by
turning it clockwise.
Attention:
Always ll the water tank A1 only with clean tap water or distilled water when the
tap water is hard or very hard. Never add descaling agents, fragrant oils, detergents,
alcohol, etc. to the water tank A1. Otherwise this could result in damage to the steam
cleaner or injury.
2. Relling the water tank
• Turn off the steam cleaner and disconnect it from the power socket. Release the trigger lock A8
by sliding it towards the open padlock symbol and press the steam release trigger A9. Hold down
the trigger A9 until all steam is released from the water tank A3.
• Turn the safety valve A1 anticlockwise until it is partially released. In this phase, do not fully screw
out the safety valve A1. In this way, you will ensure the gradual release of residual steam. Wait
approximately 5 minutes for the remaining water in the water tank A3 to cool down and then you
can screw out the safety valve A1 and take it off the lling opening.
• Pour the remaining water out of the water tank A3 and allow the steam cleaner to cool down
for approximately 10 minutes. Add water to the water tank A3 according to the instructions
contained in the previous subchapter. Take care not to overll it. There should not be more than
250ml of water in the water tank A3.
• Screw the valve A1 back on to the lling opening and tighten it rmly in the clockwise direction.
Then you can continue using the steam cleaner.
Note:
In the event that the steam cleaner is pressurised with alarger amount of steam, the valve
mechanism will not enable the safety valve A1 to be screwed out. The safety valve A1 will
keep slipping and it will not be possible to release it. In such acase, rst release all the steam
and then try again to release the safety valve A1. Wait approximately 5 minutes for the
remaining water in the water tank A3 to cool down before fully screwing out the safety
valve A1.
BEFORE FIRST USE
• Make sure that the steam cleaner is turned off and disconnected from the power socket.
• Wipe the outer surface of the steam cleaner and its accessories with aclean lightly dampened cloth
and then thoroughly wipe everything dry.
Loading ...
Loading ...
Loading ...