owner's
manual
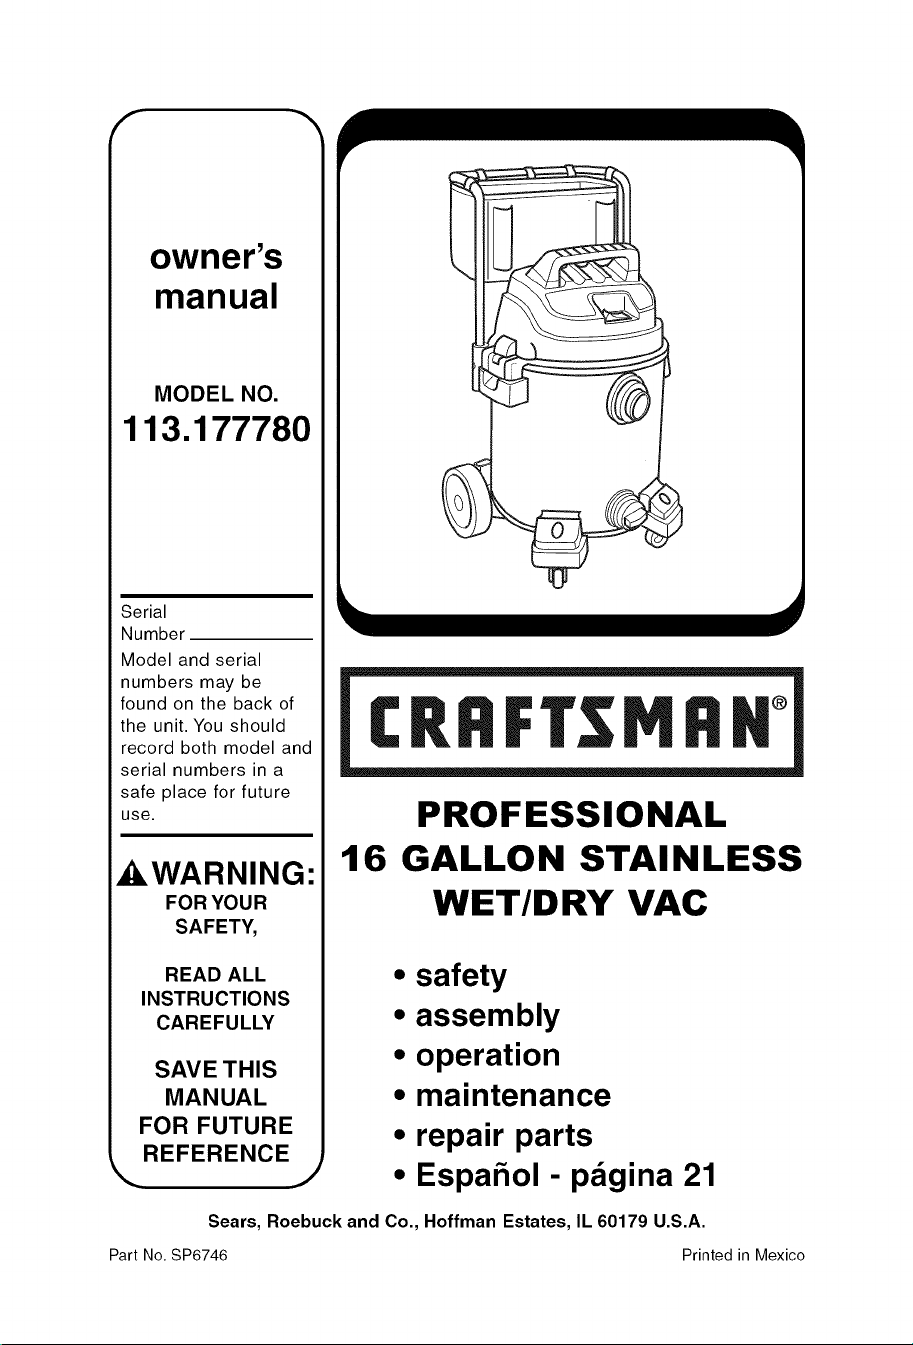
MODEL NO.
113.177780
Serial
Number
Model and serial
numbers may be
found on the back of
the unit. You should
record both model and
serial numbers in a
safe place for future
use.
_WARNING:
FOR YOUR
SAFETY,
READ ALL
INSTRUCTIONS
CAREFULLY
SAVETHIS
MANUAL
FOR FUTURE
REFERENCE
J
CRRFT MRII °
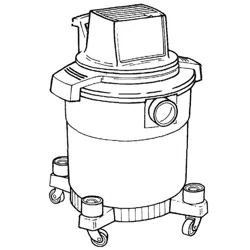
PROFESSIONAL
16 GALLON STAINLESS
WET/DRY VAC
• safety
• assembly
• operation
• maintenance
• repair parts
• Espahol - pagina 21
Sears, Roebuck and Co., Hoffman Estates, IL 60179 U.S.A.
Part No.SP6746 Printedin Mexico
Warranty
• Craftsman One Year Full Warranty
If this Craftsman product fails due to a defect in material or workmanship
within one year from the date of purchase, return it to any Sears store,
Sears Service Center, or other Craftsman outlet in the United States for
free repair (or replacement if repair proves impossible).
This warranty applies for only 90 days from the date of purchase if this
product is ever used for commercial or rental purposes.
This warranty does not include bags or filters, which are expendable
parts that can wear out from normal use within the warranty period.
This warranty gives you specific legal rights, and you may also have other
rights, which vary, from state to state.
Sears, Roebuck and Co., Hoffman Estates, IL 60179
MPORTANT SAFETY INSTRUCTIONS
Safety is a combination of using common
sense, staying alert, and knowing how
your wet/dry vacuum cleaner ("Vac")
works.
Safety Signal Words
A DANGER: Indicates a hazardous
situation which, if not avoided, will result
in death or serious injury.
_, WARNING: Indicates a hazardous
situation which, if not avoided, could
result in death or serious injury.
_i, CAUTION: Indicates a hazardous
situation which, if not avoided, could
result in minor or moderate injury.
When using your Vac, always follow basic
safety precautions including the following:
WARNING
-To reduce the risk of fire, electric
shock, or injury:
• Read and understand this manual and
all labels on the Vac before operating.
• Use only as described in this manual.
• Do not leave Vac running while
unattended - you may fail to notice
important signs indicating abnormal
operation such as loss of suction,
debris/liquid exiting exhaust, or
abnormal motor noises. Immediately
stop using Vac if you notice these
signs.
• Do not leave Vac when plugged in.
Unplug from outlet when not in use and
before servicing.
2
• Sparks inside the motor can ignite
flammable vapors or dust. To reduce
the risk of fire or explosion, do not use
near combustible liquids, gases, or
dusts, such as gasoline or other fuels,
lighter fluid, cleaners, oil-based paints,
natural gas, coal dust, magnesium
dust, grain dust, aluminum dust, or gun
powder.
• Do not vacuum anything that is burning
or smoking, such as cigarettes,
matches, or hot ashes.
• Do not vacuum drywall dust, cold
fireplace ash, or other fine dusts with
standard filter. These may pass through
the filter and be exhausted back into
the air. Use a fine dust filter instead.
• To reduce the risk of inhaling toxic
vapors, do not vacuum or use near
toxic or hazardous materials.
• To reduce the risk of electric shock,
do not expose to rain or allow liquid to
enter motor compartment. Store
indoors.
• Do not allow to be used as a toy. Close
attention is necessary when used by or
near children.
• Do not use with a torn filter or without
the filter installed except when
vacuuming liquids as described in this
manual. Dry debris ingested by the
impeller may damage the motor or be
exhausted into the air.
• Turn off Vac before unplugging.
• To reduce the risk of injury from
accidental starting, unplug power cord
before changing or cleaning filter.
Do not unplug by pulling on cord. To
unplug,grasptheplug,notthecord.
• Donotusewithdamagedcord,plugor
otherparts.IfyourVacisnotworking
asitshould,hasmissingparts,has
beendropped,damaged,leftoutdoors,
ordroppedintowater,callcustomer
service.
• Donotpullorcarrybycord,usecord
ashandle,closeadooroncord,orpull
cordaroundsharpedgesorcorners.
DonotrunVacovercord.Keepcord
awayfromheatedsurfaces.
• Donothandleplug,switch,ortheVac
withwethands.
• Useonlyextensioncordsthatarerated
foroutdooruse.Extensioncordsin
poorconditionortoosmallinwiresize
canposefireandshockhazards.
Toreducetheriskofthesehazards,
besurethecordisingoodcondition
andthatliquiddoesnotcontactthe
connection.Donotuseanextension
cordwithconductorssmallerthan
16gauge(AWG)insize.Toreduce
powerloss,usea14gaugeextension
cordif25to50ft.longand12gauge
for50ft.orlonger.
• ThisVacisdouble-insulated,
eliminatingtheneedforaseparate
groundingsystem.Useonlyidentical
replacementparts.Readthe
instructionsforServicingDouble-
InsulatedWet/DryVacs.
• Donotputanyobjectintoventilation
openings.Donotvacuumwithany
ventilationopeningsblocked;keepfree
ofdust,lint,hairoranythingthatmay
reduceairflow.
• Keephair,looseclothing,fingers,and
allpartsofbodyawayfromopenings
andmovingparts.
• Toreducetheriskoffalls,useextra
carewhencleaningonstairs.
• Toreducetheriskofbackinjuryor
falls,donotliftaVacthatisheavywith
liquidordebris.PartiallyemptytheVac
byscoopingdebrisordrainingliquidto
makeitcomfortabletolift.
• Toreducetheriskofpersonalinjuryor
damagetoVac,useonlyCraftsman
recommendedaccessories.
• Whenusingasablower:
Directairdischargeonlyatworkarea.
Donotdirectairatbystanders.
Keepchildrenawaywhenblowing.
Donotuseblowerforanyjobexcept
blowingdirtanddebris.
Donotuseasasprayer.
Wearsafetyeyewear.
Toreducetheriskofeyeinjury,wear
safetyeyewear.Theoperationofany
utilityVacorblowercanresultin
foreignobjectsbeingblownintothe
eyes,whichcanresultinsevereeye
damage.
Toreducetheriskofbeingstruckby,or
pulleddownby,arollingVac,lockthe
wheelswhenusingonanyunevenor
slopedsurface.
_k CAUTION:
• To reduce the risk of hearing damage,
wear ear protectors when using for
extended time or in a noisy area.
• For dusty operations, wear dust mask.
• Static shocks are common when the
relative humidity of the air is low.
Vacuuming fine debris with your Vac
can deposit static charge on the hose
or Vac. To reduce the frequency of
static shocks in your home or when
using this Vac, add moisture to the air
with a humidifier.
Observe the following warnings that
appear on the motor housing of your Vac:
[_ DOUBLE INSULATED
GROUNDING NOT REQUIRED.
WHEN SERVICING USE ONLY
IDENTICAL REPLACEMENT PARTS.
WARNING: For your own safety,
read and understand owner's
manual. Do not run unattended.
Do not pick up hot ashes, coals,
toxic, flammable or other hazardous
materials. Do not use around
explosive liquids or vapors.
_, WARNING: To reduce the risk of I
electric shock - do not expose to
I
rain - store indoors,
SAVE THIS MANUAL
Introduction
This Professional Wet/Dry Vac is intended
for household use. It may be used for
vacuuming wet or dry media and may be
used as a blower.
Read this owner's manual to familiarize
yourself with the product features and to
understand the specific usage of your
new Wet/Dry Vac.
Table of Contents
Section Page
Warranty ........................ 2
Important Safety Instructions ......... 2
Introduction ...................... 4
Table of Contents .................. 4
Assembly ........................ 4
Carton Contents ................. 5
Drum/Caddy Assembly ............ 6
Vac Assembly ................... 7
Installing Handle ................. 8
Removing Handle ................ 8
Installing Accessory Storage Bag ... 8
Insert Hose ..................... 9
Accessory Storage ............... 9
Operation ....................... 10
Polarized Plug ................. 10
Vacuuming Dry Materials ......... 10
Section Page
Vacuuming Liquids .............. 11
Emptying the Drum ............. 11
Blowing Feature ................ 12
Maintenance .................... 13
Filter ......................... 13
Filter Cleaning ................. 13
Filter Removal and Replacement... 13
Cleaning a Dry Filter ............ 14
Cleaning a Wet Filter ............ 14
Cleaning & Disinfecting
the Wet/Dry Vac .............. 14
Casters & Wheels ............... 14
Frame & Handles ............... 14
Storage ....................... 14
Repair Parts ..................... 16
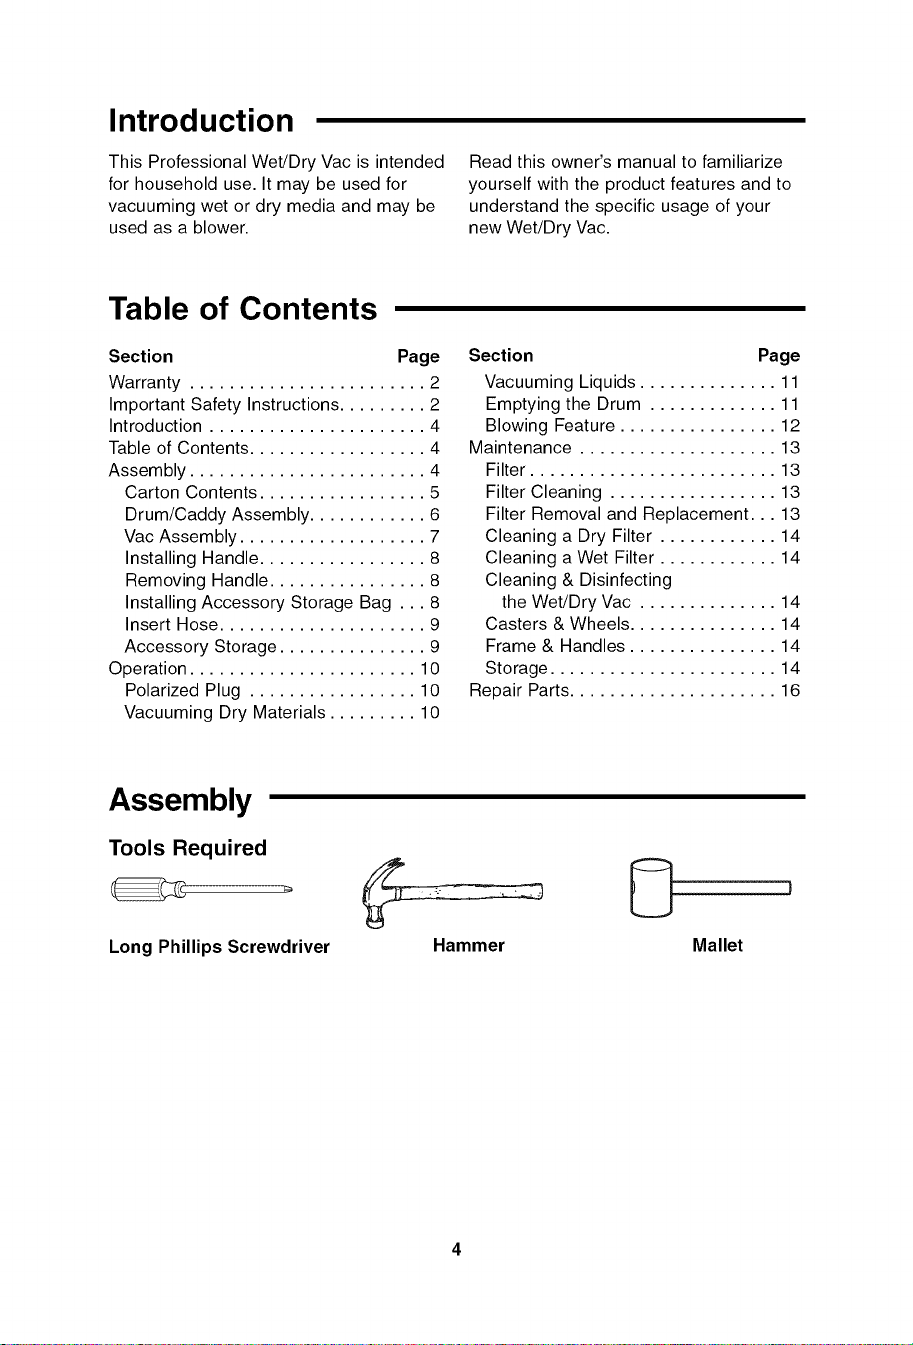
Assembly
Tools Required
Long Phillips Screwdriver
Hammer Mallet
Assembly (continued)
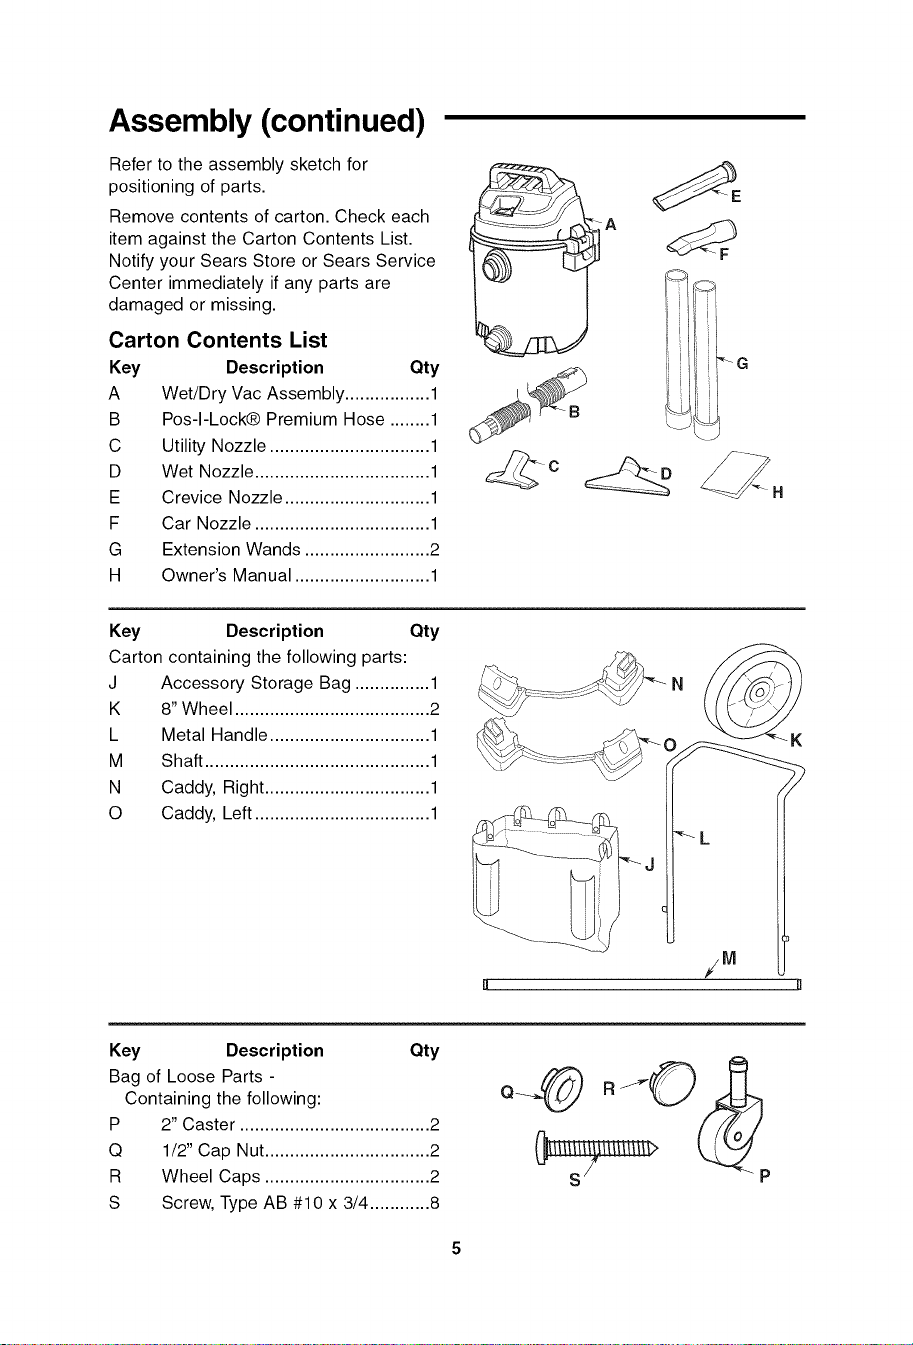
Refer to the assembly sketch for
positioning of parts.
Remove contents of carton. Check each
item against the Carton Contents List.
Notify your Sears Store or Sears Service
Center immediately if any parts are
damaged or missing.
Carton Contents List
Key Description Qty
A Wet/Dry Vac Assembly ................. 1
B Pos-I-Lock® Premium Hose ........ 1
C Utility Nozzle ................................ 1
D Wet Nozzle ................................... 1
E Crevice Nozzle ............................. 1
F Car Nozzle ................................... 1
G Extension Wands ......................... 2
H Owner's Manual ........................... 1
_A
Key Description Qty
Carton containing the following parts:
J
K
L
M
N
O
Accessory Storage Bag ............... 1
8" Wheel ....................................... 2
Metal Handle ................................ 1
Shaft ............................................. 1
Caddy, Right ................................. 1
Caddy, Left ................................... 1
Key Description Qty
Bag of Loose Parts -
Containing the following:
P 2" Caster ...................................... 2
Q 1/2" Cap Nut................................. 2
R Wheel Caps ................................. 2
S Screw, Type AB #10 x 3/4 ............ 8
P
Assembly (continued)
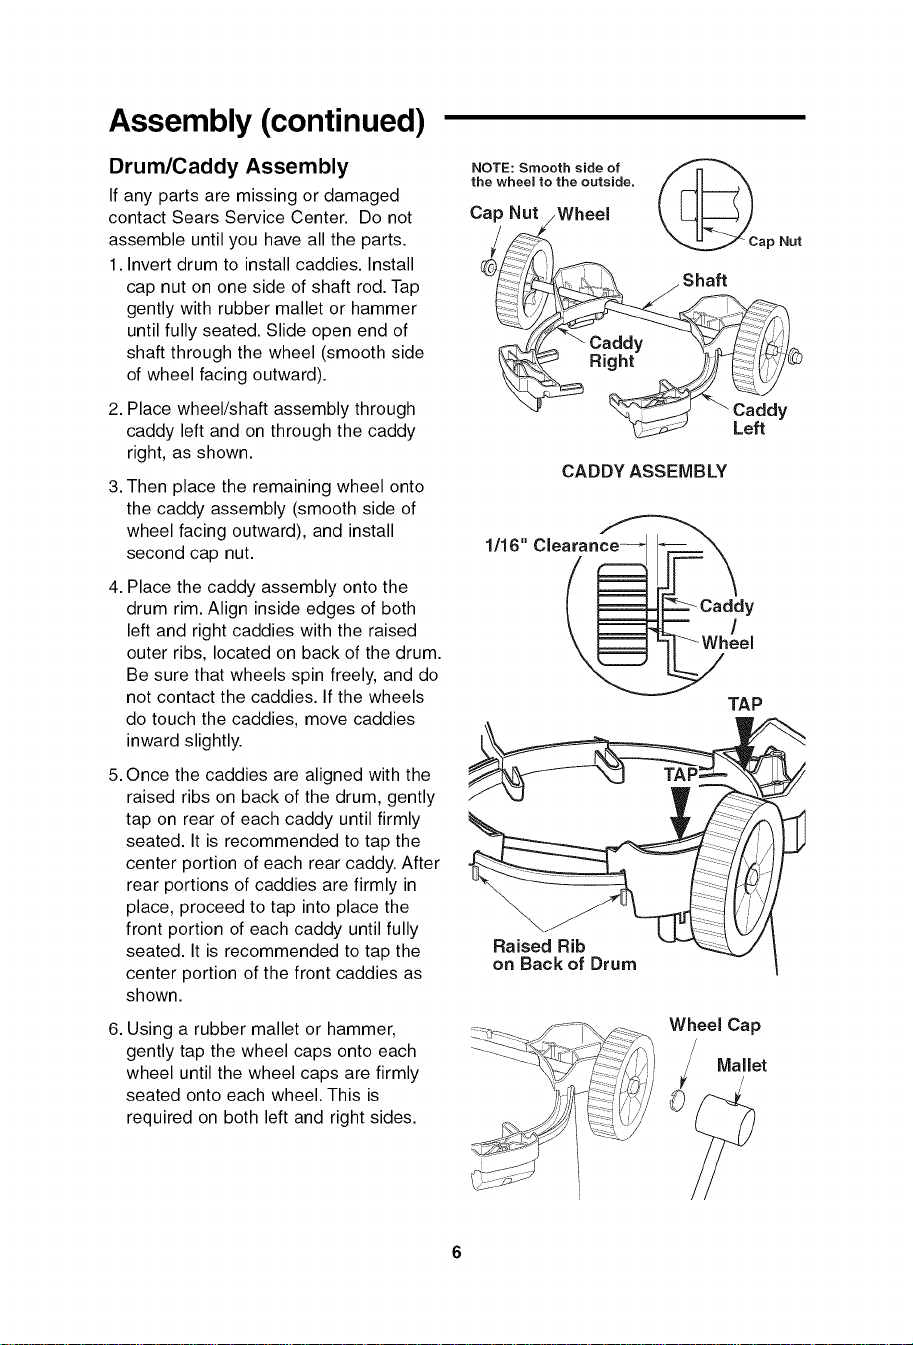
Drum/Caddy Assembly
If any parts are missing or damaged
contact Sears Service Center. Do not
assemble until you have all the parts.
1. Invert drum to install caddies. Install
cap nut on one side of shaft rod. Tap
gently with rubber mallet or hammer
until fully seated. Slide open end of
shaft through the wheel (smooth side
of wheel facing outward).
2. Place wheel/shaft assembly through
caddy left and on through the caddy
right, as shown.
3. Then place the remaining wheel onto
the caddy assembly (smooth side of
wheel facing outward), and install
second cap nut.
4. Place the caddy assembly onto the
drum rim. Align inside edges of both
left and right caddies with the raised
outer ribs, located on back of the drum.
Be sure that wheels spin freely, and do
not contact the caddies. If the wheels
do touch the caddies, move caddies
inward slightly.
5. Once the caddies are aligned with the
raised ribs on back of the drum, gently
tap on rear of each caddy until firmly
seated. It is recommended to tap the
center portion of each rear caddy. After
rear portions of caddies are firmly in
place, proceed to tap into place the
front portion of each caddy until fully
seated. It is recommended to tap the
center portion of the front caddies as
shown.
6. Using a rubber mallet or hammer,
gently tap the wheel caps onto each
wheel until the wheel caps are firmly
seated onto each wheel. This is
required on both left and right sides.
NOTE: Smooth side of
the wheem to the outside.
Cap Nut sWheel
@Cap Nut
CADDYASSEMBLY
Y
/
TAP
Raised Rib
on Back of Drum
Wheel Cap
IVlallet
Assembly (continued)
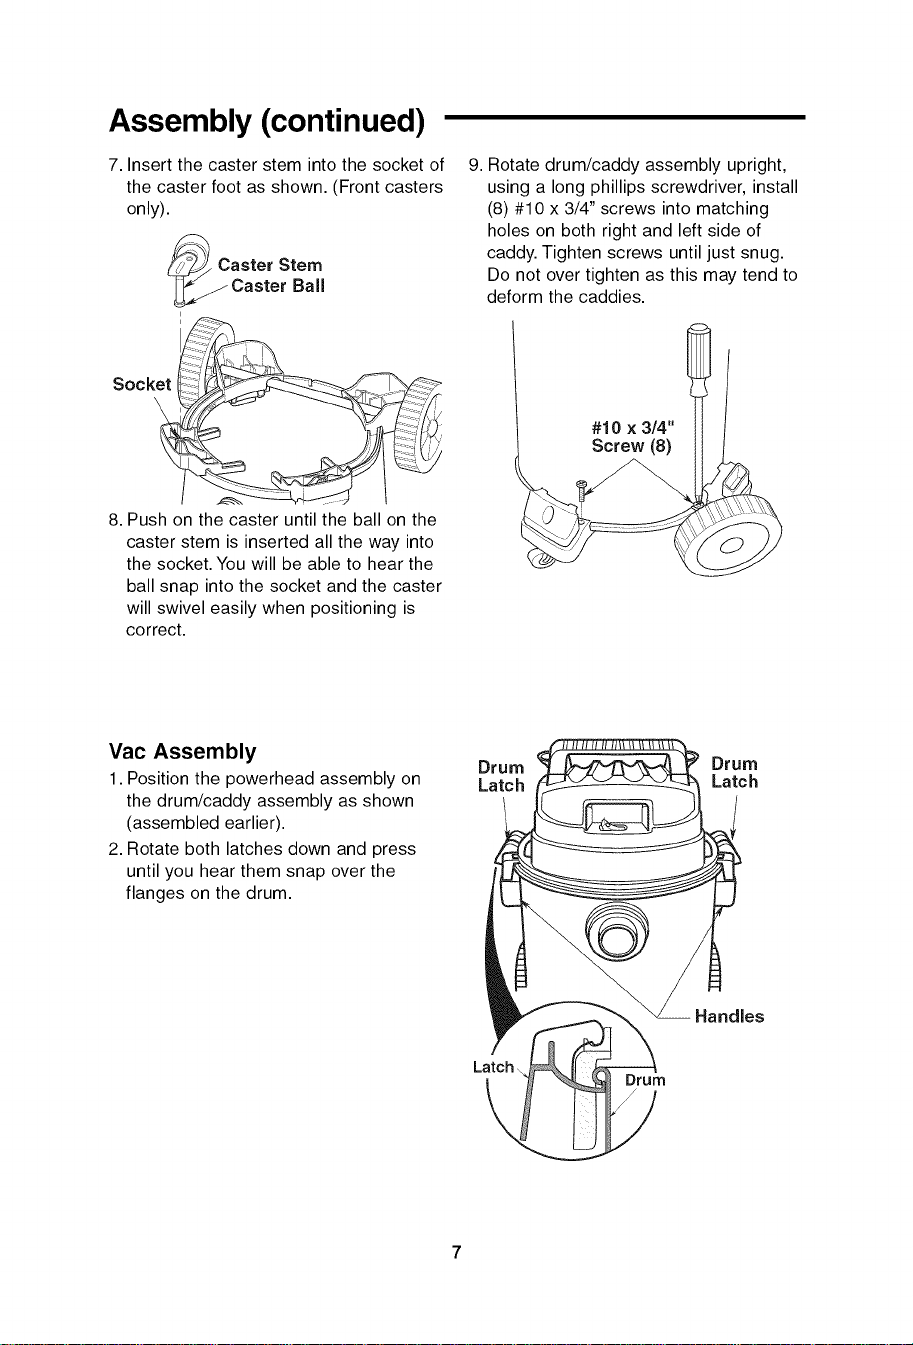
7. Insert the caster stem into the socket of
the caster foot as shown. (Front casters
only).
Caster Stem
Caster Ball
i
Socket _:_
8. Push on the caster until the ball on the
caster stem is inserted all the way into
the socket. You will be able to hear the
ball snap into the socket and the caster
will swivel easily when positioning is
correct.
9. Rotate drum/caddy assembly upright,
using a long phillips screwdriver, install
(8) #10 x 3/4" screws into matching
holes on both right and left side of
caddy. Tighten screws until just snug.
Do not over tighten as this may tend to
deform the caddies.
#10 x 3/4"
Screw (8)
Vac Assembly
1. Position the powerhead assembly on
the drum/caddy assembly as shown
(assembled earlier).
2. Rotate both latches down and press
until you hear them snap over the
flanges on the drum.
Drum Drum
Latch Latch
Latch.
Drum
Assembly (continued)
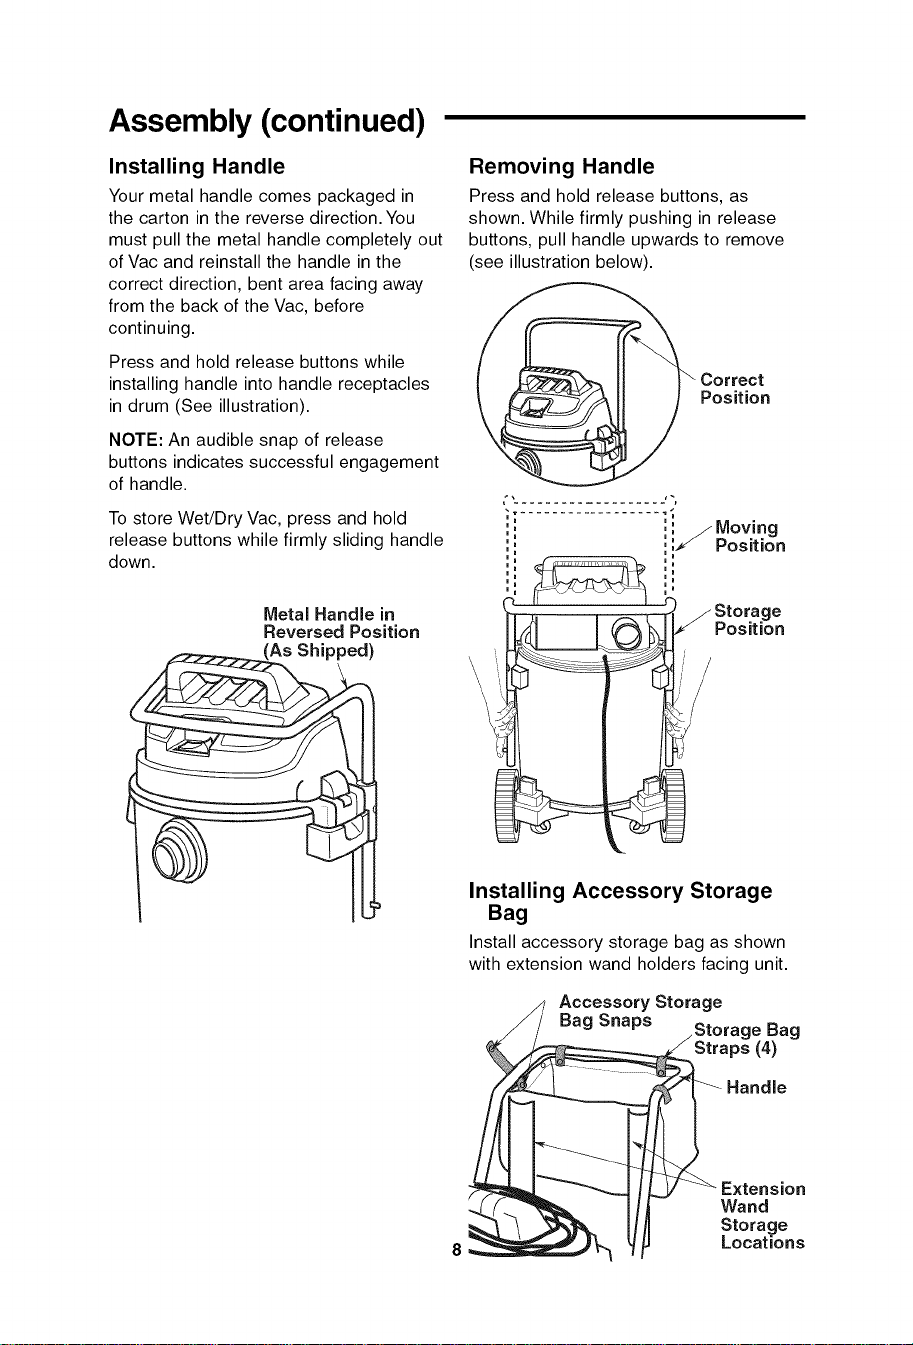
Installing Handle
Your metal handle comes packaged in
the carton in the reverse direction. You
must pull the metal handle completely out
of Vac and reinstall the handle in the
correct direction, bent area facing away
from the back of the Vac, before
continuing.
Press and hold release buttons while
installing handle into handle receptacles
in drum (See illustration).
NOTE: An audible snap of release
buttons indicates successful engagement
of handle.
To store Wet/Dry Vac, press and hold
release buttons while firmly sliding handle
down.
Metal Handle in
Reversed Position
Removing Handle
Press and hold release buttons, as
shown. While firmly pushing in release
buttons, pull handle upwards to remove
(see illustration below).
Correct
Position
........... I"
i ........ i i_ Moving
i' ',',_/Position
i' !,
,,, ,,,
q Storage
Position
\
Installing Accessory Storage
Bag
Install accessory storage bag as shown
with extension wand holders facing unit.
Accessory Storage
Bag Snaps Bag
Straps (4)
Handle
Wand
Storage
Locations
Assembly (continued)
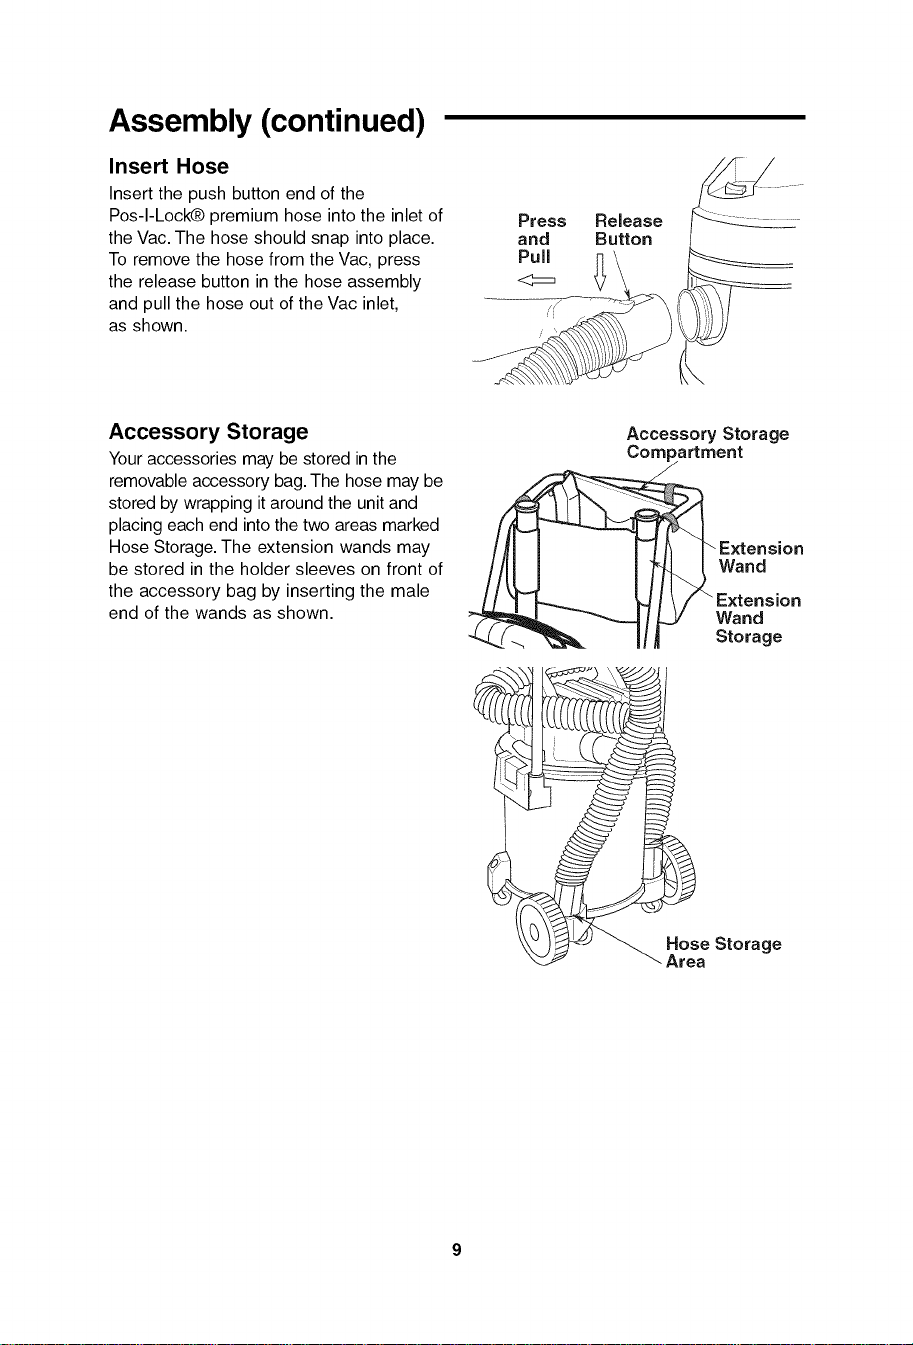
Insert Hose
Insert the push button end of the
Pos-I-Lock® premium hose into the inlet of
the Vac. The hose should snap into place.
To remove the hose from the Vac, press
the release button in the hose assembly
and pull the hose out of the Vac inlet,
as shown.
Press
and
\
Accessory Storage
Your accessories may be stored in the
removable accessory bag. The hose may be
stored by wrapping it around the unit and
placing each end into the two areas marked
Hose Storage. The extension wands may
be stored in the holder sleeves on front of
the accessory bag by inserting the male
end of the wands as shown.
Accessory Storage
Corn )artment
Wand
Wand
Storage
Storage
........\ii]7.......
Operation
_, WARNING: To reduce the risk of fire, explosion, or damage to Vac:
• Do not leave Vac running while unattended - you may fail to notice important signs
indicating abnormal operation such as loss of suction, debris/liquid exiting
exhaust, or abnormal motor noises. Immediately stop using Vac if you notice
these signs.
• Do not leave Vac plugged-in when not in use.
• Do not continue running when float has cut off suction.
• Do not operate Vac in areas with flammable gases, vapors or explosive dust in the
air. Sparks inside the motor can ignite airborne flammables. Flammable gases
and vapors include: lighter fluid, solvent-type cleaners, oil-based paints, gasoline,
alcohol, or aerosol sprays. Flammable dusts include: coal, magnesium,
aluminum, grain, or gun powder.
• Do not vacuum up explosive dusts, flammable liquids, or hot ashes.
• Do not use Vac as a sprayer.
WARNING: To reduce the risk of electric shock or injury:
• Do not expose to rain or allow liquid to enter motor compartment. Store indoors.
• Do not handle plug, switch, or Vac with wet hands.
• Do not service Vac while it is plugged-in. If your Vac is not working as it should,
has missing parts, has been dropped, damaged, left outdoors, or dropped into
water, return it to an independent service center or call customer service.
• When using an extension cord, use only outdoor-rated cords that are in good
condition. Do not allow the connection to come into contact with liquid.
• Do not vacuum toxic materials to reduce the risk of inhaling the vapors or dust.
Polarized Plug
To reduce the risk of electric shock, this
Vac has a polarized plug (one blade is
wider than the other). This plug will fit in a
polarized outlet only one way. If the plug
does not fit fully in the outlet, reverse the
plug. If it still does not fit, contact a
qualified electrician to install the proper
outlet. Do not change the plug in any way.
After you plug the power cord into the
outlet, turn the unit on by pushing the
switch from position "0" to position "1".
The symbols used on the switch actuator
are international "On & Off" symbols:
Vacuuming Dry Materials
1. The filter must always be in correct
position to reduce the risk of leaks and
possible damage to Vac.
2. Your Wet/Dry Vac comes with the
17907 Filter installed. When using your
Vac to pick up very fine dust, it will be
necessary for you to empty the drum
and clean the filter at more frequent
intervals to maintain peak Vac
performance.
NOTE: A dry filter is necessary to pick up
dry material. If you use your Vac to pick
up dust when the filter is wet, the filter will
clog quickly and be very difficult to clean.
= OFF I= ON
10

Operation (continued)
Vacuuming Liquids
WARNING: Do not operate without
filter cage and float, as they prevent
liquid from entering the impeller and
damaging the motor.
1. When picking up small amounts of
liquid the filter may be left in place.
2. When picking up large amounts of
liquid we recommend that the filter be
removed. If the filter is not removed, it
will become saturated and misting may
appear in the exhaust.
3. When the liquid in the drum reaches a
predetermined level, the float
mechanism will rise automatically to cut
off air-flow. When this happens, turn off
the Vac, unplug the power cord, and
empty the drum. You will know that the
float has risen because Vac airflow
ceases and the motor noise will become
higher in pitch, due to increased motor
speed.
4. After using the Vac to pick up liquids, the
filter must be dried to reduce the risk of
possible mildew and damage to the filter.
IMPORTANT: To reduce the risk of
damage to the Vac do not run motor with
float in raised position.
Emptying the Drum
1. The Vac comes equipped with a drain
for easy emptying of liquids. Simply
unscrew the drain cap and lift the
opposite side slightly to empty the
drum.
2. Another option is to remove the
powerhead assembly.
3. Lay powerhead assembly aside on a
clean area while emptying drum.
4. Dump the drum contents into the
proper waste disposal container.
,_k WARNING: To reduce the risk of
back injury or falls, do not lift a Vac
heavy with liquid or debris. Scoop or
drain enough contents out to make the
Vac light enough to lift comfortably.
11
Operation (continued)
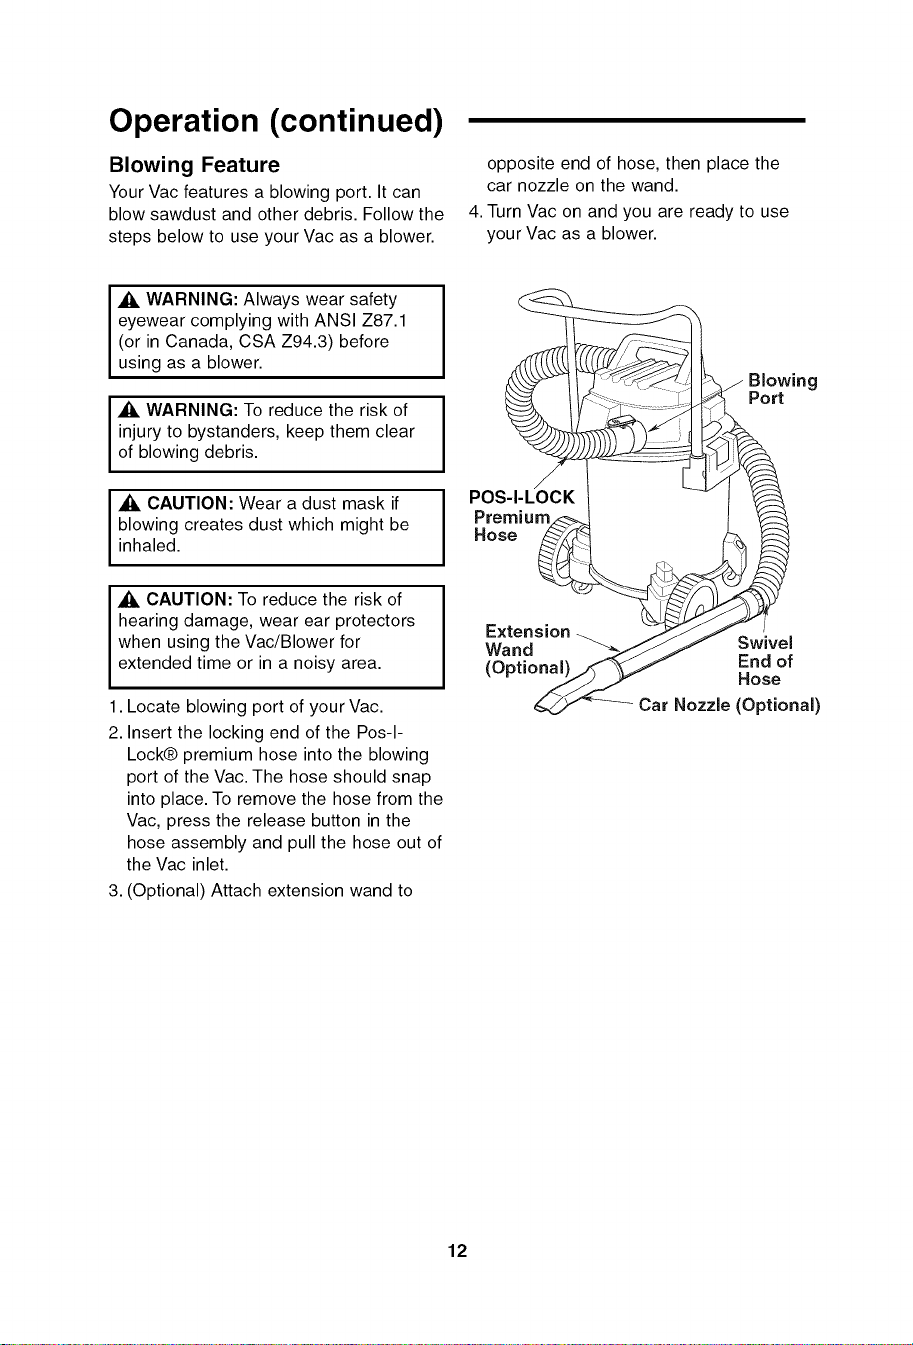
Blowing Feature
Your Vac features a blowing port. It can
blow sawdust and other debris. Follow the
steps below to use your Vac as a blower.
opposite end of hose, then place the
car nozzle on the wand.
4. Turn Vac on and you are ready to use
your Vac as a blower.
_, WARNING: Always wear safety
eyewear complying with ANSI Z87.1
(or in Canada, CSA Z94.3) before
using as a blower.
,A. WARNING: To reduce the risk of
injury to bystanders, keep them clear
of blowing debris.
_, CAUTION: Wear a dust mask if
blowing creates dust which might be
inhaled.
,A. CAUTION: To reduce the risk of
hearing damage, wear ear protectors
when using the Vac/Blower for
extended time or in a noisy area.
1. Locate blowing port of your Vac.
2. Insert the locking end of the Pos-I-
Lock® premium hose into the blowing
port of the Vac. The hose should snap
into place. To remove the hose from the
Vac, press the release button in the
hose assembly and pull the hose out of
the Vac inlet.
3. (Optional) Attach extension wand to
//
BOWng
........ i¸ i J
Extension _ -_--j/= t.
Car Nozzle (Optional)
12
Maintenance
Filter
NOTE: The filter is made of high quality
paper designed to stop very small
particles of dust. The filter can be used
for dry pick up or small amounts of liquid.
Handle the filter carefully when removing
to clean or installing it. Creases in the
filter pleats may occur from installation
but will not affect the performance of the
filter.
Filter Cleaning
Your filter should be cleaned often to
maintain peak Vac performance.
Be sure to dry the filter before storing or
picking up dry debris.
IMPORTANT: After cleaning, check the
filter for tears or small holes. Do not use a
filter with holes or tears in it. Even a small
hole can cause a lot of dust to come out
of your Vac. Replace it immediately.
Cleaning A Dry Filter
Filter Removal and Replacement
IMPORTANT: To reduce the risk of
damage to the blower wheel and motor,
always reinstall the filter before using the
Vac for dry material pickup.
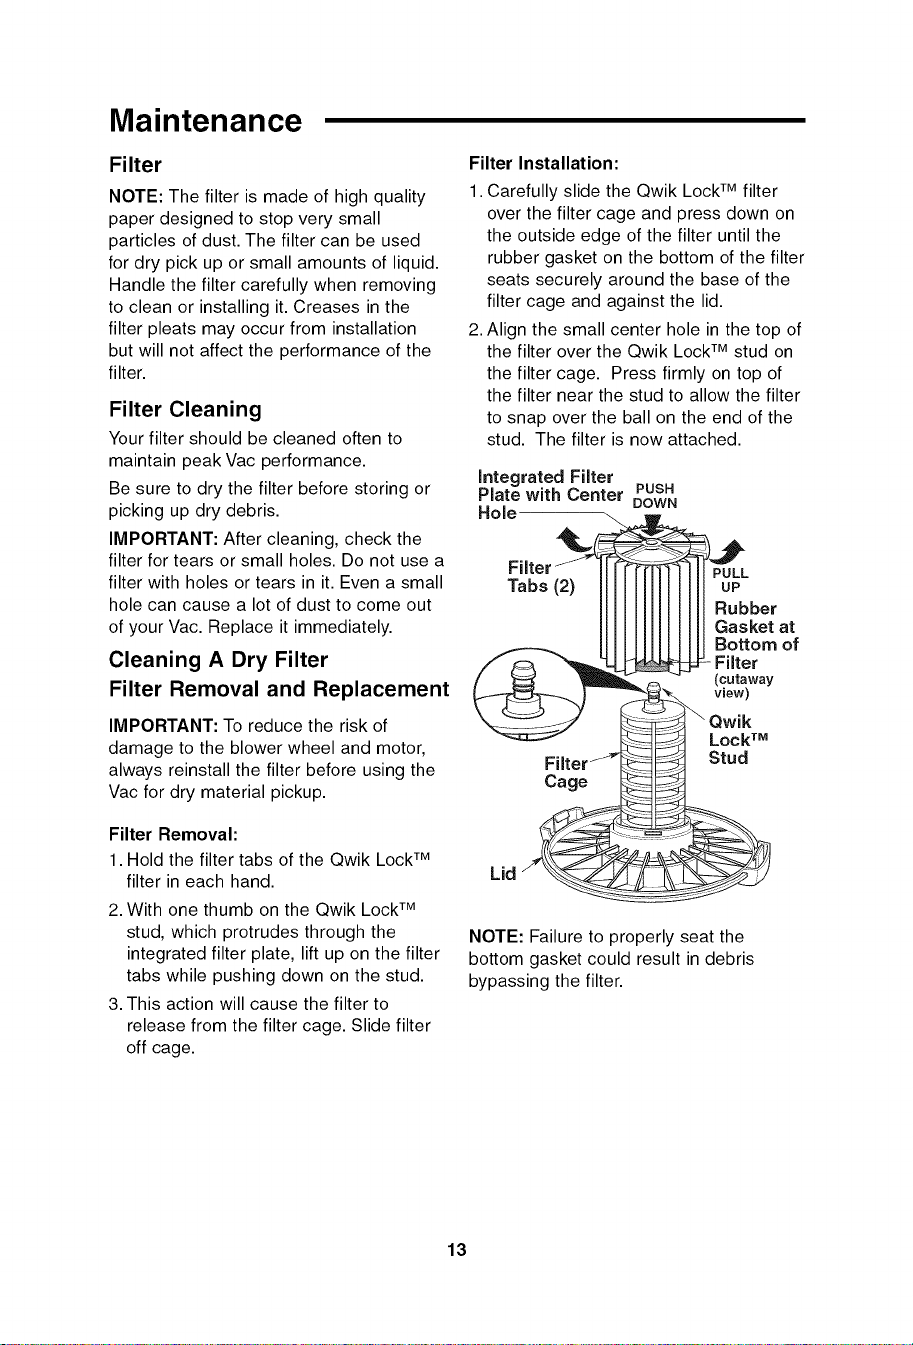
Filter Removal:
1. Hold the filter tabs of the Qwik LockTM
filter in each hand.
2. With one thumb on the Qwik Lock TM
stud, which protrudes through the
integrated filter plate, lift up on the filter
tabs while pushing down on the stud.
3. This action will cause the filter to
release from the filter cage. Slide filter
off cage.
Filter Installation:
1. Carefully slide the Qwik LockTM filter
over the filter cage and press down on
the outside edge of the filter until the
rubber gasket on the bottom of the filter
seats securely around the base of the
filter cage and against the lid.
2. Align the small center hole in the top of
the filter over the Qwik Lock TM stud on
the filter cage. Press firmly on top of
the filter near the stud to allow the filter
to snap over the ball on the end of the
stud. The filter is now attached.
Integrated Filter
Plate with Center PUSH
DOWN
Hole
Tabs(2)
Cage
Lid
(cutaway
view)
wik
LockTM
Stud
NOTE: Failure to properly seat the
bottom gasket could result in debris
bypassing the filter.
13
Maintenance (continued)
Cleaning A Dry Filter
Some removal of dry debris can be
accomplished without removing the filter
from the Vac. Slap your hand on top of
the lid while the Vac is turned off.
For best cleaning results due to
accumulated dust, clean the filter in an
open area. Cleaning SHOULD be done
outdoors and not in the living quarters.
After filter removal from Vac, remove the
dry debris by gently tapping filter against
the inside wall of your dust drum. The
debris will loosen and fall.
For thorough cleaning of dry filter with
fine dust (no debris), run water through it
as described under "Cleaning A Wet
Filter"
Cleaning A Wet Filter
After filter is removed, run water through
the filter from a hose or spigot. Take care
that water pressure from the hose is not
strong enough to damage filter.
Cleaning and Disinfecting the
Wet/Dry Vac
To keep your Wet/Dry Vac looking its
best, clean the outside with a cloth
dampened with warm water and mild
soap.
To clean the drum:
1. Dump debris out.
2. Wash drum thoroughly with warm
water and mild soap.
3. Wipe out with dry cloth.
Before prolonged storage or as needed
(i.e.; waste water pick up) the drum
should be disinfected.
To disinfect the drum:
1. Pour 1 gallon of water and 1 teaspoon
chlorine bleach into the drum.
2. Let solution stand for 20 minutes,
carefully swishing every few minutes,
making sure to wet all inside surfaces
of the drum.
3. Empty drum after 20 minutes. Rinse
with water until bleach smell is gone.
Allow drum to dry completely before
sealing the motor on the drum.
Casters and Wheels
Should your cart squeak or become hard
to roll, you should place two or three
drops of general purpose oil on each
wheel at the axle. If your casters are
noisy, you may put a drop of oil on the
roller shaft to make them quieter.
Frame and Handles
Your metal handle is painted to prevent
rust, however, liquids and corrosive
debris should be wiped off with a soft
cloth should they come in contact with
the handle.
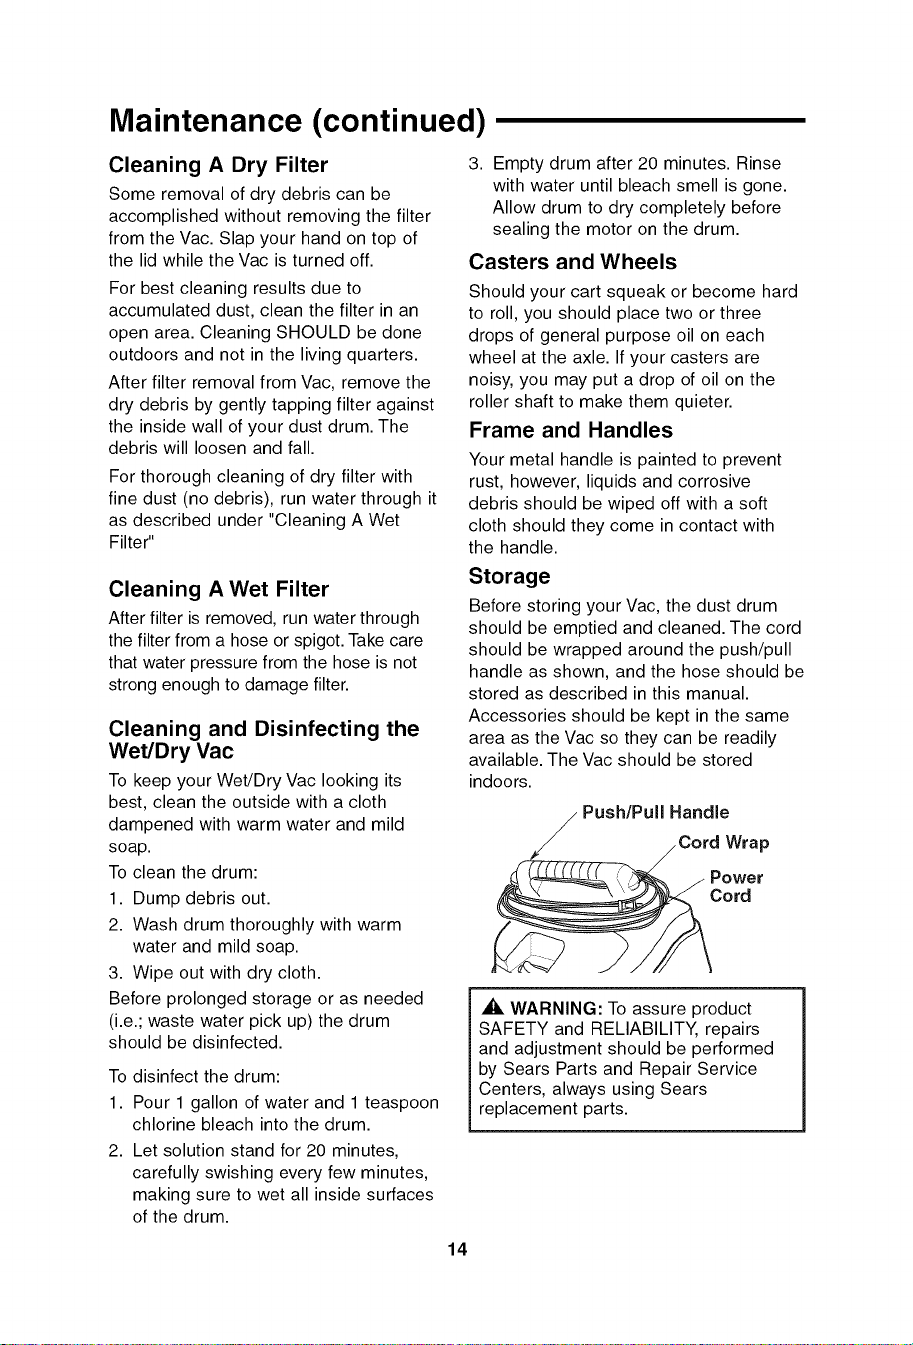
Storage
Before storing your Vac, the dust drum
should be emptied and cleaned. The cord
should be wrapped around the push/pull
handle as shown, and the hose should be
stored as described in this manual.
Accessories should be kept in the same
area as the Vac so they can be readily
available. The Vac should be stored
indoors.
Push/Pull Handle
Cord
_, WARNING: To assure product
SAFETY and RELIABILITY, repairs
and adjustment should be performed
by Sears Parts and Repair Service
Centers, always using Sears
replacement parts.
14

Notes
15
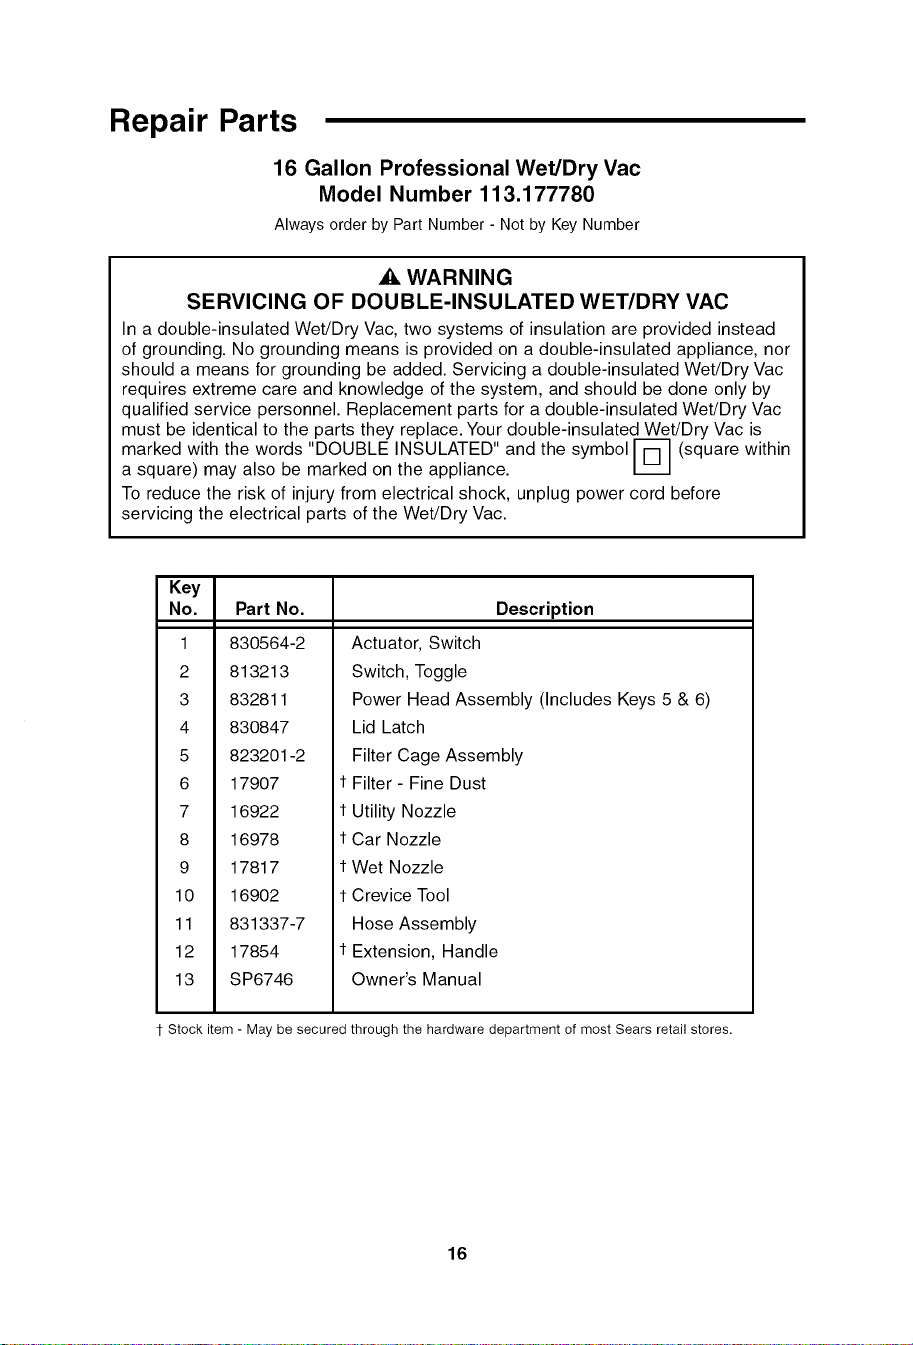
Repair Parts
16 Gallon Professional Wet/Dry Vac
Model Number 113.177780
Alwaysorder by Part Number- Notby Key Number
WARNING
SERVICING OF DOUBLE-INSULATED WET/DRY VAC
In a double-insulated Wet/Dry Vac, two systems of insulation are provided instead
of grounding. No grounding means is provided on a double-insulated appliance, nor
should a means for grounding be added. Servicing a double-insulated Wet/Dry Vac
requires extreme care and knowledge of the system, and should be done only by
qualified service personnel. Replacement parts for a double-insulated Wet/Dry Vac
must be identical to the parts they replace. Your double-insulated Wet/Dry Vac is
marked with the words "DOUBLE INSULATED" and the symbol FN- _(square within
a square) may also be marked on the appliance.
To reduce the risk of injury from electrical shock, unplug power cord before
servicing the electrical parts of the Wet/Dry Vac.
Key
No. Part No.
1 830564-2
2 813213
3 832811
4 830847
5 823201-2
6 17907
7 16922
8 16978
9 17817
10 16902
11 831337-7
12 17854
13 SP6746
1-
1-
1-
1-
1-
Description
Actuator, Switch
Switch, Toggle
Power Head Assembly (Includes Keys 5 & 6)
Lid Latch
Filter Cage Assembly
Filter- Fine Dust
Utility Nozzle
Car Nozzle
Wet Nozzle
Crevice Tool
Hose Assembly
Extension, Handle
Owner's Manual
1 Stock item - May be secured through the hardware department of most Sears retail stores.
16
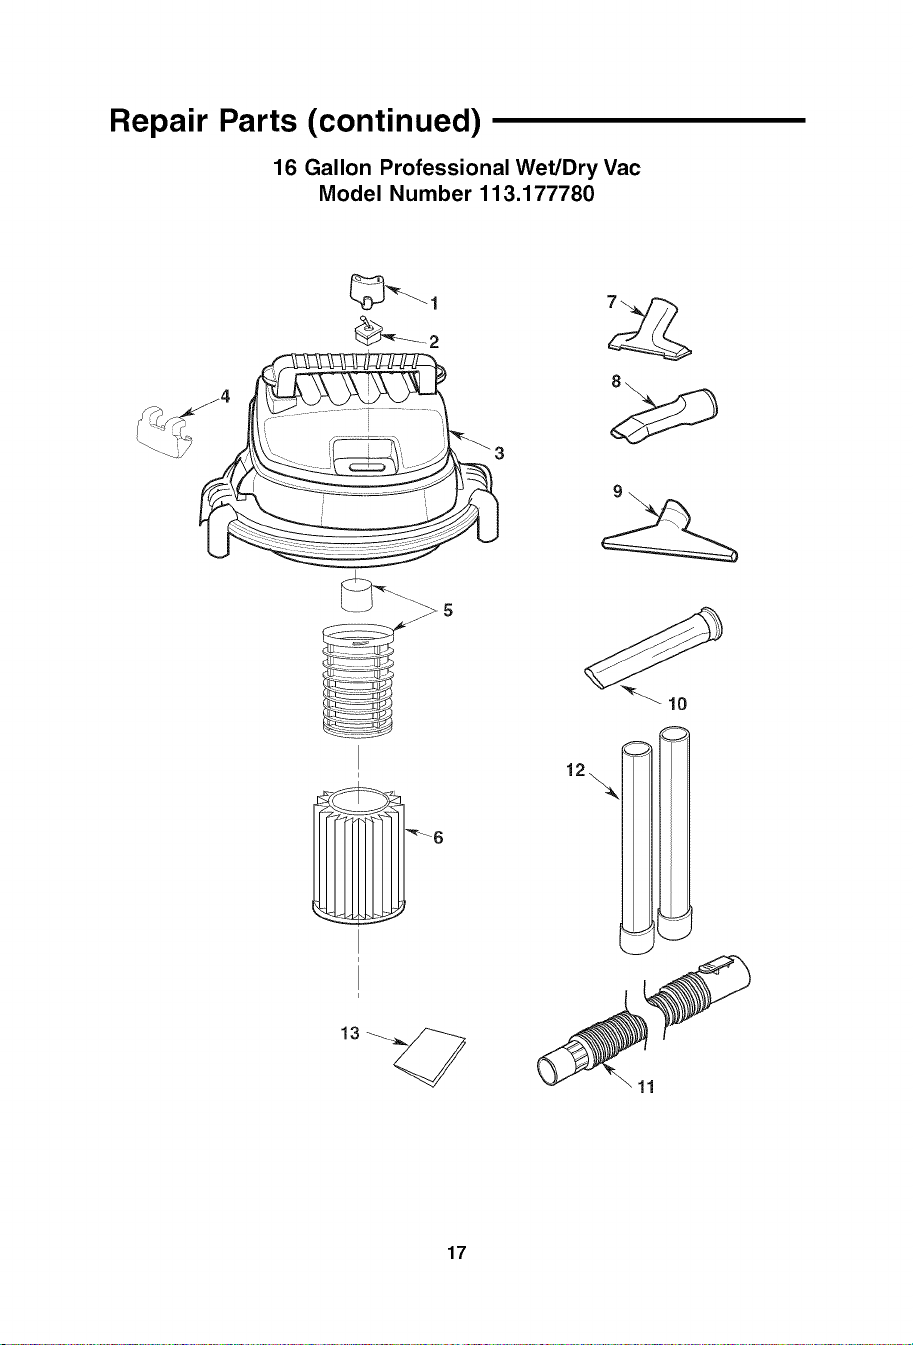
Repair Parts (continued)
16 Gallon Professional Wet/Dry Vac
Model Number 113.177780
11
17
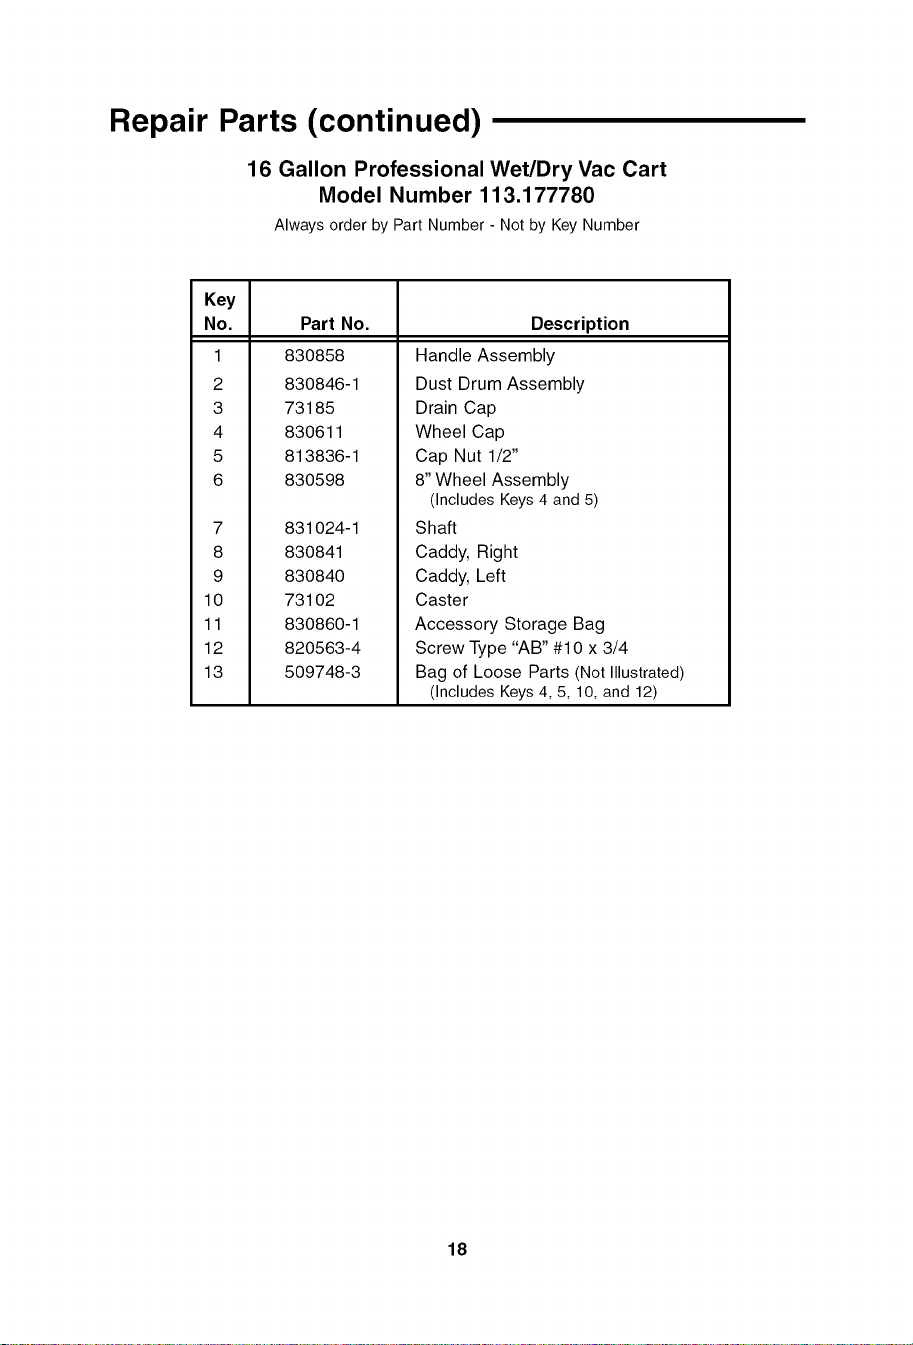
Repair Parts (continued)
16 Gallon Professional Wet/Dry Vac Cart
Model Number 113.177780
Alwaysorder by Part Number- Notby Key Number
Key
No. Part No.
1 830858
2 830846-1
3 73185
4 830611
5 813836-1
6 830598
7 831024-1
8 830841
9 830840
10 73102
11 830860-1
12 820563-4
13 509748-3
Description
Handle Assembly
Dust Drum Assembly
Drain Cap
Wheel Cap
Cap Nut 1/2"
8" Wheel Assembly
(Includes Keys4 and 5)
Shaft
Caddy, Right
Caddy, Left
Caster
Accessory Storage Bag
Screw Type "AB" #10 x 3/4
Bag of Loose Parts (Not Illustrated)
(Includes Keys4, 5, 10, and 12)
18
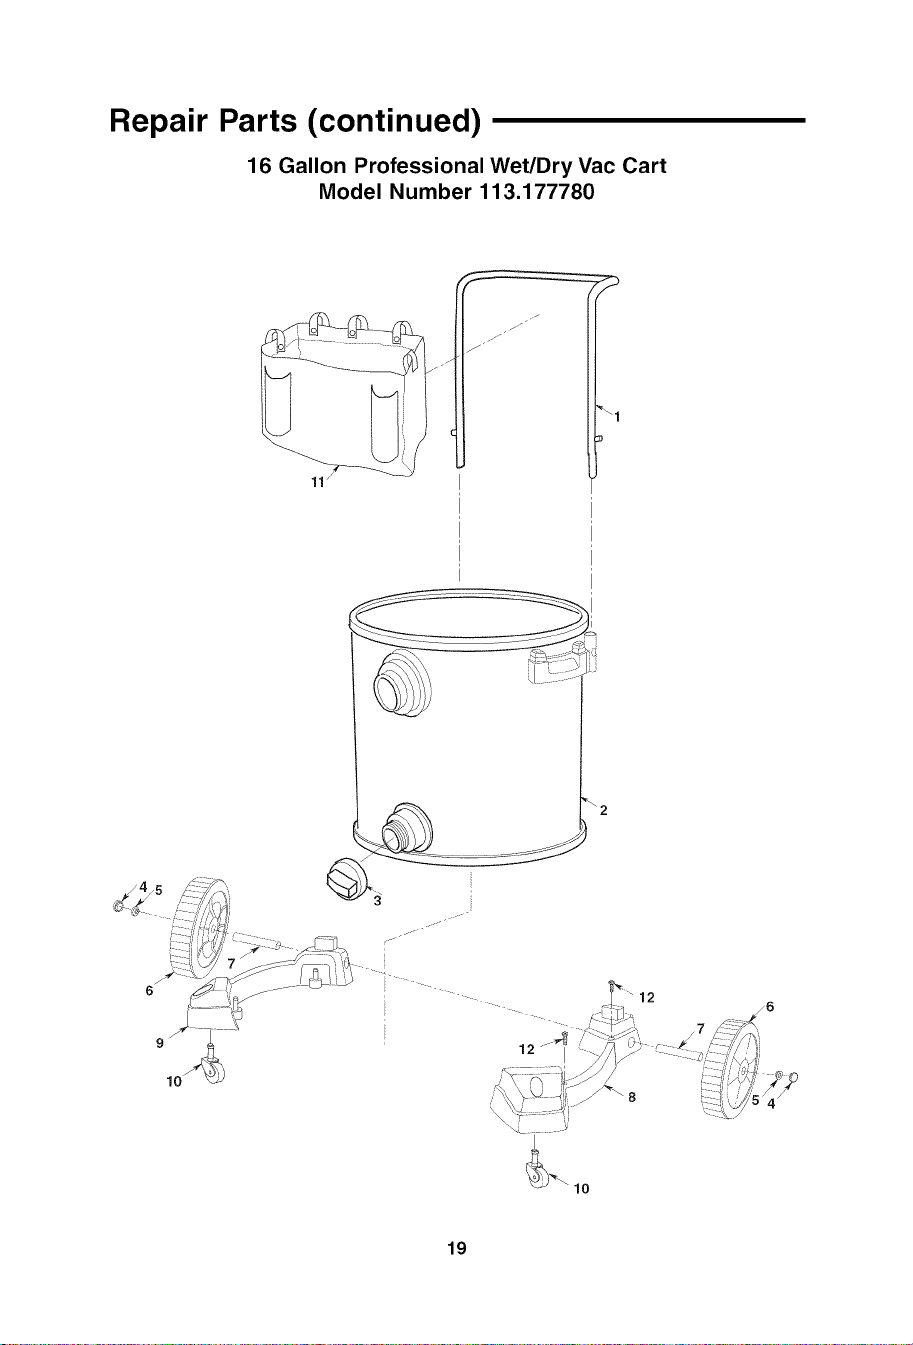
Repair Parts (continued)
16 Gallon Professional Wet/Dry Vac Cart
Model Number 113.177780
JJ
f
\1
10
12
10
19

Notes
20
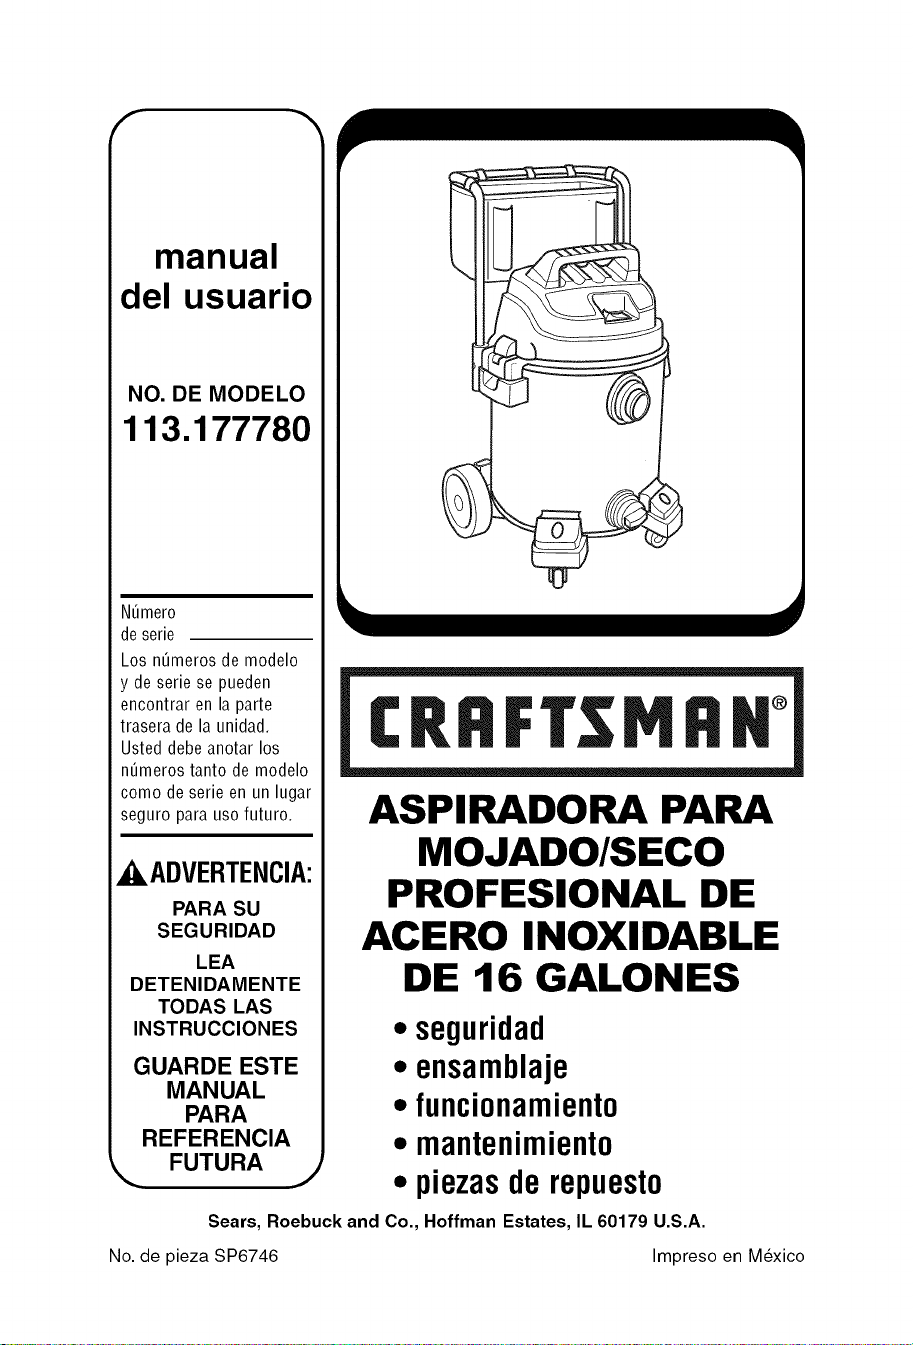
manual
del usuario
NO. DE MODELO
113.177780
N_mero
de serie
Los n_meros de modelo
y de serie se pueden
encontrar en la parte
trasera de la unidad.
Usted debeanotar los
n_meros tanto de modelo
como de serie en un lugar
seguro para uso futuro.
,AADVERTENCIA:
PARA SU
SEGURIDAD
LEA
DETENIDAMENTE
TODAS LAS
INSTRUCCIONES
GUARDE ESTE
MANUAL
PARA
REFERENCIA
CRRFT MFIH°
ASPIRADORA PARA
MOJADO/SECO
PROFESIONAL DE
ACERO INOXIDABLE
DE 16 GALONES
• seguridad
• ensamblaje
• funcionamiento
• mantenimiento
FUTURA
J • piezasde repuesto
Sears, Roebuck and Co., Hoffman Estates, IL 60179 U.S.A.
No. de pieza SP6746 Impreso en Mexico
Garantia
GarantiacompletaCraftsmandeunafio
Si esteproductoCraftsmanfalla debidoa un defectode material o defabricaciOndentrodel plazo
de unafio a partirde la fechade compra,devuOlvaloa cualquiertiendaSears, Centrode Servicio
Searsu otropuntode venta Craftsmanpara quesea reparadogratuitamente(o reemplazadosi la
reparaciOnresultaimposible).
Estagarantiase aplica solamente durante90 diasa partirde la fechade compra,si esteproducto
seutiliza algunavez parafinescomercialeso de alquiler.
Esta garantia no incluye las bolsas ni los filtros, que son piezas perecederas que se pueden
desgastarporcausadel usonormal dentrodel periodode garantia.
Estagarantiale confierea ustedderechoslegales especificosyes posibleque ustedtengatambiOn
otrosderechosquevariande unestadoa otro.
• Sears, Roebuckand Co., HoffmanEstates, IL 60179
INSTRUCCIONESDESEGURIDADIMPORTANTES
Laseguridades unacombinaciOndesentido comQn,
permaneceralertay sabercOmofunciona la
aspiradora paramojado/seco("la aspiradora").
Palabrasdeserialdeseguridad
,_ PELIGRO:indica unasituaciOnpeligrosa que,
si nose evita,causar_la muerte o lesiones graves.
,_ ADVERTENCIA:indica unasituaciOnpeligrosa
que,si nose evita, podria causarla muerte o lesiones
graves.
,_ PRECAUCI(_N:indica unasituaciOnpeligrosa
que,si nose evita, pudiera causarlesionesleveso
moderadas
Cuando utilice la aspiradora,sigasiempre las
precaucionesb_sicasde seguridad, incluyendo
las siguientes:
,A ADVERTENCIA-Pa,a
reducir el riesgo de incendio, sacudidas
el_ctricas o lesiones:
• Leay entiendaeste manualdel usuarioy todas las
etiquetas queest_ncolocadas enla aspiradora para
mojado/secoantes deutilizarla.
• Utilicela aspiradora _nicamentedela maneraque
se describe eneste manual.
• No deje laaspiradoraenmarcha mientrasest_
desatendida.Usted podria no notarse_ales
importantes queindiquen unfuncionamiento
anormal, talcomo p_rdidade succiOn,residuos o
liquido quesalenpor el escapeo ruidos anormales
del motor. Dejede usar laaspiradora inmedia-
tamente si observaestasse_ales.
• No abandonela aspiradoracuando est_enchufada.
Desench_feladel tomacorriente cuandono la est_
utilizandoy antesde realizarservicio de revision.
• Laschispas quese producenen elinterior del
motor puedenincendiar los vaporesinfiamables o
22
el polvo. Parareducir el riesgode incendio o
explosion: No use la aspiradoracercade liquidos,
gases,o polvos combustibles como gasolina u
otros combustibles, liquido encendedor,limpiado-
res, pinturasa basedeaceite, gas natural, hidrO-
geno, polvo decarbon, polvo de magnesio,polvo
dealuminio, polvode granos decerealo pOlvora.
• No recojacon laaspiradora nadaqueest_ardiendo
o humeando,como cigarrillos, fOsforoso cenizas
calientes.
• No recojacon laaspiradora polvo deparedde tipo
seconi cenizafria dechimenea u otros polvos finos
con unfiltro estAndar.Estos materialespueden
pasar por el filtro y serexpulsados devueltaal aire.
Utilice unfiltro parapolvo fino en lugar de unfiltro
estAndar.
• Parareducir el riesgode quese produzcanpeligros
parala salud causadospor vapores o polvo,no
recoja con laaspiradoramaterialestOxicos.
• Parareducir el riesgode descargasel_ctricas,no
expongala aspiradoraa la Iluvia ni deje queentren
liquidos enel compartimiento del motor. Guardela
aspiradoraen un lugarinterior.
• No permita quela aspiradora se utilicecomo un
juguete. Senecesitaprestar mMima atenciOn
cuandosea utilizadapor ni_os o cercade_stos.
• No use la aspiradoracon un filtro desgarrado osin
tenerel filtro instalado,exceptocuando recojacon
ellaliquidos de la maneraquese describe eneste
manual. Los residuossecosabsorbidos por el
impulsor podrian da_ar el motor oser expulsados
devuelta al aire.
• Apaguela aspiradoraantes dedesenchufarla.
• Parareducir el riesgode lesionesdebidasa un
arranqueaccidental,desenchufeel cordon de
energiaantes decambiar o limpiar el filtro.
• No desenchufela aspiradoratirando del cordon.
Paradesenchufarla,agarreel enchufey noel
cordon.
• Nouselaaspiradoraconelcordonda_ado,el
enchufeda_adouotraspiezasda_adas.Sila
aspiradoranofuncionacomodebe,lefaltanpiezas,
sehacaido,hasidoda_ada,sehadejadoala
intemperieosehacaidoalagua,Ilameaservicio
alcliente.
• Notiredelaaspiradorausandoelcord6nnilaIleve
porelcord6n,niuseelcordoncomoasa,nicierre
unapuertasobreelcord6n,nitiredelcord6nalre-
dedordebordesoesquinasafilados.Nopasela
aspiradoraenmarchasobreelcordon.Mantengael
cord6nalejadodelassuperficiescalientes.
• Nomanejeelenchufe,elinterruptorolaaspiradora
conlasmanosmojadas.
• Utilice0nicamentecordonesde extensi6nque
tengancapacidadnominal parauso a la intemperie.
Los cordones deextensi6nqueest_n enmalas
condiciones otengan un tama_o dealambre
demasiadopeque_opueden crearpeligros de
incendioy descargasel_ctricas.Parareducir el
riesgo deestos peligros, aseg0resedeque el
cord6n est_ enbuenascondiciones y queel liquido
no entreencontacto con la conexi6n. No utiliceun
cord6n de extensi6nque tenga conductores con un
diAmetromenor al calibre 16(AWG). Parareducir la
p_rdida depotencia, utilice uncordon deextensi6n
decalibre 14si la Iongitudes de 25 a50 pies,y de
calibre12 si la Iongitudes de50 pies o mAs.
• Estaaspiradoratieneaislamiento doble, Iocual
elimina lanecesidadde un sistema independiente
deconexi6n atierra. Utilice 0nicamentepiezasde
repuesto id_nticas.Lealas instruccionesde servicio
de revisionde lasaspiradorasparamojado/seco
con aislamientodoble.
• No ponga ning0n objetoen las aberturasdeventi-
laci6n. No recojanadacon laaspiradoracuando
cualquierade lasaberturasdeventilaci6n est_
bloqueada;mantengadichas aberturaslibres de
polvo, pelusa,pelo o cualquier cosaque pueda
reducir el flujo deaire.
• Mantengael pelo, la ropaholgada,los dedosy
todas laspares del cuerpo alejadosde lasaber-
turasy delas piezasm6viles.
• Parareducir el riesgodecaidas, tengacuidado
adicionalal limpiar enescaleras.
• Parareducir el riesgode lesionesde espaldao
caidas,no levanteunaaspiradora quepese mucho
debidoa quecontiene liquido o residuos. Saque
partedel contenidode la aspiradorao dr_nela
parcialmenteparahacer quesea Iosuficientemente
livianacomo parapoder levantarlac6modamente.
• Parareducir el riesgode lesionescorporales o
da_osa la aspiradora,utilice 0nicamente
accesorios recomendadospor Craftsman.
• Cuandoutilice la aspiradoracomo soplador:
Dirija la descargade airesolamente haciael Area
detrabajo.
No dirija el aire hacia las personasqueest_n
presentes.
Mantengaalejadosa los ni_os durantela
operaci6nde soplado.
No utilice elsoplador paratrabajosque no sean
soplar suciedady residuos.
No use laaspiradoracomo rociador.
Use protecci6n ocularde seguridad.
Parareducir elriesgode lesionesenlos ojos,use
protecci6noculardeseguridad.Lautilizaci6ndecual-
quieraspiradorautilitariaosopladorutilitariopuede
hacerque sesoplenobjetosextra_oshacialosojos,
Iocualpuedecausarda_osgravesen losojos.
Parareducir elriesgodeser golpeadooderribado
por unaaspiradoraqueest_ rodandobloqueelas
ruedasentodasuperficiedesigualo inclinada
,_, PRECAUCION:
• Para reducir el riesgo de daSosa la audici6n, use
protectores de oidos cuando utilice la aspiradora
durante muchas horas seguidas o cuando la
emplee en un Arearuidosa.
• Paraoperacionesquegeneranpolvo,use una
mascaraantipolvo.
• Las descargasde estAticason comunescuando
la humedad relativadel aire es baja.Si recoge
residuos finos con laaspiradora,se puede
depositarcarga estAticaen la manguerao en la
aspiradora.El mejor remediopara reducir la
frecuenciade lasdescargasdeestAticaensu casa
o cuandouse estaaspiradora es aSadirhumedad
al aire con un humidificador.
Sigalas siguientes advertenciasque aparecenenla
cajadel motor de laaspiradora.
._ ISLAMIENTODOBLE.NOSEREQUlERE
CONEXlONATIERRA.
CUANDOHAGASERVICIO DEREVISIONDE
LAASPIRADORA,UTILICE0NICAMENTEPIEZASDE
REPUESTOIDt_NTICAS.
,_ ADVERTENCIA:Parasupropiaseguridad,lea
yentiendaelmanualdeloperador.Notengaen
marchala aspiradoradesatendida.Norecoja
cenizascalientes,carb6ncaliente,materiales
t6xicosniinflamablesniotrosmateriales
peligrosos.Nouselaaspiradoraalrededorde
liquidosovaporesexplosivos.
,_. ADVERTENCIA:Parareducirel riesgode
sacudidasel6ctricas,noexpongala aspiradoraa
laIluviay almac6nelaeninteriores.
GUARDEESTEMANUAL
23
Introducci6n
Estaaspiradoraparamojado/secoest,.dise_ada
solamenteparausodom6stico.Sepuedeutilizar
pararecogermaterialesmojadososecosy se
puedeusarcomosoplador.
Leaestemanualdeloperadorparafamiliarizarse
conlascaracterfsticasdelproductoy paraentender
la utilizaci6nespecificadesu nuevaaspiradorapara
mojado/seco.
Indice
Afliculo P_gina
Garantia ........................... 22
Instruccionesde seguridad importantes . .. 22
Introducci6n ........................ 24
indice ............................. 24
Ensamblaje.......................... 24
Contenidode la cajadecart6n .......... 25
Ensamblajedeltambor/base de soporte.. 26
Ensamblajedela aspiradora ............ 27
Instalaci6n del asa .................. 28
Remoci6n del asa .................. 28
Instalaci6n de la bolsa de
almacenamiento de accesorios ...... 28
Introduzcala manguera................ 29
Almacenamientodeaccesorios ......... 29
Funcionamiento ....................... 30
Enchufepolarizado .................. 30
Recogidade materialessecos
con laaspiradora ................... 30
Articulo P_gina
Recogidade liquidos con la aspiradora.... 31
Vaciadodeltambor ................... 31
Dispositivode soplado ................ 32
Mantenimiento ........................ 33
Filtro ............................... 33
Limpiezadelfiltro .................... 33
Remoci6n y reemplazodelfiltro ........ 33
Limpiezade unfiltro seco .............. 34
Limpiezade unfiltro mojado............ 34
Limpiezay desinfecci6nde laaspiradora
paramojado/seco .................. 34
Ruedecillasy ruedas................. 34
Armaz6n y asas .................... 34
Almacenamiento...................... 34
Piezasde repuesto ..................... 36
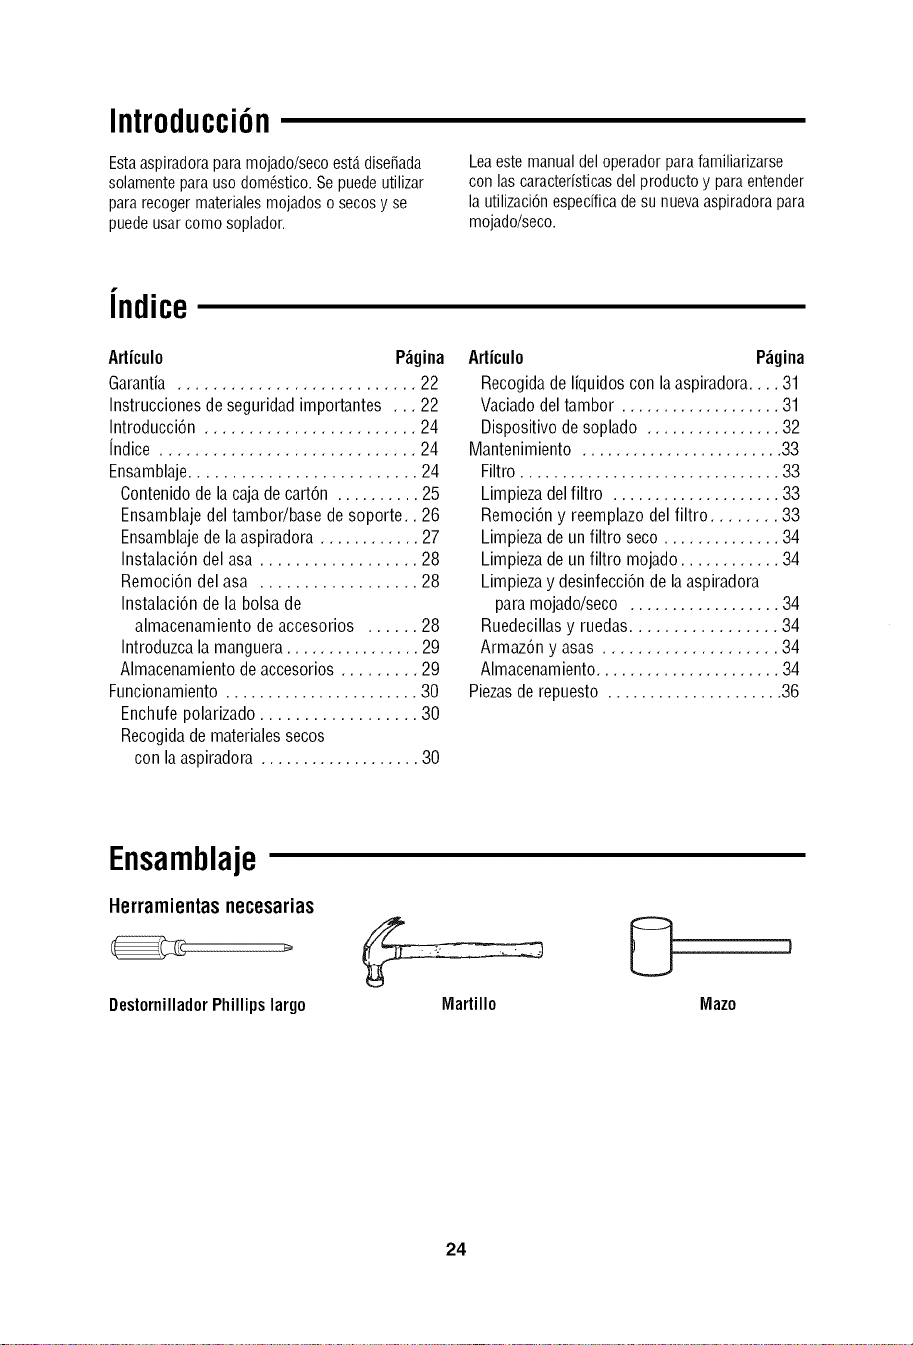
Ensamblaje
Herramientasnecesarias
DestornilladorPhillips largo
Martillo Maze
24
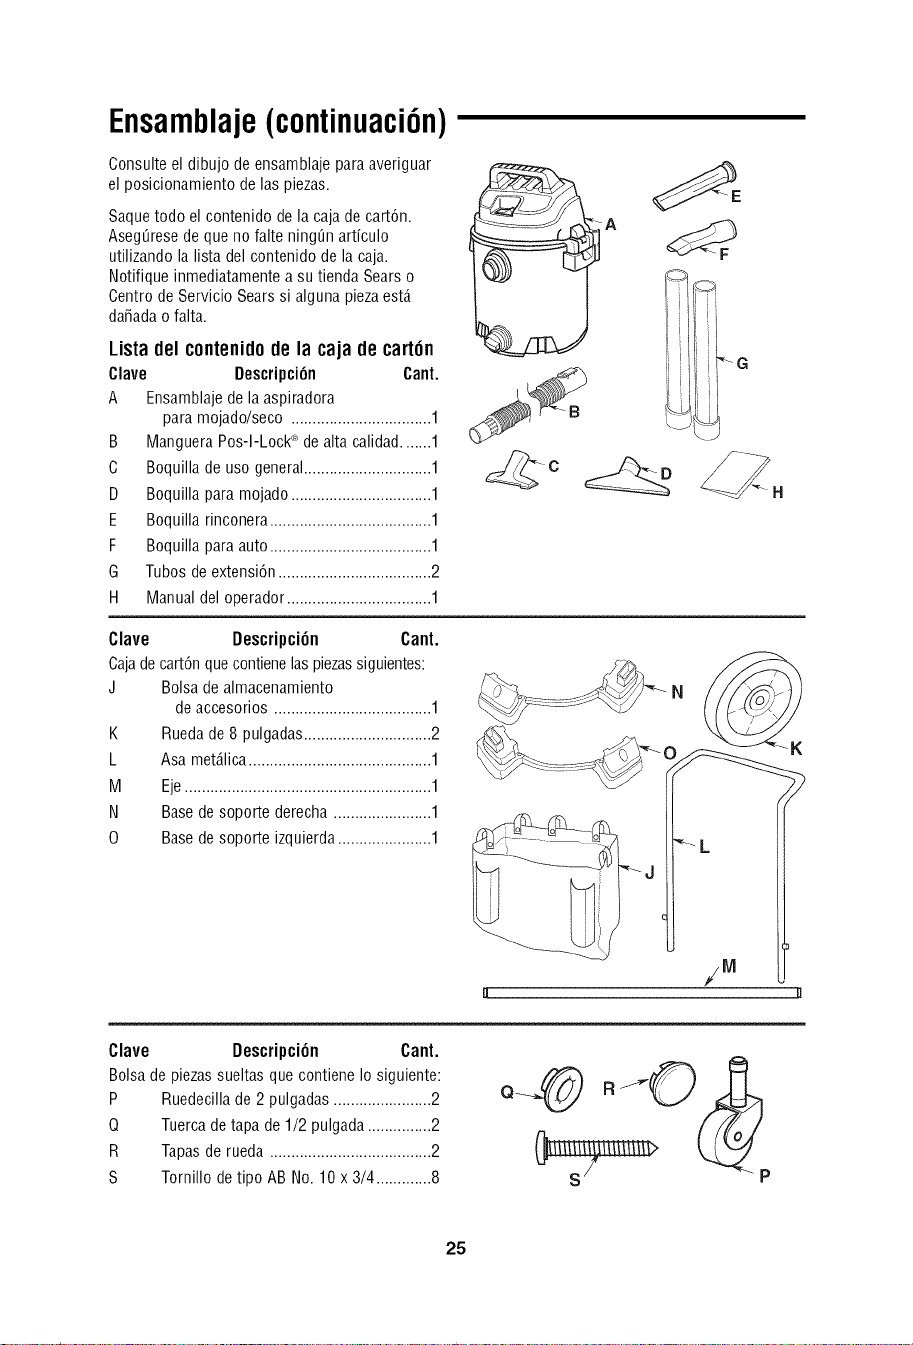
Ensamblaje(continuaci6n)
Consulteel dibujo deensamblajeparaaveriguar
el posicionamientodelas piezas.
Saquetodoel contenidodela cajadecart6n.
Aseg_resede queno falte ning_narticulo
utilizandolalista delcontenidodela caja.
Notifiqueinmediatamentea sutiendaSearso
Centrode ServicioSearssi algunapiezaest,.
da_adao falta.
Lista del contenidode la caja de carton
Clave Descripci6n Cant.
A Ensamblajede laaspiradora
paramojado/seco.................................1
B MangueraPos-I-Lock®dealta calidad.......1
C Boquillade usogeneral..............................1
D Boquillaparamojado.................................1
E Boquillarinconera......................................1
F Boquillaparaauto......................................1
G Tubosdeextensi6n....................................2
H Manualdeloperador..................................1
Clave Descripci6n Cant.
Cajadecart6nquecontienelaspiezassiguientes:
J Bolsadealmacenamiento
K
L
M
N
0
deaccesorios .....................................1
Ruedade8 pulgadas..............................2
Asamet_.lica...........................................1
Eje..........................................................1
Basedesoportederecha.......................1
Basedesoporteizquierda......................1
Clave Descripci6n Cant.
BolsadepiezassueltasquecontieneIosiguiente:
P Ruedecillade 2pulgadas.......................2
Q Tuercadetapade1/2 pulgada...............2
R Tapasde rueda......................................2
S Tornillo detipo ABNo.10 x 3/4.............8
P
25
Ensamblaje(continuaci6n)
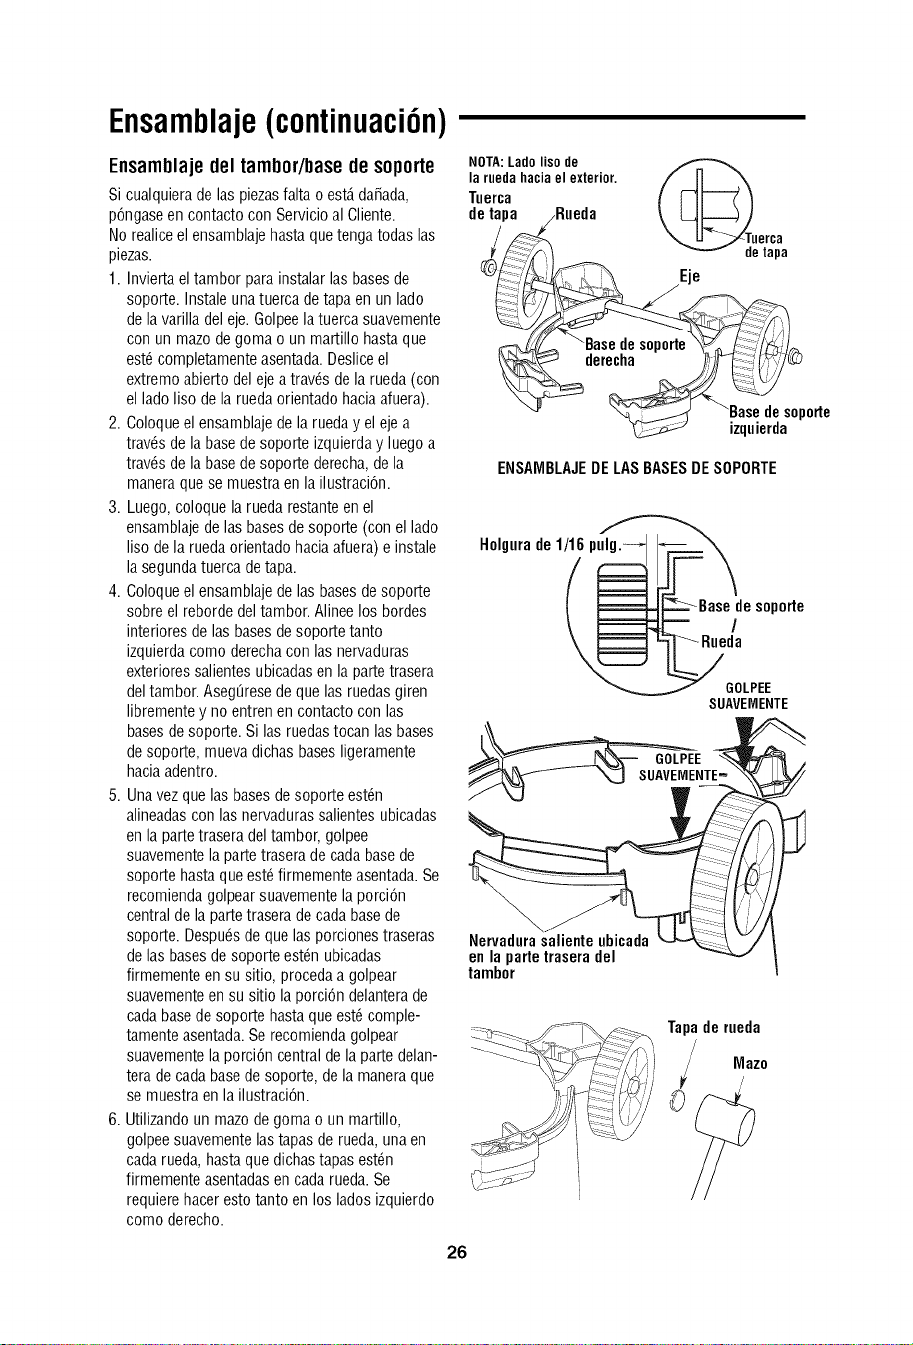
Ensamblajedel tambor/basedesoporte
Si cualquiera de las piezas falta o est,. dafiada,
p6ngase en contacto con Servicio al Cliente.
No realiceel ensamblaje hasta que tenga todas las
piezas.
1. Invierta el tambor para instalar las bases de
soporte. Instale una tuerca de tapa en un lado
de lavarilla del eje. Golpee la tuerca suavemente
con un mazo de goma o un martillo hasta que
est6 completamente asentada. Deslice el
extremo abierto del eje atrav6s de la rueda (con
el lado liso de la rueda orientado hacia afuera).
2. Coloque el ensamblaje de la rueda y eleje a
trav6s de la base desoporte izquierda y luego a
trav6s de la base desoporte derecha, de la
manera quese muestra en la ilustraci6n.
3. Luego, coloque la rueda restante en el
ensamblaje de las bases de soporte (con el lado
liso dela rueda orientado hacia afuera) e instale
la segunda tuerca de tapa.
4. Coloque el ensamblaje de las bases de soporte
sobre el reborde del tambor. Alinee los bordes
interiores de las bases desoporte tanto
izquierda como derecha con las nervaduras
exteriores salientes ubicadas en la parte trasera
del tambor. Aseg0rese de que las ruedas giren
libremente y no entren en contacto con las
bases de soporte. Si las ruedas tocan las bases
de soporte, mueva dichas bases ligeramente
hacia adentro.
5. Una vez que las bases de soporte est6n
alineadas con las nervaduras salientes ubicadas
en la parte trasera del tambor, golpee
suavemente la parte trasera de cada base de
soporte hasta que est6 firmemente asentada. Se
recomienda golpear suavemente la porci6n
central de la parte trasera decada base de
soporte. Despu6s de que las porciones traseras
de las bases de soporte est6n ubicadas
firmemente en su sitio, proceda a golpear
suavemente en su sitio la porci6n delantera de
cada base de soporte hasta que est6 comple-
tamente asentada. Se recomienda golpear
suavemente la porci6n central de la parte delan-
tera decada base de soporte, de la manera que
se muestra en la ilustraci6n.
6. Utilizando un mazo de goma o un martillo,
golpee suavemente lastapas de rueda, una en
cada rueda, hasta que dichas tapas est6n
firmemente asentadas en cada rueda. Se
requiere hacer esto tanto en los lados izquierdo
como derecho.
I10ruTA:dLaada°liias° Idexterior.
Tuerca [ [ IF--7 I
de tapa !Rueda k H_ -----))
/ _. _T.2,c a
!i ,7'M detapa
Eje
oporte
ENSAMBLAJEDELASBASESDE SOPORTE
Holgura de 1/16 pulg.-_
(
de soporte
/
GOLPEE
SUAVEMENTE
Nervadurasalienteubicada
enlapartetraseradel
tambor
Tapaderueda
Mazo
26
Ensamblaje(continuaci6n)
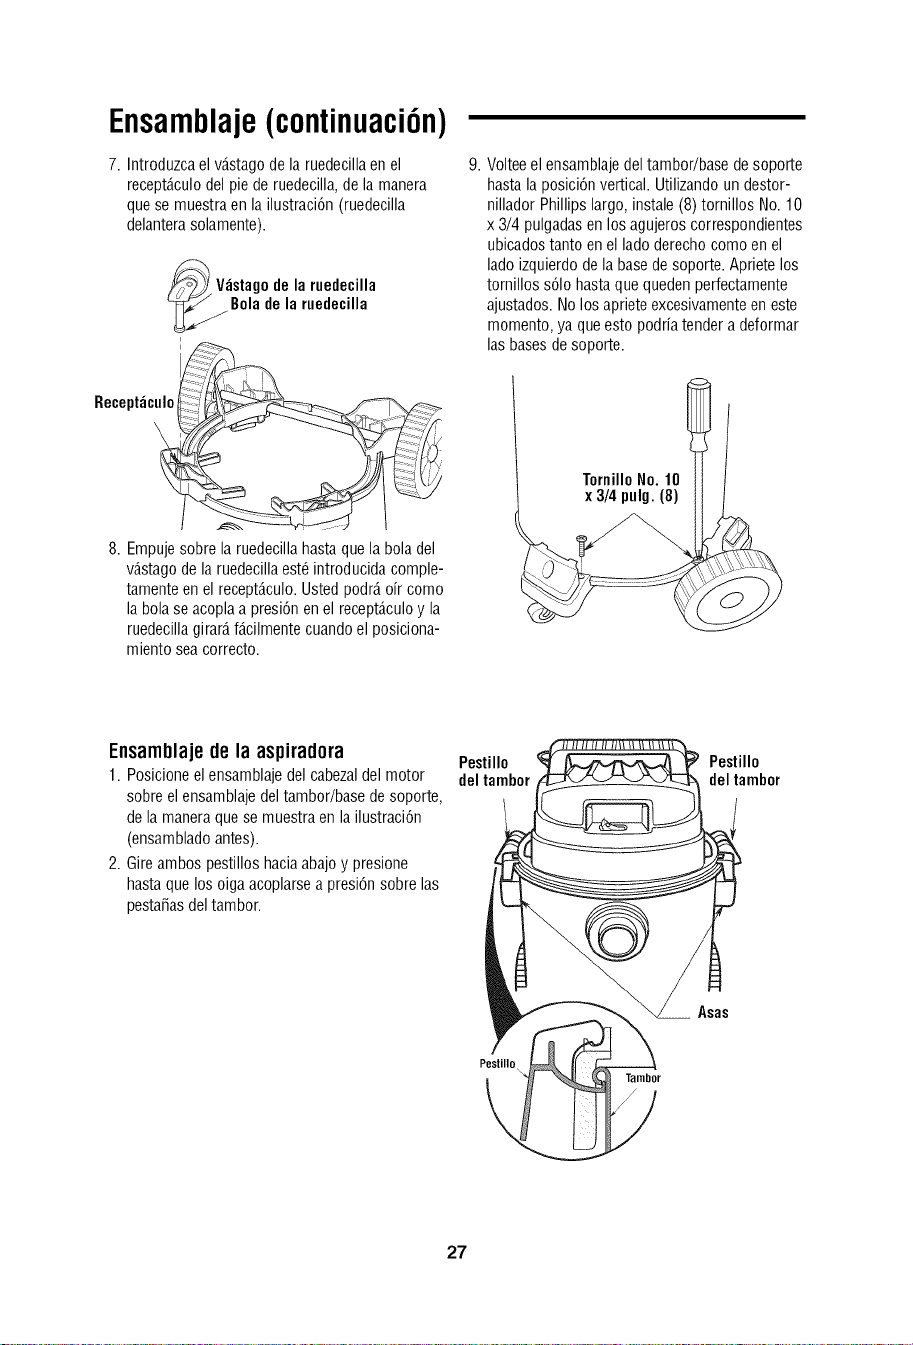
7. Introduzca el v_.stagode la ruedecilla en el
recept_.culodel pie de ruedecilla, de la manera
que se muestra en la ilustraci6n (ruedecilla
delantera solamente).
V_stagode laruedecilla
Boladelaruedecilla
i
Receptac[Jlo _ _"
8. Empuje sobre la ruedecilla hasta que la bola del
v_.stagode la ruedecilla est6 introducida comple-
tamente en el recept_.culo.Usted podr_,ofr como
la bola se acopla a presi6n en el recept_.culoy la
ruedecilla girarD,f_.cilmentecuando el posiciona-
miento sea correcto.
9. Voltee el ensamblaje del tambor/base de soporte
hasta la posici6n vertical. Utilizando un destor-
nillador Phillips largo, instale (8) tornillos No. 10
x 3/4 pulgadas en los agujeros correspondientes
ubicados tanto en el lado derecho como en el
lado izquierdo dela base de soporte. Apriete los
tornillos s61ohasta que queden perfectamente
ajustados. No los apriete excesivamente en este
momento, ya que esto podrfa tender a deformar
las bases de soporte.
TornilloNo. 10
x 3/4 pulg. (8)
Ensamblajede la aspiradora
1. Posicione el ensamblaje del cabezaldel motor
sobre el ensamblaje del tambor/base de soporte,
de la manera que se muestra en la ilustraci6n
(ensamblado antes).
2. Gire ambos pestillos haciaabajo y presione
hasta que los oiga acoplarse a presi6n sobre las
pesta_as deltambor.
Pestillo
deltambor
Pestillo
deltambor
Asas
Pestillo
Tambor
27
Ensamblaje(continuaci6n)
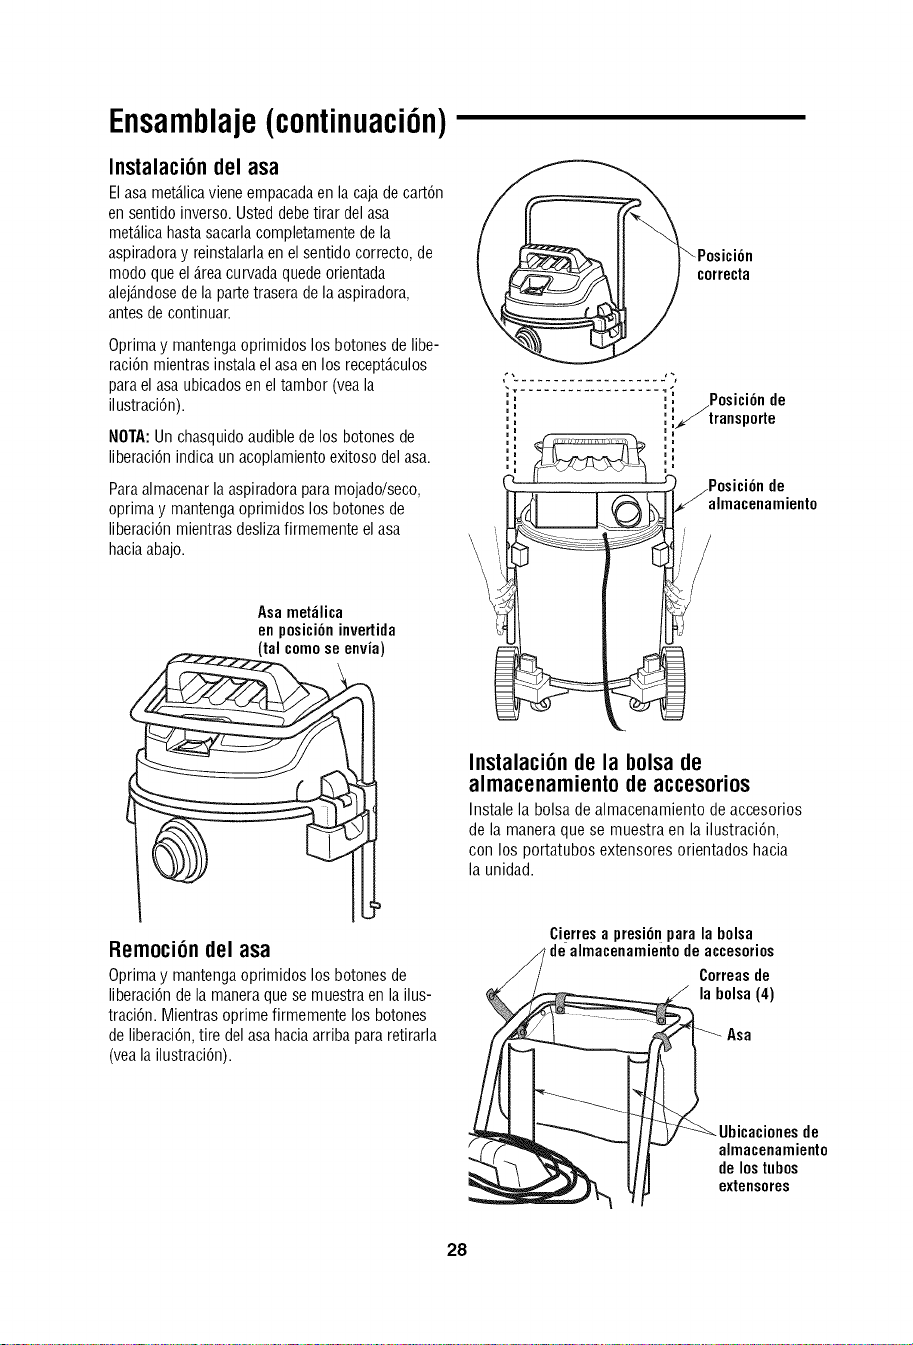
Instalaci6ndel asa
Elasametb.licavieneempacadaenla cajadecart6n
ensentidoinverso.Usteddebetirar delasa
metb.licahastasacarlacompletamentedela
aspiradoray reinstalarlaen elsentidocorrecto,de
modoqueelb.reacurvadaquedeorientada
alejb.ndosedela partetraseradelaaspiradora,
antesde continuar.
Oprimay mantengaoprimidoslos botonesdelibe-
raci6nmientrasinstalaelasaenlos receptb.culos
parael asaubicadosenel tambor(veala
ilustraci6n).
NOTA:Un chasquido audible de los botones de
liberaci6n indica un acoplamiento exitoso del asa.
Paraalmacenarla aspiradoraparamojado/seco,
oprimay mantengaoprimidoslos botonesde
liberaci6nmientrasdeslizafirmementeelasa
haciaabajo.
4
Asamet_lica
enposici6ninvertida
oo o
Remoci6ndel asa
Oprimay mantengaoprimidoslos botonesde
liberaci6ndelamaneraquese muestraenlailus-
traci6n.Mientrasoprimefirmementelos botones
deliberaci6n,tire delasahaciaarribapararetirarla
(veala ilustraci6n).
Posici6n
correcta
',i....... ',' Posicibnde
i i i if/transp Orte
11 1:
Instalaci6nde la bolsade
almacenamientode accesorios
Instalela bolsadealmacenamientodeaccesofios
dela maneraquese muestraenla ilustraci6n,
con losportatubosextensoresorientadoshacia
la unidad.
Cierresa presi6nparalabolsa
dealmacenamientode accesorios
Correas de
la bolsa (4)
Asa
de
almacenamiento
delostubos
extensores
28
Ensamblaje(continuaci6n)
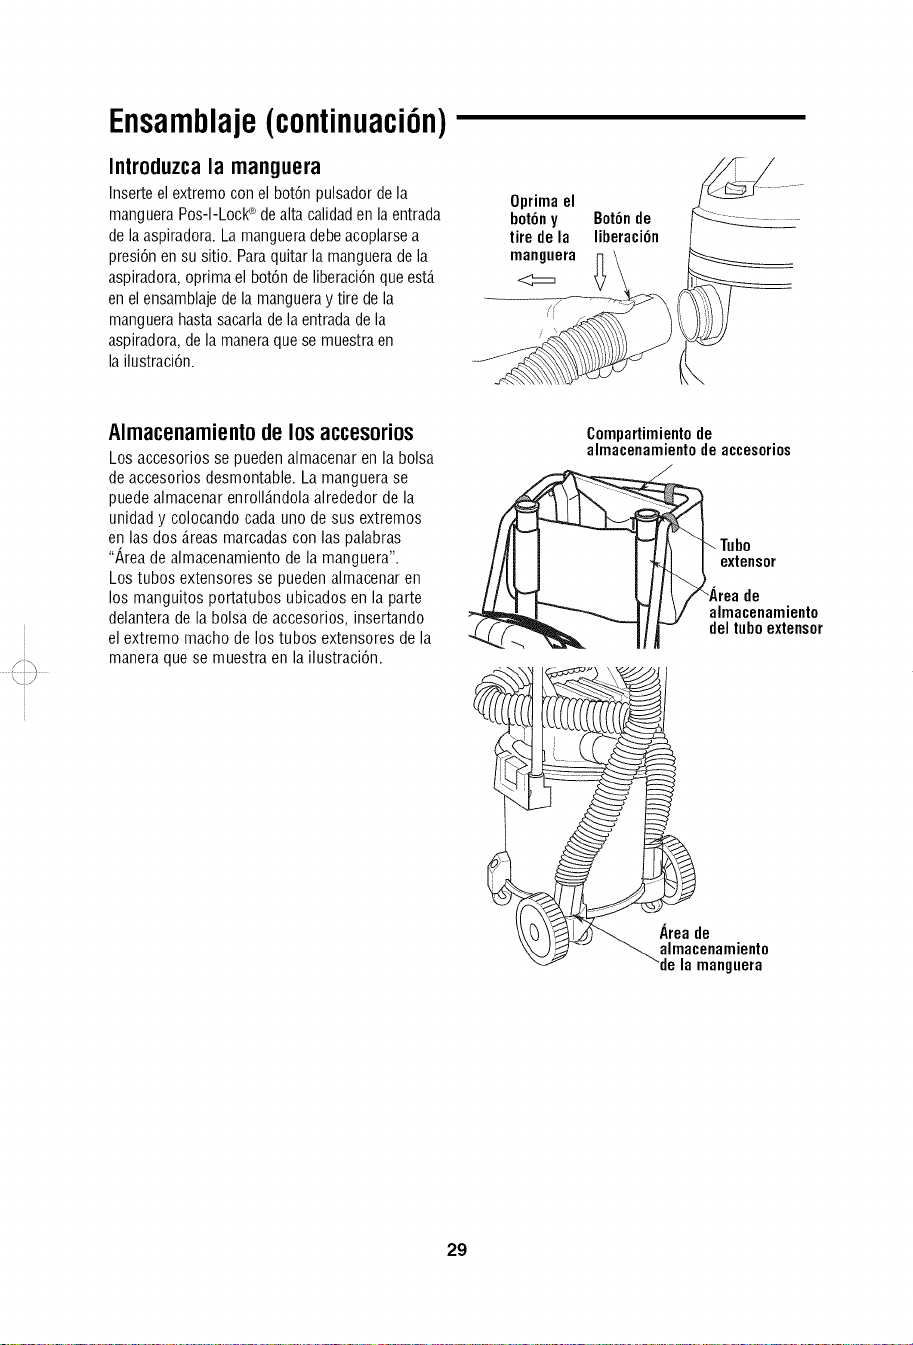
Introduzcala manguera
Inserte el extremo con el bot6n pulsador de la
manguera Pos-I-LoctP dealta calidad en la entrada
de laaspiradora. La manguera debe acoplarse a
presi6n en su sitio. Para quitar la manguera de la
aspiradora, oprima el bot6n de liberaci6n que est,.
en elensamblaje de la manguera y tire de la
manguera hasta sacarla de laentrada de la
aspiradora, de la manera que se muestra en
la ilustraci6n.
Oprimael
bot6ny
tiredela
Bot6nde
liberaci6n
\
........\ii]7.......
Almacenamientode losaccesorios
Los accesorios se pueden almacenar en la bolsa
de accesorios desmontable. La manguera se
puede almacenar enroll_.ndola alrededor de la
unidad y colocando cada uno de sus extremos
en las dos _.reas marcadas con las palabras
"Area de almacenamiento de la manguera".
Los tubos extensores se pueden almacenar en
los manguitos portatubos ubicados en la parte
delantera de la bolsa de accesorios, insertando
el extremo macho de los tubos extensores de la
manera que se muestra en la ilustraci6n.
Compartimiento de
almacenamiento de accesorios
extensor
de
almacenamiento
del tubo extensor
29
........\ii]7.......
Funcionamiento
ADVERTENCIA:Parareducirel riesgode incendio,explosiono dafiosa la aspiradora:
• Nodeje laaspiradoraenmarcha mientras est_desatendida.Usted podriano notarseiales importantes que
indiquen unfuncionamiento anormal,tal como p_rdidadesucciOn,residuos o liquido quesalenpor el
escapeo ruidos anormalesdel motor. Dejedeusar laaspiradorainmediatamentesi observaestasseiales.
• Nodeje laaspiradoraenchufadacuando nose est_utilizando.
• Nocontinie usando la aspiradoracuandoel fiotador hayacortado la succiOn.
• Noutilice la aspiradoraen _reascon gasesinflamables,vapores inflamables o polvoexplosivo enel aire.
Laschispasgeneradasdentrodel motor pueden incendiarlos materialesinflamables suspendidosen el aire.
Los gasesinflamables y losvapores inflamables incluyen:liquido encendedor,limpiadorestipo solvente,
pinturasa basedeaceite, gasolina,alcohol o rociadorestipo aerosol.Los polvos inflamablesincluyen:
polvodecarbon, polvode magnesio, polvode aluminio, polvo degrano decerealo pOlvora.
• No recojacon la aspiradorapolvos explosivos, liquidos inflamablesni cenizascalientes.
• Nouse la aspiradoracomo un rociador.
,_ ADVERTENCIA:Para reducirel riesgode descargaselOctricaso lesiones:
• Noexpongala aspiradora ala Iluvia ni deje queentreliquido enel compartimiento del motor.Almacenela
aspiradoraen unlugar interior.
• No manejeel enchufe,el interruptor o la aspiradoracon las manos mojadas.
• Nohaga serviciodeajustesy reparacionesde la aspiradoramientrasest_enchufada.Si laaspiradoranoest£
funcionando como deberia,le faltan piezas,se hacaido,est£daiada, se hadejadoa la intemperieo se ha
caidoal agua,devu_lvalaa un centro deservicioindependienteo lame a servicioalcliente.
• Cuandoutilice un cordon de extension,utilice inicamente cordonescon capacidadnominal parauso a la
intemperiequeest_n enbuenascondiciones. Nodeje quela conexiOnentre encontacto con liquido.
• No recojacon laaspiradora materialestOxicos,parareducir el riesgo deinhalar losvapores oel polvo.
Enchufe polarizado
Para reducir el riesgo desacudidas elOctricas,
este aparato electrodomOstico tiene un enchufe
polarizado (una hoja es m_.sancha que la otra).
Este enchufe entrar_,en un tomacorriente
polarizado solamente de una manera. Si el enchufe
no entra por completo en el tomacorriente, dole
la vuelta. Si sigue sin entrar, pOngaseen contacto
con un electricista competente para instalar el
tomacorriente adecuado. No haga ningin tipo de
cambio en el enchufe.
DespuOsde enchufar el cordon de energia en el
tomacorriente, encienda la unidad empujando
el interruptor de la posiciOn "O" a la posiciOn "1".
Los simbolos utilizados en el accionador del
interruptor son los simbolos internacionales de
"encendido y apagado".
Recogidade materialessecos
conla aspiradora
1. El filtro debe estar siempre en la posiciOn
correcta para reducir el riesgo defugas y
posibles daios a la aspiradora.
2. La aspiradora para mojado/seco viene con el
filtro 17907 instalado. AI utilizar la aspiradora
para recoger polvo muy fino, ser_.necesario
que usted vacie el tambor y limpie el filtro a
intervalos m_.sfrecuentes para mantener un
rendimiento 6ptimo.
NOTA: Senecesita un filtro seco para recoger
material seco. Si utiliza laaspiradora para recoger
polvo cuando el filtro est,. mojado, 6ste se atascar_.
r_.pidamentey ser_.muy dificil limpiarlo.
=APAGADOI =ENCENDIDO
30

Funcionamiento(continuaci6n)
Recogidadeliquidos
con la aspiradora
,_L ADVERTENCIA: No utilice la aspiradora sin
la jaula del filtro y el flotador, ya que estas
piezas evitan que entre liquido en el impulsor y
dafie el motor.
1. Cuando recoja cantidades pequefias de liquido,
se podr_,dejar colocado elfiltro en la aspiradora.
2. Cuando recoja cantidades grandes de liquido,
recomendamos quitar el filtro. Si no se quita el
filtro, est6 se saturar_,yes posible que aparezca
niebla en el escape.
3. Cuando el liquido contenido enel tambor de la
aspiradora alcance un nivel predeterminado, el
mecanismo de flotador subir_,autom_.ticamente
para cortar lacirculaci6n de aire. Cuando esto
ocurra, apague la aspiradora, desenchufe el
cord6n de energia y vacie el tambor. Sabr_.que
el flotador ha cortado la circulaci6n de aire
porque la succi6n cesar_,y el ruido del motor
alcanzar_,unafrecuencia m_.salta debido al
aumento de lavelocidad del motor.
4. Despu6s de utilizar la aspiradora para recoger
liquidos, se debe secar el filtro para evitar una
posible formaci6n de moho y posibles da_os al
filtro.
IMPORTANTE:Para reducir el riesgo de da_ar la
aspiradora, no hagafuncionar el motor con el
flotador en la posici6n subida.
Vaciadodeltambor
1. La aspiradora viene equipada con un drenaje
para vaciarla f_.cilmentede liquidos. Simple-
mente desenrosque la tapa del drenaje y levante
ligeramente el lado opuesto para vaciar el
tambor.
2. Otra opci6n es quitar el ensamblaje del cabezal
del motor.
3. Ponga a un lado el ensamblaje del cabezal del
motor en un _.realimpia mientras vacia el
tambor.
4. Vierta el contenido del tambor en el recipiente de
eliminaci6n de residuos apropiado.
_. ADVERTENCIA:Para reducir el riesgo de
lesiones en laespalda o de caidas, no levante
una aspiradora que pese mucho debido a que
contiene liquido o residuos. Saque o vierta bas-
tante contenido para hacer que la aspiradora sea
Io suficientemente liviana como para poder
levantarla c6modamente.
31
Funcionamiento(continuaci6n)
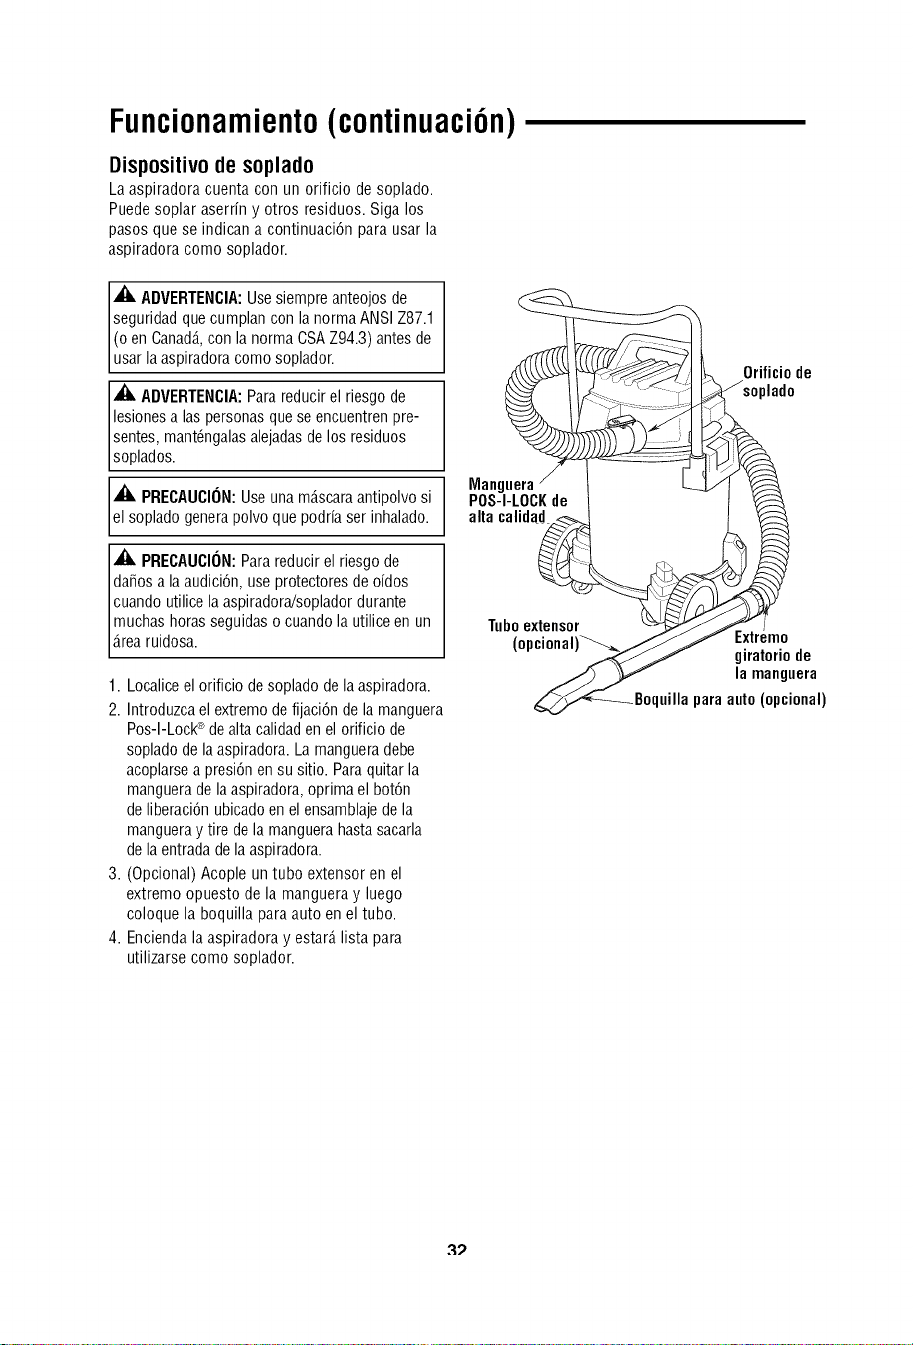
Dispositivo de soplado
La aspiradora cuenta con un orificio de soplado.
Puede soplar aserrin y otros residuos. Siga los
pasos que se indican a continuaci6n para usar la
aspiradora como soplador.
A_. ADVERTENCIA:Use siempre anteojos de
seguridad que cumplan con la norma ANSI Z87.1
(o en Canada,,con la norma CSAZ94.3) antes de
usar la aspiradora como soplador.
A ADVERTENCIA:Para reducir el riesgo de
lesiones alas personas que se encuentren pre-
sentes, mant6ngalas alejadas de los residuos
soplados.
,_, PRECAUCION:Use una m_.scaraantipolvo si
el soplado genera polvo que podria ser inhalado.
,_, PRECAUCION:Para reducir el riesgo de
da_os a la audici6n, use protectores de oidos
cuando utilice la aspiradora/soplador durante
muchas horas seguidas o cuando la utilice en un
_.rearuidosa.
1. Localice el orificio desoplado de la aspiradora.
2. Introduzca el extremo defijaci6n de la manguera
Pus-I-Lock ®de alta calidad en el orificio de
soplado de laaspiradora. La manguera debe
acoplarse a presi6n en su sitio. Para quitar la
manguera de laaspiradora, oprima el bot6n
de liberaci6n ubicado en el ensamblaje dela
manguera y tire de la manguera hasta sacarla
de laentrada de la aspiradora.
3. (Opcional) Acople un tubo extensor en el
extremo opuesto de la manguera y luego
coloque la boquilla para auto en el tubo.
4. Encienda la aspiradora y estar_, lista para
utilizarse como soplador.
//
..... _ Orificio de
_ soplado
.............. • J
POS-I-LOCKde i t
Tuboextensor _-_/J ___ /
(opcion ) / / E. tr. mo,
j._/ glraTorloue
lamanunera
_Boquilla para auto(opcional)
Mantenimiento
Filtro
NOTA:Estefiltro est,. hecho de papel de alta
calidad diseffado para detener particulas de polvo
muy pequeffas. El filtro se puede utilizar para
recoger material mojado o seco. IVlanejeel filtro
con cuidado cuando Io quite para limpiarlo o
cuando Io instale. Es posible quese formen
arrugas en los pliegues del filtro como resultado de
la instalaci6n, pero las arrugas no afectar_.nel
rendimiento del filtro.
Limpieza del filtro
El filtro se debelimpiar a menudo para mantener
un rendimiento 6ptimo dela aspiradora.
Aseglirese de secar el filtro antes de guardar la
aspiradora o de recoger residuos secos.
IMPORTANTE:Despu6s de limpiar el filtro,
compruebe si 6ste tiene desgarraduras o agujeros
pequeffos. No use un filtro que tenga agujeros o
desgarraduras. Incluso un agujero pequeffo puede
hacer que salga mucho polvo de laaspiradora.
C_.mbieloinmediatamente.
Remoci6ny reemplazodel filtro
IMPORTANTE:Para reducir el riesgo de daffar la
rueda del soplador, reinstale siempre el filtro antes
de utilizar la aspiradora para recoger material seco.
Remoci6n del filtro:
1. Sostenga las leng_etas del filtro Qwik LockTM en
cada mano.
2. Con un dedo pulgar en el v_.stagoQwik LockTM,
que sobresale a trav6s de la placadel filtro
integrada, levante las leng_etas del filtro a la vez
que empuja hacia abajo sobre el v_.stago.
3. Esta acci6n har_.que el filtro se suelte de la jaula
del filtro. Deslice elfiltro hasta retirarlo de la
jaula.
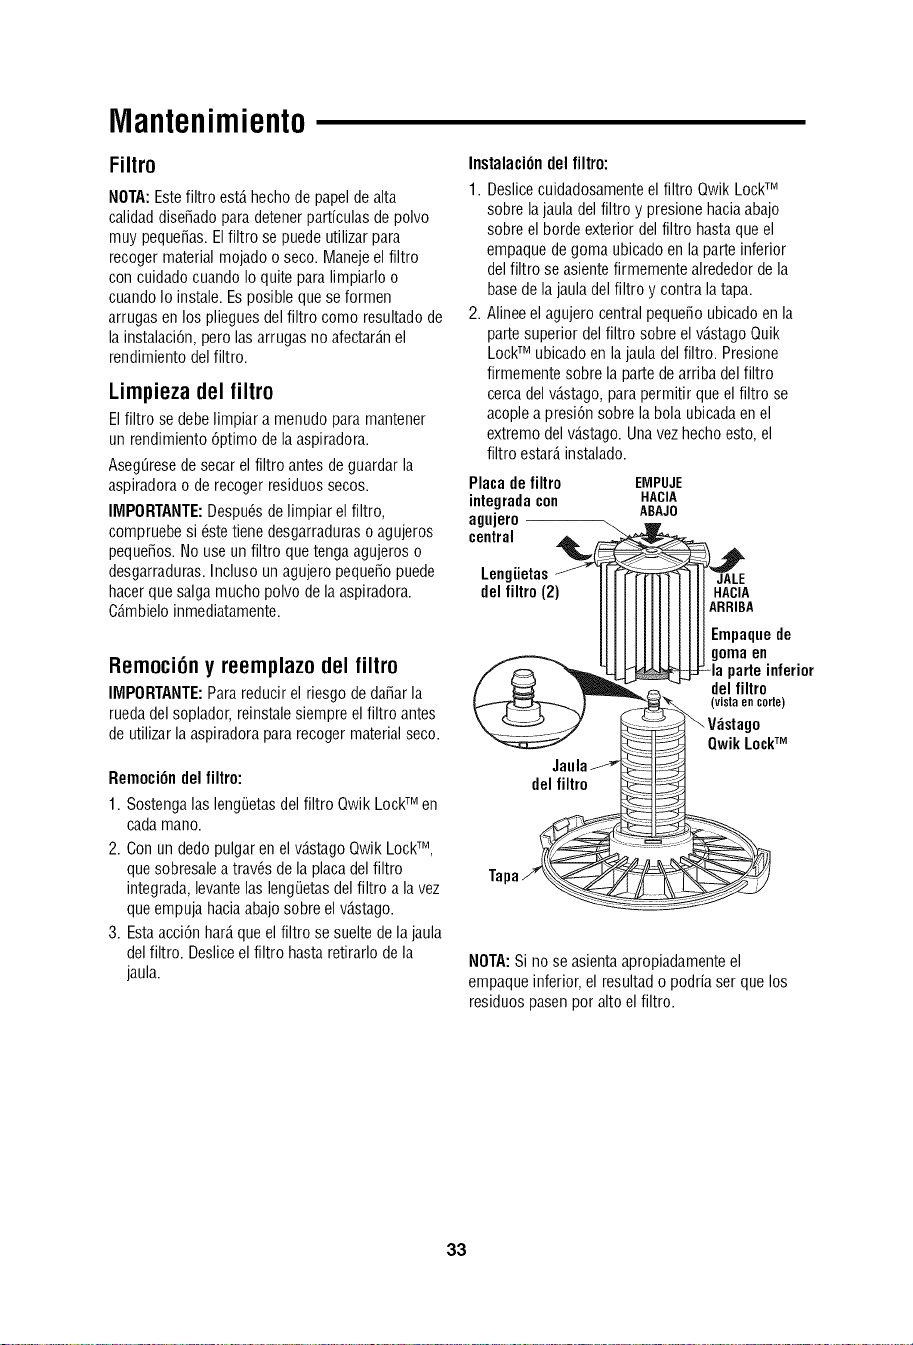
Instalaci6n del filtro:
1. Deslice cuidadosamente el filtro Qwik LockTM
sobre la jaula del filtro y presione hacia abajo
sobre el borde exterior del filtro hasta que el
empaque de goma ubicado en la parte inferior
del filtro se asiente firmemente alrededor de la
base de la jaula del filtro y contra la tapa.
2. Alinee el agujero central pequeffo ubicado en la
parte superior del filtro sobre el v_.stagoQuik
LockTM ubicado en la jaula del filtro. Presione
firmemente sobre la parte de arriba del filtro
cerca del v_.stago,para permitir que el filtro se
acople a presi6n sobre la bola ubicada en el
extremo del v_.stago. Una vezhecho esto, el
filtro estar_,instalado.
Placa de filtro EMPUJE
integrada con HACIA
ABAJO
agujero
central
LengiJetas
del filtro (2)
_JALE
JJ HACIA
II ARRIBA
[[ Empaquede
JJgoma en
=i_-Iaparte inferior
del filtro
(vista en corte)
Qwik LockTM
del filtro
Ta
NOTA:Si no se asienta apropiadamente el
empaque inferior, el resultad o podria ser que los
residuos pasen por alto el filtro.
33
Mantenimiento(continuaci6n)
Limpiezade unfiltroseco
SepuedeIograrunpocoderemoci6nderesiduos
secossin quitarel filtrodela aspiradora.D6una
palmadaconla manosobrela partesuperiordel
ensamblajedelmotormientraslaaspiradoraest,.
apagada.
Paraobtener6ptimos resultadosde limpieza
debidoala acumulaci6ndepolvo, limpieel filtro
en un_.reaabierta.LalimpiezaSEDEBErealizar
al aire librey noen elinteriorde la vivienda.
Despu6sdequitarelfiltro de laaspiradora,saque
los residuossecosgolpeandosuavementeel filtro
contralaparedinteriordeltamborparapolvo.
Losresiduossesoltar_.ny caer_.n.
Paraunalimpiezaafondo delfiltro secocon
polvofino (sinresiduos),hagapasaraguaa
trav6sdelfiltro talcomosedescribebajo
"Limpiezadeun filtro mojado".
Limpiezade unfiltro mojado
Despu6sde quitarel filtro, hagapasaraguaa
trav6sde61usandouna manguerao desdeuna
espita.Tengacuidadodeque la presi6ndelagua
procedentedela mangueranoseatan fuerte
comoparada_arel filtro.
Limpiezay desinfecci6nde la
aspiradorapara mojado/seco
Paramantenerel mejoraspectoposible dela
aspiradoraparamojado/seco,limpie suexterior
con unpasohumedecidoconaguatempladay
un jab6nsuave.
Paralimpiareltambor:
1. Vacielos residuosdeltambor.
2. Laveafondoel tambor conaguatempladay
un jab6nsuave.
3. Limpieel tamborcon un pasoseco.
Antesde unalmacenamientoprolongadoo segOn
seanecesario(por ejemplo,si se recogenaguas
residuales),sedebedesinfectarel tambor.
Paradesinfectarel tambor:
1. Eche1 gal6ndeaguay 1 cucharaditade
blanqueadordecloroen eltambor.
2. Dejequelasoluci6n reposedurante20
minutosy agitelacuidadosamentecadapocos
minutos, asegur_.ndosede mojartodas las
superficiesinterioresdeltambor.
3. Vacieel tambor despu6sde20 minutos.
Enju_.guelocon aguahastaqueel olor a
blanqueadordesaparezca.Dejeque el tambor
sesequecompletamenteantesdesellarel
motorsobre eltambor.
Ruedecillasy ruedas
Si el carrorechinaoes dificil dehacerrodar,debe
ponerdos otresgotasdeaceitede usogeneral
enel ejedecadarueda.Si lasruedecillashacen
ruido, puedeponer unagotadeaceiteenel ejedel
rodilloparaquehaganmenosruido.
Armaz6ny asas
Elasamet_.licaest,.pintadaparaimpedirla
formaci6ndeherrumbre.Sinembargo,los liqui-
dosy los residuoscorrosivosdebenlimpiarse
con unpasosuavesi entranen contactocon el
mango.
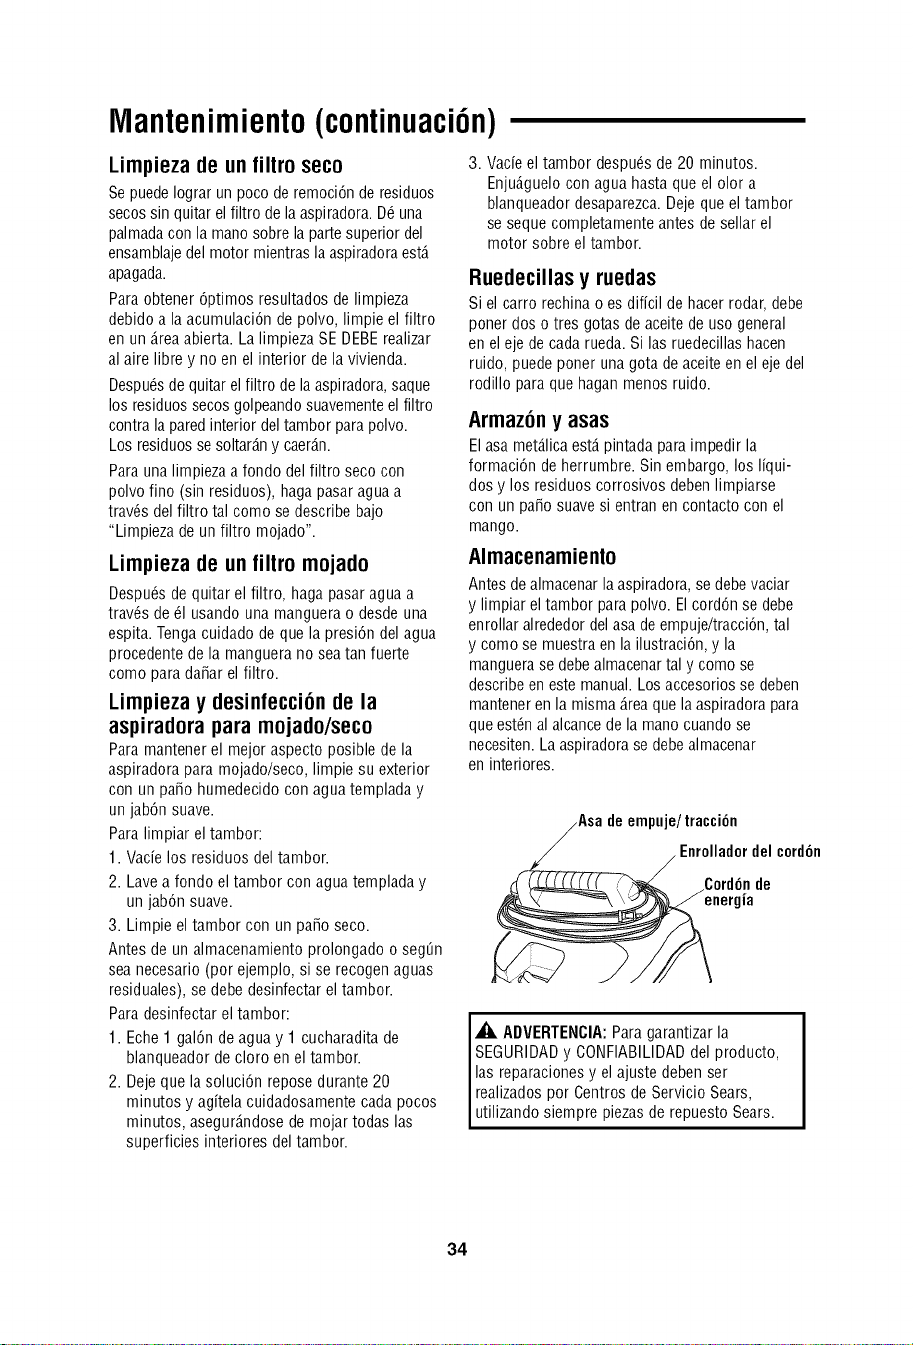
Almacenamiento
Antesdealmacenarlaaspiradora,se debevaciar
y limpiarel tamborparapolvo.Elcord6nse debe
enrollaralrededordelasadeempuje!tracci6n,tal
y comose muestraen lailustraci6n,y la
manguerase debealmacenartaly comose
describeenestemanual.Losaccesoriossedeben
mantenerenla misma_.reaquelaaspiradorapara
queest6nal alcancedela manocuandose
necesiten.Laaspiradorasedebealmacenar
eninteriores.
deempuje/tracci6n
Enrolladordelcord6n
de
la
,_L ADVERTENCIA: Para garantizar la
SEGURIDAD y CONFIABILIDAD del producto,
las reparaciones y el ajuste deben ser
realizados por Centros de Servicio Sears,
utilizando siempre piezas de repuesto Sears.
34

Notas
35

Piezas
de repuesto
Aspiradorapara mojado/secoprofesionalde 16 galones
N_merode modelo113.177780
Pida siempre por nQmero de pieza--no por nQmerode clave
,_ ADVERTENCIA
SERVICIODEAJUSTESY REPARACIONESDE
UNAASPIRADORACONAISLAMIENTODOBLE
Enuna aspiradora con aislamiento doble se proporcionan dos sistemas de aislamiento en vezde conexi6n
a tierra. No se proporciona ning_n medio deconexi6n a tierra en un aparato electrodom_stico con
aislamiento doble, ni se debea_adir a _ste ning_n medio de conexi6n a tierra. El servicio de ajustes y
reparaciones de una aspiradora con aislamiento doble requiere sumo cuidado y conocimiento del sistema,
y debe ser realizado _nicamente por personal de servicio competente. Las piezasde repuesto para la
aspiradora con aislamiento doble deben ser id_nticas alas piezas que reemplazan.Laaspiradora con
aislamiento doble est_ marcada con las palabras "DOUBLEINSULATED"(con aislamiento doble) y puede
que el simbolo r_ (un cuadrado dentro de un cuadrado) tambi_n est_ marcado en los aparatos.
Parareducir el riesgode lesionespor causade unadescargael_ctrica,desenchufeel cord6n de energiaantes
de realizarservicio deajustesy reparacionesde laspiezasel_ctricas dela aspiradorapara mojado/seco.
No.de No.de
clave pieza Descripci6n
1 830564-2
2 813213
3 832811
4 830847
5 823201-2
6 17907
7 16922
8 16978
9 17817
10 16902
11 831337-7
12 17854
13 SP6746
Accionador del interruptor
Interruptor de palanca
Ensamblaje del cabezal del motor (incluyelasclaves5y 6)
Pestillo de la tapa
Ensamblaje de la jaula del filtro
t Filtro para polvo fino
t Boquilla utilitaria
t Boquilla para auto
t Boquilla para mojado
t Boquilla rinconera
Ensamblaje de manguera
t Asa de extensi6n
Manual del usuario
1-Articulo de existencias. Se puede obtener a trav_s del departamento de ferreteria de la mayoria de las tiendas
minoristas Sears.
36
Piezas
de repuesto(continuaci6n)
Aspiradorapara mojado/secoprofesionalde 16 galones
Nz_merode modelo113.177780
11
37
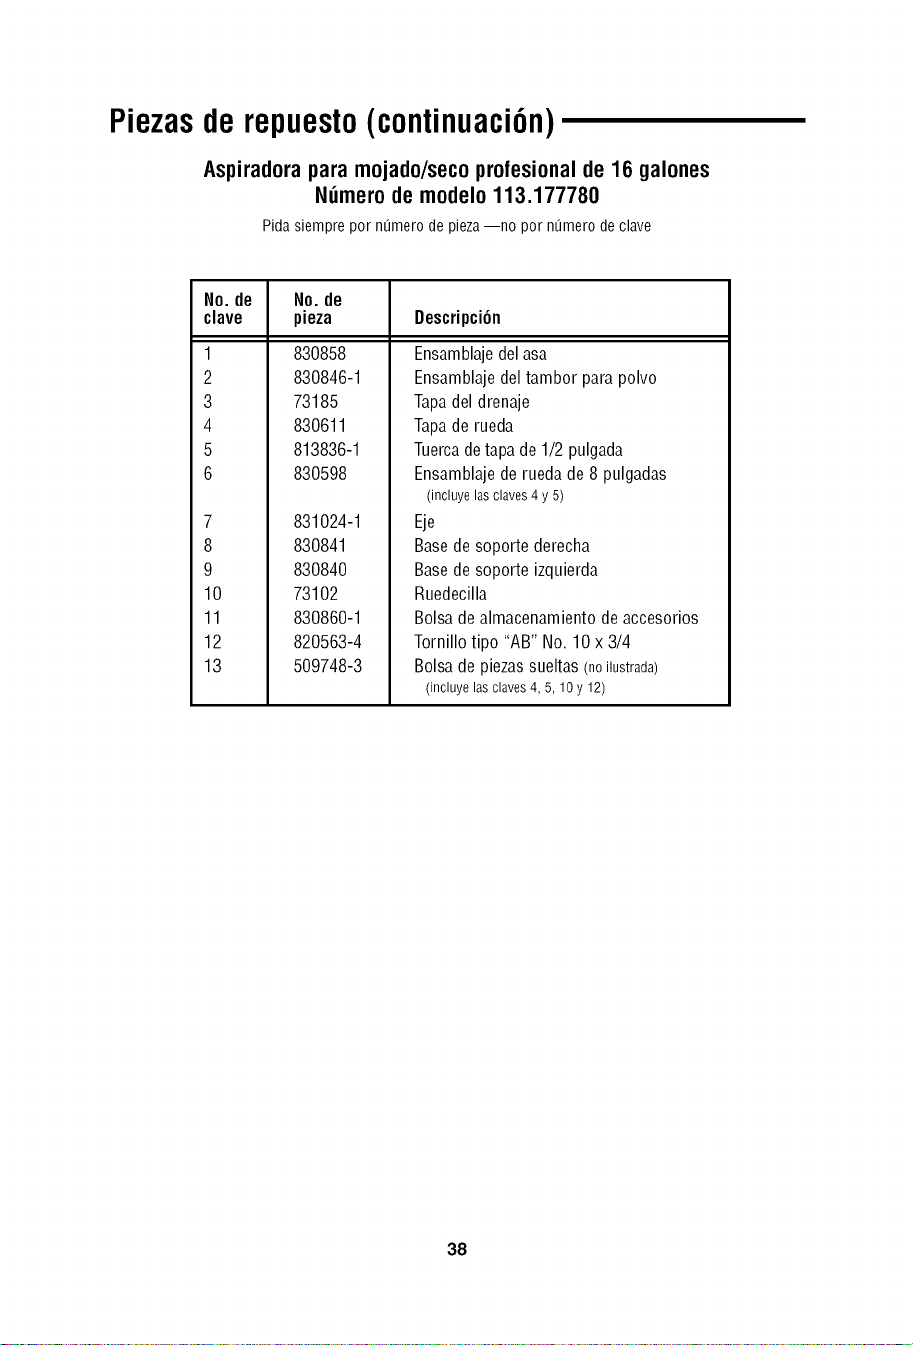
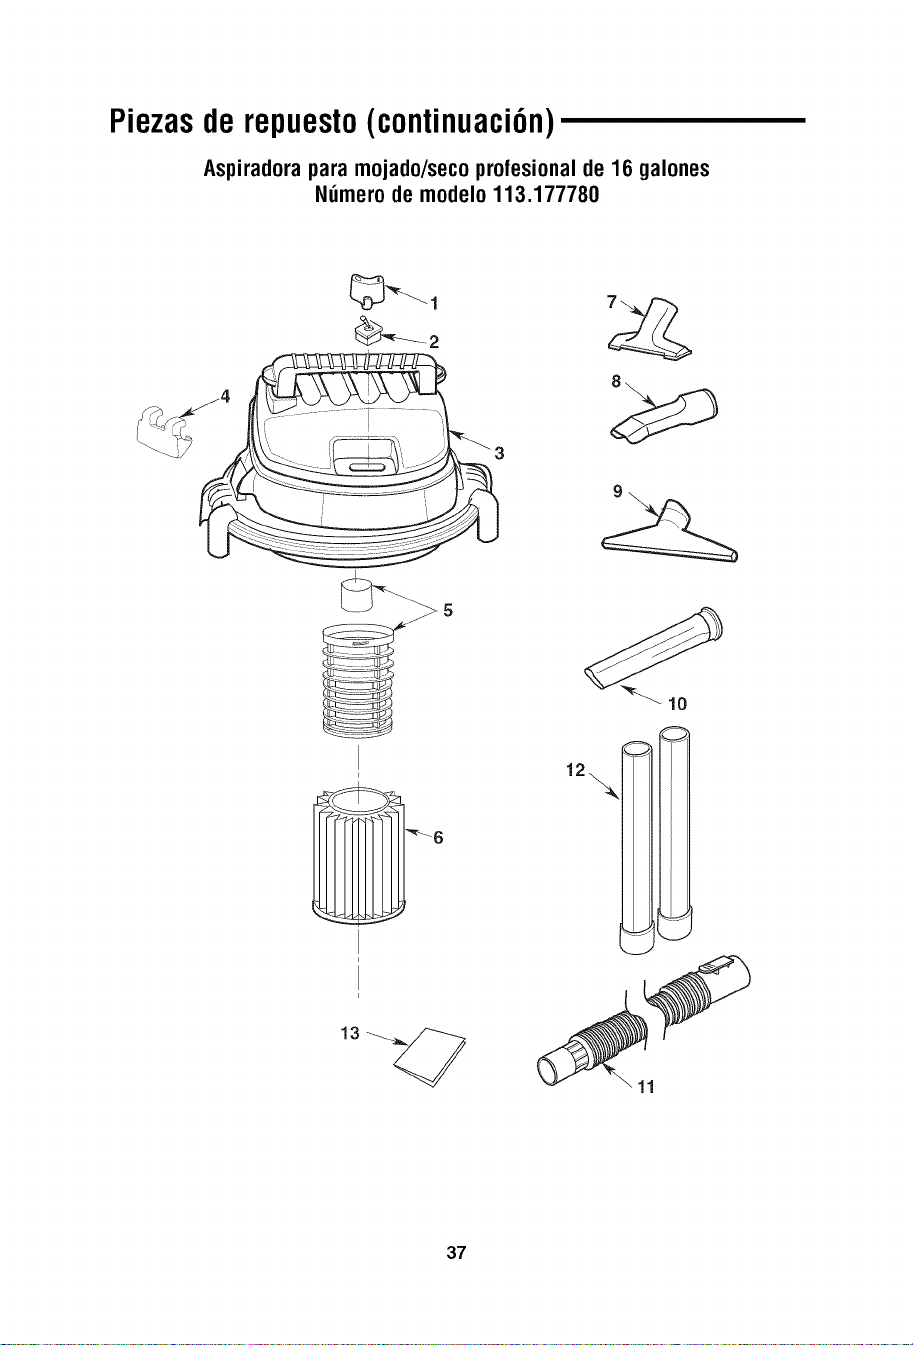
Piezas
de repuesto(continuaci6n)
Aspiradorapara mojado/secoprofesionalde 16 galones
Nz_merode modelo113.177780
Pidasiempreporn0merodepieza--no porn0merodeclave
No.de No.de
clave pieza Descripci6n
1
2
3
4
5
6
7
8
9
10
11
12
13
830858
830846-1
73185
830611
813836-1
830598
831024-1
830841
830840
73102
830860-1
820563-4
509748-3
Ensamblajedelasa
Ensamblajedeltambor para polvo
Tapadel drenaje
Tapade rueda
Tuercadetapade 1/2 pulgada
Ensamblajede ruedade 8 pulgadas
(incluye las claves 4 y 5)
Eje
Basede soporte derecha
Basede soporte izquierda
Ruedecilla
Bolsade almacenamiento de accesorios
Tornillo tipo "AB" No. 10 x 3/4
Bolsade piezassueltas (noilustrada)
(incluye las claves4, 5, 10 y 12)
38
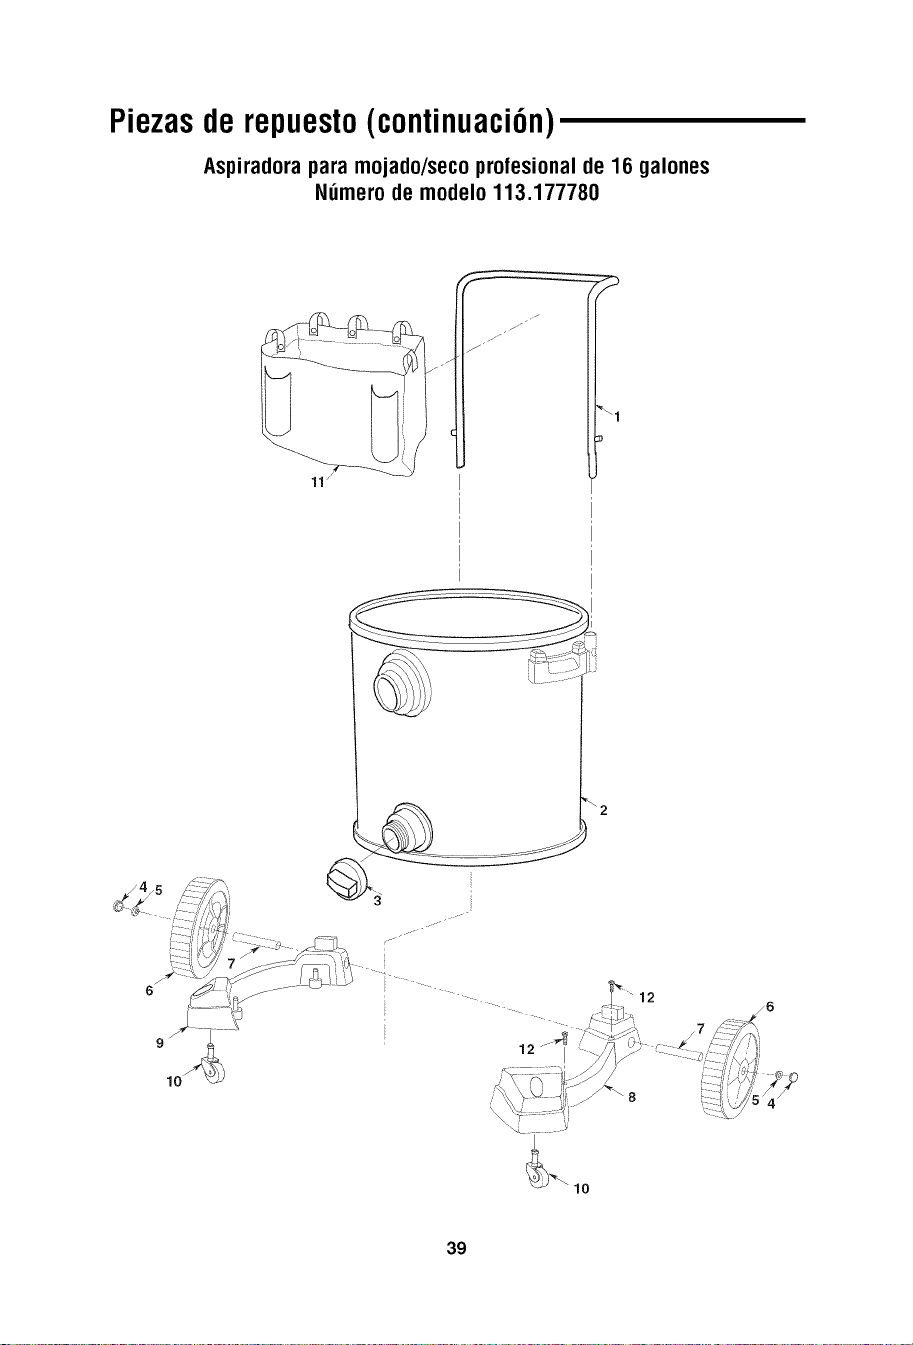
Piezas
de repuesto(continuaci6n)
Aspiradorapara mojado/secoprofesionalde 16 galones
Nzimerode modelo113.177780
/
j"
..J
f
\1
10
39

........_]::y.......
Your Home
For expert troubleshooting and home solutions advice:
manage home
www.managemyhome.com
For repair - in your home - of all major brand appliances,
lawn and garden equipment, or heating and cooling systems,
no matter who made it, no matter who sold it!
For the replacement parts, accessories and
owner's manuals that you need to do-it-yourself.
For Sears professional installation of home appliances
and items like garage door openers and water heaters.
1-800-4-MY-HOME ®
(1-800-469-4663)
www.sears.corn
Call anytime, day or night
(U.S.A. and Canada)
www.sears.ca
Our Home
For repair of carry-in items like vacuums, lawn equipment,
and electronics, call anytime for the locations of the nearest
Sears Parts & Repair Service Center
1-800-488-1222 (U.S.A.) 1-800-469-4663 (Canada)
www.sears.com www.sears.ca
To purchase a protection agreement on a product serviced by Sears:
1-800-827-6655 (U.S.A.)
1-800-361-6665 (Canada)
Para pedirserviciode reparaci6na Au Canadapour serviceenfran£;ais:
domicilio,y paraordenarpiezas: 1-800-LE-FOYER Mc
1-888-SU-HOGAR ® (1-800-533-6937)
(1-888-784-6427) www.sears.ca
(_ Sears Brands, LLC
® Registered Trademark / TMTrademark / sMService Mark of Sears Brands, LLC
® Marca Registrada / TMMarca de Fabrica / sMMarca de Servicio de Sears Brands, LLC
McMarque de commerce / _4oMarque d_pos_e de Sears Brands, LLC
Part No. SP6746 Form No.SP6746 Printed in Mexico 03/10