Loading ...
c) Warning - Remove transport tape from the lights and the filters before use.
d)Sufficient air is needed to provide proper combustion and exhausting of gases through the flue
(chimney) of fuel burning equipment to prevent back draughting. Follow the heating equipment
manufacturer's guideline and safety standards such as those published by the National Fire
Protection Association (NFPA), and the American Society for Heating, Refrigeration and Air
Conditioning Engineers (ASHRAE), and the local code authorities.
e)When cutting or drilling into wall or ceiling, do not damage electrical wiring and other hidden
utilities.
f) This appliance must always be vented to the outdoors.
g)The canopy is heavy: overall weight 65 Ibs (29kg). Please ensure adequate care when installing the
canopy to prevent personal injury, The canopy must be installed onto a solid wall or solid studs,
h)Before servicing or cleaning uniL switch power off at the service panel and lock the service
disconnection means to prevent power from being switched on accidentally. When the service
disconnection means cannot be locked, securely fasten a prominent warning device, such as a tag,
to the service panel.
i) WARNING - TO REDUCE THE RISK OF FIRE, USE ONLY METAL DUCTWORK.
WARNING - GROUNDING INSTRUCTIONS
a)This appliance must be grounded. In the event of an electrical short circuit, grounding reduces
the risk of electrical shock by providing an escape wire for the electric current. This appliance
is equipped with a cord having a grounding wire with a grounding plug. To provide protection
against electric shock the plug must only be plugged into an outlet that is properly installed and
grounded.
b)WARNtNG - Improper grounding can result in a risk of electric shock.
c)Appliance to be connected to a 15/20A circuit breaker.
d)Consult a qualified electrician if the grounding instructions are not completely understood, or if
doubt exists as to whether the appliance is properly grounded.
e)Do not use an extension cord. If the power supply cord is too short, have a qualified electrician
install an outlet near the appliance.
t
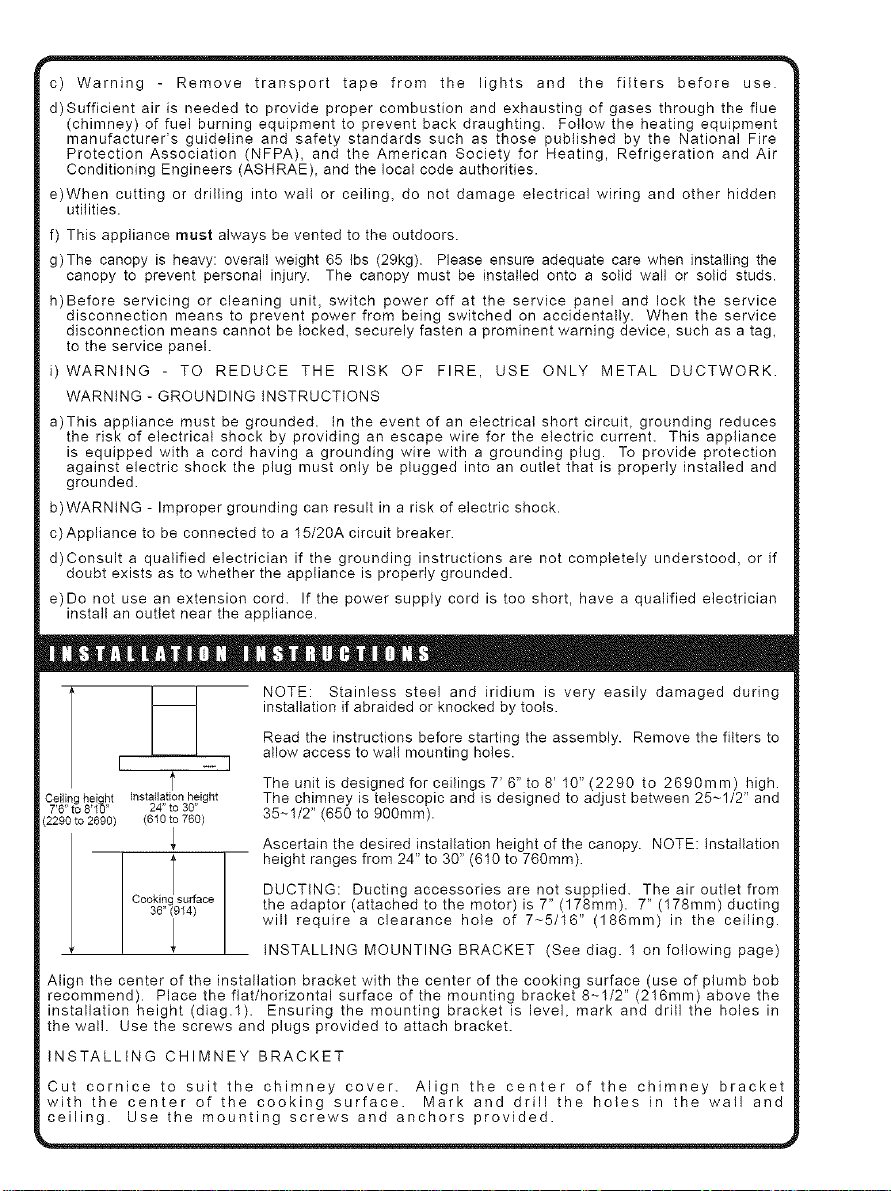
Ceilinghei ht installationheight
T6" to 8'1"_" 24"to 30"
(2290to2690) (610to 760)
NOTE: Stainless steel and iridium is very easily damaged during
installation if abraided or knocked by tools.
Read the instructions before starting the assembly. Remove the filters to
allow access to wall mounting holes.
The unit is designed for ceilings 7' 6" to 8' 10" (2290 to 2690mm) high.
The chimney is telescopic and is designed to adjust between 25~1/2" and
35-1/2" (650 to 900mm).
Ascertain the desired installation height of the canopy. NOTE: Installation
height ranges from 24" to 30" (610 to 760mm).
DUCTING: Ducting accessories are not supplied. The air outlet from
the adaptor (attached to the motor) is 7"(178mm). 7"(178mm) ducting
will require a clearance hole of 7~5/16" (186mm) in the ceiling.
INSTALLING MOUNTING BRACKET (See diag. 1 on following page)
Align the center of the installation bracket with the center of the cooking surface (use of plumb bob
recommend). Place theflat/horizontal surface of the mounting bracket 8-1/2"(216mm) abovethe
installation height (diag.1). Ensuring the mounting bracket is level, mark and drill the holes in
the wall. Use the screws and plugs provided to attach bracket.
INSTALLING CHIMNEY BRACKET
Cut cornice to suit the chimney cover. Align the center of the chimney bracket
with the center of the cooking surface. Mark and drill the holes in the wall and
ceiling. Use the mounting screws and anchors provided.
Loading ...
Loading ...