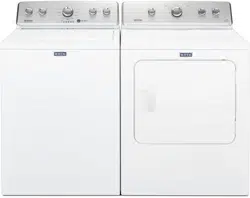
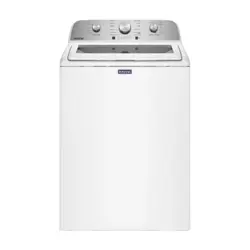
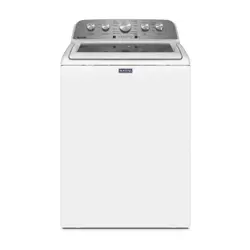
User Manual Maytag 917225 Top Load Deep Rinse MVWC465HW Washer
Table Of Contents
- DRYER SAFETY
- CHECK YOUR VENT SYSTEM
- FOR GOOD AIR FLOW
- USE SENSOR DRY/AUTOMATIC DRY CYCLES FOR
- BETTER FABRIC CARE AND ENERGY SAVINGS
- CONTROL PANEL & FEATURES
- CYCLE GUIDE
- USING YOUR DRYER
- DRYER CARE
- TROUBLESHOOTING
- WARRANTY
- ASSISTANCE OR SERVICE
CHECK YOUR VENT SYSTEM FOR GOOD AIR FLOW
Good air flow
Along with heat. dryers require good air flow to efficiently dry laundry. Proper venting will reduce your drying times and improve your energy savings. See Installation Instructions.
The venting system attached to the dryer plays a big role in good air flow. Blocked or crushed vents as well as improper venting installation will reduce air flow and dryer performance.
Service calls caused by improper venting are not covered by the warranty and will be paid by the customer. regardless of who installed the dryer. To clean or repair venting. contact a venting specialist.
Maintain good air flow by:
- Cleaning your lint screen before each load.
- Replace plastic or foil vent material with 4" (102 mm) diameter heavy, rigid vent material.
- Use the shortest length of vent possible.
- Use no more than four 90° elbows in a vent system; each bend and curve reduces air flow.
- Remove lint and debris from the exhaust hood.
- Remove lint from the entire length of the vent system at least every 2 years. When cleaning is complete, be sure to follow the “Installation Instructions” supplied with your dryer for final product check.
- Clear away items from the front of the dryer.
USE SENSOR DRY/AUTOMATIC DRY CYCLES FOR BETTER FABRIC CARE AND ENERGY SAVINGS
Use the Sensor Dry/Automatic Dry cycles to provide the most energy savings and enhanced fabric care from the dryer. During Sensor Dry/Automatic Dry cycles. drying air temperature or moisture level is sensed in the load. This sensing occurs throughout the drying cycle and the dryer shuts off when the load reaches the selected dryness.
CONTROL PANEL & FEATURES
1. TEMPERATURE/FABRIC
Select a drying temperature based on the fabrics in your load. If you are unsure of the temperature to select for a load. select the lower setting rather than the higher setting.
2. CYCLE KNOB
Use Cycle Knob to select available cycles on your dryer. Turn the knob to select a cycle for your laundry load. See Cycle Guide for detailed descriptions of cycles.
TIMED DRY
Will run the dryer for the specified time on the control. On models with a selectable temperature knob, you may choose a setting based on the fabrics in your load. On some models. temperature is included in the cycle selections. Drying time and temperature will depend on your dryer model.
SENSOR DRY/AUTOMATIC DRY
Senses moisture in the load or air temperature and shuts off when the load reaches the selected dryness level. Gives the best drying in the shortest time. Drying time will vary based on fabric type. load size. and temperature setting.
WRINKLE CONTROL Feature (on some models)
The WRINKLE CONTROL feature will run after your drying cycle is complete. It periodically starts and stops the dryer. tumbling the load without heat to help avoid wrinkling.
On some models, WRINKLE CONTROL automatically starts at the end of the cycle. Opening the door will stop this feature.
NOTE: A signal will sound periodically when the WRINKLE CONTROL setting is selected. but only if the End of Cycle signal is also selected.
3. WRINKLE CONTROL option (on some models)
When you are unable to remove a load of clothes from the dryer as soon as it stops, wrinkles can form. The WRINKLE CONTROL option periodically tumbles, rearranges, and fluffs the load to help keep wrinkles from forming.
■ Get up to 90 minutes of heat-free. periodic tumbling at the end of a cycle. Turn the WRINKLE CONTROL knob to select OFF or 90 min, at any time before the cycle has ended.
4. PUSH TO START/END OF CYCLE SIGNAL The End of Cycle Signal produces an audible sound when the drying cycle is finished. Promptly removing clothes at the end of the cycle reduces wrinkling.
Turn the END OF CYCLE SIGNAL knob to select the desired setting (On or Off). Press the PUSH TO START knob to start the dryer.
CYCLE GUIDE — SENSOR DRY/AUTOMATIC DRY CYCLES
SENSOR DRY/AUTOMATIC DRY - Senses moisture in the load or air temperature and shuts off when the load reaches the selected dryness level.
Not all features and options are available on all models. Settings and options shown in bold are default settings for that cycle.
CYCLE GUIDE — TIMED DRY CYCLES
TIMED DRY - Will run the dryer for the specified time on the control.
Not all cycles and settings are available on all models.
Setting the Drying Temperature
If your dryer has multiple heat settings:
A High temperature setting may be used for drying heavyweight items such as towels and work clothes.
A Low to Medium temperature setting may be used for drying medium-weight items such as sheets. blouses. dresses. underwear. permanent press fabrics. and some knits.
Use the Air Fluff (no heat) setting for foam. rubber. plastic. or heat-sensitive fabrics.
Line dry bonded or laminated fabrics.
NOTE: If you have questions about drying temperatures for various loads. refer to the care label directions.
USING YOUR DRYER
1. Clean the lint screen
Clean the lint screen before each load. Pull the lint screen out of its holder. Roll lint off the screen with your fingers. Do not rinse or wash screen to remove lint. Push the lint screen firmly back into place.
For additional cleaning information, see “Dryer Care”.
2. Load the dryer
Place laundry in the dryer. Close the door.
Do not tightly pack the dryer; clothes should be able to tumble freely.
NOTE: Your model may have a different door than the one shown. Some models have drop down doors.
3. Select the desired cycle
Select the desired cycle for your load. See the Cycle Guide for more information about each cycle.
SENSOR DRY/AUTOMATIC DRY Cycles
You can select a different dryness level. depending on your load. by turning the knob to dryness level.
Selecting More Dry. Energy Preferred. Normal. or Less Dry automatically adjusts the dryness level of the fabrics at which the dryer will shut off.
Sensor Dry/Automatic Dry cycles give the best drying in the shortest time. Drying time varies based on fabric type. load size. and dryness setting. Less Dry removes less moisture and is used for loads you may want to put on a hanger to complete drying.
More Dry removes more load moisture. Energy Preferred is used for a starting point for Sensor Dry/Automatic Dry cycles.
4. Set temperature (on some models)
Select temperature by turning the knob to the desired position or select the Automatic Dry Cycle that has the temperature included in the cycle selections. See “Setting the Drying Temperature”.
NOTE: Not all options and settings are available with all cycles.
5. Set Wrinkle Control (on some models)
Select Wrinkle Control by turning the knob to the desired position.
Get up to 90 minutes of heat-free. periodic tumbling at the end of a cycle. Turn the WRINKLE CONTROL knob to OFF or 90 min. at any time before the cycle has ended.
NOTE: Not all options and settings are available with all cycles.
6. Select End of Cycle Signal (if desired)
Turn the END OF CYCLE SIGNAL knob to select the desired setting (On or Off). The End of Cycle Signal produces an audible sound when the drying cycle is finished. Promptly removing clothes at the end of the cycle reduces wrinkling.
7. Press PUSH TO START to begin cycle
Push and hold the PUSH TO START knob to begin the cycle.
DRYING RACK ACCESSORY
To purchase a drying rack for your dryer. please refer to “Assistance or Service” on the back cover of the manual or contact the dealer from whom you purchased your dryer.
DRYER CARE
Cleaning the dryer location
Keep dryer area clear and free from items that would block the air flow for proper dryer operation. This includes clearing piles of laundry in front of the dryer.
Cleaning the dryer interior
To clean dryer drum
- Apply a liquid, nonflammable household cleaner to the stained area of the drum and rub with a soft cloth until stain is removed.
- Wipe drum thoroughly with a damp cloth.
- Tumble a load of clean cloths or towels to dry the drum.
NOTE: Garments that contain loose dyes, such as denim blue jeans or brightly colored cotton items, may discolor the dryer interior. These stains are not harmful to your dryer and will not stain future loads of clothes. Dry these items inside out to avoid drum staining.
Removing accumulated lint
From Inside the Dryer Cabinet
Lint should be removed every 2 years. or more often. depending on dryer usage. Cleaning should be done by a qualified servicer.
From the Exhaust Vent
Lint should be removed every 2 years. or more often. depending on dryer usage.
Cleaning the lint screen
Every load cleaning
The lint screen is located in the dryer. A screen blocked by lint can increase drying time.
To clean:
- Pull the lint screen out of its holder. Roll lint off the screen
- Push the lint screen firmly back into place.
IMPORTANT:
- Do not run the dryer with the lint screen loose. damaged. blocked. or missing. Doing so can cause overheating and damage to both the dryer and fabrics.
- If lint falls off the screen into the dryer during removal, check the exhaust hood and remove the lint. See Venting Requirements.
As needed cleaning
Laundry detergent and fabric softener residue can build up on the lint screen. This buildup can cause longer drying times for your clothes, or cause the dryer to stop before your load is completely dry. The screen is probably clogged if lint falls off while the screen is in the dryer.
Clean the lint screen with a nylon brush every 6 months, or more frequently, if it becomes clogged due to a residue buildup.
To wash:
- Roll lint off the screen with your fingers.
- Wet both sides of lint screen with hot water.
- Wet a nylon brush with hot water and liquid detergent. Scrub lint screen with the brush to remove residue buildup.
- Rinse screen with hot water.
- Thoroughly dry lint screen with a clean towel. Reinstall screen in dryer.
Vacation, storage, and moving care
Non-Use or Storage Care
Operate your dryer only when you are at home. If you will be on vacation or not using your dryer for an extended period of time, you should:
- Unplug dryer or disconnect power.
- For gas dryers only): Close shut-off valve to gas supply line.
- Clean lint screen. See “Cleaning the Lint Screen.”
Moving Care
For power supply cord-connected dryers:
- Unplug the power supply cord.
- Make sure leveling legs are secure in dryer base.
- Use tape to secure dryer door.
For direct-wired dryers:
- Turn off power at fuse or breaker box.
- Disconnect wiring.
- Make sure leveling legs are secure in dryer base.
- Use tape to secure dryer door.
For gas dryers:
- Unplug or disconnect power to dryer.
- Close shut-off valve in gas supply line.
- Disconnect gas supply line pipe and remove fittings attached to dryer pipe.
- Cap the open fuel supply line.
- Make sure leveling legs are secure in dryer base.
- Use tape to secure dryer door.
Reinstalling the Dryer
Follow the Installation Instructions to locate, level, and connect the dryer.
Changing the drum light (on some models)
- Unplug dryer or disconnect power.
- Open the dryer door. Locate the light bulb cover on the back wall of the dryer. Using a Phillips-head screwdriver, remove the screw located in the lower right-hand corner of the cover. Remove the cover.
- Turn bulb counterclockwise. Replace the bulb with a 10-watt appliance bulb only. Replace the cover and secure with the screw.
- Plug into a grounded outlet or reconnect power.
MAYTAG® LAUNDRY LIMITED WARRANTY
WHAT IS COVERED
FIRST YEAR LIMITED WARRANTY (PARTS AND LABOR)
For one year from the date of purchase, when this major appliance is installed, operated, and maintained according to instructions attached to or furnished with the product, Maytag brand of Whirlpool Corporation or Whirlpool Canada LP (hereafter Maytag”) will pay for factory specified parts and repair labor to correct defects in materials or workmanship that existed when this major appliance was purchased.
SECOND THROUGH TENTH YEAR LIMITED WARRANTY DRUM MOTOR AND STAINLESS STEEL BASKET ONLY - LABOR NOT INCLUDED)
In the second through tenth years from the date of original purchase, when this major appliance is installed, operated, and maintained according to instructions attached to or furnished with the product, Maytag will pay for factory specified parts for the following components to correct non-cosmetic defects in materials or workmanship in these parts that prevent function of this major appliance and that existed when this major appliance was purchased. This is a limited 10 year warranty on the below named parts only and does not include repair labor.
- Drum (Side Walls Only)
- Drive Motor
YOUR SOLE AND EXCLUSIVE REMEDY UNDER THIS LIMITED WARRANTY SHALL BE PRODUCT REPAIR AS PROVIDED HEREIN. Service must be provided by a Maytag designated service company. This limited warranty is valid only in the United States or Canada and applies only when the major appliance is used in the country in which it was purchased. This limited warranty is effective from the date of original consumer purchase. Proof of original purchase date is required to obtain service under this limited warranty.
WHAT IS NOT COVERED
- Commercial, non-residential, multiple-family use, or use inconsistent with published user, operator, or installation instructions.
- In-home instruction on how to use your product.
- Service to correct improper product maintenance or installation, installation not in accordance with electrical or plumbing codes, or correction of household electrical or plumbing (i.e. house wiring, fuses, or water inlet hoses).
- Consumable parts (i.e. light bulbs, batteries, air or water filters, etc.).
- Conversion of your product from natural gas or propane gas or reversal of appliance doors.
- Damage from accident, misuse, abuse, fire, floods, acts of God, or use with products not approved by Maytag.
- Repairs to parts or systems to correct product damage or defects caused by unauthorized service, alteration, or modification of the appliance.
- Cosmetic damage including scratches, dents, chips, and other damage to appliance finishes unless such damage results from defects in materials and workmanship and is reported to Maytag within 30 days.
- Discoloration, rust, or oxidation of surfaces resulting from caustic or corrosive environments, including but not limited to, high salt concentrations, high moisture or humidity, or exposure to chemicals.
- Pick-up or delivery. This product is intended for in-home repair.
- Travel or transportation expenses for service in remote locations where an authorized Maytag servicer is not available.
- Removal or reinstallation of inaccessible appliances or built-in fixtures (i.e. trim, decorative panels, flooring, cabinetry, islands, countertops, drywall, etc.) that interfere with servicing, removal, or replacement of the product.
- Service or parts for appliances with original model/serial numbers removed, altered, or not easily determined.
The cost of repair or replacement under these excluded circumstances shall be borne by the customer.