L
L!
media Proj
On
nS
Models No.
--,'TEGRATEOTUNEn-- O I G I T A L
ViVA
HD3D Sound minE®
(USA)
For assistance, pmease call :
1-888-WEW PTV(843-9788)
or, contact us via the web at:
http:fl_vw.panasonic.comlcontactin fo
(Puerto Rico)
For assistance, pmease ca[[:
787-750-4300
or visit us at w_v.panasonicpr.com
Three Important Reasons to Register Your Product
Immediately!
1 Protect Your New Investment,,.
Register your new Projection Display for insurance purposes
in case your new Projection Display is stolen.
2 Product safety not{ficat{on...
Registering your product can help us to contact you in the
unlikely event a safety notification is required under the
Consumer Product Safety Act.
3 Improved Product Development...
Help us continue to design products that meet your needs.
Register online at vww,,_.panasonic.com/register
ATSC CERTIF}ED *
DIGITAL TELEVISION
* The presence of the DTV certification mark indicates that this product will successfully
receive digital television transmissions that conform to any and all of the video formats
described in the ATSC Digital Television Standard.
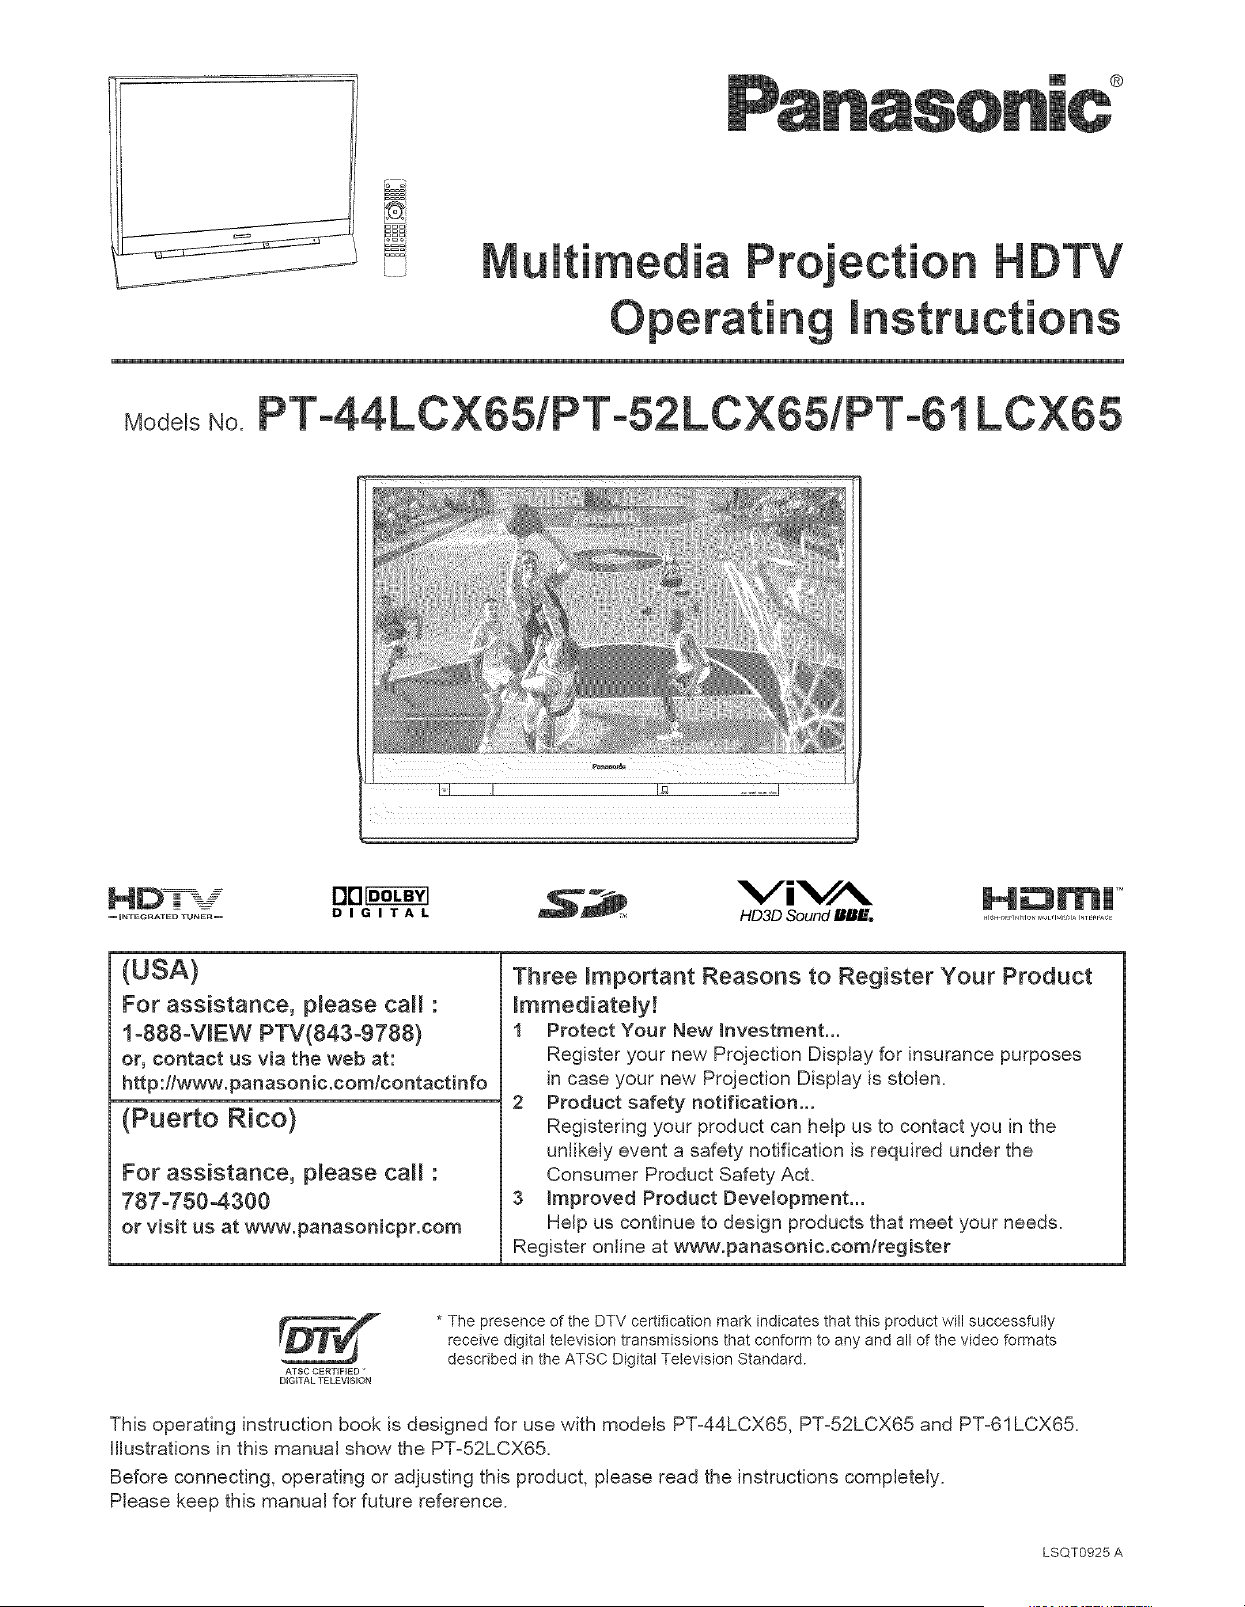
This operating instruction book is designed for use with models PT-44LCX65, PT-52LCX65 and PT-61LCX65.
Illustrations in this manual show the PT-52LCX65.
Before connecting, operating or adjusting this product, please read the instructions completely.
Please keep this manual for future reference.
LSQT0925 A

CAUTION
WARNING: To reduce the risk of electric shock, do not remove cover or back, No
user-serviceabBe parts inside. Refer servicing to qualified service personnel
This symbol warns the
user that uninsulated
voltage within the unit may
have sufficient magnitude
to cause electric shock.
Therefore, it is dangerous
to make any kind of
contact with any inside part
of this unit.
This symbol alerts the
user that important
literature concerning
the operation and
maintenance of this unit
has been included.
Therefore, it should be
read carefully in order to
avoid any problems.
The pictorial
representation of a hot
surface within a triangle
is intended to tell the
user that parts inside the
product are a risk of burns
to persons.
Note to CATV System Installer:
This reminder is provided to call the CATV system installer's attention to Article 820°40 of the NEC that provides
guidelines for proper grounding and, in particular, specifies that the cable ground shall be connected to the grounding
system of the building, as close to the point of cable entry as practical.
To reduce the risk of electric shock, fire, injury to persons or damage to this product:
1) Read these instructions before using, connecting or adjusting this product.
2) Keep these instructions for future reference.
3) Heed all warnings on the product and in this Operating Instructions manual.
4) Followalt instructions carefWly.
5) Do not use this apparatus near water. For example, near a bathtub, washbowl, kitchen sink, or laundry tub, in
a wet basement or near a swimming pool, and the like. Do not place objects filled with water, such as a vase or
the like, on top of this unit.
6) Clean only with a dry cloth. Do not use liquid cleaners or aerosol cleaners.
7) Do not block any ventilation openings. Install in accordance with the manufacturer's instructions.
Openings in the cabinet are provided for ventilation to ensure reliable operation and to protect it from
overheating. Never block openings by placing the product on a bed, sofa or similar surfaces.
8) Do not install near any heat source such as radiators, heat registers, stoves, or other apparatus
(including amplifiers) that produces heat. Do not install in a built-in installation such as a bookcase or rack,
unless proper ventilation is provided or the manufacturer's instructions have been adhered to.
9) Do not defeat the safety purpose of the polarized or grounding4ype plug. A polarized plug has two
blades with one wider than the other. A grounding type plug has two blades and a third grounding
prong. The wide blade or the third prong are provided for your safety. If the provided plug does not fit
into your outlet, consult an electrician for replacement of the obsolete outlet.
10) Protect the power cord from being walked on or pinched particularly at plugs, convenience receptacles,
and the point where they exit from the apparatus.
11) Only use attachmentstaccessories specified by the manufacturer.
12) Use only with the cart, stand, tripod, bracket, or table specified by the manufacturer, or
sold with the apparatus. When a cart is used, use caution when moving the cart/apparatus
combination to avoid injury from tip-over.
13) Unplug this apparatus during lightning storms or when unused for long periods of time.
14) Refer all servicing to qualified service personnel. Servicing is required when the apparatus has been
damaged in any way, such as power-supply cord or plug is damaged, liquid has been spilled or objects
have fallen into the apparatus, the apparatus has been exposed to rain or moisture, does not operate
normally, or has been dropped.
15) Because the temperature of the lamp unit is elevated immediately after its use, a direct touch to it may cause
burns. Replace the lamp unit only after it has cooled.
2

AS WiTH ANY SMALL OBJECT, SD CARDS CAN BE SWALLOWED BY YOUNG CHILDREN. DO NOT ALLOW
CHILDREN TO HANDLE THE SD CARD.
TO REDUCE THE RiSK OF FiRE OR ELECTRIC SHOCK, DO NOT EXPOSE THiS EQUIPMENT TO RAiN OR
MOISTURE. DO NOT PLACE OBJECTS FILLED WiTH WATER, SUCH AS A VASE OR THE LIKE, ON TOP OF
THiS APPARATUS.
(1) This Projection Display is intended to be used with the following TV stand: mode[ Tyo44LC65C for the PTo44LCX65,
TYo52LC65C for the PTo52LCX65, and TYo61 LC65C for the pTo61LCX65. Use with other stands may resumt in the
Projection Display becoming unstable, possibly causing injury.
(2) This Projection Display should not be exposed to direct sunlight, extreme temperatures or moisture, as this can
result in serious [rreparabme damage.
(3) This Projection Display has a High Intensity Discharge (HID) tamp that contains a sinai1 amount of mercury. Btalso
contains lead in some components.
Disposal of these materiams may be regulated in your community due to environmental considerations.
For disposal or recycling information please contact your locam authorities, or the Emectronics Industries Alliance:
<http:flwww.eiae.or_>
Trademarks
• VGA and XGA are trademarks of International Business Machines Corporation.
• Macintosh is a registered trademark of Apple Computer, USA.
• SVGA is trademark of the Video Electronics Standard Association.
Even if no special notation has been made of company or product trademarks, these trademarks have been fully respected,
• Equipped with ab2oTV Noise Reduction for true MTS reproduction, abx®-TV Noise Reduction is required for good stereo
separation and audio fidelity, d£Z is a registered trademark, and is licensed by dbZ Technology Licensing.
• CableCARD TM is a trademark of Cable Television Laboratories, Inc,
H rnj ,M
HDMI, the HDMI logo and
High Definition Multimedia
Interface are trademarks or
registered trademarks of HDMI
Licensing LLC.
SD Logo is a trademark.
ViVA
HD3D Sound mmE.
llllkL
High Definition Sound
E]BFD-O-L
DIGITAL
Manufactured under license from BBE Sound, Inc.
Licensed by BBE Sound, Inc. under USP5510752
and 5736897_ BBE and BBE symbol are registered
trademarks of BBE Sound, Inc.
Manufactured under license from Dolby
Laboratories. Dolby and the double-D symbol
are trademarks of Dolby Laboratories.
U.S. Patent Nos. 4,631,603; 4,577,216; 4,819,098; 4,907,093; 6,381,747; and 6,516,132.
This product incorporates copyright protection technology that is protected by U.S. patents and other intellectual
property rights. Use of this copyright protection technology must be authorized by Macrovision, and is intended
for home and other limited viewing uses only unless otherwise authorized by Macrovision. Reverse engineering
or disassembly is prohibited.
License description: To view the license information for software used in this product, press the Menu button and
select "Setup"_"About"_"License". (See page 57).
Note:
Do not allow a still picture to be displayed for an extended period, as this can cause a permanent afterimage to remain on this
unit. Examples of still pictures include Iogos, video games, computer images, teletext and images displayed in 4:3 mode.
3

Dear Panasonic Customer
Weic'ome to h_e Pa,aso,ie jbmilv _?feusmmel_s. We hope that ) ozt wi{/ have mater yeaz<_'_?fet_ioyme,l fi"om yoz_r ,ew
PFqieetiot_ Di_,lq_.
]_ obtui_7 maximum be_Tef)tj?om yore" seZ please l"ead these I_Tsll_uetio_Tsbq_bre makir,_g at_v ac(/usmTe_Tls, ar,_dl_emi_7
Ihem ,fbr filture l"e/bl_e_Tee.
Refait_ )ore _purehas'e reeeipI aLs'o, at:_dl'eeol'd h_e se1"iat mmTbe1" _{_vom" seI i_7Ihe .s)oaee provided o_7Ihe real" covet"
c_ffhese instructions.
_;;sit ore: 1JutTasotTie Web Site ::bl" (:5_ : www.pa/:_aso:Tic_eom
(LISA)
For assistance, please call : 1-888-WEW PTV(843-9788)
or, contact us via the web at: http:flwww.panasonic.comlcontactinfo
(Puerto Rico)
For assistance, p_ease call : 787-750-4300
or visit us at www.panasonicpr.com
FCC STATEMENT:
NOTE:
This equipment has been tested and found to comply with the limits for a Class B digital device, pursuant to Part
15 of the FCC Rules. These limits are designed to provide reasonable protection against harmful interference in a
residential installation. This equipment generates, uses and can radiate radio frequency energy and, if not installed
and used in accordance with the instructions, may cause harmful interference to radio communications. However,
there is no guarantee that interference will not occur in a particular installation. If this equipment does cause harmful
interference to radio or television reception, which can be determined by turning the equipment off and on, the user is
encouraged to try to correct the interference by one or more of the following measures:
• Reorient or relocate the receiving antenna,
• Increase the separation between the equipment and receiver.
• Connect the equipment into an outlet on a circuit different from that to which the receiver is connected.
• Consult the dealer or an experienced radio / TV technician for help,
FCC Caution:
To assure continued compliance, follow the attached installation instructions and use only shielded interface cables
when connecting to computer or peripheral devices. Any changes or modifications not expressly approved by the
party responsible for compliance could void the user's authority to operate this equipment.
ANY CHANGES OR MODIFICATIONS TO THIS PTV RECEIVER NOT EXPRESSLY APPROVED BY PANASONIC
CORPORATION OF NORTH AMERICA COULD CAUSE HARMFUL INTERFERENCE, WHICH WOULD VOID THE
USER'S AUTHORITY TO OPERATE THIS EQUIPMENT.
The Class ]][ insulation symbol (square within a square) indicates that this product has been evaluated
and tested to comply with Class ]][ insulation requirements.
Models Number:
Trade Name:
Responsible party:
Address:
Telephone number:
Declaration of Conformity
PT-44LCX65tPT-52LCX65tPT-61 LCX65
Panasonic
Panasonic Corporation of North America
One Panasonic Way Secaucus New Jersey 07094
1=888-VIEW PTV(843=9788)
This device complies with Part 15 of the FCC Rules. Operation is subject to the following two conditions: (1) This
device may not cause harmful interference, and (2) this device must accept any interference received, including
interference that may cause undesired operation.
4

.... Remote Control Quick Reference Guide (Operating peripheral equipment):,:.58
5
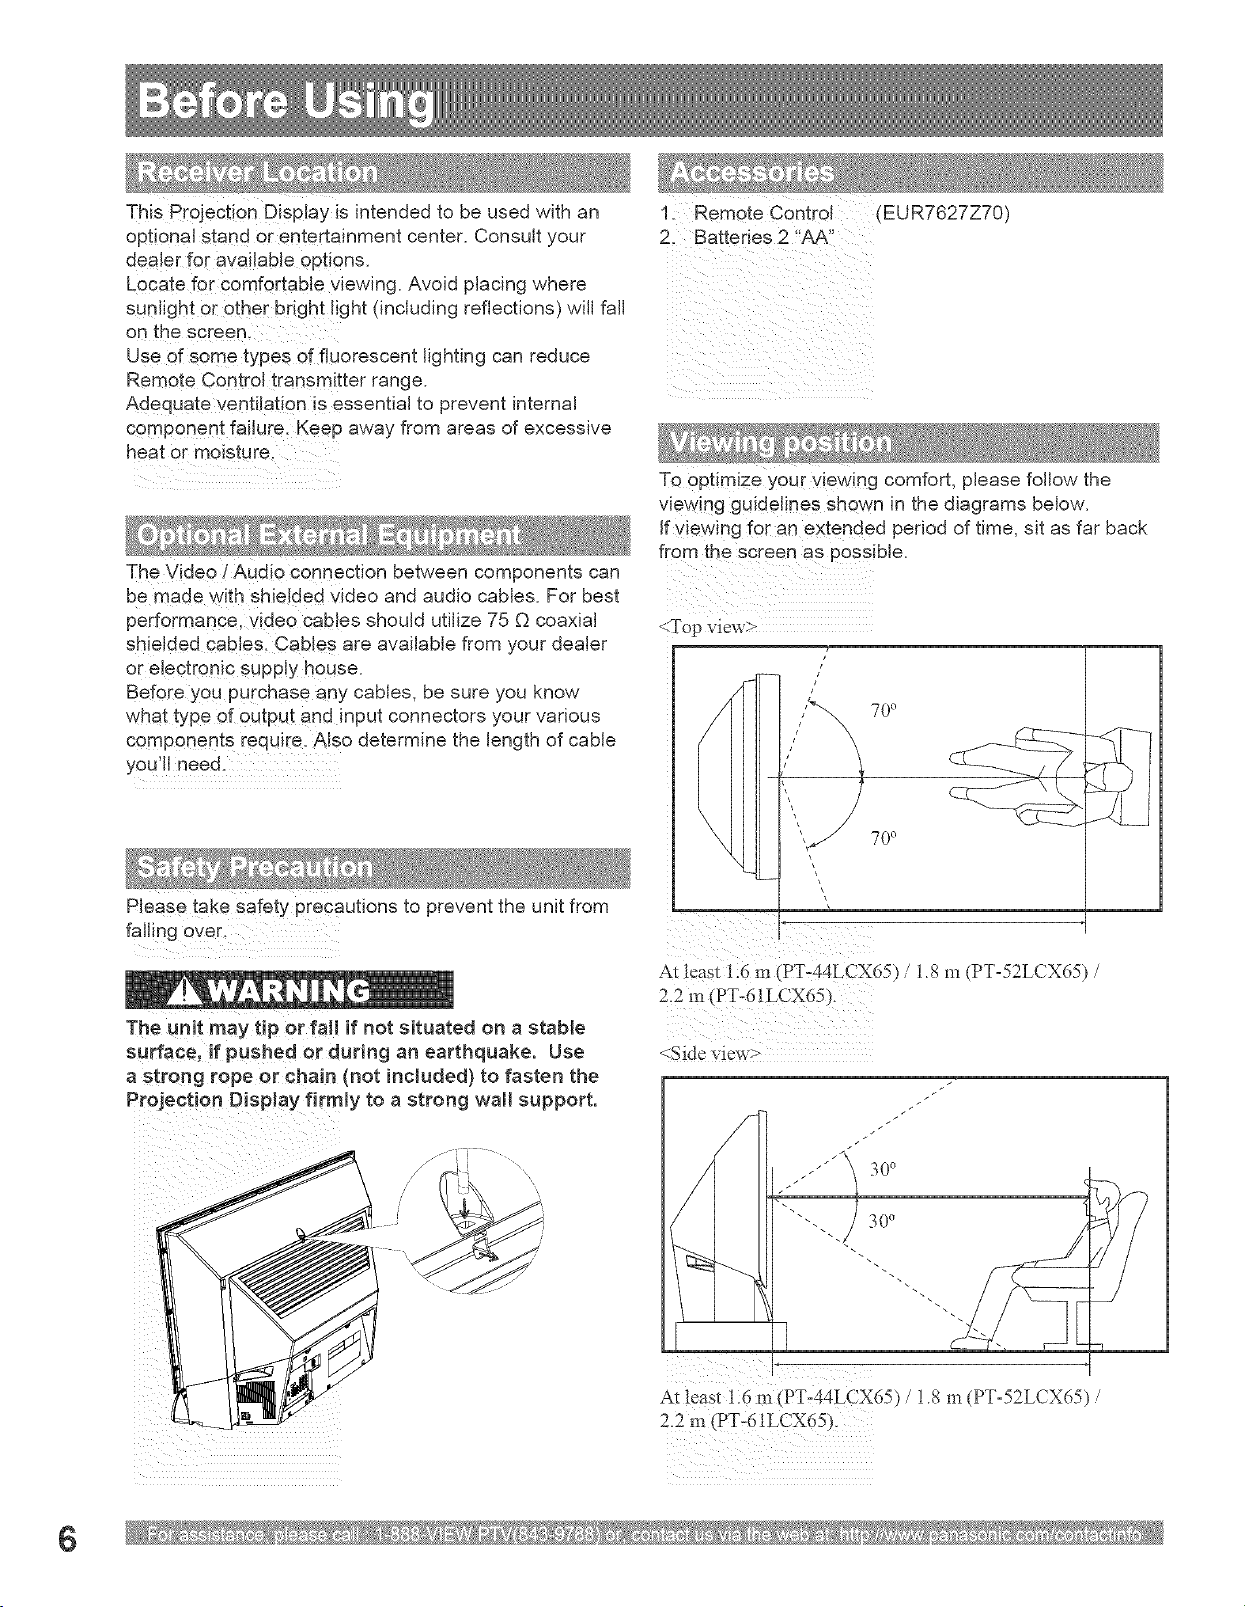
This Projection Display is intended to be used with an
optional stand or entertainment center. Consult your 2 Batter es 2 !!AA"
dealer for availabb options.
L0cate for Comfortable viewing. Avoid placing where
sunlight or other bright light (including reflections) will fail
on the screen.
Use 0f some types of fluorescent lighting can reduce
Remote Control transmitter range.
Adequate ventilatio n iS essential to prevent internal
component failure. Keep away from areas of excessive
To 0ptimize your viewing comfort, please follow the
viewing guidelines shown in the diagrams below.
If yiewing fOr an extended period of time, sit as far back
from the screen as possible.
The Video / Audio connection between components can
be made with shielded video and audio cables. For best
performance, video cables should utilize 75 O coaxial
shielded cables. Cables are available from your dealer
or ebctronic Supply house.
Before you purchase any cables, be sure you know
what type of output and input connectors your various
components require. Also determine the length of cable
you'll need.
Please take safety precautions to prevent the unit from
/
/
:i
y
70o
70o
falling over,
The url!t may tip or faJJ if not situated on a stable
surface, if pushed er during an earthquake. Use
a strong rope or chain (not included) to fasten the
Projection Disp!ay firmly to a strong wall support.
7F_,.
At least 1.6 m (PT-44LCX65) / 1,8 m (PT-52LCX65) /
2.2 m @T-61LCX65 ,.
<Side view>
At least 1.6 m (PT-44LCX65) / 1,8 m (PT-52LCX65) /
2.2 m (PT-61LCX65 _
6

Requires two AA batteries (supplied).
1. While pressing in on the catch, open cover in
direction of arrow.
2. install the batteries as shown in the battery
compartment.
{Polarity + or - must match the markings in the
compartment).
Two AA size
3. Press cover _n direction of arrow until it snaps
shut.
(1) For frequent remote control users, replace old
batteries with Alkaline batteries for longer battery
life.
(2) Whenever you remove the batteries, you may
need to reset the remote control infrared
codes. We recommend that you record the code
on pages 58°59, prior to setting up the remote.
If a CableCARD TM is installed, the cable MSO
(mu!tip!e system owner/operator) may provide an
Emergency A_ert System message. These messages
are intended to a!ert the general public of important
IocaJ or nationaJ emergency situations. In the event
of receipt of one of these messages, the Projection
Disp!ay sha!l immediately tune to the channeJ as
directed bythe EAS message. If the channel has
been blocked using the parental control, the parental
b!ock!ng has pr!ority over the forced tune.
Incorrect battery installation can cause the batteries to
leak. leading to personal injury and/or damage to the
remote control.
Observe the following precautions:
1. Batteries should always be replaced as a pair.
Always use new battenes when replacing the old
set.
2. Do not combine a used battery with a new one.
3. Do not mix battery types (example: "Zinc Carbon"
with "Alkaline").
4. Do not attempt to charge, short=circuit, disassemble,
heat or burn used batteries.
5. Battery replacement is necessary when the remote
control acts sporadically or stops operating the
Projection Display set.
Use when moving unit to a new location, or First Time
Press the VOL= button on the unit
and OK button on the Remote
L+
('_I r_ L+ control at the same time for more
than 3 seconds. When reset is done,
,, power shuts off automatically.
7
CO (Closed Captioning)
EAS (Emergency Alert System)
OSD (On-Screen Dispmay)
MSO (Multiple system ownedoperator)
Dolby Digital
This is a method of coding digital signals developed by
Dolby Laboratories. Apart from stereo (2zchannel) audio,
these signals can also be multichannel audio. A large
amount of audio information can be recorded on one
disc using this method.
PCM (pulse code modulation)
These are uncompressed digital signals, similar to those
found on CDs.
DTV (Digital Television)
Name of the process whereby television picture and
sound signals are changed to digital code for receiving
and transmitting.
HDTV (High Definition Television)
Television with improved picture quality by increasing
vertical and horizontal resolution.
ATSC (Advanced Television Systems Committee)
Standardization body that developed the Digital
Television Terrestrial formats.
HDMI (High Definition Multimedia Interface)
Interface that supports every uncompressed digital
format as well as all existing multi-channel audio format
on a single cable.
JPEG (Joint Photographic Experts Group)
A system used for compressing/decoding color still
pictures.
MPAA (Motion Picture Association of America)
Guild governing rating assignments to movies.
NTSC (National Television Systems Committee)
Standardization body that developed the Analog
Television Terrestrial formats.
Password
A four (4) digit code a user must provide in order to
perform a function.
CaMeCARD TM
A module that is required to receive premium digital
services through the cable input.
8
J
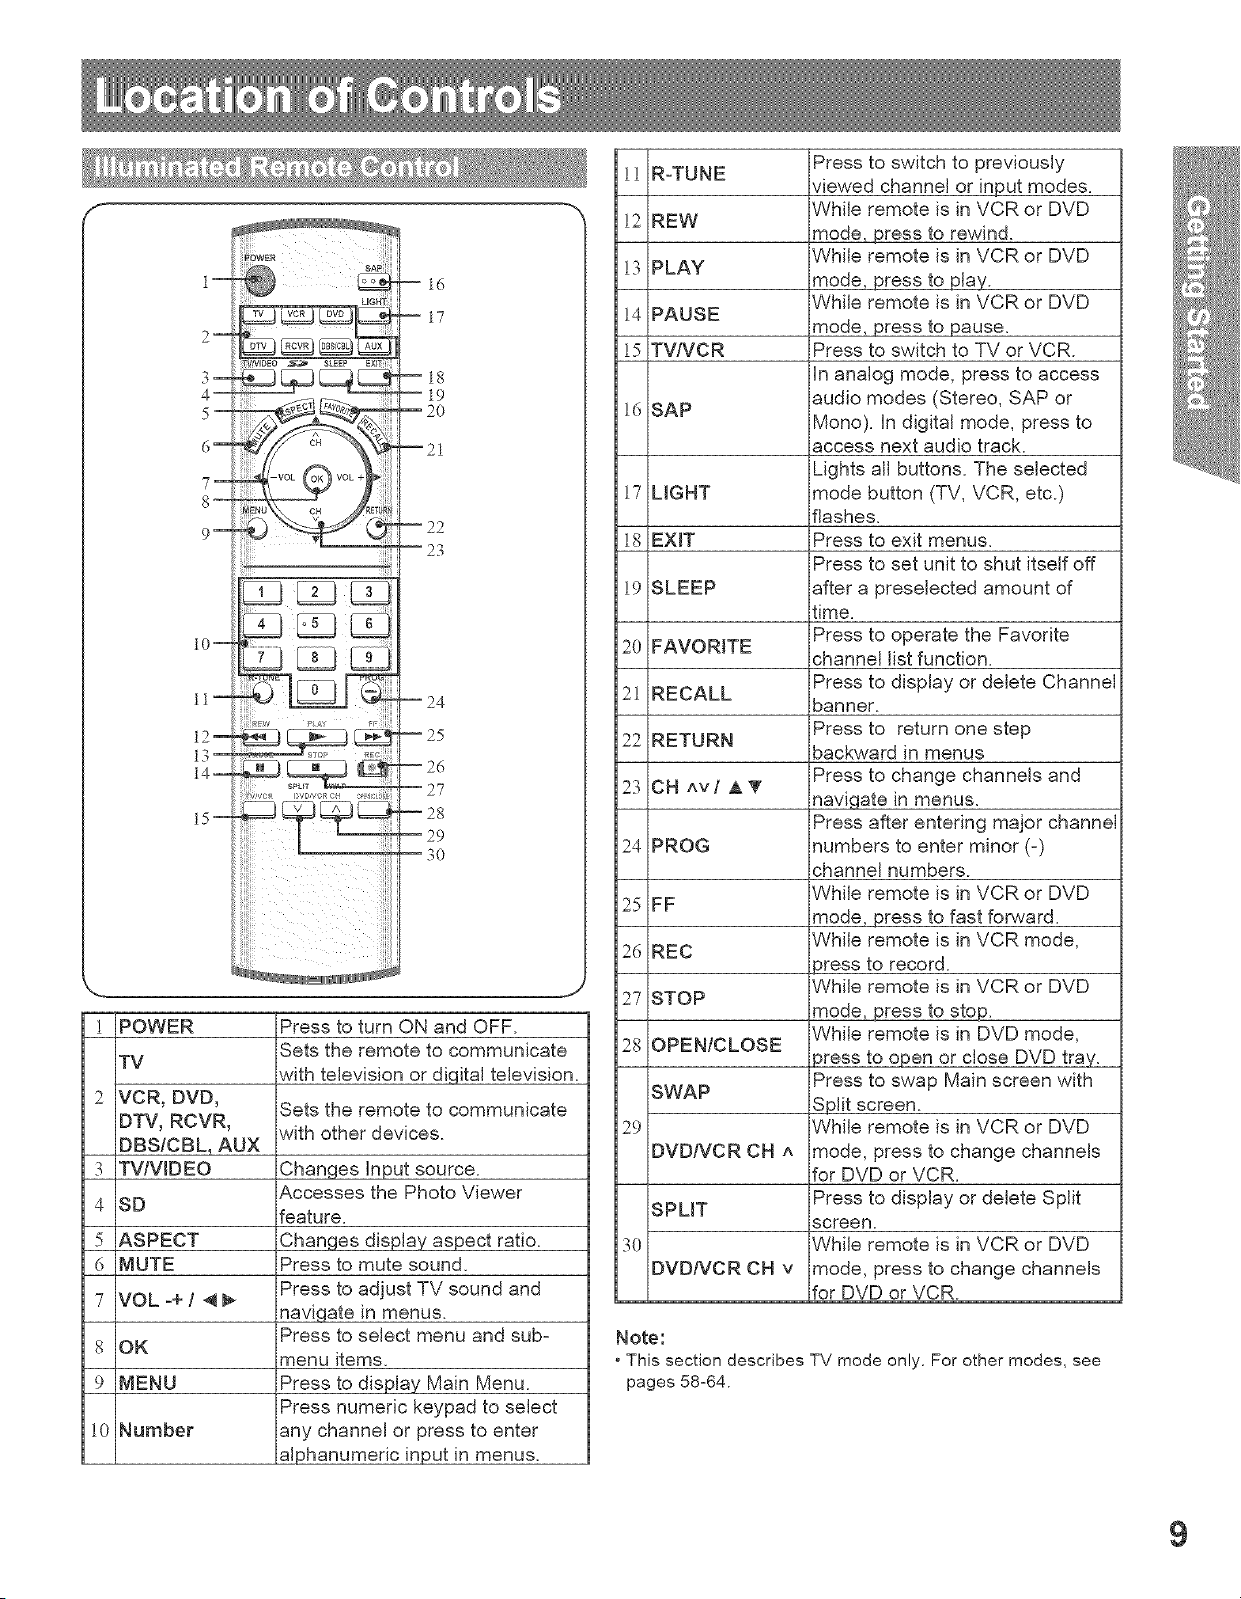
1 POWER
TV
2 [VCR, DVD,
[DTV, RCVR,
DBS/CBL, AUX
3 TVIVIDEO
4 8D
5 [ASPECT
6 MUTE
7 VOL -+ f _
8 OK
9 MENU
10 Number
Press to turn ON and OFF.
Sets the remote to communicate
with television or digital television.
Sets the remote to communicate
with other devices.
Changes Input source.
Accesses the Photo Viewer
feature.
Changes display aspect ratio.
Press to mute sound.
Press to adjust TV sound and
naviqate in menus.
Press to select menu and sub-
menu items.
Press to display Main Menu.
Press numeric keypad to select
any channel or press to enter
alphanumeric input in menus.
11 R-TUNE
12 REW
13 PLAY
14 PAUSE
15 TVlVCR
16 SAP
17 LIGHT
i8 EXiT
19 SLEEP
20 FAVORITE
21 RECALL
22 RETURN
23 CHAV/ A_'
24 PROG
25 FF
26 REC
27 STOP
28 OPENtCLOSE
SWAP
29
DVD/VCR CH A
SPLIT
30
DVD/VCR CH v
Press to switch to previously
viewed channel or input modes.
While remote is in VCR or DVD
mode, press to rewind.
While remote is in VCR or DVD
mode, press to play.
While remote is in VCR or DVD
mode, press to pause.
Press to switch to TV or VCR.
In analog mode, press to access
audio modes (Stereo, SAP or
Mono). in digital mode, press to
access next audio track.
Lights all buttons. The selected
mode button (TV, VCR, etc.)
flashes.
Press to exit menus.
Press to set unit to shut itself off
after a preselected amount of
time.
Press to operate the Favorite
channel list function.
Press to display or delete Channel
banner.
Press to return one step
backward in menus
Press to change channels and
naviqate in menus.
Press after entering major channel
numbers to enter minor (-)
channel numbers.
While remote is in VCR or DVD
mode, press to fast forward.
While remote is in VCR mode,
3ress to record.
While remote is in VCR or DVD
mode, press to stop.
While remote is in DVD mode,
3ress to open or close DVD tray.
Press to swap Main screen with
Split screen.
While remote is in VCR or DVD
mode, press to change channels
for DVD or VCR
Press to display or delete Split
screen.
While remote is in VCR or DVD
mode, press to change channels
for DVD or VCR.
Note:
• This section describes TV mode only. For other modes, see
pages 58-64.
9
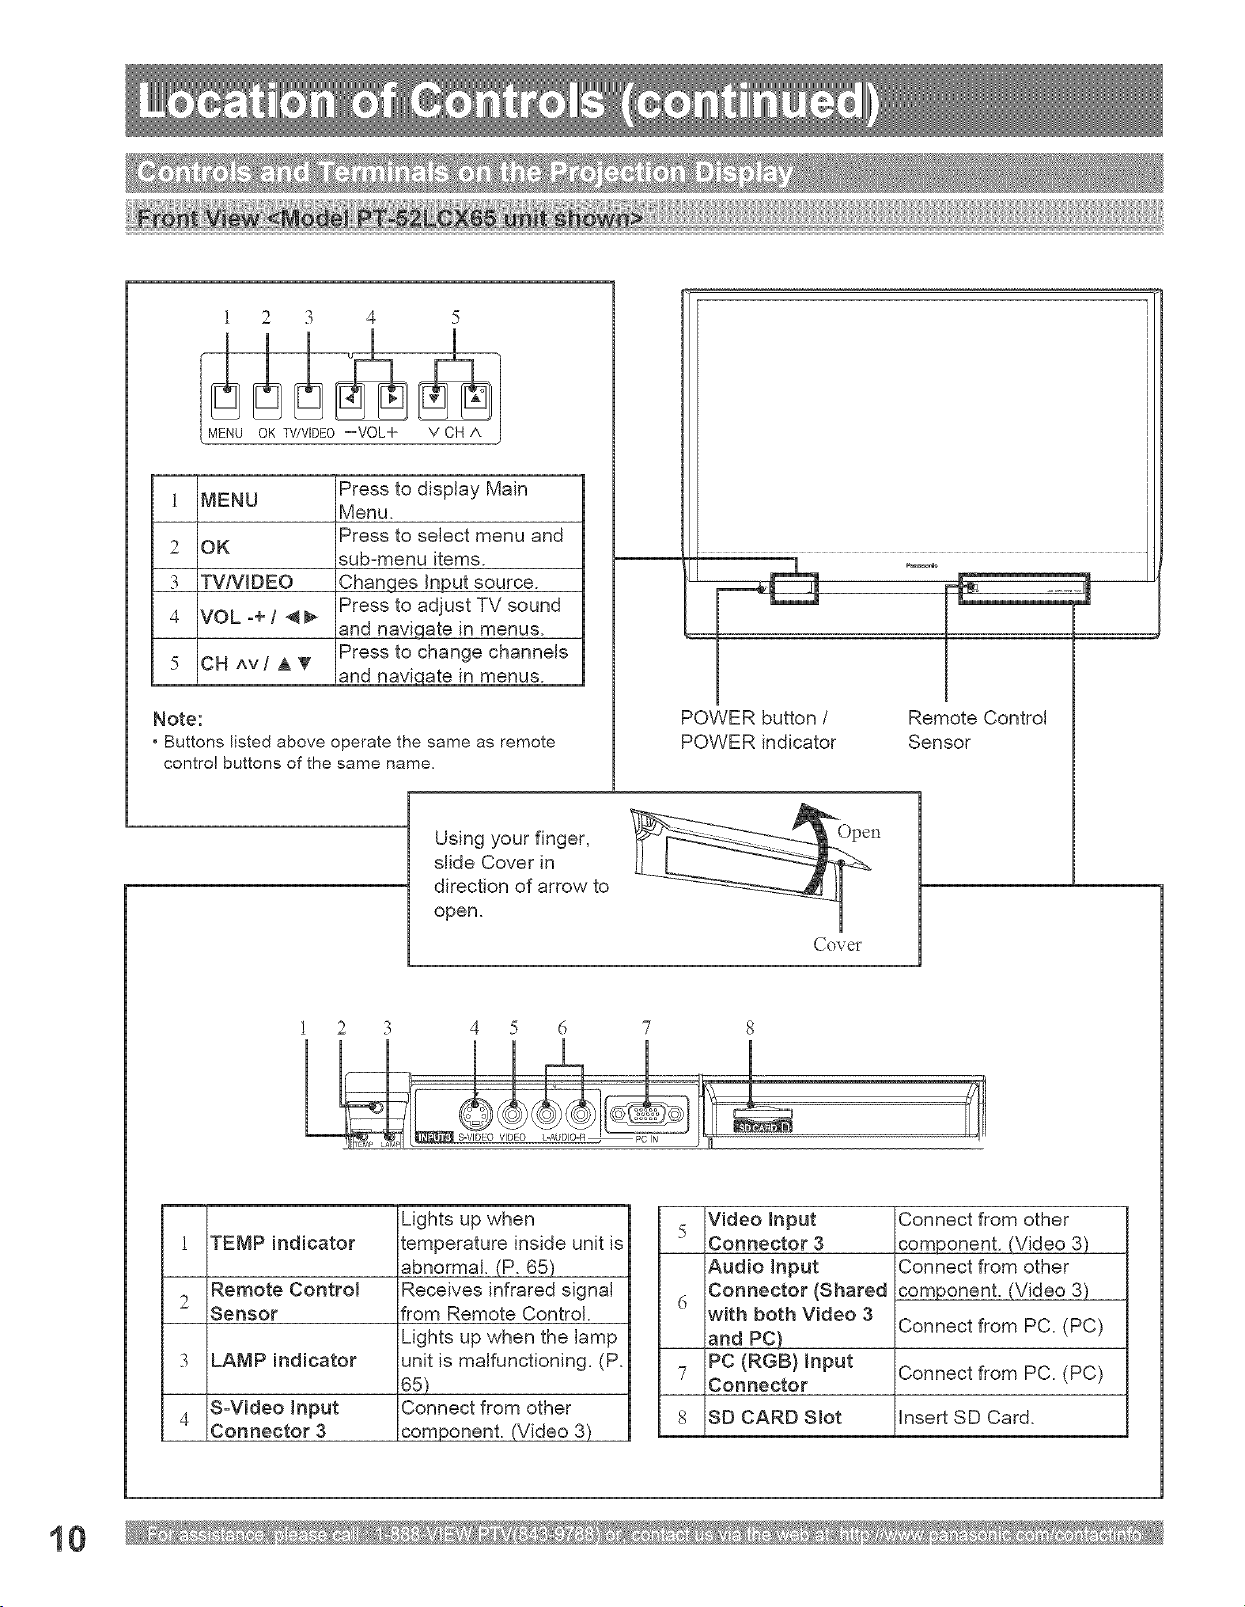
1 2 3 4 5
_M_ENU O_K TV/VIDEO --VOk+ V CH A
MENU
2 OK
3 TVIVIDEO
4 VOL-+l',q
CH AV [ ,A V
Press to display Main
Menu.
Press to select menu and
sub-menu items.
Changes Input source.
Press to adjust TV sound
and naviqate in menus.
Press to change channels
and naviqate in menus.
Note:
• Buttons listed above operate the same as remote
control buttons of the same name.
.....#.....................
I
POWER button / Remote Control
POWER indicator Sensor
Using your finger,
slide Cover in
direction of arrow to
open.
Open
Cover
1 2 3 4 5 6
1 TENP indicator
Remote Control
2
Sensor
3 LAMP indicator
S-Video Input
4
Connector 3
Lights up when
temperature inside unit is
abnormal. (P. 65)
Receives infrared signN
from Remote Control.
Lights up when the lamp
unit is malfunctioning. (P.
65)
Connect from other
component. (Video 3)
Video Input
Connector 3
Audio Input
Connector (Shared
with both Video 3
and PC)
PC (RGB) input
Connector
Connect from other
component. (Video 3)
Connect from other
component. (Video 3)
Connect from PC. (PC)
7 Connect from PC. (PC)
8 SD CARD Slot Insert SD Card.
10
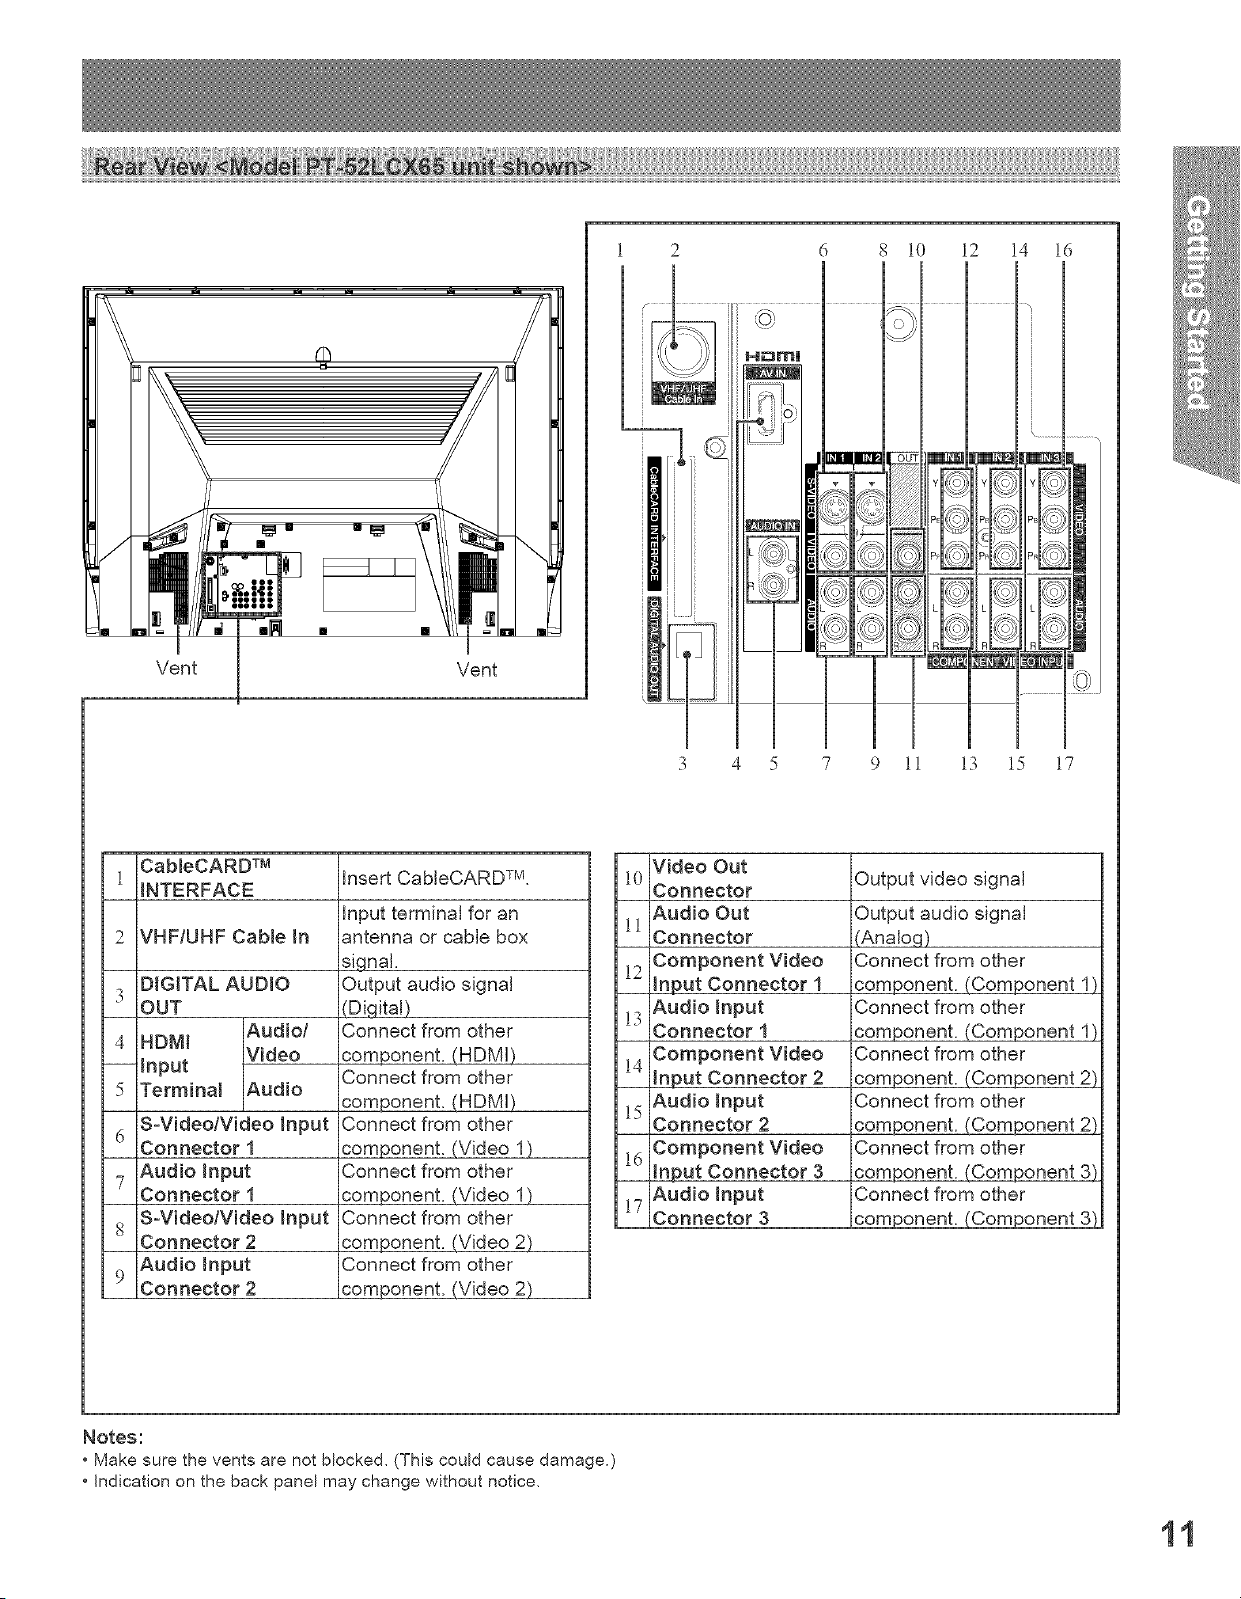
Vent
Vent
5 7
10 12
,J
A_
11 13
14 16
, _
oo
15 17
CableCARD TM
i
INTERFACE
2 VHF/UHF Cable in
DIGITAL AUDIO
3
OUT
Audio/
4 HDMI
Video
-- Input
5 Terminal Audio
6 S-Video/Video input
Connector 1
Audio Input
7
Connector 1
8 S-Video/Video Input
Connector 2
Audio Input
9
Connector 2
Insert CableCARD TM.
input terminal for an
antenna or cable box
signal.
Output audio signal
(Digital)
Connect from other
component. (HDMI)
Connect from other
component. (HDMI)
Connect from other
component. (Video 1)
Connect from other
component. (Video 1)
Connect from other
component. (Video 2)
Connect from other
component. (Video 2)
Video Out
10
Connector
Audio Out
11
Connector
Component Video
input Connector 1
Audio hput
13
Connector 1
Component Video
Input Connector 2
Audio hput
15
Connector 2
Component Video
input Connector 3
Audio Input
17
Connector 3
Output video signal
Output audio signal
(Analoq)
Connect from other
component. (Component 1
Connect from other
component. (Component 1
Connect from other
component. (Component 2)
Connect from other
component. (Component 2)
Connect from other
component. (Component 3)
Connect from other
component. (Component 3)
Notes:
* Make sure the vents are not blocked, (This could cause damage.)
* Indication on the back panel may change without notice,
11
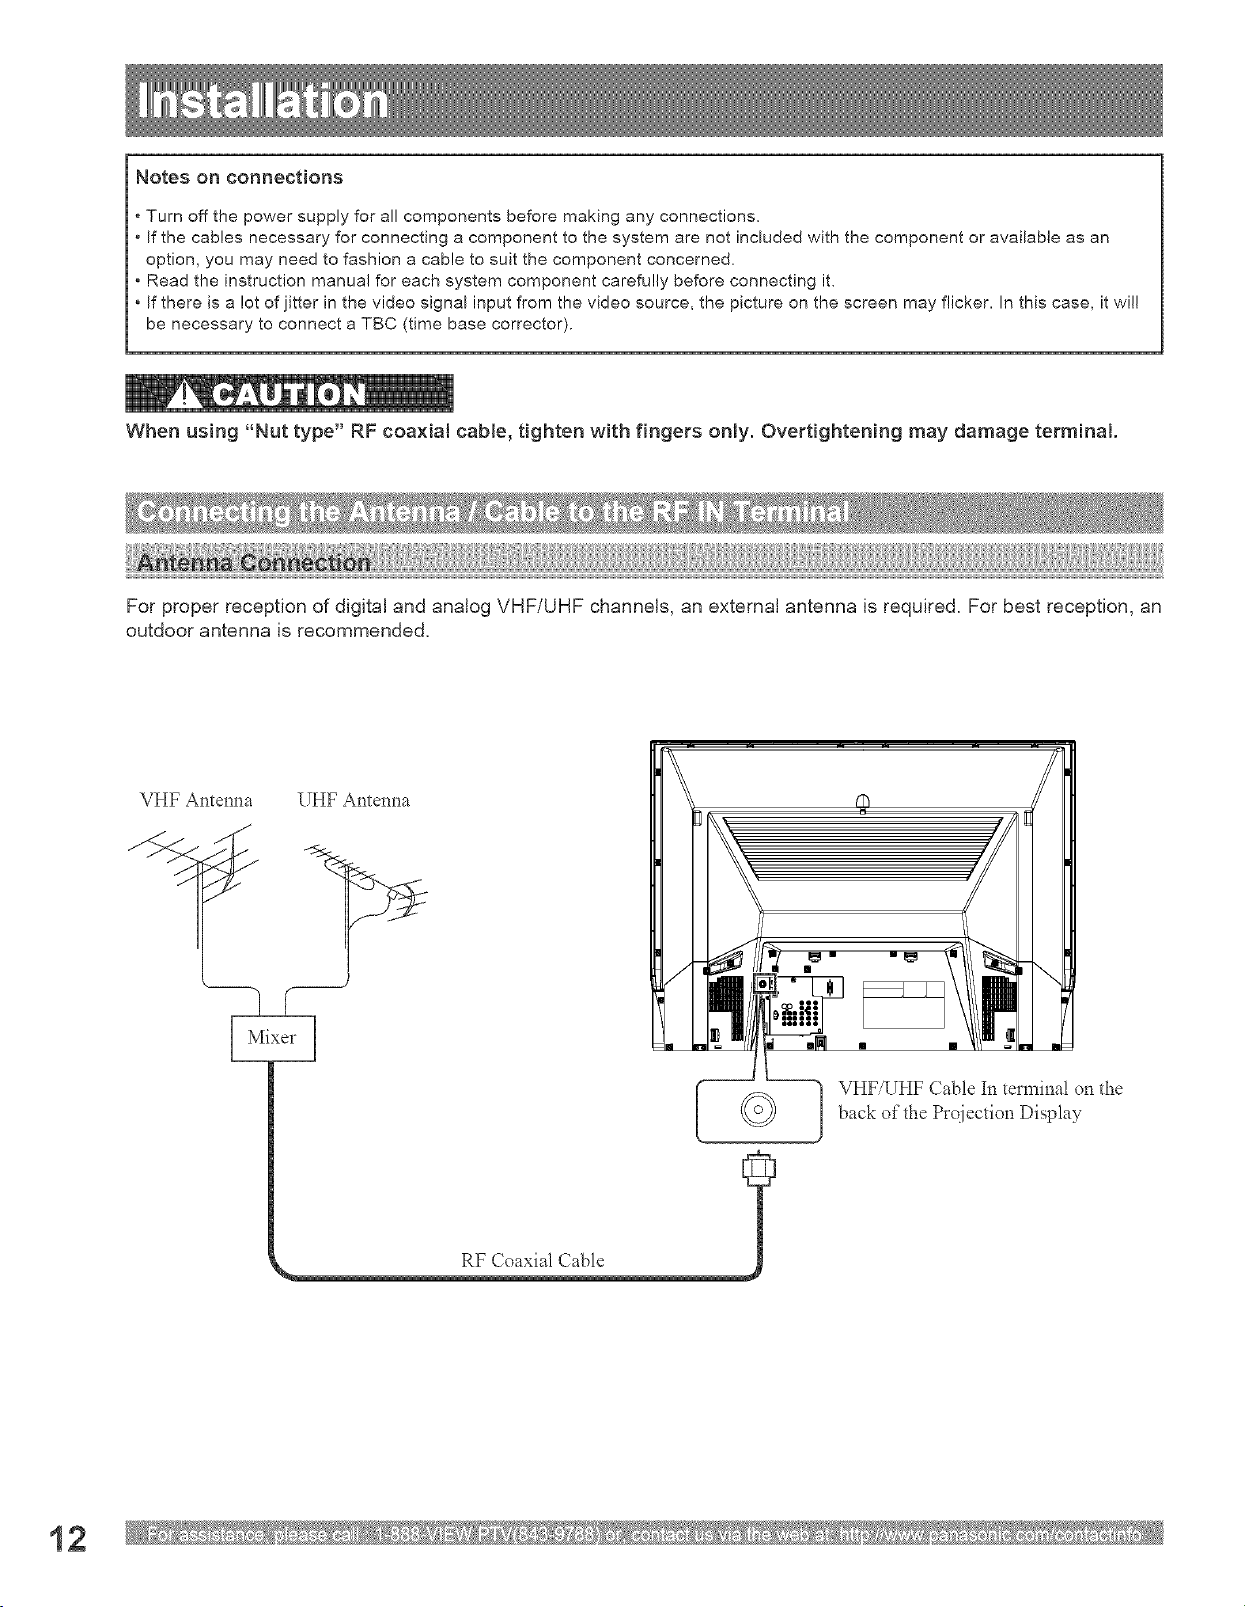
Notes on connections
* Turn off the power supply for all components before making any connections.
. If the cables necessary for connecting a component to the system are not included with the component or available as an
option, you may need to fashion a cable to suit the component concerned.
* Read the instruction manual for each system component carefully before connecting it.
If there is a lot of jitter in the video signal input from the video source, the picture on the screen may flicker. In this case, it will
be necessary to connect a TBC (time base corrector).
When using "Nut type" RF coaxial cable, tighten with fingers only. Overtightening may damage terminal.
For proper reception of digital and analog VHF/UHF channels, an external antenna is required. For best reception, an
outdoor antenna is recommended.
VHF Antenna UHF Antenna
Mixer
RF Coaxial Cable
I HF!UHF Cable In termina! on the
back of the Projection Display
i2
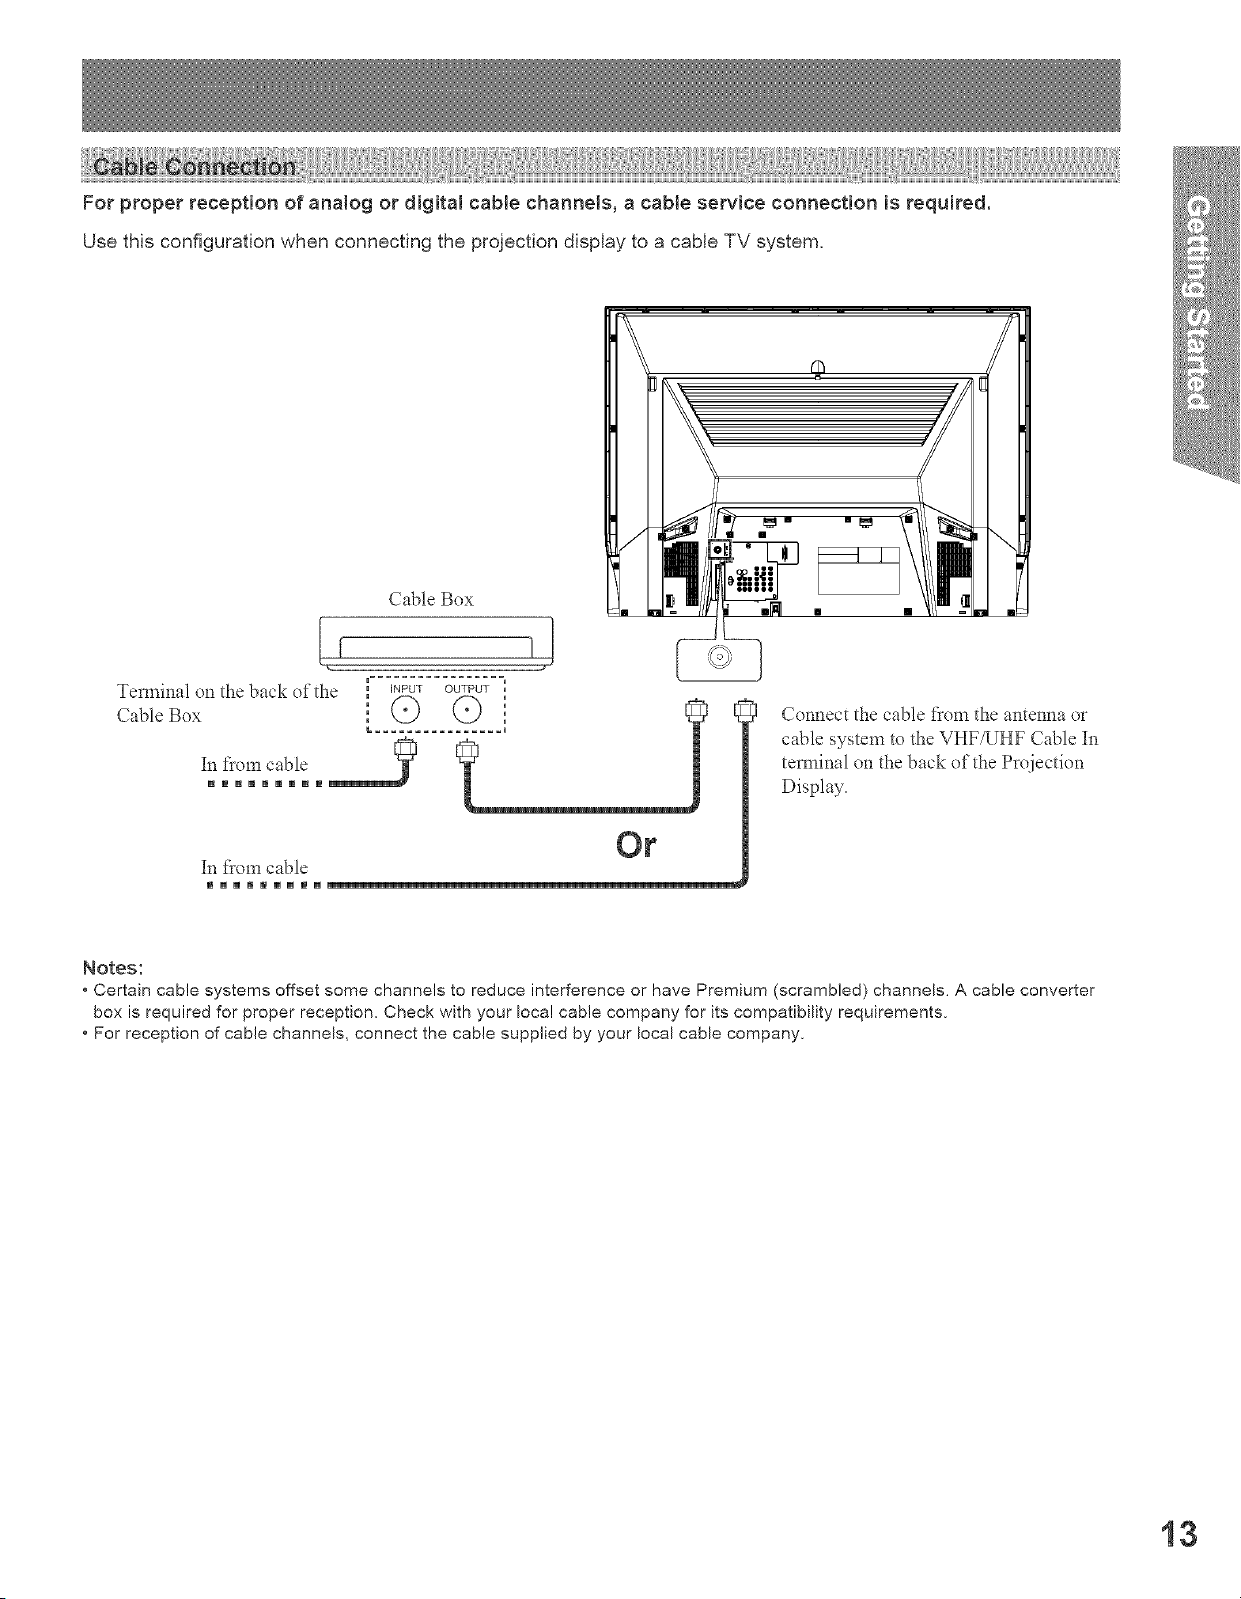
For proper reception of anatog or digital cane channels, a cane service connection is required.
Use this configuration when connecting the projection display to a cable TV system.
Com]ec/the cable flem the antenna or
cable system to the VHF/UHF Cable In
tem_inal on the back of the Projection
Display.
Notes:
* Certain cable systems offset some channels to reduce interference or have Premium (scrambled) channels. A cable converter
box is required for proper receptiom Check with your Ioca! cable company for its compatibility requirements.
, For reception of cane channels, connect the cable supplied by your local cable company.
13
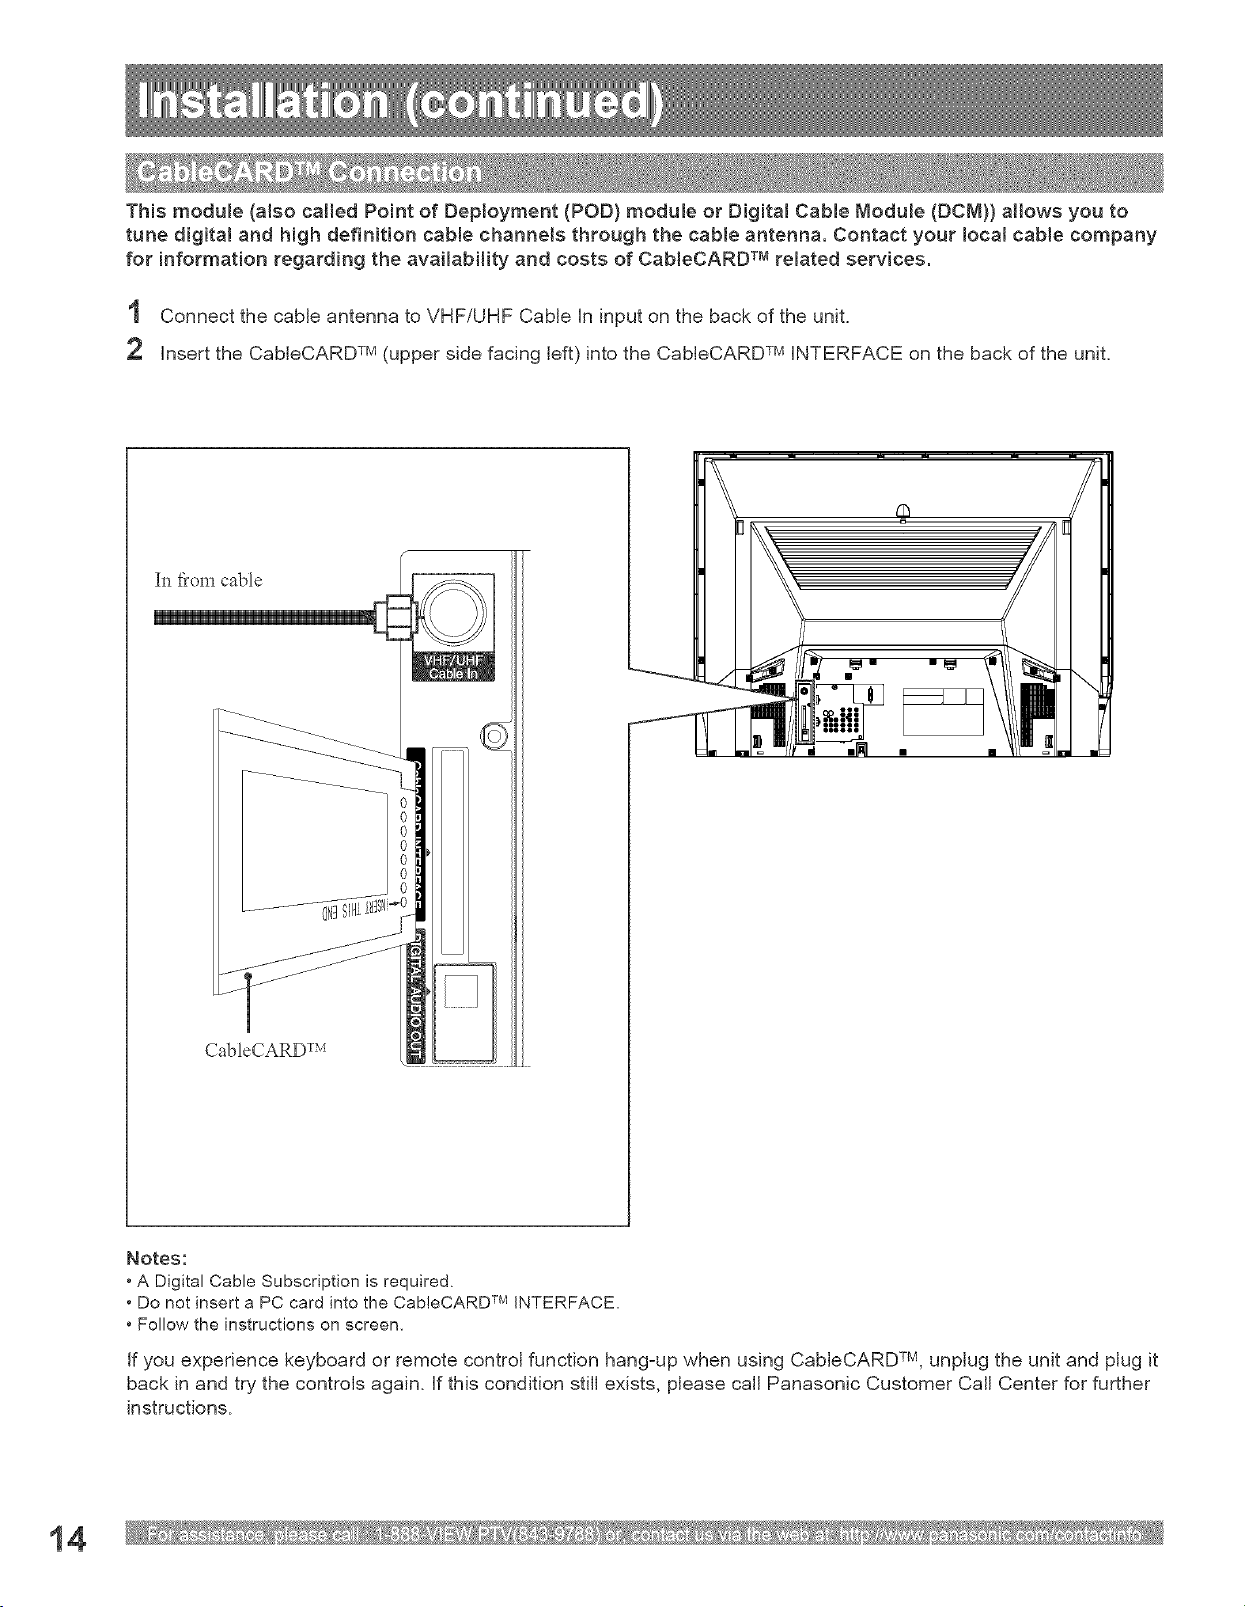
This module (also called Po{nt of Deployment (POD) module or DigRal CaNe Nodule (DCN}} NIows you to
tune digRal and high definit{on cane channels through the cane antenna, Contact your IocN cane company
for information regarding the availabHRy and costs of CaNeCARD TM related serv{ces.
1 Connect the cable antenna to VHF/UHF Cable in input on the back of the unit.
2 insert the CableCARD TM (upper side facing left) into the CableCARD TM iNTERFACE on the back of the unit.
In ti'om cable
CabIeCARD T_v_
Notes:
* A Digital CaNe Subscription is required.
* Do not insert a PC card into the CableCARD TMINTERFACE,
* Follow the instructions on screen,
if you experience keyboard or remote control function hang=up when using CableCARD TM, unplug the unit and plug it
back in and try the controls again. If this condition still exists, please call Panasonic Customer Call Center for further
instructions.
14
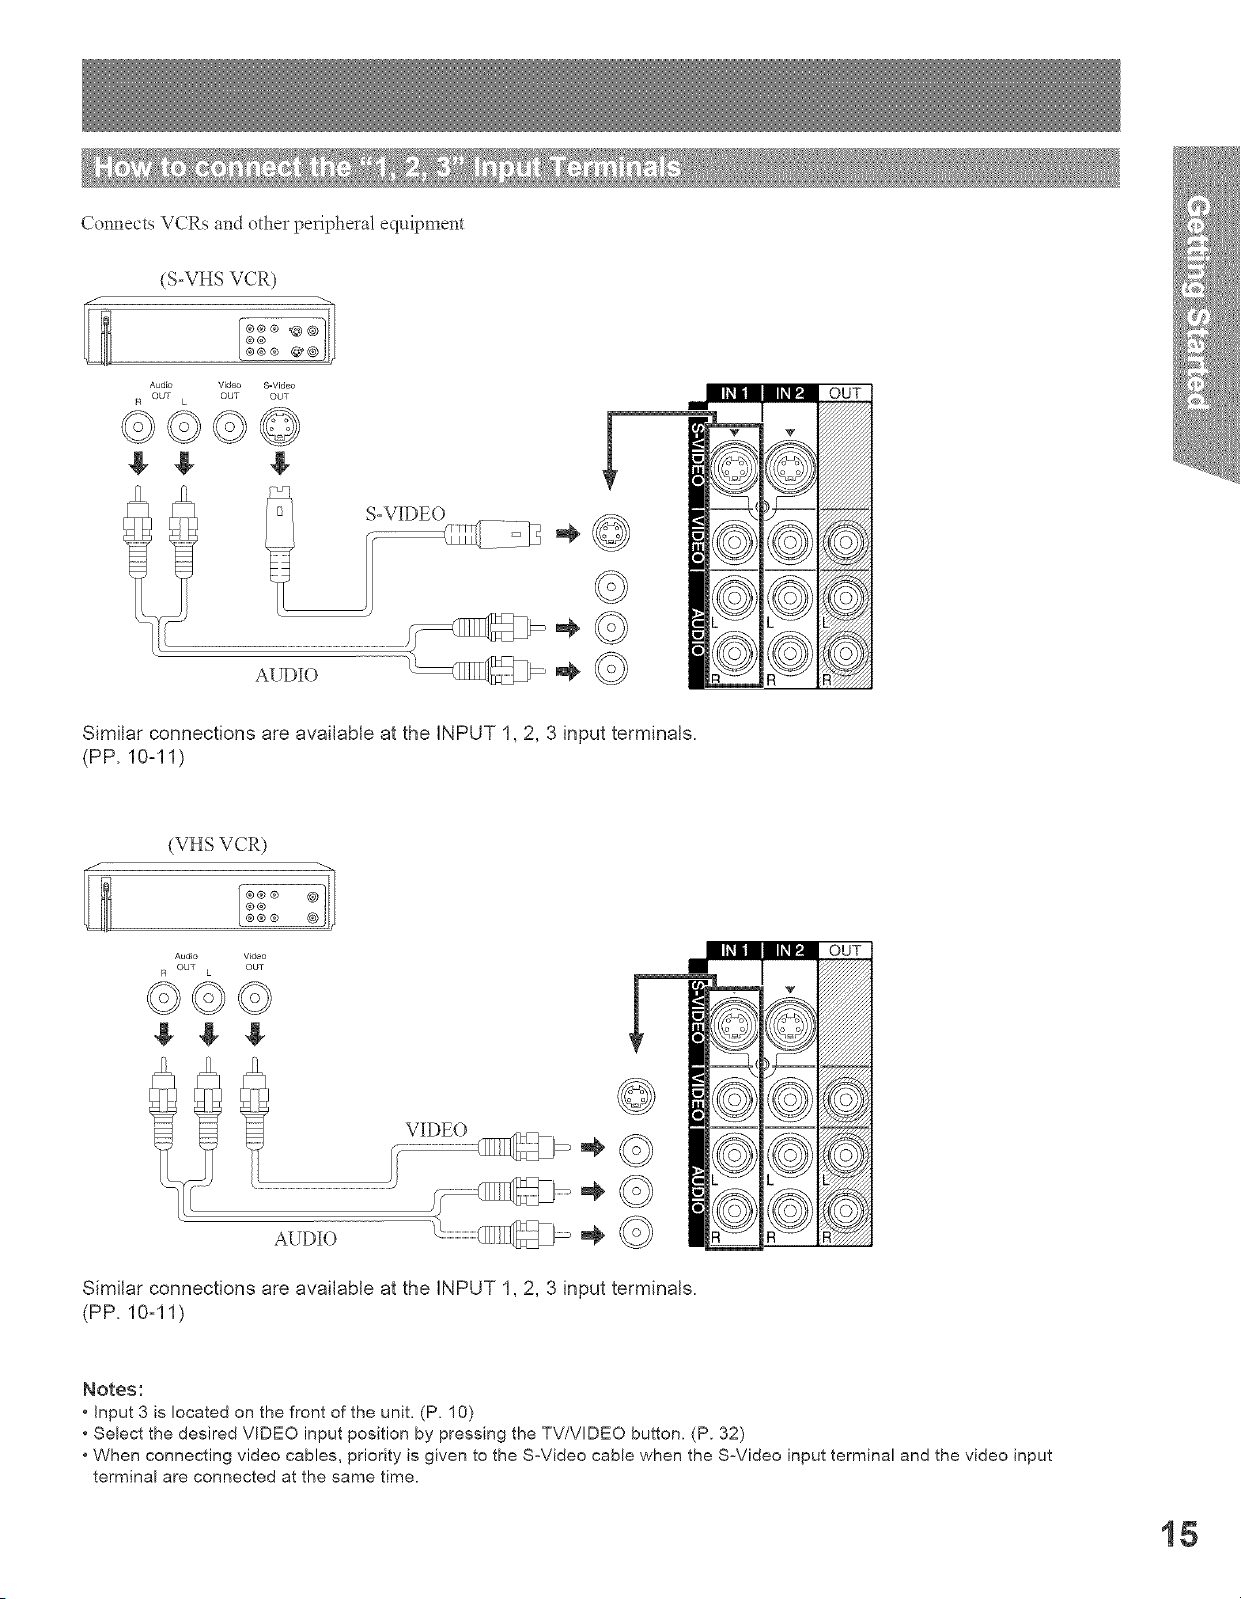
Connects VCRs and other peripheral equipment
(S-VHS VCR)
®®®
®®
@
Audio Video SmVideo
R OUT L OUT OUT
g g g
s-wDEo,
Similar connections are available at the iNPUT 1,2, 3 input terminNs.
(PP. 10-11)
/
(VHSVCa)
®® ® @_
o
Aud4o Video
R OUT L OUT
©©©
l! VIDEO _ -_ ©
Similar connections are available at the iNPUT 1,2, 3 input terminNs.
(PP. 10-11)
Notes:
• Input 3 is located on the front of the unit, (P. 10)
• Select the desired VIDEO input position by pressing the TV/VrDEO button. (P. 32)
• When connecting video cables, priority is given to the S-Video cable when the S:Video input terminal and the video input
terminal are connected at the same time.
18
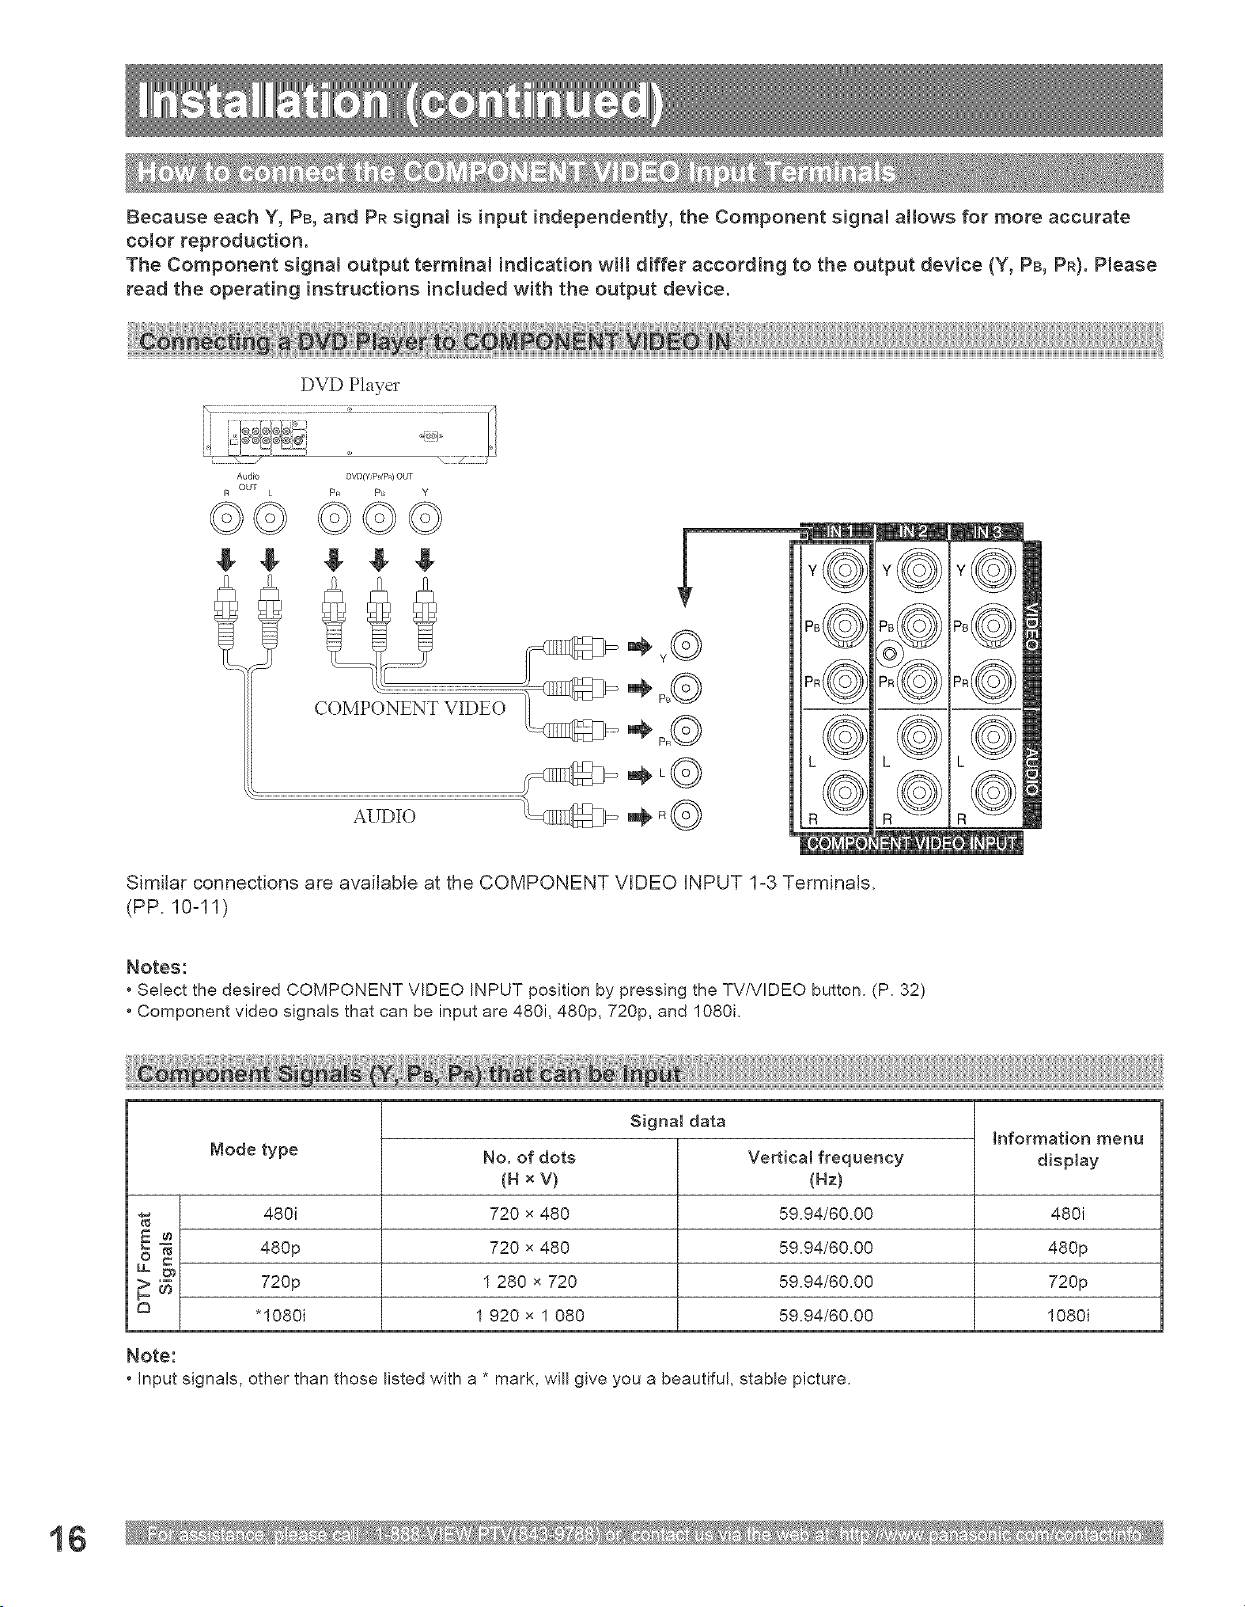
Because each Y, PB, and PR signN is input independently, the Component signa! atlows for more accurate
color reproduction,
The Component signat output terminal indication w{N differ according to the output device (Y, PB, PR). Please
read the operating instructions included with the output device.
DVDPlayer
Audio OVD(Y, PdP<) OUT
_t OUT p_ p_ y
$$ $$$
\\x>_ill
P_((((o))):
Y©
PR((((0))})
iY©
=
iPB((((O))))
= \ \,-._t//
i /f'_\
iPR((((O))))
i--
Similar connections are available at the COMPONENT VIDEO INPUT 1-3 Terminals.
(PP. 10:11)
Notes:
• Select the desired COMPONENT VIDEO INPUT position by pressing the TV/VIDEO button. (P, 32)
• Component video signals that can be input are 480i, 480p, 720p, and 1080i.
Node type
Signal data
No. of dots
(H ×V)
720 x 480
720 x 480
1 280 x 720
1 920 × 1 080
Information menu
display
Vertical frequency
(Hz)
59.94/60.00
59.94/6&00
59.94/6&00
59.94/60,00
•_ 480i 480i
o 480p 480p
> _ 720p 720p
_3 "1080i 1080i
Note:
• Input signals, other than those listed with a * mark, will give you a beautiful, stable picture.
16
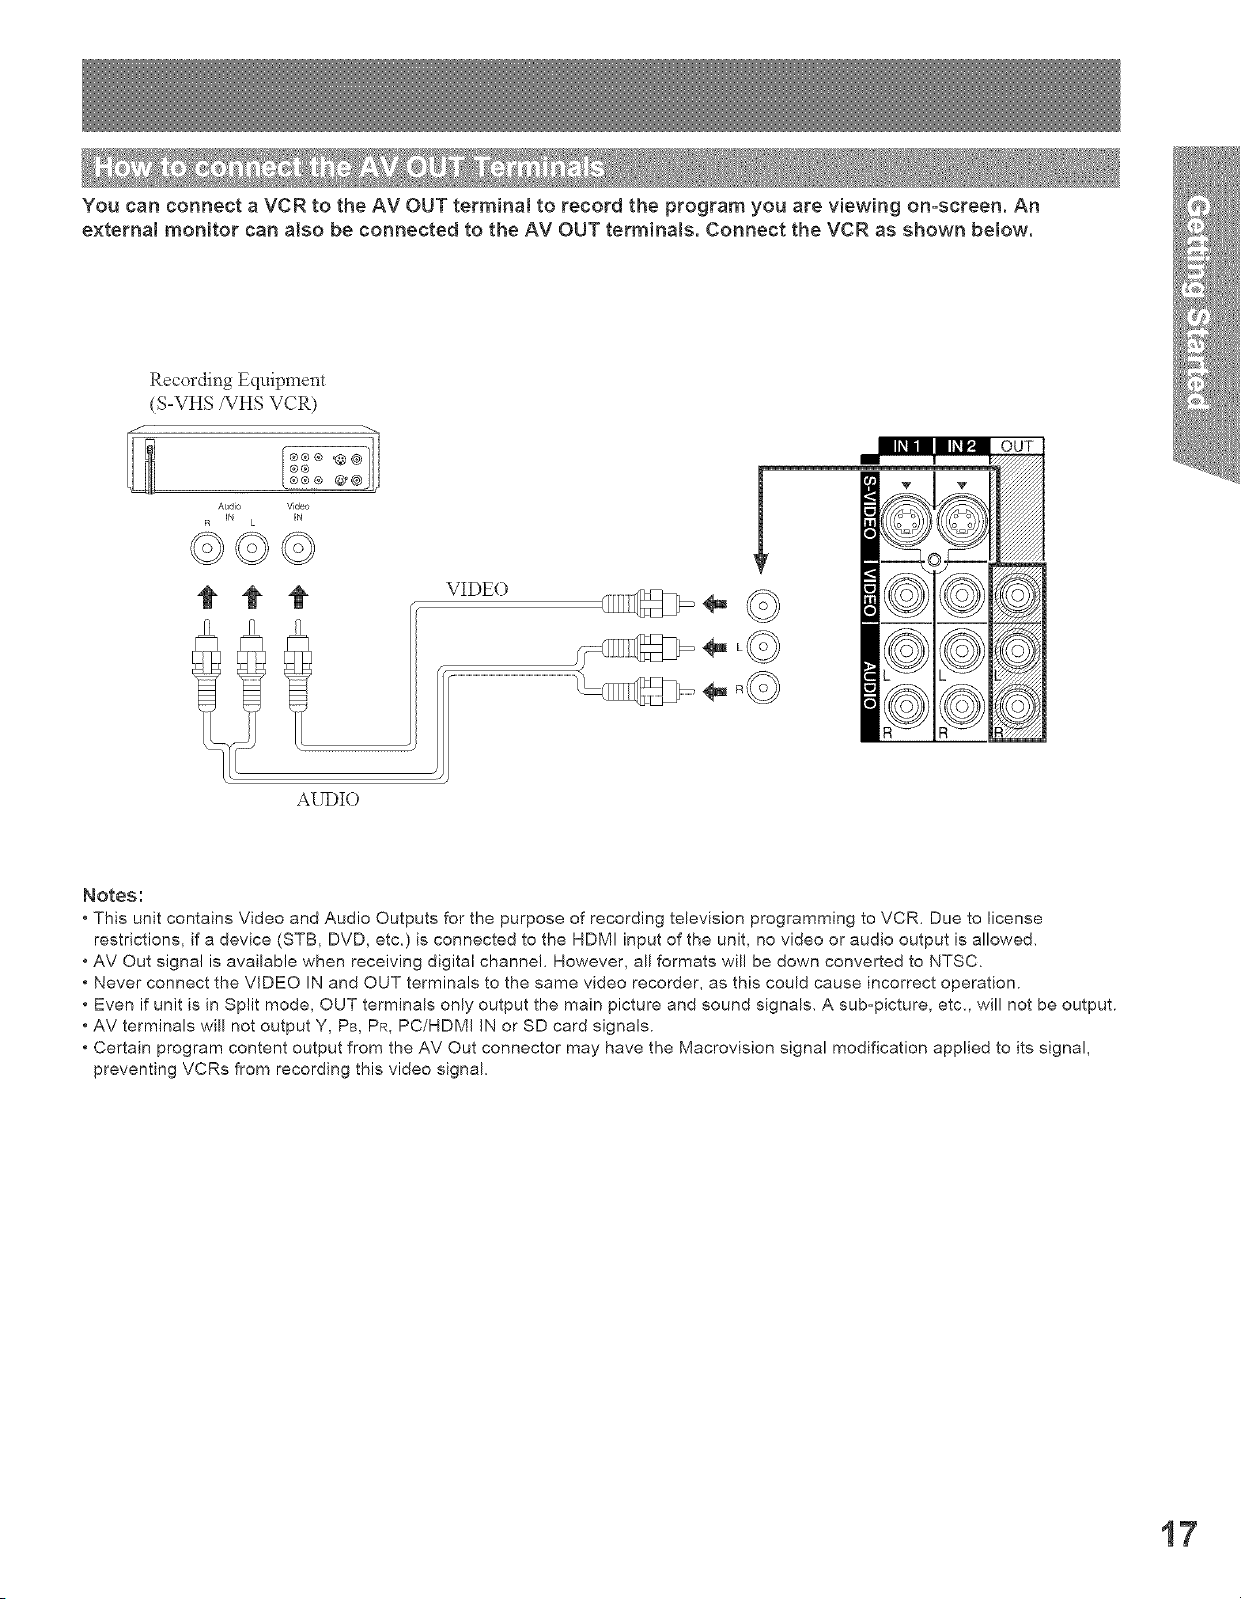
You can connect a VCR to the AV OUT terminal to record the program you are viewing on=screen. An
external monitor can also be connected to the AV OUT terminals. Connect the VCR as shown below.
/
Recording Equipment
(S-VHS/VHS VCR)
®®
®®® _®JlJ
Audio Video
IN IN
t t
AUDIO
VIDEO
Notes:
• This unit contains Video and Audio Outputs for the purpose of recording television programming to VCR. Due to license
restrictions, if a device (STB, DVD, etc.) is connected to the HDMI input of the unit, no video or audio output is allowed.
• AV Out signal is available when receiving digital channel. However, all formats will be down converted to NTSC.
• Never connect the VIDEO IN and OUT terminals to the same video recorder, as this could cause incorrect operation.
• Even if unit is in Split mode, OUT terminals only output the main picture and sound signals. A sub-picture, etc., will not be output.
• AV terminals will not output Y, PB, PR, PC/HDMI IN or SD card signals.
• Certain program content output from the AV Out connector may have the Macrovision signal modification applied to its signal,
preventing VCRs from recording this video signal.
17
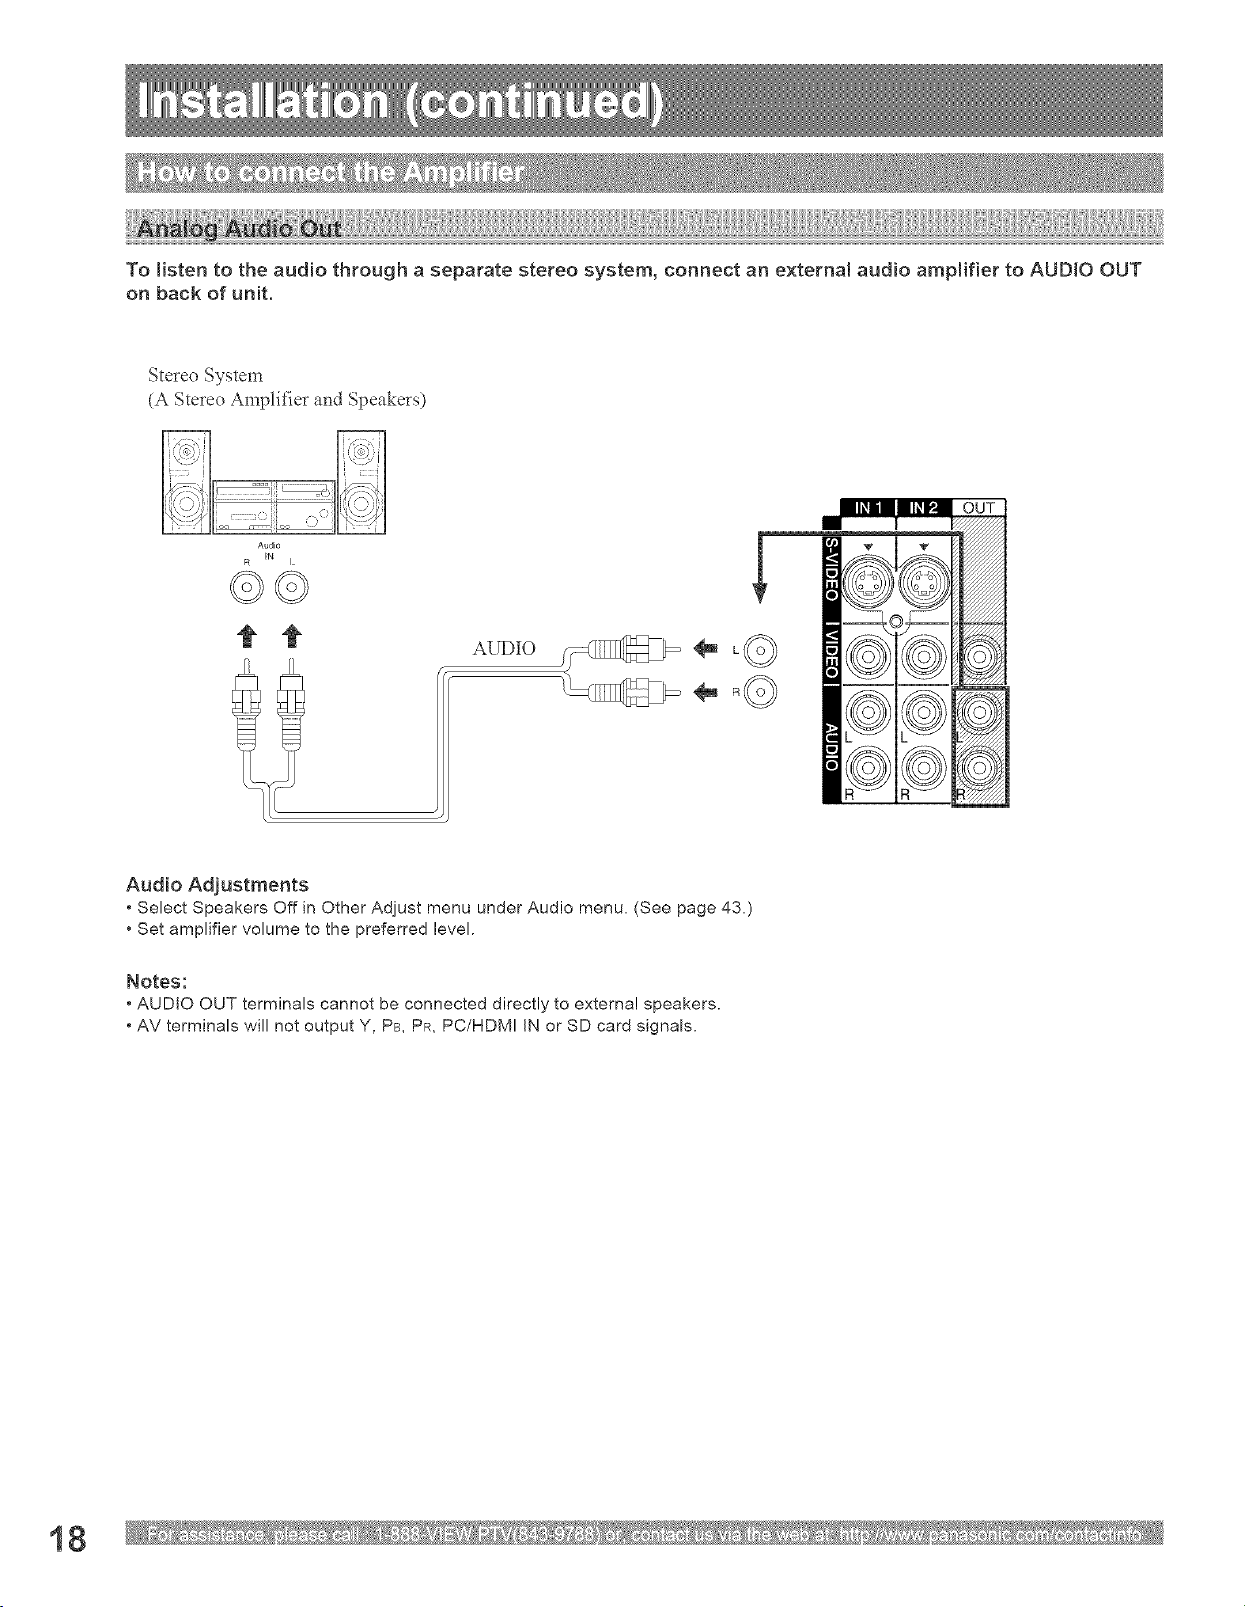
To listen to the audio through a separate stereo system, connect an e×temN audio amNifier to AUDIO OUT
on back of unit.
Stereo System
(A Stereo Amplifier and Speakers)
Audio
iN
t
AUDIO
Audio Adjustments
• Select Speakers Off in Other Adjust menu under Audio menu, (See page 43.)
• Set amplifier volume to the preferred level.
Notes:
• AUDIO OUT terminals cannot be connected directly to external speakers.
• AV terminals will not output Y, PB, PR, PC/HDMI IN or SD card signals.
18
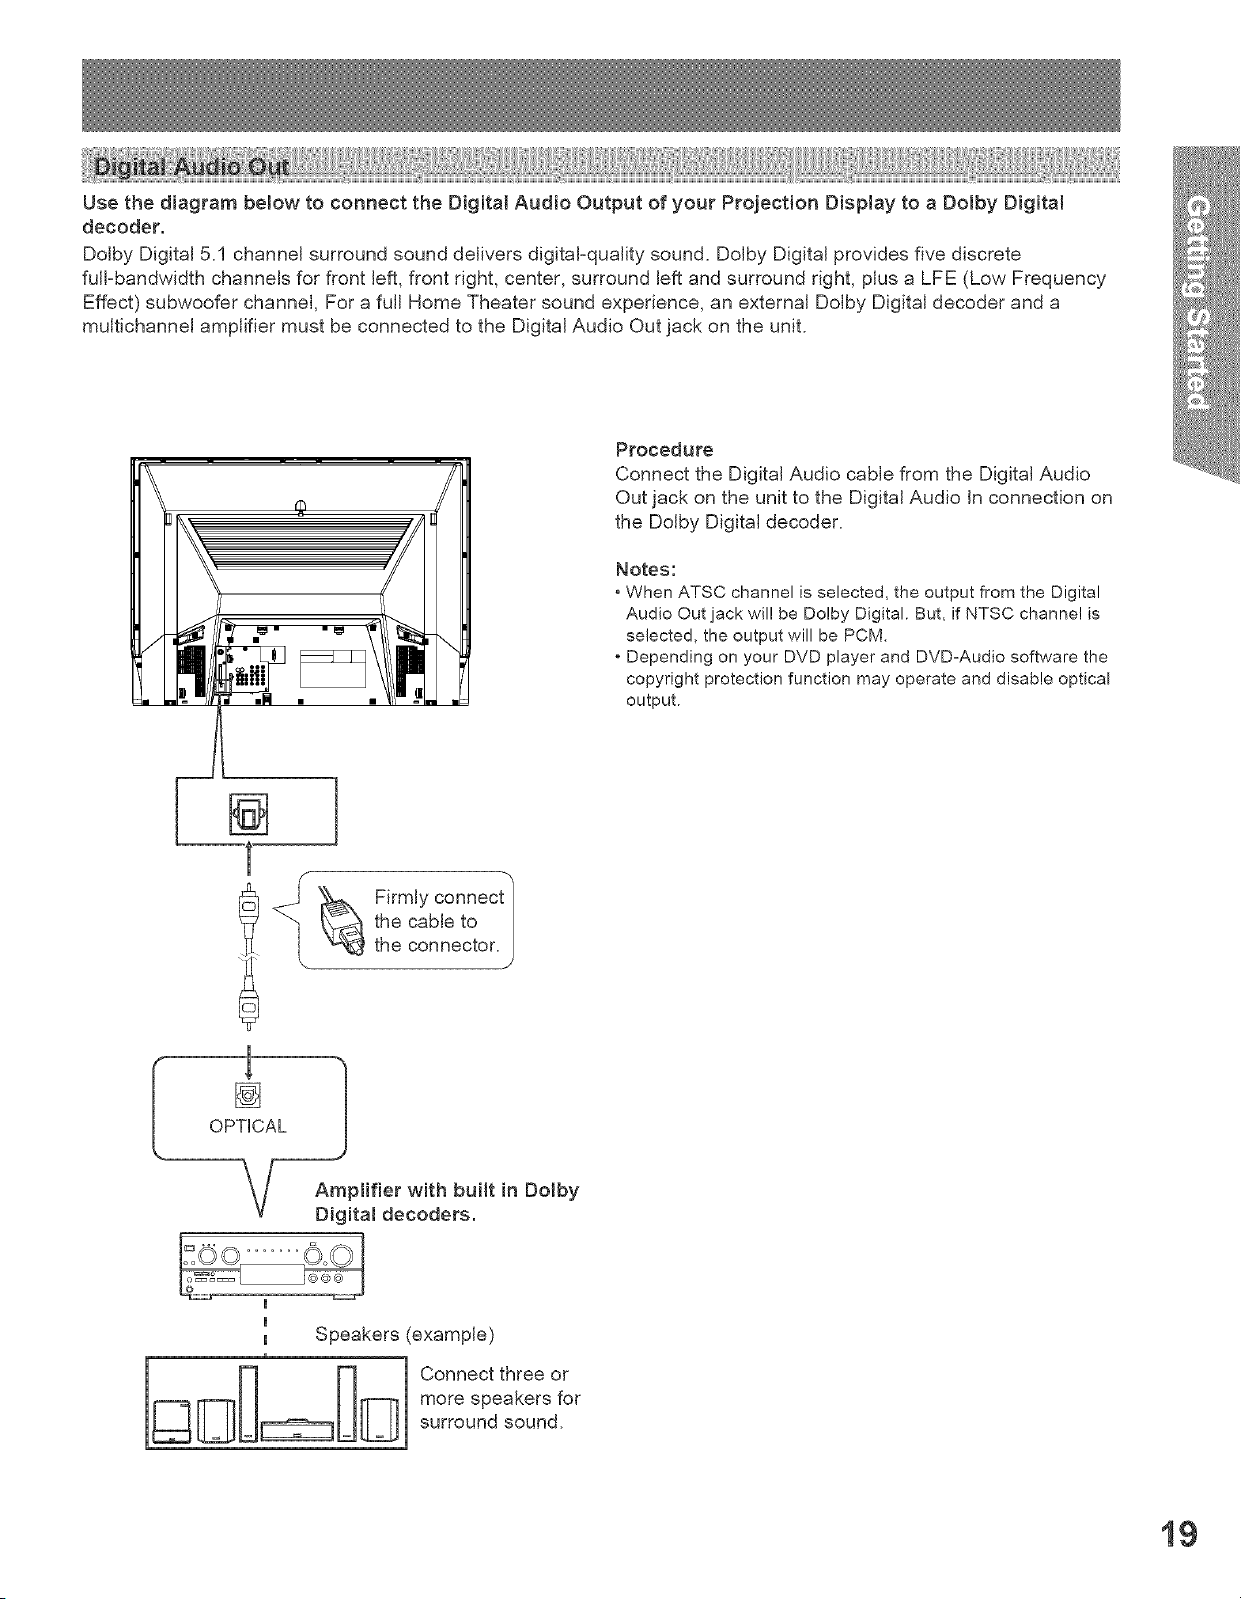
Use the diagram below to connect the Digitat Audio Output of your Projection Display to a Dolby Digital
decoder.
Dolby Digital 5.1 channel surround sound delivers digital-quality sound. Dolby Digital provides five discrete
full-bandwidth channels for front left, front right, center, surround left and surround right, plus a LFE (Low Frequency
Effect) subwoofer channel, For a full Home Theater sound experience, an external Dolby Digital decoder and a
multichannel amplifier must be connected to the Digital Audio Out jack on the unit.
Procedure
Connect the Digital Audio cable from the Digital Audio
Out jack on the unit to the Digital Audio in connection on
the Dolby Digital decoder.
Notes:
* When ATSC channel is selected, the output from the Digital
Audio Out jack wil! be Dolby Digital. But, if NTSC channel is
selected, the output will be PCM.
Depending on your DVD player and DVD-Audio software the
copyright protection function may operate and disable optical
output.
=====_
_ irmly connect
the cable to
the connector.
J
.m.
[]
OPTICAL
Amplifier with built in Dolby
Digital decoders.
m
m
m
Speakers (example)
Connect three or
more speakers for
surround sound.
19
COMPUTER
RGB OUT AUDIO OUT
$
Connect a cable which matches the at_dio
output terminal on the computer.
o® o j
Connection port view
Pin No,
1
2
3
4
5
6
7
8
Signal name
R
G
B
NC
NC
Ground for R
Ground for G
Ground for B
Pin No.
9
10
11
12
13
14
15
Signal name
NC
Ground
NC
NC
HD/CSYNC
VD
NC
NO: Not connected
Notes:
° Some PC models cannot be connected to the set. A conversion adapter is required to use the RGB cane (D=SUB 15P) (Not
included) to connect a Macintosh computer to the set, There is no need to use an adapter for computers with PC / AT compatible
D=SUB 15P terminal.
° The computer shown in the illustration is for example purposes only. Additional equipment and canes shown are not supplied
with this seL
° The picture will become dark if a PC signal with a vertical scanning frequency of 62 Ha is input. To obtain the optimum picture
quality with the Projection Display, a vertical scanning frequency of 60 Hz is recommended.
° Do not set the horizontal and vertical scanning frequencies for PC signals which are above or below the specified frequency
range.
• Select the desired PC input position by pressing the TV/VIDEO button. (P. 32)
° AUDIO IN is shared with VIDEO 3 input,
2O
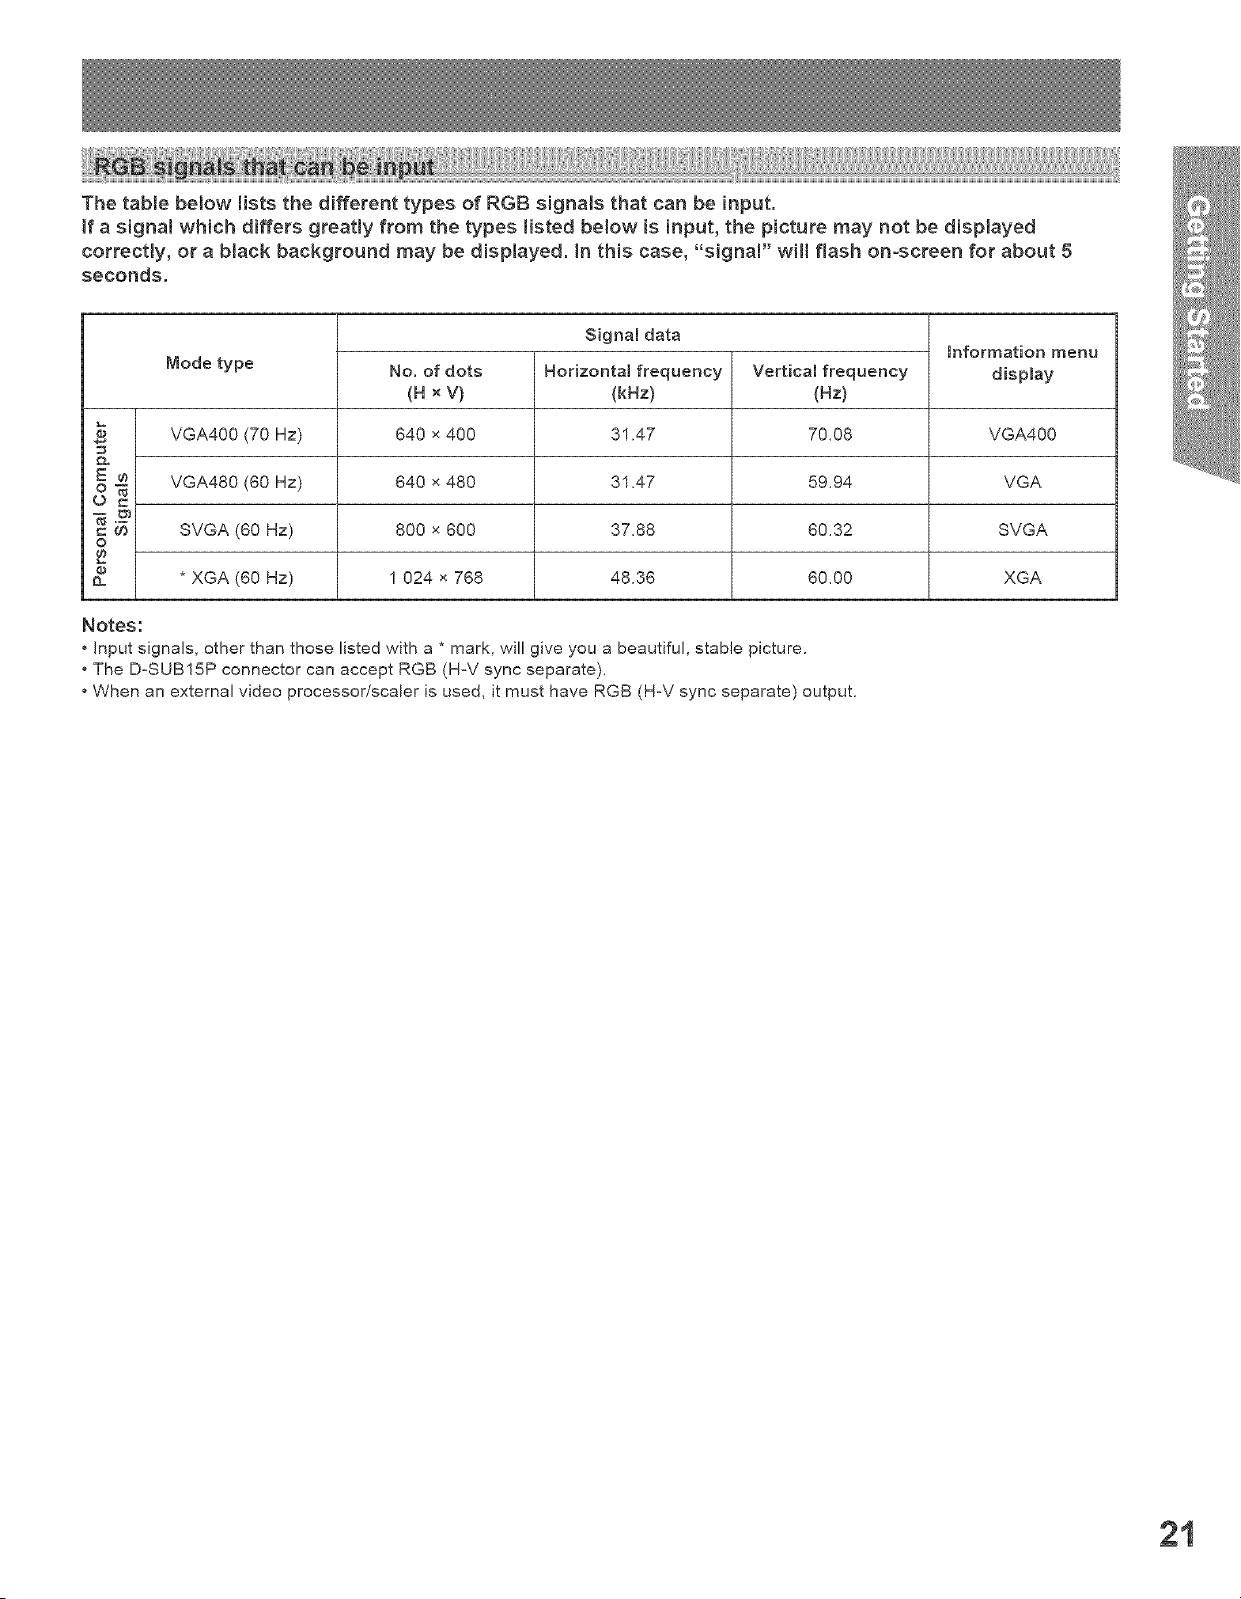
The table below lists the different types of RGB signals that can be input,
If a s{gnal which differs greatty from the types listed below is Bnput, the picture may not be dEsplayed
correctly, or a b{ack background may be displayed, in this case, "signal" witl flash on-screen for about 5
seconds.
Signal data
Information menu
Mode type No, of dots Horizontal frequency Vertical frequency display
(H × V) (kHz) (Hz)
640 x 400 31.47 70,08 VGA400
m 640 x 480 31.47 59,94 VGA
_ 800 x 600 37.88 60_32 SVGA
O
e_ 1 024 x 768 48.36 60_00 XGA
VGA4O0 (70 Hz)
VGA480 (60 Hz)
SVGA (60 Hz)
* XGA (60 Hz)
Notes:
• Input signals, other than those listed with a * mark, will give you a beautiful, stable picture.
• The D-SUB15P connector can accept RGB (H-V sync separate).
• When an external video processodscaler is used, it must have RGB (H°V sync separate) output.
21
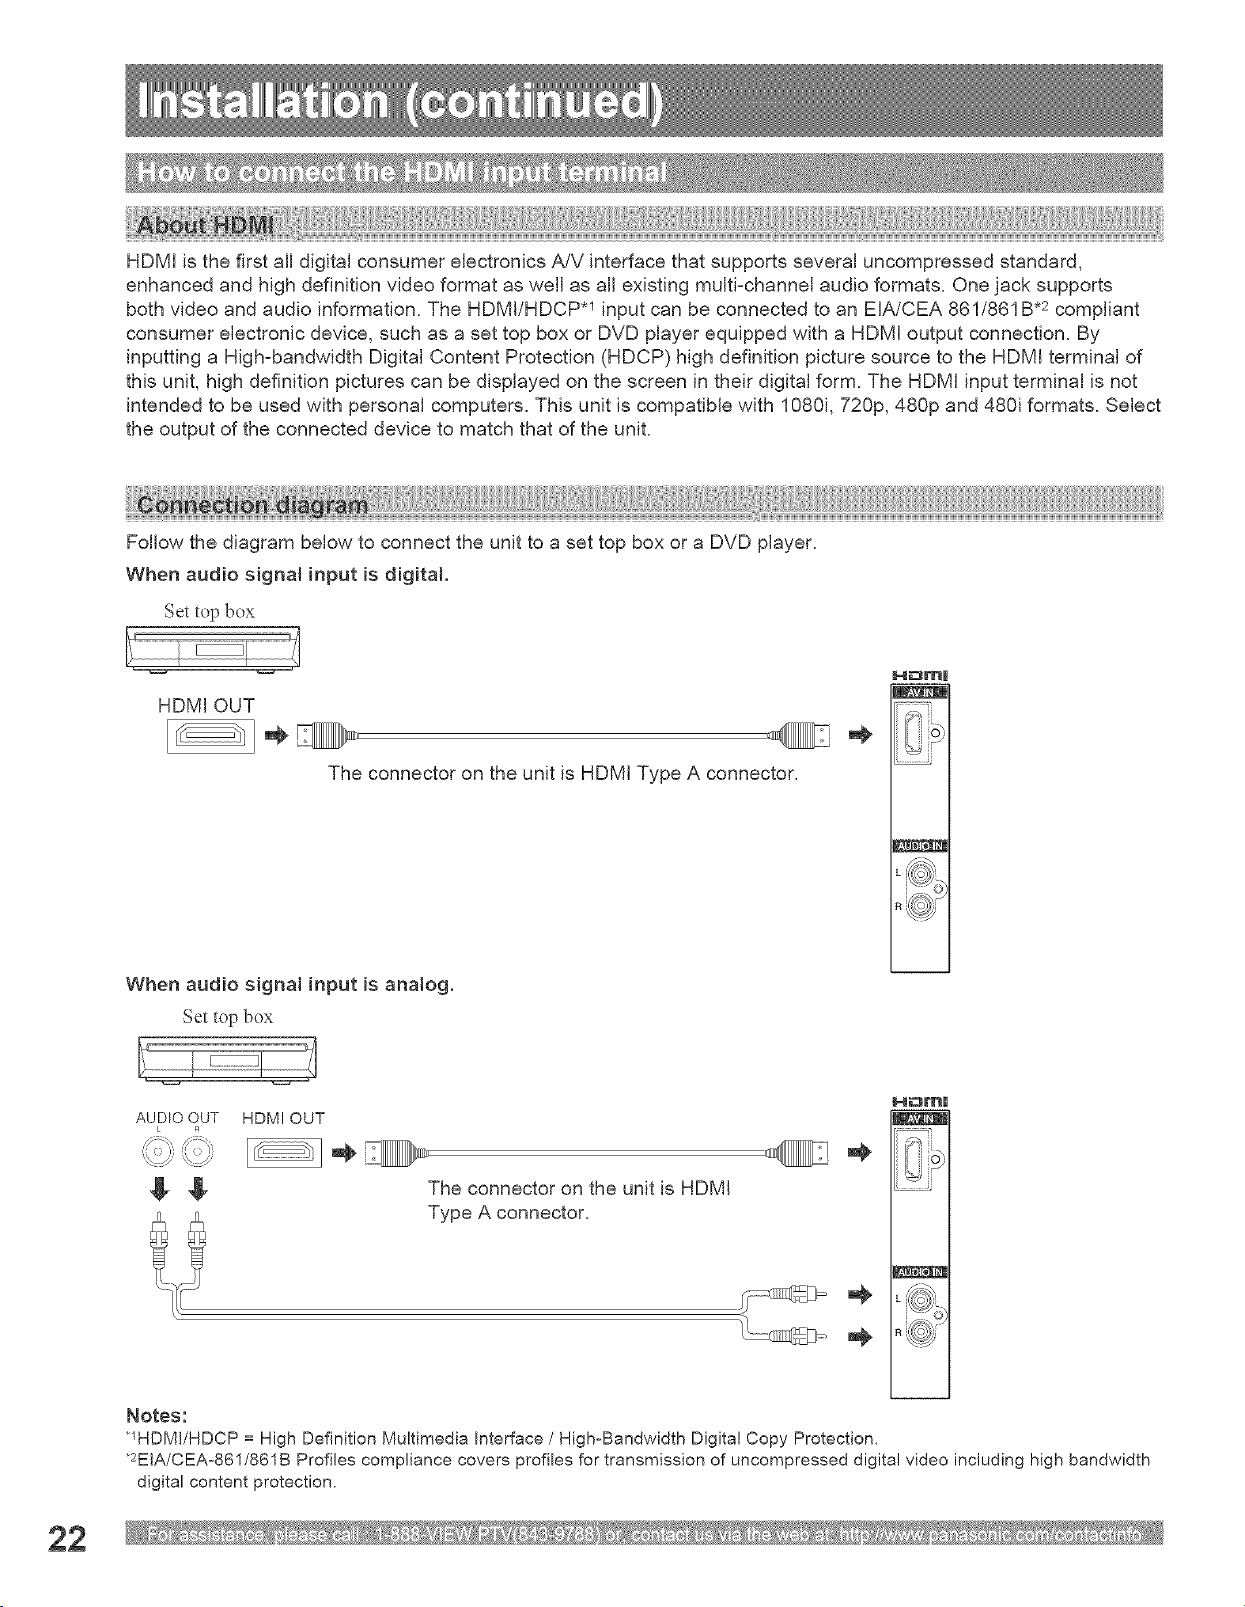
HDMI is the first all digital consumer electronics A/V interface that supports several uncompressed standard,
enhanced and high definition video format as well as all existing multi-channel audio formats. One jack supports
both video and audio information. The HDMI/HDCP .1 input can be connected to an EIA/CEA 861/861B .2 compliant
consumer electronic device, such as a set top box or DVD player equipped with a HDMI output connection. By
inputting a High-bandwidth Digital Content Protection (HDCP) high definition picture source to the HDMI terminal of
this unit, high definition pictures can be displayed on the screen in their digital form. The HDMI input terminal is not
intended to be used with personal computers. This unit is compatible with 1080i, 720p, 480p and 480i formats. Select
the output of the connected device to match that of the unit.
Follow the diagram below to connect the unit to a set top box or a DVD player.
When audio sJgnaminput is digRaL
Set top box
HDMI OUT
The connector on the unit is HDMI Type A connector.
When audio signal input is anatog.
Set top box
HZ:Jrtrl
!!iiioi
AUDIO OUT
L R
HDMI OUT
The connector on the unit is HDMI
Type A connector.
HZ:3mH
w
Notes:
*IHDMI/HDCP = High Definition Multimedia Interface/High-Bandwidth Digital Copy Protection,
*2EIA/CEA-861/861B Profiles compliance covers profiles for transmission of uncompressed digital video including high bandwidth
digital content protection.
!
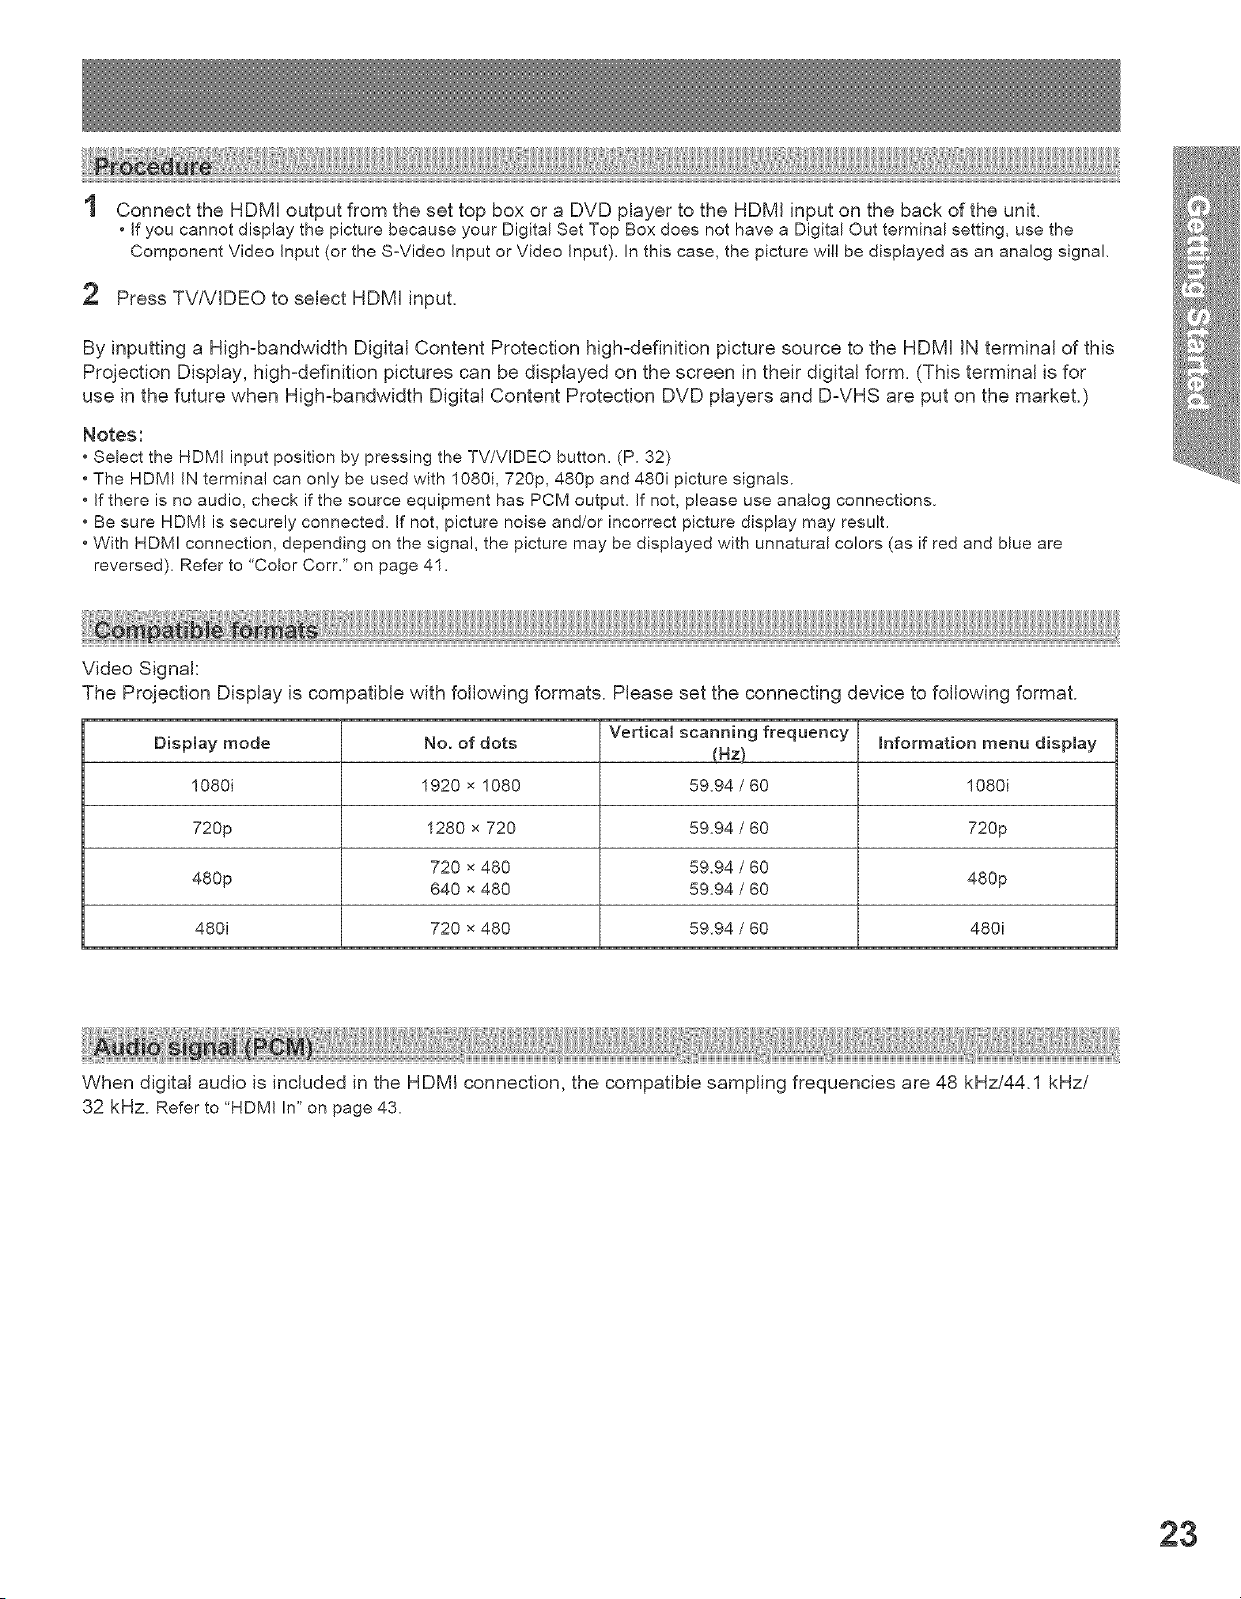
Connect the HDMI output from the set top box or a DVD player to the HDMI input on the back of the unit.
• If you cannot display the picture because your Digital Set Top Box does not have a Digital Out terminal setting, use the
Component Video Input (or the SoVideo Input or Video Input). In this case, the picture will be displayed as an analog signal,
2 Press TV/VIDEO to select HDMI input.
By inputting a Highzbandwidth Digital Content Protection highzdefinition picture source to the HDMI IN terminal of this
Projection Display, high-definition pictures can be displayed on the screen in their digital form. (This terminal is for
use in the future when High-bandwidth Digital Content Protection DVD players and D-VHS are put on the market.)
Notes:
• Select the HDMI input position by pressing the TV/VIDEO button. (P. 32)
• The HDMI IN terminal can only be used with 1080i, 720p, 480p and 480i picture signals.
• If there is no audio, check if the source equipment has PCM output. If not, please use analog connections.
• Be sure HDMI is securely connected. If not, picture noise and/or incorrect picture display may result.
• With HDMI connection, depending on the signal, the picture may be displayed with unnatural colors (as if red and blue are
reversed). Refer to 'Color Corr." on page 41.
i!!!! ....
Video Signal:
The Projection Display is compatible with following formats. Please set the connecting device to following format.
No. of dots
1920 x 1080
1280 x 720
720 x 480
640 x 480
720 x 480
Display mode
1O8Oi
720p
480p
480i
Verticalscanning frequency
IHz)
59.94/60
59.94/60
59.94/60
59.94/60
59.94/60
Information menu display
1080i
720p
480p
480i
When digital audio is included in the HDMI connection, the compatible sampling frequencies are 48 kHz/44.1 kHz/
32 kHz. Refer to 'HDMI In" on page 43,
23
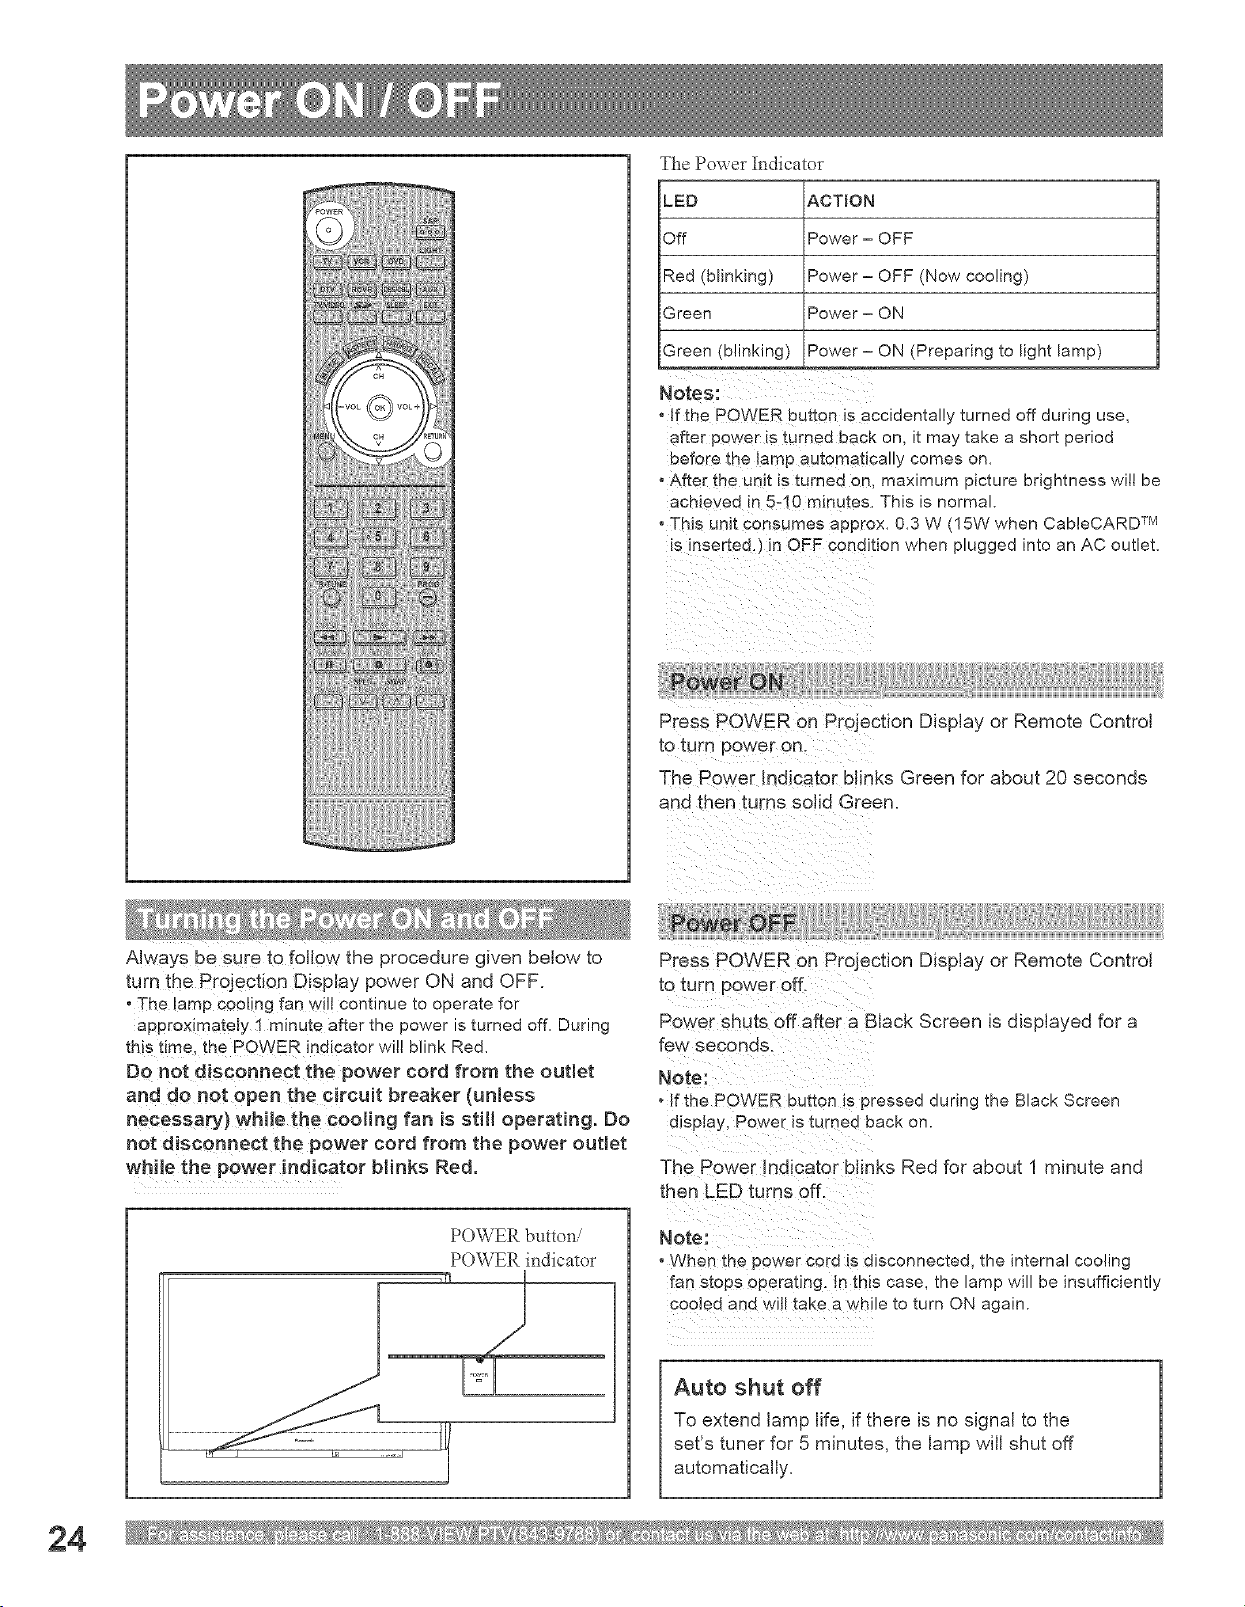
The Po_xer Indicator
LED
Off
Red (blinking)
Green
Green (blinking)
ACTION
Power = OFF
Power - OFF (Now cooling)
Power = ON
Power - ON (Preparing to light lamp)
" !f_he ROWER button is accidentally turned off during use,
after power iS turned back on, it may take a short period
before the !amp automatically comes on.
o After the unit iS turned on, maximum picture brightness will be
acNeved !n 5-10 minutes. This is normal
• This uNt consumes approx. 0.3 W (15W when CableCARD TM
is inserted,)in OEF cendRion when plugged into an AC outlet.
Press POWER on Projection Display or Remote Control
The Power Indicator blinks Green for about 20 seconds
and then turns solid Green,
Always be sure to follow the procedure given below to
turn the Projection Display power ON and OFF.
• The lamp ceoIing fan will continue to operate for
approximately 1 minute after the power is turned off. During
this time, the POWER indicator will blink Red.
DO not disconnect the power cord from the outlet
and do not open the circuit breaker (unless
necessary) whi!e the cooling fan is still operating. Do
not disconnect the power cord from the power outlet
while the power indicator blinks Red.
POWER button/
POWER indicator
PreSSPOWER on projection Display or Remote Control
to turn Power 0fL
Power shuts off after a Black Screen is displayed for a
°!f the POWER button iS pressed during the Black Screen
disp!ay, Power is turned back on.
The Rower !ndicator b!!nks Red for about 1 minute and
then LED turns off.
° When the power cord is disconnected, the internal cooling
fan Stops operating, hthis case, the lamp will be insufficiently
cooled and wi!l take a while to turn ON again.
Auto shut off
To extend lamp life, if there is no signal to the
set's tuner for 5 minutes, the lamp will shut off
automatically.
24
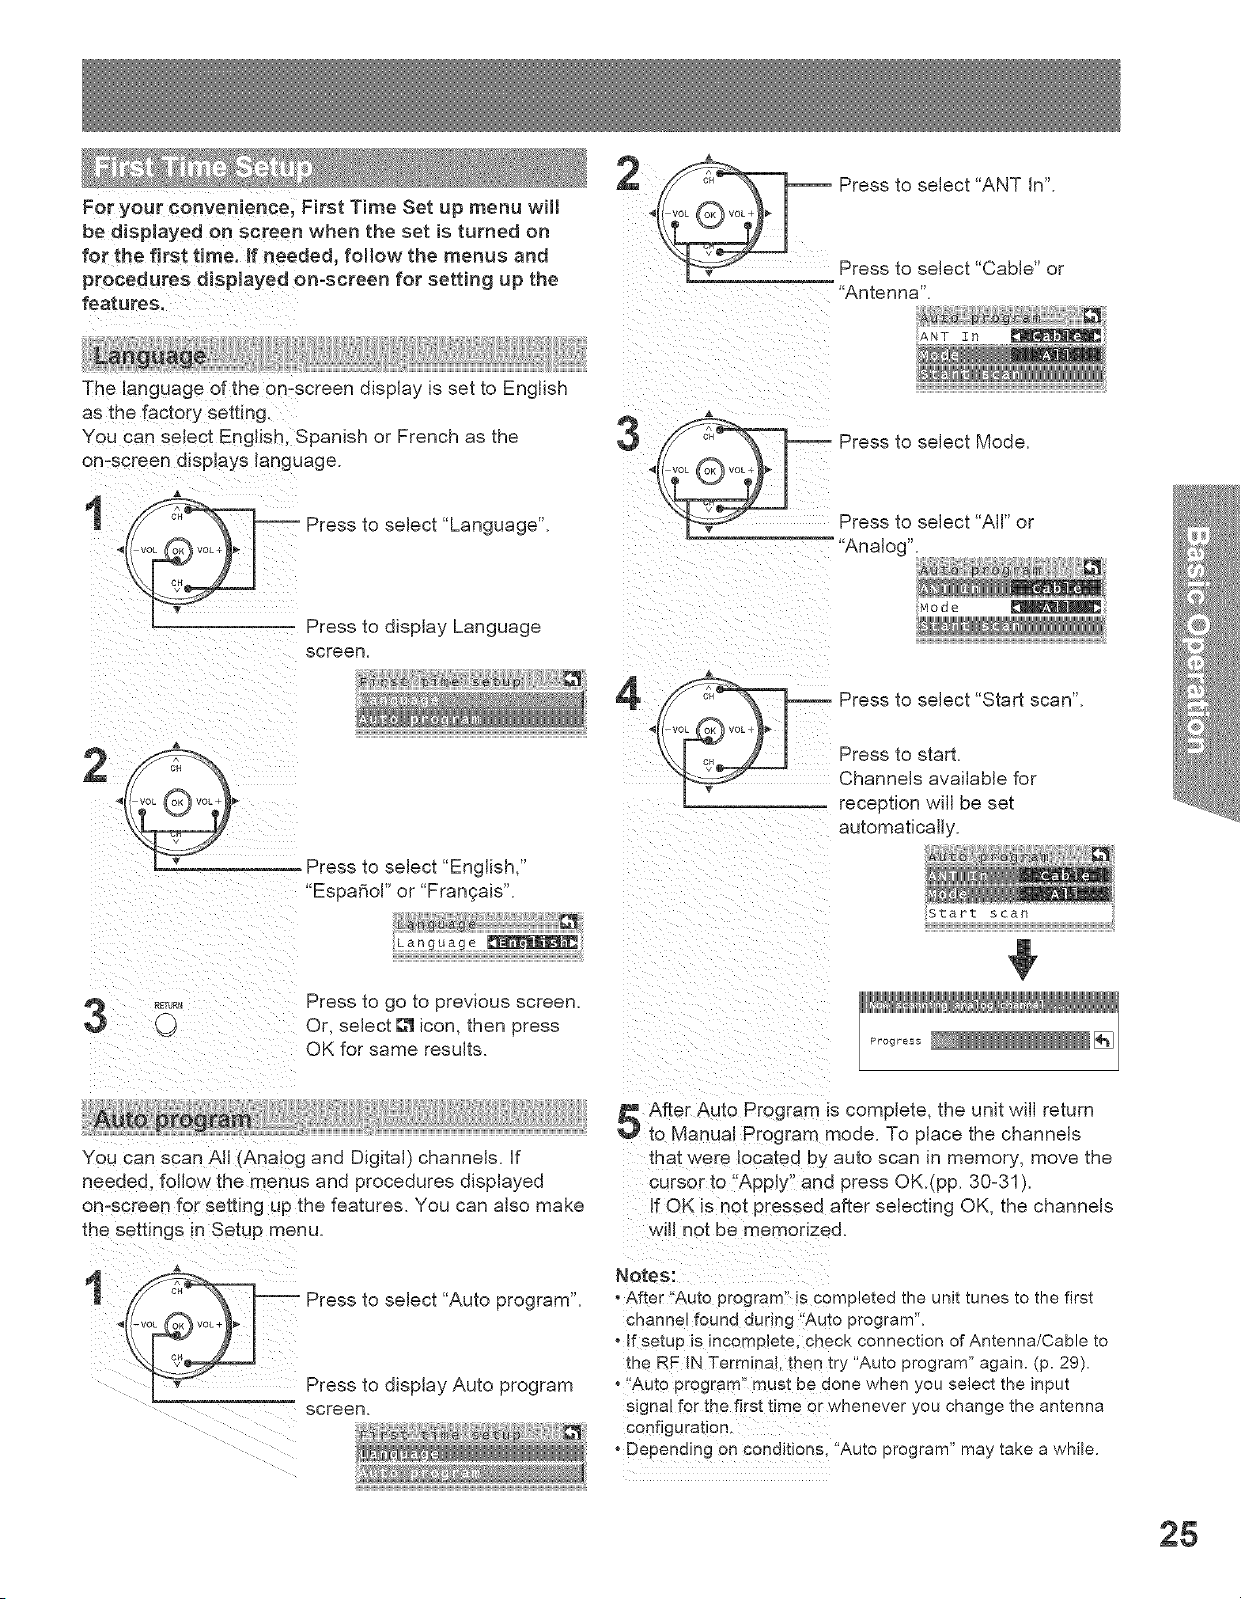
For your convenience, First Time Set up menu will
be displayed on screen when the set is turned on \_
for the first time. If needed, follow the menus and
procedures displayed on=screen for setting up the
Press to select "ANT In".
Press to select "Cable" or
"Antenna".
The language of the 0niscreen display is set to English
as the fact°ry setting.
You can se!ect English, Spanish or French as the
on-screen disp!ays language.
3
Press to select Mode.
Press to select "Language".
Press to select "All" or
"Analog".
Press to display Language
screen.
"_ Press to select "English,"
"Espa_ol" or "Frangais".
Language
_ETu_, Press to go to previous screen.
O Or, select _ icon, then press
oKforsameresu,ts
YOUcan scan All (Ana!0g and Digital) channels. If
needed, foll0w the menus and procedures displayed
on-screen for setting up the features. You can also make
the settings in Setup menu.
Press to select "Auto program".
Press to display Auto program
.... _'_
Press to select "Start scan".
Press to start.
Channels available for
reception will be set
automatically.
After Auto Program is complete, the unit will return
to Manual Program mode. To place the channels
that were located by auto scan in memory, move the
cursor to "Apply" and press OK.(pp. 30=31).
If OK _snot pressed after selecting OK, the channels
will not be memorized.
Notes:
, After "Auto program" is comr_leted the unit tunes to the first
channel found dunng 'Auto program".
o If setup is incomplete check connection of Antenna/Cable to
the RF IN Terminal. then try "Auto program" again. (p. 29).
o °'Auto program" must be done when you select the input
signal for the first time or whenever you change the antenna
configuration
o Depending on conditions. "Auto program" may take a while.
25
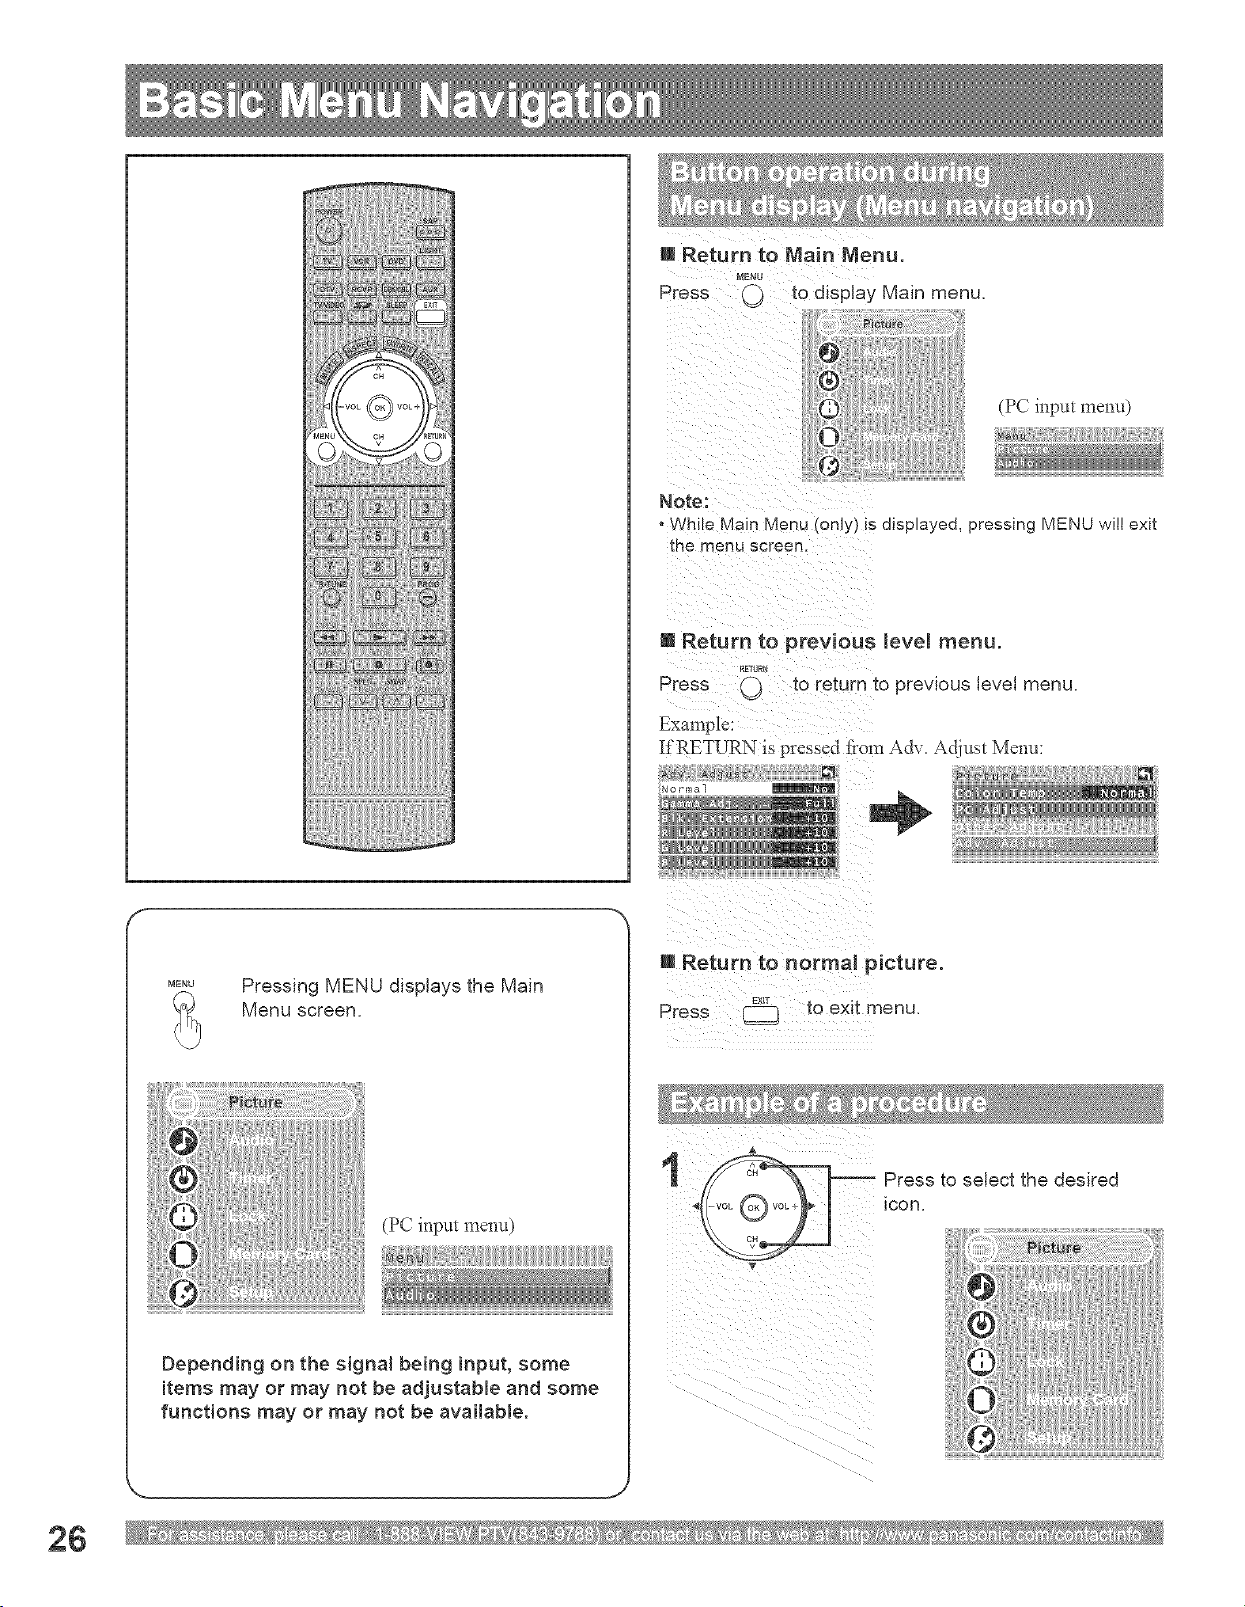
m Return to Main Nenu.
MENU
Press Q) to display Main menu.
(PC input 111enu)
, While Main Menu (Only) !S displayed, pressing MENU will exit
the menu screen.
8 Return to previous level menu.
RETUR_
Press 0 to return to previous level menu.
If RETURN is pressed from A& T.Adjust Menu:
Normal
MENU
Pressing MENU displays the Main
Menu screen.
(PC input menu)
Depending on the signa! being input, some
items may or may not be adjustaNe and some
functions may or may not be availaNe.
J
Rt Return to normal picture.
I
i
iiiiiii
Press to select the desired
icon.
26
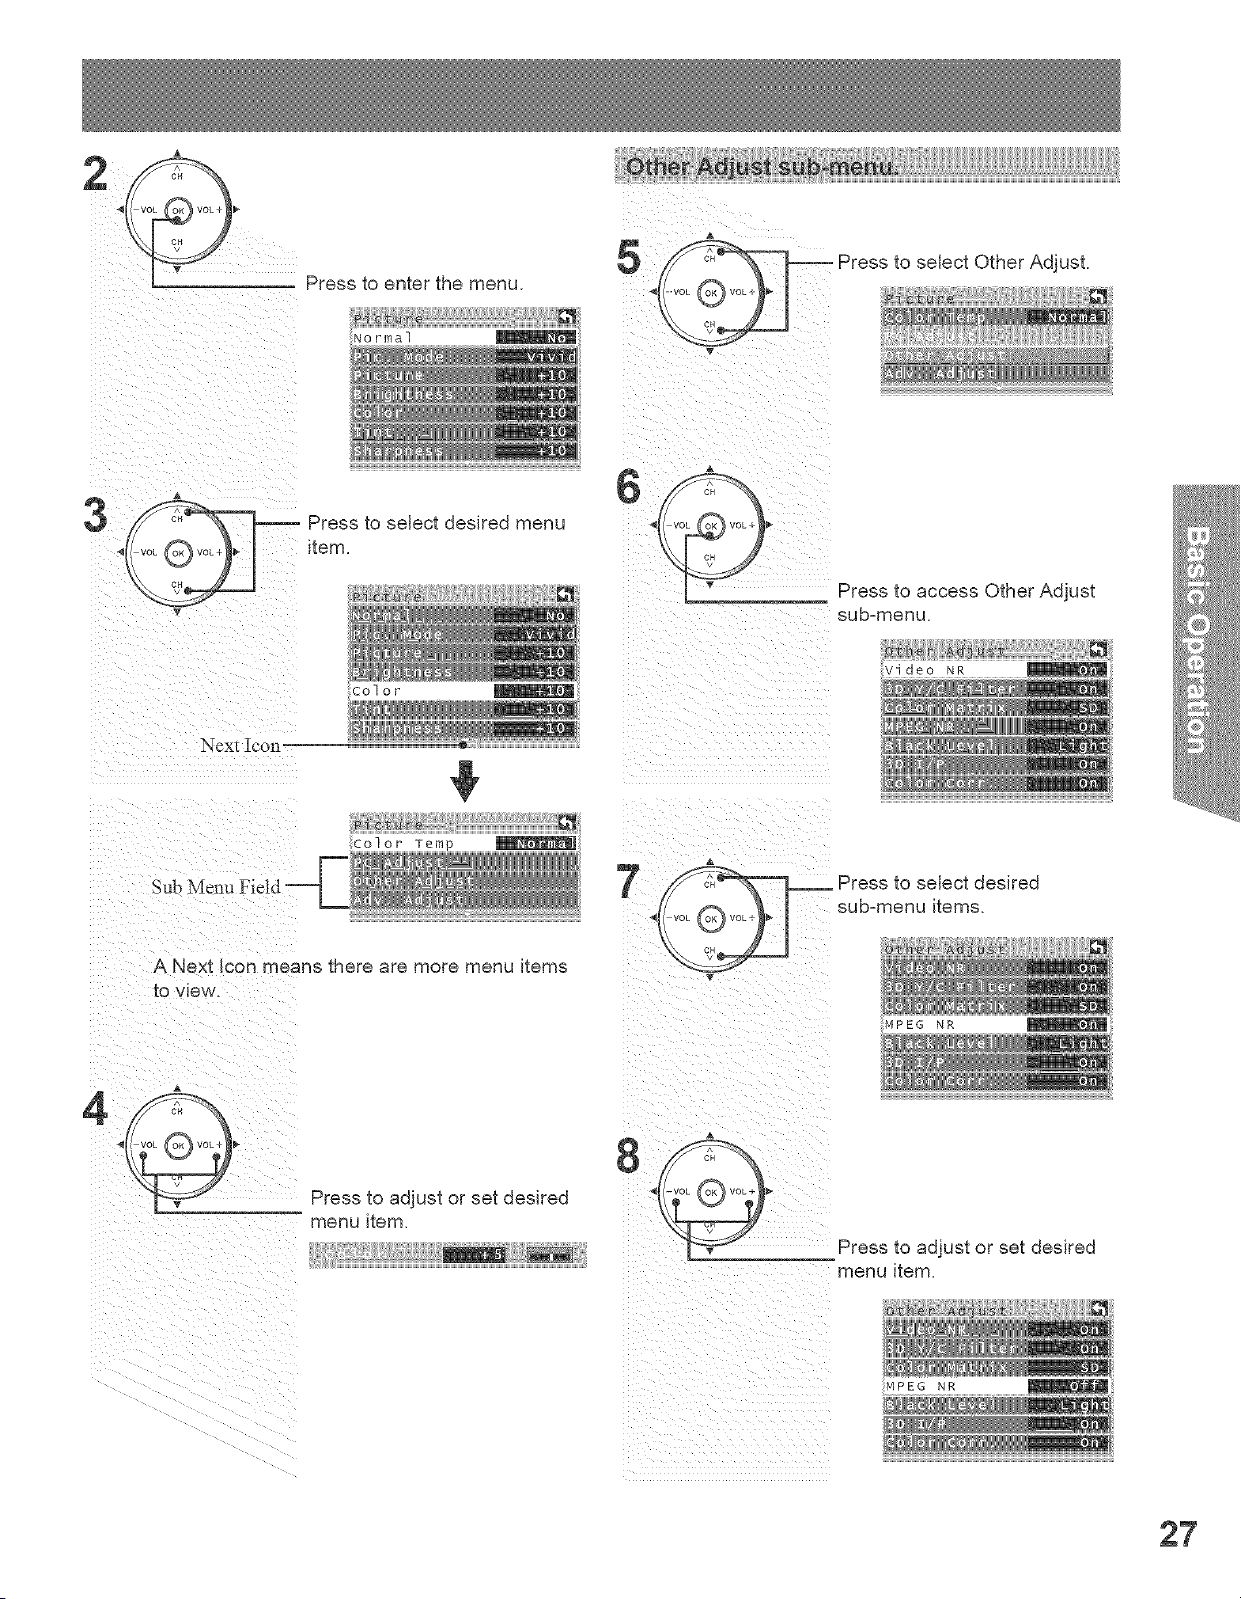
2
Press to enter the menu.
ig
Press to select Other Adjust.
Normal
Next Icon
Press to select desired menu
item.
color
A
¸Press
i__i_i_i_i___ii_i;_i_!_i_i ii_iiiiii_iii_iiiii_iii_i_i_!_i!ii_ii_
to access Other Adjust
subzmenu.
video NR
Sut_
iicolor Tem
A Next icon means there are more menu items
to view.
MPEG NR
4
Press to adjust or set desired
menu item.
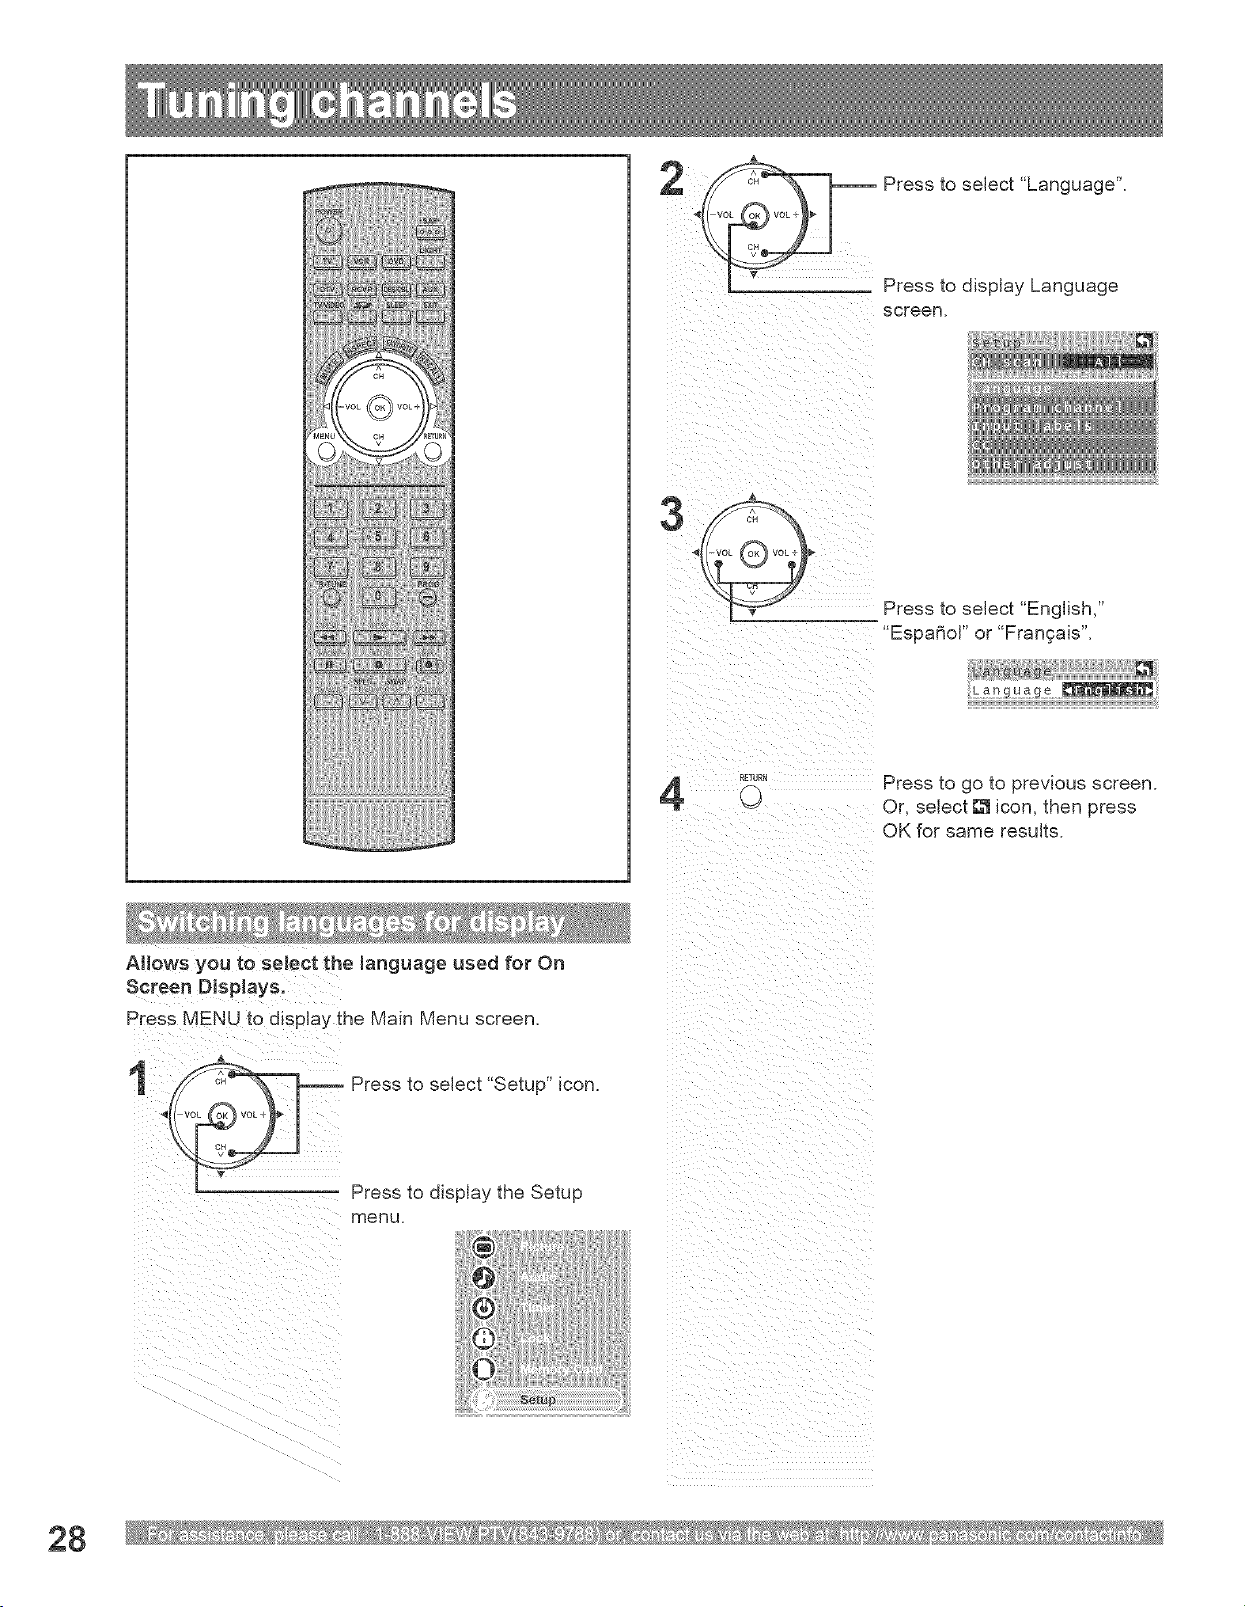
2 _ Presstoselect"Language".
h_ _ PresstodisplayLanguage
screen.
Presstoselect"English,"
"Espa_ol"or"Frangais".
Presstogoto previousscreen.
Or,select_ icon,thenpress
OKforsameresults.
AHOWSyou to selectthe language used for On
Screen Displays.
Press MENU to display the Main Menu screen.
Presstoselect"Setup"icon.
ii@.....
Press to display the Setup
menu.
28
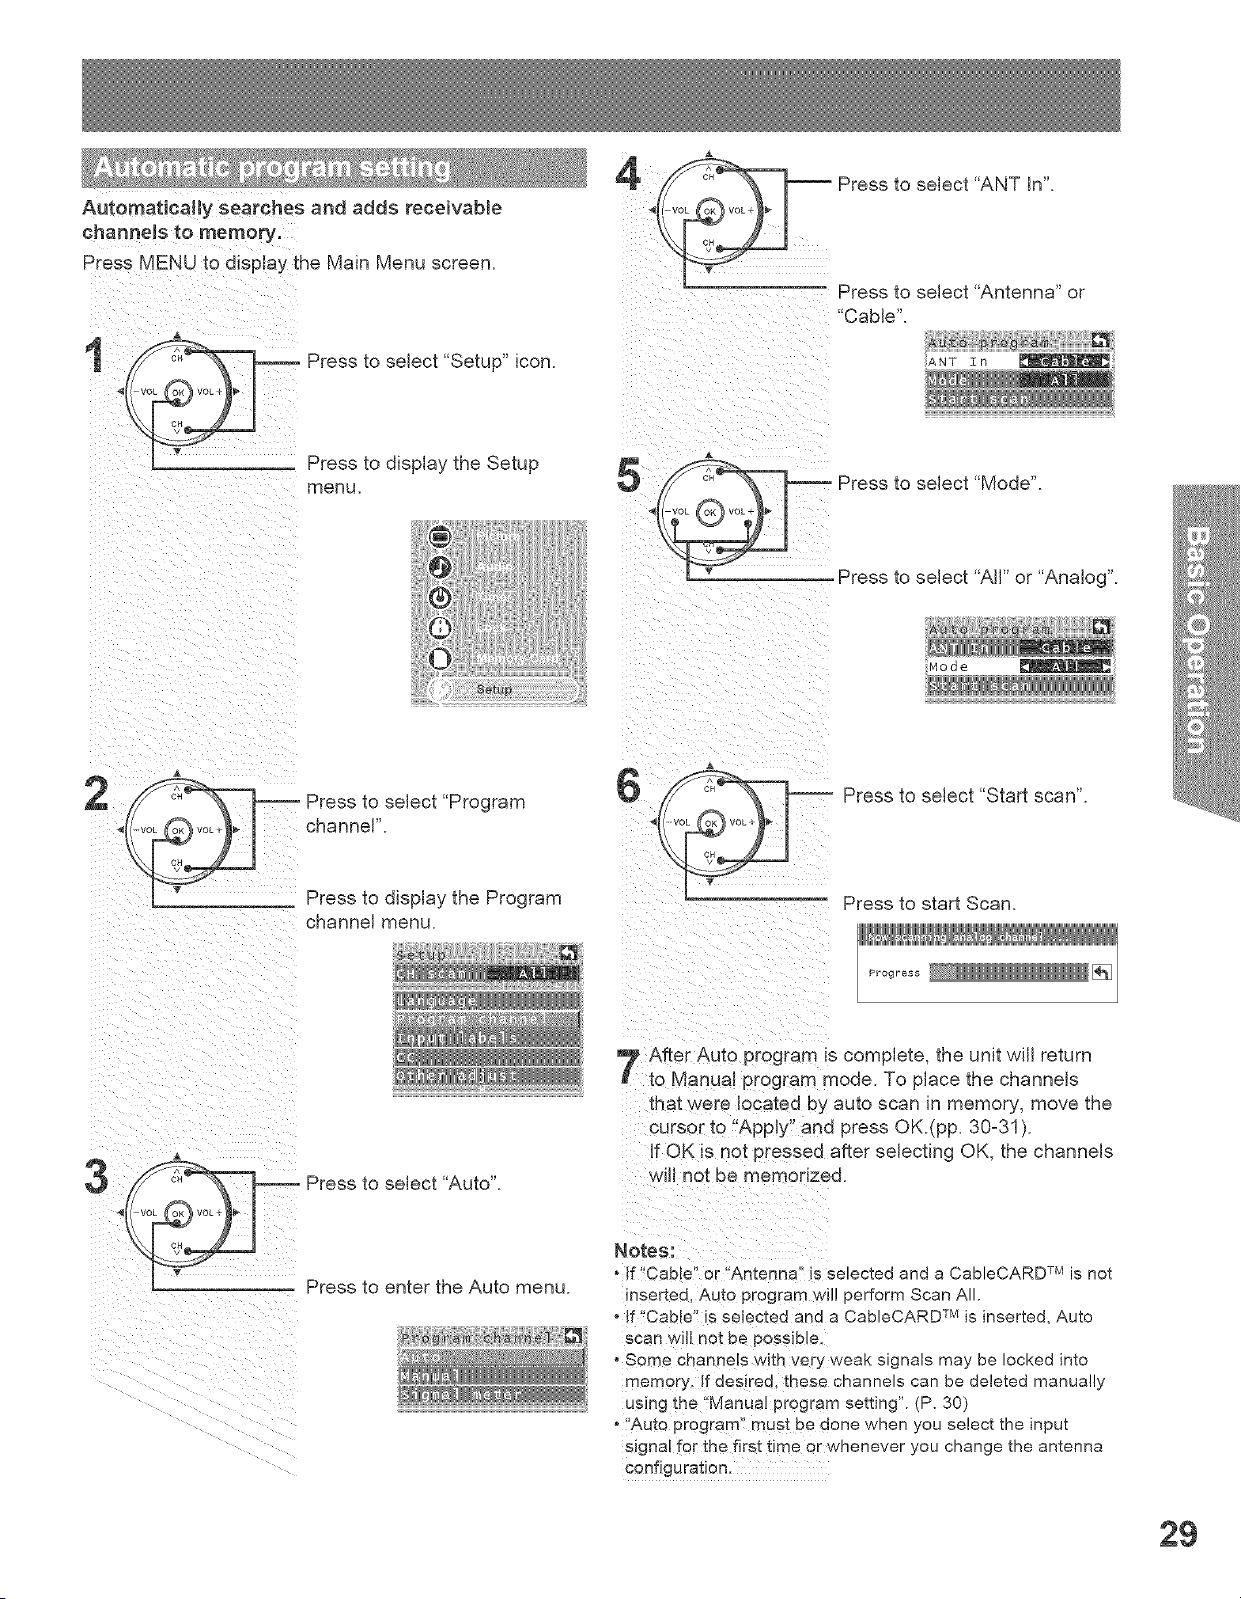
Automaticaimy searches and adds receivable
channels to memory.
Press MENU to d_splay the Main Menu screen.
m
i _ii i ii i i
1
Presstosolect"Sotup"icon ii iii ii) :ii i ii!i! ii i
Press to select "ANT In".
Press to select "Antenna" or
"Cable".
ANT In
Press to display the Setup
menu.
Press to select "Mode".
Press to select "All" or "Analog".
qode
2
Press to select "Program
channel".
Press to select "Start scan".
Press to display the Program
channel menu.
Press to start Scan.
P_og.... _[_
Press to select "Auto".
Press to enter the Auto menu.
After Aut0 program is complete, the unit will return
to Manua! program mode. To place the channels
that were located by auto scan in memory, move the
cursor to "App!y" and press OK.(pp. 30-31 ).
If OK is not pressed after selecting OK, the channels
be memorized.
"If !_Cab!el _or "Antenna:! is selected and a CableCARD TM is not
inserted, Auto program WH! perform Scan All.
o!f !!Cab!e': is selected and a CableCARD TMis inserted, Auto
scan Will not be possible.
"Some channels with very weak signals may be locked into
mem0ry, !f des!red, these channels can be deleted manually
using the '!Manual program setting". (P. 30)
,'Auto program': must be done when you select the input
signal fo[ the first time or whenever you change the antenna
configuration.
29
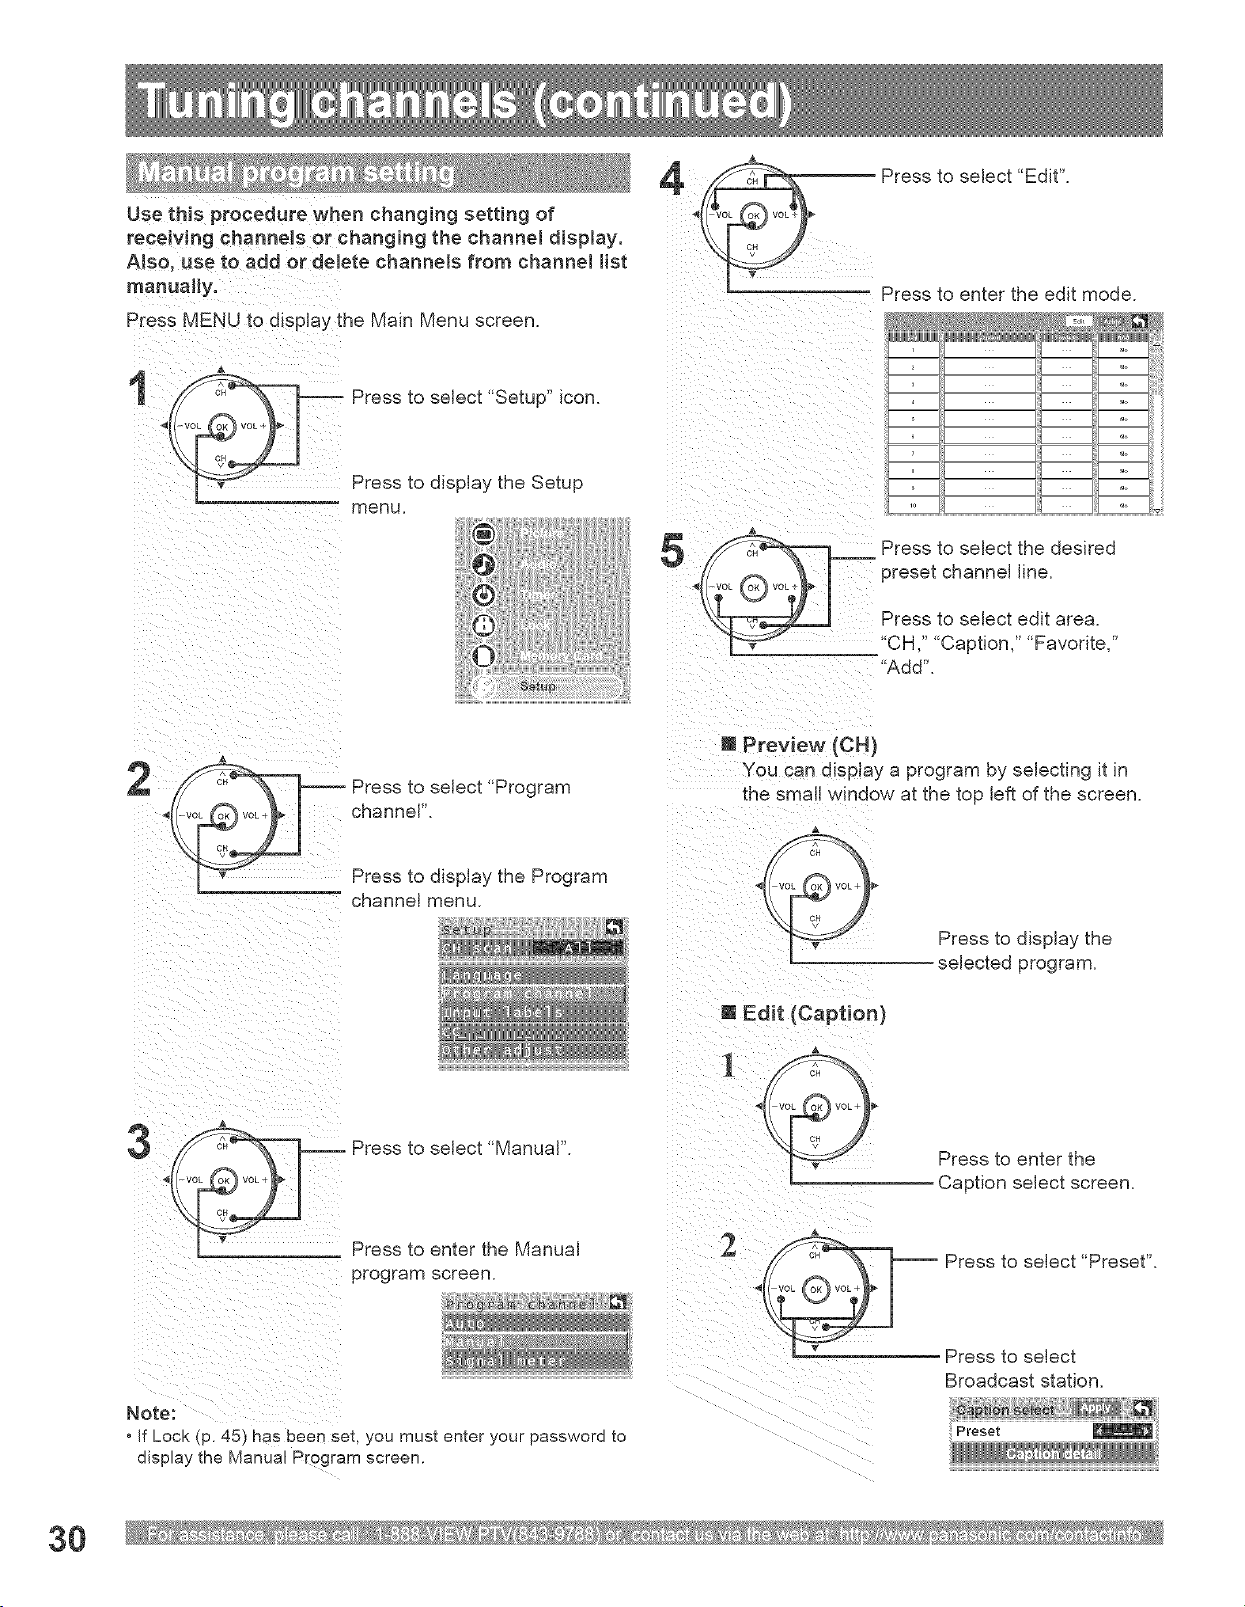
Use this procedure when changing setting of
receiving channels or changing the channel display.
Also, use to add or delete channels from channel list
manually,
Press MENU to display the Main Menu screen.
Press to select "Setup" icon.
Press to display the Setup
menu.
41__ Press to select "Edit".
Press to enter the edit mode.
Press to select the desired
preset channel line.
Press to select edit area.
. v "CH," "Caption," "Favorite,"
"Add".
2
Press to select "Program
channel".
@[ Preview (CH)
'YOUcan disp!ay a program by selecting it in
the small window at the top left of the screen.
Press to display the Program
channel menu.
@ Edit (Caption)
3 Press to select "Manual".
Press to enter the Manual
program screen.
Press to enter the
Caption select screen.
Press to select "Preset".
Note:
' LOCK_. 451 r_as been set, you must enter your password to
oIsplay the Manual Program screen.
Press to select
Broadcast station.
3O
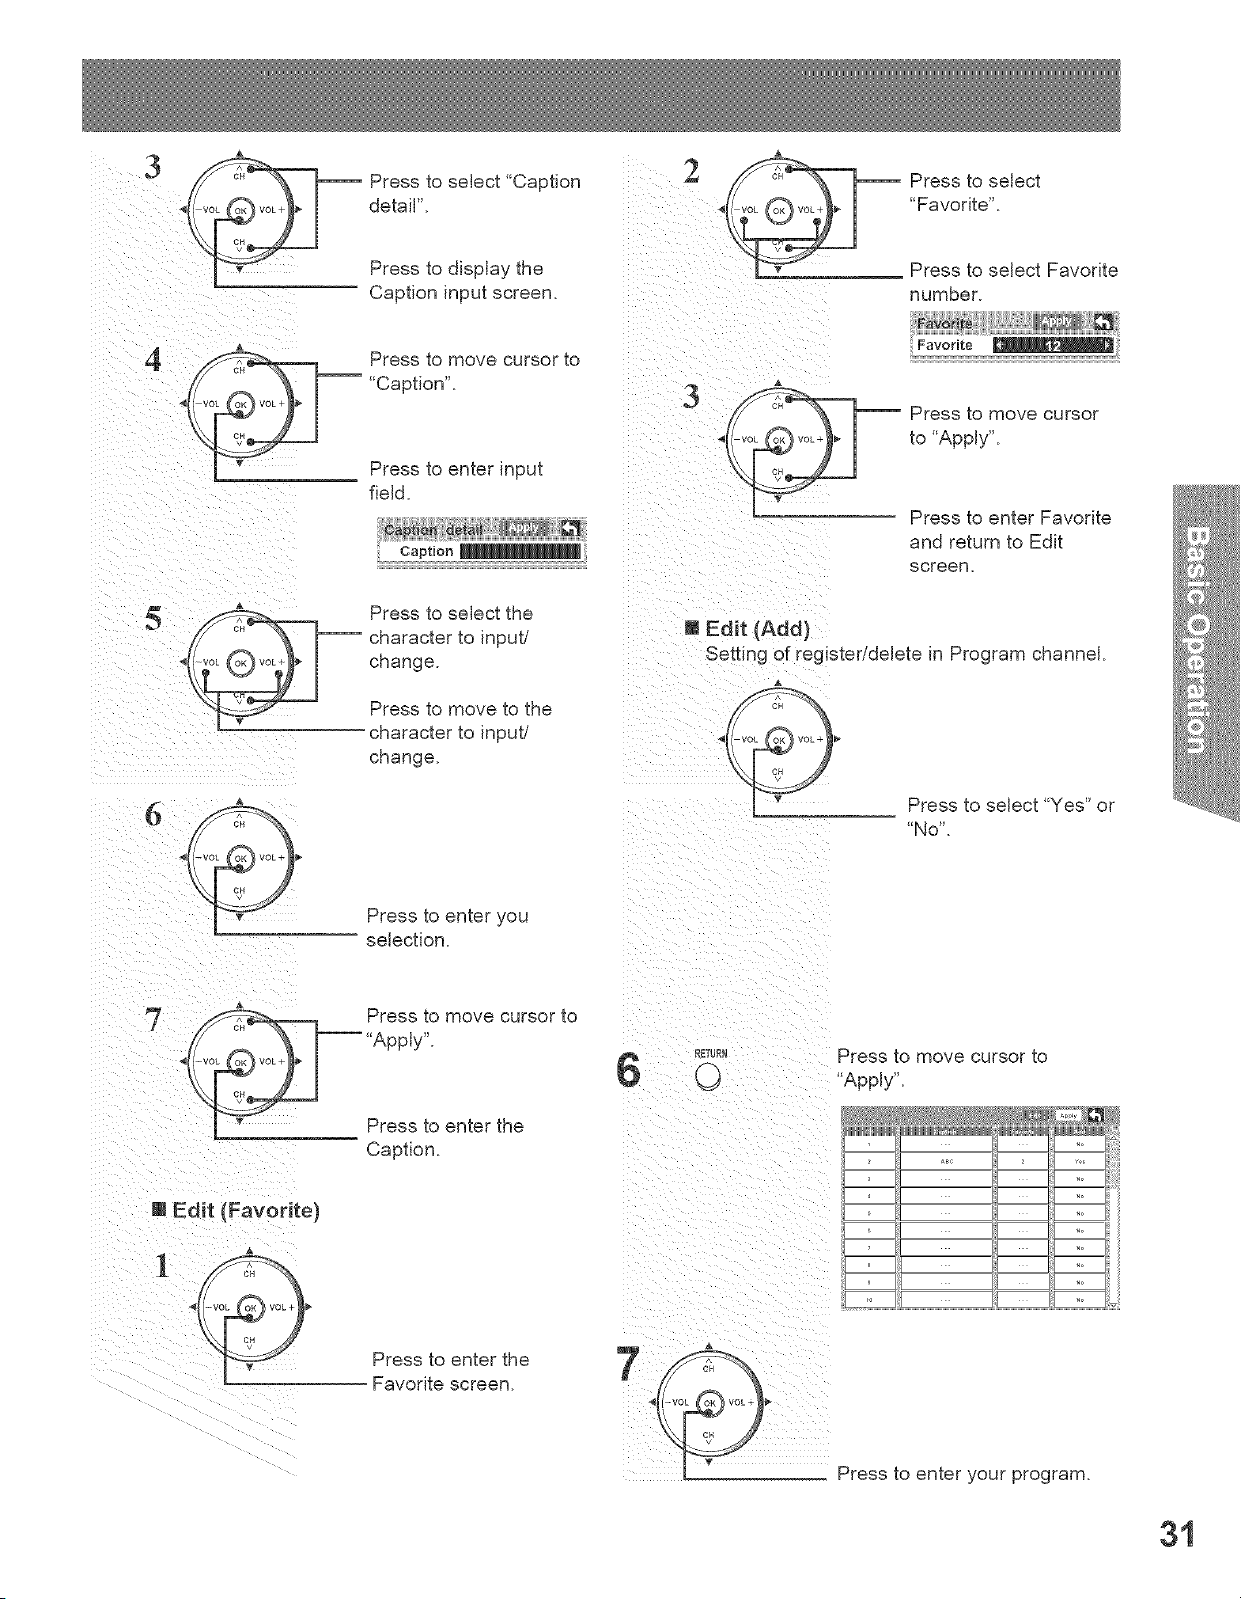
2
Press to select "Caption
detail".
Press to select
"Favorite".
Press to display the
Caption input screen.
Press to move cursor to
"Caption".
Press to enter input
field.
Press to select the
-- character to input/
change.
Press to move to the
character to input/'
change.
3
Press to select Favorite
number.
Favorite
Press to move cursor
to "Apply".
Press to enter Favorite
and return to Edit
screen.
E Edit (Add)
Setting of register/delete in Program channel.
Press to select "Yes" or
"No".
Press to enter you
selection.
Caption.
6
RETURN Press to move cursor to
0 "Apply".
ABe Ye_
"o
"o
"o
"o
"o
"o
"o
"o
Press to enter the
Favorite screen.
Press to enter your program.
31
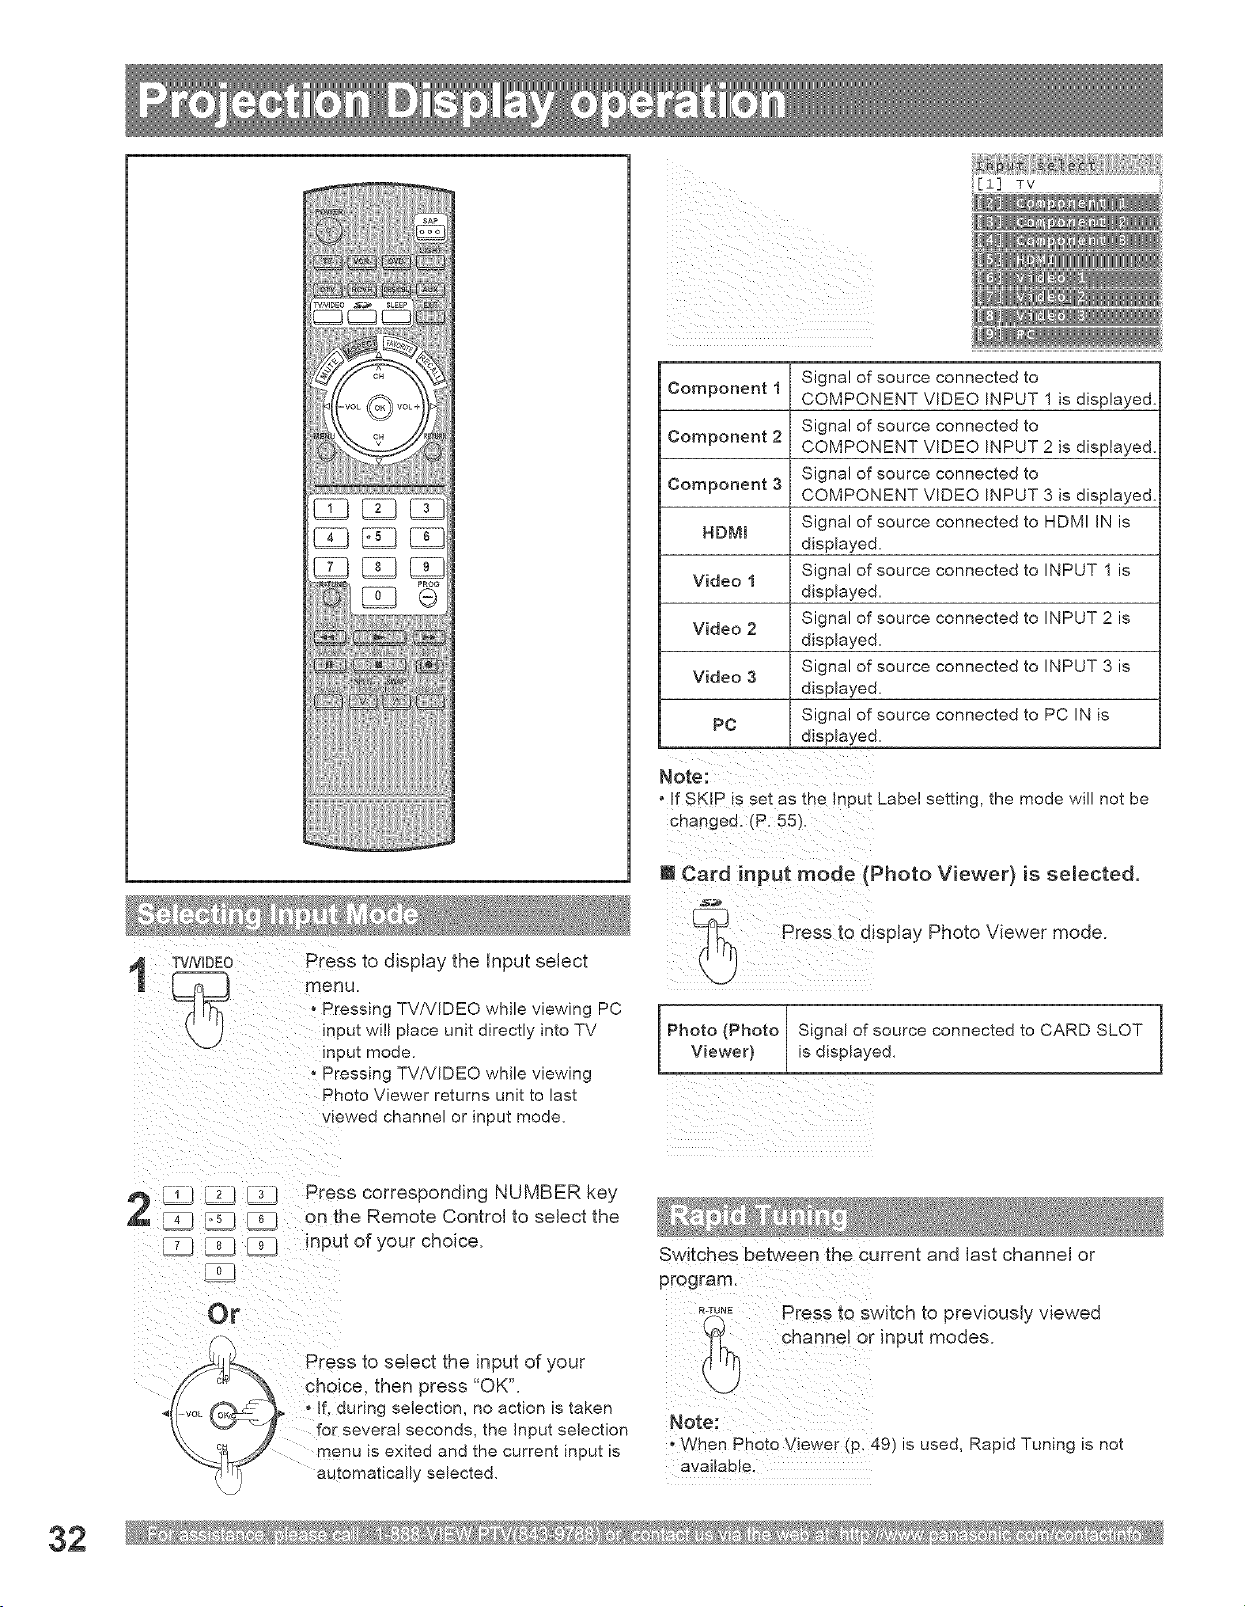
TViVIDEO Press to display the input select
Pressing TV/VIDEO while viewing PC
input will place unit directly into TV
input mode.
, Pressing TV/VIDEO while viewing
Photo Viewer returns unit to last
viewed channel or input mode.
_ _ _ Press corresponding NUMBER key
_ _j on the Remote Control to select the
_j _ input of your choice.
: Press to select the input of your
choice, then press "OK".
, ° Jr, during selection, no action is taken
for several seconds, the Input selection
menu is exited and the current input is
automatically selected.
[Z] TV
Signal of source connected to
Component 1 COMPONENT VIDEO INPUT 1 is displayed.
Signal of source connected to
Component 2 COMPONENT VIDEO INPUT 2 is displayed.
Signal of source connected to
(:;omponent 3 COMPONENT VIDEO INPUT 3 is displayed.
HDMI Signal of source connected to HDMI IN is
displayed.
Video 1 Signal of source connected to INPUT 1 is
displayed.
Video 2 Signal of source connected to INPUT 2 is
displayed.
Video 3 Signal of source connected to INPUT 3 is
displayed.
PC Signal of source connected to PC IN is
displayed.
Note:
o If SKIP is set as _ne Inpu_ LaDet setting, the mode will not be
cnanged. (P. 55).
m Card input mode (Photo Viewer) is seJected.
Press to display Photo Viewer mode.
i
Photo (Photo Signa of source connected to CARD SLOT I
V ewer) s elsplayea
I
Switches between the current and last channel or
program.
...... Press to switch to previously viewed
channel or input modes.
Note:
o When Photo Viewer {p. 49 _ is used, Rapid Tuning is not
available.
32
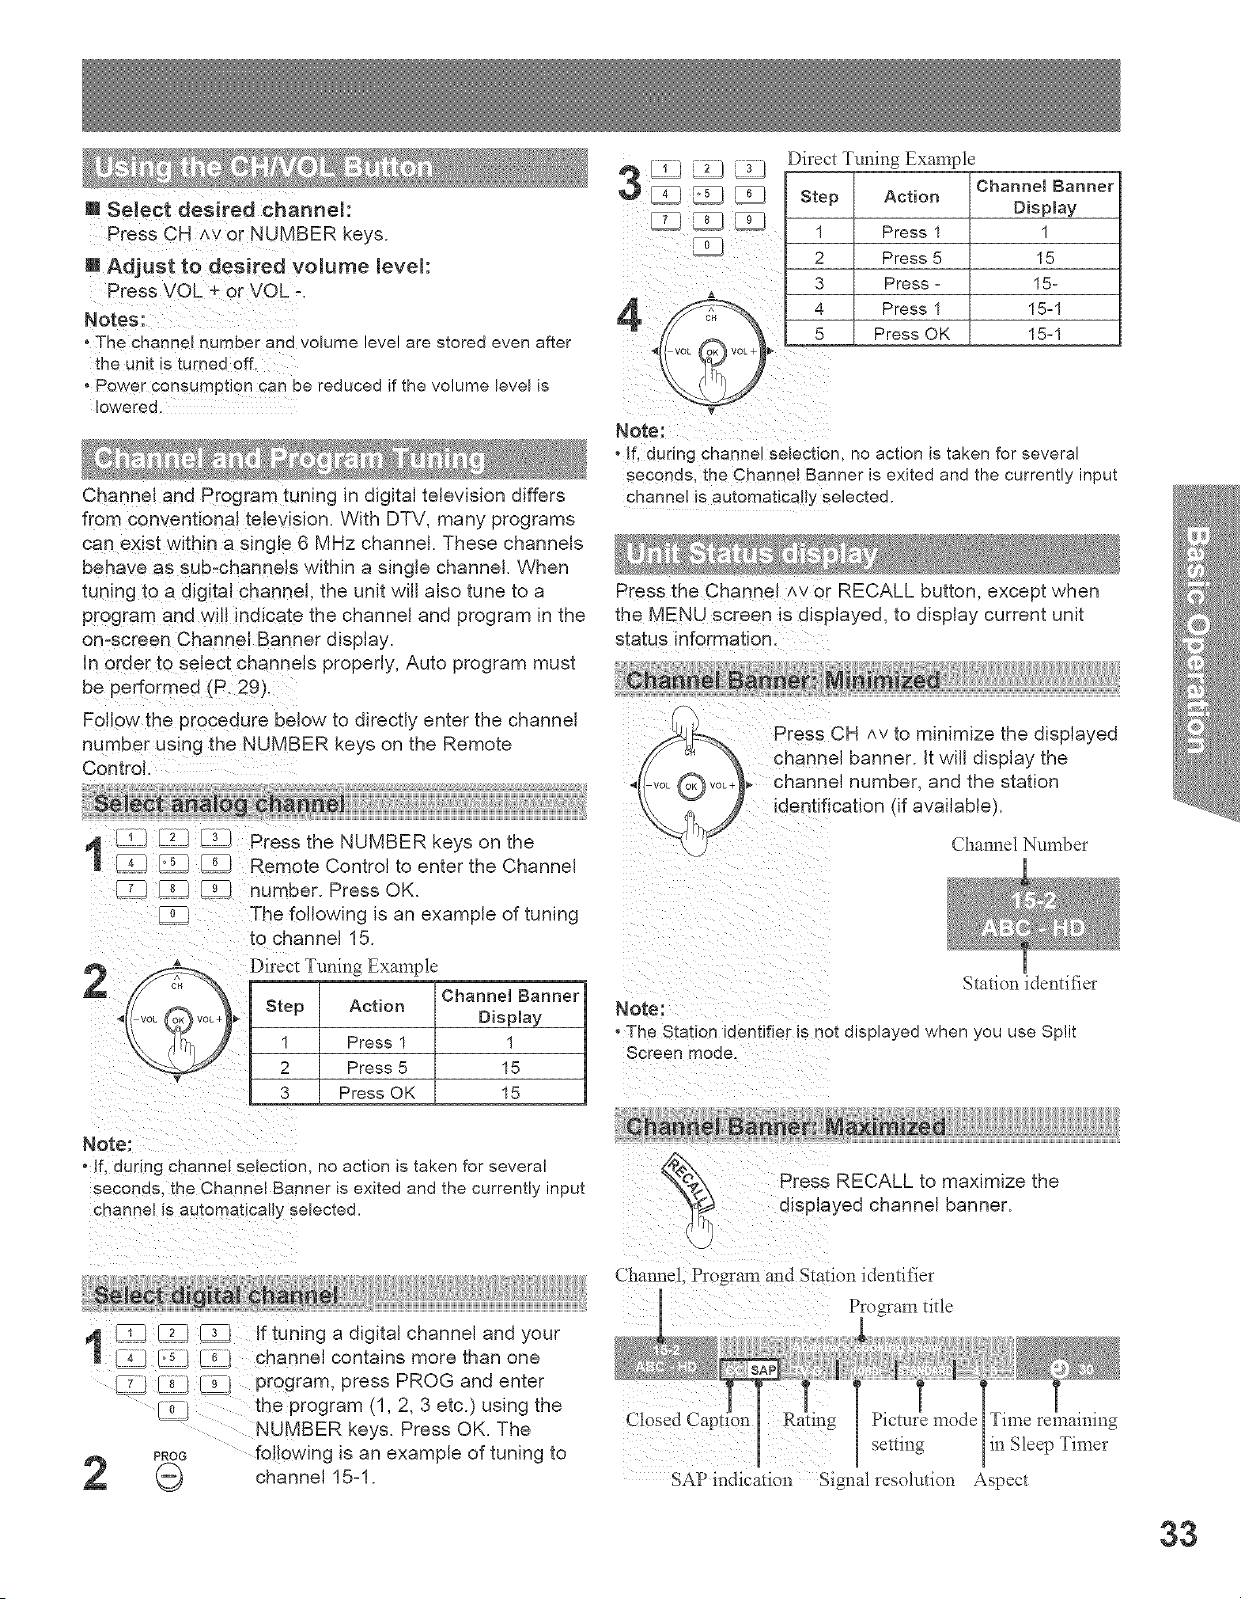
m SeJect desired channeJ:
Press #H Av or NUMBER keys.
B Adjust to desi[ed voJume level
Press VOL _ O[ VOL-.
• The channel number and volume level are stored even after
the unit is turned off
° Power consumption can be reduced if the volume level is
lowered.
Channe! and Program tuning in digital television differs
from conventional television. With DTV, many programs
can exist within a single 6 MHz channel. These channels
behave as sub,channels within a singJe channel. When
tuning to a digital chann el, the unit wiiJ aJso tune to a
Program and wi!! indicate the channel and program in the
on,screen Channel Banner display.
In order to select channels properly, Auto program must
be performed (P. 29),
FOllOwthe PrOcedure below to directly enter the channel
number using the NUMBER keys on the Remote
Control.
_ number. PressOK.
The foJiowing is an example of tuning
to channeJ 15.
3
Channel Banner
Display
1
15
Press OK 15
_ _ Step
3
Direct Ttming Example
Action
Press 1
Press 5
Press -
Press 1
Press OK
Channel Banner
Display
1
15
15-
15:1
15:1
o If, during channel selection, no action is taken for several
seconds, the Channel Banner is exited and the currently input
channel is automatically selected.
Press the Channel Aver RECALL button, except when
the MENU screen is displayed, to display current unit
status information.
) Press CH ^v to minimize the displayed
channel banner. It will display the
vo__ .... number, and the station
_ntification (if available).
Channel Nnmber
Station identifier
Note:
oThe Station identifier is not displayed when you use Split
Screen moae.
_lf, dudng channel selection, no action is taken for several
seconds, the Channel Banner is exited and the currently input
channel iS automatica!iy seJected.
I _ _ _ If tuning a digitaJ channel and your
[_ _ channeJ contains more than one
_ _ program, press PROG and enter
the program (1, 2, 3 etc.) using the
NUMBER keys. Press OK. The
PROP following is an example of tuning to
channel 15-1.
Press RECALL to maximize the
@layed channel banner.
Chalmel, Program and Station identifier
Program title
Closed me remaining
setting in Sleep Timer
SAP indication Signal resolution Aspect
33
R[ess MUTE to instantly mute the sound. Press again to
restore the previous sound level.
ss this button to mute the sound. Press
again tO reactivate sound. Sound is also
reactivated when power is turned off or
volume level is changed.
The audio output from AV OUT is not muted.
This feature lets yOU add channels to or delete channels
from the Favorite channel list.
To delete a favorite channe_
A memorized channel can be removed from the
list by holding down FAVORITE while it's position
is highlighted.
1
Press FAVORITE.
, Continue holding down FAVORtTE to
cnange between pages (1/3, 2/3, 3/3,
or exl_. Pressing _ _- also changes
the page.
Disp!ay the channe! to be placed on the Favorites
list.
H01d down FAVORITE for several
_,_ seconds.
(! 't_)Continue holding down FAVORFE to
"-,,d/ change between pages (1/3, 2/3, 3/3,
or exit). Pressing _ _ also changes
page.
z]
i _ _ _iii iiiii ii__ i
_i_i i!i_i___ii_iii_!i!_i_i
, Press A _' to highlight a position
on the list.
Then, press OK to memorize the
in that position.
o You can also use the NUMBER keys
(I-9 and 0) to directly memorize and
place the displayed channel on the
Press A T or a Numbered key (1-9
ane O)to highlight a channel on the
list.
Press OK to display the
highlighted channel.
z] 26-1
34
merle
_[b ress SAP to select the next audio track [if
avaiJable) when receiving a digitN channel.
MTS Stereo broadcast
Multi-channel Television Sound Stereo broadcast.
Select STEREO audio mode.
if stereo broadcast is weak and the display flickers, select
MONO audio mode for possibly better results.
SAP broadcast
Secondary Audio Program (sub language.)
SNect SAP audio mode for the sub language.
NONO broadcast
NormN monaural sound broadcast.
Analog mode
Press SAP button to select the desired audio
mode as described below.
(Arrow shows selection ,
oEach press of SAP #u[_on _qll change me aualo
moue as shown ee!ow
, "SAP" is selected with first _)ress of SAF eu_mn.
STERE() ]
€
SAP ]
MONO ]
U Receivable Broadcast Types
The following are possible broadcast types with their
accompanying on-screen displays. The s_gnal being
received Is indicated with a red text while the selected
audio mode is yellow back ground.
NTS Stereo and SAP broadcast
Multi-channel Television Sound Stereo, ma_n
language) and Secondary Audto Program ,sub
language/broadcasts are both being received
simultaneously. Select the STEREO or SAP audto
mode
switches the Unit OEE in a preset amount of time from 0
to 90 minutes in 30 minute intervals.
Press SLEEP repeatedly to select the
desired time.
(1', Ij To cance!, press SLEEP repeatedly until O
\--_.) appears. A{so, turning Power OFF while setting
SLEEP will reset to zero.
0 ]
3° ]
6° ]
9° ]
m
°pressing DISPLAY wit h sleep timer set displays remaining
time. Thi s can a!so be done by pressing SLEEP, If you
cont{nue to Press SLEEP i the sleep time setting mode will be
entered,
o S!eep time may aiso beset from the Menu screen. (P, 44).
38
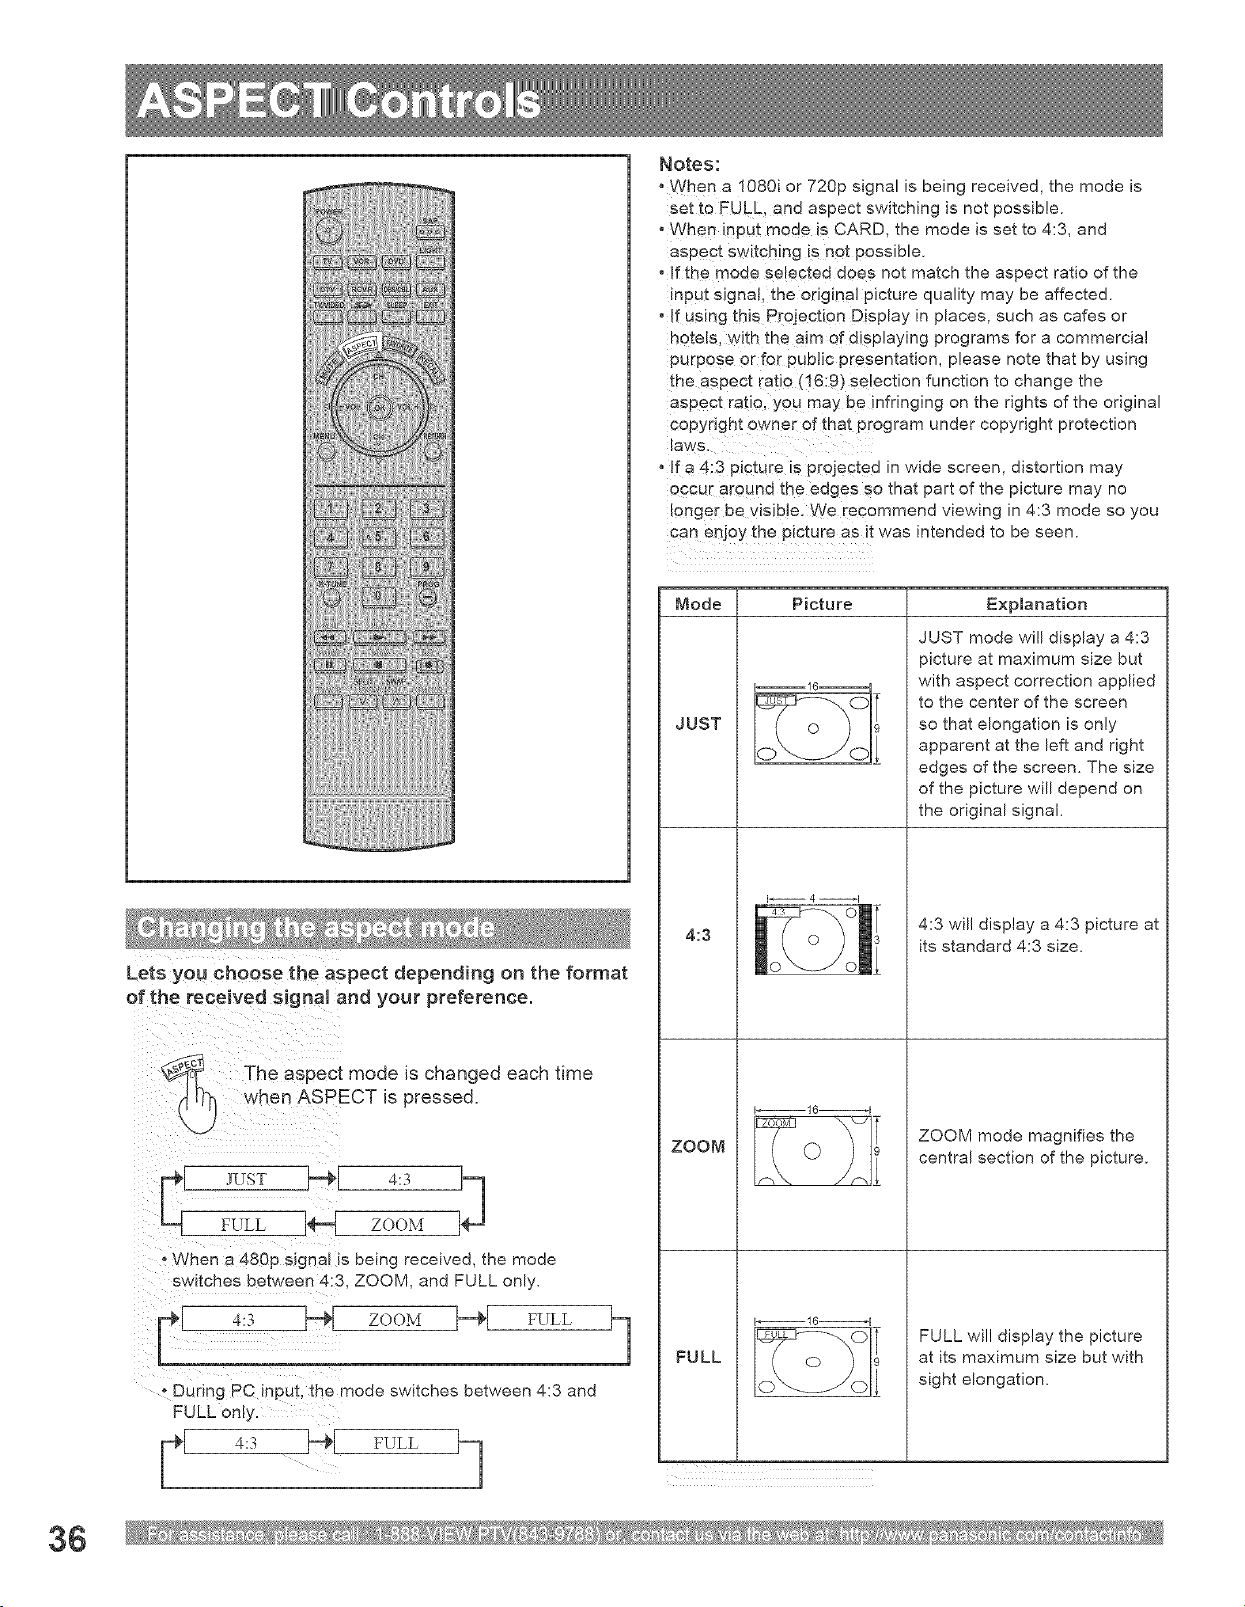
Lets you choose the aspect depending on the format
of the received signal and your preference.
_ The aspect mode _schanged each time
[_ when ASPECT is pressed.
FULL ZOOM
* When a 480p s_gnal is being received, the mode
switches between 4:3, ZOOM, and FULL only.
- During PC input, the moee swi[cnes #etween 4:3 and
=ULL only.
r' 4:3 _-l_, FULL ,_
Notes:
o When a 1080i or 720p signal is being received, the mode is
set to EULL, and aspect switching is not possible.
" When input mode is CARD, the mode is set to 4:3, and
aspect switching iS not possible.
o If the mode selected does not match the aspect ratio of the
input Signal, the original picture quality may be affected.
"!f Using this Prejeeti0n Display in places, such as cafes or
hotels, with the aim of displaying programs for a commercial
purpose or for public presentation, please note that by using
the aspect ratio (16:9) selection function to change the
aspect ratio, YOU may be infringing on the rights of the original
copyright owner of that program under copyright protection
° {f a 4:3 picture is projepted in wide screen, distortion may
occur around the edges so that part of the picture may no
longer be Visibie. We recommend viewing in 4:3 mode so you
Can enjoy the picture as it was intended to be seen.
Mode Picture
JUST
4:3
ZOOM
FULL
L
1_16ul
1_16--1
1
Explanation
JUST mode will display a 4:3
picture at maximum size but
with aspect correction applied
to the center of the screen
so that elongation is only
apparent at the left and right
edges of the screen. The size
of the picture will depend on
the original signal.
4:3 will display a 4:3 picture at
its standard 4:3 size.
ZOOM mode magnifies the
central section of the picture.
FULL will display the picture
at its maximum size but with
sight elongatiom
36
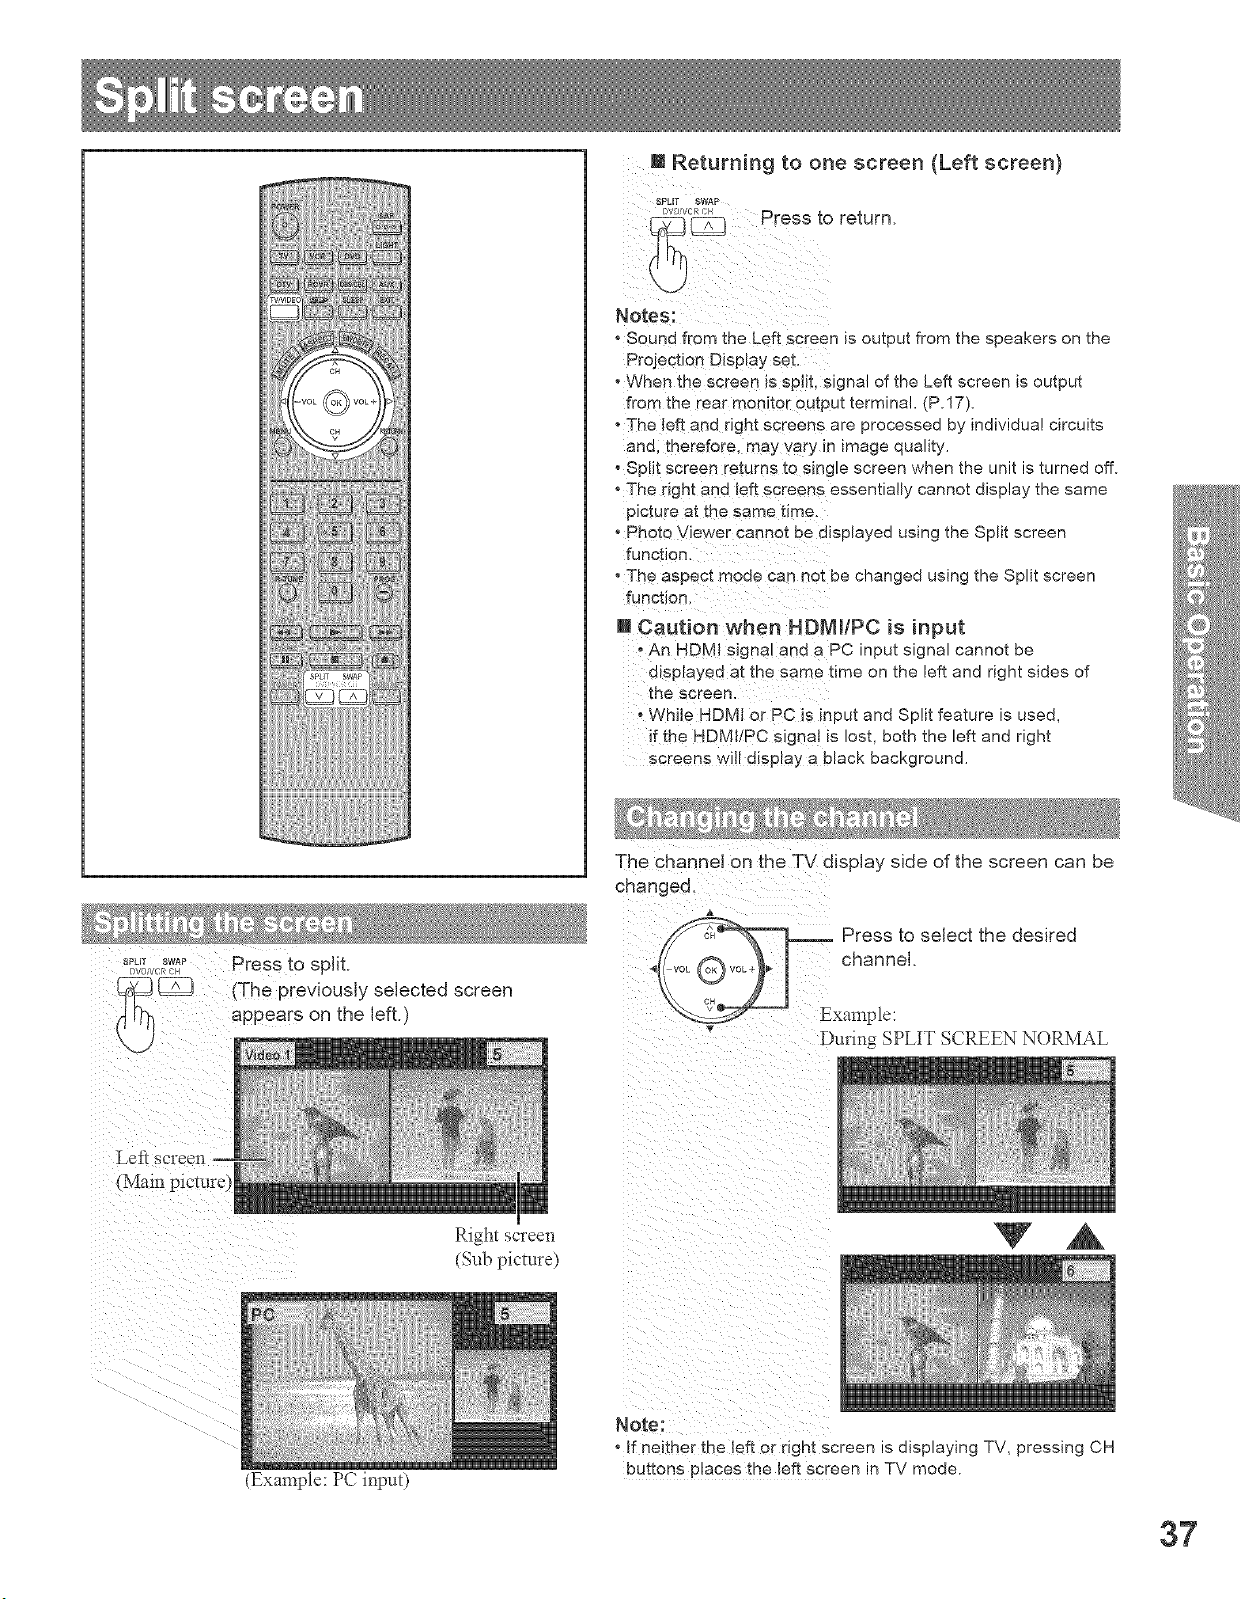
m Returning to one screen (Left screen)
SPLIT SWAP
_w_<:_.:, Press to return.
o Sound from the Left screen is output from the speakers on the
Projection Display set.
o When the screen is split, signal of the Left screen is output
from the rear moniter Output terminal. (P.17).
o The left and right screens are processed by individual circuits
and; therefore, may varY in image quality.
o Spilt screen returns te single screen when the unit is turned off.
o The right and !eft screens essentially cannot display the same
picture at the same time.
° Photo Viewer cannot be displayed using the Split screen
, The aspect mode can not be changed using the Split screen
m Caution when HDNmlPC is input
_A n HDM! signa! and a PC input signal cannot be
disp!ayed at the same time on the left and right sides of
the screen.
While HDMI or PC iS input and Split feature is used,
if the HDMI!PC signa! is lost, both the left and right
screens wi}! disp!ay a black background.
The chapneJ on the TV display side of the screen can be
changed.
A
_ Press to select the desired
.fvo e o¢1 ohoooo,
k Z/l
Example:
Dullng SPLIT SCREEN NORMAL
(Main picture)
(Example: PC input)
Rightscreen
(Sub picture)
V ,A
Note:
o if neither me left or ngm screen is displaying TV, pressing CH
buttons places the left screer in TV mode.
37
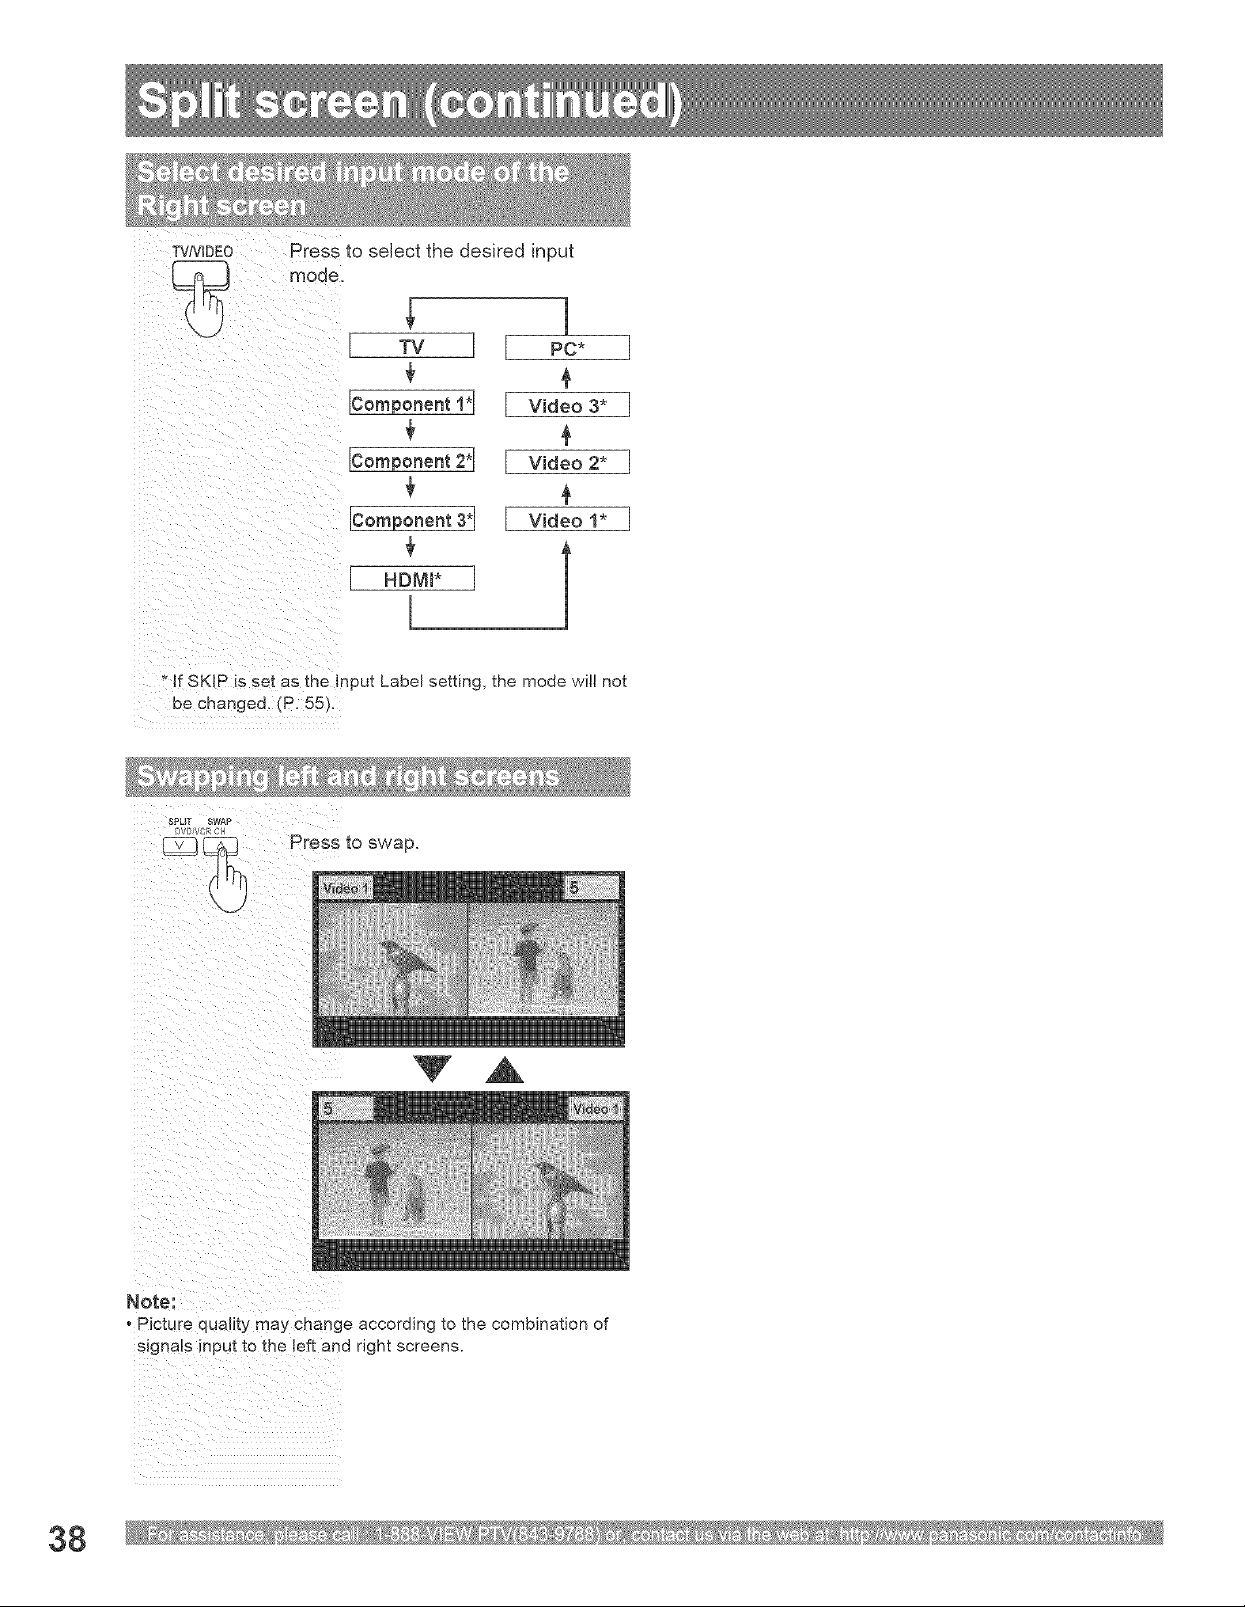
TVNIDE0 Press to select the desired input
rv ]
ICompenent1"1
Ico_poo_ot2"I
Icompoooot3.1
,DM_*]
l
1
PC*
Video 3"
VBdeo 2*
VBdeo 1"
J
]
]
]
* If SKIP is set as the Input Label setting, the mode will not
be changed. (P. 55).
SPUT SWAP
Press to swap.
V A
Note:
Picture qua_l_yma_ change according to the combination of
signaJs input to the left and right screens.
38
each item.
Press to adjust each item.
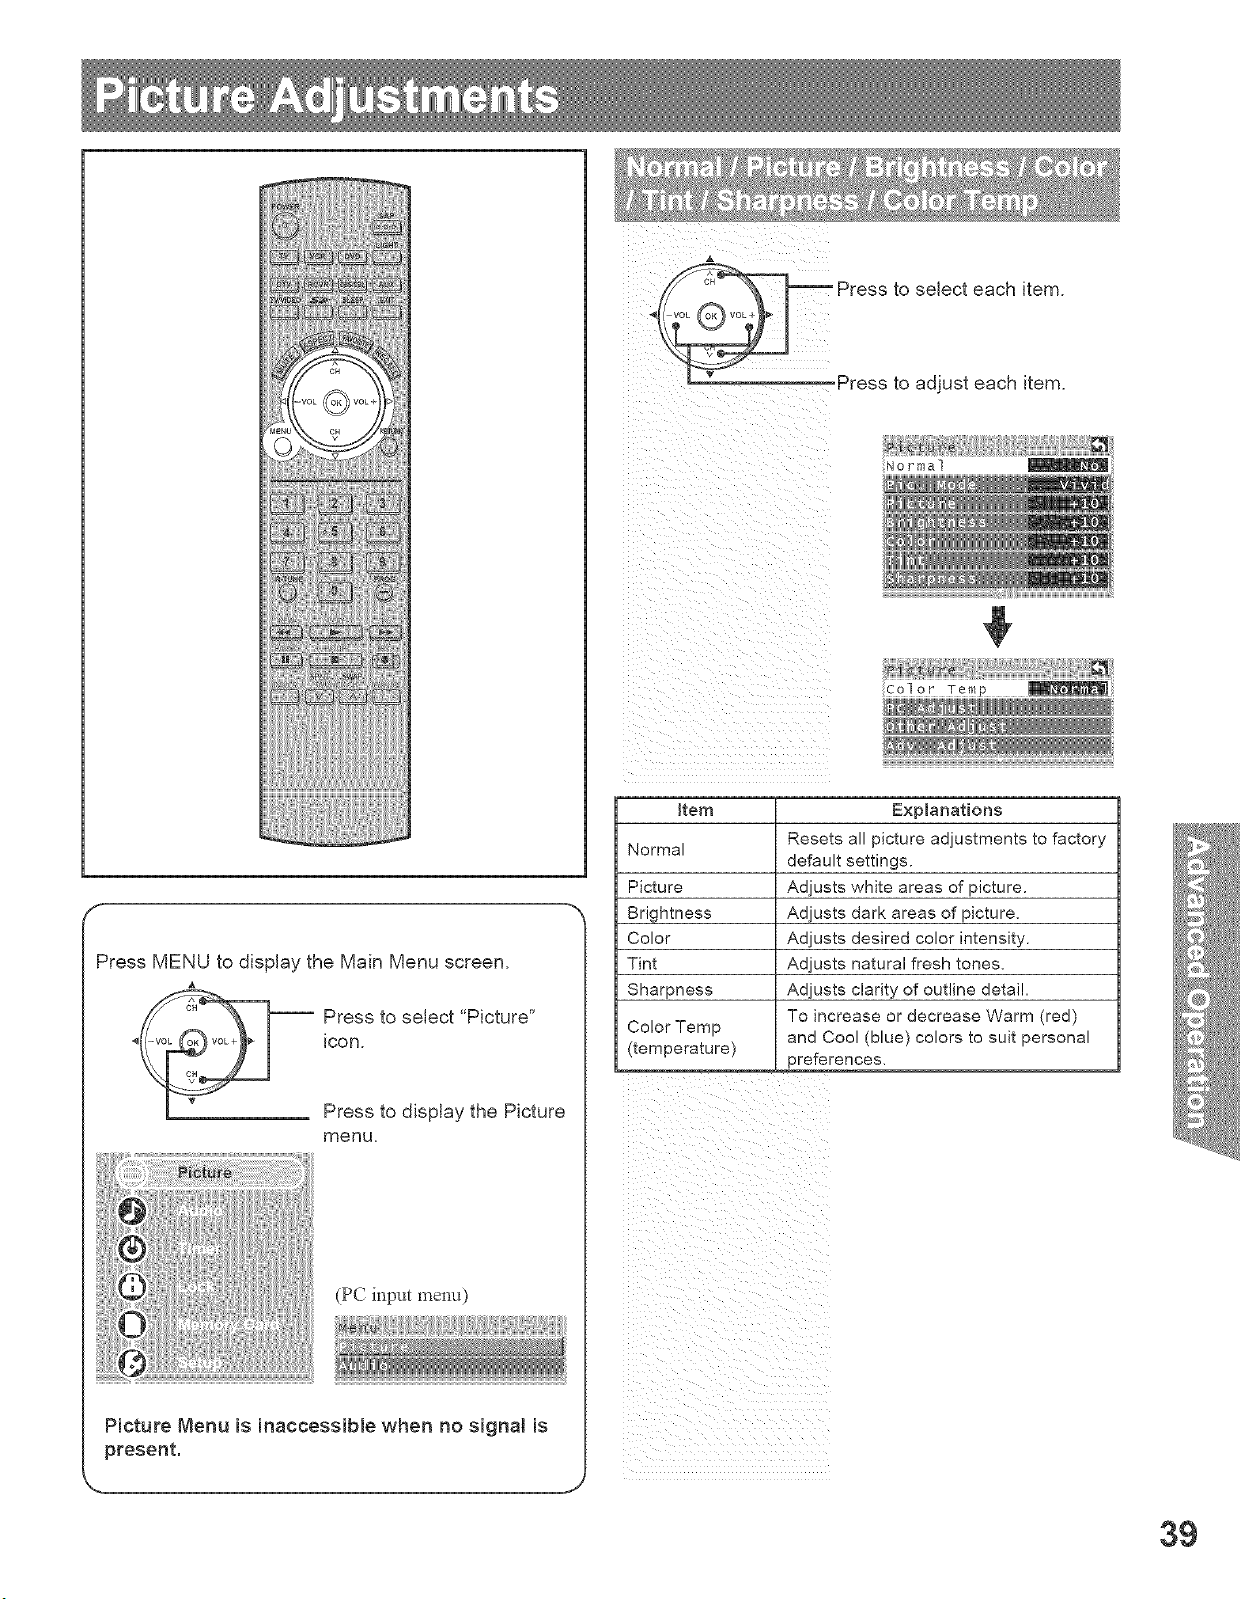
Press MENU to display the Main Menu screen.
A
-- Press to select "Picture"
icon.
Press to display the Picture
menu.
(PC input menu)
Picture Menu is inaccessible when no signal is
present.
Rein Explanations
Resets all picture adjustments to factory
Normal
default settings.
Picture Adjusts white areas of picture.
Brightness Adjusts dark areas of picture,
Color Adjusts desired color intensity.
Tint Adjusts natural fresh tones,
Sharpness Adjusts clarity of outline detail,
To increase or decrease Warm (red)
Color Temp and Cool (blue) colors to suit personal
(temperature) preferences,
i i Z i
_iil _iiiii
39

Lets jou choose one of three prezset Picture Modes
that aest suits the program to which you are viewing.
Selecting this feature w_ll also affect Color Temperature
setting
"Pic. Mode".
--Press to select picture mode.
You can adjust the picture when viewing a signal from a
PC.
Press to select "PC Adjust".
Press to display the PC Adjust
menu,
Press to select each item.
Vivid - This is the default mode. It provides enhanced picture
contrast and sharpness for viewing in a wellolit room.
, Standard - Recommended for norma viewing conditions with
subdued room I_ghting.
o Cir ama o Select this mode for watching movies in a darkened
room. it provides a soft. film-like picture.
v
Press to adjust each item,
i i i iii ii ii ii ii iii i
Item Explanations
Normal Resets all picture adjustments to factory
default settings.
Dot Clock Adjusts horizontal size.
H-Position Adjusts horizontal position.
V°Position Adjusts vertical position
Adjust in order to remove any picture
Clock Phase interference or contour blurnng
which may occur in computer images.
Signal Display input signal.
° This operation iS only Possible when the signal viewed is from
a PC.
4O
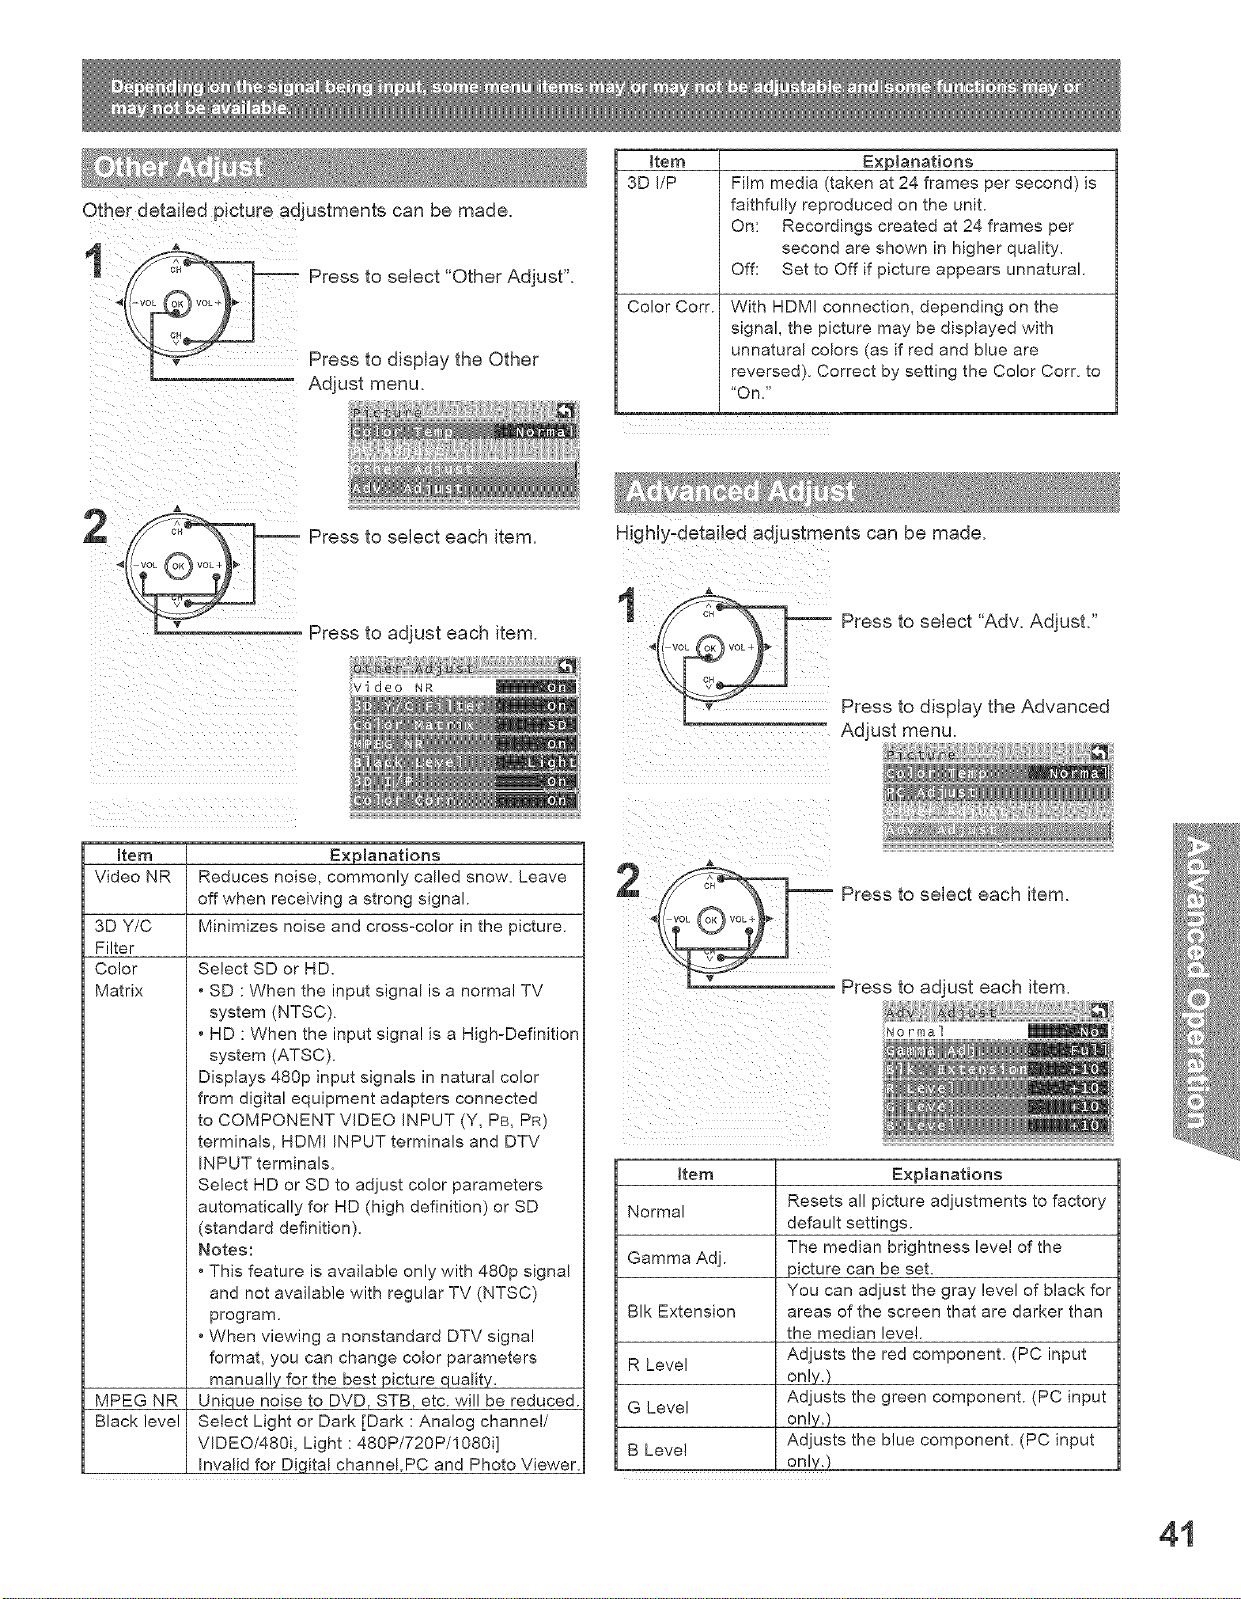
Other detailed picture adjustments can be made.
Press to select "Other Adjust".
Press to display the Other
Adjust menu.
Btem
3D I/P
Explanations
Film media (taken at 24 frames per second) is
faithfully reproduced on the unit.
On: Recordings created at 24 frames per
second are shown in higher quality.
Off: Set to Off if picture appears unnatural.
Color Corr. With HDMI connection, depending on the
signal, the picture may be displayed with
unnatural colors (as if red and blue are
reversed). Correct by setting the Color Corr. to
'On."
Press to select each item.
Press to adjust each item.
deo NR
HighlY-detailed adjustments can be made.
I¸¸¸¸¸¸¸¸¸¸¸¸¸¸- f
_ii ii i
i ii ii ii ii ii ii ii ii ii ii ii
Press to select "Adv. Adjust."
Press to display the Advanced
Adjust menu,
totem
Video NR
3D Y/C
Filter
Color
Matrix
Explanations
Reduces noise, commonly called snow. Leave
off when receiving a strong signal.
Minimizes noise and cross-color in the picture.
Select SD or HD.
• SD : When the input signal is a normal TV
system (NTSC).
• HD : When the input signal is a High-Definition
system (ATSC).
Displays 480p input signals in natural color
from digital equipment adapters connected
to COMPONENT VIDEO INPUT (Y, PB, PR)
terminals, HDMI INPUT terminals and DTV
INPUT terminals.
Select HD or SD to adjust color parameters
automatically for HD (high definition) or SD
(standard definition).
Notes:
• This feature is available only with 480p signal
and not available with regular TV (NTSC)
program.
• When viewing a nonstandard DTV signal
format, you can change color parameters
manually for the best picture quality.
MPEG NR Unique noise to DVD, STB, etc. will be reduced.
Black level Select Light or Dark [Dark : Analog channel/
VIDEO/480i, Light : 480P/720P/1080i]
Invalid for Digital channel,PC and Photo Viewer.
2'
i ii i
Press to select each item.
Press to adjust each item.
Item Explanations
Resets all picture adjustments to factory
Normal
default settings.
Gamma Adj. The median brightness level of the
picture can be set.
You can adjust the gray level of black for
BIk Extension areas of the screen that are darker than
the median level.
R Level Adjusts the red component. (PC input
only_)
G Level Adjusts the green component. (PC input
only.)
B Level Adjusts the blue component. (PC input
only.)
41
Press to select each item.
V
Press to adjust each item,
Normal
Rem Explanations
Normal Reset Bass, Treble and Balance
adjustments to factory default settings.
Bass Increase or decrease the bass response.
Increase or decrease the treble
Treble
response.
Balance Emphasize the left / right speaker
volume.
Press MENU to display the Main Menu screen.
A
@Press to select "Audio"
icon.
Press to display the Audio
menu.
(PC input menu)
={::{} {{
If unit is set to AI Sound "On," BBE "On,"
or "VIVA 3D," the other adjust items witl not
function.
% J
LeI:s yOU cnoose one of three preoset Audio Modes that best
suits me program to which you are listening.
Press to select "Audio Mode".
Press to select audio mode.
Mode
- Standard Emits the original sound.
• Dynamic Sound suited to music or movie.
, Speech Sound suited to dialogue.
42
You can hear a deeper 3-D sound effect using just the unit's
Lwo front speakers.
Press to select "BBE".
Other detailed audio adjustments can be made.
Press to select "Other Adjust".
Press to select BBE setting.
Press to display the Other
Adjust menu,
B B E
VWA 3D BBE ViVA 3D o BBE VIVA provides a musically
accurate natural 3D image with hiofi sound. The
clant'; of the sound is improved by BBE while
the width, de 3_n and height of the sound image
are expanaea by BBE's proprietary 3D sound
processing. BBE ViVA is compatible with all
TV programs including news, music, dramas,
movies and s#orts as well as electronic games.
8BE VIVA ennances the surround sound effect,
while maintaining the clarity of dialogue.
On BBE ° Sound technology enhances speech
intelligibility ann restores the dynamic range of
musica_ passages [o provide outstanding natural
SOUne.
Off Sound is normal
Press to select each item.
Press to adjust each item.
sound
item Expmanations
AI Sound Equalize overall volume levels across all channels.
(AI sound is not available in VIDEO mode).
Surround Enhances audio response when listening to stereo.
Speakers This feature is used to turn TV speakers On or Off.
o On o TV speakers operate normally.
• Off o TV speakers off.
HDMI In Perform input switching of analog audio input and
digital audio input when using the HDMI terminal
Auto : Automatically performs digital/ana!og
input switching according to the input
signal type.
Digital : Forces use of digital audio input
signal transmitted via the HDMI
terminal.
Analog : Forces use of analog audio input
signa! transmitted via separate RCA
terminals.
Notes:
• Sound s!gna[s are output from the rear AUDIO OUT and
DIG!TALAUD_Q OUT terminal. (PP. 18-19).
°When vo!ume is adjusted or the MUTE button is pressed from
the Remote Control, a message will be displayed.
43
Press to set unit to shut itself off after a preselected
amount of time.
Press to select "0," "30," "60,"
or "90".
sl ee_
Notes:
, Pressing the RECALL button with sleep timer set displays
remaining t_me.
, The on-screen display wilt flash 3, 2 and 1 to indicate the last
mree {3_ remaining m_nutes prior to turn off.
Press MENU to display the Main Menu screen.
Press to select "Timer" icon.
Press to display Timer
menu.
S_eep time may be set using the SLEEP button.
(P. 3_}.
J
44
Press MENU to display the Main Menu screen.
Press to select "Lock" icon.
Press to display the options
in the Lock menu.
You will be asked to enter your password each
time you display the Lock menu.
A 4-digit coae must be entered to view a blocked
program or change rating settings.
U Create Secret Code (First Time Setting)
Press NUMBER keys to enter
your secret code.
Note:
, Use a code that is easy to
remember and record it in a safe
place.
Create password.
i ....
Upon entering the 4 digit code,
the Lock menu is dispJayed.
m Enter Secret Code
Notes:
Press NUMBER keys to enter
your secret code.
_0{_r s_ord:...........................................................................................
Upon entering the 4 digit code,
the Lock menu is displayed.
o Once ratings are se_. res_nc_ea tapes or programs cannot be
accessed unless the secret code is entered.
o Do not forget your password. If you have forgotten it,
please contact a service center.
45
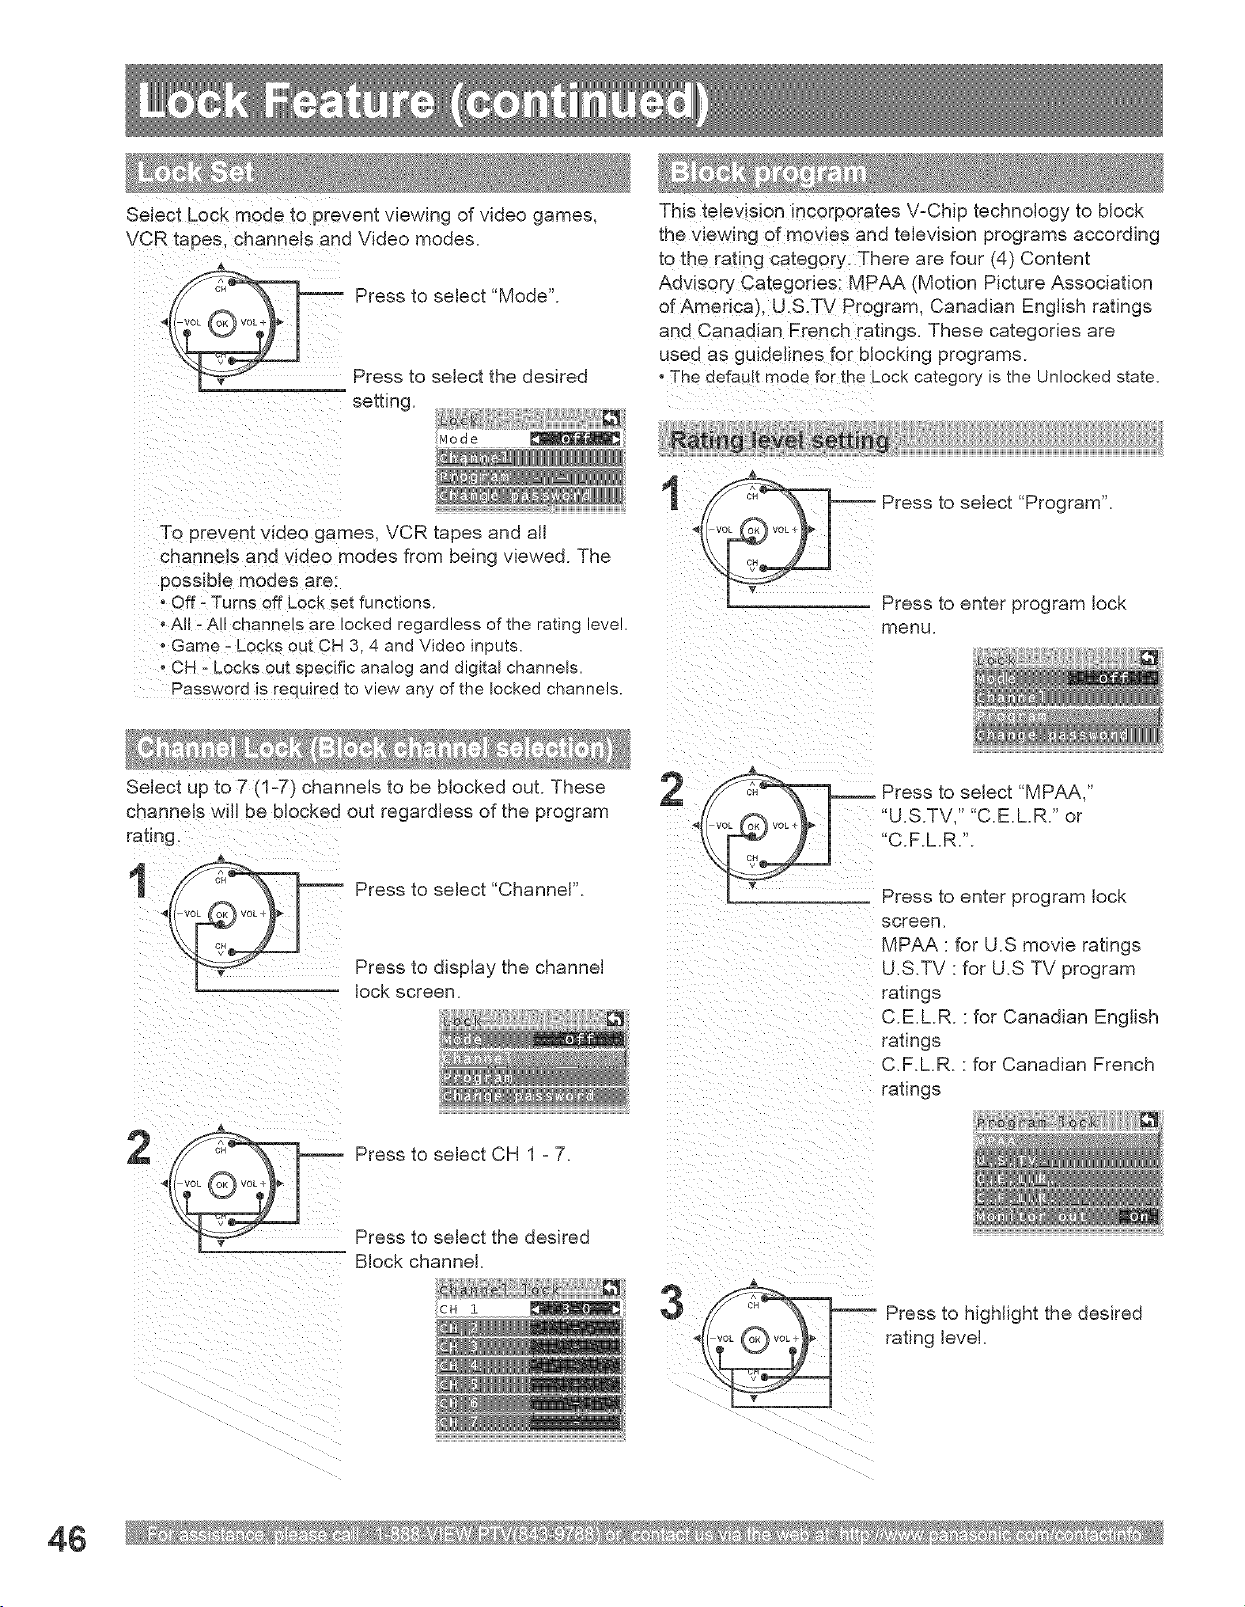
Select Lock mode to prevent viewing of video games,
VCR tapes ,channels and Video modes.
&
Press to select "Mode".
Press to select the desired
setting.
To prevent vide0 games, VCR tapes and aft
channe!S and Yideo modes from being viewed. The
possible modes are;
oOff- Turns off Lock set functions.
, All- A!! channels are locked regardless of the rating level.
,Game r Locks out C H 3, 4 and Video inputs.
o CH x Locks out specific analog and digital channels.
Password !s requ!red to view any of the locked channels.
select Up to 7 (1-7) channels to be blocked out. These
This te!evis!on incorporates V-Chip technology to block
the viewing of m0v!es and television programs according
to the rating category There are four (4) Content
Advis0ry Categories; MPAA (Motion Picture Association
of America), U.S TV Pr0gram, Canadian English ratings
and Canadian French ratings. These categories are
used as guidelines for blocking programs.
o The defau!t mode for th e Lock category is the Unlocked state.
I i Press to select "Program".
---- Press to enter program lock
menu.
i¸
channels will be blocked
rating.
A
1 ,
out regardless of the program
Press to select "Channel".
Press to display the channel
lock screen.
Press to select CH 1 - 7.
Press to select the desired
Block channel.
3
Press to select "MPAA,"
"U.S.TV," "C.E.LR." or
"C.F.LR.".
Press to enter program lock
screen.
MPAA : for U.S movie ratings
U.S.TV : for U.S TV program
ratings
C.E.L.R. : for Canadian English
ratings
C.F.LR. : for Canadian French
ratings
Press to highlight the desired
rating level.
46
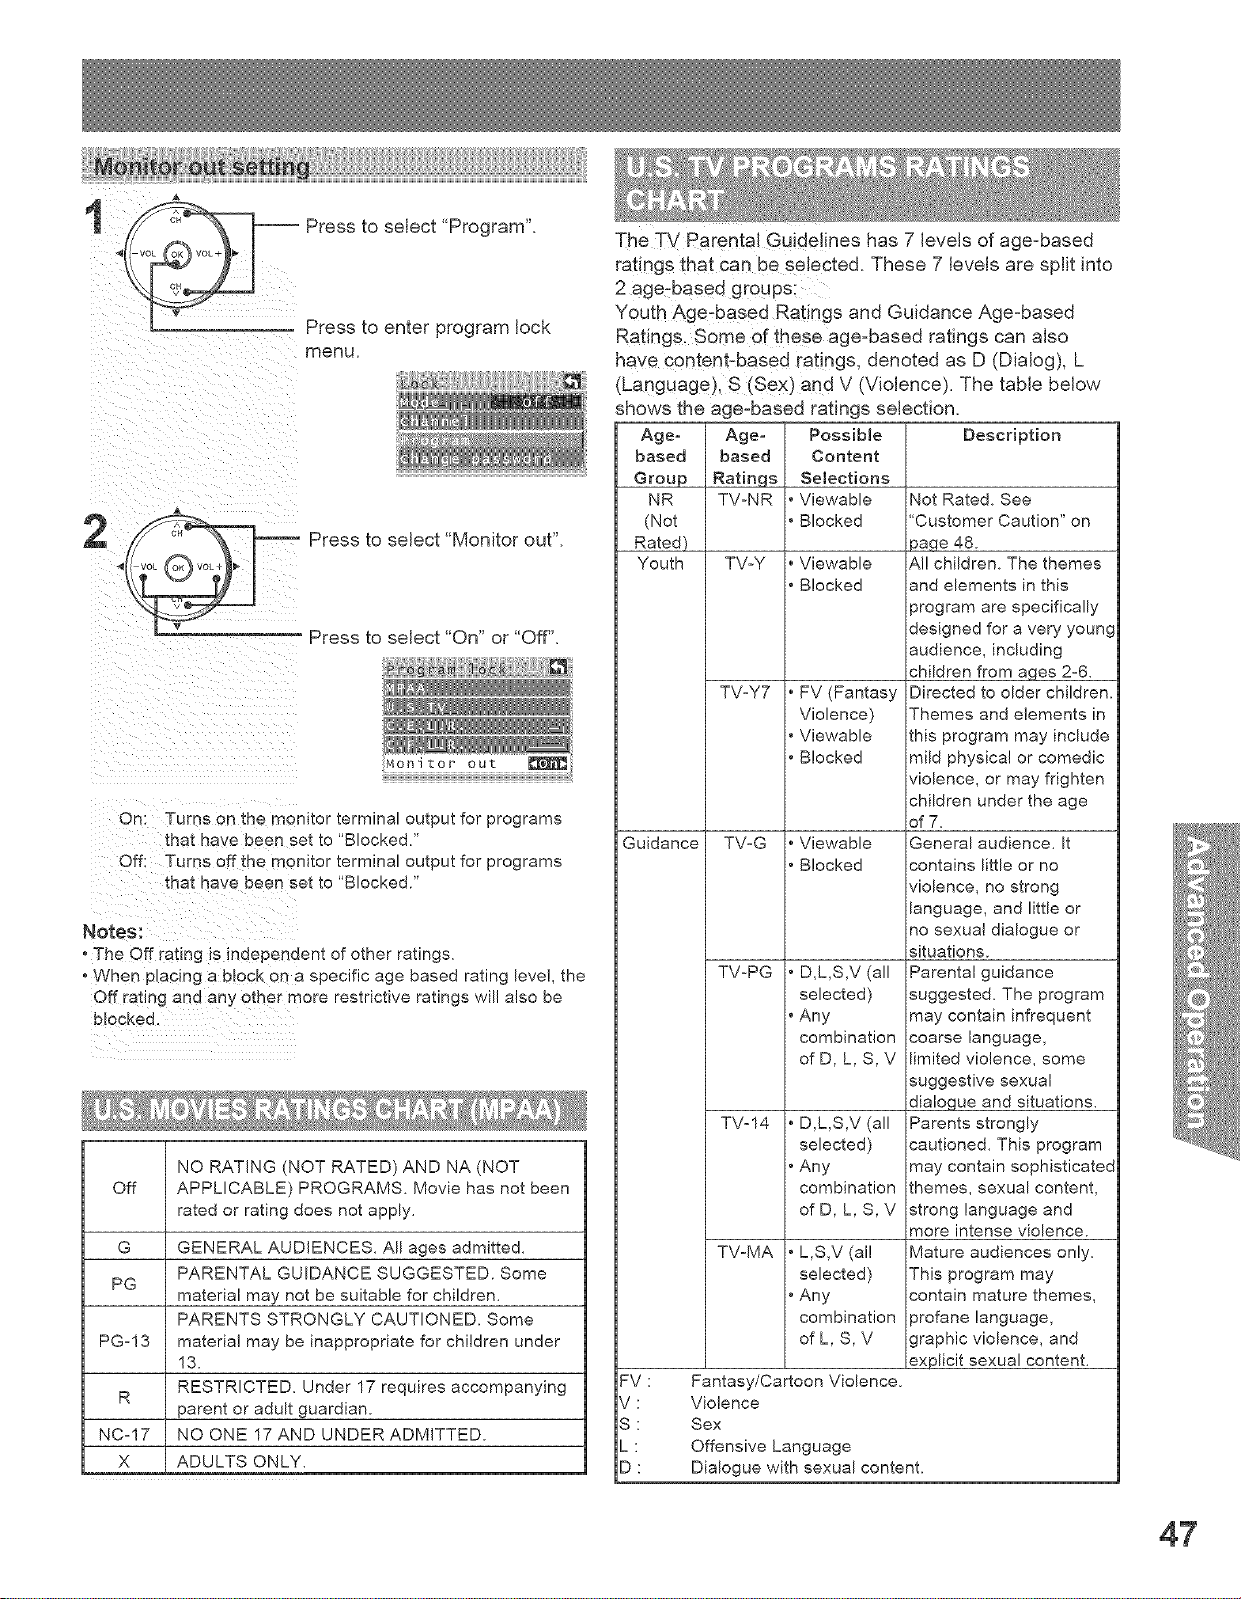
Press to select "Program".
_ Press to enter program Jock
menu,
Press to select "Monitor out".
Press to seJect "On" or "Off".
On: Turns on tne momtor terminal output for programs
that have Deer set to "Blocked."
Off: Turns off tne monitor terminal output for programs
that nave been set to "Blocked."
Notes:
The Off rating _s independent of other ratings.
When placing a b_ock on a specific age based rating level, the
Off rating ann any otner more restrictive ratings will also be
blocKea
NO RATING (NOT RATED) AND NA (NOT
Off APPLICABLE) PROGRAMS. Movie has not been
rated or rating does not apply.
G GENERAL AUDIENCES. All ages admitted.
PARENTAL GUIDANCE SUGGESTED. Some
PG
material may not be suitable for children.
PARENTS STRONGLY CAUTIONED. Some
PG-13 material may be inappropriate for children under
13.
RESTRICTED. Under 17 requires accompanying
R
parent or adult guardian.
NC-17 NO ONE 17 AND UNDER ADMITTED.
X ADULTS ONLY.
The TV ParentaJ Guidelines has 7 leveJs of age-based
ratings that can be selected. These 7 levels are split into
2 age:based groups;
Youth Age-based Ratings and Guidance Age-based
Rating& Some of thes e age-based ratings can also
have content-based ratings, denoted as D (DiaJog), L
(Language), S (Sex)and V (VioJence). The table below
shows the age-based ratings selection.
Age-
based
Group
NR
(Not
Rated_
Youth
Guidance
Age- Possible
based Content
Ratings Selections
TV-NR Viewable
Blocked
TV-Y Viewable
Blocked
TV-Y7 FV (Fantasy
Violence)
Viewable
B!ocked
TV-G Viewable
B!ocked
TV-PG D,L,S,V (all
selected)
Any
combination
of D, L, S,V
TV-14 D,L,S,V (all
selected)
Any
combination
of D, L, S,V
TV-MA L,S,V (al!
selected)
Any
combination
of L, S,V
Description
Not Rated. See
'Customer Caution" OR
)aqe 48.
Al! children. The themes
and elements in this
program are specifically
designed for a very young
audience, including
children from ages 2-6.
Directed to older children.
Themes and elements in
this program may include
mild physical or comedic
violence, or may frighten
children under the age
of 7.
General audience. It
contains little or no
violence, no strong
language, and little or
no sexual dialogue or
situations.
Parental guidance
suggested. The program
may contain infrequent
coarse language,
limited violence, some
suggestive sexual
dialogue and situations.
Parents strongly
cautioned. This program
may contain sophisticated
themes, sexual content,
strong language and
more intense violence.
Mature audiences only.
This program may
contain mature themes,
)rofane language,
graphic violence, and
explicit sexual content.
FV : Fantasy/Cartoon Violence.
V : Violence
S : Sex
L : Offensive Language
D : Dialogue with sexual content.
47
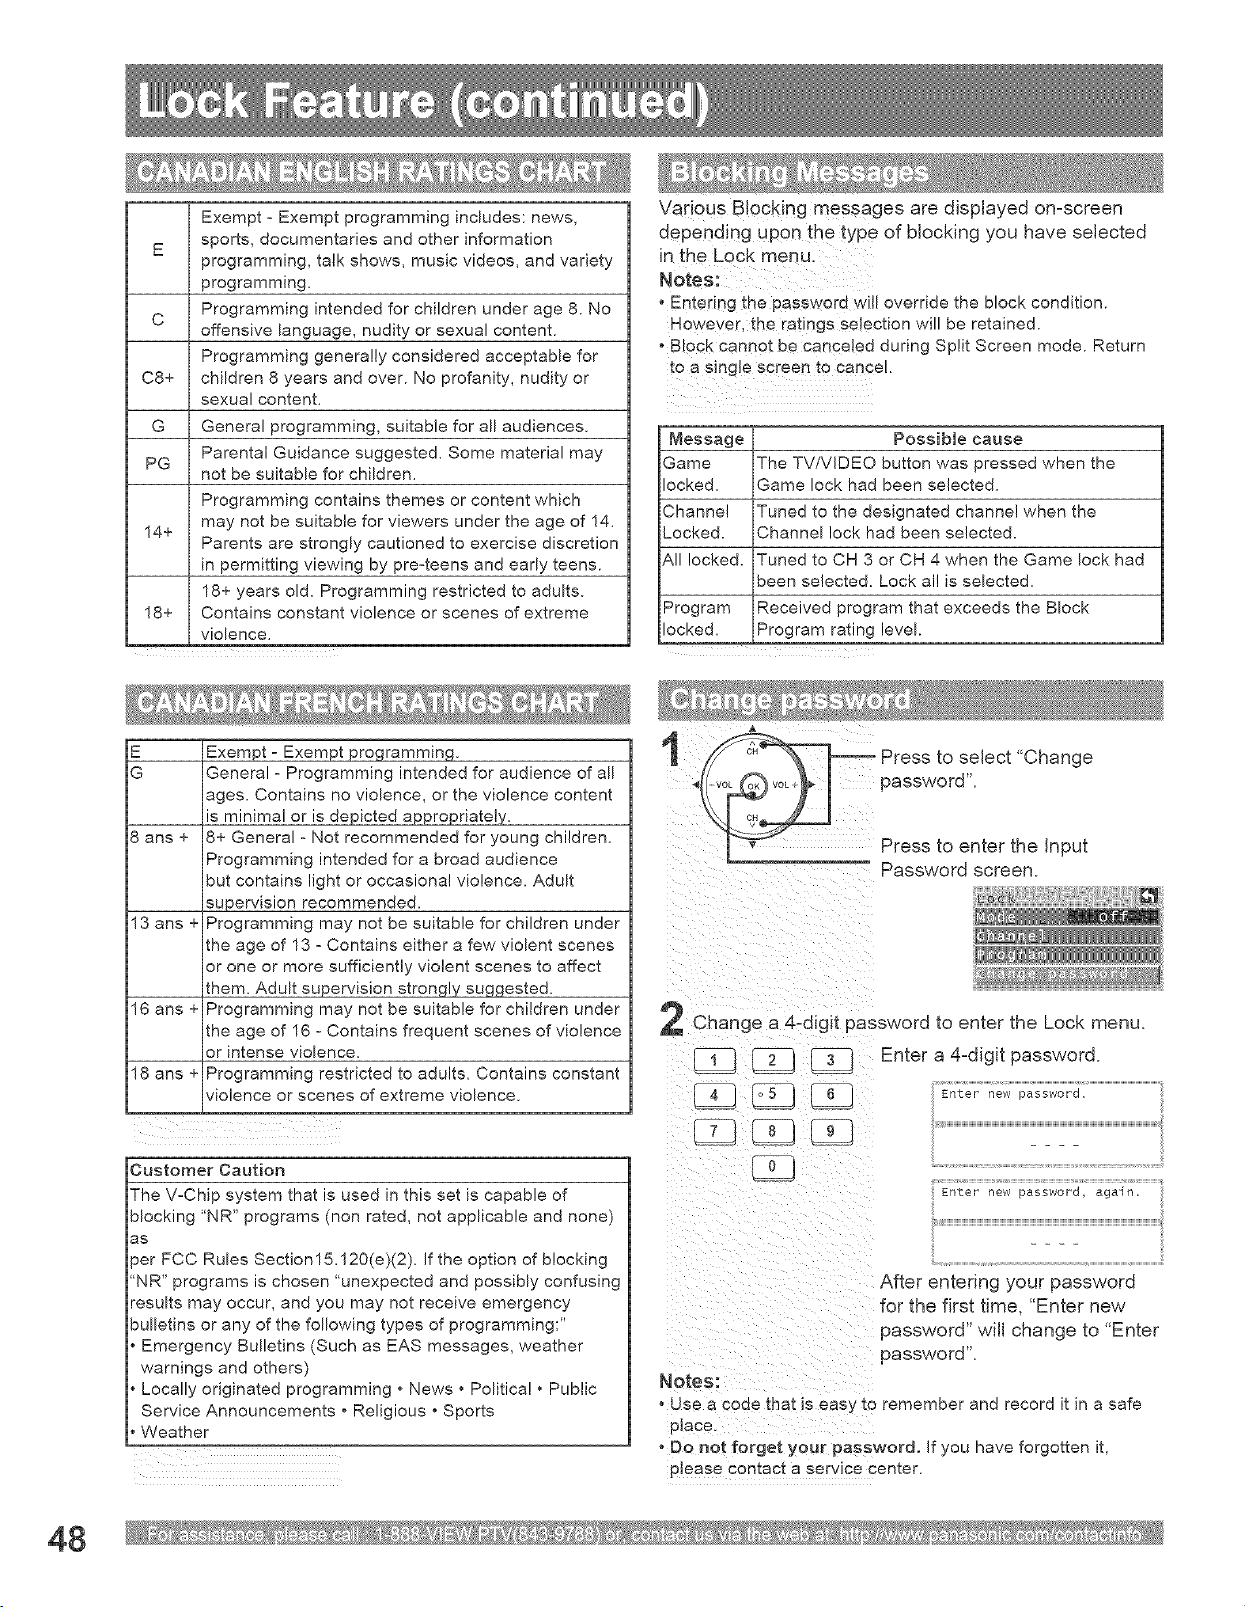
Exempt _ Exempt programming includes: news,
sports, documentaries and other information
programming, talk shows, music videos, and variety
programming.
C Programming intended for children under age 8. No
offensive language, nudity or sexual content.
Programming generally considered acceptable for
C8+ children 8 years and over. No profanity, nudity or
sexual content.
G General programming, suitable for all audiences.
Parental Guidance suggested. Some material may
PG
not be suitable for children.
Programming contains themes or content which
14+ may not be suitable for viewers under the age of 14.
Parents are strongly cautioned to exercise discretion
in permitting viewing by pre4eens and early teens.
18+ years old. Programming restricted to adults.
18+ Contains constant violence or scenes of extreme
violence.
Various Blocking messages are displayed onzscreen
depending upon the type of blocking you have selected
in the Lock menu.
°Entering the password will override the block condition.
However, the ratings se!ection will be retained.
o Block cannot be canceled during Split Screen mode. Return
to a single screen to cancel.
Message Possible cause
Game The TV/ViDEO button was pressed when the
locked. Game lock had been selected.
Channel Tuned to the designated channe! when the
Locked. Channel lock had been selected.
All locked. Tuned to CH 3 or CH 4 when the Game lock had
been selected. Lock al! is selected.
Program Received program that exceeds the Block
locked. Program rating level.
8 arts +
13 ans+
16 ans+
18 ans+
Exempt o Exempt programming.
General o Programming intended for audience of all
ages. Contains no violence, or the violence content
is minimal or is depicted appropriately.
8+ General o Not recommended for young children.
Programming intended for a broad audience
but contains light or occasional violence. Adult
supervision recommended.
Programming may not be suitable for children under
the age of 13 o Contains either a few violent scenes
or one or more sufficiently violent scenes to affect
them. Adult supervision strongly suggested.
Programming may not be suitable for children under
the age of 16 o Contains frequent scenes of violence
or intense violence.
Programming restricted to adults. Contains constant
violence or scenes of extreme violence.
Customer Caution
The VoChip system that is used in this set is capable of
blocking 'NR" programs (non rated, not applicable and none)
as
per FCC Rubs Section15.120(e)(2). if the option of b!ocking
"NR" programs is chosen "unexpected and possibly confusing
results may occur, and you may not receive emergency
bulletins or any of the following types of programming:"
Emergency Bulletins (Such as EAS messages, weather
warnings and others)
Locally originated programming _ News • Politica! • Public
Service Announcements _ Religious _ Sports
• Weather
Press to select "Change
password".
Press to enter the Input
Passwordscreen
2 change a 4_digit password to enter the Lock menu.
Enter a 4zdigit password.
Enter new password, again,
i
After entering your password
for the first time, "Enter new
password" will change to "Enter
password".
Notes:
o Use a code that is easj _o rememeer and record it in a safe
place.
o Do not forget your password, if you have forgotten it,
please contact a service center.
48
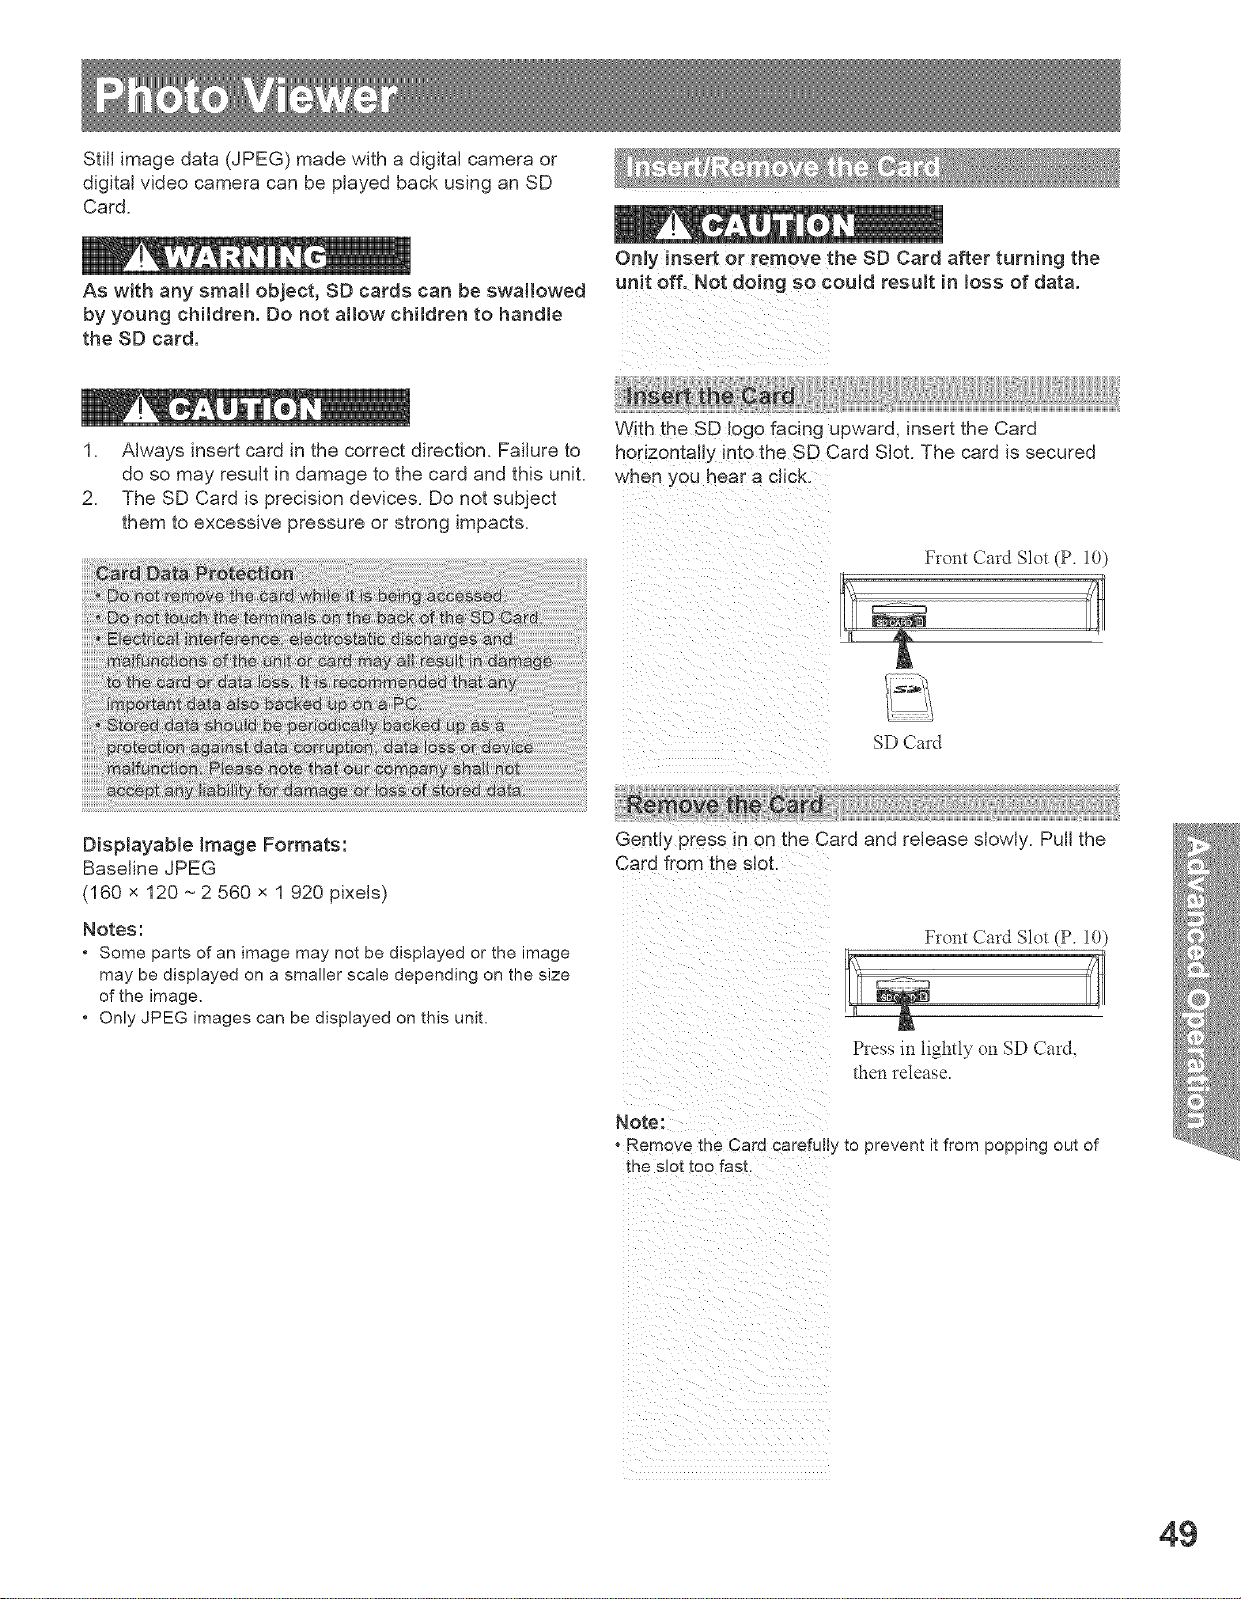
Still image data (JPEG) made with a digitN camera or
digitN video camera can be played back using an SD
Card.
As with any small object, SD cards can be swallowed
by young children. Do not atlow chitdren to handle
the SD card.
Orfly insert or remove the SD Card after turning the
unit off. Not doing so could result in loss of data.
Always
1. insert card in the correct direction. Failure to
do so may result in damage to the card and this unit.
2. The SD Card is precision devices. Do not subject
them to excessive pressure or strong impacts.
DisplayaNe image Formats:
Baseline JPEG
(160 x 120 ~2 560 x 1 920 pixels)
Notes:
• Some parts of an image may not be displayed or the image
may be displayed on a smaller scale depending on the size
of the image.
• Only JPEG images can be displayed on this unit,
With the SD log0 facing upward, insert the Card
horizontally into the SD Card Slot. The card is secured
when you hear a click.
font CardSlot(P.10)
i _ i I
SD CaM
:the Card .....:..... ii
Gently press in on the Card and release slowly. Pull the
Card from the slot.
Front Card Slot (P. 10)
Press in lightly on SD Card,
then release.
Note:
o Remove the Card carefully to prevent it from popping out of
the slot too fast.
49
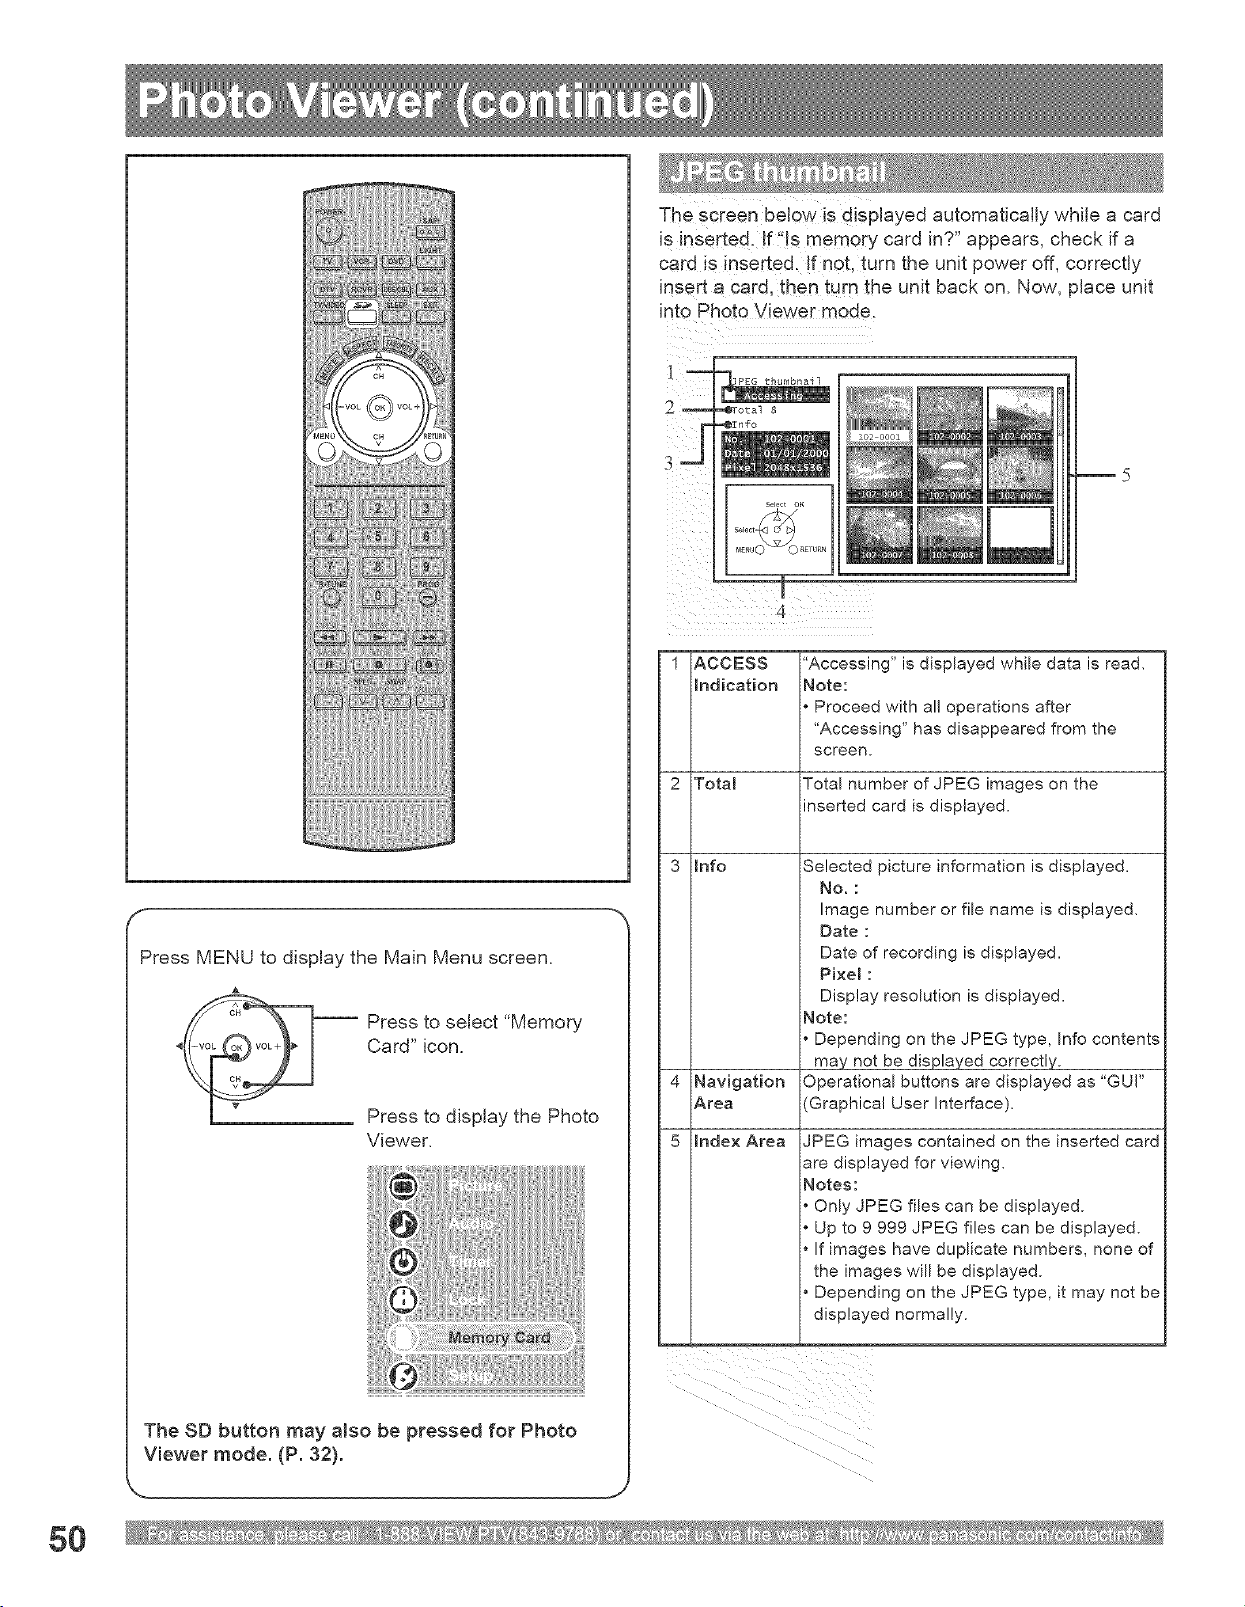
5O
f
Press MENU to display the Main Menu screen.
-- Press to select "Memory
Card" icon.
Press to display the Photo
Viewer.
The SD button may also be pressed for Photo
Viewer mode. (P. 32).
The screen below is displayed automaticaJJy whiJe a card
iS !nserted. !f :tJsmemory card in?" appears, check if a
card is inserted, !f not, turn the unit power off, correctly
insert a card, then tur n _he unit back on. Now, place unit
into Photo Viewer mode.
]PEG thumbnail
1 ACCESS
indication
"Accessing" is displayed while data is read,
Note:
* Proceed with all operations after
'Accessing" has disappeared from the
screen.
4 Navigation
Area
2 Total Total number of JPEG images on the
inserted card is displayed.
3 mnfo Selected picture information is displayed,
No. :
Image number or file name is displayed.
Date :
Date of recording is displayed,
Pixel :
Display resolution is displayed,
Note:
* Depending on the JPEG type, Info contents
may not be displayed correctly.
Operational buttons are displayed as 'GUI"
(Graphical User Interface).
5 Index Area
JPEG images contained on the inserted card
are displayed for viewing,
Notes:
Only JPEG flies can be displayed.
Up to 9 999 JPEG files can be displayed.
If images have duplicate numbers, none of
the images will be displayed.
Depending on the JPEG type, it may not be
displayed normally.
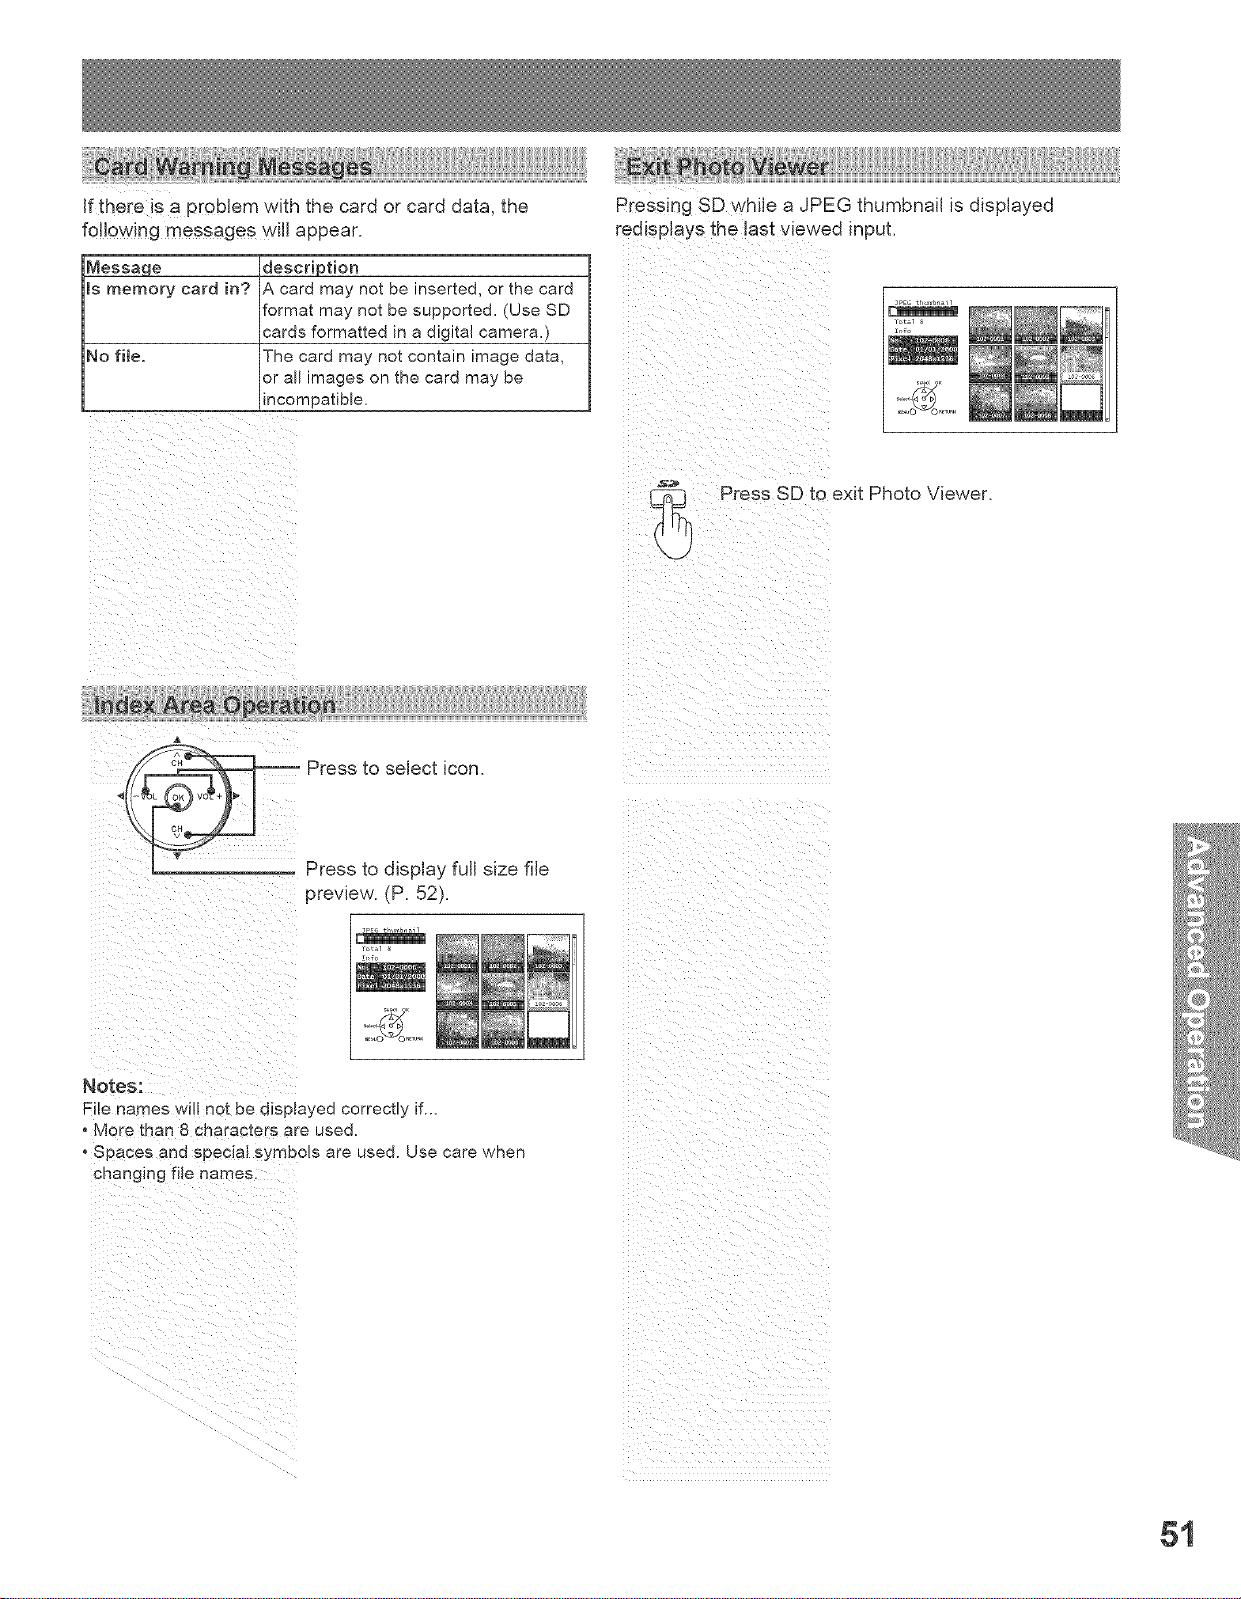
If there is a problem with the card or card data, the
re!lowing messages will appear.
Message description
is memory card in? A card may not be inserted, or the card
format may not be supported, (Use SD
cards formatted in a digital camera,)
No file. The card may not contain image data,
or all images on the card may be
incompatible,
Pressing SD while a JPEG thumbnail is displayed
redisplays the last viewed input.
_PE_thu,,bn_il
Tot_l 6
_ o_
Press SD to exit Photo Viewer.
i i _ _i_ i ii iI
Press to select icon.
Press to display full size file
preview(P S2)
i
_PEG tr ,_, I_na 3
File names will not be displayed correctly if._
More than 8 characters are used.
Spaces and special symbols are used. Use care when
changing file names:
ii ii
i__i_i!_i:!__ii!__i!__i__iiii_i_iiiiii_ii_!_:
51
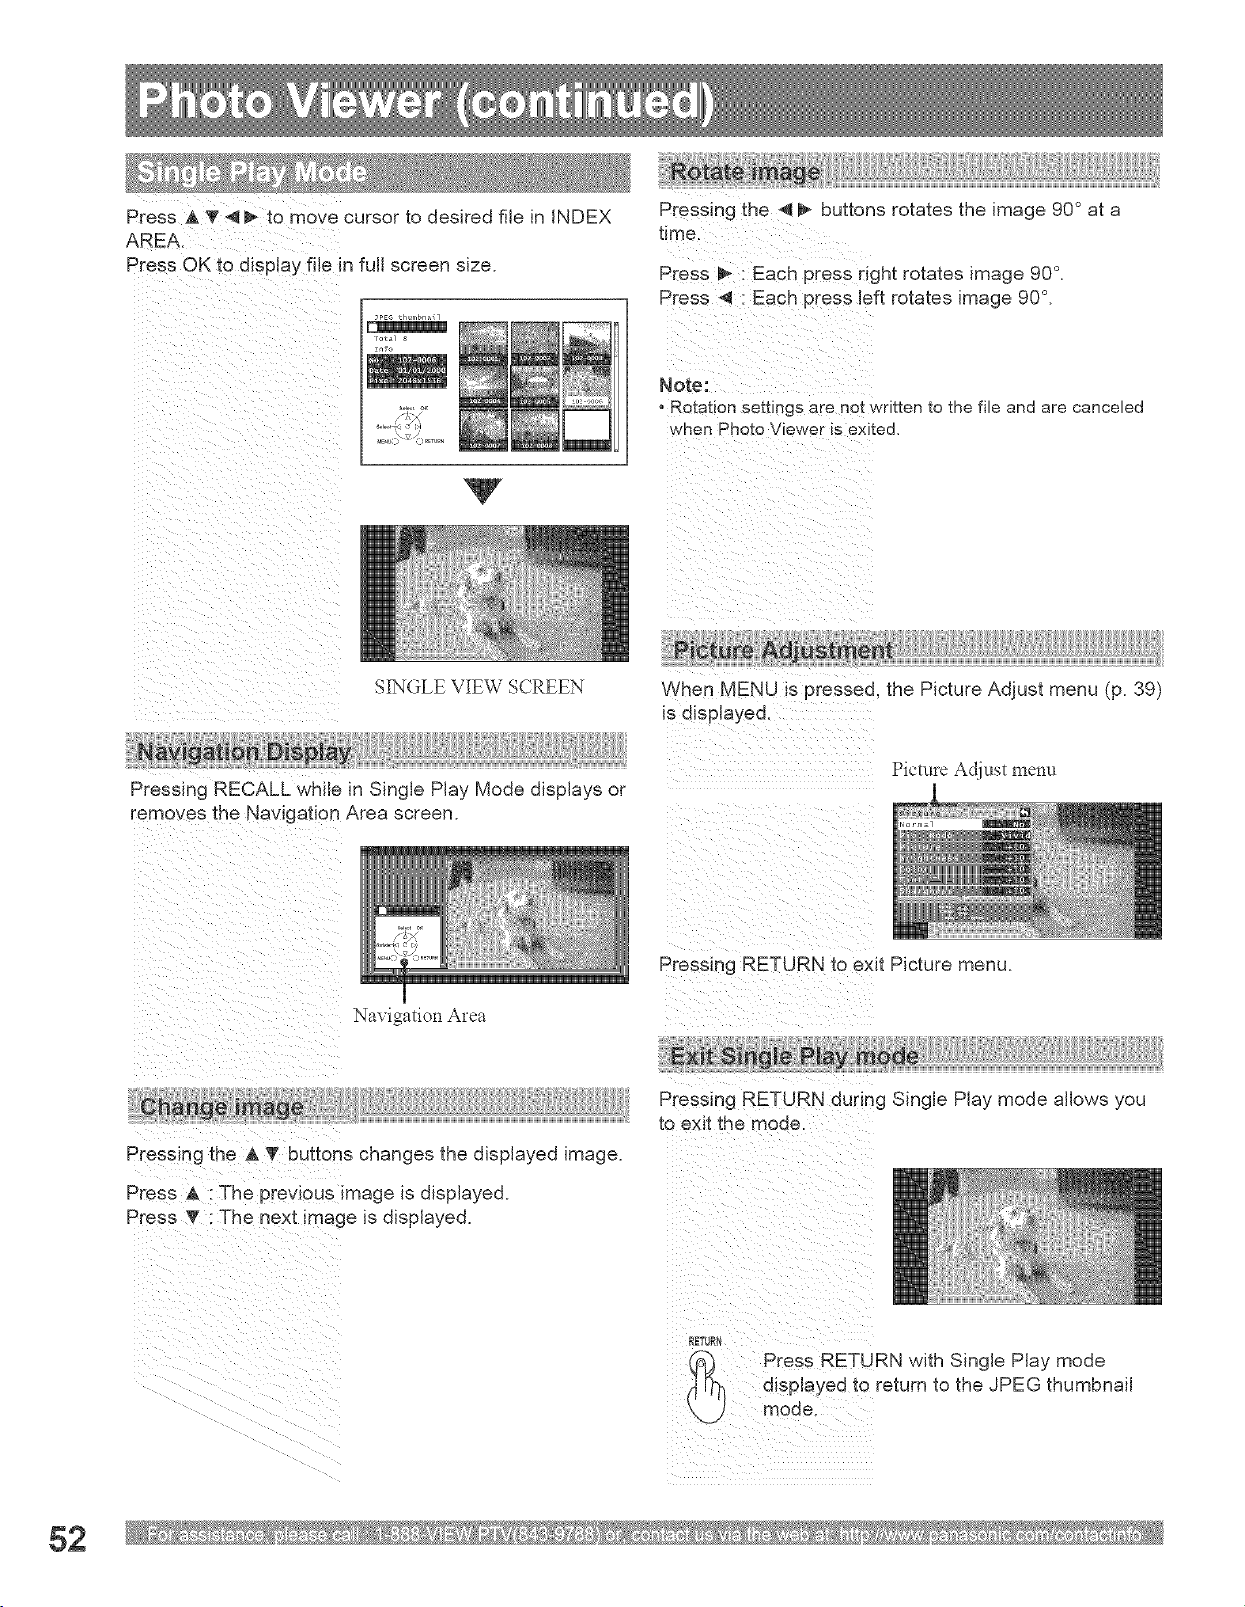
Press A T 4 _ to move cursor to desired file in INDEX
AREA.
Press OK to display file in full screen size.
Pressing the 4 _ buttons rotates the image 90° at a
time.
Press _ : Each Press right rotates image 90°.
Press _ Each pEess left rotates image 90°.
o Rotation settings are net written to the file and are canceled
when Photo Viewer is exited.
V
SINGLE VIEW SCREEN
Pressing RECALL while in Single Play Mode displays or
removes the Navigation Area screen.
When MENU is pressed, the Picture Adjust menu (p. 39)
is displayed.
Pictme Ac[iust 1YtellU
Navigation Area
Pressing RETURN to exit Picture menu.
Pressing the A T buttons changes the displayed image.
Press A : The prewous _mage is displayed.
Press T : The next mage is displayed.
Pressing RETURN during Single Play mode allows you
) Press RETURN with Single Play mode
displayed to return to the JPEG thumbnail
mode.
52
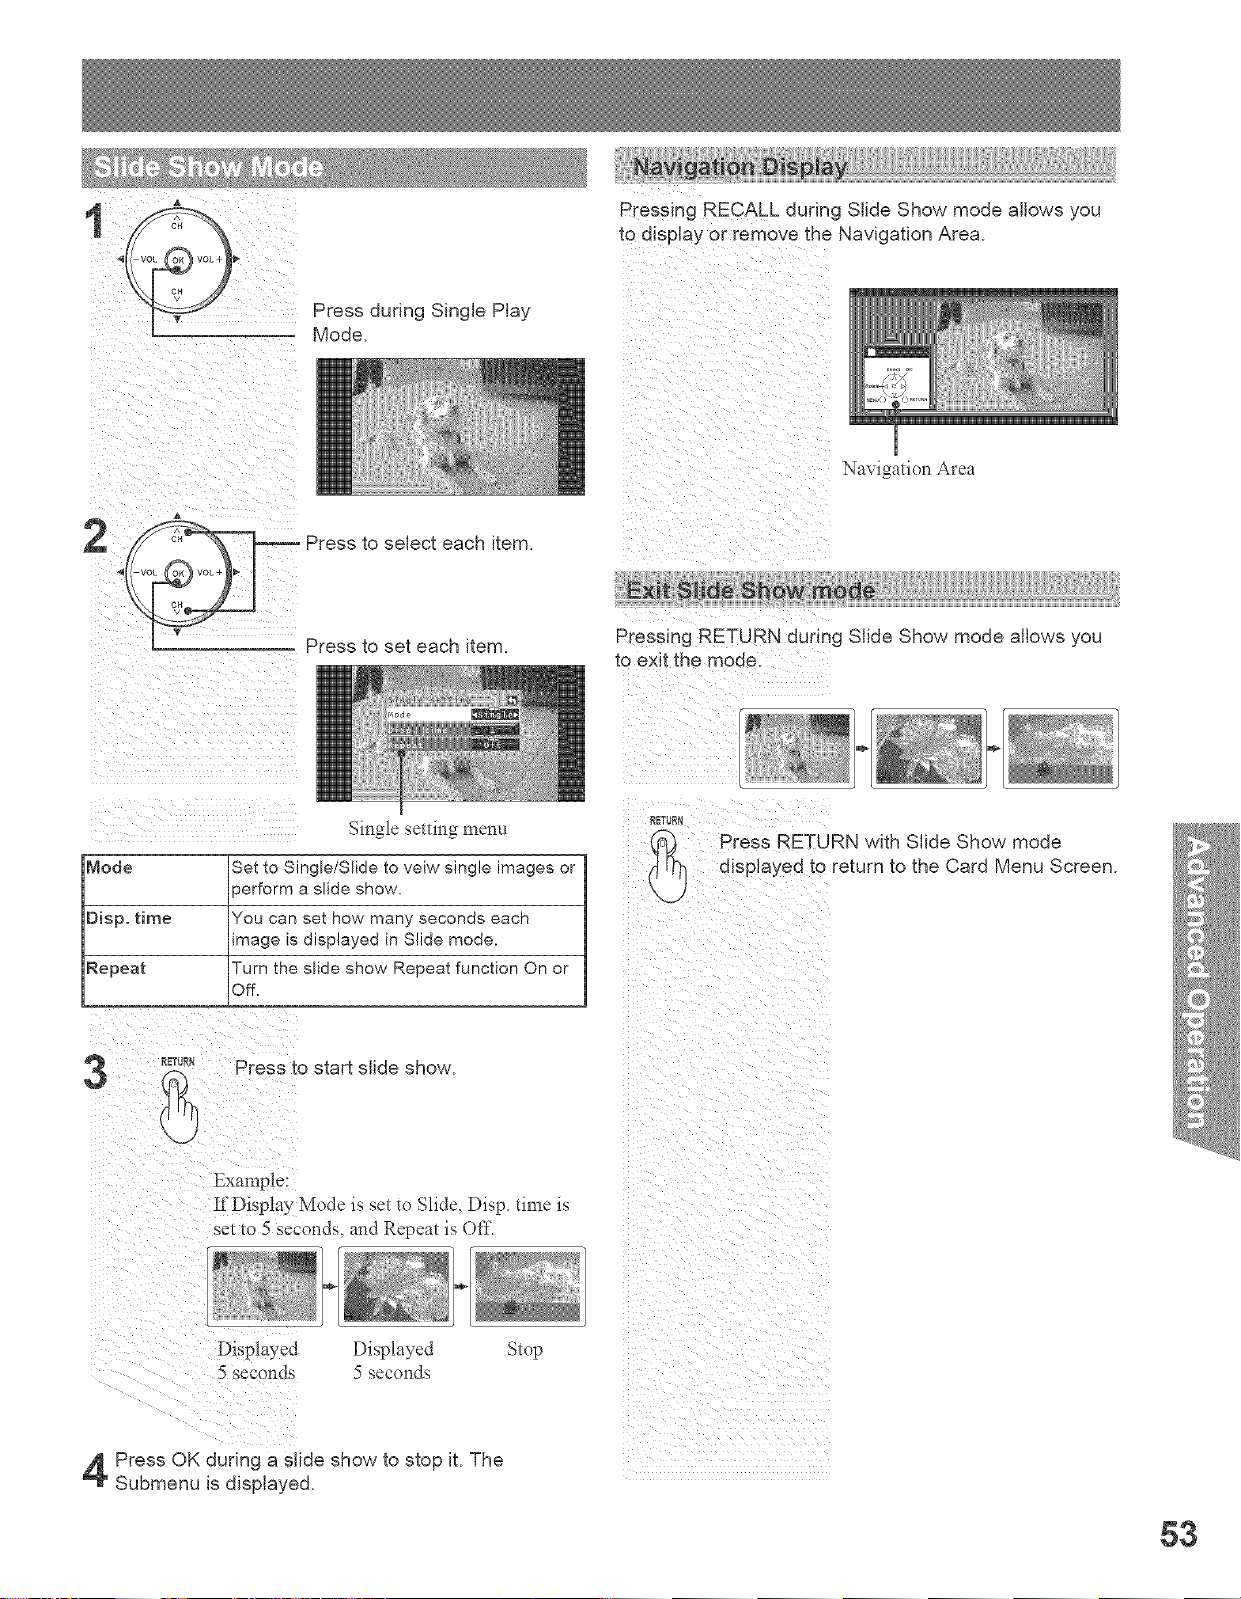
Pressing RECALL during Slide Show mode allows you
to display or remove the Navigation Area.
Navigation Area
Press to select each item.
Press to set each item.
Mode
Disp. time
Repeat
Single setting menu
Set to Single/Slide to veiw single images or
?erform a slide show,
You can set how many seconds each
image is displayed in Slide mode.
Turn the slide show Repeat function On or
Off.
Exit smi_es _:,,
Pressing RETURN during Slide Show mode aJJowsyou
to exit the mode
RETUR_
Press RETURN with Slide Show mode
displayed to return to the Card Menu Screen.
3 °°'°°! Presst°starts"desh°w
Example:
If Display Mode is set to Slide, Disp. time is
set to 5 seconds, and Repeat is Off.
Displayed Stop
5 seconds
Press OK during a slide show to stop it. The
Submenu is displayed.
53
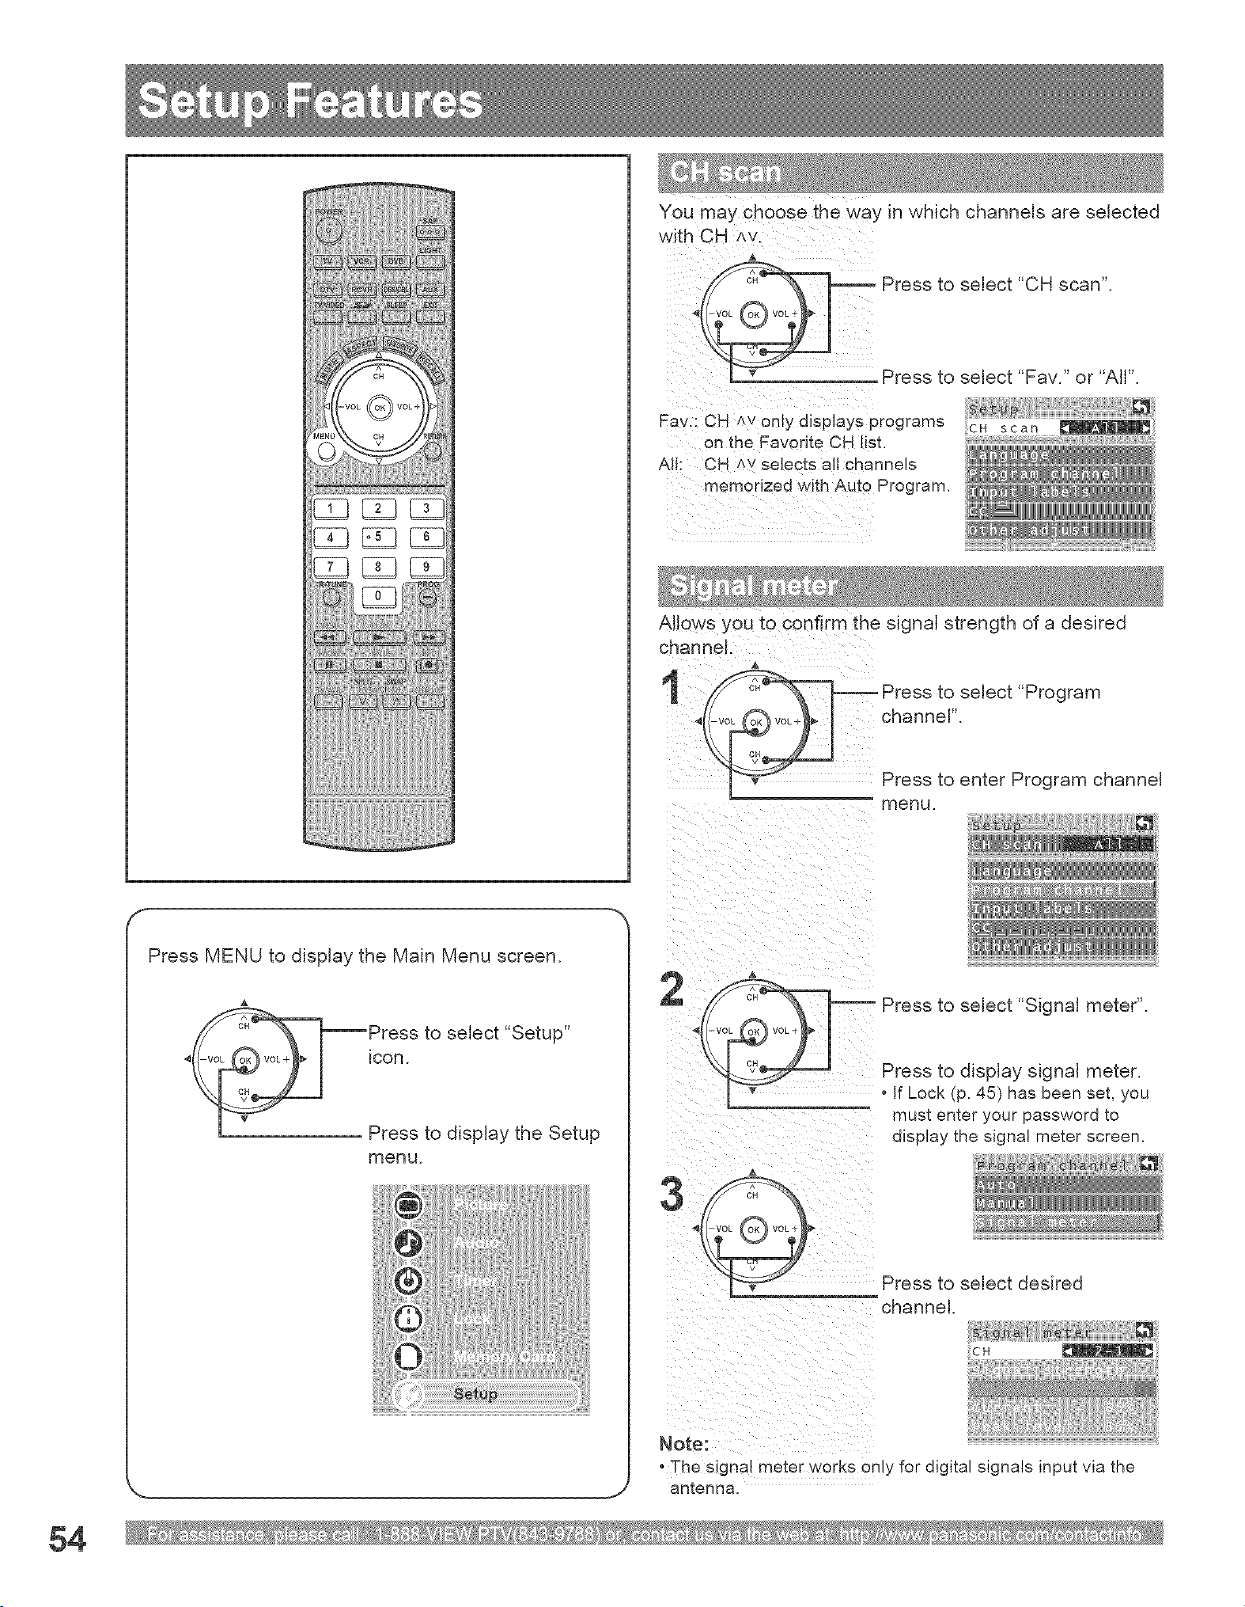
You may choose the Way in which channels are selected
with C
A
Press to select "CH scan".
Press to select "Fav." or "All".
Fav._ C H Av only disp!ays programs
on the Favodt e CH [!St.
A!!_ CH ^v selects a!! channels
memorized with Auto Program,
AHows you to confirm the signal strength of a desired
v Press to enter Program channel
menu
f
Press MENU to display the Main Menu screen.
to select "Setup"
Press to display the Setup
menu.
iiill i i i i i _ii
_,_[°_ i Press to select "Signal meter".<
L_T Presstod splays gnalmeter
• If Lock (p. 45) has been set, you
must enter your password to
display the signal meter screen.
A
to select desired
channel
The signal meter works only for digital signals input via the
antenna.

To label video input connections for omscreen display.
Press to select "Input labels".
Press to enter the subzmenu
field.
2
Press to select the each item.
Press to select the input label.
To skip the input, select 'SKIP".
The input will be skipped when
you press TV/VtDEO.
A
<_ Press to select "Mode".
Press to select the setting.
Off : Recommended mode when
Closed Caption is not being
On : To disp ay Closed Captions.
Mode
oThe closed caption is not displayed when you use HDMI connection.
o The c!0se d caption is not displayed when you use Split Screen
mode.
. If analog connected equipment is used for displaying or recording,
cIosed capti#n {CC) should be set On/Off on the connected
The CC mode setting of the TV w[tt not affect the analog input.
If a digital program is being output in analog format, the CC data wilt
also be output in analog format.
If digital connected equipment is used for input, CC should be set
'!On:i on either the connected equipment or the TV.
If CC is set "On" on both the connected equipment and the TV,
captions from each unit will overlap.
Selectable input labels
SKIP. VCR. DVD. CABLE DBS, PVR, GAME, AUX,
blank mon labelj.
The telewslon includes a builtqn decoder that is capable
or providing a visual display of the audio portion. The
program viewed must provtde Closed Captioning (CC)
for the television to display it.
Press to select "CC".
Press to enter Closed Caption
menu.
Choose the closed caption service of Analog
broadcasting.
a,
select"AnaW
_ Press to
Press to select the setting.
cc1
CC2/CC3/CC4
T1
T2/T3/T4
For video related information that can
be displayed (up to 4 lines of script on
the screen, where it does not disturb the
relevant parts of the picture). Script can
be in any language.
Other modes used for video related
information.
Blanks out a large portion of the picture
on the television screen, and displays
program guide or any other information
currently being transmitted.
Other modes that display information and
blank out a large portion of the picture of
the TV screen.
55
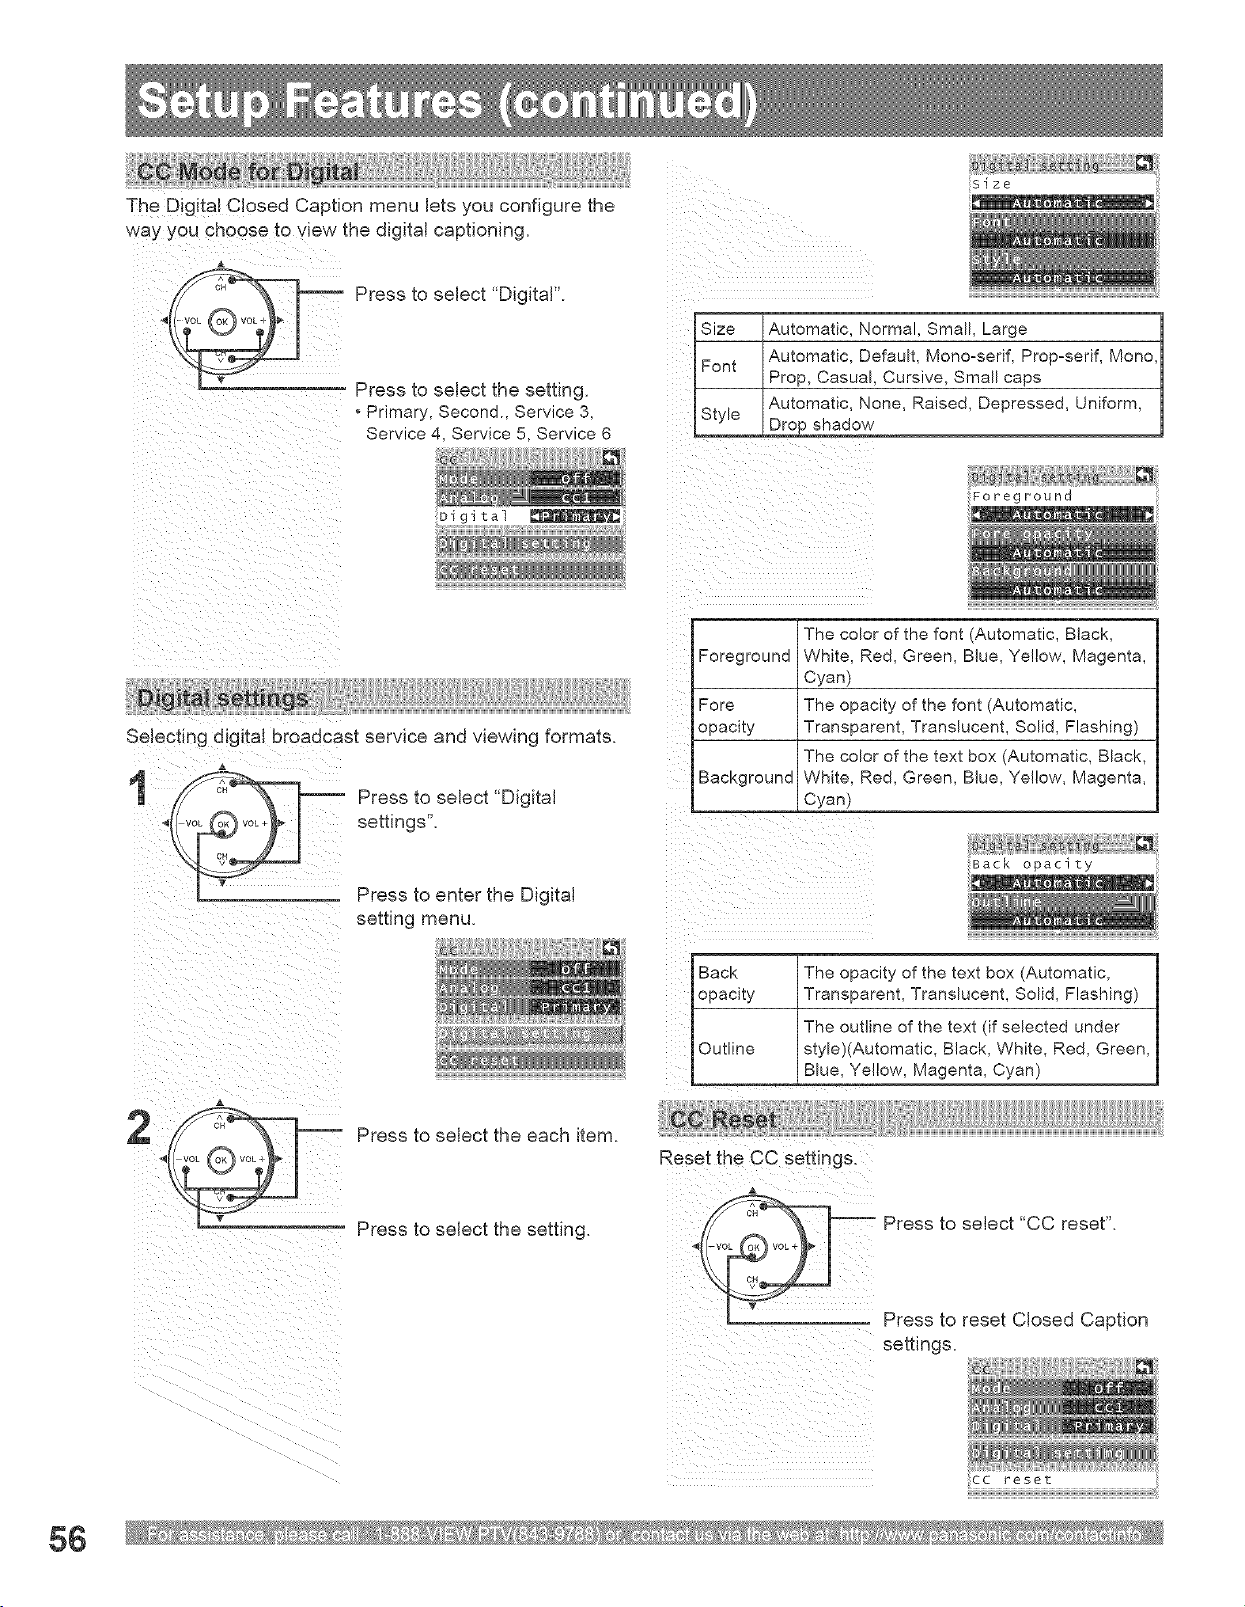
The Digital Closed Caption menu lets you configure the
way you choose to view the digital captioning.
/_! i_ __ii _ i i
Press to select "Digital".
Press to select the setting.
, Primary, Second., Service 3,
Service 4 Service 5, Service 6
sl ze
iiiiiii_
Size
Font
Style
Automatic, Normal, Small, Large
Automatic, Default, Mono-serif, Prop-serif, Mono
Prop, Casual, Cursive, Small caps
Automatic, None, Raised, Depressed, Uniform,
Drop shadow
gital
selecting digital broadcast service and viewing formats.
!k___j settings".Pressto select "Digital
__ __ Press to enter the Digital
setting menu.
Foreground
Foreground
Fore
opacity
Background
The color of the font (Automatic, Black,
White, Red, Green, Blue, Yellow, Magenta,
Cyan)
The opacity of the font (Automatic,
Transparent, Translucent, Solid, Flashing)
The color of the text box (Automatic, Black,
White, Red, Green, Blue, Yellow, Magenta,
Cyan)
;_ iiiiiiiiiiiiiiiiiiiii i
Back The opacity of the text box (Automatic,
opacity Transparent, Translucent, Solid, Flashing)
The outline of the text (if selected under
Outline style)(Automatic, Black, White, Red, Green,
Blue, Yellow, Magenta, Cyan)
Press to select the each item.
Press to select the setting.
i_ Press to select "CC reset".
: Press to reset Closed Caption
settings.
56
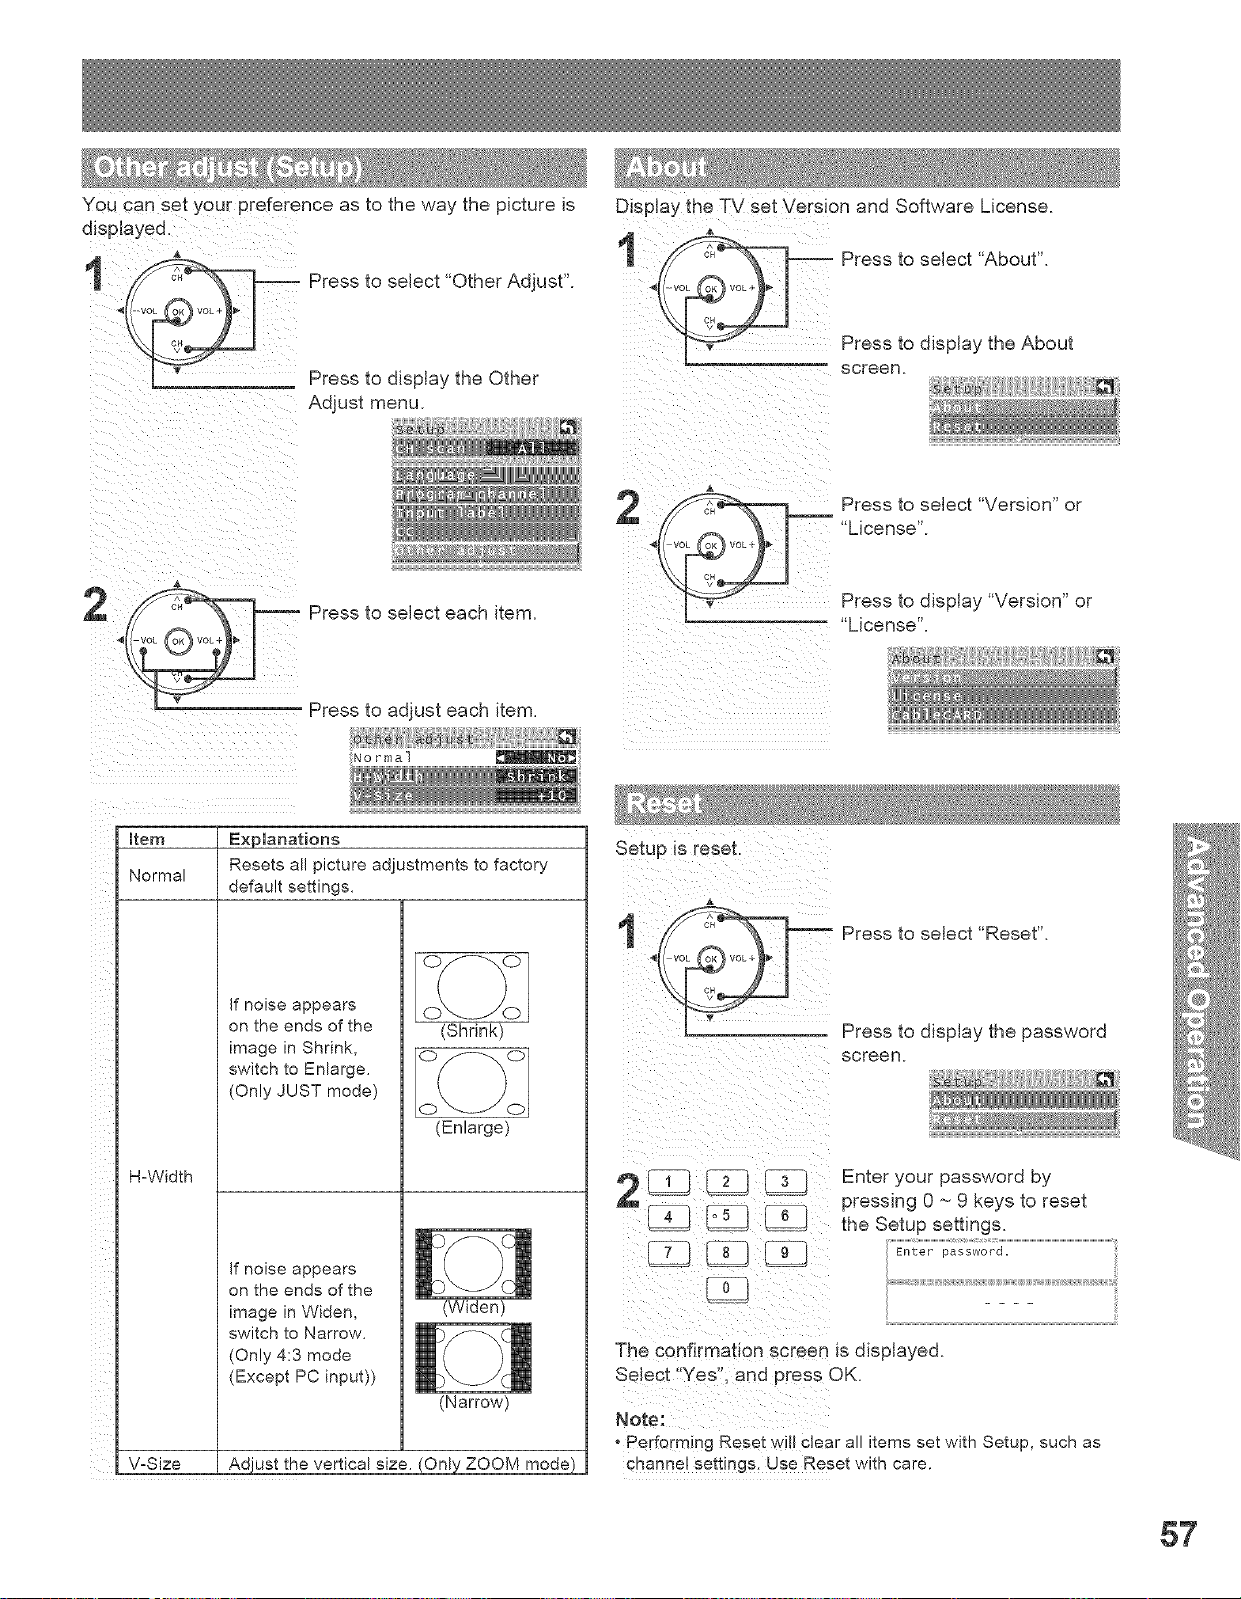
YOUcan set your preference as to the way the picture is
displayed.
Press to select "Other Adjust".
Display the TV set Version and Software License.
Press to select "About".
Press to display the Other
Adjust menu.
Press to display the About
screen.
Press to select "Version" or
"License".
Press to select each item.
Press to adjust each item.
'_o rmal
Press to display "Version" or
"License".
<
P
Item
Normal
H-Width
Explanations
Resets all picture adjustments to factory
default settings,
If noise appears
on the ends of the
image in Shrink,
switch to Enlarge,
(Only JUST mode)
If noise appears
on the ends of the
image in Widen,
switch to Narrow,
(Only 4:3 mode
(Except PC input))
oY>oo
(Shrink)
O >oO
(Enlarge)
(Widen)
(Narrow)
V-Size Adjust the vertical size, (Only ZOOM mode)
Setup _sreset.
Press to select "Reset".
Press to display the password
screen.
Enter your password by
pressing 0 ~ 9 keys to reset
the Setup settings.
Enter password.
The confirmabon screen _sdisplayed.
Select "Yes". and press OK.
Note:
, Perform ng Reset wi!l c_ear al items set with Setup, such as
channel settings. Use Reset with care.
57
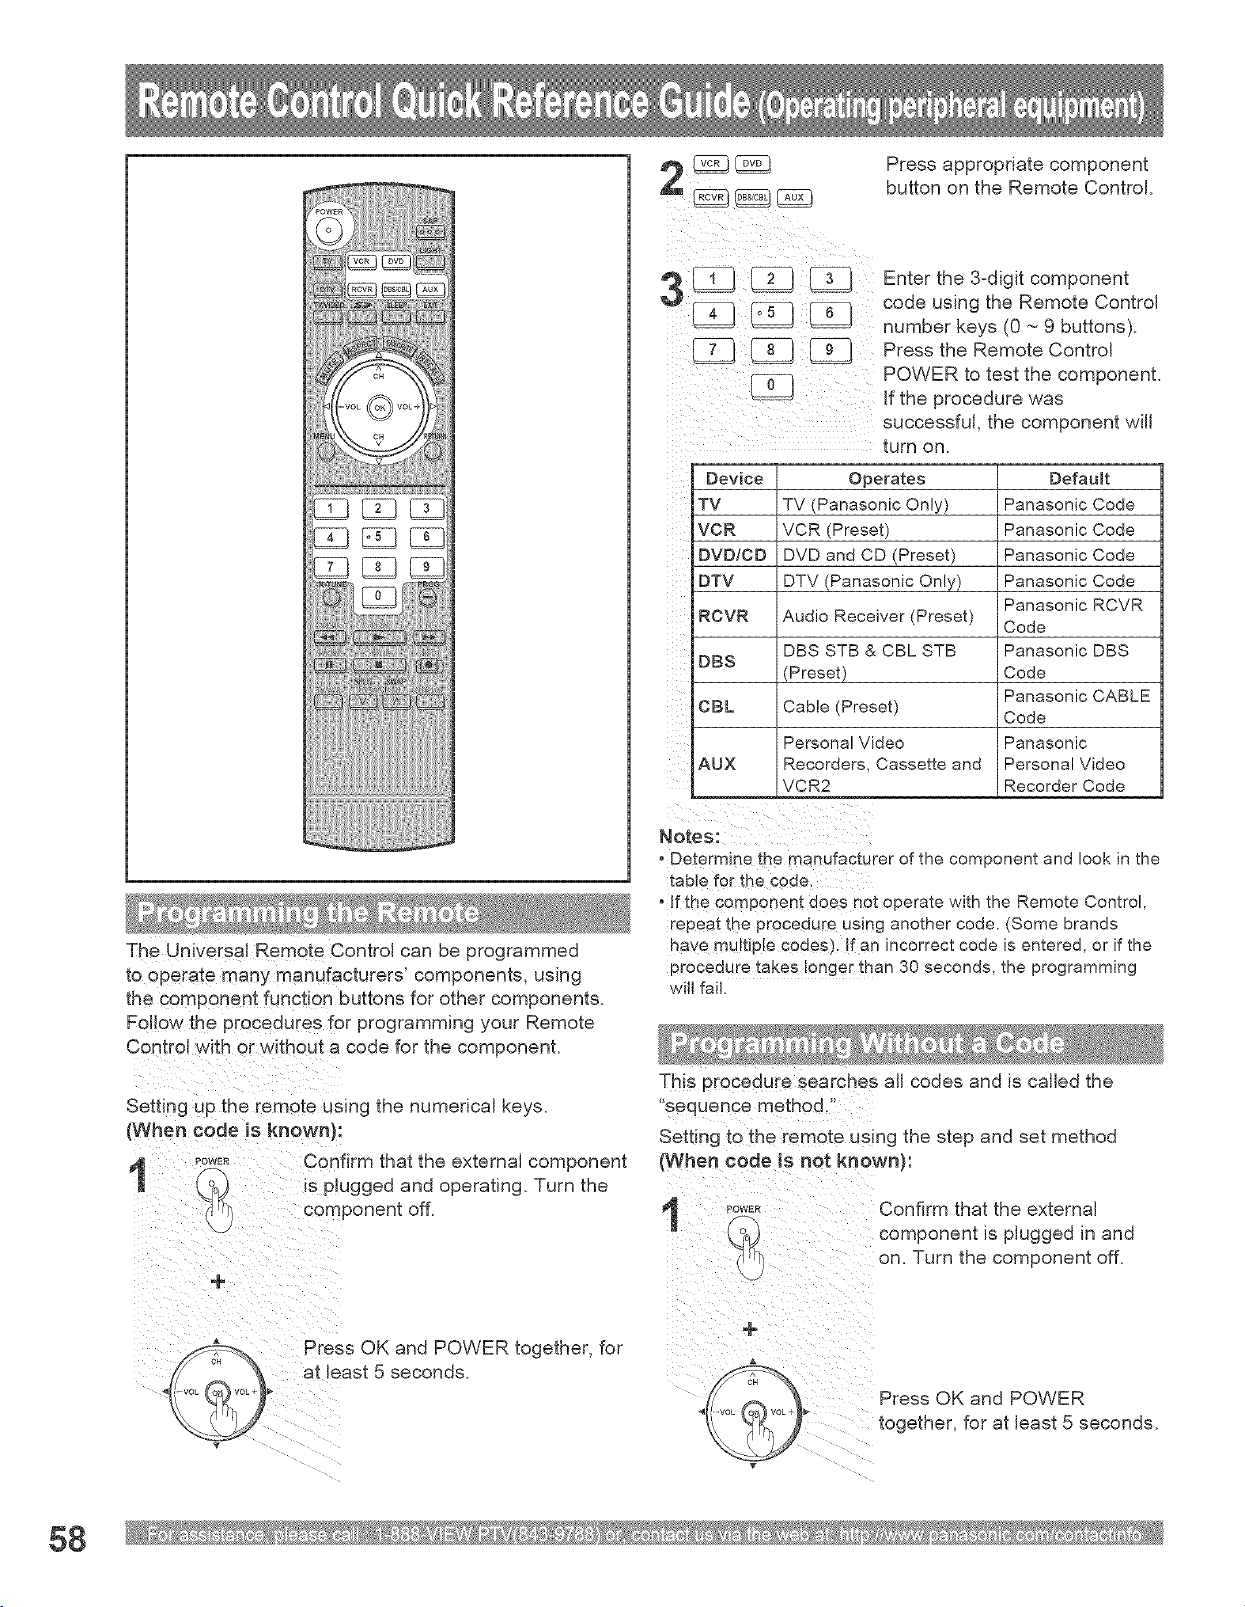
The Universal Remote Control can be programmed
to operate many manufacturers' components, using
the component function buttons for other components.
FeNow the procedures for programming your Remote
Contro with or without a code for the component.
Setting UPthe remote using the numerical keys.
(When code is known):
Po_E_ Confirm that the external component
) is pJugged and operating. Turn the
Press appropriate component
button on the Remote Control.
Enter the 3=digit component
code using the Remote Control
number keys (0 ~ 9 buttons).
PresstheRemoteContro
POWER to test the component.
[3 If the procedure was
successful, the component will
turn on.
Operates
TV (Panasonic Only)
VCR (Preset)
DVD and CD (Preset)
DTV (Panasonic Only)
RCVR Audio Receiver (Preset)
DBS STB & CBL STB
DBS
(Preset)
CBL Cable (Preset)
Personal Video
AUX Recorders, Cassette and
VCR2
Device
TV
VCR
DVD/CD
DTV
Defaumt
Panasonic Code
Panasonic Code
Panasonic Code
Panasonic Code
Panasonic RCVR
Code
Panasonic DBS
Code
Panasonic CABLE
Code
Panasonic
Personal Video
Recorder Code
Notes:
o Determine the manufacturer of the component and look in the
table for the coue
o If the component aces not operate with the Remote Control,
repeat the procedure using another code. (Some brands
have muEiple codes). If an incorrect code is entered, or if the
proceaure takes longer man 30 seconds, the programming
wil! fail.
This procedure searches aN codes and is caned the
sequence method "
Setting to the remote using the step and set method
(When code is not known):
PowER
"[
Confirm that the external
component is plugged in and
on Turn the component off.
_ Press OK and POWER together, for
_!_y _ _ at !east 5 seconds.
Press OK and POWER
together, for at least 5 seconds.
58
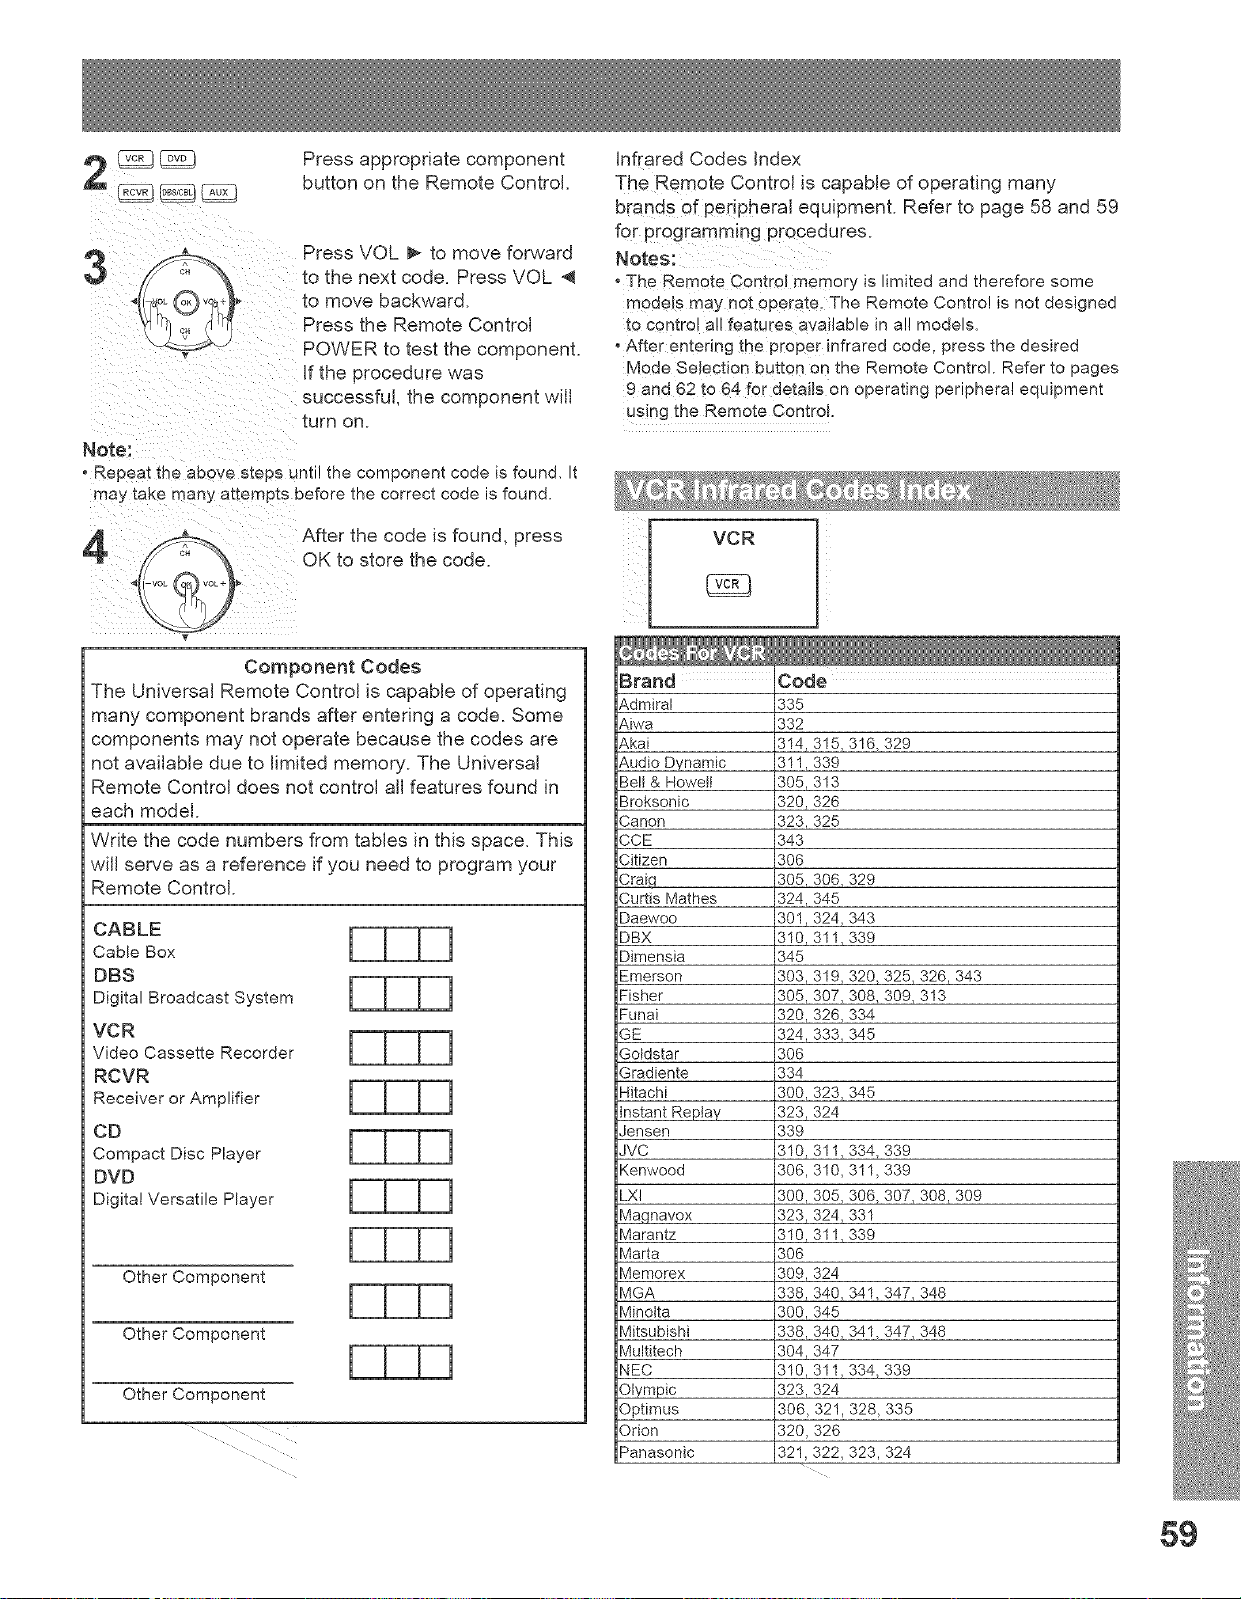
Press appropriate component
button on the Remote Control.
Press VOL _ to move forward
to the next code. Press VOL
to move backward.
Press the Remote Control
POWER to test the component.
f the procedure was
successful, the component will
turn on.
Note:
Repeatme above steps un_ume component code is found. It
may take many a[tempts before the correct code is found.
4
After the code is found, press
OK to store the code.
Component Codes
The Universal Remote Control is capable of operating
many component brands after entering a code. Some
components may not operate because the codes are
not available due to limited memory. The Universal
Remote Control does not control all features found in
each model.
Write the code numbers from tables in this space. This
will serve as a reference if you need to program your
Remote Control
CABLE
Cable Box
BBS
Digital Broadcast System _UUI
VCR
Video Cassette Recorder
ROVR
Receiveror*rap,if,or FUUI
CB
Compact Disc Player
BVB
Digita,Versat,,ePlayer FUUl
Other Component
Other Component
Other Component
FUUl
infrared Codes index
The Remote Control is capable of operating many
brands of peripheral equipment. Refer to page 58 and 59
for programming procedures.
Notes:
oThe Remote Control memory is limited and therefore some
mode!s may not operate. The Remote Control is not designed
to central all features available in al! models,
oAfter entering the proper infrared code, press the desired
Mode Selection button on the Remote Control. Refer to pages
9 and 62 to 64 for details on operating peripheral equipment
using the Remote Control.
[ VCR
Brand Code
Admiral
Aiwa
Akai
Audio Dynamic
Bell & Howell
Broksonic
Canon
CCE
Citizen
Crai,q
Curtis Mathes
Uaewoo
DBX
DJmensia
Emerson
Fisher
Funai
GE
Gotdstar
Gradiente
Hitachi
Instant Repia 7
densen
JVC
Kenwood
LXI
Ma_navox
Marantz
Marta
Memorex
MGA
Minotta
Mitsubishi
Multitech
NEC
Olympic
Optimus
Orion
Panasonic
335
332
314,315, 316,329
311,339
305, 313
320,326
323, 325
343
306
305, 306, 329
324,345
301,324,343
310, 311,339
345
303, 319, 320,325_ 326, 343
305, 307, 308,309, 313
320, 326, 334
324,333, 345
306
334
300, 323, 345
323, 324
339
310, 311,334,339
306, 310, 311,339
300, 305, 306,307,308,309
323, 324,331
310,311,339
306
309, 324
338,340, 341,347,348
300, 345
338, 340, 341,347,348
304,347
310, 311,334,339
323, 324
306,321,328,335
320,326
321,322,323,324
5g
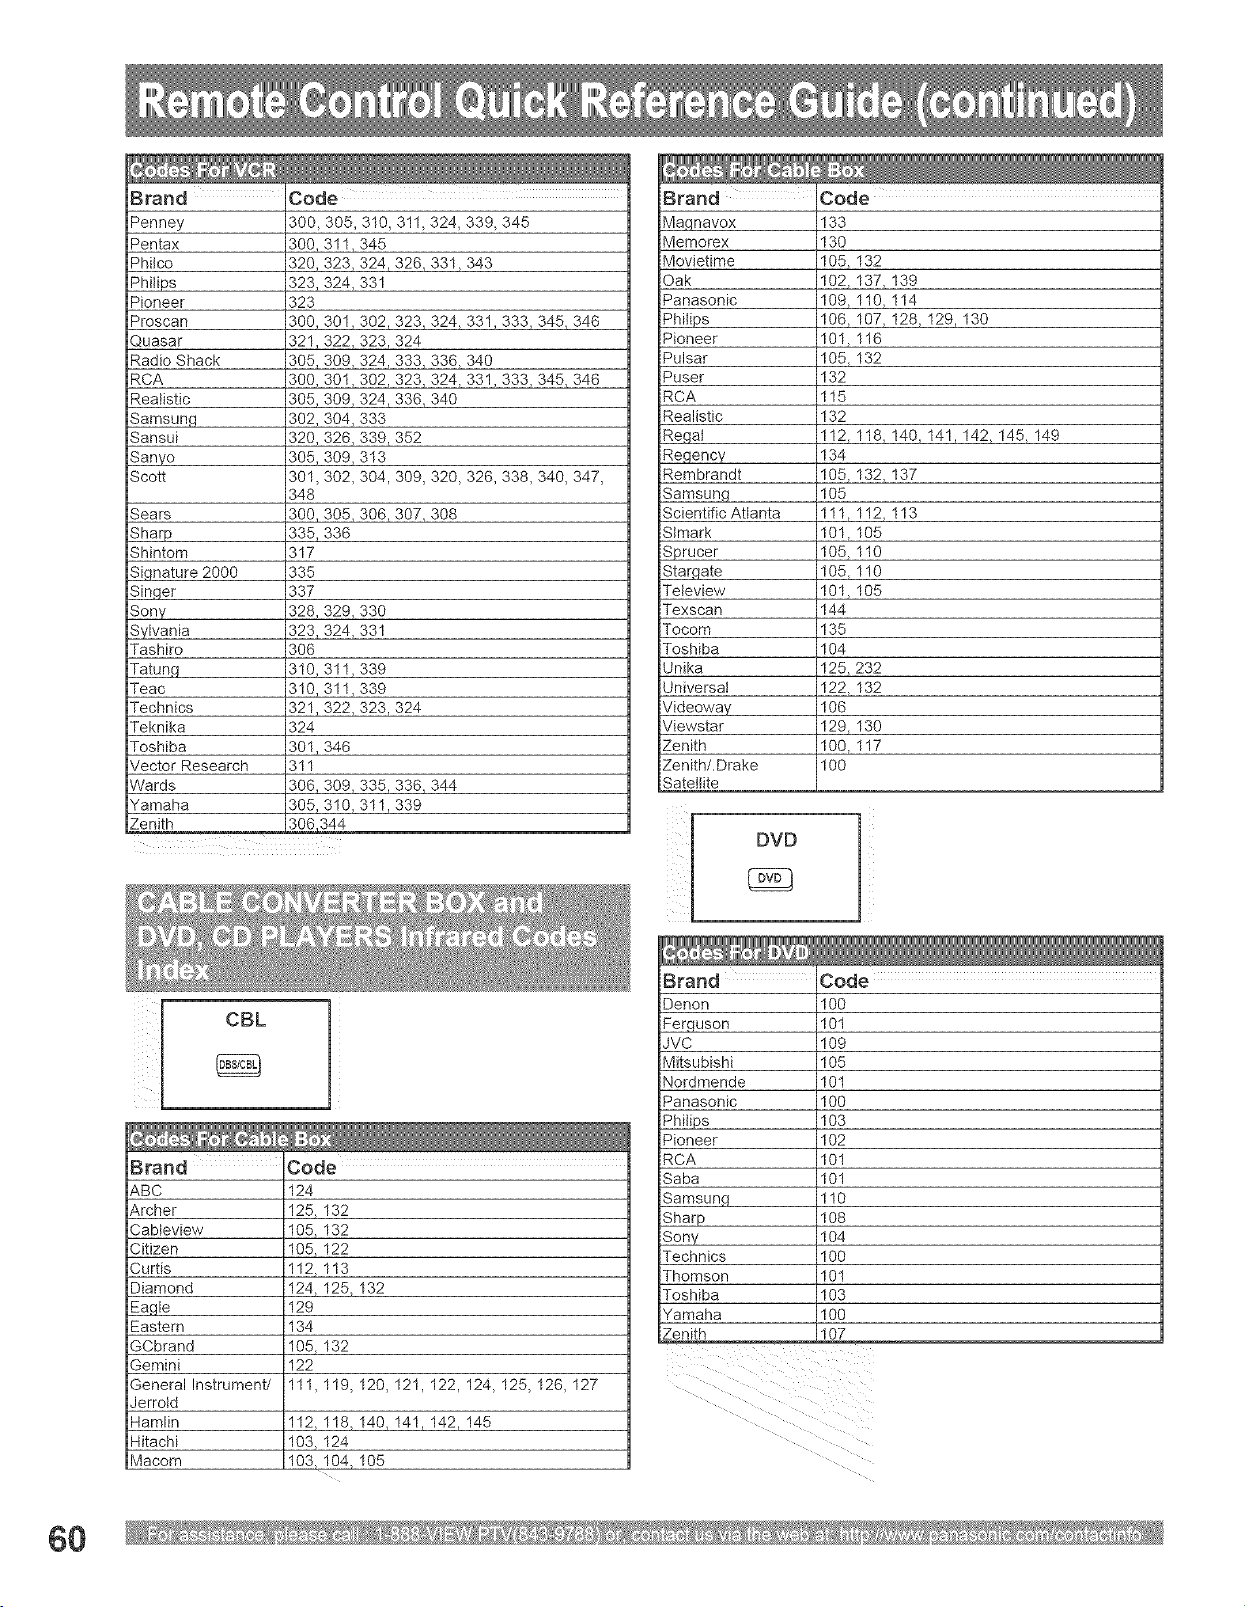
Brand
Penney
Pentax
Phitco
Philips
Pioneer
Proscan
Quasar
Radio Shack
RCA
Realistic
Samsung
Sansui
Sanyo
Scott
302,323,324,331,333,345_346
323,324
324,333,336,340
302,323,324,331,333,345_346
324,336_340
333
339,352
313
304,309,320,326,338,349,347,
Sears
Sharp
Shintom
Signature 2000
Sinqer
Sony
Sylvania
Tashiro
Tatunq
Teac
Technics
Teknika
Toshiba
Vector Research
Wards
Yamaha
Zenith
Code
300,305, 310,311,324,339, 345
300, 311,345
320, 323, 324,326_ 331_ 343
323, 324,331
323
300, 301,
321,322,
305, 309,
300, 301,
305, 399,
302, 304,
320, 326,
305, 309,
391,302,
348
300, 305, 306,307,308
335, 336
317
335
337
328, 329, 330
323, 324,331
396
310, 311,339
310, 311,339
321,322,323,324
324
301,346
311
306, 309, 335,336,344
305, 310, 311,339
306,344
Brand Code
Magnavox
Memorex
Movietime
Oak
Panasonic
Philips
Pioneer
Pulsar
Puser
RCA
Realistic
Regal
Regency
Rembrandt
Samsung
Scientific Atlanta
Stmark
Sprucer
Stargate
Teteview
Texscan
Tocom
Toshiba
Unika
Universal
Videoway
Viewstar
Zenith
Zenith/.Drake
Satellite
133
130
105_132
102_137,139
109_110,114
106_107,128,129,130
101,116
105,132
132
115
132
112,118,140,141,142,145,149
134
105,132,137
105
111,112,113
101,105
105,110
105,110
101,105
144
135
104
125_232
122,132
106
129_130
100,117
100
DVD [
CBL
Brand Code
ABC 124
Archer 125, 132
Cabteview 105, 132
Citizen 105, 122
Curtis 112, 113
Diamond 124, 125, 132
Eagle 129
Eastern 134
GCbrand 105, 132
Gemini 122
General Instrument/ 111,119, 120, 121, 122, 124, 125, 126, 127
Jerrold
Hamlin 112, 118, 140, 141, 142, 145
Hitachi 103, 124
Macom 103, 104, 105
Brand Code
Denon
Ferguson
JVC
Mitsubishi
Nordmende
Panasonic
Philips
Pioneer
RCA
Saba
Samsung
Sharp
Sony
Technics
Thomson
Toshiba
Yamaha
Zenith
100
101
109
105
101
100
103
102
101
101
119
108
104
100
101
103
100
107
6O

Brand Code
Admiral 226
Aiwa 233,235
Carver 229
Denon 242
Emerson 239
Fisher 205
Harman/Kardon 219,220,221,223
2O7
234
240,241,245
223
200,201,211,245
236
229,232
229
221
210
214,215
208,218_220_222
224,225,227
229,230
208
224,225,227
231,237,238,247
210,246
205
210,246
242,243
220
228
244
212,216,218
224,225,227
240,241,245
Yamaha 202,203,204
Hitachi
Jensen
JVC
Kardon
Kenwood
LXI/Sears
Maqnavox
Marantz
Mclntosh
Nakamichi
Onkyo
Optimus
Panasonic
Philips
Pioneer
Quasar
RCA
Sansui
Sanyo
Scott
Sharp
Sherwood
Sony
Soundesign
Teac
Technics
Victor
I Aux
Brand Code
223_224_225
231
203
214
229,230
200,207
202
205
208,209,213
216,218
222
_[wa
Oenon
Fisher
Jensen
JVC
Kenwood
Marantz
Nakamichi
©nkyo
Panasonic
Philips
Brand
Pioneer
RCA
Sansui
Sharp
Sony
Teac
Technics
Yamaha
Code
2o4
226,227,228
205,210
231
219,220
210,211,215
216,218
201,202
Brand Code
Panasonic Replay 100
TV
Phiiips Tivo 102
S£py Tivo 101
RCVR
Brand
Admiral
Aiwa
Denon
Fisher
Garrard
Harman Kardon
denser
JVC
Kenwood
Magnavox
Marantz
Mctntosh
Nakamichi
Onkyo
Optimus
Panasonic
Phitips
Pioneer
Quasar
RCA
Sansui
Sharp
Sony
Soundesign
Teac
Technics
Victor
Yamaha
Code
120
125,126
134,135,136
104
113
115,123
129
132,133
100,108
127
124
116
106
109,114
103,127,130,131
118,119,121
123
105,107
118,119,121
103,105,127,130,131
103,111,139
134,137
122
138
111,112,113
118,119,121
132_133
101,102
61
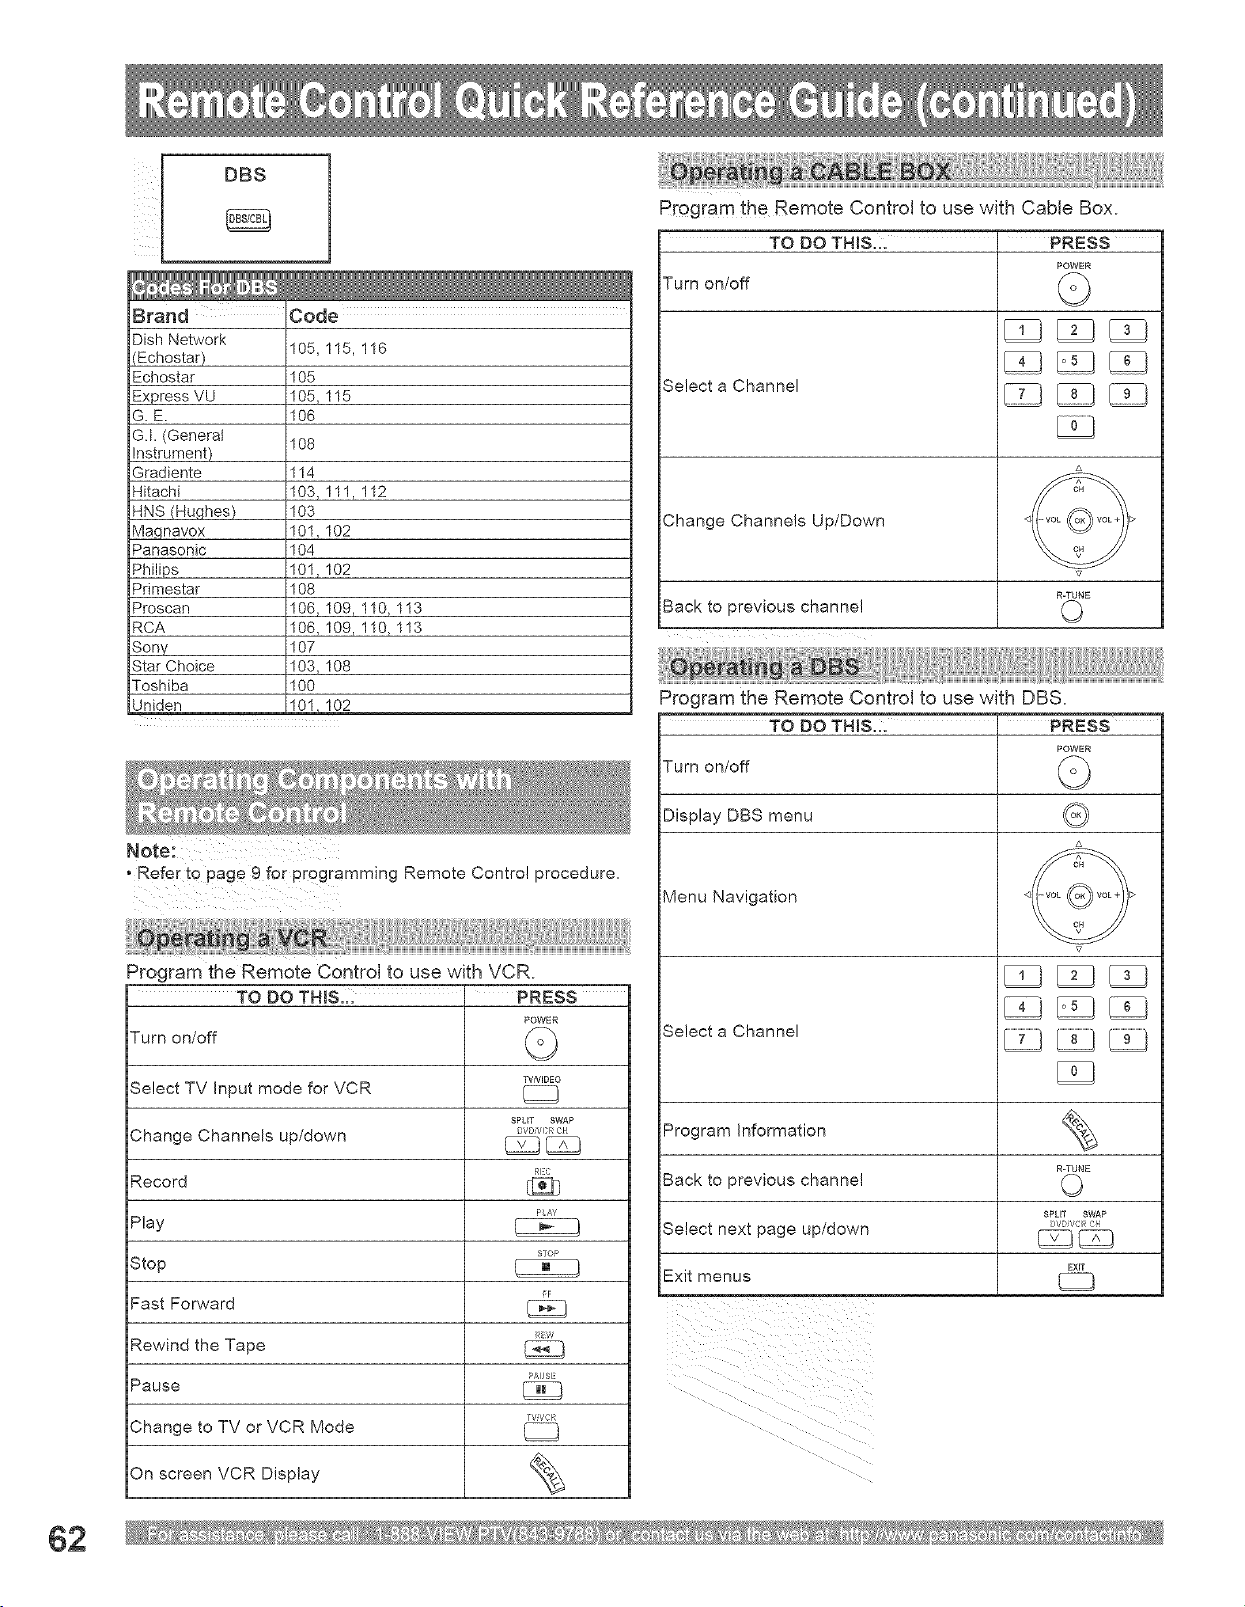
[ DBS
B_and Code LLLLLLLLLLLLLLLLLLLLLLLLLLLLLLLLLLLLLLL
JDish Network
i(Echostar)
Echostar
iExpress VU
iG.E.
SJ. (General
jlnstrument)
Sradiente
JHitachi
iHNS (Hughes)
Vlagnavox
Danasonic
Shilips
Srimestar
iProscan
RCA
Sony
Star Choice
Toshiba
i105,115,116
i105
i105,115
i106
108
114
i103,111,112
103
i101,102
104
i101,102
108
i106,109,110,113
i106,109,110,113
i107
i103,108
i100
Refer to page 9 for programming Remote Control procedure.
Program the Remote Control to use with VCR.
TO DO THIS._ ' PRESS
POWER
Turn on/off G
TVNIDEO
Select TV Input mode for VCR
SPLIT SWAP
Change Channels up/down w_vc_c.
RI:C
Record
FAY
Play
$/O'
Stop
Fast Forward u::
RW
Rewind the Tape
Pause _v_us_
fVt/CR
Change to TV or VCR Mode
screen VCR Display _\On
Program the Remote Control to use with Cable Box.
TO DO THIS..:
Turn on/off
Select a Channel
PRESS
POWER
©
Change Channels Up/Down
R-TUNE
Back to previous channe! O
Program the Remote Control to use with DBS.
TO DO THIS.: ' PRESS
POWER
Turn on/off O
Display DBS menu
Menu Navigation
Select a Channel
QJ
Program Information %
R-TUNE
Back to previous channel (_
SPLIT SWAP
Select next page up/down w:,v<_q_
EXIT
Exit menus
62
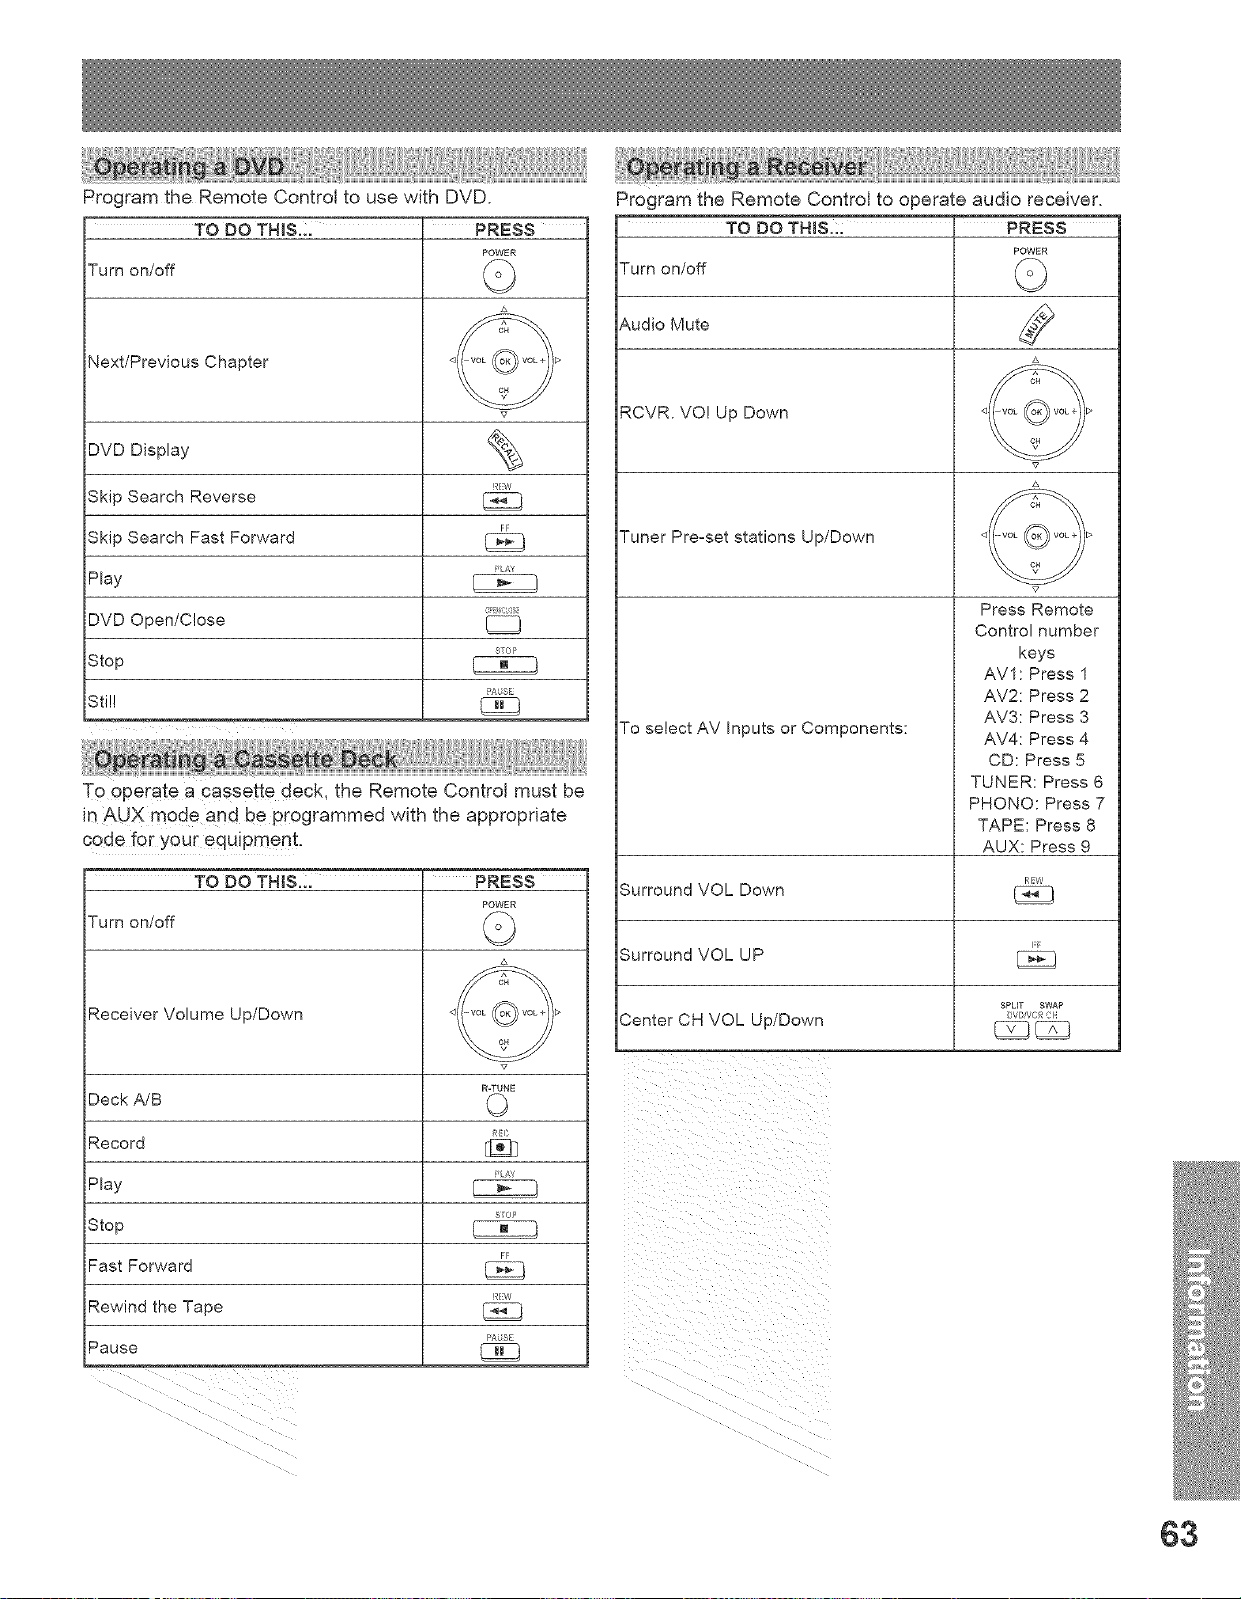
Program the Remote Control to use with DVD.
TO DO THIS.:. ' PRESS
POWER
Turn on/off ._._
Next/Previous Chapter
DVD Display %
RIW
Skip Search Reverse
I::/
Skip Search Fast Forward
Play ,,L_,Y
DVD Open/Close
Stop
i_ASI
Still
TO operate a cassette deck, the Remote Control must be
in AUX mode and be programmed with the appropriate
code for your equipment.
TO DO THIS., ' PRESS
POWER
Turn on/off
Receiver Volume Up/Down
R-TUNE
Deck A/B
Record []_j}
f'L/_,Y
Play
STOl:_
Stop
I::1
Fast Forward
RI:W
Rewind the Tape
IASI
Pause
Program the Remote Control to operate audio receiver.
TO DO THIS,:: ' PRESS
POWER
Turn on/off
Audio Mute
RCVR. VO! Up Down
Tuner Pre-set stations Up/Down
To select AV Inputs or Components:
'7
Press Remote
Control number
keys
AVI: Press 1
AV2: Press 2
AV3: Press 3
AV4: Press 4
CD: Press 5
TUNER: Press 6
PHONO: Press 7
TAPE: Press 8
AUX: Press 9
I: W
Surround VOL Down
F:
Surround VOL UP
SPLIT SWAP
Center CH VOL Up/Down _w_vccH
63
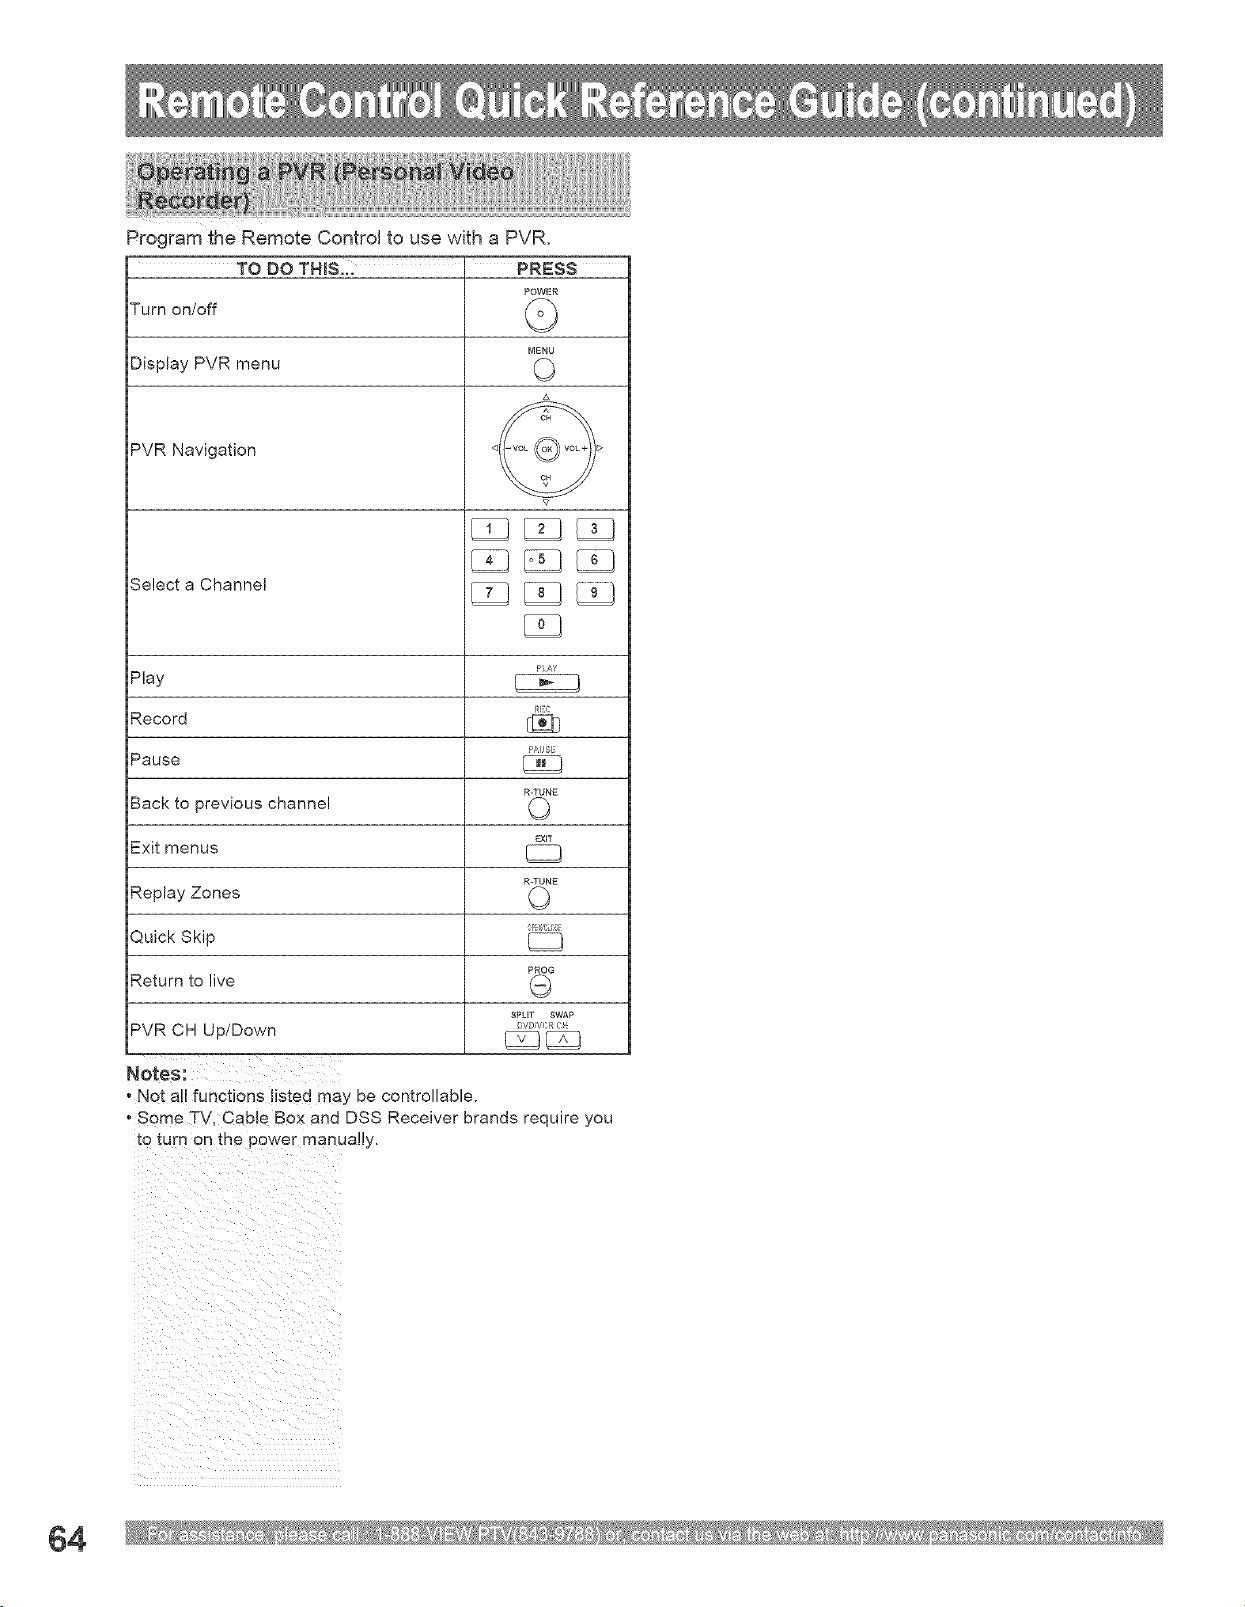
Program the Remote Control to use with a PVR.
TO DO THIS... ' PRESS
POWER
Turn on/off @
MENU
Display PVR menu (_
PVR Navigation
Select a Channel
Play
Record
Pause
Back to previous channel
Exit menus
Replay Zones
Quick Skip
Return to live
PVR CH Up/Down
v
PLAY
RIEC
PAUSE
R-TUNE
0
EXIT
R-TUNE
0
P£ gee
PROG
@
SPLIT SWAP
VD V_:R Ck
Notes:
Not all functions listed ma_ ae con_rouaele.
Some TV. Cable Box and DSS Receiver brands require you
[o turn on me power manua]!_.
64
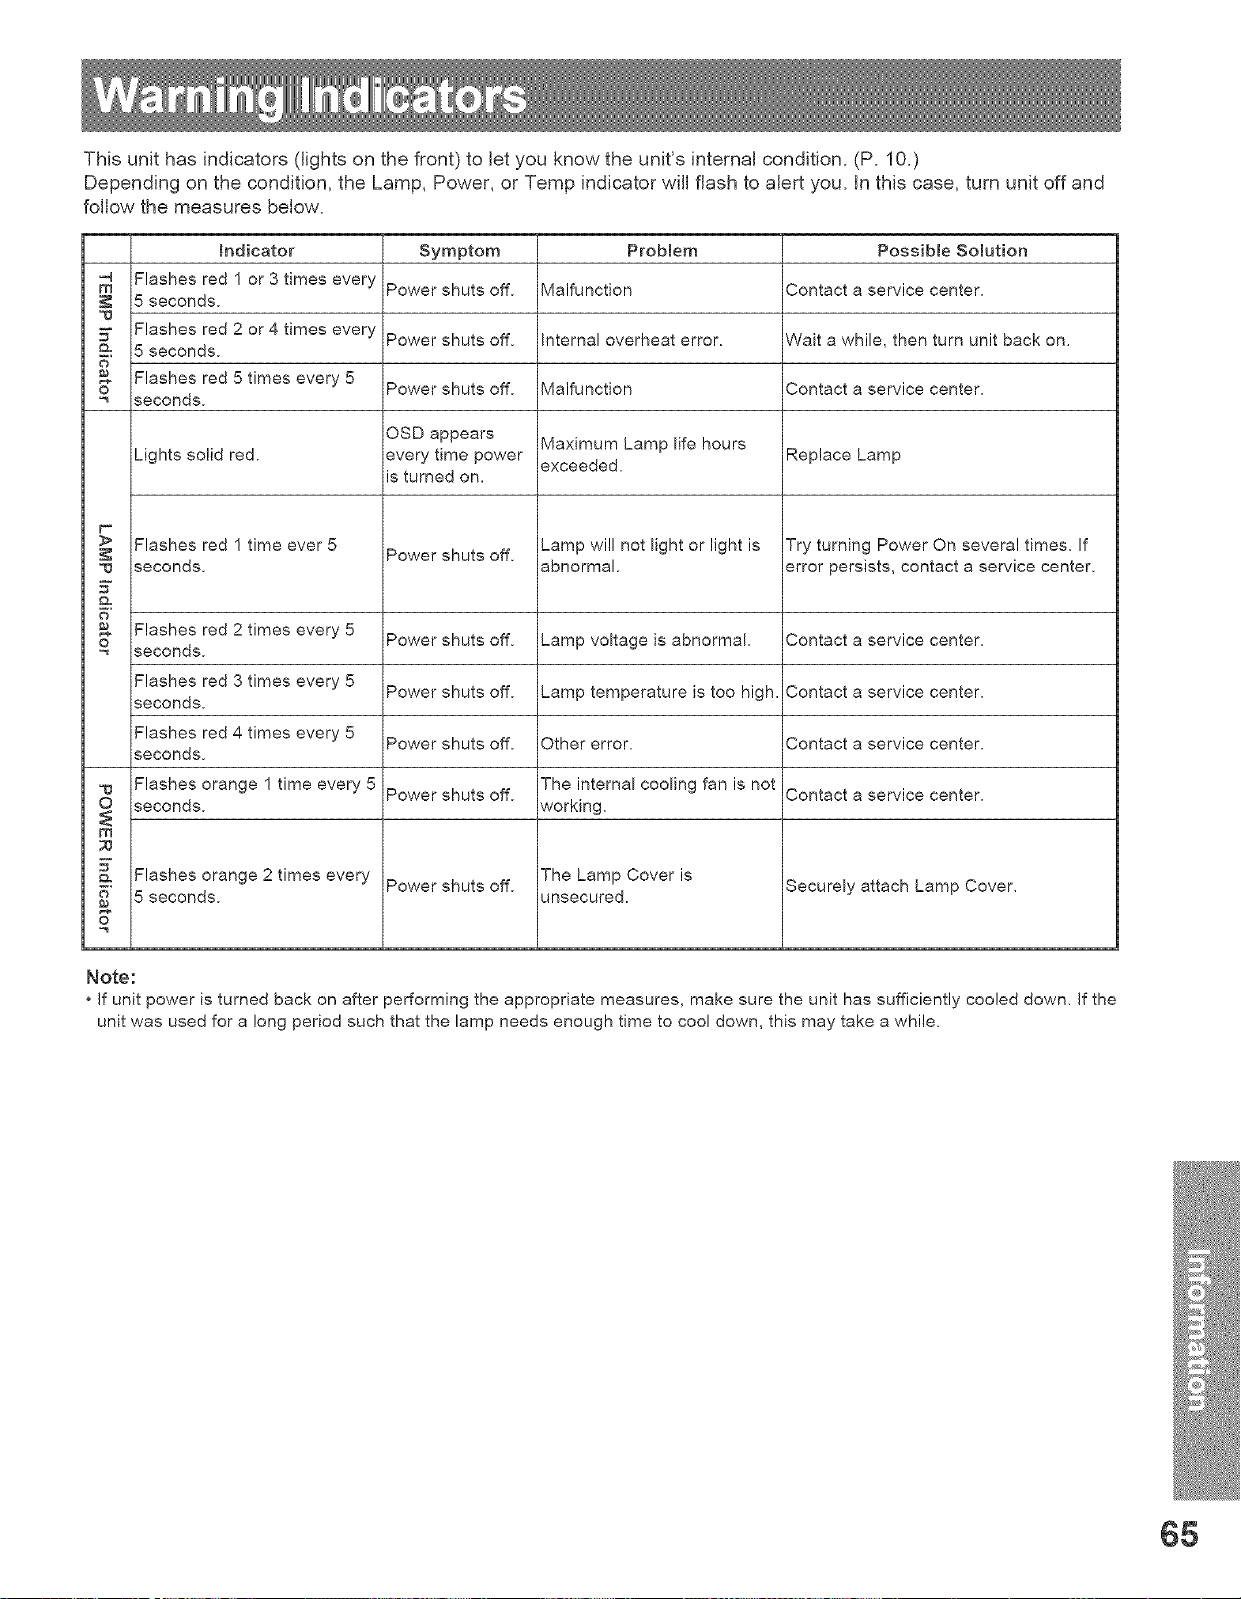
This unit has indicators (lights on the front) to let you know the unit's internal condition. (P. 10.)
Depending on the condition, the Lamp, Power, or Temp indicator will flash to alert you. In this case, turn unit off and
follow the measures below.
Indicator Symptom Problem Possible Solution
m_ Flashes red 1 or 3 times every Power shuts off. Malfunction Contact a service center.
5 seconds.
"u
5" Flashes red 2 or 4 times every Power shuts off. Internal overheat error. Wait a while, then turn unit back on.
5 seconds.
o
Flashes red 5 times every 5 Power shuts off. Malfunction Contact a service center.
o seconds.
OSD appears Maximum Lamp life hours
Lights solid red. every time power exceeded. Replace Lamp
is turned on.
r
Flashes red 1 time ever 5 Lamp will not light or light is Try turning Power On several times. If
Power shuts off.
"u seconds, abnormal, error persists, contact a service center.
5"
Flashes red 2 times every 5 Power shuts off. Lamp voltage is abnormal. Contact a service center.
o seconds.
Flashes red 3 times every 5 Power shuts off. Lamp temperature is too high. Contact a service center.
seconds.
Flashes red 4 times every 5 Power shuts off. Other error. Contact a service center.
seconds.
Flashes orange 1 time every 5 Power shuts off. The internal cooling fan is not Contact a service center.
seconds, working.
"u
m
Flashes orange 2 times every
5 seconds.
Power shuts off.
The Lamp Cover is
unsecured.
Securely attach Lamp Cover.
Note:
* If unit power is turned back on after performing the appropriate measures, make sure the unit has sufficiently cooled down. If the
unit was used for a long period such that the lamp needs enough time to cool down, this may take a while.
{}S
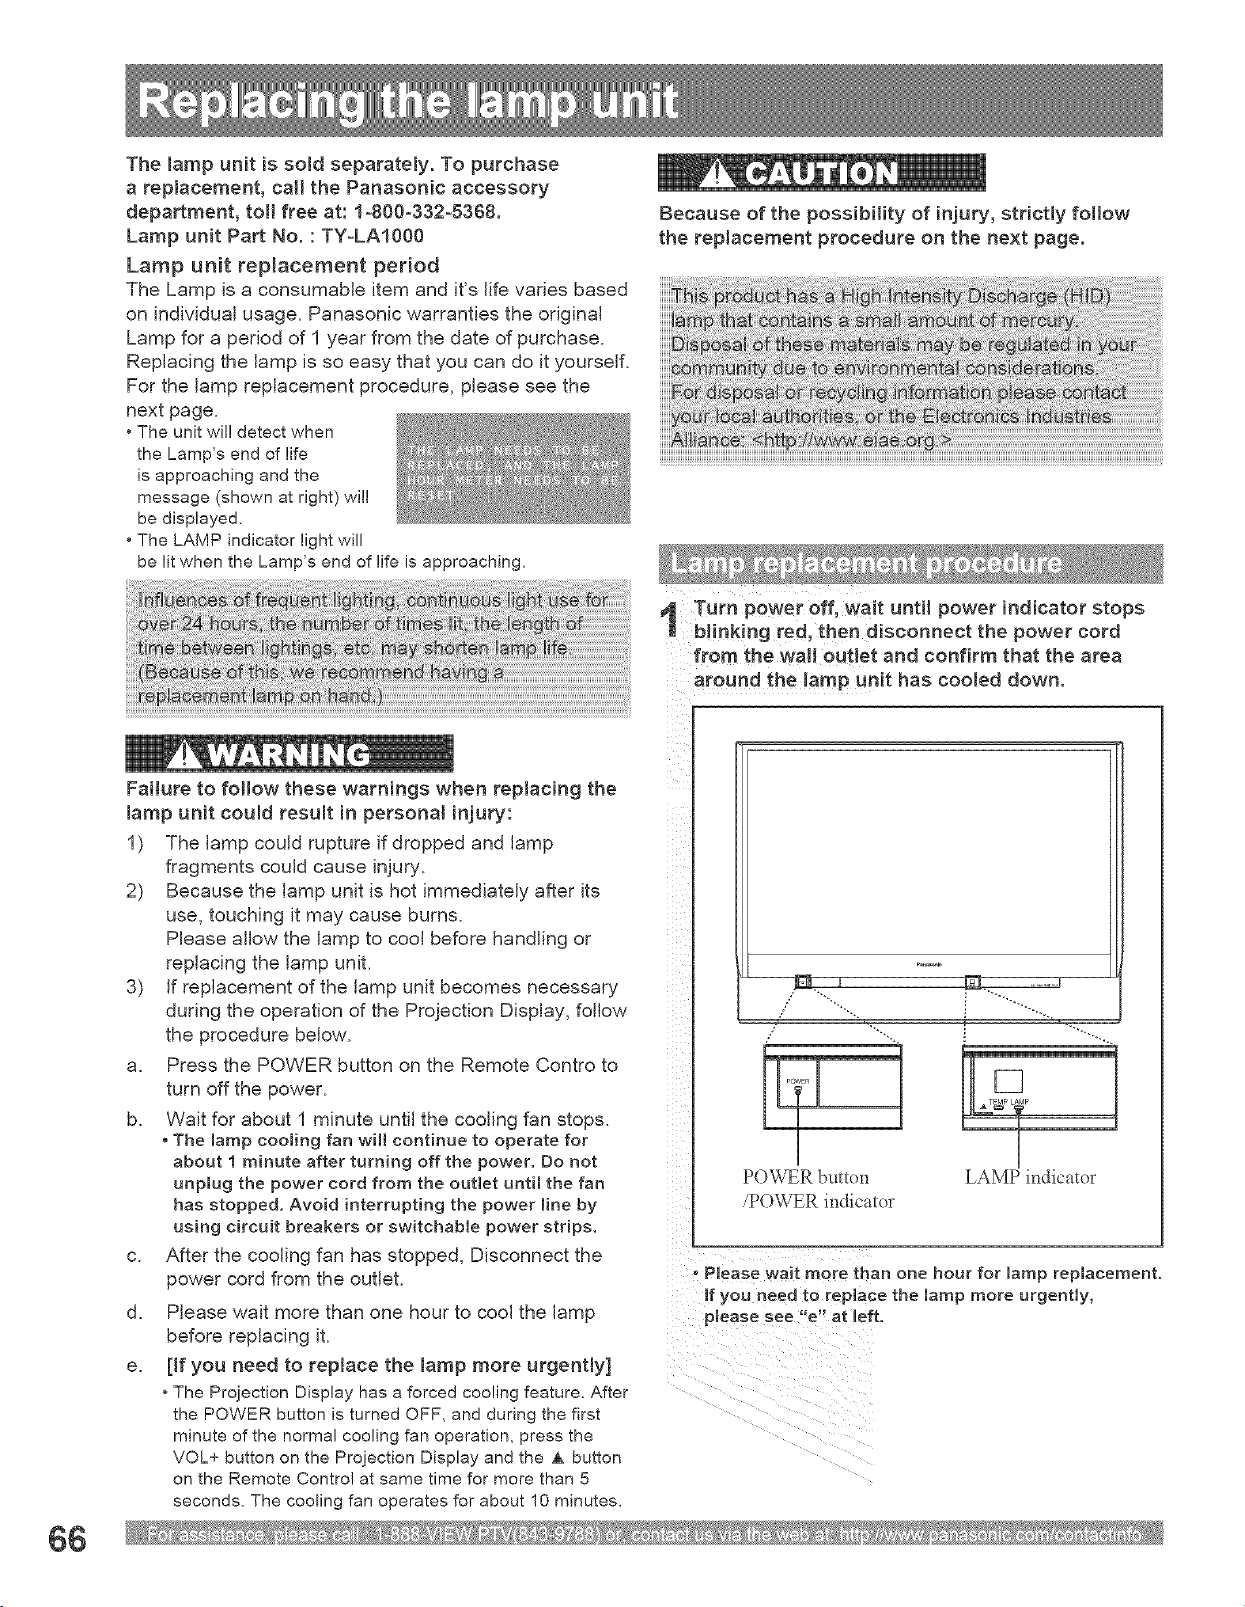
The lamp unit is sold separately. To purchase
a replacement, call the Panasonic accessory
department, tol! free at: 1=800=332=5368.
Lamp unit Part No. : TY=LA1000
Lamp unit replacement period
The Lamp is a consumable item and it's life varies based
on individual usage. Panasonic warranties the original
Lamp for a period of I year from the date of purchase.
Replacing the lamp is so easy that you can do it yourself.
For the lamp replacement procedure, please see the
next page.
• The unit wil! detect when
the Lamp's end of life
is approaching and the
message (shown at right) will
be displayed.
• The LAMP indicator light will
be lit when the Lamp's end of life is approaching.
Because of the possibility of inju_, strictly follow
the replacement procedure on the next page.
Turn power off, wait until power indicator stops
bJinking red, then d sconnect the power cord
from the wall outlet and confirm that the area
around the _amp unit has cooled down.
(}6
Failure to follow these warnings when replacing the
lamp unit could result in personal injury:
1) The [amp could rupture if dropped and lamp
fragments could cause injury.
2) Because the [amp unit is hot immediately after its
use, touching it may cause burns.
Please allow the [amp to cool before handling or
replacing the [amp unit.
3) if replacement of the lamp unit becomes necessary
during the operation of the Projection Display, follow
the procedure below.
a. Press the POWER button on the Remote Contro to
turn off the power.
b. Wait for about 1 minute until the cooling fan stops.
• The [amp cooling fan writ continue to operate for
about 1 minute after turning off the power. Do not
unplug the power cord from the out_et until the fan
has stopped. Avoid interrupting the power Hne by
using circuit breakers or switchable power strips.
c. After the cooling fan has stopped, Disconnect the
power cord from the outlet.
d. Please wait more than one hour to cool the lamp
before replacing it.
e. [if you need to replace the [amp more urgently]
• The Projection Display has a forced cooling feature. After
the POWER button is turned OFF, and during the first
minute of the normal cooling fan operation, press the
VOL+ button on the Projection Display and the _ button
on the Remote Control at same time for more than 5
seconds. The cooling fan operates for about 10 minutes.
[
POWER btmvn
/POWER indicator
LAMP indicator
, Please wait more than one hour for [amp replacement.
if you need to replace the [amp more urgently,
p[ease see "e" at [eft.
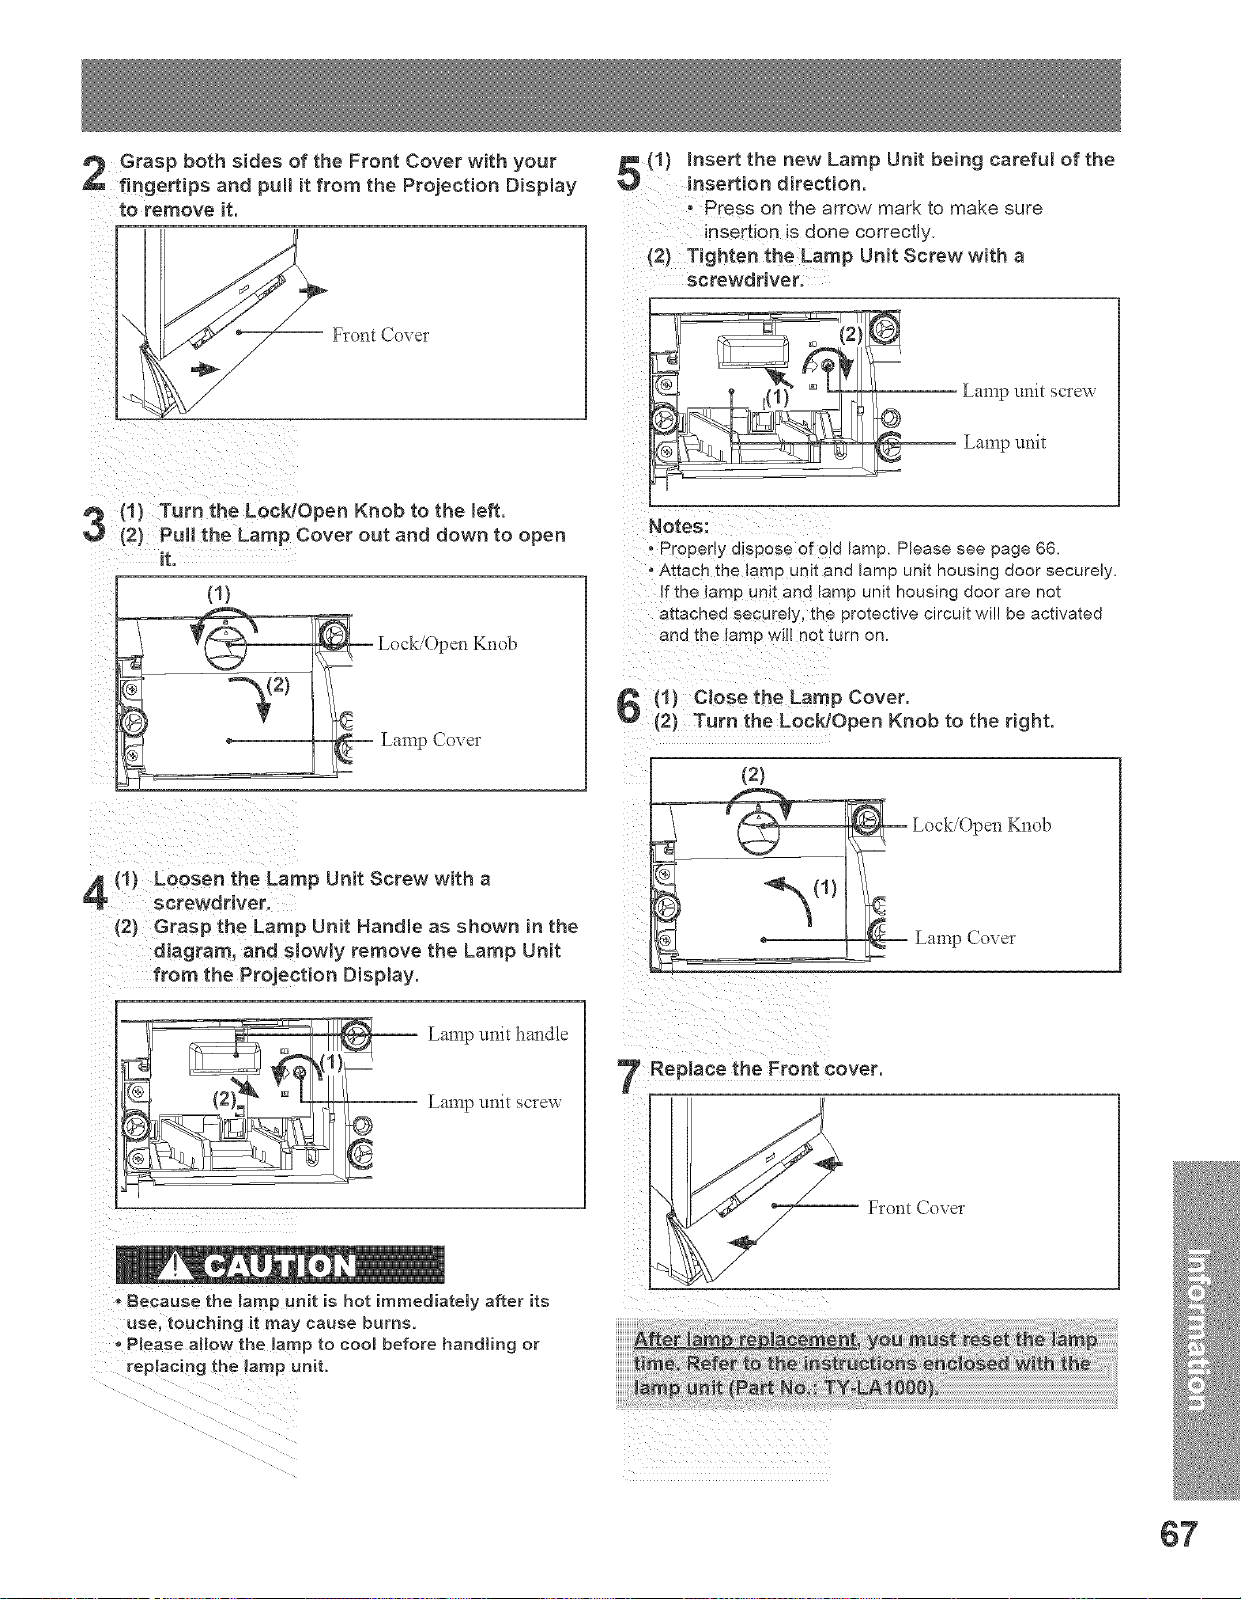
Grasp both sides of the Front Cover with your
fingertips and pull it from the Projection Display
to remove it.
Front Cover
(1) Insert the new Lamp Unit being careful of the
insertion direction.
' Press on the arrow mark to make sure
insertion is done correctly.
{2) Tighten the Lamp Unit Screwwith a
screwdriver:
Lamp 1.tnit scre'a
-- Lamp unit
(1)
(2)
it.
Lock/Open Knob
Turn the Lock/Open Knob to the left.
Pull the Lamp Cover out and down to open Notes:
- Properly dispose of old lamp. Please see page 66.
• Attach the lamp unit and lamp unit housing door securely.
If the lamp unit and lamp unit housing door are not
attached securely, the protective circuit will be activated
and the lamp will not turn on.
Lamp Cover
(1) C!ose the Lamp Cover.
{2) Turn the Lock/Open Knob to the right.
(2)
)en Knob
(1) Loosen the Lamp Unit Screw with a
screwdriver.
(2) Grasp the Lamp Unit Handle as shown in the
diagram, and stowly remove the Lamp Unit
from the Projection Display.
Lamp unit handle
-- Lamp unit scre_x
:==:
z
Because the lamp unit is hot immediately after its
usel touching it may cause burns.
PJease a!10W the !amp to coombefore handting or
rep!acing the !amp unit.
Lamp Cover
}lace the Front cover.
-- Front Cover
67
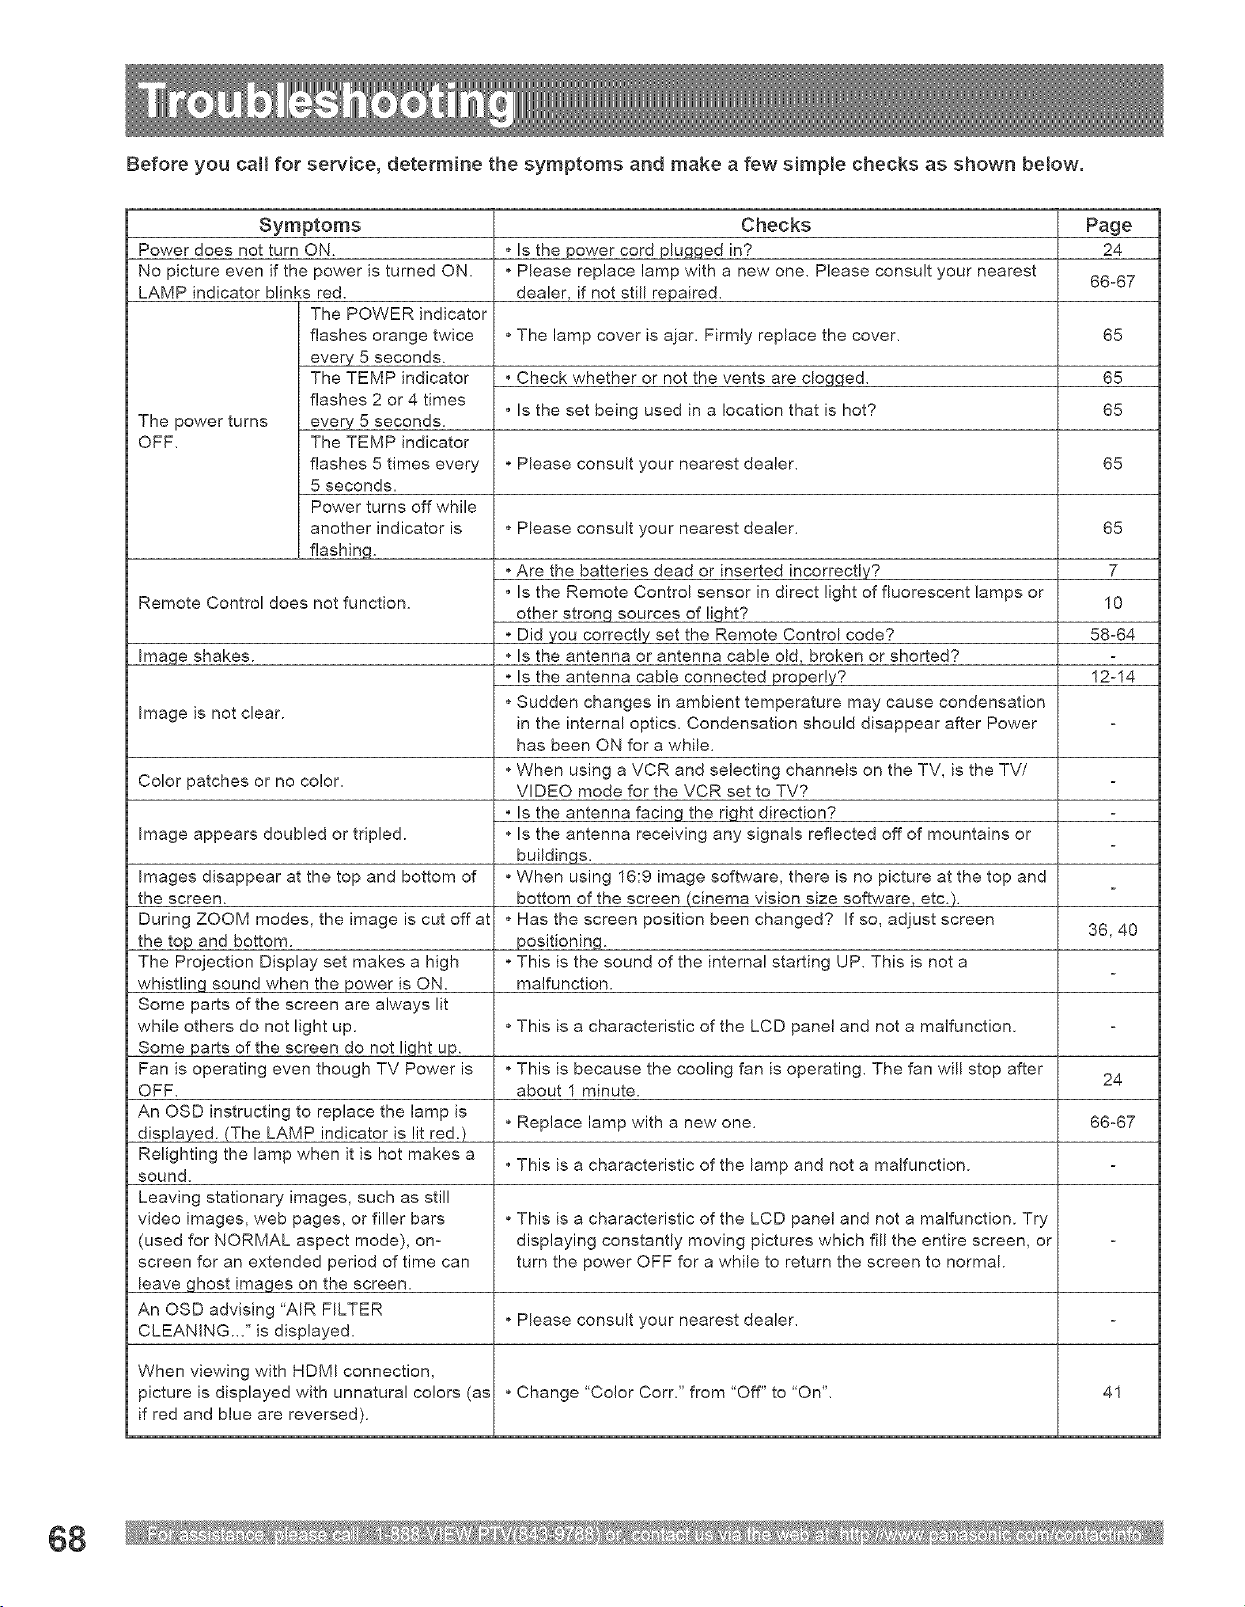
Before you call for service, determine the symptoms and make a few simple checks as shown below.
Symptoms
Power does not turn ON.
No picture even if the power is turned ON.
LAMP indicator blinks red.
The power turns
OFF,
Remote Control does
Image shakes.
Image is not clear.
The POWER indicator
flashes orange twice
every 5 seconds.
The TEMP indicator
flashes 2 or 4 times
every 5 seconds.
The TEMP indicator
flashes 5 times every
5 seconds.
Power turns off while
another indicator is
flashing.
not function.
Color patches or no color,
Image appears doubled or tripled.
Images disappear at the top and bottom of
the screen.
During ZOOM modes, the image is cut off at
the top and bottom.
The Projection Display set makes a high
whistling sound when the power is ON.
Some parts of the screen are always lit
while others do not light up.
Some parts of the screen do not light up.
Fan is operating even though TV Power is
OFF.
An OSD instructing to replace the lamp is
displayed. (The LAMP indicator is lit red.)
Relighting the lamp when it is hot makes a
sound.
Leaving stationary images, such as still
video images, web pages, or filler bars
(used for NORMAL aspect mode), on-
screen for an extended period of time can
leave ghost images on the screen.
An OSD advising 'AIR FILTER
CLEANING._" is displayed.
Checks
* Is the power cord plugged in?
* Please replace lamp with a new one, Please consult your nearest
dealer, if not still repaired,
* The lamp cover is ajar. Firmly replace the cover.
• Check whether or not the vents are clogged.
• Is the set being used in a location that is hot?
Page
24
66-67
65
65
65
* Please consult your nearest dealer. 65
* Please consult your nearest dealer.
* Are the batteries dead or inserted incorrectly?
, Is the Remote Control sensor in direct light of fluorescent lamps or
other strong sources of light?
* Did you correctly set the Remote Control code?
Is the antenna or antenna cable old, broken or shorted?
Is the antenna cable connected properly?
Sudden changes in ambient temperature may cause condensation
in the internal optics. Condensation should disappear after Power
has been ON for a while.
When using a VCR and selecting channels on the TV, is the TV/
VIDEO mode for the VCR set to TV?
, Is the antenna facing the right direction?
Is the antenna receiving any signals reflected off of mountains or
buildings_
When using 16:9 image software, there is no picture at the top and
bottom of the screen (cinema vision size software, etc3.
Has the screen position been changed? If so, adjust screen
positioning.
This is the sound of the internal starting UP. This is not a
malfunction.
This is a characteristic of the LCD panel and not a malfunction.
* This is because the cooling fan is operating. The fan will stop after
about 1 minute.
* Replace lamp with a new one.
65
7
10
58-64
12-14
36,40
24
66-67
• This is a characteristic of the lamp and not a malfunction.
This is a characteristic of the LCD panel and not a malfunction. Try
displaying constantly moving pictures which fill the entire screen, or
turn the power OFF for a while to return the screen to normal.
Please consult your nearest dealer.
When viewing with HDMI connection,
picture is displayed with unnatural colors (as * Change "Color Corr." from 'Off" to 'On". 41
if red and blue are reversed).
68
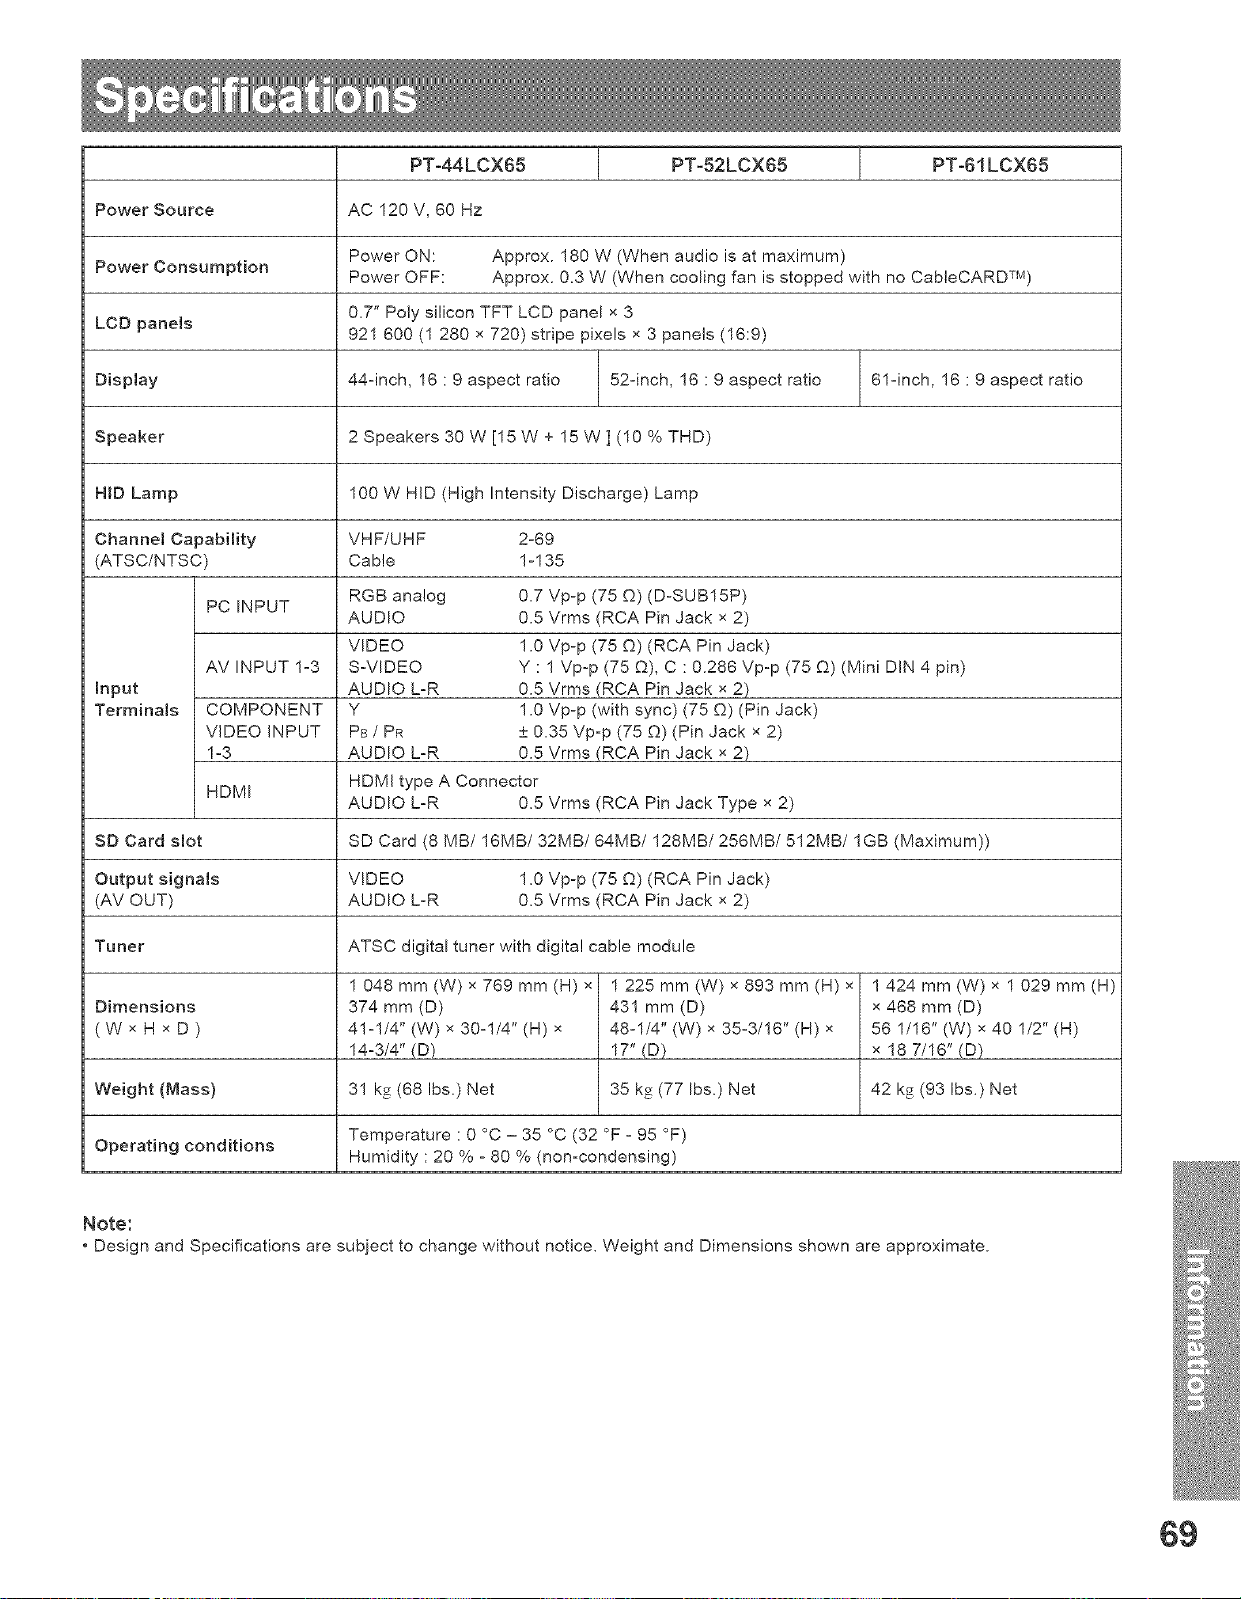
PT-44LCX65 PT-52LCX65 PT-61LCX65
Power Source
Power Consumption
LCD panels
Display
Speaker
HID Lamp
Channel Capability
(ATSC/NTSC)
Input
Terminals
SD Card slot
Output signals
(AV OUT)
Tuner
Dimensions
(WxHxD)
PCINPUT
AV INPUT 1-3
COMPONENT
VIDEO INPUT
1-3
HDMI
Weight (Mass)
Operating conditions
AC 120 V, 60 Hz
Power ON:
Power OFF:
Approx. 180 W (When audio is at maximum)
Approx. 0.3 W (When cooling fan is stopped with no CableCARD TM)
0.7" Poly silicon TFT LCD panel x 3
921 600 (1 280 x 720) stripe pixels x 3 panels (16:9)
44-inch, 16 : 9 aspect ratio 52-inch, 16 : 9 aspect ratio 61-inch, 16 : 9 aspect ratio
2 Speakers 30 W [15 W + 15 W ] (10 % THD)
100 W HID (High Intensity Discharge) Lamp
VHF/UHF 2-69
Cable 1-135
RGB analog
AUDIO
VIDEO
SWIDEO
AUDIO L=R
Y
Ps / PR
AUDIO L=R
0.7 Vp-p (75 O) (D-SUB15P)
0.5 Vrms (RCA Pin Jack x 2)
1.O Vp-p (75 O) (RCA Pin Jack)
Y : 1 Vp-p (75 O), C : 0.286 Vp-p (75 O) (Mini DIN 4 pin)
0.5 Vrms (RCA Pin Jack x 2)
1.0 Vp-p (with sync) (75 O) (Pin Jack)
± 0.35 Vp=p (75 @) (Pin Jack x 2)
0.5 Vrms (RCA Pin Jack x 2)
HDMI type A Connector
AUDIO L-R 0.5 Vrms (RCA Pin Jack Type x 2)
SD Card (8 MB/16MB/32MB/64MB/128MB/256MB/512MB/1GB (Maximum))
VIDEO
AUDIO L=R
1.O Vp-p (75 _) (RCA Pin Jack)
0.5 Vrms (RCA Pin Jack x 2)
ATSC digital tuner with digital cable module
1 048 mm (W) x 769 mm (H) x
374 mm (D)
41-1/4" (W) x 30ol/4" (H) x
14o3/4" (U)
31 kg (68 Ibs.) Net
1 225 mm (W) x 893 mm (H) x
431 mm (D)
48-1/4" (W) x 35o3/16" (H) x
17" (U)
35 kg (77 Ibs.) Net
1 424 mm (W) x 1 029 mm (H)
x 468 mm (D)
56 1/16" (W) x 40 1/2" (H)
x 18 7/16" (D)
42 kg (93 Ibs.) Net
Temperature : 0 °C = 35 °C (32 °F = 95 °F)
Humidity : 20 % - 80 % (non-condensing)
Note:
• Design and Specifications are subject to change without notice, Weight and Dimensions shown are approximate.
69
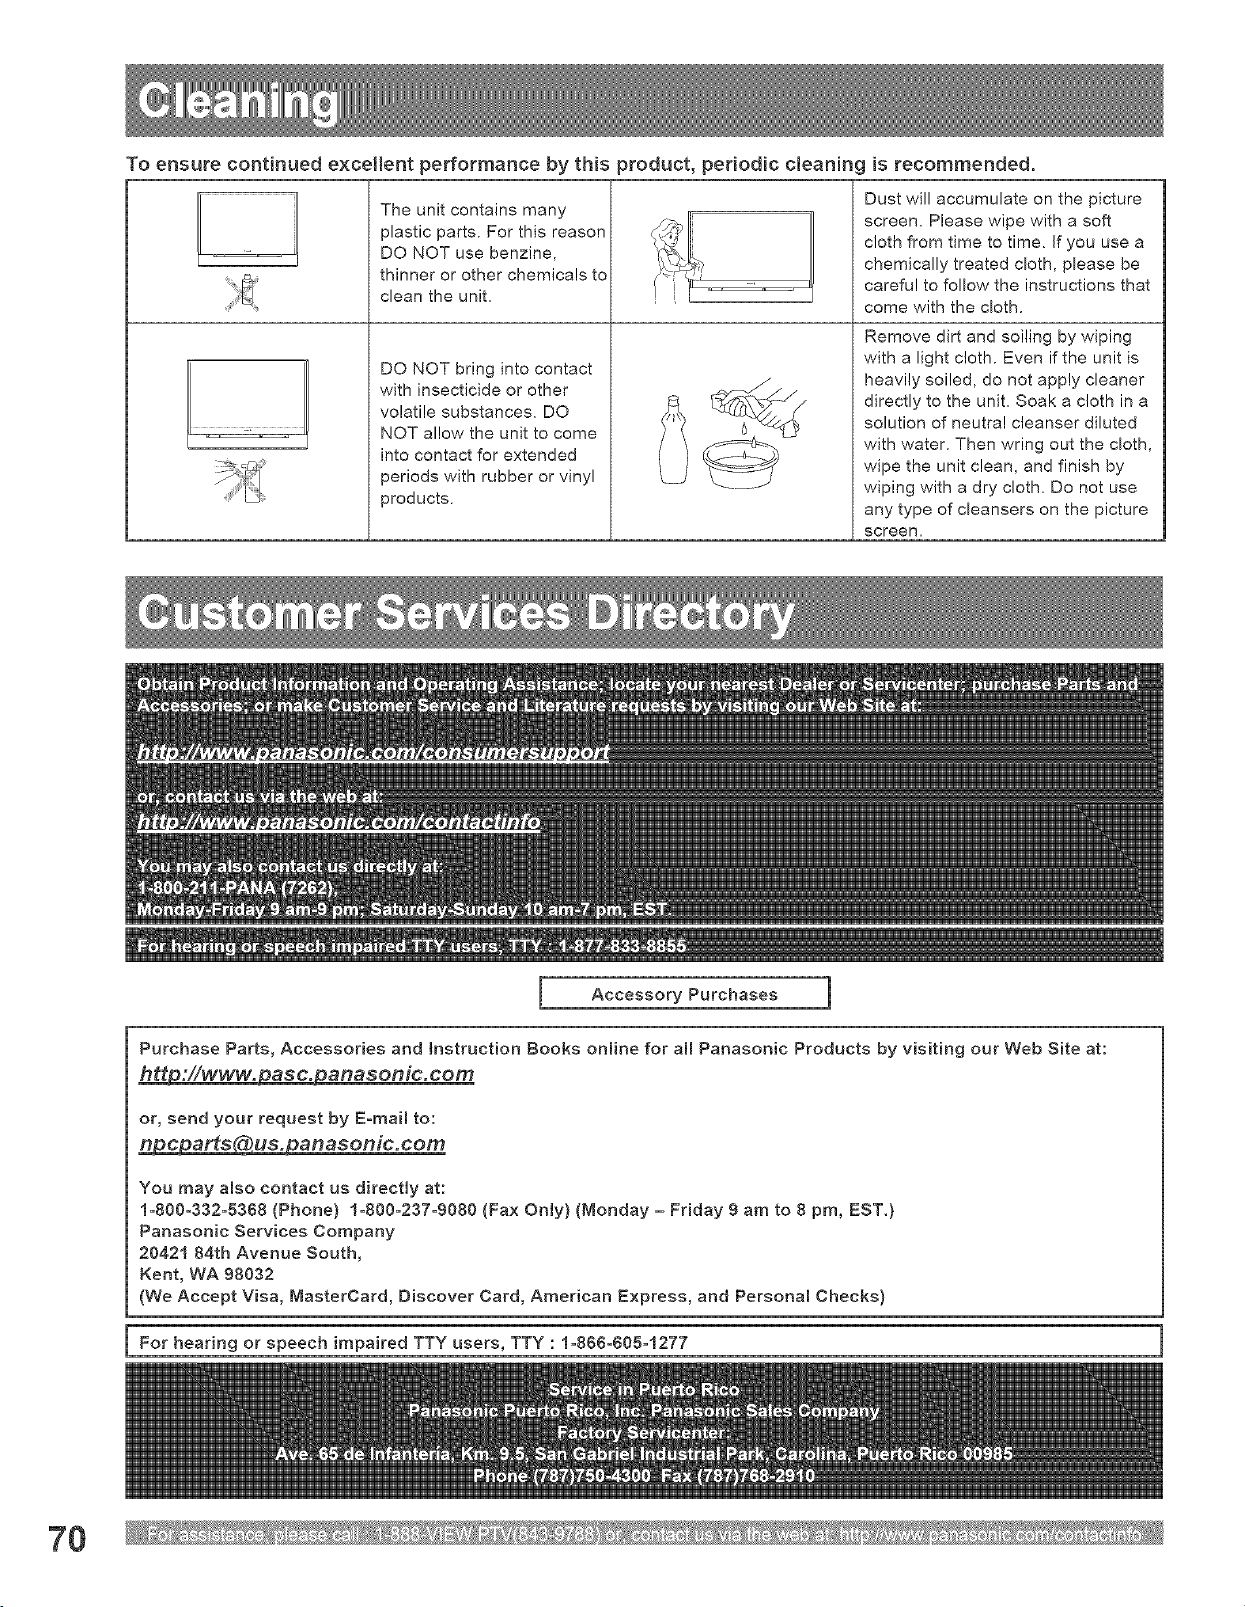
To ensure continued e×cellent performance by this product, periodic cleaning is recommended,
J
The unit contains many
plastic parts. For this reason
DO NOT use benzine,
thinner or other chemicals to
dean the unit.
DO NOT bring into contact
with insecticide or other
volatile substances. DO
NOT allow the unit to come
into contact for extended
periods with rubber or vinyl
products.
Dust will accumulate on the picture
screen. Please wipe with a soft
cloth from time to time. If you use a
chemically treated cloth, please be
careful to follow the instructions that
come with the cloth.
Remove dirt and soiling by wiping
with a light cloth. Even if the unit is
heavily soiled, do not apply cleaner
directly to the unit. Soak a cloth in a
solution of neutral cleanser diluted
with water. Then wring out the cloth,
wipe the unit clean, and finish by
wiping with a dry cloth. Do not use
any type of cleansers on the picture
screen,
Accessory Purchases ]
Purchase Parts, Accessories and Instruction Cooks online for a[[ Panasonic Products by visiting our Web Site at:
http://www_anasonic.com
or, send your request by EomaH to:
n_gj_arts(@,us.panasonic.com
You may also contact us directly at:
1o800o332o5368 (Phone) 1o800o237o9080 (Fax Only) (Monday = Friday 9 am to 8 pro, EST.}
Panasonic Services Company
20421 84th Avenue South,
Kent, WA 98032
(We Accept Visa, MasterCard, Discover Card, American Express, and Personal Checks)
For hearing or speech impaired TTY users, TTY : 1o866o605o1277
7O

PANASONIC CONSUMER ELECTRONICS COMPANY,
DIVISION OF PANASONIC CORPORATION OF NORTH
AMERICA
One Panasonic Way Secaucus, New Jersey 07094
PANASONIC SALES COMPANY, DIVISION OF PANASONIC
PUERTO RICO, INC.,
AVE. 65 de Infanteda, Km. 9.5 San Gabriel Industrial Park,
Carolina, Puerto Rico 00985
Panasonic Multimedia Projection HDTV
Limited Warranty
Limited Warranty Coverage
if your product does not work properly because of a defect in materials or workmanship, Panasonic Consumer
Electronics Company or Panasonic Sales Company (collectively referred to as "the warrantor") will, for the length
of the period indicated on the chart below, which starts with the date of original purchase ("warranty period"), at
its option either (a) repair your product with new or refurbished parts, or (b) replace it with a new or a refurbished
product. The decision to repair or replace will be made by the warrantor.
CATEGORY PARTS ]LABOR SERVICE
!
Multimedia Projection HDTV One (1) Year lOne (1) Year In-Home or Carry-In
During the "Labor" warranty period there will be no charge for labor. During the "Parts" warranty period, there will
be no charge for parts. You must carry-in your product or arrange for in-home service during the warranty period, if
non-rechargeable batteries are included, they are not warranted. This warranty only applies to products purchased
and serviced in the United States or Puerto Rico. This warranty is extended only to the original purchaser of a new
product which was not sold "as is". A purchase receipt or other proof of the original purchase date is required for
warranty service.
Carry-in or In-Home Service
For In-Home or Carry-In Service in the United States call 1-888-VIEW-PTV (1-888o843-9788).
For assistance in Puerto Rico call Panasonic Sales Company (787)-750°4300 or fax (787)-768-2910.
In-Home service requires clear, complete and easy access to the product by the authorized servicer and does
not include removal or re-installation of an installed product. It is possible that certain in-home repairs will not be
completed in-home, but will require that the product, or parts of the product, be removed for shop diagnosis and/or
repair and then returned.
Limited Warranty Limits And Exclusions
This warranty ONLY COVERS failures due to defects in materials or workmanship, and DOES NOT COVER normal
wear and tear or cosmetic damage. The warranty also does not cover damages which occurred in shipment, or
failures which are caused by products not supplied by the warrantor, or failures which result from accidents, misuse,
abuse, negJect, mishandJing, misappJication, aJteration, faulty installation, set-up adjustments, misadjustment of
consumer controls, power line surge, lightning damage, modification, or commercial use (such as in a hotel, office,
restaurant, or other business), rental use of the product, service by anyone other than a Factory Servicenter or other
Authorized Servicer, or damage that is attributable to acts of God.
THERE ARE NO EXPRESS WARRANTIES EXCEPT AS LISTED UNDER "LIMITED WARRANTY COVERAGE".
THE WARRANTOR IS NOT LIABLE FOR INCIDENTAL OR CONSEQUENTIAL DAMAGES RESULTING FROM
THE USE OF THIS PRODUCT, OR ARISING OUT OF ANY BREACH OF THIS WARRANTY. (As examples, this
excludes damages for lost time, cost of having someone remove or re-install an installed unit if applicable, or travel to
and from the servicer. The items listed are not exclusive, but are for illustration only.) ALL EXPRESS AND IMPLIED
WARRANTIES, INCLUDING THE WARRANTY OF MERCHANTABILITY, ARE LIMITED TO THE PERIOD OF THE
LIMITED WARRANTY.
Some states do not allow the exclusion or limitation of incidental or consequential damages, or limitations on how
long an implied warranty lasts, so the exclusions may not apply to you.
This warranty gives you specific legal rights and you may also have other rights, which vary, from state to state. If a
problem with this product develops during or after the warranty period, you may contact your dealer or Servicenter.
If the problem is not handled to your satisfaction, then write to the warrantor's Consumer Affairs Department at the
addresses listed for the warrantor.
PARTS AND SERVICE (iNCLUDiNG COST OF AN IN-HOME SERVICE CALL, WHERE APPLICABLE} WHICH
ARE NOT COVERED BY THiS LiMiTED WARRANTY ARE YOUR RESPONSIBILITY.
1
71
This product utilizes the following so called "open source" software:
(1) the software which is licensed under the GNU GENERAL PUBLIC LICENSE,
(2) the software which is licensed under the GNU LESSER GENERAL PUBLIC LICENSE, and
(3) software developed by the third parties and available under certain terms and conditions.
For the software categorized as (1) and (2), please refer to the terms and conditions of the following GNU
GENERAL PUBLIC LICENSE and GNU LESSER GENERAL PUBLIC LICENSE respectively.
if you wish to get further information as to the software, please contact the web site below.
http:/twww.fsf.orQ/licenses/and http:/'iwww.amqinux._
GNU GENERAL PUBLIC LICENSE
Version 2, June 1991
(opyright _- 1989 1991 Free So£v, are Foundation Inc
59 Temple Place. State 330, Boston. MA 02111-1307 USA
Eve_,one is pem_itted to copy and distribute verbatim copies of this license
document, but changing it is not allowed.
Preamble
The licenses lbr most soft,,,,are are designed to take away your freedom to
share and change it. By contrast, the GNU General Public License is intended
to _uarantee your freedom to share and change free sol_v, are--to make sure the
software is free lbr all its users. This General Public License applies to most
of the Free Software Foundation's software and to any other program ``_hose
authors commit to using it. (Some other Free Software Foundation software is
covered by the GNU Library General Public License instead.) You can apply
it to your programs, too.
\Vl_en ``_e speak of free software, we are rei_rring to freedom, not price. Our
General Public Licenses are designed to make sure that you have the freedom
to distribute copies of free soft``_are (and charge lhr this service if you ``_ish),
that you receive source code or can get it if you want it. that you can change
the software or use pieces of it in new free programs: and that you know you
can do these things.
To protect your rights, we need to make restrictions that liJrbid anyone to
deny you these rights or to ask you to surrender the rights. These restrictions
translate to certain responsibilities li._ryou if you distribute copies of the
software, or if you modil_ it.
For example, if you dislribute copies of such a program, ``_hether gratis or %r
a l?e, you must give the recipients all the rights that you have. You must make
sure that they, too, receive or can get the source code. And you must sho``_
them these terms so they kno``_their rights.
We protect your rights with two steps: (1) copyright the soliv, are, arid (2) of[?r
you this license which gives you legal permission to copy, distribute andor
modil_, the software.
Also. lbr each author's protection and ours. we ``_ant to make certain that
everyone understands that there is no warranty lhr this free software. If the
software is modified by someone else and passed on, we want its recipients to
ka_owthat _hat they have is not the origmaI, so that any problems introduced
by others will not reflect on the original authors' reputations
Finally, any free program is threatened constantly by software patents. We
a ish to avoid the danger that redistributors of a free program ``_ill individually
obtain patent licenses, m efibct making the program proprietary To prevent
this, ``_ehave made it clear that any patent must be licensed for everyone's free
use or not licensed at all
The precise terms and conditions lbr copying, distribution and modification
lbllow.
DISTRIBUTION AND MODiFiCATION
0. This License applies to any program or other work which contains a
notice placed by the copyright holder saying it may be distributed trader the
terms of this General Public License. The 'Program", below, rel?rs to any
such program or work. and a 'a ork based on the Program" means either
the Program or any derivative ``_ork under copyright la``_: that is to say,
a ``_ork containing the Program or a portion of it. either verbatim or wilh
modifications and/or translated into another language. (Hereinalier. translation
is included without limitation m the term 'modification".) Each licensee is
addressed as ' yore'.
Activities other than copying, distribution and modification are not covered
by this License: they are outside its scope. The act ofrtmning the Program is
not restricted, and the output ii'om the Program is covered only if its contents
constitute a ``_ork based on the Program (independent of having been made by
running the Program). Whether that is true depends on ``_hat the Program does.
1. You may copy and distribute verbafim copies of the Program's source
code as you receive it, in any medium, provided that you conspicuously
and appropriately publish on each copy an appropriate copyright notice and
disclaimer of warranty; keep intact all the notices that rei?r to this License and
to the absence of any warranty; and give any other recipients of the Program a
copy of this License along with the Program.
You may charge a f_e lhr the physical act of transferring a copy, and you may
at your option of[_r _ arranty protection in exchange lbr a tee.
2. You may modil}, your copy or copies of the Program or any portion of
it, thus ihrming a ``_orl<based on the Program, and copy and distribute such
modifications or work under the terms of Section 1 above, provided that you
also meet all of these conditions:
a)
b)
You nmst cause the modified files to carry prominent notices stating tha
you changed the files and li'_e date of any change.
You nmst cause any v,ork that you distribme or publish, that m ``,,hole
or m part contains or is derived from the Program or any part thereo£ to
be licensed as a whole at no charge to all third parties under the terms of
this License.
lf the modified program nom_ally reads commands mteractively ``_hen
run. yo/_tnl/.tst cause it, v,hen started framing fi_>rsuch interactive use in
the most ordinary way, to print or display an announcement including
an appropriate copyright notice and a notice that there is no v,mTanty (or
else, saying that you wovide a warranty) and that users may redistribute
the program under these conditions, and telling the user how to vie``_a
copy of this License. (}_xception: if the Program itself is interactive but
does not normally print such an announcement, your work based on the
Program is not required to print an announcement.)
Theserequirementsapplytothemodifiedv_orkasa_hole.Ifidentifiahle
sectionsofthatworkarenotderivedfromtheProgram.andcanbe
reasonablyconsideredindependentandseparate_orksinthemselves.
thenthisLicense.anditstern'is,donotapplytothosesectionswhenyon
distributethemasseparateworks.Bntv_henyondistributethesame
sectionsaspartofax_hole"ahichisaworkbasedontheProgram,the
dislribntionofthev_holemustbeonthetermsofthisLicense,whose
permissionsfbrother licensees extend to the entire u hole. and thus to
each ar*d ever?, part regardless of who wrote it.
Thus. it is not the intent of this section to claim rights or contest your rights
to work written entirely by you; rather, the intent is to exercise the right
to control the distribution of derivative or collective "aorks based on the
Program.
In addition, mere aggregation of another v_ork not based on the Program with
the Program (or with a work based on the Program) on a volmne of a storage
or distribution medinm does not bring the other u ork under the scope of this
License.
3. You rnay copy and distribute the Program (or a "_ork based on it, under
Section 2) in obiect code or executable Ibm'l under the terms of Sections 1 ar*d
2 above provided that you also do one of the fbllo'a ing:
a) Accompany it with the complete corresponding machine-readable source
code. which must be distributed under the terms of Sections I and 2
above on a medium customarily used _br soiYa are interchange; or.
b) Accompany it v_ith a written offer, valid Ibr at least three years, to
give any third party, iPr a charge no more than your cost of physically
perfhrming source distribution, a complete machine-readable copy of the
corresponding source code, to be distributed under the terms of Sections
I and 2 above on a medinm customarily used Ibr soi'r;_ are interchange:
Or,
c) Accompany it with the inii_rmation you received as to the offer to
distribute corresponding source code. (This alternative is allowed only
Ibr noncommercial distribution and only if yotl received the program
in oI:_}ectcode or execl.ttable fbrm with snch an of't_r in accord "aith
Snbsection b above.)
The source code *br a work rneans the prei}rred %rm of the v_ork %r making
modiiications to it. For an executable "_ork, complete source code means
all the source code fbr all too&des it contains, plus any associated interface
definition flies, plus the scripts used to control compilation and installation of
the exec_.ltable. However, as a special exception, the source code distributed
need not include anything that is nommlly dislributed (m either source or
binary lbm'_) vdth the m_ior components (compiler, kernel, and so on) of the
operating system on which the executable r_.ms,unless that component itself
accompanies the execotable.
If distribution of executable or o'bject code is made by ofi}ring access to copy
from a designated place, then off_ring equivalent access to copy the source
code from the same place counts as distribmion of the source code, even
tho_.tgh third parties are not
compelled to copy the source along "_ith the o'qiect code.
4. Yol.t may not copy, modify, sublicense, or distribute the Program except
as expressly provided nnder this License Any attempt other_x ise to copy,
modil_,, sublicense or distribme the Program is void, and "_ill automatically
terminate your rights under this License. However, parties >,ho have received
copies, or rights, fl'om y(m nnder this License >,ill not have their licenses
tem'm_ated so long as such parties remain in lidl compliar*ce.
5. You are not required to accept this License. since you have not signed
it Hov_ever, nothing else grants you pen'nission to modify or distribute the
Program or its derivative works. These actions are prohibited by lav_if yo_._do
r_otaccept this License. Theretbre. by modifying or distributing the Program
(or any x_orl<based on the Program), you indicate your acceptance of this
License to do so. and all its terms and conditions *hr copying, distributing or
modi]_)dng the Program or u orks based on it
6. Each time you redistribute the Prograrn (or any x_ork based on the
Program), the recipient automatically receives a license from the original
licensor to copy, distribute or modii_, the Program sntliect to these tem'_s ar*d
conditions. Yon may not impose any further restrictions on the recipients'
exercise of the rights granted herein. You are not responsible *br enfbrcing
compliar*ce by third parties to this License.
7. If. as a consequence of a court judgment or allegation of patent
infl'ingement or lbr any other reason (not limited to patent issues), conditions
are imposed on you (x_hether by court order, agreement or othenvise) that
contradict the conditions of this License, they do not excuse you from
the conditions of this License. If you cain'*ordistribnte so as to satisfy
simultaneously your obligations under this License and any other pertinent
obligations, then as a consequence you may not distribute the Program at all
For example, if a patent license v_otdd not penrlit royalty-free redistribntion
of the Program by all those "_ho receive copies directly or indirectly through
you. then the only >,ay yotl cotdd satisfy both it and this License would be to
refl'am entirely from distribution of the Program
If any portion of this section is held invalid or unenforceable under a W
particular circnmstar*ce, the balance of the section is intended to apply and the
section as a whole is intended to apply in other circumstances.
It is not the purpose of this section to induce you to infringe any patents or
olher property right claims or to contest validity of any such claims; this
section has the sole purpose of protecting the integrity of the tree sol_ are
distribntion system, which is implemented by public license practices Many
people have made generons contributions to the wide range of software
distributed thro_gh that system in reliance on consistent application of
that system; it is up to the attthoffdonor to decide if he or she is "_illing to
distribute soiba are through any other system and a licensee cannot impose that
choice.
This section is intended to make thoroughly clear u hat is believed to be a
consequence of the rest of this License.
8. If the distribution ar*_or use of the Program is restricted in certain corn'*tries
either by patents or by copyrighted interli_ces, the original copyright holder
who places the Program under this License may add an explicit geographical
distribution limitation excluding those countries, so that distribution is
pem'_itted only in or among countries not thus excluded. In such case, this
License ir_corporates the limitation as if written in the body of this License.
9. The Free Soliware Foundation may publish revised and/or new versions
of the General Public License from time to time Such new versions vdll be
similar in spirit to the present version, but may diftcr in detail to address r_ew
problems or concerns.
Each version is given a distinguishing version number. If the Program
specifies a version number of this License "_hich applies to it and 'any
later version", yo_t have the option of lbllowing the terms and conditions
either of that version or of any later version pnblished by the Free Software
Foundation. If the Program does not specii_ a version number of this License.
you may choose any version ever published by the Free Sofra are Foundation.
73
10. If you wish to incorporate parts of the Program into other free programs
_ hose distribution conditions are dill_rent, write to the author to ask
Ibr pen=ission For soiixv are x_hich is copyrighted by the Free Soiix_are
Foundation. x,_riteto the Free Software Foundation: we sometimes make
exceptions for this. Our decision will be guided by the t_o goals of preserving
the f?ee stares of all derivatives of our f?ee software and of promoting the
sharing and reuse of sofrx_are generally.
NO WARRANTY
11. BE(AUSE THE PROGRAM IS LI(ENSED FREE OF (HARGE.
THERE IS NO WARRANTY FOR THE PROGRAM. TO THE EXTENT
PERMITTED BY APPLICABLE LAW. EX(EPT WHEN OTHERWISE
STATED IN WRITING THE (.OPYRIGHT HOLDERS AND/OR
OTHER PARTIES PROVIDE THE PROGRAM 'AS IS" WITHOUT
WARRANTY OF ANY K!-ND, EITHER EXPRESSED OR IMPLIED,
fN(LUDING, BUT NOT LIMITED TO, THE IMPLIED WARRANTIES OF
MER( HANTABILITY AND FITNESS FOR A PARTICULAR PURPOSE.
THE ENTIRE RISK AS TO THE QUALITY AND PERFORMANCE OF
THE PROGRAM IS WITH YOU. SHOULD THE PROGRAM PROVE
DEFE( TIVE. YOU ASSUME THE COST OF ALL NE(ESSARY
SERVI(ING, REPAIR OR ( ORRECTION.
12. IN NO EVENT UNLESS REQUIRED BY APPLI( ABLE LAW OR
AGREED TO IN WRITING WILL ANY (.OPYRIGHT HOLDER, OR
ANY OTHER PARTY WHO MAY MODIFY AND/OR REDISTRIBUTE
THE PROGRAM AS PERMITTED ABOVE, BE LIABLE TO YOU FOR
AMAGES. INCLUDING ANY GENERAL. SPE(. IAL. IN(. IDENTAL
OR (ONSEQUENTIAL DAMAGES ARISING OUT OF THE USE OR
INABILITY TO USE THE PROGRAM (IN(LUDING BUT NOT LIMITED
TO LOSS OF DATA OR DATA BEFNG RENDERED INAC(URATE OR
LOSSES SUSTAINED BY YOU OR THIRD PARTIES OR A FAILURE
OF THE PROGRAM TO OPERATE WITH ANY OTHER PROGRAMS),
EVEN IF SU(H HOLDER OR OTHER PARTY HAS BEEN ADVISED OF
THE POSSIBILITY OF SUCH DAMAGES.
END OF TERMS AND CONDITIONS
How to ANN__WThese Terms to Your New Procjrams
If you develop a nex_ program, and you want it to be of the greatest possible
use to the public, the best way to achieve this is to make it I}ee sofrx_are which
everyone can redistribme and change under these terms.
To do so. attach the lbllowing notices to the program. It is safest to attach
them to the start of each source file to most effectively convey the exclusion
of warranty; and each file should have at least the 'copyright" line and a
pointer to where the full notice is lbund
one line to give the program's name and an idea of xvha it does:"
(opyright t: :year::" ::nanle of author:"
This program is free software: you caL_redistribute it an_or modil_ it
under the terms of the GNU General Public License as published by the
Free Soih_ are Foundation: either version 2 of the License. nr(at your
option) any later version
This program is distributed in the hope thai it will be useiid, but
WITHOUT ANY WARRANTY: without even the implied warranty
of MER(HANTABILITY or FITNESS FOR A PARTICULAR
PURPOSE. See the GNU General Public License for more details.
You should have received a copy of the GNU General Public License
along x,_ith this program: if not, write to the Free Solh_ are Foundation.
Inc., 59 Temple Place - Suite 330. Boston, MA 02111-1307, L!SA
Also add information on how to contact you by electronic and paper mail. If e
program is interactive, make it output a short notice like this _hen it starts in
an interactive mode:
Gnomovision version 69. Copyright t: year name of author
Gnomovision comes with ABSOLUTELY NO WARRANTY: lbr details
type sho_ _,_'.
This is free soiix_ are. and you are welcome to redistribute it under certain
conditions: type "show c' lbr details.
The hypothetical commands "show x_' and 'shcu_ c' should show the
appropriate parts of the General Public License. Of course, the commands you
use may be called something other than "shox,_t_' and 'shm,_ c': they could
even be mouse-clicks or menu items--x_ hatever suits your program.
You should also get your employer (if you work as a prograu_mler) or your
school, if any, to sign a 'copyright disclaimer" for the program, if necessary.
Here is a sample: alter the names:
Yoyodyne, Inc.. hereby disclaims all copyright interest in the program
'Gnomovision' (which makes passes at compilers) written by James Hacker.
::signature of Ty (non:', 1 April 1989
Ty (oon. President of Vice
This General Public License does not permit incorporating ynur program
into proprietary programs If your program is a subroutine library, you may
consider it more usefiL1to permit lmldng proprietary applications x,dth the
library. If this is what yntl x_ant to do. use the GNU Library General Public
License instead of this License.
74
GNU LESSER GENERAL PUBLIC LICENSE
Version 2.1, February 1999
( opyright _- 1991 1999 Free Softv_are Foundation Inc.
59 Tenrpte Place. Suite 330, Boston, MA 02111-1307 USA
Everyone is permitted to copy and distribute verbatmr copies of this license
docunrent, but changing it is not allowed
[This is the first released version of the Lesser GPL. It also counts as the
successor of the GNU Library Public License, version 2. hence the version
number 2.1 .]
PreamNe
The licenses lPr most softr,_are are designed to take away your freedom
to share and change it By contrast, the GNU General Public Licenses are
intended to guarantee your freedonr to share and change free soi_r_are-to
nrake sure the sofrr_are is fiee for all its users.
This license, the Lesser General Public License. applies to some specially
designated software packages--typically libraries--of the Free Sol'r _ are
Foundation and other authors r_ho decide to use it. You can use it too, but r_e
suggest you first think carelhlly about r,_hether this license or the ordinar_c
General K_lblic Lice_rse is the better strategy to use m any particular case,
based on the explanations belor_.
When r,_e speak of free software, we are rel_rring to freedonr of use, not price
Our General Ptfblic Licenses are designed to nrake sure that you have the
freedonr to distribute copies of free software (and charge lbr this sepdce if yon
_ ish): that you receive sonrce code or can get it if you r_am it: that you can
change the soiir,_are and use pieces of it in new free programs: and that you
are inlbrmed that you can do these things
To protect your rights, _ e need to nrake restrictions that lbrbid distributors to
deas_ you these rights or to ask you to surrender these rights. These restrictions
trar_slate to certain responsibilities lbr yon if you distribnte copies of the
library or if you nrodil_ it
For exanrple, if you dislribute copies of the library, whether gratis or lPr a fee.
yon nrust give the recipients all the rights that we gave you You must make
sure that they, too, receive or can get the source code If yon link other code
vdth the library, you must provide complete object files to the recipients, so
that they can relink them r_ith the library after nrakmg changes to the library
and reconrpilmg it. And you nrust show them these terms so they know their
rights
We protect yonr rights with a tr,_o-step nrethod: (I) r_e copyright then library.
and (2) we ol"l_ryou this license, which gives yon legal permission to copy,
distribute an_or nrodil_, the library.
To protect each distributor, we want to nrake it ver_" clear that there is no
r_arranty fk)r the free libracv. Also. if the library is modified by sonreone
else and passed on, the recipients should know that r_hat they have is not the
original version, so that the original author's reputation r_ill not be affected by
problenrs that nright be introduced by others
Finally, softr_ are patents pose a constant threat to the existence of any free
progranr We wish to make snre that a conrpany cannot efl_ctively reslrict the
users of a free progranr by obtaining a restrictive license fronr a patent holder.
Therefore. we insist that any patent liceL_seobtained l"_r a version of the
library nrust be consistem r_ith the ihll freedom of use specified m this license.
Most GNU software, including some libraries, is covered by the ordina U
G'qU General Public License This license, the GNU Lesser General Ptlblic
License. applies to certain designated libraries, and is quite different from the
ordinary General Public License. We use this license for certain libraries in
order to pernrit linking those libraries into non-free programs.
When a program is linked _ith a library, whether statically or using a shared
library, the conrbination of the tr_ o is legally speaking a combined work,
a derivafive of the original library. The ordinary General Public License
therelPre permits such linking only if the entire conrbmation fits its criteria
of freedonr. The Lesser General Public License permits nrore lax criteria fbr
linking other code with the library.
We call this license the "Lesser" General Public License because it does Less
to protect the user's freedonr than the ordinary General Public License. It also
provides other free solh,_are developers Less of an advantage over conrpetmg
non-free progranrs. These disadvantages are the reason we use the ordinary
General Public License fk_rnrany libraries. However. the Lesser license
provides advantages m certain special circumstances
For example, on rare occasions, there nray be a special need to encourage the
widest possible use of a certain library, so that it beconres a de-facto standard
To achieve this, non-li'ee progranrs nrnst be allor_ ed to use the librari,. A more
frequent case is that a li_ee library does the sanre job as widely used non-free
libraries. In this case. there is little to gain by Imriting the fiee library to free
software only, so r_e use the Lesser General Public License.
In other cases, permission to use a particular library in non-f?ee programs
enables a greater murrber of people to use a large body of free software. For
exanrple, permission to use the GNU ( Library m non-free programs enables
nrany more people to use the whole GNU operating system, as well as its
variant, the GNUiLinux operating systenr.
Although the Lesser General Public License is Less protective of the users'
freedonr, it does ensure that the user ofa progranr that is linked with the
Libracv has the freedom and the r_herer_ ithal to run that progranr using a
modified version of the Library
The precise terms and conditions lbr copying, distribution and modification
foltor_ Pay close attention to the difi?rence between a 'r,_ork based on the
library" and a 'work that _ses the library". The 1briner contains code derived
fronr the fibrin% whereas the latter nrust be conrbined r_ith the library in order
to run
75
TERMS AND CONDITIONS FOR COPYING.
DISTR_BUTION AND MODiFiCATiON
O. This License Agreemerit applies to any soilware libracv or other program
which contains a notice placed by the copyright holder or other authorized
party saying it may be distributed under the terms of this Lesser General
Public License (also called 'this License") Each licensee is addressed as
"you".
A 'library" means a collection of software ftmctions an&or data prepared so
as to be conveniently linked vdth application programs (which use some of
those functions and data) to f_}rmexecutables.
The 'Library", belox_, tel'ors to any such software library or work which
has been distributed under these terms. A 'work based on the Library"
means either the Library or any derivative work under copyright law: that
is to say, a work containing the Library or a portion of it, either verbatim
or with modifications and/or translated straightfor_ ardly into anolher
language. (Hereinafter, translation is included without limitation in the term
"modification".)
"Source code" %r a "_ork means the preferred %rm of the work %r making
modifications to it. For a library, complete source code means all the source
code l;or all modules it contains, plus am" associated imeriitce definition files,
plus the scripts used to control courpilation and installation of the libraLv
Activities other than copying, distribution and modificmion are not covered
by this License: they are outside its scope. The act of p_mning a program using
the Library is not restricted, and output from such a program is covered only if
its contents constitute a v_ork based on the Library (independent of the use of
the Librari, in a tool l'_r writing it). V,llether that is wde depends on x_hat the
Library does and what the program that uses the Library does.
1 You may copy and distribute verbatim copies of the Library's complete
source code as you receive it, in any medium, provided that you conspicuously
and appropriately publish on each copy an appropriate copyright notice and
disclaimer ofv_arranty; keep intact all the notices that reibr to this License and
to the absence of any warranty; and distribute a copy of this License along
with the Library.
You may charge a l?e li_r the physical act of transl?rring a copy, and you may
at your option oll?r x_arranty protection in exchange fi_r a l?e.
2 You may modify your copy or copies of the Library or any portion of
it. thus l;._rming a work based on the Library, and copy and distribute such
modifications or work under the terms of Section I above, provided that you
also meet all of these conditions:
a) The modified work rrmst itself be a software library.
b) You must canse the files modified to carry prominent notices stating that
you changed the files and the date of any change
c) You mnst canse the whole of the work to be licensed at no charge to all
third parties under the terms of this License
d) Ifa li_cility m the modified Library rei_rs to a fimction or a table of data
to be sopplied by an application program that uses the facility, other
than as an argument passed _ hen the li_cility is invoked, then you must
make a good lidth effort to ensure that,in the event an application does
not supply such function or table, the liicilitv still operates, and perf_rms
whatever part of its purpose remains meaningl_dh
(For example, a ftmction in a library to compute square roots has a
purpose that is entirely x_,ell-defined independent of the application.
TheretPre. Subsection 2d requires that any application-supplied limction
or table used by this limction must be optional: if the application does
not supply it, the square root fimction must still compute square roots.)
These requirements apply to the modified work as a x_hole. If identifiable
sections of that work are not derived from the Librm% and can be
reasonably considered independent and separate _ orks in themselves,
then this License, and its terms, do not apply to those sections "_;henyou
distribute them as separate "_orks. Bnt x_hen you distribute the same
sections as par[ of a x_hole which is a xxork based on the Library, the
distribution of the v_hole must be on the terms of this License, whose
permissions fhr other licensees extend to the entire whole, and thus to
each and ever_ part regardless ofv_ho wrote it.
Thns, it is not the intent of this section to claim rights or contest yonr rights
to "v_ork written entirely by you; rather, the intent is to exercise the right to
control the distribution of derivative or collective works based on the Library.
In addition, mere aggregation of another work not based on the Library "_ith
the Library (or ;_ith a x_ork based on the Library) on a volume of a storage
or distribution medium does not bring the other work under the scope of this
License.
3. You may opt to apply the terms of the ordinary GNU General Public
License instead of this License to a given copy of the Library To do this, you
must alter all the notices that reihr to this License. so that they refer to the
ordinary GNU General Public License. version 2. instead of to this License.
(Ira nex_er version than version 2 of the ordinarl, GNU General Public
License has appeared, then you can specii_ that version instead if you wish)
Do not mnke any other change in these notices
Once this change is made in a given copy, it is irreversible %r that copy, so
the ordinary GNU General Public License applies to all subsequent copies and
derivative works made from that copy.
This option is usefi_I when you x_ish to copy part of the code of the Library
into a program that is not a library.
4. You may copy and distribute the Libra® (or a portion or derivative of
it. under Section 2) in o_qiect code or executable li_}rmunder the terms of
Sections I arid 2 above provided that you accompany it with the complete
corresponding machine-readable sonrce code. which must be distributed
under the terms of Sections 1 and 2 above on a medium customarily used for
software interchange.
If distribution of o_qiectcode is made by ofik'ring access to copy from a
designated place, then off"ring equivalent access to copy the source code from
the same place satisfies the requirement to distribute the scmrce code. even
though third parties are not compelled to copy the source along with the o#l}ect
code.
5. A program that contains no derivative of any portion of the Library. but
is designed to work with the Library by being compiled or linked vdth it.
is called a 'a ork that uses the Library". Such a work. in isolation, is not a
derivative work of the Library, and theref_}re lidls outside the scope of this
License.
However, linking a 'work that uses the Library" with the Library creates an
executable that is a derivative of the Library (because it contains portions
of the Library), rather than a 'v_ ork that uses the fibrin)"'. The executable is
thereii_}recovered by this License. Section 6 states terms f_r distribution of
snch executables
When a 'work that uses the Library" uses material from a header file that is
part of the Library, the ok_}ectcode lL_rthe work may be a derivative work
of the Library even though the source code is not. Whether this is true is
especially significant if the work can be linked v_ithout the Library, or if
the work is itself a library. The threshold l'_r this to be trne is not precisely
defined by law.
76
If such an oI!iect lile uses onty numerical parameters, data structure layouts
and accessors, and small macros and small inlme functions (ten lines or less
m length), then the use of the obiect file is unrestricted, regardless of whether
it is legally a derivative work. (Execntables containing this o'qiect code plus
portions of the Library u ill still £tll under Section 6.)
Other_ ise. if the x_ork is a derivative of the Library, yon may distribute
the o_!iect code lhr the x_ork trader the terms of Section 6. Any executables
containing that work also fhll under Section 6 whether or not they are linked
directly with the Library itself.
6. As an exception to the Sections above, you may also combine or link a
'v_ork that uses the Library" x_ith the Library to produce a x_ork containing
portions of the Library, and distribute that work nnder terms of yol.tr choice,
provided that the terms permit modification of the x_ork lhr the customer's
ox_n use and reverse engineering lbr debugging such modifications
You must give prominent notice with each copy of the work that the Library
is used in it and that the Library and its use are covered by this License You
must supply a copy of this License. If the x_ork daring execution displays
copyright notices, ycm must include the copyright notice for the Library
among them. as well as a reference directing the user to the copy of this
License. Also. you must do one of these things:
a) Accompa W the work with the complete comesponding
machine=readable source code %r the Library including
whatever changes were used in the work (which must be
distributed under Sections i and 2 above); and, if the work
is an executable linked with the Library, with the complete
machine=readable "work that uses the Library", as object
code and/or source code, so that the user can modi*) the
Library and then relink to produce a modified executable
containing the modified Library. (It is understood that
the user who changes the contents of dei_nitions files in
the Libra W will not necessarily be able to recompile the
application to use the modified definitions$
b) Use a suitable shared library mechanisrn *Sr linking with
the Library. A suitable mechanism is one that (!) uses at
rtm time a copy of the library ah'eady present on the user's
computer system, rather than copying libra W fi_mctions
into the executable, and (2) will operate properly with a
modified version of the library, if the user installs one, as
long as the modified version is interIitce-compatible with
the version that the work was made with.
c) Accompany the work with a written offer, valid l\3r at
least three years, to give the same user the materials
specified in Subsection 6a, ;d3ove, *br a charge no more
than the cost ofper%rming this distribution.
d) If distribution of the work is made by offering access to
copy from a designated place, offer eqnivalent access to
copy the above specified materials fi'om the same place.
e) Veri_v that the user has already received a copy of these
materials or that you have already sent this user a copy.
For an executable, the required %rm of the 'u ork that uses the Library" must
include any data and utility programs needed lbr reproducing the executable
from it. Hov_ever. as a special exception, the materials to be distributed
need not include anything that is nomqatly distributed (in either source or
binary lbrm) x_ith the m Nor components (compiler, kernel, and so on) of the
operating system on which the executable r_.ms,unless that component itself
accompanies the executable.
It may happen that this requirement contradicts the license reslrictions of other
proprietary libraries that do not non=ally accompany the operating system.
Such a contradiction means you cannot ttse both them and the LibrmT together
in an executable that yon distribute
7. You may place libraU facilities that are a xvorkbased on the Libra® side-
by-side in a single library.together with other library facilities not covered by
this License, and distribute such a combined libraU, provided that the separate
distribution of the work based on the Library and of the other library facilities
is other_visepermitted, and provided that you do these ta o things:
a) Accompany the combined library x_ith a copy of the same x_ork based on
the Library, uncombined x_ith any other library facilities This must be
distributed under the terms of the Sections above.
b) Give prominent notice with the combined library of the fhct that part
of it is a x_ork based on the Library, and explaining x_here to find the
accompanying uncombined lPrm of the same xvork
8. You may not copy, modify, sublicense, link _ith. or distril-mte the Library
except as expressly provided nnder this License. Any at*erupt otherwise to
copy, modify, snblicense, link with, or distribute the Library is void. and will
automatically terminate your rights under this License. Hox_ever, parties _ho
have received copies, or rights, l_'om you nnder this License will not have their
licenses terminated so long as such parties remain in iidl compliance.
9. Yon are not required to accept this License. since you have not signed
it. Hov_ever, nothing else grants yotl penrdssion to modify or distriN.ge the
Librac_vor its derivative xvorks These actions are prohibited by law if you do
riot accept this License. Therelhre, by modi*_dng or distributing the Library
(or any x_ork based on the Library), you indicate your acceptance of this
License to do so, and all its terms and conditions lbr copying, distributing or
modi*)dng the Libra T or works based on it.
10. Each time you redistribute the Library (or any work based on the Library),
the recipient automatically receives a license l_'om the original licensor to
copy, distribute, link wilh or modii_" the Library sukdect to these terms and
conditions. You may not impose any ftgther restrictions on the recipients'
exercise of the rights granted hereto. You are not responsible *br enforcing
compliance by third parties with this License.
11. If as a consequence ofa co_.trtjudgment or allegation of patent
infringement or lbr any other reason (not limited to pa_ent issues), condhions
are imposed on you (x_hether by court order, agreement or othenvise) that
contradict the conditions of this License, they do not excuse you from
the conditions of this License. If you carmot distribute so as to satisfy
simultaneously your obligations under this License and any other pertinent
obligations, then as a consequence you may not distribute the Library a* all.
For example, if a patent license v_ould not ,enr*it royalty-free redistribution
of the Library by all those x_ho receive cop*es directly or indfrectly through
...................... you could satisl_ both it and this License would be to
refrain entirely from distribution of the Library.
lTany portion of this section is held invalid or nnen%rceable under aW
particular circumstance, the balance of the section is intended to apply, and
the section as a whole is intended to apply m other circumstances.
It is not the purpose of this section to induce you to infringe any patents or
other property right claims or to contest validity of any s_.tchdams; this
section has the sole purpose of protecting the integrity of the free soLx_are
distribution system which is implemented by public license practices Many
people have made generous conlributions to the wide range of sof}ware
distrit-mted through that system in reliance on consistent application of
that system: it is up to the anthoffdonor to decide if he or she is vdlling to
distribute softxvare through any other system and a licensee cannot impose that
choice.
This section is intended to make thoroughly clear what is believed to be a
consequence of the rest of tl'ds License.
77
12. If the distribmion and/or use of the Library is restricted in certain counlries
either by patents or by copyrighted mterlhces, the original copyright bolder
who places the Libra U under this License may add an explicit geographical
distribmion limitation excluding those countries, so that distribution is
permitted only m or among coumries not thus excluded. In such case, this
License incorporates the ]imitation as if written in the body of this License.
13. The Free Software Foundation may publish revised an&or new versions of
the Lesser General Public License from time to time. Such new versions vdli
be similar in spirit to the present version, bm may differ in detail to address
new problems or concerns.
Each version is given a distinguishing version number If the Library specifies
a version number of this License which applies to it and 'any later version",
you have the option of lhllowing the terms and conditions eflher of that
version or of any later version published by the Free Software Foundation. If
the Librarz_ does not specff_, a license version number, you may choose any
version ever published by the Free Softv_are Foundation.
14 If you vdsh to incorporate parts of the LibralT into other free programs
wbose distribution conditions are incompatible vdth these, write to the author
to ask lbr permission. For solhx are _ hich is copyrighted by the Free Software
Foundation, write to the Free Softx_are Foundation: we sometimes make
exceptions lhr this. Our decision x_ill be guided by the two goals of preserving
the free stares of all derivatives of our fi'ee softa are and of promoting the
sharing and reuse of software generally.
NO WARRANTY
15. BE(AUSE THE LIBRARY IS LI(ENSED FREE OF (HARGE.
THERE IS NO WARRANTY FOR THE LIBRARY. TO THE EXTENT
PERMITTED BY APPLI(ABLE LAW EX(EPT WHEN OTHERWISE
STATED IN WRITING THE ( OPYRIGHT HOLDERS AND/OR
OTHER PARTIES PROVIDE THE LIBRARY "AS IS" \VITHOUT
WARRANTY OF ANY KFND. EITHER EXPRESSED OR IMPLIED
IN(LUDING. BUT NOT LIMITED TO. THE IMPLIED WARRANTIES OF
MERCHANTABILITY AND FITNESS FOR A PARTICULAR PURPOSE.
THE ENTIRE RISK AS TO THE QUALITY AND PERFORMANCE
OF THE LIBRARY IS WITH YOU. SHGULD THE LIBRARY PROVE
DEFECTIVE. YOU ASSUME THE (OST OF ALL NECESSARY
SERVI(ING. REPAIR OR C()RRE( TI()N.
16 IN NO EVENT UNLESS REQUIRED BY APPLICABLE LAW OR
AGREED TO IN WRITING \V1LLANY ( OPYRIGHT H()LDER. ()R
ANY OTHER PARTY WHO MAY MODIFY AND/OR REDISTRIBUTE
THE LIBRARY AS PERMITTED ABOVE. BE LIABLE TO Y()U FOR
DAMAGES. FN(LUDING ANY GENERAL. SPE(IAL IN(IDENTAL
OR ( ONSEQUENTIAL DAMAGES ARISING OUT OF THE USE OR
INABILITY TO USE THE LIBRARY (INCLUDING BUT NOT LIMITED
TO LOSS OF DATA OR DATA BEING RENDERED INAC(URATE OR
LOSSES SUSTAINED BY YOU OR THIRD PARTIES OR A FAILURE OF
THE LIBRARY TO OPERATE WITH ANY OTHER SOFTWARE), EVEN
IF SUCH HOLDER OR ()THER PARTY HAS BEEN"ADVISED OF THE
POSSIBILITY OF SU(H DAMAGES.
END OF TERMS AND CONDITIONS
How to A_Dj_vThese Terms to Your New Libraries
If yon develop a ne'a library, and you want it to be of the greatest possible
use to the public. _ e recommend making it tree soih_ are that everyone can
redislribute and change. You can do so by permitting redistribution under
these terms (or. alternatively, under the temps of the ordinary General Public
License)
To apply these terms, attach the %11o'_ing notices to the library. It is sat_st
to attach them to the start of each source file to most efJ_ctively convey the
exclusion ofx_ arrantv; and each file should have at least the 'copyright" line
and a pointer to x_here the full notice is found.
::one line to give the libra®'s name and an idea of a hat it does.>
Copyright t: year::" :name of author>
This libra W is tree software: you can redistribute it an_or modil), it
under the terms of the GNU Lesser General Public License as published
by the Free Software Foundation: either version 2.1 of the License, or (at
your option) any later version.
This libra® is distributed in the hope that it will be uselhl, but
\V1THOUT ANY WARRANT5:': without even the implied x_arranty
of MER(HANTABILITY or FITNESS FOR A PARTI(ULAR
PURPOSE. See the GNU Lesser General Public License lbr more
details.
You should have received a copy of the GNU Lesser General Public
License along with this library; if not. write to the Free Solh,_are
Foundation, Inc.. 59 Temple Place, Suite 330. Boston, MA (12111-1307
USA
Also add in%rmation on how to contact you by electronic and paper mail
You should also get your employer (if you work as a programmer) or your
school, if any, to sign a 'copyright disclaimer" Ik)r the library, if necessary.
Here is a sample; alter the names:
Yoyo@ne, Inc.. hereby disclaims all copyright interest in the library
'Frob' (a library lbr tweaking knobs) written by James Random Hacker.
:signature of Ty Coon:.. I April 1990
Ty (oon, President of Vice
That's all there is to it!
78
1080i ................................................................................ 16, 23
480i .................................................................................. 16, 23
480p ................................................................................ 16, 23
720p ................................................................................ 16, 23
A
ASPECT button ................................................................. 9, 36
ATSC ....................................................................................... 8
AUDIO OUT Terminal ............................................................ 19
Auto shut off .......................................................................... 24
B
BBE ....................................................................................... 43
Blocking Messages ............................................................... 48
C
CableCARD TM............................................................. 8, 11, 14
CableCARD _MINTERFACE ........................................... 11, 14
CC ............................................................................... 8, 55-56
Channel up/down buttons .......................................... 9, 10, 33
Component signal input 1-3 terminals ............................. 11, 16
D
Dolby Digital ...................................................................... 8, 19
DTV ................................................................................... 8, 33
E
EAS ..................................................................................... 7, 8
H
HDM! ............................................................... 8, 22, 32, 38, 43
HDMI input terminal ......................................................... 11,22
HDTV ....................................................................................... 8
I
Input 1, 2, 3 terminals ...................................................... 11, 15
J
JPEG ............................................................................ 8, 49-53
JPEG thumbnail .................................................................... 50
L
LAMP indicator .......................................................... 10, 65-68
Left screen ............................................................................. 37
LIGHT button ........................................................................... 9
M
MPAA .......................................................................... 8, 45-46
MSO .................................................................................... 7, 8
MUTE button ..................................................................... 9, 34
N
NTSC ....................................................................................... 8
Number keys ..................................................................... 9, 33
O
OK button ................................................................................ 9
P
Password ..................................................................... 8, 45, 48
PCM ............................................................................. 8, 19, 23
PC input terminal ............................................................. 10, 20
PC position ................................................................ 32, 38, 40
POWER button (Remote Control) ..................................... 9, 24
POWER button / POWER indicator (Unit) ................. 10, 24, 65
R
R-TUNE button .................................................................. 9, 32
RECALL button ................................................................. 9, 33
Remote Control Sensor ......................................................... 10
Reset All Memory Functions ................................................... 7
RGB cable ............................................................................. 20
Right screen .......................................................................... 37
S
SAP button ........................................................................ 9, 35
SD Card ............................................................................ 49-53
Sleep Timer ..................................................................... 35, 44
Sound mute ........................................................................... 34
Stereo System ....................................................................... 18
SVGA .................................................................................... 21
T
TEMP indicator ................................................................ 10, 65
TV/VIDEO button ......................................................... 9, 10, 32
V
VCR connections ............................................................. 15, 17
VGA ....................................................................................... 21
Volume +/- buttons ...................................................... 9, 10, 33
X
XGA ....................................................................................... 21
Y
Y, PB, PR ............................................................................... 16
79

Customer' Record
The serial number of this product can be found on its back cover. You should note this serial number in the space
provided below and retain this book, plus your purchase receipt, as a permanent record of your purchase to aid in
identification in the event of theft or loss, and for Warranty Service purposes.
Model Number Serial Number
Panasonic Consumer Electronics Company,
Division of Panasonic Corporation of North America
One Panasonic Way Secaucus, New Jersey 07094
Panasonic Sales Company ("PSC'), Division of
Panasonic Puerto Rico, inc.
Ave. 65 de Infanteria, Km. 9.5
San Gabriel Industrial Park, Carolina, Puerto Rico 00985
Printed in Indonesia
LSQT0925 A
S0305-1045