Panasonic
Operating
L IrM HDTV
instructions
ModelsNo.PT-50LCZT0 / PT-56LCZT0 / PT-61LCZ70 /
PT-50LCZ7 / PT-56LCZ7 / PT-61LCZ7 /
PT-50LCZ70-K / PT-56LCZ70-K / PT-61LCZ70-K
'_ DIG|TAL
(USA)
For assistance, please call :
1-888-VIEW PTV(843-9788)
or, contact us via the web at:
http:llwww.panasonic.comlcontactinfo
(Puerto Rico)
For assistance, please call :
787-750-4300
or visit us at www.panasonic.com
w.viw Hum, TM
G_I t;'rY__I_Y _!r'_ HD3D Sound
Three Important Reasons to Register Your Product Immediatelyt
1 Protect Your New investment...
Register your new Projection Display for insurance purposes
in case your new Projection Display is stolen.
2 Product safety notification...
Registering your product can help us to contact you in the unlikely event
a safety notification is required under the Consumer Product Safety Act.
3 improved Product Development...
Help us continue to design products that meet your needs.
Register online at www.panasonic.com/register
(Canada)
For assistance, please call :
1-800-561-5505
or visit us at www.panasonic.ca
ATSC CERTIFIED "
DiGiTAL TELEVISION
* The presence of the DTV certification mark indicates that this product will
successfully receive digital television transmissions that conform to any and all of the
video formats described in the ATSC Digital Television Standard.
As an ENERGY STAR ® Partner, Panasonic Corporation of North America has
®
determined that this product or product model meets the ENERGY STAR guidelines
for energy efficiency.
This operating instruction book is designed for use with models PT-50LCZ70, PT-56LCZ70, PT-61LCZ70,
PT-50LCZ7, PT-56LCZ7, PT-61LCZ7, PT-50LCZ70-K, PT-56LCZ70-K and PT-61LCZ70-K. Illustrations in this
manual show the PT-56LCZ70.
Before connecting, operating or adjusting this product, please read the instructions completely.
Please keep this manual for future reference.
LSQT1225 B
CAUTION
WARNING: To reduce the risk of electric shock, do not remove cover or back. No
user-serviceable parts inside. Refer servicing to qualified service personnel.
This symbol warns the
user that uninsulated
voltage within the unit may
have sufficient magnitude
to cause electric shock.
Therefore, it is dangerous
to make any kind of
contact with any inside part
of this unit.
Note to CATV System Installer:
This symbol alerts the user
that important literature
concerning the operation
and maintenance of this
unit has been included.
Therefore, it should be read
carefully in order to avoid
any problems.
A he pictorial
representation of a hot
surface within a triangle
__ is intended to tell the
user that parts inside the
product are a risk of burns
to persons.
This reminder is provided to call the CATV system installer's attention to Article 820-40 of the NEC that provides
guidelines for proper grounding and, in particular, specifies that the cable ground shall be connected to the grounding
system of the building, as close to the point of cable entry as practical.
To reduce the risk of electric shock, fire, injury to persons or damage to this product:
1) Read these instructions before using, connecting or adjusting this product.
2) Keep these instructions for future reference.
3) Heed all warnings on the product and in this Operating Instructions manual.
4) Follow all instructions carefully.
5) Do not use this apparatus near water. For example, near a bathtub, washbowl, kitchen sink, or laundry tub, in a
wet basement or near a swimming pool, and the like. Do not place objects filled with water, such as a vase or the
like, on top of this unit.
6) Clean only with a dry cloth. Do not use liquid cleaners or aerosol cleaners.
7) Do not block any ventilation openings. Install in accordance with the manufacturer's instructions. Openings
in the cabinet are provided for ventilation to ensure reliable operation and to protect it from overheating. Never block
openings by placing the product on a bed, sofa or similar surfaces.
8) Do not install near any heat source such as radiators, heat registers, stoves, or other apparatus (including
amplifiers) that produces heat. Do not install in a built-in installation such as a bookcase or rack, unless proper
ventilation is provided or the manufacturer's instructions have been adhered to.
9) Do not defeat the safety purpose of the polarized or grounding-type plug. A polarized plug has two blades
with one wider than the other. A grounding type plug has two blades and a third grounding prong. The
wide blade or the third prong are provided for your safety. If the provided plug does not fit into your outlet,
consult an electrician for replacement of the obsolete outlet.
10) Protect the power cord from being walked on or pinched particularly at plugs, convenience receptacles, and
the point where they exit from the apparatus.
11) Only use attachmentslaccessories specified by the manufacturer.
12) Use only with the cart, stand, tripod, bracket, or table specified by the manufacturer, or
sold with the apparatus. When a cart is used, use caution when moving the cartlapparatus
combination to avoid injury from tip-over.
13) Unplug this apparatus during lightning storms or when unused for long periods of time.
14) Refer all servicing to qualified service personnel. Servicing is required when the apparatus has been
damaged in any way, such as power-supply cord or plug is damaged, liquid has been spilled or objects
have fallen into the apparatus, the apparatus has been exposed to rain or moisture, does not operate
normally, or has been dropped.
2
AS WITH ANY SMALL OBJECT, SD CARDS CAN BE SWALLOWED BY YOUNG CHILDREN. DO NOT ALLOW
CHILDREN TO HANDLE THE SD CARD.
TO REDUCE THE RISK OF FIRE OR ELECTRIC SHOCK, DO NOT EXPOSE THIS EQUIPMENT TO RAIN OR
MOISTURE. DO NOT PLACE OBJECTS FILLED WITH WATER, SUCH AS A VASE OR THE UKE, ON TOP OF THIS
APPARATUS.
(1) This Projection Display is intended to be used with the following "iV stand :
model TY-50LCT, TY-56LCT, TY-61LC7, TY-50LC70, TY-56LC70, or TY-61LC70 for the PT-50LCZT0,
PT-56LCZT0, PT-61 LCZT0, PT-50LCZ7, PT-56LCZT, PT-61LCZT, PT-50LCZ70-K, PT-56LCZ70-K, or
PT-61 LCZT0-K. Use with other stands may result in the Projection Display becoming unstable, possibly
causing injury.
(2) This Projection Display should not be exposed to direct sunlight, extreme temperatures or moisture, as this
can result in serious irreparable damage.
= For U.S.A. only -
(3) This Projection Display "iV has an Electrodeless Discharge Lamp that contains mercury.
Disposal may be regulated in your community due to environmental considerations.
For disposal or recycling information, please contact your local authorities, or the Electronic industries
Alliance: <http:llwww.eiae.orq>
Trademarks
• VGA and XGA are trademarks of international Business Machines Corporation.
° Macintosh is a registered trademark of Apple inc., USA.
° SVGA is a trademark of the Video Electronics Standard Association.
Even if no special notation has been made of company or product trademarks, these trademarks have been fully respected.
° Equipped with dbx_-TV Noise Reduction for true MTS reproduction, dbx_-TV Noise Reduction is required for good stereo separation
and audio fidelity, dbx_ is a registered trademark, and is licensed by dbx_ Technology Licensing.
° LIFI 7,Mis a trademark of LUXlM ® Corporation.
Hii:311rn|
HIGH-O_FmlTIONMULTIMEDIAINTERFACE
HDMI, the HDMI logo and
High-Definition Multimedia
Interface are trademarks or
registered trademarks of HDMI
Licensing LLC.
ABB£.ViVA
m E)3[C_ Sound
gJnL
High Definition Sound
Manufactured under license from BBE Sound, Inc.
Licensed by BBE Sound, Inc. under one or more of
the following US patents: 5510752, 5736897. BBE
and BBE symbol are registered trademarks of BBE
Sound, Inc.
SDHC Logo is a trademark.
DiGiTAL
Manufactured under license from Dolby
Laboratories. Dolby and the double-D symbol are
trademarks of Dolby Laboratories.
LIFI TM is a trademark of
LUXIM ® Corporation.
GalleryPlayer and the GalleryPlayer Logo are
trademarks of GalleryPlayer, inc.
GaHeryF_bye_
EZ Sync TM is a trademark of
Matsushita Electric Industrial
Co., Ltd.
i Licensed by Fergason under UPS5717422.
HDAV! Control TM
HDAVI Control TM is a trademark of
Matsushita Electric Industrial Co., Ltd.
License description: To view the license information for software used in this product, press MENU button and select
"Setup"_"About"_"License". (p. 55)
• Do not allow a still picture to be displayed for an extended period, as this can cause a permanent afterimage to remain on this unit.
Examples of still pictures include Iogos, video games, computer images, teletext and images displayed in 4:3 mode.
3
Dear Panasonic Customer
Welcome to the PanasonicJbmily of customers. We hope that you will have many years of enjo_,mentJ?om your new
Projection Display.
To obtain maximum beneJitJ?om your set, please read these Instructions bq!bre making a_v adjustments, and retain
them Jbr fitmre reJbrenee.
Retain your purchase receipt also, and record the serial number o/_,our set in the _paee provided on the rear cover of
these instructions.
_Tsit our Panasonie Web SiteJbr USA : www.panasonie.eom /Jbr Canada : www.panasonie.ea
(USA) For assistance, please call : 1-888-VIEW PTV(843-9788)
or, contact us via the web at: http:llwww.panasonic.comlcontactinfo
(Puerto Rico) For assistance, please call : 787-750-4300
or visit us at www.panasonic.com
(Canada) For assistance, please call : 1-800-561-5505
or visit us at www.panasonic.ca
= For U.S.A. =
FCC STATEMENT:
NOTE:
This equipment has been tested and found to comply with the limits for a Class B digital device, pursuant to Part 15 of
the FCC Rules. These limits are designed to provide reasonable protection against harmful interference in a residential
installation. This equipment generates, uses and can radiate radio frequency energy and, if not installed and used
in accordance with the instructions, may cause harmful interference to radio communications. However, there is no
guarantee that interference will not occur in a particular installation. If this equipment does cause harmful interference to
radio or television reception, which can be determined by turning the equipment off and on, the user is encouraged to try
to correct the interference by one or more of the following measures:
• Reorient or relocate the receiving antenna.
• increase the separation between the equipment and receiver.
• Connect the equipment into an outlet on a circuit different from that to which the receiver is connected.
• Consult the dealer or an experienced radio / TV technician for help.
FCC Caution:
To assure continued compliance, follow the attached installation instructions and use only shielded interface cables
when connecting to computer or peripheral devices. Any changes or modifications not expressly approved by the party
responsible for compliance could void the user's authority to operate this equipment.
ANY CHANGES OR MODIFICATIONS TO THIS PTV RECEIVER NOT EXPRESSLY APPROVED BY PANASONIC
CORPORATION OF NORTH AMERICA COULD CAUSE HARMFUL INTERFERENCE, WHICH WOULD VOID THE
USER'S AUTHORITY TO OPERATE THIS EQUIPMENT.
[[-'_ The Class ]][ insulation symbol (square within a square) indicates that this product has been evaluated and
tested to comply with Class ]][ insulation requirements.
J
Models Number:
Trade Name:
Responsible party:
Address:
Telephone number:
Declaration of Conformity
PT-50LCZT0/PT-56LCZ70/PT-61 LCZTOIPT-50LCZ71PT-56LCZTIPT-61 LCZ7
Panasonic
Panasonic Corporation of North America
One Panasonic Way, Secaucus, New Jersey 07094
1-888-VIEW PTV(843-9788)
This device complies with Part 15 of the FCC Rules. Operation is subject to the following two conditions: (1) This
device may not cause harmful interference, and (2) this device must accept any interference received, including
interference that may cause undesired operation.
CANADIAN NOTICE:
1. Cable Compatible Television Apparatus
2. This Class B digital apparatus complies with Canadian ICES-gO3.
4
To
Start!
,_ iMPORTANT SAFETY iNSTRUCTiONS ..................................... 2
Before Using ..................................................................................... 6
Location of Controls ........................................................................ 9
installation ....................................................................................... 12
Recommended AV Connections ................................................... 2t
Use
Now !
Power ON / OFF .............................................................................. 24
Tuning channels ............................................................................. 26
Projection Display Operation ........................................................ 29
ASPECT Controls ........................................................................... 33
Eni0v EZSy.c_"Feature 34
More Audio Adjustments._____;_ 38
Sleep Timer
Viewing from SD Card.,,,,,,,,,:,,,,,,,,,,,,i,,,,,,,,,,,,,,,,,,.,:,:i,,,::,,,:,:,,,,,,,,,46
Setup Features:L_._:_:_i:_:_:_:_:_:_::::_:_::_:_._ 49
Other operating Peripheral Equipment 56
--" - Remote Control Operation/Code List.,,,,,,,,,,,,,:,,.;,,,,:,,,,:,,,,,.,,,,,,,
• f
information, warning indicators
Troubleshooting 62
Customer Services Directory (for U,S:A:)::::::::::::::::::::::::::::::::::::::
Limited Warranty (for U,S.A:),:,:,:,,,:,,,,',,,,':,,,,",i,,,',,',,,,,,,,.,,,,,':,,,, 65
Limited Warranty (for Canada):,,,i,,:::,:::,:,.,,::,:.:,::,:,:i,,:::,:.:,,.,:,,;,: 66
lnde× _:________________________:____________________________________________________________________67
5

This Projection Display is intended to be used with an
optional stand or entertainment center. Consult your
dealer for available options.
Situate for comfortable viewing. Avoid placing where
sunlight or other bright light (including reflections) will fall
on the screen.
Use of some types of fluorescent lighting can reduce
Remote Control transmitter range.
Adequate ventilation is essential to prevent internal
component failure. Keep away from areas of excessive
heat or moisture.
The Video / Audio connection between components can
be made with shielded video and audio cables. For best
performance, video cables should utilize 75 _ coaxial
shielded cables. Cables are available from your dealer or
electronics store.
Before you purchase any cables, be sure you know
what type of output and input connectors your various
components require. Also determine the length of cable
you'll need.
Please take safety precautions to prevent the unit from
falling over.
Keep the unit at least 100 mm(4-) away from the
wall to provide proper ventilation because warm air
is discharged. Blocking the ventilation opening of
the cooling fan may damage the unit.
100 mm (4")
1. Remote Control (N2QAYB000100)
2. Batteries 2"AA"
3. Cleaning cloth (LSFQ0003)
The unit may tip or fall if not situated on a stable
surface, if pushed or during an earthquake. Use a
strong rope or chain (not included) to fasten the
Projection Display firmly to a strong wall support.
To optimize your viewing comfort, please follow the
viewing guidelines shown in the diagrams below.
If viewing for an extended period of time, sit as far back
from the screen as possible.
< Top view >
i
At least
1.8 m (PT-50LCZ70/PT-50LCZ7/PT-50LCZ70-K) /
2.0 m (PT-56LCZ70/PT-56LCZ7/PT-56LCZ70-K) /
2.2 m (PT-61LCZ70/PT-61LCZ7/PT-61LCZ70-K).
6
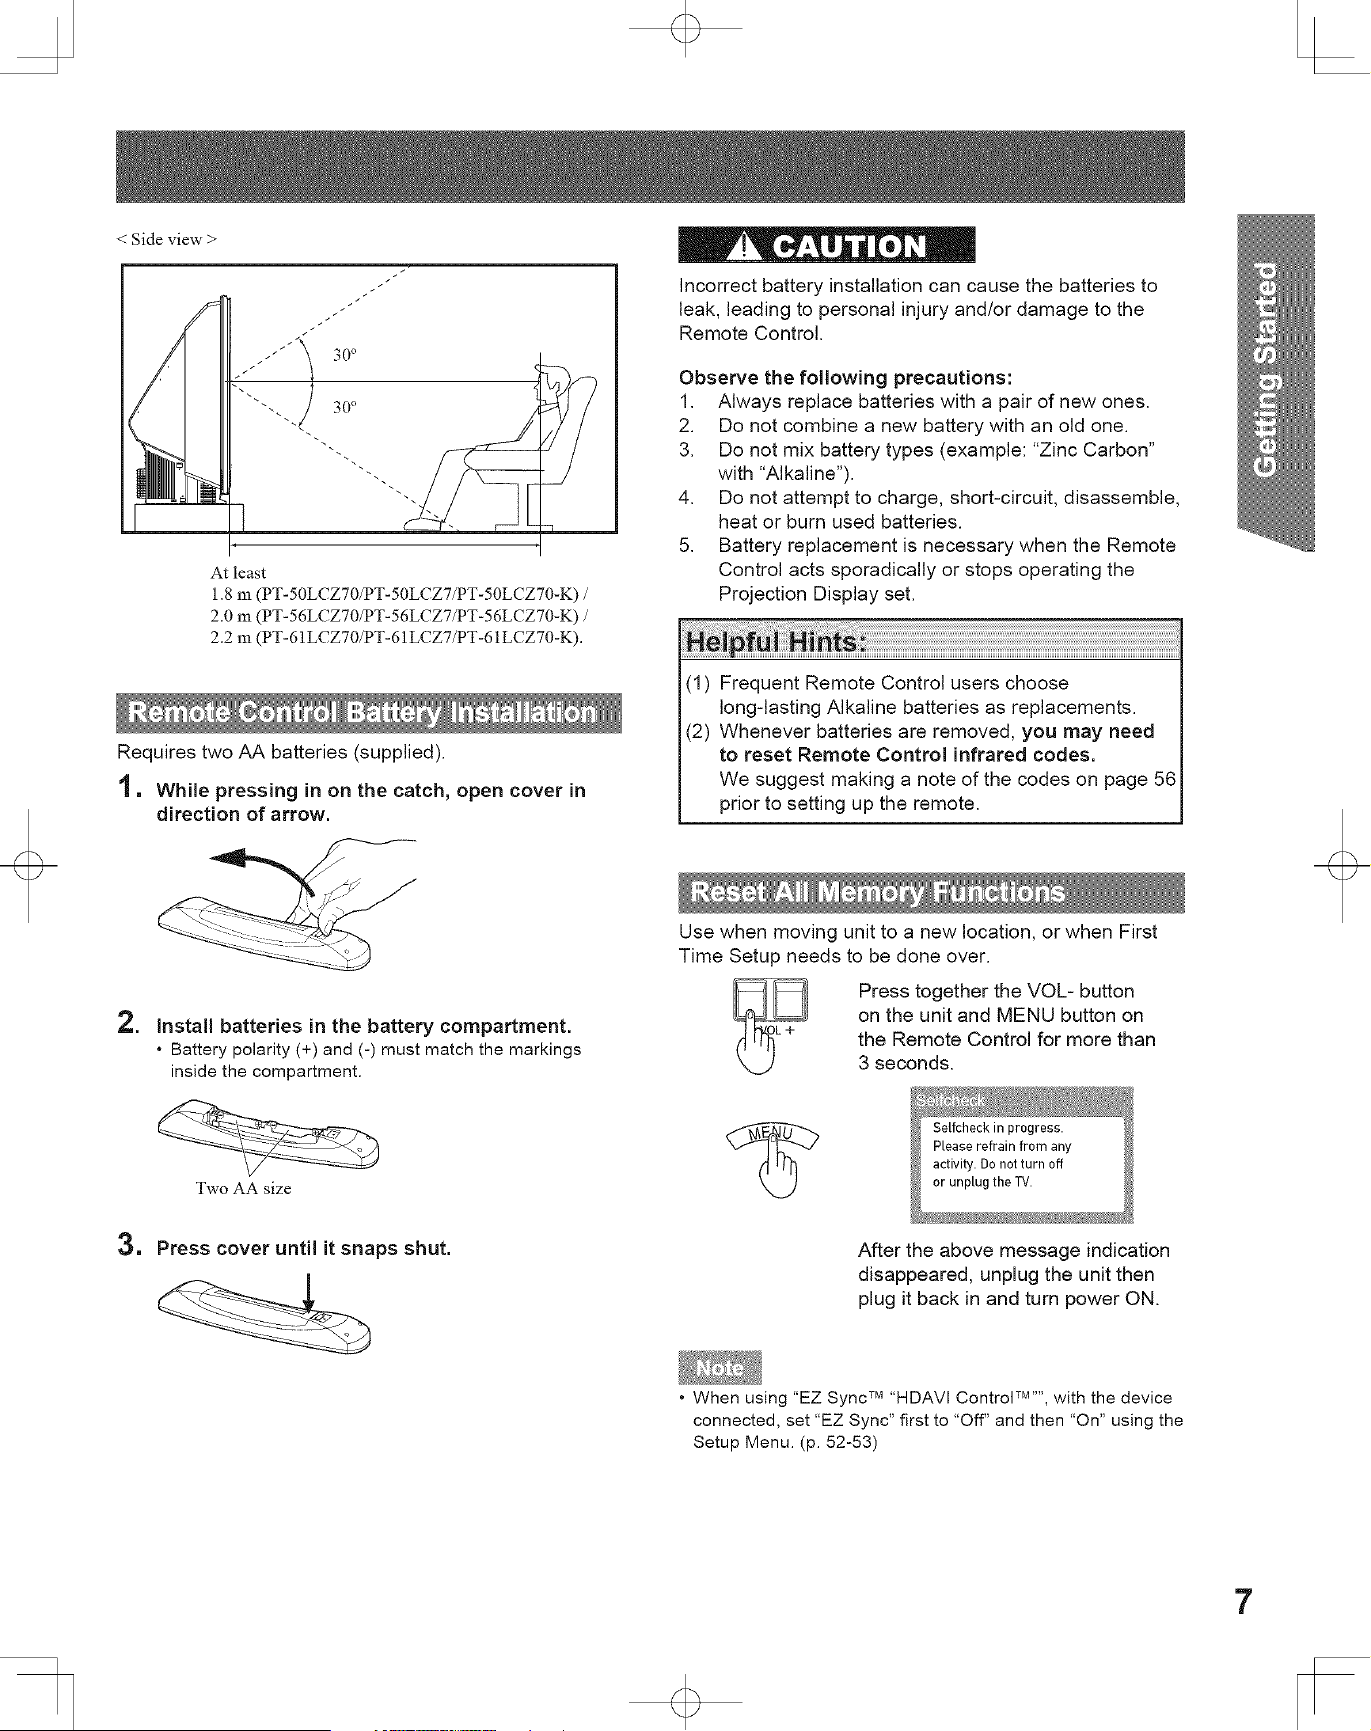
< Side view >
At least
1.8 111(PT-50LCZ70/PT-50LCZ7/PT-50LCZ70-K) /
2.0 m (PT-56LCZ70/PT-56LCZ7/PT-56LCZ70-K) /
2.2 m (PT-61LCZ70/PT-61LCZ7/PT-61LCZ70-K).
Requires two AA batteries (supplied).
'1, While pressing in on the catch, open cover in
direction of arrow.
Incorrect battery installation can cause the batteries to
leak, leading to personal injury and/or damage to the
Remote Control.
Observe the following precautions:
1. Always replace batteries with a pair of new ones.
2. Do not combine a new battery with an old one.
3. Do not mix battery types (example: "Zinc Carbon"
with "Alkaline").
4. Do not attempt to charge, short-circuit, disassemble,
heat or burn used batteries.
5. Battery replacement is necessary when the Remote
Control acts sporadically or stops operating the
Projection Display set.
(1) Frequent Remote Control users choose
long-lasting Alkaline batteries as replacements.
(2) Whenever batteries are removed, you may need
to reset Remote Control infrared codes.
We suggest making a note of the codes on page 56
prior to setting up the remote.
.
Install batteries in the battery compartment.
• Battery polarity (+) and (-) must match the markings
inside the compartment.
Use when moving unit to a new location, or when First
Time Setup needs to be done over.
Press together the VOL- button
on the unit and MENU button on
the Remote Control for more than
3 seconds.
=
Two AA size
Press cover until it snaps shut.
After the above message indication
disappeared, unplug the unit then
plug it back in and turn power ON.
TM
• When using "EZ Sync TM "HDAVI Control ...., with the device
connected, set "EZ Sync" first to "Off" and then "On" using the
Setup Menu. (p. 52-53)
7
To ensure continued excellent performance from this
product, periodic cleaning is recommended.
Projection Display
ii. _ i i __
The unit contains many
plastic parts. For this reason
DO NOT use benzine,
thinner or other chemicals
to clean the unit.
DO NOT bring into contact
with insecticide or other
volatile substances. DO
NOT allow the unit to come
into contact for extended
periods with rubber or vinyl
products.
Remove dirt and soiling by
wiping with a light cloth.
Even if the unit is heavily
soiled, do not apply cleaner
directly to the unit. Soak a
cloth in a solution of neutral
cleanser diluted with water.
Then wring out the cloth,
wipe the unit clean, and
finish by wiping with a dry
cloth. Do not use any type
of cleansers on the picture
screen.
Picture Screen
Dust will accumulate on
the picture screen. Please
wipe with a soft cloth from
time to time. If you use a
chemically treated cloth,
please be careful to follow
the instructions that come
with the cloth.
8
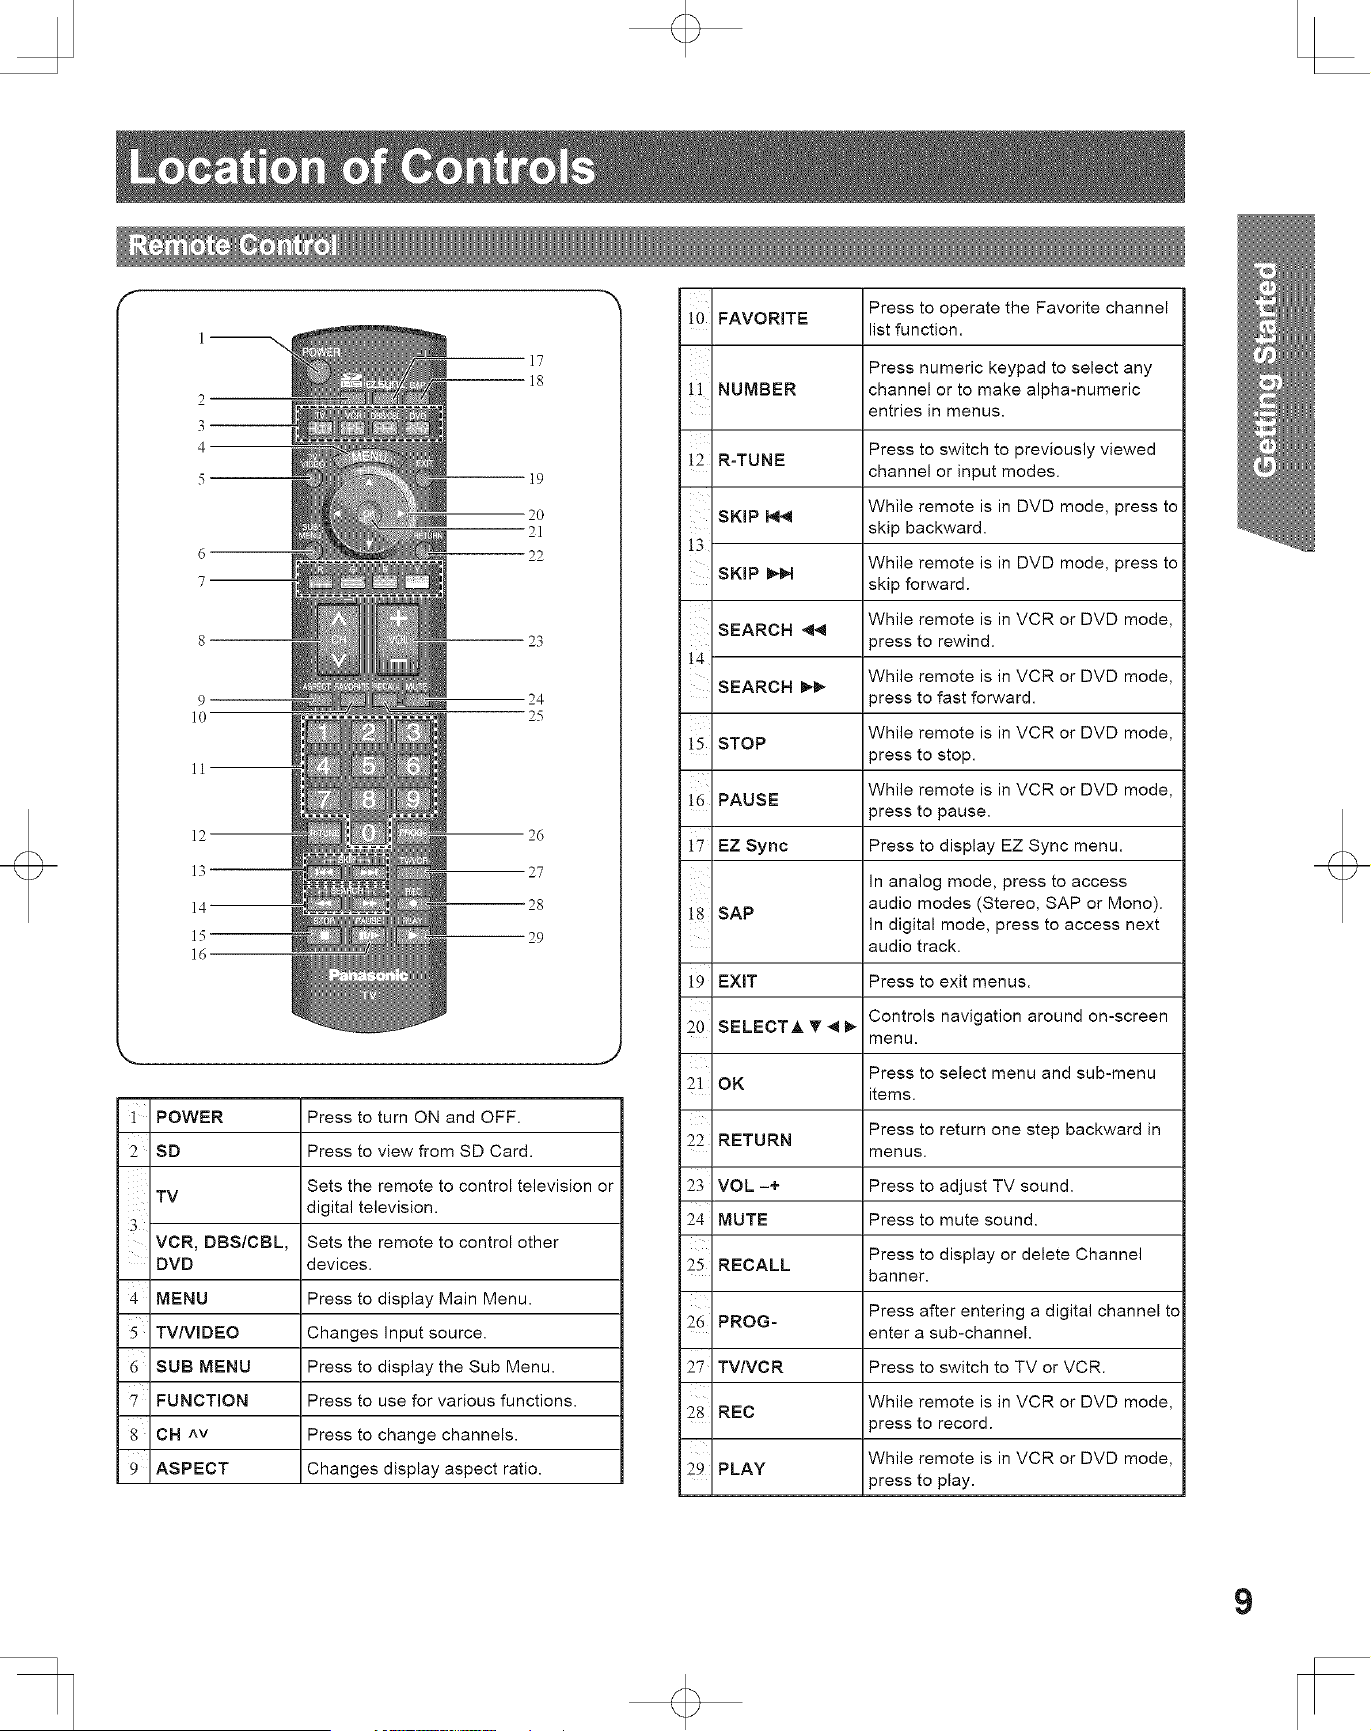
2
3
4
5
6
7
19
20
21
22
23
9 24
10 25
ll
12 26
13 27
14 28
15 29
16
J
1 POWER Press to turn ON and OFF.
SD Press to view from SD Card.
Sets the remote to control television or
TV
digital television.
3
VCR, DBS/CBL, Sets the remote to control other
DVD devices.
4 MENU Press to display Main Menu.
TV/VlDEO Changes Input source.
6 SUB MENU Press to display the Sub Menu.
'7 FUNCTION Press to use for various functions.
8 CH ^v Press to change channels.
9 ASPECT Changes display aspect ratio.
Press to operate the Favorite channel
!0 FAVORITE
list function.
Press numeric keypad to select any
!1 NUMBER channel or to make alpha-numeric
entries in menus.
!2 R-TUNE Press to switch to previously viewed
channel or input modes.
While remote is in DVD mode, press to
SKIP _
skip backward.
!3
While remote is in DVD mode, press to
SKIP _lN
skip forward.
While remote is in VCR or DVD mode,
SEARCH
i4 0ress to rewind.
While remote is in VCR or DVD mode,
SEARCH
0tess to fast forward.
While remote is in VCR or DVD mode,
!5 STOP
3ress to stop.
!6 PAUSE While remote is in VCR or DVD mode,
press to pause.
17 EZ Sync Press to display EZ Sync menu.
In analog mode, press to access
!8 SAP audio modes (Stereo, SAP or Mono).
In digital mode, press to access next
audio track.
i9 EXIT Press to exit menus.
Controls navigation around on-screen
20 SELECTA T _
menu.
Press to select menu and sub-menu
21 OK
items.
Press to return one step backward in
22 RETURN
menus.
23 VOL -+ Press to adjust TV sound.
24 MUTE Press to mute sound.
Press to display or delete Channel
25 RECALL
banner.
26 PROG= Press after entering a digital channel to
enter a sub-channel.
27 TV/VCR Press to switch to TV or VCR.
28 REC While remote is in VCR or DVD mode,
3ress to record.
While remote is in VCR or DVD mode,
29 PLAY
press to play.
9
] 2 3
POWER
button
POWER
indicator
LAMP
indicator
Press to turn ON and OFF.
(p. 24, 61,62)
Lights up green when power
is ON. (p. 24, 61,62)
Lights up or flashes when the
lamp unit is malfunctioning.
(p. 24, 61)
Open Door:
Press position O, and
slide Door open as
shown by arrow.
Close Door:
Press position O, and
slide Door closed as
shown by arrow.
m
Remote Control
Sensor
] 2 4 6 7
INPUT3 VIDEO=L=AUDI(
HDMI Input Connect from other
Terminal 3 component. (HDMI 3)
SD CARD Slot Insert SD Card.
TV/VlDEO* Changes Input source.
4 VOL =+* Press to adjust TV sound.
CH v^* Press to change channels.
Video Input Connect from other
Connector 3 component. (Video 3)
Audio Input Connect from other
Connector 3 component. (Video 3 / HDMI 3)
* Buttons listed above operate the same as Remote Control buttons of the same name.
10
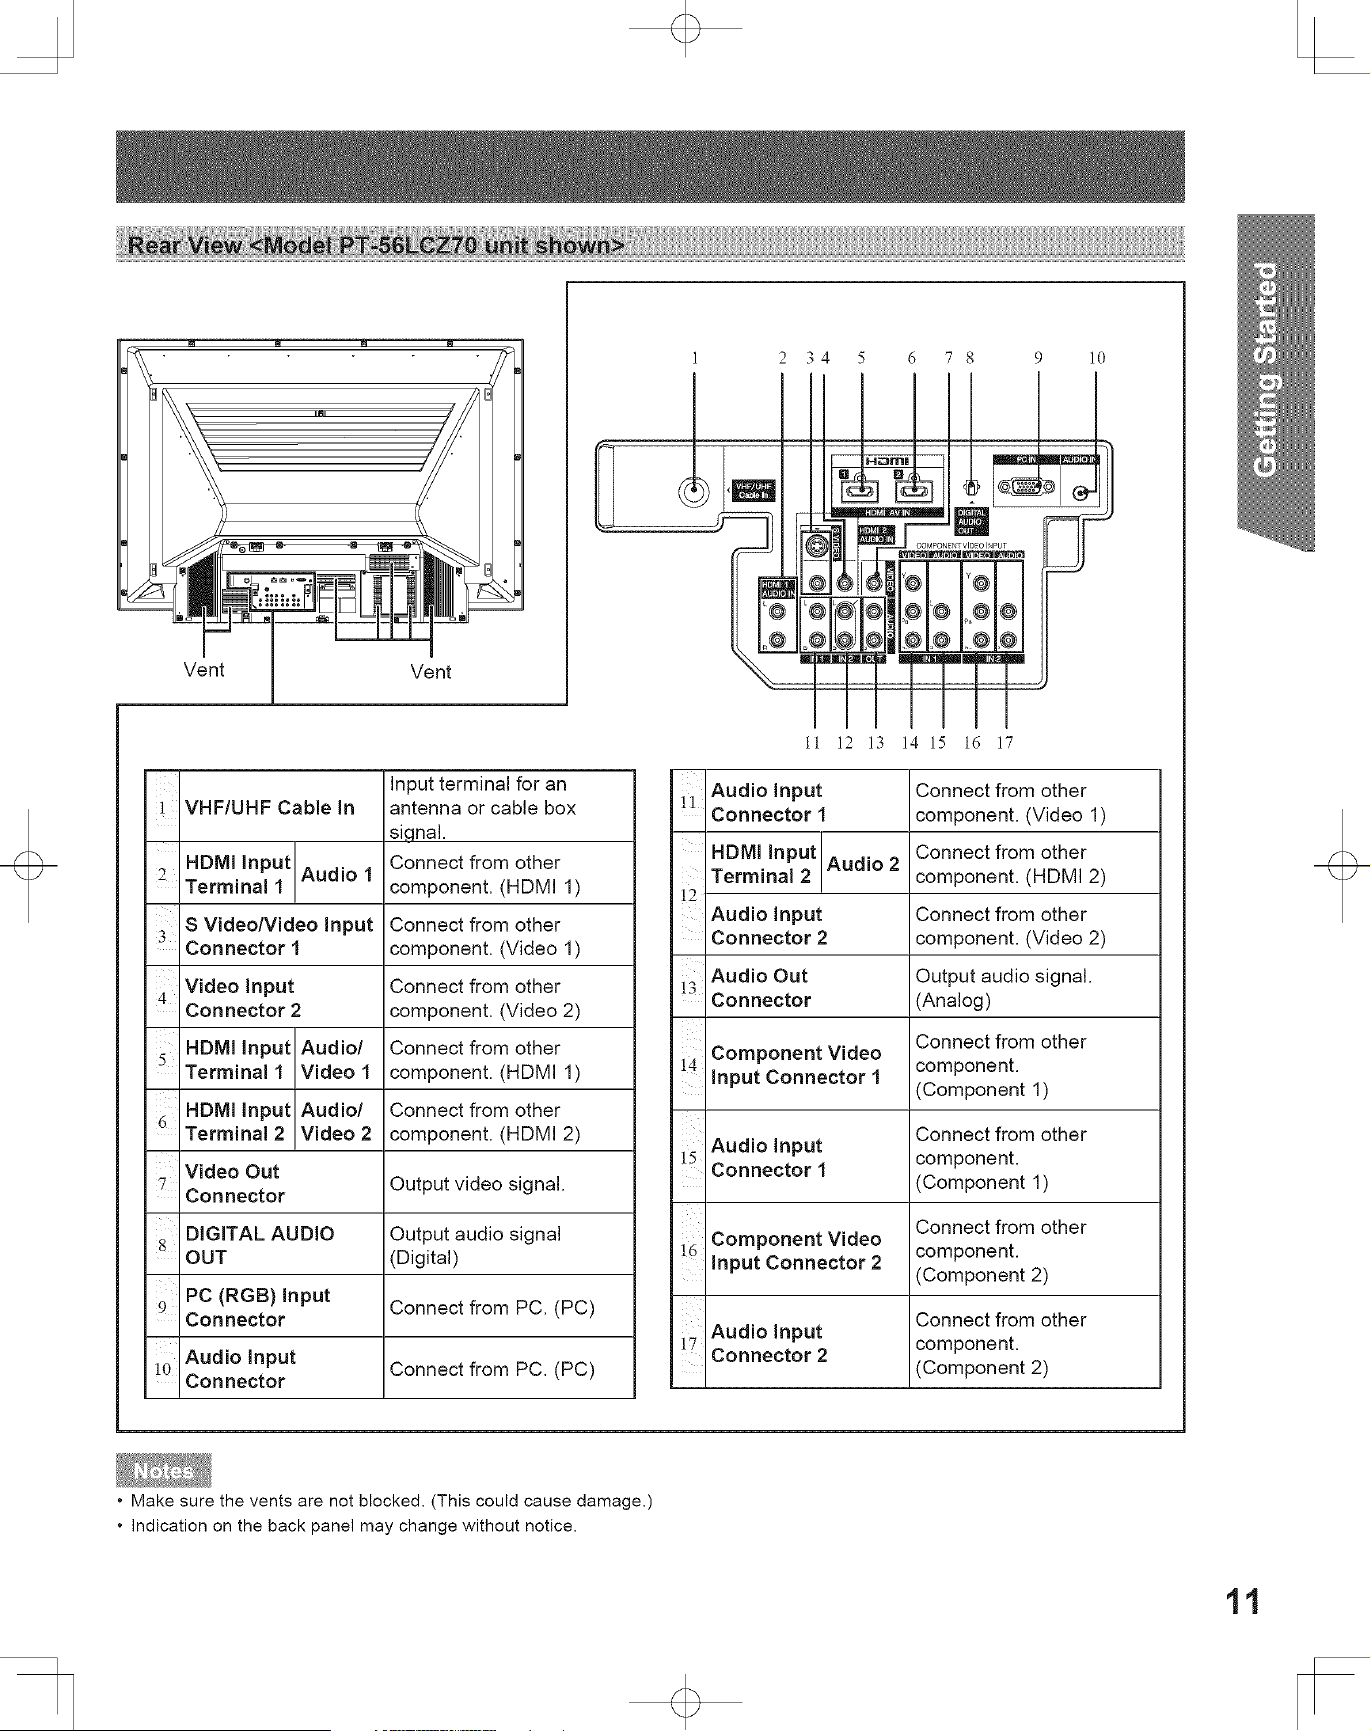
2 34 5 6 7 8 9 10
VHF/UHF CaNe In
Input terminal for an
antenna or cable box
siqnal.
Connect from other
component. (HDMI 1)
Connect from other
component. (Video 1)
Connect from other
component. (Video 2)
Connect from other
component. (HDMI 1)
Connect from other
component. (HDMI 2)
HDMi Input Audio 1
Terminal 1
S Video/Video Input
Connector 1
Video Input
Con nector 2
HDMI Input Audio/
Terminal 1 Video 1
HDMI input Audio/
Terminal 2 Video 2
Video Out
Con nector
DIGITAL AUDIO
OUT
PC (RGB) Input
Con nector
Audio Input
Con nector
Output video signal.
Output audio signal
(Digital)
Connect from PC. (PC)
10 Connect from PC. (PC)
11 12 13 14 15 16 17
Audio Input Connect from other
Connector 1 component. (Video 1)
HDMI Input Audio 2 Connect from other
Terminal 2 component. (HDMI 2)
12
Audio Input Connect from other
Connector 2 component. (Video 2)
!3 Audio Out Output audio signal.
Connector (Analog)
Connect from other
Component Video component.
Input Connector 1 (Component 1)
Connect from other
Audio Input component,
Connector 1
(Component 1)
Connect from other
i6 Component Video component.
Input Connector 2 (Component 2)
Connect from other
Audio Input component,
Connector 2
(Component 2)
• Make sure the vents are not blocked. (This could cause damage.)
• indication on the back panel may change without notice.
11
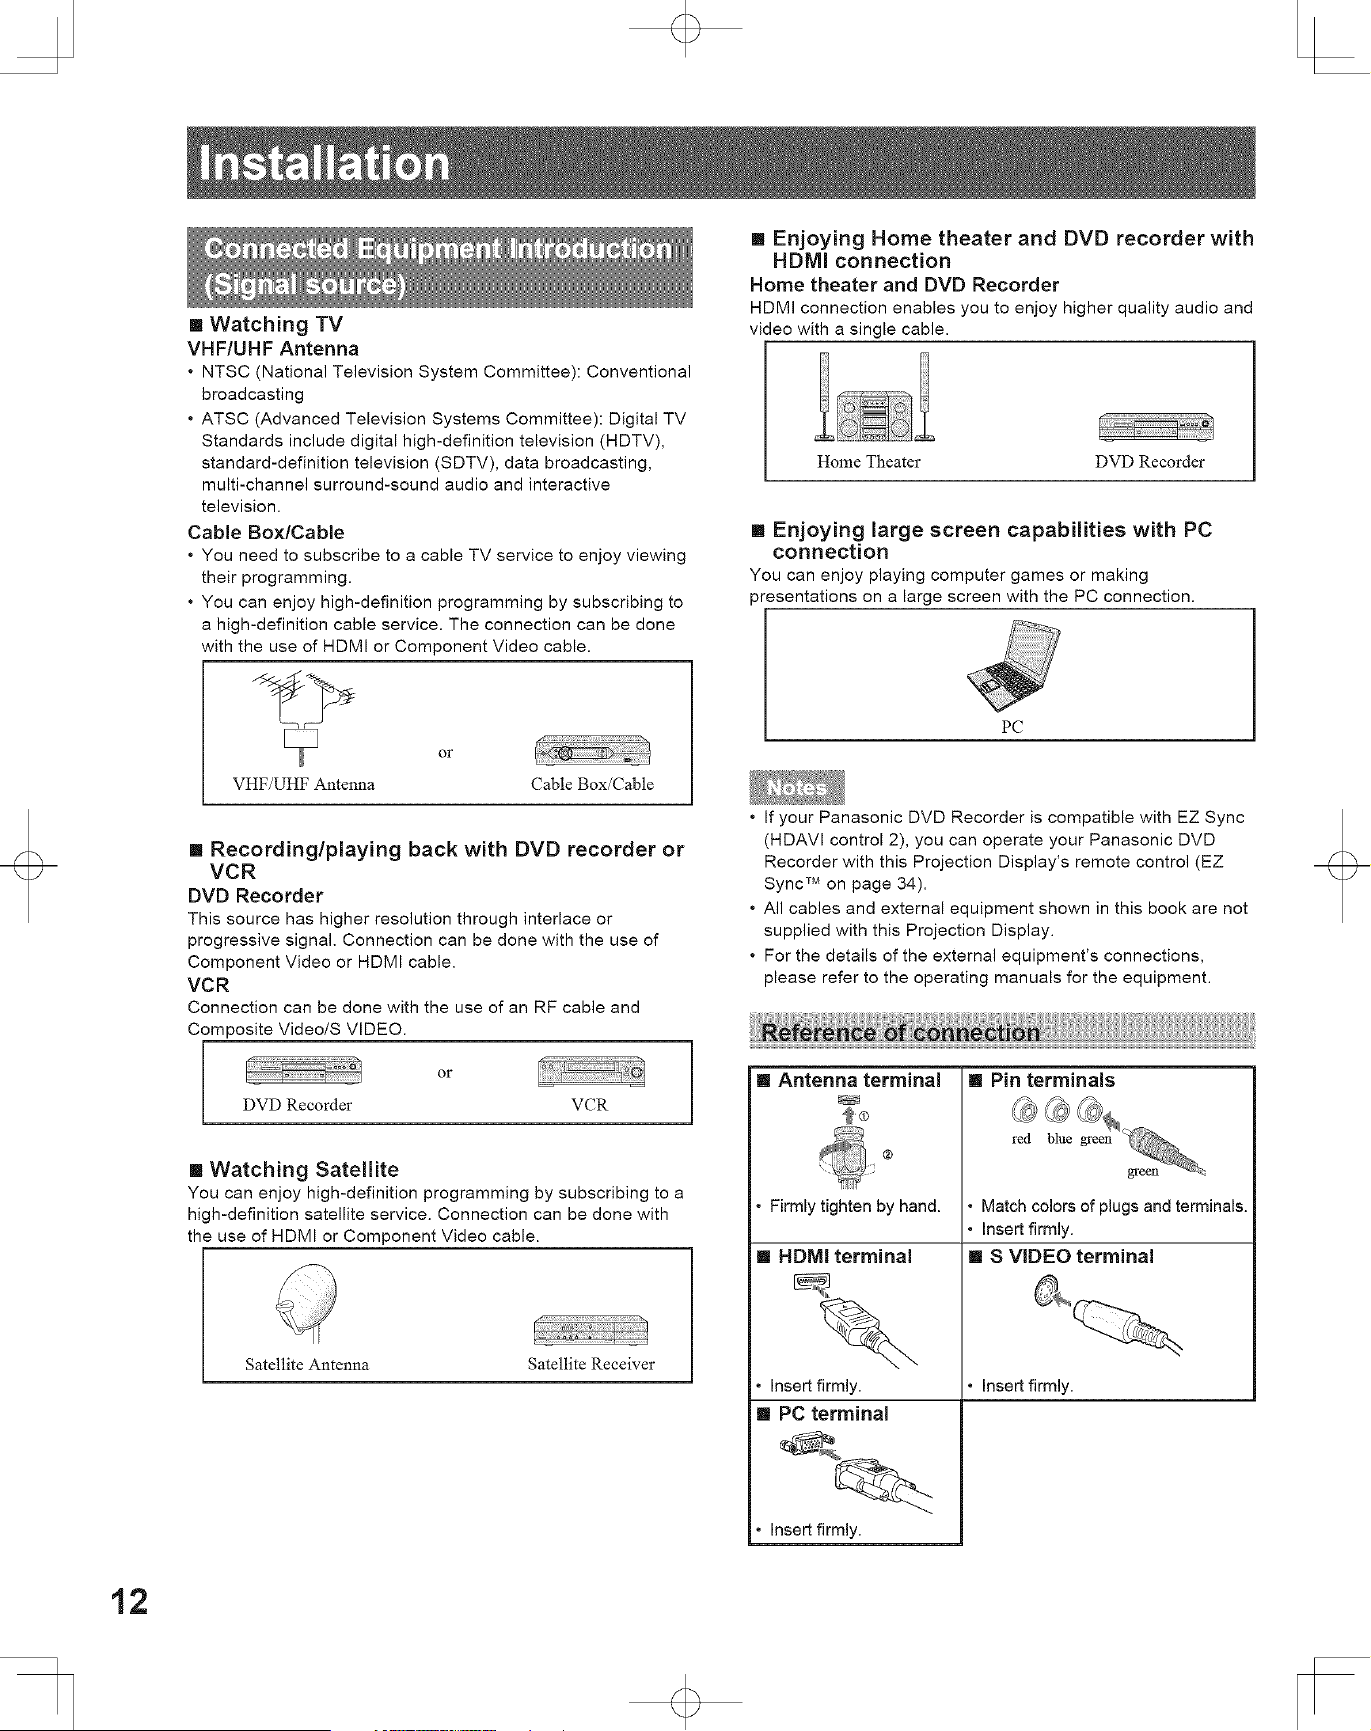
[] Watching TV
VHF/UHF Antenna
° NTSC (National Television System Committee): Conventional
broadcasting
° ATSC (Advanced Television Systems Committee): Digital TV
Standards include digital high-definition television (HDTV),
standard-definition television (SDTV), data broadcasting,
multi-channel surround-sound audio and interactive
television.
Cable Bo×/Cable
• You need to subscribe to a cable TV service to enjoy viewing
their programming.
• You can enjoy high-definition programming by subscribing to
a high-definition cable service. The connection can be done
with the use of HDMI or Component Video cable.
VHF/UHF Antenna
or
Cable Box/Cable
[] Recording/playing back with DVD recorder or
VCR
DVD Recorder
This source has higher resolution through interlace or
progressive signal. Connection can be done with the use of
Component Video or HDMI cable.
VCR
Connection can be done with the use of an RF cable and
Composite Video/S VIDEO.
[ or
DVD Recorder VCR
[] Watching Satellite
You can enjoy high-definition programming by subscribing to a
high-definition satellite service. Connection can be done with
the use of HDMI or Component Video cable.
Satellite Antenna Satellite Receiver
[] Enjoying Home theater and DVD recorder with
HDMI connection
Home theater and DVD Recorder
HDMI connection enables you to enjoy higher quality audio and
video with a single cable.
Home Theater DVD Recorder
[] Enjoying large screen capabilities with PC
connection
You can enjoy playing computer games or making
presentations on a large screen with the PC connection.
PC
• If your Panasonic DVD Recorder is compatible with EZ Sync
(HDAVI control 2), you can operate your Panasonic DVD
Recorder with this Projection Display's remote control (EZ
Sync TM on page 34).
• All cables and external equipment shown in this book are not
supplied with this Projection Display.
• For the details of the external equipment's connections,
please refer to the operating manuals for the equipment.
[] Antenna terminal
_ iiili @
• Firmly tighten by hand.
[] HDMI terminal
• Insert firmly.
[] PC terminal
• Insert firmly.
[] Pin terminals
• Match colors of plugs and terminals.
• Insert firmly.
[] S VIDEO terminal
• Insert firmly.
12
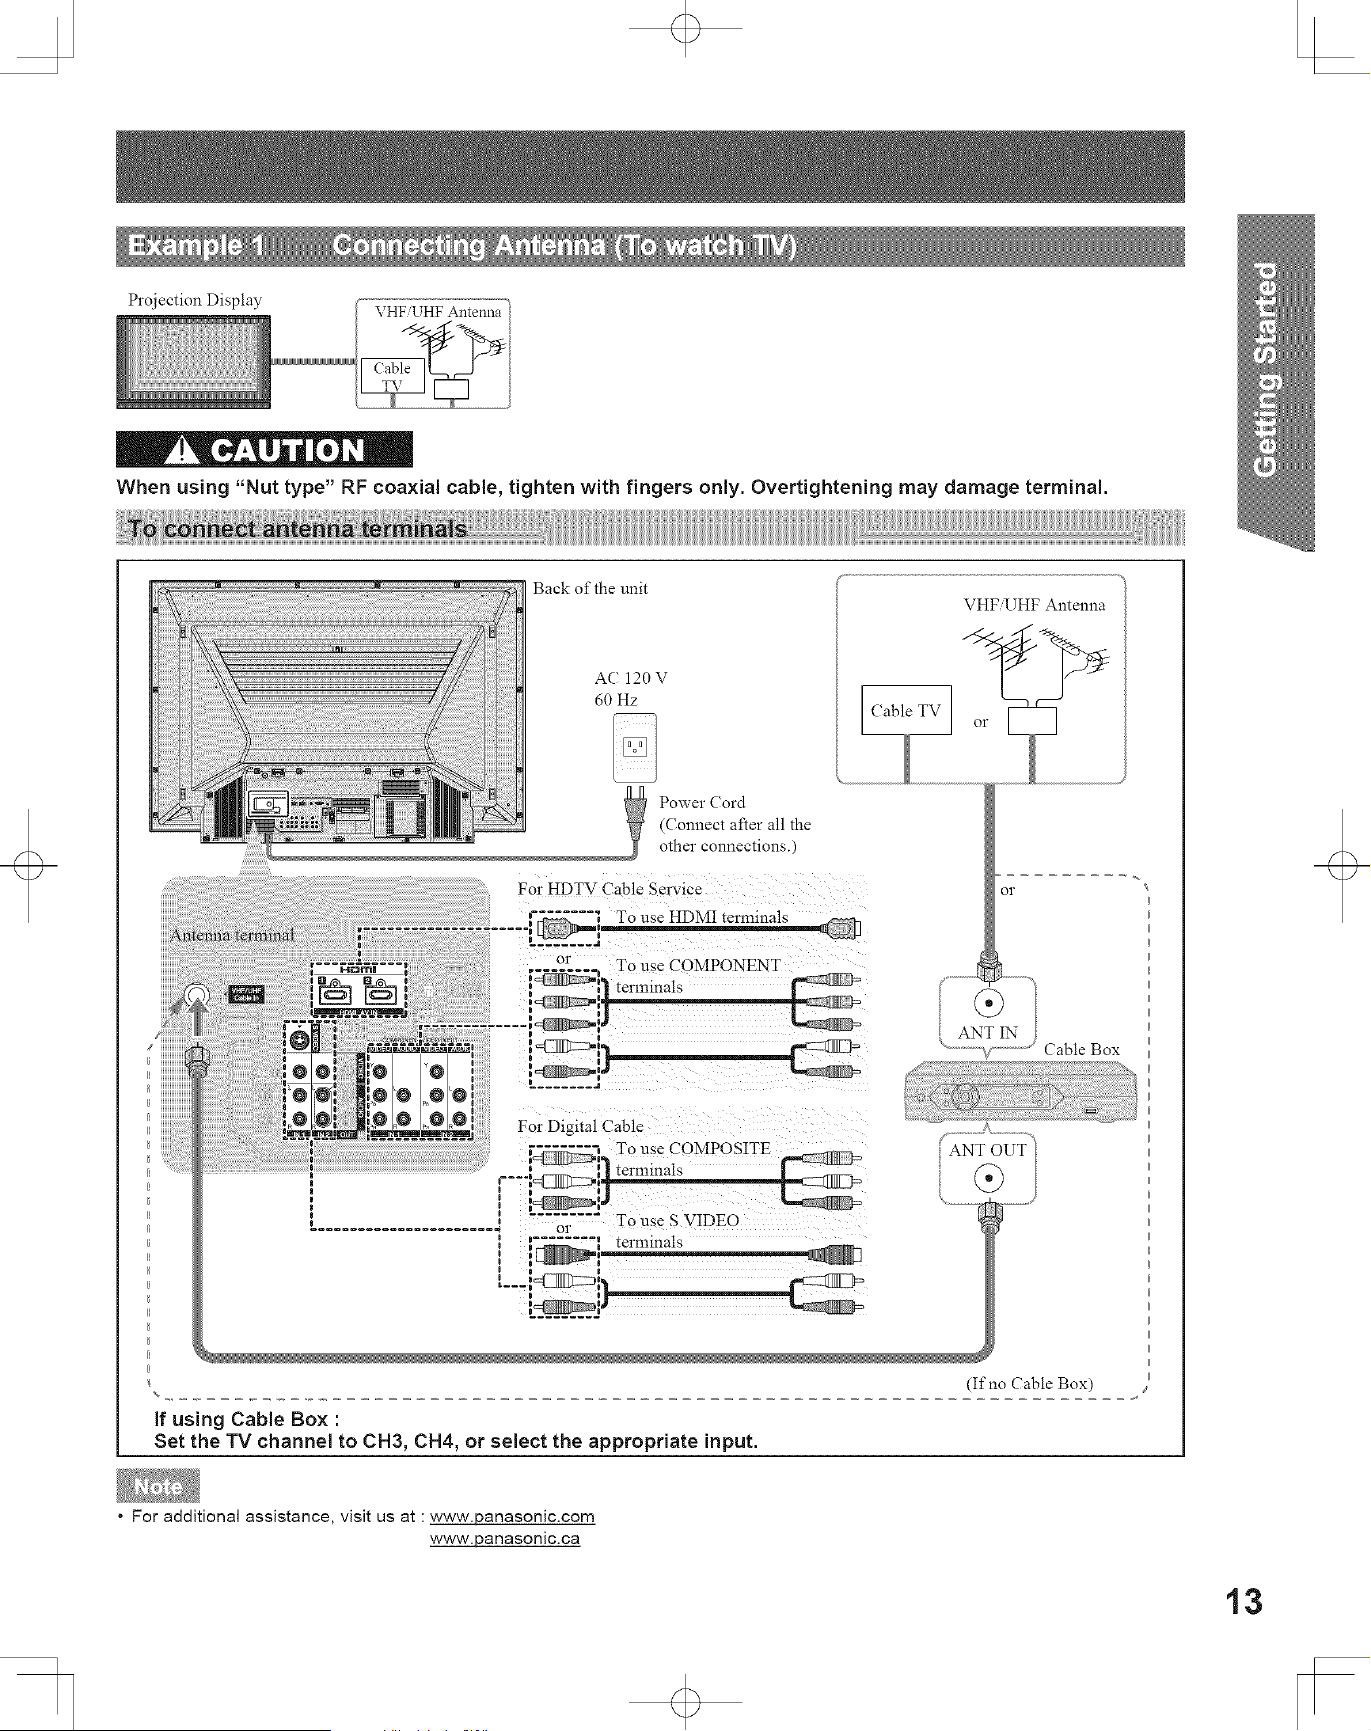
Projection Display
When using "Nut type" RF coaxial cable, tighten with fingers only. Overtightening may damage terminal.
Back of the unit
AC 120 V
60 Hz
Power Cord
(Connect after all the
other connections.)
VHF 'UHF Antenna
or
Cable Box
....................... J or To use S VIDEO
i
1
0
0 0 t
(If no Cable Box)
If using CaNe Box :
Set the TV channel to CH3, CH4, or select the appropriate input.
• For additional assistance, visit us at : www.panasonic.com
www.panasonic.ca
13
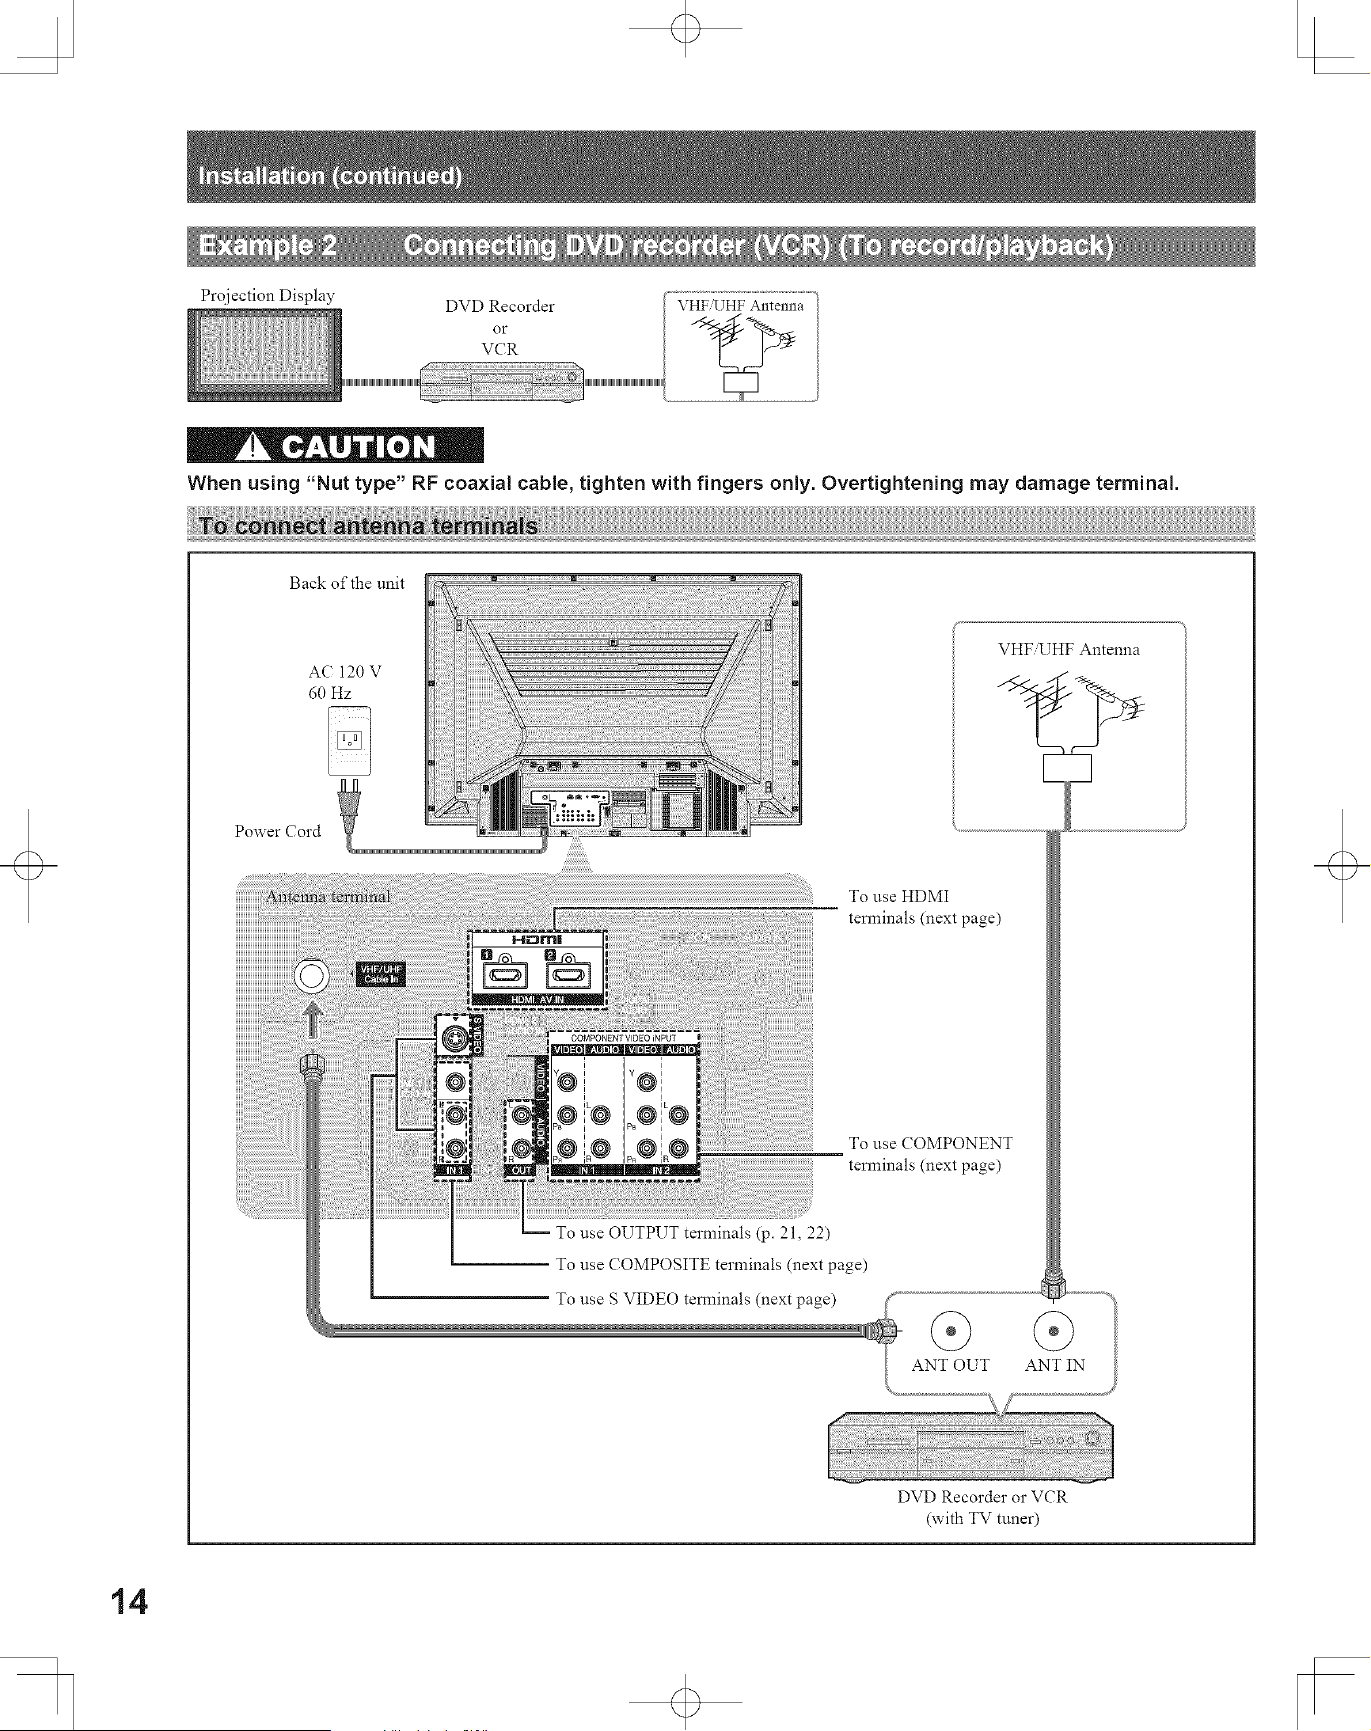
PmJection Display
DVD Recorder
or
VCR
When using "Nut type" RF coaxial cable, tighten with fingers only. Overtightening may damage terminal.
Back of the unit
AC 120 V
60 Hz
Power Cord
COMPONENT VIDEO iNPUT
p0@iL@
Left@
Po use OUTPUT terminals (p. 21, 22)
Po use COMPOSITE terminals (next page)
1-o use S VIDEO tem_inals (next page)
VHF,UHF Antenna
El
To use HDMI
tenninals (next page)
To use COMPONENT
terminals (next page)
ANT OUT ANT IN
DVD Recorder or VCR
(with TV tuner)
14
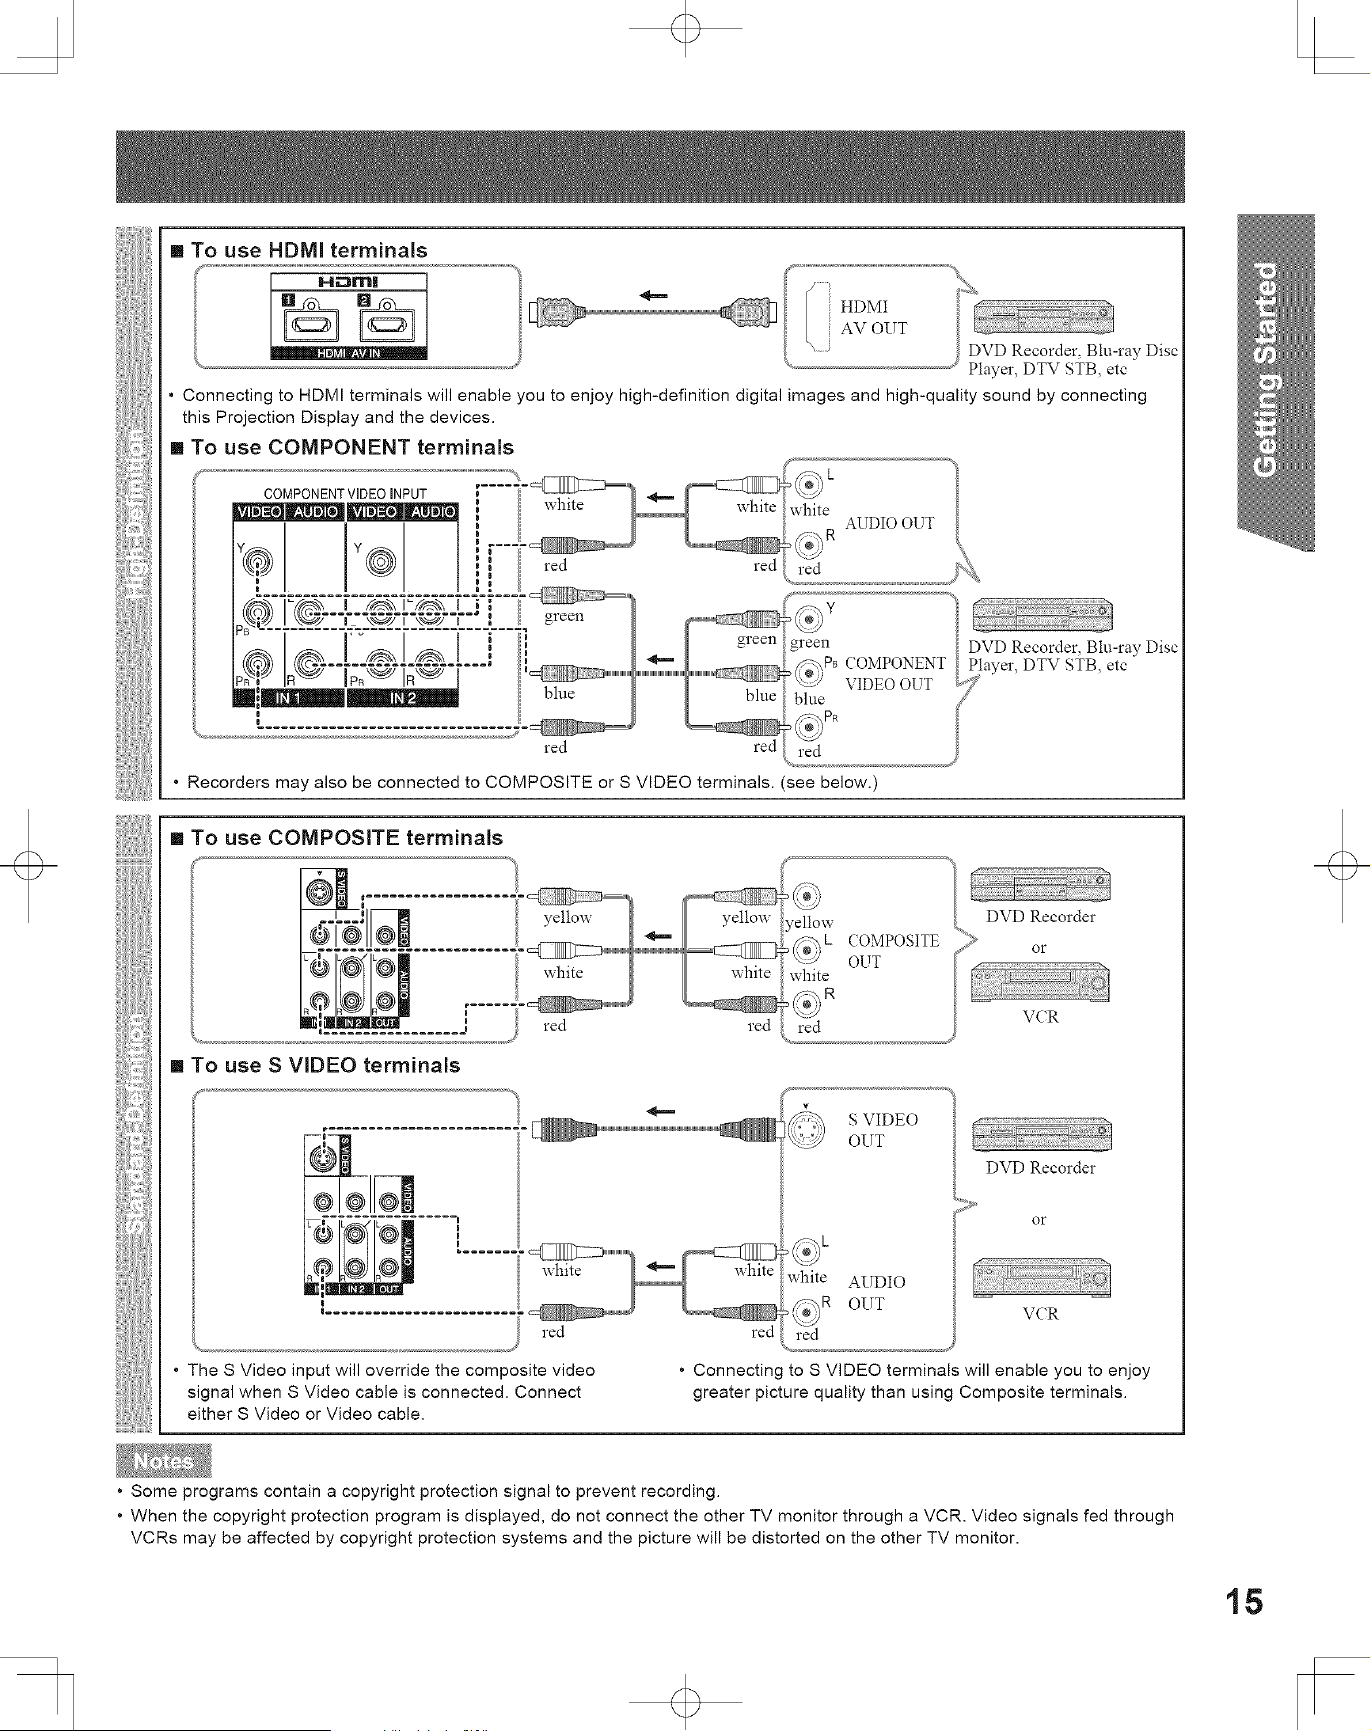
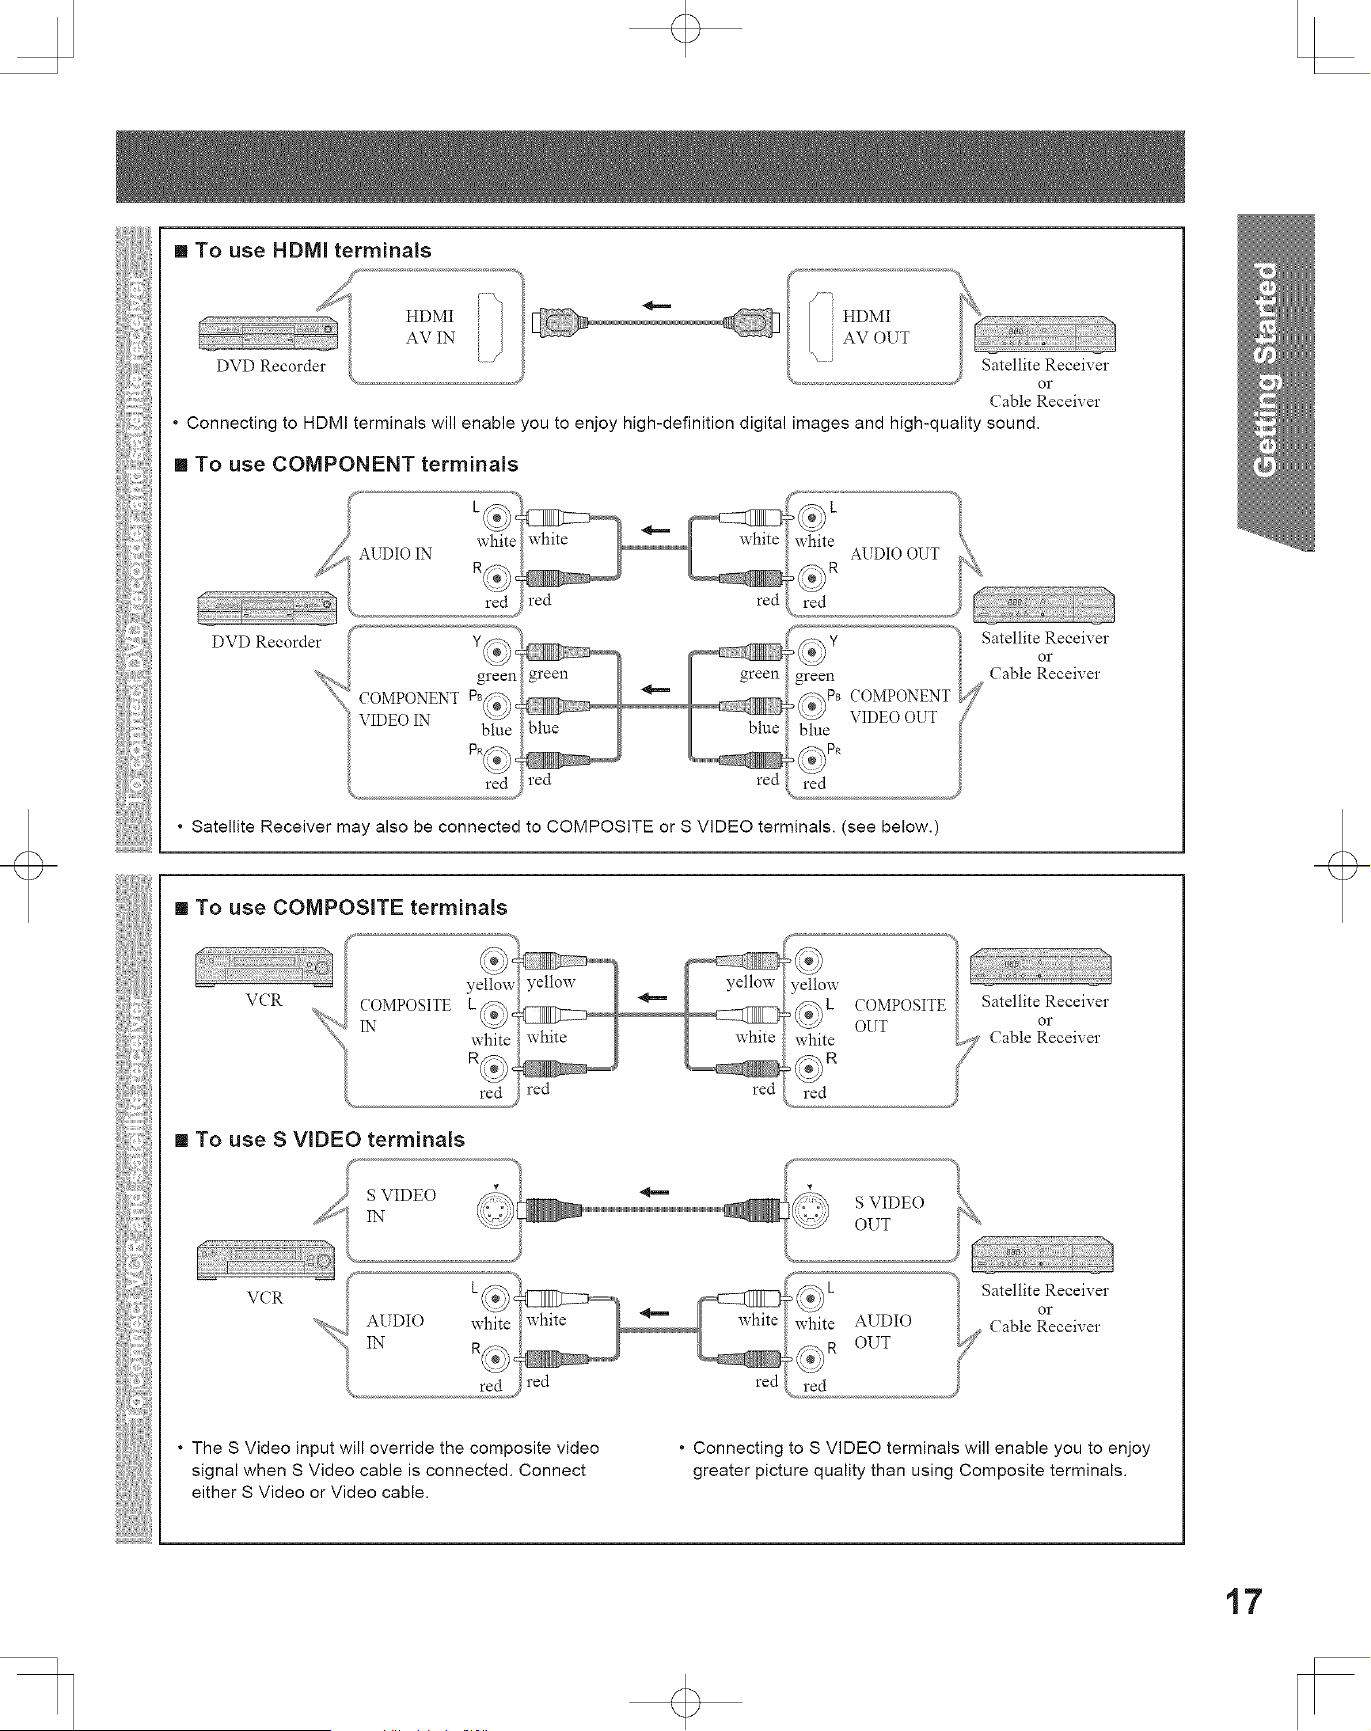
[] To use HDMI terminals
• Connecting to HDMI terminals will enable you to enjoy high-definition digital images and high-quality sound by connecting
this Projection Display and the devices.
[] To use COMPONENT terminals
%
COMPONENTVIDEOINPUT
red
red red
• Recorders may also be connected to COMPOSITE or S VIDEO terminals.
AUDIO OUT
green DVD Recorder. Bin-ray Disc
,f_'_PB COMPONENT Player_ DTV STB_ etc
_2:Y VIDEO OUT _Yblue
red J
'see below.)
[] To use COMPOSITE terminals
[] To use S VIDEO terminals
-{
o®I®D
red
yellow
COMPOSITE _ or
o@L
white OUT
: ,(_.{>R VCR
red
• The S Video input will override the composite video
signal when S Video cable is connected. Connect
either S Video or Video cable.
red
• Connecting to S VIDEO terminals will enable you to enjoy
greater picture quality than using Composite terminals.
• Some programs contain a copyright protection signal to prevent recording.
• When the copyright protection program is displayed, do not connect the other TV monitor through a VCR. Video signals fed through
VCRs may be affected by copyright protection systems and the picture will be distorted on the other TV monitor.
15
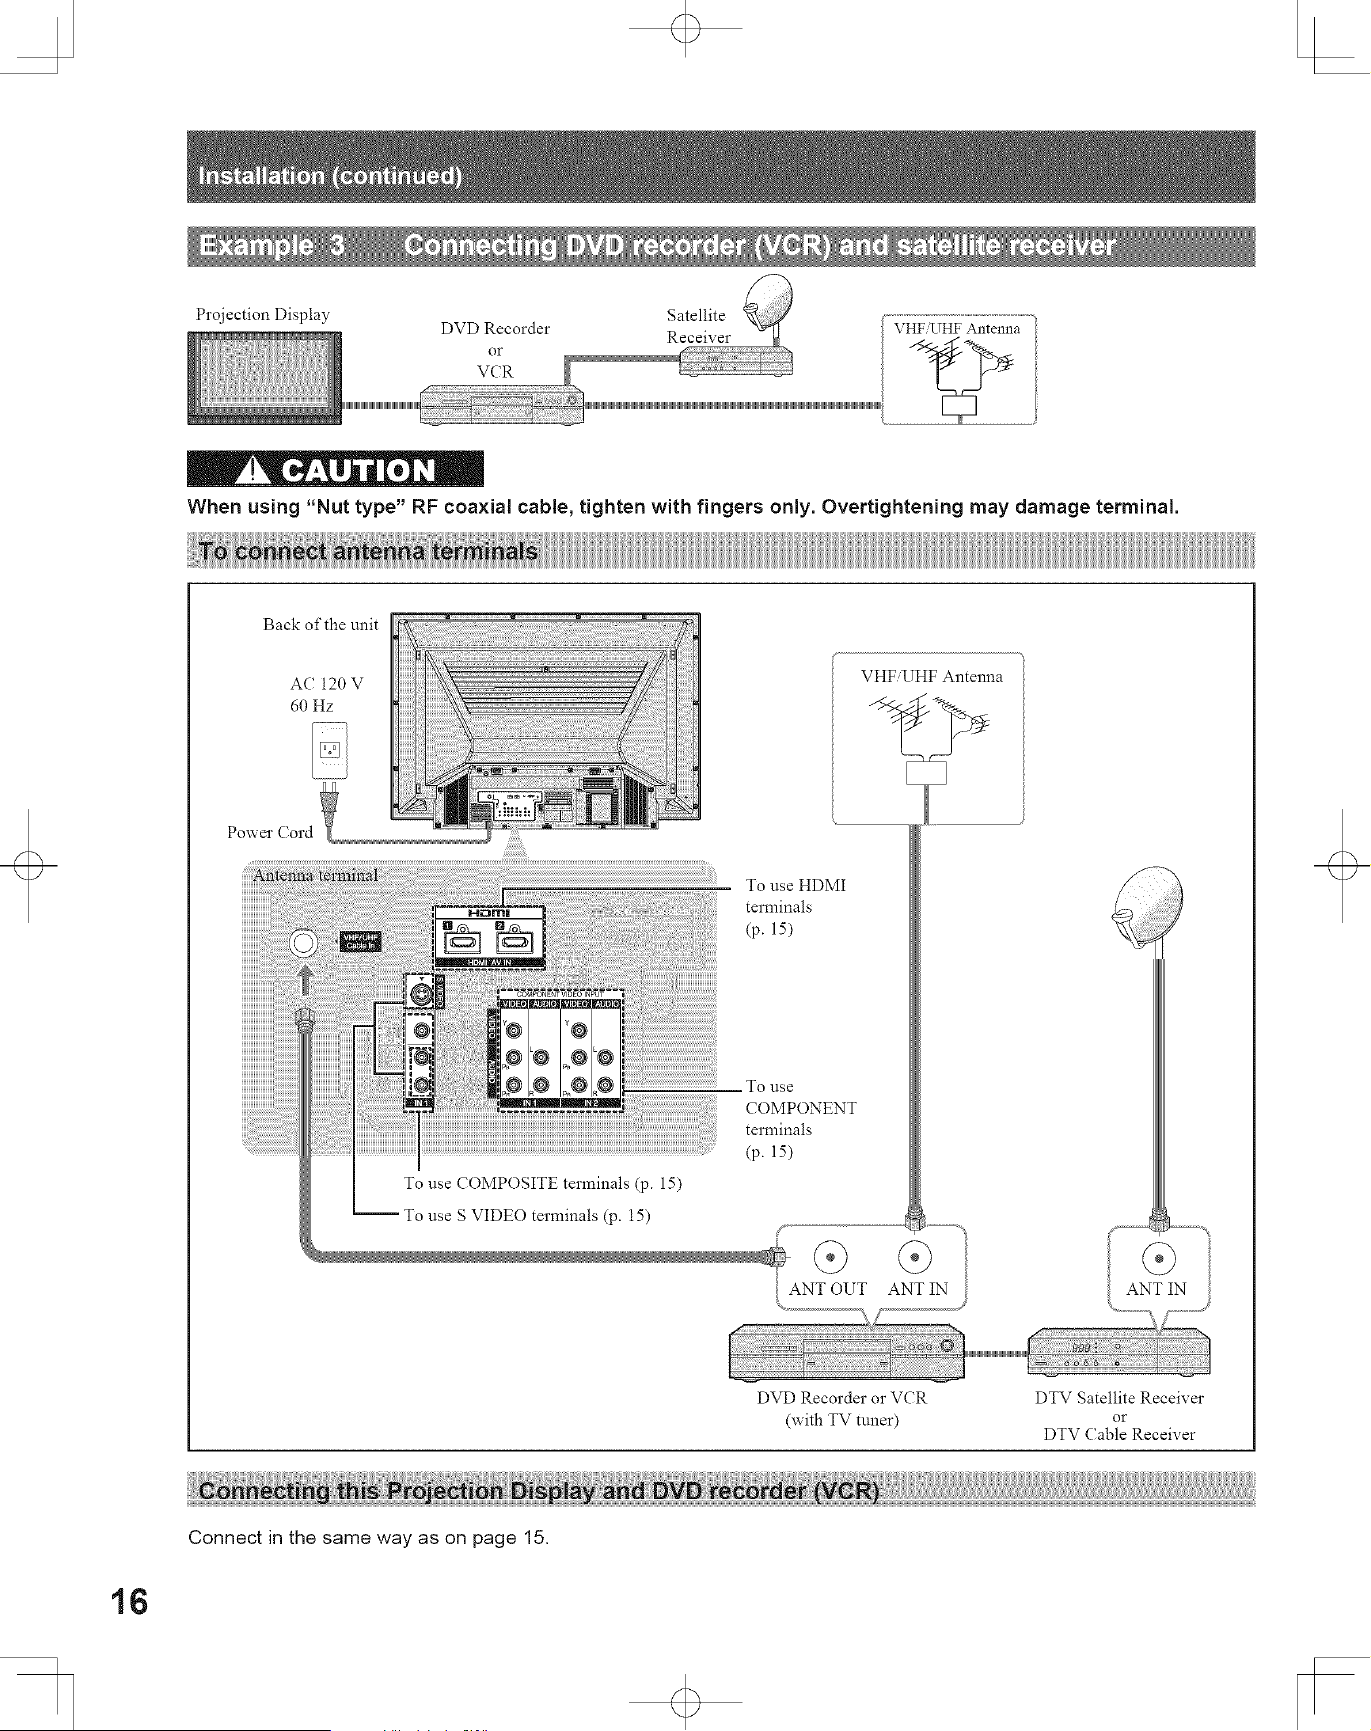
Projection Display Satellite
DVD Recorder Receiver
or
VCR
VHF IJHF Antenna
When using "Nut type" RF coaxial cane, tighten with fingers only. Overtightening may damage terminal.
Back of the unit
AC 120 V
60 Hz
y_
VHF UHF Antenna
Power Cord
To use COMPOSITE terminals (p. 15)
go use S VIDEO terminals (p. 15)
To use HDMI
terminals
(p. 15)
To use
COMPONENT
terminals
(p. 15)
ANT IN
DVD Recorder or VCR
(with TV tuner)
i,==_
DTV Satellite Receiver
or
DTV (;able Receiver
16
Connect in the same way as on page 15.
iiiiiiiiiiiiiiiiiiiiiiiiii!_
iiiiiiiiiiiiiiiiiiiiiiiiii!_
[] To use HDMI terminals
Satellite Recei_ er
or
(;able Recei_ er
• Connecting to HDMI terminals will enable you to enjoy high-definition digital images and high-quality sound.
[] To use COMPONENT terminals
whit__ _vhite / white
AUDIO IN / _ / AUDIO OUT
f :
DVD Recorder
green
COMPONENT Pa@,
VIDEO IN
blue
PR_;),
red
green
_'-_-,P8 ( 0MPONEN_I
/,:79
blue VIDEO OUT
red red
• Satellite Receiver may also be connected to COMPOSITE or S VIDEO terminals. (see below.)
Satellite Receix er
or
Cable Receix er
[] To use COMPOSITE terminals
red red
[] To use S VIDEO terminals
S VIDEO
S VIDEO
IN OUT
AUDIO
IN
Satellite Receix er
or
(;able Receix er
• The S Video input will override the composite video
signal when S Video cable is connected. Connect
either S Video or Video cable.
• Connecting to S VIDEO terminals will enable you to enjoy
greater picture quality than using Composite terminals.
17
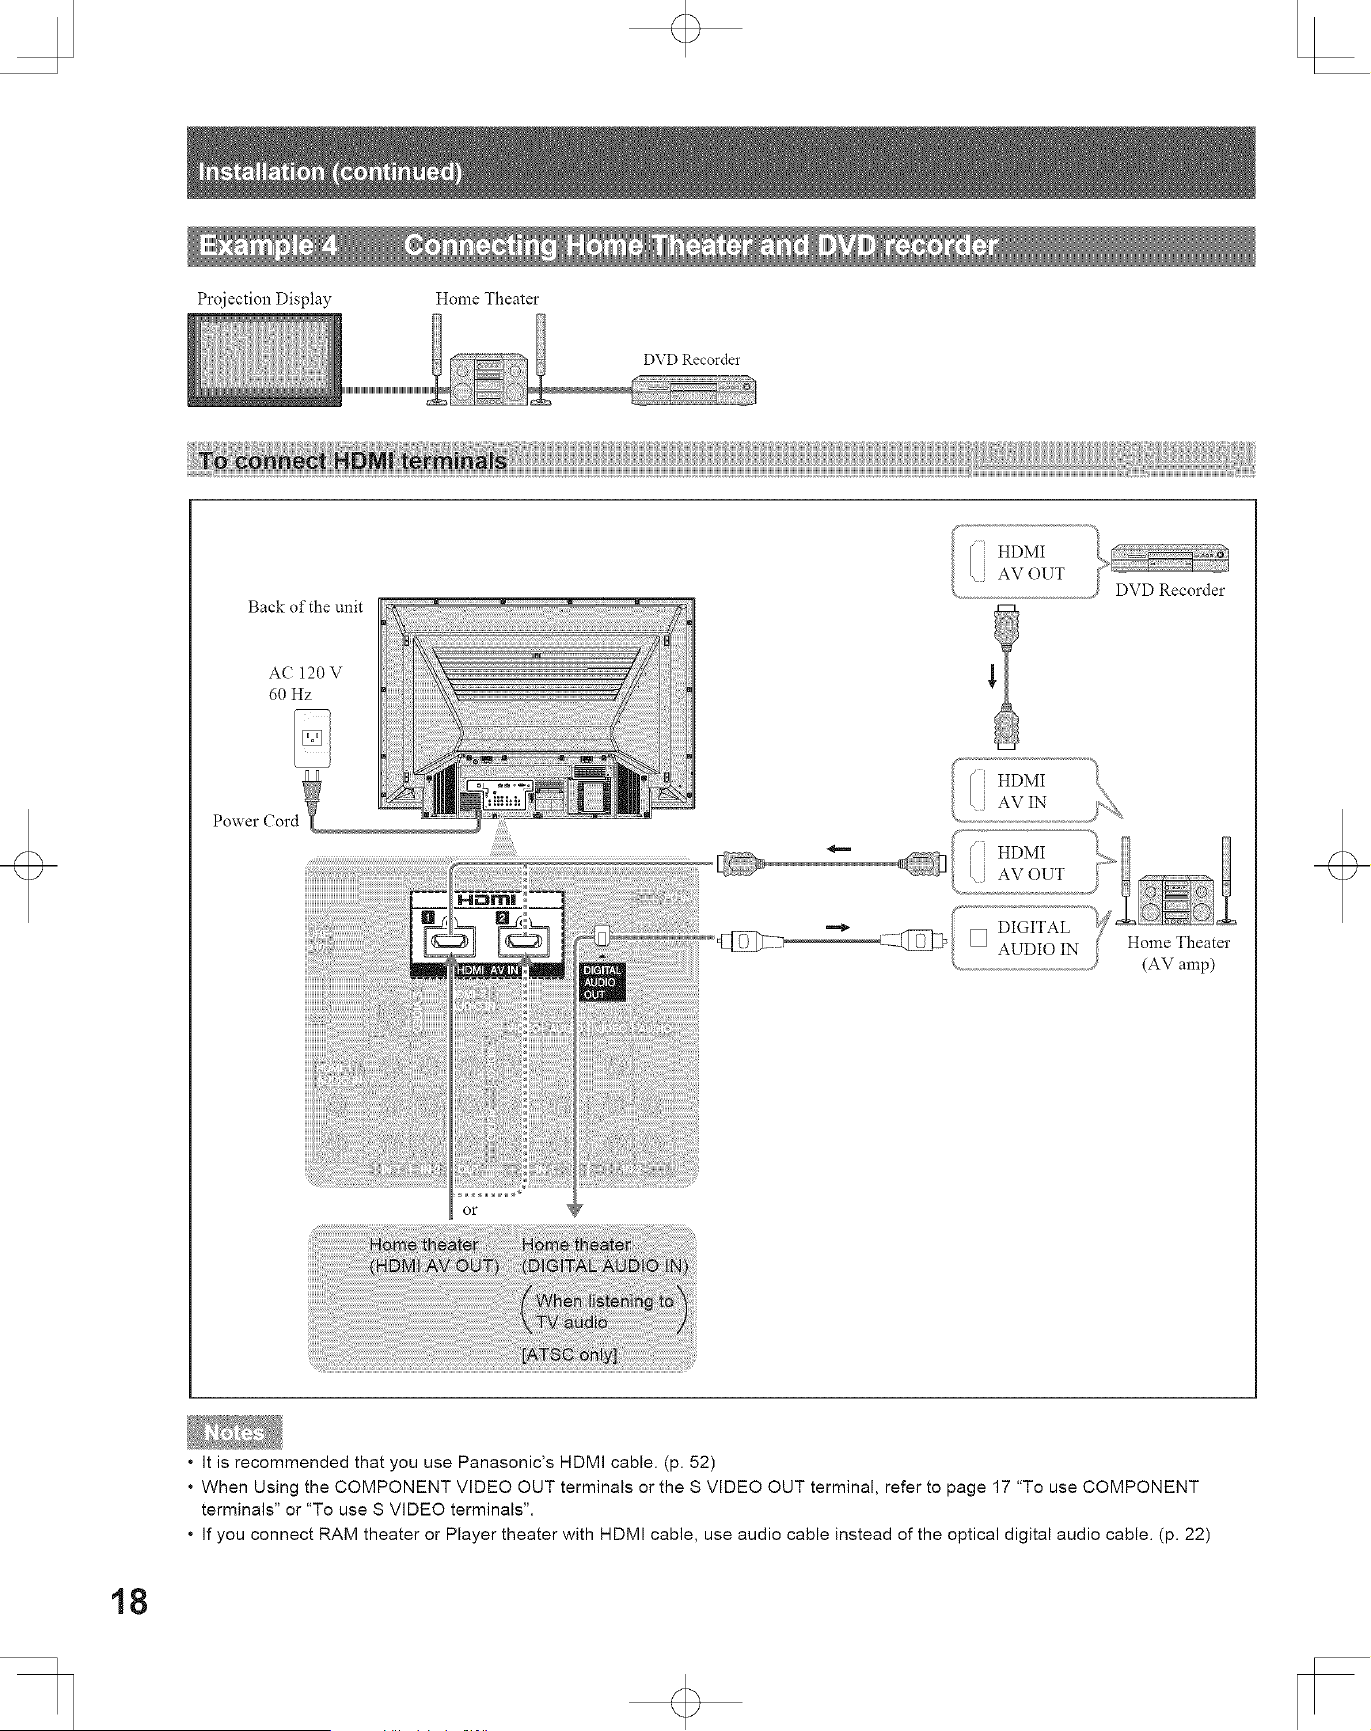
Pr(_iection Display
Home Theater
DVD Recorder
Back of the unit
AC 120 V
60 Hz
Power Cord
[] DIGITAL
AUDIO IN
Home Theater
(AV amp)
• It is recommended that you use Panasonic's HDMI cable. (p. 52)
• When Using the COMPONENT VIDEO OUT terminals or the S VIDEO OUT terminal, refer to page 17 "To use COMPONENT
terminals" or "To use S VIDEO terminals".
• If you connect RAM theater or Player theater with HDMI cable, use audio cable instead of the optical digital audio cable. (p. 22)
18
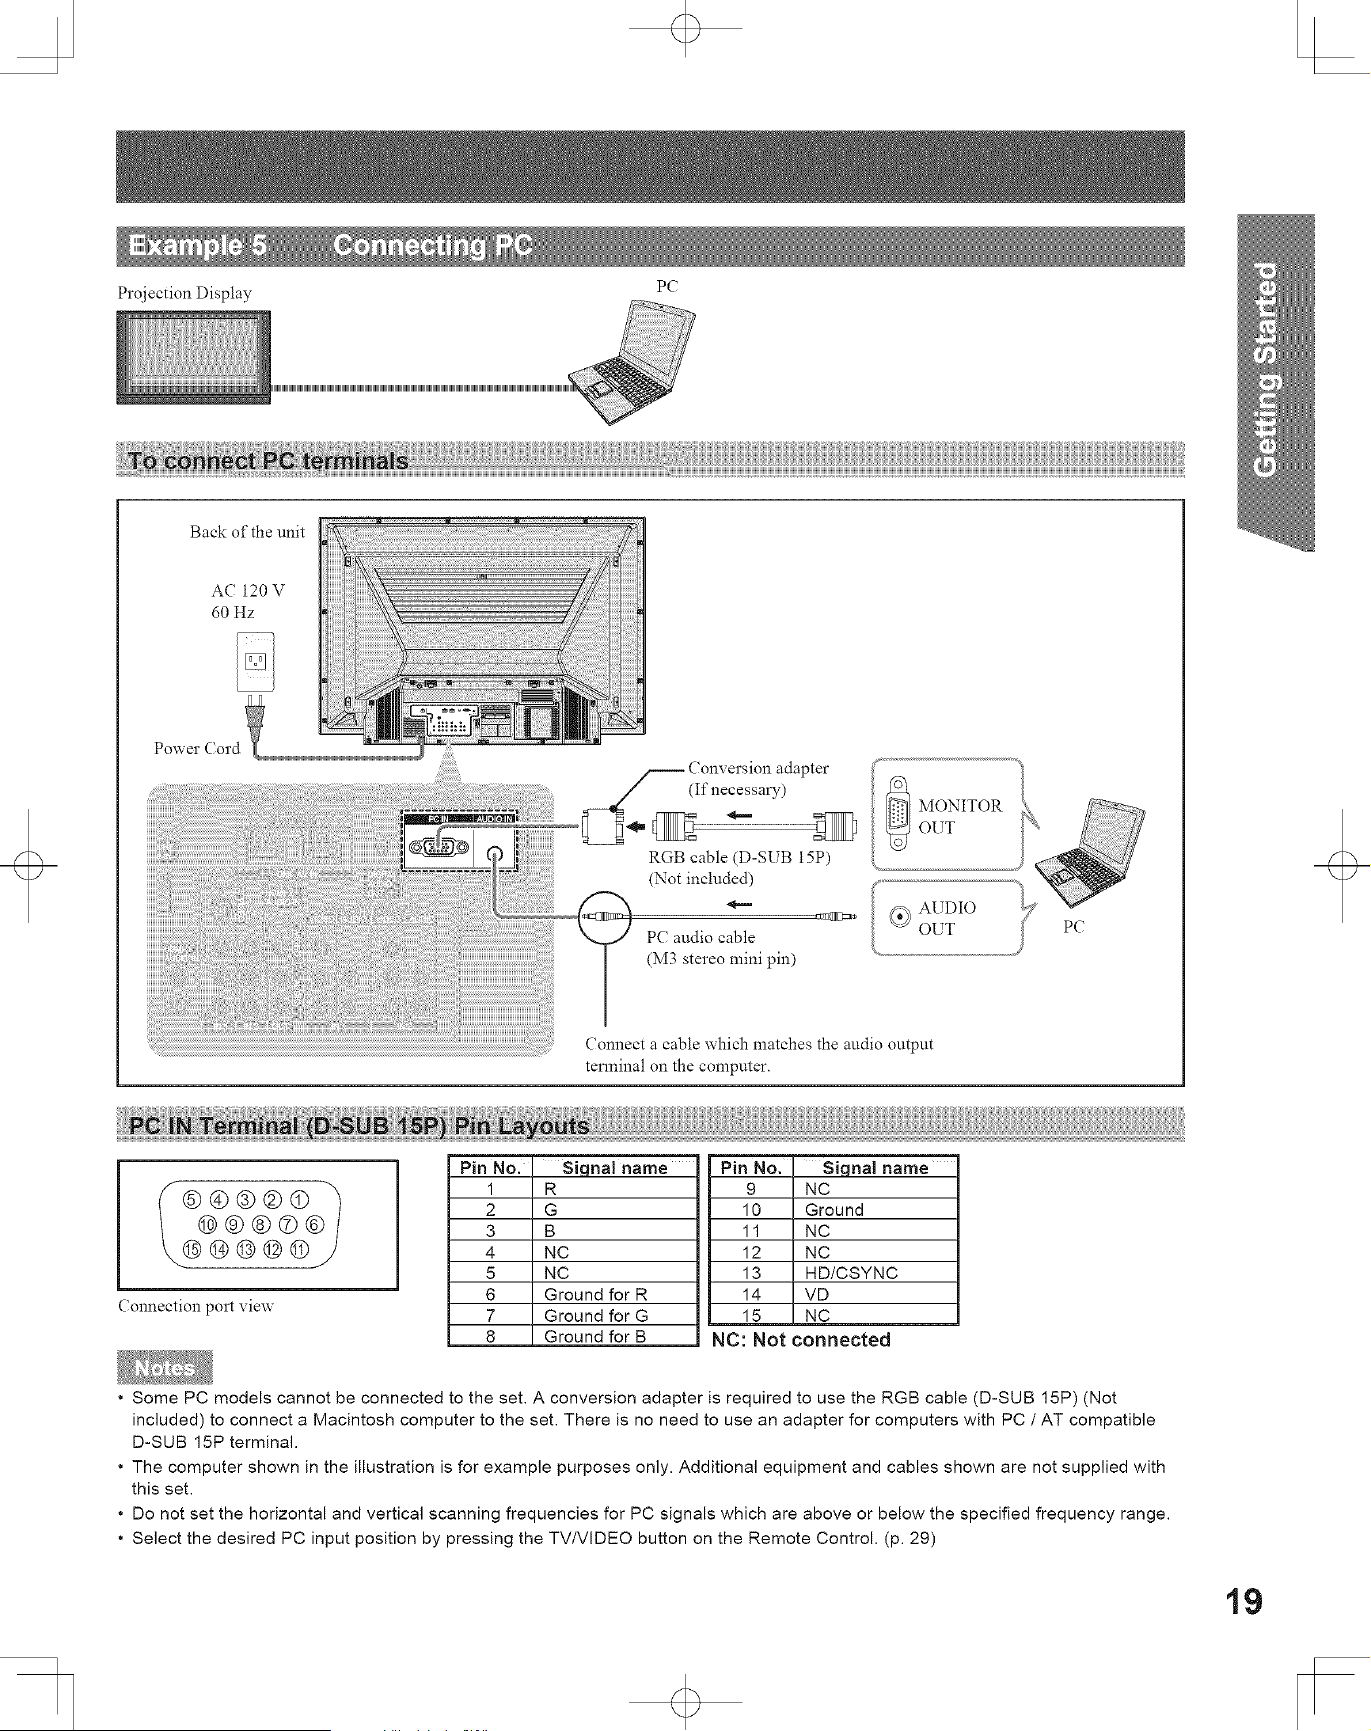
Projection Display
PC
Back of the unit
AC 120 V
60 Hz
Power Cord
F Conx ersion adapter
(If necessary)
RGB cable (D-SUB 15P)
(Not included)
ctm_=m,
PC audio came
(M3 stereo mini pin)
Connect a cable which matches the audio output
terminal on the compmer.
Connection port view
Pin No.
1
2
3
4
5
6
7
8
Siqna! name
R
G
B
NC
NC
Ground for R
Ground for G
Ground for B
Pin No.
9
10
11
12
13
14
15
Siqnal name
NC
Ground
NC
NC
HD/CSYNC
VD
NC
NC: Not connected
* Some PC models cannot be connected to the set. A conversion adapter is required to use the RGB cable (D-SUB 15P) (Not
included) to connect a Macintosh computer to the set. There is no need to use an adapter for computers with PC / AT compatible
D-SUB 15P terminal.
* The computer shown in the illustration is for example purposes only. Additional equipment and cables shown are not supplied with
this set.
. Do not set the horizontal and vertical scanning frequencies for PC signals which are above or below the specified frequency range.
* Select the desired PC input position by pressing the TV/VIDEO button on the Remote Control. (p. 29)
19
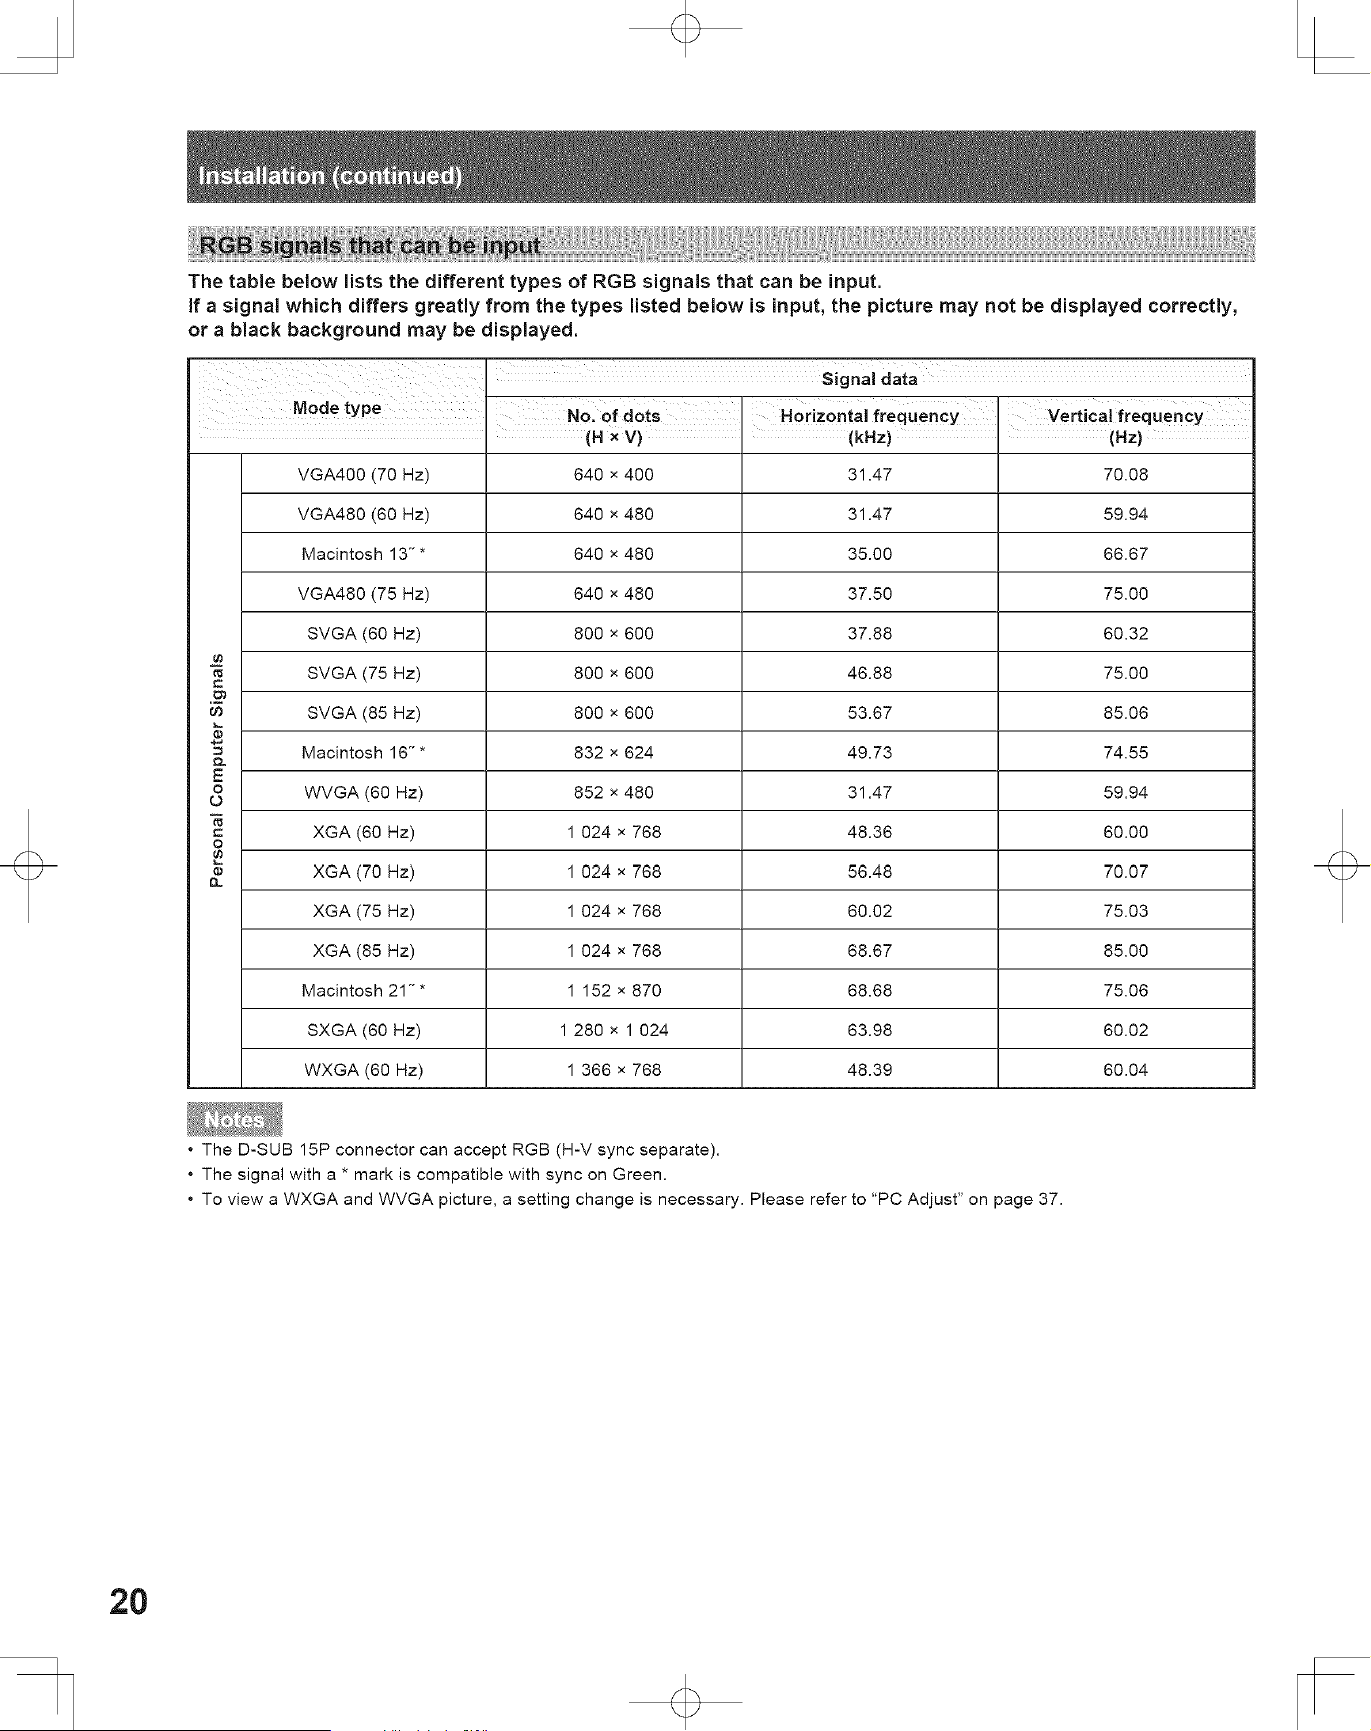
The table below lists the different types of RGB signals that can be input.
If a signal which differs greatly from the types listed below is input, the picture may not be displayed correctly,
or a black background may be displayed.
Mode type i
I NO. of dots Honzonta frequency
VGA400 (70 Hz) 640 x 400 31.47
VGA480 (60 Hz) 640 x 480 31.47
Macintosh 13- * 640 x 480 35.00
VGA480 (75 Hz) 640 x 480 37.50
SVGA (60 Hz) 800 x 800 37.88
SVGA (75 Hz) 800 x 600 46.88
,m
SVGA (85 Hz) 800 x 600 53.67
= Macintosh 16-* 832 x 624 49.73
E
o WVGA (60 Hz) 852 x 480 31.47
O
XGA (60 Hz) 1 024 x 768 48.36
o
• XGA (70 Hz) 1 024 × 768 56.48
XGA (75 Hz) 1 024 x 768 60.02
XGA (85 Hz) 1 024 x 768 68.67
Macintosh 21 " * 1 152 x 870 68.68
SXGA (60 Hz) 1 280 x 1 024 63.98
WXGA (60 Hz) 1 366 x 768 48.39
vertical frequency
iiii iii iii iii
70.08
59.94
66.67
75.00
60.32
75.00
85.06
74.55
59.94
60.00
70.07
75.03
85.00
75.06
60.02
60.04
• The D-SUB 15P connector can accept RGB (H-V sync separate).
• The signal with a * mark is compatible with sync on Green.
• To view a WXGA and WVGA picture, a setting change is necessary. Please refer to "PC Adjust" on page 37.
20
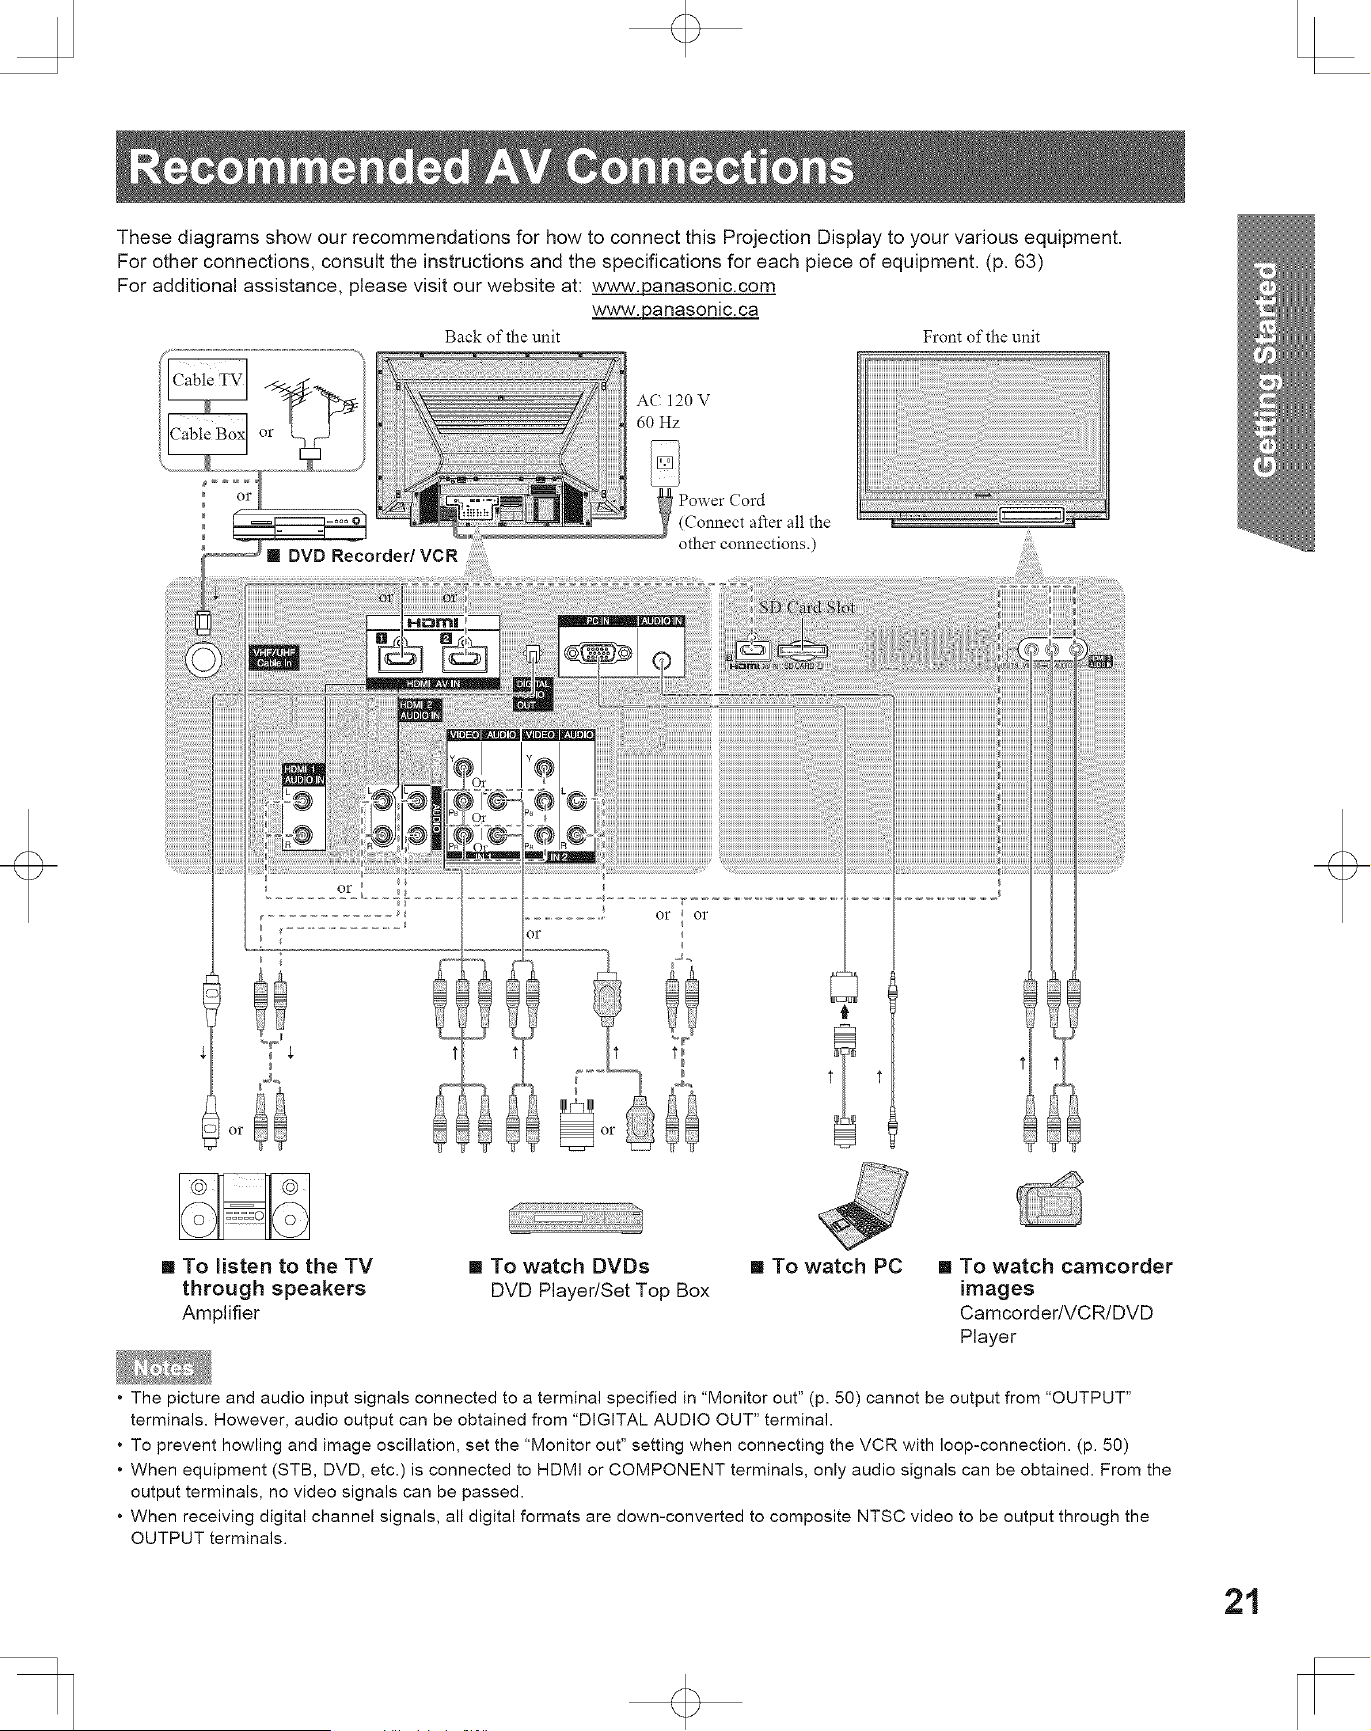
These diagrams show our recommendations for how to connect this Projection Display to your various equipment.
For other connections, consult the instructions and the specifications for each piece of equipment. (p. 63)
For additional assistance, please visit our website at: www.panasonic.com
www.panasonic.ca
Back of the unit Front of'the unit
AC 120 V
60 Hz
Power Cord
(Connect after all the
other connections.)
[] DVD Recorder/VCR
[] To listen to the TV
through speakers
Amplifier
t t
[] To watch DVDs
DVD Player/Set Top Box
[] To watch PC [] To watch camcorder
images
CamcorderiVCR/DVD
Player
• The picture and audio input signals connected to a terminal specified in "Monitor out" (p. 50) cannot be output from "OUTPUT"
terminals. However, audio output can be obtained from "DIGITAL AUDIO OUT" terminal.
• To prevent howling and image oscillation, set the "Monitor out" setting when connecting the VCR with loop-connection. (p. 50)
• When equipment (STB, DVD, etc.) is connected to HDMI or COMPONENT terminals, only audio signals can be obtained. From the
output terminals, no video signals can be passed.
• When receiving digital channel signals, all digital formats are down-converted to composite NTSC video to be output through the
OUTPUT terminals.
21
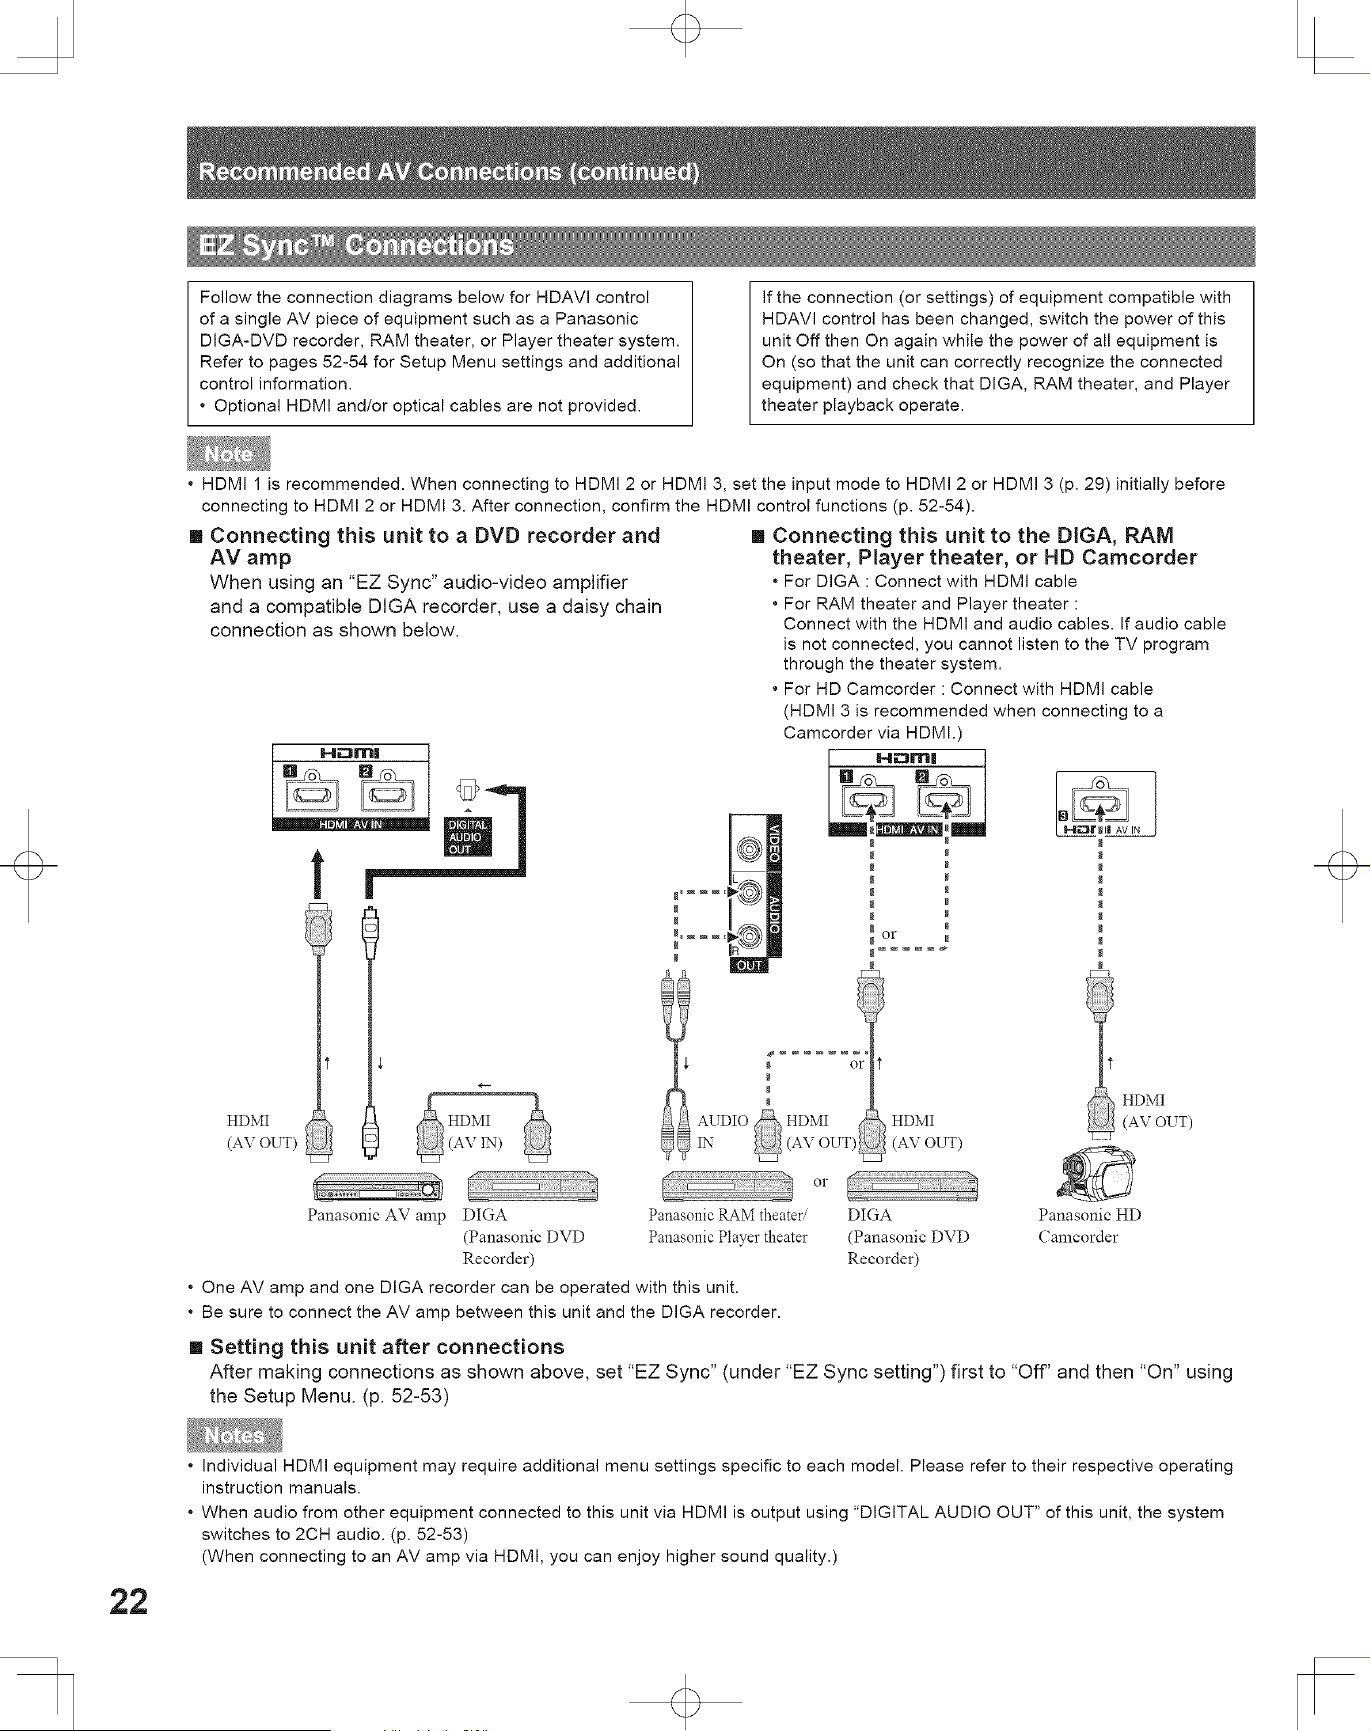
Follow the connection diagrams below for HDAVI control
of a single AV piece of equipment such as a Panasonic
DIGA-DVD recorder, RAM theater, or Player theater system.
Refer to pages 52-54 for Setup Menu settings and additional
control information.
• Optional HDMI and/or optical cables are not provided.
If the connection (or settings) of equipment compatible with
HDAVI control has been changed, switch the power of this
unit Off then On again while the power of all equipment is
On (so that the unit can correctly recognize the connected
equipment) and check that DIGA, RAM theater, and Player
theater playback operate.
• HDMI 1 is recommended. When connecting to HDMI 2 or HDMI 3, set the input mode to HDMI 2 or HDMI 3 (p. 29) initially before
connecting to HDMI 2 or HDMI 3. After connection, confirm the HDMI control functions (p. 52-54).
[] Connecting this unit to a DVD recorder and
AV amp
When using an "EZ Sync" audio-video amplifier
and a compatible DIGA recorder, use a daisy chain
connection as shown below.
HDMI
(AV OUT)
(AVrN)
Panasonic AV amp DIGA
(Panasonic DVD
Recorder)
One AV amp and one DIGA recorder can be operated with this unit.
Be sure to connect the AV amp between this unit and the DIGA recorder.
[] Connecting this unit to the DIGA, RAM
theater, Player theater, or HD Camcorder
• For DIGA : Connect with HDMI cable
• For RAM theater and Player theater :
Connect with the HDMI and audio cables. If audio cable
is not connected, you cannot listen to the TV program
through the theater system.
• For HD Camcerder : Connect with HDMI cable
(HDMI 3 is recommended when connecting to a
Camcorder via HDMI.)
or
or
Panasonic RAM theater DIGA
Panasonic Player theater (Panasonie DVD
Recorder)
HDMI
(AV OUT)
Panasonic HD
Camcorder
[] Setting this unit after connections
After making connections as shown above, set "EZ Sync" (under "EZ Sync setting") first to "Off' and then "On" using
the Setup Menu. (p. 52-53)
22
o
o
Individual HDMI equipment may require additional menu settings specific to each model. Please refer to their respective operating
instruction manuals.
When audio from other equipment connected to this unit via HDMI is output using "DIGITAL AUDIO OUT" of this unit, the system
switches to 2CH audio. (p. 52-53)
(When connecting to an AV amp via HDMI, you can enjoy higher sound quality.)
HDMI (high-definition multimedia interface) allows you to enjoy high-definition digital images and high-quality sound by
connecting this Projection Display and the devices.
HDMI-compatible equipment ('1) with an HDMI or DVI output terminal, such as a Set Top Box or a DVD player, can be
connected to the HDMI connector using an HDMI compliant (fully wired) cable.
• HDMI is the world's first complete digital consumer AV interface complying with a non-compression standard.
• If the external equipment has only a DVl output, connect to the HDMI terminal via a DVl to HDMI adapter cable (*2).
• When the DVl to HDMI adapter cable is used, connect the audio cable to the audio input terminal.
• Audio settings can be made on the "HDMI 1 in", "HDMI 2 in" or "HDMI 3 in" menu screen. (p. 39)
Applicable audio signal sampling frequencies (L.PCM): 48 kHz, 44.1 kHz, 32 kHz
('1): The HDMI logo is displayed on an HDMI-compliant device.
(*2): Enquire at your local digital equipment retailer shop.
Use with a PC is not assumed.
All signals are reformatted before being displayed on the screen.
If the connected device has an aspect adjustment function, set the aspect ratio to "16:9".
This HDMI connector is "type A".
These HDMI connectors are compatible with HDCP (High-Bandwidth Digital Content Protection) copyright protection.
A device having no digital output terminal may be connected to the input terminal of either "COMPONENT", "S VIDEO", or "VIDEO"
to receive analog signals.
• The HDMI input terminal can be used with only the following image signals: 480i, 480p, 720p, 1080i and 1080p. Match the output
setting of the digital device.
• For details of the applicable HDMI signals, see below.
HDMI is the first all digital consumer electronics A/V interface that supports several uncompressed standards, enhanced
and high-definition video formats as well as all existing multichannel audio formats. One jack supports both video and
audio information. The HDMI/HDCP .1 input can be connected to an EIA/CEA 861/861D .2 compliant consumer electronic
device, such as a Set Top Box or DVD player equipped with a HDMI output connection. By inputting a High-bandwidth
Digital Content Protection (HDCP) high-definition picture source to the HDMI terminal of this unit, high-definition pictures
can be displayed on the screen in their digital form. The HDMI input terminal is not intended to be used with personal
computers. This unit is compatible with 1080p, 1080i, 720p, 480p and 480i formats. Select the output of the connected
device to match that of the unit.
,1 HDMI/HDCP = High-Definition Multimedia Interface / High-Bandwidth Digital Copy Protection.
*2 EIA/CEA-861/861D Profiles compliance covers profiles for transmission of uncompressed digital video including high bandwidth
digital content protection.
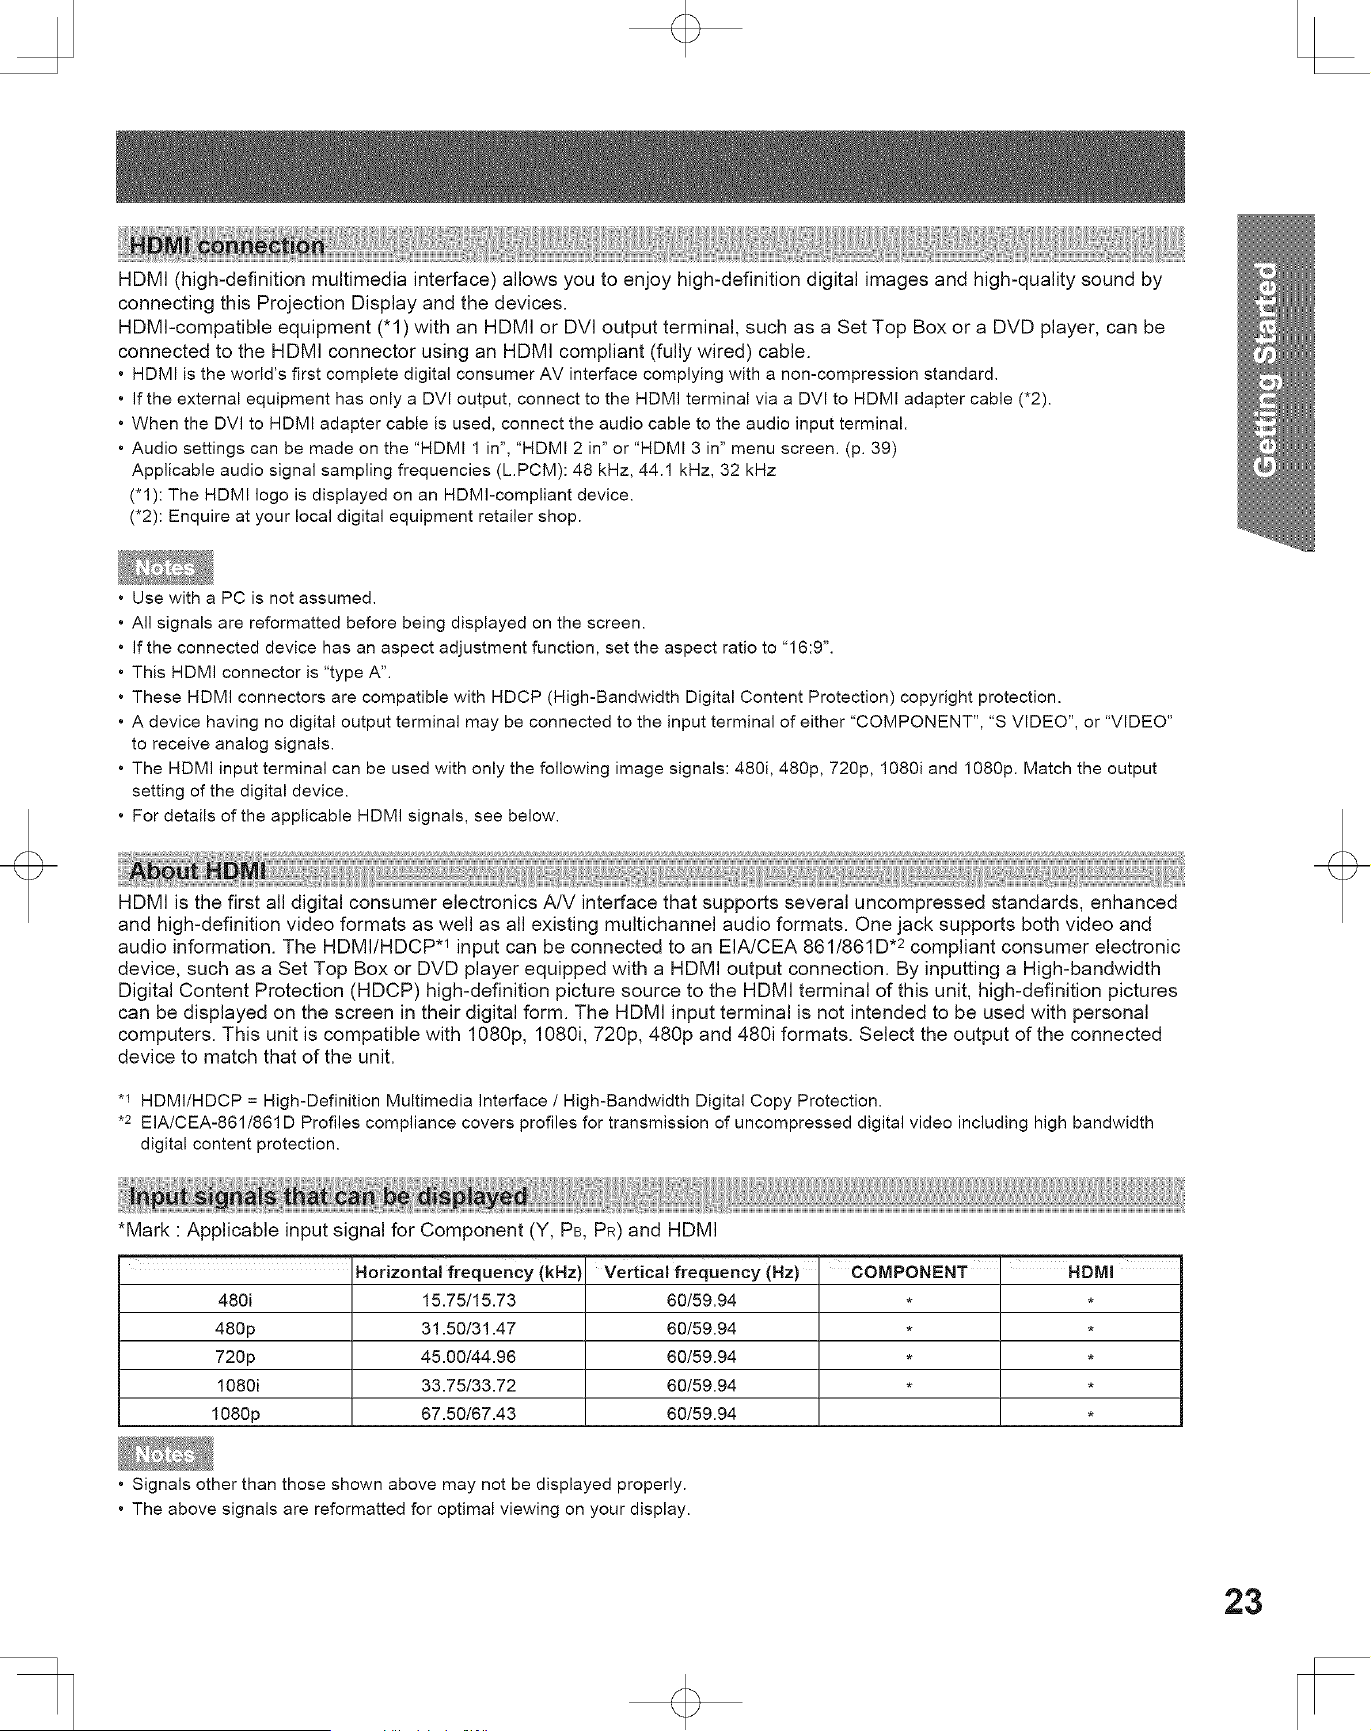
*Mark • Applicable input signal for Component (Y, PB, PR) and HDMI
I
'Horizontal frequency (kHz) verticalfrequency(Hz)' COMPONENT
HDMI
480i 15.75/15.73 60/59.94 * *
48gp 31.50!31.47 60/59.94 * *
720p 45.00!44.96 60/59.94 * *
1080i 33.75/33.72 60/59.94 * *
1080p 67.50/67.43 60/59.94 *
• Signals other than those shown above may not be displayed properly.
• The above signals are reformatted for optimal viewing on your display.
23
Always be sure to follow the procedure given below to
turn the Projection Display power ON and OFF.
• The lamp cooling fan will continue to operate for
approximately 3 minutes after the power is turned off. During
this time, the POWER indicator will blink Red.
Do not disconnect the power cord from the outlet
and do not open the circuit breaker (unless
necessary) while the cooling fan is still operating. Do
not disconnect the power cord from the power outlet
while the power indicator blinks Red.
POWER button
POWER indicator
The Power Indicator
LED ACTION
Off Power- OFF
Red (blinking) Power - OFF (Now cooling)
Green Power- ON
Green (blinking) Power- ON (Preparing to light lamp)
• If the POWER button is accidentally turned off during use,
after power is turned back on, it may take a short period
before the lamp automatically comes on.
• This unit consumes approx. 0.4 W in OFF condition when
plugged into an AC outlet.
Press POWER on Projection Display or Remote Control
to turn power on.
• The Power Indicator blinks Green for about 10 seconds and
then turns solid Green.
• Picture display may be delayed when the unit has not been
used for a long time or ambient temperature is low.
• The fan rotating sound may be increased in high temperature
condition.
Press POWER on Projection Display or Remote Control
to turn power off.
• Power shuts off after a Black Screen is displayed for about
3 minutes. If the POWER button is pressed during the Black
Screen display, Power is turned back on.
• The Power Indicator blinks Red for about 3 minutes and then
LED turns off.
Auto shut off
• If "No signal shut-off" has been selected "Set", the TV will
automatically turn off if NO SIGNAL is present for more
than 10 minutes. (p. 54-55)
• If "No action shut-off" has been selected "Set", the TV will
automatically turn off if no key has been pressed for more
than 3 hours. (p. 54-55)
24
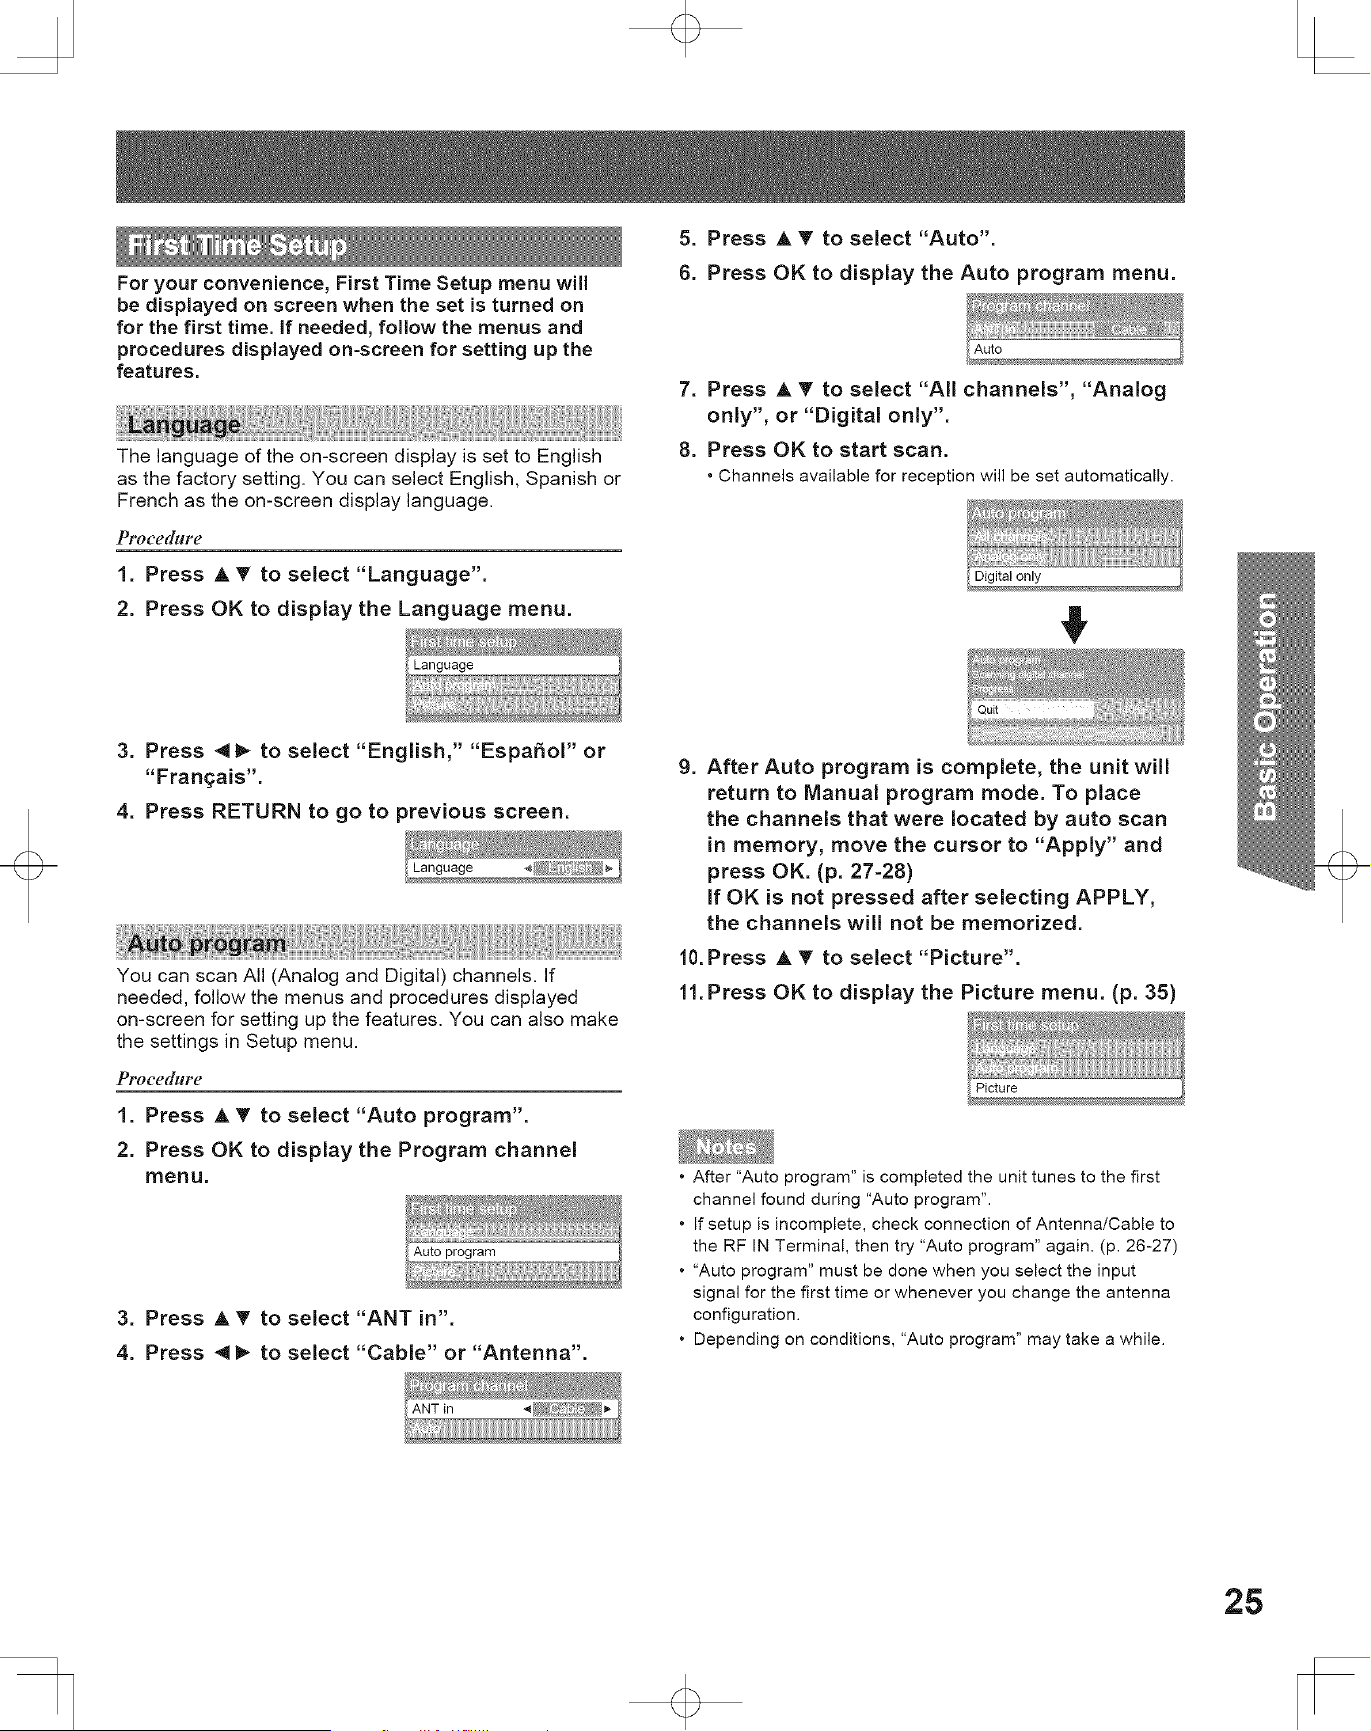
For your convenience, First Time Setup menu will
be displayed on screen when the set is turned on
for the first time. If needed, follow the menus and
procedures displayed on=screen for setting up the
features.
The language of the on-screen display is set to English
as the factory setting= You can select English, Spanish or
French as the on-screen display language.
Proeedure
1. Press A T to select "Language".
2. Press OK to display the Language menu.
5. Press J, T to select "Auto".
6. Press OK to display the Auto program menu.
Auto
7. Press A T to select "All channels", "Analog
only', or "Digital only'.
8. Press OK to start scan.
• Channels available for reception will be set automatically.
3. Press 4_ to select "English," "EspafioF or
"Fran£ais'.
4. Press RETURN to go to previous screen.
You can scan All (Analog and Digital) channel& If
needed, follow the menus and procedures displayed
on-screen for setting up the features. You can also make
the settings in Setup menu.
PPocedblre
1. Press A _r to select "Auto program".
2. Press OK to display the Program channel
menu,
3. Press A T to select "ANT in".
4. Press 4 I_ to select "Cable" or "Antenna".
9. After Auto program is complete, the unit will
return to Manual program mode. To place
the channels that were located by auto scan
in memory, move the cursor to "Apply" and
press OK. (p. 27-28)
If OK is not pressed after selecting APPLY,
the channels will not be memorized.
10. Press A T to select "Picture".
ll.Press OK to display the Picture menu. (p. 35)
• After "Auto program" is completed the unit tunes to the first
channel found during "Auto program".
• If setup is incomplete, check connection of Antenna/Cable to
the RF IN Terminal, then try "Auto program" again. (p. 26-27)
• "Auto program" must be done when you select the input
signal for the first time or whenever you change the antenna
configuration.
• Depending on conditions, "Auto program" may take a while.
25

Allows you to select the language used for
On=Screen Displays.
5. Press OK to display the Language menu.
Language
6. Press 4 _ to select "English," "Espafiol" or
"Fran_:ais'.
7. Press RETURN to go to previous screen.
Automatically searches and adds receivable
channels to memory.
Procedblre
1. Press MENU to display the Main Menu
screen.
2. Press A Y to select "Setup" icon.
3. Press OK to display the Setup menu.
Procedbllw
1. Press MENU to display the Main Menu
screen.
2. Press A Y to select "Setup" icon.
3. Press OK to display the Setup menu.
4. Press A T to select "Program channel".
5. Press OK to display the Program channel
menu.
Program channel
4. Press A T to select "Language".
26
6. Press A T to select "ANT in".
7. Press 4 I_ to select "Antenna" or "Cable".
8. Press A T to select "Auto".
9. Press OK to display the Auto program menu.
Use this procedure when changing setting of
receiving channels or changing the channel display.
Also, use to add or delete channels from channel list
manually.
Procedure
1. Press MENU to display the Main Menu
screen.
2. Press A T to select "Setup" icon.
3. Press OK to display the Setup menu.
10. Press A T to select "All channels", "Analog
only", or "Digital only'.
11. Press OK to start scan.
4. Press A T to select "Program channel'.
5. Press OK to display the Program channel
menu.
• If Lock (p. 41) has been set, you must enter your
password to display the Program channel menu.
12.After Auto program is complete, the unit will
return to Manual program mode. To place
the channels that were located by auto scan
in memory, move the cursor to "Apply" and
press OK. (p. 27-28)
If OK is not pressed after selecting APPLY,
the channels will not be memorized.
Program channel
6. Press A T to select "Manual".
7. Press OK to enter the Manual program
screen.
• Some channels with very weak signals may be locked into
memory. If desired, these channels can be deleted manually
using the "Manual program setting". (p. 27-28)
• "Auto program" must be done when you select the input
signal for the first time or whenever you change the antenna
configuration.
27
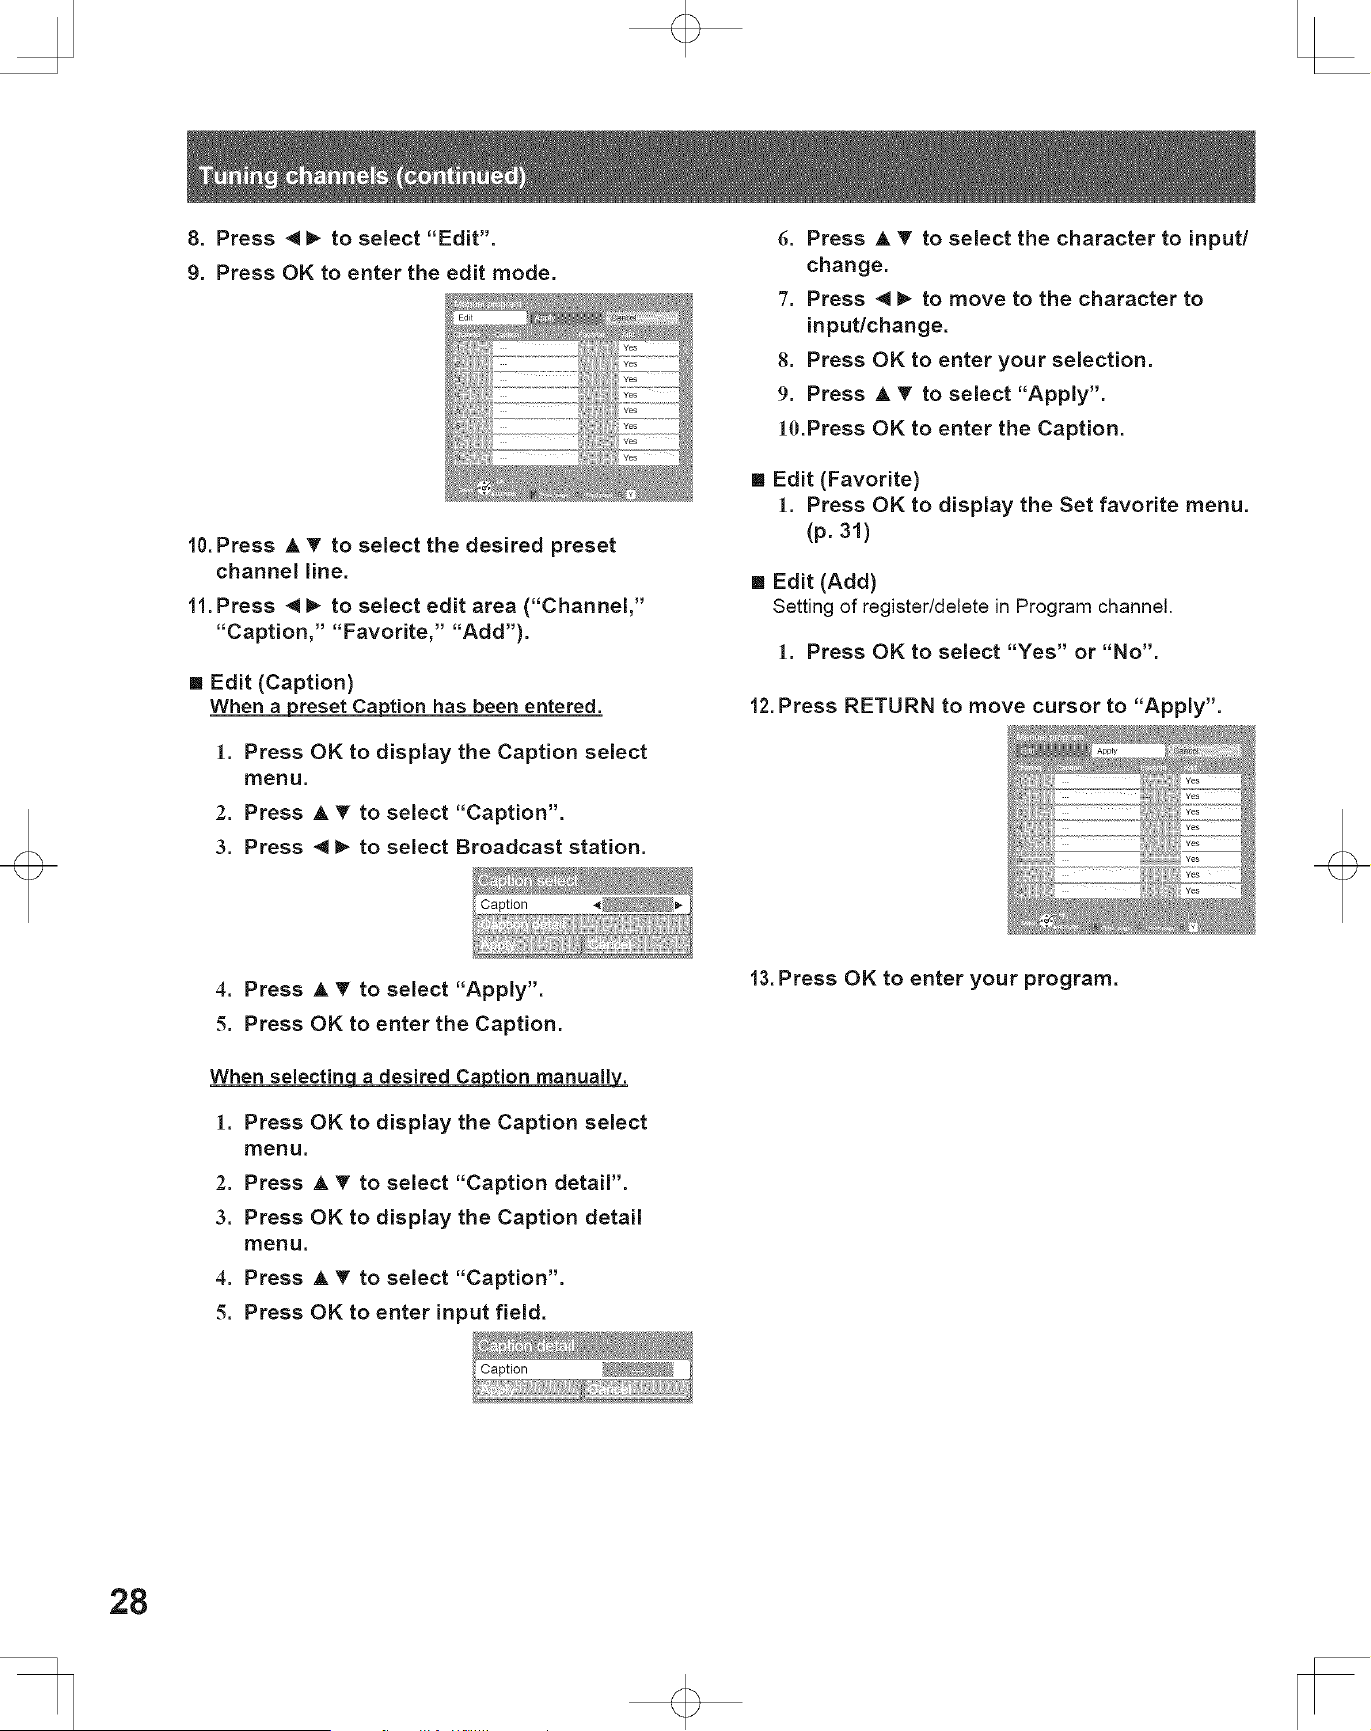
8. Press 4_ to select "Edit".
9. Press OK to enter the edit mode.
10. Press A T to select the desired preset
channel line.
11. Press 4 _ to select edit area ("Channel,"
"Caption," "Favorite," "Add").
[] Edit (Caption)
When a preset Caption has been entered.
1. Press OK to display the Caption select
menu,
2. Press A T to select "Caption".
3. Press _ _ to select Broadcast station.
6. Press A _' to select the character to input/
change.
"7. Press 4 _ to move to the character to
input/change.
8. Press OK to enter your selection.
9. Press A T to select "Apply".
10.Press OK to enter the Caption.
[] Edit (Favorite)
1. Press OK to display the Set favorite menu.
(p. 31)
[] Edit (Add)
Setting of register/delete in Program channel.
1. Press OK to select "Yes" or "No".
12. Press RETURN to move cursor to "Apply".
4. Press A T to select "Apply".
5. Press OK to enter the Caption.
When selectin a desired Ca tion manually.
1. Press OK to display the Caption select
menu.
2. Press A T to select "Caption detail".
3. Press OK to display the Caption detail
menu.
4. Press J, T to select "Caption".
5. Press OK to enter input field.
13. Press OK to enter your program.
28

P#'ocedbllw
1. Press TV/VIDEO to display the Input select
menu,
2. Press corresponding NUMBER keys to select
the input of your choice. Or, press • T to
select the input of your choice, then press
OK.
• If, during selection, no action is taken for several seconds,
the Input selection menu is exited and the current input is
automatically selected.
2
3
4
6
7
8
9
0
Signal of source connected to COMPONENT
Component I VIDEO INPUT 1 is displayed.
Signal of source connected to COMPONENT
Component 2 VIDEO INPUT 2 is displayed.
HDMI 1 Signal of source connected to HDMI IN 1 is
displayed.
HDMI 2 Signal of source connected to HDMI IN 2 is
displayed.
HDMI 3 Signal of source connected to HDMI IN 3 is
displayed.
Signal of source connected to VIDEO INPUT
Video 1 1 is displayed.
Signal of source connected to S VIDEO
INPUT is displayed.
Video 2 Signal of source connected to VIDEO INPUT
2 is displayed.
Video 3 Signal of source connected to VIDEO INPUT
3 is displayed.
PC Signal of source connected to PC IN is
displayed.
• [f SKIP is set as the Input Label setting, the mode will not be
changed. (p. 50)
[] Card input mode (Photo viewer) is selected.
Proeedure
1. Press SD to display Photo viewer mode.
I Photo ] of connected to CARD SLOT
Signal
source
/
(Photo viewer)| is displayed.
Switches between the current and last channel or input
modes.
1
PFoce([lgFe
1. Press R-TUNE to switch to previously viewed
channel or input modes.
• When Photo viewer (p. 46) is used, Rapid Tuning is not
available.
[] Select desired channel:
Press CH ^v or NUMBER keys.
[] Adjust to desired volume level:
Press VOL+ or VOL-.
• The channel number and volume level are stored even after
the unit is turned off.
• Power consumption can be reduced if the volume level is
lowered.
29
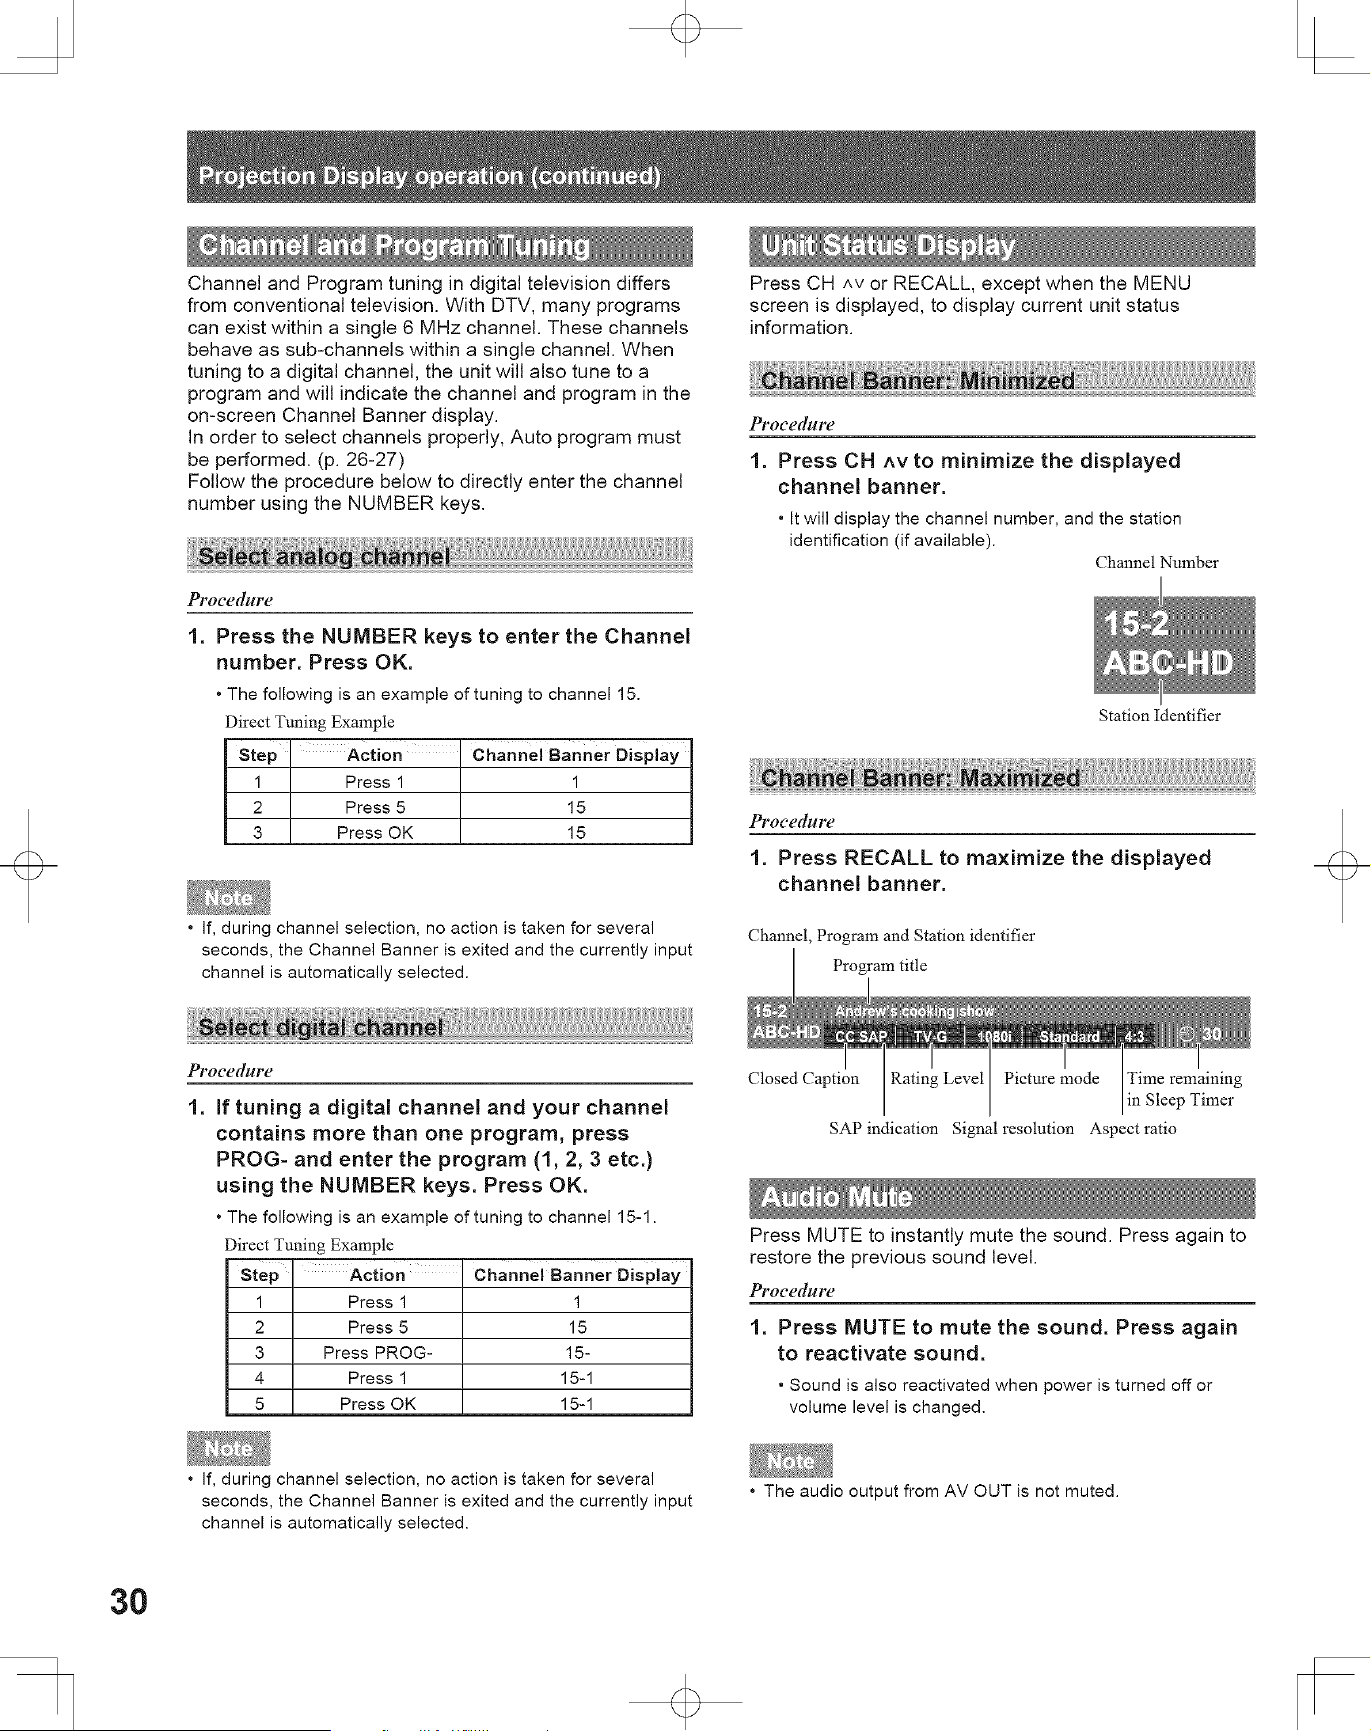
Channel and Program tuning in digital television differs
from conventional television. With DTV, many programs
can exist within a single 6 MHz channel. These channels
behave as sub-channels within a single channel. When
tuning to a digital channel, the unit will also tune to a
program and will indicate the channel and program in the
on-screen Channel Banner display.
In order to select channels properly, Auto program must
be performed. (p. 26-27)
Follow the procedure below to directly enter the channel
number using the NUMBER keys.
PFoce([lIFe
1. Press the NUMBER keys to enter the Channel
number. Press OK.
• The following is an example of tuning to channel 15.
Direct Tuning Example
Step Action' Channei Banner Display
1 Press 1 1
2 Press 5 15
3 Press OK 15
• If, during channel selection, no action is taken for several
seconds, the Channel Banner is exited and the currently input
channel is automatically selected.
Pt'oced_Fe
1. If tuning a digital channel and your channel
contains more than one program, press
PROG- and enter the program (1, 2, 3 etc.)
using the NUMBER keys. Press OK.
• The following is an example of tuning to channel 15-1.
Direct Tuning Example
step ' Action
1 Press 1
2 Press 5
3 Press PROG-
4 Press 1
5 Press OK
Channel Banner Display
1
15
15-
15-1
15-1
Press CH ^v or RECALL, except when the MENU
screen is displayed, to display current unit status
information.
Procedblre
1. Press OH ^v to minimize the displayed
channel banner.
• [t will display the channel number, and the station
identification (if available).
Channel Number
Station Identifier
PFocedblre
1. Press RECALL to maximize the displayed
channel banner.
Channel, Program and Station identifier
Program title
Closed Caption Rating Level Picture mode Time remaining
in Sleep Timer
SAP indication Signal resolution Aspect ratio
Press MUTE to instantly mute the sound. Press again to
restore the previous sound level.
PFocedblre
1. Press MUTE to mute the sound. Press again
to reactivate sound.
• Sound is also reactivated when power is turned off or
volume level is changed.
• If, during channel selection, no action is taken for several
seconds, the Channel Banner is exited and the currently input
channel is automatically selected.
• The audio output from AV OUT is not muted.
30
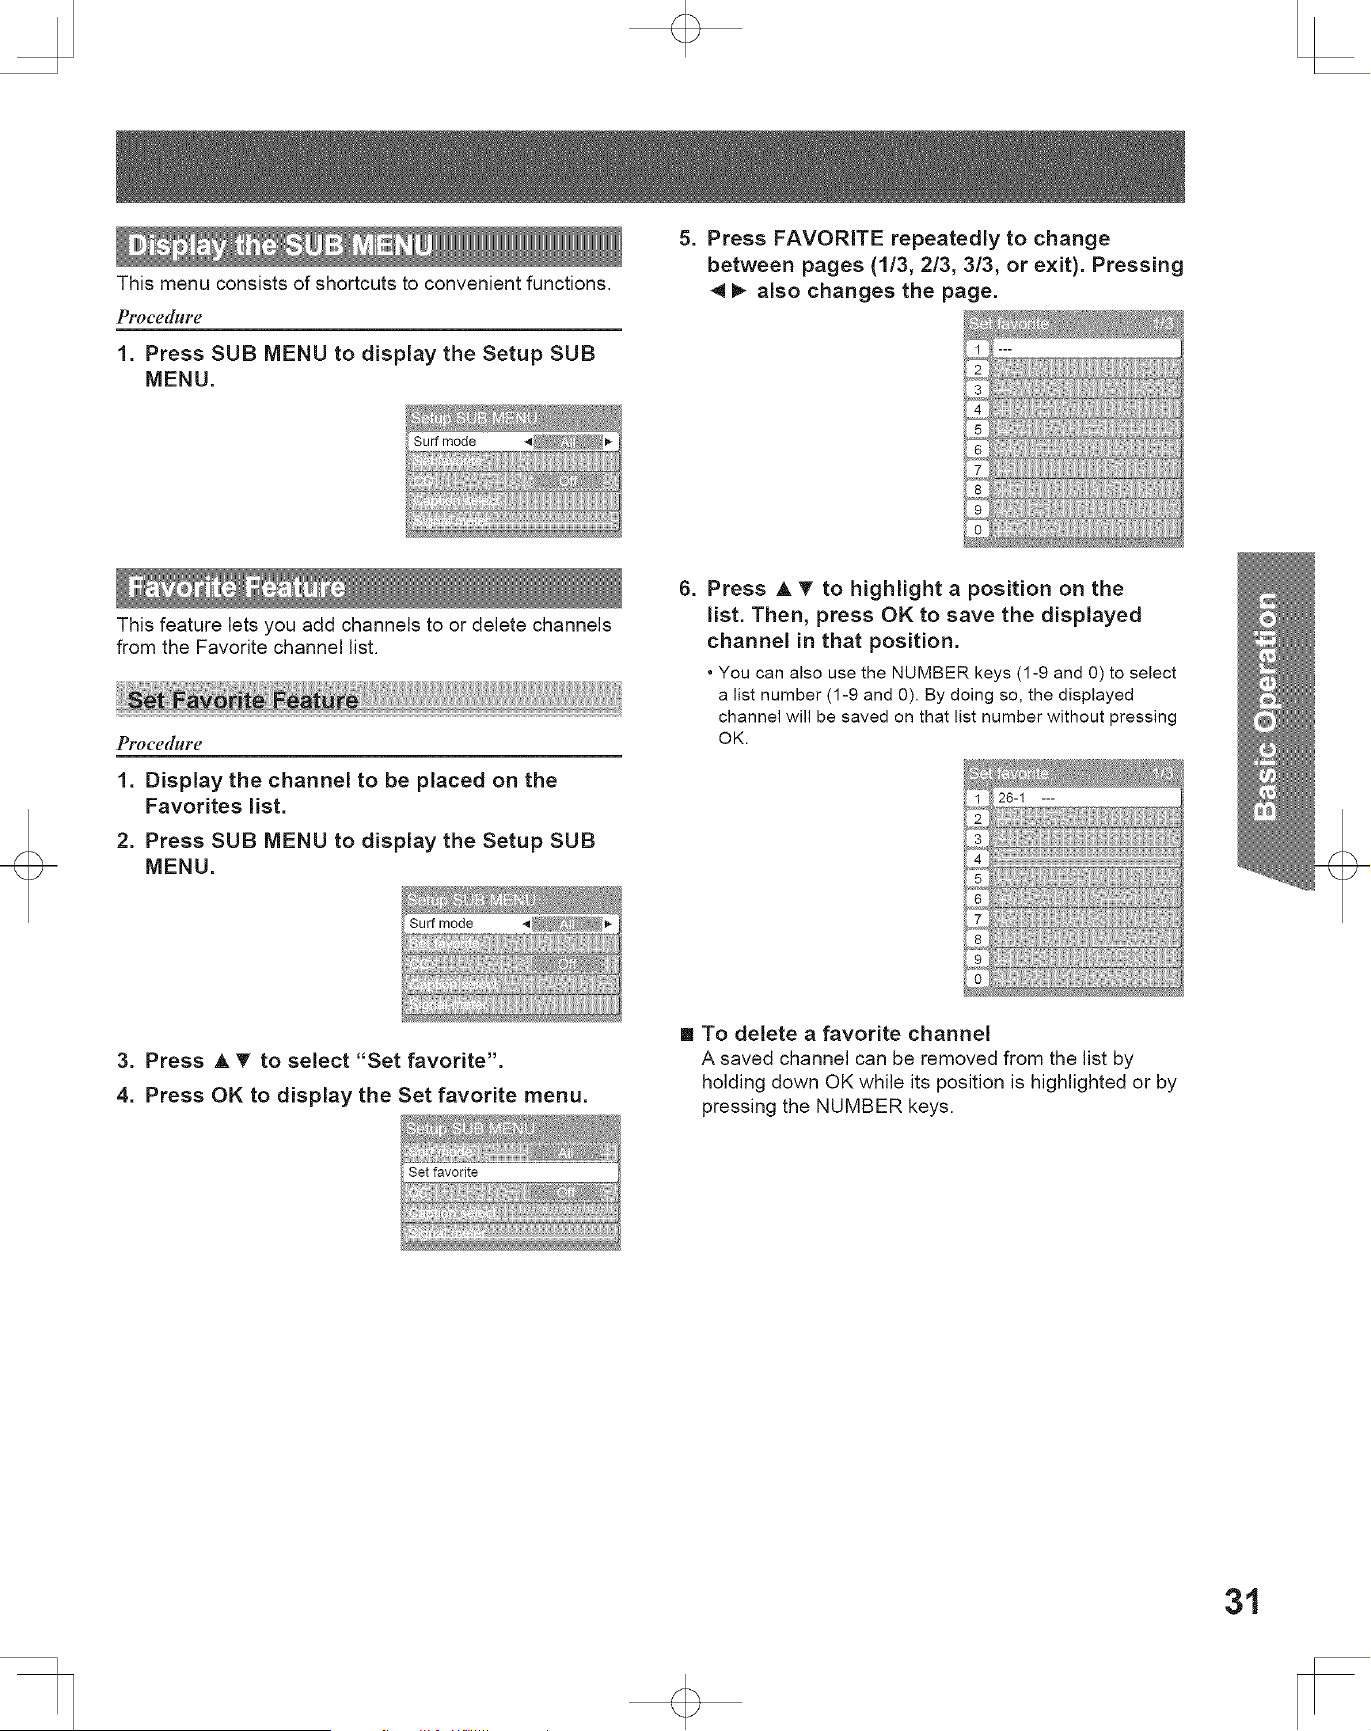
This menu consists of shortcuts to convenient functions•
PPocedbllw
1. Press SUB MENU to display the Setup SUB
MENU.
This feature lets you add channels to or delete channels
from the Favorite channel list.
PPOCe([ldre
1. Display the channel to be placed on the
Favorites list.
2. Press SUB MENU to display the Setup SUB
MENU.
3. Press A T to select "Set favorite".
4. Press OK to display the Set favorite menu.
5. Press FAVORffE repeatedly to change
between pages (1/3, 2/3, 3/3, or exit). Pressing
4 _, also changes the page.
h
6. Press A T to highlight a position on the
list. Then, press OK to save the displayed
channel in that position.
• You can also use the NUMBER keys (1-9 and 0) to select
a list number (1-9 and 0). By doing so, the displayed
channel will be saved on that list number without pressing
OK.
[] To delete a favorite channel
A saved channel can be removed from the list by
holding down OK while its position is highlighted or by
pressing the NUMBER keys•
31
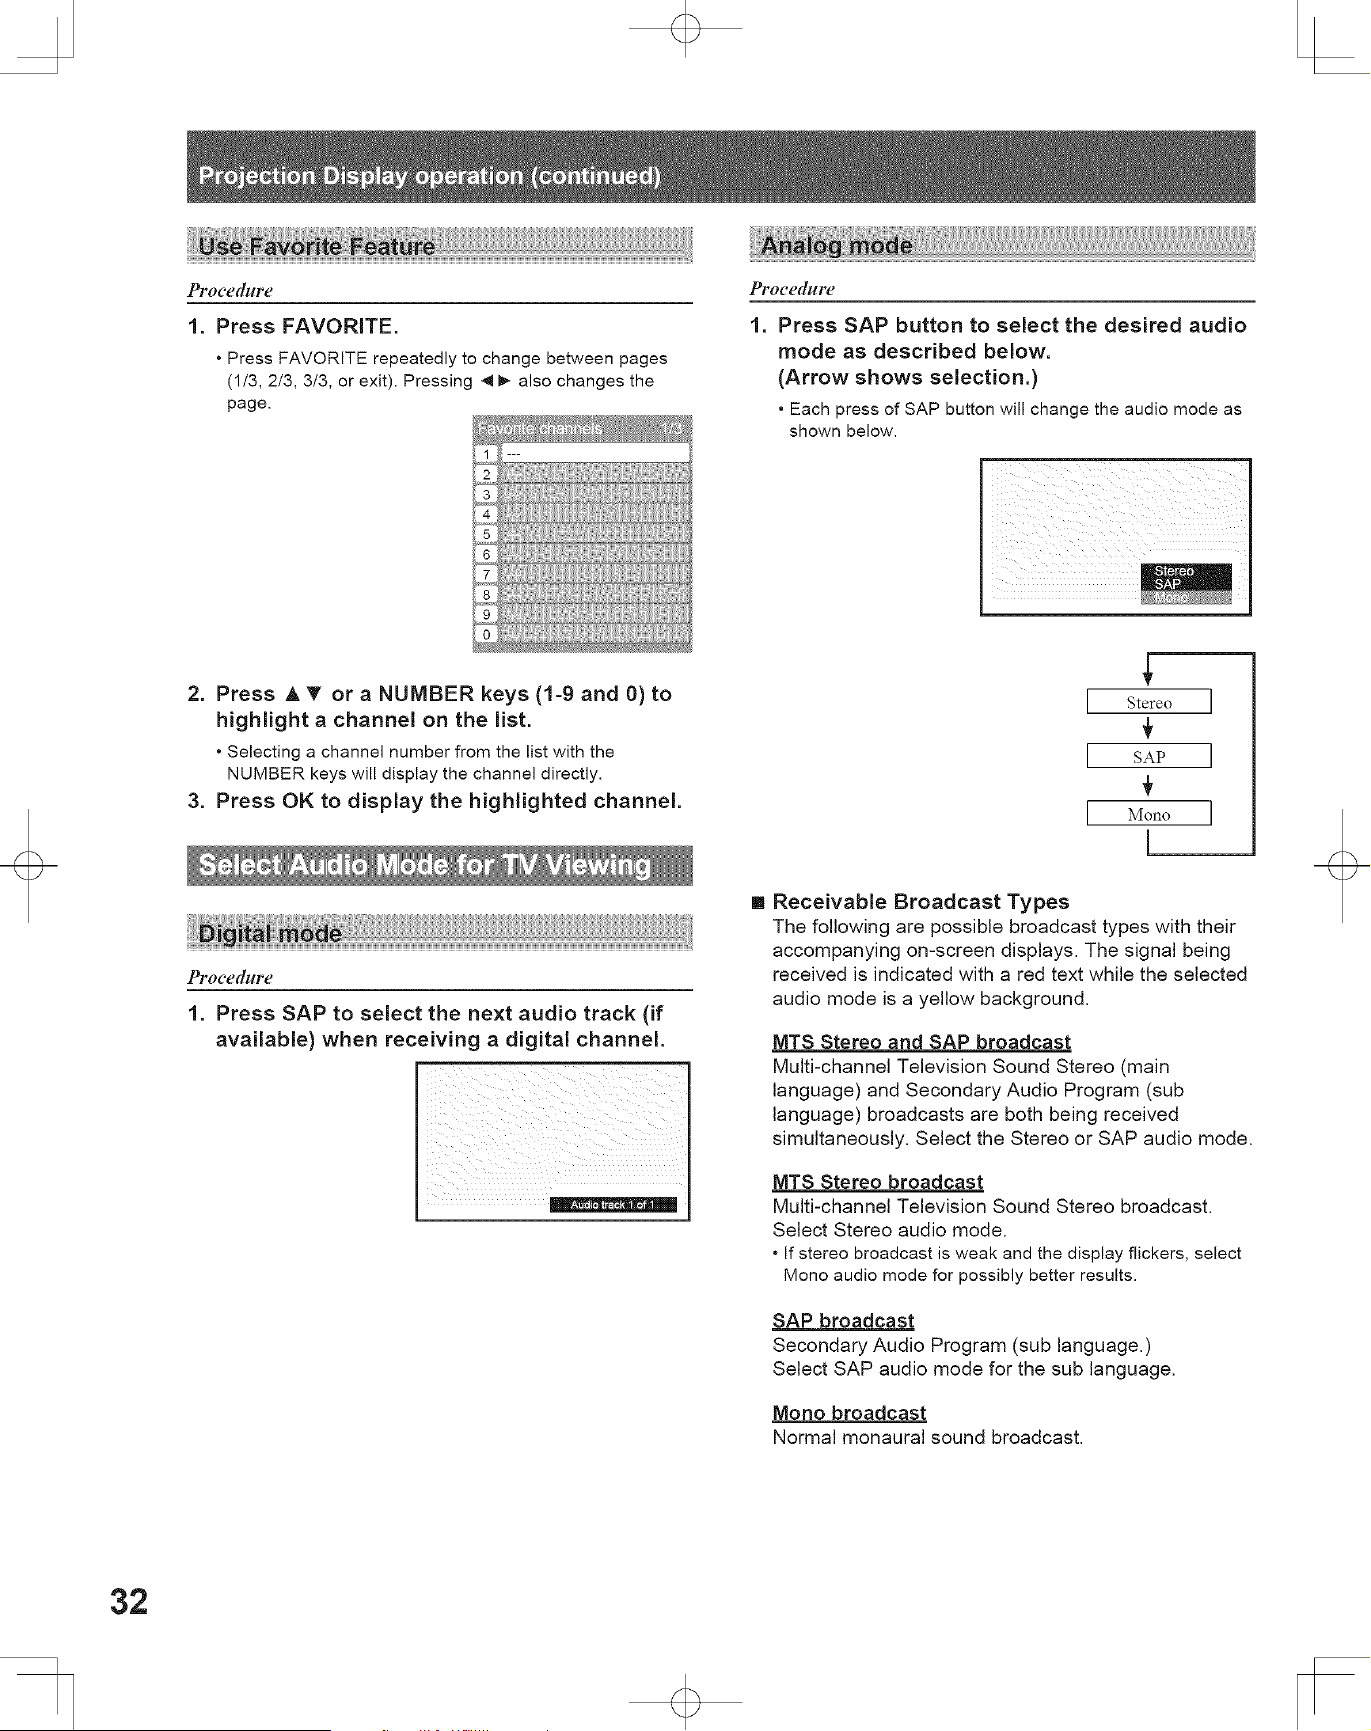
! ! !!!!!
Procedure
1. Press FAVORITE.
• Press FAVORITE repeatedly to change between pages
(1/3, 2/3, 3/3, or exit). Pressing .q m,-also changes the
page.
Pl'OC¢([gIFe
1. Press SAP button to select the desired audio
mode as described below.
(Arrow shows selection.)
• Each press of SAP button will change the audio mode as
shown below.
2. Press A T or a NUMBER keys (1-9 and 0) to
highlight a channel on the list.
• Selecting a channel number from the list with the
NUMBER keys will display the channel directly.
3. Press OK to display the highlighted channel
I I
I SAP I
I Mono I
Procedure
1. Press SAP to select the next audio track (if
available) when receiving a digital channel.
7
Receivable Broadcast Types
The following are possible broadcast types with their
accompanying on-screen displays. The signal being
received is indicated with a red text while the selected
audio mode is a yellow background.
MTS Stereo and SAP broadcast
Multi-channel Television Sound Stereo (main
language) and Secondary Audio Program (sub
language) broadcasts are both being received
simultaneously. Select the Stereo or SAP audio mode.
MTS Stereo broadcast
Multi-channel Television Sound Stereo broadcast.
Select Stereo audio mode.
• If stereo broadcast is weak and the display flickers, select
Mono audio mode for possibly better results.
SAP broadcast
Secondary Audio Program (sub language=)
Select SAP audio mode for the sub language,
Mono broadcast
Normal monaural sound broadcast.
32
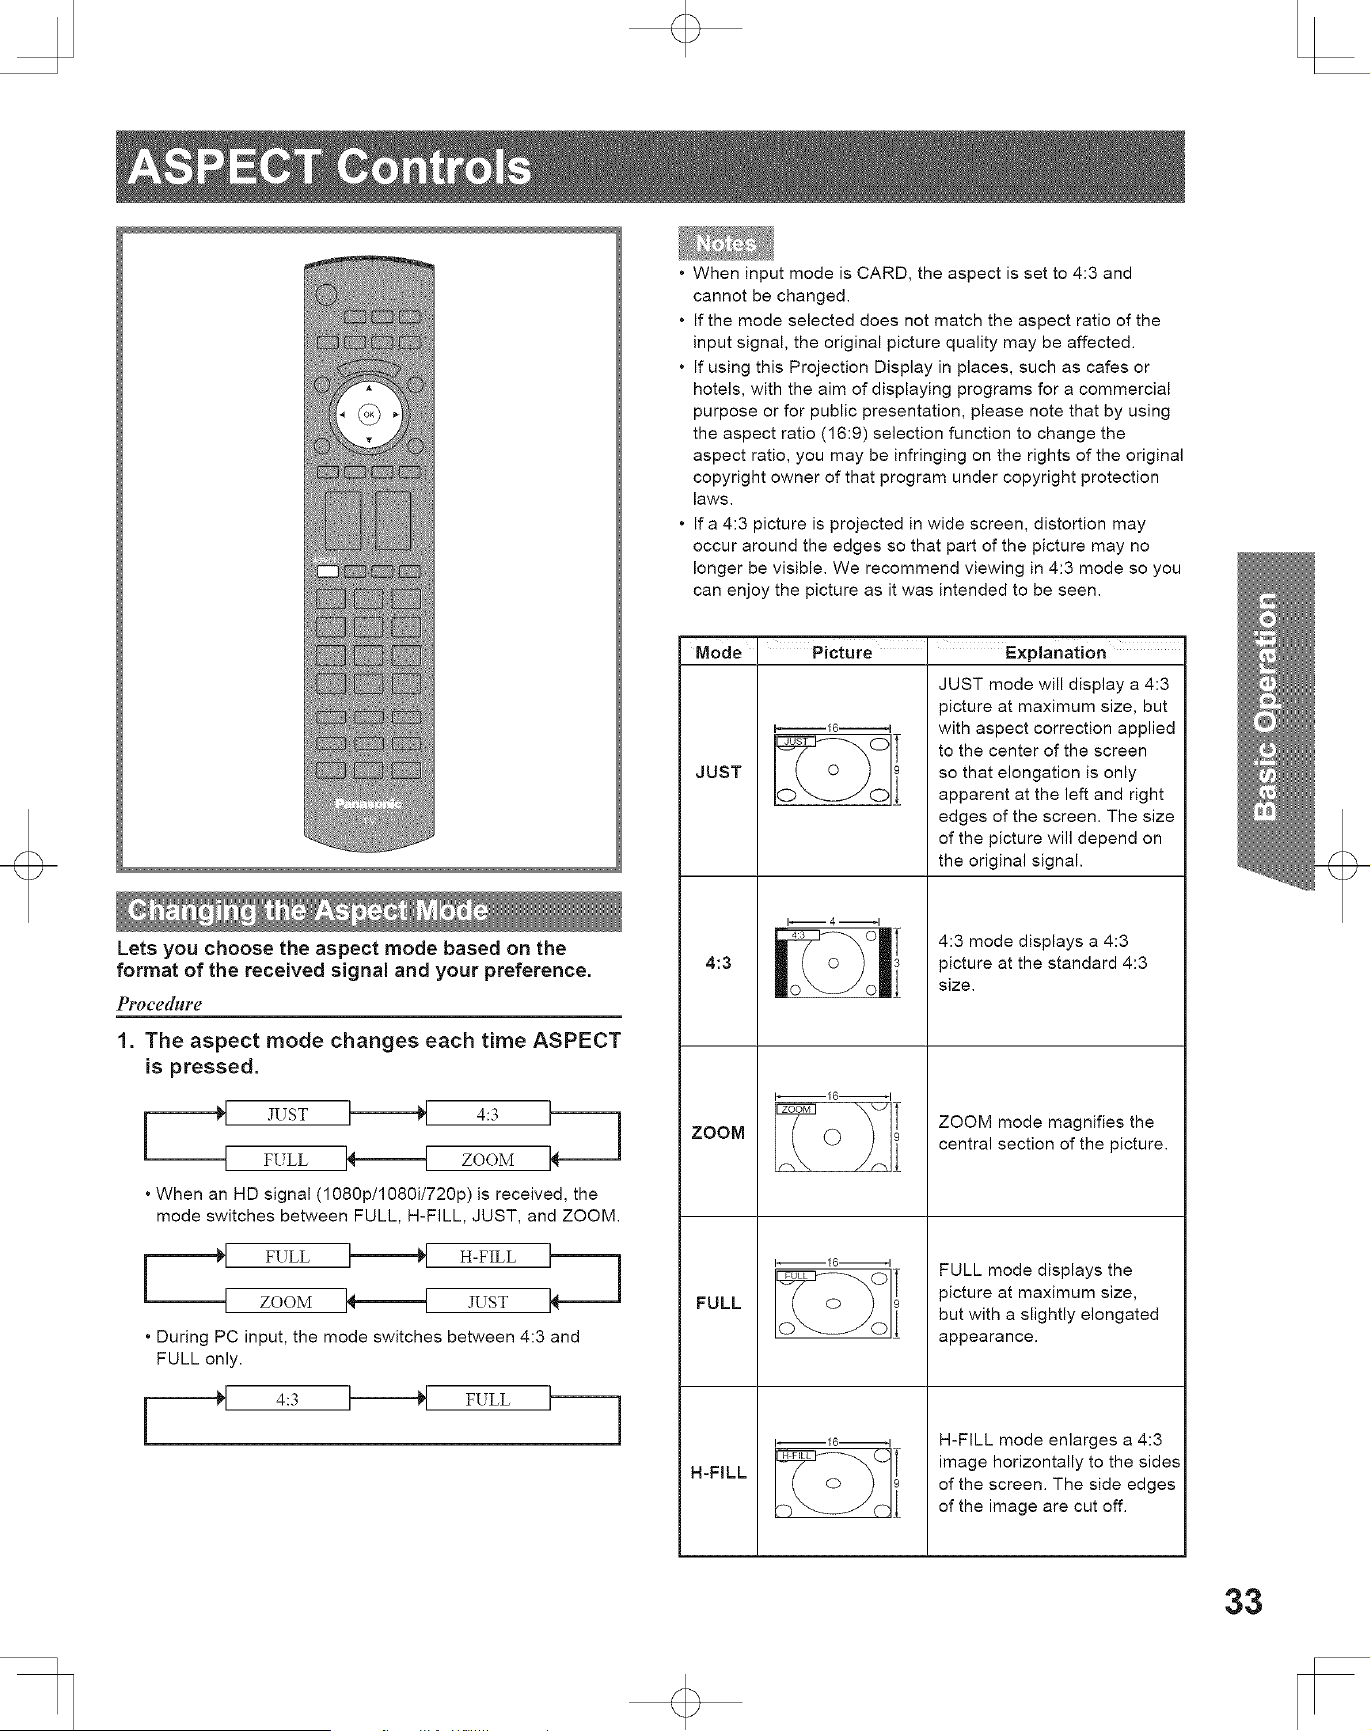
Lets you choose the aspect mode based on the
format of the received signal and your preference.
P#.ocedblre
1. The aspect mode changes each time ASPECT
is pressed.
JUST 4:3
FULL ZOOM
• When an HD signal (1080p/1080i/720p) is received, the
mode switches between FULL, H-FILL, JUST, and ZOOM.
FULL H-FILL
ZOOM JUST
• During PC input, the mode switches between 4:3 and
FULL only.
4:3 FULL
• When input mode is CARD, the aspect is set to 4:3 and
cannot be changed.
• [f the mode selected does not match the aspect ratio of the
input signal, the original picture quality may be affected.
• If using this Projection Display in places, such as cafes or
hotels, with the aim of displaying programs for a commercial
purpose or for public presentation, please note that by using
the aspect ratio (16:9) selection function to change the
aspect ratio, you may be infringing on the rights of the original
copyright owner of that program under copyright protection
laws.
• If a 4:3 picture is projected in wide screen, distortion may
occur around the edges so that part of the picture may no
longer be visible. We recommend viewing in 4:3 mode so you
can enjoy the picture as it was intended to be seen.
Mode Picture ' Explanation
JUST
4:3
ZOOM
FULL
H-FILL
i_-i 16.illi-H
T
T
I_ 4 _1
1--16ul
i
l
JUST mode will display a 4:3
picture at maximum size, but
with aspect correction applied
to the center of the screen
so that elongation is only
apparent at the left and right
edges of the screen. The size
of the picture will depend on
the original signal.
4:3 mode displays a 4:3
picture at the standard 4:3
size.
ZOOM mode magnifies the
central section of the picture.
FULL mode displays the
picture at maximum size,
but with a slightly elongated
appearance.
H-FILL mode enlarges a 4:3
image horizontally to the sides
of the screen. The side edges
of the image are cut off.
33

If you connect equipment that has the "HDAVI Control 2"
function to the TV with HDMI cable, you can enjoy using
this convenient function. For details, "EZ Sync Control"
on pages 22 and 52-54.
ProcedgIFe
1. Press A _ to select the equipment,
2. Press OK to operate the selected equipment
with this Projection Display's Remote
Control.
° Follow the menu of the equipment and enjoy watching.
• For the remote control operations, refer to page 54.
[] Return to TV screen
Press EXIT.
• For details, see the equipment manual or ask your local
dealer.
34
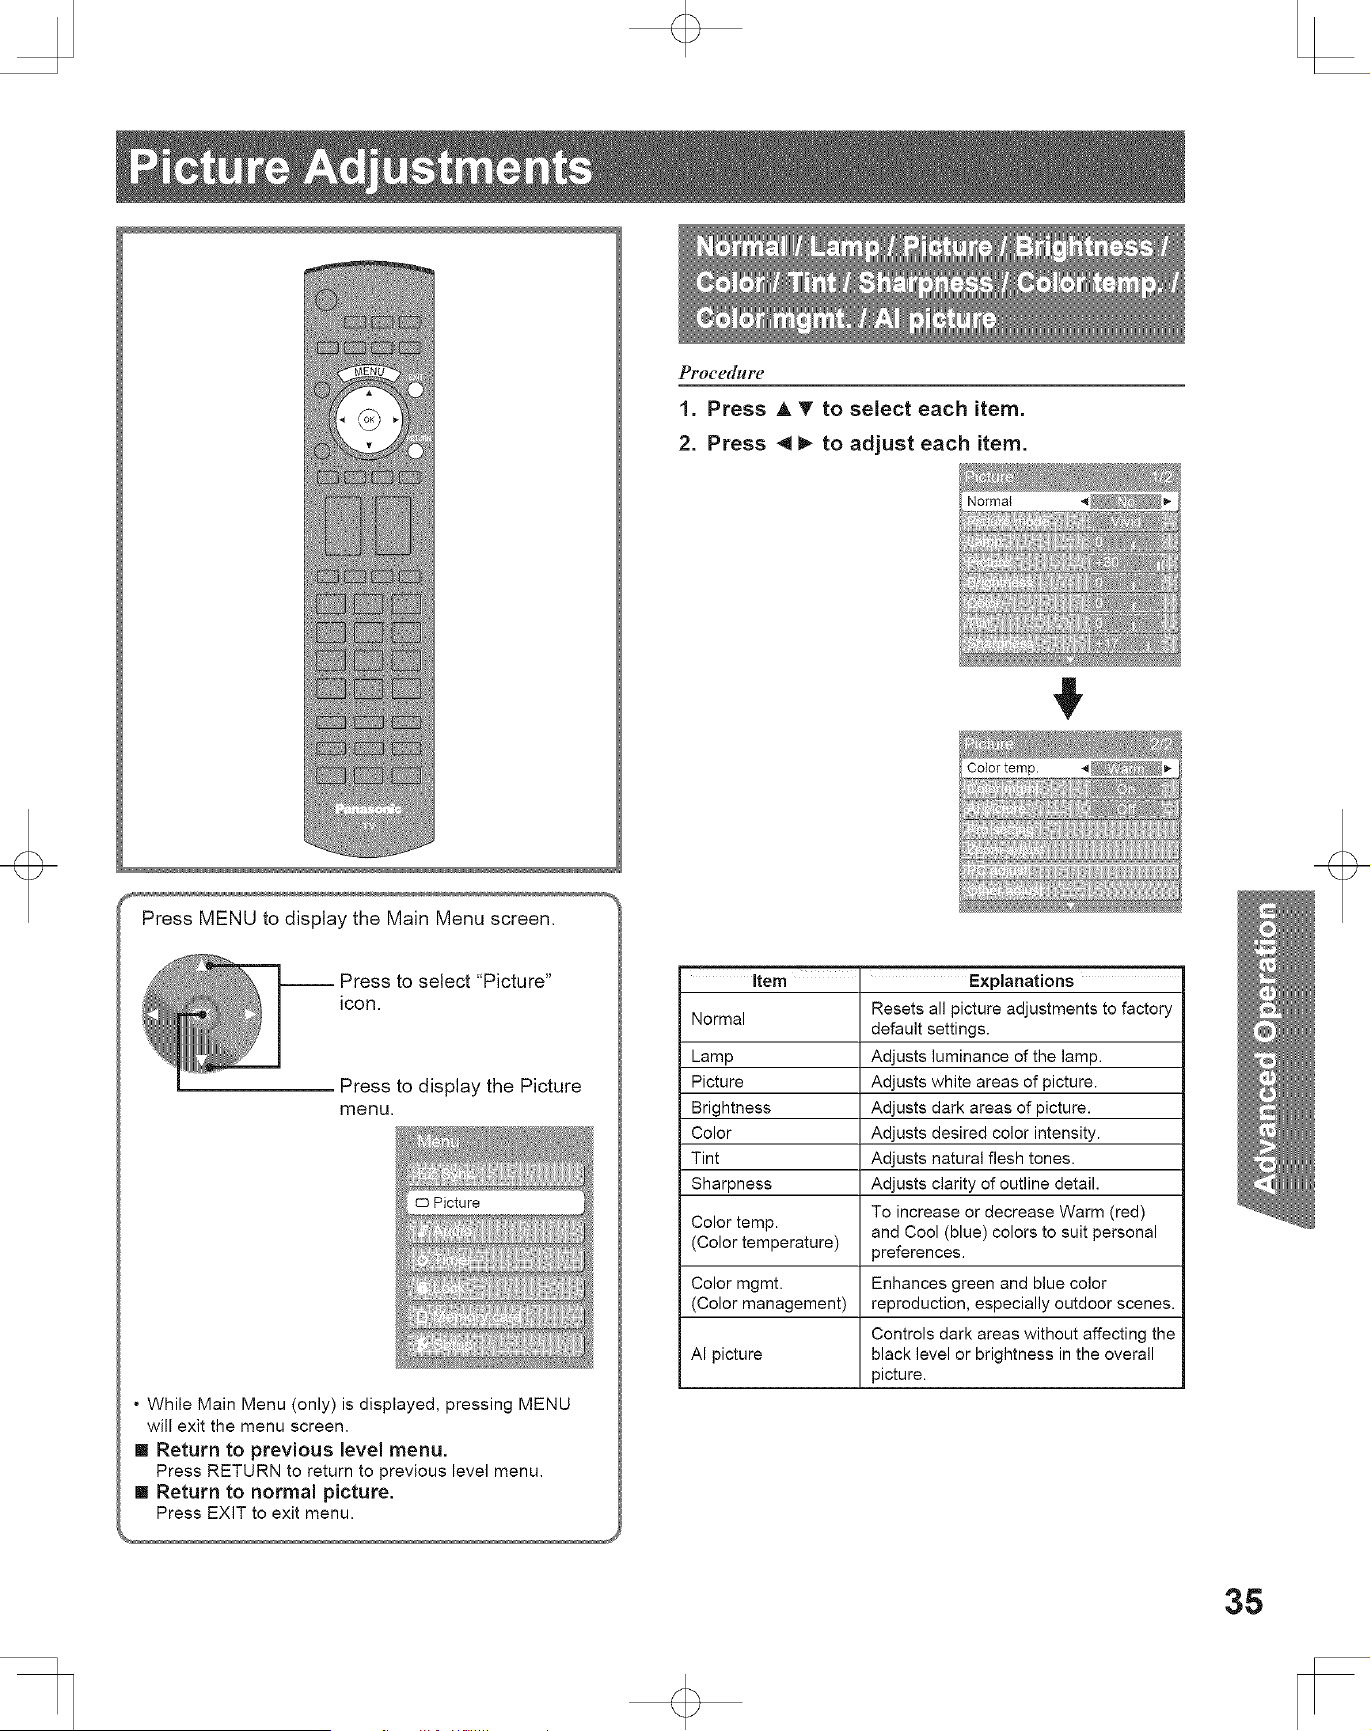
Press MENU to display the Main Menu screen.
-- Press to select "Picture"
icon.
Press to display the Picture
menu,
• While Main Menu (only) is displayed, pressing MENU
will exit the menu screen.
II Return to previous level menu.
Press RETURN to return to previous level menu.
II Return to normal picture.
Press EXIT to exit menu.
PFOCe([ldFe
1. Press A V to select each item.
2. Press 4 _ to adjust each item.
Item ' Explanations
Resets all picture adjustments to factory
Normal
default settings.
Lamp Adjusts luminance of the lamp.
Picture Adjusts white areas of picture.
Brightness Adjusts dark areas of picture.
Color Adjusts desired color intensity.
Tint Adjusts natural flesh tones.
Sharpness Adjusts clarity of outline detail.
To increase or decrease Warm (red)
Color temp. and Cool (blue) colors to suit personal
(Color temperature) preferences.
Color mgmt. Enhances green and blue color
(Color management) reproduction, especially outdoor scenes.
Controls dark areas without affecting the
AI picture black level or brightness in the overall
picture.
35
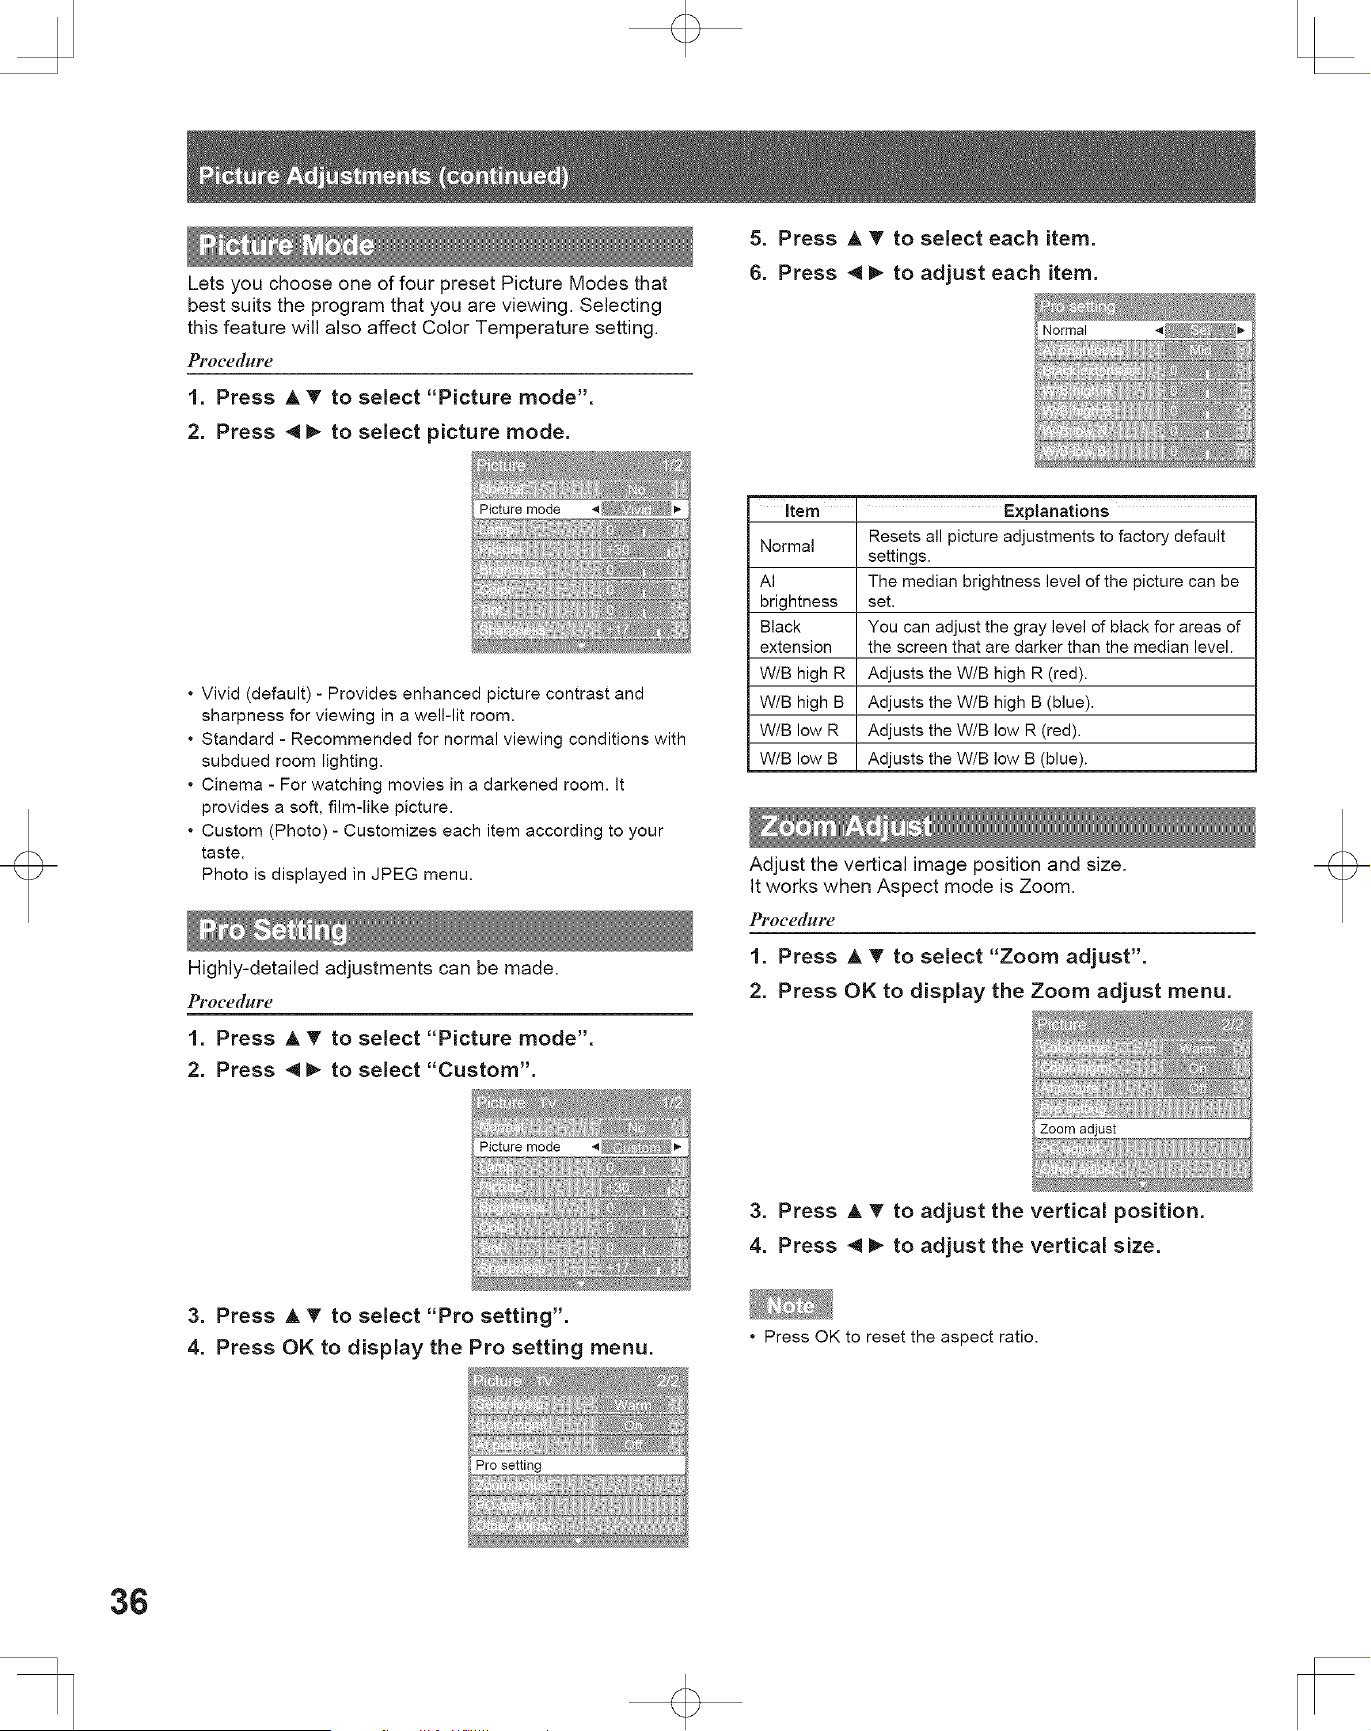
Lets you choose one of four preset Picture Modes that
best suits the program that you are viewing. Selecting
this feature will also affect Color Temperature setting.
Procedure
1. Press A T to select "Picture mode".
2. Press 4 I_ to select picture mode.
5. Press A T to select each item.
6. Press 4 _ to adjust each item.
Picture mode 4
• Vivid (default) - Provides enhanced picture contrast and
sharpness for viewing in a well-lit room.
• Standard - Recommended for normal viewing conditions with
subdued room lighting.
• Cinema - For watching movies in a darkened room. It
provides a soft, film-like picture.
• Custom (Photo) - Customizes each item according to your
taste.
Photo is displayed in JPEG menu.
Highly-detailed adjustments can be made,
Pt.oc_'dblr_'
1. Press A T to select "Picture mode".
2. Press _ to select "Custom".
Picture mode 4
Item ' Explanations
Resets all picture adjustments to factory default
Normal
settings.
AI The median brightness level of the picture can be
brightness set.
Black You can adjust the gray level of black for areas of
extension the screen that are darker than the median level.
W/B high R Adjusts the W/B high R (red).
W/B high B Adjusts the W/B high B (blue).
W/B low R Adjusts the W/B low R (red).
W/B low B Adjusts the W/B low B (blue).
Adjust the vertical image position and size.
It works when Aspect mode is Zoom.
Pl'oce([HFe
1. Press A T to select "Zoom adjust".
2. Press OK to display the Zoom adjust menu.
Zoom adjust
3. Press A _' to adjust the vertical position.
4. Press 4 _ to adjust the vertical size.
3. Press A _r to select "Pro setting".
4. Press OK to display the Pro setting menu.
• Press OK to reset the aspect ratio.
36
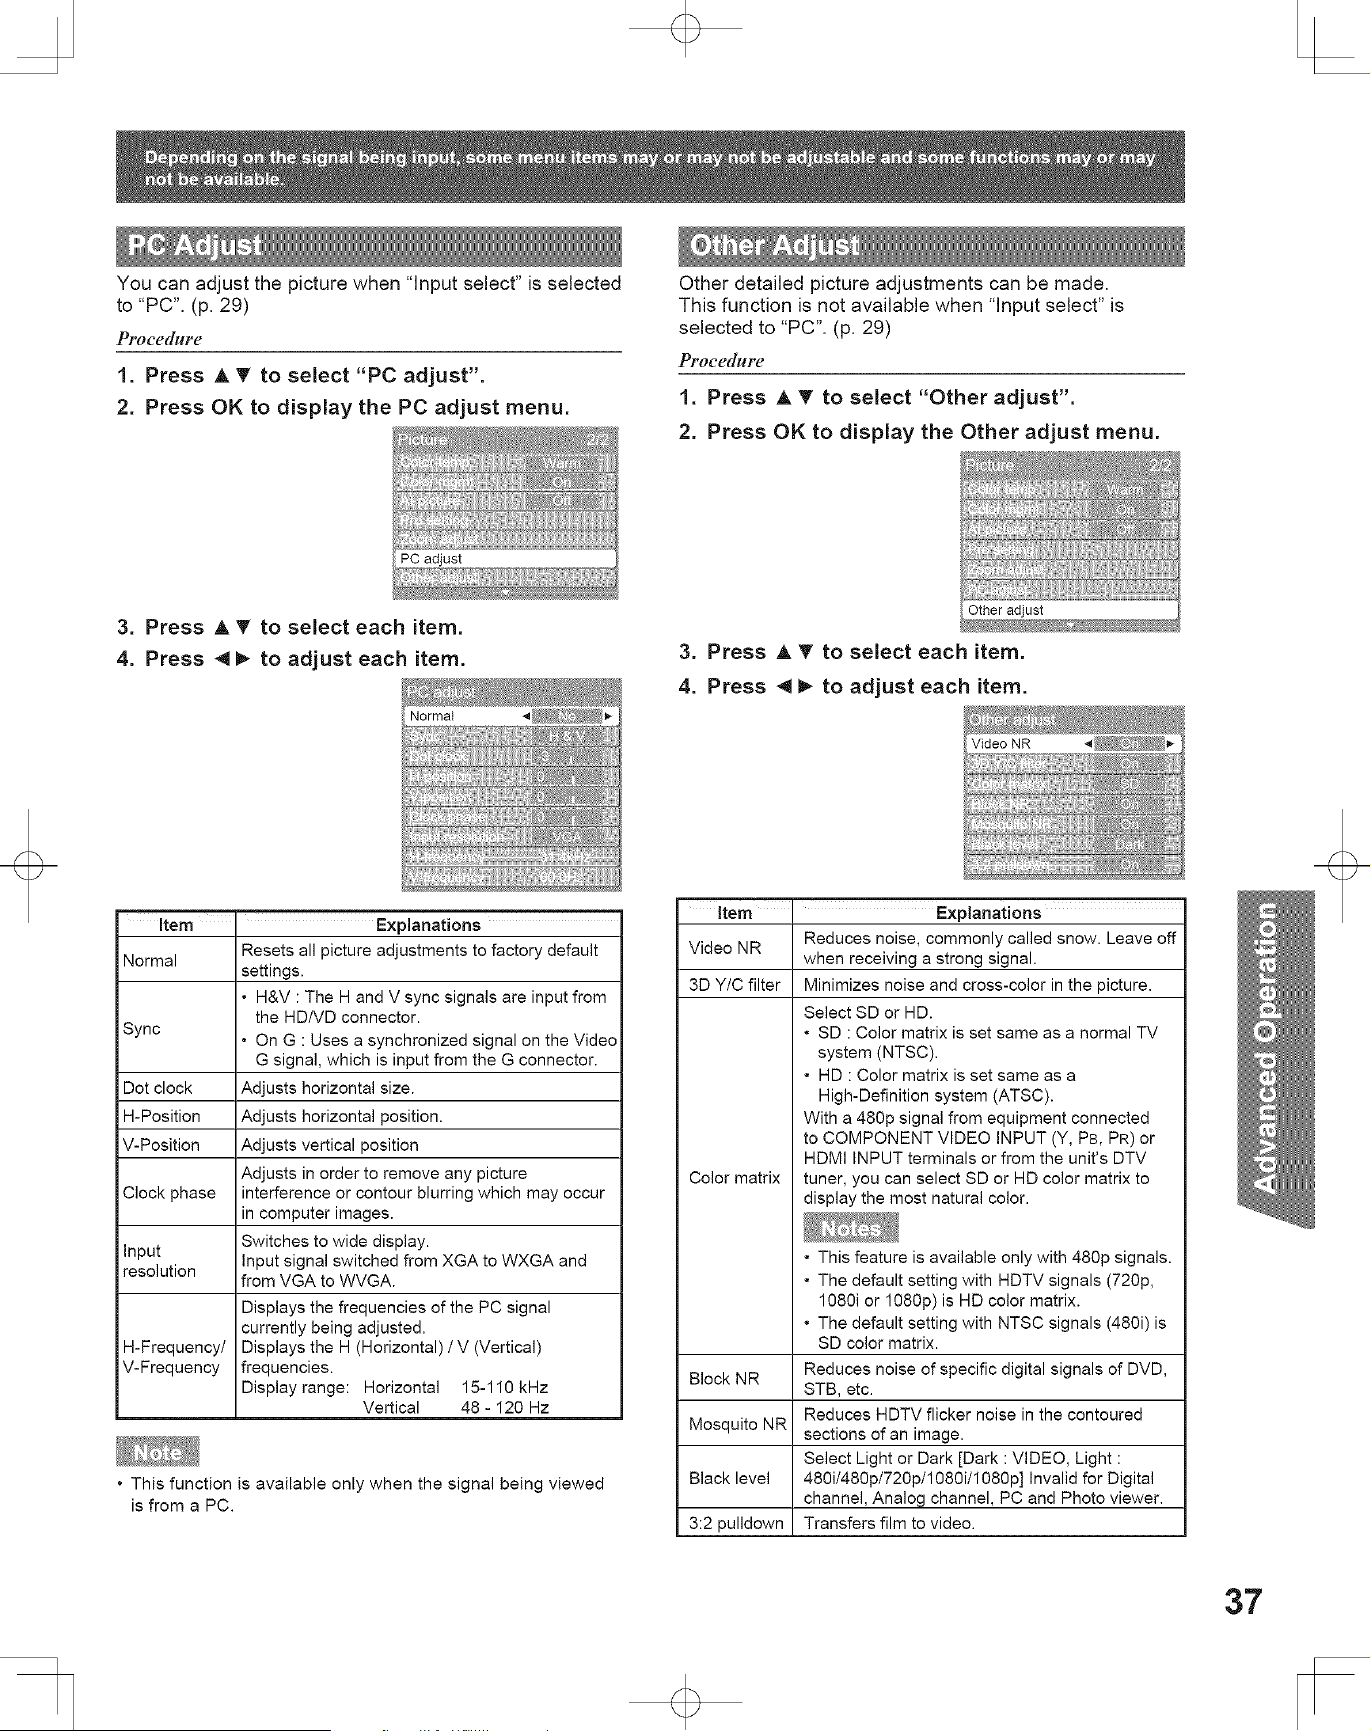
You can adjust the picture when "Input select" is selected
to "PC". (p, 29)
PFoce([l_gFe
1. Press A V to select "PC adjust".
2. Press OK to display the PC adjust menu.
Other detailed picture adjustments can be made.
This function is not available when "Input select" is
selected to "PC", (p, 29)
Procedure
1. Press A V to select "Other adjust".
2. Press OK to display the Other adjust menu.
3. Press A T to select each item.
4. Press 4 _, to adjust each item.
3. Press A T to select each item.
4. Press 4 I_ to adjust each item.
item ' Explanations
Resets all picture adjustments to factory default
Normal
settings.
• H&V : The H and V sync signals are input from
the HD/VD connector.
Sync • On G : Uses a synchronized signal on the Video
G signal, which is input from the G connector.
Dot clock Adjusts horizontal size.
H-Position Adjusts horizontal position.
V-Position Adjusts vertical position
Adjusts in order to remove any picture
Clock phase interference or contour blurring which may occur
tn computer images.
Input Switches to wide display.
resolution Input signal switched from XGA to WXGA and
from VGA to WVGA.
Displays the frequencies of the PC signal
currently being adjusted.
H-Frequency/ Displays the H (Horizontal) /V (Vertical)
V-Frequency frequencies.
Display range: Horizontal 15-110 kHz
Vertical 48 - 120 Hz
• This function is available only when the signal being viewed
is from a PC.
Item i Explanations
Reduces noise, commonly called snow. Leave off
Video NR
when receiving a strong signal.
3D Y/C filter Minimizes noise and cross-color in the picture.
Select SD or HD.
• SD : Color matrix is set same as a normal IV
system (NTSC).
• HD : Color matrix is set same as a
High-Definition system (ATSC).
With a 480p signal from equipment connected
to COMPONENT VIDEO INPUT (Y, PB, PR) or
HDMI INPUT terminals or from the unit's DTV
Color matrix tuner, you can select SD or HD color matrix to
display the most natural color.
Block NR
Mosquito NR
Black level
3:2 pulldown
• This feature is available only with 480p signals.
• The default setting with HDTV signals (720p,
1080i or 1080p) is HD color matrix.
• The default setting with NTSC signals (480i) is
SD color matrix.
Reduces noise of specific digital signals of DVD,
STB, etc.
Reduces HDTV flicker noise in the contoured
sections of an image.
Select Light or Dark [Dark : VIDEO, Light :
480i/480p/72Op/1080i/1080p] Invalid for Digital
channel, Analog channel, PC and Photo viewer.
Transfers film to video.
37

Pt.ocedblre
1. Press A T to select each item.
2. Press 4 _ to adjust each item.
i
item ' Explanations
Normal Reset Bass, Treble and Balance
adjustments to factory default settings.
Bass Increase or decrease the bass response.
Treble Increase or decrease the treble response.
Balance Emphasize the left / right speaker volume.
Other detailed audio adjustments can be made,
Procedllre
1. Press A T to select "Other adjust".
2. Press OK to display the Other adjust menu.
3. Press A T to select each item.
4. Press _ i_ to adjust each item.
38
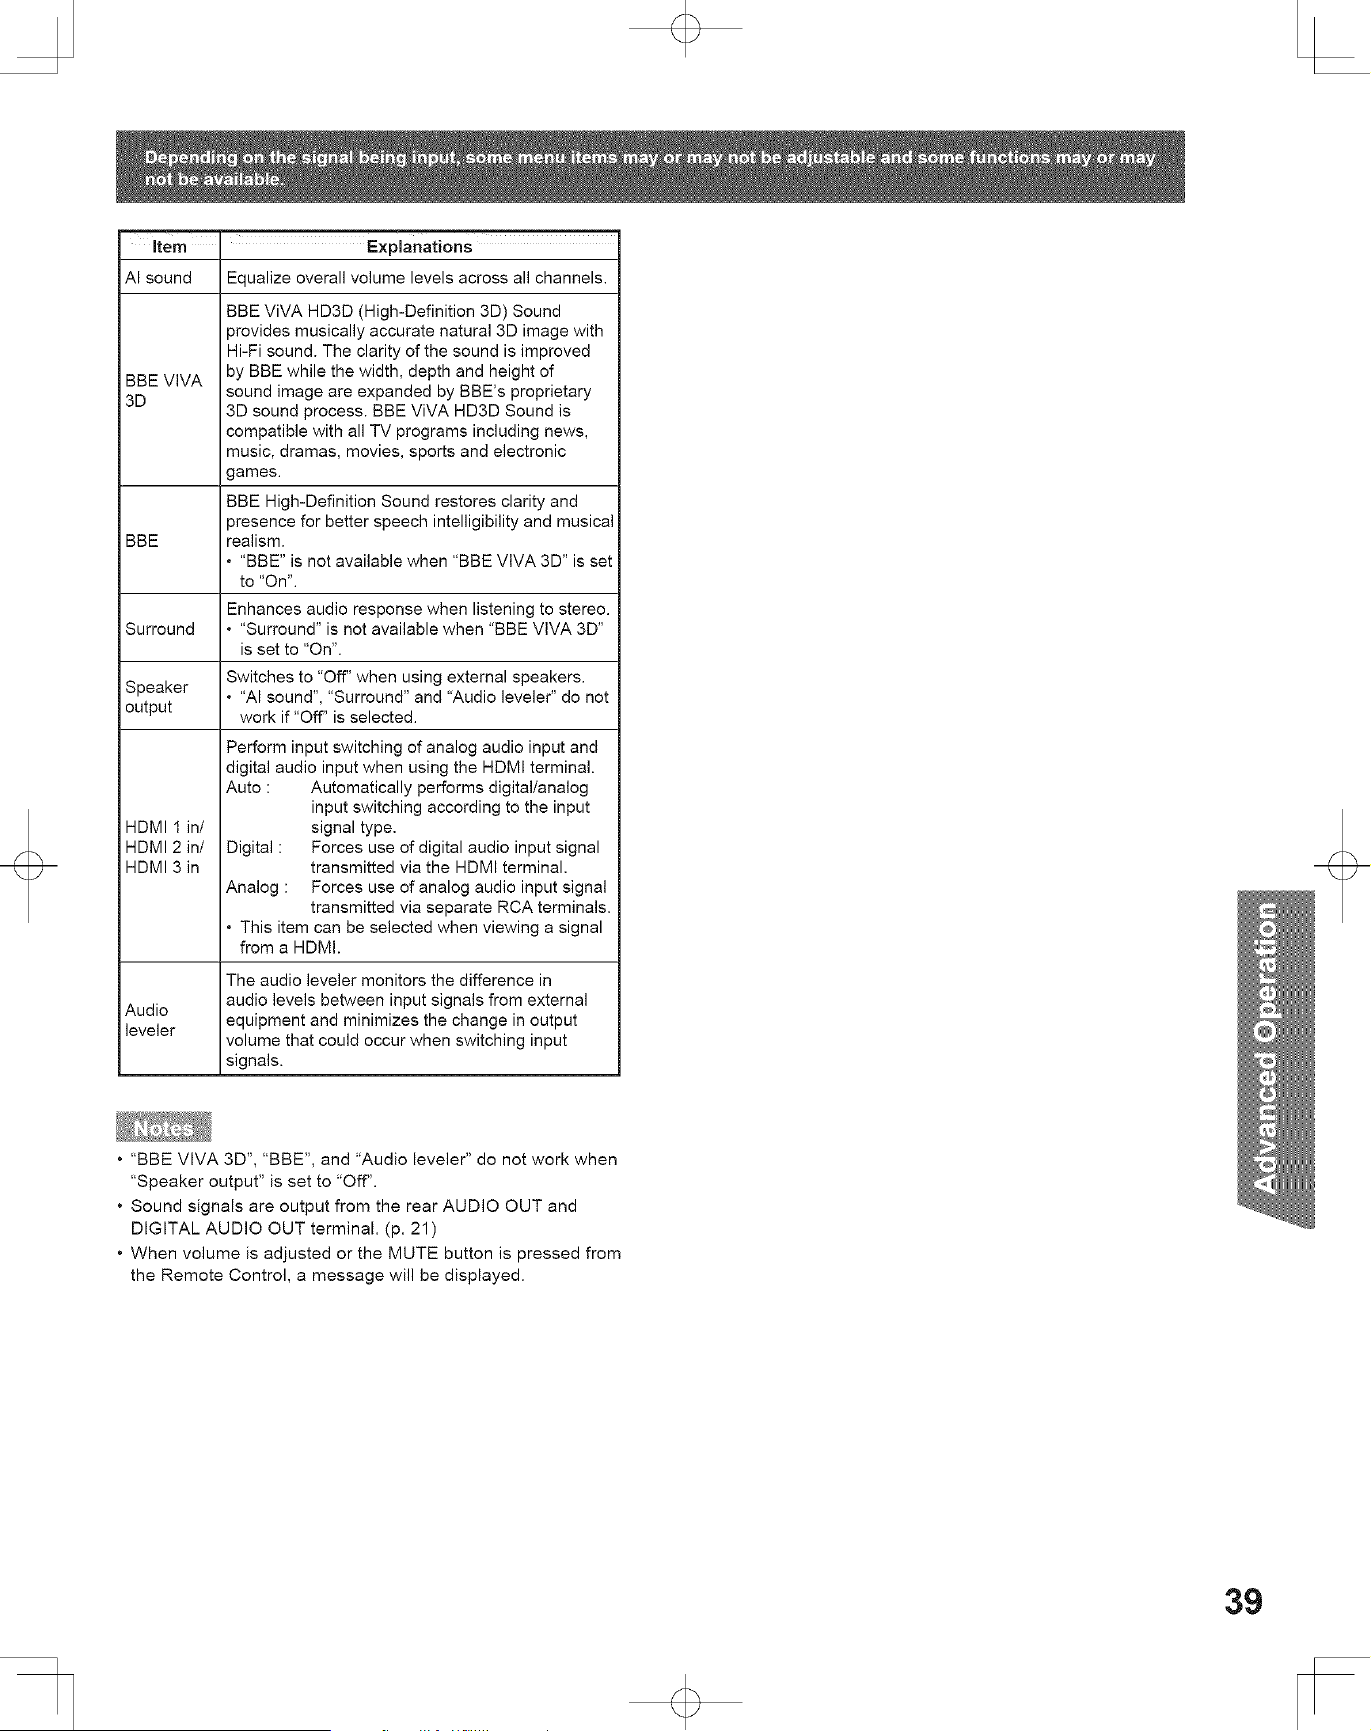
ite , E×planatio.
AI sound Equalize overall volume levels across all channels.
BBE ViVA HD3D (High-Definition 3D) Sound
provides musically accurate natural 3D image with
Hi-Fi sound. The clarity of the sound is improved
BBE VIVA by BBE while the width, depth and height of
sound image are expanded by BBE's proprietary
3D
3D sound process. BBE ViVA HD3D Sound is
compatible with all TV programs including news,
music, dramas, movies, sports and electronic
games.
BBE High-Definition Sound restores clarity and
presence for better speech intelligibility and musical
BBE realism.
• "BBE" is not available when "BBE VIVA 3D" is set
to "On".
Enhances audio response when listening to stereo.
Surround ° "Surround" is not available when "BBE VIVA 3D"
is set to "On".
Switches to "Off" when using external speakers.
Speaker ° "AI sound", "Surround" and "Audio leveler" do not
output work if "Off" is selected.
Perform input switching of analog audio input and
digital audio input when using the HDMI terminal.
Auto : Automatically performs digital/analog
input switching according to the input
HDMI 1 in/ signal type.
HDMI 2 in/ Digital : Forces use of digital audio input signal
HDMI 3 in transmitted via the HDMI terminal.
Analog : Forces use of analog audio input signal
transmitted via separate RCA terminals.
° This item can be selected when viewing a signal
from a HDMI.
The audio leveler monitors the difference in
audio levels between input signals from external
Audio
leveler equipment and minimizes the change in output
volume that could occur when switching input
signals.
• "BBE VIVA 3D", "BBE", and "Audio leveler" do not work when
"Speaker output" is set to "Off".
• Sound signals are output from the rear AUDIO OUT and
DIGITAL AUDIO OUT terminal. (p. 21 )
• When volume is adjusted or the MUTE button is pressed from
the Remote Control, a message will be displayed.
39
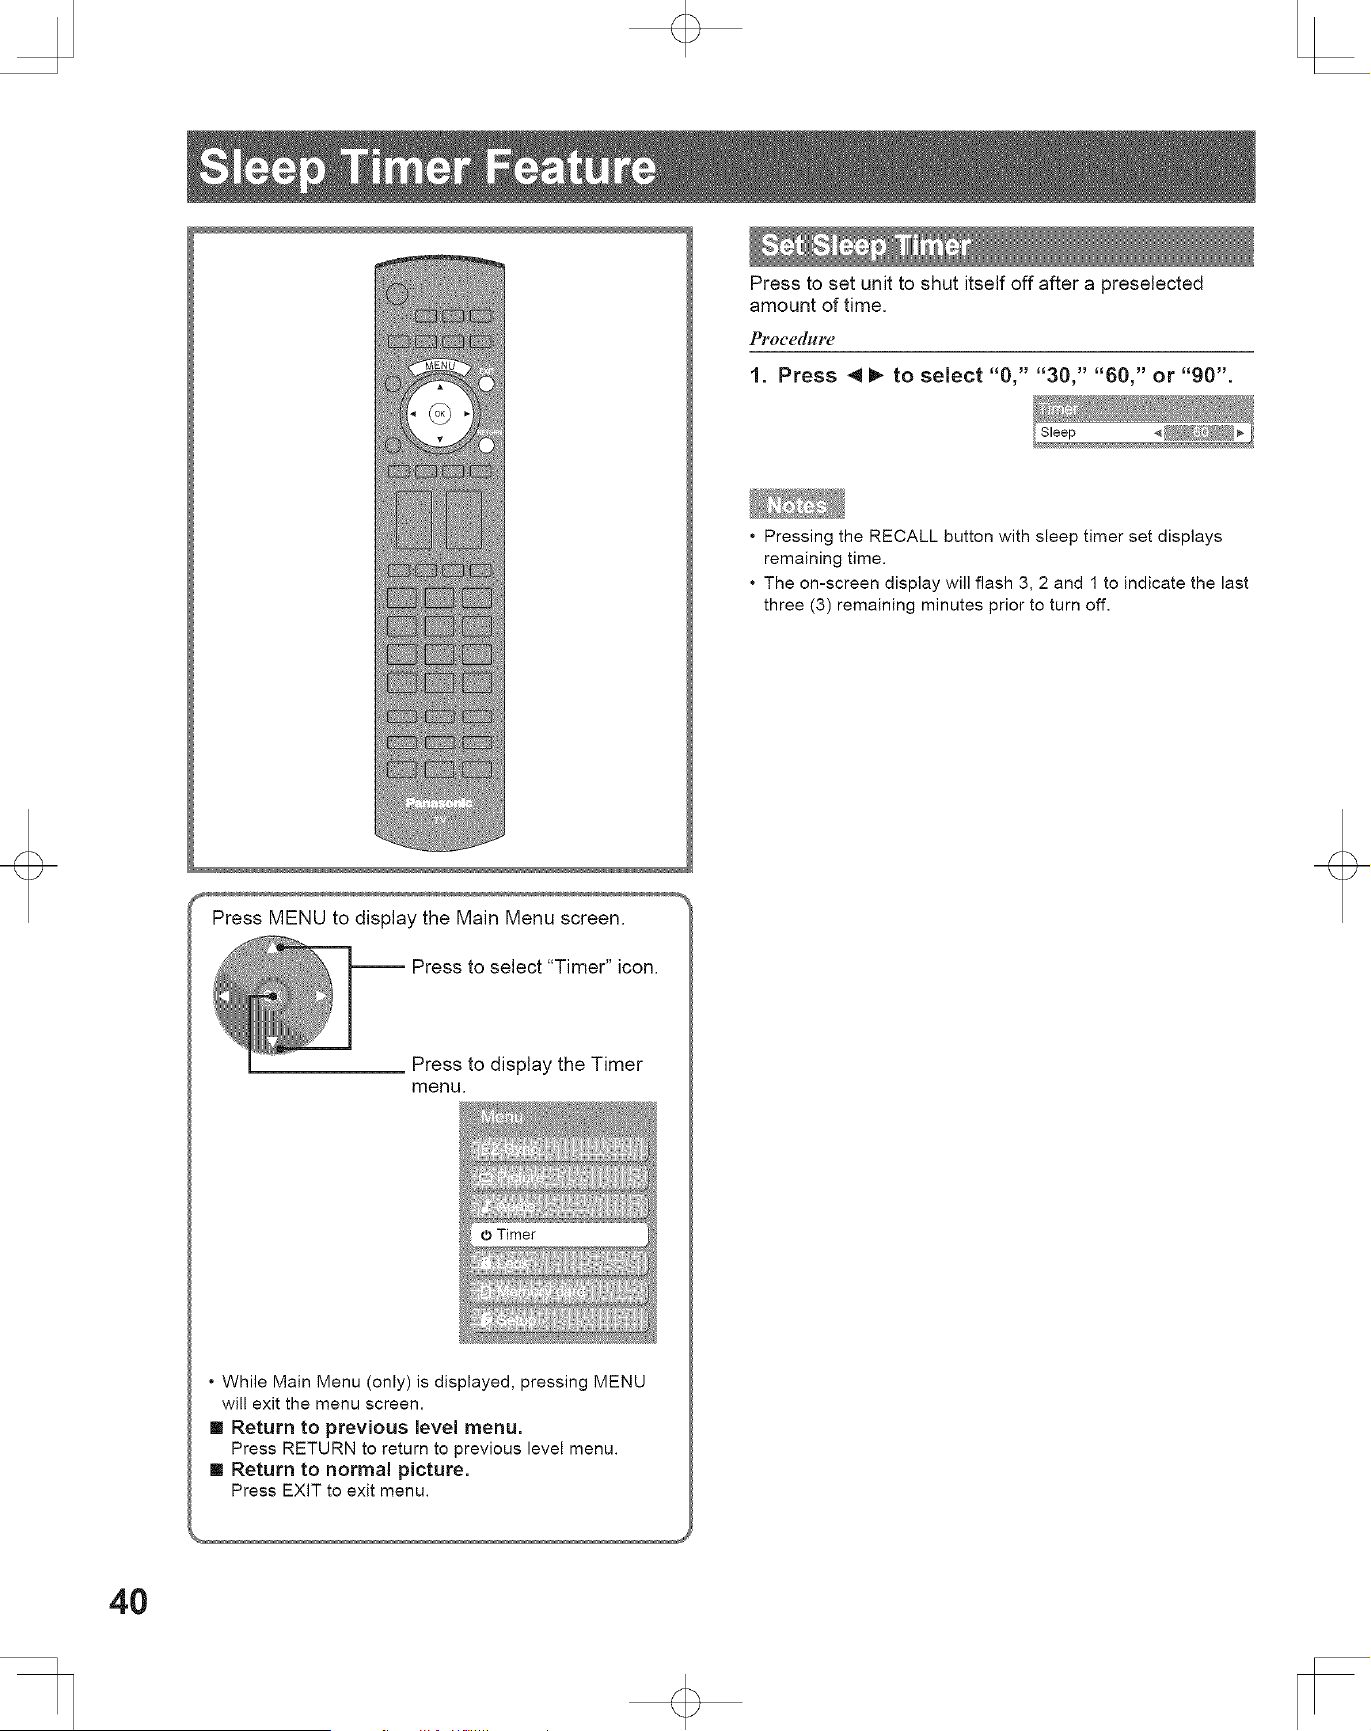
Press to set unit to shut itself off after a preselected
amount of time=
PFoce([HFe
1. Press 4 I_ to select "0," "30," "60," or "90".
• Pressing the RECALL button with sleep timer set displays
remaining time.
• The on-screen display will flash 3, 2 and 1 to indicate the last
three (3) remaining minutes prior to turn off.
40
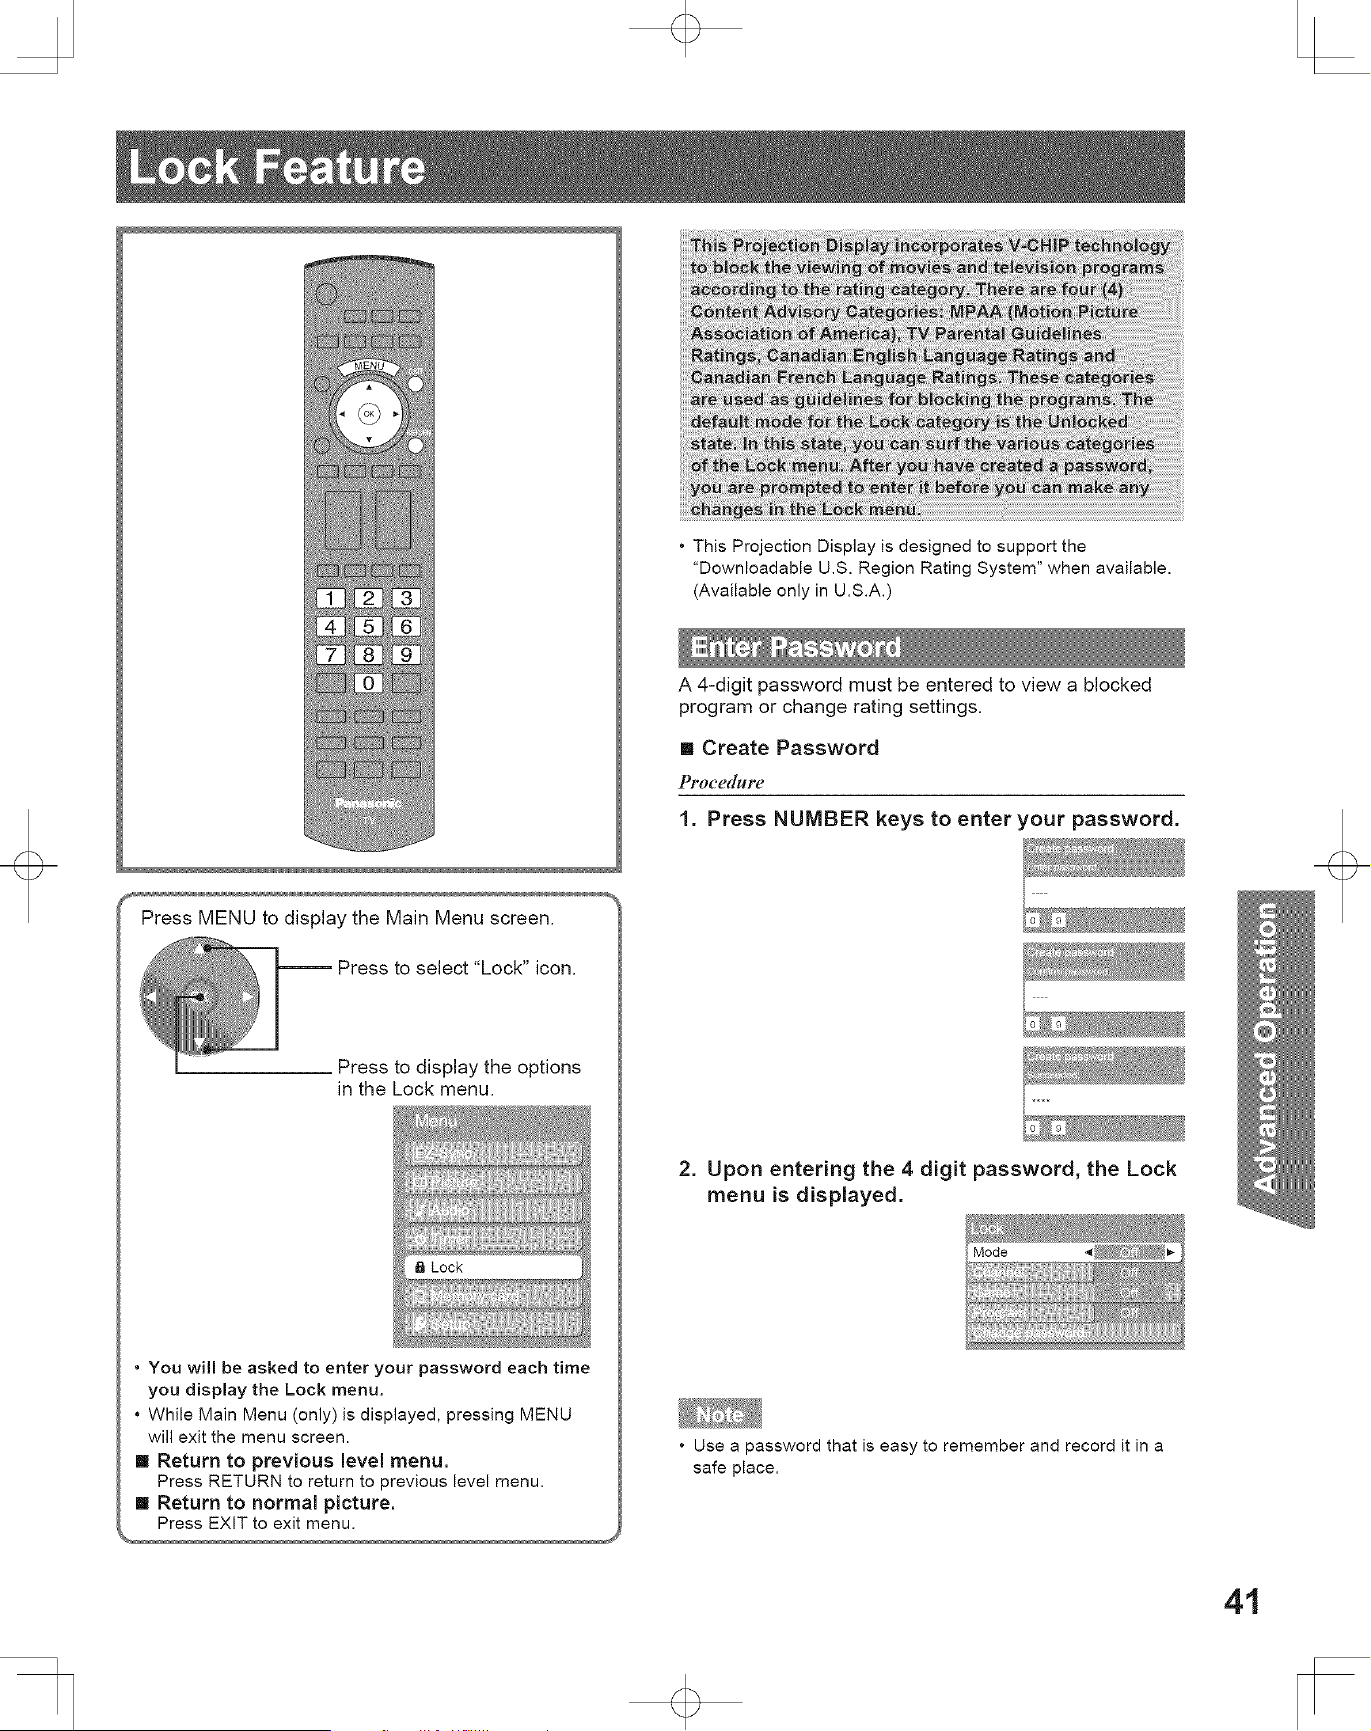
Press MENU to display the Main Menu screen.
Press to select "Lock" icon.
Press to display the options
in the Lock menu.
a Lock
• You will be asked to enter your password each time
you display the Lock menu.
• While Main Menu (only) is displayed, pressing MENU
will exit the menu screen.
m Return to previous level menu.
Press RETURN to return to previous level menu.
m Return to normal picture.
Press EXIT to exit menu.
• This Projection Display is designed to support the
"Downloadable U.S. Region Rating System" when available.
(Available only in U.S.A.)
A 4-digit password must be entered to view a blocked
program or change rating settings,
[] Create Password
Procedure
1. Press NUMBER keys to enter your password.
2. Upon entering the 4 digit password, the Lock
menu is displayed.
• Use a password that is easy to remember and record it in a
safe place.
41
[] Enter Password
Procedure
1. Press NUMBER keys to enter your password.
2. Upon entering the 4 digit password, the Lock
menu is displayed.
Select up to 7 (1-7) channels to be blocked out. These
channels will be blocked out regardless of the program
rating.
Procedure
1. Press A T to select "Channel".
2. Press OK to display the Channel lock menu.
• Once ratings are set, restricted tapes or programs cannot be
accessed unless the secret password is entered.
• Do not forget your password. If you have forgotten it,
please contact service center.
Select Lock mode to prevent viewing of video games,
VCR tapes, channels and Video modes=
PFoce([lgFe
1. Press A V to select "Mode".
2. Press _ _, to select the desired setting.
3. Press A T to select "Mode".
4. Press 4 _ to select "Custom".
• All - Locks all channels.
• Off - Unlocks all channels.
To prevent video games, VCR tapes and all channels
and video modes from being viewed. The available
modes are:
• Off - Unlocks all the lock settings of "Channel", "Game" and
"Program".
• All - Locks all the inputs regardless of the lock setting of
"Channel", "Game" and "Program".
• Custom - Locks specified inputs of "Channel", "Game" and
"Program".
• "Channel", "Game" and "Program" will grey out unless
"Custom" is selected in "Mode".
5. Press A T to select Channel 1 - 7.
6. Press 4 _, to select the desired Block
channel.
42
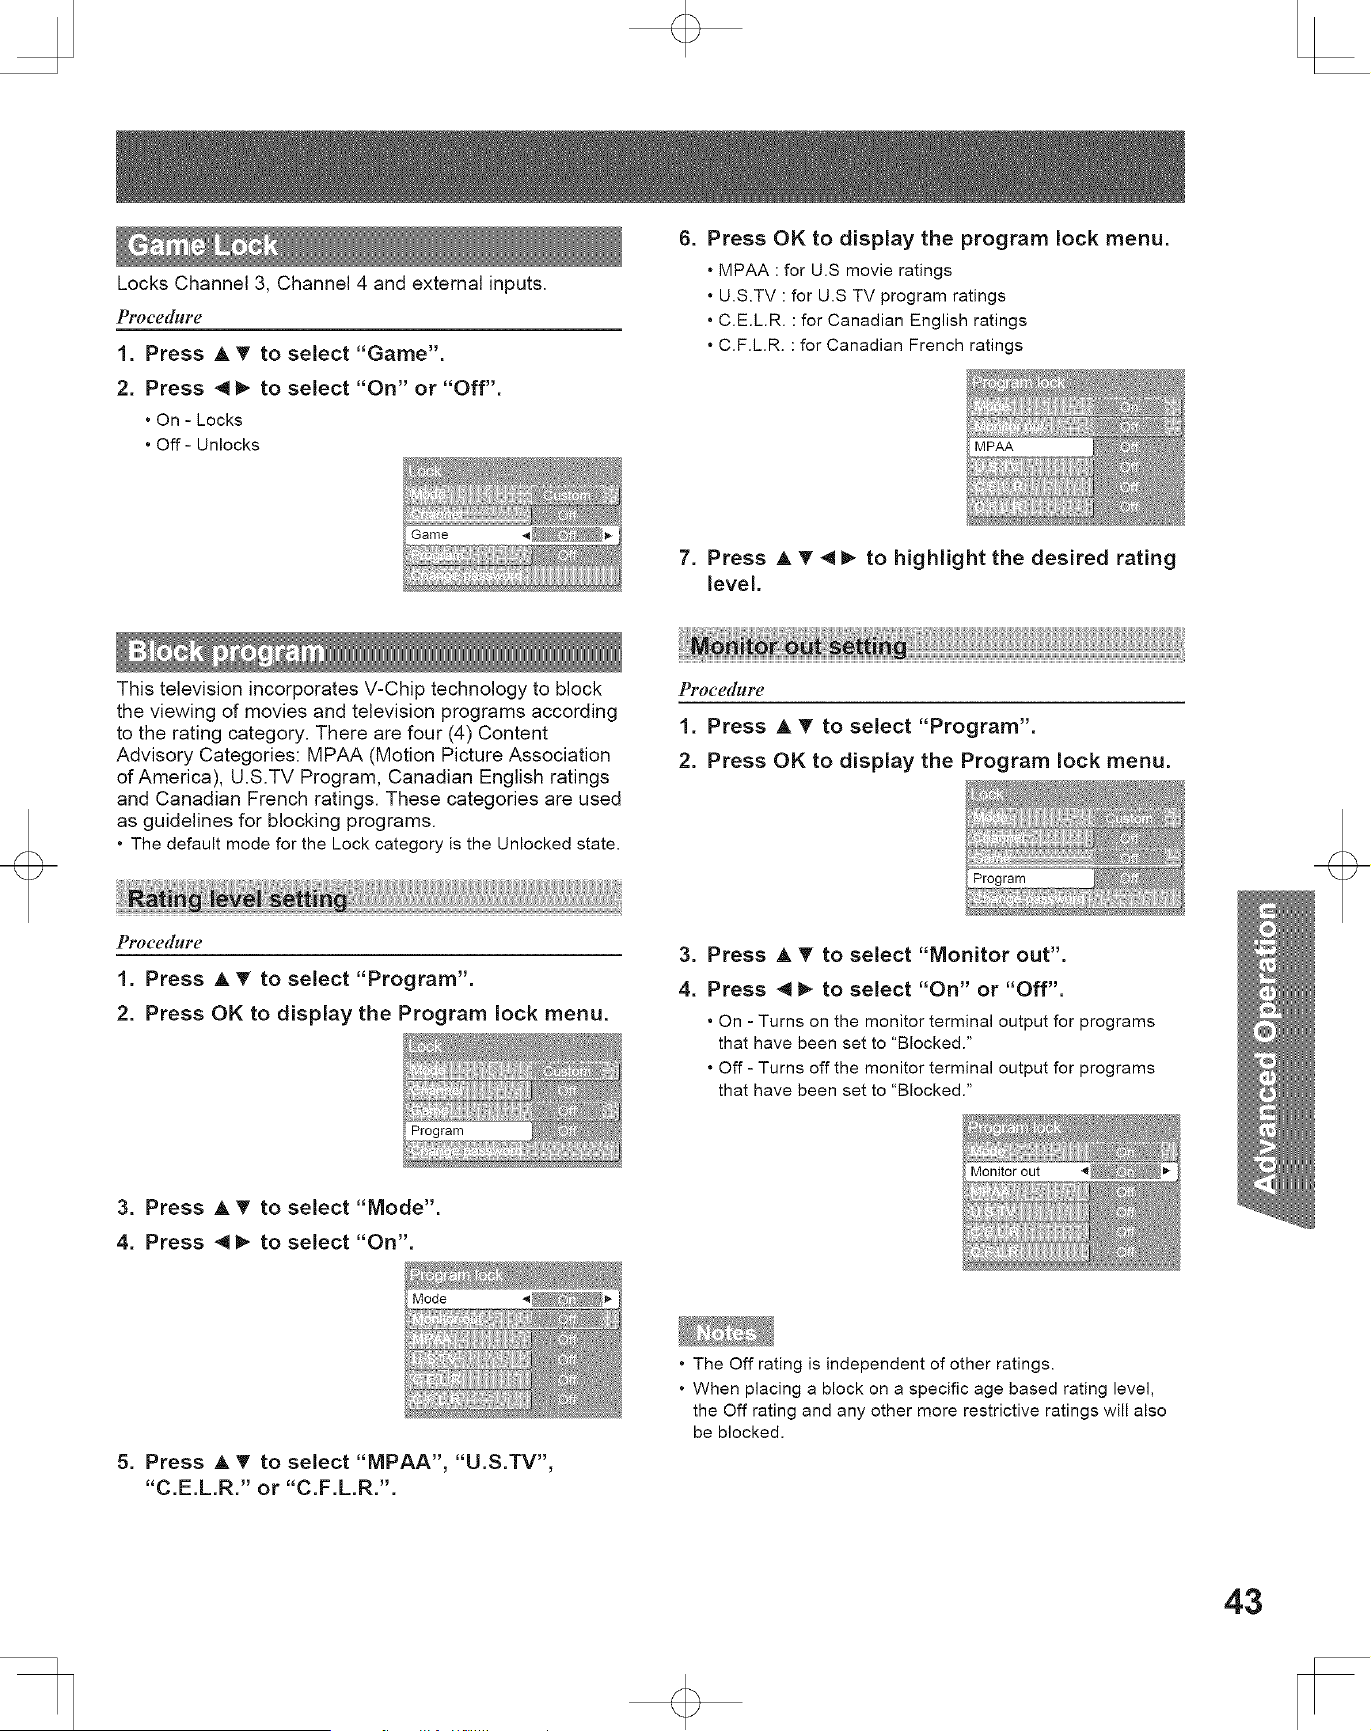
Locks Channel 3, Channel 4 and external inputs.
PPocedblre
1. Press A _' to select "Game".
2. Press _ I_ to select "On" or "Off".
• On - Locks
• Off- Unlocks
6. Press OK to display the program lock menu.
• MPAA : for U.S movie ratings
• U.S.TV : for U.S TV program ratings
• C.E.LR. : for Canadian English ratings
• C.F.LR. : for Canadian French ratings
7. Press A T 4 _ to highlight the desired rating
level.
This television incorporates V-Chip technology to block
the viewing of movies and television programs according
to the rating category. There are four (4) Content
Advisory Categories: MPAA (Motion Picture Association
of America), U.S.TV Program, Canadian English ratings
and Canadian French ratings. These categories are used
as guidelines for blocking programs.
• The default mode for the Lock category is the Unlocked state.
PFoce([lgre
1. Press A T to select "Program".
2. Press OK to display the Program lock menu.
Program
Pl*oce([gll*e
1. Press A T to select "Program".
2. Press OK to display the Program lock menu.
3. Press A V" to select "Monitor out".
4. Press 411_ to select "On" or "Off".
• On - Turns on the monitor terminal output for programs
that have been set to "Blocked."
• Off - Turns off the monitor terminal output for programs
that have been set to "Blocked."
3. Press A T to select "Mode".
4. Press 4 I_ to select "On".
5. Press A T to select "MPAA", "U.S.TV",
"C.E.L.R." or "C.F.L.R.'.
• The Off rating is independent of other ratings.
• When placing a block on a specific age based rating level,
the Off rating and any other more restrictive ratings will also
be blocked,
43

NO RATING (NOT RATED) AND NA (NOT
Off APPLICABLE) PROGRAMS. Movie has not been
rated or rating does not apply.
G GENERAL AUDIENCES. All ages admitted.
PARENTAL GUIDANCE SUGGESTED. Some
PG
material may not be suitable for children.
PARENTS STRONGLY CAUTIONED. Some material
PG-13
may be inappropriate for children under 13.
RESTRICTED. Under 17 requires accompanying
R
parent or adult guardian.
NC-17 NO ONE 17 AND UNDER ADMITTED.
X ADULTS ONLY.
The TV Parental Guidelines has 7 levels of age-based
ratings that can be selected. These 7 levels are split into
2 age-based groups:
Youth Age-based Ratings and Guidance Age-based
Ratings. Some of these age-based ratings can also
have content-based ratings, denoted as D (Dialog), L
(Language), S (Sex) and V (Violence). The table below
shows the age-based ratings selection.
Age-Age_
based based
Group Ratings
Blocked
Content
Selections
NR • Viewable
TV-NR
(Not Rated) • Blocked
• Viewable
TV-Y
• Blocked
TV-Y7
Youth
• FV
(Fantasy
Violence)
• Viewable
• Blocked
DescriPtion
Not Rated. See "Customer
Caution" on page 45.
All children. The themes and
elements in this program
are specifically designed
for a very young audience,
including children from ages
2-6.
Directed to older children.
Themes and elements in
this program may include
mild physical or comedic
violence, or may frighten
children under the age of 7.
Age- Age_
based based
Group Ratings
TV-G
TV-PG
Guidance
Content
Selections
• Viewable
• Blocked
• D,L,S,V (all
selected)
• Any
combination
ofD, L,S,V
• D,L,S,V (all
selected)
TV-14 • Any
combination
ofD, L,S,V
• L,S,V (all
selected)
TV-MA • Any
combination
ofL, S,V
Description
General audience. It
contains little or no violence
no strong language, and
little or no sexual dialogue
or situations.
Parental guidance
suggested. The program
may contain infrequent
coarse language, limited
violence, some suggestive
sexual dialogue and
situations.
Parents strongly cautioned.
This program may contain
sophisticated themes,
sexual content, strong
language and more intense
violence.
Mature audiences only.
This program may contain
mature themes, profane
language, graphic violence,
and explicit sexual content.
FV : Fantasy/Cartoon Violence.
V : Violence
S : Sex
L : Offensive Language
D : Dialogue with sexual content.
Exempt - Exempt programming includes: news, sports,
E documentaries and other information programming, talk
shows, music videos, and variety programming.
C Programming intended for children under age 8. No
offensive language, nudity or sexual content.
Programming generally considered acceptable for
C8+ children 8 years and over. No profanity, nudity or sexual
content.
G General programming, suitable for all audiences.
Parental Guidance suggested. Some material may not
PG
be suitable for children.
Programming contains themes or content which may not
be suitable for viewers under the age of 14. Parents are
14+
strongly cautioned to exercise discretion in permitting
viewing by pre-teens and early teens.
18+ years old. Programming restricted to adults.
18+ Contains constant violence or scenes of extreme
violence.
44
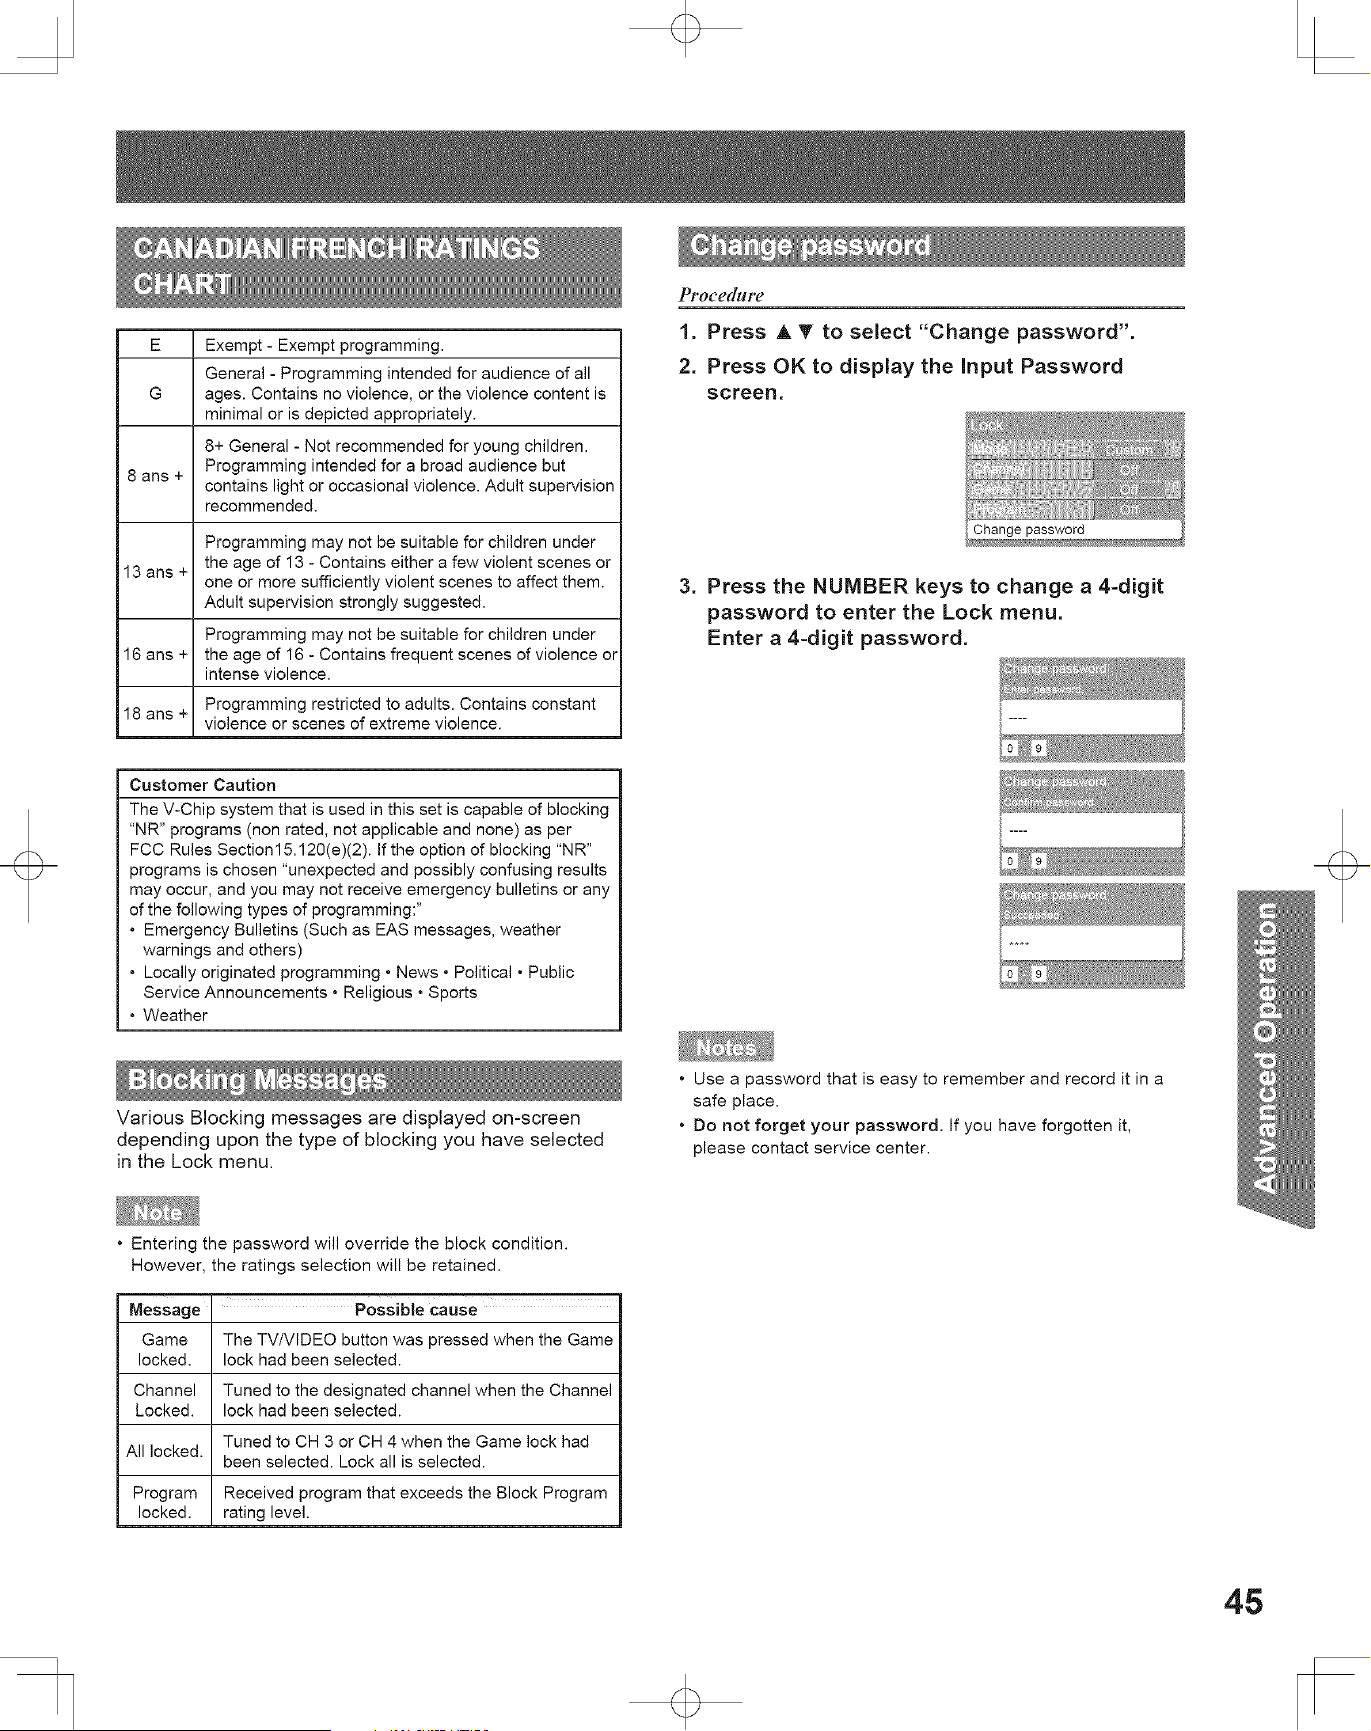
E Exempt - Exempt programming.
General - Programming intended for audience of all
G ages. Contains no violence, or the violence content is
minimal or is depicted appropriately.
8+ General - Not recommended for young children.
8 arts + Programming intended for a broad audience but
contains light or occasional violence. Adult supervision
recommended.
Programming may not be suitable for children under
13 arts + the age of 13 - Contains either a few violent scenes or
one or more sufficiently violent scenes to affect them.
Adult supervision strongly suggested.
Programming may not be suitable for children under
16 arts + the age of 16 - Contains frequent scenes of violence or
intense violence.
18 arts + Programming restricted to adults. Contains constant
violence or scenes of extreme violence.
Pt.ocedblre
1. Press A T to select "Change password".
2. Press OK to display the Input Password
screen.
3. Press the NUMBER keys to change a 4-digit
password to enter the Lock menu.
Enter a 4-digit password.
i ....
Customer Caution
The V-Chip system that is used in this set is capable of blocking
"NR" programs (non rated, not applicable and none) as per
FCC Rules Section15.120(e)(2). If the option of blocking "NR"
programs is chosen "unexpected and possibly confusing results
may occur, and you may not receive emergency bulletins or any
of the following types of programming:"
• Emergency Bulletins (Such as EAS messages, weather
warnings and others)
• Locally originated programming • News • Political • Public
Service Announcements • Religious • Sports
• Weather
i ....
Various Blocking messages are displayed on-screen
depending upon the type of blocking you have selected
in the Lock menu.
• Use a password that is easy to remember and record it in a
safe place.
• Do not forget your password. If you have forgotten it,
please contact service center.
• Entering the password will override the block condition.
However, the ratings selection will be retained.
Message Possible cause
Game The TV/VIDEO button was pressed when the Game
locked, lock had been selected.
Channel Tuned to the designated channel when the Channel
Locked. lock had been selected.
Tuned to CH 3 or CH 4 when the Game lock had
All locked.
been selected. Lock all is selected.
Program Received program that exceeds the Block Program
locked, rating level.
45
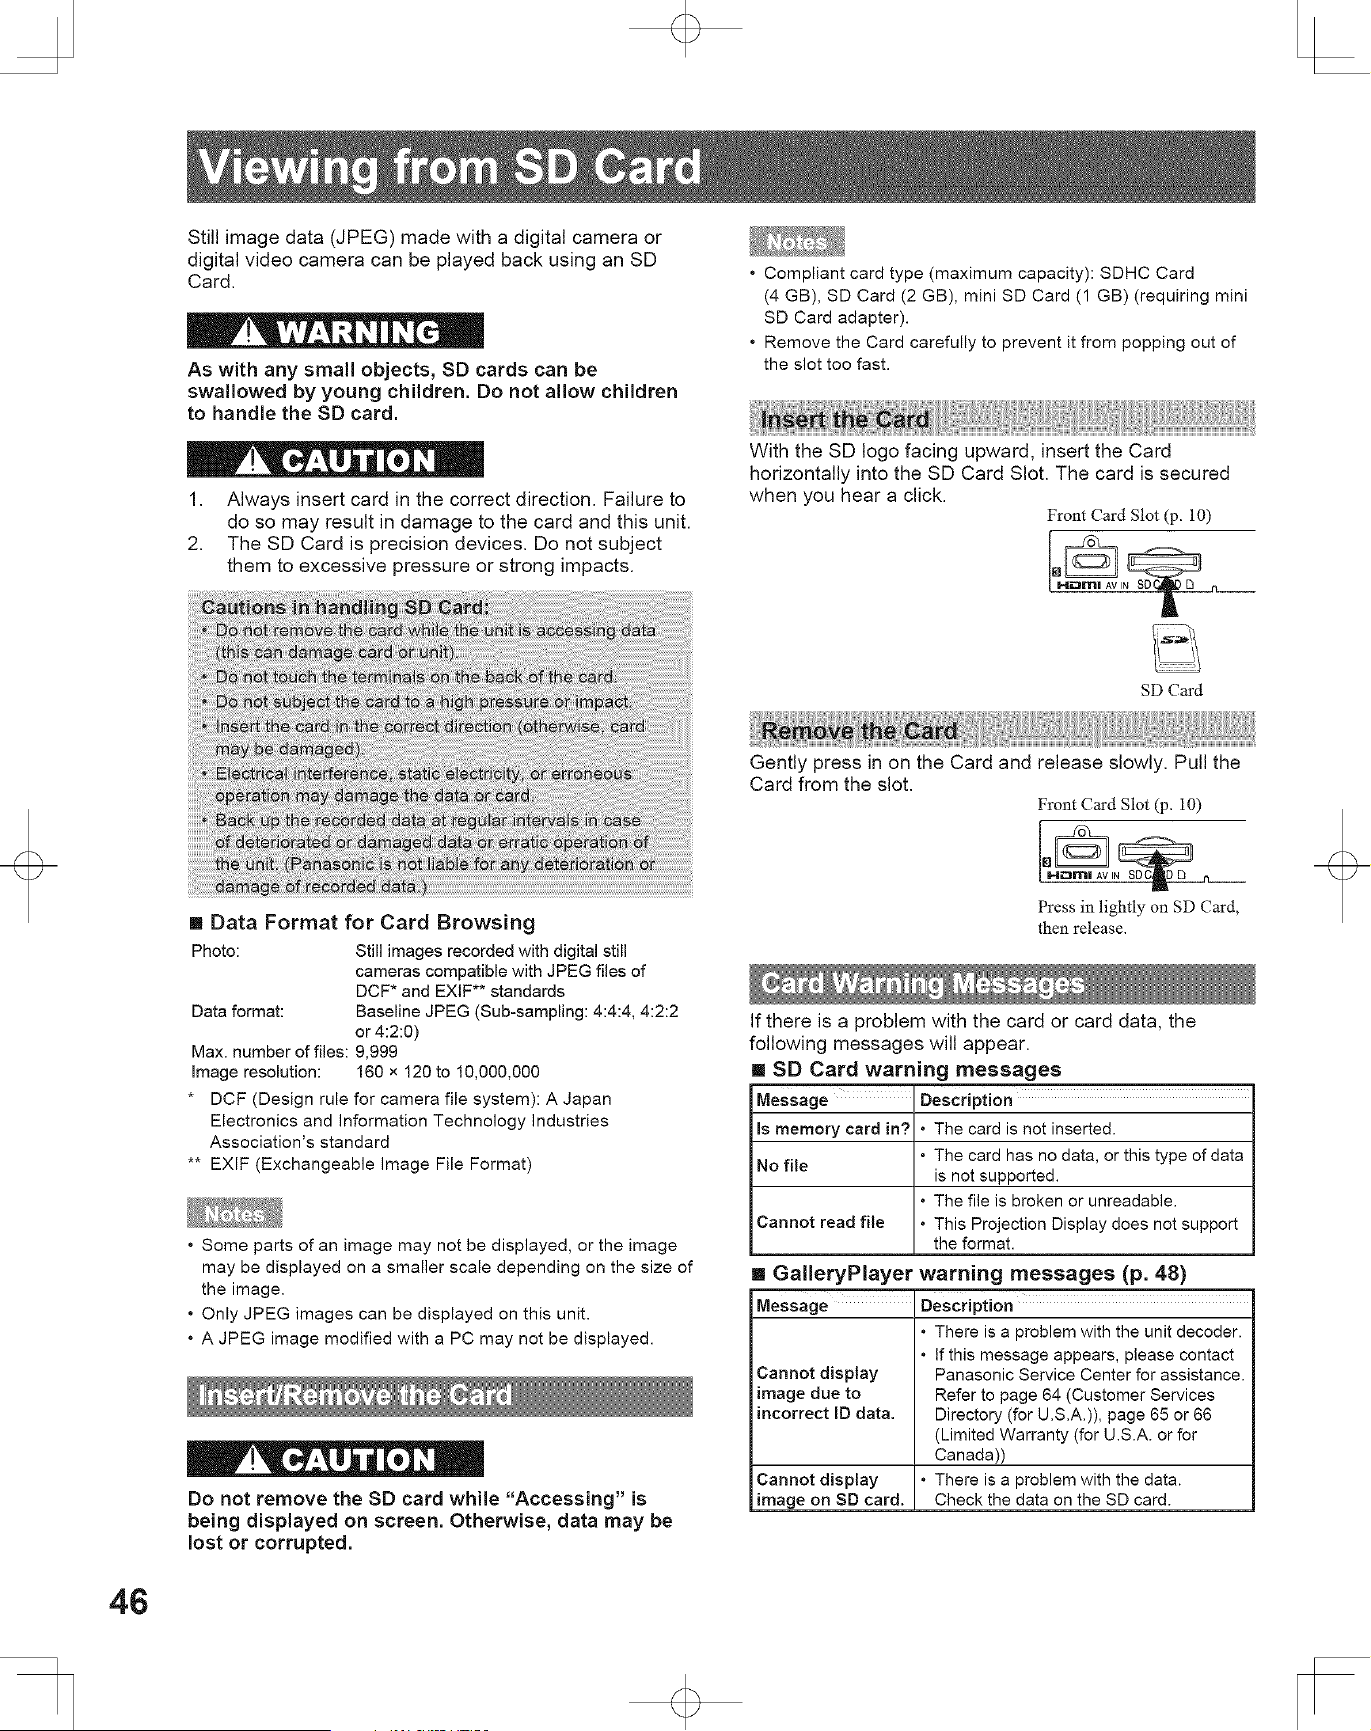
Still image data (JPEG) made with a digital camera or
digital video camera can be played back using an SD
Card.
As with any small objects, SD cards can be
swallowed by young children. Do not allow children
to handle the SD card.
1. Always insert card in the correct direction. Failure to
do so may result in damage to the card and this unit.
2. The SD Card is precision devices. Do not subject
them to excessive pressure or strong impacts.
[] Data Format for Card Browsing
• Compliant card type (maximum capacity): SDHC Card
(4 GB), SD Card (2 GB), mini SD Card (1 GB) (requiring mini
SD Card adapter).
° Remove the Card carefully to prevent it from popping out of
the slot too fast.
With the SD logo facing upward, insert the Card
horizontally into the SD Card Slot. The card is secured
when you hear a click.
Front Card Slot (p. 10)
SD Card
Gently press in on the Card and release slowly. Pull the
Card from the slot.
Front Card Slot (p. 10)
46
Photo: Still images recorded with digital still
cameras compatible with JPEG files of
DCF* and EXIF** standards
Data format: Baseline JPEG (Sub-sampling: 4:4:4, 4:2:2
or 4:2:0)
Max. number of Nes: 9,999
Image resolution: 160 x 120 to 10,000,000
* DCF (Design rule for camera file system): A Japan
Electronics and Information Technology Industries
Association's standard
** EXIF (Exchangeable Image File Format)
• Some parts of an image may not be displayed, or the image
may be displayed on a smaller scale depending on the size of
the image.
• Only JPEG images can be displayed on this unit.
• A JPEG image modified with a PC may not be displayed.
Do not remove the SD card while "Accessing" is
being displayed on screen. Otherwise, data may be
lost or corrupted.
Hi_RIt!
Press in lightly on SD Card,
then release.
If there is a problem with the card or card data, the
following messages will appear.
[] SD Card warning messages
Message Description
is memory card in? • The card is not inserted.
• The card has no data, or this type of data
No file
is not supported.
• The file is broken or unreadable.
Cannot read file • This Projection Display does not support
the format.
[] GalleryPlayer warning messages (p. 48)
Message Description
• There is a problem with the unit decoder.
• If this message appears, please contact
Cannot display Panasonic Service Center for assistance.
image due to Refer to page 64 (Customer Services
incorrect ID data. Directory (for U.S.A.)), page 65 or 66
(Limited Warranty (for U.S.A. or for
Canada))
• There is a problem with the data.
Check the data on the SD card.
Cannot display
image on SD card.
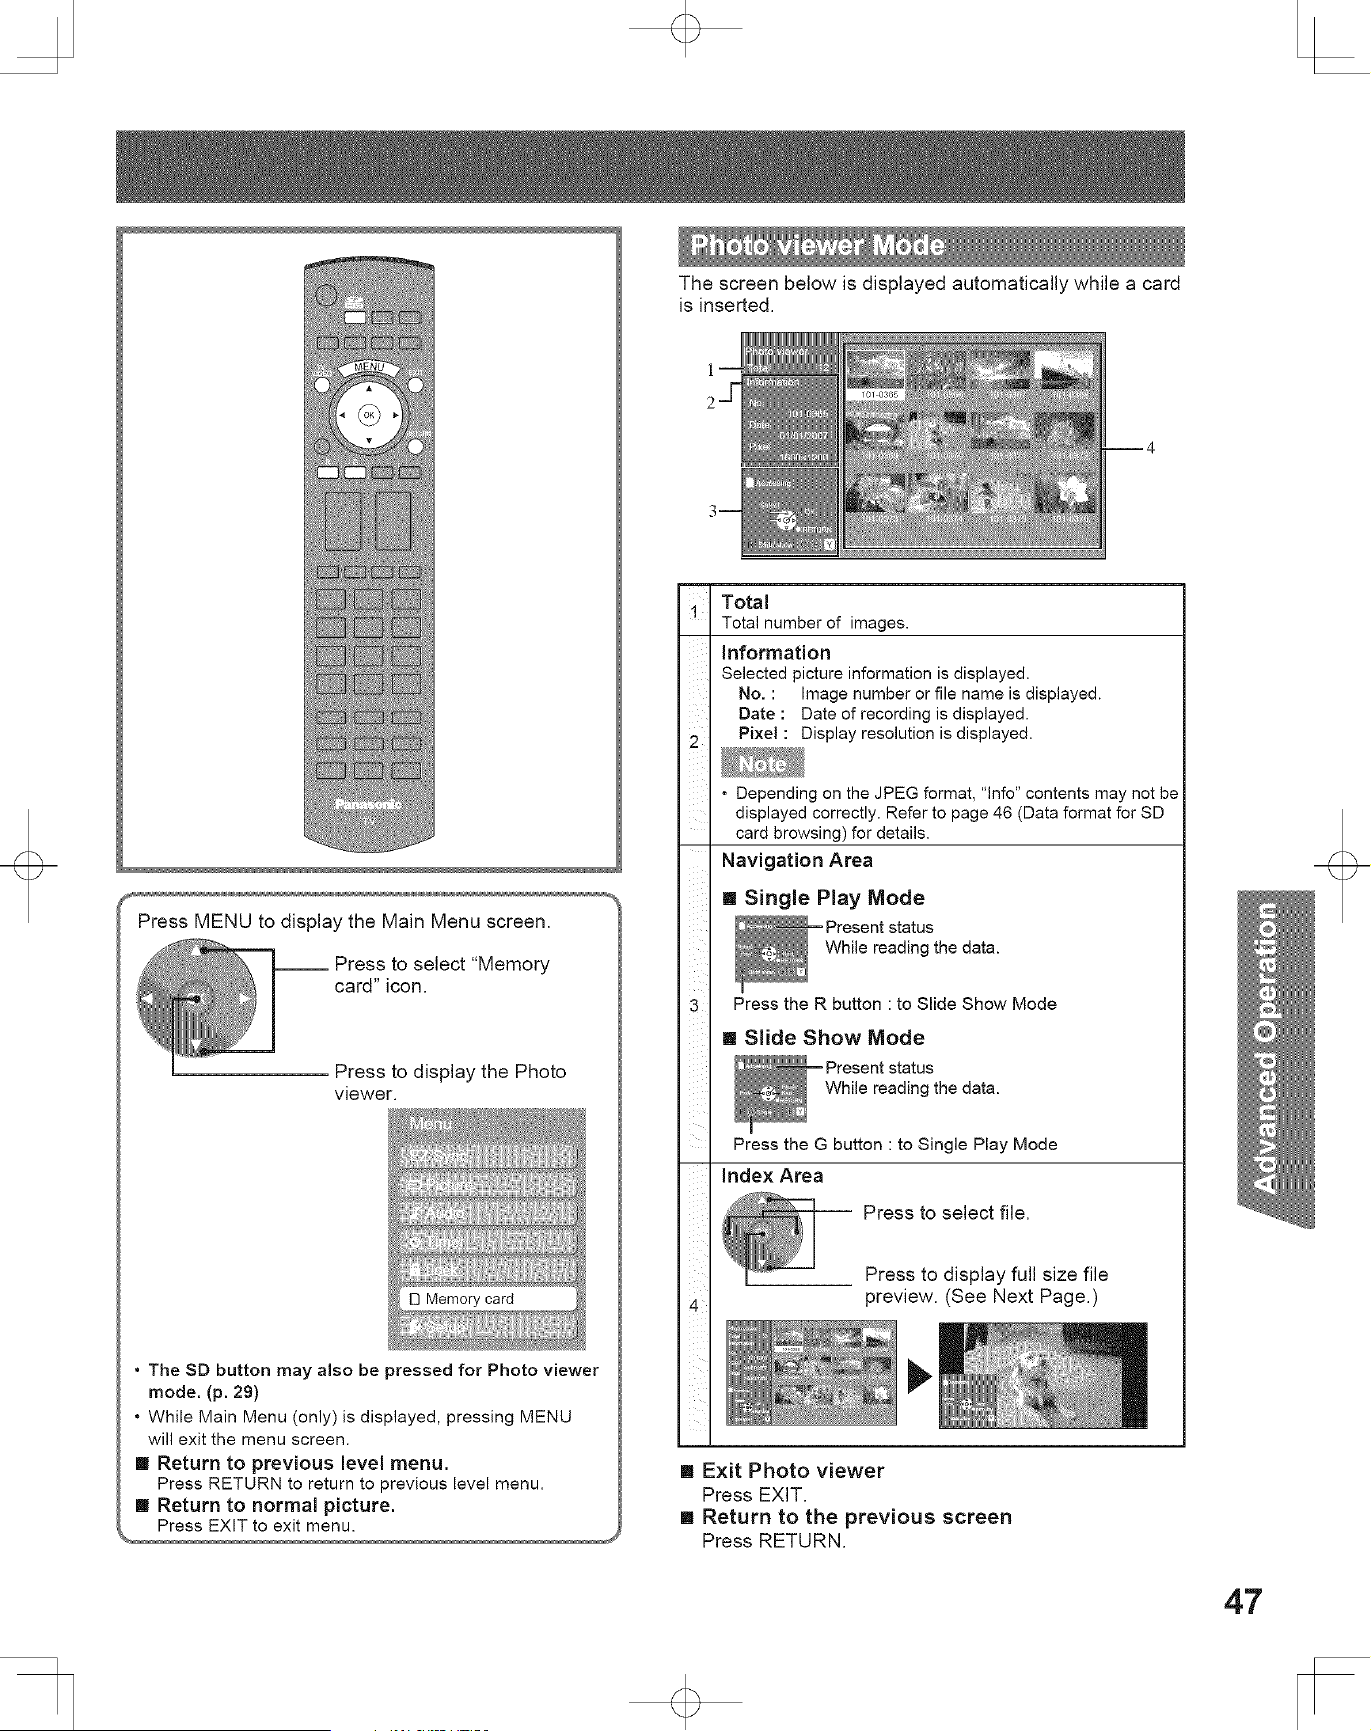
Press MENU to display the Main Menu screen.
to select "Memory
card" icon.
Press to display the Photo
viewer.
D Memory card
• The SD button may also be pressed for Photo viewer
mode. (p. 29)
• While Main Menu (only) is displayed, pressing MENU
will exit the menu screen.
[] Return to previous level menu.
Press RETURN to return to previous level menu.
[] Return to normal picture.
The screen below is displayed automatically while a card
is inserted.
1
2
Total
Total number of images.
Information
Selected picture information is displayed.
No. : Image number or file name is displayed.
Date : Date of recording is displayed.
Pixe( : Display resolution is displayed.
• Depending on the JPEG format, "lnfo" contents may not be
displayed correctly. Refer to page 46 (Data format far SD
card browsing) for details.
Navigation Area
[] Single Play Mode
(_ Present status
While reading the data.
Press the R button : to Slide Show Mode3
Index Area
[] Slide Show Mode
'_ Present status
While reading the data.
Press the G button : to Single Play Mode
-- Press to select file.
4
Press to display full size file
preview. (See Next Page.)
[] Exit Photo viewer
Press EXIT.
[] Return to the previous screen
Press RETURN.
47
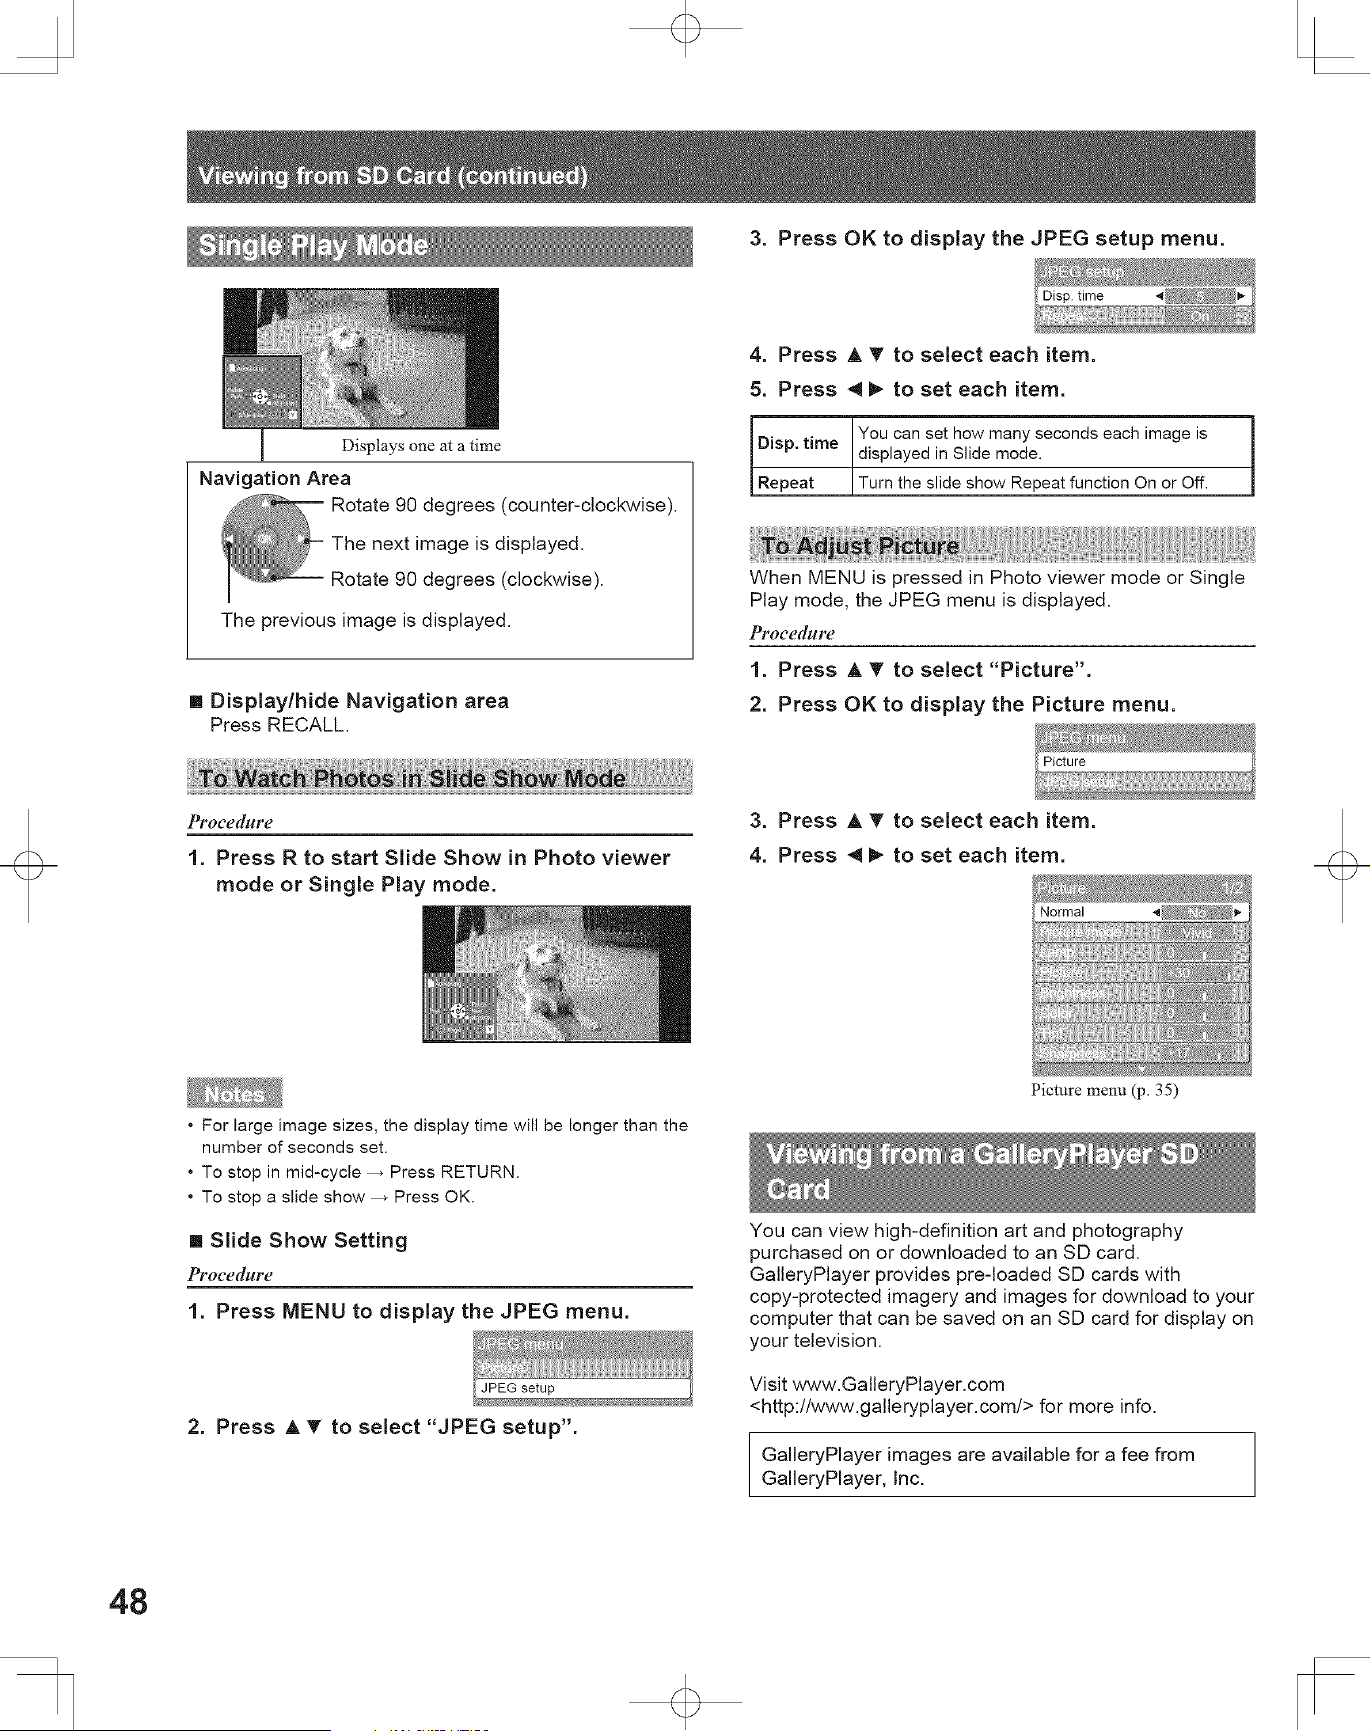
3. Press OK to display the JPEG setup menu.
Displays one at a time
Navigation Area
Rotate 90 degrees (counter-clockwise).
The next image is displayed.
Rotate 90 degrees (clockwise).
The previous image is displayed.
[] Display/hide Navigation area
Press RECALL.
4. Press A T to select each item.
5. Press 4 _ to set each item.
You can set how many seconds each image is
Disp, time displayed in Slide mode.
Repeat Turn the slide show Repeat function On or Off.
When MENU is pressed in Photo viewer mode or Single
Play mode, the JPEG menu is displaye&
PFoce([lgFe
1. Press A T to select "Picture".
2. Press OK to display the Picture menu.
PFOCe([ldre
1. Press R to start Slide Show in Photo viewer
mode or Single Play mode.
3. Press A T to select each item.
4. Press 4 _ to set each item.
• For large image sizes, the display time will be longer than the
number of seconds set.
• To stop in mid-cycle _ Press RETURN.
• To stop a slide show _ Press OK.
[] Slide Show Setting
Proeedure
1. Press MENU to display the JPEG menu.
2. Press A T to select "JPEG setup".
Picture menu (p. 35)
You can view high-definition art and photography
purchased on or downloaded to an SD card.
GalleryPlayer provides pre-loaded SD cards with
copy-protected imagery and images for download to your
computer that can be saved on an SD card for display on
your television.
Visit wwwGalleryPlayer=com
<http://www.galleryplayer.com/> for more info.
GNleryPlayer images are available for a fee from
GNleryPlayer, Inc.
48
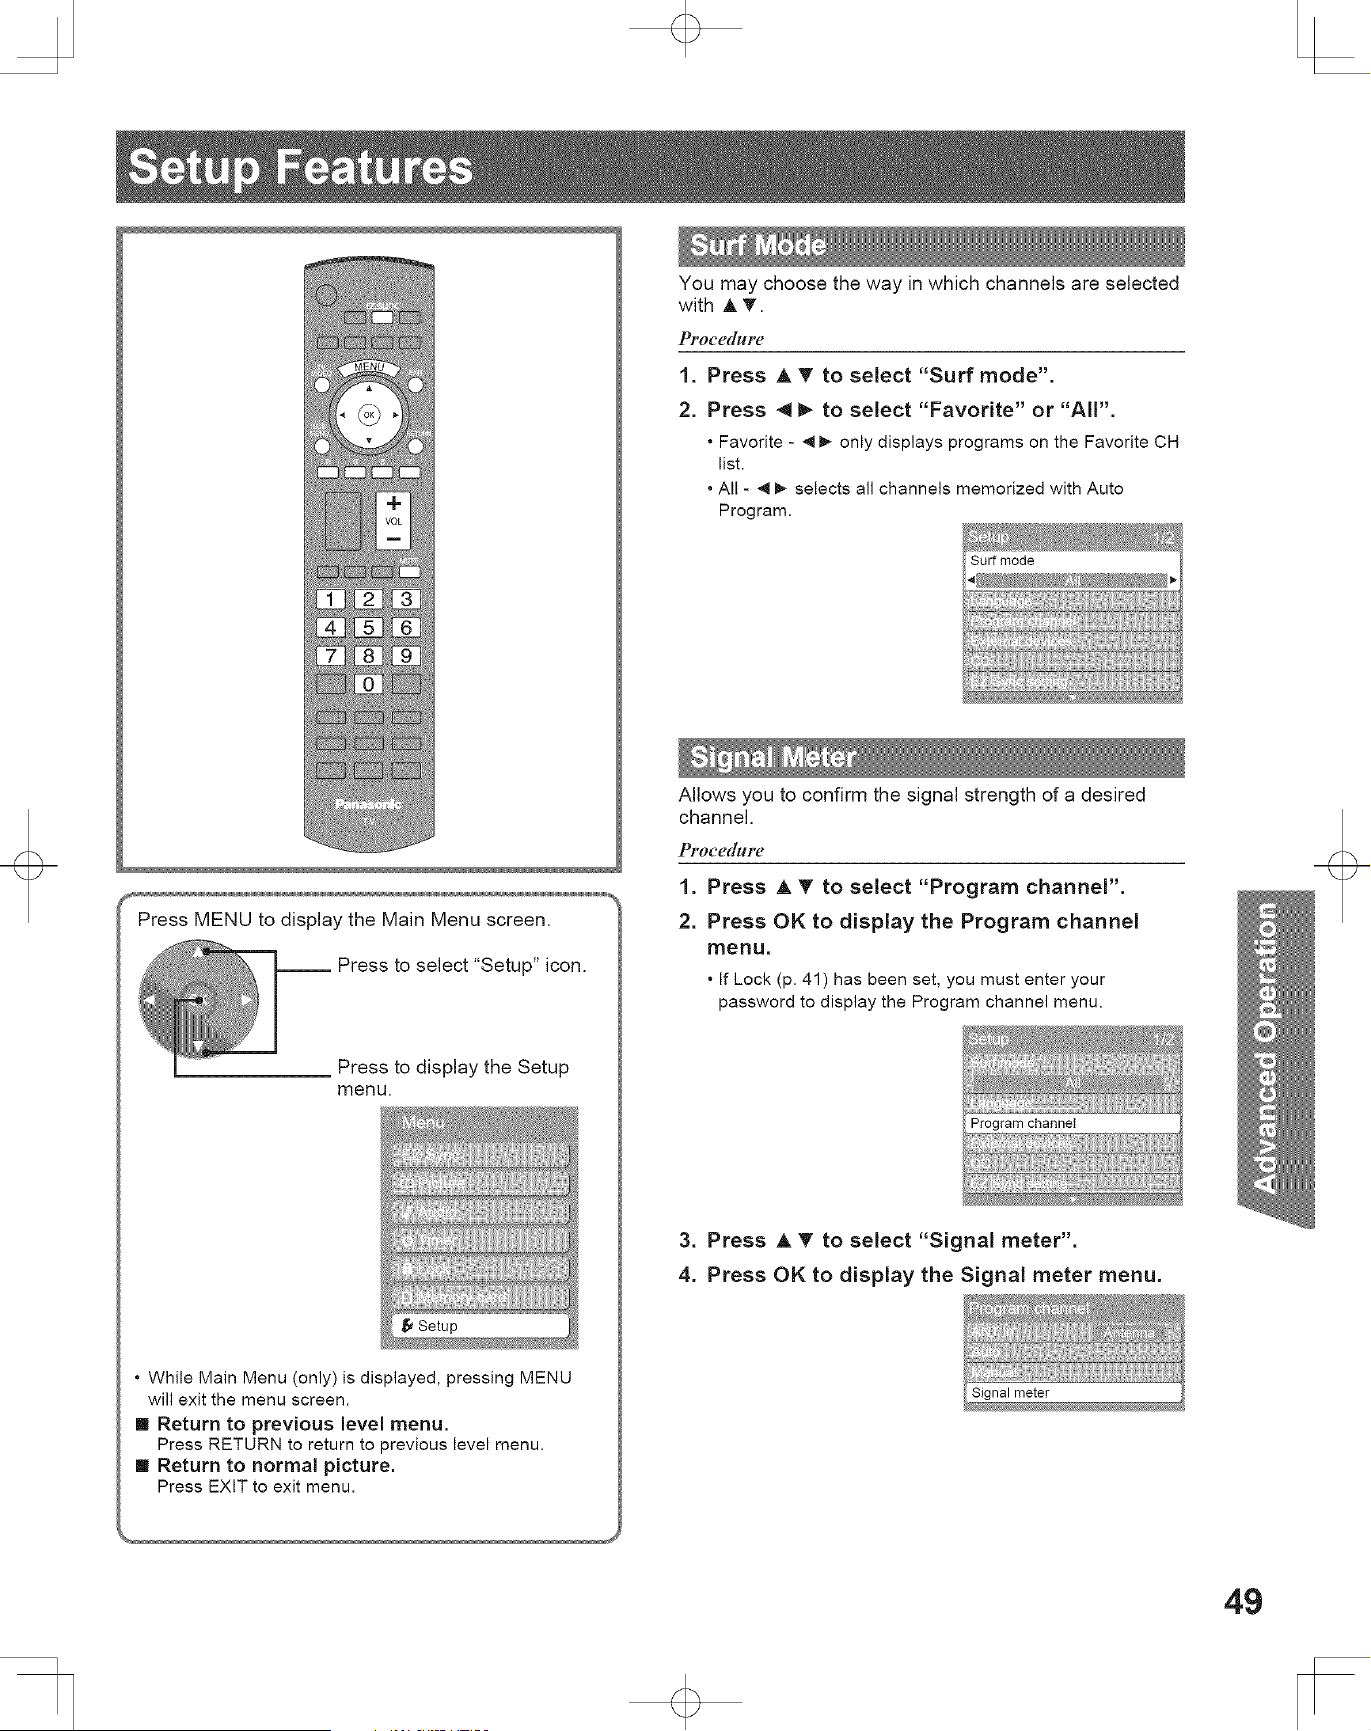
Press MENU to display the Main Menu screen.
__ Press to select "Setup" icon.
Press to display the Setup
menu.
• While Main Menu (only) is displayed, pressing MENU
will exit the menu screen.
II Return to previous level menu.
Press RETURN to return to previous level menu.
II Return to normal picture.
Press EXIT to exit menu.
You may choose the way in which channels are selected
with A _r.
PFoce([HFe
1. Press A T to select "Surf mode".
2. Press 4 _ to select "Favorite" or "All".
• Favorite - 4 m,- only displays programs on the Favorite CH
list.
• All - 4 _ selects all channels memorized with Auto
Program.
Allows you to confirm the signal strength of a desired
channel.
PFoce(lblFe
1. Press A T to select "Program channel".
2. Press OK to display the Program channel
menu,
• [f Lock (p. 41) has been set, you must enter your
password to display the Program channel menu.
3. Press A T to select "Signal meter".
4. Press OK to display the Signal meter menu.
49
5. Press 4 I_ to select desired channel.
• The signal meter works only for digital signals input via the
antenna.
To label video input connections for on-screen display.
When connecting external equipment to this unit - Stops
output of the picture and sound signals at the AV OUT
jacks for the input source selected in this menu to avoid
signal loop.
Procedglre
1. Press A T to select "External devices".
2. Press OK to display the External devices
menu.
Procedglre
1. Press A T to select "External devices".
2. Press OK to display the External devices
menu.
External devices
3. Press A T to select "Monitor out".
4. Press OK to display the Monitor out menu.
External devices
5. Press A T to select each item.
6. Press 4 _ to select "On" or "Off".
3. Press A T to select "Input labels".
4. Press OK to display the Input labels menu.
5. Press A T to select each item.
6. Press 4 I_ to select the input label.
• To skip the input, select "SKIP". The input will be skipped
when you press TV/VIDEO.
• Selectable input labels : SKIP, VCR, DVD, CABLE, DBS,
PVR, GAME, AUX, blank (non label).
• Select "Off" to stop output of picture and audio.
(Video l/Video 2/Video 3)
• Comp.1 / Comp.2 / HDMI 1 / HDMI 2 / HDMI 3 cannot
output video signals regardless of "Monitor out" setting.
When equipment (STB, DVD, etc.) is connected to HDMI or
COMPONENT terminals, only audio signals can be obtained.
From the output terminals, no video signals can be passed.
50
The television includes a built-in decoder that is capable
of providing a visual display of the audio portion. The
program viewed must provide Closed Caption (CC) for
the television to display it.
Procedglre
1. Press A _r to select "CC'.
2. Press OK to display the CC (Closed Caption)
menu,
Choose the Closed Caption service of Analog
broadcasting.
Procedure
i. Press A T to select "Analog".
2. Press 4 _- to select the setting.
cc
PFocedblre
1. Press A T to select "Mode".
2. Press 4 _- to select "On" or "Off".
• Off - Recommended mode when Closed Caption is not
being used.
• On - To display Closed Captions.
For video related information that can be
CC1 displayed (up to 4 lines of script on the screen,
where it does not disturb the relevant parts of
the picture). Script can be in any language.
CC2/CC3/CC4 Other modes used for video related information.
Blanks out a large portion of the picture on
the television screen, and displays program
T1
guide or any other information currently being
transmitted.
Other modes that display information and blank
T2/T3/T4 out a large portion of the picture of the -IV
screen.
• The Closed Caption is not displayed when you use HDMI
connection.
• If analog connected equipment is used for displaying or
recording, Closed Caption (CC) should be set On/Off on the
connected equipment.
The CC mode setting of the TV will not affect the analog
input.
If a digital program is being output in analog format, the CC
data will also be output in analog format.
If digital connected equipment is used for input, CC should be
set "On" on either the connected equipment or the TV.
If CC is set "On" on both the connected equipment and the
TV, captions from each unit will overlap.
The Digital Closed Caption menu lets you configure the
way you choose to view the digital captioning,
Pl*OC_'([ldFe
1. Press A _r to select "Digital".
2. Press 4 _ to select the setting.
• Primary, Second., Service 3, Service 4, Service 5,
Service 6
5i
Selecting digital broadcast service and viewing formats.
PFOCe([ldre
1. Press A V to select "Digital setting".
2. Press OK to display the Digital setting menu.
Reset the CC settings.
PFOCe([ldFe
1. Press A T to select "CO reset".
2. Press OK to reset Closed Caption settings.
3. Press A T to select each item.
4. Press 4 1_ to select the setting.
Size Automatic, Normal, Small, Large
Font Automatic, Default, Mono-serif, Prop-serif, Mono,
Prop, Casual, Cursive, Small caps
Style Automatic, None, Raised, Depressed, Uniform,
Drop shadow
The color of the font (Automatic, Black, White, Red,
Foreground Green, Blue, Yellow, Magenta, Cyan)
The opacity of the font (Automatic, Transparent,
Fore opacity Translucent, Solid, Flashing)
Background The color of the text box (Automatic, Black, White,
Red, Green, Blue, Yellow, Magenta, Cyan)
The opacity of the text box (Automatic,
Back opacity Transparent, Translucent, Solid, Flashing)
The outline of the text (if selected under style)
Outline (Automatic, Black, White, Red, Green, Blue,
Yellow, Magenta, Cyan)
* Simultaneously control all Panasonic "HDAVl Control"
equipped components using one button on one remote.
Enjoy additional HDMI Inter-Operability with Panasonic
products which have "HDAVI Control" function.
This Projection Display supports "HDAVI Control 2"
function.
Connections to some Panasonic equipment (DVD
Recorder DIGA, HD Camcorder, RAM theater, Player
theater, Amplifier, etc.) with HDMI cables allow you to
interface automatically.
The equipment with "HDAVI Control" function enables
the following operations:
Automatic Input Switching, Power on link, Power off link
and Speaker control (p. 53-54)
In addition, the equipment with "HDAVI Control 2"
function enables the following operation:
EZ Sync Control only with this Projection Display's
remote control (for "HDAVI Control 2"). (p. 54)
EZ Sync "HDAVI Control", based on the control functions
provided by HDMI which is an industry standard known
as HDMI CEC (Consumer Electronics Control), is a
unique function that we have developed and added. As
such, its operation with other manufacturers' equipment
that supports HDMI CEC cannot be guaranteed.
• For the first time / When adding new equipment,
reconnecting the equipment or changing the setup.
After the connection turn the equipment on and then
switch this Projection Display on.
Select the input mode to HDMI 1, HDMI 2, or HDMI 3
(p. 29), and make sure that an image is displayed
correctly.
• This function needs an HDMI compliant (fully wired)
cable. Non-HDMI-compliant cables cannot be utilized. It is
recommended that you use Panasonic's HDMI cable.
Recommended part number: RP-CDHG15 (1.5 m),
RP-CDHG30 (3.0 m), RP-CDHG50 (5.0 m)
52
HDMI connections to some Panasonic equipment
allow you to interface automatically.
• This function may not work normally depending on the
equipment condition.
• The equipment can be operated by other equipment's
remote controls with this function on even if this Projection
Display is in Standby mode.
• Image or sound may not be available for the first few
seconds when the playback starts.
• Image or sound may not be available for the first few
seconds when Input mode is switched.
• Volume function will be displayed when adjusting the
volume of the equipment.
• If you connect the same kind of equipment at once (for
example: one DIGA to HDMI 1 / another DIGA to HDMI 2),
EZ Sync TM is available for the terminal with the smaller
number.
• If you connect the equipment that has "HDAVl Control 2"
function to the TV with HDMI cable, the sound from
DIGITAL AUDIO OUT terminal can be output as
multi-channel surround.
PFOCe([ldre
1. Press A V to select "EZ Syne setting".
2. Press OK to display the EZ Sync setting
menu,
Item ' Explanations
Controls equipment connected to HDMI terminal.
EZ Sync (p. 52-53)
• "Power off link", "Power on link", and "Default
speakers" cannot be selected if "Off" is set.
When "Set" is selected and this Projection Display
is turned off, all connected EZ Sync compatible
equipment is also automatically turned off.
Power off • DIGA (Panasonic DVD Recorder) will not turn off if
link it is still in rec mode.
Caution:
• This Projection Display remains on even if the EZ
Sync compatible equipment is turned off.
When "Set" is selected, this Projection Display
is turned on automatically and switches to the
appropriate HDMI input whenever EZ Sync
Power on compatible equipment is initially turned on and Play
mode is selected.
link • While the power lamp is blinking, the picture
cannot be seen.
• Power on link will not work until lamp cooling is
completed when power is turned off.
"TV" is the default setting. To set the Home theater
Default system as default speakers, change the default
speakers speakers setting from "TV" to "Theater". Sound will
be output from the Home Theater whenever this
Projection Display is powered on.
3. Press A T to select "EZ Sync".
4. Press _i_ to select "On".
• Default setting is "On". If no HDMI devices are connected
or standard HDMI (without "EZ Sync") is used, set to "Off".
5. Press A T to select each item.
6. Press 4 _, to select the setting.
At the start of the DIGA, Player theater, or RAM theater
playback, this Projection Display's input automatically
switches to the input based on the playback equipment.
• For the RAM theater, the speakers automatically switch to the
theater system.
If using the DIGA operation, this Projection Display's input
automatically switches to the DIGA and DIGA menu is
displayed.
You can select Home theater, or TV speakers for audio
output.
Control theater speakers with this Projection Display's
remote control.
This function is available only when Panasonic Amplifier
or Player theater is connected.
Procedure
1. Press EZ Sync to display the EZ Sync menu.
53
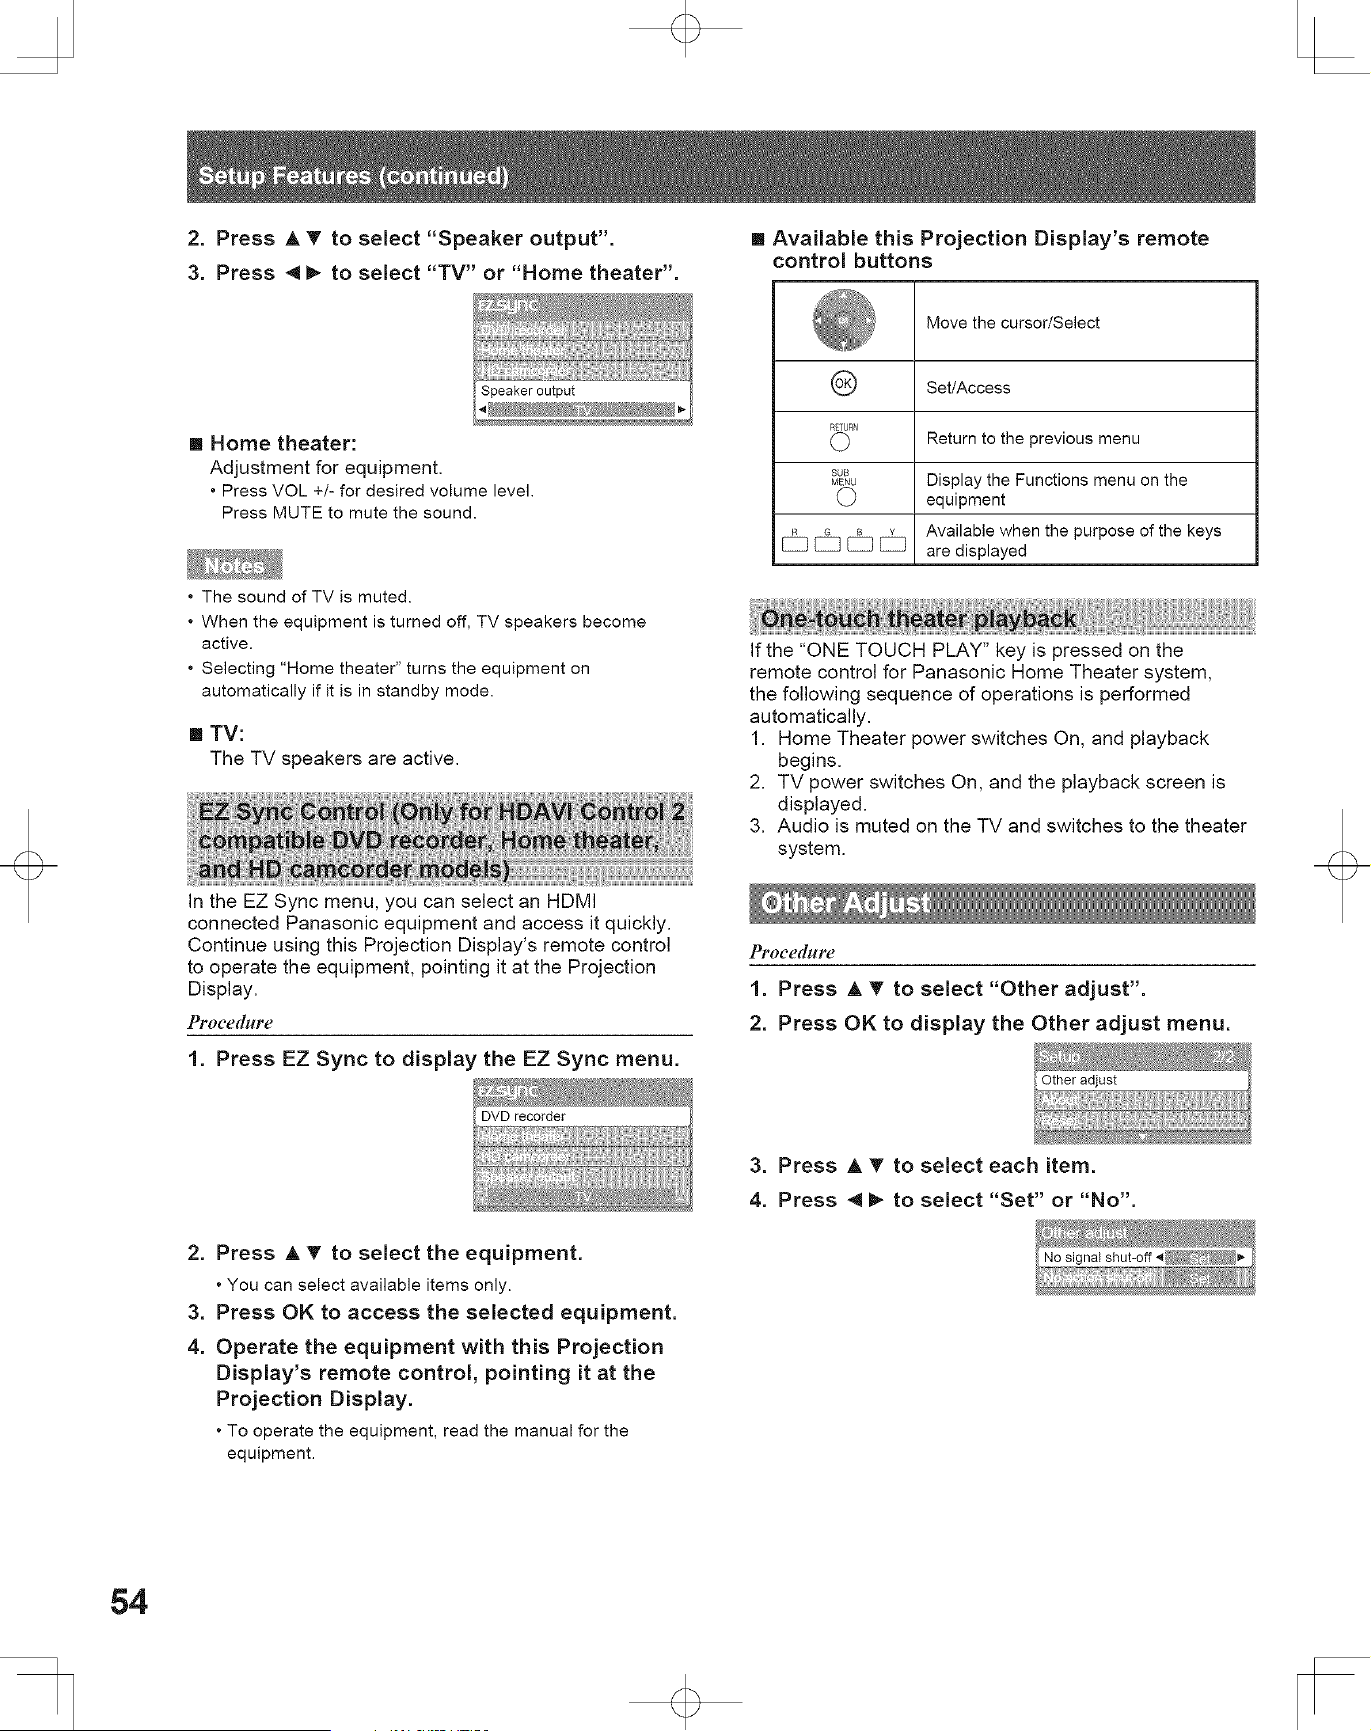
2. Press A T to select "Speaker output".
3. Press 4 I_ to select "TV" or "Home theater".
[] Home theater:
Adjustment for equipment.
• Press VOL +/- for desired volume level.
Press MUTE to mute the sound.
• The sound of TV is muted.
• When the equipment is turned off, TV speakers become
active.
• Selecting "Home theater" turns the equipment on
automatically if it is in standby mode.
[] TV:
The TV speakers are active.
In the EZ Sync menu, you can select an HDMI
connected Panasonic equipment and access it quickly.
Continue using this Projection Display's remote control
to operate the equipment, pointing it at the Projection
Display.
Pi'ocedHFe
1. Press EZ Sync to display the EZ Sync menu.
[] Available this Projection Display's remote
control buttons
'_ Move the cursor/Select
® Set/Access
RETURN
(_ Return to the previous menu
SUB
MENU Display the Functions menu on the
C) equipment
Available when the purpose of the keys
[_ _ _ [_ are displayed
If the "ONE TOUCH PLAY" key is pressed on the
remote control for Panasonic Home Theater system,
the following sequence of operations is performed
automatically.
1. Home Theater power switches On, and playback
begins.
2. TV power switches On, and the playback screen is
displayed.
3. Audio is muted on the TV and switches to the theater
system.
Pl"oce([HFe
1. Press A T to select "Other adjust".
2. Press OK to display the Other adjust menu.
3. Press A T to select each item.
4. Press 4 _, to select "Set" or "No".
2. Press A T to select the equipment.
• You can select available items only.
3. Press OK to access the selected equipment.
4. Operate the equipment with this Projection
Display's remote control, pointing it at the
Projection Display.
• To operate the equipment, read the manual for the
equipment.
54
No signal
shut-off
No action
shut-off
To conserve energy, this Projection Display
automatically turns off when NO SIGNAL continues
more than 10 minutes.
• Not in use when setting "PC", "Photo viewer mode",
"Lock", or Digital channel.
• "No signal shut-off was activated" will be displayed
for about 10 seconds when this Projection Display is
turned on for the first time after turning the power off
by "No signal shut-off'.
• The on-screen display will flash 3, 2 and 1 to
indicate the last three (3) remaining minutes prior to
the shut-off.
To conserve energy, this Projection Display
automatically turns off when no operation of remote or
front panel key continues more than 3 hours.
• Not in use when setting "PC".
• "No action shut-off was activated" will be displayed
for about 10 seconds when this Projection Display is
turned on for the first time after turning the power off
by "No action shut off'.
• The on-screen display will flash 3, 2 and 1 to
indicate the last three (3) remaining minutes prior to
the shut-off.
Display the TV set Version and Software License.
Setup is reset.
PFocedblre
1. Press A T to select "Reset".
2. Press OK to display the password screen.
3. Enter your password by pressing the
NUMBER keys to reset the Setup settings.
4. The confirmation screen is displayed.
Select "Yes", and press OK.
Yes
Proce([glre
1. Press A T to select "About".
2. Press OK to display the About screen.
3. Press A T to select "Version" or "License".
4. Press OK to display the Version or License
screen.
• Performing Reset will clear all items set with Setup, such as
channel settings. Use Reset with care.
• POWER indicator flashes red. After flashing stops, unplug the
unit then plug it back in and turn power ON.
• When using "EZ Sync TM "HDAVI Control TM'''', with the device
connected, set "EZ Sync" first to "Off" and then "On" using the
Setup Menu. (p. 52-53)
55
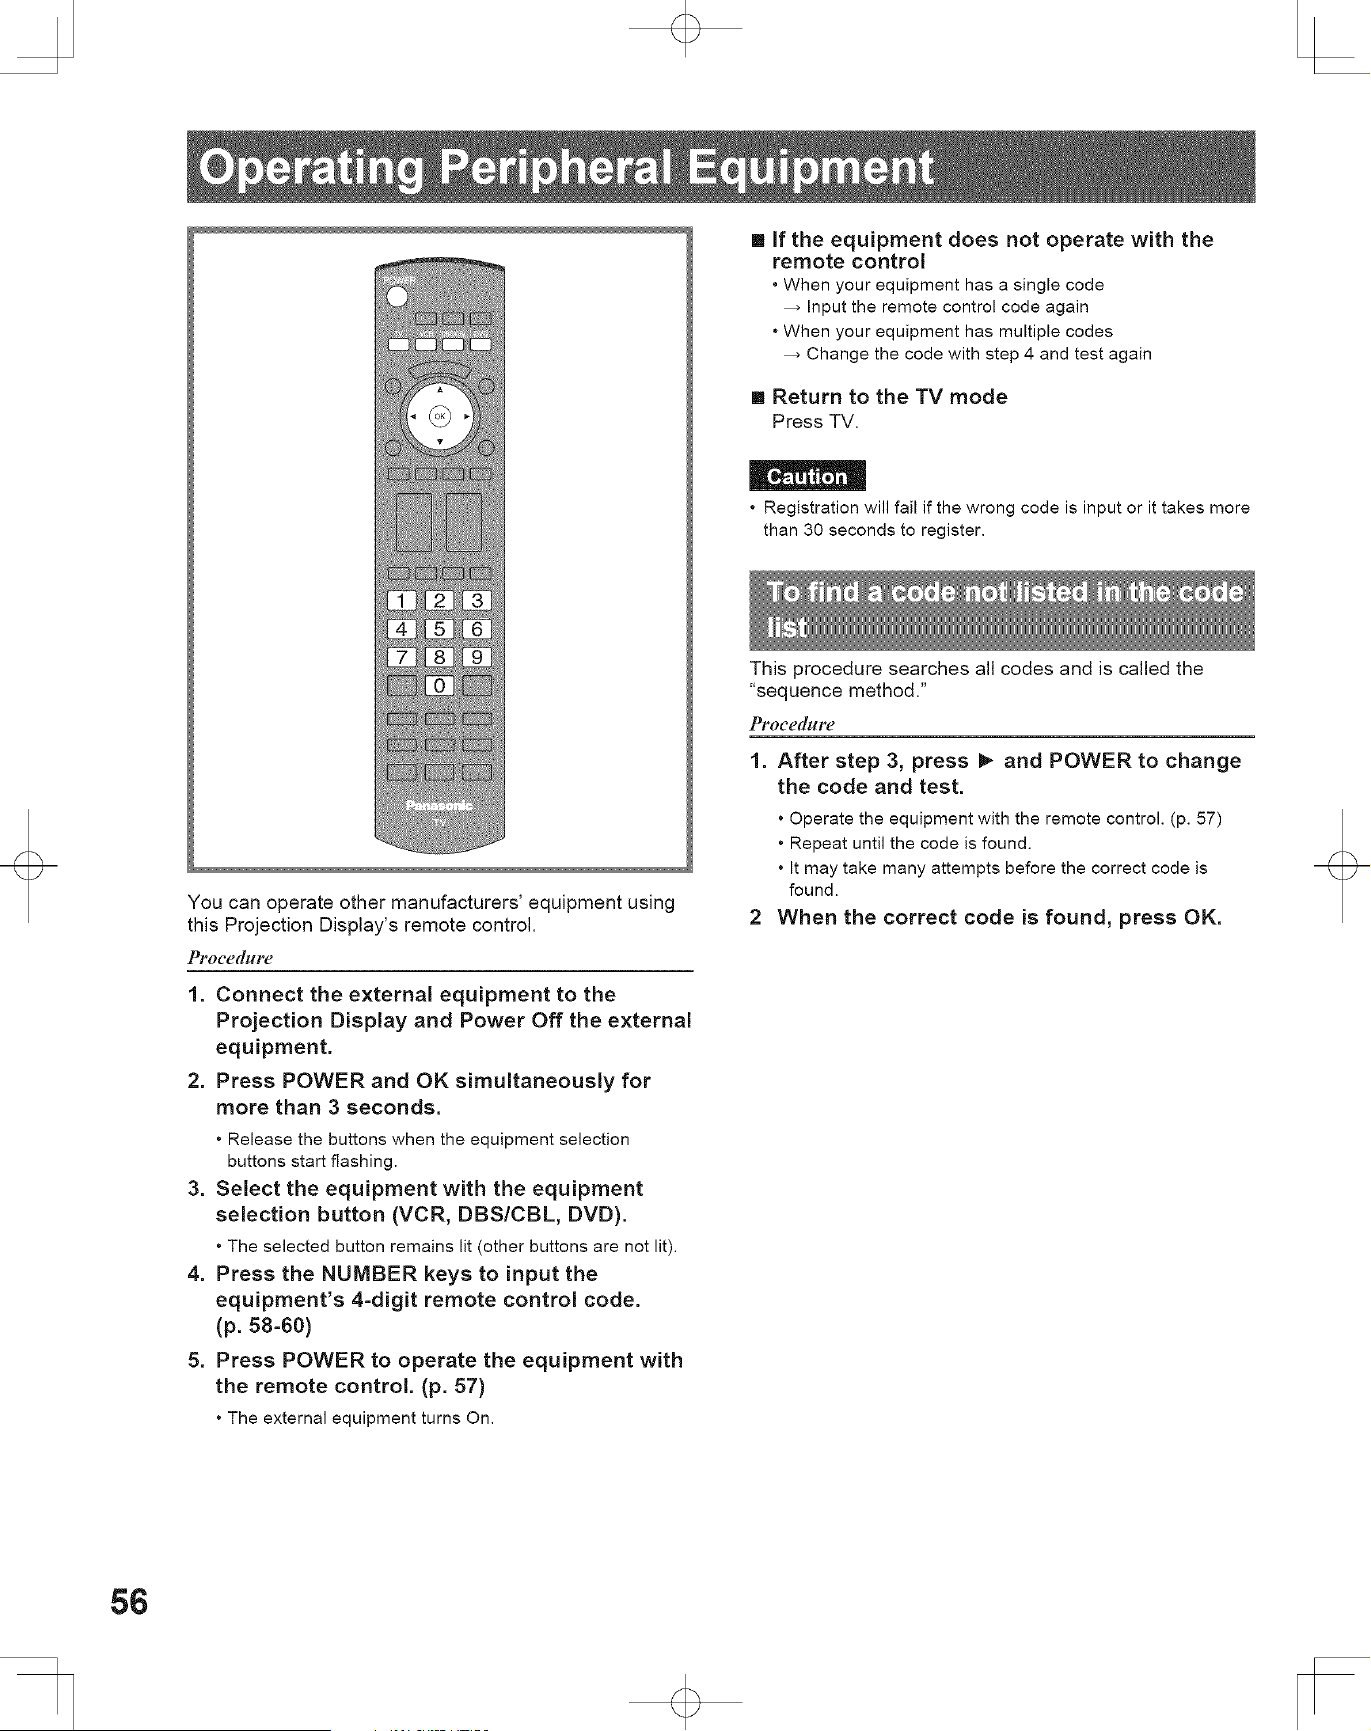
You can operate other manufacturers' equipment using
this Projection Display's remote control,
Procedure
1. Connect the e×ternal equipment to the
Projection Display and Power Off the e×ternal
equipment,
2, Press POWER and OK simultaneously for
more than 3 seconds,
• Release the buttons when the equipment selection
buttons start flashing.
3. Select the equipment with the equipment
selection button (VCR, DBS/CBL, DVD).
• The selected button remains lit (other buttons are not lit).
4. Press the NUMBER keys to input the
equipment's 4-digit remote control code,
(p. 58-60)
5, Press POWER to operate the equipment with
the remote control. (p. 57)
• The external equipment turns On.
[] If the equipment does not operate with the
remote control
• When your equipment has a single code
Input the remote control code again
• When your equipment has multiple codes
Change the code with step 4 and test again
[] Return to the TV mode
Press TV.
• Registration will fail if the wrong code is input or it takes more
than 30 seconds to register.
This procedure searches all codes and is called the
"sequence method."
Proce([giFe
1. After step 3, press I_ and POWER to change
the code and test.
• Operate the equipment with the remote control. (p. 57)
• Repeat until the code is found.
• It may take many attempts before the correct code is
found.
2 When the correct code is found, press OK.
56
The following explains how to operate external devices with the remote control,
• Register the remote control codes (p. 56) if you want to operate an external device of another manufacturer. (p. 58-60)
• Operation may not be possible depending on the available memory size of the remote control.
This remote control is not designed to cover operation of all functions of all models.
[] Remote Control Operation List
This chart defines which keys are operational after programming (if needed) while in the selected remote control
mode, CABLE, DBS, VCR, or DVD.
DBS/CBL MODE =
KEY NAME , VCR MODE , , DVD MODE
' ' (DBS) ' (CBL) "
POWER
Power Power Power Power
i LIST LIST DVD AUDIO
TV
VIDEO
TV Input Switch TV Input Swtich TV Input Swtich TV Input Swtich
i Menu Menu Functions
EXIT
i Exit Exit --
i Up/Down/Left/Right Up/Down/Left/Right Up/Down/Left/Right
i Select Select Enter
SUB
MENU
i Guide Guide Sub Menu
RETURN
i
PPV/VOD PPV/VOD Return
i Red A Red
i Green B Green
i Blue C Blue
i Yellow D Yellow
Channel UptDown Channel Up/Down Channel Up/Down Channel Up/Down
TV Volume Up/Down TV Volume Up/Down TV Volume Up/Down TV Volume Up/Down
ASPECT
i Aspect Aspect --
FAVORITE
i Favorite Favorite Direct Navigator
RECALL
Onscreen Display Info Info/Display/OSD Onscreen Display
MUTE
_ TV Mute TV Mute TV Mute TV Mute
0-9 0-9 0-9 0-9
i Last Channel Last Channel Drive Select
i Sub Channel Music PROG (Sub Channel)
_SKIP_
_ i Page Down/Up Page DowntUp Skip Reverse/Forward
TV/VOR
TV/VCR Switch TV/DBS Switch TV/CBL Switch --
SEARCH
_ Rewind/Fast Forward Rewind/Fast Forward Rewind/Fast Forward Reverse/Forward
REC
_ VCR Record PVR Record -1 PVR Record -1 Record
STOP
Stop Stop Stop Stop
PAUSE
Pause Pause Pause Pause
pLAy
_ Play Play Play Play
"1 Combination type
57
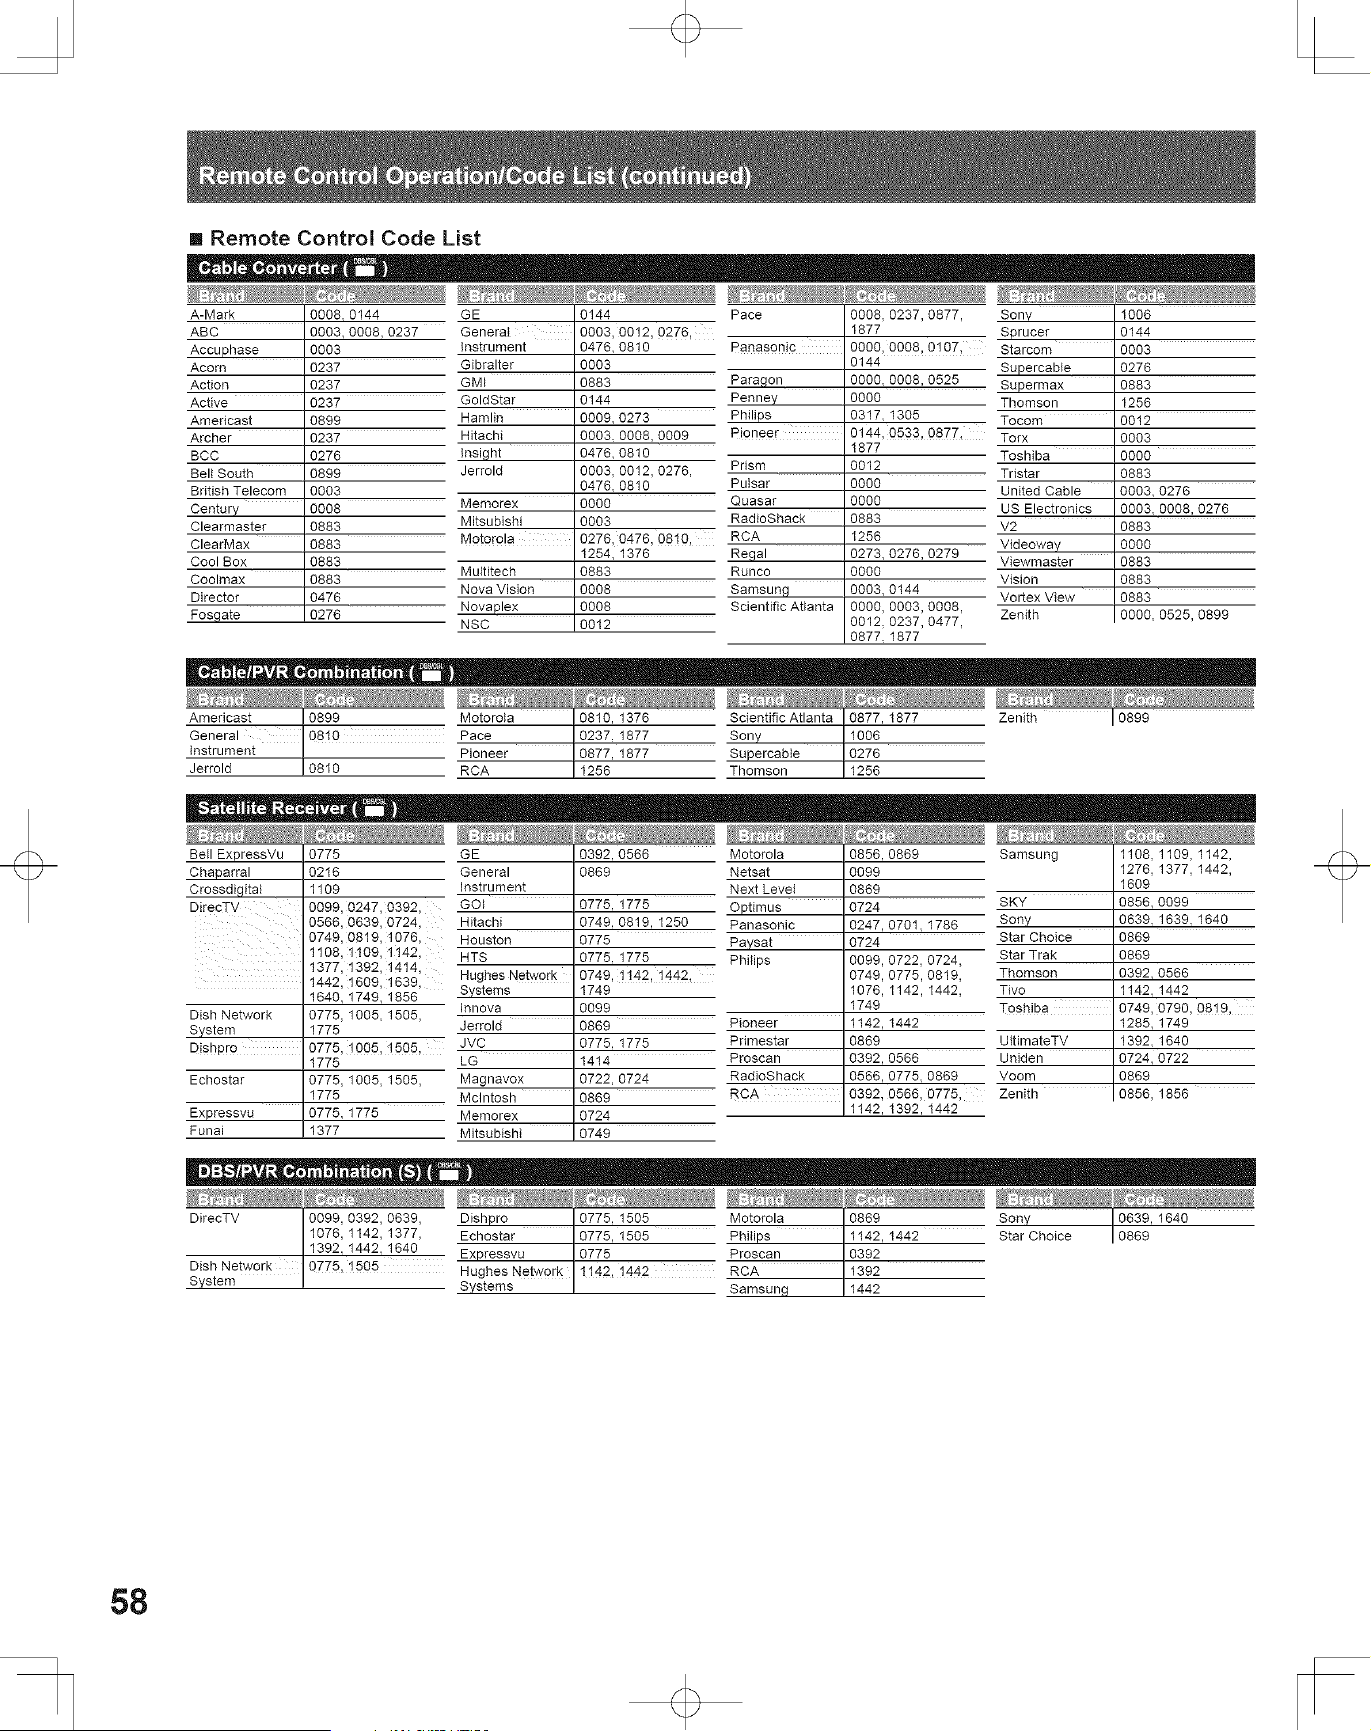
[] Remote Control Code List
A-Mark 0008• 0144 GE 0144
ABC 0003, 0008, 0237 Generai 0003, 0012, 0276,
Accuphase 0003 instrument 0476, 0810
Acorn 0237 Gibralter 0003
Action 0237 GMI 0883
Active 0237 GoldStar 0144
Hamlin 0009, 0273
Hitachi 0003, 0008, 0009
Amedcast 0899
Archer 0237
BCC 0276
Belt South 0899
British Telecom 0003
Century 0008
Clearmaster 0883
ClearMax 0883
Cool Box 0883
Coolmax 0883
Director 0476
Fosgate 0276
Pace 0008,0237,0877, Sony 1006
1877 Sprucer 0144
Panasonic 0O0O, 0008, 0107, Starcom 0003
0144 Supercabie 0276
Paragon 0000,0008,0525
Supermax 0883
Penner 0O0O Thomson 1256
Philips 0317.1305 Tocom 0012
Pioneer 0144,0533,0877, Torx 0003
insight 0476, 0810
Jerrold 0003, 0012, 0276,
0476. 0810
Memorex 0000
Mitsubishi 0003
Motorola 0276, 0476, 0810,
1254, 1376
Multitech 0883
Nova Vision 0008
Novaplex 0008
NSC 0012
Prism
Putsar
Quasar
RadioShack
RCA
Regal
Runco
Samsung
ScientificAtlanta
1877
Toshiba
0012
Tbstar
0000
United Cable
0000
US Electronics
0883
V2
1256
Videoway
0273, 0276, 0279 Viewmaster
0000
Vision
0003, 0144
Vortex View
0000, 0003, 0008, Zenith
0012, 0237, 0477,
0877. 1877
0O00
0883
0003,0276
0003,0008,0276
0883
0000
0883
0883
0883
0000,0525,0899
Amedcast 0899 Motorota 0810, 1376 Scientific Atlanta L0877,1877 Zenith I 0899
General 0810 Pace 0237, 1877 Sony ! 1006
instrument Pioneer 0877, 1877 Supercable 19276
Jerrold 0810 RCA 1256 Thomson | 1256
_t ..... ....
Bell ExpressVu 0775
Chaparral 0216
Crossdigital 1109
DirecTV 0999, 0247, 0392,
0566, 0639, 0724,
0749, 0819, t076,
1108, 1109, 1142,
1377,1392,1414,
1442, 1609, 1639,
1649, 1749, 1856
Dish Network 0775, 1005, 1505,
Svstem 1775
DishPro 0775, 1005, t505,
1775
Echostar 0775, 1005, 1505,
1775
Expressvu 0775, 1775
Funai 1377
GE
General
Instrument
GOI
Hitachi
Houston
HTS
Hughes Network
Systems
Innova
Jerrold
JVC
LG
0392,0566
0869
0775,1775
0749,0819,1250
0775
0775•1775
0749,1142,1442_
1749
0099
0869
0775•1775
1414
Motorola 0856, 0869
Netsat 0099
Next Level 0869
Optimus 0724
Panasonic 0247, 0701. 1786
Paysat 0724
Philips 0099, 0722, 0724,
0749, 0775, 0819,
1076, 1142, 1442,
1749
Pioneer 1142, 1442
Primestar 0869
Proscan 9392, 0566
Samsung
SKY
Sony
Star Choice
Star Trak
Thomson
Tivo
Toshiba
UitimateTV
Uniden
Magnavox
Mcintosh
Memorex
Mitsubishi
0722,0724
0869
0724
0749
1108,1109,1142,
1276,1377,1442,
1609
0856,0099
0639•1639•1640
0869
0869
03920566
1142•1442
0749,0790,0819,
1285,1749
1392•1640
0724,0722
RadioShack 0566, 0775• 0869 Voom 0869
RCA 0392, 0566, 0775, Zenith 0856, 1856
1142, 1392, 1442
DirecTV [ 0099, 0392, 0639, Dishpro [ 0775, 1505 Motorola 0869 Sony 0639, 1640
1076, 1142, 1377, Echostar ! 0775, 1505 Philips 1142, 1442 Star Choice 0869
1392. 1442. _ Expressvu [ 0775 Proscan 0392
_twork | 0775, 1505 Hughes Network 1"14,2,1442 RCA 1392
System | Systems Samsung 1442
58
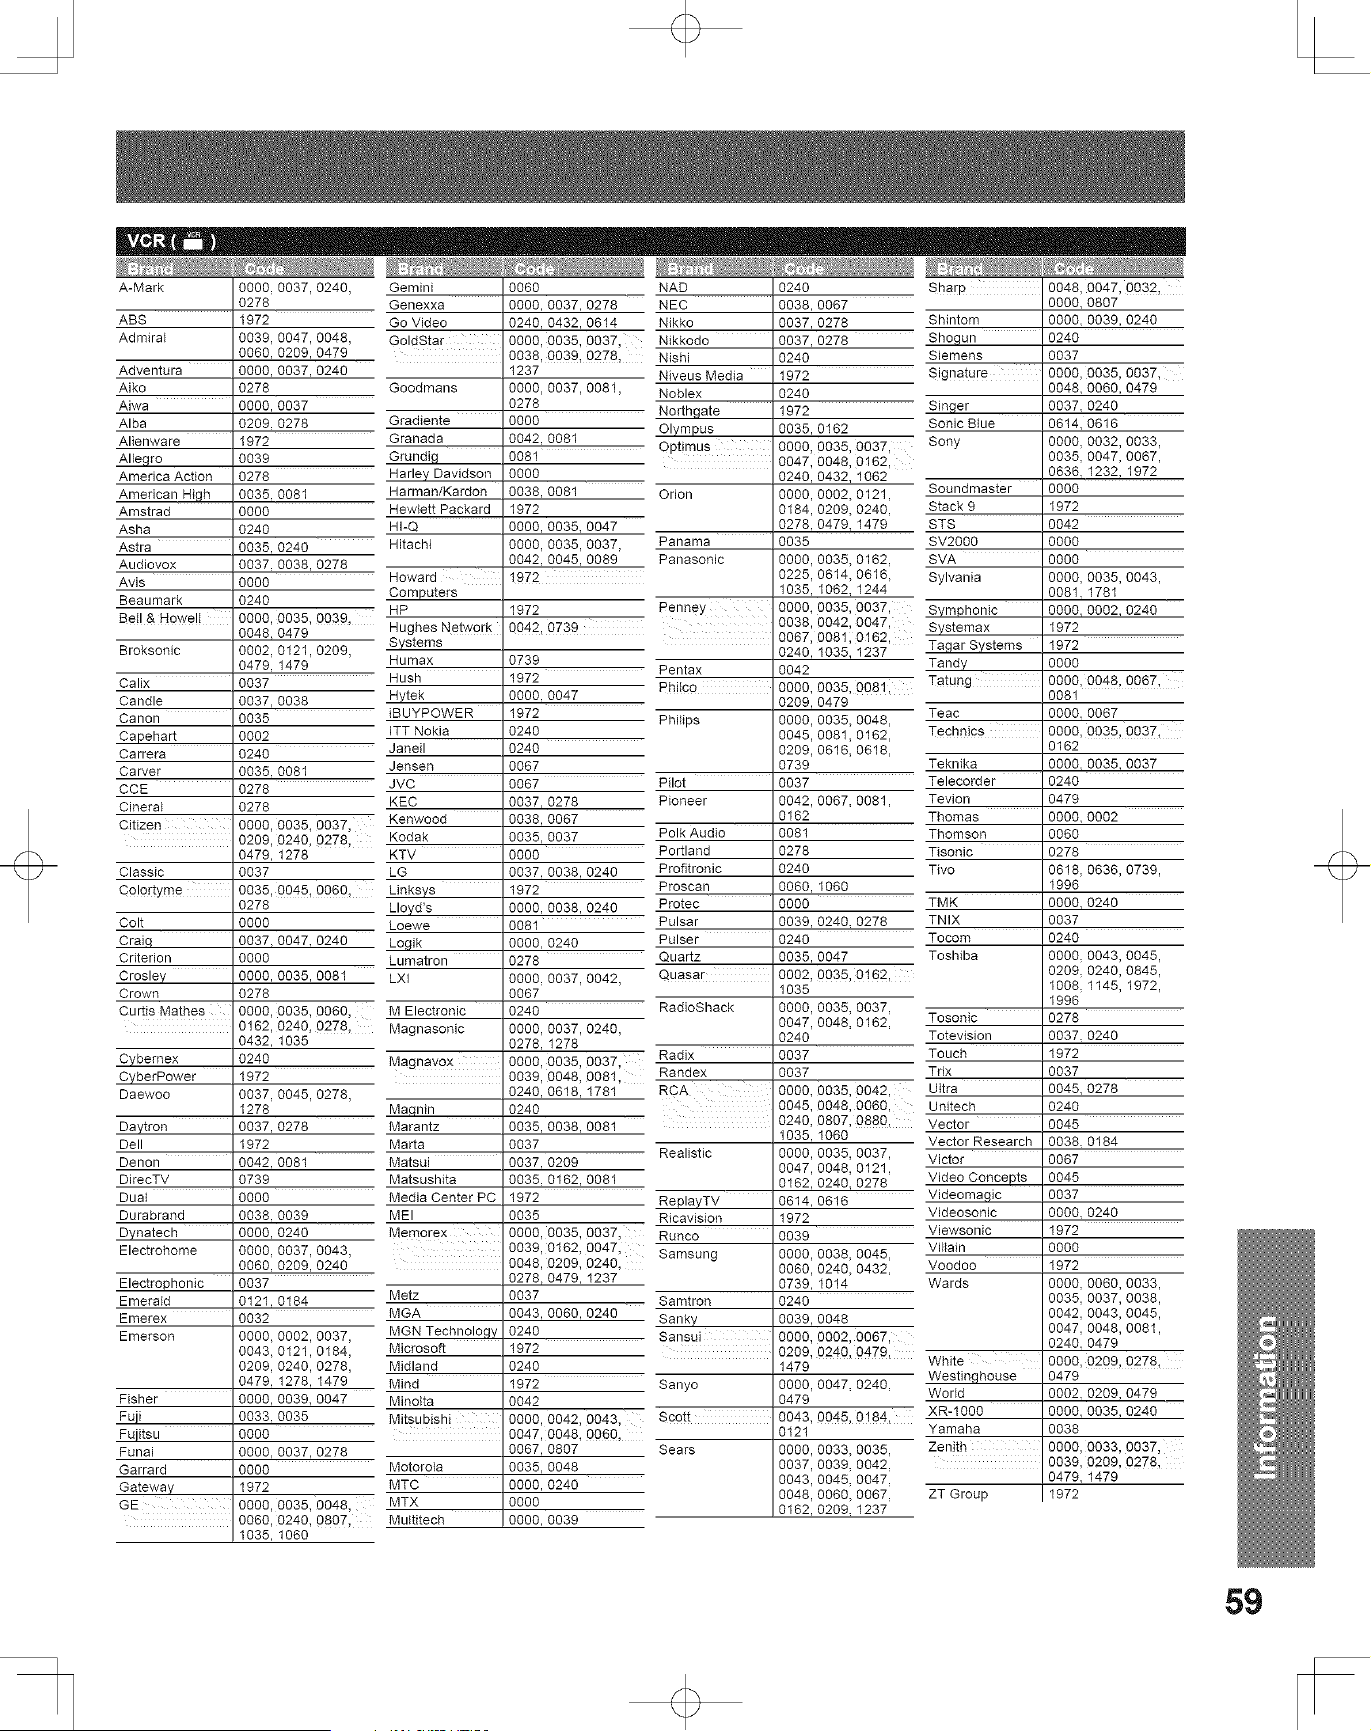
A-Mark
ABS
Admiral
Adventura
Aiko
Aiwa
Alba
Alienware
Allegro
America Action
American H!gh
Amstrad
Asha
Astra
Audiovox
Avis
Beaumark
0000,0037,0240,
0278
1972
0039,0047,0048,
0060.0209,0479
0000, 0037,0240
0278
0000,0037
0209.0278
1972
0039
Gemini 0060
Genexxa 0000, 0037, 0278
Go Video 0240, 0432, 0614
GoldStar 0000, 0035, 0037,
0038, 0039, 0278,
1237
Goodmans 0000, 0037, 0081,
0278
Gradiente 0000
Granada 0042. 0081
Grundig 0081
NAD 0240 Sharp 0048, 0047, 0032,
NEC 0038 0067 0000, 0807
Nikko 0037, 0278 Shintom 0O0O. 0039, 0240
Nikkodo 0037, 0278 Shogun 0240
Nishi 0240 Siemens 0037
Niveus Media 1972 Signatur e 0000, 0035, 0037,
Noblex 0240 0048, 0060, 0479
1972 Singer 0037. 0240
Olympus 0035, 0162 Sonic Blue 0614, 0616
Optimus 0000, 0035, 0037, Sony 0000, 0032, 0033,
0047, 0048, 0162, 0035, 0047, 0067,
0278 Harley Davidson 0000
0035. 0081 Harman/Kardon 0038, 0081
0000 Hewlett Packard 1972
0240 HI-Q 0000, 0035, 0047
0035, 0240 Hitachi 0000, 0035, 0037,
0037. 0038, 0278 0042, 0045, 0089
0000 Howard ,1972
0240 Computers
Bell & Howell _ 0000, 0035, 0039,
0048, 0479
Broksonic 0002, 0121,0209,
0479. 1479
Calix 0037
Candle 0037. 0038
0035
0002
Canon
Capehart
Carrera
Carver
CCE
HP
Hughes Network
Systems
Humax
Hush
Hytek
iBUYPOWER
ITT Nokia
1972
0042,0739
O739
1972
0000.0047
1972
0240
0240 Janeil
0035. 0081 Jensen
0278 JVC
Cineral 0278
Citizen 0000, 0035, 0037,
0209,0240,0278,
0479,1278
Classic
Colortyme
Colt
Craig
Criterion
Crosley
Crown
OO37
0035,0045,0060,
0278
0000
0037,0047, 0240
0000
0000,0035,0081
0278
CuRis Mathes 0000, 0035, 0060,
0162,0240,0278,
0432,1035
Cvbemex 0240
CvberPower 1972
Daewoo 0037,0045,0278,
1278
Davtron 0037, 0278
Dell 1972
Denon 0042,0081
DirecTV 0739
Dual 0000
Durabrand 0038. 0039
Dvnatech 0000, 0240
Electrohome 0O0O, 0037,0043,
0080.0209,0240
Electrophonic 0037
Emerald 0121.0184
Emerex 0032
Emerson 0O0O, 0002, 0037,
0043,0121,0184,
0209,0240,0278,
0479.1278,1479
Fisher 0000, 0039, 0047
O24O
0067
0067
KEC 0037.0278
Kenwood 0038,0067
Kodak 0035.0037
KTV 0000
LG 0037,0038,0240
LJnksys 1972
Lloyd's 0000,0038,0240
Loewe 0081
Logik 0000. 0240
Lumatron 0278
LXI 0000,0037,0042,
0067
M Electronic 0240
Magnasonic 0000, 0037,0240,
0278.1278
Magnav0x 0000,0035,0037,
0039, 0048, 0o81,
024o, o618,1781
Magnin 0240
Marantz 0035, 0038,0081
Ma_a 0037
Matsui 0037, 0209
Matsushita 0035, 0162, 0081
Media Center PC 1972
MEI 0035
Memorex 0000, 0035, 0037,
0039,0162,0047,
0048,0209,0240,
0278,0479,1237
Metz 0037
MGA 0043, 0060, 0240
MGN Technology 0240
Microsoft 1972
Midland 0240
Mind 1972
Minolta 0042
0636.J232,1972
0000
1972
0042
0240,0432,1062
Orion 0000,0002, 0121, Soundmaster
0184, 0209, 0240, Stack 9
0278,0479.1479 STS
Panama 0035 SV2000 0000
Panasonic 0000,0035, 0162, SVA 0000
0225,0614, 0616, Sylvania 0000, 0035,0043,
1035,1062.1244 0081.1781
Penney 0000,0035,0037, Symphonic 0000,0002,0240
0038,0042, 0047, Systemax 1972
0067, 0081; 0162, Tagar Systems 1972
0240,1035,1237
Pentax 0042 Tandy 0000
Phiico 0000,0035,0081, Tatung 0000,0048,0067,
0o81
Pilot
Pioneer
Polk Audio
Portland
Profitronic
Proscan
0209,0479
Philips 0000,0035, 0048,
0045,0081,0162,
0209,0616,0618,
0739
0037
0042,0067,0081,
0162
0081
0278
0240
0060,1060
Protec 0000
Pulsar 0039,0240. 0278
Pulser 0240
Quartz 0035,0047
Quasar 0002,0035,0162,
1035
RadioShack 0000,0035,0037,
0047,0048, 0162,
0240
Radix 0037
Randex 0037
Teac 0000.0067
Technics 0000, 0035, 0037,
0162
Teknika 0000,0035,0037
Telecorder 0240
Tevion 0479
Thomas 0000 0002
Thomson 0060
Tisonic 0278
Tivo 0618, 0636,0739,
1996
TMK 0000,0240
TNIX 0037
Tocom 0240
Toshiba 0000, 0043,0045,
0209,0240,0845,
1008,1145,1972,
1996
Tosonic 0278
Totevision 0037.0240
Touch 1972
Tdx 0037
RCA 0000, 0035, 0042, Ultra
0045, 0048, 0060, Unitech
0240, 0807, 0880, Vector
1035, 1060 Vector Research
Realistic 0000, 0035, 0037, Victor
0047, 0048, 0121,
0162, 0240. 0278 Video Concepts
ReplayTV 0614, 0616 Videomaqic
Ricavision 1972 Videosonic
Runco 0039 Viewsonic
Samsung 0000, 0038, 0045, Villain
0060, 0240, 0432, Voodoo
0739, 1014 Wards
Samtron 0240
Sankv 0039, 0048
Sansui 0000, 0002, 0067,
0209, 0240, 0479,
1479 White
Sanyo 0000, 0047, 0240, Westinghouse
0479 World
Scott 0043, 0045, 0184, XR-IO00
0121 Yamaha
Sears
0045, 0278
0240
0045
0038. 0184
0067
0045
0037
0000.0240
1972
0000
1972
0000,0060,0033,
0035,0037,0038,
0042,0043,0045,
0047,0048,0081,
0240. 0479
0000,0209,0278,
Fuji 0033. 0035 Mitsubishi 0000, 0042, 0043,
Fuitsu 0000 0047, 0048, 0060,
Funai 0000. 0037, 0278 0067, 0807
Garrard 0000 Motorola 0035. 0048
Gateway 197_ MTC ' 0000, 0240 ' 0043, 0045, 0047.
0048, 0060, 0067.
GE 0000, 0035, 0048, MTX 0000 0162, 0209. 1237
0060, 0240, 0807, Mu_titech 0000, 0039
1035, 1060
0479
0002.0209,0479
0000, 0035,0240
0038
0000,0033, 0035, Zenith 0000, 0033, 0037,
0037,0039,0042, 0039,0209,0278,
0479,1479
ZT Group 1972
59
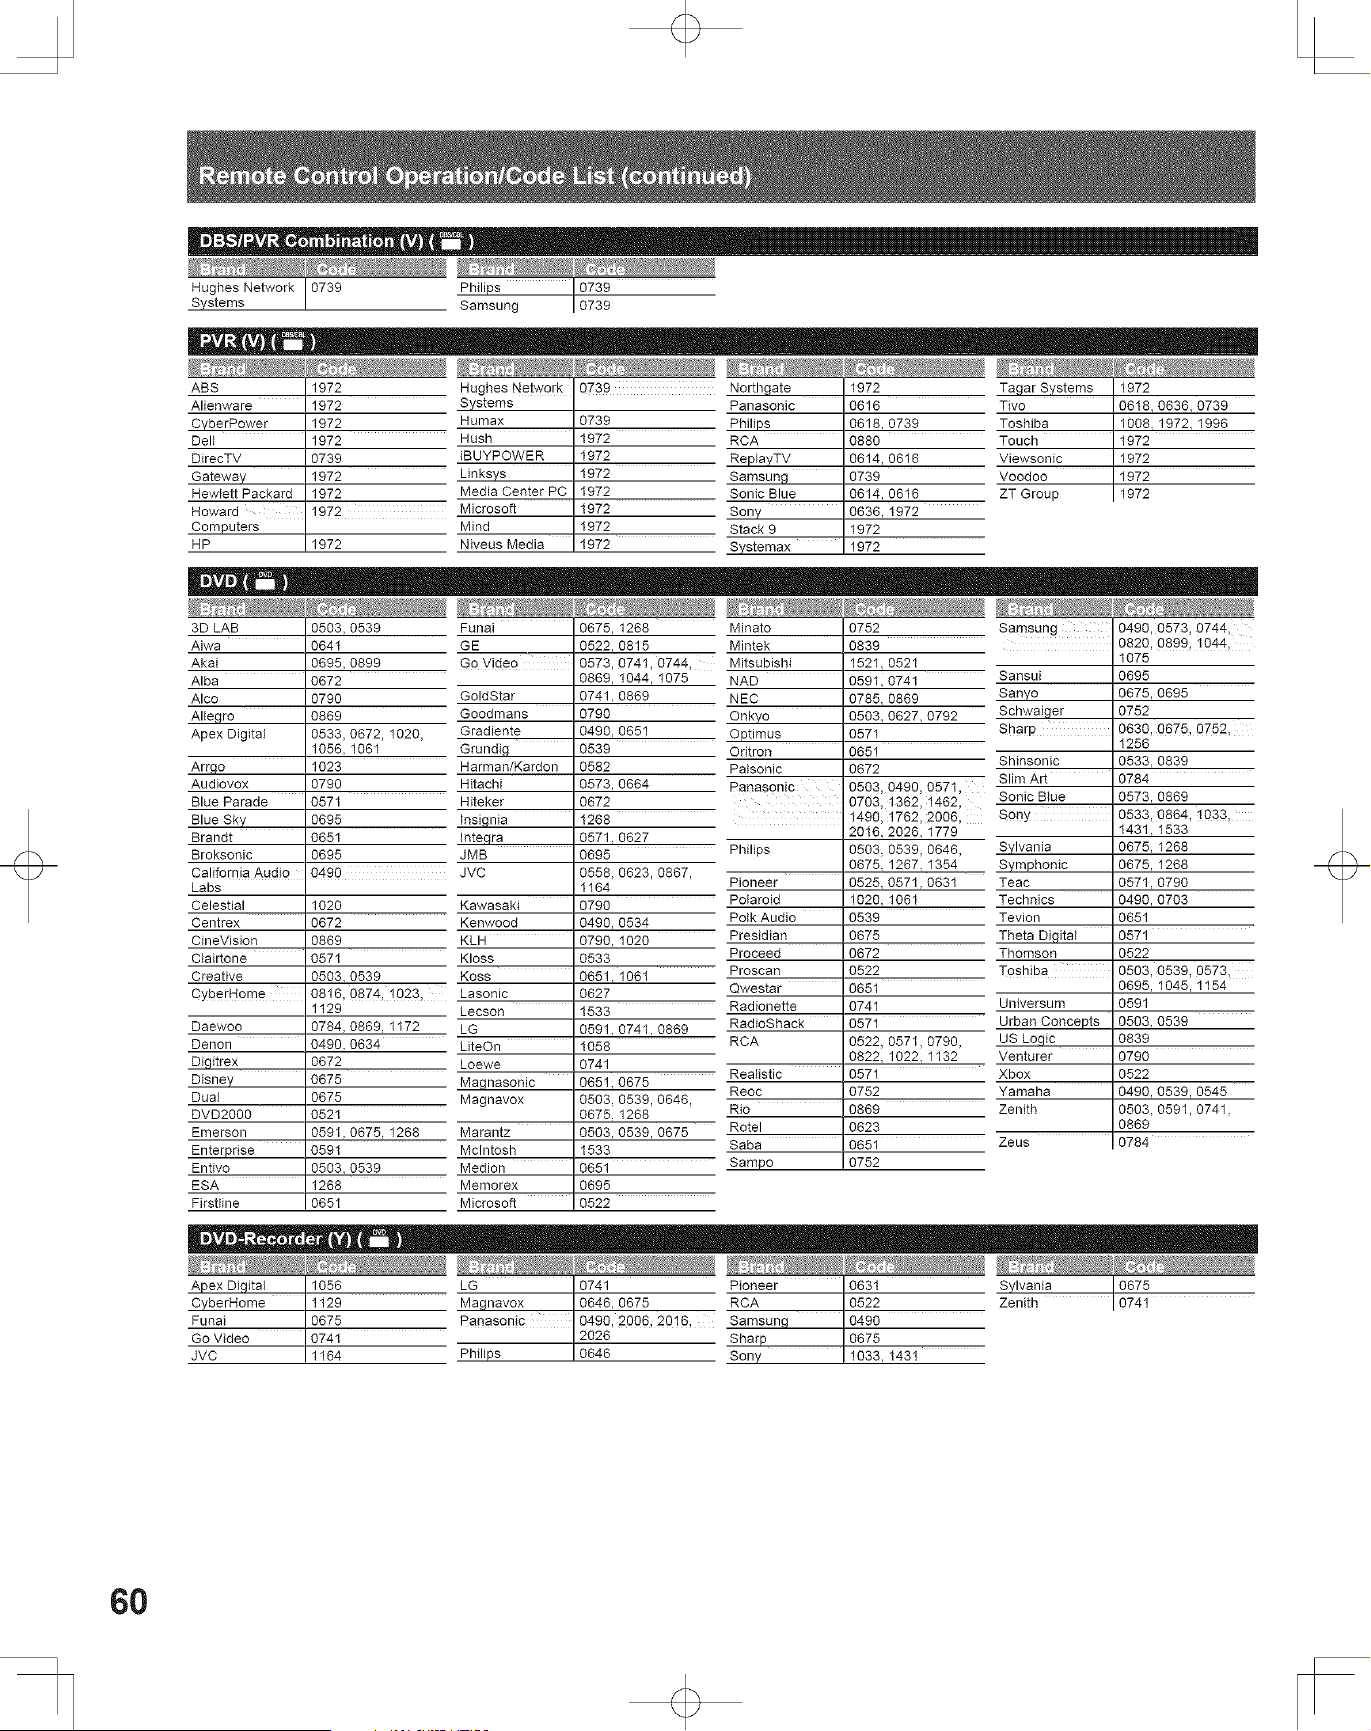
JJJJJiiiii......
Hughes Network J0739 Philips 0739
Systems ! Samsung 0739
ABS 1972 Hughes Network , 0739 North gate 1972
Alienware 1972 Systems
CyberPower 1972 Humax
Delt 1972 Hush
DirecTV 0739 iBUYPOWER
Gateway 1972 LJnksys
Hewlett Packard 1972 Media Center PC
Howard 1972 Microsoft
Computers Mind
HP 1972 Niveus Media
Panasonic 0616
0739 Philips 0618, 0739
1972 RCA 0880
1972 ReplavTV 0614, 0616
1972 Samsun,g 0739
1972 Sonic Blue 0614, 0616
1972 Sony 0636, 1972
1972 Stack 9 1972
1972 Systemax 1972
Ta,gar SYstems ! 1972
Tivo ! 0616, 0636, 0739
Toshib a 11006 1972, 1996
Touch ! 1972
Views°nic 11972
Voodoo 1972
ZT Group 1972
3D LAB 0503, 0539
Aiwa 0641
Akai 0695, 0899
Alba 0672
Alco 0790
Alleqro 0869
Apex Digital 0533, 0672, 1020,
1056, 1061
Arrgo 1023
Audiovox 0790
Blue Parade 0571
Blue Sky 0695
Brandt 0651
Broksonic 0695
California Audio 0490 JVC
Labs
Celestial 1020
Centrex 0672
CineVision 0869
Ctairtone 0571
Creative 0503, 0539
CYberH0rne 0816, 0874, 1023,
1129
0784,0869.1172
0490,0634
0672
0675
0675
0521
0591,0675.1268
0591
0503,0539
1268
0651
FunaJ
GE
Go Video
GoldStar
Goodmans
Gradiente
Grandi,g
Harman/Kardon
Hitachi
Hiteker
insignia
Inteqra
JMB
0675, 1268 Minato
0522. 0815 Mintek
0573, 0741, 0744, Mitsubishi
0869, 1044, 1075 NAD
0741. 0869 NEC
0790 Onkyo
0490. 0651
Optimus
0539 Oritron
0582 Palsonic
0573,0664
0672
1268
0571.0627
0695
0558,0623,0867,
1164
O752
0839
1521.0521
059110741
0785.0869
0503,0627,0792
0571
0651
0672
Samsung 0490, 0573, 0744,
0820,0899,1044,
1075
Sansui 0695
Sanvo 0675, 0695
Schwai,ger 0752
Sharp 0630, 0675, 0752,
1256
Shinsonic 0533. 0839
O534
1020
Kawasaki 0790
Kenwood 0490.
KLH 0790,
Kloss 0533
Koss 0651
Lasonic 0627
Lecson 1533
LG 0591.
LJteOn 1058
hoewe
Magnasonic
Magnavox
Marantz
Mclntosh
Medion
Memorex
Microsoft
1061
0741.0869
0741
Realistic
0651,0675
Reoc
0503,0539,0646,
0675.1268
0503, 0539, 0675 Rotel
1533 Saba
0651 Sampo
0695
0522
0571 Xbox
0752 Yamaha
Rio 0869 Zenith
0623
0651 Zeus
0752
- Slim Art 0784
1431 1533
0675.1268
0675,1268
0571.0790
0490,0703
0651
0571
0522
Daewoo
Denon
Di,gitrex
Disney
Dual
DVD2000
Emerson
Enterprise
Entivo
ESA
Firstline
Panasonic 0503, 0490, 0571,
0703, 1362, 1462, Sonic Blue 0573. 0869
1490, 1762, 2006, Sony 0533, 0864, 1033,
2016, 2026, 1779
Philips 0503, 0539, 0646, Sylvania
0675. 1267. 1354 Symphonic
Pioneer 0525, 0571,0631 Teac
Polaroid 1020. 1061 Technics
Potk Audio 0539 Tevion
Presidian 0675 Theta Diqitat
Proceed 0672 Thomson
Proscan 0522 Toshiba 0503, 0539, 0573,
Qwestar 0651 0695, 1045, 1154
Radionette 0741 Universum 0591
RadioShack 0571 Urban Concepts 0503, 0539
RCA 0522, 0571, 0790, US Lo,gic 0839
0822. 1022. 1132 Venturer 0790
0522
0490, 0539, 0545
0503, 0591,0741,
0869
0784
Apex Di,gital 1056 LG ! 0741 Pioneer 0631 Sylvania J0675
CyberHome 1129 Ma,gnavox 10646, 0675 RCA 0522 Zenith , 0741
Funai 0675 Ranason!c 0490, 20(36, 20!6, samsun,g 0490
Go Video 0741 2026 Sharp 0675
JVC 1164 Ph ps 0646 Sony 1033, 1431
60
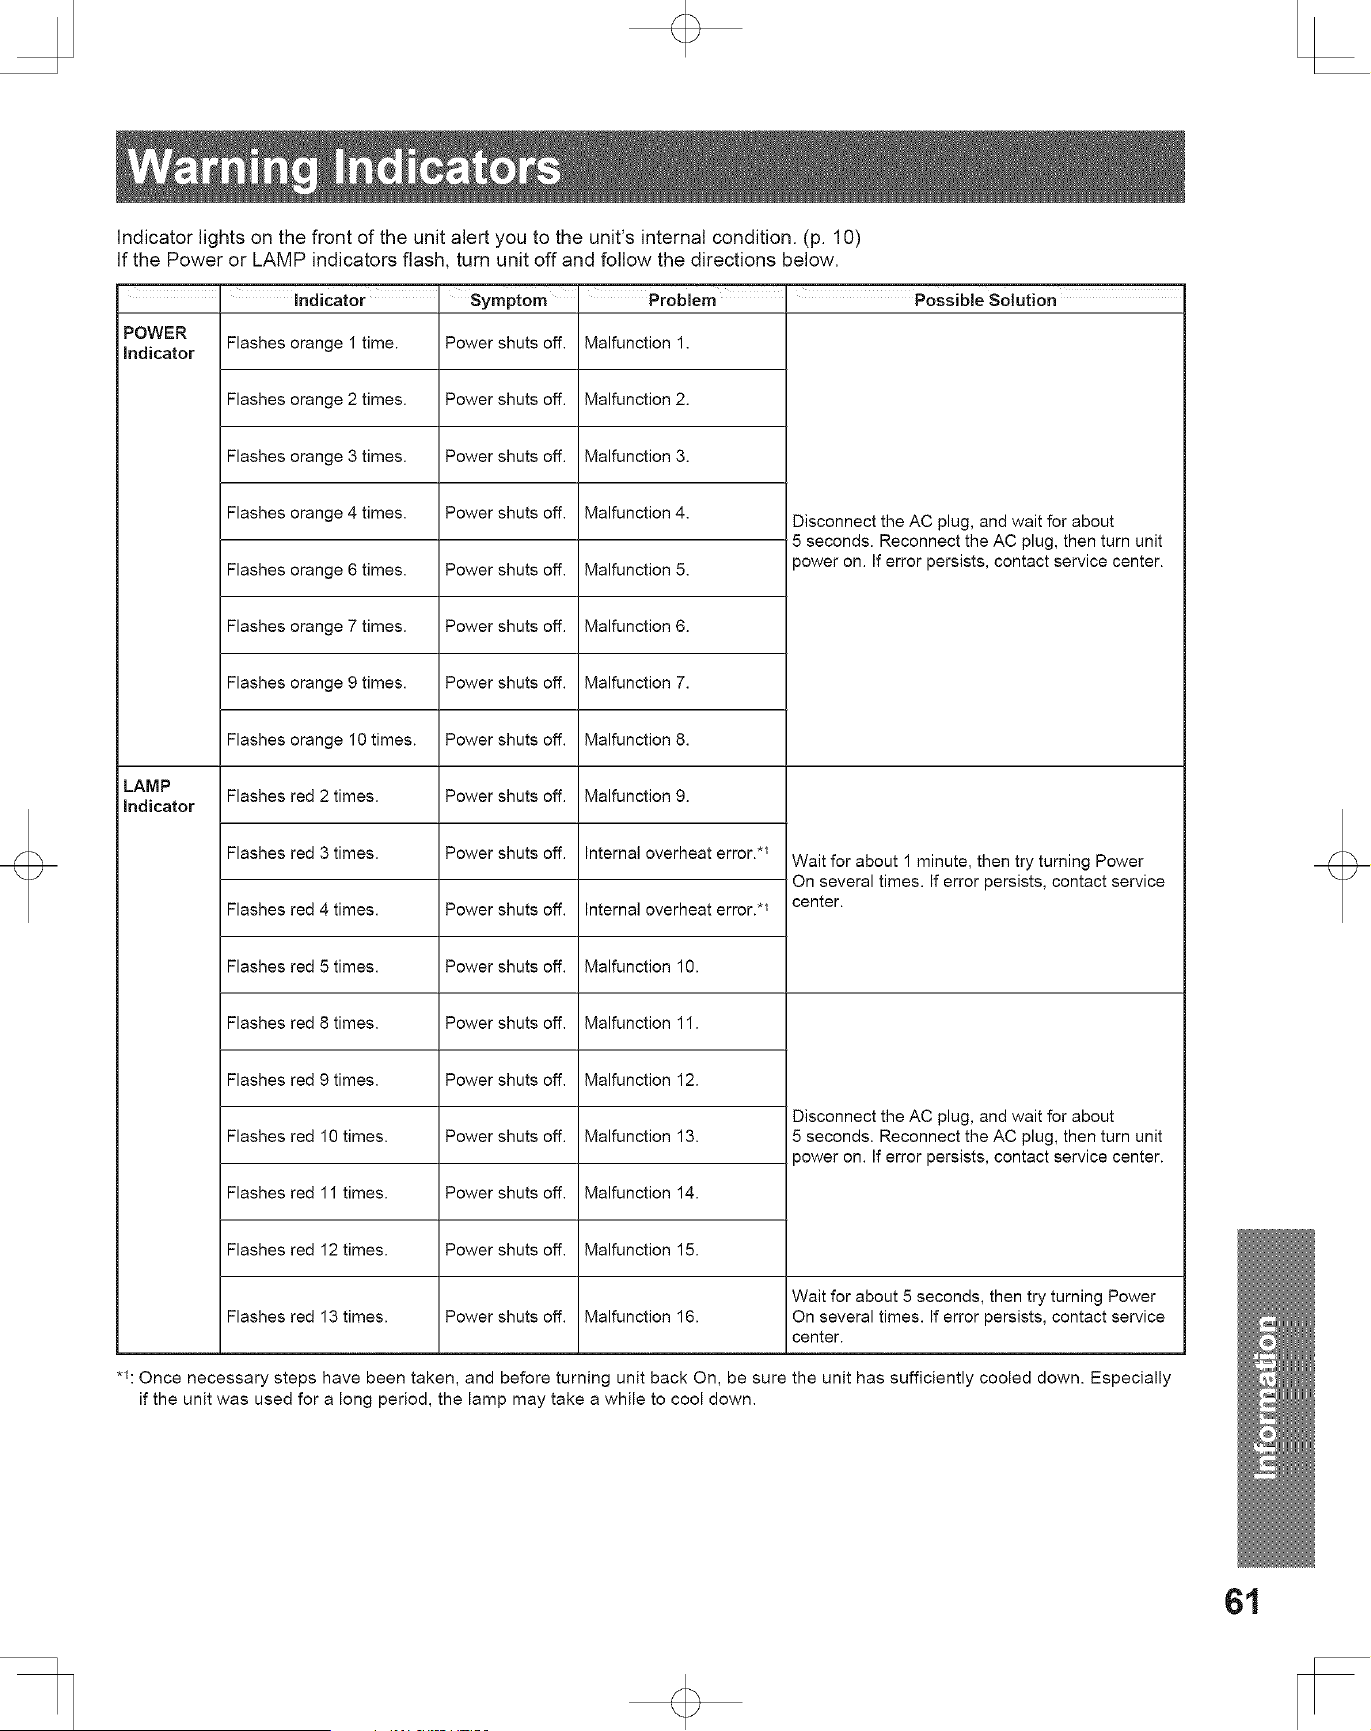
Indicator lights on the front of the unit alert you to the unit's internal condition. (p. 10)
If the Power or LAMP indicators flash, turn unit off and follow the directions below.
indicator i symptom Probmem Possible S0tution
POWER
Indicator
LAMP
indicator
Flashes orange 1 time.
Flashes orange 2 times.
Flashes orange 3 times.
Flashes orange 4 times.
Flashes orange 6 times.
Flashes orange 7 times.
Flashes orange 9 times.
Flashes orange 10 times.
Flashes red 2 times.
Flashes red 3 times.
Flashes red 4 times.
Flashes red 5 times.
Flashes red 8 times.
Flashes red 9 times.
Flashes red 10 times.
Flashes red 11 times.
Flashes red 12 times.
Flashes red 13 times.
Power shuts off.
Power shuts off.
Power shuts off.
Power shuts off.
Power shuts off.
Power shuts off.
Power shuts off.
Power shuts off.
Power shuts off.
Power shuts off.
Power shuts off.
Power shuts off.
Power shuts off.
Power shuts off.
Power shuts off.
Power shuts off.
Power shuts off.
Power shuts off.
Malfunction 1.
Malfunction 2.
Malfunction 3.
Malfunction 4.
Malfunction 5.
Malfunction 6.
Malfunction 7.
Malfunction 8.
Malfunction 9.
Internal overheat error. .1
Internal overheat error.*_
Malfunction 10.
Malfunction 11.
Malfunction 12.
Malfunction 13.
Malfunction 14.
Malfunction 15.
Malfunction 16.
Disconnect the AC plug, and wait for about
5 seconds. Reconnect the AC plug, then turn unit
power on. If error persists, contact service center.
Wait for about 1 minute, then try turning Power
On several times. If error persists, contact service
center.
Disconnect the AC plug, and wait for about
5 seconds. Reconnect the AC plug, then turn unit
power on. If error persists, contact service center.
Wait for about 5 seconds, then try turning Power
On several times. If error persists, contact service
center.
,1: Once necessary steps have been taken, and before turning unit back On, be sure the unit has sufficiently cooled down. Especially
if the unit was used for a long period, the lamp may take a while to cool down.
61
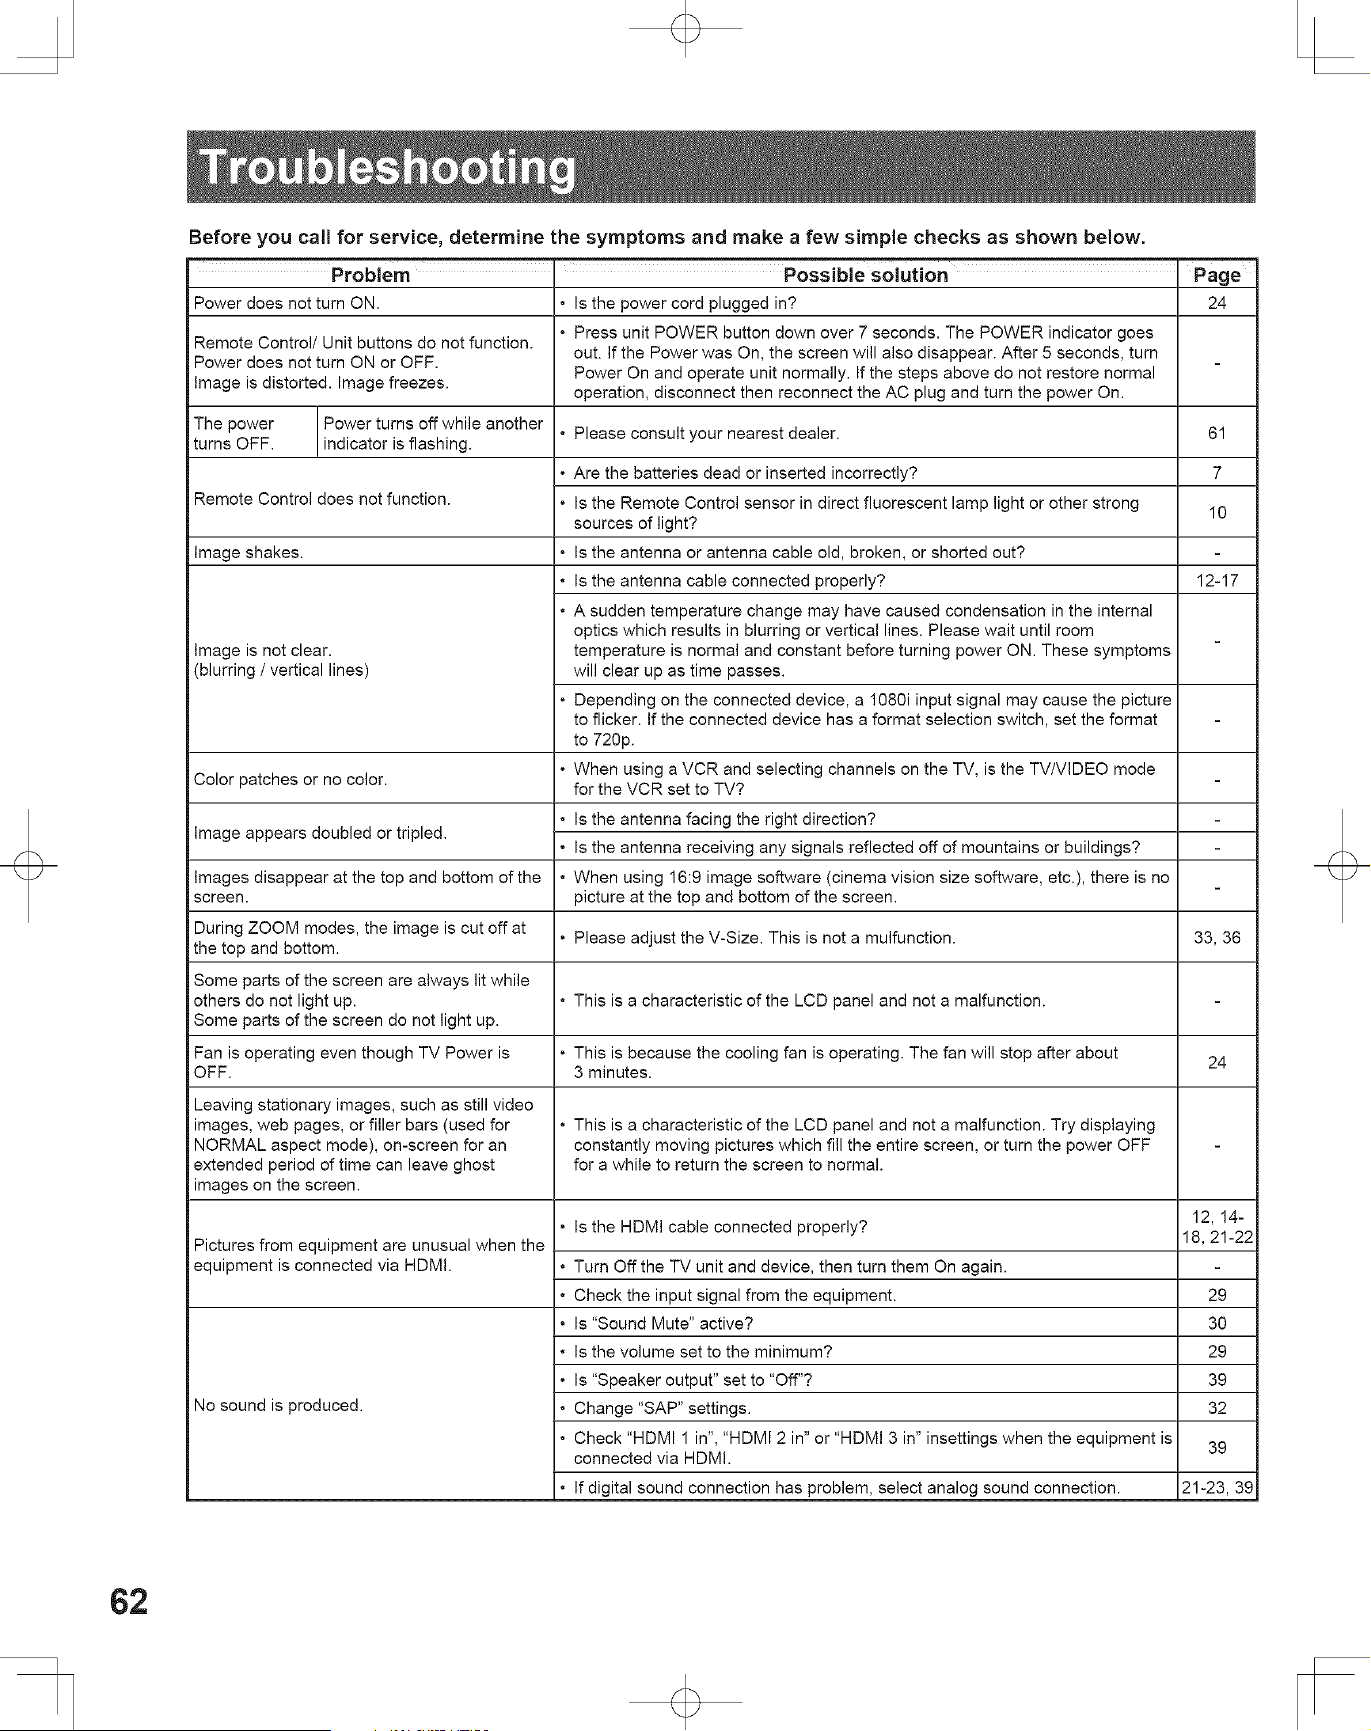
Before you call for service, determine the symptoms and make a few simple checks as shown below.
Problem Possible solution
Power does not turn ON.
• Is the power cord plugged in?
Remote Control/Unit buttons do not function.
Power does not turn ON or OFF.
Image is distorted. Image freezes.
• Press unit POWER button down over 7 seconds. The POWER indicator goes
out. If the Power was On, the screen will also disappear. After 5 seconds, turn
Power On and operate unit normally. If the steps above do not restore normal
operation, disconnect then reconnect the AC plug and turn the power On.
The power
turns OFF.
Power turns off while another
• Please consult your nearest dealer.
indicator is flashing.
Remote Control does not function.
• Are the batteries dead or inserted incorrectly?
• Is the Remote Control sensor in direct fluorescent lamp light or other strong
sources of light?
Image shakes.
• Is the antenna or antenna cable old, broken, or shorted out?
• Is the antenna cable connected properly?
Image is not clear.
(blurring / vertical lines)
• A sudden temperature change may have caused condensation in the internal
optics which results in blurring or vertical lines. Please wait until room
temperature is normal and constant before turning power ON. These symptoms
will clear up as time passes.
• Depending on the connected device, a 1080i input signal may cause the picture
to flicker. If the connected device has a format selection switch, set the format
to 720p.
Color patches or no color.
• When using a VCR and selecting channels on the TV, is the TV/VIDEO mode
for the VCR set to TV?
Image appears doubled or tripled.
• Is the antenna facing the right direction?
• Is the antenna receiving any signals reflected off of mountains or buildings?
Images disappear at the top and bottom of the • When using 16:9 image software (cinema vision size software, etc.), there is no
screen, picture at the top and bottom of the screen.
During ZOOM modes, the image is cut off at
• Please adjust the V-Size. This is not a mulfunction.
the top and bottom.
Some parts of the screen are always lit while
others do not light up. • This is a characteristic of the LCD panel and not a malfunction.
Some parts of the screen do not light up.
Fan is operating even though TV Power is
OFF.
• This is because the cooling fan is operating. The fan will stop after about
3 minutes.
Leaving stationary images, such as still video
images, web pages, or filler bars (used for
NORMAL aspect mode), on-screen for an
extended period of time can leave ghost
images on the screen.
• This is a characteristic of the LCD panel and not a malfunction. Try displaying
constantly moving pictures which fill the entire screen, or turn the power OFF
for a while to return the screen to normal.
Pictures from equipment are unusual when the
equipment is connected via HDMI.
No sound is produced.
Page
24
61
7
10
12-17
33,36
24
• Is the HDMI cable connected properly? 12, 14-
18, 21-22
• Turn Off the TV unit and device, then turn them On again.
• Check the input signal from the equipment. 29
• Is "Sound Mute" active? 30
• Is the volume set to the minimum? 29
• Is "Speaker output" set to "Off"? 39
• Change "SAP" settings. 32
• Check "HDMI 1 in", "HDMI 2 in" or "HDMI 3 in" insettings when the equipment is
39
connected via HDMI.
• If digital sound connection has problem, select analog sound connection. 21-23, 39
62
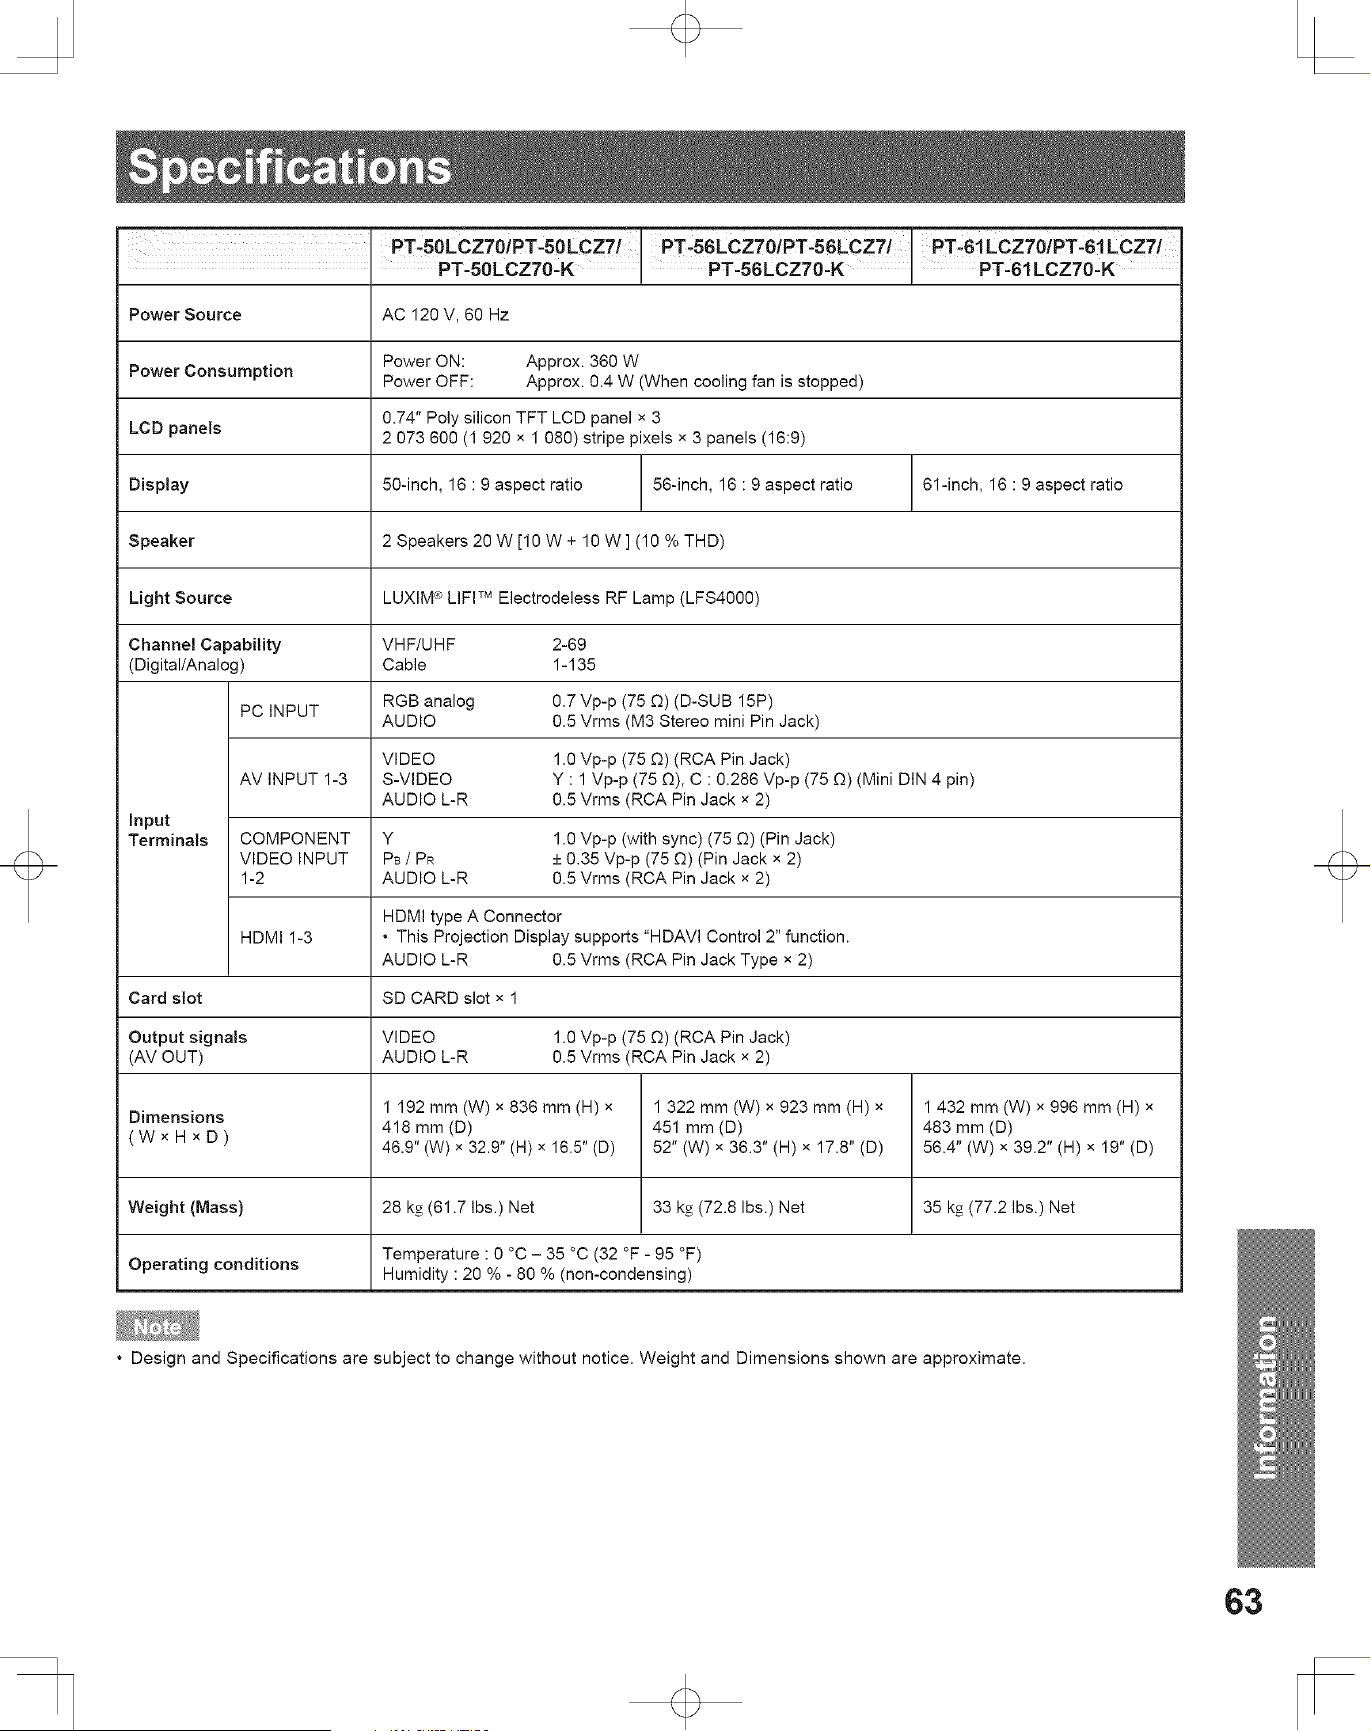
PT:BOLCZTOIPT-BOECZI! PT:56LCZ101PT-56LCZII PT-BiLCZlOiPT-BiLCZI!
PT-BOLCZT0-K i PT-BBLCZT0-K i PT-61LCZT0-K
Power Source AC 120 V, 60 Hz
Power Consumption Power ON: Approx. 360 W
Power OFF: Approx. 0.4 W (When cooling fan is stopped)
0.74" Poly silicon TFT LCD panel x 3
LCD panels 2 073 600 (1 920 x 1 080) stripe pixels x 3 panels (16:9)
Display 50-inch, 16 : 9 aspect ratio 56-inch, 16 : 9 aspect ratio 61-inch, 16 : 9 aspect ratio
Speaker 2 Speakers 20 W [10 W + 10 W ] (10 % THD)
Light Source LUXIM _>LIFF M Electrodeless RF Lamp (LFS4000)
Channel Capability VHF/UHF 2-69
(Digital/Analog) Cable 1-135
RGB analog 0.7 Vp-p (75 £Q)(D-SUB 15P)
PC INPUT
AUDIO 0.5 Vrms (M3 Stereo mini Pin Jack)
VIDEO 1.0 Vp-p (75 £Q)(RCA Pin Jack)
AV INPUT 1-3 S-VIDEO Y : 1 Vp-p (75 Q), C : 0.286 Vp-p (75 £Q)(Mini DIN 4 pin)
AUDIO L-R 0.5 Vrms (RCA Pin Jack x 2)
Input
Terminals COMPONENT Y 1.0 Vp-p (with sync) (75 _) (Pin Jack)
VIDEO INPUT PB / PR + 0.35 Vp-p (75 Q) (Pin Jack x 2)
1-2 AUDIO L-R 0.5 Vrms (RCA Pin Jack x 2)
HDMI type A Connector
HDMI 1-3 • This Projection Display supports "HDAVI Control 2" function.
AUDIO L-R 0.5 Vrms (RCA Pin Jack Type x 2)
Card slot SD CARD slot x 1
Output signals VIDEO 1.0 Vp-p (75 _) (RCA Pin Jack)
(AM OUT) AUDIO L-R 0.5 Vrms (RCA Pin Jack x 2)
1 192 mm (W) x 836 mm (H) x 1 322 mm (W) x 923 mm (H) x 1 432 mm (W) x 996 mm (H) x
Dimensions
(W x H x D ) 418 mm (D) 451 mm (D) 483 mm (D)
48.9" (W) x 32.9" (H) x 16.5" (D) 52" (W) x 36.3" (H) x 17.8" (D) 56.4" (W) x 39.2" (H) x 19" (D)
Weight (Mass) 28 kg (61.7 Ibs.) Net 33 kg (72.8 Ibs.) Net 35 kg (77.2 Ibs.) Net
Temperature : 0 °C - 35 °C (32 °F - 95 °F)
Operating conditions Humidity : 20 % - 80 % (non-condensing)
• Design and Specifications are subject to change without notice. Weight and Dimensions shown are approximate.
63
Accesso_ Purchases i
Purchase Parts, Accessories and instruction Books online for all Panasonic Products by visiting our Web Site at:
httD ://www._anasonic.com
or, send your request by E-mail to:
no___coarts_us.Danasonic.com
You may also contact us directly at:
1=800=332=5368 (Phone) 1-800=237-9080 (Fax Only) (Monday - Friday 9 am to 9 pro, EST.)
Panasonic Service and Technology Company (PSTC)
20421 84th Avenue South,
Kent, WA 98032
(We Accept Visa, MasterCard, Discover Card, American Express, and Personal Checks)
i For hearing or speech impaired TTY users, TTY : 1=866=605=1277 ]
64
PANASONIC CONSUMER ELECTRONICS COMPANY,
DIVISION OF PANASONIC CORPORATION OF NORTH
AMERICA
One Panasonic Way, Secaucus, New Jersey 07094
PANASONIC SALES COMPANY, DIVISION OF PANASONIC
PUERTO RICO, INC.,
AVE. 65 de Infanteria, Km. 9.5 San Gabriel Industrial Park,
Carolina, Puerto Rico 00985
Panasonic LIF! TM HDTV
Limited Warranty
Limited Warranty Coverage
If your product does not work properly because of a defect in materials or workmanship, Panasonic Consumer
Electronics Company or Panasonic Sales Company (collectively referred to as "the warrantor") will, for the length of the
period indicated on the chart below, which starts with the date of original purchase ("warranty period"), at its option either
(a) repair your product with new or refurbished parts, or (b) replace it with a new or a refurbished product. The decision
to repair or replace will be made by the warrantor.
CATEGORY PARTS LABOR SERVICE
LIFI TMHDTV One (1) Year TV 1 Year In-Home or Carry-In
Original LIFI TMlamp unit - 5 years
During the "Labor" warranty period there will be no charge for labor. During the "Parts" warranty period, there will be
no charge for parts. You must carry-in your product or arrange for in-home service during the warranty period. If non-
rechargeable batteries are included, they are not warranted. This warranty only applies to products purchased and
serviced in the United States or Puerto Rico. This warranty is extended only to the original purchaser of a new product
which was not sold "as is". A purchase receipt or other proof of the original purchase date is required for warranty
service.
Carry-in or In-Home Service
For In-Home or Carry-In Service in the United States call 1-888-VIEW-PTV (1-888-843-9788).
For assistance in Puerto Rico call Panasonic Sales Company (787)-750-4300 or fax (787)-768-2910.
In-Home service requires clear, complete and easy access to the product by the authorized servicer and does not
include removal or re-installation of an installed product= It is possible that certain in-home repairs will not be completed
in-home, but will require that the product, or parts of the product, be removed for shop diagnosis and/or repair and then
returned.
Limited Warranty Limits And Exclusions
This warranty ONLY COVERS failures due to defects in materials or workmanship, and DOES NOT COVER normal
wear and tear or cosmetic damage. The warranty also does not cover damages which occurred in shipment, or failures
which are caused by products not supplied by the warrantor, or failures which result from accidents, misuse, abuse,
neglect, bug infestation, mishandling, misapplication, alteration, faulty installation, set-up adjustments, misadjustment
of consumer controls, power line surge, lightning damage, modification, or commercial use (such as in a hotel, office,
restaurant, or other business), rental use of the product, service by anyone other than a Factory Servicenter or other
Authorized Servicer, or damage that is attributable to acts of God.
THERE ARE NO EXPRESS WARRANTIES EXCEPT AS LISTED UNDER "LIMITED WARRANTY COVERAGE".
THE WARRANTOR iS NOT LIABLE FOR iNCiDENTAL OR CONSEQUENTIAL DAMAGES RESULTING FROM
THE USE OF THIS PRODUCT, OR ARISING OUT OF ANY BREACH OF THIS WARRANTY. (As examples, this
excludes damages for lost time, cost of having someone remove or re-install an installed unit if applicable, or travel to
and from the servicer. The items listed are not exclusive, but are for illustration only.) ALL EXPRESS AND iMPLiED
WARRANTIES, INCLUDING THE WARRANTY OF MERCHANTABILITY, ARE LIMITED TO THE PERIOD OF THE
LIMITED WARRANTY.
Some states do not allow the exclusion or limitation of incidental or consequential damages, or limitations on how long
an implied warranty lasts, so the exclusions may not apply to you.
This warranty gives you specific legal rights and you may also have other rights, which vary, from state to state. If a
problem with this product develops during or after the warranty period, you may contact your dealer or Servicenter. If the
problem is not handled to your satisfaction, then write to the warrantor's Consumer Affairs Department at the addresses
listed for the warrantor.
PARTS AND SERVICE (INCLUDING COST OF AN IN-HOME SERVICE CALL, WHERE APPLICABLE) WHICH ARE
NOT COVERED BY THIS LIMITED WARRANTY ARE YOUR RESPONSIBILITY.
65
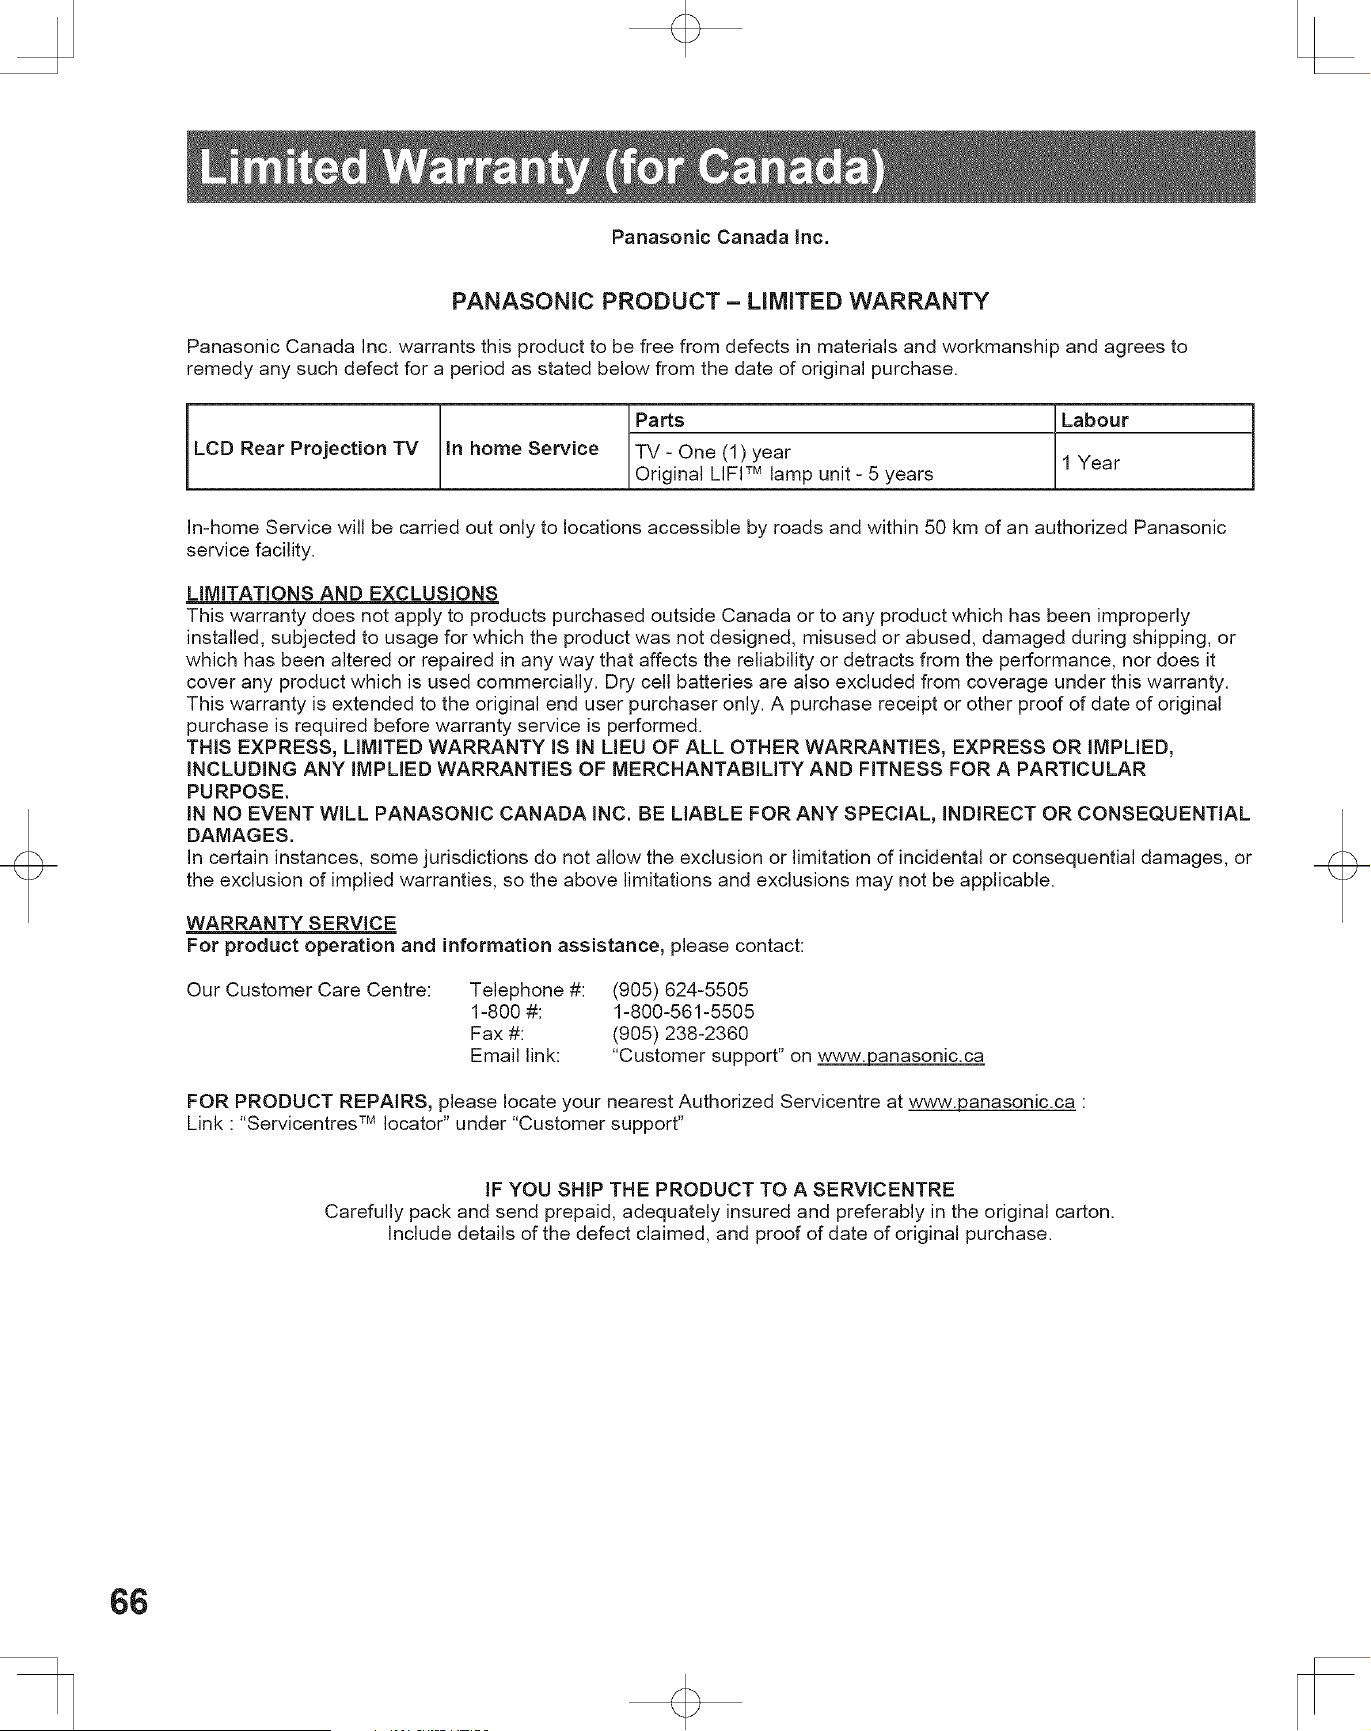
Panasonic Canada inc.
PANASONIC PRODUCT = LiMiTED WARRANTY
Panasonic Canada Inc. warrants this product to be free from defects in materials and workmanship and agrees to
remedy any such defect for a period as stated below from the date of original purchase.
Parts
LOB Rear Projection TV In home Service TV - One (1) year
Original LIFI TMlamp unit - 5 years
Labour
1 Year
In-home Service will be carried out only to locations accessible by roads and within 50 km of an authorized Panasonic
service facility.
LIMITATIONS AND EXCLUSIONS
This warranty does not apply to products purchased outside Canada or to any product which has been improperly
installed, subjected to usage for which the product was not designed, misused or abused, damaged during shipping, or
which has been altered or repaired in any way that affects the reliability or detracts from the performance, nor does it
cover any product which is used commercially. Dry cell batteries are also excluded from coverage under this warranty.
This warranty is extended to the original end user purchaser only. A purchase receipt or other proof of date of original
purchase is required before warranty service is performed.
THIS EXPRESS, LIMITED WARRANTY IS IN LIEU OF ALL OTHER WARRANTIES, EXPRESS OR IMPLIED,
INCLUDING ANY IMPLIED WARRANTIES OF MERCHANTABILITY AND FITNESS FOR A PARTICULAR
PU RPOSE.
IN NO EVENT WILL PANASONIC CANADA INC. BE LIABLE FOR ANY SPECIAL, INDIRECT OR CONSEQUENTIAL
DAMAGES.
In certain instances, some jurisdictions do not allow the exclusion or limitation of incidental or consequential damages, or
the exclusion of implied warranties, so the above limitations and exclusions may not be applicable.
WARRANTY SERVICE
For product operation and information assistance, please contact:
Our Customer Care Centre:
Telephone #:
1-800 #:
Fax #:
Email link:
(905) 624-5505
1-800-561-5505
(905) 238-2360
"Customer support" on www.panasonic.ca
FOR PRODUCT REPAIRS, please locate your nearest Authorized Servicentre at www.panasonic.ca :
Link : "Servicentres TMIocator" under "Customer support"
IF YOU SHIP THE PRODUCT TO A SERVlCENTRE
Carefully pack and send prepaid, adequately insured and preferably in the original carton.
Include details of the defect claimed, and proof of date of original purchase.
66
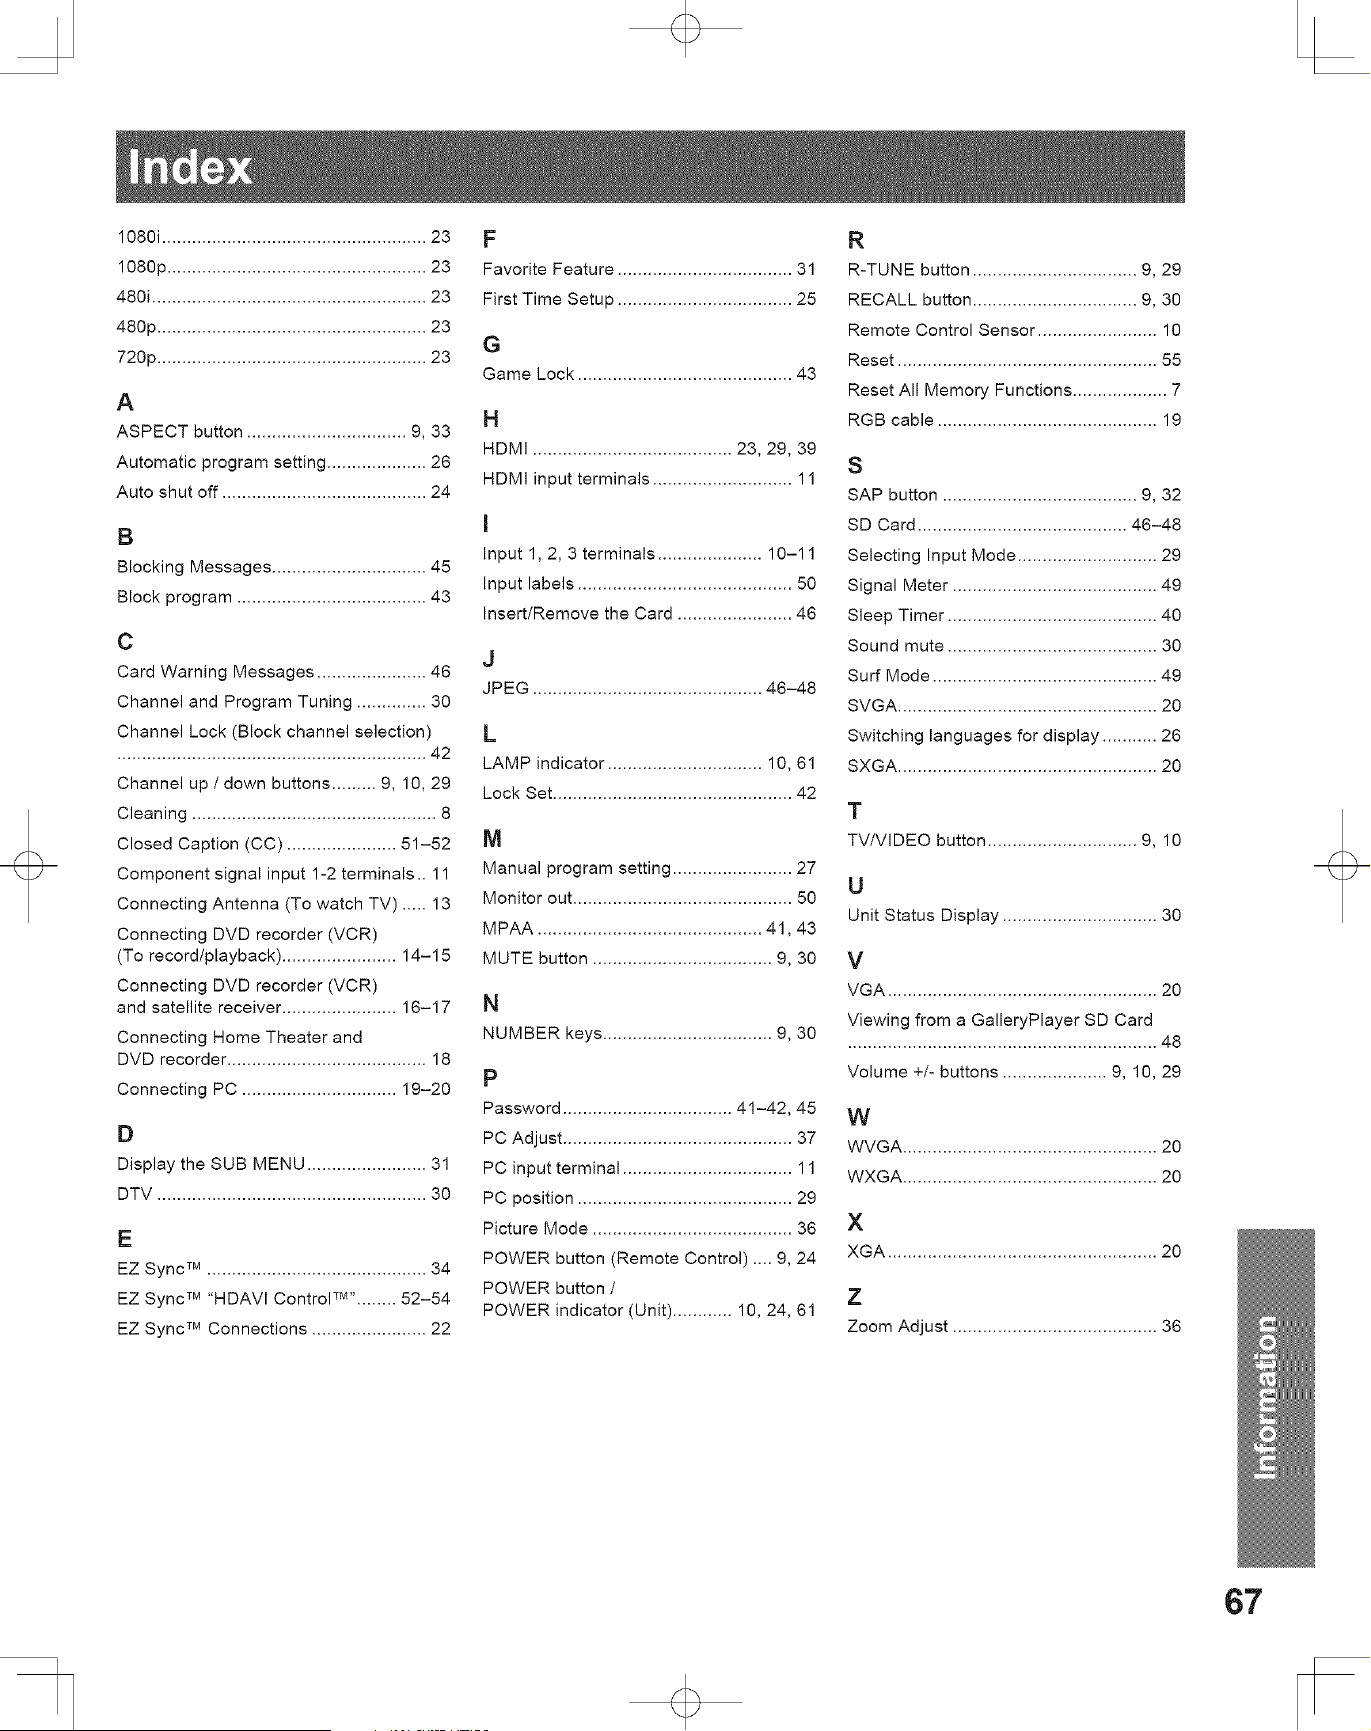
f1080i ..................................................... 23
f1080p .................................................... 23
480i ....................................................... 23
480p ...................................................... 23
720p ...................................................... 23
A
ASPECT button ................................ 9, 33
Automatic program setting .................... 26
Auto shut off ......................................... 24
B
Blocking Messages ............................... 45
Block program ...................................... 43
C
Card Warning Messages ...................... 46
Channel and Program Tuning .............. 30
Channel Lock (Block channel selection)
..............................................................42
Channel up / down buttons ......... 9, 10, 29
Cleaning ................................................. 8
Closed Caption (CC) ...................... 51-52
Component signal input 1-2 terminals .. 11
Connecting Antenna (To watch TV) ..... 13
Connecting DVD recorder (VCR)
(To record/playback) ....................... 14-15
Connecting DVD recorder (VCR)
and satellite receiver ....................... 16-17
Connecting Home Theater and
DVD recorder ........................................ 18
Connecting PC ............................... 19-20
D
Display the SUB MENU ........................ 31
DTV ...................................................... 30
E
EZ Sync TM............................................ 34
EZ Sync TM"HDAVI Control TM''........ 52-54
EZ Sync TM Connections ....................... 22
Favorite Feature ................................... 31
First Time Setup ................................... 25
G
Game Lock ........................................... 43
H
HDMI ........................................ 23, 29, 39
HDMI input terminals ............................ 11
I
Input 1, 2, 3 terminals ..................... 10-11
Input labels ........................................... 50
Insert/Remove the Card ....................... 46
J
JPEG .............................................. 46-48
L
LAMP indicator ............................... 10, 61
Lock Set ................................................ 42
M
Manual program setting ........................ 27
Monitor out ............................................ 50
MPAA ............................................. 41,43
MUTE button .................................... 9, 30
N
NUMBER keys .................................. 9, 30
P
Password .................................. 41-42, 45
PC Adjust .............................................. 37
PC input terminal .................................. 11
PC position ........................................... 29
Picture Mode ........................................ 36
POWER button (Remote Control) .... 9, 24
POWER button /
POWER indicator (Unit) ............ 10, 24, 61
R
R-TUNE button ................................. 9, 29
RECALL button ................................. 9, 30
Remote Control Sensor ........................ 10
Reset .................................................... 55
Reset All Memory Functions ................... 7
RGB cable ............................................ 19
S
SAP button ....................................... 9, 32
SD Card .......................................... 46-48
Selecting Input Mode ............................ 29
Signal Meter ......................................... 49
Sleep Timer .......................................... 40
Sound mute .......................................... 30
Surf Mode ............................................. 49
SVGA .................................................... 20
Switching languages for display ........... 26
SXGA .................................................... 20
T
TV/VIDEO button .............................. 9, 10
U
Unit Status Display ............................... 30
V
VGA ...................................................... 20
Viewing from a GalleryPlayer SD Card
.............................................................. 48
Volume +/- buttons ..................... 9, 10, 29
W
WVGA ................................................... 20
WXGA ................................................... 20
X
XGA ...................................................... 20
Z
Zoom Adjust ......................................... 36
67
Customer's Record
The serial number of this product can be found on its back cover. You should note this serial number in the space
provided below and retain this book, plus your purchase receipt, as a permanent record of your purchase to aid in
identification in the event of theft or loss, and for Warranty Service purposes.
Model Number Serial Number
Panasonic Consumer Electronics Company,
Division of Panasonic Corporation of North America
One Panasonic Way, Secaucus, New Jersey 07094
Panasonic Sales Company ("PSC'), Division of
Panasonic Puerto Rico, Inc.
Ave. 65 de Infanteria, Km. 9.5
San Gabriel Industrial Park, Carolina, Puerto Rico 00985
Panasonic Canada Inc.
5770 Ambler Drive,
Mississauga, Ontario L4W 2T3
(905) 624-5010
www.panasonic.ca
Printed in Indonesia
LSQT1225 B
S0407-1077

