Eeotro nduoton
user manua
_,<_the possibilities
Thank youforpurchasing this Samsung produc_,
Toreceive more complete service, pleaseregister
yourproduc_at
www.samsung.com/global/register
Of VOLAr
J
Enhanced convenience. Better cooking. Easy maintenance. Your new electric range has been designed to
bring you these benefits and more.
The latest in heat-distribution technology
Other ranges with just one fan tend to make a swirl of heat that fails to cover the whole inside of
the oven. This means uneven heat distribution and uneven cooking. Your new range has Surround
Airvection TM, which Samsung innovated by adding a third heating element and a multi-fan system
that circulates the heat evenly in all directions. You get more efficient energy consumption and
more even cooking.
Steam Quick cleaning
Thanks to Steam Quick TM, Samsung's unique technology for light-duty cleaning jobs, keeping
your oven spick-and-span isasnap -- no hassle, no odor, no chemicals. Steam Quick TM cleans
the inside of your range with high-temperature steam in just 20 minutes.
Bigger is better
With a capacity of 5.9 cubic feet, your new range is equipped with more space than any of its
competitors in the U.S. market. This means greater convenience for you when cooking for the
holidays or when entertaining.
®
Induction Cooktop Features
Fast and Efficient - Induction cooking heats faster while using less energy. Induction power
levels are quick to boil and efficient when simmering.
A Cooler Cooktop- Aunique feature of the Induction Cooktop iswhether turned ON or OFF, the
cooktop surface remains cooler than Radiant ceramic style cooktops. Virtually no wasted heat is
produced since the heat begins with the presence of apan.
Easy Clean-ups- The cooler cooktop surface (when compared to a Radiant cooktop) makes
clean-ups easier. Spills resist sticking or burning so they wipe up easier.
Magnetic Detector - The coil sensor automatically detects whether the pan ismagnetic and
eliminates any accidental "turn-ONs" ; such as setting down cooking utensils like spatulas or
spoons.
Pan Size Detection - The pan size recognition sensor automatically detects and adapts the
Cooking Zones to the pan sizes in use for consistent, more even cooking.
More Responsive - Induction cooktops are more responsive than their electric or gas
counterparts because only the pan heats. This type of cooking heats easier and will be just as
responsive when reducing to a simmer.
CAUTION -The Cooking Zones may appear to be cool while turned ON and after they have been
turned OFR The ceramic glass surface may be HOT from residual heat transfered from the
cookware and burns may occur.
2 Features of your new range
Read and follow all instructions before using your oven to prevent the
risk of fire, electric shock, personal injury, or damage when using the
range. This guide does not cover all possible conditions that may occur. Always
contact your service agent or manufacturer about problems that you do not
understand,
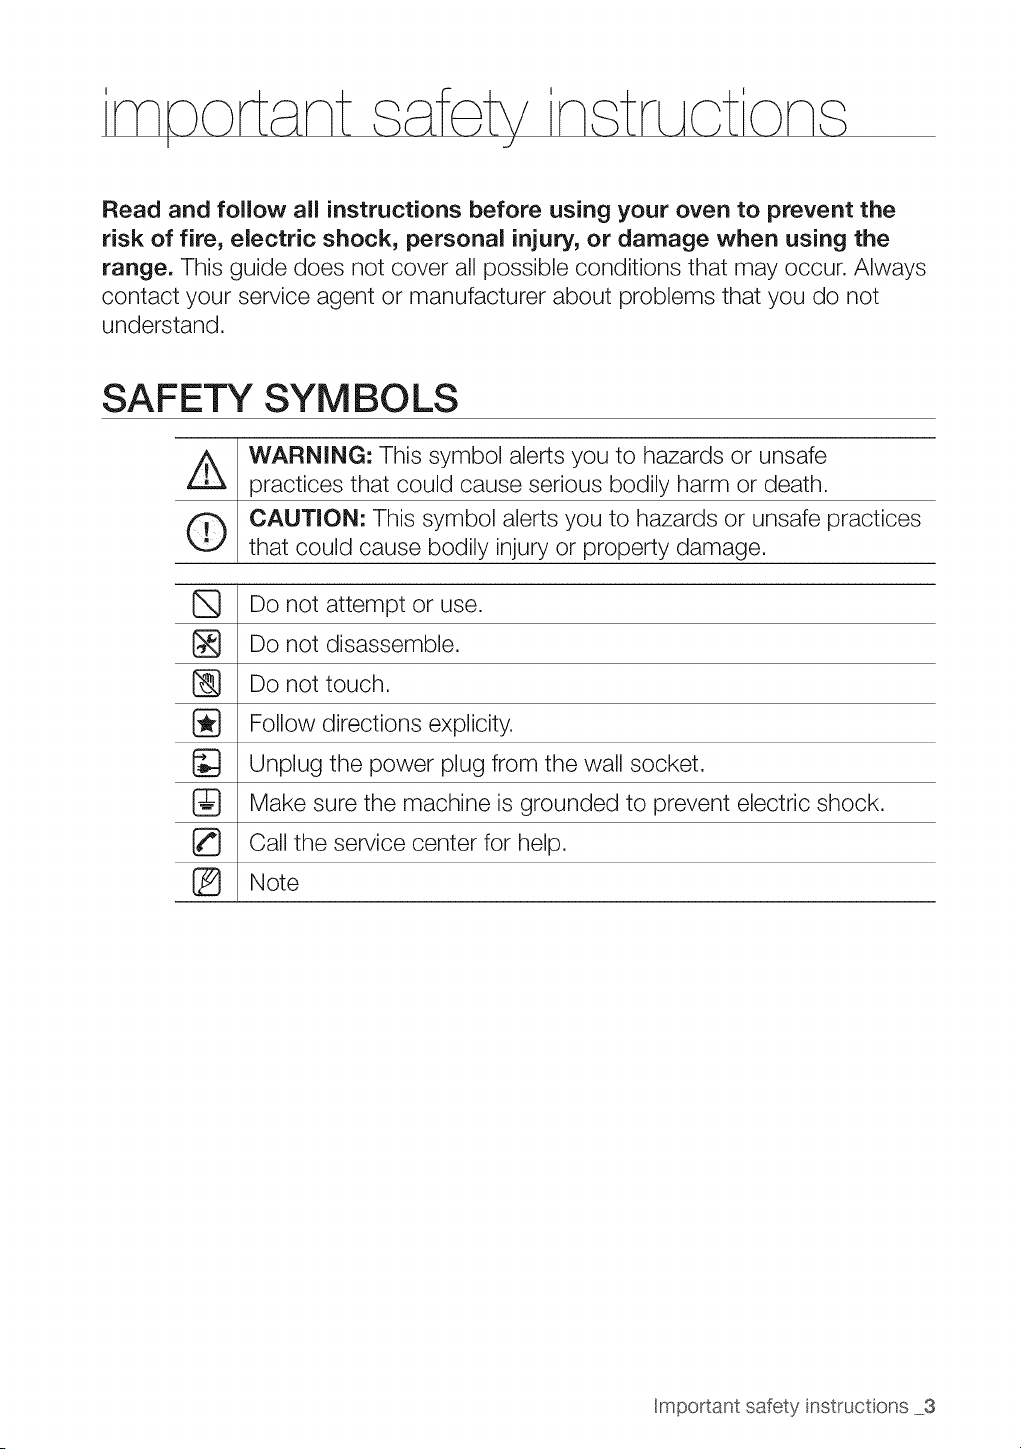
SAFETY SYMBOLS
WARNING: This symbol alerts you to hazards or unsafe
practices that could cause serious bodily harm or death,
CAUTION: This symbol alerts you to hazards or unsafe practices
that could cause bodily injury or property damage.
[_ Do not attempt or use.
Do not disassemble.
Do not touch,
Follow directions explicity,
[_ Unplug the power plug from the wall socket,
Make sure the machine is grounded to prevent electric shock,
Call the service center for help,
[_ Note
Hmportant safety instructions 3
ANTI-TIP DEVICE
[_ WARNING=To reduce the risk of tipping the range, the range must be
secured by a properly installed Anti-Tip device. TO CHECK IF THE
DEVICES ARE INSTALLED PROPERLY, REMOVE (necessary
part or parts:} AND VERIFY THAT THE ANTI=TIP DEVICES ARE
ENGAGED. Refer to the installation manual for instructions.
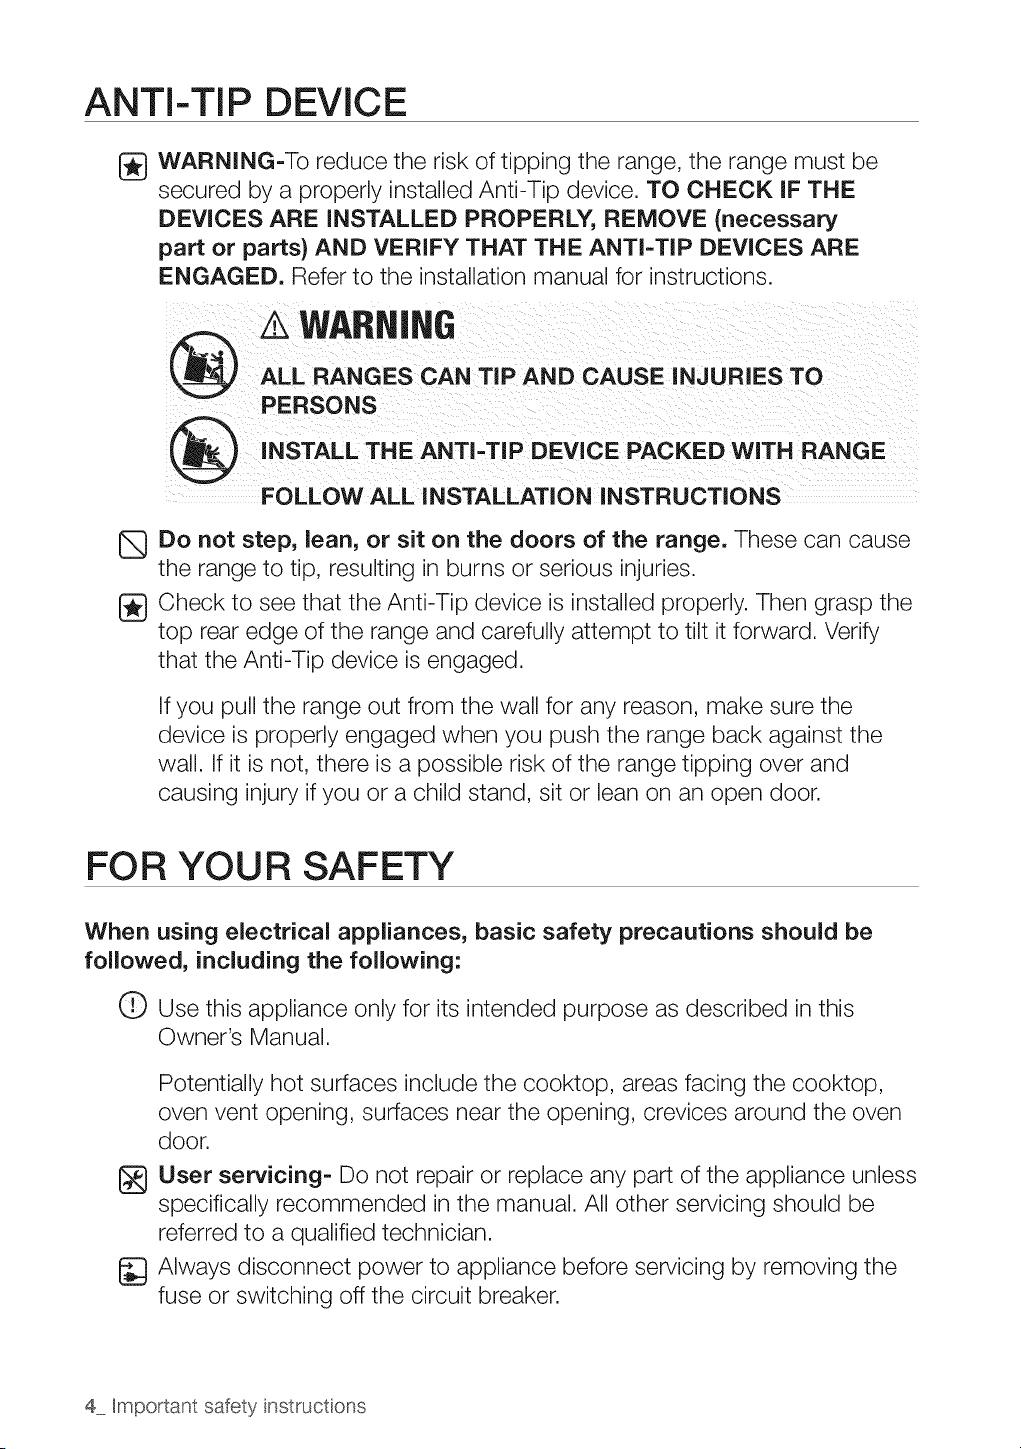
WARNING
ALL RANGES CAN TIP AND CAUSE INJURIES TO
PERSONS
INSTALL THE ANTI-TIP DEVICE PACKED WITH RANGE
FOLLOW ALL INSTALLATION INSTRUCTIONS
Do not step, lean, or sit on the doors of the range. These can cause
the range to tip, resulting in burns or serious injuries.
Check to see that the Anti-Tip device isinstalled properly. Then grasp the
top rear edge of the range and carefully attempt to tilt itforward. Verify
that the Anti-Tip device is engaged.
If you pull the range out from the wall for any reason, make sure the
device isproperly engaged when you push the range back against the
wall. If itisnot, there isa possible risk of the range tipping over and
causing injuryif you or a child stand, sit or lean on an open door.
FOR YOUR SAFETY
When using electrical appliances, basic safety precautions should be
followed, including the following:
0 Use this appliance only for its intended purpose as described in this
Owner's Manual.
Potentially hot surfaces include the cooktop, areas facing the cooktop,
oven vent opening, surfaces near the opening, crevices around the oven
door.
[_ User servicing= Do not repair or replace any part of the appliance unless
specifically recommended in the manual. All other servicing should be
referred to a qualified technician.
_} Always disconnect power to appliance before servicing by removing the
fuse or switching off the circuit breaker.
4 Hmpo_'tantsafety instructions
Do not enter inside the oven.
CAUTION = Do not store items of interest to children in cabinets above a
range or on the back guard of a range. Children climbing on the range to
reach items could be seriously injured.
Do not leave children alone. Children should not be left alone or
unattended in an area where appliance is in use. They should never be
allowed to sit or stand on any part of the appliance.
Never use your appliance for warming or heating the room.
Do not use water on grease fires. Turn off the oven to avoid spreading
the flame. Smother the fire or flame by closing the door or use dry
chemical, baking soda, or a foam-type extinguisher.
[_ Storage in or on appliance. Flammable materials should not be
stored inan oven or near surface units. Be sure all packing materials are
removed from the appliance before operating it. Keep plastics, clothes,
and paper away from parts of the appliance that may become hot.
Wear proper apparel. Loose-fitting or hanging garments should never
be worn while using the appliance.
Use only dry potholders. Moist or damp potholders on hot surfaces
may result inburns from steam. Do not let the potholder touch hot
heating elements. Do not use a towel or other bulky cloth.
Teach children not to play with the controls or any other part of the range.
For your safety, do not use high-pressure water cleaners or steam jet
cleaners.
If the supply cord isdamaged, it must be replaced by the manufacturer,
its service agent or similarly qualified persons in order to avoid a hazard.
The appliance is not intended for use by persons (including children) with
reduced physical, sensory or mental capabilities, or lack of experience
and knowledge, unless they have been given supervision or instruction
concerning use of the appliance by a person responsible for their safety.
Read and follow all instructions and warnings on the cleaning cream
labels.
Hmportant safety instructions 5
INDUCTION COOKTOP ELEMENTS
®
Be sure you know which touch control operates each surface
heating unit. Place a pan of food on the unit before turning iton, and
turn the unit off before removing the pan.
Use Proper Pan Size-This appliance is equipped with one or more
surface units of different sizes. Select utensils having flat bottoms large
enough to cover the surface unit heating element. The use of undersized
utensils will expose a portion of the heating element to direct contact and
may result in ignition of clothing. Proper relationship of utensil to element
will also improve efficiency.
Utensil Handles Should Be Turned inward and Not Extend Over
Adjacent Surface Elements-To reduce the risk of burns, ignition of
flammable materials, and spillage due to unintentional contact with the
utensil, the handle of the utensil should be positioned so that it is turned
inward, and does not extend over adjacent surface units.
Never Leave Surface Elements Unattended at High Heat Settings
- Boilovers cause smoking and greasy spillovers that may ignite, or a pan
that has boiled dry may melt.
Metallic objects such as knives, forks, spoons and lids should not be
placed on the Induction Cooktop surface since they can get hot.
When preparing flaming foods under a ventilating hood, turn the
fan on.
Use care when touching the cooktop. The glass surface of the
cooktop will retain heat after the controls have been turned off.
Always turn the surface units off before removing cookware.
Keep an eye on foods being fried at high or medium high heat settings.
Be careful when placing spoons or other stirring utensils on the glass
cooktop surface when itisin use. They may become hot and could
cause burns.
[_ Do not lift the cooktop. Lifting the cooktop can lead to damage and
improper operation of the range.
Never use the glass cooktop surface as a cutting board.
Do not operate the cooktop when there is no cookware.
6 Hmportant safety instructions
ELECTRICAL SAFETY
[_ Proper Installation- Be sure your appliance is properly installed and
grounded by a qualified technician.
A
The appliance should be serviced only by qualified service personnel.
Repairs carried out by unqualified individuals may cause injury or serious
malfunction. Ifyour appliance is in need of repair, contact a Samsung
authorized service center. Failure to follow these instructions may result in
damage and void the warranty.
Flush - mounted appliances may be operated only after they have
been installed in cabinets and workplaces that conform to the relevant
standards. This ensures sufficient protection against contact for electrical
units as required by the essential safety standards.
ifyour appliance malfunctions or iffractures, cracks or splits appear:
switch off all cooking zones;
disconnect the Induction Cooktop from the mains supply; and
contact your local service centre.
The oven must be switched off before removing the guard and that, after
cleaning, the guard must be replaced in accordance with the instructions
If the surface is cracked, switch off the appliance to avoid the possibility
of electrical shock.Do not use your induction Cooktop until the glass
surface has been replaced.
WARNING- Ensure that the appliance is switched off before replacing the
lamp to avoid the possibility of electric shock.
Important safety instructions 7
CHILD SAFETY
Z_ This appliance is not intended for use by young children or infirm persons
without the adequate supervision of a responsible adult.
Young children should be supervised to ensure that they do not play with
the appliance.
The cooking zones will become hot when you cook. Always keep small
children away from the appliance.
During cleaning, the surfaces may get hotter than usual and children
should be kept away.
WARNING- Accessible parts may become hot during use. To avoid
burns, young children should be kept away.
OVEN
[] DO NOT TOUCH HEATING ELEMENTS OR INTERIOR SURFACES
OF THE OVEN. Heating elements may be hot even though they are dark
in color. Interior surfaces of an oven become hot enough to cause burns.
During and after use, do not touch or let clothing or other flammable
materials contact heating elements or interior surfaces of oven until
they have had sufficient time to cool. Other surfaces of the appliance
may become hot enough to cause burns. Among these surfaces are
oven vent openings and surfaces near these openings, oven doors, and
windows of oven doors.
Do not heat unopened food containers. Build-up of pressure may
cause the container to burst and result in injury.
Do not use the oven to dry newspapers. If overheated, they can
catch on fire.
Do not use the oven for a storage area. Items stored in an oven can
ignite.
Do not use harsh abrasive cleaners or sharp metal scrapers to clean the
oven door glass since they can scratch the surface, which may result in
shattering of the glass
8 Impo_'tant safety instructions
[_ Use care when opening door. Let hot air or steam escape before you
remove or replace food inthe oven.
Protective liners. Do not use aluminum foil to line the oven bottoms,
except as suggested in the manual. Improper installation of these liners
may result ina risk of electric shock or fire.
Keep over= vent ducts unobstructed. The oven vent is located above
the right rear surface unit. this area could become hot during oven use.
Never block this vent or place plastic or heat-sensitive items on it.
Placement of oven racks. Always place oven racks in the desired
location while the oven iscool. If the rack must be moved while the oven
ishot, do not let the potholder come in contact with the hot heating
element in the oven.
During use the appliance becomes hot. Care should be taken to
avoid touching heating elements inside the oven.
Do not allow aluminum foil or a meat probe to contact heating elements.
WARMING DRAWER
DO NOT TOUCH THE HEATING ELEMENT OR THE INTERIOR
SURFACE OF THE DRAWER. These surfaces may be hot enough to
burn.
REMEMBER: The inside surface of the drawer may be hot when the
drawer is opened.
The purpose of the warming drawer is to hold hot cooked foods at
serving temperature. Always start with hot food; cold food cannot be
heated or cooked in the warming drawer.
Use care when opening the drawer. Open the drawer a crack and
let hot air or steam escape before removing or replacing food. Hot air or
steam which escapes can cause burns to hands, face and/or eyes.
Hmportant safety instructions 9
Do not use the drawer to dry newspapers. If overheated, they can
catch on fire.
Do not use aluminum foil to line the drawer. Foil is an excellent heat
insulator and will trap heat beneath it. This will upset the performance of
the drawer and itcould damage the interior finish.
Do not leave paper products, plastics, canned food or combustible
materials in the drawer.
Never leave jars or cans of fat drippings in or near your drawer.
Do not warm food in the drawer for more than three hours.
SELF-CLEANING OVENS
[_ Do not clean the door gasket. The door gasket isessential for a good
seal. Care should be taken not to rub, damage, or move the gasket.
[_ Never keep pet birds in the kitchen. The health of birds isextremely
sensitive to the fumes released during an oven self-clean cycle. Fumes
may be harmful or fatal to birds. Move birds to a well-ventilated room.
Clean only parts listed in this manual in the self=clean cycle. Before
self-cleaning the oven, remove the broil pan, rack, utensils, and food.
No commercial oven cleaner or oven liner protective coating of any kind
should be used in or on the outside of the oven. Use only a ceramic
cooktop cleaner or the cleaner supplied with this appliance on the glass
cooktop.
Nickel oven shelves should be removed from the oven before beginning
the self-cleaning cycle, or they may discolor.
Ifthe self-clean mode malfunctions, turn the oven off and disconnect the
power supply. Have it serviced by a qualified technician.
Excess spillage and all utensils should be removed before performing self
cleaning.
10 Hmportant safety instructions
VENTILATING HOOD
(_ Clean ventilating hoods frequently. Grease should not be allowed to
accumulate on the hood or filter.
When flaming foods under the hood, turn the fan on.
GLASS/CERAMIC COOKING SURFACES
DO NOT TOUCH SURFACE UNITS OR AREAS NEAR UNITS.
Surface units may be hot even though they are dark in color. Areas near
surface units may become hot enough to cause burns. During and after
use, do not touch, or let clothing or other flammable materials contact
surface units or areas near units until they have had sufficient time to
cool. Among these areas are the cook-top and facing the cook-top.
Do not cook on broken cooktop. If cooktop should break, cleaning
solutions and spillovers may penetrate the broken cook-top and create a
risk of electric shock. Contact a qualified technician immediately.
Clean cooktop with caution. If a wet sponge or cloth isused to wipe
spills on a hot cooking area, be careful to avoid steam burn. Some
cleaners can produce noxious fumes if applied to a hot surface.
BEFORE YOU BEGIN
[_ Clean the oven thoroughly before using for the first time. Remove
accessories and operate the oven at the bake setting at 400°F for 1 hour
before using. There will be a distinctive odor; this isnormal, but ensure
your kitchen is well ventilated during this conditioning period.
Hmportant safety instructions 11
ontent
INTRODUCING YOUR NEW RANGE
13 Overview
13 What's included with your range
t
INDUCTION COOKING
USING THE WARMING DRAWER
i;
9/
OPERATING THE OVEN
MAINTAINING YOUR APPLIANCE
./
TROUBLESHOOTING
14 About induction cooktop cooking
16 Location of the Induction Cooktop elements and
controls
16 Cookware for induction cooking zones
17 USE THE CORRECT SIZE COOKWARE
17 Before Using the Cooktop
19 Induction touch control
19 Using the touch control sensors
20 How to set the appliance for induction cooktop
cooking
20 Switching the appliance on
20 Select cooking zone and heat seting
21 Power boost control
21 Simmer Control
21 Switching the appliance off
22 Switching acooking zone off
22 Using the child safety lock
28 Turning the warming drawer on or off
29 The oven control panel
30 Setting the clock
31 Minimum and maximum settings
31 Setting the kitchen timer
32 Using the oven racks
33 Baking
34 Convection baking
36 Convection roasting
38 Timed cooking
39 Delay timed cooking
40 Broiling
42 Using the custom cook feature
43 Proofing
44 Using the keep warm function
45 Extra features
47 Turning the oven light on and off
49 Self-cleaning
51 Steam-cleaning
52 Care and cleaning of the oven
54 Care and cleaning of the glass cooktop
56 Removing and replacing the oven door
57 Removing and replacing the warming drawer
58 Changing the oven light
59 Troubleshooting
12 Contents
WARRANTY
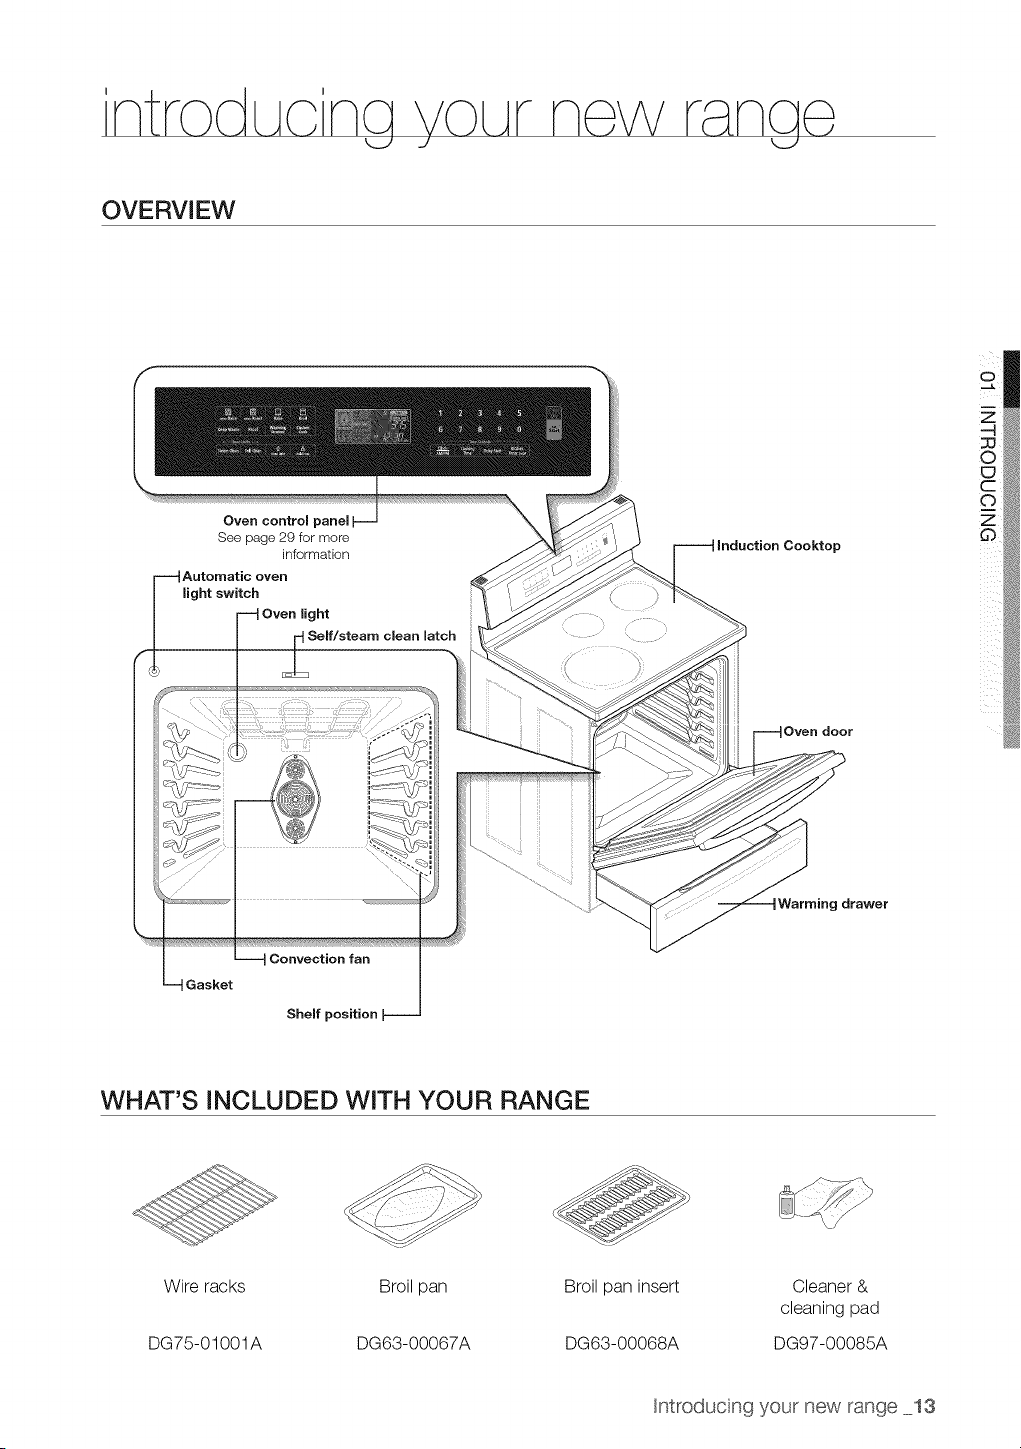
OVERVl EW
Oven controm
See page 29 for more
information
Automatic even
light switch
light
Self/steam clean latch
• !:!i
Induction Ceektep
Oven door
o
0
g drawer
Gasket
Convection fan
Shelf position
}i
WHAT'S INCLUDED WITH YOUR RANGE
Wire racks
DG75-01001A
Broil pan
DG63-00067A
Broil pan insert
DG63-00068A
Cleaner &
cleaning pad
DG97-00085A
Hntroducing your new range 13
ABOUT INDUCTION COOKTOP COOKING
O
CAUTION
®
tAUT[ON
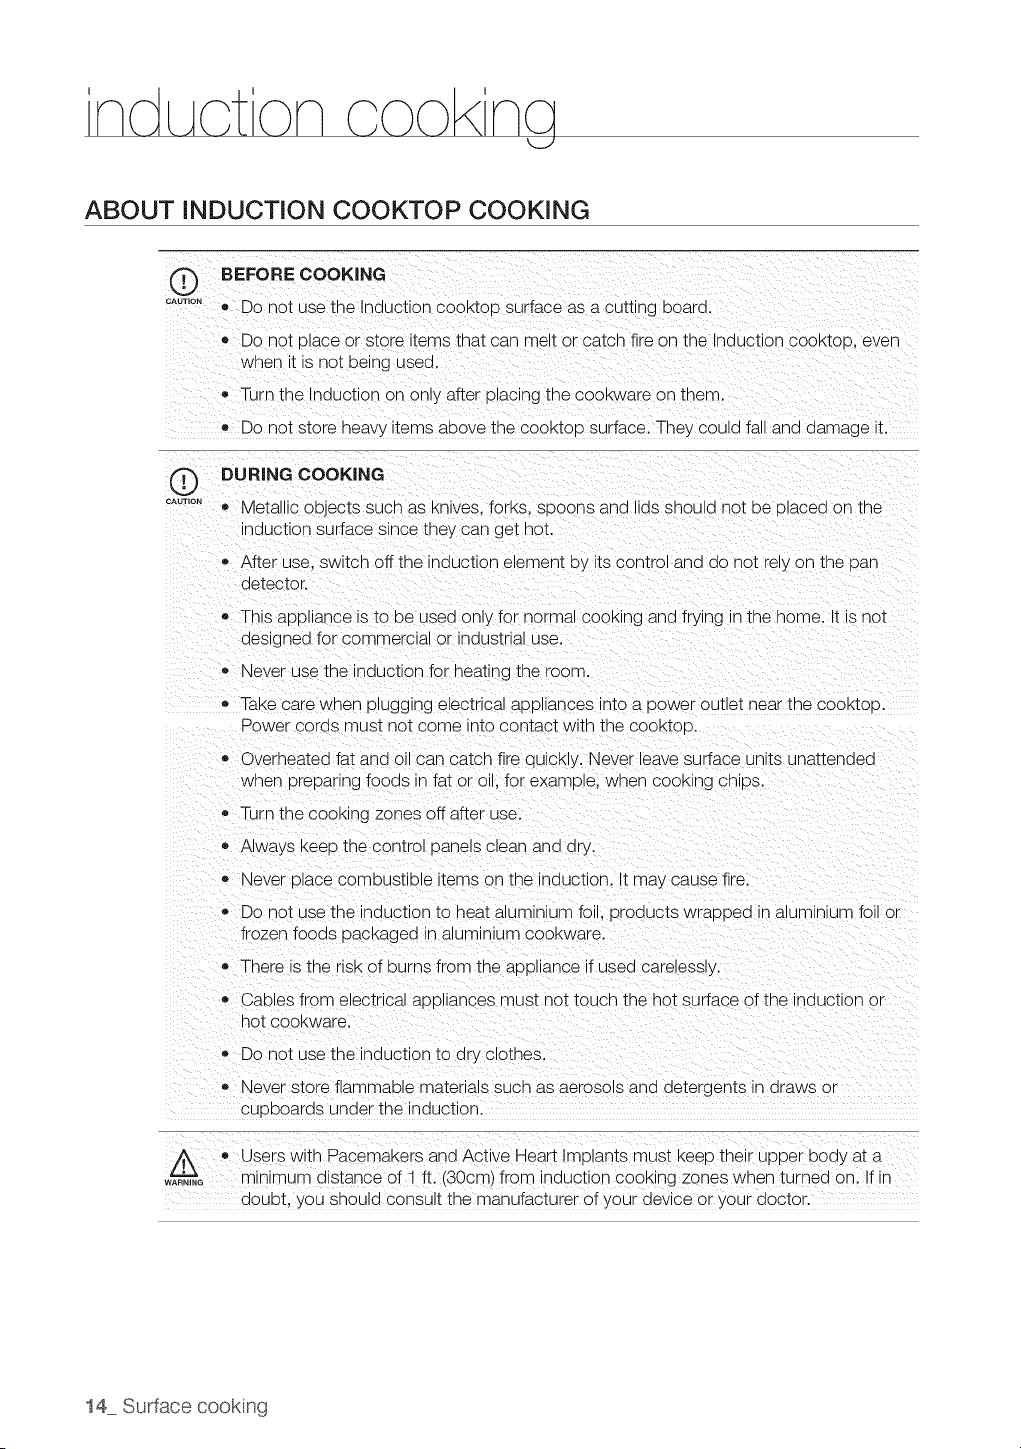
BEFORE COOKING
o Do not use the Induction cooktoD surface as a cutting board.
o Do not place or store items that can melt or catch fire on tne nduction cooktoD, even
wner _t s not being usea.
Turn the Induction on only after p acing the cookware on them
Do not store heav_ terns above the cooktoo surface. They could fall and damage it.
DURING COOKING
Metallic o__ectssuch as Knwes, forks, spoons ana llas snould not be placed on the
nduct_onsurface since tney can get hot.
After use. switch off the induction element by its control and do not relyon the Dan
detector.
This aDD ance isto oe usea only for normal COOKingandfrying ntne home. It is not
aes gned for commercial or naustrlal use.
Never use the induction for heating the room
Takecare when plugging electrlca appliances into a Dower outlet near the cooKtco.
Power coras must not come nto contact wth the cooktoD.
Overheated fat and Oll can catch fire quickly. Never leave surface units unattenaea
wner preparing foods in fat or o. for example, wnen COOKingcnlDs.
- Turn the COOKingzones off after use.
Always KeeDthe contro_ oanels clean ana dry.
Never place combustib e items on the nduction. It may cause fire,
Do not use the induction to heat albmlnlum fo. Products wrapped iP aumlnlum fo or
frozen foods pacKagea in alumlnlum COOKware.
There is the risk of burns from the appliance if used carelessly,
* Cables from electrical appliances must not touch the hot surface ofthe inauctlon or
hot COOKware.
Do not use the induction to dry clothes.
Never store flammable materials sucn asaerosols and detergents in draws or
cb oboards under the induction.
Z_ e Users with Pacemakers andActive Heart Implants must keep tnelr upper D)ay at a
....... minimum distance of 1 fl (30crr, from induction COOKInJzones when tu'ned on. If in
doubt, jou should consult the manufacturer of your aewce or your doctor.
14 Surface cookng
AFTER COOKING
CAUTION
- Do not touch the Induction e_ements untilthey nave coo ea aown
• The surface ma.' De still be hot ana bums may occur ifthe glass surface istouched
before t has COOledaown sufficientl%
• Immediately aean SDIIIson the cooK_ng areato prevent a tougn aean_ng cnore later.
e If cabinet storage is provlaea alrectly above the cooking surface, maKesure that the
terns are infrequently used and can De safely stored _nan area subjected to heat.
Ternoeratures may be unsafe for items such as volatile lioulas, aeaners or aeroso
sprays,
Surface cookng 15
LOCATION OF THE INDUCTION COOKTOP ELEMENTS AND
CONTROLS
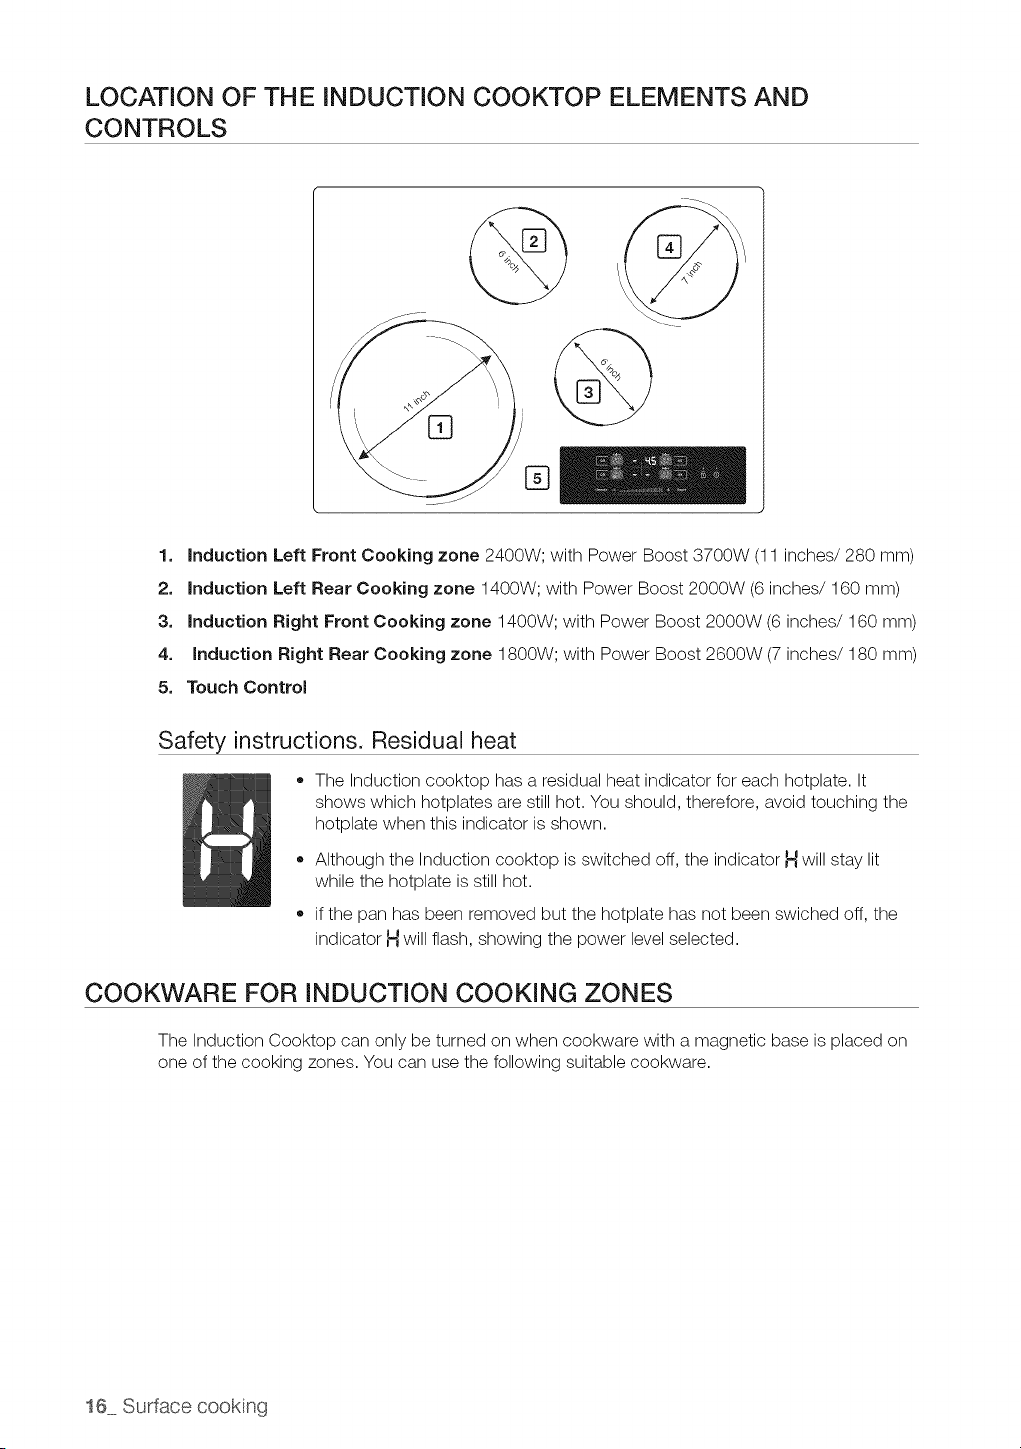
1. Induction Left Front Cooking zone 2400W; with Power Boost 3700W (11 inches/280 mm)
2, Induction Left Rear Cooking zone 1400W; with Power Boost 2000W (6inches/160 mm)
3, Induction Right Front Cooking zone 1400W; with Power Boost 2000W (6 inches/160 mm)
4, Induction Right Rear Cooking zone 1800W; with Power Boost 2600W (7 inches/180 mm)
5. Touch Control
Safety instructions. Residual heat
The Induction cooktop has a residual heat indicator for each hotplate. It
shows which hotplates are still hot. You should, therefore, avoid touching the
hotplate when this indicator is shown.
Although the Induction cooktop isswitched off, the indicator Hwill stay lit
while the hotplate isstill hot.
if the pan has been removed but the hotplate has not been swiched off, the
indicator Hwill flash, showing the power levelselected.
COOKWARE FOR INDUCTION COOKING ZONES
The Induction Cooktop can only be turned on when cookware with a magnetic base isplaced on
one of the cooking zones. You can use the following suitable cookware.
16 Su_ace cooking
USE THE CORRECT SIZE COOKWARE
• The 4 Cooking Zones available on the Induction Cooktop require a minimum pan size to
be used at each location. The inner ring of each Cooking Zone isyour guide to the correct
minimum pan size. The pan bottom must fully cover the inner ring for proper cooking to occur.
The thicker outer ring at each Cooking Zone is helpful to determine the maximum pan size.
After centering the cookware of the cooktop, make sure the cookware does not extend more
than 1/2" beyond the thicker line on the Cooking Zone. The pan must fully contact the glass
surface without the bottom of the pan touching the metal cooktop trims.
If a pan made of the correct material iscentered properly on any of the active Cooking
Zones but istoo small, the affected Cooking Zone display will flash and the pan will not
heat.
BEFORE USING THE COOKTOP
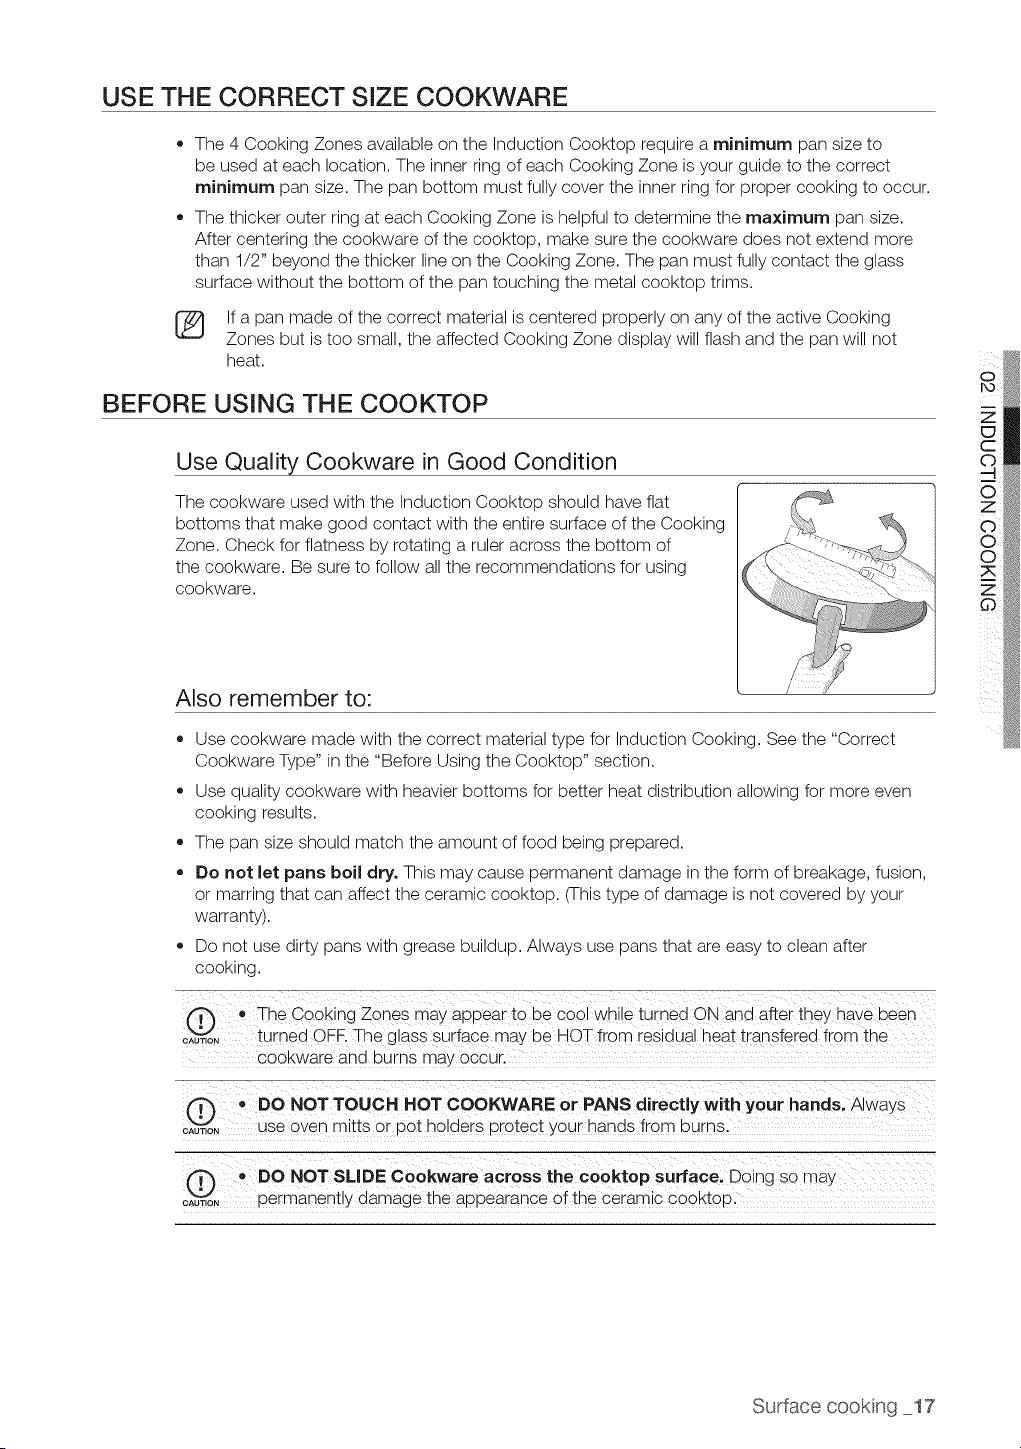
Use Quality Cookware in Good Condition
The cookware used with the Induction Cooktop should have flat
bottoms that make good contact with the entire surface of the Cooking
Zone. Check for flatness by rotating aruler across the bottom of
the cookware. Be sure to follow all the recommendations for using
cookware.
Also remember to:
Use cookware made with the correct material type for Induction Cooking. See the "Correct
Cookware Type" in the "Before Using the Cooktop" section.
Use quality cookware with heavier bottoms for better heat distribution allowing for more even
cooking results.
The pan size should match the amount offood being prepared.
,, Do not let pans boil dry. This may cause permanent damage in the form of breakage, fusion,
or marring that can affect the ceramic cooktop. (Thistype of damage isnot covered by your
warranty).
Do not use dirty pans with grease buildup. Always use pans that are easy to clean after
cooking.
O • The Cooking Zones may appear to be cool while turned ON and after they have oeen
o_:..... turned OFF. The g ass surface may be HOT from residual heat transfered from the
COOKwareand iourns ma_occur.
O • DO NOT TOUCH HOT COOKWARE or PANS directty with your hands. Always
oAuT,o, use oven qq_ttsor ,Dotholders protect _our hands from burns.
O ® DO NOT SLIDE Cookware across the cooktop surface. Doing so may
o_:..... permanently damage the appearance ofthe ceramic cooktop.
Surface cookng 17
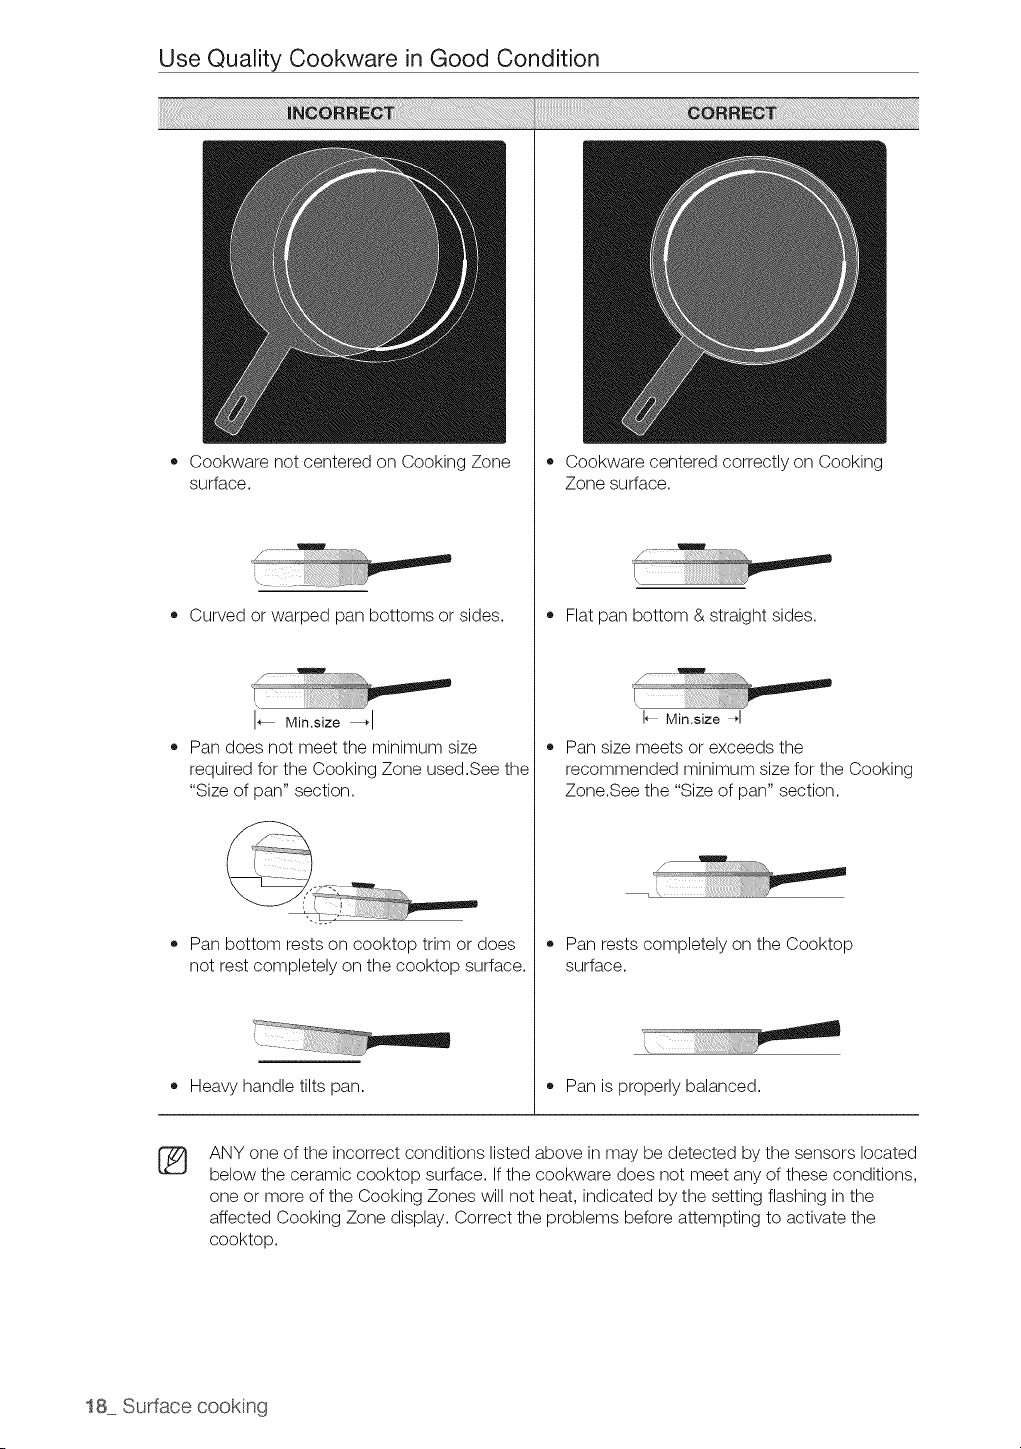
Use Quality Cookware in Good Condition
,, Cookware not centered on Cooking Zone
surface.
• Curved or warped pan bottoms or sides.
I_ Min.size 41
• Pan does not meet the minimum size
required for the Cooking Zone used.See the
"Size of pan" section.
• Pan bottom rests on cooktop trim or does
not rest completely on the cooktop surface.
• Heavy handle tilts pan.
,, Cookware centered correctly on Cooking
Zone surface.
Flat pan bottom & straight sides.
I_ Min.size _1
Pan size meets or exceeds the
recommended minimum size for the Cooking
Zone.See the "Size of pan" section.
!
f
Pan rests completely on the Cooktop
surface.
Pan is properly balanced.
®
ANY one of the incorrect conditions listed above in may be detected by the sensors located
below the ceramic cooktop surface. If the cookware does not meet any of these conditions,
one or more of the Cooking Zones will not heat, indicated by the setting flashing in the
affected Cooking Zone display. Correct the problems before attempting to activate the
cooktop.
18 Surface cookng
INDUCTION TOUCH CONTROL
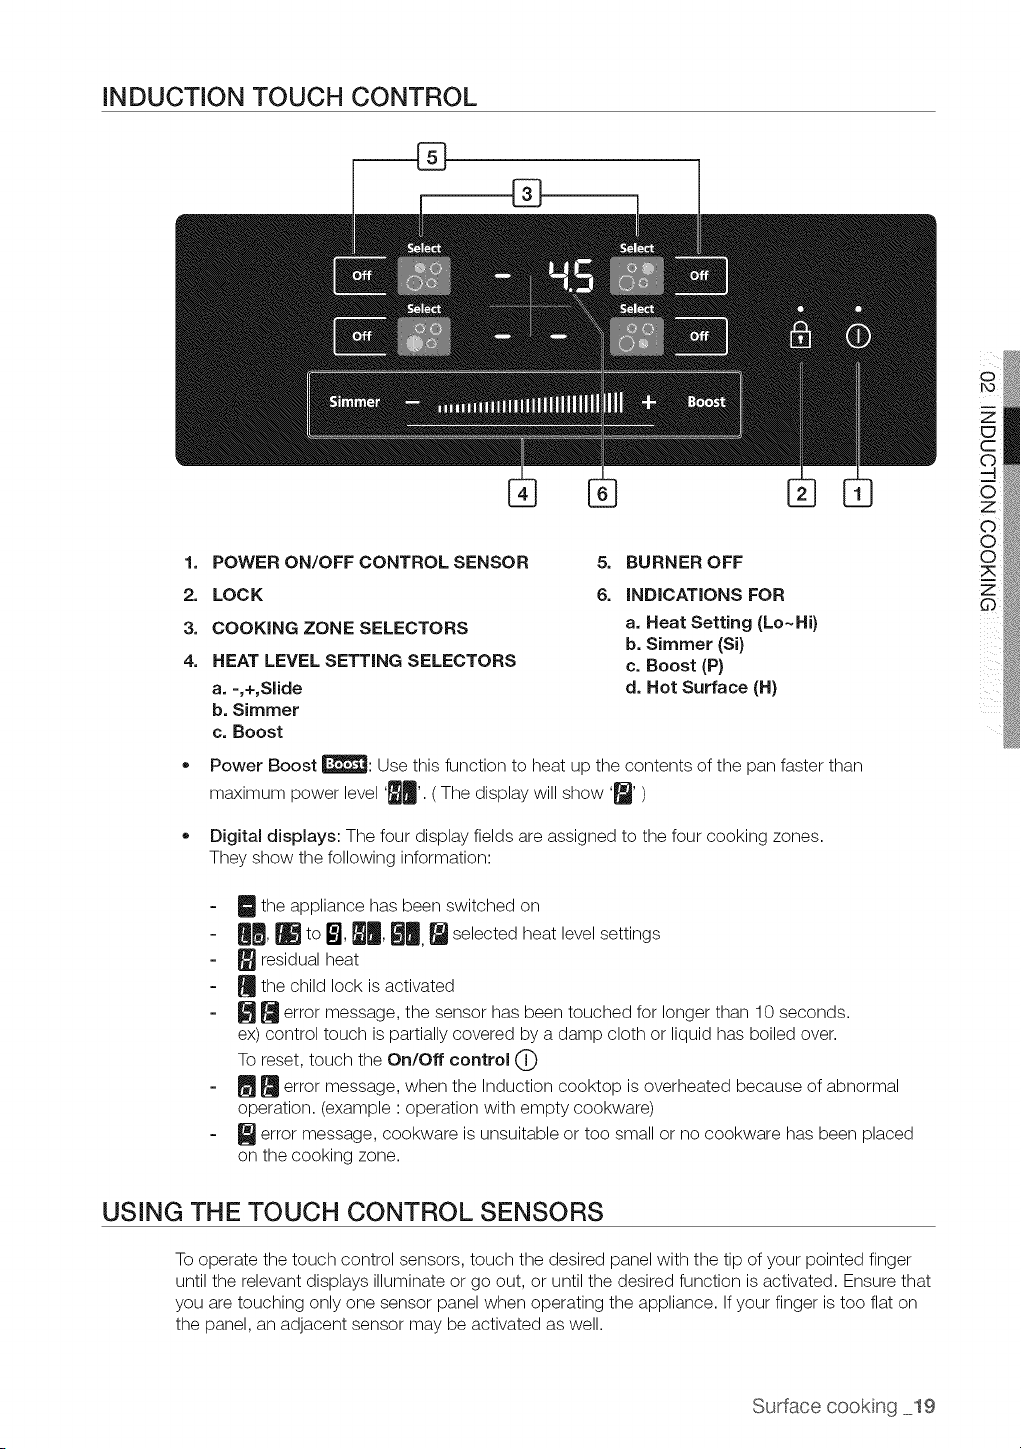
1. POWER ON/OFF CONTROL SENSOR
2. LOCK
3. COOKING ZONE SELECTORS
4. HEAT LEVEL SETTING SELECTORS
a. -,+,Slide
b. Simmer
c. Boost
5. BURNER OFF
6= iNDiCATiONS FOR
a. Heat Setting (Lo~Hi)
b. Simmer (Si)
c. Boost (P)
d. Hot Surface (H}
Power Boost _: Use this function to heat up the contents of the pan faster than
maximum power level '_'. (The display will show '[]')
Digital displays: The four display fields are assigned to the four cooking zones.
They show the following information:
- D the appliance has been switched on
- U_, _ toI_i,_, _, [] selected heat level settings
- [] residual heat
- [] the child lock isactivated
- _ [] error message, the sensor has been touched for longer than 10 seconds.
ex) control touch ispartially covered by a damp cloth or liquid has boiled over.
To reset, touch the On/Off control C)
- _ [] error message, when the Induction cooktop is overheated because of abnormal
operation. (example : operation with empty cookware)
- _ error message, cookware is unsuitable or too small or no cookware has been placed
on the cooking zone.
USING THE TOUCH CONTROL SENSORS
To operate the touch control sensors, touch the desired panel with the tip of your pointed finger
until the relevant displays illuminate or go out, or until the desired function isactivated. Ensure that
you are touching only one sensor panel when operating the appliance. If your finger is too flat on
the panel, an adjacent sensor may be activated as well.
5
Z
©
0
0
Surface cookng 19
HOW TO SET THE APPLIANCE FOR INDUCTION COOKTOP
COOKING
O _ The induction cooktop elements may beh0t and burns may 0ccur_D0 n0t t0uch th e
..... , surface elements until they have cooled down sufficiently.
e At high or over the 6 level never leave food unattended! Boilevers cause smoking and
gieasy spi Io_ers may catch on fiiei
t Be sure you turn the Touch control to OFF when you finish cooking,
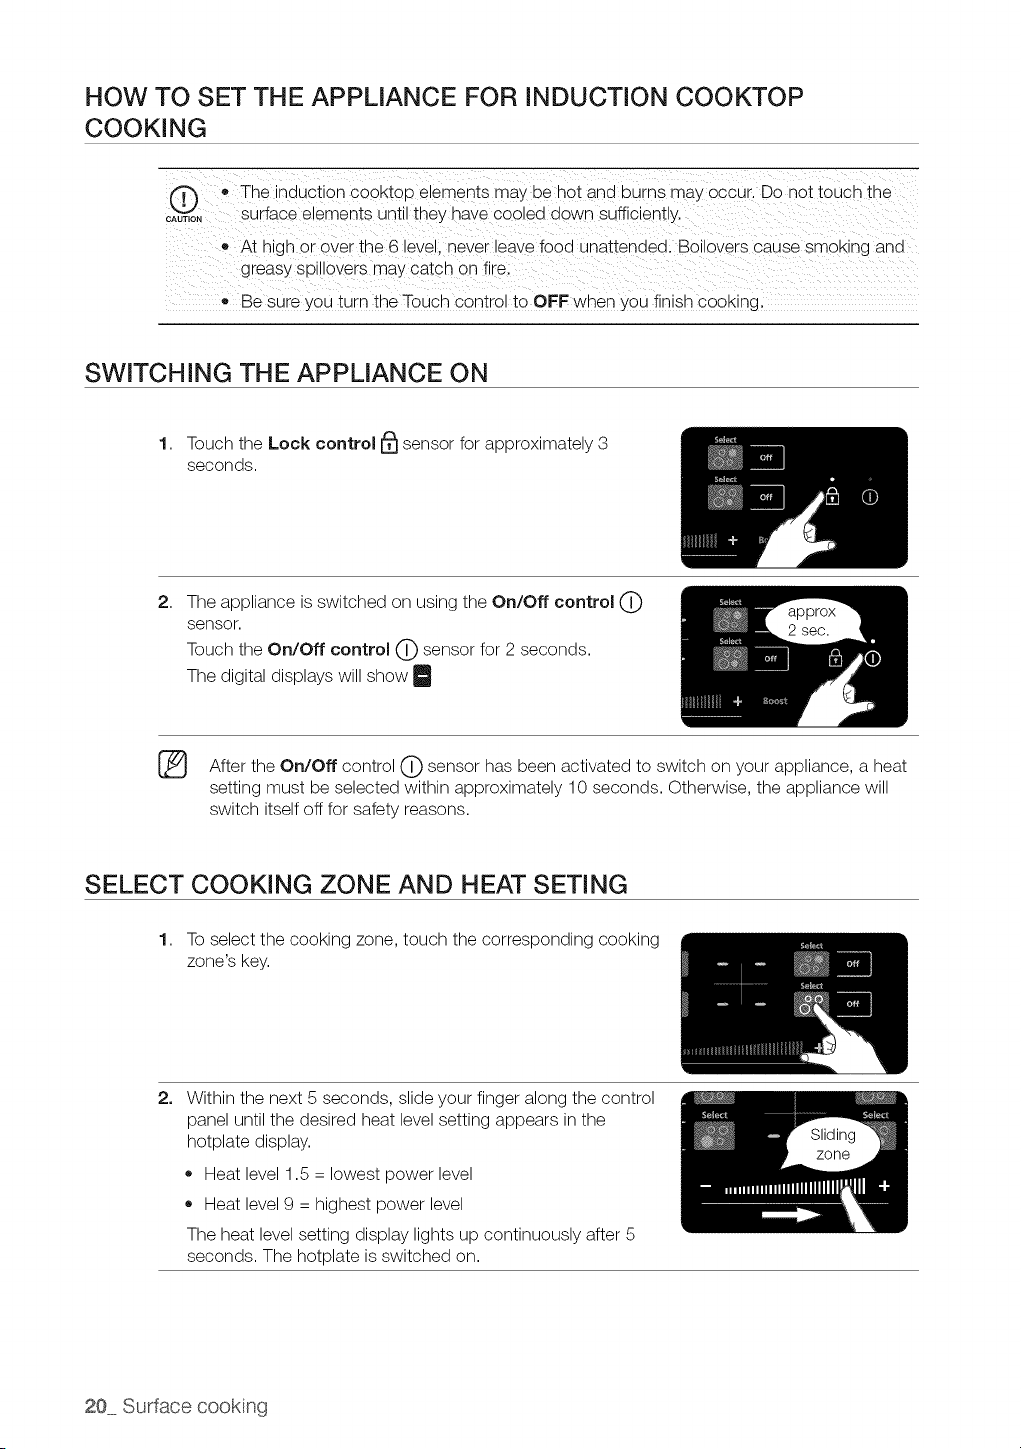
SWITCHING THE APPLIANCE ON
1. Touch the Lock control I_ sensor for approximately 3
seconds.
2,
The appliance isswitched on using the On/Off control (_
sensor.
Touch the On/Off control (_) sensor for 2 seconds.
The digital displays will show
2 sec.
[_ After the On/Off control C) sensor has been activated to switch on your appliance, a heat
setting must be selected within approximately 10 seconds. Otherwise, the appliance will
switch itself off for safety reasons.
SELECT COOKING ZONE AND HEAT SETING
1. To select the cooking zone, touch the corresponding cooking
zone's key.
2_
Within the next 5 seconds, slide your finger along the control
panel until the desired heat level setting appears in the
hotplate display.
• Heat level 1.5 = lowest power level
Heat level 9 = highest power level
The heat level setting display lights up continuously after 5
seconds. The hotplate isswitched on.
zone
20 Surface cookng

3. To set and adjust the power level(_ to _) for cooking,
touch the Heat level setting selectors ( D or D )
®
For faster adjustment, keep your finger on the Heat level setting selectors ( _ or _ )
until the required value isobtained.
If more than one sensor is pressed for longer than 10 seconds, _ _ will show in the heat
setting display. To reset, touch the On/Off control C) sensor.
POWER BOOST CONTROL
The power boost function _ makes additional power
available to each cooking zone. (example : bring a large
volume of water to the boil)
The power boost function isactivated for a maximum of 10
minutes for each cooking zone.
After Power Boost is finished, the cooking zones automatically
return to power level_
[_} Incertain circumstances, the Power boost function may be deactivated automatically to
protect the internal electronic components of the induction.
SIMMER CONTROL
The simmer controls _ areused to simmer and keep
large quantities of foods warm such as stews and soup.
The simmer settings of the small cooking zone(6inch) are ideal
for delicate foods and melting chocolate.
SWITCHING THE APPLIANCE OFF
To completely switch off the appliance, use the On/Off
control C) sensor.
Touch the On/Off control C) sensor.
[_ After switching off a single cooking zone or the entire cooking surface, the presence of
residual heat will be indicated in the digital displays of the corresponding cooking zones in
the form of an _ (for "Hot Surface").
Surface cookng 21
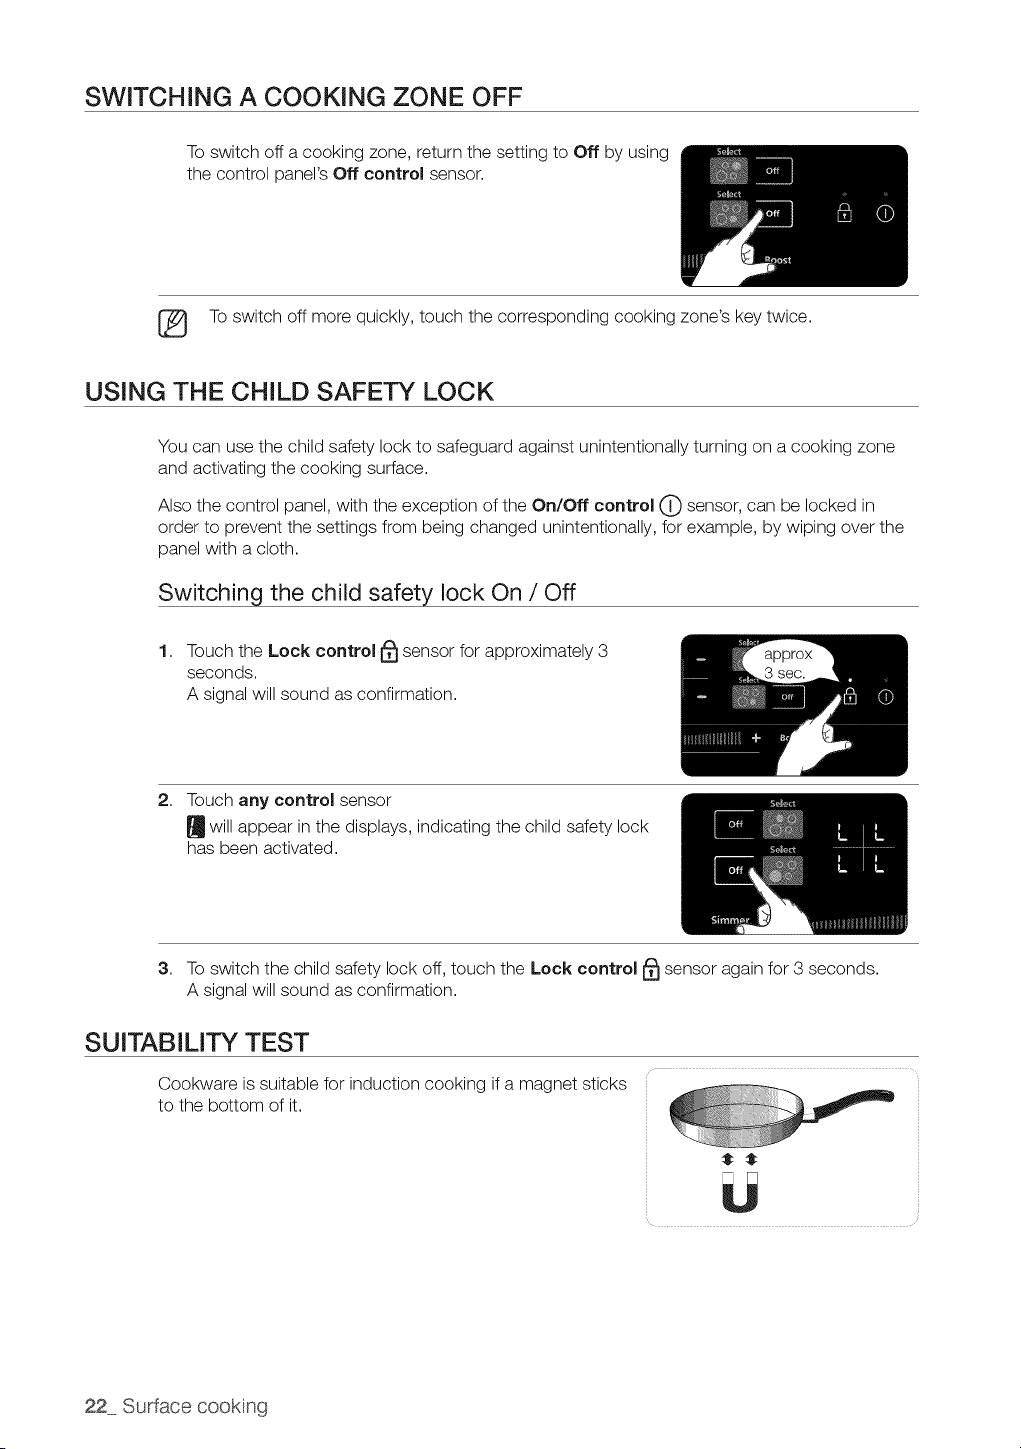
SWITCHING A COOKING ZONE OFF
To switch off a cooking zone, return the setting to Off by using
the control panel's Off control sensor.
(_ To switch off more quickly, touch the corresponding cooking zone's key twice.
USING THE CHILD SAFETY LOCK
You can use the child safety lock to safeguard against unintentionally turning on a cooking zone
and activating the cooking surface.
Also the control panel, with the exception of the On/Off control C) sensor, can be locked in
order to prevent the settings from being changed unintentionally, for example, by wiping over the
panel with acloth.
Switching the child safety lock On / Off
1. Touch the Lock control I_ sensor for approximately 3
seconds.
A signal will sound asconfirmation.
2. Touch any control sensor
[] will appear in the displays, indicating the child safety lock
has been activated.
3. To switch the child safety lock off, touch the Lock control _ sensor again for 3 seconds.
A signal will sound asconfirmation.
SUITABILITY TEST
Cookware issuitable for induction cooking ifamagnet sticks
to the bottom of it.
22 Surface cooking
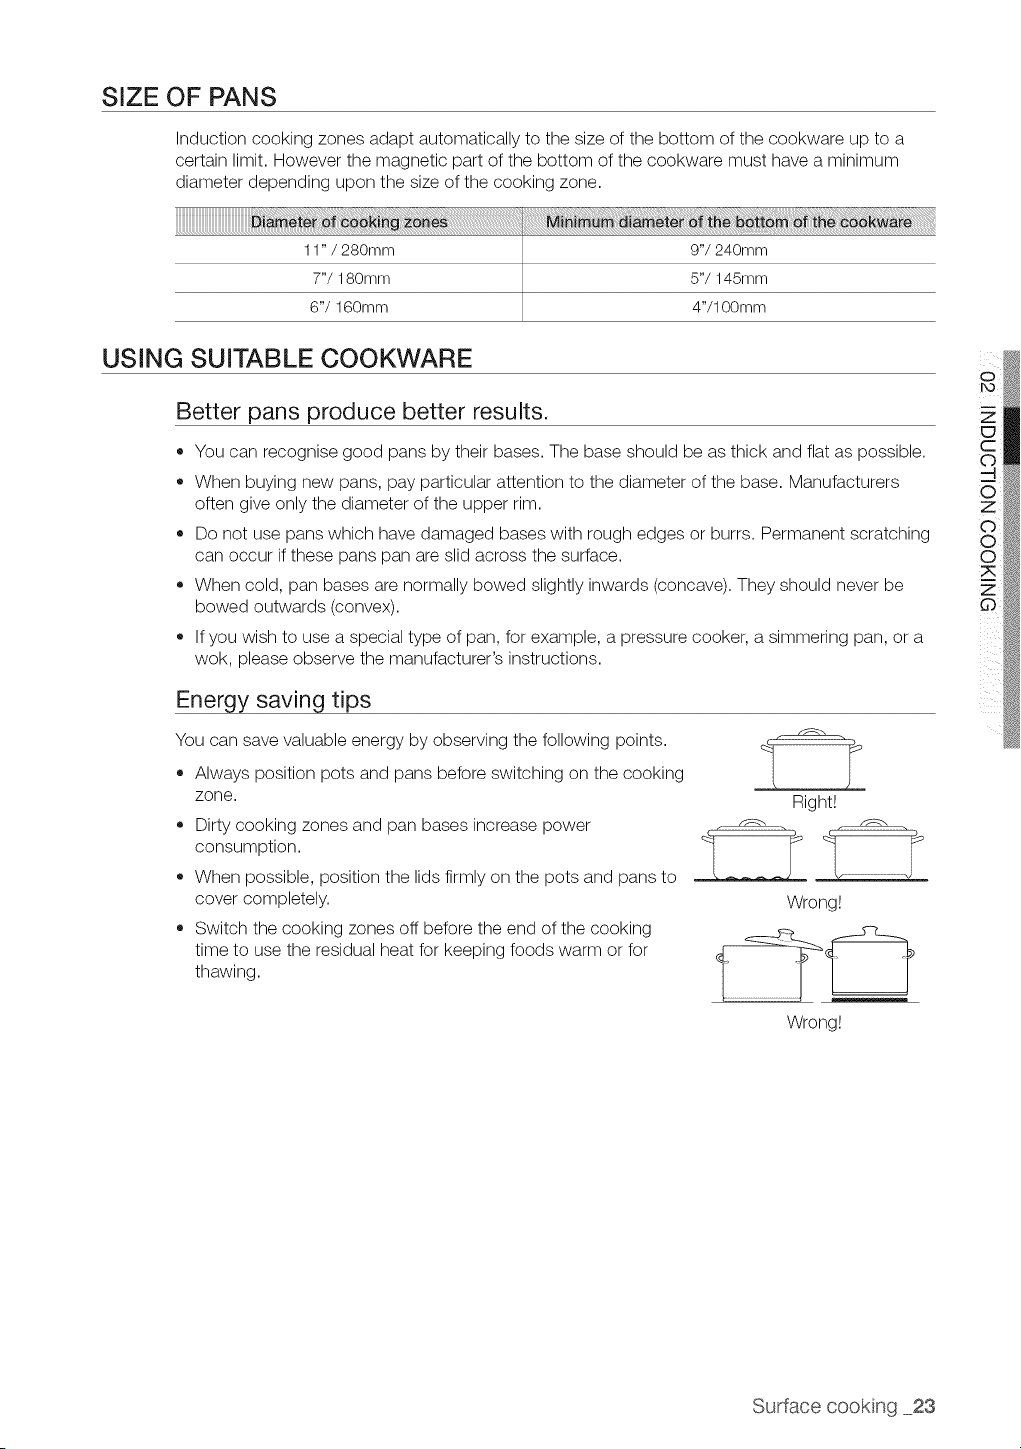
SIZE OF PANS
Induction cooking zones adapt automatically to the size of the bottom of the cookware up to a
certain limit. However the magnetic part ofthe bottom ofthe cookware must have a minimum
diameter depending upon the size of the cooking zone.
11" / 280mm 9"/240mm
7"/180mm 5"/145mm
6"/160mm 4"/100mm
USING SUITABLE COOKWARE
Better pans produce better results.
• You can recognise good pans by their bases. The base should be as thick and flat as possible.
When buying new pans, pay particular attention to the diameter of the base. Manufacturers
often give only the diameter of the upper rim.
Do not use pans which have damaged bases with rough edges or burrs. Permanent scratching
can occur ifthese pans pan are slid across the surface.
When cold, pan bases arenormally bowed slightly inwards (concave). They should never be
bowed outwards (convex).
,, If you wish to use a special type of pan, for example, a pressure cooker, asimmering pan, or a
wok, please observe the manufacturer's instructions.
Energy saving tips
You can save valuable energy by observing the following points.
Always position pots and pans before switching on the cooking
zone.
Dirty cooking zones and pan bases increase power
consumption.
When possible, position the lids firmly on the pots and pans to
cover completely.
Switch the cooking zones off before the end of the cooking
time to use the residual heat for keeping foods warm or for
thawing.
Right_
Wrong!
Wrong!
Surface cookng 23
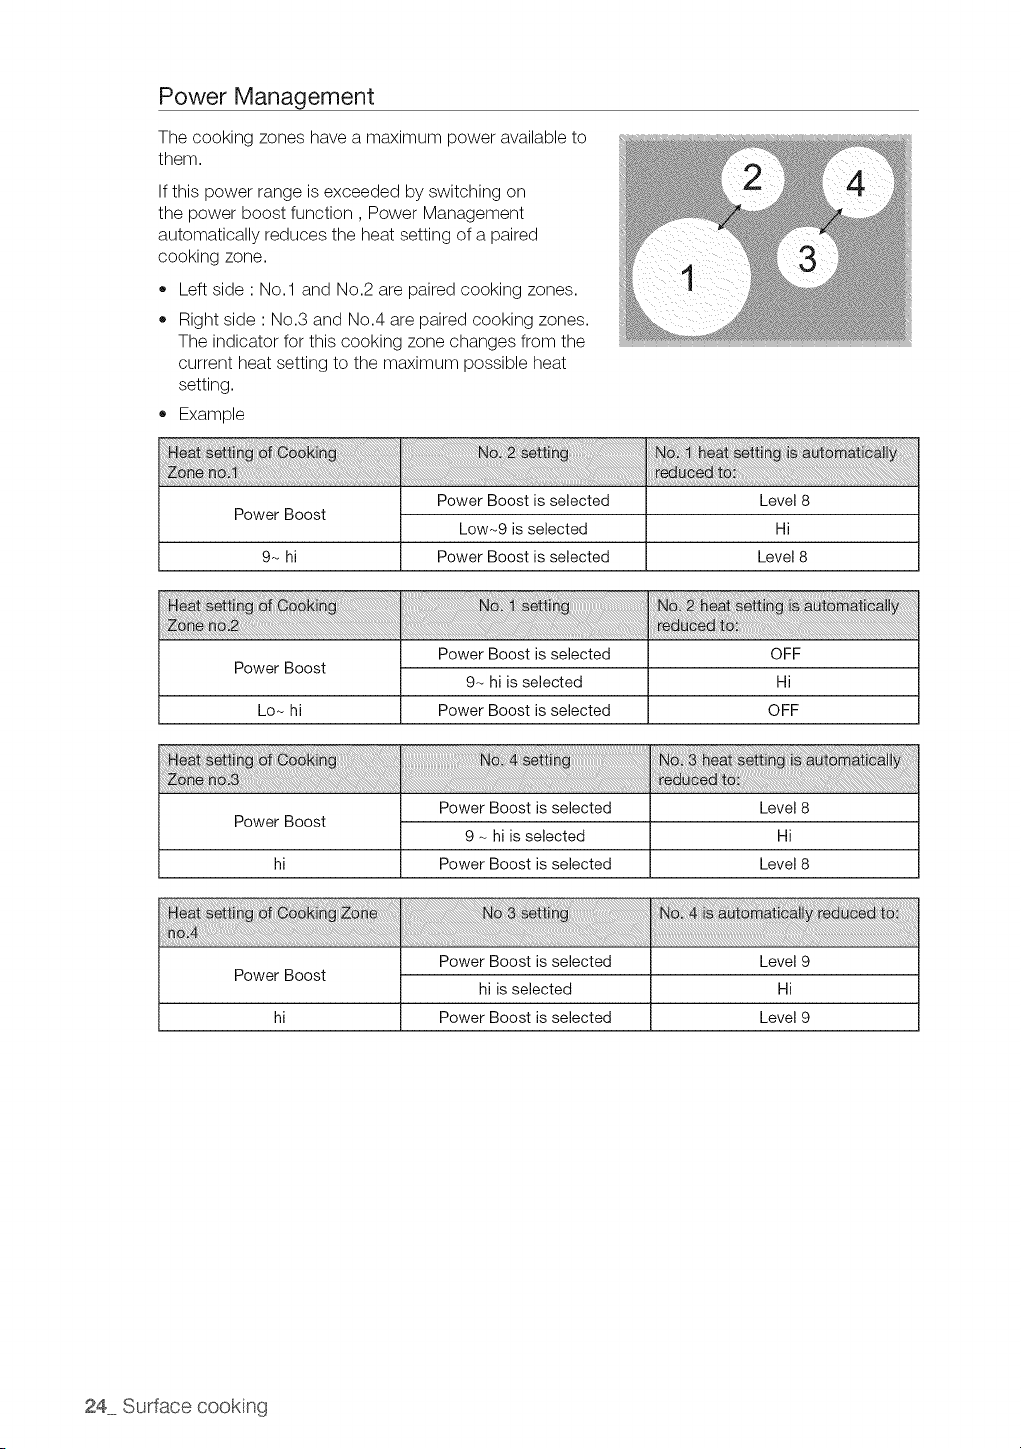
Power Management
The cooking zones have a maximum power available to
them.
If this power range is exceeded by switching on
the power boost function, Power Management
automatically reduces the heat setting of a paired
cooking zone.
• Left side : No.1 and No.2 are paired cooking zones.
Right side : No.3 and No.4 arepaired cooking zones.
The indicator for this cooking zone changes from the
current heat setting to the maximum possible heat
setting.
Example
Power Boost
9_ hi
Power Boost is selected
Low_9 isselected
Power Boost is selected
Level 8
Hi
Level 8
Power Boost
Lob hi
Power Boost is selected
9_ hi is selected
Power Boost is selected
OFF
Hi
OFF
i_!_!_!_i_!_i_!i_iiiiiiiiiiiii_i_i_i_i_i!!i!_i!!!i!i!i!i!i!i!i!i!i!i_i_i_i_i_i_i_i_i_i_i_i_i_i_i_ii_!i_i_i_i_i_i_i_iiii_i_i_iiii_iiiiiiiiiii_i!i_ii_i_i_i_i_i_i_i_i_i!!_i_i_ii_i_iii_iiiiiiii_i_i!i_i_i_i_i_iii_i_i_i_i!i_i!i_i_i_i_i_i
Power Boost
hi
Power Boost isselected
9 - hi is selected
Power Boost isselected
Level 8
Hi
Level 8
Power Boost
hi
Power Boost isselected
hi isselected
Power Boost isselected
Level 9
Hi
Level 9
24 Surface cookng
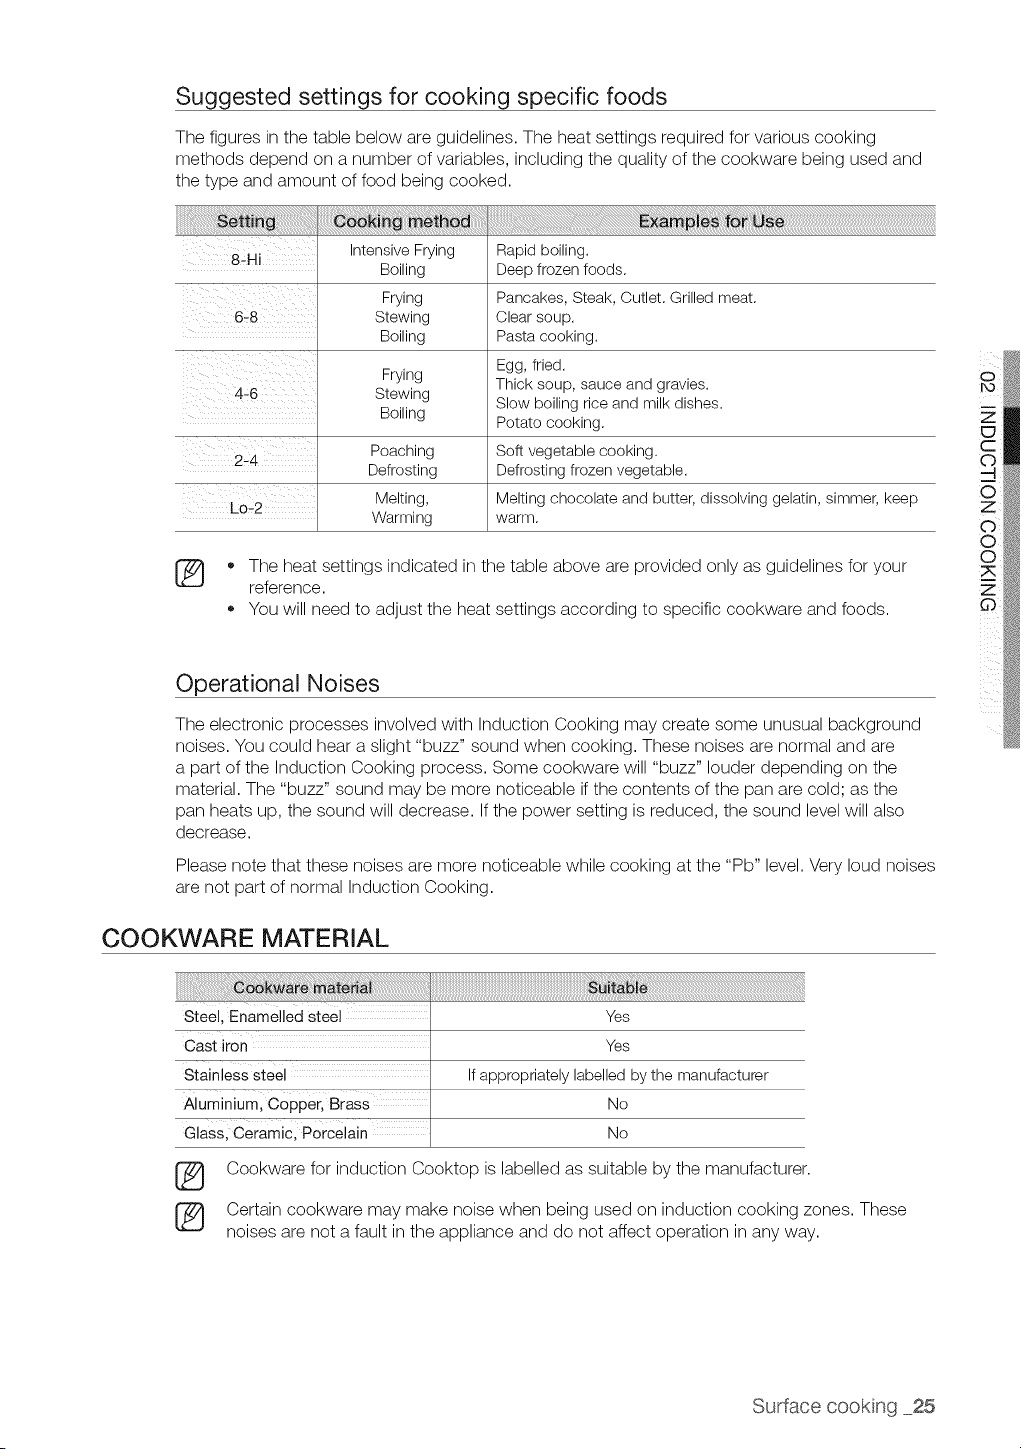
Suggested settings for cooking specific foods
The figures in the table below are guidelines. The heat settings required for various cooking
methods depend on a number of variables, including the quality of the cookware being used and
the type and amount of food being cooked.
Intensive Frying Rapid boiling.
8-Hi
Boiling Deep frozen foods.
Frying Pancakes, Steak, Cutlet. Grilled meat.
6-8 Stewing Clear soup.
Boiling Pasta cooking.
Frying Egg, fried.
Thick soup, sauce and gravies.
Stewing
Boiling Slow boiling rice and milk dishes.
Potato cooking.
Poaching Soft vegetable cooking.
2-4
Defrosting Defrosting frozen vegetable.
Melting, Melting chocolate and butter, dissolving gelatin, simmer, keep
Lo-2
Warming warm.
[_ * The heat settings indicated in the table above are provided only as guidelines for your
reference.
You will need to adjust the heat settings according to specific cookware and foods.
Operational Noises
The electronic processes involved with Induction Cooking may create some unusual background
noises. You could hear a slight "buzz" sound when cooking. These noises are normal and are
a part of the Induction Cooking process. Some cookware will "buzz" louder depending on the
material. The "buzz" sound may be more noticeable if the contents of the pan arecold; asthe
pan heats up, the sound will decrease. If the power setting is reduced, the sound level will also
decrease.
Please note that these noises aremore noticeable while cooking at the "Pb" level.Very loud noises
are not part of normal Induction Cooking.
COOKWARE MATERIAL
Steel, Enamelled steel
Cast iron
Stainless steel
Aluminiuml Copper, Brass
Glass, Ceramic, Porcelain
Yes
Yes
Ifappropriately labelledby themanufacturer
No
No
_ ookware for induction Cooktop islabelled as suitable by the manufacturer.
Certain cookware may make noise when being used on induction cooking zones. These
noises are not a fault in the appliance and do not affect operation in any way.
Surface cookng 25
PROTECTING THE iNDUCTiON COOKTOP SURFACE
Cleaning
• Clean the cooktop before using it for the first time.
Clean your cooktop daily or after each use. This will keep your cooktop looking good and can
prevent damage.
If a spillover occurs while cooking, immediately clean the spill from the cooking area while it is
hot to prevent a tough cleaning chore later. Using extreme care, wipe the spill with a clean dry
towel.
Do not allow spills to remain on the cooking area or the cooktop trim for a long period of time.
Do not use abrasive cleansing powders or scouring pads, which will scratch the cooktop.
Do not use chlorine bleach, ammonia, or other cleansers not specifically recommended for use
on a glass-ceramic surface.
Preventing marks and scratches
Do not use glass cookware. It may scratch the cooktop.
Do not place a trivet or wok ring between the cooktop and the pan. These items can mark or
scratch the cooktop.
Make sure the cooktop and the pan bottom are clean.
Do not slide metal pans across the cooktop.
Preventing stains
Do not use a soiled dish cloth or sponge to clean the cooktop surface. A film will remain, which
may cause stains on the cooking surface after the area is heated.
Continuously cooking on a soiled surface may/will result in apermanent stain.
Preventing other damage
Do not allow plastic, sugar, or foods with high sugar content to melt onto the hot cooktop.
Should this happen, clean immediately.
Do not let a pan boil dry as this will damage the cooktop and the pan.
Do not use the cooktop as a work surface or cutting board.
Do not cook food directly on the cooktop without the proper cookware.
26 Surface cookng
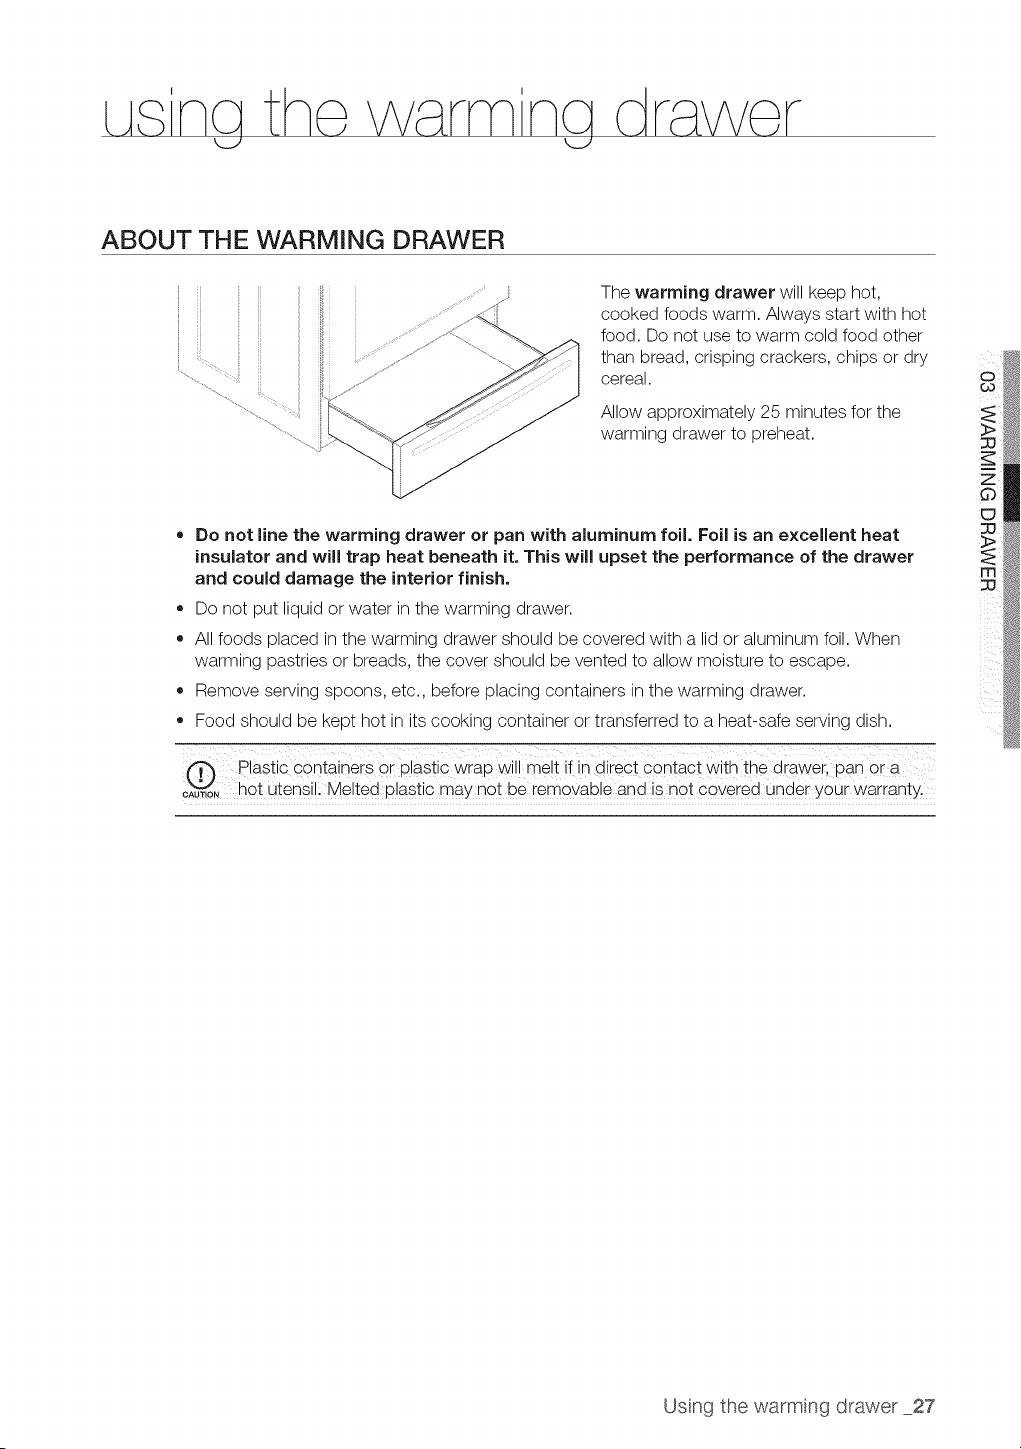
ABOUT THE WARMING DRAWER
The warming drawer will keep hot,
cooked foods warm. Always start with hot
food. Do not use to warm cold food other
than bread, crisping crackers, chips or dry
cereal.
Allow approximately 25 minutes for the
warming drawer to preheat.
• Do not line the warming drawer or pan with aluminum foil. Foil is an excellent heat
insulator and will trap heat beneath it. This will upset the performance of the drawer
and could damage the interior finish.
• Do not DU1: IlaUla or wa[er _ [ne warmlno _rawer.
• All foods 91aceo _ [ne warmlno _rawer ShOUld De covered NI1:B a _ or aluminum foil. When
warming cast:ties or Dreaas. 1:necover snoula De ven[ea [o allOWmols1:ure 1:oescaoe.
,, Remove serving SDOOBS.e1:c.,before placing conl:alners n 1:mewarmlno arawer.
= Food ShOUldDe K601: no1: In 1:8COOKIngcon1:alner or transferred 1:oa heat-safe serving diSh.
Plastic contaners or Plastic wrap will melt if n d_rectcc qtact with the drawer, dan or a
oAUT,ONhot utensil. Melted Dlast_c may not be removable and is not covered under your warrant,.
o
CO
Using the warming drawer 27
TURNING THE WARMING DRAWER ON OR OFF
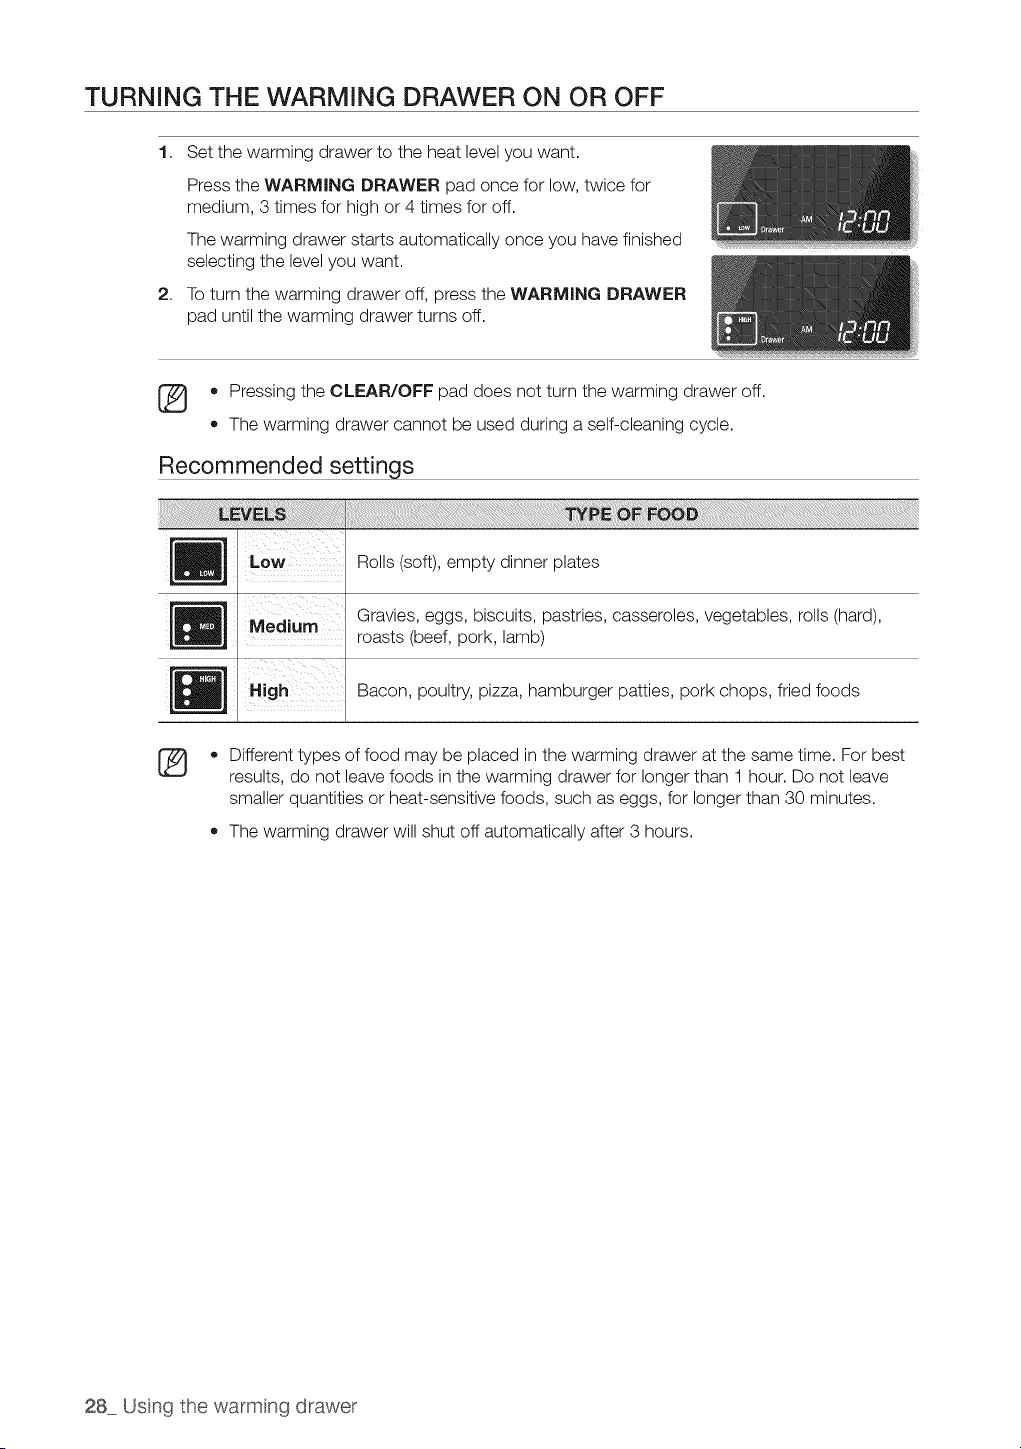
1. Set the warming drawer to the heat level you want.
Press the WARMING DRAWER pad once for low, twice for
medium, 3 times for high or 4 times for off.
The warming drawer starts automatically once you have finished
selecting the level you want.
2. To turn the warming drawer off, press the WARMING DRAWER
pad untilthe warming drawer turns off.
(_ • Pressing the CLEAR/OFF pad does not turn the warming drawer off.
• The warming drawer cannot be used during a self-cleaning cycle.
Recommended settings
Low
Medium
Rolls (soft), empty dinner plates
Gravies, eggs, biscuits, pastries, casseroles, vegetables, rolls(hard),
roasts (beef, pork, lamb)
Bacon, poultry, pizza, hamburger patties, pork chops, fried foods
®
• Different types of food may be placed in the warming drawer at the same time. For best
results, do not leave foods in the warming drawer for longer than 1 hour. Do not leave
smaller quantities or heat-sensitive foods, such as eggs, for longer than 30 minutes.
• The warming drawer will shut off automatically after 3 hours.
28 Usng the warmng drawer
I
THE OVEN CONTROL PANEL
READ THE INSTRUCTIONS CAREFULLY BEFORE USING THE OVEN. For satisfactory use
of your oven, become familiar with the various features and functions of the oven as described
below. Detailed instructions for each feature and function follow later inthis user manual.
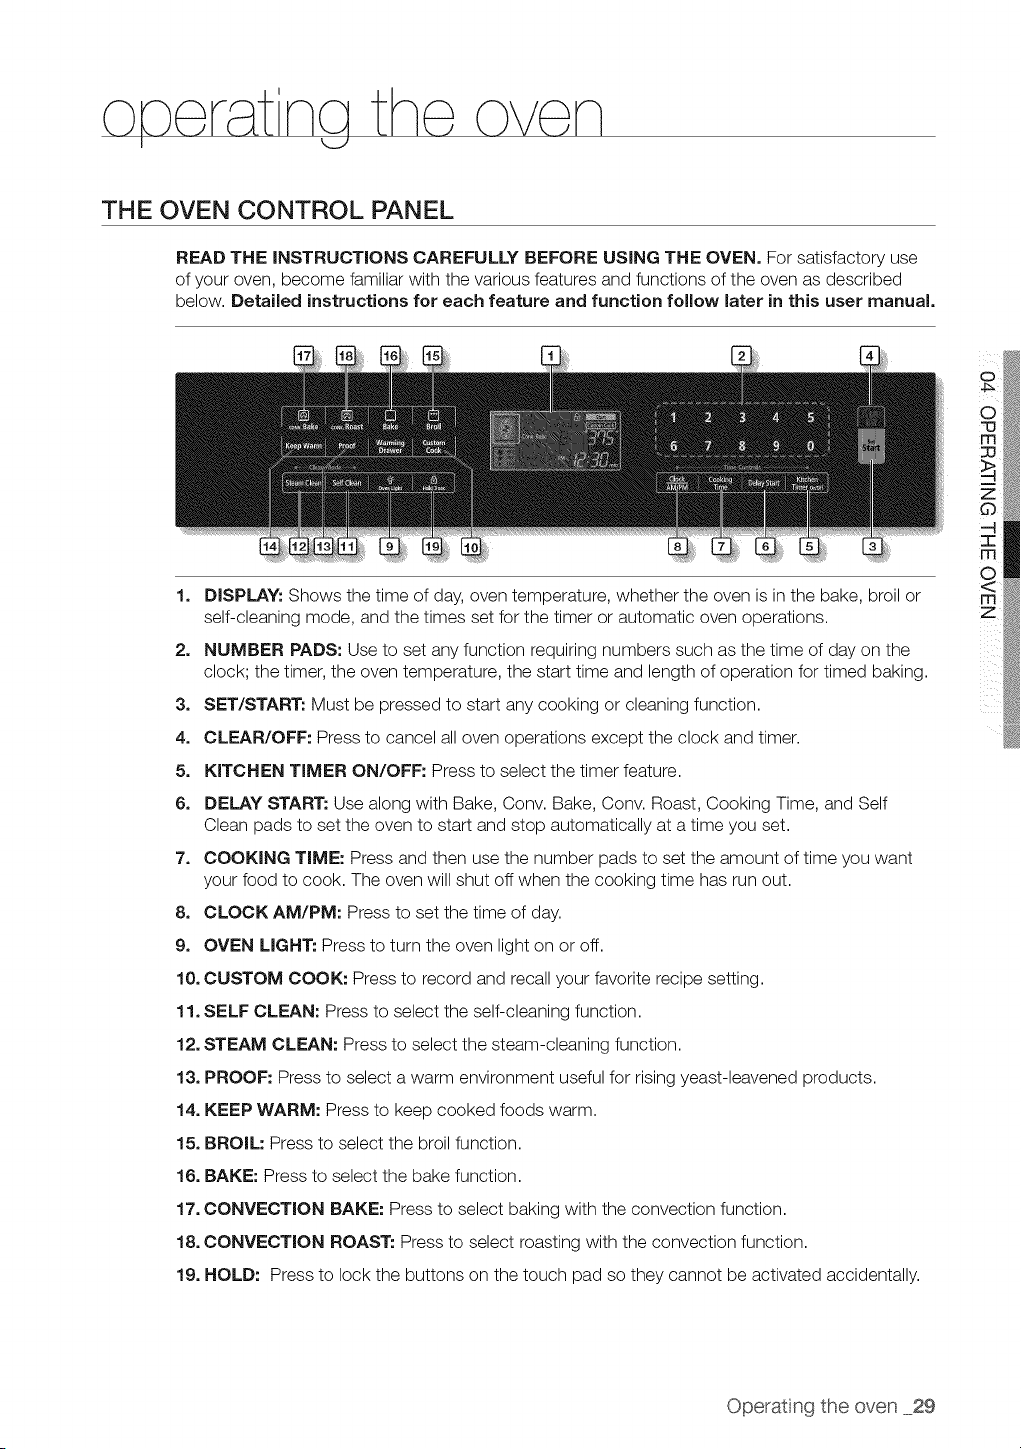
1. DISPLAY: Shows the time of day, oven temperature, whether the oven isin the bake, broil or
self-cleaning mode, and the times set for the timer or automatic oven operations.
2. NUMBER PADS: Use to set any function requiring numbers such as the time of day on the
clock; the timer, the oven temperature, the start time and length of operation for timed baking.
3. SET/START: Must be pressed to start any cooking or cleaning function.
4. CLEAR/OFF: Press to cancel all oven operations except the clock and timer.
5. KITCHEN TIMER ON/OFF: Press to select the timer feature.
6. DELAY START: Use along with Bake, Conv. Bake, Conv. Roast, Cooking Time, and Self
Clean pads to set the oven to start and stop automatically at a time you set.
7. COOKING TIME: Press and then use the number pads to set the amount of time you want
your food to cook. The oven will shut offwhen the cooking time has run out.
8. CLOCK AM/PM: Press to set the time of day.
9. OVEN LIGHT: Pressto turn the oven light on or off.
10. CUSTOM COOK: Press to record and recall your favorite recipe setting.
11. SELF CLEAN: Press to select the self-cleaning function.
12. STEAM CLEAN: Press to select the steam-cleaning function.
13. PROOF: Pressto select a warm environment useful for rising yeast-leavened products.
14. KEEP WARM: Press to keep cooked foods warm.
15. BROIL: Pressto select the broil function.
16. BAKE: Press to select the bake function.
17. CONVECTION BAKE: Press to select baking with the convection function.
18. CONVECTION ROAST: Press to select roasting with the convection function.
19. HOLD: Press to lock the buttons on the touch pad so they cannot be activated accidentally.
Operatng the oven 29
SETTING THE CLOCK
The clock must be set to the correct time of day for the automatic oven timing functions to work
properly.
• The time of day cannot be changed during a timed cooking, a delay-timed cooking or a self-
cleaning cycle.
• You can choose between a 12-hour or 24-hour display. The default is 12-hour.
Flow to set the clock
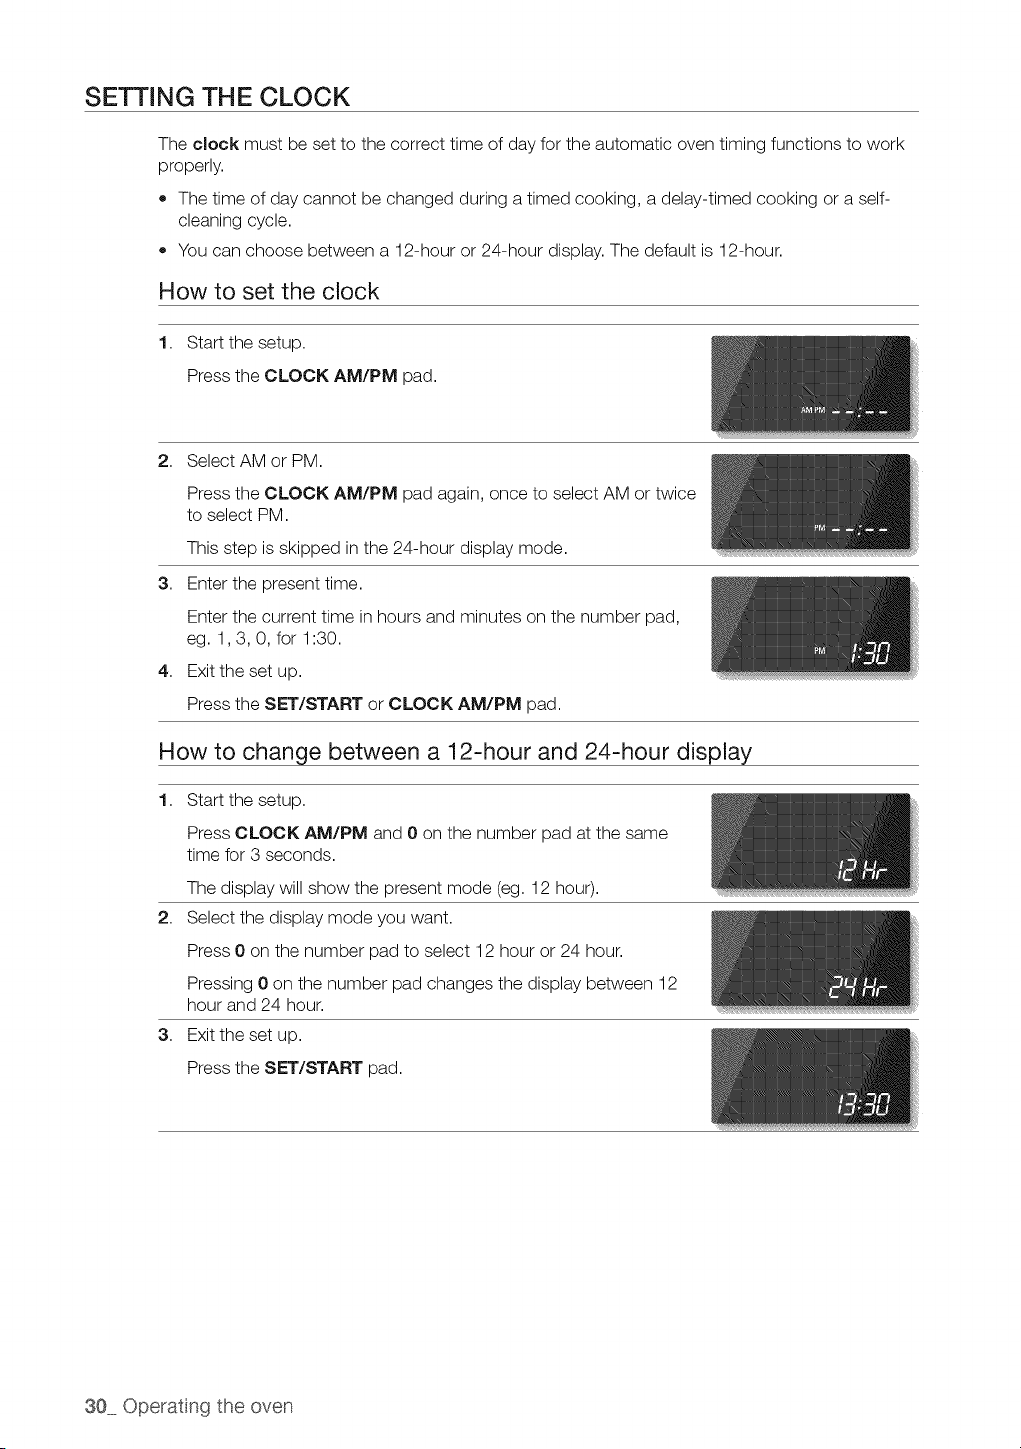
1. Start the setup.
Press the CLOCK AM/PM pad.
2. Select AM or PM.
Press the CLOCK AM/PM pad again, once to select AM or twice
to select PM.
This step isskipped in the 24-hour display mode.
3. Enter the present time.
Enter the current time in hours and minutes on the number pad,
eg. 1,3, 0, for 1:30.
4. Exit the set up.
Press the SET/START or CLOCK AM/PM pad.
How to change between a 12-hour and 24-hour display
1.
2,
3,
Start the setup.
Press CLOCK AM/PM and 0 on the number pad atthe same
time for 3 seconds.
The display will show the present mode (eg. 12 hour).
Select the display mode you want.
Press 0 on the number pad to select 12 hour or 24 hour.
Pressing 0 on the number pad changes the display between 12
hour and 24 hour.
Exit the set up.
Press the SET/START pad.
30 Operatng the oven
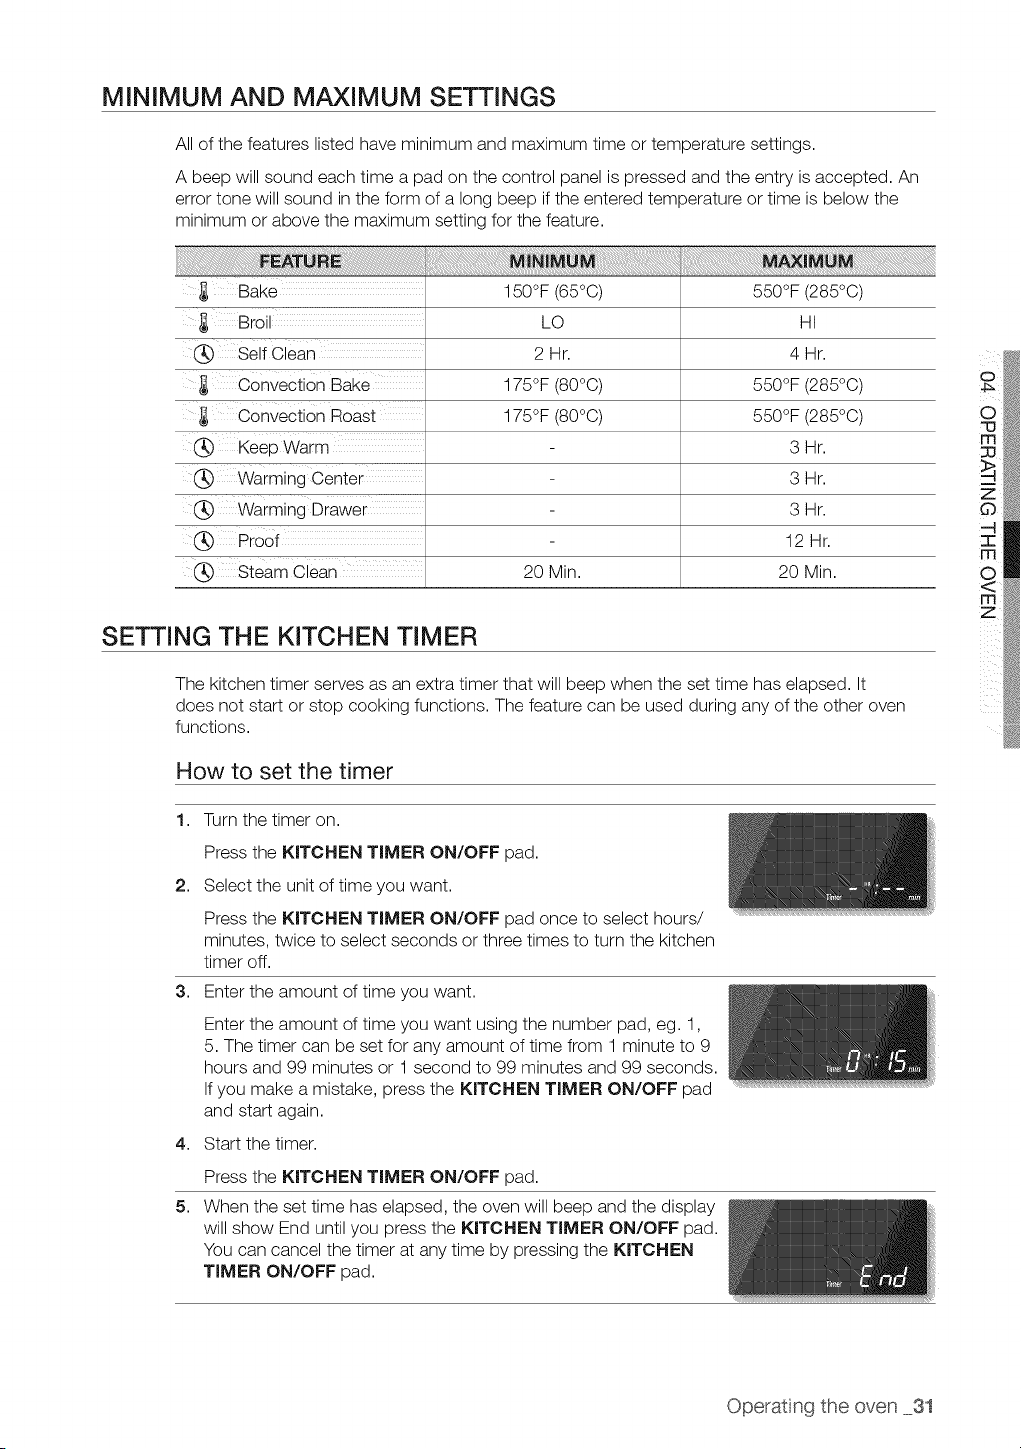
MINIMUM AND MAXIMUM SETTINGS
All ofthe features listed have minimum and maximum time or temperature settings.
A beep will sound each time a pad on the control panel is pressed and the entry isaccepted. An
error tone will sound in the form of a long beep ifthe entered temperature or time is below the
minimum or above the maximum setting for the feature.
Bake
Bro
(_ SelfClean
Convection Bake
Convection Roast
150°F (65°C)
LO
2Hr.
175°F (80°0)
175°F (80°0)
550°F (285°C)
HI
4 Hr.
550°F (285°0)
550°F (285°0)
_._ Keep Warm
_._ Wiarmin9 Center
0_ Wiarmino Drawer
0_ Proof
(_ Steam Clean
20 Min.
SETTING THE KITCHEN TIMER
3 Hr.
3 Hr.
3 Hr.
12 Hr.
20 Min.
The Kltcnen timer serves as an extra timer that will beep when the set time has elapsed. It
aces not start or stcp COOKingfunctions. The feature can be used during any of the other oven
functions.
How to set the timer
1. Turn the timer on.
Press the KITCHEN TIMER ON/OFF pad.
2. Select the unit of time you want.
Press the KITCHEN TIMER ON/OFF pad once to select hours/
minutes, twice to select seconds or three times to turn the kitchen
timer off.
3. Enter the amount of time you want.
4,
5,
Enter the amount of time you want using the number pad, eg. 1,
5.The timer can be set for any amount of time from 1 minute to 9
hours and 99 minutes or 1 second to 99 minutes and 99 seconds.
If you make amistake, press the KITCHEN TIMER ON/OFF pad
and start again.
Start the timer.
Press the KITCHEN TIMER ON/OFF pad.
When the set time has elapsed, the oven will beep and the display
will show End until you press the KITCHEN TIMER ON/OFF pad.
You can cancel the timer at any time by pressing the KITCHEN
TIMER ON/OFF pad.
Operatng the oven 31
USING THE OVEN RACKS
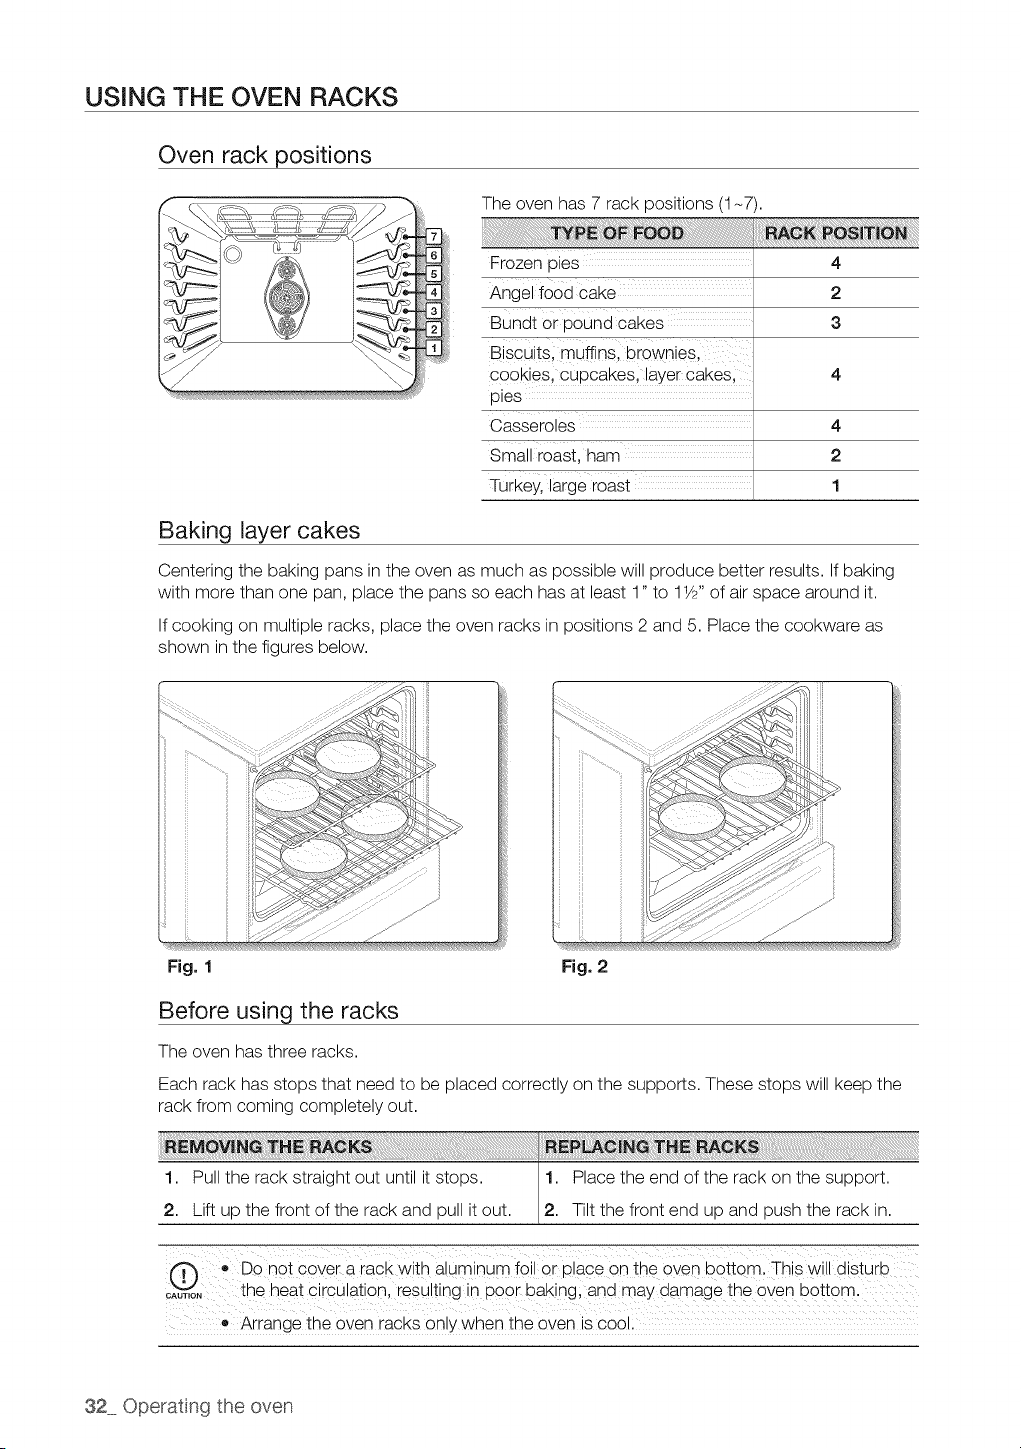
Oven rack positions
The oven has 7 rack positions (1-7).
Frozen pies
Angel food cake
Bundt or pound Cakes
Biscuits; muffins, browniesl
cookies, cupcakes, layer cakesl
pies
Casseroles
Small roast, ham
Turkey, large roast
4
2
3
4
2
1
Baking layer cakes
Centering the baking pans inthe oven as much as possible will produce better results. If baking
with more than one pan, place the pans so each has at least 1" to 11/2"of air space around it.
If cooking on multiple racks, place the oven racks in positions 2 and 5. Place the cookware as
shown in the figures below.
Fig. 1 Fig. 2
Before using the racks
The oven has three racks.
Each rack has stops that need to be placed correctly on the supports. These stops will keep the
rack from coming completely out.
1. Pull the rack straight out until itstops. 1 Place the end ofthe rack on the support.
2. Lift up the front of the rack and pull itout. 2 Tiltthe front end up and push the rack in.
, DO not cover a rack with aluminum foi!or place on the oven bottom: This will disturb
_Au,,o, the heat c rcuaton, resut ng n poor bakng; and may damage the oven bottom,
® Arrange the oven racks onlywhen the OveniscooL
32 Operatng the oven
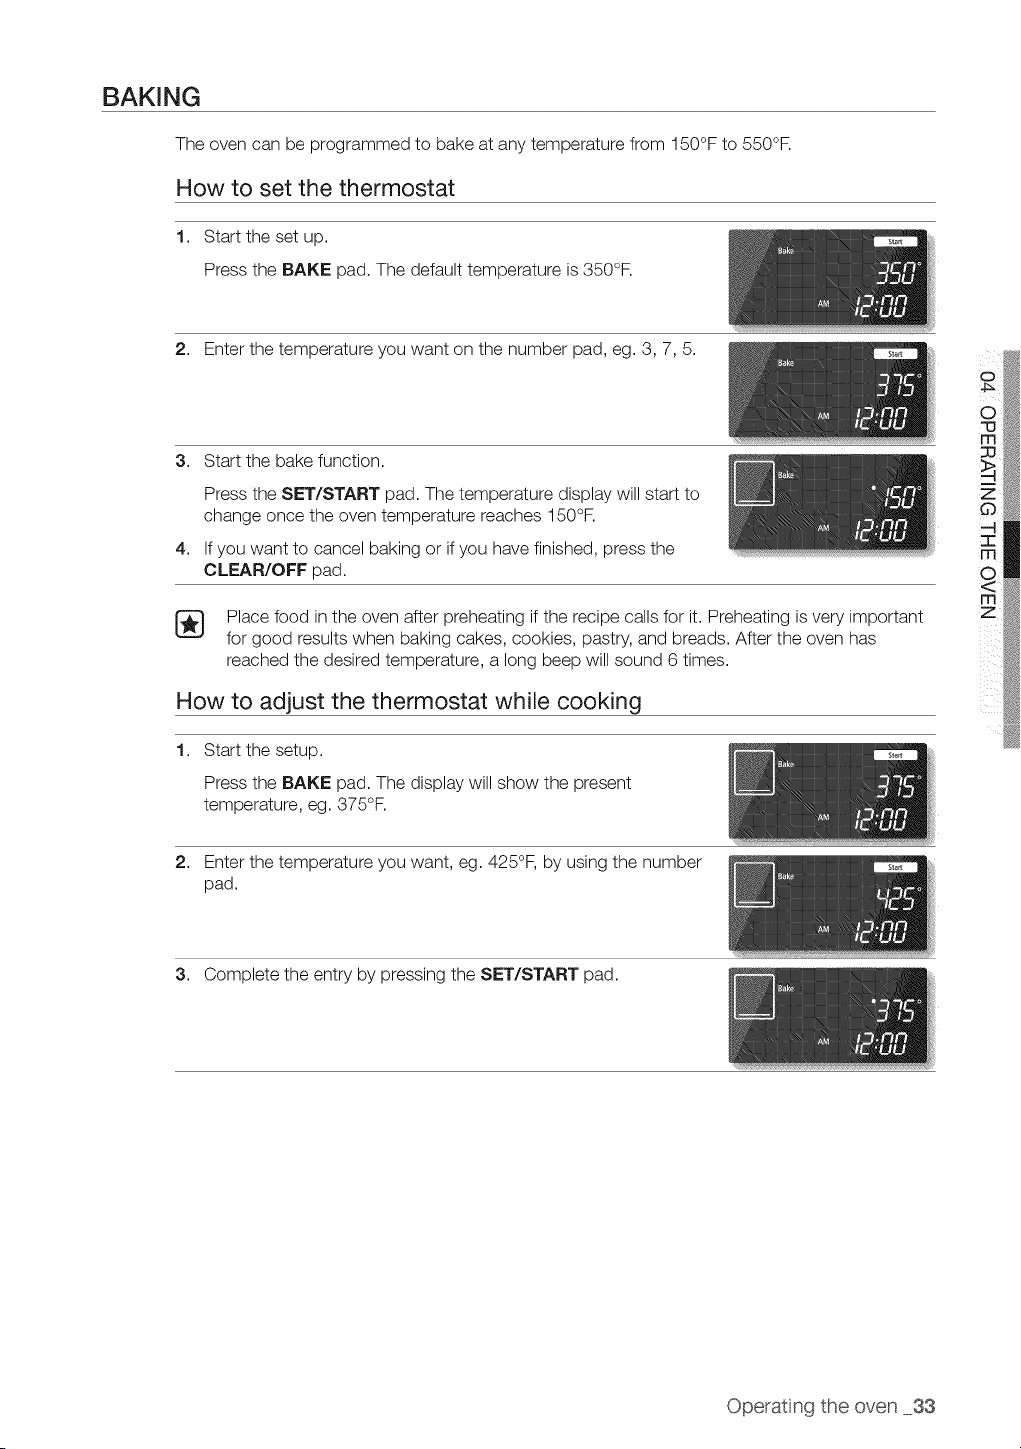
BAKING
The oven can be programmed to bake at any temperature from 150°F to 550°F.
How to set the thermostat
1. Start the set up.
Press the BAKE pad. The default temperature is350°F.
2. Enter the temperature you want on the number pad, eg. 3, 7, 5.
3. Start the bake function.
4,
Press the SET/START pad. The temperature display will start to
change once the oven temperature reaches 150°F.
If you want to cancel baking or ifyou have finished, press the
CLEAR/OFF pad.
[_ Place food in the oven after preheating ifthe recipe calls for it. Preheating isvery important
for good results when baking cakes, cookies, pastry, and breads. After the oven has
reached the desired temperature, a long beep will sound 6 times.
How to adjust the thermostat while cooking
1. Start the setup.
Press the BAKE pad. The display will show the present
temperature, eg. 375°F.
O
2. Enter the temperature you want, eg. 425°F, by using the number
pad.
3. Complete the entry by pressing the SET/START pad.
Operatng the oven 33
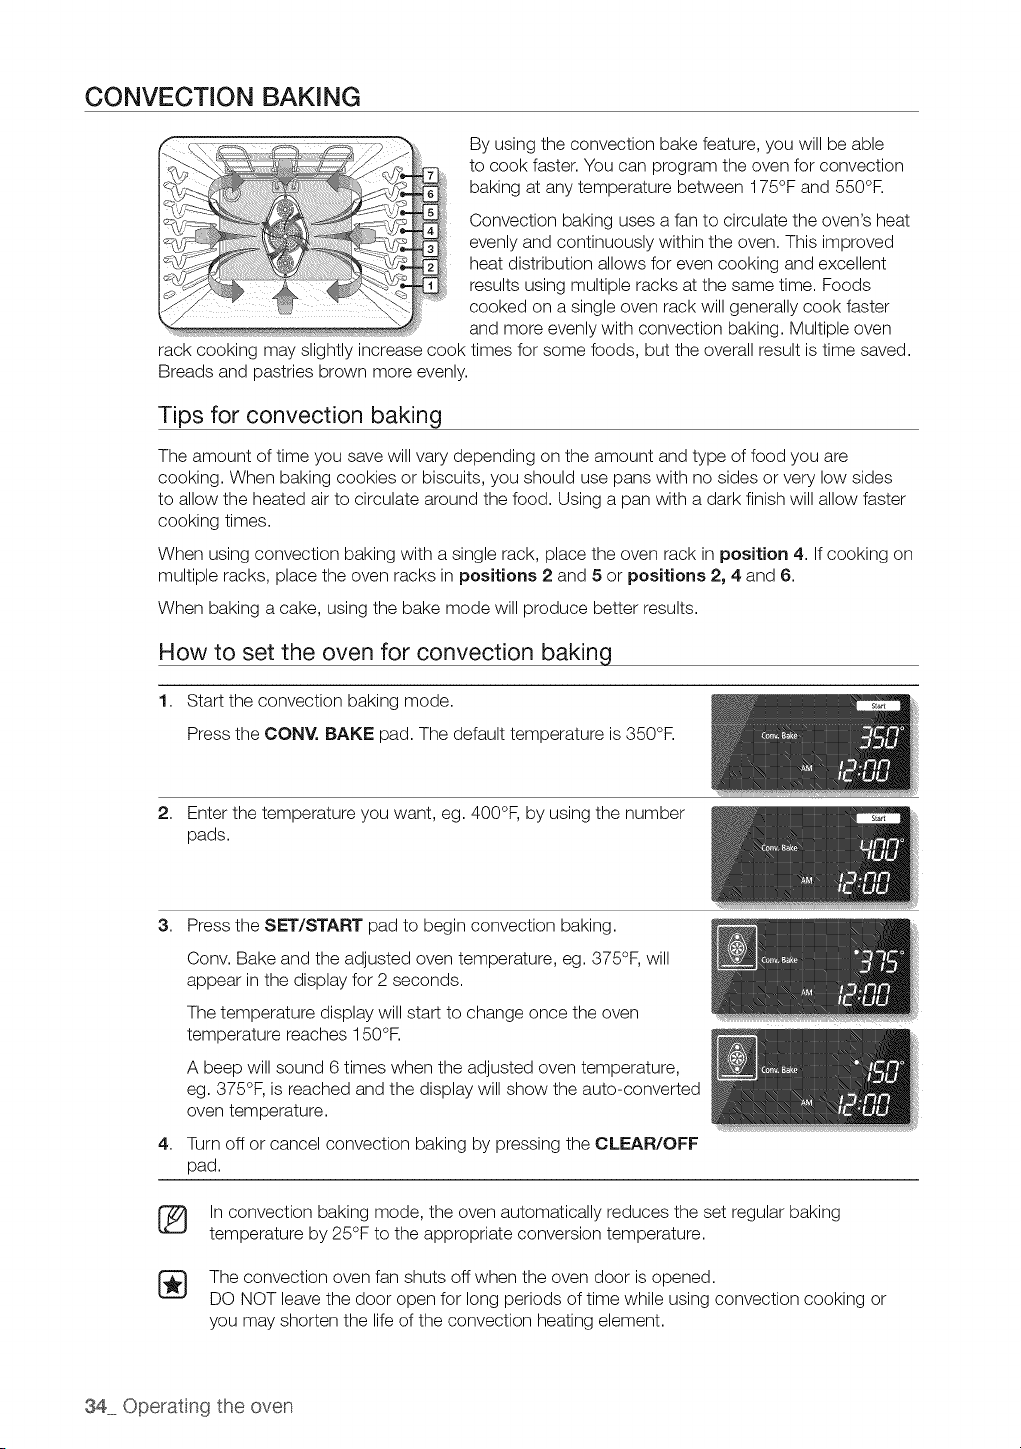
CONVECTION BAKING
By using the convection bake feature, you will be able
to cook faster. You can program the oven for convection
baking atany temperature between 175°F and 550°R
Convection baking uses a fan to circulate the oven's heat
evenly and continuously within the oven. This improved
heat distribution allows for even cooking and excellent
results using multiple racks atthe same time. Foods
cooked on a single oven rack will generally cook faster
and more evenly with convection baking. Multiple oven
rack cooking may slightly increase cook times for some foods, but the overall result istime saved.
Breads and pastries brown more evenly.
Tips for convection baking
The amount of time you save will vary depending on the amount and type of food you are
cooking. When baking cookies or biscuits, you should use pans with no sides or very low sides
to allow the heated air to circulate around the food. Using a pan with a dark finish will allow faster
cooking times.
When using convection baking with a single rack, place the oven rack in position 4. If cooking on
multiple racks, place the oven racks in positions 2 and 5 or positions 2, 4 and 6.
When baking a cake, using the bake mode will produce better results.
How to set the oven for convection baking
1. Start the convection baking mode.
Press the CONY, BAKE pad. The default temperature is350°R
2. Enter the temperature you want, eg. 400°F, by using the number
pads.
3. Press the SET/START pad to begin convection baking.
4,
®
Conv. Bake and the adjusted oven temperature, eg. 375°F, will
appear in the display for 2 seconds.
The temperature display will start to change once the oven
temperature reaches 150°R
A beep will sound 6times when the adjusted oven temperature,
eg. 375°F, is reached and the display will show the auto-converted
oven temperature.
Turn off or cancel convection baking by pressing the CLEAR/OFF
pad.
Inconvection baking mode, the oven automatically reduces the set regular bakinc
temperature by 25°F to the appropriate conversion temperature.
The convection oven fan shuts off when the oven door isopened.
DO NOT leave the door open for long periods of time while using convection cooking or
you may shorten the life of the convection heating element.
34 Operatng the oven
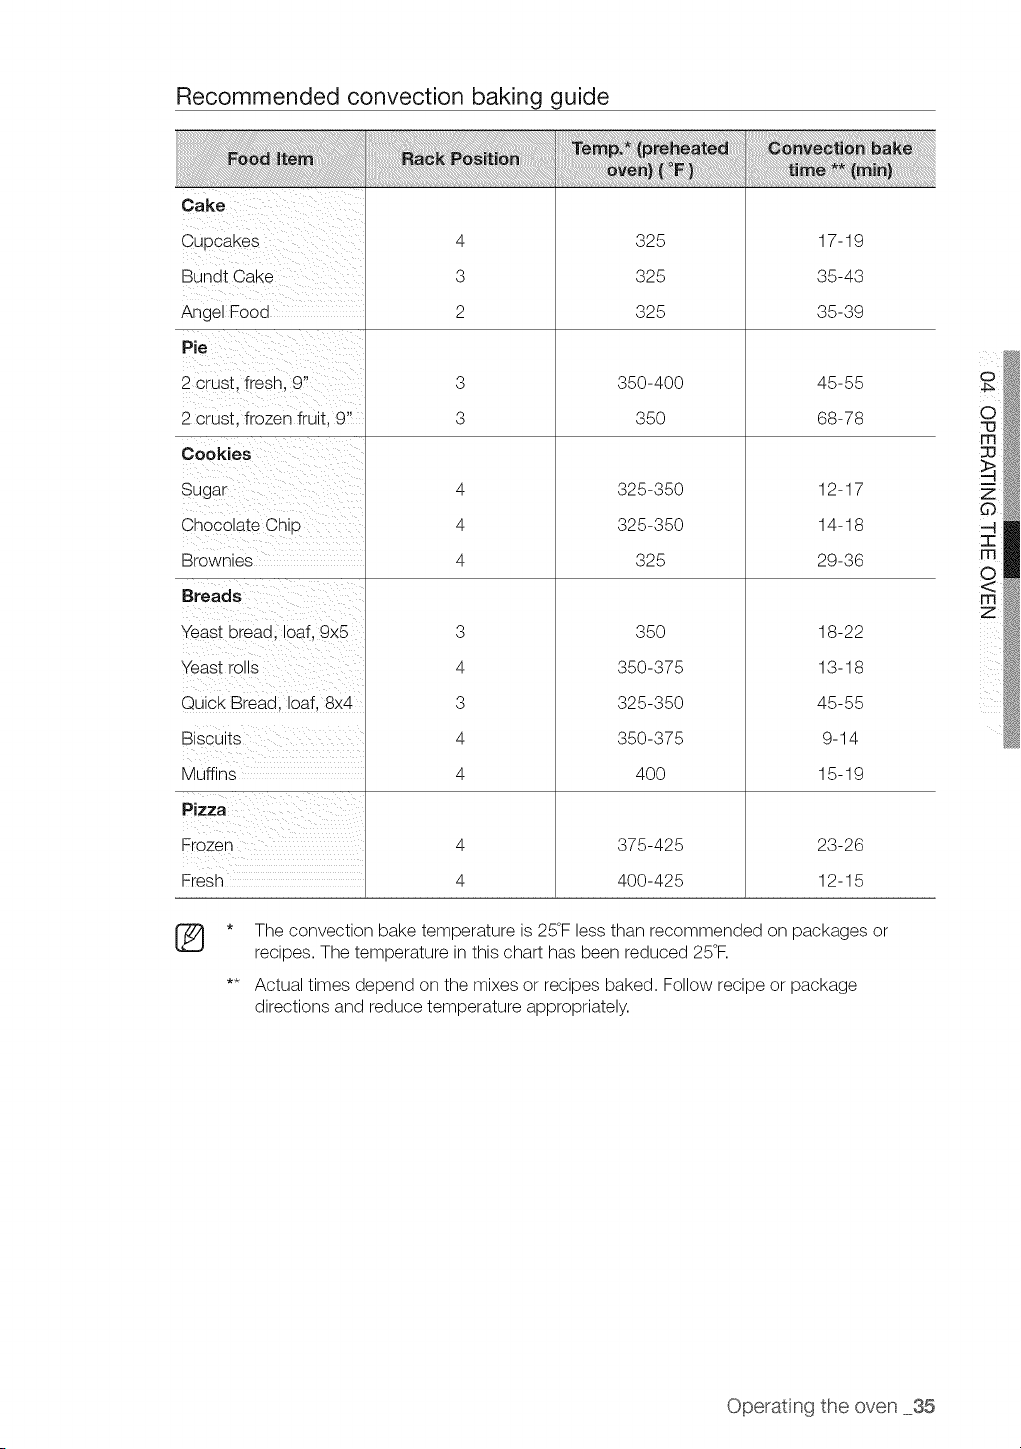
Recommended convection baking guide
Cupcakes
AngelFood
2 crust, fresh, 9"
2 crust, frozen fruit, 9"
Cookies
Chocolate Chip
Brownies
Yeast bread loaf 9x5
Yeast rolls
Quick Bread, loaf, 8x4
Muffins
Frozen
Fresh
4
3
2
3
3
4
4
4
3
4
3
4
4
4
4
325
325
325
350-400
35O
325-350
325-350
325
35O
350-375
325-350
350-375
4OO
375-425
400-425
17-19
35-43
35-39
45-55
68-78
12-17
14-18
29-36
18-22
13-18
45-55
9-14
15-19
23-26
12-15
®
The convection bake temperature is 25°Fless than recommended on packages or
recipes. The temperature in this chart has been reduced 25°F.
Actual times depend on the mixes or recipes baked. Follow recipe or package
directions and reduce temperature appropriately.
Operat ng the oven 35
CONVECTION ROASTING
Convection roasting isgood for cooking large tender cuts of meat, uncovered.
Heat comes from the top heating element. The convection fan circulates the heated airevenly
over and around the food. Meat and poultry are browned on allsides as ifthey were cooked on a
rotisserie. The heated airseals in juices quickly for a moist and tender product while, at the same
time, creating a rich golden brown exterior.
How to set the oven for convection roasting
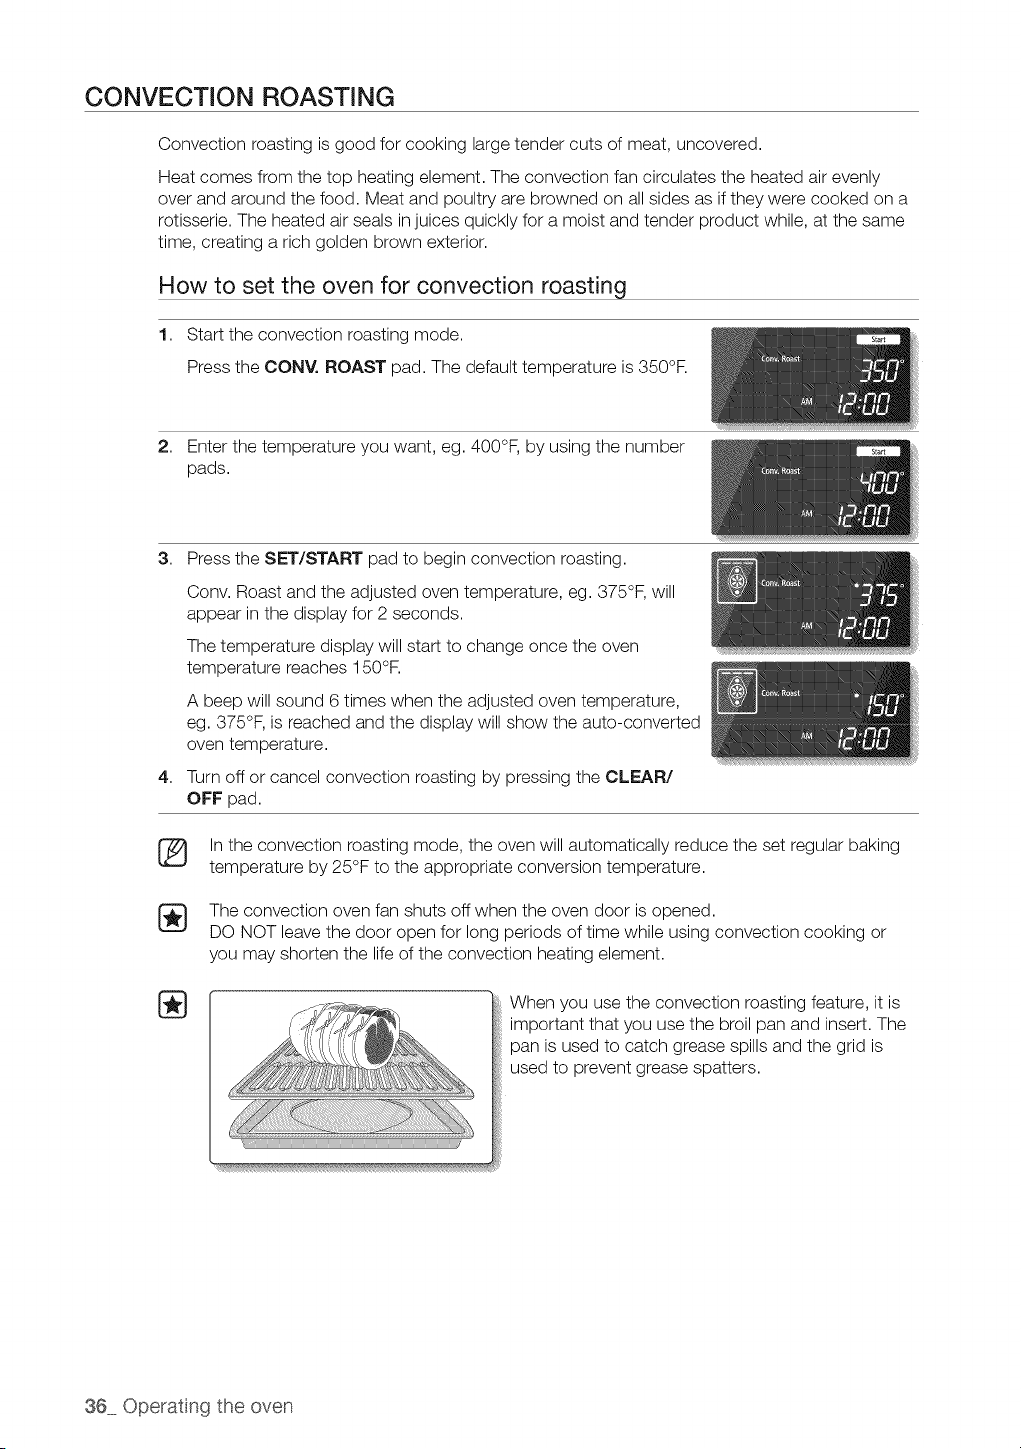
1. Start the convection roasting mode.
Press the CONY. ROAST pad. The default temperature is350°R
2. Enter the temperature you want, eg. 400°F, by using the number
pads.
3. Press the SET/START pad to begin convection roasting.
4,
®
®
Conv. Roast and the adjusted oven temperature, eg. 375°F, will
appear in the display for 2 seconds.
The temperature display will start to change once the oven
temperature reaches 150°R
A beep will sound 6times when the adjusted oven temperature,
eg. 375°F, is reached and the display wi!! show the auto-converted
oven temperature.
Turn off or cancel convection roasting by pressing the CLEAR/
OFF pad.
Inthe convection roasting mode, the oven will automatically reduce the set regular baking
temperature by 25°F to the appropriate conversion temperature.
The convection oven fan shuts off when the oven door isopened.
DO NOT leave the door open for long periods of time while using convection cooking or
you may shorten the life of the convection heating element.
When you use the convection roasting feature, it is
important that you use the broil pan and insert. The
pan is used to catch grease spills and the grid is
used to prevent grease spatters.
36 Operatng the oven

Recommended convection roasting guide
Beef
Rib Roast
RibEyeRoast,
(boneless)
Rump, Eye; Tip
Sirloin (boneless)
Tenderloin Roast
Pork
Loin Roast
(boneless or
bone:in)
Shoulder
Poultry
Chicken _ whole
Turkey,
unstuffed**
Turkey,
unstuffed**
Turkey,
unstuffed**
Turkey Breast
Cornish Hen
Lamb
Haii
Who,eL÷g
%
4-6
4-6
325
325
325
325
25-28
28-32
24-29
29-34
25-30
28-35
28-38
145 (med/rare)
160 (medium)
145 (med/rare)
160 (medium)
145 (med/rare)
160 (medium)
145 (med/rare)
5-8
3-6
3-4
12-15
16-20
21-25
3-8
1-11/2
3-4
6-8
35O
35O
375
325
325
325
325
35O
15-25
20-30
17-23
12-16
11-15
8-12
20-25
45-75 (total time)
170
16O
18O
18O
18O
18O
17O
18O
325
325
25-30
30-35
25-30
30-35
160 (medium)
170 (well)
160 (medium)
170 (well)
* Roasting times are approximate and may vary depending on the shape of the meat.
The convection roast temperature is 25°Fless than recommended on packages or
recipes. The temperature in this chart has been reduced 25°R
** Stuffed turkey requires additional roasting time. The minimum safe temperature for
stuffing in poultry is 165°R
Operat ng the oven 37
TIMED COOKING
Intimed cooking, the oven turns on immediately and cooks for the length oftime you select. At
the end ofthe cooking time, the oven turns off automatically.
• You can usethe timed cooking feature only with another cooking operation (bake, convection
bake, or convection roast).
• You can set the oven for timed cooking before setting other cooking operations.
• The clock must be set to the current time.
How to set the oven for timed cooking
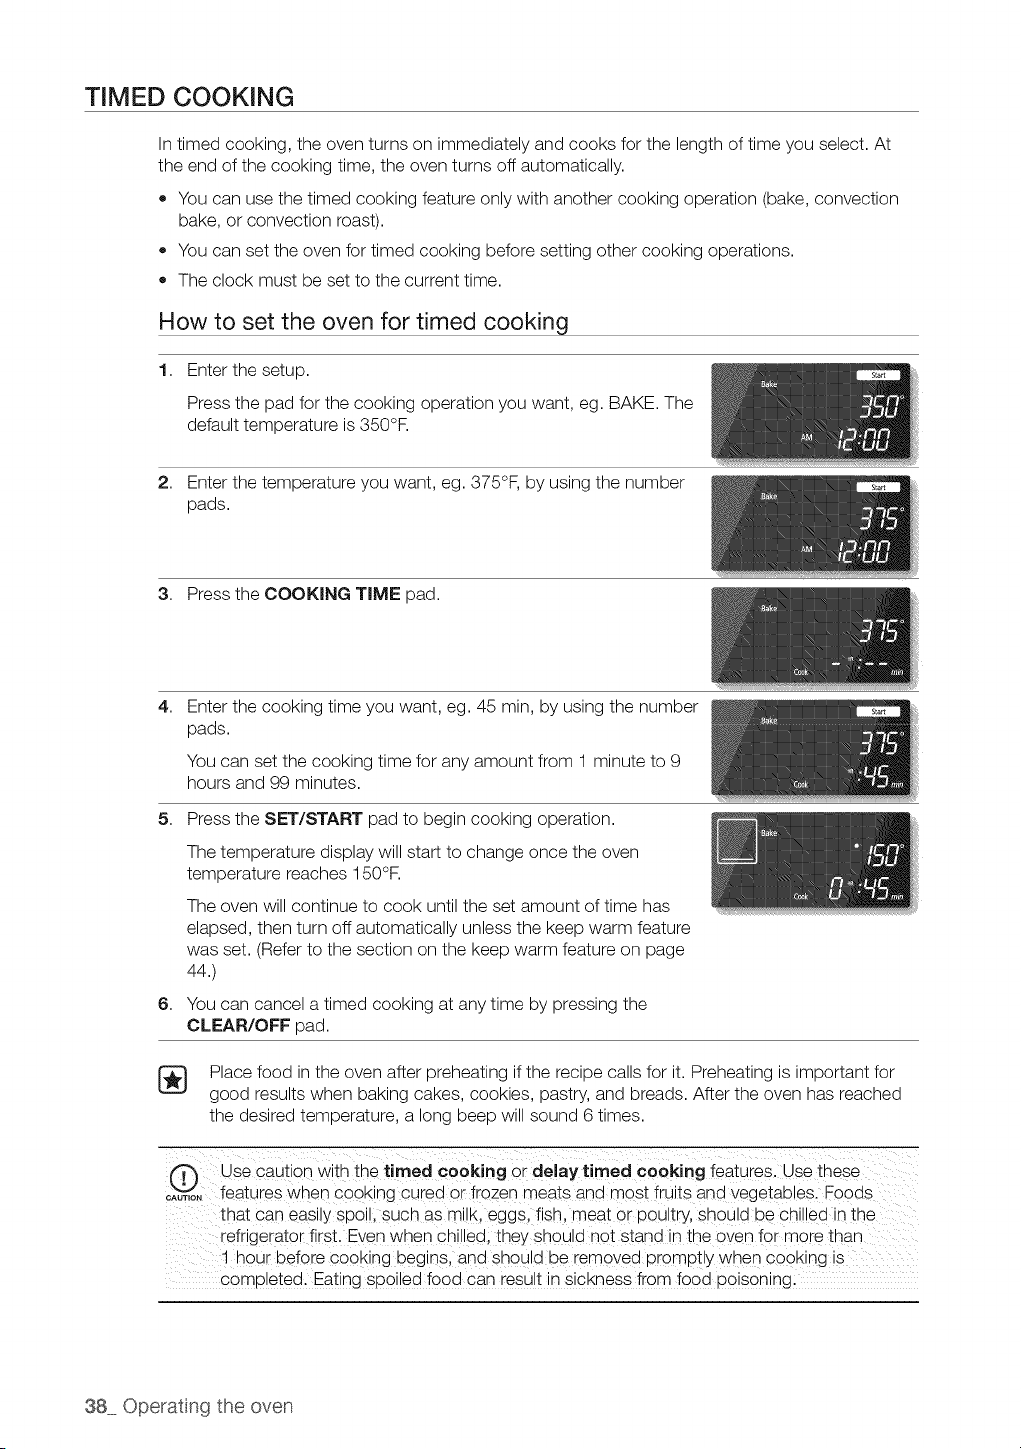
1. Enter the setup.
Press the pad for the cooking operation you want, eg. BAKE. The
default temperature is 350°R
2. Enter the temperature you want, eg. 375°F, by using the number
pads.
3. Press the COOKING TIME pad.
4,
Enter the cooking time you want, eg. 45 min, by using the number
pads.
You can set the cooking time for any amount from 1 minute to 9
hours and 99 minutes.
5. Press the SET/START pad to begin cooking operation.
6,
The temperature display will start to change once the oven
temperature reaches 150°R
The oven will continue to cook until the set amount oftime has
elapsed, then turn off automatically unless the keep warm feature
was set. (Refer to the section on the keep warm feature on page
44.)
You can cancel a timed cooking at any time by pressing the
CLEAR/OFF pad.
Place food inthe oven after preheating ifthe recipe calls for it. Preheating isimportant for
good results when baking cakes, cookies, pastry, and breads. After the oven has reached
the desired temperature, a long beep will sound 6 times.
O Use caution with the timed cooking Ordelaytimed cooking features. Use these
_;..... features when cook ng cured or frozen meats and m0st fru ts and vegetab es, Fo0ds
that can easi!y spoi!i such as mi!k, eggs, fish, meat or poultry, should be chi!!ed in the
refrigerator first. Even when chilled; they should not stand in the oven for more than
! hour before Cooking begins, and sh0uld be removed promptly when cooking is
comp!eted, Eating spoi!ed food can result in sickness from food poisoningl
38 Operatng the oven
DELAY TIMED COOKING
Ina delay timed cooking, the oven's timer turns the oven on and off attimes you select in
advance.
• You can use the delay timed cooking feature only with another cooking operation (bake,
convection bake, or convection roast).
• You can set the oven for a delay timed cooking before setting other cooking operations.
• The clock must be set to the current time.
Flow to set the oven for delay timed cooking
1. Position the oven rack(s) and place the food in the oven.
2. Enter the setup.
Press the pad for the cooking operation you want, eg. BAKE. The
default temperature is350°R
3. Use the number pads to enter the temperature you want, eg.
375°R
4. Press the COOKING TIME pad.
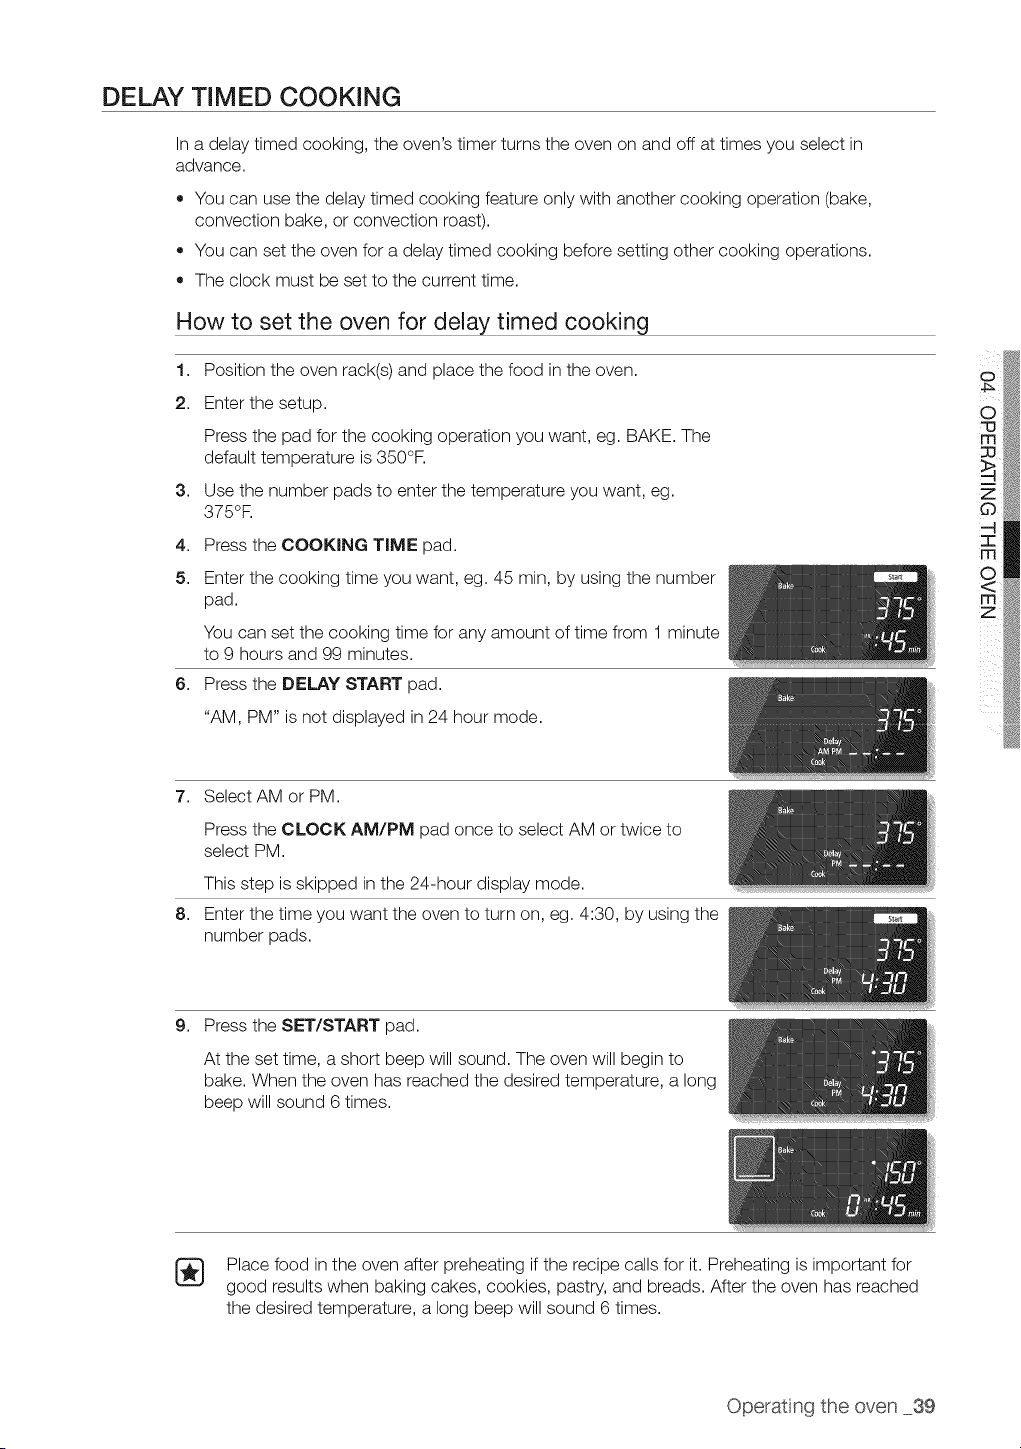
5. Enter the cooking time you want, eg. 45 min, by using the number
pad.
You can set the cooking time for any amount of time from 1 minute
to 9 hours and 99 minutes.
6. Press the DELAY START pad.
"AM, PM" is not displayed in 24 hour mode.
7. Select AM or PM.
Press the CLOCK AM/PM pad once to select AM or twice to
select PM.
This step is skipped in the 24-hour display mode.
8. Enter the time you want the oven to turn on, eg. 4:30, by using the
number pads.
9. Press the SET/START pad.
At the set time, a short beep will sound. The oven will begin to
bake. When the oven has reached the desired temperature, a long
beep will sound 6times.
[_ Place food in the oven after preheating ifthe recipe calls for it. Preheating is important for
good results when baking cakes, cookies, pastry, and breads. After the oven has reached
the desired temperature, a long beep will sound 6 times.
Operatng the oven 39
BROILING
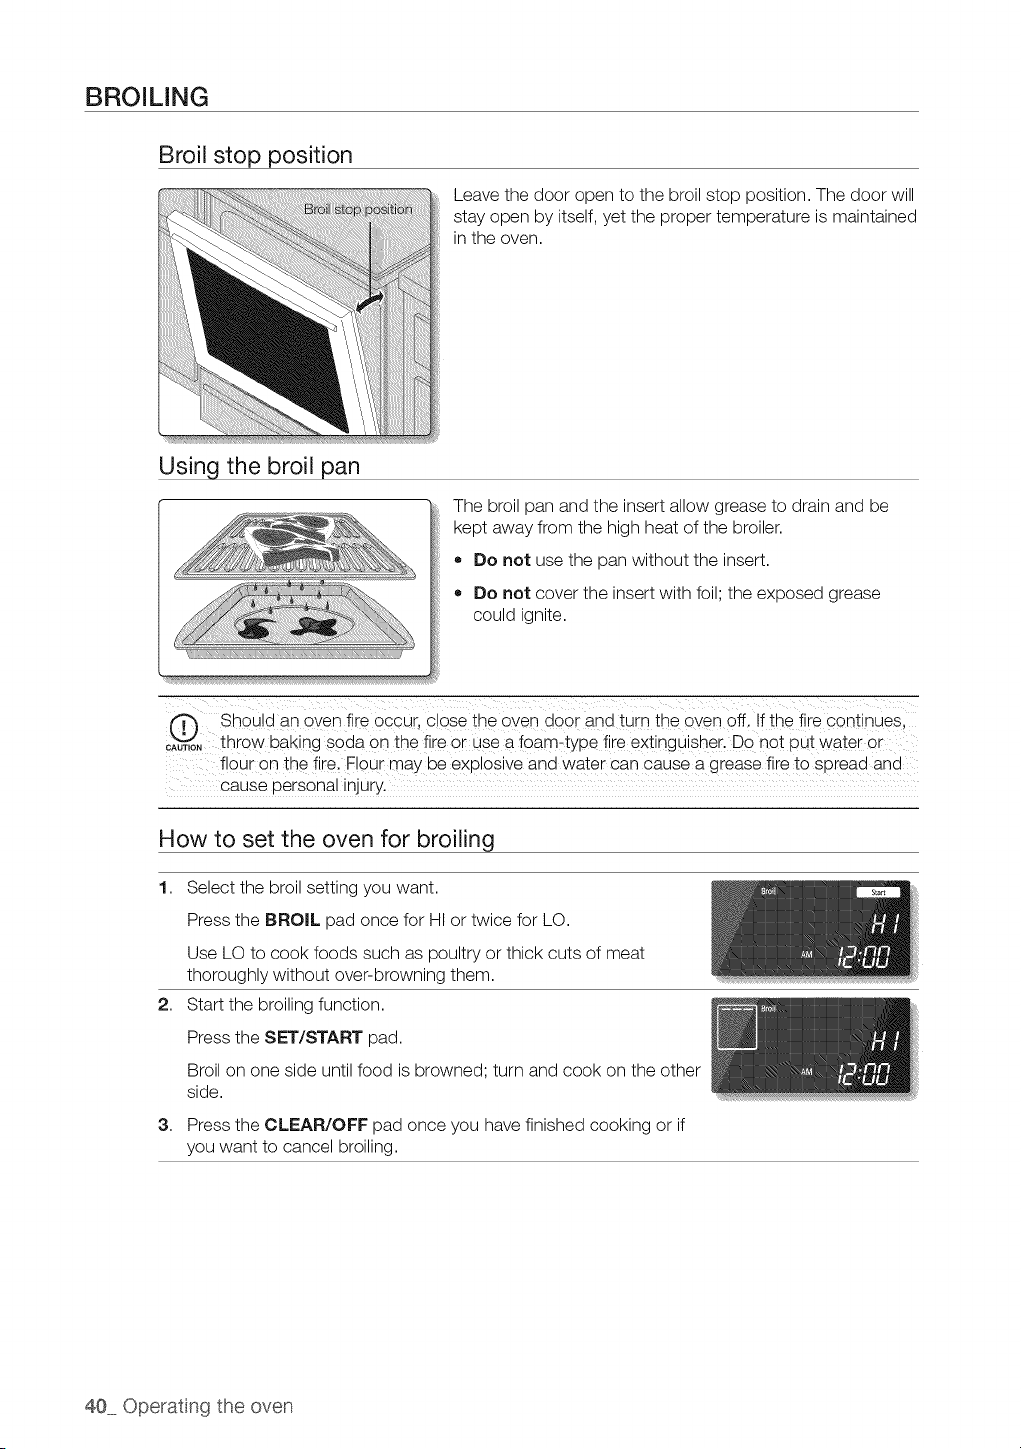
Broil stop position
Using the broil pan
Leave the door open to the broil stop position. The door will
stay open by itself, yet the proper temperature is maintained
in the oven.
The broil pan and the insert allow grease to drain and be
kept away from the high heat of the broiler.
o Do not usethe pan without the insert.
o Do not cover the insert with foil; the exposed grease
could ignite.
Should an oven fire occur, close the oven door and turn the oven off. If the fire Continues,
"_u,,oN throw baking SOda0n the fireoiuse a foam typeiire extingUisheil DQnot PutWateior
flour on the fire. Flour may beexplosive and water can cause a grease fire to spread and
cause personal injury.
How to set the oven for broiling
1. Select the broil setting you want.
Press the BROIL pad once for HI or twice for LO.
Use LO to cook foods such as poultry or thick cuts of meat
thoroughly without over-browning them.
2. Start the broiling function.
Press the SET/START pad.
Broil on one side untilfood isbrowned; turn and cook on the other
side.
3. Press the CLEAR/OFF pad once you have finished cooking or if
you want to cancel broiling.
40 Operatng the oven
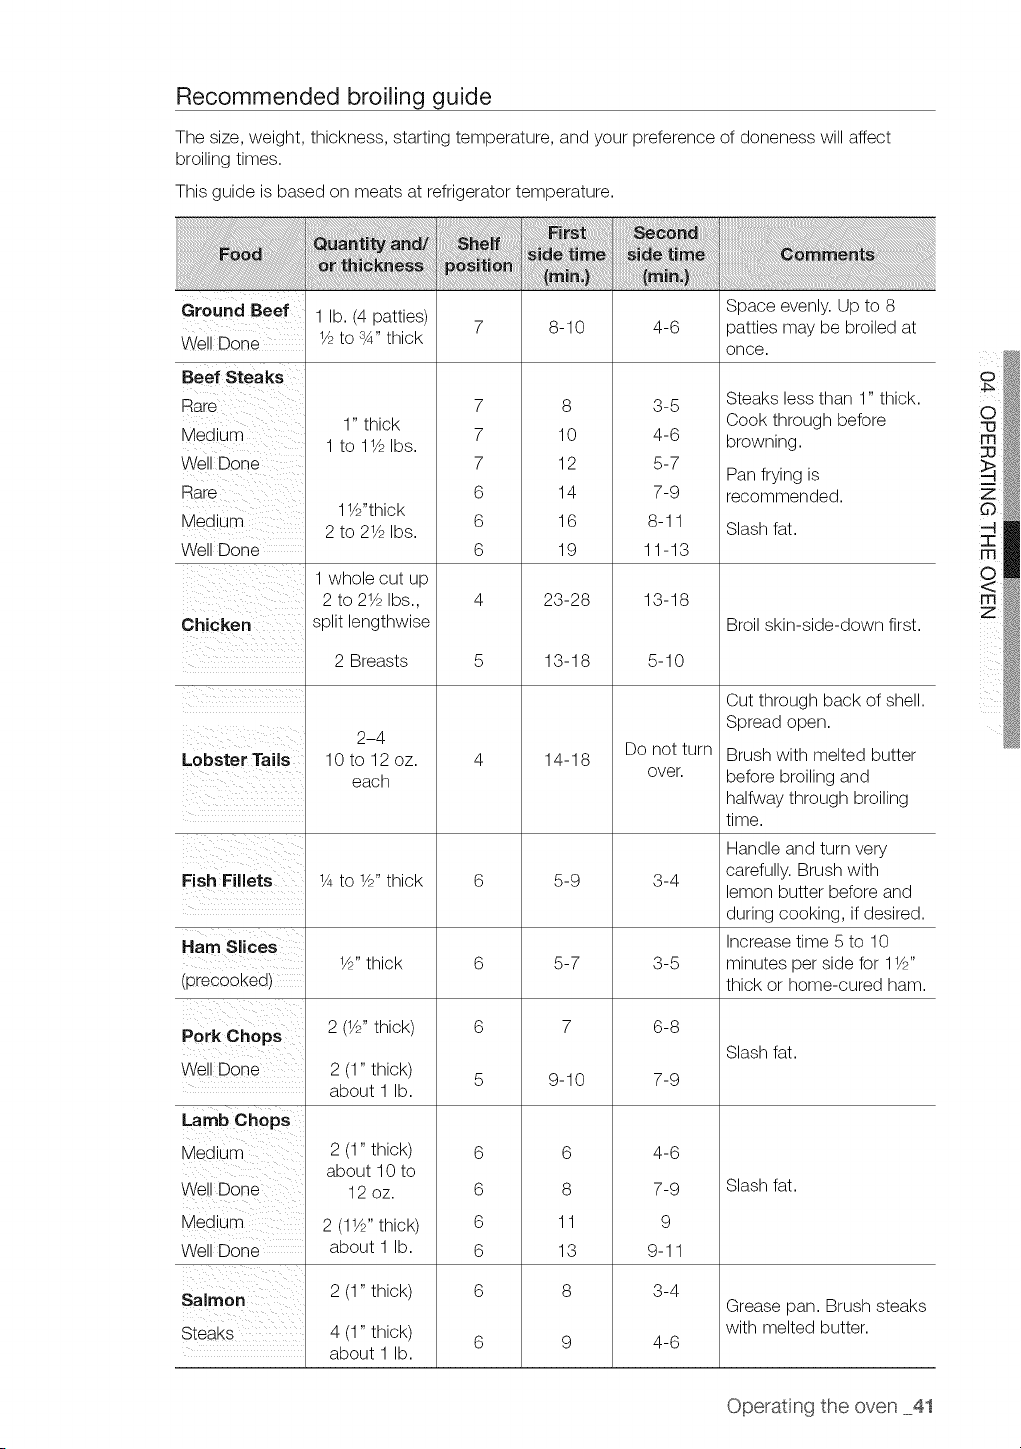
Recommended broiling guide
The size, weight, thickness, starting temperature, and your preference of doneness will affect
broiling times.
This guide isbased on meats at refrigerator temperature.
Ground Beef
Well Done
BeefSteaks
Rare
Medium
!
Well Done
Rare
MediUm
Well Done
1 lb. (4 patties)
lf2 to 3_,,thick
1" thick
1 to 11/2Ibs.
11/2"thick
2 to 21/2Ibs.
1 whole cut up
2 to 21/2Ibs.,
7
7
7
6
6
6
8-10
8
10
12
14
16
19
23-28
4-6
3-5
4-6
5-7
7-9
8-11
11-13
13-18
Space evenly. Up to 8
patties may be broiled at
once.
Steaks less than 1" thick.
Cook through before
browning.
Pan frying is
recommended.
Slash fat.
Chicken split lengthwise
2 Breasts
Lobster Tails
2-4
10 to 12 oz.
each
13-18
14-18
5-10
Do not turn
over.
Broil skin-side-down first.
Cut through back of shell.
Spread open.
Brush with melted butter
before broiling and
halfway through broiling
time.
Handle and turn very
Fish Fillets 1/4to Y2"thick 6 5-9 3-4 carefully. Brush with
lemon butter before and
during cooking, if desired.
Ham Slices Increase time 5to 10
YZ'thick 6 5-7 3-5 minutes per side for 1YZ'
(precooked) thick or home-cured ham.
Pork Chops 2 (1_2"thick) 6 7 6-8
Slash fat.
Well Done 2 (1" thick) 5 9-10 7-9
about 1 lb.
2 (1" thick)
about 10 to
12 oz.
6
6
6
6
6
4-6
7-9
9
9-11
3-4
Lamb Chops
Medium
Well Done
MediUm
Well Done
2 (1YZ' thick)
about 1 lb.
6
8
11
13
8
Slash fat.
Salmon 2 (1" thick)
Grease pan. Brush steaks
Steaks 4 (1" thick) 6 9 4-6 with melted butter.
about 1 lb.
Operat ng the oven 41
USING THE CUSTOM COOK FEATURE
By using the custom cook feature, you can record up to 3 different recipe settings. The feature
may be used for baking, convection baking, or convection roasting. It will not work with any other
function, including the delay start feature.
Flow to record a recipe setting
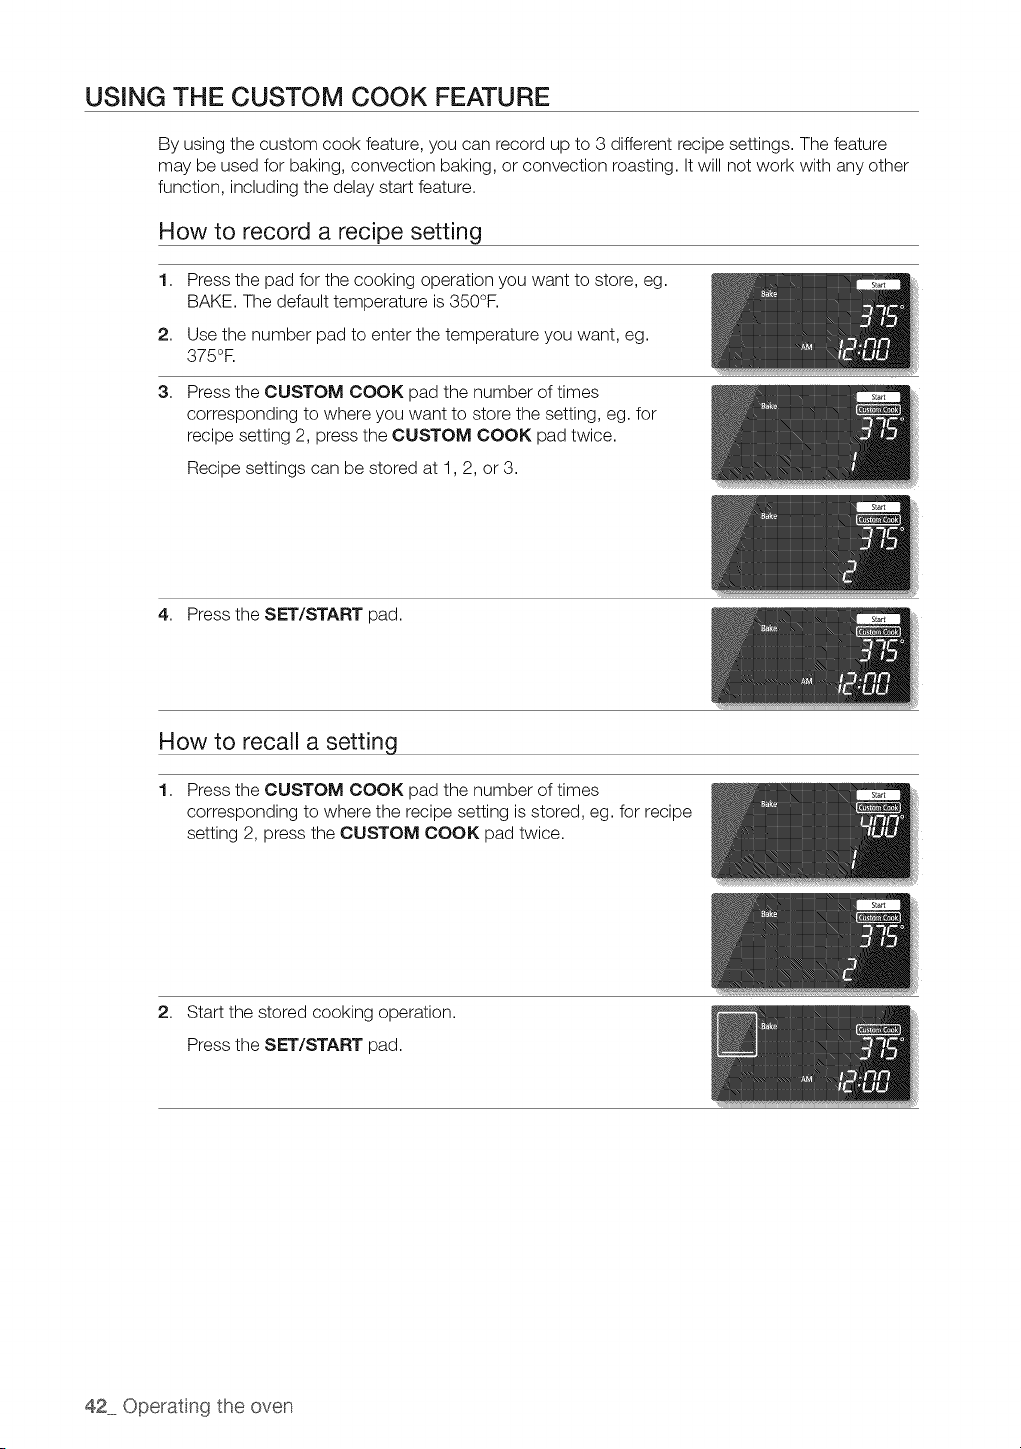
1,
2,
3,
Press the pad for the cooking operation you want to store, eg.
BAKE. The default temperature is350°F.
Use the number pad to enter the temperature you want, eg.
375°R
Press the CUSTOM COOK pad the number of times
corresponding to where you want to store the setting, eg. for
recipe setting 2, press the CUSTOM COOK pad twice.
Recipe settings can be stored at 1,2, or 3.
4. Press the SET/START pad.
Flow to recall a setting
1. Press the CUSTOM COOK pad the number of times
corresponding to where the recipe setting isstored, eg. for recipe
setting 2, press the CUSTOM COOK pad twice.
2,
Start the stored cooking operation.
Press the SET/START pad.
42 Operatng the oven
PROOFING
The proofing feature maintains a warm environment useful for rising yeast-leavened products.
How to set the oven for proofing
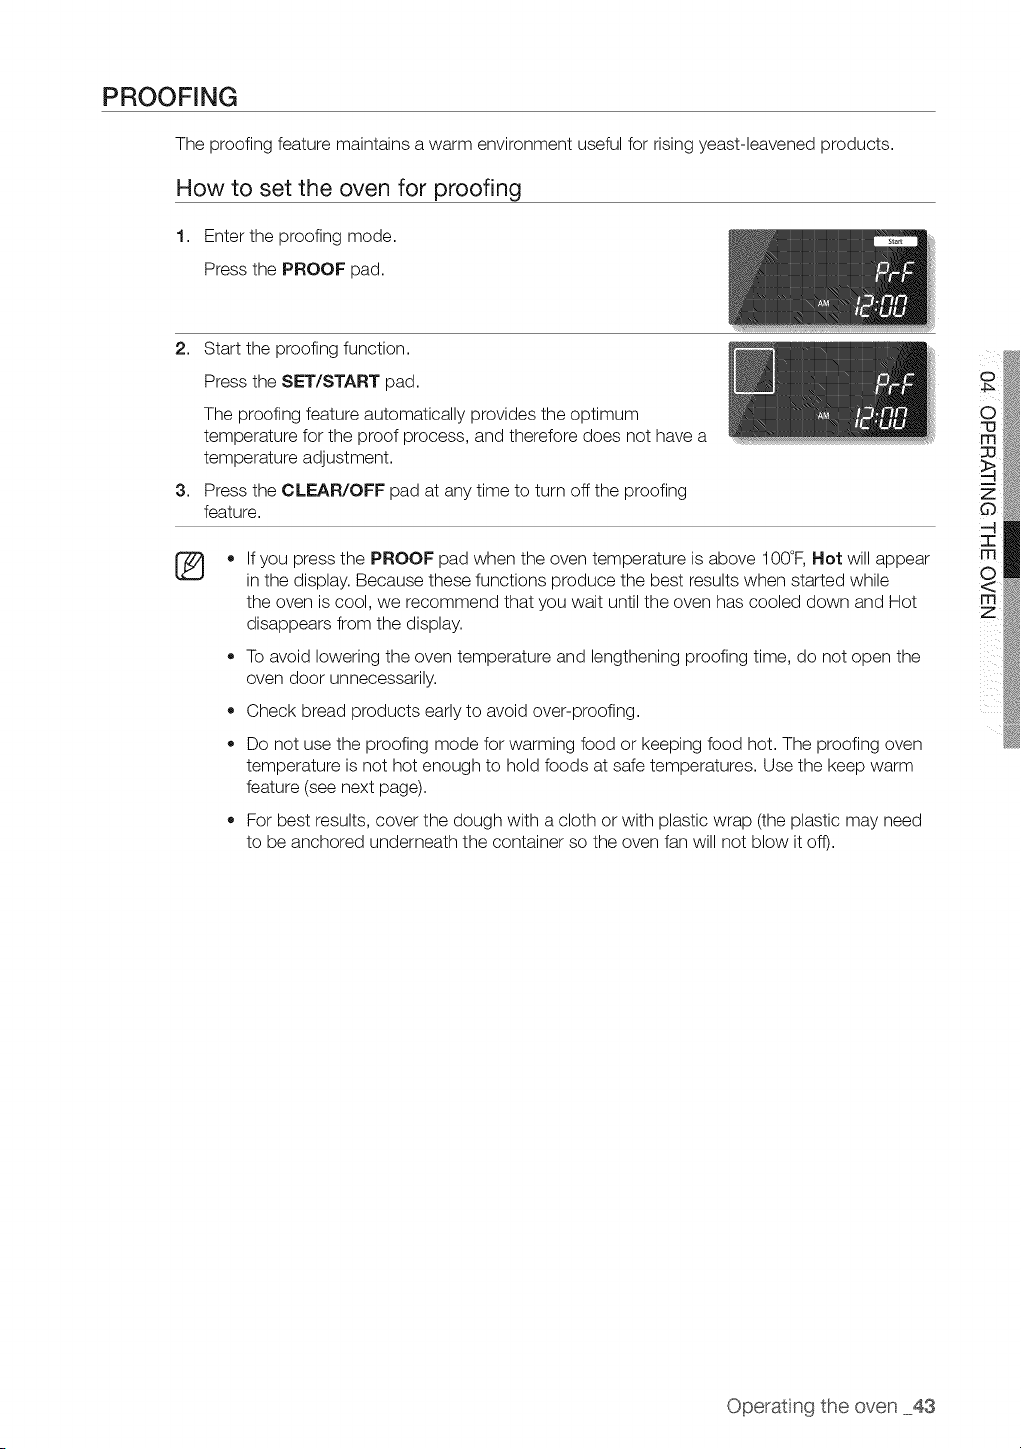
1. Enter the proofing mode.
Press the PROOF pad.
2. Start the proofing function.
Press the SET/START pad.
The proofing feature automatically provides the optimum
temperature for the proof process, and therefore does not have a
temperature adjustment.
3. Press the CLEAR/OFF pad at any time to turn off the proofing
feature.
o
o
If you press the PROOF pad when the oven temperature is above 100°F, Hot will appear
in the display. Because these functions produce the best results when started while
the oven iscool, we recommend that you wait until the oven has cooled down and Hot
disappears from the display.
To avoid lowering the oven temperature and lengthening proofing time, do not open the
oven door unnecessarily.
Check bread products early to avoid over-proofing.
Do not use the proofing mode for warming food or keeping food hot. The proofing oven
temperature isnot hot enough to hold foods at safe temperatures. Use the keep warm
feature (see next page).
For best results, cover the dough with a cloth or with plastic wrap (the plastic may need
to be anchored underneath the container so the oven fan will not blow it off).
Operatng the oven 43
USING THE KEEP WARM FUNCTION
The keep warm feature will maintain an oven temperature of 170°R You should not use this feature
to reheat cold foods. The keep warm feature will keep cooked food warm for serving up to 3
hours after cooking has finished.
After 3 hours, the feature will shut the oven off automatically. The feature may be used without any
other cooking operations or may be set to activate after a timed or delay timed cooking operation.
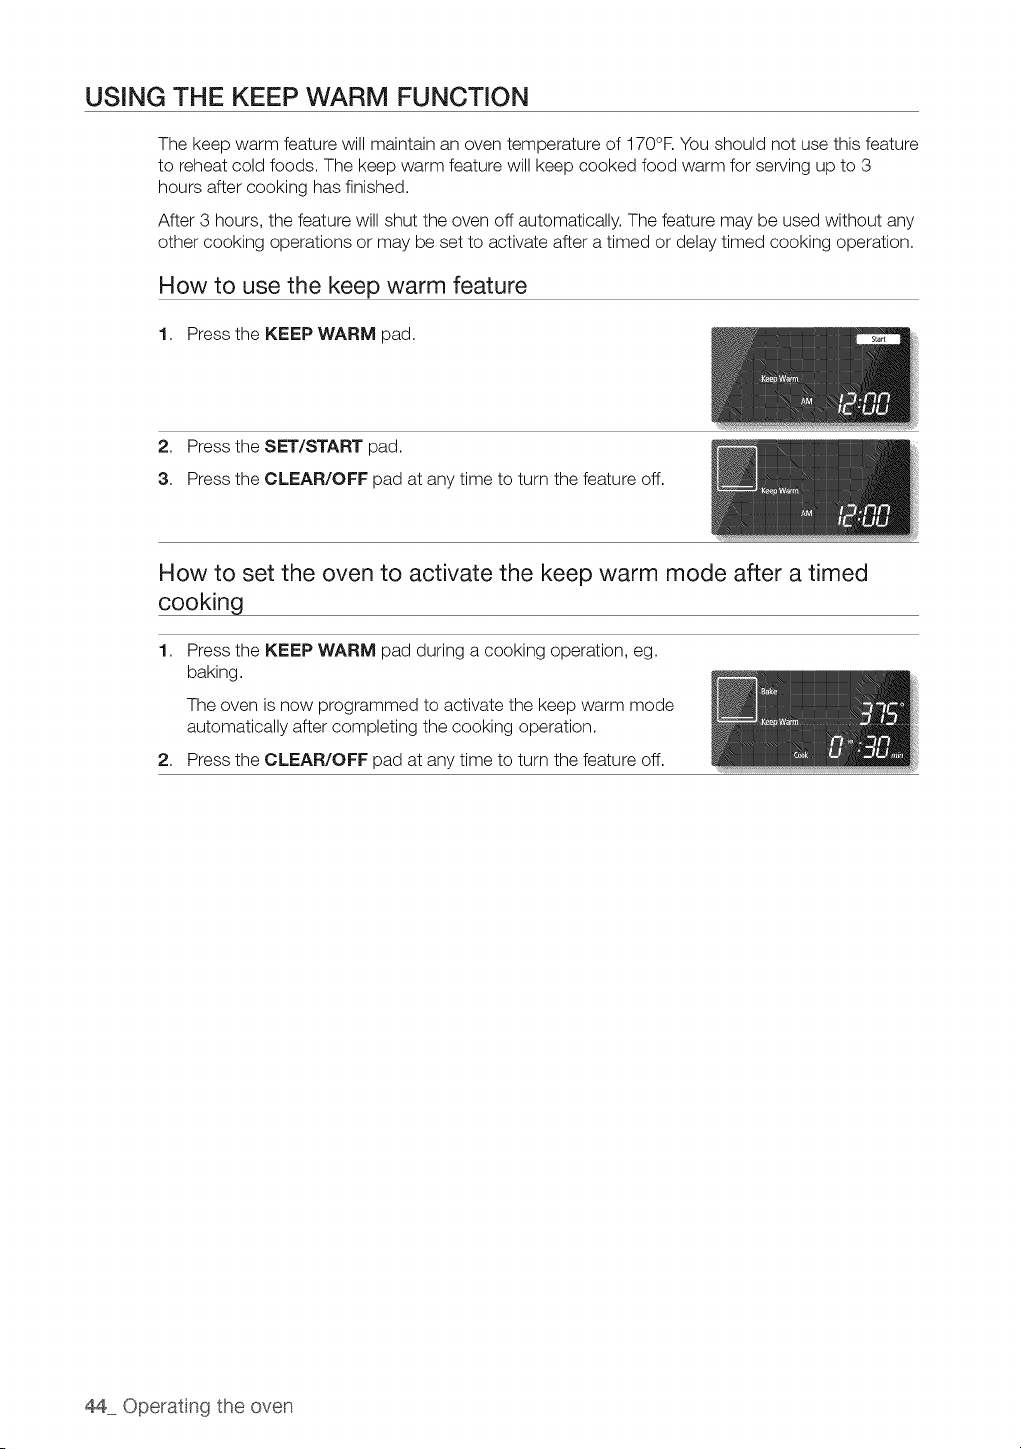
How to use the keep warm feature
1. Press the KEEP WARM pad.
2. Press the SET/START pad.
3. Press the CLEAR/OFF pad at any time to turn the feature off.
How to set the oven to activate the keep warm mode after a timed
cooking
1. Press the KEEP WARM pad during a cooking operation, eg.
baking.
The oven isnow programmed to activate the keep warm mode
automatically after completing the cooking operation.
2. Press the CLEAR/OFF pad at any time to turn the feature off.
44 Operatng the oven
EXTRA FEATURES
12 hour energy saving
With this feature, should you forget and leave the oven on, the control will automatically turn off
the oven after 12 hours during baking functions or after 3 hours during a broil function.
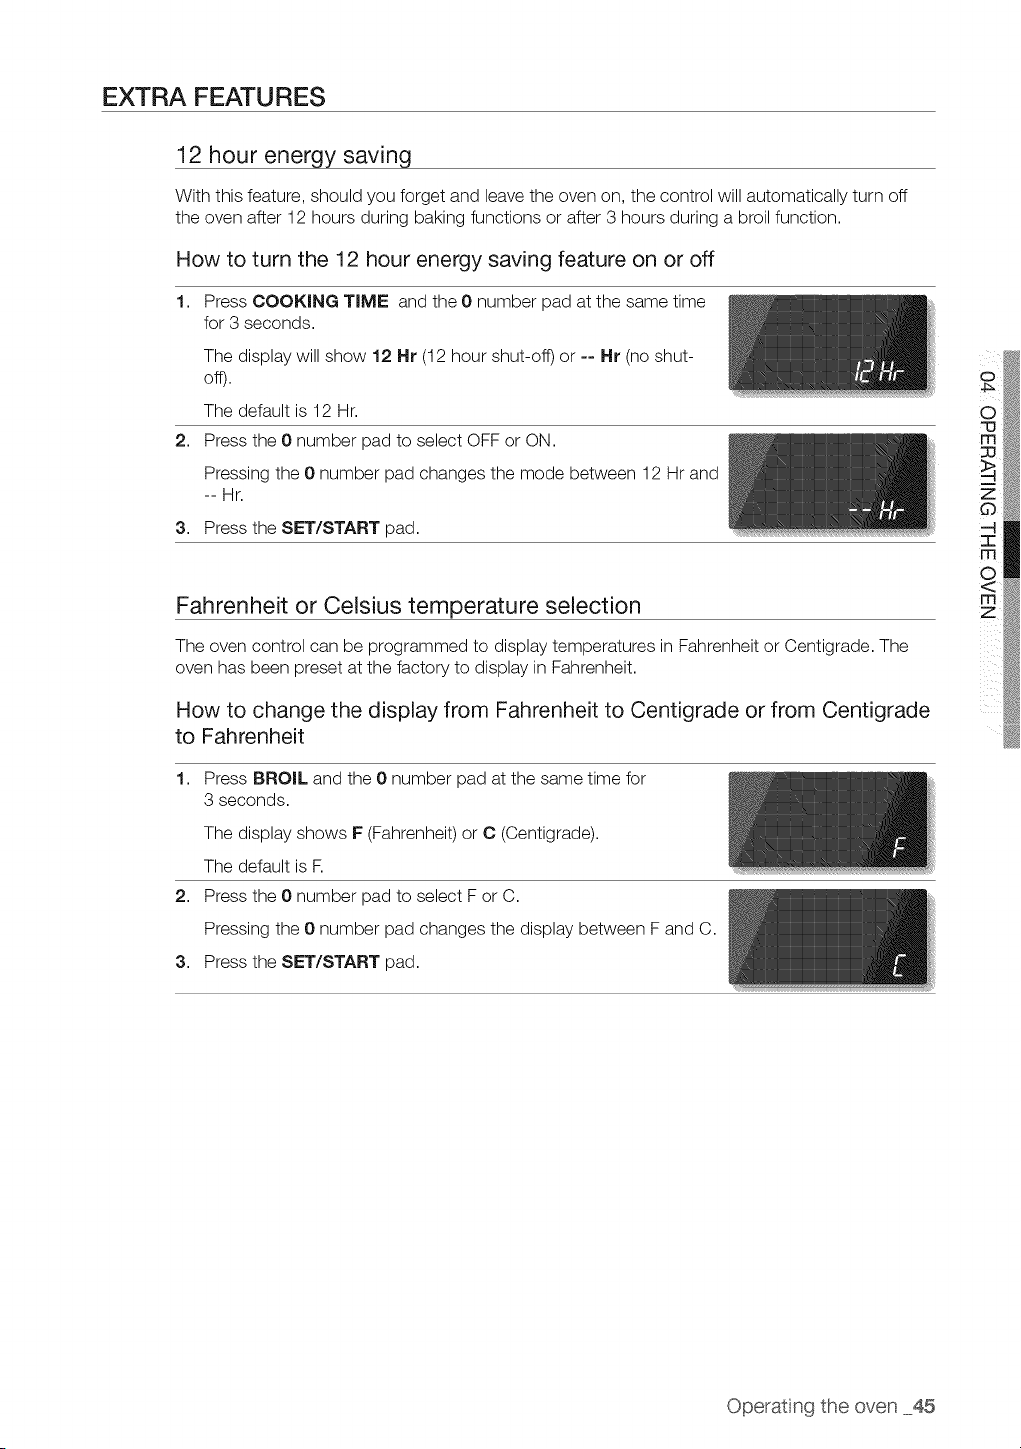
How to turn the 12 hour energy saving feature on or off
1. Press COOKING TIME and the 0 number pad atthe same time
for 3 seconds.
The display will show 12 Hr (12 hour shut-off) or -- Hr (no shut-
off).
The default is 12 Hr.
2. Press the 0 number pad to select OFF or ON.
Pressing the 0 number pad changes the mode between 12 Hr and
--Hr.
3. Press the SET/START pad.
Fahrenheit or Celsius temperature selection
The oven control can be programmed to display temperatures in Fahrenheit or Centigrade. The
oven has been preset at the factory to display in Fahrenheit.
How to change the display from Fahrenheit to Centigrade or from Centigrade
to Fahrenheit
1. Press BROIL and the 0 number pad at the same time for
3 seconds.
The display shows F (Fahrenheit) or C (Centigrade).
The default is R
2. Press the 0 number pad to select For C.
Pressing the 0 number pad changes the display between Fand C.
3. Press the SET/START pad.
Operatng the oven 45
Convection auto conversion feature
When using convection bake, the convection auto conversion feature will automatically convert
entered regular baking temperatures to convection baking temperatures.
This feature is activated so that the display will show the actual converted (reduced) temperature.
For example, ifyou enter a regular recipe temperature of 350°F and press the Set/Start pad, the
display will show the converted temperature of 325°R
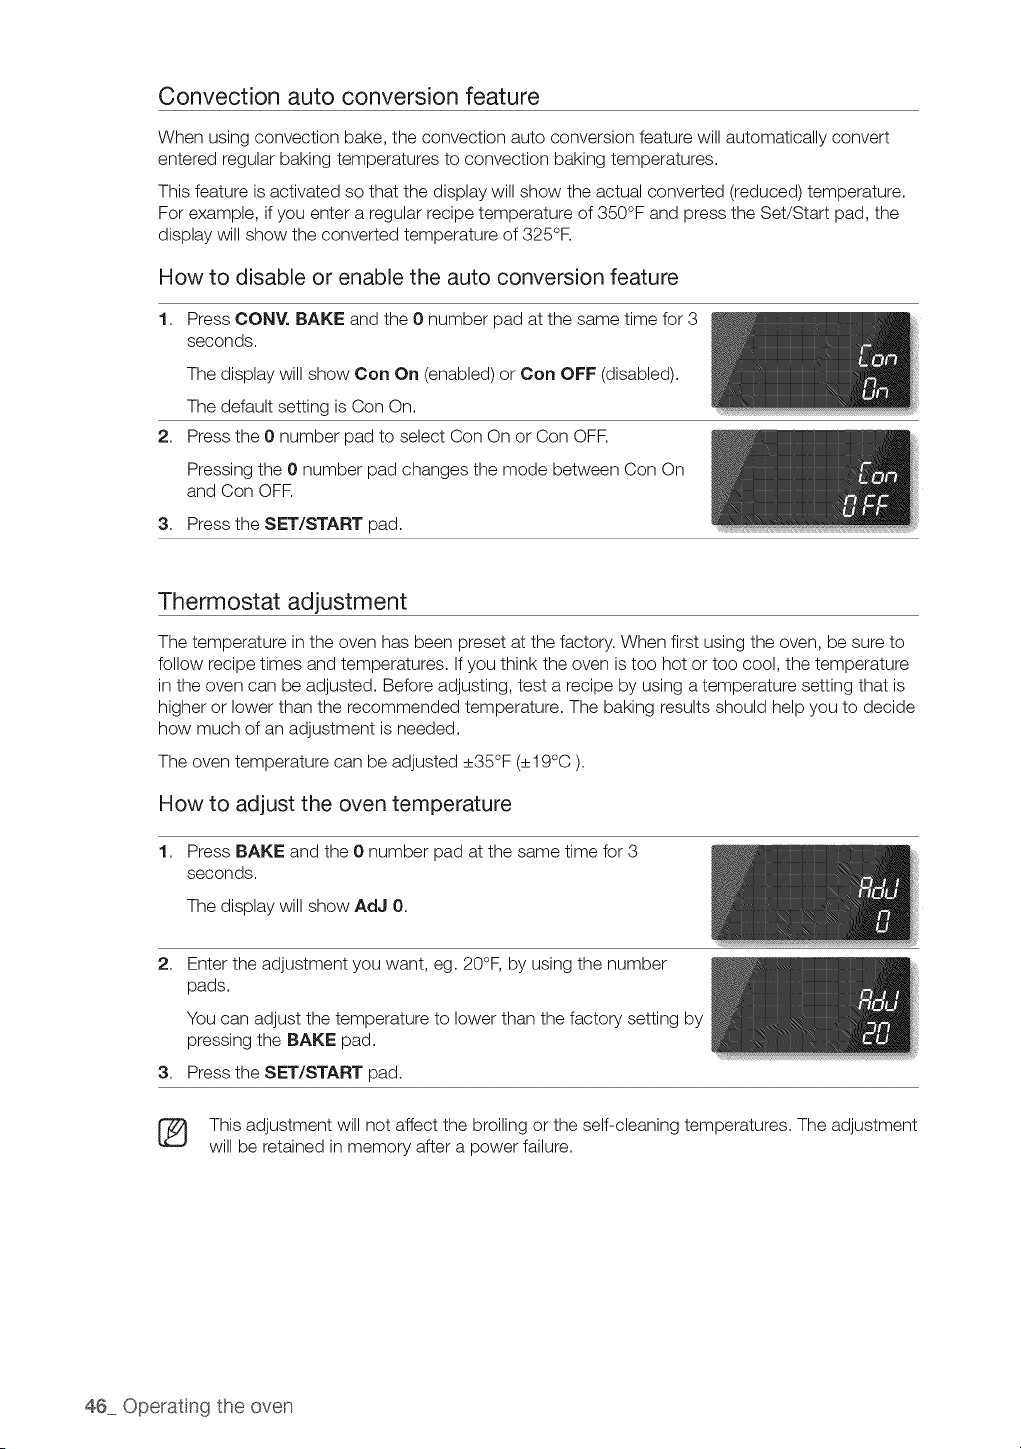
How to disable or enable the auto conversion feature
1. Press CONY. BAKE and the 0 number pad at the same time for 3
seconds.
The display will show Con On (enabled) or Con OFF (disabled).
The default setting isCon On.
2. Press the 0 number pad to select Con On or Con OFR
Pressing the 0 number pad changes the mode between Con On
and Con OFF.
3. Press the SET/START pad.
Thermostat adjustment
The temperature inthe oven has been preset at the factory. When first using the oven, be sure to
follow recipe times and temperatures. If you think the oven istoo hot or too cool, the temperature
in the oven can be adjusted. Before adjusting, test a recipe by using a temperature setting that is
higher or lower than the recommended temperature. The baking results should help you to decide
how much of an adjustment isneeded.
The oven temperature can be adjusted _+35°F (_+19°C).
How to adjust the oven temperature
1. Press BAKE and the 0 number pad atthe same time for 3
seconds.
The display will show AdJ 0.
2,
Enter the adjustment you want, eg. 20°F, by using the number
pads.
You can adjust the temperature to lower than the factory setting by
pressing the BAKE pad.
3. Press the SET/START pad.
(_ This adjustment will not affect the broiling or the self-cleaning temperatures. The adjustment
will be retained in memory after a power failure.
46 Operating the oven

Sound on/off
By using this feature, you can set the oven controls to operate silently.
How to turn the sound on or off
1. Press Oven Light and the 0 number pad atthe same time for 3
seconds.
The display will show Snd On (sound on) or Snd OFF (sound off).
The default setting isSnd On.
2. Press the 0 number pad to select OFF or ON.
Pressing the 0 number pad changes the mode between Snd On
and Snd OFF.
3. Press the SET/START pad.
Control lockout
This feature will allow you to lock the buttons on the touch pad sothey cannot be activated
accidentally.
How to activate the control lockout feature
1. Press the Hold 3 sec _ pad for 3 seconds.
The display will show Loc and a Lock icon continuously, as well as
the current time.
All functions must be cancelled before the control lockout is
activated.
This function is available under 400°F.
How to unlock the controls
1. Press the Hold 3 sec 1_ pad for 3 seconds.
Loc and the lock icon will disappear from the display.
TURNING THE OVEN LIGHT ON AND OFF
• The oven light turns on automatically when the door isopened.
• The oven light turns off automatically when the door isclosed.
• You can turn the oven light on and off manually by pressing the OVEN LIGHT pad.
Operatng the oven 47
Setting the Sabbath
(For use on the Jewish Sabbath & Holidays)
The Sabbath feature can be used with baking only. The oven temperature may be set higher
or lower after setting the Sabbath feature (theoven temperature adjustment feature should be
used only during Jewish holidays). The display, however, will not change and tones will not sound
when a change occurs. Once the oven isproperly set for baking with the Sabbath feature active,
the oven will remain continuously on until cancelled. This will override the factory preset 12 hour
energy saving feature. If the oven light isneeded during the Sabbath, press the OVEN LIGHT pad
before activating the Sabbath feature. Once the oven light isturned on and the Sabbath feature is
active, the oven light will remain on until the Sabbath feature isturned off. If the oven light needs to
be off, be sure to turn the oven light off before activating the Sabbath feature.
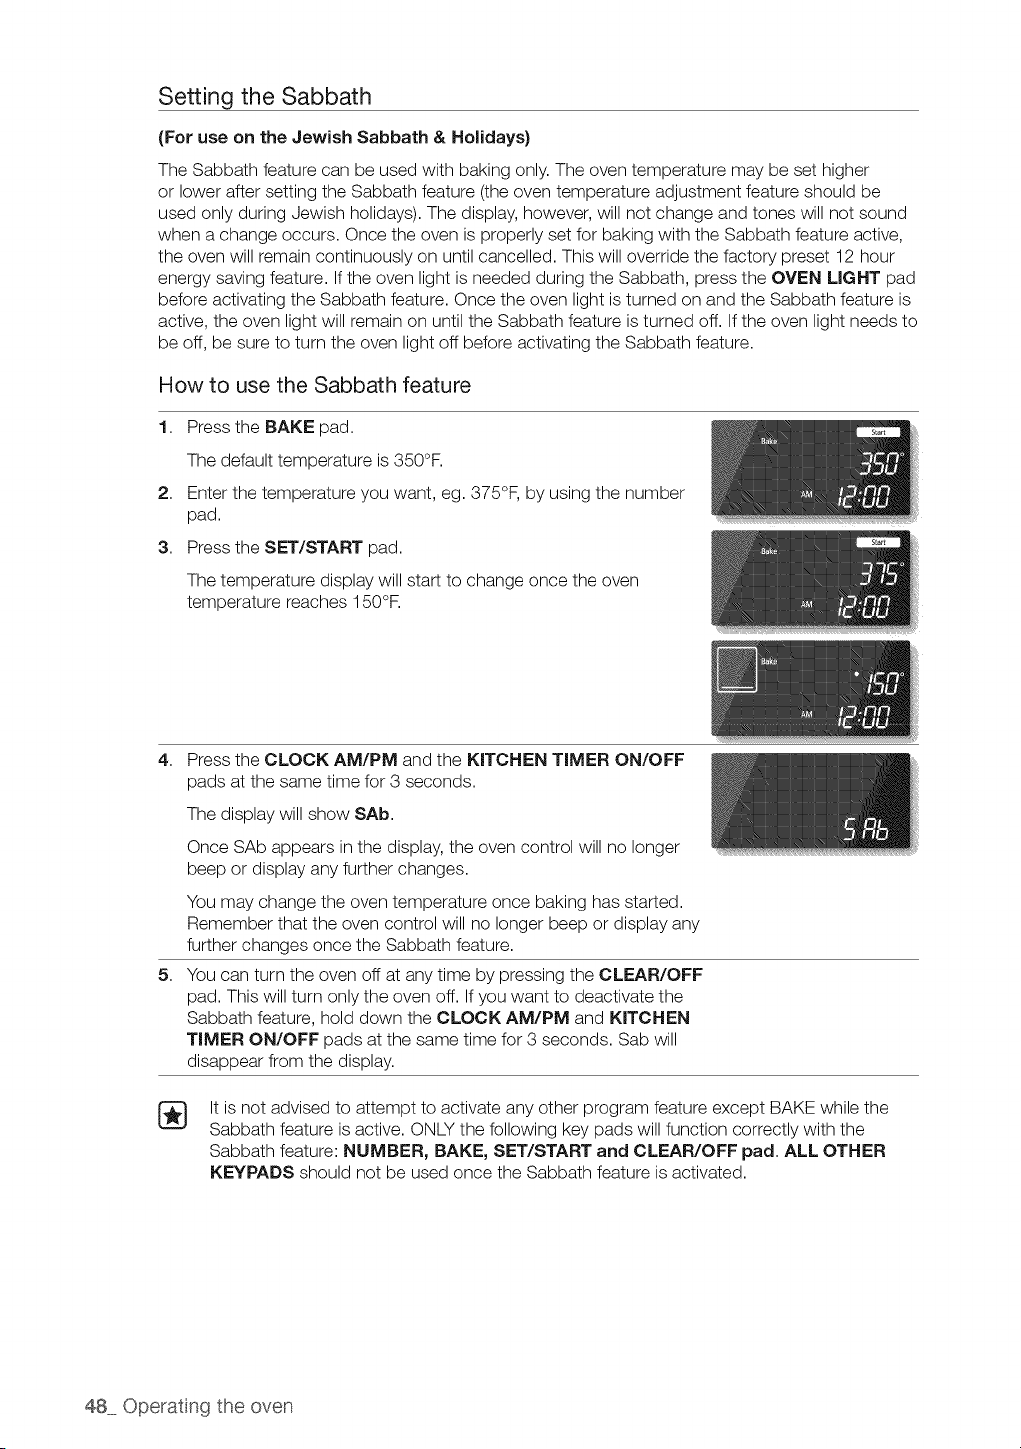
How to use the Sabbath feature
1. Press the BAKE pad.
The default temperature is 350°R
2. Enter the temperature you want, eg. 375°R by using the number
pad.
3. Press the SET/START pad.
The temperature display will start to change once the oven
temperature reaches 150°R
4,
5,
Press the CLOCK AM/PM and the KITCHEN TIMER ON/OFF
pads at the same time for 3 seconds.
The display will show SAb.
Once SAb appears in the display, the oven control will no longer
beep or display any further changes.
You may change the oven temperature once baking has started.
Remember that the oven control will no longer beep or display any
further changes once the Sabbath feature.
You can turn the oven off at any time by pressing the CLEAR/OFF
pad. This will turn only the oven off. If you want to deactivate the
Sabbath feature, hold down the CLOCK AM/PM and KITCHEN
TIMER ON/OFF pads at the same time for 3 seconds. Sab will
disappear from the display.
®
It isnot advised to attempt to activate any other program feature except BAKE while the
Sabbath feature isactive. ONLYthe following key pads will function correctly with the
Sabbath feature: NUMBER, BAKE, SET/START and CLEAR/OFF pad. ALL OTHER
KEYPADS should not be used once the Sabbath feature is activated.
48 Operatng the oven
SELF-CLEANING
This self-cleaning oven uses high temperatures (well above cooking temperatures) to burn off
leftover grease and residue completely or reduce them to a finely powdered ash that you can wipe
away with a damp cloth.
® During the self-cleaning cycle, the outside of the range win become very not to the
oAuT,o, touch. Do not eave small cP dren unattended near the aDDilance.
• The healtn of some birds isextremely sensitive to the fumes given off during the self-
cleaning cycle of any range. Move birds to anotner we -ventilated room.
De not ne the oven wans. racKs, bottom or any other Dartof the "angewith
aluminum foil. Doing so wm result in Door neat distribution, produce Door DaKmg
results and cause permanent damage to the oven qtenor _a_ummumfoi will melt to
the interior surface ofthe oven,.
• Do not force the oven door open. Th_s can damage the automatic door locking
svstem. Use care wnen opening the oven odor after the se f-cleaning cycle is
complete. Stand to the side of the oven wnen opening the door to allow hot airor
steam to escape. The oven may still be VERY HOT.
Before a self-cleaning cycle
FiI. 1 _ -
clean the
over door
o
o
We recommend venting your kitchen with an open window
or using a ventilation fan or hood during the self-cleaning
cycle.
Remove the wire rack, broil pan, broil pan insert, all
cookware and any aluminum foil from the oven.
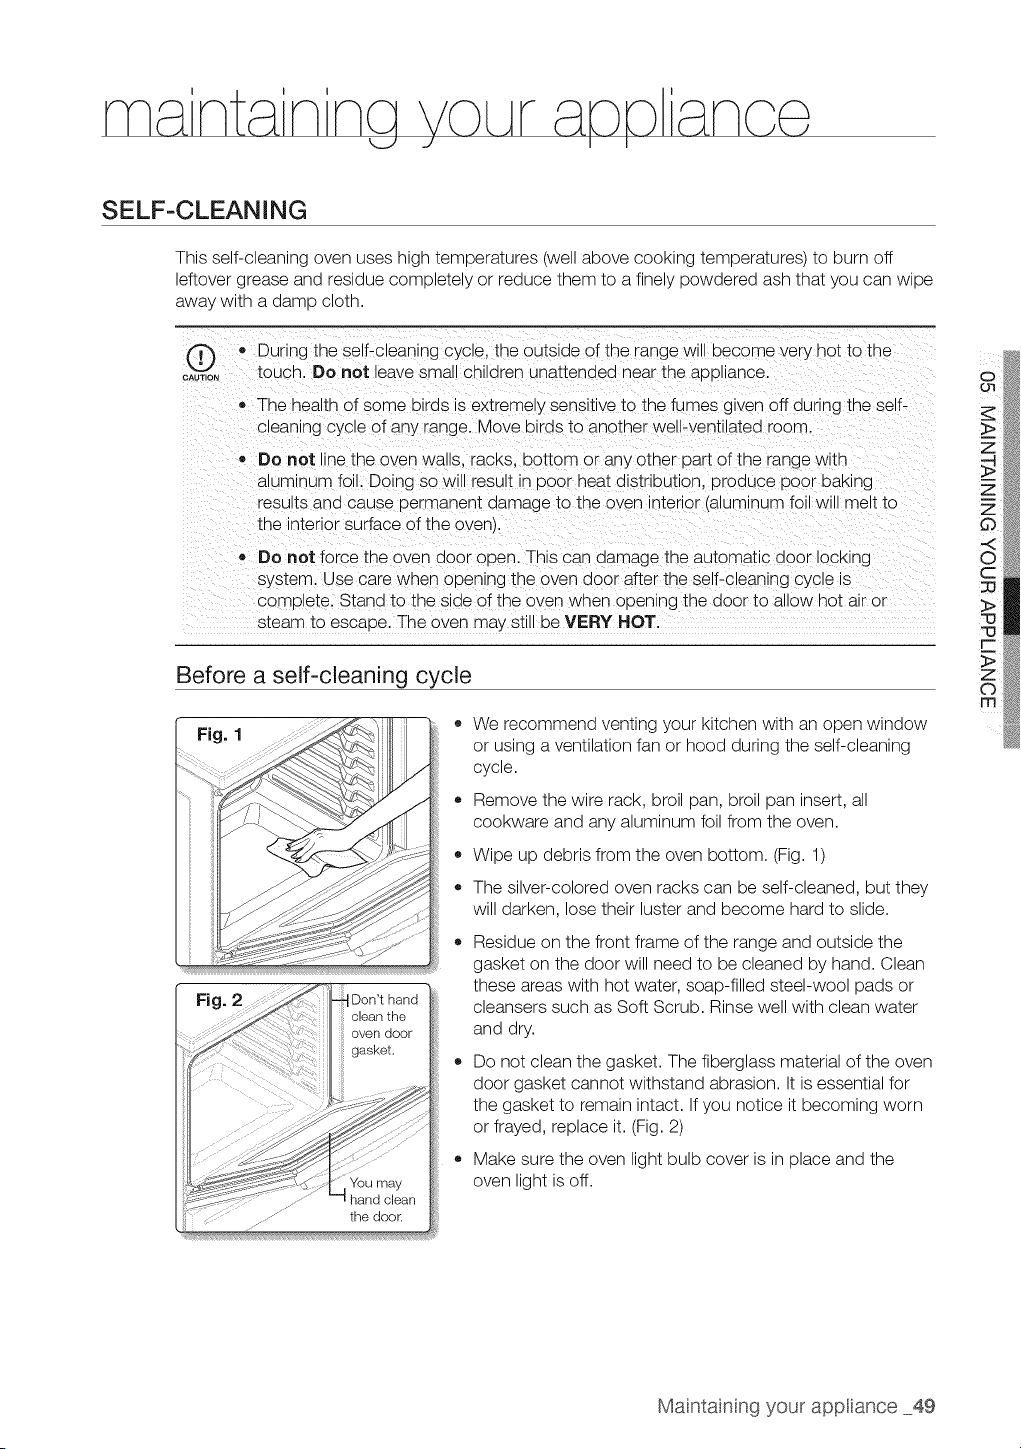
Wipe up debris from the oven bottom. (Fig. 1)
The silver-colored oven racks can be self-cleaned, but they
will darken, lose their luster and become hard to slide.
Residue on the front frame ofthe range and outside the
gasket on the door will need to be cleaned by hand. Clean
these areas with hot water, soap-filled steel-wool pads or
cleansers such as Soft Scrub. Rinse well with clean water
and dry.
Do not clean the gasket. The fiberglass material of the oven
door gasket cannot withstand abrasion. Itisessential for
the gasket to remain intact. If you notice it becoming worn
or frayed, replace it. (Fig.2)
Make sure the oven light bulb cover isin place and the
oven light isoff.
Mantaning your appiance 49

How to set the oven for self-cleaning
1,
2,
Select the length of time for the self-cleaning operation, eg. 3
hours.
Press the SELF CLEAN pad once for a 3 hour clean time, twice
for a 4 hour clean time, or 3 times for a 2 hour clean time.
The default setting is3 hours.
Start the self-cleaning cycle.
Press the SET/START pad. The motor-driven door lock will
engage automatically.
[_ • You will not be able to start a self-cleaning cycle ifthe control lockout feature isactivated
or ifthe oven's temperature is too hot.
• The oven door locks automatically. The display will show the clean time remaining. It
is not be possible to open the oven door untilthe temperature drops to a safe/cool
temperature.
• The self-cleaning feature will not operate when a Induction cooktop element ison. If
a surface element gets turned on during a self-cleaning cycle, the cycle will turn off
automatically.
Flow to delay the start of self-cleaning
1. Press the SELF CLEAN pad.
Select the desired self-clean time by pressing the SELF CLEAN pad.
2. Press the DELAY START pad.
3. Using the CLOCK AM/PM and number pads, enter the time you want the clean cycle to start.
4. Press the SET/START pad.
The display will show Delay, Self clean and Lock icon. The motor-driven door lock will
engage automatically.
5. Self-Cleaning cycle will turn on automatically atthe set time.
Flow to turn off the self-cleaning feature
You may find itnecessary to stop or interrupt aself-cleaning cycle due to smoke in the oven.
(When the self-cleaning cycle is done, End will show in the display and a beep will sound 6 times.
1. Press the CLEAR/OFF pad.
2. You will be able to open the oven door once the oven has cooled down for approximately 1
hour.
After a self-cleaning cycle
• You may notice some white ash in the oven. Wipe it up with a damp cloth after the oven cools.
(Ifwhite spots remain, remove them with a soap-filled steel wool pad and rinse thoroughly with
a vinegar and water mixture.)
• If the oven isnot clean after one cycle, repeat the cycle.
• You cannot set the oven for cooking until the oven iscool enough for the door to unlock.
50 Maintaining your appiance
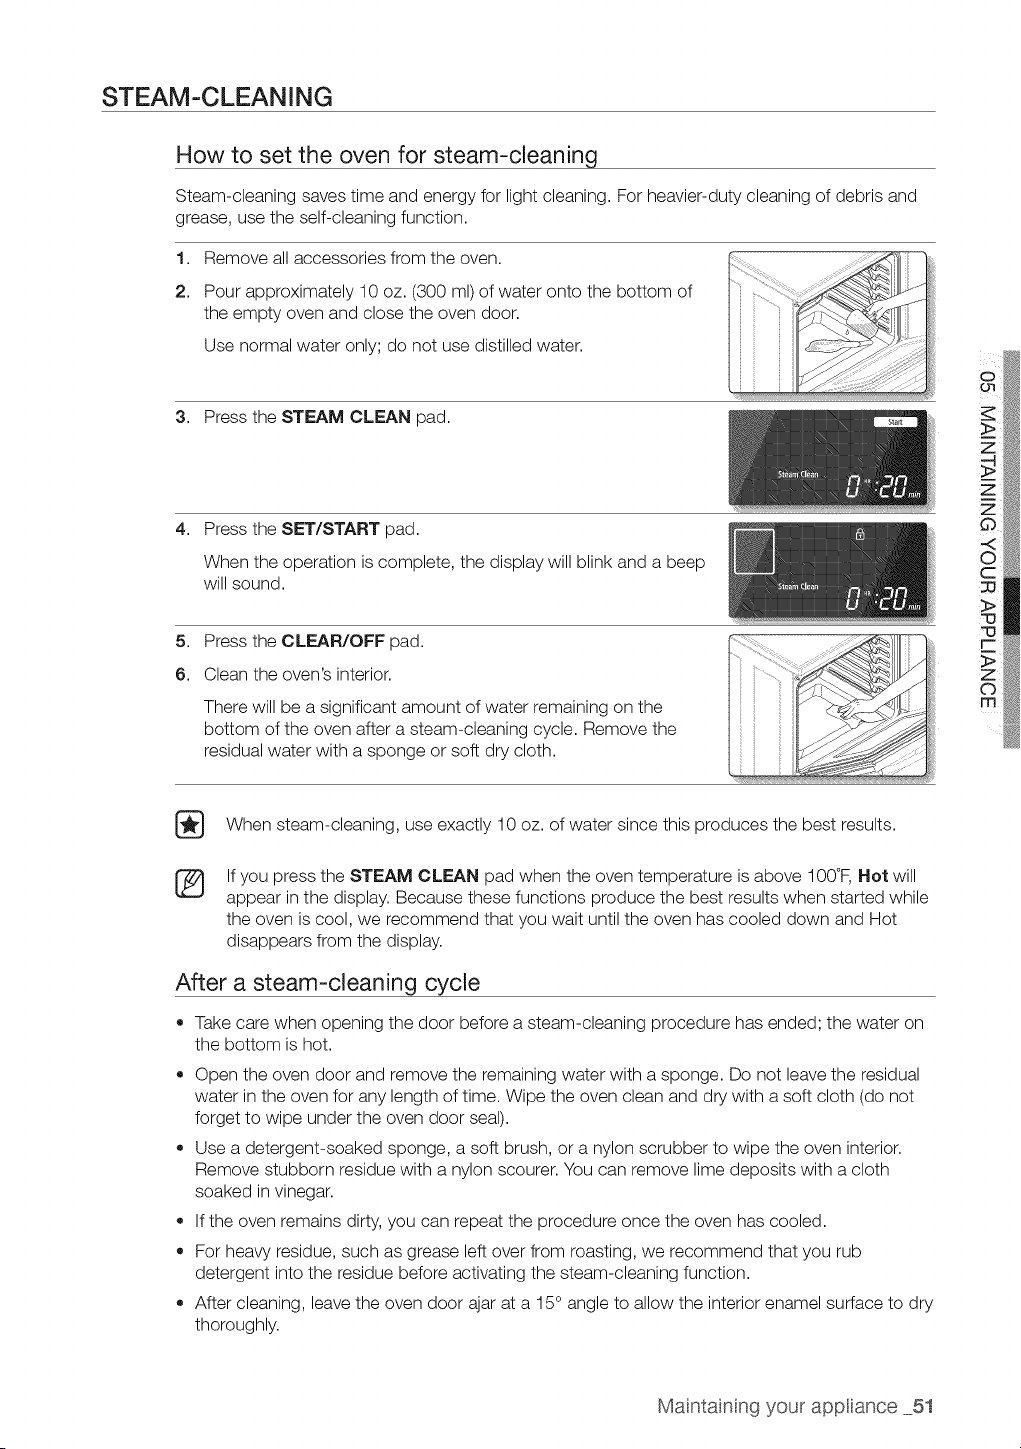
STEAM-CLEANING
How to set the oven for steam-cleaning
Steam-cleaning saves time and energy for light cleaning. For heavier-duty cleaning of debris and
grease, use the self-cleaning function.
1. Remove all accessories from the oven.
2. Pour approximately 10oz. (300 ml)of water onto the bottom of
the empty oven and close the oven door.
Use normal water only; do not use distilled water.
3. Press the STEAM CLEAN pad.
4. Press the SET/START pad.
When the operation is complete, the display will blink and a beep
will sound.
5. Press the CLEAR/OFF pad.
6. Clean the oven's interior.
There will be a significant amount of water remaining on the
bottom of the oven after a steam-cleaning cycle. Remove the
residual water with a sponge or soft dry cloth.
[_ When steam-cleaning, use exactly 10 oz. of water since this produces the best results.
%
If you press the STEAM CLEAN pad when the oven temperature is above 100°F,Hot will
appear in the display. Because these functions produce the best results when started while
the oven iscool, we recommend that you wait until the oven has cooled down and Hot
disappears from the display.
After a steam-cleaning cycle
Take care when opening the door before a steam-cleaning procedure has ended; the water on
the bottom ishot.
• Open the oven door and remove the remaining water with a sponge. Do not leave the residual
water in the oven for any length of time. Wipe the oven clean and dry with a soft cloth (do not
forget to wipe under the oven door seal).
• Use a detergent-soaked sponge, asoft brush, or a nylon scrubber to wipe the oven interior.
Remove stubborn residue with a nylon scourer. You can remove lime deposits with a cloth
soaked in vinegar.
• If the oven remains dirty, you can repeat the procedure once the oven has cooled.
• For heaw residue, such as grease left over from roasting, we recommend that you rub
detergent into the residue before activating the steam-cleaning function.
• After cleaning, leave the oven door ajar at a 15° angle to allow the interior enamel surface to dry
thoroughly.
Mantaning your appiance 51
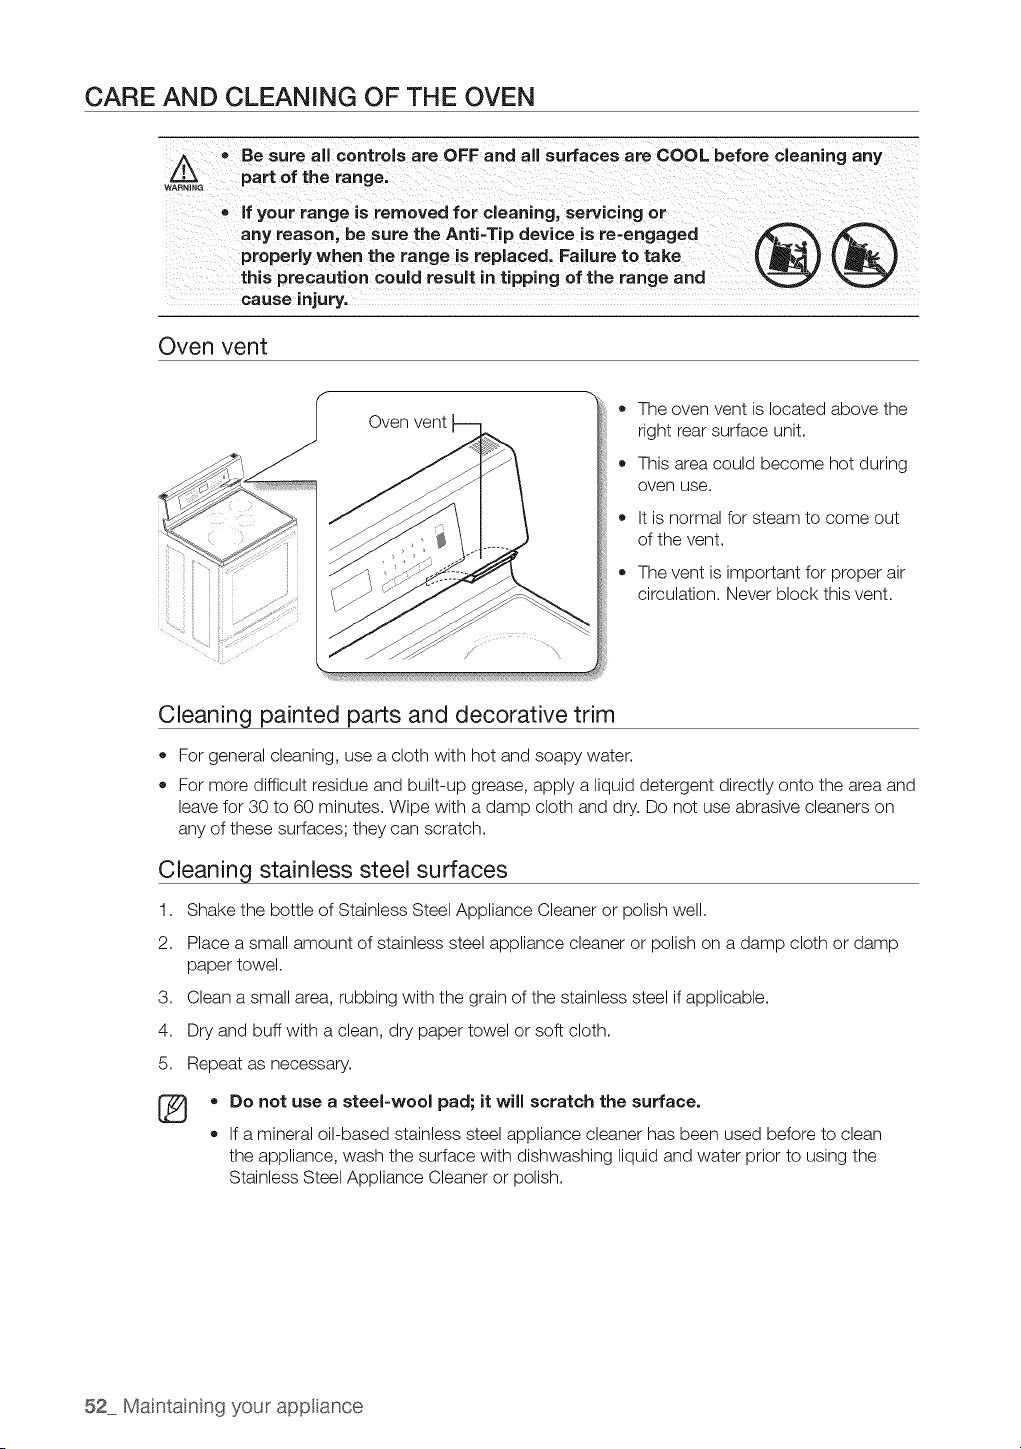
CARE AND CLEANING OF THE OVEN
w_._.,.G• Be sure all controls are OFF and all surfaces are COOL before cleaning any
part of the range.
o if your range is removed for cleaning, servicing or
any reason, be sure the Anti=Tip device isre=engaged
properly when the range is replaced. Failure to take
this precaution could result in tipping of the range and
cause injury.
®®
Oven vent
i_!iiiiii
Oven vent
o The oven vent islocated above the
right rear surface unit.
o This area could become hot during
oven use.
It isnormal for steam to come out
of the vent.
The vent is important for proper air
circulation. Never block this vent.
Cleaning painted parts and decorative trim
• For general cleaning, use a cloth with hot and soapy water.
• For more difficult residue and built-up grease, apply a liquid detergent directly onto the area and
leave for 30 to 60 minutes. Wipe with a damp cloth and dry. Do not use abrasive cleaners on
any ofthese surfaces; they can scratch.
Cleaning stainless steel surfaces
1. Shake the bottle of Stainless Steel Appliance Cleaner or polish well.
2. Place a small amount of stainless steel appliance cleaner or polish on a damp cloth or damp
paper towel.
3. Clean asmall area, rubbing with the grain of the stainless steel ifapplicable.
4. Dry and buff with a clean, dry paper towel or soft cloth.
5. Repeat as necessary.
[_ = Do not use a steel-wool pad; itwill scratch the surface.
• If a mineral oil-based stainless steel appliance cleaner has been used before to clean
the appliance, wash the surface with dishwashing liquid and water prior to using the
Stainless Steel Appliance Cleaner or polish.
52 Maintaining your appiance

Cleaning the broil pan and insert
Ii
o
Do not attempt to clean the broil pan or insert by
leaving it in the oven during a self=cleaning cycle,
After broiling, remove the broil pan from the oven.
Remove the insert from the pan. Carefully pour out the
grease from the pan into a proper container.
Wash and rinse the broil pan and grid in hot water
with a soap=filled scouring pad,
Soaking the pan will remove burned-on foods.
Both the broil pan and insert may be cleaned with a
commercial oven cleaner and are dishwasher-safe.
Do not store a soiled broil pan and insert
anywhere in the range,
Oven racks
If the racks are left in the oven during a self-cleaning cycle, their color will turn slightly blue and
the finish will be dull. After the self-cleaning cycle iscomplete and the oven has cooled, rub the
sides of the racks with wax paper or a cloth containing a small amount of oil. This will help the
racks glide more easily into their tracks.
Oven door
Don'thand
Use soap & water to thoroughly clean the top, sides,
and front of the oven door. Rinse well. You may use a
glass cleaner on the outside glass of the oven door. DO
NOT immerse the door in water. DO NOT spray or
allow water or the glass cleaner to enter the door
vents. DO NOT use oven cleaners, cleaning powders,
or any harsh abrasive cleaning materials on the outside
of the oven door.
DO NOT clean the oven door gasket. The oven
door gasket is made of a woven material which is
essential for a good seal. Care should betaken not to
rub, damage or remove this gasket.
Mantaning your appiance 53
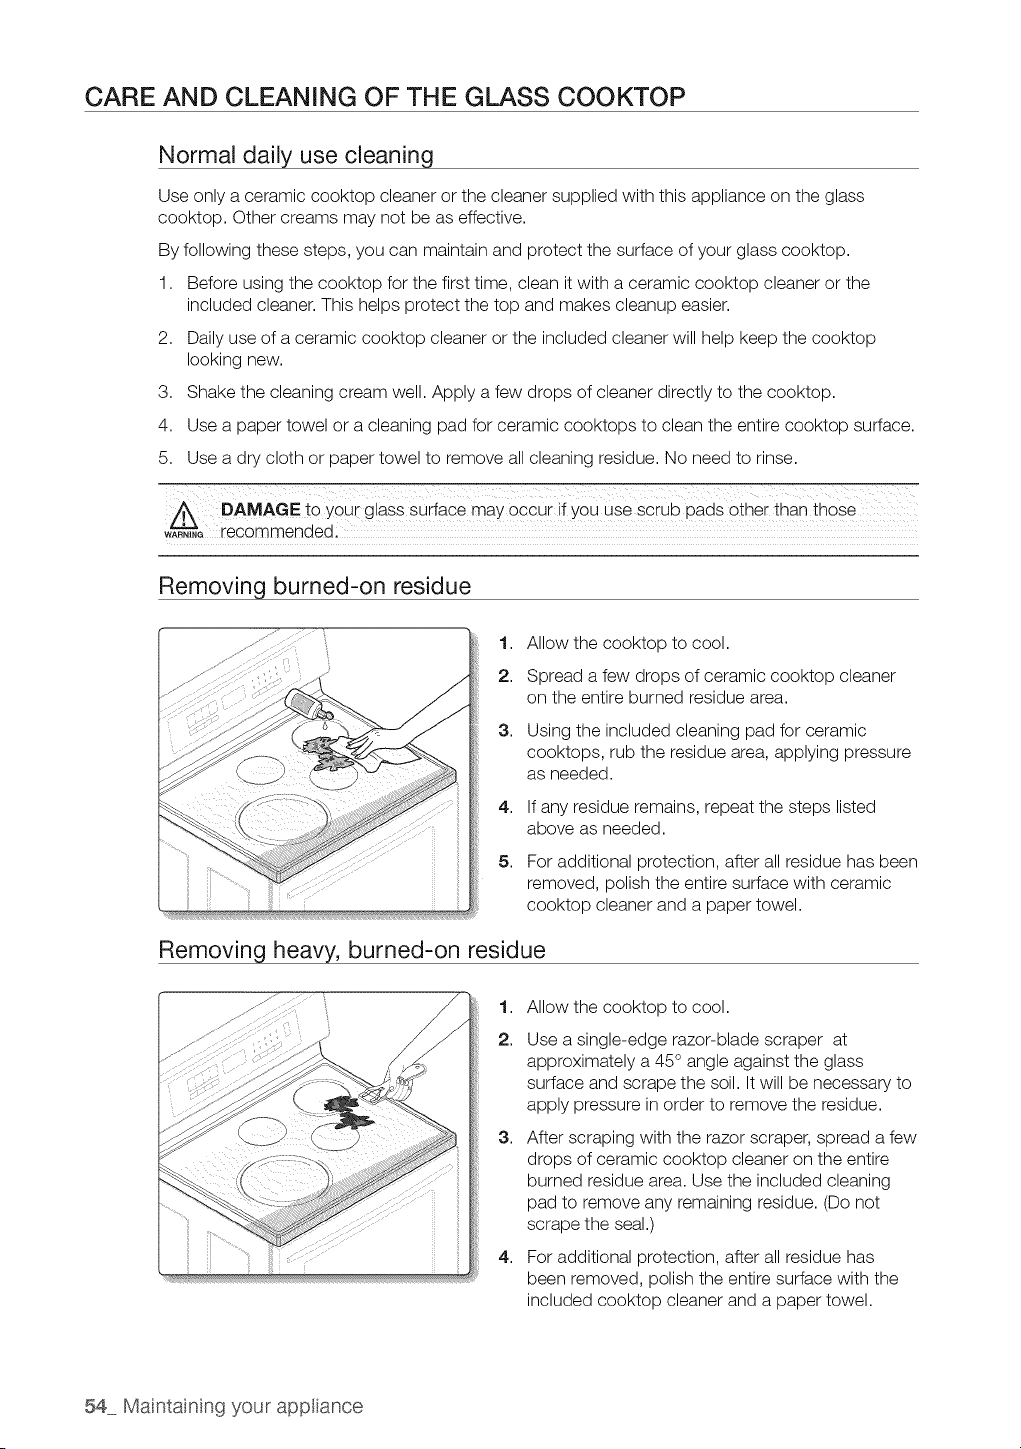
CARE AND CLEANING OF THE GLASS COOKTOP
Normal daily use cleaning
Use only a ceramic cooktop cleaner or the cleaner supplied with this appliance on the glass
cooktop. Other creams may not be as effective.
By following these steps, you can maintain and protect the surface ofyour glass cooktop.
1. Before using the cooktop for the first time, clean it with a ceramic cooktop cleaner or the
included cleaner. This helps protect the top and makes cleanup easier.
2. Daily use of a ceramic cooktop cleaner or the included cleaner will help keep the cooktop
looking new.
3. Shake the cleaning cream well. Apply afew drops of cleaner directly to the cooktop.
4. Use a paper towel or a cleaning pad for ceramic cooktops to clean the entire cooktop surface.
5. Use a dry cloth or paper towel to remove allcleaning residue. No need to rinse.
DAMAGE to Y0Ui glasS Surface may occur ii youuse sciub loads other thanthose
w*RN_._recommended:
Removing burned-on residue
1. Allow the cooktop to cool.
2. Spread a few drops of ceramic cooktop cleaner
on the entire burned residue area.
3,
4,
5,
Using the included cleaning pad for ceramic
cooktops, rub the residue area, applying pressure
as needed.
If any residue remains, repeat the steps listed
above as needed.
For additional protection, after allresidue has been
removed, polish the entire surface with ceramic
cooktop cleaner and a paper towel.
Removing heavy, burned-on residue
1,
2,
3,
4,
Allow the cooktop to cool.
Use a single-edge razor-blade scraper at
approximately a 45 ° angle against the glass
surface and scrape the soil. It will be necessary to
apply pressure in order to remove the residue.
After scraping with the razor scraper, spread a few
drops of ceramic cooktop cleaner on the entire
burned residue area. Use the included cleaning
pad to remove any remaining residue. (Do not
scrape the seal.)
For additional protection, after allresidue has
been removed, polish the entire surface with the
included cooktop cleaner and a paper towel.
54 Maintaining your appliance
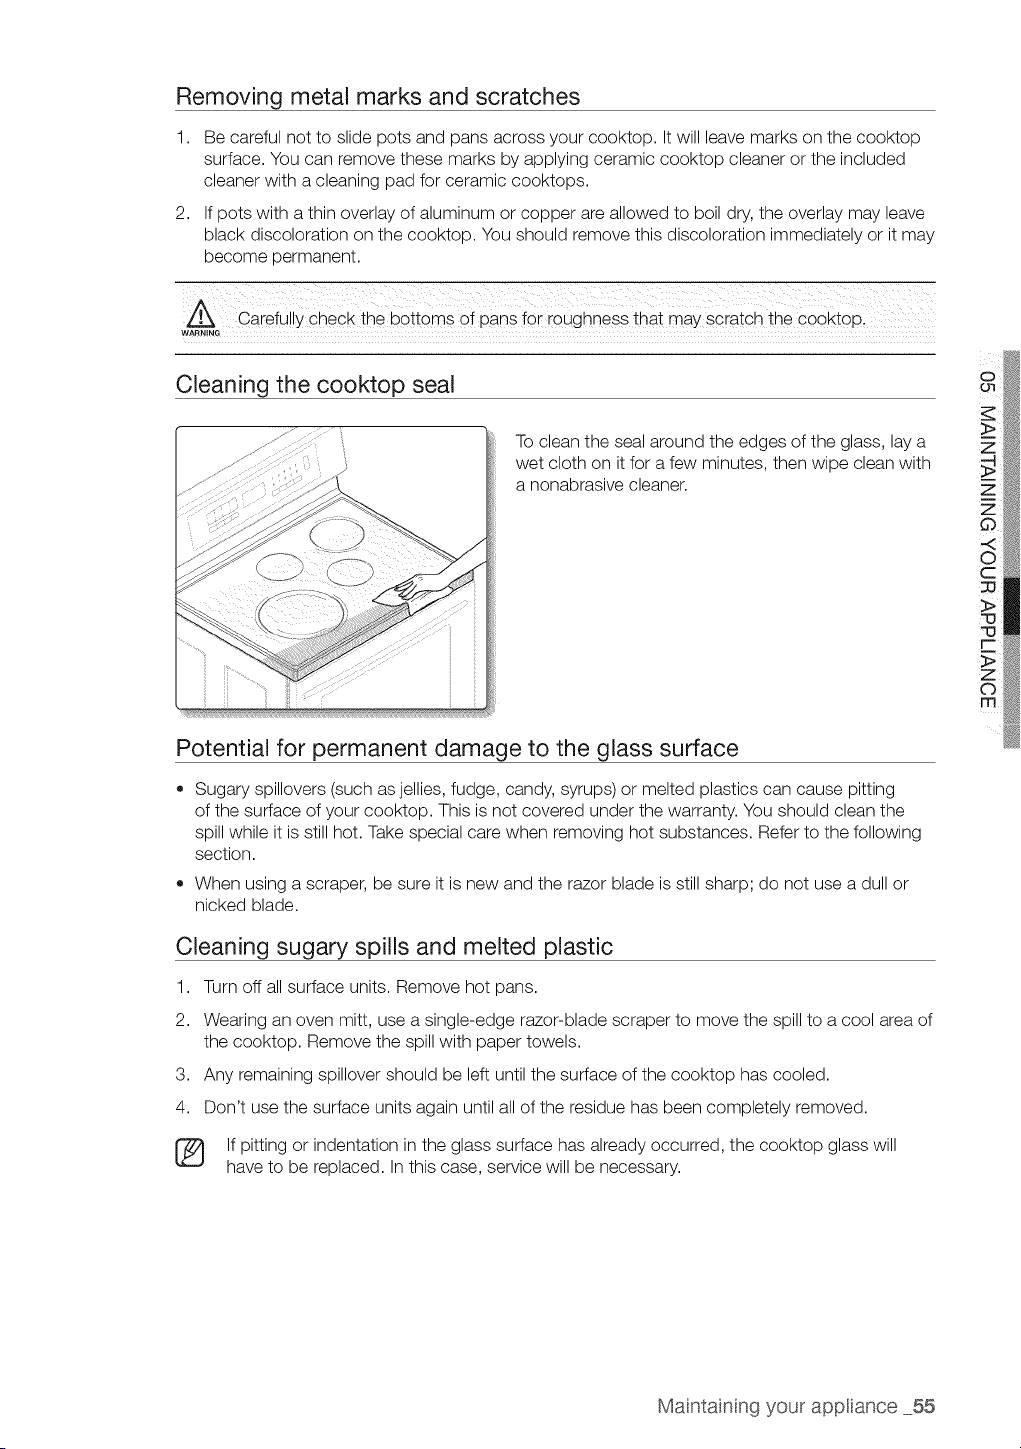
Removing metal marks and scratches
1,
2,
Be careful not to slide pots and pans across your cooktop. Itwill leave marks on the cooktop
surface. You can remove these marks by applying ceramic cooktop cleaner or the included
cleaner with a cleaning pad for ceramic cooktops.
If pots with a thin overlay of aluminum or copper areallowed to boil dry, the overlay may leave
black discoloration on the cooktop. You should remove this discoloration immediately or itmay
become permanent.
carefully check the b0ttoms 0i pans f0i i0ughness that may scratch the C00kt0P
WARNING
Cleaning the cooktop seal
To clean the seal around the edges of the glass, lay a
wet cloth on itfor a few minutes, then wipe clean with
a nonabrasive cleaner.
Potential for permanent damage to the glass surface
• Sugary spillovers (such as jellies, fudge, candy, syrups) or melted plastics can cause pitting
of the surface ofyour cooktop. This is not covered under the warranty. You should clean the
spill while itis still hot. Take special care when removing hot substances. Refer to the following
section.
• When using a scraper, be sure it is new and the razor blade isstill sharp; do not use a dull or
nicked blade.
Cleaning sugary spills and melted plastic
1. Turn off allsurface units. Remove hot pans.
2. Wearing an oven mitt, use a single-edge razor-blade scraper to move the spill to a cool area of
the cooktop. Remove the spill with paper towels.
3. Any remaining spillover should be left until the surface ofthe cooktop has cooled.
4. Don't use the surface units again until all ofthe residue has been completely removed.
[_ If pitting or indentation in the glass surface has already occurred, the cooktop glass will
have to be replaced. Inthis case, service will be necessary.
Mantaning your appiance 55
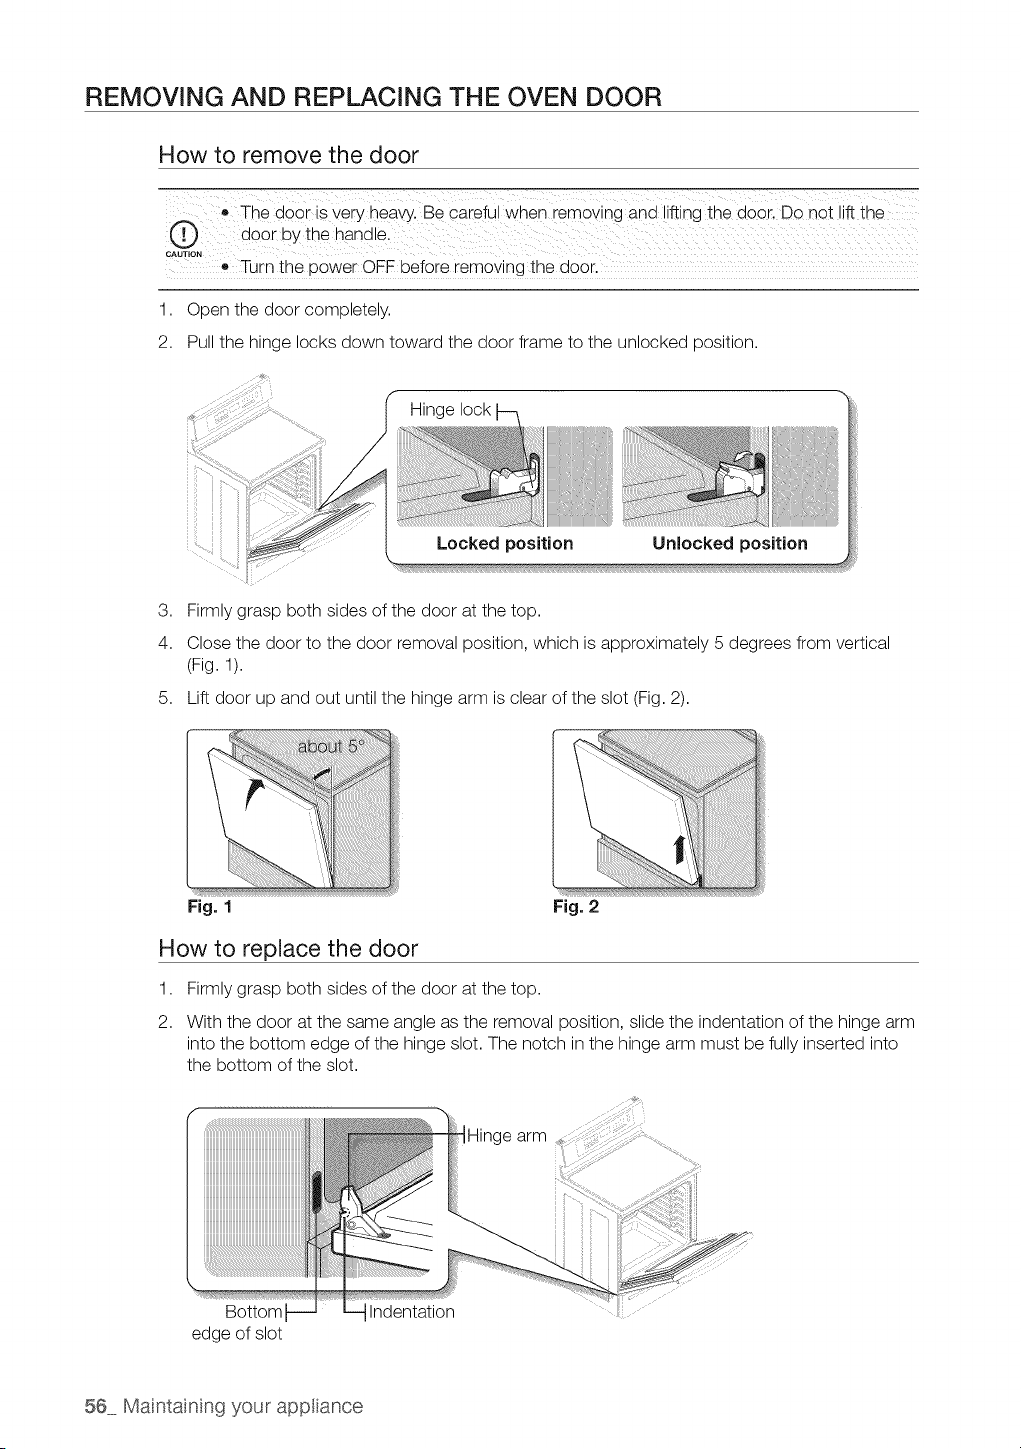
REMOVING AND REPLACING THE OVEN DOOR
How to remove the door
L' The do0r iSvery heaw. Be caiefu! When removing and !iftingthe door. DOnot liftthe
@ door by the handlel
CAUTION
Turn the power OFF before removing the door.
1. Open the door completely.
2. Pull the hinge locks down toward the door frame to the unlocked position.
3. Firmly grasp both sides ofthe door atthe top.
4. Close the door to the door removal position, which isapproximately 5degrees from vertical
(Fig. 1).
5. Lift door up and out until the hinge arm is clear ofthe slot (Fig. 2).
Fig. 1 Fig. 2
How to replace the door
1,
2.
Firmly grasp both sides ofthe door at the top.
With the door at the same angle as the removal position, slide the indentation ofthe hinge arm
into the bottom edge of the hinge slot. The notch in the hinge arm must be fully inserted into
the bottom of the slot.
edge of slot
56 Mantaining your appiance
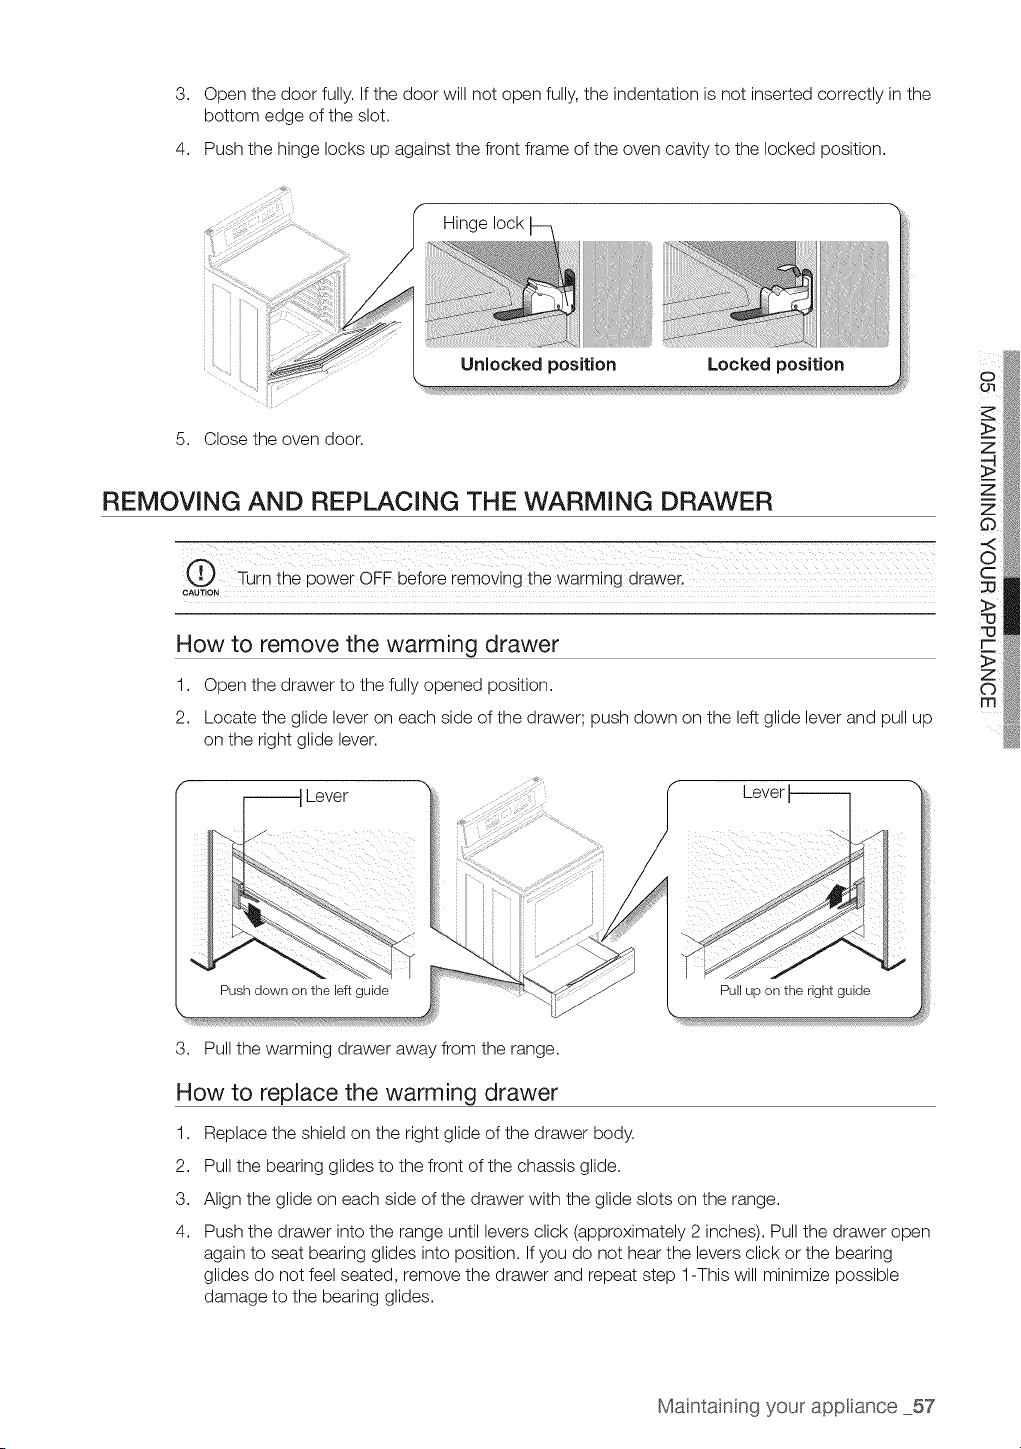
3. Open the door fully. If the door will not open fully, the indentation isnot inserted correctly in the
bottom edge of the slot.
4. Push the hinge locks up against the front frame ofthe oven cavity to the locked position.
5. Close the oven door.
Hinge lock
Unlocked position Locked position
REMOVING AND REPLACING THE WARMING DRAWER
CAUTION
How to remove the warming drawer
1. Open the drawer to the fully opened position.
2. Locate the glide lever on each side of the drawer; push down on the left glide lever and pull up
on the right glide lever.
Push down on the left guide
Lever
3. Pull the warming drawer away from the range.
How to replace the warming drawer
1.
2.
3.
4.
Pull up on the right guide
Replace the shield on the right glide of the drawer body.
Pull the bearing glides to the front ofthe chassis glide.
Align the glide on each side of the drawer with the glide slots on the range.
Push the drawer into the range until levers click (approximately 2 inches). Pull the drawer open
again to seat bearing glides into position. If you do not hear the levers click or the bearing
glides do not feel seated, remove the drawer and repeat step 1-This will minimize possible
damage to the bearing glides.
Mantaning your appiance 57
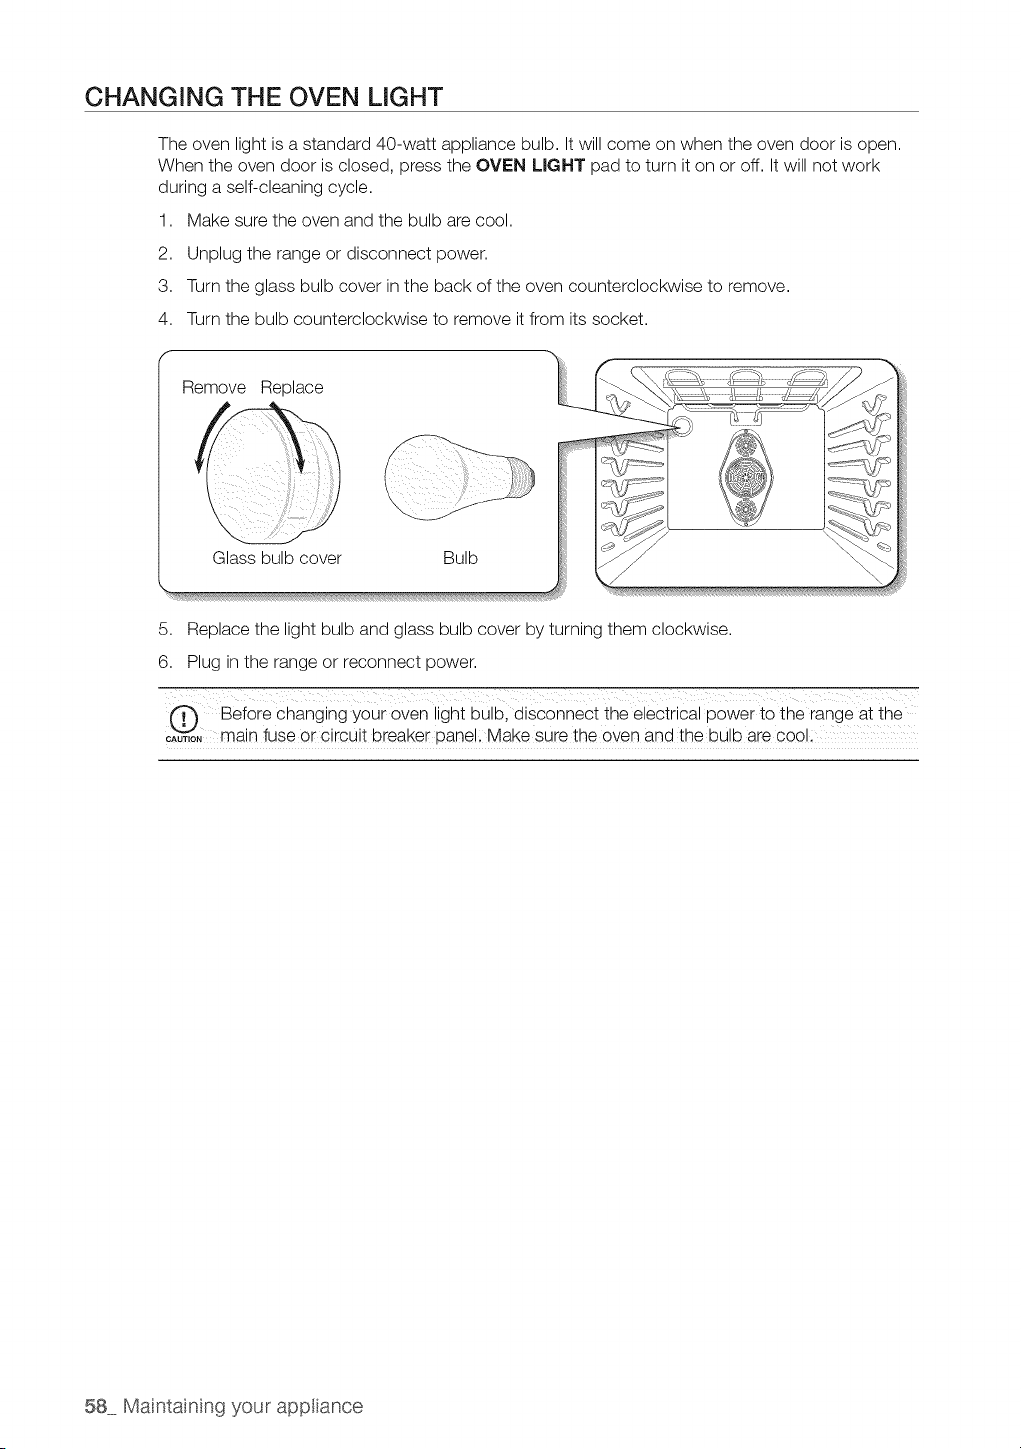
CHANGING THE OVEN LIGHT
The oven light isa standard 40-watt appliance bulb. It will come on when the oven door isopen.
When the oven door is closed, press the OVEN LIGHT pad to turn it on or off. It will not work
during a self-cleaning cycle.
1. Make sure the oven and the bulb arecool.
2. Unplug the range or disconnect power.
3. Turn the glass bulb cover in the back ofthe oven counterclockwise to remove.
4. Turn the bulb counterclockwise to remove itfrom its socket.
f
Remove Replace
Glass bulb cover Bulb
5. Replace the light bulb and glass bulb cover by turning them clockwise.
6. Plug in the range or reconnect power.
Before changing your oven light bulb, disconnect the electrical power to the range atthe
oAuT,o"",main fuse or circuit breaker panel; Make sure the oven and the bulb are cooll
58 Mantaining your appiance
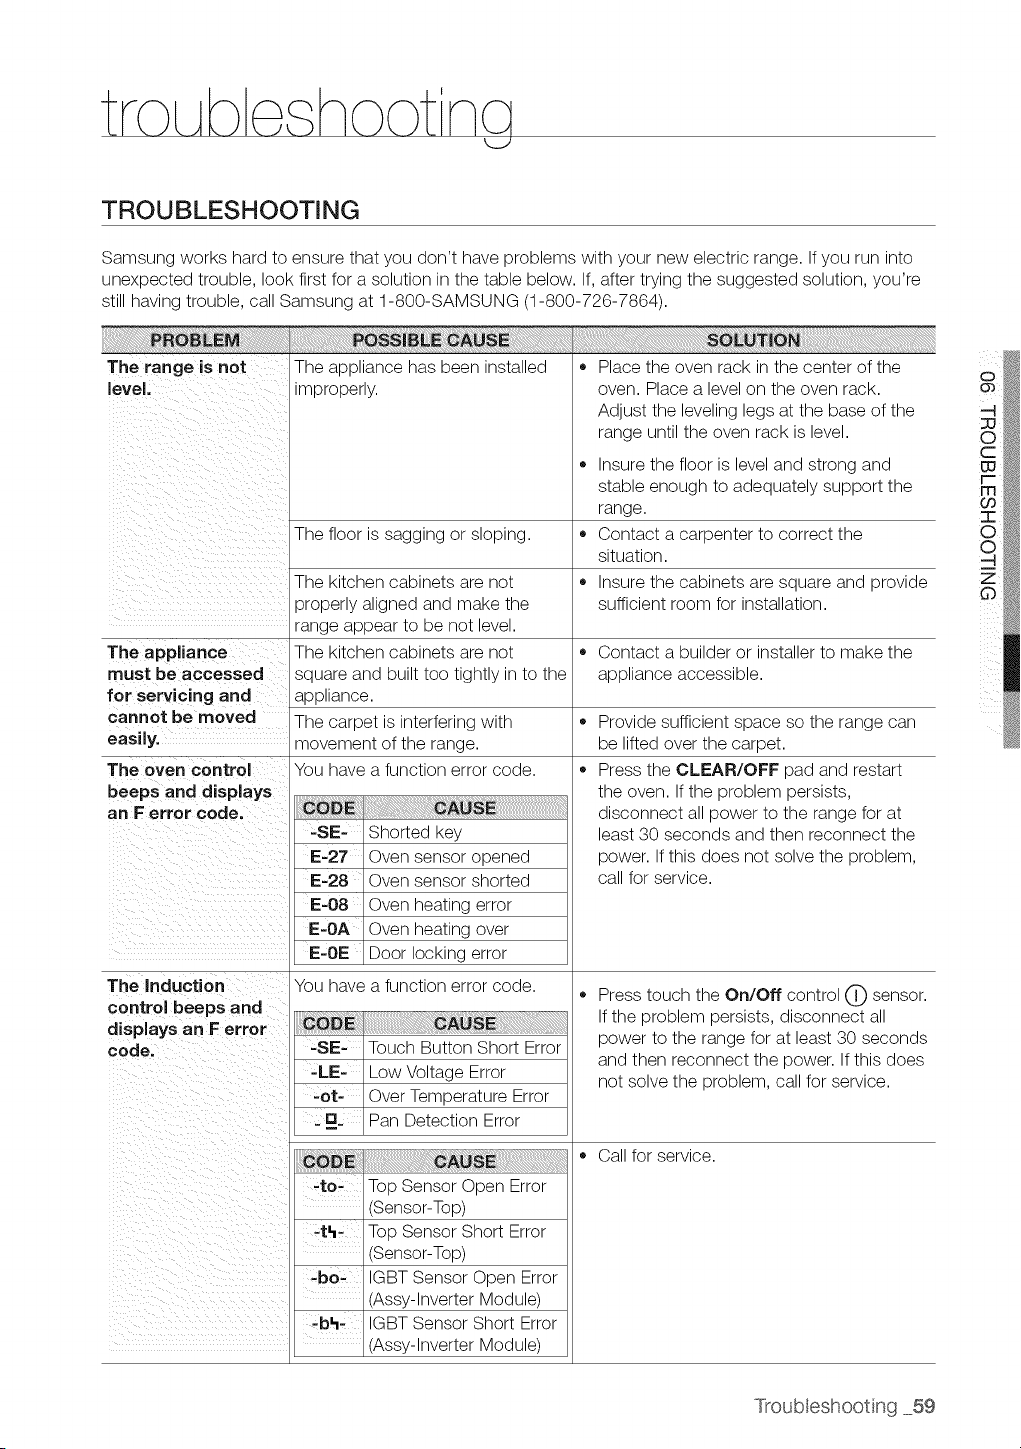
TROUBLESHOOTING
Samsung works hard to ensure that you don't have problems with your new electric range. If you run into
unexpected trouble, look first for a solution in the table below. If,after trying the suggested solution, you're
still having trouble, call Samsung at 1-800-SAMSUNG (1-800-726-7864).
PROBLEM POSSiBlECAUSE
The range is not The appliance has been installed
level, improperly.
The floor is sagging or sloping. •
The kitchen cabinets are not ,,
properly aligned and make the
range appear to be not level.
The appliance The kitchen cabinets are not ,,
must be accessed square and built too tightly in to the
for servicing and appliance.
cannot be moved The carpet is interfering with ,,
easily, movement of the range.
The oven control You have a function error code. ,,
beeps and displays
an Ferror code.
Shorted key
E-27 Oven sensor opened
E-28 Oven sensor shorted
E-08 Oven heating error
E-OA Oven heating over
E=OE Door locking error
The induction You have a function error code. ,,
dontrol beeps and
isplays an F error
Touch Button Short Error
Low Voltage Error
-or- Over Temperature Error
_u Pan Detection Error
c sE
=to- Top Sensor Open Error
(Sensor-Top)
Top Sensor Short Error
(Sensor-Top)
IGBT Sensor Open Error
(Assy-lnverter Module)
=bh- IGBT Sensor Short Error
(Assy-lnverter Module)
,, Place the oven rack in the center of the
oven. Place a level on the oven rack.
Adjust the leveling legs at the base of the
range until the oven rack is level.
Insure the floor islevel and strong and
stable enough to adequately support the
range.
Contact acarpenter to correct the
situation.
Insure the cabinets are square and provide
sufficient room for installation.
Contact abuilder or installer to make the
appliance accessible.
Provide sufficient space so the range can
be lifted over the carpet.
Press the CLEAR/OFF pad and restart
the oven. If the problem persists,
disconnect all power to the range for at
least 30 seconds and then reconnect the
power. If this does not solve the problem,
call for service.
Press touch the On/Off control C) sensor.
If the problem persists, disconnect all
power to the range for at least 30 seconds
and then reconnect the power. If this does
not solve the problem, call for service.
Callfor service.
Troub eshoot ng 59
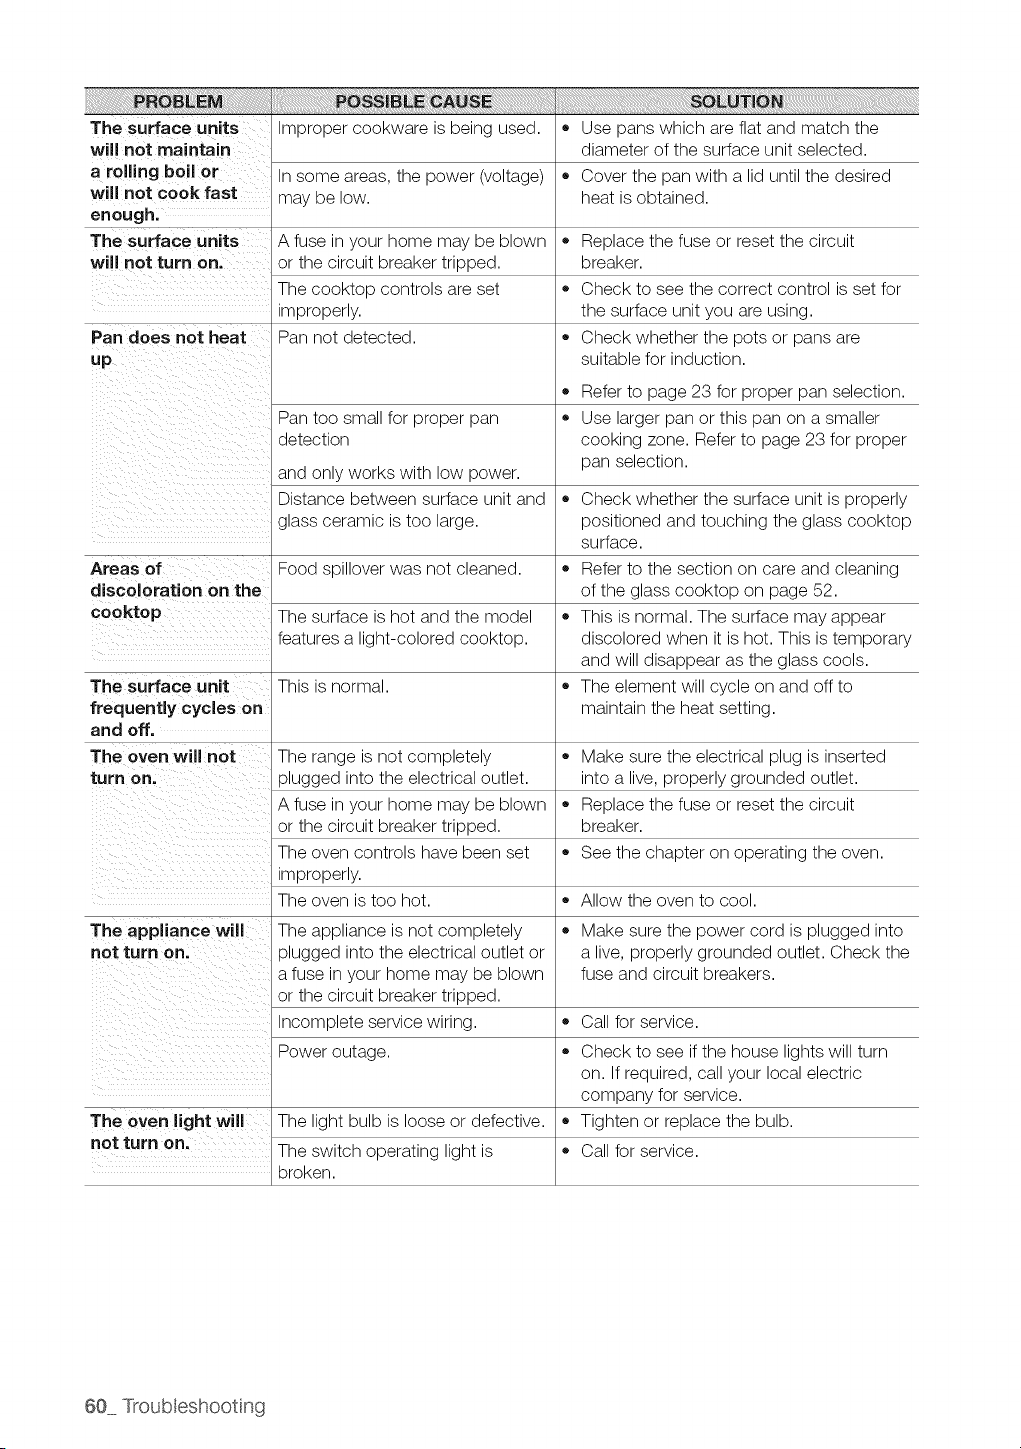
The surface units Improper cookware is being used. • Use pans which are flat and match the
will not maintain diameter of the surface unit selected.
a rolling boil or Insome areas, the power (voltage) • Cover the pan with a lid until the desired
will not cook fast may be low. heat isobtained.
enough.
The surface units
will not turn on.
o
Pan does not heat
up
A fuse in your home may be blown
or the circuit breaker tripped.
The cooktop controls are set
improperly.
Pan not detected.
Pan too small for proper pan
detection
and only works with low power.
Distance between surface unit and
glass ceramic is too large.
o
o
Areas of Food spillover was not cleaned.
discoloration on the
cooktop
The surface unit
frequently cycles on
and off.
The oven will not
turn On.
The surface is hot and the model
features a light-colored cooktop.
This isnormal.
Replace the fuse or reset the circuit
breaker.
Check to see the correct control isset for
the surface unit you are using.
Check whether the pots or pans are
suitable for induction.
Refer to page 23 for proper pan selection.
Use larger pan or this pan on a smaller
cooking zone. Refer to page 23 for proper
pan selection.
Check whether the surface unit isproperly
positioned and touching the glass cooktop
surface.
Refer to the section on care and cleaning
of the glass cooktop on page 52.
This isnormal. The surface may appear
discolored when it is hot. This istemporary
and will disappear as the glass cools.
The element will cycle on and off to
maintain the heat setting.
The appliance will
not turn on.
The range is not completely = Make sure the electrical plug is inserted
plugged into the electrical outlet, into a live, properly grounded outlet.
A fuse in your home may be blown • Replace the fuse or reset the circuit
or the circuit breaker tripped, breaker.
The oven controls have been set = See the chapter on operating the oven.
improperly.
The oven istoo hot. = Allow the oven to cool.
The appliance is not completely
plugged into the electrical outlet or
a fuse in your home may be blown
or the circuit breaker tripped.
Incomplete service wiring.
Make sure the power cord isplugged into
a live, properly grounded outlet. Check the
fuse and circuit breakers.
Call for service.
Power outage. • Check to see ifthe house lights will turn
on. If required, call your local electric
company for service.
The oven light will The light bulb is loose or defective. = Tighten or replace the bulb.
not turn on. The switch operating light is • Call for service.
broken.
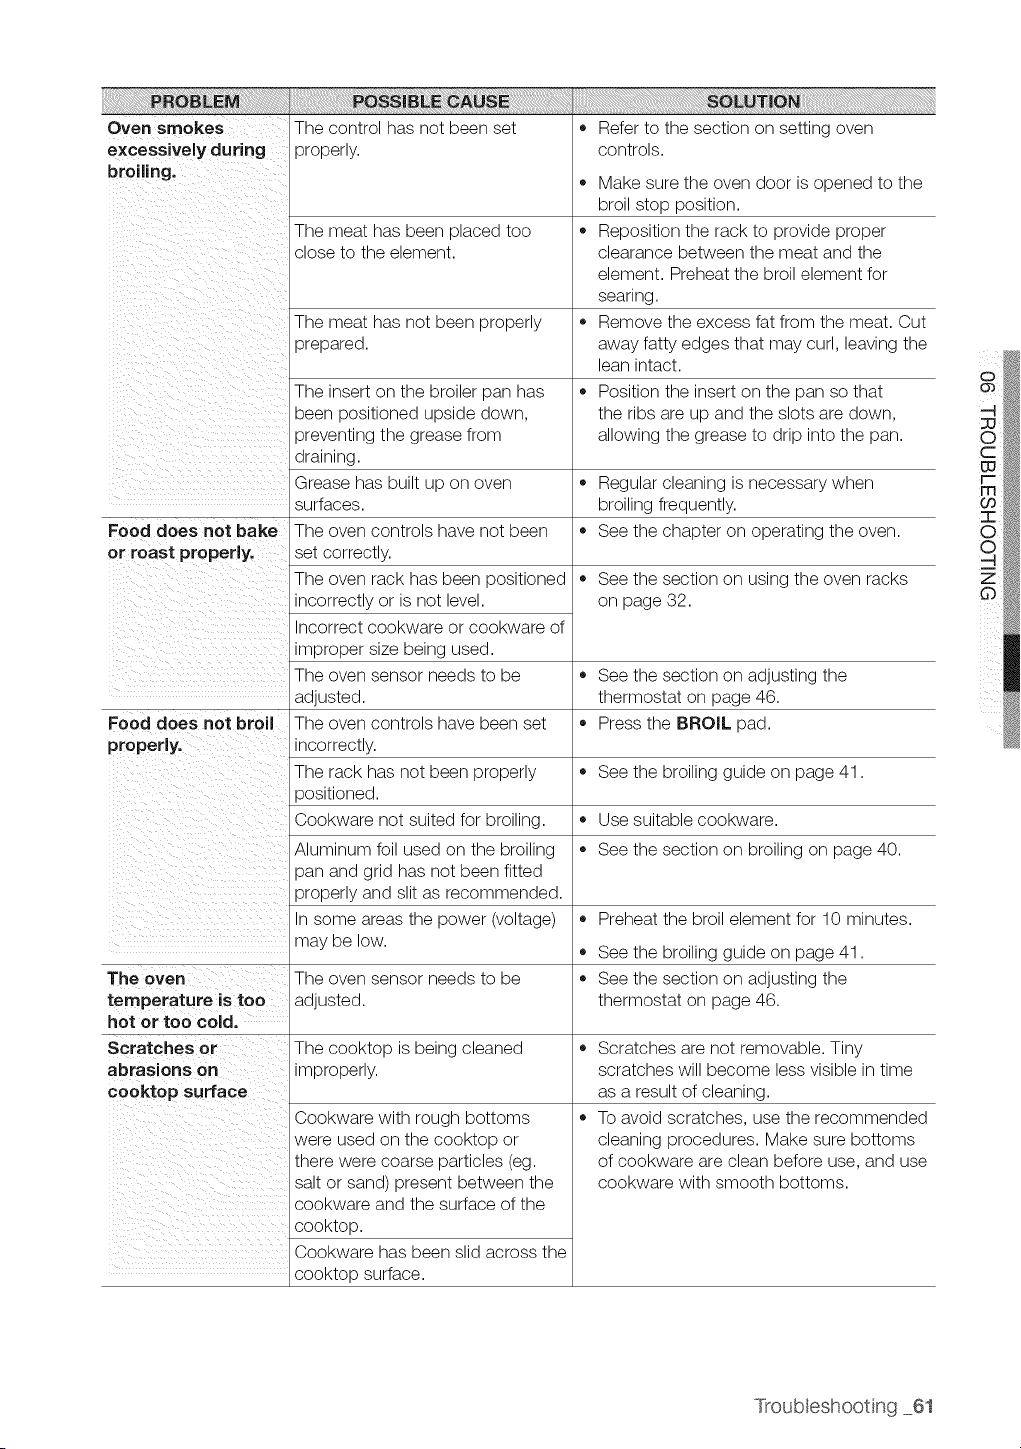
Oven smokes
excesswely during
broiling.
Food does not bake
or roast properly.
Food does not broil
properly,
The oven
temperature is too
hot or too cold.
Scratches or
abrasions on
cookto p surface
The control has not been set
properly.
Refer to the section on setting oven
controls.
• Make sure the oven door isopened to the
broil stop position.
The meat has been placed too • Reposition the rack to provide proper
close to the element, clearance between the meat and the
element. Preheat the broil element for
searing.
The meat has not been properly • Remove the excess fat from the meat. Cut
prepared, away fatty edges that may curl, leaving the
lean intact.
Position the insert on the pan so that
the ribs areup and the slots are down,
allowing the grease to drip into the pan.
,, Regular cleaning isnecessary when
broiling frequently.
See the chapter on operating the oven.
See the section on using the oven racks
on page 32.
The insert on the broiler pan has
been positioned upside down,
preventing the grease from
draining.
Grease has built up on oven
surfaces.
The oven controls have not been
set correctly.
The oven rack has been positioned
incorrectly or is not level.
Incorrect cookware or cookware of
improper size being used.
The oven sensor needs to be
adjusted.
The oven controls have been set
incorrectly.
The rack has not been properly
_ositioned.
Cookware not suited for broiling.
Aluminum foil used on the broiling
pan and grid has not been fitted
properly and slit as recommended.
Insome areas the power (voltage)
may be low.
The oven sensor needs to be
adjusted.
Cookware with rough bottoms
were used on the cooktop or
there were coarse particles (eg.
salt or sand) present between the
cookware and the surface of the
cooktop.
Cookware has been slid across the
cooktop surface.
The cooktop isbeing cleaned
improperly.
o
See the section on adjusting the
thermostat on page 46.
= Press the BROIL pad.
See the broiling guide on page 41.
Use suitable cookware.
,, See the section on broiling on page 40.
Preheat the broil element for 10 minutes.
See the broiling guide on page 41.
,, See the section on adjusting the
thermostat on page 46.
Scratches are not removable. Tiny
scratches will become less visible in time
as a result ofcleaning.
To avoid scratches, use the recommended
cleaning procedures. Make sure bottoms
ofcookware areclean before use, and use
cookware with smooth bottoms.
Troubleshoot ng 61
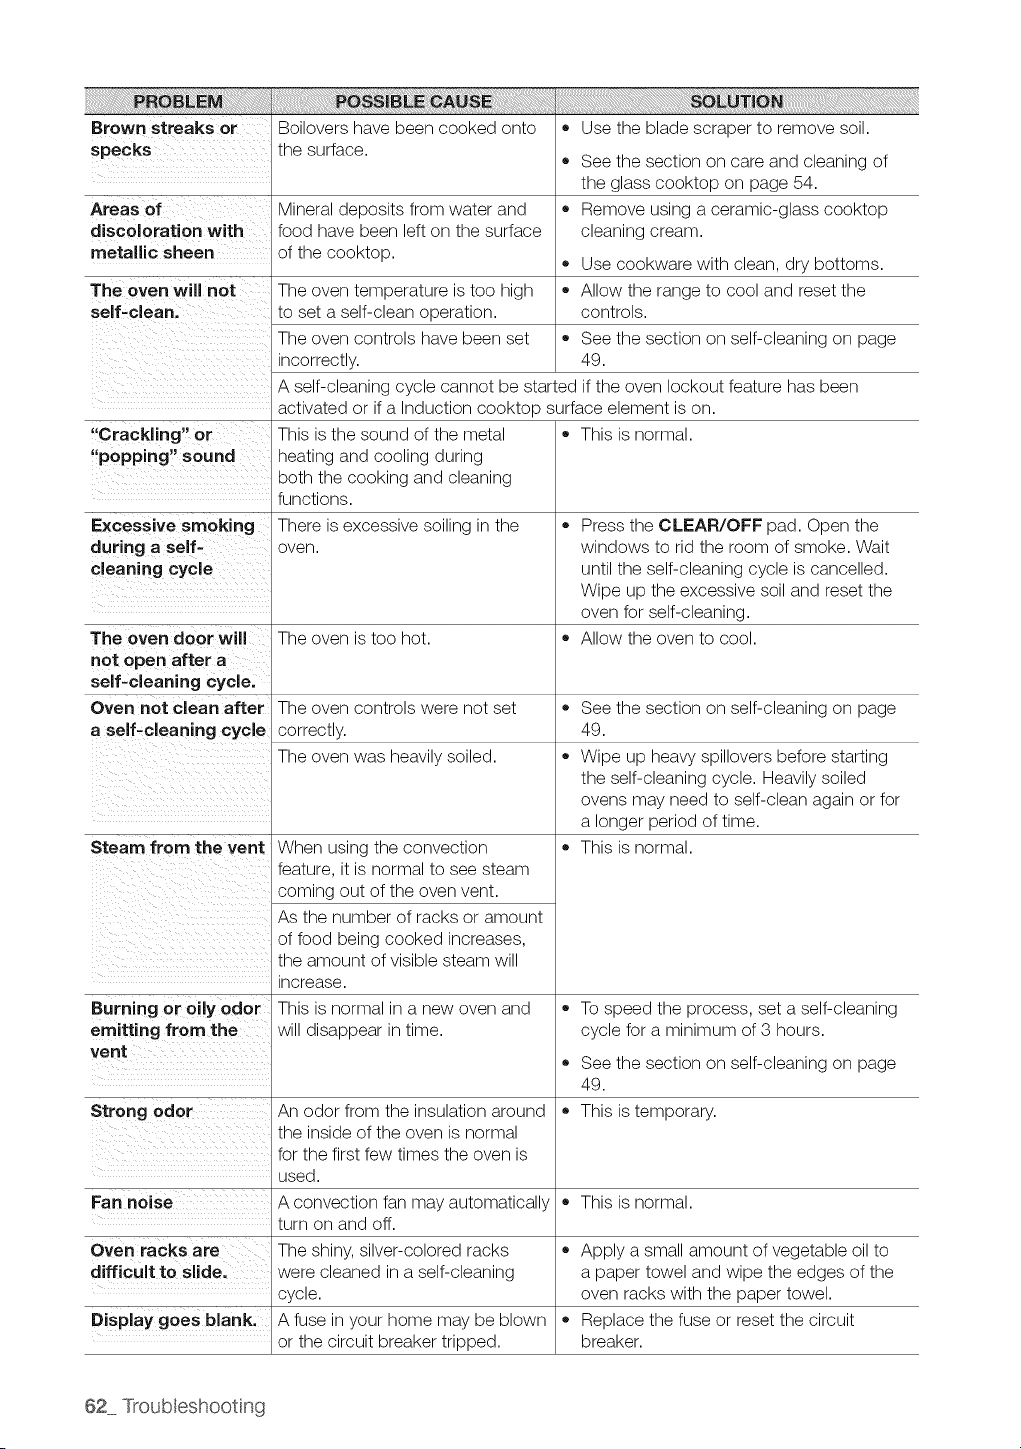
Brown streaks Or
specks
Areas of
discoloration with
metallic sheen
Boilovers have been cooked onto
the surface.
Mineral deposits from water and
food have been left on the surface
of the cooktop.
• Use the blade scraper to remove soil.
,, See the section on care and cleaning of
the glass cooktop on page 54.
,, Remove using a ceramic-glass cooktop
cleaning cream.
Use cookware with clean, dry bottoms.
The oven will not The oven temperature istoo high • Allow the range to cool and reset the
self--clean, to set a self-clean operation, controls.
The oven controls have been set ,, See the section on self-cleaning on page
incorrectly. 49.
A self-cleaning cycle cannot be started ifthe oven lockout feature has been
activated or if a Induction cooktop surface element ison.
!!Crackling, or This isthe sound of the metal • This isnormal.
f!popping!! sound heating and cooling during
both the cooking and cleaning
functions.
Excessive smoking There isexcessive soiling in the •
during a oven.
cleaning cycle
Press the CLEAR/OFF pad. Open the
windows to rid the room of smoke. Wait
until the self-cleaning cycle is cancelled.
Wipe up the excessive soil and reset the
oven for self-cleaning.
Allow the oven to cool.
Burning oroily odor • To speed the process, set a self-cleaning
emitting from the cycle for a minimum of 3 hours.
vent
See the section on self-cleaning on page
49.
Strong odor An odor from the insulation around • This istemporary.
the inside of the oven isnormal
for the first few times the oven is
used.
Fan noise A convection fan may automatically ,, This isnormal.
turn on and off.
Oven racks are The shiny, silver-colored racks ,, Apply a small amount ofvegetable oil to
difficult to slide, were cleaned in a self-cleaning a paper towel and wipe the edges of the
cycle, oven racks with the paper towel.
Display goes blank. A fuse in your home may be blown ,, Replace the fuse or reset the circuit
or the circuit breaker tripped, breaker.
When using the convection
feature, it is normal to see steam
coming out ofthe oven vent.
As the number of racks or amount
of food being cooked increases,
the amount of visible steam will
increase.
This isnormal in a new oven and
will disappear in time.
The oven door will The oven istoo hot.
not open after a
self-cleaning cycle.
Oven not clean after The oven controls were not set ,, See the section on self-cleaning on page
a self-cleaning cycle correctly. 49.
The oven was heavily soiled. • Wipe up heavy spillovers before starting
the self-cleaning cycle. Heavily soiled
ovens may need to self-clean again or for
a longer period of time.
Steam from the vent • This isnormal.
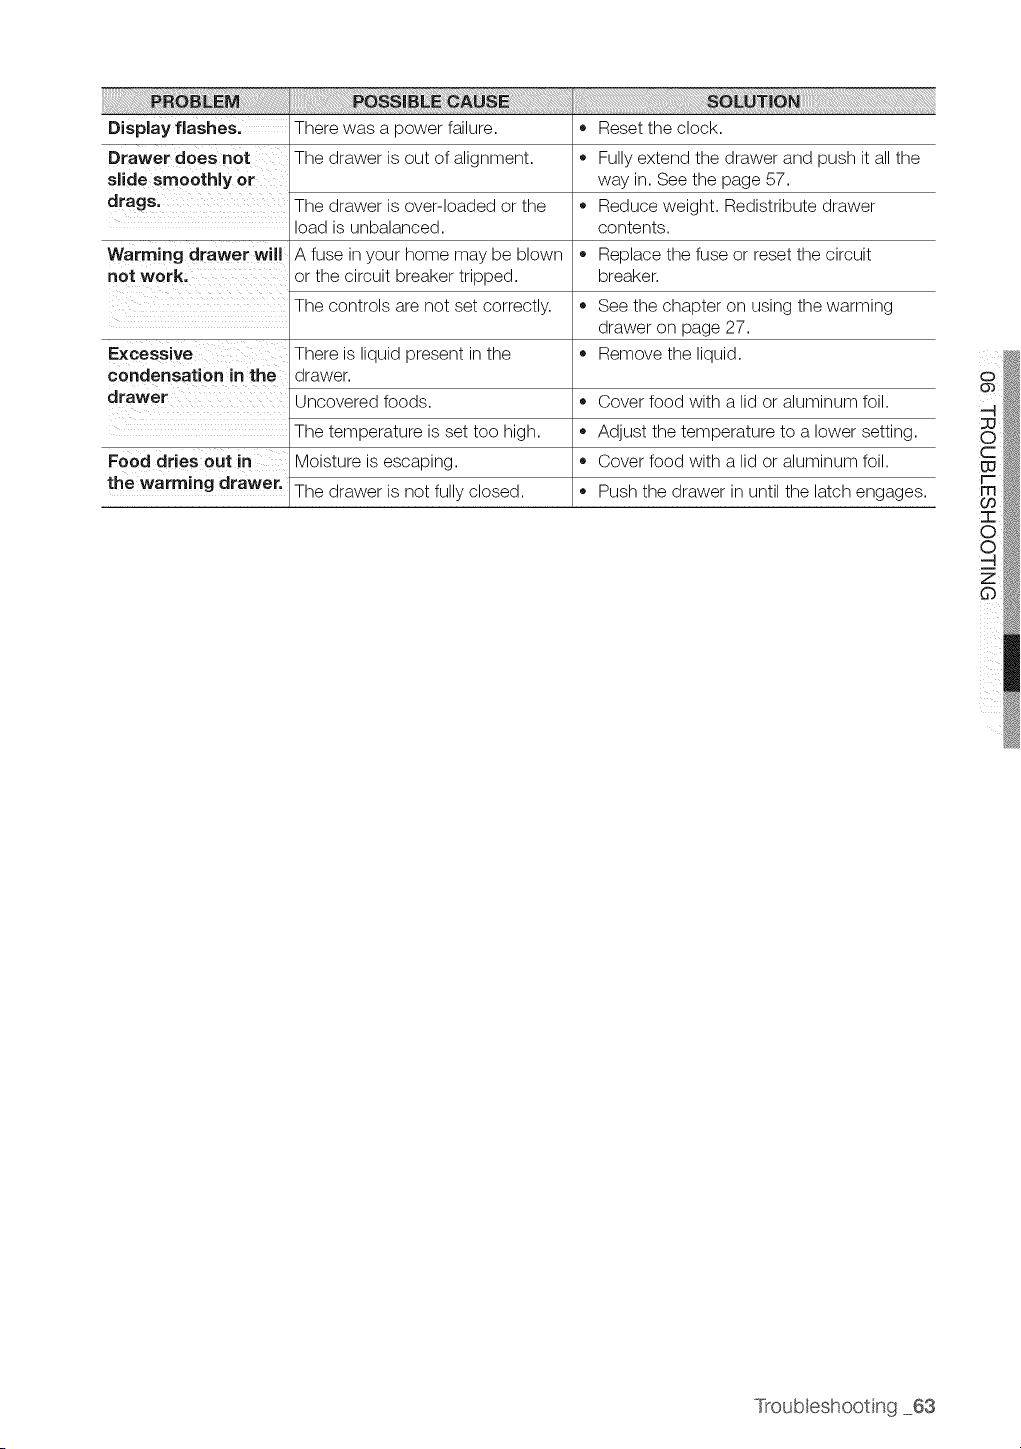
Display flashes.
Drawer does not
slide smoothly or
drags.
There was a power failure.
The drawer is out of alignment.
The drawer is over-loaded or the
load is unbalanced.
A fuse in your home may be blown
or the circuit breaker tripped.
The controls are not set correctly.
• Reset the clock.
Warming drawer will
not work,
See the chapter on using the warming
drawer on page 27.
Excessive • Remove the liquid.
condensation in the
drawer
There is liquid present in the
drawer.
Uncovered foods.
The temperature isset too high.
Moisture isescaping.
The drawer is not fully closed.
Food dries out in
the warming drawer.
Fullyextend the drawer and push it allthe
way in. See the page 57.
Reduce weight. Redistribute drawer
contents.
Replace the fuse or reset the circuit
breaker.
Cover food with a lid or aluminum foil.
Adjust the temperature to a lower setting.
Cover food with a lid or aluminum foil.
Push the drawer in until the latch engages.
Troubleshooting 63
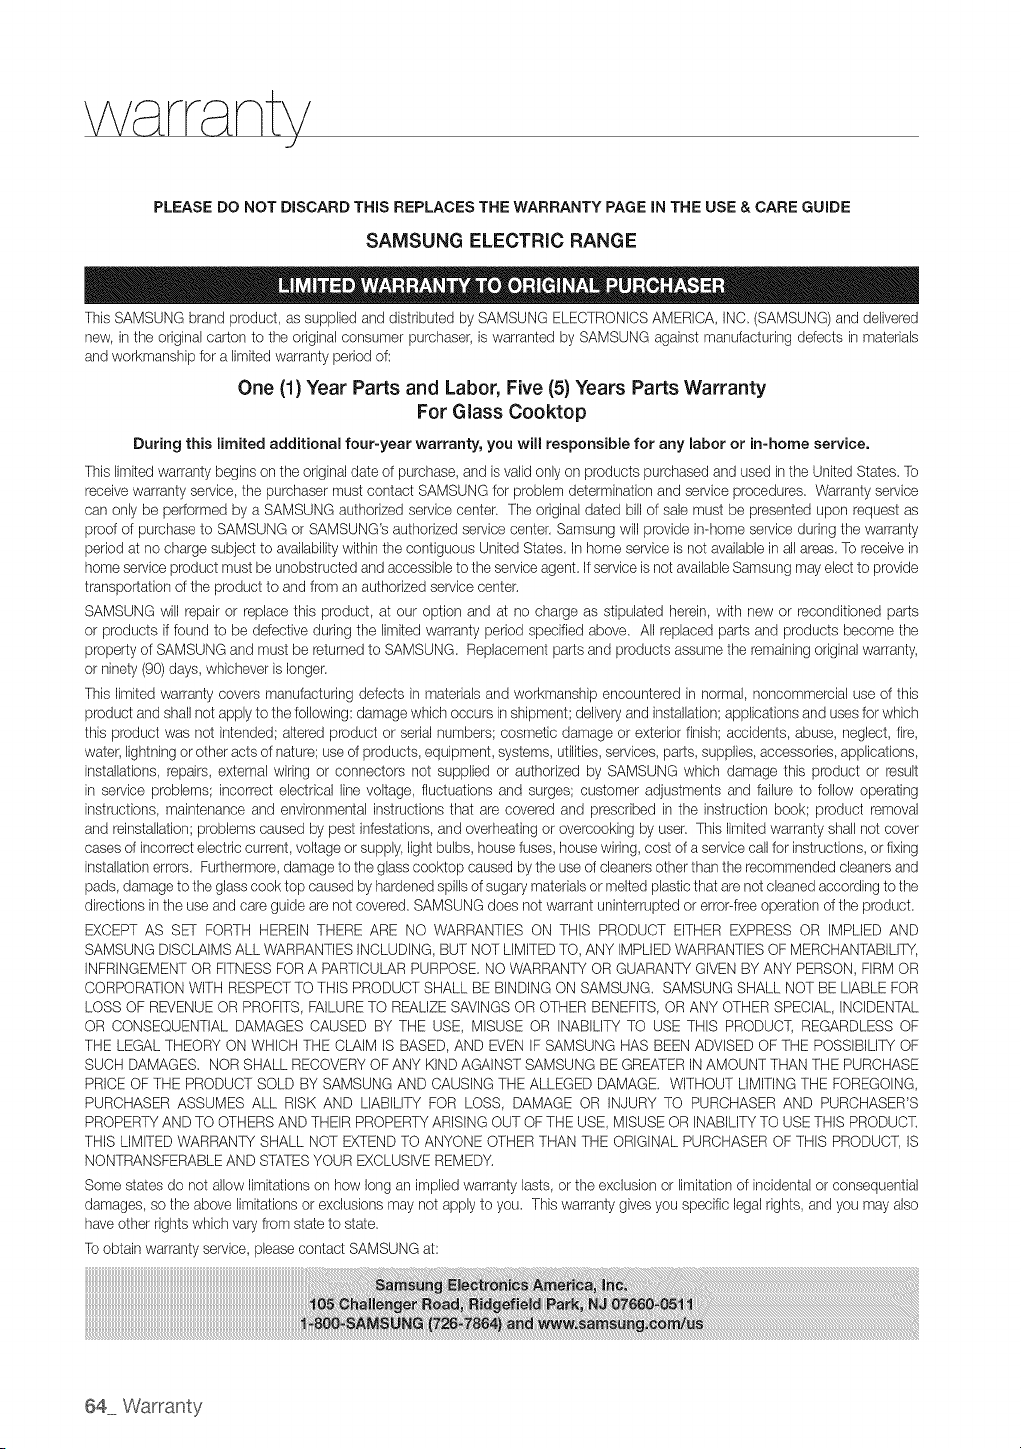
PLEASE DO NOT DISCARD THiS REPLACES THE WARRANTY PAGE iN THE USE & CARE GUIDE
SAMSUNG ELECTRIC RANGE
ThisSAMSUNG brandproduct, as suppNedand distributed by SAMSUNGELECTRONICSAMERICA,INC (SAMSUNG)and delivered
new, inthe original carton to the original consumer purchaser,iswarranted bySAMSUNG against manufacturing defects in materials
and workmanship foralimitedwarrantyperiod of:
One (1) Year Parts and Labor, Five (5} Years Parts Warranty
For Glass Cooktop
During this limited additional four-year warranty, you will responsible for any labor or in-home service.
Thislimitedwarranty begins on the original date of purchase, and isvalidonlyon productspurchased and usedin the UnitedStates. To
receive warrantyservice,the purchasermustcontact SAMSUNG forproblem determinationandserviceprocedures. Warrantyservice
can only be perlormed by aSAMSUNGauthorized servicecenter. The original dated bill of sale must bepresented upon requestas
proofof purchase to SAMSUNG or SAMSUNG'sauthorizedservicecenter. Samsung will provide in-homeserviceduring the warranty
period atno chargesubject to availabilitywithinthe contiguous UnitedStates.Inhome serviceisnot available inallareas.To receive in
home serviceproduct mustbe unobstructed and accessible to the serviceagent, if serviceisnot availableSamsung mayelectto provide
transportation of the productto and froman authorized servicecenter.
SAMSUNG will repairor replacethis product, at our option and at no charge as stipulated herein,with new or reconditioned parts
or products iffound to be defectiveduring thelimitedwarranty period specified above. All replacedparts and products become the
property of SAMSUNGand mustbe returned to SAMSUNG. Replacementparts and products assume the remaining original warranty,
orninety(90)days, whichever islonger.
Thislimited warranty covers manufacturing defects in materialsandworkmanship encountered innormal, noncommercial useof this
product and shall not apply to the following:damage which occurs in shipment;deliveryand installation;applications and uses forwhich
thisproduct was not intended; altered product or serial numbers; cosmetic damageor exterior finish; accidents, abuse, neglect, fire,
water,lightningorotheracts of nature; useof products, equipment, systems, utilities,services, parts, supplies, accessories, applications,
installations, repairs, externalwiring or connectors not supplied or authorized by SAMSUNG which damage this product or result
in service problems; incorrect electrical linevoltage, fluctuations and surges; customer adjustments and failureto follow operating
instructions, maintenanceand environmental instructionsthat are covered and prescribed in the instructionbook; product removal
and reinstallation;problems caused by pest infestations,andoverheating or overcookingby user. This limitedwarranty shallnotcover
casesofincorrect electriccurrent, voltage orsupply,lightbulbs,house fuses, housewiring,costof a servicecallfor instructions,orfixing
installationerrors. Furthermore,damagetothe glasscooklop caused by the useofcleanersotherthan the recommended cleaners and
pads,damage to the glasscooktop caused by hardened spills of sugarymaterialsormeltedplastic that arenot cleaned accordingtothe
directionsin the useand care guidearenot covered.SAMSUNGdoes notwarrantuninterrupted or error-freeoperationofthe product.
EXCEPTAS SET FORTH HEREIN THERE ARE NO WARRANTIES ON THIS PRODUCT EITHER EXPRESS OR IMPLIEDAND
SAMSUNG DISCLAIMSALL WARRANTIESINCLUDING, BUT NOT LIMITEDTO, ANY IMPLIEDWARRANTIESOF MERCHANTABILITY,
INFRINGEMENTOR FITNESSFORA PARTICULARPURPOSE.NO WARRANTY OR GUARANW GIVEN BY ANY PERSON, FIRMOR
CORPORATIONWITHRESPECTTO THIS PRODUCTSHALL BE BINDINGON SAMSUNG. SAMSUNG SHALLNOT BELIABLE FOR
LOSS OF REVENUEOR PROFITS,FAILURETO REALIZESAVINGSOR OTHER BENEFITS,OR ANY OTHERSPECIAL, INCIDENTAL
OR CONSEQUENTIAL DAMAGES CAUSED BY THE USE, MISUSE OR INABILITYTO USE THIS PRODUCT, REGARDLESS OF
THELEGAL THEORYON WHICH THE CLAIM IS BASED, ANDEVEN IFSAMSUNG HASBEENADVISED OF THE POSSIBILIW OF
SUCHDAMAGES. NOR SHALL RECOVERYOF ANY KIND AGAINST SAMSUNG BEGREATERiN AMOUNTTHANTHE PURCHASE
PRICE OF THEPRODUCT SOLD BYSAMSUNG AND CAUSING THE ALLEGEDDAMAGE. WITHOUT LIMITINGTHEFOREGOING,
PURCHASERASSUMES ALL RISK AND LIABILITY FOR LOSS, DAMAGE OR INJURYTO PURCHASERAND PURCHASER'S
PROPERTYAND TO OTHERSAND THEIR PROPERTYARISINGOUTOFTHEUSE, MISUSE OR INABiLiTYTO USETHIS PRODUCT.
THiS LIMITEDWARRANTYSHALLNOTEXTENDTO ANYONE OTHER THANTHEORIGINAL PURCHASER OF THIS PRODUCT,iS
NONTRANSFERABLEANDSTATESYOUREXCLUSIVEREMEDY.
Somestatesdo not allowlimitations on how longanimpliedwarranty lasts, ortheexclusionor limitation of incidental or consequential
damages, so the above limitationsor exclusions may notapply to you. Thiswarranty givesyou specificlegalrights,and you mayalso
haveotherrightswhichvaryfromstateto state.
Toobtainwarrantyservice,please contact SAMSUNGat:
G4 Warranty


ELECTRONICS
QUESTIONS OR COMMENTS?
IN THE US 1-800-SAMSUNG(726-7864) www.samsung,com/us
IN CANADA 1-800-SAMSUNG(726-7864) www.samsung,com/ca
IN MEXICO 01-800-SAMSUNG(726-7864) www.samsung,com/mx
DG68-00229A