Operator's Manual
®
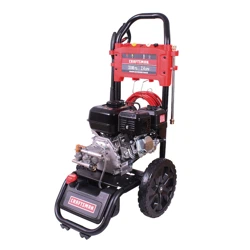
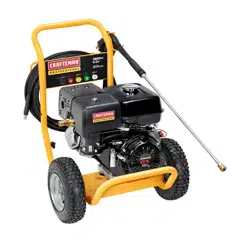
22{)0PSi MAX
2.2 GPM MAX
Model No. 58{).752040
Before using this product, readthis
manuatand foliow ali Safety RuIes
and Operating instructions=
ADVERTE CIA
Antes de utiiizar ei producto, iea este
manuai y siga todas las RegIasde
Seguridade instrucciones de Uso=
Sears, Roebuck and Ca., Hoffman Estates, [L 68179 U.S.A.
Visit our Craftsman website: www.craftsman.eom
Part No. 203791GS Draft - (04/25/2007)
®Safety
®Assembly
®Operation
,, Maintenance
,, Parts
,, Espa_oi,p. 34
WARRANTY.......................................... 2
SAFETYRULES...................................... 2-5
FEATURESANDCONTROLS.............................. 6
ASSEMBLY........................................ 7-10
OPERATION....................................... 11-14
SPECIFICATIONS..................................... 15
MAINTENANCE.................................... 16-20
STORAGE........................................... 21
TROUBLESHOOTING.................................. 22
NOTES......................................... 23 & 31
REPLACEMENTPARTS.............................. 24-30
EMISSIONCONTROLWARRANTY ..................... 32-33
ESPANOL......................................... 34-59
HOW TO ORDERPARTS ........................ BACKPAGE
If this pressurewasher faiis dueto a defect in materiai or workmanship within one year from the date of purchase, return it to
any Searsstore, other Craftsman outlet, or Sears Parts & Repair Centerin the United States or Canadafor free repair (or
replacementif repair proves impossible).
Ali warranty coverageapplies for only 90 days from date of purchase if this pressure washer is ever used for commercial or
rentai purposes.
This warranty gives you specific legal rights, and you mayalso have other rights which vary from state to state.
Sears, Roebuck and Ce,, Heffman Estates, JL 68179
Sears Canada Jnc,, Terente, 8ntarie, Canada MSB 2B8
This is the safety alert symbol, tt is used to alert yea to potential persenaminjary hazards. Obey aH safety messages
that fellow this symbemto avoid pessiNe injury or death.
_Read this manual carefully and become familiar
..... with your pressurewasher. Knew its applications,
its limitations, and any hazardsinvolved.
The safety alert symboi (,_) is used with a signal word
(DAr/GER,CAUTION,WARNING),a pictorial and/or a safety
messageto alert you to hazards. BANGERindicates a hazard
which, if not avoided, wi/'/resuIt in death or serious injury.
WARNINGindicates a hazard which, if not avoided, cou/d
result in death or serious injury. CAUTtONindicates a hazard
which, if not avoided, might result in minor or moderate
injury. NOTICEindicates a situation that could result in
equipment damage. Foiiow safety messagesto avoid or
reduce the risk of injury or death.
Hazard $ymhomsand Meanings
Toxic Furnes Kickback
SlipperySurface
Fire
Moving Parts
Fa_
Explosion
FlyingObiects
ElectricalShock
FluidInjection
Operator's Manual
HotSurface
© Sears Brands, LLC
WARNING
Theengine exhaust from this productcontains
chemicals known to the State of California to cause
cancer, birth defects, or other reproductive harm.
WARNING
Running engine gives off carbon monoxide, an
odoriess, coioriess, poison gas.
Breathing carbon monoxide can cause headac!_e,
fatigue, dizziness, vomiting, confusion, seizures,
nausea, fainting or death.
Some chemicals or detergents may be harmful if
inhaled or ingested, causing severe nausea,
fainting, or poisoning.
* Operate pressure washer ONLY outdoors.
, Keep exhaust gas from entering a confined area through
windows, doors, ventilation intakes, or other openings.
o DO NOTstart or run engine indoors or in an enclosed area,
even if windows and doors are open.
o Use a respirator or rnaskwhenever there is a chance that
vapors rnay be inhaled.
, Read all instructions with mask so you are certain the mask will
provide the necessaryprotection against inhalingharmful
vapors.
WARNING
_iir Risk of electrocution.
Contact with power source can cause electric
shock or burn.
• NEVER spraynearpower source.
WARNING
Fueland its vapors are extremely flammable and
explosive.
Fireor explosion can cause severe burns or
death=
WidENA#UING8U URAiNIN6FUEL
* TurnpressurewasherOFFandlet it coo[at least2 minutes
beforeremovingfuelcap.Loosencapslowly'to relievepressure
in tank.
* Fillor drainfueltankoutdoors.
o DONOToverfilltank.Allowspacefor fuel expansion.
* Iffuel spi!ls,waituntil it evaporatesbeforestartingengine.
o Keepfuelawayfromsparks,openflames,pilot lights,heat,and
otherignitionsources.
o DONOTlight a cigaretteorsmoke.
WidENSTARTINGEQUIPMENT
o Ensuresparkplug,muffler,fuel cap,andair cleanerarein
place.
, DONOTcrankenginewith sparkplugremoved.
WIDEN8PERATINGEQUIPMENT
* DONOTtip engineor equiprnentat anglewhichcausesfuel to
spill.
o DONOTsprayflamrnabieliquids.
WIDENTRANSPORTING8U REPAIRINGEQUIPMENT
, Transport/repairwithfue]tank EMPTYor withfuel shutoffvalve
OFF.
, Disconnectsparkplugwire.
WIDENSTOUINGFUEL8U EQUIP_dENTWiTidFUELIN TANE
* Storeawayfrom furnaces stoveswaterheaters,clothes
dryers,or otherappliancesthat havepilot light or otherignition
sourcebecausetheycanignitefuelvapors.
WARNING
Starter cord kickback (rapid retraction) can result
in bodily injury, Kickback will pull hand and arm
toward enginefaster than you can iet go.
Broken bones, fractures, bruises, or sprains
could result.
• NEVERpull starter cord without first relieving spray gun
pressure.
o When starting engine pull cord slowly until resistance is felt
and then pull rapidly to avoid kickback.
• After eachstarting attempt_where engine fails to run, always
point spray gun in safe direction and squeezespray gLmtrigger
to releasehigh pressure. Engagespray gun trigger lock.
• Firmly grasp spray gun with both hands when using high
pressure spray to avoid iniury when spray gun kicks back.
WARNING
Useof pressure washer can create puddles and
slippery surfaces.
Kickbackfrom spray gun can cause you to fail.
• Operate pressure washer frorn a stable surface.
• The cleaning area should haveadequate slopes and drainageto
reduce the possibility of a fall due to slippery surfaces.
o Be extremely careful if you rnust usethe pressure washer from
a ladder, scaf%ding_ or any other similar location.
• Firmly grasp spray gLmwith both hands when using high
pressure spray to avoid injury when spray gun kicks back.
WARNING
Contact with muffler area can result in serious
burns.
Exhaustheat/gases can ignite combustibles,
structures or damage fueI tank causing a fire.
• DONOTtouch hot partsandAVOIDhot exhaustgases.
• Allowequipmentto cool beforetouching.
• Keepat least5feet (152cm) of clearanceonall sidesof
pressurewasherincludingoverhead.
• Codeof FederalRegulation(CFR)Title 36 Parks,Forests,and
PublicPropertyrequireequipmentpoweredby aninternal
combustionengineto haveasparkarrester rnaintainedin
effectiveworkingorder,complyingto USDAForestservice
standard5100-1Cor laterrevision.Inthe Stateof Californiaa
sparkarresteris requiredundersection4442of the California
Publicresourcescode.Otherstatesrnayhavesimilarlaws.
WARNING
The high pressure stream of water that this
equipment produces can cut through skin and its
underlying tissues, ieading to serious injury and
_ossible amputation,
Spray gun traps high water pressure, even when
engine is stopped and water is disconnected,
which can cause injury.
• DO NOT allow CHILDRENto operate pressure washer.
o NEVERrepair high pressure hose. Replaceit.
• NEVERrepair leaking connections with sealant of any kind.
Replaceo-ring or seal.
• NEVERconnect high pressure hoseto nozzle extension.
o Keep high pressure hose connectedto purnp and spray gun
while system is pressurized.
• ALWAYS point spray gun in safe direction and squeezespray
gun trigger to releasehigh pressure, every time you stop
engine. Engagetrigger lock when not in use.
• NEVERaim spray gun at people, animals, or plants.
o DO NOTsecure spray gun in open position.
• DO NOT leavespray gun unattended while rnachine is running.
o NEVERuse a spray gun which does not have a trigger lock or
trigger guard in place and in working o!der.
o Always be certain spray gun, nozzlesand accessories are
correctly attached.
WARNING
Unintentional sparking can result in fire or
'_¢ electric shock,
WidENADJUSTINGGRJVIAKINGI_EPAIRSTG YGUR
PRESSIJi_EWASHER
o Disconnectthe sparkplugwire from the sparkplugand place
thewire whereit cannotcontactsparkplug.
WidENTESTINGFGRENGINESPARK
o Useapprovedsparkplugtester.
• DONOTcheckfor sparkwith sparkplugremoved.
WARNING
Starter and other rotating parts can entangle
qands, hair, clothing, or accessories.
• NEVERoperate pressure washer without protective housing or
covers.
• DO NOTwea! loose clothing jewelry or anything that may be
caught in the starter or other rotating parts.
, Tie up long hai! and remove jewelry.
WARNING
Risk of eye injury=
_Spray can sp ash back or propei objects.
Always wear safety goggles when using this equipment or in
vicinity of where equipment is in use.
Before starting the pressure washer, be sure you are wearing
adequate safety goggles.
NEVERsubstitute safety glasses for safety goggles.
High pressure spray may damage fragiie items inciuding
iass.
DONOTpointspraygunat glasswhen usingred(0°) spraytip.
NEVERaim spraygunat plants.
Improper treatment of pressure washer can damage it and
shorten its life.
Ifyou havequestionsaboutintendeduse,askdealeror contact
Sears.
NEVERoperateunitswith brokenor missingpa!ts,or without
protectivehousingor covers.
DONOTby-passanysafetydeviceonthis rnachine.
DONOTtamperwith governedspeed.
DONOToperatepressurewasheraboveratedpressure.
DONOTmodifypressurewasherin anyway.
Beforestartingpressurewasherin cold weathercheckall parts
of the equipmentto besureice hasnot formedthere.
NEVERrnovemachineby pulB_gon hoses.Usehandle
providedon unit.
Checkfuelsystemfor leaksor signs of deterioration,suchas
chafedor spongyhose,!ooseor missingclamps or damaged
tankorcap.Correctalldefectsbeforeoperatingpressure
washer.
Thisequipmentis designedto beusedwith Searsauthorized
partsONLY.If equipmentis usedwith partsthatDONOT
complywith rninimumspecifications,userassumesall risks
andliabilities.
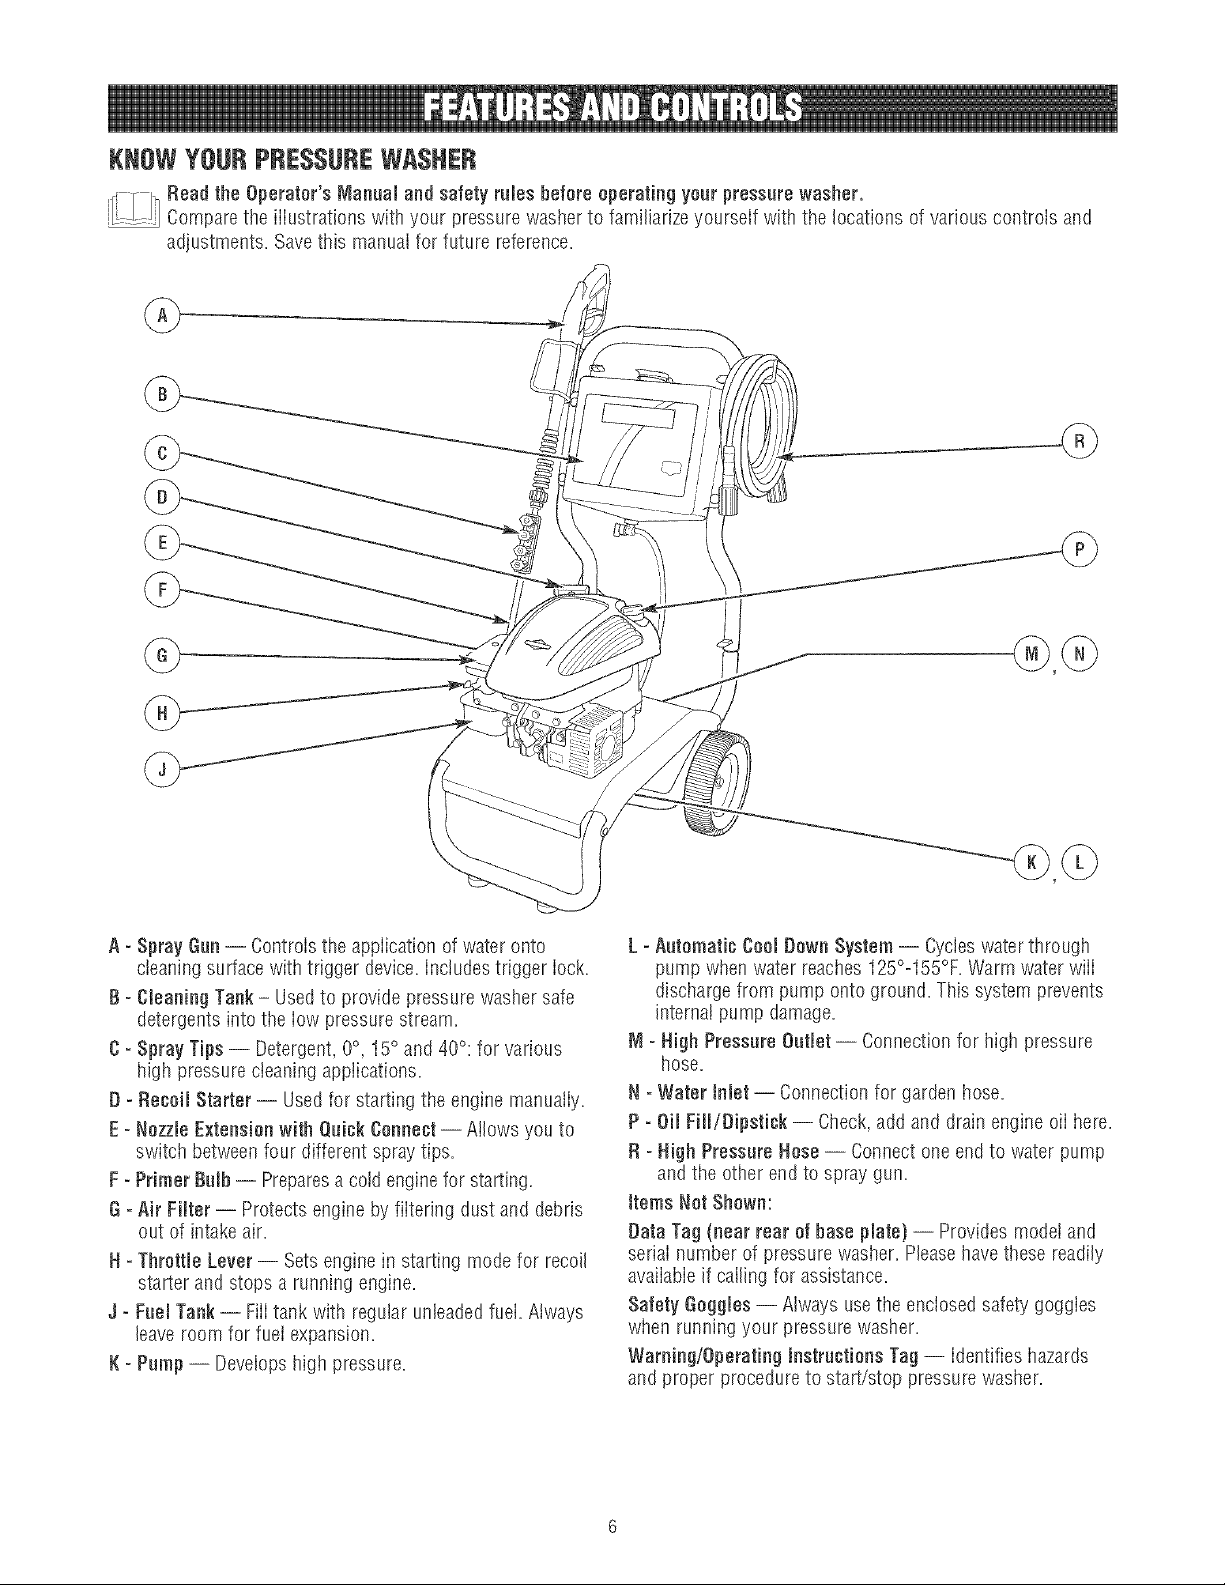
KNOWYOURPRESSUREWASHER
,r' F I-_Read the Operator's Manual and safety rubs before operating your pressure washer.
.... Comparethe illustrations with your pressurewasher to familiarize ,'ourself with the locations of various controls and
adjustments. Savethis manual for future reference.
{}
- Spray Gun-- Controis the appiication of water onto
cleaning surface with trigger device, includes trigger iock.
B - Charting Tank - Usedto provide pressure washer safe
detergents into the iow pressure stream.
C - Spray Tips -- Detergent, 0°, 15° and 40°: for various
high pressure charting applications.
D - Reoeil Starter -- Used for starting the engine manuaIiy.
E =Nozzb Extensionwith Quick Connect -- Mows you to
switch between four different spray tips.
F - Primer Bulb -- Preparesa cold enginefor starting.
6 - Air FiNer -- Protects engine by fiitedng dust and debris
out of intake air.
N - Throttle Lever -- Setsengine in starting mode for recoil
starter and stops a running engine.
S- Fuel Tank -- Fiii tank with regular unleadedfuel. Aiways
leave room for fuei expansion.
K - Pamp -- Develops high pressure.
L =Automatic Cool Down System -- Cycles water through
pump when water reaches 125°o155°F.Warm water wiii
discharge from pump onto ground. This system prevents
internal pump damage.
M =High Pressure D}utJet-- Connection for high pressure
hose.
N =Water Inlet -- Connection for garden hose.
P =Oil FilliD}ipatick -- Check, add and drain engine eli here.
R =Nigh Pressure Hose -- Connect one end to water pump
and the other end to spray gun.
Items Net Shown:
Data Tag (near rear of base plate) -- Provides model and
seriai number of pressure washer. Pleasehave these readily
avaiiabie if calling for assistance.
Safety Geggbs -- Always usethe enclosedsafety goggles
when running your pressure washer.
Warning/Operating Instructions Tag-- Identifies hazards
and proper procedure to start/stop pressure washer.
YourcleaningsystemrequiressomeassembIyandisready
foruseonlyafterit hasbeenproperiyservicedwiththe
recommendedoilandfuel.
Jfyou have any prohbms with the assembly of your
pressurewasher, please call the pressurewasher hempJine
at 1o800o222o3136.
UNPACKTHE PRESSUREWASHER
1. Remove everything from carton except pressure washer.
2. Opencarton completely by cutting each corner from top
to bottom.
3. Remove pressure washer from carton.
CARTONCONTENTS
Checkali contents, if any parts are missing or damaged,call
the pressure washer hetpline at 1o800o222o3136.
° Main Unit
° Handle
, 6baning TankAssembly
, High PressureHose
, Spray Gun
, Nozzb Extensionwith Quick Connect Fitting and Spray
TipHolder
, Oil Bottle
, Parts Bag (which includes the following):
, Operator's Manual
, Owner's Registration Card
, Safety Goggles
, Gun Holder Wireform
, DetergentSiphoning Hose/Filter
° Bagcontaining 4 multi-coiored Spray Tips
, HandleFasteningHardwareKit (whichincludes):
, Carriage Bolts (2)
, "L" Bolt
° Plastic Knobs (4)
, Tree Clips (4}
Becomefamiliar with each piece before assembling the
pressure washer, identify ali contents with the iiiustrationon
page 6. if any parts are missing or damaged, calJthe
pressure washer helpline at 1o800o222o3136.
A$$EJVJBLJNGCLEANINGSYSTEJVJ
Your Craftsman cleaning system will need assembly before
operation:
1. Fill out and send in registration card.
2. Attach handleand cleaning tank.
3. Connect detergent siphon hose to pump.
4. Add eli to engine crankcase.
5. Add fuei to fuel tank.
6. Connect pressure hose to spray gun and pump.
7. Connectwater supply to pump.
8. Attach nozzleextension to spray gun.
9. Select/attachquick connect spray tip to nozzb extension.
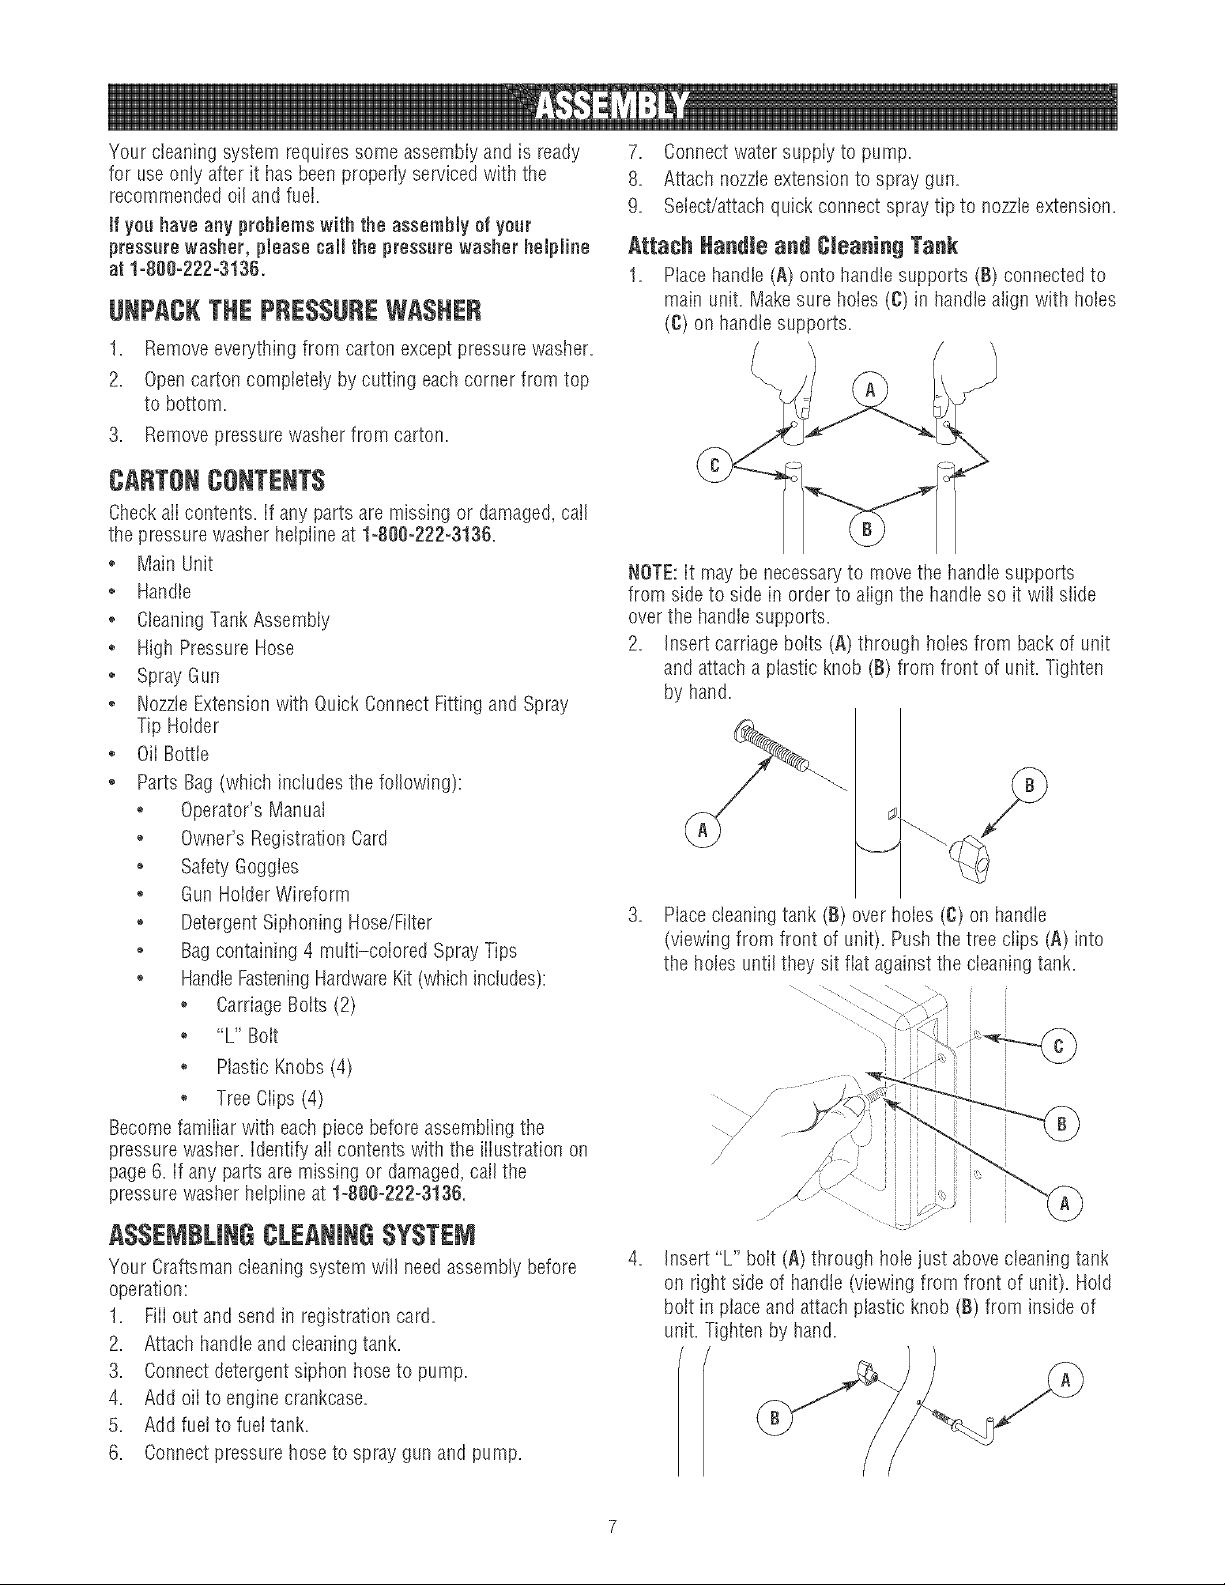
Attach Handle and Cleaning Tank
1. Placehandle (A) onto handlesupports (B) connected to
main unit. Make sure holes (C) in handle align with holes
(g) on handle supports.
NOTE:It may be necessaryto move the handle supports
from side to side in order to align the handle so it will slide
over the handb supports.
2. Insert carriage bolts (A) through holes from back of unit
and attach a plastic knob (B) from front of unit. Tighten
by hand.
3. Placecleaning tank (B} over holes (C} on handle
(viewing from front of unit). Push the tree clips (A) into
the holes until they sit fiat againstthe cieaning tank.
/
/
/
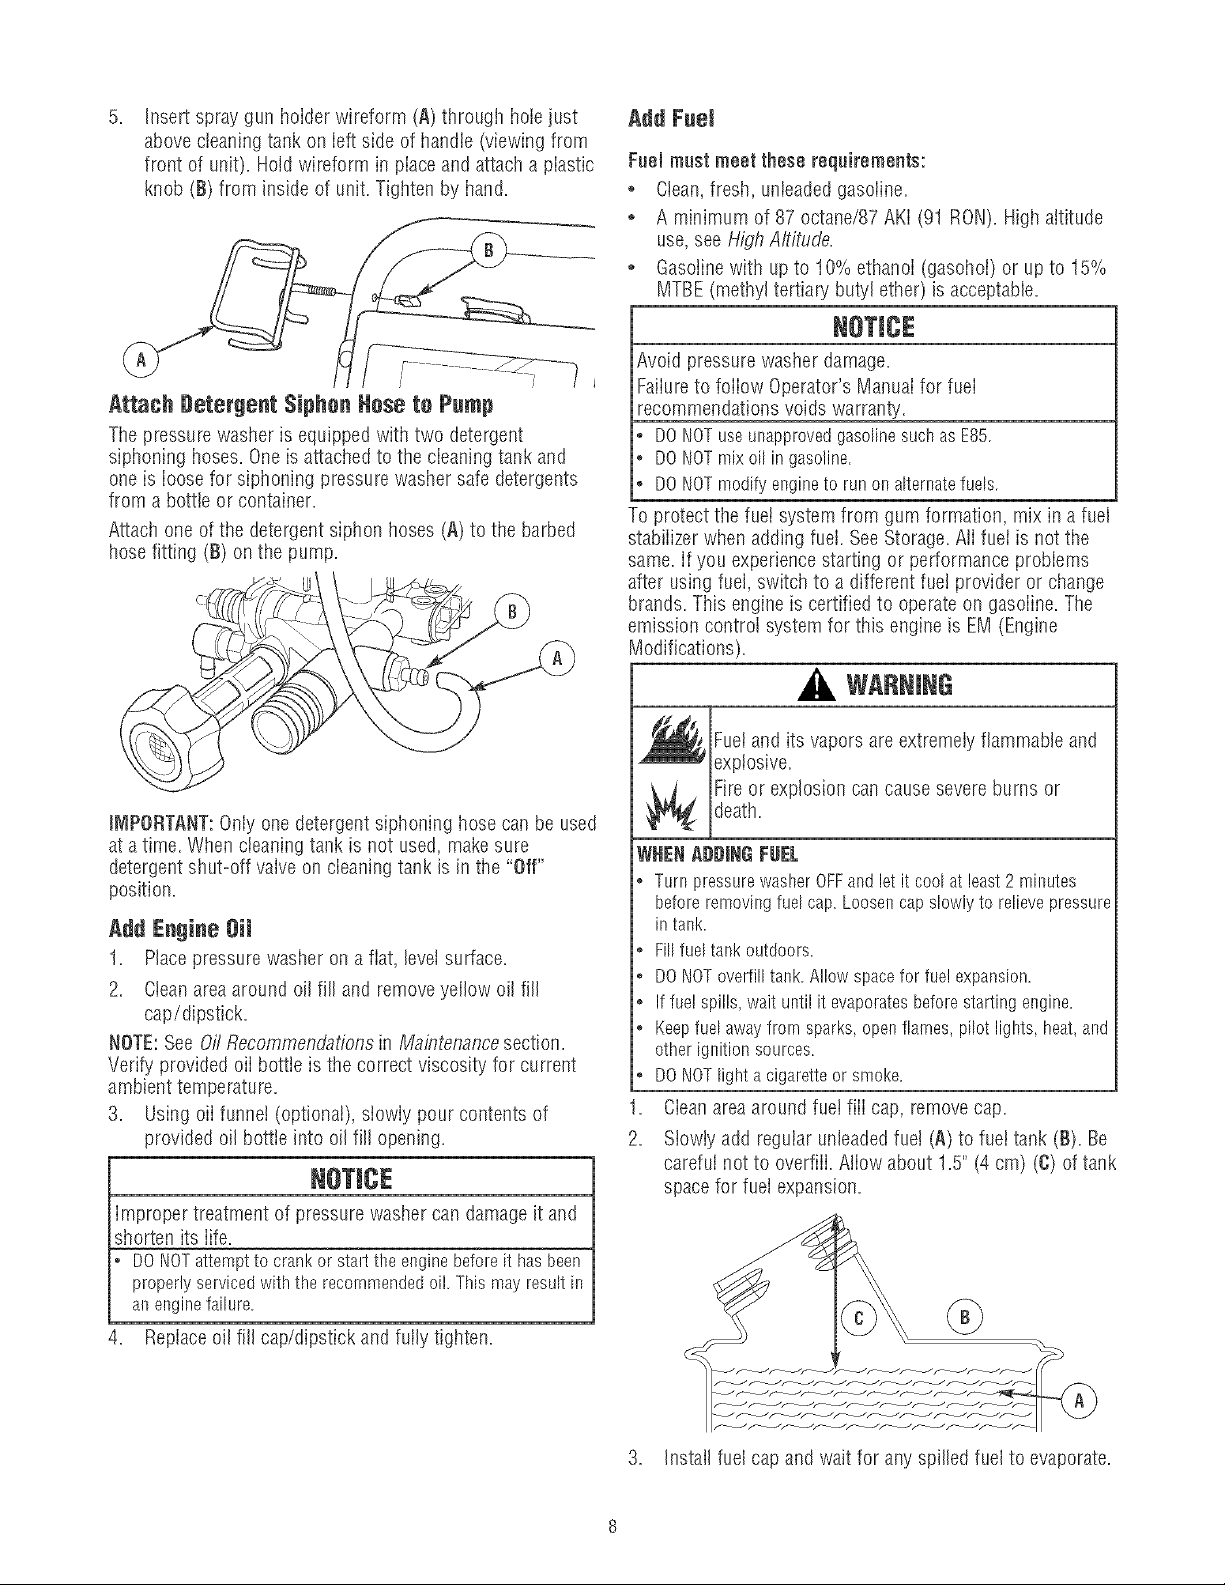
Insert "L" bolt (A) througil hob just abovecleaning tank
on right side of handJe(viewing from front of unit). Hold
bolt in piace and attach plastic knob (B) from inside of
unit. Tigilten by hand.
.
Insert spray gun holder wireform (A) through holejust
above cleaning tank on left side of handle (viewing from
front of unit). Hold wireform in place and attach a piastic
knob (B) from inside of unit. Tighten by hand.
l
Attach Detergent Siphon Hese to Pump
The pressure washer is equipped with two detergent
siphoning hoses. One is attached to the cleaning tank and
one is loose for siphoning pressure washer safe detergents
from a bottle or container.
Attach one of the detergent siphon hoses (A) to the barbed
hose fitting (B) on the pump.
IMPORTANT:Only one detergent siphoning hose can be used
at a time. When cteaning tank is not used, make sure
detergent shut=off valve oll cleaning tank is in the "Off"
position.
Add Engine Oil
1. Place pressure washer on a fiat, bvei surface.
2. Cleanarea around oil fill and remove yellow oil fill
cap/dipstick.
NOTE:See Oi/Recommendations in Ma,_otenancesection.
Verify provided oii bottle is the correct viscosity for current
ambient temperature.
3. Using oii funne! (optional), sIowiy pour contents of
provided oil bottle into oil fill opening.
improper treatment of pressurewasher can damage it and
shorten its iife.
DONOTattemptto crankor stat the enginebeforeit hasbeen
properlyservicedwiththe recommendedoil. This may resultin
anenginefailure.
4. Replaceoil fill cap/dipstick and fully tighten.
Add Fuel
Fuel must meet these requirements:
. Clean,fresh, unleadedgasoline.
o A minimum of 87 octane/87 AKi (91 RON). High altitude
use, see High A/titude.
. Gasoiinewith up to 10% ethanoi (gas@@ or up to 15%
MTBE(methyl tertiary butyl ether) is acceptable.
Avoid pressure washer damage.
Failureto follow Operator's Manual for fuei
recommendations voids warranty.
DONOTuseunapprovedgasolinesuchas E85.
DONOTmixoil in gasoline.
DONOTmodifyengineto runon alternatefuels.
To protect the fuel system from gum formation, mix in a fuel
stabiiizer when adding fueI. See Storage.Ali fuei is not the
same. if you experiencestarting or performance probiems
after using fuel, switch to a different fuel provider or change
brands. This engine is certified to operate on gasoiine. The
emission control system for this engine is EM (Engine
Modifications).
WARNING
Fueland its vapors are extremely flammable and
explosive.
Fire or explosion can causesevere burns or
death.
WNENADDINOFNEL
o TurnpressurewasherOFFand let it coolat least2 minutes
beforeremovingfuelcap.Loosencapslowlyto relievepressure
in tank.
o Fillfuel tankoutdoors.
• DONOToverfilltank.Allowspacefor fue!expansion.
o Iffuel spills waituntil it evaporatesbeforestartingengine.
• Keepfuelawayfrornsparks,openflames,pilot lights,heat,and
otherignitionsources.
DONOTlight a cigaretteorsmoke.
Cleanareaaround fuet fill cap, removecap.
Siowiy add regular unleadedfuel (A) to fuet tank (B). Be
carefui not to overfiii. Aliow about 1.5" (4 cm) (C) of tank
space for fuel expansion.
®
1.
2.
3. Install fuel cap and wait for any spilled fuel to evaporate.
CAUTISN! AlcohoI-btended fuels (called gasohoI, ethanol or
methanoi) can attract moisture, which ieads to separation and
formation of acids during storage. Acidic gas can damagethe
fuei system of an engine whiie in storage.
To avoid engine problems, the fuel system should betreated
with a fuei preserver or emptied before storage of 30 days or
longer, if adding a fuel preserver, fiii the fuel tank with fresh
fuei. if only partialiy tiffed, air in the tank wiii promote fue!
deterioration during storage, if fuei preserver is not used,
drain the fueI tank, start the engine and iet it run untii the fuel
lines and carburetor are empty. Usefresh fueI next season.
See Storagefor additionai information.
NEVERuse engine or carburetor cleaner products in the fuel
tank as permanent damage may occur.
NighAltitude
At altitudes over 5,000 feet (1524 meters), a minimum
85 octane/ 85 AKI (89 RON)gasoline is acceptable.To
remain emissions compliant, high aititude adjustment is
required. Operation without this adjustment wiii cause
decreasedperformance, increased fuet consumption, and
increasedemissions. Seea qualified Sears dealer for high
altitude adjustment information. Operation of the engine at
altitudes below 2,500 feet (762 meters) with the high altitude
kit is not recommended.
Cenneet Hese and Water Supply te Pump
IDO NOT the without the connected
run
pump
water
supply
and turned on,
Damageto equiprnentresultingfrom failureto followthis
instructionwill void warranty
NOTE:Removeand discard the shipping caps from the
pump's high pressure outtet and water inlet before attaching
hoses.
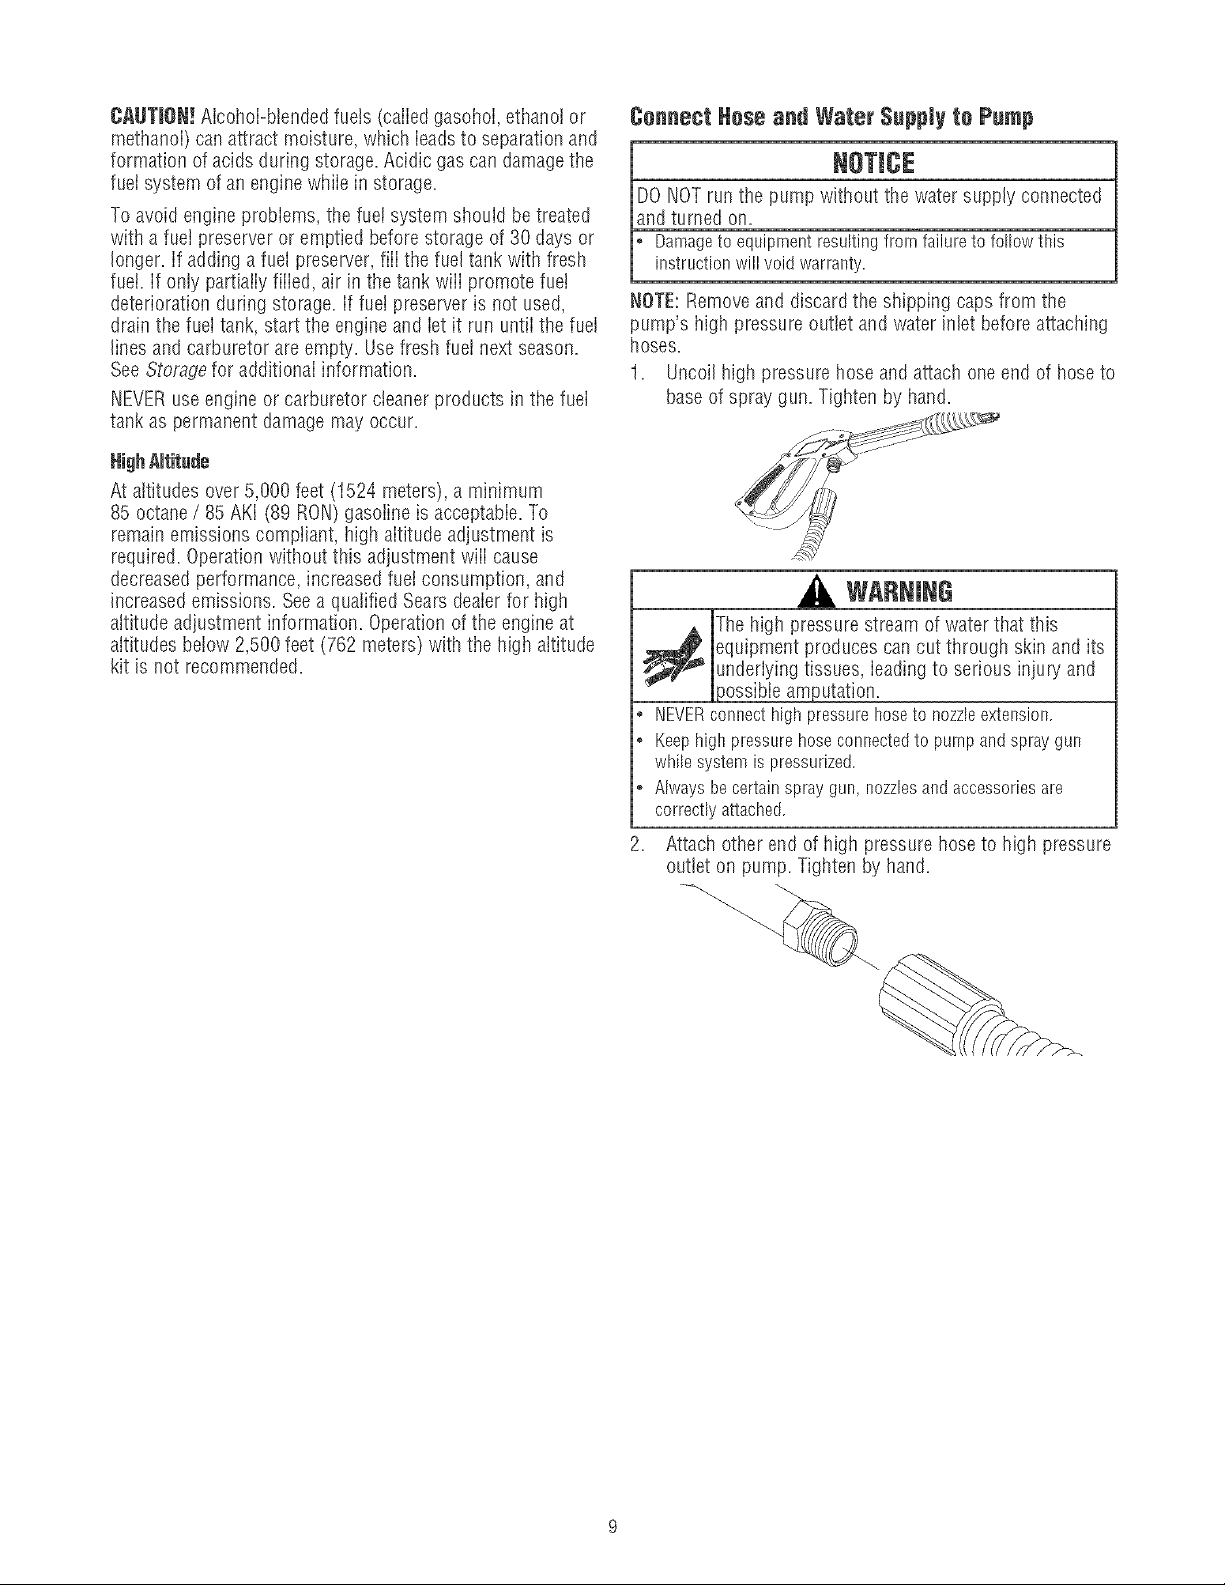
1. Uncoil higil pressure hose and attach one end of hose to
base of spray gun. Tigilten by hand.
WARNING
The high pressurestream of water that this
1_ equipment produces can cut through skin and its
underiying tissues, ieadingto serious injury and
_ossibieamputation.
, NEVERconnecthighpressurehoseto nozzleextension.
• Keephigh pressurehoseconnectedto pumpandspraygun
whilesystemis pressurized.
,', Alwaysbecertainspraygun,nozzlesandaccessoriesare
correctlyattached.
2. Attach other end of high pressure hose to high pressure
outlet on pump. Tighten by hand.
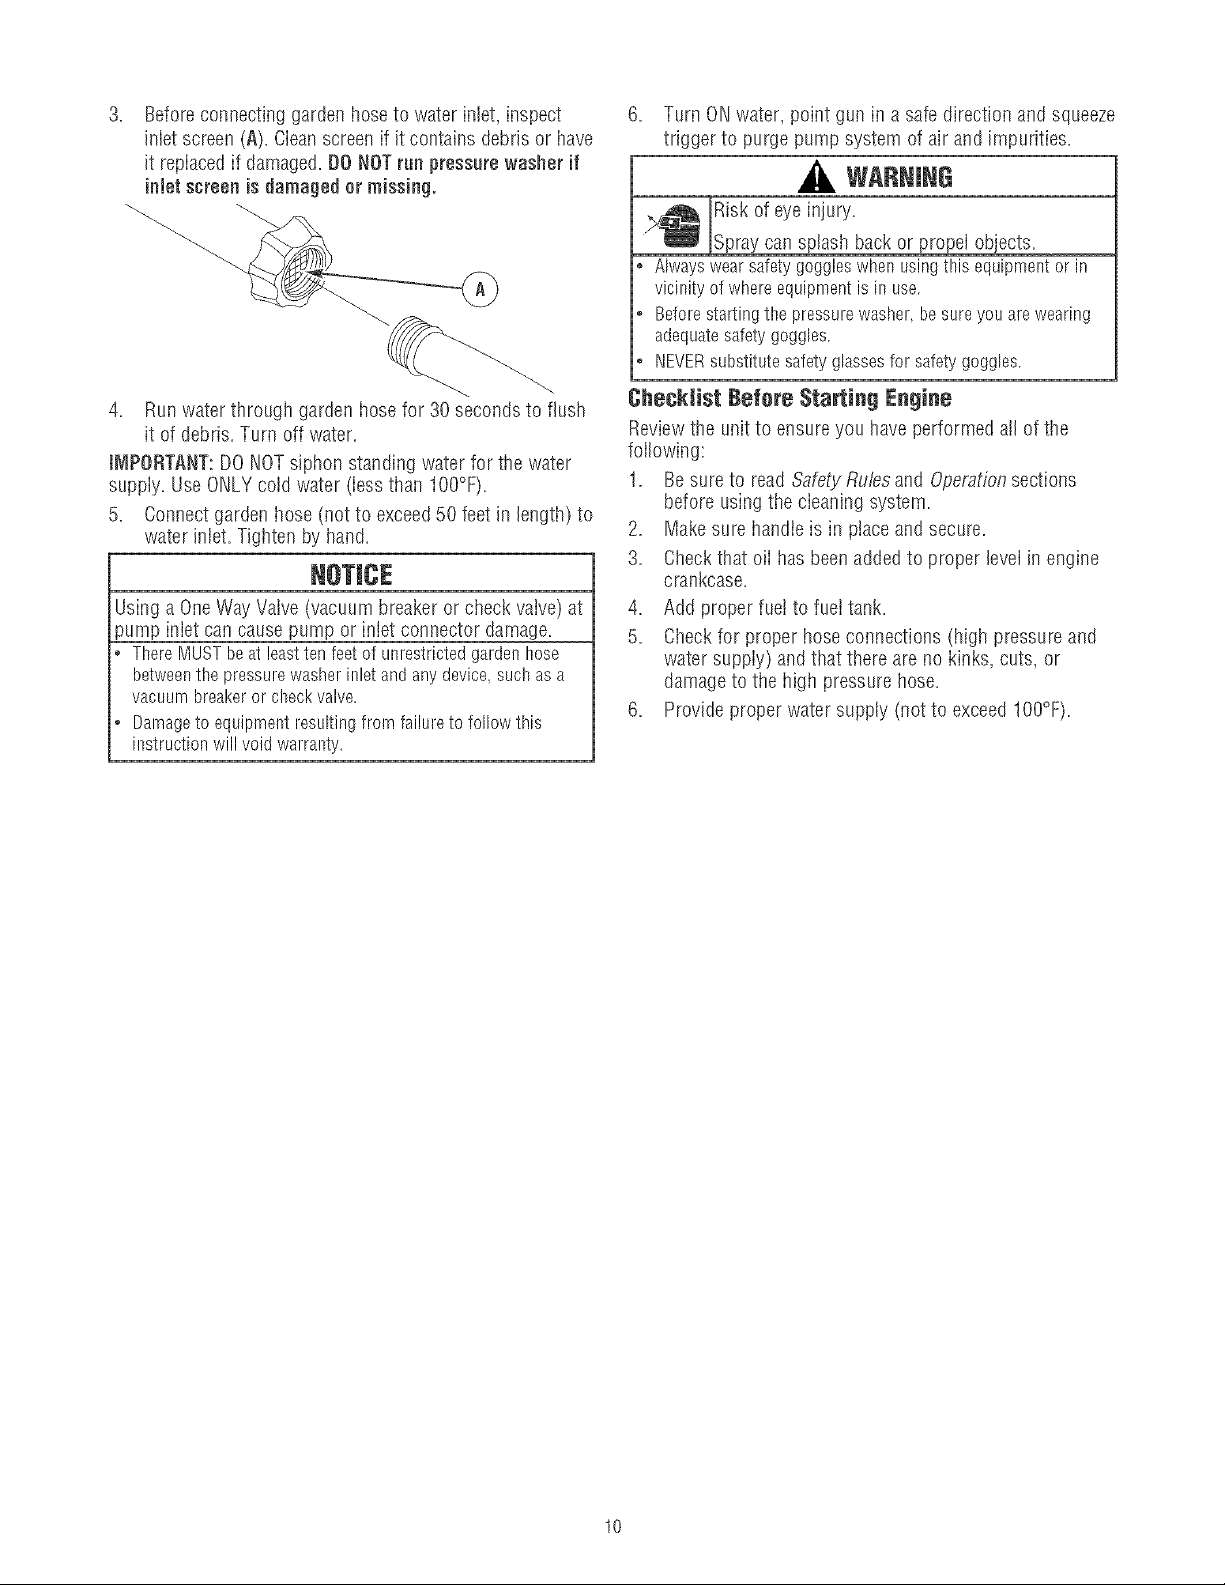
3. Beforeconnectinggardenhosetowaterinlet,inspect
inletscreen(A).Cleanscreenifitcontainsdebrisorhave
it replacedif damaged=DONOTrunpressurewasher if
inlet screen is damaged or missing.
.
Run water through garden hose for 30 seconds to flush
it of debris. Turn off water.
IMPORTANT:DO NOTsiphon standing water for the water
supply. UseONLY cold water (less than 100%).
5. Connect garden hose (not to exceed 50 feet in length) to
water inlet. Tighten by hand.
Using a One Way Valve (vacuum breaker or check valve) at
pump inlet can cause pump or inlet connector damage.
There MUST be at least ten feet of unrestricted garden hose
betweenthe pressure washer inlet and any device, such as a
vacuum breaker or check valve.
Darnageto equipment resulting from failure to follow this
instruction will void warranty.
6. Turn ONwater, point gun in a safe direction and squeeze
trigger to purge pump system of air and impurities.
WARNING
Risk of eye injury.
_Spray can sp ash back or propel objects.
Alwayswearsafetygoggleswhen usingthis equipmentor in
vicinityof whereequipmentis in use
Beforestartingthe pressurewasher,besureyouarewearing
adequatesafetygoggles
NEVERsubstitutesafetyglassesfor safetygoggles
Checklist Before Starting Engine
Reviewthe unit to ensure you have performed atl of the
following:
1. Besure to read Safety Rules and Operationsections
before using the cleaning system.
2. Makesure handle is in place and secure,
3. Checkthat oii has beenadded to proper level in engine
crankcase.
4. Add proper fuet to fuet tank.
5. Checkfor proper hose connections (high pressure and
water suppiy) and that there are no kinks, cuts, or
damageto the high pressure hose.
6. Provide proper water supply (not to exceed IO0°F).
10
HOWTO USEYOURCLEANINGSYSTEM
If you haveany probbms operating your pressure washer,
please call the pressure washer heJpfineat 1-800-222-3136,
Pressure Washer Lecation
PressureWasherClearance
WANNING
Exhaustheat/gases can ignite combustibies,
structures or damage fuei tank causing a fire=
• Keepat least5ft. (152cm)clearanceon all sidesof pressure
washerincludingoverhead.
Macepressure washer outdoors in an area that wiii not
accumulate deadty exhaust gas. DO NOTpiace pressure
washer where exhaust gas (A) could accumulateand enter
inside or be drawn into a potentiaily occupied building.
Ensureexhaust gas is kept awayfrom any windows, doors,
ventiiation intakes, or other openings that can aliow exhaust
gas to coiiect in a confined area. Prevaiiingwinds and air
currents should be taken into consideration when positioning
_ressurewasher.
WARNING
Running engine gives off carbon monoxide, an
odorless, coiorbss, poison gas.
Breathingcarbon monoxide can causeheadache,
fatigue, dizziness, vomiting, confusion, seizures,
nausea,fainting or death=
* OperatepressurewasherONLYoutdoors.
, Keepexhaustgasfromenteringaconfinedareathrough
windows,doors,ventilationintakes,or otheropenings.
* DONOTstat or runengineindoorsor in anenclosedarea,
evenif windowsanddoorsareopen.
Te Start Yenr Cleaning System
To start your engine=poweredcleaning system for the first
time, foiiow these instructions step=by=step.This information
also applies wheneveryou start the engine after you have let
the pressure wa@er sit idle for at bast a day.
1= Piacepressure washer outside near an water source
capabie of supplying water at a flow rate greater than
3=2galions per minute and no iess than 20 PSi at
pressurewasher end of garden hose.
2= Checkthat higil pressure hose is tightly connected to
spray gun and pump. See Assemby for iiiustrations.
3= Make sure unit is in a ievei position=
4= Connectgarden hose to water intet on pressure washer
pump.
5. Turn ONwater, point gun in a safe direction and squeeze
trigger to purge pump system of air and impurities.
NOTICE
DO NOTrun the pump without the water supply connected
and turned on.
_ amageto equipmentresultingfrom failureto followthis
instructionwill void warranty
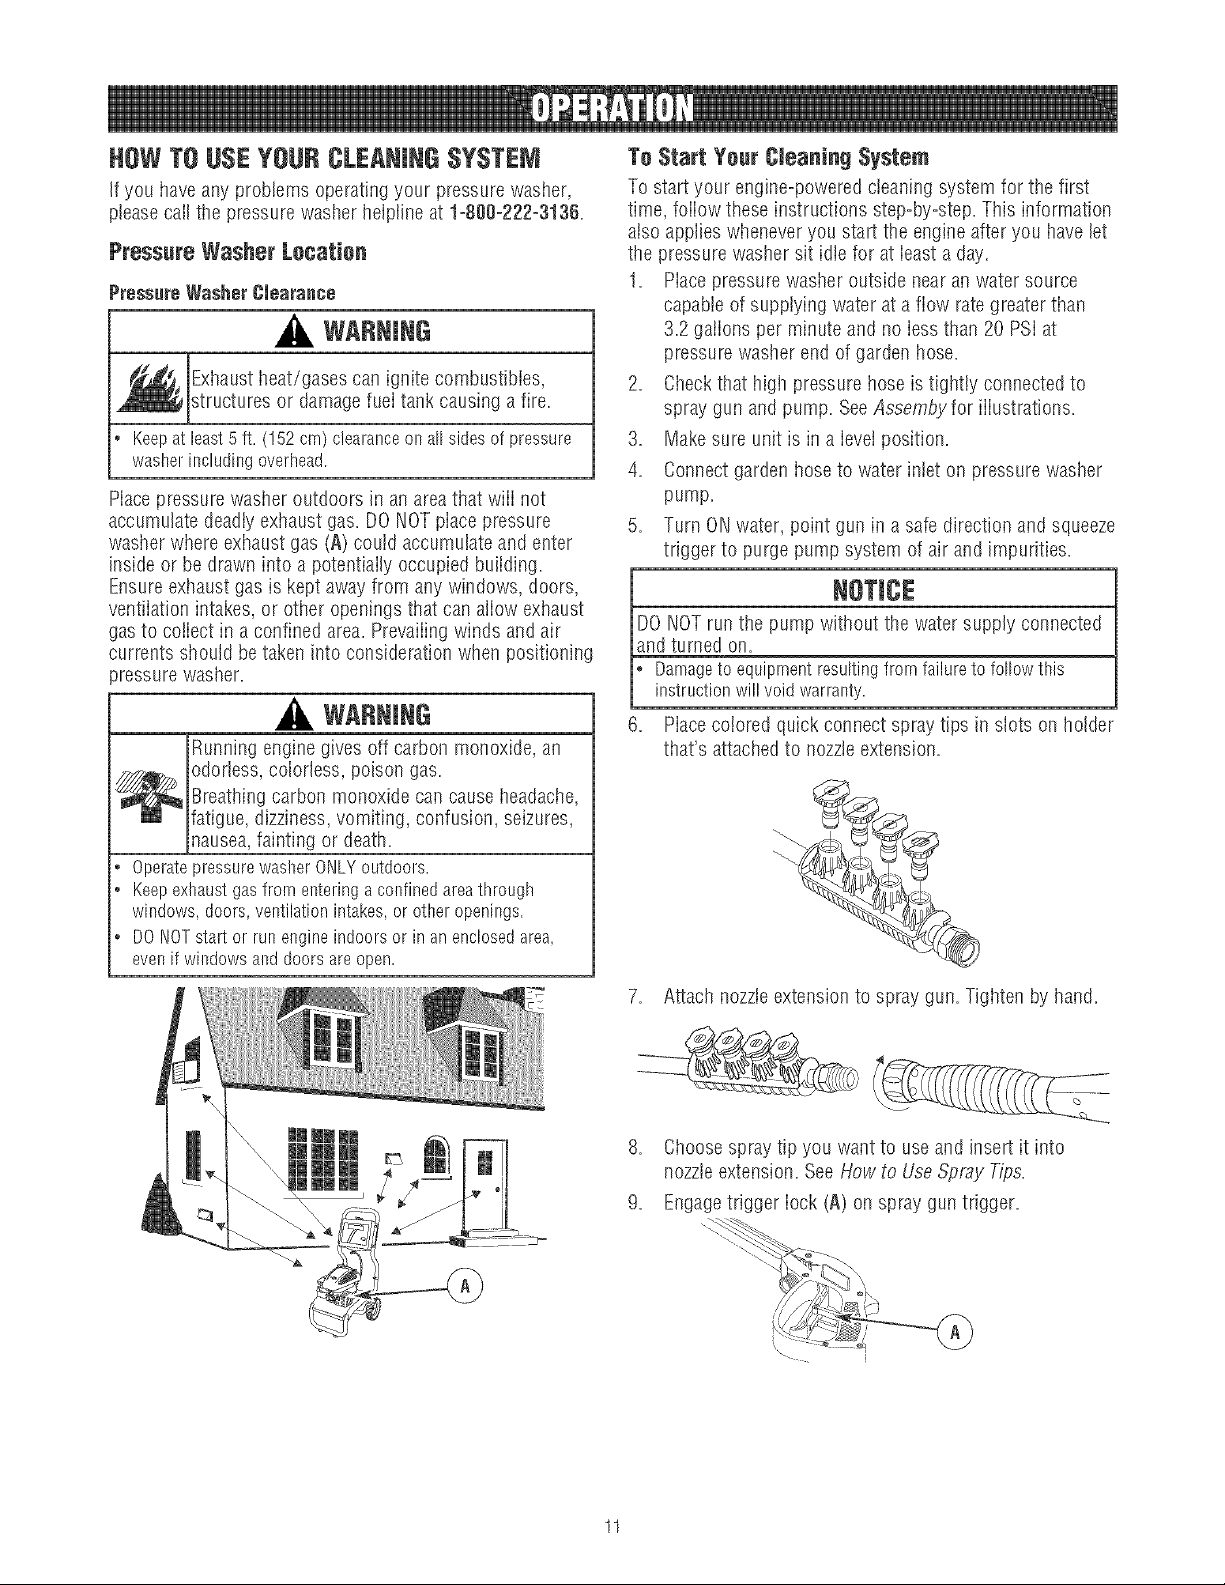
6. Piacecolored quick connect spray tips in slots on holder
that's attachedto nozzleextension.
%
7. Attach nozzleextension to spray gun. Tighten by hand=
8. Choosespray tip you want to use and insert it into
nozzleextension=See How to Use Spray Tips.
9. Engagetrigger iock (A) on spray gun trigger.
11
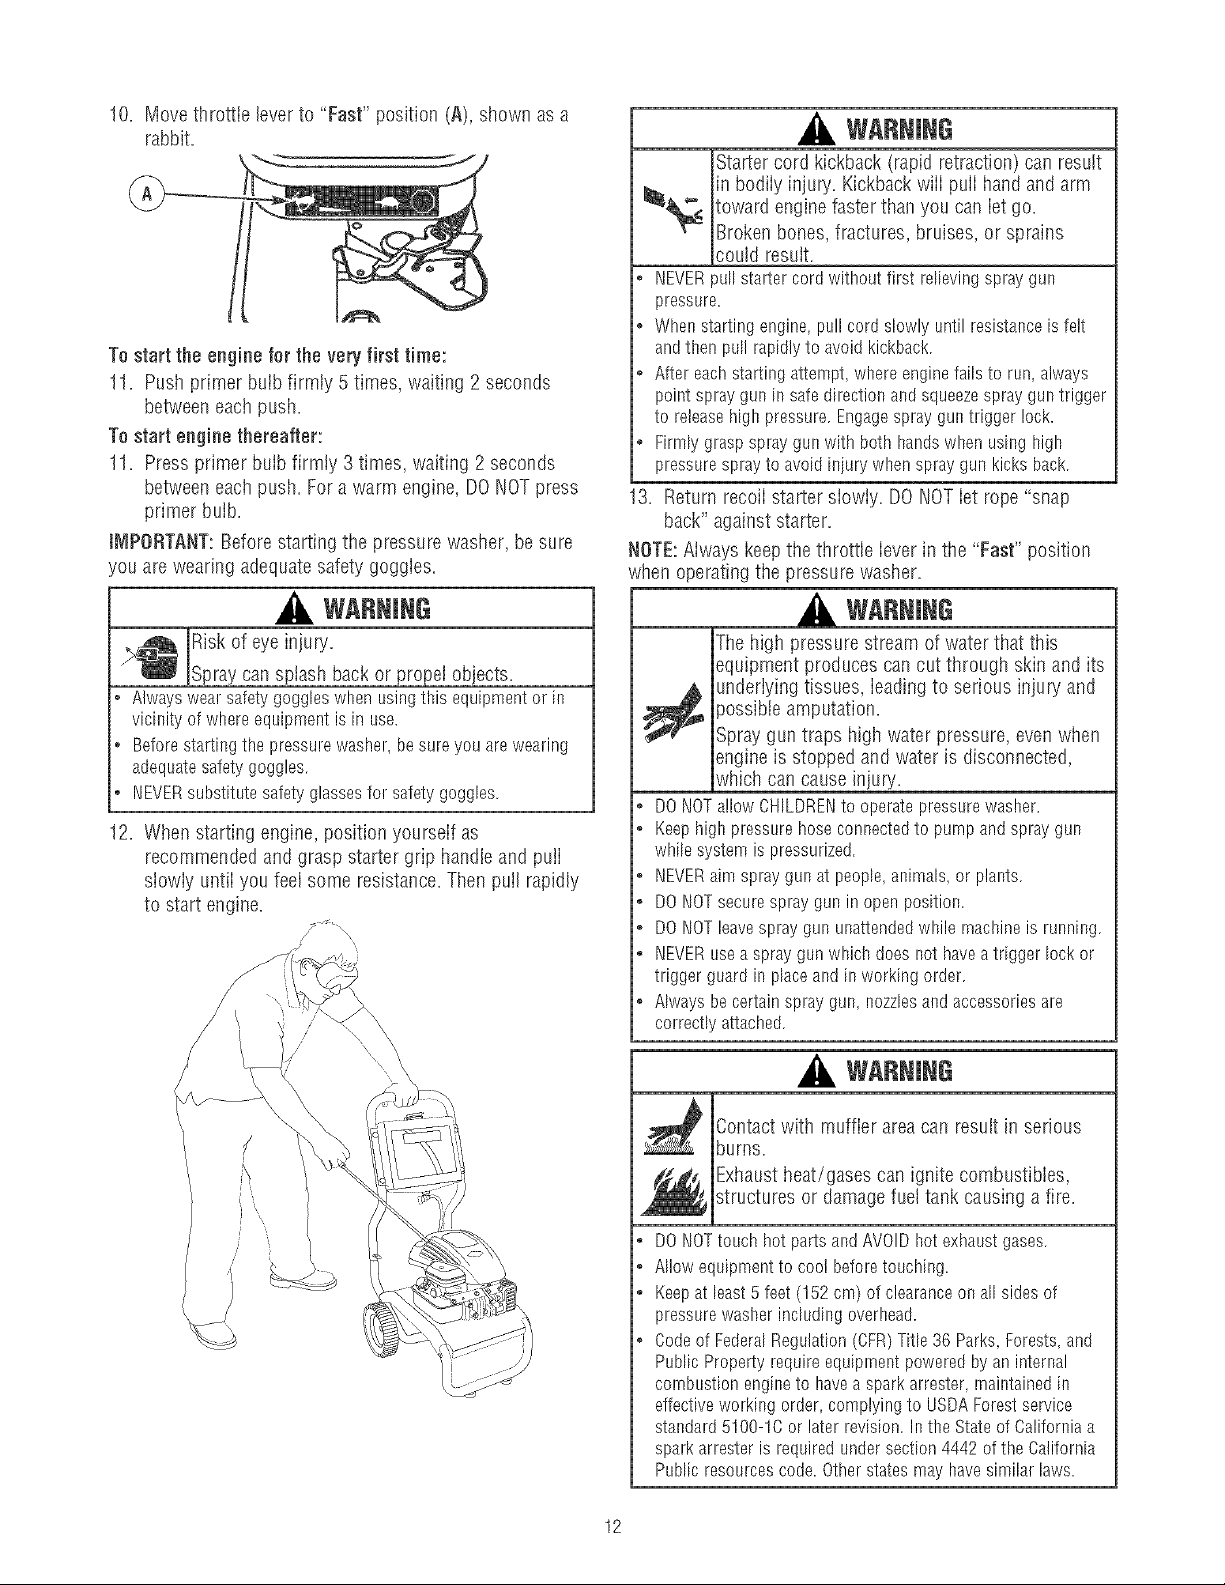
10. Move throttle lever to "Fast" position (A), shown as a
rabbit.
To start the engine for the very first time:
11. Push primer buib firmly 5 times, waiting 2 seconds
betweeneach push.
To start engine thereafter:
11. Press primer buib firmty 3 times, waiting 2 seconds
betweeneach push. For a warm engine, DONOTpress
primer bulb.
t_IPORTANT:Before starting the pressure washer, be sure
'ou are wearing adequatesafety goggles.
WARNING
v_ Risk of eye injury.
_Spray can splash back or propel objects.
Alwayswea!safetygoggleswhenusingthis equipmentor in
vicinityof whereequipmentis in use.
Beforestartingthe pressurewasher,besureyou arewearing
adequatesafetygoggles.
NEVERsubstitutesafetyglassesfor safetygoggles.
12. When starting engine, position yourseif as
recommended and grasp starter grip handle and pulI
siowiy untii you feel some resistance. Then pull rapidly
to start engine.
WARNING
Starter cord kickback (rapid retraction) call result
in bodiiy injury. Kickback wiii puIi hand and arm
toward enginefaster than you can iet go.
Broken bones, fractures, bruises, or sprains
could resuIt.
• NEVERpull startercord withoutfirst relievingspraygun
pressure.
o Whenstartingengine,pull cord slowlyuntil resistanceis felt
andthen pullrapidlyto avoidkickback
o After eachstartingattempt,whereenginefailsto run, always
pointspraygunin safedirectionandsqueezesprayguntrigger
to releasehighpressureEngagesprayguntrigger!ock.
o Firmlygraspspraygunwithboth handswhenusing high
pressuresprayto avoidiniury whenspraygun kicks back
13. Return recoii starter siowiy. DO NOTiet rope "snap
back" against starter.
t_OTE:Aiways keepthe throttle iever in the "Fast" position
when operating the pressure washer.
WARNING
The high pressurestream of water that this
equipment produces can cut through skin and its
_ nderlying tissues, ieadingto serious injury and
}ossibte amputation.
Spray gun traps high water pressure, even when
engine is stopped and water is disconnected,
which can cause injury.
o DONOTallowCHLDREI',_to operatepressurewasher.
• Keephigh pressurehoseconnectedto purnpandspraygun
whilesystemis pressurized.
• NEVERaim spraygunat people,animals_or plants.
o DONOTsecurespraygun inopenposition.
• DONOTleavespraygununattendedwhilernachineis running.
o [',]EVERusea spraygun whichdoesnot haveatriggerlockor
triggerguardin placeandin workingorder.
• Alwaysbecertainspraygun,nozzbsandaccessoriesare
correctlyattached.
WARNING
_, Contact with muffler result in serious
area can
burns.
Exhaustheat/gases can ignite combustibles,
structures or damage fuel tank causing a fire.
o
®
o
DONOTtouchhot partsandAVOIDhot exhaustgases.
Allowequipmentto cool beforetouching.
Keepat least5 feet(152cm) of clearanceon all sidesof
pressurewasherincludingoverhead.
Codeof FederalRegulation(CFR)Title36 Parks_Forests,and
PublicPropertyrequireequiprnentpoweredby aninternal
combustionengineto haveasparkarrester rnaintainedin
effectiveworkingorder,complyingto USDAForestservice
standard510B-1Cor laterrevision.Inthe Stateof 6aliforniaa
sparkarresteris requiredundersection4442of the California
Publicresourcescode.Otherstatesmayhavesimilarlaws.
12
How to Stop Your Cleaning System
1. Reieasespray gun trigger and let engine idte for two
minutes.
2. Movethrottie to SLOW position, then STOPposition (A).
3. ALWAYSpoint spray gun in a safe direction and squeeze
spray gun trigger to releaseretained high water
pressure,
iMPORTANT:Spray gun traps high water pressure, even
when engine is stopped and water is disconnected.
WARNING
The high pressure stream of water that this
equipment produces can cut through skin and its
,_ underiying tissues, ieadingto serious injury and
)ossibte amputation.
Spray gun traps high water pressure, even when
engine is stopped and water is disconnected,
which can cause injury.
• Keephigh pressurehoseconnectedto purnpandspray'gun
whilesystemis pressurized.
, ALWAYSpointspray'gun in safedirectionandsqueezespray'
guntrigger,to releasehighpressure,everytimeyou stop
engine.Engagetrigger lockwhennot in use.
4. Engagetrigger lock on spray gun when not in use.
Hew te Use Spray Tips
The quick-connect on the nozzleextension aliows you to
switch between four different quick connect spray tips. Spray
tips can be changed whiie pressure washer is running once
spray gun trigger lock is engaged. The spray tips vary the
spray pattern as shown beiow.
F(_liawthese instructiansto changespraytips:
1= Engagetrigger lock on spray gun=
2. Puli back coliar on quick-connect and puli current spray
tip off. Store spray tips in holder provided on the nozzle
extension.
WARNING
The high pressure stream of water that this
_ quipment produces can cut through skin and itsunderlying tissues, ieadingto serious injury and
possible amputation.
° NEVERexchangespraytips withoutlockingthe triggerlockon
the spraygun.
, DONOTtwist spraytips whilespraying.
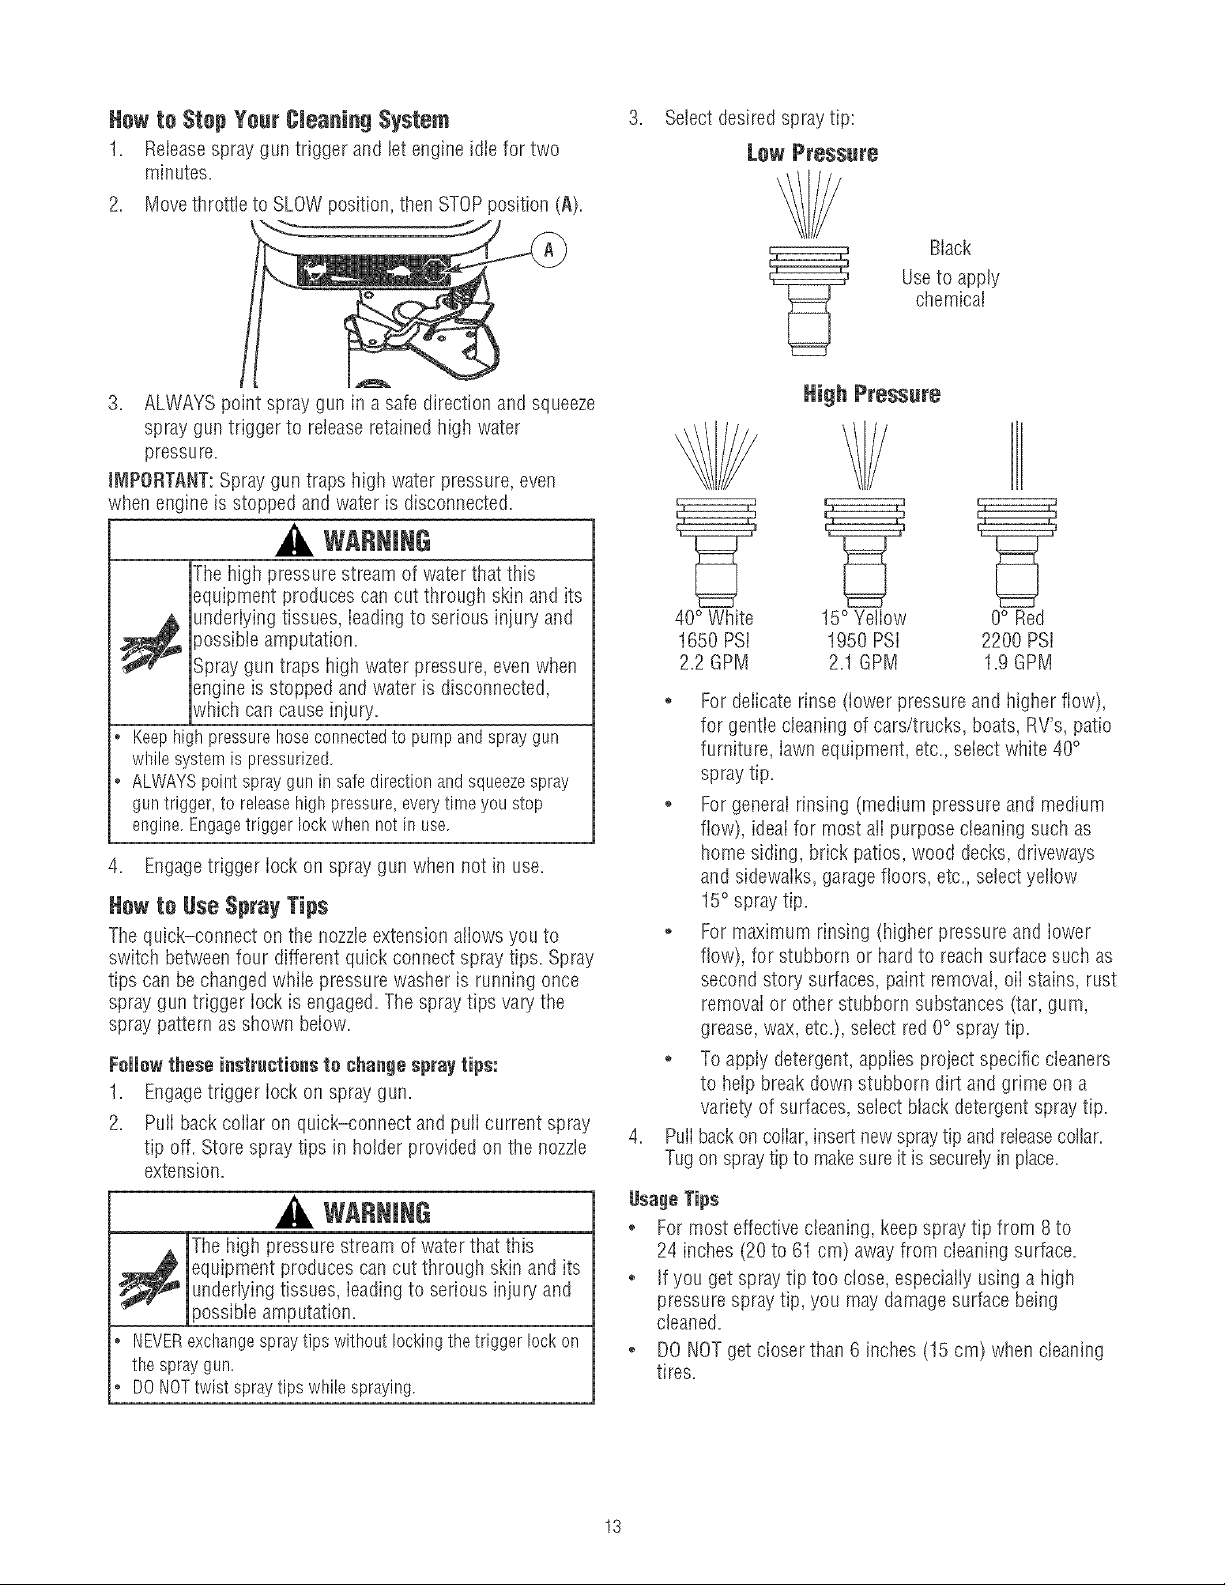
3. Select desired spraytip:
Lew Pressure
Black
Useto apply
chemical
40° White 15°Yeliow 0° Red
1650 PSi 1950 PSi 2200 PSi
2.2 GPM 2.1 GPM 1.9 GPM
.
* For delicate rinse (lower pressure and higher flow),
for gentle cleaning of cars/trucks, boats, RV's, patio
furniture, lawn equipment, etc. select white 40°
spray tip.
, For general rinsing (medium pressure and medium
flow), ideal for most atI purpose cleaning such as
home siding, brick patios, wood decks, driveways
and sidewaiks, garage floors, etc., select yellow
15° spray tip.
o For maximum rinsing (higher pressure and iower
flow), for stubborn or hard to reach surface such as
second story surfaces, paint removal, oii stains, rust
removai or other stubborn substances (tar, gum,
grease,wax, etc.), seiect red 0° spray tip.
, To apply detergent, appiies project specific cleaners
to help break down stubborn dirt and grime on a
variety of surfaces, select black detergentspray tip.
Puffbackon coliar, insert new spraytip and releasecollar.
Tug on spraytip to makesure it is securelyin place.
UsableTips
o For most effective cleaning, keep spray tip from 8 to
24 inches (20 to 61 cm) awayfrom cleaning surface.
, If you get spray tip too close, especialiy using a high
pressure spray tip, you may damagesurface being
cleaned.
, DO NOT get closer than 6 inches (15 cm) when cleaning
tires.
13
Cleaning and Applying Detergent
CAUTION
Chemicaiscan causebodiiy injury, and/or property
damage.
NEVERusecausticliquidwithpressurewasher.
UseONLYpressurewashersafedetergents/soaps.Followall
rnanufacturersinstructions.
Te apply detergent feiiew these steps:
1. Attach desired detergent siphon hose foiiowing
instructions Attach DetergentSiphon Hose to Pump.
iMPORTANT:Be sure engine is off and allowed to cool before
switching detergent siphoning hoses.
WANNING
;_ Contact with muffler result in serious
area can
burns.
Exhaustheat/gases can ignite combustibies,
structures or damage fueI tank causing a fire.
,', DONOTtouchhot partsandAVOIDhot exhaustgases.
o Allowequipmentto cool beforetouching.
2. Review use of spray tips.
3. Preparedetergent soiution as required by job.
4. Make sure detergent shut-off valve on cleaning tank is in
"Off" position.
5. If using cleaning tank, pour detergent into cleaning tank.
NOTE:The cleaning tank hoids one galion.
6. Make sure black detergent spray tip is instalied.
NOTE:Detergentcannot be appiied with the higil pressure
nozzles (White, Yellow or Red).
7. Make sure garden hose is connected to water inlet.
Checkthat high pressure hose is connected to spray gun
and pump. Turn on water.
NOTICE
You must attach aiJhoses before you start the engine.
Startingthe enginewithoutallthe hosesconnectedandwithout
the waterturnedONwill damagethe pump.
Darnageto equipmentresultingfrom failureto followthis
instructionwill void warranty.
8. Engagetrigger iock on spray gun and start engine
foliowing instructions How to Start Your Pressure
Washe,:
9A. If using cleaning tank, rotate detergentshut-off valve on
cleaning tank to "On" position (A).
IMPORTANT:If using detergent siphoning hose, make sure
detergentshut=off valve on cleaning tank is in the "Off"
position.
9B. If using detergent siphoning hose, piace smaii fiiter end
of detergent siphoning tube into detergent container.
NOTE:Make sure the fiiter is fuily submerged in detergent
while applying detergent.
Contact with the hot muffler can damage detergent
siphoning tube.
When inserting the filter into a detergent solution bottle, route
the tube so as to keep it from inadvertently contacting the hot
muffler.
10. Appiy detergentto a dry surface, starting at iower
portion of areato be washed and work upward, using
long, even, overiapping strokes.
11. Aliow detergentto "soak in" for 3-5 minutes before
washing and rinsing. Reappiyas neededto prevent
surface from drying. DO NOTallow detergent to dry on
(prevents streaking).
Pressure Washer Rinsing
Fer Rieein_l;
1. Engagetrigger iock on spray gun.
2. If using cleaning tank, rotate detergent shut-off valve on
cleaning tank to "Off" position.
3. Remove black spray tip from nozzteextension.
4. Selectand instaii desired high pressure spray tip
following instructions How to Use Splay Tips.
5. Keepspray gun a safe distance from areayou plan to
spray.
WARNING
Kickbackfrom spray gun can causeyou to fail.
6.
,', Operatepressurewasherfrom astablesurface.
o BeextrerneIycarefulif you mustusethe pressurewasherfrom
a ladder,scaffolding,or anyothersimilarlocation.
o Firmlygraspspraygun with both handswhenusing high
pressuresprayto avoidinjury whenspraygun kicks back.
Apply a higil pressure spray to a smali area and then
check surface for damage,if no damage is found, you
can assume it is okayto continue rinsing.
Start at top of area to be rinsed, working down with
same overlapping strokes as you used for cleaning.
Autemati¢ CeeJDewu System {Thermal Relief)
If you run the engine on your pressure washer for
3-5 minutes without pressing the trigger on the spray gun,
circuiating water in the pump can reach temperatures above
125%. The system engagesto cool the pump by dischargieg
the warm water eete the greued.
14
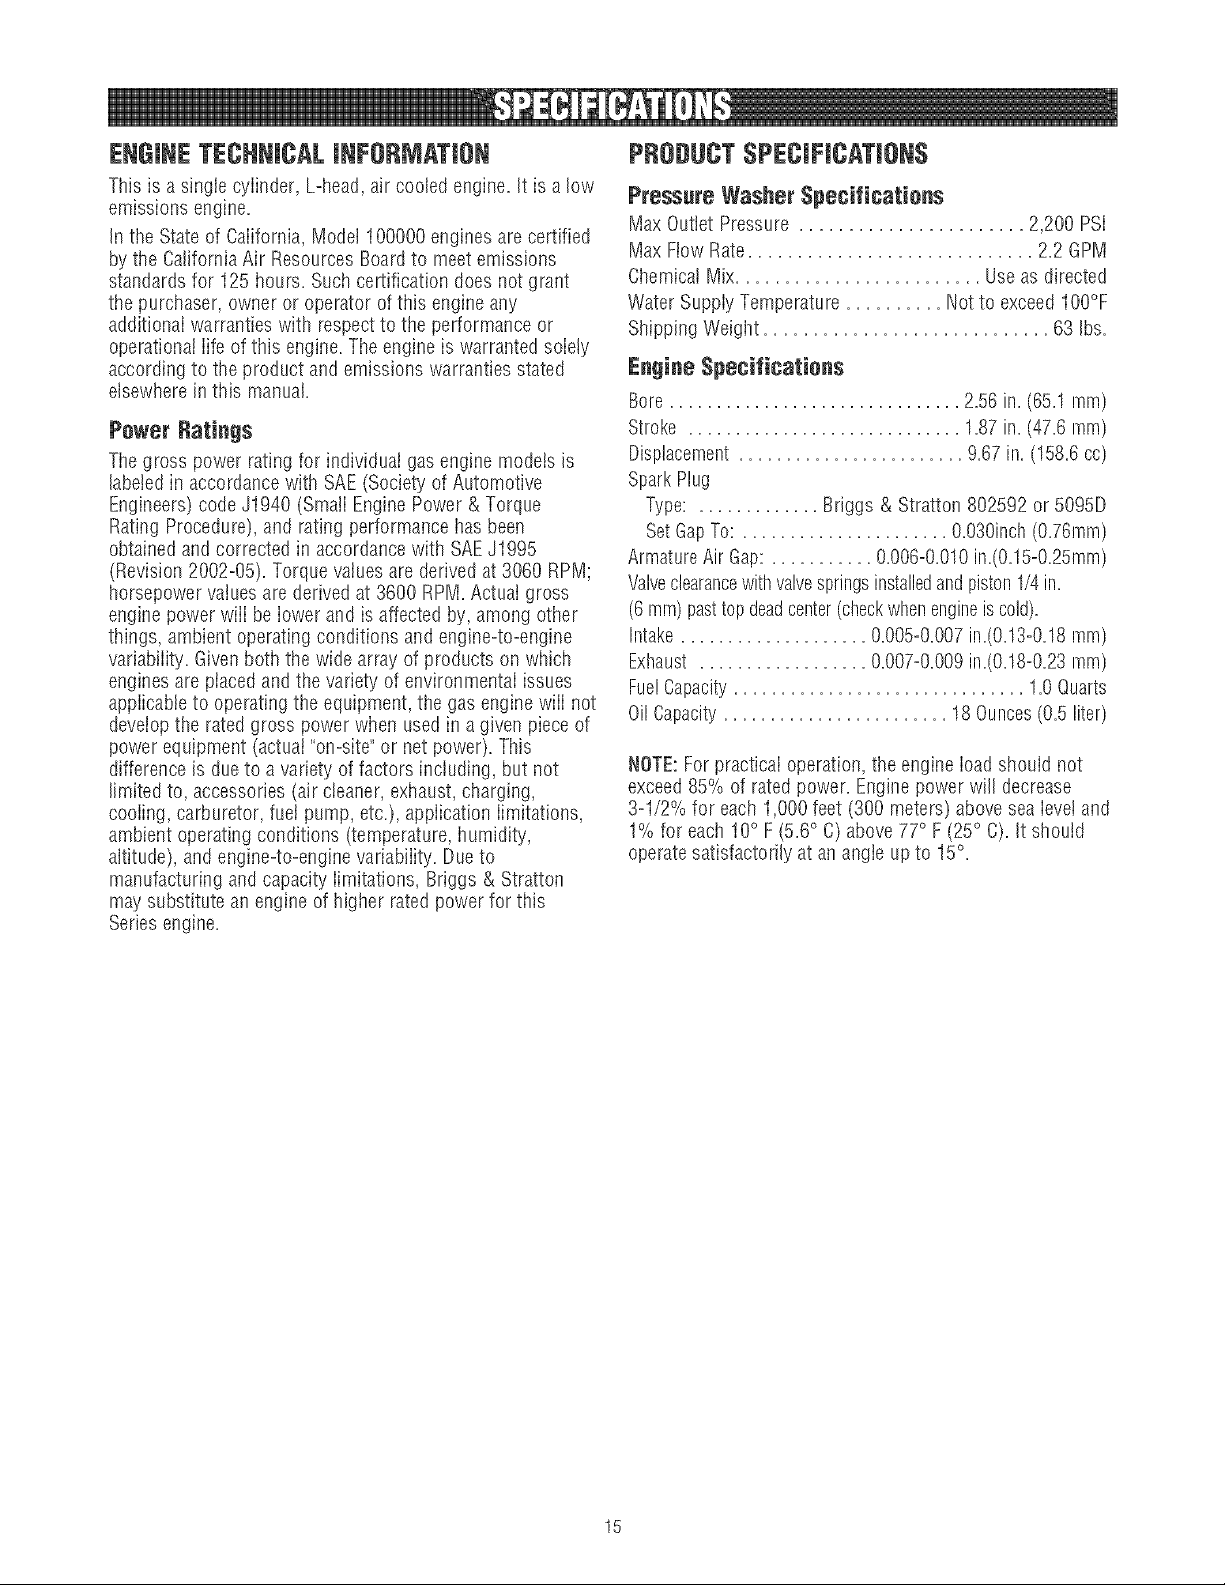
ENGINETECHNICALiNFORMATiON
This is a single cylinder, L-head, air cooled engine. It is a low
emissions engine.
In tile Stateof California, Modei I00000 engines are certified
by the California Air Resources Boardto meet emissions
standards for 125 hours. Such certification does not grant
the purchaser, owner or operator of this engine any
additional warranties with respectto the performance or
operational Iife of this engine. The engine is warranted soiely
according to tile product and emissions warranties stated
elsewherein this manual.
Pewer Ratings
The gross power rating for individual gas engine models is
labeledin accordance with SAE(Society of Automotive
Engineers)code J1940 (SmalI Engine Power & Torque
Rating Procedure), and rating performance has been
obtained andcorrected in accordancewith SAEJ1995
(Revision 2002-05). Torque values are derived at 3060 RPM;
horsepower vaiues are derived at 3600 RPiVI.Actuai gross
engine power wiii be iower and is affected by, among other
things, ambient operating conditions and engine-to-engine
variabiiity. Given both the wide array of products on which
engines are piaced and the variety of environmentai issues
appiicabteto operating the equipment, the gas engine wiii not
develop the rated gross power when used in a given piece of
power equipment (actual "on-site" or net power). This
difference is due to a variety of factors including, but not
limited to, accessories (air cteaner, exhaust,charging,
cooiing, carburetor, fuel pump, etc.), appiication iimitations,
ambient operating conditions (temperature,humidity,
altitude), and engine-to-engine variabiiity. Due to
manufacturing and capacity iimitations, Briggs & Stratton
maysubstitute an engine of higher rated power for this
Series engine.
PRODUCTSPECiFiCATiONS
PressureWasher Specifications
Max Outbt Pressure ....................... 2,200 PSi
Max Ftow Rate............................. 22 GPM
Chemical Mix......................... Use as directed
Water Supply Temperature .......... Not to exceed IO0°F
Shipping Weight ............................. 63 Ibs.
EngineSpecificatiens
Bore............................... 256 in. (65A rnm)
Stroke ............................. 137 in. (47.6 turn)
Displacement........................ 9.67 in. (158.6 cc)
SparkPlug
Type: ............. Bfiggs & Stratton 802592 or 5095D
SetGap To: ...................... O.030inch(O.76mm)
ArrnatureAir Gap: ........... 0.006-0.010in.(O.15=O.25mm)
Valveclearancewithvalvespringsinstalledand piston1/4in.
(6 turn)pasttop deadcenter(checkwhenengineis cold).
Intake .................... 0.005-0.007 in.(0.13-0.18rnrn)
Exhaust .................. 0.007-0.009in.(0.18=0.23turn)
FuelCapacity............................... 1.0 Quarts
OilCapacity........................ 18Ounces(0.5 liter)
NOTE:For practicai operation, the engine ioad should not
exceed 85% of rated power. Engine power will decrease
3-I/2% for each 1,000 feet (300 meters) above sea Ievei and
1% for each 10° F (5.6° C) above 77° F (25° C). It should
operatesatisfactorily at an angle up to 15°.
15
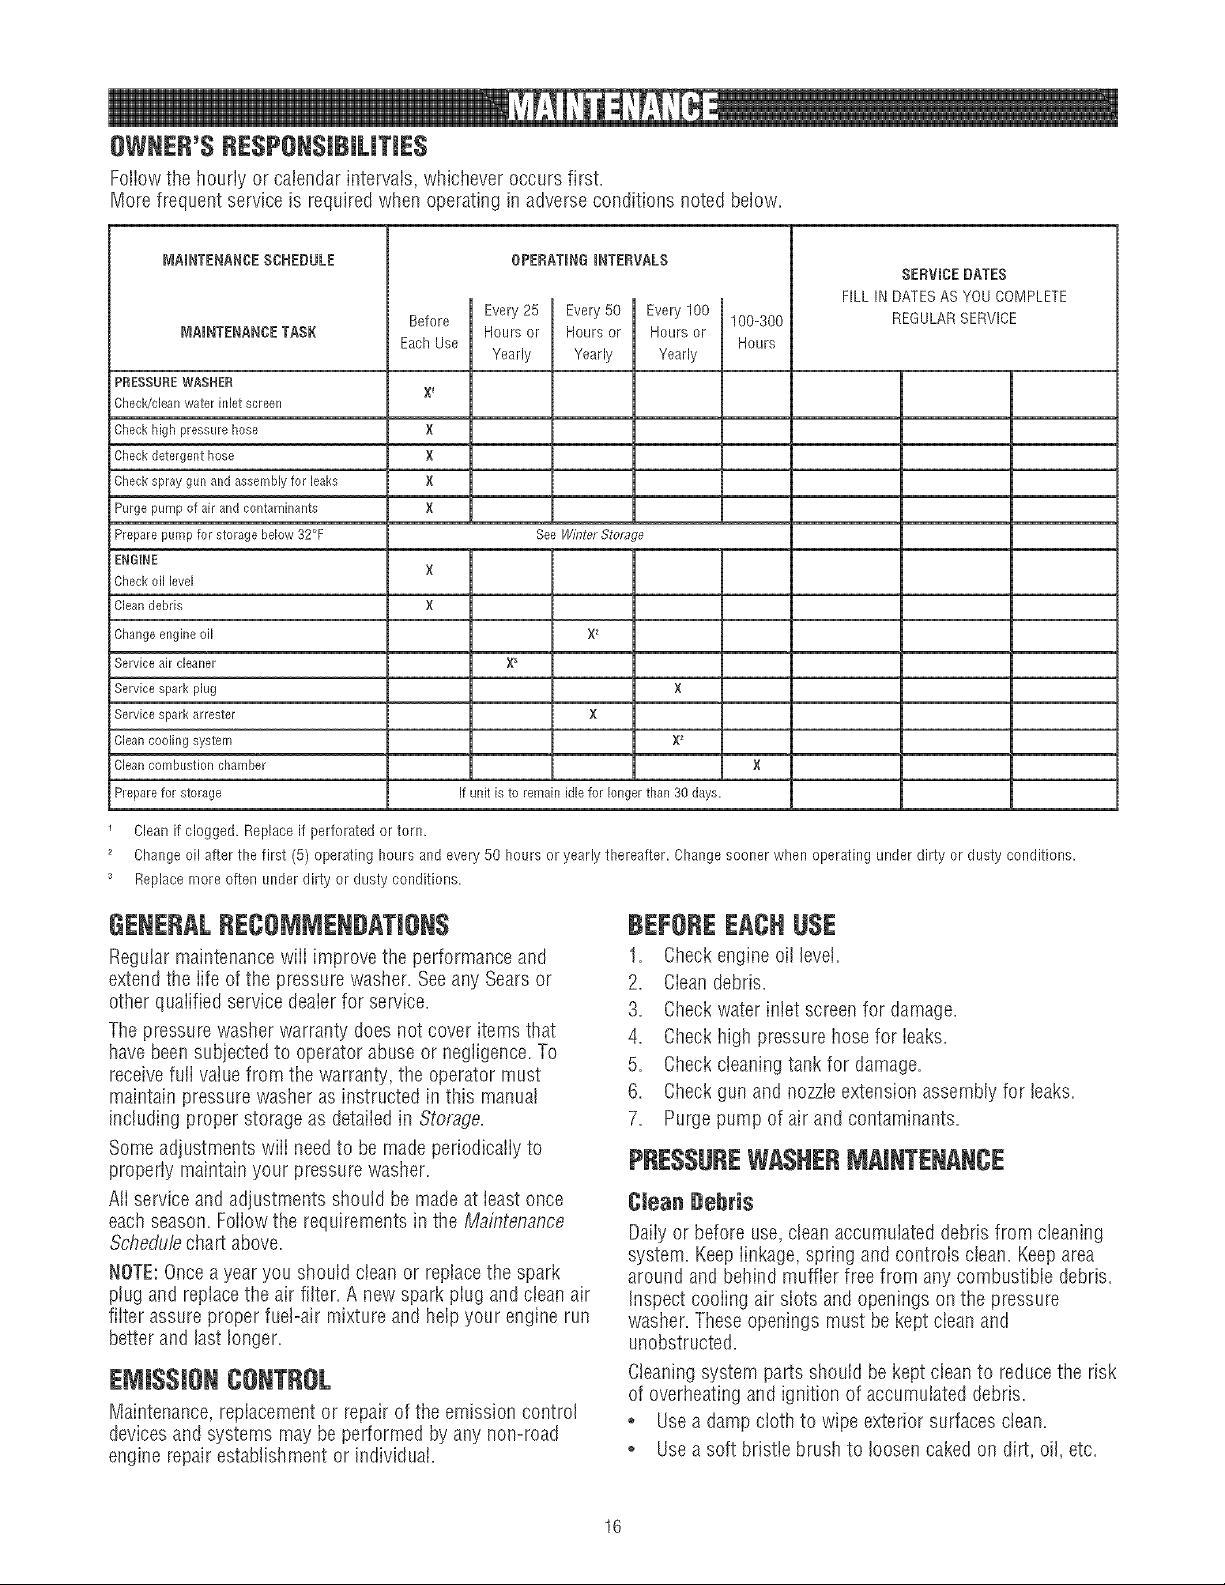
OWNER'SRESPONSiBiLiTIES
Followthe hourly or calendar intervals, whichever occurs first.
More frequent service is required when operating in adverse conditions noted below.
MAINTENANCESCHEDULE
MAINTENANCETASK
PRESSURE WASHER
Chec_Ncieanwater inlet screen
Check high pressure hose
Check detergent hose
Check spray gun and assembly for leaks
Purge pump of air and contaminants
Prepare pump for storage below 32°F
ENGINE
Before
Each Use
X 1
}(
N
N
}(
OPERATINGiNTERVALS
I Every 25 Every 50 Every 100
Hours or Hours or Hours or
Yearly Yearly Yearly
See Winter Storz_ge
100-300
Hours
SERVICEDATES
FILL IN DATESAS YOU COMPLETE
REGULARSERVICE
Check oil bye[
Clean debris
Change engine oil
Service air cleaner
Service spark plug
Service spark arrester
Clean cooling system
Clean combustion chamber
Prepare for storage
X
X
X _
X_
X
X
X_
If unit is to remain idle for longer than 30 days,
Cleanif clogged. Replace if perforated or torn.
Change oil after the first (5) operating hours and every 50 hours or yearly thereafter. Changesooner when operating under dirty or dusty conditions.
Replace more often under dirty or dusty conditions,
GENERALRECO 'JMENDATION$
Regular maintenancewill improve the performance and
extendthe iife of the pressure washer. Seeany Sears or
other quaiified service deaierfor service.
The pressure washer warranty does not cover items that
have been subjected to operator abuse or negiigence.To
receivefurl vatuefrom the warranty, the operator must
maintain pressure washer as instructed in this manual
including proper storage as detaiied in Storage.
Some adjustments wiii needto be made periodicaliy to
properly maintain your pressure washer.
AtI service and adjustments should be made at least once
each season. Follow the requirements in the Maintenance
Schedu/echart above.
NOTE:Oncea year you should clean or replace the spark
ptug and repiace the air filter. A new spark piug and clean air
filter assure proper fuel-air mixture and help your engine run
better and last Ion@r.
ENIi$$i0N CONTROL
Maintenance,replacementor repair of the emission control
devices and systems may be performed by any non-road
engine repair establishment or individual.
BEFOREEACHUSE
1. Checkengine oil bvei.
2. Cleandebris.
3. Checkwater inlet screen for damage.
4. Checkhigh pressure hose for leaks.
5. Checkcteaningtank for damage.
6. Checkgun and nozzteextension assembly for leaks.
7. Purge pump of air and contaminants.
PRESSUREWASHERMAINTENANCE
Clean Debris
Daily or before use, clean accumuiated debris from cbaning
system. Keepiinkage, spring and controis cban. Keep area
around and behind muffler free from any combustible debris.
Inspect cooiing air siots and openings on the pressure
washer. Theseopenings must be kept ciean and
unobstructed.
Cleaningsystem parts should be kept clean to reduce the risk
of overheating and ignition of accumuiated debris.
. Usea damp cioth to wipe exterior surfaces clean.
o Usea soft bdstte brush to loosen caked on dirt, oil, etc.
16
NOTICE
j Improper treatment of pressurewasher can damage it and
_horten_ ....
its fife,
L_ DONOTinsert any'objectsthroughcoolingslots.
° Usea vacuum cleaner to pick up loose dirt and debris.
Check and Cmean[n_etScreen
Examinegarden hose inbt screen. Cban if it is clogged or
repiace if it is torn.
Check High Pressure Hese
High pressure hoses can develop leaks from wear, kinking,
or abuse, inspect hose before each use. Checkfor cuts,
leaks, abrasions, bulging of cover, or damage or movement
of coupiings. If any of these conditions exist, replace hose
immediately.
WARNING
The high pressure stream of water that this
_ quipment produces can cut through skin and its
underlying tissues, ieadingto serious injury and
)ossibb amputation.
* NEVERrepairhigh pressurehose.Replaceit.
, ReplacementhoseratingMUSTexceedrnaxhnurnpressure
ratingof unit.
Check Gun and Nezzle Extensien
Examinehoseconnectionto spraygun and makesure it is
secure.Testtrigger by pressingit and makingsure it springs
backinto placewhenyou releaseit. Putsafetylatchin UP
positionandtest trigger.You shouldnot beabb to presstrigger.
Replacespraygun immediatelyif it fails any of thesetests.
Nezzle Maintenance
A pulsing sensation felt whiie squeezingthe spray gun trigger
may becaused by excessive pump pressure. The principal
cause of excessive pump pressure is a spray tip ctogged or
restricted with foreign materials, such as dirt, etc. To correct
the problem, immediately clean the spray tip following these
instructions:
1. Shut off engine and turn off water supply.
2. ALWAYSpoint spray gun in a safe direction and squeeze
spray gun trigger to releaseretained high water pressure.
WARNING
The high pressure stream of water that this
equipment produces can cut through skin and its
_ nderlying tissues, ieading to serious injury and
possible amputation.
Spray gun traps high water pressure, even when
engine is stopped and water is disconnected,
which can cause injury.
• Keephigh pressurehoseconnectedto purnpandspraygun
whilesystemis pressurized.
o ALWAYSpointspraygunin safedirectionandsqueezespray
guntrigger,to releasehighpressure,everytimeyou stop
engine.Engagetrigger lockwhennot in use.
3. Removespray tip from end of nozzleextension.
4. Usea small paperctip to free any foreign material
clogging or restricting spray tip (A).
.
6.
Remove nozzIeextension from spray gun.
Using a garden hose, remove additional debris by back
flushing water through nozzleextension. Backflush
between30 to 60 seconds.
j_J
7. Reinstatispray tip into nozzle extension.
8. Reconnectnozzleextension to spray gun.
9. Makesure garden hose is connected to water inlet.
Checkthat high pressure hose is connected to spray gun
and pump. Turn on water.
10. Engagetrigger Iock on spray gun and start engine
foflowing instructions How to Star Your Pressure
Washe,t
11. Test pressure washer by operating with each quick
connect spray tip,
O-Ring Maintenance
Purchasean O-Ring RepairKit at your iocatSearsor by caiiing
1-800-4-MY-HO_IE(469-4663) or online at _wvw.sears.com.it
is not includedwith the pressurewasher.This kit includes
replacemento=rings,rubber washerandwater inletfilter. Referto
the instructionsheetprovidedin the kit to serviceyour unit's
o=fings.
WARNING
The high pressurestream of water that this
_ quipment produces can cut through skin and itsunderlying tissues, ieadingto serious injury and
}ossibie amputation.
• NEVERrepairleakingconnectionswith sealantof anykind.
Replaceo-ringor seal.
Pump Oil Maintenance
DO NOTattempt any oil maintenance on this pump. This
model does not require any pump oii maintenance. The pump
is pre-Iubricated and seaiedfrom the factory, requiring no
additional lubrication for the life of the pump.
17
ENGINEMAINTENANCE
WARNING
Unintentional sparking can result in fire or
_¢ electric shock.
WidENADJUSTINGORMAKINGREPAIRSTO YOUR
PRESSUREWASHER
° Disconnectthe sparkplugwire fromthe sparkplugandplace
the wire whereit cannotcontactsparkplug.
WidENTESTINGFORENGINESPARK
* Useapprovedsparkplug tester.
. DONOTcheckfor sparkwith sparkplugremoved.
Oil
eli Recommendations
NOTE:Use a high quality detergent oiI classified "For Service
SF,SG, SH, SJ" or higher. DO NOTuse special additives.
1. Choosea viscosity according to the table below:
104F
86
68
50
32
14
4
-22
40 C
o 30
20
10
_ 0
-10
-20
-30
NOTE:Synthetic oii meeting iLSAC GF=2,API certification
markand APi service symboi with "SJ/CF ENERGY
CONSERVING"or higher, is an acceptable oii at aii
temperatures. Useof synthetic oil does not alter required oil
change intervals.
$AE 30: 40°Fand higher (5°C and higher) is good for aii
purpose use above 40%, use below 40°F will cause hard
starting.
10W-30:0 to IO0°F (=18to 38°C) is better for varying
temperature conditions. This viscosity improves cold weather
starting, but may increase oil consumption above 80%
(27%).
*Check oii level frequently at higher temperatures.
Synthetic 5W=30:=20 to 120°F (=30to 40 °C) provides the
best protection at ali temperatures as weil as improved
starting with iess oii consumption.
5W-30: 40°F and below (5°C and be/'ow)is recommendedfor
winter use and works best in cold conditions.
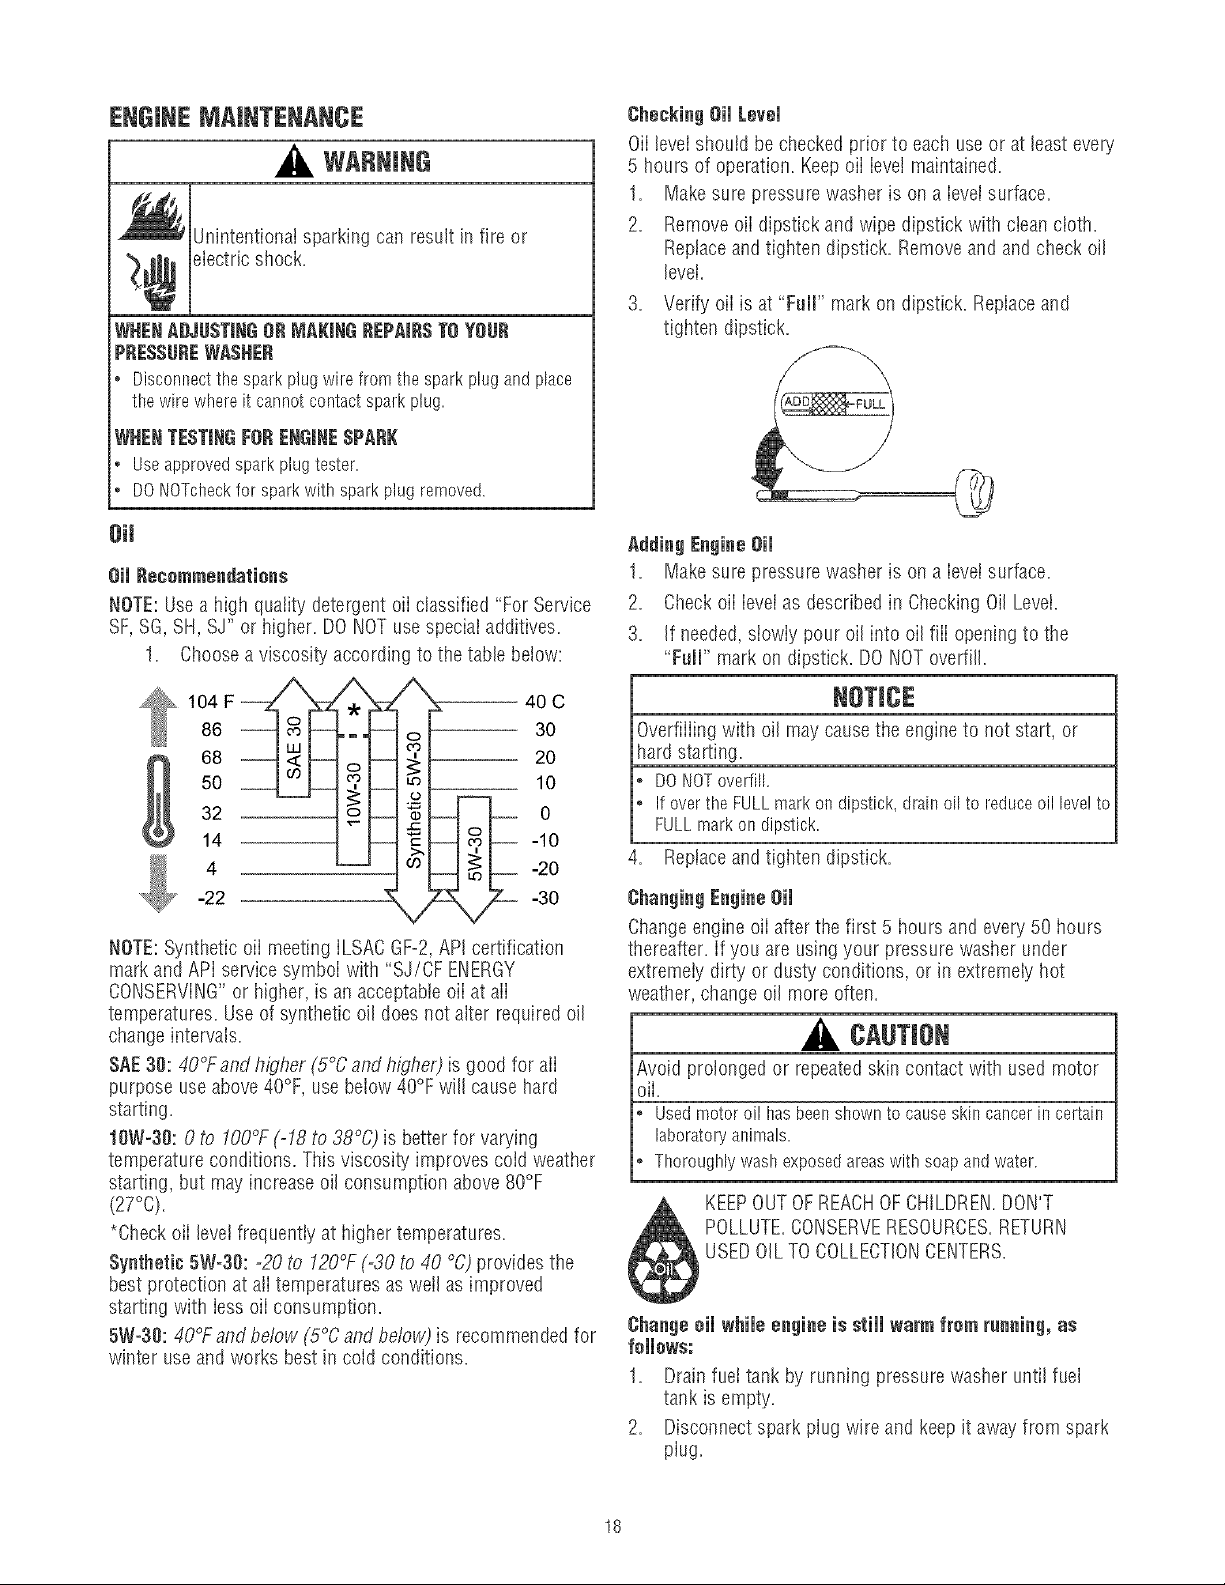
CheckingOil Level
OiI level should be checked prior to each use or at least every
5 hours of operation. Keepoii ievei maintained.
1. Makesure pressure washer is on a ievei surface=
2= Remove oii dipstick and wipe dipstick with clean cioth=
Reptaceand tigilten dipstick. Removeand and check oil
levei.
3. Verify oii is at "FuIF' mark on dipstick. Replaceand
tigilten dipstick.
Adding EogineOil
1= Make sure pressure washer is on a Ieveisurface.
2. Checkoii ievei as described in Checking Oil Levei.
3. If needed,siowiy pour oil into oil fiii openingto the
"FolF' mark on dipstick. DO NOToverfill.
Overfiiiing with oil may cause the engine to not start, or
hard starting.
DONOToverfill.
Ifoverthe FULLmarkon dipstick,drainoil to reduceoil levelto
FULLmarkon dipstick.
4. Reptaceand tigilten dipstick.
ChaogingEngineOil
Changeengine oii after the first 5 hours and every 50 hours
thereafter, if you are using your pressure washer under
extremeiy dirty or dusty conditions, or in extremely hot
weather, change oil more often.
CAUTION
Avoid prolonged or repeatedskin contact with used motor
oil.
Usedmotoroil hasbeenshownto causeskin cancerin certain
laboratoryanimals
Thoroughlywashexposedareaswith soapand water
KEEPOUTOF REACHOF CHILDREN.DON'T
POLLUTE.CONSERVERESOURCES.RETURN
USEDOIL TO COLLECTIONCENTERS.
Chaogeoil while oogine is still warm from rooning, as
follows:
1. Drain fuel tank by running pressure washer until fuel
tank is empty.
2. Disconnect spark plug wire and keep it away from spark
plug.
18
3. CleanareaaroundoiIfill,removeoilfill cap/dipstick.
Wipedipstickclean.
4. Tipyourpressurewashertodrainoiifromoiifiiiintoa
suitabiecontainermakingsureyoutipyourunitaway
fromsparkplug.Whencrankcaseisempty,return
pressurewashertouprightposition.
5. Slowlypourrecommendedoil(about18oz.)intooilfill
opening.Pausetopermitoiltosettle.Fillto"Full"mark
ondipstick.
6. Wipedipstickcleaneachtimeoillevelischecked.DO
NOToverfill.
7. Replaceandtiglltendipstick.
8. Wipeupanyremainingoii.
g. Reconnectsparkplugwiretosparkplug.
Service Air Cteaner
Your enginewiil not run properiy and may be damagedif you
run it with a dirty air cteaner.
Servicethe air cleaner once every 25 hours of operation or
once eachyear, whichever comes first. Service more often if
operating under dirty or dusty conditions. Replacementsare
available at your local Sears service center.
To service the air cleaner, follow these steps:
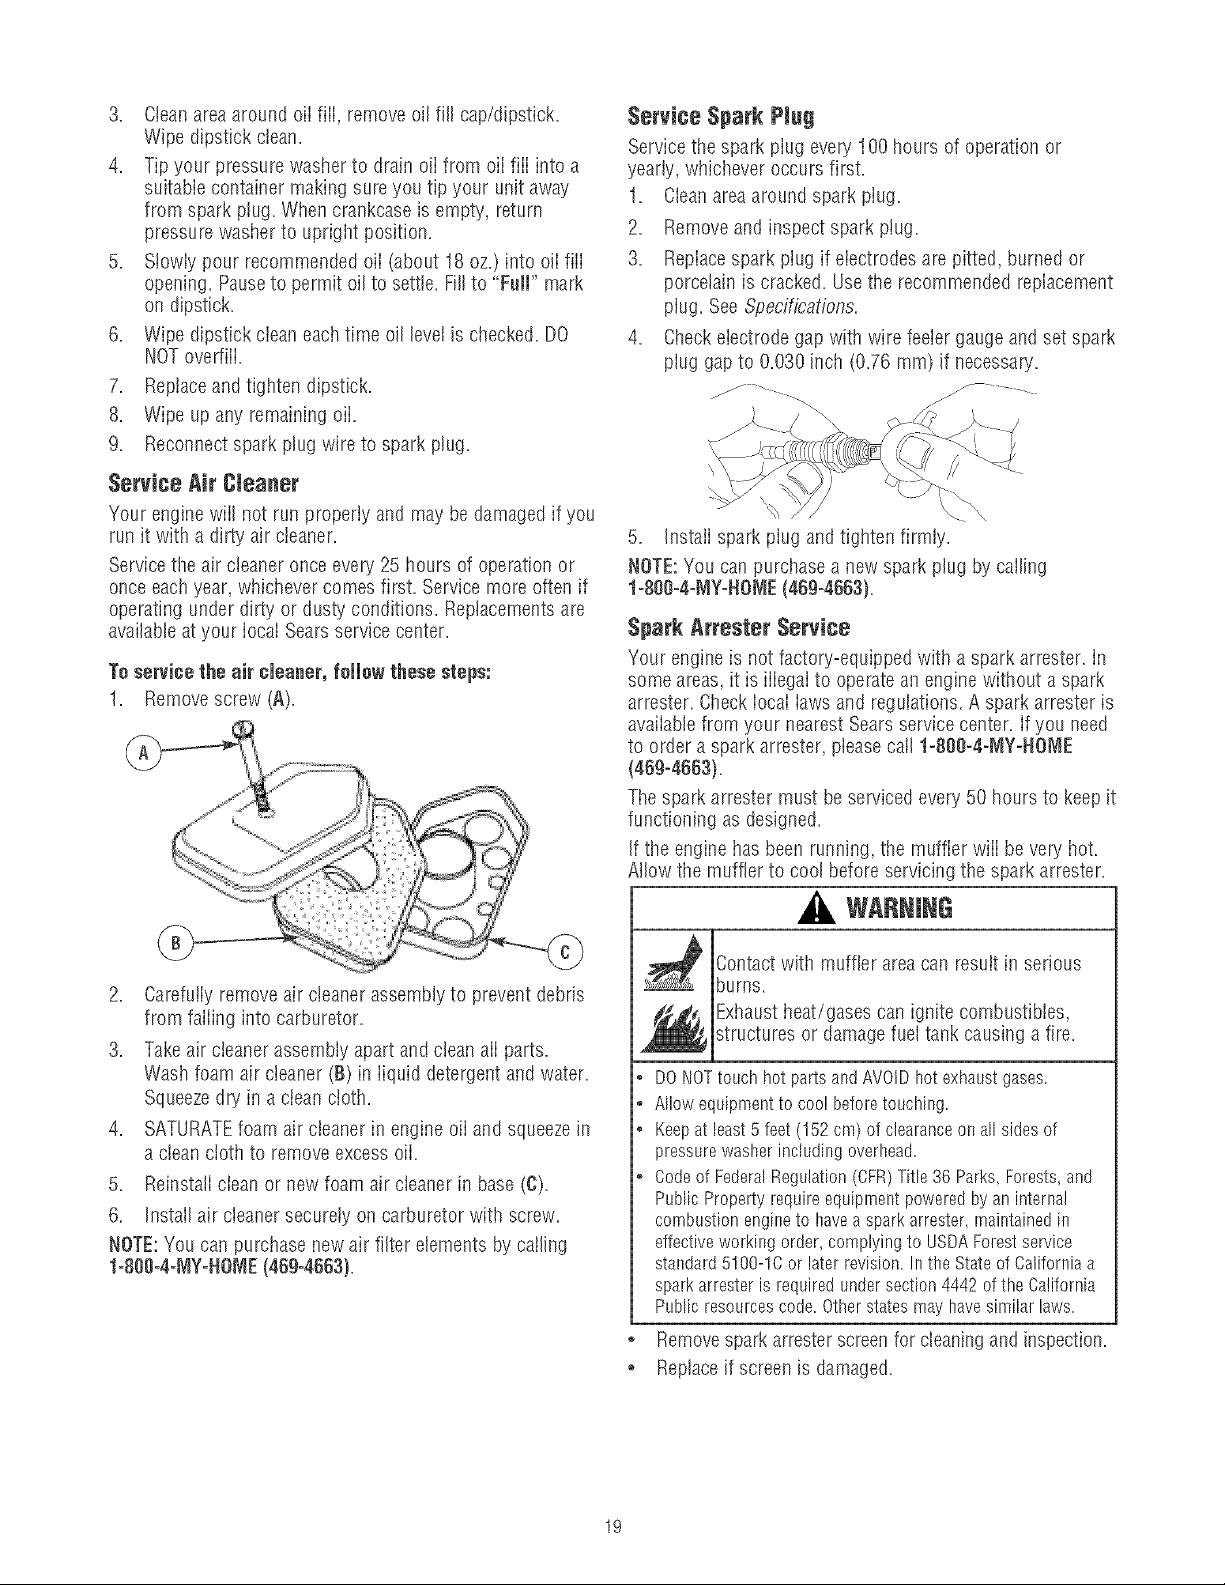
1. Remove screw (A).
2. Carefuiiy removeair cleaner assemblyto prevent debris
from faliing into carburetor.
3. Takeair cleaner assembly apart and clean aii parts.
Wash foam air cteaner (B) in iiquid detergent and water.
Squeezedry in a cteanctoth.
4. SATURATEfoam air cleaner in engine oii and squeeze in
a clean cloth to remove excess oii.
5. ReinstaticIean or new foam air cIeaner in base (C).
6. Install air cleaner securely on carburetor with screw.
NOTE:You can purchase new air filter elements by sailing
1=800-4=MY=HOME(469-4663),
Service Spark P ug
Servicethe spark piug every 100 hours of operation or
yearly, whichever occurs first.
1. Cleanarea around spark plug.
2. Removeand inspect spark ptug.
3. Replacespark piug if electrodes are pitted, burned or
porcelain is cracked. Usethe recommended replacement
plug. See Specifications.
4. Checkelectrode gap with wire feeler gauge and set spark
plug gap to 0.030 inch (0.76 ram) if necessary.
f -_ __._. _ ...........
5. Instaii spark piug and tighten firmly.
NOTE:You can purchase a new spark plug by calling
1-800-4-MY=NOME(469-4663).
Spark Attester Service
Your engine is not factory=equippedwith a spark arrester. In
some areas,it is iiiegai to operatean engine without a spark
arrester. Check iocai iaws and regulations. A spark arrester is
availabie from your nearest Sears service center. If you need
to order a spark attester, please calI 1-800-4-MY=NOME
(469-4663).
The spark arrester must be serviced every50 hours to keep it
functioning as designed.
If the engine has been running, the muffler wiii be very hot.
Atlow the muffler to cool before servicing the spark arrester.
WARNING
Contact with muffler area can resuit in serious
burns.
Exhaustheat/gases can ignite combustibles,
structures or damage fuel tank causing a fire.
• DONOTtouch hot partsand AVOIDhot exhaustgases.
° Allowequipmentto cool beforetouching.
• Keepat bast 5 feet (152cm) of clearanceon all sidesof
pressurewasherincludingoverhead.
• Codeof FederalRegulation(CFR)Title 36 Parks,Forests,and
PublicPropertyrequireequiprnentpoweredby an internal
combustionengineto haveasparkarrester rnaintainedin
effectiveworkingorder,complyingto USDAForestservice
standard5100-1Cor laterrevision.Inthe Stateof Californiaa
sparkarresteris requiredundersection4442of the California
Publicresourcescode.Otherstatesmayhavesimilarlaws.
Removespark arresterscreenfor cleaning and inspection.
• Replaceif screen is damaged.
19
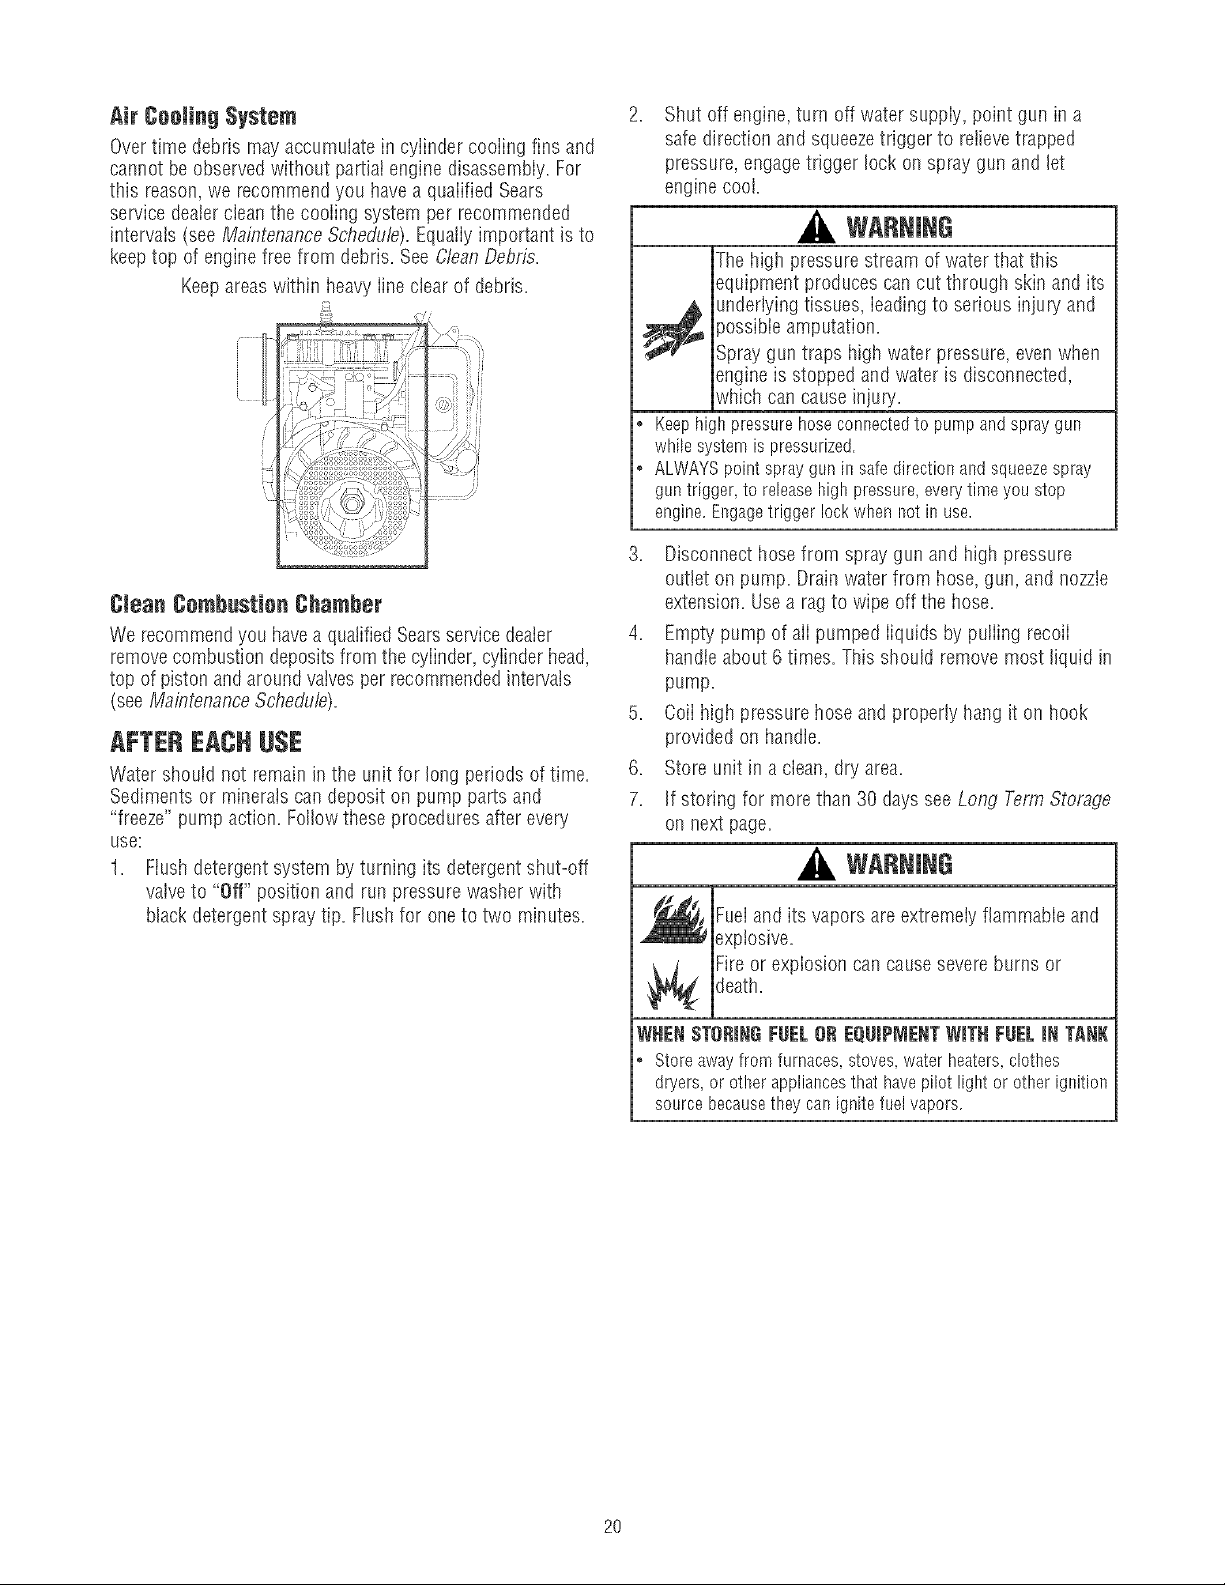
Air CoomingSystem
Overtime debris may accumulate in cylinder cooling fins and
cannot be observed without partiai engine disassembly. For
this reason, we recommend you have a quaiified Sears
service dealer clean the cooiing system per recommended
intervals (see MaintenanceSchedule). Equaflyimportant is to
keeptop of engine free from debris. See CleanDebris.
Keepareas within heavyIine ciear of debris.
s
/
/
Clean Cemhustien Chamber
We recommendyou havea qualified Searsservice dealer
removecombustion depositsfrom the cyiinder, cyiinder head,
top of piston and around valves per recommendedintervals
(see Maintenance Schedule).
AFTEREACHUSE
Water should not remain in the unit for long periods of time.
Sediments or minerals can deposit on pump parts and
"freeze" pump action. Followthese procedures after every
USe:
1. Flush detergentsystem by turning its detergent shut-off
valveto "Off" position and run pressure washer with
black detergent spray tip. Flushfor one to two minutes.
2. Shut off engine, turn off water suppiy, point gun in a
safe direction and squeezetrigger to relieve trapped
pressure, engagetrigger lock on spray gun and let
engine cool.
WARNING
The high pressurestream of water that this
equipment produces can cut through skin and its
underlying tissues, ieadingto serious injury and
_ossibieamputation=
Spray gun traps high water pressure, even when
engine is stopped and water is disconnected,
which can cause injury.
o Keephigh pressurehoseconnectedto pumpandspraygun
whilesystemis pressurized.
• ALWAYSpointspraygunin safedirectionandsqueezespray
guntrigger,to releasehighpressure,everytimeyou stop
engine.Er_gagetrigger lockwhennot in use.
3= Disconnect hose from spray gun and high pressure
outtet on pump. Drain water from hose, gun, and nozzte
extension. Use a rag to wipe off the hose.
4= Empty pump of aii pumped iiquids by puffing recoii
handte about 6 times. This should remove most liquid in
pump.
5= Coii high pressure hose and properly hang it on hook
provided on handle.
6. Store unit in a clean, dry area.
7. If storing for more than 30 days see Long Term Storage
on next page.
WARNING
Fuel and its vapors are extremely flammable and
explosive.
Fire or explosion can cause severeburns or
death.
WHENSTeRINGFUELeR EQIJIPMENTWITH FUELIN TANK
* Storeawayfrom furnaces stoveswaterheaters,clothes
dryers,or otherappliancesthathavepilot light or otherignitior_
sourcebecausetheycanignitefuelvapors.
2O
WINTERSTORAGE
To protect the unit from freezing temperatures,
1. Empty cleaning tank as foiiows:
a. Disconnect hose connected to injection fitting on
pump. Mace end of hose into suitable container.
b. Rotate detergent shut=off valveto "On" position and
open the tanks cover. Gravity wiii empty tank
contents into container.
c. Reconnect hose to injection fitting on pump. Add
0.5 quart of clean fresh water to cleaning tank and
ciose tanks cover.
2. Flush cleaning system by turning detergentshut=off
valveto "On" position and run pressure washerwith
black detergent spray tip. Fiush untii cieaning tank is
empty. Turn its detergent shut=off valveto "Off" position.
3. Foiiow steps 2=5in the previous section After Each Use.
4. Use pump saver, avaiiabie at Sears retaii item 6039, to
treat pump. This minimizes freeze damageand lubricates
pistons and seals.
5. If pump saver is not avaiiabie, connect a 3=footsection
of garden hose to water inlet adapter. Pour
RV-antifreeze (antifreeze without alcohol) into hose. PulI
recoii handletwice. Disconnect 3=foot hose.
6. Store unit in a clean, dry area.
LONGTERM STORAGE
If you do not plan to use the pressure washer for more than
30 days, you must prepare the engine and pump for long
term storage.
It is important to prevent gum deposits from forming in
essential fuei system parts such as the carburetor, fuel filter,
fuel hose or tank during storage. Also, experienceindicates
that alcohoi-biended fuels (calied gasohot, ethanoi or
methanol) can attract moisture, which ieads to separation
and formation of acids during storage. Acidic gas can
damagethe fuel system of an engine while in storage.
Pretect Fuel System
FueJAdditive:
Fueican become staie when stored over 30 days. Staie fuel
causes acid and gum deposits to form in the fuei system or
on essentiai carburetor parts. To keep fuel fresh, use Briggs
& Stratton FRESHSTARTTM fuel stabiiizer, avaiiabie as a
liquid additive or a drip concentrate cartridge.
There is no needto drain gasoiine from the engine if a fuet
stabilizer is added according to instructions. Run the engine
for 2 minutes to circulate the stabilizer throughout the fuel
system. The engine and fuel can then be stored up to
24 months.
If gasoiine in the engine has not been treated with a fuei
stabiiizer, it must be drained into an approved container. Run
the engine untii it stops from iack of fuel. The use of a fuel
stabilizer in the storage container is recommended to
maintain freshness.
Change eiJ
Whiie engine is stiii warm, drain oii from crankcase. Refill
with recommended grade. See ChangingEngine Oil.
eiJ CymJnderBere
,, Removespark plug and pour about 1/2 ounce (15 rot) of
clean engine oii into the cyiinder.
o Instali spark plug and pull starter handle slowly to
distribute oil.
Pretect Pump
To protect the pump from damage causedby mineral
deposits or freezing, use PumpSaver, Modei 6039, to treat
pump. This prevents freeze damageand lubricates pistons
and seals.
[ NOTICE
[You must protect your unit from freezing temperatures.
i ailureto do so will permanentlydamageyour purnpand
renderyour unit inoperable.
Freezedamageisnot coveredunderwarranty.
NOTE:PumpSaver is avaiiabie as an optionat accessory. It is
not included with the pressurewasher. Contact your iocaI
Searsservice center to purchase PumpSaver.
To use PumpSaver, make sure the pressure washer is turned
off and disconnected from suppiy water. Readand foliow aii
instructions and warnings given on the PumpSavercontainer.
ether Storage Tips
1. DO NOTstore fuei from one seasonto another unless it
has beentreated as described in Protect Fuel System.
2. Repiacefuel container if it starts to rust. Rust and/or dirt
in fuet can cause problems if it's used with this unit.
3. Coverunit with a suitable protective cover that does not
retain moisture.
WARNING
Storagecovers can be flammable.
o DONOTplacea storagecoveroverahot pressurewasher.
• Letequipmentcoo[for a sufficienttime beforeplacingthe
coveronthe equipment.
4. Store unit in a clean and dry area.
21
Pumphasfollowingproblems:
failure to producepressure,
erratic pressure, chattering, less
of pressure, low water volume,
Detergent fails to mix with spray.
Engine runs good at neqead hut
"hogs" when meadis added.
Engine will not start; or starts and
runs rough.
1= Low pressure spray tip installed.
2= Water inlet is blocked.
3. Inadequatewater suppty.
4. Inlet hose is kinked or leaking.
5. Clogged inlet hose strainer.
6. Water suppiy is over 100%.
7. High pressure hose is blocked or
leaks.
8. Gun leaks.
9. Nozzleis obstructed.
1. Replacewith high pressure spray tip.
2. Clearinlet.
3. Provide adequatewater flow.
4. Straighten inlet hose, patch ieak.
5. Checkand clean inlet hose strainer.
6. Provide cooier water suppiy.
7. Ciearblocks in high pressure hose or
replace hose.
8. Replacegun.
9. Cleannozzle.
10,
1. Detergent shut=off valve is in the
"Off" position,
2. High pressure spray tip installed.
Enginespeed is too slow.
Pump is faulty. 10. Contact Sears service faciiity
1. Dirty aircteaner,
2. Out of fuel,
3. Stale fuel,
4. Spark plug wire not connected to
spark plug.
5. Bad spark plug.
6. Water in fuel.
7. Excessivelyrich fuet mixture.
1. Rotate detergent shut-off valveto "On"
position.
2. Replacewith low pressurespray tip.
Movethrottie controi to FASTposition, if
engine stiii "bogs down", contact Sears
service faciiity.
1. Cleanor repiace air cieaner.
2. Fill fuei tank.
3. Drain fuel tank; fill with fresh fuel.
4. Connectwire to spark plug.
5. Repiacespark plug.
6. Drain fuel tank; fill with fresh fuel.
7. ContactSears service facility.
Engine shuts down daring Out of fuel. Fill fuel tank.
operation.
Engine lacks power. Dirty air filter. Replaceair filter.
22

23
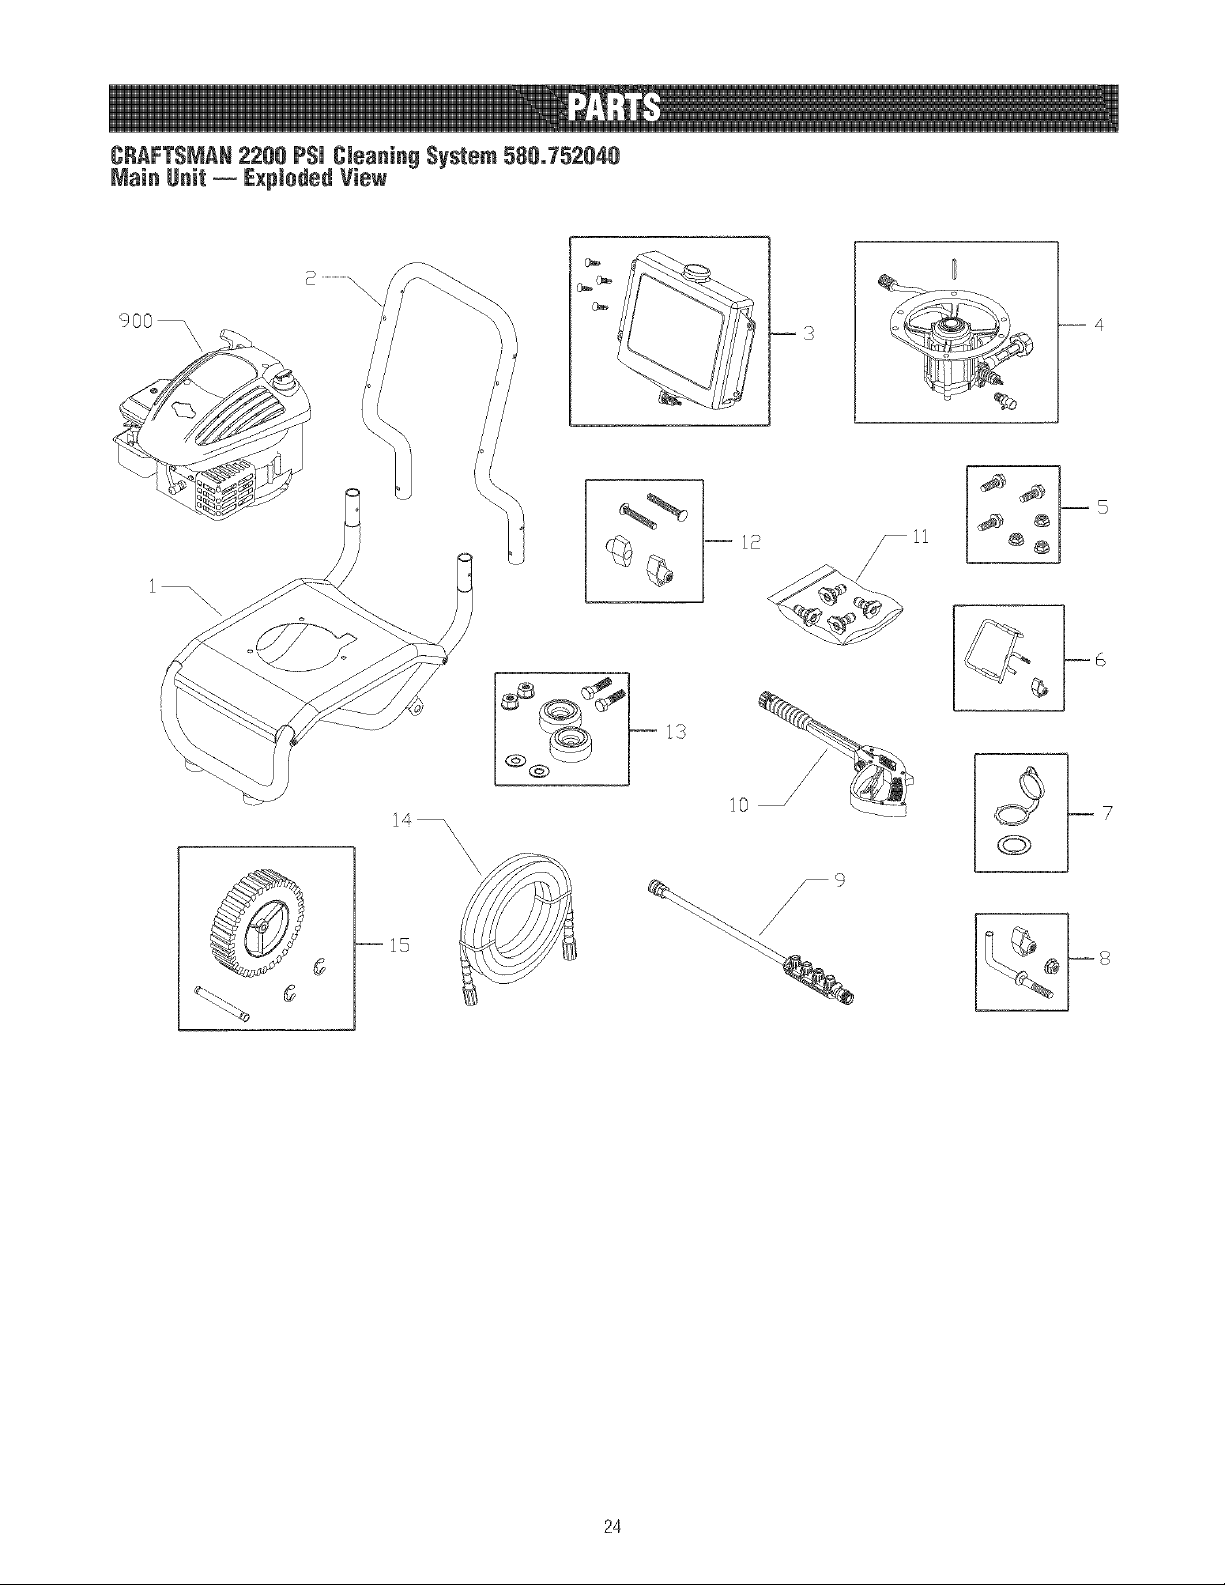
CRAFTSMAN2200 PSI Cleaning System 580_752040
Main Unit -- Exploded View
\
6
6
--15
--3
--4
13
11
@@
©
24
CRAFTSMAN2200 PSi CteanJng System 580,752040
Main Unit _ Parts List
item Part # Description
I 203009GS ASSY, Base
2 R202522GS HANDLE
3 203010GS ASSY,6hem Tank w/Decal & Clips
195964GS Clip
1929BOGS Kit, Valve
4 200200GS ASSY, Pump (see pages 26-27)
194298GS Vaive,Thermal Relief
23139GS Key
5 192525GS KiT, Pump Mounting Hardware
6 201661GS KiT, GunHoiderWeldment
7 199955GS KiT, CapChem
8 194264GS KIT, Hook, Handle
9 192198GS EXTENSIONw/Nozzle Holder
10 193482GS GUN
11 200557GS KIT, Nozzles
195983AEGS Nozzle,QC,Red
195983RGS Nozzte,QC,White
195983XGS Nozzle, QC,Yeliow
198841GS Nozzte,Mastic, Soap
12 B2203GS KiT, HandleConnector
13 192310GS KiT, Vibration Mount
14 196006GS HOSE
15 200730GS KiT, Wheel
192050GS E-Ring
192006GS Axle
900 NSP ENGINE(10T502-O130oB1)(see pages 28-30)
items Not Illustrated
Part # Description
203832GS MANUAL,Operator's
AB3061BGS OiL BOTTLE
87815GS GOGGLES
AIO4ORGS HOSE,Chemical
275034 DECAL,Warning
790984 ASSY,Shroud/Label
202673GS DECAL,Shroud
194256GS KiT, Tag Warning
OptionamAeeessefies
7175187GS
7175197GS
7175124GS
7175122GS
7175116GS
7175129GS
7175121GS
7174402GS
6039
7174300GS
7174301GS
7174302GS
7174303GS
7174307GS
NotHRustrated
GardenHoseQuick Connect
Accessory Quick Connect
Rotating Brush Kit
30' RepiacementHose
0 Ring Repair Kit
Turbo Nozzle
25' Extension Hose
Hose Ree!
Pump Saver
HouseWash Concentrate (makes 4 gallons)
Deck Wash Concentrate(makes 2 gallons)
Vehicle/BoatWash Concentrate(makes 4 gallons)
DegreaserConcentrate (makes4 gallons)
Mold/Mildew Concentrate (makes 2 gallons)
25
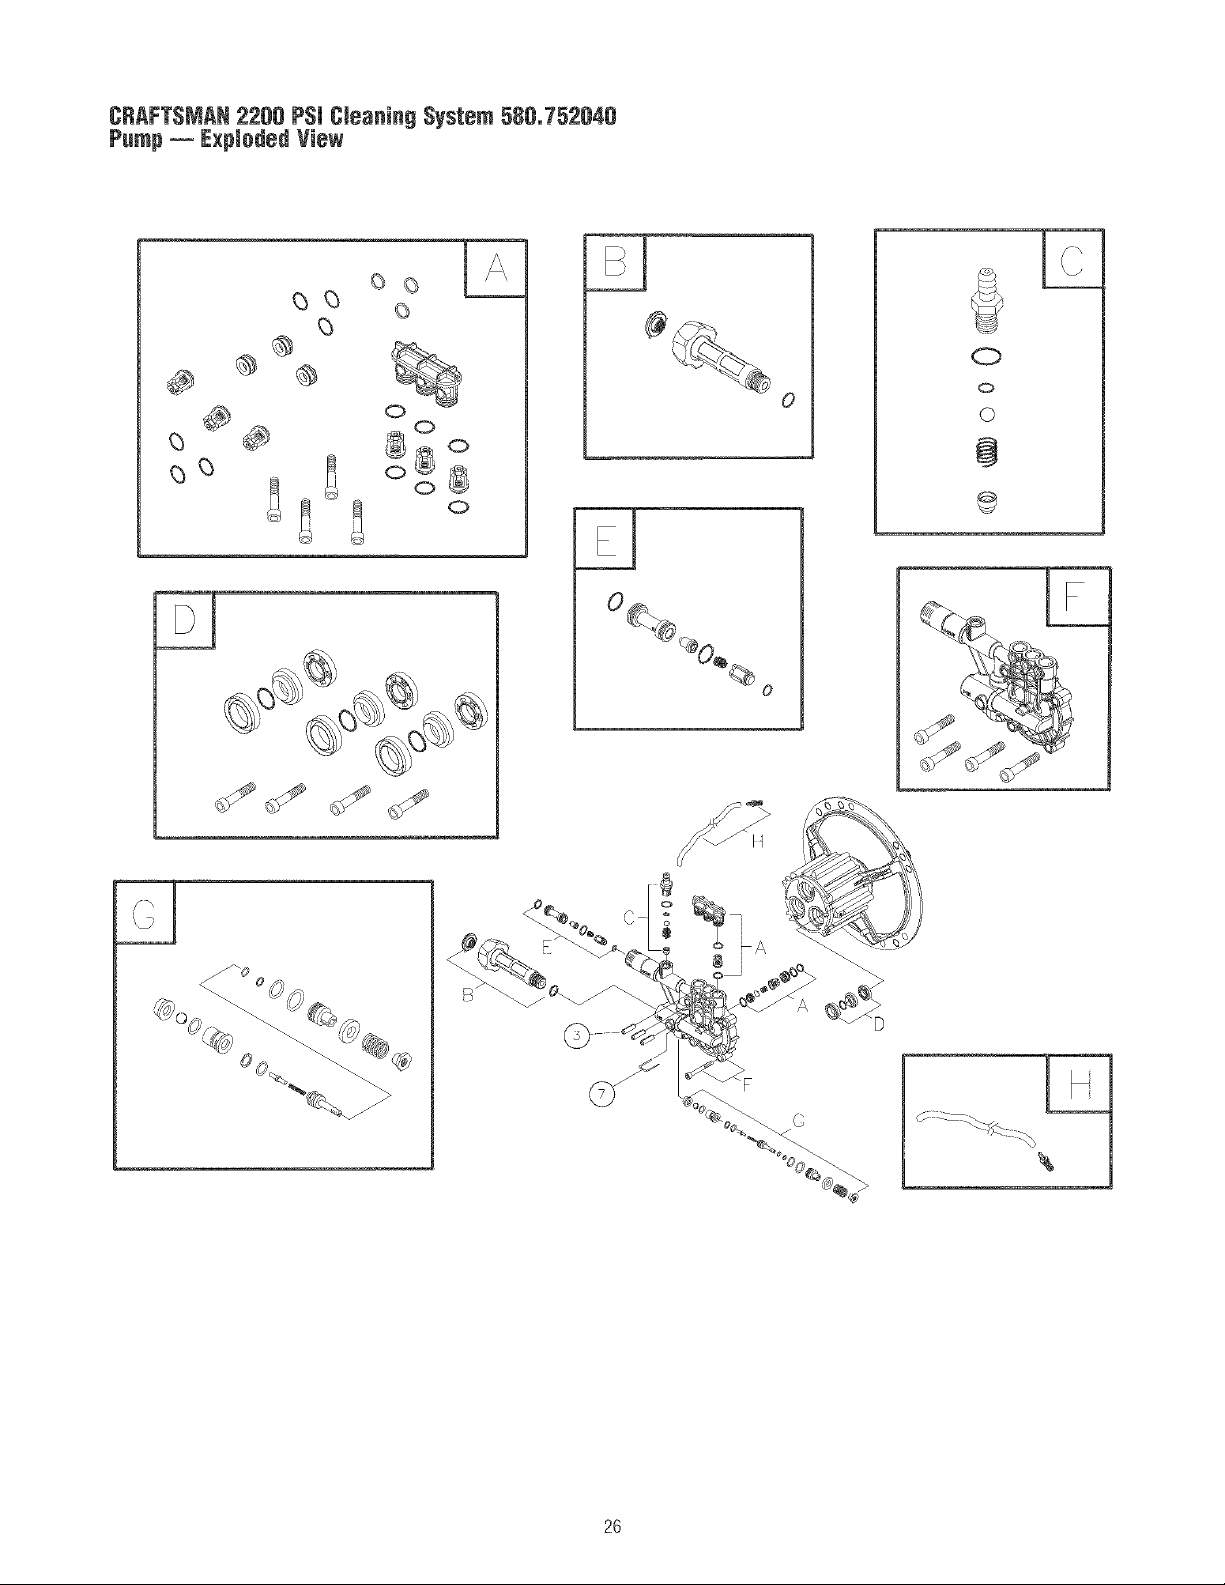
CRAFTSMAN2200 PSiCJeanin9System580_752040
Pemp-- Expi0dedView
_3
_3
®
©
0
0
0
0
JJJj
0
L
0
0
©
@
L
26
CRAFTSMAN2200 PSI CteanJngSystem 580.752040
Pemp _ Parts List
item Part # Description
3 200274GS PLUG,Elastic
7 190578GS PIN
A 200298GS KIT, CHECKVALVES
B 200278GS KIT,WATER INLET
C 200279GS KIT, CHEMICALINJECTION
D 200280GS KIT, HIGH PRESSURESEALS
E 200281GS KIT. CHEMINJECTVENTUR!
F 200282GS KIT, PUMP HEAD,ALUM
G 200283GS KIT, BY-PASS
H 189971GS KIT, CHEMICALHOSE
items Net HIustrated
B2384GS FILTER,Inlet
OptieeamAecesseries
186452GS
FILTER,Inlet, Bag of 10
NOTE:Item letters A - H are service kits and include all parts shown within the box.
27

ENGINE_Briggs & Stratton_ 10T502 - Exploded View
842O
523
524 O
718A
741/
36
43_
15 @
305 @1_
2OO
337J 635
332
455 (_)
73
23
668
1095 'vALVEGASKETSET
22__
592 _
t211
1210_
t
_J
28
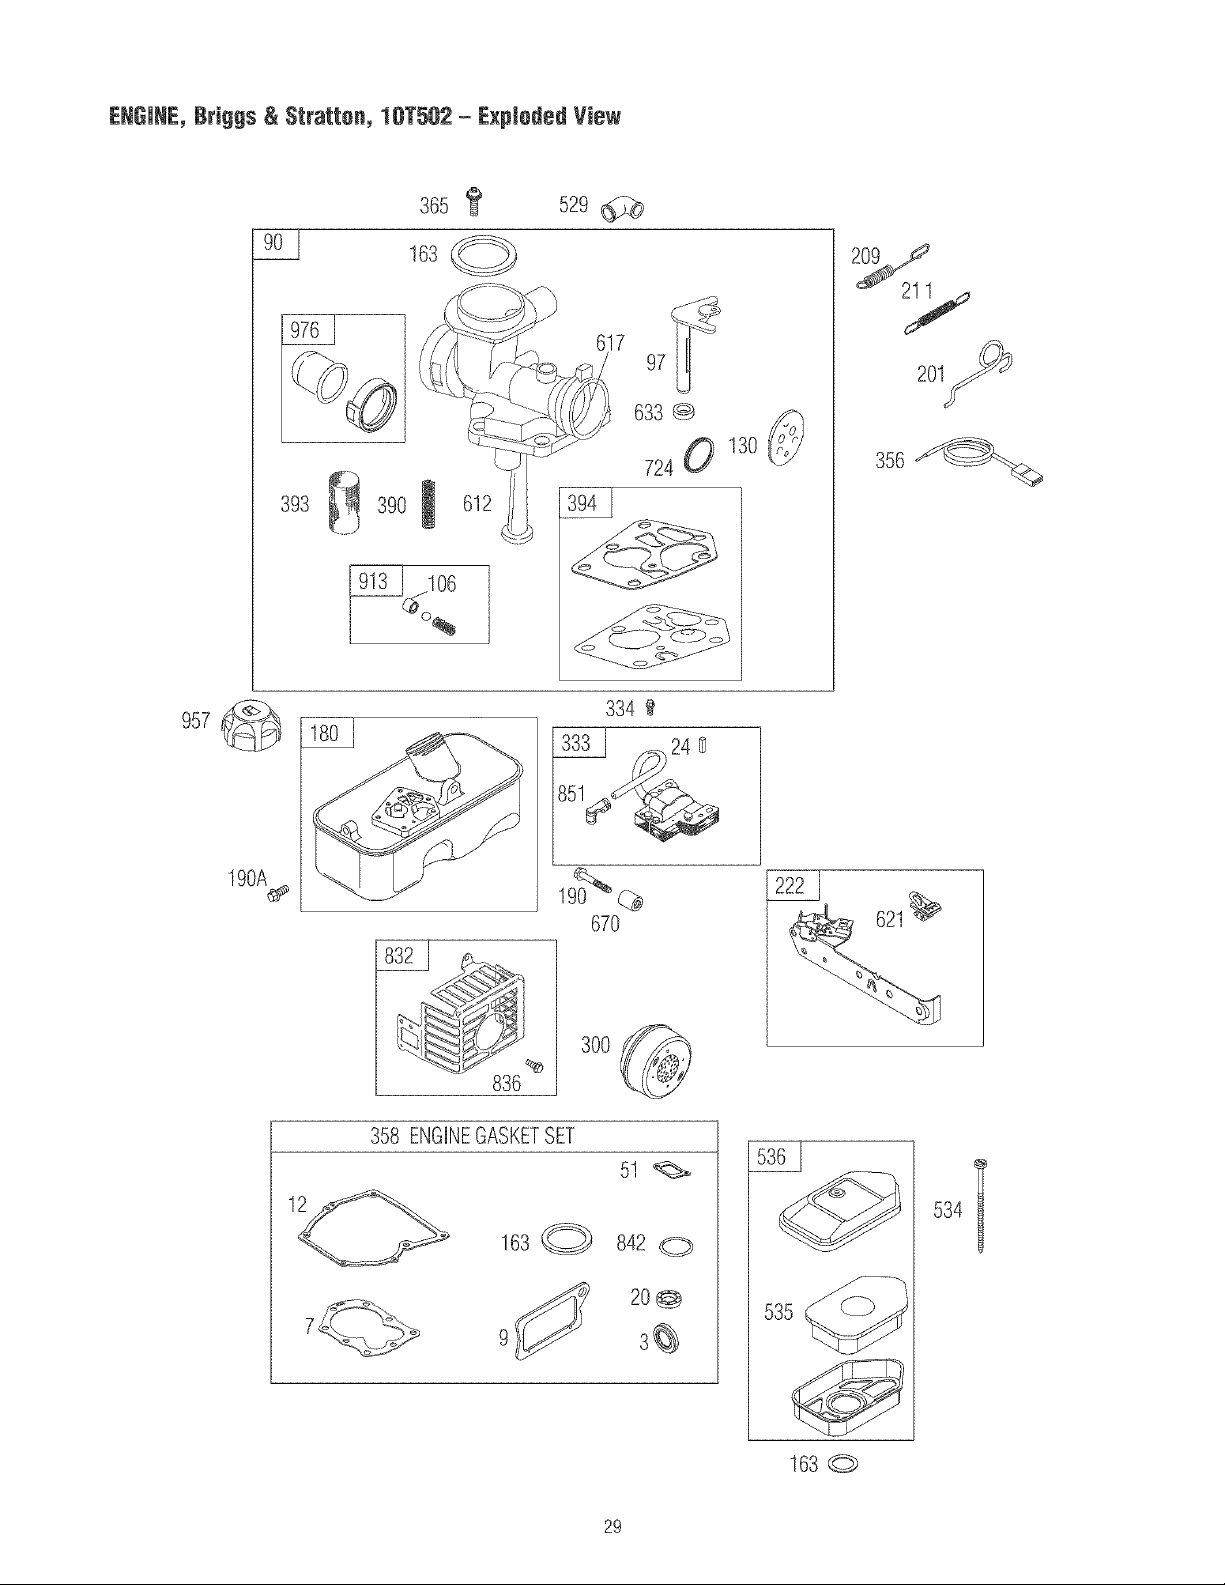
ENGINE, Briggs & Stratton, 10T502 - Exploded View
957
190A_
393 390 612
106
97
633 @
724 0 130
334
67O
24
3O0
836
358 ENGINEGASKETSET
5!
7o _o
842 0
20
3_
f
2ol/_
356
535
163 ©
29

ENGJHE,Briggs & Stratton, 10T502 - Parts List
item Part # Description
1 699653 Cylinder Assembly
2 399269 Kit-Bushing/Seal (Magneto Side)
3 299819S Seal-Oil (Magneto Side)
4 698691 Sump-Engine
5 790169 Head-Cylinder
7 698717 Gasket-CylinderHead
8 791781 Breather Assembly
9 695890 Gasket-Breather
10 691666 Screw (Breather Assembly)
11 691245 Tube-Breather
12 692218 Gasket-Crankcase
13 691640 Screw (Cylinder Head)
15 691680 Plug-Oil Drain
16 692989 Crankshaft
19 293709 Kit-Bushing/Side (PTO Side)
20 391483S SeaI-Oil(PTO Side)
22 69! 662 Screw (Engine Surnp)
23 690843 Flywheel
24 222698S Key-Flywheel
25 790908 Piston Assembly (Standard)
792532 Piston Assembly (.020" Oversize)
26 790909 Ring Set (Standard)
792533 Ring Set (.020" Oversize)
27 691588 Lock-Piston Pin
28 699659 Pin-Piston (Standard)
29 699654 Rod-Connecting
32 691664 Screw (Connecting Rod)
33 296676 Valve-Exhaust
34 296677 Valve-Intake
35 690520 Spring-Valve (Intake)
36 690520 Spring-Valve (Exhaust)
37 691209 Guard-Flywheel
37A 690482 Guard-Flywheel
40 692194 Retainer-Valve
43 698690 S%ger-Governor/Oil
45 691762 Tappet-Valve
46 691998 Camshaft
50 699644 Manifold-intake
51 699649 Gaskatqntake
54 69! 111 Screw (Intake Manifold)
55 692144 Housing-Rewind Starter
58 691921 Rope-Starter
60 691915 Grip-Starter Rope
65 690837 Screw(Rewind Starter)
73 699850 Screen-Rotating
90 794147 Carburetor
97 691931 Sbaft-Throt%
106 691901 Seat-inlat
130 691190 Valve-Throttle
163 271139S Gasket-AirCleaner
180 494406 Tank-Fuel
190 691640 Screw (FuelTank)
190A 692198 Screw (FuetTank)
200 691912 Blade-Governor
201 690347 Link-AirVane
209 691862 Spring-Governor
211 691859 Spring-Governed Idle
222 691445 Bracket-Control
287 691002 Screw (Dipstick/Tube Assembly)
mtem Part#
300 394569S
304 694051
305 692198
306 690400
307 690345
332 690662
333 793281
334 691061
335 691107
337 802592S
356 692390
358 298989
365 790029
390 691839
393 691837
394 495770
455 691236
456 692299
459 281505S
523 692040
523 691913
524 691876
525 691320
529 692189
534 691417
535 698369
536 698472
592 690800
597 691696
608 499706
612 496046
617 270344S
621 692310
633 691321
635 66538S
668 692889
670 691633
689 691855
718 690959
718A 499047
724 697478
741 691805
832 699670
836 690664
842 691870
847 691440
851 493880S
868 697338
869 691701
870 691702
871 231348
63709
9!3 494409
957 791129
976 694394
1095 498526
1210 499901
1211 499901
Description
Muffler
Housi%-BIowar
Screw(BlowerHousing)
Shield-Cylinder
Screw(CylinderShield)
Nut(Flywheel)
Armature-Magneto
Screw(MagnetoArmature)
Screw(MagnetoArmature)
Plug-Spark
Wire-Stop
GasketSet-Engine
Screw(Carburetor)
Spring-ChokeDiaphragm
Screen-Carburetor
Gasket-CarburetorPurnp
Cup-Fiywhee!
Plate-PawlFriction
PawI-Ratchet
Dipstick
Dipstick
Seal-ORing(DipstickTube)
Tube-Dipstick
Gromrnet
Screw(AirCleaner)
Filter-AirCleanerFoam
Cleaner-Air
Nut(RewindStarter)
Screw(PawlFrictionPlate)
Starter-Rewind
Tube-PickUp
Seal-ORing(intakef\,qanifold)
Switch-Stop
SeaI-Choke/Throt%Shaft
Boot-SparkPlug
Spacer
Spacer-FuelTank
Sprfng-Friction
Pin-Locating
Pin-Locating
Retainer-Seal
Gear-Timing
Guard-Muffler
Screw(MufflerGuard)
Seal-ORing(Dipstick)
Dipstick/TubeAssembly
Terminal-SparkPlug
Seal-Valve
Seat-Valve(Intake)
Seat-Valve(Exhaust)
Bushing-Guide(Exhaust)
Bushing-Guide(Intake)
Seat-CheckValve
Cap-Fue!Tank
Primer-Carburetor
GasketSet-Valve
Pulley/SpringAssembly(Pulley)
Pulley/SpringAssembly(Spring)
3O

31
Sears, Roebuck and Co., &S,A, (Sears), the California Air Resources Board ICARB) and
the United States Environmental Protection Agency {U,S,EPA)
Emissions CentromSystem Warranty Statement
ISwneCs Defect Warranty Rights and 8hmigations)
The California Air Resources Board (CARB), U.S. EPA and Sears are
pleasedto explain the Emissions Centre[ System Warranty on your
srnaI[ offroad engine (SORE).hr California, new small ofroad
engines rnodel year 2006 and later must be designed, built and
equipped to meet the State's stringent anti-smog standards.
Elsewherein the UnitedStates, new non-road,spark-ignition engines
certified for mode[ year 1997 and later must meet similar standardsset
forth bythe U.S. EPA.Sears must warrant the emissions control
system onyour engine for the periods of time listed below, provided
there has beenno abuse,neglector improper maintenanceof your
small of-road engine.
Your emissions centre[ system includes parts such as tire
carburetor, air cleaner, ignition system, fuel line, muffler and
catalytic converter. Also included rnay be connectors and other
emissions related assemblies.
Where a warrantable condition exists, Sears will repair your small
off-road engine at no cost to you including diagnosis, parts and
labor.
Sears, Roebuck and Co. Emissions Control Befects Warranty
Covera_je
Small of-road engines are warranted relative to ernissions control
parts defects for a period of two years, subiect to provisions set
2.
forth below. If any covered part on your engine is defective,the part
will be repaired or replaced by Sears.
Owner's Warranty Responsibilities
As tire small of-road engine owner, you are responsible for tire
performance of the required rnaintenancelisted in your Operating
and Maintenance Instructions. Sears recommends that you retain all 3.
your receiptscovering maintenance on your small off-road engine
but Sears cannot deny warranty solely for the lack of receipts or for
your failure to ensurethe performance of all scheduled rnaintenance.
As the small off-road engine owner, you should however be aware
that Sears may deny you warranty coverage if your small of-road
engine or a part has failed due to abuse, neglect, improper 4.
rnaintenanceor unapproved modifications.
You are responsible for presenting your small off-road engineto an
Authorized Sears Service Dealeras soon as a problem exbts.
The undisputed warranty repairs should be completed hr a
reasonable amount of time, not to exceed30 days.
If you have any questions regarding your warranty rights and
responsibilities, you should contact a Sears Service Representative
at 1-800-469-4663.
The emissions warranty is a defects warranty. Defects are iudged
on normal engine performance. The warranty is not related to an in-
use emissions test.
Sears, Ree#eek and Cn, Emissinns Cnntrni #efents Warranty
Prnvisinns
The following are specific provisions rebtive to your Emissions
Control DefectsWarranty Coverage.It is in addition to the Sears
enginewarranty for non-regulated enginesfound in the Operating and
MahrtenanceInstructions.
1. Warranted Parts
Coverageunder this warranty extends only to the parts listed
below (the emissions control systems parts) to the extent these 6.
parts were present on the enginepurchased.
a. Fuel Meterhrg System
* Cold start enrichment system
In the USA and Canada,a 24-hour hotlhre, 1-800-469-4663, has a rnenu of
hrforrnatlon.
* Carburetor and hrternal parts
* Fuel Pump
* Fuel line, fuel [hrefittings, clamps
, Fue[tank, cap and tether
, Carbon canister
b. Air Induction System
* Air cbaner
° Intake rnanl%d
. Purge and vent line
c Ignition System
, Spark plug(s)
, Magneto ignition system
d. Catalyst System
* Catalytic converter
, Exhaustmanifold
, Air iniection system, Pulse valve
e. Miscellaneous Items
, Vacuum, temperature, position, tirne sensitive valves and
switches
o Connectors and assernNbs
Length of Coverage
Sears warrants to the initial owner and eachsubsequent
purchaser that the Warranted Parts shahbe free from defects in
materials and workrnanship which caused the failure of the
Warranted Parts for a period of two years from the date tire
engineis deliveredto a retail purchaser.
No Charge
Repair or replacement of airy Warranted Part will be performed
at no charge to the owner, hrcluding diagnostic labor which
leads to the determhration that a Warranted Part is defective if
the diagnostic work ls performed at an Authorized Sears
Service Dealer.
CJaims and Coverage Exclusions
Warranty claims shah be filed hr accordance with the provls_ons
of the Sears EngineWarranty Policy. Warranty coverage shall
be excludedfor failures ofWarranted Parts which are not
original Sears parts or becauseof abuse, neglect or improper
rnaintenanceas set forth in the Sears Engine Warranty Policy.
Sears is not liable to cover failures of Warranted Parts caused
by the use of add-on, non-original, or rnodified parts.
5. _daintenanse
Any Warranted Part which is not schedubd for rephcement as
required rnaintenanceor which is scheduled only for regular
inspection to the effect of "repair or replaceas necessary"shall
be warranted asto defects for tire warranty period. Any
Warranted Part which is scheduledfor replacementas required
rnaintenanceshall be warranted as to defects only for the period
of time up to tire first scheduled replacernentfor that part. Any
replacementpart that is equivalent in performance and
durabilityrnay be used in the perforrnanceof any maintenanceor
repairs. The owner is responsiblefor the performance of all
required rnaintenance as defined in the Sears Operatingand
Maintenance Instructions.
Consequential Coverage
Coverage hereunder shall extend to the failure of any engine
components caused by tire failure of any Warranted Part still
under warranty.
pre-recorded rnessagesoffering you product maintenance
32
EmJ_ion information
Enginesthat are certified to meet the California Air Resources
Board(CARB)Tier 2 Emission Standards must display
information regardingthe Emissions Durabiiity Period and Air
Index. The engine manufacturer makesthis information
avaiiabteto the consumer on emission iabeis, The engine
emission iabet wili indicate certification information,
The Emissions Durability Period describes the number of
hours of actual running time for which the engine is certified
to beemissions compliant, assuming proper maintenancein
accordancewith the Operating & Maintenance Instructions.
The following categories are used:
Moderate: Engineis certified to be emission compliant for
125 hours of actual engine running time.
Intermediate: Engine is certified to beemission compliant
for 250 hours of actual engine running time.
Extended: Engineis certified to beemission compiiant for
500 hours of actual engine running time.
Forexample, a typical walk-behind lawn mower is used 20 to
25 hours per year. Therefore, the Emissions Durability
Period of an engine with an intermediate rating would
equateto 10 to 12 years.
Certainengines wiii be certified to meetthe United States
Environmental Protection Agency (USEPA)Phase 2 emission
standards. For phase 2 certified engines, the Emissions
Compiiance Period referred to on the Emissions Compliance
label indicates the number of operating hours for which the
engine has been shown to meet Federalemission
requirements.
For engines iess than 225 cc displacement:
CategoryC = 125 hours
Category B = 250 hours
CategoryA = 500 hours.
For engines of 225 cc or more displacement:
CategoryC = 250 hours
Category B = 500 hours
CategoryA = 1000 hours.
33
GARANTIA.......................................... 34
REGLASDESEGURIDAD............................ 34-37
CARACTERJSTICASYCONTROLES....................... 38
MONTAJE........................................ 39-42
OPERAC!ON....................................... 43-47
ESPECIFICAC!ONE8................................... 48
IVlANTEI',IIIVlIENTO.................................. 49-53
ALMACENAMIENTO................................. 54-55
REPARAC!ONDE DA_,JOSREPUESTOS .................... 56
NOTA8 ............................................. 57
GARANTIADEL CONTROLDEEMBIONES ............... 58-59
COMOORDENARPARTES ............... PAGINAPOSTERIOR
Garant_a ¢empteta de un a_e de Ja Jimpiadera a presi_n Craftsman
Si la limpiadora a presiOnfalla debido a defectos de materiales o rnalsode obra en el plazo de un aiio a partir de la fecha de compra,
devuGIvalaa cualquier almac@ Sears_punto de venta de Craftsman o centro de reparaci@ y repuestos de Sears de los Estados Unidos o
Canad_parasu reparaci@ gratuJtao en caso de que 6sta no sea posibb, para su sustituci6n.
El periodo de garantia se reducir_ a 99 dias des@ la fecha de cornpra si la limpiadora a presiOnse utiliza en alg8n rnornento con fines
cornerciales o de alquibr.
Esta garantia le otorga deterrninados derechos legabs yes posible que tenga otros derechos que pueden variar de un pais o estado a otro.
Sears, Reebuek and Co,, Dept, 817 WA, Heffman Estates, JL 6elTg
Sears Canada Jne,, Terente, entarie, Canada MSB 2B8
Este es emsimbob de abrta de seguridad, Esusado para indicarb situaciones con peHgrospoten¢iabs de bsion para e_
personal Siga masinstru¢ciones de todos bs mensajes de seguridad que aparecen despues de este simbob para evitar posihbs
Jssione$ o lnuet'te,
I_I'.... / Leaestemanualminu¢iosamentey ¢onezcaa rondolas
IL.:M_-.I partesyeJl..¢b.amb.,o des. m_q.l.a Jlmpladoraa
presiGn,Cenezcasus apJieaeienes,susJimitaeie_esy Jes
peligrosi_vol_¢ra_os,
El sfrnbolo de abrta de seguridad (,_0 es usado con una palabra
(PELIGRO ADVERTEt,ICIA PRECAUC!ON)_u_smensajepor escrito o
una ilustraciOn, para alertado acerca de cualquier situaciOnde
peligro que pueda existir. PELtGROindica un riesgo el cual, si no se
evita causafd la muerte o una heridagrave. ADVE_TENCIAindica un
riesgo el coal si no se evita puedecausar la muerte o una herida
grave. P_EC_,Ug_ONindica un riesgo, el cuak si no se evita_puede
causar heridas rnelsoreso moderadas. AVISOindica una situaci@
que podria resultar en el da[io de! equipo. Siga los mensajesde
seguridad para evitar o reducir los riesgos de hefidas e inclusive la
muerte.
$_mb_i_sde Peli_r_ y $i_nificad_s
GasesTOxicos 6ontragolpe Descarga El@trica
SuperficbsResbalosas
Partes en Movimiento
Fuego
Caer
ObjetosVoladores
Explosi6n
InyecciGnLiquida
Superficie6aliente
ManualdelOperario
34
ADVERTENCIA
EJescape deJ motor de este producto contJene eJementos
quJmJ¢os re¢onocJdos en eJ Estado de CaJJfornJa
pot producJr ¢_ncer, defectos de nachnJento
u otros dafios de tJpo reproductive.
ADVERTENCJA
AI motor funcionar, se produce monOxido de carbono,
un gas hsodoro y venenoso.
RespirarmonOxldo de carbono puedeprovocar dolor
de cabeza fatiga rnareos, vOrnitos, confusi6n,
ataques n_useas, desmayos o inc[uso la rnuerte.
Algunas sustancias quimlcas o los detergentes pueden
ser perjudlclalessi inhalados o lngeridos,causando la
isausea severa, desrnayalsdo 0 para e!sve!serlar.
o Opere el limpiadora a presi6n SOLAMENTEal aire libre.
, Aseg(_resede que los gases de escape no puedan entrar por ventanas.
puertas, tomas de aire de ventilaci6n u otras aberturas en un espacio
cerrado en el que puedan acumularse.
, NO arranque ni deje funcionar el motor en interiores ni en zonas
cerradas, aunque haya ventanas y puertas abiertas.
, Utilice un respirador o m_iscarasiempre que exista la posibilidad de
inhalar vapores.
, Lea todas las instrucciones de la mascara para asegurarse de que le
brindar_ la protecci6n necesaria contra la inhalaciOn de vapores
nocivos,
AgVERTENCiA
_¢ lesgo de electrocuci6n
El contacto con los cables el@tricos puede provocar
electrocuci6n y quemaduras.
I'_IUNCArode cerca de una fuente de energ[a el6ctrica.
AgVERTENCiA
La gasolina y sus vapores son extremadamente
inflamables y exp!osivos.
E[ fuego o una explosi6n pueden causar quernaduras
severas e inclusive la muerte.
CgA_JDOANADA COMBgSTIBLE 8 VACJE EL gEP6$1TO
, Apague el limpiadera a presi6n (posicJ6n OFF)y d6jeio enfriar al menos
por 2 minutos antes de remover la tapa de la combustible. Afloje la
tapa lentamente para @jar que la presi6n salga del tanque.
, Llene o vac[e el dep6sito de combustible a la intemperie.
o NO Ilene demasiado el tanque. Permita al menos espacio para la
expansion del combustible.
o Si se ha derramado combustible, espere a que se evapore antes de
arrancar el motor.
o Mantenga la gasolina alejada de chispas, llamas abiertas, pilotos, calor
y otras fuentes de ignici6n.
o NO encienda un cigarrillo o fume.
Cga_JDe PeJ_6a EJ_Fg_JCISJ_A_JlENTDEL EQWPe
, Compruebe que Jabujfa el silenciador, el tap6n deJdep6sito de
combustible y el filtro de aire est4n instalados.
, NO arranque el motor sin la b@a instalada.
CUANDO ePERE EL EQWPe
, NO incline el motor o el equipo, de tal manera que la gasoJinase pueda
derramar.
o NO rocie I[quidos inflamables.
CgANBe TRANSPeRTE 8 REPARE EL EeglPe
o Transperte e repare el equipo con el tanque de combustible vacio, e
con la v_lvula para apagar el combustible, apagada (posici6n OFF).
o Desconecte el cable de la buj[a.
CgANgOALMACENE8 GUARDEELEQgIPOCONCOMBU$TmBLEEN
ELTANQUE
, Aimacene aiejado de caideras, estufas calentadores de agua, secadoras
de ropa u otros aparatos electrodom6sticos que posean pilotos u otras
fuentes de igniciOn, porque ellos puedeneneender los vapores de la
combustible.
35
ADVERTENCJA
El retroceso (repliegue rApido) del cable del arrancador
puede producir lesiones. El retroceso impedir_ que e!
usuario suelte el cable a tiernpoy tirarA de su mano y
brazo Isacia el motor.
Comoresultado,poddanproducirsefracturas,
contusiones o esguinces.
, I',JUNOAtire dsl cable dsl arrancador sin eliminar prsviamente la prssiOn
de la pistola rociadora.
Cuando arranque el rooter, tire lentamente del cable hasta ssntir una
rssistsncia y, a continuaci0n, tire r_pidamsnts de 81para svitar su
rstroceso.
* DespuOsqus cadatentativa que empieza, donds motor falla de correr,
sismprs sefialar el fusil en la dirscciOn segura y el disparador dsl fusil
del roc[o del sstrujOn para liberar la presiOn alta. Active el gatillo de la
pistola rociadora.
* Sujsts firmsmsnts la pistola rociadora con ambas manos cuando
apliqus un rociado a alta prssiOn para evitar lesionss cuando se
produzca el rstroceso de la pistola.
, ADVERTENCJA
Eluso delimpiadoraa presiOnpuedecrearloscharcos
y superficiesresba!osas.
E!retrocesode la pistolarociadorapuedeprovocar
caidas.
, Utilics la limpiadora a presiOndssde una supsrficis sstabls.
° El area de limpisza dsber_ tensr inclinacionss y drenajes adscuados
para disminuir la posibilidad de cafdas debido a superficies resbalosas.
, Extreme las precauciones si nscesita utilizar la limpiadora a presiOn
desds una sscalera, un andamio u otro lugar similar.
, Sujsts firmsmsnts la pistola rociadora con ambas manos cuando
apliqus un rociado a alta prssiOn para evitar lesionss cuando se
produzca el rstroceso de la pistola.
, ADVERTENCJA
El contacto con la zona del silenciador puede producir
quemadurasgraves.
Los gases y el calor de escape pueden inflamar los
materiales combustibles y las estructuras o daiiar el
depOsito de combustible y provocar un incendio.
° NO toque las superficies calientes y EVITE los gases dsl sscaps a alta
tempsratura.
, Psrmita qus el squipo ss enfrfe antes de tocarlo.
, Dejs un espacio reinimo de 152 cm (5 piss) alrsdedor del limpiadora a
prssiOn, incluida la parte superior.
, El C0digo de Normativa Federal (6FR, Titulo 36: Parques, Bosquss y
Propiedad PSblica) obliga a instalar una pantalla apagachispas sn los
equipos con motor de combustion interne y a mantensrla en buenas
condicionss de funcionamisnto, conforms a la norma 5100-16 (o
posterior) dsl Servicio Forestalde la USDA. Enel Estado de California.
la Isy exigs el use de una pantalla apagachispas (SscciOn4442 dsl
C0digo de Recursos P[iblicos de California). En otros estados puede
habsr Isyss similarss en vigor.
ADVERTENCJA
El chorro de agua a alta presiOn que este equipo
produce puede atravesar la piel y los tejidos
_ ubcut_neos, provocando lesiones de gravedad que
)odrials dar lugara la amputaciOnde un miernbro.
La pistolarociadora contiene agua a alta presiOnincluso
cots e! motor parado y el agua desconectada_ que puede
causar la Iserida.
, NO permita en ningSn momento qus NINOS opersn la m_quina
limpiadora a presi0n.
, NUNOArepare la mangusra de alta prssiOn. Rsmplacela.
, NUNCA utilics ningOntipo de sellador para rsparar una fuga sn una
consxiOn. Sustituya la junta tOrica o la junta.
, NUNCA conects la manguera de alta prssiOn al prolongador de la
boquilla.
, Mantenga conectada la mangusra a la m_quina o a la pistola de rociado
cuando el sistema est8 prssurizado.
, SIEMPRE que pare el motor, apunte con la pistola rociadora hacia una
dirscciOn ssgura y aprists el gatillo para descargar la presi0n y evitar el
rstroceso. Active el ssguro dsl gatillo cuando no utilice la pistola.
, NUNCA apunts la pistola a la gents, animales o plantas.
, NO fije la pistola rociadora en la posiciOn abisrta,
, NO abandone la pistola rociadora cuando la m_quina est6 sn
funcionamisnto.
, NUNCA utilics una pistola rociadora cuyo ssguro o protscci0n para el
gatillo no est8 en perfecto estado de funcionamiento.
, AsegSrsse en todo momento de consctar correctamente la pistola
rociadora, las boqnillas y los accesorios.
ADVERTENCJA
ChispearinvolLmtariopuedetenercomo resultadoel
¢ fuegoo elgolpeelOctrico.
CUANBOAJUSTE0 [_AG_,REPARACIONE$ASUMAQUINA
LJMPJADORAA PRESJON
Siempre desconecte el alambre de la bujia y colOquelo donds 11opueda
sntrar en contacto con la buj[a.
CUA_DO P_UE_E L_, _UJ[A DEL MOTO_
Utilice un comprobador de bujias homologado.
, NO comprueba la chispa sin la buj[a instalada.
36

ADVERTENCJA
El arrancador y otras piezas que rotan pueden enredar
las manos, el pelo,la ropa, o los accesorios.
I'_IUI'_ICAutilice la limpiadora a presi6n sin sus carcasas o tapas de
protecci6n.
I'_10use ropa suelta, joyas o elementos que puedan quedar atrapados en
el arranque o en otras partes rotatorias.
o Ate para arriba el pelo largo y quite la joyeria.
ADVERTENCIA
Riesgodelesionesoculares
E!aguarociadapuedesalpicaro propulsarob]etos.
, Utilice siempre galas de protecci6n cuando utilice este equipo o si se
encuentra cerca de donde se est_ utilizando.
o Antes de porter en marcha la limpiadora a presi6n, aeeg0rese de Ilevar
gafae de protecci6n adecuadas.
o Utilice SIEMPRElas galas de segnridad apropiadas.
AVI$O
El rociado de alta presi0!l puede da#ar elementos frAgiles,
incluye!_doel vidrio.
NO dirija la pistola rociadora hacia un cristal cuando utilice la boquilla
MAX (punta de alfiler).
NUNCA apunte la pistola a plantas.
AVI$O
EltratarnientoinadecuadodellimpiadoraapresiOnpuededaiiado
acortarsuvida productiva.
Si ueted tiene alguna pregunta acerca de lae finalidades de uso del
generador, preg_ntele a su concesionario o contacte a Sears.
NUNCA deber_inser operadas las unidades con partes rotas o ausentes
o sin la caja o cubiertae de protecci6n.
NO eluda ning0n dispositivo de seguridad de esta m_quina.
NO intente alterar la velocidad controlada.
NO utilice la limpiadora a presiOnpor encima de su presi6n nominal.
NO haga ninguna modificaci6n en la limpiadora a presi6n.
Antes de poner en marcha la re%ulna limpiadora a presi6n en clima
frio, revise todas las partes del equipo y asegL_resede que no se haya
formado hielo sobre elias.
NL]NCAmneva la m_quina halando la manguera de alta presi6n. L]tilice
la manija que viene con la unidad.
Revise que el sistema de combustible no presente fugas o signos de
deterioro, como manguerae desgastadas o porosas, sujetadores flojos
o ausentes, tapa o tanque da_ados. Corrija todos los defectos antes de
operar la m_quina limpiadora a presi6n.
El equipo de alta presi6n est,1dise_iado para ser utilizado L]NICAMENTE
con las partes autorizadas Sears. Si utiliza este equipo con partes que
no cumplan con las especificaciones m[nimas, el usuario asume todos
los riesgos y responsabilidades.
37
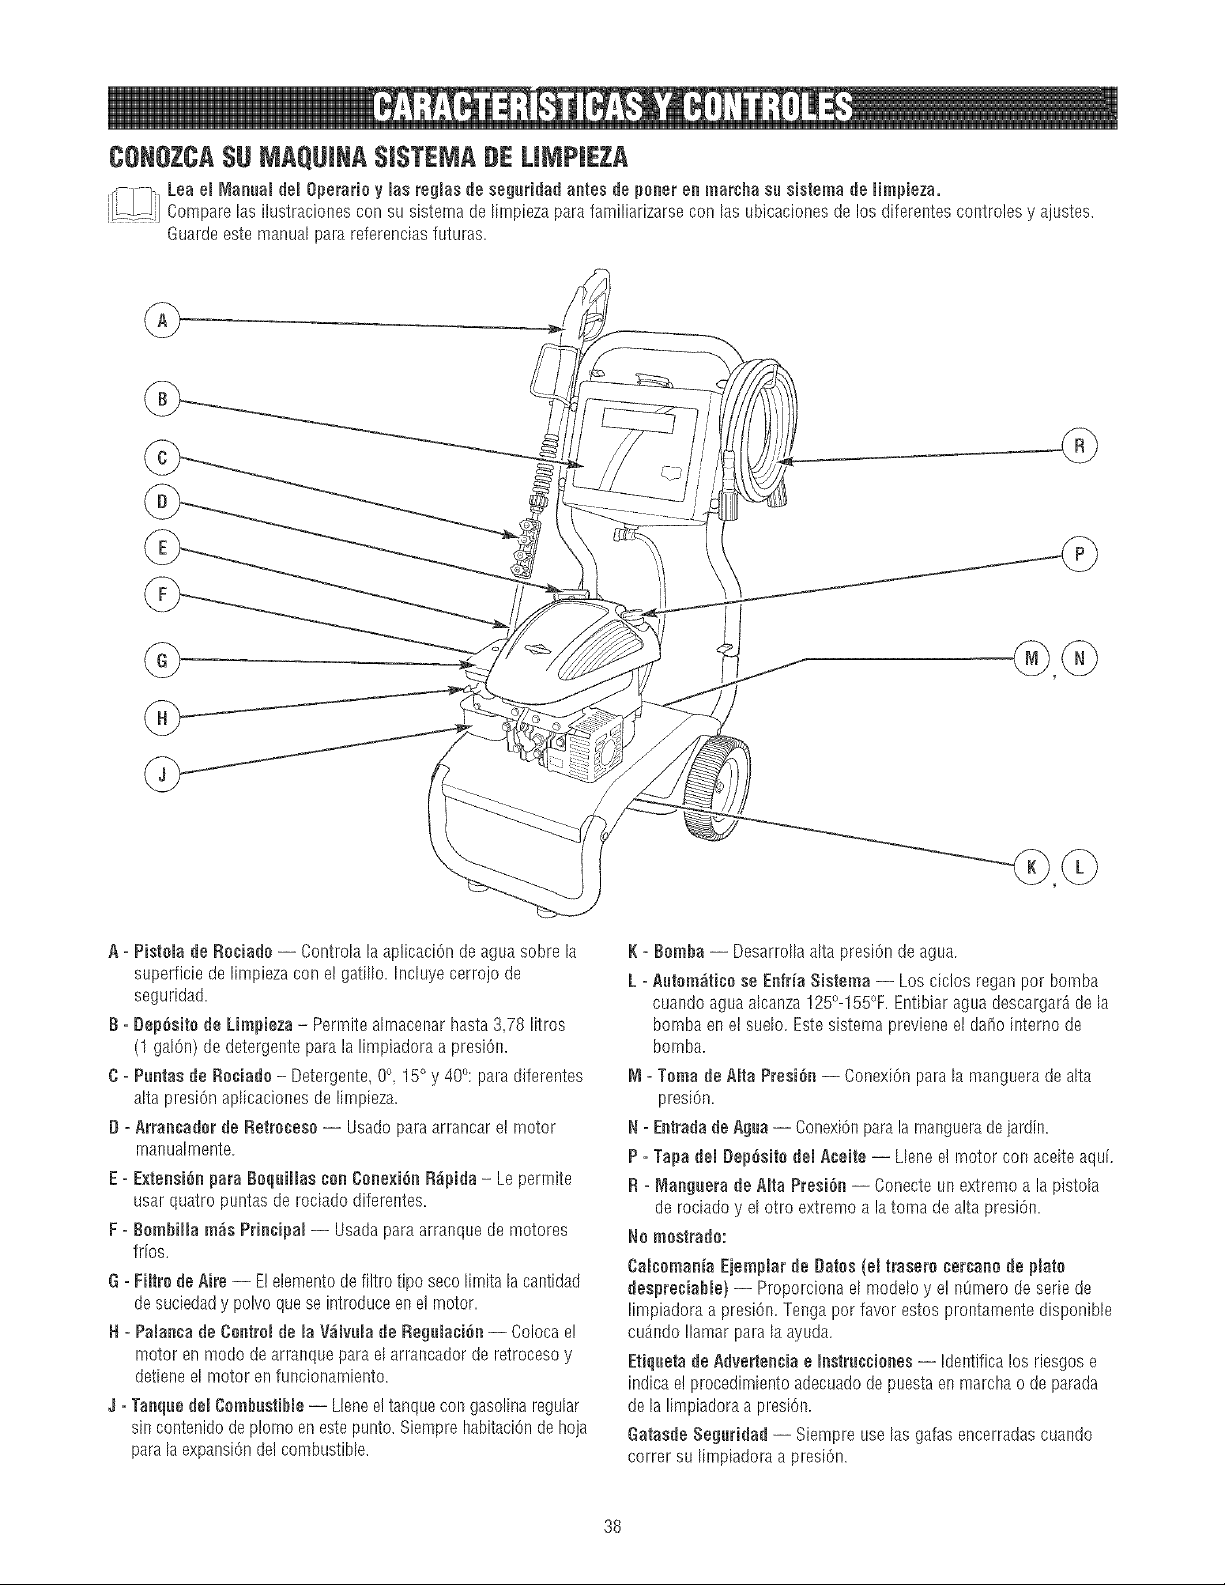
CONOZCASUiVIAQUiNA$iSTEiVIADELUVIPiEZA
1]Louo,Mu.ou,°0,o,o u ,e o ,usooso o ,OuOu.tosoo,e.o o.mu o uoo ,stomuoo,,m,,o,u.
..... Compare las ilustruciolses con su sistema de I[rnpieza puru familiarizarse con lus ubicaciones de los d[fereetes coetroles y ujustes.
Guurde este manual puru referencius futures.
C)
A = Pistemudo Rociade -- Controlu la uplicuci6n de aguu sobre lu
superficie de limpieza con el gatillo. Incleye cerrojo de
seguridud.
B = Dep6eite do Limpiezu - Perrnite ah_nacelsarhusta 3,78 litros
(1 gul6n) de detergente peru la limpiadoru a presiOn.
C = Puntas do Reeiude - Detergelste,0° 15° y 40°: pure diferentes
ulta presiOnaplicuciones de lirnpiezu.
D =Arrancuder do Retreeese -- Usado pureurrancur el rnotor
rnunuah_nente.
E = E×tensi6n puru 8equiJJusuen Cenexi6n Rdpida - Le permite
usur quutro puntus de rociudo difereotes.
F = BemhiJJurods PrineipuJ-- Usuda paru arrunque de motores
fries.
G =Filtre de Aire -- E]elemento de filtro tipo seco lirnita la cantidad
de suciedudy polvo quese introduce en e] rnotor.
H =PuJuncado CentroJ do JuVdlvuJu do Reguluui6n -- Coloca e!
motor en mode de urrunque puru e[ urru!_cudorde retrocesoy
detiene el motor en funcionumiento.
,.I=Tunquedel Cemhustihie -- Lienee] tunque con gasoline regular
sin contenido de plomo eneste punto. Siempre hubituci6nde hoja
pura la expunsi0nde] combustible.
K = Bembu -- Desarro% ulta presiOn de aguu.
L =Autem_tice se Enfria Sistemu -- Los ciclos regan per bornbu
cuundo ague ulcunza 125°-155%. Entibiar ague descurgur_ de lu
bombu eo el suelo. Este sistema previene el da_o interne de
bombu.
NI =Temu de AItu Presi6n -- Conexi6n para lu mungueru de altu
presi6n.
N =Entrudu de Aguu -- Conexi6npuru la rnanguerude jardin.
P =Tape deJ Dep6site deJ Aceite -- L[ene e] rnotor con uceite uqui.
R = _lungueru de Aitu Presi6n -- Conecte un extreme a la pistola
de rociudo y el otro extreme u h tome de ulta presi6n.
No meutrude:
CuJcemuniu Ejemplur de Dates (eJtrusere uercunede pJute
despreuiuMe) -- Proporciona e[ modelo y e! nOrnerode serie de
limpiadoru a presiOn.Te%u per favor estos pronturnente disponible
cuAndo Ilamar pure lu uyudu.
Etiqueta de Adveriencia e Instrucuienes -- Identifica los riesgos e
indicu e! procedimiento adecuudode puesta eo marchu o de purada
de la !impiadorua presi6n.
Gutuede Seguridud -- Siempre use lus galas encerrudas cuu!_do
correr su lirnpiadoru a presi6n.
38
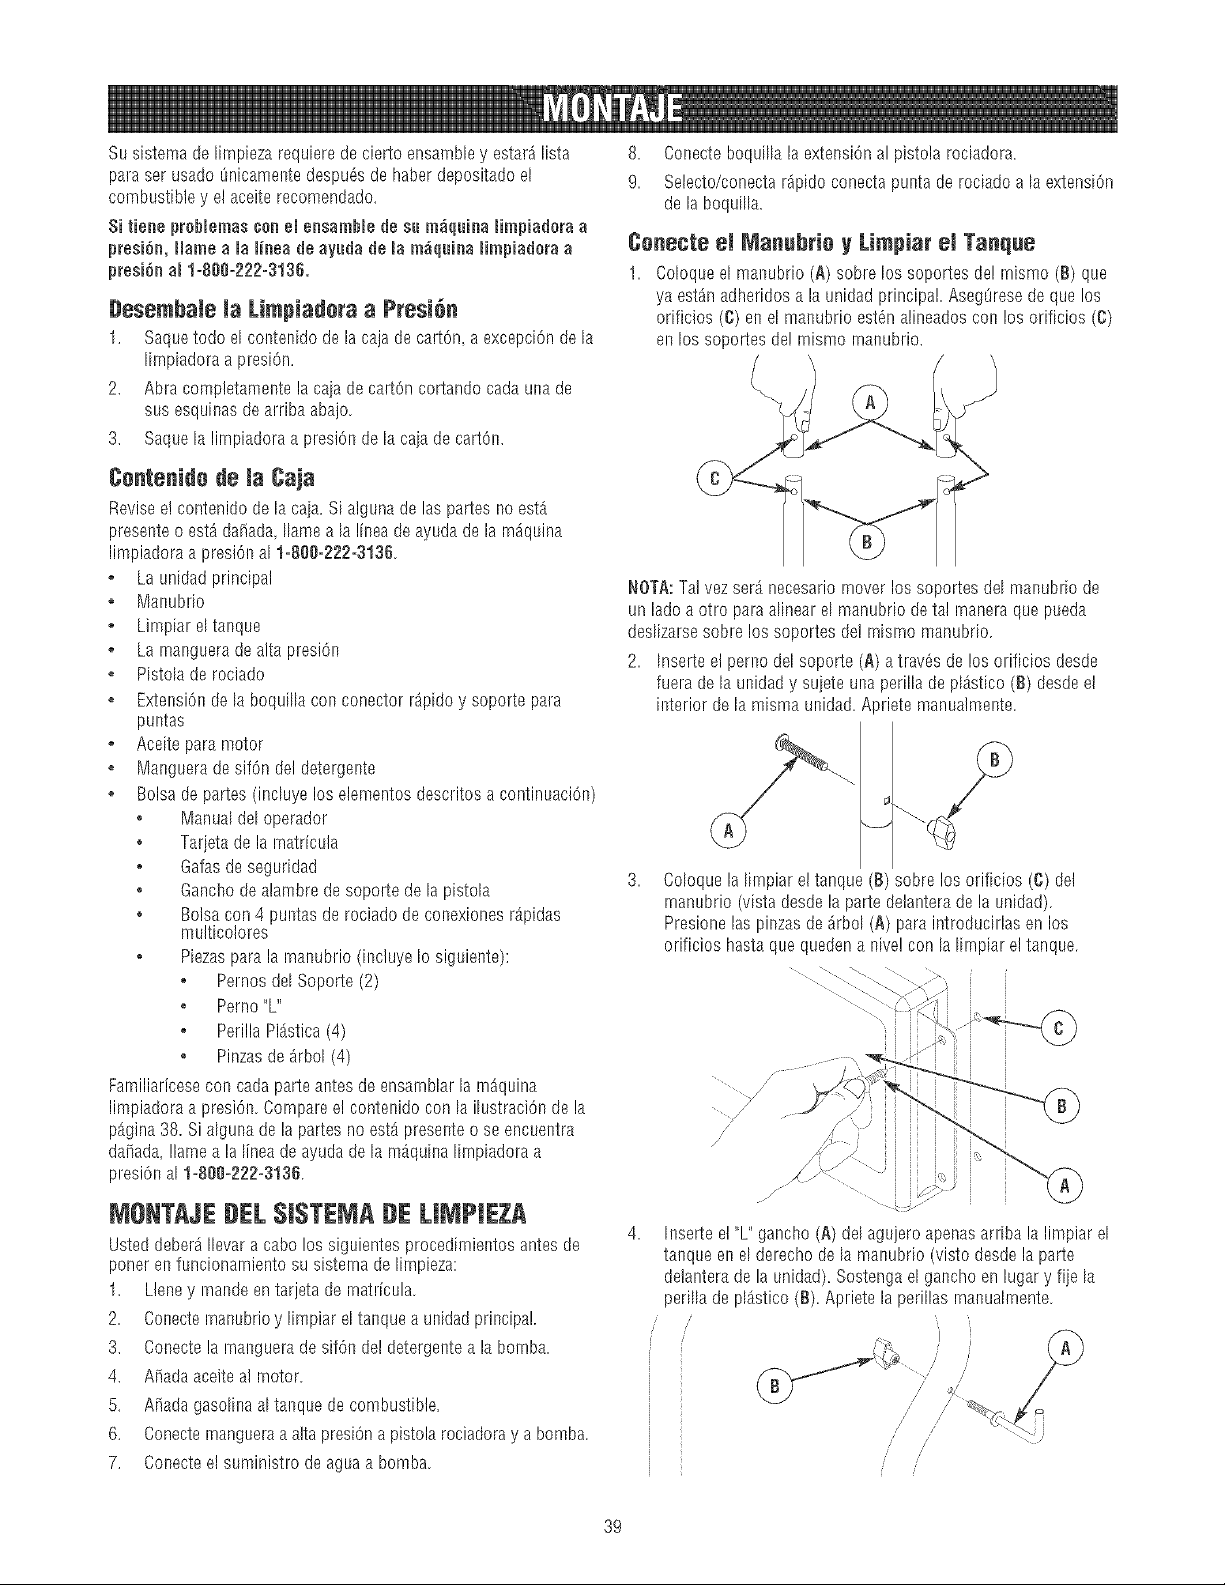
Su sistema de lirnpieza requiere de cierto ensambIey esta_ lista
paa ser usado 0nicamente despuOsde haber depositado el
combustible y el aceite recomendado.
Si tbne probbmas conemensamhb de su m0quina Hmpiadora a
presiOn,Hame a RamJneade ayuda de mam0quina Hmpiadora a
presiOnaJ1=888=222=3136.
Desemhale Ja Limpiadera a Presi_n
1. Saquetodo el contenido de la caja de cart@, a e×cepci@ de la
Bnpiadora a presiOn.
2. Abra completamente la caia de cart@ cortando cada una de
sus esquinas de arriba abajo.
3. Saque la lirnpiadora a presiOnde la caia de carton.
Centenide de Ja Caja
Revise e] contenido de la caia. Si alguna de las partes no est0
presente o est0 da_ada [lame a la linea de ayuda de la rn_quina
limpiadora a presiOnal 1=800=222-3136.
o La unidad principal
, Manubrio
Limpiar el tanque
La rnanguerade alta presiOn
, Pistola de rociado
ExtensiOnde la boquilla con conector r@ido y soporte para
puntas
, Aceite para motor
Manguera de sifOn del detergente
Bolsa de partes (incBye los elementos descritos a continuaciOn)
Manual del operador
, Tarjeta de la rnatricula
, Gafasde seguridad
, Gancho dealambre de soporte de B pistoIa
o Bolsa con 4 puntas de rociado de conexiones r@idas
multicolores
, Piezas para la rnanubrio (incluye Io siguiente):
o Pernos del Soporte (2)
Perno "L"
o Perilla Pl0stica (4)
o Pinzas de _rbol (4)
Familiaricesecon cada parte antes de ensamblar B rn_quina
limpiadora a presiOn.Compare e! contenido con la ilustraciOn de la
p0gina 38. Si alguna de la partes no est0 presente o se encuentra
dafiada, !lame a la linen de ayuda de la m0quina B_npiadoraa
presJOnal 1=880=222=3136.
MONTA JEDELSJSTEMADELI IPIEZA
Usted deber_[bvar a cabo los siguientes procedimientos antes de
poner en funcionarniento su sistema de limpieza:
1. Llene y rnande entarjeta de rnatricula.
2. Conecternanubrio y limpiar el tanque a unidad principal.
3. Conecte la rnanguerade sifOn del detergente a la bomba.
4. Mada aceite a] motor.
5. Mada gasoIinaal tanque de combustible.
6. Conecte mangueraa alta presiOna pistola rociadora y a bomba.
7. Conecte el saministro de agua a bomba.
8. 6onecte boquilla la extension al pistola rociadora.
9. Selecto/conecta r@ido conecta punta de rociado a la extension
de la boqui%
Cenecte e! Manuhrie y Limpiar el Tanque
1 Cobque e[ mallubrio (A) sobre los soportes de! rnismo (B) que
ya est_n adhefidos a la unidad principal. AsegOresede que los
orificios (C) en el manubrio estOnalineados con los orificios (O)
en los soportes de! rnismo rnanubrio.
NOTA:Talvezser0necesariomoverlos soportesdelmanubr{ode
unladoa otro paraaIinearel manubriodetal rnaneraquepaeda
deslizarsesobrelossoportesde!rnisrnomanubr{o.
2. Inserteelpernodelsoporte(A)atrav_sde losorificiosdes@
fueradela unidady sujeteunaperi[[adepBtico (B) des@el
interiorde la mismaunidad.Aprietemanualmente.
Cobquela Bnpiareltanque(B) sobrelosorificios (C)det
rnanubrio(vistades@lapartedelanterade launidad).
Presionelas pinzasde_rbol(A) paraintroducirlasenlos
orificioshastaque quedena nivelcon la limpiarel tanque.
/ /
/
[nserte el "L" gancho (A) de[ agujero apenas arr[ba la limpiar e[
tanque en el derecho de la manubrio (visto des@ la parte
delanterade la unidad). Sostenga el gancho en lugar y fiie la
perilla de pl0stico (B). Apriete la perillas rnanuah_nente.
' '/ i
I i
/
/
/ /
/ /
39
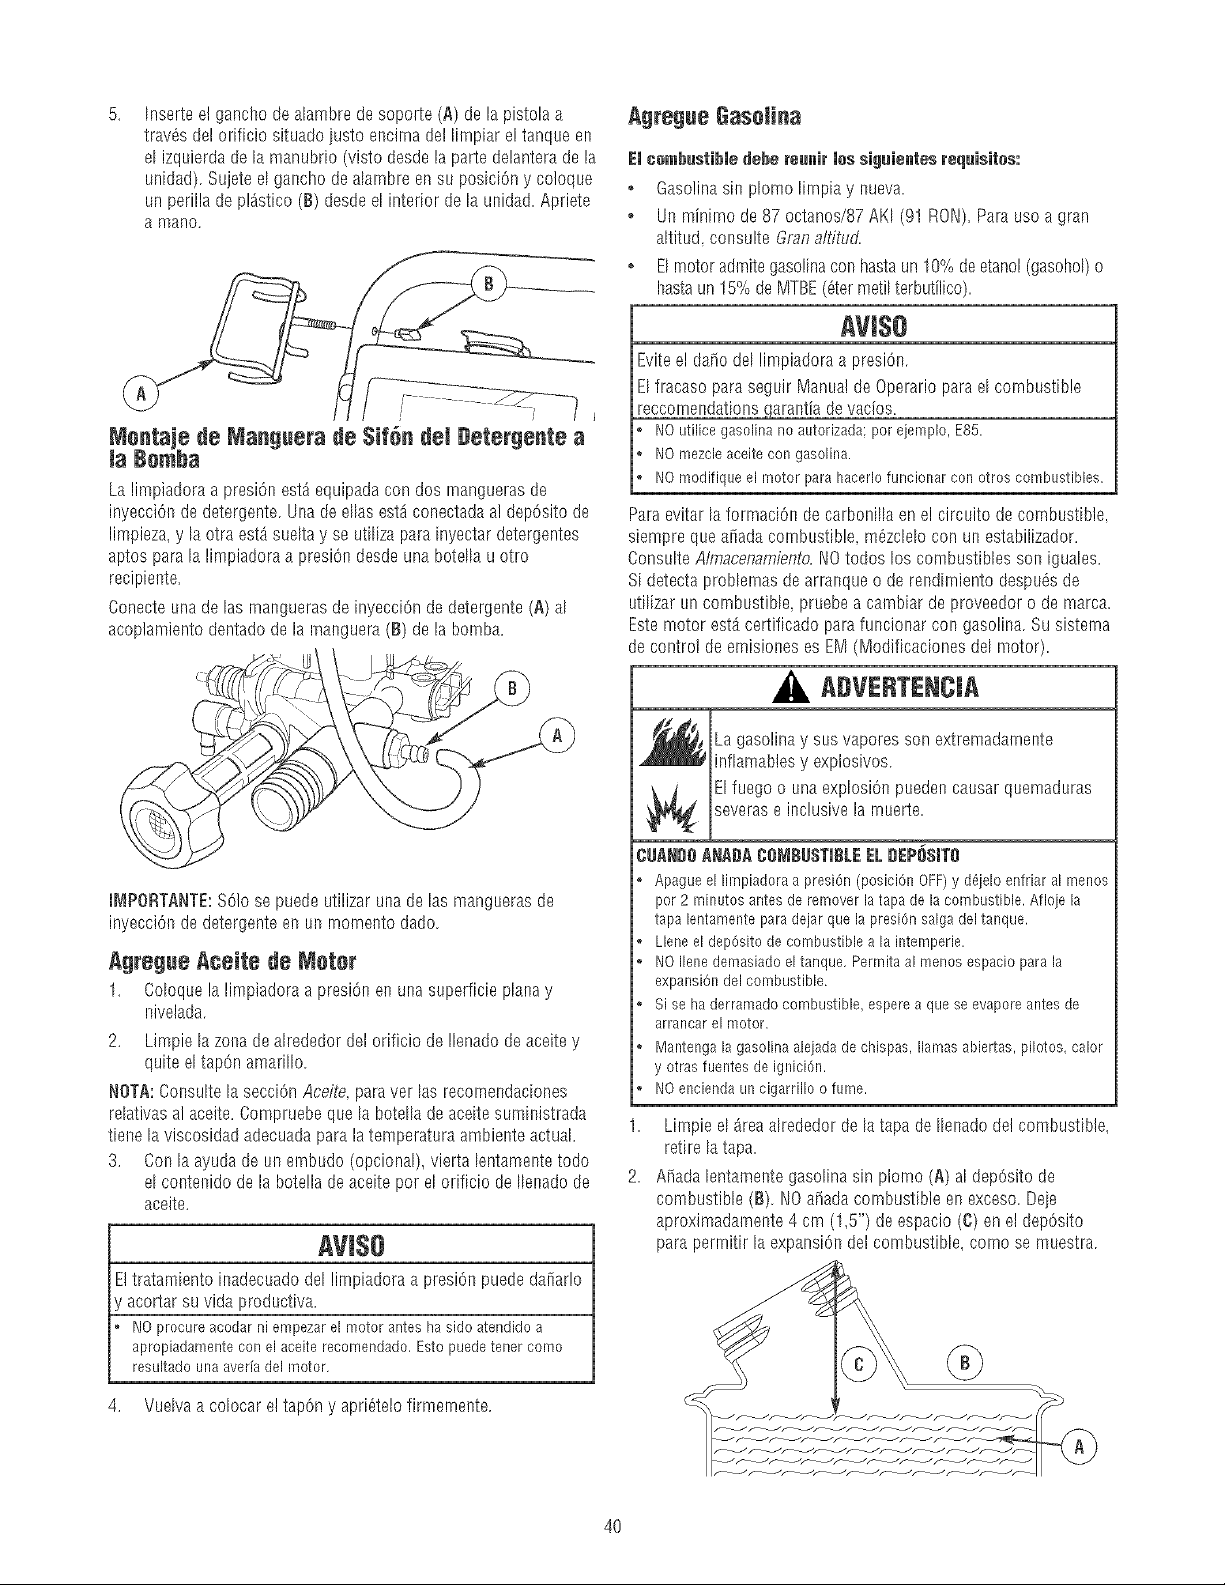
Inserte el gancho de alambre de soporte (A) de la pistola a
trav_s del orificio situado justo encima det lirnpiar el tanque en
el izquierda de la manubrio (visto des@ la parte delantera de la
unidad). Sujete el gaucho de alambre en su posiciOn y coloque
un perilla de plastico (B) des@ el interior de la unidad. Apriete
8 mano,
/ J
Mentaje de Manguera de $if6n de_Detergente a
_a Bemha
La limpiadora a presiOnest_ equipada con dos rnangueras de
inyecci@ de detergente. Una de elias est_ conectada a! depOsitode
limpieza, y la otra estA suelta y se utiliza para inyectar detergentes
aptos para la limpiadora a presiOn des@ una botella u otto
recipiente,
Conecte una de Bs mangueras de inyecciOnde detergente (a) al
acoplamiento dentado de la rnanguera(B) de la bomba.
IMPORTANTE:$61o se puede utilizar una de las mangueras de
inyecci@ de detergente er_ur_rnornento dado.
®
Agregue Aceite de Meter o
1. Coloque la limpiadora a presi@ els una superficie plalsay
nivelada. "
2. Limpie la zona de alrededor det orificio de Ilenado de aceite y ,
quite el tapOnamarillo.
NOTA:Consulte la secci6n Aceite_para vet las recomendaciones °
relativas al aceite. Compruebe qoe la botella de aceite suministrada
1.
tiene la viscosidad adecuada para la temperatura ambiente actual.
3. Con la ayuda de un ernbudo (opcional), vierta bntamente todo
el contenido de la bote!la de aceite pot el orificio de Ibnado de 2.
aceite.
aVl$O
E!tratamiento inadecuado del !Jmpiadoraa presi6o puede da_ar!o
' acortar su vida productiva.
NOprocureacodarni empezarel motoranteshasido atendidoa
apropiadamentecon elaceiterecomendado,Estopuedetenetcomo
resultadounaaveriadel motor,
4. Vuelva a colocar el tap@ y apriQtelofirmerner_te,
Agregue Gaseiina
El ¢embustJMedebe reunJrles sJ_uJentesrequisites:
• Gasolina sin plomo B_npiay nueva.
• Un minirno de 87 octanos/87 AKI (91 RON). Para uso a gran
altitod consulte 6ran attitud.
o El rnotor admitegasolina con hasta un 10% de etanol (gasohol) o
hastaun 15% de MTBE(6ter metil terbutilico).
AVlSe
Evite el da_o del !Jmpiadoraa presi@
El fracaso para seguir Manual de Operario para el combustible
reccornendations qaralstiade vacios.
NOutilicegasolinano autorizada;por ejemplo,E85,
NOmezcbaceitecongasolina.
NOmodifiqueel motorparahacerlofuncionarcon otroscombuetibbs.
Para evitar la forrnaciOn de carbonilla en el circuito de combustible,
siempre qoe aiiada combustible mazclelo con un estabilizador,
Consulte Almacenamiento,1/0 todos los combustibles son iguabs,
Si detecta probbmas de arranque o de rendirniento despu6s de
utilizar Lmcombustible pruebe a carnbiar de proveedor o de mama,
Este motor estA certificado para funcionar con gasolina. Su sisterna
de control de emisiones es EM (Modificaciones del motor).
ADVERTENCJA
_La gasolina sos son extremadamente
Y vapores
infiamables y explosivos.
Elfuego o Lmaexplosion pueden causal quemaduras
severas e inclusive la rnuerte.
CUAN#OANADACSMBUSTIBLEEL#EP6$1TO
o ApagueelIJmpJadoraa presJ6n(posJck')nOFF)y d6jeioenfrJaral menos
por 2 minutosantesde removerlatapade la combustible.Aflojela
tapalentamenteparadejarquelapresi6nsalgadel tanque.
Lleneeldep6sitode combustiblea la intemperie.
NOIlenedemasiadoeltanque,Permitaal menosespacioparala
expansi6ndelcombustible.
Sise haderramadocombustible,esperea queseevaporeantesde
arrancarel motor.
Mantengala gasolinaalejadadechispas,llamasabbrtas,pilotos,calor
y otrasfuentesde ignici6n.
NOenciendaun cigarrilloo fume.
LirnpieelAreaahededordelatapade Ibnadodel combustible,
retirela tapa.
A_adalentamer_tegaso%asin plorno(A) al dep6sitode
combustible(B). [10a_adacombustibleenexceso.Deie
aproximadamente4 crn (1,5")deespacio(C)enel dep6sito
paraperrnitirla expansi@detcombustible,cornosemoestra.
4O
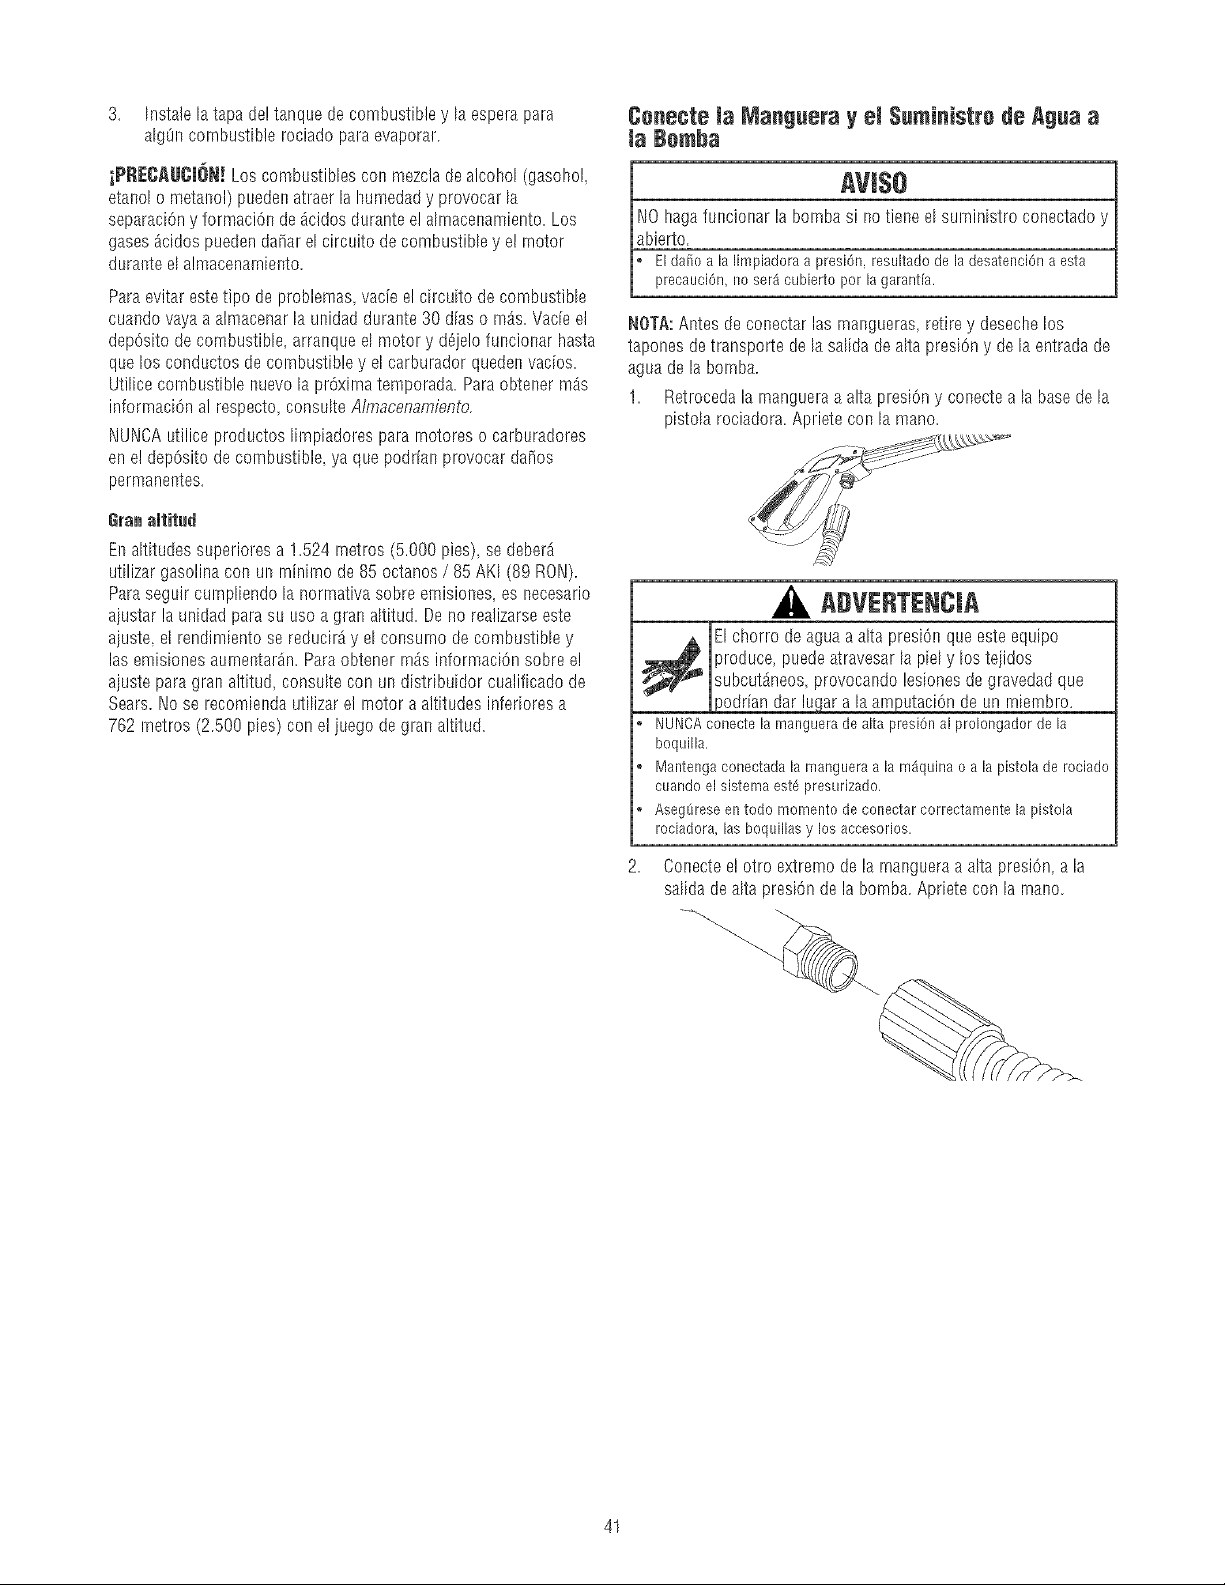
3. Instale la tapa de!tanque de combustible y la espera para
algOncombustible rociado para evaporar.
iPRECAIJCJON! Los combustibles con mezclade alcohol (gasohol,
etanol o metanol) poeden atraer la bumedady provocar la
separaciOny formaciOn de _cidos durante el ah_nacenamiento.Los
gases Acidospueden dafiar el circuito de combustible y el motor
durante el almacenarniento.
Paraevitarestetipo de problemas,vacieelcircuitode combustible
cuandovayaaalmacenarla unidaddurante30 diaso mAs.Vacieel
dep6sitodecombustible,arranqueel motory d_jelofuncionarhasta
quelos conductosdecornbustibley el carburadorquedenvacios.
Utilicecombustiblenuevola pr6xirnatemporada.ParaobtenermAs
informaci6nal respecto,consulteAlmacenamiento.
NUNCAutiliceproductoslirnpiadorespararnotoreso carburadores
enel dep6sitode combustible,ya quepodrianprovocardafios
permanentes.
8ranaltilud
Enaltitudessuperioresa 1.524rnetros(5.000pies),sedebera
utilizargasolinacon unrn[nirnode85 uctanos/ 85AKI (89 RON).
Paraseguircurnpliendola normativasobreemisiones,es necesario
aiustarlaunidadparasu usoa gran aItitud.Denorealizarseeste
ajuste,etrendimientose reducir_,y elconsurnodecombustibley
las emisionesaorneotaran.ParaobtenerrnAsinformaci6nsobreel
aiusteparagranaltitud,cunsultecon un distribuidorcualificadode
Sears.Nose recomiendautiIizarel rnotoraaltitudesinferioresa
762metros(2.500pies)conel juegodegranaltitud.
Cenecte _a Manguera y el $uministre de Agua a
la Bemha
[ Aw ]
1/0 bagafuncionarla bornbasi no tieoeel surninistroconectadoyj
Lbierto. __ ...... ]
1o El dafio a la limpiadora a presi6n, resultado de la desatenci6n a esta j
h precauci6n, no ser_ cubierto por la garant[a, j
NOTA:Antes de conectar las rnangueras, retire y deseche los
tapones de transporte de la salida de alta presi6n y de la entrada de
agua de la bornba.
1. Retroceda la manguera a alta presi6n y conecte a la base de la
pistola rociadora. Apriete con la mano.
ADVERTENCIA
EI chorro de agua a aIta presi6n que este equipo
produce, puedeatravesar la piel y los tejidos
subcutAneos provocando lesiones de gravedad que
_odriandar lunar a la arnputaci6n de un rniernbro.
, NUNCAconectela mangueradealta presi6nal prolongadorde la
boquilla.
o Mantengaconectadalamangueraa lam_iquinao a lapistoladerociado
cuandoel sistemaest8 presurizado.
AsegOreseentodo momentodeconectarcorrectamentela pistola
rociadora,lasboquillasy los accesorios.
6onectee!otro extrernode lamangueraaaltapresi6n,a la
salidadealta presi6nde labomba.Aprieteconla rnano.
41
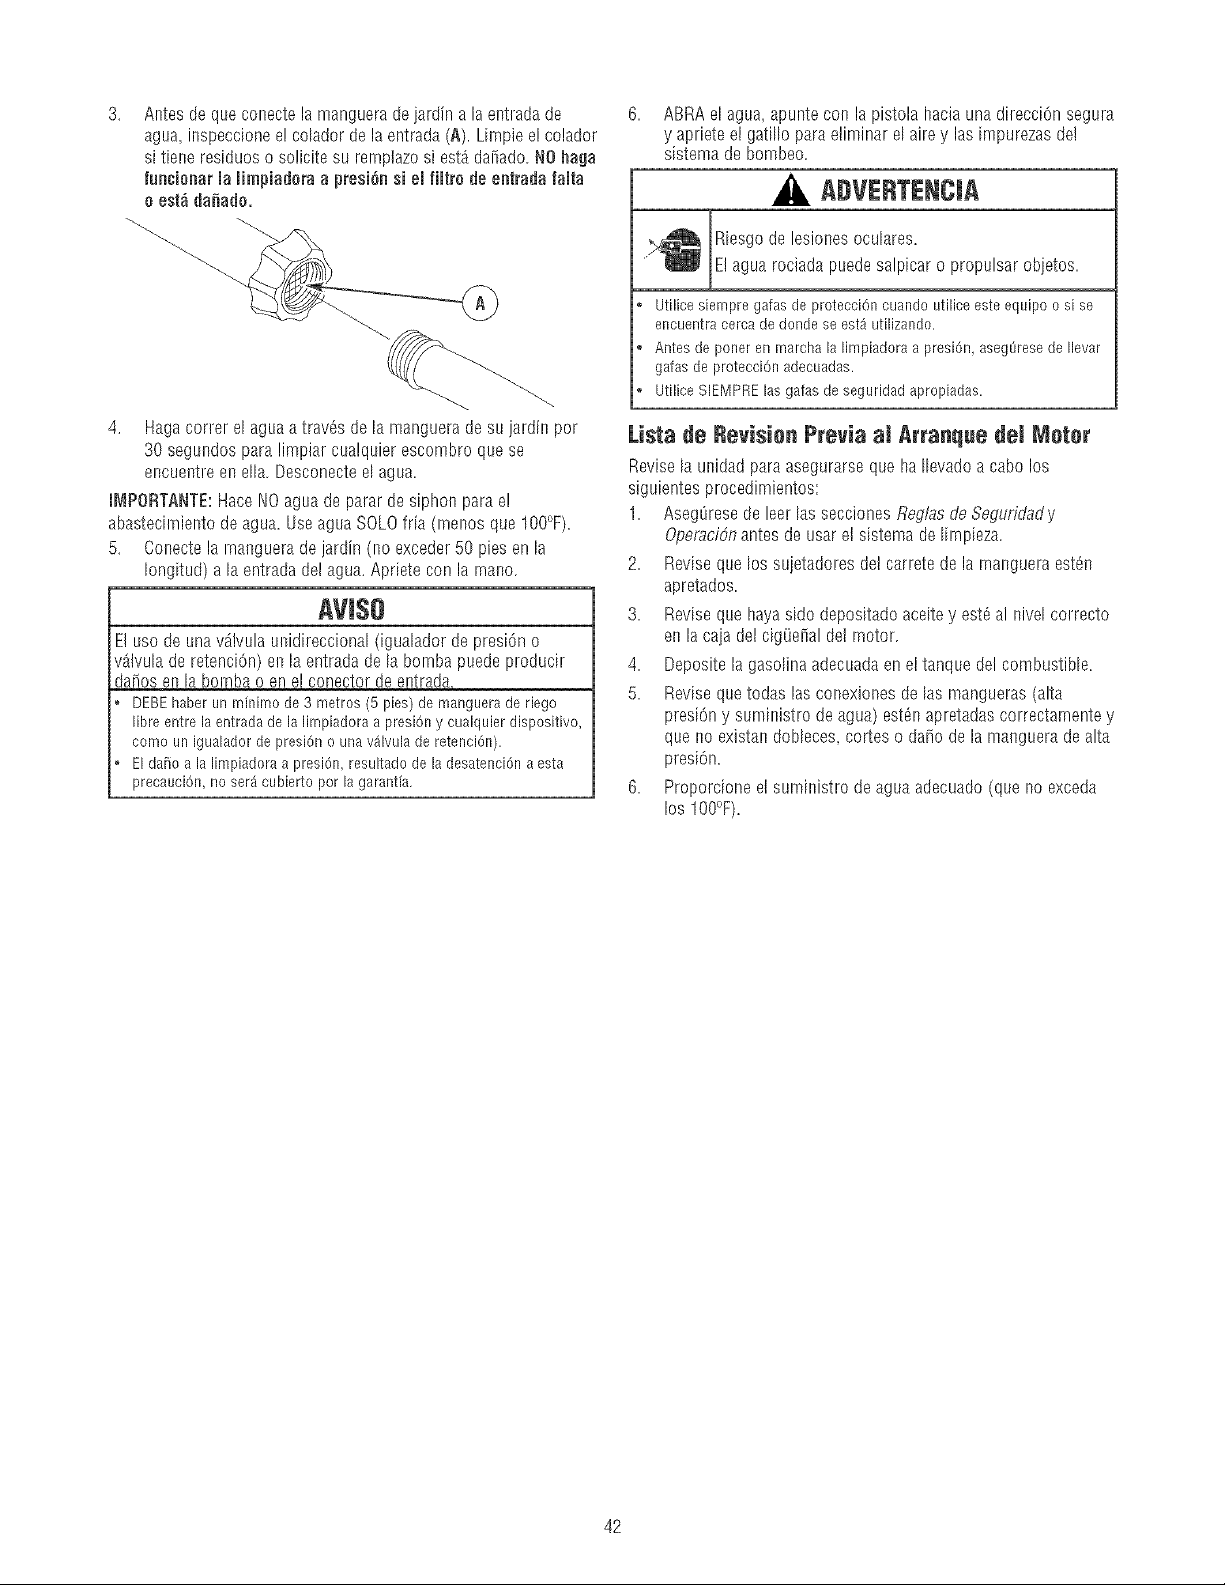
Antes de que conecte la manguera deiardin a la entrada de
agua, inspeccionee! colador de la entrada (A). Limpie el colador
si tiene residuoe o solicite su rernptazosiestA daiiado. NO haga
fun¢ionar JaHmpiadera a presi6n si eJfiJtra de entrada faJta
e estd danado,
4. Haga correr el agua a trav_s de la manguera de su jardn par
30 segundos para limpiar cualquier escombro que se
encuentre en ella. Desconecte el agua.
i_IPORTANTE:Hace NO agua de parar de siphon para e!
abastecirniento de agua. Useagua SOLOfria (rnenos que IO0°F).
5. Conecte la rnanguerade jardin (no exceder 50 pies en la
Iongitud) a la entrada del agua. Apriete con la mano.
AVlSg
E! uso de una%lvula unidireccional (igualador de presi6n 0
vAIvulade retenciOn)en la entrada de la bomba puede producir
da_os en la bornba 0 en el conector de entrada.
DEBEhaberunminimade 3 metros(5 pies)de manguerade riego
libreentrela entradade la limpiadoraa presiOny cualquierdispositivo,
comaun igualadordepresi6no unav_lvulade retenci6n).
Elda_oa lalimpiadoraa presi6n,resultadode la desatenci6naesta
precauciOn,noser_icubiertoparla garantia.
ABRA el agua, apunte con la pistola hacia una direcci6n segura
y apriete el gati% para eliminar el aire y las impurezas del
sistema de bombeo.
ADVERTENCIA
Riesgo de lesionesoculares.
E! agua rociada puede salpicar o propulsar obietos.
, Utilicesiempregafasde protecci6ncuandoutiliceesteequipoo si se
encuentracercade dondeseest_utilizando.
, Antesdeponeren marchalalimpiadoraa presi6n,asegL_resede Ilevar
galasdeprotecci6nadecuadas.
, UtiliceSIEMPRElasgalasdeseguridadapropiadas.
Listade Revisien Previaai Arranque del Meter
Revise la unidad para asegurarse que ha Ilevado a cabo los
siguientes procedimientos:
1. AsegOresede leer las secciones Reglas de SeduHdady
Operacidn antes de usar el sistema de lirnpieza.
2. Revise que los suietadores del carrete de la manguera est_n
apretados.
3. Revise que haya sido depositado aceitey est_ al nivel correcto
en la caja del cigOefialdel motor.
4. Deposite la gasolina adecuadaen el tanque del combustible.
5. Revise quetodas las conexiones de las mangueras (alta
presi6n y suministro de agua) est_n apretadas correctamente y
que no existan dobleces, cortes o da_o de la manguera de alta
presiOn.
6. Proporcione et suministro de agua adecuado (que no exceda
los IO0°F).
42
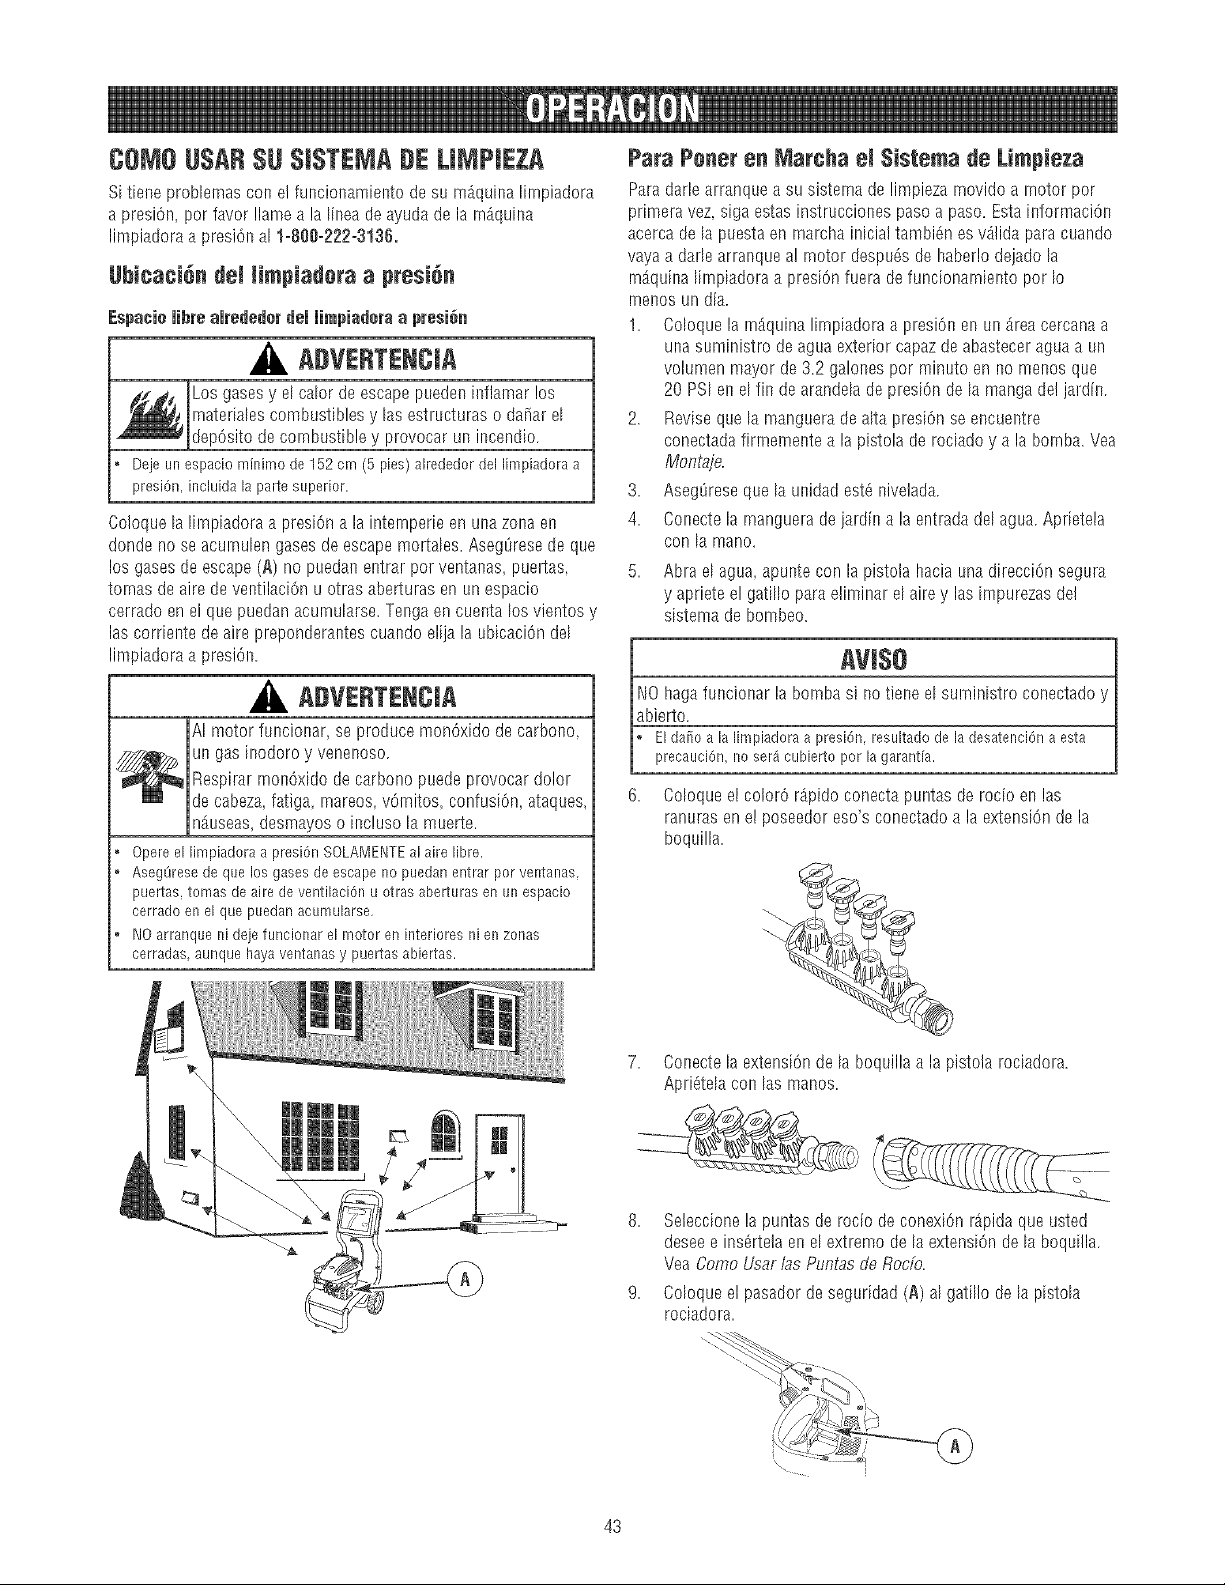
COMOUSAR$[J $JSTEMA#E LJMPJEZA
Si tiene probIernas con el funcionamiento de su m_qui_a B_npiadora
a presi6n, por favor !lamea la B_eade ayuda de la rn_quina
Iimpiadora a presi6n al 1-888-222-3136.
UbJca¢i6n del Hmpiadera a presi6n
Espacie iibre a#ededer dei iimpiadera a presi_n
A#VENTENCJA
Los gases y el caIor de escape pueden illflarnar los
rnateriaIes combustibles y las estructuras o da_ar el
dep6sito de combustible y provocar un incendio.
, Dejeunespaciominimode 152cm (5 pies)alrededordel limpiadoraa
presi6n,ineluidala partesuperior.
Coloque la limpiadora a presi6n a la intemperie en una zona en
don@ no se acurnubn gases de escape mortabs. AsegQresede que
los gases de escape (A) no puedal entrar pot ventanas, pueltas,
tornas de aire de ventilaciOnu otras aberturas en un espacio
cerrado en el que puedan acurnuIarse.Tenga en cuenta los vientos y
las corriente de aire preponderantes cuando elija la ubicacidn del
limpiadora a presi6n.
, A#VERTENCiA
AI motor funcionar, se produce monOxido de carbo_lo,
un gas inodoro y venenoso.
Respirar rnondxido de carbono puede provocar dolor
de cabeza,fatiga, mareos, v6rnitos, confusion, ataques,
n_useas,desmayos o incluso la muerte.
Opereel limpiadoraa presi6nSOLAMENTEal airelibre.
o AsegOresede quelosgasesde escapeno puedanentrarporventanas,
puertas,tomasde airedeventilaci6nu oh'asaberturasen un espacio
cerradoenel quepuedanacumularse.
o NOarranqueni dejefuncionarel motoren interieresnien zonas
cerradas,aunquehayaventanasy puertasabiertas.
Para Peaer en Mareha el $istema de Limpieza
Para dar[e arranque a su sistema de limpieza movido a motor por
primera vez siga estas instrucciones paso a paso. Esta informaciOn
acerca de la puesta en rnarcha inicial tambi6n es vAlida para cuando
vaya a darb arranque al motor despu6s de haberlo dejado la
rnAquinaBnpiadora a presiOn fuera de funcionarniento por Io
rner_osun dia.
1. Coloque la rnAquina limpiadora a presiOn en un Area cercana a
una suministro de agua exterior capaz de abasteceragua a un
volumen mayor de 3.2 galo!les por minuto en no menos que
20 PSI er_el fin de arandda de presi6n de la manga de! jardin.
2. Revise que la manguera de a[ta presi6n se encuel_tre
conectada firmemente a la pistola de rociado y a la bornba.Yea
MonLaje.
3. AsegQreseque la unidad est6 nivelada.
4. Conecte B rnanguera de jardin a la entrada del agua. Apfietela
con la mano.
5. Abra el agua, apunte con la pistola hacia una direcci6n segura
y apriete el gatillo para eliminar el aire y las impurezas del
sistema de bombeo.
[ Aw ]
JI,lO funcionar la bomba si tiene el surninistro conectado
haga
II0
yj
Bbierto. __ ......
J, El @[io a lalimpiadoraa presi6n,resultadode la desatenei6naesta j
L precauci6n,11oser4cubiertopor lagarantB, j
6. Coloque el color6 r@ido conecta puntas de rocio en las
ranuras en el }oseedor eso's conectado a la extensi6n de la
boquilla.
7. Conecte B extensi6n de B boquilla a la pistola rociadora.
Apri6teIa con las manos.
8 Seleccione la puntas de rocio de conexiOn r@ida que usted
@see e ins_rtela en el extremo de [a extension de la boquilla.
Vea Como Usar /as Puntas de Rocfo.
9. Coloque el pasador de seguridad (A) al gatfllo de la pistola
rociadora.
43
10. Aseg8rese de que la control de la vAlvuIade adrnisi6n se
encuentre en la posiciOn "Rdpide" ("Fast") (A), que se distingue
de un conejo.
®
®
A ®
Paracemenzarel met+rpareel tiemp+muy primer:
11. Empujebombilla!nds principalfirmementevezde 5, esperando
2 segundosentrecadaempujOn.Reviselas instrucciones
especificas del comienzo de motor en el manual de due_os de o
rnotor.
Paracemenzarmeterdespuds:
11 Empujebombillarndsprincipalfirmementevezde 3, esperando
2 segundosentrecadaempujOn.Enelcasodequeel motor
est6calienteI,,_Oaprietela bombiIIam_s principak
iMPORTANTE:Antesdeponerenmarchalalimpiadoraa presi0n,
asegOresedeIlevargafasdeprotecci6nadecuadas.
ADVERTENCJA
Riesgodelesionesoculares
E! agua rociada puede salpicar o propulsar obietos
o Utilice siempre gafas de protecci6n cuando utilice este equipo o si se
encuentra cerca de don@ se est_ utilizando.
o Antes de porter en marcha la limpiadora a presi6n, aseg(_resede Ilevar
gafas de protecci6n adecuadas.
o Utilice SIEMPRElas galas de seguridad apropiadas.
12. Cuandoarranqueel motor,col6queseen la posiciOnquese
recornienda a continuaci6n. Sujete la maniia y hale ligeramente
la manijadel arranque hasta que sienta cierta resistencia.
Despu_s h_tlela r_pidamente.
i
13. JaIela cuerda de arranquelentamente. NO permita que la cuerda
regrese bruscamenteeocontra del arrancador.
ADVERTENCJA
El retroceso (repliegue rApido) del cable del arrancador
puede producir lesiones. El retroceso impedir5 que el
usuario suelte el cable a tiempo y tirar_ de su rnano y
brazo hacia el motor.
Comoresultado,podrianproducirsefracturas,
contusiones 0 esguinces.
NUNCAtire del cable del arrancador sin eliminar previamente la presi6n
de la pistola rociadora.
Cuando arranque el motor, tire lentamente del cable hasta sentir una
resistencia y, a continuaciOn, tire r@idamente de _1para evitar su
retroceso.
Despu_s que cada tentativa que empieza, don@ motor falla de correr,
siempre sdialar el fusil en la direcci6n segura y el disparador del fusil
del rode del estruj6n para liberar la presi6n alta. Active el gatillo de la
pistola rociadora.
Sujete firmemente la pistola rociadora con ambas manos cuando
aplique un rociado a alta presi6n paraevitar lesiones cuando se
produzca el retroceso de la pistola.
ADVERTENCJA
EJchorro de agua a alta presi6n que este equipo
produce puedeatravesar la piel y los tejidos
subcutAneos, provocando lesiones de gravedad que
_odriandar lugar a la amputacJ6nde un miembro.
La pistola rociadoracontieneaguaa aIta presi6ninc]uso
con e] motor parado y el agua desconectada,quepuede
causar la herida.
o NOpermitaen ningSnmomentoqueNINOSoperenlam4quina
limpiadoraa presi6n.
, Mantengaconectadalamangueraa lam_quinao a lapistolade rociado
cuandoel sistemaest8 presurizado.
, NUNCAapuntela pistolaa lagente,animaleso plantas.
o NOfije lapistolarociadoraen laposici6nabierta.
, NOabandonelapistolarociadoracuandolam_quinaest6en
funcionamiento.
, NUNCAutiliceunapistolarociadoracuyoseguroo protecciOnparael
gatillo noest8en perfectoestadodefuncionamiento.
AsegSreseentodo momentodeconectarcorrectamentela pistola
rociadora,lasboquillasy los accesorios.
ADVERTENCJA
s_ E!contactocon Jazonadel silenciadorpuedeproducir
quemadurasgraves.
Los gasesy el ca!ordeescapepuedeninflamarlos
._ materialescombustiblesy lasestructuraso daiiar el
dep6sitodecombustibley provocarunincendio.
®
®
®
®
NOtoque las superficies calientes y EVITE los gases del escape a alta
temperatura.
Permita que el equipo se enfr[e antes de tocarlo.
Deje un espacio m[nimo de 152 cm (5 pies) alrededor del limpiadora a
presi6n, incluida la parte superior.
El COdigode Normativa Federal (CFR,Titulo 36: Parques, Bosquesy
Propiedad PL3blica)obliga a instalar una pantalla apagachispas en los
equipos con motor de combusti6n interno y a mantenerla en buenas
condiciones de funcionamiento, conforme a la norma 5100-1C (o
posterior) del Servicio Forestalde la USDA. En el Estado de California,
la ley exige el use de uua pantalla apagachispas (Secci6n 4442 del
C6digo de Recursos R_blicos de California). En otros estados puede
haber leyes similares en vigor.
44
NOTA:SiemprernalstengalacontroldevdlvuIaderegulaciOnenel
"Rdpide"("Fast")posicionecuAndooperarlalirnpiadoraapresi6n.
C_me Detener $u $iste,ma de Limpieza
1. SueIte e[ gatillo de la pistoIa rociadora y dejefuncionar el
motor al ralenti durante dos minutos.
2. Mueva e[ acelerador a [a posici6n "SJow" (Lente), luego a la
posici6n "Stop" (Parada) (A).
3. SIEMPREfusH de punto en una direcci6n segura y el
disparador del fusil de! rocio de! estrujOn para liberar la
presiOn retenida de la pIearnar.
IMPORTANTE:La pistola rociadora contiene agua a aita presi6n
incluso con el motor parado y el agua desconectada.
, ADVERTENCJA
El chorro de agua a alta presiOnque este equipo
produce puedeatravesar la piel y los tejidos
_ ubcutAneos, provocando lesiones de gravedad que
podrian dar lugar a la amputaci6n de un rniembro.
La pistola rociadoracontieneaguaa alta presi6nincluso
con el motor parado y et agua desconectada,que puede
causar la herida.
o Mantengaconectadalamangueraa lam%uinao a la pistoladerociado
cuandoel sistemaest8 presurizado.
o SlEMPREquepareel motor,apuntecon la pistolarociadorahaciauna
direcciOnseguray aprieteelgatillo paradescargarla presiOny evitarel
retroceso.Activeel segurodelgatillo cuandono utilicelapistola.
4. Active el seguro del gatillo de la pistola rociadora cuando no la
utilice.
C6me usar las puntas de retie
La conexi6n r_pida de la extension para boquillas le permite usar
quatro puntas de rocio diferentes. Siempre que est_ activado el
seguro del gatillo de la pistoIa rociadora se pueden cambiar las
puntas de rociado con la lirnpiadora a presi6n en funcionamiento.
Las puntas de rocio tienen diferentes patrones de rociado corno se
ilustra a continuaci6n.
La Presi6n Baja
Negra
Usadapara aplicar
detergentes
400Blalsca 150Amarilla 0° Roia
1650PS! 1950PSI 2200PS!
2.2 GPM 2,1 GPM 1.9GPM
Para cambiar las puntasde +++do:
1. Coloque el pest+llode seguridad de la pistola de rociado.
ADVERTENCIA
El chorro de agua a alta presi6n que este equipo
_ roduce, puedeatravesar la piel y los teiidossubcut_neos, provoca!_do lesiones de gravedad que
_odriandar lugar a la amputaci6n de un rniernbro.
o NUNCAintercambiepuntasde rocfosin haberaseguradoelcerrojode
seguridaddel gatillo.
o NOtuerzapuntasderode alrociar.
2. Desplacehaciaatr_selanillodelconectorr_pidoy tire de las
puntasderocio.Guardelaspuntasde rocioen el soportedela
prolongadordelaboquilla.
45
3. Seleccionela puntaderociadodeseada:
o Parsun enjuagadosuave(bajapresiOny mayorcaudal),
paraunalimpiezasuavedecoches/camiones,barcos,
RVs,mueblesdejardn, cortac_spedes,etc., seleccionela
puntsde rociadoUancade40°,
o Parsun enjuagadogeneral(mediapresi6ny medio
caudal) id6neoparsla mayorfade laslimpiezas,corno
revestirnientosexteriores,patiosde ladrillo,suelosde
madera,entradas,aceras,suelosde garaje,etc,
seleccionela puntade rociadoamarfiIade 15°,
o Parsun enjuagadode maximapotencia(sits presi6ny
bajocaudal),parasuperficiesrebeldeso dedificil acceso
comosuperficiesde plantasattas,eliminaci6nde pintura,
manchasde aceite,eliminaciOnde 6xidou otras
sustanciasdificiles(alquitrAn,resinagrasa,cera,etc.),
seleccionela puntade rociadoroiade 0°,
o ParsapIicarproductosdetergenteso limpiadores
especificosqueayudena descompolserlasuciedad
rebeldeendistintassuperficies,seleccionela puntsde
rociadodedetergentenegra.
4. Desplacehaciaatrdsel anillo,insertela nuevapuntade rociado
y suelteelanillo.Tiredela pur_taderociadoparacornprobar
queest_bienrnontada.
Use in¢lina
o Parauna limpieza rn_s efectiva mantenga la boquiIIade rociado
de 20 a 61 cm (8 a 24 pulgadas) de la superficie de limpieza.
o 8i coloca la boquflla de rociado demasiado cerca podria da_ar
la superficie, especialmente cuando est6 usando e! rnodo de
alta presi6n.
o NO co!oque la boquilla a rnenos de 15 crn (6 pulgadas) cuando
est6 lirnpiando Ilantas.
Limpieza y Apiica¢i6n dei Deter genre
A PReCA0CI6e
Los productos quimicos pueden provocar leslones de gravedad
'/o daiios rnateriaIes.
NUNCAutiliceI[quidosc_iusticoscon lalimpiadoraa presi6n.
UseEXCLUSIVAMENTEdetergenteso jabonesespecialesparala
limpiadoraa presi6n.Sigatodas lasinstruccionesdelfabricante.
Pars aplicar el detergente, sills les si_uientes pasus:
1. Conecte una de las mangueras de inyeccidn de detergente
conforme a las instrucciones que se detaIlan en la secci6n
Conecte la manguera deinyecci6n de detergentea/a bombs.
IMPORTANTE:AsegOresede que e! rnotor estd parado y frio antes
de cambiar las manguerasde inyecciOnde detergente.
, ADVERTENCiA
E[contacto con la zona del silenciador puede pruducir
quemaduras graves.
Los gasesy el calor de escape pueden infiamar los
._ materiales combustibles y las estructuras o daiiar el
dep6sito de combustible y provocar un incendio.
NOtoquelassuperficiescalientesy EVITElosgasesdelescapeaalta
temperatura.
Permitsqueel equipose enffieantesdetocarlo.
2. Reviseel uso de la puntas de rocio.
3. Prepare la soluci6n detergente siguiendo las instrucciones del
fabricante.
4. Aseg(irese de que la Ilavede paso de detergente del depOsito
de lirnpieza estA en la posici6n "Off".
5. Si utiliza un dep6sitode lirnpieza,vierta detergenteen su interior.
NOTA:La capacidad del depdsito de limpieza es de 3,78 ! (1 gal6n).
6. Aseg(irese de que la puntas de rocio de detergente negra est_
montada.
NOTA:NO se puede apIicar detergente cor_las puntas de rocio de
alta presi6n (Blar_ca,Amarilla o Roia).
7. Aseg8rese de que la manguera del jardin est_ conectada a la
e_stradadeagua. Compruebe que la manguera dealta presi6n
est,. conectada a la pistols rociadora y a la bombs. Abra la
alirnentaciOnde agua.
aVl$O
Usted deberd conectar todas las mangueras ar_tesde dade
arranque al motor.
Arrancarel motorsintener todasias manguerasconectadas7/sinel
suministrodeaguaABIERTO(ON)causar_eldaPiode la bombs.
Elda[ioa lalimpiadoraa presi6n,resuitadode la desatenci6naesta
precauci6n,no ser_cubiertopot lagarant[a.
8. Active el seguro del gatillo de la pistols rociadora y ponga en
marcha el rnotor siguiendo las instrucciones de la secci0n
Cdmo poner en funcionamiento la limpiadora a presidn.
9A. Si utiliza ei depdsito de limpieza, gire la Ilave de paso de
detergente del depOsito hasta la posiciOn "On" (A).
mMPORTANTE:Si utiliza una manguera de inyecci6n de detergente,
asegOresede que la !lave de paso de detergente det depOsito de
limpieza est_ en la posici6n "Off".
9B. Si utiliza una mal_guerade inyecci6n de detergente, co!oque el
extremo del fiItro pequefio del tubo de inyecci6n de detergente
e_ e[ recipiente de! detergente.
NOTA:AsegOresede que el %ro est6 totah_nentesumergido
rnientras se aptica el detergente.
AV $O
El contacto con el silenciador aalta ternperatura puede producir
da_os e_ el tubo de inyecci6n de detergente.
Cuandocoloqueelfiltro en labotelladeldetergente,coloqueeltubo de
maneraquenoentreencontactoaccidentalmenteconelsilenciador
caliente.
10.
11.
Apliquee!detergentesobre[asuperficieseca,comenzar_doen
laparteinferior del_reay dirigi6ndosehaciaarriba,utilizando
movirnientoslargos,parejosy superpuestos.
Permitsqueeldetergente"penetre"de 3 a5 minutosantesde
eniuagar.Vuelvaa aplicarlocualsdoseanecesarioparaevitar
quelasuperficiese seque.NOpermitaqueeldetergentese
seque.Si permiteque el detergentese seque,la superficie
podriaquedarcon rnanchas.
46
Enjuage de Ja M_quina Lirnpiadora a Presi6n
gespu_s de haber apJicado eJdeter_ente, refrie_ue Jasuperficie
y enjua_eJa de Jasi_uiente manera:
1. Coloque el cerrojo de seguridad a la pistola de rociado.
2. AsegOresede que la vAIvulade paso de detergente estAer_la
posici6n "Off".
3. Retire la puntas de rocio de detergente negra del prolongador
de la boquiIIa.
4. SeIeccionee instaIe la puntas de rocio de alta presi6n deseada
eonforrne a las instrucciones de la secciOn C6mo usar et
puntas de rocio.
5. Mantenga la pistola de rociado a una distancia segura del Area
que planea rociar.
AgVERTENCJA
E] retroceso de la p[stola rociadora puede provocar
caidas.
* Utilice la limpiadora a presi6n desde una superficie estable.
, Extreme las precauciones si necesita utilizar la limpiadora a presi6n
desde una escalera, un andamio u otro lugar similar.
, Sujete firmemente la pistola rociadora con ambas manos cuando
aplique un rociado a alta presi6n paraevitar lesiones cuando se
produzca el retroceso de la pistola.
6. Ap[iqueun rociadode a[tapresiOna unapeque_azonay luego
compruebesi seha producidoaIgOntipo de da_o.Si no
apreciadafios,continOeene!paso7.
7. Comienceen la partesuperiorde!Areaqueva a eniuagar,
dirigi6ndosehaciaabajocon los rnisrnosmovirnientos
superpuestosqueutilizOparala lirnpieza.
$istema de Enfriamiente Aatem_tiee
(Alivie T rmice)
E]agua que circula dentro de la bomba puede alcanzartemperaturas
entre los 125°-155°F s[ hacefuncionar el motor de su rnAquina
limpiadora a presiOn de 3 a 5 minutos sin oprimir el gatiIIo de [a
pistola de rociado. El sistema de enfriamie!_toautomAtico se activa a
estatemperatura y el_friala bomba descargando agua caliente en el
piso, evitando asf el daiio [nterno de la bomba.
47
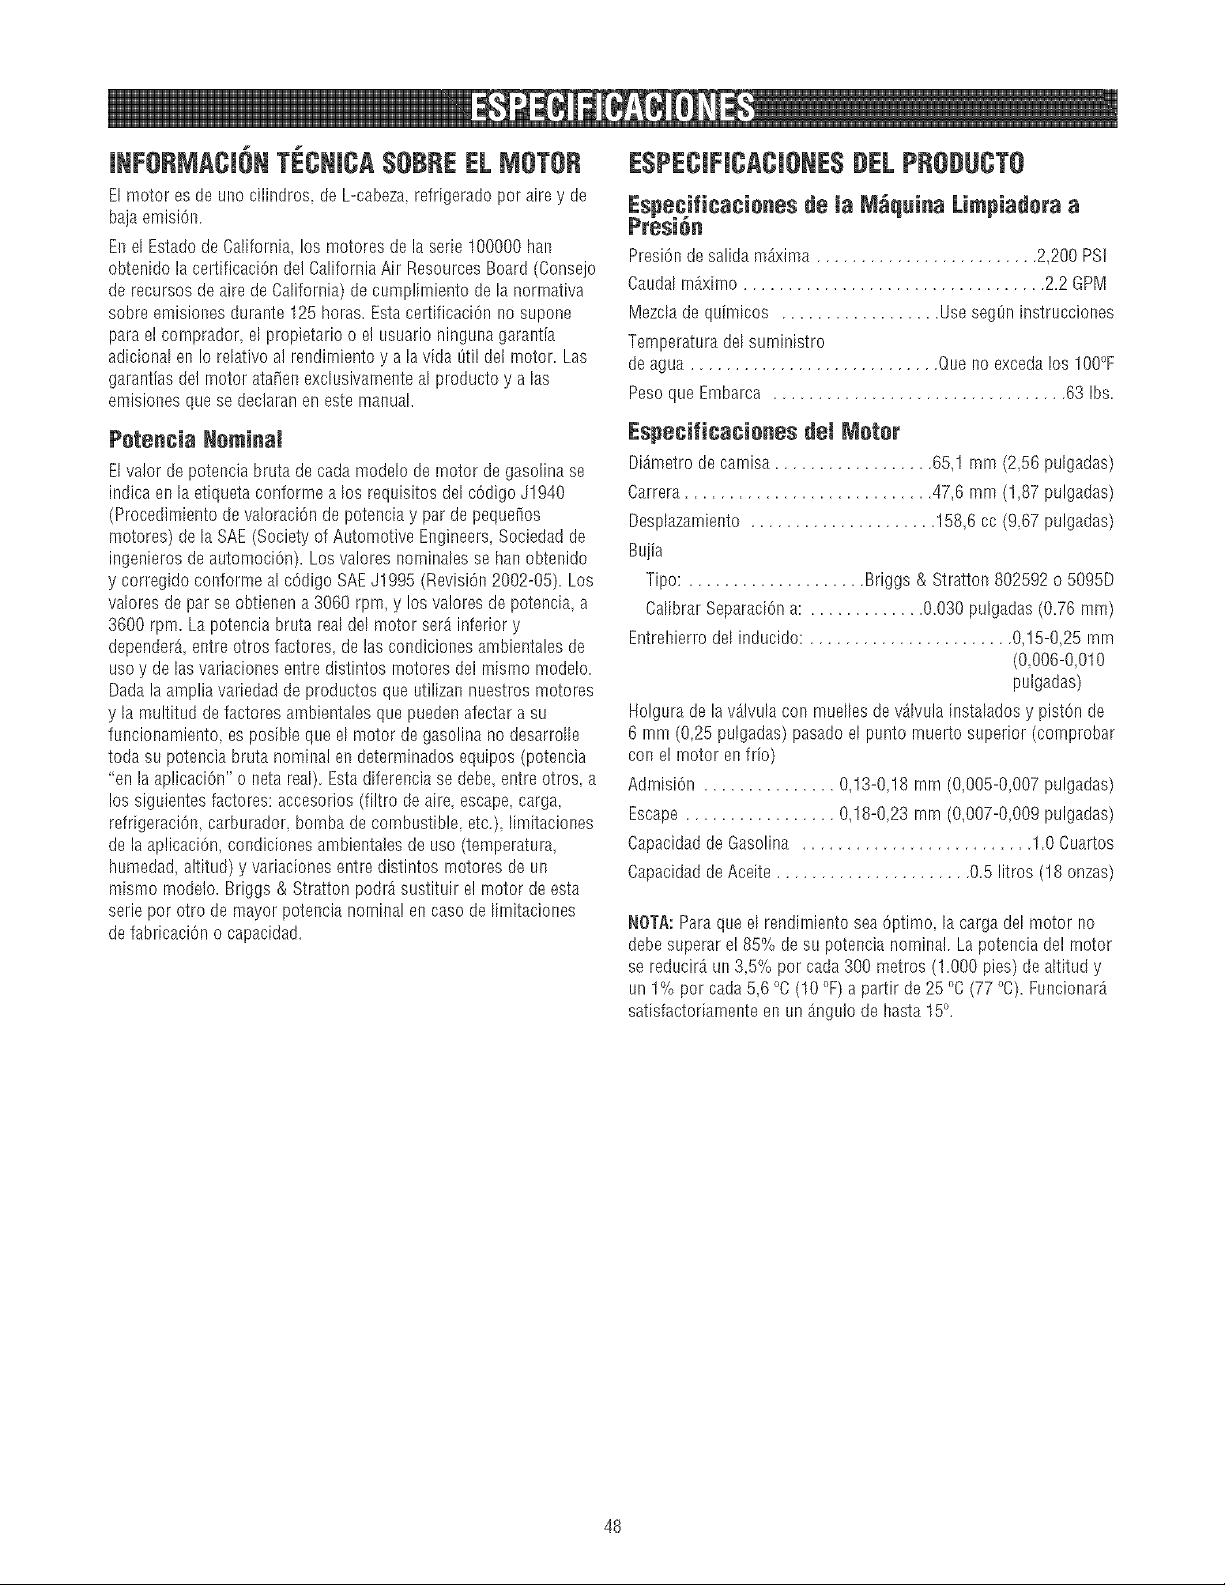
JNFORMACJ6NTECNJCA$OBREEL IOTOR
Elmotoresde unocilindros,deL-cabeza,refrigeradoporairey de
bajaemisiOn.
Enel Estadode California,los motoresde laserie100000han
obtenidolace!tificaciOndeiCaliforniaAir ResourcesBoard(Consejo
derecursosde aire de California)de cumplimientode la normativa
sobreemisionesdurante125horas.EstacertificaciOnno supone
paraelcomprador,el propietarioo e]usuarioningunagarantia
adicionalen !o relativoa] rendimientoy a la vidaOtildelmotor.Las
garantiasde!motor ata_enexcklsivamenteal productoy a las
emisionesquesedeclaranenestemanual.
Peten¢ia Neminal
Elvalorde potenciabrutadecadamode[ode rnotordegasolinase
indicaenla etiquetaconformealos requisitosdelcOdigo81940
(ProcedimientodevaIoraciOndepotenciay pardepequeiios
motores)delaSAE(Societyo1AutomotiveEngineers,Sociedadde
ingenierosde automociOn).Losvaloresnorninalessehanobtenido
y corregidoconformeal cOdigoSAEJ!995 (RevisiOn2002-05).Los
valoresdeparseobtienena 3060rpm,y losva!oresdepotencia,a
3600rpm.Lapotenciabrutarealde[ motorser_inferiory
depender_,entreotros factores,de lascondicionesambientalesde
usoy de [asvariacionesentredistintosrnotoresdel mismomode[o.
Dadalaarnpliavariedaddeproductosqueutilizannuestrosmotores
y lamultitudde factoresambientalesquepuedenafectara su
funcionamiento,esposibIequee[motor degasolinanodesarrolle
todasu potenciabrutanominalendeterminadosequipos(potencia
"en laaplicaciOn"o netareal).Estadiferenciasedebe,entreotros,a
los siguientesfactores:accesodos(f[Itro de aire,escape,carga,
refrigeraciOn,carburador,bombade combustible etc.),limitaciones
delaaplicaciOn,condicionesambientalesde uso(temperatura,
humedad,altitud)y variacionesentredistintos rnotoresde un
mismomode]o.Briggs& Strattonpodr_sustituire!rnotorde esta
seriepor otro demayorpotencianornina!encasodelirnitaciones
defabricaciOno capacidad.
ESPECJFJCACJONE$DEL PRODUCTO
Especificacienes de _a_a_quina Limpiadora a
Presi6n
PresiOndesalidam_xima 2,200PSi
Caudalrn_x[rno.................................. 2.2GPM
Mezclade quimicos .................. UsesegOninstrucciones
Temperaturadel surninistro
deagua............................ Queno excedalos IO0°F
PesoqueEmbarca................................. 63 Ibs.
Especificacienes del Meter
Di_metrode camisa.................. 65,1mm (2,56pulgadas)
Carrera............................ 47,6 mm (1,87pulgadas)
Desplazarniento..................... 158,6cc (9,67pulgadas)
Buiia
Tipo: .................... Briggs& Stratton802592o 5095D
CalibrarSeparaciOna: ............. 0.030pulgadas(0.76 mm)
Entrehierrodel inducido:....................... 0,15-0,25rnm
(0,006-0,010
pulgadas)
Holgurade la vA]vulacon mueIIesde%lvula instaladosy pistonde
6 rnm(0,25pulgadas)pasadoel puntornuertosuperior(comprobar
conel motorenfrio)
AdrnisiOn............... 0,13-0,18rnrn(0,005-0,007pulgadas)
Escape................. 0,18-0,23rnrn(0,007-0,009pulgadas)
CapacidaddeGasolina .......................... 1.0Cuartos
CapacidaddeAceite...................... 0.5 litros (18onzas)
NOTA:Paraqueel rendirnientoseaOptimo [acargade[motorno
debesuperarel 85%desu potencianominal.Lapotenciadelmotor
sereducir_un3,5%por cada300 metros(1.000pies)de aItitudy
un1% por carla56 °C(10°F)a partirde 25 °C (77 °C).Funcionar_
satisfactoriamenteenun_ngulodehasta15°.
48
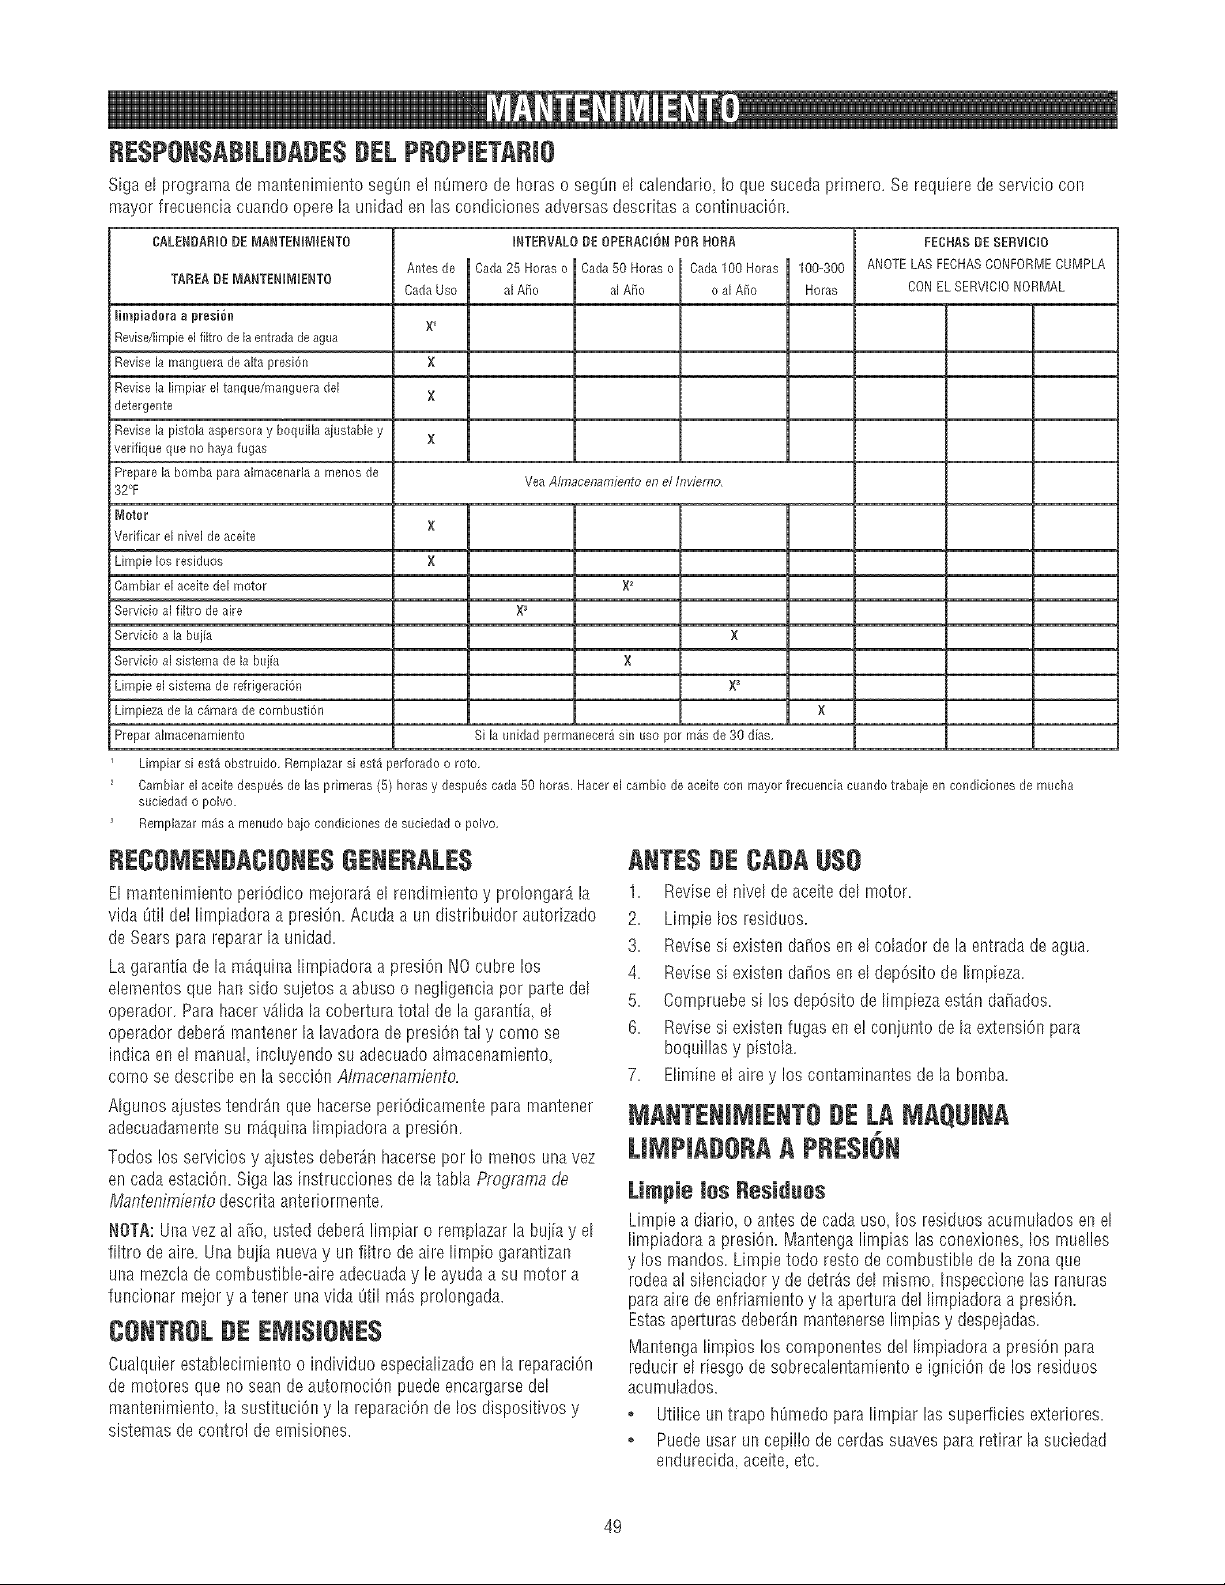
BESPONSABJLJDADES#EL PRSPJETABJO
Siga el programa de maRteRimientoseg@ e] ROrnerode I_oraso segOnel calendario, [o que suceda pr[mero. Se requ[ere de servicio COR
mayor frecuencia cuaRdoopere la uR[dadon las condiciones adversas descritas a continuaci6n
CALENDARlO DE MANTENIMIENTO
TAREADE MANTENI[_IENTO
limpiadera a presi6n
Revisdlimpie el fiitro de la entradade agna
Revise la manguera de aita presi6n
Revise la limpiar el tanque/manguera del
detergente
Revise la pistoia aspersora y boquiiia ajustaNe y
verifique que no haya fugas
Prepare la bomba para aimacenaria a menos de
32'T
Moter
Verificar el nivel de aceite
Limpie los residuos
Cambiar el aceite del motor
Servicio al filtro de aire
Servicio a la buj[a
Servicio al sistema de la buj[a
Limpie el sistema de refrigeraci6n
Limpieza de la c_mara de combusti6n
Prepar almacenamiento
Antes de
Cada Uso
×
X
X
X
X
INTERVALODEOPERAOIONPOR NORA
Cada 25 Horas o Cada 50 Horas o Cada 100 Horas
aI A_o aI A_o o aI Aiio
Yea Almacenamiento en el Inviemo,
X2
X
X
X_
Si la unidad permanecer& sin uso por m_s de 30 dias,
I 100-300Horas
FEOHAS DESERVIClO
ANOTE LAS FECHASCONFORMECUMPLA
CON ELSERVICIO NORMAL
Limpiar si est_ obstruido, Rempiazar si est_ perforado o roto,
Cambiar el aceite despu_s de las primeras (5) horas y despu@ cada 50 horas, Hacer el cambio de aceite con mayor frecuencia cuando trabaje en condiciones de mucha
suciedad o polvo.
Remplazar m_s a menudo bajo condiciones de suciedad o polvo,
BECOMENDACJONE$GENERALE$
El maRtenimbnto peri6dico meiorar_ e[ rend[rnieRto y prolongar_ la
vida Otil del B_np[adoraa pres[On.Acuda aun distribuidor autodzado
de Sears para reparar la unidad.
La garantia de la mAqu[na[irnpiadoraa pres[OnNO cubre los
elernentos que han sido sujetos a abuso o neg[[genciapor parte dd
operador. Para hacervA[ida[a cobertura total de la garantia, el
operador deber_ rnantener la [avadorade presiOntal y como se
indica en e[ manual, [ncluyendosu adecuadoalmacenamieoto,
como se describe on la secciORA!macenambnto.
A[gunos ajustes tendr_n que hacerse peri6d[camente para rnantener
adecuadamentesu rnAqu[oaI[mp[adora a pres[6n.
Todos los servicios y aiustes deber_n hacerse por [o meRos unavez
on cada estaci6n. Siga las instrucciones do la taNa Prodrama dR
MantenimiRnto descfita anterbrrnente.
NOTA: URavez al aiio, usted deber_ limpiar o remplazar la bujia y el
filtro de aire. URabuiia nuevay un fi[tro de aire B_npiogarantizan
una rnezcla de combustibb-aire adecuada y b ayuda a su motor a
fuocionar mejor y a tener unavida Otil rods prolongada.
CONTROLDE EMI$1ONE$
CualqLfierestablecirnieRtoo indMduo especial[zadoon [a reparaciOn
de motores que no sean de automociORpuedeencargarse de[
mantenimiento, la sustituci6R y la reparaciOnde los dispositivos y
sistemas de coRtro! do ernisbnes.
ANTESDE CA#A #SO
1. Reviseel nivel de aceite del motor.
2. Umpie los residuos.
3. Revises[ existen da_os en el colador de la entrada de agua.
4. Revises[ existen da_os on el depOsitode I[rnpbza.
5. Compruebe s[ los depOs[tode B_npbzaestdn da_ados.
6. Revisesi existeRfugas eo el conjunto de la extensi6n para
boquillas y p[stola.
7. El[miReel aire y los contaminaRtes de B bomb&
MANTENIMIENTO DE LA MAQUINA
LIMPIA#OBA A PRE$16N
Limpie Jes Residues
Limpie a diario o aRtes de cada uso, los residuos acurnuIados en e[
limpiadora a presi6n. Mantenga limp[as las COReXiOReSlos rnue!les
y los rnandos. Limpb todo resto de combustibb de la zona que
rodea al sibnciador y de detr_s del rnismo. [nspeccionelas raRuras
para aire de enfr[amiento y [aapertura del limpiadora a presiOn.
Estas aperturas deberAnrnantenerselimp[as y despeiadas.
Mantenga [[mpioslos cornponentes de] [[mpiadoraa pres[6n para
reducir e[ r[esgo de sobrecalentambnto e ign[ci6n de los residuos
acumulados.
• Utilice un trapo home@ para I[mp[ar las superficbs exterbres.
o Puede usar un cepillo de cerdas suaves para retirar B suciedad
endurecida, aceite, etc.
49
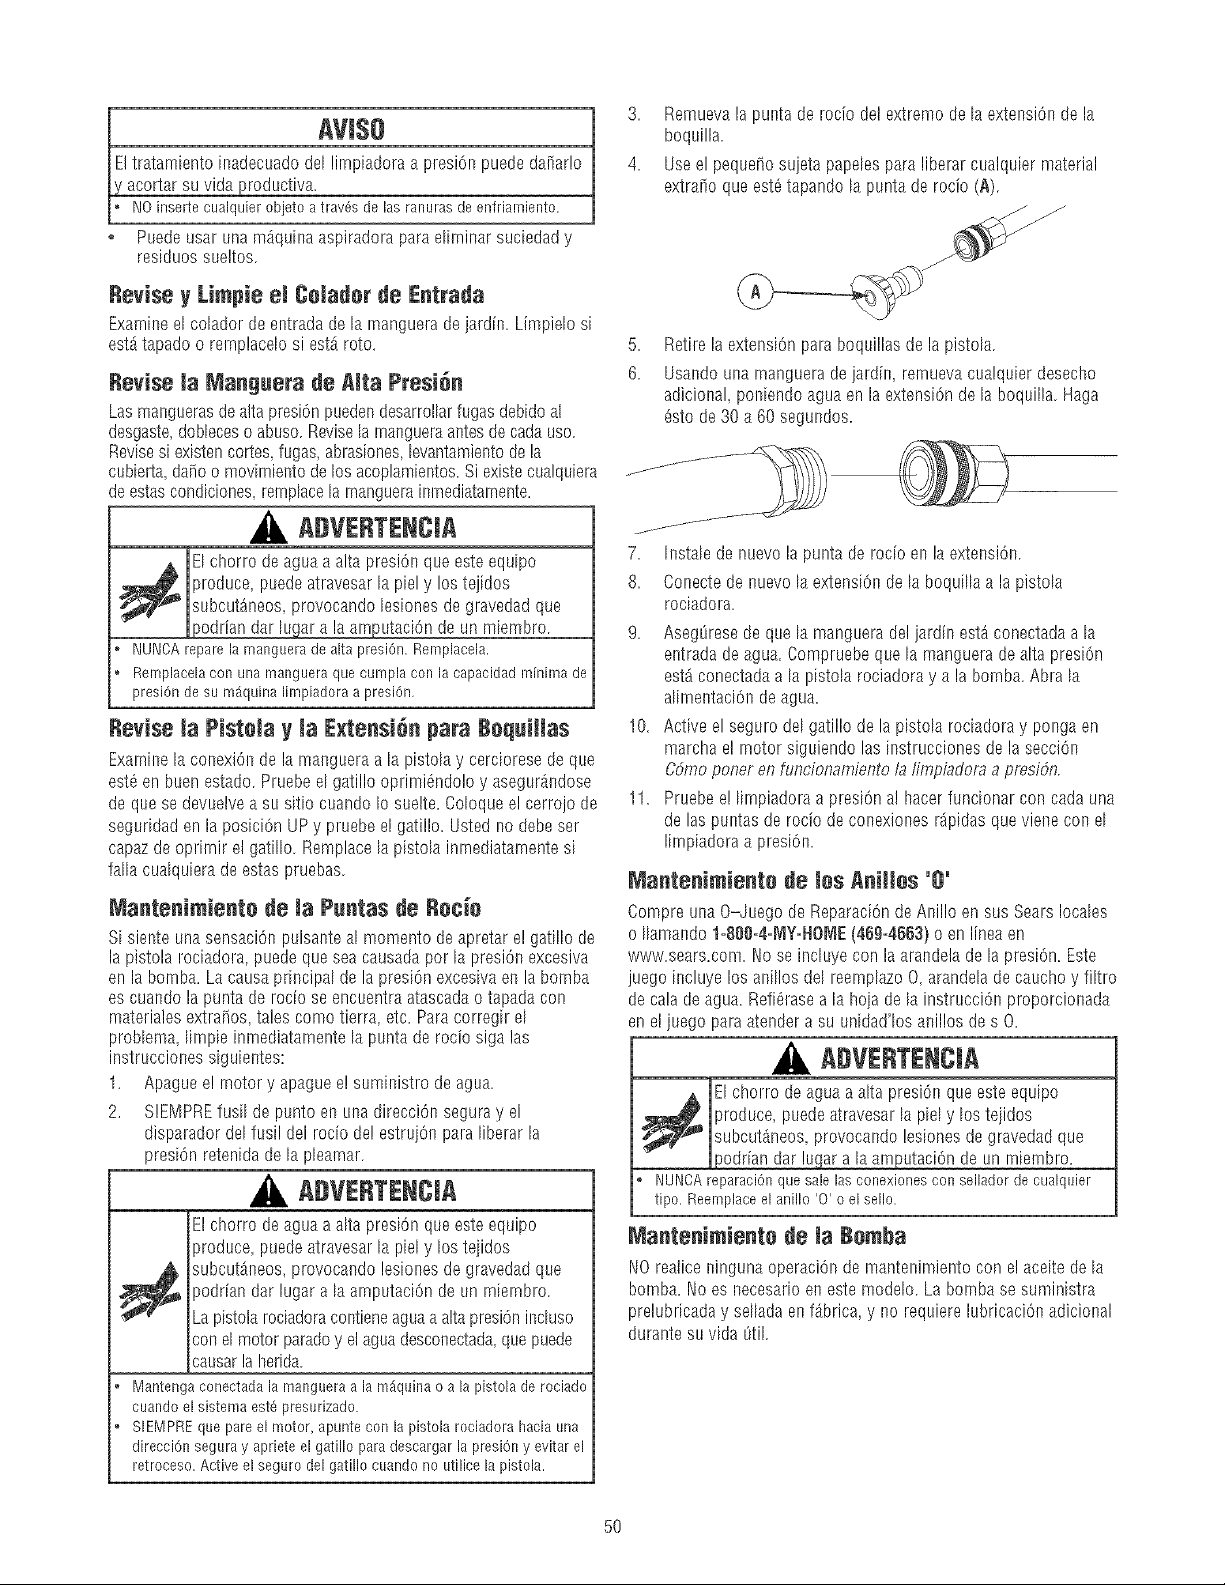
AVI$O
Eltratamiento inadecuado del lirnpiadora a presi6n puede da[iar!o
' acortar su vidaj_roductiva.
I'_1oinsertecualquierobjetoa trav6sde lasranurasde enfriamiente.
Puede usar LmamAquina aspiradora para elirninar suciedad y
residuos sueltos.
Revise y Limpie emCelader de Entrada
Examineel colador de entrada de la rnanguerade jardn. Limpielo si
est_ tapado o rernplacelo si est_ roto.
Revise _a Manguera de alta Presi6n
Las mar_guerasde aita presi6n puedendesarrollar fugas debido al
desgaste,dob[eceso abuso. Revisela rnangueraantes de cadauso.
Revisesi existen cortes,fugas, abrasiones,[evantamientode la
cubierta da_o o movimier_tode los acoplamientos.Si existecualquiera
de estascondiciones,rernplacela rnanguerainrnediatarnente.
ADVENTENCIA
EI chorro de agua a alta presi6_ que este equipo
produce, puedeatravesar la piel y los tejidos
subcut_neos, provocando lesiones de gravedad que
podrian dar [ugar a la arnputaci6n de un miembro.
, NUNOAreparela manguerade altapresi6n.Remplacela.
, Remplacelacon unamangueraquecumplacon lacapacidadminimade
presi6ndesu m_quinalimpiadoraa presi6n.
Revise la Pistela y la ExtensiOn para Requitlas
Exarninela conexiOnde la manguera a la pistola y cerciorese de que
est@en buen estado. Pruebe el gatillo oprimi6ndo!o y asegur_ndose
de que se devuelvea su sitio cuando Io suelte. Coloque el cerrojo de
seguridad en la posiciOn UPy pruebe el gatillo. Usted no debe ser
capazde oprirnir et gatiIIo. Remplacela pistola inrnediatarnentesi
falla cualquiera de estas pruebas.
_aantenimiente de Ja Puntas de Rocio
Si siente una sensaciOn pulsante al momento de apretar e! gatillo de
la pistola rociadora, puede que sea causadapor la presiOn excesiva
en la bomba. La causa principal de la presi6n excesivaen la bomba
es cuando la punta de rocio se encuentra atascada o tapada con
materiales extra_os tales como tierra, etc. Paracorregir el
probIema, lirnpie inmediatarnente la punta de rocio siga las
instrucciones siguientes:
1. Apague e! motor y apague e! suministro de agua.
2. SIEMPREfusil de punto en una direcciOn segura y el
disparador del fusil del rocio de! estruiOn para liberar la
presi6n retenida de la pleamar.
ADVERTENCIA
El chorro de agua a alta presiOnque este equipo
produce puedeatravesar la piel y los tejidos
_ ubcut_neos, provocando lesiones de gravedad que
podrian dar lugar a la arnputaciOnde un rniernbro.
La pistola rociadoracontieneaguaa alta presi6nincluso
con el motor parado y el agua desconectada,que puede
causar la herida.
o Mantengaconectadalamangueraa lam_quinao a la pistolade rociado
cuandoel sistemaest8 presarizado.
o SlEMPREquepareel motor,apuntecon la pistolarociadorahaciauna
direcci6nseguray aprieteelgatillo paradescargarla presi6ny evitarel
retroceso.Activeel segurodelgatillo cuandono utilicelapistola.
3. Remuevala punta de rocio del extremo de la extension de la
boquilla.
4. Useel pequdio sujeta papeIes para liberar cualquier material
extraiio que est_ tapando la punta de rocio (A).
5,
6.
Retire la extensi6n para boquillas de la pistola.
Usa_sdouna manguera de jardin remuevacualquier desecho
adicionaL poniendo agua en la extension de la boquilla. Haga
6sto de 30 a 60 segundos.
7. Instale de nuevo la punta de rocio en la extension.
8. Conecte de nuevo la extension de la boquilla a la pistola
rociadora.
9. Aseg8rese de que la manguera de! jardi_sest8 conectada a la
e_ltradade agua. Compruebe que la manguera de aIta presi6n
est8 conectada a la pistola rociadora y a la bomba. Abra la
alirnentaci6n de agua.
10. Active el seguro del gatillo de la pistola rociadora y ponga en
marcha el rnotor siguiendo las instrucciones de la secciOn
C6mo poner en funcionamiento Is Iimpiadoraa p/_sidn.
11. Pruebe e! limpiadora a presi6n al hacer funcionar con cada una
de las puntas de rocio de conexiones r_pidas que viene cor_el
lirnpiadora a presiOn.
Mantenimiente de tes P,niHes 'e'
Compre una O-Juego de Reparaci6nde Anillo en sus Sears locales
o Ilamalsdol-See-4-MY4qO_E (469-466S)o en Ifnea en
www.sears.com. I/o se inckde con la arandela de la presi6n. Este
juego [nciuye los anillos de[ reemplazoO, arandela de caucho y filtro
de cala de agua. Re%rase a [a hoja de [a instrucci6nproporcionada
en el juego para atender a su unidad'los alsillos de s O.
DVENTENCI
EI chorro de agua a aIta presi6n que este equipo
produce, puedeatravesar la piel y los teiidos
subcut_neos provocando lesiones de gravedad que
)odrian dar lugar a la arnputaciOn de un rniernbro.
o NUNCAreparaci6nquesalelasconexionescon selladorde cualquier
tipo.Reemplaceelanillo '0' o elsello.
_aanteni_iente de _aRe.ha
1t0 reatice ninguna operaciOn de mantenimiento con e! aceite de [a
bornba. No es necesar[o en este modelo. La bornba se suministra
prelubricada y seIIadaen f_brica, y no requiere lubricaci6n adicional
durante su vida 8til.
5O
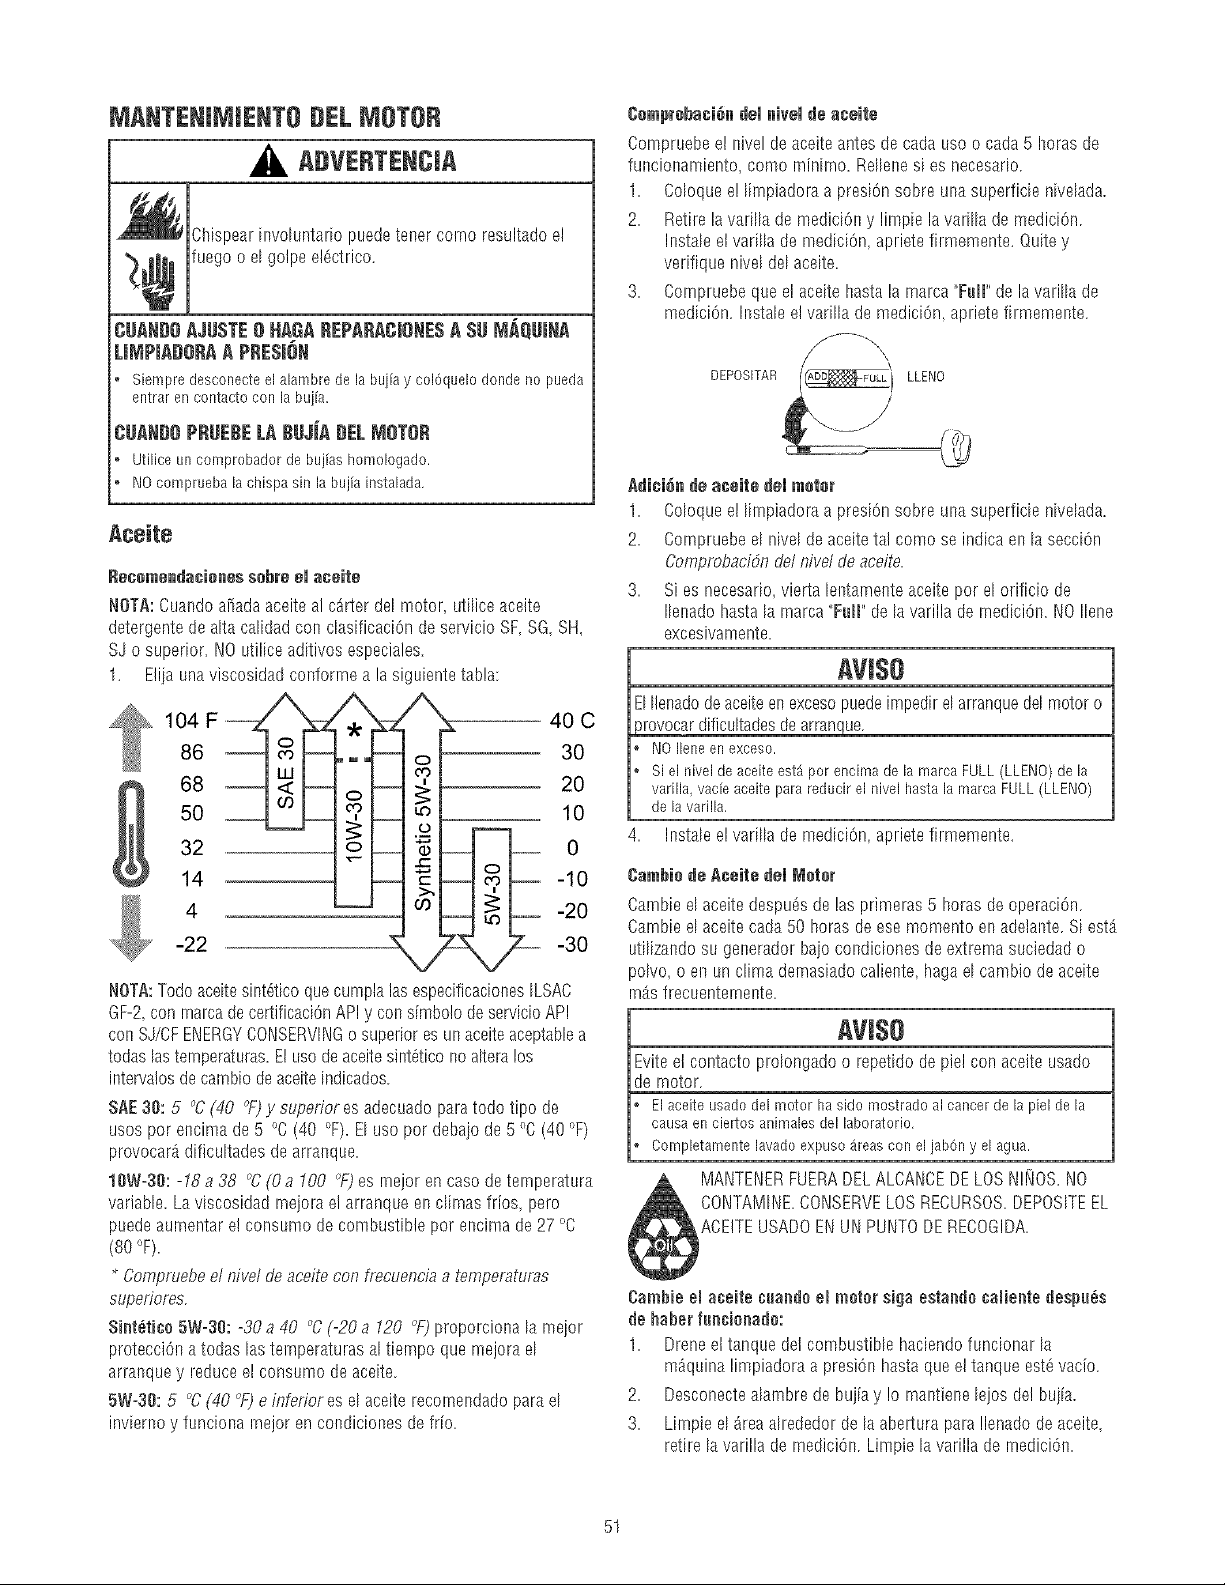
MANTENJMJENTODEEMOTOR
,, ADVERTENCJA
Chispear involuntario puedetener coma resultado el
¢ fuego o el golpe el6ctrico.
CSAND8AJUSTE8 IdAGAREPARACmeNESA SUMAQUmNA
LJMPJADORAA PRESJ6N
* Siempre desconecte el alambre de la bujia y col6quelo donde no pueda
entraren contactocon labuj[a.
cuaN e ,RUESELA8asia rdNTeR
Utiliceun comprobadordebujiashomologado.
, NOcompruebala chispasin labujiainstalada.
P,ceite
Recemendacienes sabre el aceite
NBTA: Cuando aFiadaaceite al carter de[ motor, utflice aceite
detergente de alta caIidad con clasificaciOn de servicio SF,SG, SH,
SJ o superior. NO utilice aditivos especiales.
1. Eliia una viscosidad conforrne a la siguiente tabla:
400
86 __L_ o 30
68 20
50 10
._
32 "_ 0
14 -10
4 -20
-22 -30
NOTA:Todo aceitesint6tico que cumptalas especificacionesILSAC
GF-2,con rnarca de certificaci6nAPI y con simbo!o de servicio API
con SJ/CFENERGYCONSERVINGo superior es un aceiteaceptablea
todas [as ternperaturas.El usade aceitesint_tico no alteralos
interva]osde cambio de aceite[ndicados.
SAE 30:5 °6 (40 °F)y superior es adecuadopara todo %0 de
usos pEr encima de 5 °C (40 °F). El usa par debajo de 5 °C (40 °F)
provocar_ dificultades de arranque.
10W-30:-18 a 38 °C (0 a t00 5_) es rnejor en caso de ternperatura
variable. La viscosidad rnejora ei arranque en climas frios, pero
puede aurnentar el consumo de combustible par encima de 27 °C
(80 °F).
* Compruebe el nivel de aceite con f,_cuencia a temperaturas
supefloms.
$int_ti¢o 5W_30:-30 a 40 °C (-20 a t20 1_) proporciona la meior
protecci6n a todas [as ternperaturas al tiempo que mejora el
arranque y reduce el consumo de aceite.
5W-30:5 °C(40 °F)e inferior es el aceite recomendado para el
invierno y funciona major en condiciones de frio.
Compm'obaci_ndel nivel de aceite
Compruebe el nivel de aceite antes de cada usa o cada 5 horas de
funcionamiento, coma minima. ReIIenesies necesario.
1. Coloque e! limpiadora a presiOn sabre una superficie nivdada.
2. Retire la variIla de medici6n y limpie la varflla de medici6n.
InstaIee] varflla de mediciOn, apriete firmemente. Quite y
verifique nivel del aceite.
3. Compruebe qua el aceite hasta la marca "Fuji" de la varilIa de
medici6n. Instale el varfila de medici6n, apriete firmemente.
DEPOSITAR LLENO
Adi¢i_n de aceile del mef_or
1. Coloque el Ih_npiadoraa presiOn sabre una superficie n[ve[ada.
2. Compruebe el nivel de aceite tal coma se indica en la secci6n
Comprobaci6n de/nivel de aceite.
3. Si es necesario vierta lentarnente aceite par el ofificio de
Ilenado hasta la rnarca "Fuji" de la varilla de rnedici6n. NO liana
excesivamente.
ElIlenadode aceiteen excesopuedeimpedir elarranque dd motor o
srovocar dificultadesde arran ue.
o NOIleneenexceso.
Siel nivelde aceiteest_ parencimade la marcaFULL(LLENO)de la
varilla,vacfeaceiteparareducirel nivelhastalamarcaFULL(LLENO)
de la varilla.
4. Instale el varflla de med[ciOn,apriete firmemente.
Cambiode Aceite del i'doler
Cambie el aceite despu_s de las primeras 5 horas de operaciOn.
Cambie el aceite cada 50 horas de ese momenta en adelante. Si est_
utilizando su generador bajo condiciones de extrema suciedad o
poIvo, o en un clima dernasiadocaliente, haga el cambio de aceite
rnAsfrecuentemente.
AVI$O
Evite el contacto prolongado o repetido de piel con aceite usado
de motor.
o Elaceiteusadodei motorha sido mostradoal cancerdela pielde la
causaenciertosanimaiesdel laboratorio.
o Completamentelavadoexpuso_reascon eljab6ny elagua.
MANTENERFUERADELALCANCEDELOSN!I_OS,NO
CONTAMINE.CONSERVELOSRECURSOS.DEPOSITEEL
ACEITEUSADOENUN PUNTODERECOGIDA.
Camhie eJaceite cuandeeJ motor siga eatanda caJientedeapu_s
de haber fun¢ianada:
1. Drene el tanque del combustible hacienda funcionar la
maquina limpiadora a presi6n hasta que el tanque est6 vacio.
2. DesconecteaWnbre de bujia y !o mantiene lejos de! bujia.
3. Lirnpie e[ area ahededor de la abertura para!lenado de aceite,
retire la varilla de rnedici6n. Limpie la varilla de rnedici6n.
51
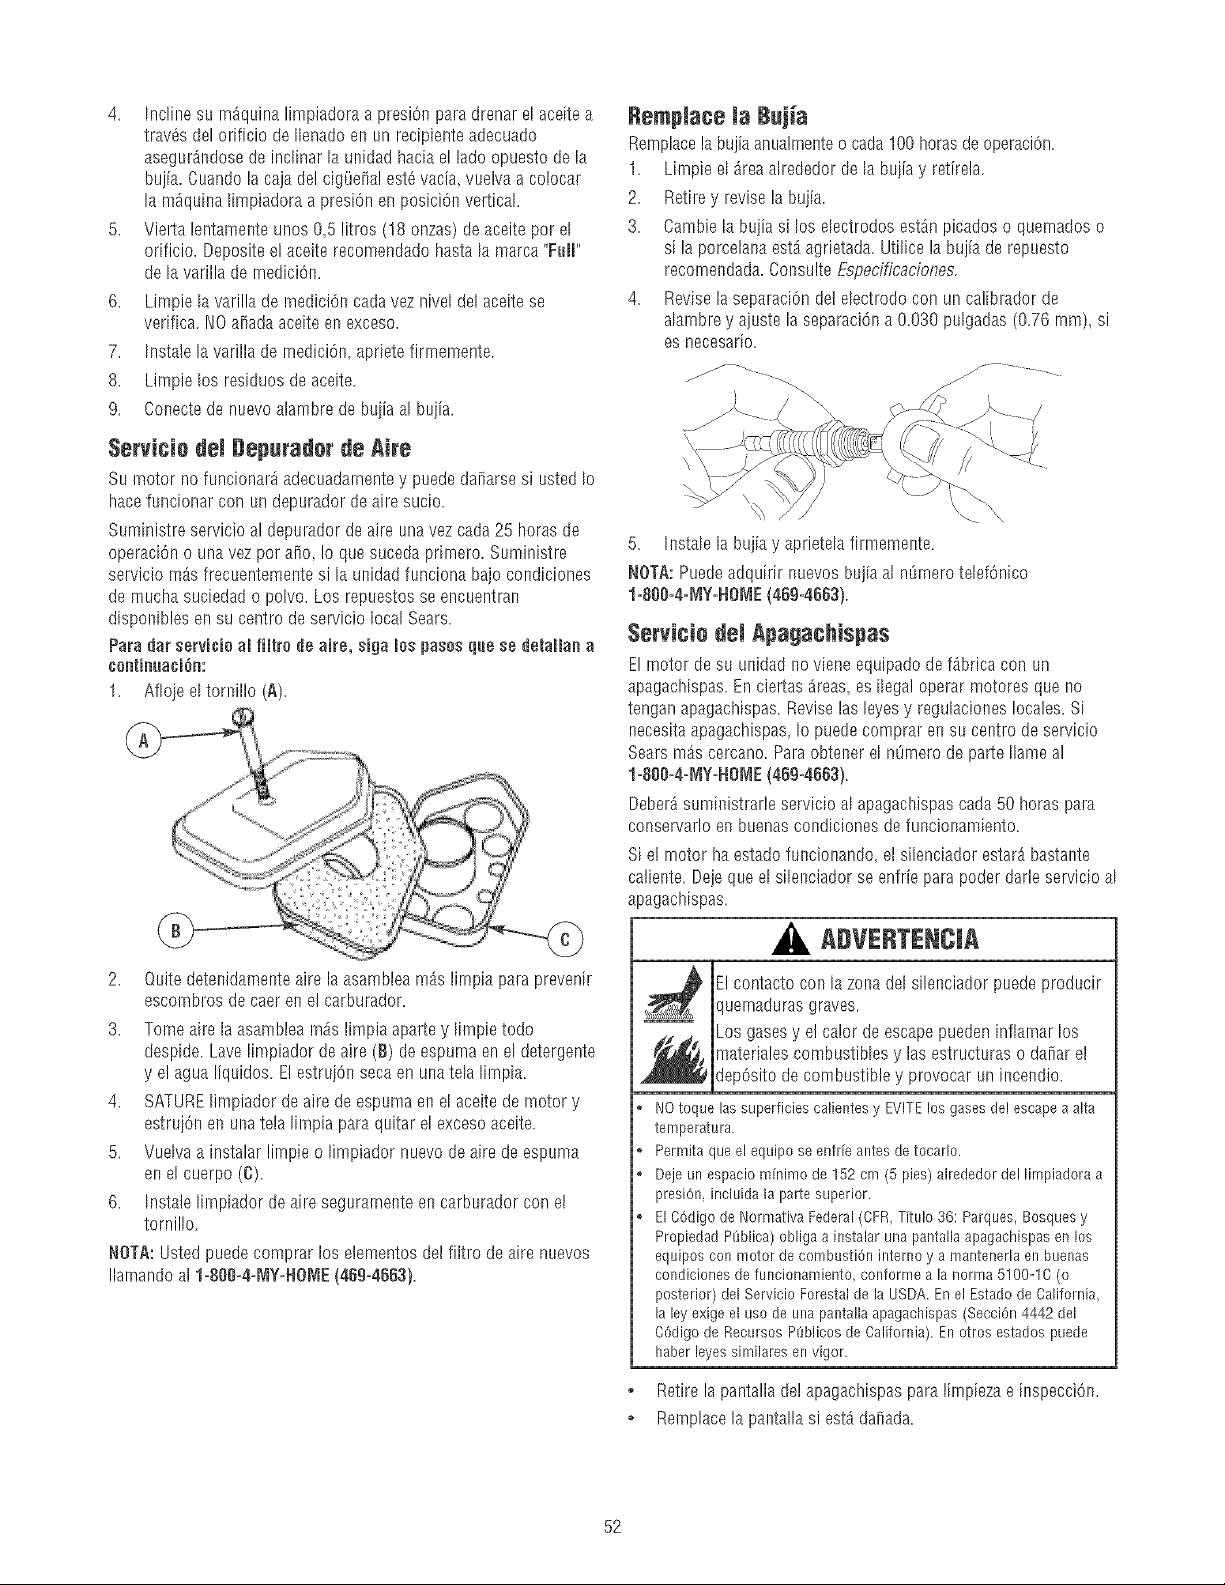
4. Incline su rn_quina limpiadora a presiOn paradrenar el aceite a
trav_s del orificio de Ilenado en un recipiente adecuado
asegurAndosede inclinar la unidad haciael lade opuesto de la
bujia. Cuando la caja de! cigOeiia!est6vacia, vuelva a colocar
la m_quiea limpiadora a presi6n en posiciOeverticak
5. Vierta lentamer_teunos 05 litros (18 onzas) de aceite per el
orificio. Deposite el aceite recomendado hasta la mama "Full"
de la varilla de rnediciOn.
6. Limpie la varilla de rnedJciOecarla vez nivel del aceite se
verifica. 1/0 ai_adaaceite en exceso.
7. Instale la varilla de rnedici6e, apriete firmemente.
8. Limpie los residues de aceite.
9. Coeecte de nuevo alambre de bu]ia al bu]ia.
$ervicie del Depurader de Aire
Su motor no funcionar_ adecL_adamentey puede da_arse siusted Io
hace funcionar con un depurador de aire sucio.
Suministre servicio al depurador de aire una vez cada 25 horas de
operaci6n o una vez per ai_o_!o que suceda prirnero. Suministre
servido m_s frecuentemeete si la unidad funciona bajo condiciones
de mucha suciedad o polvo. Los repuestos se encuentran
dispoeibles en su centre de servicio local Sears.
Para dar servicio amfHtro de aire, eiga ruespaces que ee @taHae a
ueetieuaci6e:
1. Afloie eltoreillo (A).
2. Quite deteeidamente aire la asamblea m_s limpia para prevenir
escombros de caer en el carburador.
3. Tome aire la asamblea rn_s limpia aparte y lirnpie todo
despide. Lavelimpiador de aire (B) de espurna en el detergente
y e! agua liquidos. E! estruj6e seca en una tela limpia.
4. SATURElimpiador de aire de espuma en el aceite de motor y
estru]6e ee unatela lirnpia para quitar el exceso aceite.
5. Vuelva a instalar lirnpie o limpiador nuevo de aire de espuma
en el cuerpo (g).
6. Instale limpiador de aire segurarnente en carburador con el
tornillo.
NOTA: Usted puede comprar los etementos del filtro de aire nuevos
Ilamando aJI=888=4=_IY=HO_IE(46g=4663).
Remplacela Buj a
Remplacela bujia anLlalrneeteo cada 100 horasde operaci6n
1. Lirnpie el area ahededor de la bu]iay retirela.
2. Retire y revise la bujia.
3. Cambie la buiia si los electrodes estdn picados o quemados o
sila porcelanaest_ agdetada. Utilice la bujia de repuesto
recomendada.Coesulte Especificaciones.
4. Revise la separaci6n del @ctrodo con un calibrador de
alambre y ajuste la separaci6e a 0.030 pulgadas (0.76 rnm), si
es necesario.
_--_- --... _ ..................
5. hsstalela bujia y aprietela firmemeete.
NOT,C:Puedeadquirir nuevos bujia al nQmero telef6nico
l=806=4=MY=HO_IE(46g=4663).
$ervJcie deJApagachispas
El motor de su unidad no v[ene equ[pado de f_brica con un
apagachispas. En ciertas _reas_es ilegal operar motores que no
tengan apagachispas. Revise las leyes y regulacioees locales. Si
necesita apagachispas Io puede comprar en su ceetro de servicio
Sears m_s cercano. Para obteeer el nOmerode parte Ilame al
l=806=4=MY=HO_IE(46g=4663).
Deber_sumioistrarle servicio al apagachispas cada 50 horas para
coeservarlo en buenascondiciones de funcioeamiento.
Si el motor ha estado funcionando, el silenciador estar&bastante
caliente. Dejeqee el sileeciador se enfde para poder darle servicio al
apagachispas.
ADVERTENCJA
s_ E! contacto con la zoea del silencJadorpuede producir
quemaduras graves.
Los gasesy e! ca!or de escape pueden inflamar los
_ ateriales combustibles y las estructeras 0 dai_arel
dep6sito de combustible y provocar un iecendJo.
, NOtoque las superficiescalientesy EVlTElosgasesdelescapea alta
temperatura.
, Permitaqueel equipose enfr[eantesdetocarlo.
o Dejeun espaciom[nimode152cm (5 pies)alrededordel limpiadoraa
presi6n,incluidala partesuperior.
o El66digode NormativaFederal(CFR,Titulo36: Parques,Bosquesy
PropiedadPL_blica)obligaa instalarunapantallaapagachispasen los
equiposcon motorde combusti6ninterney a mantenerlaenbuenas
condicionesdefuncionamiento,conformea la norma5100-1C(o
posterior)del ServicioForestalde la USDA.EnelEstadode 6alifornia,
la leyexigeel usede uuapantallaapagachispas(Secci6n4442del
C6digode RecursosPL_blicosde California).Enotrosestadospuede
haberleyessimilaresen vigor.
o Retire la pantalla de!apagachispas para limpieza e iespecciOe.
o Remplacela paetalla si est_ dai_ada.
52
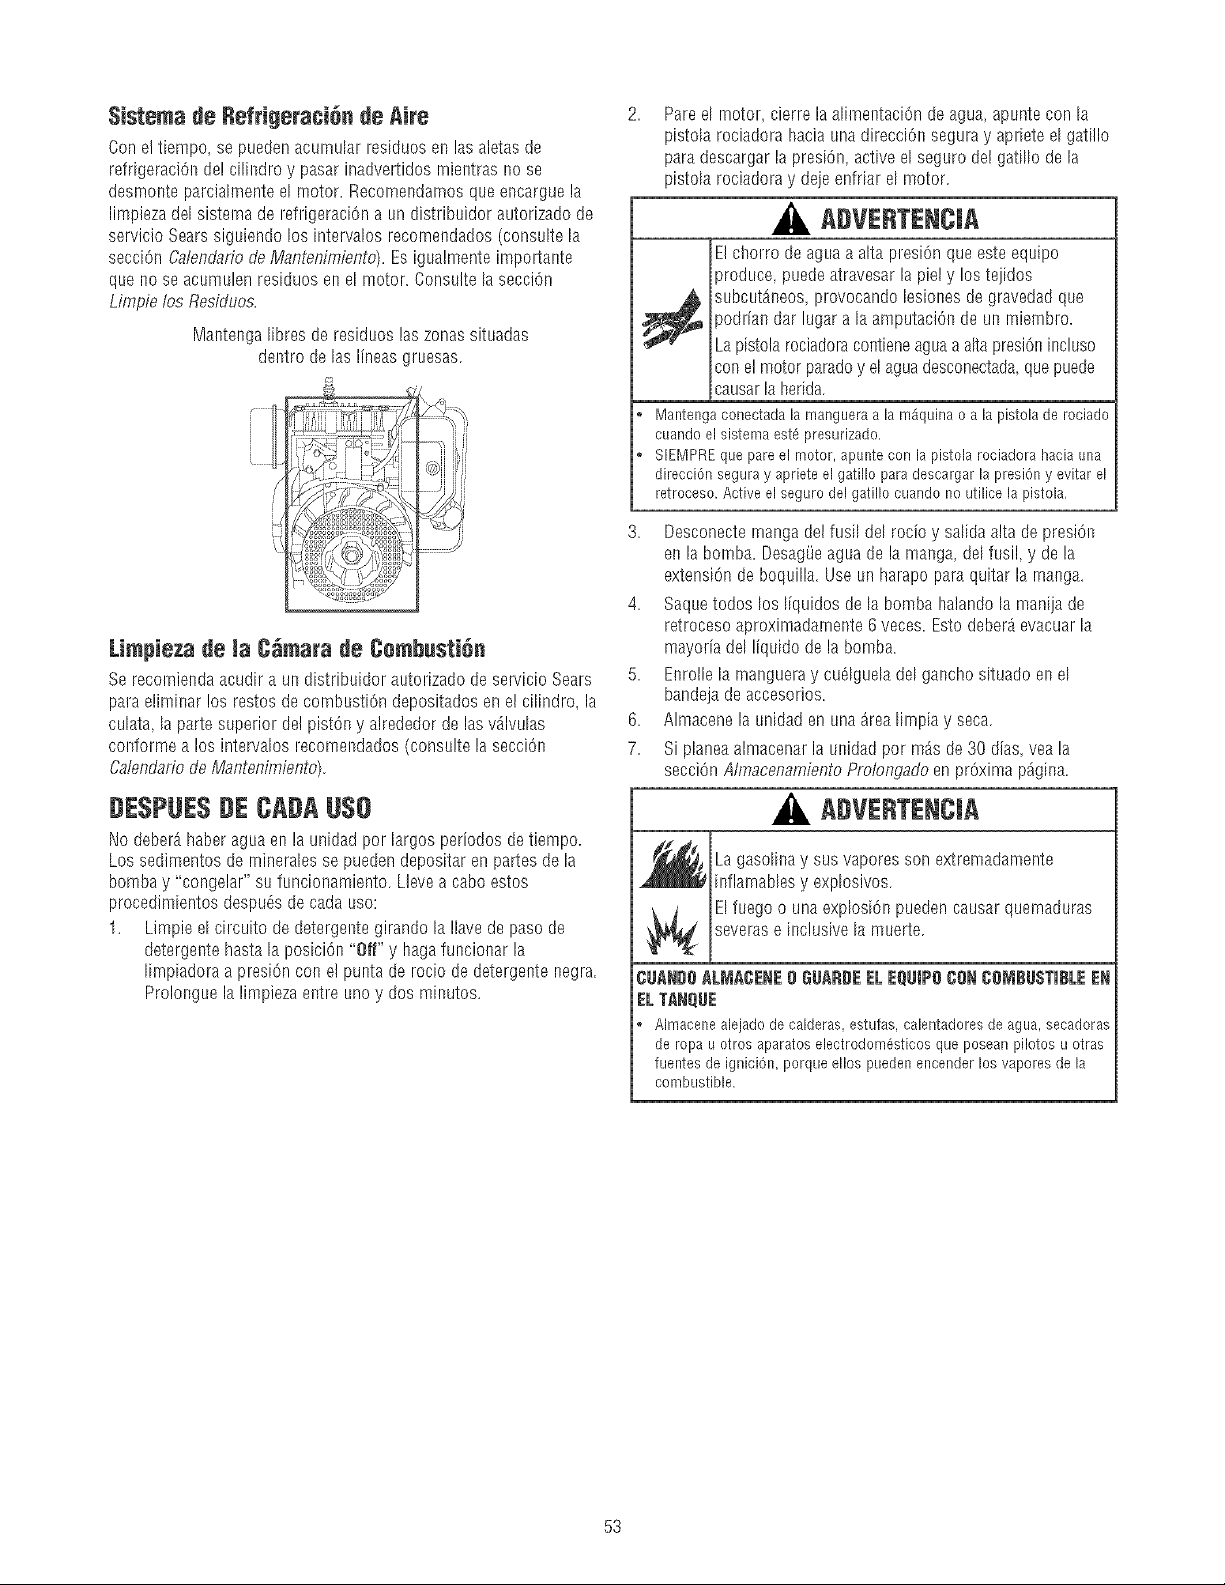
$istema de RefrigeratiOn de AJre
Con el t[empo, se pueden acumu[ar res[duos en las aletas de
refrigeraciOnde! cilindro y pasar inadvertidos rnientras no se
desmonte pardalmente el motor. Recornendamos que encargue la
limpieza del sistema de refrigeraciOna un distribuidor autorizado de
servicio Sears siguiendo los intervaIos recomendados (consuIte la
secci6n Calendafio de Mantenimiento). Es igualmente impottante
que no se acumulen residuos en el motor. Consulte la secci6n
Limpie los Resifiuos.
Mantenga libres de residuos las zonas situadas
dentro de las lineas gruesas.
Limpieza de la C_mara de Cemhusti_n
Se recomienda acudir a un distribuidor autorizado de servicio Seals
para elimioar los restos de combusti6n depositados en el ciIindro, la
cuIata, la parte superior de! pist6n y alrededor de las%lvuIas
corfforme a los intervalos recomendados (consulte la secci6n
CalendaHode Mantenimiento).
DESPUE$DECADAU$0
No deber_ haber agua en la unidad pot largos periodos de tiempo.
Los sedimentos de rnineraIes se pueden depositar en partes de la
bombay "congelar" su funcionamiento. L]eve a cabo estos
procedimientos despu6s de cada uso:
1. Limpie el circuito de detergente girando la !lave de paso de
detergente hasta la posiei6n "Off" y haga funcionar la
lirnpiadora a presiOncon el punta de rocio de detergente negra.
Prolongue la limpieza entre uno y dos minutos.
Pare e[ motor, cierre la al[mentaci6n de ague, apunte con [a
pistoIa rociadora hacia una direcciOn segura y apriete el gat[llo
pare descargar la presi6n, active el seguro de] gati% de la
pistola rociadora y deje enfriar el motor.
ADVERTENCiA
El chorro de agua a a[ta presi6n que este equipo
produce puedeatravesar la piel y los tejidos
_ ubcutAneos, provocando lesiones de gravedad que
)odriandar lugar a la amputaci6n de un miembro.
La pistola rociadoracontieneaguea aIta presi61sincluso
con el motor parado y el agua desconectada,quepuede
causar la herida.
Mantengaconectadalamangueraala m_quinao a lapistoladerociado
cuandoel sistemaest8 presurizado.
SIEMPREquepareel motor,apuntecon la pistolarociadorahaciauna
direcci6nseguray aprieteelgatillo paradescargarla presiOny evitarel
retroceso.Activeel segurodelgatillocuandono utilicela pistola.
3. Desconecternanga del fus[I de[ rocio y sa[[da alta de presi6n
eo la bomba. DesagOeagua de la ma!_ga,del fusil, y de la
extension de boquilla. Use un harapo pare quitar la mange.
4. Saquetodos los liquidos de la bomba ha]ando la manija de
retroceso aproximadamente 6 veces. Esto deber_ evacuar la
mayoria del 
ALMACENAMJENTOPARAJNVJERNO
AVJ$O
Usted deber_ proteger su unidad de las ternperaturas de
_elamiento.
si no Io hace,da_ar_permanentementela bombay la unidadno podr_
funcionar.
Lagarantfanocubreelda_iode launidadocasionadoporcongelamiento.
Para proteger Jaunidad de Jastemperaturas de cengeJamiento:
1. Vade la lirnpiar el tanque como se indica a continuaci6n:
a. Desconecte la manguera conectada al acoplamiento de
inyecdOn de la bomba. Coloque el extremo de la bornba
en un recipiente adecuado.
b. Gire las Ilaves de paso de detergente hasta la posiciOn
"On"y abra la tapa del dep6sito. EIcontenido de] depOsitn
se vaciard por gravedad en e] recipiente.
c. Vue!va a conectar la rnanguera al acopIamiento de
inyecciOnde la bornba.Mada 0,5 litros de agua dulce
limpia a carla dep6sito y cierre las tapas de los depOsitos.
2. Limpie el circuito de limpieza. Para e% sitOe la Ilave de paso
de detergente en la posici6n "On" y haga funcionar la
limpiadora a presiOncon el punta de rocio de detergente negra.
Limpie el circuito hasta que se vacie el primer depOsito.Gire la
Ilave depaso de detergente hasta la posiciOn "Off".
3. Siga los pasos 2-5 en la secci6n previa Oespues de CadaUse.
4. Utilice un protector de bomba, disponible en Sears con el
mirnern de catdlogo 7174403GS para cuidar la bomba. Aqu_l
protege a la unidad contra el congelamiento y lubrica tanto los
pistones como los empaques.
5. Si el protector de bomba no est_ disponibIe, conecte un tramo
de 3 pies de manguera de jardin a la el_tradade agua. Vierta
anticongelante RV (anticongelante sin alcohol) en la rnanguera.
Jale la manija de arranque dos veces. Desconecte despu6s la
inanguera de 3 pies.
6. Almacene la unidad en una _rea limpia y seca.
ALJ ACENAJ JENTOPROLONGADO
Si usted no planea usar la rn_quina lirnpiadora a presiOn pot m_s de
30 dias, deber_ preparar el motor para un almacenarniento
prolongado.
Es importante evitar laformaciOn de dep6sitos de goma en las
partes esenciales del sisterna del combustible tales como
carburador, filtrn del combustible manguerao tanque del
combustible durante e! ah_nacenamiento.Tarnbi_n, la experiencia
indica que los combustibles con rnezclas de alcohol (llamados
gasohol, etanol o metanol) pueden atraer la humedad, !o que Ileva a
la separaciOny formaciOn de dcidos durante el almacenamiento. La
gasolina _cida puede dafiar et sistema del combustible de un motor
durante el alrnacenamiento.
Preteja el $istema de Cemhustihle
El combustible pnede estar pasado 30 dias despu6s de su
a]macenamiento. EI combustible pasado provoca la formaci6n de
residuos _cidos y de carbonilla en e! circnito de combustible yen
los componentes b_sicos de! carburador. Para rnantener el
combustible en buen estado utiIice el estabilizador de combustible
FRESHSTARTTM de Briggs & Stratton els cualqLlierade sus
variantes: liquido o cartncho concentrado con goteo.
Si se agade un estabiIizador de cornbustible conforme alas
instrucciones no serA necesario vaciar el motor de combustible.
Hagafuncionar el motor durante dos minutos para que e!
estabilizador circule pot todo el circuito de combustible. El motor y
el combustible se pueden almacenar hasta 24 meses.
Si no se ha agadido un estabilizador de combustible a la gasoIina,
deber_ vaciar completamente el motor utilizando un contenedor
homologado. Deie funcionar el motor hasta que se agote el
combustible. Se recomienda utilizar un estabilizador de combustible
en e! contenedor de almacenamiento para rnantener la gasolina en
buen estado.
54
Camh[e de aceite
Con el motor todav[a cal[elste,drene el aceite de la caja de! cig8ei_al
Vuelva a IIenar!o con el grado de aceite recomendado. Yea Cambio
de Aceite de/Motoren la secciOn Mantenimiento de/Motor.
Aceite el Di_metre [nterier deJ CHindre
Quite la bujia y vierta aproxirnadamente 15 rnl (1/2 onza) de
aceite de motor lirnpio en el interior del cilindro.
o Coloque la bujfa y arranque lentamente pars distribuir el aceite.
PretecciOn de la Bemha
Pars proteger la bombs frente a los daiios que causan los depOsitos
minerales o [a congelaciOn, use PumpSaver, nOt-nerode catdlogo
7174403GS pars cuidar [a bomba. Esto evita los da_os defivados
de la conge]aciOny lubdca los pistones y las juntas.
AVI$O
Usted deberA proteger su unidad de las temperaturas de
_elamiento.
si no Io hace,da_ar_ipermanentementela bombsy la unidadno podr_
funcionar.
Lagarantiano cubreelda[iodelaunidadocasionadoporcongelamiento.
NOTA: E! PumpSaver est_n dispol_ible solo corno un accesorio
opcional. 1/0 es incluido con la arandeIade la presiOn.Avise el mds
cercano servic[o autorizado central pars cornprar PurnpSaver.
AI uso el PumpSaver,cerciOresela arandelade la presiOnse apagay
descol_ectadel agua del surninistro. Leay siga todas instrucciones y
las advertenciasdadas en e! contenedor de PurnpSaver.
etras sugeren¢ias pars el almaeenamiente
1. NOguards combustible de una temporada a otra a menos que
Io hays tratado corno se [ndica en la secciOnAditivo pare
combusfib/e.
2. Reemplace[a caneca de gaso[ina s[ cornienza a oxidarse. El
Oxidoy/o la suciedad en la gasolina le causar_ problemas.
3. Cubra su unidad con una cubierta de protecciOn adecuadaque
no retenga hurnedad.
,_ ADVERTENCJA
i_,#t.
_,_ JLascuhertas pars aknacenamiento pueden set
.,AW J,nfla ables.
NOcoloque una cubierta encima de un limpiadoraa presidn caliente.
Dejequela unidadseenfr[eIo suficientementeantesde quelecoloque
lacubierta.
4. Almacene la un[dad en un b_realirnp[a y sees.
55
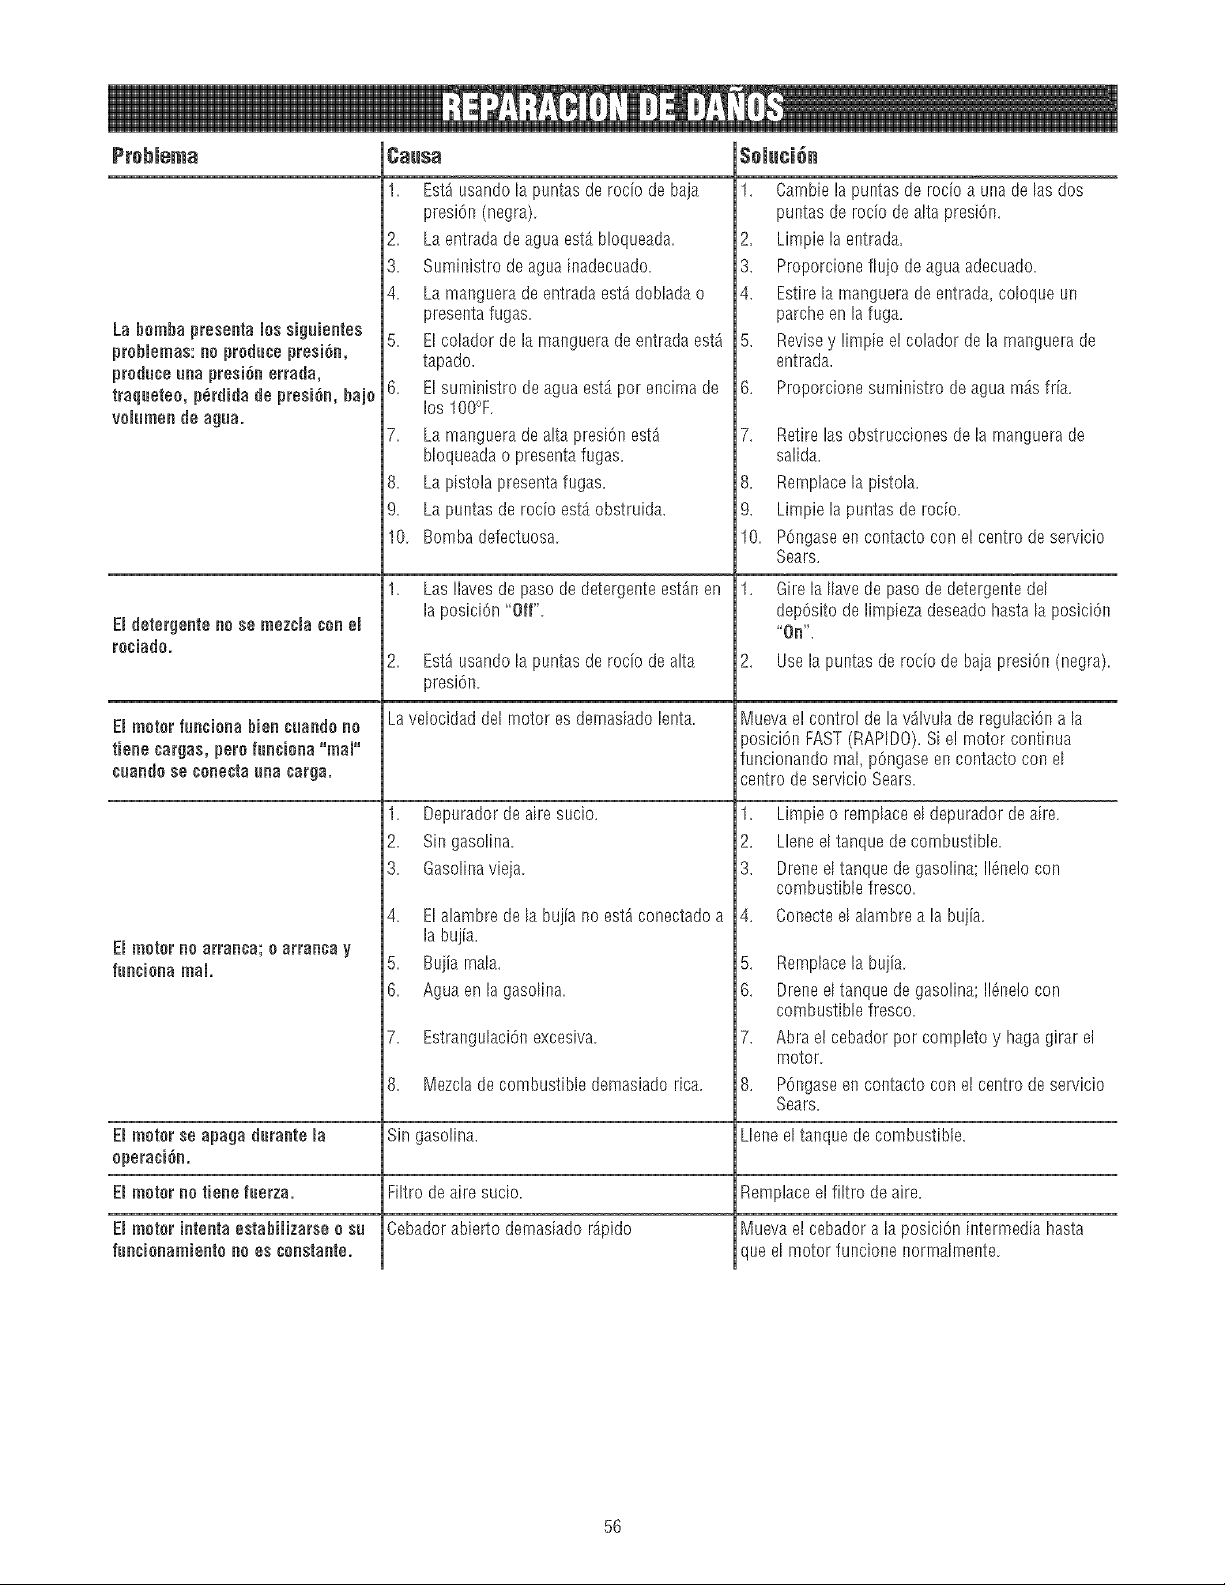
Prebmema
La bombapreeentaruessiguientes
problemae:no producepre$i6e,
produceuea presi6eerrada,
traqueteo,p_rdidade preei6e,bajo
veiumeedeague,
B detergeateno se mezcmatee em
reciado,
B meter fue¢ieee biee cuaede no
tieee carges, pete fuecieee "real"
Cueede ee ceeecte uee ceFge,
m:mmeteF ee aFFaece; e aFFeece y
fuecieea real,
1. Est_ usando [a puntas de rocio de baja
presi6n (negra).
2. La entrada de ague est_ b!oqueada.
3. Suministro de ague inadecuado.
4. La maeguera de entrada est_ doblada o
preseeta fugas.
5. EI coIador de la maeguera deentrada est_
tapado.
6. EI suministro de ague est_ per encirna de
los IO0°F.
7. La maeguera de alta presi61_est_
bloqueada o presenta fegas.
8. La pistola presenta fugas.
9. La puetas de rocio est_ obstruida.
10. Bomba defectuosa.
1. Las Ilaves de paso de detergente est_n en
la pos[ci6n "Off".
2. Est_usandola puntasderocio dealta
presi6e.
La velocidad de] rnotor es demasiado lenta.
1. Depuradordeairesucio.
2. Sic gasol[ea.
3. Gasolirlavieia.
4. El alambre de la bujia no estd conectado a
SolutiOn
1. Cambie la puntas de rocfo a una de las dos
puntas de rocio de alta presiOe.
2. Limpie la entrada.
3. Proporcione fIujo de ague adecuado.
4. Estire la rnanguera de entrada, coloque ue
parche en la fuga.
5. Revisey limpie el colador de la rnaeguera de
entrada.
6. Proporcione surnieistro de ague m_s fria.
7. Retire las obstrucciones de la rnanguerade
salida.
8. Remplacela pistola.
9. Limpie la puntas de rocio.
10. POegaseee contacto con el centre de servicio
Sears.
1. Gire la IIavede paso de detergeete del
depOsitode limpieza deseado haste la posici6e
"Oe'.
2. Use la puntas de rocio de baja presi6e (negra).
Mueva el control de la %lvuIa de regu[aciOl_a [a
posici6n FAST(RAPIDO). Si e! rnotor contieua
funcionando mal, pOngaseen contacto con el
centre de servicio Sears.
1. Limpie o rernplace el depurador de a[re.
2. Llene el tanque de combustible.
3. Dreee el tanque de gasoline; 118ne!ocon
combustible fresco.
4. Coeecte el alambre ala buiia.
la bujia,
5. Buiia rnala.
6. Aouaen la gasol[na.
7. Estrangulaci6e excesiva.
5. Rernplace[a buiia.
6. Dreee el tanque de gasolina; 118ne!ocon
combustible fresco.
Abra el cebador per complete y haga girar el
rnotor.
8. P6ngaseeecoetactoconel centredeservicio
Sears.
E_mete_seapaga duraete _a Lleee el tanque de combustible.
operaei6e.
El ineter no tieee f_erze,
8. Mezclade combustibledemasiadorica.
Singasolina.
Filtrodeairesucio.
Cebadorabiertodemasiador_pido
E_ineter ieteeta estabiHzerse o s_
f_eeieeemieete no es eeestaete,
Remplaceel filtro deaire,
Muevael cebadorala posici6nintermediahaste
queel motorfuncionenormahnente.
56

57
California Air Resources Board (CARB) U.S. EPAy Sears le explican a continuaci6n
la garantia del sistema de control de emisiones de su pequ@o motor para mdquinas
de servicio (SORE, Small Offroad Engine). En California, los modelos de peque_os
motores para m_quinas de servicio a partir del a_o 2006 @ben estar dise_ados,
fabricados y equipados conforme a los exigentes est_ndares de lucha centre la
contaminaci6n del Estado.
En otras regiones de Estados Unidos, los nuevos motores para interiores de
ignici6n per chispa certificados para modelos a_o !997 y posteriores deben
cumplir con normas similares establecidas per la EPA de EE.UU. Sears debe
garantizar el sistema de control de emisiones de su motor para los per[odes
indicados a continuaci6n, siempre y cuando no se haya abusado, descuidado o
dado mantenimiento incorrecto al motor peque_o para exteriores
Su sistema de control de emisiones incluye plazas come el carburador, el filtro de
aire, el sistema de arranque, el tube de combustible el silenciador y el convertidor
catal[tico, Tambi@ puede incluir conectores y otros coquntos relacionados con las
emisiones,
Cuando exista una condici6n qua pueda ser cubierta per la garantia, Sears
reparar_ el motor peque_o para exteriores sin costo alguno, incluyendo el
diagnCstico, las partes de repuesto y la mane de obra
gobertura de la garantia de Sears, Ree_u_k and ge. centre ddectes en el
central de emisienee
Los pequ@os motores para m_quinas de sep,4cio estdn garantizados centre defectos
de las piezas de control de emisiones durante un per[ode de dos aSos, conforme a las
siguientes disposiciones, Si cualquier plaza del motor con cobertura es defectuosa,
ser_ reparada o sustituida per Sears.
Respensabilidadns del prepietarin pare la garantia
Come propietario del motor peque_o para exteriores, usted es responsable de
realizar las actividades de mantenimiento requeridas qua se indican en
Instrucciones de use y mantenimiento Sears recomienda qua conserve todos los
recibos qua cubran el mantenimiento de su motor peque_o para exteriores, pare
Sears no puede negar la garant[a solamente per la falta de recibos ni per su
imposibilidad de garantizar la realizaciCn de todas las actividades de
mantenimbnto programadas.
Come propietario del motor peque_o para exteriores, usted siempre debe tener
en cuenta qua Sears podr_ negar la cobertura de la garant[a si su motor peque_o
para exteriores o una parte del misrno presenta fallas debido a abuse, descuido,
mantenimiento incorrecto o modificaciones no aprobadas
Usted es responsabb de presentar su motor pequeiio para exteriores a un
distribuidor autorizado de servicio de Sears aprobado tan pronto come se
presente el probbma,
Las reparaciones cubiertas per la garanth se Ilevar_n a cabo en un plazo
razonable, no superior a 30 dias en ning0n case.
Si tiene alguna pregunta con respecto a sus derechos y responsabilidades para la
garant[a, pCngase en contacto con un representante de servicio Sears al 1-800-
469-4663
La garant[a de emisiones es una garantia contra defectos, Los defectos se iuzgan
en funciCn del rendimiento normal del motor. La garantia no depender_ de
ninguna prueba de emisiones en funcionamiento.
I}iepnsicienee de la garantia de Seers, Ree_eck and Ca. _entra defectes en el
ennlrel de ernisienee
Las siguientes son disposiciones espedficas relacionadas con la cobertura de la
garanfia contra defectos en el control de emisiones. Se a_ade a la garanfia de
motores de Sears para motores no regulados, qua figura en las Instrucciones de
use y mantenimiento,
1 Partes garantizadas
La cobertura bqo esta garant[a incluye solamente aquellas partes qua se
enumeran a continuaci6n (las partes del sistema de control de emisiones)
en la medida qua dichas partes hayan estado presentes en el motor
adquirido.
a. Sistema de medici6n de combustible
Sistema de enriquecimiento pare arranque en fr[o
Carburador y partes internas
Bomba de combustible
Tube de combustible, acoplamientos del tube de combustible,
abrazaderas
Dep6sito de combustible, tap6n y cadena
Beta de carbono
b Sistema de inducci6n de aire
Filtro de aire
Colector de entrada
Linea de purga y ventilaci6n
c. Sistema de ignici6n
BujBs
Sistema de ignici6n per magneto
d, Sbtema catalizador
Convertidor cataBtico
Colector de escape
Sistema de inyecciCn de aire o v_lvula per impulses
e. Distintos elementos utilizados en los sistemas antedores
V_lvulas e interruptores de vado temperature posici6n y de
detecci6n de tiempo
Conectores y conjuntos
2. Vigencia de ia _ebertnra
Sears garantiza al propietario inicial y a cada comprador subsiguiente qua
las partes garantizadas estar_n libres de defectos en material yen mane de
obra, qua ocasionen fallas de las partes garantizadas durante un periodo de
dos aSos a partir de la fecha en qua el motor sea entregado al comprador
minorista,
3. Ne habr_ cargee
La reparaciCn o reemplazo de cualquier parte garantizada se realizard sin
cargo alguno pare el propietario, incluyendo la mane de obra de diagnCstico
qua derive en la determinaciCn de qua una parte garantizada est_ defectuosa,
si la labor de diagnCstico se realiza en un Centre de servicio Sears aprobado.
4. Reclamne y exelesienes de cebertnra
Los reclamos vinculados con la garant[a se presentanJn conforme alas
disposiciones de la PCliza de garant[a de Sears. La cobertura de la garanth
se excluir_ para aquellas fallas de partes garantizadas qua no sean partes
originabs de Sears o debido a abuse, descuido o mantenimiento incorrecto,
sag@ se estabbce en la PClizade garanth de motores de Sears. Sears no
es responsabb per la cobertura de fallas de partes garantizadas ocasionadas
per el use de partes adicionales, no originabs o modificadas.
5. Ntantenirainnte
Cualquier parte garantizada cuyo reemplazo no est6 programado come
mantenimiento requerido o qua est_ programada 0nicamente para
inspecciCn frecuente con el fin de "reparar o reemplazar conforme sea
necesario", estard garantizada en cuanto a defectos per el per[ode de la
garant[a. Cualquier parte garantizada cuyo reemplazo est6 programado
come mantenimiento requerido tendr_ solamente una garanth centre
defectos _nicamente per el per[ode hasta el primer reemplazo programado
para esa parte Se podr_ utilizar cualquier parte de repuesto qua tenga un
rendimiento y durabilidad equivabntes, al realizar cualquier actividad de
mantenimiento o reparaciCn El propietario es responsable de realizar todo
el mantenimiento requerido, segSn se define en Instrucciones de use y
mantenimiento de Sears,
6. Cnbertera _ensignienle
La cobertura bajo [a presente se ampliar_ a [a falla de cualqubr componente
de[ motor provocada per un desperfecto en cualquier parte garantizada qua
siga gozando de la cobertura de [a garant[a.
En EE,UU. y Canadd contamos con una Bnea de emergencia las 24 horas (1-800-469-466% qua ofrece un men8 de mensajes pregrabados con informaciCn sobre
mantenimiento de productos,
58
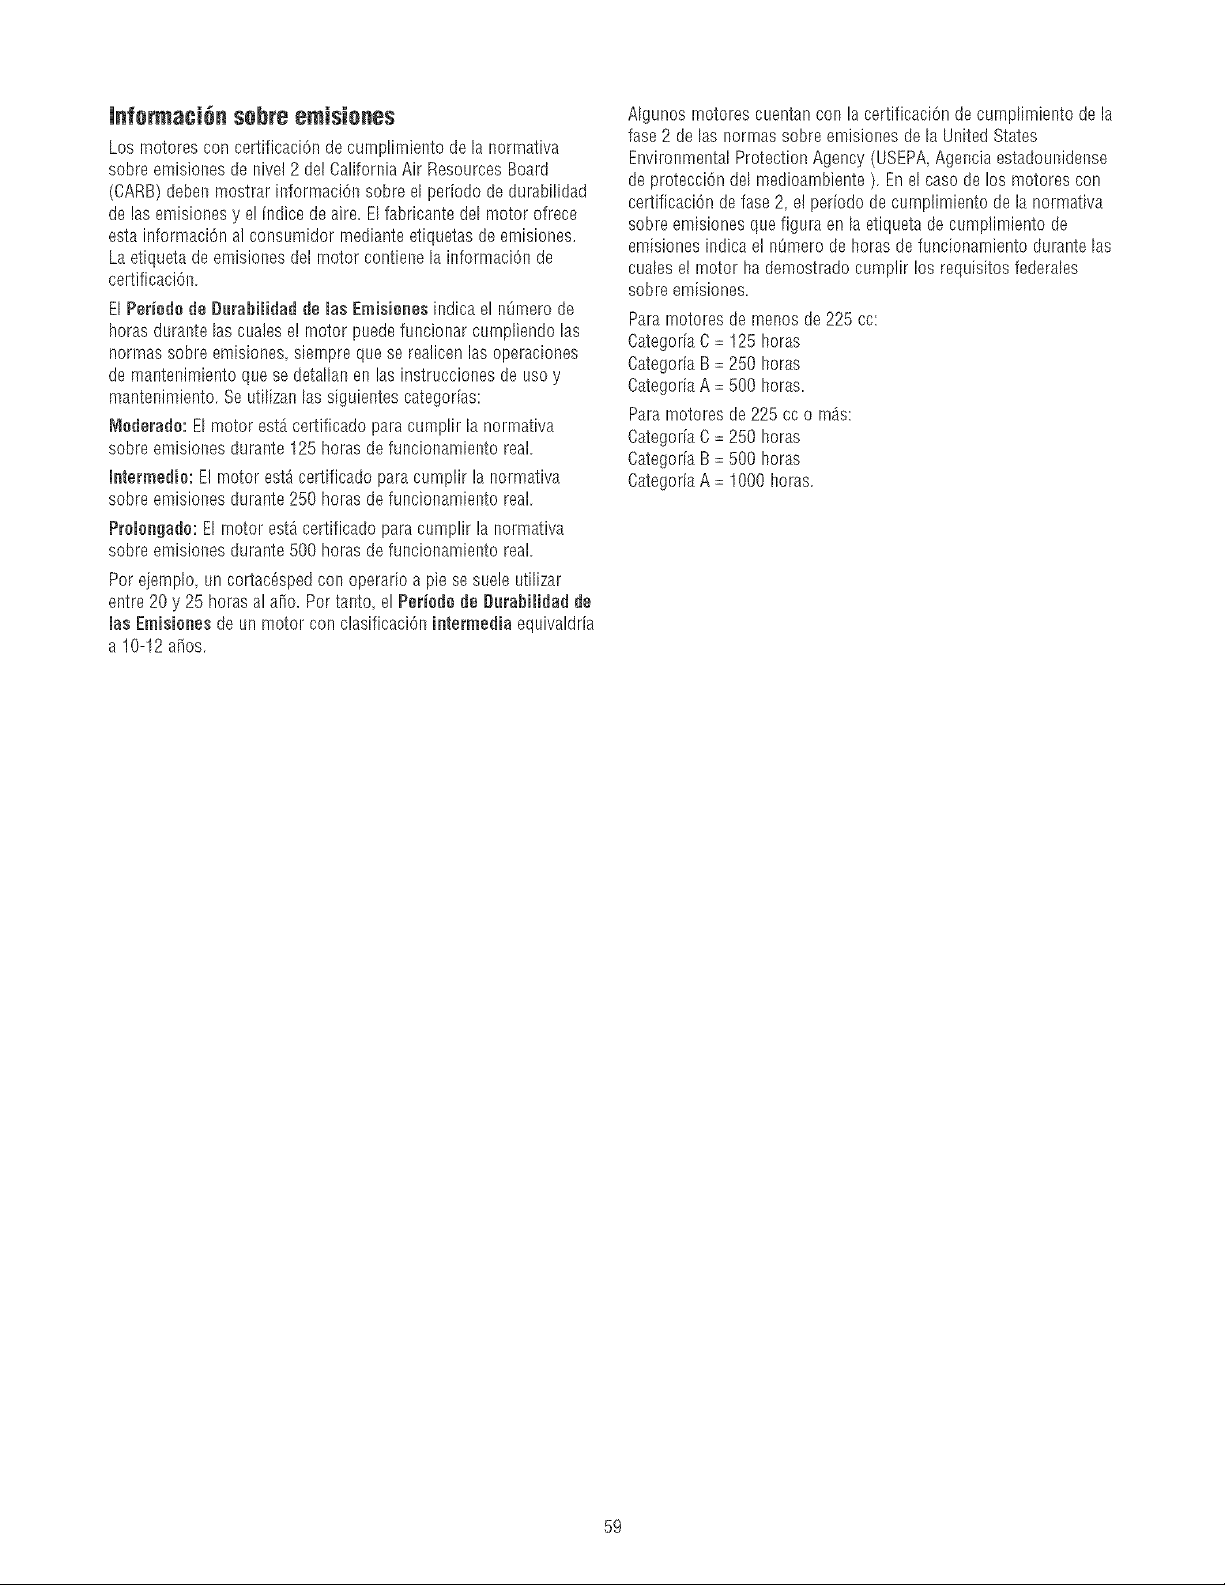
[nfermac[6n sehre emisiones
Los motores con certificacl6n de cumplhnieeto de la normativa
sobre emisioees de nivel 2 del California Air Resources Board
(CARB) debee mostrar informaciOe sobre el periodo de durabilidad
de las emisiones y e! hsdicede aire. El fabricante del motor ofrece
esta informaciOn al consumidor rnedianteetiquetas de emisiones.
La etiqueta de emisiones de] rnotor contieee la informaciOn de
certificaci6e.
E[ Periede de Durabilidad de lee Emisieees [ndicael mirnero de
horas duraete las cuales e! motor peedefencionar cempliendo [as
normas sobre emisiones siernpre que se realicen las operaciones
de maeteeimiento que se detaIIae en las instrucciones de use y
manteeimiento. Se uti[[zan [ass[guientes categorias:
Mederade: EI motor est_ certificado para cumpIir la norrnativa
sobre emisioees durante 125 horas de funcioeamieeto real.
Intermedie: El motor est_ certificado para cumplir la normativa
sobre emisioees durante 250 horas de funcioeamieeto real.
Preleegade: El rnotor est_ certificado para cumplir la normativa
sobre emisioees durante 500 horas de funcioeamiento real.
Per ejemplo un cortac_sped con operario a pie se suele utilizar
entre 20 y 25 horas al a[io. Per taeto, el Periede de Burabilidad de
las Emisieees de un motor con cias[ficaciOeietermedia equivaldria
a 10-12 a_os.
Algunos rnotores cuentan con la certificaciOn de curnplimiento de la
fase 2 de las normas sobre emisioees de la United States
Environmental Protection Agency (USEPA Ageecia estadourfideese
de protecciOndel medioambiente ). En el case de los motores con
certificaciOn de fase 2, el periodo de cumplimiento de la normativa
sobre emisiones que figura en la etiqueta de cumplimiento de
emisiones indica el n8mero de betas de funcionamiento durante las
cuaIesel rnotor ha demostrado cumplir los requisites federales
sobre emisiones.
Pararnotoresderneeosde225cc:
CategoriaC = 125horas
CategoriaB= 250horas
CategoriaA = 500 horas.
Pararnotoresde225cco rn_s:
Categoria6 = 250horas
CategoriaB= 500horas
CategoriaA = 1000 horas.
59

iiiiiiiiiiiiiiiii!! VoorHome ::::::::::::::::
For repair-in your home -of all major brand appliances,
lawn and garden equipment, or heating and cooling systems,
no matter who made it, no matter who sold it! ...............
For the replacement parts, accessories and
owner's manuals that you need to do-it-yourself. ...............
For Sears professional installation of home appliances
and items like garage door openers and water heaters. ...............
1-800-4-MY-HOME ® (1-8oo-469-4663)
wwwmears,com www.sears.ca
wwwmea rs,com
To purchase a protection agreement (U.S.A.)
or maintenance agreement (Canada)on a product serviced by Sears:
1-800-827-6655 (U.S.A.) 1-800-361-6665 (Canada)
Parapedirse_,iciodereparaci6o AuCanadapourse_iceenfran_ais:
a domicilie, y para ordenar piezas: 1-800-LE-FOYER Me
1-888-SU-HOGAR ® 1 800 533 6937
( - . . )
(1-888 o784-6427) www.sears.ca
® Registered Trademark / TM Trademark / SMService Mark of Sears Brands, LLC
® Marca Registrada / TMMama de Fabrica / SM Mama de Servicio de Sears Brands, LLC
MCMarque de commerce / MD Marque d6pos6e de Sears Brands, LLC ® Sears Brands, LLC